NZ AU
HWF80ECW1
HWF10ECW1
HWF10ECB1

心 Warning-Important Safety information
.
General information and tips
i
� Environmental information
冗
_
Disposal
心RNING!
.
2
Le
g
en
d
Thank you r purchasing a Hai er Product.
Please read these instructions carefully before using this appliance. The instructions contain
important information which will help you get the best out of the appliance and ensure safe
and proper installation, use and maintenance.
Keep this manual in a convenient place so you can always refer to it for the safe and proper
use of the appliance.
If you sell the appliance, give it away, or leave it behind when you move house, make sure you
also pass this manual so that the new owner can get familiar with the appliance and safety
warnings.
Help protect the environment and human health.
Put the packaging in applicable containers to
recycle it. Help to recycle waste of electrical and
electronic appliances. Do not dispose appliances
marked with this symbol with the household
waste. Return the product to your local recycling
facility or contact your municipal office.
NZ AUNZ AU
2
Thank You
Risk of injury or suffocation!
Disconnect the appliance from the mains supply. Cut off the mains cable and dispose
of it. Remove the door catch to prevent children and pets from getting trapped in the
appliance.

NZ AUNZ AU
3
3
Content
1-
Safety information................................................................................................
4
2-
Product description..............................................................................................
7
3-
Control panel..........................................................................................................8
4-
Cycles..................................................................................................................
....12
5
-
Consumption........................................................................................................14
6-
Daily use ................................................................................................................
..15
7-
Eco-friendly washing..........................................................................................20
8-
C
are and
cleaning..............................................................................................21
9-
Troubleshooting..................................................................................................23
10-
lnstallation............................................................................................................27
11-
Technical data...................................................................................................31
12-
C ustomer service.............................................................................................33

NZ AUNZ AU
Before switching on the appliance for the first time, read the
following safety hints!
心
.
RNING!
Bere
rst
use
4
►
This appliance is not intended for use by persons (including children)
with reduced physical, sensory or mental capabilities, or lack
of experience and knowledge, unless
they are supervised or
given
instructions on how to use it by someone responsible for their
safety.
►
Supervise children to ensure they do not play with the appliance or
climb inside the drum.
►
Do not swing on or put weight on the door.
►
The appliance should only be used for garments recommended
for machine washing. Always follow the advice on the care label.
►
Do not touch or operate the machine with wet hands or with bare-
feet.
►
Do not place dripping wet clothing in or on top of the appliance as it
may create an electrical hazard.
►
Do not use the appliance if industrial chemicals (e.g. solvents) have
been used on the clothes.
►
Remove all items such as lighters and matches from pockets.
►
Pull up zips, fix loose threads and protect embellishments to
prevent garments from being damaged and entangled.
►
Garments that contain metal reinforcements should not be placed
in the appliance. If necessary, use an appropriate laundry bag or net.
4
1-Safety information
► Do not operate this machine if it has been damaged during
transportation. Contact your dealer or Haier service technician.
► Ensure all transport bolts are removed before running the appliance.
Failure to do so might end in damage to the appliance.
► Remove all packaging and keep out of reach of children.
► This appliance is heavy, we recommend 2 people to move and install
the appliance.
► This product has been designed for personal, family or household
use.
This product is not designed for any commercial use. Any
commercial use will terminate this product's manufacturer’s
warranty.
Daily
use

5
WARNING!
Daily use
▶ The appliance might get hot during operation, use caution if in close
proximity.
▶ Unplug the appliance before undertaking maintenance. Hold the plug
(not the cable) when unplugging the machine.
▶ Ensure there are no undesirable objects inside the drum before
starting a cycle.
▶ Ensure that the ambient temperature is between
5°C
and 35°C
before using the appliance.
Capacity
▶ Do not load the appliance beyond its rated capacity
▶ MAXIMUM WASH CAPACITY: HWF80EC: 8Kg , HWF10EC: 10Kg
▶ Capacity refers to the maximum dry weight of items the appliance
can wash each time
Washer Information
▶
Do not open the detergent dispenser drawer during a cycle.
▶
If a high wash temperature is selected, the door glass will become
hot.
Do not touch the surface and keep children away
from the appliance.
▶
Do not add petrol, dry-cleaning solvents, perfumes or other
flammable or explosive substances to the wash water. These
substances give off vapours that could ignite or explode.
▶
Do not wash articles that have been previously cleaned in,washed in,
soaked in, or spotted with gasoline, dry-cleaning solvents, or other
flammable or explosive substances as they give off vapours that could
ignite or explode.
▶
Do not wash an electric blanket in your washer unless the care label
specifically states it is safe to do so.
▶
Fabric softeners, or similar products, should be used as specified by
the manufacturer instructions.
NZ AUNZ AU
1-Safety information

NZ AUNZ AU
心 RNING!
.
Maintenance, Cleaning and Disposal
6
► Keep the gasket, dispenser and door clean to prevent odours.
► Do not use water spray or steam to clean the appliance.
► A damaged electrical cable must be replaced by a Haier service
technician or similarly qualified person. Do not use the appliance until
it has been repaired to avoid a risk of electric shock.
► When disposing of the appliance, it is recommended that the door is
removed to avoidchildren getting trapped inside, and that the
electrical cable is cut off close to themachine.
► Unless the product is modified by an certified technician, any
changes might result in loss of warranty.
Intended use
This appliance is intended for washing machine-washable laundry only. Please follow
the instructions on the label of each garment. It is designed exclusively for domestic
use inside the house. It is not intended for commercial or industrial use.
Changes or modifications to the device are not allowed. Unintended use may cause
hazards and loss of all warranty and liability claims.
1-Safety information
2.2 Accessories
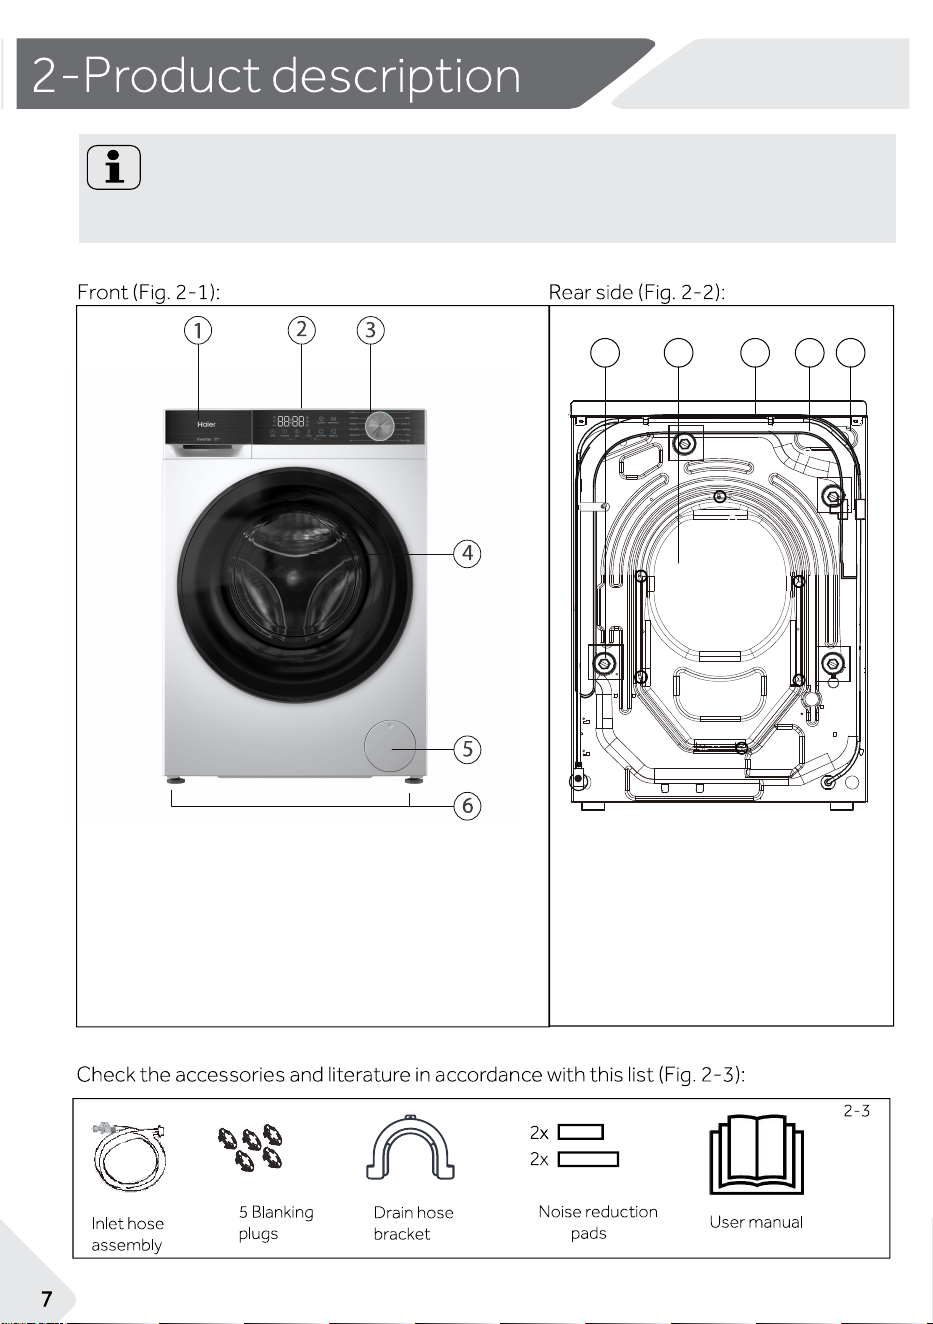
2.1 Picture of appliance
2-1
2-2
1
Dispenser
2
Top panel
3
Control panel
4
Door
5
Filter cover
6
Adjustable feet
Note:
Due to technical changes and different models, the illustrations in the following
chapters may differ from your model.
NZ AUNZ AU
1
2
3 4
5
T1
T2
T3
T4
1 Transportation bolts (T1-T4)
2 Backcover
3 Power cord
4 Drain hose
5 Water inlet valve
1
3
2
5
6
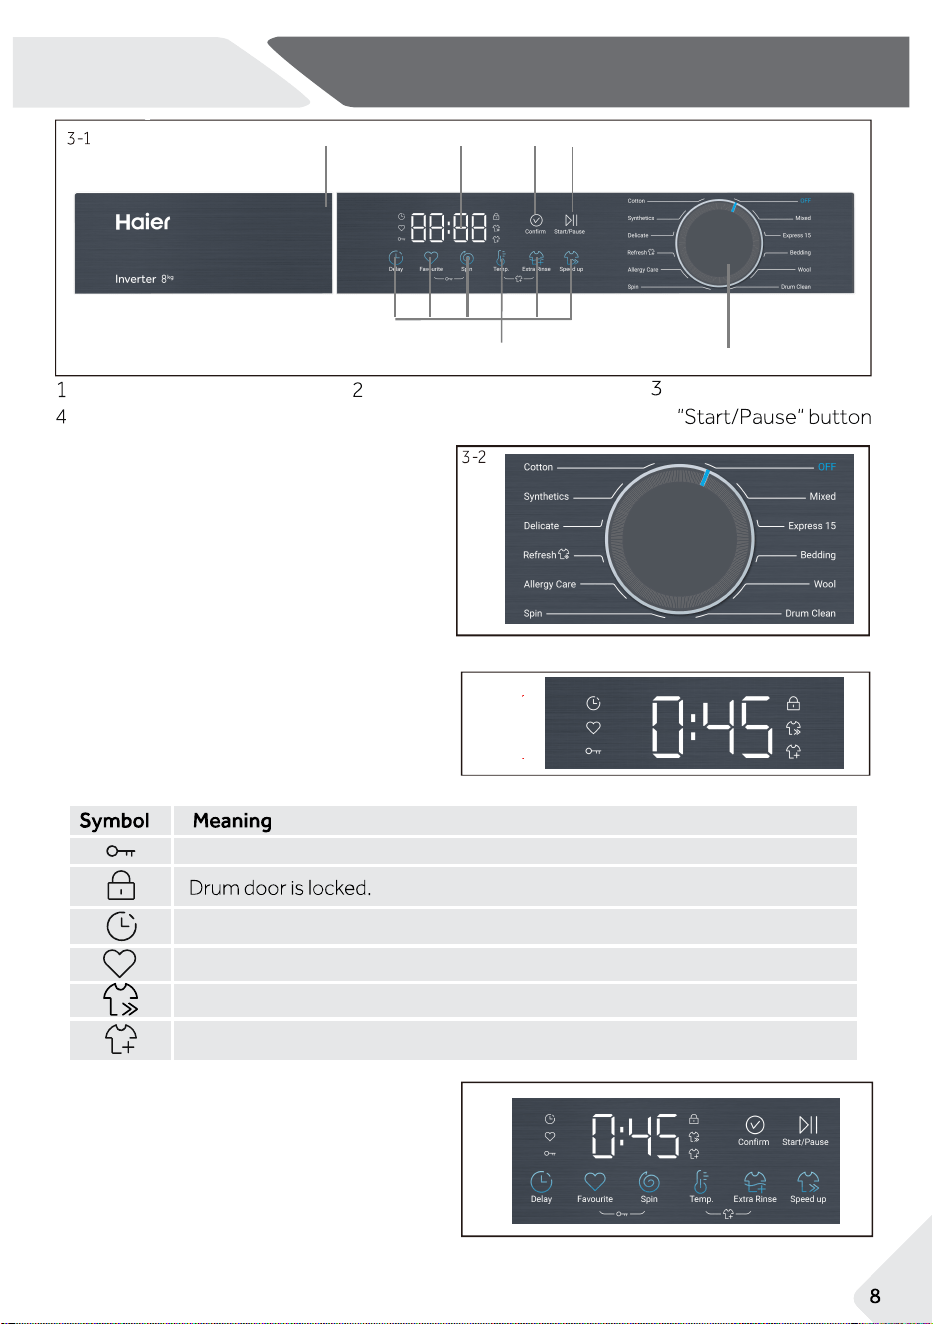
Dial
Display
6
Function buttons
5 "Confirm"
button
The display (Fig. 3-3) will show important
information about the cycle:
Options and modifiers, remaining time,
error codes and service information,
warnings and notifications.
NZ AUNZ AU
3-Control panel
4
Dispenser
3-3
Favourite.
Delay Start
Control panel is locked.
Speed up
Add garment.
3-4
3.3
Function buttons
After selecting a cycle, users can also
select
different functions based on their
needs by
pressing the function buttons
(Fig. 3-4).
3.1
Dial
3.2
Display
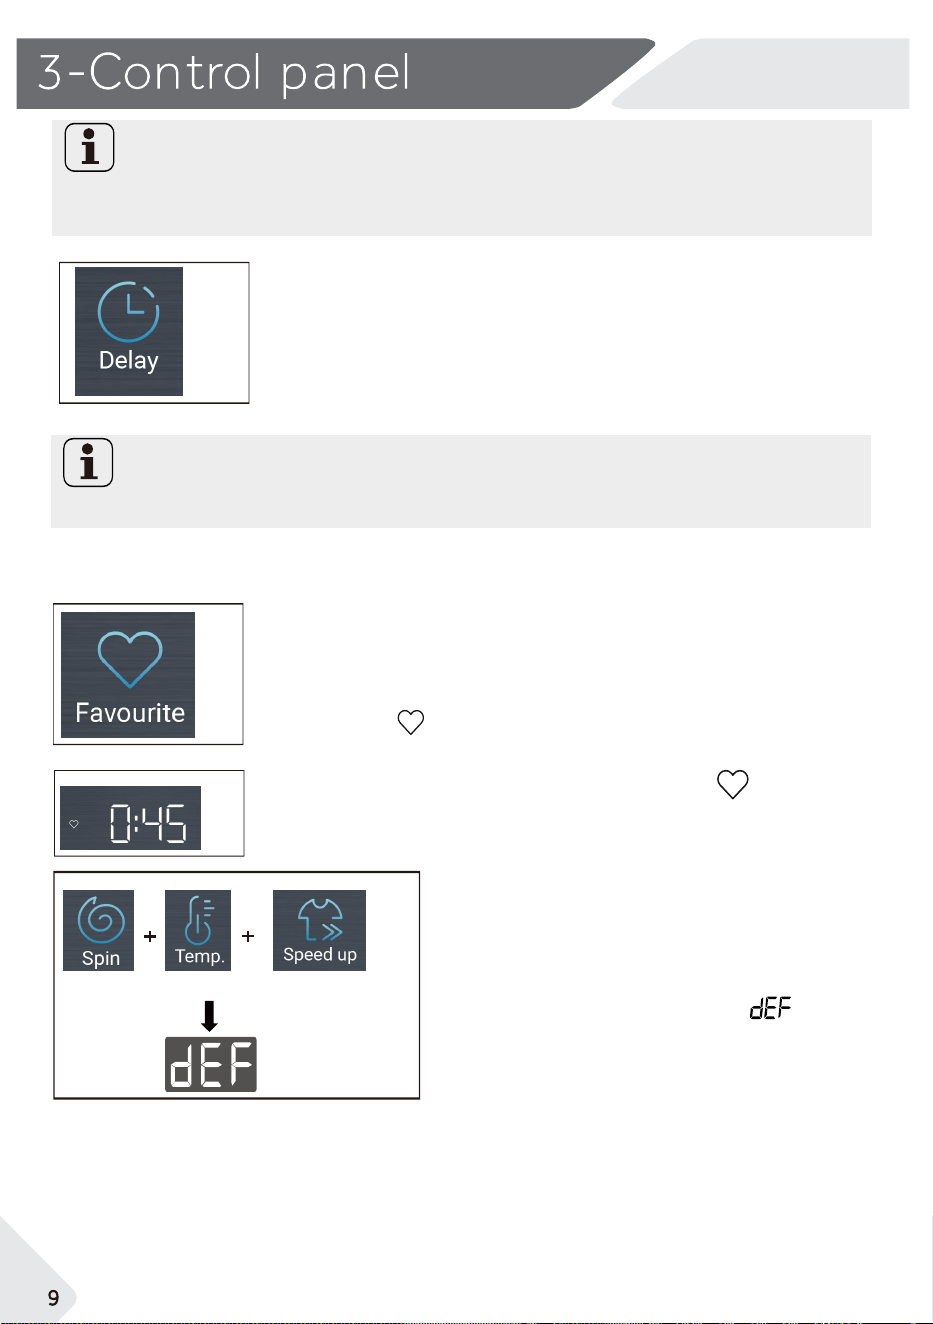
By turning the dial (Fig. 3-2) one program
at a time can be selected. The default
settings of the program will be displayed.
NZ AUNZ AU
Cotto
Refre
Spe
Note: Default settings
To get best results in each cycle, Haier has defined specific default settings. If there
is no special requirement, default settings are recommended.
3-
5
3-6
3-7
3.3.1
Delay
The button is used to adjust the scheduled time
continuously. The adjustable time ranges from 15 minutes,
30 minutes, 1 hour, 2 hours, up to 12 hours. After 1 hour,
each press increases the scheduled time by 1 hour.
3.3.2
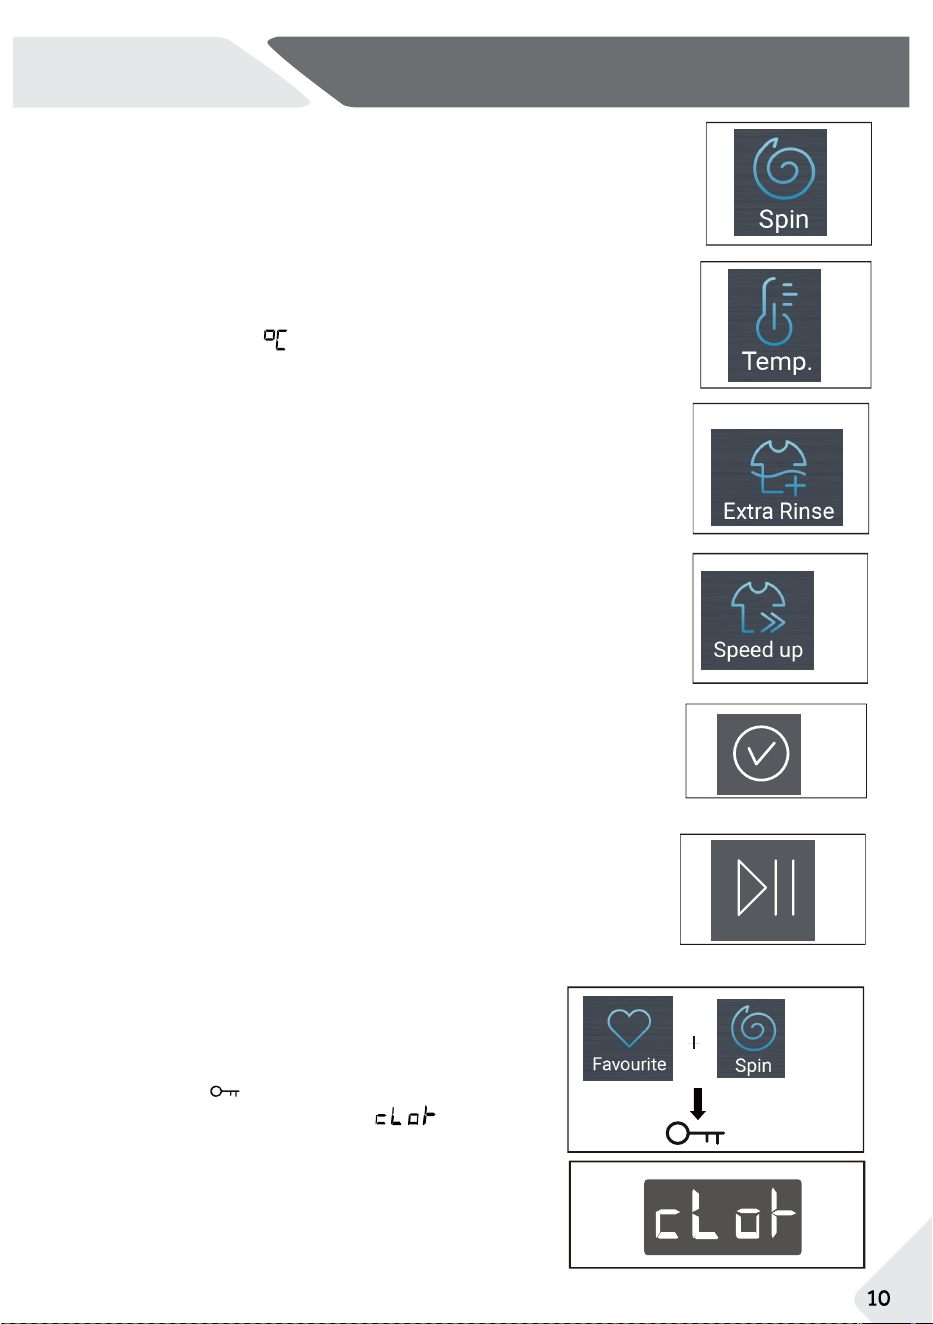
Favourite
The next time you select this cycle, the icon will light up
(Fig.3-7), it will automatically come with your preferred
settings .
3-8
Quick method to deactivate preferred
Note
This function should be set after you have completed selecting the required options.
Selec
t the desired cy
cle on the dial, then select the m
odifiers
that y
ou want to save f
or that cycle. Press the "Favourite"
butto
n(Fig.3-6)
–
the LED
flashes 2s and the machine
bee
ps.
Then the " " LED stay
s illuminated indicating tha
t
the
favourites
configuration has been saved.
settings for all cycles, just select the "Express
15" cycle, then press the "Spin","Temp." and "
Speed up" buttons(Fig. 3-8) simultaneously for
3 seconds,the screen will display , and all
cycles will go back to the default settings.
removal
Delay
art
ycare
Smart
Shirt Cotton
Remote
Synthetics
Delicate
Refresh
NZ AUNZ AU
3-Control panel
3-13
3.3.7
Confirm
3-14
Temp.
3.3.4
Temp.
Press this button (Fig. 3-10) to select the washing temperature. If
the screen displays "-- ", it means the water will not be heated.
3-9
3-10
3.3.8
Start/Pause
Press the Start/Pause button (Fig. 3-14) to start a washing
cycle.
Press the button again to pause the washing cycle.
Press the button again to continue the cycle.
3.3.3
Spin
Press this button (Fig. 3-9) to select the spin speed (0, 400, 600,
800, 1000, 1200, 1400 (HWF10EC only) ). If the value "0" is
displayed, the laundry will not spin.
3-11
3.3.5
Extra Rinse
It can be selected in the standby mode (the default state
is off).Press this button(Fig.3-11) to increase the number
of rinses by one.
3.3.6
Speed
up
In standby mode, you can make a selection (the default state is
off). Pressing this button (Fig.3-12) will reduce the washing
time set by the current program by one third.
3-12
In order to start the cycle, press the 'Confirm' button (Fig. 3-13)
first, to lock in the cycle selections.
Then press the Start/Pause button (Fig. 3-14) to start the
cycle.
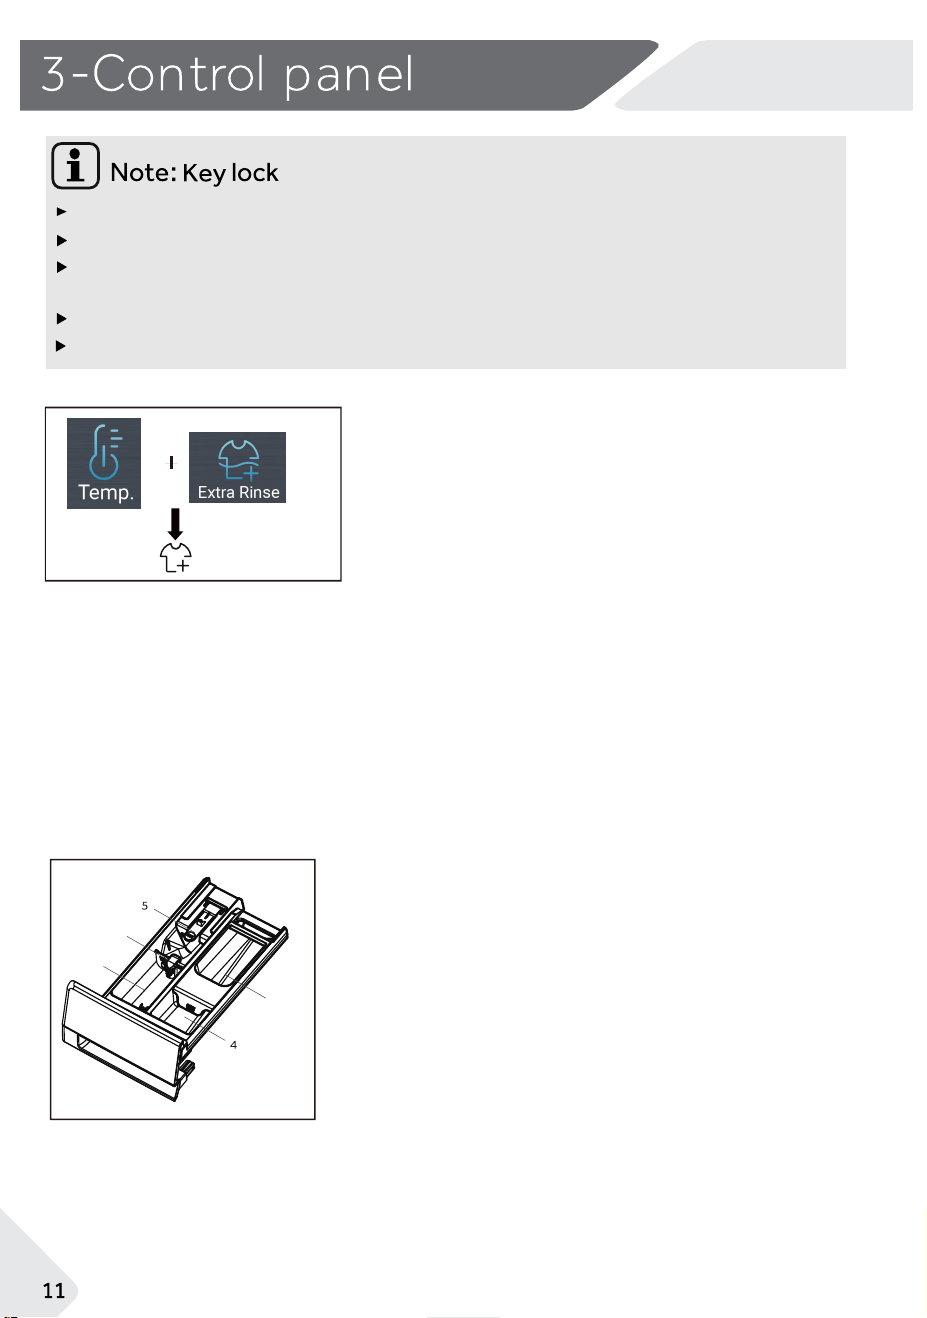
Press the "Spin" and "Favourite"
buttons (Fig. 3-
3.3.9
Key lock
15)
simultaneously for 3 seconds
to activate
the
Key Lock function. The screen will
display the icon .
Once activated, if a button
is pressed, the screen will display
(Fig. 3-
16).Use the same method to deactivate the Key
Lock function. The Key Lock function can be
selected at any time.
3-
16
3-15
NZ AUNZ AU
3-18
3.4 Dispenser
3-17
Press the "Temperature" button and the "Extra Rinse"
button (Fig. 3-17)for 3 seconds, and the function of
adding clothes during the process will be activated.
3.3.10 Add Garment
Cycle will be paused (if the water level is too high,
product will drain the water to a level where the door
can be opened), then users can open the door, put the
garments into the drum and close the door, then press
the "Confirm" button and "Start/Pause" button to
resume the cycle.
"Add Garment" is only available during sensing, filling or washing stages AND if the
temperature selected is Cold/30/40. If "Add Garment" is pressed at any other stage of
the cycle, the machine will beep but it will not pause or drain.
The Key Lock function can be activated and deactivated manually at any time.
Key Lock remains activated at the end of a cycle.
Key Lock remains activated if the mach ine is powered off via the display or
switched off at the wall.
When powered back on, the product will still have Key Lock activated.
The Key Lock function cannot be activated or deactivated through the App.
Within the dispenser drawer are the following
compartments (Fig.3-18).
1.Compartment for powder or liquid detergent.
2.Detergent flap selector, lift it up for powder
detergent, keep it down for liquid detergent.
3.This compartment is not available on HWF80EC and
HWF10EC.
4.
Compartment for softener.
5.Lock tab, press it down to pull out dispenser drawer.
Please refer to the detergent manufacturer's
information, when selecting suitable detergents.
¹
²
³
NZ AUNZ AU
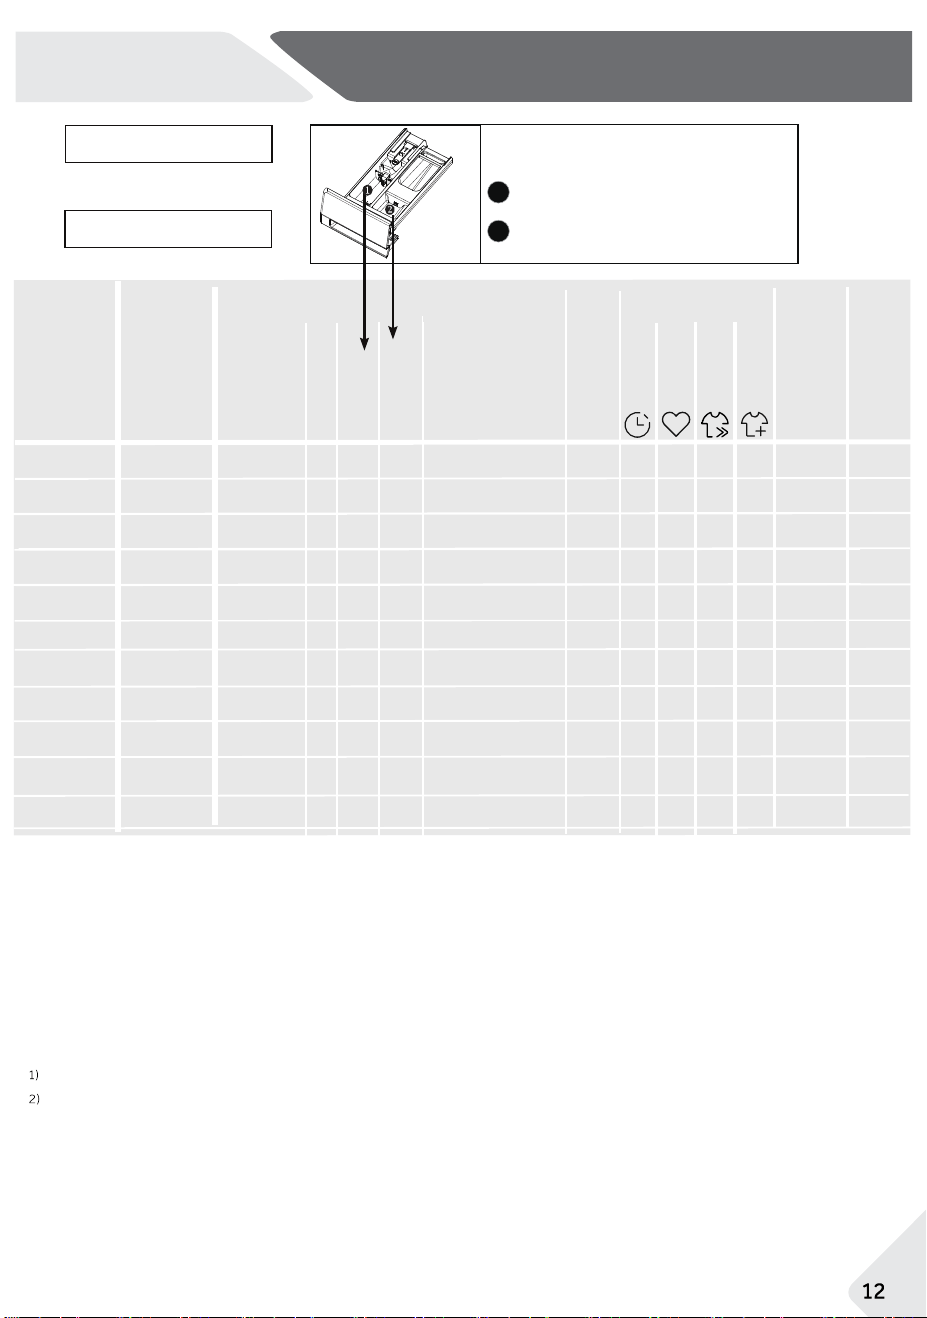
4-Cycles
--
reTemperatu
Function
in
1)
Default
selectable
range
Fabrics
type
Cotton / Synthetic
-- to 30
30
/
•
Yes,
º
Optional,
/
No
1000
1000
Bedding
-- to 60
30
-- to 80
30
1000
Detergent
Softener or
care product
Cotton
Mixed
/
default
duration(min)
-- to 60
30
/
1000
1000
/
Cotton
Cotton/Synthetic
Cotton/Synthetic
Not-fragile fabric
Cycle
Default
spin
speed
in rpm
Express 15
Cotton
Refresh
Wool
Delicate
AllergyCare
Spin
Drum Clean
º
º
º
/
/
º
/
/
º
/
/
º
/
º
º
º
º
º
º
º
º
º
º
º
º
º
º
º
º
1200
/
800
600
/
-- to 40
--
/
--
-- to 80
60
-- or 80
80
-- to 40
/
1
2
6
Delicate laundry
and silk
/
/
Machine-washable
fabric made of wool
or with wool content
Water will not be heated
Choose 80°C wash temperature only for special hygienic requirements.
Reduce detergent
amount because the cycle "Express 15" duration is short.
2
1
8
1
2
Detergent compartment for:
Power Detergent/Liquid Detergent
Softener or care product
2)
º
º
º
º
º
º
º
º
º
º
º
º
º
º
8
8
8
/
/
/
/
/
/
º
º
/
º
º
º
º
º
-- to 60 30
1000
Synthetics
8
Synthetic or mixed
fabirc
º
º
º
º
ºº
AUTO
15
89
18
40
45
102
8
60
AUTO
AUTO
Cotton/Synthetic
/
Max. load
in kg
HWF80EC
Max.
Etra
rinse
3
3
1
2
2
2
2
3
/
/
/
/
Remote
NZ AUNZ AU
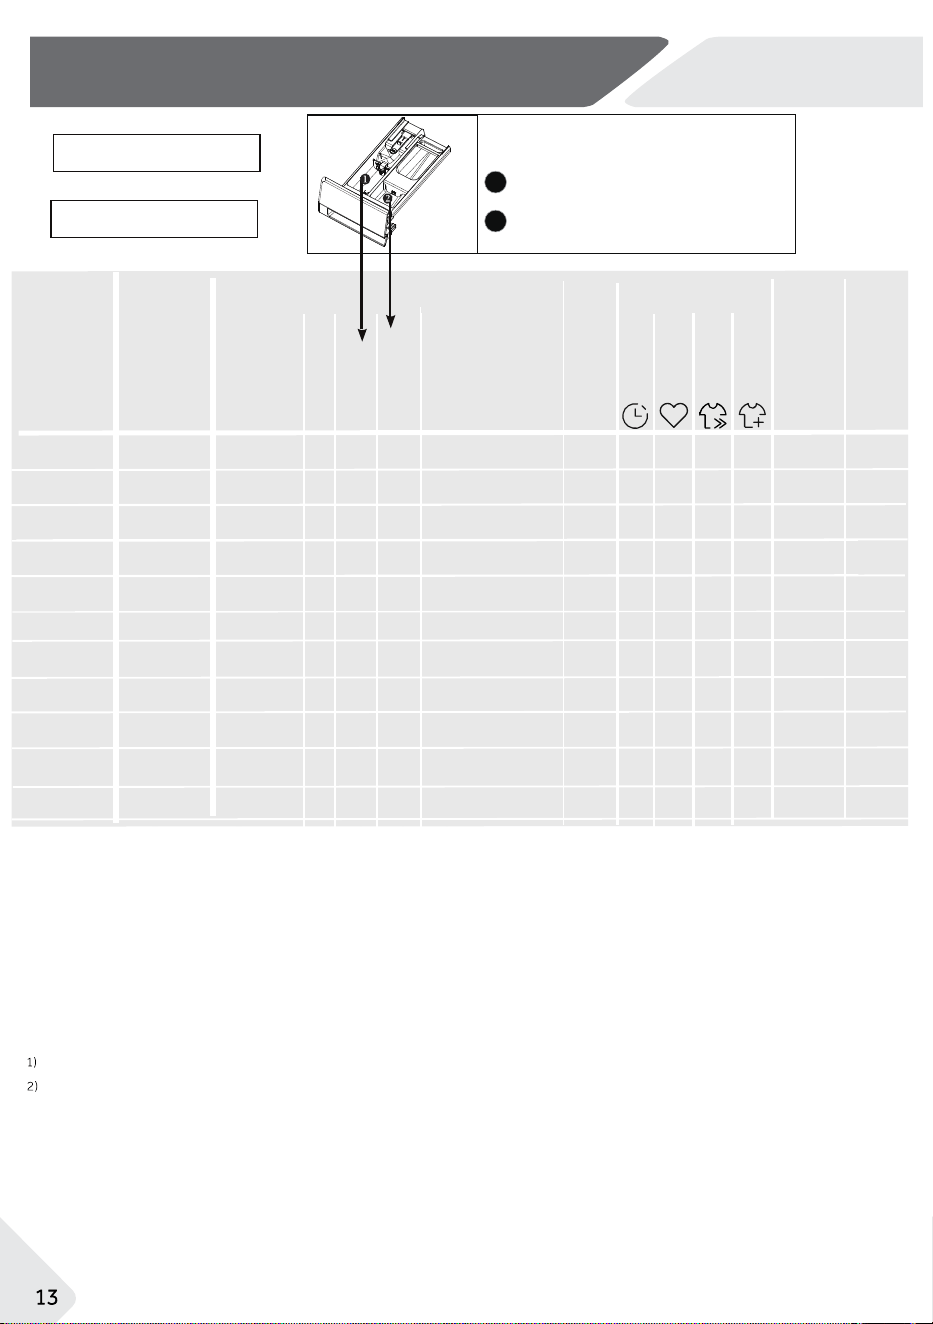
4-Cycles
--
•
Yes,
º
Optional,
/
No
Water will not be heated
Choose 90°C wash temperature only for special hygienic requirements.
Reduce detergent
amount because the cycle "Express 15" duration is short.
1
2
Detergent compartment for:
Power Detergent/Liquid Detergent
Softener or care product
2)
HWF10EC
Temperature
Function
in
1)
Default
selectable
range
Fabrics
type
Cotton / Synthetic
-- to 30
30
1000
1000
Bedding
-- to 60
30
-- to 90
30
1000
Detergent
Softener or
care product
Cotton
Mixed
/
default
duration(min)
-- to 60
30
/
1000
1000
/
Cotton
Cotton/Synthetic
Cotton/Synthetic
Not-fragile fabric
Cycle
Default
spin
speed
in rpm
Express 15
Cotton
Refresh
Wool
Delicate
AllergyCare
Spin
Drum Clean
º
º
º
/
/
º
/
/
º
/
/
º
/
º
º
º
º
º
º
º
º
º
º
º
º
º
º
º
º
1200
/
800
600
/
-- to 40
--
--
-- to 90
60
-- or 90
90
-- to 40
1
2.5
7
Delicate laundry
and silk
/
Machine-washable
fabric made of wool
or with wool content
2.5
1
10
º
º
º
º
º
º
º
º
º
º
º
º
º
º
10
10
10
/
/
/
/
/
/
º
º
/
º
º
º
º
º
-- to 60 30
1000
Synthetics
10
Synthetic or mixed
fabirc
º
º
º
º
ºº
AUTO
15
89
18
40
50
107
8
60
AUTO
AUTO
Cotton/Synthetic
/
Max. load
in kg
Max.
Etra
rinse
3
3
2 2
2
2
2
3
/
/
1
/
/
/
/
/
/
Remote
14
This product is equipped with a loading weight recognition sensor. When the load weight
is low, corresponding energy, water and washing time will be adjusted automatically for
some cycles. The displayed cycle duration may vary depending on the load weight,
including "Mixed, Towels, Cotton, Synthetics" cycles.
NZ AU
5-Consumption
Energy and Water Label Cycle
HWF80EC
The cycle for energy and water labelling in accordance with AS/NZS 2040:2021 and AS/
NZS 6400:2016 is as follows: Cotton, Spin: 1200, Temp: 40°C, Extra Rinse: P-1. This cycle
is the recommended energy and water saving cycle for normally soiled everyday washing,
equal to the rated capacity.
HWF10EC
Note for Testing Laboratories: The powder detergent is placed directly into the bottom of
the drum. No more than the maximum amount of anti-foaming agent is then placed into the
bottom of the drum followed by the PBIS solution. The load is then added in accordance with
AS/NZS 2040:2021.
The cycle for energy and water labelling in accordance with AS/NZS 2040:2021 and AS/NZS
6400:2016 is as follows: Cotton, Spin: 1400, Temp: 40°C, Extra Rinse: P-1. This cycle is the
recommended energy and water saving cycle for normally soiled everyday washing, equal to
the rated capacity.
15
15
NZ AUNZ AU
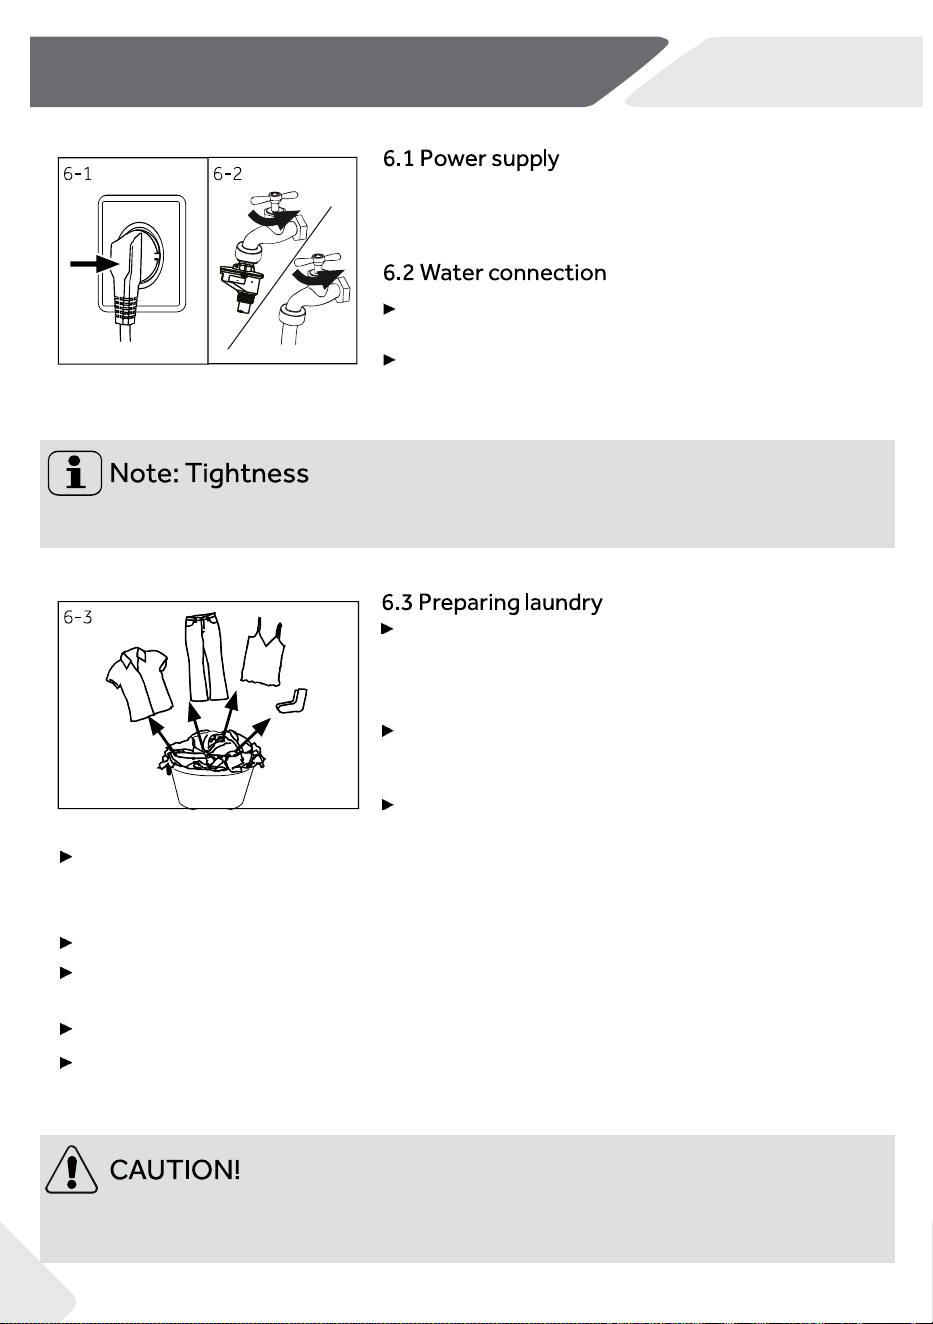
6-Daily use
Non-textile, as well as small, loose or sharp-edged items may cause malfunctions and
damage to clothes and appliance.
Before use, turn on the tap to check if there is any water leakage around the joint
between the tap and the inlet hose.
Before connecting, make sure the water inlet is
clean and intact.
Connect the inlet hose to the wall tap and the
water valve at the rear of the washing machine
Turn on the tap (Fig. 6-2)
Sort clothes according to fabric type (cotton, syn-
the tics, wool or silk etc.) and how dirty they are
(Fig.6-3). Follow instructions on the clothes labels.
Separate white clothes from coloured ones. Wash
coloured textiles first by hand to check if
they fade
or run.
Empty pockets (keys, coins, etc.) and remove
hard
decorative objects (e.g. brooches).
Garments without hems, delicates and finely woven textile such as fine curtains
should be put into a wash bag to care for this delicate laundry(hand or dry cleaning
would be better).
Close zips, velcro fastener and hooks, make sure the buttons are sewn on tightly.
Place sensitive items like laundry without firm hem, delicate underwear and small
items such as socks, belts, bras, etc. in a wash bag.
Unfold large pieces of fabric such as bed sheets,bedspreads etc.
Turn jeans and printed, decorated or color-intensive textile inside out; possibly wash
separately.
Connect the product to a power socket (Fig. 6-1).
Please also refer to section 11- Installation (see page
32).
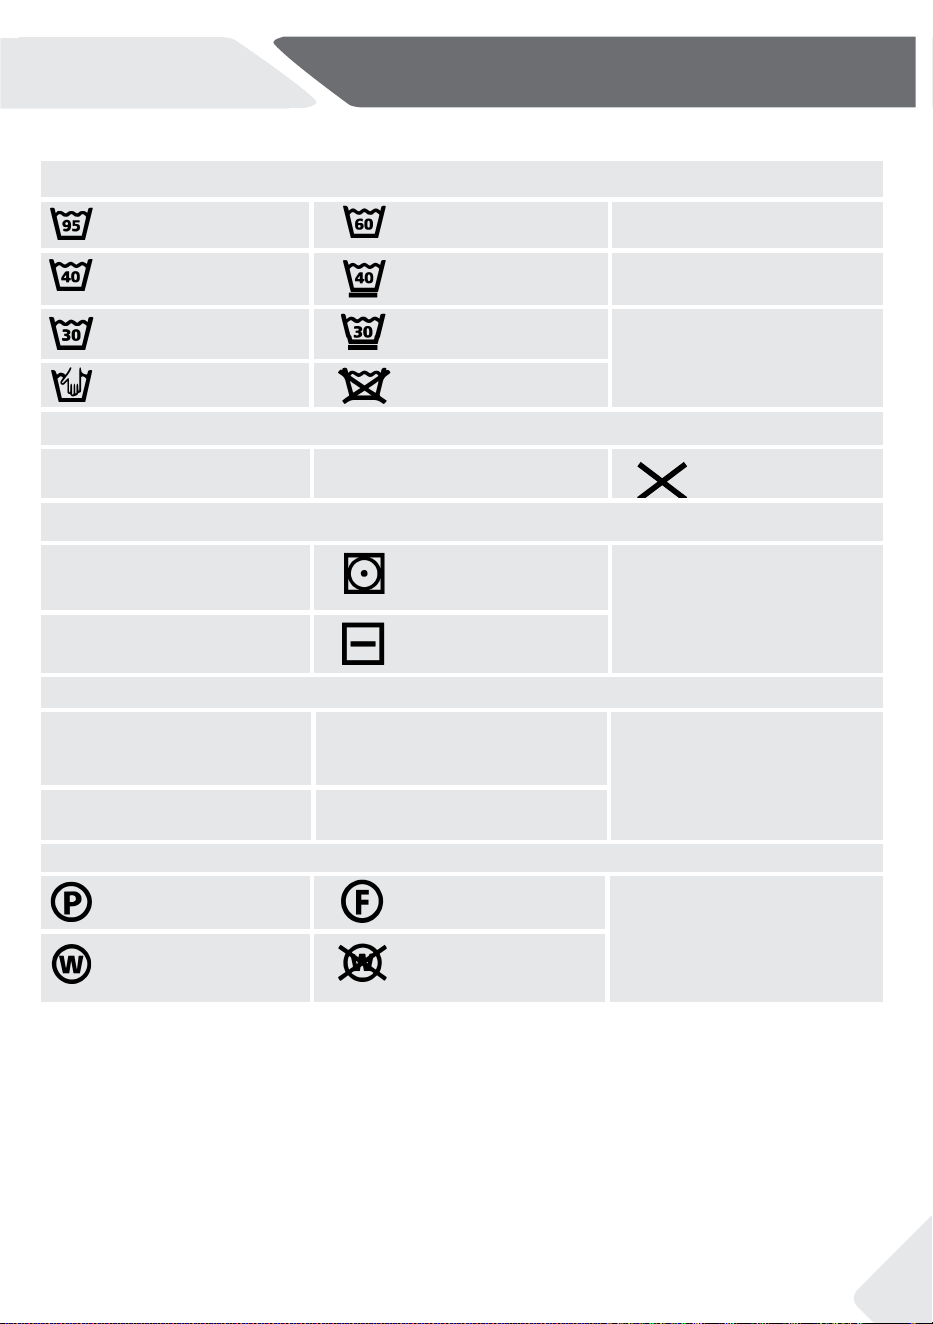
16
NZ AUNZ AU
6-Daily use
回
回
回
回
Bleaching
�
D
rying
o
田
Ironing
邑
远
Pro
f
e
ssional Textile Care
@
@
回
支
]-
品
回
�
曰
0
云
恋
©
四
�
因
丘
忘
►
►
Some of these symbols may not be in the device menu.
6.4 Loadingtheappliance
►
Fabric Care
chart
Washing
Washable upto 95°C
normal process
Washable up to 40°C
normal process
Washable up to 30°C
normal process
Wash by hand
max. 40°C
Washable up to 60°C
normal process
Washable up to 40°C
gentle process
Washable up to 30°C
gentle process
Do not wash
Any bleaching allowed
Only oxygen/
non-chlorine
Tumble drying possible
normal temperature
Tumble drying possible
lower temperature
Do not tumble dry
Line drying
Flat drying
Iron at a maximum
temperature
up to 200 °C
Do not iron
Iron at a moderate
temperature
up to 150°C
Iron at a low temper-
ature up to 110 °C;
without steam (steam
ironing may cause irre-
versible damage)
Dry cleaning in tetra-
chloroethene
Professional wet clean
Dry cleaning in hy-
drocarbons
Do not professional
wet clean
Do not dry clean
Do not bleach
四
�
Washable up to 60
gentle process
四
very
W
ge
a
n
s
t
h
le
a
b
p
l
r
e
o
u
ce
p
s
t
s
o 40
very
W
ge
a
n
s
t
h
le
a
b
p
l
r
e u
ce
p
s
t
s
o
30
o
�
Place the laundry into the drum, item by item.
Don't overload the washing machine drum. Please refer to the cycle tables
on pages 12 and 13 for maximum load sizes suitable for a selected cycle.
Close the door carefully. Make sure that no pieces of laundry are pinched.
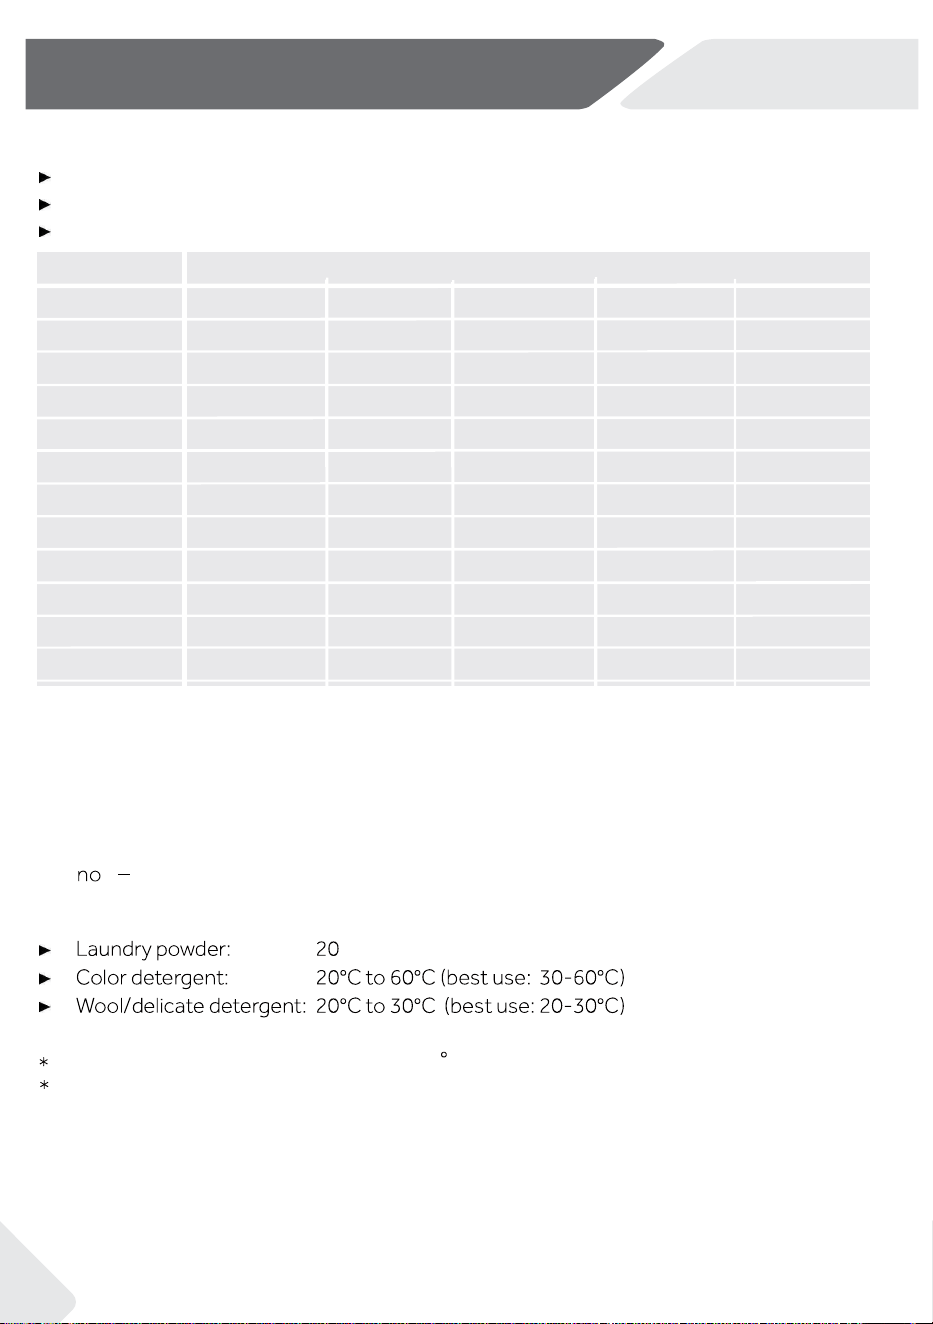
NZ AUNZ AU
17
SH
Cycle
Kind of detergent
SoftenerSpecialDelicateColourUniversal
Mixed
√
-
-
Bedding
Delicate
-
Cotton
Synthetic
Refresh
Allergy Care
Spin
Wool
√
√
√
--
√
-
√
-
√
√
-
√
√
√
-
-
√
√
√
-
-
√
√
-
-
√
√
√
-
-
-
-
-
-
√
√
Express 15
√=
Recommended
If using liquid detergent, it is not recommended to activate the time delay.
We recommend by using:
√
Drum Clean
-
-
-
√
-
√
√
-
º
=
6-Daily use
6.5 Selecting detergent
Washing efficiency and performance is determined by detergent quality.
Use only washing machine approved detergent.
If needed, use specific detergents, e.g for synthetic and woolen fabric.
*Choose the highest wash temperature only for special hygienic requirements.
If you choose a water temperature of 60 C, we recommend using less detergent.
If suds are a problem, we recommend using less detergent, or a low sudsing detergent.
=Not Recommended
°Cto 90°C* (HWF80EC only 80°C*)(best use: 40-60°C)
-
-
-
-
-
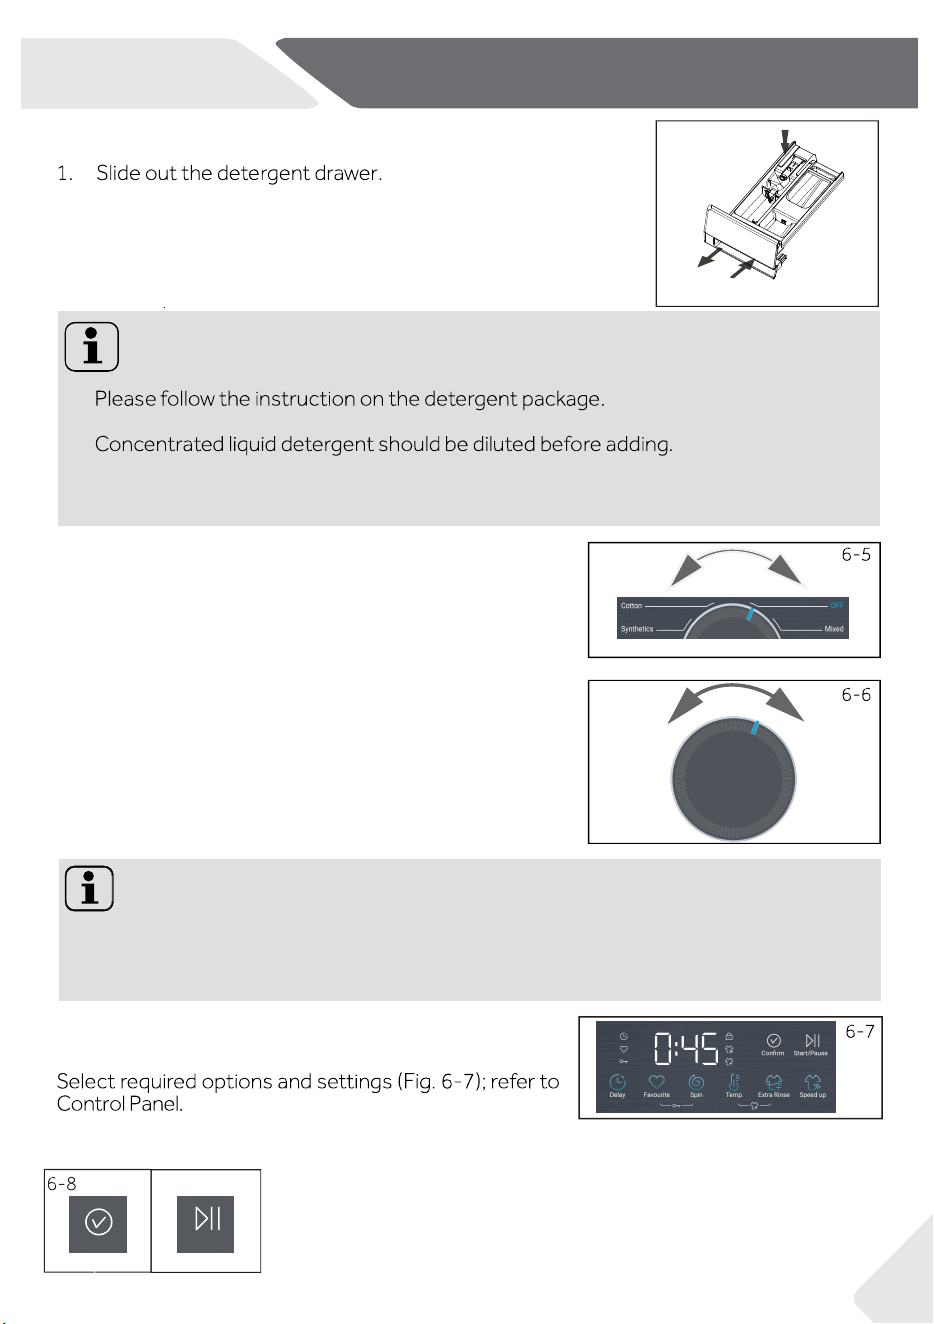
18
NZ AUNZ AU
6-Daily use
Spin
Sma rt
Shi rt
Quick 15’
Cotton
Remote
Ba bycar e
Synth etics
Eco 40 -60
Cotton 2 0°C
Deli cate
Al lergy ca re
Refr esh
6.6 Adding detergent
6.9 Add individual selections
▶
▶
▶
Carefully choose the cycle settings according to the care symbols on all laundry
labels and according to the cycle table.
6-4
Note:
Note: Odour removal
1
3
2
2. Put the detergent and softener into corresponding
compartments(Fig. 6-4).
3. Close the detergent drawer gently.
6.7 Switch on the appliance
Switch on the washer by rotating the dial.(Fig.6-5)
6.8 Select a cycle
To get the best washing results, select a cycle which
best fits the degree of soiling and type of laundry.
Turn the dial (Fig. 6-6) to select the desired cycle.
Before first use, we recommend to run cycle "Drum clean" with no load and small
amount
of detergent in the detergent compartment (2) or a special washing machine cleaning
product to remove odours.
6.10 Start the cycle
6-9
After selecting the cycle and preferred settings, press the "Confirm"
button (Fig. 6-8), then press the "Start/Pause" button (Fig. 6-9),
the product will start running.
NZ AUNZ AU
19
6-Daily use
▶
▶
6.12 After washing
6.11 Pause/change cycle
During the cycle, press the "Start/Pause" button to pause the cycle, then press it again
to resume the cycle.
To change to another cycle when the product is running, press the "Start/Pause" button
to pause the cycle, use the dial to select another cycle, press the "Confirm" and "
Start/Pause"button in order, the product will start running.
Note: Standby-mode/energy-saving mode
Note: Door lock
For safety reasons, the door is locked during the washing cycle. It is only possible to
open the door at the end of the cycle or after the cycle was cancelled correctly (see
description above).
When the water level is high, the water temperature is high, or the drum is spinning,
it is not possible to open the door. The door will remain locked for the duration of
the cycle.
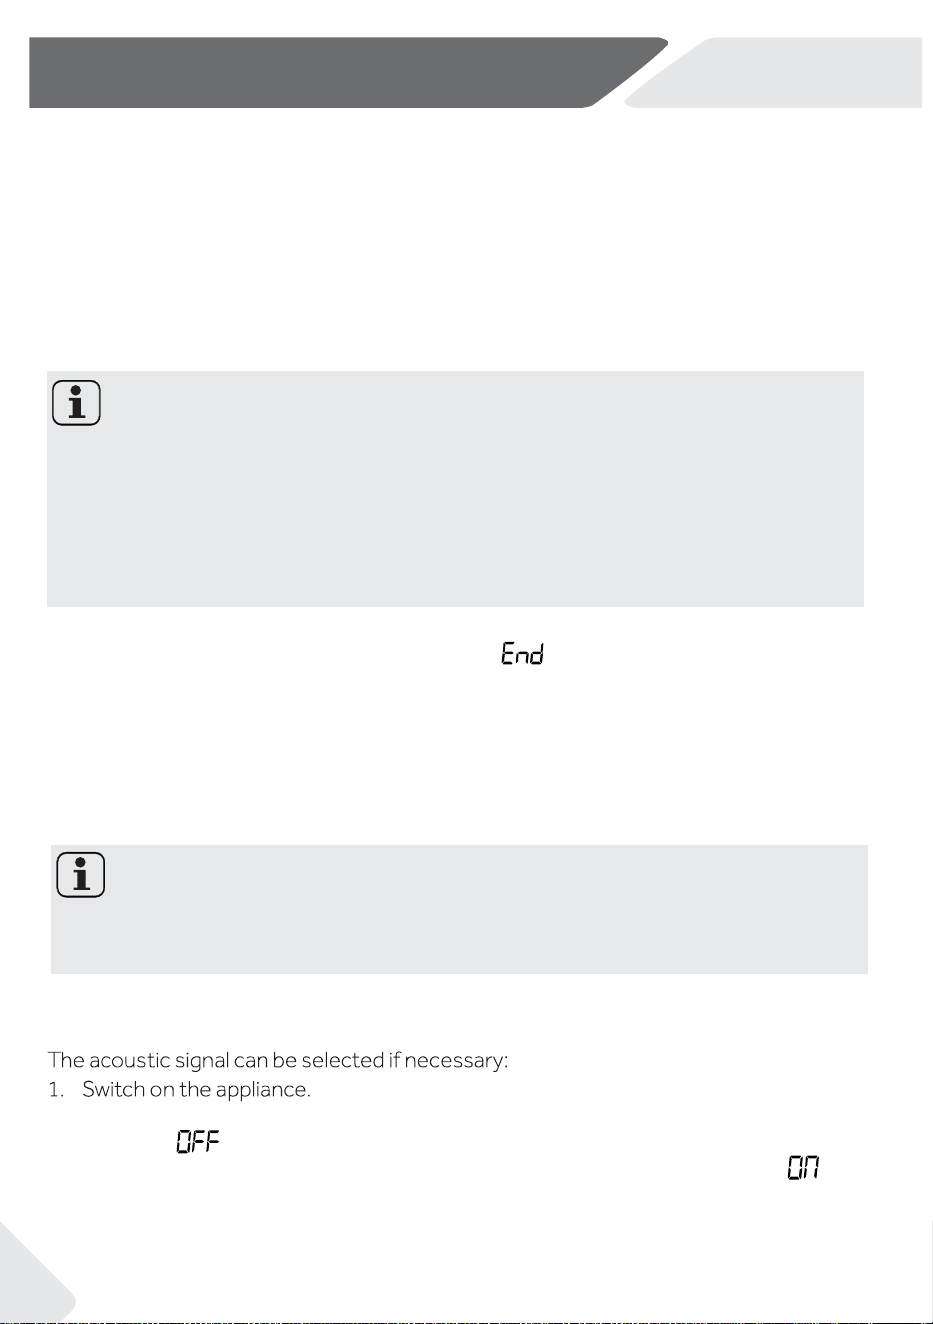
1. At the end of the cycle, the screen will display '' ''.
2. The appliance switches off automatically
3. Remove laundry as soon as possible to avoid the formation of wrinkles.
4. Turn off the water supply.
5. Unplug the power cord.
6. Open the door to prevent formation of moisture and odours. Leave it open while not
in use.
To save energy, the product will enter standby-mode and the display will turn off after 2
minutes of inactivity. Turn the dial to exit the standby-mode.
6.13Activateordeactivatethebuzzer
"
"
2.
Touch
th
e "Delay" button and "Spin" button at the same time for
about 3
seconds."
" will be displayed and the buzzer will be
deactivated.
For
activating the buzzer,
touch these two buttons at the same time again.
will be
displayed.
20
NZ AUNZ AU
7-Eco-friendly wshing
General information:
▶
The “Mixed” cycle is able to clean normally soiled cotton laundry declared to be
washable at 40 °C or 60 °C;
▶
The most efficient cycles in terms of energy consumption are generally those
that perform at lower temperatures and longer duration;
▶
ing speed: the higher
the spinning speed in the spinning phase, the higher the noise and the lower the remain-
ing moisture content.
To achieve best use of energy, water, detergent and time, you should use the recom-
mended maximum load size.
Do not overload the washing machine (hand width clearance above laundry).
For slightly soiled laundry, select the Express15 cycle.
Apply exact dosages of each washing agent.
Choose the lowest suitable washing temperature, modern detergents are effective
below 60°C.
Adjust default settings up only when there is heavy stains.
21
NZ AUNZ AU
8-Care and cleaning
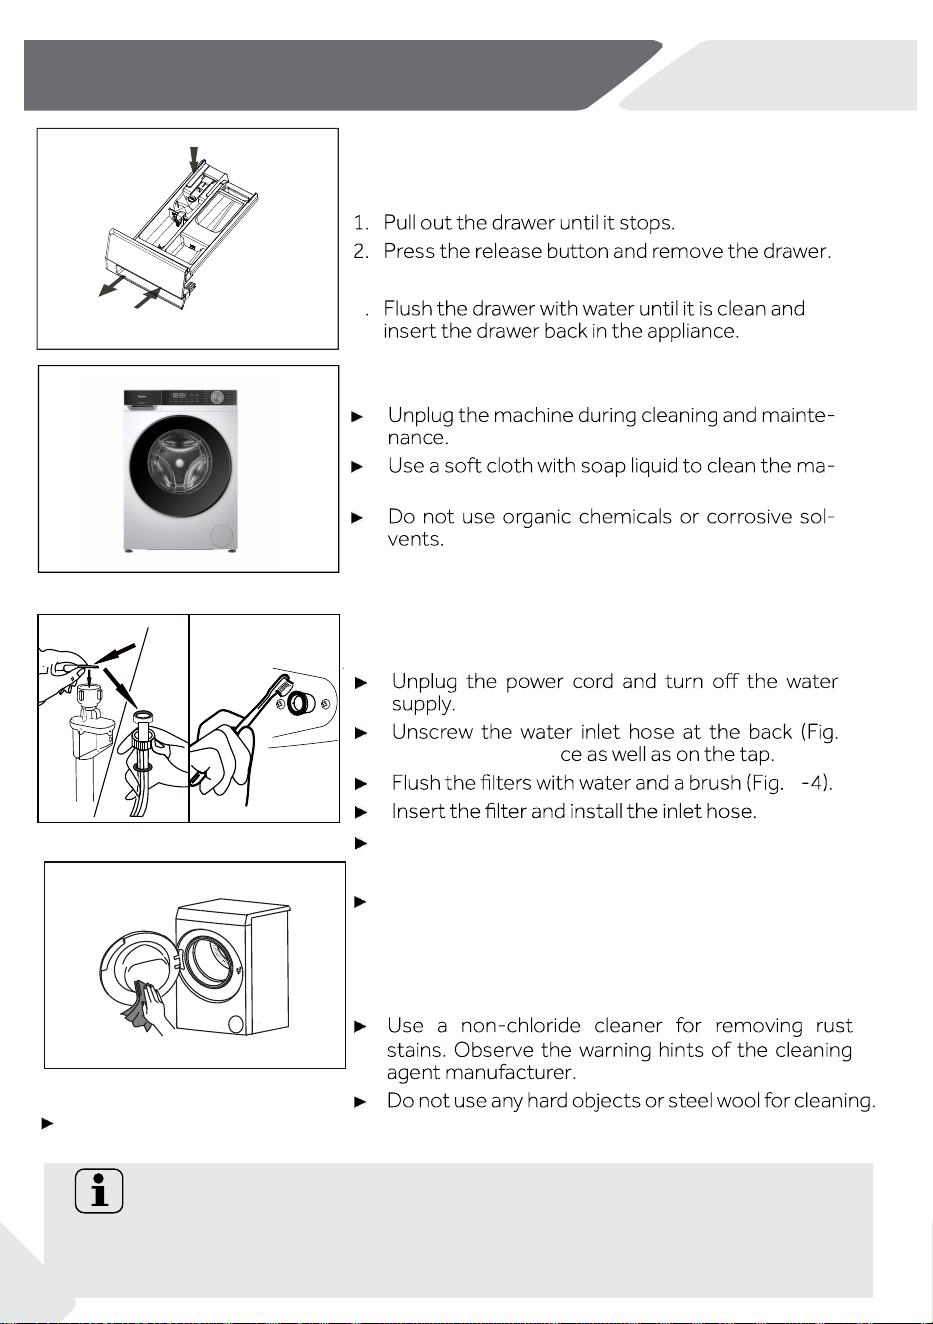
8.2 Cleaning the machine
Turn on the tap to see if it leaks.
8.4 Cleaning the drum
8.1 Cleaning the detergent drawer
Make sure there are no detergent residues.
Clean the drawer regularly (Fig. 8-1):
Remove accidentally washed items,especially
metal parts such as pins, coins, etc. from the
drum (Fig. 8-5) and the groove of the door gasket
(rubber) because they cause rust stains and
damage.
8
8-3) of the applian
8-5
8-48-3
8-2
8-1
Note: Hygiene
After the procedure, open the door, use a towel to clean the stains and foam
around the gasket, and keep the inside and outside of the gasket clean.
3.
Wipe the inside of each compartment with a towel.
4
chine exterior surfaces (Fig 8-2)and rubber components.
8.3 Water inlet valve and inlet valve filter
To prevent blockage of water supply by solid substan-
ces like lime, clean the inlet valve filter regularly.
For regular maintenance, we recommend running the cycle " Drum clean" within every
100cycles to avoid residue and odour build up. Add a small amount of detergent to the
detergent compartment (2) or use a special machine cleaner.
1
3
2
22
NZ AUNZ AU
8-Care and cleaning
and odours. Leave it open while not used.
Before next usage, carefully check the power cord,
water inlet and drain hose. Make sure everything is
properly installed and without leakage.
8
Pump filter sealing has to be clean and undamaged. If the lid is not fully tightened,
water can escape.
The filter must be in place, or it may lead to leakage.
8
8
8 8
8.
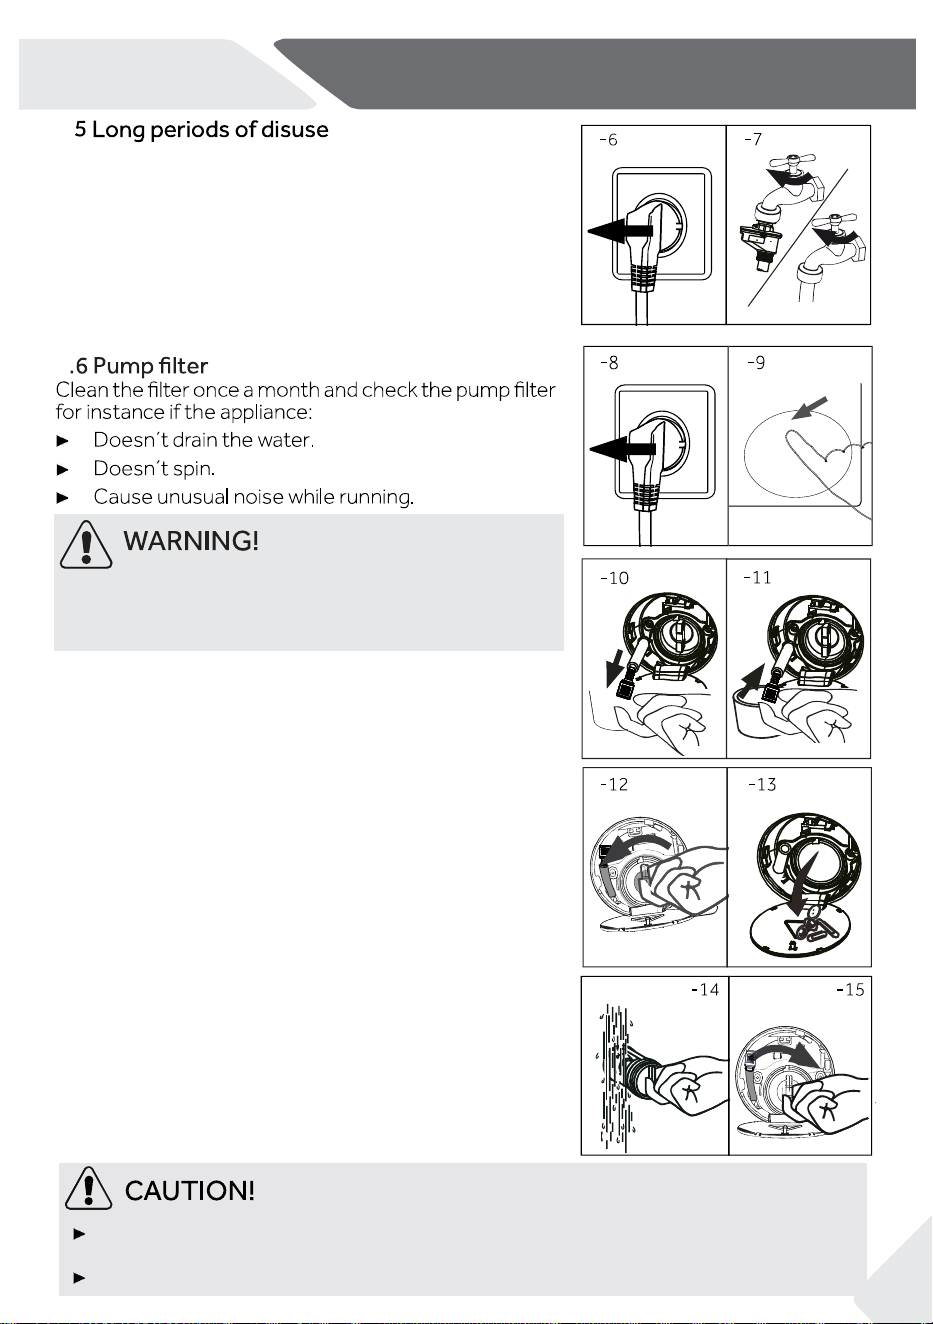
If the appliance is left idle for a long period:
1. Pull out the electrical plug (Fig. 8-6).
2. Turn off water supply (Fig.8-7).
3. Open the door to prevent formation of moisture
Scalding Risk! Water in the pump filter can be very hot!
Before any operation, please ensure water has cooled
down.
1. Turn off and unplug the machine (Fig. 8-8).
2. Push and open service flap (Fig.8-9).
3.
Provide a flat container to catch residual water. (Fig
8-10) There could be bigger amounts!
4. Pull the drain hose out and hold its end above the
container (Fig. 8-10).
5. Take the sealing plug out of the drain hose (Fig.
8-10).
6. After complete drainage, close drain hose (Fig.
8-11) and push it back into the machine.
7. Unscrew and remove the pump filter in
counterclockwise direction(Fig.8-12).
8. Remove contaminants and dirt (Fig.8-13).
9. Carefully clean the pump filter.e.g. using running
water(Fig.8-14).
10.
After cleaning, reinstall the handle and tighten it
until it does not move. At this time, the handle is
in vertical state.(Fig.8-15)
11. Close service flap.
8
8
8
8
8
8
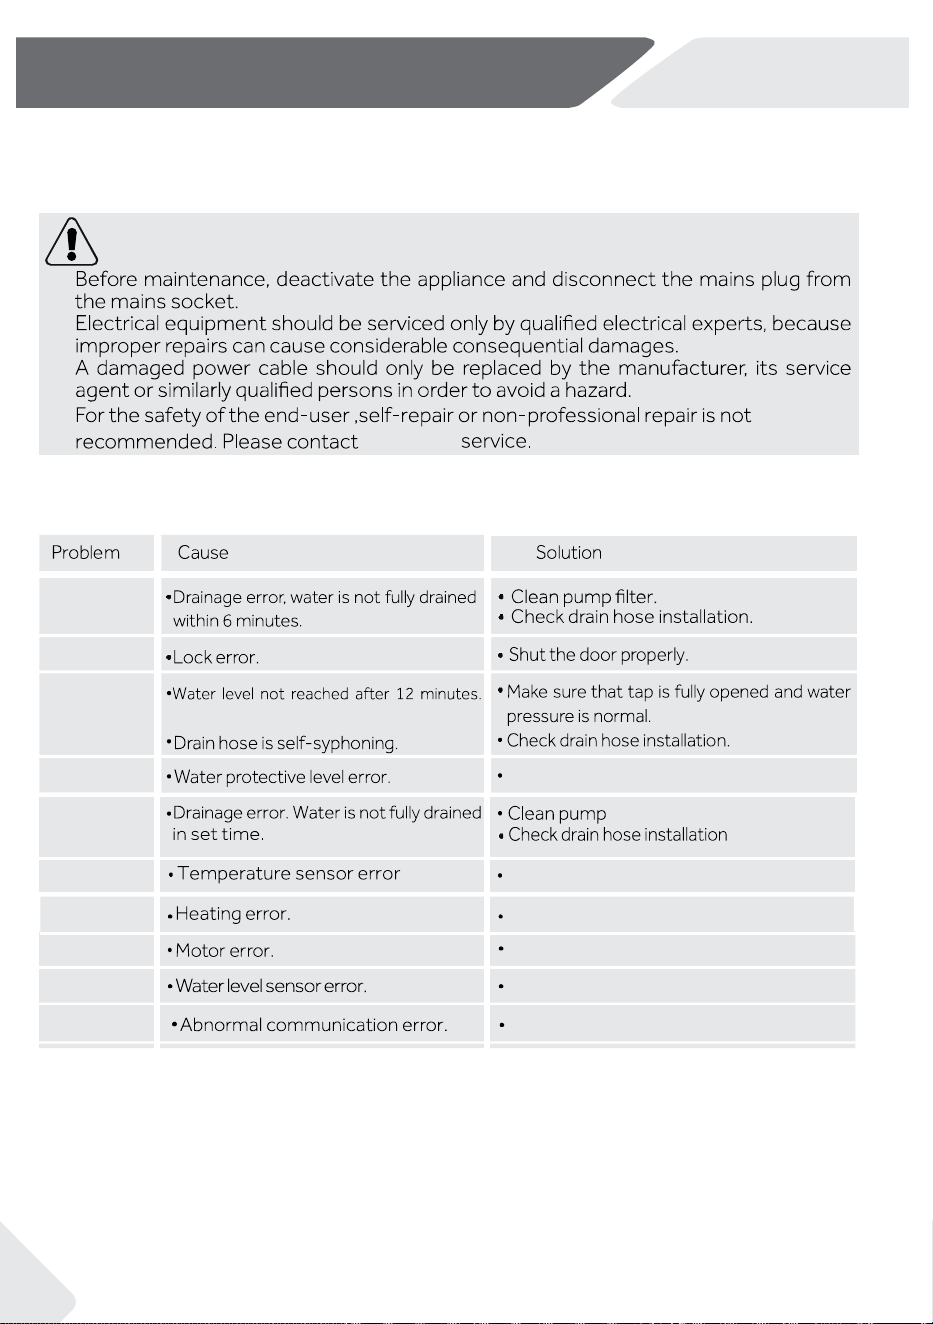
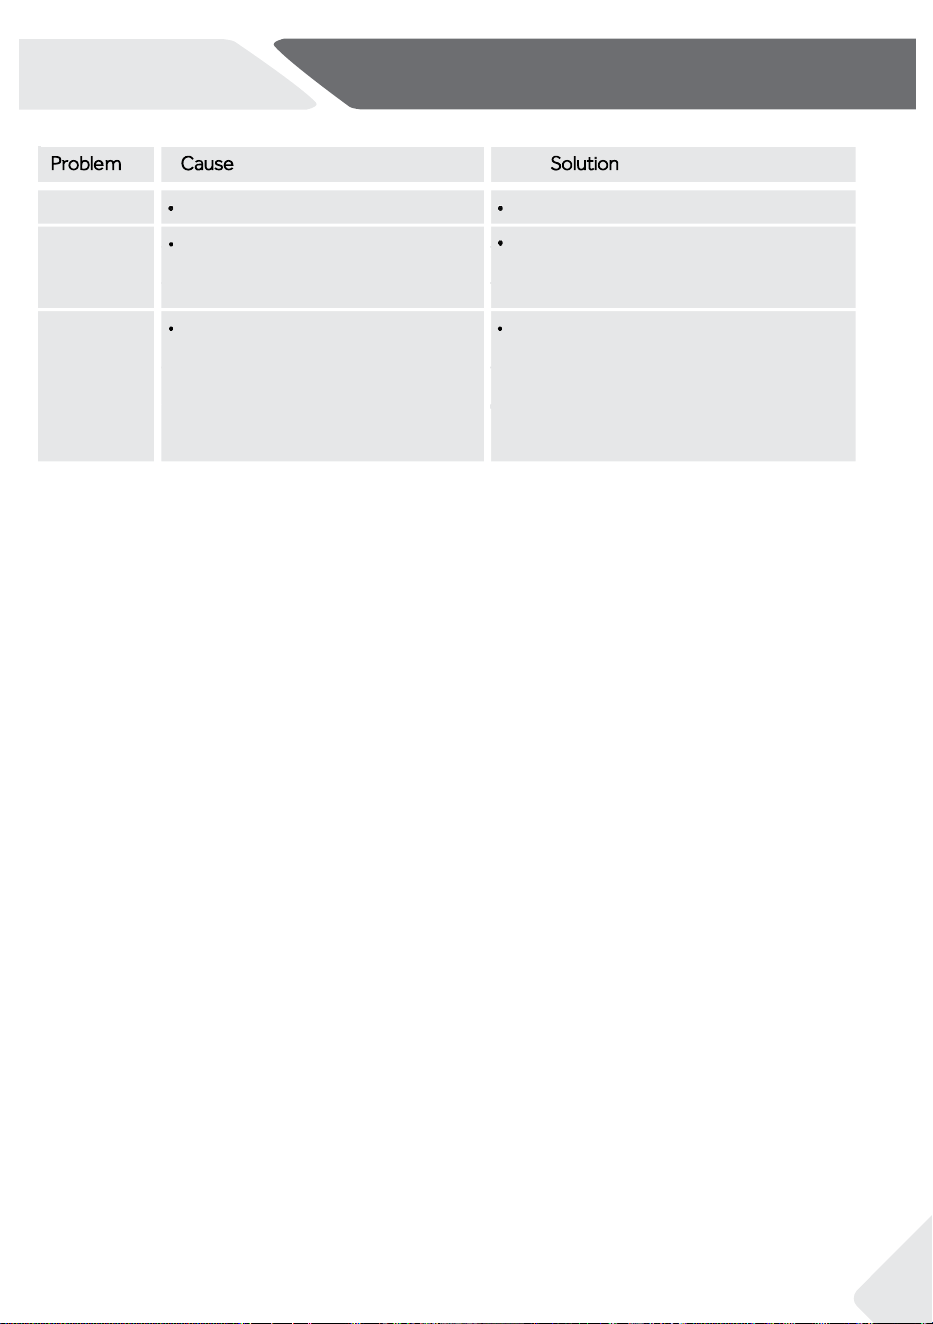
9.1 Troubleshooting with display code
WARNING!
.
CLR FLTR
E2
E4
E8
E5
F3
F4
F7
FA
.
FC0/FC2
▶
▶
▶
▶
customer
Contact customer service.
Contact customer service.
Contact customer service.
Contact customer service.
Contact customer service.
Contact customer service.
Many problems which occur can be resolved by yourself without specific expertise. In case
of a problem, please check all shown possibilities and follow below instructions before you
contact customer service. See CUSTOMER SERVICE.
filter
.
23
NZ AUNZ AU
9-Troubleshooting
NZ AUNZ AU
nd
Lock
Eb
Laundry is caught in the door when
closed.
The water level, temperature, or
spin speed does not meet the
requirements for opening the door
Model has not been selected
Set the machine model
Please open the door and put the clothes
into the drum completely. Then press the
"Start" button to run the cycle.
Contact customer service.
9-Troubleshooting
2
4
NZ AUNZ AU
9.
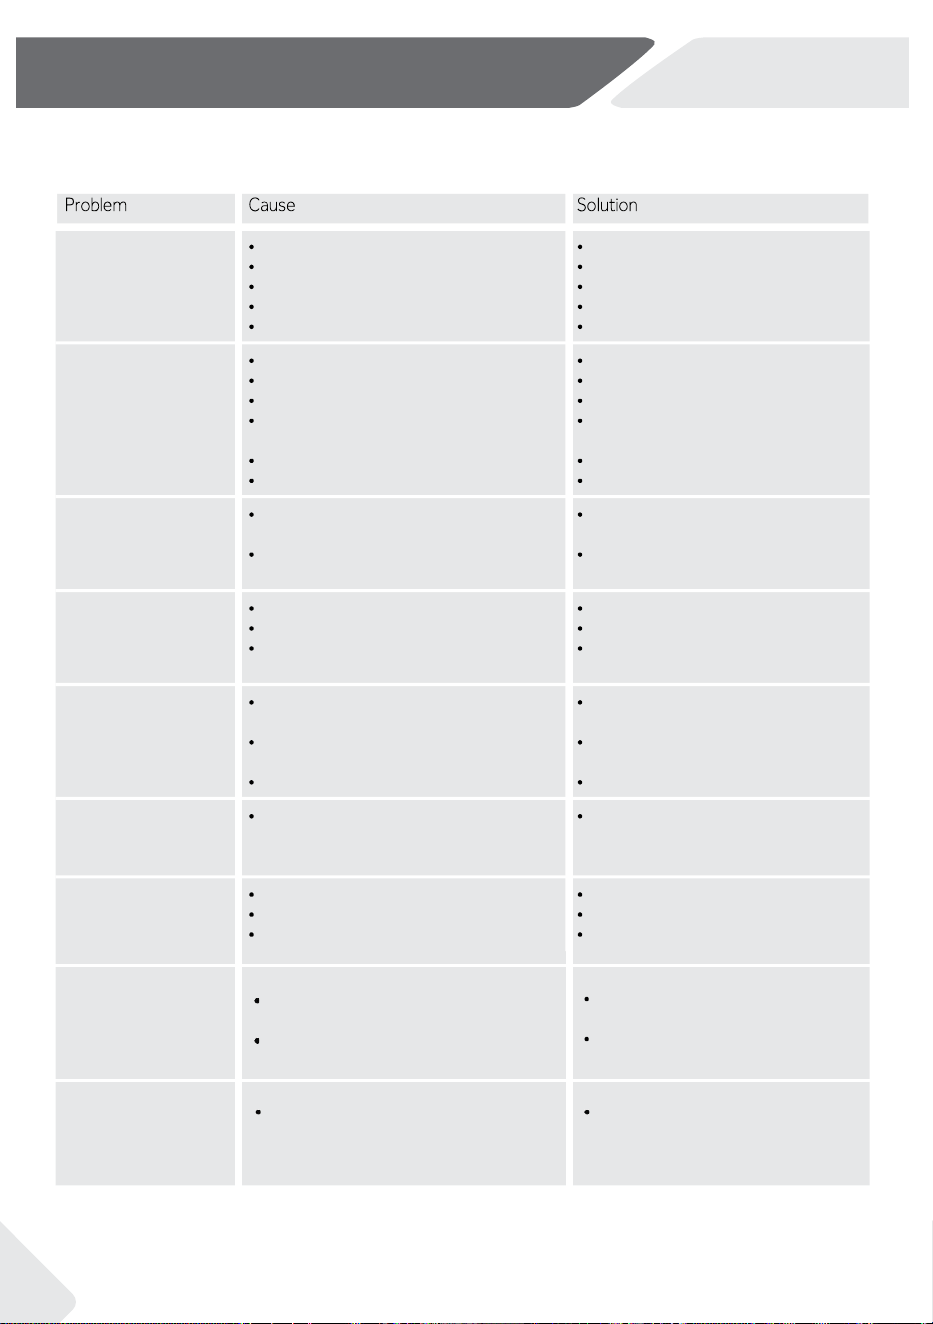
2 Troubleshooting without display code
Height of drain hose is below 60
cm
Drain hose end could reach into
water.
Water or electric failure.
Appliance displays error code
Problem due to load pattern
During soaking process.
Machine is
draining
while being filled.
Drainage failure
Strong vibration
while spinning
Washing machine
fails to operate.
Operation stops
for a period of
time.
Automatic adjust-
ment of washing
time.
Check water tap.
Check inlet hose.
Unblock inlet hose filter.
Check water pressure.
Close the door properly.
Ensure the water supply.
Make sure that drain hose is
properly installed.
Make sure the drain hose is not
in water.
Unblock drain hose.
Clean pump filter.
Make sure that drain hose is
properly installed
Check power and water supply.
Consider display codes
Reduce or adjust load.
Cancel cycle and restart
This is normal and doesn't af-
fect functionality.
Cycle is not yet started.
Do
or is not properly closed.
Machine has not been switched on
Power failure.
Key lock is activated
Check cycle and start it.
Close the door properly
Switch the machine on.
Check power supply.
Deactivate key lock.
Washing machine
can not be filled
with water.
No water.
Inlet hose is kinked.
Inlet hose filter is blocked.
Water pressure is less than 0.05
MPa
Door is not properly closed
Water supply failure.
Not all transportation bolts have
been removed
Appliance is not on solid and flat
ground.
Something wrong with the load.
Remove all transportation bolts
Ensure solid and flat ground.
Check load weight and balance
Detergent is not appropriate.
Excessive use of detergent.
Drain hose is blocked
Pump filter is blocked.
Drain hose end is higher than 100
cm above floor level
Excessive foam
overflows drum
and/or detergent
drawer.
Check detergent recommen
dations.
Reduce amount of
detergent.
Cycle duration can change
automatically.
Operation stops
before wash cycle
ends.
25
NZ AUNZ AU
9-Troubleshooting
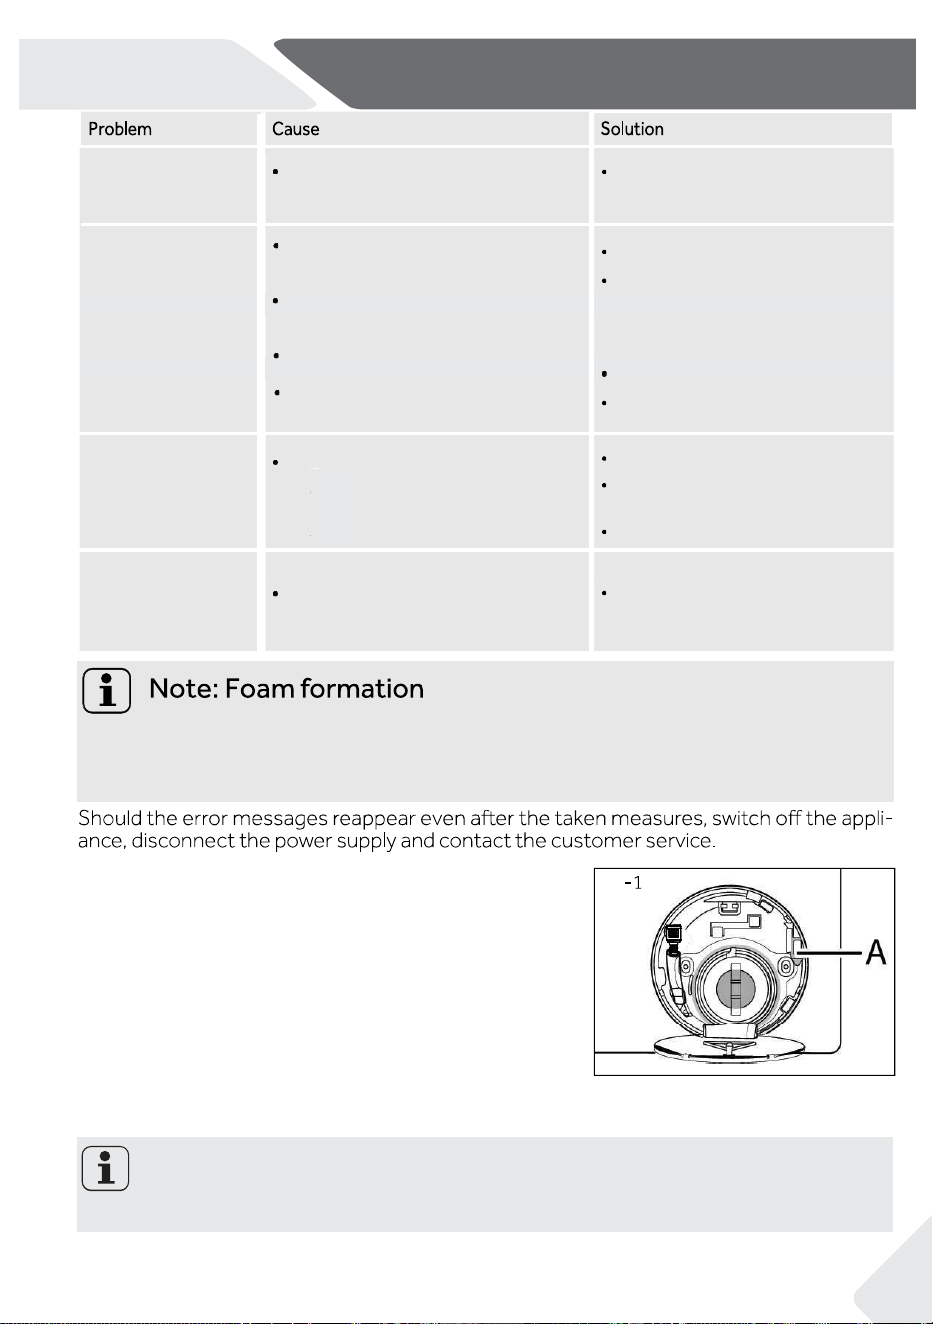
Spinning fails.
Unsatisfactory
washing result.
Washing powder
residues are on the
laundry.
Laundry has grey
patches.
Unbalance of laundry.
ficient.
Maximum load has been exceeded.
Laundry was unevenly distributed
in the drum.
Insoluble particles of detergent can
remain as white spots on the laun-
dry.
Caused by fats such as oils, creams
or ointments.
Reduce loading.
Pretreat the laundry with a spe-
cial cleaner.
Check machine load and laun-
dry and run a spinning cycle
again.
Degree of soil does not match with
selected cycle.
Detergent quantity was not suf-
according to the degree of
soil and
according to
manufacture
specifications.
Loosen the laundry.
Perform extra rinse.
Try to brush the residues from
the
laundry.
Choose another detergent.
26
Select another cycle.
Choose the detergent
When the washing machine is in a safe state (water level below the window
with a certain distance,drum temperature below 55°C, drum is not spinning),
can unlock the door.
9.3 In case of power failure
The current cycle and its setting will be saved.
When power supply is restored, operation will be re-
sumed.
In case of an emergency(such as an power failure,and
the door is locked), you can manually open the
door
lock and remove your load. In order to do that,water
level needs to be lowered as described in"Pump filter".
Then pull lever (A) until door is
unlocked with a gentle
click.
NZ AUNZ AU
NZ AUNZ AU
9-Troubleshooting
9
If too much foam is inspected during spin cycle, the spin stage will stop and the drain
pump will be activated for 90 seconds. This process will be repeated 3 times. If the
foam is not eliminated after 3 attempts, the cycle will end without spinning.
NZ AUNZ AU
1.
2.
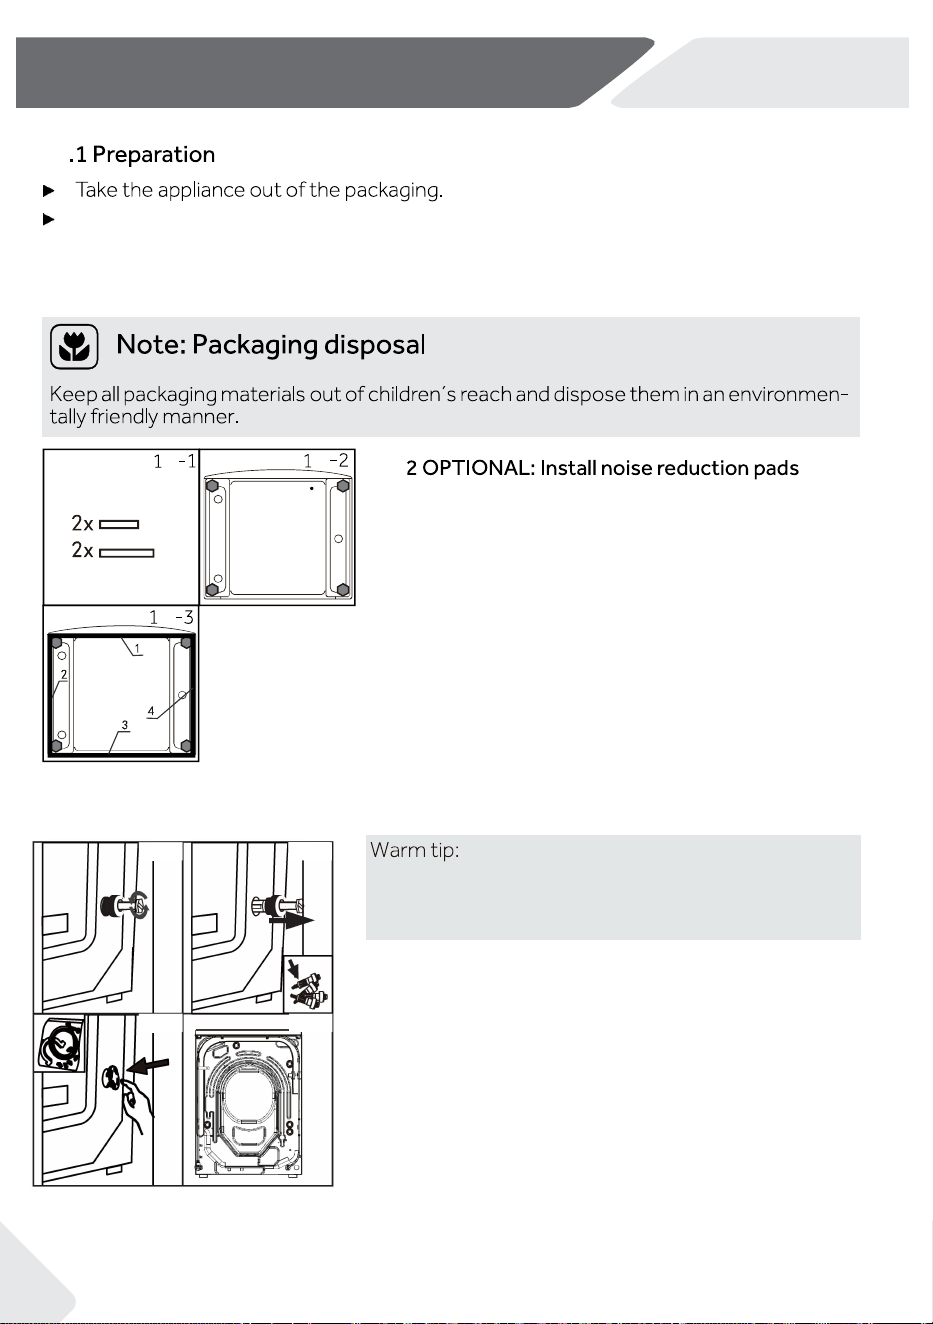
Noise reduction pad is optional, which could help to
reduce noise. Please assemble it or not according
to your own demand.
27
10-Installation
10
10.
10-4
10-5
10-7
10-6
Remove all packaging material including the protective film on cabinet and the
polystyrene base. Keep all packaging out of children's reach. While opening the
package, water drops may be
seen on plastic bag and sight window. This normal
phenomenon results from water
tests in the factory.
1.When opening the shrink package, you will find four
noise reduction pads. These are used for reducing noise
(Fig. 10-1).
2. Lay the washing machine down to its back, with the
washing machine door pointing upwards and the base of
the product towards the installer (Fig. 10-2).
3. Take out the noise reduction pads and remove the
double-sided adhesive protective film;paste around the
bottom; the noise reduction pads under the washing
machine cabinet as shown in Figure 10-3(two longer
padsin position 1 and 3, two shorter pads in position 2
and 4).
Finally set the machine upright again(Fig. 10-3).
10.3 Dismantle the transportation bolts
Remove all 4 bolts on the rear side and take out
plastic
spacers (Fig. 10-4)(Fig. 10-5).
Fill the holes with blanking plugs (Fig. 10-6) (Fig. 10-7).
0
0
0
The transportation bolts are designed for clamping
anti-vibration components inside the appliance during
transportation to prevent internal damage.
10-8
10-8
Keep all parts of the transport protection in a safe place for later use. Whenever the
appliance is to be moved, reinstall the protection parts first.
10
If the machine is to be moved to a distant location, reinstall the transportation bolts in
reverse order.
28
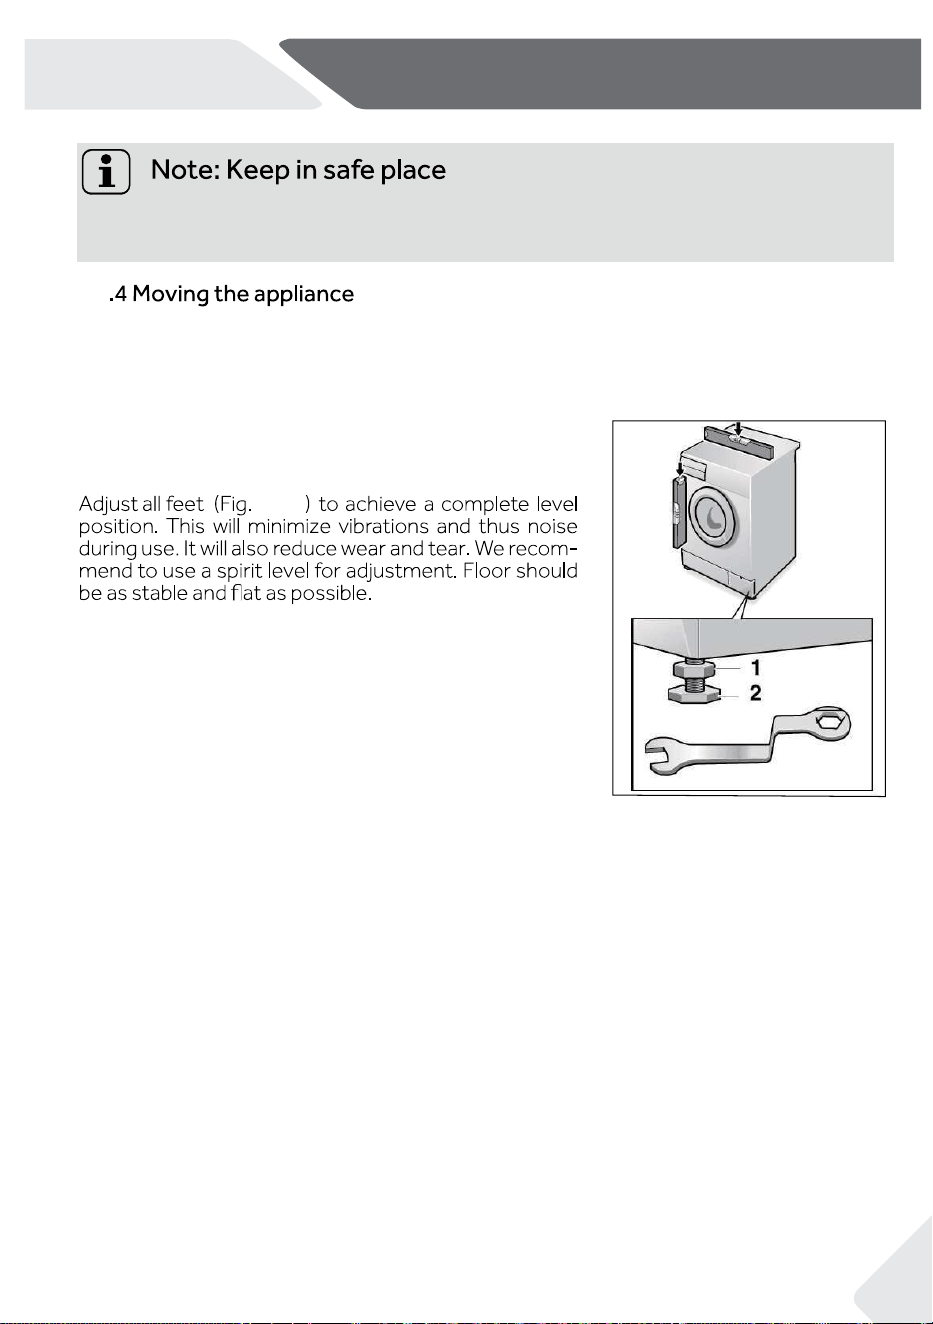
1. Loosen the locknut (1) with a wrench.
2. Adjust the height by turning the foot (2).
3. Tighten locknut (1) against the housing.
NZ AUNZ AU
NZ AUNZ AU
10-Installation
10.5 Levelling the appliance
10-9
10-10
10-10
10-11
10-11
60-100
29
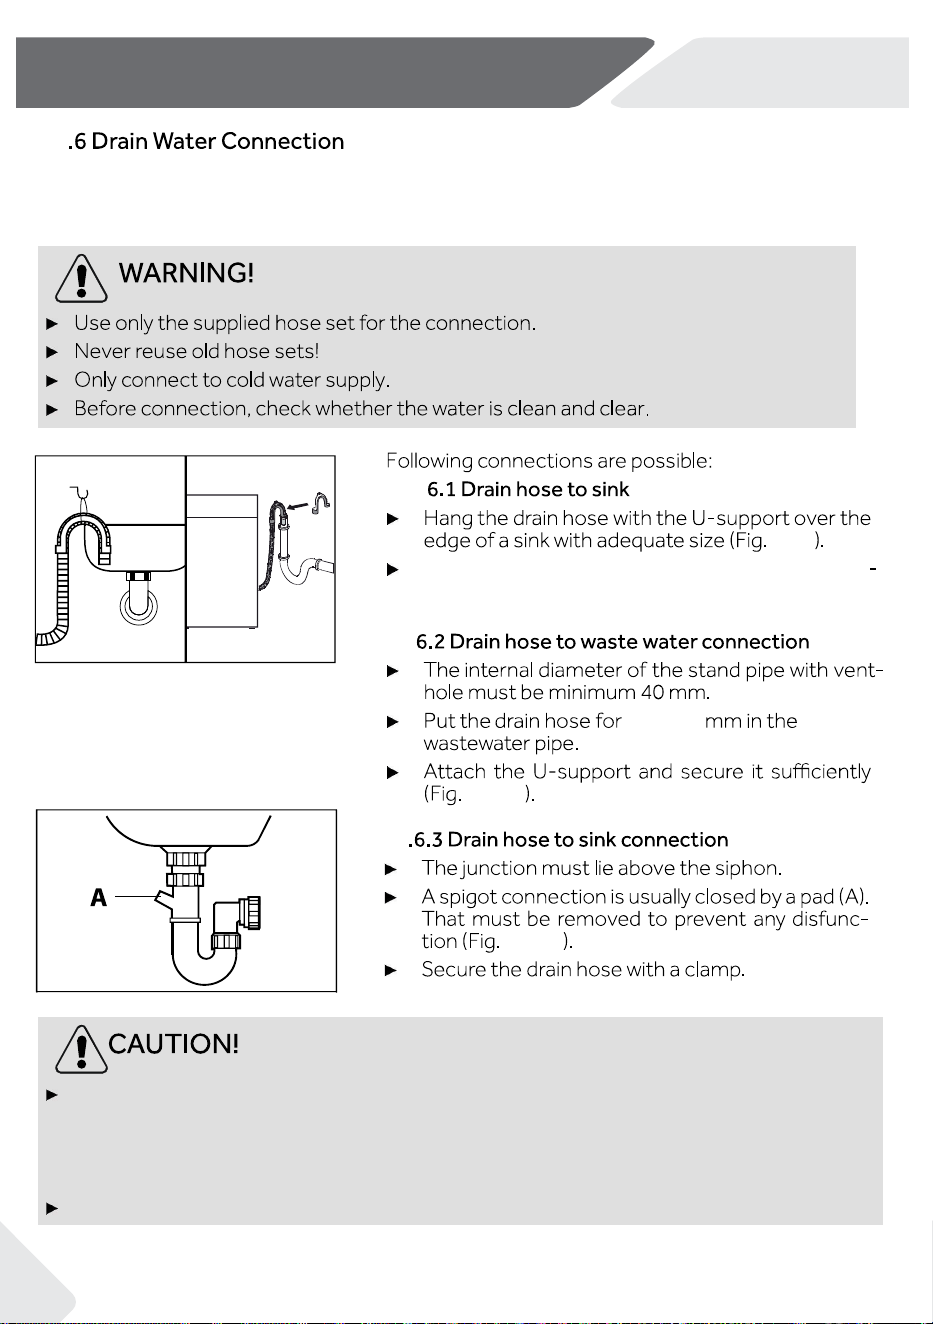
The drain hose should not be submerged in water and should be securely fixed
and
leak-free. Ifthe drain hose is placed on the ground or if the pipe is at a height
of less
than 60 cm, thewashing machine will continuously drain while being filled(self-
siphoning).
Drain hose is not to be extended. If necessary contact customer service.
10-9
Protect the U-support sufficiently against slip
ping.
NZ AUNZ AU
10-Installation
10.
10.
10.
10.
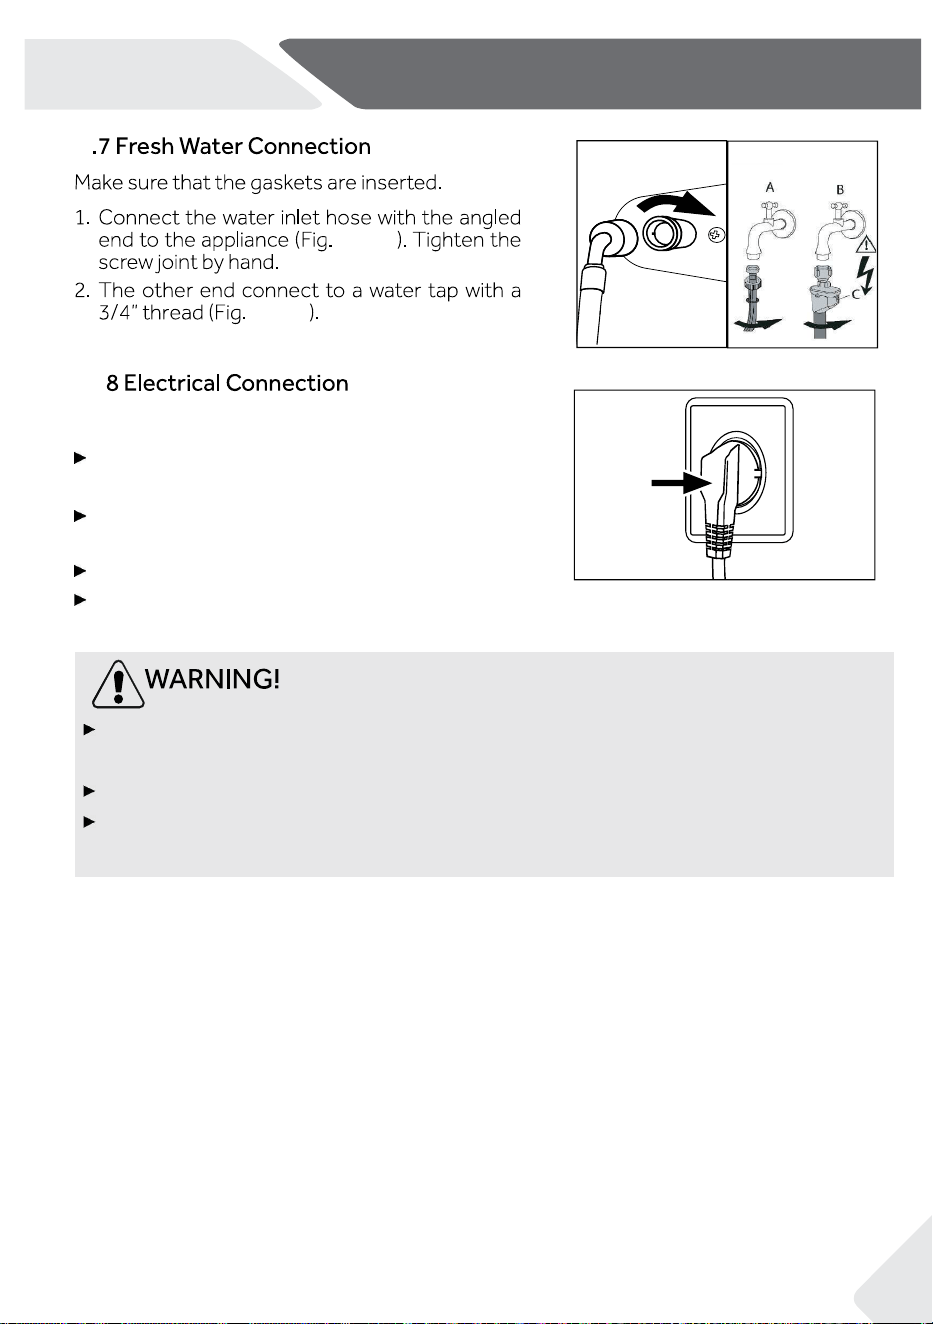
Fix the water drain hose properly to the piping. The hose has to reach at one point a
height between 60 and 100 cm above the appliance base! If possible, always keep the
drain hose fixed to the clip at the back of the appliance.
10-12
10-1310-12
10-13
10-14
30
NZ AUNZ AU
NZ AUNZ AU
10-Installation
10.
10.
Before connection check if:
power supply, socket and fuse are appropriate
to the rating plate.
the power socket is earthed and no multi-plug
or extension is being used.
the power plug and socket are matched.
Put the plug into the socket(Fig. 10-14).
Ensure always that all connections (power supply, drain and fresh water hose)
are firm,dry and leak free!
Make sure that these parts are never crushed, kinked or twisted.
If the supply cord is damaged, it must be replaced by the service agent (see
warranty card) in order to avoid a hazard.
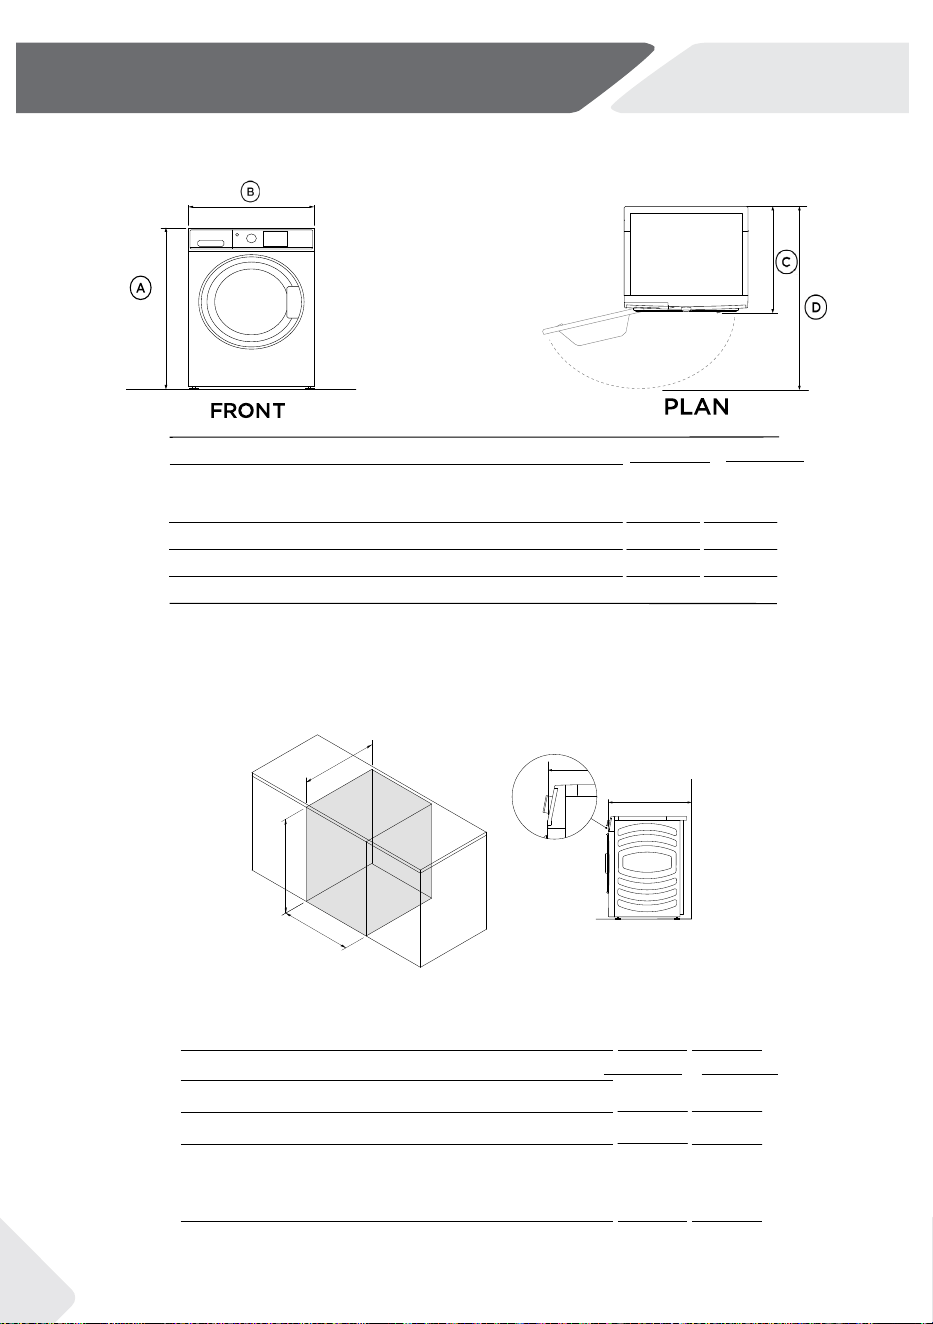
11.1 Additional technical data
ISOMETRIC
b
a
c
CAVITY DIMENSIONS
A Minimum cavity height
B Minimum cavity width
C Minimum cavity depth
z Flush with front panel of the product*
z In cupboard
3
1
*
Front panel of the product
NZ AUNZ AU
11-Technical data
B Overall width
D Depth with door open
* Exact height is dependent on foot adjustment
**Including dial and door (when closed)
Actual product dimensions may vary by ± 2mm.
850
865
PRODUCT DIMENSIONS
(MM)
A
Overall height*
z
Min
z
Max
HWF80EC
850
865
HWF10EC
5
9
9
9
5
2
C
Overall depth**
507
595
565
1051
HWF80EC
HWF10EC
865
622
865
622
523
577
581
635
ELECTRICAL
Volts
Hz
Amps(maximum)
Power consumption(w)
220-240V
50
10A
1950(10)/1900(80)
32
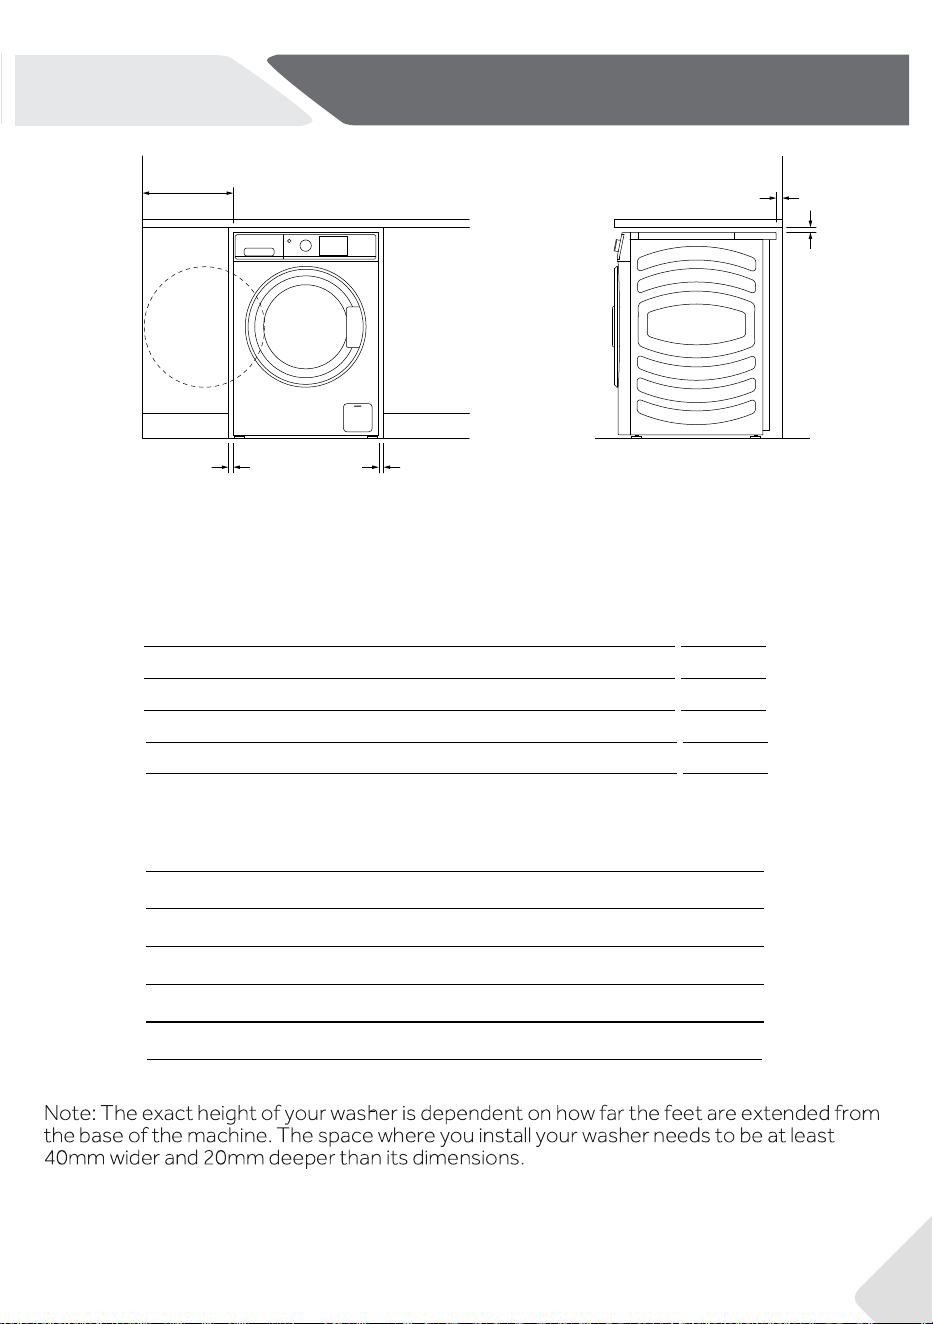
PROFILEFRONT
a
b
bb
CLEARANCE DIMENSIONS
MM
Minimum washer door clearance to adjacent wall
Minimum gap clearance to adjacent product or
cabinetry*
a
b
240
15
NZ AUNZ AU
NZ AUNZ AU
11-Technical data
C
C
Minimum gap clearance to the adjacent wall or cabinetry
30

Model ____________________ Serial No. _____________________
Also check the Warranty Card supplied with the product in case of warranty.
For General business enquiries and for more information, please refer to
www.haier.com
Before contacting our service team, ensure that you have the following
information available.
The information can be found in the rating plate.
33
We recommend our Haier Customer Service and the use of original spare parts.
If you have a problem with your appliance, please first check the section
TROUBLESHOOTING.
If you cannot find a solution there please contact:
▶ your local dealer,or
▶ The Service and Support area at www.haier.com where you can find telephone
numbers, FAQs and where you can activate a service claim.
NZ AUNZ AU
12-Customer
service


0020509288MA