
Technical Support and E-Warranty Certificate www.vevor.com/support
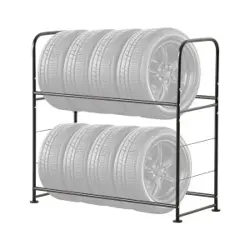
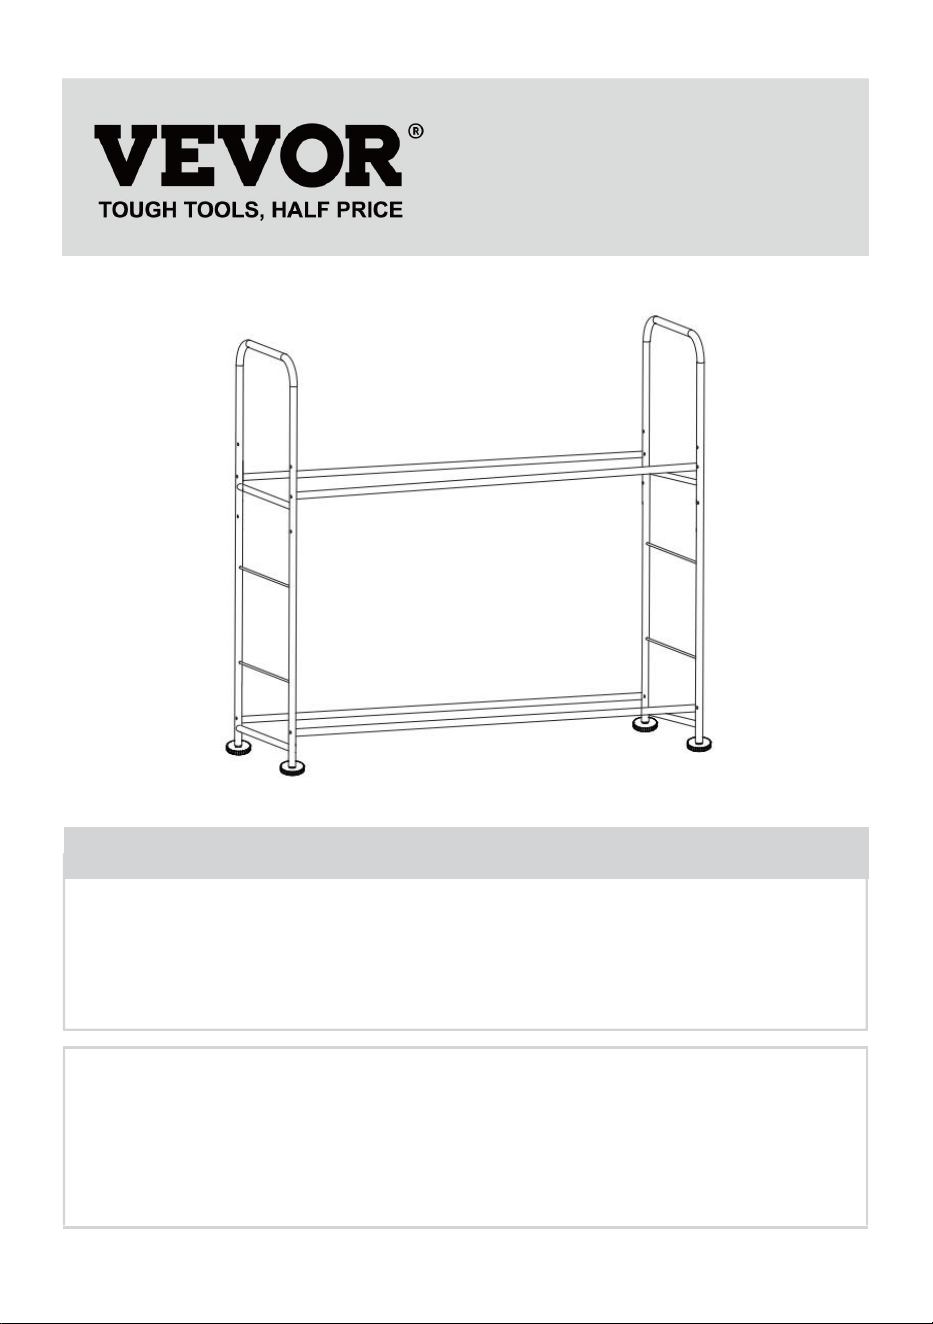
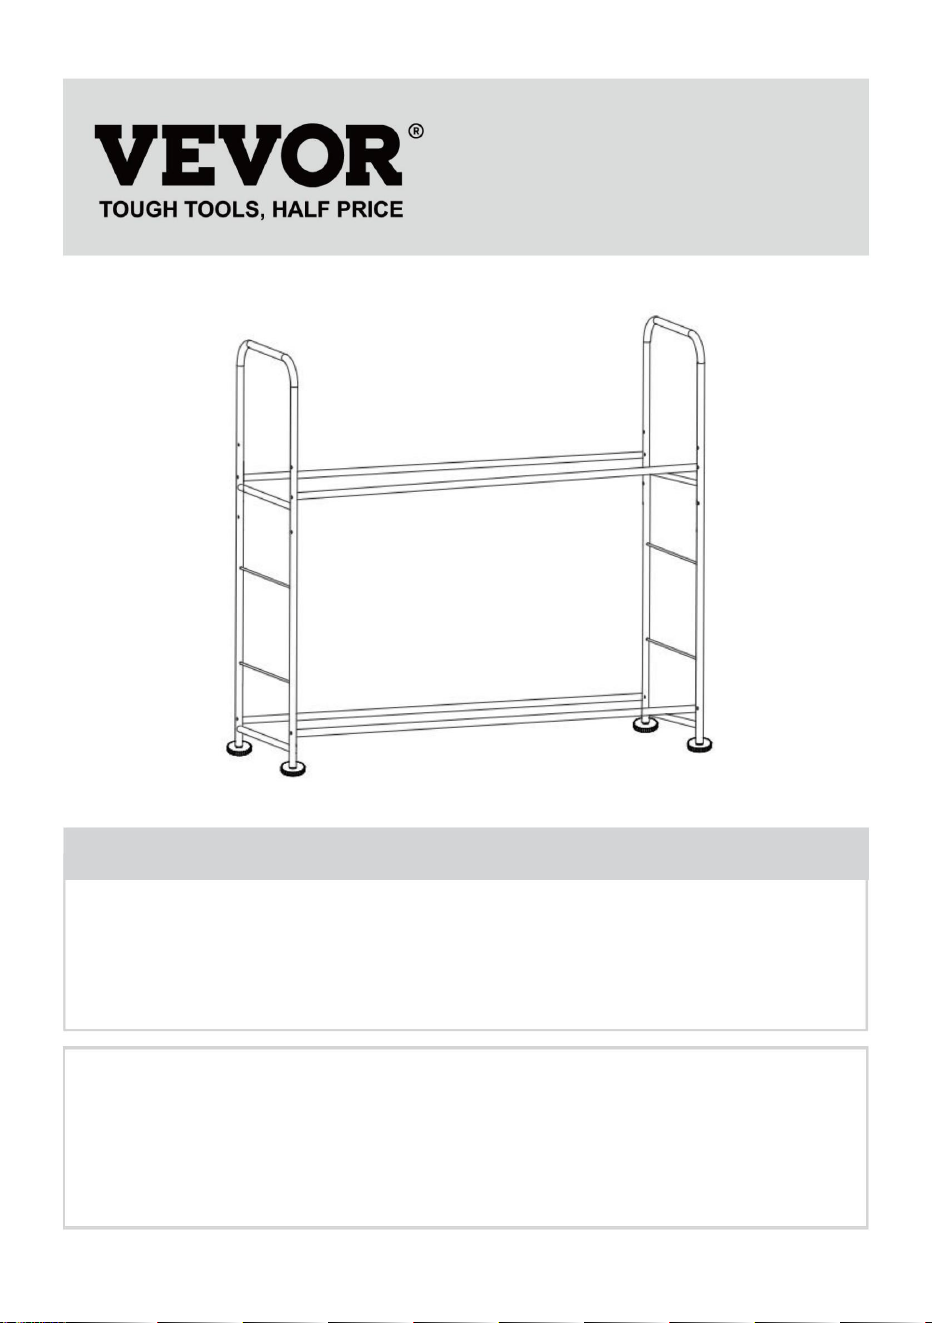
TIRE RACK
MODEL: LX060
We continue to be committed to provide you tools with competitive price.
"Save Half", "Half Price" or any other similar expressions used by us only
represents an estimate of savings you might benefit from buying certain tools
with us compared to the major top brands and does not necessarily mean to cover
all categories of tools offered by us. You are kindly reminded to verify carefully
when you are placing an order with us if you are actually Saving
Half in comparison with the top major brands.
- 1 -
MODEL: LX060
<Picture Only For Reference >
Have product questions? Need technical support? Please feel free to
contact us:
Technical Support and E-Warranty Certificate
www.vevor.com/support
NEED HELP? CONTACT US!
This is the original instruction, please read all manual instructions
carefully before operating. VEVOR reserves a clear interpretation of our
user manual. The appearance of the product shall be subject to the
product you received. Please forgive us that we won't inform you again if
there are any technology or software updates on our product.
TIRE RACK

- 2 -
IMPORTANT SAFEGUARDS
WARNING: Read and understand this entire manual before
operating or servicing this product. Failure to follow these
warnings and instructions can cause personal injury or damage
to valuable property.
• Avoid children using the product. And this product is not a toy. Do not
allow children to play.
SETUP PRECAUTIONS
1.Assemble only according to these instructions. Improper assembly can
create hazards.
2.Keep the assembly area clean and well-lit.
3.Capabilities apply to properly and completely assembled product only.
4. Keep bystanders out of the area during assembly.
5. Do not assemble when tired or when under the influence of alcohol,
drugs or medication.
6.Keep away from sharp points,blades and other items.
7.For additional information regarding the parts listed in the following
pages, please refer to the Assembly Diagram of this manual. Unwrap and
separate all parts in a clean work area. Please keep small spare parts out
of children's reach.
SAVE THESE INSTRUCTIONS
SAFETY AND PRECAUTIONS
WARNING:
Only used to place tires.
This product is intended for indoor installation use only.

- 3 -
SPECIFICATION
Model
LX060
Size
L*W*H: 1150*495*1180mm
Caster wheel
Not included
Number of layer
2
Capacity
8 tyres
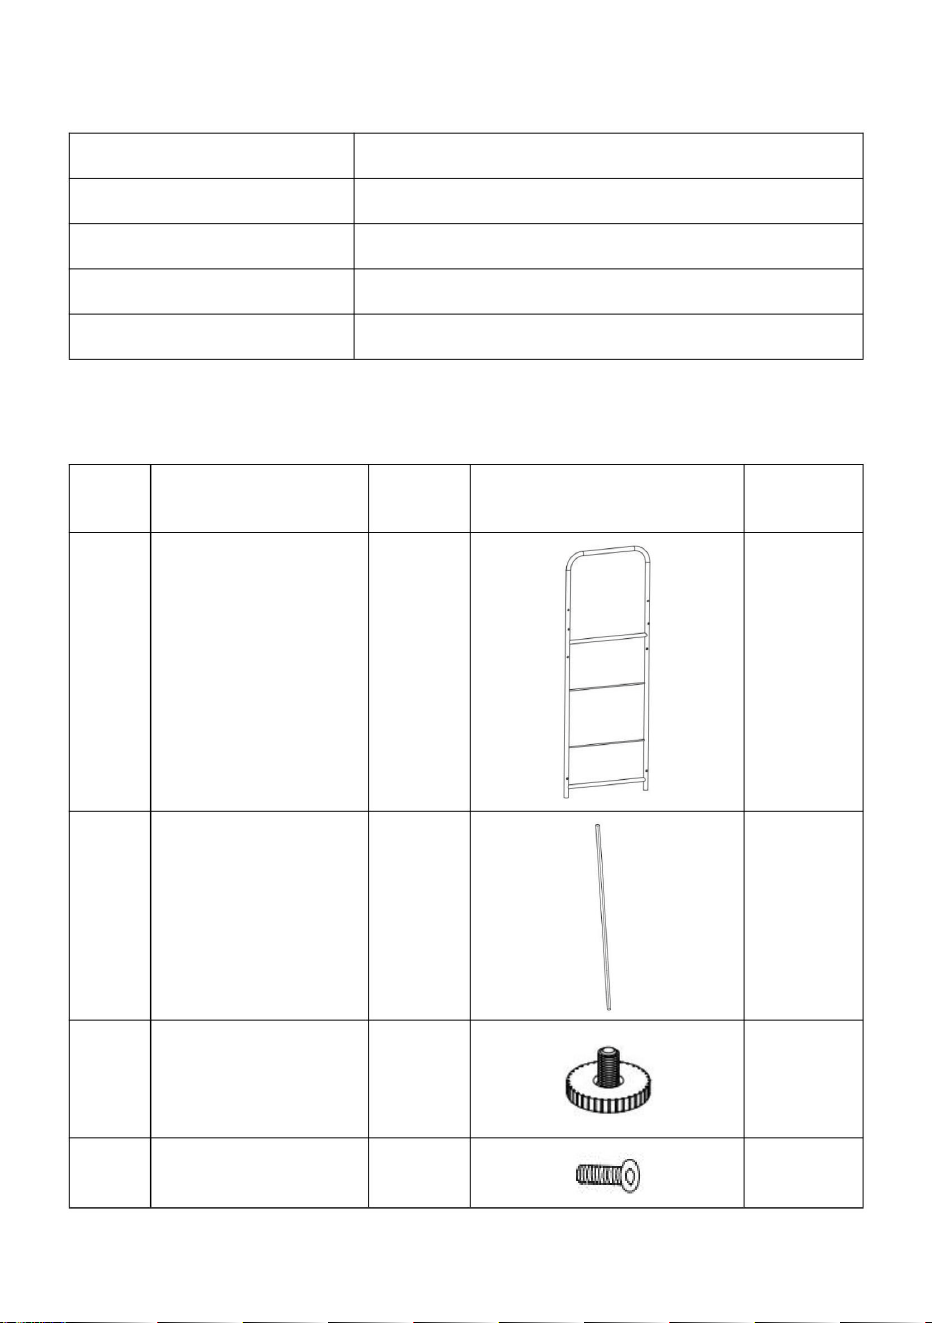
PART LIST
No.
Name
Code
Picture
LX060
1
Upright
A
2
2
Beam
B
4
3
Foot mount
C
4
4
M8×45 Screw
D
8
- 4 -
5
Washer
E
8
6
Plastic pad
F
8
7
Allen key
G
1
8
Dust cover rope
H
4
9
Dust cover
L
1
10
Manual
/
/
1
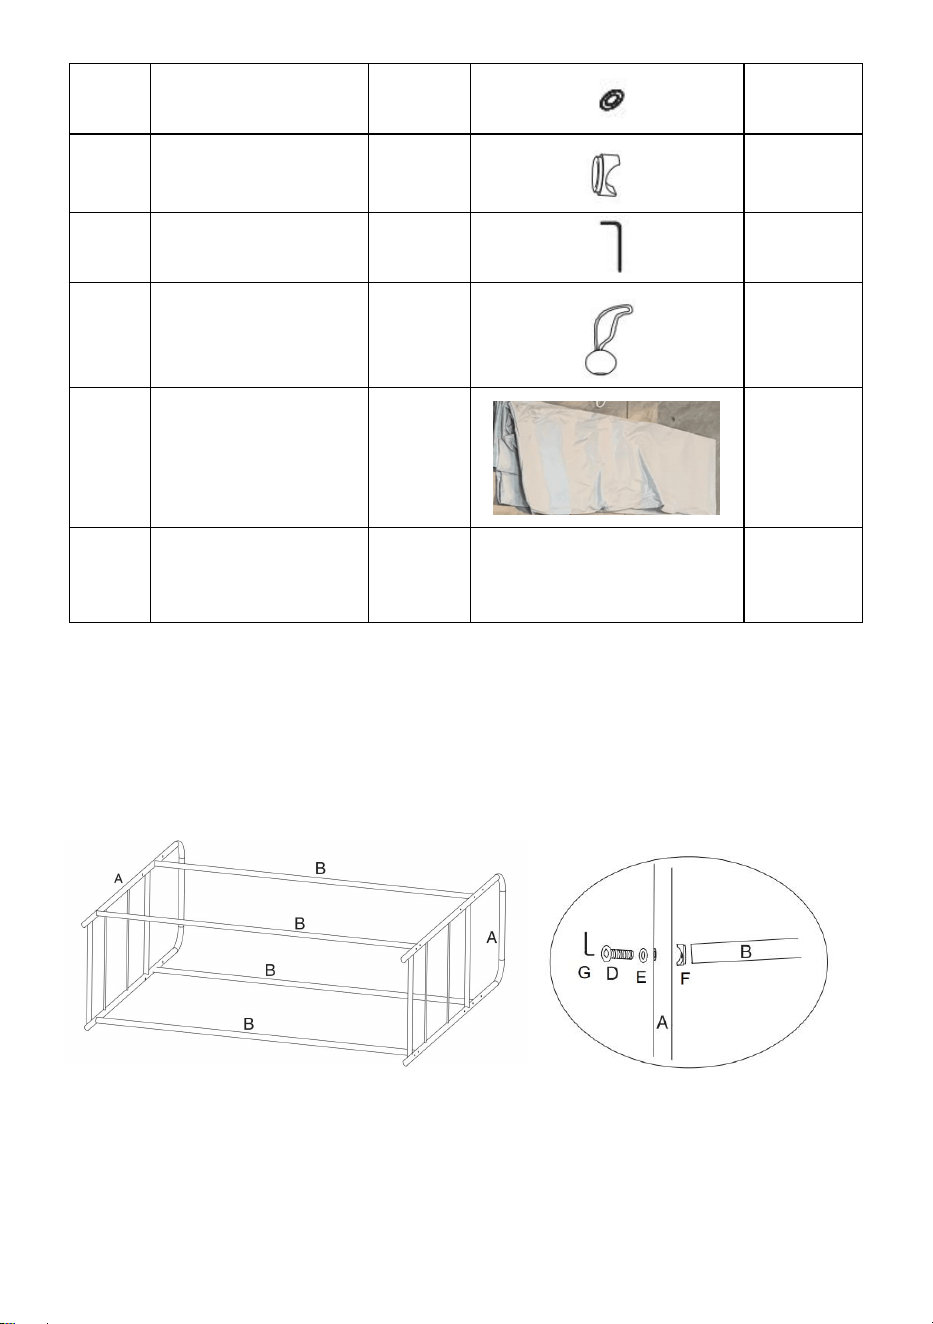
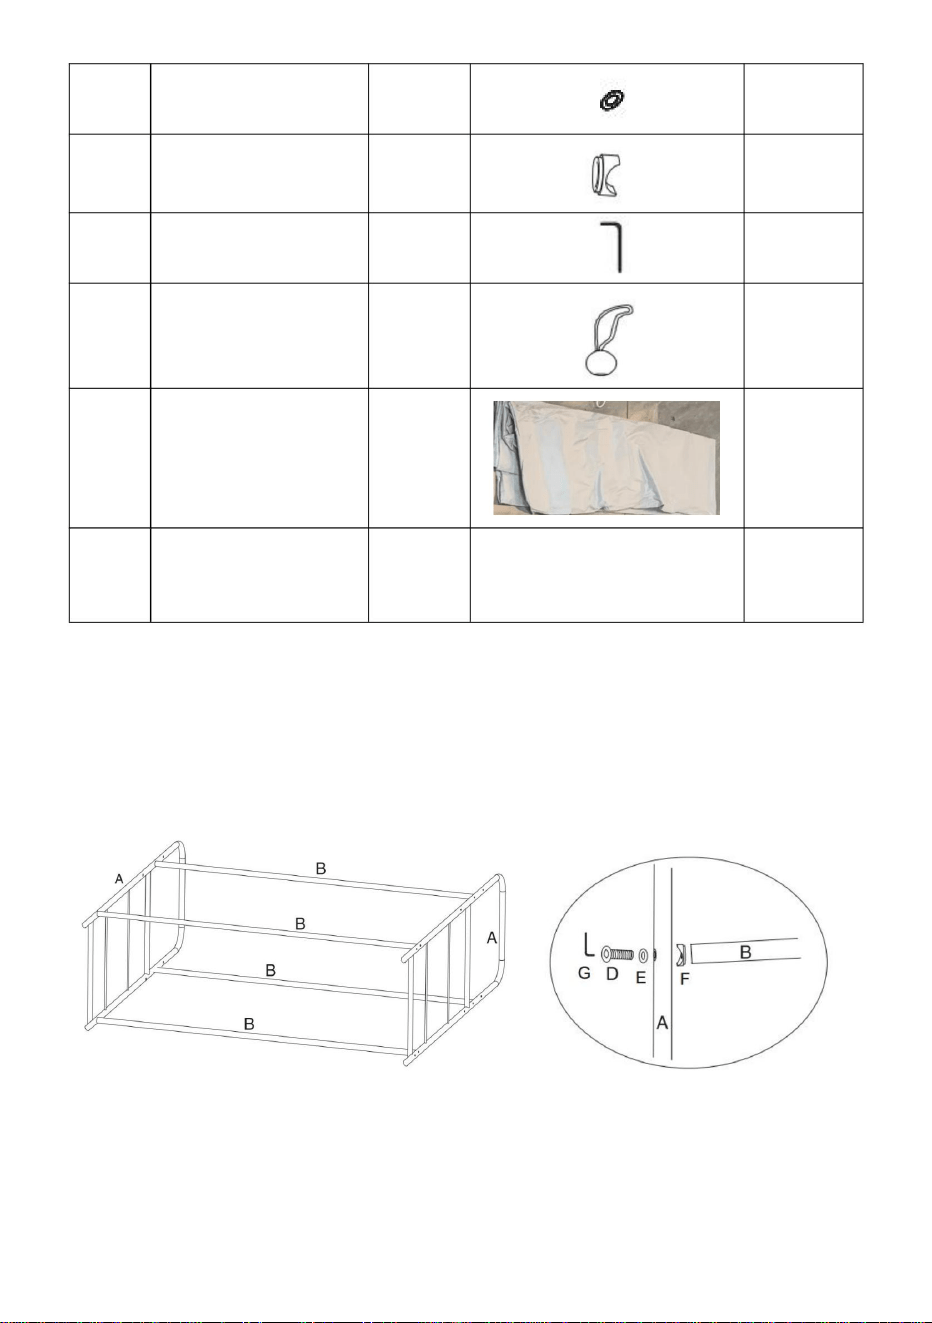
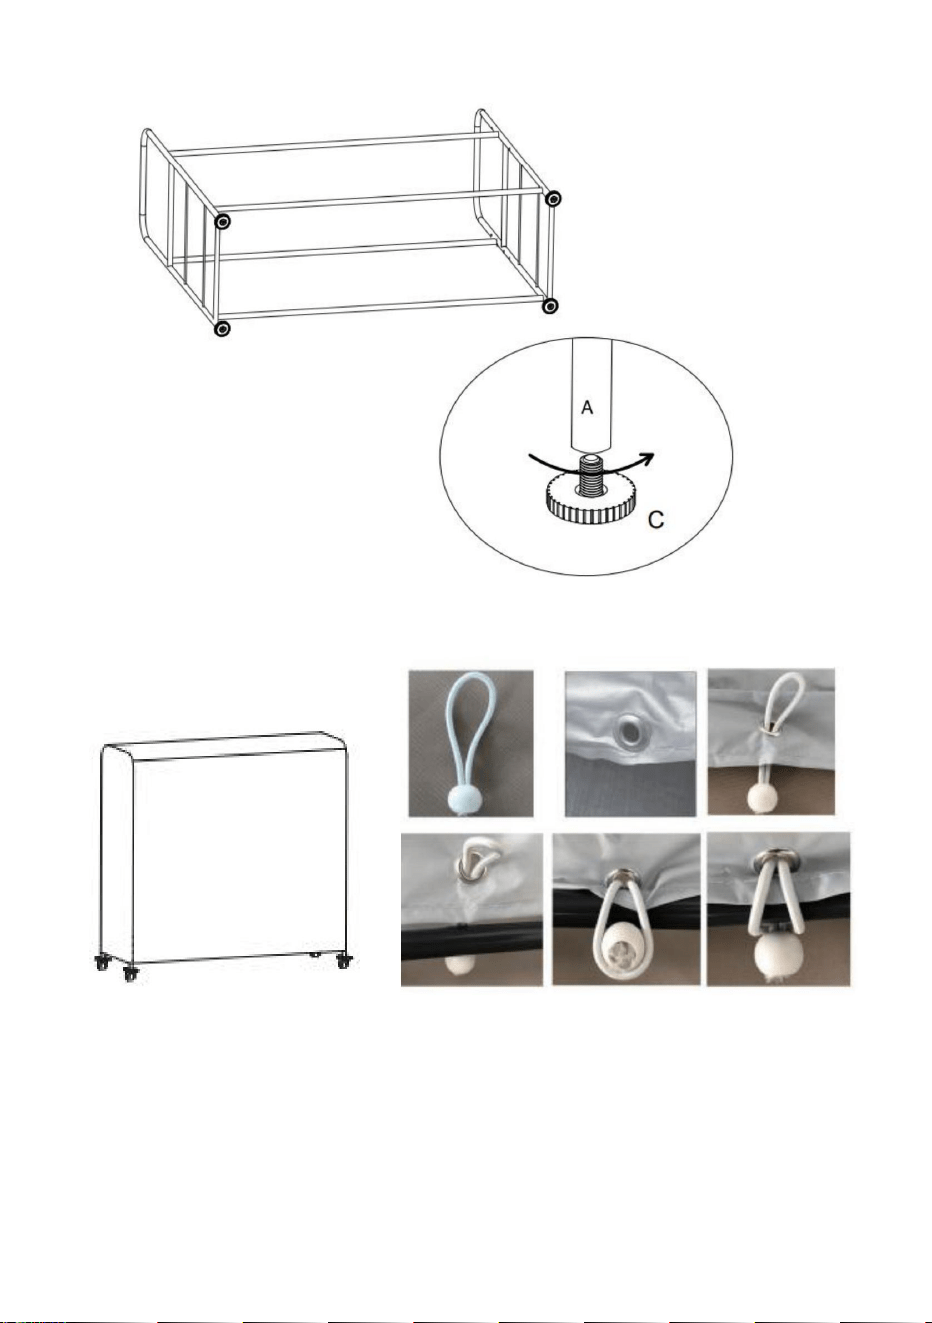
TIRE RACK ASSEMBLE
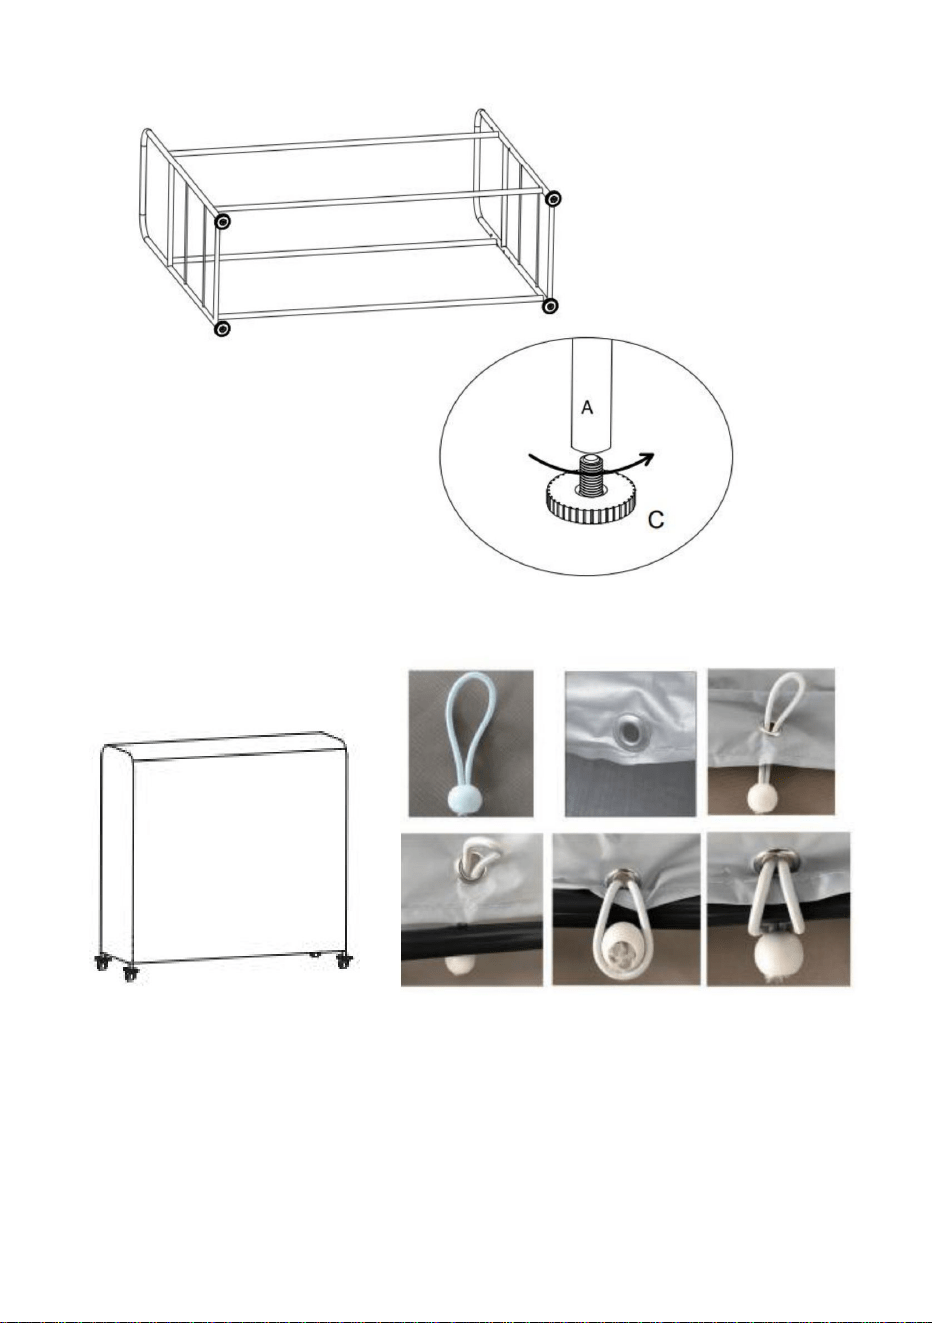
STEP1. Select the upright A, assemble it to the beam B, use the allen key
to fasten the screws D with E, F.

- 5 -
STEP2. Assemble 4 foot mount C, screw them into the A.
STEP3. Put the dust cover onto the tire rack frame, pass the duct cover
rope into the dust cover hole, until fasten the dust cover.

- 6 -
Manufacturer: Shanghaimuxinmuyeyouxiangongsi
Address: Shuangchenglu 803nong11hao1602A-1609shi, baoshanqu,
shanghai 200000 CN.
Imported to AUS: SIHAO PTY LTD. 1 ROKEVA STREETEASTWOOD
NSW 2122 Australia
Imported to USA: Sanven Technology Ltd. Suite 250, 9166 Anaheim
Place, Rancho Cucamonga, CA 91730
REP
UK
YH CONSULTING LIMITED.
C/O YH Consulting Limited Office 147,
Centurion House, London Road,
Staines-upon-Thames, Surrey, TW18 4AX
REP
EC
E-CrossStu GmbH
Mainzer Landstr.69,
60329 Frankfurt am Main.


SUPPORTDEPNEU
«Économisezlamoitié»,«Moitiéprix»outouteautreexpressionsimilaireutiliséepar
nousnereprésentequ'uneestimationdeséconomiesquevouspourriezréaliserenachetant
certainsoutilscheznousparrapportauxgrandesmarquesetnecouvrepasnécessairementtoutes
lescatégoriesd'outilsquenousproposons.Nousvousrappelonsdebienvouloirvérifier
soigneusementlorsquevouspassezunecommandecheznoussivous
économisezréellementlamoitiéparrapportauxgrandesmarques.
Nouscontinuonsànousengageràvousfournirdesoutilsàdesprixcompétitifs.
MODÈLE:LX060
Assistancetechniqueetcertificatdegarantieélectroniquewww.vevor.com/support
Machine Translated by Google

BESOIND'AIDE?CONTACTEZNOUS!
1
Vousavezdesquestionssurnosproduits?Vousavezbesoind'assistancetechnique?
N'hésitezpas
ànouscontacter:Assistancetechniqueetcertificatdegarantie
électroniquewww.vevor.com/support
<Photoàtitreindicatifseulement>
MODÈLE:LX060
Ils'agitdelanoticed'utilisationd'origine.Veuillezlireattentivementtoutesles
instructionsdumanuelavantdel'utiliser.VEVORseréserveledroitd'interpréter
clairementnotremanueld'utilisation.L'apparenceduproduitdépendduproduit
quevousavezreçu.Veuilleznousexcuser,nousnevousinformeronsplussidesmises
àjourtechnologiquesoulogiciellessontdisponiblessurnotreproduit.
SUPPORTDEPNEU
Machine Translated by Google

créerdesdangers.
lesavertissementsetlesinstructionspeuvententraînerdesblessurescorporellesoudesdommages
5.Nemontezpaslorsquevousêtesfatiguéousousl'influencedel'alcool,dedroguesoude
médicaments.
horsdeportéedesenfants.
4.Gardezlesspectateurshorsdelazonependantlemontage.
d'utiliseroud'entretenirceproduit.Lenonrespectdeces
Utiliséuniquementpourplacerdes
pneus.Ceproduitestdestinéàuneutilisationenintérieuruniquement.
permettreauxenfantsdejouer.
7.Pourplusd'informationssurlespiècesrépertoriéescidessous
6.Teniràl'écartdesobjetspointus,deslamesetautresobjets.
àdesbiensdevaleur.•Évitez
quelesenfantsn'utilisentleproduit.Etceproduitn'estpasunjouet.
séparertouteslespiècesdansunezonedetravailpropre.Veuillezgarderlespetitespiècesderechangeàl'écart
1.Assemblezuniquementseloncesinstructions.Unassemblageincorrectpeut
pages,veuillezvousréférerauschémad'assemblagedecemanuel.Déballezet
AVERTISSEMENT:Lisezetcomprenezl'intégralitédecemanuelavant
3.Lescapacitéss'appliquentuniquementauproduitcorrectementetcomplètementassemblé.
2.Gardezlazonedemontagepropreetbienéclairée.
AVERTISSEMENT:
PRÉCAUTIONSD'INSTALLATION
CONSERVEZCESINSTRUCTIONS
MESURESDESÉCURITÉIMPORTANTES
SÉCURITÉETPRÉCAUTIONS
2
Machine Translated by Google

3
LISTEDESPIÈCES
SPÉCIFICATION
Code
8
LX060
Image
4
C
Noninclus
1
Modèle
8pneus
UN 2
Taille
4 D
Nom
Nombredecouches
Faisceau
LX060
L*l*H:1150*495*1180mm
3
2
Supportpourpied
Droit
4
2
Roulettepivotante
Non.
VisM8×45
B
Capacité
Machine Translated by Google
ASSEMBLAGEDESUPPORTDEPNEUS
4
Manuel10
1
G
8
8
Cachepoussière
1
ET
pourfixerlesvisDavecE,F.
/
Tamponenplastique
H
Cordedeprotectionantipoussière
6
/
9
8
F
4
Rondelle
CléAllen
1L
5
7
ÉTAPE1.SélectionnezlemontantA,assemblezleàlapoutreB,utilisezlacléAllen
Machine Translated by Google

5
ÉTAPE3.Placezlecachepoussièresurlecadredusupportdepneu,passezlacordeducache
conduitdansletrouducachepoussière,jusqu'àcequelecachepoussièresoitfixé.
ÉTAPE2.Assemblezles4supportsdepiedC,vissezlesdansleA.
Machine Translated by Google

REPRÉSENTANTDELACE
REPRÉSENTANTDUROYAUMEUNI
ImportéauxÉtatsUnis:SanvenTechnologyLtd.Suite250,9166Anaheim
Lieu,RanchoCucamonga,CA91730
YHCONSULTINGLIMITÉE.
C/OYHConsultingLimitedBureau147,
Adresse:Shuangchenglu803nong11hao1602A1609shi,baoshanqu,shanghai
200000CN.
NSW2122Australie
ImportéenAustralie:SIHAOPTYLTD.1ROKEVASTREETEASTWOOD
Fabricant:Shanghaimuxinmuyeyouxiangongsi
MaisonduCenturion,routedeLondres,
StainesuponThames,Surrey,TW184AX
ECrossStuGmbH
MainzerLandstr.69,
60329FrancfortsurleMain.
6
Machine Translated by Google


MODELL: LX060
REIFENREGAL
Technischer Support und E-Garantie-Zertifikat www.vevor.com/support
Wir sind weiterhin bestrebt, Ihnen Werkzeuge zu wettbewerbsfähigen Preisen anzubieten.
„Sparen Sie die Hälfte“, „Halber Preis“ oder andere ähnliche Ausdrücke, die wir verwenden,
stellen nur eine Schätzung der Ersparnis dar, die Sie beim Kauf bestimmter Werkzeuge bei uns
im Vergleich zu den großen Topmarken erzielen können, und decken nicht unbedingt alle von uns
angebotenen Werkzeugkategorien ab. Wir möchten Sie freundlich daran erinnern, bei der
Bestellung bei uns sorgfältig zu prüfen, ob Sie im Vergleich zu den großen
Topmarken tatsächlich die Hälfte sparen.
Machine Translated by Google

Brauchen Sie Hilfe? Kontaktieren Sie uns!
Haben Sie Fragen zum Produkt? Benötigen Sie technischen Support? Bitte kontaktieren Sie
uns:
Technischer Support und E-Garantie-Zertifikat www.vevor.com/
support
Dies ist die Originalanleitung. Bitte lesen Sie alle Anweisungen sorgfältig durch,
bevor Sie das Gerät in Betrieb nehmen. VEVOR behält sich eine klare Auslegung unserer
Bedienungsanleitung vor. Das Erscheinungsbild des Produkts richtet sich nach
dem Produkt, das Sie erhalten haben. Bitte verzeihen Sie uns, dass wir Sie nicht erneut
informieren, wenn es Technologie- oder Software-Updates für unser Produkt gibt.
<Bild nur als Referenz>
MODELL: LX060
REIFENREGAL
- 1 -
Machine Translated by Google
WARNUNG:
- 2 -
Betrieb oder Wartung dieses Produkts. Die Nichtbeachtung dieser
4. Halten Sie während der Montage unbeteiligte Zuschauer vom Bereich fern.
Warnungen und Anweisungen können zu Verletzungen oder Schäden führen
5. Nicht montieren, wenn Sie müde sind oder unter dem Einfluss von Alkohol, Drogen oder Medikamenten
stehen.
ÿ Wird nur zum Platzieren von Reifen
verwendet. ÿ Dieses Produkt ist nur für die Installation im Innenbereich vorgesehen.
6. Von scharfen Spitzen, Klingen und anderen Gegenständen fernhalten.
zu wertvollem Eigentum. •
Vermeiden Sie die Verwendung des Produkts durch Kinder. Und dieses Produkt ist kein Spielzeug.
Erlauben Sie Kindern zu spielen.
7.Weitere Informationen zu den im Folgenden aufgeführten Teilen finden Sie
Seiten finden Sie im Montagediagramm dieses Handbuchs. Auspacken und
1. Nur gemäß dieser Anleitung zusammenbauen. Unsachgemäßer Zusammenbau kann
Trennen Sie alle Teile in einem sauberen Arbeitsbereich. Bitte bewahren Sie kleine Ersatzteile
2. Halten Sie den Versammlungsbereich sauber und gut beleuchtet.
Gefahren schaffen.
außerhalb der Reichweite von Kindern.
WARNUNG: Lesen Sie das gesamte Handbuch sorgfältig durch, bevor Sie
3. Die Funktionen gelten nur für ordnungsgemäß und vollständig montierte Produkte.
BEWAHREN SIE DIESE ANWEISUNGEN AUF
SICHERHEIT UND VORSICHTSMASSNAHMEN
VORSICHTSMASSNAHMEN BEI DER EINRICHTUNG
WICHTIGE SICHERHEITSHINWEISE
Machine Translated by Google

2
Größe
2
4
Anzahl der Schichten
Name
Strahl
D
LX060
Bild
4
A
Nicht enthalten
1
C
Modell
8 Reifen
Lenkrolle
NEIN.
2
4
M8×45 Schraube
Kapazität
B
Code
8
L*B*H: 1150*495*1180mm
LX060
3
Aufrecht
Fußhalterung
TEILELISTE
SPEZIFIKATION
- 3 -
Machine Translated by Google

REIFENREGAL MONTIEREN
Handbuch10
1
UND
1
M 1
8
8
SCHRITT 1. Wählen Sie den Pfosten A aus, montieren Sie ihn am Balken B und verwenden Sie den Inbusschlüssel
zum Befestigen der Schrauben D mit E, F.
Staubschutzseil
/
6
/
Kunststoffunterlage
H
F
4
8
9
5
G
7
Staubschutzhülle
Waschmaschine
Inbusschlüssel
- 4 -
Machine Translated by Google

- 5 -
SCHRITT 2. Montieren Sie die 4 Fußhalterungen C und schrauben Sie sie in A.
SCHRITT 3. Setzen Sie die Staubschutzhülle auf den Rahmen des Reifenregals, führen Sie das Kabel der
Kanalabdeckung durch die Staubschutzhüllenöffnung und befestigen Sie die Staubschutzhülle.
Machine Translated by Google

UK REP
Vertreter der EG
Ort, Rancho Cucamonga, CA 91730
Importiert in die USA: Sanven Technology Ltd. Suite 250, 9166 Anaheim
YH CONSULTING LIMITED.
C/O YH Consulting Limited Office 147,
Nach AUS importiert: SIHAO PTY LTD. 1 ROKEVA STREETEASTWOOD
NSW 2122 Australien
Adresse: Shuangchenglu 803nong11hao1602A-1609shi, baoshanqu, Shanghai
200000 CN.
Hersteller: Shanghaimuxinmuyeyouxiangongsi
Centurion House, London Road,
Staines-upon-Thames, Surrey, TW18 4AX
E-CrossStu GmbH
Mainzer Landstr.69,
60329 Frankfurt am Main.
- 6 -
Machine Translated by Google


MODELLO: LX060
PORTA PNEUMATICI
Supporto tecnico e certificato di garanzia elettronica www.vevor.com/support
Continuiamo a impegnarci per fornirvi strumenti a prezzi competitivi.
"Risparmia la metà", "Metà prezzo" o qualsiasi altra espressione simile da noi
utilizzata rappresenta solo una stima del risparmio che potresti ottenere acquistando
determinati utensili con noi rispetto ai principali marchi principali e non significa
necessariamente coprire tutte le categorie di utensili da noi offerti. Ti ricordiamo
gentilmente di verificare attentamente quando effettui un ordine con noi
se stai effettivamente risparmiando la metà rispetto ai principali marchi principali.
Machine Translated by Google

Hai domande sul prodotto? Hai bisogno di supporto tecnico? Non esitare a contattarci:
Supporto
tecnico e certificato di garanzia elettronica www.vevor.com/
support
Questa è l'istruzione originale, si prega di leggere attentamente tutte le istruzioni del
manuale prima di utilizzare. VEVOR si riserva una chiara interpretazione del nostro manuale
utente. L'aspetto del prodotto sarà soggetto al prodotto ricevuto. Vi preghiamo di
perdonarci se non vi informeremo di nuovo se ci sono aggiornamenti tecnologici o software sul
nostro prodotto.
<Immagine solo per riferimento>
MODELLO: LX060
HAI BISOGNO DI AIUTO? CONTATTACI!
PORTA PNEUMATICI
- 1 -
Machine Translated by Google

AVVERTIMENTO:
- 2 -
funzionamento o la manutenzione di questo prodotto. La mancata osservanza di queste
4. Tenere gli astanti fuori dall'area durante l'assemblea.
le avvertenze e le istruzioni possono causare lesioni personali o danni
5. Non riunirsi quando si è stanchi o sotto l'effetto di alcol, droghe o farmaci.
ÿ Utilizzato solo per posizionare
pneumatici. ÿ Questo prodotto è destinato esclusivamente all'installazione in ambienti interni.
6. Tenere lontano da punte affilate, lame e altri oggetti.
a beni di valore. • Evitare
che i bambini utilizzino il prodotto. E questo prodotto non è un giocattolo. Non
permettere ai bambini di giocare.
7.Per ulteriori informazioni sulle parti elencate di seguito
pagine, fare riferimento allo schema di montaggio di questo manuale. Scartare e
1. Assemblare solo secondo queste istruzioni. Un assemblaggio improprio può
separare tutte le parti in un'area di lavoro pulita. Si prega di tenere piccole parti di ricambio fuori
2. Mantenere l'area di assemblaggio pulita e ben illuminata.
creare pericoli.
dalla portata dei bambini.
ATTENZIONE: leggere e comprendere l'intero manuale prima
3. Le capacità si applicano solo al prodotto correttamente e completamente assemblato.
SALVA QUESTE ISTRUZIONI
SICUREZZA E PRECAUZIONI
PRECAUZIONI DI INSTALLAZIONE
IMPORTANTI MISURE DI SICUREZZA
Machine Translated by Google

- 3 -
ELENCO DEI PEZZI
SPECIFICHE
2
Misurare
2
4
Numero di strati
Nome
Trave
D
Modello LX060
Immagine
4
UN
Non incluso
1
C
Modello
8 pneumatici
Ruota girevole
NO.
2
4
Vite M8×45
Capacità
B
Codice
8
L*W*H: 1150*495*1180mm
Modello LX060
3
Verticale
Montaggio a piede
Machine Translated by Google

1
10 Manuale
MONTAGGIO PORTA PNEUMATICI
E
1
L 1
8
8
STEP1. Selezionare il montante A, assemblarlo alla trave B, utilizzare la chiave a brugola
per fissare le viti D con E, F.
Corda di protezione antipolvere
/
6
/
Tampone di plastica
H
F
4
8
9
5
G
7
Copertura antipolvere
Rondella
Chiave a brugola
- 4 -
Machine Translated by Google

- 5 -
FASE 2. Assemblare il supporto da 4 piedi C e avvitarlo in A.
FASE 3. Posizionare la copertura antipolvere sul telaio del porta pneumatici, far passare la corda della copertura
del condotto nel foro della copertura antipolvere, fino a fissare la copertura antipolvere.
Machine Translated by Google

Rappresentante della CE
RAPPRESENTANZA DEL REGNO UNITO
Luogo, Rancho Cucamonga, CA 91730
Importato negli USA: Sanven Technology Ltd. Suite 250, 9166 Anaheim
CONSULENZA YH LIMITATA.
C/O YH Consulting Limited Ufficio 147,
Importato in AUS: SIHAO PTY LTD. 1 ROKEVA STREETEASTWOOD
Nuovo Galles del Sud 2122 Australia
Indirizzo: Shuangchenglu 803nong11hao1602A-1609shi, baoshanqu, shanghai
200000 CN.
Produttore: Shanghaimuxinmuyeyouxiangongsi
E-CrossStu GmbH
Staines-upon-Thames, Surrey, TW18 4AX
Casa del centurione, London Road,
Mainzer Landstr.69,
60329 Francoforte sul Meno.
- 6 -
Machine Translated by Google


PORTLANTASPARANEUMÁTICOS
"Ahorrelamitad","mitaddeprecio"ocualquierotraexpresiónsimilarqueutilicemos
solorepresentaunaestimacióndelahorroquepodríaobteneralcomprarciertas
herramientasconnosotrosencomparaciónconlasprincipalesmarcasynonecesariamente
significaquecubratodaslascategoríasdeherramientasqueofrecemos.Lerecordamos
que,alrealizarunpedidoconnosotros,verifiquecuidadosamentesi
realmenteestáahorrandolamitadencomparaciónconlasprincipalesmarcas.
Seguimoscomprometidosabrindarleherramientasaprecioscompetitivos.
MODELO:LX060
Soportetécnicoycertificadodegarantíaelectrónicawww.vevor.com/support
Machine Translated by Google

¿NECESITASAYUDA?¡CONTÁCTANOS!
1
¿Tienepreguntassobreelproducto?¿Necesitaasistenciatécnica?Nodudeenponerseen
contactocon
nosotros:Asistenciatécnicaycertificadodegarantíaelectrónica
www.vevor.com/support
<Imagensolocomoreferencia>
MODELO:LX060
Estassonlasinstruccionesoriginales,leaatentamentetodaslasinstruccionesdel
manualantesdeutilizarelproducto.VEVORsereservaunainterpretaciónclaradenuestro
manualdeusuario.Laaparienciadelproductoestarásujetaalproductoquerecibió.
Perdónenospornoinformarlenuevamentesihayactualizacionesdetecnologíaosoftwareen
nuestroproducto.
PORTLANTASPARANEUMÁTICOS
Machine Translated by Google

ADVERTENCIA:
crearpeligros
Lasadvertenciaseinstruccionespuedencausarlesionesodañospersonales.
5.Nosereúnacuandoestécansadoobajolainfluenciadelalcohol,drogasomedicamentos.
fueradelalcancedelosniños.
4.Mantengaalostranseúntesfueradeláreaduranteelmontaje.
operarorepararesteproducto.Elincumplimientodeestas
Seutilizaúnicamenteparacolocar
neumáticos.Esteproductoestádiseñadoúnicamenteparausoeninstalacioneseninteriores.
Permitirquelosniñosjueguen.
7.Paraobtenerinformaciónadicionalsobrelaspiezasenumeradasacontinuación
6.Manteneralejadodepuntasafiladas,cuchillasyotroselementos.
aobjetosvaliosos.•Evite
quelosniñosutilicenelproducto.Esteproductonoesunjuguete.
Separetodaslaspiezasenunáreadetrabajolimpia.Guardelaspiezasderepuestopequeñasfuera
1.Realiceelmontajeúnicamentedeacuerdoconestasinstrucciones.Unmontajeincorrectopuede
páginas,consulteeldiagramadeensamblajedeestemanual.Desenvuelvay
ADVERTENCIA:Leaycomprendatodoestemanualantesde
3.Lascapacidadesseaplicanúnicamenteaproductosensambladosdeformacorrectaycompleta.
2.Mantengaeláreademontajelimpiaybieniluminada.
GUARDEESTASINSTRUCCIONES
PRECAUCIONESDEINSTALACIÓN
MEDIDASDESEGURIDADIMPORTANTES
SEGURIDADYPRECAUCIONES
2
Machine Translated by Google
3
LISTADEPIEZAS
ESPECIFICACIÓN
Código
8
LX060
Imagen
4
do
Noincluido
1
Modelo
8neumáticos
A 2
Tamaño
4 D
Nombre
Númerodecapas
Haz
LX060
LargoxAnchoxAlto:1150x495x1180mm
3
2
Montajedepie
Vertical
4
2
Ruedagiratoria
No.
TornilloM8×45
B
Capacidad
Machine Translated by Google

Manual10
1
4
ENSAMBLAJEDEPORTAULAS
GRAMO
8
8
Guardapolvo
1
Y
ParafijarlostornillosDconE,F.
/
Almohadilladeplástico
yo
Cuerdaprotectoracontraelpolvo
6
/
9
8
F
4
LlaveAllen
Arandela
1yo
5
7
PASO1.SeleccioneelmontanteA,mónteloenlavigaB,uselallaveAllen
Machine Translated by Google
5
PASO2.Ensamblelos4soportesdepieCyatorníllelosenelA.
PASO3.Coloquelacubiertaantipolvoenelmarcodelportaneumáticos,paselacuerdadela
cubiertadelconductoporelorificiodelacubiertaantipolvohastaquequedefija.
Machine Translated by Google

6
ImportadoaEE.UU.:SanvenTechnologyLtd.Suite250,9166Anaheim
Lugar,RanchoCucamonga,CA91730
YHCONSULTINGLIMITADA.
C/OYHConsultingLimitedOficina147,
ImportadoaAustralia:SIHAOPTYLTD.1ROKEVASTREETEASTWOOD
NuevaGalesdelSur2122Australia
Dirección:Shuangchenglu803nong11hao1602A1609shi,baoshanqu,shanghai
200000CN.
Fabricante:Shanghaimuxinmuyeyouxiangongsi
ECrossStuGmbH
MainzerLandstr.69,
60329FráncfortdelMeno.
StainesuponThames,Surrey,TW184AX
CasaCenturión,LondonRoad,
REPRESENTANTECE
REPRESENTANTEDELREINOUNIDO
Machine Translated by Google


MODEL: LX060
„Oszczędź połowę”, „Połowa ceny” lub inne podobne wyrażenia używane przez
nas stanowią jedynie szacunkowe oszczędności, jakie możesz uzyskać, kupując u nas
określone narzędzia w porównaniu z głównymi markami i niekoniecznie oznaczają one
objęcie wszystkich kategorii oferowanych przez nas narzędzi. Uprzejmie przypominamy,
aby przy składaniu zamówienia dokładnie sprawdzić, czy faktycznie
oszczędzasz połowę w porównaniu z głównymi markami.
Nadal staramy się oferować Państwu narzędzia w konkurencyjnych cenach.
STOJAK NA OPONY
Wsparcie techniczne i certyfikat gwarancji elektronicznej www.vevor.com/support
Machine Translated by Google

POTRZEBUJESZ POMOCY? SKONTAKTUJ SIĘ Z NAMI!
- 1 -
Masz pytania dotyczące produktu? Potrzebujesz wsparcia technicznego? Skontaktuj się z
nami: Wsparcie
techniczne i certyfikat E-Gwarancji www.vevor.com/support
<Zdjęcie tylko w celach informacyjnych>
MODEL: LX060
To jest oryginalna instrukcja, przed użyciem należy uważnie przeczytać wszystkie
instrukcje. VEVOR zastrzega sobie jasną interpretację naszej instrukcji obsługi. Wygląd
produktu będzie zależał od produktu, który otrzymałeś. Prosimy o wybaczenie, że nie
poinformujemy Cię ponownie, jeśli w naszym produkcie pojawią się jakiekolwiek aktualizacje
technologiczne lub oprogramowania.
STOJAK NA OPONY
Machine Translated by Google

OSTRZEŻENIE:
pozwól dzieciom się bawić.
7. Aby uzyskać dodatkowe informacje dotyczące części wymienionych poniżej,
do wartościowego mienia. •
Unikaj używania produktu przez dzieci. Produkt ten nie jest zabawką. Nie
6. Trzymaj z dala od ostrych punktów, ostrzy i innych przedmiotów.
Służy wyłącznie do zakładania opon.
Produkt przeznaczony jest wyłącznie do montażu wewnątrz pomieszczeń.
ostrzeżenia i instrukcje mogą spowodować obrażenia ciała lub szkody
5. Nie przychodź na spotkania, jeśli jesteś zmęczony lub pod wpływem alkoholu, narkotyków lub
leków.
4. Podczas montażu nie dopuszczaj osób postronnych na teren montażu.
obsługi lub serwisowania tego produktu. Nieprzestrzeganie tych
OSTRZEŻENIE: Przed przystąpieniem do użytkowania należy przeczytać i zrozumieć całą instrukcję.
3. Możliwości dotyczą wyłącznie prawidłowo i kompletnie zmontowanego produktu.
stwarzać zagrożenia.
2. Utrzymuj miejsce zgromadzenia w czystości i zapewnij dobre oświetlenie.
niedostępny dla dzieci.
oddzielić wszystkie części w czystym miejscu pracy. Proszę trzymać małe części zamienne z dala
1.Montaż należy wykonywać wyłącznie zgodnie z niniejszą instrukcją. Nieprawidłowy montaż może
strony, zapoznaj się ze schematem montażu w tym podręczniku. Rozpakuj i
ŚRODKI OSTROŻNOŚCI PODCZAS KONFIGURACJI
ZAPISZ TE INSTRUKCJE
WAŻNE ZABEZPIECZENIA
BEZPIECZEŃSTWO I ŚRODKI OSTROŻNOŚCI
- 2 -
Machine Translated by Google

2
Mocowanie stopy
Pionowo
LX060
Dł.*szer.*wys.: 1150*495*1180 mm
3
Pojemność
Kod
8
B
4
2
Koło jezdne
NIE.
Nie wliczone
1
C
Śruba M8×45
Model
8 opon
A
LX060
Zdjęcie
4
Liczba warstw
Nazwa
Belka
D
2
Rozmiar
4
LISTA CZĘŚCI
SPECYFIKACJA
- 3 -
Machine Translated by Google

MONTAŻ STOJAKA NA OPONY
- 4 -
Podręcznik10
1
Podkładka plastikowa
H
/
6
Lina osłony przeciwpyłowej
/
8
8
1
I
L
Klucz imbusowy
Pralka
1
G
5
7
9
8
Osłona przeciwpyłowa
KROK 1. Wybierz pion A, zamontuj go do belki B, użyj klucza imbusowego
F
4
Aby przymocować śruby D do E, F.
Machine Translated by Google

- 5 -
KROK 3. Załóż osłonę przeciwpyłową na ramę stojaka na opony, przeciągnij linkę osłony kanału
przez otwór osłony przeciwpyłowej, aż do zamocowania osłony przeciwpyłowej.
KROK 2. Złóż 4-stopowe mocowanie C, przykręć je do A.
Machine Translated by Google
REP WIELKIEJ BRYTANII
Przedstawiciel UE
Importowane do USA: Sanven Technology Ltd. Suite 250, 9166 Anaheim
NSW 2122 Australia
Miejsce, Rancho Cucamonga, CA 91730
C/O YH Consulting Limited Biuro 147,
Importowane do AUS: SIHAO PTY LTD. 1 ROKEVA STREETEASTWOOD
YH CONSULTING LIMITED.
Adres: Shuangchenglu 803nong11hao1602A-1609shi, baoshanqu, szanghaj
200000 CN.
Producent: Shanghaimuxinmuyeyouxiangongsi
Staines-upon-Thames, Surrey, TW18 4AX
E-CrossStu GmbH
Mainzer Landstr.69,
60329 Frankfurt nad Menem.
Dom Centuriona, London Road,
- 6 -
Machine Translated by Google


BANDENREK
"Save Half", "Half Price" of andere soortgelijke uitdrukkingen die wij gebruiken, geven alleen
een schatting van de besparingen die u kunt behalen door bepaalde gereedschappen bij ons te
kopen in vergelijking met de grote topmerken en betekent niet noodzakelijkerwijs dat alle categorieën
gereedschappen die wij aanbieden, worden gedekt. Wij herinneren u eraan om zorgvuldig te
controleren of u daadwerkelijk de helft bespaart in vergelijking met de grote
topmerken wanneer u een bestelling bij ons plaatst.
Wij streven er voortdurend naar om u gereedschappen tegen concurrerende prijzen te leveren.
MODEL: LX060
Technische ondersteuning en e-garantiecertificaat www.vevor.com/support
Machine Translated by Google
<Afbeelding alleen ter referentie>
Heeft u vragen over het product? Heeft u technische ondersteuning nodig? Neem dan gerust
contact met
ons op: Technische ondersteuning en E-garantiecertificaat
www.vevor.com/support
MODEL: LX060
Dit is de originele instructie, lees alle handleidingen zorgvuldig door voordat u het
product gebruikt. VEVOR behoudt zich een duidelijke interpretatie van onze gebruikershandleiding
voor. Het uiterlijk van het product is afhankelijk van het product dat u hebt ontvangen.
Vergeef ons dat we u niet opnieuw zullen informeren als er technologie- of software-updates
voor ons product zijn.
- 1 -
HULP NODIG? NEEM CONTACT MET ONS OP!
BANDENREK
Machine Translated by Google

WAARSCHUWING:
gevaren creëren.
Waarschuwingen en instructies kunnen persoonlijk letsel of schade veroorzaken
5. Kom niet bijeen als u moe bent of onder invloed van alcohol, drugs of medicijnen.
van het bereik van kinderen.
4. Houd omstanders uit de buurt tijdens de montage.
het bedienen of onderhouden van dit product. Het niet naleven van deze
ÿ Wordt alleen gebruikt om banden te
plaatsen. ÿ Dit product is uitsluitend bedoeld voor gebruik binnenshuis.
kinderen laten spelen.
7. Voor aanvullende informatie over de onderdelen die hieronder worden vermeld,
6. Houd het apparaat uit de buurt van scherpe punten, messen en andere voorwerpen.
tot waardevolle eigendommen.
• Voorkom dat kinderen het product gebruiken. En dit product is geen speelgoed. Gebruik het niet
scheid alle onderdelen in een schone werkruimte. Houd kleine reserveonderdelen buiten
1. Monteer alleen volgens deze instructies. Onjuiste montage kan
pagina's, raadpleeg dan het montageschema van deze handleiding. Uitpakken en
WAARSCHUWING: Lees en begrijp deze hele handleiding voordat u
3. Mogelijkheden gelden alleen voor producten die correct en volledig zijn gemonteerd.
2. Zorg ervoor dat de montageplek schoon en goed verlicht is.
BEWAAR DEZE INSTRUCTIES
VOORZORGSMAATREGELEN BIJ DE INSTALLATIE
BELANGRIJKE VEILIGHEIDSMAATREGELEN
VEILIGHEID EN VOORZORGSMAATREGELEN
- 2 -
Machine Translated by Google

- 3 -
ONDERDELENLIJST
SPECIFICATIE
Code
8
LX060
Afbeelding
4
C
Niet inbegrepen
1
Model
8 banden
A 2
Maat
4 D
Naam
Aantal lagen
Straal
LX060
Lengte*B*H: 1150*495*1180mm
3
2
Voetbevestiging
Rechtop
4
2
Nee.
Zwenkwiel
M8×45 schroef
B
Capaciteit
Machine Translated by Google

1
10 Handmatig
- 4 -
BANDENREK MONTEREN
G
8
8
Stofkap
1
EN
om de schroeven D vast te draaien met E, F.
/
Kunststof pad
H
Stofkap touw
6
/
9
8
F
4
Wasmachine
Inbussleutel
1Ik
5
7
STAP 1. Selecteer de staander A, monteer deze aan de balk B, gebruik de inbussleutel
Machine Translated by Google
STAP 2. Monteer de 4-voetbevestiging C en schroef deze in de A.
STAP 3. Plaats de stofkap op het frame van het bandenrek, steek het touw van de
luchtkanaalkap door het gat in de stofkap en maak de stofkap vast.
- 5 -
Machine Translated by Google

EC-REP
VK REP
Geïmporteerd naar de VS: Sanven Technology Ltd. Suite 250, 9166 Anaheim
Plaats, Rancho Cucamonga, CA 91730
YH CONSULTING LIMITED.
Centurionhuis, Londen Road,
Adres: Shuangchenglu 803nong11hao1602A-1609shi, baoshanqu, shanghai
200000 CN.
NSW 2122 Australië
Geïmporteerd naar AUS: SIHAO PTY LTD. 1 ROKEVA STREETEASTWOOD
Fabrikant: Shanghaimuxinmuyeyouxiangongsi
Staines-upon-Thames, Surrey, TW18 4AX
Mainzer Landstr.69,
60329 Frankfurt am Main.
E-CrossStu GmbH
C/O YH Consulting Limited Kantoor 147,
- 6 -
Machine Translated by Google


DÄCKHÅLLARE
"Spara hälften", "halva priset" eller andra liknande uttryck som används av oss
representerar bara en uppskattning av besparingar du kan dra nytta av att köpa vissa
verktyg hos oss jämfört med de stora toppmärkena och betyder inte nödvändigtvis att täcka
alla kategorier av verktyg som erbjuds av oss. Du påminns om att noggrant kontrollera
när du gör en beställning hos oss om du verkligen sparar hälften i
jämförelse med de främsta varumärkena.
Vi fortsätter att vara engagerade i att ge dig verktyg till konkurrenskraftiga priser.
MODELL: LX060
Teknisk support och e-garanticertifikat www.vevor.com/support
Machine Translated by Google

Har du produktfrågor? Behöver du teknisk support? Kontakta oss gärna: Teknisk support och
e-
garanticertifikat www.vevor.com/support
<Endast bild för referens >
MODELL: LX060
Detta är den ursprungliga instruktionen, läs alla instruktioner noggrant
innan du använder den. VEVOR reserverar sig för en tydlig tolkning av vår
användarmanual. Utseendet på produkten är beroende av den produkt
du fått. Ursäkta oss att vi inte kommer att informera dig igen om det finns
någon teknik eller mjukvaruuppdateringar på vår produkt.
- 1 -
BEHÖVER HJÄLP? KONTAKTA OSS!
DÄCKHÅLLARE
Machine Translated by Google

skapa faror.
5. Sätt dig inte ihop när du är trött eller påverkad av alkohol, droger eller mediciner.
varningar och instruktioner kan orsaka personskada eller skada
av barns räckvidd.
4. Håll åskådare borta från området under monteringen.
använda eller serva denna produkt. Underlåtenhet att följa dessa
ÿ Används endast för att placera
däck. ÿ Denna produkt är endast avsedd för installation inomhus.
låta barn leka.
7.För ytterligare information om delarna som listas nedan
6. Håll dig borta från vassa spetsar, knivar och andra föremål.
till värdefull egendom. •
Undvik att barn använder produkten. Och den här produkten är inte en leksak. Gör inte det
separera alla delar i ett rent arbetsområde. Vänligen håll små reservdelar borta
1. Montera endast enligt dessa instruktioner. Felaktig montering kan
sidorna, se monteringsdiagrammet i denna manual. Packa upp och
VARNING: Läs och förstå hela denna manual innan
3.Förmågan gäller endast för korrekt och färdigmonterad produkt.
2.Håll monteringsområdet rent och väl upplyst.
VARNING:
SPARA DESSA INSTRUKTIONER
FÖRSIKTIGHETSÅTGÄRDER FÖR INSTÄLLNING
VIKTIGA SÄKERHETSÅTGÄRDER
SÄKERHET OCH FÖRSIKTIGHETSÅTGÄRDER
- 2 -
Machine Translated by Google

Svänghjul Ingår ej
Inga.
1
C
M8×45 Skruv
Modell
8 däck
LX060
Bild
A
4
Antal lager
D
Namn
Balk
2
Storlek
4
2
Fotfäste
Upprätt
LX060
L*B*H: 1150*495*1180mm
3
Kapacitet
Koda
B
8
4
2
DELLISTA
SPECIFIKATION
- 3 -
Machine Translated by Google

DÄCKHÅLLARE
- 4 -
Manuell10
1
G
8
8
Dammskydd
1
OCH
för att fästa skruvarna D med E, F.
/
Plastdyna
H
Dammskyddsrep
6
/
9
8
F
4
Insexnyckel
Bricka
1L
5
7
STEG1. Välj stolpen A, montera den till balken B, använd insexnyckeln
Machine Translated by Google

- 5 -
STEG 2. Montera 4 fots fäste C, skruva fast dem i A.
STEG 3. Sätt dammskyddet på däckställets ram, för kanalskyddsrepet in
i dammskyddets hål tills dammskyddet fästs.
Machine Translated by Google

EC REP
UK REP
Importerad till USA: Sanven Technology Ltd. Suite 250, 9166 Anaheim
Place, Rancho Cucamonga, CA 91730
YH CONSULTING LIMITED.
Adress: Shuangchenglu 803nong11hao1602A-1609shi, baoshanqu, shanghai
200000 CN.
NSW 2122 Australien
Importerad till AUS: SIHAO PTY LTD. 1 ROKEVA STREETEASTWOOD
Tillverkare: Shanghaimuxinmuyeyouxiangongsi
Centurion House, London Road,
Staines-upon-Thames, Surrey, TW18 4AX
C/O YH Consulting Limited Office 147,
Mainzer Landstr.69,
60329 Frankfurt am Main.
E-CrossStu GmbH
- 6 -
Machine Translated by Google

