Original Instructions
Version 1 – 10/24
EN
TORQUE
WRENCH
17653, 17738, 17766

– 2 –
Stock No. 17653 17738 17766
Part No. EXMTW-3/8 EXMTW-1/2 EXMTW-1/2B
Drive Size 3/8" 1/2" 1/2"
Torque Range 20 – 142Nm 40 – 200Nm 60 – 340Nm
Accuracy +/- 4% +/-4% +/-4%
Application Clockwise only Clockwise only Clockwise only
Head Style Fixed ratchet Fixed ratchet Fixed ratchet
Tooth Count 32T 32T 32T
Overall Length (approx.) 450mm 535mm 615mm
1.2 Specication
1.1 Intended Use
This tool has been designed to tighten screws, bolts and
other xings to the required torque.
Any other application beyond the conditions established
for use will be considered misuse. Draper Tools accepts
no responsibility for improper use of this product.
Read this manual in full before using this product and
retain it for future use. Always use the latest version of
the manual. Please visit drapertools.com/manuals for
the latest version.
Note: The torque wrench is calibrated in Nm. The ft/lb scale is the conversion of Nm scale, so the ft/lb scale is only
for reference.
1. Product Introduction
User Manual for: Torque Wrenches
Stock Nos: 17653, 17738, 17766
Part Nos: EXMTW-3/8, EXMTW-1/2, EXMTW-1/2B
Revisions
Version 1: October 2024
First release
This torque wrench is accurate to +/- 4% of the set load and has been manufactured and tested in accordance
to ISO 6789-2:2017.

– 3 –
EN
Important: Read all the Health and Safety instructions
before attempting to operate, maintain or repair this
product. Failure to follow these instructions may
result in damage to the workpiece, tool or cause it to
require recalibration.
• Important: ALWAYS read the manufacturer’s
instructions for the recommended torque settings.
Incorrect torque settings can result in serious damage
or injury when the workpiece is used.
• This torque wrench is a precision tool. It must NOT be
used to pry or loosen nuts, bolts or xings; to separate
materials; as a substitute for ratchet spanners or
hammers; or as a breaker bar. Used in such a way
will damage the calibration setting and invalidate
your warranty.
• DO NOT interfere with or loosen the lock nut as this
will aect the calibration. If it becomes loose DO NOT
use the torque wrench.
• DO NOT use to torque left handed threads.
• Before rst use, test the torque wrench on non-critical
xings to familiarise yourself with the responses
that indicate the congured torque is reached.
Important: Some responses may be less noticeable
at lower torques.
• ALWAYS select the correct size and type of socket
for use with the xing.
• NEVER set the torque wrench beyond its maximum
or minimum settings as this may damage the internal
spring and distort the calibration.
• ALWAYS return the torque wrench to its minimum
setting when not in use. − Failure to do this will
weaken the internal spring and distort the calibration
of the tool. Damage caused to the tool in this way is
not covered by your warranty.
• DO NOT over-tighten xings as this may result
in breakages.
• Stop applying force as soon as a noticeable ‘Click’
is heard.
• DO NOT turn the adjustment lever (2) anti-clockwise
while setting the torque as this may result in damage.
• Observe all standard safety precautions and good
practices when in a workshop environment.
• Inspect the product before every use for cracked,
corroded or broken parts.
WARNING!
DO NOT use this product if it is
damaged in any way. Contact Draper Tools for
repair and replacement options.
• Use this product only for its intended purpose and do
not modify it in any way.
2. Health and Safety Information

– 4 –
Please visit drapertools.com for our full range of accessories and consumables.
3.2 Packaging
Carefully remove the product from the packaging and
examine it for any signs of damage that may have
occurred during shipment.
Keep the product packaging for the duration of the
warranty period for reference should the product need to
be returned for repair.
If any part is damaged or missing, do not attempt to use
the product. Please contact the Draper Helpline; contact
details can be found at the back of this manual.
WARNING! Keep packaging materials out of reach of
children. Dispose of packaging correctly and
responsibly and in accordance with local regulations.
(1) Drive square
(2) Adjustment lever
(3) Torque primary scale
(4) Torque secondary scale collar
(5) Locking ring
(6) Handle
3.1 Product Overview
3. Identication and Unpacking
(6)
(5)
(2)
(4)
(1)
(3)
– 5 –
EN
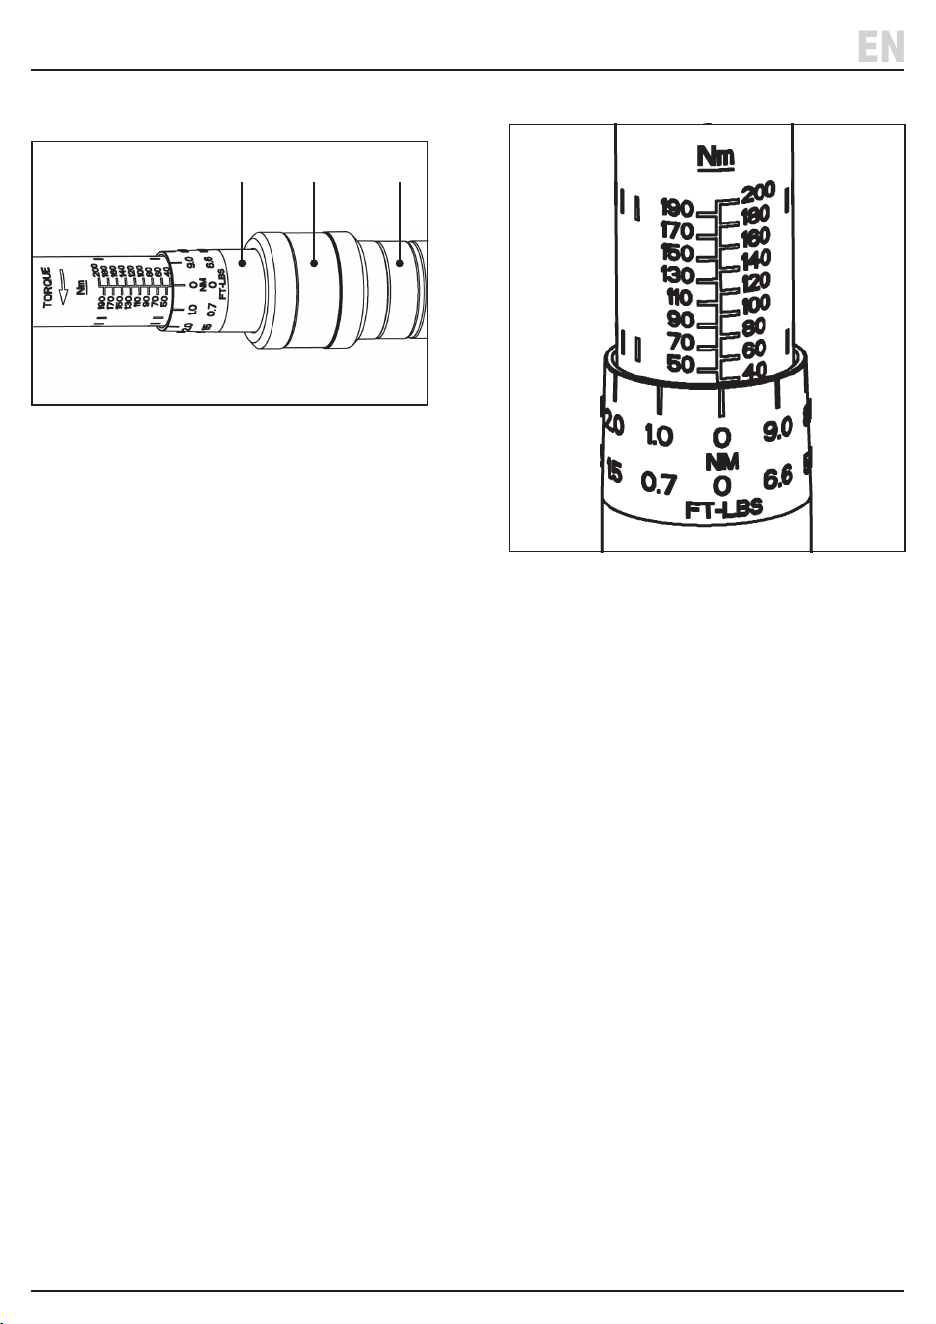
4.1 Setting the Torque
1 Fig.
1. To unlock handle, pull the locking ring (5) down
and turn the handle (6).
2. Set the required torque by turning the handle until
the selected torque on the primary scale aligned
with the ‘0’ on the secondary scale collar (4).
Then continue to turn the handle make minor
adjustment on the secondary scale (Fig. 2).
3. Lock the handle by releasing the locking ring
until you hear or feel a ‘CLICK’ and the handle
does not turn.
• When the torque wrench is not in use, ensure the
adjustment is at the lowest torque setting.
Setting Examples
2 Fig.
4. Operating Instructions
(4) (5) (6)
– Setting example 40Nm

– 6 –
4.2 Using the Torque Wrench
Important:
• Always use the correct size socket.
• Apply a steady slow force on the grip handle.
When the required torque is reached, this will be
indicated by the following:
− Audible click: The click will be quieter at lower
torque settings.
− Touch: The handle will be felt to “break away”
at the point of the set torque.
− Visually: The handle will be seen to “break away”
at the point of the set torque.
Note: Responses may be less perceptible at
lower torques.
WARNING!
Once the set torque is reached,
DO NOT continue to turn the torque wrench
as this will deliver an incorrect torque and may
damage the parts.
1. Select the required socket or bit and adaptors as
appropriate and t onto the square drive.
2. Set the adjustment direction by moving the lever (2)
on the back of the wrench head:
− To rotate the ratchet head clockwise, move the
switch to the right position.
− To rotate the ratchet head anticlockwise,
move the switch to the left position.
3. Set the wrench torque; see section 4.1.
4. Place the bit or socket onto the xing and apply
a slow steady force in the desired direction.
5. When the set torque has been reached, the tool will
exhibit an audible, tangible and visual response.
6. Carefully remove the wrench from the xing.
4. Operating Instructions
mN/m
millinewton-
metre
cN/m
centinewton-
metre
N/m
newton-
metre
daN/m
decanewton-
metre
cm/kg
centimetre-
kg
m/kg
metre-
kg
in-oz
inch-
ounce
in-lb
inch-
pound
ft-lb
foot-
pound
1mN/m
1cN/m
1N/m
1daN/m
1
10
1000
10000
0.1
1
100
1000
0.001
0.01
1
10
0.0001
0.001
0.1
1
0.0102
0.102
10.2
102
0.000102
0.00102
0.102
1.02
0.1416
1.416
141.6
1416
0.00885
0.0885
8.85
88.5
0.000738
0.00738
0.738
7.38
1cm/kg
1m/kg
98
9810
9.8
981
0.098
9.81
0.0098
0.98
1
100
0.01
1
13.9
1390
0.868
86.8
0.0723
7.23
lin-oz
lin/lb
lft-lb
7.06
112.9
1355
0.706
11.29
35
0.00706
0.1129
1.355
0.0007
0.01129
0.1135
0.072
1.152
13.8
0.00072
0.0115
0.138
1
0.063
0.0052
16
1
0.083
192
12
1
4.3 Conversion Chart

– 7 –
EN
5. Maintenance, Storage and Disposal
5.1 General Maintenance and Storage
Important: A torque wrench is a precision tool. Failure to
calibrate your tool regularly or to store correctly will
constitute misuse and invalidate your warranty.
• The torque wrench is lubricated for life and should not
be oiled. The only exception is the head which may be
lubricated as needed for smooth operation.
• Keep the product free from grease, chemicals and
other substances to prevent damage from corrosion.
• Wipe the wrench with a dry cloth only.
• DO NOT use solvents or chemicals that may interfere
with the internal lubrication.
• Store this product in the storage case supplied, in a
clean and dry location, out of direct sunlight and out
of reach of children.
• ALWAYS return the torque wrench to its lowest setting
before storage. Failure to do this will weaken the
internal springs and distort the calibration of the tool.
− Frequently used tools should be calibrated
more often.
• NEVER attempt to repair or adjust this product.
Servicing, repairs and calibration must be carried out
ONLY by qualied and authorised service agents.
If the torque wrench fails to function correctly for any of
the following reasons, return the tool to an authorised
Draper Tools agent:
− The ratchet fails to function.
− The handle lock fails to function.
− The wrench does not “click” at the set torque.
− The handle does not break away at the set torque.
• At the end of its working life, dispose of the product
responsibly and in line with local regulations;
recycle where possible.
5.2 Calibration
• Have the torque wrench calibrated at least once a
year or after approximately 5000 cycles by a certied
calibration centre. For the rst recalibration,
the period of validity starts with user’s rst
operation of the torque tool.
• Torque tools are classied as test devices. If a
calibration routine is required, the calibration interval
shall be chosen on the basis of the factors of
operation such as required accuracy, frequency of
use, typical load during operation as well as ambient
conditions during operation and storage conditions.
• The interval should be decided according to the user’s
procedures for the control of test devices and by the
requirements of the user.
• The torque tool shall be recalibrated when it has been
subjected to an overload greater than 125% of
maximum rated load and after repair, or after any
improper handling which might inuence any errors
in measurement.
NOTE: the recalibration routine for the torque wrench
is NOT covered by the product warranty.
Should the tool develop a fault, return the complete tool
to your nearest distributor or contact Draper Tools
directly. Proof of purchase must be provided.
If, upon inspection, it is found that the fault occurring is
due to defective materials or workmanship, repairs will
be carried out free of charge. This warranty covers parts
and labour for the lifetime of the product. However, if the
tools are hired out, the warranty period is 90 days from
the date of purchase.
This warranty does not apply to any consumable parts,
batteries or normal wear and tear, nor does it cover any
damage caused by misuse, careless or unsafe handling,
alterations, accidents, or repairs attempted or made by
any personnel other than the authorised Draper Tools
repair agent.
Visit drapertools.com/warranty for full details.
6. Warranty

© Published by Draper Tools Limited© Published by Draper Tools Limited
Delta International
Delta International BV
Oude Graaf 8
6002 NL
Weert
Netherlands
Contact Details
Draper Tools
Draper Tools Limited
Hursley Road
Chandler’s Ford
Eastleigh
Hampshire
SO53 1YF
UK
Website: drapertools.com
Email: [email protected]
Product Helpline: +44 (0) 23 8049 4344
Telephone Sales Desk: +44 (0) 23 8049 4333
General Enquiries: +44 (0) 23 8026 6355
Please contact the Draper Tools Product Helpline for repair and servicing enquiries.
