2
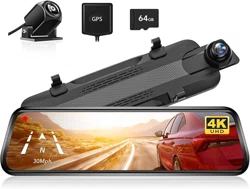
D07S Dash Cam
User Manual


IC warning:
This device contains licence-exempt transmitter(s)/receiver(s)/ that comply with Innovation Science and
Economic Development Canada's licence-exempt RSS(s). Operation is subject to the following two conditions:
1. this device may not cause interference and
2. this device must accept any interference, including interference that may cause undesired operation of the
device.
Radiation Exposure: This equipment complies with Canada radiation exposure limits set forth for an
uncontrolled environment; To maintain compliance with IC's RF Exposure guidelines, This equipment should
be. installed and operated with minimum distance of 20cm the radiator your body. This device and its
antenna(s) must not be co-located or operation in conjunction with any other antenna or transmitter.
Déclaration de l'ISED Canada :
Cet appareil contient des tasmittre (s) / récepteur (s) sans licence / conformes à l'innovationRSS exemptes de
licence de Sciences et Développement économique Canada. L'opération est sous réserve des deux conditions
suivantes :
1. cet appareil ne peut pas causer d'interférences et
2. cet dispositif doit accepter toute interférence, y compris peut provoquer le fonctionnement indésirable de
l'appareil.
Exposition aux rayonnements : Cet équipement est conforme aux radiations du Canada limites d'exposition
pour un environnement incontrôlé noncé d'exposition RF Pour maintenir le respect des guides d'exposition RF
d'IC, cquipment doit être.installé et actionné avec une distance minimale de 20cm le radiateur de votre corps.
Cet appareil et ses antennes ne doivent pas être co-localisé ou en opération en conjonction avec toute autre
antenne ou émetteur.

01
CONTENT
Package Contents
Appearance
Button Function
About the Micro SD Card
Installation
HOME SCREEN
Power ON/OFF
About Time settings
Video Mode
Playback Mode
03
04
05
06
07
10
11
13
13
14

02
CONTENT
About WIFI Function
Play on Computer
GPS Player
About the Camera Settings
Product Specifications
FAQ
18
19
23
24
29
30
03
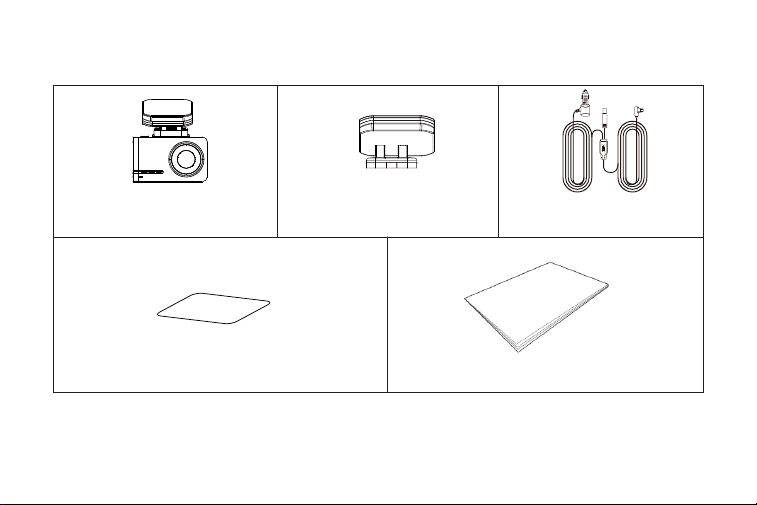
Package Connects
Dash Cam Built-in GPS Car Cigar
Electrostatic Adsorption User Manual
Following items are included in the package, if any items are missing or damaged, contact
WOLFBOX immediately.
04
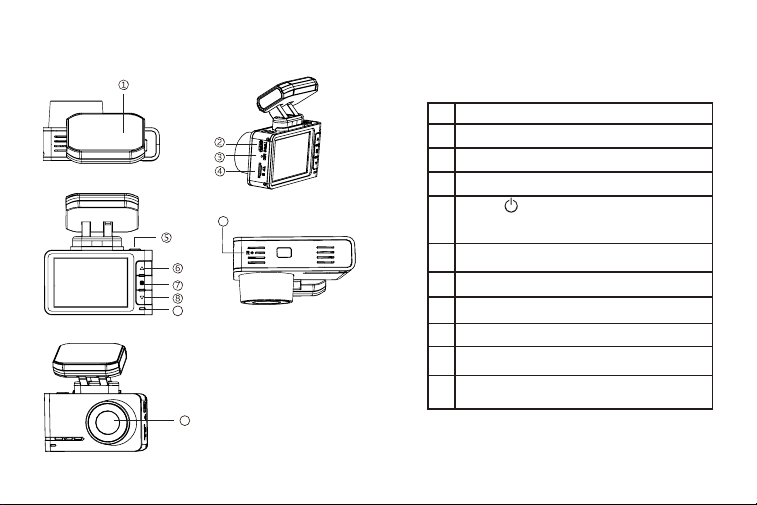
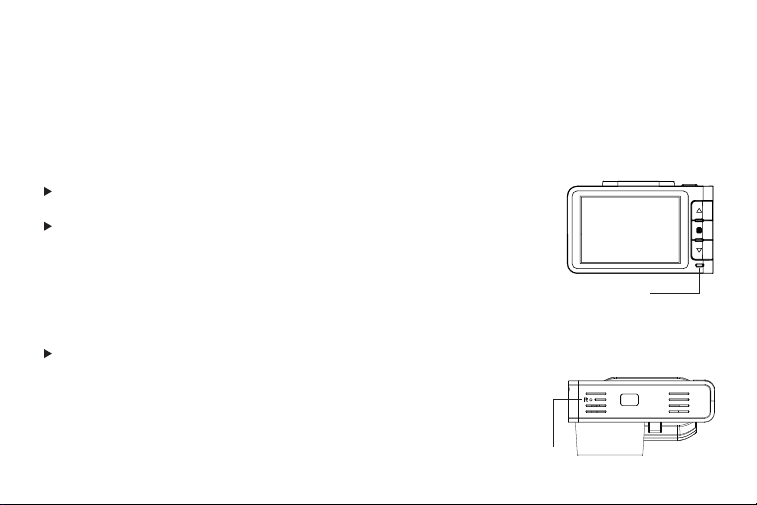
Appearance
Built-in GPS bracket
Type-C
Sound collecting port
Micro SD card slot
Up
Menu/Mode
Down
Power light
Reset button (*Reset the and restart the
system.)
Lens: Please remove the lens protection film
before use
1
2
3
4
6
7
8
9
9
10
11
Power
Press and hold the power button for 3 seconds to turn off
the power.In various modes,you can check the displayed
items by short press.
5
10
11
05
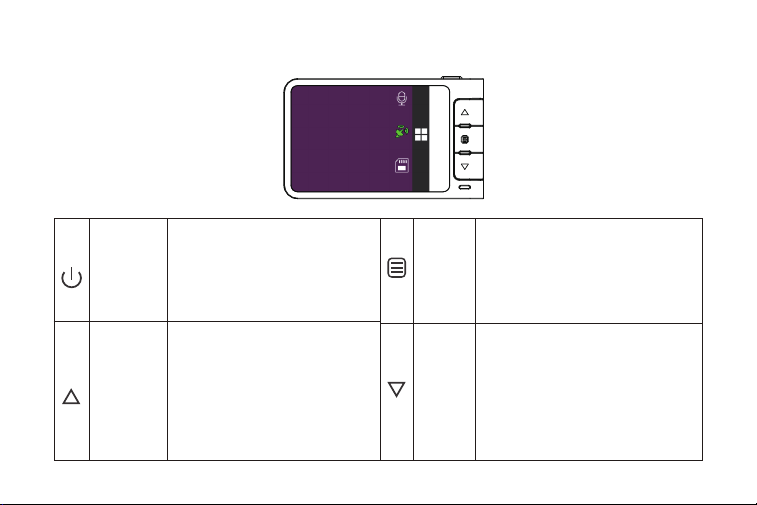
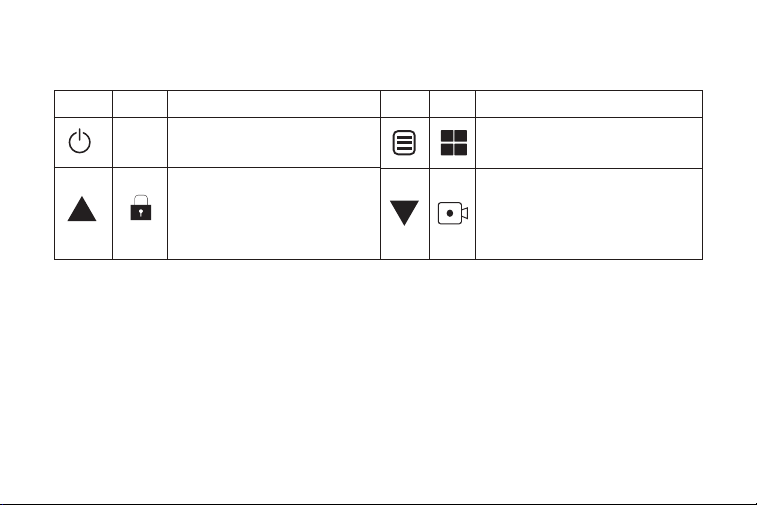
Button Function
Turn Screen OFF the Camera
Lock the Current Loop Cycle Video
File while Video is being Recorded.
Take a Snapshot in Video mode
Enter Main Menu in Recording Mode
Switch Front and Rear Camera Screen
when plug in rear camera
Scroll UP while In any Menu Setting
Scroll Down while in any Menu
Settings
Enter/Confirm Specific Settings
Return
Scroll to Previous Video Files while in
Playback
Scroll to Next Video Files while in Play
Mode
Switch Front and Rear Camera Screen
when plug in rear camera
LONG PRESS for 2-Seconds Turn OFF
The Camera
Fast Rewind while Video is being
Played in Playback Mode
Fast Forward while video is being
played in Play Mode
LONG PRESS for 2-Seconds - to Turn
ON/OFF WiFi
LONG PRESS for 2-Seconds Stop
Recording
Play/Pause Current Video while in
Play Mode
Power Button
UP
Menu/OK
Down

06
to scroll down until you see FORMAT, press the " " button to confirm to format the SD
card.
This product will check the Micro SD card at start up and will announce if it is not inserted or
damaged, that can prevent missed shots.
Do not remove or insert a Micro SD card while the power is on.
Use a Micro SD card with Class 10 or higher(8GB-128GB). We Recommend 32GB (ASIN
:
B09Q87X76V); 128GB (ASIN: B0B7KWV4CJ)
For stable use,it is recommended to format the micro SD card regularly.Recommend: Once a
month.
Please press the " " button once to enter the menu settings, Then press the down button
Please format SD card on D07S dash cam.
About the Micro SD Card
When using a new MicroSD card, be sure to format it on the main body.

07
To install
Make sure the camera is turned OFF First. Then facing towards the front of the camera (Lens
Side). Then insert the memory card half way in. Then use the finger nail or a paper clip to
push the card all the way inward until it clicks and locks in place.
To remove
To remove the Micro SD card, gently push its edge inward until it clicks, and then pops out,
then simply pull it out of the slot.
How to insert and remove a card
Installation
The camera comes with the default settings which allows you to start using your camera right
out of the box without changing any settings. Make sure to format the memory card before first
time use.
08
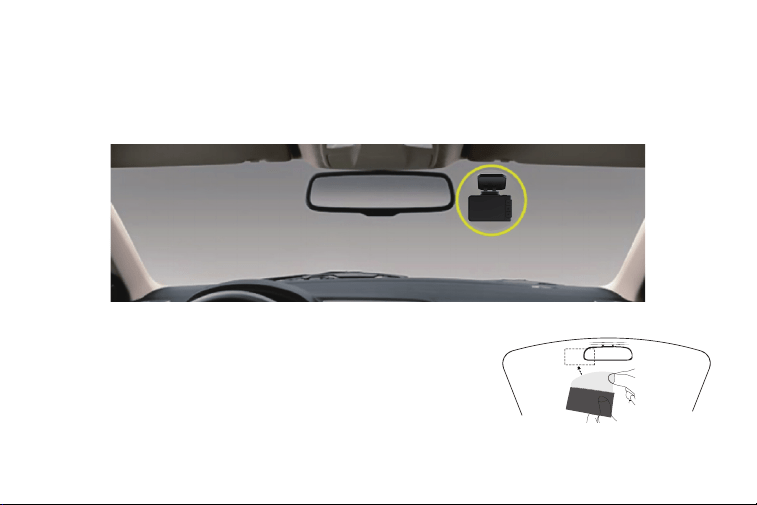
2. Make sure to clean your windshield from the dust particles
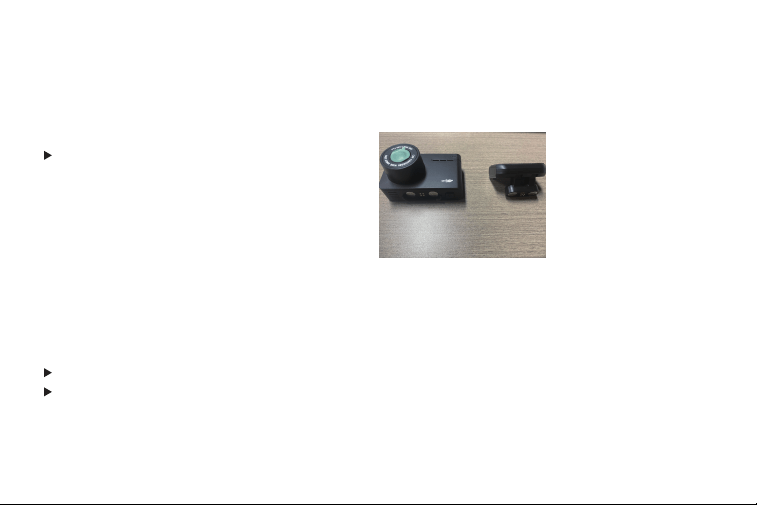
How to install the main body
1. Installation Position-Most people will install D07S next to the rear view mirror and
opposite side from the drive. First, Stop the engine where there is some light and in a safe
place.
and attack attach the electrostatic sticker to the windshield.

09
3. Peel off the 3M tape attached to the GPS built-in bracket and
attach it on the electrostatic sticker on the windshield.
Since the adhesive strength is strong on both sides and it is difficult to peel off once it is
pasted, it will be troublesome if the pasting position is incorrect. Therefore, we design
the electrostatic sticker to attached to the windshield first,then stick the bracket with 3M
Adhesive on the electrostatic sticker. You can easily readjust location by sticking the 3M
Adhesive on electrostatic sticker and peel it off.
To strengthen the fixing force,do not attach the main body and leave it for 24 hours or more.
Re-sticking may weaken the adhesive strength of the tape and cause it to fall off. If you need
more accessories, please CONTACT US.
About electrostatic Sticker
4. Use the power cord to connect the Type-C Port of the product to
car's cigarette lighter socket.
10
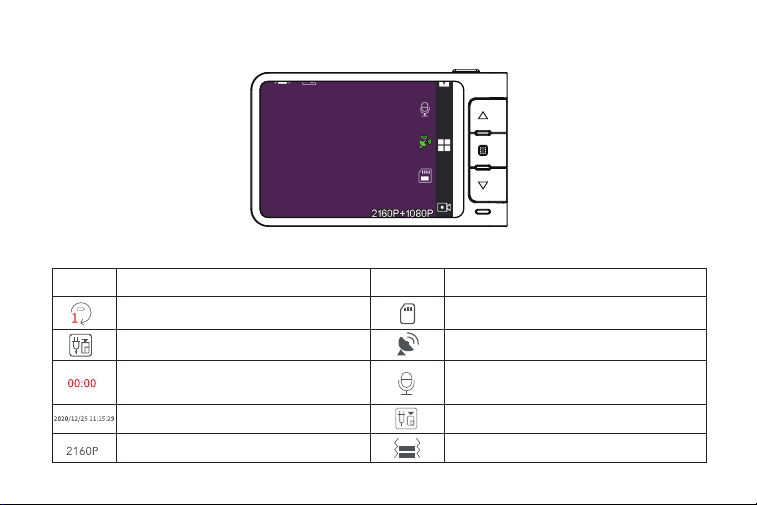
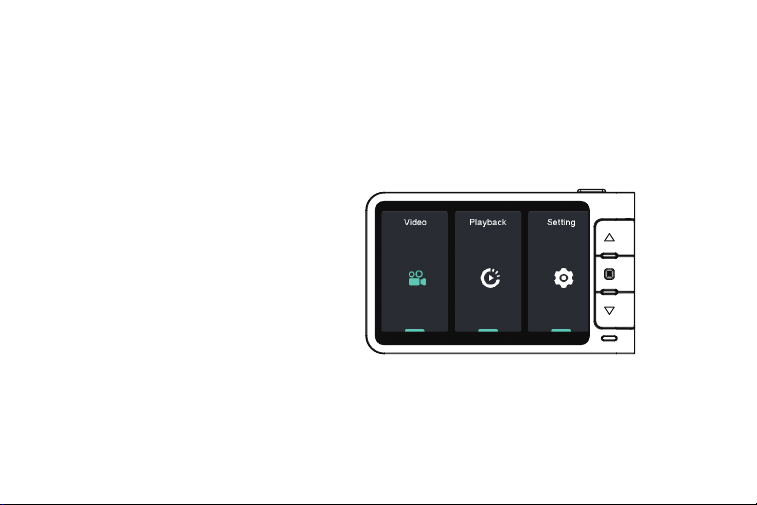
HOME SCREEN
ICONS ICONS
WHAT DOES IT MEAN? WHAT DOES IT MEAN?
Generates in 1 min/3 mins/5 mins per file
Indicates that the rear camera is not
connected
Display the date and time of the machine
Display recording resolution
Show SD card status
Display GPS status
Displays the recording status and recording
time. The red icon flashes during recording
to show the current video recording time
Display voice recording status
Indicates that the rear camera is
connected
G-Sensor sensitivity display
Home Screen Status Icons
11
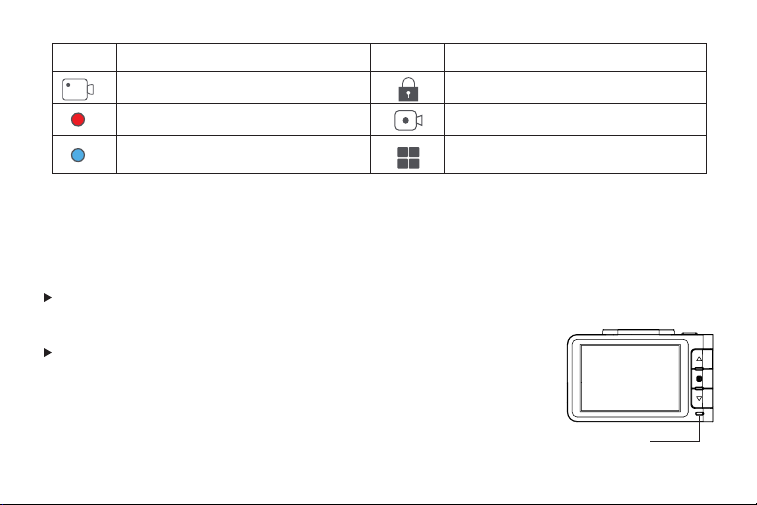
ICONS ICONS
WHAT DOES IT MEAN? WHAT DOES IT MEAN?
Show video recording mode
Red led blinking: Recording Video No
Red led:Not Recording Video
Emergency Video Lock
Stop Recording Video
Enter the menu
Power on
Power ON/OFF
<Power ON>
If you turn on the engine (ACC on) while the cigar power adapter is
connected,the power will be turned on automatically and the opening
screen will be displayed.
Press and hold the power button to turn off the power during
startup,and then briefly press the power button again to turn on the
power of the unit and display the opening screen.
The lamp lights
up in blue
12
When the engine is turned off the power is automatically turned off.
If you press and hold the power button while the power is on, the
power of this unit will be turned off.
Press the RESET Button at the bottom of the camera once. If the
camera is freezing or stuck where no buttons will respond, then
please press the RESET button only ONCE at the bottom of the
camera with a paper clip or tip of the pen while it is turned ON.
This will restart the camera.
Micro SD card check function
Reset
This product will check the MicroSD card at startup and will announce if it is not inserted or
damaged,that can prevent missed shots.
<Power off>
Blue lamp goes out
Reset Button
13
About Time Settings
Video Mode
2-CAMERA MODES
You can set the GMT time-zone value instead, so the camera will set the date and time based
on the GMT value selection when it receives the GPS signal lock Automatically. You can set the
Daylight Saving Time by adjust the time-zone.
When the engine is turned on,the power is automatically turn on.
D07S has 2 different camera modes:
1. Video mode
2. Playback mode
14
Button function in video mode
Long press to turn on/off the WiFi
function (If turned on, the password
will be displayed. You can use the
power button to check)
You can manually lock the file by short
press
Long press to stop recording
Press once to take a snapshot
Press once to enter the main menu
Long press to power on/ off
Press once to switch the view display
Button Button Icon Icon Function Function
There are four resolutions:
*Front only: 3840*2160P
*Front only: 2560*1440P
Playback Mode
Playback mode lets you play your Video file or photos. It can even let you delete or lock any
videos while viewing it.
15
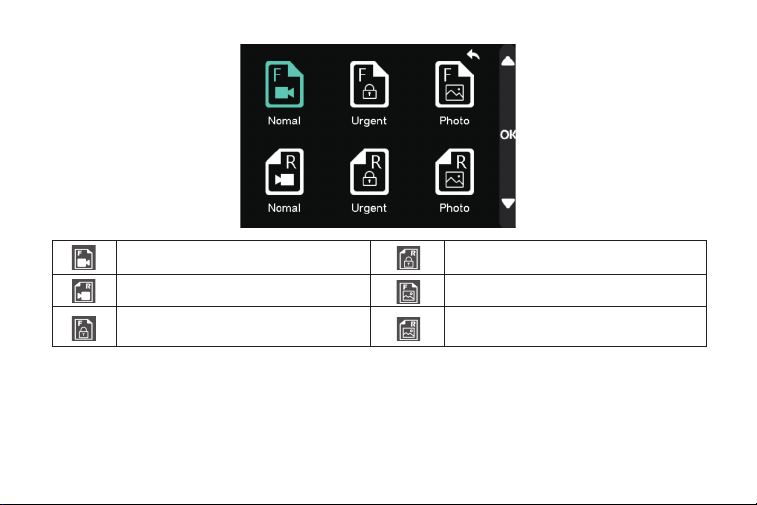
Normal files of front camera
Normal files of rear camera
Locked files of front camera
Locked files of rear camera
Photos of front camera
Photos of rear camera
16
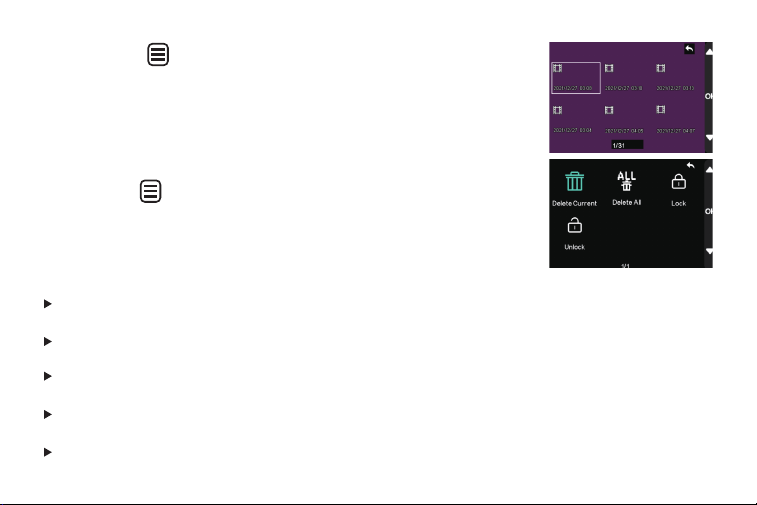
Short press " "button to playback the file.
Long press " " button to delete/lock/unlock the selected file.
[Delete Current]: Delete the displayed file
[Delete All]: Delete all files
*Unable to delete locked file.You can manually unlock and then erase.
[Lock]: Manually lock the display file
[Unlock]: Manually unlock the displayed files
17
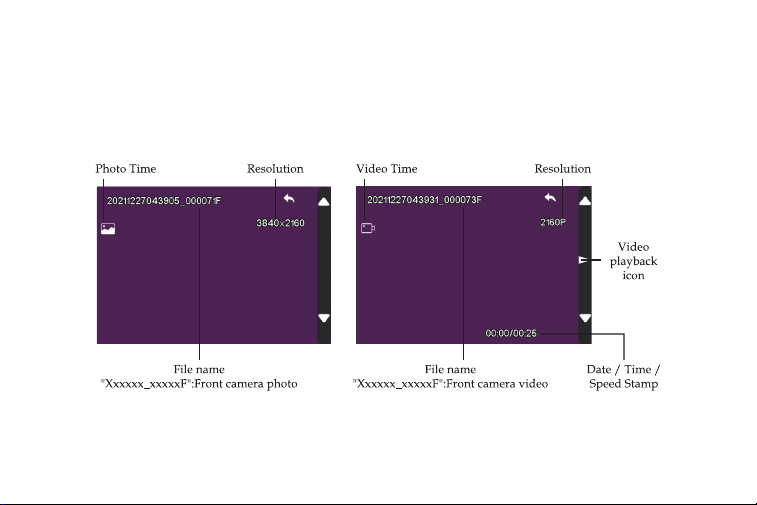
Photo and Video Files Screen
<Still photo file> <Video File>
18
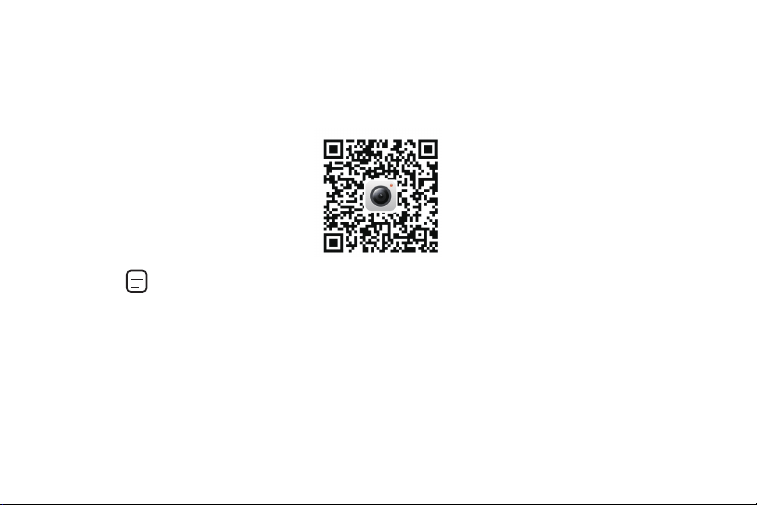
How to connect wifi
1. Download the WOLFBOX app
You can download this app from the app store or scan the QR code below to download the
Wolfbox App.
2. Turn on the wifi function
Press the“ ", select ”setting“, then select [WIFI] and turn the Wifi function on.
3. Connect WiFi
Open the phone WLAN page and connect the D07S WiFi. Then Enter the default password:
12345678. To join the network.
4. Open the Wolfbox app
Once your dashcam is successfully connected to WIFI, enter the APP and you will see the page
for adding devices.
19
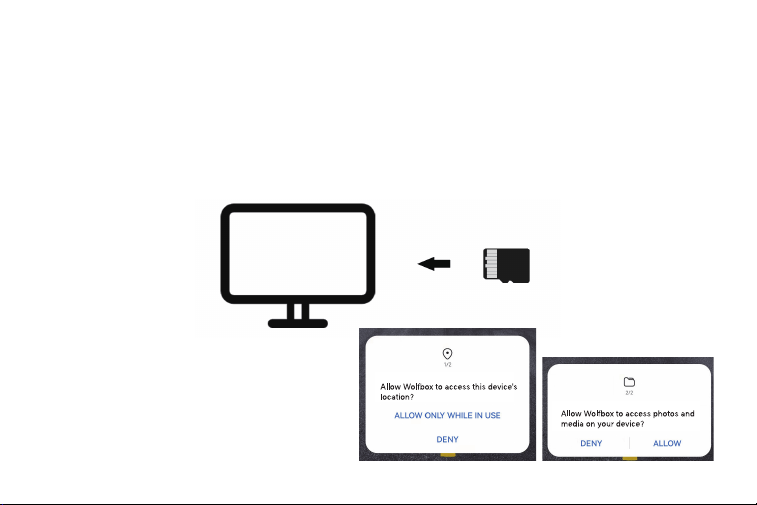
Play on computer
For Android Phone
How to output data on computer:
The video recorded by this product can be displayed in conjunction with Google Maps by
installing the dedicated viewer software on your computer.
* An internet connection is required.
Please choose to allow when these prompts
appear.
20
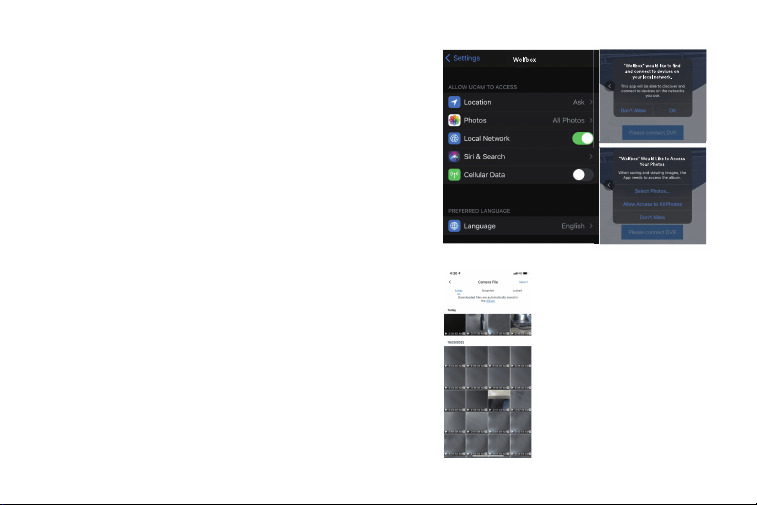
For iPhone
Check/Play date with APP
If you get this pop up for your iPhone while using
WiFi feature, make sure to tap on "ALLOW"or "OK"

21
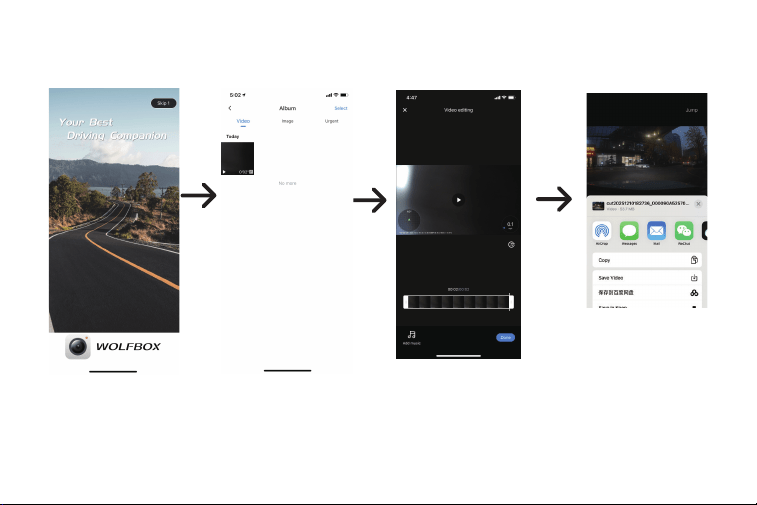
You can check and play the data by pressing on the recording screen to enter the data
file.
On the data file screen, press[Edit],select the file you want to download, and press [Download]
to download the file and ave it to the [local album] which you can find on the interface of
APP, then you can download to the smartphone album.
You cannot delete the lock file unless unlocked the file manually.
You can select a local album, play the downloaded data, and view it in conjunction with
Google Maps. (internet connection environment is required.)
22
Edit and share with the APP
You can enter local albums, edit downloaded files and share them in the APP interface.
23
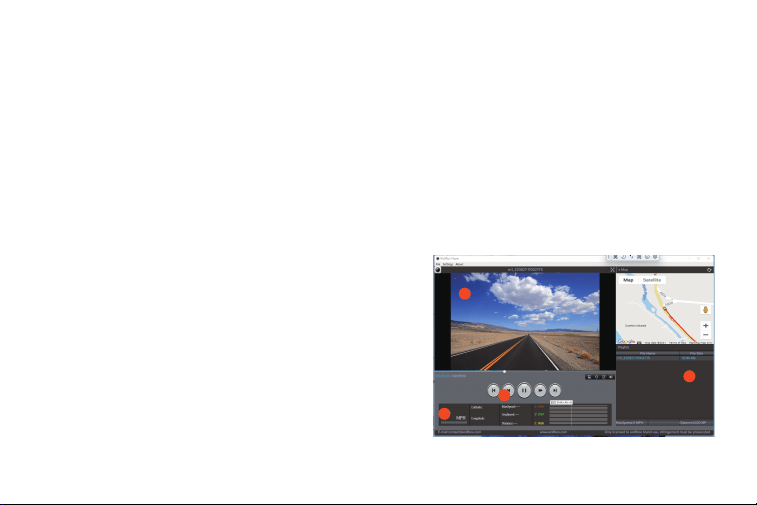
GPS Player installation
Correct Video Player to Play 4K Videos
1. TO see the Exact GPS route with the video on
google maps
2. Play back your recorded videos
3. Check Driving Speed
We recommend GPS Media player which can view google maps. You can get it free at
https://wolfbox.com/gps-player/
4. Show longitude and latitude
5. Your video files (F represents the front camera
video, R represents the rear camera video)
1
2
3
4
5
24
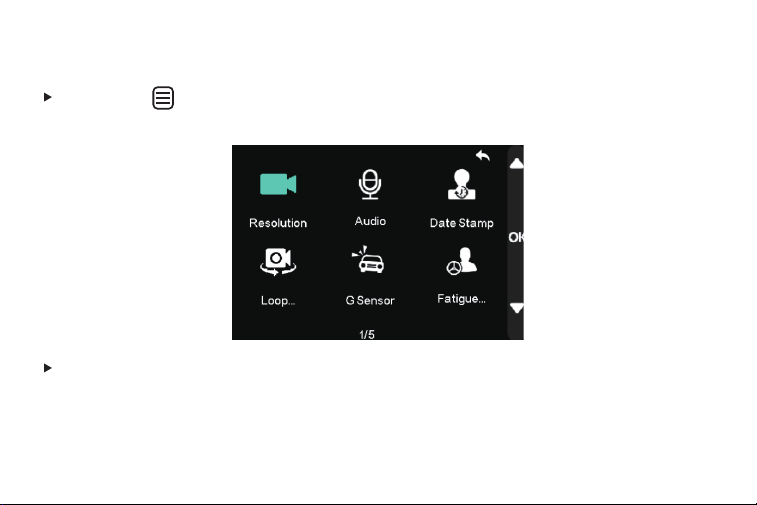
About the Camera Settings
Short press " " button to enter the setting interface after power on. In this case, the video
recording will be stopped and you get the Settings Menu.
[G-Sensor]: Off /low /medium/ high
G-Sensor is a 3-axis impact gravitational accelerometer which is designed to detect physical
and gravitational forces on the camera. The video will be locked-in the event when G-Sensor
is triggered due to physical or gravitational impact force on the camera, the current loop
cycle length of video file will be locked so it will NOT be deleted by loop cycle function.
25
[Fatigue Driving]: Off/1H/2H/3H/4H
A reminder will be made when drive for 1H/2H/3H/4H continuously.
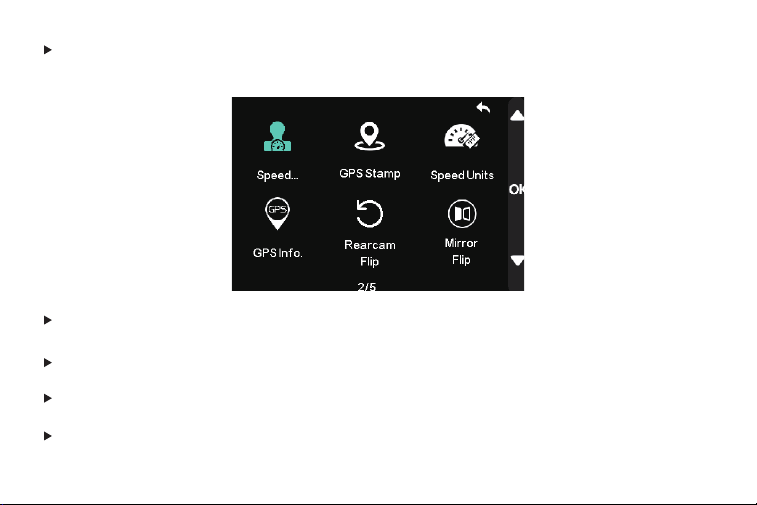
[Speed Stamp]: Speed stamp on/off
[GPS Stamp]: GPS stamp on/off
[Speed Units]: KMH/MPH
[GPS Info]: This feature allow you to see your current geographical location in Latitude &
Longitude.
26
[RearCam Flip]: You can flip the angle of the rear camera by 180°.
[Mirror Flip]: You can Mirror image left and right.
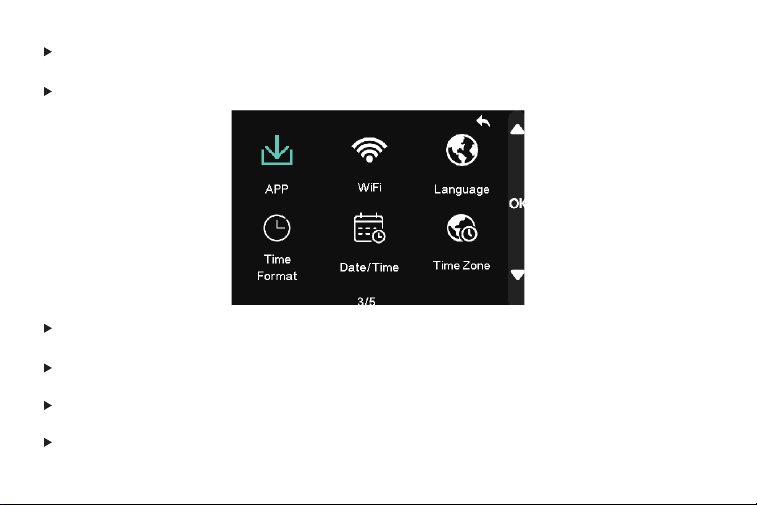
[APP]: QR code to download the APP
[WiFi]: WiFi on / off
[Language]: This setting allows you to choose your language setting for camera's firmware.
[Time Format]: 12H/24H
27
[Date/Time]: You do not need to manually adjust the time because GPS will automatically
update the time based on your location.
[Time Zone]: Here you can choose your desired or local time zone setting based on GMT
value.
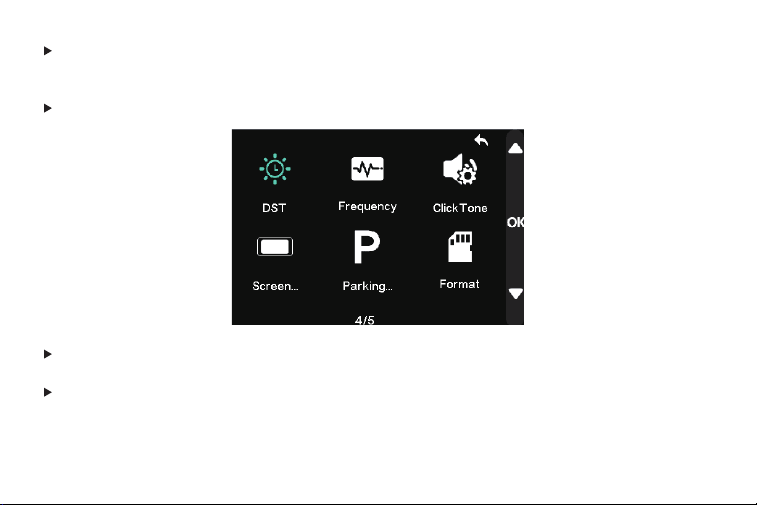
[DST]: You can adjust the DAYLIGHT SAVING TIME ON/OFF.
[Frequency]: Here you should choose the frequency accordingly to your power supply
specification used in your country based on your geographical location.
60 Hz (USA - North America)
50 Hz (Europe - Most Asian Countries)
28
[ClickTone]: This feature allows you to turn ON/OFF camera button's beep sound.
[Screen Saver]: OFF-This will keep the video ON all the time.
10S/30S/2Min-The screen will turn off, but the recording will remain.
[Parking Monitoring]: Requires hardwire kit(sold separately)
Does not work without hardwire kit(ASIN: B0BKPBFFS8 or B09X1L1GMX).
[Format]: This feature will allow you to format inserted memory card, all the data will be
deleted.
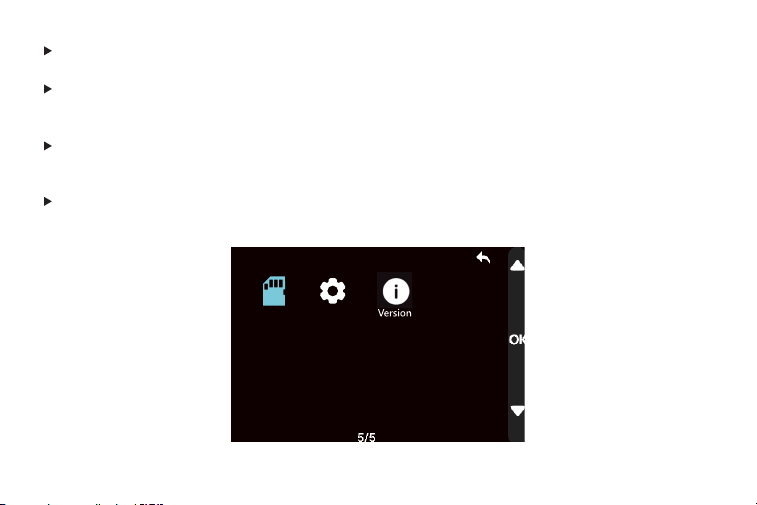
Default SettingFormat

29
[Default Setting]: Here you can restore all the settings to factory default settings.
[Version]: Here you can check the current firmware version installed on your camera.
We will notify you via Amazon if there is a new software version.
Product Specifications
Model
Display
Power
Aperture
Battery
Video Format
Loop Recording
Recording Method
Screen View
Resolution
GPS
G-sensor
Audio
Micro SD card
Temperature
Warranty period
Record Display
Method
D07S
2.45 inch IPS
12V/24V
1.5
Super capacitor
Video: MP4 Image:JPG
1/3/5mins
Yes
3 Axis G-sensor
-20°C-70°C
1Year
Nomal recording / Emergency
recording
Front view
Support sound recording and
Front 3840*2160P
Front 2560*1440P
playback
Main body display /Computer/
Smartphone
Micro SD 8GB-128GB

30
Please READ ME Before Installation
Please reach us ASAP if professional help needed. 32GB TF SD card/ Hardware Kit, you can
choose one for free.(Shipping address needed)
When you encounter difficulties, please read this manual for a quick solution, if you still
cannot solve it, please feel free to CONTACT us.
Type-C D07S:
1 APP: "WOLFBOX”
2 Hardwire kit for Parking Mode Asin: B09X1L1GMX or ASIN:B0BKPBFFS8
Type-C D07S:
Q: How to download the app for the mini dash cam/Where couldI get the app for the mini dash
cam?
A: IOS / Android Devices: search "WOLFBOX" on App Store / Google Play store.
31
Pls confirm whether you're using the
original accessories first. If not, pls use
the original accessory and check the
problem.
Q: How to connect WIFI?
A: You should download the app first, then connect the WIFI as below steps:
Q: Why can't my dash cam be turned on? /Why does my dash cam automatically turn on and
off after using it for a period of time?
A
:
1 Turn the WiFi on: Long press the UP button to turn on
2 Find the WLAN on your phone and link it (password: 12345678 or check it on the
screen on dash cam).

32
We have tested almost all common smartphones with Android, IOS system on the market. If
there still has problems connecting to the app, please feel free to CONTACT US. We will give
technical support.
Q: Why the app keeps disconnecting. How can I fix this?
A: The available distance of the WIFI connection is 9-15ft, and it will be automatically
disconnected if out of the range.If still disconnect within this range, you can forget the WIFI in
your phone and restart both the mini dash cam and your phone, then re-connect.Problem still
exist, pls tell us to get further help.
Q: SD Card error occurs/The SD card isn't compatible with the mini dash cam/
After formatting card in device, it intermittently farls requiring to format again.
A: Please format the SD card or replace the SD card.Recommended TF Card
Asin: B09Q87X76V
;
B0B7KWV4CJ

33
Class 10, U3 Speed Micro-SD Card for 4K Video is required. Please DON'T USE any "SanDisk
Ultra" or "Generic Class 10 for HD Video" Cards from third party sellers. They are NOT made
for 4K high-end dash cam. lf you have any problems about SD card, please tell us and we will
support you to solve. Avoid fake cards.
Q: Won't loop recording/Loop recording doesn't work/Stop recording after recording a video.
A: Please format the SD card first. If still doesn't work, you can replace the SD card.
Or CONTACT US directly, we will help you solve it.
Q: After connected to WiFi, phone shows no network.
A: Because the main function of D07S's WiFi is to play back video, it does not have the function
of surfing the Internet, which means that after the WiFi is connected, it will show that there is no
network. But the APP can be used normally.
Q: My date and time is constantly changing/I have to reset the date&time again and again.
A: Please set [Timezone] before setting Date/Time.

34
Q: How to connect the hardwire kit.
A: How to find the BATT, ACC correctly/Why the battery still drain out after connected to the
hardwire kit.
Q: How to find the BATT, ACC correctly/Why the battery still drain out after connected to the
hardwire kit.
A: BATT with electric all the time no matter the car is on or off, ACC only have electric when the
car is on, you can use an voltage tester pen to check it accordingly. If you're still not sure about
it, please provide your fuse box drawings to us, we will let our technical department to help
you find it. If you connect both the yellow and red cable to the BATT, it will cause the battery
drainout.
When there is a "card error" or the loop recording function cannot be used normally, please
download the latest firmware from the official website. If you still can't solve the problem,
please feel free to contact us.
https://wolfbox.com Download Firmware

35
Great Customer Service
If you have any problem about the function or installation, please feel free to TELL us.
For more information: WOLFBOX
E-mail: [email protected]
Website: www.wolfbox.com
Europe: [email protected]
Other Countries: [email protected]
FAQ and Operation
Scan to Get D07S
Videos
Installation of
hardwire kit
Whats APP Line WOLFBOX APP

Check us out here!
We have professional customer service!
E-mail: [email protected]
Phone: +1 888 296 8399