
To reduce the risk of injury, the user must read and understand the Operator’s
Manual before using this product. Save these instructions for future reference.

TABLE OF CONTENTS
2
1. SAFETY INFORMATION
2. OPERATING SAFETY
2.1 General Notes
2.2 Usage Safety
2.3 Chemical Handling
2.4 Battery Safety
2.5 Service Safety
3. EQUIPMENT PERFORMANCE
3.1 Backpack Fogger Design
3.2 TOMAHAWK® Battery
3.3 Specifications
3.4 Battery Sprayer Parts
3.5 Unpacking the Unit
4. EQUIPMENT ASSEMBLY
4.1 Warnings
4.2 Wand Assembly
5. CHARGING THE BATTERY
5.1 Warnings
5.2 How to Charge
5.3 While Charging
5.4 Installing the Battery
6. BACKPACK STRAPS ADJUSTMENT
7. OPERATION
7.1 Filling Tank
7.2 Spraying Operation
7.3 Spraying Tips
7.4 Stopping the Machine
7.5 Adjusting the Discharge Rate
7.6 When Spraying is Complete
8. STORAGE
9. REPLACEMENT PARTS
10. TROUBLESHOOTING
11. MAINTENANCE RECORD
12. EQUIPMENT WARRANTY
12.1 Warranty Claims
13. SERVICE CENTER
4
5
5
5
6
6
6
7
7
7
7
8
8
9
9
9
9
10
10
10
10
11
12
12
12
12
13
13
14
14
15
15
16
17
17
17
Equipment Resources
TOMAHAWK®
www.tomahawk-power.com
How To Video Library
More of a visual person? Visit our Video Library for equipment
assembly instructions, troubleshooting tips, and more!
Found on each product listing or the Service Videos Page
Manual and Assembly Guide Library
Visit our Manual Library if you are looking for a lost
operations manual or a particular spare part?
Found on each product listing or the Tomahawk Manuals Page
Service Requests
In need of a quick fix or a service center referral? Submit a
Service Request and a Tomahawk Technician will respond
shortly to get you the help you need.
Choose “Service Request” at the bottom of www.tomahawk-power.com
3
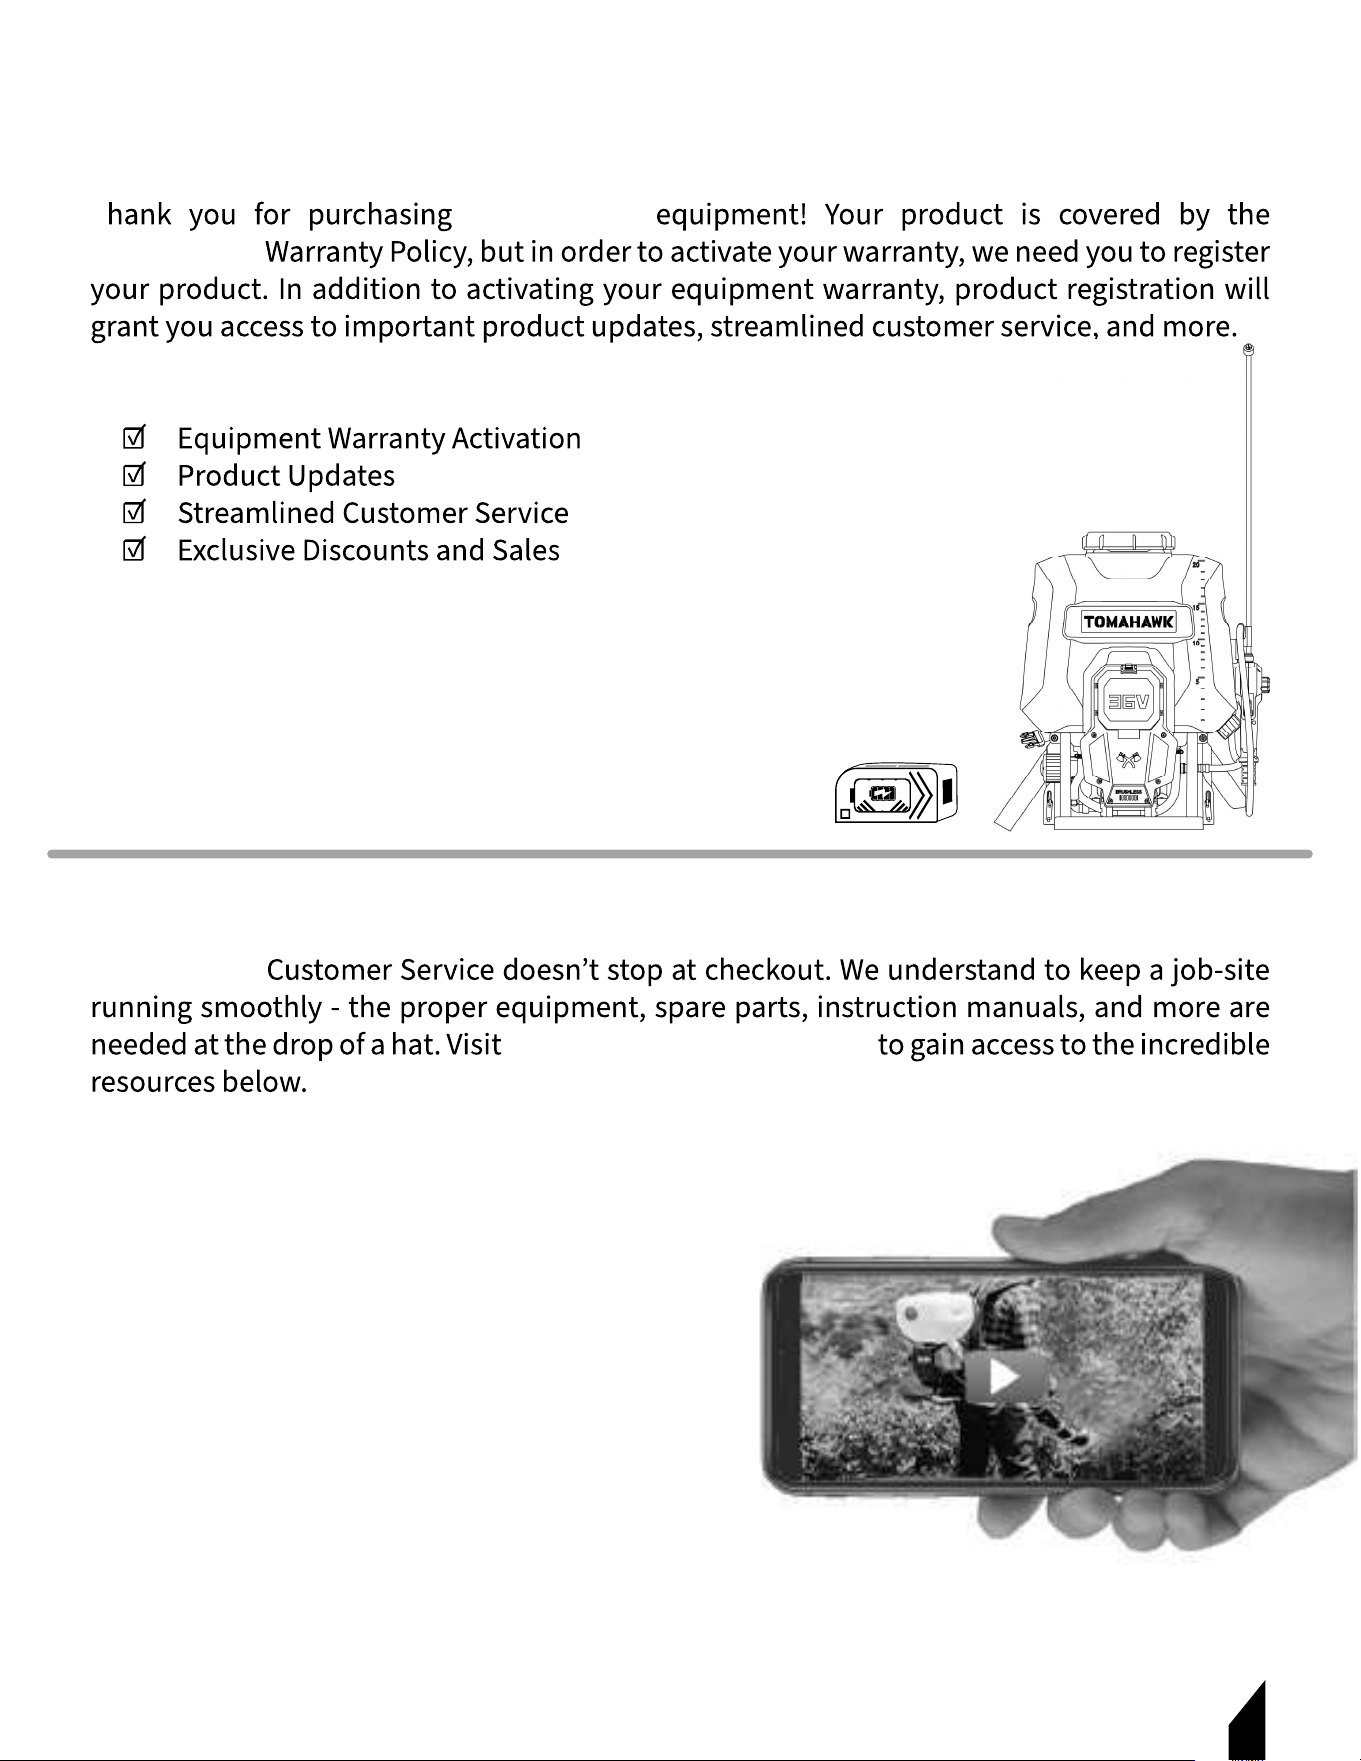
Register Your Equipment
T TOMAHAWK®
TOMAHAWK®
INCLUDED WITH YOUR REGISTRATION
STEPS TO REGISTER YOUR EQUIPMENT
1. Visit www.tomahawk-power.com
2. Choose “Product Registration” at the bottom of the page
3. Enter your equipment’s serial number to get started
4. Provide all required information
5. Submit Registration

4
TOMAHAWK® .
TOMAHAWK®
TOMAHAWK®
TOMAHAWK®
1. SAFETY INFORMATION
DANGER
WARNING
CAUTION
DANGER
WARNING
CAUTION
5
2. OPERATING SAFETY
2.1 General Notes
2.1.1
2.1.2
2.1.3
2.1.4
2.1.5
2.2 Usage Safety
2.2.1 NEVER
2.2.2 NEVER
2.2.3 NEVER
2.2.4 NEVER
2.2.5 NEVER
2.2.6 ALWAYS
2.2.7 OBSERVE
2.2.8
WARNING
2.3 Chemical Handling
2.3.1 ALWAYS wear eye protection when handling chemicals.
2.3.2 ALWAYS wear the proper protective equipment/clothing when handling chemicals.
Proper protective equipment includes safety goggles or glasses, mask/respirator, and a
long-sleeved shirt and long pants.
2.3.3 ALWAYS use mask to protect mouth and face from dust and/or pesticide when
handling chemicals.
2.3.4 ALWAYS
2.4 Battery Safety
2.4.1 NEVER store or charge battery in wet conditions.
2.4.2 NEVER make any adjustments to the tool if battery is connected.
2.4.3 NEVER interfere with the batteries integrity as this can cause injury and void warranty.
2.4.4 NEVER use or dispose battery in fire as this can cause it to explode. Check local codes
for more information on proper battery disposal.
2.4.5 NEVER use equipment if it has been damaged or modified as this can cause injury.
2.4.6 When not in use, ensure battery is stored in a dry place away from any flammable objects.
2.4.7
2.4.8 Only use the manufacturer’s designated battery with this machine. Use of any other
battery can damage unit and will void warranty.
2.4.9 Battery leakage may occur when operated in extreme temperature conditions. If
battery liquid contacts skin, wash immediately with water and soap, following with white
distilled vinegar or lemon juice to neutralize. If the liquid comes in contact with eyes, flush
out eyes with water for 10 minutes and seek medical attention immediately.
2.4.10 Have all servicing done by an approved TOMAHAWK® Technician or Service Center
with original replacement parts.
2.5 Service Safety
WARNING
6
WARNING
Always follow the chemical manufacturer’s instructions, safety guidelines, and
recommendations when using any chemicals/solutions with this machine.
WARNING

3. EQUIPMENT PERFORMANCE
3.1 Backpack Sprayer Design
TOMAHAWK®
3.2 TOMAHAWK® Battery
TOMAHAWK®
3.3 Specifications
7
Tank Size 5 Gallon
Power 0.5 kW, 7.5 Ah
Voltage 36V
Spray Reach 25 - 30ft
Spray Volume 1.32 GPM
Motor Brushless Motor
Runtime (min) Minutes
Fan Speed 00 RPM
Input Voltage
AC110V
Pressure
50 - 0 PSI
Sprayer Weight 20 lbs
Dimensions 17” x 13.7” x 22.8”
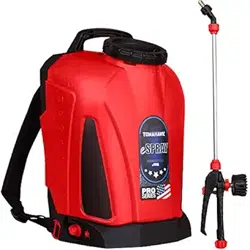
eTPS25 BATTERY POWERED SPRAYER
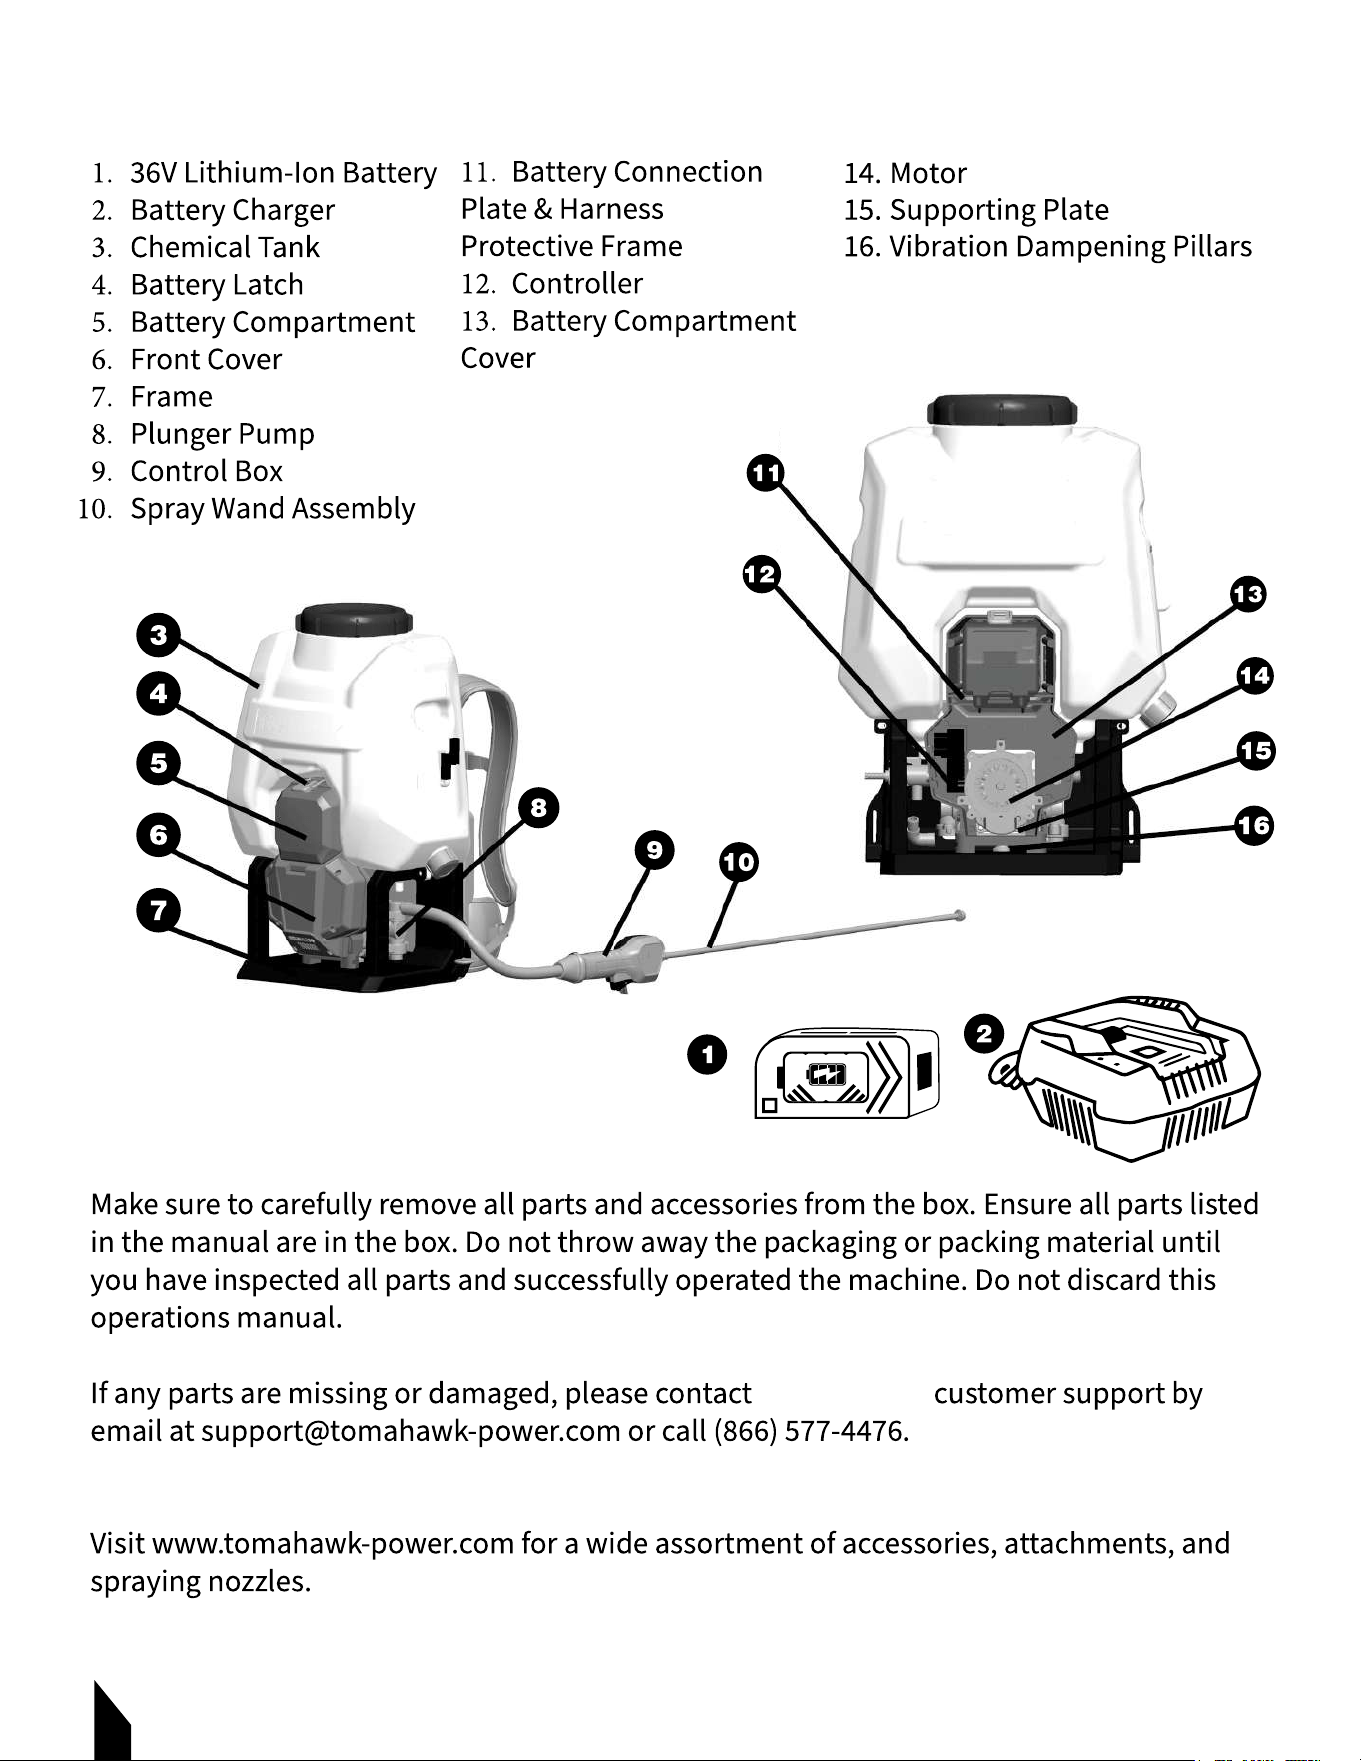
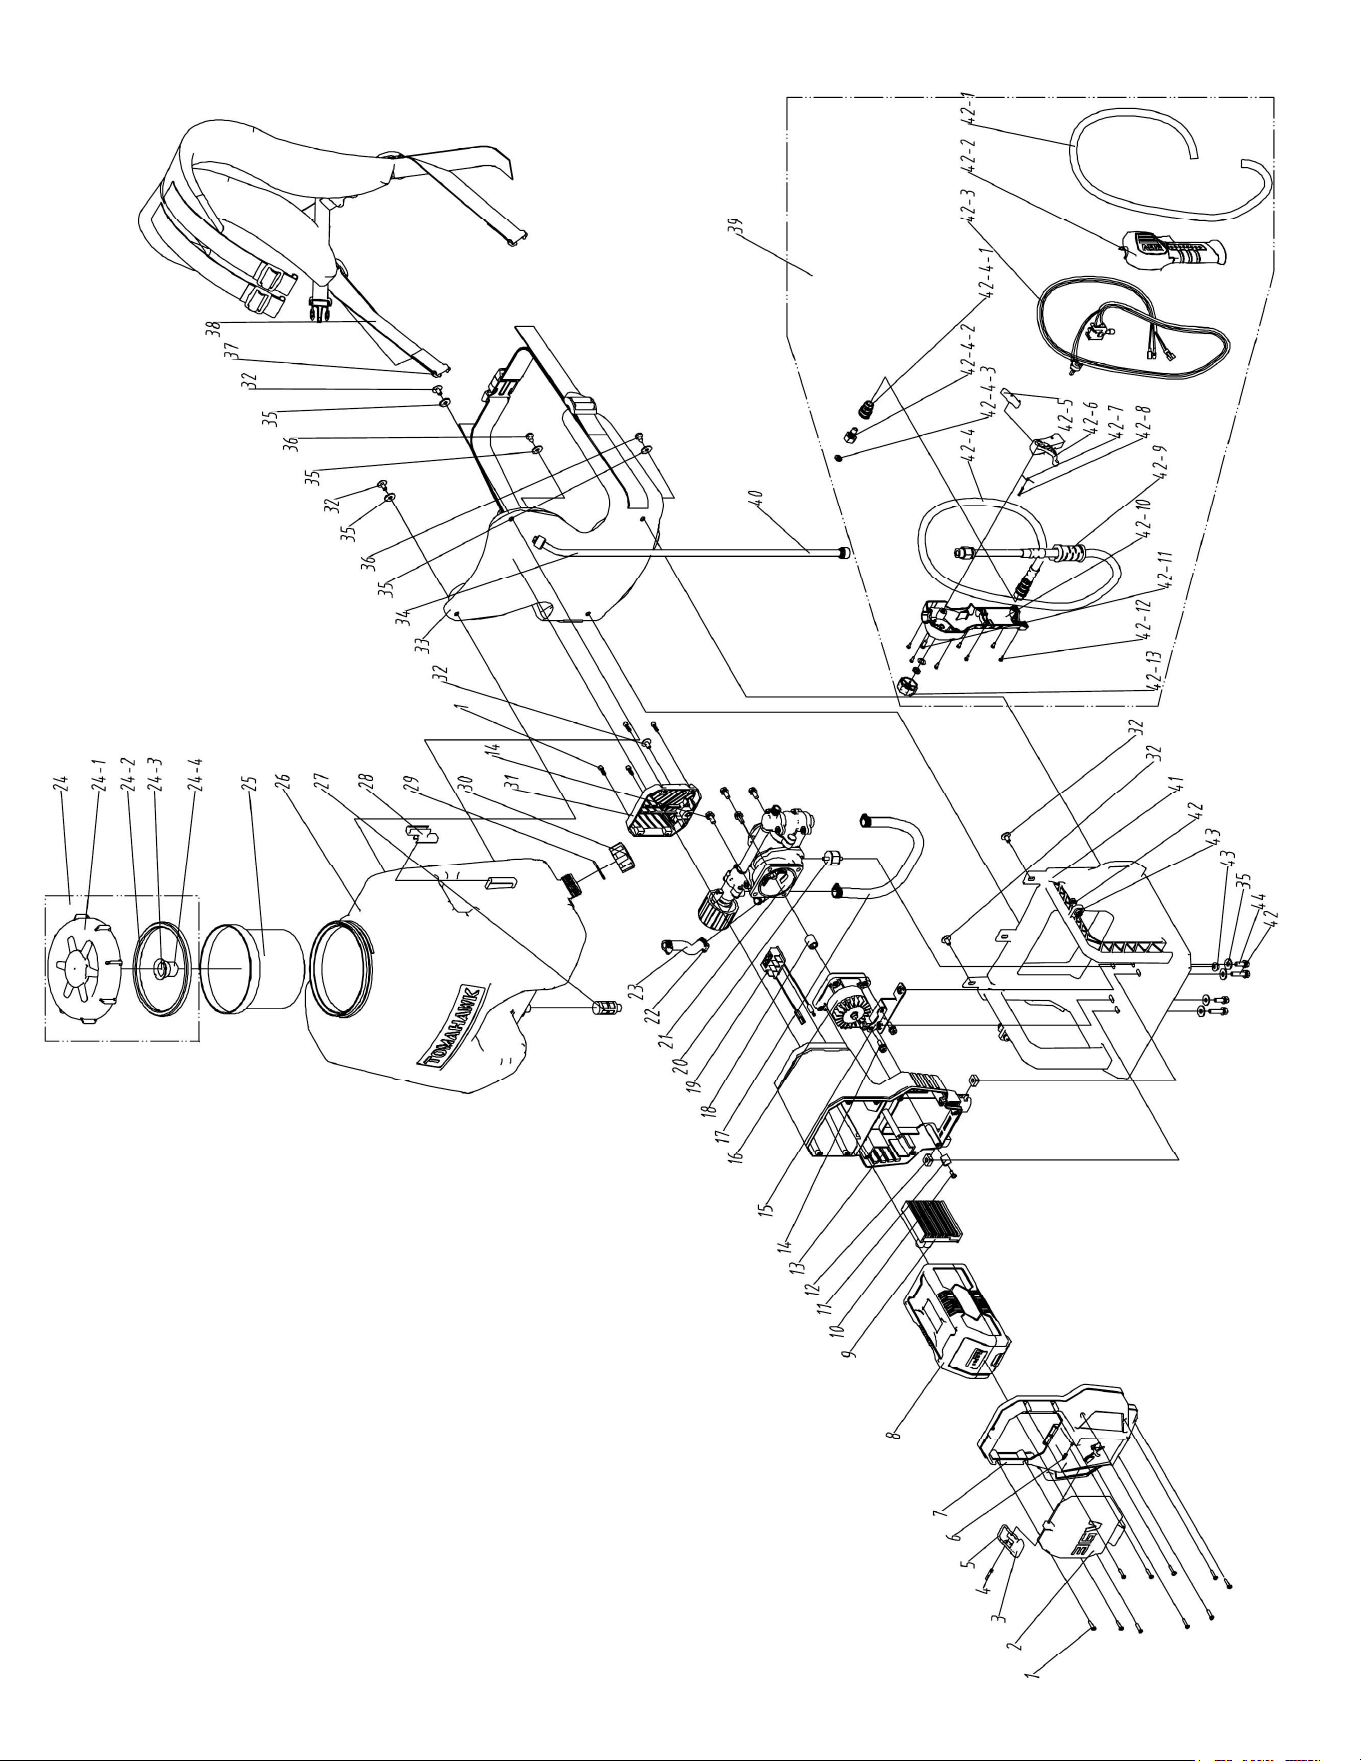
3.4 Battery Sprayer Parts
3.5 Unpacking the Unit
TOMAHAWK®
3.6 Spraying Accessories
8
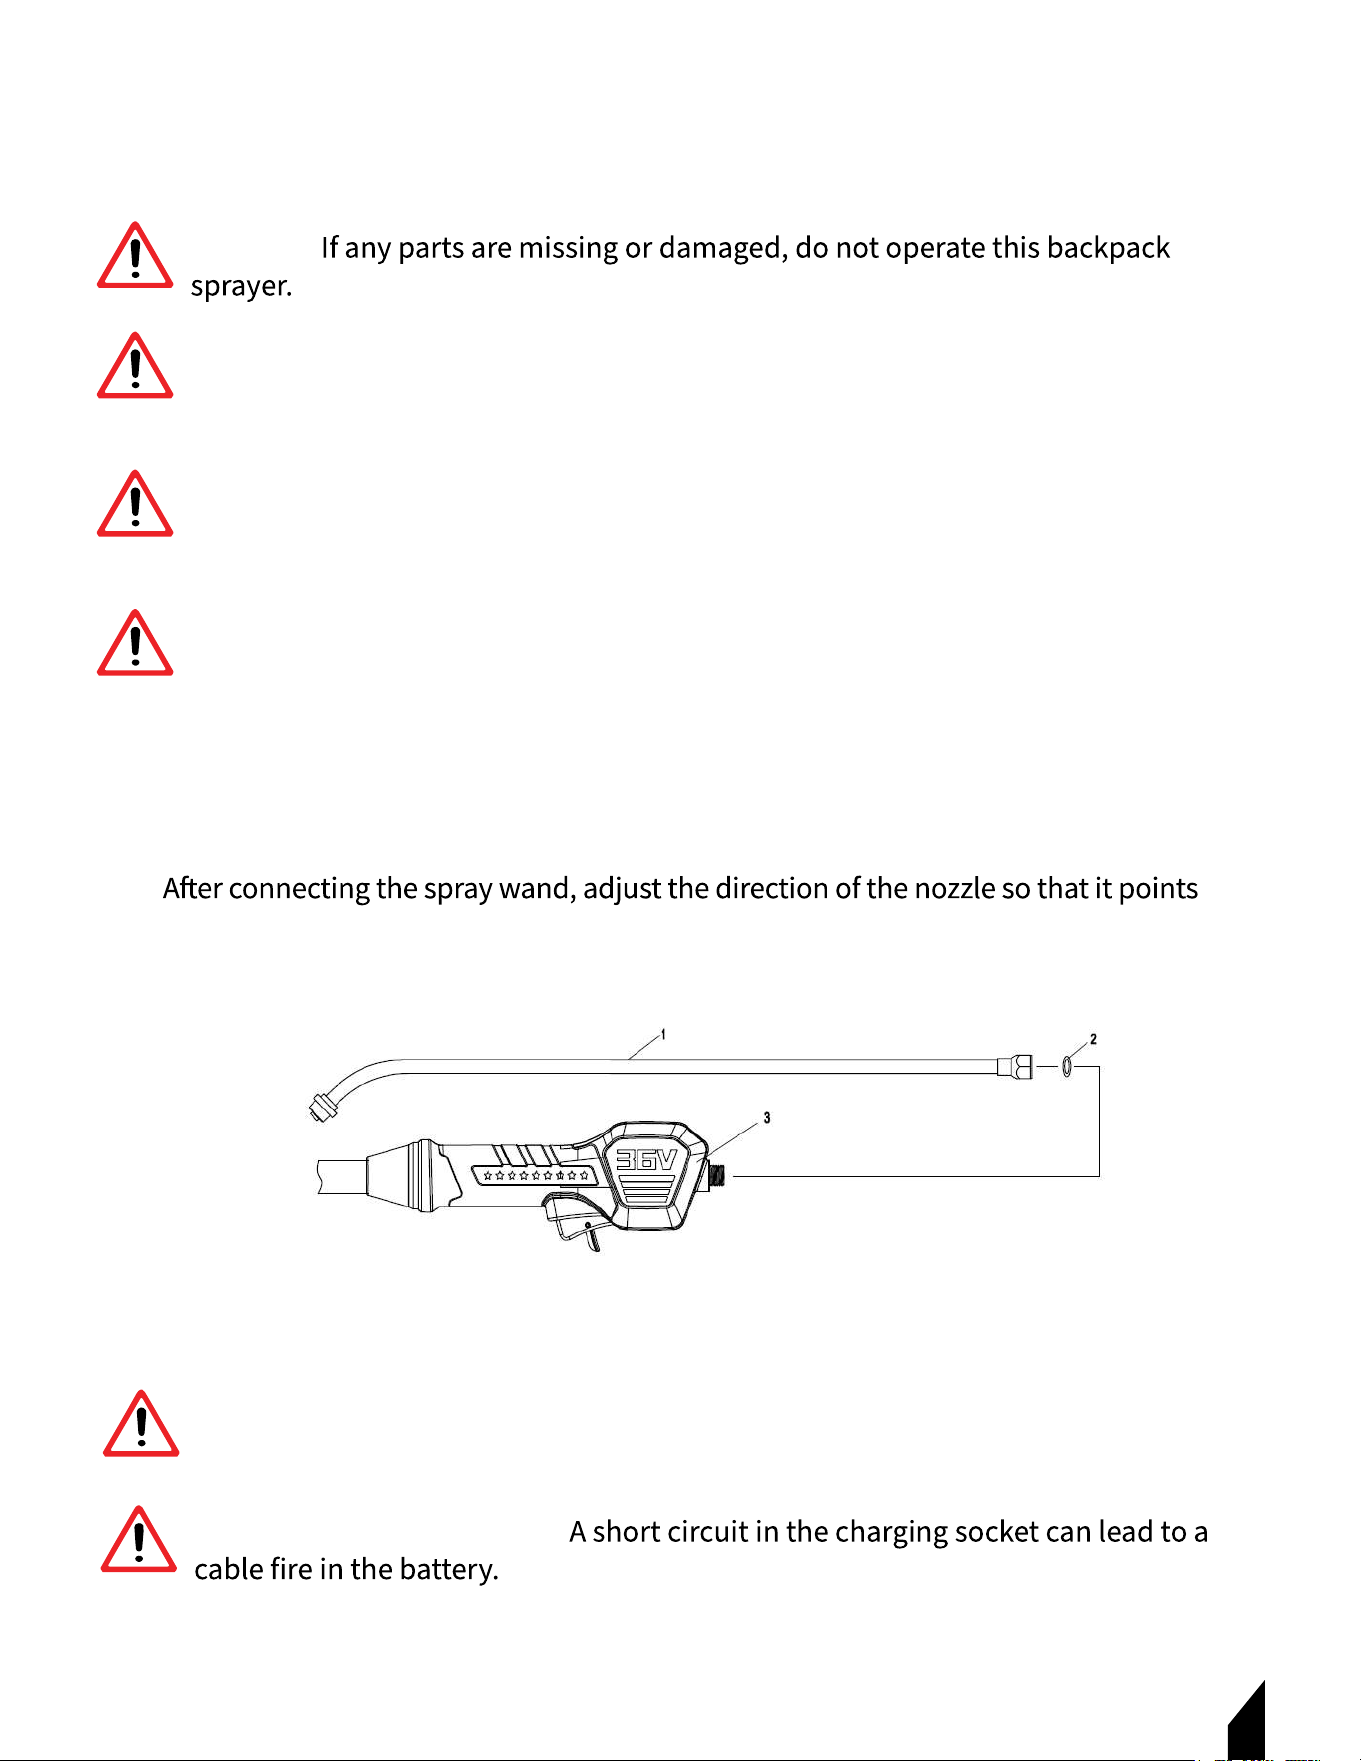
4.2 Wand Assembly
4.2.1 Grab spray wand and place a gasket at the end of the wand.
4.2.2 Screw the spray wand into the control handle. FIGURE 1.
4.2.3
downward.
5. CHARGING THE BATTERY
5.1 Warnings
4. EQUIPMENT ASSEMBLY
4.1 Warnings
WARNING
Failure to do so may result in personal injury or damage to this machine.
WARNING
WARNING Never make modifications or fabricate accessories to be used with this
machine. Modifications or alterations may result in personal injury or damage to this
machine.
WARNING
WARNING Do not connect the battery before the machine is fully assembled. Failure
to comply may cause accidental starting and may result in personal injury or damage
to this machine.
WARNING
WARNING To prevent personal injury or damage to this machine, ensure the machine is
OFF, the battery is removed, and the impellers have stopped before removing any parts.
WARNING
9
WARNING Do not insert any electrically conductive objects in the charging socket
or the battery may be damaged by a short circuit.
WARNING
WARNING - DANGER OF FIRE -
WARNING
FIGURE 1
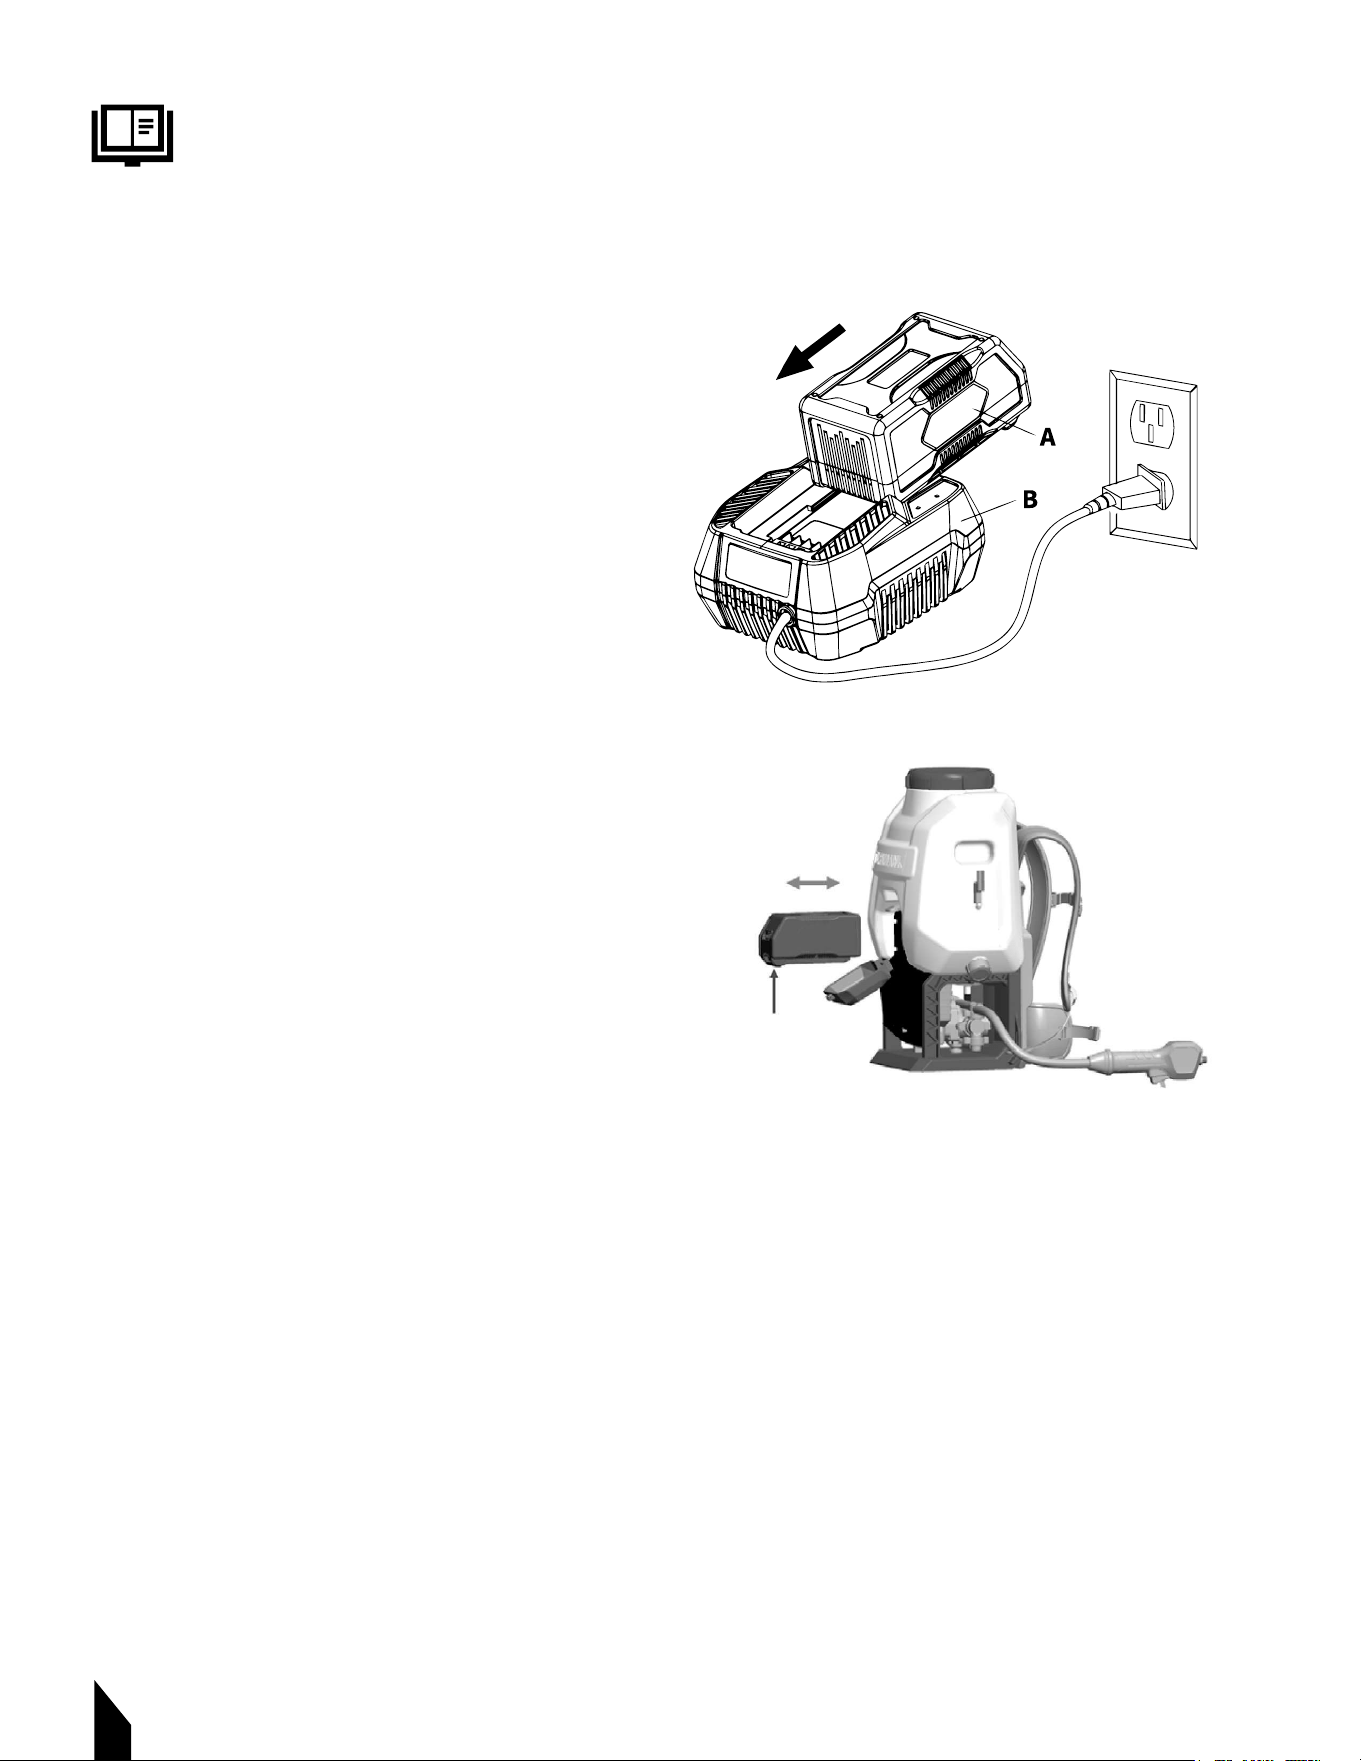
5.2 How to Charge
5.2.1 Remove the battery from the
machine.
5.2.2 Plug the charger into a power outlet
in a dry location. FIGURE 2A.
5.2.3 Align the tongue of the battery (A)
with the guides in the charging dock (B).
5.2.4 Slide the battery into the charger
docking station using the guides on the
battery and charger docking station.
FIGURE 2A.
5.3 While Charging
5.3.1 The LED indicator on the charger
lights up RED during charging.
5.3.2 The charging of the battery takes
approximately 2 hours.
5.3.3 The LED indicator on the charger
lights up green when finished charging.
5.4 Installing the Battery
5.4.1 Open the door of the machine’s battery
compartment. FIGURE 2B.
5.4.2 Align the tongue of the battery with the guides in the battery compartment.
5.4.3 Grasp the machine firmly and slide the battery into the compartment until the battery
release button locks into place. Close the compartment door.
NOTE: Never force the battery pack. It should slide and click into place.
10
The charger has a fully electronic voltage and current limitation function. This ensures
that a connected battery is always kept at the optimum state of charge. This prevents
overcharging of the battery. The battery is not fully charged on delivery. It is
recommended to fully charge the battery before operating the machine for the first time.
FIGURE 2A
FIGURE 2B
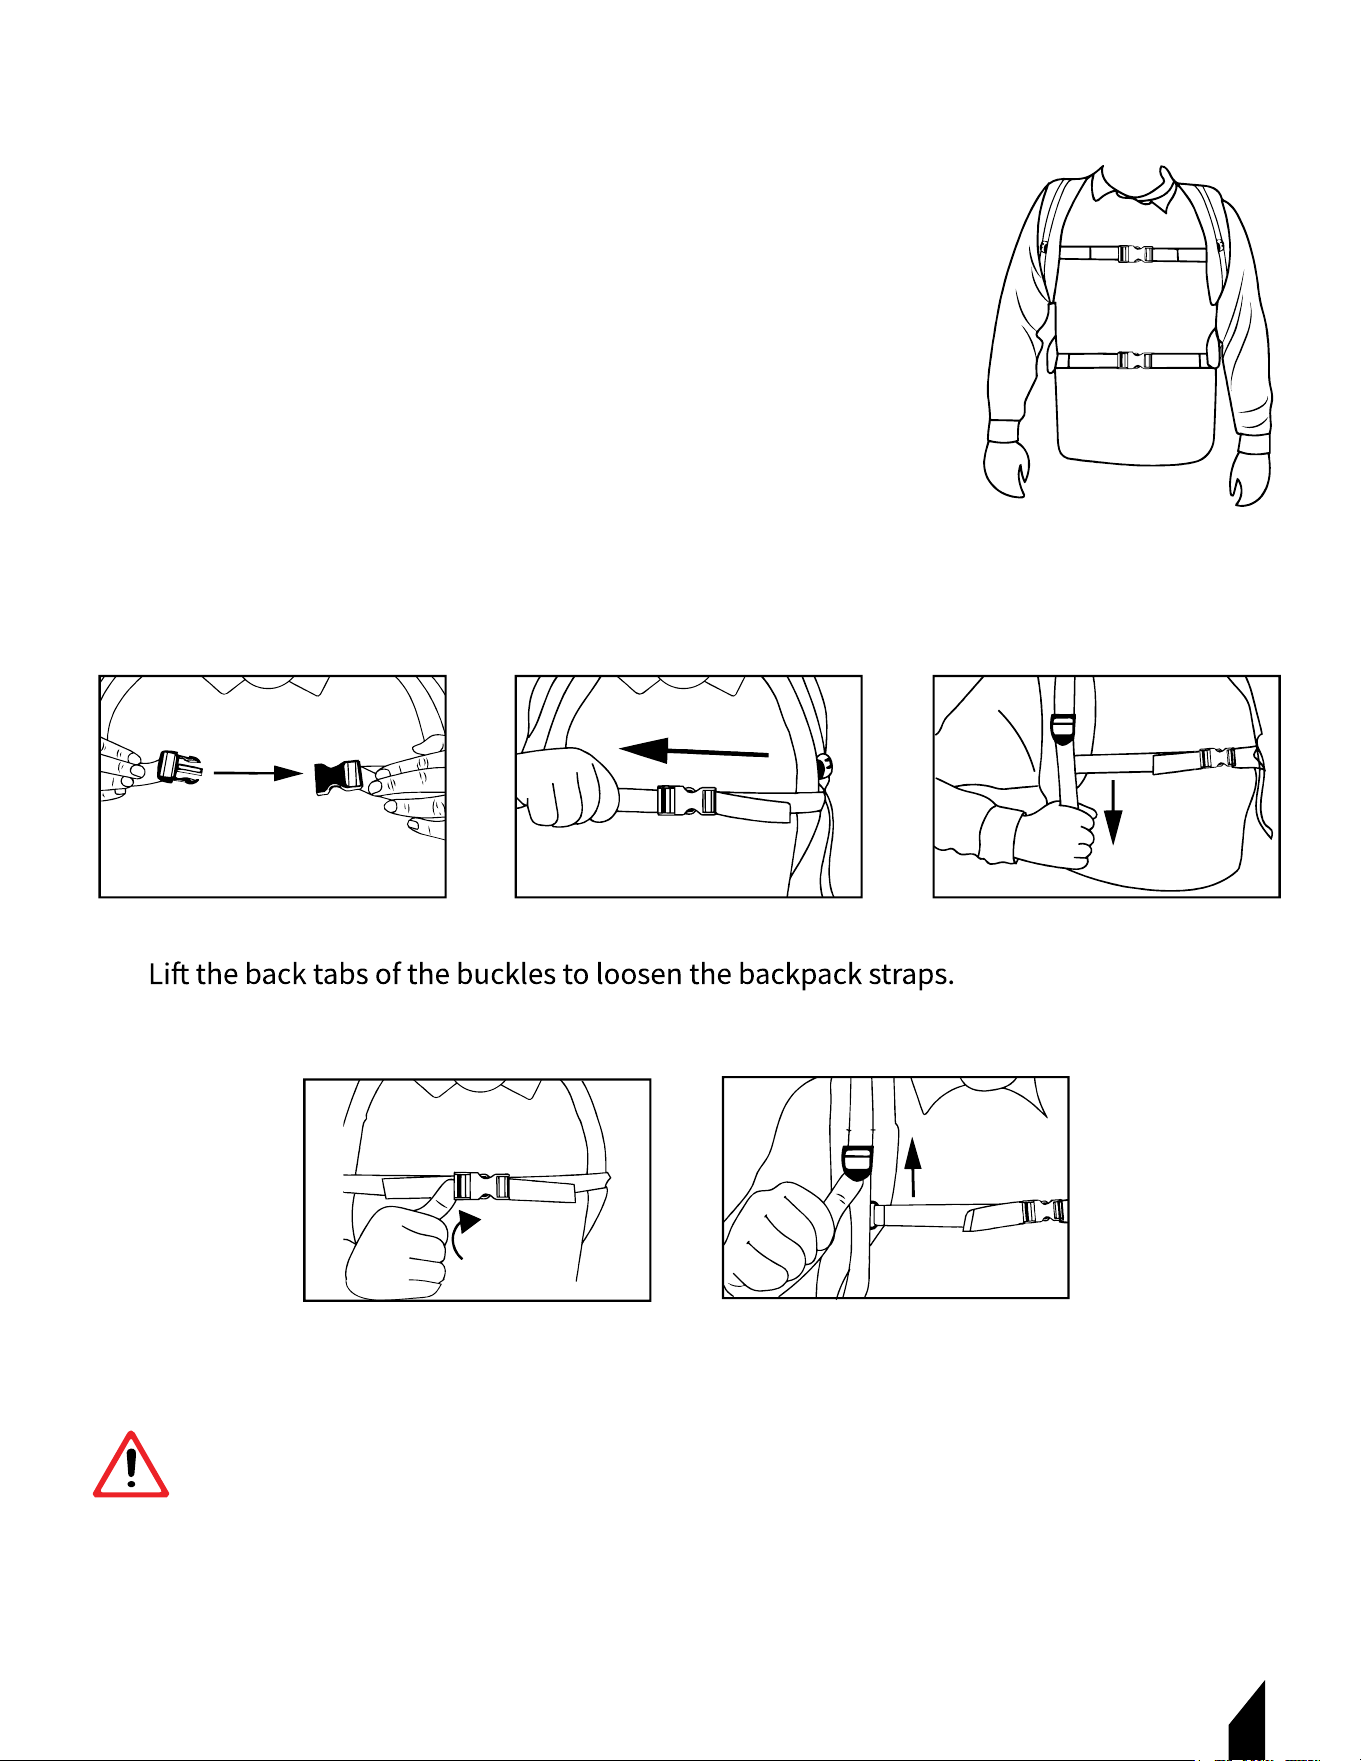
6. BACKPACK STRAPS ADJUSTMENT
Make sure your backpack straps and harness are well adjusted for
proper operation. Adjust the straps for comfortable machine
placement. Adjust the cross-body harness so the machine weight
is equally distributed across the operator’s shoulders.
6.1 Once the machine is comfortable on your back, connect the
top horizontal chest buckle FIGURE 3 and then tighten by pulling
on the end of the strap. FIGURE 4.
6.2 Pull the ends of the backpack straps downward to tighten. FIGURE 5.
6.3 FIGURE 6. FIGURE 7.
FIGURE 3 FIGURE 5
11
FIGURE 4
FIGURE 6 FIGURE 7
WARNING In the event of imminent danger, the machine must be removed quickly. The
horizontal chest strap must be released first before setting the machine on the ground.
WARNING
12
7. OPERATION
The operator should always wear the personal protective equipment/clothing (PPE) when
handling this tool. PPE includes mask/respirator, safety goggles, ear protection, boots,
gloves, and a long-sleeved shirt and long pants to cover as much exposed skin as possible.
7.1 Filling the Tank
NOTE: Before adding chemicals, perform a test spray with clean water to check for leaks.
Do not overfill or pour too quickly. The solution must be clean to avoid wand clogging.
7.1.1 Make sure the rubber gasket within the lid is clean and in good condition.
7.1.2 Place the machine on an even, level surface.
7.1.3 Close the water valve at the base of the throttle control.
7.1.4 Replace the lid and tighten it firmly.
7.2 Spraying Operation
7.2.1 Install the battery (refer to Figure 2), ensuring it is properly seated.
7.2.2 Check the battery level and recharge if low.
7.2.3 Put on the sprayer, adjust the harness for comfort.
7.2.4 Then press and hold the limit trigger, and quickly press the power switch twice within
3 seconds, then release.
7.2.5 Next, turn on the speed control switch (Figure 8) and adjust the spray flow as needed
to begin spraying.
7.2.6
7.3 Spraying Tips
7.3.1
one spot continuously to avoid harming plants.
7.3.2
7.3.3 Coordinate your forward walking pace with the wand's swinging speed to ensure even
coverage and prevent missed areas.
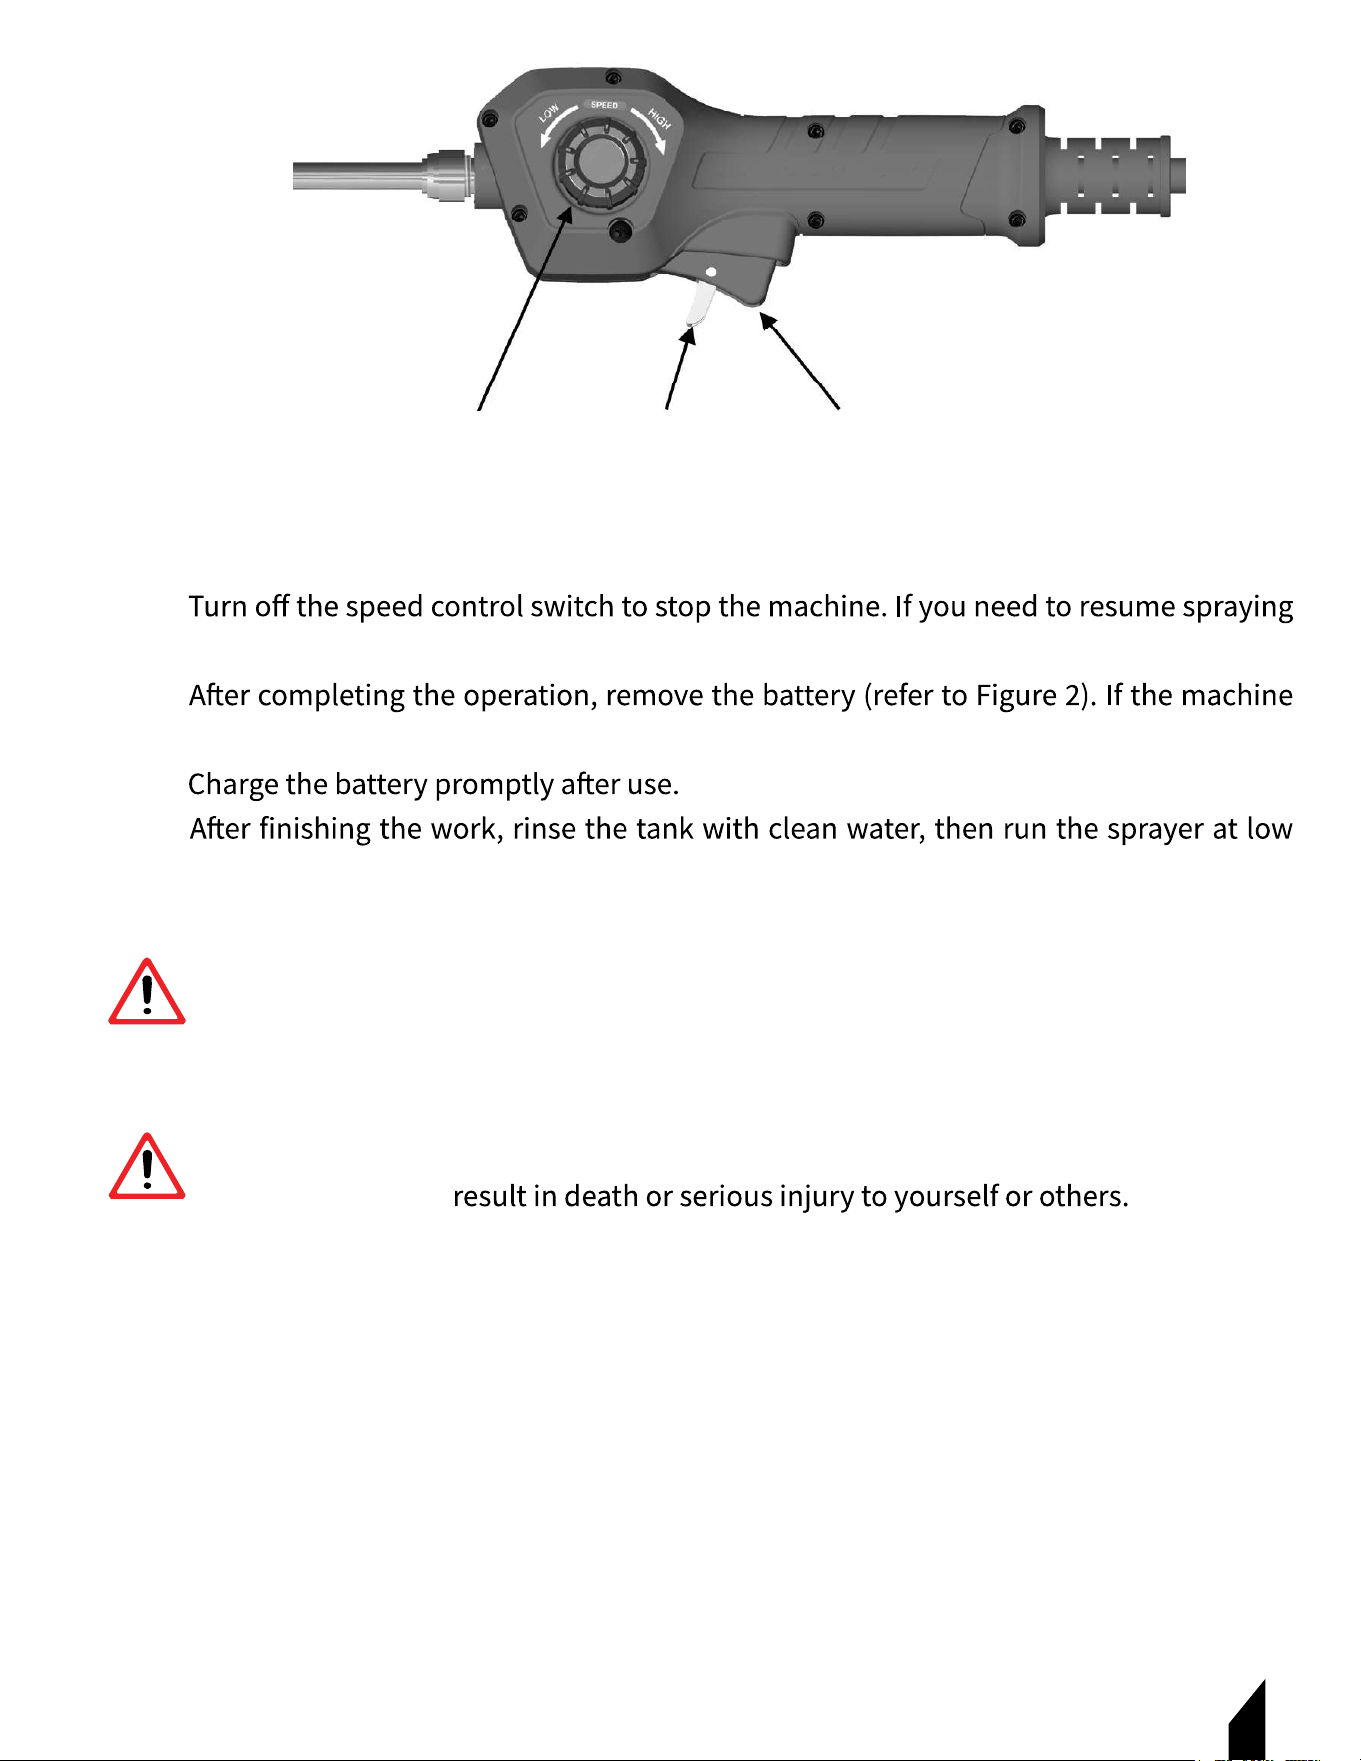
7.4 Stopping the Machine
7.4.1
later, you must again quickly press the power switch twice.
7.4.2
will not be used for an extended period, always remove the battery from the compartment.
7.4.3
7.4.4
speed to flush the internal parts that were in contact with the chemicals.
7.5 Adjusting the Discharge Rate
7.5.1 Rotate the knob on top of the speed control switch to adjust the fluid discharge rate.
7.5.2 The numbers on the speed control switch must be aligned with the marker pointing
toward the clear wand.
Position 1 = Minimum Flow Rate
Position 4 = Maximum Flow Rate
13
Speed Control
Switch
Limit Trigger
Power Switch
WARNING
Always follow the chemical manufacturer’s instructions, safety guidelines,
and recommendations when using any chemicals/solutions with this machine.
WARNING
WARNING Always spray solutions downwind and be mindful or your surroundings.
Failure to do so may
WARNING
FIGURE 8

14
7.6 When Spraying is Complete
7.6.1 Close the water valve completely to prevent leakage.
7.6.2 “Starting and Stopping the Machine”
7.6.3 Turn the speed control switch rate to Position 1 and collect any remaining
chemical/solution in a proper container.
7.6.4 Drain the tank in a well ventilated area. Clean and rinse the tank, pipes with clean
water.
NOTE: Safely dispose of any remaining chemical/spray solution by
following the the
chemical manufacturer’s instructions, safety guidelines, recommendations, and local
environmental requirements.
7.6.5 With the lid removed, allow the machine to dry completely.
7.6.6 If the strainer is dirty, pull it upward and out of the tank and clean completely.
7.6.7 Place the machine in a dry area - out of reach of children, pets, and unauthorized persons.
8. STORAGE
8.1 For periods of non-use longer than 2 months this machine must be prepared for proper storage.
8.2 Drain and clean the tank in a well ventilated area.
8.3 Ensure the tank, pipes are empty and flushed out with clean water to prevent chemical
corrosion.
8.4 Wipe down the machine and make sure all parts are clean.
8.5 Remove the battery pack and store it in a safe dry place, out of reach of children, pets,
unauthorized persons, and away from any sunlight. If you do not plan to use the charger for
any other TOMAHAWK® equipment, place it with the battery pack as well.
8.6 Store it separately and fully charged. Check the battery every 3 months and recharge if
the level falls below 50%.
8.7 Place the machine in a dry well ventilated area on an even, level surface - away from any
sunlight. Secure the machine to prevent it from tipping over or being damaged.

9. REPLACEMENT PARTS
9.1 For replacement parts and technical questions visit www.tomahawk-power.com or scan
the QR code on the front of this manual.
9.2 Not all equipment components are available for replacement. The illustrations within
this manual are a convenient reference to the location and position of parts
in the assembly sequence.
9.3 When ordering parts, the following may be required: equipment model number, serial
number/lot, date code, and description. The manufacturer reserves the right to make design
changes and/or improvements to equipment, parts, accessories, and manuals without
notice.
10. TROUBLESHOOTING
15
PROBLEM POSSIBLE CAUSES SOLUTION
Nozzle clogged Clean nozzle
Plunger stuck or worn Check/replace
Issue with power switch
Motor slow/damaged Check/replace
Loose seals Check/replace
Hose aging
Replace hose
Cap not tightened Tighten cap
Seal misaligned/aged Adjust/replace
Internal hose damaged
Replace
Replace/clear
Low spray volume
Leaking joints
Tank cap leaking
Switch assembly leaks
16
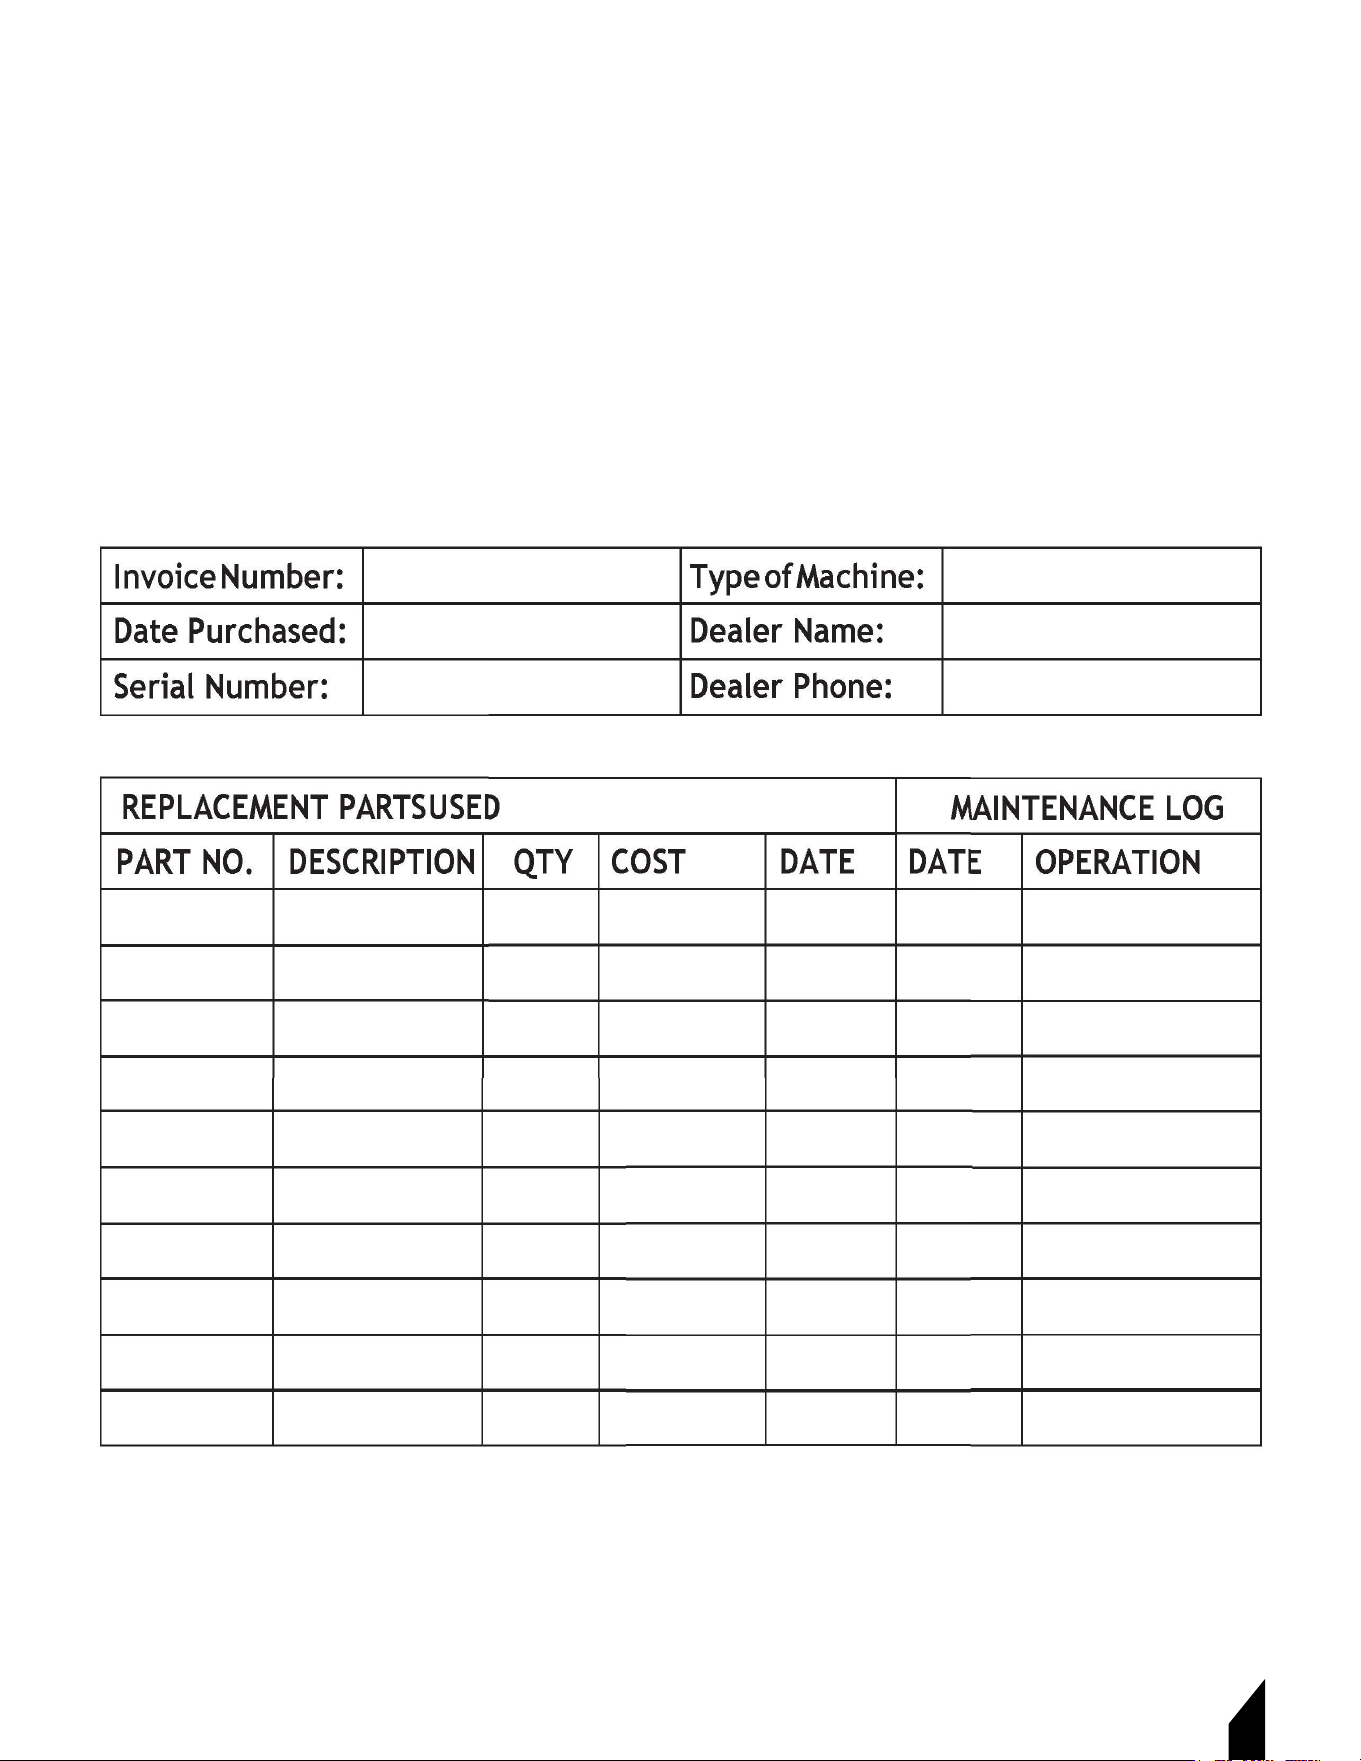
11. MAINTENANCE RECORD
TOMAHAWK® tools are assembled with care and will provide years of service when properly
maintained. Preventative maintenance and routine service are essential to the long life of
your welding generator. Adhere to reading through this manual thoroughly. You will find
that you can do some of the regular maintenance yourself. However, when in need of parts
or major service, be sure to contact a TOMAHAWK® Technician. For your convenience we
have provided this space to record relevant data about your TOMAHAWK® equipment.

17
12. EQUIPMENT WARRANTY
Your new TOMAHAWK® equipment is warranted to the original purchaser for a period of
one-year (12 months) from the original date of purchase. The TOMAHAWK® warranty is
against defects in design, materials and workmanship.
The following are not covered under the warranty:
12.1
Damage caused by abuse, misuse, dropping or other similar damage caused by or as a
result of failure to follow assembly, operation or user maintenance instructions.
12.2
Alterations, additions or repairs carried out by persons other than TOMAHAWK® or their
recognized agents.
12.3
Transportation or shipment costs to and from TOMAHAWK® or their recognized agents,
for repair or assessment against a warranty claim, on any machine.
12.4
Materials and/or labor costs to renew, repair or replace components due to fair
wear and tear.
12.5
TOMAHAWK® and/or their recognized agents, directors, employees or insurers will not
be held liable for consequential or other damages, losses or expenses in connection with or
by reason of or the inability to use the machine for any purpose.
12.1 Warranty Claims
Before submitting any warranty claim, you will need to register your new TOMAHAWK®
equipment through www.tomahawk-power.com or email
support@tomahawk-power.com.
Follow the steps on page 3 or scan this QR codes to complete
all warranty claims should firstly be directed to TOMAHAWK® through the online Service
Request form found at
www.tomahawk-power.com/pages/service-request.
13. SERVICES CENTERS
Our service centers are equipped to handle your equipment maintenance and repair needs
support and genuine parts needed to keep your equipment running smoothly. All locations
are listed on the webpage .
For Service Call (866) 577-
4476
18
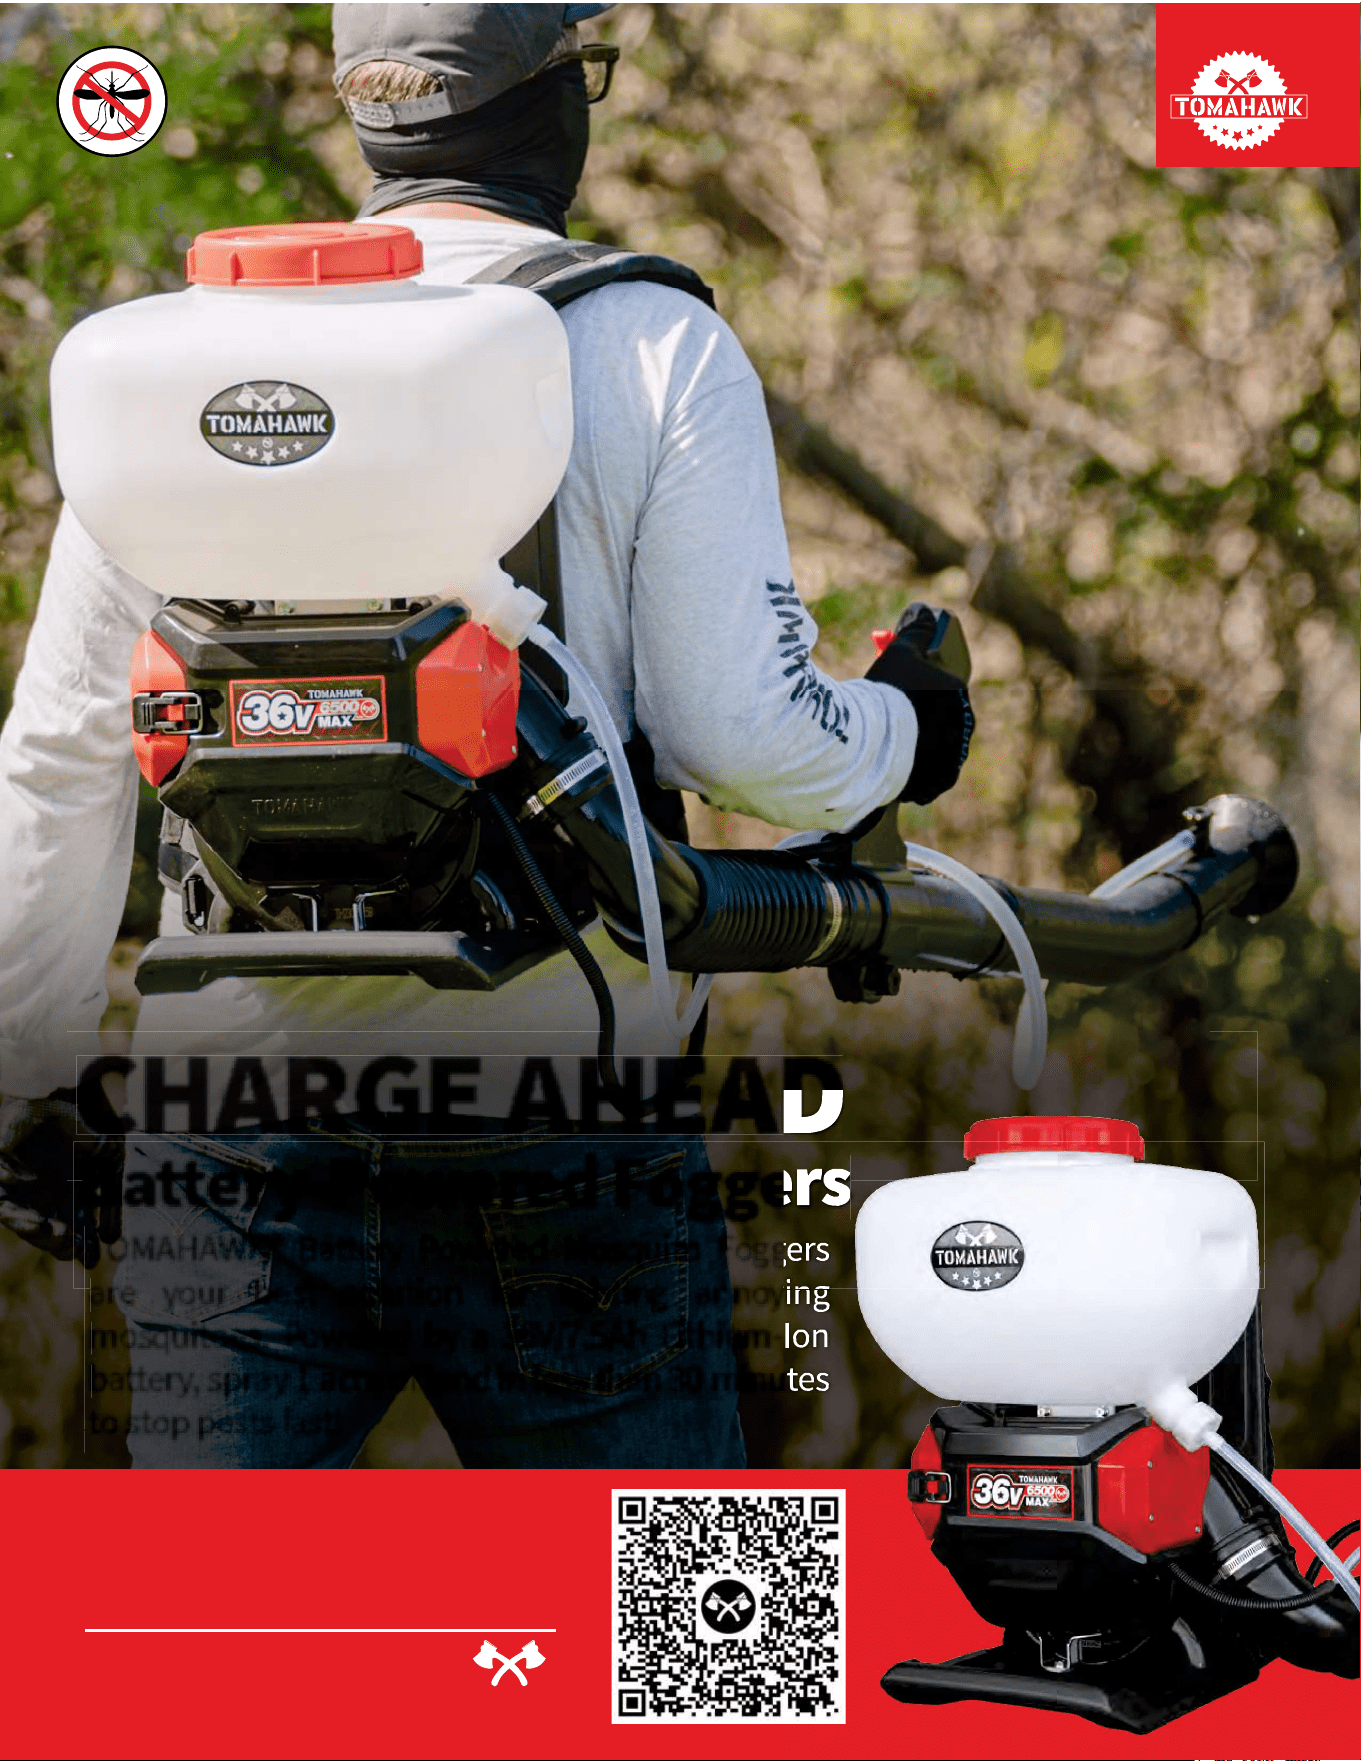
CHARGE AHEAD
Battery-Powered Foggers
TOMAHAWK® Battery Powered Mosquito Foggers
are your best solution for fighting annoying
mosquitoes. Powered by a 36V/7.5Ah Lithium-Ion
battery, spray 1 acre of land in less than 30 minutes
to stop pests fast!
Item #: eTMD14
4 GALLON BATTERY
BACKPACK FOGGER
www.tomahawk-power.com
19

13. PART LIST
Part#:
eTMD14
Part#:
TPS25
Backpack Fogger
2-in-One Spreader / Blower
Gas-Powered, 3HP, 2-Stroke, 30ft Reach,
4 Gallon Tank, Cover 1 Acre in 30 Minutes
Lawn, Seed Feed, Ice Melt
5-70 Adjustable PSI,
25ft Reach, Battery-Powered, 12V/7ah
Cover 1 Acre of Land in 15 Minutes
Run Time @ 45 PSI: > 11 Hours (400cc/min)
2-in-One Spreader / Blower
Battery-Powered, 36V/7.5ah, 25ft Reach
5 Gallon Tank, Cover 1 Acre in 30 Minutes
Lawn, Seed Feed, Ice Melt
2-in-One Spreader / Blower
Gas-Powered, 3HP, 2-Stroke, 40ft Reach,
490 CFM/220 MPH, 25-100 ,icrons,
4 Gallon Tank, Spray 1 Acre in 30 Minutes
2-in-One Spreader / Blower
Gas-Powered, 3HP, 2-Stroke, 40ft Reach,
490 CFM/220 MPH, 25-100 Microns,
4 Gallon Tank, Spray 1 Acre in 30 Minutes
50-450 Adjustable PSI
30ft Reach, Gas-Powered, 1.8HP, 2-Stroke,
Cover 1 Acre of Land in 15 Minutes
Flow Rate: 1-2.5 GPM, 5 Gallon Tank
Trash Water Pumps
Part#:
2" Pump, Honda GX170, 164 GPM, Elevation: 105ft,
Suction: 26ft
3" Pump, Honda GX270, 375 GPM, Elevation: 89ft,
Suction: 25ft
4" Pump, Honda GX390, 581 GPM, Elevation: 92ft,
Suction: 26ft
We’re here to help!
Email us at [email protected]
Battery Backpack Fogger
Backpack Sprayer
Part#:
TGS30
Run Time @ 45 PSI: > 11 Hours (400cc/min)
25ft Reach, Battery-Powered, 12V/7ah
Part#:
eTPS18
Part#:
eTGS30
Battery Sprayer Fertilizer Spreader Battery Fertilizer Spreader
Equipment Guide
Power Buggy
48V-20Ah Battery
Handles up to 8 cu ft or 660 lbs. Bucket Capacity
Hydraulic Bucket with 92
o
Tilt, 8 Hour Run Time
Snow Plow Attachment & Bucket Extender Available
Part#: TBUGGY300e
50-500 Adjustable PSI,
30ft Reach Honda, Gas-Powered, 1.8HP,
4-Stroke Cover 1 Acre of Land in 15 Minutes,
Includes 100ft Hose and Nozzle
Part#:
TBS500
Skid Sprayer
Part#:
TMD14
TW2H
TW3H
TW4H
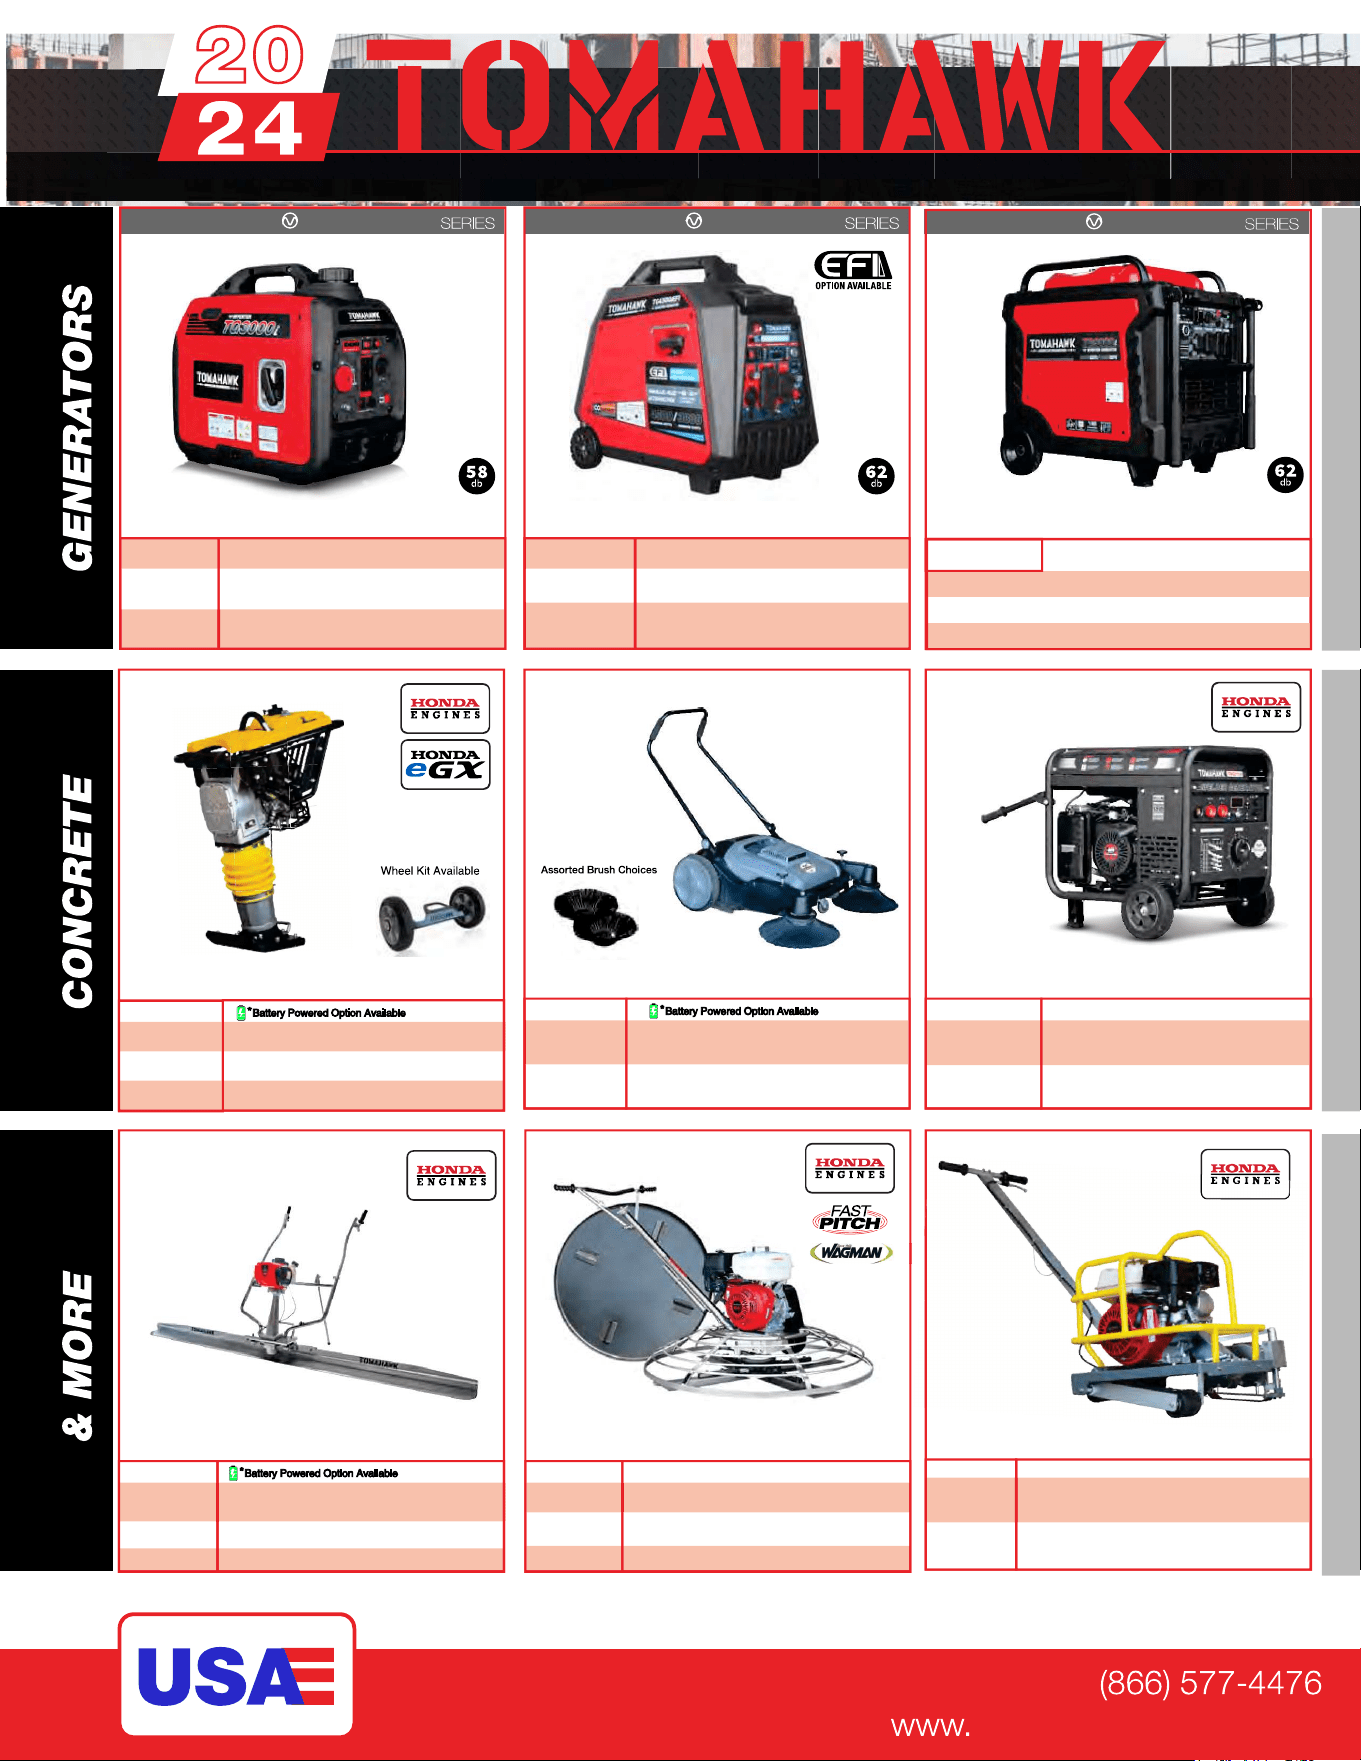
QUIET INVERTER
QUIET INVERTER
4,500 - 5,500 Watt Series
10,500 Watt Series
QUIET INVERTER
tomahawk-power.com
ASSEMBLED IN THE
PARTS SOURCED GLOBALLY
TG2000i
TG3000i
2,000 - 3,300 Watt Series
Equipment Guide
4,500w Max
/
3,800w Rated
5,500w Max / 5,000w Rated, 120/220V
Run Time 8 Hrs @ 50% Load
CARB Compliant, GFCI
TG4500i
TG5500i
10,500w Max
/
8,500w Rated
Voltage Selector, 120/220V
Run Time 14.5hrs @ 25% Load
CARB Compliant, GFCI, CO Detector
TG9000i
2,200w Max
/
2,000w Rated
3,300w Max
/
3,000w Rated,
120/220V, 30 AMP Twist Lock
Run Time 8 Hrs @ 50% Load
CARB Compliant, GFCI 120v
Welder Generators
120 Amp Welder, 60% Duty Cycle,
2000w, Includes Wheel Kit
210 Amp Welder, 60% Duty Cycle,
2000w, Includes Wheel Ki
t
6010-7024 Rods Compatible
Part#:
TWG120A
TWG210A
Floor Sweepers
38" Working Width, Triple Broom
System, 14.5 Gallon
30" Working Width, Battery Powered
Triple Broom System, 13.5 Gallon
Part#:
TOS38
eTOS30
Rammers
Part#:
TR68H
JX60H
eJX60H
3,550 lbs/sq ft, Honda GX120
3,350 lbs/sq ft, Honda GX100
3,350 lbs/sq ft, Honda GXE2.0S
TVSA-H
TVSA-T
eTVSA
Power Screeds
Part#:
Honda, Gas-Powered,
6-16 ft Magnesium Blades
Battery-Powered, 6-16 ft Magnesium Blades
Gas-Powered, 6-14 ftAluminum Blades
Part#:
TPT24H
TPT36H
TPT46H
2 ft Edger, Honda GX160, 0-28
o
Blade Pitch
3 ft, Honda GX160/GX270, 0-28
o
Blade Pitch
4 ft, Honda GX270/GX390, 0-28
o
Blade Pitch
Walk Behind Trowels
Items Listed Includes Combo Blades
Early Entry Saws
Part#:
TFS6H
TFS10H
6" Blade Diameter, Blade Compatibility,
Honda GX120
10" Blade Diameter, Self Propelled,
Blade Compatibility, Honda GX270/GX390

TOMAHAWK®, LLC
San Diego, CA
Sales Support
(866) 577-4476
Equipment Support
(866) 577-4476
www.tomahawk-power.com
Tomahawk understands to keep a job-site running smoothly the proper equipment and
spare parts are needed at the drop of a hat. With same day shipping and faster
delivery times, count on Tomahawk to keep you powered throughout the day! With
long lasting parts and engines, Tomahawk equipment will be the star of your fleet for
years to come. Visit www.tomahawk-power.com to get started today!
Power Your World
FACEBOOK
facebook.com/TomahawkPowerUSA
YOUTUBE
youtube.com/TomahawkPower
INSTAGRAM
@tomahawkpower