en-us
2
Further information and explanations are available online:
Table of contents
1 IMPORTANT SAFETY INSTRUCTIONS.................... 3
1.1 Safety definitions....................................................... 3
1.2 Safe use.................................................................... 3
1.3 Child safety ............................................................... 4
1.4 Proper installation and maintenance ......................... 4
1.5 State of California Proposition 65 Warnings .............. 4
2 Preventing material damage .................................... 5
3 Environmental protection and energy-saving ........ 5
3.1 Disposal of packaging ............................................... 5
4 Before using for the first time .................................. 5
4.1 Cleaning the appliance before using it for the first
time........................................................................... 5
5 Familiarizing yourself with your appliance ............. 5
5.1 Function .................................................................... 5
5.2 Appliance .................................................................. 6
5.3 Control elements....................................................... 6
5.4 Vacuum-sealing levels .............................................. 6
6 Accessories............................................................... 7
6.1 Other accessories ..................................................... 7
7 Basic Operation ........................................................ 7
7.1 Opening the appliance .............................................. 7
7.2 Closing the appliance................................................ 7
7.3 Switching on the appliance........................................ 7
7.4 Switching off the appliance........................................ 7
8 Vacuum-sealing in a bag .......................................... 8
8.1 Suitable vacuum-sealing bags .................................. 8
8.2 Filling the bag............................................................ 8
8.3 Vacuum-sealing in a bag........................................... 9
8.4 Early heat-sealing ..................................................... 9
8.5 Canceling the vacuum-sealing process in a bag ....... 9
9 Vacuum-sealing in a container .............................. 10
9.1 Suitable vacuum-sealing containers........................ 10
9.2 Vacuum-sealing in a container ................................ 10
9.3 Canceling the vacuum-sealing process in a
container ................................................................. 10
10 Drying .................................................................... 10
10.1 Starting drying....................................................... 10
11 Cleaning and maintenance................................... 11
11.1 Cleaning agents .................................................... 11
11.2 Cleaning the appliance.......................................... 11
11.3 Cleaning the glass front and glass lid.................... 11
11.4 Cleaning the stainless steel vacuum-sealing
compartment .......................................................... 11
11.5 Cleaning the plastic control panel........................... 11
11.6 Cleaning the heat-sealing bar................................. 11
11.7 Cleaning theaccessories ....................................... 11
12 Troubleshooting..................................................... 12
13 How it works ........................................................... 13
13.1 Vacuum-sealing for sous-vide cooking ................... 13
13.2 Vacuum-sealing glass bottles................................. 14
13.3 Fast marinating and flavoring ................................. 14
13.4 Storing and transporting food ................................. 14
13.5 Recommended settings.......................................... 15
14 Disposal .................................................................. 15
14.1 Disposal of your old appliance................................ 15
15 Customer Service................................................... 15
15.1 Model number (E-Nr.) and production number
(FD)........................................................................ 16
15.2 Rating plate location............................................... 16
16 STATEMENT OF LIMITED PRODUCT
WARRANTY ............................................................ 16
16.1 What this warranty covers & Who it applies to........ 16
16.2 How long the warranty lasts ................................... 16
16.3 Repair/replace as your exclusive remedy ............... 16
16.4 Out of warranty product.......................................... 17
16.5 Warranty exclusions ............................................... 17
16.6 Obtaining warranty service ..................................... 18
16.7 Product information ................................................ 18

en-us
3
Read all of the instructions carefully before using the
appliance. In order to reduce the risk of fire, electric
shocks and personal injuries when using the appliance,
follow the basic safety precautions, including the following
safety instructions.
1.1 Safety definitions
Here you can find explanations of the safety signal words
used in this manual.
WARNING
This indicates that death or serious injuries may occur as
a result of non-observance of this warning.
CAUTION
This indicates that minor or moderate injuries may occur
as a result of non-observance of this warning.
NOTICE:
This indicates that damage to the appliance or property
may occur as a result of non-compliance with this
advisory.
Note:This alerts you to important information and/or tips.
1.2 Safe use
WARNING
When properly cared for, your new appliance has been
designed to be safe and reliable.
▶ Read all instructions carefully before use. These
precautions will reduce the risk of burns, electric shock,
fire, and injury to persons.
▶ When using kitchen appliances, basic safety
precautions must be followed, including those in the
following pages.
This appliance is intended for normal family household
use only. It is not approved for outdoor use. See the
Statement of Limited Product Warranty. If you have any
questions, contact the manufacturer.
Examine the appliance after unpacking it. In the event of
transport damage, do not plug it in.
WARNING
Using this appliance other than for its intended use can
cause fire or injury to persons.
▶ Use this appliance only for its intended use as
described in this manual.
▶ Never use the appliance for storage.
WARNING
The heat-sealing bar in the vacuum-sealing compartment
becomes extremely hot if the appliance is used frequently
and there are long heat-sealing times.
▶ Never touch the hot heat-sealing bar.
▶ Keep children away from the appliance.
WARNING
Moisture intrusion may cause an electric shock.
▶ Do not use any steam cleaners or high-pressure
cleaners to clean the appliance.
To avoid risk of injury from damaged insulation of the
power cord, observe the following.
▶ Never let the power cord come into contact with heat
sources.
▶ Never let the power cord come into contact with sharp
points or edges.
▶ Never kink, crush or modify the power cord.
WARNING
The heat-sealing bar in the vacuum-sealing compartment
becomes extremely hot. Flammable vapors may ignite.
▶ Do not vacuum-seal any flammable liquids in the
vacuum-sealing bag.
▶ Do not store any combustible materials and objects
inside the appliance.
WARNING
The smallest cracks in the glass lid may result in it
imploding when the vacuum is attached.
▶ Unplug the appliance from the mains or switch off the
fuse in the fuse box.
▶ Call Customer Service.
Any misuse of the vacuum-sealing drawer may lead to
injury.
▶ Do not insert any hoses that are connected to the
appliance into any body cavities.
▶ Do not vacuum-seal any living animals.
WARNING
During the vacuuming process, the vacuum-sealing
compartment and the glass lid deform due to the high
negative pressure. The protective layer on the glass may
be damaged and the glass lid may break.
▶ Screw-top jars, other hard containers, and non-
deformable food that are vacuum-sealed in the
compartment when the lid is closed must not come into
contact with this lid.
▶ Hard containers and non-deformable food must not
protrude over a maximum height of 3¼" (80mm).
IMPORTANT SAFETY INSTRUCTIONS
READ AND SAVE THESE INSTRUCTIONS

en-us
4
1.3 Child safety
This appliance is not intended for use by persons
(including children) with reduced physical, sensory or
mental capabilities, or lack of experience and knowledge,
unless they have been given supervision or instruction
concerning use of the appliance by a person responsible
for their safety.
When children become old enough to use the appliance, it
is the responsibility of the parents or legal guardians to
ensure that they are instructed in safe practices by
qualified persons.
Children should be supervised to ensure that they do not
play with the appliance.
WARNING
Do not allow children to use this appliance unless closely
supervised by an adult.
▶ Children and pets should not be left alone or
unattended in the area where the appliance is in use.
They should never be allowed to play in its vicinity,
whether or not the appliance is in use.
Do not allow anyone to climb, stand, lean, sit, or hang on
any part of an appliance, especially a door, warming
drawer, or storage drawer.
▶ This can damage the appliance, and the unit may tip
over, potentially causing severe injury.
Do not let children play with the appliance.
CAUTION
Do not store items of interest to children in an appliance,
in cabinets above an appliance or on the backguard of an
appliance. Children climbing on the appliance to reach
items could be seriously injured.
Do Not Leave Children Alone.
▶ Children should not be left alone or unattended in the
area where the appliance is in use.
▶ They should never be allowed to sit or stand on any
part of the appliance.
WARNING
To avoid the risk of suffocation:
▶ Do not allow children to play with packaging material.
1.4 Proper installation and maintenance
WARNING
In the event of a malfunction, it might become necessary
to turn off the power supply.
▶ Have the installer show you the circuit breaker or fuse.
Mark it for easy reference.
To avoid electrical shock hazard, before servicing the
appliance, turn power off at the service panel and lock the
panel to prevent the power from being switched on
accidentally.
Proper Installation - Improper installation or grounding can
cause electric shock.
▶ This appliance must be properly installed and grounded
by a qualified technician.
▶ Connect only to properly grounded outlet.
▶ Refer to installation instructions for details.
User Servicing - Do not repair or replace any part of the
appliance unless specifically recommended in this
manual.
▶ All other servicing should be referred to an authorized
service provider.
WARNING
Malfunctions can cause injuries.
▶ Do not operate this appliance if it is not working
properly, or if it has been damaged. Contact an
authorized service provider.
1.5 State of California Proposition 65
Warnings
This product may contain a chemical known to the State
of California, which can cause cancer or reproductive
harm. Therefore, the packaging of your product may bear
the following label as required by California:
IMPORTANT SAFETY INSTRUCTIONS
READ AND SAVE THESE INSTRUCTIONS

Preventing material damage en-us
5
Preventing material damage
2 Preventing material damage
Preventing material damage
NOTICE:
Damage to the appliance may affect the safety
considerably.
▶ Check the appliance for damage before each use.
▶ Check that the glass lid is intact.
▶ Never use a damaged appliance.
▶ Call Customer Service.
Using the appliance carelessly may cause damage to the
appliance.
▶ Open and close the glass lid slowly.
▶ Do not place any objects on the glass lid.
▶ Do not use the appliance as a work surface or storage
space.
▶ Do not let any objects fall onto the glass lid.
▶ Pull the drawer out completely during use.
▶ After use, close the drawer completely.
Foreign objects in the vacuum-sealing compartment
damage the appliance.
▶ Before closing the glass lid, ensure that there is no
debris in the vacuum-sealing compartment.
If the seal is positioned incorrectly or is damaged, this
impairs the function of the appliance and may damage the
appliance.
▶ Check that the seal is positioned correctly on the glass
lid.
▶ The seal's contact surface must be clean and free from
debris.
▶ Do not damage the seal with pointed or sharp objects.
▶ Never operate an appliance with a defective seal.
▶ If a seal is defective, contact customer service.
Using tools to open the glass lid damages the appliance.
▶ In the event of a power outage during the vacuum-
sealing process, wait until the power supply is restored.
The vacuum in the vacuum-sealing compartment is
retained. Restart the vacuum-sealing process.
Escaping steam caused by boiling at excessive
temperatures may lead to malfunctions.
▶ Only use bags that are suitable for vacuum-sealing
food.
▶ Do not use any sales packages that have already been
opened.
▶ Process the food that is to be vacuum-sealed at an
output temperature of 33-46°F (1–8°C).
▶ Do not vacuum-seal liquids in the vacuum-sealing bag
at the highest level. Recommendation: Use vacuum-
sealing level2.
▶ Heat-seal the bag if you notice an intensified formation
of bubbles.
Moisture may damage the appliance.
▶ Do not use the appliance to store food and drinks. The
moisture in the food may cause corrosion damage.
Environmental protection and energy-saving
3 Environmental protection and
energy-saving
Environmental protection and energy-saving
3.1 Disposal of packaging
The packaging materials are environmentally compatible
and can be recycled.
▶ Sort the individual components by type and dispose of
them separately.
Before using for the first time
4 Before using for the first time
Before using for the first time
Prepare the appliance for use.
4.1 Cleaning the appliance before using it for
the first time
Note:Once the mains plug is connected, a signal tone
sounds. The indicators light up one after the other.
Requirement:There are no objects in the appliance.
1. Press on the appliance's front panel.
a The appliance opens and can be pulled out all the way
by the sides or underside of the front panel.
2. Remove the raised vacuuming platform.
3. Clean the appliance with a damp cloth and a neutral
cleaning agent, such as dishwashing liquid and water.
Familiarizing yourself with your appliance
5 Familiarizing yourself with your
appliance
Familiarizing yourself with your appliance
5.1 Function
During the vacuum-sealing process, air is pumped out of
the vacuum-sealing compartment and the bag.
This produces a high vacuum in the compartment. The
higher the vacuum-sealing level, the less air remains in
the compartment and the bag, and the higher the pressure
difference to the environment.
Once the selected vacuum-sealing level has been
reached, the heat-sealing bar is pressed against the
silicone bar on the glass lid. During this, the bag is heat-
sealed.
After a short cooling time, air flows back into the
compartment, creating a loud noise. During this process,
the bag suddenly contracts and encloses the food. The
drawer's glass lid then opens.
en-us Familiarizing yourself with your appliance
6
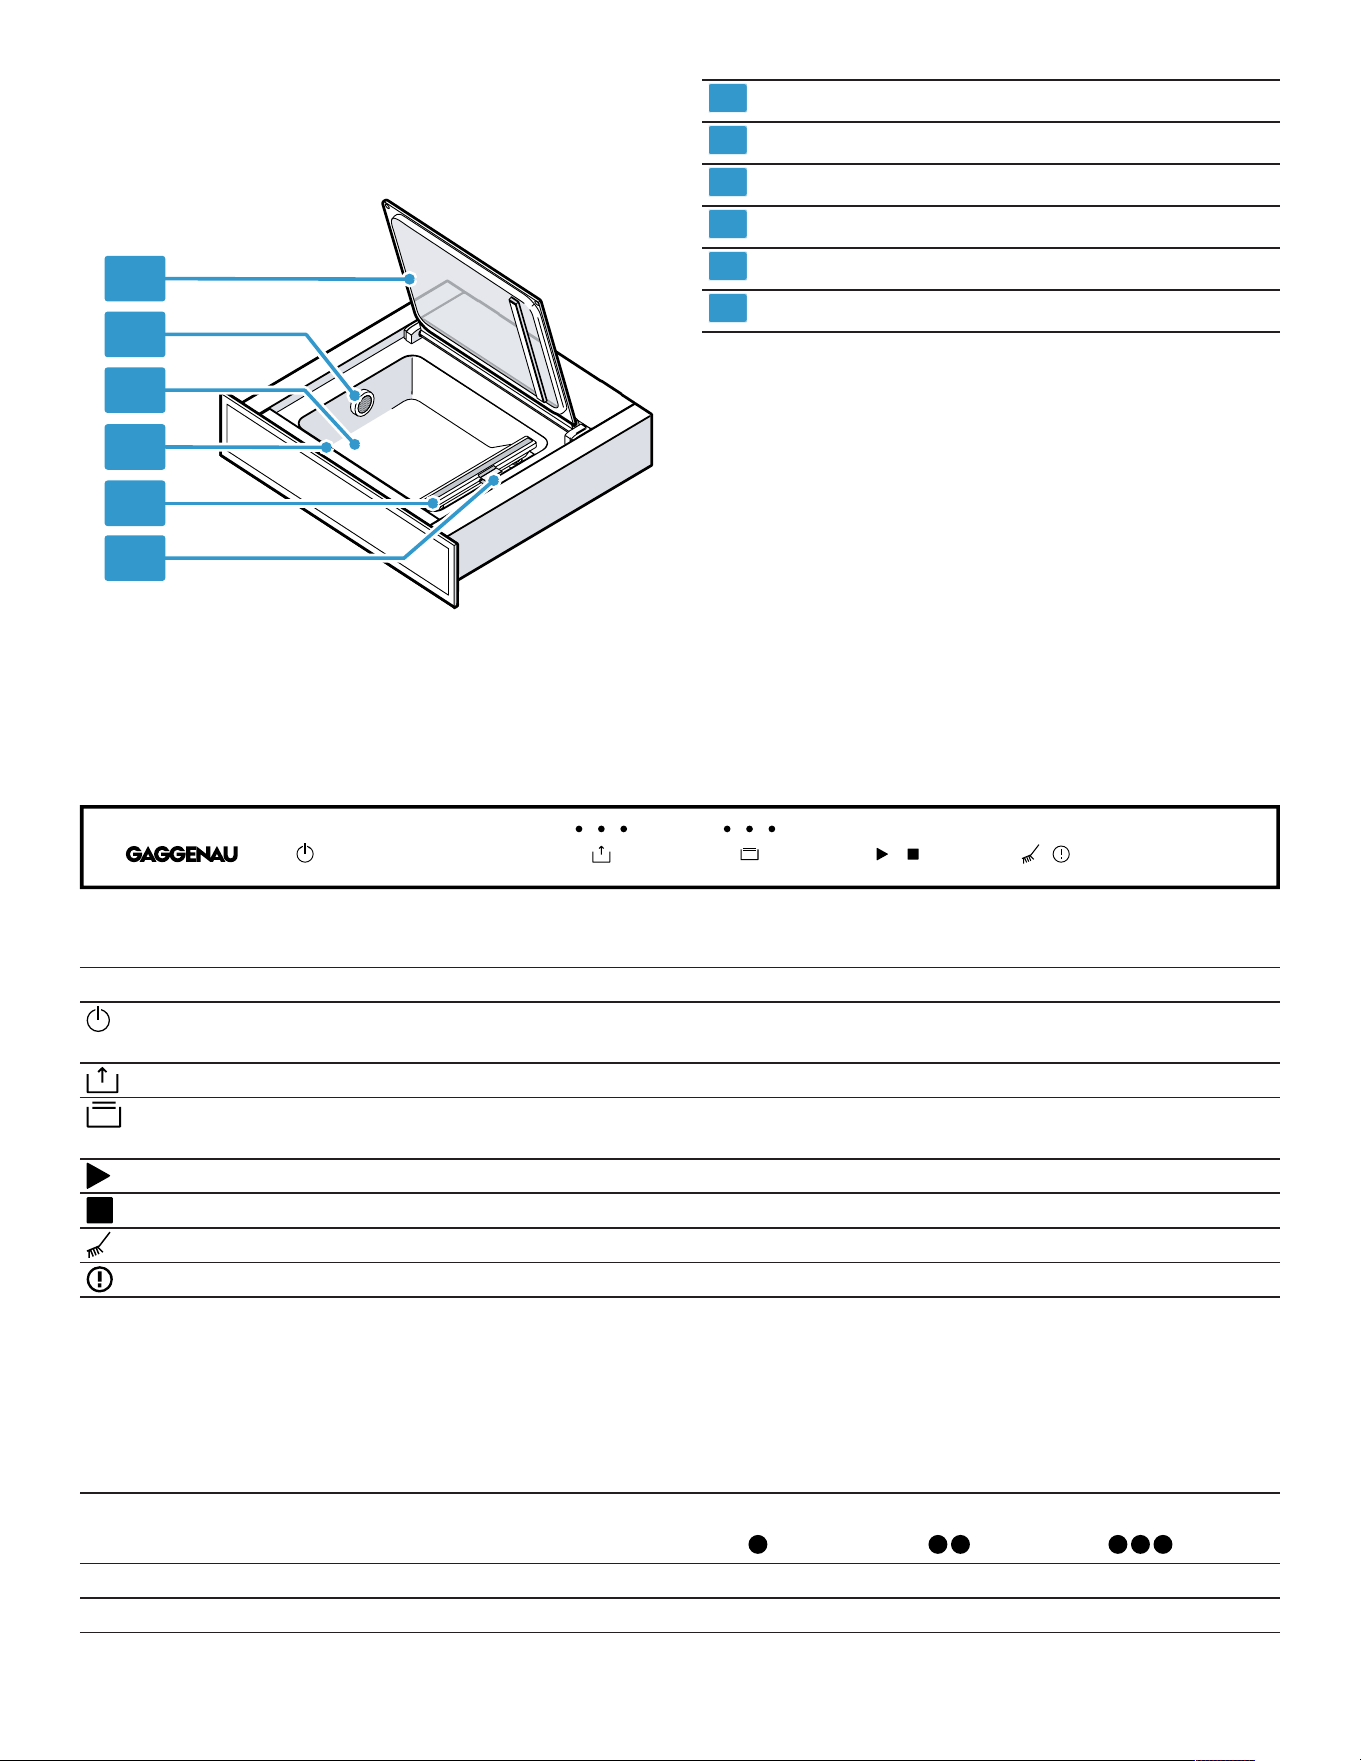
5.2 Appliance
Here you can find an overview of the parts of your
appliance.
1
2
3
4
5
6
1
Glass lid
2
Air outlet
3
Vacuum-sealing compartment
4
Control panel
5
Heat-sealing bar
6
Bag clamp
5.3 Control elements
You can use the control panel to configure all functions of your appliance and to obtain information about the operating
status.
Symbol Meaning Explanation
Switch on
Switch off
Switching on the appliance
Switching off the appliance
Vacuum-sealing level Select the vacuum-sealing level
Heat-sealing time Select a heat-sealing time
Heat-seal the vacuum-sealing bag early
Start Start the vacuum-sealing process
Stop Cancel the vacuum-sealing process
Dry Dry the pump
Note Refer to the fault table
5.4 Vacuum-sealing levels
The vacuum-sealing levels 1 to 3 achieve different degrees of vacuum.
When vacuum-sealing in the container, the degrees of vacuum are lower and therefore better suited for the particular
food. When the external vacuum adapter is attached, the appliance automatically detects which mode has just been
activated.
Vacuum-sealing levels
Display
1 2 3
Vacuum-sealing in a bag 80% 95% 99%
Vacuum-sealing containers and bottles 50% 75% 90%
Accessories en-us
7
Accessories
6 Accessories
Accessories
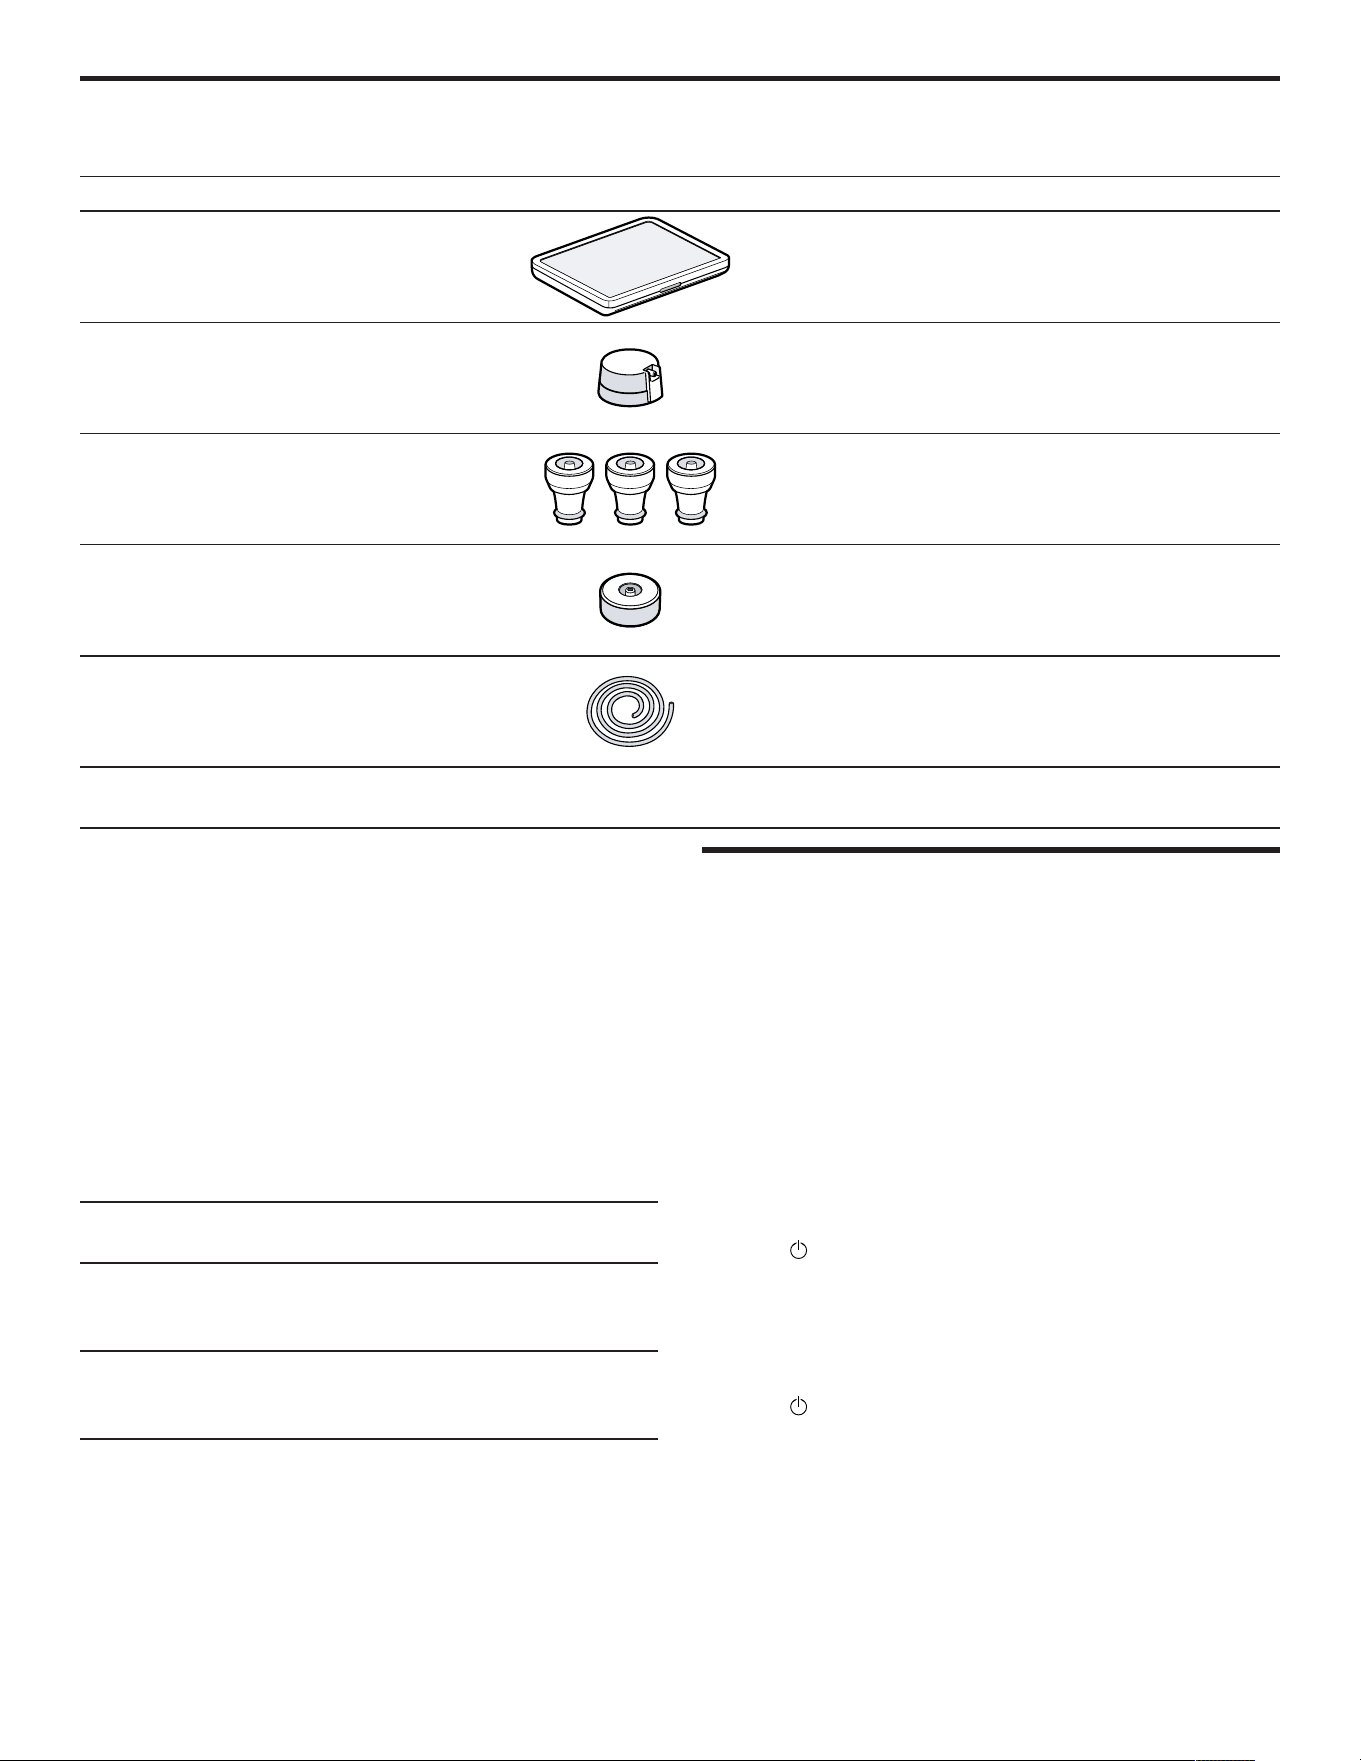
Only use genuine accessories. These are designed especially for your appliance.
Accessories Property Use
Raised vacuuming platform As a surface for flat food that is to be
vacuum-sealed in the compartment.
External vacuum adapter Vacuum-sealing containers or bottles.
Vacuum stoppers for bottles Vacuum-seal and seal bottles.
Adapter for bottle stoppers Connect vacuum stoppers for bottles to
the vacuum hose.
Vacuum hose Connect the external vacuum adapter
to the vacuum-sealing container or the
adapter for bottle stoppers.
Vacuum-sealing bags 7.1" x 11" (180 x 280mm) - 50 pcs
9.5" x 13.8" (240 x 350mm) - 50 pcs
6.1 Other accessories
You can purchase other accessories from our Customer
Service, specialist retailers or online.
You will find a comprehensive range of products for your
appliance in our brochures and online:
www.gaggenau.com
Accessories are appliance-specific. When purchasing,
always check for compatibility with your appliance model
number (E-Nr).
You can find out which accessories are available for your
appliance in our online shop or from our Customer
Service.
Other accessories Customer Service order
number
Vacuum-sealing bag 7.1" x
11" (180x280mm) (100
pcs)
00578813
Vacuum-sealing bag 9.5" x
13.8" (240x350mm) (100
pcs)
00578814
Basic Operation
7 Basic Operation
Basic Operation
7.1 Opening the appliance
▶ Press on the appliance's front panel.
a The appliance opens and can be pulled out all the way
by the sides or underside of the front panel.
7.2 Closing the appliance
▶ Push the appliance in.
7.3 Switching on the appliance
▶ Press .
7.4 Switching off the appliance
If you do not perform any actions on the appliance for
10minutes, the appliance automatically switches off.
▶ Press .
en-us Vacuum-sealing in a bag
8
Vacuum-sealing in a bag
8 Vacuum-sealing in a bag
Vacuum-sealing in a bag
In the bag, vacuum-sealed food has a longer shelf life.
You can therefore marinate the food or prepare for sous-
vide cooking.
8.1 Suitable vacuum-sealing bags
Use suitable vacuum-sealing bags in order to achieve an
optimum result.
Use the original vacuum-
sealing bags that are
enclosed with the appliance
or can be ordered as
accessories.
¡ These bags are suitable
for a temperature range
of -40°F to 212°F
(-40°C to 100°C).
¡ The optimum heat-
sealing time for these
bags is level 2.
¡ The bags are suitable for
use in the microwave.
Pierce the bags before
you heat them up in the
microwave.
Only use bags that are
suitable for vacuum-sealing
food.
Commercially available
products are different when
it comes to the quality of
the food, temperature
resistance, material, and
surface.
The heat-sealing time for
the vacuum-sealing bag
always depends on the
material from which it is
made.
¡ Thin-walled bag: Heat-
sealing level1
¡ Thicker material: Heat-
sealing level2 or higher
Use bags with a maximum
width of 240mm.
The length of the heat-
sealing bar limits the size of
the vacuum-sealing bag
that can be used.
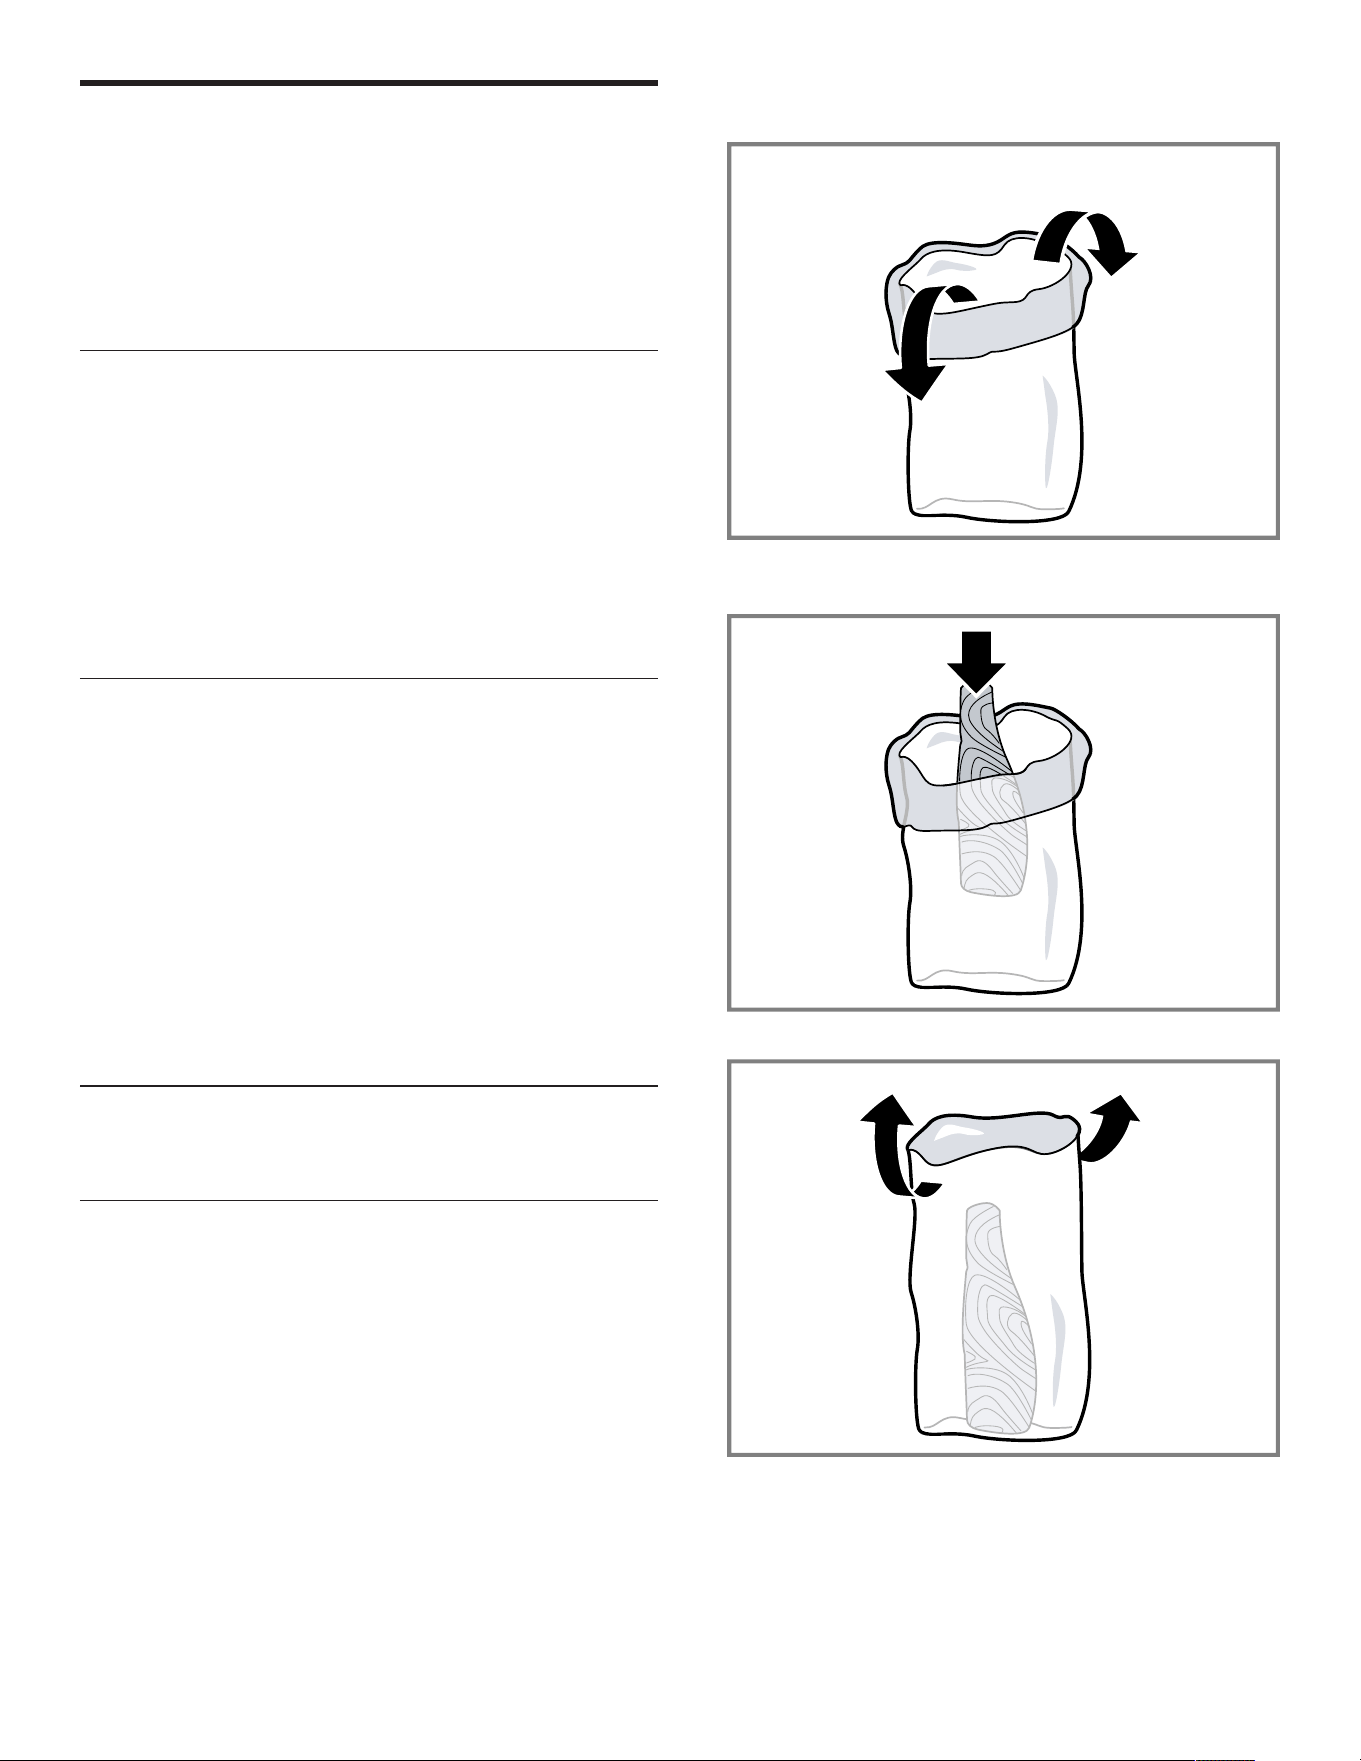
8.2 Filling the bag
Requirements
¡ The edge of the bag is clean and dry.
¡ There is no food residue around the edge of the bag in
the area around the seam.
1. Fold over the edge of the bag outwards by approx.
3cm.
2. Where possible, position the items of food in the
vacuum-sealing bag next to each other.
3. Fold the edge of the bag back.
Tip:To ensure that you can keep track of your bags and
the food that is vacuum-sealed within them, make a note
on the bag of the date of the vacuum-sealing along with
the contents.

Vacuum-sealing in a bag en-us
9
8.3 Vacuum-sealing in a bag
WARNING
The heat-sealing bar in the vacuum-sealing compartment
becomes extremely hot if the appliance is used frequently
and there are long heat-sealing times.
▶ Never touch the hot heat-sealing bar.
▶ Keep children away from the appliance.
Requirement:The initial temperature of the food is ideally
in the range of 1–8°C.
1. Open the glass lid.
2. Place the vacuum-sealing bag in the compartment and
secure using the bag clamp.
3. Make sure that the air outlet is not covered so that the
pump can extract the air from the compartment.
4. Ensure that the bag is centered and the ends of the bag
are lying flat on top of each other on the heat-sealing
bar. To ensure that the heat-sealing seam is perfectly
closed, secure the bag using the bag clamp.
5. Use the raised vacuuming platform so that the bag does
not slip.
6. Press to select the vacuum-sealing level.
7. Press to select the heat-sealing time.
8. Tightly close the glass lid and hold it there for a few
seconds.
9. Press to start the vacuum-sealing process.
a The vacuum-sealing process starts. The vacuum-
sealing level indicators pulsate in orange one after the
other until the selected value has been reached.
a The heat-sealing process starts. The vacuum-sealing
level indicators pulsate in orange one after the other
until the selected level has been reached.
a The vacuum-sealing process can take up to 1minute.
a At the end of the process, the compartment is
ventilated. A signal tone sounds.
10.Once the vacuum-sealing process is finished, open the
glass lid.
11.Remove the heat-sealed vacuum-sealing bag from the
compartment.
12.After vacuum-sealing, check the heat-sealing seam on
the bag.
‒ Carefully pull the seam apart.
‒ If the seam does not stay together, select a higher
heat-sealing level.
‒ If the seam is deformed, select a lower heat-sealing
level or leave the appliance to cool down.
Note:If you vacuum-seal food in bags several times in
succession, the heat-sealing bar becomes increasingly
hotter. This may impair the quality of the heat-sealing
seam. After several vacuum-sealing processes, select a
lower heat-sealing time or leave the appliance to cool for
approx. 2minutes between the processes.
8.4 Early heat-sealing
Use this function if you only want to pack your delicate
food in a bag so that it is air-tight, without the contents
sitting too tightly against the bag. Also use this function if
bubbles are forming in the liquids in the bag.
1. To stop the vacuum-sealing process and heat-seal the
bag early, press .
a The appliance displays the vacuum-sealing level until it
is reached.
a At the end of the process, the compartment is
ventilated.
a A signal tone sounds.
2. Open the glass lid.
3. Remove the heat-sealed vacuum-sealing bag from the
compartment.
Note:To heat-seal the bag, the appliance requires a
specific degree of vacuum.
If you press first, the appliance pumps air out of the
compartment until this degree has been reached. The bag
is then heat-sealed.
8.5 Canceling the vacuum-sealing process in
a bag
1. To cancel the vacuum-sealing process early, press .
a The appliance displays the vacuum-sealing level until it
is reached.
a The bag is not heat-sealed.
a The lid opens slightly and the compartment is
ventilated.
en-us Vacuum-sealing in a container
10
a A signal tone sounds.
2. Remove the vacuum-sealing bag from the
compartment.
Vacuum-sealing in a container
9 Vacuum-sealing in a container
Vacuum-sealing in a container
In the container, vacuum-sealed food has a longer shelf
life.
9.1 Suitable vacuum-sealing containers
Use suitable vacuum-sealing containers in order to
achieve an optimal result.
Only use containers that
are suitable for vacuum-
sealing food.
Commercially available
products are different when
it comes to the quality of
the food and material.
The vacuum hose attached
to this appliance has an
internal diameter of 3mm.
You may need an adapter
for your container so that
the hose fits. These
adapters are often already
included with the vacuum-
sealing containers.
9.2 Vacuum-sealing in a container
Vacuum-seal the food in a suitable vacuum-sealing
container in order to preserve the food for longer.
1. Open the glass lid.
2. Plug the vacuum adapter into the air outlet.
3. Secure the hose to the vacuum adapter and the
vacuum-sealing container.
4. Press to select the vacuum-sealing level.
5. Press to start the vacuum-sealing process.
a The vacuum-sealing process starts. The vacuum-
sealing level indicators pulsate in orange one after the
other until the selected value has been reached.
a The vacuum-sealing process can take up to 1minute.
a The vacuum-sealing level that has been reached lights
up and a signal tone sounds.
6. Detach the hose from the container and the external
vacuum adapter.
Note:If larger bubbles form, cancel the vacuum-sealing
process. →
Page9
9.3 Canceling the vacuum-sealing process in
a container
1. To cancel the vacuum-sealing process early, press .
a The appliance displays the vacuum-sealing level until it
is reached.
2. Detach the hose from the container and the external
vacuum adapter.
Drying
10 Drying
Drying
When vacuum-sealing food, the smallest amount of water
gets into the vacuum pump system.
This effect occurs predominantly when you are vacuum-
sealing liquids or extremely moist food. For this reason,
the appliance comes with a drying function, which further
removes any liquid that collects in the pump.
After a certain operating time, the appliance prompts you
to run a drying cycle.
¡ If the symbol lights up white, it is advisable to run a
drying cycle. However, at this point, you can continue to
use the appliance as normal.
¡ If the symbol lights up red, you must run a drying
cycle. The appliance blocks the vacuum-sealing
function.
Note:We recommend that you run the drying cycle before
the appliance blocks the vacuum-sealing function from
working.
10.1 Starting drying
Note:You can close the appliance while drying is in
progress.
Requirement: lights up white or red.
1. Ensure that there are no objects or liquid residues in the
vacuum-sealing compartment.
‒ Clean the vacuum-sealing compartment if required.
2. Tightly close the glass lid and hold it there.
3. Press .
To interrupt the drying cycle, press . continues to
light up white or red. Restart the drying cycle after
switching the appliance back on.
a The drying cycle starts and takes up to 20minutes.
a During the procedure, pulsates in orange.
a At the end of the process, the vacuum-sealing
compartment is ventilated, and 3 short signal tones
sound.
a You can now open the glass lid.
a If no longer lights up, the appliance has cooled down
and is ready for operation.
a If, at the end of the drying cycle, a long signal tone
sounds and and light up, there is still residual
moisture in the pump system. Re-run the drying cycle
once the appliance has cooled down.

Cleaning and maintenance en-us
11
a If continues to light up white or red, re-run the drying
cycle.
4. Before restarting the appliance and after running the
drying cycle, allow the appliance to cool down.
Cleaning and maintenance
11 Cleaning and maintenance
Cleaning and maintenance
11.1 Cleaning agents
You can obtain suitable cleaning products from Customer
Service or the online shop.
NOTICE:
Unsuitable cleaning agents may damage the surfaces of
the appliance.
▶ Do not use strong or abrasive cleaning agents.
▶ Do not use cleaning agents with a high alcohol content.
▶ Do not use hard scouring pads or cleaning sponges.
▶ Only use glass cleaners, glass scrapers or stainless
steel care products if recommended in the cleaning
instructions for the relevant part.
▶ Wash sponge cloths thoroughly before use.
11.2 Cleaning the appliance
WARNING
The heat-sealing bar in the vacuum-sealing compartment
becomes extremely hot if the appliance is used frequently
and there are long heat-sealing times.
▶ Never touch the hot heat-sealing bar.
▶ Keep children away from the appliance.
WARNING
Moisture intrusion may cause an electric shock.
▶ Do not use any steam cleaners or high-pressure
cleaners to clean the appliance.
Requirements
¡ The appliance is switched off.
¡ Ensure that the heat-sealing bar in the vacuum-sealing
compartment has cooled down.
1. Clean the appliance with a damp cloth and neutral
cleaning agents, such as dish soap and water.
During cleaning, ensure that no water or other liquid
gets into the vacuum-sealing compartment or, in
particular, into the vacuum pump's air outlet.
Never spray the inside or outside of the appliance with
water.
2. Leave the appliance and accessory parts to fully dry
after they have been cleaned.
11.3 Cleaning the glass front and glass lid
▶ Clean the glass front and the glass lid with glass
cleaner and a soft cloth.
Do not use any abrasive sponges that may scratch or
any glass scrapers.
11.4 Cleaning the stainless steel vacuum-
sealing compartment
1. Always remove limescale, grease, starch or albumin
stains immediately. Corrosion may form under such
stains.
2. Clean with water and some dish soap.
3. Dry with a soft cloth.
11.5 Cleaning the plastic control panel
▶ Clean the control panel using a soft cloth.
Do not use any abrasive sponges that may scratch or
any glass scrapers.
11.6 Cleaning the heat-sealing bar
NOTICE:
Cleaning in the dishwasher leads to damage.
▶ Never clean the appliance components in the
dishwasher.
1. Remove the remaining film from the heat-sealing bar.
2. Never use abrasive cleaning agents to clean the heat-
sealing bar.
3. Dry with a soft cloth.
11.7 Cleaning theaccessories
NOTICE:
Cleaning in the dishwasher leads to damage.
▶ Never clean the appliance components in the
dishwasher.
1. Clean using a sponge cloth and hot soapy water in the
direction of the finish.
2. Dry with a soft cloth.
en-us Troubleshooting
12
Troubleshooting
12 Troubleshooting
Troubleshooting
You can eliminate minor issues on your appliance
yourself. Please read the information on eliminating issues
before contacting Customer Service. This may avoid
unnecessary repair visits.
WARNING
To avoid risk of injury from improper repairs, observe the
following.
▶ Only qualified technicians or authorized service
providers should perform repairs.
▶ If the power cord or the appliance power cable of this
appliance becomes damaged, it must be replaced with
a special power cord or special appliance power cable,
which is available from the manufacturer or the
manufacturer's Customer Service.
▶ If the power cord of this appliance is damaged, it must
be replaced by trained, specialist personnel.
▶ Only genuine spare parts may be used to repair the
appliance.
▶ If the appliance has an issue, call Customer Service.
Issue Cause and troubleshooting
The appliance is not working. The circuit breaker in the circuit breaker panel has tripped.
▶ Check the breaker panel.
The fuse in the fuse box has
blown.
The circuit breaker in the circuit breaker panel has tripped.
▶ Call
→
"Customer Service", Page15
.
The front panel is not aligned. The front panel was not aligned during installation.
▶ Adjust the front panel.
The vacuum-sealing process will
not start. does not appear even
though the lid is closed.
The door switch on the glass lid is missing or is not being detected by the appliance.
▶ Call
→
"Customer Service", Page15
.
If you try to operate the appliance
several times in succession, the
vacuum-sealing process seems to
run as normal but the bag is not
heat-sealed.
The temperature protection switch for the heat-sealing transformer has tripped.
1. Allow the appliance to cool for at least 10minutes.
2. Allow the appliance to cool for at least 2minutes between vacuum-sealing
operations.
3. Restart the vacuum-sealing process.
The bag is defective, which means
that no vacuum remains in the
vacuum-sealing bag.
Sharp parts of the food (such as bones) may poke holes in the bag.
1. Check the bag for damage.
2. Use a different bag if it is damaged.
3. Place sharp-edged food that is to be vacuum-sealed in the bag in such a way
that you do not damage the wall of the bag.
The heat-sealing seam is
defective, which means that no
vacuum remains in the vacuum-
sealing bag.
The selected heat-sealing time is unsuitable for the film jacket.
▶ Select a different heat-sealing time.
There is liquid, grease or crumbs or creases along the heat-sealed seam.
1. Make sure that the bag is dry, that it has no creases, and that it is positioned fully
on the heat-sealing bar.
2. Use a different bag if it is damaged.
3. Fold over the edge of the bag by 3cm before you fill it.
The lid cannot be opened. A slight vacuum has formed and it is holding the lid closed.
1. Never use force to open the lid.
2. Start a new vacuum-sealing process and then cancel it immediately.
3. Disconnect the appliance from the power supply.
4. Start up the appliance again after 30seconds.
5. Press and hold for more than 5seconds.
a The appliance is reset.
Issue Cause and troubleshooting
appears after a few seconds. The glass lid has not been closed properly.
1. Open and close the glass lid again.
2. When doing so, lightly press on the glass lid for the first few seconds.
How it works en-us
13
Issue Cause and troubleshooting
appears after a few seconds. The seal on the glass lid is not fitted properly.
▶ Check the seal.
The seal on the glass lid has deformed.
▶ Gently press the seal to straighten it out.
The lid on the external vacuum-sealing container has not been closed properly.
1. Check the position of the external vacuum adapter.
2. Only use suitable vacuum-sealing containers.
The external vacuum adapter is not positioned correctly on the vacuum-sealing
compartment's air outlet.
▶ Check the position of the external vacuum adapter.
appears after the pump has
been running for 2minutes.
As the temperature rises, liquids begin to boil, meaning that the vacuum cannot be
formed.
1. Only vacuum-seal cold liquids.
2. If the vacuum-sealing compartment is wet, wipe it dry.
3. Heat-seal the vacuum-sealing bag early if larger bubbles form.
4. Select a lower vacuum-sealing level.
and light up after the drying
process.
One drying cycle alone was not sufficient.
1. Wait until goes out.
2. Repeat the drying process.
→
"Starting drying", Page10
How it works
13 How it works
How it works
Here, you can find the ideal settings for various dishes as
well as the best accessories and cookware. We have
perfectly tailored these recommendations to your
appliance.
13.1 Vacuum-sealing for sous-vide cooking
You can use your appliance to prepare food for sous-vide
cooking. Sous-vide cooking is a method of cooking "under
a vacuum" at low temperatures between 122-203°F (50–
95°C) and in 100% steam or in a bain marie.
The appliance is used to heat-seal the food in a special
air-tight, heat-resistant cooking bag.
WARNING
Sous-vide cooking is a low-temperature cooking method; if
the instructions for use and hygiene instructions are not
adhered to, this can result adverse health effects.
▶ Only use high-quality, perfectly fresh food.
▶ Wash and disinfect your hands.
▶ Use disposable gloves, cooking tongs or grill tongs.
▶ Take extra care when preparing critical food, such as
poultry, eggs, and fish.
▶ Always thoroughly rinse and peel fruit and vegetables.
▶ Always keep work surfaces and chopping boards clean.
▶ Use different cutting boards for different types of food.
▶ Only interrupt the cold chain briefly to prepare the food.
▶ Store vacuum-sealed food in the refrigerator for a
maximum of 24hours before you start the cooking
process.
▶ Once the food is cooked, consume it immediately. Do
not store it after cooking – not even in the refrigerator. It
is not suitable for reheating.
Notes
¡ Use the enclosed vacuum-sealing bags for sous-vide
cooking. You can reorder the vacuum-sealing bags.
¡ Do not cook the food in the bag in which you bought it
(e.g. portions of fish). These bags are not suitable for
sous-vide cooking.
¡ Position the items of food in the bag next to each other
and not on top of each other.
Vacuum-sealing for sous-vide cooking
1. In order to achieve an even transfer of heat and
therefore a perfect cooking result, use the highest
vacuum-sealing level to vacuum-seal food.
2. Before cooking the food, check that the vacuum in the
bag is intact. To do this, refer to these points:
– There is no air in the vacuum-sealing bag.
– The heat-sealed seam is perfectly sealed.
– There are no holes in the vacuum-sealing bag. Do
not use a core temperature probe.
– Pieces of meat or fish that have been vacuum-sealed
together are not pressed directly against one another.
– Vegetables and desserts are vacuum-sealed flat.
3. If the vacuum-sealing bag is not filled as it should be,
place the food into a new bag and vacuum-seal it again.
Note:To prevent gases escaping from the food, e.g. from
vegetables, vacuum-seal the food no more than one day
before you cook it. The gases inhibit the transfer of heat or
cause the texture of the food to change, thus altering how
it cooks, as a result of the vacuum pressure.
en-us How it works
14
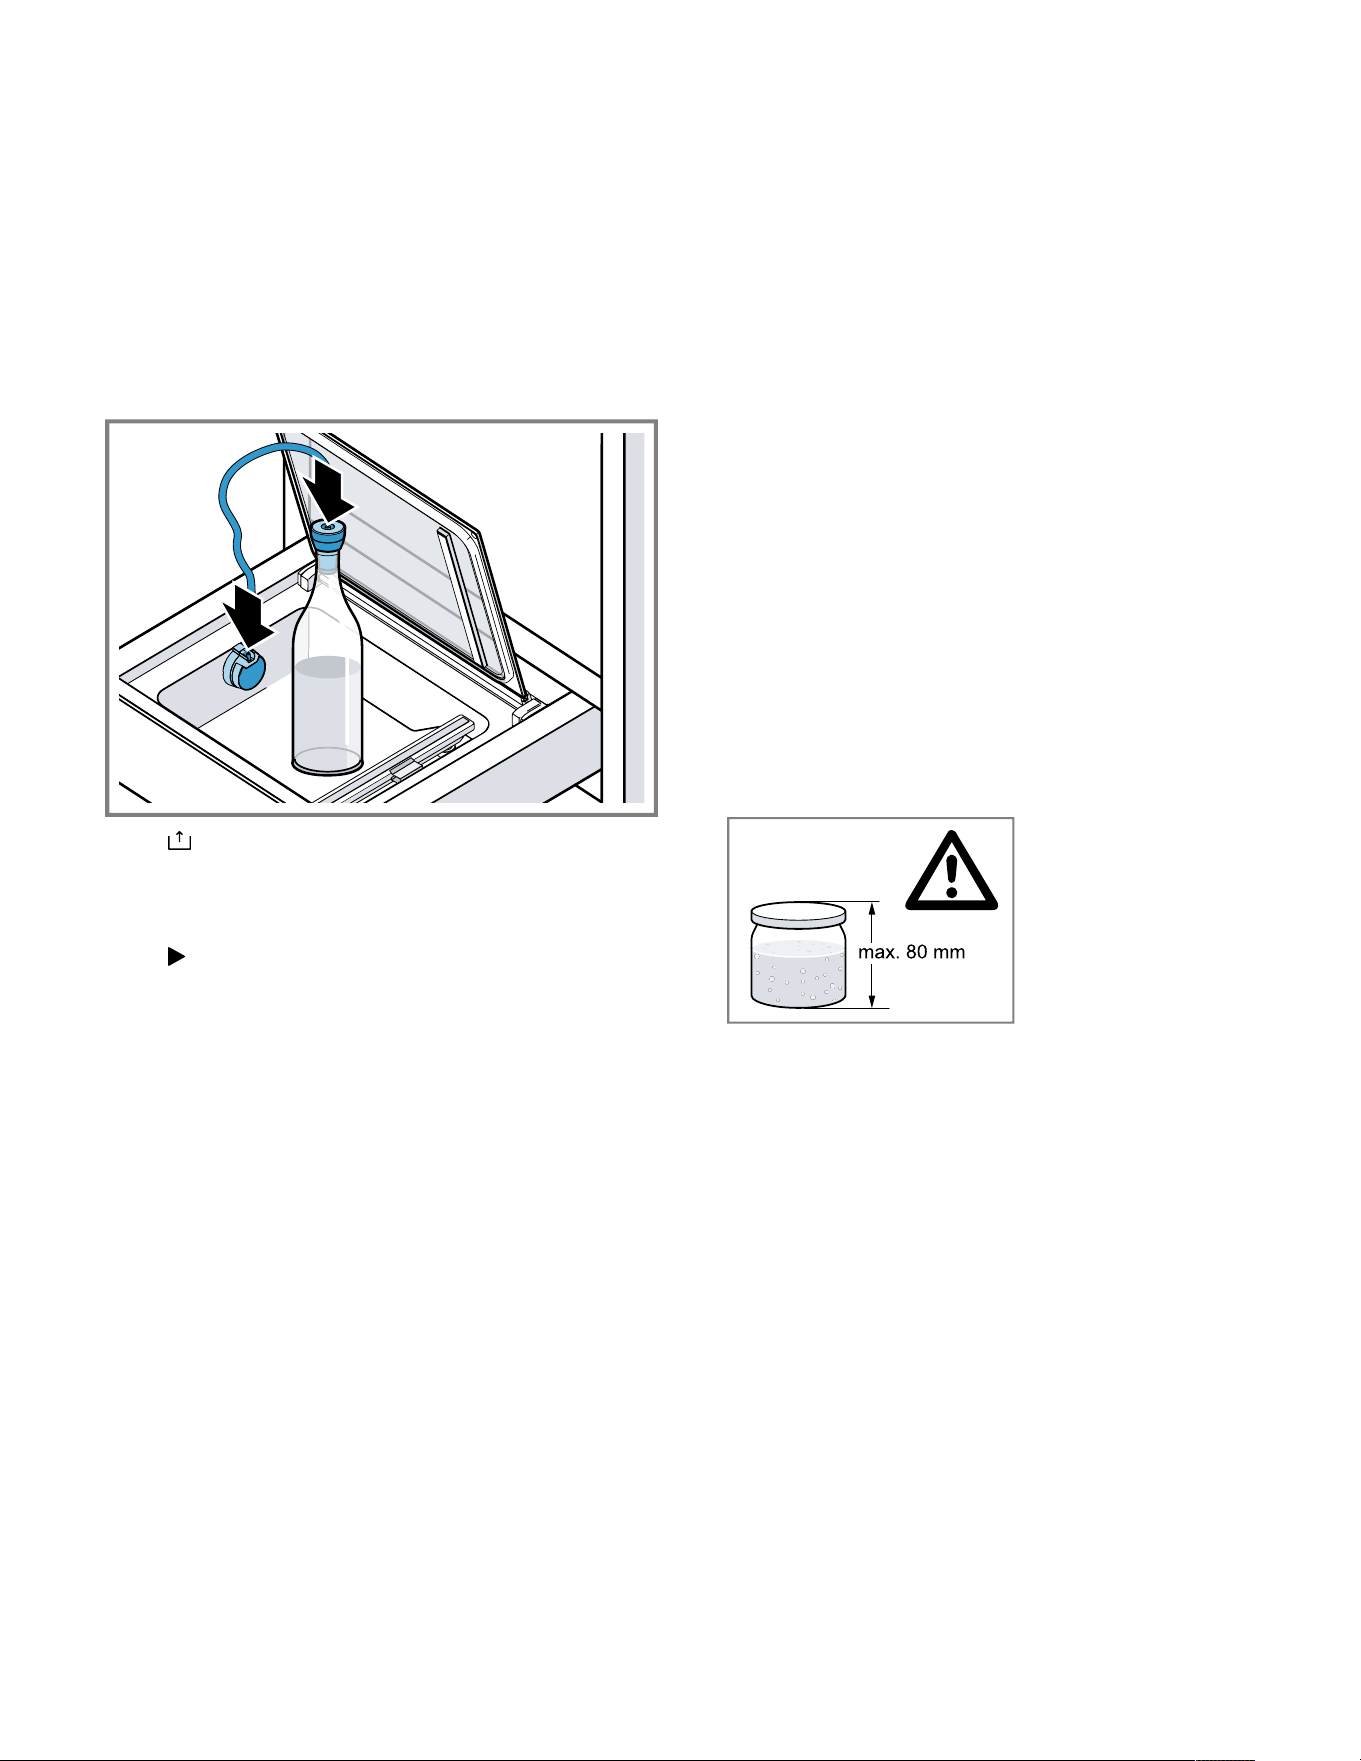
13.2 Vacuum-sealing glass bottles
You can also use your appliance to vacuum and reseal
glass bottles, e.g. bottles of cooking oil.
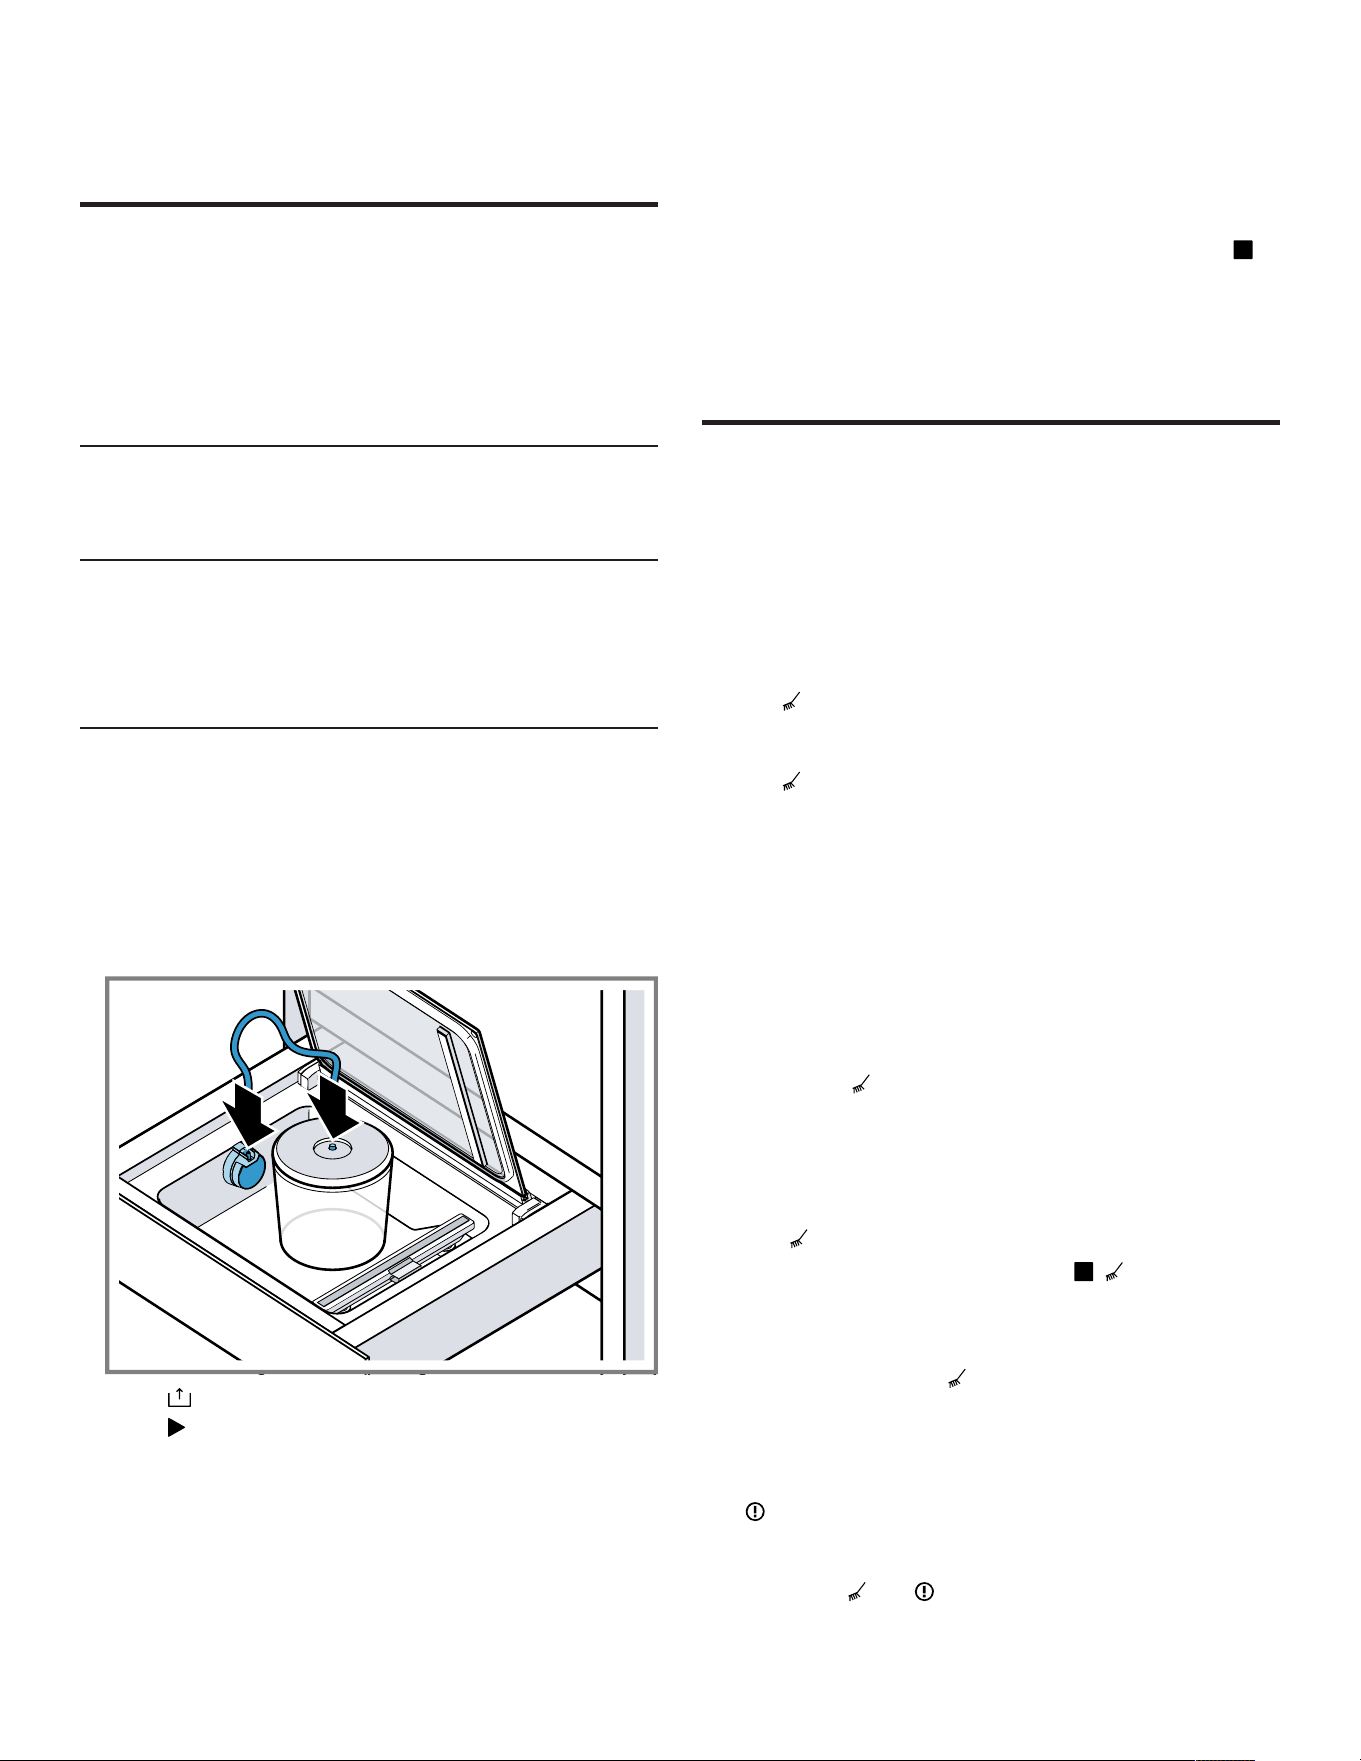
1. Fit the air outlet on the vacuum adapter in such a way
that the outlet for the hose is facing upwards vertically.
2. Secure the vacuum stopper for bottles to the bottle
opening.
3. Press the bottle stopper adapter onto the vacuum
stopper for bottles.
4. Disconnect the hose from the vacuum adapter and
secure the bottle stopper adapter.
5. Press to select the vacuum-sealing level.
‒ Always vacuum-seal bottles at the lowest level.
‒ Do not vacuum-seal any carbonated liquids, such as
sparkling wine.
6. Press to start the vacuum-sealing process.
a The vacuum-sealing process starts. The vacuum-
sealing level indicators pulsate in orange one after the
other until the selected value has been reached.
a The vacuum-sealing level that has been reached lights
up and a signal tone sounds.
7. Detach the hose from the bottle stopper adapter and the
external vacuum adapter.
8. Undo the bottle stopper adapter from the vacuum
stopper for bottles.
13.3 Fast marinating and flavoring
You can use your appliance to quickly add flavor to or
marinate food such as meat, fruit, and vegetables.
Marinating your food in the traditional way usually takes a
long time and is not particularly intensive. When you
vacuum-seal in a bag, the food's cell pores open. The
marinade that is added can be absorbed quickly. This
produces a more intensive taste in a much shorter time.
13.4 Storing and transporting food
You can use the vacuum-sealing process to store your
food for longer and can benefit from additional
advantages.
¡ Thanks to the low-oxygen environment in the vacuum,
freshly vacuum-sealed food remains edible for longer
when it is stored correctly.
¡ Freezer burn is less likely to occur when the food has
been frozen and vacuum-sealed.
¡ You can re-seal food, such as jams and sauces, in
glass containers.
¡ Vacuum-sealing significantly increases the storage
time.
¡ Store food such as cheese, fish, or garlic without any
unpleasant odors. The hermetic sealing that takes place
during vacuum-sealing means that no unwanted odors
can get out and the flavor cannot be absorbed by the
other food.
¡ Sealed vacuum-sealing bags or vacuum-sealing
containers are the ideal means of transport for liquid
foods. They are easy to handle, leak-proof, and space-
saving.
NOTICE:
Glass containers that are too tall may damage the
appliance's glass lid.
▶ Do not use glass containers that are taller than 80 cm.
Notes
¡ Only use screw-top jars that are stable and intact.
¡ Only tighten the container by hand. The container is
automatically sealed by the vacuum-sealing process.
¡ Not all jars or lids are suitable for being re-sealed under
a vacuum. After vacuum-sealing, check whether a
vacuum has been formed. A lid that is curving inwards
and can only be opened with a lot of force is an
indication that the vacuuming process has worked. If
the lid makes a clicking sound when it is pushed in and
released and if it is easy to open, no vacuum has
occurred. Repeat the vacuum-sealing process or use
more suitable screw-top jars.

Disposal en-us
15
13.5 Recommended settings
This section provides you with recommendations for the
vacuum-sealing levels for different foods. Observe the
specific information on the recommended vacuum-sealing
levels as well as on preparing the food.
When stored correctly, vacuum-sealed food stays fresh for
significantly longer. Higher vacuum-sealing levels retain
the quality, appearance, and ingredients of the food.
Notes
¡ Only use fresh food.
¡ Check the quality of the food before vacuum-sealing it.
¡ Only vacuum-seal cold food – within a temperature
range of 33-46°F (1–8°C) is best.
¡ Start at the lowest of the recommended vacuum-sealing
levels.
¡ Check the quality of the food after you remove it from
storage. Do not use any food that is of questionable
quality.
Food at room temperature (68 to 73°F / 20 to 23°C)
Food Vacuum-sealing level recommendation
Baked items 1, 2, 3
Dried baked items and cookies 1
Tea and coffee 1, 2, 3 Store in a dark place
Rice and pasta 2 Vacuum-seal in a container
Flour and semolina 1
Nuts without shell 3 Store in a dark place
Dried fruits 3
Crackers and chips 1, 2 Vacuum-seal in a container
Fresh food that has been frozen (-0.5 to 3°F / -18 to -16°C) or stored in a refrigerator (37 to 44°F / 3 to 7°C)
Food Vacuum-sealing level recommendation
Fish 3
Poultry 3
Meat 3
Whole sausage 3
Sliced sausage 3
Hard cheese 3
Soft cheese 2 Vacuum-seal in a container
Vegetables 2 Peel and blanch beforehand
Washed salad greens 2 Vacuum-seal in a container
Herbs 1, 2 Vacuum-seal in a container
Fruit, hard 3
Fruit, soft 2 Vacuum-seal in a container
Pre-frosting recommended
Disposal
14 Disposal
Disposal
14.1 Disposal of your old appliance
Environmentally compatible disposal allows valuable raw
materials to be recycled.
1. Unplug the appliance from the power supply.
2. Cut through the power cord.
3. Dispose of the appliance in an environmentally
responsible manner.
Information about current disposal methods can be
obtained from your specialist dealer or local authority.
Customer Service
15 Customer Service
Customer Service
With any warranty repair, we will make sure your
appliance is repaired by an authorized service provider
using genuine replacement parts. We use only genuine
replacement parts for all repairs.
Detailed information on the warranty period and terms of
warranty can be found in the Statement of Limited Product
Warranty, from your retailer, or on our website.
If you contact Customer Service, you will need the model
number (E-Nr.) and the production number (FD) of your
appliance.
USA:
en-us STATEMENT OF LIMITED PRODUCT WARRANTY
16
1-877-442-4436
www.gaggenau.com
www.gaggenau.com/us/appliances/eshop
CA:
1-877-442-4436
www.gaggenau.com
www.gaggenau.ca
15.1 Model number (E-Nr.) and production
number (FD)
You can find the model number (E-Nr.) and the production
number (FD) on the appliance's rating plate.
Making a note of your appliance's details and the
Customer Service telephone number will enable you to
find them again quickly.
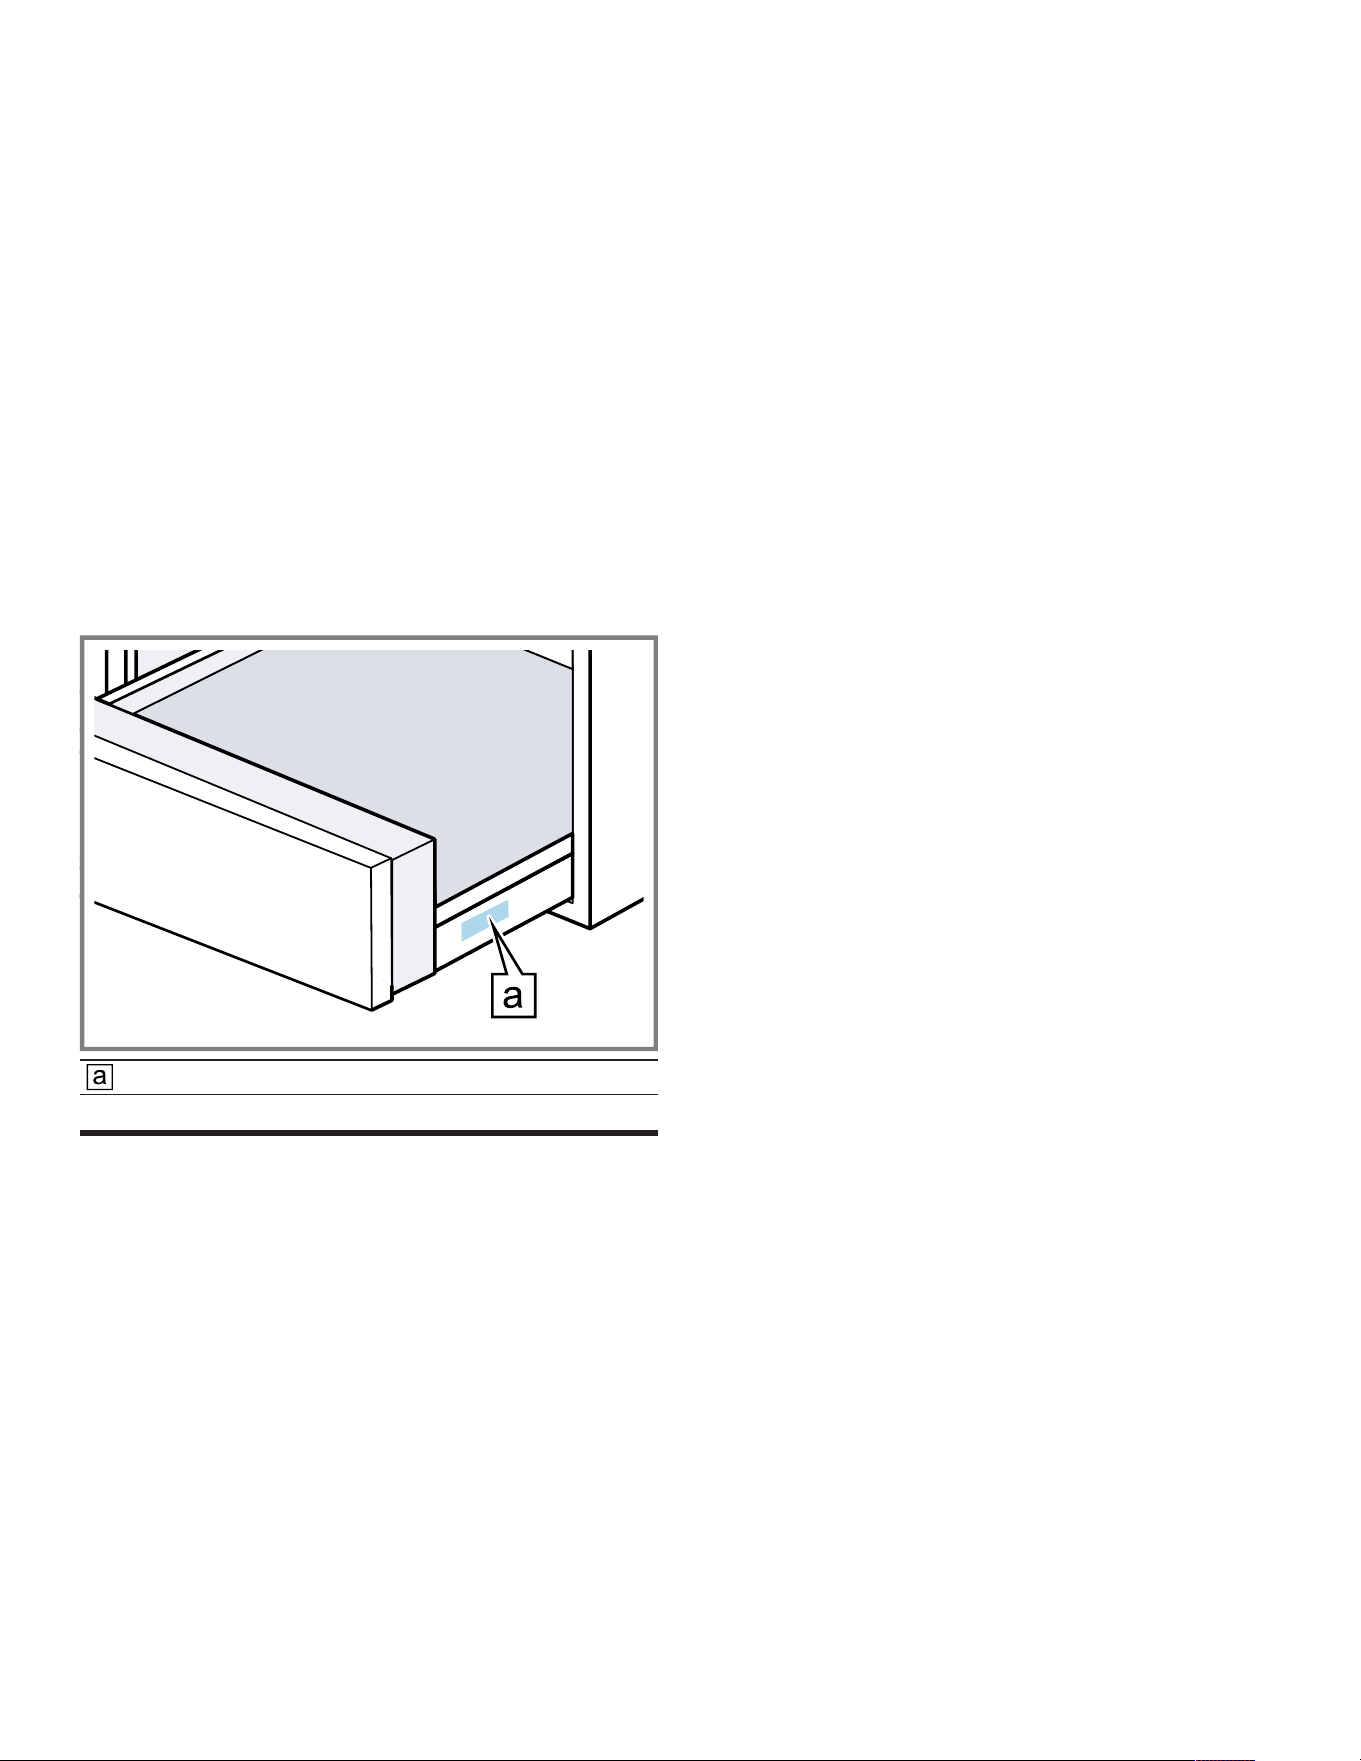
15.2 Rating plate location
You can find the rating plate at the right side of the drawer.
Open the drawer to view it.
Rating plate
STATEMENT OF LIMITED PRODUCT WARRANTY
16 STATEMENT OF LIMITED
PRODUCT WARRANTY
STATEMENT OF LIMITED PRODUCT WARRANTY
16.1 What this warranty covers & Who it
applies to
The limited warranty provided by BSH Home Appliances
(“Gaggenau“) in this Statement of Limited Product
Warranty applies only to the Gaggenau appliance sold to
you (“Product“), provided that the Product was purchased:
¡ For your normal, household (non-commercial) use, and
has in fact at all times only been used for normal
household purposes.
¡ New at retail from a BSH authorized dealer or directly
from BSH (not a display, "as is", or previously returned
model), and not for resale, or commercial use.
¡ Within the United States or Canada, and has at all times
remained within the country of original purchase.
The warranties stated herein apply to the original
purchaser of the product warranted herein and to each
succeeding owner of the product purchased for ordinary
home use during the term of the warranty.
Please make sure to register your Product; while not
necessary to effectuate warranty coverage, it is the best
way for Gaggenau to notify you in the unlikely event of a
safety notice or product recall.
16.2 How long the warranty lasts
Gaggenau warrants that the Product is free from defects in
materials and workmanship for a period of seven hundred
and thirty (730) days from the date of the original delivery.
The foregoing timeline begins to run upon the date of
original delivery, and shall not be stalled, tolled, extended,
or suspended, for any reason whatsoever. This Product is
also warranted to be free from cosmetic defects in
material and workmanship (such as scratches of stainless
steel, paint/porcelain blemishes, chips, dents, or other
damage to the finish) of the Product, for a period of sixty
(60) days from the date of delivery or closing date for new
construction. This cosmetic warranty excludes slight color
variations due to inherent differences in painted and
porcelain parts, as well as differences caused by kitchen
lighting, product location, or other similar factors. This
cosmetic warranty specifically excludes any display, floor,
“As Is”, or “B” stock appliances.
16.3 Repair/replace as your exclusive
remedy
During this warranty period, Gaggenau or one of its
authorized service providers will repair your Product
without charge to you (subject to certain limitations stated
herein) if your Product proves to have been manufactured
with a defect in materials or workmanship. If reasonable
attempts to repair the Product have been made without
success, then Gaggenau will replace your Product
(upgraded models may be available to you, in Gaggenau's
sole discretion, for an additional charge). Nothing in this
warranty requires damaged or defective parts to be
replaced with parts of a different type or design than the
original parts. All removed parts and components shall
become the property of Gaggenau at its sole option. All
replaced and/or repaired parts shall assume the identity of
the original part for purposes of this warranty and this
warranty shall not be extended with respect to such parts.
Gaggenau's sole liability and responsibility hereunder is to
repair manufacturer-defective Product only, using a
Gaggenau authorized service provider during normal
business hours. For safety and property damage
concerns, Gaggenau highly recommends that you do not
attempt to repair the Product yourself, or use a non-
authorized service provider; Gaggenau will have no
responsibility or liability for damage resulting from repairs
or work performed by a non-authorized service provider.
Authorized service providers are those persons or
companies that have been specially trained on Gaggenau
products, and who possess, in Gaggenau's opinion, a

STATEMENT OF LIMITED PRODUCT WARRANTY en-us
17
superior reputation for customer service and technical
ability (note that they are independent entities and are not
agents, partners, affiliates or representatives of
Gaggenau). Nevertheless, taking your product to be
serviced by a repair shop that is not affiliated with or an
authorized dealer of Gaggenau will not void this warranty.
Also, using third-party parts will not void this warranty.
Notwithstanding the foregoing, Gaggenau will not incur
any liability, or have responsibility, for the Product if it is
located in a remote area (more than 100 miles from an
authorized service provider) or is reasonably inaccessible,
hazardous, threatening, or treacherous locale,
surroundings, or environment; in any such event, if you
request, Gaggenau would still pay for labor and parts and
ship the parts to the nearest authorized service provider,
but you would still be fully liable and responsible for any
travel time or other special charges by the service
company, assuming they agree to make the service call.
Further, to the extent you have installed the Product in a
difficult-to-access location or have otherwise installed
temporary or permanent fixtures that create barriers to
accessing or removing the Product, Gaggenau will not
incur any liability for, or have responsibility, for work or
costs associated with moving the Product or otherwise
creating access to the Product in order to repair or replace
it. All such costs shall be your sole responsibility.
16.4 Out of warranty product
Gaggenau is under no obligation, at law or otherwise, to
provide you with any concessions, including repairs,
prorates, or Product replacement, once this warranty has
expired.
16.5 Warranty exclusions
The warranty coverage described herein excludes all
defects or damage that are not the direct fault of
Gaggenau, including without limitation, one or more of the
following:
¡ Use of the Product in anything other than its normal,
customary and intended manner (including without
limitation, any form of commercial use, use or storage of
an indoor product outdoors, use of the Product in
conjunction with air or water-going vessels).
¡ Any party's willful misconduct, negligence, misuse,
abuse, accidents, neglect, improper operation, failure to
maintain, improper or negligent installation, tampering,
failure to follow operating instructions, mishandling,
unauthorized service (including selfperformed "fixing" or
exploration of the appliance's internal workings).
¡ Adjustment, alteration or modification of any kind.
¡ A failure to comply with any applicable state, local, city,
or county electrical, plumbing and/or building codes,
regulations, or laws, including failure to install the
product in strict conformity with local fire and building
codes and regulations.
¡ Ordinary wear and tear, spills of food, liquid, grease
accumulations, or other substances that accumulate on,
in, or around the Product.
¡ Any external, elemental and/or environmental forces
and factors, including without limitation, rain, wind,
sand, floods, fires, mud slides, freezing temperatures,
excessive moisture or extended exposure to humidity,
lightning, power surges, structural failures surrounding
the appliance, and acts of God.
¡ Service calls to correct the installation of your Product,
to instruct you how to use your Product, to replace
house fuses or correct house wiring or plumbing.
¡ Removal and replacement of trim or decorative panels
that interfere with servicing the Product.
¡ Damage or defects caused by labor or parts installed by
any non-authorized service provider, unless approved
by Gaggenau before service is performed.
In no event shall Gaggenau have any liability or
responsibility whatsoever for damage to surrounding
property, including cabinetry, floors, ceilings, and other
structures or objects around the Product. Also excluded
from this warranty are Products, on which the serial
numbers have been altered, defaced, or removed; service
visits to teach you how to use the Product, or visits where
there is nothing wrong with the Product; correction of
installation problems (you are solely responsible for any
structure and setting for the Product, including all
electrical, plumbing or other connecting facilities, for
proper foundation/flooring, and for any alterations
including without limitation cabinetry, walls, floors,
shelving, etc.); and resetting of breakers or fuses.
TO THE EXTENT ALLOWED BY LAW, THIS WARRANTY
SETS OUT YOUR EXCLUSIVE REMEDIES WITH
RESPECT TO PRODUCT, WHETHER THE CLAIM
ARISES IN CONTRACT OR TORT (INCLUDING STRICT
LIABILITY, OR NEGLIGENCE) OR OTHERWISE. THIS
WARRANTY IS IN LIEU OF ALL OTHER WARRANTIES,
WHETHER EXPRESS OR IMPLIED. ANY WARRANTY
IMPLIED BY LAW, WHETHER FOR MERCHANTABILITY
OR FITNESS FOR A PARTICULAR PURPOSE, OR
OTHERWISE, SHALL BE EFFECTIVE ONLY FOR THE
PERIOD THAT THIS EXPRESS LIMITED WARRANTY IS
EFFECTIVE. IN NO EVENT WILL THE MANUFACTURER
BE LIABLE FOR CONSEQUENTIAL, SPECIAL,
INCIDENTAL, INDIRECT, "BUSINESS LOSS", AND/OR
PUNITIVE DAMAGES, LOSSES, OR EXPENSES,
INCLUDING WITHOUT LIMITATION TIME AWAY FROM
WORK, HOTELS AND/OR RESTAURANT MEALS,
REMODELLING EXPENSES IN EXCESS OF DIRECT
DAMAGES WHICH ARE DEFINITIVELY CAUSED
EXCLUSIVELY BY GAGGENAU, OR OTHERWISE.
SOME STATES DO NOT ALLOW THE EXCLUSION OR
LIMITATION OF INCIDENTAL OR CONSEQUENTIAL
DAMAGES, AND SOME STATES DO NOT ALLOW
LIMITATIONS ON HOW LONG AN IMPLIED WARRANTY
LASTS, SO THE ABOVE EXCLUSIONS OR
LIMITATIONS MAY NOT APPLY TO YOU. THIS
WARRANTY GIVES YOU SPECIFIC LEGAL RIGHTS,
AND YOU MAY ALSO HAVE OTHER RIGHTS WHICH
VARY FROM STATE TO STATE.
No attempt to alter, modify or amend this warranty shall be
effective unless authorized in writing by an officer of BSH.

en-us STATEMENT OF LIMITED PRODUCT WARRANTY
18
16.6 Obtaining warranty service
To obtain warranty service for your product, you should
contact Gaggenau Customer Support at 1-877-442-4436
to schedule a repair.
16.7 Product information
For handy reference, copy the information below from the
rating plate. Keep your invoice and/or delivery documents
for warranty validation.
Model number (E-Nr.)
Production number
(FD)
Date of delivery

BSH Home Appliances Corporation
1901 Main Street, Suite 600
Irvine, CA 92614
USA
www.gaggenau.com
1-877-442-4436
© 2025 BSH Home Appliances Corporation
*9001959993*
9001959993 en-us (050811)