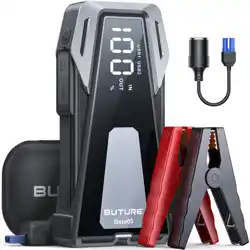
QUICK-START GUIDE
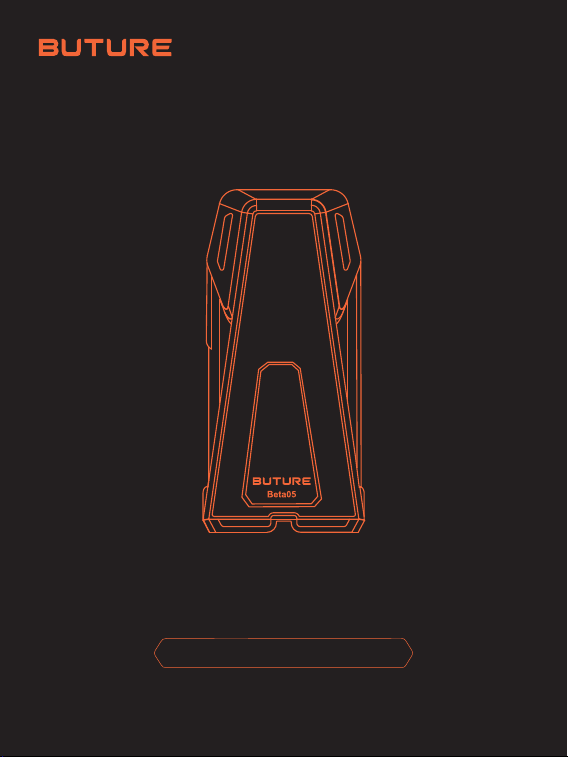
Beta05 JUMP STARTER

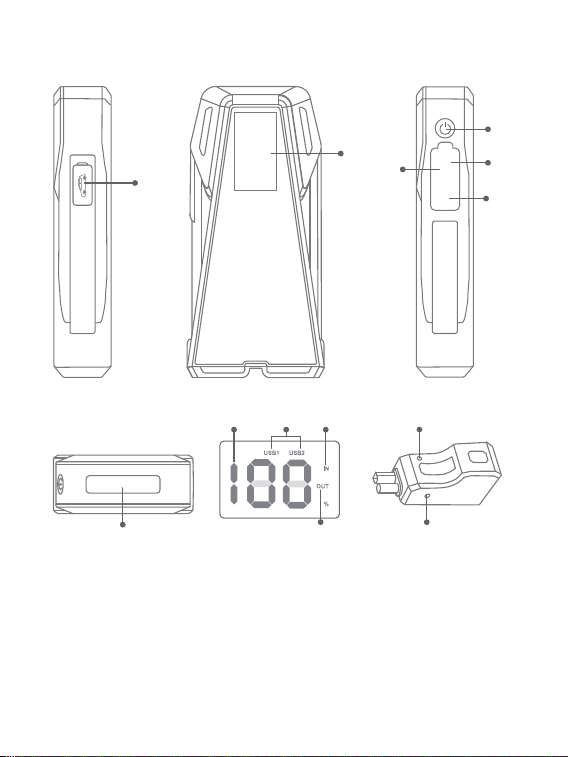
PRODUCT OVERVIEW
⑫Indicator
⑬Force Start Button
①Jumpstart Port
②Display
③USB Output 1
④USB Output 2 (18W)
⑤Power Button
⑥USB C Input
⑦
②
①
④
⑪
⑤
⑥
③
USB1
USB2
USB-C
⑦LED Light
⑧Power Level
⑨Port Using
⑩Charging
⑪Discharging
⑬
⑫
⑨ ⑩
⑧
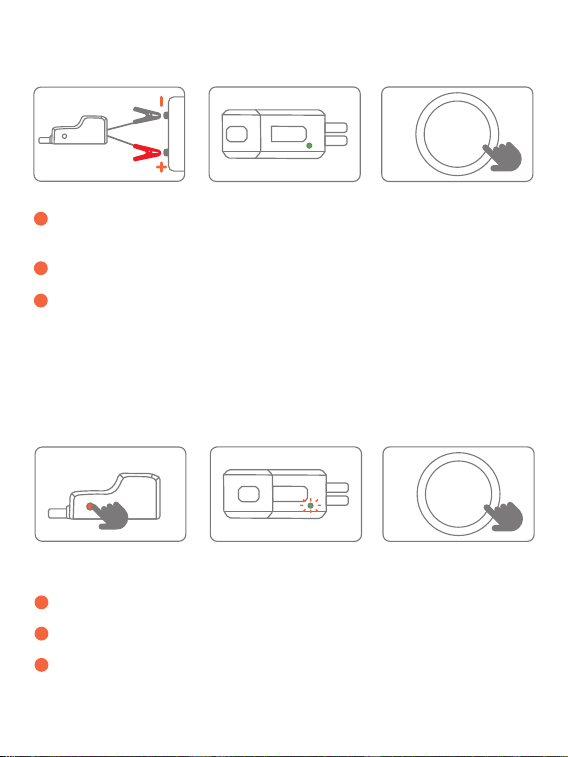
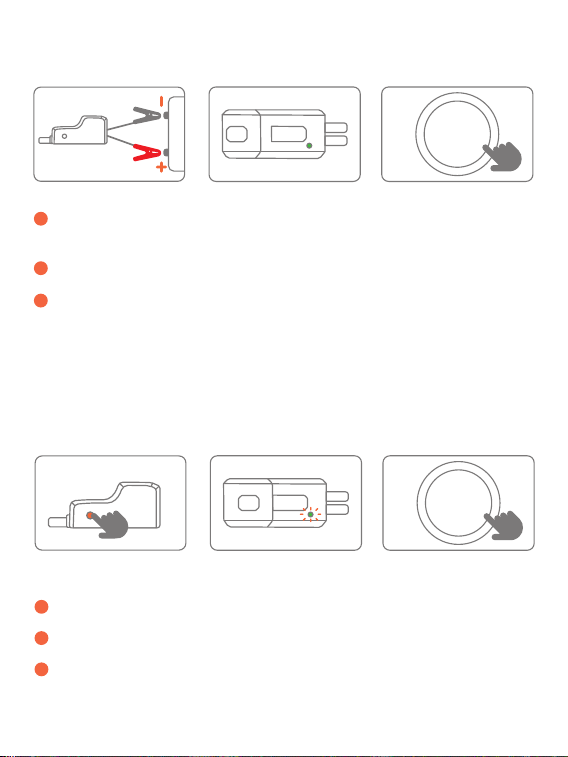
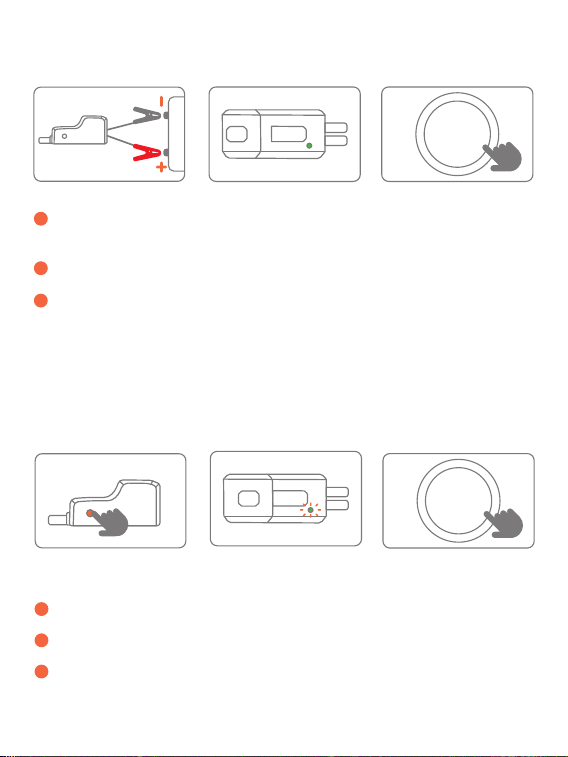
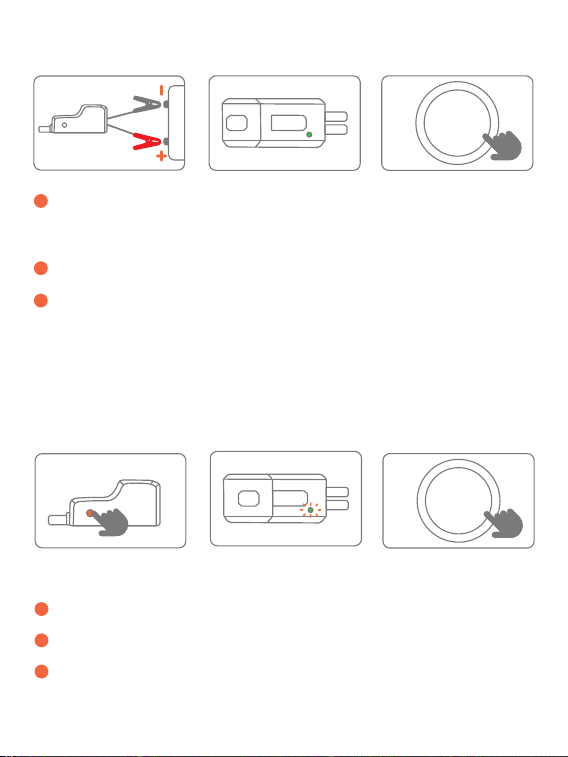
JUMP START YOUR CAR
1
Insert the jumper cable into the jump starter and connect the
clamps to car battery (red to +, black to -).
2
The indicator of jumper cable turns solid green.
3
Start your car engine.
Warning: When using the Force Start Function, auto-detection and safety
features will be disabled.
1
Press the force start button for 5 seconds.
2
The indicator of jumper cable is green.
3
Start your car engine.
3 steps to fix the problem:
If three attempts fail when you correctly connected the clamps to your
car, you can use the Force Start Function to enter boost mode.
START
/STOP
· ABOUT THE FORCE START FUNCTION
START
/STOP

· ABOUT THE TROUBLESHOOTING
In any of the following situations, the smart clamp will turn protections on:
Indicator
Solid red light with
regular long and
short beeps
The green light
flashes 5 times, then
the red light is
always on
· Jump starter battery is low and needs to be
charged
· Startup Timeout Protection
---Press the force start button for about 3S until the
indicator turns to steady green. It means that it
returns to work
Solid red light
Solid red light with
slow and brief beeps
Solid red light with
quick and brief
beeps
· Reverse Charge Protection
---Reconnect to try again
· High Temperature Protection
---Remove the clamps to let it cool
· Relay Short-circuit
---Jumper cable failure. Contact
[email protected] with details
Other
Please contact [email protected] with
details
· Short-circuit Protection
--- Do not connect smart clips together or to the
same metal
· Reverse-connection Protection
--- Reverse smart clip to ensure right connection
· Over Limit Protection
---Reconnect to try again
· Five Intervals of Start-up Protection
---Press the force start button for about 3S until
the indicator turns to steady green. It means that it
returns to work
Situations

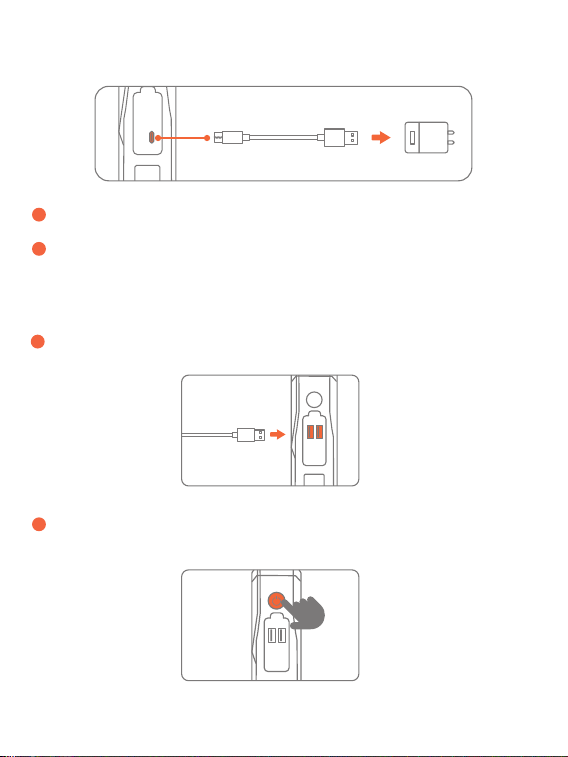
RECHARGE
CHARGE ELECTRONIC DEVIDES
1
Insert the charging cable into USB C port.
1
Plug the cable into any USB outport.
2
Connect to corresponding adaptor (adaptor not included).
2
Press the power button.

IMPORTANT SAFETY WARNING
1. Store in a cool and well-ventilated place out reach of children and pets.
2. Do not place the product in high temperature environment for a long
time. The operation temperature of this product is -20~60℃. The storage
temperature should not exceed 50℃/122℉.
3. Only start vehicles with the smart jumper cable supplied by the
manufacturer.
4. Do not use the product if the clamp or cable is damaged.
5. Do not connect the red and black clamps together when the product is
outputting.
1. The product is for 12V vehicles only.
2. Do not use the product with less than 10% power as this will damage the
product.
3. Recharge every 3 months to prolong the lifespan.
4.Wait at least 30 minutes before recharging after starting the car.
5. 60s is recommended between starts, otherwise it will overheat.
PRECAUTIONS
Lighting SOS OFFStrobe(white) Strobe(Orange)
LED LIGHTING
Press the power
button 3s
Press shortly
Press the power button 3s
Press shortly Press shortly Press shortly

6. Do not connect the red and black clamps to the same piece of metal.
7. Do not disassemble or modify this product.
8. Do not use detergent to clean this product.
9. Do not abuse this product and avoid heavy dropping or repeatedly
hitting it.
10. Do not operate the product in explosive environments such as
flammable liquids, gases or dusts.
11. Do not immerse the product in water.
12. Do not litter the product and it should be safely recycled.
13. Do not incinerate the product or exposed to high temperatures, as
they may explode.
14. Only use replacement parts or accessories provided or recommended
by manufacturer.

PRODUKTÜBERSICHT
Anzeige
Force Start Taste
⑫
⑬
Starthilfe-Anschluss
Anzeige
USB-Ausgang 1
USB-Ausgang 2 (18W)
Power-Taste
USB-C-Eingang
①
②
③
④
⑤
⑥
⑦
②
①
④
⑪
⑤
⑥
③
USB1
USB2
USB-C
LED-Leuchte
Leistungsstufe
Anschluss Verwendung
Aufladen
Entladen
⑦
⑧
⑨
⑩
⑪
⑬
⑫
⑨ ⑩
⑧
START FAHRZEUGE
1
Stecke den Klemmstecker vollständig in das Produkt. Schließen Sie
die Klemmen an die Autobatterie an (rot zu +, schwarz zu -).
2
Die Anzeige des Überbrückungskabels leuchtet grün.
3
Starte das Fahrzeug.
Warnung: Bei Verwendung der Force-Start-Funktion werden die
automatische Erkennung und die Sicherheitsfunktionen deaktiviert.
1
Drücken Sie die Force-Start-Taste für 5 Sekunden.
2
Die Anzeige des Überbrückungskabels leuchtet grün.
3
Starten Sie den Motor Ihres Fahrzeugs.
3 Schritte zur Behebung des Problems:
Wenn drei Versuche fehlschlagen, obwohl Sie die Klemmen korrekt an Ihr
Fahrzeug angeschlossen haben, können Sie die Force-Start-Funktion
verwenden, um den Boost-Modus zu aktivieren.
START
/STOP
· ÜBER DIE FORCE-START-FUNKTION
START
/STOP

· ÜBER DIE FEHLERSUCHE
In einer der folgenden Situationen schaltet die intelligente Klemme die
Schutzvorrichtungen ein:
Indikator
Rotes Dauerlicht mit
regelmäßigen
langen und kurzen
Signaltönen
Grünes Licht blinkt 5
Mal, dann leuchtet
das rote Licht immer
· Die Starthilfebatterie ist schwach und muss
aufgeladen werden
· Schutz vor Zeitüberschreitung beim Starten
---Drücken Sie den Startknopf etwa 3 Sekunden
lang, bis die Anzeige konstant grün leuchtet. Dies
bedeutet, dass das Gerät wieder funktioniert
Rotes Dauerlicht
Rotes Dauerlicht mit
langsamen und
kurzen Pieptönen
Rotes Dauerlicht mit
schnellen und kurzen
Signaltönen
· Schutz vor umgekehrter Aufladung
---Wiederanschließen, um es erneut zu versuchen
· Schutz vor hoher Temperatur
---Entfernen Sie die Klemmen, um es abkühlen zu
lassen
· Relaiskurzschluss
---Überbrückungskabel defekt. Wenden Sie sich
mit Einzelheiten an [email protected]
Andere
Bitte kontaktieren Sie [email protected]
mit Details
· Kurzschlussschutz
--- Smart Clips nicht miteinander oder mit
demselben Metall verbinden
· Schutz gegen Verpolung
--- Smart-Clip umdrehen, um die richtige
Verbindung zu gewährleisten
· Überlastungsschutz
--- Wiederanschließen, um es erneut zu versuchen
· Fünf Intervalle für den Startschutz
---Drücken Sie die Starttaste etwa 3 Sekunden
lang, bis die Anzeige dauerhaft grün leuchtet. Das
bedeutet, dass das Gerät wieder funktioniert
Situationen

AUFLADEN
Deine Geräte aufladen
1
Stecken Sie das Ladekabel in den USB-C-Anschluss.
1
Stecken Sie das Kabel in einen beliebigen USB-Anschluss.
2
An den entsprechenden Adapter anschließen (Adapter nicht im
Lieferumfang enthalten).
2
Drücken Sie den Netzschalter.

WICHTIGE SICHERHEITSWARNUNG
1. Bewahre das Produkt an einem kühlen und gut belüfteten Ort außerhalb
der Reichweite von Kindern und Haustieren auf.
2. Lege das Produkt nicht über einen längeren Zeitraum in eine
Umgebung mit hohen Temperaturen. Die Betriebstemperatur dieses
Produkts beträgt -20~60℃. Die Lagertemperatur sollte 50℃/122℉ nicht
überschreiten.
3. Starte Fahrzeuge nur mit dem vom Hersteller gelieferten Smart-Jump-
er-Kabel.
1. Das Produkt ist nur für 12V-Fahrzeuge geeignet.
2. Verwenden Sie das Produkt nicht mit weniger als 10 % Leistung, da dies
das Produkt beschädigt.
3. Laden Sie alle 3 Monate auf, um die Lebensdauer zu verlängern.
4.Warten Sie mindestens 30 Minuten, bevor Sie das Auto nach dem
Starten aufladen.
5. Zwischen den Starts werden 60 Sekunden empfohlen, da es sonst
überhitzt.
VORSICHTSMAßNAHMEN
LED-TASCHENLAMPE
LED-Licht SOS OFFStroboskop
(weiß)
Stroboskop
(Orange)
Drücke den
Einschaltknopf 3
Sekunden lang
Kurz drücken
Drücke den Einschaltknopf 3 Sekunden lang
Kurz drücken Kurz drücken Kurz drücken

4. Verwende das Produkt nicht, wenn die Klemme oder das Kabel
beschädigt ist.
6. Verbinde die rote und die schwarze Klemme nicht mit demselben
Metallstück.
7. Nimm das Produkt nicht auseinander und verändere es nicht.
8. Verwende keine Reinigungsmittel, um das Produkt zu reinigen.
9. Missbrauche dieses Produkt nicht und vermeide es, es fallen zu lassen
oder wiederholt dagegen zu schlagen.
10. Betreibe das Produkt nicht in explosiven Umgebungen wie
entflammbaren Flüssigkeiten, Gasen oder Stäuben.
11. Tauche das Produkt nicht in Wasser ein.
12. Wirf das Produkt nicht weg und recycle es sicher.
13. Das Produkt darf nicht verbrannt oder hohen Temperaturen
ausgesetzt werden, da es explodieren kann.
14. Verwende nur Ersatzteile oder Zubehör, die vom Hersteller geliefert
oder empfohlen werden.

APERÇU DU PRODUIT
l'indicateur
Bouton de
démarrage
forcé
⑫
⑬
Port de démarrage
Affichage
Sortie USB 1
Sortie USB 2 (18W)
Bouton d'alimentation
Entrée USB C
①
②
③
④
⑤
⑥
⑦
②
①
④
⑪
⑤
⑥
③
USB1
USB2
USB-C
Voyant LED
Niveau d'alimentation
Port Utilisation
Chargement
Décharge
⑦
⑧
⑨
⑩
⑪
⑬
⑫
⑨ ⑩
⑧
DÉMARRER VOTRE VOITURE
1
Insérez le câble de démarrage dans le démarreur et connectez les
pinces à la batterie de la voiture (rouge au +, noir au -).
2
L'indicateur du câble de liaison devient vert fixe.
3
Démarrez le moteur de votre voiture.
Avertissement: Lors de l'utilisation de la fonction de démarrage forcé, les
fonctions d'autodétection et de sécurité sont désactivées.
1
Appuyez sur le bouton de démarrage forcé pendant 5 secondes.
2
L'indicateur du câble de liaison est vert.
3
Start your car engine.
3 étapes pour résoudre le problème :
Si trois tentatives échouent alors que vous avez correctement connecté
les pinces à votre voiture, vous pouvez utiliser la fonction de démarrage
forcé pour passer en mode boost.
START
/STOP
· À PROPOS DE LA FONCTION DE DÉMARRAGE FORCÉ
START
/STOP

· À PROPOS DU DÉPANNAGE
Dans l'une des situations suivantes, la pince intelligente activera les protections :
Indicateur
Voyant rouge fixe
accompagné de
bips longs et courts
réguliers
Le voyant vert
clignote 5 fois, puis
le voyant rouge
reste allumé.
· La batterie du démarreur est faible et doit être
rechargée
· Protection du délai de démarrage
---Appuyez sur le bouton de démarrage forcé
pendant environ 3 secondes jusqu'à ce que
l'indicateur devienne vert fixe. Cela signifie que
l'appareil se remet à fonctionner
Lumière rouge fixe
Voyant rouge fixe
accompagné de bips
lents et brefs
Voyant rouge fixe
accompagné de bips
rapides et brefs
· Protection contre l'inversion de charge
---Reconnecter pour réessayer
· Protection contre les hautes températures
---Retirer les pinces pour laisser refroidir.
· Court-circuit du relais
---Défaillance du câble de cavalier. Contactez
[email protected] pour plus de détails
Autres
Veuillez contacter [email protected] pour
plus d'informations
· Protection contre les courts-circuits
--- Ne pas connecter les smart clips ensemble ou
au même métal
· Protection contre les connexions inversées
--- Inverser le smart clip pour assurer la bonne
connexion
· Protection contre les dépassements de limite
---Reconnecter pour réessayer
· Cinq intervalles de protection au démarrage
---Appuyez sur le bouton de démarrage forcé
pendant environ 3 secondes jusqu'à ce que
l'indicateur devienne vert fixe. Cela signifie que
l'appareil se remet à fonctionner
Situations

RECHARGE
CHARGE ÉLECTRONIQUE DEVIDES
1
Insérez le câble de chargement dans le port USB C.
1
Branchez le câble dans n'importe quel port USB.
2
Connectez l'adaptateur correspondant (adaptateur non inclus).
2
Appuyez sur le bouton d'alimentation.

AVERTISSEMENT IMPORTANT EN MATIERE DE SECURITE
1. Conserver dans un endroit frais et bien ventilé, hors de portée des
enfants et des animaux domestiques.
2. Ne pas placer le produit dans un environnement à haute température
pendant une longue période. La température de fonctionnement de ce
produit est de -20~60℃. La température de stockage ne doit pas
dépasser 50℃/122℉.
3. Ne démarrez les véhicules qu'avec le câble de démarrage intelligent
fourni par le fabricant.
1. Ce produit est destiné aux véhicules de 12 V uniquement.
2. N'utilisez pas le produit avec une puissance inférieure à 10 %, car cela
endommagerait le produit.
3. Rechargez le produit tous les 3 mois pour prolonger sa durée de vie.
4. attendre au moins 30 minutes avant de recharger après avoir démarré
la voiture.
5. Il est recommandé d'espacer les démarrages de 60 secondes, sous
peine de surchauffe.
PRÉCAUTIONS
ÉCLAIRAGE LED
Éclairage SOS OFFStroboscope
(blanc)
Stroboscope
(orange)
Appuyez sur le
bouton
d'alimentation 3s
Appuyer
brièvement
Appuyez sur le bouton d'alimentation 3s
Appuyer
brièvement
Appuyer
brièvement
Appuyer
brièvement

4. Ne pas utiliser le produit si la pince ou le câble est endommagé.
5. Ne pas connecter les pinces rouge et noire ensemble lorsque le produit
est en cours de production.
6. Ne pas connecter les pinces rouge et noire à la même pièce de métal.
7. Ne pas démonter ou modifier ce produit.
8. Ne pas utiliser de détergent pour nettoyer ce produit.
9. N'abusez pas de ce produit et évitez de le faire tomber lourdement ou
de le heurter de manière répétée.
10. Ne pas utiliser le produit dans des environnements explosifs tels que
des liquides, des gaz ou des poussières inflammables.
11. Ne pas immerger le produit dans l'eau.
12. Ne pas jeter le produit à la poubelle et le recycler en toute sécurité.
13. Ne pas incinérer le produit ou l'exposer à des températures élevées,
car il risque d'exploser.
14. N'utiliser que les pièces de rechange ou les accessoires fournis ou
recommandés par le fabricant.

PANORAMICA DEL PRODOTTO
⑦
②
①
④
⑪
⑤
⑥
③
USB1
USB2
USB-C
⑬
⑫
⑨ ⑩
⑧
Indicatore
Pulsante di
Avvio Forzato
⑫
⑬
Porta di avvio
Display
Uscita USB 1
Uscita USB 2 (18W)
Pulsante di alimentazione
Ingresso USB C
①
②
③
④
⑤
⑥
Luce LED
Livello di potenza
Utilizzo della porta
Ricarica
Scarico
⑦
⑧
⑨
⑩
⑪

AVVIAMENTO DELL'AUTO
1
Inserire il cavo di avviamento nell'avviatore e collegare i morsetti
alla batteria dell'auto (rosso a +, nero a -).
2
L'indicatore del cavo jumper diventa verde fisso.
3
Sullo schermo appare il cartello.
Attenzione: Quando si utilizza la funzione di avvio forzato, le funzioni di
rilevamento automatico e di sicurezza vengono disattivate.
1
Premere il pulsante di avvio forzato per 5 secondi.
2
L'indicatore del cavo jumper è verde.
3
Avviare il motore dell'auto.
3 passi per risolvere il problema:
Se tre tentativi falliscono dopo aver collegato correttamente le pinze
all'auto, è possibile utilizzare la funzione di avviamento forzato per entrare
in modalità boost.
START
/STOP
· SULLA FUNZIONE DI AVVIO DELLA FORZA
START
/STOP

· SULLA RISOLUZIONE DEI PROBLEMI
In una qualsiasi delle seguenti situazioni, il morsetto intelligente attiverà le
protezioni:
Indicatore
Luce rossa fissa con
segnali acustici
lunghi e brevi
regolari
La luce verde
lampeggia 5 volte,
poi la luce rossa è
sempre accesa
· La batteria dell'avviatore è scarica e deve essere
caricata
· Protezione dal timeout di avvio
---Premere il pulsante di avvio forzato per circa 3S
finché l'indicatore non diventa verde fisso.Vuol dire
che si torna a lavorare
Luce rossa fissa
Luce rossa fissa con
segnali acustici lenti
e brevi
Luce rossa fissa con
segnali acustici rapidi
e brevi
· Protezione da carica inversa
---Riconnettersi per riprovare
· Protezione dalle alte temperature
---Rimuovere le fascette per lasciarlo raffreddare
· Cortocircuito del relè
---Guasto del cavo jumper. Contatta
[email protected] con i dettagli
Altro
Contatta [email protected] con i dettagli
· Protezione da cortocircuito
--- Non collegare le clip intelligenti insieme o allo
stesso metallo
· Protezione dalla connessione inversa
--- Clip intelligente inversa per garantire la corretta
connessione
· Protezione oltre limite
---Riconnettersi per riprovare
· Cinque intervalli di protezione all'avvio
---Premere il pulsante di avvio forzato per circa 3
secondi finché l'indicatore non diventa verde fisso.
Vuol dire che si torna a lavorare
Situazioni
RICARICA
CARICARE I DISPOSITIVI ELETTRONICI
1
Inserire il cavo di ricarica nella porta USB C.
1
Collegare il cavo a una qualsiasi porta USB.
2
Collegare all'adattatore corrispondente (adattatore non incluso).
2
Premere il pulsante di accensione.

IMPORTANTE AVVERTENZA DI SICUREZZA
1.Conservare in un luogo fresco e ben ventilato, fuori dalla portata di
bambini e animali domestici.
2. Non collocare il prodotto in ambienti ad alta temperatura per lungo
tempo. La temperatura di funzionamento di questo prodotto è -20~60℃.
La temperatura di conservazione non deve superare i 50℃/122℉.
3. Avviare i veicoli solo con il cavo di avviamento intelligente fornito dal
produttore.
1. Il prodotto è destinato esclusivamente ai veicoli a 12 V.
2. Non utilizzare il prodotto con una potenza inferiore al 10% per non
danneggiarlo.
3. Ricaricare ogni 3 mesi per prolungarne la durata.
4. Attendere almeno 30 minuti prima di ricaricare il prodotto dopo
l'avviamento dell'auto.
5. Si consiglia di attendere 60s tra un avvio e l'altro, altrimenti il prodotto si
surriscalda.
PRECAUZIONI
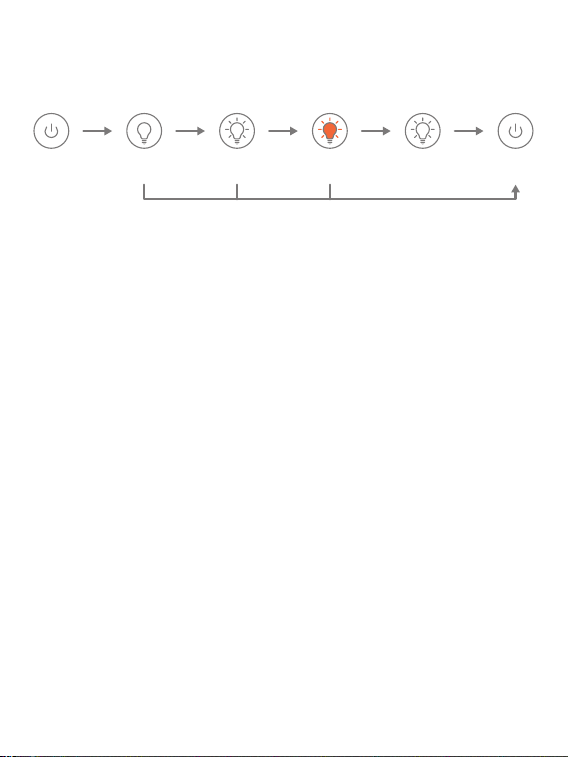
LUCE LED
Illuminazione SOS SPENTOStrobo (bianco) Strobo (arancione)
Premere il pulsante
di accensione per
3 secondi
Premere
brevemente
Premere il pulsante di accensione per 3 secondi
Premere
brevemente
Premere
brevemente
Premere
brevemente

4. Non utilizzare il prodotto se il morsetto o il cavo sono danneggiati.
5. Non collegare insieme i morsetti rosso e nero quando il prodotto è in
uscita.
6. Non collegare insieme i morsetti rosso e nero quando il prodotto è in
uscita.
7. Non smontare o modificare il prodotto.
8. Non utilizzare detergenti per pulire il prodotto.
9. Non abusare del prodotto ed evitare di farlo cadere pesantemente o di
colpirlo ripetutamente.
10. Non utilizzare il prodotto in ambienti esplosivi come liquidi, gas o
polveri infiammabili.
11. Non immergere il prodotto in acqua.
12. Non gettare il prodotto nell'immondizia e riciclarlo in modo sicuro.
13. Non incenerire il prodotto e non esporlo ad alte temperature, poiché
potrebbe esplodere.
14. Utilizzare solo parti di ricambio o accessori forniti o raccomandati dal
produttore.

RESUMEN DE PRODUCTOS
⑦
②
①
④
⑪
⑤
⑥
③
USB1
USB2
USB-C
Indicador
Botón de
Arranque
Forzado
⑫
⑬
Puerto de Arranque
Pantalla
Salida USB 1
Salida USB 2 (18W)
Botón de Encendido
Entrada USB C
①
②
③
④
⑤
⑥
Luz LED
Nivel de Potencia
Puerto en Uso
Carga
Descargando
⑦
⑧
⑨
⑩
⑪
⑬
⑫
⑨ ⑩
⑧

ARRANQUE SU COCHE
1
Inserte el cable de arranque en el arrancador y conecte las pinzas a
la batería del coche (rojo a +, negro a -).
2
El indicador del cable puente se enciende en verde fijo.
3
Arranca el motor de tu coche.
Advertencia: Al utilizar la función de arranque forzado, se desactivarán
las funciones de autodetección y seguridad.
1
Pulsa el botón de arranque forzado durante 5 segundos.
2
El indicador del cable de arranque está en verde.
3
Arranca el motor de tu coche.
3 pasos para solucionar el problema:
Si fallan tres intentos al conectar correctamente las pinzas a tu coche,
puedes utilizar la función de arranque forzado para entrar en el modo
boost.
START
/STOP
· ACERCA DE LA FUNCIÓN DE ARRANQUE FORZADO
START
/STOP

· ACERCA DE LA RESOLUCIÓN DE PROBLEMAS
En cualquiera de las siguientes situaciones, la pinza inteligente activará las
protecciones:
Indicator
Luz roja fija con
pitidos regulares
largos y cortos
La luz verde
parpadea 5 veces,
luego la luz roja está
siempre encendida
· Arrancador de coches es la batería baja, necesita
ser cargado
· Protección de tiempo de arranque
---Pulse el botón de arranque forzado durante
unos 3S hasta que el indicador cambie a verde fijo.
Significa que vuelve a funcionar
Luz roja fija
Luz roja fija con
pitidos lentos y
breves
Luz roja fija con
pitidos rápidos y
breves
· Protección contra carga inversa
---Reconectar para volver a intentarlo
· Protección contra altas temperaturas
---Retire las abrazaderas para dejar que se enfríe.
· Cortocircuito del relé
---Fallo del cable puente. Póngase en contacto con
[email protected] con los detalles
Otros
Póngase en contacto con [email protected]
con los detalles
· Protección contra cortocircuitos
--- No conectar los smart clips juntos o al mismo
metal.
· Protección de conexión inversa
--- Invierta el smart clip para garantizar una
conexión correcta
· Protección contra sobrecarga
---Reconectar para volver a intentarlo
· Fünf Intervalle für den Startschutz
---Drücken Sie die Starttaste etwa 3 Sekunden
lang, bis die Anzeige dauerhaft grün leuchtet. Das
bedeutet, dass das Gerät wieder funktioniert
Situaciones

SOBRE LA RESOLUCIÓN DE PROBLEMAS RECARGA
CARGAR DISPOSITIVOS ELECTRÓNICOS
1
Inserta el cable de carga en el puerto USB C.
1
Conecta el cable a cualquier puerto USB.
2
Conéctalo al adaptador correspondiente (adaptador no incluido).
2
Pulsa el botón de encendido.

ADVERTENCIA IMPORTANTE DE SEGURIDAD
1. Almacene en un lugar fresco y bien ventilado fuera del alcance de niños
y mascotas.
2. No exponga el producto a altas temperaturas durante mucho tiempo.
La temperatura de funcionamiento de este producto es de -20~60℃. La
temperatura de almacenamiento no debe superar los 50℃/122℉.
3. Arranque los vehículos únicamente con el cable de arranque
inteligente suministrado por el fabricante.
1. El producto es sólo para vehículos de 12V.
2. No utilice el producto con menos del 10% de potencia ya que dañará el
producto.
3. Recárguelo cada 3 meses para prolongar su vida útil.
4. Espere al menos 30 minutos antes de recargar después de arrancar el
coche.
5. 60s entre arranques, de lo contrario se sobrecalentará.
PRECAUCIONES
ILUMINACIÓN LED
Iluminación SOS OFFStrobe(Blanco) Strobe(Naranja)
Pulse el botón de
encendido 3s
Pulse
brevemente
Pulse el botón de encendido 3s
Pulse
brevemente
Pulse
brevemente
Pulse
brevemente

4. No utilice el producto si la pinza o el cable están dañados.
5. No conecte las pinzas roja y negra juntas cuando el producto esté
saliendo.
6. No conecte las pinzas roja y negra a la misma pieza de metal.
7. No desmonte ni modifique este producto.
8. No utilice detergente para limpiar este producto.
9. No abuse de este producto y evite dejarlo caer con fuerza o golpearlo
repetidamente.
10. No utilice el producto en entornos explosivos como líquidos, gases o
polvos inflamables.
11. No sumerja el producto en agua.
12. No tire el producto a la basura y debe reciclarse de forma segura.
13. No incinere el producto ni lo exponga a altas temperaturas, ya que
puede explotar.
14. Utilice sólo piezas de repuesto o accesorios suministrados o
recomendados por el fabricante.
製品概要
インジケーター
強制起動ボタン
⑫
⑬
ジャンプスタートポート
ディスプレイ
USB出力1
USB出力2(18W)
電源ボタン
USB C 入力
①
②
③
④
⑤
⑥
⑦
②
①
④
⑪
⑤
⑥
③
USB1
USB2
USB-C
LED ライト
電量
ポート使用
充電中
出力中
⑦
⑧
⑨
⑩
⑪
⑬
⑫
⑨ ⑩
⑧
車を始動する
1
ジャンパーケーブルのプラグをジャンプスターターにしかっりに挿
入し、クランプを車のバッテリー接続します(赤いクリップ/ +、黒
いクリップ/- )。
2
ジャンパーケーブルのインジケーターが緑に点灯します。
3
車を始動します。
警告: 強制起動機能を使用すると、自動検出および安全機能は無効になります。
1
強制起動ボタンを5秒間押します。
2
インジケーターは緑になります。
3
車を始動します。
3つのステップ問題を解決する:
クランプを車に正しく接続して3回失敗した場合は、強制起動モードを使用
してブーストモードに入ることができます。
START
/STOP
· 強制起動モードについて
START
/STOP

· ラブルシューティング
以下のいずれかの場合、スマートクランプは保護機能をオンにします:
インジケーター
赤色点灯、長短のビ
ープ音が規則的に鳴
る
緑ランプが5回点滅し
、その後赤ランプが
常時点灯する
ジャンプスターターのバッテリー残量が少なく、充電
が必要
· 起動タイムアウト保護
---インジケータが緑色に点灯するまで、強制起動ボタ
ンを約 3 秒間押す。作業に戻ることを意味する
赤のライトが常に点
灯する
赤色点灯、ゆっくり
と短いビープ音
赤色点灯、素早く短
いビープ音
· 逆充電保護
---再接続する
· 高温保護
---クランプを外して冷やす
· リレー短絡
---ジャンパーケーブルの故障。詳細は
[email protected] までご連絡ください
ほか
詳細は [email protected] までご連絡ください
· 短絡保護
--- スマートクリップ同士、または同じ金属に接続し
ないでください
· 逆接続保護
--- スマートクリップを逆回転させ、正しい接続を確
保する
· オーバーリミット保護
---再接続する
· 起動保護の5つの間隔
---インジケータが安定した緑に変わるまで、強制
起動ボタンを約 3 秒間押してください。それは仕事
に戻ることを意味する
状態

本体への充電
他のデバイスへの充電
1
充電ケーブルをUSB Cポートに差し込みます。
1
ケーブルをUSB出力ポートに差し込みます。
2
対応するアダプタ(別売)に接続します。
2
電源ボタンを押して充電を開始します。
安全注意
1.風通しの良い日陰に保管してください。 子供とペットの接触は避けてく
ださい。
2.本製品を長時間高温環境に置かないでください。 使用温度は-20~60℃で
す。 保存温度は50℃を超えません。
3.メーカー提供のジャンプケーブルのみで車を起動してください。
4.クリップやケーブルが破損している場合は使用しないでください。
5.本製品に接続する時、赤と黒のクリップは一緒に接続しないでください。
6.赤と黒のクリップを同じ金属に接続しないでください。
1. この製品は12 v車専用です。
2. 10%以下の電力で使用すると破損しますので、使用しないでください。
3. 寿命を延ばすために3ヶ月ごとに充電してください。
4.車を起動してから充電するまで、少なくとも30分は待ちましょう。
5. 開始と終了の間に60秒推奨されます。
注意
LEDライト
照明 SOS オフストロボ
(ホワイト)
ストロボ
(オレンジ)
電源ボタン
を3秒長押す
短押す
電源ボタンを3秒長押す
短押す 短押す 短押す

7.本製品を分解または改造しないでください。
8.洗剤を使用しないでください。
9.本製品を乱用しないでください。 強い衝撃を避けます。
10.引火性液体、気体又は粉尘等の爆発性環境で製品を操作しないでくださ
い。
11.製品を水につけないでください。
12.製品をポイ舎てないでください。 安全に回収されるべきです。
13.爆発する可能性があるので、製品を燃やしたり、高温にさらさないでく
ださい。
14.メーカーから提供または推奨されている部品のみを使用してください。
https://ibuture.com/pages/user-manuals
@buture.official@buture.official
[email protected] https://ibuture.com
Scan And Download PDF Version Of User Manual
WHERE TO GET MORE HELP
