User Manual
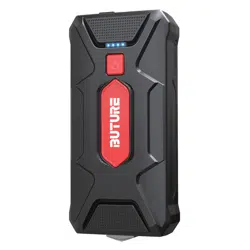
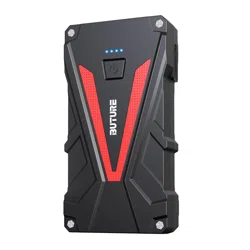
BUTURE BR600 Jump Starter


Language
01-09
10-17
18-27
28-37
38-44
45-53
English
Deutsch
Français
Italiano
Español
日本語

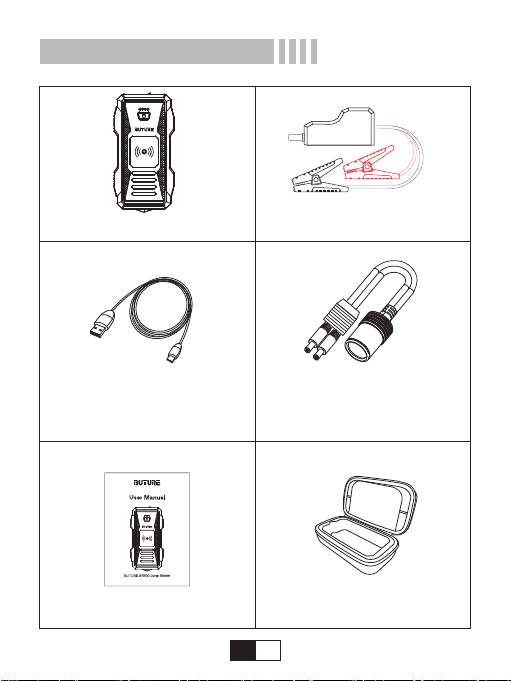
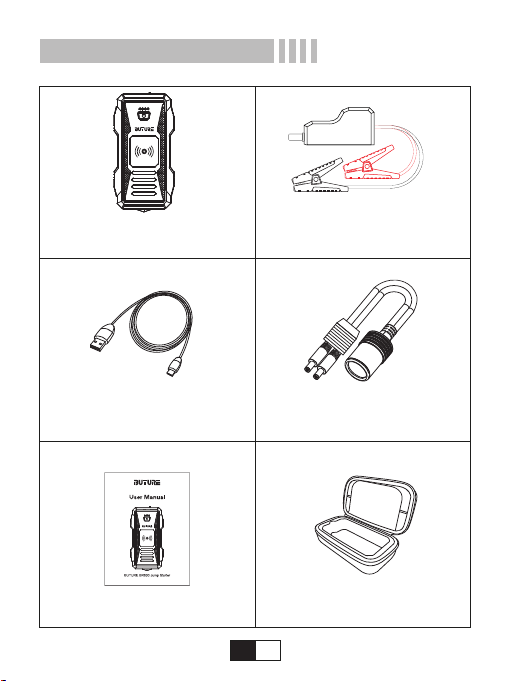
Package Content
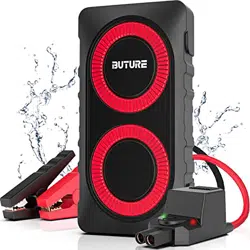
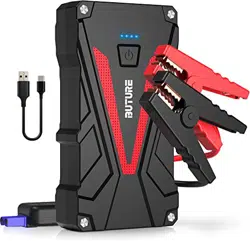
BUTURE BR600 Jump Starter Smart Jumper Cables
Type C Cable EC5 Cigarette Lighter
User Manual Storage Box
EN 01

Introduction
Thank you for purchasing BUTURE BR600 car jump starter. Please
read the user manual carefully before you start to use the product.
Key Features
★A Powerful Jump Starter: Car Jump Starter with 2500 amps peak
current can jump starts 12V cars, SUV, truck or van (All Gas or 8.0L
Diesel) in seconds up to 30 times on a single charge.
★Power Bank & Wireless Charger:10W wireless charger function
and large 23800mAh battery capacity can provide sufficient power to
quick charge your smartphones.
★Dual USB Charger with QC3.0 & 5V 2.4A: It can full charge your
laptops, smart phones, tablets, and other devices at the fastest
speed possible.
★Safety Protection: The high quality and spray gold clamps with a
built-in protection circuit provides over-current protection, short circuit
protection, over-load protection, over-voltage protection, over-charge
protection. Provide ultimate protection for your safety.
★A Life Saver: 4 modes LED light: flashlight, strobe light, SOS signal
light, and warning light, built-in safety hammer for emergency.
EN 02
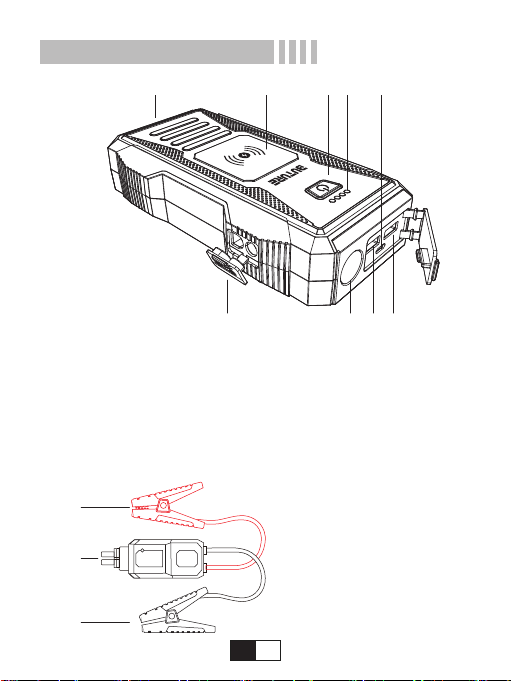
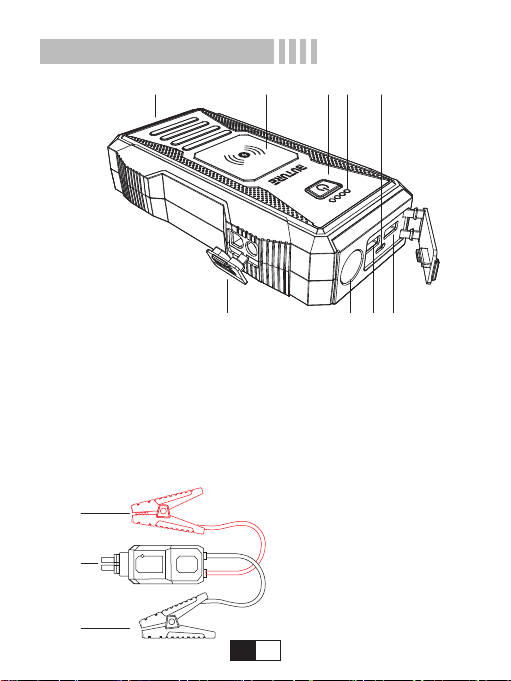
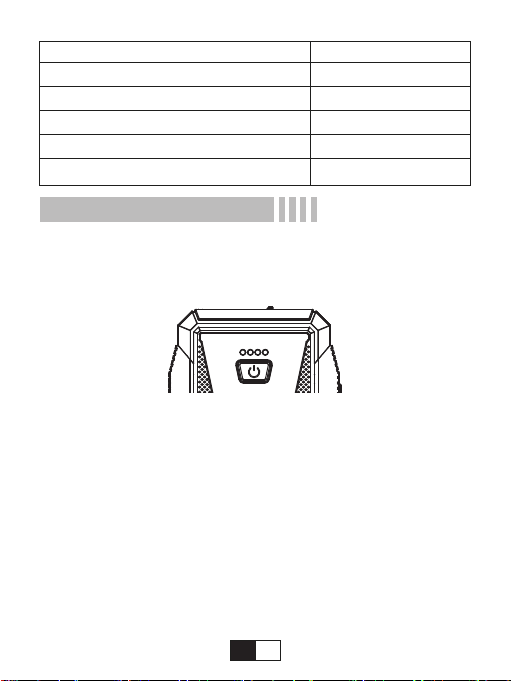
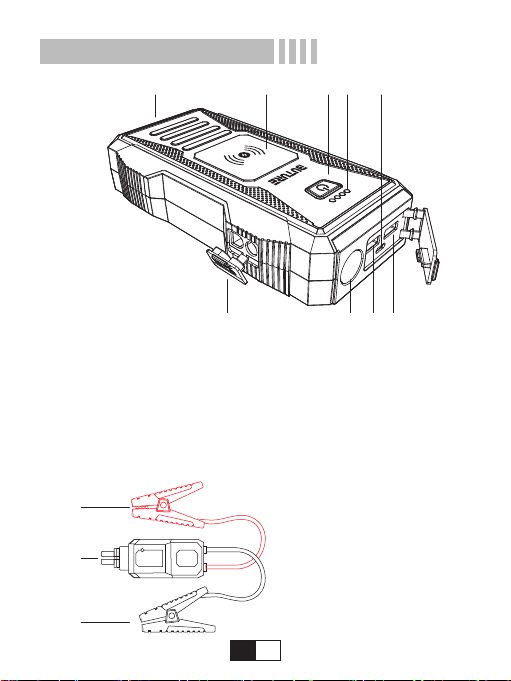
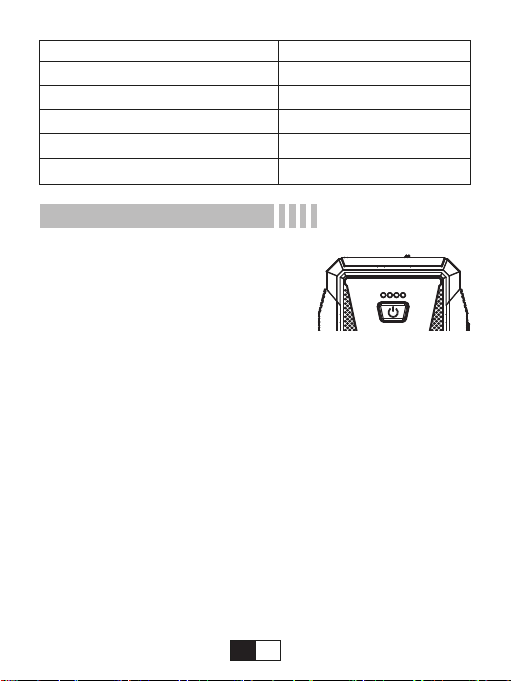
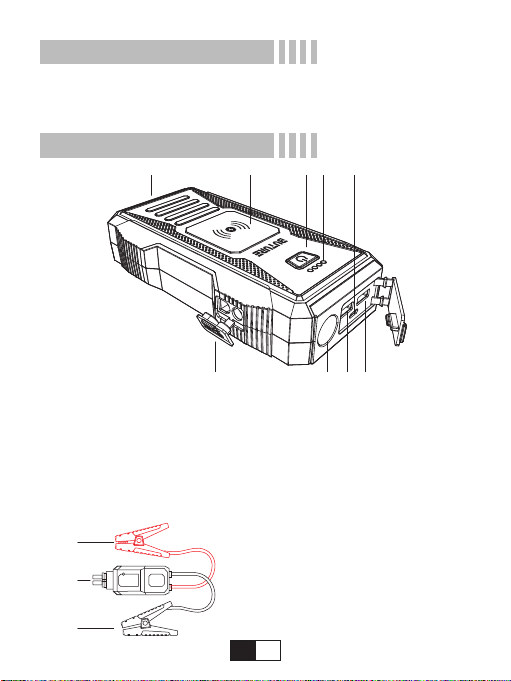
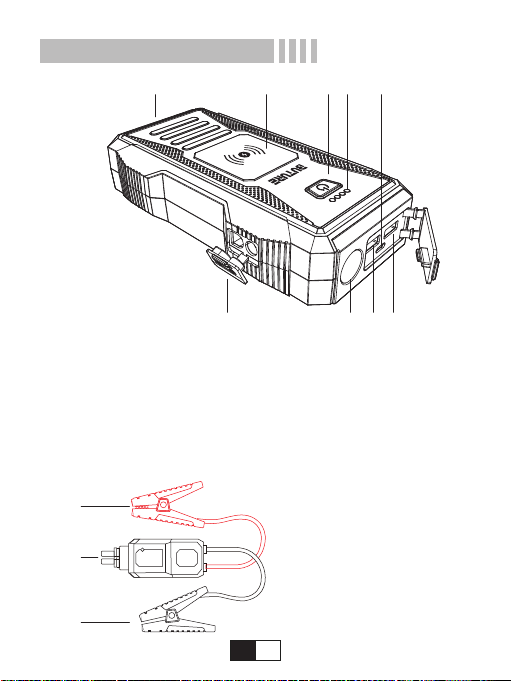
①Jump Starting Port
②LED Light
③QC3.0 USB Output
④5V/2.4A USB Output
⑤TYPE C Input
①Red Jumper Cable (+)
②Black Jumper Cable (-)
③Smart Clamp Plug
⑥Power Switch
⑦Battery Indicator
⑧Wireless charger
⑨Safety Hammer
Know Your Product
Powerful Circuit Protection System - Smart Clamps
①②
①
②
③
③
④
⑤⑥⑦⑧⑨
EN 03

Technical Specifications
Technical Details
No
1
2
3
4
5
6
7
8
9
Function
ON/OFF Button
Flashlight
Charge indicator light
USB C input
Output 1 QC3.0
Output 2 USB
Wireless charger
Jump starting port
Safety hammer
Operation
Press the button to charge your devices.
Press the button to see the remaining capacity
Long press the button to turn on/off the flashlight
Normal, SOS, Strobe, Warning Light, off
Shows the charging press:25%,50%,75% and 100%
Charge the stater with Type c cable
Charge your phone,tablet,camera,etc.75% faster
than a standard charge
Charge your phone,tablet,camera,etc. 5V/2.4A 12W
output
Charge your phone or other devices which can
support wireless charger
Insert the plug into the jump starting port
Use in emergency or dangerous situation
Model
Capacity
Starting Current
Peak Current
USB C Input
Output 1
Output 2
Wireless Charger
Dimensions(L*W*H)
BR600
23800mAh
1200A
2500A
9V/2A, 5V/3A
9V/2A, 5V/2.4A
5V/2.4A
10W
183*95.5*42.8
EN 04
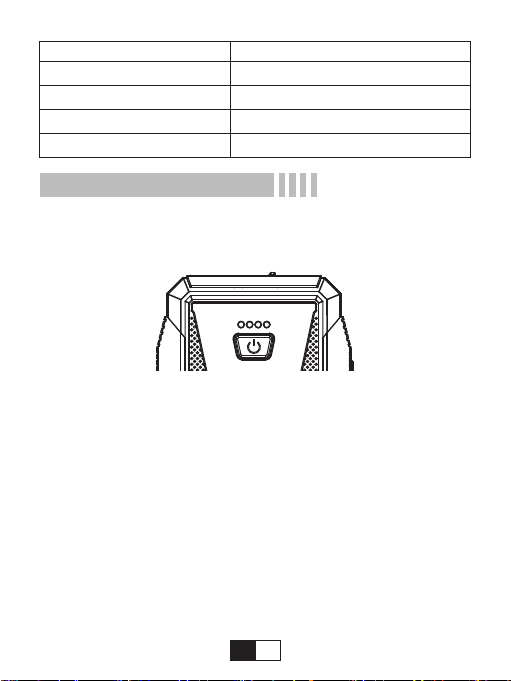
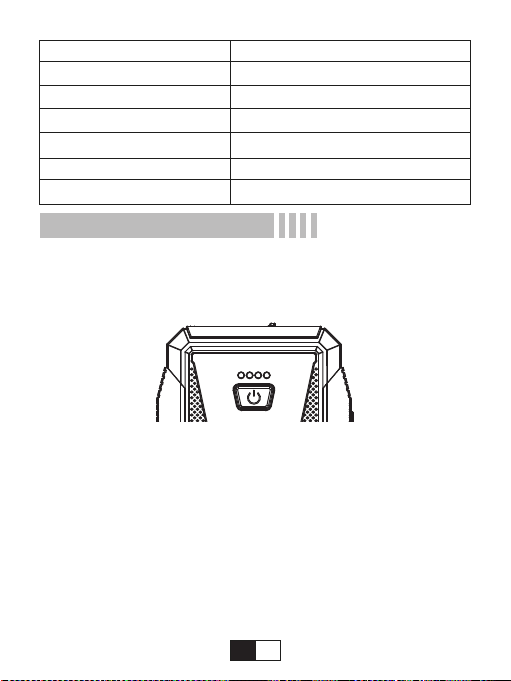
Press the power button to check the capacity of the Jump starter.Indi-
cator Lights as below picture(25%,50%,75%,100%)
NOTE: The wall charger or car charger is not included in the
package, you can use a universal USB charger to recharge the unit,
such as your phone or pad charger(2A above is suggested)
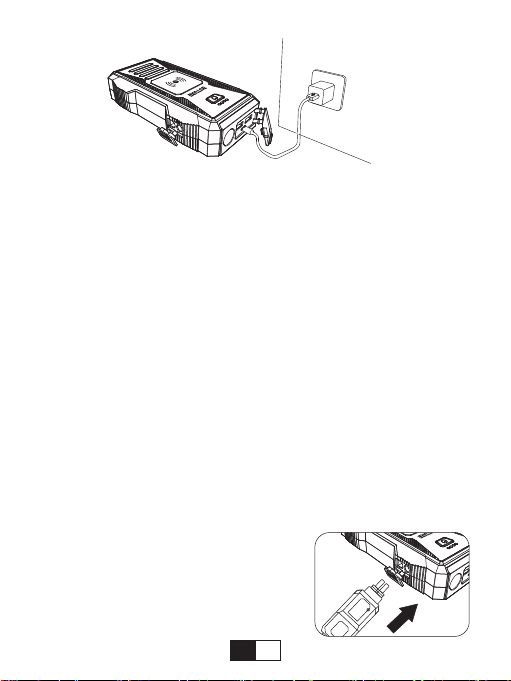
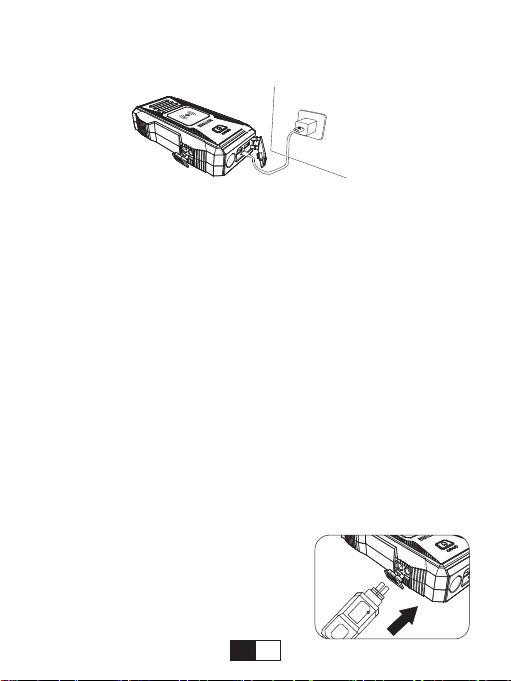
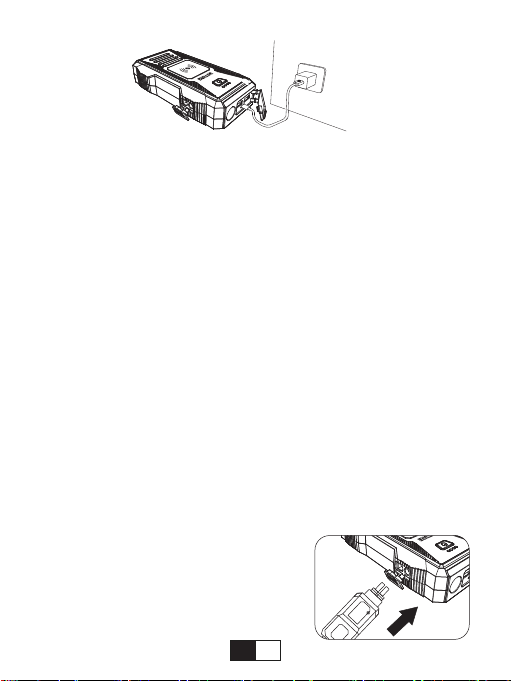
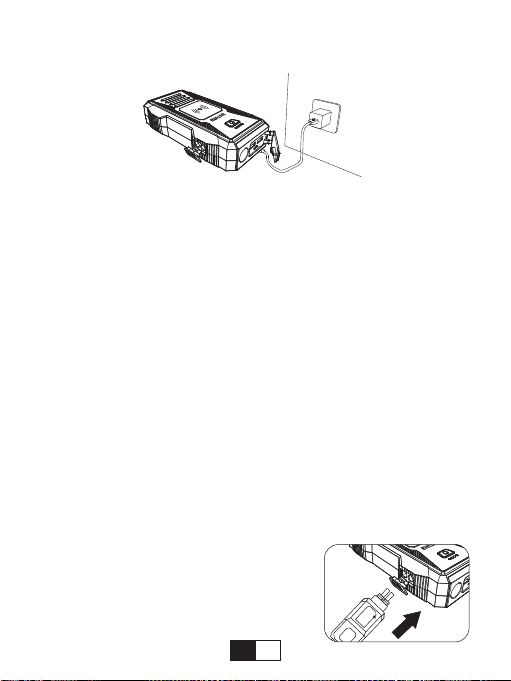
At Home:
1.Plug the USB cable into any USB wall adaptor (5V 2A above, not
included)
2.Connect the UCB C cable(included) to the unit
In Car:
1.Plug the USB car adapter(not included)into an available 12v socket
2.Connect the USB C (included ) to the unit.
Note: It is recommended to recharge the Jump starter every
3-4months to maintain the efficiency and prolong the service life of
the internal battery even if the unit has not been used.
Operation
Power indicator light
Recharge the Jump starter
Overload/Discharge Fuse
Working Temperature
Backflow Protection
Short circuit fuse protection
Reverse polarity protection
≤13V±0.3V
-20℃~60℃ / -4℉~140℉
≥12.6V±0.3V
√
√
EN 05
Use the original manufacturer's USB cable that came with your
device and plug it into one of the USB output ports.You can charge
two devices at the same time.One of the ports has a maximum output
of 9V/2A while the other has a maximum output of 5V/2.4A.Press the
power button once to begin charging your device.The power level
indicator will show the battery level.To check the power capacity
again, simply press the power button once.
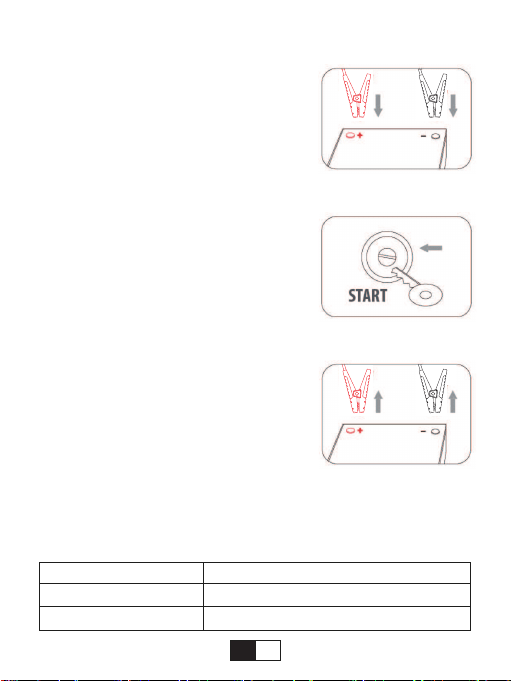
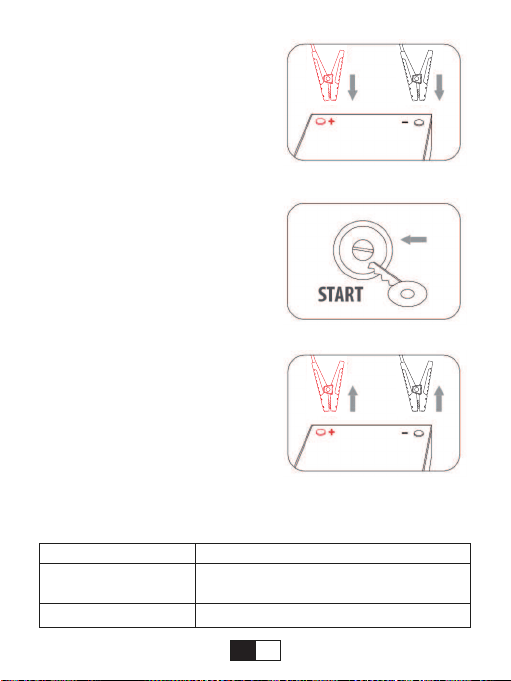
To jump start the vehicle battery, put the vehicle in park(neutral if the
vehicle has a manual transmission)and engage the emergency
brake. Locate the battery for the vehicle and follow the steps listed
below.
Jump cables are color-coded, RED for POSITIVE(+)and BLACK for
NEGATIVE(-). Do not mix up the cables or allow the metal ends to
touch together because this may damage the battery. charging
system and/or electronics on a vehicle.
Note:
This product is for 12V car only. Check to make sure that 3 or 4
indicator lights are illuminated(battery level is above 50%)before you
use it to start your car.
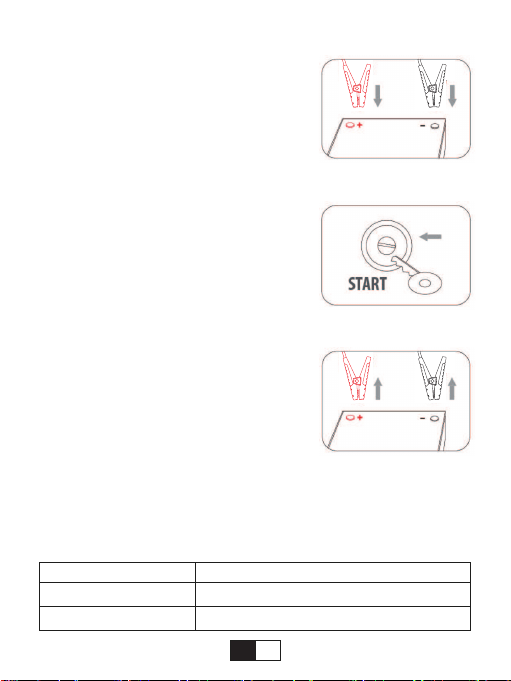
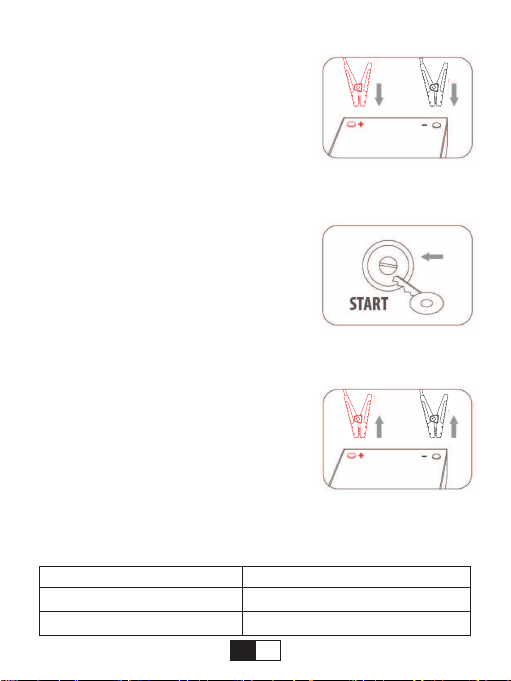
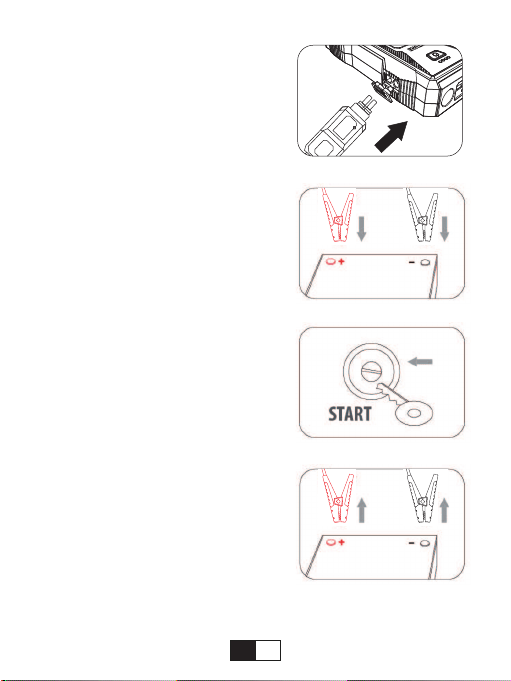
Step1: Insert the plug of the smart battery
clamp completely into the jump starter. If
the green and red light indicators on the
battery clamp are flashing alternately, you
are safe to move on to the next step.
Charging your devices from the USB output
To Jump Start Your Car
EN 06
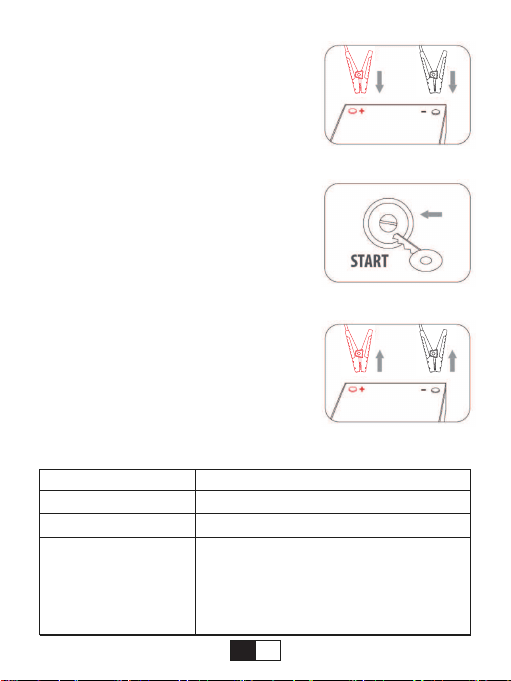
Step 2:Connect the red clamp to the positive
terminal(+)of the car battery and connect the
black clamp to the negative(-)of the car
battery. If the indicator light of the smart
clamp is solid green, you can move on to the
next step.
However, if the red indicator light is on:
1. The battery clamp may be connected in
reverse. In this case, you need to disconnect
the battery clamp from the vehicle and the
jump starter.
2. Adjust the clamps for maximum contact
with the battery terminals.
Step3: Start Your Car.
If you failed to start your car, you need to
disconnect the battery clamp from the vehicle
and the jump starter.wait for at least 30
seconds, then try again.
Step 4:
Once your car is started. Remove the battery
clamp from the car-battery and the jump
starter within 30 seconds.
In any of the following situations, the smart clamp turns
protection on:
LED indicator
The red/green led will flash
The green light is always on
The red light is always on
Situations
Ready to work
Work status
1.battery clamp is reversely connected
--check whether the clip is reversely connected
2.the clamp is short-circuited
----check whether two clamps together connect
or connect both cable clamps to the same piece
of metal
EN 07

1.When jump-starting a vehicle, please ensure that the blue plug is
securely fitted into the jump start socket on your jump starter
2. Do not allow this product in water
3. Do not operate the product in explosive atmospheres, such as in
the presence of flammable liquid, gas or dust
4. Do not modify or disassemble the product
5. Do not store in locations where the temperature may exceed 140℉
(60℃)
6. If battery leakage occurs, take it to your local battery recycling
center for disposal, do not attempt to use it.
7. This car jump starter is for use with 12V vehicles only.
Warnings:
The battery is self-contained and not consumer replaceable, The
battery must be disposed of properly when it no longer holds a
charge. Proper charging practices will increase the life of the product.
Battery Disposal
The red light flashes slowly
The red light LED flashes
quickly
The green light flashes
slowly
Back charge protection, the voltage of the car
battery is higher than 12.6V.
---No jump starter needed.the car battery is
enough to start your car
The temperature of the clamp exceeds
65±5degrees
----remove the clamp until the red-green led flash
The voltage of the starter is too low
----try to replace the startup power supply or
charge it in time
EN 08

Warranty
Our company provides customers with warranty of 24 months from
the date of purchase.
Contact US
For additional assistance or warranty cover claim, please contact us:
E-Mail: [email protected]
Battery Disposal
Issue
Can not jump
start
LED light keeps
flashing
No wall adaptor
Cause
Wrong connection
30-second timer to
jump start has expired
Low battery status
Protection is working
Charge the unit via
your phone charger
Remedy
Make sure to clamp the RED jumper
cable to the Positive(+)post on the
battery. And Black jumper cable to
Negative(-)post.
Disconnect the cables from the vehicle
battery and reconnect it.
Recharge the unit until at least three
solid lights
Refer to the LED Indicator Table of the
manual
Plug the USB cable into a universal
wall adapter (2A above is suggested),
such as your phone or pad charger.
EN 09
Lieferumfang
Tragbare Starthilfe Powerbank Smart Clamps (Starthilfekabel)
USB-C-Kabel
EC5 Adapter für
Zigarettenanzünder
Bedienungsanleitung Aufbewahrungstasche
DE
10

Vorwort
Sehr geehrter Kunde, vielen Dank dass Sie sich für den Kauf einer
BuTure BR600 Starthilfe-Powerbank entschieden haben. Bitte lessen
Sie diese Bedienungsanleitung sorgfältig bevor Sie das Produkt in
Betrieb nehmen.
Hauptmerkmale
★Leistungsstarke Auto Starthilfe:Mit 2500A Spitzenstrom kann Auto
Starthilfe 12V Fahrzeuge(Alle Benzin oder 8,0L Dieselmotor)
starten. Geeignet für PKW, SUV,LKW, Motorräder, usw.
★Power Bank & Wireless Charger Funktion: Auto Starthilfe mit 10W
Wireless Charger und 23800mAh kapazität .die bequemste Art zu
laden zu erleben, einfach das Gerät auf die Starthilfe legen, fertig.
★Tragbares Ladegerät mit QC3.0 und 5V 2.4A: Sie kann somit Ihre
mobile Gerat(Smartphone, Kamera, Kindle,etc.) schneller laden als
ein Standard-Ladegerat.Kompatibel mit QC 1.0 und 2.0.
★Die patentierte Sicherheitstechnik (Smart Battery Clip) bietet einen
Explosions- und Verpolungsschutz, wodurch Kurzschluss, Übertem-
peratur, Überspannung, Überladung, Tiefenentladung, Überstrom
und Verpolung verhindert werden.
★LED-Technik: Es gib 4 LED-Leucht-Modi (“Taschenlampe’, “SOS”,
“Stroboskop”,“Warnlicht”) die sehr niitzlich sein kénnen, z. B. bei
Unfallen, Outdoor-Aktivitaten, etc.
DE
11
① Auto-Starthilfe-Port
② Taschenlampe
③ USB Output 1 QC 3.0
④ USB Output 2 5V/2.4A
⑤ USB C Input
⑥ ON/OFF Taster (multifunktional)
⑦ Ladestatus-Anzeige
⑧ Wireless charger
⑨ Notfallhammer
① Rotes Starthilfekabel
(Plus-Pol )
② Schwarzes Starthilfekabel
(Minus-Pol)
③ “Smart Clamp”-Stecker
Produktdetails
Leistungsstarkes Stromkreisschutz System – Smart
Clamps (Starthilfekabel)
①②
①
②
③
③
④
⑤⑥⑦⑧⑨
DE
12

Technische Spezifikationen
Technische Details
No
1
2
3
4
5
6
7
8
9
Funktion
ON/OFF Taster
LED-Lichtmodus
Ladestatus-Anzeige
USB C Input
USB Output 1
QC 3.0
USB Output 2 5V/2.4A
Wireless Charger
Auto-Starthilfe-Port
Notfallhammer
Bedienung
Drücken Sie den Taster um Ihre Geräte aufzuladen
Drücken Sie den Taster um die verbleibende Kapazität
anzeigen
Durch langes Drücken des Tasters schalten Sie die
Taschenlampe an/aus
“Taschenlampe’, “SOS”, “Stroboskop” und “Warnlicht”
Zeigt den Ladefortschritt an (25%, 50%, 75%, 100%)
Lädt die Powerbank mit dem Typ C Kabel
Lädt Ihr Smartphone, Tablet, Kamera, etc. ca. 75%
schneller als ein Standardladegerat
Lädt Ihr Smartphone, Tablet, Kamera, etc.
Lädt Ihr Smartphone oder andere Geräte auf, die das
Wireless Charger unterstützen.
Stecken Sie den Stecker in dem Auto-Starthilfe-Port
Verwendung in Notfällen oder in gefährlichen
Situationen
Modell
Kapazität
Anlaufstrom
Spitzenstrom
USB C Input
USB Output 1
USB Output 2
Wireless Charger
BR600
23800mAh
1200A
2500A
9V/2A, 5V/3A
9V/2A, 5V/2.4A
5V/2.4A
10W
DE
13

1.Im Lieferumfang bieten wir kein Ladegerät. Bitte nutzen Sie das
mitgelieferte USB-C-Kabel um die Starthilfe aufzuladen.
2.Während des AufLadevorgangs blinkt die LED, wenn die Starthilfe
vollständig aufgeladen ist, werden alle vier LEDs leuchten.
3.Bitte beachten: Bevor Sie das Produkt zum ersten Mal verwenden,
laden Sie bitte die Starthilfe für mindestens fünf Stunden auf.
Hinweis:
» Das Produkt ist nur für 12V Fahrzeuge geeignet.
» Stellen Sie sicher, dass 3 bis 4 Anzeigeleuchten leuchten( der
Batterieladestand liegt über 50%),bevor Sie damit Ihr Fahrzeug starten.
Schritt 1: Stecken Sie den Stecker der
Smart Battery Clamp vollständig in die
Starthilfe. Wenn die grüne und die rote
Anzeige der Batterieklemme abwechselnd
blinken, können Sie mit Sicherheit zum
nächsten Schritt übergehen.
Inbetriebnahme
Laden Sie die Starthilfe-Powerbank
Starten Sie das Auto
Abmaße(L*W*H)
Overload/Discharge Fuse
Working Temperature
Backflow Protection
Short circuit fuse protection
Reverse polarity protection
183*95.5*42.8mm
≤13V±0.3V
-20℃~60℃ / -4℉~140℉
≥12.6V±0.3V
√
√
DE
14
Schritt 2: Verbinden Sie die rote Klemme mit
dem Pluspol(+) der Autobatterie und verbinden
Sie die schwarze Klemme mit dem
Minuspol(-)der Autobatterie. Wenn die grüne
und die rote Anzeige der Batterieklemme
abwechselnd blinken, können Sie mit
Sicherheit zum nächsten Schritt übergehen.
Wenn jedoch die rote Kontroll Leuchte
leuchtet:
1)Die Batterieklemme kann umgekehrt
angeschloßen werden. In diesem Fall müssen
Sie die Batterieklemme vom Fahrzeug und
vom Starthilfegerät trennen.
2)Stellen Sie die Klemmen für maximalen
Kontakt mit den Batterieklemmen ein.
Schritt 3: Starten Sie das Auto.
Wenn Sie Ihr Auto nicht starten konnten,
müssen Sie die Batterieklemme vom Fahrzeug
und vom Starthilfegerät trennen. Warten Sie
mindestens 30 Sekunden und versuchen Sie
es erneut.
Schritt 4: Sobald Ihr Auto gestartet ist,
entfernen Sie die Batterieklemme aus der
Autobatterie und der Starthilfe innerhalb von
30 Sekunden.
In jeder der folgenden Situationen schaltet sich die
“Smart Clamp” automatisch in den Schutzmodus.
LED Anzeige
die grüne/ rote LED blinkt
die grüne LED leuchtet
Status
Die Starthilfe ist betriebsbereit.
Die Starthilfe ist in Betrieb.
DE
15

1. Benutzen Sie nur die original “Smart Clamps” um Ihr Fahrzeug zu
starten.
2. Benutzen Sie diese Einheit NICHT, wenn irgendeine Kabelklemme
oder ein Kabel beschädigt sein sollte.
3.Legen Sie das Produkt NICHT im Regen oder in feuchtem oder
eingetauchtem Zustand, das Produkt ist nicht wasserdicht.
4.Keine Chemikalien oder scharfe Reinigungsmittel zur Reinigung
des Produktes verwenden.
5.Produkt NICHT auseinander bauen, es könnte beschädigt werden.
6.Produkt NICHT länger heißen Umgebungen aussetzen.
7.Benutzen Sie die Starthilfe nur fir Fahrzeuge mit 12V
Bordnetzspannung, sonst werden schwere Schäden entstehen (an
Fahrzeug und Starthilfe).
8.Überprüfen Sie den Ladestatus des Produktes bitte mindestens alle
drei Monate und laden Sie es rechtzeitig auf.
Sicherheitsanweisungen
die rote LED leuchtet
die rote LED blinkt
(langsam)
die rote LED blinkt
(schnell)
die grüne LED blinkt
(langsam)
1.Die Starthilfekabel sind verkehrt herum
angeschlossen.
---- Prüfen Sie, ob die Starthilfekabel an den
richtigen Batteriepolen angeschlossen sind.
2.Das Starthilfekabel ist “kurzgeschlossen”.
---- Prüfen Sie, ob die beiden Starthilfekabel
einander oder das selbe Stück Metall berühren.
Rückflusssicherung: die Batteriespannung der
Autobatterie ist höher als 12.6V
---- Keine Starthilfe erforderlich, die Autobatterie
hat genug Spannung um Ihr Fahrzeug zu starten
Die Temperatur der Starthilfekabel übersteigt
65°C (+/-5°C)
---- Entfernen Sie die Starthilfekabel bis die
rote/grüne LED blinkt.
Die Spannung der Starthilfe ist zu niedrig.
---- Laden Sie die Starthilfe zeitnah auf.
DE
16

Garantie
F: Wie schaltet man diese Powerbank aus?
A: Sie schaltet sich automatisch ab wenn sie nicht belastet wird oder
der Ladevorgang abgeschlossen ist.
F:Welche Art von Adapter sollte ich verwenden?
A: Sie können das Ladegerät Ihres Smartphones oder Tablets
verwenden.
F: Wie lange dauert es die BuTure BR600 Starthilfe-Powerbank
vollständig zu laden?
A: Ungefähr 4-5 Stunden an einer 5V2A adapter.
F: Nach vollständiger Aufladung kann das Produkt das Auto
mehrmals aufladen?
A: Ungefähr 30 Mal.
F: Wie oft kann dieses Produkt mein Smartphone aufladen?
A: Dies ist abhängig von der Akku-Kapazität Ihres Smartphones.
Wir bieten den Kunden eine Garantie von 24 Monaten ab Kaufdatum.
Kontaktieren Sie uns
Fur Anfragen oder Kommentare zu unseren Produkten senden Sie
bitte eine E-Mail an [email protected], und wir werden Ihnen so
schnell wie méglich antworten.
FAQ & Trouble Shooting
DE
17

Contenu du coffret
Booster Batterie BUTURE BR600 Câbles intelligents de démarrage
Câble de type C EC5 Briquet
Manuel d’instruction Boîte de rangement
FR
18

Introduction
Vous avez choisi le <BUTURE BR600 CAR JUMP STARTER>, suivez
attentivement les instructions contenues dans ce guide pour effectuer
l’utilisation de votre jump starter dans les meilleures conditions.
Les caractéristiques
★ Un puissant Jump Starter: Ce jump starter avec un courant de pointe
de 2500A peut faire démarrer une voiture de 12V, un SUV, un camion ou
une camionnette (Tout gaz ou 8,0 L diesel) en quelques secondes,
jusqu’à 30 fois.
★Banque d'alimentation et chargeur sans fil: La fonction de chargeur
sans fil 10 W et la grande capacité de la batterie 23800 mAh peuvent
fournir une puissance suffisante pour charger rapidement vos
smartphones.
★Double chargeur USB avec QC3.0 et 5V 2.4A: il peut charger
complètement les ordinateurs portables, smartphones, tablettes et autres
appareils à la vitesse la plus rapide.
★Protection de sécurité: les pinces de haute qualité et en or pulvérisé
avec un circuit de protection intégré offrent une protection contre les
surintensités, une protection contre les courts-circuits, une protection
contre les surcharges, une protection contre les surtensions, une
protection contre les surcharges. Fournissez une protection ultime pour
votre sécurité.
★Kit de sécurité de sauvetage: Il existe 4 modes d'éclairage LED
(normal, SOS, stroboscope et avertissement), marteau de sécurité
intégré pour les urgences. Ce qui est potentiellement une bouée de
sauvetage d'urgence en camping, pique-nique, aventure en plein air ou
lors d'enquêtes.
FR
19
① Port de départ du saut
② LED Lumière
③ QC3.0 USB Output
④ 5V/2.4A USB Output
⑤ Entrée TYPE C
⑥ Interrupteur
⑦ Indicateur de batterie
⑧ Chargeur sans fil
⑨ Marteau de sécurité
① Pince Rouge(+)
② Pince Nori(-)
③ Prise "Smart Clamp"
Connaissez votre produit
Système de protection de circuit puissant - Pinces
intelligentes
①②
①
②
③
③
④
⑤⑥⑦⑧⑨
FR
20

Spécifications techniques:
Détails techniques
No
1
2
3
4
5
6
7
8
9
Fonction
Bouton ON / OFF
Lampe électrique
Lumière de charge
Entrée USB C
Uscita 1 QC3.0
Uscita 2 USB
Chargeur sans fil
Port de démarrage
rapide
Marteau de sécurité
Opération
Appuyez sur le bouton pour charger vos appareils.
Appuyez sur le bouton pour voir la capacité restante
Appuyez longuement sur le bouton pour allumer /
éteindre la lampe de poche
Normal, SOS, Strobe, Warning, OFF
Afficher la presse de charge: 25%, 50%, 75% et 100%
Chargez le stator avec un câble de type c
Rechargez votre téléphone, tablette, appareil photo,
etc. 75% plus rapidement qu'une charge standard
Chargez votre téléphone, tablette, appareil photo, etc.
Sortie 5V / 2.4A 12W
Chargez votre téléphone ou d'autres appareils
prenant en charge le chargeur sans fil
Insérez la fiche dans le port de démarrage
Utilisation en situation d'urgence ou dangereuse
Modèle
Capacité
Courant de démarrage
Courant de crête
Entrée USB C
Sortie 1
Sortie 2
Chargeur sans fil
BR600
23800mAh
1200A
2500A
9V / 2A, 5V / 3A
9V / 2A, 5V / 2.4A
5V/2.4A
10W
FR
21
Appuyez sur le bouton d'alimentation pour vérifier la capacité du
démarreur Jump. Voyants lumineux comme sur l'image ci-dessous
(25%, 50%, 75%, 100%)
REMARQUE: le chargeur mural ou le chargeur de voiture ne sont
pas inclus dans le package, vous pouvez utiliser un chargeur USB
universel pour charger l'appareil, tel qu'un téléphone ou un chargeur
de pad (2A ci-dessus recommandé)
A la maison:
1.Connectez le câble USB à n'importe quel adaptateur mural USB
(5V 2A ci-dessus, non inclus)
2.Connectez le câble UCB C (inclus) à l'unité
Dans la voiture:
1. Branchez l'adaptateur de voiture USB (non inclus) dans une prise
12V disponible
2.Connectez le câble USB C (fourni) à l'appareil.
Opération
Voyant d'alimentation
Chargement du démarreur d'urgence
Dimensions (L * W * H)
Fusible de surcharge / décharge
Température de fonctionnement
Protection contre le refoulement
Protection par fusible contre les courts-circuits
Protection contre l'inversion de polarité
183*95.5*42.8
≤13V±0.3V
-20℃~60℃ / -4℉~140℉
≥12.6V±0.3V
√
√
FR
22
1. Veuillez utiliser l’adaptateur 5V2A/9V2A(Soutenir QC2.0) à charger
votre appareil (câble Type-C inclus,adaptateur non fourni)
2. Avec l’adaptateur 5V2A, le chargement complet de l’appareil
prends environ 4 heures. Afin de prolonger la vie de batterie, il est
recommandé de charger complètement l’appareil tous les 3 à 6 mois.
Remarque: il est recommandé de recharger le démarreur Jump tous
les 3 à 4 mois pour maintenir l'efficacité et prolonger la durée de vie
de la batterie interne même si l'unité n'a pas été utilisée.
Pour démarrer la batterie du véhicule, garez le véhicule (au point mort si
le véhicule a une transmission manuelle) et engagez le frein d'urgence.
Trouvez la batterie du véhicule et suivez les étapes ci-dessous.
Les câbles de saut sont codés par couleur, ROUGE pour POSITIF (+) et
NOIR pour NÉGATIF (-). Ne mélangez pas les câbles et ne laissez pas
les extrémités métalliques se toucher car cela pourrait endommager la
batterie. système de charge et / ou électronique sur un véhicule.
Remarque:
Ce produit est destiné aux voitures 12V uniquement. Vérifiez que 3 ou 4
lumières sont allumées (le niveau de la batterie est supérieur à 50%)
avant de l'utiliser pour démarrer la voiture.
Étape 1:
Insérez complètement la fiche de la borne
de batterie intelligente dans le démarreur. Si
les voyants vert et rouge sur la borne de la
batterie clignotent alternativement, vous
pouvez passer en toute sécurité à l'étape
suivante.
Recharger votre jump starter depuis la sortie USB
Démarrez votre voiture
FR
23
Étape 2:
Connectez la borne rouge à la borne positive
(+) de la batterie de voiture et connectez la
borne noire au négatif (-) de la batterie de
voiture. Si le voyant lumineux du terminal
intelligent est vert fixe, vous pouvez passer à
l'étape suivante.
Cependant, si le voyant rouge est allumé:
1. Le clip de la batterie peut être inversé. Dans
ce cas, la borne de batterie doit être
déconnectée du véhicule et du démarreur.
2. Ajustez le clip pour maximiser le contact
avec les bornes de la batterie.
Étape 3: démarrez votre voiture
a.Insérez complètement le bouchon de l'étrier
intelligent dans le démarreur, les voyants vert
et rouge clignotent alternativement
Fixez correctement les pinces rouges et noires
aux électrodes de la batterie de la voiture
(rouge au positif et noir au négatif). (Le feu
vert reste allumé)
c. Allumez le véhicule.
Étape 4: Lors du démarrage du véhicule,
retirez immédiatement le câble de démarrage
de la batterie du véhicule.
Si l’une des situations suivantes se produit, le clamp se
retrouve en mode protection
LED INDICATEUR
La LED verte/rouge clignote
La LED verte toujours allumé
SITUATION
Prêt à travailler
Statut de travailler
FR
24

1. Utilisez toujours le clip d’origine pour démarrer le véhicule.
2. N’utilisez pas cet appareil si il y a des dommages avec les câble,
pince.
3. Seulement pour véhicule 12V. Si non, il causera de sérieux
dommages à l’appareil.
4. Ne démarrer pas votre voiture lorsque la capacité de la batterie du
BR600 est inférieure à 30%.
5. Ne connectez pas les deux pince ensemble lorsque le démarreur
est en marche ou les connectées à la même pièce de métal.
6. Si le moteur ne démarre pas le premier fois, le-débranchez de la
batterie de la voiture et attendez au moins 30 secondes avant de
reconnecter le moteur. Maximisez trois tentatives en deux minutes.
7. Une fois le moteur est démarré, débranchez les pinces dans les 30
secondes.
Indicateurs de sécurité
La LED rouge toujours
allumé
La LED rouge clignote
lentement
La LED rouge clignote
rapidement
La LED verte clignote
lentement
1. La pince de la batterie est connectée à
l’envers— verifiez la pince
2. La pince est short circuit— verifiez si deux
pince connectées ensemble ou deux les pince
sont connectées à la même pièce de métal
Protection de charge inverse, la tension de la
batterie de la voiture est supérieure à 12.6V
-Aucun jump starter nécessaire, la batterie de la
voiture suffit pour démarrer votre voiture
La température de pince dépasse 65 degrés
— retirez la pince jusqu’à ce que la LED verte
clignote
La tension est trop basse — remplacez
l’alimentation de démarrage ou la changez
FR
25

Q: Pourquoi l'indicateur clignote-t-il toujours en rouge et vert?
Pourquoi l'indicateur ne devient-il pas vert? Pourquoi je ne peux pas
démarrer ma voiture?
R: Veuillez noter que ce produit ne fonctionne qu'avecune batterie
morte / déchargée (12V).
Q: comment éteindre cet appareil ?
R: cet appareil s’éteint automatiquement lorsqu’aucune charge ou la
charge est terminée
Q: Quel type d’adaptateur devrais-je utiliser ?
R: vous pouvez utiliser le chargeur de votre téléphone ou tablette
Q: Combien de fois ce produit peut-il démarrer le véhicule à pleine
capacité?
R: Jusqu'à 25 fois à 25 ℃ / 77 ℉. (Les temps peuvent varier en
fonction de la température de travail)
Q: Quelle est la plage de température de travail?
R : -20 ℃ ~ 60 ℃ / -4 ℉ ~ 140 ℉
Q: combien de temps cet appareil sera-t-il complètement changé ?
R: environ 4 heures avec l’adaptateur 5V2A AC
FAQ et dépannage
1. Ne pas exposer le produit à la lumière directe du soleil ou à des
zones chauds
2. Ne pas frapper ou laisser tomber ce produit
3. Ne démontez pas le produit,c’est dangereux
4. Ne pas utiliser de produit chimique ou de détergent pour nettoyer
le produit
5. Ne place pas le produit dans un environnement à haute
température pendant longtemps. La température de fonctionnement :
-20 ℃ ~ 60 ℃ / -4 ℉ ~ 140 ℉.
6. Verifiez l’énergie du produit au moins tous les trois mois et le
changez à temps
Sécurité
FR
26

Garantie
Notre entreprise offre à ses clients une garantie de 24 mois à
compter de la date d'achat.
Contactez nous
Pour toute assistance supplémentaire ou demande de couverture de
garantie, veuillez nous contacter:
Courriel: [email protected]
Dépannage
Problème
Impossible de
démarrer
La lumière
LED continue
de clignoter
Pas
d'adaptateur
mural
Causa
Mauvaise connexion
Le délai de démarrage
de 30 secondes a expiré
Batterie faible
Travaux de protection
Chargez l'unité via le
chargeur de téléphone
Remède
Assurez-vous de fixer le câble volant
ROUGE à la borne positive (+) de la
batterie. Et un câble de démarrage noir
sur la borne négative (-).
Débranchez les câbles de la batterie
du véhicule et rebranchez-la.
Rechargez l'unité jusqu'à ce qu'au
moins trois lumières fixes
Reportez-vous au tableau des voyants
LED du manuel
Branchez le câble USB dans un
adaptateur mural universel (2A
ci-dessus est suggéré), tel que votre
téléphone ou chargeur de pad.
FR
27

Contenuto della confezione
Avviatore Batteria BUTURE BR600 Cavi d'Accoppiamento Smart
Cavo USB C EC5 Accendisigari
Manuale Utente Scatola di immagazzinaggio
I T
28

Introduzione
Grazie per aver acquistato l’avviatore d’emergenza per auto BUTURE
BR600. Leggere attentamente il manuale dell'utente prima di iniziare a
utilizzare il prodotto.
Caratteristiche principali
★Un potente avviatore d’emergenza: Avviatore d’emergenza per auto
con 2500 Amps di picco può avviare auto, SUV, camion o pulmini (All
Gas o 8.0L Diesel) con batteria da 12V in secondi fino a un massimo di
30 volte senza ricarica.
★Power Bank e Caricabatterie Wireless: la funzione di caricabatterie
wireless da 10 W e l'ampia capacità della batteria da 23800 mAh
possono fornire energia sufficiente per caricare rapidamente i tuoi
smartphone.
★ Caricatore doppio USB con QC3.0 e 5V 2.4A: può caricare
completamente laptop, smartphone, tablet e altri dispositivi alla massima
velocità possibile.
★ La sicurezza prima: La tecnologia di sicurezza brevettata della clip per
batteria intelligente ha una protezione antideflagrante e contro la polarità
inversa, che impedisce cortocircuiti, temperature troppo elevate,
sovratensione, sovraccarico, sovraccarico, sovracorrente e inversione di
polarità.
★Kit di sicurezza salvavita: Ci sono 4 modalità di luce a LED (normale,
SOS, strobo e avvertimento), martello di sicurezza incorporato per le
emergenze. Che è potenzialmente un salvavita di emergenza quando si
va in campeggio, picnic, avventura all'aperto o durante le indagini.
I T
29
① Salta la porta di partenza
② Luce LED
③ QC3.0 USB Output
④ 5V/2.4A USB Output
⑤ Ingresso TIPO C
⑥ Interruttore di alimentazione
⑦ Indicatore di batteria
⑧ Caricabatterie Wireless
⑨ Martello di sicurezza
①Morsetti rossi(+)
②Morsetti neri(-)
③Spina Smart Clamp
Connaissez votre produit
Powerful Circuit Protection System - Smart Clamps
①②
①
②
③
③
④
⑤⑥⑦
⑧⑨
I T
30

Specifiche Tecniche:
Détails techniques
No
1
2
3
4
5
6
7
8
9
Funzione
Tasto ON / OFF
Torcia elettrica
Spia di carica
Ingresso USB C.
Uscita 1 QC3.0
Uscita 2 USB
Caricabatterie
Wireless
Salta la porta di
partenza
Martello di sicurezza
Operazione
Premi il pulsante per caricare i tuoi dispositivi.
Premere il pulsante per visualizzare la capacità
rimanente
Premi a lungo il pulsante per accendere / spegnere la
torcia
Normale, SOS , Strobo, Warning, spento
Mostra la pressa di ricarica: 25%, 50%, 75% e 100%
Caricare lo stater con cavo di tipo C.
Carica il tuo telefono, tablet, fotocamera, ecc. 75% più
velocemente di una ricarica standard
Carica il tuo telefono, tablet, fotocamera, ecc. Uscita
5V / 2.4A 12W
Caricare il telefono o altri dispositivi in grado di
supportare il caricabatterie wireless
Inserire la spina nella porta di inizio del salto
Utilizzare in situazioni di emergenza o pericolose
Modello
Capacità
Corrente di avviamento
Corrente di picco
Ingresso USB C
Uscita 1
Uscita 2
Caricabatterie Wireless
BR600
23800mAh
1200A
2500A
9V / 2A, 5V / 3A
9 V / 2 A, 5 V / 2.4 A
5V/2.4A
10W
I T
31
Premere il pulsante di accensione per
verificare la capacità dell'avviatore Jump.
L'indicatore si illumina come nell'immag-
ine seguente (25%, 50%, 75%, 100%)
NOTA: il caricabatterie da parete o il caricabatteria per auto non sono
inclusi nella confezione, è possibile utilizzare un caricabatterie USB
universale per ricaricare l'unità, come il telefono o il caricabatterie per
pad (si consiglia 2A sopra)
A casa:
1.Collegare il cavo USB a qualsiasi adattatore USB a parete (5V 2A
sopra, non incluso)
2.Collegare il cavo UCB C (incluso) all'unità
In macchina:
1. Inserire l'adattatore USB per auto (non incluso) in una presa da 12
V disponibile
2.Collegare il cavo USB C (incluso) all'unità.
Operazione
Spia di alimentazione
Nota: si consiglia di ricaricare l'avviatore Jump ogni 3-4 mesi per
mantenere l'efficienza e prolungare la durata della batteria interna
anche se l'unità non è stata utilizzata.
Ricarica avviatore d'emergenza
Dimensioni (L * W * H)
Fusibile di sovraccarico / scarica
Temperatura di lavoro
Protezione da riflusso
Protezione fusibile da corto circuito
Protezione da inversione di polarità
183*95.5*42.8
≤13V±0.3V
-20℃~60℃ / -4℉~140℉
≥12.6V±0.3V
√
√
I T
32
Utilizzare il cavo USB del produttore originale fornito con il dispositivo
e collegarlo a una delle porte di uscita USB. È possibile caricare due
dispositivi contemporaneamente. Una delle porte ha un'uscita
massima di 9 V / 2 A mentre l'altra ha un massimo uscita di 5 V / 2.4 A.
Premere una volta il pulsante di accensione per iniziare a caricare il
dispositivo. L'indicatore del livello di potenza mostrerà il livello della
batteria. Per verificare nuovamente la capacità di alimentazione, è
sufficiente premere una volta il pulsante di accensione.
Per avviare la batteria del veicolo, mettere il veicolo in parcheggio (in folle
se il veicolo ha una trasmissione manuale) e inserire il freno di
emergenza. Individua la batteria del veicolo e segui i passaggi elencati di
seguito.
I cavi Jump sono codificati a colori, ROSSO per POSITIVO (+) e NERO
per NEGATIVO (-). Non mescolare i cavi o consentire alle estremità
metalliche di toccarsi perché ciò potrebbe danneggiare la batteria.
sistema di ricarica e / o elettronica su un veicolo.
Nota:
Questo prodotto è solo per auto 12V. Verificare che 3 o 4 spie siano
accese (il livello della batteria è superiore al 50%) prima di utilizzarlo per
avviare l'auto.
Passo 1:
Inserire completamente la spina del morsetto
della batteria intelligente nell'avviatore di
avviamento. Se gli indicatori di luce verde e
rossa sul morsetto della batteria lampeggia-
no alternativamente, si può procedere con
sicurezza al passaggio successivo.
Carica i tuoi dispositivi dall'uscita USB
Avviare la tua auto
I T
33
Passo 2:
Collegare il morsetto rosso al terminale
positivo (+) della batteria dell'auto e collegare il
morsetto nero al negativo (-) della batteria
dell'auto. Se l'indicatore luminoso del morsetto
intelligente è verde fisso, è possibile passare
al passaggio successivo.
Tuttavia, se la spia rossa è accesa:
1. La clip della batteria potrebbe essere
invertita. In questo caso, è necessario
scollegare il morsetto della batteria dal veicolo
e dall'avviatore di avviamento.
2. Regolare la clip per massimizzare il contatto
con i terminali della batteria.
Passo 3: Avviare la tua auto
a.Inserire completamente la spina delle pinze
intelligente nell'avviatore di avviamento, La
luce verde e rossa lampeggiano alternativa-
mente
b.Agganciare correttamente le pinze rosse e
nere agli elettrodi della batteria dell'auto (da
rosso a positivo e da nero a negativo). (La
luce verde rimane accesa)
c. Accendere il veicolo.
Passo 4: All'avvio del veicolo, rimuovere
immediatamente il cavo di avvio dalla batteria
del veicolo.
In una delle seguenti situazioni, la pinza intelligente attiva
la modalità di protezione:
Indicatore LED
Il led rosso / verde lampegger
Il Led verde è acceso fisso
Significato
Pronto a lavorare
Stato del lavoro
I T
34

1. Utilizzare la spina originale originale per avviare l'auto.
2. NON utilizzare questa unità se il morsetto o il cavo sono
danneggiati.
3. Avviare solo per veicoli a 12V, altrimenti si potrebbero causare
gravi danni all'unità.
4. Non avviare la macchina quando la capacità della batteria del
BR600 è inferiore al 30%.
5. Non collegare insieme due morsetti quando l’avviatore d’emergen-
za è acceso. E non collegare entrambi i fermacavi allo stesso pezzo
di metallo.
6. Se il motore non si avvia al primo tentativo, scollegare il dispositivo
dalla batteria dell'auto e attendere almeno 20 secondi prima di
ricollegarlo. Massimizza tre tentativi in due minuti.
7. Una volta avviato il motore, scollegare i morsetti entro 30 secondi.
Indicazioni di Sicurezza
La luce rossa è sempre
accesa
La luce rossa
lampeggia lentamente
Il LED rosso lampeggia
rapidamente
La luce verde
lampeggia lentamente
1.Il morsetto della batteria è collegato in modo
inverso
--- controlla se la clip è collegata al contrario
2.Il morsetto è in cortocircuito
--- verificare se due morsetti si collegano o
collegano entrambi i cavi allo stesso pezzo di
metallo
Protezione da back charge, la tensione della batteria
dell'auto è superiore a 12.6 V.
-Nessun avviamento di salto necessario, la batteria
dell'auto è sufficiente per avviare la tua auto
La temperatura della pinza supera i 65 (+/- 5) gradi
--- rimuovere il morsetto fino a quando il led
rosso-verde lampeggia
La tensione di avviamento è troppo bassa
--possibile sostituire l'alimentatore di avvio o
modificarlo in tempo
I T
35

D: Perché l'indicatore lampeggia sempre in rosso e verde? Perché
l'indicatore non si trasforma in luce verde? Perché non riesco ad
avviare la mia macchina?
A: Notare che questo prodotto funziona solo con una batteria scarica
/ scarica (12V).
D: Come spegnere questo dispositivo?
A: Questo dispositivo si spegne automaticamente quando nessun a
batteria è collegata o a ricarica completata.
D: Che tipo di adattatore dovrei usare?
A: Puoi usare il caricabatterie del tuo telefono o tablet.
D: Quante volte questo prodotto può avviare il veicolo a piena
capacità?
A: Fino a 30 volte a 25 ℃ / 77 ℉. (I tempi possono variare in base
alla temperatura di lavoro)
D: Quanto tempo occorre per caricare completamente l'avviatore
d’emergenza BUTURE BR600?
A: Circa 4 ore tramite l'adattatore 5V2A CA.
D: Qual è l'intervallo di temperatura di lavoro?
A: -20 ℃ ~ 60 ℃ / -4 ℉ ~ 140 ℉
FAQ & Problemi comuni
1. NON esporre il prodotto alla luce diretta del sole o in aree calde.
2. NON far cadere o urtare l’avviatore d’emergenza.
3. NON smontare l'apparecchiatura, potrebbe causare danni.
4. NON utilizzare prodotti chimici o detergenti per pulire il prodotto.
5. NON collocare i prodotti in ambienti ad alta temperatura a lungo.
La temperatura di funzionamento: da -20℃~60℃ / -4℉~140℉.
6. Controllare il livello di carica del prodotto almeno ogni tre mesi e
caricare il prodotto in tempo.
Manutenzione e cura
I T
36

Garanzia
La nostra azienda offre ai clienti una garanzia di 24 mesi dalla data di
acquisto.
Contattaci
Per ulteriore assistenza o richiesta di copertura in garanzia, non
esitate a contattarci:
E-mail: [email protected]
Risoluzione dei problemi
Problema
Impossibile
avviare la
macchina
La luce a LED
continua a
lampeggiare
Nessun
adattatore a
parete
Causa
Connessione errata
Il timer di 30 secondi
per l'avvio è scaduto
Batteria scarica
La protezione funziona
Caricare l'unità tramite
il caricabatterie del
telefono
Rimedio
Assicurati di fissare il cavo jumper
ROSSO al polo positivo (+) sulla batteria.
E cavo jumper nero per post negativo (-).
Scollegare i cavi dalla batteria del
veicolo e ricollegarlo.
Ricaricare l'unità fino ad almeno tre luci
fisse
Consultare la tabella degli indicatori LED
del manuale
Inserire il cavo USB in un adattatore a
muro universale (si consiglia 2A sopra),
come il telefono o il caricabatterie per
pad.
I T
37

Contenido del Paquete
BUTURE BR600
Arrancador de coche
Abrazaderas Inteligentes
USB C Cable EC5 Encendedor
Manual de usuario Caja de Almacenamiento
ES
38
Introducción
Muchas gracias por comprar el arrancador de para coche BuTure
BR600. Por favor, lea atentamente el manual del usuario antes de
comenzar a utilizar el producto.
①Puerto de arrancar
②Linterna
③Salida 1, QC 3.0
④Salida 2, 5V 2.4A
⑤Entrada USB C
⑥Botón ON/OFF(Multifuncional)
⑦Luces indicadoras de carga
⑧Cargador Inalámbrico
⑨ Martillo de Seguridad
①Pinza inteligente roja
(electrodo positivo)
②Pinza inteligente negra
(electrodo negativo)
③Conector de las pinzas
inteligentes
Conozca su producto
Sistema de protección de alta corriente-abrazaderas
de arranque
①②
①
②
③
③
④
⑤⑥⑦⑧⑨
ES
39

Especificaciones (1):
Especificaciones (2):
No
1
2
3
4
5
6
7
8
9
Función
Botón ON/OFF
Linterna
Luces indicadoras
de carga
Entrada USB C
Salida 1, QC 3.0
Salida 2, 5V 2.4A
Cargador
Inalámbrico
Puerto de arrancar
Martillo de seguridad
Operación
Presione el botón para cargar sus dispositivos
Presione el botón para ver la batería restante
Mantenga presionado el botón para encender o
apagar la linterna
Normal, SOS, estroboscopica y advertencia
Muestran la carga total de la batería: 25%, 50%,
75% y 100%
Para cargar el arrancador de coche con un cable
type C
Para cargar su teléfono, tablet, camara, etc, 75%
mas rapido que un cargador normal
Para cargar su teléfono, tablet, camara, etc.
Cargue su teléfono u otros dispositivos que sean
compatibles con el cargador inalámbrico
Inserte el enchufe en el puerto de arrancar
Para el cualquier emergencia.
Modelo
Capacidad
Corriente de arranque
Corriente pico
Entrada USB C
Salida 1
Salida 2
Cargador Inalámbrico
BR600
23800mAh
1200A
2500A
9V/2A, 5V/3A
9V/2A, 5V/2.4A
5V/2.4A
10W
ES
40

1.No ofrecemos un cargador. Utilice el cable USB-C suministrado
para cargar el arrancador de salto.
2.Cuando esté cargando el arrancador de coche, la luz LED
parpadeará, una vez esté completamente cargado, las 4 luces
encendidas.
3.Nota: antes de usar el dispositivo por primera vez, cargue el
arranque automático durante al menos 7 horas. Cuando esté Ileno
de electricidad, aparecen cuatro luces encendidas.
Nota:
» Este producto es solo para vehículos de 12V.
» Verifique que 3 o 4 luces indicadores estén encendidas (el nivel de
la batería esté por encima del 50%) antes de usarlo para arrancar su
automóvil.
Empezando
Cargando su arrancador de coche
Arrancar su vehículo
Dimensions(L*W*H)
Protección contra sobredescarga
High-temperature protection
Protección de carga de vuelta
Proteccion contra cortocircuitos
Protección de conexión inversa
183*95.5*42.8
≤13V±0.3V
-20℃~60℃
≥12.6V±0.3V
√
√
ES
41
Paso 1: Inserte el enchufe de la
abrazadera de bateria inteligente por
completo en el arrancador de coche.
Si los indicadores de luz verde y roja
en la pinza de la bateria parpadean
alternativamente, puede pasar al
siguiente paso.
Paso 2: Conecte la abrazadera roja
al terminal positivo (+) de la bateria
del automovil y conecte la
abrazadera negra al terminal
negativo (-) de la bateria del
automdvil. Si los indicadores de luz
verde y roja en la pinza de la bateria
parpadean alternativamente, puede
pasar al siguiente paso.
Paso 3: Arrancar su automovil.Sino
pudo arrancar su automodvil, debe
desconectar la abrazadera de la
bateria del vehiculo y del arrancador
de coche. Espere al menos 30
segundos, luego inténtelo de nuevo.
Paso 4: Una vez que haya arrancado
su automovil, retire la abrazadera de
la bateria del automévil y el
arrancador en 30segundos.
ES
42

1.Use las clip inteligente original para arrancar el vehículo.
2.NO usar el producto si alguno de los cables esta dafiado.
3. Sólo arranque vehículos de 12V, de lo contrario se podrían causar
serios daños a la unidad.
4.No arranque su automóvil cuando la capacidad de la batería sea
inferior al 50%.
5.No conecte las dos pinzas entre si cuando el arrancador de coche esté
encendido. No conecte ambas pinzas a la misma pieza de metal.
Indicaciones de seguridad
Bajo cualquiera de las siguientes situaciones, la abraza-
dera inteligente enciende el modo de protección:
Indicador LED
El LED rojo y verde parpadean
La luz verde está fija
La luz LED rojo está fija
La luz LED rojo parpadea
lentamente
La luz LED roja parpadea
rapido
La luz verde parpadea
lentamente
Situación
Listo para trabajar
Trabajando
1.La pinza de la bateria esta conectada al revés
---Verificar si el clip esta conectado a la inversa
2.La pinza esta en cortocircuito
----Verifique si las pinzas estan conectadas entre
si o si las pinzas estan
conectadas a la misma pieza de metal
Proteccién de vuelta de carga, el voltaje de la
bateria del coche es mayor a 12.6V.
----No necesita el arrancador de coche, la bateria
del coche es suficiente para
La temperatura de la pinza excede los
-20°C~60°C
----Desconecte la pinza hasta que la luz
parpadee entre rojo y verde
El voltaje del arrancador de coche es muy bajo
----Intente cambiar la fuente de alimentacion o
cargarlo
ES
43

Garantía
6.Si el motor no arranca en un primer intento, desconecte la unidad
de la bateria del coche y espere por lo menos 20 segundos antes de
volver a conectar. Maximo 3 intentos en 2 minutos.
7.Una vez que el motor se haya conseguido arrancar con éxito,
desconectar las pinzas en los siguientes 30 segundos.
P: Cómo de apaga esta fuente de energía?
R: Esta fuente de energía se apagará automáticamente cuando no
detecte ninguna carga ni se esté efectuando una recarga.
P: Qué tipo de adaptador debo usar?
R: Puede usar el cargador de su teléfono o tableta.
P: Cuánto tarda cargar por completo el arrancador de coche
BUTURE?
R: Entre 4 horas utilizando el adaptador de 5V2A.
P: Cuántas veces puede encender el vehículo este producto con una
carga completa?
R: Unas 30 veces.
Nuestra empresa ofrece a los clientes una garantia de 24 meses a
partir de la fecha de compra.
Contáctenos
Para cualquier consulta o comentario sobre nuestros productos,
envie un correo electrénico ,y le responderemos lo antes posible.
E-Mail: [email protected]
Preguntas Frecuentes y Solución de Problemas
ES
44
パッケージ内容
BUTURE BR600
ジャンプスターター
スマートクランプ
Type CケーブルEC5シガーライター
取扱説明書収納ケース
JP
45

はじめに
この度BUTURE BR600車ジャンプスターターをお買い上げいただき、
ありがとうございます。 製品を正しく使用するために、お使いの前にこの
取扱説明書をよくお読みください。
主な機能
★パワフルなジャンプスターター:ピーク電流最大2500Aのカージャン
プスターターはジープ・トラック・バンなどの12Vの車(最大8Lガソリンと
8Lディーゼルエンジン)を数秒で最大30回(一回満充電後)ぐらいジャン
プスタートできます。
★モバイルバッテリー&ワイヤレス充電器:10Wのワイヤレス充電器と
23800mAhの大容量のバッテリーにより、スマートフォンに急速充電す
るのに、十分な電力を供給します。
★QC3.0と5V2.4Aポータブル充電器:ラップトップ、スマートフォン、タブ
レット及びその他のデバイスに高速充電できます。
★安全保護:保護回路を内蔵した高品質のスプレーゴールドクランプは
、過電流保護・短絡保護・過負荷保護・過電圧保護及び過充電保護の機
能が付いており、お客様のため最優の安全保護を提供します。
★応急用セット:4つのモード機能付きのLEDライト:懐中電灯モード・ス
トロボライトモード・SOS信号ライトモード・警告モードです。緊急時のた
めの応急用ハンマーも備えされています。
JP
46
①スマートクランプのポート
②LEDライト
③QC3.0USB出力
④5V/2.4AUSB出力
⑤TYPEC入力
①赤いクランプ(+)
②黒いクランプ(-)
③スマートクランププラグ
⑥電源スイッチ
⑦電気量インジケーターライト
⑧ワイヤレス充電器
⑨応急用ハンマー
各部の名前
強力な回路保護システム-スマートクランプ
①②
①
②
③
③
④
⑤⑥⑦⑧⑨
JP
47

各部の機能
商品仕様
番号
1
2
3
4
5
6
7
8
9
名前
電源スイッチ
LEDライト
電気量インジケータ
ーライト
TYPEC入力
QC3.0USB出力
QC3.0USB出力
ワイヤレス充電器
スマートクランプのポ
ート
応急用ハンマー
機能と作用
このボタンを押してデバイスに充電する
このボタンを押して残りの容量を確認する
このボタンを長押ししてLEDライトをオン/オフにする
照明、SOS、ストロボ、警告、オフ
バッテリー残量を表示:25%、50%、75%、100%
Type cケーブルはここから挿入してジャンプスタッター
に充電する
スマートフォン・タブレット・カメラなどのデバイスに高
速充電。充電速度は普通のポートより75%速い
スマートフォン・タブレット・カメラなどのデバイスに充
電。 5V / 2.4A 12W出力する
スマートフォンまたは他のワイヤレス充電機能つくのデ
バイスに充電する
ジャンパーケーブルはここから挿入する
緊急または危険な状況での車の窓ガラスなどを潰す
型番
容量
スタートー電流
ピーク電流
Typec入力
出力1
出力2
BR600
23800mAh
1200A
2500A
9V/2A,5V/3A
9V/2A,5V/2.4A
5V/2.4A
JP
48
電源ボタンを押して、ジャンプスターターの電気量を確認します。毎イン
ジケーターライトは25%の電気量を表示し、四つのインジケーターライ
トは総計100%電気量を表示します。
ご注意:充電器や車の充電器を含まれていません。携帯電話などの汎用
な充電器を使用してジャンプスターターに充電してください。(2A以上の
充電器を推奨)
家にいるの場合:
1. Type C ケーブルをUSB充電器に接続します。(5V 2A以上の充電器を
推奨、パッケージに含まれていません)
2.ジャンプスターターにUSB Cケーブル(付属)を接続します。
車の中にいるの場合:
1.USB充電器(含まれていません)を利用可能な12Vソケットに差し込み
ます。
2.Type c ケーブル(付属)をジャンプスターターに接続します。
操作
電気量インジケーターライト
ジャンプスターターに充電
ワイヤレス充電器
寸法(L * W * H)
過負荷/放電保護
作業温度
逆流防止保護
短絡保護
逆極性保護
10W
183*95.5*42.8mm
≤13V±0.3V
-20℃~60℃/-4℉~140℉
≥12.6V±0.3V
√
√
JP
49
注:内蔵バッテリーの寿命を延ばすために、製品を使用していない場合
でも、3〜4か月ごとに一度充電することをお勧めします。
デバイスに付属のUSBケーブルをUSB出力ポートに差し込みます。2つ
のデバイスに同時に充電できます。1つのUSB出力ポートの最大出力は
9V / 2Aで、もう一方のポートは最大出力は5V / 2.4Aです。電源ボタンを
1回押すと、デバイスの充電が始まり、インジケーターがジャンプスター
ターの電池残量が表示されます。電池残量をもう一度確認するには、電
源ボタンをもう1回押してください。
車のバッテリーをジャンプスタートするには、車が駐車の状態で(車に手
動トランスミッションがある場合はニュートラルの状態)、緊急ブレーキ
をかけます。車のバッテリーを見つけて、以下に記載されている手順に
従ってください。
スマートプラグは色分けされており、正(+)は 赤 色 で 、負(-)は黒で表示し
ます。バッテリー・車両の充電システム・電子機器などを損傷する可能性
があるため、ケーブルを混同使用したり、金属に接触させたりしないでく
ださい。
注意:
この製品は12Vの車のみ対応します。車を始動する前に、ジャンプスター
ターは少なくとも3つのインジケーターライトが点灯していることを確保
してください(バッテリー残量が50%を超えています)。
手順1:ジャンパーケーブルのプラグをジ
ャンプスターターにしかっりに挿入して、ス
マートクランプのインジケータライトが緑
と赤のインジケーターライトが交互に点
滅します。
USB出力からデバイスに充電
車をジャンプスタート
JP
50
手順2:赤いクランプを車のバッテリーの
プラス端子(+)に接続し、黒いクランプを
車のバッテリーのマイナス端子(-)に接
続します。スマートクランプのインジケー
タライトが緑に点灯します。
この時、赤いインジケータライトが点灯し
ますと、以下のいくつかの可能性があり
ます。
1.クランプは間違えて接続されています。
この場合は、車からジャンプスターター
を取り外して、スマートクランプを外して、
手順1からやり直してください。
2.クランプは車のバッテリーによく接続
されていなかった。この場合はクランプ
を調整して、バッテリー端子との接続の
部分を最大にしてください。
手順3:車を始動します。
車の始動が失敗した場合は、車からジャ
ンプスターターを取り外して、スマートク
ランプを外してください。少なくとも30秒
後に、手順1から再始動してみてください。
手順4:
車を始動下後30秒のうちに、車からジャ
ンプスターターを取り外して、スマートク
ランプを外してください。
スマートクランプのインジケータの保護機能の状態について
インジケータ状態
赤い/緑のライトが交互に点
滅します
緑のライトが点灯します
説明
スマートクランプが作業状態に入った。
ジャンプスターターが作業状態に入った。
JP
51

1.車をジャンプスタートするまえに、スマートプラグがジャンプスタータ
ーにしっかり挿入されていることを確保してください。
2.本製品を水中に入れないでください。
3.可燃性の液体・ガス・ほこりのある場所など爆発性の環境で本製品を
使用しないでください。
4.本製品を改造または分解しないでください。
5.本製品を温度が140F(60℃)を超える可能性のある場所に保存しない
でください。
6.バッテリーの液漏れが発生した場合は、使用しないでください。最寄り
のバッテリーリサイクルセンターに持ち込んで廃棄してください。
7.本製品は12Vの車でのみ使用できます。
警告:
赤いライトが点灯します
赤いライトがゆっくり点滅
します
赤いライトがはやく点滅
します
赤いライトがゆっくり点滅
します
1.スマートクランプが間違えて接続されています。
2.スマートクランプは短絡/内部短絡します。
---2つのクランプを接続しない、そして同じ金属に接
続しないことを確保してください。
3.車のバッテリーが短絡します。/電圧はゼロになりま
す。
車のバッテリーの電圧は12.6Vよりも高いので逆充電
保護モードになります。
---ジャンプスターターを使わなくても車を正常に始
動できます。
スマートクランプの温度が65(+/- 5)度を超えます。
---赤いと緑のライトが交互に点滅するまでにクラン
プを取り外してください。
ジャンプスターターのバッテリー残量が足りない。
---ジャンプスターターに充電下後に使用してくださ
い。
JP
52

保証
本製品のバッテリーは自己完結型であり、差し替えできません。バッテリ
ーは、充電できなくなるときに廃棄する必要があります。 適切な充電方
法は製品の寿命を延ばせます。
BUTUREは購入日から製品に24ヶ月の安心保証を提供します。
お問い合わせ
製品や保証にお問い合わせがある場合、以下のカスタマーサポートメー
ルをお問い合わせください。24時間のうちに(休日抜き)対応します。
電子メールアドレス:[email protected]
バッテリーの廃棄
トラブルシューティング
問題
始動できない
スマートクラン
プのインジケー
タライトが点滅
し続ける
充電器がない
原因
ミスに接続
車に接続した30秒の内
に車を始動しなかった
製品はバッテリー残量
が少ない
スマートクランプの保
護機能がしている
携帯電話やタブレット
などの充電器を利用す
る
対策
赤いクランプを車のバッテリーのプラス
端子(+)に、黒いクランプを車のバッテ
リーのマイナス端子(-)に接続すること
を確保します。
車両のバッテリーからクリップを取り外
して再度接続します。
少なくとも3つのライトが点灯するまで
に製品に充電してください。
上記のスマートクランプのインジケータ
の保護機能の状態の表を参照してくだ
さい。
携帯電話やタブレットなどの充電器を利
用して製品に充電します。電流が2A以上
の充電器を推奨します。
JP
53