Refrigerator
User Manual
HPG2 9643IB XR4UK
15 7550 0376/ EN / AA/ 2/17/2026 12:03 PM
7291842056
EN
EN / 2
Please read this manual first!
Our valued customer,
Thank you for choosing product. We want you to get the best results from your product,
which is manufactured with high quality and technology. To do this, please read this entire
manual and the other documents provided carefully before using the product.
Follow all the information and warnings in the user manual. This will protect you and your
product from potential hazards. Keep the user manual. If you give the product to someone
else, include the user manual with it.
The following symbols appear in the user manual and on the product:
Read the user manual.
Hazard that may result in death or injury.
The model information as stored in the product data base can be
reached by entering following website and searching for your model
identifier (*) found on energy label.
https://eprel.ec.europa.eu/
EN / 3
1 Safety Instructions
• This section includes the
safety instructions necessary
to prevent the risk of personal
injury or material damage.
• Our company shall not be held
responsible for damages that
may occur if these instructions
are not observed.
• Always have installation and
repair operations performed by
manufacturer, authorized ser-
vice or a person who will be
described by importer com-
pany.
• Use original spare parts and
accessories only.
• Do not repair or replace any
component of the product un-
less it is clearly specified in the
user manual.
• Do not perform any modifica-
tions on the product.
1.1 Important Safety
Symbols
Risk of electric shock!
Read the user manual.
Danger that may result in
burns due to contact with hot
surfaces.
Combustible material, warn-
ing against fire hazard.
Risk of injury due to contact
with sharp surfaces!
Risk of UV-C radiation
1.2 Intention of Use
• This product is not suitable for
commercial use and should
not be used for a purpose
other than its intended use.
• This product is intended for
operating interiors, such as
households or similar.
For example;
In the staff kitchens of the
stores, offices and other work-
ing environments,
In farm houses,
In the units of hotels, motels or
other resting facilities that are
used by the customers,
In hostels, or similar environ-
ments,
In catering services and similar
non-retail applications.
• This product shall not be used
in open or enclosed external
environments such as vessels,
camper vans, balconies or ter-
races. Exposing the product to
rain, snow, sunlight and wind
may cause risk of fire.
EN

EN / 4
1.3 Safety of Children,
Vulnerable Persons
and Pets
• This product may be used by
children aged 8 years and
older and persons with under-
developed physical, sensory or
mental capabilities or lack of
experience and knowledge if
they are being supervised or
have been given instruction
concerning use of the appli-
ance in a safe way and the
hazards involved.
• Children between 3 and 8
years are allowed to put and
take out food into/from the
cooler product.
• Children and pets must not
play with, climb on, or get in-
side the product.
• Children and pets must be kept
away from the cabin area
(compressor) where electrical
parts are located.
• Cleaning and user mainten-
ance must not be performed
by children unless there is
someone overseeing them.
• Keep the packaging materials
away from children. Risk of in-
jury and suffocation.
• If there is a lock available on
the product’s door, keep the
key out of children's reach.
1.4 Electrical Safety
• The product shall not be
plugged into the outlet during
installation, maintenance,
cleaning, repair, and transport-
ation operations.
• If the power cable is damaged,
it must be replaced by the per-
son sent by the manufacturer,
authorized service provider or
the importer to prevent any po-
tential danger.
• Do not tuck the power cable
under the product or to the
rear of the product. Do not put
heavy items on the power
cable. The power cable should
not be bent, crushed, and
come into contact with any
heat source.
• Use an original cable only. Do
not use cut or damaged
cables.
• Do not use an extension cord,
multi-plug or adaptor to oper-
ate your product.
• Portable multi-plugs or port-
able power supplies may over-
heat and cause fire. Thus, do
not have a multi-plug, portable
power sources behind or in the
vicinity of the product.
EN / 5
• Before plugging the product
into the power source, please
remove the power cable from
the condenser hook (if avail-
able) during the installation.
• The user should not be able to
reach the electrical parts after
installation.
• Do not plug the product’s
power cord in a loose or dam-
aged power outlet. These
types of connections may
overheat and cause fire.
• The plug shall be easily ac-
cessible. If this is not possible,
a mechanism that meets the
electrical legislation and that
disconnects all terminals from
the mains (fuse, switch, main
switch, etc.) shall be available
on the electrical installation.
• The product must not be oper-
ated with an external switching
device such as a timer, or a re-
mote controlled system.
• Do not use the product when
your feet are bare or your body
is wet.
• Do not touch the plug with wet
hands.
• When unplugging the appli-
ance, don’t hold the power
cable, but the plug.
• Make sure that the plug is not
wet, dirty or dusty.
• Do not ever connect your
product to power saving
devices. These systems are
harmful for the product.
1.5 Handling Safety
• Make sure to unplug the appli-
ance before carrying the
product.
• This product is heavy, do not
handle it by yourself. Injuries
may occur if the product falls
on you. Do not bump into
places or drop the product
while transporting it.
• Always close the doors and do
not hold the product by its
doors while transporting it.
• Be careful not to damage the
cooling system and the pipes
while handling the product. Do
not operate the product if the
pipes are damaged, and con-
tact an authorized service.
1.6 Installation Safety
• To prepare the product for use,
see the information in the user
and installation manual and
make sure the electric and wa-
ter utilities are as required. If
not, call a qualified electrician
and plumber to arrange the
utilities as necessary.
• Failure to do so may result in
electric shock, fire, problems
with the product, or injury.
EN

EN / 6
• Before starting the installation,
switch off the fuse to de-ener-
gise the power line to which
the product is connected.
• The product should be in-
stalled by two or more people.
Use protective gloves while re-
moving the product from the
packaging and installation.
• This product is designed for
use at a maximum altitude of
2000 metres above sea level.
• Keep children away from in-
stallation area.
• Check for any damage on the
product before installing it. Do
not have the product installed
if it is damaged.
• Always use personal protective
equipment (gloves, etc.) during
product installation, mainten-
ance and repair. Risk of injury.
• Do not install or leave the
product in places where it may
be exposed to external ambi-
ent temperatures.
• Place the product on a clean,
level and hard surface and bal-
ance it with the adjustable legs
(by rotating the front feet to
the right or left). Otherwise, the
refrigerator may tip over and
cause injuries.
• Proceed with care to prevent
causing any damage to the
floors (tiling etc.) while moving
the product. Install the product
on a floor, or provide sufficient
support depending on the size,
weight and the use-case of the
product. Ensure that the
product is not near a heat
source, and all four feet are
stable and leaning against the
floor. Install the product as ne-
cessary, and ensure that it is
horizontal, using a bubble
level. To ensure the complete
efficiency of the refrigerant cir-
cuit, wait for at least two hours
before operating the product.
• The product shall be installed
in a dry and ventilated environ-
ment. Do not keep carpets,
rugs or similar covers under
the product. This may cause
risk of fire as a result of inad-
equate ventilation!
• Do not block or cover ventila-
tion holes. Otherwise, power
consumption increases and
your product may be damaged.
• Leave sufficient space by the
sides and above to ensure ad-
equate ventilation. The gap
between the back panel and
the wall behind the product
must be a minimum of 50mm
in order to prevent hot sur-
faces. Reducing this distance
may increase the energy con-
sumption of product.

EN / 7
• When placing the product,
make sure that the supply
cable is not damaged or
pinched.
• The product must not be con-
nected to supply systems and
power sources which may
cause sudden voltage changes
(i.e. a portable solar-energy
power source). Otherwise,
damage to your product may
occur as a result of the abrupt
voltage fluctuations!
• The more refrigerant a refriger-
ator contains, the bigger its in-
stallation room shall be. In very
small rooms, a flammable gas-
air mixture may occur in case
of a gas leak in the cooling
system. At least 1 m³ of
volume is required for each 8
grams of refrigerant. The
amount of the refrigerant avail-
able in your product is spe-
cified in the Type Label.
• The product must never be
placed in such a way that
power cables, the metal hose
of the gas stove, metal gas or
water pipes come into contact
with the product's rear wall (or
the condenser).
• The installation place of the
product must not be exposed
to direct sunlight and it shall
not be in the vicinity of a heat
source such as stoves, radiat-
ors, etc. If you cannot prevent
installation of the product in
the vicinity of a heat source,
use a suitable insulation plate
and make sure the minimum
distance to the heat source is
as specified below:
– At least 30 cm away from
heat sources such as stoves,
ovens, heating units and
heaters, etc.,
– And at least 5 cm away from
electrical ovens.
• Your product has the protec-
tion class of I.
• Plug the product in a grounded
socket that conforms with the
Voltage, Current and Fre-
quency values specified in the
type label. The socket must
have a 10A – 16A fuse. Our
firm will not assume respons-
ibility for any damages due to
usage without earthing and
without power connection in
compliance with local and na-
tional regulations.
• The product’s power cable
must be unplugged during in-
stallation. Otherwise, risk of
electric shock and injury may
occur!
• Do not plug the product to
loose, broken, dirty, greasy
sockets or sockets that have
come out of their seats or
sockets with a risk of water
EN

EN / 8
contact. These types of con-
nections may overheat and
cause fire.
• Place the power cable and
hoses (if any) of the product
so that they shall not cause a
risk of tripping over.
• Penetration of humidity and li-
quid to live parts or to the
power cord may cause short
circuit. Thus, do not use the
product in humid environ-
ments or in areas where water
may splash (e.g. garage, laun-
dry room, etc.) If the refriger-
ator is wet by water, unplug it
and contact an authorized ser-
vice.
• Do not ever connect your refri-
gerator to power saving
devices. These systems are
harmful for the product.
• There is a risk of contact with
electrical parts when removing
the electronic board cover and
the compressor rear cover (if
fitted). Do not remove the elec-
tronic board cover and the
compressor rear cover (if fit-
ted). There is a risk of electro-
cution!
1.7 Operational Safety
• Do not ever use chemical
solvents on the product. These
materials contain an explosion
risk.
• In case of a failure of the
product, unplug it (or de-ener-
gise the fuse to which it is con-
nected), and do not operate
until it is repaired by the au-
thorized service. There is a risk
of electric shock!
• Do not place flames (lighted
candle, cigarette, etc.) or heat
sources (iron, hob, oven, etc.)
on or near the product. Do not
place flammable/explosive
materials near the product...
• Do not get on the product. Risk
of falling and injury!
• Do not cause damage to the
pipes of the cooling system us-
ing sharp and piercing tools.
The refrigerant that sprays out
in case of puncturing the gas
pipes, pipe extensions or upper
surface coatings may cause ir-
ritation of skin and injury to the
eyes.
• Do not intervene in or damage
the coolant circuit Risk of ex-
plosion.

EN / 9
• Do not place and operate elec-
trical appliances inside the re-
frigerator/freezer unless it is
advised by the manufacturer.
• Do not use any procedures
other than those recommen-
ded by the manufacturer to
speed up defrosting.
• Take due care not to jam any
parts of your hands or your
body to the moving parts in-
side the product. Be careful to
prevent jamming of your fin-
gers between the refrigerator
and its door. Be careful while
opening or closing the door if
there are children around.
• Do not put ice cream, ice
cubes or frozen food to your
mouth as soon as you take
them out of the freezer. Risk of
frostbite!
• Do not touch the inner walls,
metal parts of the freezer or
food kept inside the freezer
with wet hands. Risk of frost-
bite!
• Do not place soda cans or
cans and bottles that contain
fluids that may be frozen to the
freezer compartment. Cans or
bottles may explode. Risk of
injury and material damage!
• Do not use or place materials
sensitive against temperature
such as flammable sprays,
flammable objects, dry ice or
other chemical agents in the
vicinity of the refrigerator. Risk
of fire and explosion!
• Do not store explosive materi-
als such as aerosol cans with
flammable materials inside the
product.
• Do not place cans containing
fluids over the product an open
state. Splashing of water on an
electrical part may cause an
electric shock or a fire.
• Due to risk of breaking, do not
store glass containers with li-
quid inside in the freezer com-
partment.
• This product is not intended
for storage and cooling of
medicines, blood plasma,
laboratory preparations or sim-
ilar materials and products
that are subject to the Medical
Products Directive.
• If the product is used against
its intended purpose, it may
cause damage to or deteriora-
tion of the products stored in-
side.
• If your refrigerator is equipped
with blue light, do not look at
this light with optical devices.
Do not stare directly at UV LED
light for a long time. Ultraviolet
rays may cause eye strain.
• Do not fill the product with
more contents than its capa-
city. Do not use any proced-
EN

EN / 10
ures other than those recom-
mended by the manufacturer
to speed up defrosting. Injuries
or damages may occur if the
contents of the refrigerator fall
when the door is opened. Sim-
ilar problems may also occur
when an object is placed over
the product.
• Ensure that you have removed
any ice or water that may have
fallen to the floor to prevent in-
juries.
• Change the locations of the
racks/bottle racks on the door
of your refrigerator only when
the racks are empty. Danger of
injury!
• Do not place objects that may
fall/tip over on the product.
These objects may fall while
opening or closing the door
and cause injuries and/or ma-
terial damages.
• Do not hit or exert excessive
pressure on glass surfaces.
Broken glass may cause injur-
ies and/or material damages.
• For products designed to use
an air filter inside an access-
ible fan cover, the filter must
always be in position when the
refrigerator is in function.
• Do not block out the fan (if
available) with food.
• Damaged gaskets should be
replaced as soon as possible.
• Your product may have special
compartments (Fresh Food
Compartment, Zero Degrees
Compartment etc.) Unless oth-
erwise stated in the relevant
manual of the product, these
compartments can be re-
moved, and the product can be
used with the same perform-
ance.
• The cooling system in your
product contains R600a refri-
gerant. The refrigerant type
used in the product is spe-
cified in the type label. This
gas is flammable. Therefore,
be careful not to damage the
cooling system and the pipes
while operating the product. In
case of damage to the pipes;
1. Do not touch the product or
the power cable.
2. Keep the product away from
potential sources of fire that
may cause the product to
catch fire.
3. Ventilate the area where the
product is placed. Do not use
a fan.
4. Contact Authorized Service.
Before disposing of old products
that shall not be used any more:
1. Unplug the power cord from
the mains socket.

EN / 11
2. Cut the power cable and re-
move it from the appliance
together with the plug.
3. Do not remove the racks and
drawers from the product to
prevent children from getting
inside the appliance.
4. Remove the doors.
5. Store the product so that it
shall not be tipped over.
6. Do not allow children to play
with the scrapped product.
7. If the product is damaged
and you observe gas leak,
please stay away from the
gas. Gas may cause frostbite
if it contacts your skin.
• Do not dispose of the product
by throwing it into fire. Risk of
explosion.
• If there is a lock available on
the product’s door, keep the
key out of children's reach.
For Products with Water Dis-
penser / Icematic
• Use only drinking water. Do not
fill the water tank with fruit
juice, milk, fizzy beverages, al-
coholic beverages or any other
liquids incompatible for use in
the water dispenser. This may
cause risk to your health and
safety.
• Do not allow the children to
play with the water dispenser
or icematic to prevent acci-
dents and injuries.
• Do not insert your hands, fin-
gers or other objects inside the
hole of the water dispenser, ice
channel or inside the container
of the icematic. This may
cause injuries or material dam-
ages.
• The hose sets supplied with
the product shall be used. Do
not use the old hose sets. Do
not extend the hoses!
• Always connect your product
to cold water inlet. Do not per-
form installation on the hot
water inlet. The pressure for
the cold water inlet shall be 90
PSi (620 kPa – 6.2 bar) max-
imum. If your water pressure
exceeds 80Psi (550 kPa – 5.5
bar) or has a water impact ef-
fect, use a pressure limiting
valve on your mains system.
Ask help from professional
plumbers if you do not know
how to control your water pres-
sure.
• High pressure may cause dam-
age to the hose connections
and pose a risk of flooding.
• Take required precautions
against the risk of freezing of
hoses. The operating water
temperature interval shall be
0.6°C (33°F) minimum and
38°C (100°F) maximum. There
is a risk of flooding if the hose
is cracked/perforated.
EN

EN / 12
1.8 Food Storage
Safety
Please pay attention to the fol-
lowing warnings to avoid food
spoilage:
• Leaving the doors open for a
long time may cause the tem-
perature inside the product to
rise.
• Regularly clean the accessible
drainage systems in contact
with food.
• Clean the water tanks that
have not been used for 48
hours and mains-fed water
systems that have not been
used for more than 5 days.
• Store raw meat and fish
products in appropriate com-
partments within the product.
Thus, it does not drip on or
come into contact with other
foods.
• Two-star freezer compart-
ments are used for storing pre-
filled foods, making and stor-
ing ice and ice cream.
• One, two and three-star com-
partments are not appropriate
for freezing fresh food.
• If the cooling product has been
left empty for a long time, turn
off the product, defrost, clean,
and dry the product in order to
protect the housing of the
product.
• After the foods are placed,
check if the compartment
hatches, and especially the
freezer door, are properly
closed.
• Use the refrigerator compart-
ment for storing fresh foods,
and the freezer compartment
for storing frozen goods, freez-
ing fresh foods and preparing
ice cubes.
• Do not store foods without
properly sealing them in the re-
frigerator and the freezer com-
partments, to prevent direct
contact with the inner sur-
faces.
1.9 Maintenance and
Cleaning Safety
• Unplug the refrigerator or de-
energise the fuse before clean-
ing it or starting to perform
maintenance.
• Do not pull by the door or door
handle if you are going to
move the product for cleaning
purposes. The door may cause
injuries if the handle is pulled
too hard.
• Do not place hands, feet or
metal objects under or behind
your product. Jamming may
occur or any sharp edge may
cause personal injuries.

EN / 13
• Do not wash the inside or out-
side of the product with a pres-
sure washer, steam, spray wa-
ter or pouring water. Risk of
electric shock and fire.
• When cleaning the product, do
not use sharp and abrasive
tools or household cleaning
agents, detergent, gas, gasol-
ine, thinner, alcohol, varnish,
and similar substances. Use
only cleaning and maintenance
agents that are not harmful for
food inside the product.
• Do not use paper towels, kit-
chen sponges or other hard
cleaning materials.
• Do not ever use steam or
steamed cleaning materials for
cleaning the product and thaw-
ing the ice inside it. Steam con-
tacts the live areas in your re-
frigerator and causes short cir-
cuit or electric shock.
• Do not use any mechanical
tools or any other tools than
the recommendations of the
manufacturer to speed up the
thawing operation.
• Take care to keep water away
from the ventilation holes,
electronic circuits or lighting of
the product. Otherwise, risk of
fire or electric shock may oc-
cur.
• Use a clean, dry cloth to wipe
the dust or foreign material on
the tips of the plugs. Do not
use a wet or damp piece of
cloth to clean the plug. Other-
wise, risk of fire or electric
shock may occur.
1.10 Lighting
Contact an authorized service
when you shall replace the LED /
bulb using for lighting.
1.11 Disposal of the Old
Product
When disposing of your old
product follow the instructions
below:
• To prevent children from acci-
dentally locking themselves
into the product, if there is
door lock, disable it.
• Splash of coolant is harmful to
the eyes. Do not damage any
part of the cooling system
while disposing of the product.
• It may be fatal if the com-
pressor oil is swallowed or if it
penetrates the respiratory
tract.
• Cooling system of your
product includes R600a gas as
specified in the type label. This
gas is flammable. Do not dis-
pose of the product by throw-
ing it into fire. Risk of explo-
sion!
EN

EN / 14
• C -Pentane is used as a blow-
ing agent in insulation foam
and it is a flammable sub-
stance. Do not dispose of the
product by throwing it into fire.
1.12 HomeWhiz
• Follow the safety warnings
even if you are away from the
product while operating the
product via HomeWhiz app.
Also, pay attention to the warn-
ings in the app.
1.13 Technical Information About Bluetooth + Wi-fi
Frequency Band: 2.4GHz (Wi-fi or bluetooth function)
Max. Transferring Power: < 100mW (Wi-fi or bluetooth function)
Software Details: Quartz_WiFi.XXX
SIMPLIFIED EU DECLARATION OF CON-
FORMITY:
Hereby, Arçelik A.Ş. declares
that the radio equipment is in
compliance with Directive
2014/53/EU.
The full text of the EU declara-
tion of conformity is available at
the following internet ad-
dress:parts-selfser-
vice.europeanappliances.com
This product collects and trans-
mits usage data when connec-
ted to the internet (e.g. temper-
ature settings, usage duration,
error codes etc.). In accordance
with the EU Data Act (Regulation
EU 2023/2854), you have the
right to access and manage this
data.
For details on what data is col-
lected, how it is used, and how
to access it, please visit:
www.homewhiz.com/eu-data-act-policy
Frequency Band: 2.4GHz (Wi-fi or bluetooth function)
Max. Transferring Power: < 100mW (Wi-fi or bluetooth function)
Software Details: Quartz_WiFi.XXX
UKCA Declaration of Conformity:
Arçelik A.Ş. states that this
product is in compliance with
2017 Radio Equipment Regula-
tion (2017).
The entire UKCA declaration of
conformity is available on the
following website:Hotpoint
EN / 15
2 Environmental Instructions
2.1 Compliance with the WEEE Dir-
ective and Disposing of the
Waste Product
This product complies with EU
WEEE Directive (2012/19/EU).
This product bears a classifica-
tion symbol for waste electrical
and electronic equipment
(WEEE).
This symbol indicates that this product
shall not be disposed with other household
wastes at the end of its service life. Used
device must be returned to official collec-
tion point for recycling of electrical and
electronic devices. To find these collection
systems please contact to your local au-
thorities or retailer where the product was
puchased. Each household performs im-
portant role in recovering and recycling of
old appliance. Appropriate disposal of used
appliance helps prevent potential negative
consequences for the environment and hu-
man health.
Compliance with RoHS Directive
The product you have purchased complies
with EU RoHS Directive (2011/65/EU). It
does not contain harmful and prohibited
materials specified in the Directive.
Package information
Packaging materials of the product
are manufactured from recyclable
materials in accordance with our
National Environment Regulations.
Do not dispose of the packaging
materials together with the do-
mestic or other wastes. Take them
to the packaging material collection
points designated by the local au-
thorities.
Conformity with standards and
test information / Declaration of EC
conformity
Development, manufacture and
sales stages of this product con-
form to the safety rules in all relev-
ant guidelines of the European
Community. 2014/35/EU, 2014/30/
EU, 93/68/EC, IEC 60436/DIN
44990, EN 50242
EN
EN / 16
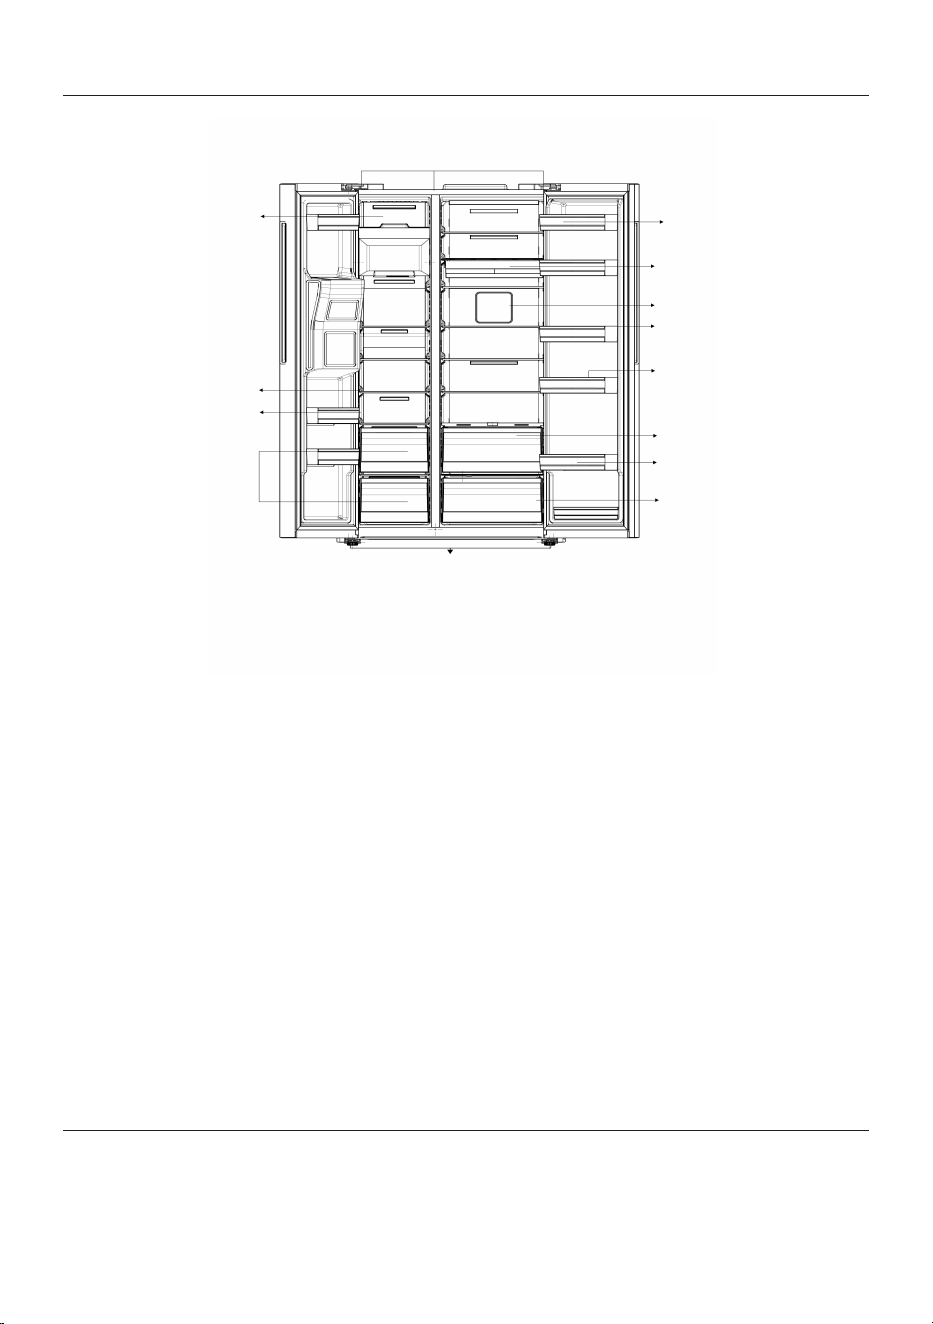
3 Your refrigerator
1
2
3
4
5
6
7
8
9
10
11
12
13
14
15
1 Freezer compartment 2 Chiller compartment
3 *Chiller compartment door rack 4 *Sliding tray
5 *Fan 6 *Chiller compartment glass shelves
7 *Eggy compartment 8 *Zero degree zone
9 **Refrigerator compartment door
shelves**
10 *Crisper
11 Adjustable feet 12 *Freezer compartment drawers
13 *Freezer compartment door racks 14 *Freezer compartment glass shelves
15 *Ice maker
*Optional: The figures in this instruction
manual are schematic and may not be ex-
actly the same as your product. If the parts
you purchased are not available with your
product, these figures are applicable to
other models.
4 Installation
Right place for installation
Read the “Safety Instructions” first!
Contact the Authorized Service for the
product's installation. To prepare the
product for installation, see the information
EN / 17
in the user manual and make sure the elec-
tric and water utilities are as required. If
not, call an electrician and plumber to ar-
range the utilities as necessary.
• Damaged power cable must be replaced
by Authorized Service.
• When placing two coolers in adjacent po-
sition, leave at least 4 cm distance
between the two units.
• Keep the product out of direct sunlight
and in a dry place.
• The distance between the product and
the side walls should be 3 mm and the
distance between the product and the
rear wall should be 35 mm. (ElegantFit)
• If the door span is too narrow for the
product to pass, remove the door and
turn the product sideways; if this does
not work, contact the authorized service.
• Place the product on a flat surface to
avoid vibration
• Place the product at least 30 cm away
from the heater, stove and similar
sources of heat and at least 5 cm away
from electric ovens.
• Do not expose the product to direct sun-
light or keep in damp environments.
• Before transport or use, never open the
control board cover on the product. Risk
of electric shock and fire!
• Our firm will not assume responsibility
for any damages due to usage without
earthing and without power connection in
compliance with national regulations.
• The power cable plug must be easily ac-
cessible after installation.
Hot surface warning!
The side walls of your product are equipped
with cooler pipes to enhance the cooling
system. High pressure fluid may flow
through these surfaces, and cause hot sur-
faces on the side walls. This is normal and
it does not require servicing. Be careful
when you contact these areas.
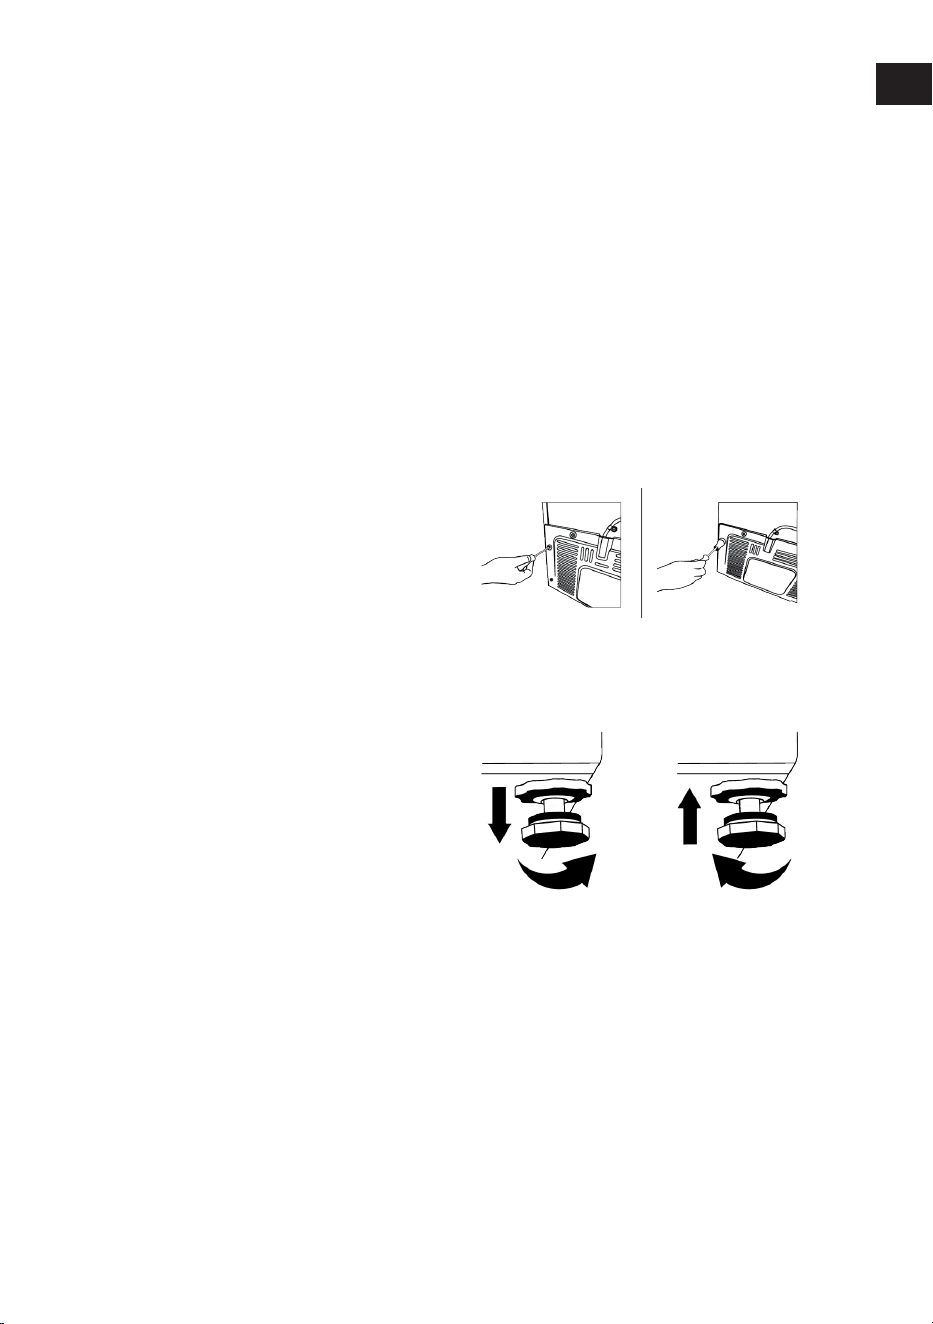
Attaching the plastic wedges
Use the plastic wedges provided with the
product to maintain sufficient space for air
circulation between the product and the
wall.
• Remove the screws on the product and
mount the screws provided with the
wedges.
• Attach 2 plastic wedges on the ventila-
tion cover as shown in the figure.
Adjusting the Legs
If the product is not in balanced position,
adjust the front adjustable stands by rotat-
ing right or left.
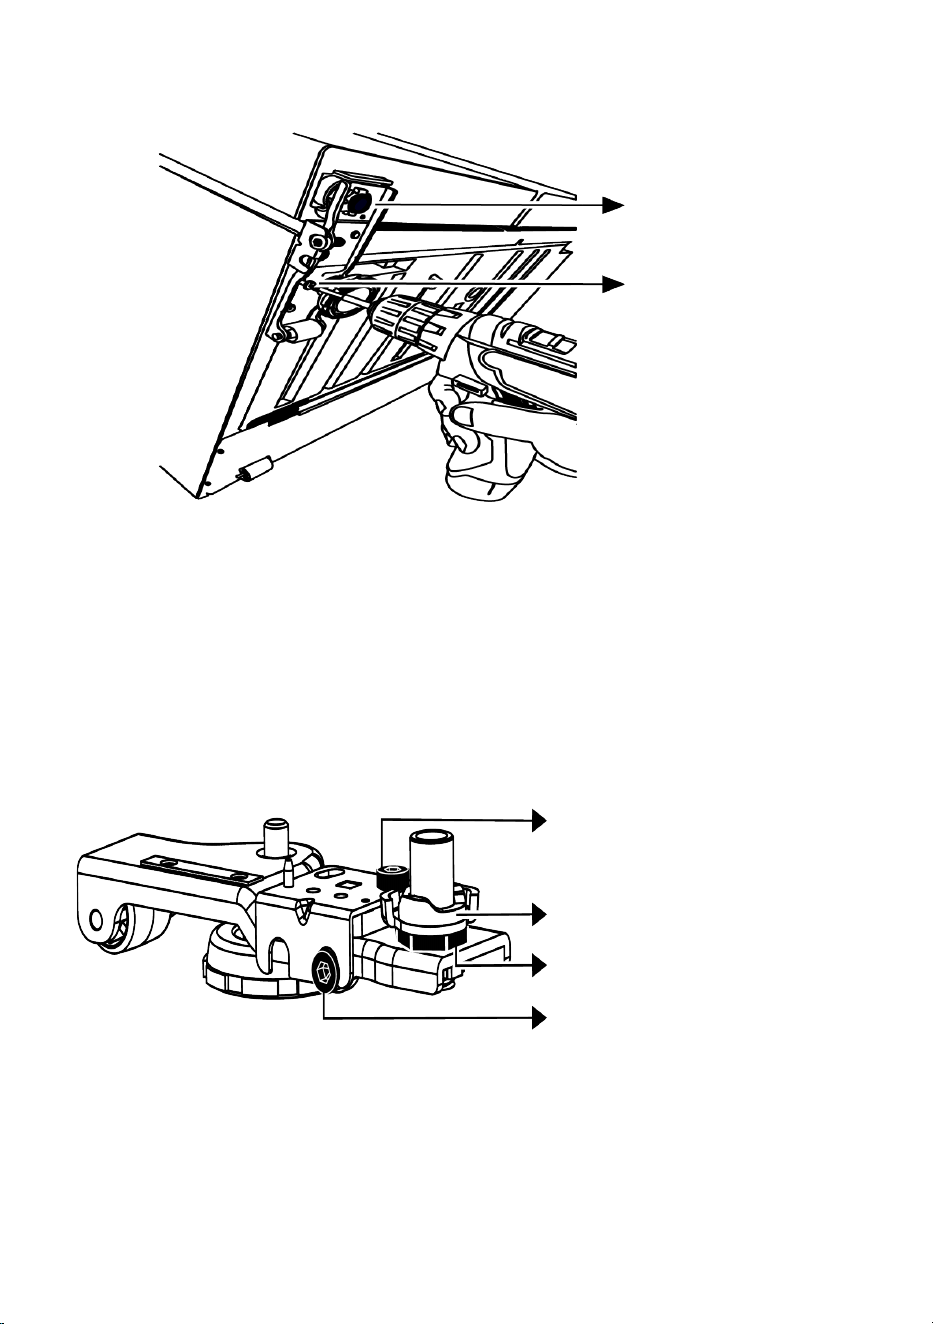
For adjusting the doors vertically,
Loosen the fixing nut at the bottom. Screw
adjusting nut (CW/CCW) according to the
position of the door. Tighten the fixing nut
bolt for the final position.
EN
EN / 18
Fixing Bolt
Fixing Bolt
For adjusting the doors horizontally,
Loosen the fixing screw at the bottom
Loosen the fixing nut at the top. Screw the
adjusting bolt (CW/CCW) on the side ac-
cording to the position of the door. Tighten
the fixing nut on the top for the final posi-
tion Tighten the fixing screw at the bottom
Fixing Bolt
Adjusting Nut
Fixing Bolt
Adjusting Bolt
EN / 19
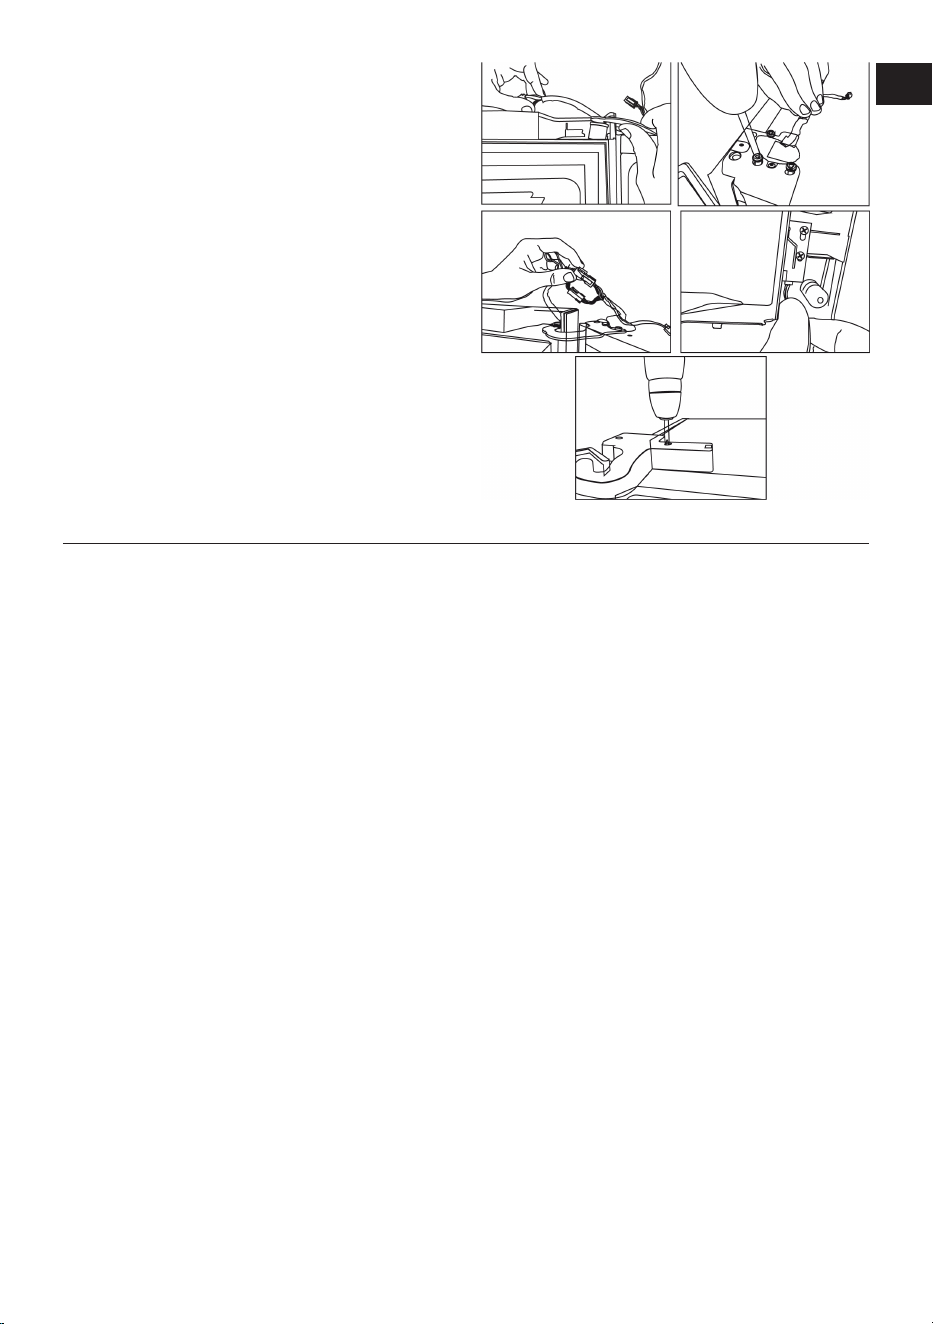
Fix the upper hinge assembly with 3
screws.
Install the hinge cover after the sockets are
installed.
Secure the hinge cover with two screws.
5 Preparation
Read the “Safety Instructions” first!
5.1 What To Do For Energy Saving
• When loading the food, leave enough
space inside the refrigerator to allow suf-
ficient air circulation for cooling.
• Since hot and humid air will not directly
penetrate into your product when the
doors are not opened, your product will
optimize itself in conditions sufficient to
protect your food. Under these circum-
stances, functions and components such
as compressor, fan, heater, defrost, light-
ing, display and so on will operate ac-
cording to the needs by consuming min-
imum energy.
• In case that multiple options are present,
glass shelves must be placed so that the
air outlets at the rear wall are not blocked
and preferably, in a way that air outlets
remain below the glass shelf. This com-
bination may help improving air distribu-
tion and energy efficiency.
• Using the below drawer when storing is
strongly recommended.
• For optimum performance, Quick Freez-
ing can be used (if available), 24 hours
prior to placing fresh foods in the freezer.
• In most cases, 24 hours is enough for the
Quick Freezing function after fresh foods
are placed in the freezer. After some
time, Quick Freezing function will deactiv-
ate automatically.
• When freezing a small amount of food,
Quick Freezing function can be deactiv-
ated after some time to ensure energy
saving.
• Store food in the cooler or chill compart-
ment according to proper storage condi-
tions to save energy.
5.2 First Use
Before using your product make sure the
necessary preparations are made in line
with the instructions in "Safety Instructions"
and "Installation" sections.
• Wait for at least 2 hours before operating
the product, to ensure the complete effi-
ciency of refrigeration.
• Keep the product running without placing
any food inside for 6 hours and the
product door should be kept as closed as
possible.
EN

EN / 20
• The temperature change caused by open-
ing and closing of the door while using
the product may normally lead to con-
densation on door/body shelves and
glassware placed in the product.
• A sound will be heard when the com-
pressor is engaged. It is normal for the
product to make noise even if the com-
pressor is not running, as fluid and gas
may be compressed in the cooling sys-
tem.
• It is normal for the front edges of the
product to be warm. These areas are de-
signed to warm up in order to prevent
condensation
• For some models, indicator panel turns
off automatically 1 minute after the door
closes. It will be reactivated when the
door is opened or any button is pressed.
5.3 Climate Class and Definitions
Please refer to the Climate Class on the rat-
ing plate of your device. One of the follow-
ing information is applicable to your device
according to the Climate Class.
• SN: Long Term Temperate Climate: This
cooling device is designed for use at am-
bient temperatures between 10 °C and 32
°C.
• N: Temperate Climate: This cooling
device is designed for use at ambient
temperatures between 16°C and 32 °C.
• ST: Subtropical Climate: This cooling
device is designed for use at ambient
temperatures between 16°C and 38°C.
• T: Tropical Climate: This cooling device
is designed for use at ambient temperat-
ures between 16°C and 43°C.
6 Operating the Product
Read the “Safety Instructions” first!
• The product shall be used for storing
food only.
• Turn off the water valve if you will be
away from home (e.g. at vacation) and
you will not be using the Icematic or the
water dispenser for a long period of time.
Otherwise, water leaks may occur.
Unplugging the Product
• Remove the food to prevent odours,
• Wait for the ice to melt, clean the interior
and let it dry, leave the doors open to
avoid damaging the inner body plastics.
EN / 21
7 Control Panel of the Product
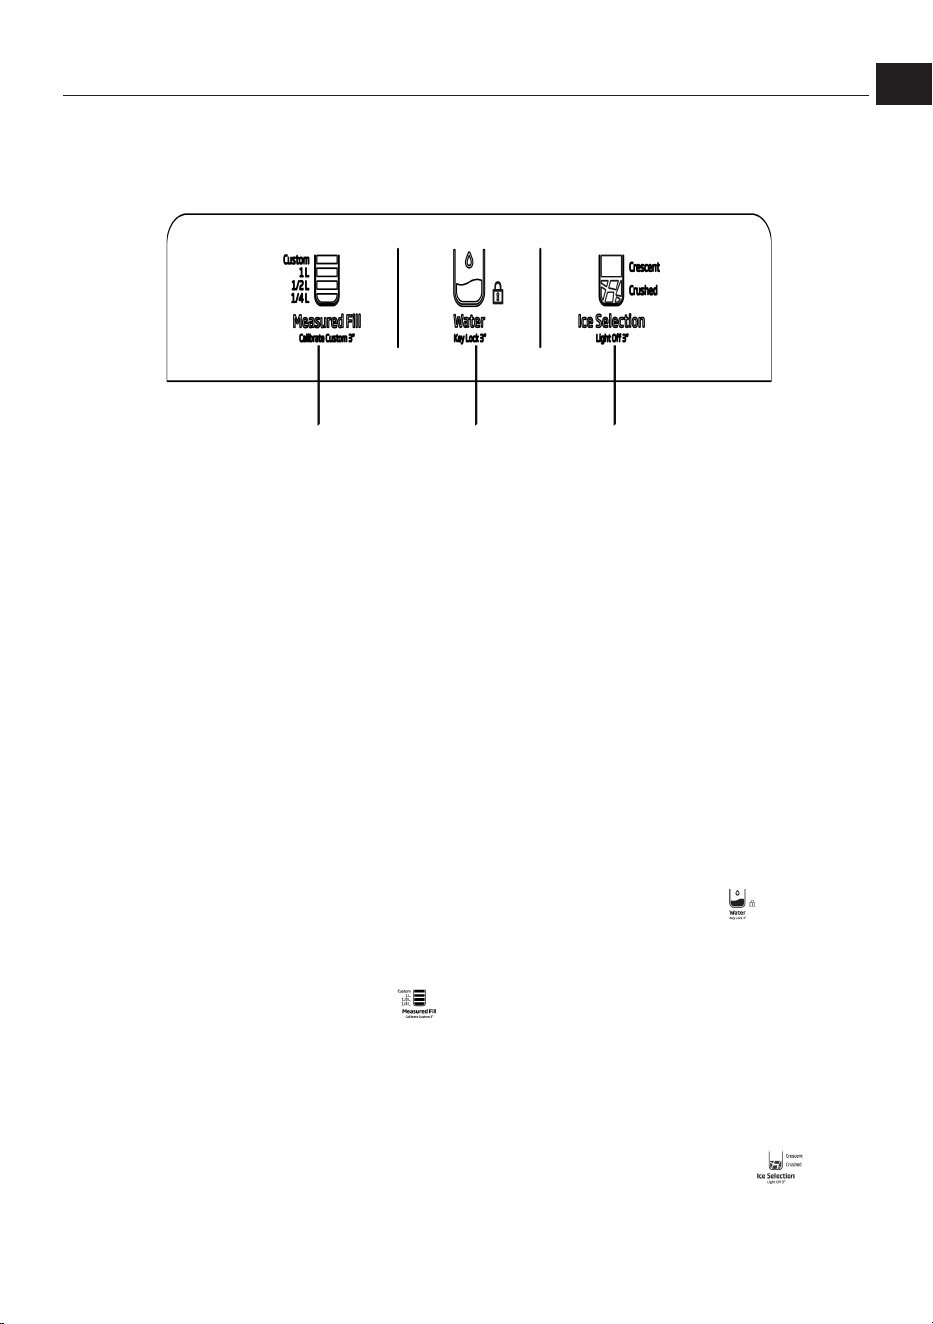
1
2
3
1 Water Volume Selection Key 2 Water Selection Key
3 Ice Cube Selection Key
Read the “Safety Instructions” first!
The audio and visual functions on the in-
strument panel help you use the product.
*Optional: The functions shown are op-
tional, the functions on the display panel of
your product may differ in terms of shape
and location.
1. Water Quantity Selection Button
This button allows the user to adjust the
amount of water. A short press of the but-
ton toggles between 1/4 L, 1/2 L, and 1 L.
Custom (custom) option is used to auto-
matically dispense a predetermined
amount of water. When the user holds this
button for 3 seconds, the current amount of
water Custom is recorded as the amount.
After that, Custom Each time the trigger is
pressed while the LED is selected, the user
will receive the preset amount of water.
2. Water Selection Button
This button activates the water flow from
the trigger. Once the user selects this
mode, the water flow continues as long as
the trigger is pressed. You can also lock the
screen by holding down this button for 3
seconds.
Notes: This lock only locks the on-screen
buttons; the trigger watering process is not
affected.
3. Ice Cube Selection Button
With this button, the user can switch to ice
making mode. Each short press on the but-
ton Crescent (cube) and Crushed (Cracked)
EN

EN / 22
ice options are switched. You can also turn
off the trigger light by holding this button
for 3 seconds.
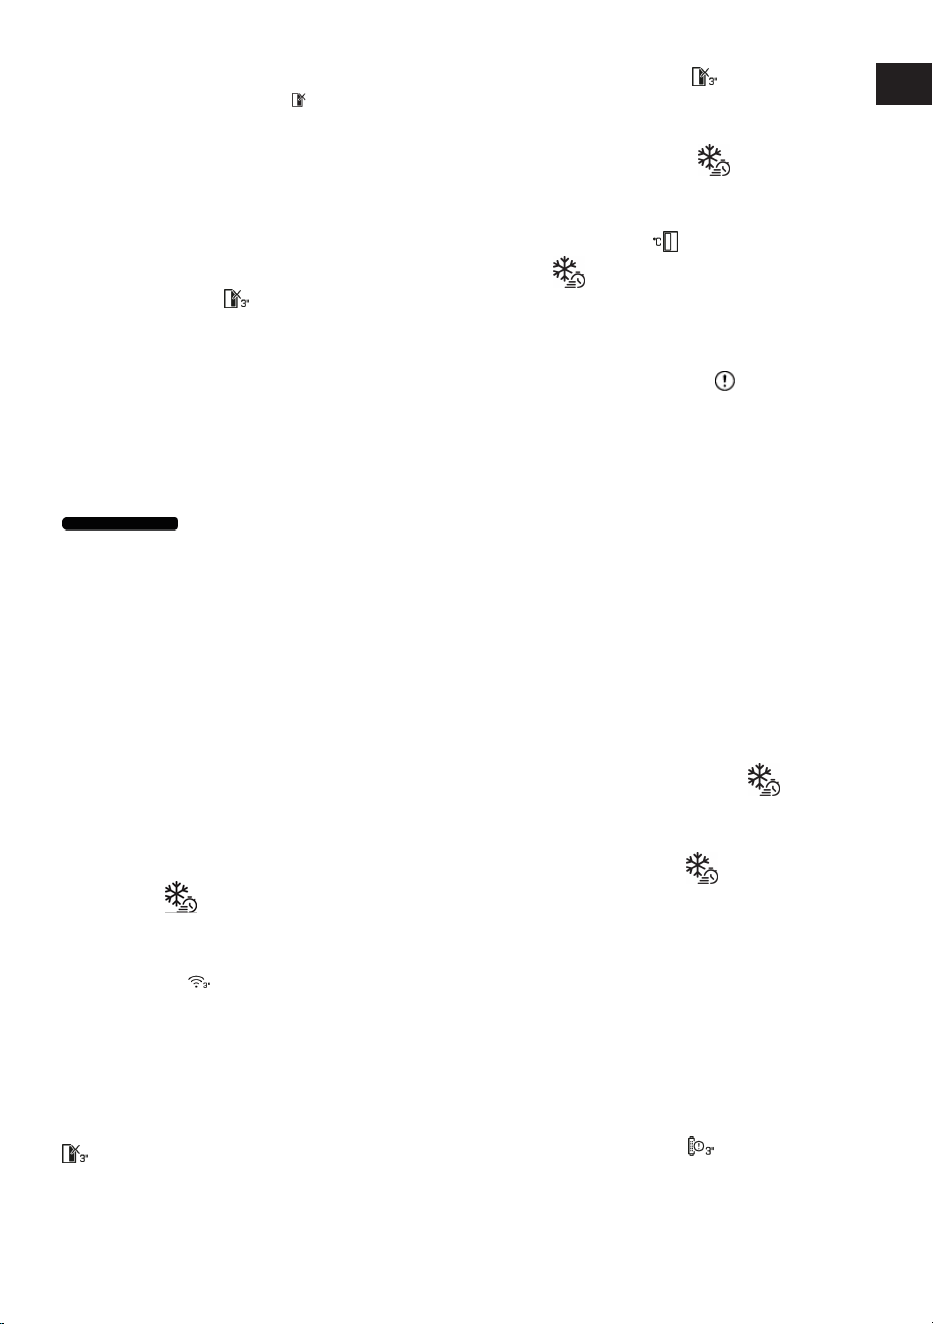
1
2
3
4
5
6
7
8
9
10
11
1 *Refrigerator compartment closing
(Holiday) function icon
2 *Refrigerator compartment shutdown
(Holiday) button
3 *Energy saving indicator 4 Error status indicator
5 *Quick freeze function icon 6 *Quick freeze button
7 *Filter reset button 8 *Wireless button
9 *Ice maker on/off switch 10 Freezer compartment temperature
setting knob
11 Refrigerator compartment temperat-
ure adjustment button
Read the “Safety Instructions” first!
The audio and visual functions on the in-
strument panel help you use the product.
*Optional: The functions shown are op-
tional, the functions on the display panel of
your product may differ in terms of shape
and location.
EN / 23
1. Refrigerator Compartment Shutdown
(Holiday) Function Icon
The relevant icon, the holiday symbol, illu-
minates when Refrigerator Compartment
Shutdown is activated. The Refrigerator
Compartment temperature display shows “-
-“ and the Refrigerator Compartment does
not perform active cooling.
2. Refrigerator Compartment Shutdown
(Holiday) Button
To activate the vacation function, press the
button for 3 seconds. Vacation mode is ac-
tivated and the vacation icon lights up. The
refrigerator compartment temperature in-
dicator will show "- -" and the refrigerator
compartment will not perform active cool-
ing.
3. Energy Saving (Display Off) Indicator
When the product's doors are not being
opened or closed, energy saving mode is
automatically activated and the energy sav-
ing symbol will light up (a horizontal sym-
bol will appear). Energy saving function.
When activated, all icons on the screen ex-
cept the energy saving icon turn off. If any
button is pressed or a door is opened while
the energy saving function is active, the
function is deactivated and the icons on the
screen return to normal. The energy saving
function is a factory default function and
cannot be deactivated.
*Wireless Connection Settings Reset
Key {116}+
To reset the wireless connection settings,
press and hold the Quick Freeze ({118})
and Wireless ( ) buttons simultaneously
for 3 seconds.
When wireless settings are reset/restored
to factory defaults, all user information pre-
viously used for setup is forgotten on the
product.
*Celsius/Fahrenheit Conversion {120} +
Pressing the Refrigerator Compartment
Temperature Adjustment Button ({122})
and the Refrigerator Compartment Shut-
down (Holiday) Button ( ) simultaneously
for 3 seconds will switch the temperature
display between Celsius and Fahrenheit.
*Sabbath Mode {124} +
To activate/deactivate Sabbath mode,
press the Freezer Compartment Temperat-
ure Setting Button ( ) and the Quick
Freeze ( ) button simultaneously for 3
seconds. When Sabbath mode is activated,
the display buttons, door opening alarm, or
lights will not function.
4. Error Status Indicator
This indicator will be active when the refri-
gerator is not cooling sufficiently or a
sensor error occurs. The letter "E" will ap-
pear on the freezer compartment temperat-
ure indicator, and numbers such as 1, 2,
and 3 will appear on the refrigerator com-
partment temperature indicator.
These numbers on the display inform the
service about the error that has occurred.
When you load hot food into the freezer
compartment or leave the door open for an
extended period, an exclamation point may
illuminate temporarily. This is not a mal-
function; the warning will clear when the
food cools or any button is pressed.
5. Quick Freeze Function Icon
The corresponding icon lights up when the
fast freezing function is activated.
6. Quick Freeze Button
When the fast freeze button is pressed, the
fast freeze icon illuminates and the fast
freeze function is activated. The freezer
compartment temperature is set to -27°C.
To cancel the function, press the button
again. The fast freeze function automatic-
ally cancels itself. If you want to freeze
large quantities of fresh food, press the
fast freeze button before placing the food
in the freezer compartment.
7. Filter Reset Button
The refrigerator's water inlet filter should be
replaced at regular intervals. Your refriger-
ator automatically calculates this time.
When the filter's lifespan is over, the LED on
EN

EN / 24
the filter replacement warning button will
light up. After replacing the filter, press and
hold the button for 3 seconds to turn off
the filter replacement warning LED.
8. Wireless Button
When you hold down the button for 3
seconds, the wireless connection icon on
the display will flash slowly (0.5-second in-
tervals). This initiates the initial registration
of the home network to the product. Once
the wireless connection is established with
the product, the wireless connection icon
will remain lit.
After the initial setup is complete, you can
activate/deactivate the connection by
pressing this button. The wireless connec-
tion icon will flash rapidly (at 0.2-second in-
tervals) until the connection is established.
Once the connection is active, the wireless
network icon will remain lit. If the connec-
tion is not established for an extended
period, check your connection settings and
refer to the "Troubleshooting" section of
the user manual. The HomeWhiz app must
be used for wireless connection. Setup
steps are explained through the app during
setup.
You can access the app by scanning the QR
code on the HomeWhiz label on the
product. The app is available in the App
Store for iOS devices and the Play Store for
Android devices. For more information, visit
https://www.homewhiz.com/
9. Ice Maker On/Off Button
Pressing this button for 3 seconds activ-
ates ice making and the LED above the but-
ton illuminates. Pressing the button again
for 3 seconds cancels the ice making pro-
cess, allowing you to use previously pre-
pared ice cubes even if the function is can-
celed.
10. Freezer Compartment Temperature
Adjustment Button
The temperature setting for the freezer
compartment is made. By pressing the but-
ton, the freezer compartment temperature
can be set to -18, -19, -20, -21, -22, -23, -24
Celsius.
11. Refrigerator Compartment Temperat-
ure Adjustment Button
The temperature setting for the refrigerator
compartment is made. By pressing the but-
ton, the refrigerator compartment temper-
ature can be set to 8, 7, 6, 5, 4, 3, 2 and 1 °C.
*
The temperature can be set between 1-8°C
for the chiller compartment and between
-24 and -15°C for the freezer compartment.
Adjustable temperature values may vary
provided that they are within these ranges
according to product specifications.
8 Use of Your Appliance
8.1 Food Storage in Freezer, Refri-
gerator and Chill Compartment
Storing food in the freezer compartment
• You can cool faster by activating the Fast
Freeze function 4-6 hours before freez-
ing.
• Bring hot foods to room temperature be-
fore placing them in the freezer compart-
ment.
• Foods to be frozen should be divided into
portions large enough to be consumed
each time and frozen in separate pack-
ages.
• It is recommended that you wrap food
before putting it in the freezer.
• To prevent the storage period from ex-
ceeding, write the freezing date, duration
and name of the food on the package ac-
cording to the storage periods of differ-
ent foods.

EN / 25
• Eat thawed foods quickly. Thawed foods
cannot be refrozen unless cooked. It is
not safe to consume fresh foods that
have been thawed and refrozen without
cooking.
• When freezing fresh food, do not allow it
to come into contact with already frozen
food. Otherwise, the frozen food will
thaw.
Storing frozen foods
• When storing food, comply with the times
specified in these instructions.
• To preserve the quality of food, try to
keep the time between purchase and
storage as short as possible.
• Buy frozen foods stored at –18°C or be-
low.
• Avoid buying foods with ice, etc., in their
packaging. This means the product may
have partially thawed and refrozen. Tem-
perature affects food quality.
• Do not exceed the storage time recom-
mended by the food manufacturer. Re-
move only the amount of food you need
from the freezer.
• Except in cases of extreme environ-
mental conditions, if your product is set
to the set values specified in the recom-
mended set value table, food will remain
fresh for longer in both the fresh food
compartment and the freezer compart-
ment.
• If the fresh food compartment is set to a
lower temperature, fresh fruits and veget-
ables may partially freeze.
Quick freezing
1. Activate the quick freezing function 24
hours before placing your fresh foods.
2. After 24 hours after pressing the but-
ton, place your food that you want to
freeze in the third or fourth shelves
with higher freezing capacity.
3. Once the quick freezing function is ac-
tivated, it is automatically cancelled
after a period of time.
Deep freezer information
According to IEC 62552 standards, for
every 100 liters of freezer compartment
volume, the product must be able to freeze
4.5 kg of food at 25°C room temperature in
24 hours at -18°C or lower temperatures.
Long-term preservation of food is only pos-
sible at temperatures of -18°C and below.
You can preserve the freshness of food
items (in the deep freezer at temperatures
of -18°C and below) for months.
Food items to be frozen should not be al-
lowed to come into contact with previously
frozen foods to prevent them from partially
thawing.
To extend the storage life of frozen veget-
ables, boil them and drain them. After
draining, place them in airtight containers
and place them in the freezer. Bananas, to-
matoes, lettuce, celery, hard-boiled eggs,
potatoes, etc., are not suitable for freezing.
Freezing these foods will only negatively af-
fect their nutritional value and eating qual-
ity. There is no risk of spoilage that poses a
health risk.
Placement of foods
Freezer compartment shelves: Various
frozen foods such as meat, fish, ice cream,
vegetables, etc.
Refrigerator compartment shelves: Food in
pots, covered dishes and covered contain-
ers, eggs (in a covered container)
Refrigerator compartment door shelves:
Small, packaged food or beverages
Vegetable bin: Vegetables and fruits
Fresh food compartment: Deli products
(breakfast items, meat products to be con-
sumed quickly)
Storing Food in the Refrigerator Com-
partment
• If the compartment door is opened and
closed frequently and left open for long
periods of time, the compartment tem-
peratures will increase significantly,
which may reduce the life of the food and
cause the food to spoil.
EN

EN / 26
• To avoid any change in odor or taste,
foods should be stored in closed contain-
ers.
• Do not store too much food in your
product. To achieve better and more
even cooling, place the food items
spaced apart so that cold air can circu-
late between them.
• Leave space between the food and the in-
side wall to allow air flow. Food placed
against the back wall can freeze.
• Allow cooked, hot food to cool to room
temperature before placing it in the appli-
ance. Then, you can place the lukewarm
food on the lower shelves of your appli-
ance. Do not place lukewarm food near
easily perishable foods.
• Defrost your frozen food in the fresh food
compartment. This way, you can use the
frozen food to cool the fresh food com-
partment and save energy.
• Storing unripe tropical fruits (mango, vari-
ous types of melon, papaya, banana,
pineapple) in your produce can acceler-
ate the ripening process. This is not re-
commended as it will result in a shorter
shelf life.
• Onions, garlic, ginger, and other root ve-
getables should be stored in a dark, cool
room, not in the produce itself.
• If you notice that any food inside the
product has spoiled, discard that food
and clean any accessories that came into
contact with it.
• To quickly cool large pot dishes like
soups and stews, you can divide them
into shallow containers and place them
in your container.
• Do not place unwrapped foods near
eggs.
• Keep fruits and vegetables separate from
each other and store each type together
(e.g. apples with apples, carrots with car-
rots).
• Remove the greens from the plastic bag,
wrap them in a paper towel or dishcloth,
and then add them to the dish. If you
wash these types of foods before adding
them to the dish, remember to dry them
afterwards.
• You can create a humid environment and
allow air flow by storing fruits and veget-
ables that are prone to drying in perfor-
ated or open-mouthed plastic bags.
• Except in cases of extreme environ-
mental conditions, if your product is set
to the set values specified (in the recom-
mended set value table), the food will re-
main fresh for longer in both the fresh
food compartment and the freezer com-
partment.
• Do not store cold-sensitive vegetables
such as leafy greens, tomatoes, and cu-
cumbers in the cold compartment. If the
cold compartment must be used to store
vegetables, ensure that your refrigerator's
control panel is set to 5°C or warmer.
Food Storage in the Chill Compartment
In the cold compartment, the temperature
of the food being stored can vary between
+3°C and -3°C. Temperatures may drop be-
low 0°C in the chill compartment, therefore
it is not suitable for storing fresh fruits/ve-
getables. If you need to store fresh food in
the chill compartment, make sure you set
the refrigerator setting to 5°C or warmer.
Store different foods in different places
according to their characteristics.
Food Location
Egg Door shelf
Dairy products (butter, cheese) Zero degree (breakfast) compartment, if available
Fruits, vegetables and greens
Fruit and vegetable compartment, vegetable bin or
EverFresh+ compartment (if available)
EN / 27
Food Location
Fresh meat, poultry, fish, sausage derivatives Cooked foods Zero degree (breakfast) compartment, if available
Ready-to-eat foods, packaged goods, canned goods and
pickles
Top shelves or door shelf
Beverages, bottles, condiments and snacks Door shelf
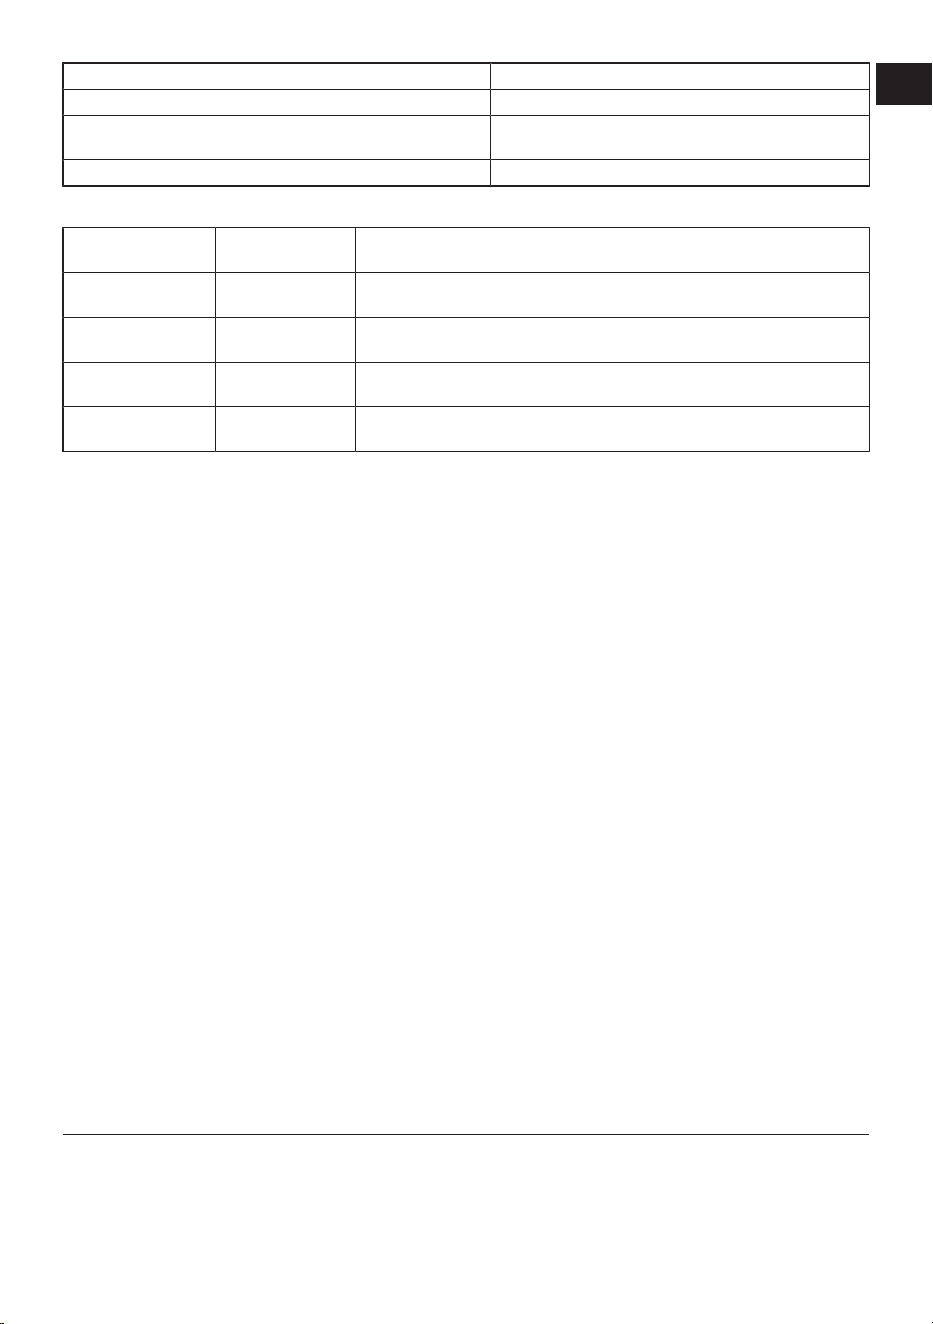
Recommended set values table
Freezer Compart-
ment Setting
Fridge Compart-
ment Setting
Remarks
-22°C 4°C
This is the default, recommended setting. This setting is recommended if
ambient temperature is below 30°C.
-22°C or colder 4°C
These settings are recommended for ambient temperatures exceeding
30°C.
Quick Freeze 4°C
Use when you want to freeze your food in a short time. When the process
ends, the product’s settings will return to previous position.
-18°C or colder 2°C
Use these settings if you believe the cooler compartment is not cold
enough due to ambient temperature or frequently opening the door.
8.2 Replacing the Illumination Lamp
Call the Authorized Service when the Bulb/
LED used for lighting in your refrigerator
will be replaced.
Lamp(s) used in this appliance cannot be
used for house lighting. Intended use of
this lamp is to help the user place food into
the refrigerator / freezer safely and com-
fortably.
8.3 Door Open Alert
The door open alert system of your refriger-
ator may differ depending on the model.
Version 1;
If the door of the product remains open for
a certain time (between 60 s and 120 s), an
audio warning signal sounds; depending on
the product model, a visual warning signal
(light flash) can also be displayed. If you
close the door of the device or press a but-
ton on the screen of the device, if any, the
warning sound will stop.
Version 2;
If the door of the device remains open for a
certain period of time (between 60 s and
120 s), the door open alert is sounded. The
door open alert is sounded gradually. First,
an audible warning starts to sound. After 4
minutes, if the door is still not closed, a
visual warning (lighting flash) is activated.
The door open alert will be delayed for a
certain period of time (between 60 s and
120 s) when any key on the product screen,
if any, is pressed. Then the process will
start again. When the device door is closed,
the door open alert will be cancelled.
8.4 Active Check
Active Check is a smart control feature that
constantly monitors your product's status
using artificial intelligence, identifying po-
tential problems before they even occur
and notifying you. This ensures your
product's performance is always secure
and prevents unexpected malfunctions. For
Active Check to work, your product must be
connected to the internet via the Home-
Whiz app.
9 Product Features
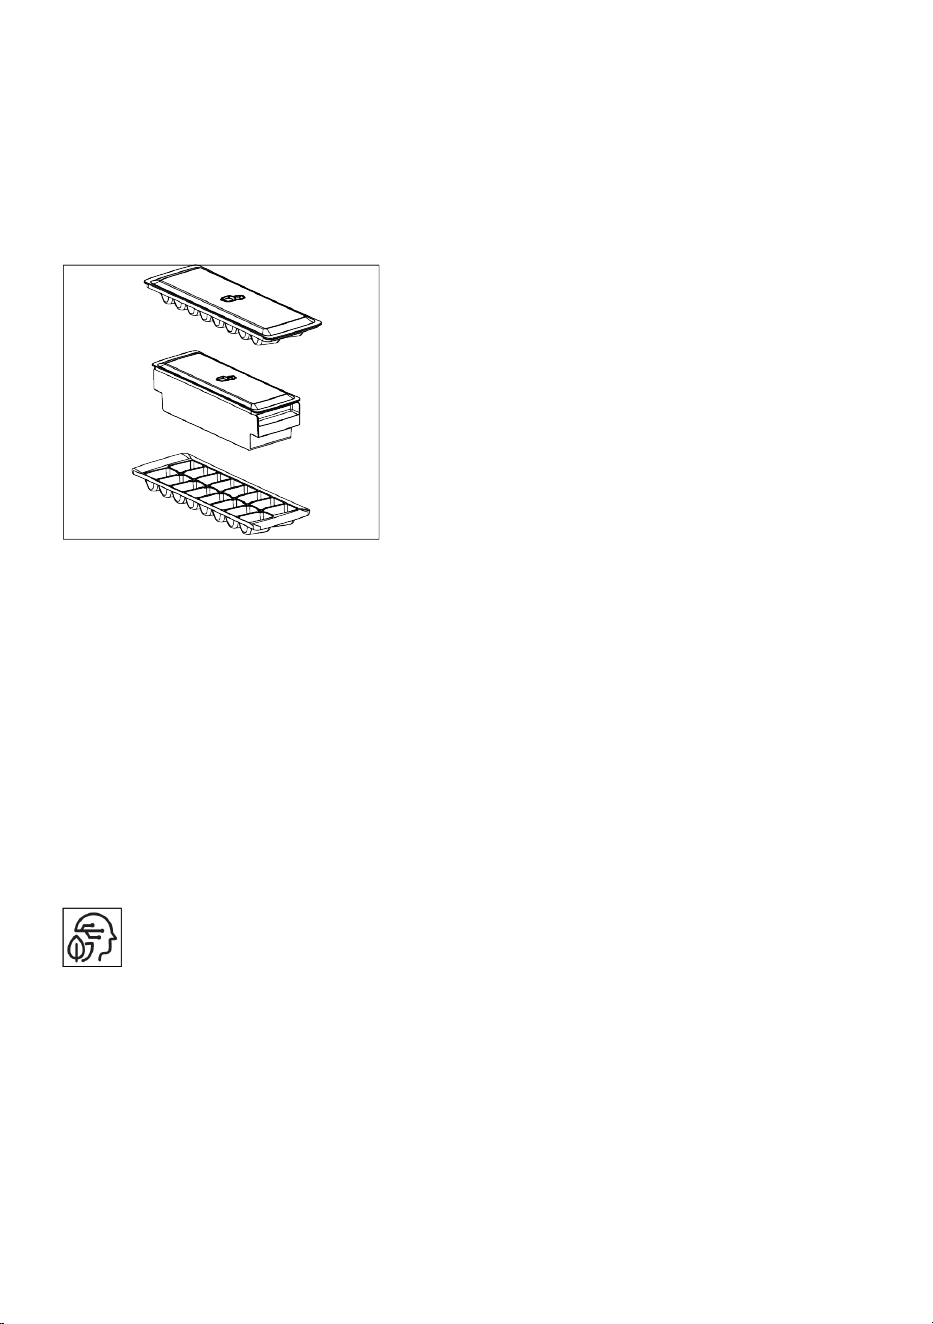
9.1 The ice storage area
Ice Container
Ice bucket allows you to take ice easily
from the refrigerator.
Using the ice bucket
1. Take the ice bucket out of the freezer
compartment.
2. Fill the ice bucket with water.
EN
EN / 28
3. Place the ice bucket into the freezer
compartment. The ice will be ready
after approximately two hours.
4. Take the ice bucket from the freezer
compartment and bend in slightly over
the holder that you are going to serve.
Ice will easily pour into the serving
holder.
9.2 Dairy Products Cold Storage
Area
Cold Storage Compartment
The Cold Storage Compartment provides a
lower temperature inside the product. Use
this compartment to store deli products
(salami, sausages, dairy products, etc.) or
meat, chicken, and fish products that need
to be kept at a lower temperature for imme-
diate consumption. Do not store fruits and
vegetables in this compartment.
9.3 Artificial Intelligence (AI) Tech-
nology
Artificial Intelligence Feature
Your product features Artificial Intelligence.
For this feature to work, your product must
be added to the HomeWhiz app and con-
nected to the internet.
In the HomeWhiz app, you can turn the AI
feature on or off from the helper functions
page for your specific product.
Thanks to its autonomous technology, your
product adapts to your usage habits, offer-
ing high energy efficiency and saving you
up to 20%.
• The stated savings figures are obtained
under standard laboratory conditions.
Your savings figures may vary depending
on customer usage conditions and cli-
mate.
9.4 Energy Management
Your product has an energy consumption
management feature. For this feature to
work, your product must be added to the
HomeWhiz application and connected to
the internet.
You can track your appliance's consump-
tion information using the Homewhiz app's
Energy Management panel.
You can monitor the consumption informa-
tion of your smart product according to dif-
ferent time periods and save money with
suggestions to reduce your consumption.
• The consumption values stated on the
product label are obtained under stand-
ard laboratory conditions. The consump-
tion values shown in the HomeWhiz app
are for informational purposes only and
may differ from actual consumption val-
ues depending on customer usage condi-
tions and climate.
9.5 Using the Door Water Dis-
penser
After connecting your product to the water
source or changing the water filter, flush
the water system. Use a sturdy container to
press and hold the water dispenser lever
for 5 seconds, then release for another 5
seconds. Continue this cycle until water be-
gins to flow. Once water starts flowing,
continue pressing and releasing the water
dispenser pedal (press for 5 seconds, re-
lease for 5 seconds) until you reach 4 gal-
lons. 15 liters of water has been dispensed.
This process purges the air from the filter
and water dispenser system, preparing the
water filter for use. Additional purging may
EN / 29
be required in some homes. Water may
gush from the dispenser as air is removed
from the system.
Allow the product to cool for 24 hours and
let the water cool. Remove enough water
each week to ensure a fresh supply.
After continuously dispensing water for 5
minutes, the water dispenser will stop dis-
pensing water to prevent overflow. To re-
sume dispensing water, press the dis-
penser pedal again.
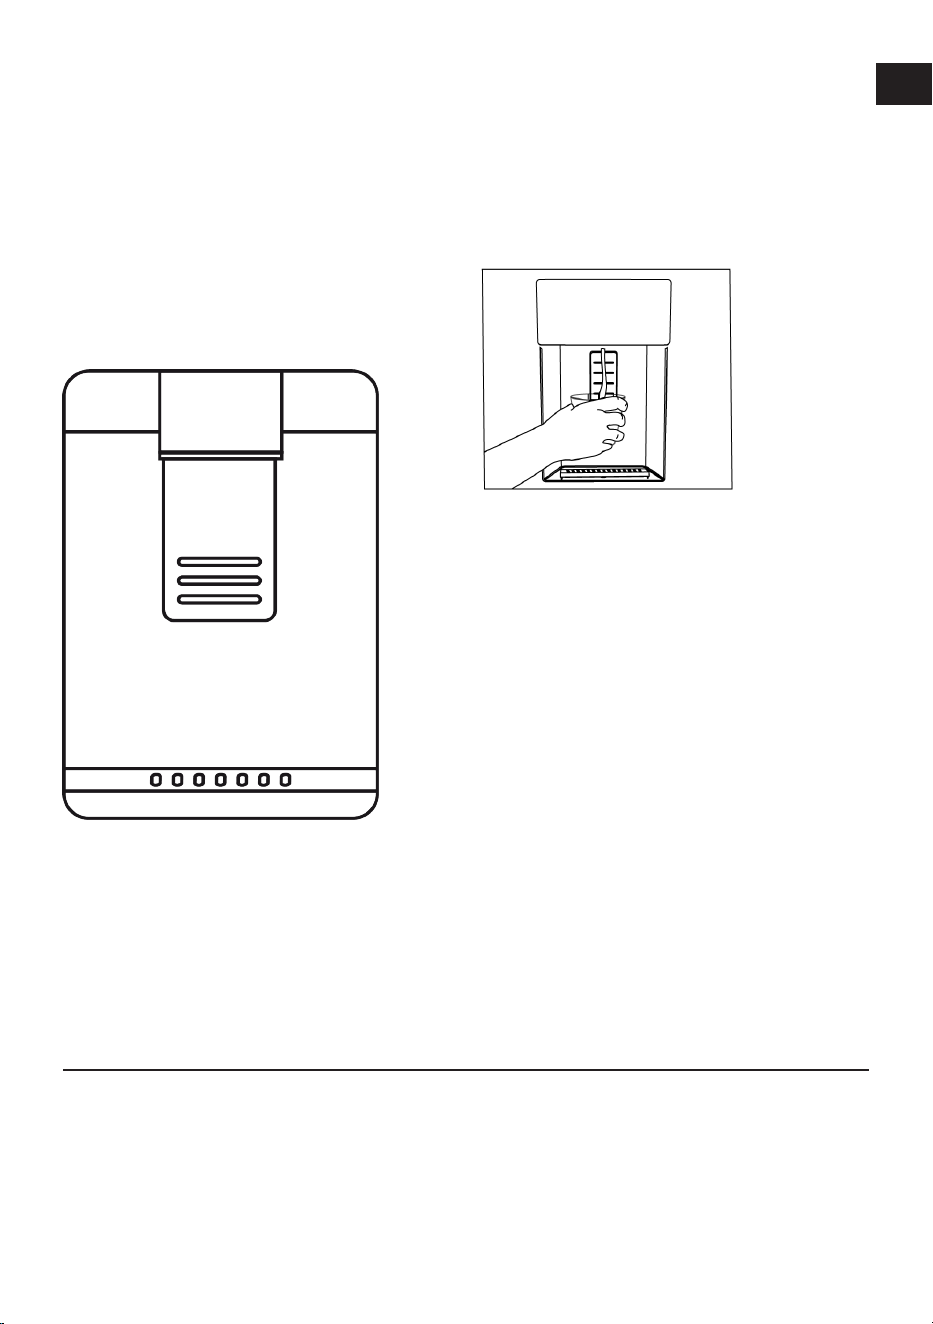
*Water fountain at the door
*Water Intake
When you press the pedal to turn on the
water fountain, hold a container under the
spout of the fountain.
Release the tap to stop drawing water.
It's normal for the first few glasses of water
from the spring to be lukewarm.
Use only clean drinking water.
If the water fountain hasn't been used for a
long time, pour out the first few cups of wa-
ter to obtain clean water.
For the first use, you need to wait approx-
imately 24 hours for the water to cool
down.
Remove the glass a little while after pulling
the trigger.
For using the water fountain
Before using your product for the first time
and after changing your water filter, water
may drip from the dispenser. To prevent
water from dripping or leaking from the dis-
penser, purge 5-6 gallons (approximately
20 liters) of water from the dispenser be-
fore using your product for the first time
and after each water filter change to re-
move air from the system. This removes
trapped air and prevents the dispenser
from leaking. If there is an obstruction in
the water flow, the straightness of the wa-
ter line and the coupling position at the
back of the unit should be checked.
It's normal for your water dispenser to leak
only a few drops of water after you've taken
some.
If you haven't used the water dispenser for
a long time, pour out the first few glasses
of water to get clean water.
10 Maintenance and Cleaning
Read the “Safety Instructions” first!
• Unplug your appliance before cleaning it.
• The dust on the ventilation grille on the
back of the product should be removed
(without opening the lid) at least once a
year. Cleaning should be done with a dry
cloth.
For products that include a water dis-
penser/ice machine.
• If the water in the tank has been left
standing for 2-3 weeks, it should be
changed.
• The water tank and water dispenser parts
should not be washed in a dishwasher.
EN

EN / 30
• Dissolve one teaspoon of baking soda in
half a liter of water. Wet a cloth with this
solution and wring it out thoroughly. Wipe
the inside of your appliance with this
cloth and then dry it completely.
• Ensure that water does not enter the
lamp housing, LED light lens, ventilation
holes, and other electrical parts. Risk of
electric shock and short circuit!
• Do not open or perform cleaning, main-
tenance, or repair work on electrical com-
ponents (control board cover, com-
pressor rear cover (if applicable) without
authorization. If your product does not
have a cover on the compressor area, ab-
solutely do not touch this area or use any
tools to come into contact with it. Risk of
electric shock and injury!
• Clean the door with a damp cloth. Re-
move all contents from your product, in-
cluding the door and body shelves. Lift
the door shelves upwards to remove
them. After cleaning and drying, slide the
shelves back into place from top to bot-
tom.
• Never use chlorine-containing water or
cleaning agents for cleaning the exterior
surface of the product or chrome-plated
parts. Chlorine causes rust on these
types of metal surfaces.
• For any reason, do not put your hands,
feet, or any metal objects under or
between the product. Pinch or any sharp
edges could cause personal injury.
• To prevent the prints on the plastic part
from peeling off or deforming, do not use
sharp, abrasive tools, soap, household
cleaning products, detergents, gasoline,
polish, etc. For cleaning, use a soft cloth
with lukewarm water and dry.
For products without No Frost;
• Water droplets and up to a finger's thick-
ness of frost will form on the back wall of
the cooler compartment. Do not clean it,
and absolutely do not apply oil or similar
substances.
• Use only a slightly damp microfiber cloth
for cleaning the exterior surface of the
product. Sponges and other types of
cleaning cloths may cause scratches.
• To clean the interior surfaces of the
product, wash all removable parts with a
mild solution of soap, water, and baking
soda. Rinse thoroughly and dry com-
pletely. Prevent water from getting into
the lights and control panel.
• Be careful not to let water get into the
lamp housing and other electrical parts.
• Clean the door with a damp cloth. Re-
move all contents to take out the door
and body shelves. Lift the door shelves
upwards to remove them. After cleaning
and drying, slide them back in place from
top to bottom.
• Never use chlorine-containing water or
cleaning agents for cleaning the exterior
surface of the product or chrome-plated
parts. Chlorine causes rust on these
types of metal surfaces.
• To prevent the prints on the plastic part
from peeling off or deforming, do not use
sharp, abrasive tools, soap, household
cleaning products, detergents, gasoline,
polish, etc. For cleaning, use a soft cloth
with lukewarm water and dry.
• In products without No Frost technology;
water droplets and up to a finger's thick-
ness of frost will form on the back wall of
the cooling compartment. Do not clean it,
and absolutely do not apply oil or similar
substances.
• Use only a slightly damp microfiber cloth
for cleaning the exterior surface of the
product. Sponges and other types of
cleaning cloths may cause scratches.
• To clean the interior surfaces of the
product, wash all removable parts with a
mild solution of soap, water, and baking
soda. Rinse thoroughly and dry com-
pletely. Prevent water from getting into
the lights and control panel.
• Do not use vinegar, rubbing alcohol, or
other alcohol-based cleaners on any in-
terior surfaces.

EN / 31
Stainless Steel Exterior Surfaces
Use a non-abrasive stainless steel cleaner
and apply it with a lint-free, soft cloth. To
polish, gently wipe the surface with a mi-
crofiber cloth dampened with water and
use a dry polishing pad. Always follow the
grain of the stainless steel.
Preventing Bad Odors
No substances that could cause odor are
used in the production of your product.
However, odors may arise due to improper
food storage and failure to properly clean
the product's interior surface.
• To prevent this problem, clean with bak-
ing soda water every 15 days.
• Store food in sealed containers, as mi-
croorganisms released from open food
can cause bad odors.
• Never store expired or spoiled food in
your product.
Protection of Plastic Surfaces
If oil spills on plastic surfaces, clean them
immediately with warm water, as the oil
can damage the surface.
11 Troubleshooting
Read the “Safety Instructions” first!
Check this list before contacting the ser-
vice. Doing so will save you time and
money. This list includes frequent com-
plaints that are not related to faulty work-
manship or materials. Certain features
mentioned herein may not apply to your
product.
If the problem persists after following the
instructions in this section, contact your
vendor or an Authorized Service. Do not try
to repair the product.
The refrigerator is not working.
• The power plug is not fully settled. >>>
Plug it in to settle completely into the
socket.
• The fuse connected to the socket power-
ing the product or the main fuse is blown.
>>> Check the fuse.
Condensation on the side wall of the
cooler compartment (MULTI ZONE,
COOL CONTROL and FLEXI ZONE).
• The door is opened too frequently. >>>
Take care not to open the product's door
too frequently.
• The environment is too humid. >>> Do
not install the product in humid environ-
ments.
• Foods containing liquids are kept in un-
sealed holders. >>> Keep the foods con-
taining liquids in sealed holders.
• The product's door is left open. >>> Do
not keep the product's door open for long
periods.
• The thermostat is set to a very cool tem-
perature. >>> Set the thermostat to an ap-
propriate temperature.
Compressor is not working.
• In case of sudden power failure or pulling
the power plug off and putting back on,
the gas pressure in the product's cooling
system is not balanced, which triggers
the compressor thermic safeguard. The
product will restart after approximately 6
minutes. If the product does not restart
after this period, contact the service.
• Defrosting is active. >>> This is normal
for a fully-automatic defrosting product.
The defrosting is carried out periodically.
• The product is not plugged in. >>> Make
sure the power cord is plugged in.
• The temperature setting is incorrect. >>>
Select the appropriate temperature set-
ting.
• The power is out. >>> The product will
continue to operate normally once the
power is restored.
The refrigerator's operating noise is in-
creasing while in use.
• The product's operating performance
may vary depending on the ambient tem-
perature variations. This is normal and
not a malfunction.
EN

EN / 32
The refrigerator runs too often or for too
long.
• The new product may be larger than the
previous one. Larger products will run for
longer periods.
• The room temperature may be high. >>>
The product will normally run for long
periods in higher room temperature.
• The product may have been recently
plugged in or a new food item is placed
inside. >>> The product will take longer to
reach the set temperature when recently
plugged in or a new food item is placed
inside. This is normal.
• Large quantities of hot food may have
been recently placed into the product.
>>> Do not place hot food into the
product.
• The doors were opened frequently or
kept open for long periods. >>> The warm
air moving inside will cause the product
to run longer. Do not open the doors too
frequently.
• The freezer or cooler door may be ajar.
>>> Check that the doors are fully closed.
• The product may be set to a temperature
that is too low. >>> Set the temperature
to a higher degree and wait for the
product to reach the adjusted temperat-
ure.
• The cooler or freezer door washer may
be dirty, worn out, broken or not properly
settled. >>> Clean or replace the gasket.
Damaged / torn door washer will cause
the product to run for longer periods to
preserve the current temperature.
The freezer temperature is very low, but
the cooler temperature is adequate.
• The freezer compartment temperature is
set to a very low degree. >>> Set the
freezer compartment temperature to a
higher degree and check again.
The cooler temperature is very low, but
the freezer temperature is adequate.
• The cooler compartment temperature is
set to a very low degree. >>> Set the
cooler compartment temperature to a
higher degree and check again.
The food items kept in cooler compart-
ment drawers are frozen.
• The cooler compartment temperature is
set to a very low degree. >>> Set the
cooler compartment temperature to a
higher degree and check again.
The temperature in the cooler or the
freezer is too high.
• The cooler compartment temperature is
set to a very high degree. >>> Temperat-
ure setting of the cooler compartment
has an effect on the temperature in the
freezer compartment. Wait until the tem-
perature of relevant parts reach the suffi-
cient level by changing the temperature
of cooler or freezer compartments.
• The doors were opened frequently or
kept open for long periods. >>> Do not
open the doors too frequently.
• The door may be ajar. >>> Fully close the
door.
• The product may have been recently
plugged in or a new food item is placed
inside. >>> This is normal. The product
will take longer to reach the set temperat-
ure when recently plugged in or a new
food item is placed inside.
• Large quantities of hot food may have
been recently placed into the product.
>>> Do not place hot food into the
product.
Shaking or noise.
• The surface is not flat or durable >>> If
the product is shaking when moved
slowly, adjust the stands to balance the
product. Also make sure the ground is
sufficiently durable to bear the product.
• Any items placed on the product may
cause noise. >>> Remove any items
placed on the product.

EN / 33
• The product is making noise of liquid
flowing, spraying etc.
• The product's operating principles in-
volve liquid and gas flows. >>> This is
normal and not a malfunction.
There is sound of wind blowing coming
from the product.
• The product uses a fan for the cooling
process. This is normal and not a mal-
function.
There is condensation on the product's
internal walls.
• Hot or humid weather will increase icing
and condensation. This is normal and not
a malfunction.
• The doors were opened frequently or
kept open for long periods. >>> Do not
open the doors too frequently; if open,
close the door.
• The door may be ajar. >>> Fully close the
door.
There is condensation on the product's
exterior or between the doors.
• The ambient weather may be humid, this
is quite normal in humid weather. >>>
The condensation will dissipate when the
humidity is reduced.
The interior smells bad.
• The product is not cleaned regularly. >>>
Clean the interior regularly using sponge,
warm water and carbonated water.
• Certain holders and packaging materials
may cause odour. >>> Use holders and
odour-free packaging materials.
• The foods were placed in unsealed hold-
ers. >>> Keep the foods in sealed hold-
ers. Micro-organisms may spread out of
unsealed food items and cause bad
odour.
• Remove any expired or spoilt foods from
the product.
The door is not closing.
• Food packages may be blocking the
door. >>> Relocate any items blocking
the doors.
• The product is not standing in full upright
position on the ground. >>> Adjust the
stands to balance the product.
• The surface is not flat or durable >>>
Make sure the surface is flat and suffi-
ciently durable to bear the product.
The crisper is jammed.
• The food items may be in contact with
the upper section of the drawer. >>> Re-
organize the food items in the drawer.
Temperature on the product surface.
• High temperature may be observed
between two doors, on the side panels
and on the rear grill area while your
product is operated. This is normal and it
does not require servicing.
Fan continues to operate when the door
is opened.
• Fan may continue to operate when the
freezer door is open.
If the problem persists after following the
instructions in this section, contact your
vendor or an Authorized Service. Do not try
to repair the product. This is normal.
EN
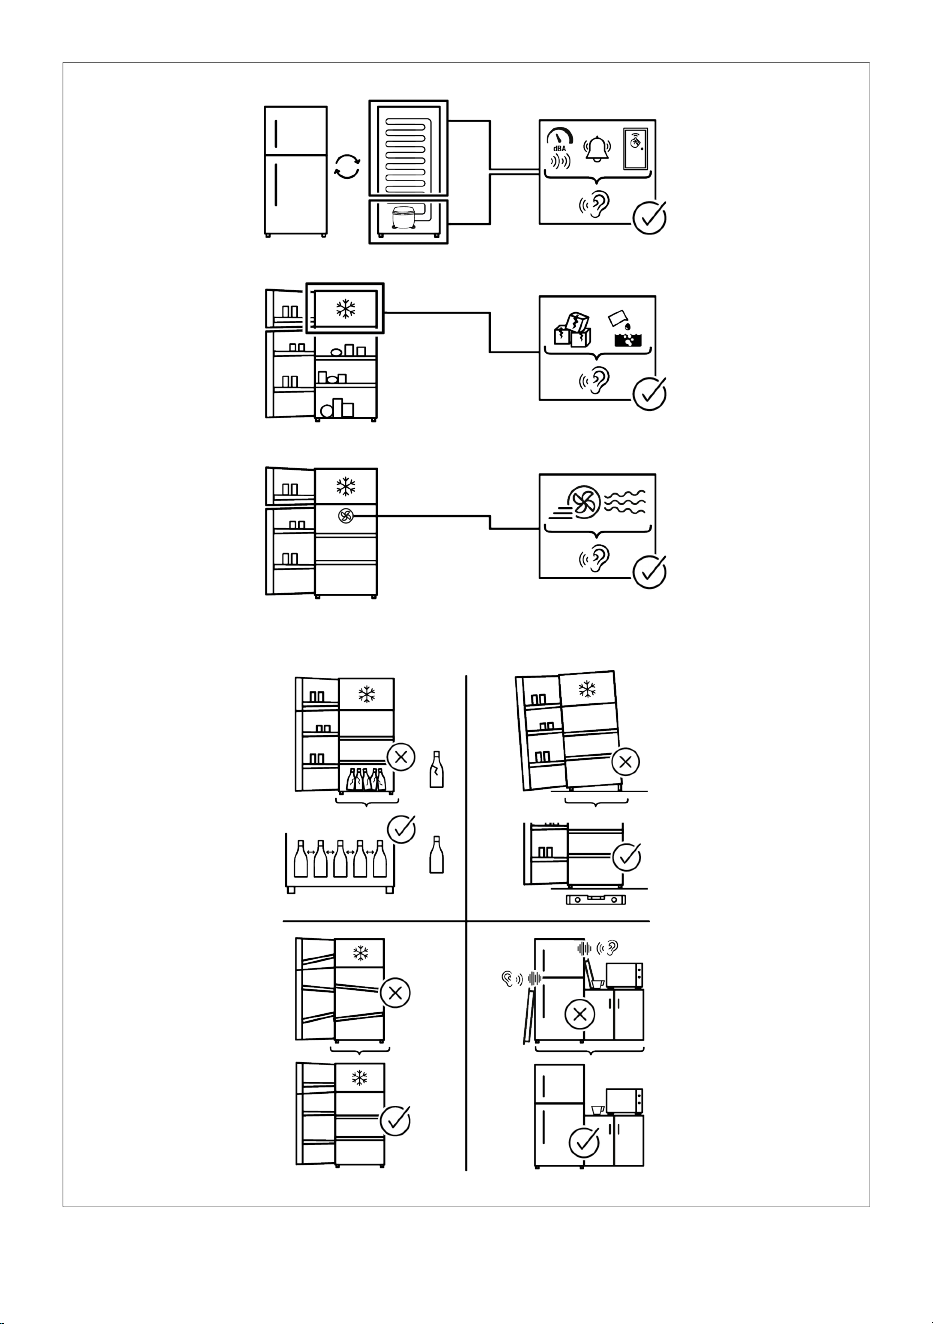
EN / 34

EN / 35
DISCLAIMER
Some (simple) failures can be adequately
handled by the end-user without any safety
issue or unsafe use arising, provided that
they are carried out within the limits and in
accordance with the following instructions
(see the “Self-Repair” section).
Therefore, unless otherwise authorized in
the “Self-Repair” section below, repairs
shall be addressed to registered profes-
sional repairers in order to avoid safety is-
sues. A registered Professional repairer is a
professional repairer that has been granted
access to the instructions and spare parts
list of this product by the manufacturer ac-
cording to the methods described in legis-
lative acts pursuant to Directive 2009/125/
EC.
However, only the service agent (i.e.au-
thorized professional repairers) that you
can reach through the phone number given
in the user manual/warranty card or
through your authorized dealer may
provide service under the guarantee terms.
Therefore, please be advised that repairs
by professional repairers (who are not au-
thorized by) Hotpoint shall void the guar-
antee.
Self-Repair
Self-repair can be done by the end-user
with regard exclusively to the following
spare parts:door handles,door hinges, trays,
baskets and door gaskets (an updated list
is also available parts-selfser-
vice.europeanappliances.com as of 1st
March 2021).
Moreover, to ensure product safety and to
prevent risk of serious injury, the mentioned
self-repair shall be done following the in-
structions in the user manual for selfrepair
or which are available in parts-selfser-
vice.europeanappliances.com . For your
safety, unplug the product before attempt-
ing any self-repair.
Repair and repair attempts by end-users for
parts not included in such list and/or not
following the instructions in the user manu-
als for self-repair or which are available in
parts-selfservice.europeanappliances.com,
might give raise to safety issues not attrib-
utable to Hotpoint, and will void the war-
ranty of the product.
Therefore, it is highly recommended that
end-users refrain from the attempt to carry
out repairs falling outside the mentioned
list of spare parts, contacting in such cases
authorized professional repairers or re-
gistered professional repairers. On the con-
trary, such attempts by end-users may
cause safety issues and damage the
product and subsequently cause fire, flood,
electrocution and serious personal injury to
occur.
By way of example, but not limited to,the
following repairs must be addressed to au-
thorized professional repairers or re-
gistered professional repairers:compressor,
cooling circuit, main board,inverter board,
display board, etc.
The manufacturer/seller cannot be held li-
able in any case where end-users do not
comply with the above.
The spare part availability of the refriger-
ator that you purchased is 10 years.During
this period, original spare parts will be avail-
able to operate the refrigerator properly
The minimum duration of guarantee of the
refrigerator that you purchased is 24
months.
This product is equipped with a lighting
source of the "G" energy class.
The lighting source in this product shall
only be replaced by Professional repairer.
EN

