
User Manual
(Universal)


Contents
Product Overview
03
Product Features04-06
Settings07-10
CarPlay / Android Auto11-12
FAQ13-19
Compliance & Legal20-21
02
Product Overview
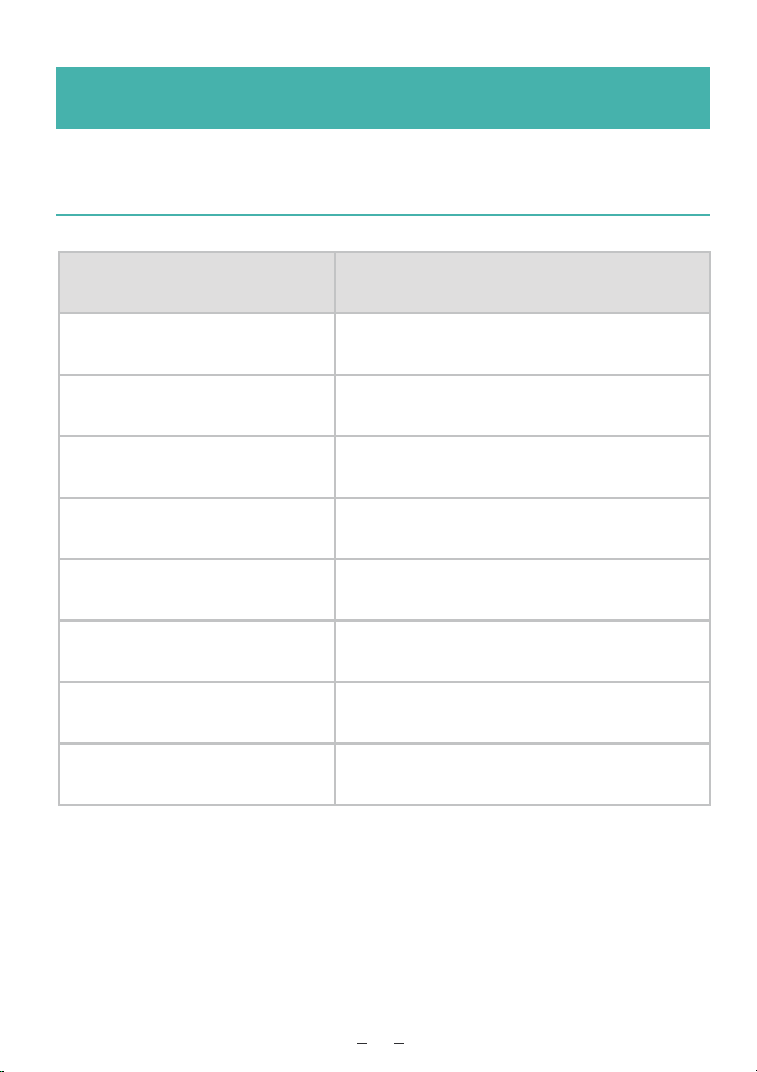
Product Specifications
Item
Operating Voltage
Max Operating Current
Standby Current
Operating Temperature
Operating Humidity
System
Connectivity
Smartphone Integration
Specification
10V-16V DC
<15A
<10 mA
-20°C~+70°C
0%-80%
Android OS
Wi-Fi/ Bluetooth / GPS
Wireless /Wired CarPlay (Bluetooth
ConnectionOnly) / Android Auto
03

Product Features
Multimedia
FM/AM Radio
Music and Video Playback
USB Media Support
Bluetooth Music Streaming
Navigation
GPS Navigation
Google Maps Support
Online Navigation Apps
Integrated infotainment system delivering seamless multimedia experience
and intelligent navigation capabilities for modern driving.
All features designed for safe, intuitive in-vehicle interaction.
04

Product Features
Connectivity Features
Bluetooth Hands-Free Calling
Wi-Fi Internet Access
Smartphone Screen Mirroring
Apple CarPlay
Android Auto
Vehicle Integration
Steering Wheel Control Learning
Backup Camera Support
CANBUS Support (Model Dependent)
05

Software Application
Entertainment
Radio
Music
Video
Bluetooth
BT Music
Navigation & System
Maps
Steering Wheel Learning
File Manager
Theme
Equalizer (EQ)
Smart Connectivity
CarPlay
Android Auto
Screen Mirroring
App Store
Play Store
06
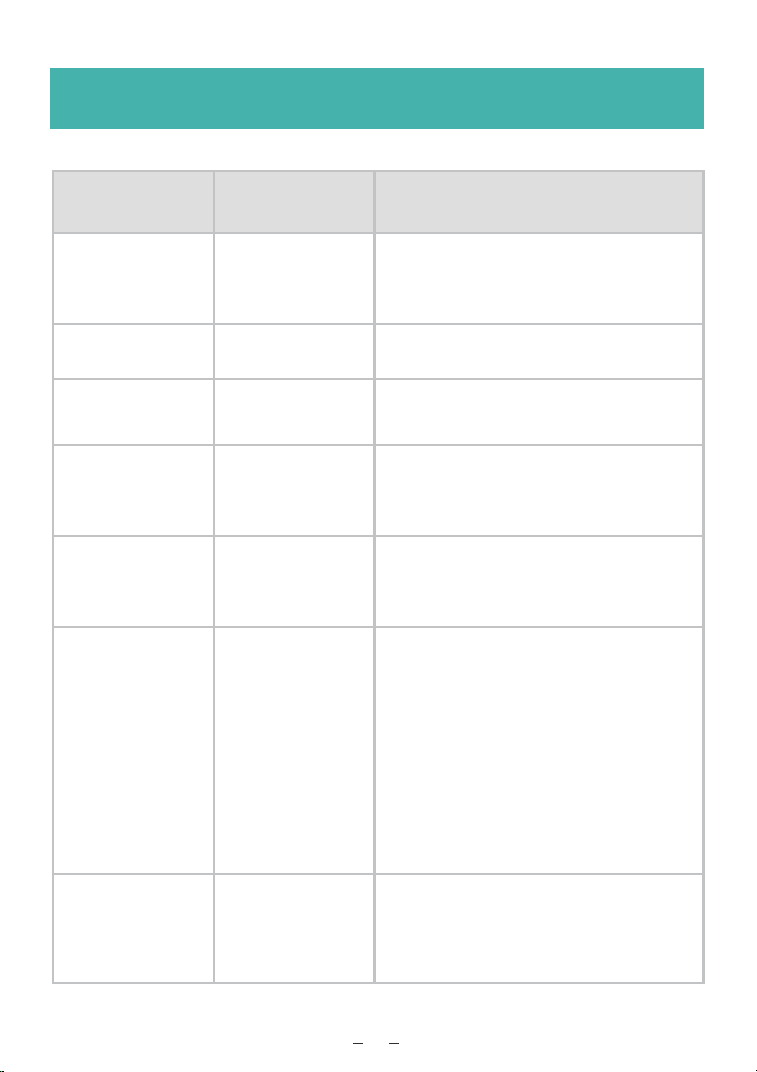
Settings
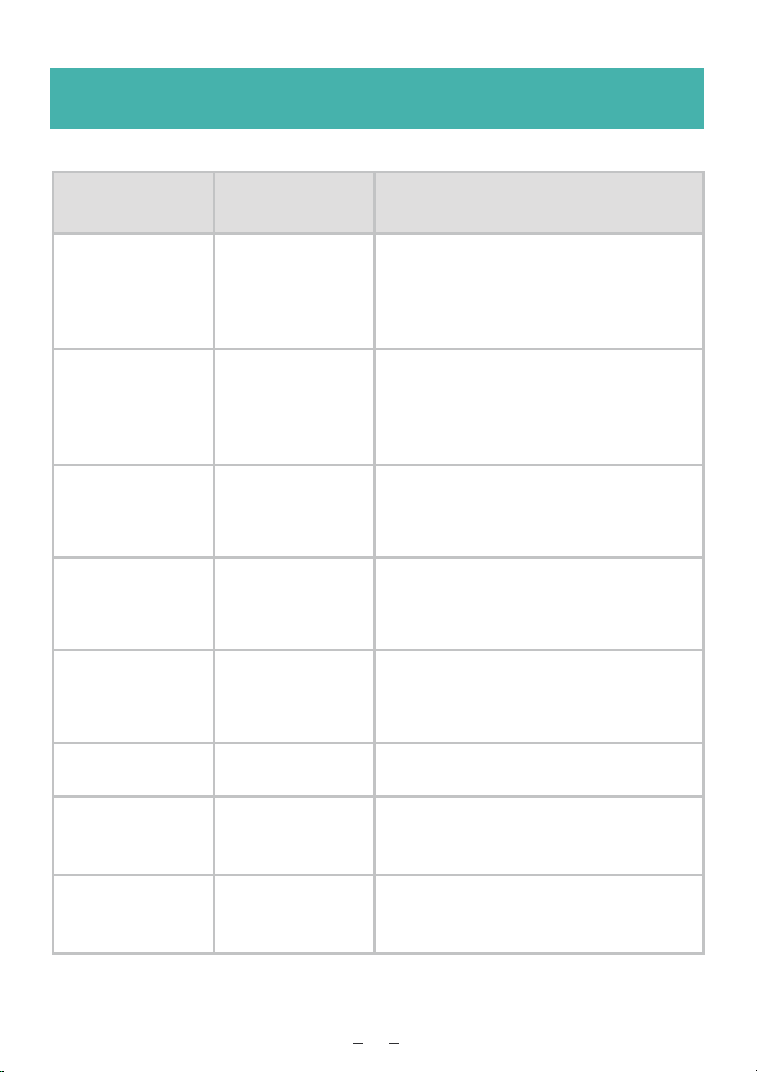
Category Function Description
Click on the WIFl icon, then start the
search. In the list,find the desired
WIFI and perform the connection
operation.
Click on the "Hotspot" icon, select "Wi-Fi
hotspot", turn on the hotspot, you can
share the local hotspot, and you can also
modify the hotspot name and password.
Click on the SIMs icon, for network data
managementand settings. Note: The icon will
only be effective when a SIM card is inserted.
The system shows the font size
adjustment settings.
The driving warning is turned off.
You can watch videos while driving.
Display
Display
Font size
More display
Setting of static logo and dynamic logo.
Click on the APP icon, then select "See all
apps". In the list, find the desired APP and
you can view its version,clear the cache
and uninstall it, etc.
Brightness and Display: Brightness
adjustment for daytime mode and
nighttime mode.
07
Display Power logo
Brightness
regulate
Network
Display
APPs
Network
Network
Network
WIFI
Hotspot
SIMs
Settings
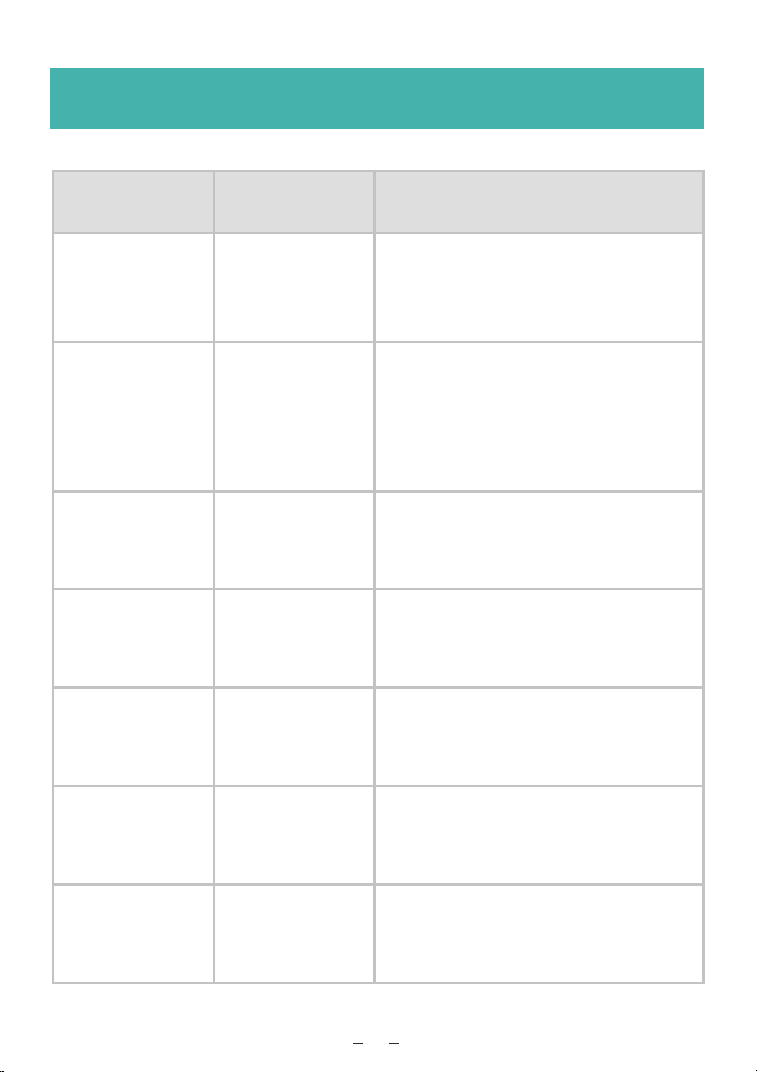
Category Function Description
Set the date and time. The system
will update automatically by default
and no settings are required.
Add applications that allow
for long-term operation in the
background.
Google Account Management.
System language and input method
settings.
Person
Person
Person
Person
Person
WhiteList
Google &
Account
Languages &
input
Date & time
Navigation
Settings
Click on the APP icon, then select "See
all apps". In the list, find the desired
APP and you can view its version,clear
the cache and uninstall it, etc.
Learning of steering wheel buttons:
Method: Click the "Start Learning" button,
then press the buttons on the steering
wheel for 1 second. After that, a prompt
will appear asking you to select the
buttons you want to learn. When the icon
lights up, it indicates that the learning is
successful. Repeat this process for each
other button until all are learned. Then,
click "End Learning" to complete.
Receiver area and channel search/
stop sensitivity settings.
Device
Device
Radio settings
Steering Wheel
learning
08
The navigation shortcut keys can be
customized. The default setting is
Goolge Maps.
Settings
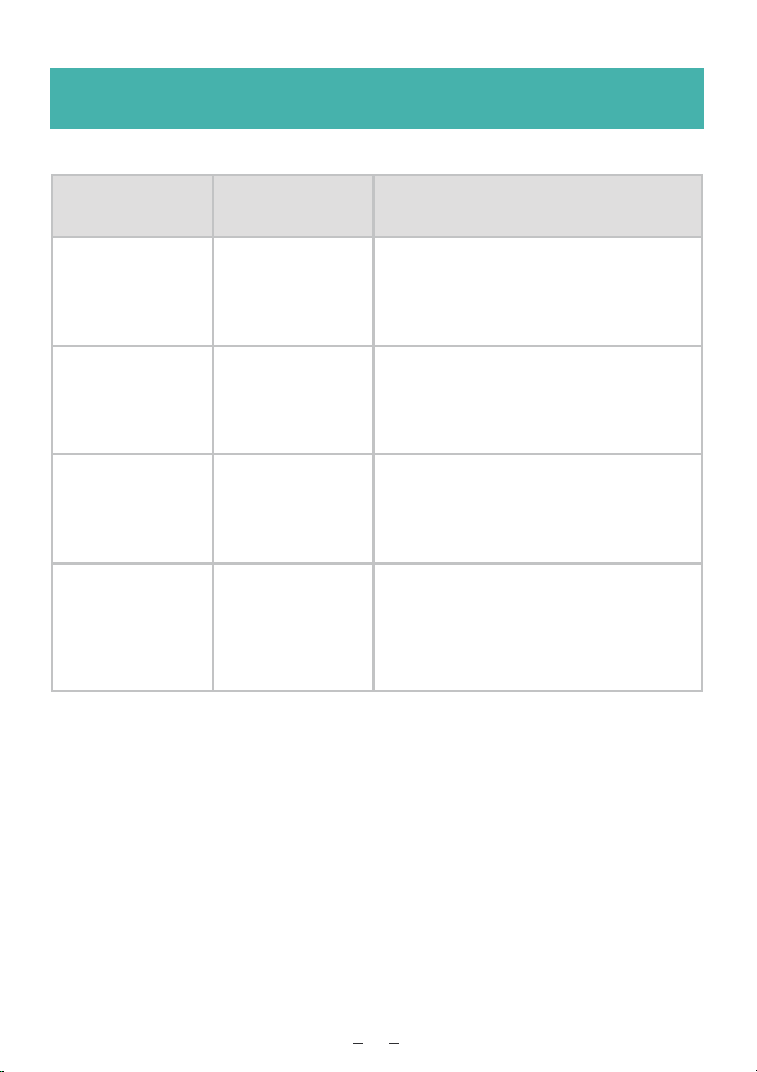
Category Function Description
Restore the default system
volume setting upon startup.
The default volume setting for
Bluetooth calls.
The volume setting for the navigation
function.
Setting for reducing the volume
when reversing the vehicle.
The sound of the screen touch
response, to turn on or off.
Sound
Sound
Sound
Sound
Sound
Default Volume
Navi Volume
Beep
BT Phone
Volume
BackCar Volume
Reduction
Setting of static logo and dynamic logo.
Enable and disable the auxiliary
lines and trajectory lines for the
camera.
CAN bus settings: Select the CAN box
supplier, choose the vehicle series, select
the specific model, and then make
corresponding selections based on the
year and configuration.
Device
Device
Camera settings
More settings
09
Category Function Description
MCU version information.
Core board system version
information.
It has been set up by default at the
factory and is not accessible to
users.
When personal settings are in disorder or
the system is malfunctioning, you can try
to restore the factory settings
to make the device return to normal.
System
System
System
System
MCU Version
APP Version
Factory setting
Reset
Settings
10

1: Turn on your phone's Hotspot and Bluetooth, then simply connect via
Bluetooth.
2: Tap the Bluetooth icon on the car stereo, tap (Search Device) Select
your phone name from the device list, then tap connect via Bluetooth.Enter
the pairing code 0000 on your phone, or tap Pair/Confirm when prompted.After
confirming the connection, the Bluetooth pairing will be completed. Within 3-5
seconds, the system will automatically switch to the smartphone connectivity
interface.
3:In the connectivity interface, you can use your phone's Bluetooth calling,
navigation, music, andother functions.
4:To exit the connectivity interface, tap the Exit, Back, or Car icon on the
application screen.
5:To remove the connection, delete the paired device from the Bluetooth device
list, then go to Setting Network Settings and turn off the hotspot.
CarPlay / Android Auto
Supported Mobile Devices
Android smartphones (Android Auto)
iPhone (Apple CarPlay)
Connection Method
Method:
11

CarPlay / Android Auto
Android Interface
CarPlay Interface
12
Bluetooth Pairing Interface

1.Please press the "RST" button on the panel to reset the machine. If it stil fails to
start, please follow the steps below to troubleshoot.
2.Please check if all the connection lines are properly inserted and fully engaged,
and reinsert and re-extract them.
3. Please measure the power line plug at the host end, and check whether there
is a voltage of 10 to 16 volts for both the BATT+ (yellow wire) and the ACC (red
wire)
Note: If the measured voltage is abnormal, please check whether the fuse in the
vehicle fuse box has blown.
4. For those equipped with CAN BUS decoding for ACC voltage, please check
whether the wiring of the CAN BUS box is correct, and whether the CAN BUS
box is faulty or not compatible.
5. After the above troubleshooting steps, if the problem still persists, please
contact customer service or replace the main unit
Black screen and unable to start up
FAQ
1.Please press the "RST" button on the panel to reset the machine. If there is still
no sound, please follow the steps below to troubleshoot.
2. Please check whether all the connection lines are properly inserted and fully
engaged. If the original vehicle is equipped with a power amplifier, the 12V-AMP
control line needs to be connected as well.
There is no sound output from the speaker
13

1.Click on the radio icon to enter, manually set the frequency of a commonly
used radio station If the radio sound only has noise without any signal or the
signal is poor, follow the steps below to troubleshoot.
2.Please check if the radio receiving antenna is properly plugged in and if the
antenna is damaged.
3. The radio antenna of the original vehicle is powered by an external power
supply. Therefore, you need to connect the power supply line to the 12V-ANT
control line of the power supply cable.
4. The radio signal is good, but the search for channels cannot be stopped:
Please check if the remote receiving function has been enabled, if the stop
channel sensitivity setting is too high, or if the radio reception area has not been
set correctly. The operation method is as follows:settings--Device---Radio
settings,
5. After the above troubleshooting steps, if the problem still persists, please
contact customerservice or replace the main unit
The radio cannot findany radio stations
3. Please measure the voltage at the power plug of the host unit. The voltage of
the four speaker wires should be between
4. For audio with CAN BUS decoding, please check whether the wiring of the
CAN BUS box is correct, and whether the CAN BUS box is faulty or incompatible.
5. After the above troubleshooting steps, if the problem still persists, please
contact customer service or replace the main unit.
FAQ
14

FAQ
1.Please check whether the GPS receiving antenna is tightened properly,
whether it is in the wrong position, or whether it is damaged.
2. If the vehicle is located in a signal-blocking area or indoors, please drive to an
area with signal coverage or an open outdoor space to check if the signal has
returned to normal.
3. If the vehicle is equipped with devices that are susceptible to EMC interference
(such as recording devices) or if the glass is coated with a film that blocks signals
effectively, please replace the receiving antenna with one that is placed at a
position with better signal reception and securely fixed.
4. After the above troubleshooting steps, if the problem still persists, please
contact customer service or replace the main unit.
GPS no signal, abnormal positioning
1.Please check whether the reversing control wire of the camera is properly
connected to the main wire, and measure whether there is an input of 8 to 14V
when the reversing gear is engaged. If there is no voltage, please check whether
the wiring of the tail light is correct.
2.If the vehicle requires CAN BUS decoding for reversing control voltage output,
please check whether the wiring of the CAN BUS box is correct, and whether the
CAN BUS box is faulty or incompatible.
Reverse parking does not respond to the switch
15

FAQ
1.Please check if the camera format of the host is set correctly. If the host can
automatically identify the format, this item can be ignored.
2.Please check if the power supply line for the rearview camera is properly
connected and the power supply voltage should be between 8 and 14 volts.
3. Please check whether the signal output of the rearview camera is correctly
connected to the reverse signal input port of the host.
4. After the above checks, the fault still cannot be eliminated. Please contact
customer service or replace the camera.
No image during reversing
1.When learning the steering wheel, when pressing the steering wheel button,
the screen should prompt "Please press the button you want to learn". The
learned button should be in a lit state. If the learning fails to proceed normally,
please follow the following steps to troubleshoot the issue.
2. When pressing all the buttons on the steering wheel, there is no response.
Please check if all the connection cables are properly connected and there are no
missing plugs or loose connections.
3. The steering wheel buttons are decoded by the CAN BUS. Please check if the
wiring of the CAN BUS box is correct, if the CAN BUS model settings are correct,
and if the box is faulty or incompatible.
4. After the above troubleshooting attempts, if the problem still persists, please
contact customer service
The buttons on the steering wheel for controlling
the multimediafunctions are malfunctioning
16

FAQ
1.Please press the "RST" button on the panel to reset the machine. At the same
time, turn off and restart your mobile phone, and then reconnect it.
2.If the built-in microphone is used and the sound is too low, please connect an
external microphone; if the external microphone is used and the sound is still
too low, please disconnect it and use the built-in microphone instead.
3.Increase the signal gain of the microphone on this device. If excessive gain
causes noise, reduce the gain until there is no noise at all, and this value will be
the optimal setting.method: Settings--System---Factory setting---1234---Gain
Setting---mic gain/bt mic gain.
4. After the above troubleshooting attempts, if the problem still persists, please
contact customer service.
The Bluetooth call cannot pick up the speaker's
voice or the voice is very faint
1.Please restart the machine. Pull down the quick control bar from the screen
and click"Restart the machine". Or press the "RST" button to reset the machine.
2.There is an unsupported version of an application. Please uninstall the
problematic application.
3.Please follow the instructions in the settings to perform the factory reset
operation.
4. After the above troubleshooting attempts, if the problem still persists, please
contact customer service.
Application crashes or runs abnormally
17

1.After the Bluetooth connection is established, it will automatically switch to the
ZLINK5 interface and keep loading. Please check if the WIFI on your phone is
turned on.
2. Please check if the WIFI antenna is properly plugged in.
3.Please press the "RST" button on the panel to reset the machine. At the same
time, turn off and restart your mobile phone, and then reconnect it.
4. After the above troubleshooting attempts, if the problem still persists, please
contact customer service.
CarPlay cannot be connected
1.After the Bluetooth connection is established, it will automatically switch to the
ZLINK5 interface and keep loading. Please check if the WIFI on your phone is
turned on.
2. Please check if the WIFI antenna is properly plugged in.
3.Please press the "RST" button on the panel to reset the machine. At the same
time, turn off and restart your mobile phone, and then reconnect it.
4. The mobile phone may not support the Android Auto function. In that case,
go to the Google Play Store to download the application. If the connection still
fails after installing the Android Auto application, please replace the phone and
try again.
5. After the above troubleshooting attempts, if the problem still persists, please
contact customer service.
Android Auto cannot be connected
FAQ
18

1.Upgrading the system program online requires a considerable amount of
data. It is recommended to perform the upgrade operation using a stable WIFI
network.
2. During the online system upgrade process, do not power off or perform any
other operations Follow the upgrade prompts to proceed and wait for the
upgrade to complete.
3. Upgrade Steps: Click the FOTA icon to initiate the upgrade process. The
upgrade will be carried out in three separate sections. Make the upgrade as
needed. For example, if it is the OS upgrade: Os Upgrade Check version. Note: If
the prompt indicates that it is already the latest version, no further upgrade is
required. If it indicates a new version, follow the prompts to proceed to the
completion of the upgrade.
If you have any questions or require technical assistance, please contact us at:
Email: [email protected]
FOTA Online Upgrade
Need Technical Support?
FAQ
19

California Proposition 65 Warning
FCC Compliance Information
Compliance & Legal
20
WARNING: This product can expose you to chemicals including lead, which
is known to the State of California to cause cancer and birth defects or other
reproductive harm. For more information, go to www.P65Warnings.ca.gov.
Product Name:Car Multimedia Navigation System
Model: AUSTA-A9
FCC ID:2BXET-AUSTA-A9
Responsible Party in the United States:
HOORAY INDUSTRY LLC
1408 Pinon Place
Fullerton, CA 92835 United States
FCC Compliance Statement
This device complies with Part 15 of the FCC Rules. Operation is subject to the
following two conditions: (1) this device may not cause harmful interference, and (2)
this device must accept any interference received, including interference that may
cause undesired operation.

21
Class B Digital Device Notice
This equipment has been tested and found to comply with the limits for a
Class B digital device, pursuant to Part 15 of the FCC Rules. These limits are
designed to provide reasonable protection against harmful interference in a
residential installation. This equipment generates, uses and can radiate radio
frequency energy and, if not installed and used in accordance with the
instructions, may cause harmful interference to radio communications.
However, there is no guarantee that interference will not occur in a particular
installation.
If this equipment does cause harmful interference to radio or television
reception, which can be determined by turning the equipment off and on,
the user is encouraged to try to correct the interference by one or more of
the following measures:
- Reorient or relocate the receiving antenna.
- Increase the separation between the equipment and receiver.
- Connect the equipment into an outlet on a circuit different from that to
which the receiver is connected.
- Consult the dealer or an experienced radio/TV technician for help.
FCC Radiation Exposure Statement
This equipment complies with FCC radiation exposure limits set forth for an
uncontrolled environment. This equipment should be installed and operated
with a minimum distance of 20 cm between the radiator and your body. This
transmitter must not be co-located or operating in conjunction with any
other antenna or transmitter.
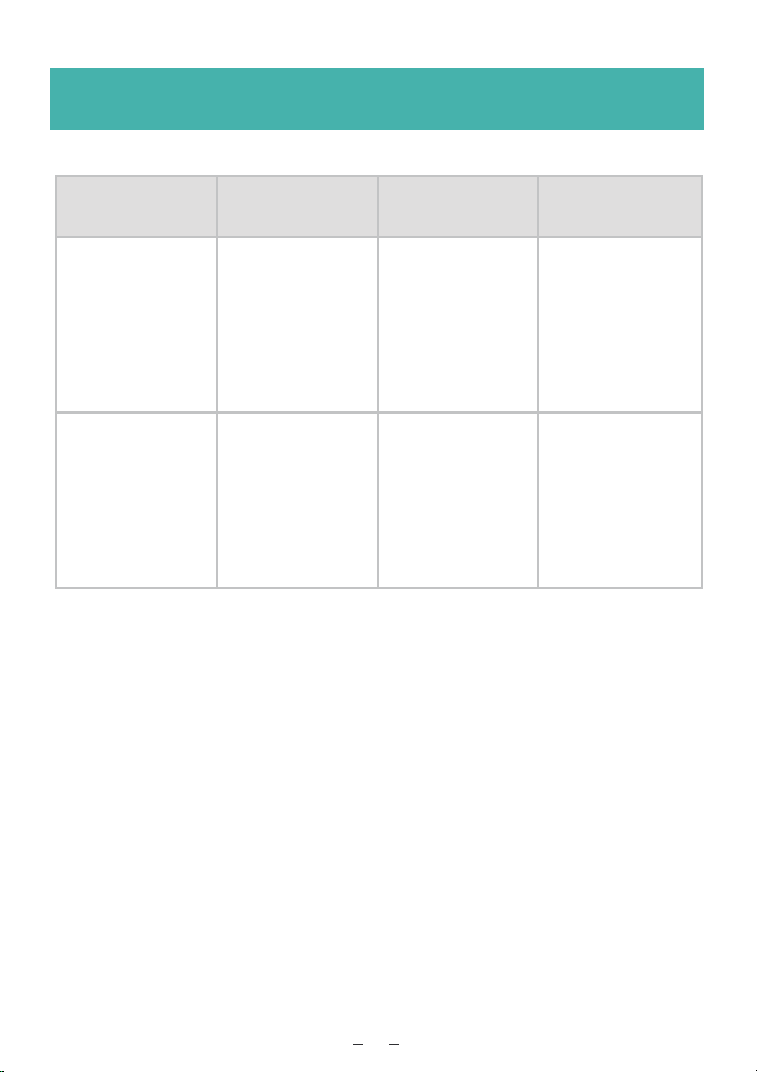
LTE-FDD WCDMA LTE-TDD
Supported Network Bands
22
band1
band8
EU
US
band1
band3
band7
band8
band20
band28
band2
band4
band5
band12
band13
band25
band26
band38
band40
band41(200M)
band2
band4
band5