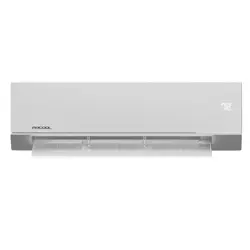
MODELS:
Read this manual carefully before installation and keep it where
the operator can easily nd it for future reference.
Due to updates and constantly improving performance, the
information and instructions within this manual are subject to
change without notice.
Version Date: July 2, 2025
Please visit www.mrcool.com/documentation
to ensure you have the latest version of this manual.
This product utilizes R-454B refrigerant
MRCOOL
®
Olympus Series
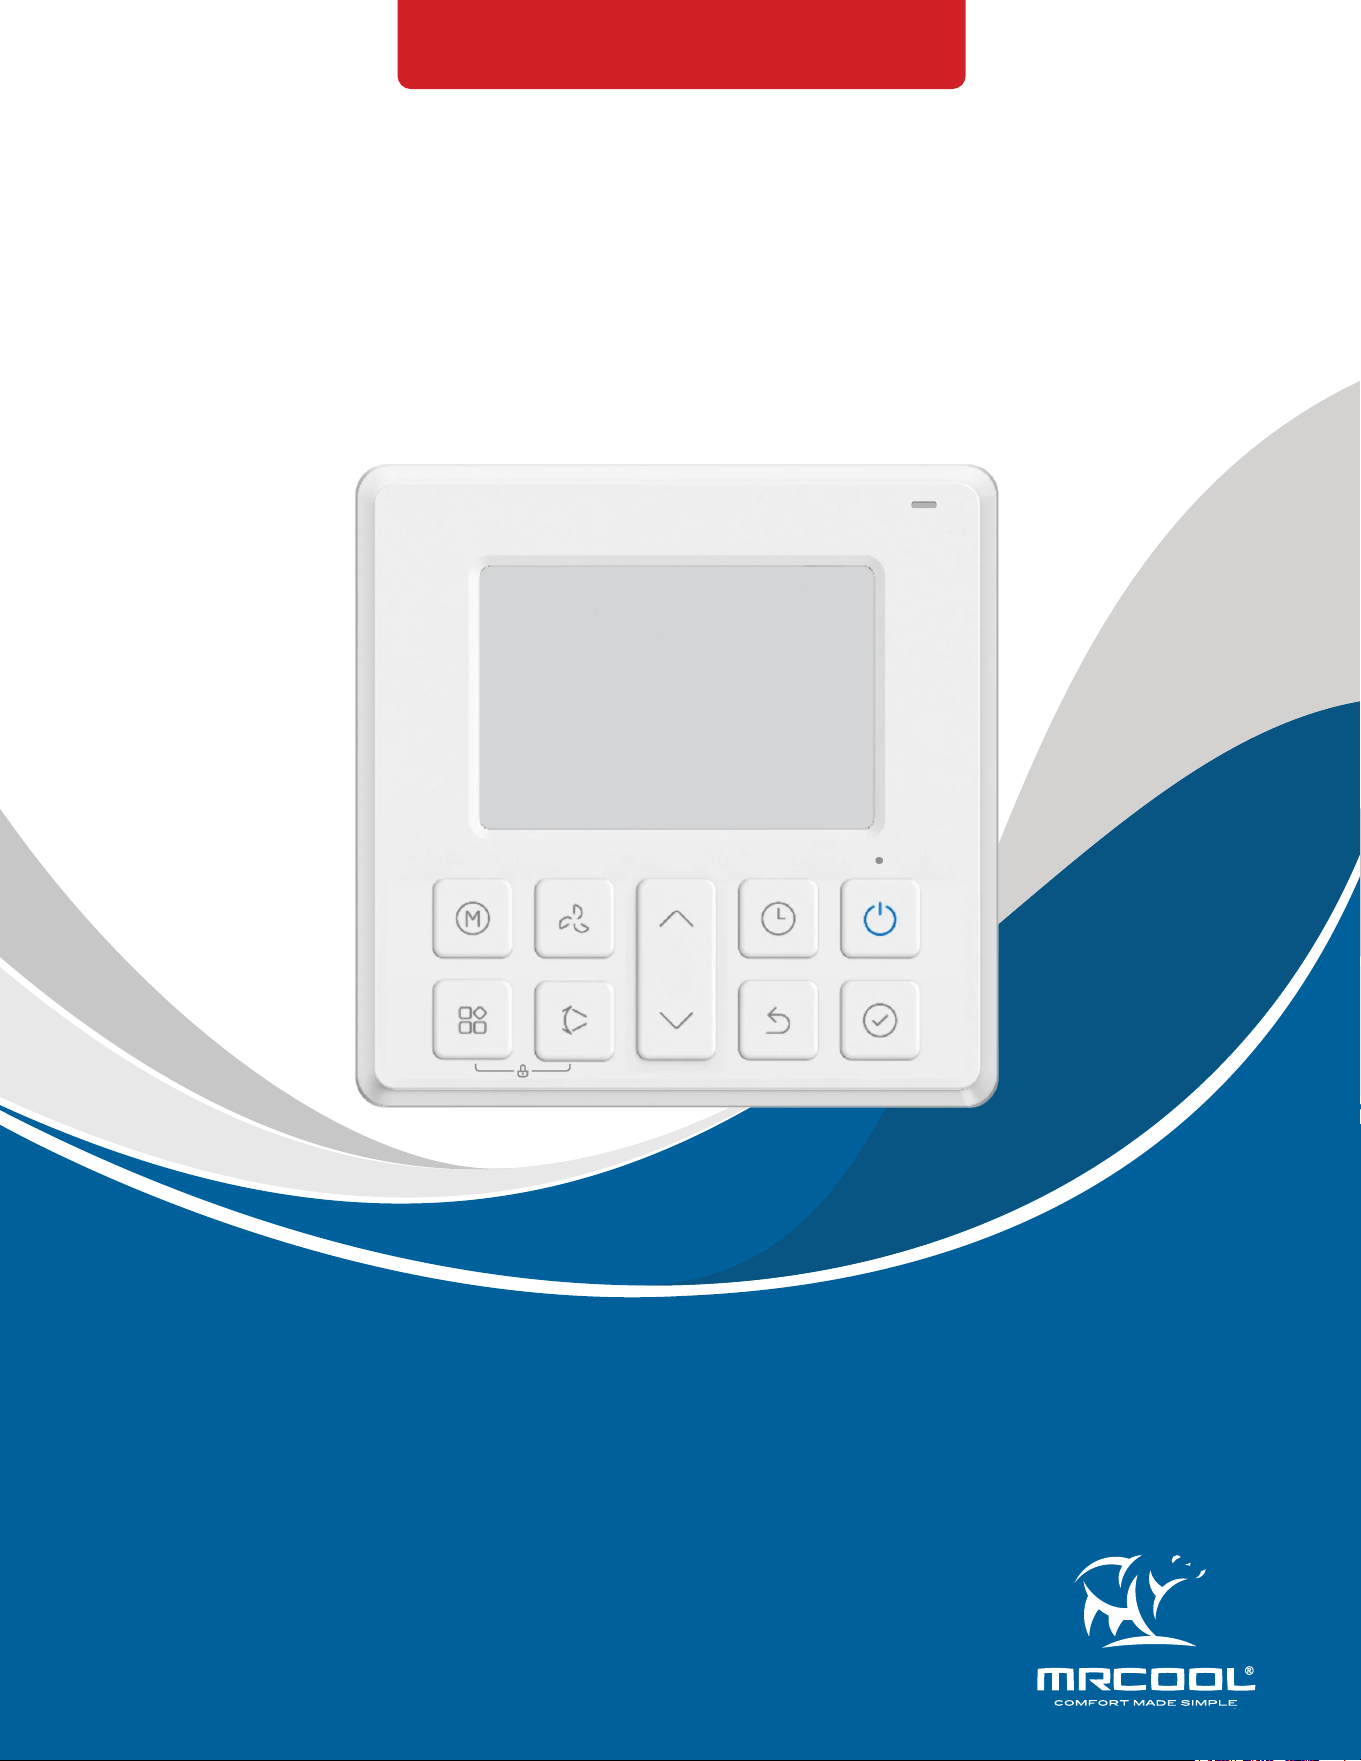
Wired Thermostat
INSTALLATION & OWNER’S MANUAL
DUCT-*HP-230B-O
mrcool.com1
CONTENTS
SAFETY ......................................................................................................... 1
UNIT OVERVIEW .......................................................................................... 2
2.1 Packing List ..................................................................................... 2
2.2 Dimensions ..................................................................................... 2
2.3 Button Functions ............................................................................ 3
2.4 LCD Display Icons ........................................................................... 4
UNIT INSTALLATION .................................................................................. 5
3.1 Wiring ............................................................................................... 5
3.2 Installation ...................................................................................... 7
UNIT FUNCTIONS ....................................................................................... 8
TROUBLESHOOTING ................................................................................ 12
1
2
3
4
5
Incorrect usage may cause serious damage or injury.
The symbols below are used throughout this manual to indicate instructions that should be followed
closely or actions that should be avoided to prevent death, injury, and/or property damage.
Safety Precautions
CAUTION
Indicates the possibility of personal injury or loss of life.
Indicates the possibility of property damage or serious
consequences.
Read Before Using
WARNING
WARNING
1. This product should only be installed by professionals. Installation by others may lead to incorrect
installation, electric shock, or re.
2. Adhere to this installation manual.
3. Re-installation must be performed by professionals.
4. Do not install the unit in a location potentially exposed to ammable gas leakage, as this could lead to re.
SAFETY
1
CAUTION
1. Do not operate the unit with wet hands or let water enter the unit. This could lead to electric shock.
2. The wiring should adapt to the current of the thermostat. Otherwise, electrical leakage may occur and
result in re.
3. The specied cables should be used in the wiring. No external force should be applied to the terminal. This
could lead to electrical shock or re.
mrcool.com 2 2
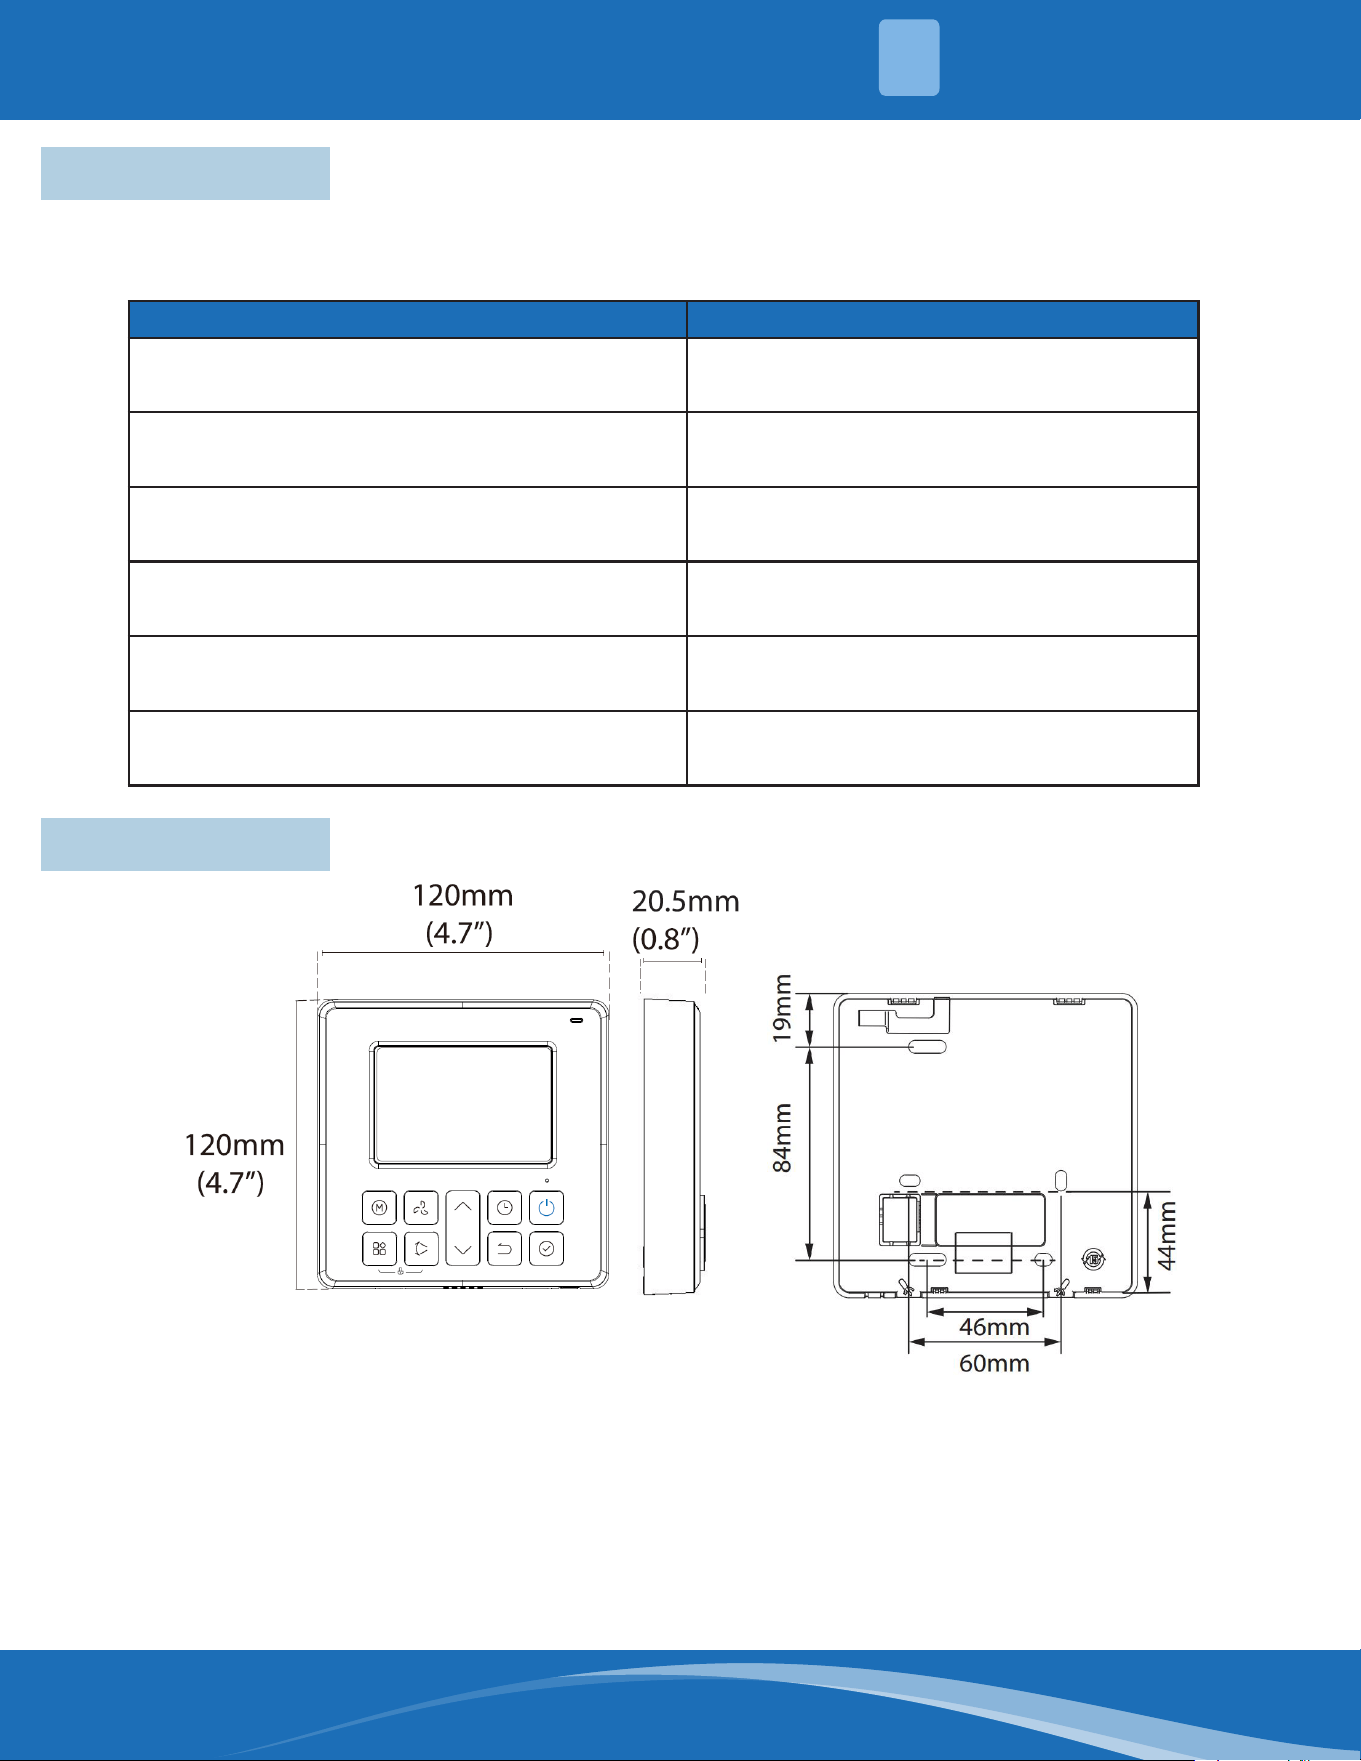
PART QUANTITY
Manual
1
Screws (M4X25)
5
Anchors 3
Plastic Screw Bars
2
(Optional for Switch Box)
Connective Wire Group 1
Tapping Lock Screw & Washer (M4X8)
1
(For sheet metal of indoor unit)
2.1 Packing List
This product comes with the following accessories. Use all of the installation parts and accessories to
install the unit. Improper installation may result in electrical shock and re, or cause the equipment to
fail. The items that are not included with the product must be purchased separately.
UNIT OVERVIEW
2
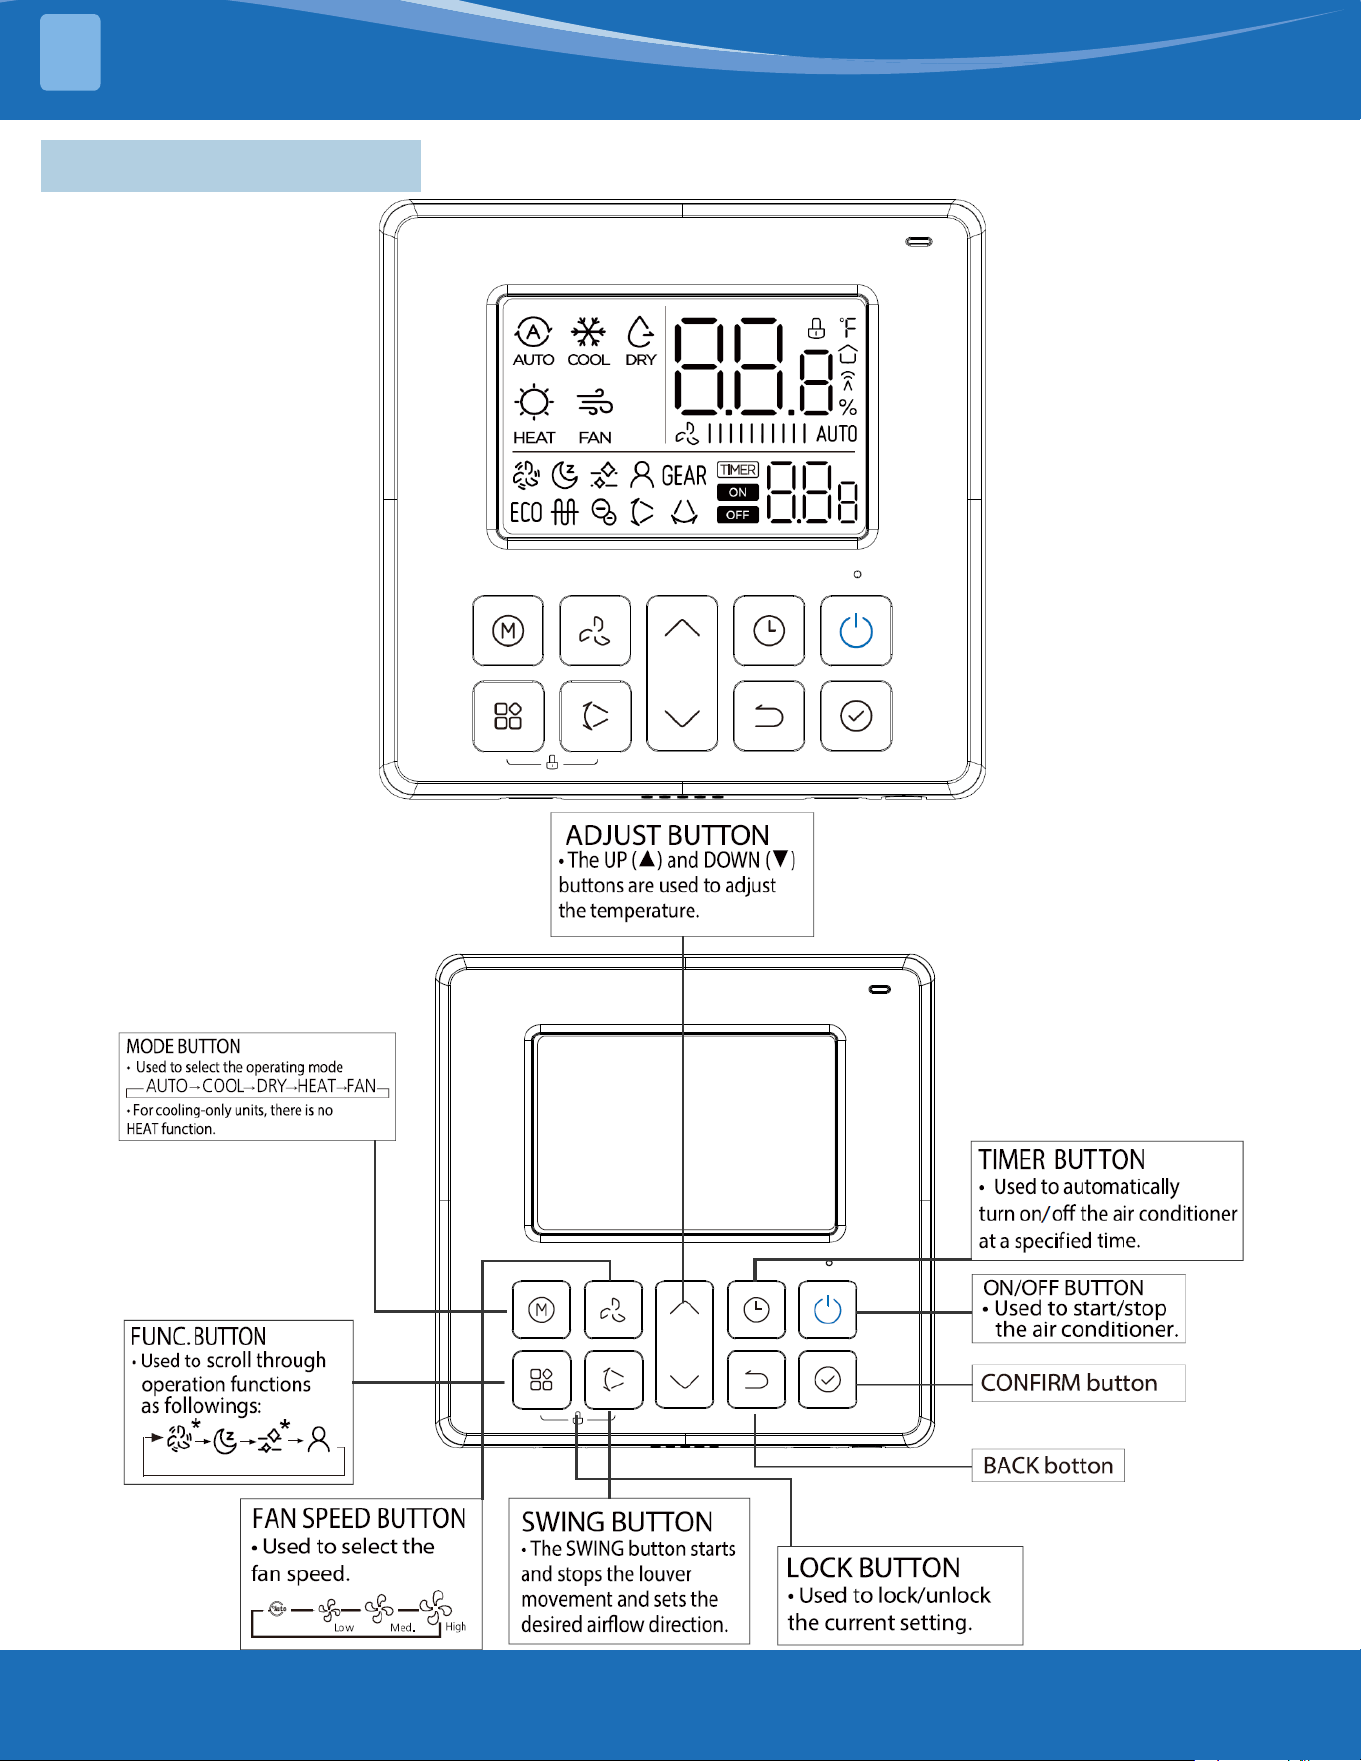
2.2 Dimensions
mrcool.com3
UNIT OVERVIEW
2
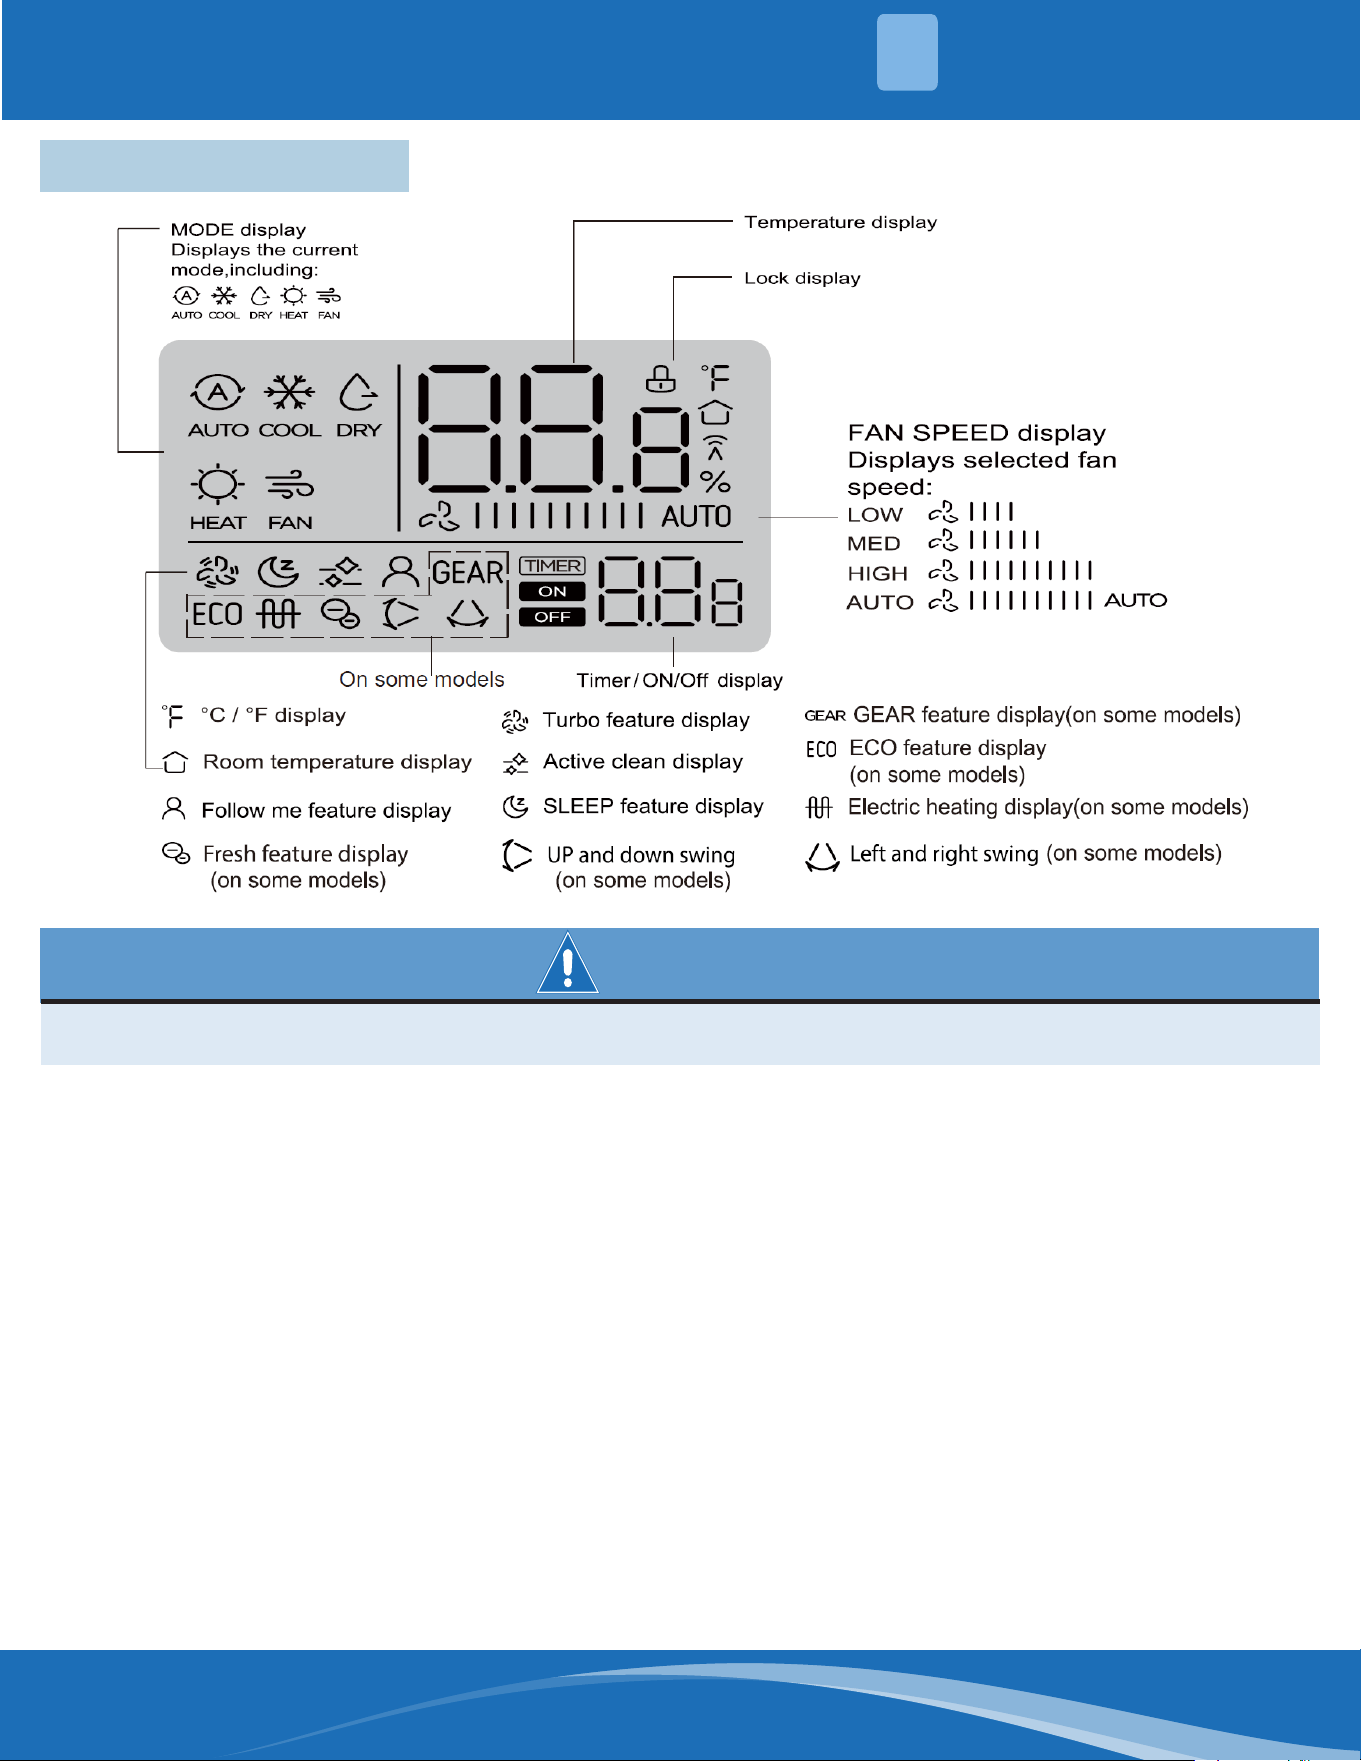
2.3 Button Functions
mrcool.com 4
4
UNIT OVERVIEW
2
2.4 LCD Display Icons
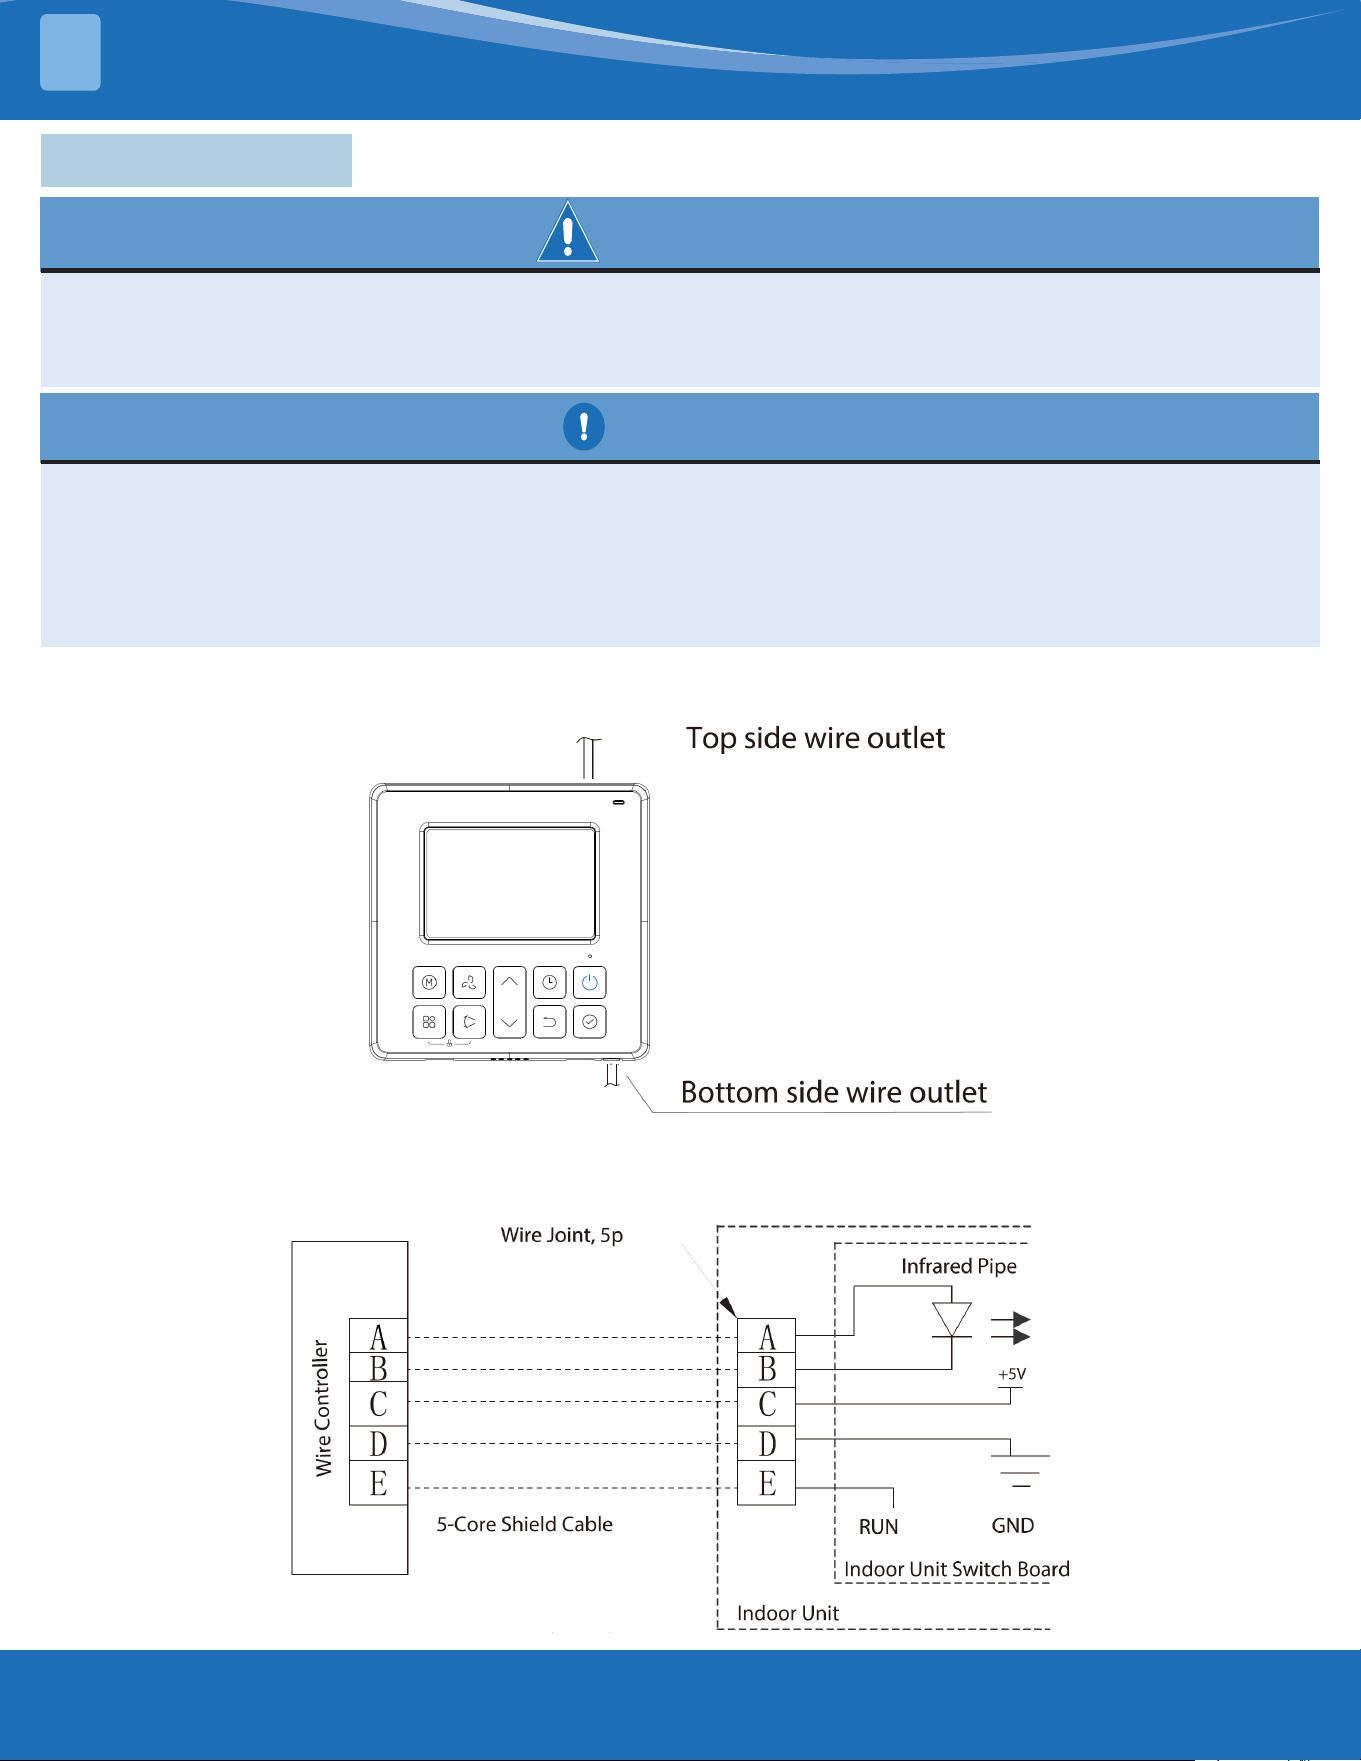
WARNING
1. Do not remove the cover or touch the interior parts of the unit.
2. Do not use sharp or pointed objects to press the buttons of the unit.
mrcool.com5
3.1 Wiring
PRODUCT INSTALLATION
3
WARNING
1. The wiring should adapt to the wire control current. Otherwise, re can result from electrical leakage or
overheating.
2. Only use the specied cables for the wiring. Do not apply external force to the terminal, as the wire can
become damaged, leading to risk of re.
CAUTION
1. The shielded wire must be grounded.
2. The connecting cable should be no longer than 65.5' (20m).
3. The thermostat operates on a low voltage circuit loop. Do not connect a 220V or 380V cable to the circuit
loop.
4. Make sure that congured tubes are 12-20" (30-50cm) or more apart.
5. Do not use an ohmmeter to detect the insulation after wiring the thermostat.
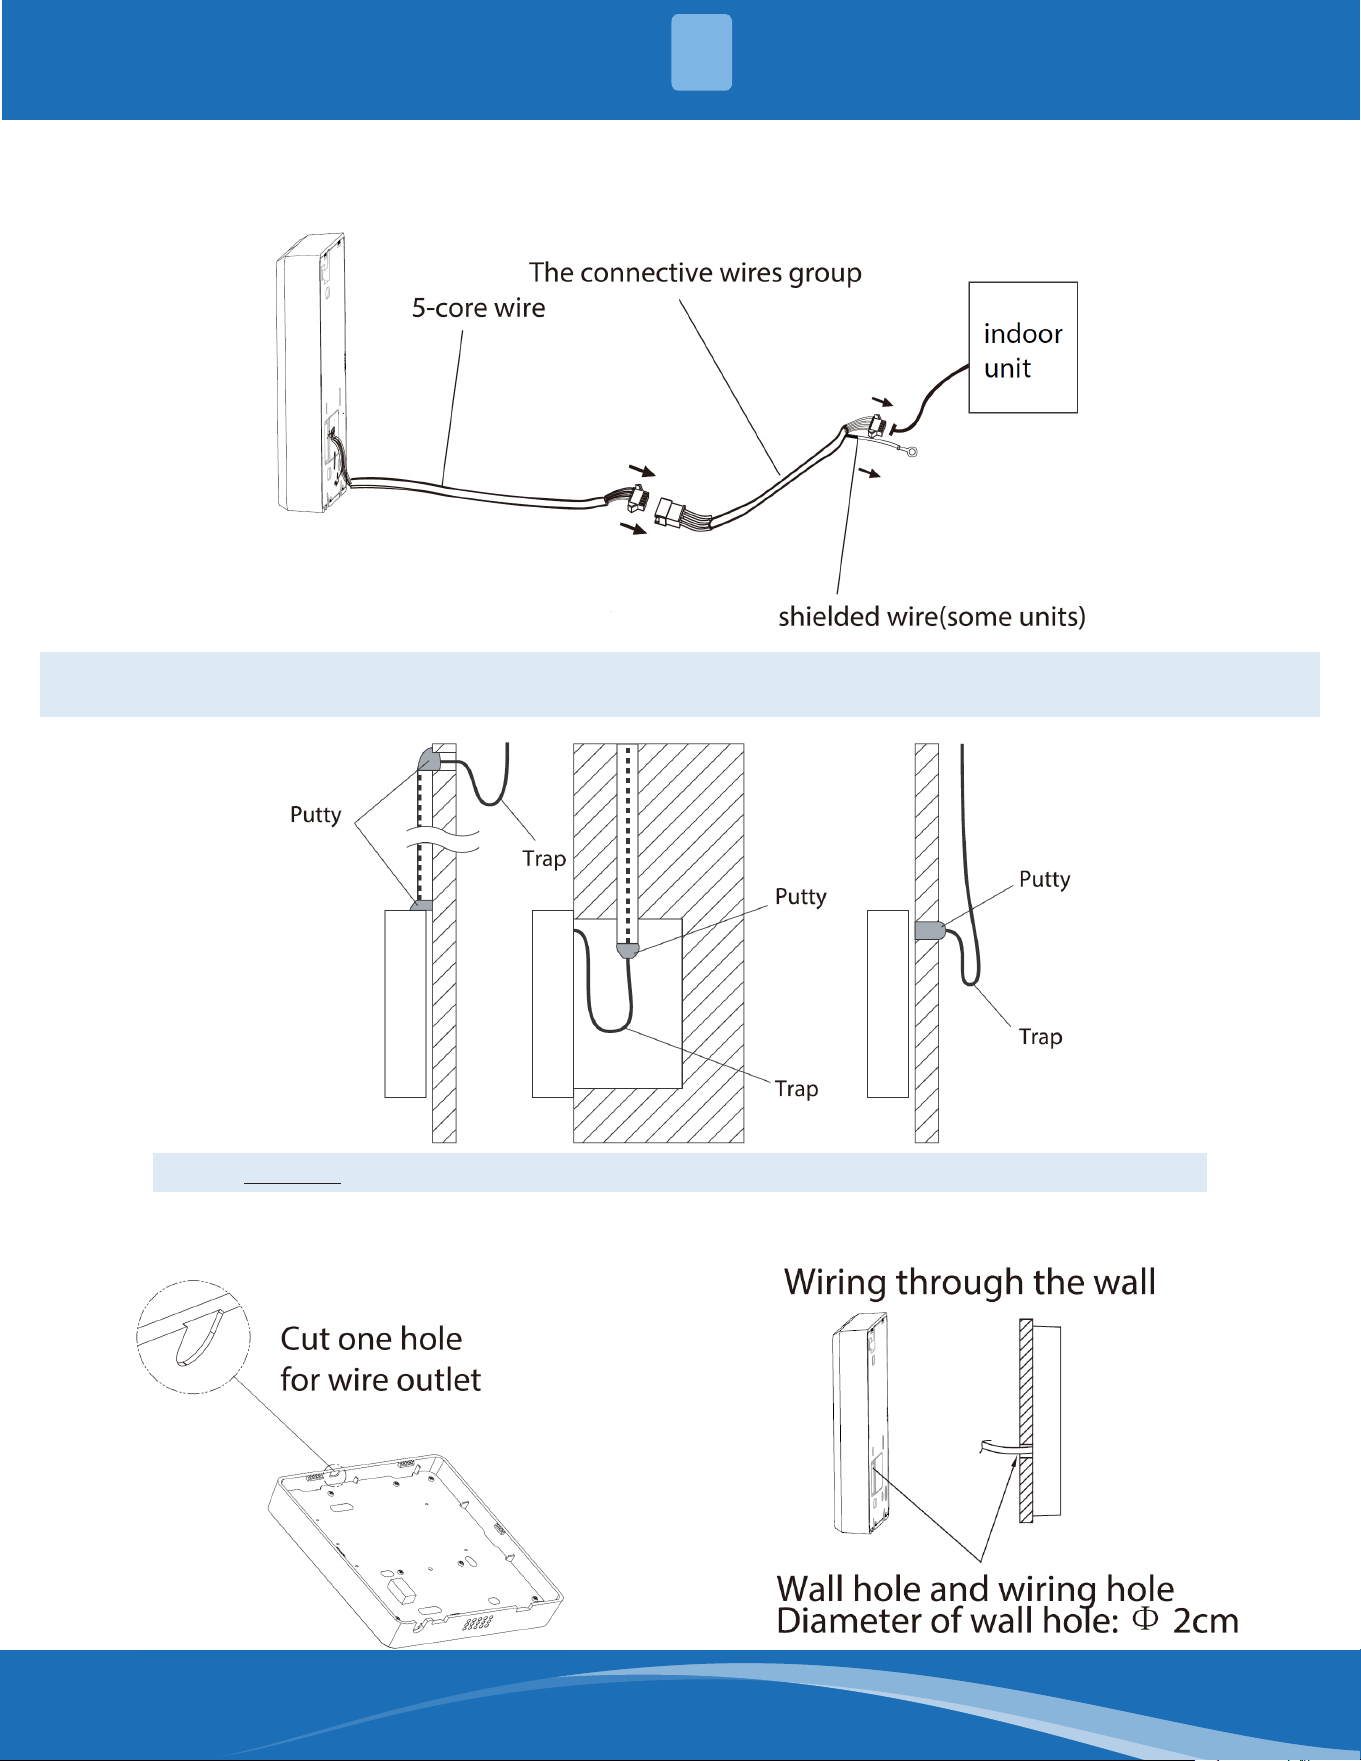
Wire Outlet Overview
Wiring Diagram
Refer to the following diagram to wire the thermostat to the indoor unit.
mrcool.com 6
6
PRODUCT INSTALLATION
3
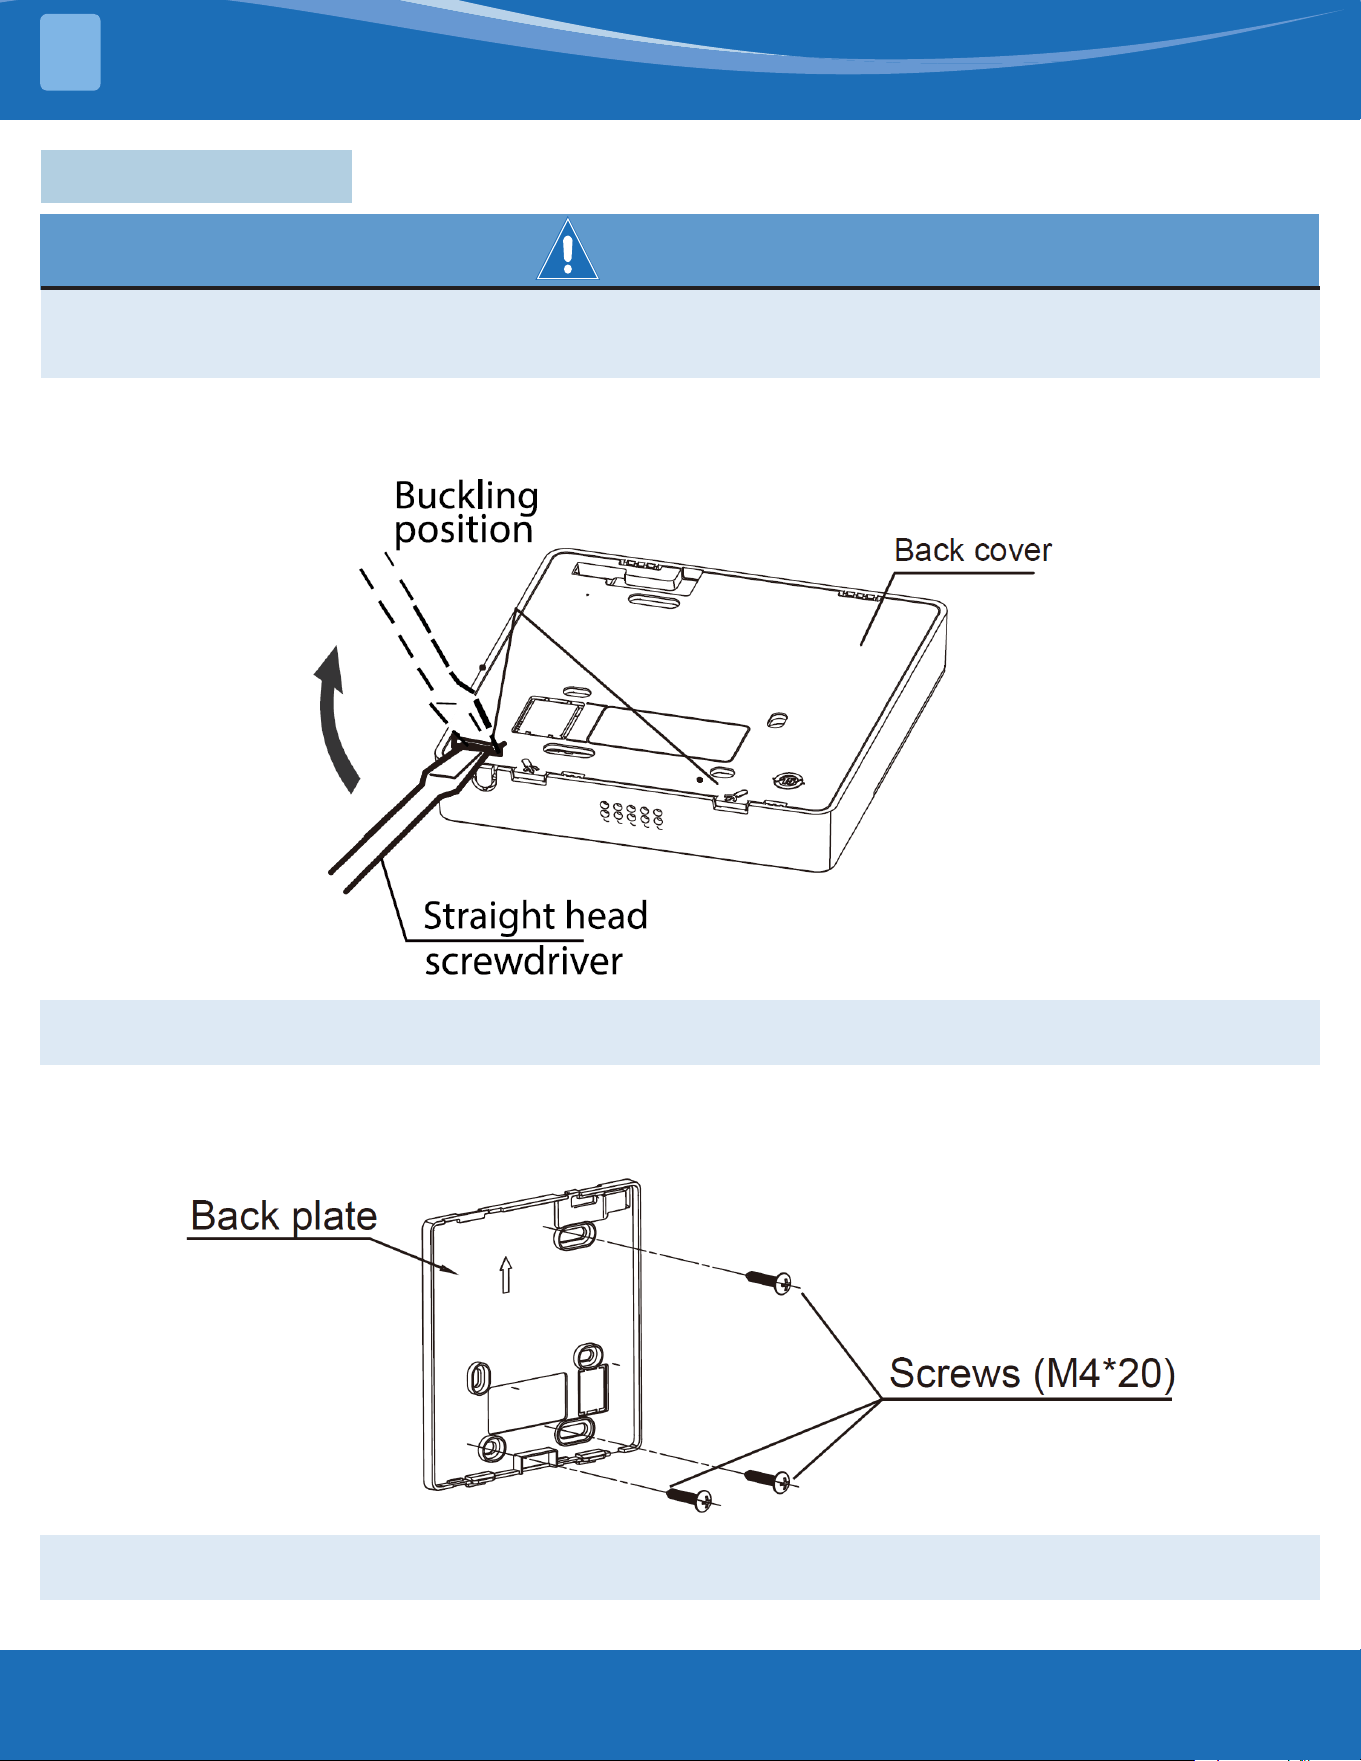
1. Connect the wire from the display panel of the indoor unit to a connecting cable. Then, connect the
other side of the connecting cable to the thermostat.
NOTE: Be sure to reserve a length of the connecting wire for periodic maintenance. If there is a connection lug
at the end of the shielded wire, the connection lug should be properly grounded.
2. For exposed mounting, cut holes on four of the
sides according to the following gure:
NOTE: DO NOT allow water to enter the thermostat. Use a trap and putty to seal the wires.
For shielded wiring, refer to the following gure:
mrcool.com7
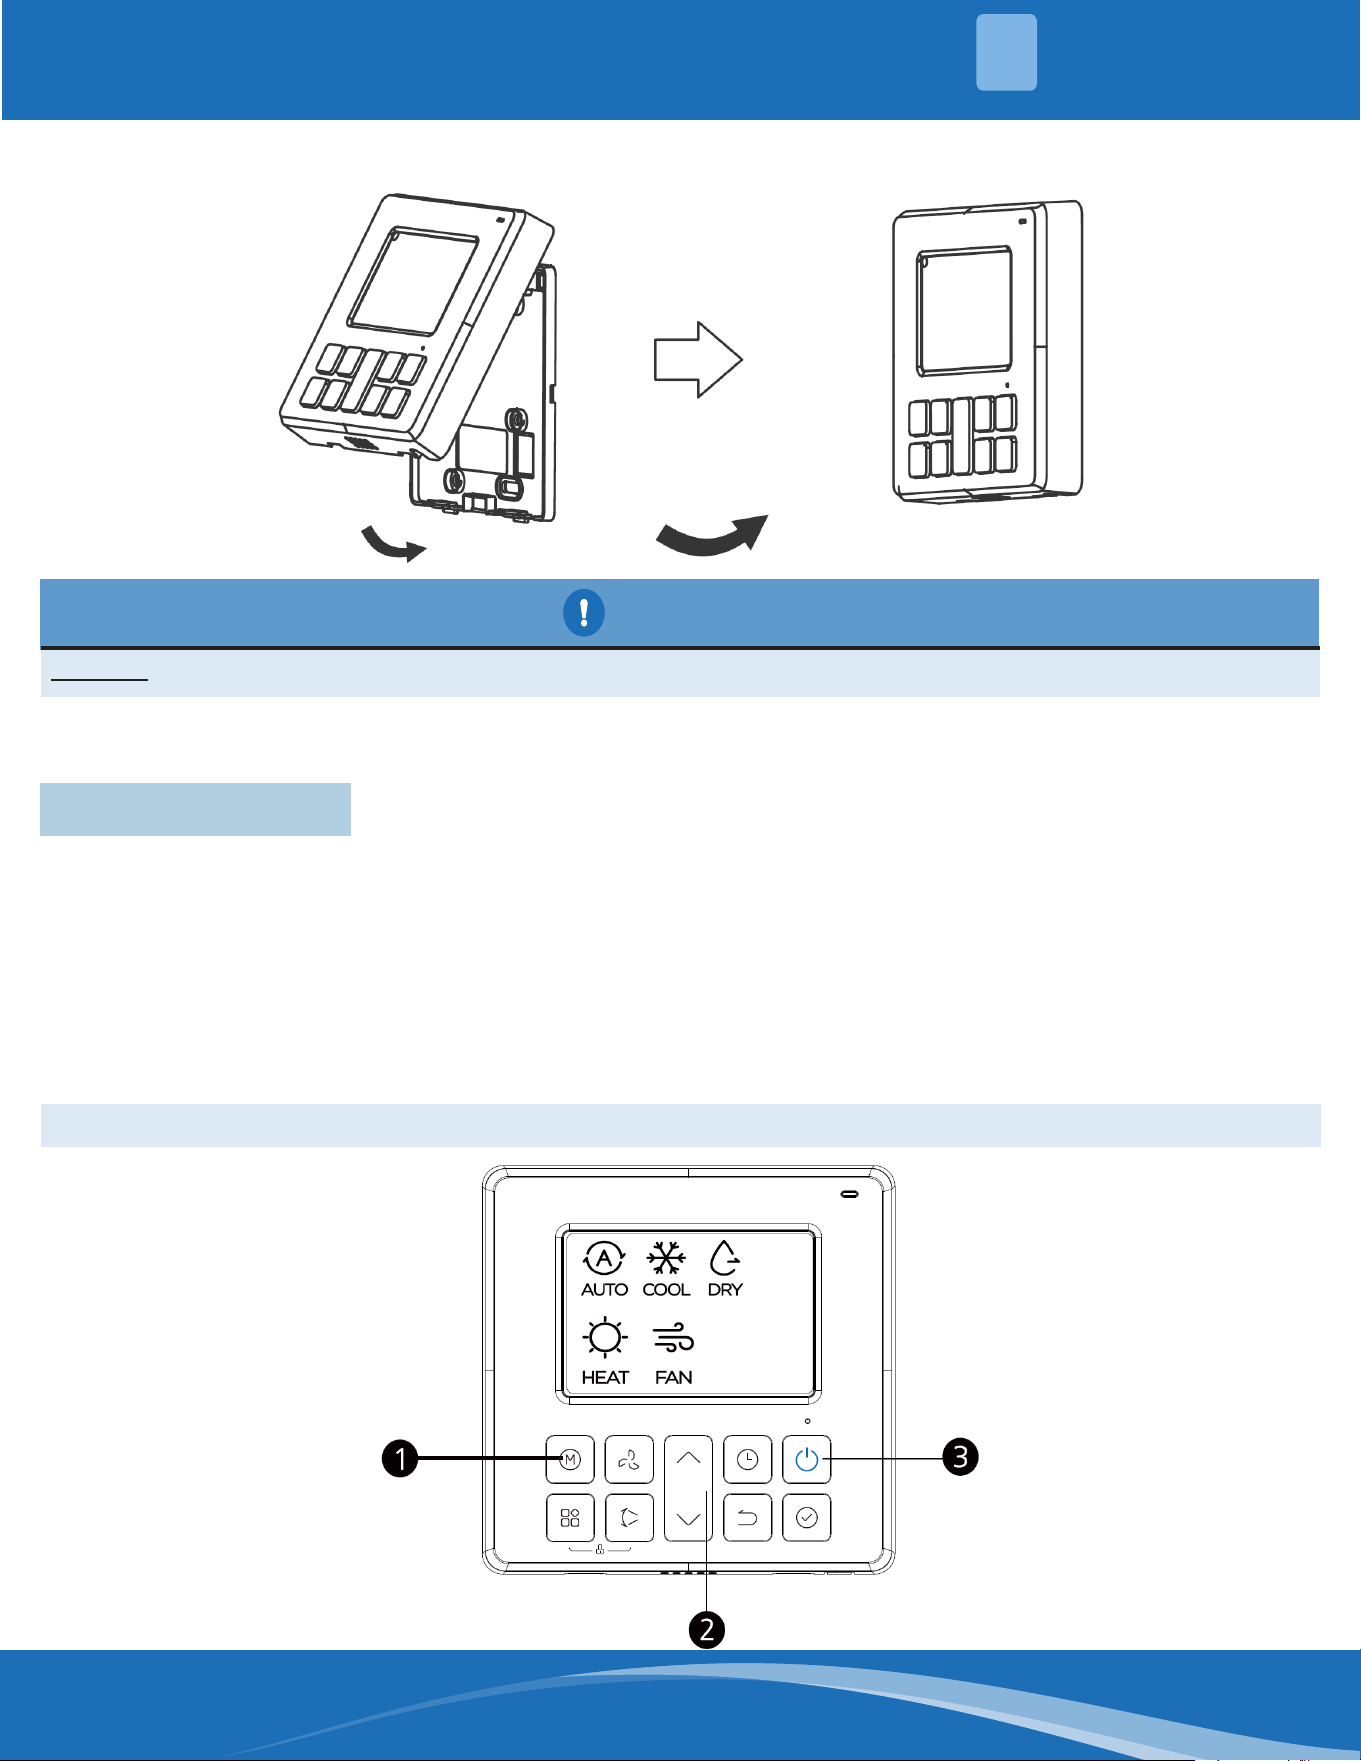
1. Remove the top panel of the thermostat. Insert a screwdriver into the two slots at the bottom of the
unit to pop o the top panel.
3.2 Installation
WARNING
1. Do not operate the unit with wet hands, as this could lead to electrical shock.
2. Do not install the unit near ammable liquids or gases such as gasoline or hydrogen sulde, as it will create
a re hazard.
NOTE: The Printed Circuit Board (PCB) is mounted in the upper part of the thermostat. Be careful not to
damage the board with the screwdriver.
2. Mount the back plate of the unit. Fasten the back plate to the wall with 3 screws and anchors.
NOTE: Place the unit on a at surface. Be careful not to distort the back plate of the thermostat by over-
tightening the screws.
PRODUCT INSTALLATION
3
mrcool.com 8
8
CAUTION
DO NOT clamp the wired when reattaching the top panel.
3. Reattach the top panel of the unit.
FUNCTIONS
4
4 - Functions
The following are instructions for the basic functions of the wired thermostat.
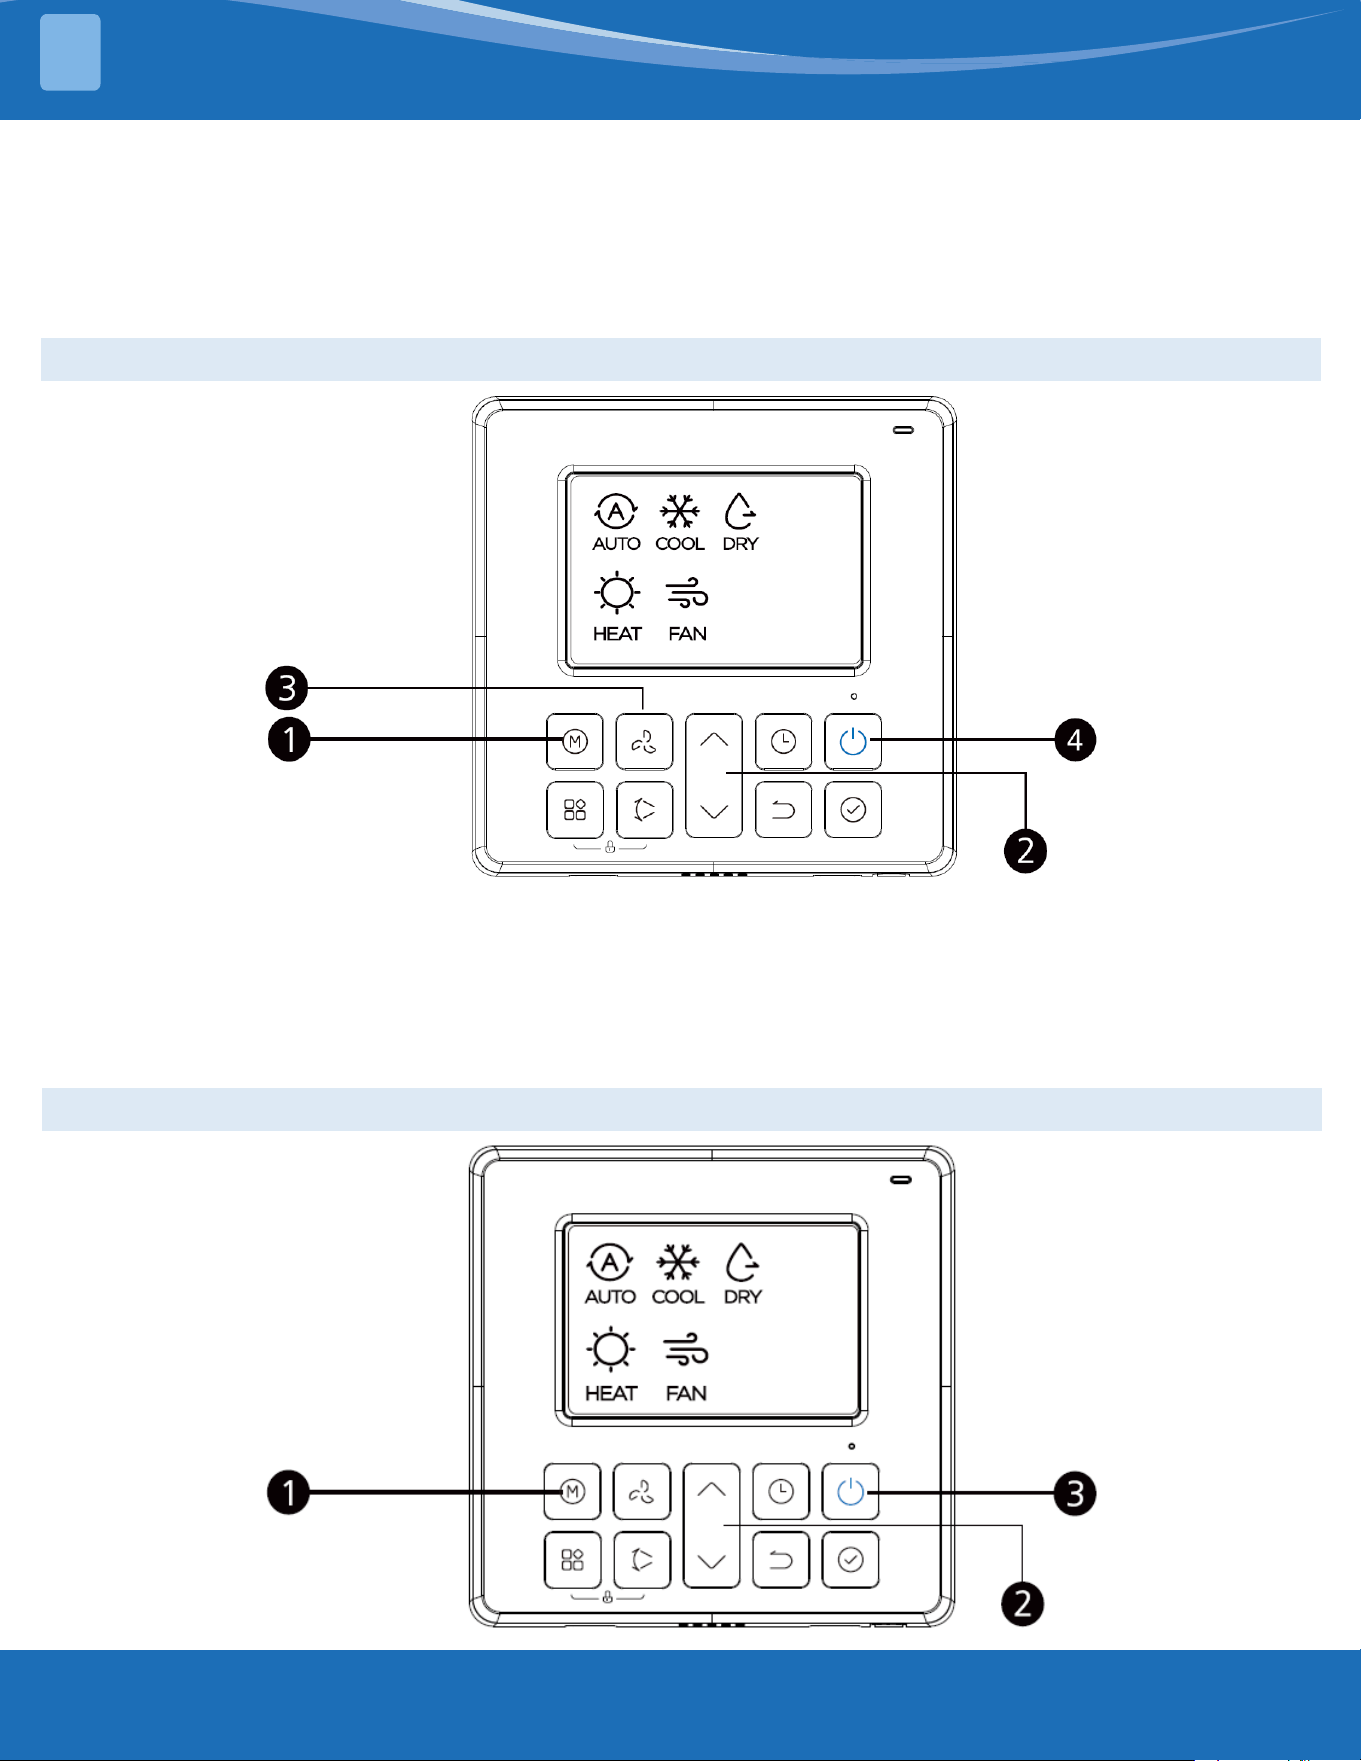
Auto Function
In Auto Mode, the unit will automatically select the Cool, Heat, Fan, or Dry function based on the set
temperature.
1. Press the Mode button, and select Auto.
2. Set your desired temperature using the Up and Down buttons. (In Auto mode, fan speed cannot be set.)
3. Press the On/O button to start the unit.
NOTE: In Auto mode, the fan speed is automatically set on Auto mode and cannot be changed.
mrcool.com9
Cool/Heat/Fan Function
1. Press the Mode button to select Cool, Heat, or Fan.
2. Set your desired temperature using the Up or Down buttons.
3. Press the Fan Speed button to select the fan speed.
4. Press the On/O button to start the unit.
NOTE: In Fan mode, the temperature cannot be changed.
Dry Function
1. Press the Mode button to select Dry.
2. Set your desired temperature using the Up or Down buttons.
3. Press the On/O button to start the unit.
NOTE: In Dry mode, the Fan Speed buttons cannot be used.
FUNCTIONS
4
mrcool.com 10
10
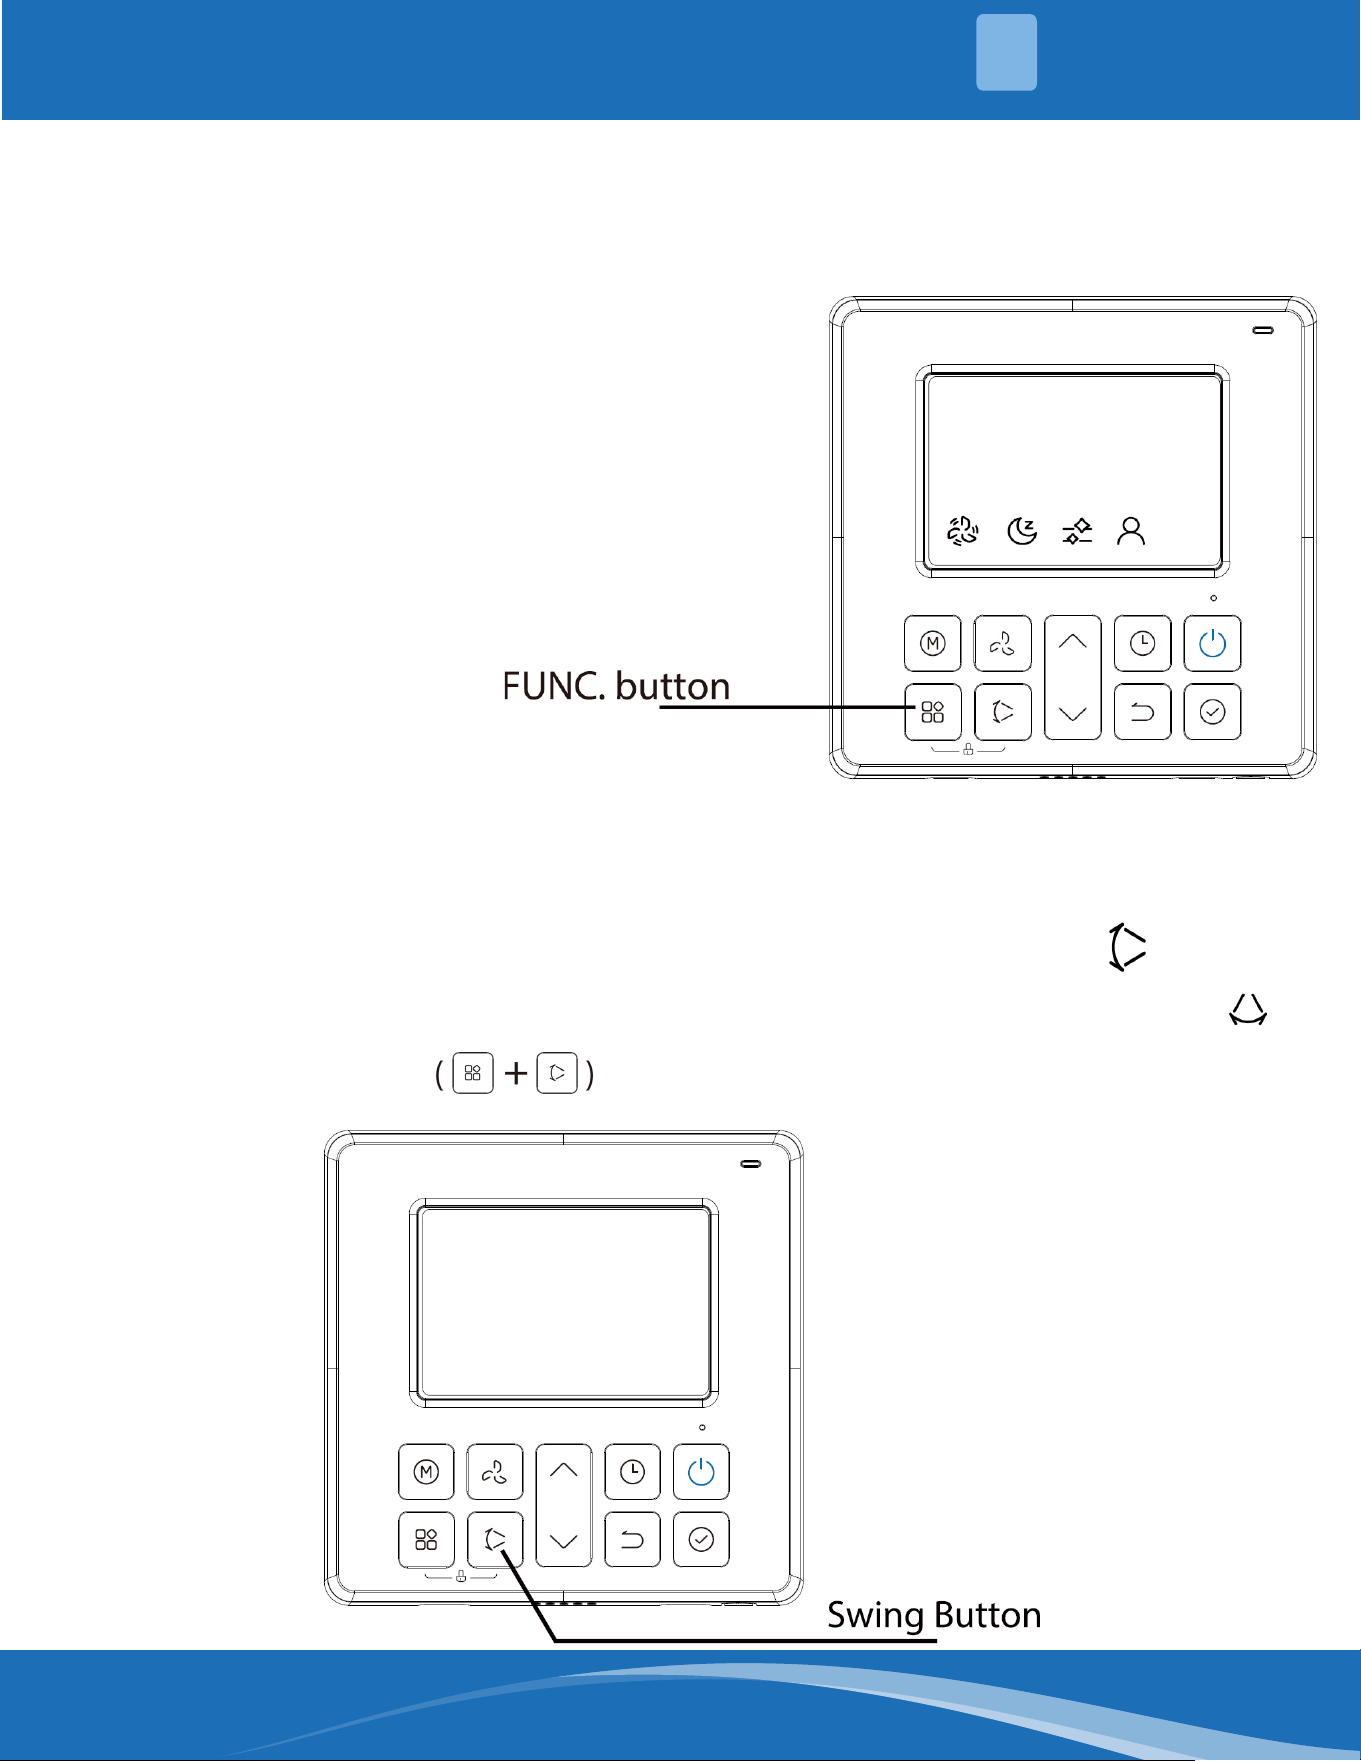
Follow Me Function
1. When the Follow Me function is selected, press the conrm button once, and Follow Me on the unit will
illuminate.
2. When the Follow Me function is selected, press the conrm button again to cancel the Follow Me function,
and the Follow Me icon will turn o.
Setting Air Flow Direction
1. Up-Down Swing - Press the Swing button to start the Up-Down Swing function. The icon will
appear. Press it again to stop.
2. Left-Right Swing - Press the Swing button for 2 seconds to start Left-Right Swing function. The icon
will appear. Press it for 2 seconds again to stop.
3. Turn On/O Child Lock - Press and hold the function key and the horizontal swing key
for 3 seconds.
3. The Follow Me function is invalid in Dry and Fan mode. The
Follow Me function is not canceled when pressing the mode
key or powering o. Only select Follow Me in the function
key, and conrm to cancel, or press the 8° heating function to
cancel.
4. By default, the Follow Me function is enabled on the machine.
5. Press the Function button to enter the setting selection.
Then, scroll through the operating functions as follows:
TurboSleepCleanFollow MeTurbo
The selected symbol will flash in the display; press the OK button
to confirm.
FUNCTIONS
4
mrcool.com11
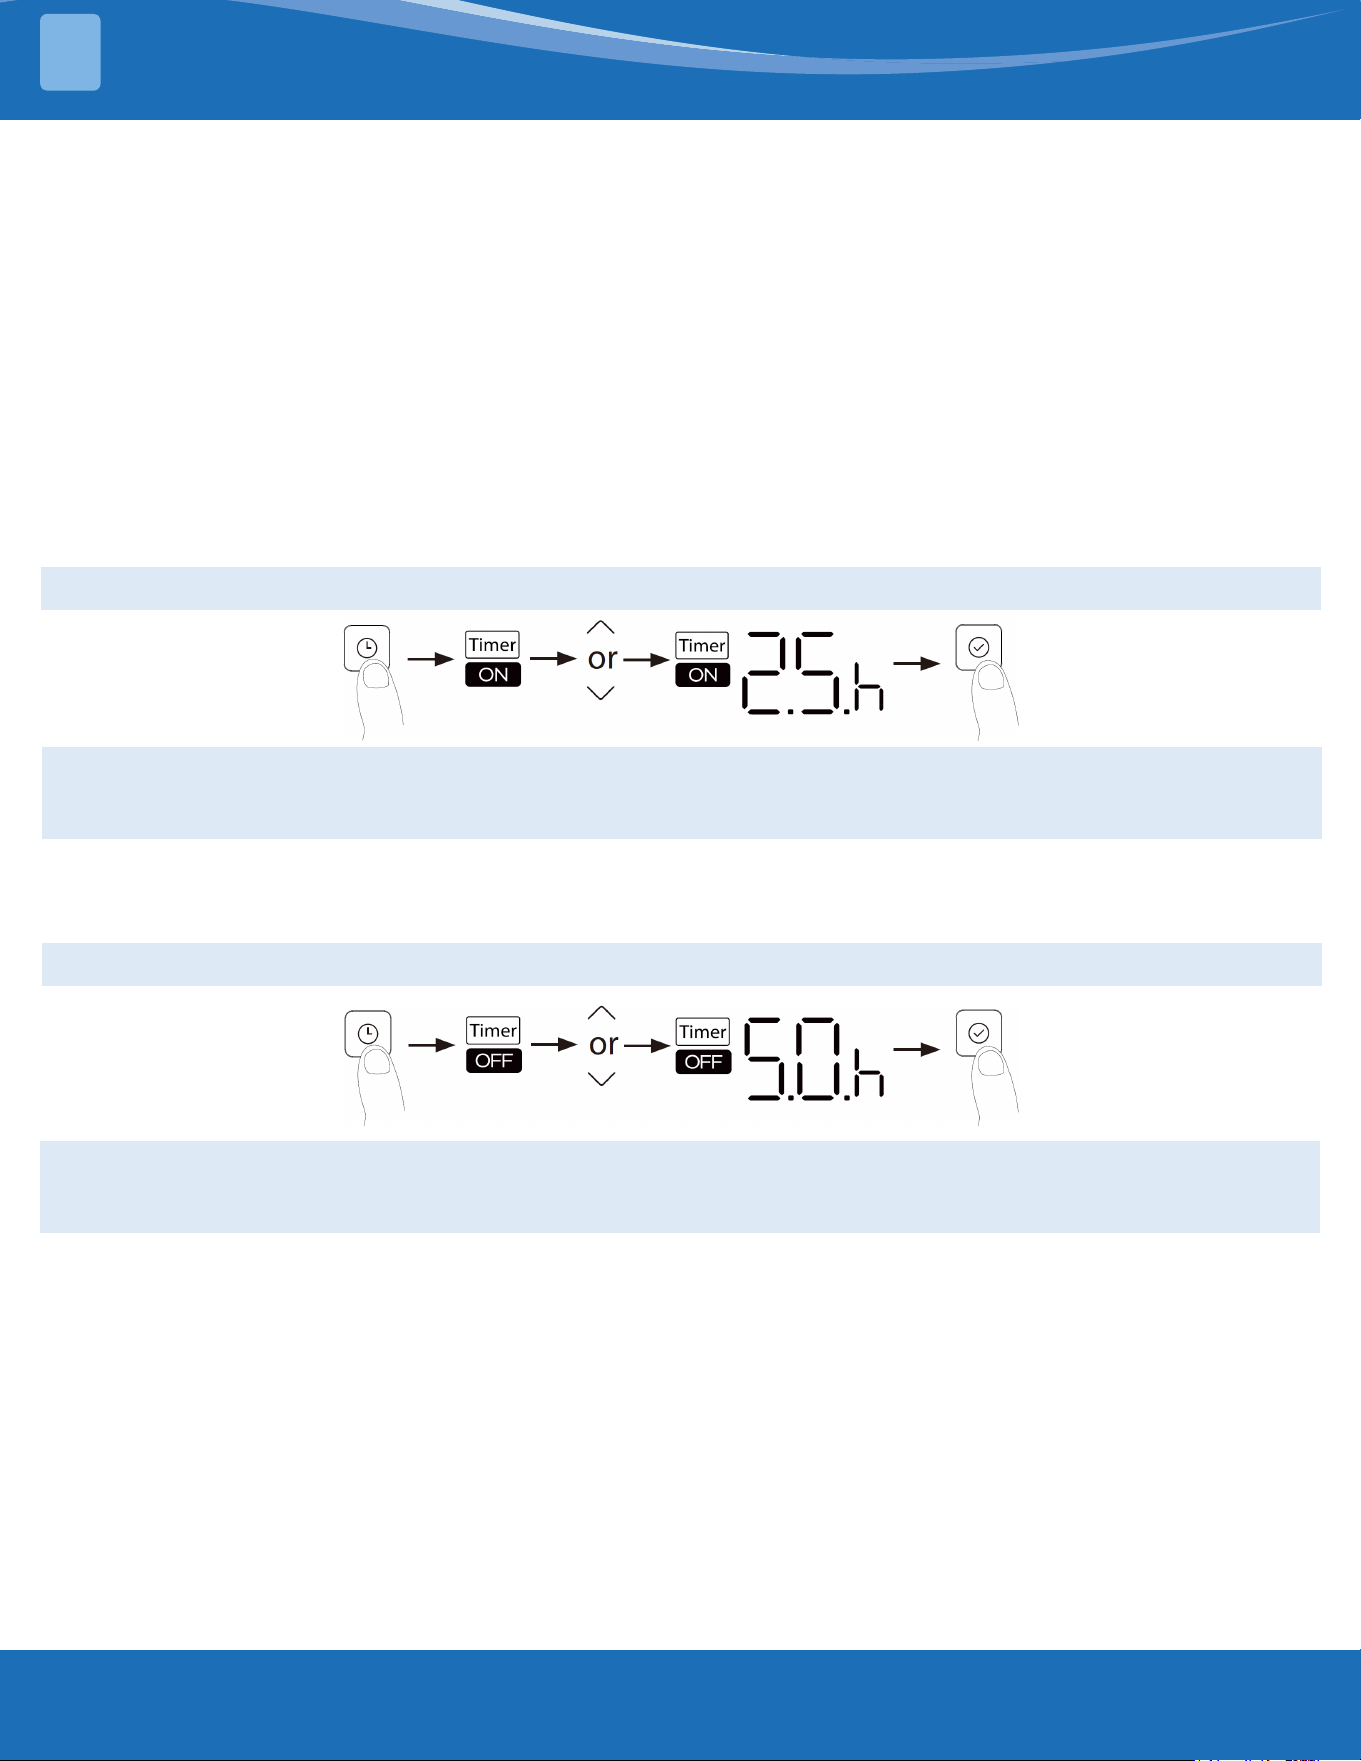
Timer Function
The unit has two timer-related functions:
• Timer On - sets the amount of time after which the unit will automatically turn on. (Delayed on)
• Timer O - sets the amount of time after which the unit will automatically turn o. (Delayed o)
1. Timer On Function:
The Timer On function allows you to set a period of time after which the unit will automatically turn on, such as
when you arrive home from work.
a. Press Timer On button. By default, the last time period previously set along with an "H" (indicating hours) will
appear on the display.
b. Press Timer On button repeatedly to set the time you want the unit to turn on.
c. Wait 3 seconds, then the Timer On function will be activated. The digital display on the thermostat will then
return to the temperature display.
EXAMPLE: Setting unit to turn on after 2.5 hours.
NOTE: The number indicates the amount of time after the current time that you want the unit to turn on. For
example, if you set Timer On for 2 hours, "2.0 H" will appear on the screen, and the unit will turn on after 2
hours.
2. Timer O Function:
The Timer O function allows you to set a period of time after which the unit will automatically turn o, such as
when you wake up.
EXAMPLE: Setting unit to turn o after 5 hours.
NOTE: When setting the Timer On or Timer O functions, up to 10 hours, the time will increase in 30 minute
increments with each press. After 10 hours and up to 24, each press will increase in 1 hour increments. The
timer will revert to zero after 24 hours. You can turn o either function by setting its timer to "0.0 H".
Setting both Timer On and Timer O Simultaneously (Combined Timer Function)
Keep in mind that the time periods you set for both functions refer to hours after the current time. For example,
if the current time is 1:00pm, and you want the unit to turn on automatically at 7:00pm. You want it to operate
for 2 hours, then automatically turn o at 9:00pm.
FUNCTIONS
4
mrcool.com 12
12
FP Function
The unit will operate at high fan speed (while the compressor is on) with temperature automatically set
to 46°F (8°C).
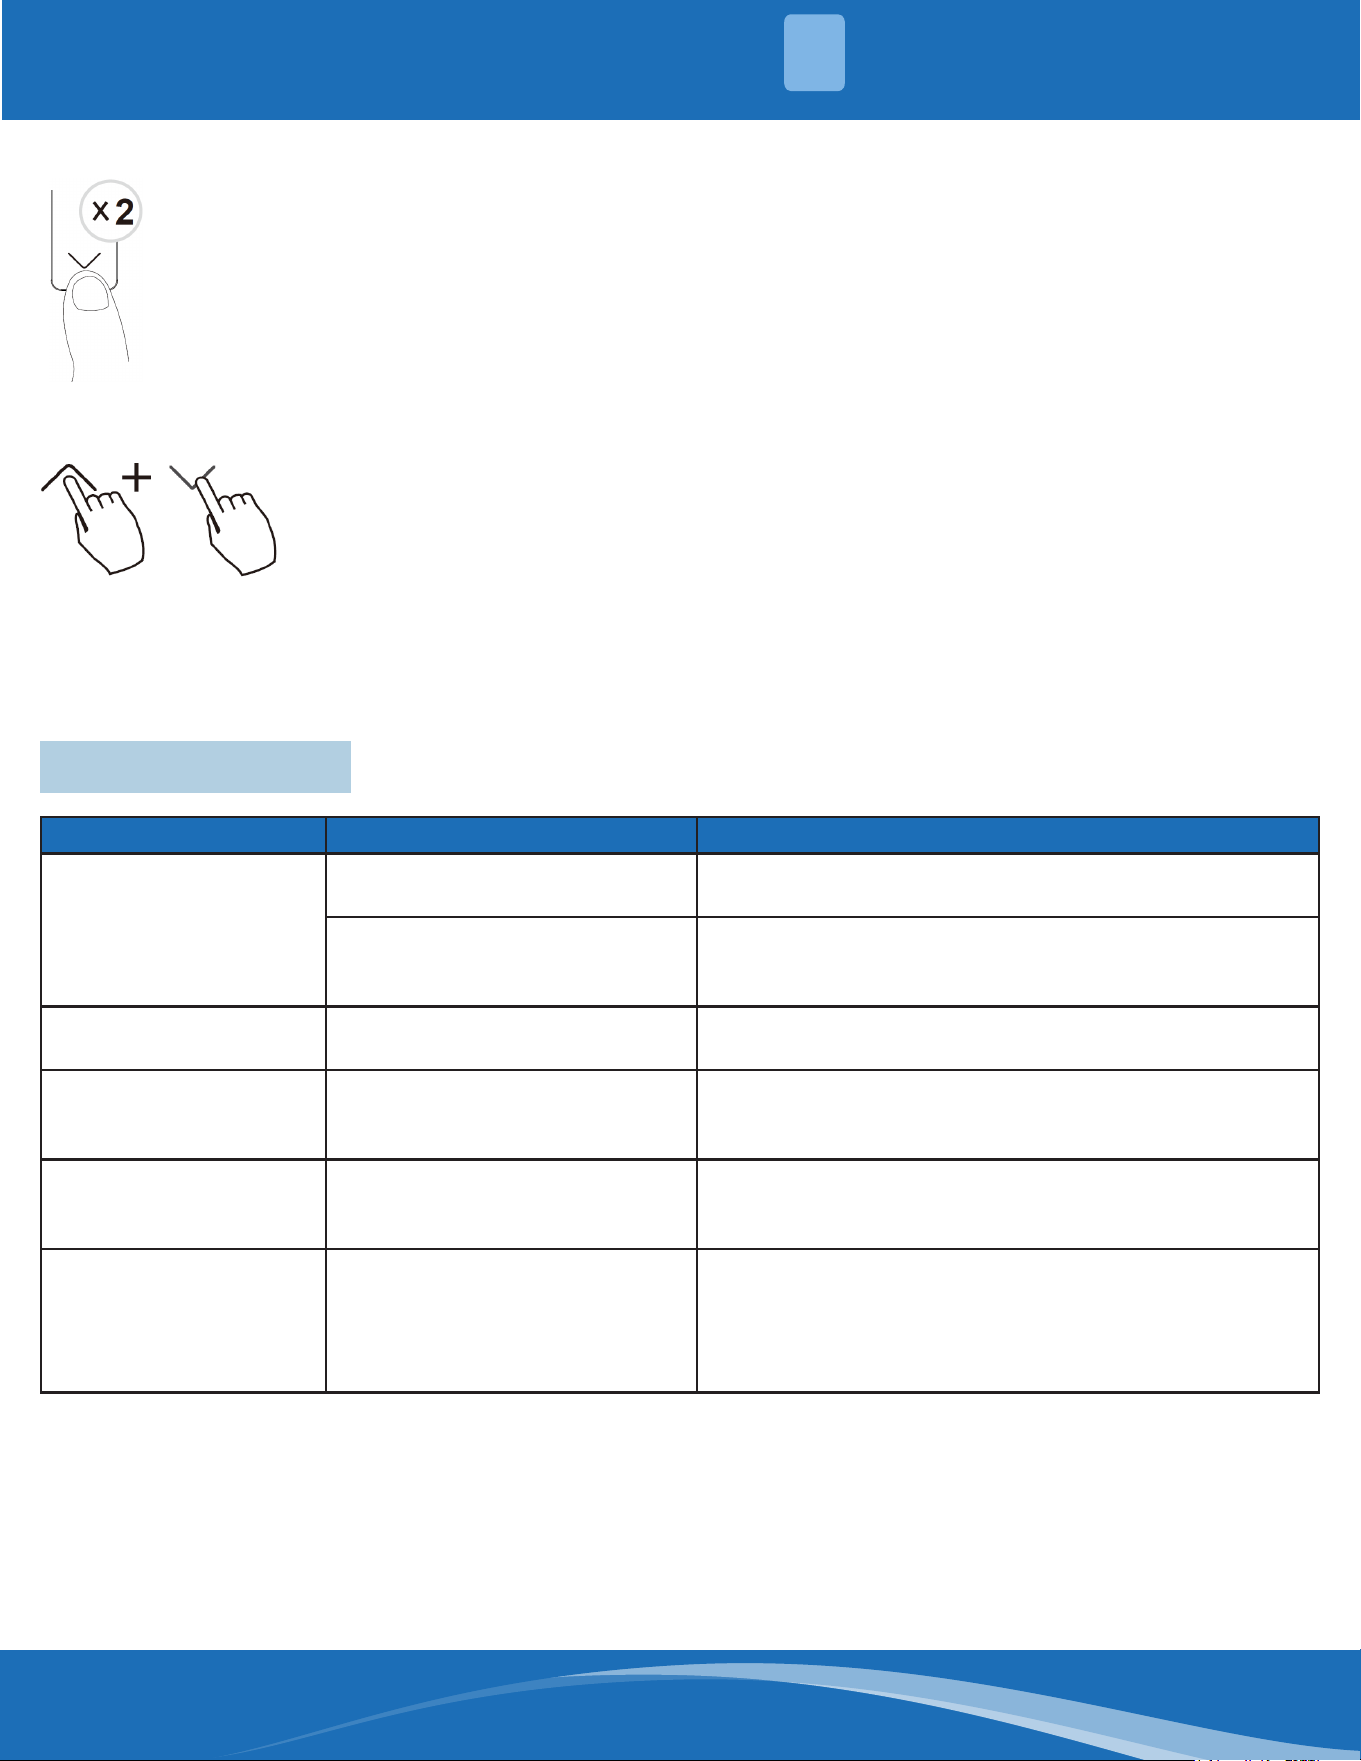
Note: This function is for heat pump units only. Press this button 2 times in 1 second under Heat mode
with a setting temperature of 60/62°F (16/17°C) or 68°F (20°C) (some models) to activate FP function.
Press On/O, Sleep, Mode, Fan, and Temp. button while operating to cancel this function.
°C and °F Scale Selection
Press the up and down buttons for 3 seconds to alternate the temperature display
between °C and °F.
Problem Possible Causes Solution
The fan speed cannot
be changed
Check whether AUTO mode
has been selected.
In AUTO mode, the fan speed is set automatically
and cannot be changed.
Check whether DRY mode
has been selected.
In DRY mode, the fan speed button is disabled. The
fan speed can only be changed in COOL, FAN, and
HEAT mode.
The temperature
display is o.
Check whether FAN mode is
selected.
In FAN mode, the temperature cannot be adjusted.
The TIMER OFF
disappears after a
period of time.
If the TIMER OFF function
was activated, the operation
may have nished.
The unit will automatically stop at the set time and
the indicator light will turn o.
The TIMER ON
indicator disappears
after a period of time.
If the TIMER ON function
was activated, the operation
may have nished.
The unit will automatically start at the set time and
the indicator light will turn o.
There is no sound
when the ON/OFF
button is pressed.
Check whether the signal
transmitter of the remote
control is properly directed
towards the infrared signal
receiver of the indoor unit.
Point the remote control directly at the receiver and
press the ON/OFF button twice.
TROUBLESHOOTING
5
5 - Troubleshooting

MRCOOL
®
Olympus Series
Wired Thermostat
The design and specications of this product and/or manual are subject to change without prior notice.
Consult with the sales agency or manufacturer for details.