TM
OWNER’S MANUAL
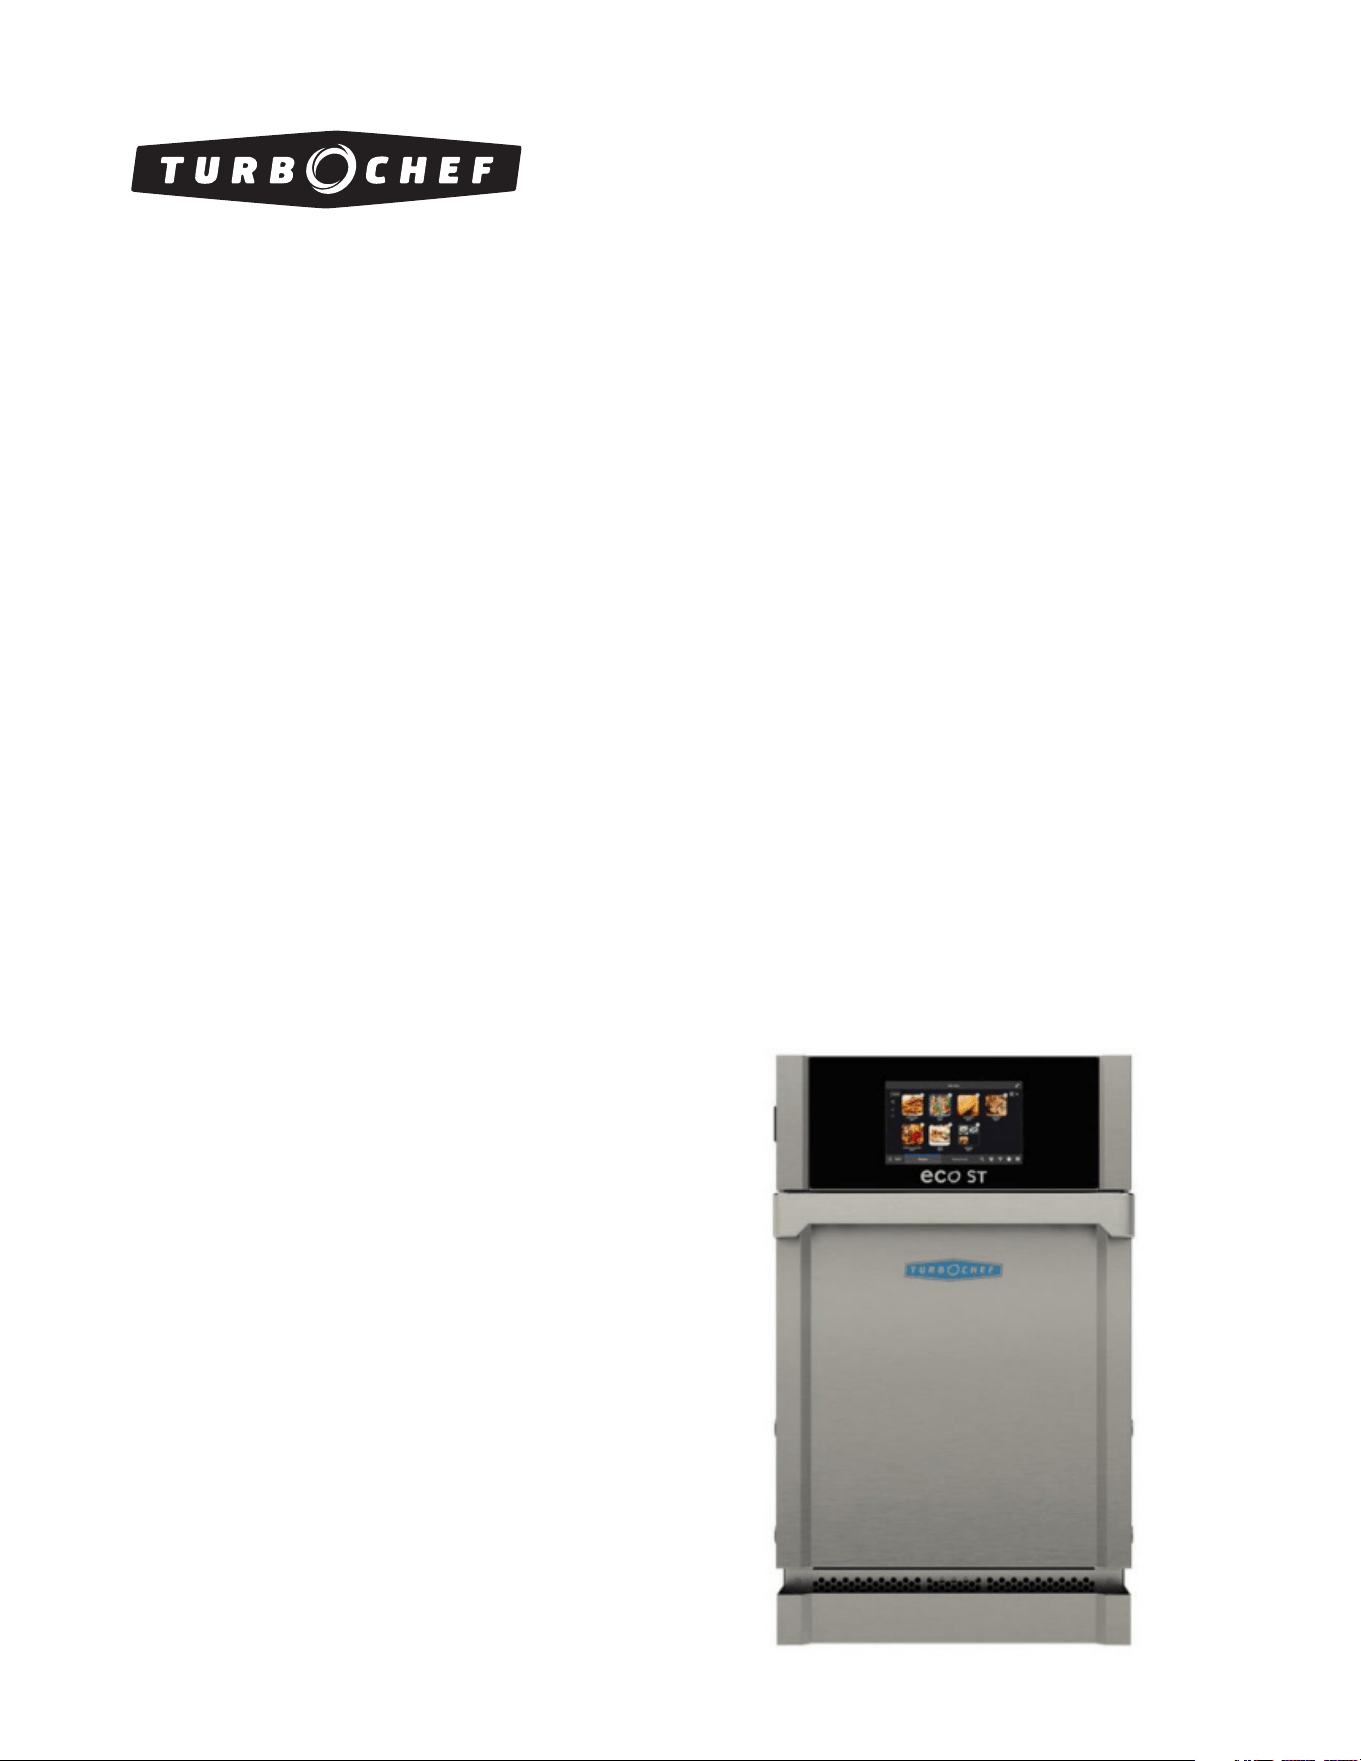
for the turbochef eco st rapid cook oven
©2022-2023 TurboChef Technologies, LLC
ECS-1001 / Rev G / October 2023

ECS-1001 / Rev G / October 2023

For further information, call
800.90TURBO
or
+1 214.379.6000
ECS-1001 / Rev G / October 2023ECS-1001 / Rev G / October 2023

Original Instructions
The information contained in this manual is important for the proper installation, use, maintenance,
and repair of this oven. Follow these procedures and instructions to help ensure satisfactory baking results
and years of trouble-free service.
Errors – descriptive, typographic, or pictorial – are subject to correction. Specifications are subject to
change without notice.
Please carefully read this manual and retain it for future reference.
ECS-1001 / Rev G / October 2023

Important Safety Instructions i
General Safety Information i
Reducing Fire Risk i
Grounding Instructions ii
Power Cord Replacement or Removal ii
Precautions to Avoid Possible Exposure to Excessive Microwave Energy ii
RF Interference Considerations ii
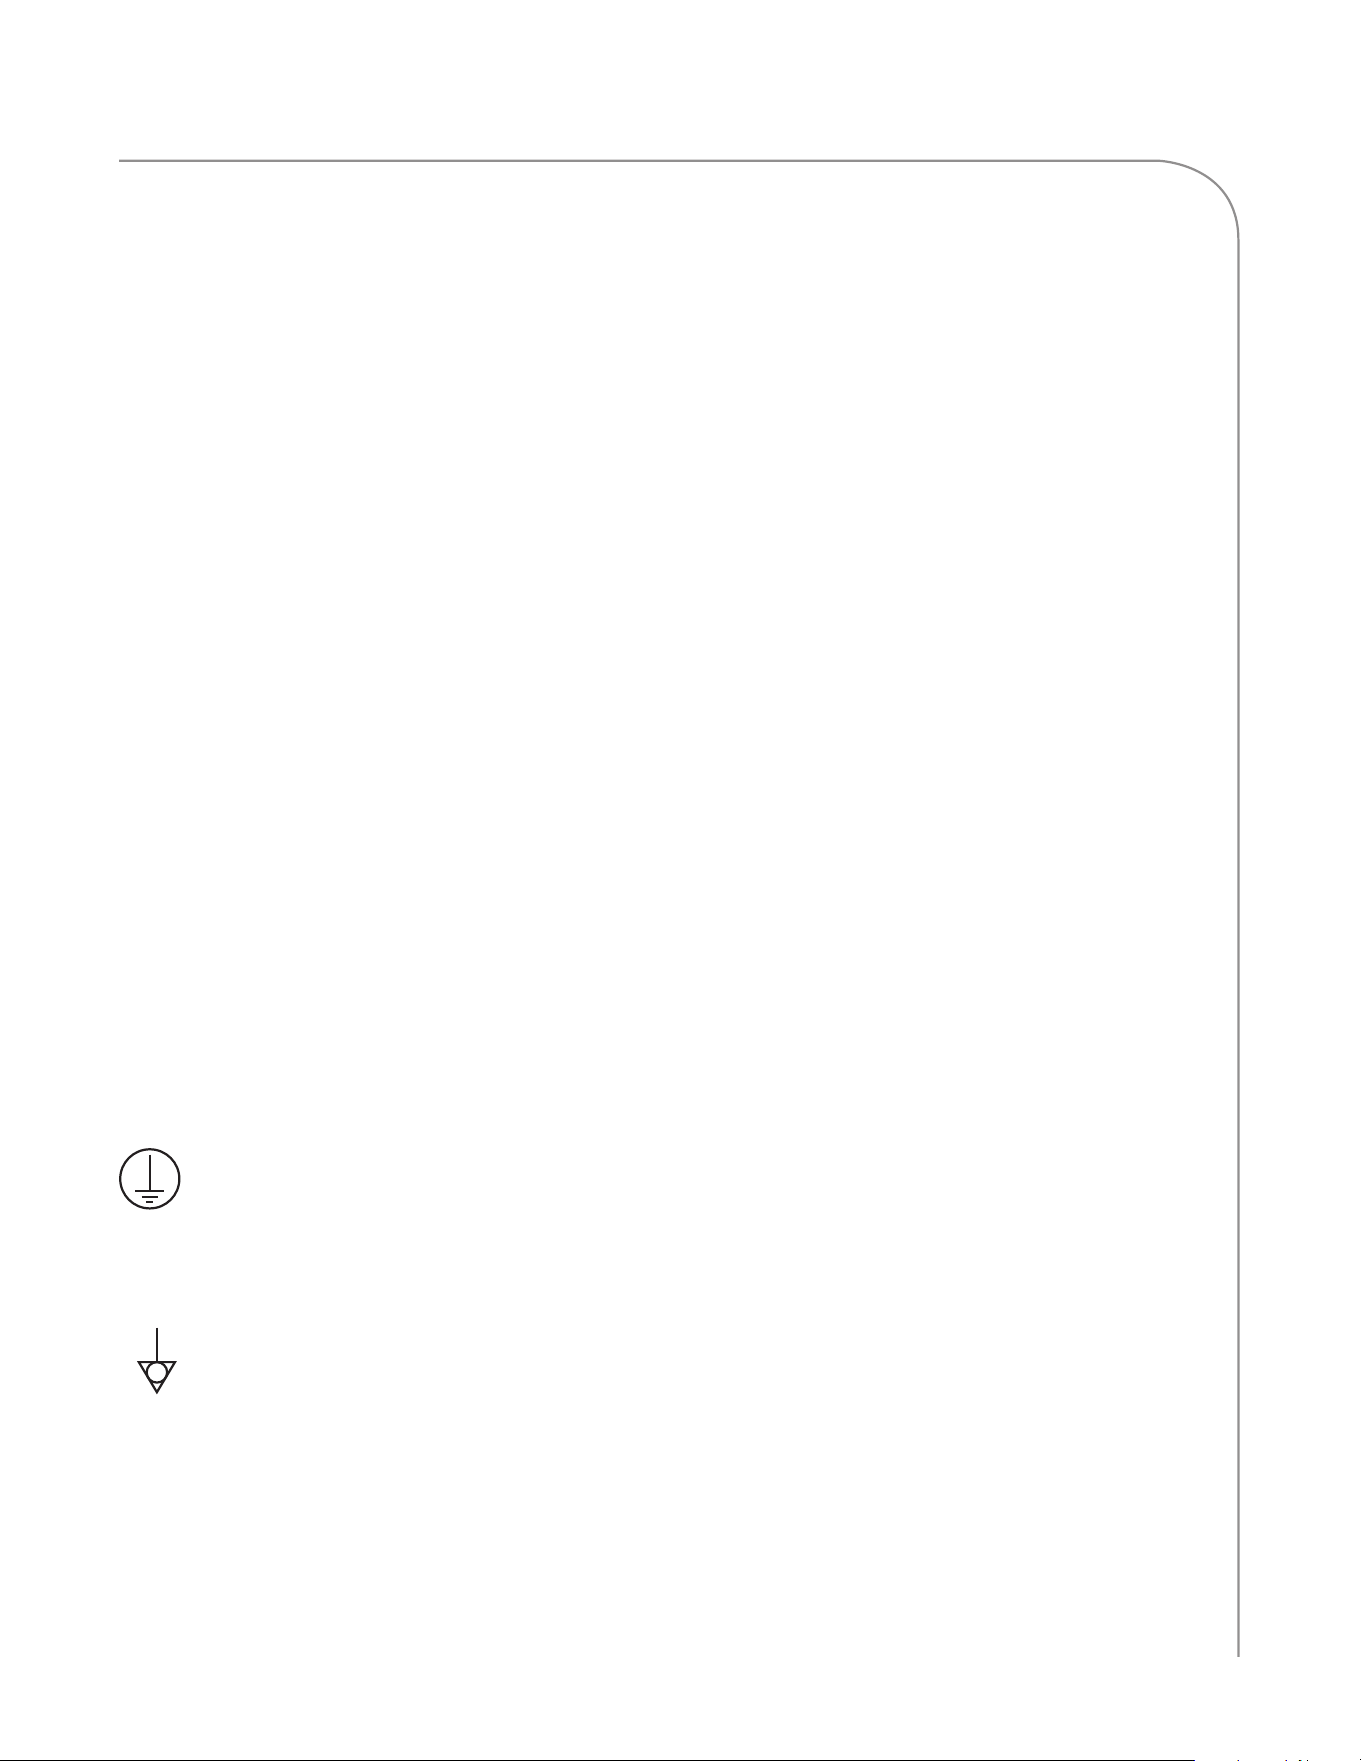
Protective Earth (Ground) Symbol iii
Equipotential Bonding Symbol iii
Specifications and Installation
Theory of Operation 1
Features 1
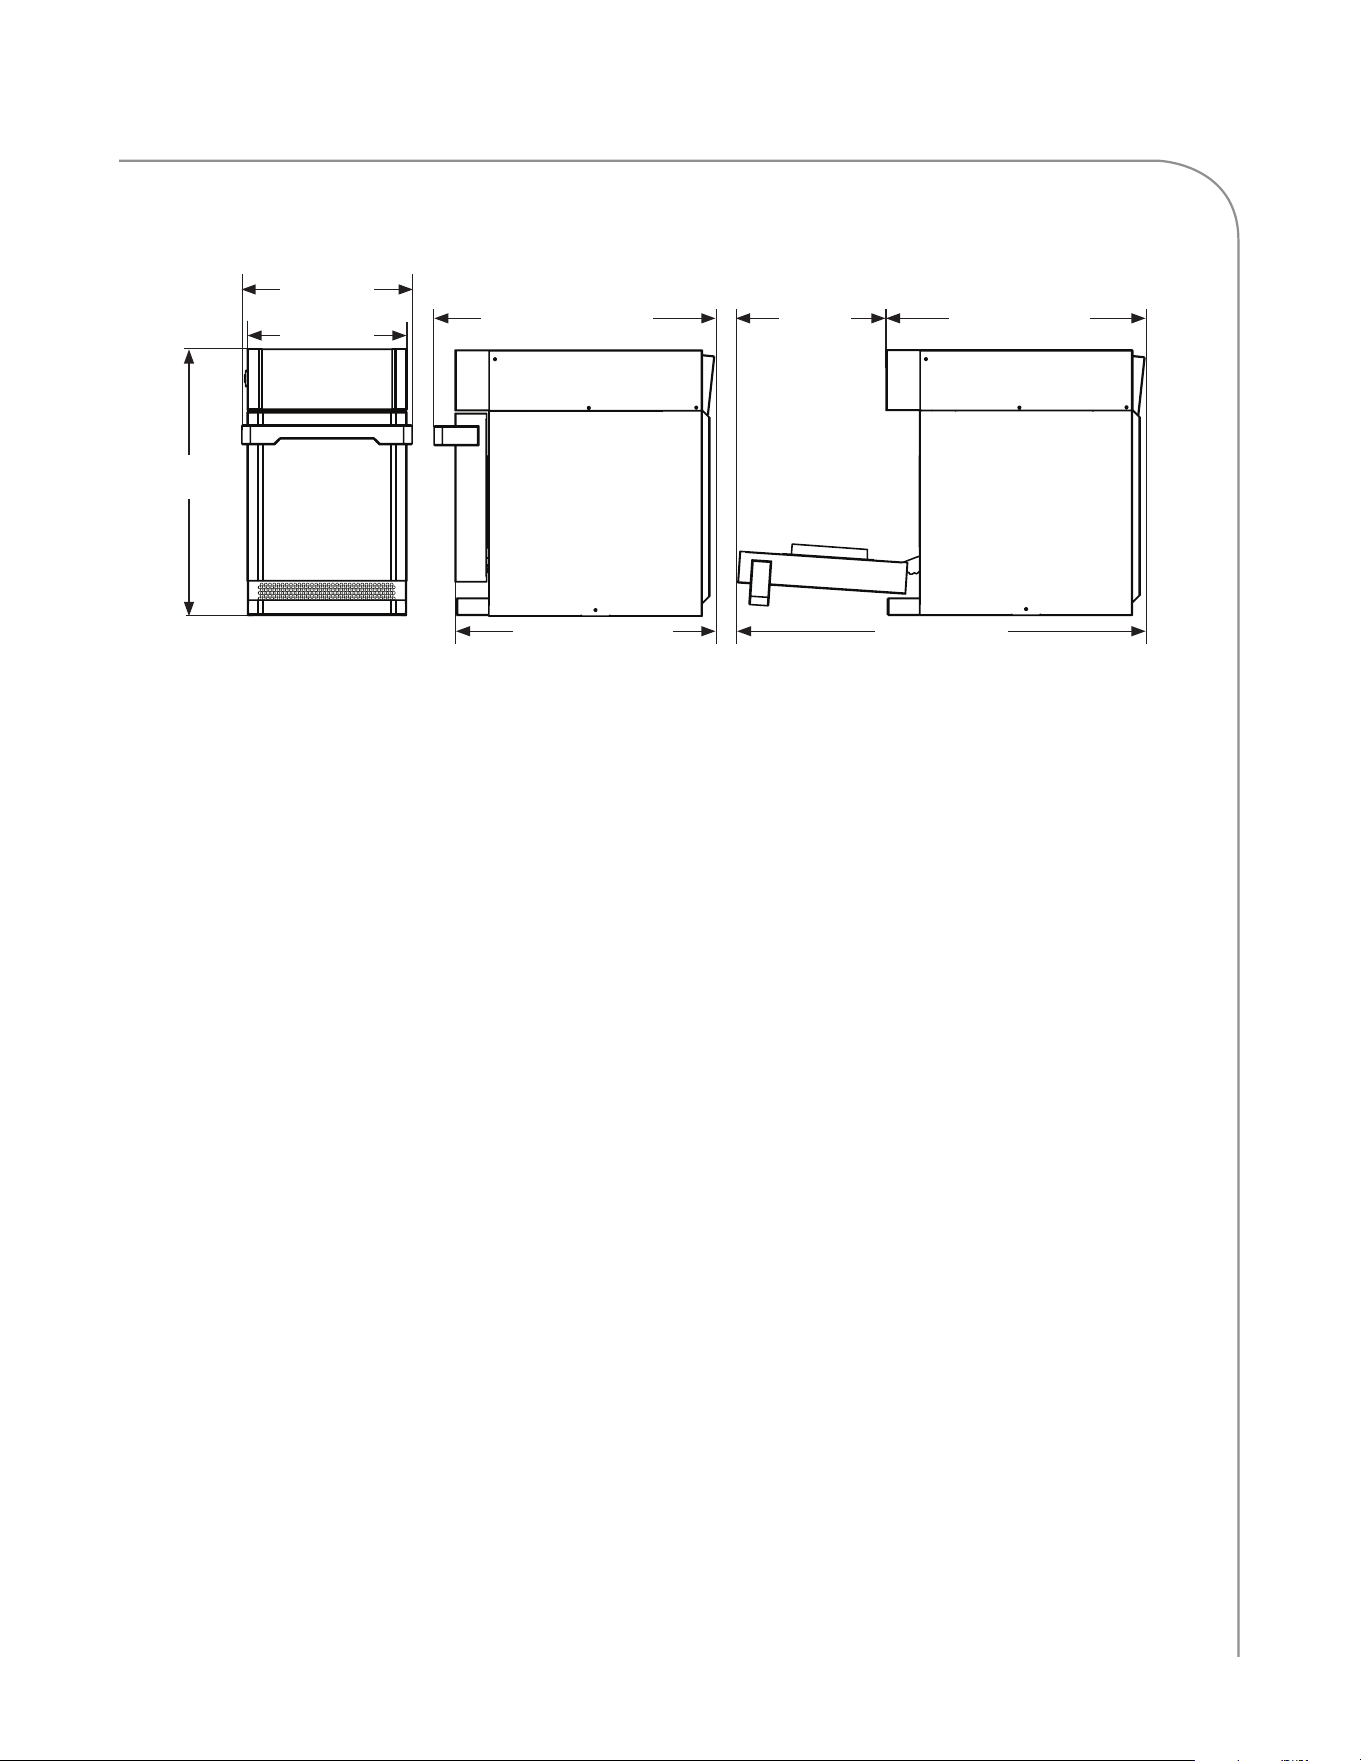
Dimensions 1
Certifications 2
Oven Construction 2
Electrical Specifications 2
Installation 2
Unpacking Instructions 2
Installation Warnings - Read Before Lifting Oven 2
Lifting and Placing the Oven 3
Installation Near Open Heat Source 3
Oven Restraint Kit 4
ChefComm Pro® 4
Open Kitchen
TM
4
Date and Time Prompt 4
Registration Prompt 4
Voltage Selection 4
Ventilation 5
Maintenance 6
OneTouch Controller Operation 8
Oven Controls: OneTouch 8
Recipe Mode 9
Manual Cook Mode 11
Oven Settings 12
Master Volume 12
Menu Edit 12
Manual Cook 12
Demo Mode 12
Menu Download 12
Temperature Units (C/F) 12
Show Grid/List View Toggle 12
Table of Contents
ECS-1001 / Rev G / October 2023ECS-1001 / Rev G / October 2023

F2 Bypass 12
Language 12
Date/Time/Time Format 13
Reboot 13
Network 13
Load Menu from USB: OneTouch Controller 13
Save Menu to USB: OneTouch Controller 13
Edit Mode: OneTouch 14
Creating a Group 14
Editing a Group 15
Creating a Recipe 15
Adding a Recipe to a Group 17
Editing a Recipe 18
Legacy Controller Operation 19
Oven Controls 19
Menu Cook Mode 20
Manual Cook Mode 23
The Info Mode 24
Information Screen 24
Counters Screen 24
Options Screen 25
Editing 25
Cook More 25
Load Menu 25
VAC 25
Demo Mode 25
Manual Cooking 25
Diagnostic Mode 25
F2 Bypass 25
Settings Screen 25
Temperature 26
Language 26
WiFi Network 26
Volume 27
Date 27
Time 27
Auto On 27
Auto Off 28
Service Screen 28
Manufacturing Mode 28
Load Menu from USB 28
ECS-1001 / Rev G / October 2023

Save Menu to USB 29
Firmware Update 29
The Edit Mode 30
Edit Set Temperature 30
Access Edit Items Screen 30
Name a Group 31
Delete a Group 31
Move a Group 32
Item Editing Options 32
Edit Settings 24
Name Item 36
Change Group 36
Move Item 36
Delete Item 37
Troubleshooting 38
North America Limited Warranty 40
International Limited Warranty 42
ECS-1001 / Rev G / October 2023ECS-1001 / Rev G / October 2023

This page intentionally blank.
ECS-1001 / Rev G / October 2023

i
SAFETY INSTRUCTIONS
IMPORTANT SAFETY INSTRUCTIONS
WARNING: When operating this oven, strictly adhere to the following safety precautions to reduce
the risk of burns, electric shock, fire, injury, damage to oven or property near oven, or possible
exposure to excessive microwave energy.
GENERAL SAFETY INFORMATION
a
Read all instructions before using this appliance.
a
Read and follow the specific “Precautions to be Observed to Avoid Possible Exposure to Excessive
Microwave Energy” found on page ii.
a
This appliance must be grounded. Connect only to a properly grounded outlet. See “Grounding
Instructions” on page ii.
a
Install or locate this appliance only in accordance with the provided installation instructions.
a
This appliance should be serviced by qualified service personnel only. Contact the nearest authorized
service facility for examination, repair, or adjustment.
a
Keep the cord away from heated surfaces.
a
Liquids, such as water, coffee, or tea are able to be overheated beyond the boiling point without
appearing to be boiling. Visible bubbling or boiling when the container is removed from the
microwave oven is not always present. this could result in very hot liquid suddenly boiling
over when the container is disturbed or a utensil is inserted into the liquid.
a
warning: The contents of feeding bottles and baby food jars must be stirred or shaken and the
temperature checked before consumption, in order to avoid burns (IEC 60335-2-90).
a
Use this appliance only for its intended uses as described in this manual.
a
Only use utensils that are suitable for use in microwave ovens (IEC 60335-2-90).
X
do not use corrosive chemicals or vapors in this appliance; it is not designed for industrial/laboratory
use.
X
warning: do not heat liquids or other foods in sealed containers (e.g., jars, whole eggs, etc.) since
they are liable to explode.
X
warning: Failure to maintain the oven in a clean condition could lead to deterioration of the surface
that could adversely affect the life of the appliance and possibly result in a hazardous situation.
X
do not allow children to use this appliance.
X
do not operate this appliance if it has a damaged cord or plug, is not working properly, or has been
damaged or dropped. See “Power Cord Replacement” found on page ii.
X
do not cover or block any openings on this appliance.
X
do not store this appliance outdoors.
X
do not use this product near water (e.g., near a kitchen sink, in a wet basement, near a swimming
pool).
X
do not immerse the cord or plug in water.
X
do not let the cord hang over the edge of a table or counter.
X
do not use a water jet for cleaning. See pages 6-7 in this manual for proper cleaning procedures.
X
do not use this product without the bottom jetplate installed. The oven will not cook properly and
damage to the oven may occur.
X
This appliance is not to be used by children or persons with reduced physical, sensory or mental
capabilities, or lack of experience and knowledge, unless they have been given supervision or instruction.
SAVE THESE INSTRUCTIONS
ECS-1001 / Rev G / October 2023ECS-1001 / Rev G / October 2023

ii
SAFETY INSTRUCTIONS
REDUCING FIRE RISK
a
Remove wire twist-ties from paper or plastic bags used to facilitate cooking in the oven.
a
If materials inside the oven ignite, keep the oven door closed, turn the oven off, and disconnect the
power cord or shut off power at the fuse or circuit breaker panel.
a
If smoke is observed, switch off or unplug the oven. Keep the door closed to stifle any flames.
X
do not use the cook cavity for storage purposes.
X
do not overcook food. Carefully attend to the oven if paper, plastic, or other combustible materials are
placed inside the oven to facilitate cooking.
X
do not leave paper products, cooking utensils, or food in the cavity when the oven is not in use.
GROUNDING INSTRUCTIONS
This appliance must be grounded. In the event of an electrical short circuit, grounding reduces the risk of
electric shock by providing an escape wire for the electric current. This oven is equipped with a cord that
has a grounding wire with a grounding plug, which must be plugged into an outlet that is properly installed
and grounded. Consult a qualified electrician or serviceman if uncertain about the ability to follow
grounding instructions or if in doubt as to whether the appliance is properly grounded.
X
d o n o t use an extension cord. If the power cord is too short, have a qualified electrician or serviceman
install an outlet near the appliance.
WARNING: Improper grounding can result in risk of electric shock.
Power Cord Replacement or removal
This appliance must be grounded. In the event of an electrical short circuit, grounding reduces the risk of
electric shock by providing an escape wire for the electric current. This appliance is equipped with a cord
having a grounding wire with a grounding plug. The plug must be plugged into an outlet that is properly
installed and grounded.
WARNING: Improper use of the grounding can result in a risk of electric shock. Consult a qualified
electrician or serviceman if the grounding instructions are not completely understood, or if doubt
exists as to whether the appliance is properly grounded, and either:
1. If it is necessary to use an extension cord, use only a 3-wire extension cord that has a 3-blade grounding
plug, and a 3-slot receptacle that will accept the plug on the appliance. The marked rating of the extension
cord shall be equal to or greater than the electrical rating of the appliance,
– OR –
2. Do not use an extension cord. If the power supply cord is too short, have a qualified electrician or
serviceman install an outlet near the appliance.
A commercial microwave oven complying with the Exception No.2 to 38.1, shall have instructions that
contain the statement “Warning: Risk of Electric Shock. If the cord or plug becomes damaged, replace only
with a cord and plug of the same type”.
X
do not use an extension cord. If the power cord is too short, have a qualified electrician or serviceman
install an outlet near the appliance.
WARNING: Improper grounding can result in risk of electric shock.
SAVE THESE INSTRUCTIONS
ECS-1001 / Rev G / October 2023
iii
SAFETY INSTRUCTIONS
SAVE THESE INSTRUCTIONS
PRECAUTIONS TO AVOID POSSIBLE EXPOSURE TO
EXCESSIVE MICROWAVE ENERGY
(a) Do not attempt to operate this oven with the door open since open-door operation can result in
harmful exposure to microwave energy. It is important not to defeat or tamper with the safety
interlocks.
(b) Do not place any object between the oven front face and the door or allow soil or cleaner residue to
accumulate on sealing surfaces.
(c) Do not operate the oven if it is damaged. It is particularly important that the oven door close properly
and that there is no damage to the: (1) Door (bent), (2) hinges and latches (broken or loosened), (3)
door seals and sealing surfaces.
(d) The oven should not be adjusted or repaired by anyone except properly qualified service personnel.
RF INTERFERENCE CONSIDERATIONS
This oven generates radio frequency signals. This device has been tested and was determined to be in
compliance with applicable portions of FCC part 18 requirements and to the protection requirements
of Council Directive 89/336/EEC on the approximation of the laws of the Member States relating to
electromagnetic compatibility at the time of manufacture. However, some equipment with sensitivity to
signals below these limits may experience interference.
If your equipment experiences interference:
a
Increase the physical separation between this oven and the sensitive equipment.
a
If the sensitive device can be grounded, do so following accepted grounding practices.
a
If battery-powered microphones are being affected, ensure that the batteries are fully charged.
a
Keep sensitive equipment on separate electrical circuits if possible.
a
Route intercom wires, microphone wires, speaker cables, etc. away from the oven.
PROTECTIVE EARTH (GROUND) SYMBOL
This symbol identifies the terminal which is intended for connecting an external conductor for
protection against electric shock in case of a fault, or the terminal of a protective earth (ground)
electrode.
EQUIPOTENTIAL BONDING SYMBOL
This symbol identifies the terminals which, when connected together, bring the various parts
of an equipment or of a system to the same potential, not necessarily being the earth (ground)
potential, e.g. for local bonding.
ECS-1001 / Rev G / October 2023ECS-1001 / Rev G / October 2023

This page intentionally blank.
ECS-1001 / Rev G / October 2023
1
SPECIFICATIONS AND INSTALLATION
Theory of Operation
Utilizing TurboChef’s patented technology to
rapidly cook food without compromising quality,
the ECO ST oven provides superior cooking
performance while requiring minimal space and
energy consumption. The control system precisely
coordinates impinged airflow with top-launched
microwave to deliver product-specific results, and
integral catalytic converters allow for UL®-certified
ventless operation (see page 5 for details).
This manual includes instructions for installing,
cleaning, and operating the ECO ST oven.
If you have questions that are not addressed
in this manual, contact Customer Support
at 800.90TURBO (+1 214.379.6000) or your
Authorized Distributor.
Features
- High-contrast, durable capacitive touch screen
- Manual mode for on-the-fly cooking
- Up to 16 selectable languages
- Menu editing tools
- Menu Load and Save via USB
- WiFi/Open Kitchen™ ready
Dimensions
Oven Dimensions
Height: 23.8” (605 mm)
Width (base): 14.2” (361 mm)
Width (overall): 15.2” (386 mm)
Depth (footprint): 23.1” (587 mm)
Depth (door closed): 24.9” (633)
Depth (door open): 36.2” (920 mm)
Oven Weight
130 lbs. (59 kg)
Cook Cavity Dimensions
Height: 7.2” (183 mm)
Usable Height: 5.7” (145 mm)
Width: 12.5” (318 mm)
Depth: 10.5” (267 mm)
Useable Depth: 9.3” (236 mm)
Volume: 0.54 cu ft (15.3 liters)
Useable Volume: 0.38 cu ft (10.1 liters)
Clearances
Top: 5” (127 mm)
Sides: 1” (25 mm)
Figure 1: ECO ST Oven Dimensions
23.1” (587 mm)
24.9” (633 mm)
23.1” (587 mm)
13.1”
(333 mm)
36.2” (920 mm)
14.2”
(361 mm)
23.8”
(605 mm)
15.2”
(386 mm)
ECS-1001 / Rev G / October 2023ECS-1001 / Rev G / October 2023
2
GENERAL OVEN INFORMATION / INSTALLATION
Certifications
Oven Construction
Exterior
- Corrosion-resistant steel outer wrap and
door
- Cool-to-touch exterior; all surfaces below
122°F/50°C
- Ergonomic door handle
Interior
- 201/304 stainless steel
- Fully welded and insulated cook chamber
- Removable rack and lower jetplate
Electrical Specifications
TurboChef recommends a Type D circuit breaker
for all installations outside the United States.
Single Phase
US/Canada: 208/240* VAC, 60 Hz, 30 A, 6.2 kW
Europe (UK): 230 VAC, 50 Hz, 27 A, 6.2 kW
Brazil (BK): 220 VAC, 60 Hz, 28 A, 6.2 kW
Latin America (LA): 220 VAC, 60 Hz, 28 A, 6.2 kW
Japan 50 Hz (JK): 200 VAC, 50 Hz, 30 A, 6.2 kW
Japan 60 Hz (JK): 200 VAC, 60 Hz, 30 A, 6.2 kW
Multi Phase
Europe Delta (ED): 230 VAC, 50 Hz, 20 A, 6.2 kW
Europe Wye (EW): 400 VAC, 50 Hz, 16 A, 6.2 kW
Australia Wye (AU): 400 VAC, 50 Hz, 16 A, 6.2 kW
Japan Delta 50 Hz (JD): 200 VAC, 50 Hz, 20 A, 6.2 kW
Japan Delta 60 Hz (JD): 200 VAC, 60 Hz, 20 A, 6.2 kW
Korea/Middle East Wye (KW): 400 VAC, 60 Hz, 16 A,
6.2 kW
Korea/Middle East Delta (SD): 230 VAC, 60 Hz, 20 A,
6.2 kW
* US/Canada models include a voltage sensor
that detects 208 or 240 VAC, but does not
compensate for lack-of or over-voltage
installations.
Installation
Install or locate this appliance only in accordance with
the instructions below.
Unpacking Instructions
1. Remove the oven from its packaging.
2. Before discarding, check the packaging thoroughly for
accessories and literature.
NOTE: Packaging may also be retained in case the
oven may at some point be shipped somewhere else or
returned to the manufacturer.
3. Check the cook cavity thoroughly for packaging,
accessories, and literature.
4. Discard any packaging in the cook cavity.
Installation Warnings - Read Before Lifting Oven
WARNING: The ECO ST oven weighs approximately
130 lb. (59 kg). TurboChef recommends lifting the
oven with no fewer than two people.
WARNING: Never lift the oven from the front and
rear or by the door handle. Doing so will cause the
door to misalign, resulting in a non-warranty service
call.
WARNING: The oven must be properly placed on a
food station at all times. TurboChef will not recognize
a fallen oven as a warrantable claim and is not liable
for any injuries that may result.
WARNING: This oven is not intended for built-in
installation (i.e., installing the oven in any structure
that surrounds the oven by five or more sides). Be
sure to provide a minimum of 1” (51 mm) clearance
for all sides and 5” (127 mm) clearance for the top.
ECS-1001 / Rev G / October 2023
3
SPECIFICATIONS AND INSTALLATION
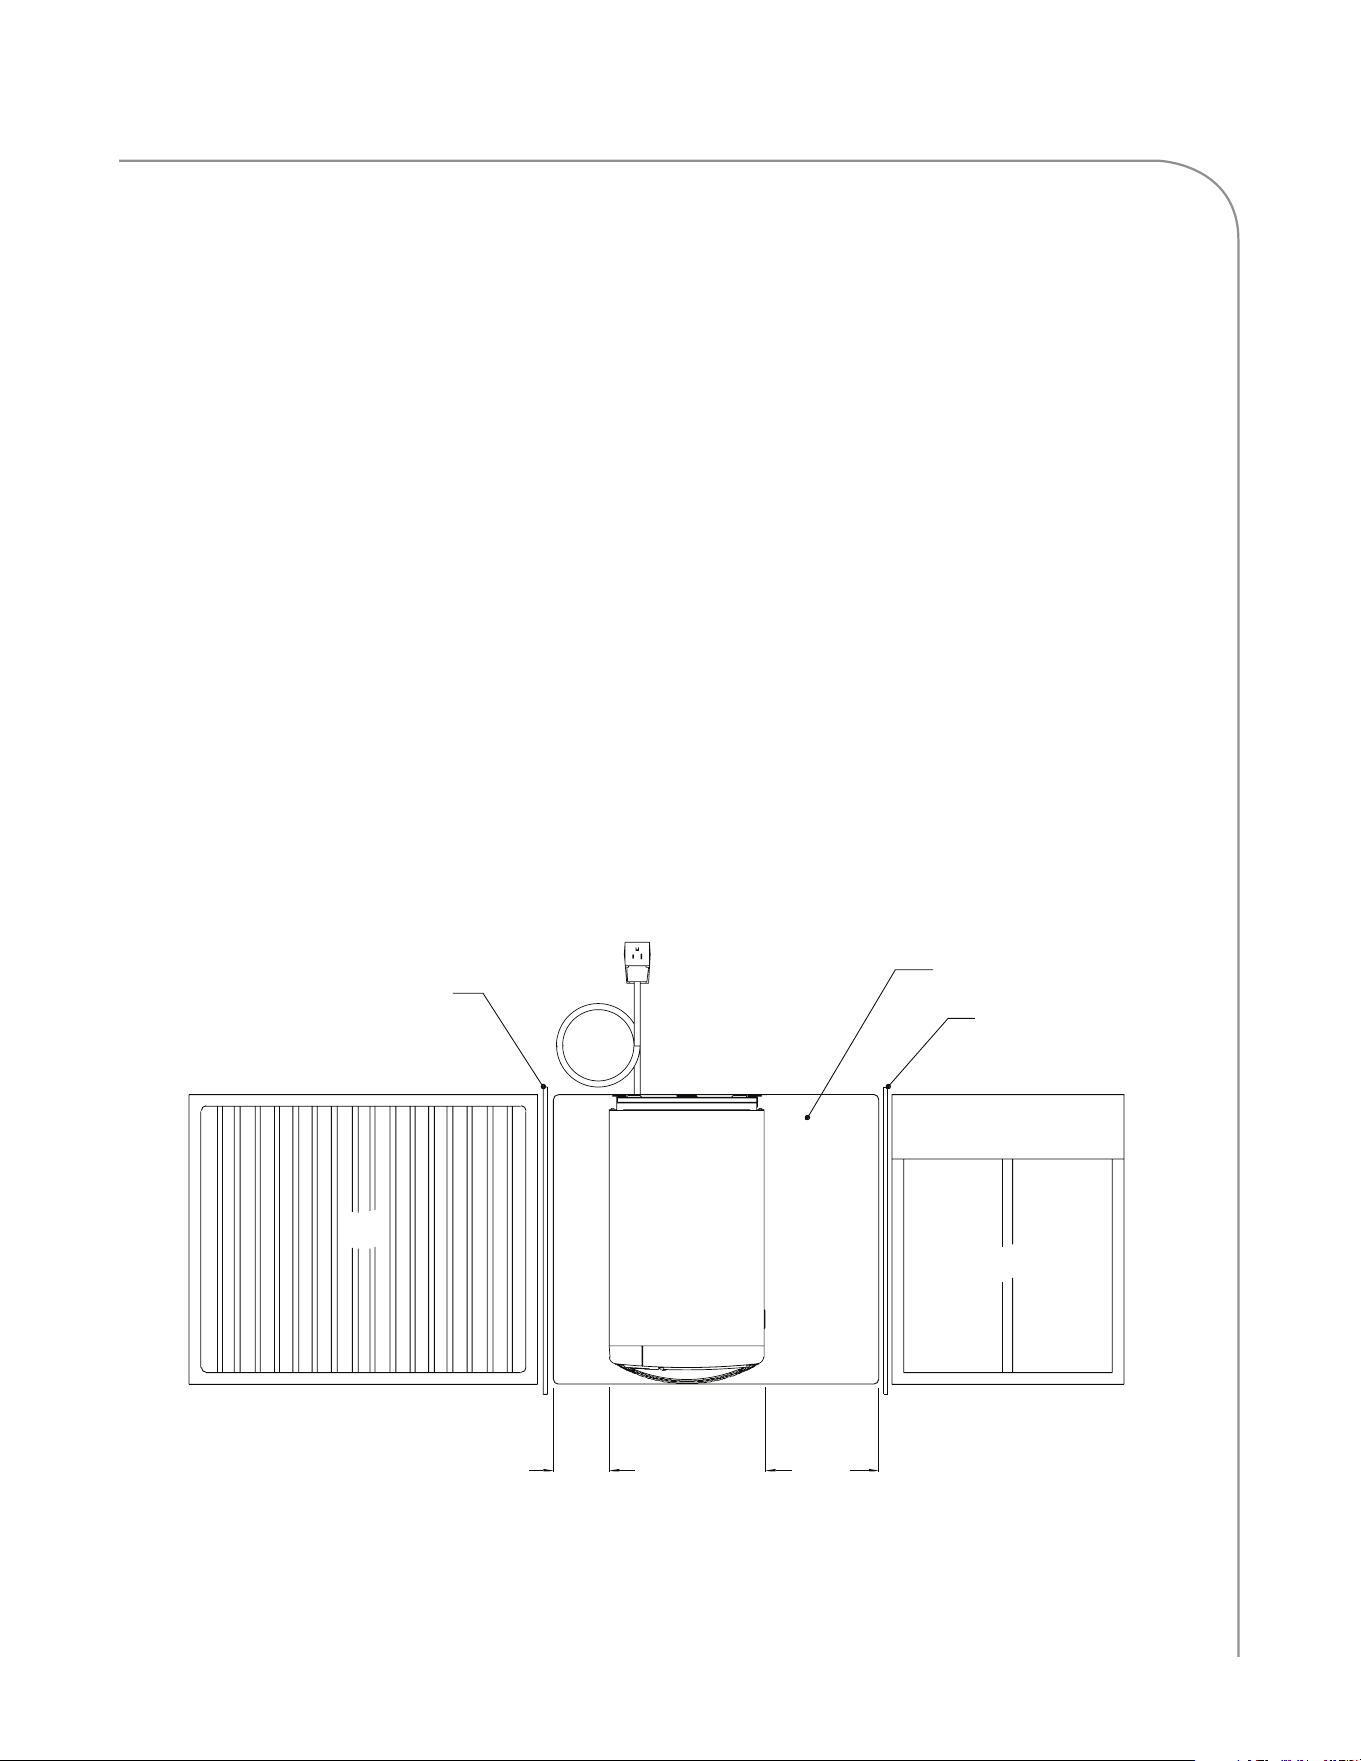
Figure 2: Installation Near Open Heat Source
Grill
Partition
25.0” (635 mm)
Above Counter Top
TurboChef
i1 Oven
6”
(152 mm)
Minimum
12”
(305 mm)
Minimum
Deep Fryer
Counter Top / Table
Partition
25.0” (635 mm)
Above Counter Top
Lifting and Placing the Oven
1. Prepare a surface at least 23.1” (587 mm)
deep and capable of supporting 135 lb. (61
kg).
2. Position one or more persons at the left and
right sides of the oven.
3. Place hands under the oven and lift.
4. Place the oven on the prepared surface,
ensuring no edges are hanging off the sides.
5. Ensure the lower panel (crumb tray) is
attached below the oven door.
6. Plug in the oven.
NOTE: The oven is primarily serviced through
its top. DO NOT install shelving directly over
the unit. The operator will be responsible for
service charges incurred as a result of added time
required to access the top of the oven.
Installation Near Open Heat Source
When placing a TurboChef oven near an open heat
source (see Figure 2, below), strictly adhere to the
following:
- If the oven is being placed near a grill or stove,
a divider must exist between the oven and the
open heat source, with a minimum of 6” (153
mm) between the oven and the divider.
- If the oven is being placed near a fryer, a divider
must exist between the oven and fryer, with a
minimum of 12” (305 mm) between the oven
and the divider.
- The height of the divider must be greater than or
equal to the height of the oven, 21.5’’ (546 mm).
- Verify the oven location has a minimum 5”
(127 mm) clearance on top and a minimum 1”
(51 mm) clearance on each side.
ECS-1001 / Rev G / October 2023ECS-1001 / Rev G / October 2023

4
GENERAL OVEN INFORMATION / INSTALLATION
Oven Restraint Kit
Part Number: TC3-0242
WARNING: The Oven Restraint Kit will not
prevent the oven from falling off a countertop
if the oven is pulled off or allowed to slide off
the edge. Installation instructions are included
with the kit.
ChefComm OneTouch
Part Number: CON-7006
ChefComm OneTouch® lets you easily create
menu settings on a computer and upload them
to an oven via USB. For more information, call
TurboChef Customer Support at 800.90TURBO
or +1 214.379.6000.
Open Kitchen
™
Open Kitchen® from Powerhouse Dynamics, a
Middleby company, is an Internet of Things (IoT)
solution used by foodservice operators to connect
and monitor HVAC, refrigeration, and foodservice
cooking equipment, across any brand. This level of
connectivity provides access to real-time data on
food prep and storage, tracks and handles energy
management on HVAC equipment, gives visibility on
important key performance indicators, and empowers
chefs to remotely distribute recipe updates to cooking
equipment, which is a big asset for chains and multi-
location restaurants.
Open Kitchen connectivity is now available as a
bundled option with your newly purchased TurboChef
equipment.
ConnectWare
Connectware® is a versatile, plug-and-play
communications module designed to enable
equipment in restaurants, retailers, and other facilities
to connect to the Cloud. Powerhouse Dynamics
developed ConnectWare to take the burden and
expense of communications support from the OEMs
and provide a consistent yet flexible method that
enables their equipment to communicate.
ConnectWare simply plugs into a factory installed
ConnectWare Dock; no installation required.
ConnectWare supports multiple
communications protocols:
• Wi-Fi (includes the highly secure Microsoft
Azure Sphere® chipset)
• Ethernet version also available
• Plug and play across protocols, making it “future
proof ”
Date and Time Prompt (Legacy Only)
The oven maintains a data log that contains
valuable information about the operation of the
oven, including faults, items cooked, and other
events. An accurate date and time are important for
the data log. If the oven loses the date and time as
a result of prolonged disconnection from power, a
prompt will alert the operator to set the date and
time. The prompt will only occur once. If bypassed,
the operator must update the date and time from
the Info Mode Settings screen (see page 25 for
details.)
Registration Prompt (Legacy Only)
At the time the oven is installed, registration
information should be input into the oven
including store number, address, et cetera. This
information is important for warranty tracking
purposes. If registration information is not entered,
you may be prompted by the oven to input the
registration information whenever the oven is
turned on at the start of the day. To eliminate the
prompts, simply fill in the registration information
requested at the prompt screen.
Voltage Selection
For North America oven models, the oven will
detect 208 or 240 incoming voltage.
If incoming voltage for the store is different than
the factory-preset voltage, the operator will be
required to select either 208 or 240. The correct
voltage will be enlarged on the screen, identifying
which option to touch (see Figure 3 below).
Figure 3: Selecting Voltage
ECS-1001 / Rev G / October 2023

5
SPECIFICATIONS AND INSTALLATION
Ventilation
The TurboChef ECO ST oven has been approved
by Underwriter’s Laboratory for ventless operation
(UL KNLZ listing) for all food items except for
foods classified as “fatty raw proteins.” Such foods
include bone-in, skin-on chicken, raw hamburger
meat, raw bacon, raw sausage, steaks, etc. If
cooking these types of foods, consult local HVAC
codes and authorities to ensure compliance with
ventilation requirements.
To ensure continued compliance with all health,
building, and fire codes, you are required to
maintain clean and sanitary conditions around
your oven at all times.
NOTE: In no event shall the manufacturer assume
any liability for damages or injuries resulting from
installations which are not in compliance with the
instructions and codes previously listed. Failure to
comply with these instructions could result in the
issuance of a temporary cease and desist order from
the local health department until the environment
concerns are addressed.
ECS-1001 / Rev G / October 2023ECS-1001 / Rev G / October 2023
6
CLEANING
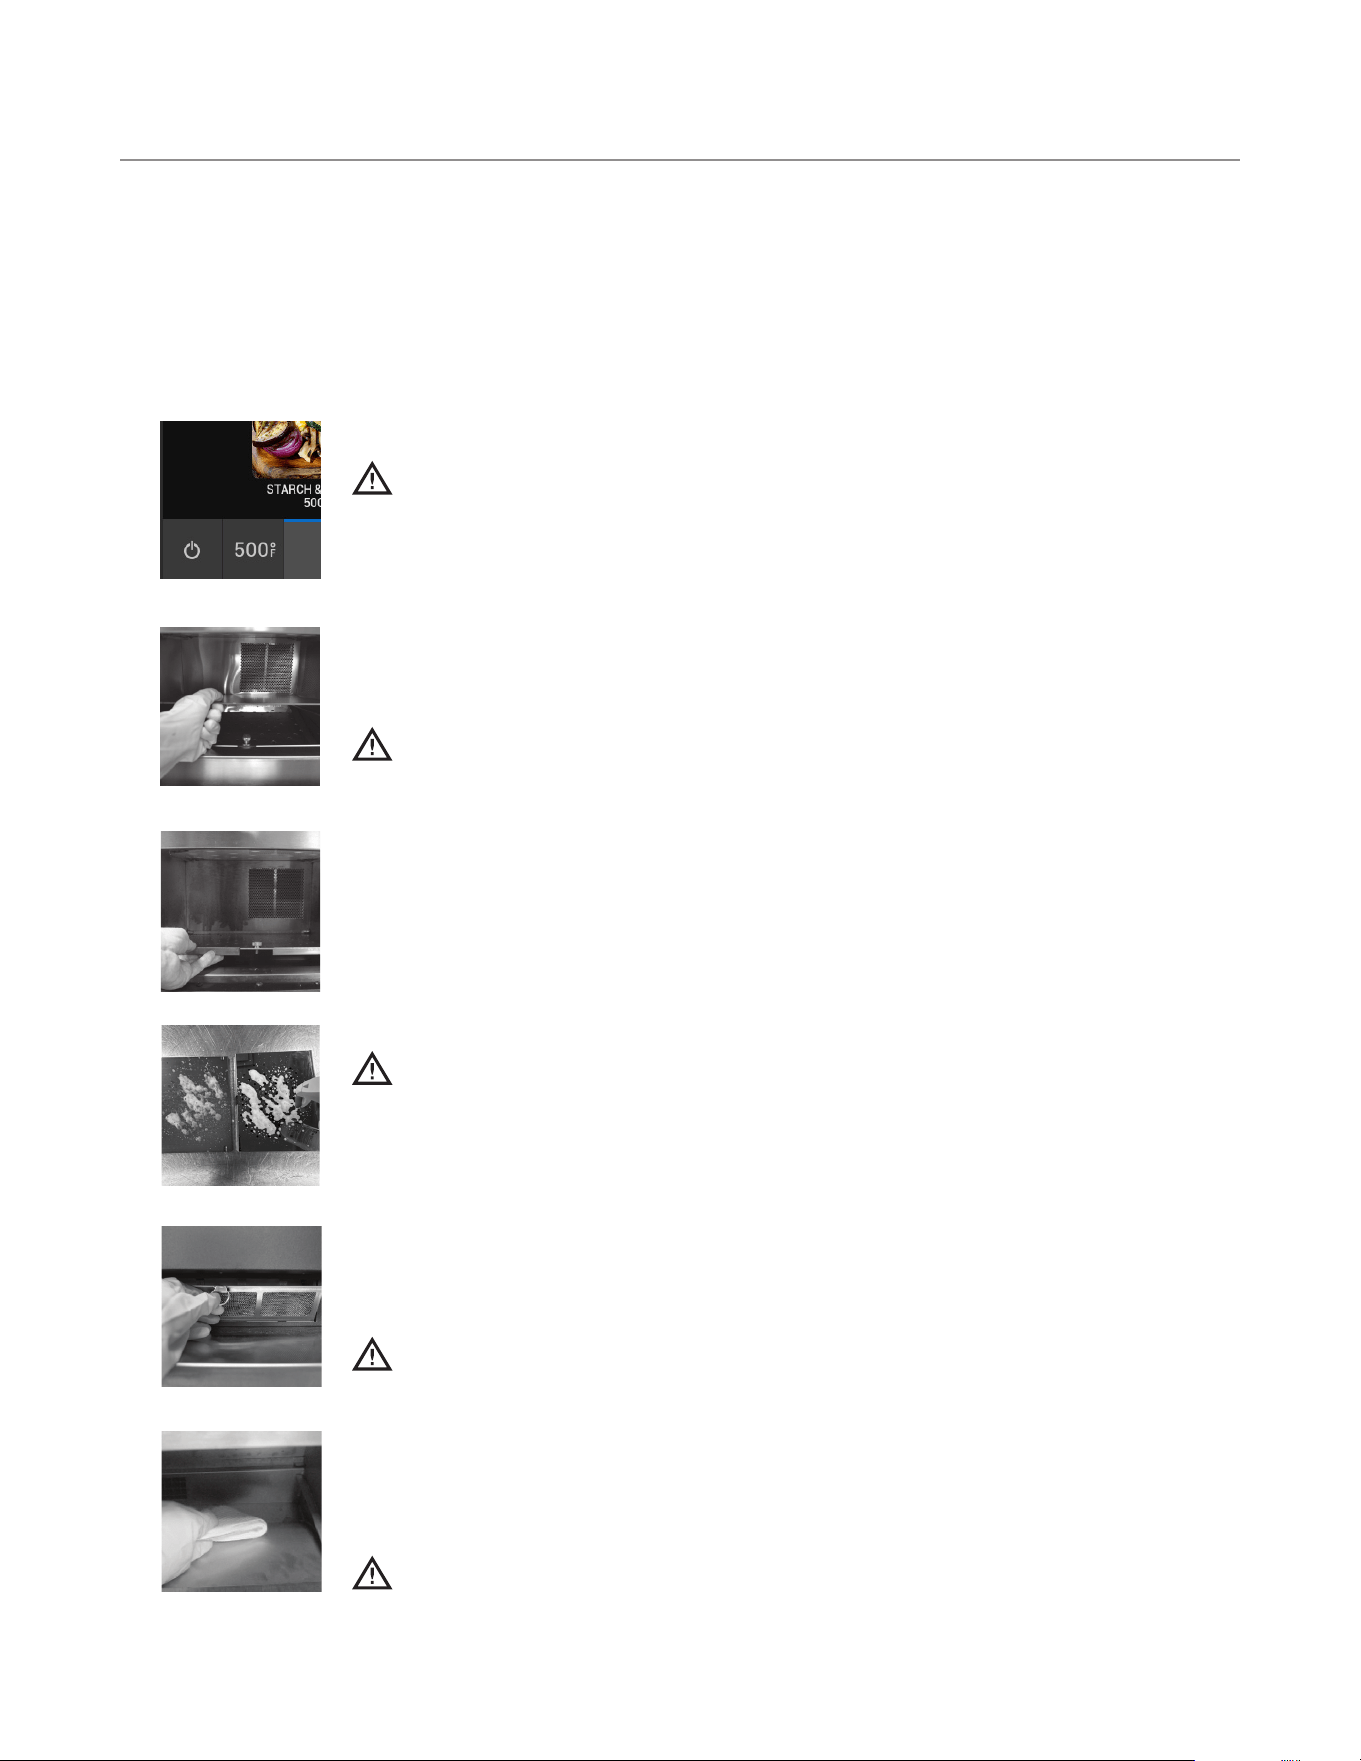
Step 1: Prepare the Oven
WARNING: The oven operates at approximately 500°F (260°C) and may cause injury if
not allowed to cool properly.
• Turn off the oven by touching the Off icon.
• Slightly open the oven door.
• Cooling takes approximately 30 minutes. DO NOT proceed to Step 2 until the oven
displays “ready to clean.”
Step 2: Remove the Cook Plate and Lower Jetplate
WARNING: Be sure the oven interior is cool before removing these items.
• Remove the cook plate from the oven (Step 2, Fig. A).
• Loosen the bottom jetplate thumbscrew.
• Lift the front of the bottom jetplate and pull it out from the cavity (Step 2, Fig. B).
Step 3: Clean the Lower Jetplate and Cook Plate.
• Spray jetplate and cook plate with oven cleaner, scrub with scrub pad.
• Rinse with water and dry with clean towel.
Step 4: Remove the Lower Crumb Tray and Clean the Air Filter
CAUTION: TurboChef does not recognize blocked air vents as a warrantable claim.
The filter must be cleaned regularly or replaced if damaged. During oven operation,
the filter must remain in place at all times.
• Remove the lower crumb tray (under the door) by lifting straight up until the bolts are
free from the retaining slots.
• Empty and clean the lower crumb tray.
• Remove the air filter from the front of the oven. Rinse the air filter with hot water.
• Allow the air filter to dry completely.
CAUTION: DO NOT operate the oven without the air filter in place.
Step 5: Wipe the Oven Interior
• Use a food vacuum or damp towel to remove large particles from the oven cavity.
Step 6: Clean the Oven Interior
• Spray TurboChef Oven Cleaner onto the top, bottom, and sides of the interior.
CAUTION: DO NOT spray Oven Cleaner into the holes on the back oven wall. Doing so
can damage critical oven components, resulting in a non-warranty service call.
• Allow Oven Cleaner to penetrate stains for five minutes.
• Clean the oven interior with a nylon scrub pad.
Daily Maintenance
Follow the steps below when cleaning your ECO
ST oven. Use only TurboChef ®-approved cleaning
chemicals. The use of any other cleaning products
may damage critical oven components, resulting in a
non-warranty service call.
Supplies and Equipment
TurboChef ® Oven Cleaner (Product Number:
105704), TurboChef ® Oven Guard (Product
Number: 105703), nylon scrub pad, cleaning towel,
disposable gloves, protective eyewear, dust mask
(optional).
Step 4
Step 2 (Fig A)
Step 5
Step 2 (Fig B)
Step 1
* The ECO ST includes a standard oven cleaner kit with oven
guard. Product number 10571.
Step 3
ECS-1001 / Rev G / October 2023
7
CLEANING
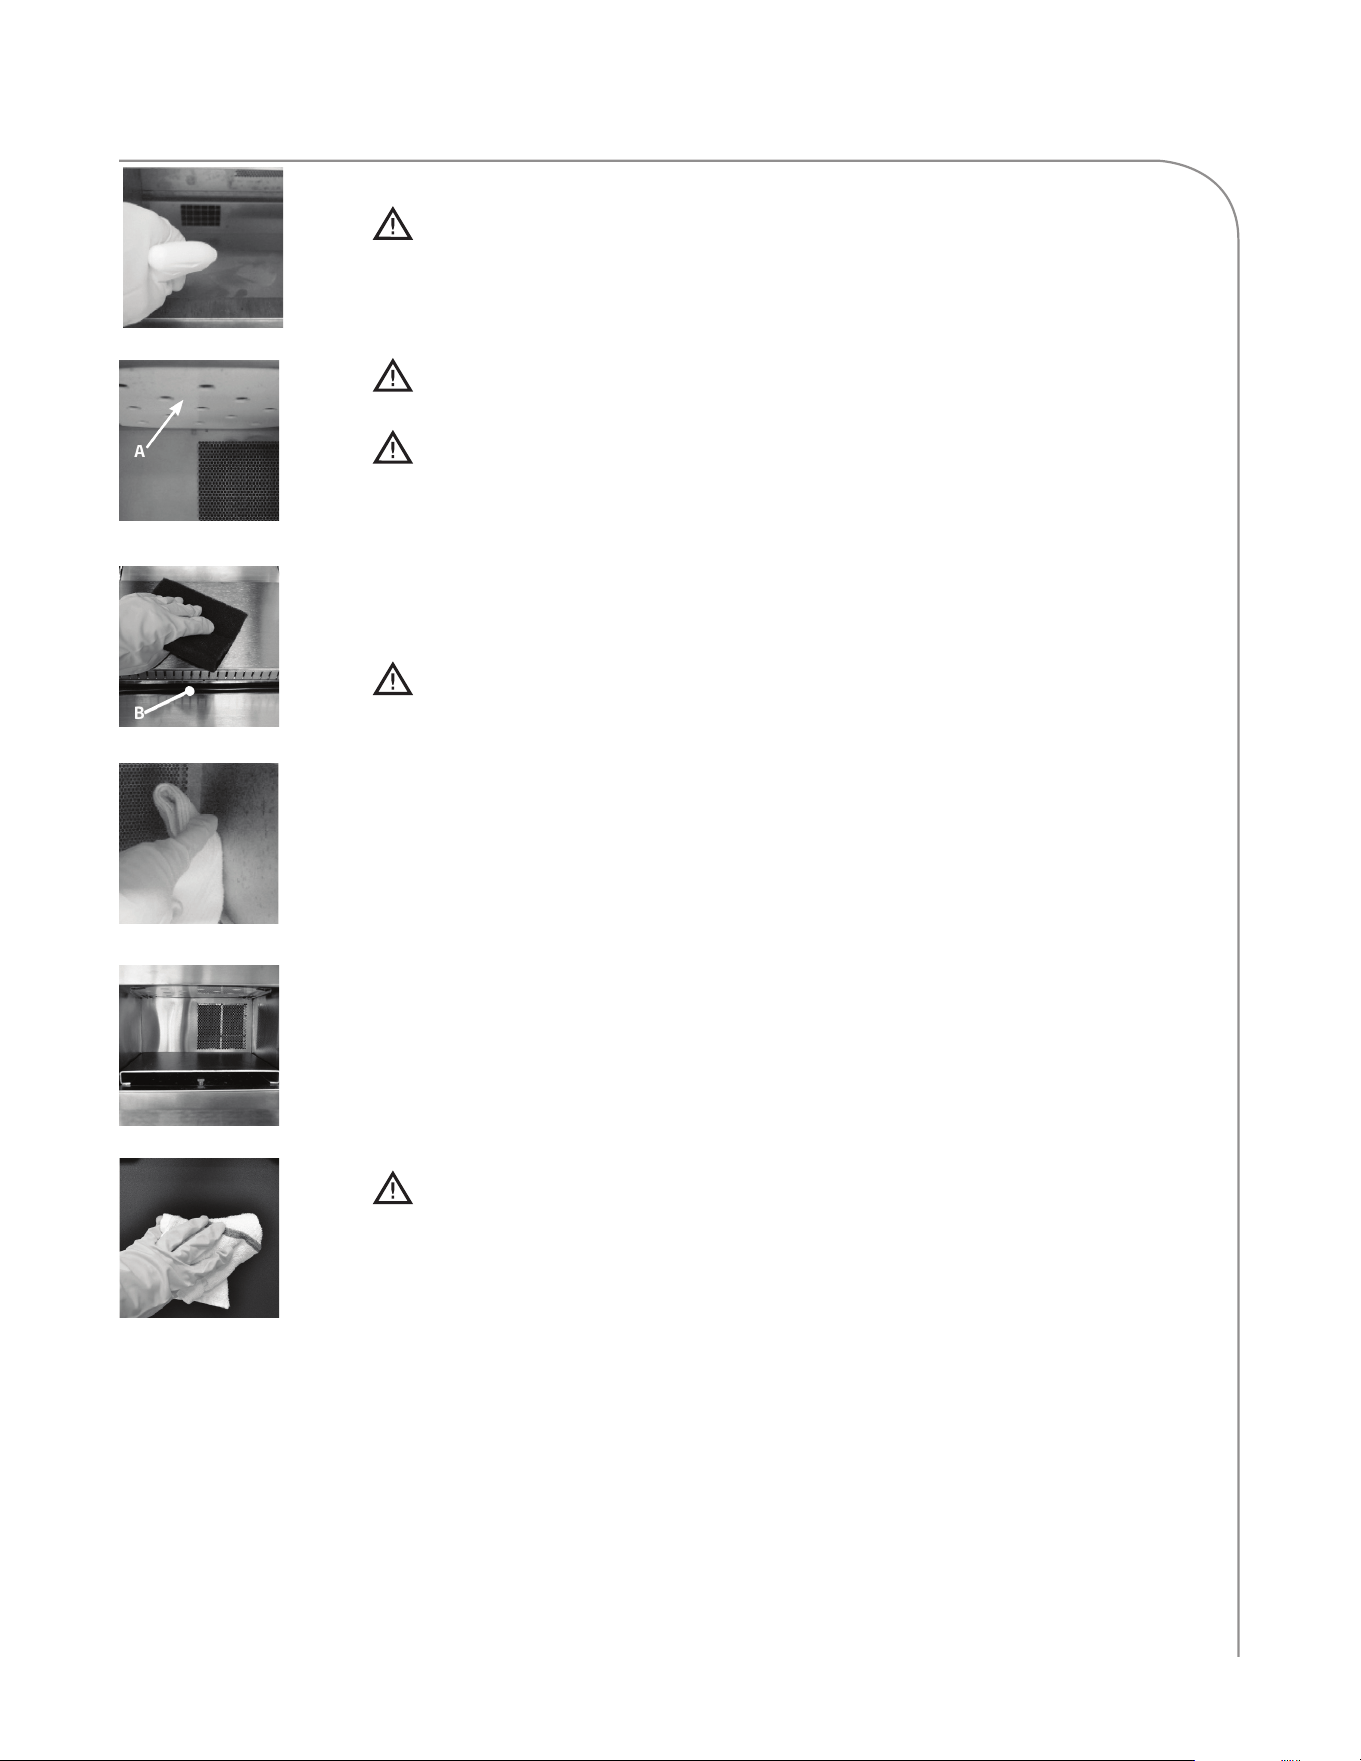
Step 6: Clean the Oven Interior, Continued
CAUTION: DO NOT attempt to scrub the upper jetplate (A). If food is stuck
to the oven ceiling, gently remove it without applying pressure to the glass
plate. Breakage will result in a non-warranty service call.
Step 7: Clean and Dry the Oven Door
CAUTION: DO NOT spray Oven Cleaner directly onto the oven door gasket
(B) or saturate it with water.
CAUTION: DO NOT scrub or attempt to clean the oven door gasket (B).
Doing so may cause the oven door to misalign, resulting in a non-warranty
service call.
• Clean oven door with Oven Cleaner and a nylon scrub pad.
• Wipe the oven door with a damp towel.
Step 8: Rinse or Wipe the Oven Interior
CAUTION: DO NOT use a hose or water jet for cleaning. Doing so can damage
critical oven components, resulting in a non-warranty service call.
• Wipe down the oven interior with a clean damp towel.
• Dry the oven interior with a clean towel.
Step 9: Reinstall Components
• Reinstall the lower jetplate and tighten the thumbscrew.
• Reinstall the cook plate.
• Close the oven door.
• Reinstall the filter, or replace it with a new one if the mesh is deteriorated, has
large openings, or has started to dislodge from the frame.
• Reinstall the lower panel.
Step 10: Clean the Oven Exterior
• Wipe the oven exterior with a clean, damp towel.
CAUTION: DO NOT spray chemicals into any openings, such as the vents below
the door or on the back panel. Doing so can damage critical oven components,
resulting in a non-warranty service call.
• The oven is ready to turn on.
Step 6
Step 7
Step 8
Step 10
Step 9
Step 6, Continued
A
B
ECS-1001 / Rev G / October 2023ECS-1001 / Rev G / October 2023
8
ONETOUCH CONTROLLER OPERATION
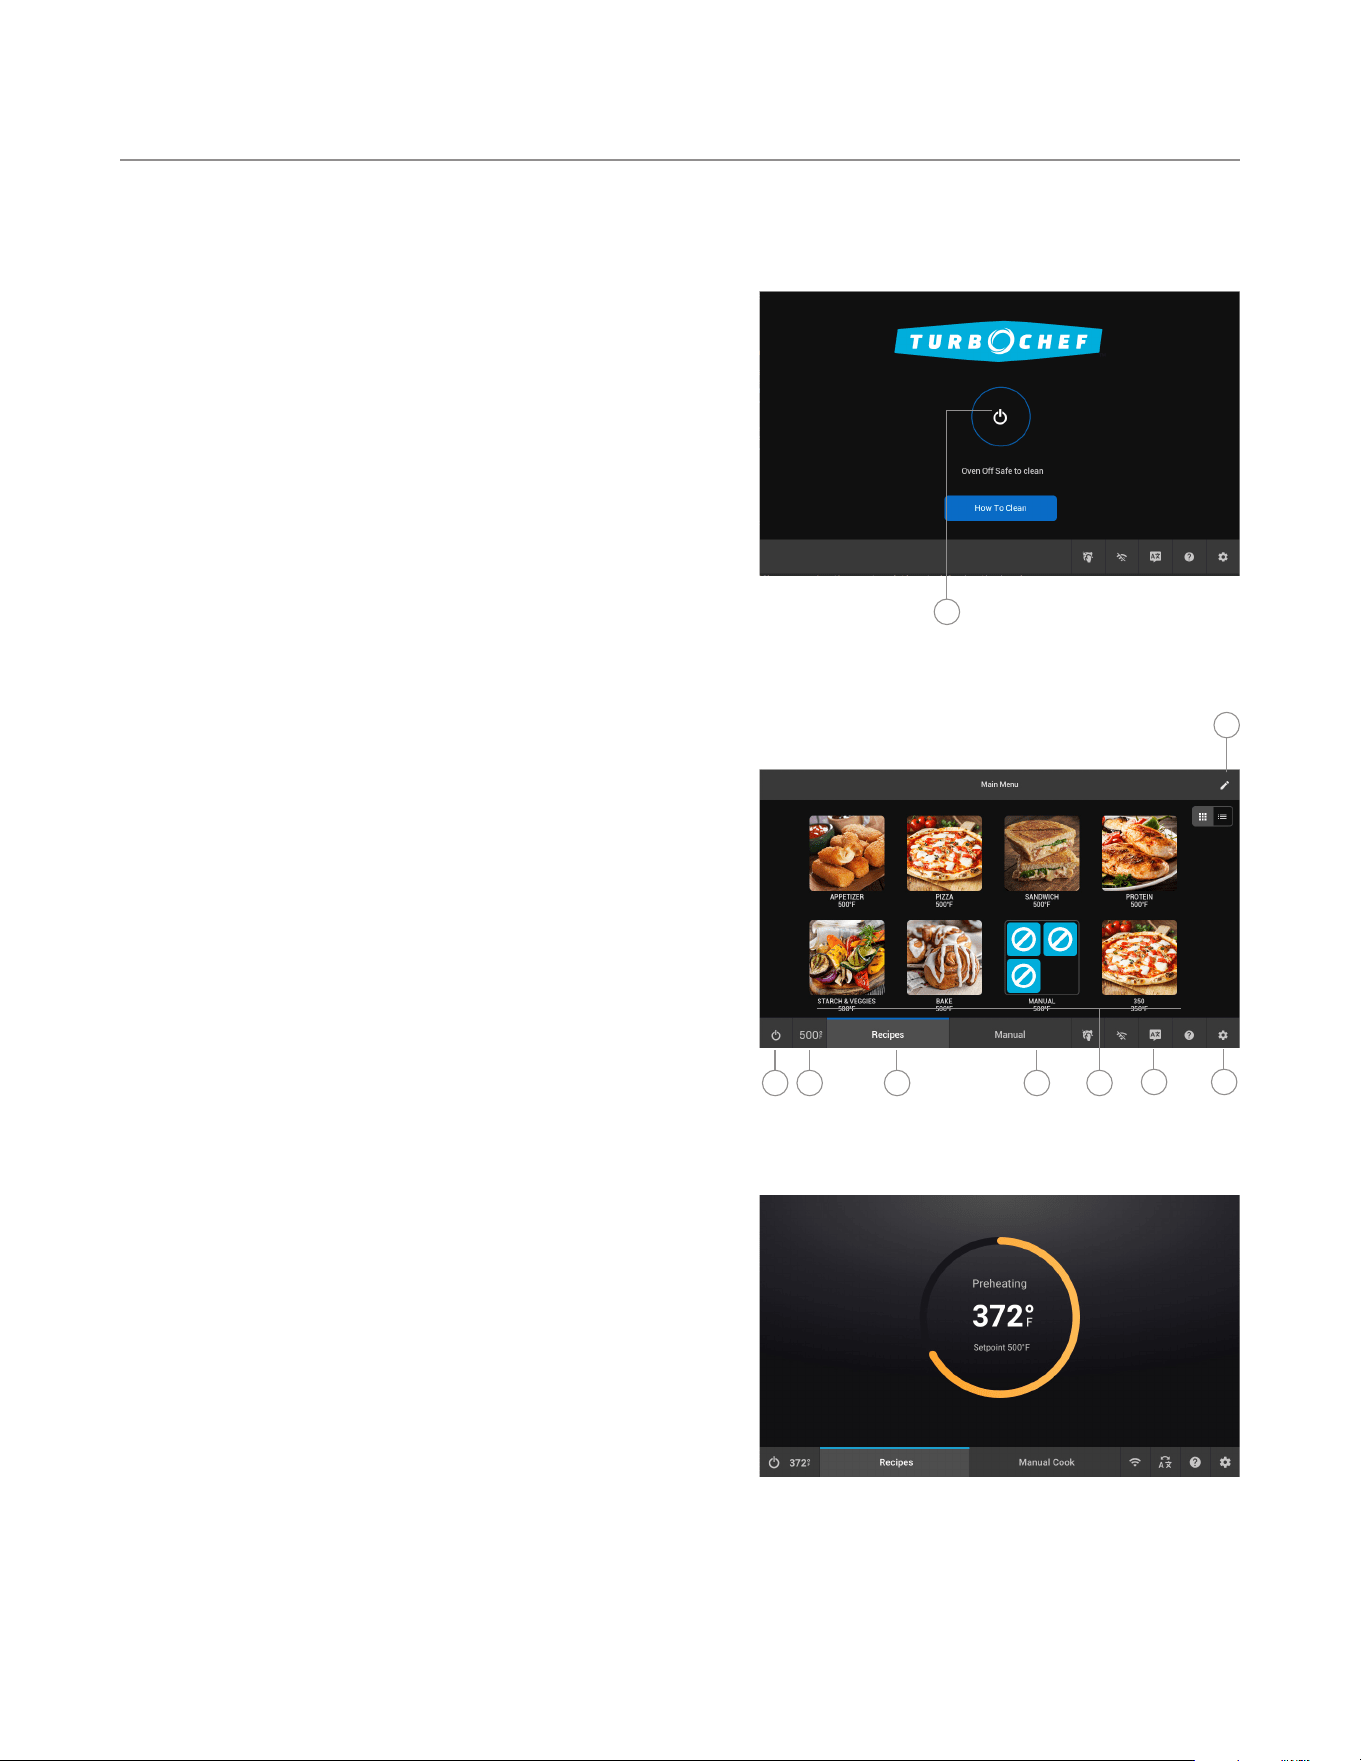
Oven Controls: OneTouch Controller
1. Power Icon
Touch to begin preheating. By default, the oven
preheats to the lowest set temperature.
2. Group Select
Select a group and the oven will preheat to its set
temperature. The set temperature will be displayed
near the group name. If “All Recipes” is selected, the
oven will preheat to the lowest recipe temperature in
the menu.
3. Off Icon
Touch to turn the oven off (cool down).
4. Temperature Icon
While the oven is preheating, touch to view progress
(9). While the oven is at temp (idle), this button
will not be operational, but will display the oven
temperature for informational purposes.
5. Recipes
When in Manual Cook Mode (6) or Preheat Progress
(9), touch “Recipes” to return to Recipe Cook Mode.
If the oven is preheating, it will not allow recipes to
be elected for cooking until the set point is reached.
6. Manual Cook
Touch to enter Manual Cook Mode (page 11).
7. WiFi Network/Network Settings
If the oven is connected via WiFi or Ethernet to
Open Kitchen
TM
, information about the connection
status will be visible here.
8. Settings Icon
Touch to access Settings Mode (page 12).
9. Edit Icon
The Edit icon will only be displayed when Edit Mode
(page 14) is enabled. Touching this icon will allow
you to edit menu items.
10. Preheat Progress
Indicates preheat progress; touch the temperature
icon (4) to view.
Figure 6: Oven Controls: OneTouch Preheat
NOTE: Display options vary depending on which features
are enabled.
1
23 4 5 6
8
9
7
Figure 4: Oven Controls: OneTouch Power On
Figure 5: Oven Controls: Group/Temperature Select
ECS-1001 / Rev G / October 2023
9
ONETOUCH CONTROLLER OPERATION
Recipe Mode: OneTouch Controller
The oven is preprogrammed with recipe settings at the time of manufacture and is ready to operate out
of the box. New menu settings can be loaded via USB (page 13) or programmed manually (page 11). If
settings are not present, the oven will cook only in manual mode (page 11).
This oven uses impingement and microwave to cook food faster than traditional cooking methods.
Air enters the cavity from the top and bottom using a single fan. Because of this design and to ensure
uniformity of cooking, the oven must be operated only while the bottom jetplate is in place. While the
bottom jetplate is removable for cleaning, it is not removable for cooking. Without the bottom jetplate in
place, the oven will not deliver the proper cooking performance to either the top or bottom of the food
item. Additionally, oven damage may result.
The sequence of the steps below may vary, and some may not apply.
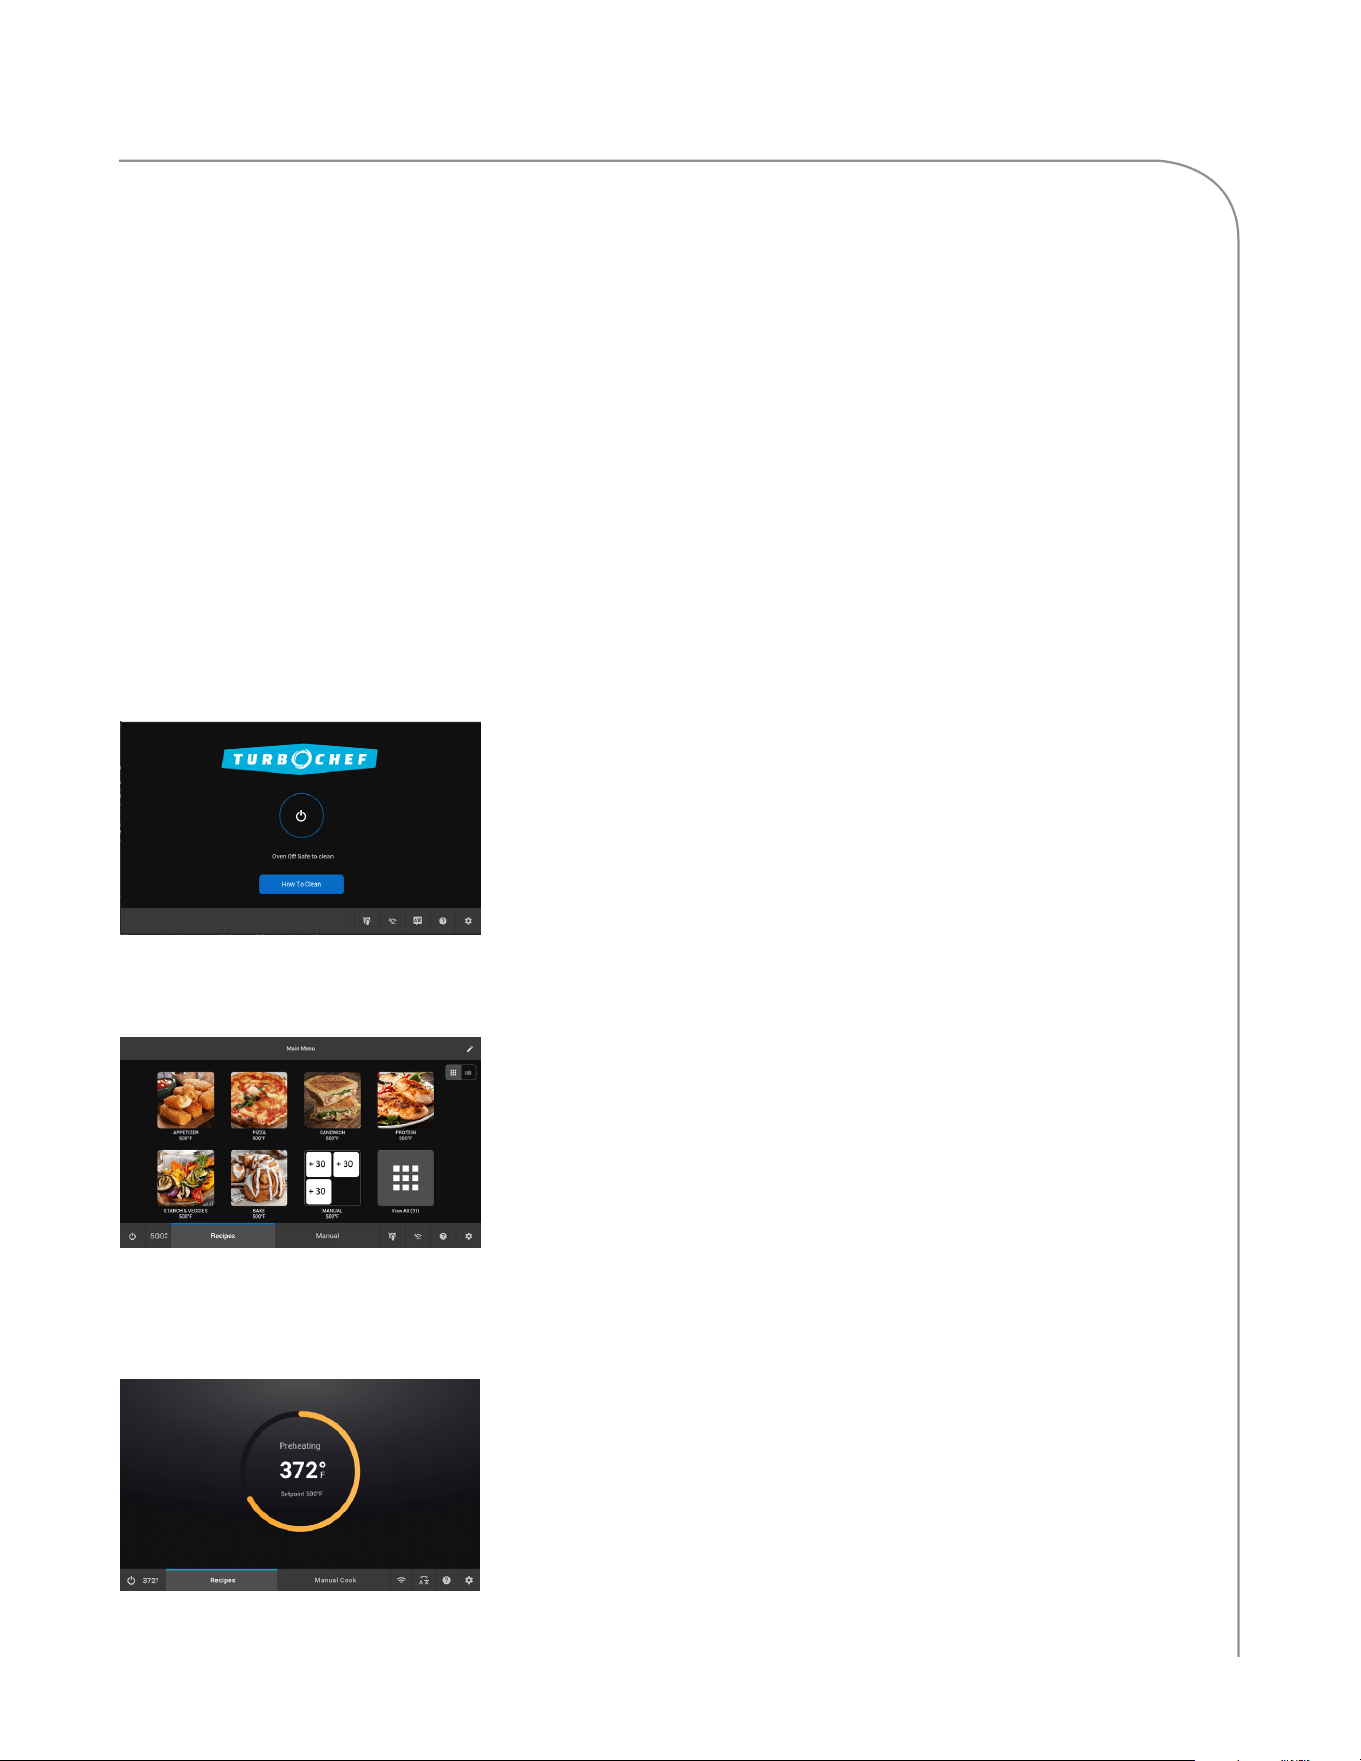
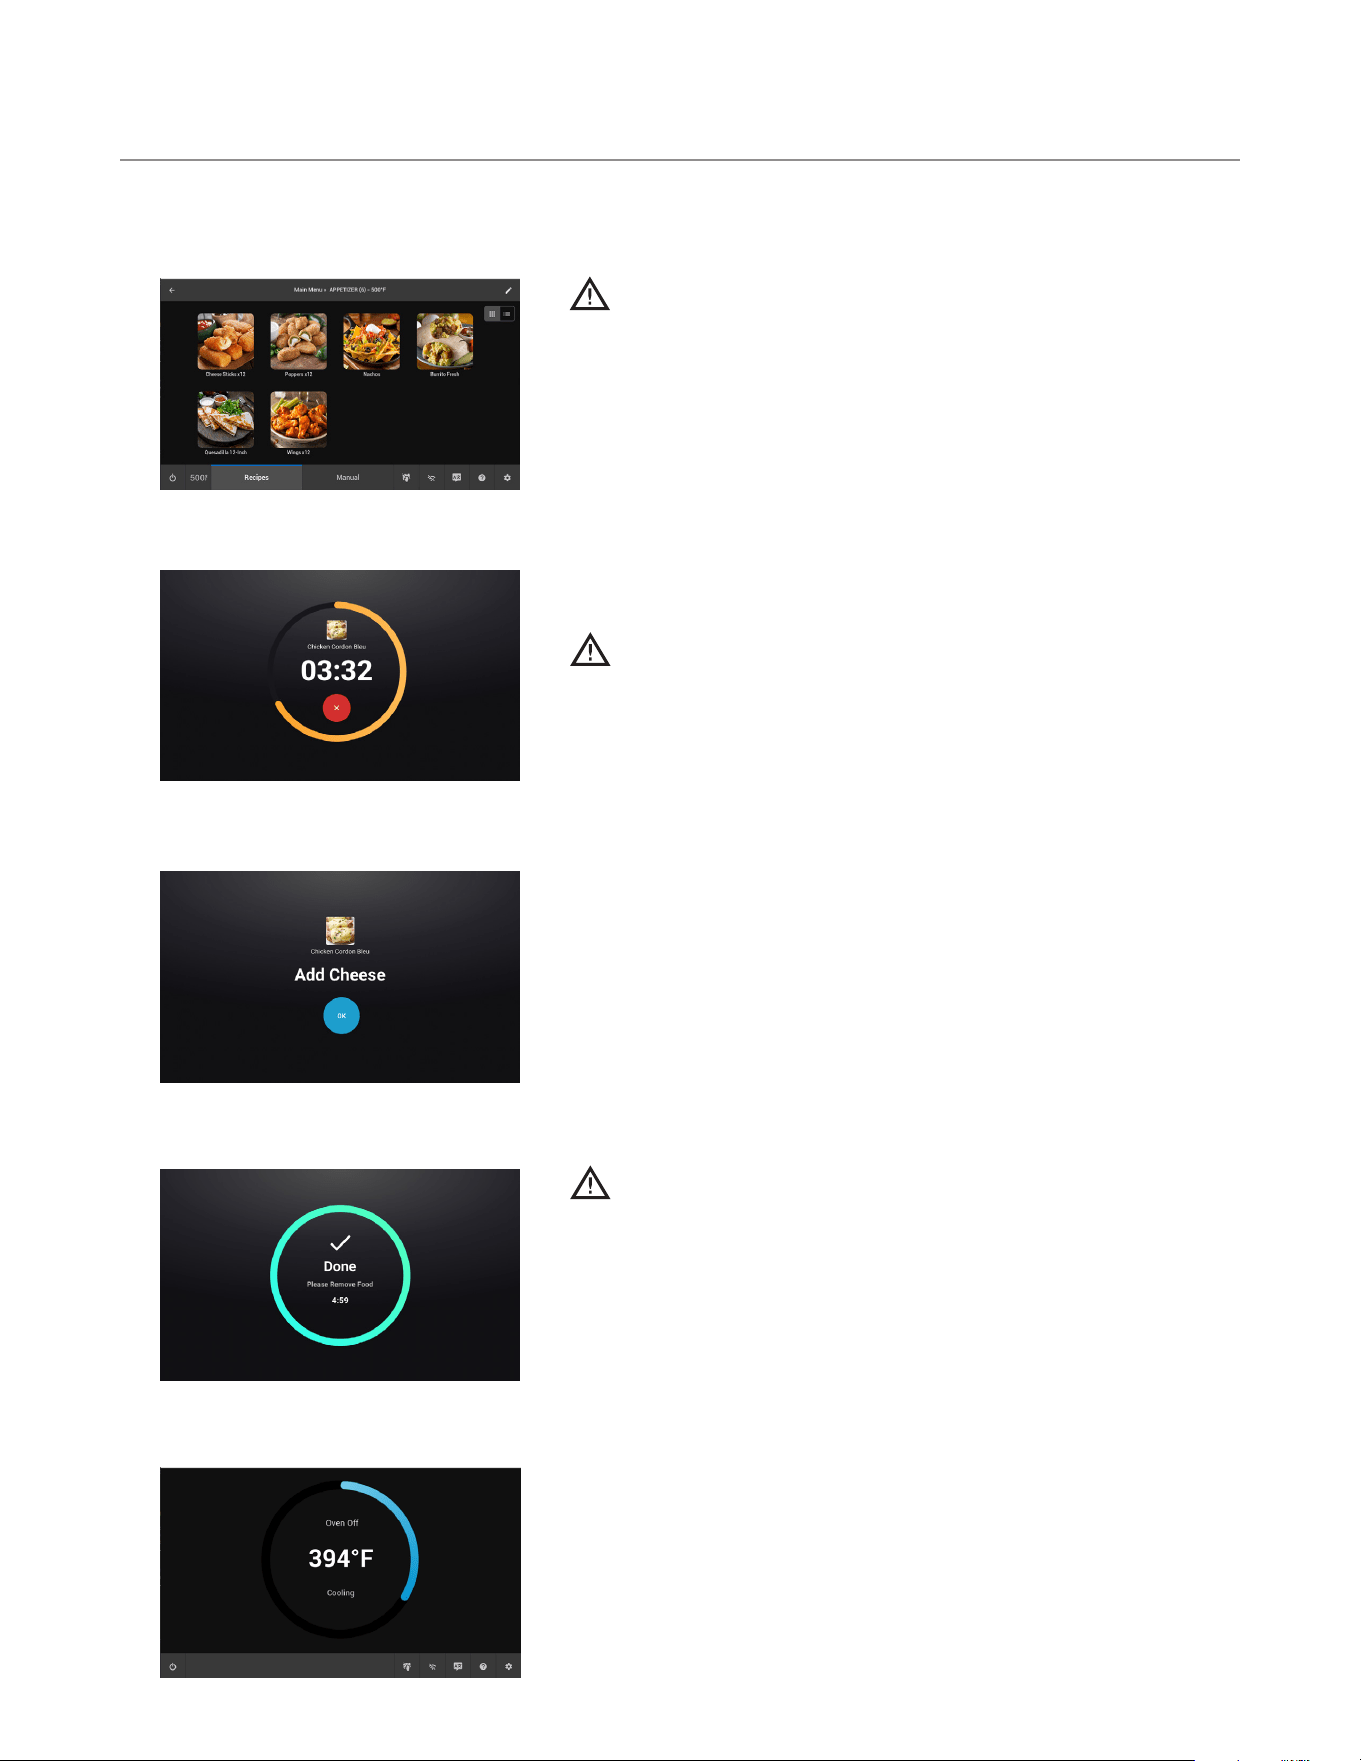
Step 3: Preheat Progress
NOTE: When the oven is done warming up, it will “soak” for an
additional eight minutes. “Soaking” ensures the cavity surfaces
absorb enough heat so that cooking will not be affected.
While the oven is preheating, you can touch the “Recipes” button to
view recipes or select a new group.
Step 2: Select a group to select a set temperature.
NOTE: The legacy controller has universal temperatures. The
OneTouch controller allows temperature to be set per recipe, and
then like-temperature recipes to be added to groups. If multiple
groups contain the same set temperature, then select any one of them
to preheat. Until a group is selected, the oven will preheat to the
lowest set temperature in the menu.
Step 1: Touch the Power Icon in the center of the screen to begin preheat.
Figure 7: Power Icon
Figure 8: Group/Temperature Selection
Figure 9: Preheat
ECS-1001 / Rev G / October 2023ECS-1001 / Rev G / October 2023
10
ONETOUCH CONTROLLER OPERATION
Step 5: Cooking
Note: To immediately stop a cook cycle, touch the red “X.”
CAUTION: Opening the oven door while the cook timer is
counting down could shorten the lifespan of critical oven
components.
Note: If the oven door is opened during a cook cycle, the cycle will
pause until the door is closed.
Step 7: Check/Remove Food from Oven
WARNING: Dish/inside of oven and door are hot!
Note: Some recipes may include an extra timer at the end of a cook
cycle. If this end-of-cycle timer expires, it means the food was left
in the cavity for too long and must be discarded.
Step 4: Place Food in the Oven and Select a Recipe
WARNING: Inside of oven and oven door are hot!
Step 6: Cooking Alerts
Note: Some recipes may include alerts that require action mid-cook.
Step 8: Cooling Down
When finished cooking for the day, touch the power button
(bottom left corner) to begin cooling down.
Figure 10: Recipe Selection
Figure 11: Cooking
Figure 12: Mid-cook Alert
Figure 13: Check Food Timer
Figure 14: Off/Cooling Down
ECS-1001 / Rev G / October 2023
11
ONETOUCH CONTROLLER OPERATION
Manual Cook Mode: OneTouch Controller
Manual Cook Mode allows cooking “on the fly,” whereas Recipe Mode (page 8) allows cooking from preset
cook settings. To access Manual Mode, touch the Manual icon when the oven is preheating or idling in the
Recipe Mode (page 8).
NOTE: If the “Manual” icon is not present, see page 8 to make it appear.
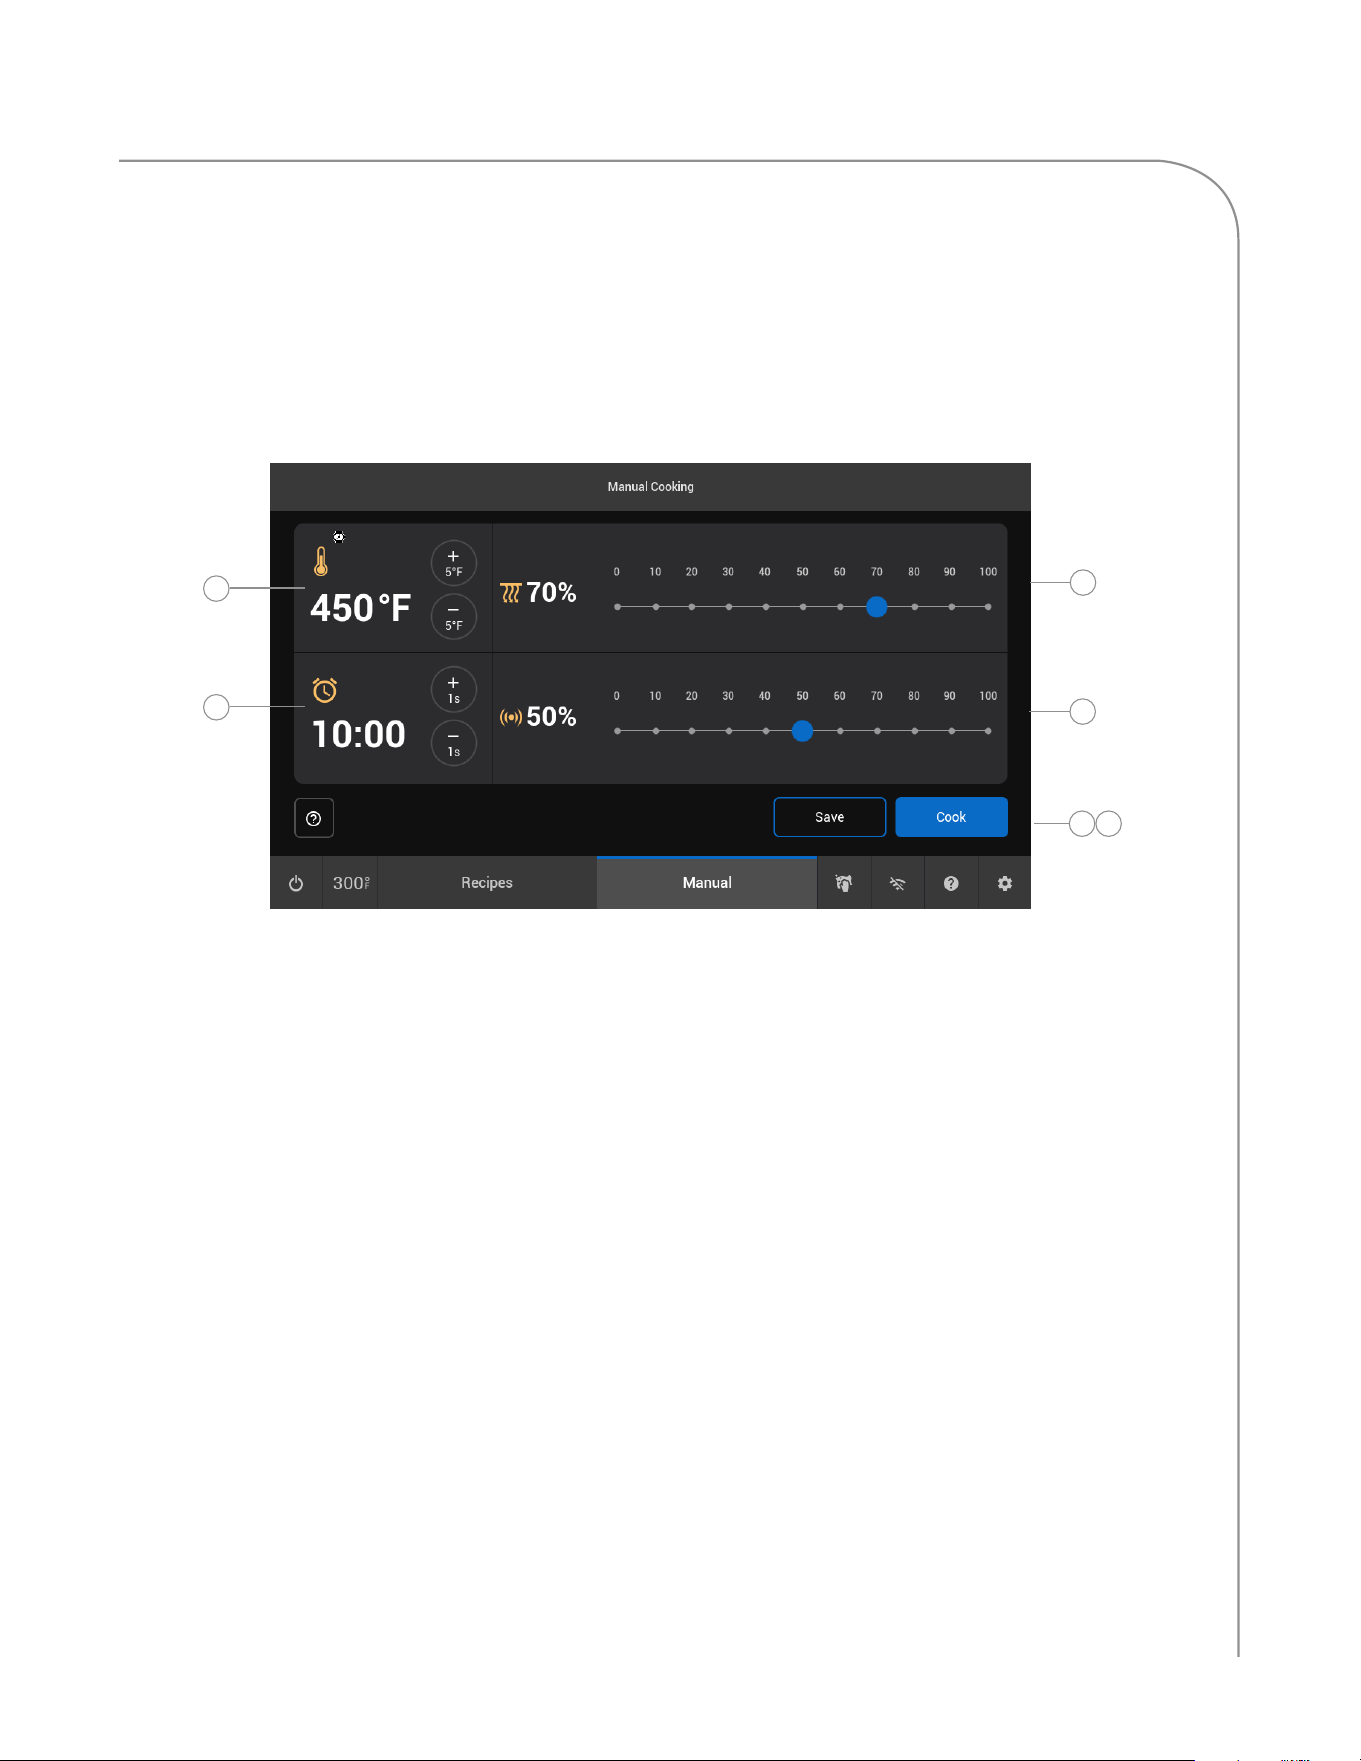
3
1
1. Set Temperature
Temperature can be set by touching or holding
down the +5° or -5° buttons.
2. Time
Time can be set by touching or holding down
the +1 or -1 buttons.
3. % Air
% Air determines the amount of airflow. The
more air, the more the product will brown or
crisp. % Air can be set from 0-100% in 10%
increments.
4. % Microwave
% Microwave determines the amount of
microwave, and can be set from 0-100% in
10% increments. For example, 50% means
the microwave system will remain on for five
continuous seconds for every ten seconds during
the cook cycle.
5. Save to Menu
If you want to save a manual mode setting as a
recipe (page 13), touch “Save.”
6. Cook
Touch to cook.
NOTE: The oven may require additional
warming time before cooking can be performed.
4
5
2
6
Figure 15: OneTouch Manual Mode
ECS-1001 / Rev G / October 2023ECS-1001 / Rev G / October 2023
12
ONETOUCH CONTROLLER OPERATION
Settings Mode: OneTouch Controller
To access the protected sections of Settings Mode,
input your manager passcode. If your organization
has not defined a custom manager passcode, use
the default manager passcode 8648.
From the Settings Mode, access:
- Data Plate
- Data Log
- Oven Settings (see below for more info)
- Fault Counts
- Fault History
- Service Settings
- Network (see below for more info)
Oven Settings
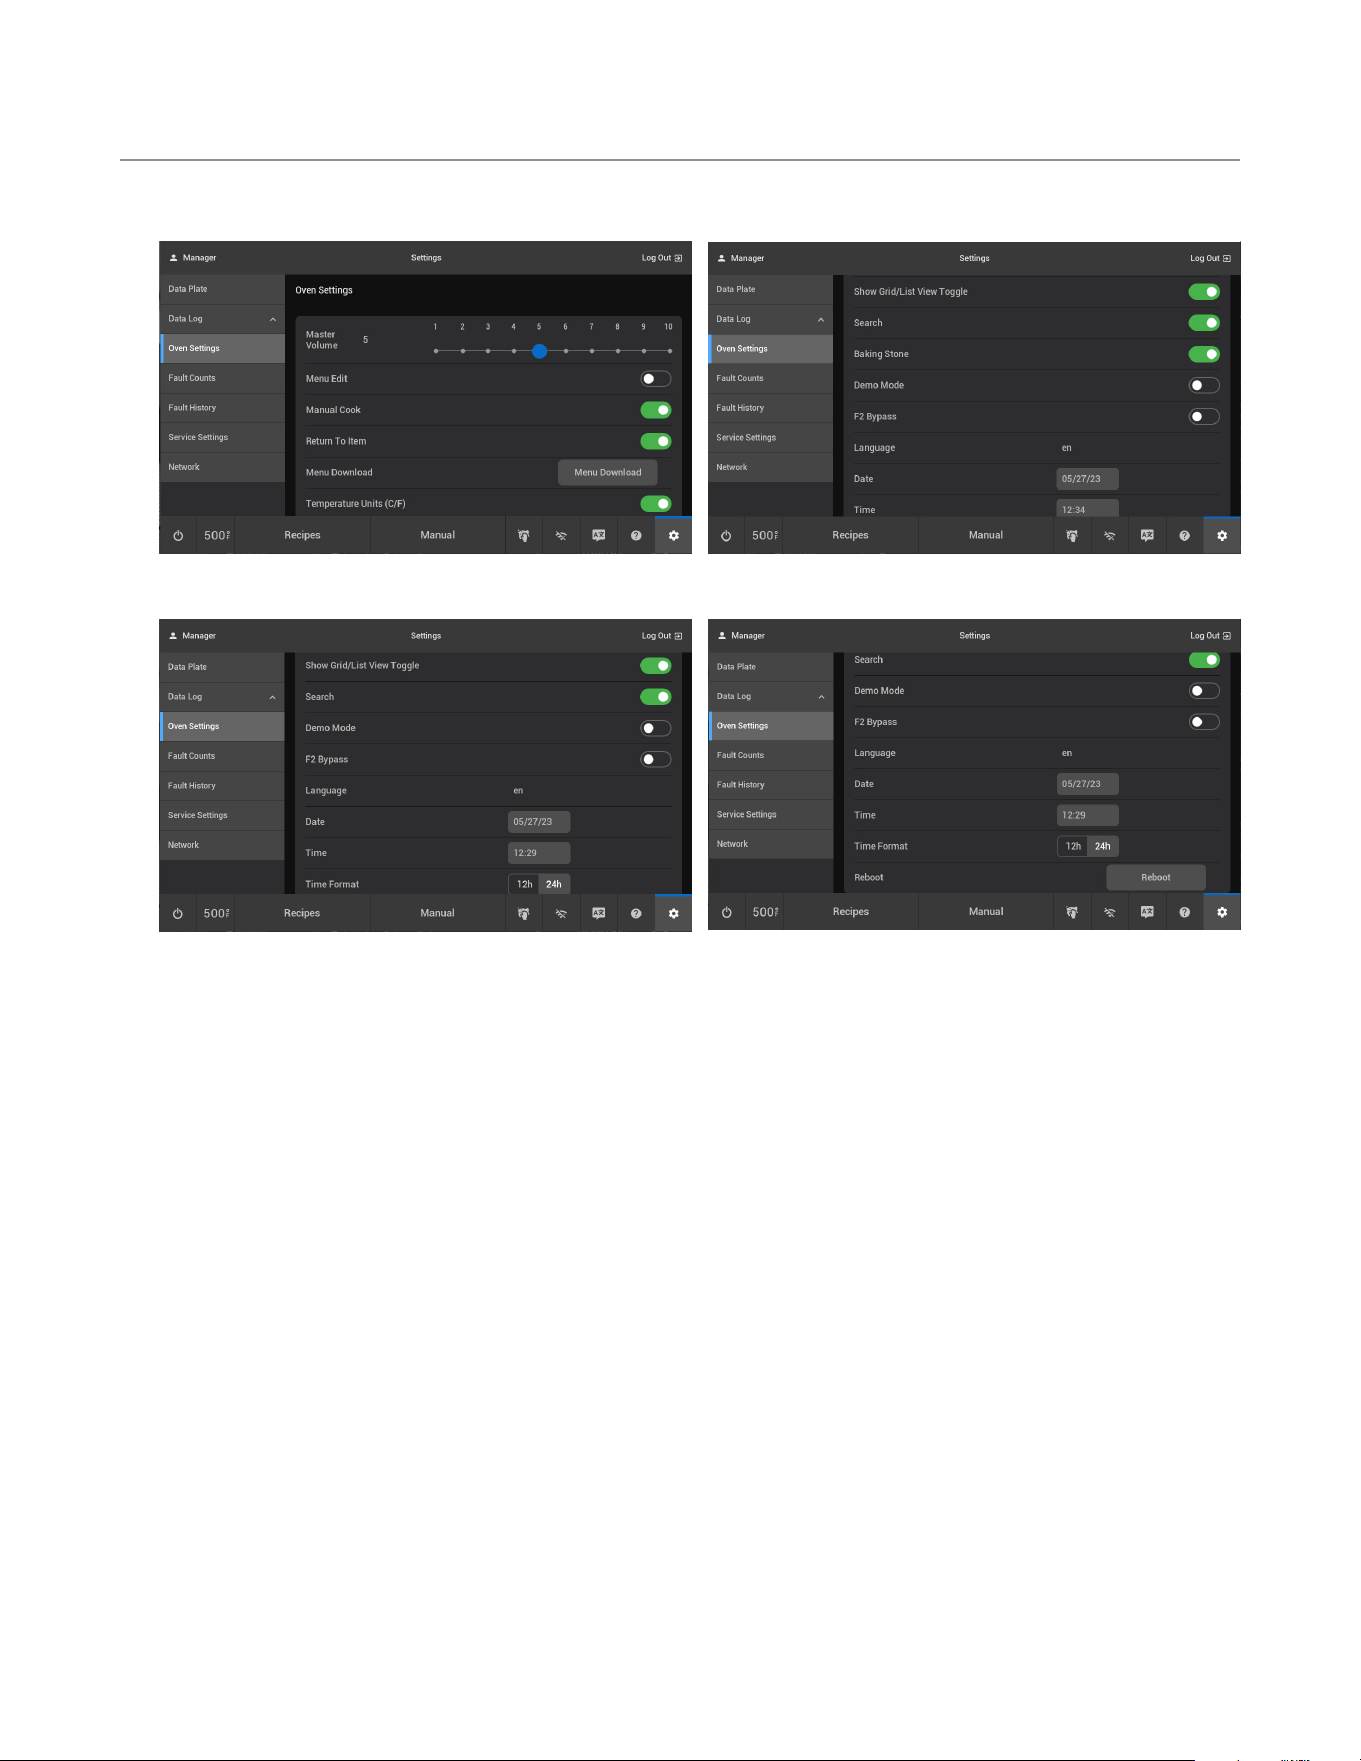
Master Volume
Set the volume from 1-10.
Menu Edit
Enable or disable the button that allows the operator to
edit recipe settings. See page 11 for more details.
Manual Cook
Enable to allow access to Manual Cooking mode.
See page 11 for more details.
Menu Download
Downloads the currently installed menu to a USB
flash drive.
Temperature Units (C/F)
The temperature unit setting is configured at the
factory. Touch to change the temperature unit
settings.
Show Grid/List View Toggle
Enable or disable the button that allows the operator
to change between icon/tile view and list view on the
Group and Recipe screens.
Search
Allows for a quick recipe search.
Demo Mode
Demo Mode is a feature used to demonstrate the
cooking features of the oven without turning on the
heaters or microwave system. Demo Mode must be
disabled during regular operation.
Figure 16a: OneTouch Settings Menu (Part 1)
Figure 16b: OneTouch Settings Menu (Part 2)
Figure 16c: OneTouch Settings Menu (Part 2 Bullet Only)
Figure 16d: OneTouch Settings Menu (Part 3)
ECS-1001 / Rev G / October 2023
13
ONETOUCH CONTROLLER OPERATION
F2 Bypass
The F2 alarm indicates the oven temperature is
to low. F2 Bypass Enabled means the oven will
not terminate a cook cycle when an F2 alarm
is encountered. The oven will still log the fault
condition. F2 Bypass Disabled means the oven will
function as it normally would; i.e., when an F2
alarm is discovered during a cook cycle, the oven
will terminate the cook cycle.
Language
The default language is English. To change to
another language, touch “Language: English”
and then touch the preferred language and touch
“ENTER.” The available languages are:
Date/Time/Time Format
These options allow the user to set the date, time,
and time format. If the oven is connected to the
internet, the date and time will synchronize with an
online world clock.
Reboot
Restarts the controller/equipment.
Network
If the oven is connected to a ConnectWare module
or via Ethernet, information about the connection
status will be visible here. WiFi credentials (if
applicable) can also be input/changed.
Load Menu from USB: OneTouch
Controller
USB setup: When loading from USB, the recipe file
and images/icons must be compressed into a .TGZ
file. If saving the menu from the oven (see below),
the oven will create the .TGZ file in a way that
can be loaded easily to other ovens. ChefComm
OneTouch also creates .TGZ files for recipe
updates.
A .TGZ menu file is not backwards-compatible for
the legacy controller.
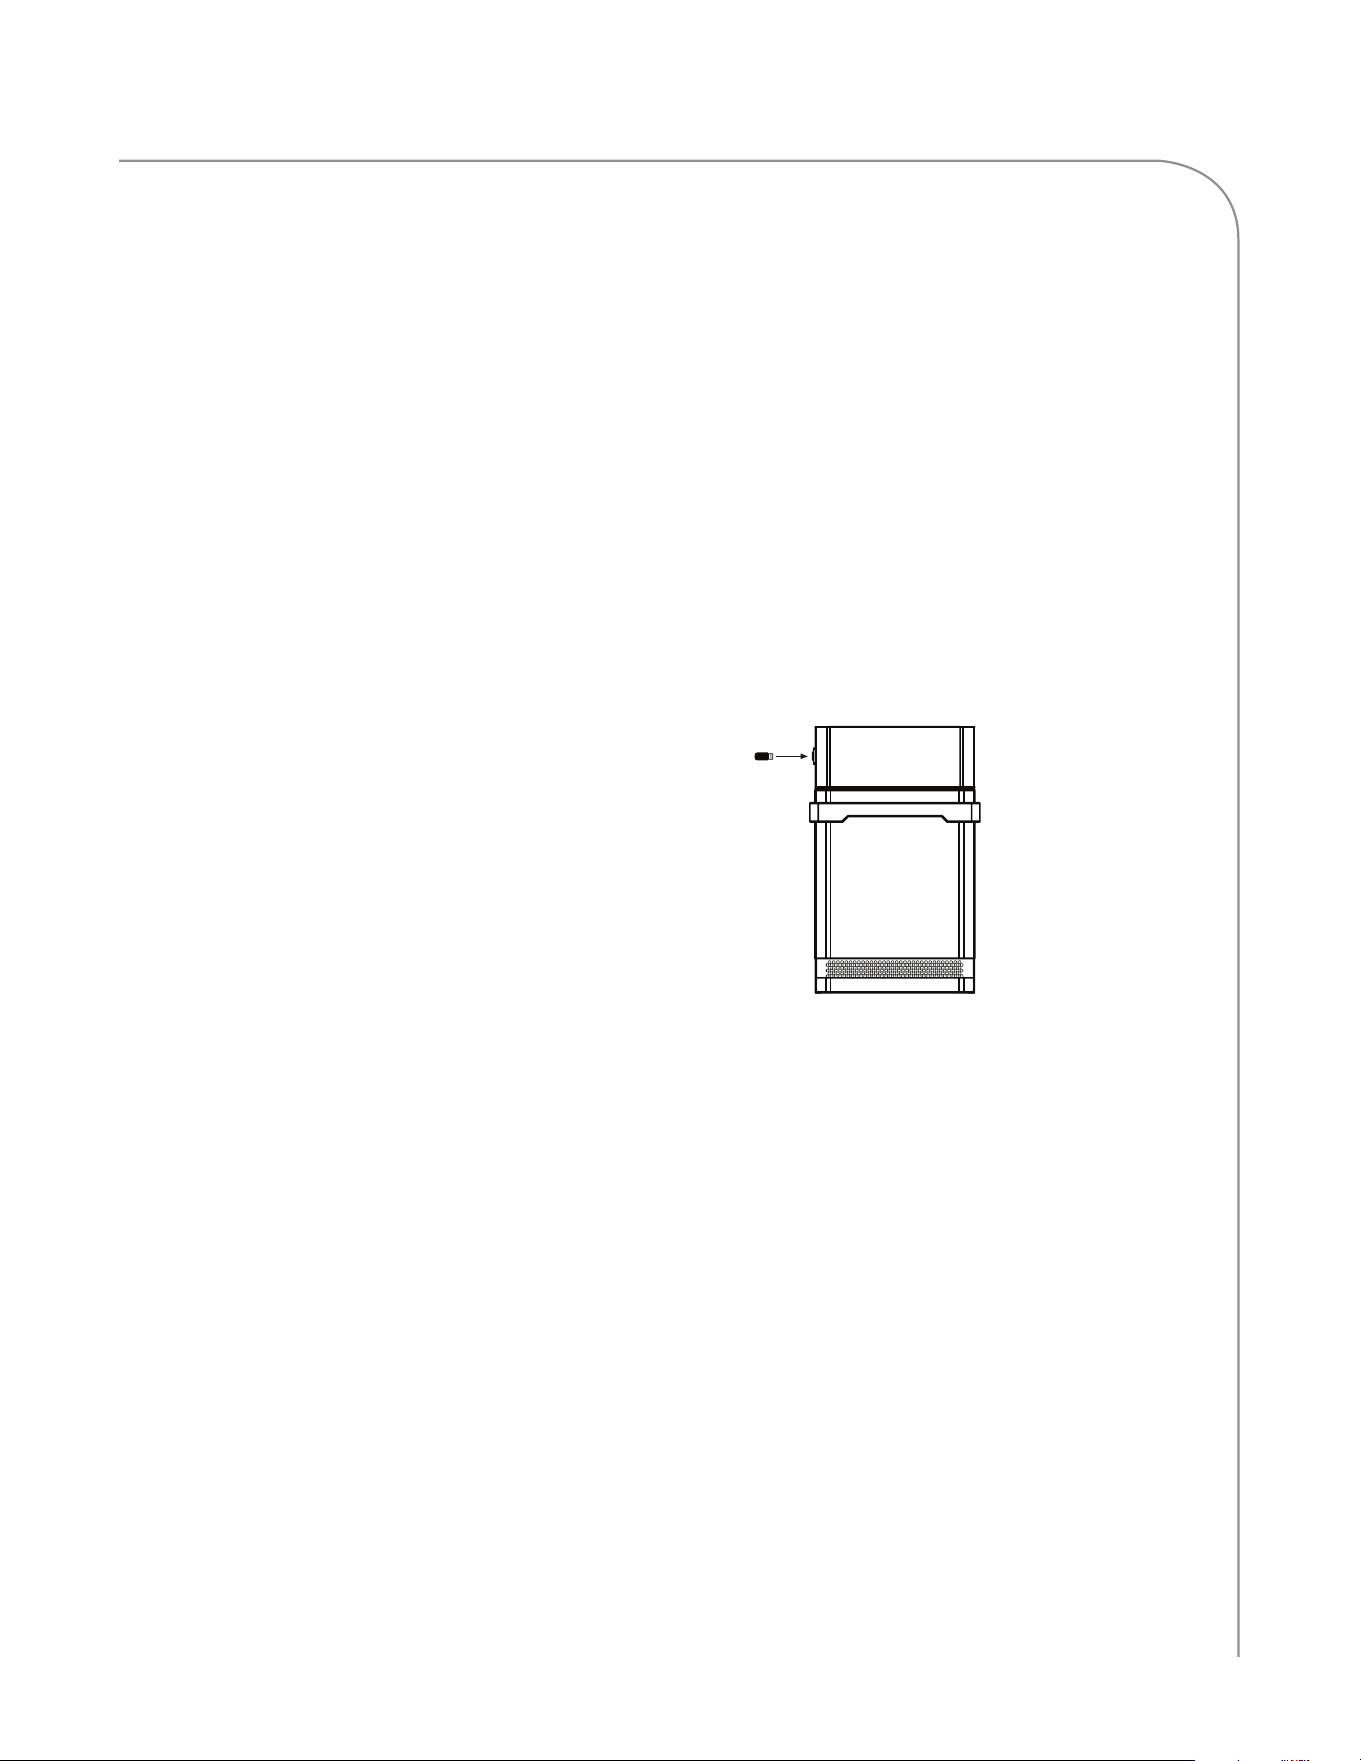
When the oven is off or cooling down, insert the
USB (see below).
Figure 17: Insert USB
The oven will automatically detect the device. Select
“Update” to proceed or “Cancel” to cancel.
The update will take several seconds, after which
the controller will reboot one or two times. After
the controller reboots, wait 10 seconds and then
remove the USB drive.
NOTE: The process is identical for updating
oven firmware. Do not update firmware unless
instructed by the factory.
Save Menu to USB: OneTouch
Controller
See Menu Download on page 12.
ECS-1001 / Rev G / October 2023ECS-1001 / Rev G / October 2023
14
ONETOUCH CONTROLLER OPERATION
Edit Mode: OneTouch Controller
To enable Edit Mode,
1. Touch the Settings icon (page 8)
2. Enter your passcode to access Oven Settings (see
Page 12).
3. Set the “Editing” toggle to the on position.
The “Editing” icon will appear on the top-right corner
of the screen when in menu mode (see page 8). When
“Editing” is touched the operator can create, delete,
move, or edit a group or item.
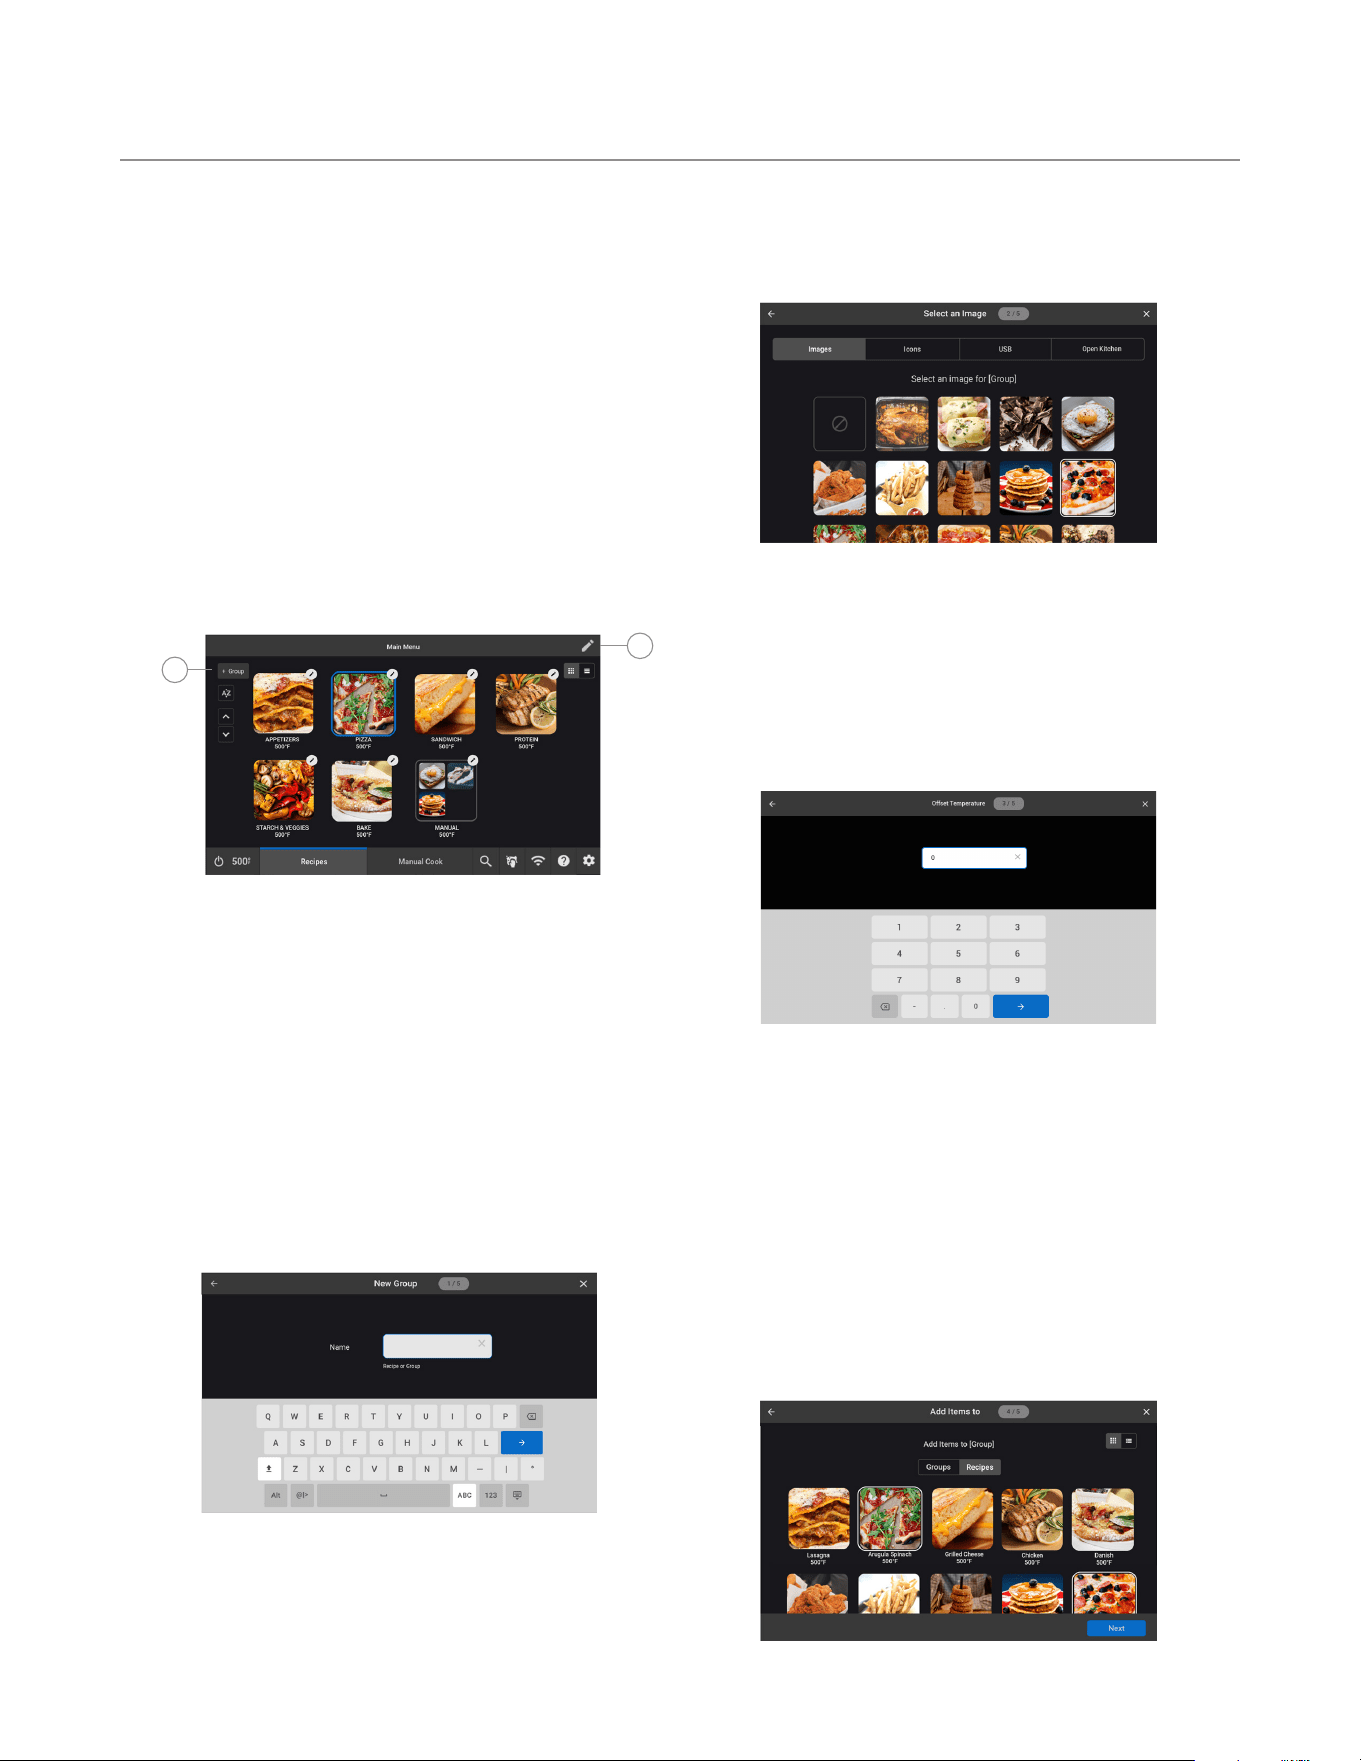
Creating a Group
1
2
Figure 18: Edit Mode: Create Group
NOTE: At any time, touch the “X” in the top-right
corner to cancel the action of creating a group.
From the group select screen:
1. Touch the Edit button in the top-right corner of
the screen (Figure 18, above).
If the edit button is not present, verify it is
enabled in the Settings menu (see page 8).
2. Touch the “+Group” button (Figure 18, above).
3. Input the group name and touch the blue arrow
button to continue (Figure 19, below).
Figure 19: Name New Group
4. Select an image and touch the blue “Save”
button (Figure 20, below).
Figure 20: Select Group Image
NOTE: If you have a USB drive with image files
inside a folder named “Images,” insert it from this
screen and select “USB” to assign the image.
5. Bullet Only: Input the “idle” offset temperature
and touch the blue arrow button to continue
(Figure 21).
Figure 21: Input Idle Offset (Bullet Only)
NOTE: The offset temperature is recipe-specific;
it allows the bottom heater to provide more or less
heat for different browning results. For optimal
performance, the “idle”setting being assigned
per this step should match the average or most
common offset values in the recipes assigned to
this group.
6. Add recipes (or subgroups) to the group by
selecting/deselecting each recipe, and click the
blue “Next” button.
Figure 22: Add Recipes/Subgroups
ECS-1001 / Rev G / October 2023
15
ONETOUCH CONTROLLER OPERATION
NOTE: The set temperature of the first recipe
determines the temperature for the group. If some
recipes were developed at a different set temperature,
they will not be selectable after the first recipe is selected.
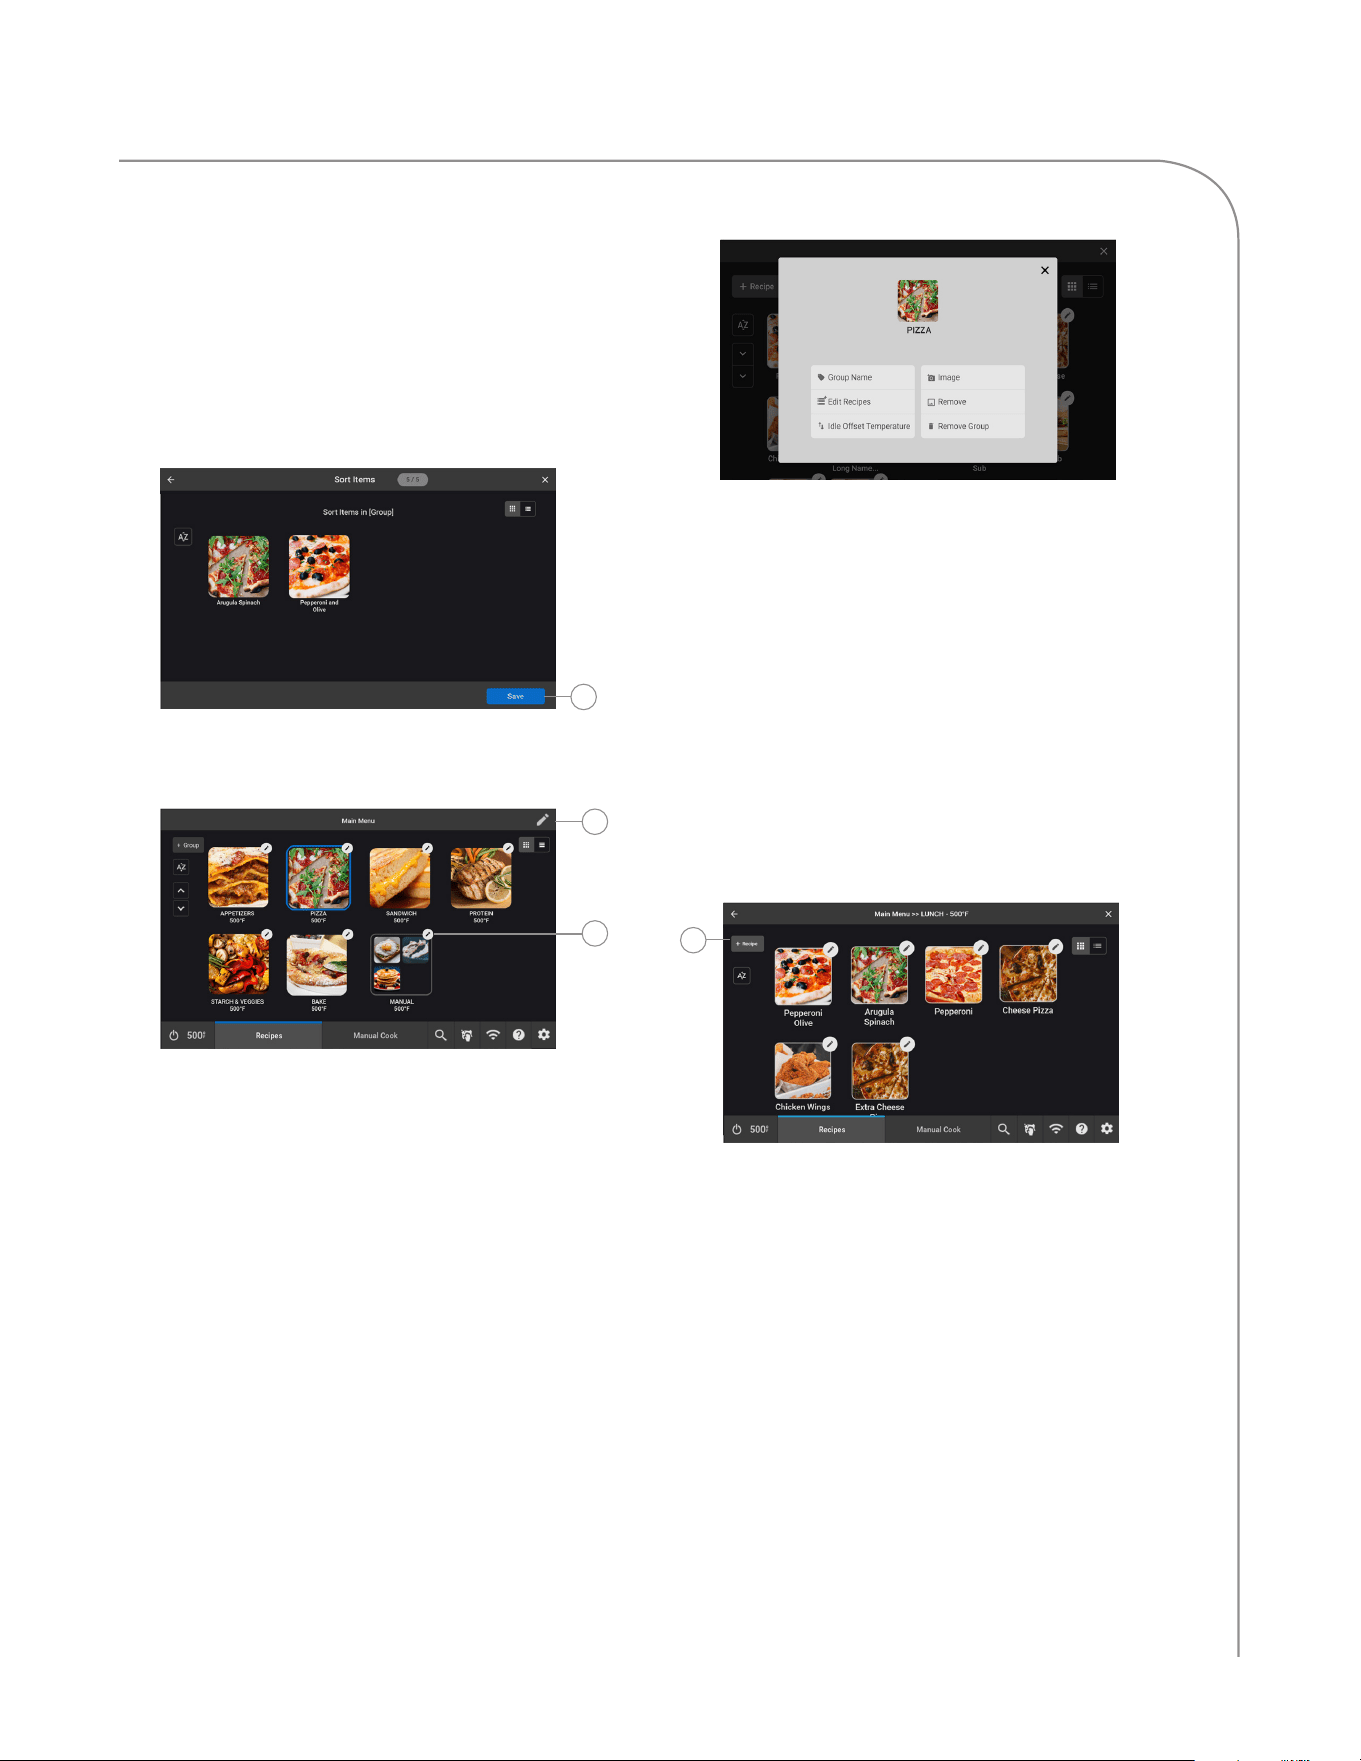
7. Sort the recipes you assigned to the group by
touching and dragging the item icons. When
finished, touch the blue “Save” button.
7
Figure 23: Sort Items in Group
Editing a Group
1
2
Figure 24: Select Group to Edit
NOTE: At any time, touch the “X” in the top-right
corner to cancel the action of editing a group.
From the group select screen:
1. Touch the Edit button in the top-right corner of
the screen (Figure 24, above).
If the edit button is not present, verify it is
enabled in the Settings menu (see page 8).
2. Touch the Edit Pencil button for the group you
want to edit (Figure 24, above).
3. Select an option (Figure 25, adjacent column).
Figure 25: Edit Group Options
NOTE: See the previous section “Creating a Group”
(page 14) for more information about:
- Group Name
- Image
- Move
- Remove Group
NOTE: See section “Editing a Recipe” for more
information about the “Edit Recipe” option.
Creating a Recipe
3
Figure 26: Add/Create Recipe
NOTE: At any time, touch the “X” in the top-right
corner to cancel the action of creating a recipe.
From the group select screen:
1. Select a group for which you want to add or
create a recipe.
NOTE: To create a recipe without selecting a
group, select the “all recipes” button.
2. Touch the Edit button in the top-right corner
of the screen. If the edit button is not present,
verify it is enabled in Settings (see page 14).
3. Touch the “+Recipe” button (Figure 26, above).
4. Select “New”.
ECS-1001 / Rev G / October 2023ECS-1001 / Rev G / October 2023
16
ONETOUCH CONTROLLER OPERATION
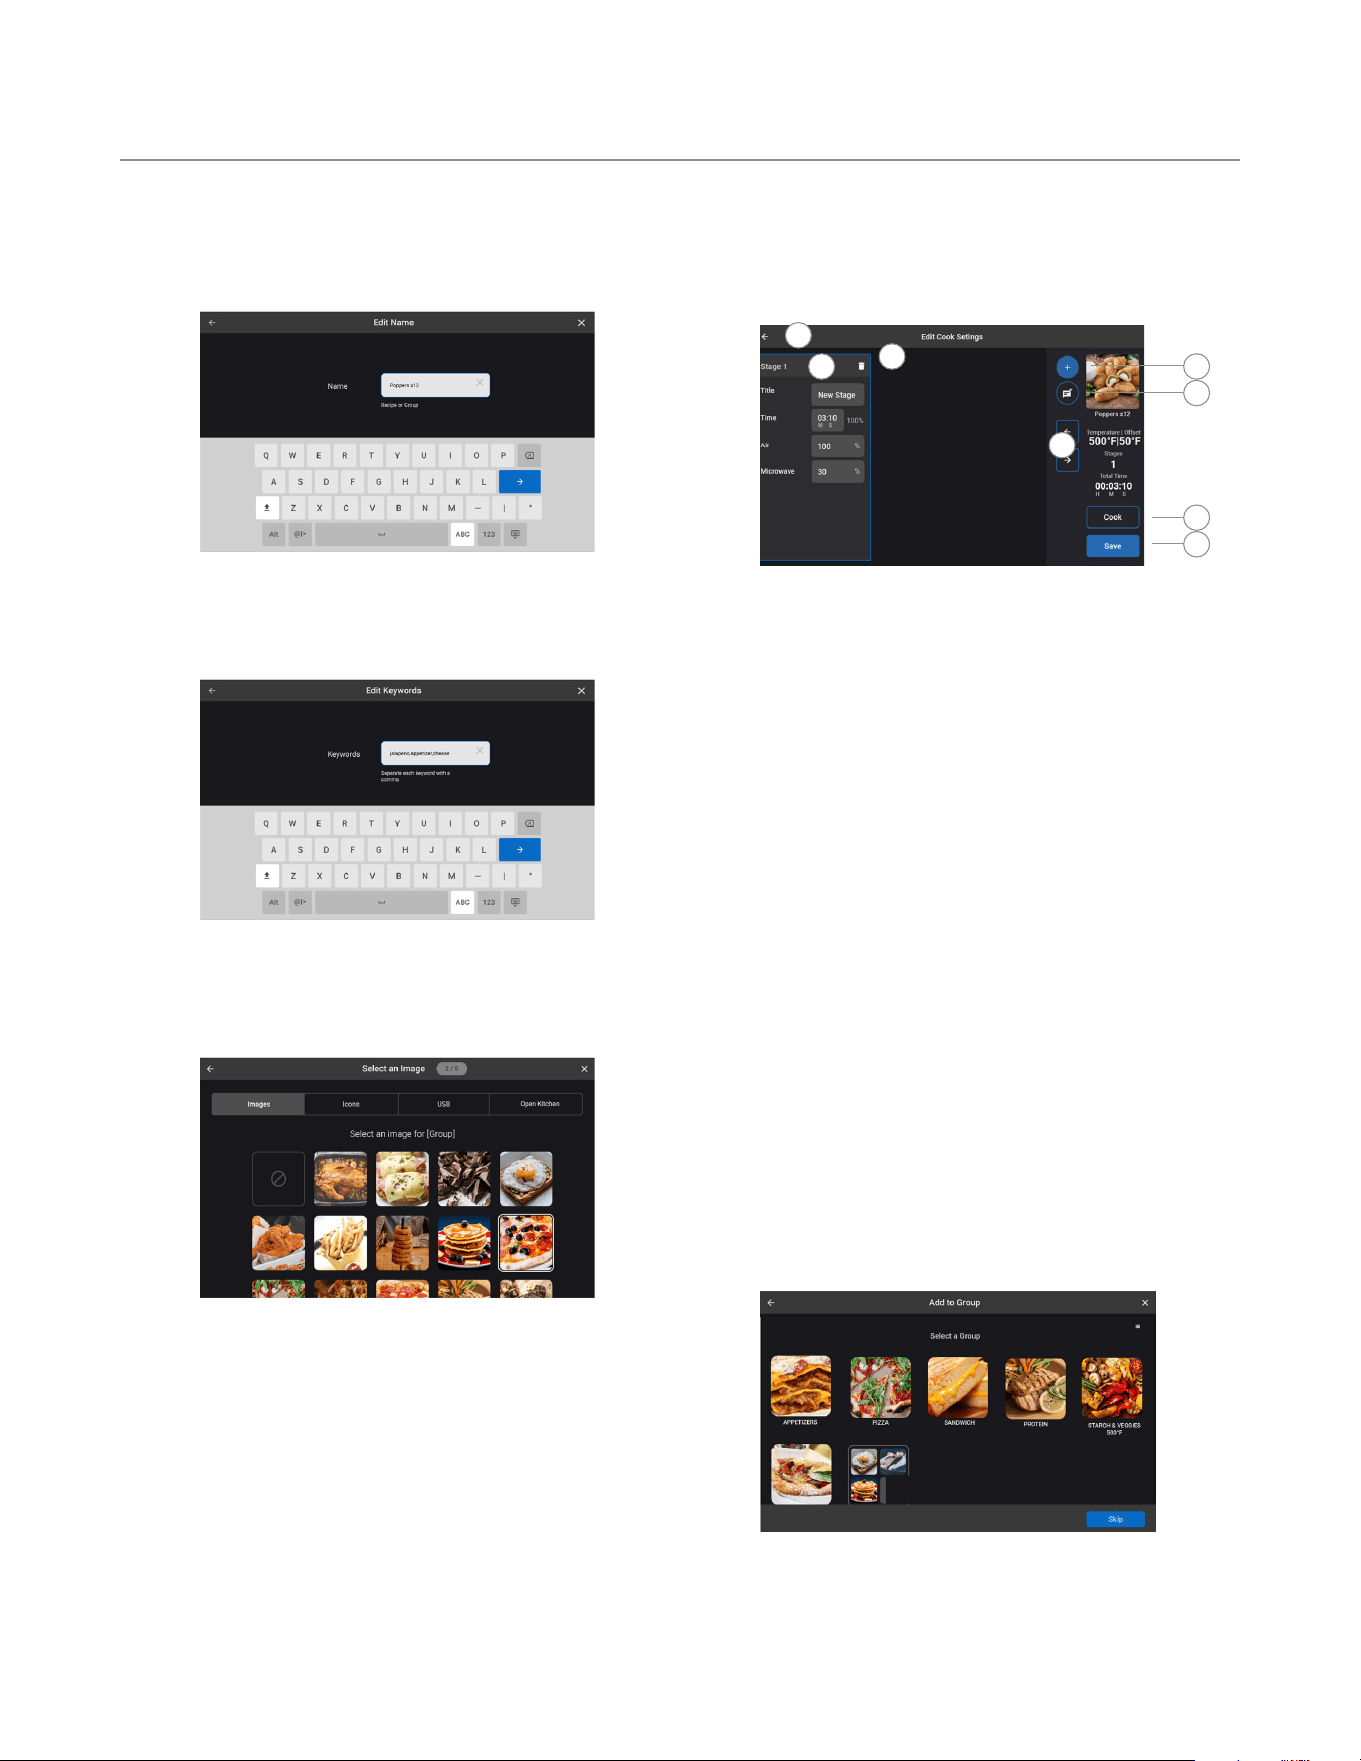
5. Input the recipe name and touch the blue arrow
button to continue (Figure 27, below).
Figure 27: New Recipe Name
6. Input keywords for the search option and touch
the blue arrow button to continue (Figure 28).
Figure 28: New Recipe Keywords
7. Select an image and touch the blue “Next”button
(Figure 29, below).
Figure 29: Select Image for New Recipe
NOTE: If you have a USB drive with image files
inside a folder named “Images,” insert it from this
screen and select “USB” to assign the image.
8. Input the recipe temperature and touch the blue
arrow button to continue.
NOTE: This option will only appear if you
opted to create a recipe from the “All Recipes”
screen. Otherwise, the recipe temperature will be
applied from the group from which “+Recipe” was
selected.
9. Add cook settings:
a
c
d
e
f
g
b
h
Figure 30: New Recipe Cook Settings
a. Touch the “+” button to add a stage.
b. Touch the stage to reorder it or to edit cook
settings including:
- Cook time per stage
- Percent air per stage
- Percent microwave per stage
c. Touch the trash can to delete a stage.
d. Touch the note button to add a cooking note
that will appear in the cook cycle between
stages. See step 6 on page 12 for more
details.
e. Touch the left or right arrows to rearrange
stages.
f. Touch “Cook” to perform a test cook.
g. Touch “Save” to continue.
h. Touch the back arrow to return to the
previous step (see step 9).
10. Select which group(s) to which the recipe will be
added (Figure 31, below).
Figure 31: Select Groups to Place Recipe Into
11. Touch “Next” (or “Skip” if no groups are
selected).
ECS-1001 / Rev G / October 2023
17
ONETOUCH CONTROLLER OPERATION
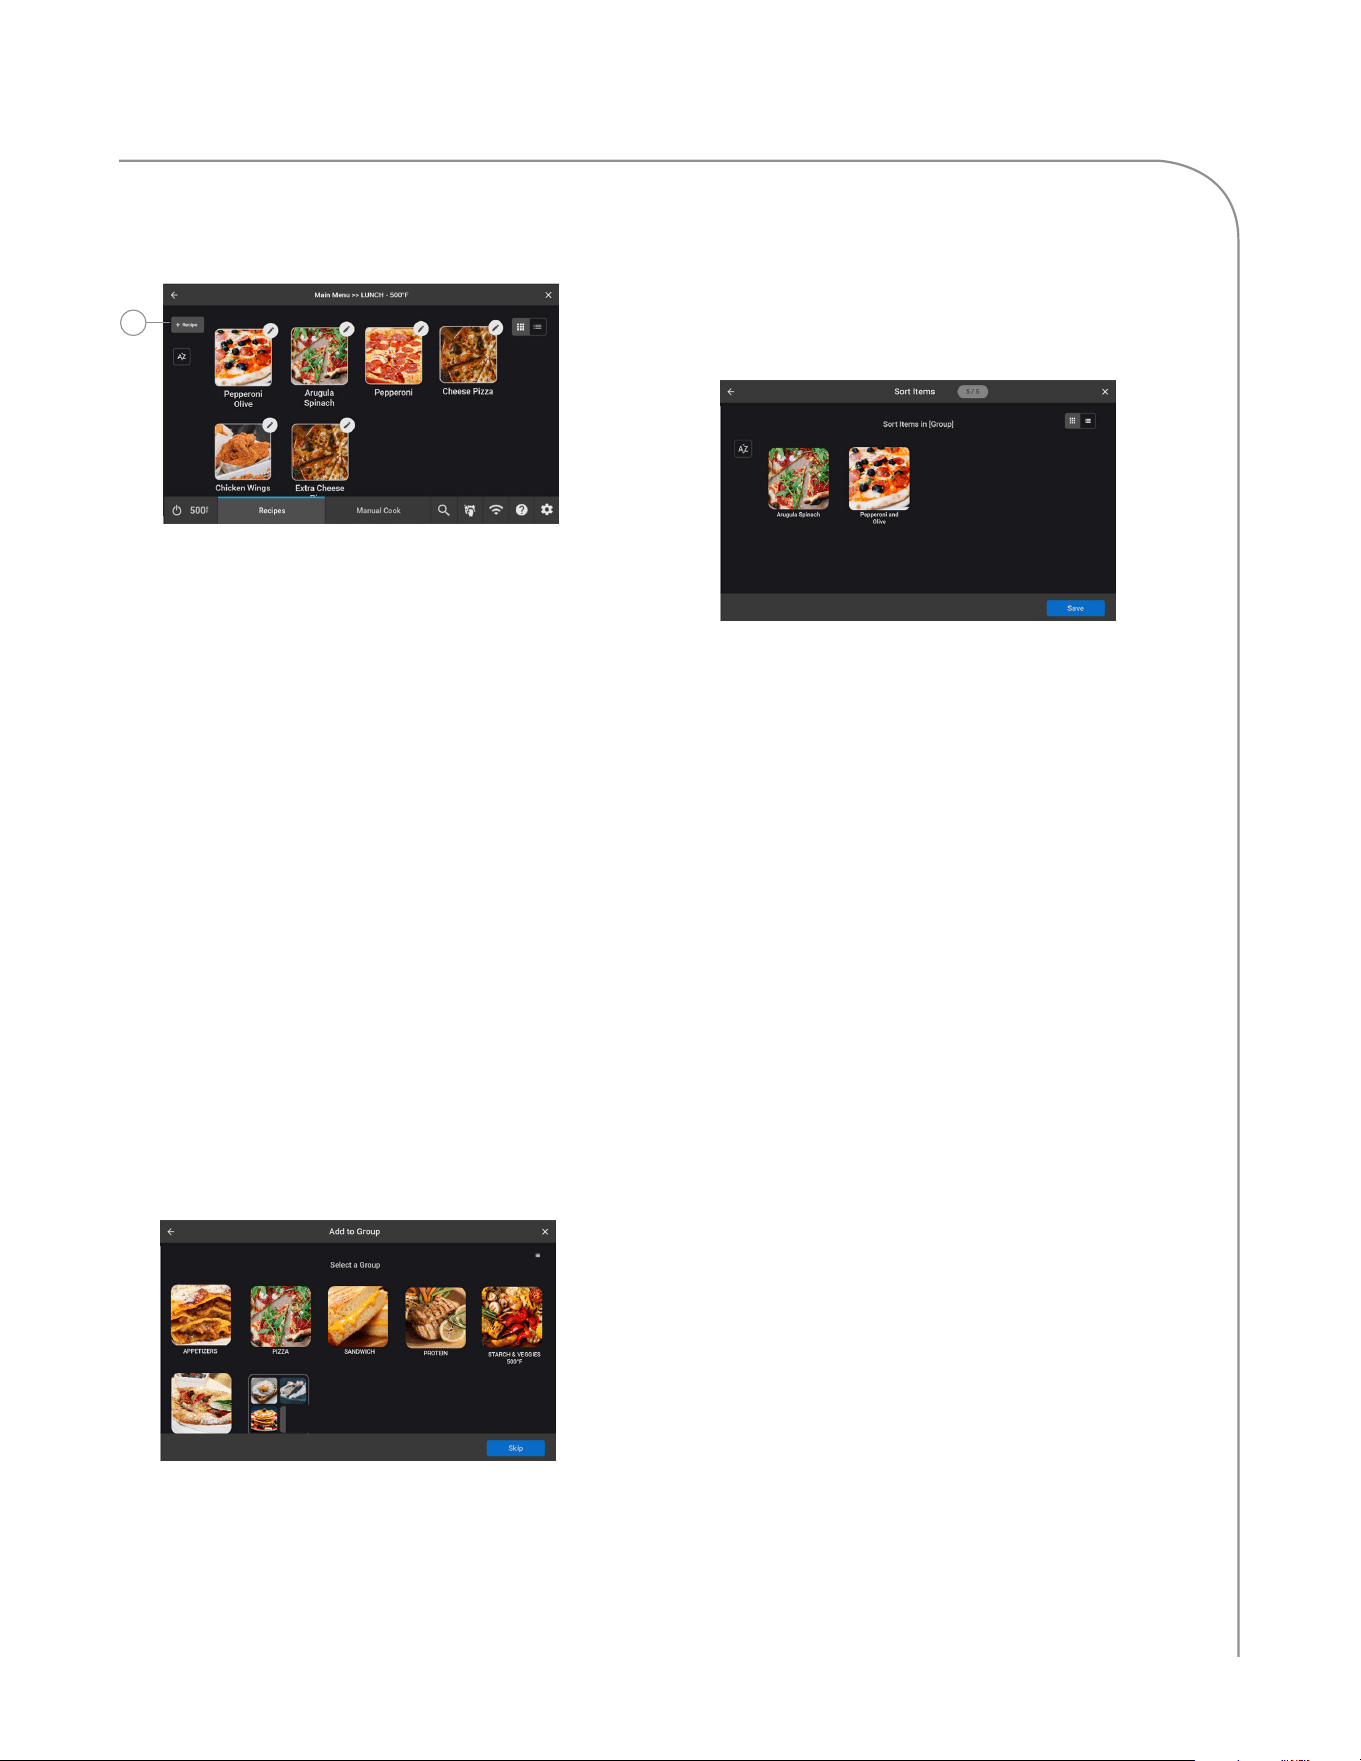
Adding a Recipe to a Group
3
Figure 32: Add Recipe to Group
NOTE: At any time, touch the “X” in the top-right
corner to cancel the action of adding a recipe.
From the group select screen:
1. Select a group for which you want to add or
create a recipe.
NOTE: To create a recipe without selecting a
group, select the “all recipes” button.
2. Touch the Edit button in the top-right corner of
the screen.
If the edit button is not present, verify it is
enabled in the Settings menu (see page 8).
3. Touch the “+Recipe” button (Figure 32, above).
4. Select “Existing”.
5. Select a recipe (or recipes) to add to the group
(Figure 33, below).
NOTE: Only recipes with set temperatures
that match the group set temperature will be
selectable.
Figure 33: Select Groups to Place Recipe Into
6. Touch “Next”.
7. Sort recipes in the group by holding/dragging
items in place. You can also sort in alphabetical
order using the “A/Z” button.
Figure 34: Sort Recipes in Group
8. Touch “Save”.
ECS-1001 / Rev G / October 2023ECS-1001 / Rev G / October 2023
18
ONETOUCH CONTROLLER OPERATION
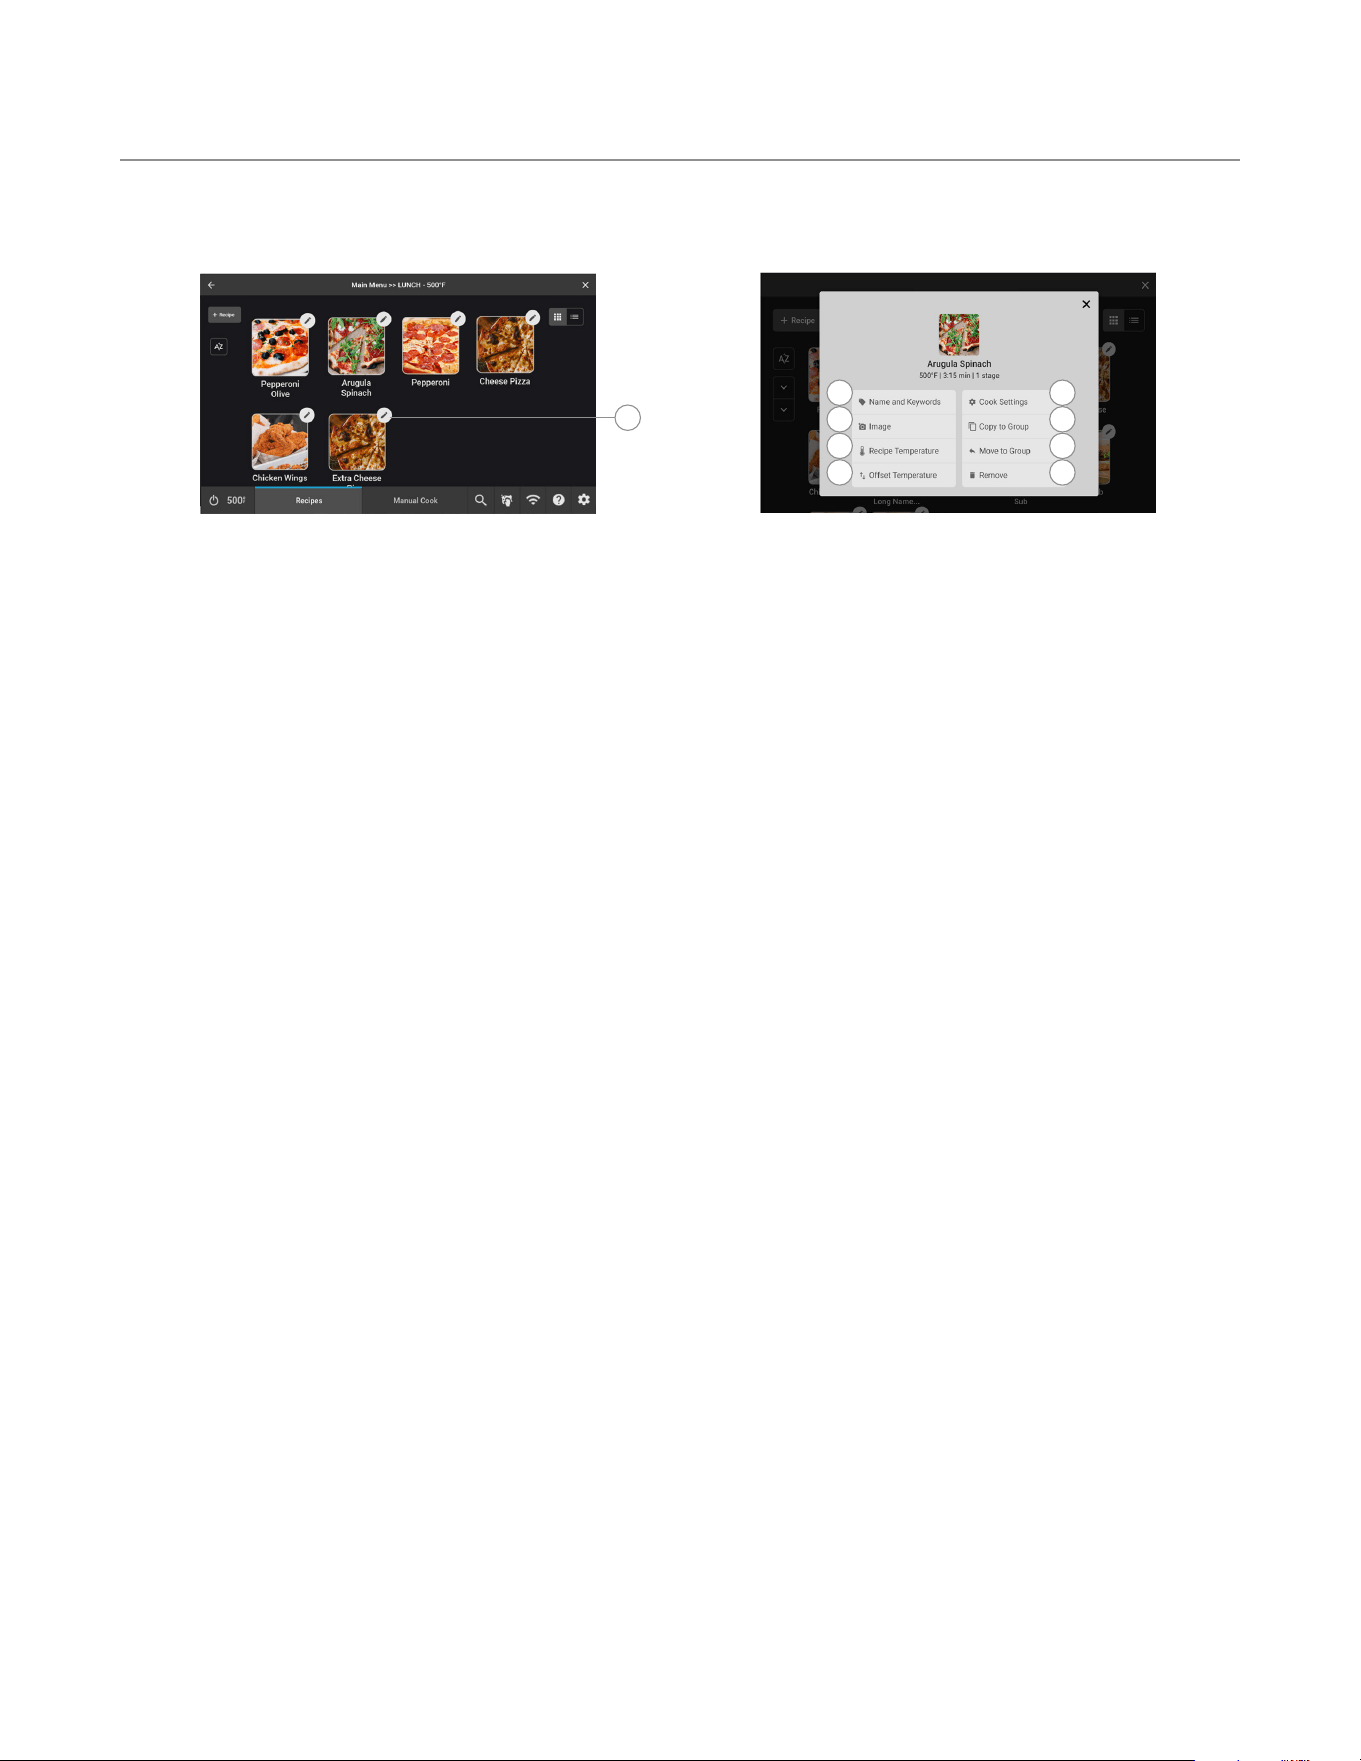
Editing a Recipe
3
Figure 35: Select Recipe to Edit
NOTE: At any time, touch the “X” in the top-right
corner to cancel the action of editing a recipe.
From the group select screen:
1. Select a group that contains the recipe you want
to edit.
NOTE: To edit a recipe without selecting a
group, select the “all recipes” button.
2. Touch the Edit button in the top-right corner
of the screen. If the edit button is not present,
verify it is enabled in Settings (see page 8).
3. Touch the Edit Pencil button for the group you
want to edit (Figure 35, above).
Figure 36: Edit Recipe Options
4. Select an option (Figure 36, above).
a. Edit the recipe name and/or keywords for
the search option.
b. Change the recipe image/icon.
c. Edit the recipe temperature.
NOTE: Editing the temperature will cause
the recipe to become disassocated from
groups it is currently in.
d. Edit the cook settings (see step 10, page 16
for more information).
e. Copy the recipe to a new group or groups.
f. Move the recipe to a new group or groups.
g. Remove/delete the recipe.
e
f
g
h
a
b
c
d
ECS-1001 / Rev G / October 2023
19
LEGACY CONTROLLER OPERATION
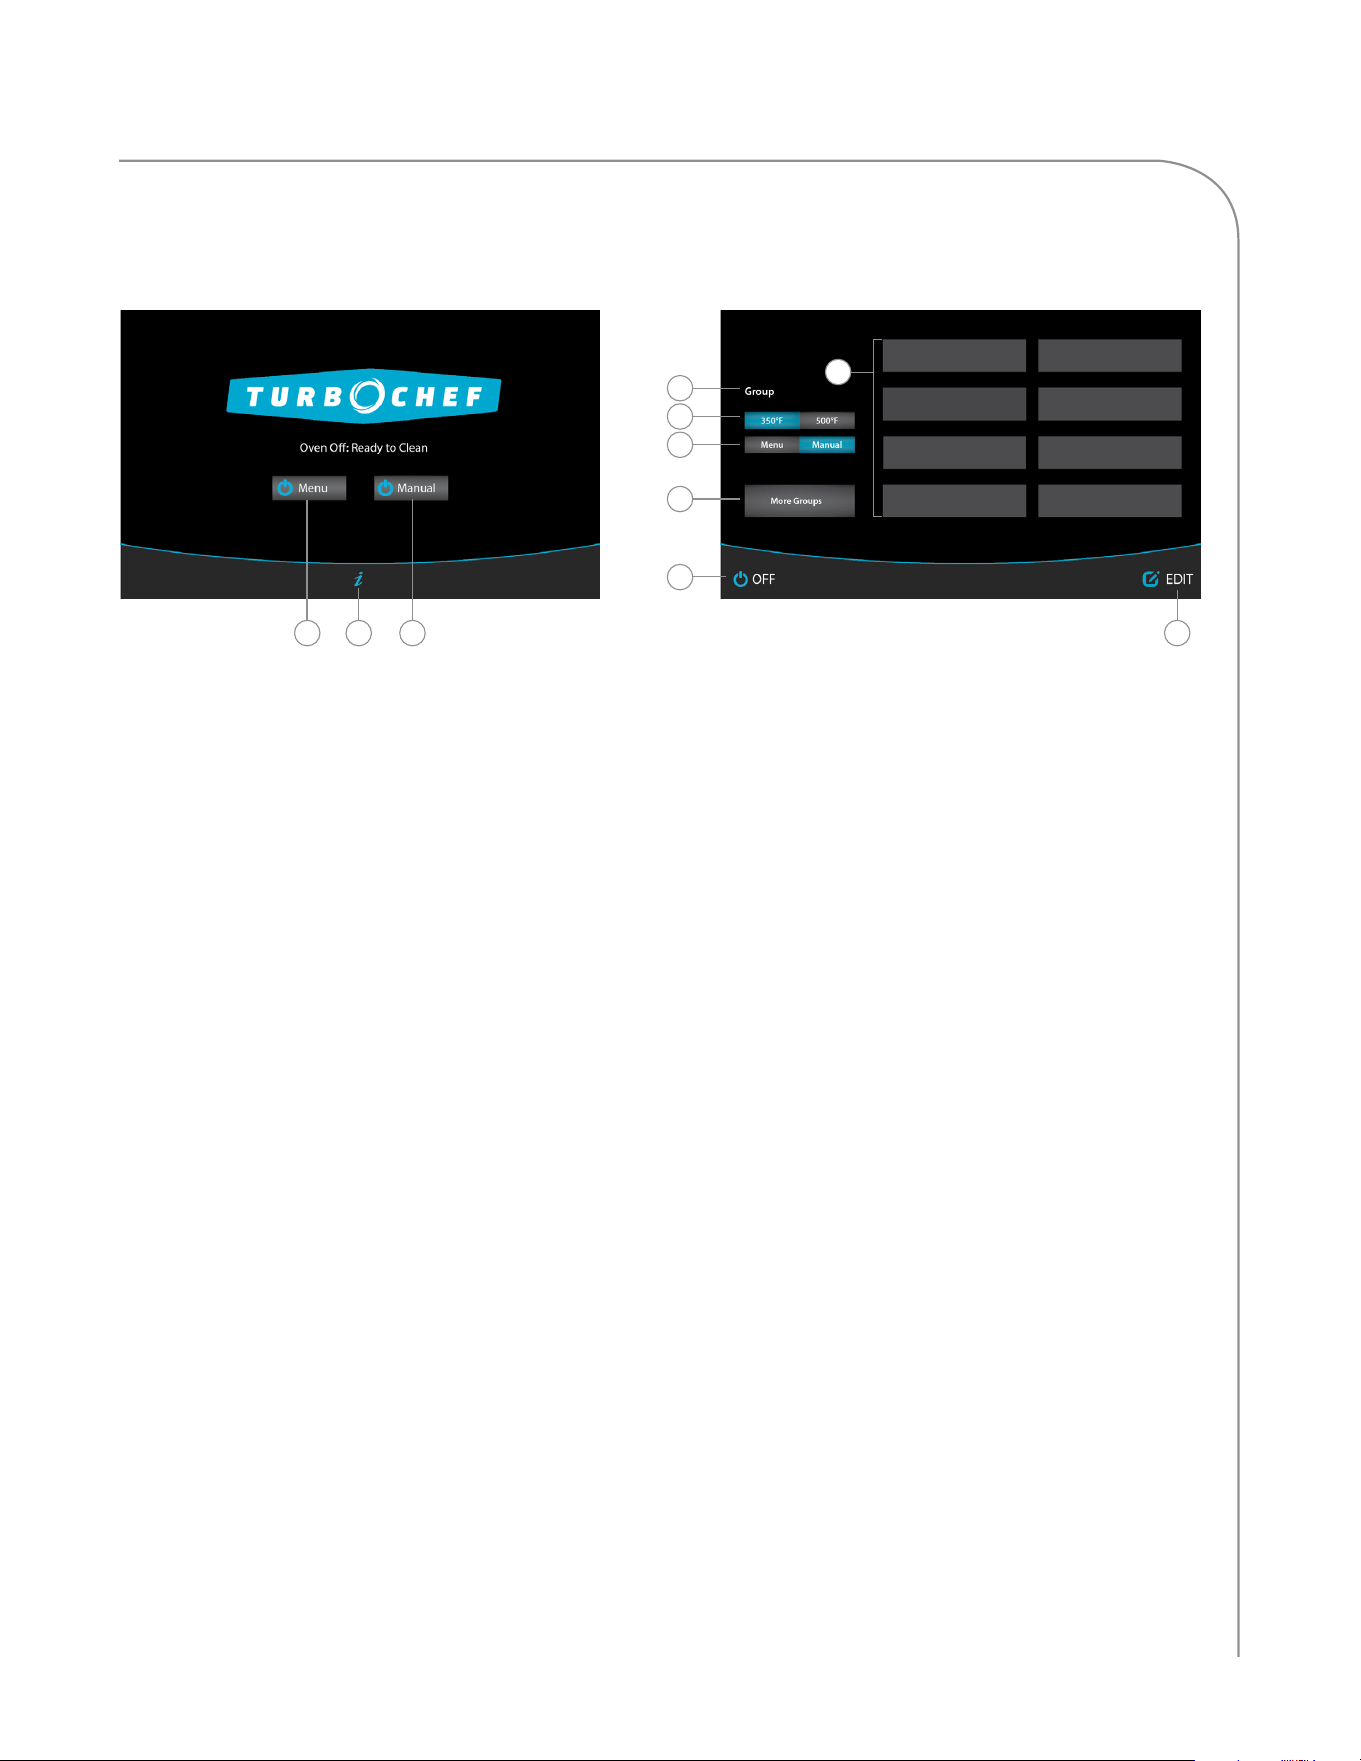
Figure 37: Legacy Oven Controls
NOTE: Display options vary depending on which features are enabled.
5
6
9
4
7
8
10
1 3 2
1. Menu Icon/Temperature Icon
Touch to turn the oven on and cook in menu
cook mode (page 20).
NOTE: If Manual Mode is disabled, a
temperature icon will be shown instead of the
menu icon.
2. Manual Icon
Touch to turn the oven on and cook in manual
cook mode (page 23). The Manual icon is only
present if enabled (page 28).
3. “i” Icon
Touch to access Info Mode (page 24). The “i”
icon is only displayed when the oven is off or
cooling down.
4. Off Icon
Touch to turn the oven off (cool down).
5. Edit Icon
The Edit icon will only be displayed when Edit
Mode (page 30) is enabled. Touching this icon
will allow you to edit existing menu items.
6. Groups/Items (1-8 and 9-16)
The oven contains 16 food groups divided into 2
groups of 8. Each food group contains 16 items
divided into 2 groups of 8.
7. Group Name
When viewing items, the group name indicates
which group is being displayed.
8. Set Temperature Toggle
The set temperature toggle will only be
displayed when operating with two different set
temperatures. Touch the toggle to view groups
from the other set temperature.
9. Menu/Manual Toggle
The Menu/Manual toggle will only be displayed
when manual cooking is enabled and will allow
you to switch between menu mode (page 20)
and manual cook mode (page 23).
10. More/Previous Groups or Items
This icon will only be displayed when using one
set temperature. To view additional groups or
items, touch “More Groups” or “More Items.”
Or, if on screen two, touch “Previous Groups” or
“Previous Items.”
Oven Controls: Legacy Controller
ECS-1001 / Rev G / October 2023ECS-1001 / Rev G / October 2023
20
LEGACY CONTROLLER OPERATION
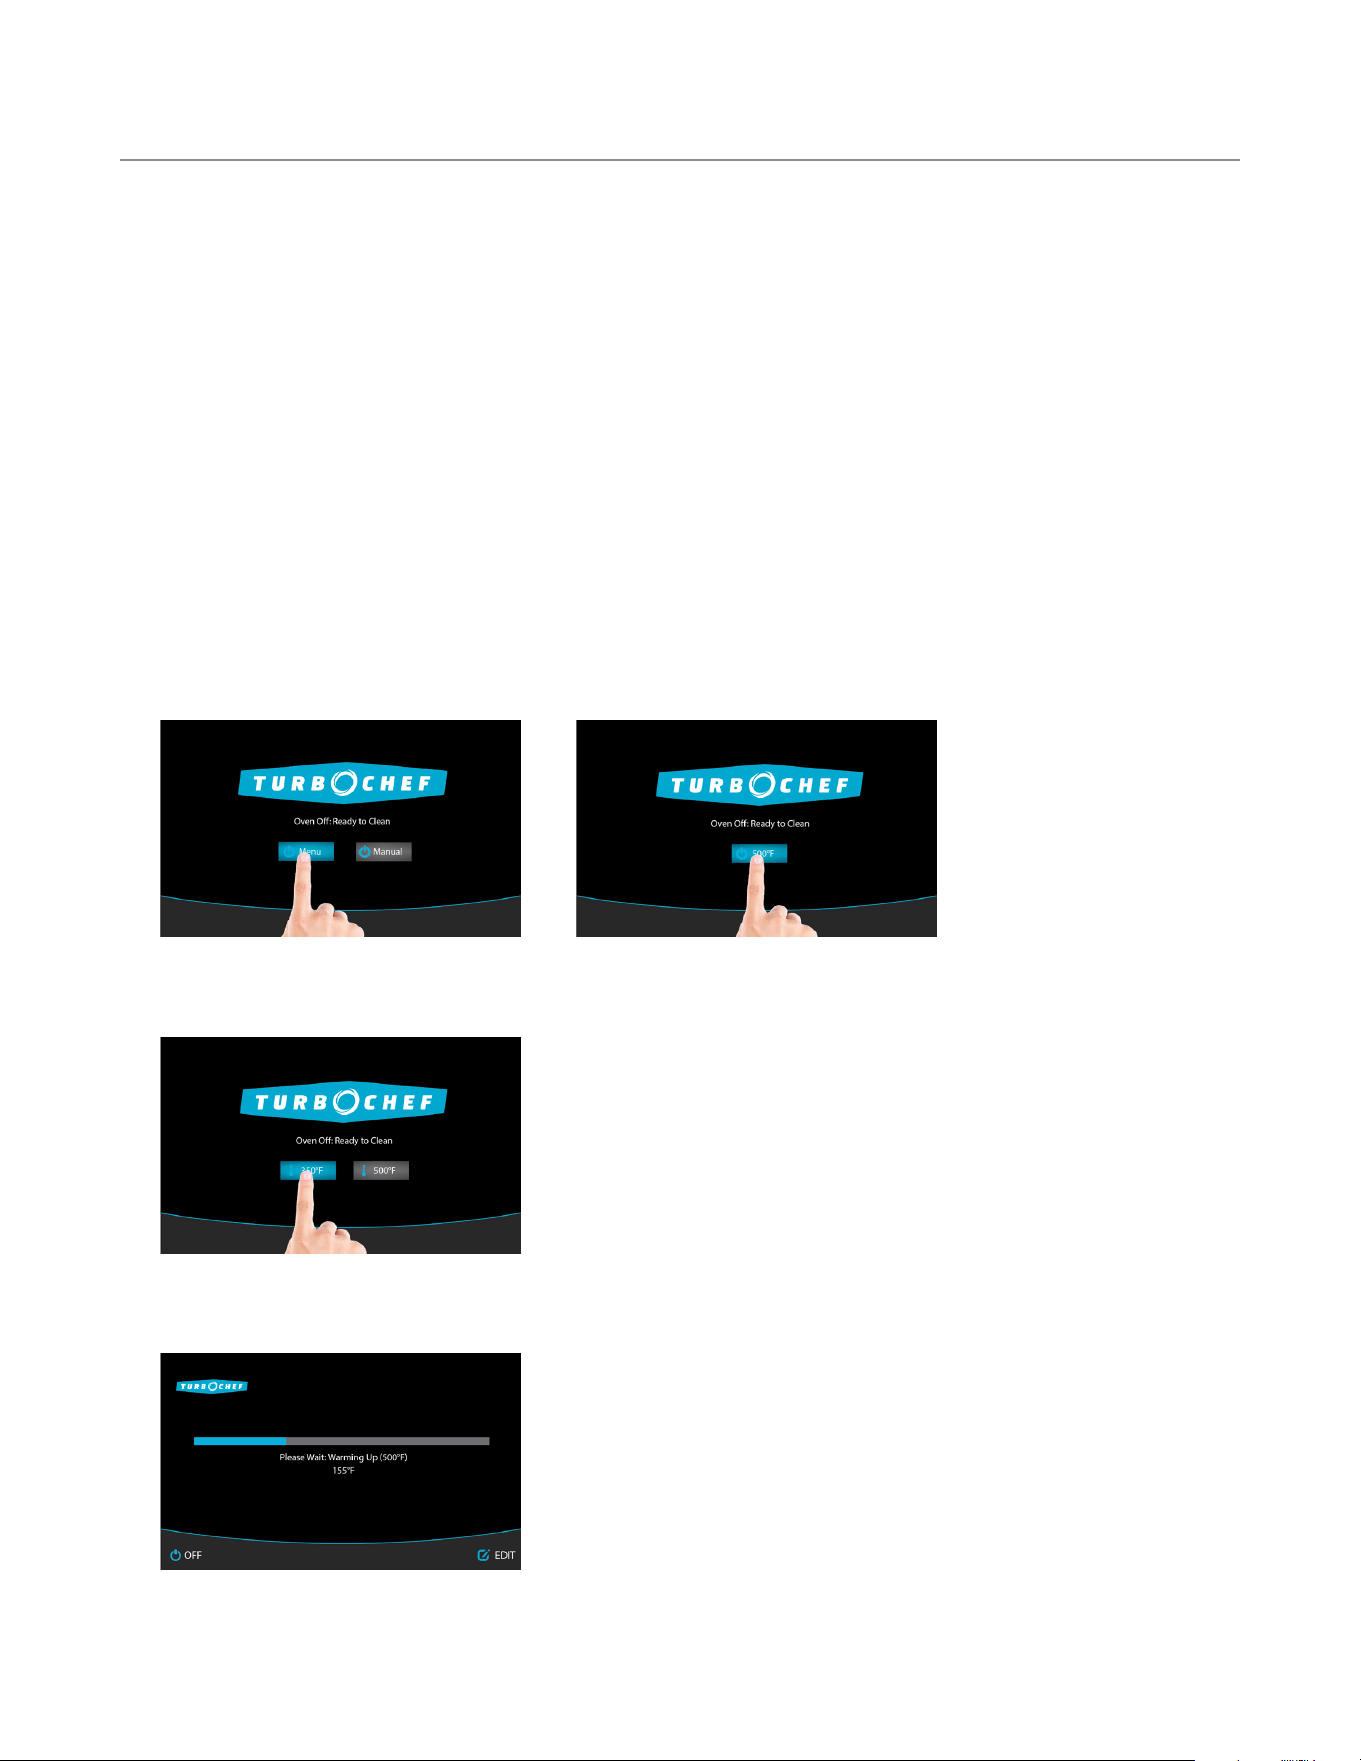
Step 3: Warming Up
NOTE: When the oven is done warming up, it will “soak” for an
additional eight minutes. “Soaking” ensures the cavity surfaces
absorb enough heat so that cooking will not be affected.
Step 2: Select Cook Temperature
NOTE: If the temperatures are the same, or if Manual Mode is
disabled, this screen will be bypassed.
Step 1: Touch “Menu” or the Oven Set Temperature Icon to Turn the Oven On
Menu Cook Mode
The oven is preprogrammed with recipe settings at the time of manufacture and is ready to operate out of
the box. New menu settings can be loaded via USB (page 27), programmed manually (page 29) or via Open
Kitchen™ (page 4).
If settings are not present, the oven will cook only in manual mode (page 23).
This oven uses impingement and microwave to cook food faster than traditional cooking methods. Air
enters the cavity from the top and bottom using independent top and bottom fans. Because of this design
and to ensure uniformity of cooking, the oven must be operated only while the bottom jetplate is in place.
While the bottom jetplate is removable for cleaning, it is not removable for cooking. Without the bottom
jetplate in place, the oven will not deliver the proper cooking performance to either the top or bottom of
the food item. Additionally, a non-warranty service call may result.
The sequence of the steps below may vary, and some may not apply.
ECS-1001 / Rev G / October 2023
21
LEGACY CONTROLLER OPERATION
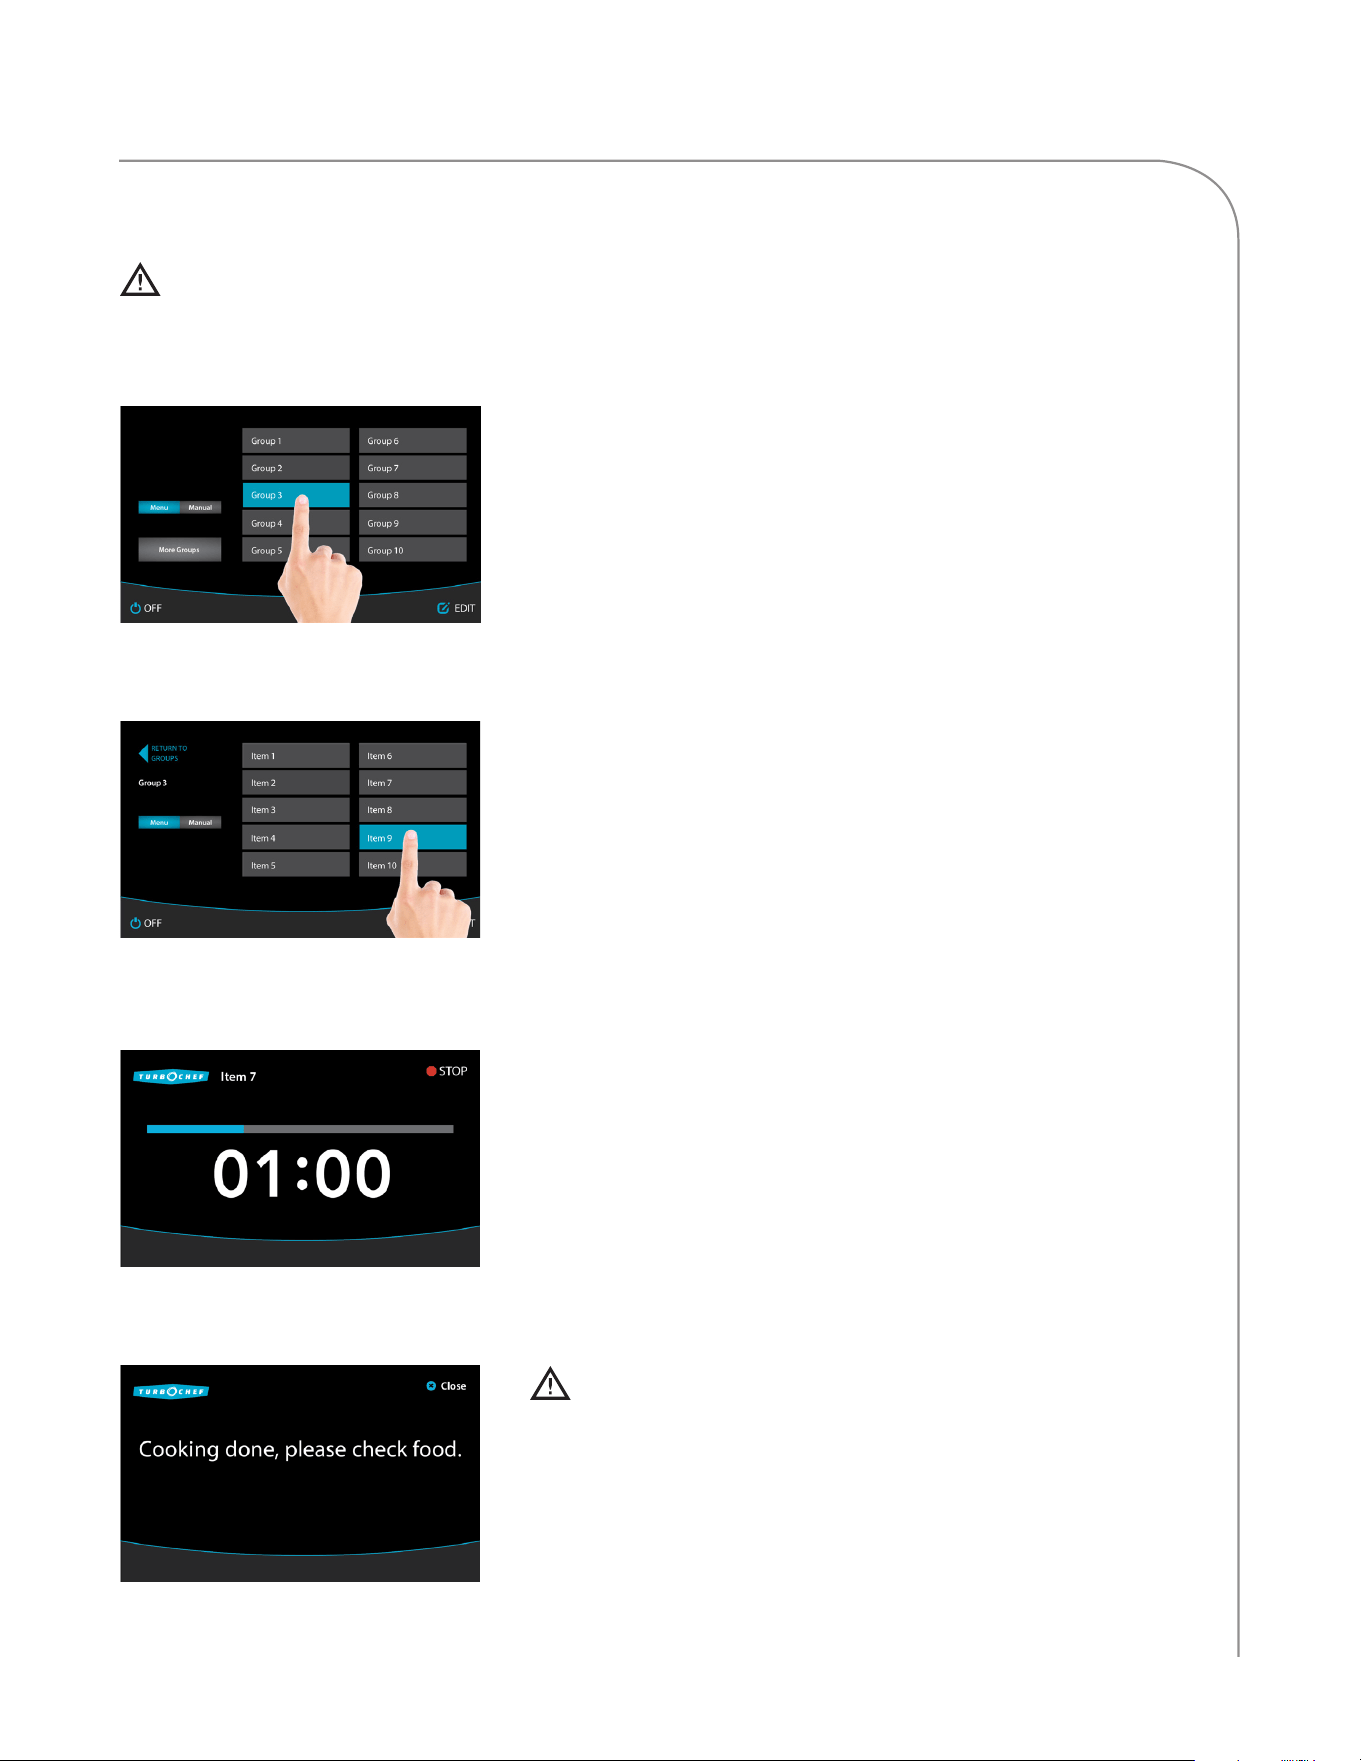
Step 7: Cooking
NOTE: To immediately terminate a cook cycle, touch “STOP.”
NOTE: If the oven door is opened during a cook cycle, the cycle will
pause until the door is closed. Touch “YES” to resume.
NOTE: Touch “More Groups” to view additional groups.
Step 5: Select a Group
Step 8: Check/Remove Food from Oven
WARNING: Dish/inside of oven and door are hot!
Step 6: Select an Item
NOTE: Touch “More Items” to view additional items.
Step 4: Place Food in the Oven
WARNING: Inside of oven and oven door are hot!
ECS-1001 / Rev G / October 2023ECS-1001 / Rev G / October 2023
22
LEGACY CONTROLLER OPERATION
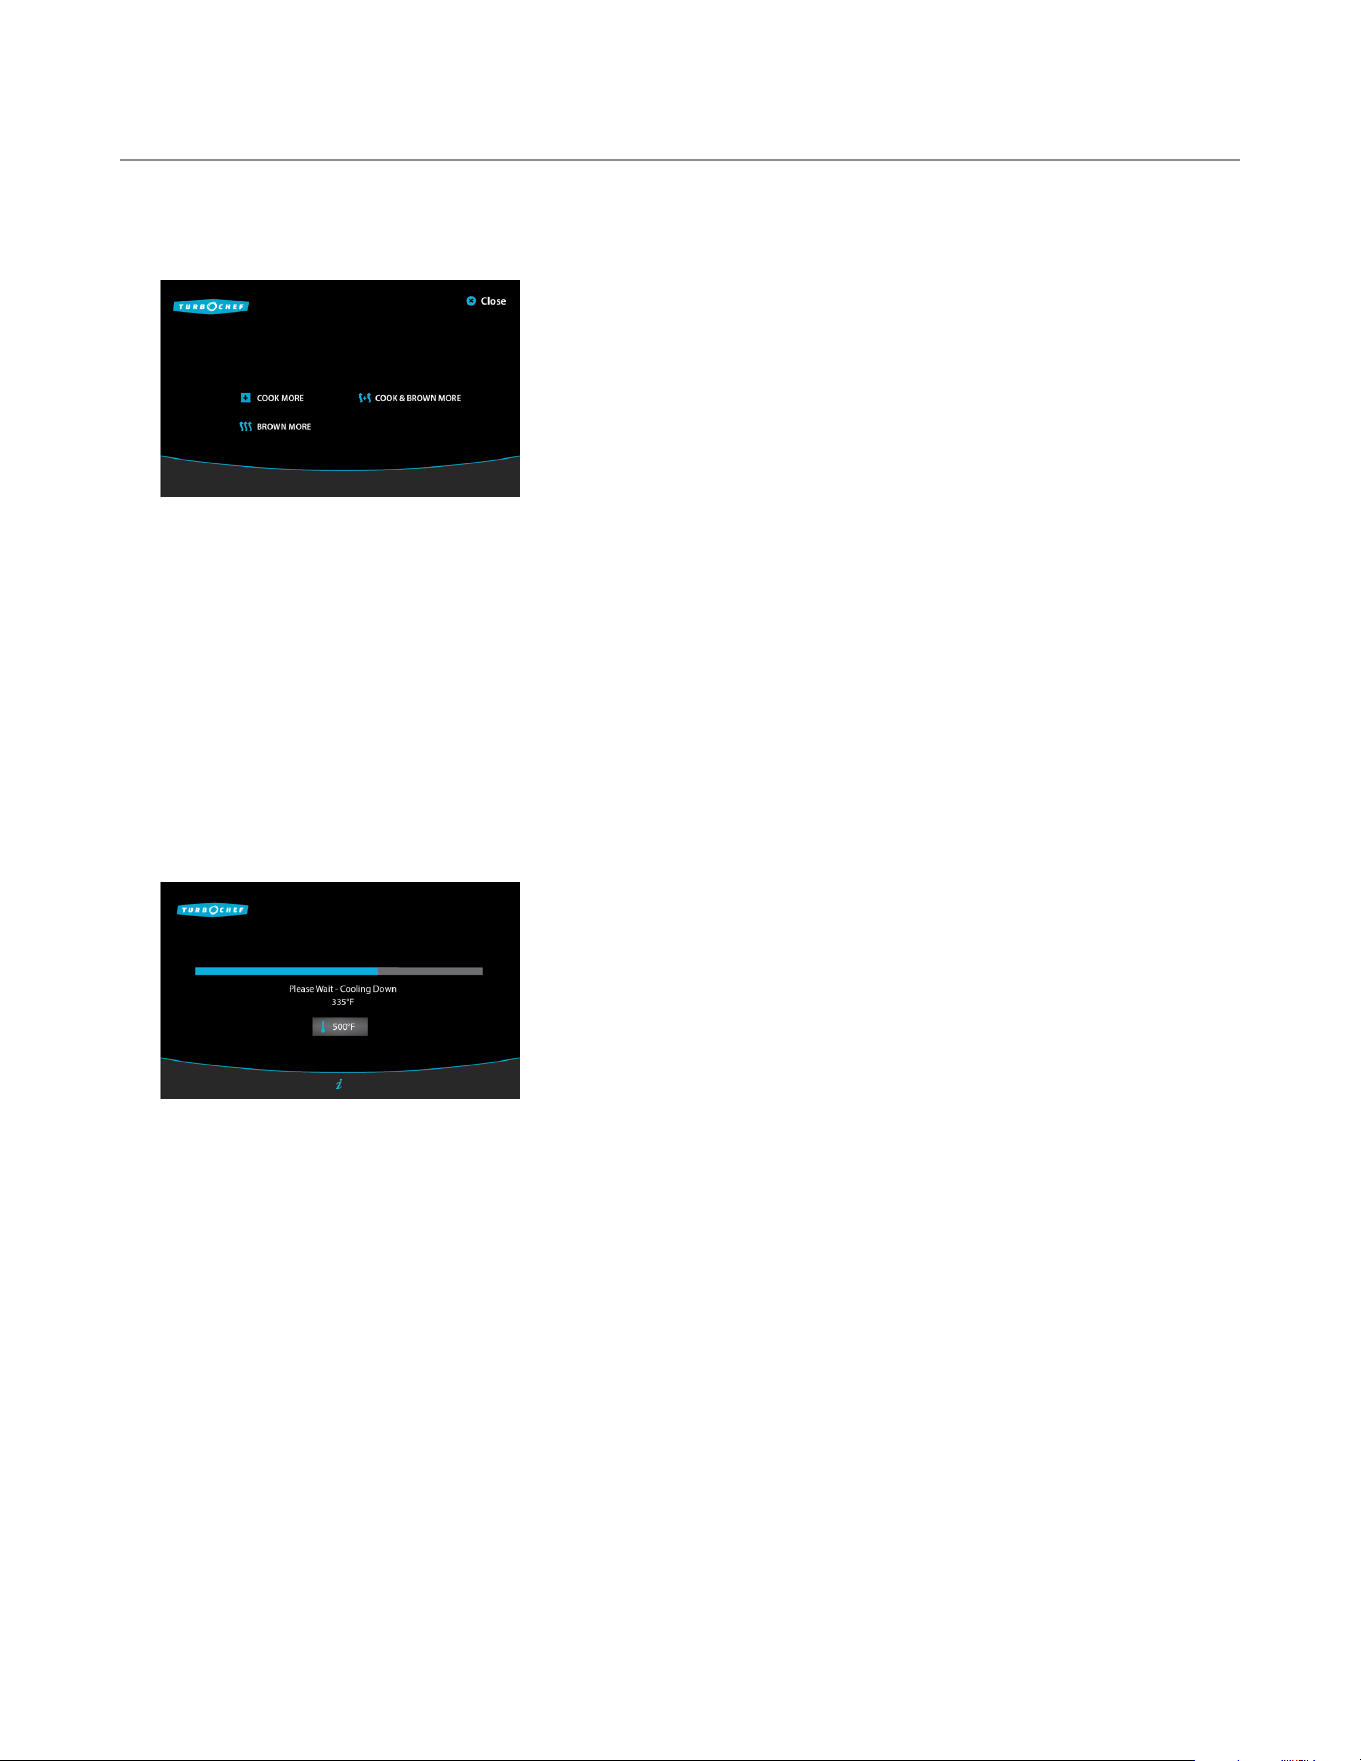
Step 9: Cook More / Brown More / Cook & Brown More
NOTE: This option must be enabled in order to cook an item
beyond its original cook time (see page 16 for details).
To cook an item longer than its original cook time, touch one of the
icons on the screen:
- Touch “Cook More” if the inside of the food item requires
cooking.
- Touch “Brown More” if the outside of the food item requires
browning or crisping.
- Touch “Cook & Brown More” if both the inside and outside of the
food item require cooking.
Selecting one of these options will cook the item for 20% of the
last cook time selected. The minimum cook time is the fewer of 15
seconds or the entire original cook cycle. The maximum cook time is
one minute. The oven will cook at the settings listed below:
- Cook More: 10% air, 100% microwave
- Brown More: 100% air, 0% microwave
Step 10: Cooling Down
When finished cooking for the day, touch “OFF” to turn the oven off
and begin cooling down.
ECS-1001 / Rev G / October 2023
23
LEGACY CONTROLLER OPERATION
Legacy Controller Manual Cook Mode
Manual Cook Mode allows cooking “on the fly,” whereas Menu Cook Mode (page 22) allows cooking from
preset cook settings. To access Manual Mode, touch the Manual icon when the oven is off or cooling down
(page 22) or touch the Menu/Manual toggle on the on the Menu Mode screen.
NOTE: If the “Manual” icon is not present, see page 19 to make it appear.
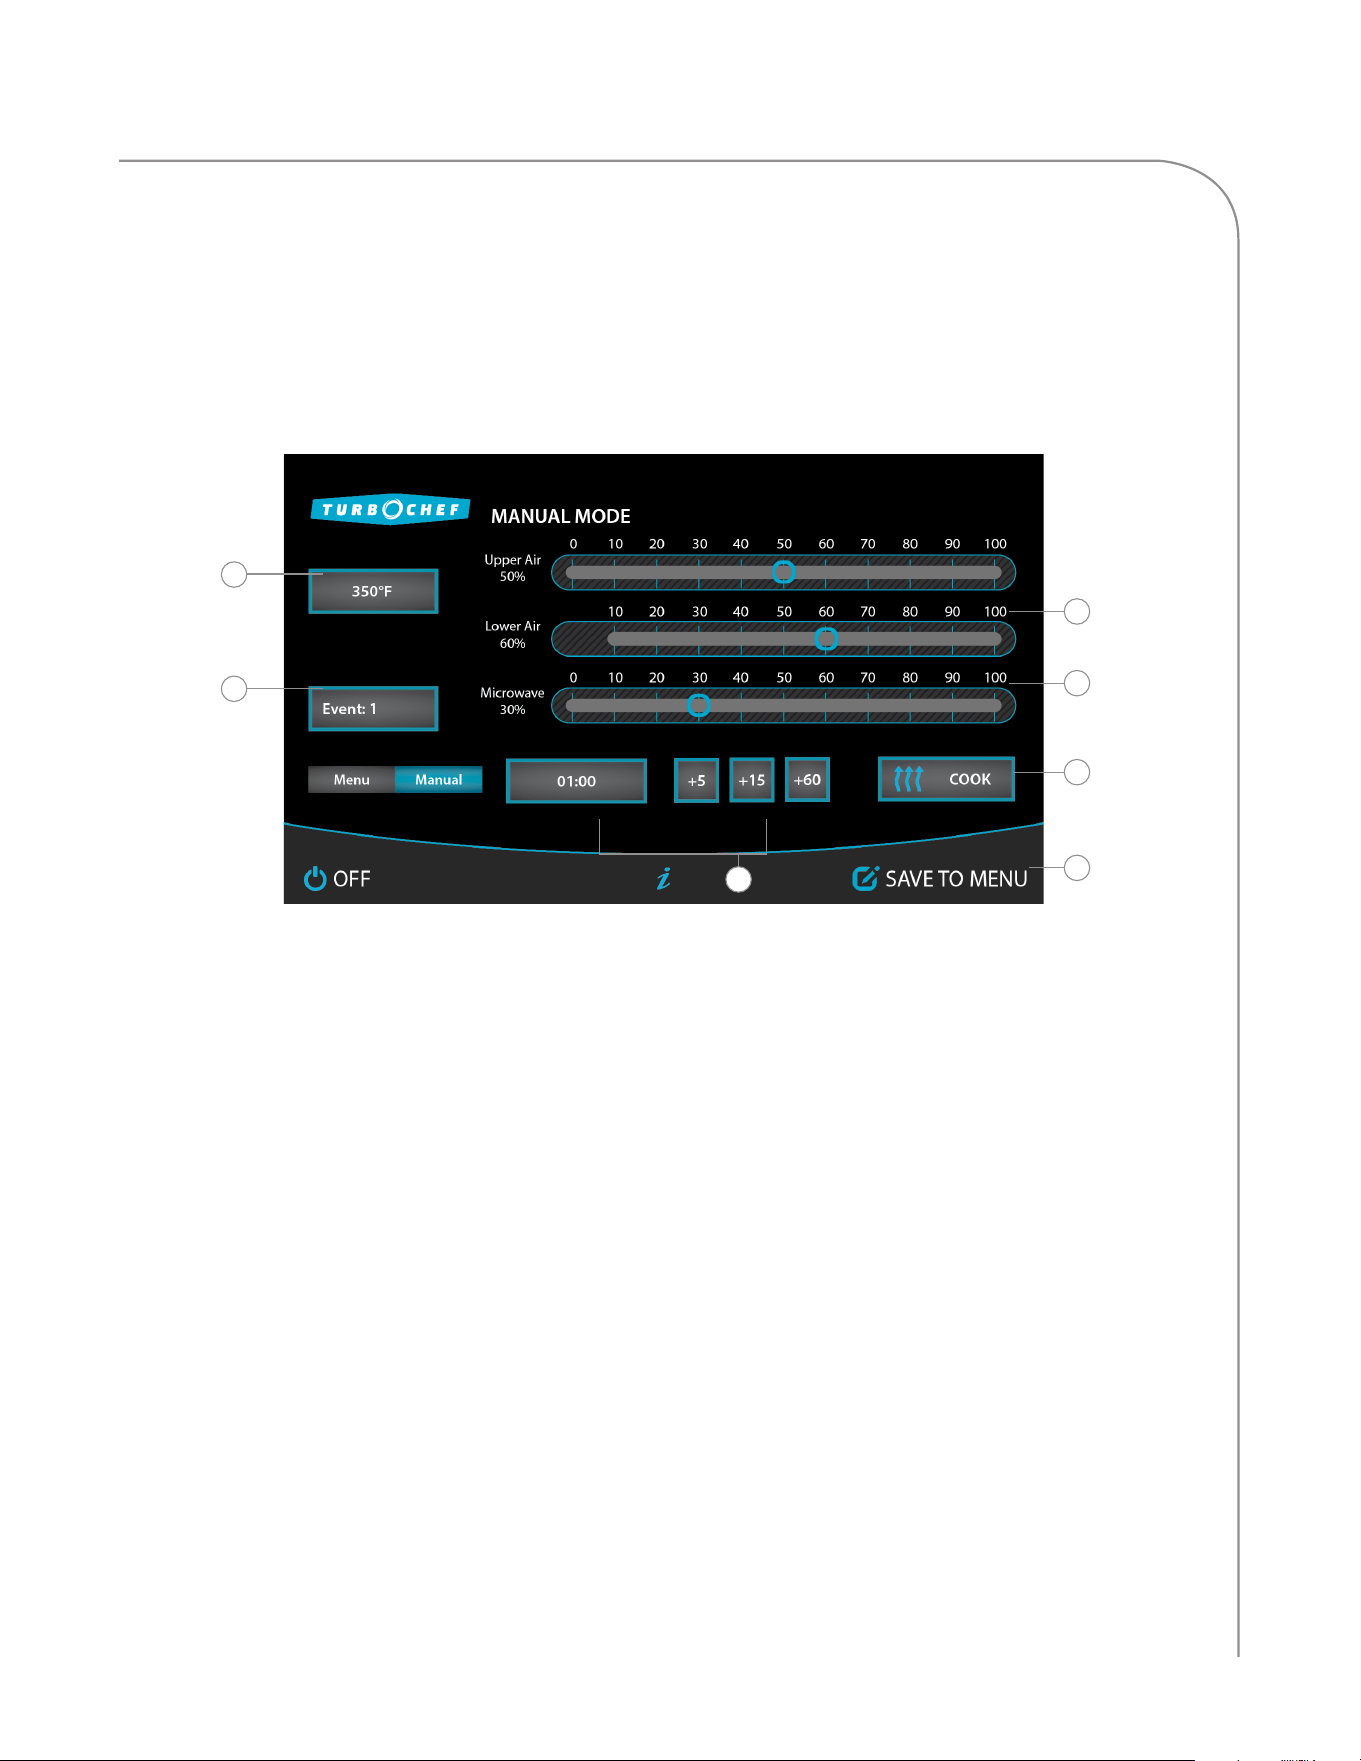
1. Set Temperature
Touch to change the set temperature. The
temperature range is 300–520°F (149–271°C).
2. Events
Manual Mode can store six unique cook
settings, called events. Touch “Events” to view
settings for events 1 through 6.
3. % Air
% Air determines the amount of airflow. The
more air, the more the product will brown or
crisp. % Air can be set from 10-100% in 10%
increments.
4. % Microwave
% Microwave determines the amount of
microwave, and can be set from 0-100% in
10% increments. For example, 50% means
the microwave system will remain on for five
continuous seconds for every ten seconds
during the cook cycle.
5. Time
Time can be set from 0-15 minutes. There are
four time icons. The first allows the operator to
enter the time manually. The others allow the
operator to add time in 5, 15, or 60 second
increments.
6. Cook
Touch to cook.
NOTE: The oven may require additional
warming time before cooking can be performed.
7. Save to Menu
If you want to save a manual mode setting
into the oven menu, touch “Save to Menu.” All
six events will be added together as one menu
recipe item, and the cook times for each event
will be summed and divided into percentages
of one cook cycle.
Continued on next page...
Figure 38: Manual Cook Mode Controls
3
1
4
5
6
7
2
ECS-1001 / Rev G / October 2023ECS-1001 / Rev G / October 2023
24
LEGACY CONTROLLER OPERATION
...continued from previous page.
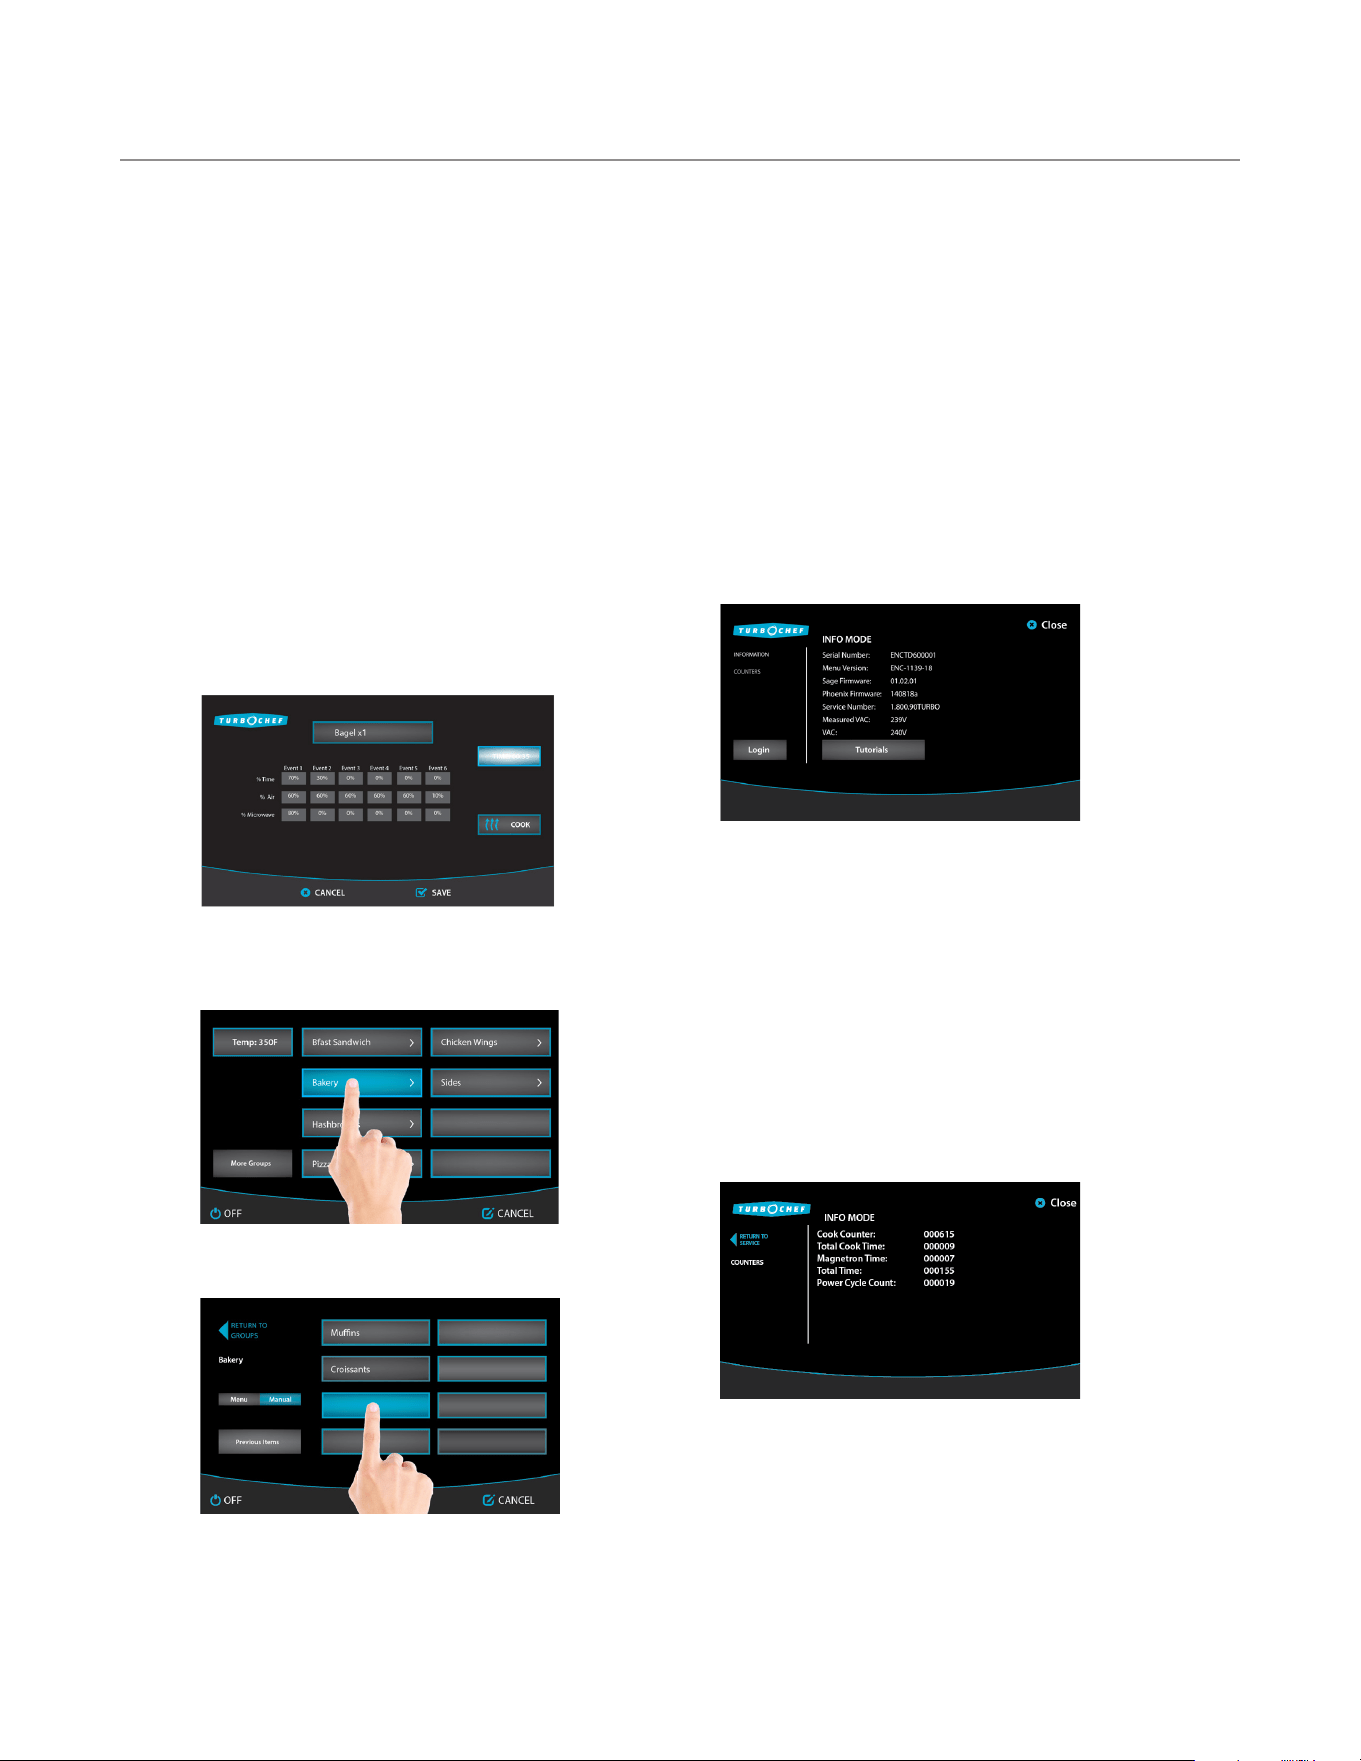
7. Save to Menu, continued
a. Edit settings, if necessary, by touching the
setting you wish to edit. From this screen,
the following settings are editable:
- % Time
- % Air
- % Microwave
- Time
- Recipe Name
NOTE: For additional instructions for
editing settings, see page 34.
b. Touch “SAVE.”
c. Select a location for the new menu item by
first selecting a group.
d. Select an item to overwrite.
Info Mode: Legacy Controller
To access Info Mode, touch the “i” icon when the
oven is off, cooling down, or in manual mode.
From the Info Mode screen, access:
- Information
- Counters
- Options
- Settings
- Service
- Manufacturing (Mfg)
Info Mode: Information Screen
From the Information screen, view the following:
- Serial Number
- Menu Version
- Sage Firmware
- Phoenix Firmware
- Service Number
- Measured VAC (Voltage) - View Incoming
- WiFi Connectivity Status
- Tutorials: View information on installing,
operating, and maintaining the oven.
Info Mode: Counters Screen
From the Counters screen, view:
- Cook counter
- Total cook time
- Magnetron time
- Total time (oven on)
- Power cycles: The number of times the oven has
cycled power.
- Menu Repair Counter
- Fault log: View time stamps of each fault
occurrence and the fault code.
ECS-1001 / Rev G / October 2023
25
LEGACY CONTROLLER OPERATION
Info Mode: Options Screen
From the Info Mode Information or Counters
screen, touch “Login” to access the Options screen.
When prompted, input the password 9 4 2 8 and
then touch “ENTER.”
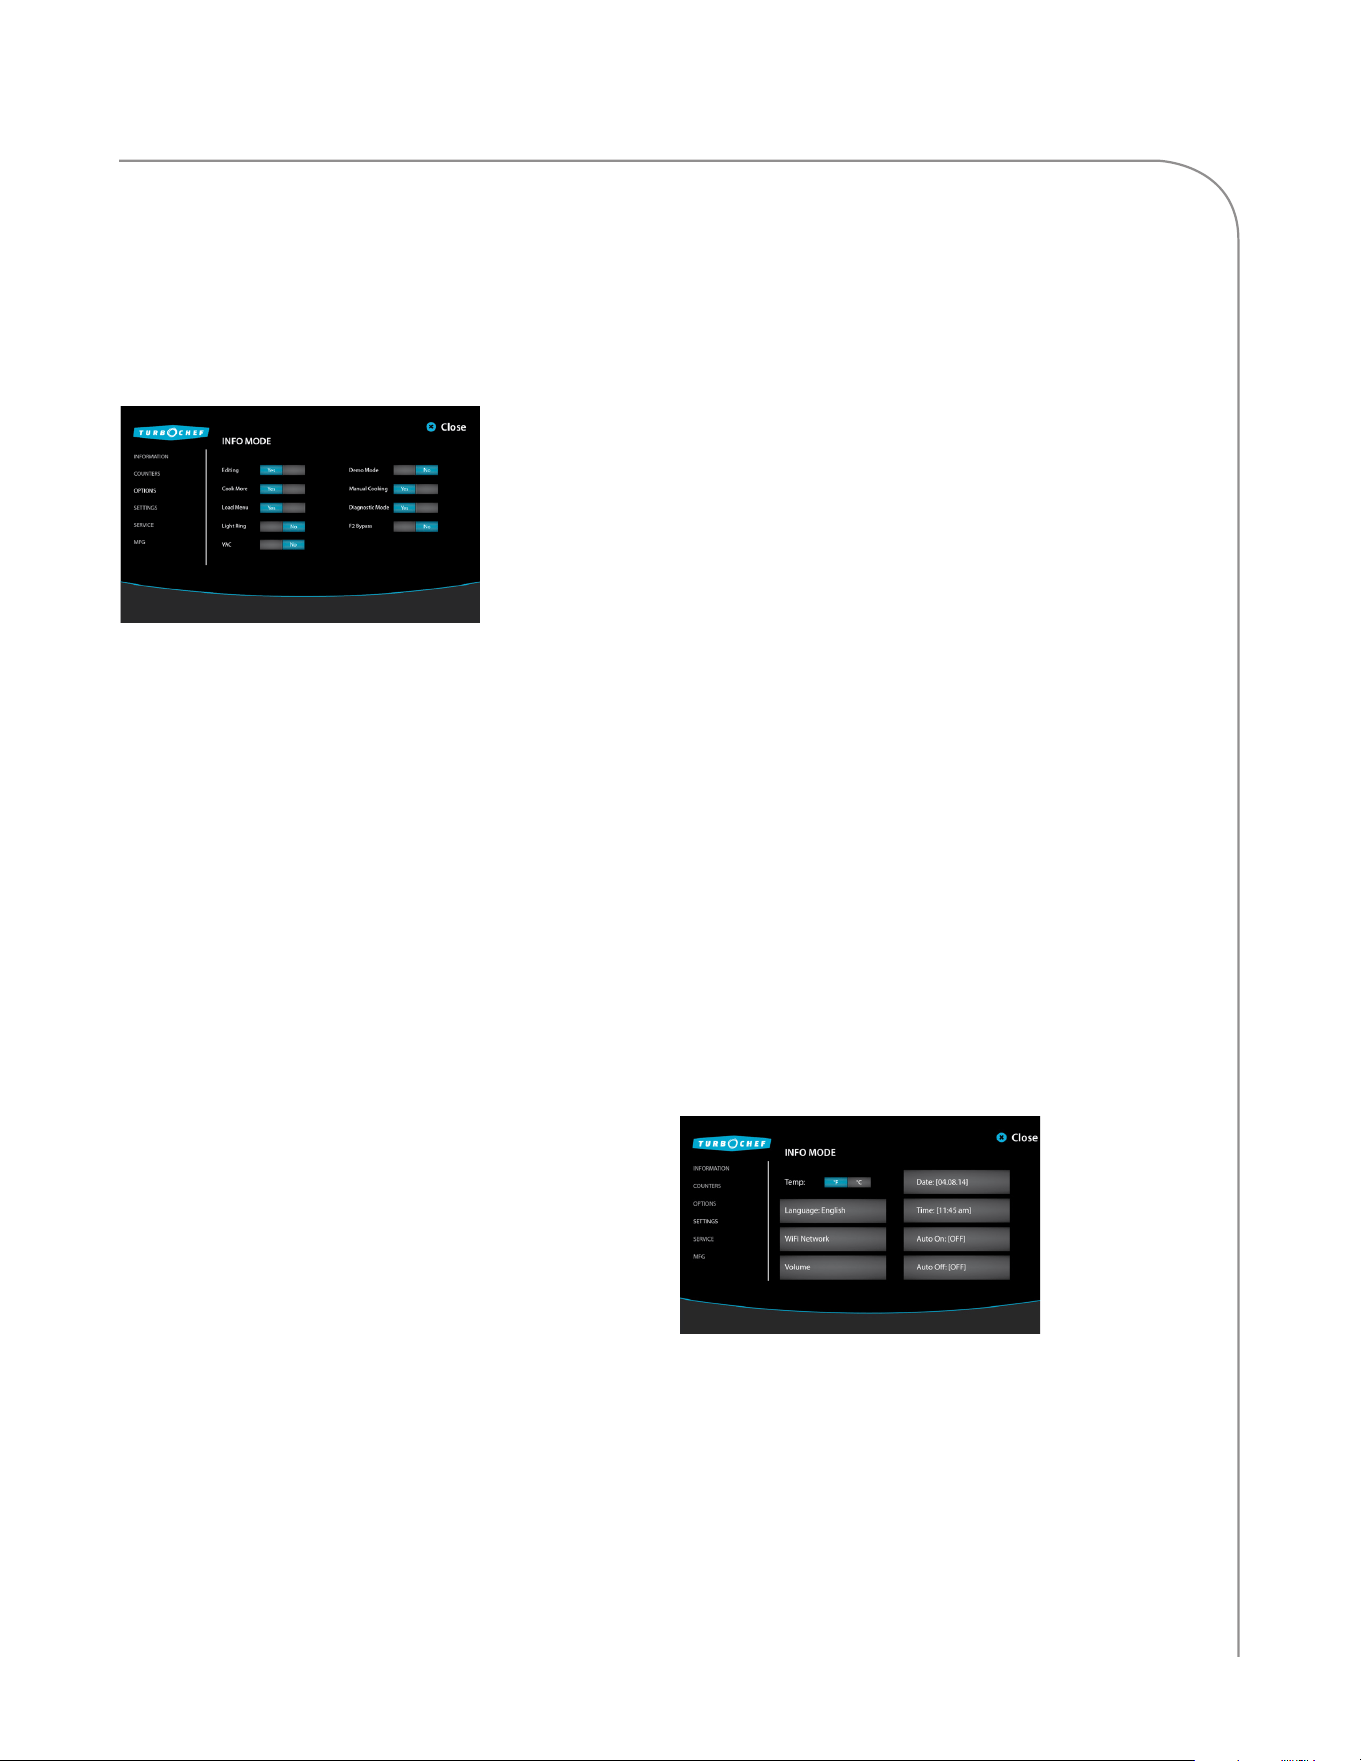
From the options screen, enable/disable:
- Editing
- Cook More
- Load Menu
- VAC
- Demo Mode
- Manual Cooking
- Diagnostic Mode
- F2 Bypass
Editing
Edit Mode enables or disables the portal that allows the
operator to change menu settings, rename food groups
and items, and change the cooking temperature. The
Edit icon will be displayed at the bottom of the screen
(page 21) when this option is set to YES. See pages 33-41
for more details on editing menu settings.
Cook More
Cook More controls whether or not the three “cook
more” options appear when a cook cycle is done.
This option must be enabled in order to cook an item
beyond its original cook time. See page 35 for details.
Load Menu
Load Menu enables or disables USB detection,
which allows the operator to upload and/or
download new menu settings from USB. Setting
Load Menu to NO will prevent the operator from
loading a menu. See page 31 for more details.
VAC
When VAC is set to YES the incoming voltage will
be displayed on the Info screen. This is set by the
factory and should not be changed.
Demo Mode
Demo Mode is a feature used to demonstrate the
cooking features of the oven without turning on the
heaters or microwave system. Demo Mode must be
set to NO during regular operation.
Manual Cooking
When Manual Cooking is set to YES, the operator can
cook items “on the fly.” See page 25 for more details.
Diagnostic Mode
Diagnostic Mode allows the operator to view and
test oven components. This mode should only
be used by qualified service technicians, unless
otherwise instructed by TurboChef.
F2 Bypass
The F2 alarm indicates the oven temperature is too
low. YES means the oven will not terminate a cook
cycle when an F2 alarm is encountered. The oven
will still log the fault condition. NO means the
oven will function as it normally would; i.e., when
an F2 alarm is discovered during a cook cycle, the
oven will terminate the cook cycle.
Info Mode: Settings Screen
From the Information or Counters screen, touch
“Login” to access the Settings screen. When prompted,
input the password 9 4 2 8 and then touch “ENTER.”
From the settings screen, set:
- Temperature Management
- Language
- WiFi Network
- Sound Volume
- Date
- Time
- Auto On
- Auto Off
ECS-1001 / Rev G / October 2023ECS-1001 / Rev G / October 2023
26
LEGACY CONTROLLER OPERATION
Temperature Measurement
The temperature measurement setting is configured
at the factory. Touch °F (Fahrenheit) or °C (Celsius)
to change the temperature measurement settings.
Language
The default language is English. To change to
another language, touch “Language: English”
and then touch the preferred language and touch
“ENTER.” The available languages are:
- French
- German
- Polish
- Portuguese
- Spanish
The available languages may also be:
- Chinese
- Korean
- Japanese
- Russian
- Dutch
WiFi Network:
NOTE: Feature or service may not be available.
Connecting the oven to a WiFi network and utilizing
TurboChef’s connectivity services, such as Open
Kitchen (page 4) will allow you to remotely update the
menu and firmware for one or all of your ovens and
will enable access to reporting tools and live data
streams to view what is being cooked and when.Special
instructions for corporate/chain customers may be
required. Contact your facility administrator for more
information.
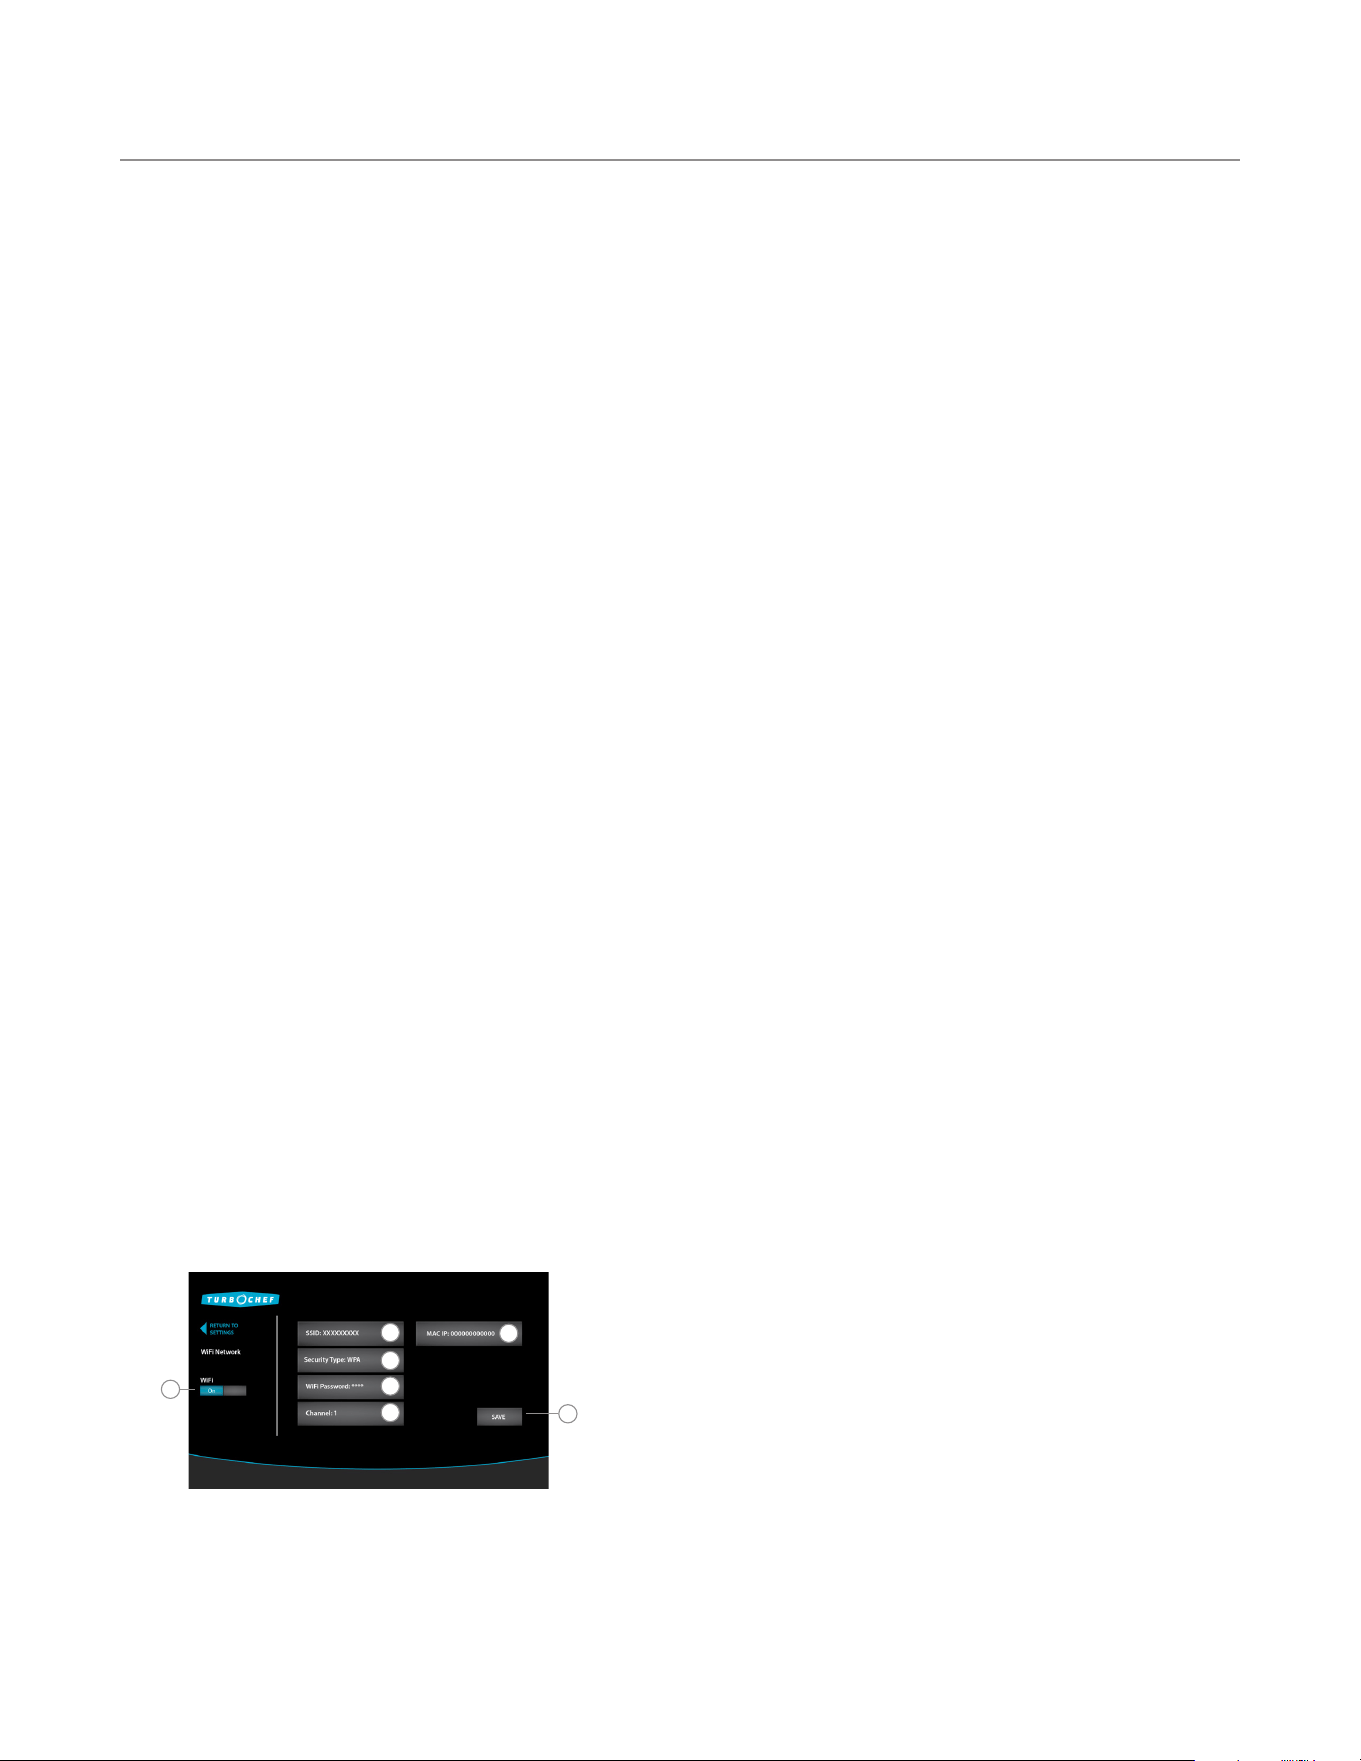
1
2
3
4
5
6
7
Figure 38: WiFi Network Setup
From the WiFi Network setup screen (See Figure
38 above), the following information may be
entered to configure the oven for networking:
- WiFi On/Off
- SSID
- Security Type
- WiFi Password
1. WiFi On/Off
Toggle this option to enable/disable the oven’s WiFi
capabilities.
2. SSID
The SSID is the case sensitive name of the WiFi
network that you wish the oven to join. After
touching the SSID button, use the on-screen
keyboard to type in the WiFi network name and
touch Enter.
If you are unsure of the SSID for the network,
contact your network administrator. In some
instances, the SSID may be printed on a label on
the bottom of your WiFi router.
3. Security Type
The Security Type is set by your WiFi router. After
touching “Security Type,” match one of the four
displayed security types to the one your router is
using by selecting one of the following options
from the screen: Open, WPA, WPA2, WEP.
After selecting the correct Security Type, press the
Enter key.
If you are unsure of the Security Type used by the
network, contact your network administrator. In
some instances, the Security Type may be printed
on a label on the bottom of your WiFi router.
4. WiFi Password
The WiFi Password is the case sensitive password
needed to join the WiFi network. After touching
the WiFi Password button, use the on-screen
keyboard to type in the WiFi network password
and touch Enter.
If you are unsure of the WiFi Password for the
network, contact your network administrator. In
some instances, the WiFi Password may be printed
on a label on the bottom of your WiFi router.
NOTE: “Open” networks do not use WiFi
passwords. Clear or leave this field empty when
using the oven on an “Open” network.
ECS-1001 / Rev G / October 2023
27
LEGACY CONTROLLER OPERATION
5. Channel
The Channel is determined and assigned by the
WiFi router.
NOTE: If you are experiencing difficulty obtaining
or keeping WiFi connectivity, TurboChef
recommends setting the WiFi router’s channel to 1.
Change the network channel by logging into your
router. For help with your WiFi router, contact
your network administrator.
6. MAC IP
The MAC IP is automatically assigned.
7. SAVE Button
After entering or updating any of the settings on
the WiFi Network screen, press the SAVE button.
Failure to press the SAVE button will result in
the loss of any changes that have been made.
Ensuring Connectivity
Verify if the oven is connected from the Info Mode:
Information screen on page 13.
For help determining the correct network setup
information, contact your network administrator.
If MAC IP is blank, the oven may not be configured
properly to connect to a WiFi network. Call
TurboChef Customer Support at 800.90TURBO or
+1 214.379.6000.
Sound Volume
Touch “Volume” and use the plus or minus icons or
slider to increase or decrease the oven sound.
Date
An accurate date is important for using “auto-on”
and “auto-off ” (see adjacent for details). It also
helps ensure the accuracy of diagnostics and fault
condition reporting.
NOTE: The oven may not retain the date if left
unplugged for a prolonged period of time (more
than several hours).
To set the date, touch “Date.” Enter the date in the
following format - MM/DD/YY. Touch “ENTER” to
save the changes.
Time
An accurate time is important for using “auto-on”
and “auto-off ” (see adjacent for details). It also
helps ensure the accuracy of diagnostics and fault
condition reporting.
NOTE: The oven may not retain the date if left
unplugged for a prolonged period of time (more
than several hours).
NOTE: The clock will not automatically update for
Daylight Savings Time.
To set the time, touch “Time.” Enter the time in
24-hour format (8:30 p.m. = 20:30). Touch “ENTER” to
save the changes.
NOTE: The user interface will automatically convert
the time to 12-hour format.
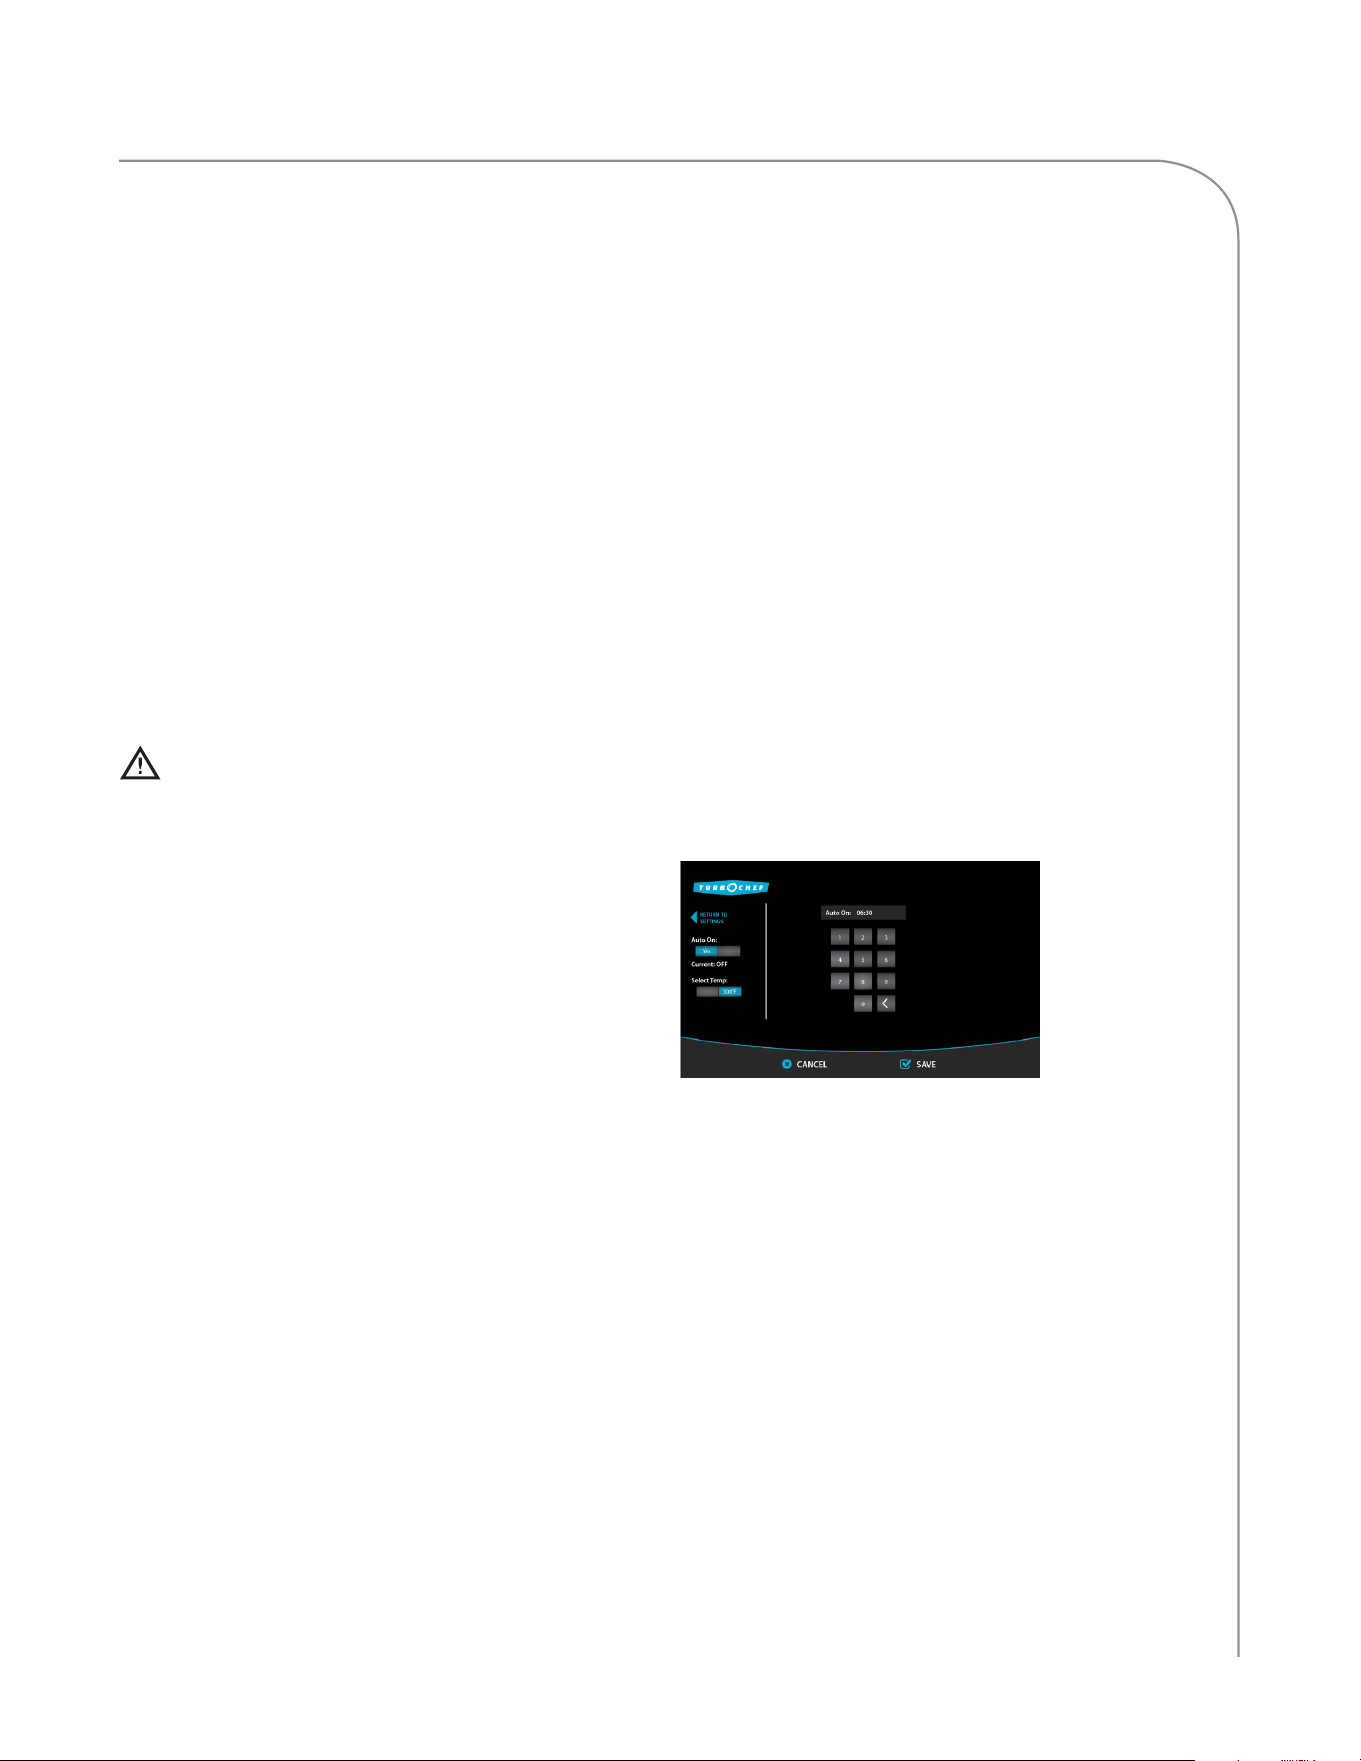
Auto On
“Auto On” is a feature that turns the oven on
automatically at a specific time of day.
1. To set auto-on, ensure the time of day is accurate
(above).
2. Toggle the yes/no icon to the YES position to
enable Auto On.
3. Select the temperature to which the oven will
automatically heat up.
4. Enter the time in 24-hour format (8:30 p.m. =
20:30). Touch “SAVE” to save all changes.
NOTE: The time will automatically convert to 12-hour
format when saved.
ECS-1001 / Rev G / October 2023ECS-1001 / Rev G / October 2023
28
LEGACY CONTROLLER OPERATION
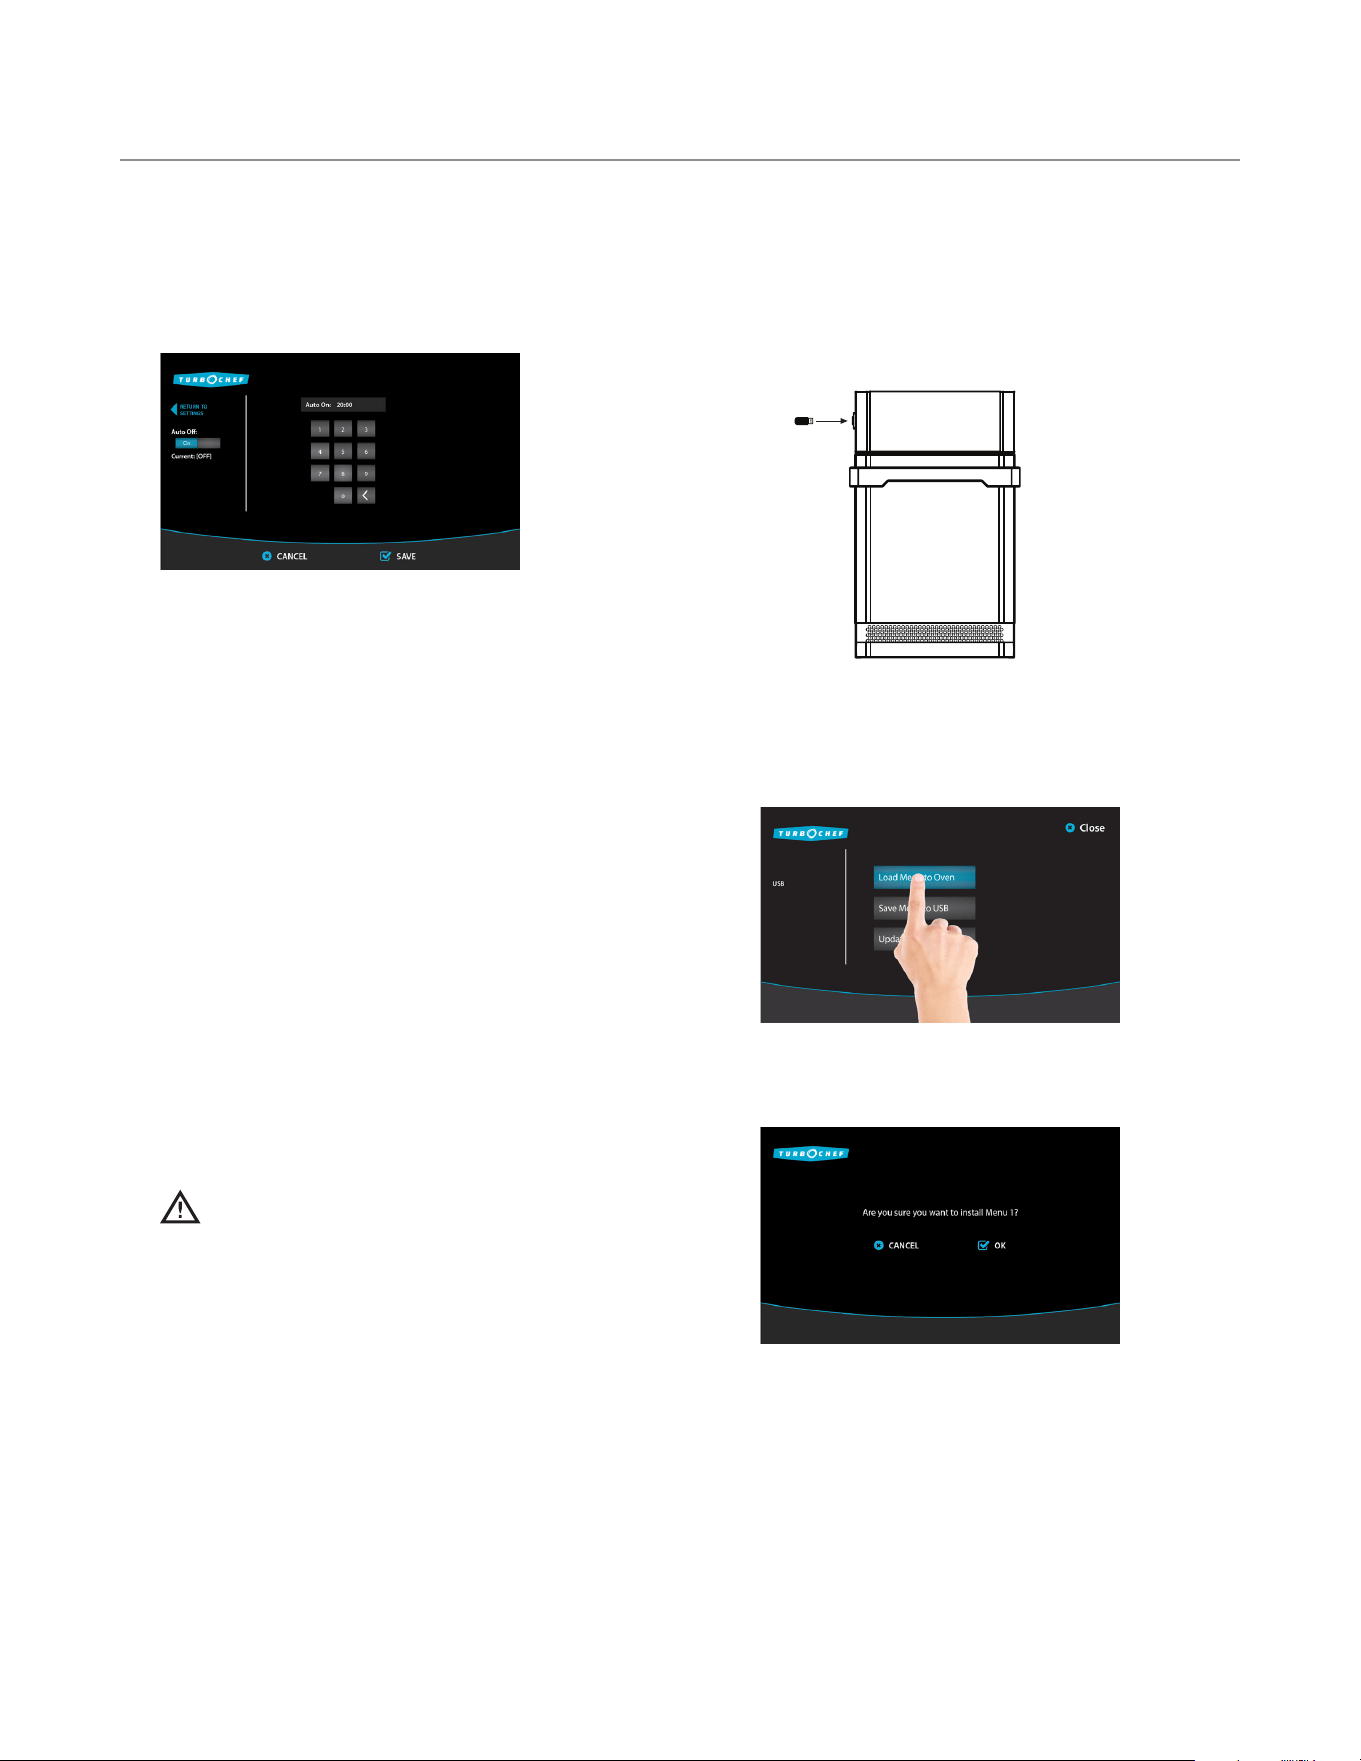
Auto Off
“Auto Off ” is a feature that turns the oven off
automatically at a specific time of day.
1. To set auto-off time, ensure the time of
day is accurate (page 16).
2. Toggle the yes/no icon to the YES position to
enable Auto Off.
3. Enter the time in 24-hour format (8:30 p.m. =
20:30). Touch “SAVE” to save all changes.
NOTE: The time will automatically convert to 12-hour
format when saved.
Info Mode: Service Screen
Only qualified service technicians should access
the service options, unless otherwise instructed by
TurboChef.
Info Mode: Manufacturing (MFG)
Only qualified service technicians should access
the MFG options, unless otherwise instructed by
TurboChef.
CAUTION: Changing the oven model will
result in the oven not cooking properly and a
non-warranty service call.
Load Menu from USB
NOTE: To update a menu, you may need to verify
that access to the Load Menu screen is turned on.
See page 25 for details.
USB setup: When loading from USB, the menu can
be in BIN (binary) format. The files must be loaded
on the root of the USB. To obtain the proper binary
file, contact your menu administrator, TurboChef
Technical Support, or consult your ChefComm
OneTouch® instructions.
To load a menu to the oven,
1. When the oven is off or cooling down, insert the
USB (see below). The oven will automatically
detect the device. Touch “OK” to proceed.
2. Load the menu:
a. Touch “Load Menu to Oven.”
b. Touch “OK” to confirm the selection and begin
the installation.
c. Touch the menu to load.
NOTE: If multiple menus are on the USB, the oven
will display the menu names Otherwise this step
will be bypassed.
Continued on next page...
ECS-1001 / Rev G / October 2023
29
LEGACY CONTROLLER OPERATION
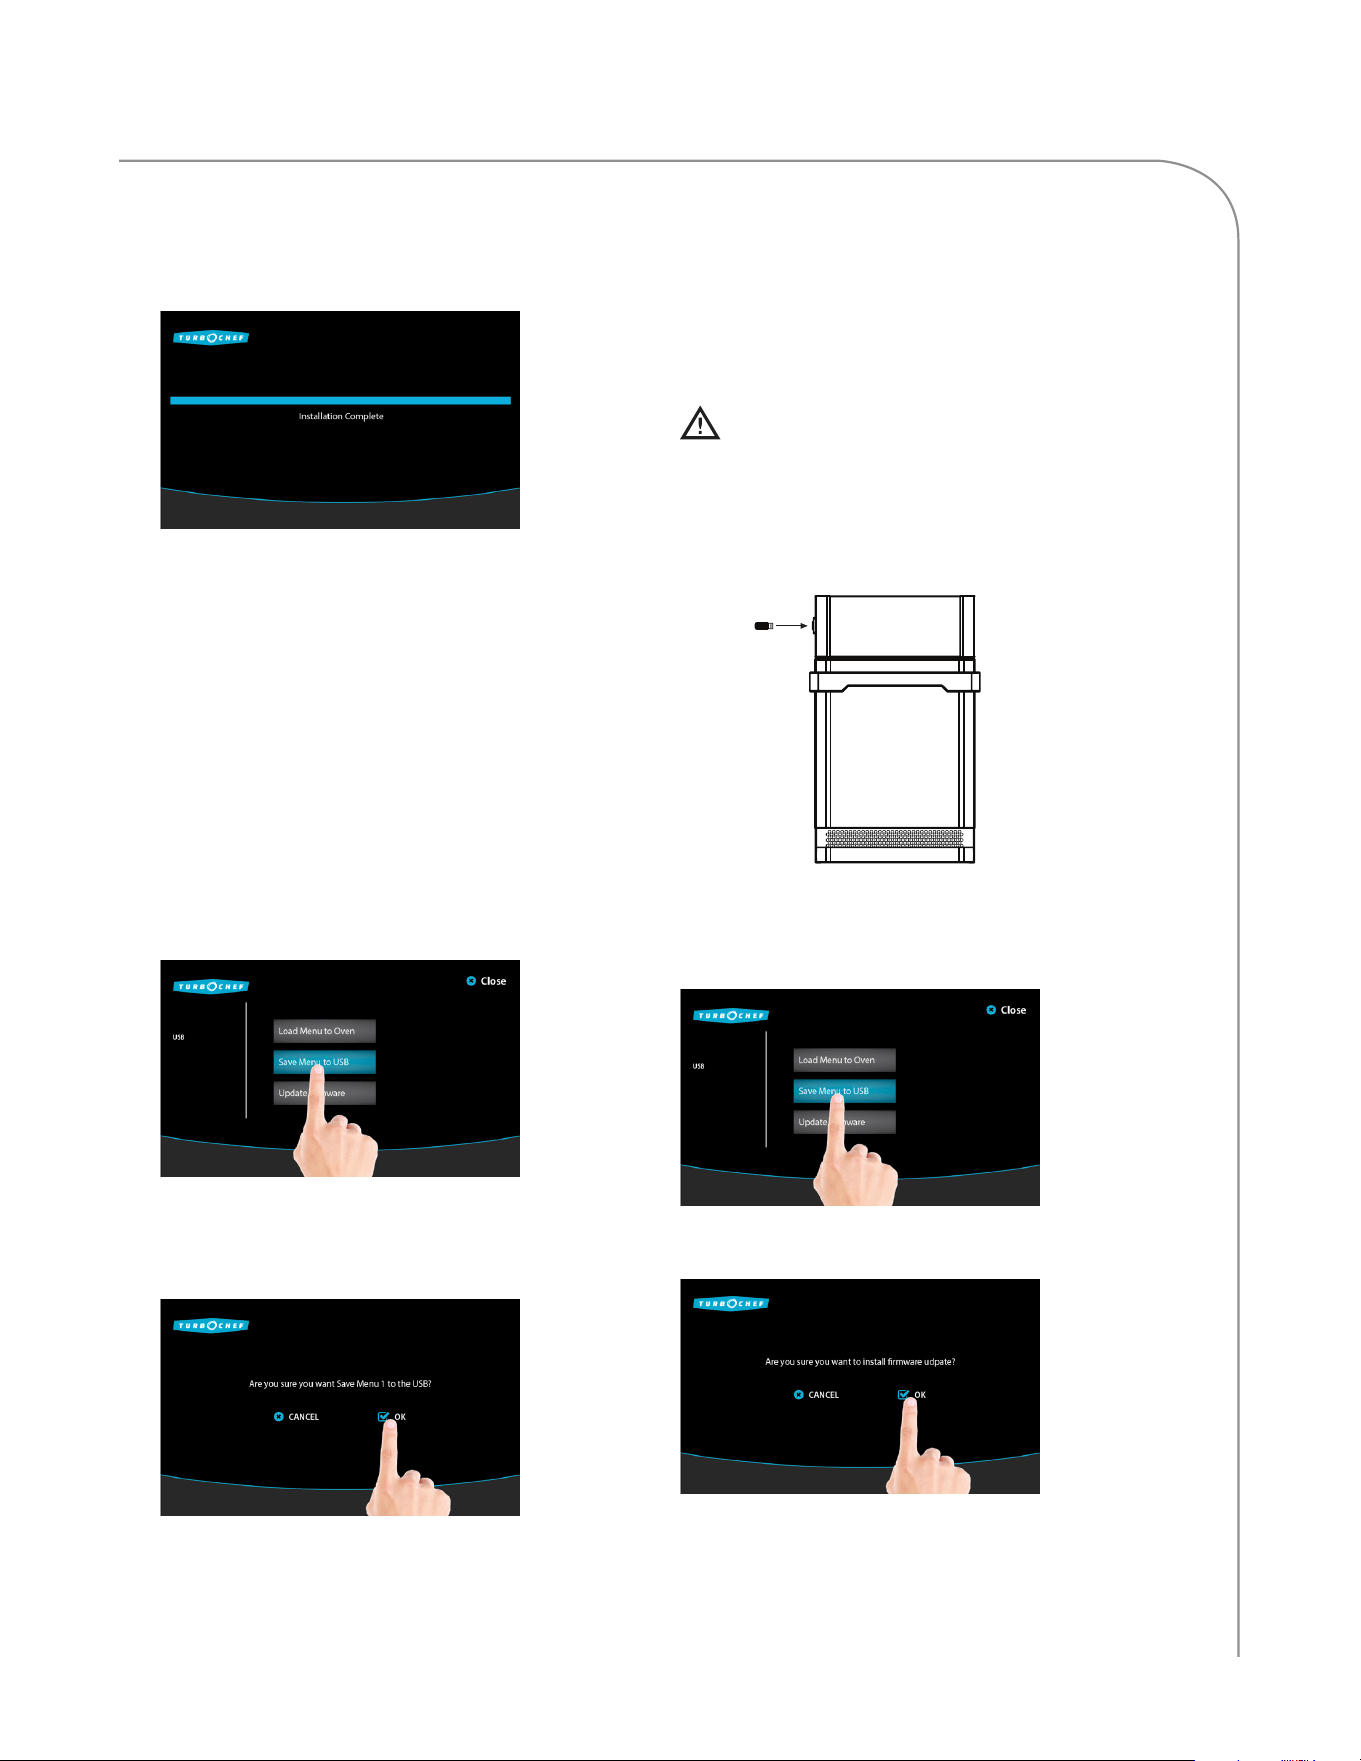
3. Once installation is complete, the oven will
display “Installation Complete.”
Save Menu to USB
NOTE: To save a copy of the oven menu, you may
need to verify that access to the Load Menu screen
is turned on. See page 25 for details.
If desired, name the menu from the Menu Info
screen to make it easy to find on your USB drive.
See page 28.
1. When the oven is off or cooling down, insert the
USB (see page 28). The oven will automatically
detect the device. Touch “OK” to proceed.
2. Touch “Save Menu to USB.”
3. Touch “OK” to begin saving the menu to
the USB Touch “CANCEL” to go back to the
previous screen.
4. Once installation is complete, the oven will
display “Save Complete.”
NOTE: If saving the menu to USB, the menu file will
be saved in a folder named: TC_Menus. If this folder
does not exist on the USB drive, the oven will create
it.
Firmware Update
TurboChef may at some point recommend a
firmware update. The update will make sure your
oven is operating at its maximum efficiency, but
should not affect cooking results or menu settings.
CAUTION: Do not remove the USB until
“Installation Complete” is displayed.
1. When the oven is off or cooling down, insert
the USB (see below). The oven will automatically
detect the USB. Touch “OK” to proceed.
2. Load the firmware:
a. Touch “Update Firmware.”
b. Touch “OK” to confirm the selection.
3. The oven will install each firmware file included
with the update. Once installation is complete,
the oven will display “Installation Complete.”
ECS-1001 / Rev G / October 2023ECS-1001 / Rev G / October 2023
30
LEGACY CONTROLLER OPERATION
Edit Mode
To enable Edit Mode,
1. Touch the “i” icon when the oven is off or
cooling down.
2. From the Info Mode screen, touch “Login” to
access the Options screen. When prompted,
enter the passcode 9 4 2 8 and then touch
“Enter.”
3. Set “Editing” to “YES” to enable Edit Mode.
The “Edit” icon will appear at the bottom of the
screen in menu mode. When “Edit” is touched
from the group select screen, the operator can:
- Edit the set temperature
- Access the edit items screen
- Name a group
- Delete a group
- Move a group
When “Edit” is touched from the item select screen,
the operator can:
- Edit Settings (page 34)
- Name Item (page 36)
- Change Group (page 36)
- Move Item (page 36)
- Delete Item (page 37)
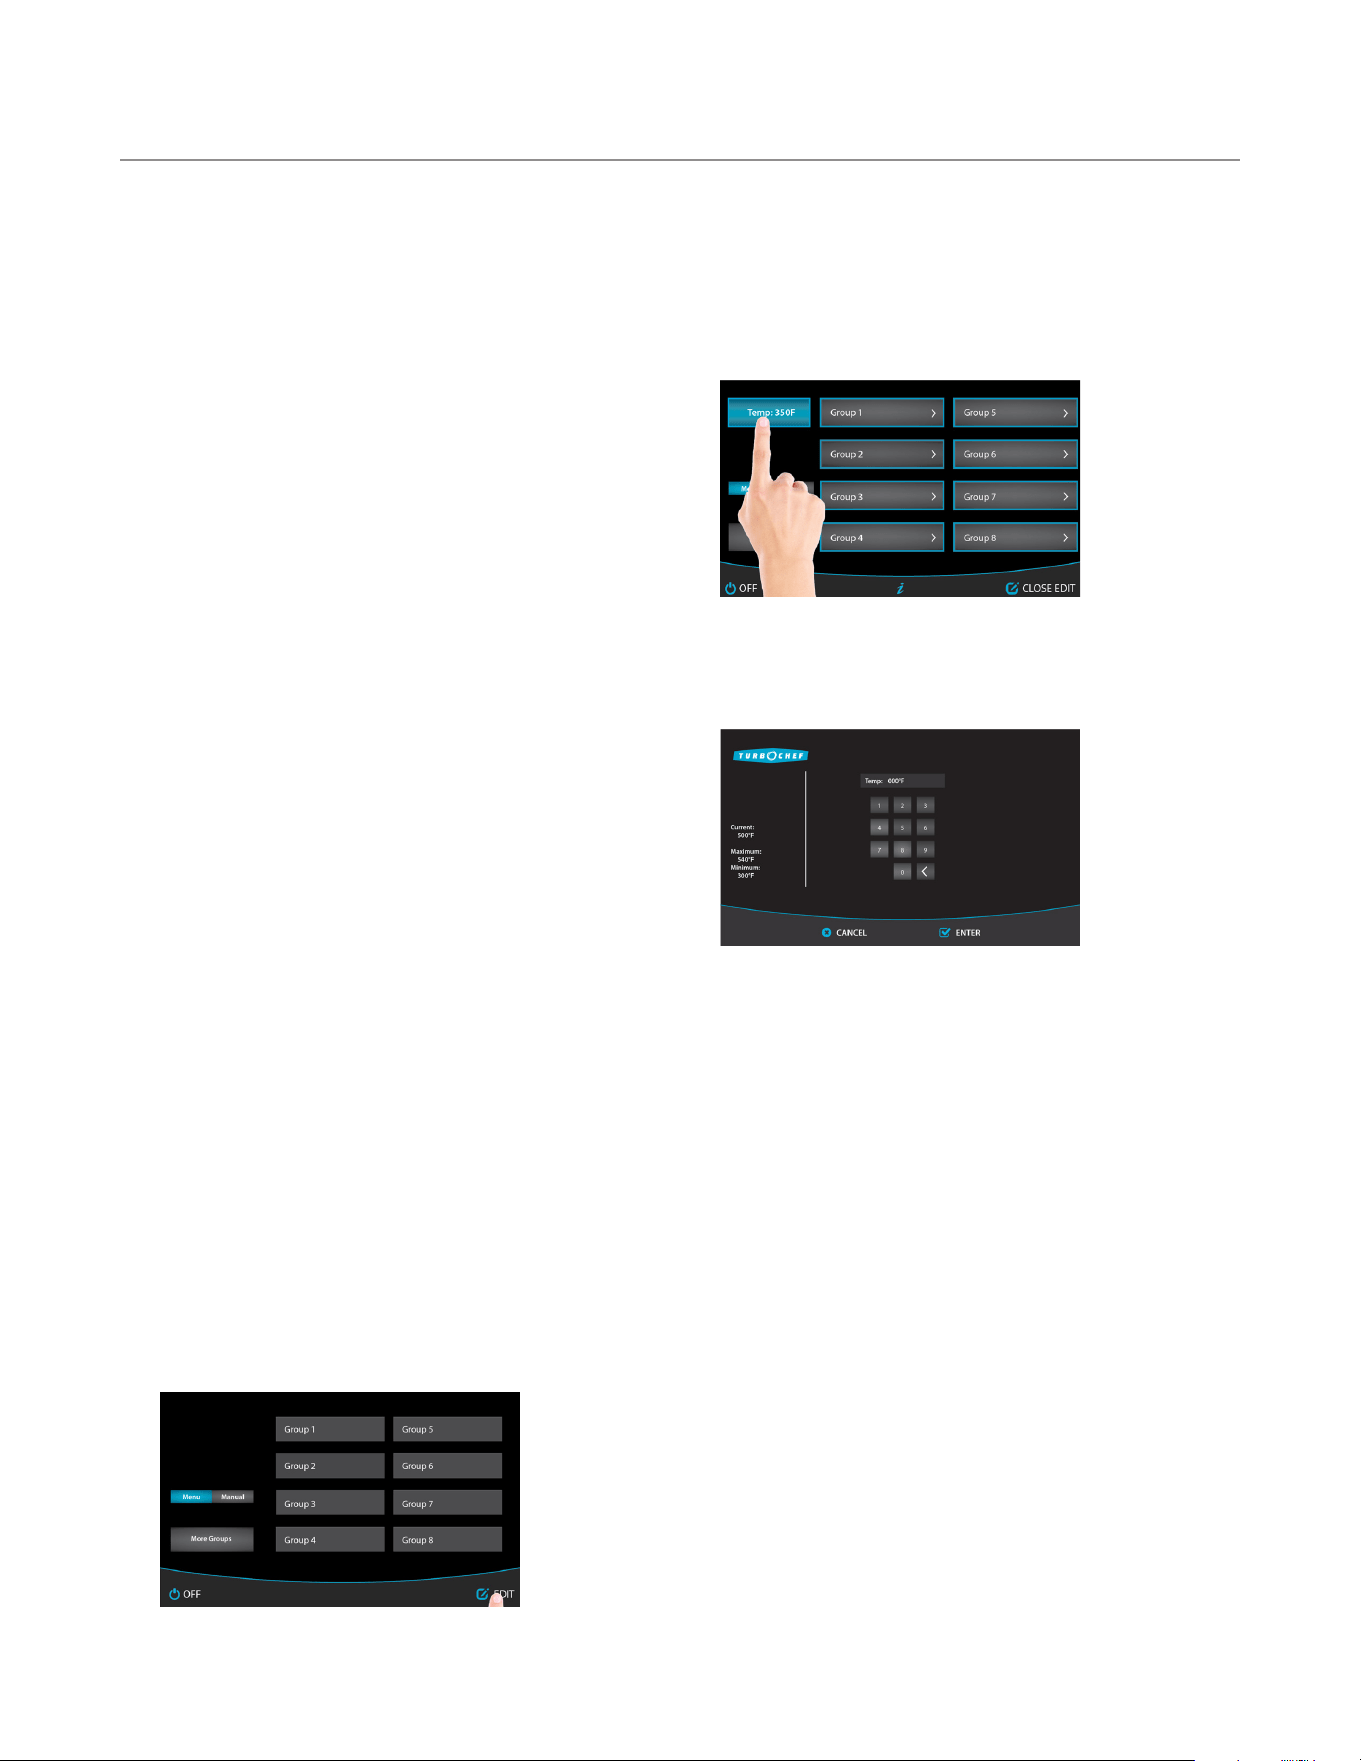
Edit Set Temperature
The menu set temperature should never be changed
to compensate for over-cooking or under-cooking.
If recipe settings are not cooking as desired, consult
your menu developer, authorized distributor, or
TurboChef Customer Support.
To change a set temperature,
1. Place the oven in Edit Mode.
2. Touch the current set temperature.
NOTE: The set temperature will apply only to
the groups adjacent to it. Be sure to check the
temperature for groups 1-8, but also for groups 9-16.
3. Using the number keys, enter the new set
temperature. The temperature range is 300–
540°F (149–282°C).
4. Touch “ENTER” to confirm the change.
Access Edit Items Screen
Item settings can be edited from the Edit Settings
screen. See page 34 for more details.
ECS-1001 / Rev G / October 2023
31
LEGACY CONTROLLER OPERATION
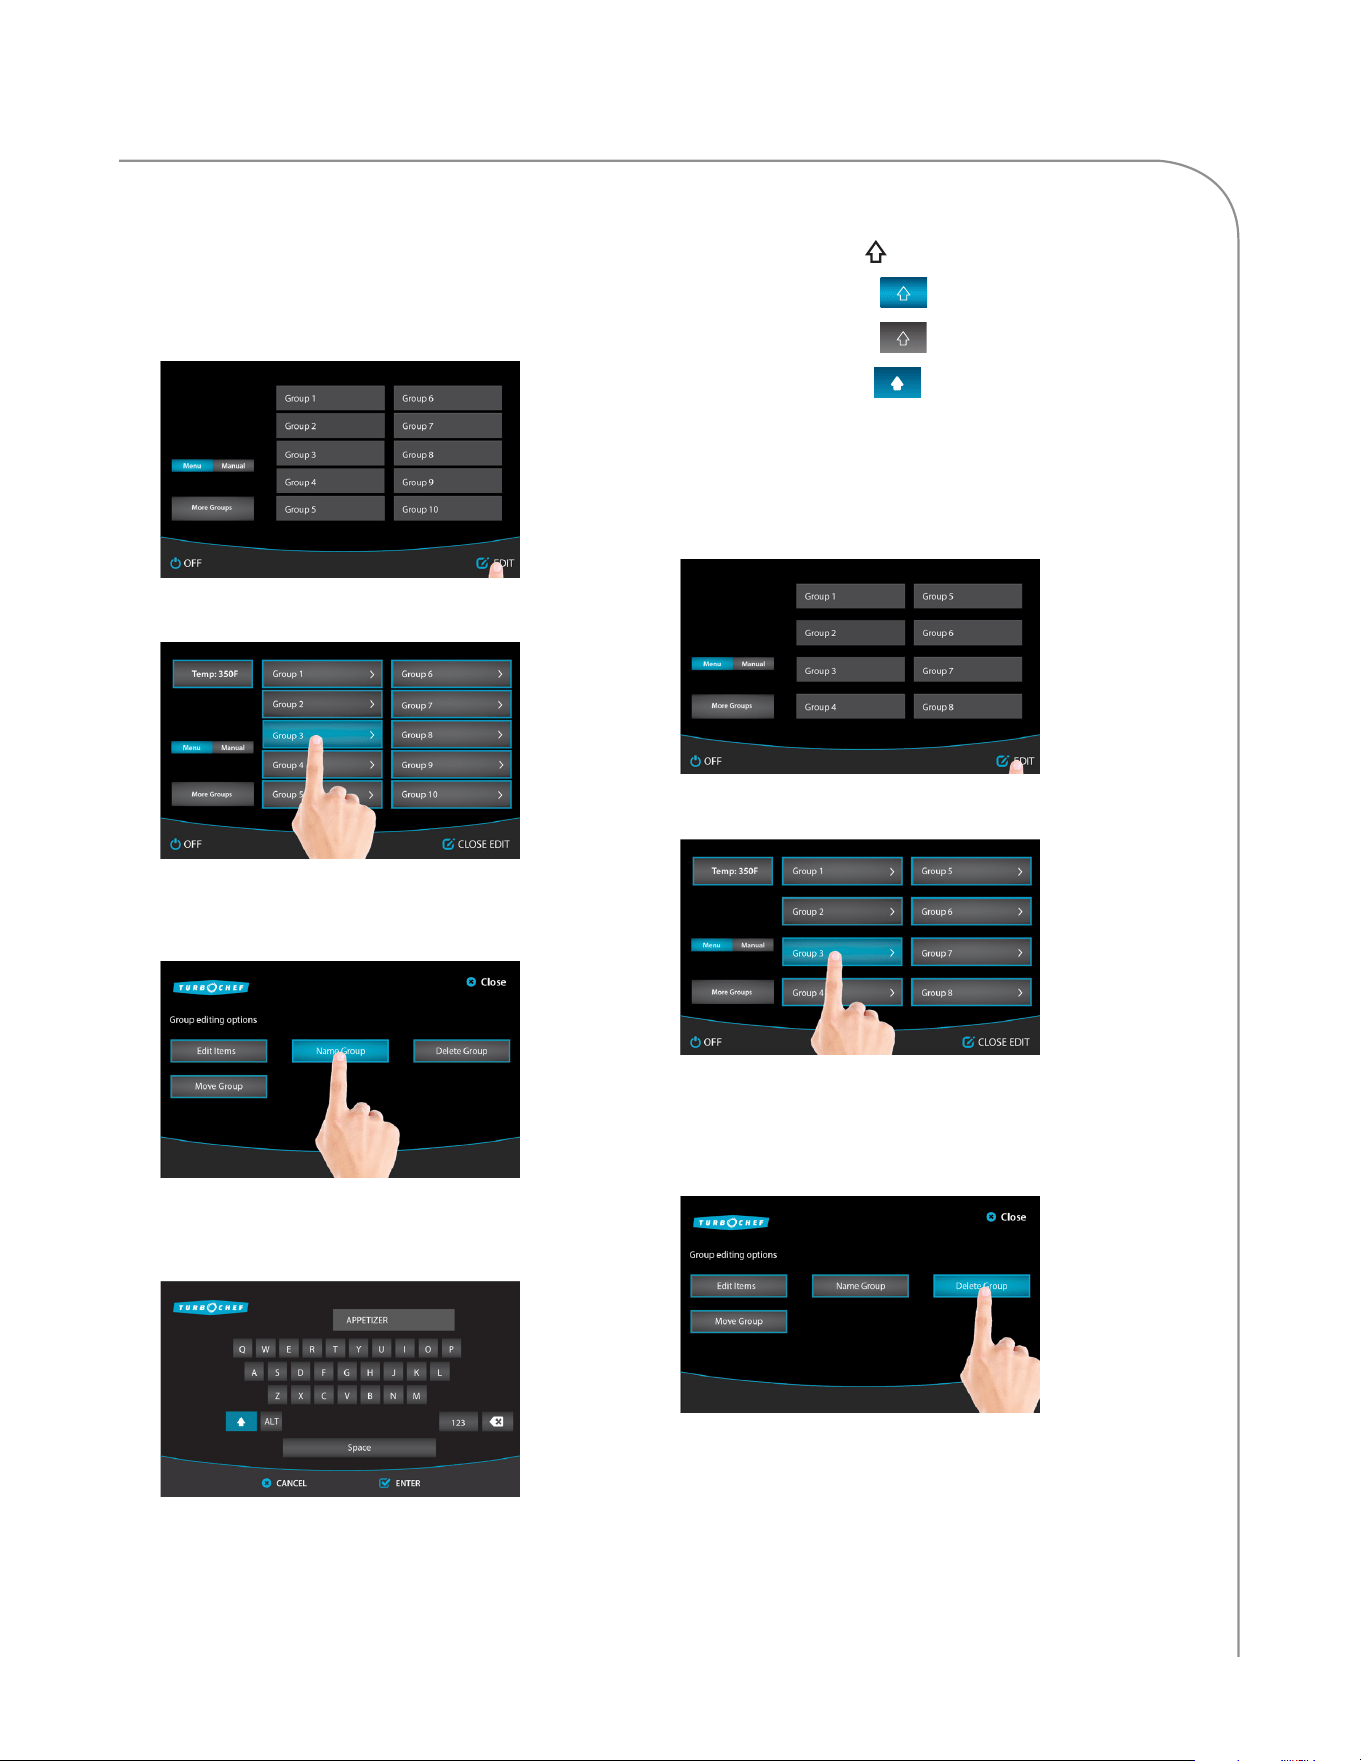
Name a Group
To name or edit a group name,
1. Place the oven in Edit Mode.
2. Select a Group.
3. Select one of the options:
a. To edit a group name, touch “Name Group.”
b. Using the keypad, enter the new group
name. Touch “ENTER” to save changes.
NOTE: Touch the “123” icon to access numbers
and symbols.
NOTE: Touch the icon to change case between:
- Uppercase
- Lowercase
- Caps lock
Delete a Group
To delete a group,
1. Place the oven in Edit Mode.
2. Touch the group to delete.
3. To delete a group, touch “Delete Group.”
NOTE: Deleting a group will delete all items in
the group.
ECS-1001 / Rev G / October 2023ECS-1001 / Rev G / October 2023
32
LEGACY CONTROLLER OPERATION
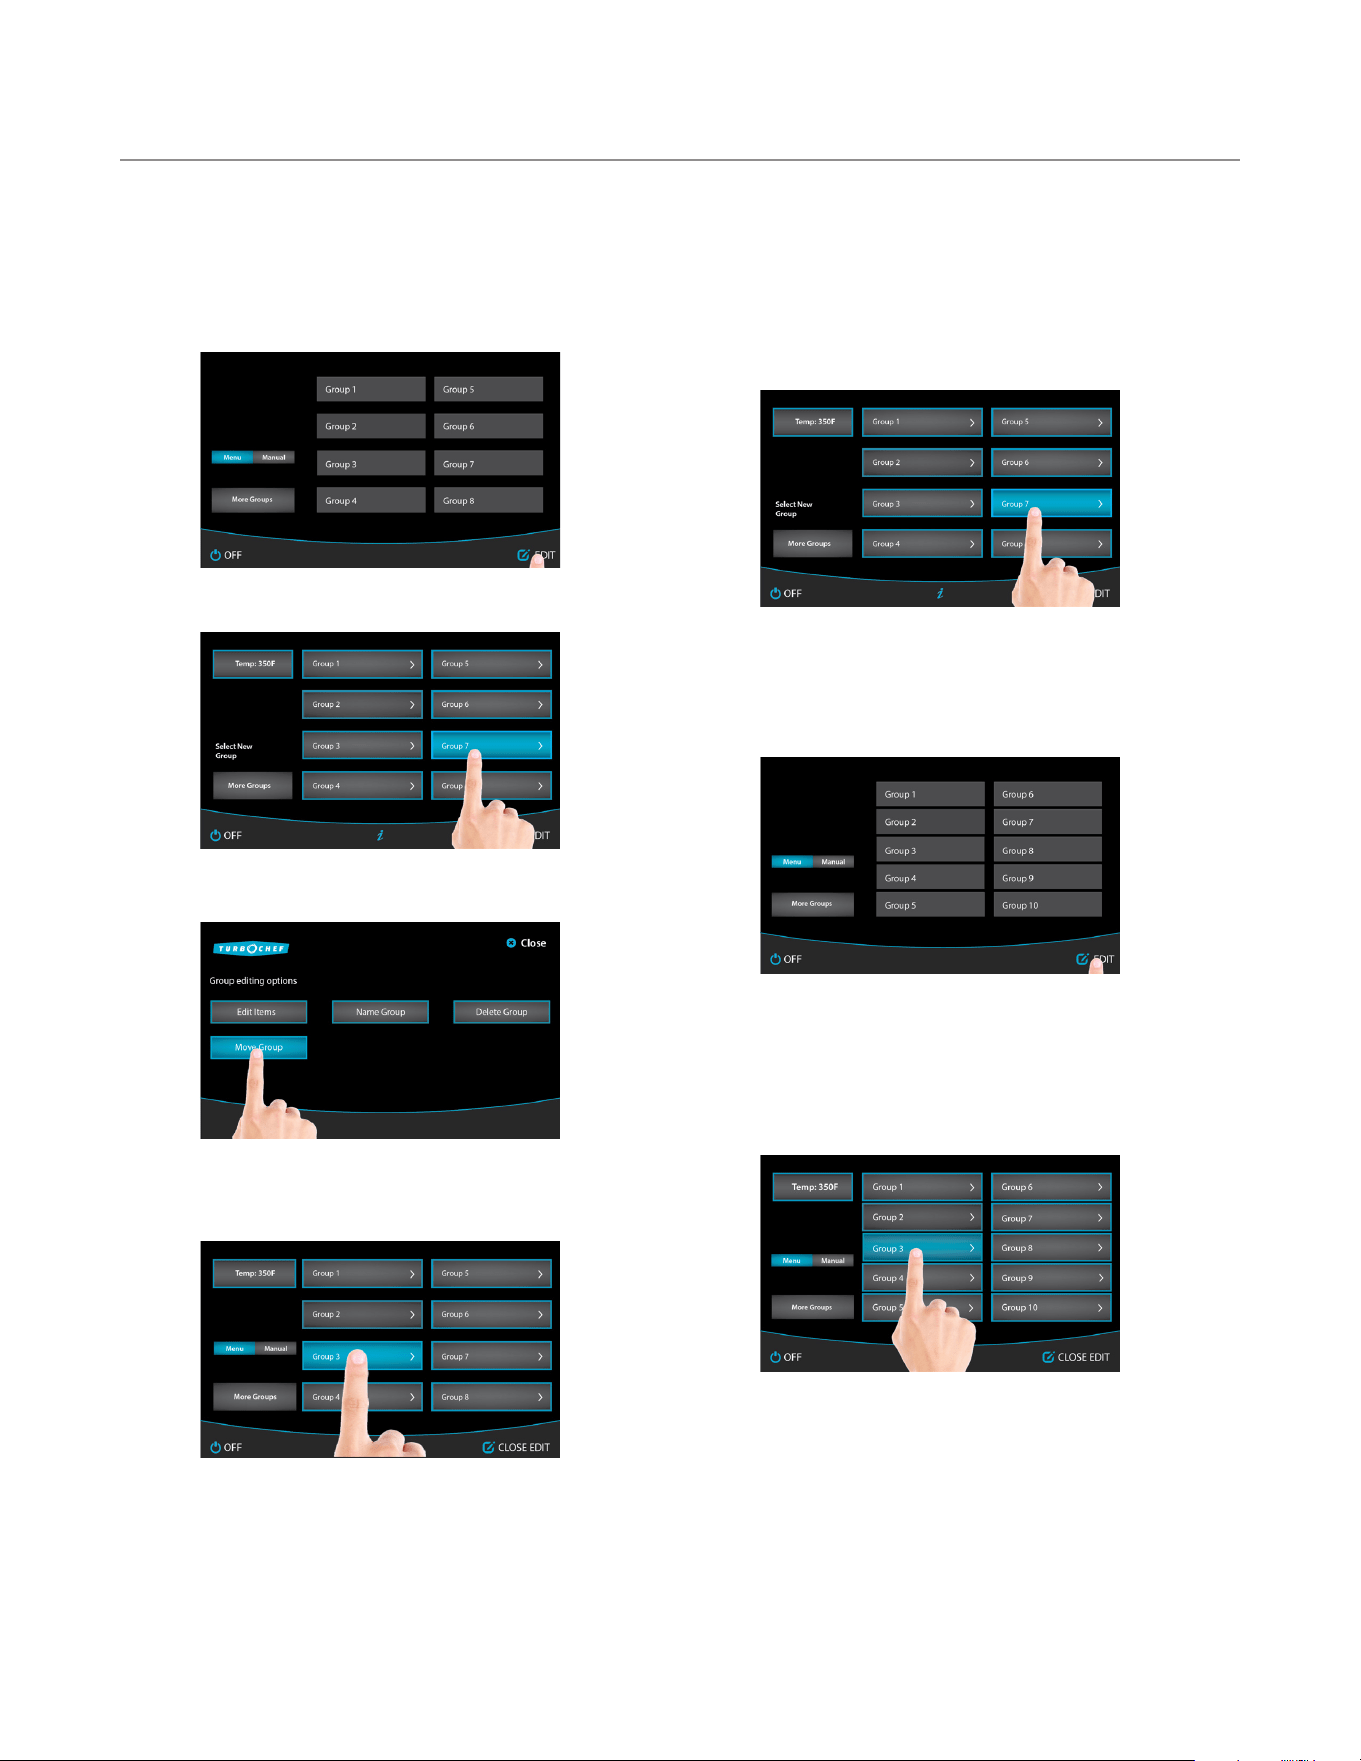
Move a Group
To move a group to another location,
1. Place the oven in Edit Mode.
2. Touch the Group to move.
3. Touch “Move Group.”
4. The group that is to move will be highlighted
blue.
5. Touch the new location for the group.
NOTE: If a group is moved to a space that
already contains settings, the old settings
in that space will be overwritten.
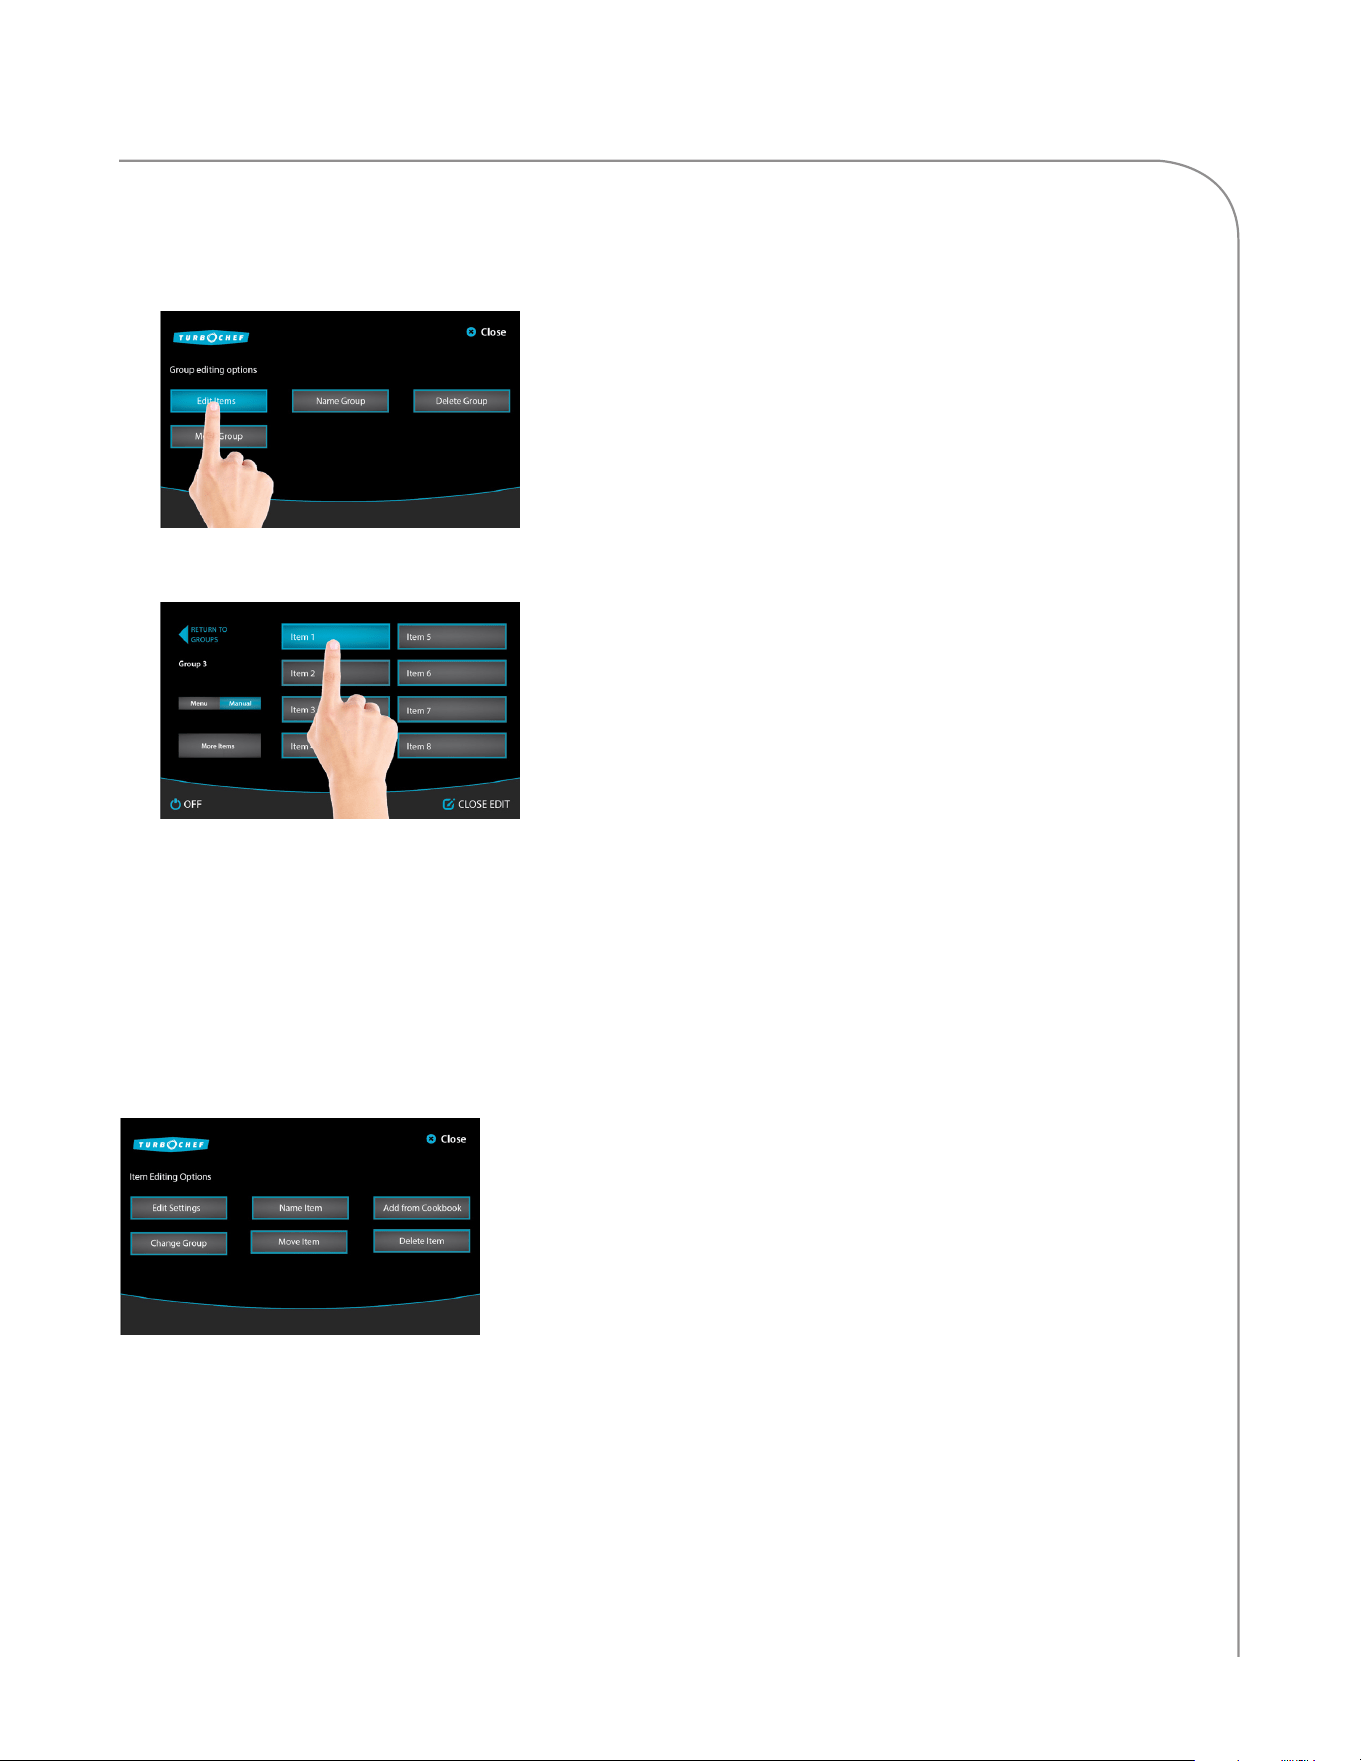
Item Editing Options
To access the Edit Settings screen,
1. Touch “EDIT” to place the oven in Edit Mode.
2. Touch the group that contains the item to edit.
NOTE: Accessing Edit Mode from the item
select screen, rather than the group select screen,
will bypass this step.
Continued on next page...
ECS-1001 / Rev G / October 2023
33
LEGACY CONTROLLER OPERATION
3. From the Group Editing Options screen, touch
“Edit Items.”
4. Touch an item to edit.
5. From the Item Editing Options screen, the
operator can:
- Edit Settings (page 34)
- Name Item (page 36)
- Change Group (page 37)
- Move Item (page 37)
- Delete Item (page 38)
ECS-1001 / Rev G / October 2023ECS-1001 / Rev G / October 2023
34
LEGACY CONTROLLER OPERATION
Edit Settings
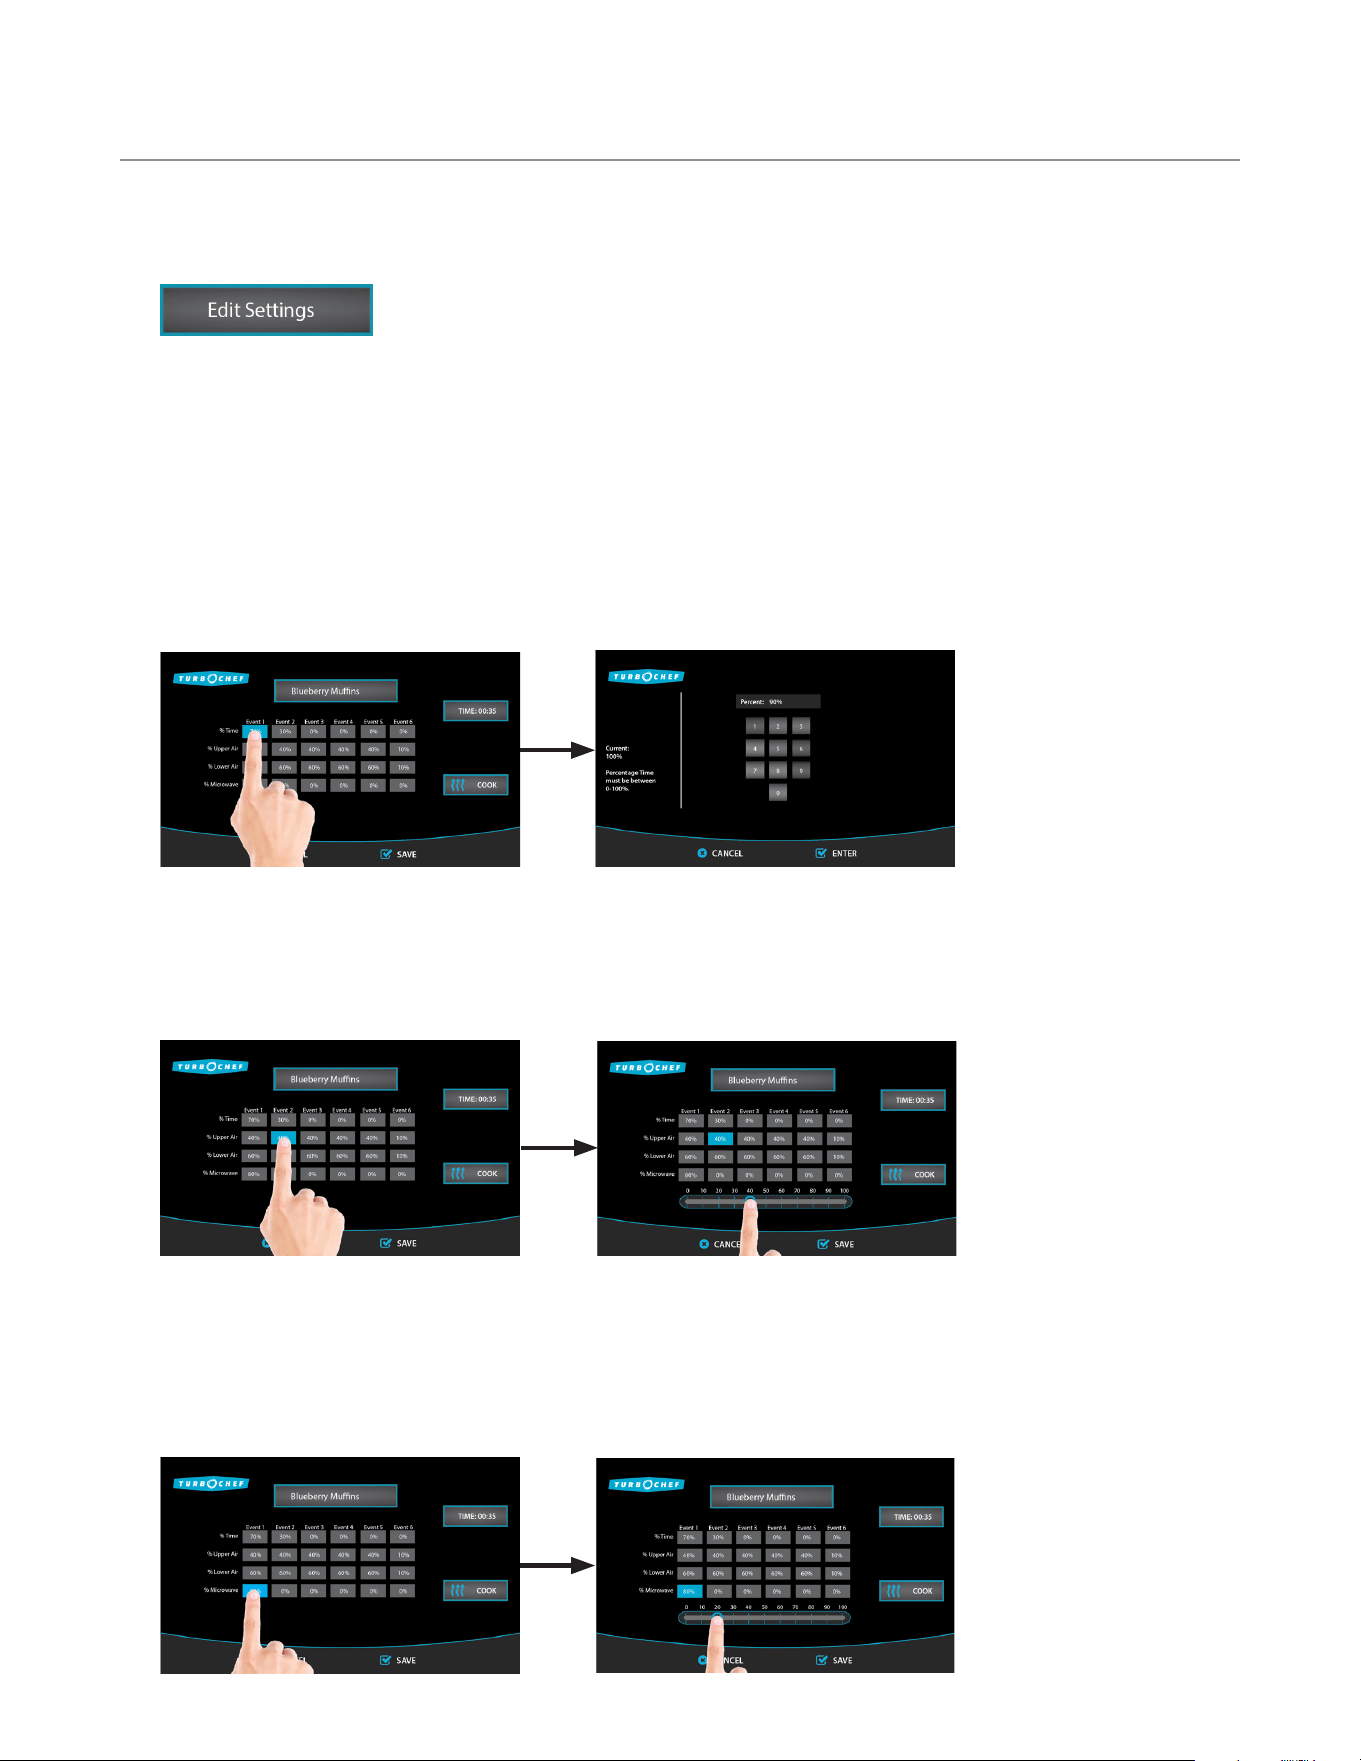
From the Item Editing Options screen (page 32), select “Edit Settings.” From the
Edit Settings screen the operator can:
- Edit % Air Time
- Edit % Air
- Edit % Microwave
- Edit Cook Time
- Name an Item
- Run a Test Cook Cycle
Edit % Time
Touch a % Time icon to change, enter the new percentage, and touch “ENTER.” % Time can be set from
0-100% for each event. The sum of all events must be 100. Once all changes are made, touch “SAVE.”
Edit % Air
Touch the % Air to be changed and adjust it using the sliding bar that appears below the grid. % Air
determines the amount of airflow. The more air, the more the product will brown or crisp. % Air can be set
from 10-100% in 10% increments. Once all changes are made, touch “SAVE.”
Edit % Microwave
Touch the % Microwave to change and adjust it using the sliding bar that appears below the grid. %
Microwave can be set from 0-100% in 10% increments. For example, 50% means the microwave system will
remain on for five continuous seconds for every ten seconds during the cook cycle. Once all changes are
made, touch “SAVE.”
ECS-1001 / Rev G / October 2023
35
LEGACY CONTROLLER OPERATION
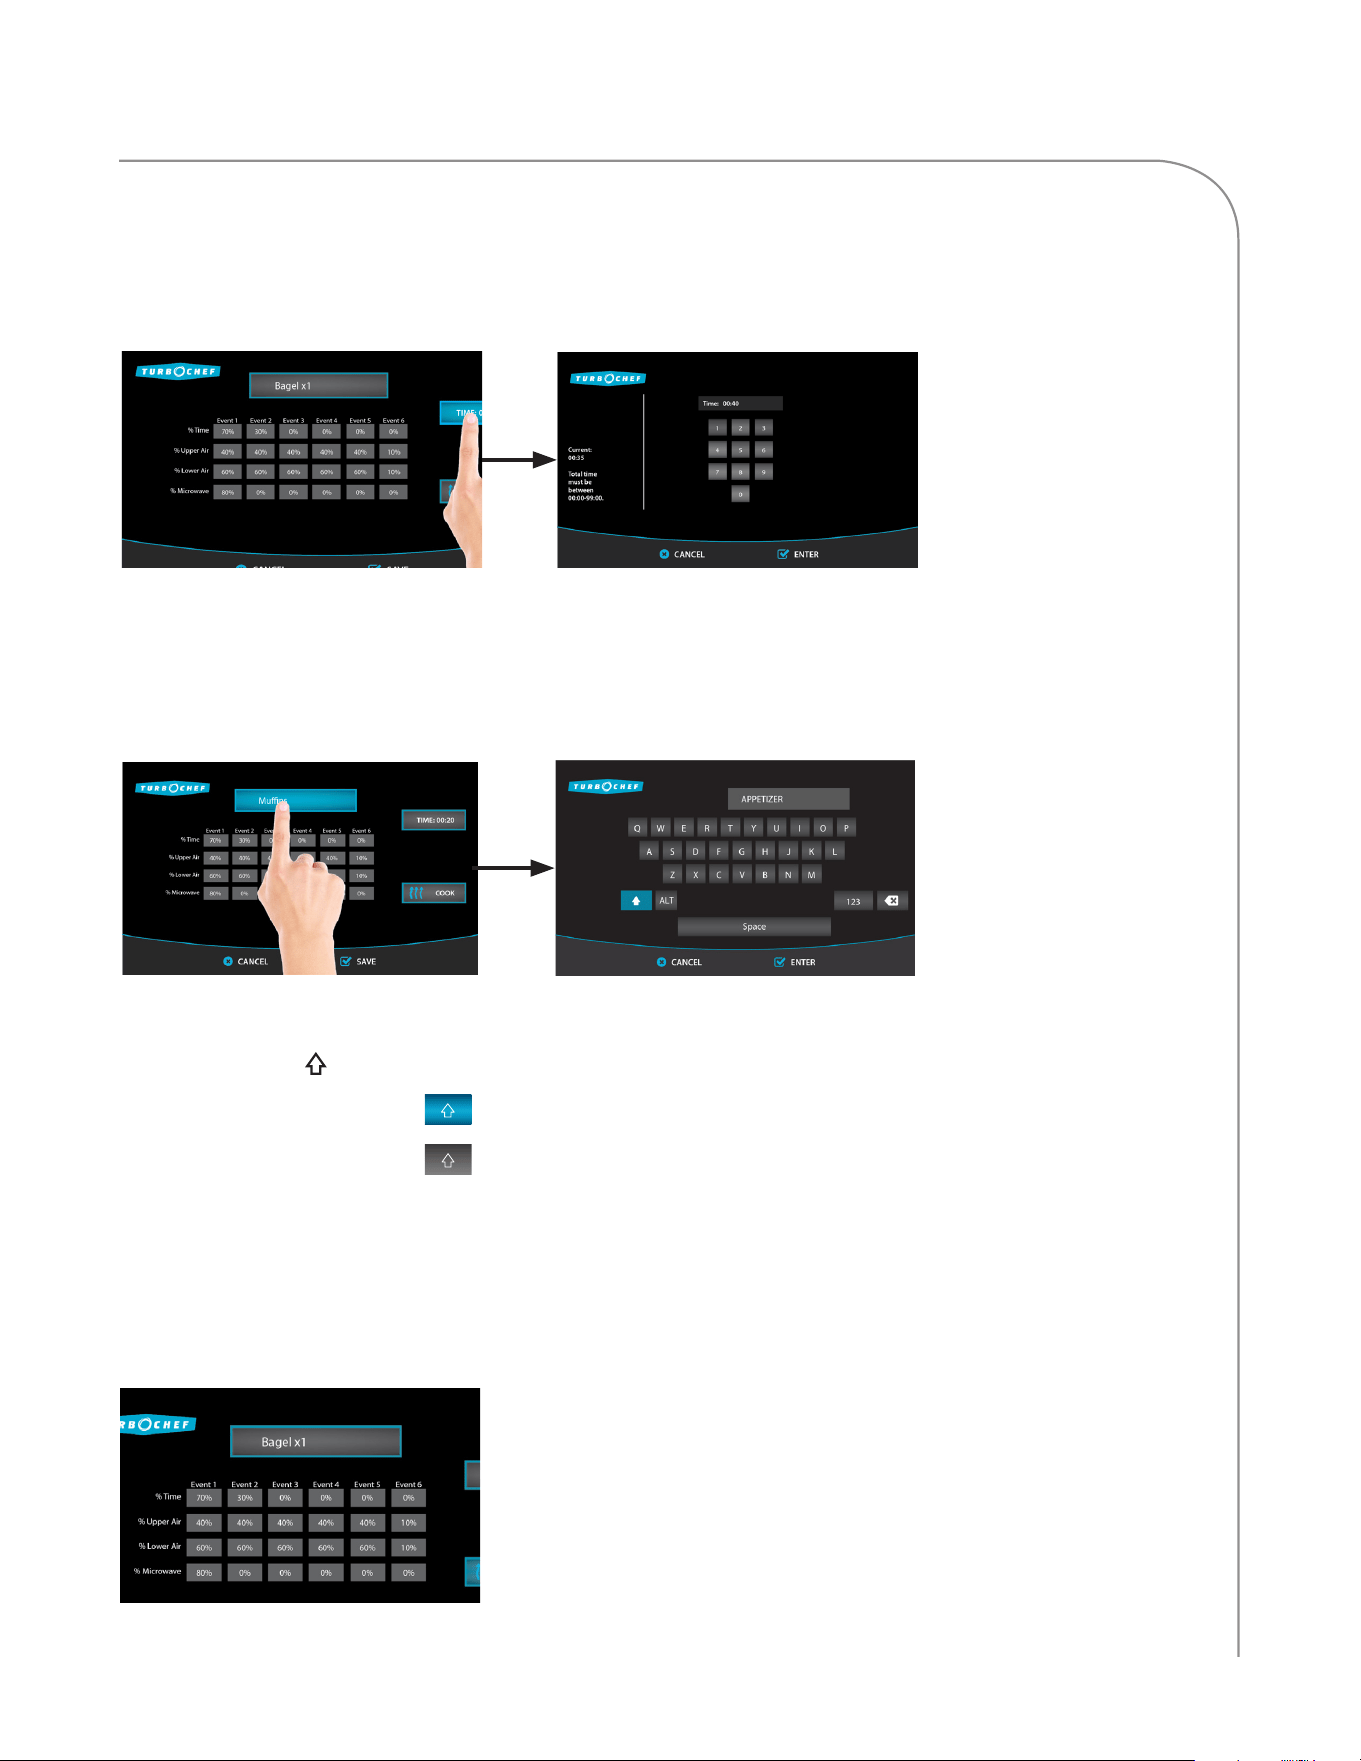
Edit Cook Time
Touch the current cook time. The maximum allowable cook time is 15 minutes. Using the number keypad,
enter the cook time and touch “ENTER.” Once all changes are made, touch “SAVE.”
Name an Item
Touch the current name. Using the keypad, input the name and touch “ENTER.” Once all changes are
made, touch “SAVE.”
NOTE: The field allows for a maximum of 16 characters.
NOTE: Touch the “123” icon to access numbers and symbols.
NOTE: Touch the icon to change case between:
- Uppercase, blue icon
- Lowercase, gray icon
NOTE: Touch the Alt icon to show special characters.
Run a Test Cook Cycle
If desired, touch “Cook” to perform a test cook.
NOTE: The oven may require additional warm-up time before a test cook can be performed.
ECS-1001 / Rev G / October 2023ECS-1001 / Rev G / October 2023
36
LEGACY CONTROLLER OPERATION
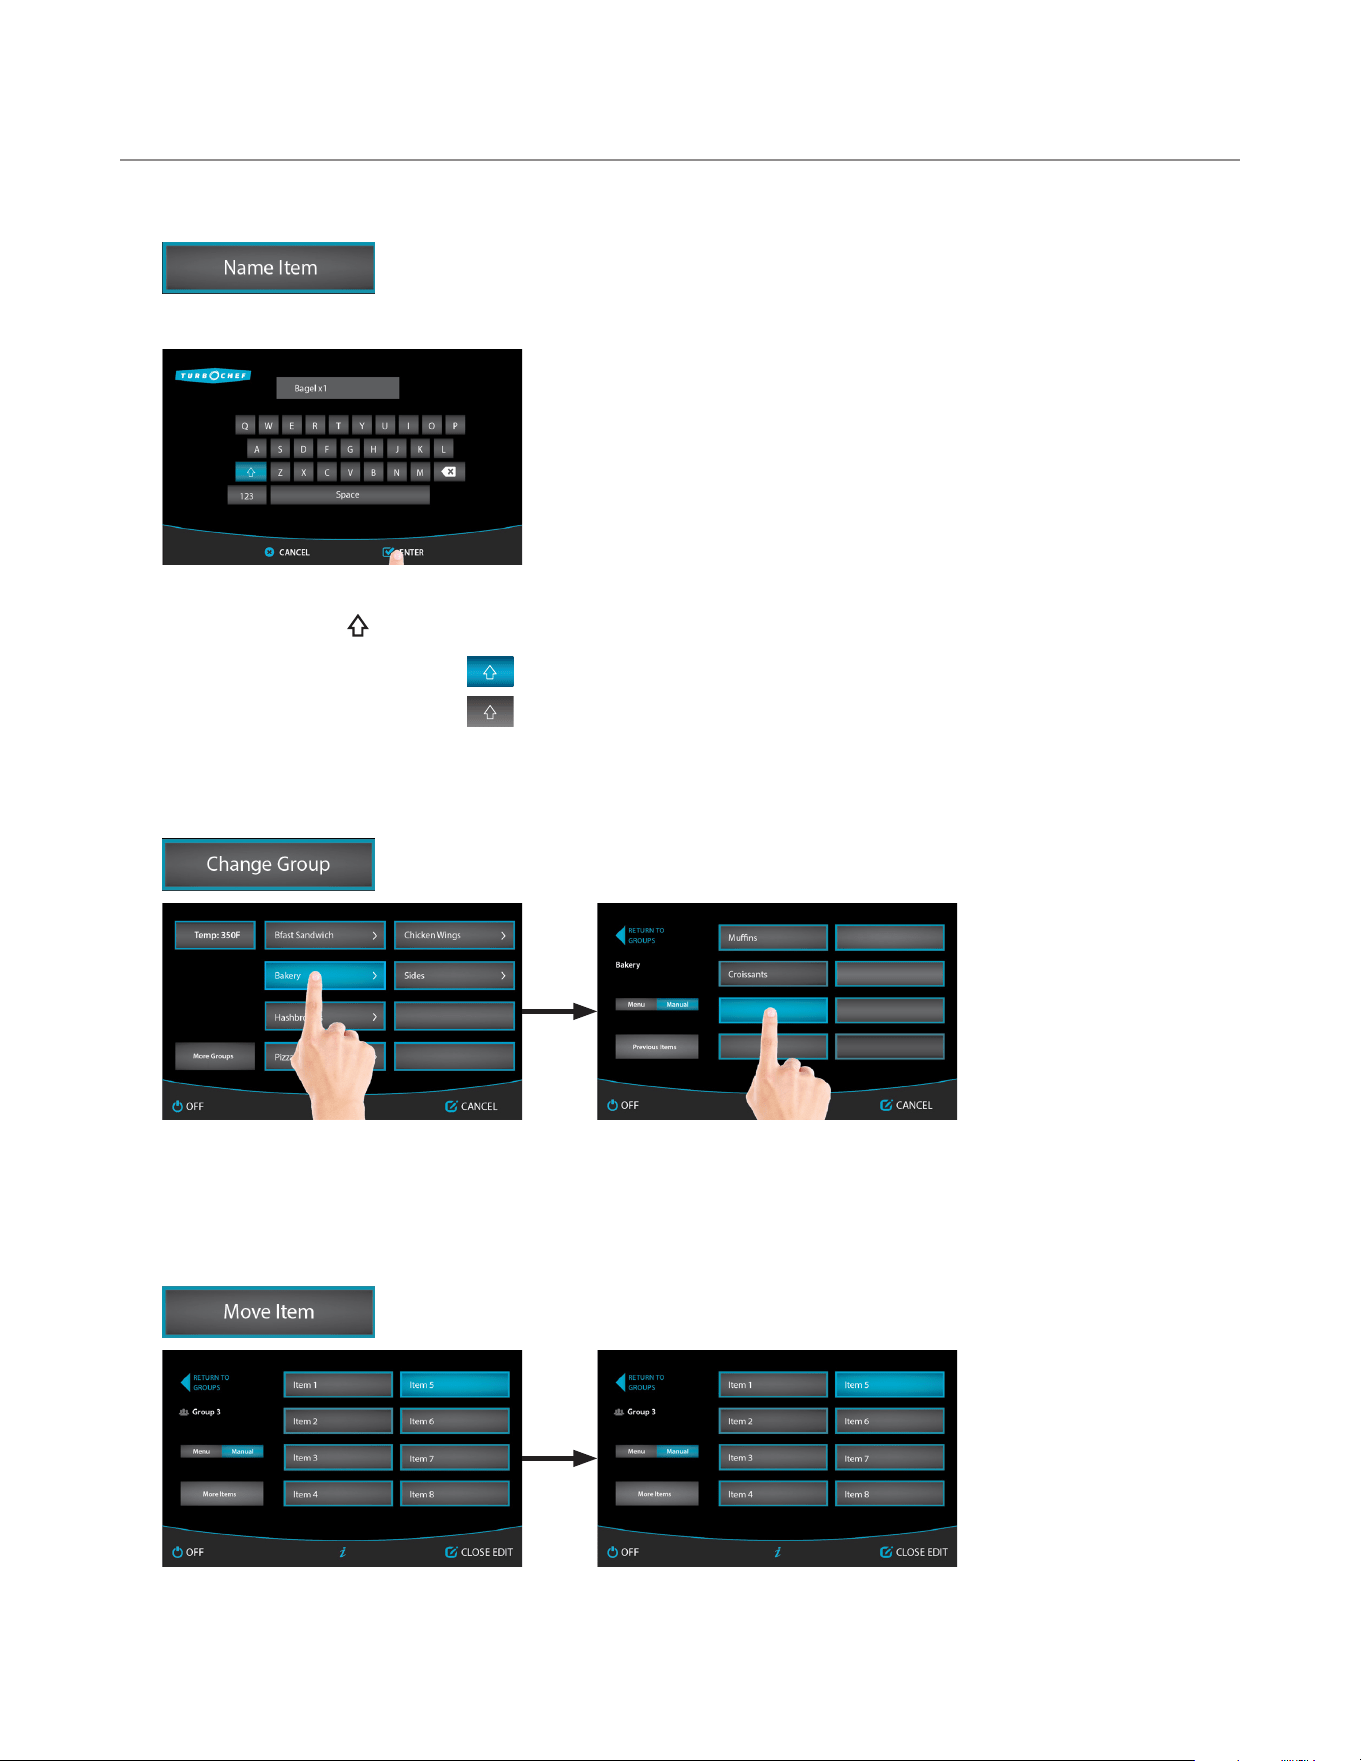
Name Item
From the “Editing Options” screen (page 32), select “Name Item” to name or edit
an item name. After editing the name, touch “ENTER” to save changes.
NOTE: The field allows for a maximum of 16 characters.
NOTE: Touch the “123” icon to access numbers and symbols.
NOTE: Touch the icon to change case between:
- Uppercase, blue icon
- Lowercase, gray icon
NOTE: Touch the Alt icon to show special characters.
Change Group
From the “Editing Options” screen (page 32), select “Change Group.”
Select a new group. Touch an item space to indicate where the item will be moved.
NOTE: If an item is moved to a space that already contains
settings, the old settings will be overwritten.
Move Item
From the “Editing Options” screen (page 32), select “Move Item.”
The item that is to move will be
highlighted blue.
Touch an item space to indicate where the item will be moved.
NOTE: If an item is moved to a space that already contains
settings, the old settings will be overwritten.
ECS-1001 / Rev G / October 2023
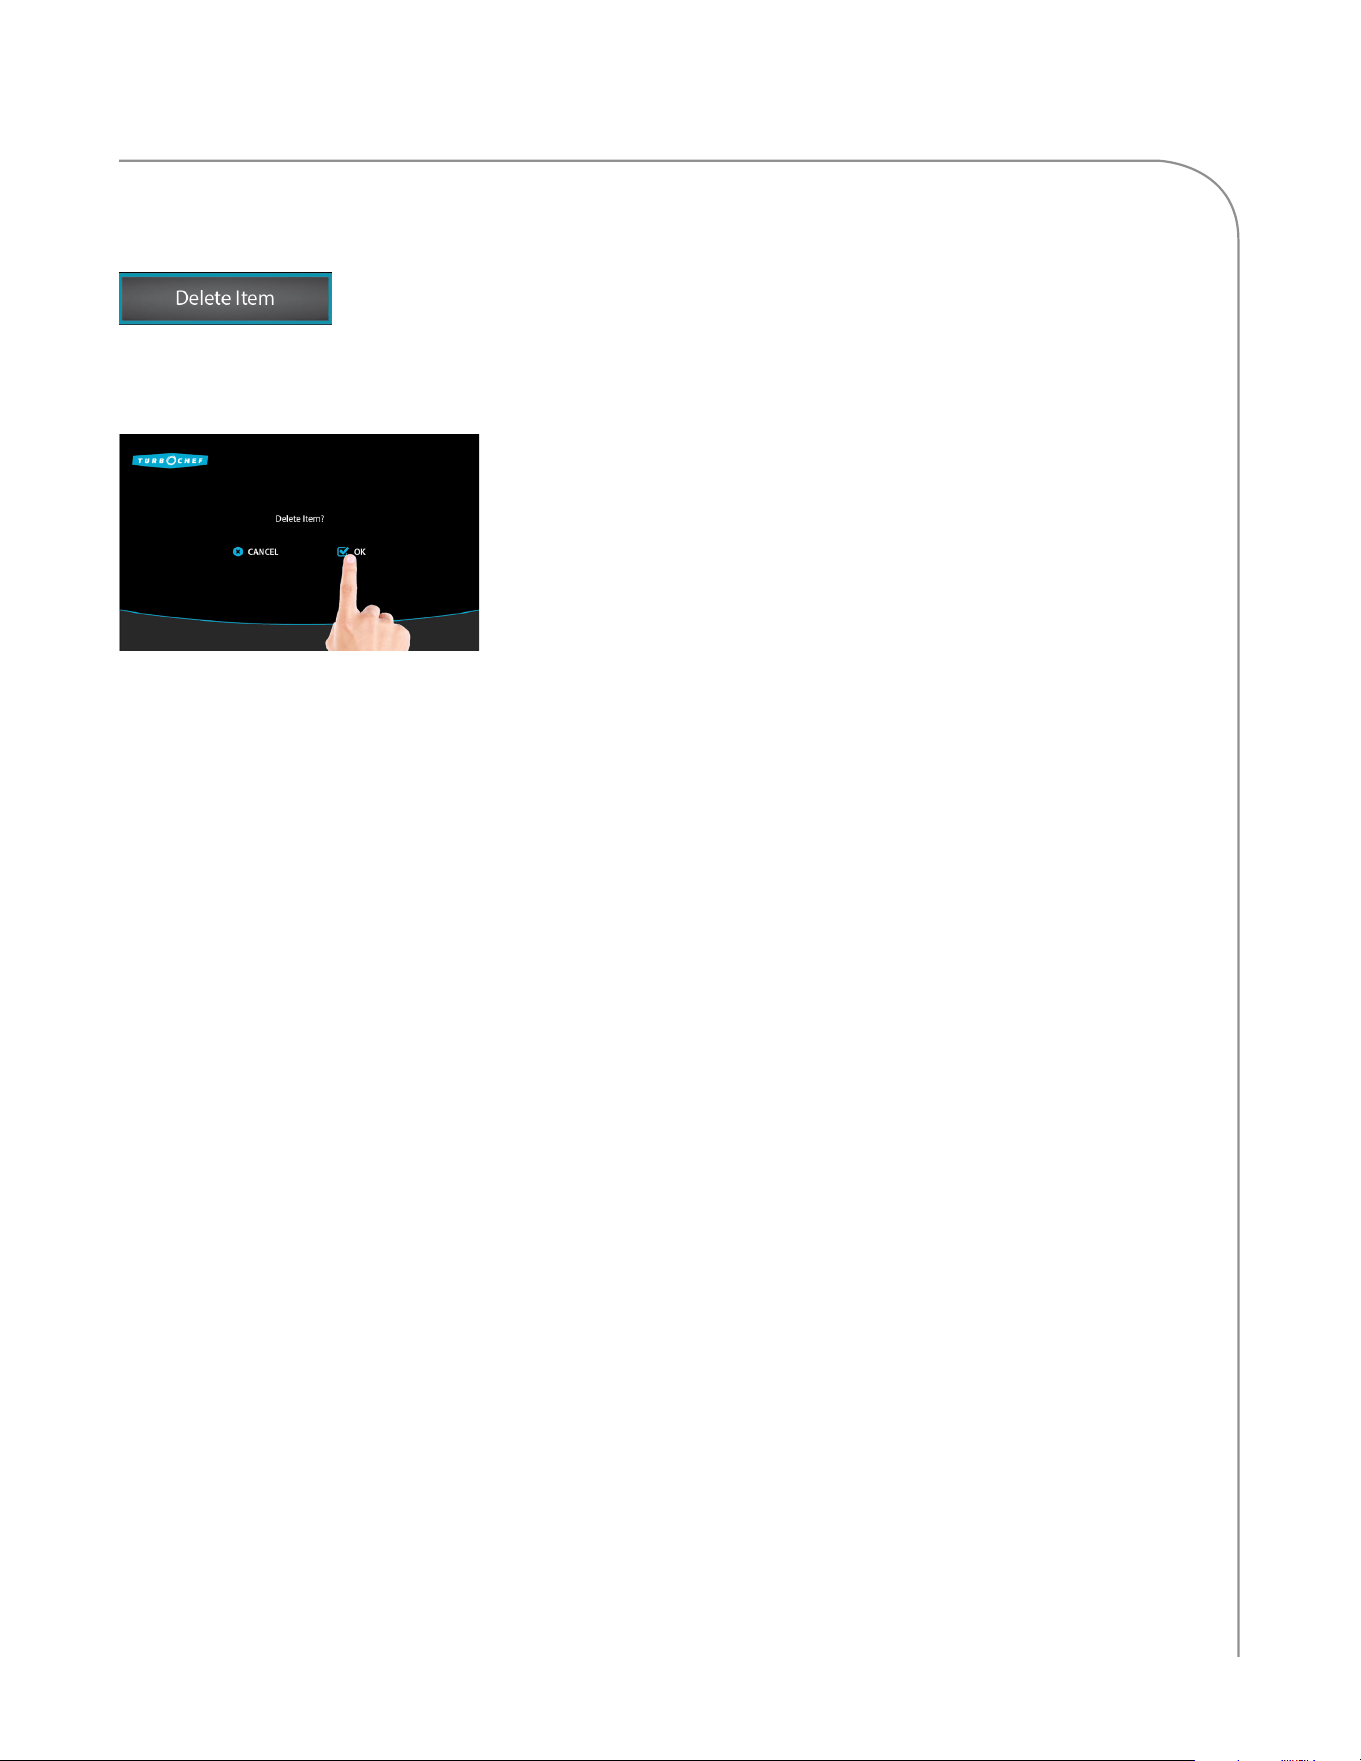
37
LEGACY CONTROLLER OPERATION
Delete Item
From the “Editing Options” screen (page 32), select “Delete Item.” Touch
“OK” to delete the item.
NOTE: Once an item is deleted, it cannot be recovered.
ECS-1001 / Rev G / October 2023ECS-1001 / Rev G / October 2023

38
TROUBLESHOOTING
Troubleshooting
The following is a list of fault codes and error messages, along with the possible problem(s) that
the oven may experience. Please attempt the recommended action before calling Customer Support
(800.90TURBO, +1 214.379.6000) or your Authorized Distributor.
If any fault or error message occurs that is not listed below, contact Customer Support (800.90TURBO,
+1 214.379.6000).
NOTE: Any fault codes listed in bold will terminate a cook cycle upon discovery. F6 will not terminate a
cook cycle; however, it will alert the user of a possible air circulation problem.
WARNING: Food, oven door, and oven cavity are hot! Use extreme caution when troubleshooting
the issues below.
Issue
Possible Cause(s)
Resolution
No power to
oven.
Oven is not plugged in.
Main circuit breaker is tripped.
Plug the oven in.
Verify the wall circuit breaker is on. Reset the
breaker, then power the oven back on.
Oven is not
warming up
properly.
Oven is in the Off state.
Door is not closed.
Oven has been switched off at the
main circuit breaker.
High-limit thermostat tripped
Touch “Menu” and then a set temperature.
Close the cook cavity door.
Turn the oven off and unplug the oven – leave for two
minutes. Re-plug in the oven, switch on the isolator/
main power supply, and touch “Menu” and then a set
temperature.
Press the button located on the oven rear wall
(below the filter) to reset the high-limit thermostat.
Display
reads
“Oven Door
Open”
and alarm
sounds.
Food obstruction preventing
door from closing.
Oven door is open.
Door switches are out of alignment.
Open the door and remove the obstruction.
Open and close the door several times.
Call Customer Support.
Oven is not
cooking
properly.
Incorrect oven model specified.
Oven is not clean. (Large deposits of
grease, carbon, or food debris dilute
the microwave.)
Incorrect group and/or item name was
selected for the product.
Product was not cooked from correct
starting state (for example, chilled or
frozen).
Product out of specification.
From the Info Mode Manufacturing screen, ensure
that the oven model is set to “ECOST.”
Clean the oven following the cleaning instructions
on pages 8-9.
Ensure the correct food group and/or item was
selected.
Ensure the product was in the correct state before
being placed in the oven.
Ensure the product is exactly the same weight/size as
the typical product.
Oven is not
beeping.
Bad boot up when power was
cycled.
Unplug the oven for 30 seconds and plug the oven
back in and see if the issue is resolved. If not, call
Customer Support.
ECS-1001 / Rev G / October 2023

39
TROUBLESHOOTING
Issue Possible Cause(s) Resolution
Steam or smoke is
present.
Oven is not clean. (Large deposits
of grease, carbon, or food debris
dilute the microwave.)
Rear vent is clogged.
Clean the oven following the cleaning instructions
on pages 6-7.
Clean the air filter, (step 4, page 6).
Oven is cooling
down, shutting
down, or making
selections on its
own.
Debris is on the display.
F12: Firmware Reboot
Clean the display.
Check the fault log (see page 24) to see if any F12
faults have been logged. If so, record the Phoenix
Firmware version (see page 24) and contact the
factory to see if a firmware update is available.
Touch response
is slow or not
detecting touch at
all.
Bad boot up when power was
cycled.
Unplug the oven for 30 seconds and plug the oven
back in and see if the issue is resolved. If not, call
Customer Support.
F1: Blower
Running Status
Bad
Oven power interrupted. Verify the wall circuit breaker is on. Reset the
breaker and then power the oven on.
Turn the oven off and unplug the oven –
leave for two minutes. Re-plug in the oven, switch
on the isolator/main power supply, and select
“Menu” and then a set temperature.
F2: Cook
Temperature Low
Oven power interrupted.
Air nozzles on the top/bottom
of the cook cavity are clogged.
Oven door is out of alignment.
Defective heater.
Blower motor not running.
Oven not fully warmed up.
Verify the wall circuit breaker is on. Reset the
breaker and then power the oven on.
During daily cleaning, make sure to unclog the air
nozzles on the top/bottom of the cook cavity.
Open and close the door several times and verify
the door is closed.
Reset the high-limit thermostat located on the
oven rear wall near the power cord.
Call Customer Support.
Repeat warmup and allow the oven to idle for five
minutes.
F5: Magnetron
Over Temperature
Blockage of cool air into the oven.
Rear cooling fan exhaust guard(s)
clogged.
Remove anything that may be obstructing the flow
of cool air into the side/rear oven panels.
Make sure the rear fans are free of debris.
F6: EC Temp Blockage of cool air into the oven.
Rear cooling fan exhaust guard(s)
clogged.
Remove anything that may be obstructing the flow
of cool air into the side/rear oven panels.
Make sure the rear fans are free of debris.
ECS-1001 / Rev G / October 2023ECS-1001 / Rev G / October 2023

40
NORTH AMERICA LIMITED WARRANTY
North America Limited Warranty
TurboChef “i5” and “i3” Rapid Cook Oven – North America
The TurboChef rapid cook oven Limited Warranty outlined below is activated upon shipment of your oven. Should you
require additional assistance after reviewing the warranty outlined below, please call TurboChef Customer Support at
800.90TURBO.
Limited Warranty
TurboChef Technologies, LLC (“TurboChef”) warrants to you, the purchaser, that under normal use the TurboChef rapid
cook oven you have purchased (the “Equipment”) will be free from defects in material and workmanship during the
Warranty Period, subject to the terms and conditions set forth herein. The “Warranty Period” is twelve (12) months from
the date the Equipment is shipped from TurboChef ’s U.S. factory or distribution center. This warranty is conditioned
upon you promptly notifying TurboChef of any claims, as provided in the paragraph entitled “Warranty Claims” below,
and providing TurboChef with all data and information requested by TurboChef or its service agents in connection with
such claims as well as all necessary access to your premises and the Equipment. This warranty is made only to the initial
purchaser of the Equipment from TurboChef or its authorized dealer; it is not assignable to subsequent purchasers unless
TurboChef consents to such assignment in writing.
Disclaimer of Warranties
Except as provided in the Limited Warranty above, the Equipment is provided “as-is”. TurboChef disclaims all
other warranties, express, statutory or implied, including without limitation, the implied warranties of title, non-
infringement, merchantability and fitness for a particular purpose. TurboChef does not warrant that the Equipment
will meet your specifications or needs. You acknowledge that you are solely responsible for the selection of the
Equipment and determining the suitability of the Equipment for your needs.
Warranty Exclusions
Improper Installation, Operation or Maintenance: Equipment that is not installed, operated and maintained in
accordance with TurboChef’s rapid cook oven owner’s manual (as may be updated by TurboChef from time to time, the
“Manual”), a copy of which is provided to you with the Equipment or otherwise will be furnished to you upon request,
is excluded from this warranty. This warranty does not apply to damage or failure which results, in TurboChef ’s or its
service agent’s sole opinion, from failure to provide a suitable installation and operating environment (including power
and HVAC) and facilities as prescribed by the Manual, misuse, abuse, accident, neglect, power failure or power surges
(over or under voltage), or to damage or failure from flood, fire, lightning or other natural or man-made disasters, or
other Acts of God, or to Equipment that has missing or altered serial numbers.
Modifications and Repair: Equipment that has been modified or altered by persons other than TurboChef or its service agents,
or Equipment that has had non-approved devices or connection items attached thereto, is excluded from coverage under this
warranty.
Repair of the Equipment by anyone other than TurboChef or its authorized service agents will void all warranties on the
Equipment.
Accessories: Accessories and parts (collectively “Accessories”) that are consumed in the normal course of Equipment
operation or maintenance are excluded from this warranty. Failure of or damage to Equipment or components from
the use of non-approved cleaning chemicals, devices or processes is also excluded from this warranty. Accessories may
include, but are not limited to, ceramic cooking platters, paddles and approved cleaning chemicals and devices.
Outstanding Invoices: If the full invoiced amount for Equipment purchased has not been paid within forty-five
(45) days from the invoice date, then TurboChef will have no obligation to honor this or any other warranty on the
Equipment until payment is received in full, including any accrued interest or other charges, has been satisfied, at which
time warranty coverage will be reinstated, but the Warranty Period will not be extended.
ECS-1001 / Rev G / October 2023

41
NORTH AMERICA LIMITED WARRANTY
Warranty Service, Exclusive Remedy
TurboChef will be solely responsible for determining whether or not the Equipment or any component thereof is
defective. Defective components covered by this warranty will be repaired or replaced at TurboChef’s option without
charge to you and such repaired or replacement components will be covered by this warranty for the balance of
the Warranty Period. Parts used in the repair of defective components and replacement components may be new,
recovered or rebuilt. At its sole option, TurboChef may decide to replace defective Equipment covered by this
warranty with new, recovered or rebuilt Equipment of equal or greater capability, and such Equipment will be covered
by this Limited Warranty for the balance of the Warranty Period. Defective Equipment and components will become
the property of TurboChef. This paragraph states TurboChef’s sole and exclusive obligation and liability and your
sole and exclusive remedy under this warranty. TurboChef shall not be responsible for a failure to provide warranty
services due to causes beyond TurboChef ’s or its service agents’ control.
Warranty Claims
Claims under this warranty must be reported to TurboChef during our normal working hours at 800.90TURBO,
or such other reporting service as TurboChef may designate. Upon receipt of the claim and related information
and preliminary verification that the claim is valid, TurboChef will promptly notify an authorized service agent
to contact you and arrange for an on-site repair visit during the service agent’s normal working hours. Any costs
incurred by TurboChef or its service agent associated with a service agent being refused or unable to gain access to
the Equipment on your premises, or a claim not covered by this warranty, will be charged to you.
Disclaimer of Damages
TurboChef disclaims all incidental, special and consequential damages, including but not limited to loss of use,
lost revenue or profits, or substitute use, suffered by you or any third party, whether arising in contract, tort
(including negligence), or otherwise, resulting from any breach by TurboChef or its service agents of this warranty,
or resulting from the manufacture, use, or defects, of or in the Equipment, even if TurboChef was apprised of the
possibility of such damages.
Customer Indemnity
You agree to indemnify, defend and hold TurboChef harmless from all third party claims, demands, judgments,
fees and costs directly or indirectly arising out of or related to your use of the Equipment. You further agree to
indemnify and hold TurboChef harmless from any incidental, consequential or special damages suffered by you,
including lost revenue or profits, loss of use, or substitute use, during periods of Equipment failure or loss of use.
Territory
This warranty is valid in the United States of America, Canada and Puerto Rico.
Governing Law, Entire Warranty
This warranty shall be governed and construed in accordance with the laws of the State of Georgia, USA (except with
respect to its provisions regarding conflicts of laws). The warranty described herein is the complete and only warranty
for Equipment and supersedes all prior oral or written agreements and understandings that may have existed between
us relating to Equipment warranties. The terms of this warranty may not be altered, amended or modified except by a
signed writing from TurboChef. Any purported alteration, amendment or modification by a service agent or anyone else
will not be enforceable against TurboChef.
Charges for Non-Warranty Service or Rejection of Service Visit
In the event that repairs, replacement or service are provided by TurboChef’s service agents for work not covered
by this limited warranty, customer agrees to pay the service agent directly according to the service agent’s normal
scale of charges. In the event TurboChef is invoiced by the service agent for services not covered under this
extended warranty, TurboChef will invoice customer and customer will pay such invoice based on terms of net 10
days. Customer also agrees to pay any cost incurred by TurboChef or its service agent associated with a service
agent responding to a call for service, but then being refused or unable to gain access to the Oven on Customer’s
premises. Failure to submit payment may, at TurboChef’s discretion, result in TurboChef voiding the balance of the
warranty. In no event will TurboChef authorize service to a store with an outstanding Non-Warranty invoice.
ECS-1001 / Rev G / October 2023ECS-1001 / Rev G / October 2023

42
INTERNATIONAL LIMITED WARRANTY
International Limited Warranty
This Limited Warranty shall apply to the sales of all TurboChef ECO ST ovens (the “Equipment” manufactured
by TurboChef Technologies, LLC (“TurboChef”), and sold to purchasers outside of the United States, Canada,
Puerto Rico, Central and South America by an Authorized Distributor of TurboChef International (the “Authorized
Distributor”).
Limited Warranty
You, the purchaser (“You”) have entered into a sales contract with the Authorized Distributor for the purchase of
the Equipment. This Limited Warranty is made to you by the Authorized Distributor from whom you purchased
the Equipment with the support of TurboChef. Subject to the limitations stated below, the Authorized Distributor
warrants to You that the quantity and specification of the Equipment delivered to You shall be as set out in the
Authorized Distributor’s acceptance of your order and that the Equipment will be free from any material defects in
the product and workmanship for twelve (12) months from the date of installation (the “Warranty Period”), subject to
the terms and conditions set forth herein.
Disclaimer
You acknowledge that You are solely responsible for the selection of the Equipment and determining the suitability
of the Equipment for Your needs. All other warranties, conditions or terms relating to fitness for purpose, quality or
condition of the Equipment, whether expressed or implied by statute or common law or otherwise are excluded to the
fullest extent permitted by law.
The TurboChef Global Warranty System
This Limited Warranty commences upon delivery of the Equipment to Your premises. The Authorized Distributor
will inspect and install the Equipment at Your premises in accordance with TurboChef’s instructions and will record
theserial number of the Equipment, Your contact details, the date and location of installation and the results of
the Authorized Distributor’s inspection. This information will be entered by the Authorized Distributor into the
TurboChef global warranty system and will be used by TurboChef, the Authorized Distributor and its authorized
service agents for the provision of the warranty service.
Required Upgrades
At any time during the Equipment’s warranty period, TurboChef reserves the right to perform any upgrade that
Turbo-Chef deems necessary to the Equipment, whether reactively, i.e., at the time of the next opportune servicing as
defined by TurboChef, or proactively, i.e., at any time TurboChef deems necessary. These upgrades include, but are
not limited to, any upgrade that ensures the proper, reliable, and safe operation of the Equipment. If any upgrade is
refused by the customer, TurboChef reserves the right to, from the date of refusal, void the Equipment’s remaining
warranty period.
Warranty Service
During the Warranty Period, any materially defective Equipment will be repaired or replaced free of charge at
TurboChef ’s option provided that:
1. You notify the Authorized Distributor from whom You purchased the Equipment and/or TurboChef as soon as
reasonably possible after discovery of a defect and in accordance with the warranty claims procedure set out below;
2. You provide the Authorized Distributor from whom You purchased the Equipment and/or TurboChef with all data
and information reasonably requested by TurboChef, the Authorized Distributor or its authorized service agents in
connection with Your warranty claim;
3. You make the Equipment available to TurboChef, the Authorized Distributor or its authorized service agents;
4. The Equipment has been installed by an Authorized Distributor and you have provided all necessary information for
the Authorized Distributor to register the Equipment in the TurboChef global warranty system;
5. The Equipment has been operated and maintained by You in accordance with TurboChef ’s “Owner’s
Manual” provided with the Equipment (and as updated by TurboChef);
ECS-1001 / Rev G / October 2023

43
INTERNATIONAL LIMITED WARRANTY
6. You have not used any non-approved devices, accessories, consumables or parts in conjunction with the
Equipment; and
7. Repairs, modifications or alterations have not been attempted other than by TurboChef, an Authorized
Distributor or its authorized service agent.
Neither TurboChef nor the Authorized Distributor assumes any liability for damage caused by Your failure to provide a
suitable installation and operating environment (including power and HVAC) or facilities as prescribed by the Manual,
misuse or abuse or by accident, neglect, power failure or power surges (over or under voltage) howsoever arising.
At its sole option, TurboChef may replace defective Equipment or components with new, recovered or rebuilt Equipment
of equal or greater capability, and such Equipment or components will be warranted by the Authorized Distributor
for the balance of the Warranty Period. Replaced defective Equipment or components will become the property of
TurboChef.
Warranty Claims: Any warranty claim must be made directly in writing either to the Authorized Distributor from whom
You purchased the Equipment or to TurboChef at the following address:
TurboChef Technologies, LLC
2801 Trade Center Drive
Carrollton, Texas 75007
Phone: +1 214-379-6000
Fax: +1 214-379-6073
The claim must include the serial number of the Equipment and be received by TurboChef on or before the last day
of the Warranty Period. Upon receipt of Your claim, TurboChef will promptly notify an Authorized Distributor or an
authorized service agent to contact You, to verify Your claim and, if necessary, to arrange for an on-site repair visit
during normal working hours.
Consumables and Parts Used with The Equipment: Neither TurboChef nor the Authorized Distributor assumes
any liability for consumables and parts that are used in the normal course of Equipment operation or for failure of or
damage to Equipment or components from the use of non-approved cleaning chemicals, devices or processes.
Charges for Service Not Covered by Limited Warranty: In the event that You request and receive repairs,
replacement or service not covered by this Limited Warranty, You will be invoiced and must pay the Authorized
Distributor or authorized service agent directly according to its normal scale of charges and business terms.
Product Liability: Neither TurboChef nor the Authorized Distributor assumes any liability for any incidental, special
or consequential damages, including but not limited to loss of use, lost revenue or profits, or substitute use suffered
by You or any third party, whether arising in contract, tort (including negligence), or otherwise resulting from any
breach by TurboChef or the Authorized Distributor of the Limited Warranty provided herein.
Exclusive Remedy: This Limited Warranty states the Authorized Distributors and TurboChef ’s sole and exclusive
obligation and liability and your sole and exclusive remedy under this Limited Warranty.
Third Party Rights: The UK Contract (Rights of Third Parties) Act 1999 is excluded from applying to this Limited
Warranty and nothing herein confers or purports to confer on any third party any benefit or any right to enforce any
term of this Limited Warranty.
Severability: If any item or provision contained in this Limited Warranty or any part of them (“an offending
provision”) is declared to be or becomes unenforceable, invalid or illegal for any reason whatsoever in any
jurisdiction, the other terms and provisions of this Limited Warranty shall remain in full force and effect in that
jurisdiction as if it had been executed without the offending provision appearing in it and the entire Limited Warranty
shall remain in full force and effect in all other jurisdictions.
Governing Law, Entire, Agreement: This Limited Warranty shall be governed by and construed according to English
law. The application of the United Nations Convention on International Sale of Goods to this Limited Warranty is
expressly excluded. This Limited Warranty may not be altered, amended or modified by the Authorized Distributor or
its service agent, and no representation, alteration, amendment or modification by TurboChef shall be valid unless in a
signed form from TurboChef.
ECS-1001 / Rev G / October 2023ECS-1001 / Rev G / October 2023

Part Number: ECS-1001 / Revision G / October 2023
Country Code: NA/EU
TM
Global Operations
2801 Trade Center Drive
Carrollton, Texas 75007 usa
+1 214.379.6000 phone
+1 214.379.6073 fax
+1 833.925.5819 International
Customer Support:
800.90TURBO
+1 214.379.6000
turbochef.com
For service or information:
within north america call
Customer Support at 800.90TURBO
ou tside north america call
+1 833.925.5819 or Your Authorized Distributor
ECS-1001 / Rev G / October 2023