1
042926
TrueFlame Gas Side & Power Burner User Manual
Models: Side Burner: TFSB2; TFSB2L
Power Burner: TFPB; TFPBL
Remove
ATTENTION:
INSTALLER: PLEASE LEAVE THESE INSTRUCTIONS WITH THE CONSUMER.
CONSUMER: PLEASE READ & RETAIN THESE INSTRUCTIONS FOR FUTURE
REFERENCE AND BEFORE INSTALLING OR OPERATING.
This appliance is designed as an “ATTENDED APPLIANCE”.
DO NOT leave this appliance burning when unattended.
2
042926
WARNINGS
READ THIS MANUAL CAREFULLY AND COMPLETELY
BEFORE USING YOUR SIDE BURNER TO REDUCE THE
RISK OF:
Fire, burn hazard, personal injury or property damage,
improper installation or servicing electric shock.
THIS PRODUCT IS DESIGNED FOR OUTDOOR USE ONLY
Improper installation, adjustment, alteration, service or
maintenance can cause property damage, injury or death.
Read this manual thoroughly before installation, use, or
servicing of this product.
CODE AND SUPPLY REQUIREMENTS:
This Side Burner must be installed in accordance with local
codes and ordinances, or, in the absence of local codes,
with the latest National Fuel Gas Code (ANSI Z223.1/NFPA
54), or Natural Gas and Propane Storage and Handling
Installation Code (CSA-B149.1)
IF YOU SMELL GAS:
Shut off all gas supply lines to the Side Burner. Extinguish
any open ames. Carefully open the lid. Remember, it may
be extremely hot! If odor continues, keep everyone away
from the Side Burner and immediately call your gas suppli-
er or your re department.
EXPLOSION HAZARD:
DO NOT use the Side Burner as a storage area for amma-
ble materials. Keep area clear and free from combustible
materials, gasoline, and other ammable vapors and
liquids. Failure to do so can result in death, explosion, or
re. An LP cylinder not connected for use shall not be
stored in the vicinity of this or any other appliance.
The outdoor cooking gas appliance and its dedicated
shutoff valve must be disconnected from the gas supply
piping system during pressure testing of that system at test
pressures in excess of .5 psi (3.5kPa).
The outdoor cooking gas appliance must be isolated from
the gas supply piping system by closing its dedicated
manual shutoff valve during any pressure testing of the gas
supply piping system at test pressures equal to or less than
.5 psi (3.5kPa).
WARNING
NEVER cover slots, holes, or passage in the oven bottom
or cover an entire grate with material such as aluminum foil.
Doing so blocks air ow through the oven and may cause
carbon monoxide poisoning.
Aluminum foil linings may trap heat causing a re hazard.
CALIFORNIA PROPOSITION 65
WARNING
This product is designed to operate with one of the
following fuel sources: Liquid Propane or Natural Gas.
The fuel used to operate this product, and the products of
combustion of such fuel, can expose you to chemicals
including Benzene which is known to the State of California
to cause cancer, birth defects and other reproductive harm
and Carbon Monoxide which is known to the State of
California to cause birth defects or other reproductive harm.
(For more information go to: www.p65Warnings.ca.gov.)
This appliance is designed as an “ATTENDED
APPLIANCE”. DO NOT leave this appliance
burning when unattended.
3
042926
TABLE OF CONTENTS
To view on your phone, scan the QR
code on your smart phone’s camera app.
(For Android devices, use Google Lens.)
PART #: Side Burner: TFSB2; TFSB2L
Power Burner: TFPB; TFPBL
THANK YOU
Thank you for your purchase. We’d like to welcome
you to the TrueFlame family of luxury outdoor kitchen
products, and we look forward to being a part your
home for years to come. As a family business with
over 30 years of industry experience, we aim to deliver
exceptional quality and personal service.
Welcome to the TrueFlame family and we hope you
love your new Side Burner!
FOR YOUR RECORDS
Please record the following information and refer to it when
contacting TrueFlame or an authorized dealer. The serial
number is located on the rating plate. The rating plate is
located on the underneath side of the drip tray.
INSTALLER
Please leave this manual for the owner
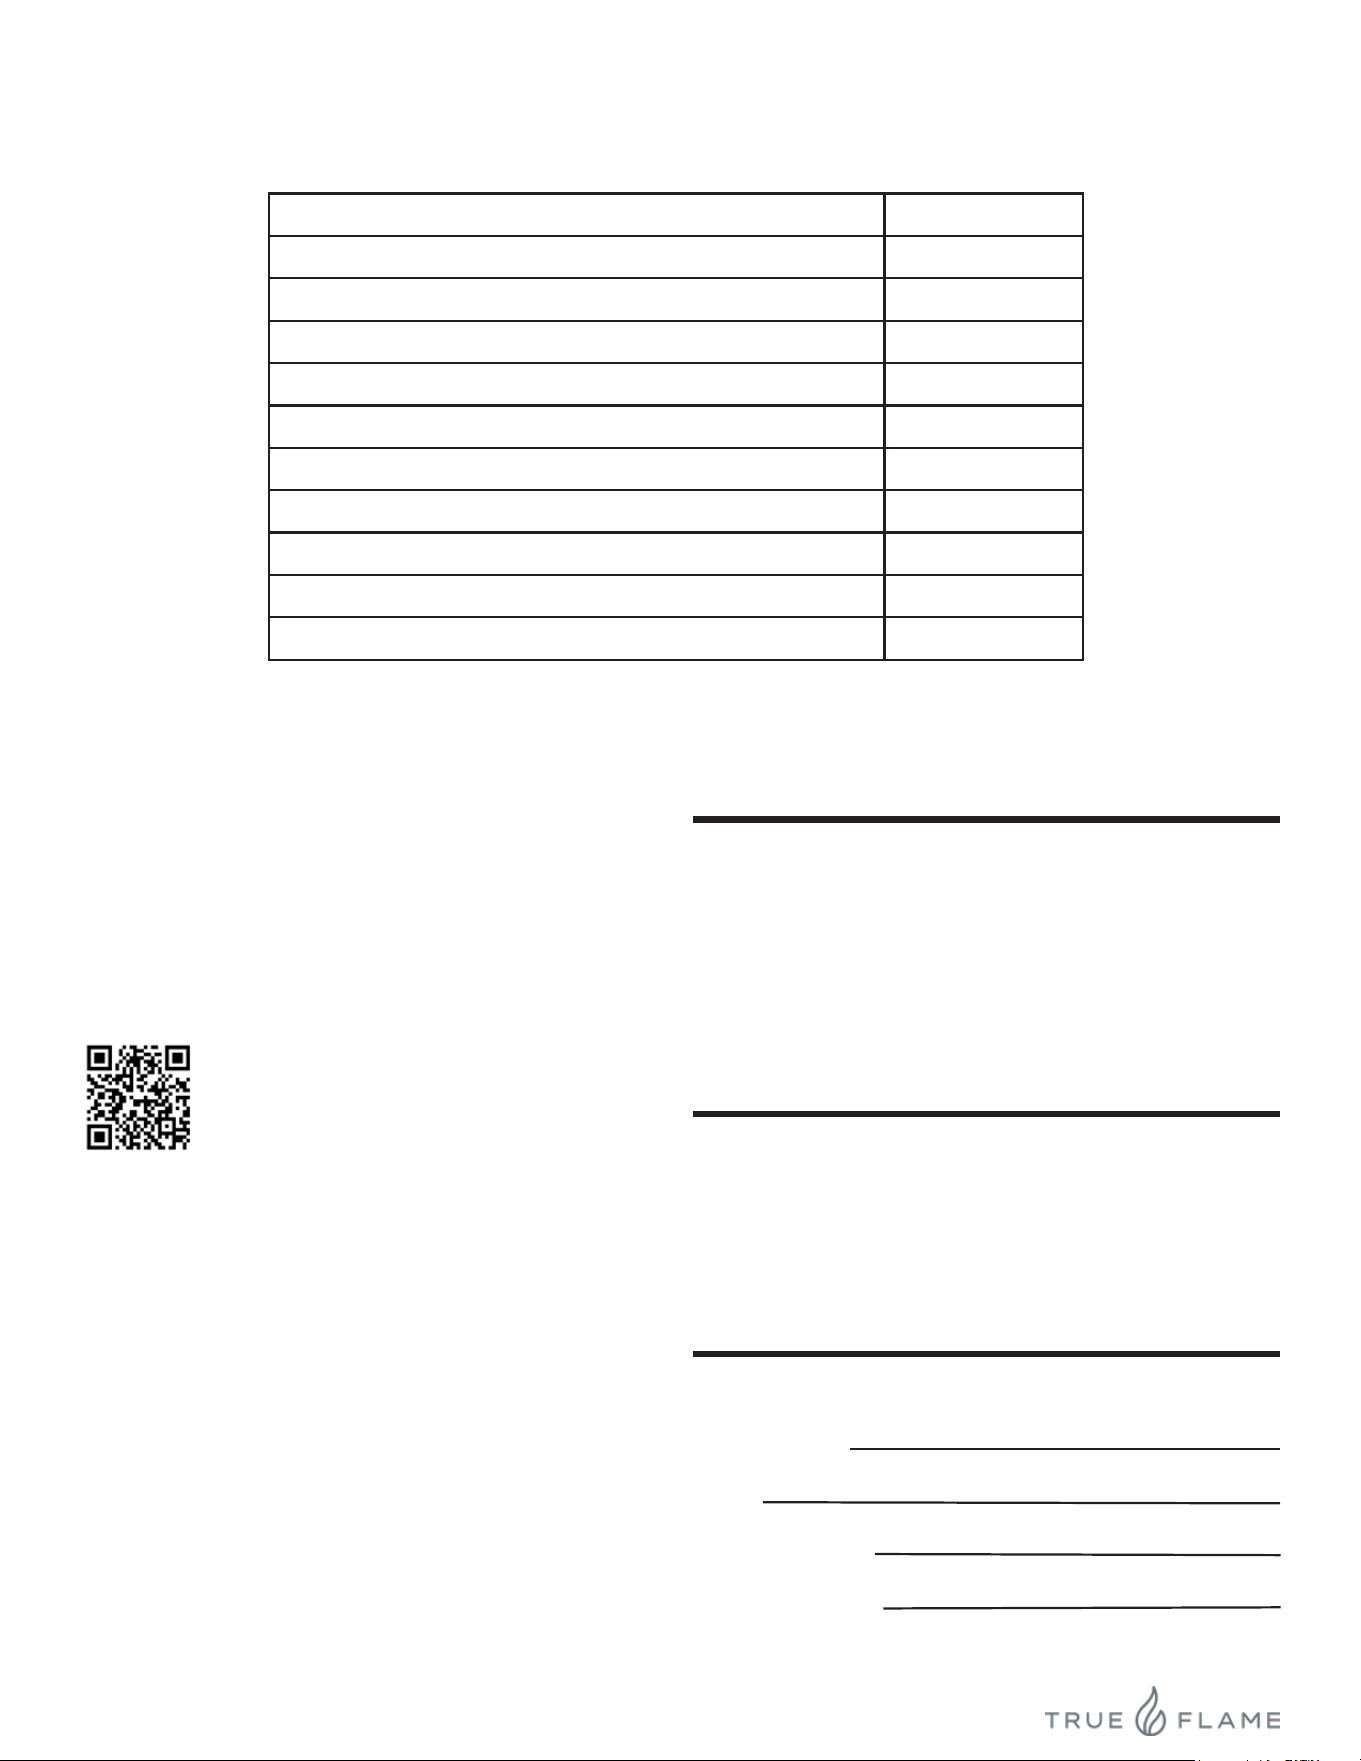
Serial Number:
Serial Number located underneath Drip Tray
Model:
Date of Purchase:
Place of Purchase:
For warranty information and to register your Side Burner
visit, amddirect.com/register
(Natural Gas & Liquid Propane Gas Congurations)
Warnings
2 & 4
Before Using the Side Burner
5
Installation
6-7
Gas Requirements
8-10
Custom-Built Enclosures/Island
11
Operation & Maintenance Tips
12-14
Maintenance Tips/ Optional Accessories
14
Side & Power Burner Illustrations
15
Illustrated & Replacement Parts
16-17
Warranty
18
Notes
19

4
042926
SAFETY AND INSTALLATION WARNINGS
• Please read all instructions before installation or operating your gas Side Burner to prevent injury and appliance dam-
age
• All gas Side Burners will get hot during use. Use extreme caution when operating.
• Do not touch hot surfaces.
• Never use dented, rusty or damaged propane cylinders. Never store additional or empty propane cylinders in the Side
Burner cabinet or in the vicinity of this or any other appliance
• Close supervision is necessary when this or any appliance is used near children. Keep children away from the Side
Burner during operation and until the Side Burner has cooled off
• Children should never be left alone or unattended in an area where a Side Burner is located. Place your Side Burner
well away from areas where children play. Do not store items that may interest children in or around the Side Burner,
in the cart, or in the masonry enclosure
• Never move the Side Burner when hot. When in use, portions of the Side Burner are hot enough to cause severe
burns.
• Always maintain the required clearances from combustibles as detailed. The Side Burner is designed for outdoor use
only. Never use in a garage, building, shed, breezeway, or other enclosed area. Do not use this Side Burner under
any unprotected overhead combustible construction
• Gas Side Burners are not designed or certied for and are not to be installed in or on recreational vehicles, portable
trailers, boats or any other moving installation
• Always have an ABC Fire Extinguisher accessible — never attempt to extinguish a grease re with water or other
liquids
• Storing your Side Burner: Store your Side Burner in a well-ventilated area. If stored indoors, detach and leave L.P.
cylinder outdoors in a well-ventilated area away from heat and away from where children may tamper with it
• Keep any electrical supply cord and the fuel supply hose away from any heated surfaces. Electrical cords should be
placed away from walkways to avoid tripping hazard
• Do not repair or replace any part of the Side Burner unless specically recommended in this manual. Other service
should be performed by a qualied technician
• If the Side Burner is installed by a professional installer or technician, be sure that he/she shows you where your gas
supply shut-off is located. All gas lines must have a shut-off that is readily and easily accessible. If you smell gas,
check for gas leaks immediately. Check only with a soap and water solution. Never check for gas leaks with an open
ame
• Do not twist the gas supply hose
• Inspect the L.P. gas supply hose prior to each use of the Side Burner. If there is evidence of excessive abrasion or
wear, or the hose is cut, it must be replaced before using the Side Burner
• The use of accessories, regulators, or components not recommend by the appliance manufacturer may cause injuries
and will void warranty
• Never light the Side Burner while the lid is on. Be certain the burners are positioned and seated over the gas valves
and on the burner support
• Never lean over the cooking surface when lighting or operating the Side Burner
• Use proper cooking tools with wood handles and insulated oven mitts when operating the Side Burner
• Be sure the gas supplied to the Side Burner conforms to the model you purchased. A natural gas Side Burner requires
natural gas to operate; a liquid propane Side Burner requires liquid propane to operate
• Never connect the appliance to an unregulated gas supply line. Side Burners operated without a regulator are unsafe
and will not be serviced until installed properly and safely. Unsafe operation without a gas regulator will void the war-
ranty
• Side Burners operating with natural gas must be installed with the NG regulator supplied with the unit and set to 4.0”
of water column pressure
• Side Burners operating with Liquid Propane must be installed with an LP regulator and set to 11” of water column
pressure
WARNINGS

5
042926
CHECK FOR SHIPPING DAMAGED:
VISIBLE DAMAGE
If your shipment arrives with visible damage to the box/
carton, be sure the damage is noted on the bill of freight
or express receipt and signed by the person making the
delivery. File claim for damages immediately, regardless of
the extent of damage.
CONCEALED DAMAGES
If damages are unnoticed until the Side Burner is un-
packed, notify the transportation company or carrier
immediately and le a concealed damage claim with them.
This should be done within (5) days of the delivery date. Be
sure to hold on to the box/carton for inspection. We cannot
assume
responsibility for damage or loss incurred in transit.
IMPORTANT NOTES:
BE MINDFUL OF WIND DIRECTION
Using your Side Burner in windy conditions may disrupt
the front-to-back air ow that the Side Burner is designed
for. If wind pushes the heat into the control panel, then the
control panel and knobs could become extremely hot. Your
Side Burner pulls air in through its front and vents hot gas-
es up through the grate. If the control panel or knobs are
hot to the touch, turn the Side Burner off.
GAS LINE LENGTH
Keep all gas supply lines as short as possible. Gas lines
lose pressure over distance and with each elbow or “T”
tting added. This drop in pressure affects Side Burner
performance.
PROPER LEVELING
PROPER LEVELING DURING INSTALLATION IS
CRITICAL. A SIDE BURNER THAT IS OUT OF LEVEL
WILL CAUSE ERRATIC BURNER COMBUSTION AND
INEFFICIENT, UNEVEN HEATING. THE SIDE BURNER
SHOULD BE LEVEL IN ALL DIRECTIONS. ADJUST-
MENTS MAY NEED TO BE MADE EACH TIME WHEN
MOVING A FREESTANDING UNIT.
CONSTRUCTION ZONES
Keep all stainless steel products away from construction
zones. Construction debris such as (but not limited to)
stone dust, stucco, and lime dust could damage or
permanently discolor stainless steel products. Keep all
caustic chemicals including chlorine and pool cleaning
products away from stainless steel at all times.
BEFORE USING THE SIDE BURNER
UNPACKING YOUR SIDE BURNER
Included with your TrueFlame Side Burner are the following
loose items:
Cooking Grates: TFSB2(1), TFPB(2)
Drip Tray: TFSB2(1), TFPB(1)
Lid: TFSB2(1), TFPB(1)
Lid Handle: TFSB2(1), TFPB(1)
Manual: TFSB2(1), TFPB(1)
Transformer: TFSB2(1), TFPB(1)
Set of orices
• If Side Burner is factory set LP, NG orices will be
included
• If Side Burner is factory set NG, LP orices will be
included
• The drip tray will be at the bottom of the unit and will
slide into the drip tray support brackets.
6
042926
INSTALLATION
N
on
-
C
o
m
b
usti
b
le
En
s
l
o
s
u
r
e
A
B
C
A
M
e
t
a
l
S
t
u
d
s
Ventilation
Ventilation
Figure 1
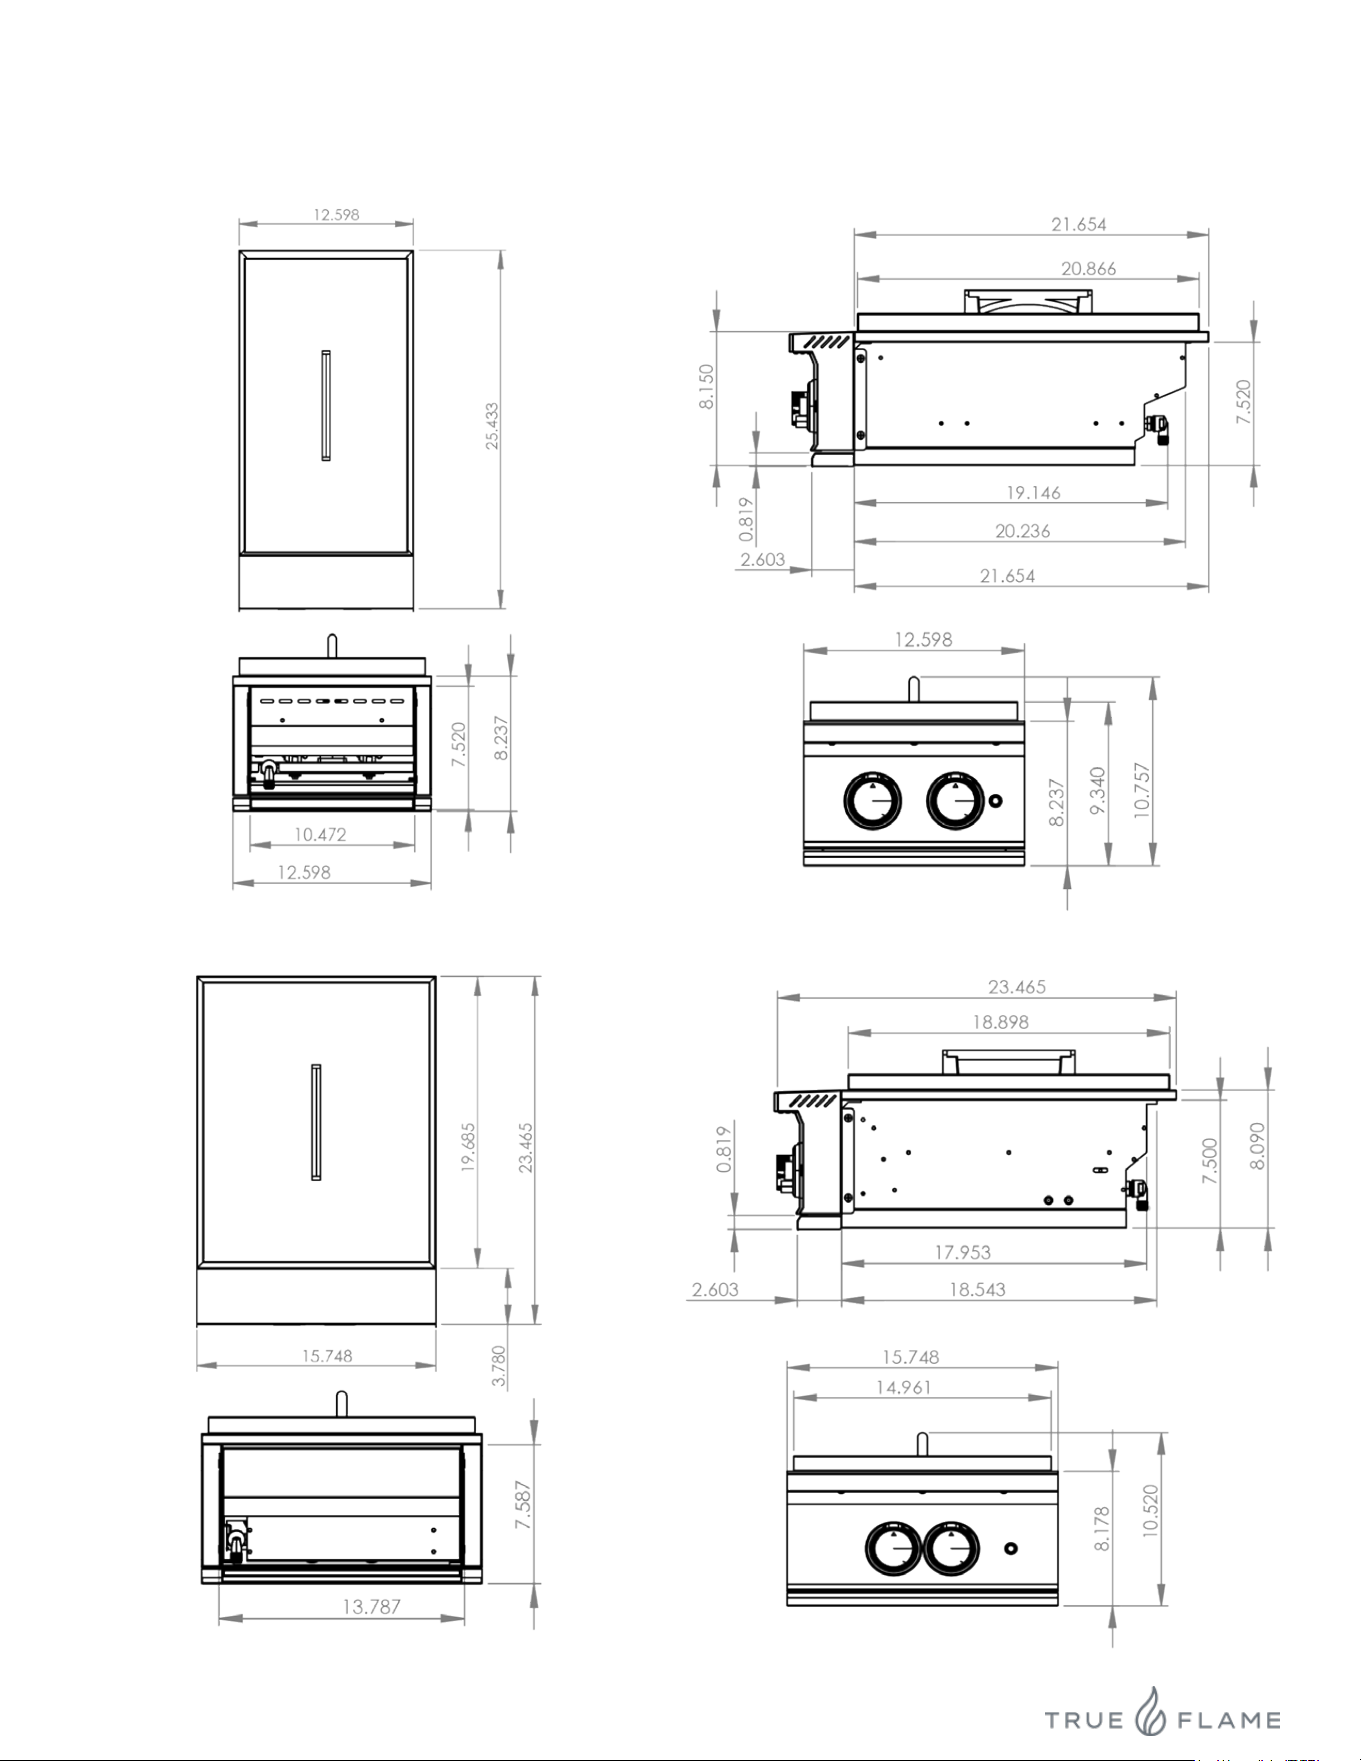
Side Burner
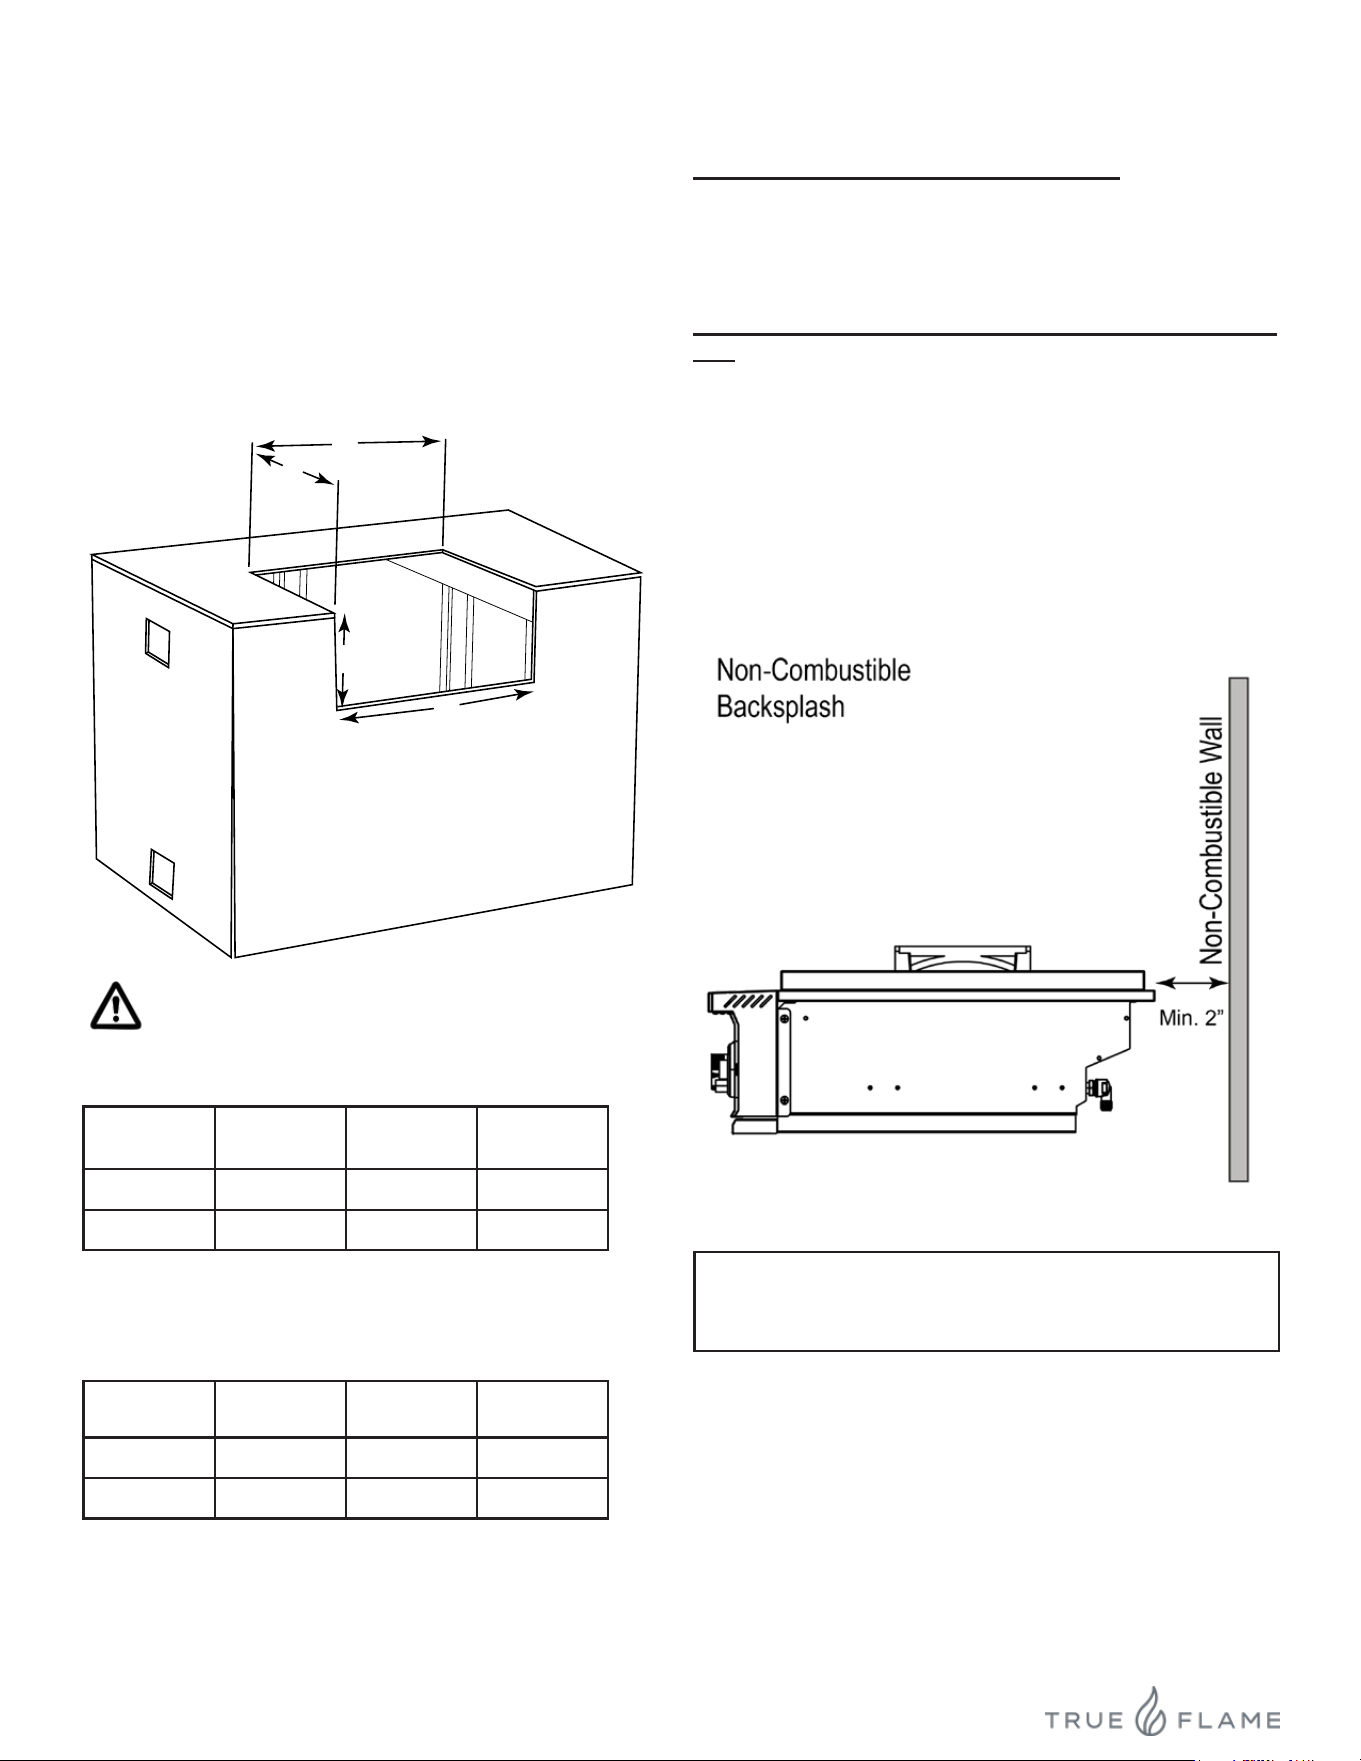
MODEL A: WIDTH B: HEIGHT C: DEPTH
TFSB2 10 3/4” 7 3/4” 20 1/2”
TFPB 14” 7 3/4” 18 3/4”
Side Burner
MODEL A: WIDTH B: HEIGHT C: DEPTH
TFSB2 12 1/2” 10 3/4” 25 1/2”
TFPB 15 3/4” 10 1/2” 23 1/2”
ISLAND CUT OUT DIMENSIONS
OVERALL PRODUCT DIMENSIONS
ALL BBQ ISLANDS MUST BE MANUFACTURED
FROM “NON COMBUSTIBLE” MATERIALS.
TrueFlame Side Burners are a “built-in” gas unit that re-
quires a non-combustible island/enclosure. Use Figure 1
and Table 1 as a guide.
It is recommended to use cement board with steel studs
and proper ventilation per local codes. A minimum 4-inch
vent size is recommended, one at the top and one at the
bottom to provide free owing air keep the island cool
during operation of the Side Burner.
Table 1
Table 2
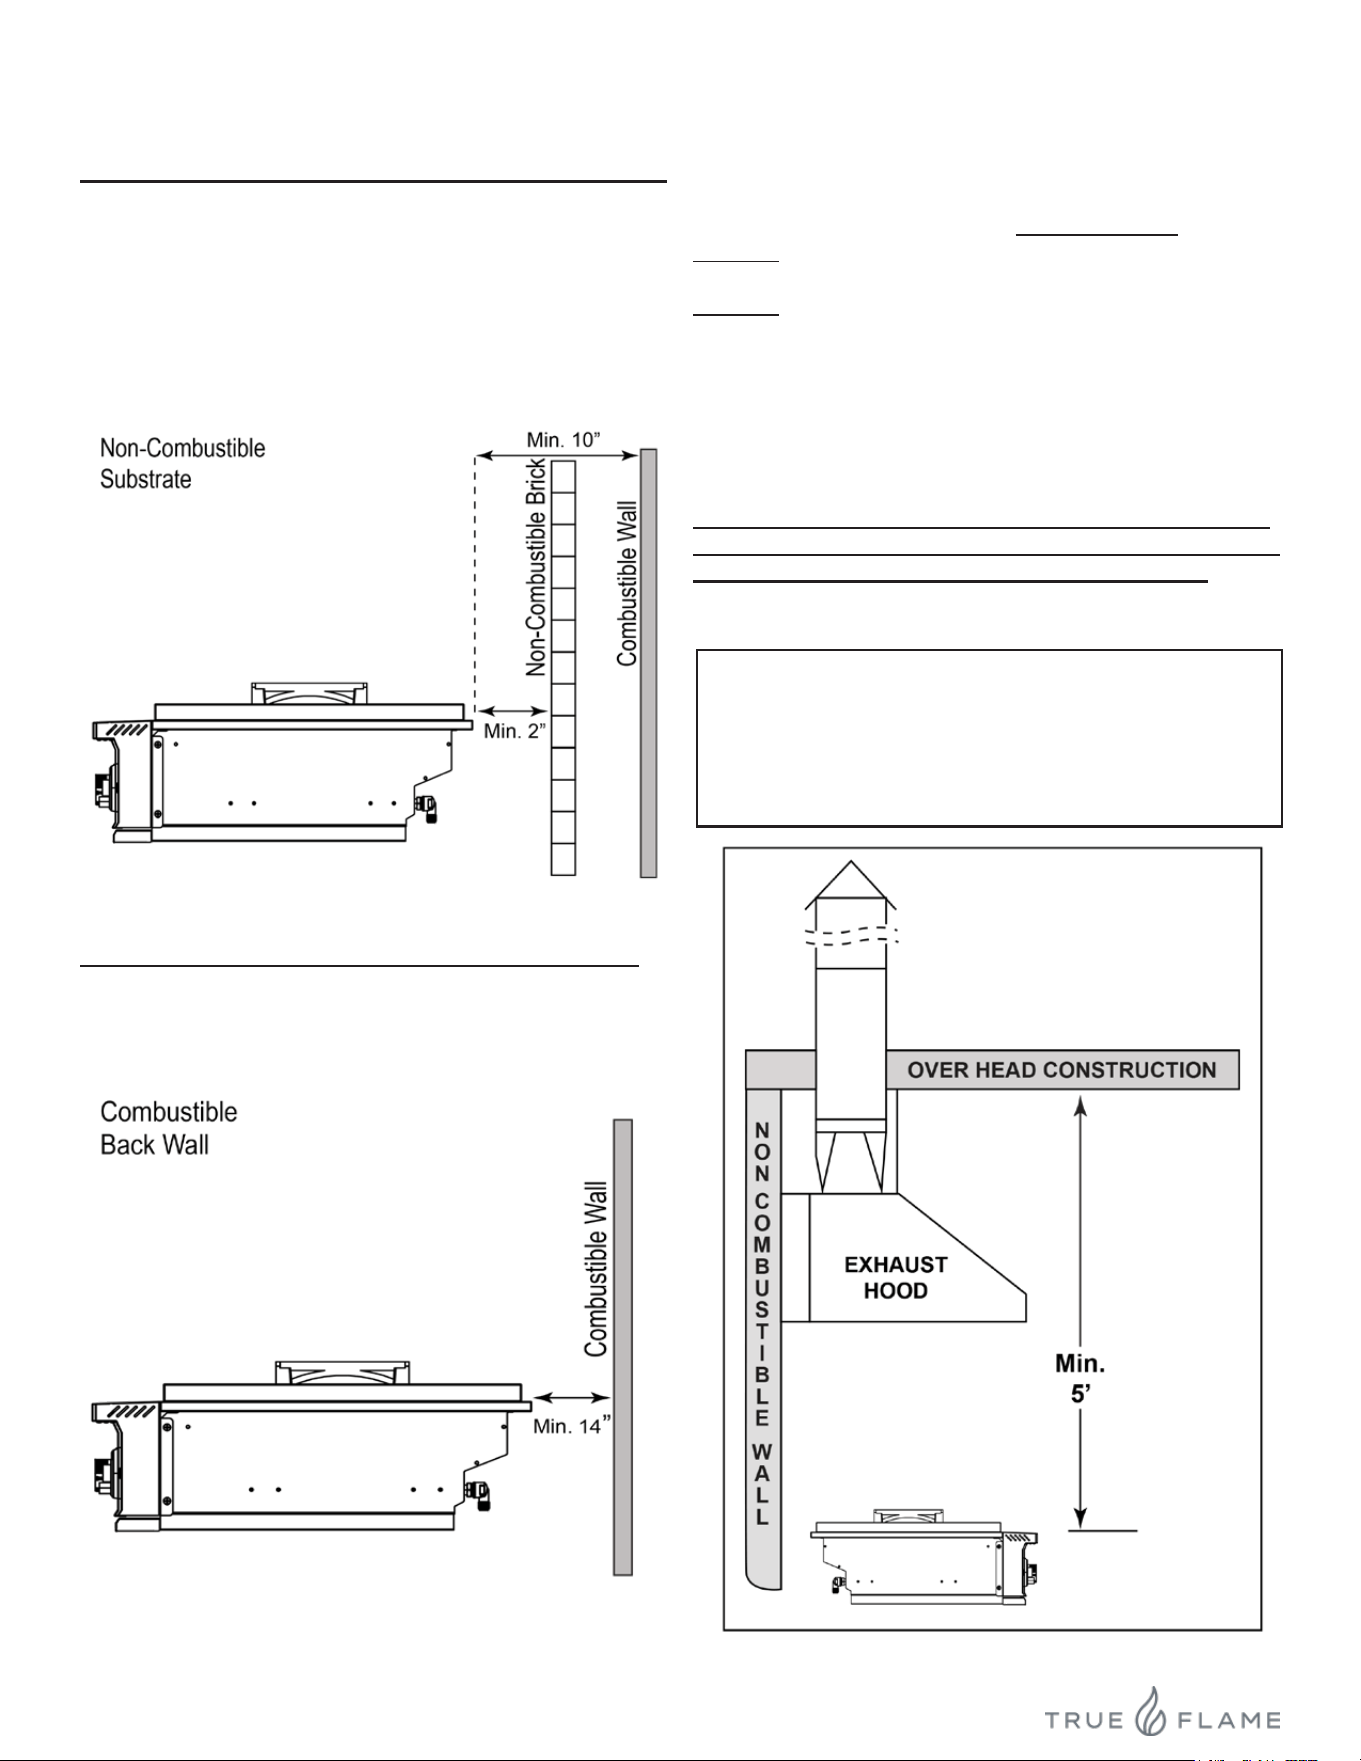
The side burner must have a minimum of 10” clearance
from the right side, left side and rear (back) of the grill from
a protected combustible wall. Refer to Figure 3 (Page 7).
IMPORTANT NOTE:
Clearance from the side burner and a non-combustible
wall
(i.e. brick wall, see Figure. 2). The side burner requires a
minimum of 2” clearance from the right side, left side and
rear (back) of the side burner from any non-combustible
wall. This allows for proper ventilation and helps prevent
dangerous overheating.
If a non-combustible backsplash exists, it must have a
minimum of a 2” clearance from the rear of the side burner
(to allow for proper ventilation and help prevent dangerous
overheating. Clearance Figure 2).
MINIMUM SIDE BURNER CLEARANCES:
Minimum clearances between the Side Burner and any
side wall or rear wall must fall within one (or more) of the
following:
Figure 2
IMPORTANT NOTE:
This 2” backsplash clearance must rst be met prior to
any non-combustible walls beginning behind it.
Note: Refer to page 10 for Custom Built-In Enclosures/
Islands when building.
7
042926
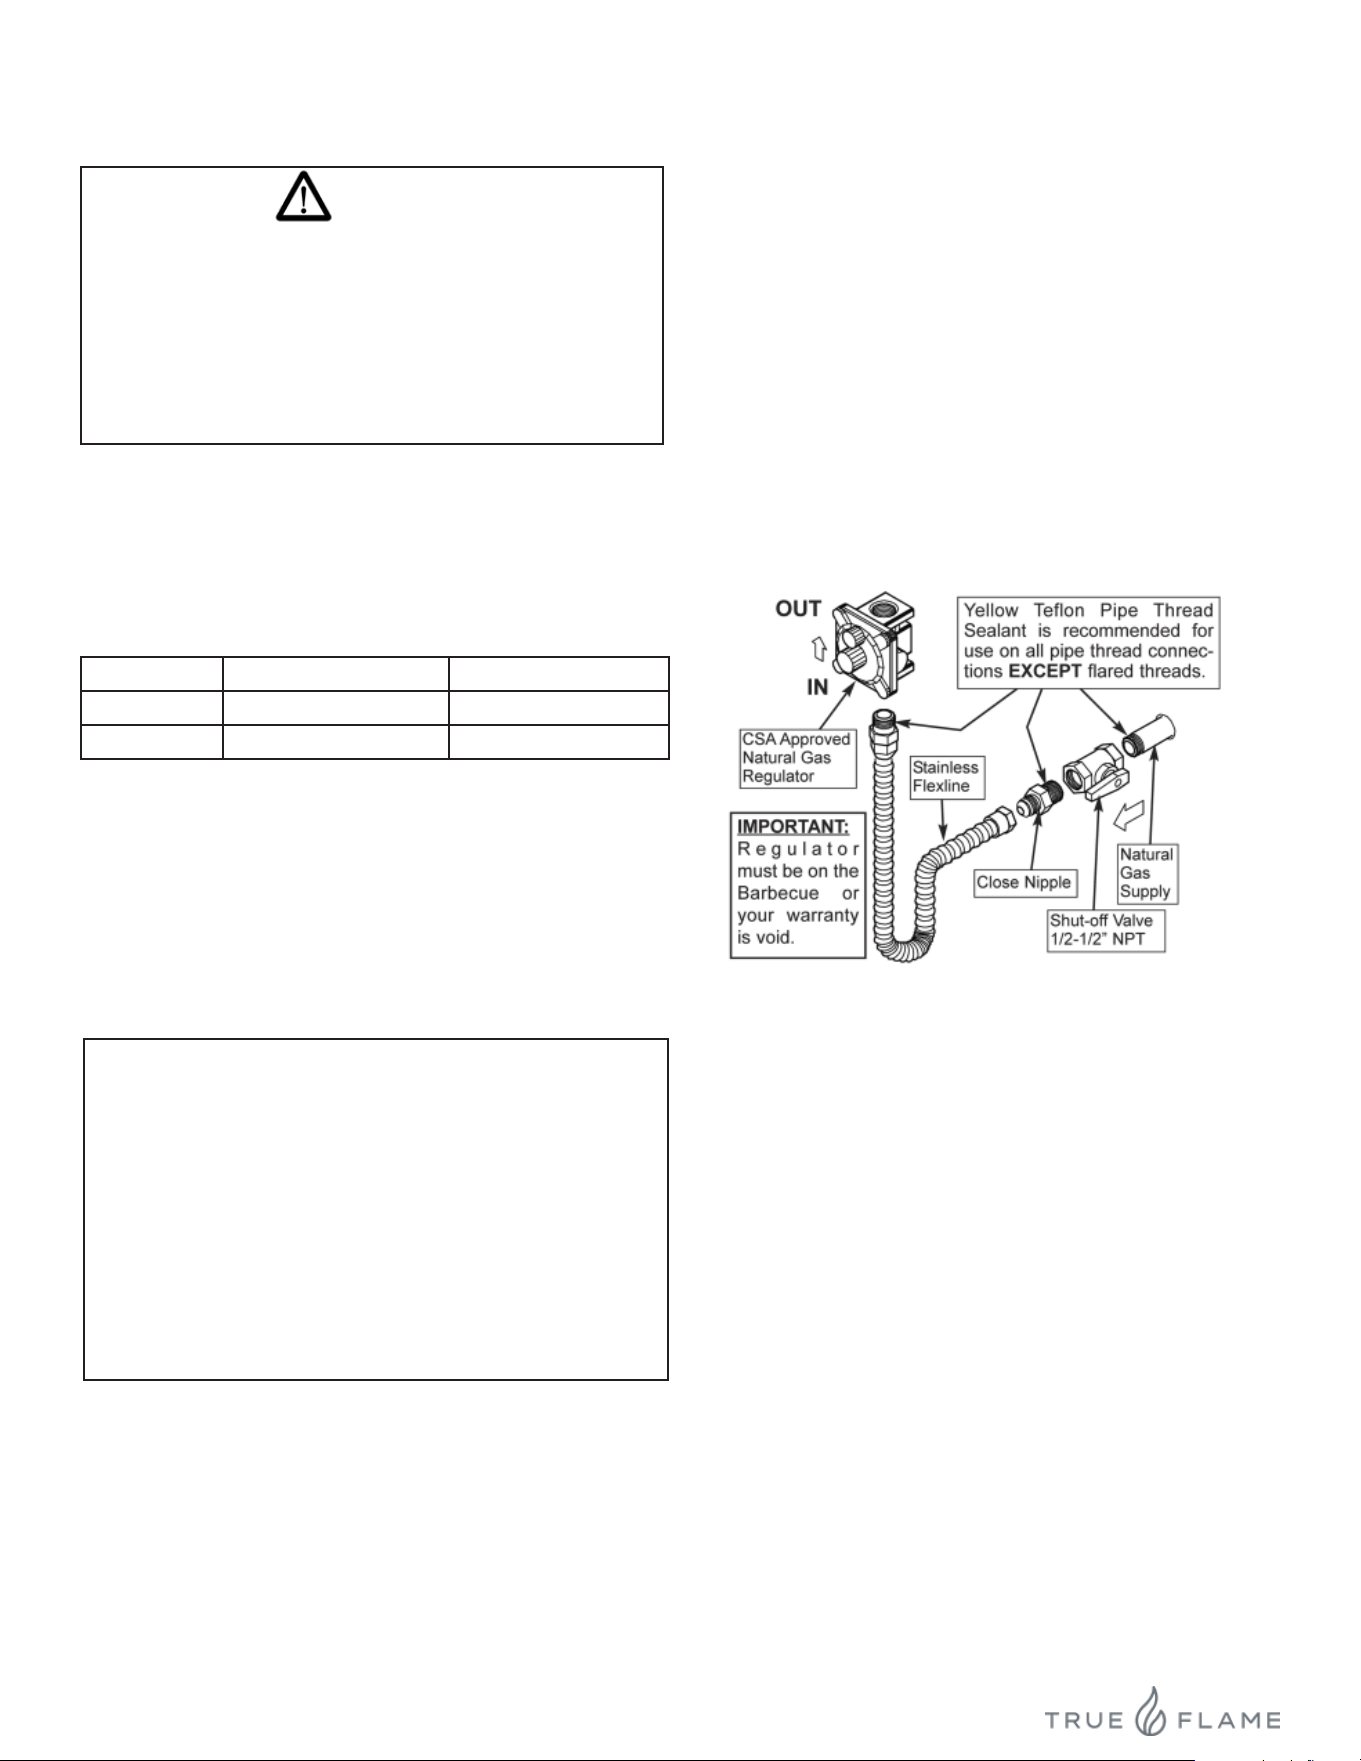
Clearance from the grill and protected combustible wall
(i.e. A non-combustible wall in front of a combustible wall to
serve as a barrier. This can be accomplished by brick or a
metal stud nished with non-combustible substrate.
See Figure 3). The side burner must have a minimum of
10” right, left and rear clearance from the protected com-
bustible wall. ( 2” non-combustible material clearance, plus
an additional 8” clearance between the grill and protected
wall.)
INSTALLATION
Figure 3
Clearance from the side burner and combustible wall
(Clearance Figure 4). The side burner must have a mini-
mum clearance of 14” from the right side, left side and rear
of the side burner to any combustible wall.
Figure 4
OVERHEAD CONSTRUCTION AND EXHAUST HOOD
REQUIREMENTS
This Side Burner is designed for outdoor use only.
DO NOT use this Side Burner inside a building, garage, or
enclosed area.
DO NOT use this Side Burner in or on a recreational vehi-
cle or boat.
When installing this Side Burner in a combustible surround,
an TrueFlame insulating jacket/Side Burner liner must be
used.
A minimum ve (5) foot clearance is required between the
countertop and the overhead construction.
When the Side Burner is installed under any overhead
construction, the area above the cooking surface of the
Side Burner must be used with an exhaust hood. The
exhaust hood provides the protection for the combustible
overhead construction. See Figure 5.
IMPORTANT NOTE:
• DO NOT use this appliance under unprotected
combustible overhead construction.
• When installed under overhead non-combustible
construction, an exhaust hood is highly recommended.
Figure 5
When using an exhaust hood, the area
above the cooking surface of the Side
Burner must be covered with a hood
larger than the cooking area of the Side
Burner, AND the blower must produce
a minimum of 1200 CFM (cubic feet per
minute) for proper exhausting outdoors.
8
042926
GAS REQUIREMENTS
GAS LINES
Never connect a gas line directly to the Side
Burner. A pressure regulator must be installed
on all gas equipment. Removing or failing to
install the pressure regulator can result in re
and serious personal injury and will void the
warranty
WARNING
Ensure the gas supplied meets the minimum pressure
requirements. See Table 3 for gas requirements measure in
Water Column (W.C.) pressure.
GAS PRESSURE REQUIREMENTS
Pressure Natural Gas Propane Gas
Min. Inlet 4.0” WC (1.00.kPa) 10.0” WC (2.49 kPa)
Max. Inlet 7.0” WC (1.74 kPa) 14.0” WC (3.48 kPa)
Table 3
IMPORTANT:
All electrical outlets in the vicinity of the Side
Burner must be properly grounded in accor-
dance with local codes, or in the absence of
local codes, with the National Electrical Code,
ANSI/NFPA 70 or the Canadian Electrical Code,
CSA C22.1, whichever is applicable.
Keep all electrical supply cords and fuel supply
hoses away from any heated surface.
NOTE: Both the regulator and burner orices have been
tuned for the type of gas specied on the rating plate.
Converting to a different type of gas requires a conversion
kit. Conversion kits are included with this Side Burner and
located with the manual. Converting gases may require
additional parts not included with this Side Burner. (See
Gas Conversion section for details).
NATURAL GAS REQUIREMENTS
• TrueFlame recommends that only qualied profession-
als perform the required plumbing on this product.
• Check the Rating Plate to make sure the gas
supply you are hooking up to is the gas type the Side
Burner is manufactured for.
• To ensure satisfactory performance, the gas supply
line must be sized to accommodate the total BTU
requirements of all the gas-red equipment that will be
connected to that line.
• In no case should pipe less than 1/2” inside diameter
or 1” outside diameter ever be used to connect this
product.
NOTE: DO NOT use any tape, pipe dope or threading
compound on any are tting. This will cause a clog
in the regulator and prevent your Side Burner from
functioning properly.
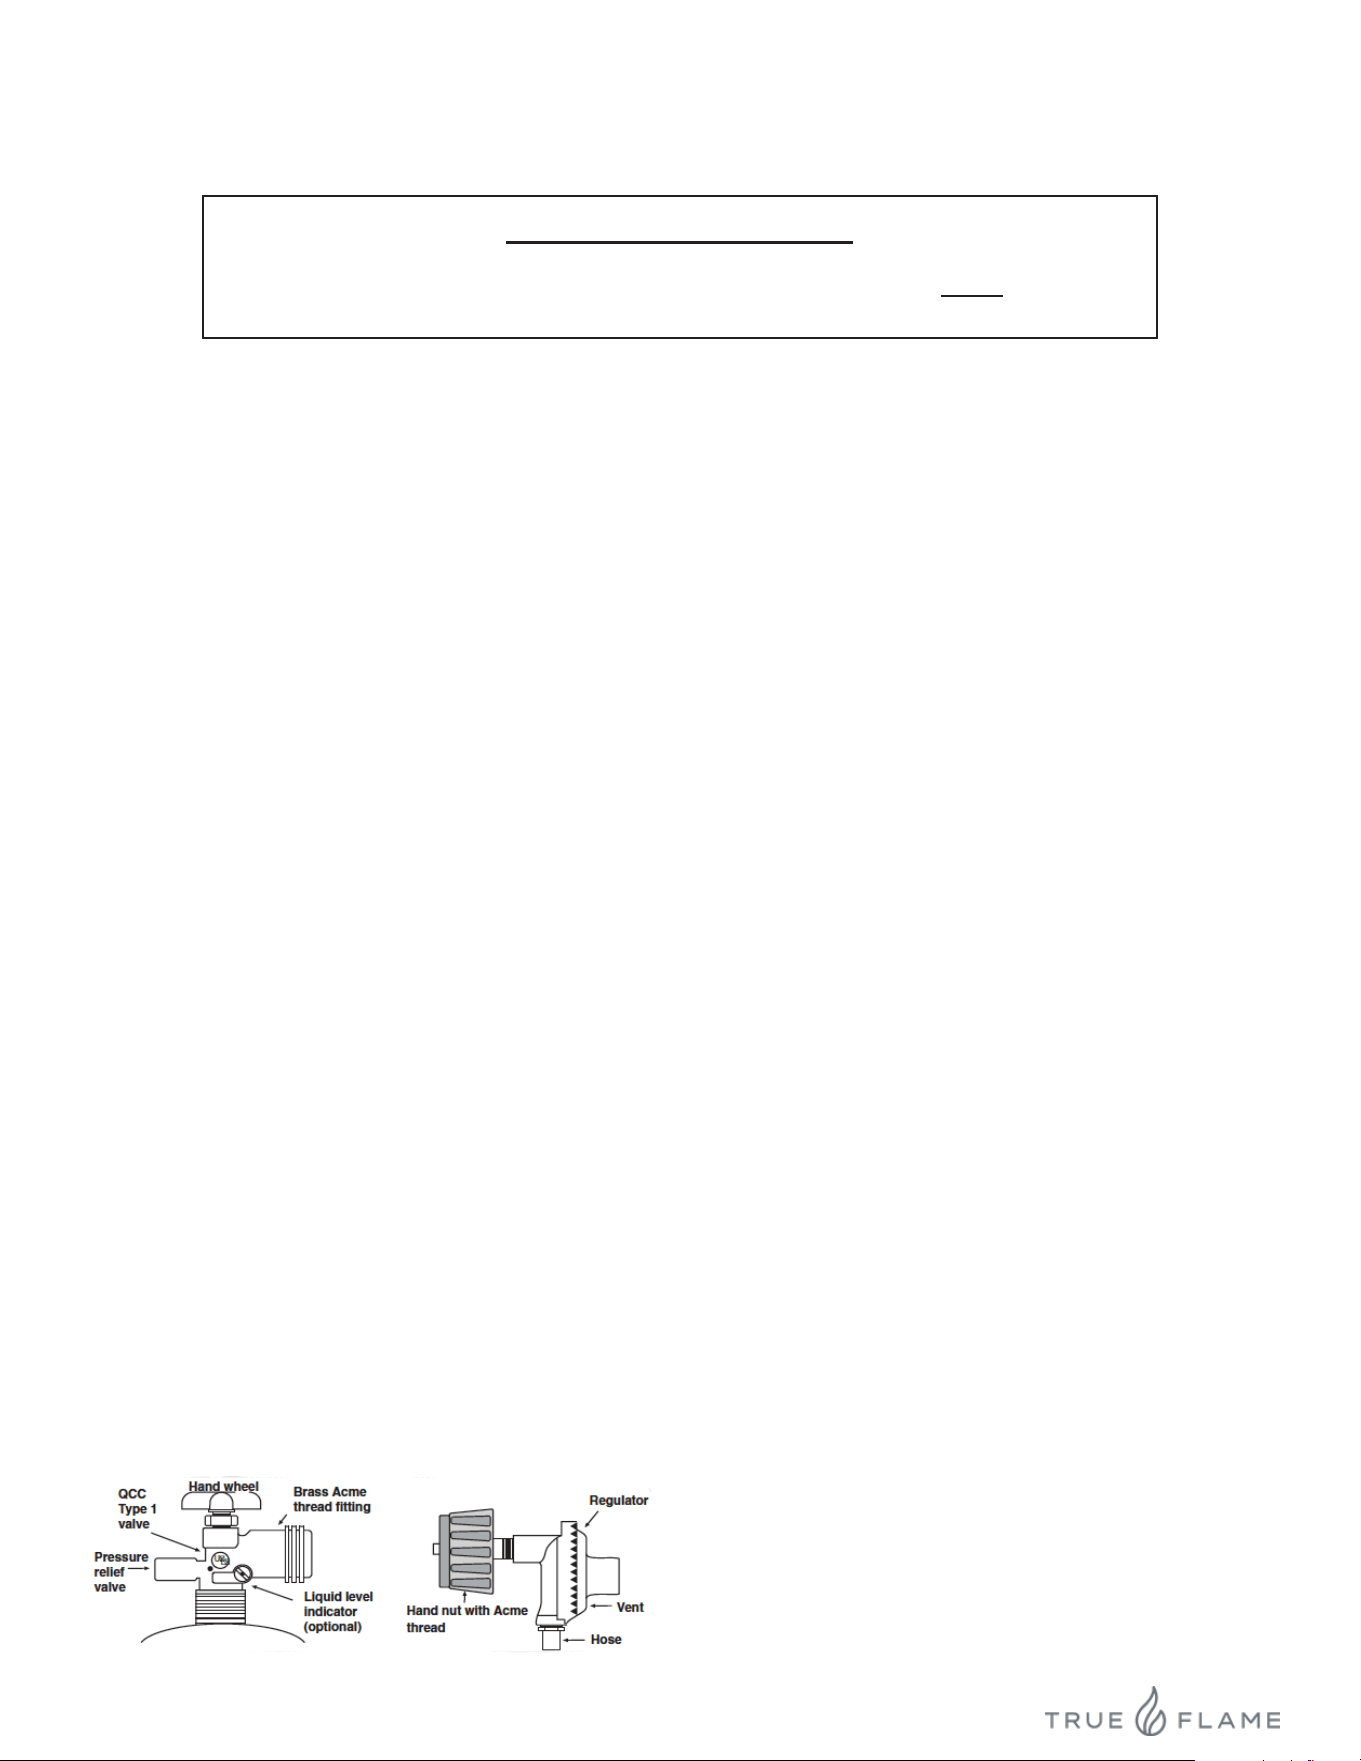
CONNECTING TO THE NG REGULATOR
Figure 6
9
042926
Figure 7
GAS REQUIREMENTS
SAFE USE AND MAINTENANCE OF PROPANE GAS CYLINDERS
IMPORTANT FOR YOUR SAFETY
READ AND FOLLOW ALL WARNINGS PROVIDED WITH THE PROPANE GAS CYLINDER.
When operating a Propane gas cylinder, these instructions and warnings MUST be observed.
FAILURE TO DO SO MAY RESULT IN A SERIOUS FIRE OR EXPLOSION
CYLINDER/CONNECTOR REQUIREMENTS
a. Propane gas cylinders, valves and hoses must be
maintained in good condition and inspected before
each use of an appliance. They must be replaced if
there is any visible damage. If the hose is cut or shows
any excessive abrasion or wear, it must be replaced
before using the appliance. (See section e.)
b. This unit, when used with a cylinder, should be
connected to a standard 5-gallon (20 lb.) propane gas
cylinder equipped with a listed overlling prevention
device.
c. Cylinder dimensions should be approximately 12”
(30.5cm) in diameter and 18” (45.7cm) high. Cylin-
ders must be constructed and marked in accordance
with the U.S. Department of Transportation (D.O.T.)
Specications for LP-Gas Cylinders, or the standard
for Cylinders, Spheres, and Tubes for Transportation of
Dangerous Goods and Commission, CAN/CSA-B339,
as applicable.
d. The cylinder used must include a collar to protect the
cylinder valve, and the cylinder supply system must be
arranged for vapor withdrawal.
e. The pressure regulator and hose assembly used must
match the specication for Type I by ANSI Z 21.58/CGA
1.6 (See Figure 7)
f. The propane gas cylinder valve must be equipped with
a cylinder connection device, described as Type I in the
standard dened in paragraph “e” above. This device
is commonly describes as an Acme thread coupler.
g. If the propane gas cylinder comes with a dust cap,
place the dust cap on the cylinder valve outlet
whenever the cylinder is not in use.
COUPLER OPERATION
To connect the regulator/hose to the Propane gas
cylinder valve tting:
Press the hand nut on the regulator over the Acme thread
tting on the cylinder valve. Turn the hand nut clockwise
to engage the threads and tighten until snug. The pliers of
a wrench should not be necessary. Only cylinder marked
“Propane” may be used.
To Disconnect:
Turn the hand nut counterclockwise until detached. See
Figure 7.
IMPORTANT: Before using the unit, and after each time
the cylinder is removed and reattached check the hose for
wear (See section “a”) and check all connections for leaks.
Turn OFF the unit valves and open the main cylinder valve,
then check connections with soapy water. Repair any leaks
before lighting the unit.
CAUTION: Always turn the Propane cylinder main valve
OFF after each use, and before moving the unit and
cylinder or disconnecting the coupling. This valve must
remain closed and the cylinder disconnected while the
appliance is not in use, even though the gas ow is stopped
by a safety feature when the coupler is disconnected.
Carefully inspect the hose assembly each time before
the gas is turned ON. A cracked or frayed hose must be
replaced immediately.
If the appliance is stored indoors, the cylinder must be
disconnected and removed. Disconnected cylinders must
be stored outdoors, out of reach of children, with threaded
valve plugs tightly installed, and must not be stored in a
building, garage, or any other enclosed area.
FOR YOUR SAFETY
• DO NOT store a spare Propane gas cylinder under of
near this appliance.
• NEVER ll the cylinder beyond 80% full.
• IF THE INFORMATION IN SECTIONS “a” AND “b”
IS NOT FOLLOWED EXACTLY, A FIRE CAUSING
DEATH OR SERIOUS INJURY MY OCCUR.
For ventilation recommendations and enclosure
requirements, see the INSTALLATION and CUS-
TOM-BUILT ENCLOSURES/ ISLANDS sections on
pages 6 and 11.
10
042926
PROPANE GAS TANK REQUIREMENTS
FILLING AND REFILLING LP GAS CYLINDERS
All purging and relling of LP gas cylinders must be
performed by qualied personnel in the LP gas
industry. Never store a spare LP gas cylinder under or
near this appliance.
Never ll the LP gas cylinder beyond 80 percent full.
Failure to follow these instructions may result in
explosion, personal injury or death.
LP gas Side Burner models are designed for use with a
standard 20 lb. liquid propane gas (LP) tank with type (1)
valve connections. (Not included)
A dented or rusty LP tank may be hazardous and should be
avoided. If in doubt, have it checked by your LP supplier.
Always check for leaks after every LP tank change. (See
Checking For Leaks)
LP Tanks must be stored outdoors in a well-ventilated area
out of the reach of children. If your Side Burner is stored
indoors, the LP tank must be stored outside, in upright posi-
tion and away from excessive heat.
IMPORTANT:
All installation and all installation parts must conform to
local codes with the National Electrical Code,
ANSI Z223.1/ NFPA 70 latest edition and the National
Fuel Gas Code ANSI Z223.1/NFPA 54 in the U.S. and
CGA-B149.1/.2 in Canada
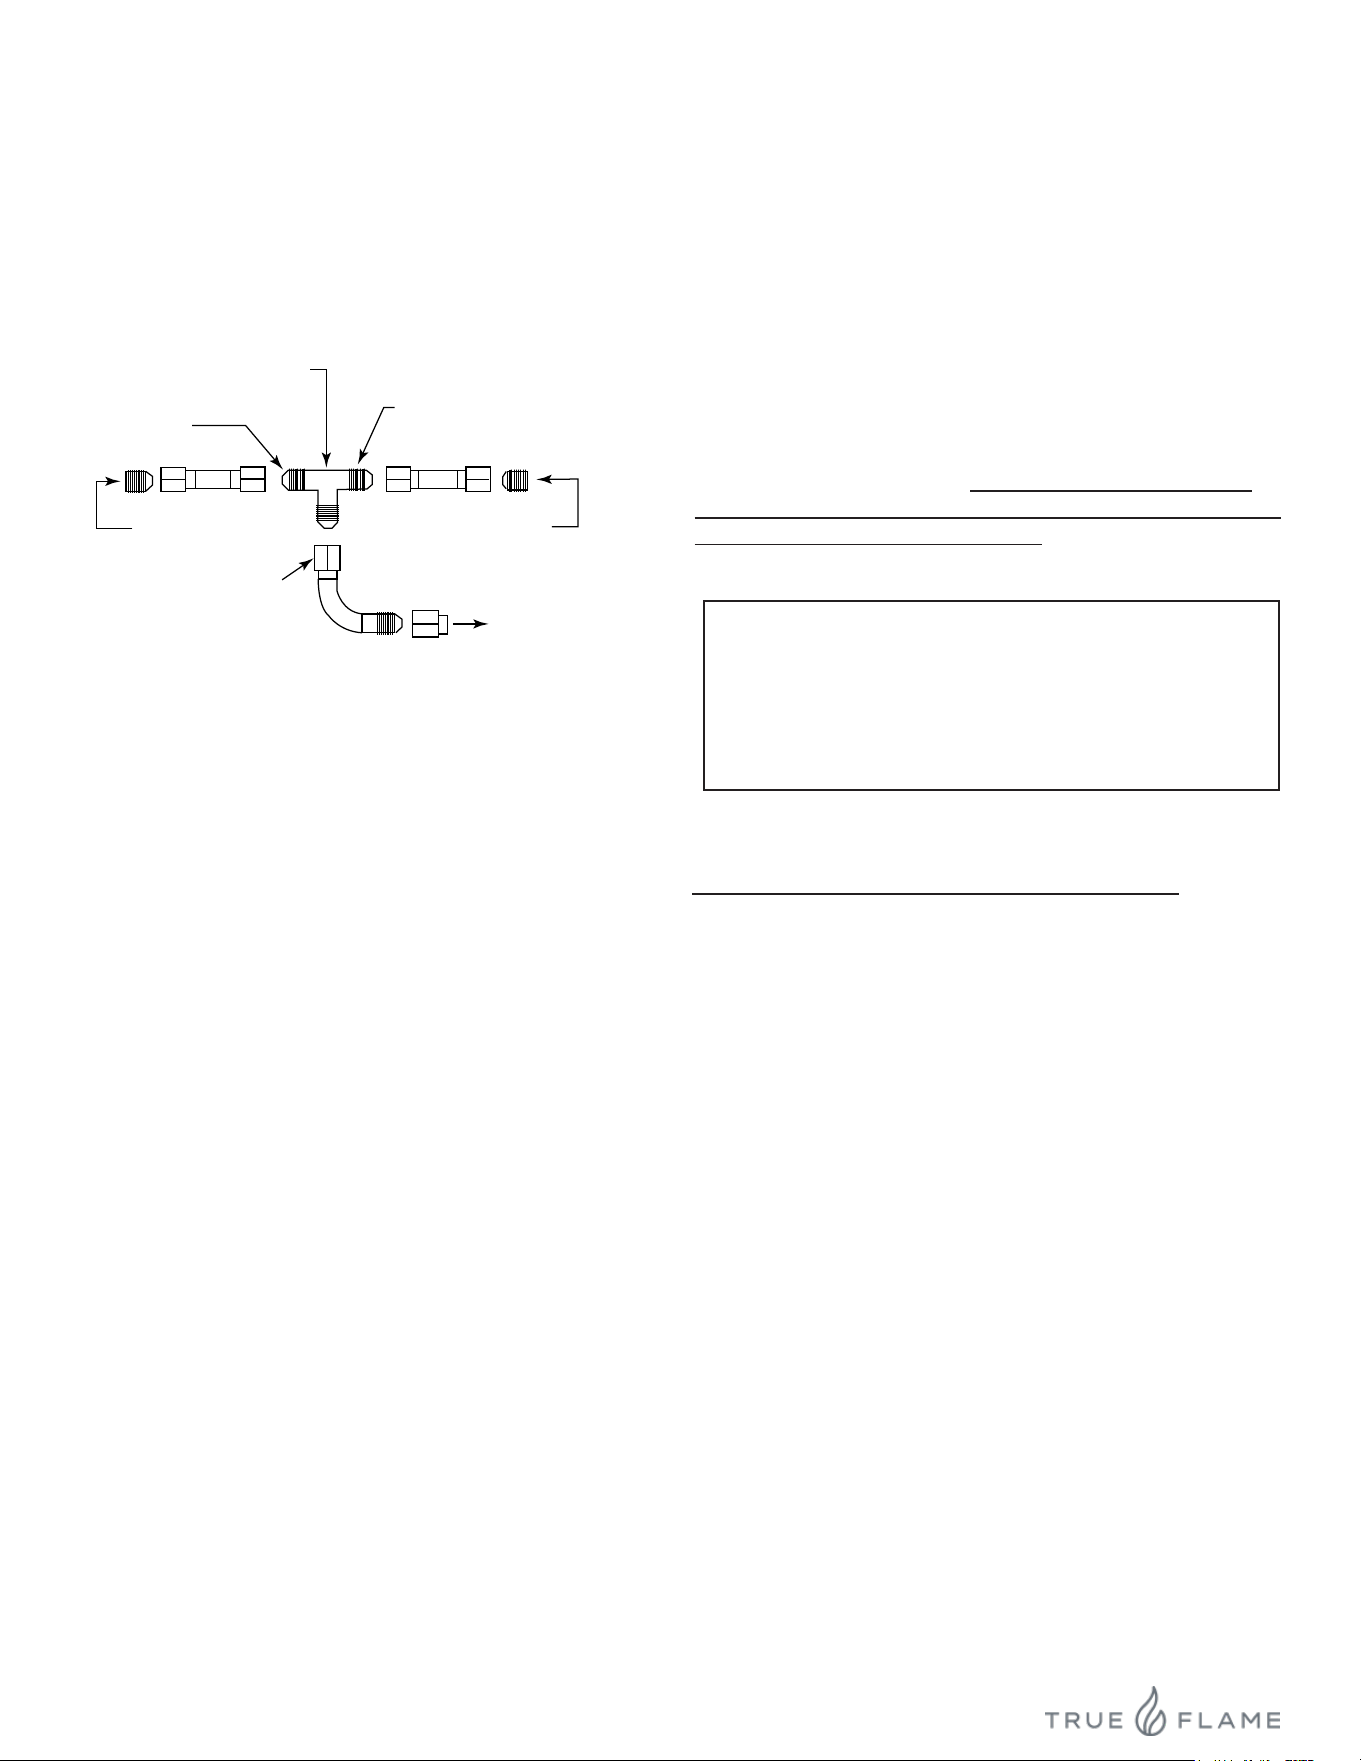
CONNECTING TO A SIDE BURNER
You will need a ‘T’ adapter tting (not provided) or similar
connection to connect a single gas line to both a grill and
a Side Burner. We recommend a licensed gas technician
install all gas lines. See below Figure 8 for
installation of a ‘T’ adapter.
From Side Burner
To Propane Tank or
Natural Gas Connection
3/8” Fittings
From Grill
To grill, located underneath
and behind grill
To side burner, located underneath
and behind burner
3/8” threaded “T” adapter
LIQUID PROPANE INSTALLATION
IMPORTANT:
Ventilation is recommended in the enclosure on opposite
sides to create cross-ventilation. Liquid propane is heavi-
er than natural gas and vents should be located near the
bottom of the enclosure.
TESTING FOR LEAKS
Create a soapy water solution of 1 part soap and 3 parts
water. Conrm that all control knobs are in the off position.
Turn on the fuel supply.
For Natural Gas, turn the valve handle ¼ turn to align with
the gas ow. For LP, turn the cylinder valve counter
clockwise one full rotation. Apply the soap solution
generously by paint brush or squirt bottle on all connections
and ttings. If bubble appear to grow on any of the
connections, you have a gas leak. IMMEDIATELY turn OFF
the gas supply. Wash off the soapy solution with cold water
and dry. Tighten the loose joint or replace the faulty part
with manufacturer-recommended replacement parts.
DO NOT attempt to repair the L.P. cylinder valve if it is
damaged. The only way to safely resolve a damaged
cylinder is to replace it by calling an authorized gas
appliance service technician or an LP gas dealer. Repeat
the leak test to ensure that no leaks are present. Do not
use the appliance until the leak is corrected.
GAS REQUIREMENTS
11
042926
CUSTOM-BUILT ENCLOSURES/ ISLANDS
VENTILATION RECOMMENDED
FOR ALL ENCLOSURES
FOR ALL GAS TYPES:
Natural Gas, Household Propane or LP Cylinder/Tanks
FOR YOUR SAFETY, you must provide the openings
listed below for replacement air and ventilation of the
Side Burner enclosure (i.e. in case of possible gas
leaks from connections or LP tanks/cylinders). Failure
to do so may result in a re or explosion causing prop-
erty damage, bodily injury or death.
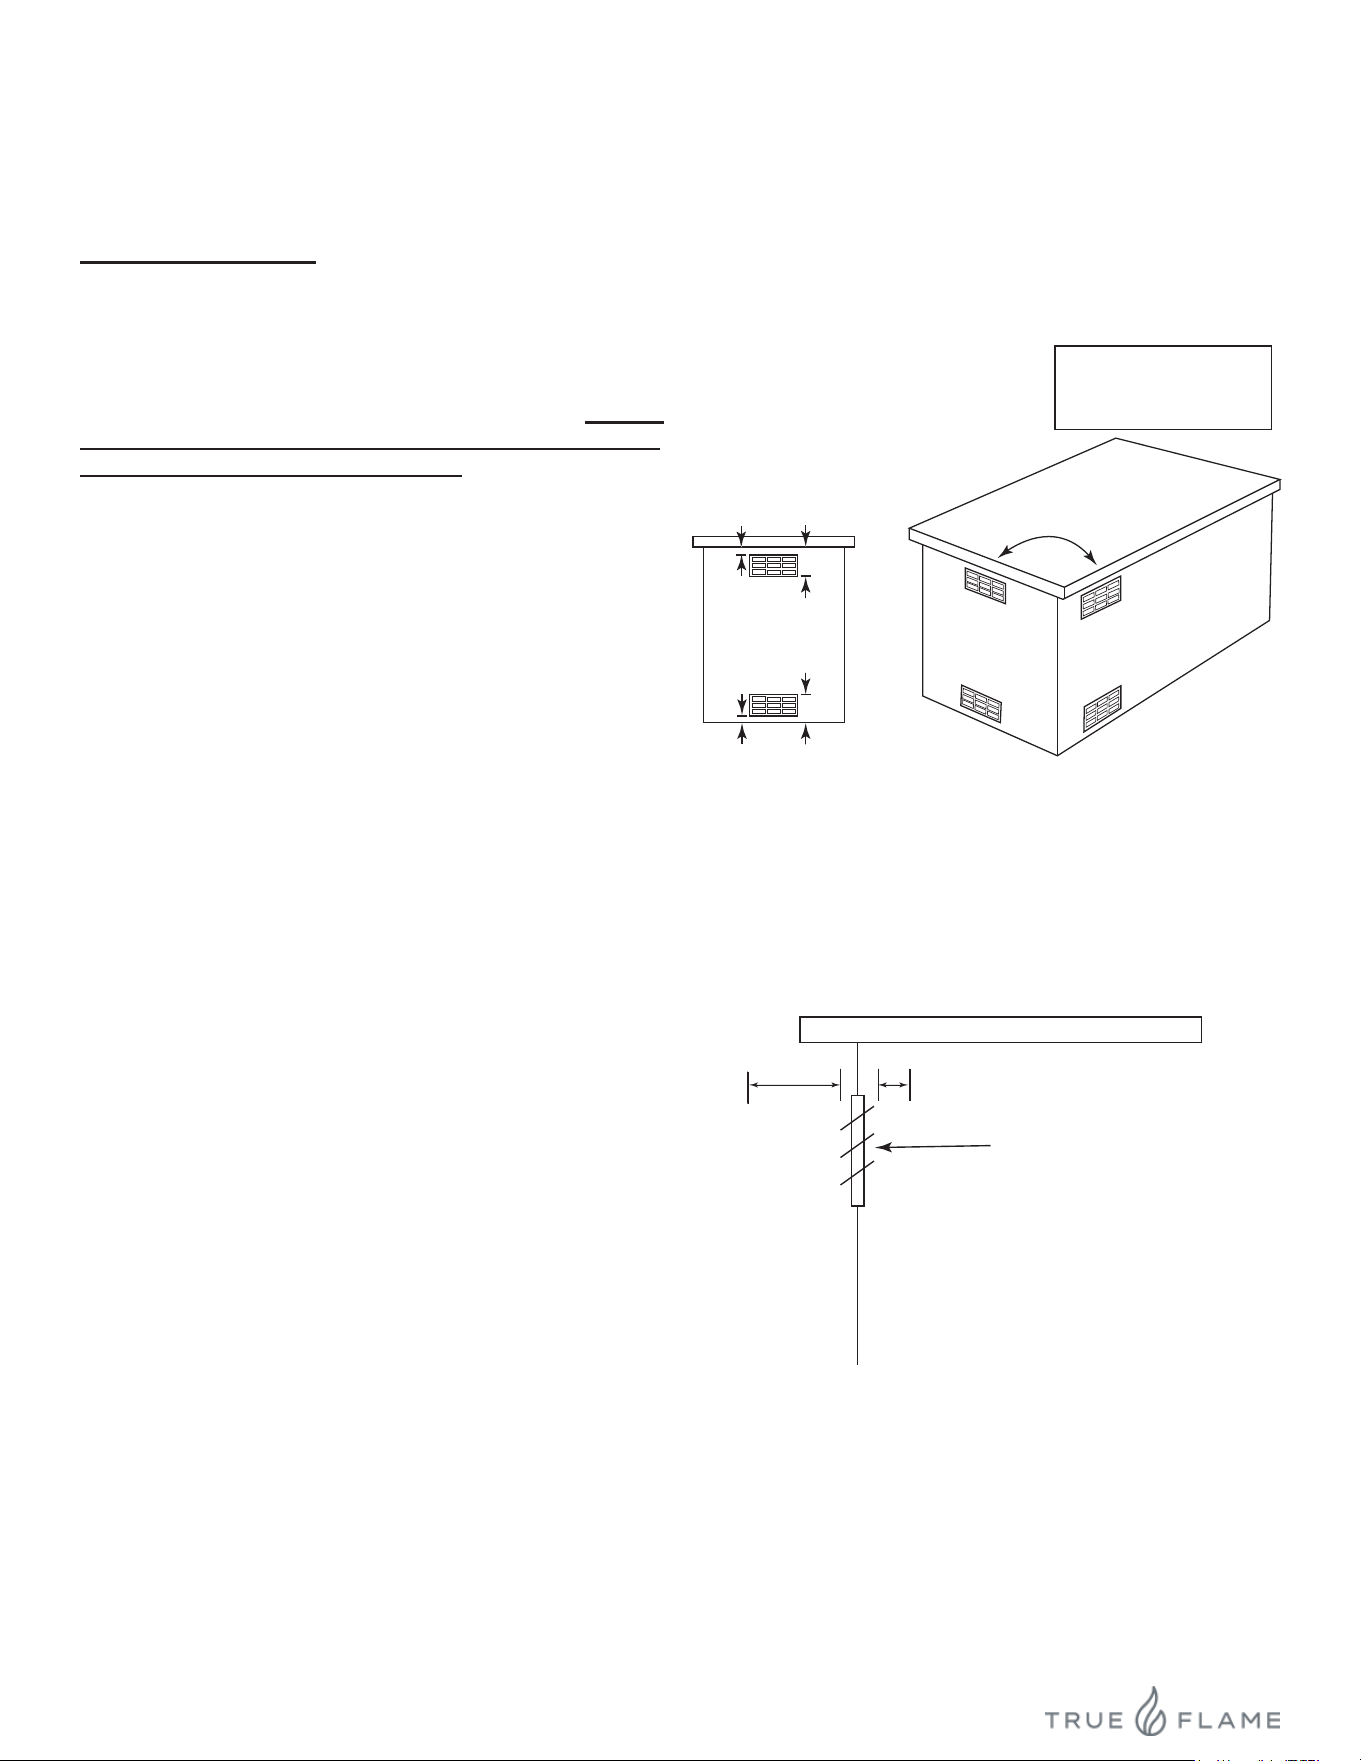
One side of the enclosure shall be kept completely
open to the outside OR four (4) minimum ventilation
openings MUST be provided:
• Each opening must have a minimum of 10 sq. in. of
free area. The openings must be equally sized, provid-
ing a total of 40 sq. in.
• Two openings must be in the side walls of the
enclosure, at the top and spaced a minimum of 90º
from each other. The openings must begin 1” or less
below the countertop edge and end no more than 5”
below the countertop edge. See Figure 9.
• Two openings must be in the side walls of the
enclosure, at the bottom (oor level) and spaced a
minimum of 90º from each other. The openings must
begin 1” above the oor level and end no more than 5”
above oor level.
• The openings must remain unobstructed:
The clearance between the openings and any items
outside of the enclosure is a minimum of 6”. The
clearance between the openings and any items withing
the enclosure is a minimum of 2”. This provides free
owing air inside and outside the enclosure to keep the
island cool during operation of the Side Burner. See
Figure 9.
IMPORTANT:
Ventilation is required in the enclosure on opposite sides
to create cross-ventilation. Liquid propane is heavier than
natural gas and vents should be located near the bottom of
the enclosure.
Min. 90˚
1” Min.
5” Max.
Min. (4) Openings
10 sq.in. of free
area min. (each)
Total= 40 sq. in.
Countertop
Ventilation Requirements
• Minimum 4 openings (2 per side wall
spaced at 90°)
• Top openings: within 5” of countertop
• Bottom openings: within 5” of floor
• Each vent opening: Min. 10 sq. in of
free area (Total to = 40 sq. in.)
Vent openings must be kept
clear and free at all times.
5” Max.
1” Min.
Enclosure Side View
Vent Opening
2” Min.
6” Min.
• 6” Minimum clearance in front of all
vent openings to any items outside
the enclosure
• 2“ Minimum clearance in front of all
vent openings to any items inside
the enclosure
UNOBSTRUCTED VENT OPENINGS
VENTILATION RECOMMENDATIONS
Figure 9
Figure 10

12
042926
OPERATION & MAINTENANCE TIPS
READ INSTRUCTIONS
BEFORE LIGHTING
SPARK IGNITION
CAUTION: Keep your face and body away from
the Side Burner top when lighting
Always remove the stainless steel lid before light-
ing; do not attempt to ignite burners while the lid
is on.
Make sure gas supply is turned ON.
Make sure burner control knobs are in the “OFF”
position. DO NOT turn on more than one valve at
a time for initial ignition.
1. Press in the control knob then slightly turn
the knob counterclockwise while still pressing
inward.
2. Hold in the above position for 5 seconds
allowing the gas to reach the manifold.
3. Turn the knob counterclockwise past the
ignition to the high setting to ignite. You will
hear the one time clicking sound of the spark
ignition.
4. If ignition does not occur in 5 seconds, turn
the burner control OFF, wait 5 minutes, and
repeat the lighting procedure.
5. After ignition, set the knob to the desired
setting.
1. Place either a burning long-barrel butane
lighter or a burning long-stem match near
the manual ash tube to the right of the Side
Burner. For back burners, hold the ame
against the surface of the back burner.
2. Hold the lighter or match ame at the top of
the manual ash tube for ve (5) seconds,
or, next to the back burner. Then depress the
appropriate control knob and while pressing
turn it counterclockwise to the HI position.
Remove the lighter or match when the burner
lights and release the control knob.
3. If ignition does not occur in 5 seconds, turn
the burner control OFF, wait 5 minutes, and
repeat the lighting procedure.
4. After ignition, set the knob to the desired
setting.
MANUAL (MATCH LIGHT) IGNITION
READ INSTRUCTIONS
BEFORE LIGHTING
CAUTION: Keep your face and body away from
the Side Burner top when lighting
Always remove the stainless steel lid before light-
ing; do not attempt to ignite burners while the lid
is on.
Make sure gas supply is turned ON.
Make sure burner control knobs are in the “OFF”
position. DO NOT turn on more than one valve at
a time for initial ignition.
SHUT OFF INSTRUCTIONS
1. To shut OFF the Side Burner, depress each valve control knob and
while pressing turn clockwise to the “OFF” position.
2. Always close the valve from the gas supply after each use of the
Side Burner.
This appliance is designed as an “ATTENDED APPLIANCE”.
DO NOT leave this appliance burning when unattended.

13
042926
OPERATION & MAINTENANCE TIPS
SHUT OFF INSTRUCTIONS
1. To shut off the unit, depress each valve control knob
and while pressing turn clockwise to the “OFF” position.
2. Always close the valve from the gas supply after each
use of the unit.
NOTE:
When using a portable Propane tank: Propane tanks are
equipped with a safety shutdown device that may cause
low or no gas pressure/ ame at the burners if operating
and lighting instructions are not followed exactly.
ADJUSTING YOUR BURNER TO A LOWER SETTING
• Make sure the Side Burner is cool.
• Remove the grate so you can see the ames while
adjusting the burners.
• Light the burner.
• Turn the burner to “LOW”.
• Pull off the control knob.
• Use a at head screw driver and adjust the “gold
athead screw” in the valve to the proper ame height.
MAINTENANCE TIPS
Stainless steels need to be cleaned for aesthetic
considerations and to preserve corrosion resistance.
Stainless steel is protected from corrosion by a thin layer of
chromium oxide. Oxygen from the atmosphere combines
with the chromium in the stainless steel to form this passive
chromium oxide lm that protects from further corrosion.
SIDE BURNER EXTERIOR
Routinely wipe down your Side Burner exterior with warm
water and nish by applying stainless steel polish.
SIDE BURNER INTERIOR
• Burn off excess food debris and marinades for 15
minutes after cooking.
• Use an approved stainless-steel oven cleaner to
remove grease build up.
• Routinely have a professional barbecue cleaning
company detail the Side Burner for best results and
longevity.
STAINLESS STEEL MAINTENANCE
After each use wipe down the exterior of the Side Burner to
remove grease and splatters. Use a commercially available
stainless-steel cleaner to clean and polish the exterior sur-
faces. Doing these things on a regular basis minimizes the
amount of effort required
When removing stubborn stains:
• Do not use metallic abrasives and always rub in the
direction of the grain.
• Some household cleaning products are not suitable for
stainless steel; be sure to read the label before using
on the Side Burner.
• Always use the mildest cleaning solution rst, scrub-
bing in the direction of the grain.
• Specks of grease may gather in the grain of the
stainless steel and bake on to the surface, giving the
appearance of rust.
• To remove these baked-on foods use a ne to medium
grit non-metallic abrasive pad (Scotch Brite is good) in
conjunction with a stainless steel cleaner.
• Solutions used for cleaning concrete and masonry can
be very corrosive and will ‘attack’ stainless steel
• Be sure your TrueFlame products are well protected
before using these products.
POWER FRONT PANEL LED
To power the external LED lights, insert the trans wire (two
prong connection) into the transformer. Plug the transform-
er into an electrical outlet rated for the transformer.
Any contamination of the surface by dirt, or other
material, hinders this passivation process and traps
corrosive agents reducing corrosion protection. Thus,
routine cleaning is necessary to preserve the
appearance and integrity of the surface.

14
042926
IMPORTANT NOTE: FOR LOCATIONS NEAR COASTAL AREAS AND POOLS:
#304 stainless steel materials used in the construction of your TrueFlame Side Burner are highly rust
resistant, however, chlorine in the air from swimming pools or the salt from sea air may cause surface
rust to appear and even create some pitting if left on the product. Here are a few tips to avoid this if
instructions are not followed exactly.
• Regularly wipe down the exterior surfaces with a damp cloth (micro ber towels work well).
• Allow the surfaces to dry before installing the cover. Do not cover a damp Side Burner.
• In extreme environments apply a rust inhibitor which leaves a microscopic protective layer on the
Side Burner.
• For seasonal storage use the product referred to above, ensure the Side Burner is dry, then cover
and secure the cover to minimize the amount of damp air getting to the surfaces.
OPERATION & MAINTENANCE TIPS
After your rst use, certain areas of the Side Burner may discolor from the intense heat given off by the
burners; this is normal and cannot be cleaned off. For light and heavy food stains there are many differ-
ent stainless; steel cleaners available.
15
042926
SIDE BURNER: TFSB2
POWER BURNER: TFPB
SIDE & POWER BURNER ILLUSTRATIONS
16
042926
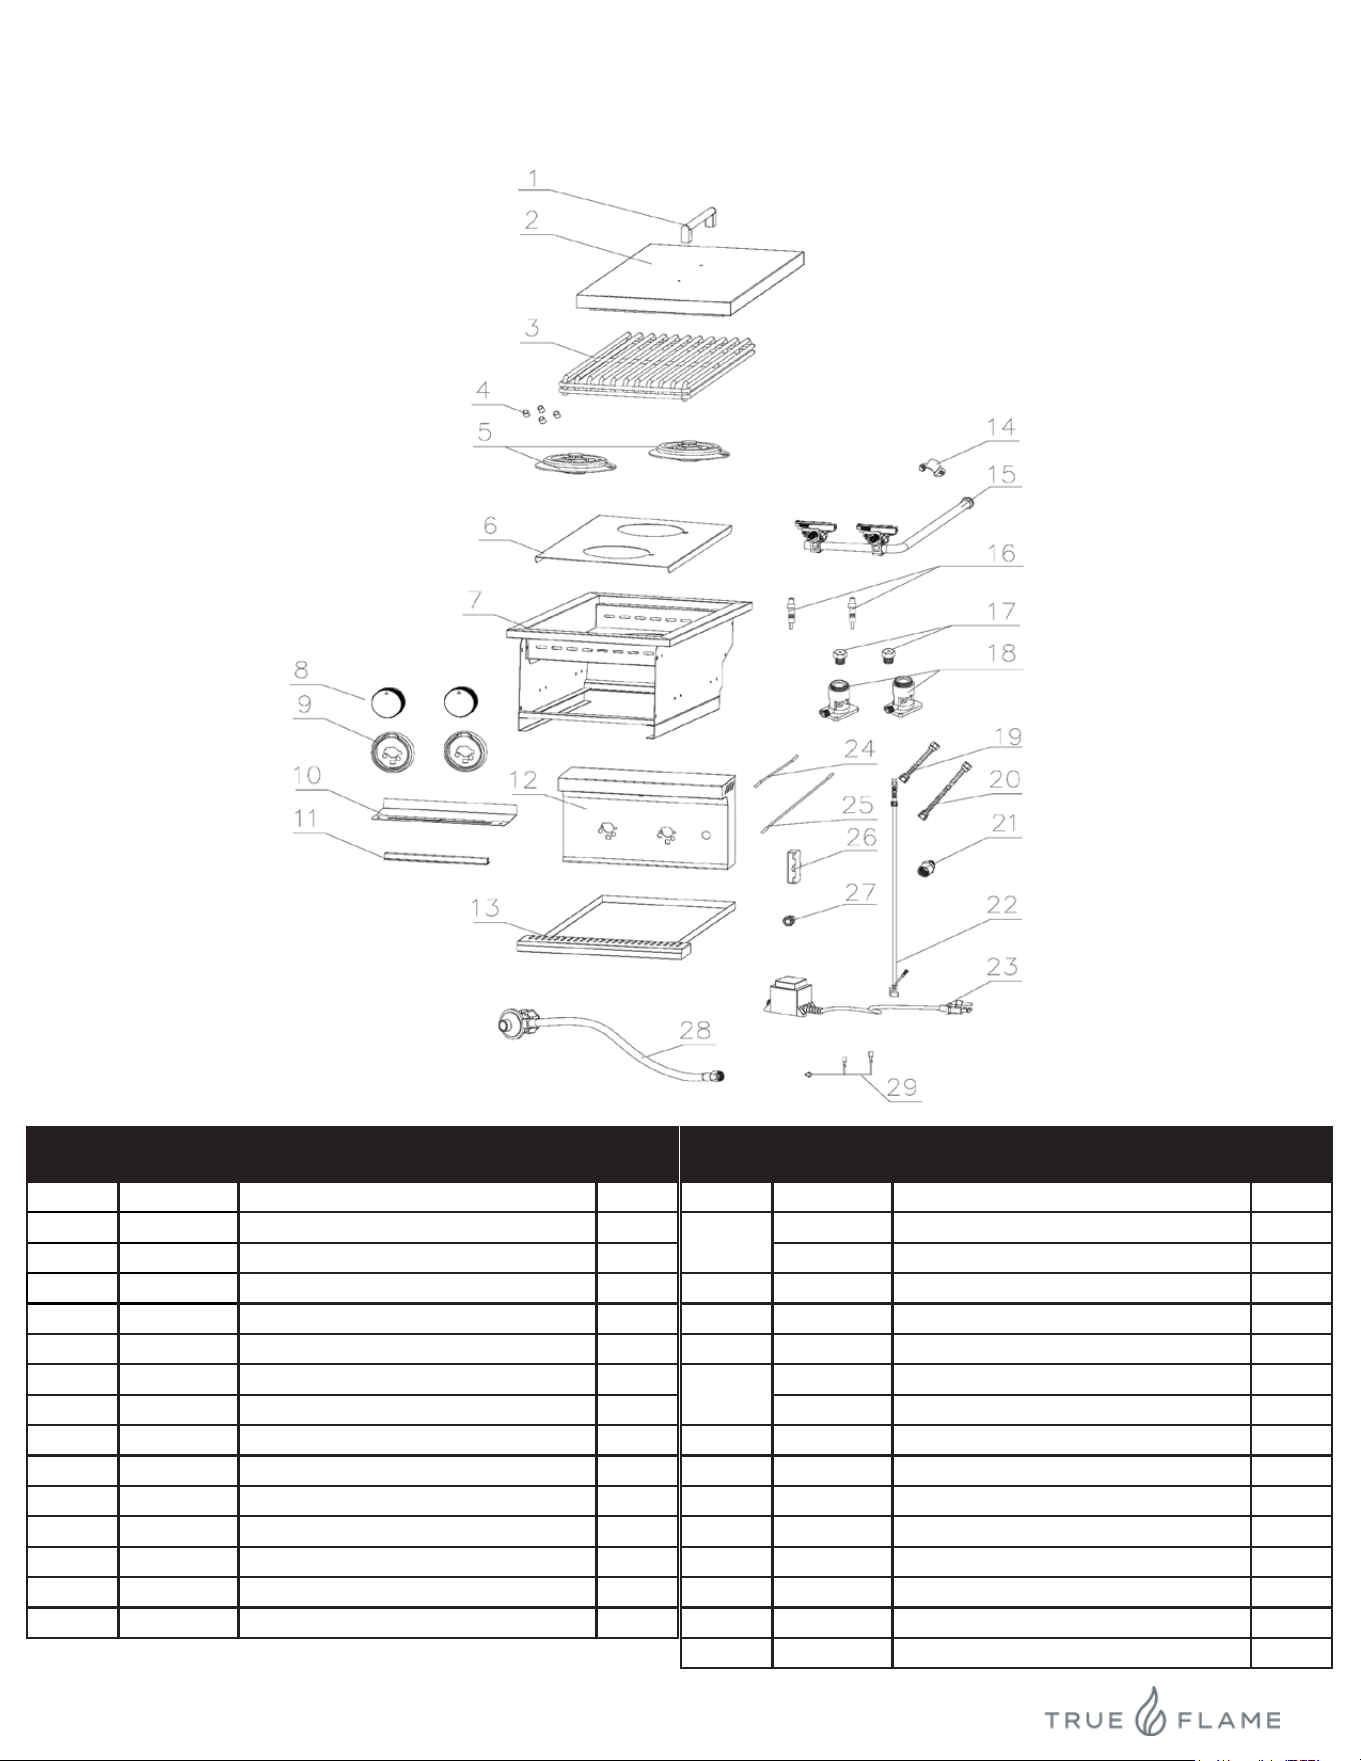
ILLUSTRATED & REPLACEMENT PARTS
TFSB2
Double Side Burner
ITEMITEM PART #PART # DESCRIPTION
QTY.
1 11223 COVER HANDLE ASSEMBLY 1
2 11224 COVER 1
3 11225 COOKING GRATE 2
4 11226 LEG RUBBER SLEEVE OF WARMING RACK 1
5 11227 BURNER ASSEMBLY 1
6 11228 BURNER FIXING PLATE 1
7 11229 FIREBOX ASSEMBLY 1
8 11152 KNOB 1
9 11153 KNOB BEZEL 2
10 11232 LED SHIELD 2
11 11233 LED STRIP 1
12 11234 CONTROL PANEL ASSEMBLY 2
13 11235 DRIP TRAY 2
14 11236 MAIN VALVE FIXING PLATE 1
15 11237 MAIN VALVE MANIFOLD 1
ITEMITEM PART #PART # DESCRIPTION
QTY.
16 11238 IGNITION ASSEMBLY 1
17
11239 NG ORIFICE 1
11332 LP ORIFICE 1
18 11227 BURNER BASE 1
19 11241 FLEX LINE ASSEMBLY-1 1
20 11242 FLEX LINE ASSEMBLY-2 1
21
11270 LP FITTING (LP ONLY) 1
11202 NG FITTING (NG ONLY) 1
22 11244 MAIN WIRING HARNESS 1
23 11245 TRANSFORMER 1
24 11246 IGNITION WIRE ASSEMBLY-1 1
25 11247 IGNITION WIRE ASSEMBLY-2 1
26 11179 BALLAST RESISTOR ASSEMBLY 1
27 11200 BUTTON SWITCH 1
28 11268 HOSE & REGULATOR ASSEMBLY 1
29 11251 LED WIRE 1
17
042926
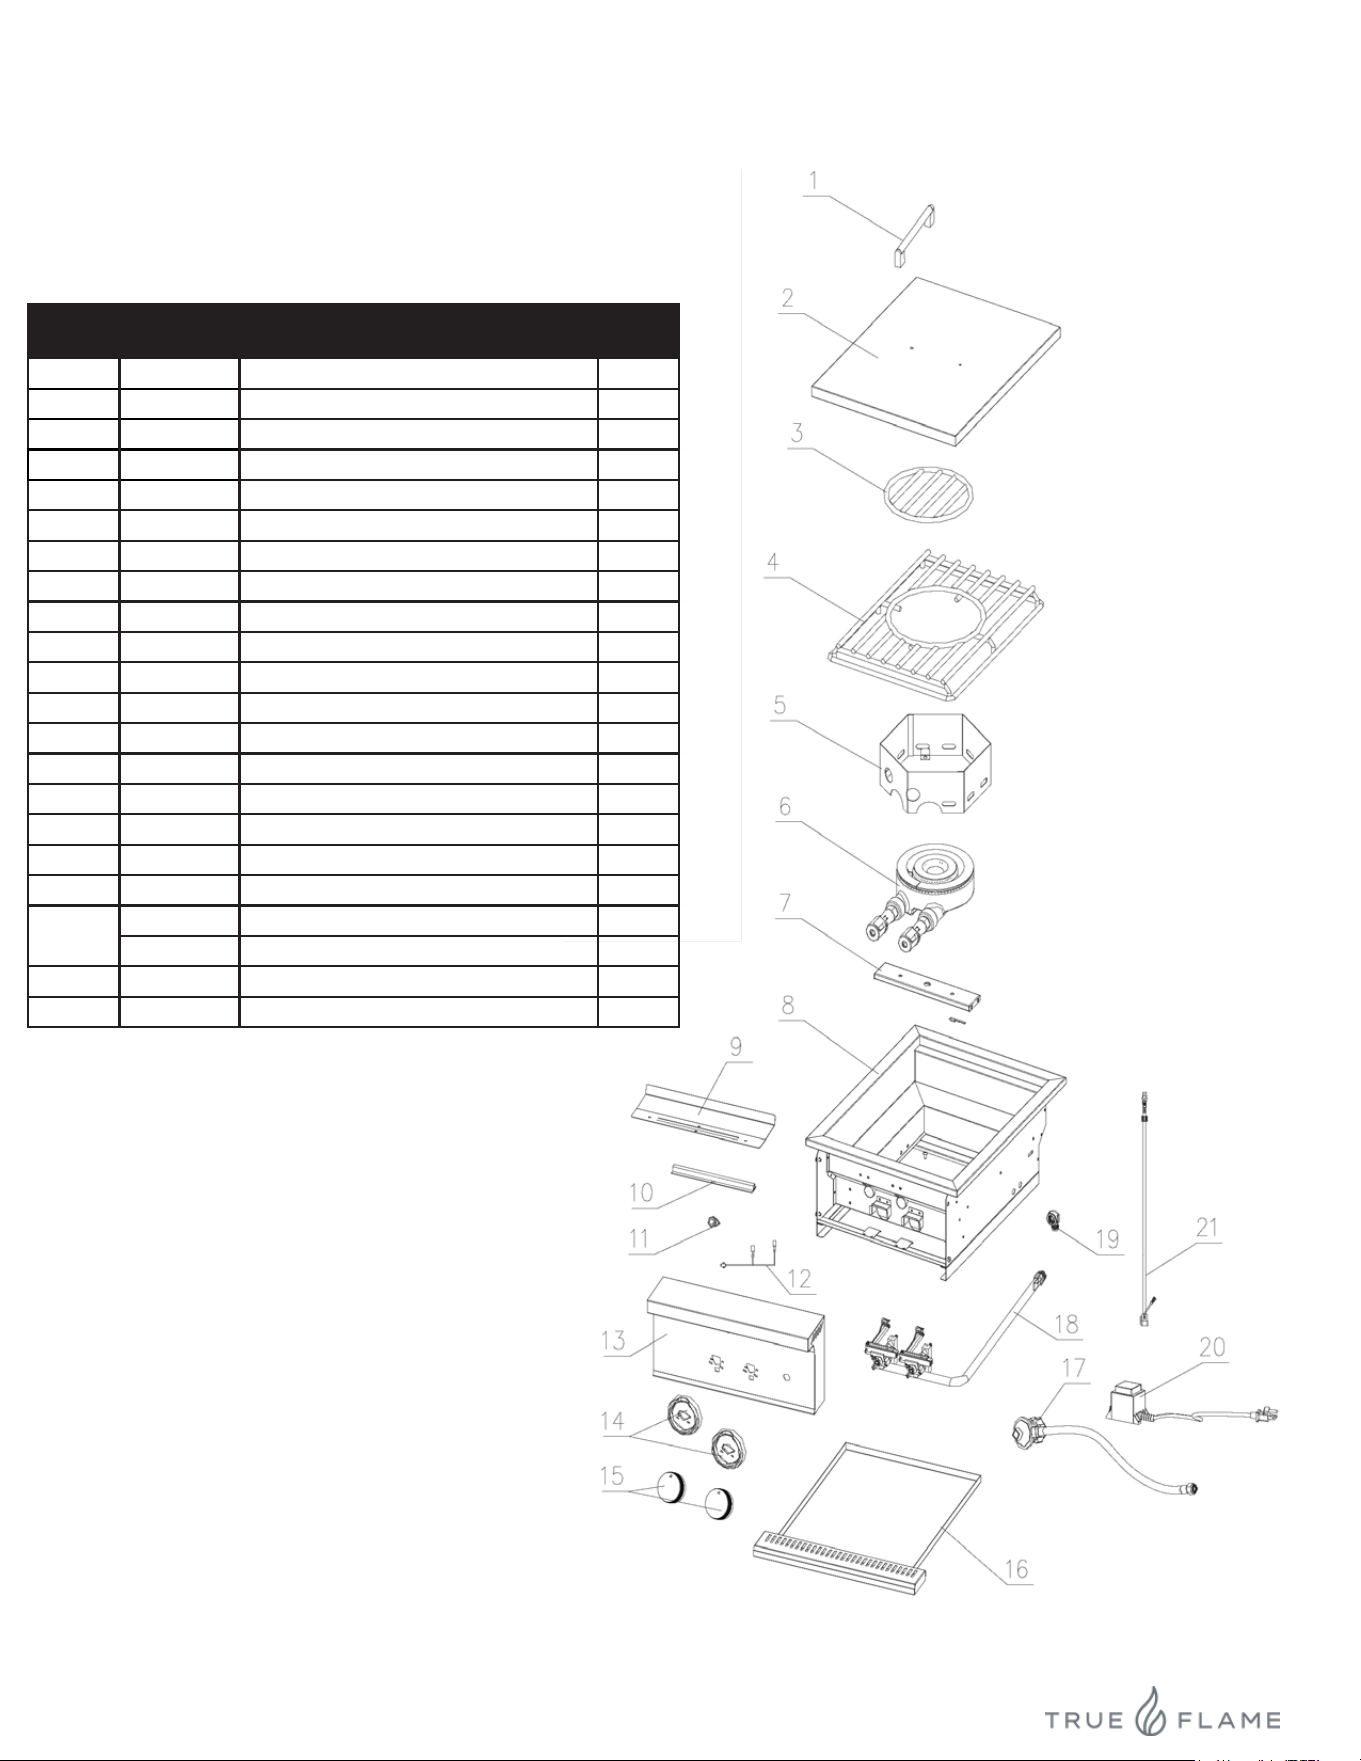
ILLUSTRATED & REPLACEMENT PARTS
TFPB
Power Burner
ITEMITEM PART #PART # DESCRIPTION
QTY.
1 11252 LID HANDLE 1
2 11253 LID 1
3 11254 COOKING GRATE INNER 1
4 11255 COOKING GRATE 1
5 11256 WIND SHIELD 1
6 11257 BURNER ASSEMBLY 1
7 11258 BURNER FIXING PLATE 1
8 11259 FIREBOX ASSEMBLY 1
9 11260 LED HEAT SHIELD 1
10 11261 LED STRIP 1
11 11262 LED SWITCH 1
12 11263 LED WIRE 1
13 11264 CONTROL PANEL ASSEMBLY 1
14 11265 KNOB BEZEL 2
15 11266 KNOB 2
16 11267 DRIP TRAY ASSEMBLY 1
17 11268 HOSE ASSEMBLY 1
18 11269 MANIFOLD 1
19
11270 LP FITTING (LP ONLY) 1
11243 NG FITTING (NG ONLY) 1
20 11245 TRANSFORMER 1
21 11272 MAIN WIRING HARNESS 1
18
042926
17322 GOTHARD STREET

19
042926
NOTES

20
042926
For more information call
Customer Care at 800-966-8126
Hours: 7am - 5pm PST
17322 GOTHARD STREET
HUNTINGTON BEACH, CA 92647
800.966.8126