
P9V User Guide

Manual Revision Record
Version
Date
Description
Revised By
1.0
2022.03.18
Xiongli.Ding
2.0
2026.09.14
Ziqi.Xia

contents
Chapter 1 Product Introduction .................................................................................. 6
1.1 Panel Definition
........................................................................................................ 6
1.1.1 Front
............................................................................................................. 6
1.1.2 Back and Sides
.............................................................................................. 7
1.2 Key and Indicator Definition
.................................................................................... 8
1.3 Accessories
............................................................................................................... 9
1.3.1 Cables CTMM-1.5
.......................................................................................... 9
1.3.2 Adapter ZL-018GL20WCN01
......................................................................... 9
Chapter 2 Basic Operations........................................................................................ 11
2.1 Power on / off, restart, sleep
................................................................................. 11
2.1.1 Power on / off
............................................................................................. 11
2.1.2 restart
......................................................................................................... 11
2.1.3 Wake up / Sleep
.......................................................................................... 11
2.1.4 Restart
........................................................................................................ 11
2.2 Screenshot
............................................................................................................ 12
2.3 Installing / Removing the SIM Card / TF Card
......................................................... 12
2.4 Battery Charging
..................................................................................................... 12
2.5 Installing the Wrist Strap
........................................................................................ 12
Chapter 3 Data Transfer .............................................................................................. 14
3.1 Data Transfer Connection Methods
...................................................................... 14
3.1.1 P9V USB File Transfer Method
..................................................................... 14
3.1.2 Bluetooth Data Transfer Method
................................................................. 14
3.2 Data File Path
........................................................................................................ 15
3.3 File Copy and Paste
.............................................................................................. 16
3.3.1 Copy
........................................................................................................... 16
3.3.2 Paste
........................................................................................................... 16
3.4 Enable Developer Debugging Options
.................................................................. 16
Chapter 4 Brief Description of the Operating System ........................................ 18
4.1 System Main Interface and Start Menu
................................................................. 18

4.2 Status Indicator
..................................................................................................... 19
4.3 Pre-installed Applications
..................................................................................... 19
4.4 Interact with the Device
......................................................................................... 19
4.5
Input Method
........................................................................................................ 19
4.5.1 Physical Keyboard Input Method
................................................................. 19
4.5.2 Other Input Methods
.................................................................................. 19
4.6
Settings
.................................................................................................................. 20
4.6.1 Network & Internet
...................................................................................... 20
4.6.2 Connected Devices
...................................................................................... 21
4.6.3 buttons
....................................................................................................... 21
4.6.4 Apps & Notifications
................................................................................... 22
4.6.5 battery
........................................................................................................ 22
4.6.6 Display
........................................................................................................ 23
4.6.7 Sound
......................................................................................................... 23
4.6.8 Storage
....................................................................................................... 24
4.6.9 Security & Location
...................................................................................... 24
4.6.10 Accounts
..................................................................................................... 25
4.6.11 Accessibility
................................................................................................. 25
4.6.12 System
........................................................................................................ 26
4.6.13 About Phone
.............................................................................................. 26
4.7
Other Information
....................................................................... 错误!未定义书签。
Chapter 5 Software Operations................................................................................. 27
5.1 Software Installation
............................................................................................... 27
5.1.1 Local Installation
.......................................................................................... 27
5.1.2 Installation via App Market
.......................................................................... 27
5.2 System Firmware Upgrade
..................................................................................... 27
5.2.1 Online Upgrade
........................................................................................... 27
5.2.2 SD Card Upgrade
......................................................................................... 28
Chapter 6 Troubleshooting and Product Maintenance ...................................... 29
6.1 Troubleshooting
.................................................................................................... 29
6.2 Product Maintenance
............................................................................................. 29

Appendix 1 P9V Product Specifications ...................................................................... 31
1 Product Rendering .......................................................................................................... 31
2 Product Technical Specifications .................................................................................... 31
2.1 General Technical Specifications Overview ......................................................... 31
2.2 Detailed Technical Specifications ......................................................................... 32
2.2.1 Physical Characteristics .................................................................................... 32
2.2.2 System Platform ................................................................................................ 32
2.2.3 Interface & Communication ............................................................................... 33
2.2.4 Power Specifications ......................................................................................... 33
2.2.5 Function Key Definition ...................................................................................... 33
5
Chapter 1 Product Introduction
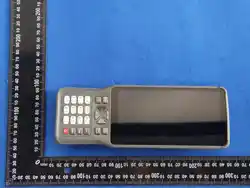
The P9V is a professional smart notebook based on the Android 14 operating
system, equipped with an 8-core 2.0GHz powerful processor, 4GB RAM, and 64GB
of large storage. It is IP68 protected and offers excellent performance and a
smooth experience even in harsh working environments. However, the device does
not support voice communication. It has no earpiece/receiver, cannot make cellular
voice calls, and cannot be used as a smartphone.
This chapter mainly introduces the appearance of the P9V product and its handset
accessories. The product appearance covers panel definition, key definition, and
connector definition.
1.1 Panel Definition
1.1.1 Front
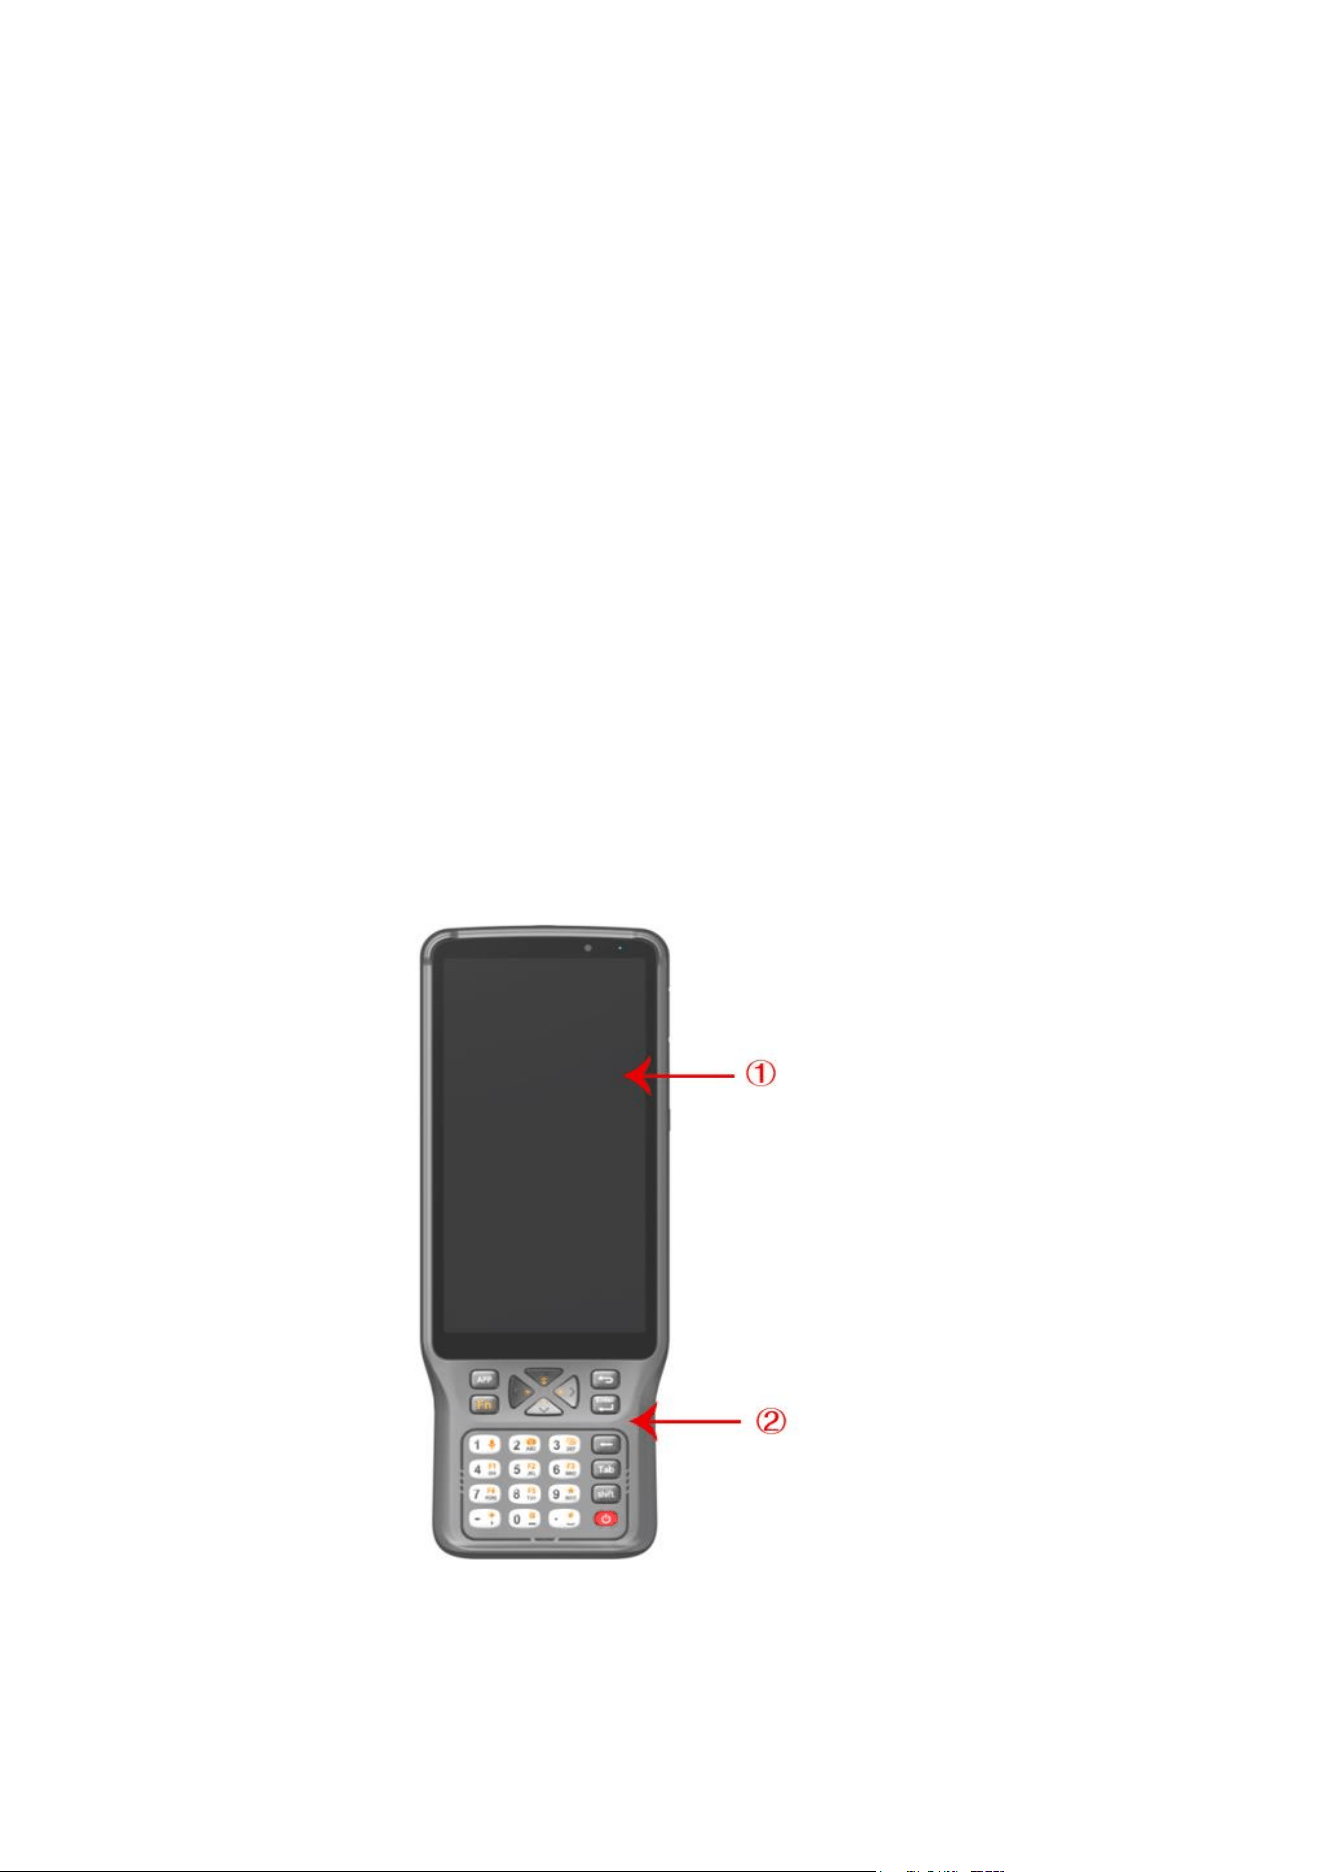
Figure 1-1 Front of the Handheld Controller
5
Table 1-1 Description of Front Panel Components Functions
No.
Component
Description
①
Touch Screen
Displays the screen and responds to your touch operations.
②
Key Console
Includes 24 keys such as numeric keys and special function
keys.
1.1.2 Back and Sides
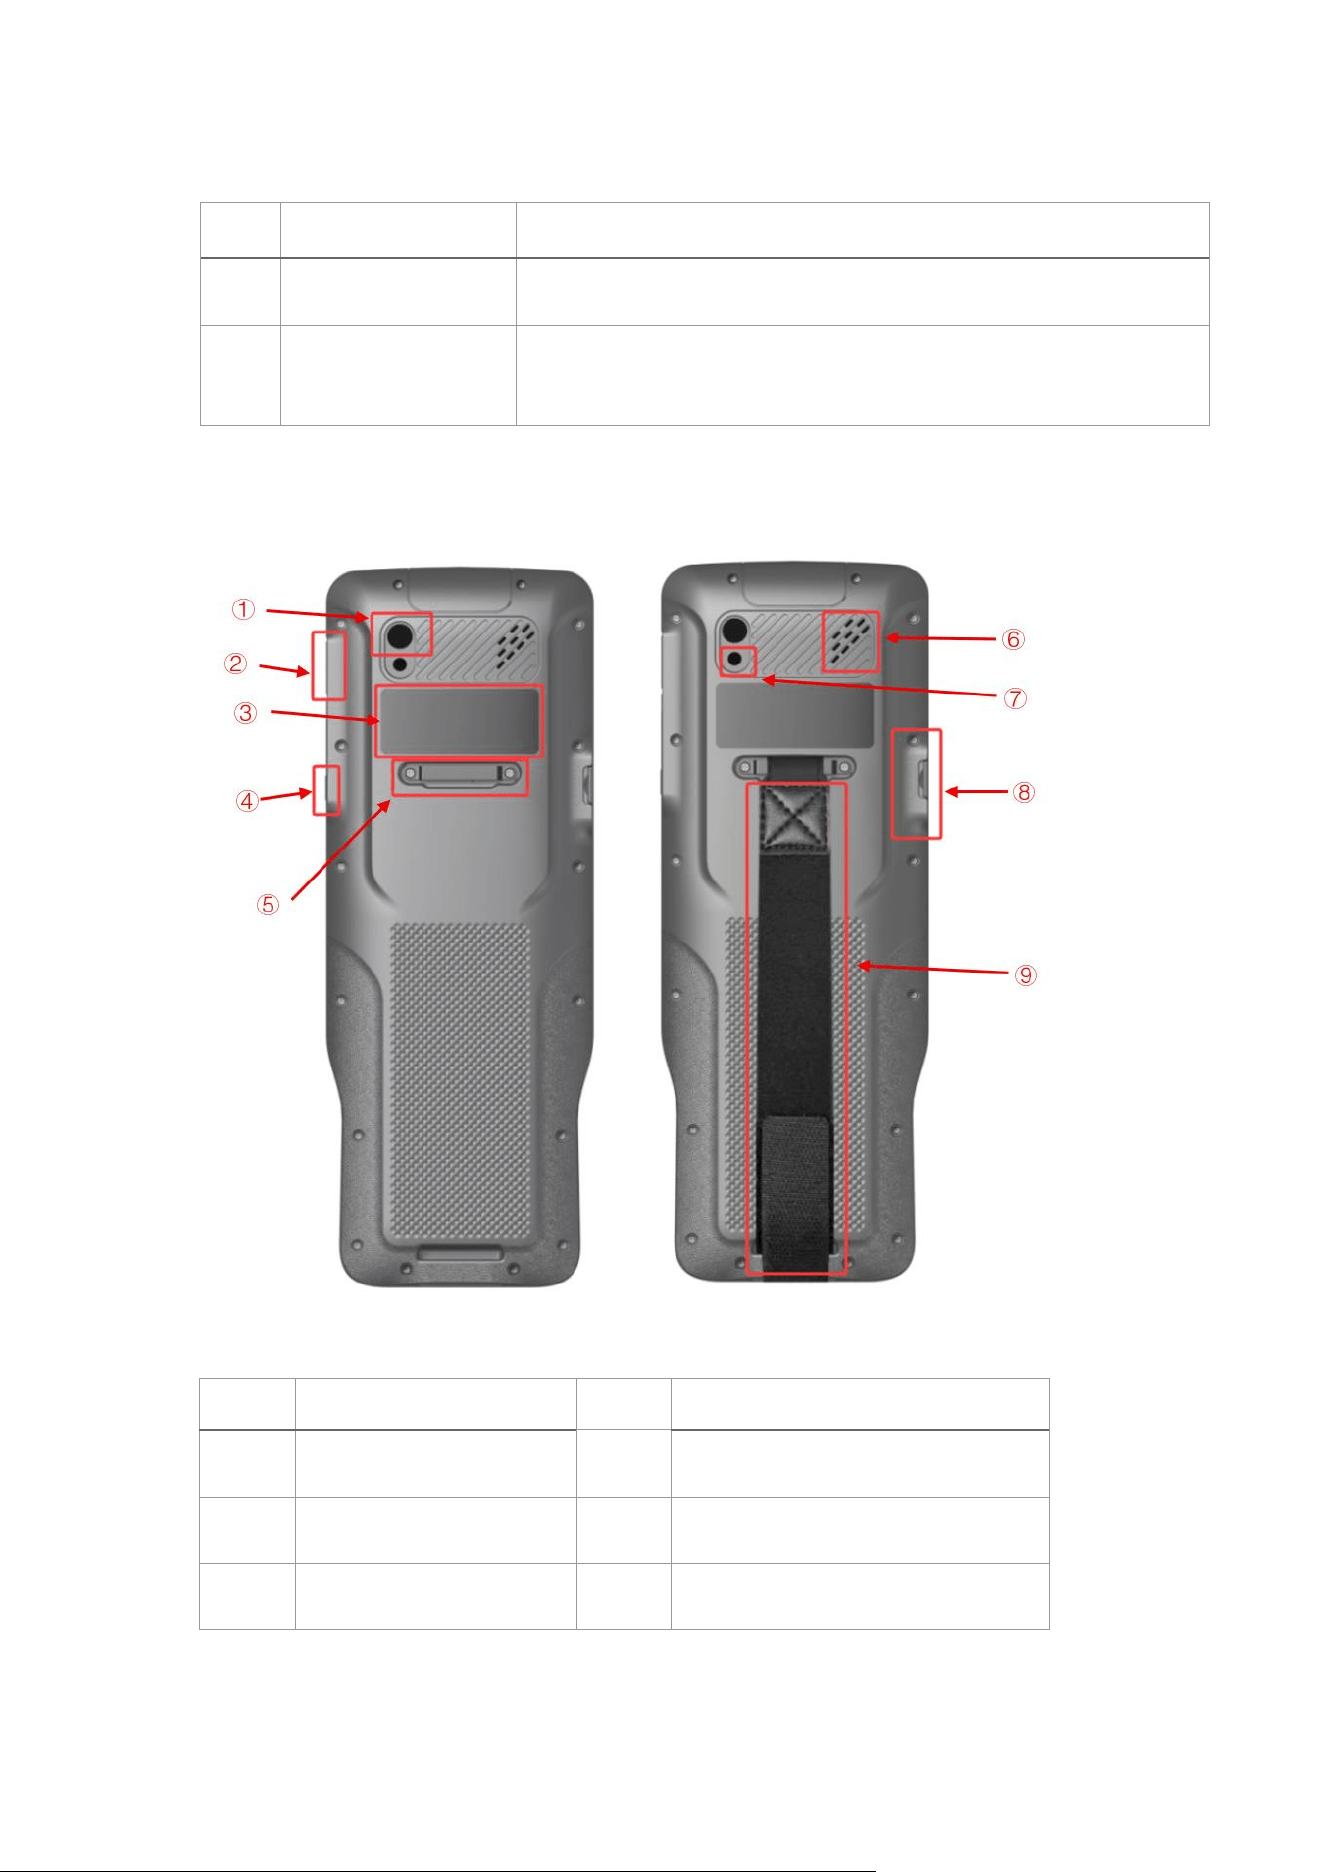
Figure 1-2: Back and Side Views of the Controller
No.
Component
No.
Component
1
Camera
6
Speaker Grille
2
USB
7
Flash Light
3
Nameplate
8
SIM Card Cover
5
4
Side Key
9
Black Wrist Strap
5
Wrist Strap Hardware
\
\
1.2 Key and Indicator Definition
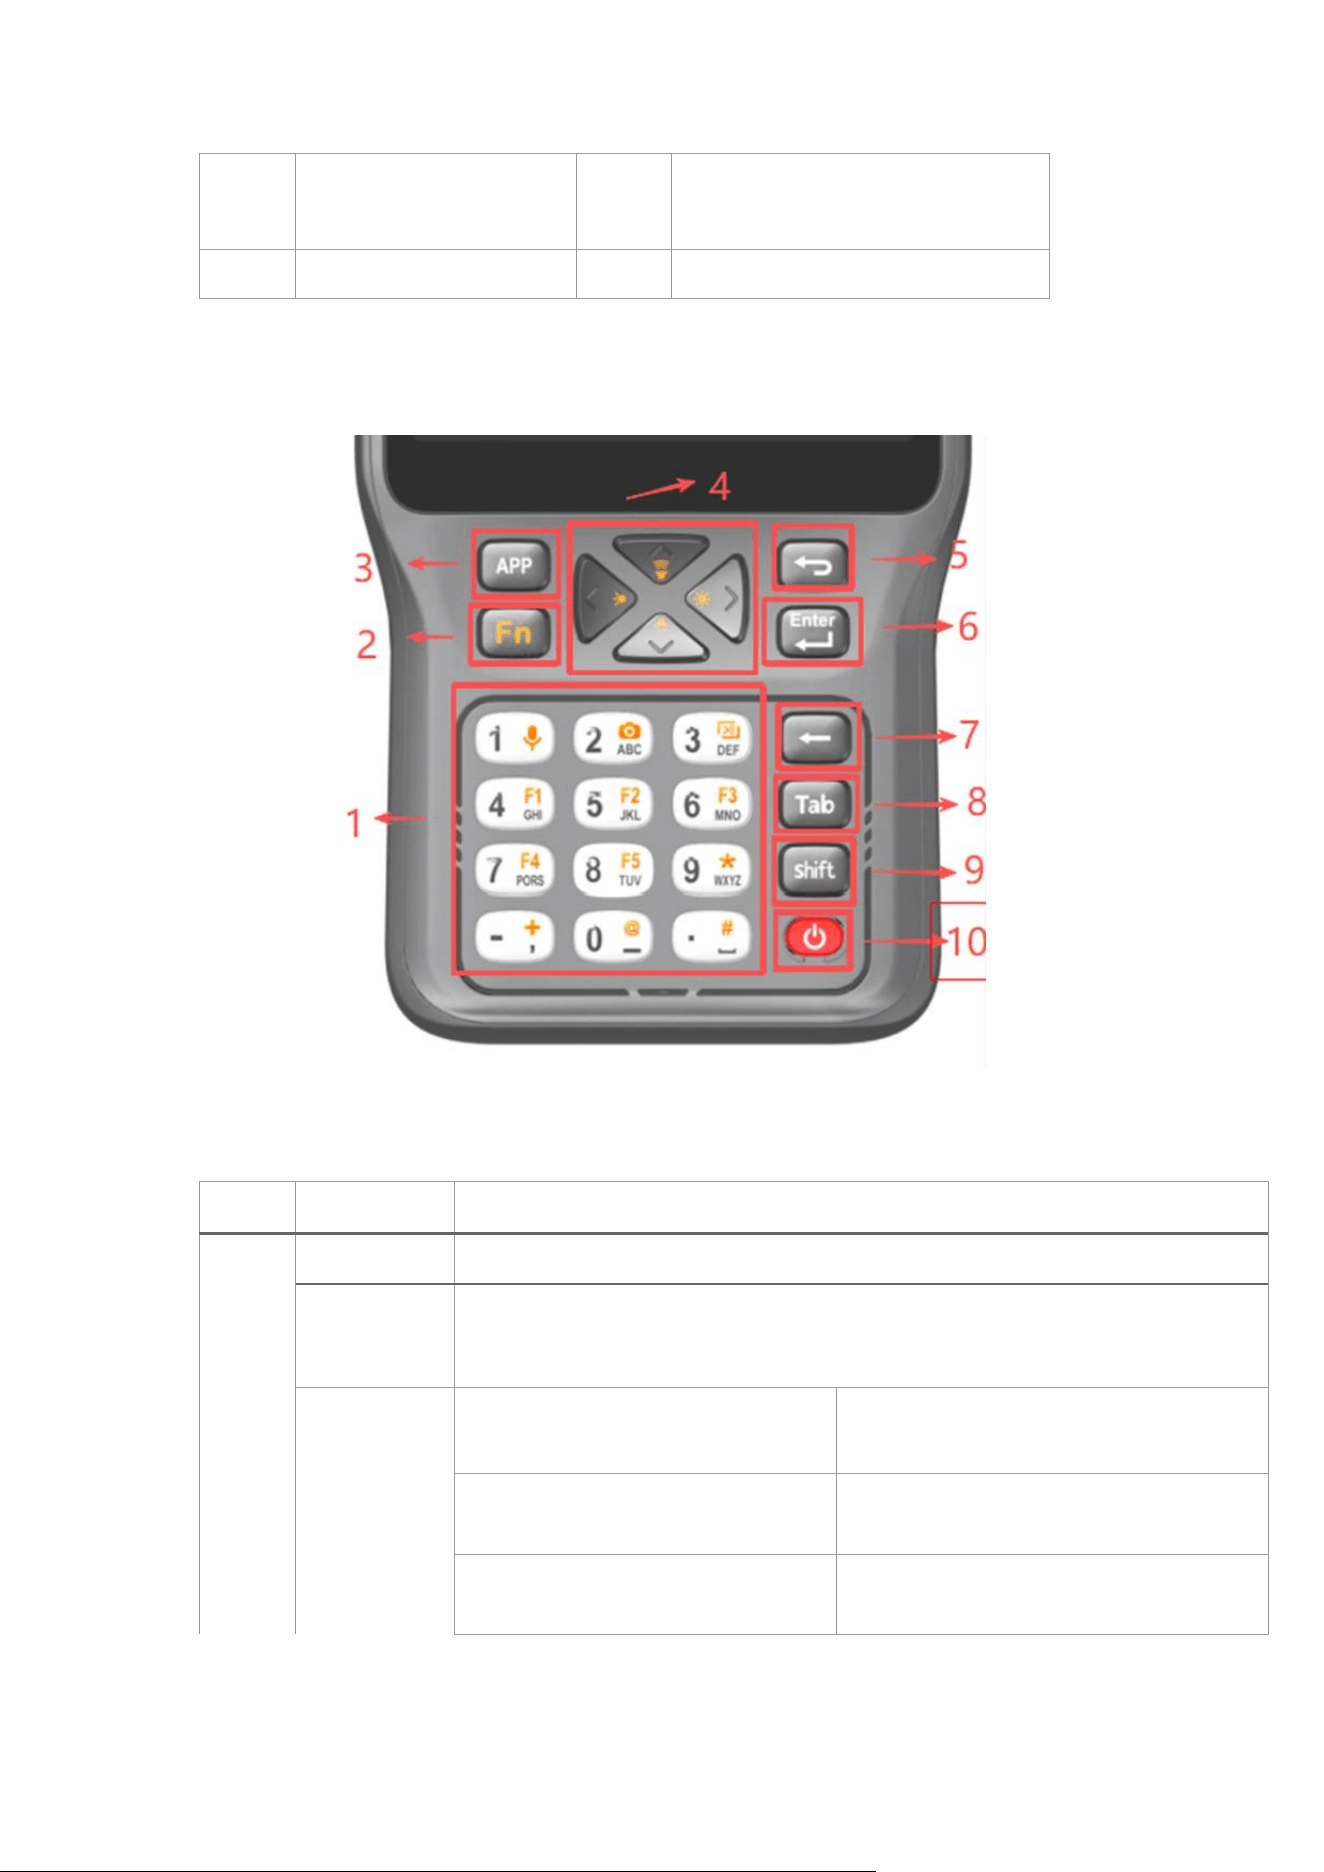
Figure 1-3 Handheld Controller Buttons
Table 1-3 Description of Handheld Controller Button Functions
No.
Key
Definition & Description
1(Numer
ic Key)
2 (FN
Key)
Numeric Key
Enter numbers
FN
Switches between numbers and letters when using the physical keyboard FN
input mode, and toggles among Chinese, numbers, and letters in Chinese input
mode.
Special
function
keys
(functions
indicated by
the orange
icons when
Voice function (marked with the
orange icon on the "1" key)
Enables voice input and allows Surpad
to execute certain voice commands.
Camera function (marked with the
orange icon on the "2" key)
Can activate the camera function.
Screenshot function (marked with
the orange icon on the "3" key)
Allows quick screenshot capture.

5
Fn is locked)
F1-F5
User-defined function key
3
Survey Key
When the Surpad interface is not active, pressing this key opens or switches to
the Surpad interface (the displayed interface corresponds to the software
version).
When on the Surpad interface, this key functions as a collection key.
4
Directional
keys
Moves up, down, left and right on the screen or in menus.
In function mode, the up and down keys control the volume.
In function mode, the left and right keys control the screen brightness.
5
Back Key
Returns to the previous interface.
6
Enter key
Confirm / Line break.
When on the Surpad interface and in non-input state, it acts as the collection
key.
7
Undo key
Deletes one character backward in the character input field.
8
Tab Key
Tab Key
9
Shift Key
Switches between lowercase and uppercase letters when using the physical
keyboard input method.
10
Power key
Power on / off
1.3 Accessories
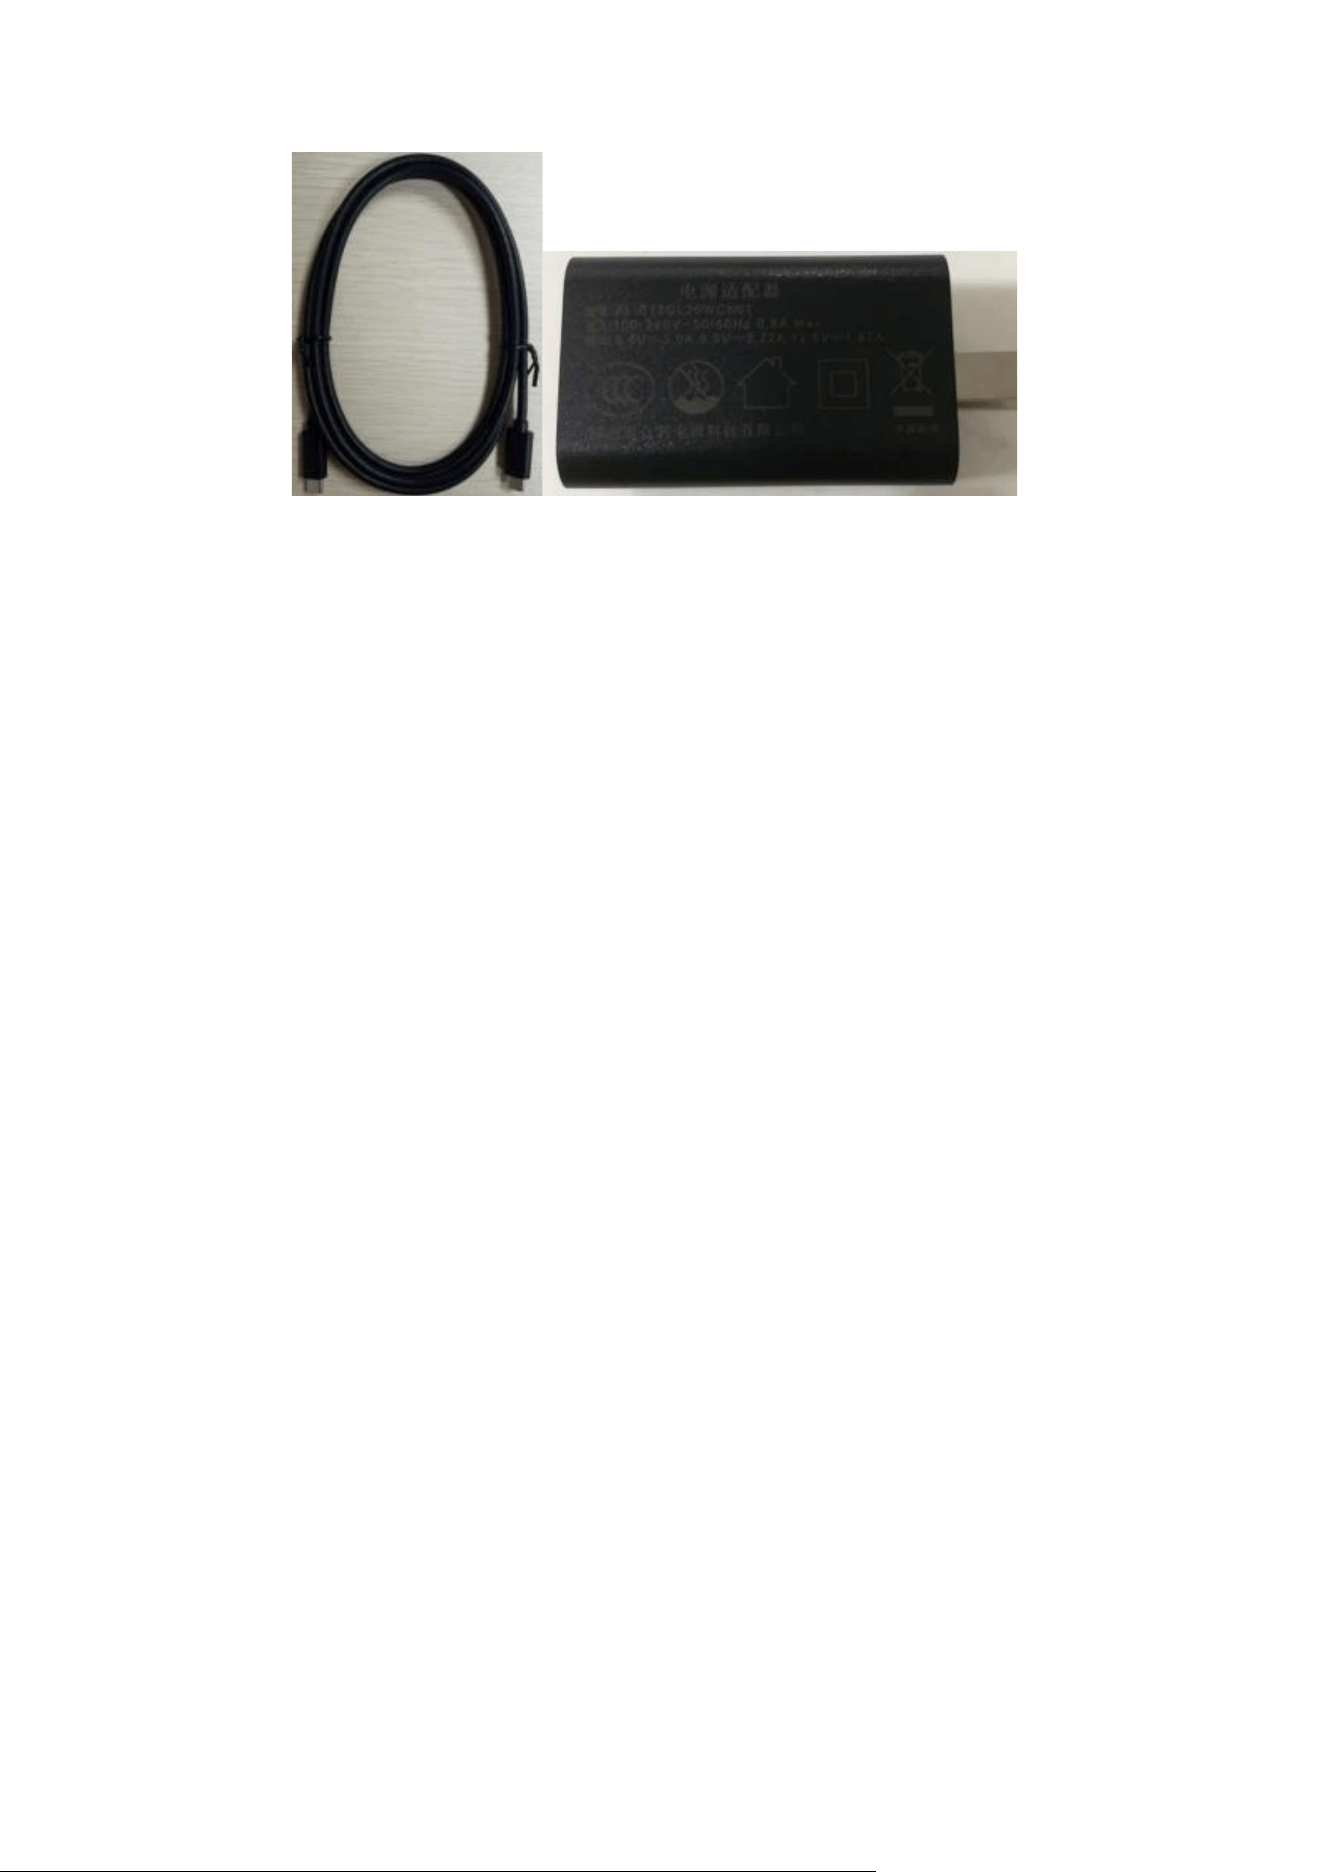
1.3.1 Cables CTMM-1.5
Users can charge the P9V controller and transfer data using the CTMM-1.5 cable
and adapter.The charging cable is a Type-C male to Type-C male cable with a
length of 1.5 meters.
1.3.2 Adapter ZL-018GL20WCN01
The output voltage and current of the adapter are 5V/3A and 9V/2.22A
5
Figure 1-4 CTMM-1.5 CableFigure 1-5 Adapter ZL-018GL20WCN01
7
Chapter 2 Basic Operations
This chapter mainly introduces the basic operations of the device.
2.1 Power on / off, restart, sleep
2.1.1 Power on / off
Press and hold the power key until the device vibrates once, then release it.The
startup time is approximately 20 seconds.
2.1.2 restart
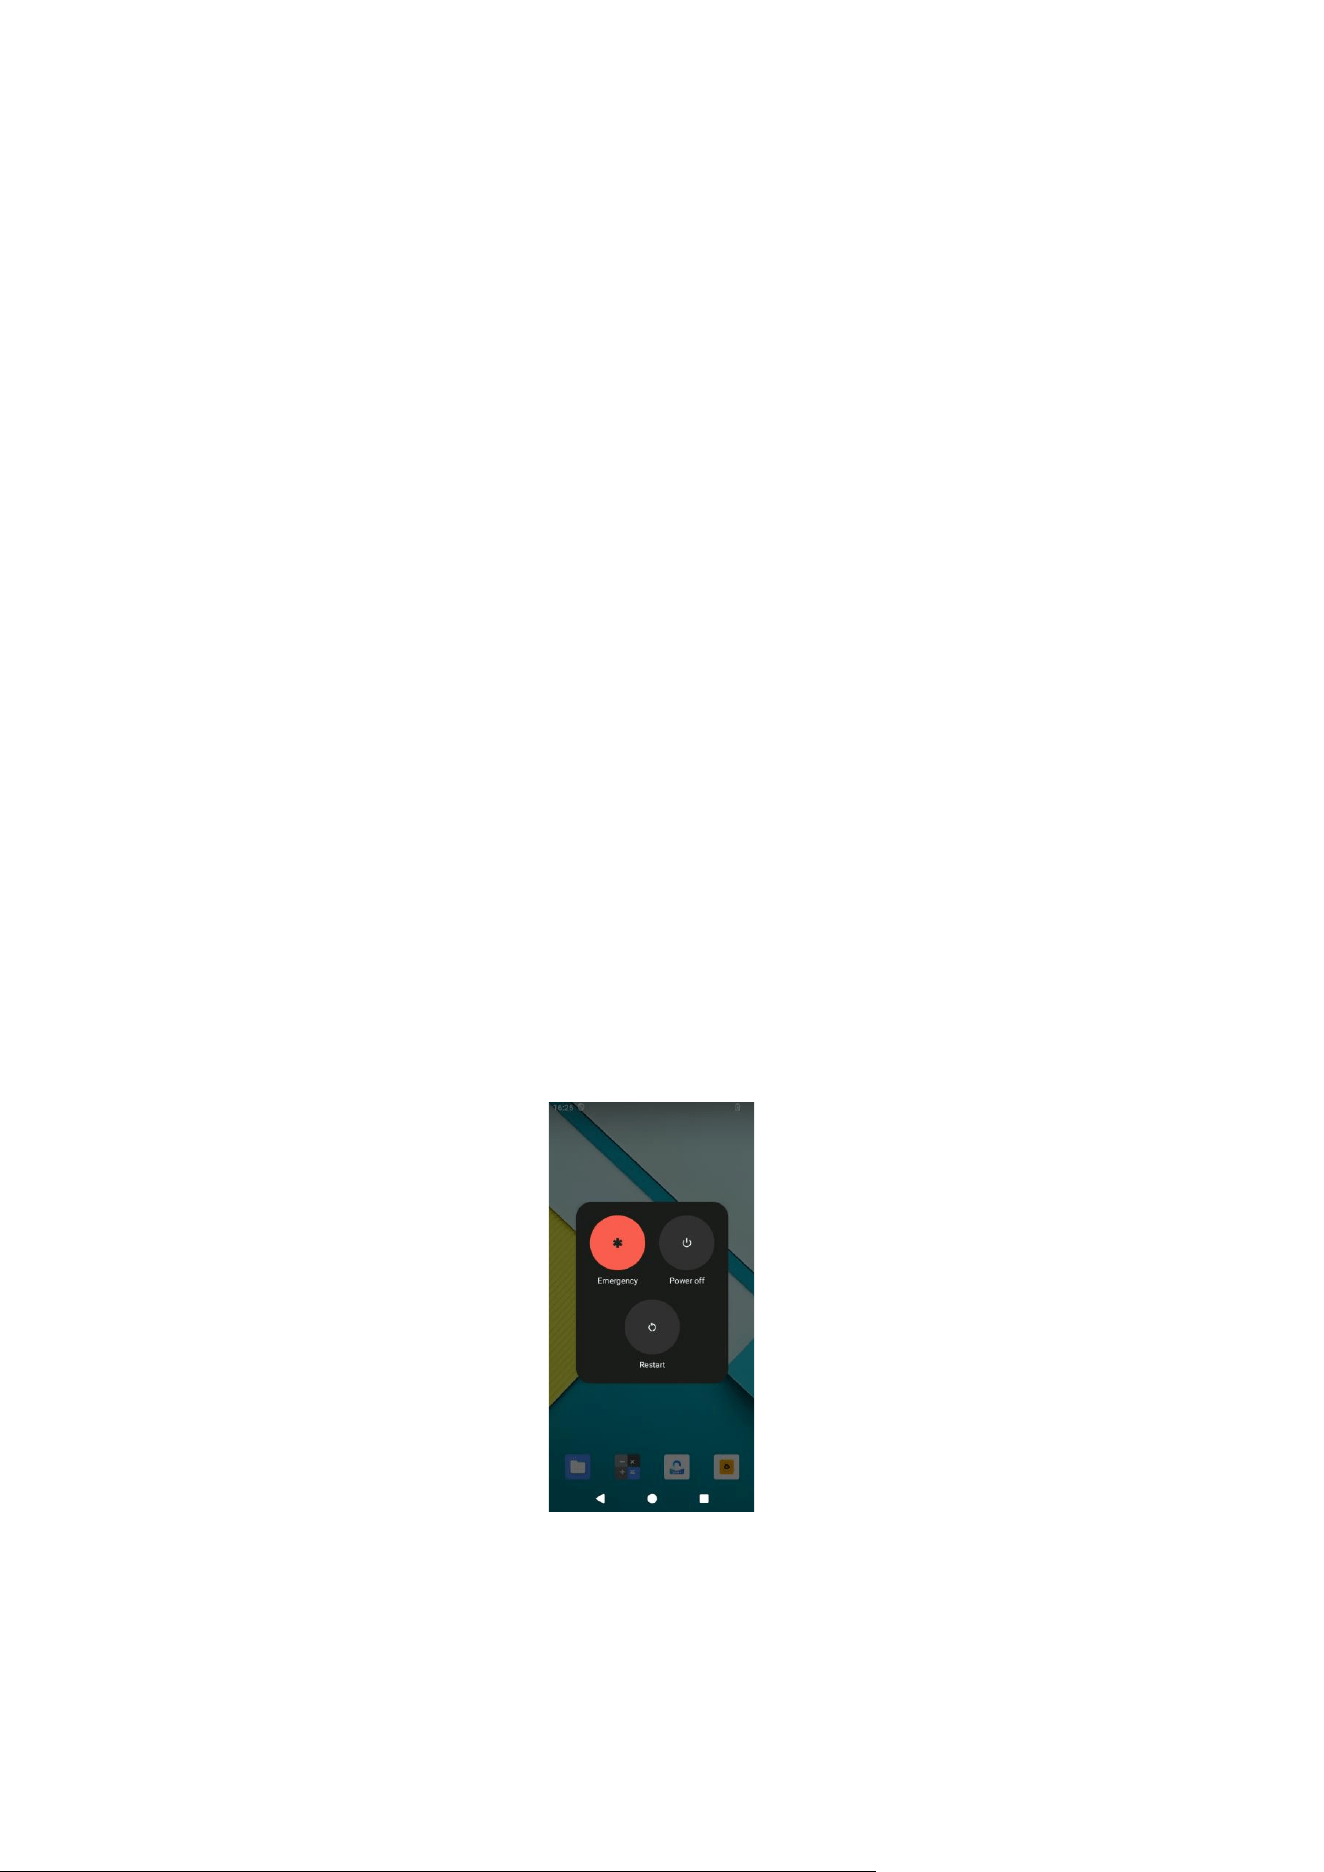
When the device is not in use, press and hold the power key until the dialog
shown in Figure 2-1 appears on the screen, then tap Power off to shut down
the device.
2.1.3 Wake up / Sleep
Briefly press the power key to wake up the controller or put it into sleep mode.
2.1.4 Restart
Press and hold the power key until the dialog box shown in Figure 2-1 appears
on the screen, then tap Restart to reboot the device.
Figure 2-1

7
2.2 Screenshot
Press and hold the right arrow key and the Power key simultaneously to take a
screenshot. Alternatively, briefly press the Fn key on the controller; when the Fn
icon appears at the top of the screen, press key “3” in the white key area to
activate the corresponding orange function and take a screenshot. You can also
take a screenshot by swiping down the notification bar and tapping the
screenshot option in the notification bar.
2.3 Installing / Removing the SIM Card / TF Card
(1) Open the card slot cover. The SIM/TF card slot is located on the left side when
facing the screen.
(2) Insert the TF card or SIM card into the slot according to the arrow direction
marked on the cover, then fasten the card slot cover.
2.4 Battery Charging
The lithium-ion battery must be fully charged before first use.Charging from 0%
takes approximately 4 hours, and the continuous working time is more than 15
hours.The charger is equipped with overcharge protection.
Note: Please follow the instructions below to ensure optimal performance of the
lithium battery:
⚫ Please use the power adapter supplied with the product.;
⚫ There is no need to wait until the battery is fully depleted before charging;
charge it at any time as needed.;
⚫ Do not charge the battery if the ambient temperature is too high (above 45°C)
or too low (below 0°C).;
⚫ If the device will not be used for an extended period, it is recommended to
fully charge the battery every 3 months.Over-discharging may reduce the
battery’s full charge capacity.
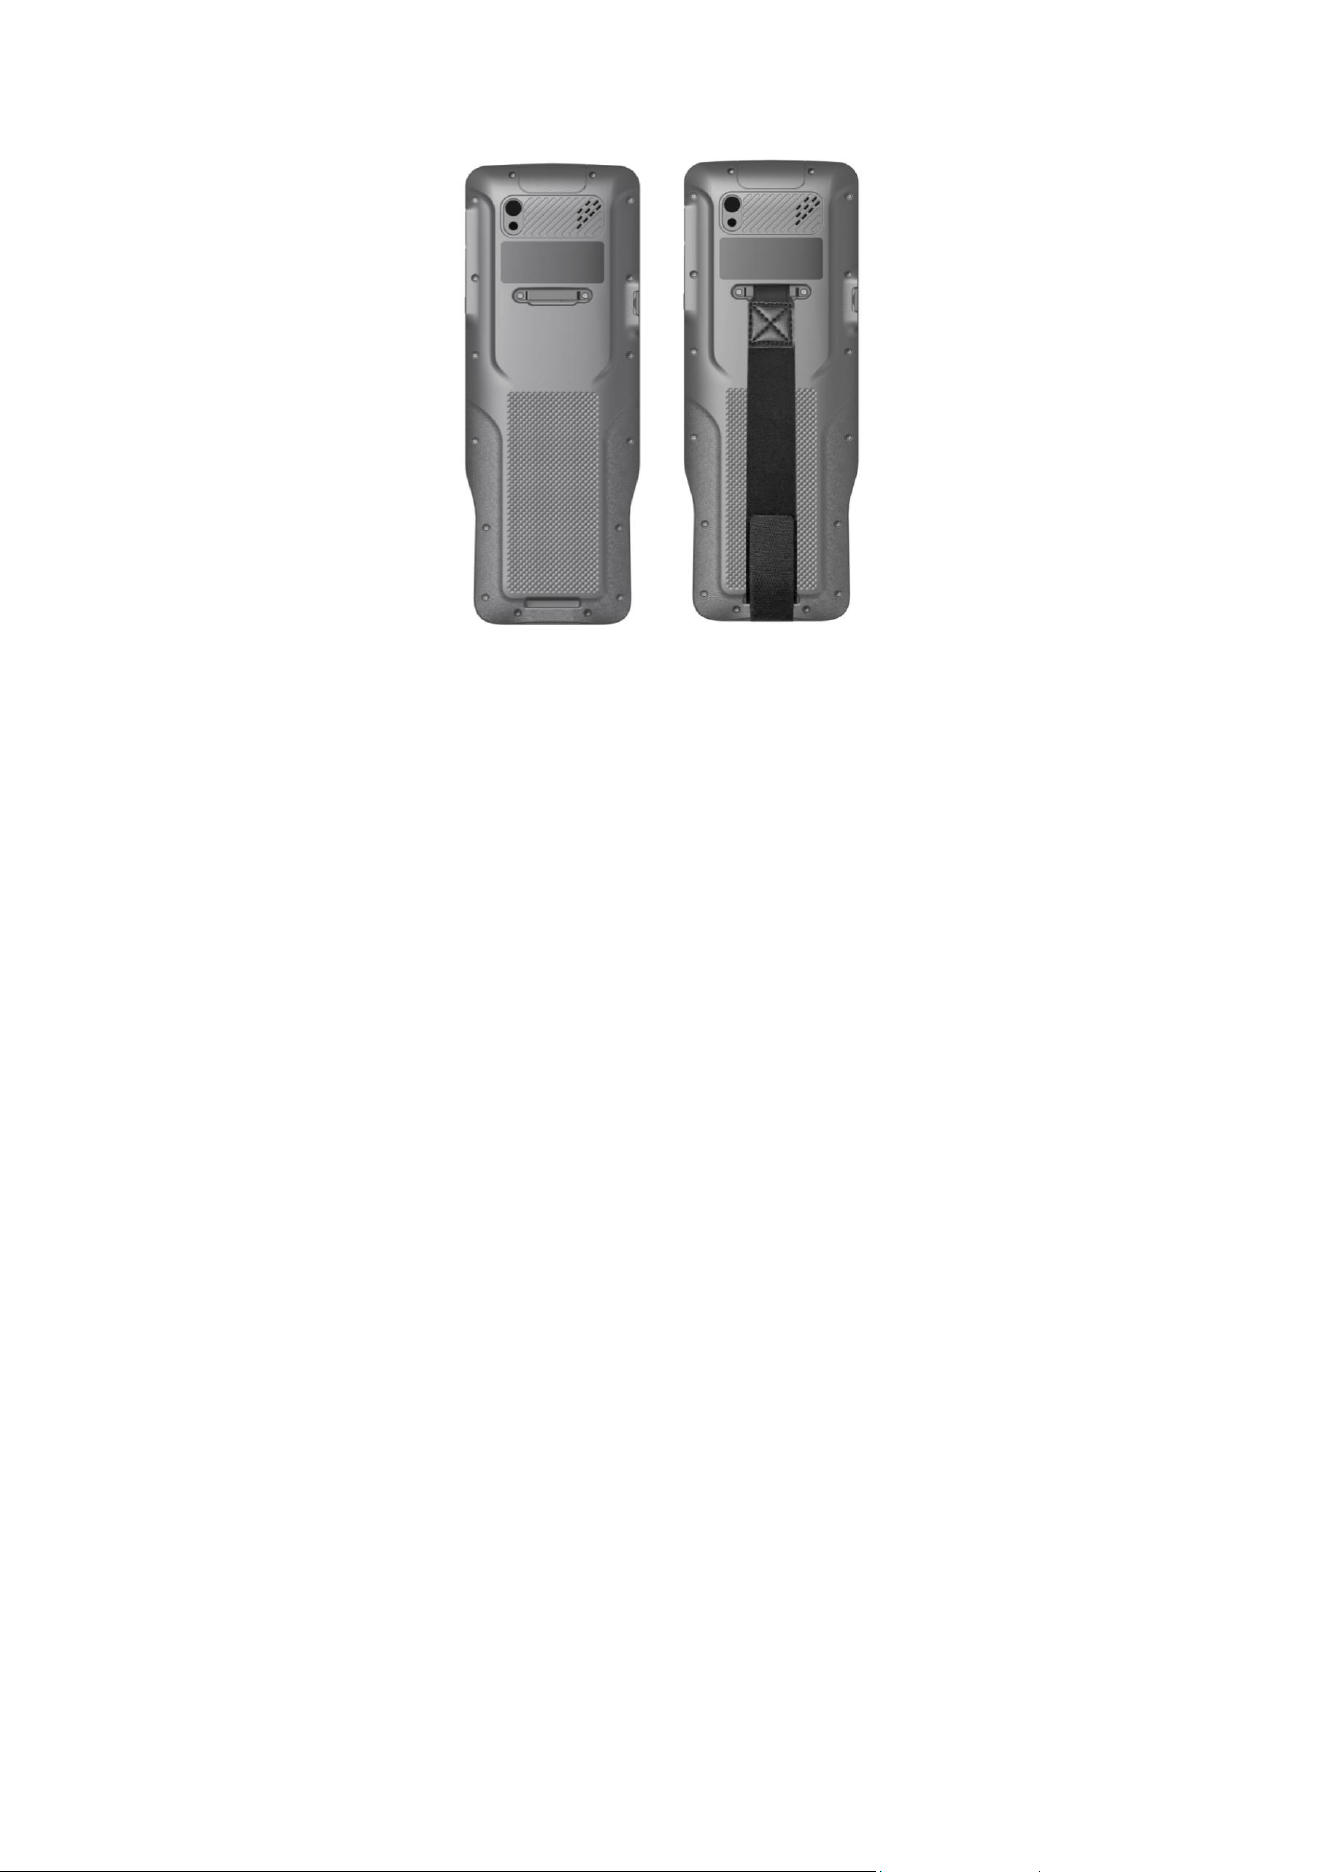
2.5 Installing the Wrist Strap
Align the upper part of the wrist strap with the two mounting holes on the back
of the device, then tighten the screws with a screwdriver.Fasten the other end to
the strap hole at the bottom of the device.Refer to Figure 2-2 for the installed
appearance.
7
Figure 2-2
12
Chapter 3 Data Transfer
3.1 Data Transfer Connection Methods
3.1.1 P9V USB File Transfer Method
(1) Connect the P9V to the computer using a data cable.
(2) On the P9V controller, swipe down the notification bar, tap to open USB Preferences,
and select File Transfer.
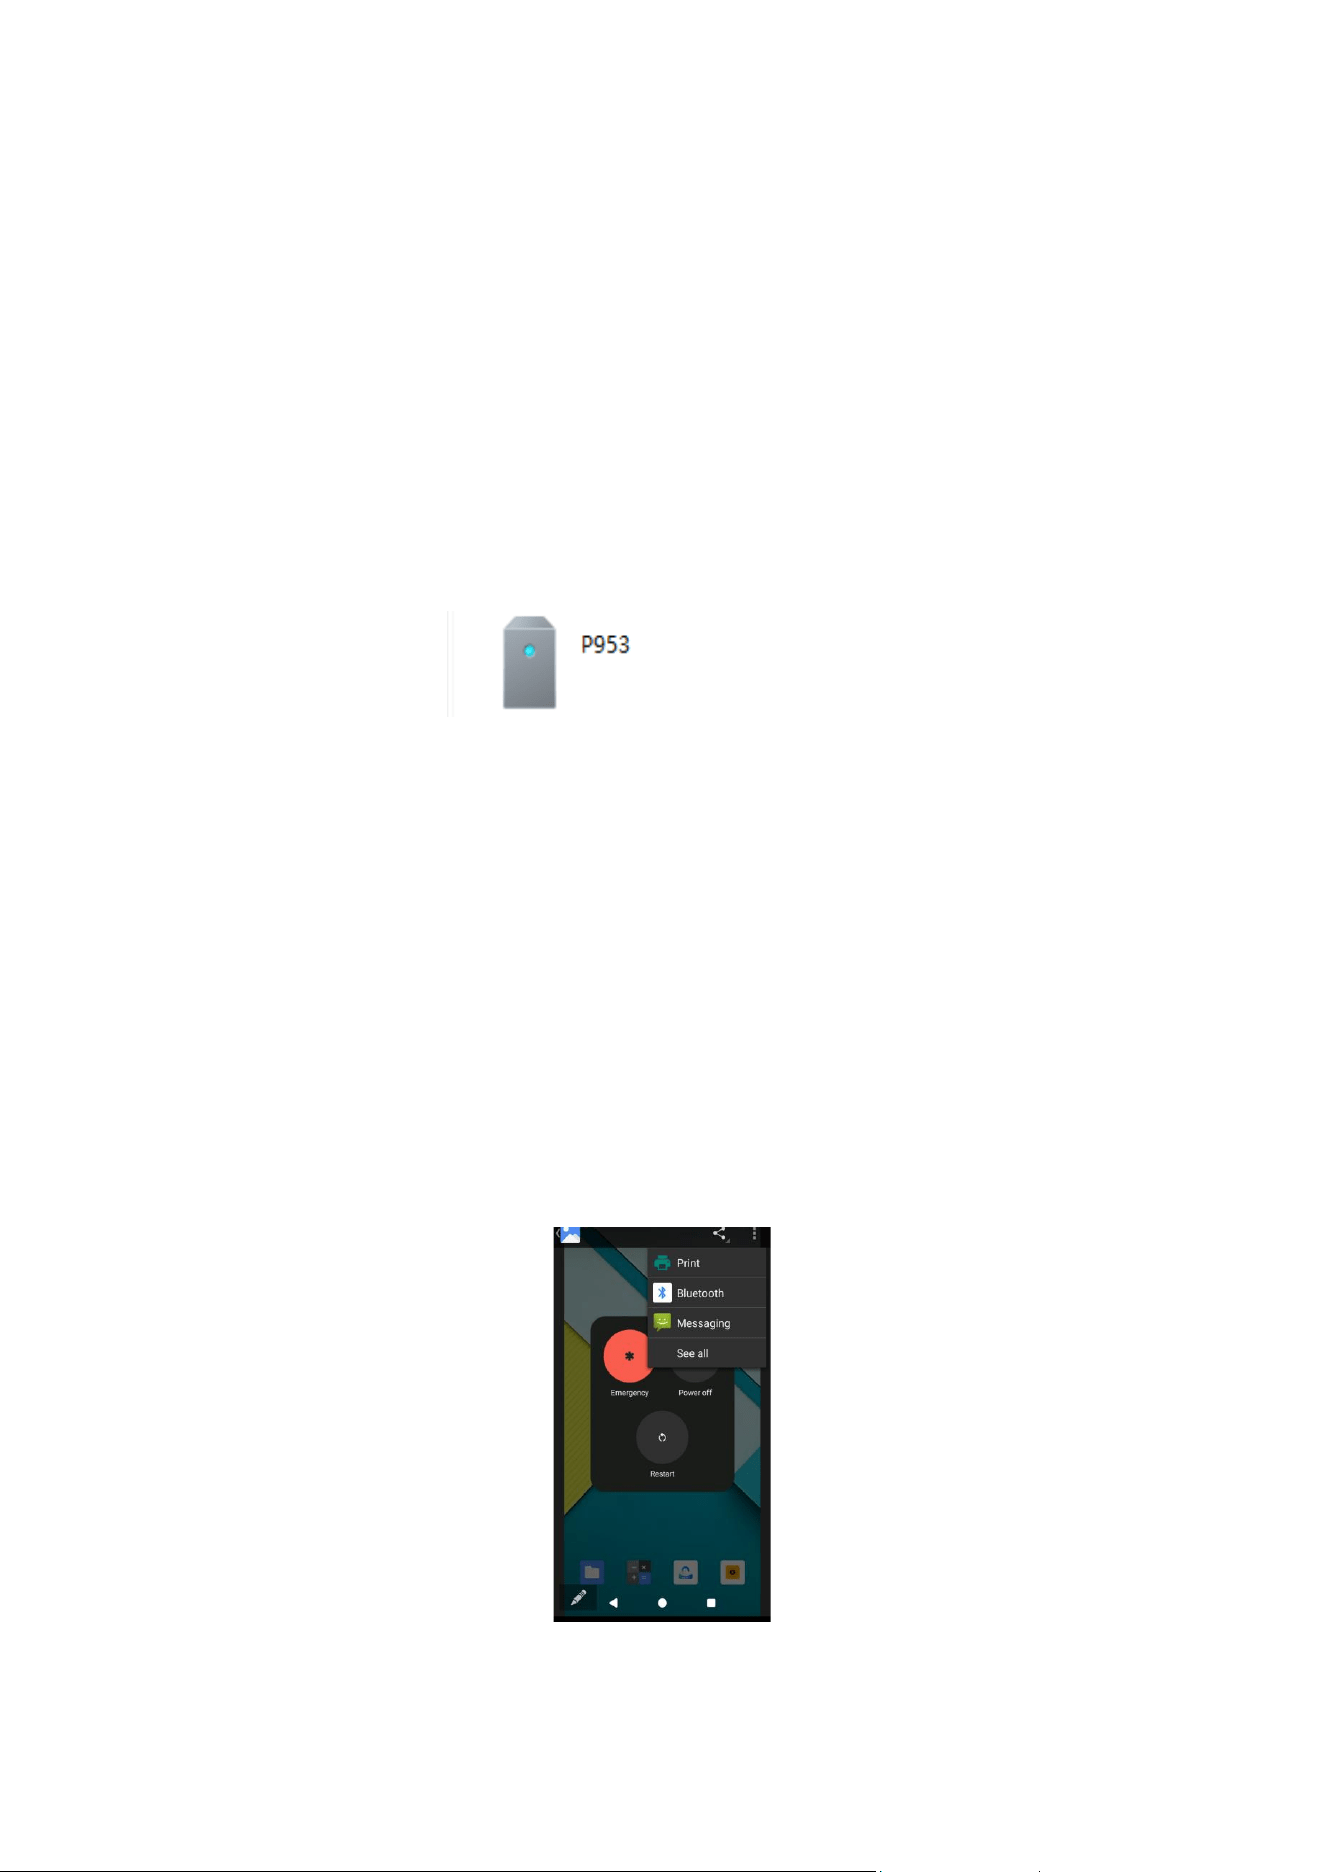
(3) On the computer, a P9V drive will appear in This PC; open it to transfer data.
Figure 3-1
3.1.2 Bluetooth Data Transfer Method
Steps for data transfer via Bluetooth between Windows 10 and the P9V controller:
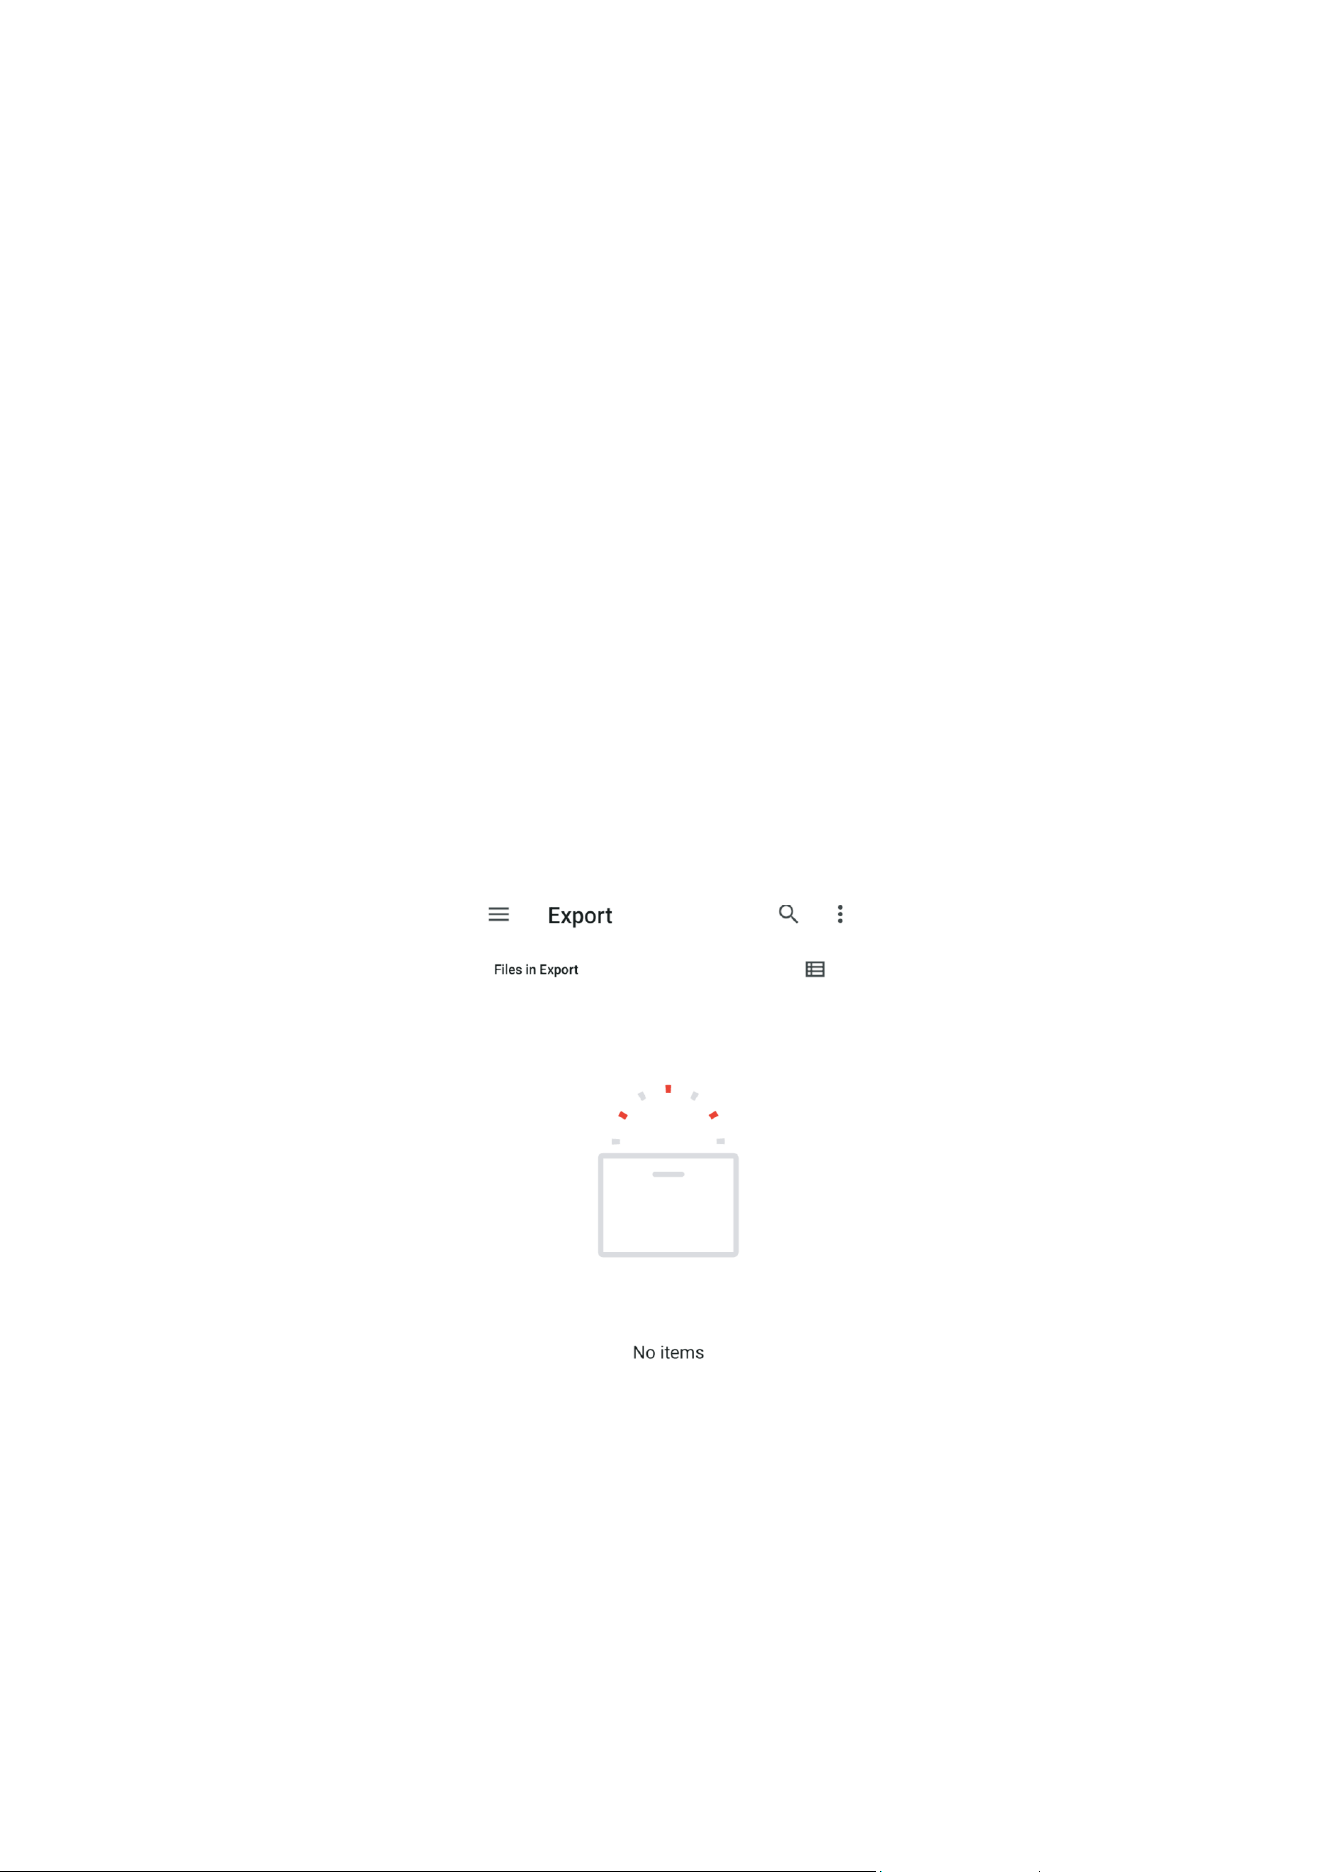
(1) On the P9V, select the file, tap the three-dot icon in the upper right corner, choose
Bluetooth as the sending method, and tap Send.
(2) On the computer, open the Bluetooth File Received dialog box.
(3) When the target computer is found during Bluetooth device searching on the P9V,
select the corresponding device.
(4) The file transfer will start immediately. You can set the save path after the transfer
is completed.
Figure3-2
12
Steps for data transfer via Bluetooth between Windows 7 and P9V:
(1) Search for Bluetooth in the computer Start menu, then click Change
Bluetooth settings and configure as follows:
(2) On the P9V, select the file, tap the three-dot icon in the lower left corner, select
Bluetooth as the sending method, and tap Send.
(3) When the P9V finds the target computer via Bluetooth device search, tap the
corresponding device.
;
3.2 Data File Path
a. The directory of the SurPad folder is File > SurPad.
b. The folder for SurPad project files is File Manager > SurPad > Project.
c. The centralized location for SurPad exported data is File Manager > SurPad >
Export.
Figure3-10
12
3.3 File Copy and Paste
3.3.1 Copy
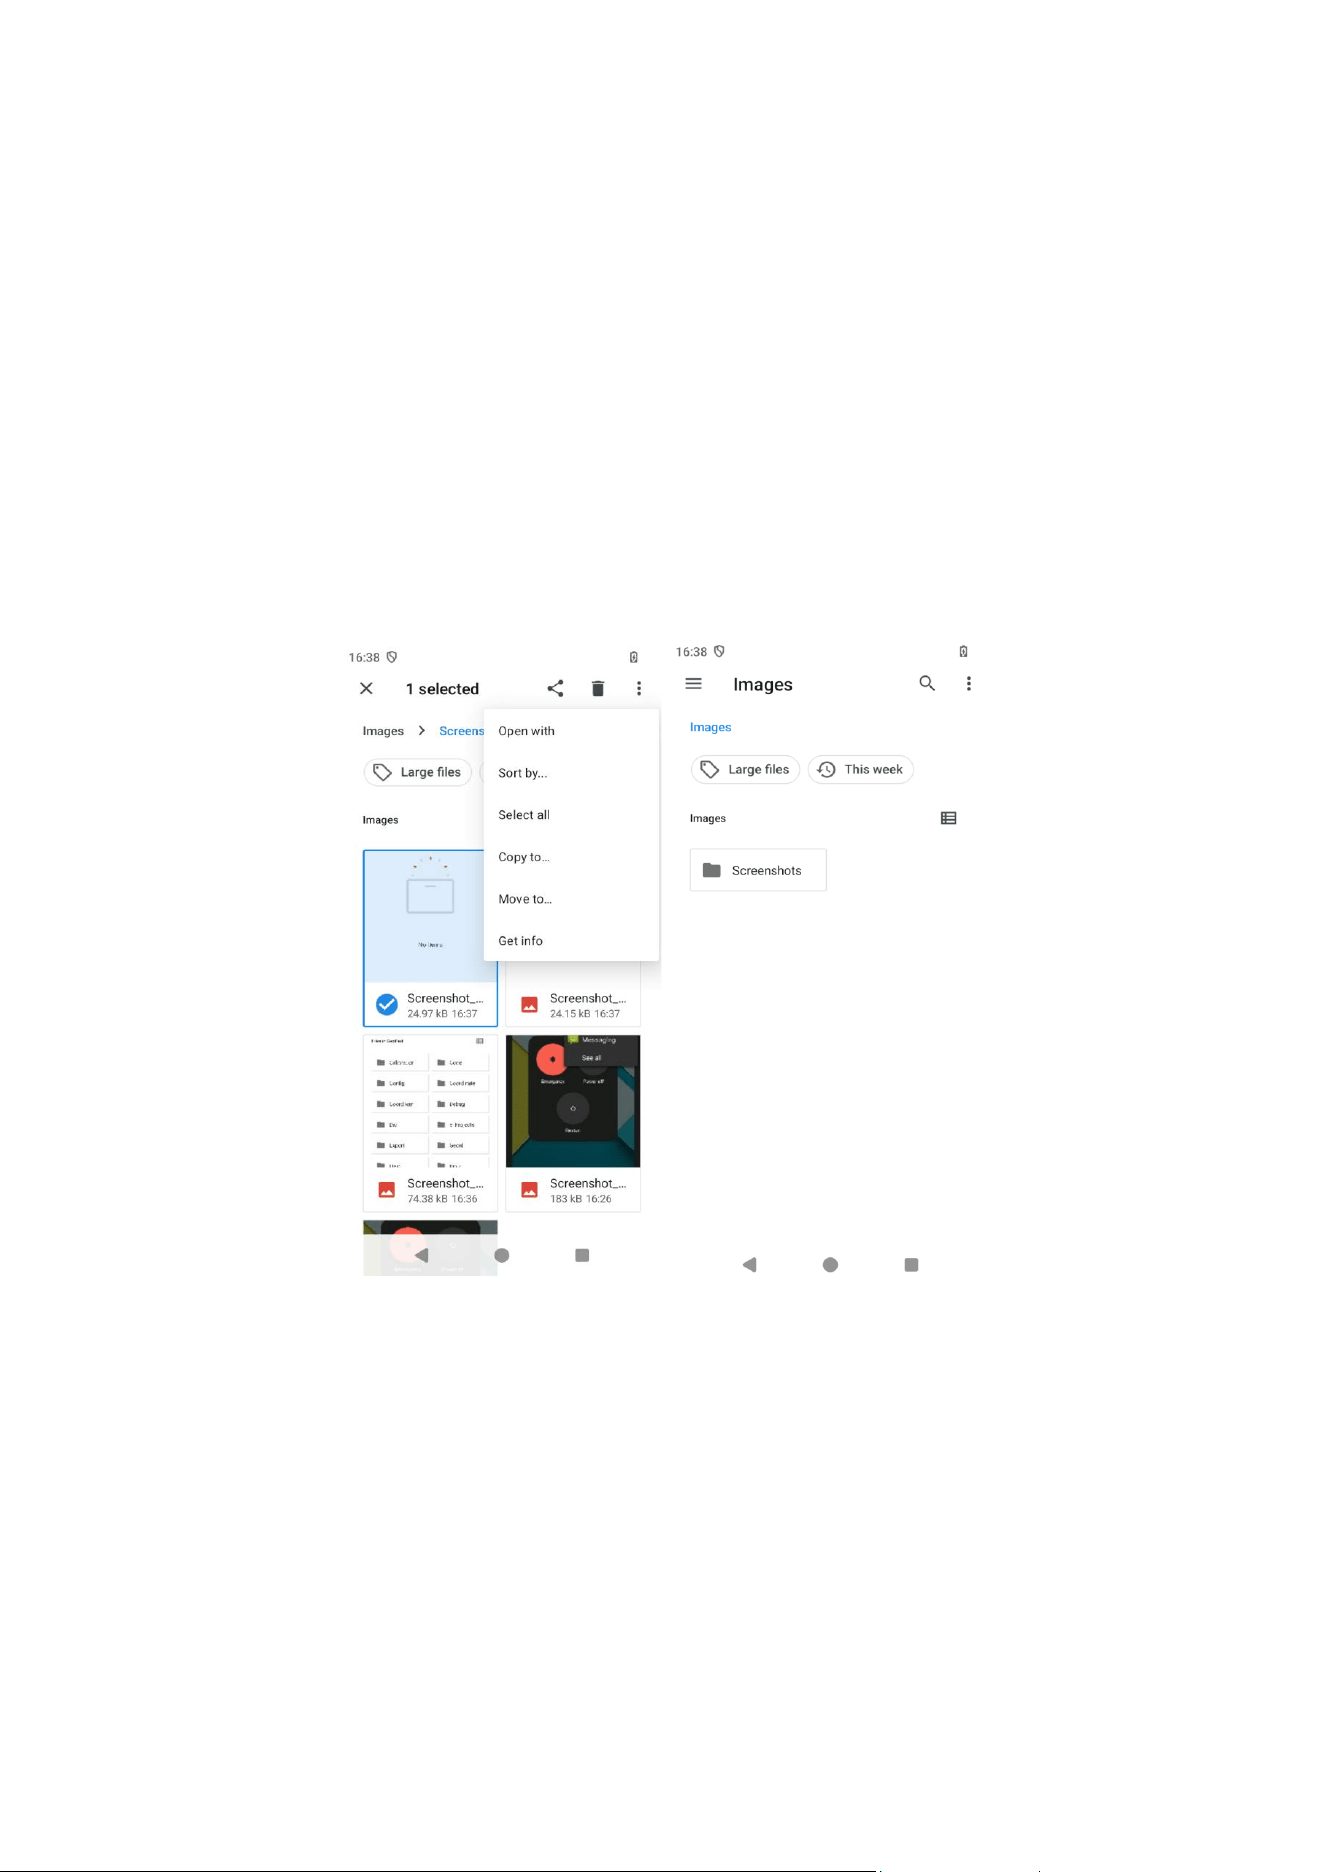
Open the data file directory, long press and select the file,
as shown in Figure 3-
11.
3.3.2 Paste
Tap "Copy to", select the target directory, and tap Copy to complete pasting, as
shown in Figure 3-12.
Figure 3-11 Figure 3-12
3.4 Enable Developer Debugging Options
If your P9V needs to enable developer debugging options, perform the following
operations:
(1) Enter the system Settings menu, find About Phone at the bottom, and tap to
enter About Phone.
(2) Find Build Number at the bottom and tap it 7 times consecutively to automatically
enable developer options.
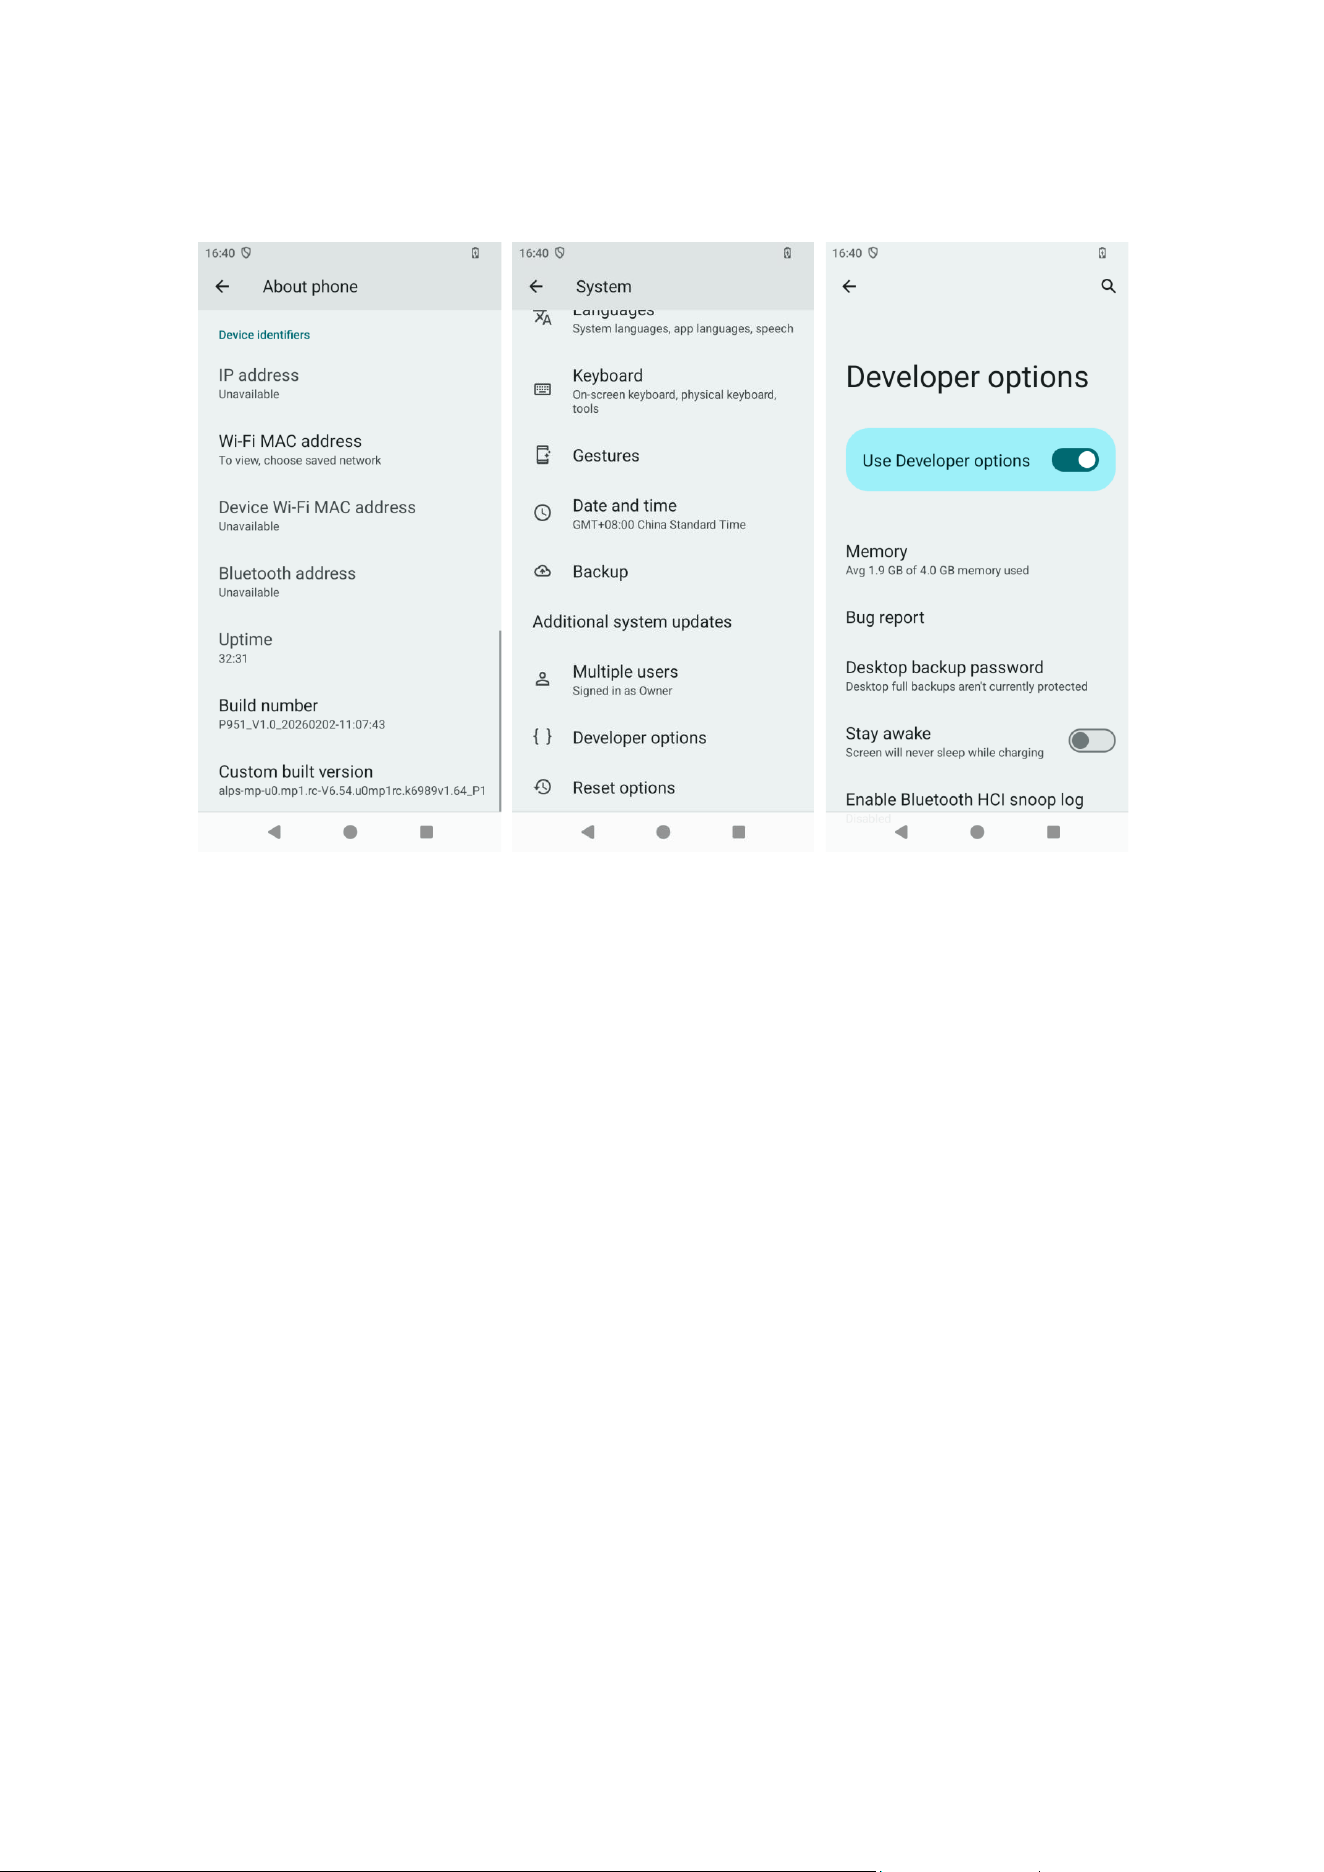
12
(3) Return to the system Settings menu, enter the System menu, tap Advanced, then
tap Developer Options, where you can configure developer debugging settings.
Figure 3-13 Figure 3-14 Figure 3-15
13
Chapter 4 Brief Description of the Operating
System
4.1 System Main Interface and Start Menu
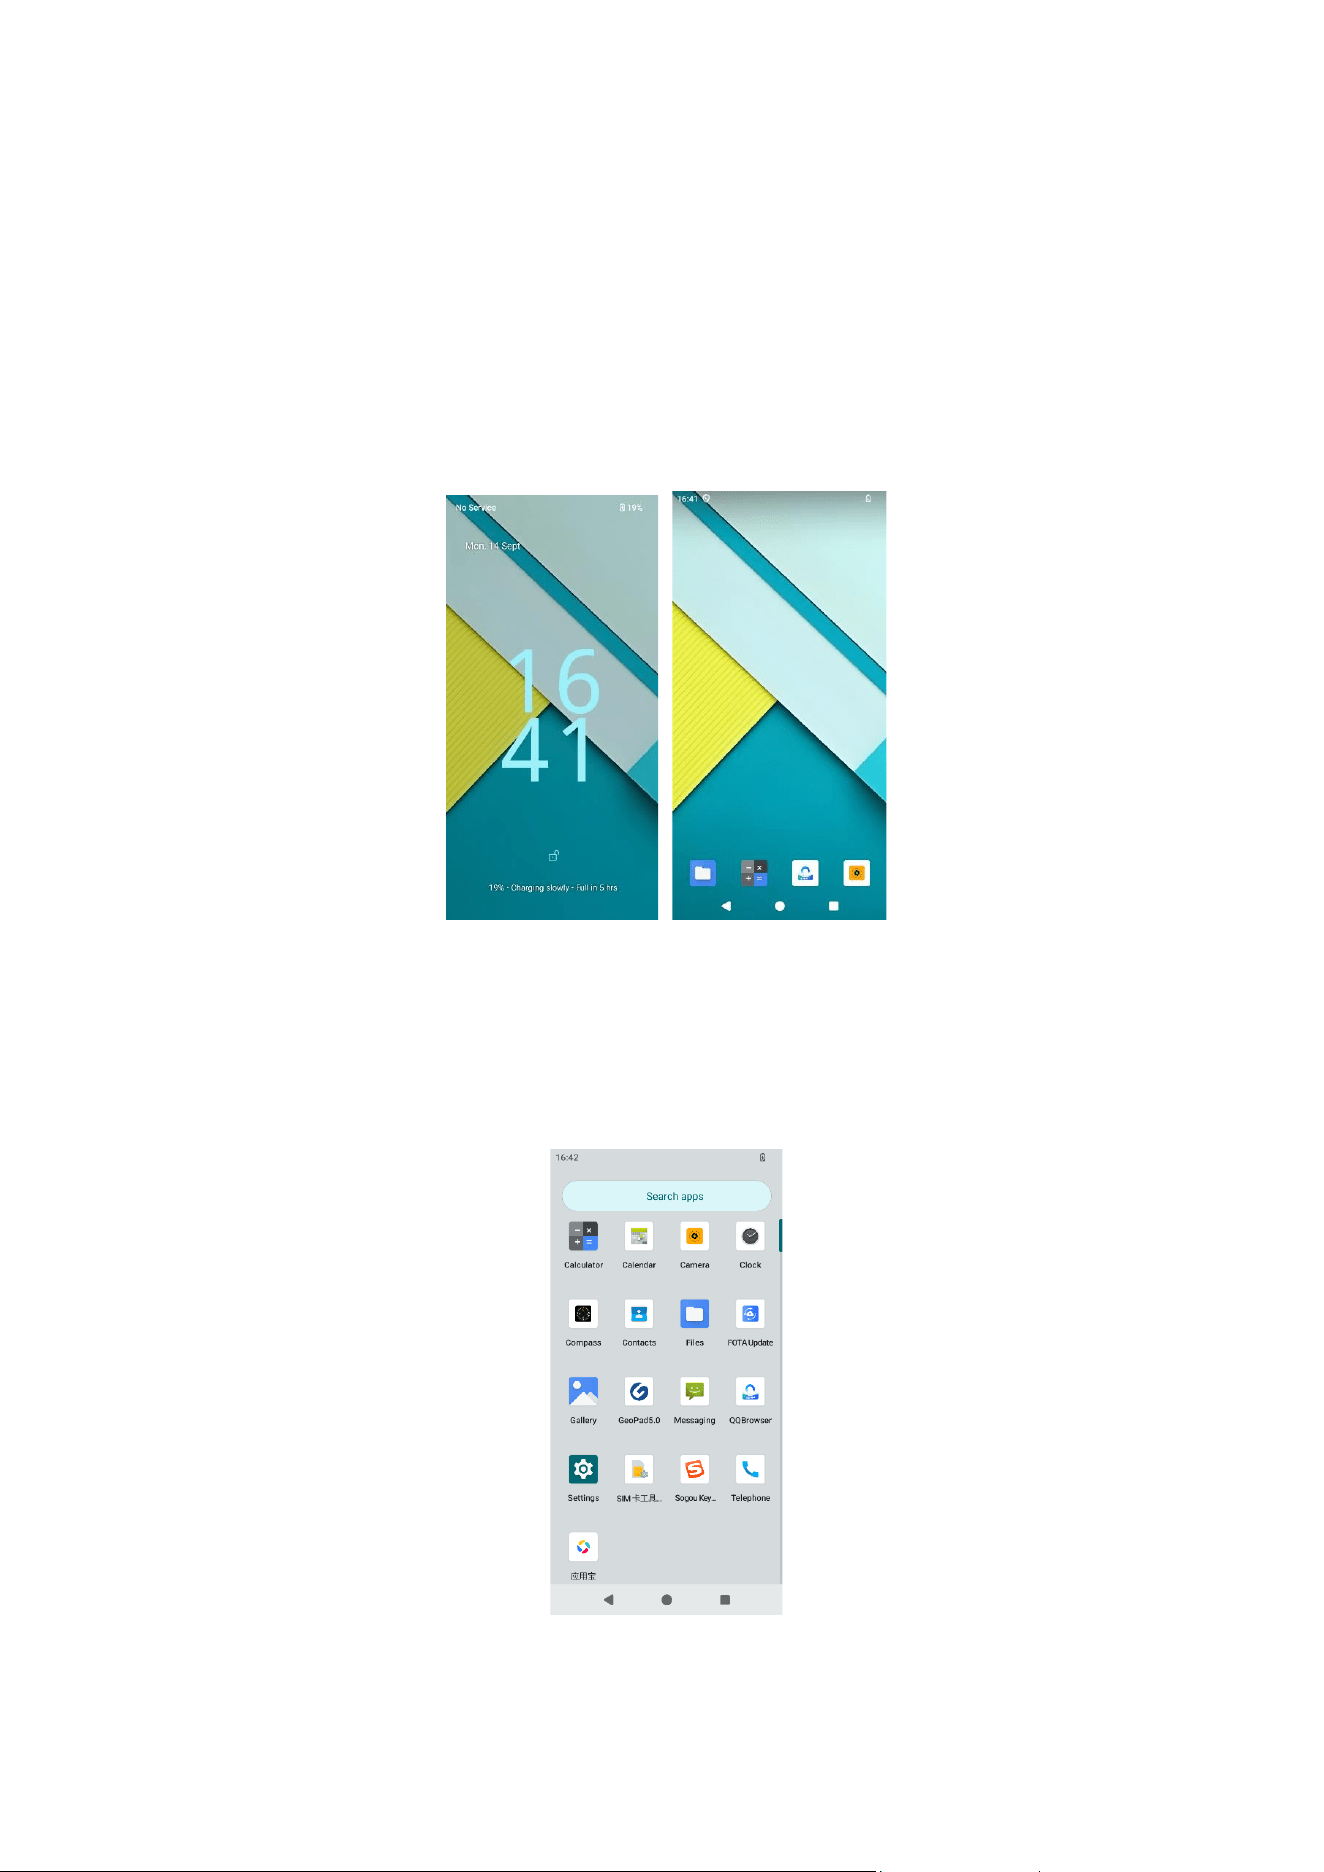
Press and hold the power button to turn on the device, and the lock screen will
appear as shown in Figure 4-1. Swipe up on the screen to unlock and enter the
home screen, as shown in Figure 4-2.
Figure4-1 Figure4-2
Swipe up on the home screen to enter the app interface (Figure 4-3), where you
can swipe up and down to view all installed applications. Press and hold the app
icon until it lifts, then drag the icon to move it to your desired position.
Figure4-3

21
4.2 Status Indicator
Status indicators appear in the title bar at the top of the screen. Users can view
current device settings such as time, battery level, SIM card status, WIFI,
Bluetooth, airplane mode, etc.
4.3 Pre-installed Applications
The device comes pre-installed with some basic applications, such as Email,
Calendar, Sogou Input Method, etc., to ensure basic user operation.
4.4 Interact with the Device
Interact with the handheld device by tapping items on the touch screen or
scrolling up and down with your finger.
4.5
Input Method
4.5.1 Physical Keyboard Input Method
Users can input information via the physical keyboard at the bottom of the device
screen. Short press the Shift key to switch between Chinese and English input
methods. Long press the Shift key to switch the Fn function keys in the numeric
area or switch between uppercase and lowercase English letters.
The notification bar displays the current input type.
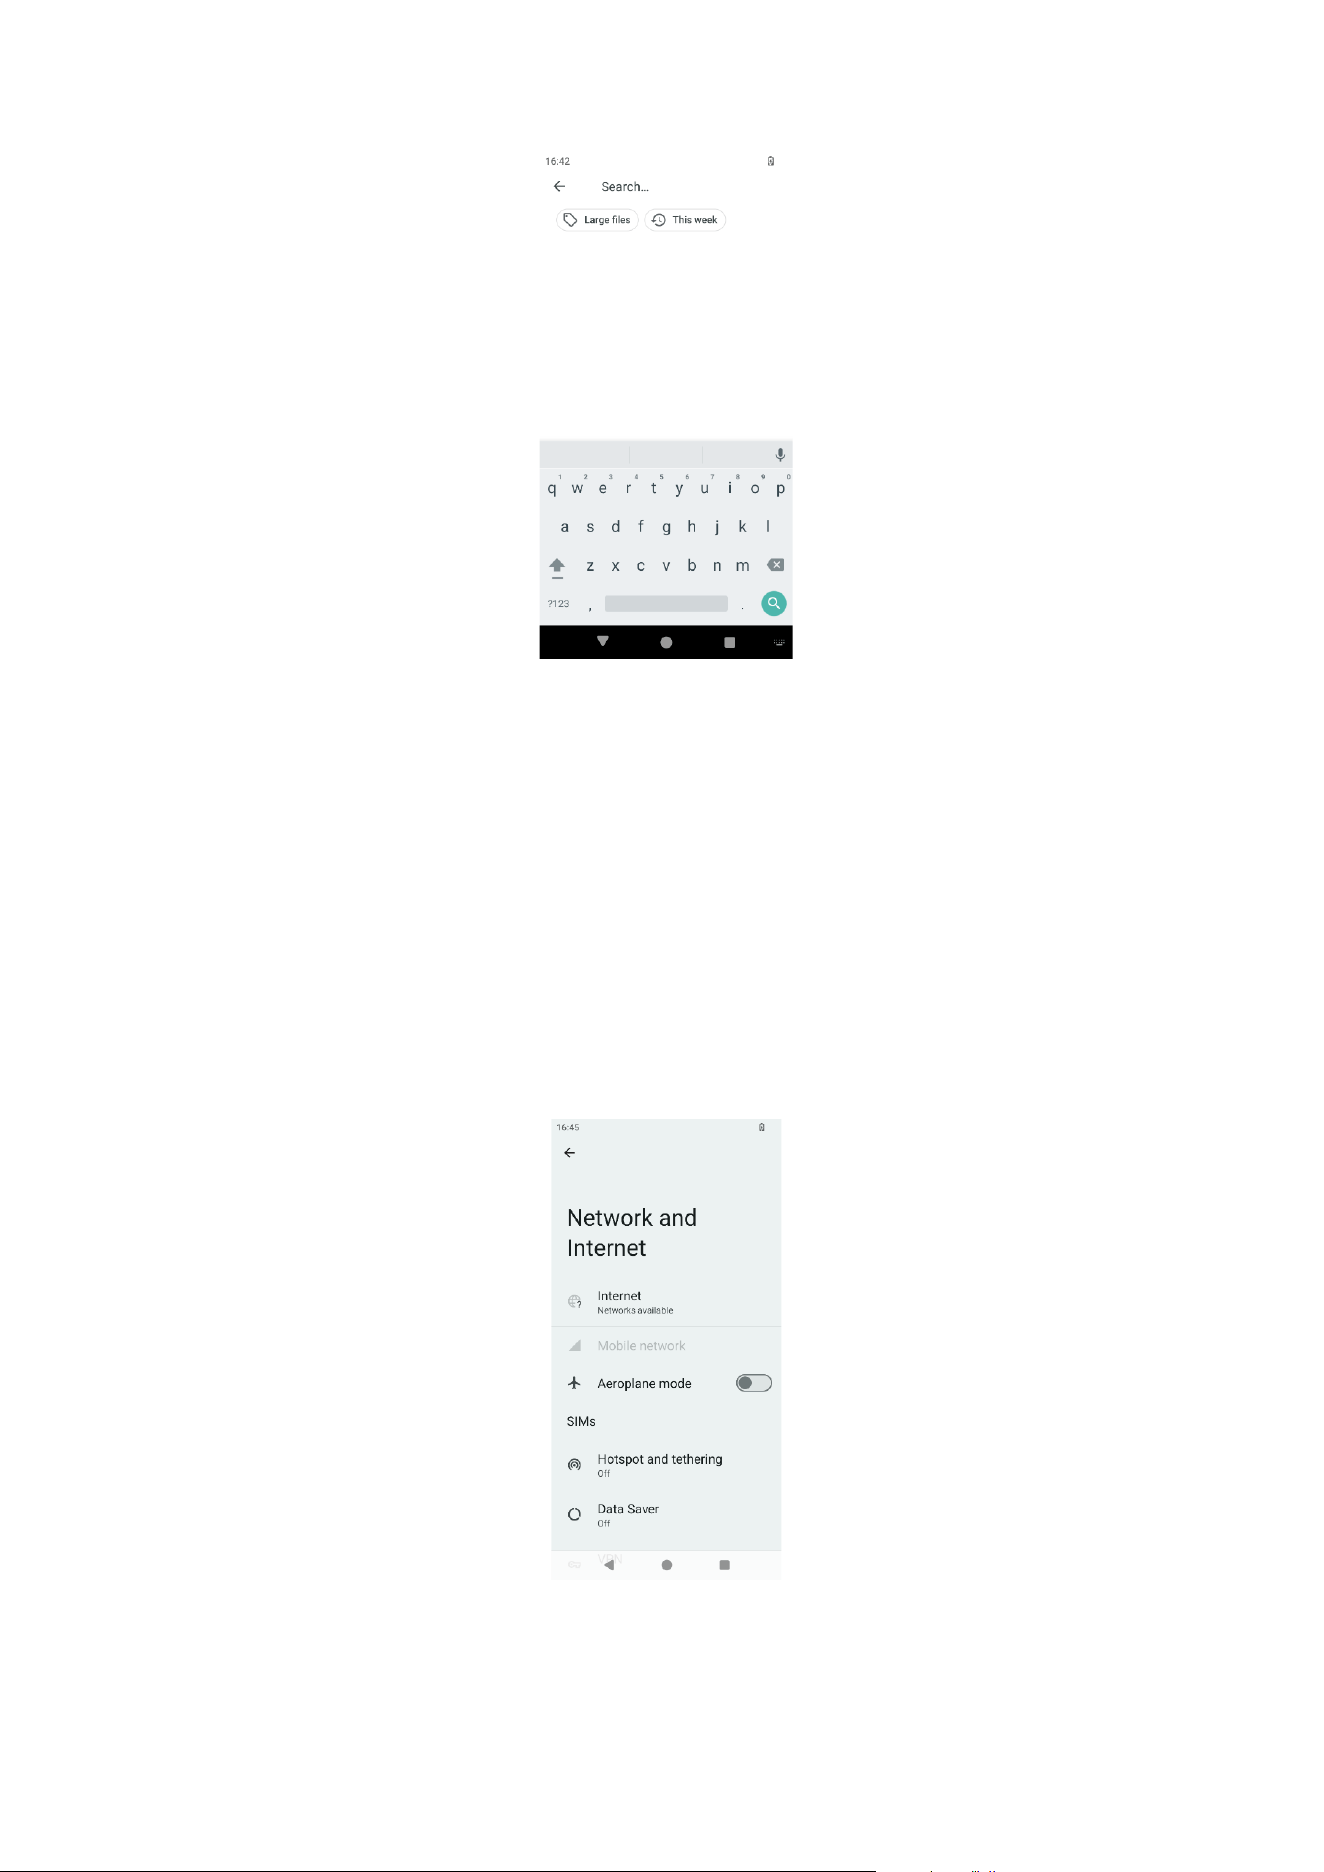
4.5.2 Other Input Methods
The device supports the installation of third-party input methods. Users may
install other input methods as needed. During text input, users can freely switch
input methods via the keyboard icon in the lower-left corner of the screen, as
shown in Figure 4-4.
21
Figure4-4
4.6
Settings
After entering the Settings page, users can view and configure Network & Internet,
Connected devices, Buttons, Apps & notifications, Battery, Display, Sound, Storage,
Security & location, Accounts, Accessibility, System, and About phone.
4.6.1 Network & Internet
Users can view and configure WLAN, mobile network, hotspot, SIM card, airplane
mode, VPN, etc. here, as shown in Figure 4-5.
Figure 4-5
21
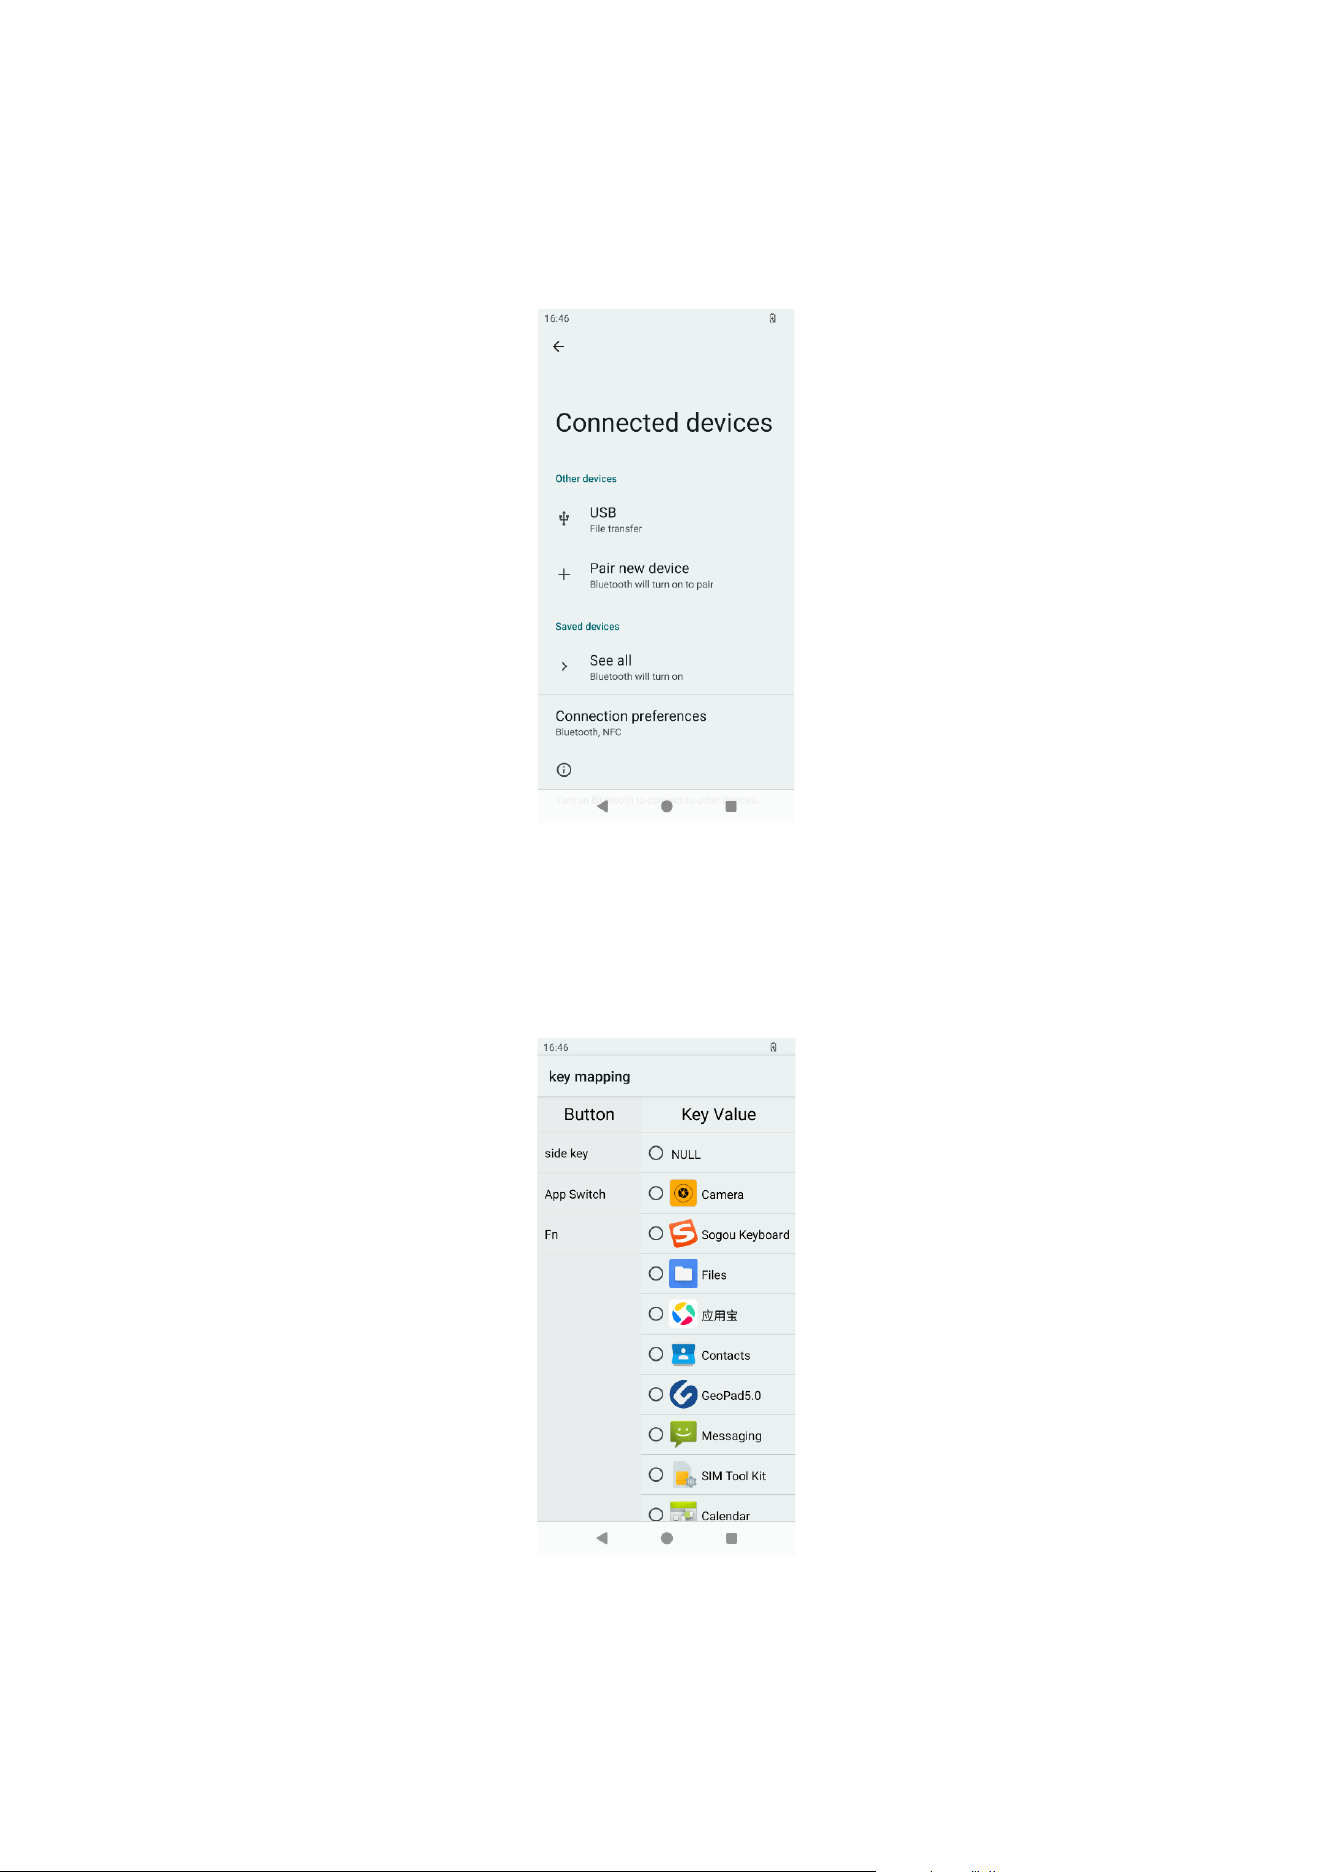
4.6.2 Connected Devices
Users can view and configure connected devices, devices to be connected, and
connection preferences here, as shown in Figure 4-6.
Figure 4-6
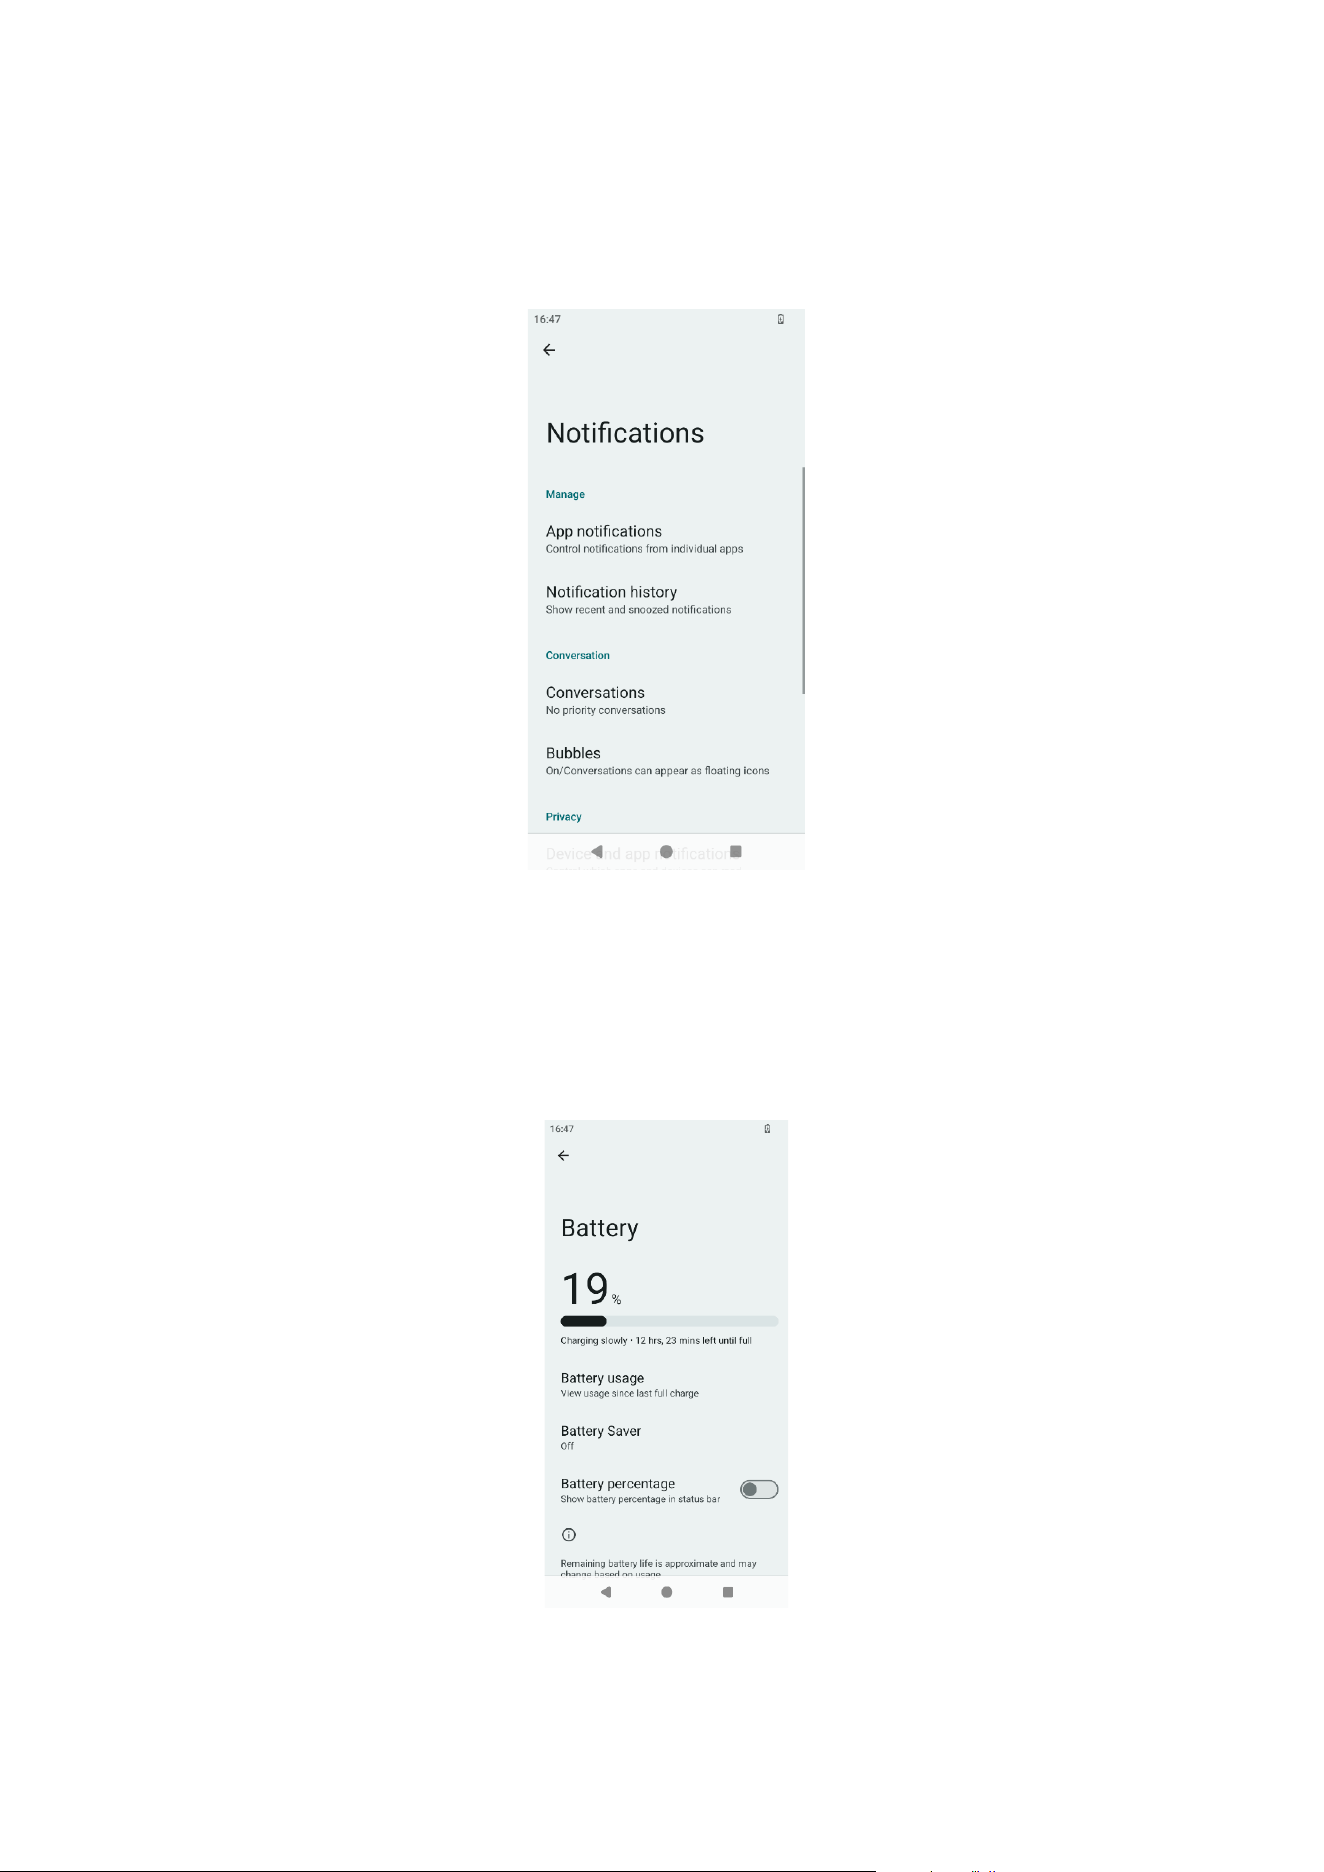
4.6.3 buttons
Users can customize the custom buttons here, as shown in Figure 4-7.
Figure 4-7
21
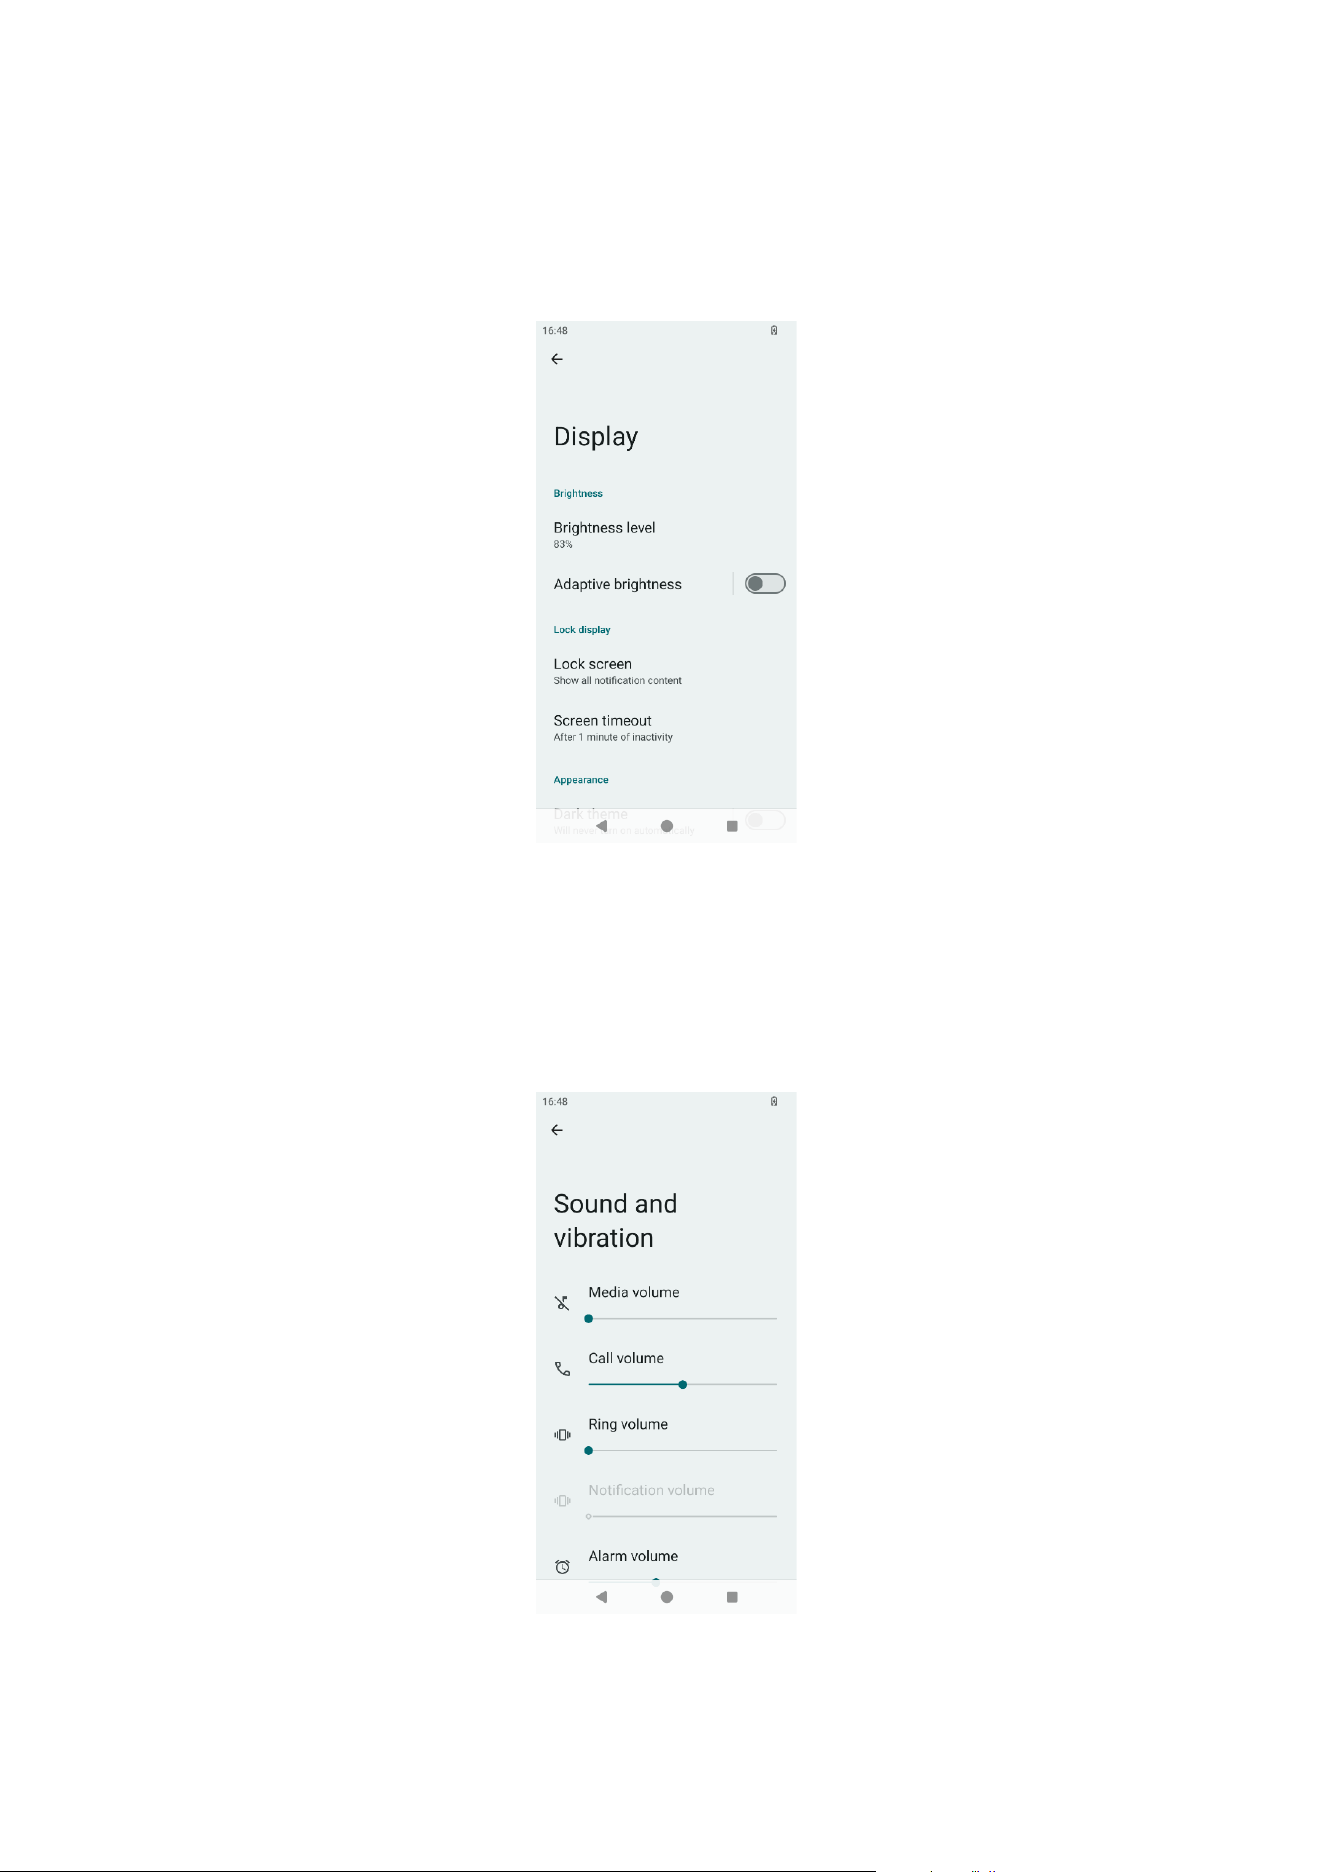
4.6.4 Apps & Notifications
Users can view and manage applications and notifications here, as shown in
Figure 4-8.
Figure 4-8
4.6.5 battery
Users can view and manage battery status, modes and display here, as shown in
Figure 4-9.
Figure 4-9
21
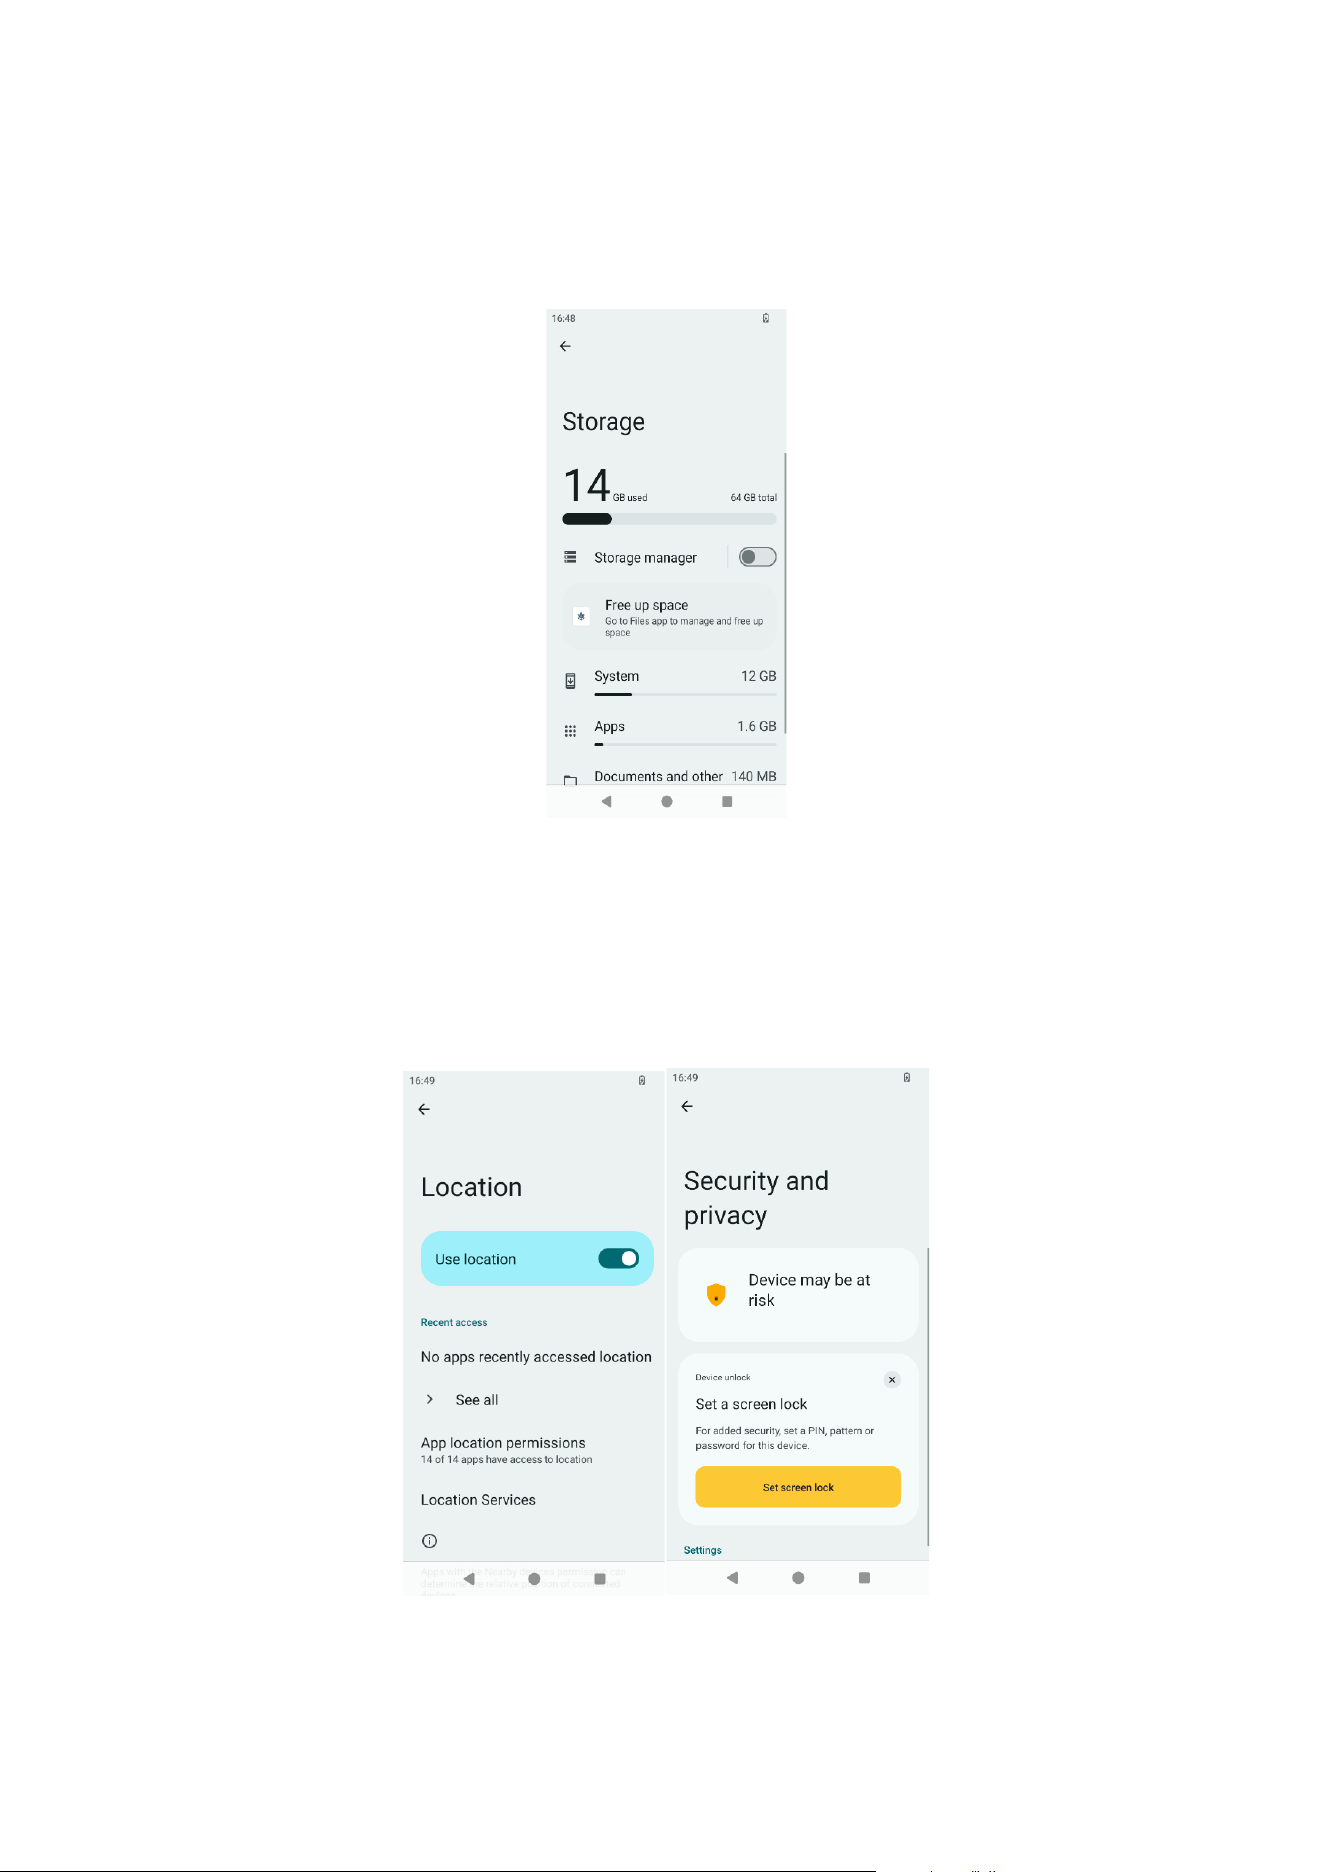
4.6.6 Display
Users can view and configure screen brightness, night mode, wallpaper, sleep
timeout, display size, screen saver, etc. here, as shown in Figure 4-10.
Figure 4-10
4.6.7 Sound
Users can view and configure volume, ring mode, ringtone, notification tones,
vibration, etc. here, as shown in Figure 4-11.
Figure 4-11
21
4.6.8 Storage
Users can view and manage the device storage status here, as shown in Figure 4-
12.
Figure 4-12
4.6.9 Security & Location
Users can view and configure location information usage and security settings of
the device here, as shown in Figure 4-13.
Figure 4-13
21
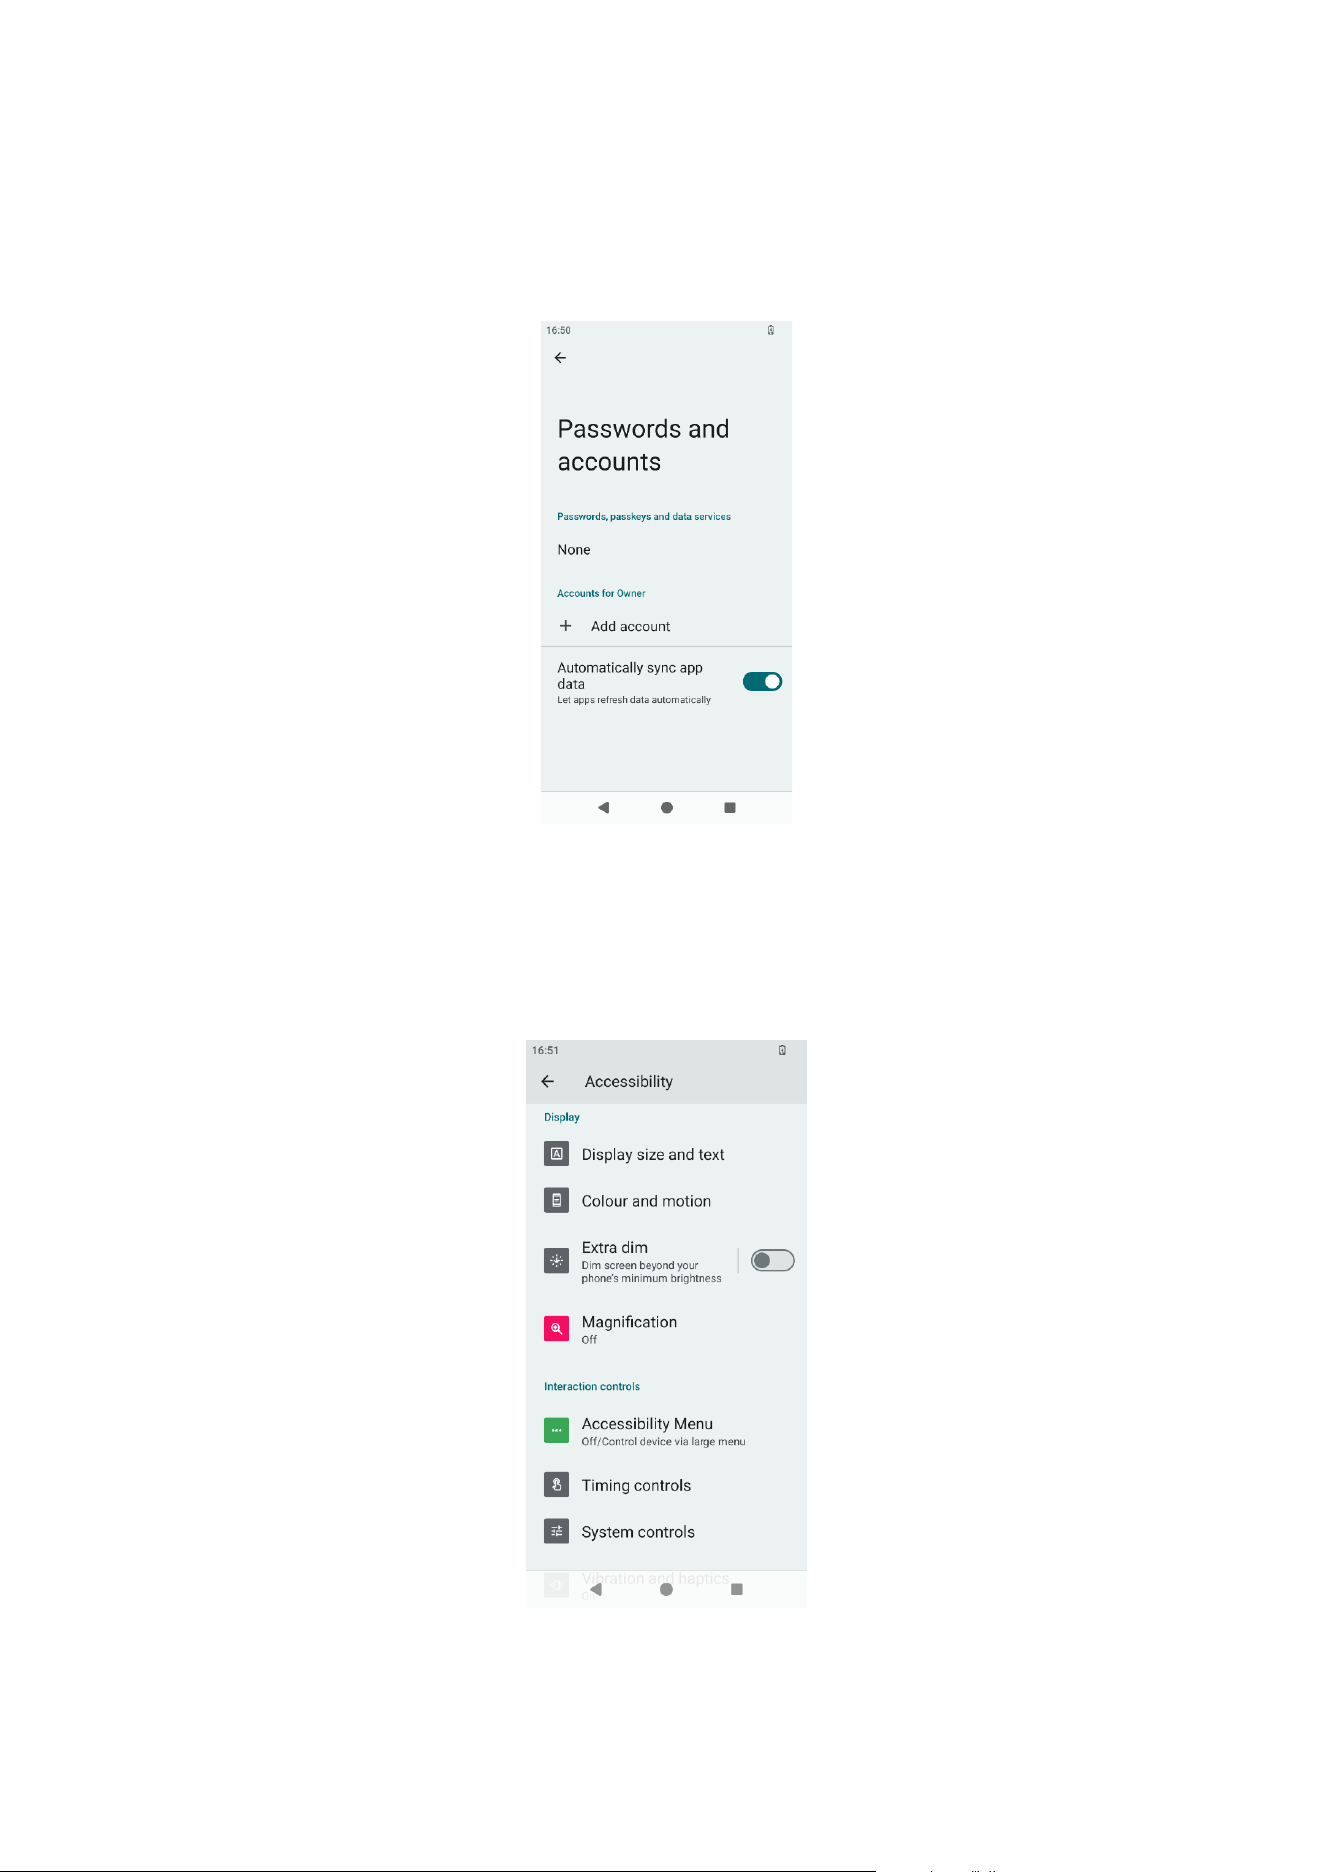
4.6.10 Accounts
Users can view and manage account information for various applications here,
as shown in Figure 4-14.
Figure 4-14
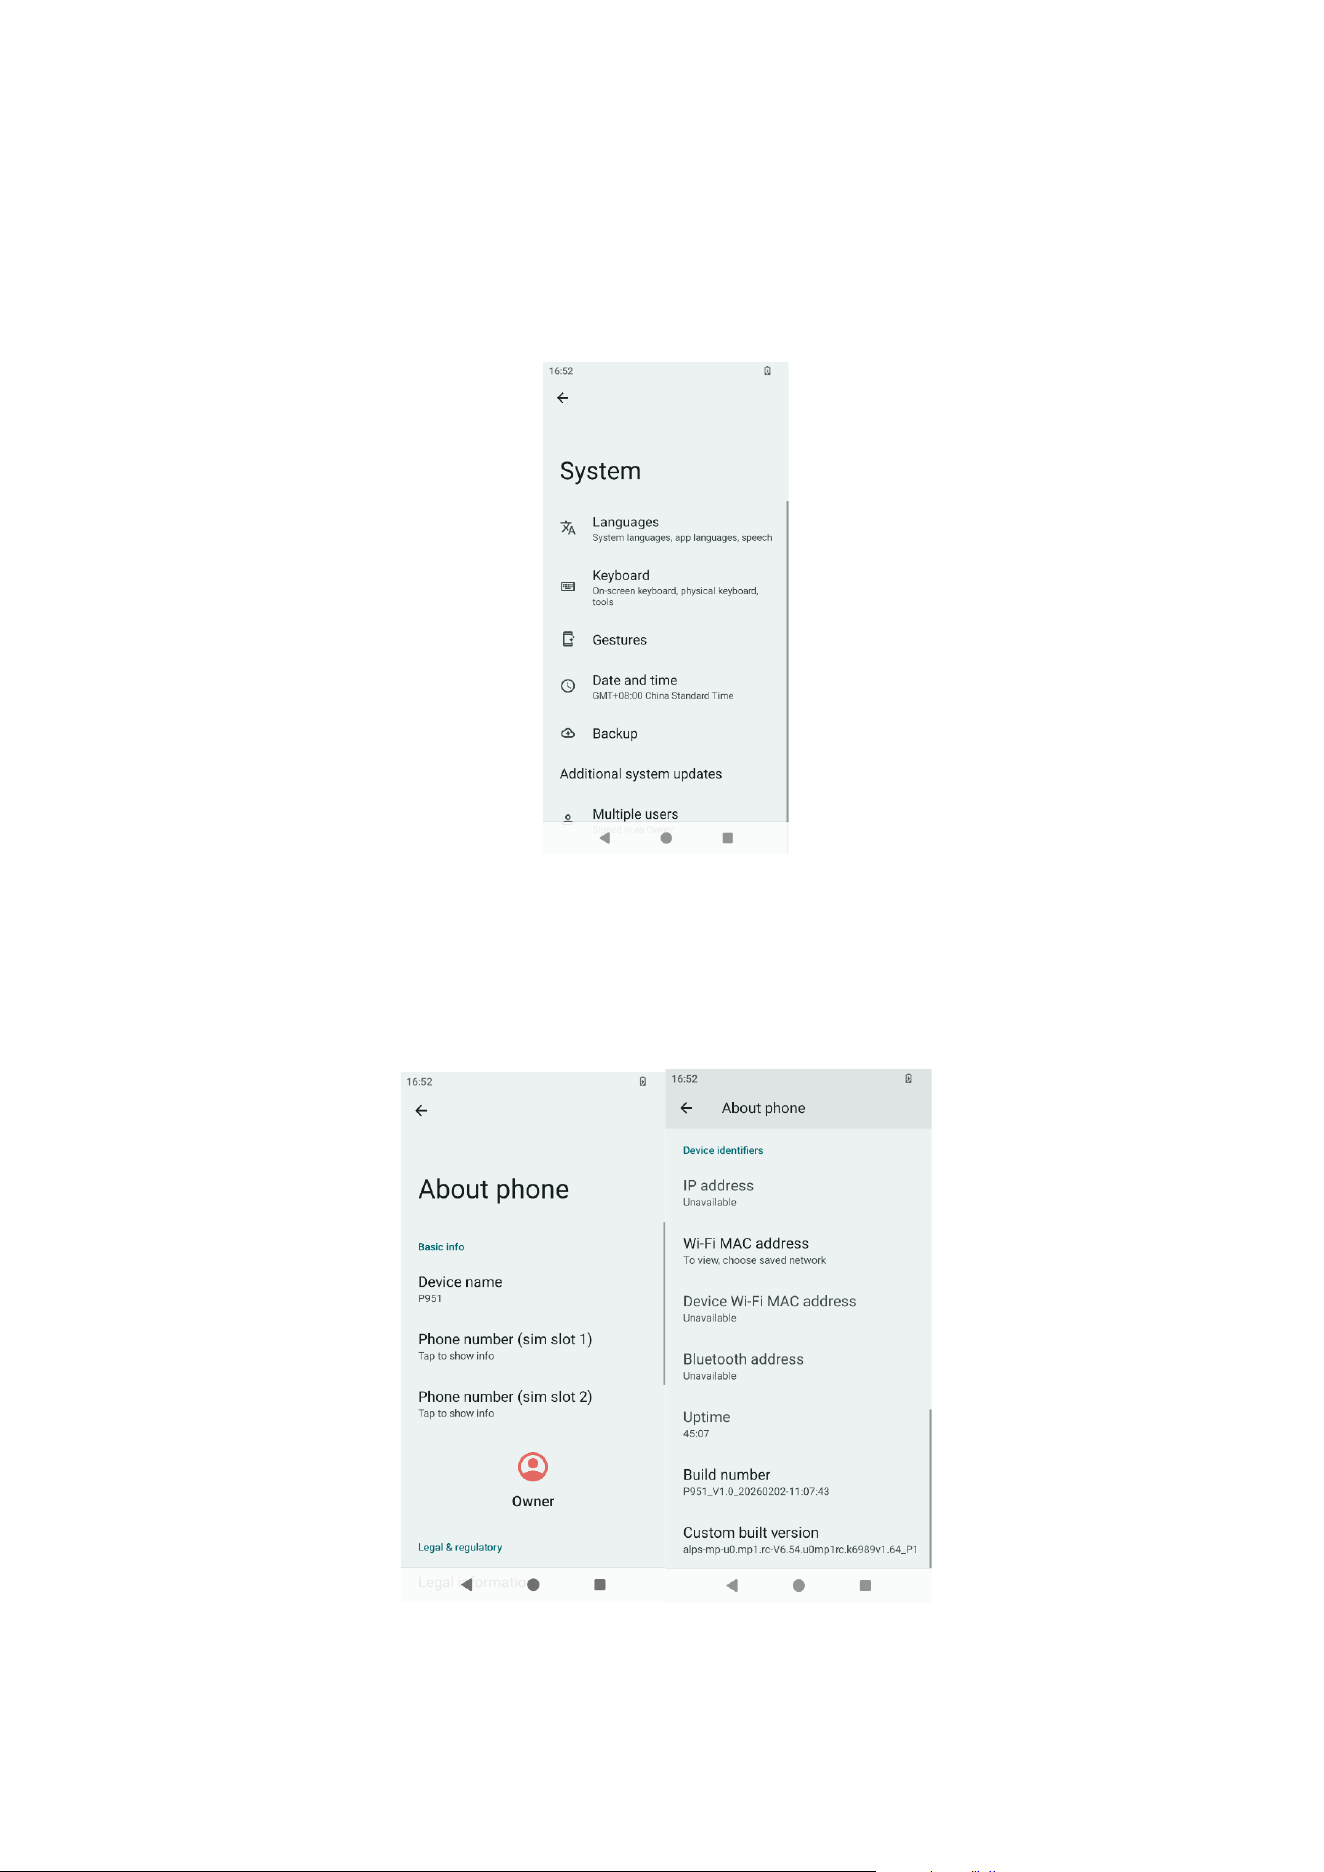
4.6.11 Accessibility
Users can view and configure accessibility features here, as shown in Figure 4-15.
Figure 4-15
21
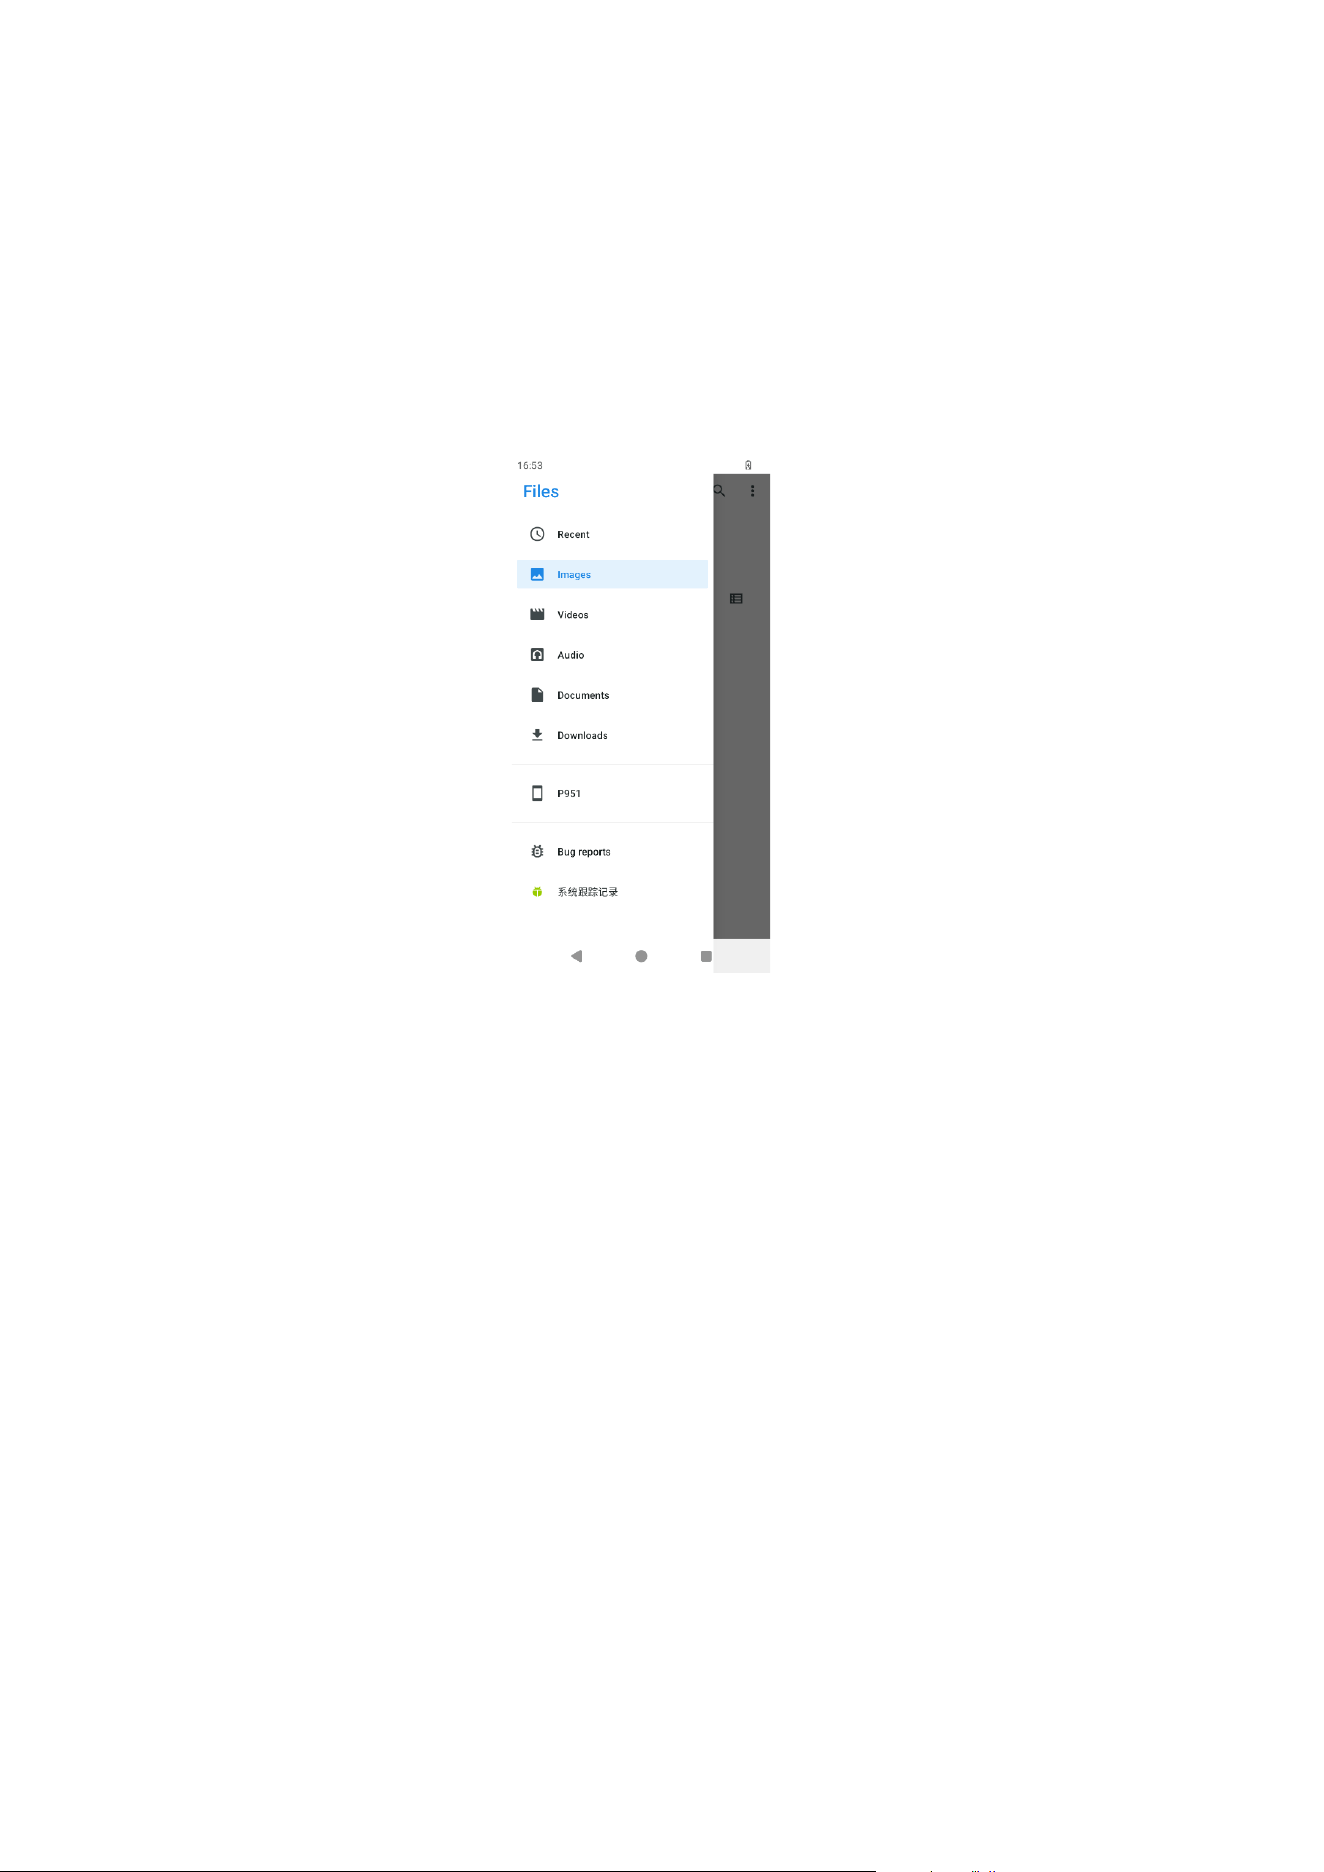
4.6.12 System
Users can view and manage system language & input method, gestures, date &
time, backup, reset, multiple users and other settings here, as shown in Figure 4-
16.
Figure 4-16
4.6.13 About Phone
Users can view the device status here, as shown in Figure 4-17.
Figure4-17

24
Chapter 5 Software Operations
In addition to the programs pre-installed on the device, you can also install the
software you need on it.
5.1 Software Installation
5.1.1 Local Installation
(1) Download the required software or save it to the local device via other transfer
methods.
(2) Locate the installation package in the device file manager, tap it to start
installation, and follow the on-screen instructions. The installation path is
system default.
5.1.2 Installation via App Market
Install the desired software directly using an app market (such as 360 Mobile
Assistant).
Note: If the system prompts you to restart the device after successful installation,
follow the instructions accordingly.
Tap Settings → Device → Apps. On the Downloaded tab, select the software to be
uninstalled and tap Uninstall to complete the operation.
Alternatively, drag the app icon directly on the app interface to the Uninstall label in
the upper-right corner to uninstall it.
5.2 System Firmware Upgrade
When connected to the network, the controller will automatically send an update
notification if a new system firmware version is available.
To perform a system firmware upgrade, tap the System Update icon on the app
interface. Two methods are available for users to choose from.
5.2.1 Online Upgrade
24
When connected to the network, tap Check for Updates. If a new update is
available, follow the prompts to perform the system upgrade.
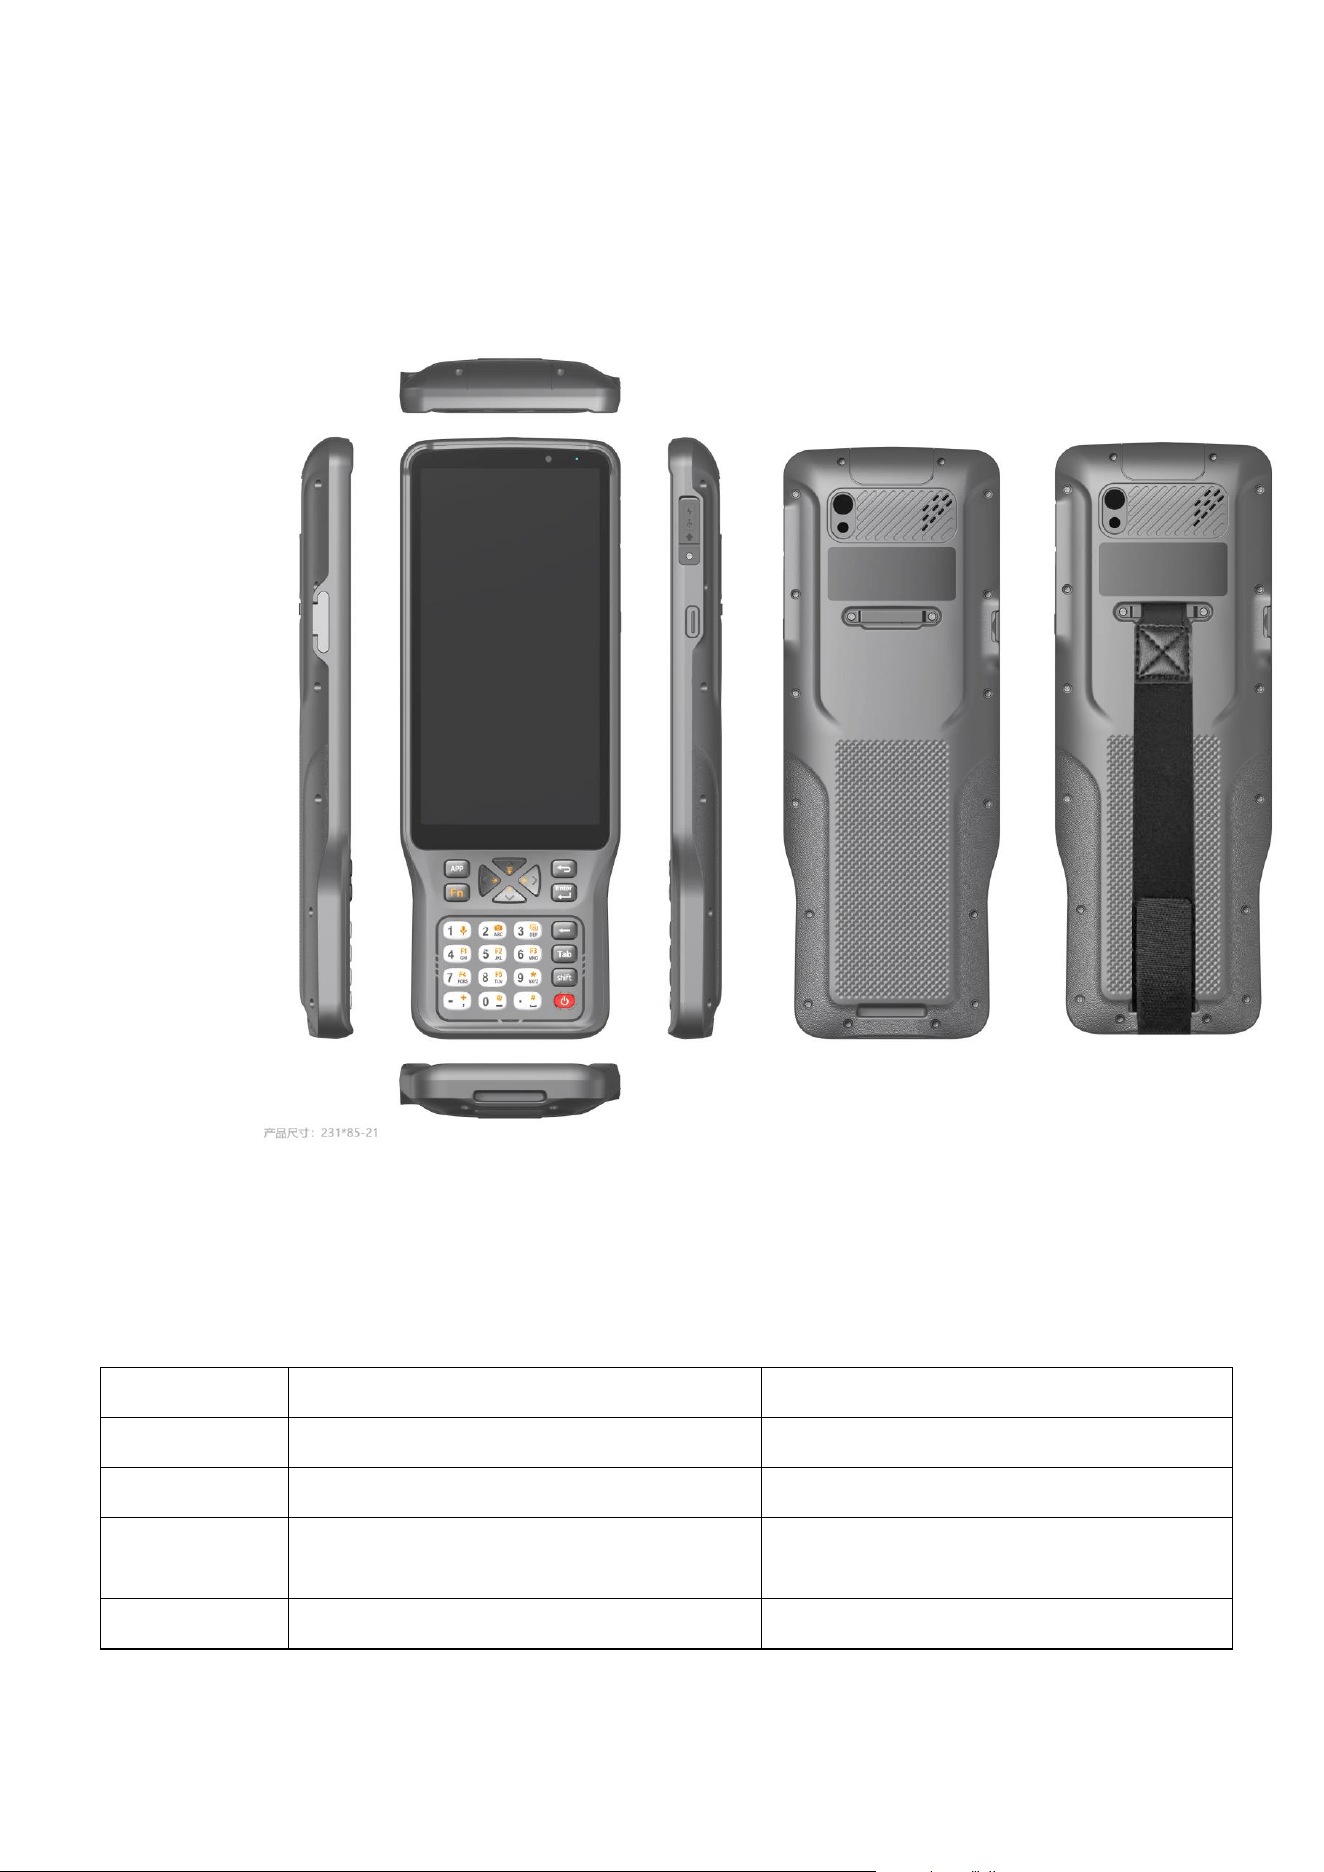
5.2.2 SD Card Upgrade
Insert the SD card containing the upgrade package into the controller, tap Upgrade
from SD Card, locate the required upgrade package in File Manager, and follow the
prompts to perform the system upgrade, as shown in Figure 5-1.
Figure 5-1

25
Chapter 6 Troubleshooting and Product
Maintenance
This chapter provides solutions to common problems encountered during
product use and introduces some maintenance rules. Please contact relevant
technical personnel if you have any questions.
6.1 Troubleshooting
Problem
Solution
Cannot Power On
The remaining battery power may be too low to start up
and operate. Please charge the battery.
If the battery is extremely low, a pre-charge of approximately 30
minutes is required before the indicator lights up.
Slow Screen
Response
Please ensure the battery is not low. If the problem
persists, reset the device.
Screen Completely
Unresponsive
Please reset the device.
Cannot connect
to a computer
via USB
Before establishing a connection, ensure both the device and
the desktop computer are powered on.
Check that the cable is securely connected to the desktop
computer and the TYPE-C port of the device.
Restart both devices and reconnect the cable. Unplug the cable
before restarting.
Insufficient
memory
warning
message
appears
Delete unnecessary files.
Uninstall unnecessary applications.
Stop unused programs. To view running programs, long press the
Home key to display active applications.
Please reset the device.
6.2 Product Maintenance
Proper maintenance of this product ensures normal operation and reduces the risk
of product damage:

25
⚫ Do not place the product in high-temperature or high-humidity environments;
⚫ Avoid prolonged exposure to strong light or ultraviolet radiation;
⚫ Do not drop the product or subject it to severe impact;
⚫ Do not disassemble, repair or modify the product without authorization;
⚫ Do not store or carry the product with flammable, explosive or corrosive
substances;
Note:For the P9V Controller, if any performance failure occurs within the
warranty period, the consumer may contact the local dealer for after-sales
service.
27
Appendix 1 P9V Product Specifications
1 Product Rendering
Figure1 P9V Product Rendering
2 Product Technical Specifications
2.1 General Technical Specifications Overview
Product Type
Chinese Version
Global Version
Bluetooth
BT5.0 BLE
BT5.0 BLE
WiFi
802.11 a/b/g/n/ac
802.11 a/b/g/n/ac
Network
4G Full Netcom, supporting China Mobile,
China Unicom and China Telecom
4G Full Netcom, supporting China Mobile,
China Unicom and China Telecom
SIM Card Slot
Nano SIM
Nano SIM
27
TF Card Slot
Supports MicroSD expansion, maximum
up to 512GB
Supports MicroSD expansion, maximum
up to 512GB
RAM
4GB
4GB
ROM
64GB
64GB
NFC
Support
Support
Indicator Light
One tri-color indicator for charging status
One tri-color indicator for charging status
Buttons
T9 numeric keypad (numeric keys and
function keys) and side keys
T9 numeric keypad (numeric keys and
function keys) and side keys
3D
Accelerometer
Support
Support
Geomagnetic
Sensor
Support
Support
Gyroscope
Support
Support
Camera
Rear 13MP camera with flash
Rear 13MP camera with flash
GNSS
GPS/A-GPS, GLONASS, BDS, Galileo
GPS/A-GPS, GLONASS, BDS, Galileo
Single-point positioning, no raw data output
Single-point positioning, no raw data
output
2.2 Detailed Technical Specifications
2.2.1 Physical Characteristics
Dimensions
231*85*21
Weight
To be determined
Operating
Temperature
-25 °C to +65 °C
Storage
Temperature
-30°C to +70°C
Waterproof and
dustproof rating
IP68
Humidity
5% – 95%, non-condensing
Drop resistance
1.5 m drop resistance
2.2.2 System Platform
27
Operating System
Chinese version: Android 14, 8-core
2.0 GHz
Global version: Android 14, 8-core
2.0 GHz
RAM
4GB
Storage
64GB
External Storage
Up to 512 GB supported
2.2.3 Interface & Communication
Display
6.0-inch HD touch screen、1440*720、550nit
Connector
Standard Type‑C for charging and data transfer, supports OTG upgrade
Communicati
on
Bluetooth:5.0 BLE
WiFi:2.4G/5G, 802.11 ac/a/b/g/n
Network
Chinese version:
GSM: 850/900/1800/1900
WCDMA: B1/B5/B4/B8
LTE-TDD: B34/B38/B39/B40/B41
LTE-
FDD:B1/B3//B4/B5/B7/B8/B20/B28/B66
Global version:
GSM: 850/900/1800/1900
WCDMA: B1/B2/B4/B5/B8
LTE-TDD: B34/B38/39/B40/B41
LTE-FDD:B1/B2/B3/B4/B5/B7/B8/B12
/B13/B17/B20/B25/B26/B28/B66
Other
Interfaces
External memory card slot
External SIM card slot
2.2.4 Power Specifications
Built-in battery
8000mAh
Input Voltage
To be determined
Adapter
Type-C PD 适配器
Working time
12hours
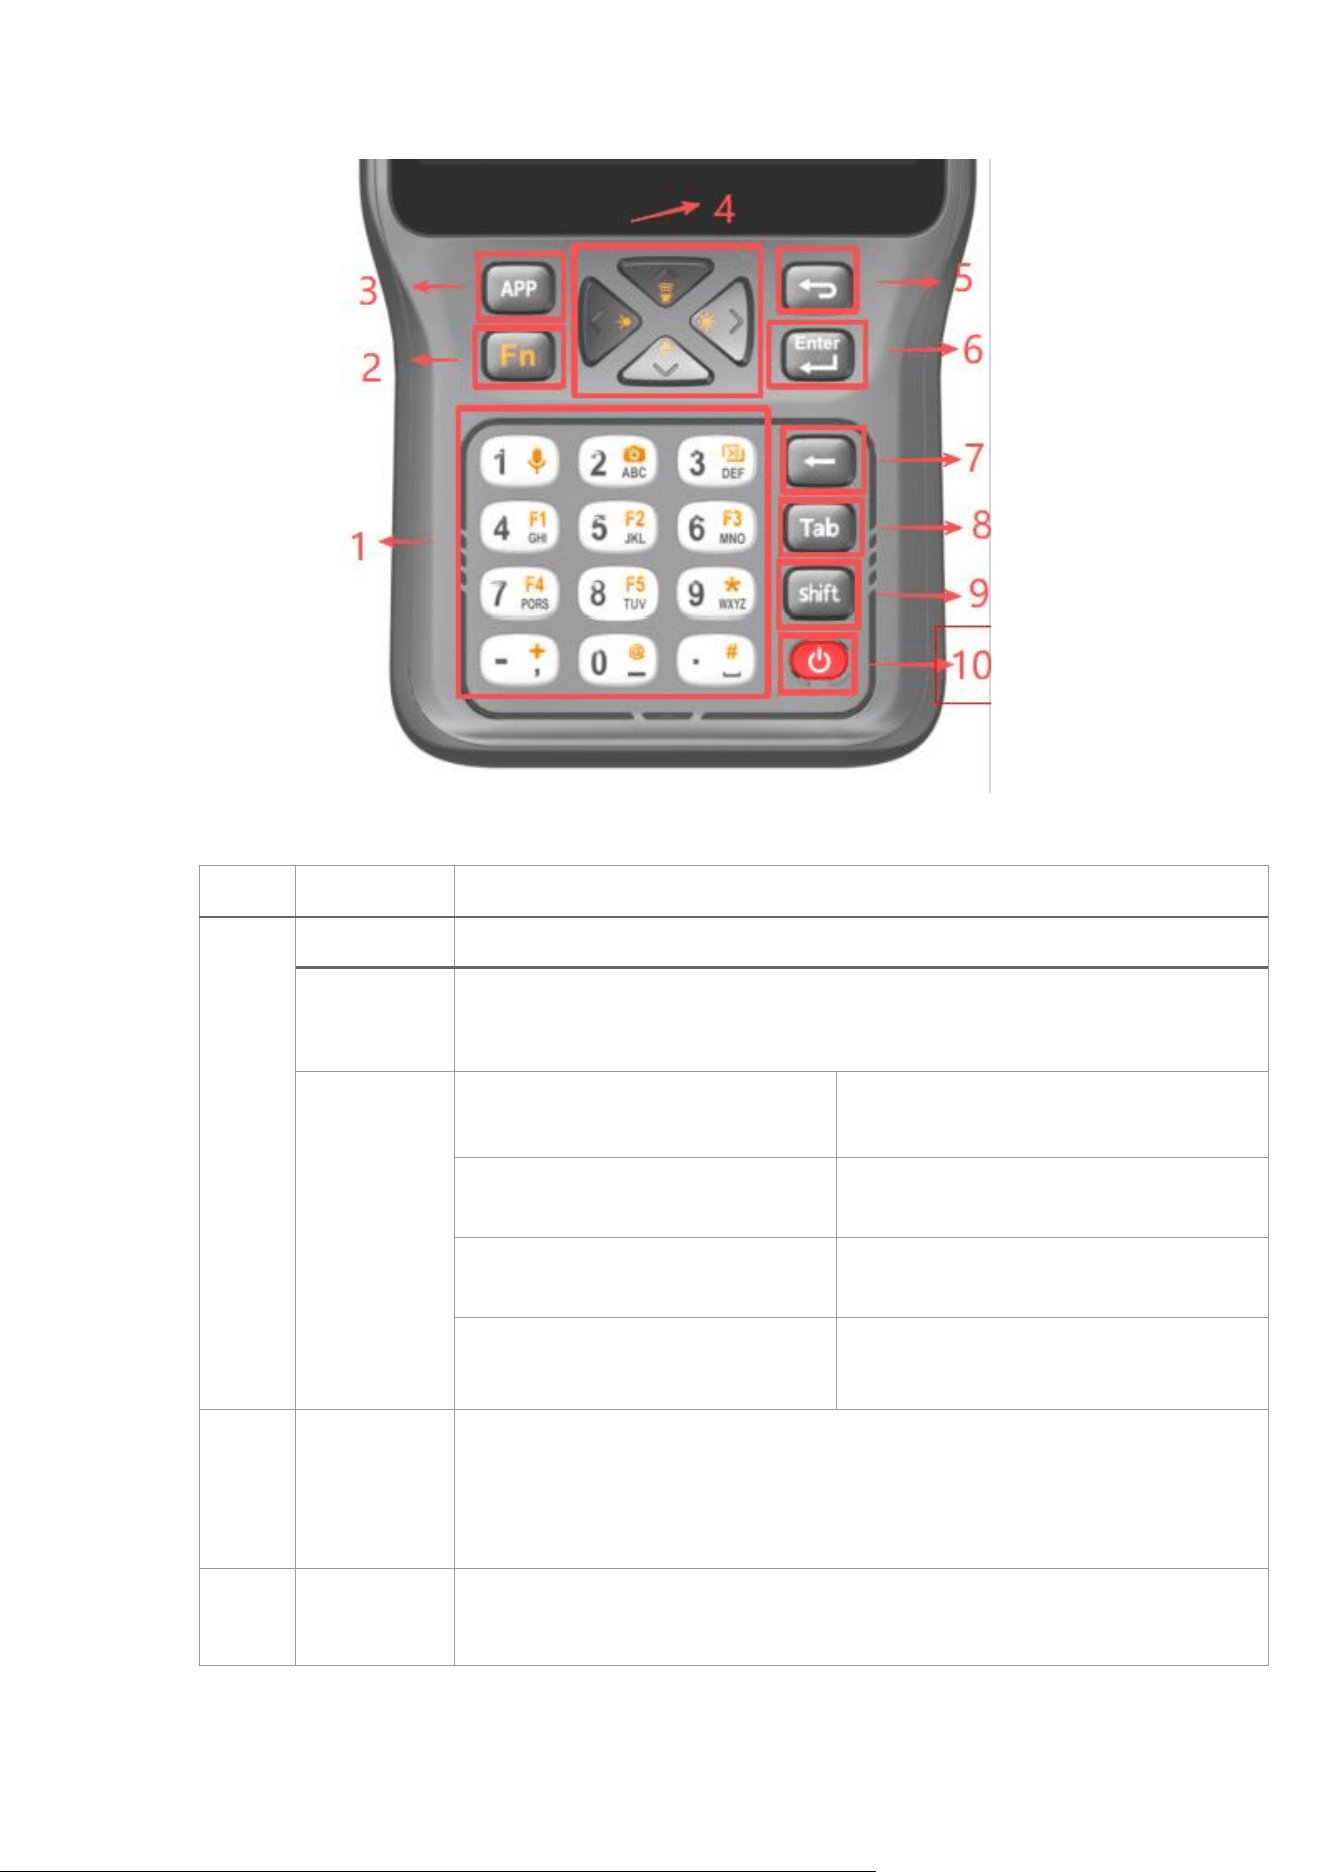
2.2.5 Function Key Definition
27
No.
Key
Definition & Description
1(Numer
ic Key)
2 (FN
Key)
Numeric Key
Enter numbers
FN
Switches between numbers and letters when using the physical keyboard FN
input mode, and toggles among Chinese, numbers, and letters in Chinese input
mode.
Special
function
keys
(functions
indicated by
the orange
icons when
Fn is locked)
Voice function (marked with the
orange icon on the "1" key)
Enables voice input and allows Surpad
to execute certain voice commands.
Camera function (marked with the
orange icon on the "2" key)
Can activate the camera function.
Screenshot function (marked with
the orange icon on the "3" key)
Allows quick screenshot capture.
F1-F5
User-defined function key
3
Survey Key
When the Surpad interface is not active, pressing this key opens or switches to
the Surpad interface (the displayed interface corresponds to the software
version).
When on the Surpad interface, this key functions as a collection key.
4
Directional
Moves up, down, left and right on the screen or in menus.
In function mode, the up and down keys control the volume.

27
keys
In function mode, the left and right keys control the screen brightness.
5
Back Key
Returns to the previous interface.
6
Enter key
Confirm / Line break.
When on the Surpad interface and in non-input state, it acts as the collection
key.
7
Undo key
Deletes one character backward in the character input field.
8
Tab Key
Tab Key
9
Shift Key
Switches between lowercase and uppercase letters when using the physical
keyboard input method.
10
Power key
Power on / off

FCC warning statements:
This equipment has been tested and found to comply with the limits for a Class
B digital device, pursuant to part 15 of the FCC Rules. These limits are
designed to provide reasonable protection against harmful interference in a
residential installation. This equipment generates, uses and can radiate radio
frequency energy and, if not installed and used in accordance with the
instructions, may cause harmful interference to radio communications.
However, there is no guarantee that interference will not occur in a particular
installation. If this equipment does cause harmful interference to radio or
television reception, which can be determined by turning the equipment off and
on, the user is encouraged to try to correct the interference by one or more of
the following measures:
• Reorient or relocate the receiving antenna.
• Increase the separation between the equipment and receiver.
• Connect the equipment into an outlet on a circuit different from that to which
the receiver is connected.
• Consult the dealer or an experienced radio/TV technician for help.
Caution: Any changes or modifications to this device not explicitly approved
by manufacturer could void your authority to operate this equipment.
This device complies with part 15 of the FCC Rules. Operation is subject to the
following two conditions: (1) This device may not cause harmful interference,
and (2) this device must accept any interference received, including
interference that may cause undesired operation.
The device has been evaluated to meet general RF exposure requirement.