
Read this manual carefully and save it for future reference.
Lisez attentivement ce manuel et conservez-le pour référence future.
Lea este manual con atención y guárdelo para futuras consultas.
1
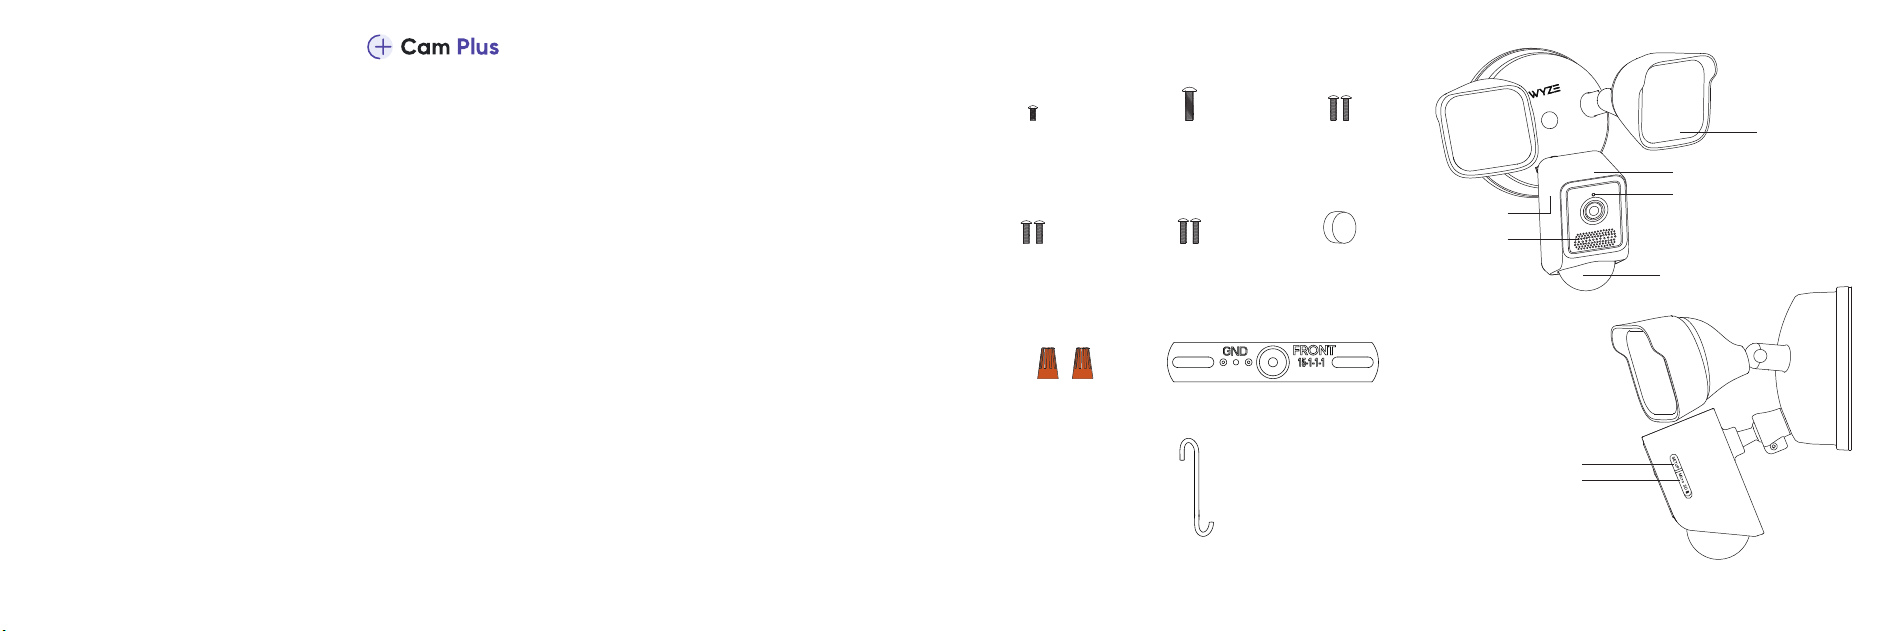
Ground Wire
Screw × 1 (Bag A)
Floodlight
Screw × 1 (Bag B)
Bracket Screws
#8 × 2 (Bag C)
Bracket Screws
#10 × 2 (Bag D)
Bracket Screws
#6 × 2 (Bag E)
Rubber
Stopper × 1
Wire Nuts × 2
Hook × 1
Mounting Bracket × 1
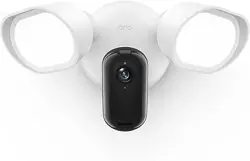
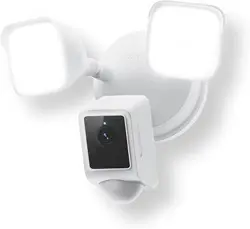
Assembled Wyze Cam Floodlight v2 Camera x 1
SETUP button
Micro SD card slot
LED Lamp
Camera
Status Light
Motion Sensor
Microphone
Speaker
IN THE BOX
Record Full-Length Videos
Get unlimited full-length video recordings.
Smart AI Detection
Detect people, packages, vehicles, and more.
Back-to-Back Event Recording
Capture everything without 5-minute gaps.
Exclusive Discounts
Get exclusive discounts on Wyze products.
Subscribe or learn more at services.wyze.com.
GET BETTER SECURITY WITH
Welcome to Wyze!
Hi! Thanks for getting your hands on
a Wyze Cam Floodlight v2, and if
this is your first Wyze product,
welcome to the Wyze family! You
just made a commitment to a
better, more connected lifestyle.
Please read this guide carefully
before setting up the device, and
keep it in a safe place for future
reference.
Disclaimer: The products, accessories, user interfaces, etc. illustrated in this guide are
intended for reference only. Due to product updates, the actual product and the
illustrations in this guide may vary.
Clause de non-responsabilité : Les produits, accessoires, interfaces utilisateur, etc.
illustrés dans ce guide sont destinés à servir de référence uniquement. En raison des
mises à jour des produits, le produit réel et les illustrations de ce guide peuvent varier.
Descargo de responsabilidad: Los productos, accesorios, interfaces de usuario, etc. que
se ilustran en esta guía son sólo de referencia. Debido a las actualizaciones del
producto, el producto real y las ilustraciones de esta guía pueden variar.
SETUP
Download the Wyze app and sign in or create an
account.
Select Add Device > Cameras > Wyze Cam Floodlight
v2 and follow the instructions in the app.
1
2
4
3
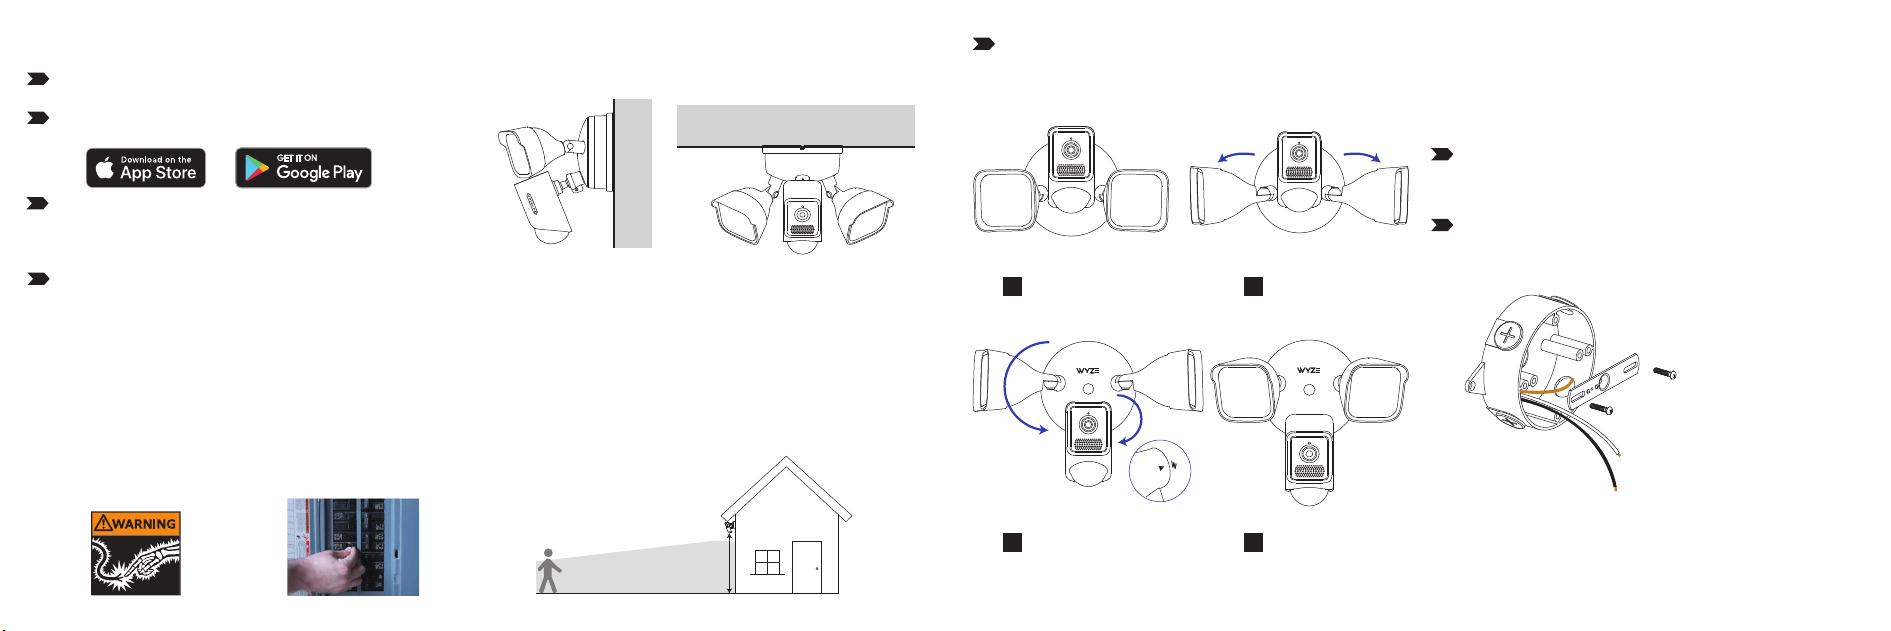
WALL MOUNT
Recommended Installation Location
Tip: When Wyze Cam Floodlight v2 is mounted 10 feet
above the ground, it will detect motion up to 30 feet away.
30 feet
10 feet
3
2
Rotate the lights
and camera 180°
3
Tilt lights up
4
Take your Wyze Cam Floodlight v2 out of the box and
rotate the camera 180° so that the Wyze logo is at the
top and the motion sensor is pointed down.
1
Starting position
1
Tilt lights down
2
Rotate the
lights 180°
Junction Box
2 3
Check your local laws for installation. If you are outside
of North America, installation and wiring must be
performed by a licensed electrician. Make sure you
follow all code standards when doing wire installation.
WARNING: Risk of electrical shock!
1. Make sure you have a junction box for your floodlight
installation. If you need one installed, please contact
a licensed electrician.
2. Verify that the power supply is a 120 V AC 60 Hz
power source.
3. Disconnect power using the fuse or circuit breaker
before continuing.
Notes: Do not use a dimmer switch or timer for this
product.
Apply caulk to mounting surface on all sides to ensure
complete waterproofing.
You can mount the floodlight vertically on the wall or
overhang under eaves.
WALL MOUNT
(refer to pages 2-5)
EAVE MOUNT
(refer to pages 5-7)
Important: While positioning the camera for wall installation,
find the “W” and arrows on the joint arm behind the camera.
Make sure the arrows are in alignment. Do not rotate the
camera completely around as this may twist or break the
connection line.
Place the mounting bracket on the junction box. Align
the 2 screw holes and tighten the bracket using
matching bracket screws (Bag C, D, or E).
Remove your existing floodlight and any brackets
that may be attached if you are replacing a previous
product.
Note: If you don't have a junction box, please find a licensed
electrician to install one and follow local building codes.
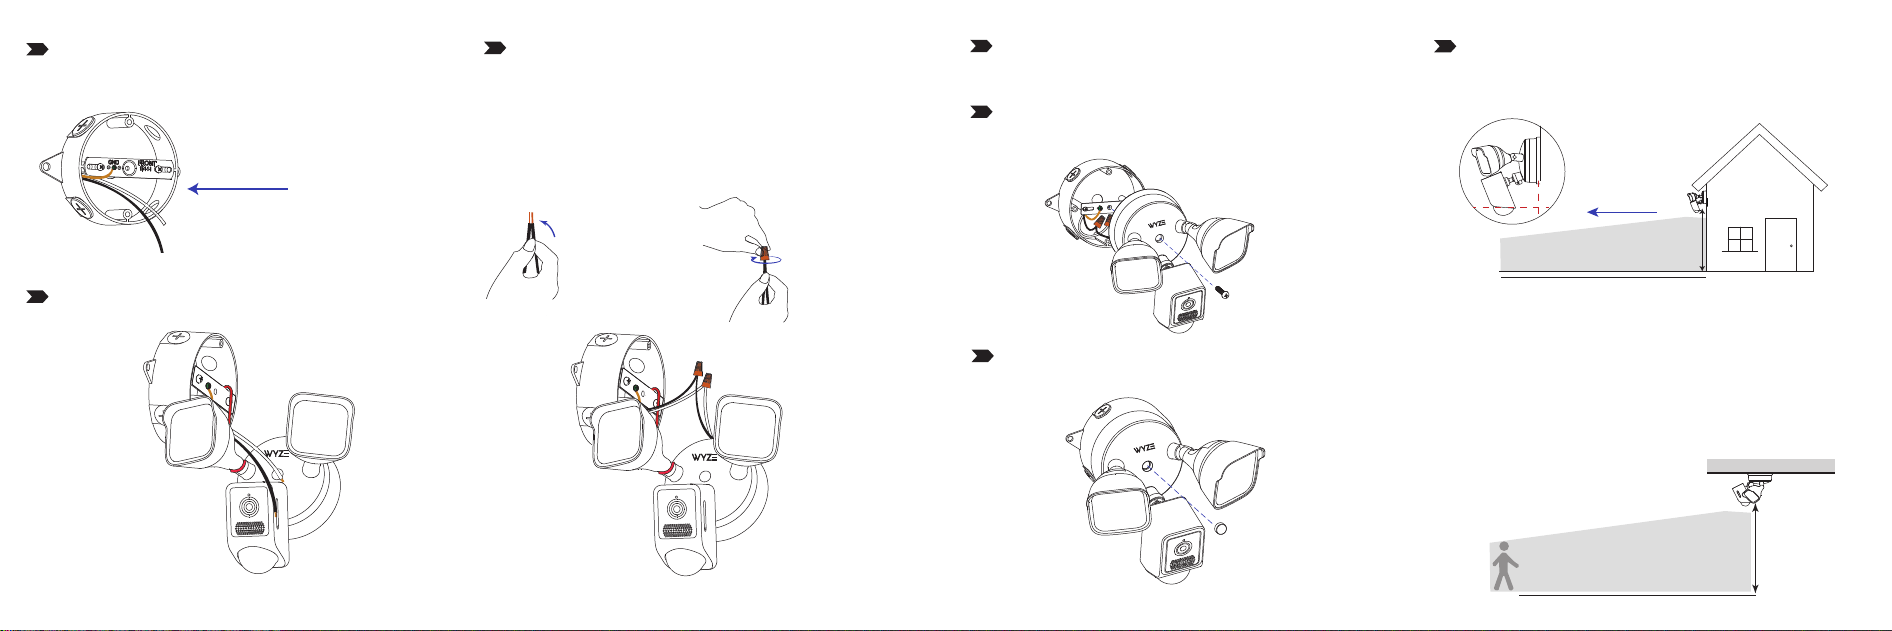
Adjust the angle of the motion sensor so it is
parallel to the ground.
The angle should
be parallel to the
ground.
30 feet
10 feet
10
EAVE MOUNT
30 feet
10 feet
Recommended Installation Location
Tip: When Wyze Cam Floodlight v2 is mounted 10 feet
above the ground, it will detect motion up to 30 feet away.
Ground wire is usually
exposed copper wire
or colored green.
Use the
ground screw
Use the ground wire screw (Bag A) to attach the
ground wire to the middle of the mounting bracket.
4
5
Hold the wires
together.
Twist the wire nut
5-10 times.
Use the
floodlight screw (Bag B)
6
7
8
9
4 5
Hang the floodlight on the mounting bracket using
the provided hook as shown in the picture.
Connect the hot wire (usually black) from your
floodlight to the hot wire from your junction box. Then
connect the 2 neutral wires (usually white). Cap the
wires using wire nuts and twist them 5-10 times. Gently
tug on the wire nut to make sure it's securely attached.
IMPORTANT: If you are not sure which wire is which,
please consult an electrician for safety.
Screw your Wyze Cam Floodlight v2 to the mounting
bracket using the floodlight screw (Bag B).
Push the wires back into the junction box. Make sure
the wires are not pinched between Wyze Cam
Floodlight v2 and the mounting bracket.
Place the rubber stopper over the floodlight screw to
protect the screw.
2
3
4
6
Caution: Do not force
the wires on the
mounting bracket
Junction Box
5
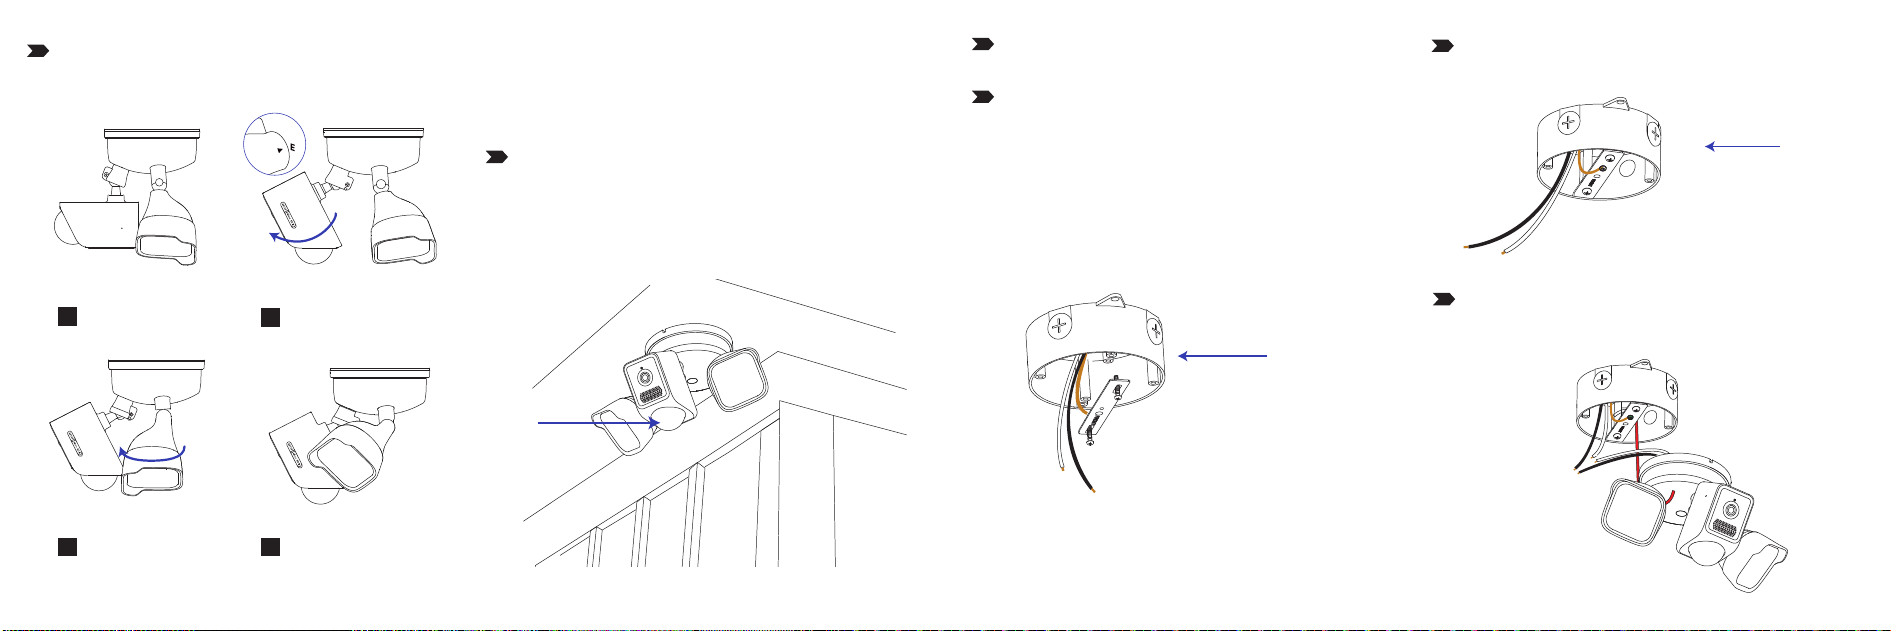
Use the ground wire screw to attach the ground wire to
the middle of the mounting bracket (Bag A).
Ground wire is usually
exposed copper wire
or colored green.
Use the
ground screw
Hang the floodlight on the mounting bracket using
the provided hook as shown in the picture.
Motion
sensor
facing out
1
Take your Wyze Cam Floodlight v2 out of the box. Raise
the LED lamps to the highest position first and then
rotate it 180° to lower the LED lamp.
Rotate lights up
Starting position
1
Rotate the camera 180°
2
3
Tilt lights up
4
Rotate the
camera 180°
6 7
While positioning the camera for an overhang
installation, find the “E” and arrows on the joint arm
behind the camera. Make sure the arrows are in
alignment. Do not rotate the camera completely
around as this may twist or break the connection line.
Tilt the camera slightly up so the camera is looking out
and the motion sensor is facing out and downward
when mounted under an overhang.
Remove your existing floodlight and any brackets that
may be attached if you are replacing an older floodlight.
Place the mounting bracket on the junction box.
Align the 2 screw holes and tighten the bracket
using matching bracket screws (Bag C, D, or E).
Note: If you don't have a junction box, please find a
licensed electrician to install one and follow local
building codes.
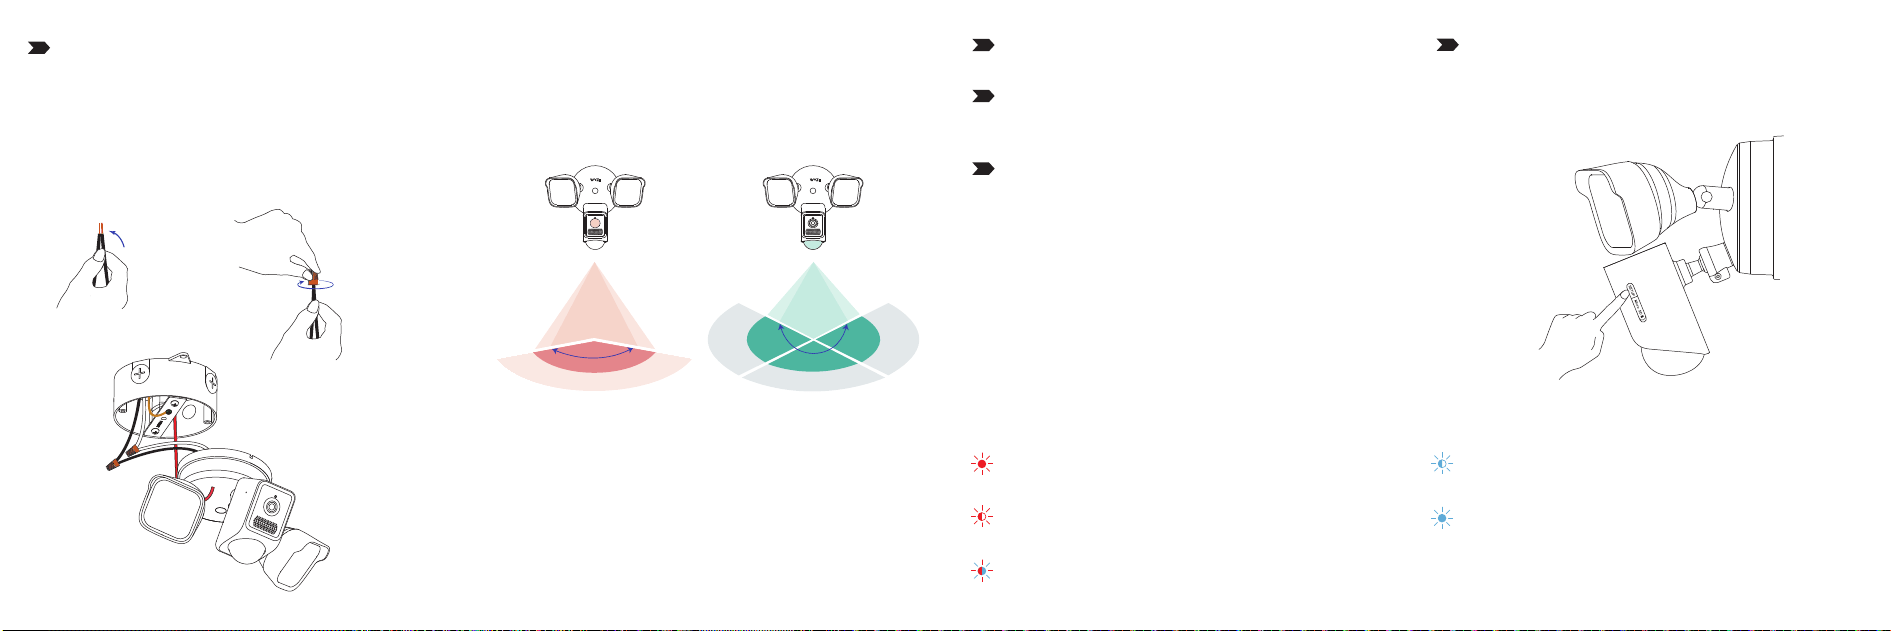
WYZE CAM FLOODLIGHT V2
STATUS LIGHT GUIDE
Solid red light
The device is powered on an initializing The device is connecting to Wi-Fi
Flashing red light
The device is ready to connect
Flashing red & blue lights
Connection is in progress
The device is working properly
Solid blue light
Flashing blue light
If you need to reinstall the device after resetting
or deleting the device, press the SETUP button
on the side of the camera for 3 seconds
or until a voice prompt sounds.
11
10
Motion area for
triggering the lights 270°
Camera field of
view 160°
270°
7
8
9
Note: The screw and rubber plug installation steps are
the same as 8 and 9 for wall installation.
The next steps are the same for both eave
and wall mounting.
160°
8 9
Connect the hot wire (usually black) from your
floodlight to the hot wire from your junction box. Then
connect the 2 neutral wires (usually white). Cap the
wires using wire nuts and twist them 5-10 times. Gently
tug on the wire nut to make sure it's securely attached.
IMPORTANT: If you are not sure which wire is which,
please consult an electrician for safety.
Hold the wires
together.
Twist the wire nut
5-10 times.
Restore power to the junction box using the circuit
breaker or fuse box. The camera status light should
flash red.
Follow the instructions in the Wyze app to finish setup.
Rotate and tilt the floodlight so it points where you
want it.
Note: We recommend leaving the ladder in place until
after you're done pairing the camera(s) and adjusting the
floodlight position.

WARRANTY
SPECIFICATIONS
FCC WARNING
10 11
RF RADIATION EXPOSURE
STATEMENT
ISED RSS WARNING
DÉCLARATION D'EXPOSITION
AUX RADIATIONS DE LA L'ISED
SUPPLIER’S DECLARATION OF
CONFORMITY
AVERTISSEMENT DE L'ISED
CONCERNANT LES NORMES RSS
ISED RADIATION EXPOSURE
STATEMENT
L’émetteur/récepteur exempt de licence contenu dans le présent
appareil est conforme aux CNR d’Innovation, Sciences et
Développement économique Canada applicables aux appareils
radio exempts de licence. L’exploitation est autorisée aux deux
conditions suivantes: (1) L’appareil ne doit pas produire de
brouillage; (2) L’appareil doit accepter tout brouillage
radioélectrique subi, même si le brouillage est susceptible d’en
compromettre le fonctionnement.
This equipment complies with IC RSS-102 radiation exposure
limits set forth for an uncontrolled environment. This equipment
should be installed and operated with minimum distance
20cm between the radiator and your body.
Cet équipement est conforme aux limites d'exposition aux
radiations IC CNR-102 établies pour un environnement non
contrôlé. Cet équipement doit être installé et utilisé avec une
distance minimale de 20cm entre le radiateur et votre corps.
Your Wyze product is covered by a one-year limited
warranty. You can view the limited warranty terms at
https://wyze.com/return-warranty-policy or request
a copy by contacting Wyze at +1 (206) 339-9646.
Brand Name: WYZECFL2 WYZECFL2BL
Model Number: WYZECFL2 WYZECFL2BL
Suppliers Name: Wyze Labs, Inc.
Suppliers Address (USA): 5808 Lake Washington Blvd NE
Ste 300 Kirkland WA 98033
Suppliers Phone Number or Internet Contact Information:
1-844-999-3226
Model: WYZECFL2 WYZECFL2BL
Connectivity: 2.4 GHz Wi-Fi
Weather Resistance: IP65
Input: Hardwired 120V~50/60Hz 0.61A
Apple logo and App Store are trademarks of Apple Inc.,
registered in the U.S. and other countries and regions.
Google Assistant, Google Home, Google Play, and the
Google Play logo are trademarks of Google LLC.
Wyze and Wyze Cam Floodlight v2
are trademarks of Wyze Labs, Inc.
This device complies with Part 15 of the FCC Rules.
Operation is subject to the following two conditions:
(1) This device may not cause harmful interference, and
(2) This device must accept any interference received, including
interference that may cause undesired operation.
Caution: The user is cautioned that changes or modifications not
expressly approved by the party responsible for compliance could
void the user’s authority to operate the equipment.
This equipment has been tested and found to comply with the limits
for a Class B digital device, pursuant to Part 15 of the FCC Rules. These
limits are designed to provide reasonable protection against harmful
interference in a residential installation. This equipment generates,
uses, and can radiate radio frequency energy and, if not installed and
used in accordance with the instructions, may cause harmful
interference to radio communications. However, there is no guarantee
that interference will not occur in a particular installation. If this
equipment does cause harmful interference to radio or television
reception, which can be determined by turning the equipment o and
on, the user is encouraged to try to correct the interference by one or
more of the following measures:
- Reorient or relocate the receiving antenna.
- Increase the separation between the equipment and receiver.
- Connect the equipment into an outlet on a circuit dierent from that
to which the receiver is connected.
- Consult the dealer or an experienced radio/TV technician for help.
This equipment complies with FCC radiation exposure limits set
forth for an uncontrolled environment. This equipment should be
installed and operated with minimum distance 20cm between the
radiator and your body.
This device contains licence-exempt transmitter(s)/receiver(s) that
comply with Innovation, Science and Economic Development
Canada’s licence-exempt RSS(s). Operation is subject to the
following two conditions: (1) This device may not cause interference
and (2) This device must accept any interference, including
interference that may cause undesired operation of the device.

Scan the QR code
to learn more
NEED HELP?
Contact our Support Team:
https://wyze.com/support
Join the Community:
https://wyze.com/community