MODEL #44351
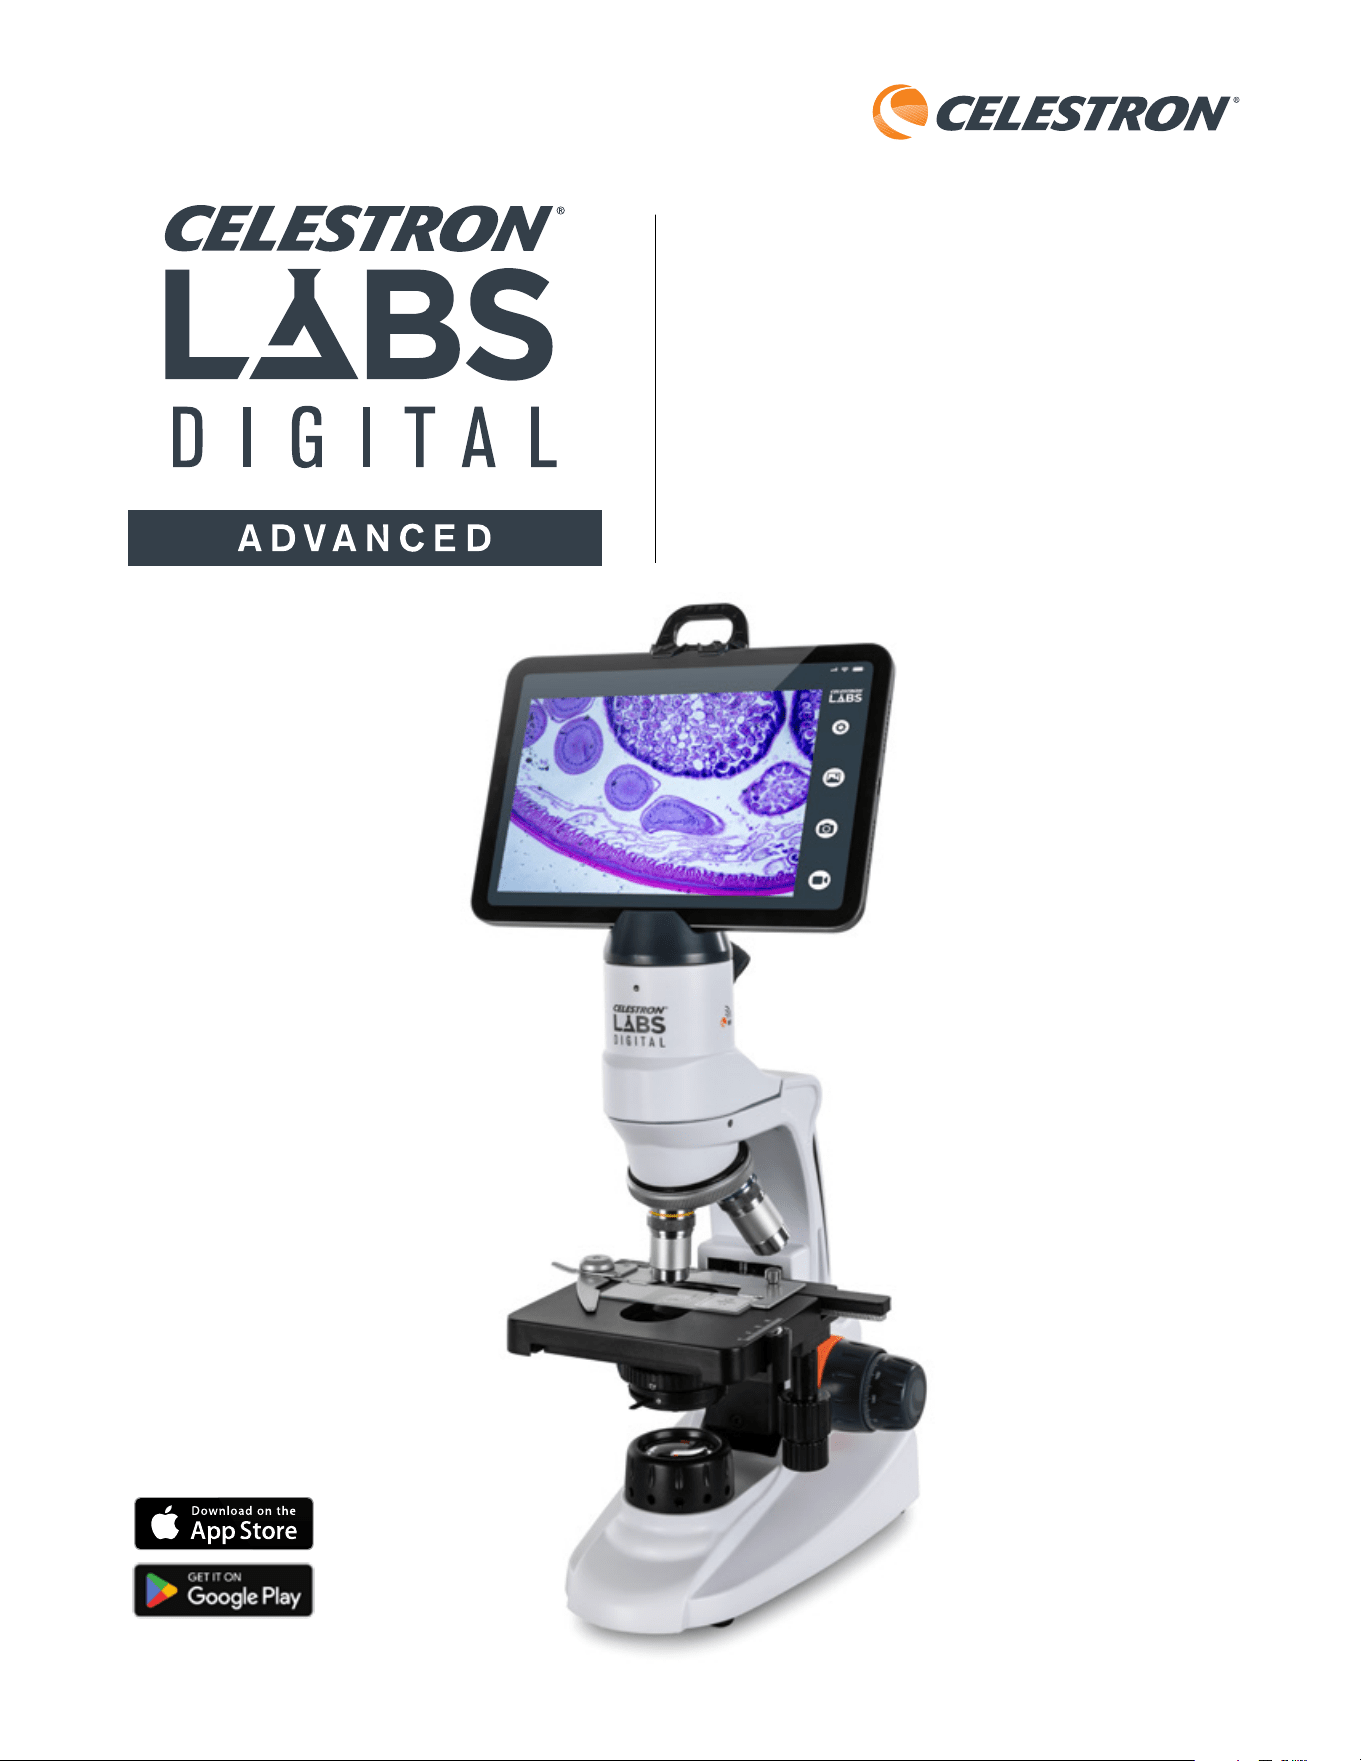
Tablet not included
INSTRUCTION MANUAL
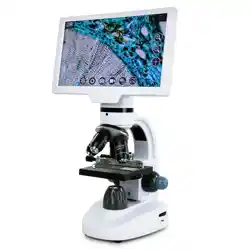
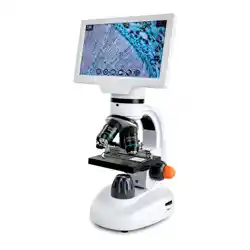
Wi-Fi DESKTOP MICROSCOPE
2
|
ENGLISH
INTRODUCTION
Thank you for purchasing the Celestron Labs Digital Wi-Fi
Desktop Microscope.
Unlike traditional microscopes, this model uses a built-in 2MP digital
camera instead of an eyepiece. Specimens are viewed live on your
smartphone or tablet via the microscope’s dedicated Wi-Fi signal. No
internet connection is required.
This microscope provides magnification from 48x to 480x and is well-
suited for examining prepared slides of plant and animal tissue, fibers,
yeasts, molds, bacteria, and other biological specimens.
The free Celestron Labs Digital Wi-Fi App works with iOS and
Android devices. With it, you can capture still images, record video,
enable measurement tools, and save files directly to your device for
sharing or analysis.
The microscope offers traditional high-end features, including a fully
adjustable mechanical stage, three achromatic objectives (4x, 10x,
and 40x), an Abbe condenser with an iris diaphragm, and coarse
and fine focus controls. Also included are five prepared slides, a
calibration slide, a multi-country AC adapter, and a smart device
stand with safety strap.
Before getting started, read through the setup instructions and review
the diagrams in this manual. A few minutes of preparation will ensure
a smooth setup and the best possible performance.
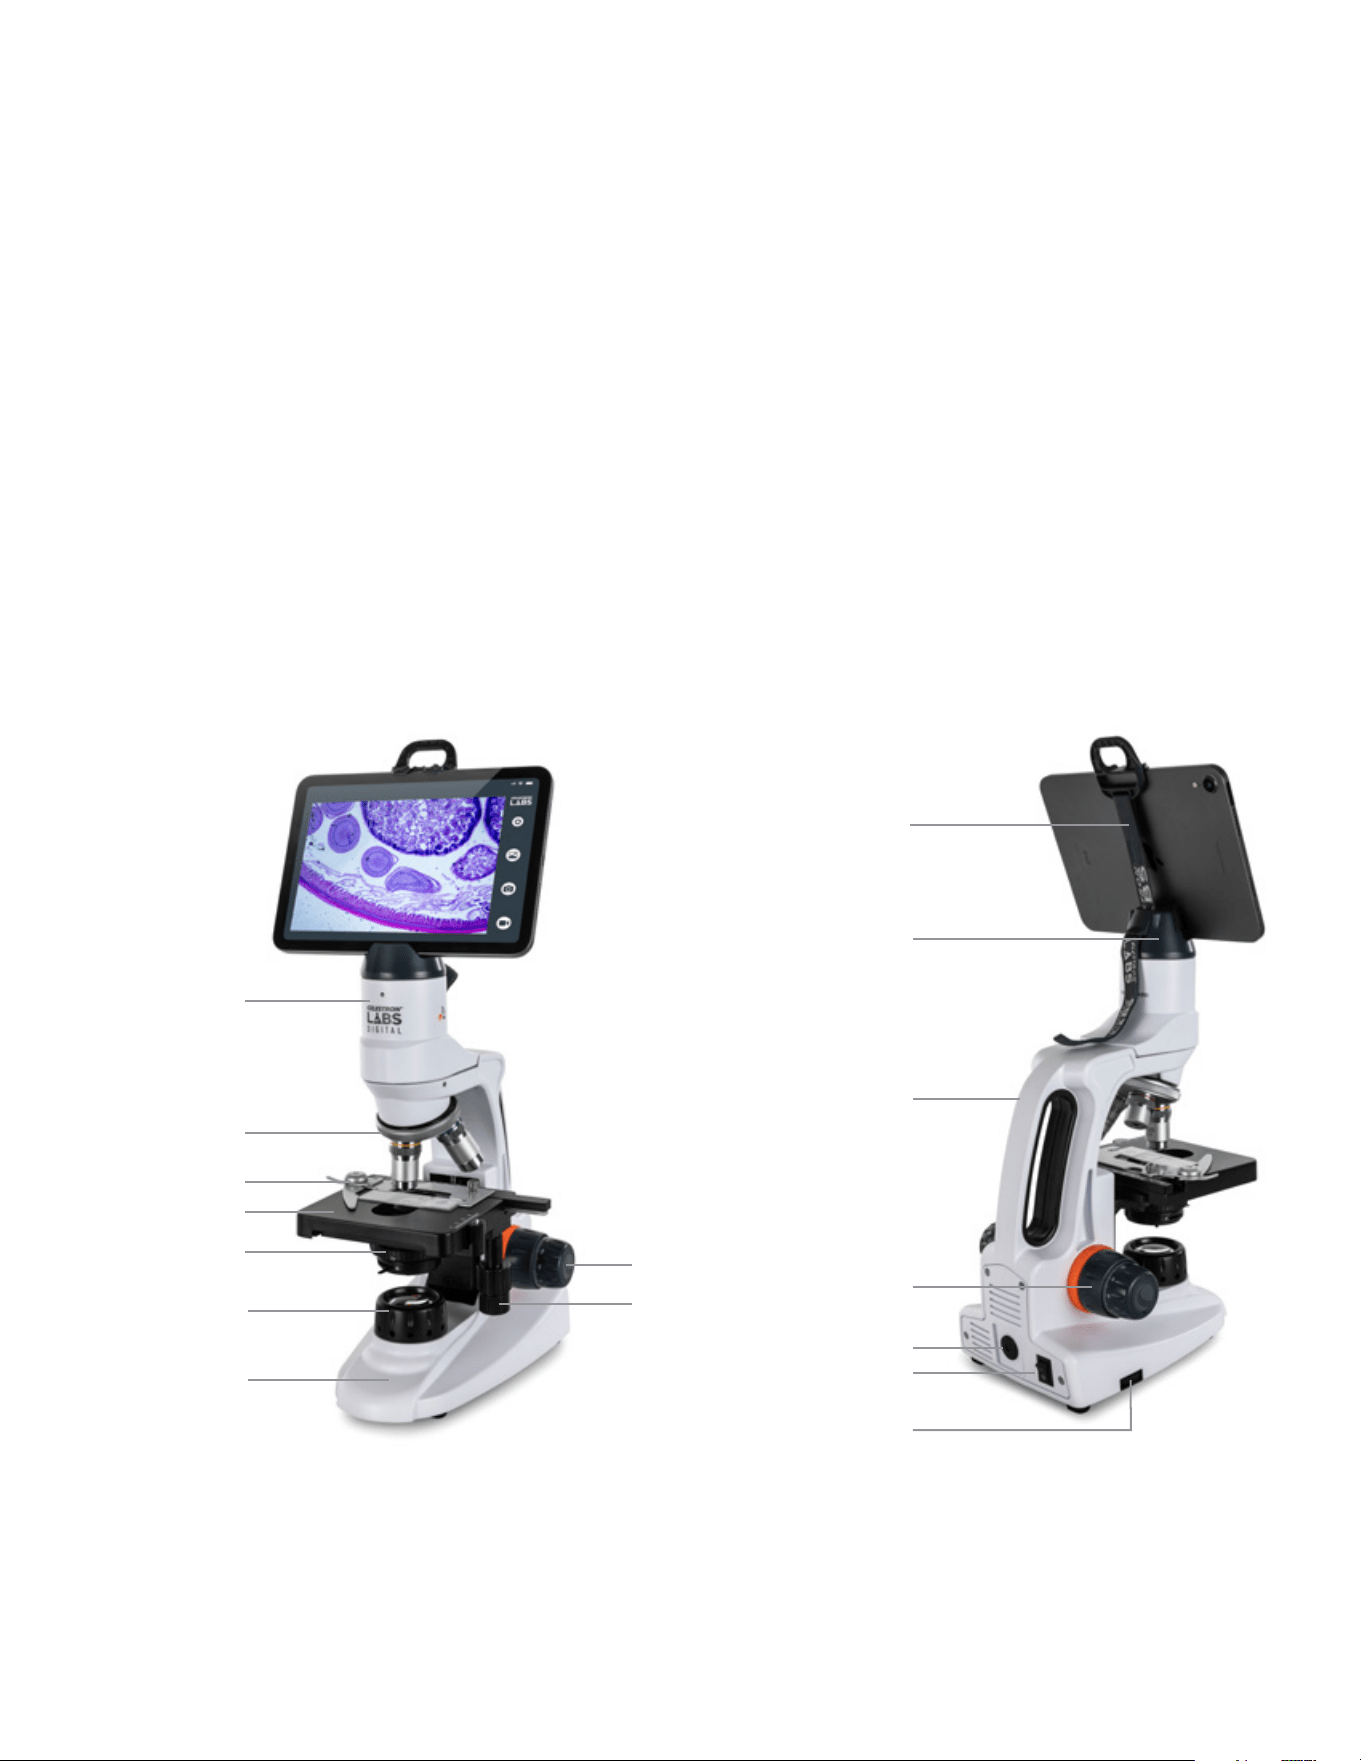
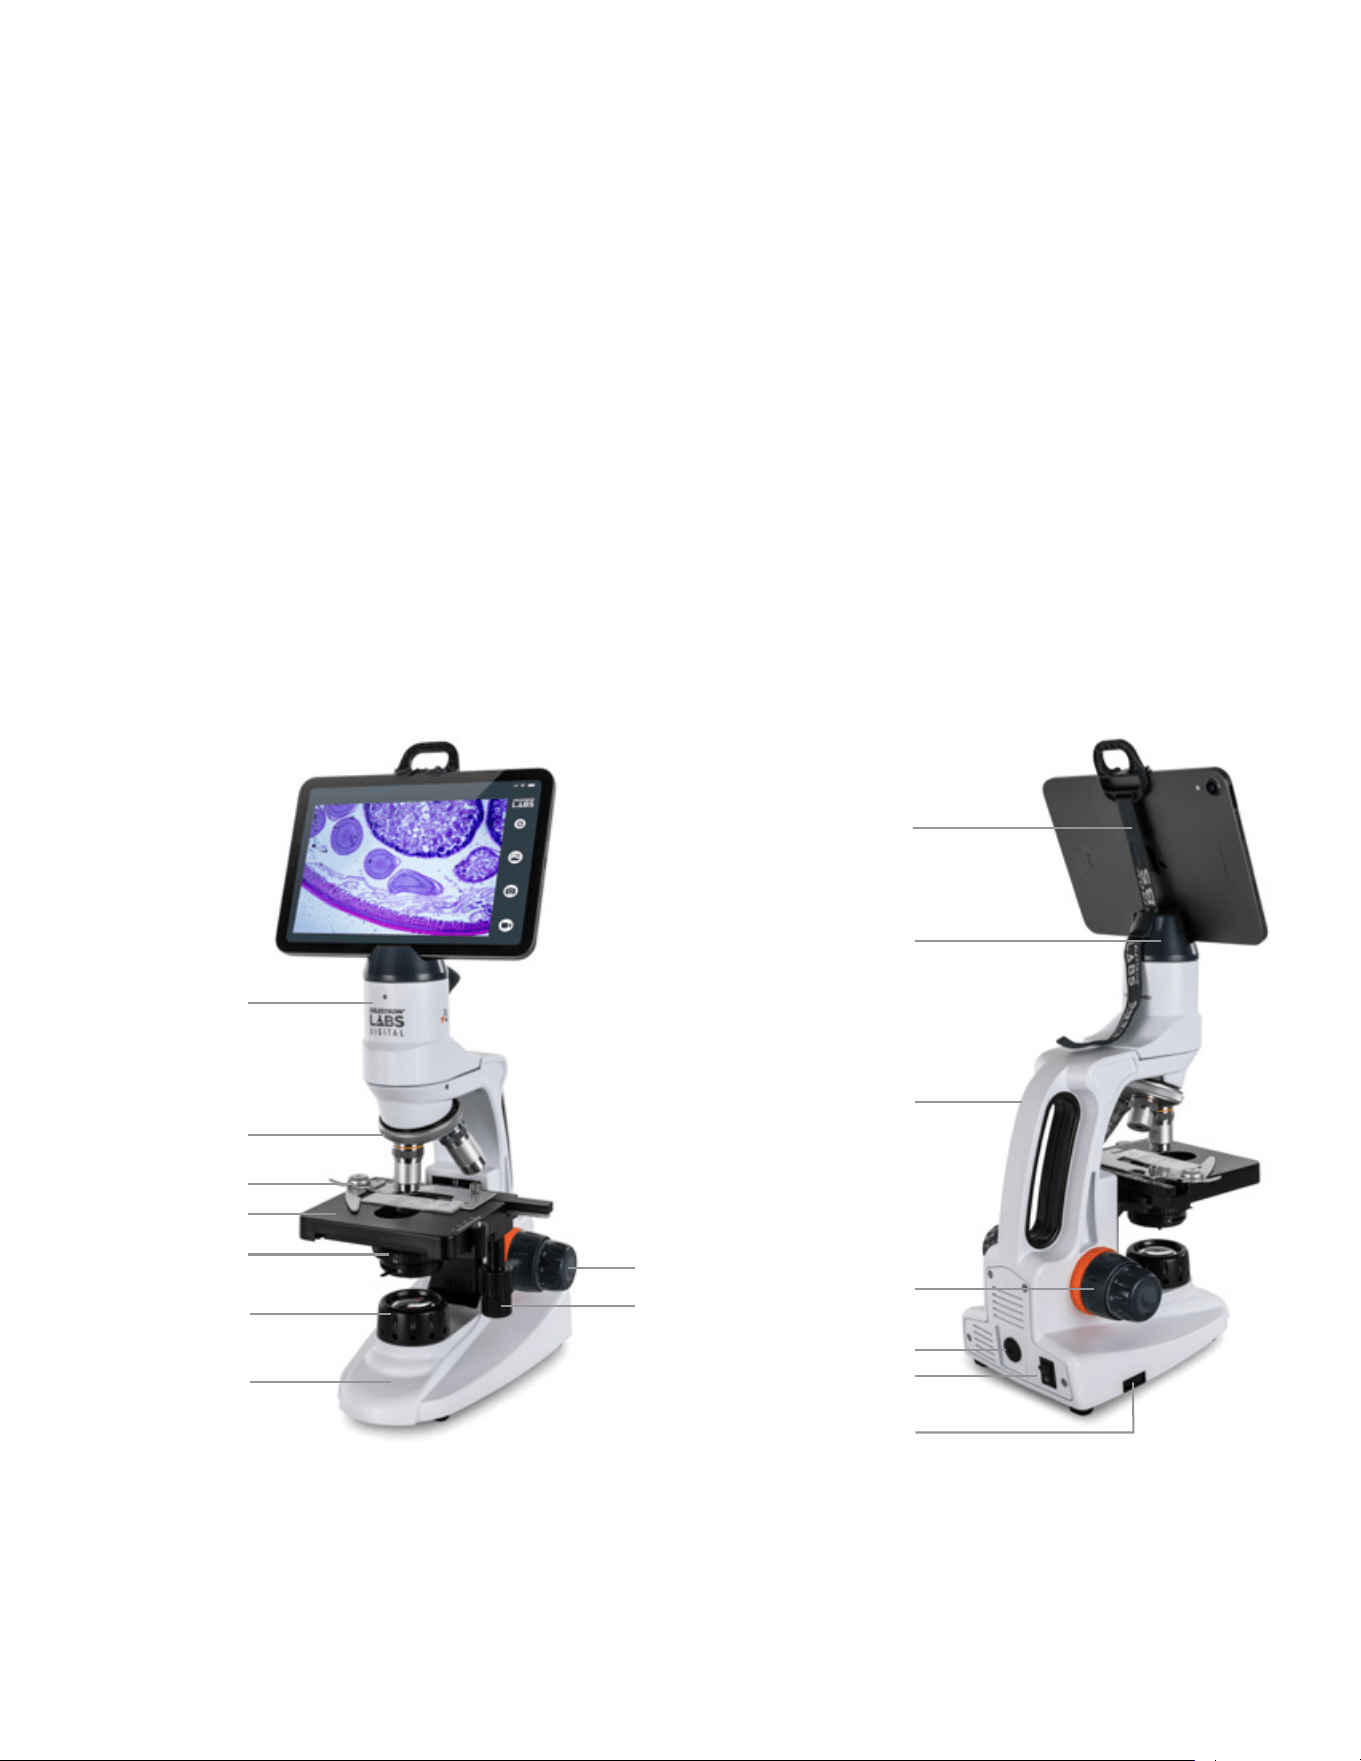
Safety Hook and Strap
Smart Device Holder
Microscope Head w/Sensor
and Wi-Fi Module
Trinocular Objective Turret
w/3 Objectives
Slide Holder
Mechanical Stage
Abbe Condensor
Illuminator
Base
Fine Focus Wheel
X,Y Stage
Adjustment Knobs
Carry Handle
Course Focus Wheel
5.5mm Power Jack
On/Off Switch
Illuminator Adjustment Wheel
ENGLISH
|
3
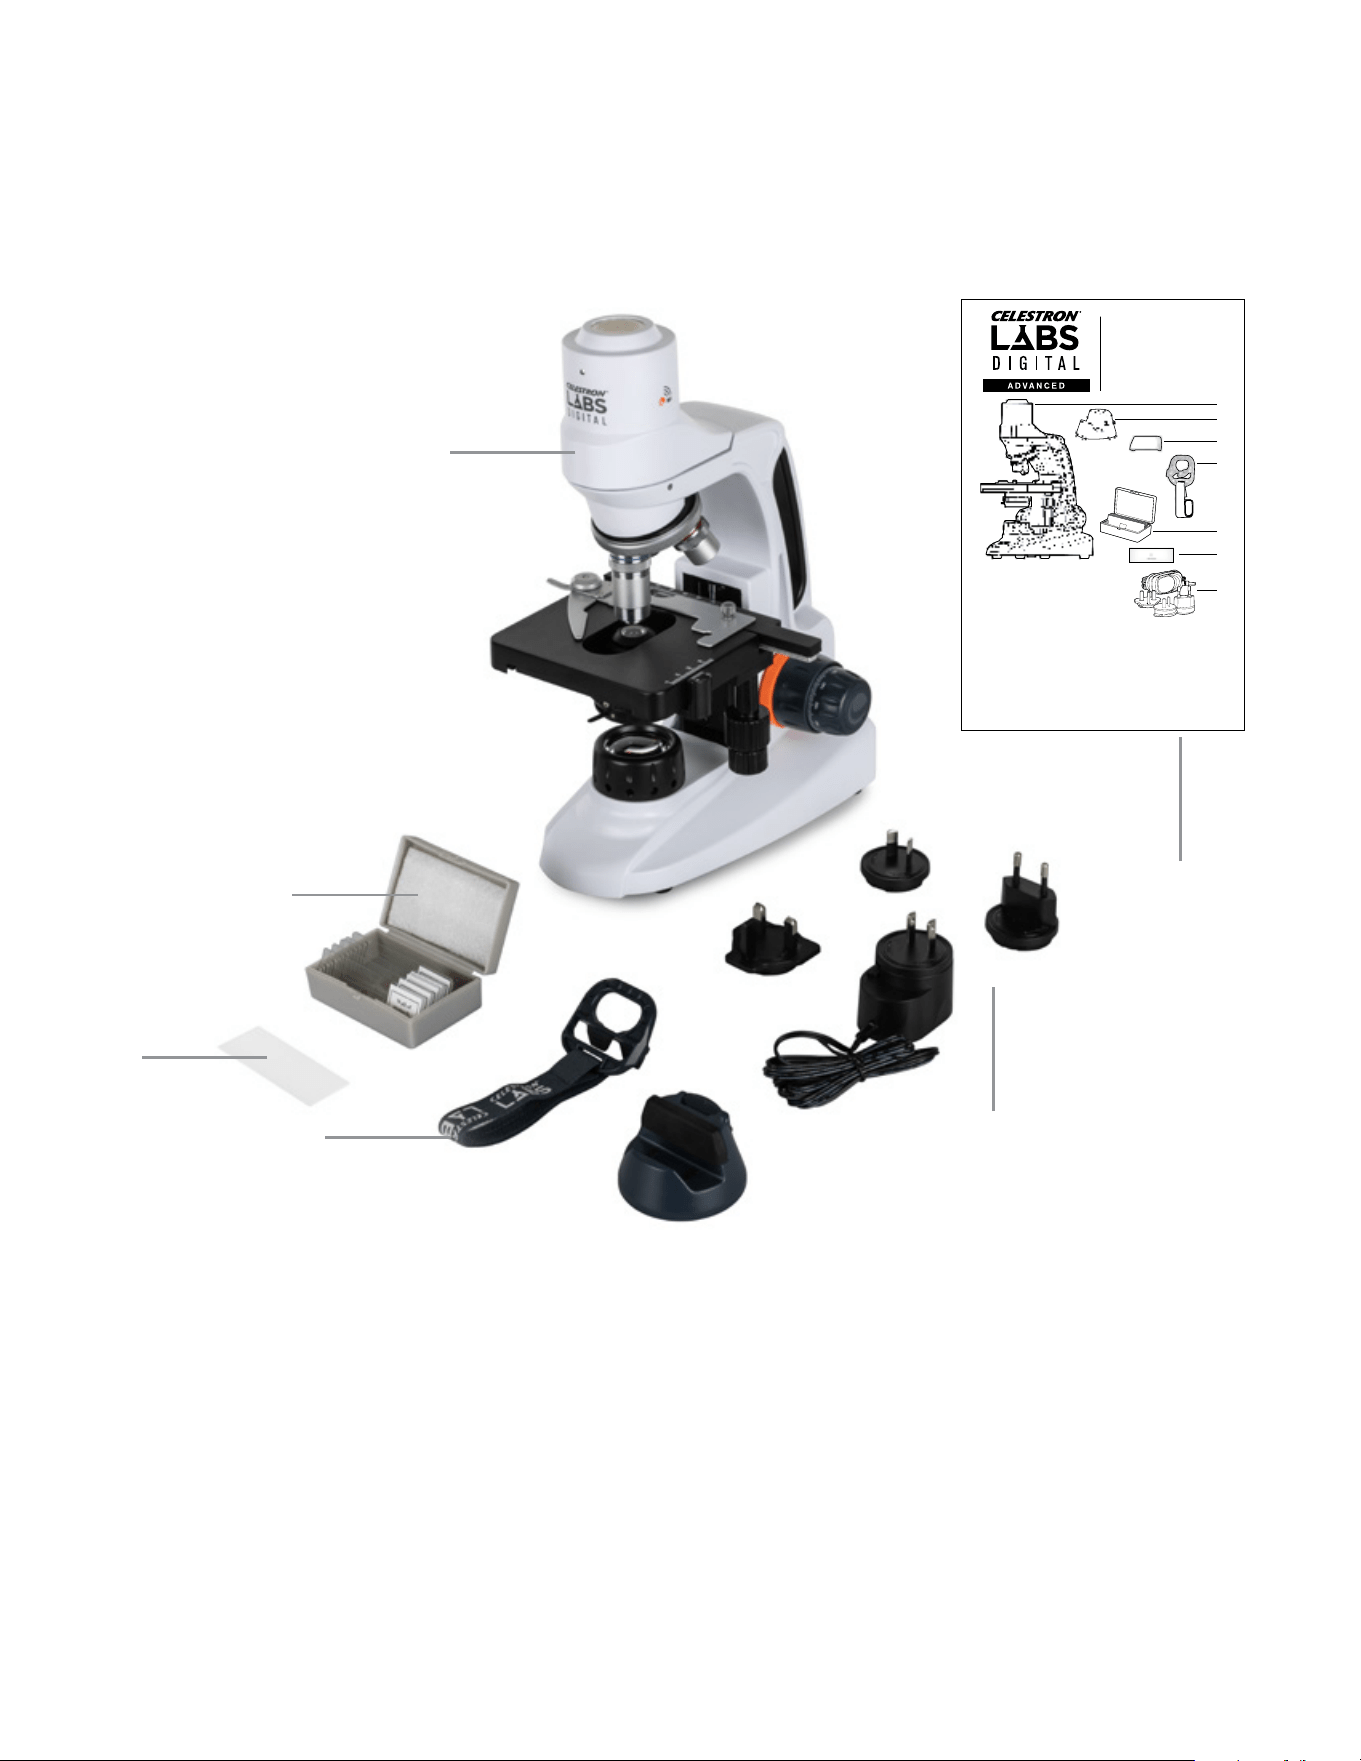
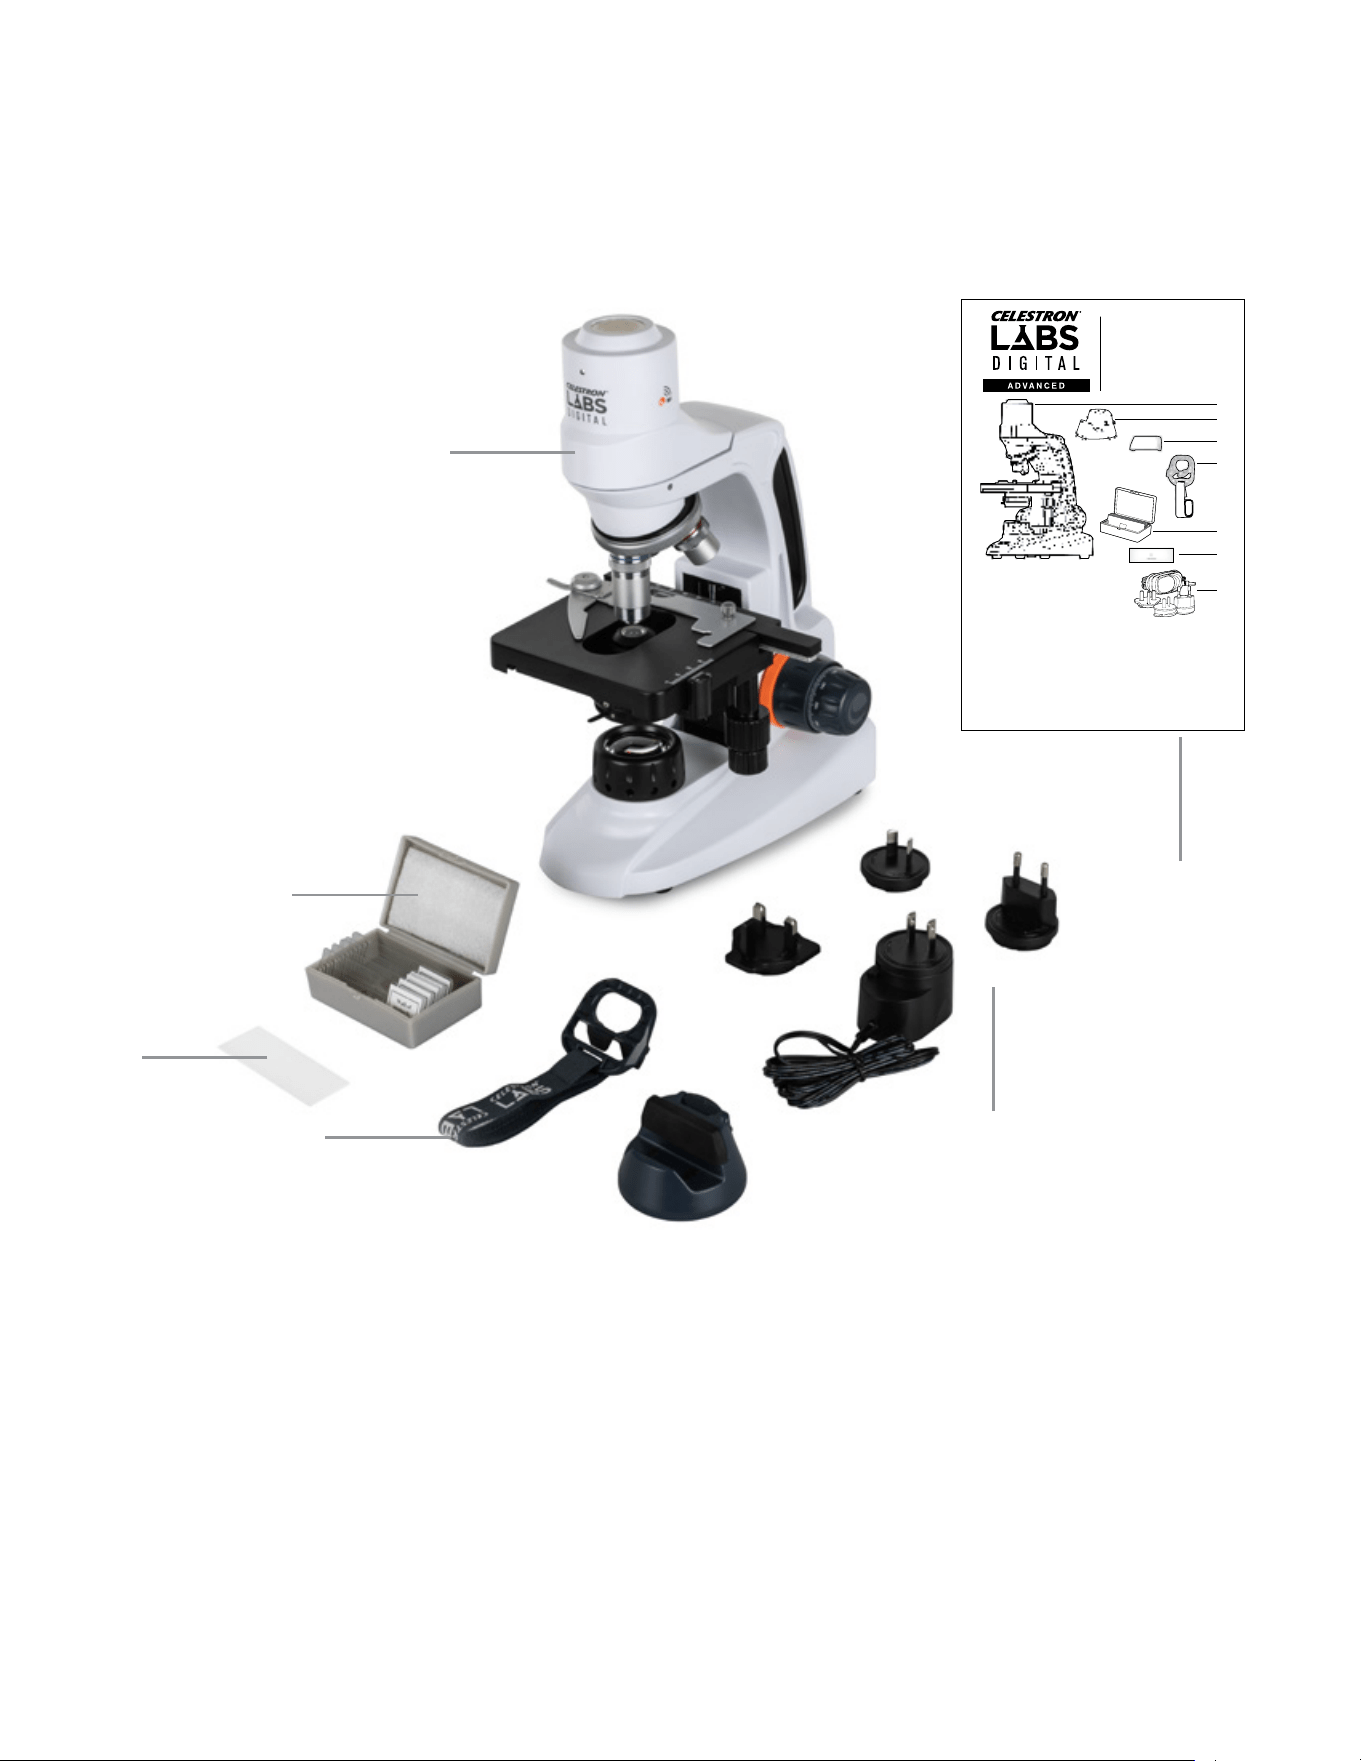
Carefully unpack your Wi-Fi Desktop Microscope and verify that all items listed below are present:
[A] Celestron Labs Digital Wi-Fi Desktop Microscope
[B] Five prepared slides
[C] Calibration slide
[D] Multi-country AC adapter with four plugs
[E] Smart device stand with safety strap
[F] Quick Setup Guide
A
B
C
E
D
F
MODEL #44351
QUICK START GUIDE
Contenu de la boîte
[A] M icroscope d e table Wi-F i 2MP
Celes tron Labs 2 MP
[B] So cle intellige nt
[C] Ad aptateur d e socle intell igent
[D] Sa ngle de sécuri té de socle int elligent
[E] Boî te de 5 de lame s de spécimens
préparées
[F] Ré glette d’ét alonnage
[G] Ada ptateur se cteur inte rnational
CA 100–2 40 V
What’s in the Box
[A] C elestron L abs 2MP Wi- Fi Deskt op
Microscope
[B] Sm art Device S tand
[C] Sma rt Device S tand Boos ter
[D] Sm art Device S tand Safe ty Strap
[E] Bo x of 5 Prepar ed Specimen Sli des
[F] C alibratio n Slide
[G] Mul ti-count ry 100–240V A C Adapter
Lieferumfang
[A] C elestron L abs 2MP WL AN
Desktopmikro skop
[B] Smart-Geräte-Gestell
[C] Smart-Geräte-Gestellver stärkung
[D] Smart-Geräte-Gestell-Sicherheitsgurt
[E] Bo x mit 5 vorber eiteten Obj ektträ gern
[F] Kalibrierungsobjek tträger
[G] Lä nderübergr eifender 10 0–240 V
AC-Adapter
Contenuto della confezione
[A] M icroscopi o da tavolo Wi -Fi Celest ron
Labs 2 MP
[B] Sup porto per di spositiv o smart
[C] Boo ster per dis positivo s mart
[D] Cing hia di sicure zza per supp orto per
dispositivo smart
[E] Co nfezione da 5 v etrini pre parati
[F] Ve trino di cali brazione
[G] Ada ttator e CA 100-240 V mul ti-paese
Contenido de la caja
[A] M icroscopi o WiFi de escr itorio de 2M P
CelestronLabs
[B] Sop orte de disp ositivo in teligente
[C] Pot enciador de so porte de dis positivo i nteligent e
[D] Cor rea de segur idad del sopor te de dispos itivo
inteligente
[E] Ca ja de 5 portam uestras d e especímene s
preparados
[F] Re gla de calibr ado
[G] Ada ptador 100 -240V CA mult inacional
Wi-Fi DESKTOP MICROSCOPE
ENGL ISH
NEED ASSISTANCE? Contact Celestron Technical Suppor t
celestron.com/pages/technical-support
Produ ct design and s pecificat ions are subj ect to change w ithout pri or
noti fication. • T his product i s designed and i ntended for u se by those
14 year s of age and older.
©2025 C elestro n. Celestr on and Symbol
are tr ademarks o f Celestr on, LLC. • All r ights res erved. • Cele stron.c om
US: Cele stron, 28 35 Columbia S treet, Tor rance, CA 90 503 USA • UK :
Celes tron Globa l Ltd., Unit 2 Tra nsigo, Gabl es Way, Thatch am RG19 4JZ,
Unite d Kingdom • Made i n China | 06-25
FRA NÇAIS
BESOIN D’ASSISTANCE? Contactez le support technique de
Celestron
celestron.com/pages/technical-support
Le des ign et les spéci fications d u produit son t sujette s à modificat ion sans
préa vis. • Ce prod uit est conçu e t prévu pour ê tre utilis é par des pers onnes
âgées d e 14 a ns et plus
©2025 C elestro n. Celestr on et le Symbol s ont
des mar ques dépos ées de Celest ron, LLC. • Tou s droits rés ervés • Cel estron.
com • US: C elestron .com • 2835 Col umbia Stre et, Torrance , CA 90503 U SA •
UK: Cel estron Glo bal Ltd., Uni t 2 Tr ansigo, Gab les Way, That cham RG19 4JZ ,
Royaum e-Uni • Fabr iqué en Chine | 06 -25
DEUTSCH
BENÖTIGEN SIE UNTERSTÜ TZUNG? Wenden Sie sich an die
technische Unterstützung von Celestron unter
celestron.com/pages/technical-support
Produ ktdesign u nd technisch e Daten könne n ohne vorher ige Ankündig ung
geänd ert werden . Dieses Pro dukt ist für P ersonen ab 14 J ahren konzi piert
und vorgesehen.
©2025 C elestro n. Celestr on und Symbol
sind Wa renzeichen v on Celestr on, LLC. Al le Rechte vor behalten. C elestron .
com • US A: Celestr on, 2835 Col umbia Stre et, Torrance , CA 90503 U SA • UK:
Celes tron Globa l Ltd., Einhei t 2 Transigo, Ga bles Way, Tha tcham RG19 4JZ ,
Verein igtes König reich • Herge stellt in Chi na | 06-25
celestron.com/pages/warranty
ITALIANO
BISOGNO DI AIUTO? Contattare il suppor to tecnico Celestron
celestron.com/pages/technical-support
Il desi gn del prodot to e le specifi che sono sogge tti a modifi che senza
prev ia notifica . Questo pr odotto è pro gettat o per essere u tilizza to da
pers one di età par i o superiore a i 14 anni.
©2025 C elestro n. Celetron e S ymbol
sono ma rchi di Celes tron, LLC . • Tu tti i dirit ti riserv ati. • Celes tron.com
• Sta ti Uniti: Cele stron, 28 35 Columbia S treet, Torr ance, CA 90 503 Stat i
Uniti • R egno Unito: Ce lestron Gl obal Ltd., Un it 2 Transigo, G ables Way,
That cham RG18 4JZ Re gno Unito • Pro dotto in Cin a | 06-25
ESPAÑOL
¿NECESITA AYUDA? Contacte con el soporte técnico de
Celestron
celestron.com/pages/technical-support
El dise ño y las especi ficaciones d el producto e stán sujet os a cambios s in
noti ficación pre via. Este p roducto ha s ido diseñado y e stá pensad o para
ser us ado por perso nas de 14 años o más d e edad.
©2025 Celestron. Celestron y su símbolo
son marcas comerciales de Celest ron, LLC. • Todos los derechos reserv ados.
• C elestron .com • EE.UU.: Celestr on, 283 5 Columb ia Str eet, Torr ance, C A
9050 3 EE .UU. • GB: Celes tron Global Ltd., Unit 2 Tr ansigo, Gables Way,
That cham RG19 4JZ, Re ino Unido • Fabric ado en China | 06-25
B
A
C
D
E
F
G
CLICK FOR FULL MANUAL
CLIQUEZ POUR CONSULTER LE MODE D’EMPLOI COMPLET
FÜR DIE VOLLSTÄNDIGE ANLEITUNG KLICKEN
FARE CL IC PER IL MANUALE COMPLETO
PULSE PARA EL MANUAL COMPLETO
QR CODE

4
|
ENGLISH
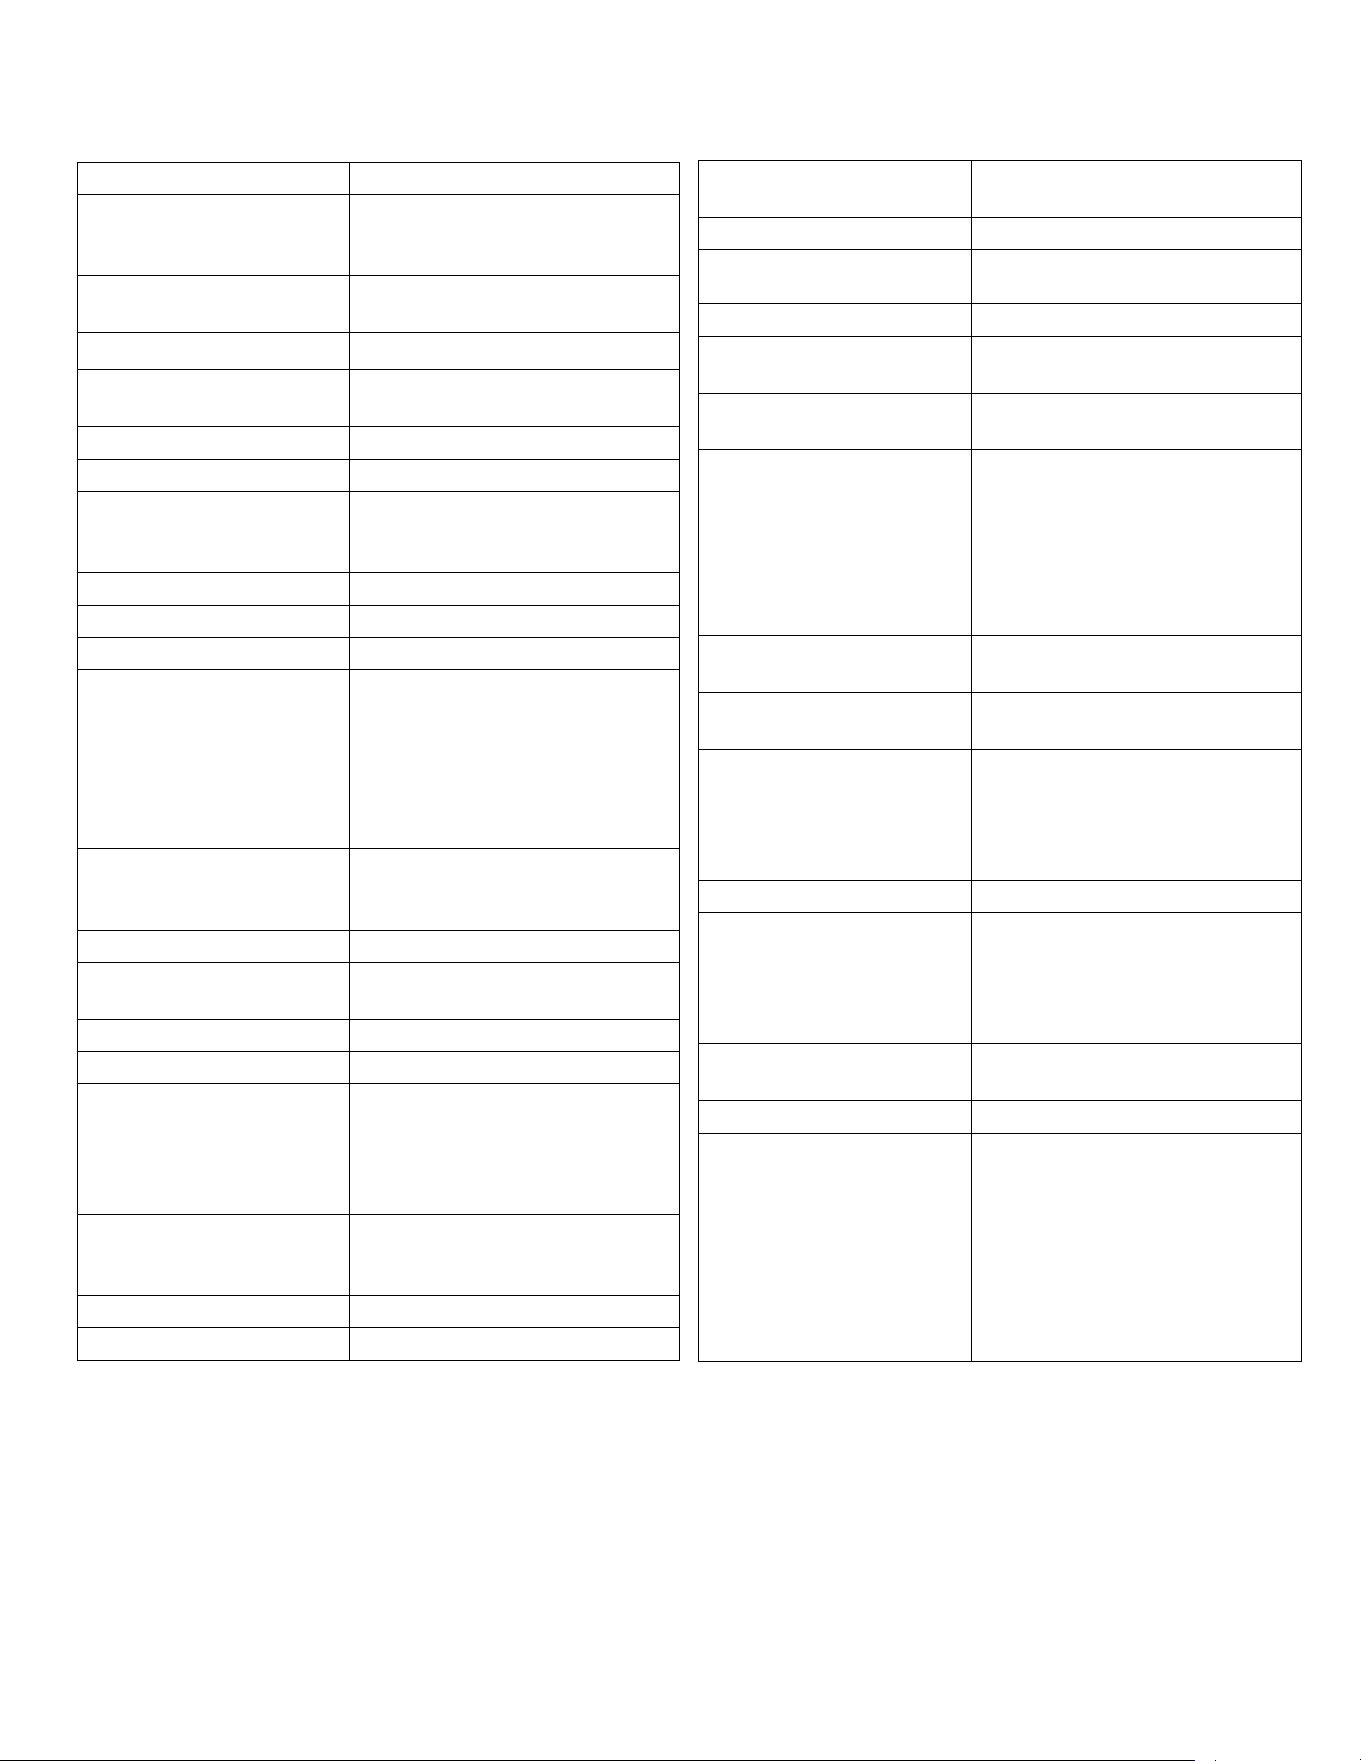
Type of Microscope: Wi-Fi Desktop /w triple objectives
Head: Head has sensor and Wi-Fi module for
sending wireless streaming images
Eyepiece Type: CMOS Sensor in lieu of eyepiece (12x
magnification)
Sensor Size: 2MP | 1/2.8” Sony IMX290 LQR-XC
Stage Type: Mechanical - Double Layer, 115mm
x 125mm (4.52” x 4.92”)
Sensor magnification: 12x
Pixel Size: 2.9 μm x 2.9 μm
Memory Type: No memory- uses smart device memory
to save images and video
Still image capture
resolution:
640x480/ 1280x720/ 1920x1080
Video resolution: 640x480/ 1280x720/ 1920x1080
Shutter trigger position: In device APP
Software: Celestron Labs Digital Wi-Fi APP
• Still Image
• Video
• Measurement feature
Software Compatability: • iOS
• Android
Nosepiece: Triple with click stop
Objective(s) Type: (3) Finite Plan Achromatic CF objectives
on turret
Objective(s) Standard: DIN 35 RMS
Objective(s)
Magnification
4x, 10x, 40x
Magnification Range: 48x, 120x, and 480x (Final determined
by device screen size. Spec based on
5” smartphone screen size)
FOV • 4x: 37.5mm
• 10x: 6.7mm
• 40x: .65mm
Objective(s) Thread: WJ 4/5” x 1/36”
Focus Type(s): Course and Fine Focus
Focus Travel (per
rotation):
0.7mm to 35.3mm (.027” to 1.39”) (est.)
Illumination Type: LEDs (3W/4V- 220V/110V)
Illumination Position(s): Bottom Illuminator
Illumination Adjustability
Mechanism:
Adjustment dial on base
Power Source: Universal AC Adapter* 100 to 240V,
50/60 hz multi-country plug
Battery Option: Yes. 3AA Batteries for (2 hours)
backup power- if needed
Stage: Double layers mechanical stage
• Stage size: 115mm×125mm
(4.5” x 4.9”)
• Moving range: 70mm×30mm
(2.75” x 1.18”)
Condenser Type: Abbe condenser with iris diaphragm
& filter
Condenser N.A.: N.A. 1.25
Port(s) In: AC Adapter/ 5-6V DC, 200-1000mA
tip positive electrical input. (Jack should
be 5.5mm (.21”) OD, 2.1mm (.08”) ID
and 12.5mm (.49”) long)
Port(s) Out: NA
AC Adapter: 5-6V DC, 200-1000mA tip positive
electrical input. Jack should be 5.5mm
(.21”) OD, 2.1mm (.08”) ID and
12.5mm (.49”) long
Microscope
Dimensions:
170mm x 140mm x 330mm
(6.7” x 5.5” x 13”)
Microscope Weight: 56 oz (1600g)
Included Items: • 5 Prepared Slides
• Calibration slide
• AC adapter (4 plug for International)
• Unique, optional smart device holder
with safety strap
SPECIFICATIONS
ENGLISH
|
5
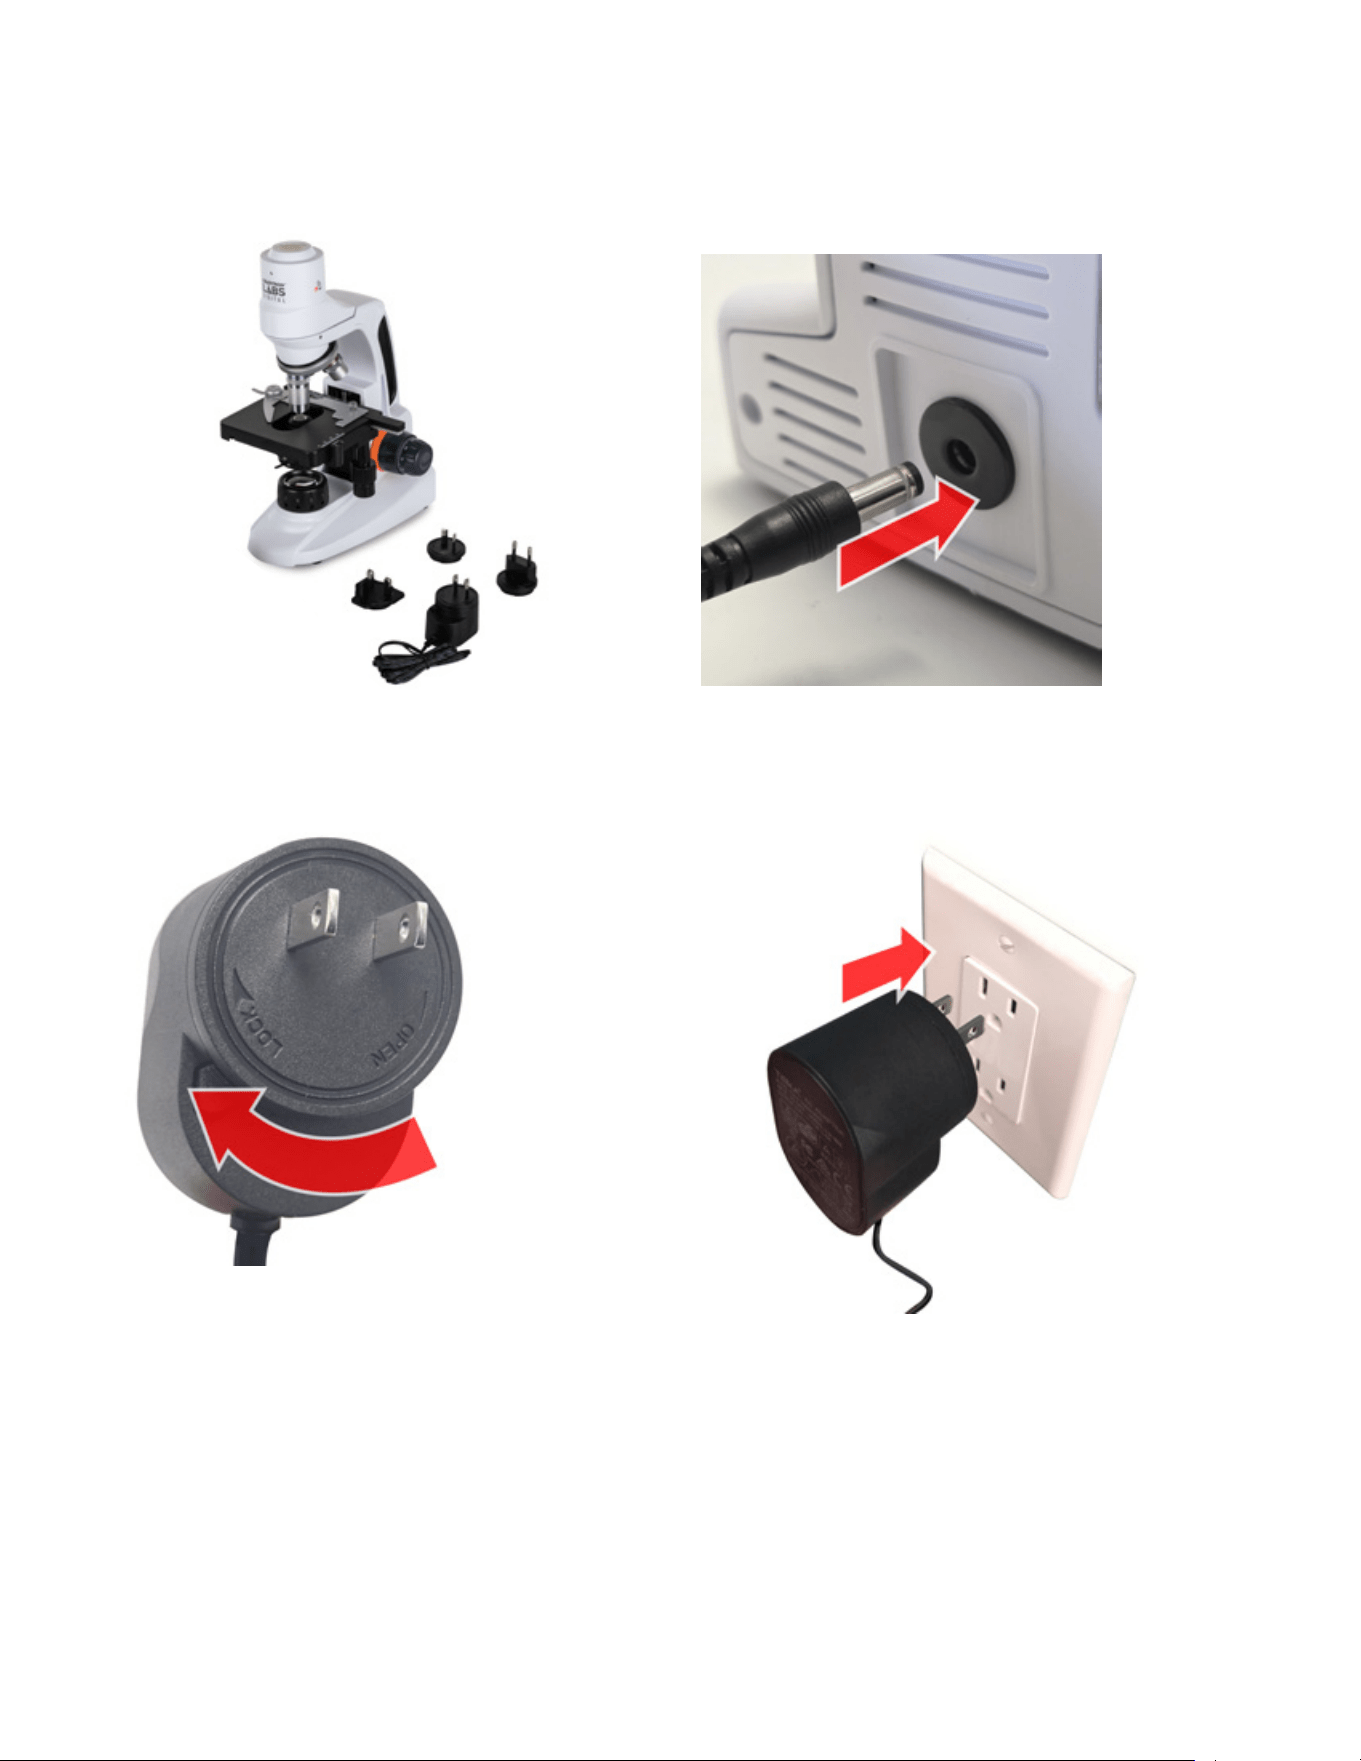
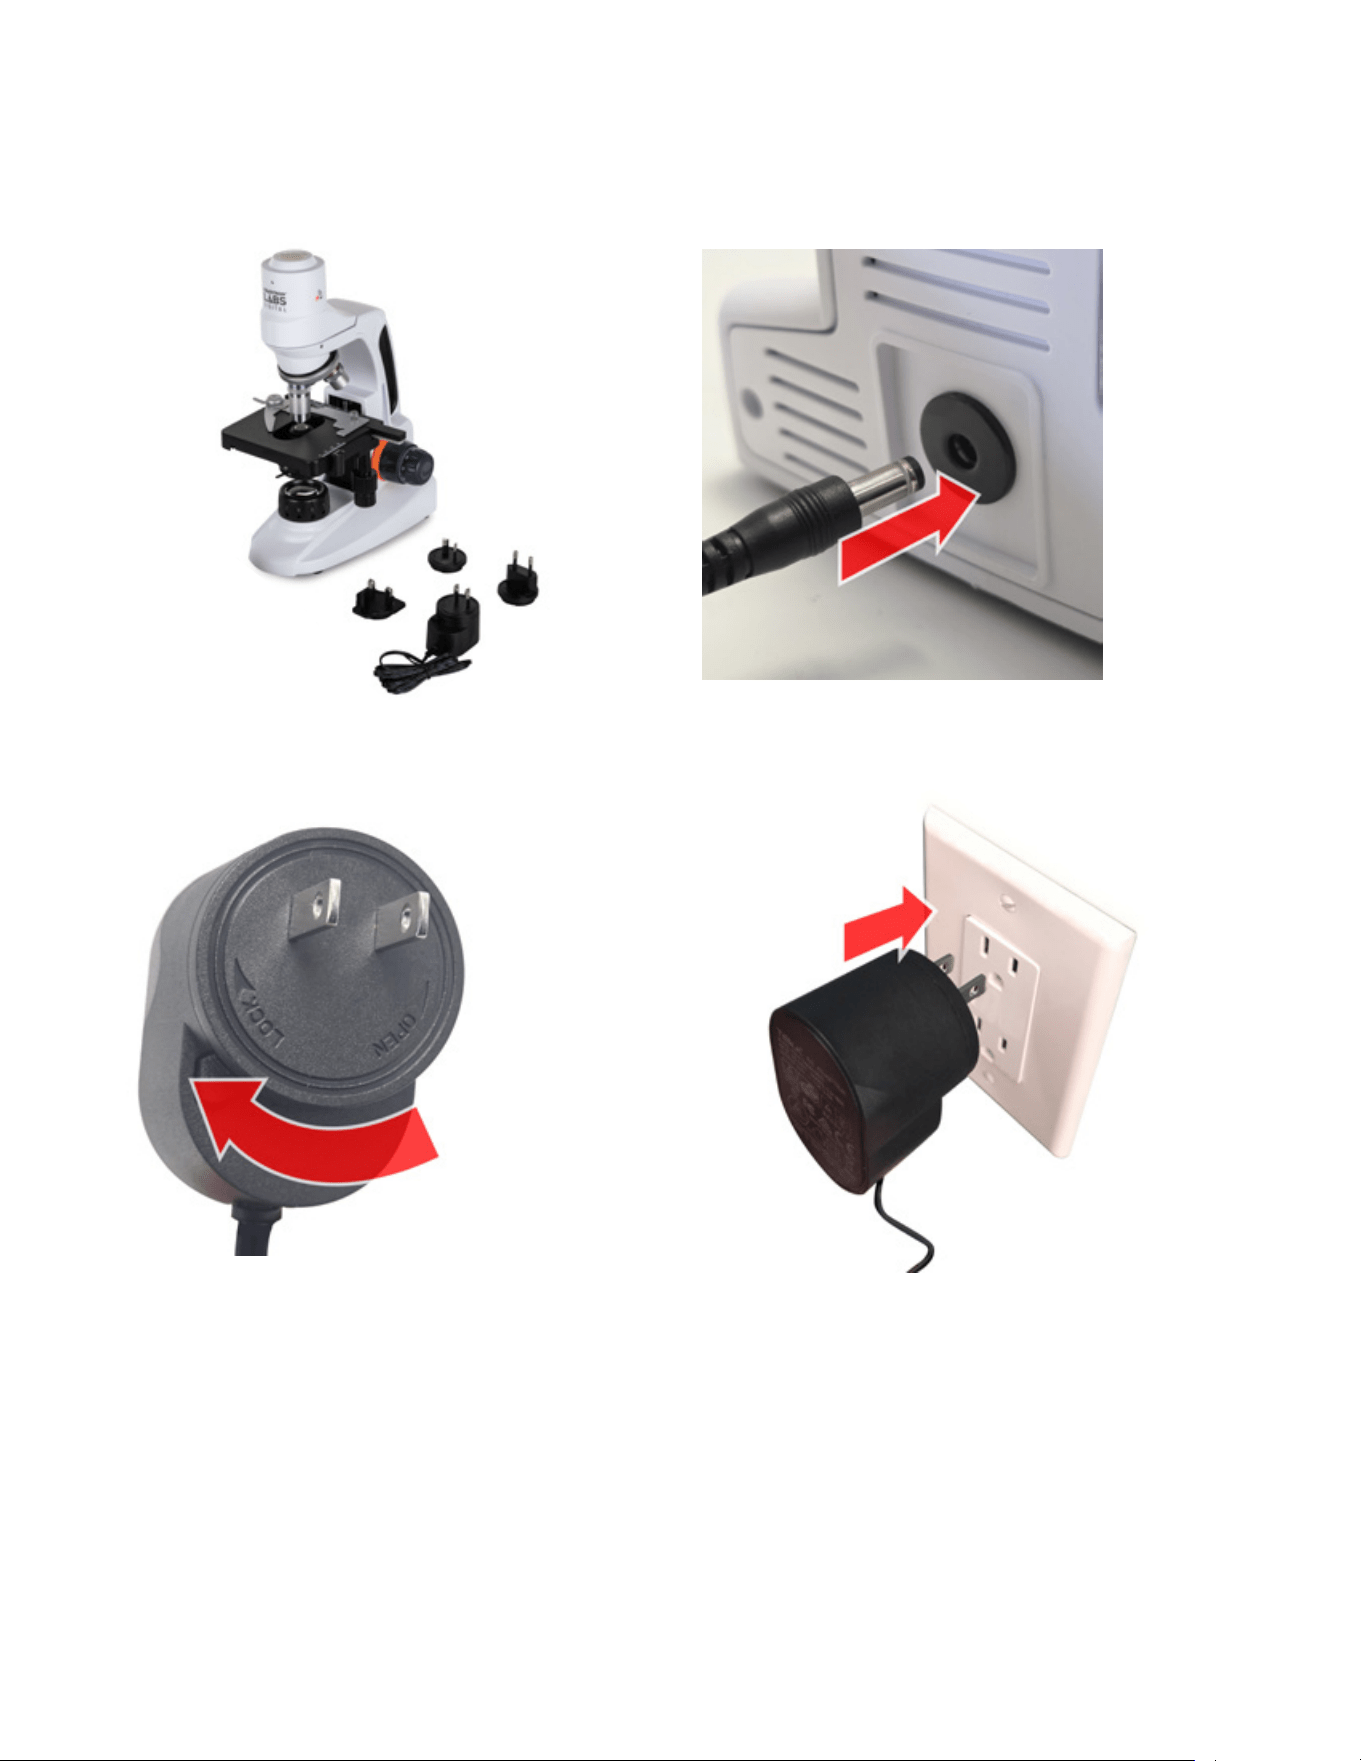
1. Place the microscope and other parts on a stable, flat surface
SET UP
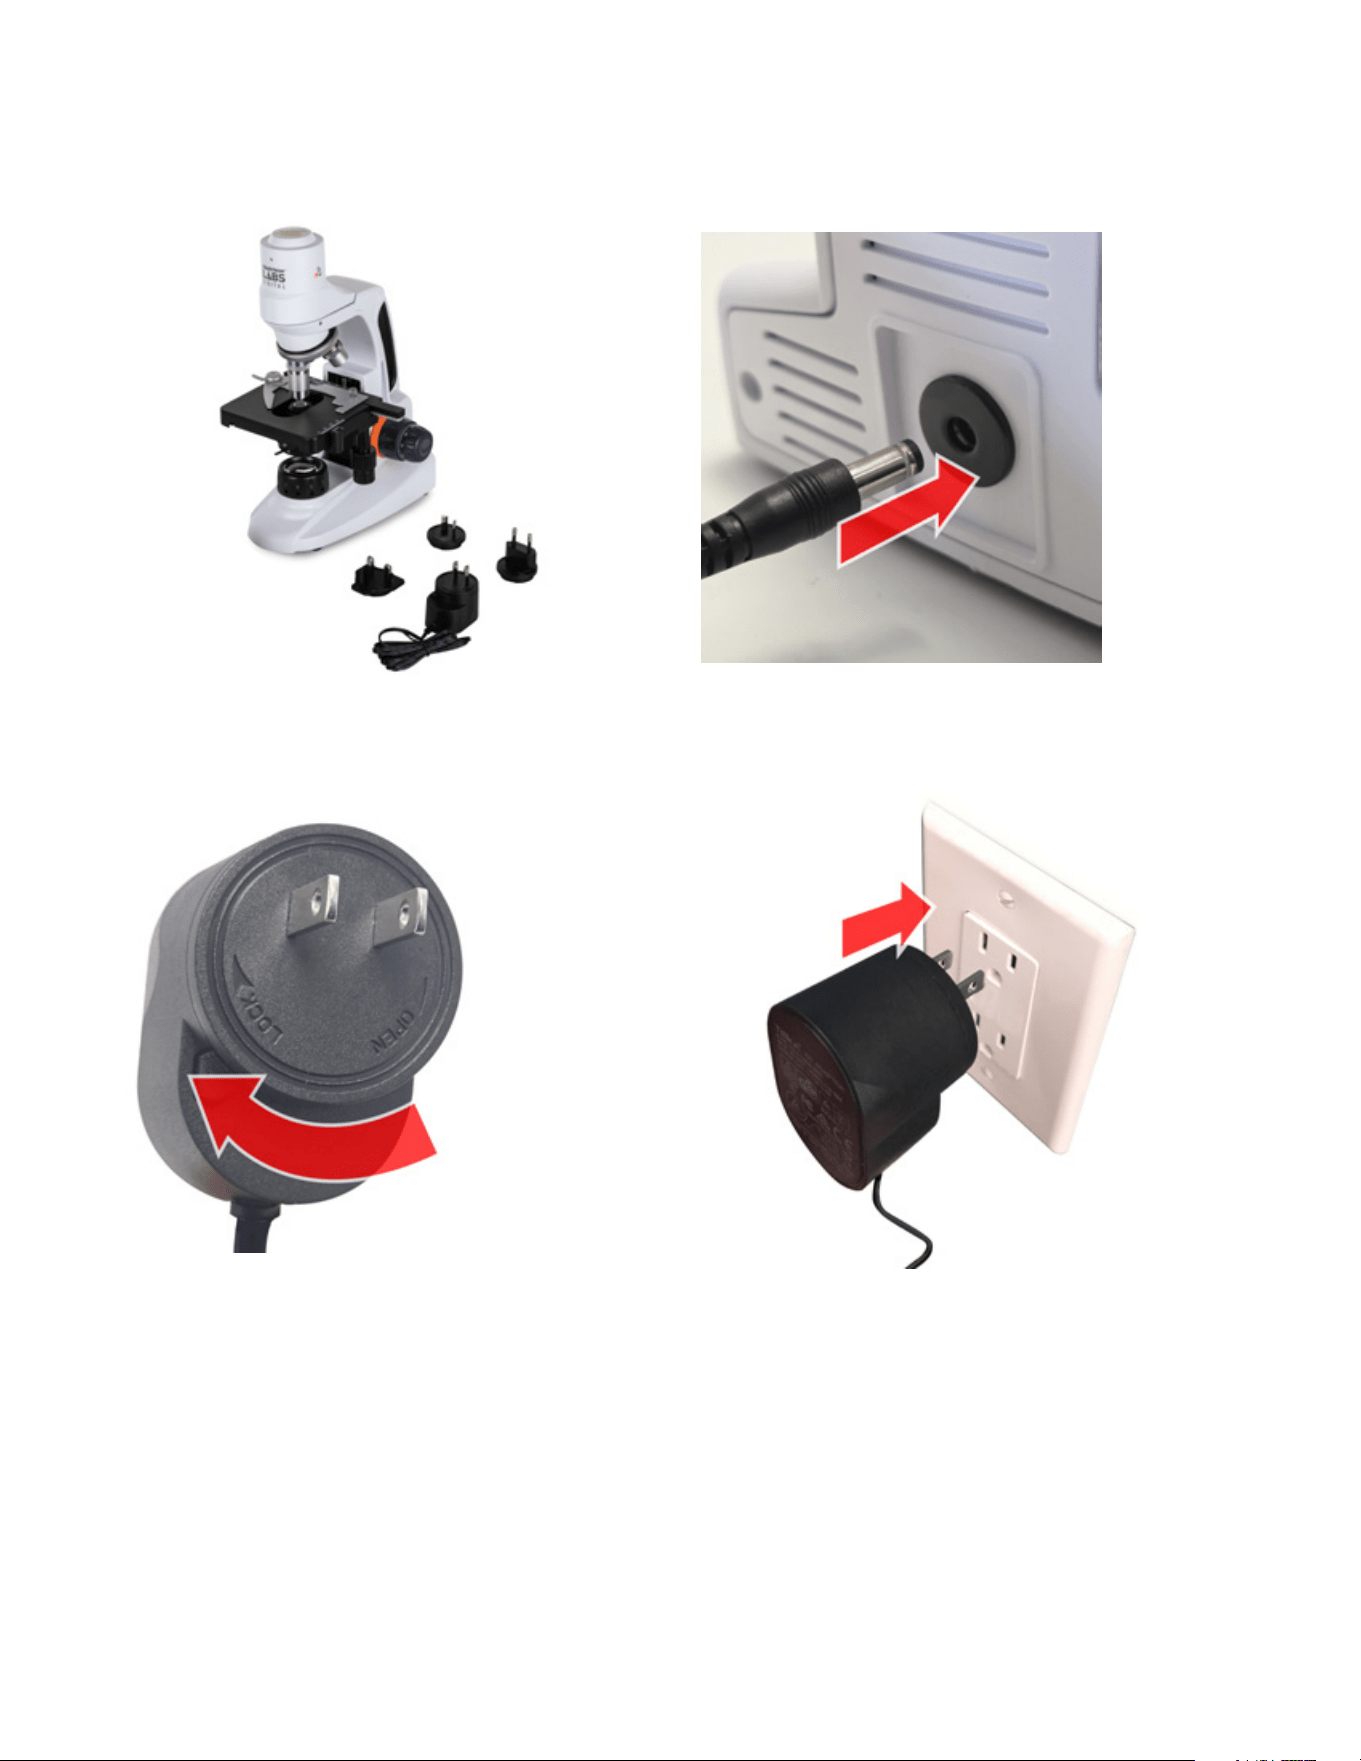
STEP 1: CONNECT POWER
2. Insert the small connector from the AC adapter into the power
socket on the back of the microscope.
3. Select the correct plug for your country and attach it to the
adapter.
4. Plug the adapter into a 120-240V wall outlet.
6
|
ENGLISH
The illuminator should turn on. If it does not, rotate
the brightness dial on the side of the base to increase
illumination.
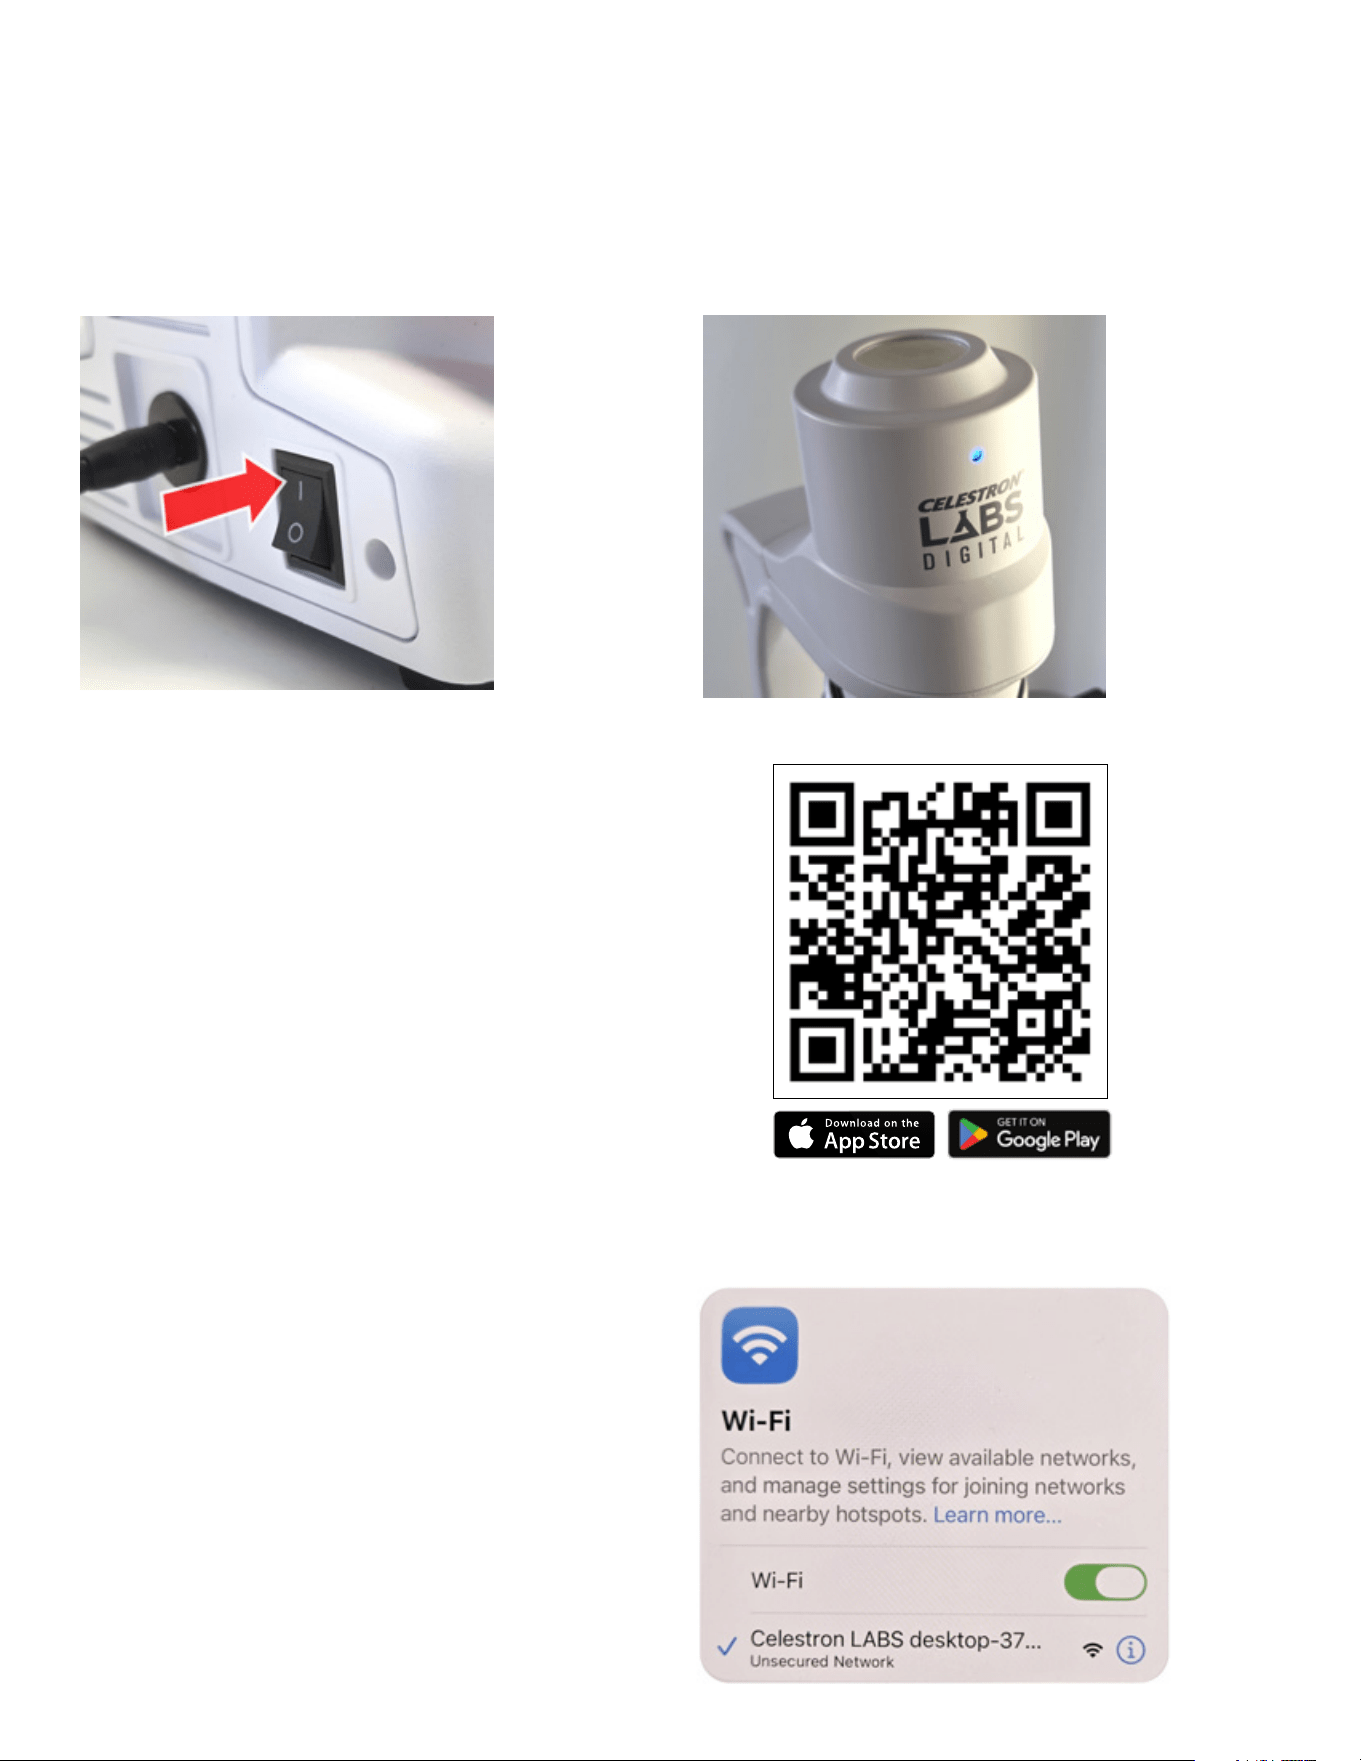
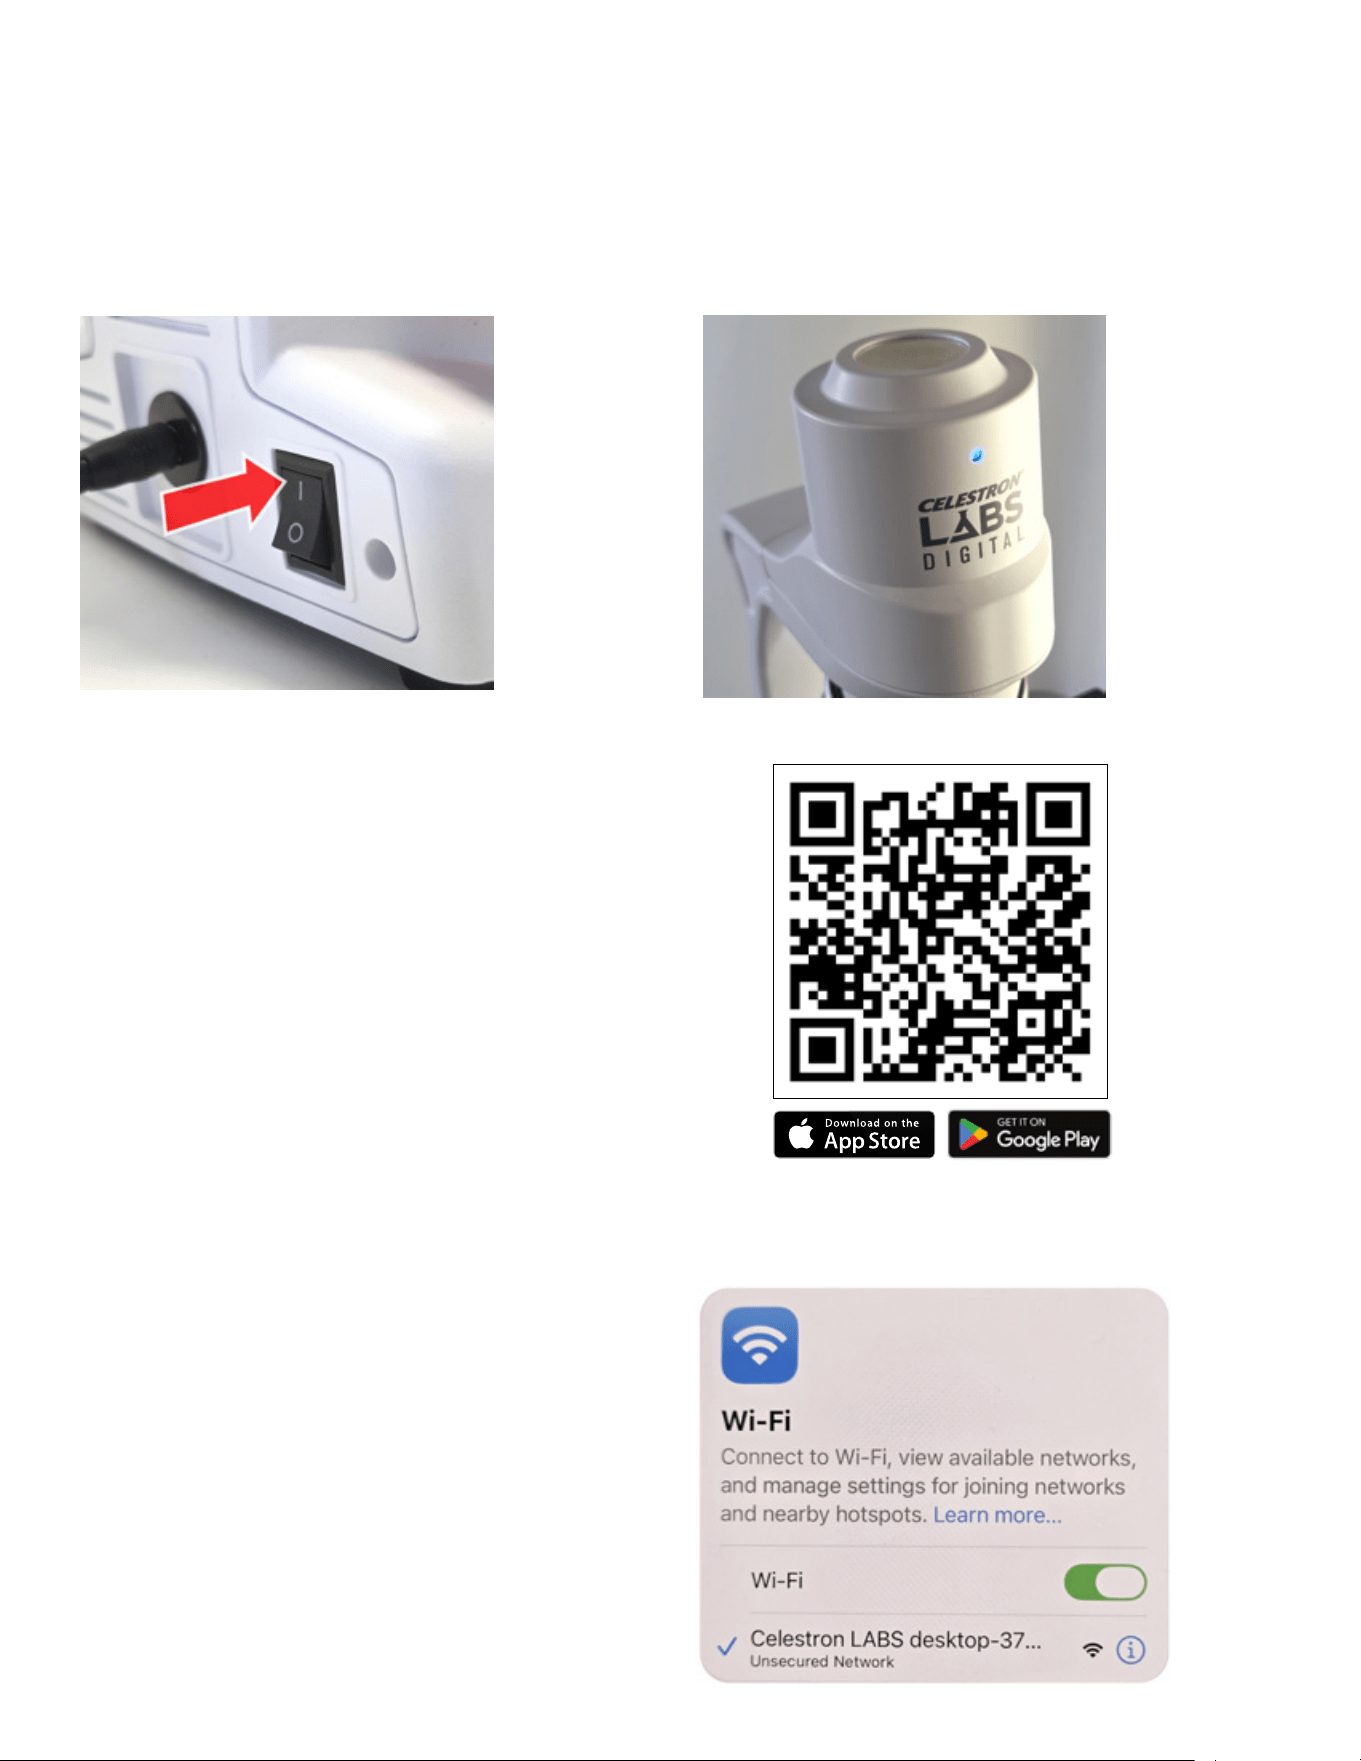
The blue LED indicator will begin blinking. This indicates the
microscope is broadcasting its Wi-Fi signal.
If the blue LED does not illuminate:
• Confirm the power adapter is securely connected.
• Verify the wall outlet is active.
STEP 3: INSTALL THE APP
This microscope’s companion app works with iOS and Android
devices. Scan the QR code below or search for “Celestron Labs
Digital Wi-Fi” in the Apple App Store or Google Play Store.
Download and install the free app.
1. Open the Wi-Fi settings on your smartphone or tablet.
2. Look for a network named:
Celestron LABS Desktop-XXXX
(The four X’s represent a unique letter/number combination.)
3. Tap the network to connect.
Once connected, the blue LED will stop blinking and remain steady.
Your device may display a message stating there is no internet
connection. This is normal. The microscope creates its own direct
Wi-Fi connection and does not use your Wi-Fi network.
STEP 2: POWER ON
Turn on the power switch located on the base of the microscope.
STEP 4: CONNECT TO THE MICROSCOPE’S WI-FI NETWORK
ENGLISH
|
7
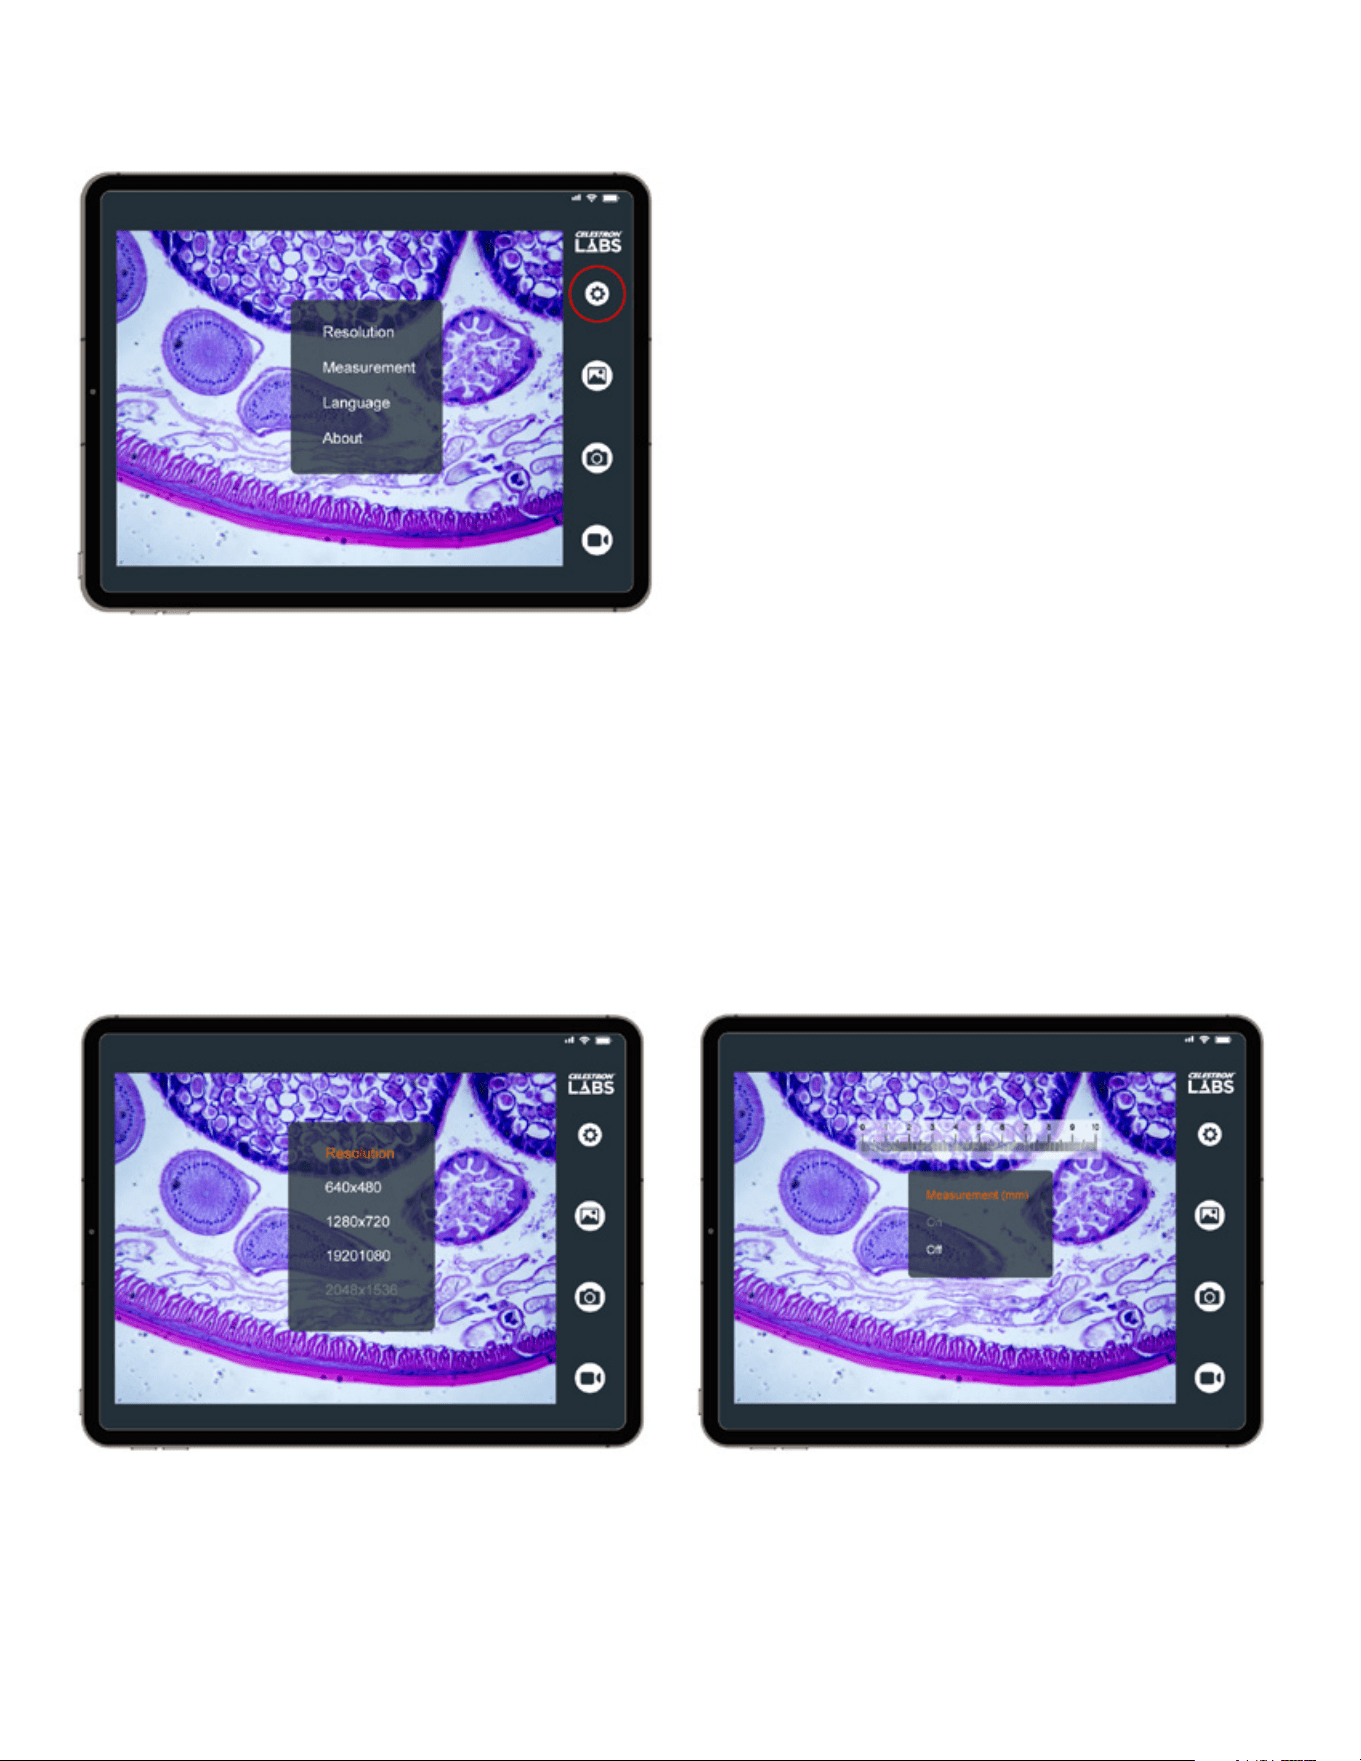
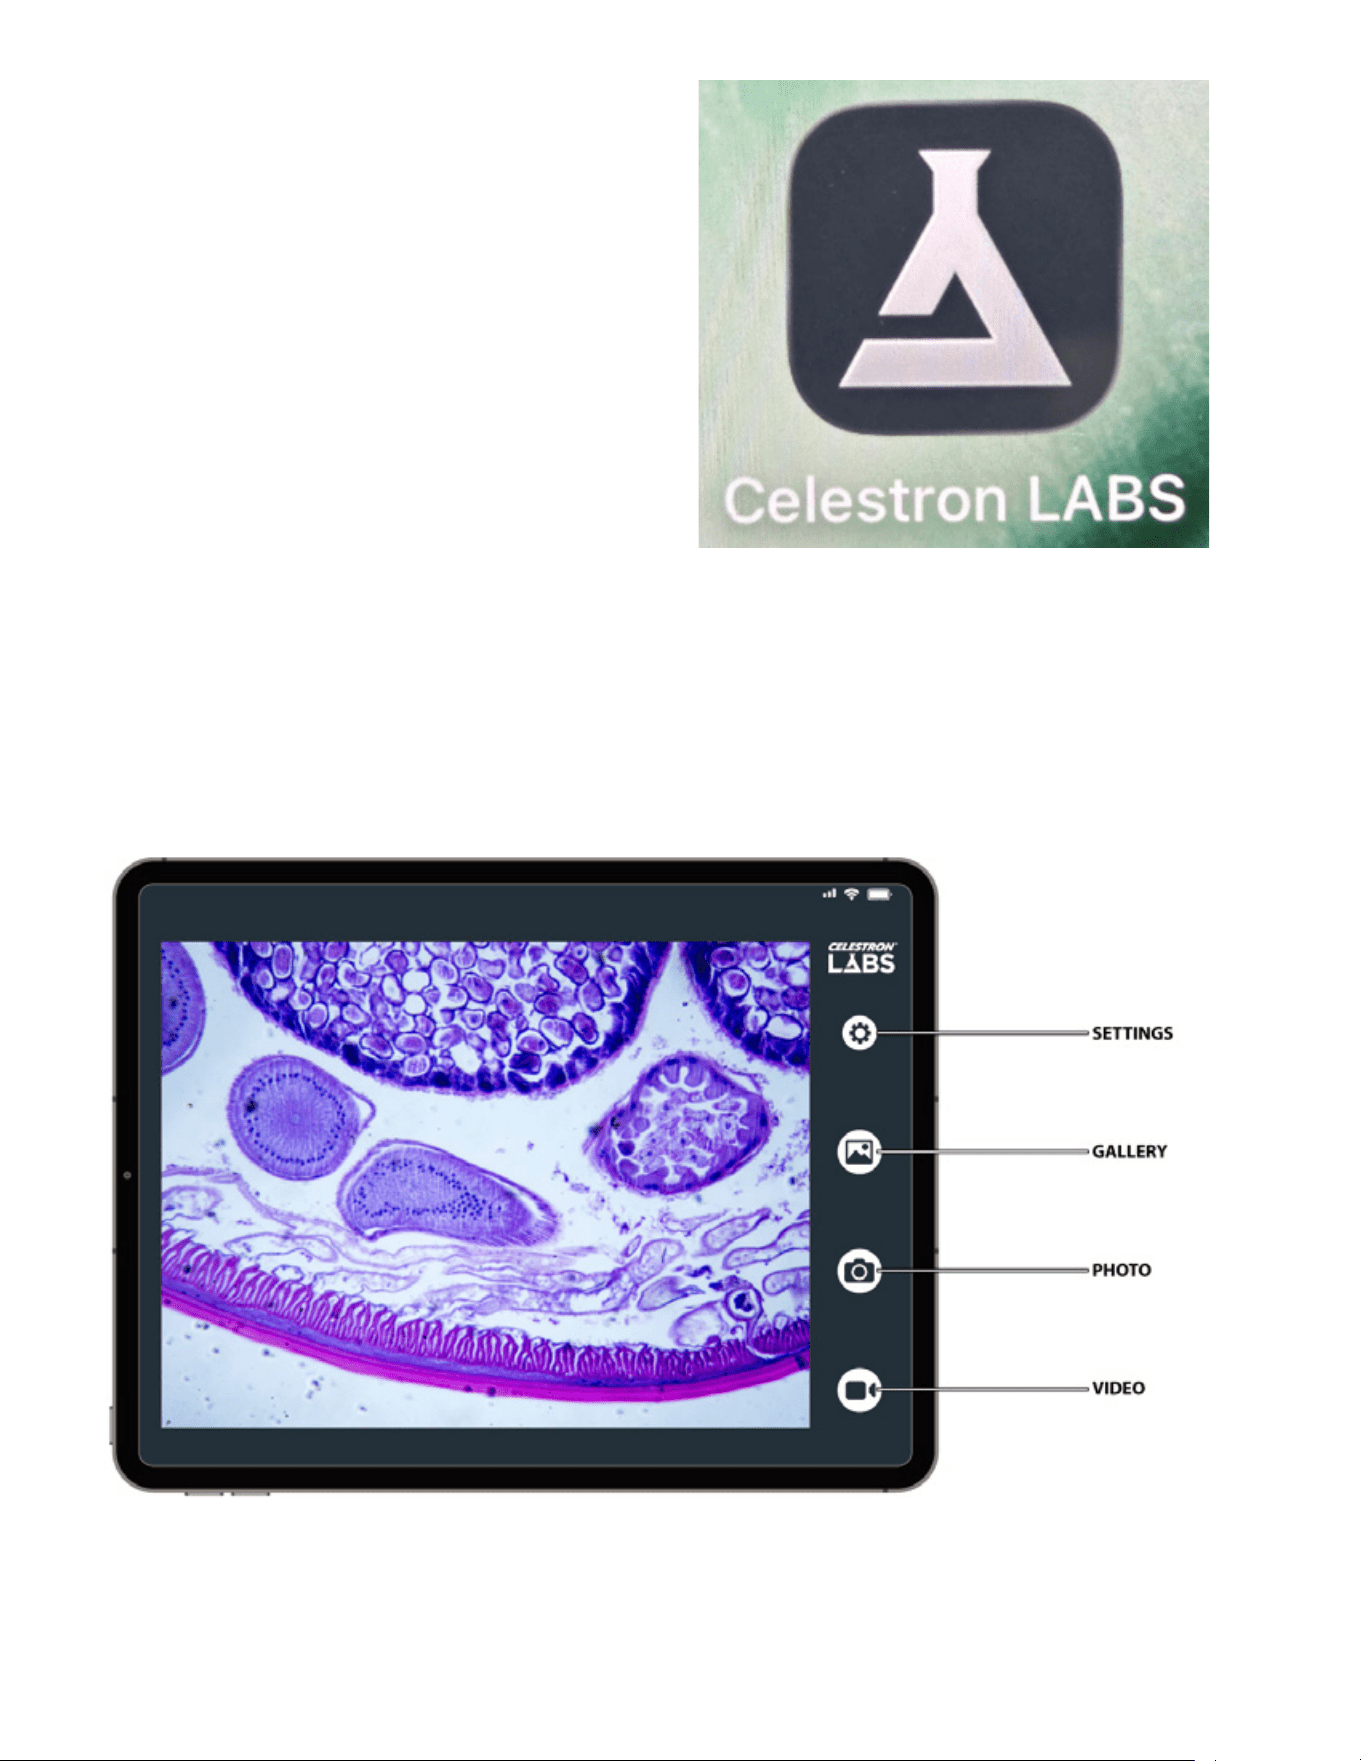
The main interface is shown below. The labeled callouts identify each feature described in this section.
USING THE APP
STEP 5: START VIEWING
Open the Celestron Labs Digital Wi-Fi App.
Live video should begin streaming within about 30 seconds.
If video does not appear:
• Confirm your device is connected to the Celestron LABS
Desktop-XXXX network.
• Close and reopen the app.
8
|
ENGLISH
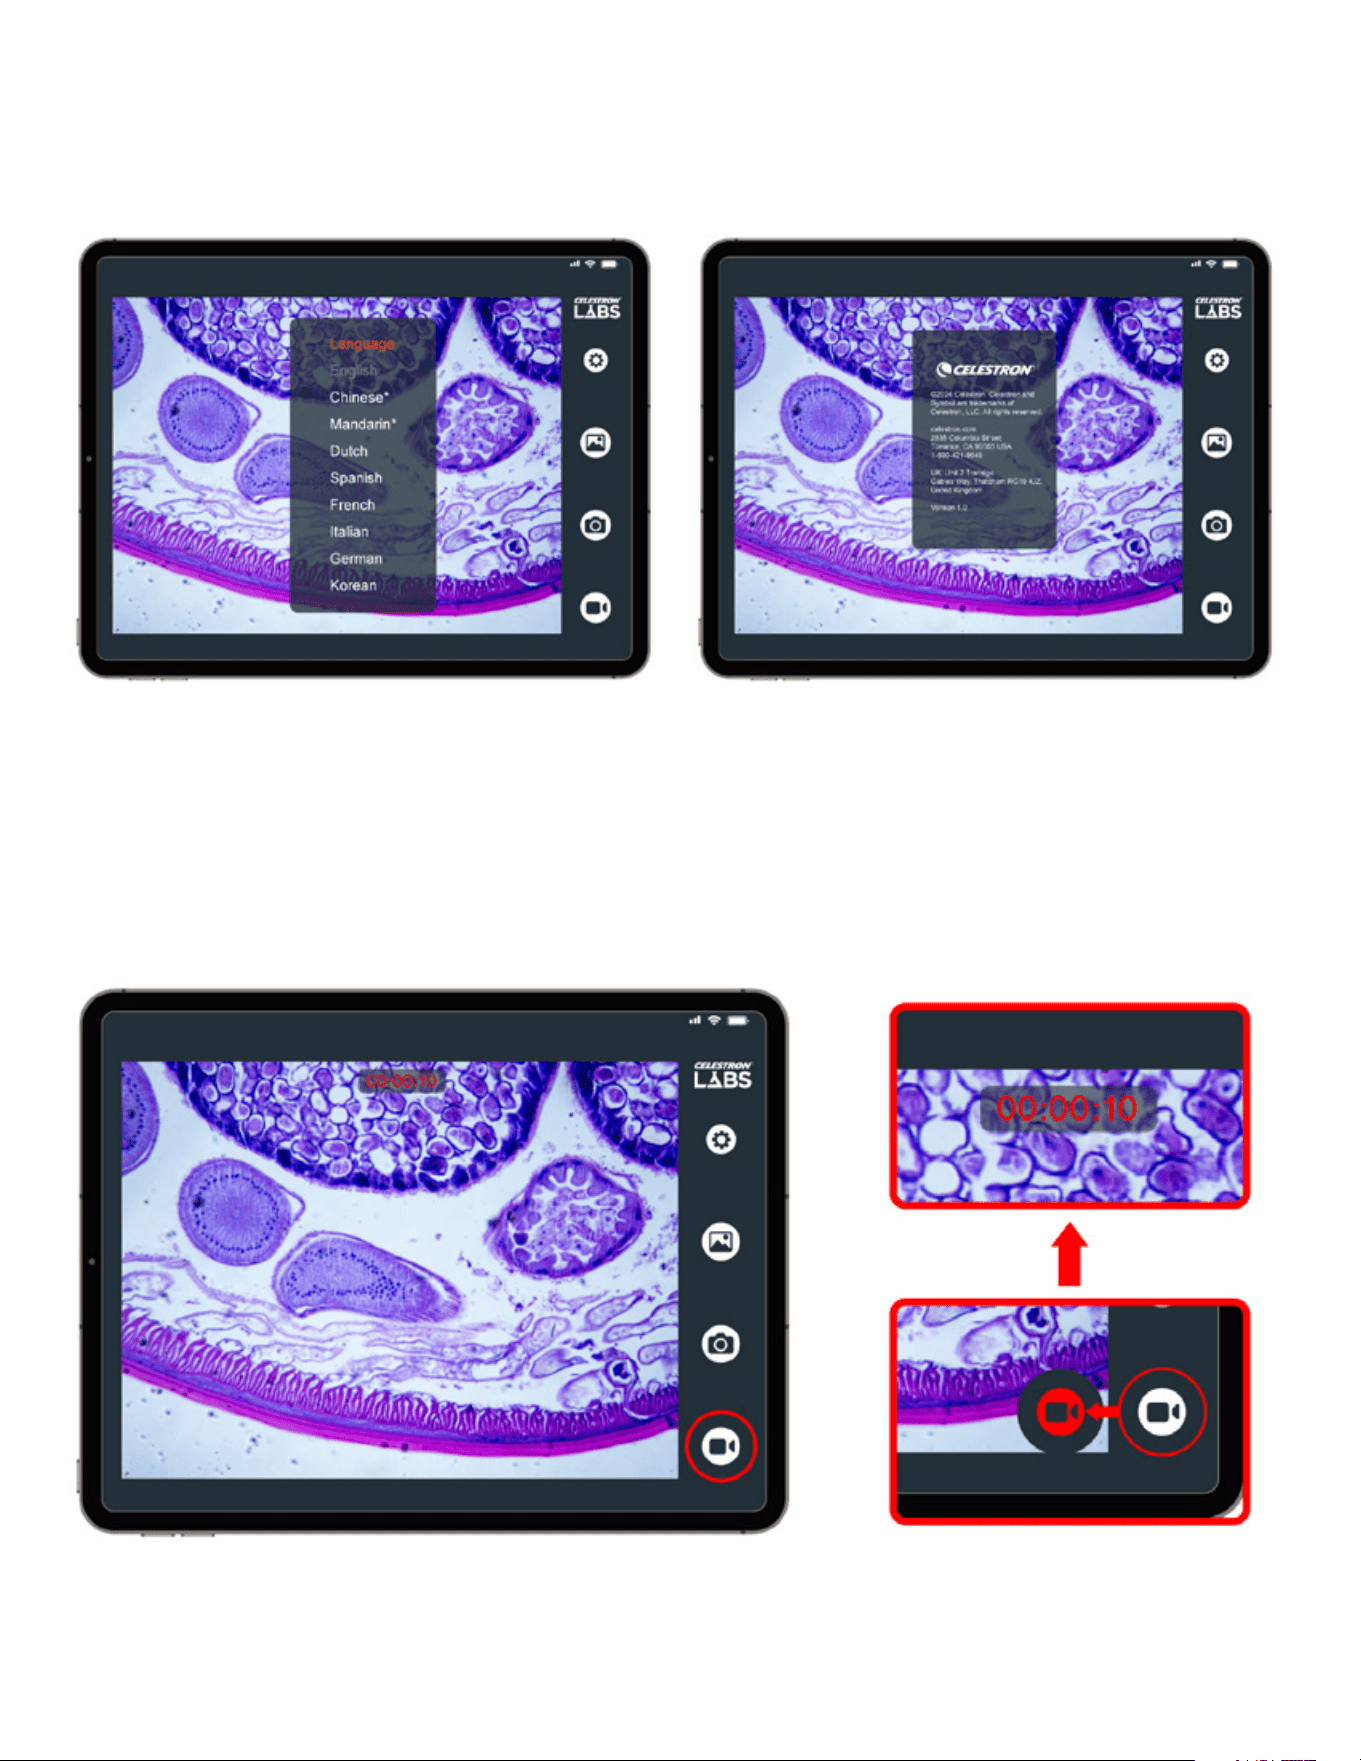
A. SETTINGS:
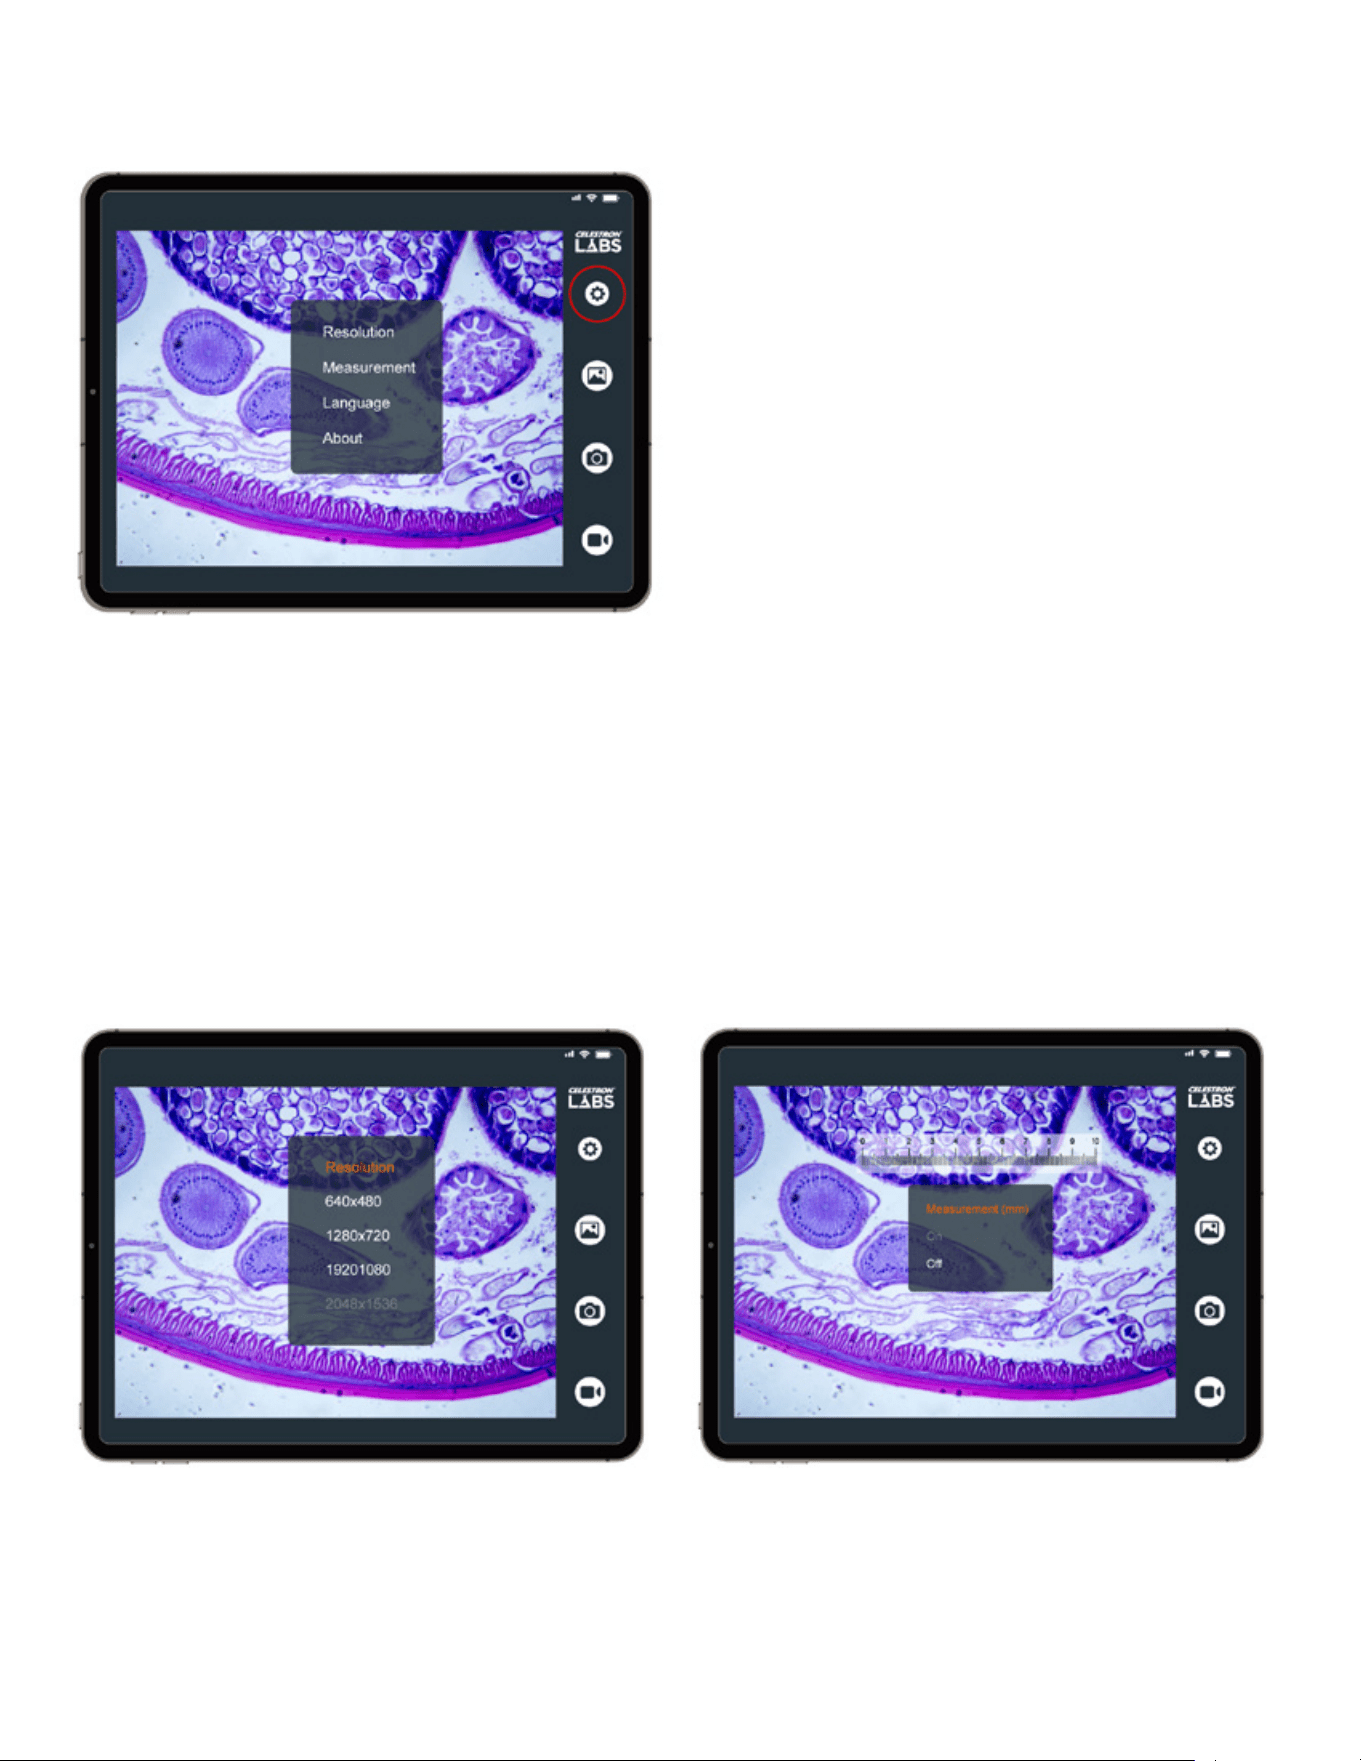
Tap the Settings icon to access the following options:
RESOLUTION:
Select the image and video resolution.
Higher resolutions provide greater detail but create larger file sizes.
Available settings:
• 640 × 480
• 1280 × 720
• 1920 × 1080
• 2048 × 1536 (maximum resolution)
MEASUREMENT:
Turn the digital measurement reticle on or off.
You can use this as a general guide for comparison or, when
calibrated, estimate specimen dimensions directly on screen.
ENGLISH
|
9
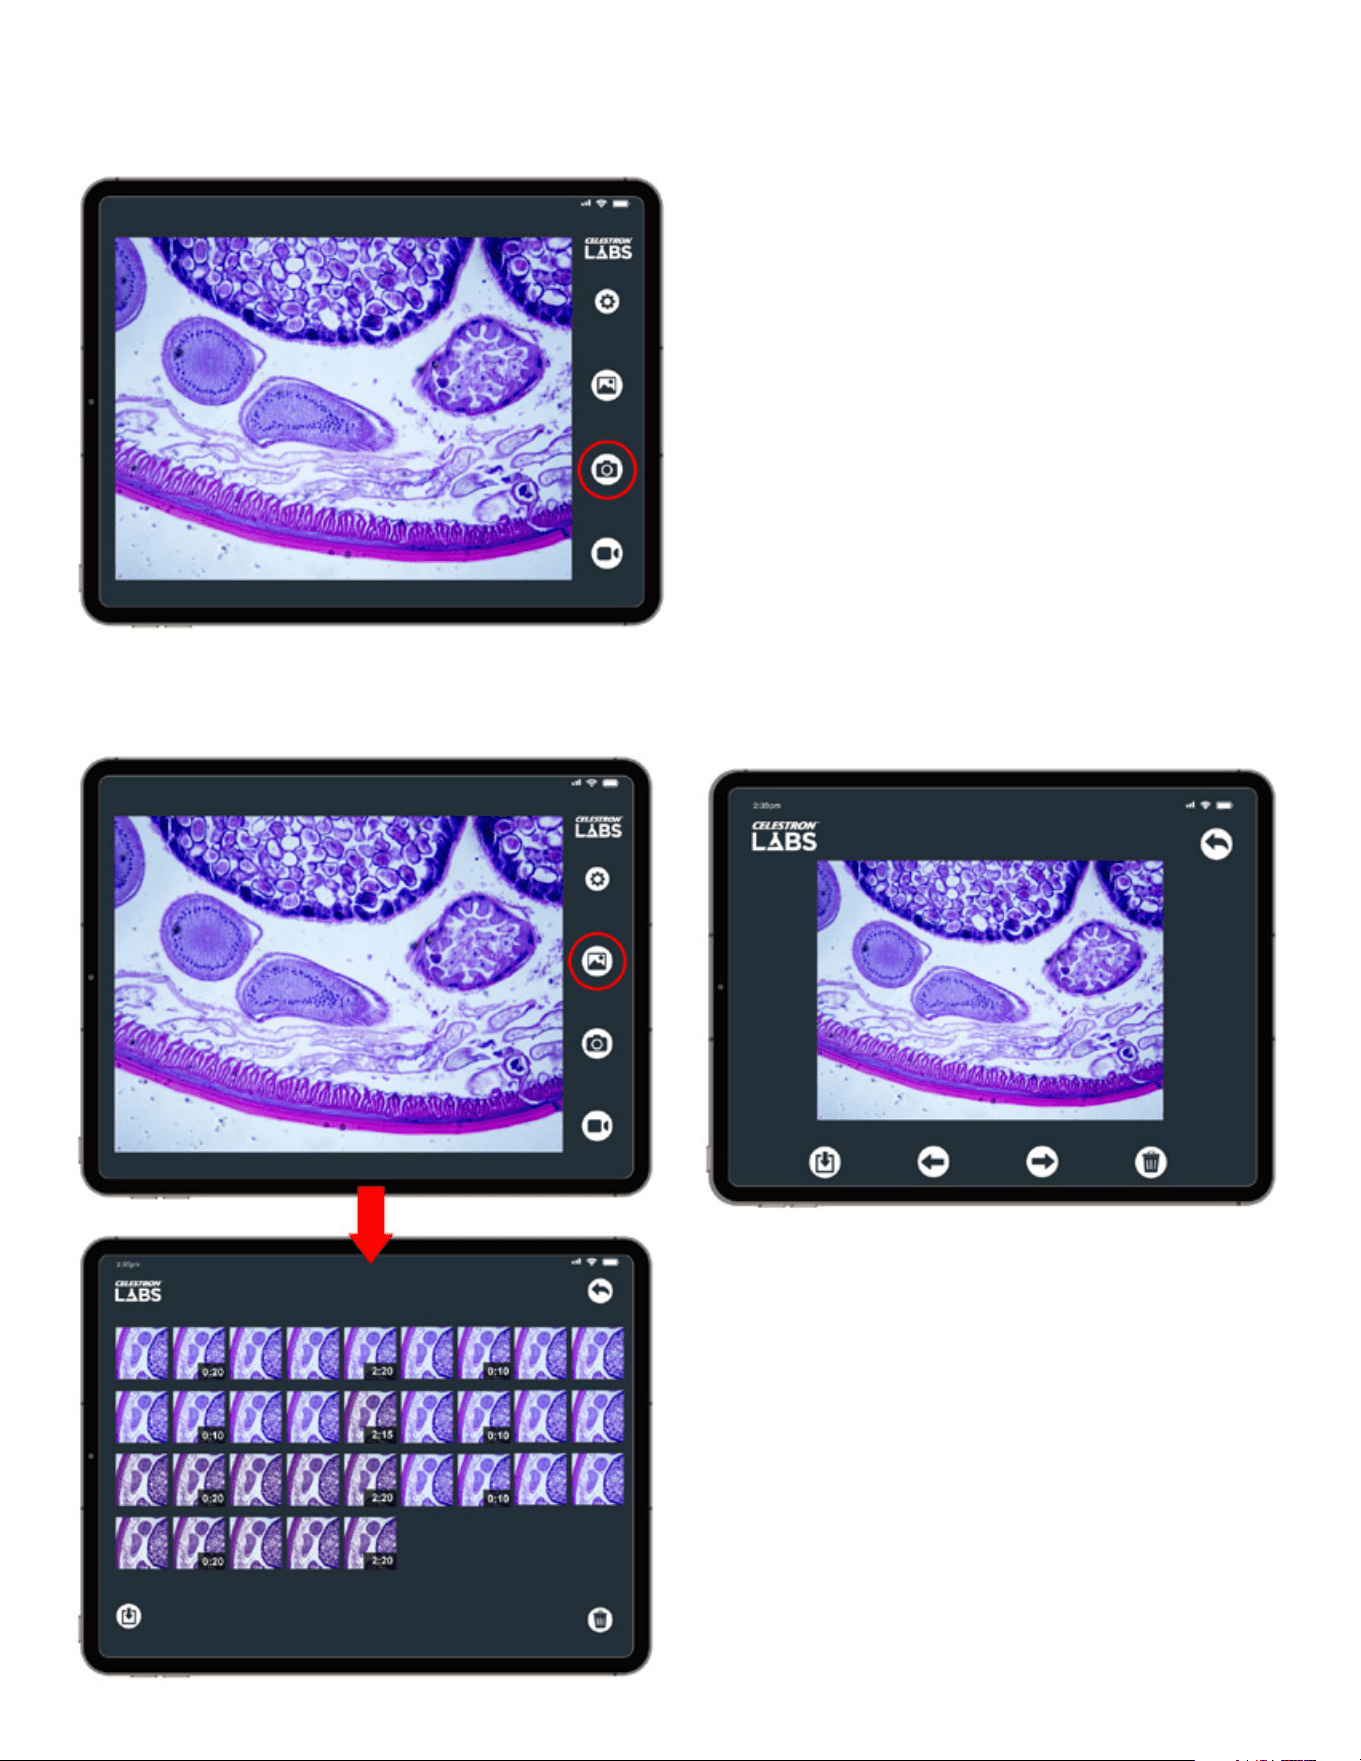
LANGUAGE:
Change the interface language.
Available options include English (default), Chinese (Simplified),
Chinese (Traditional), Dutch, Spanish, French, Italian, German,
and Korean.
ABOUT
Displays the app version number, legal information, and Celestron
contact details.
B. VIDEO RECORDING
Tap the Video icon to begin recording. A timer will appear at the
top of the screen while recording is in progress.
Tap the icon again to stop recording.
Videos are saved directly to your device.
10
|
ENGLISH
C. TAKING PHOTOS
Tap the Photo icon to capture a still image. Images are saved directly to your device.
Tap the Gallery icon to view saved images and videos.
• Tap a thumbnail to view full screen.
• Swipe left or right to scroll through saved files.
• To play a video, tap the screen and select Play.
IMPORTANT PERMISSION NOTICE
Depending on your device settings, you may be prompted to allow
the app access to your photos and files. Full access is required to
save images and videos.
D. GALLERY
ENGLISH
|
11
USING THE MICROSCOPE
The Digital Wi-Fi Desktop Microscope functions like a traditional compound microscope, with the built-in camera replacing the eyepiece.
Before observing, confirm:
• The microscope is powered on.
• The blue LED is steady (Wi-Fi connected).
• The app is open and streaming.
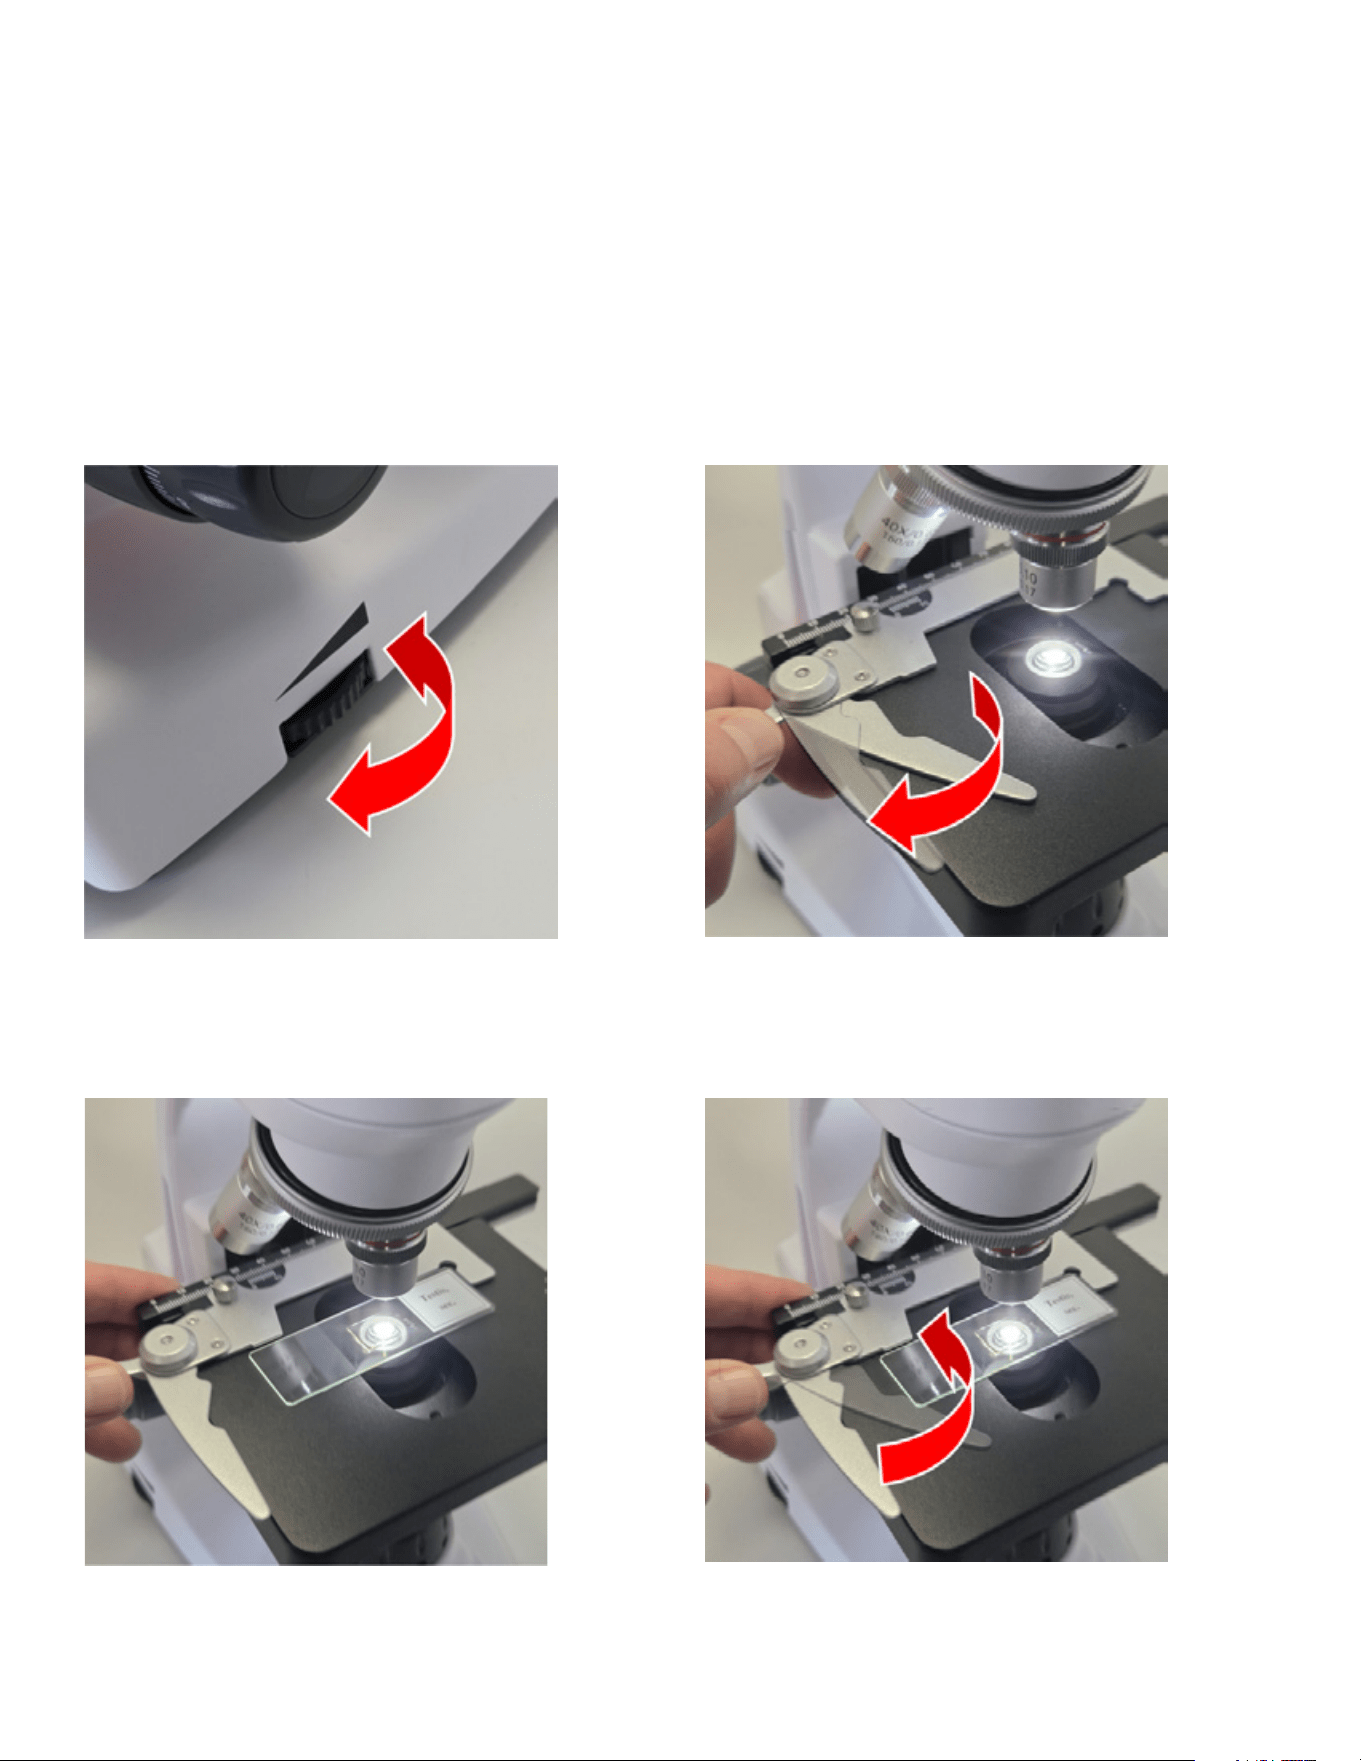
ADJUST ILLUMINATION
Rotate the brightness control dial on the base of the
microscope to activate the illuminator and adjust light intensity.
INSERT A SLIDE
1. Pivot the slide retaining clamp arm open.
2. Place the slide flat on the stage, with the right edge
touching the stationary holder guide.
3. Gently release the clamp arm to secure the slide.
12
|
ENGLISH
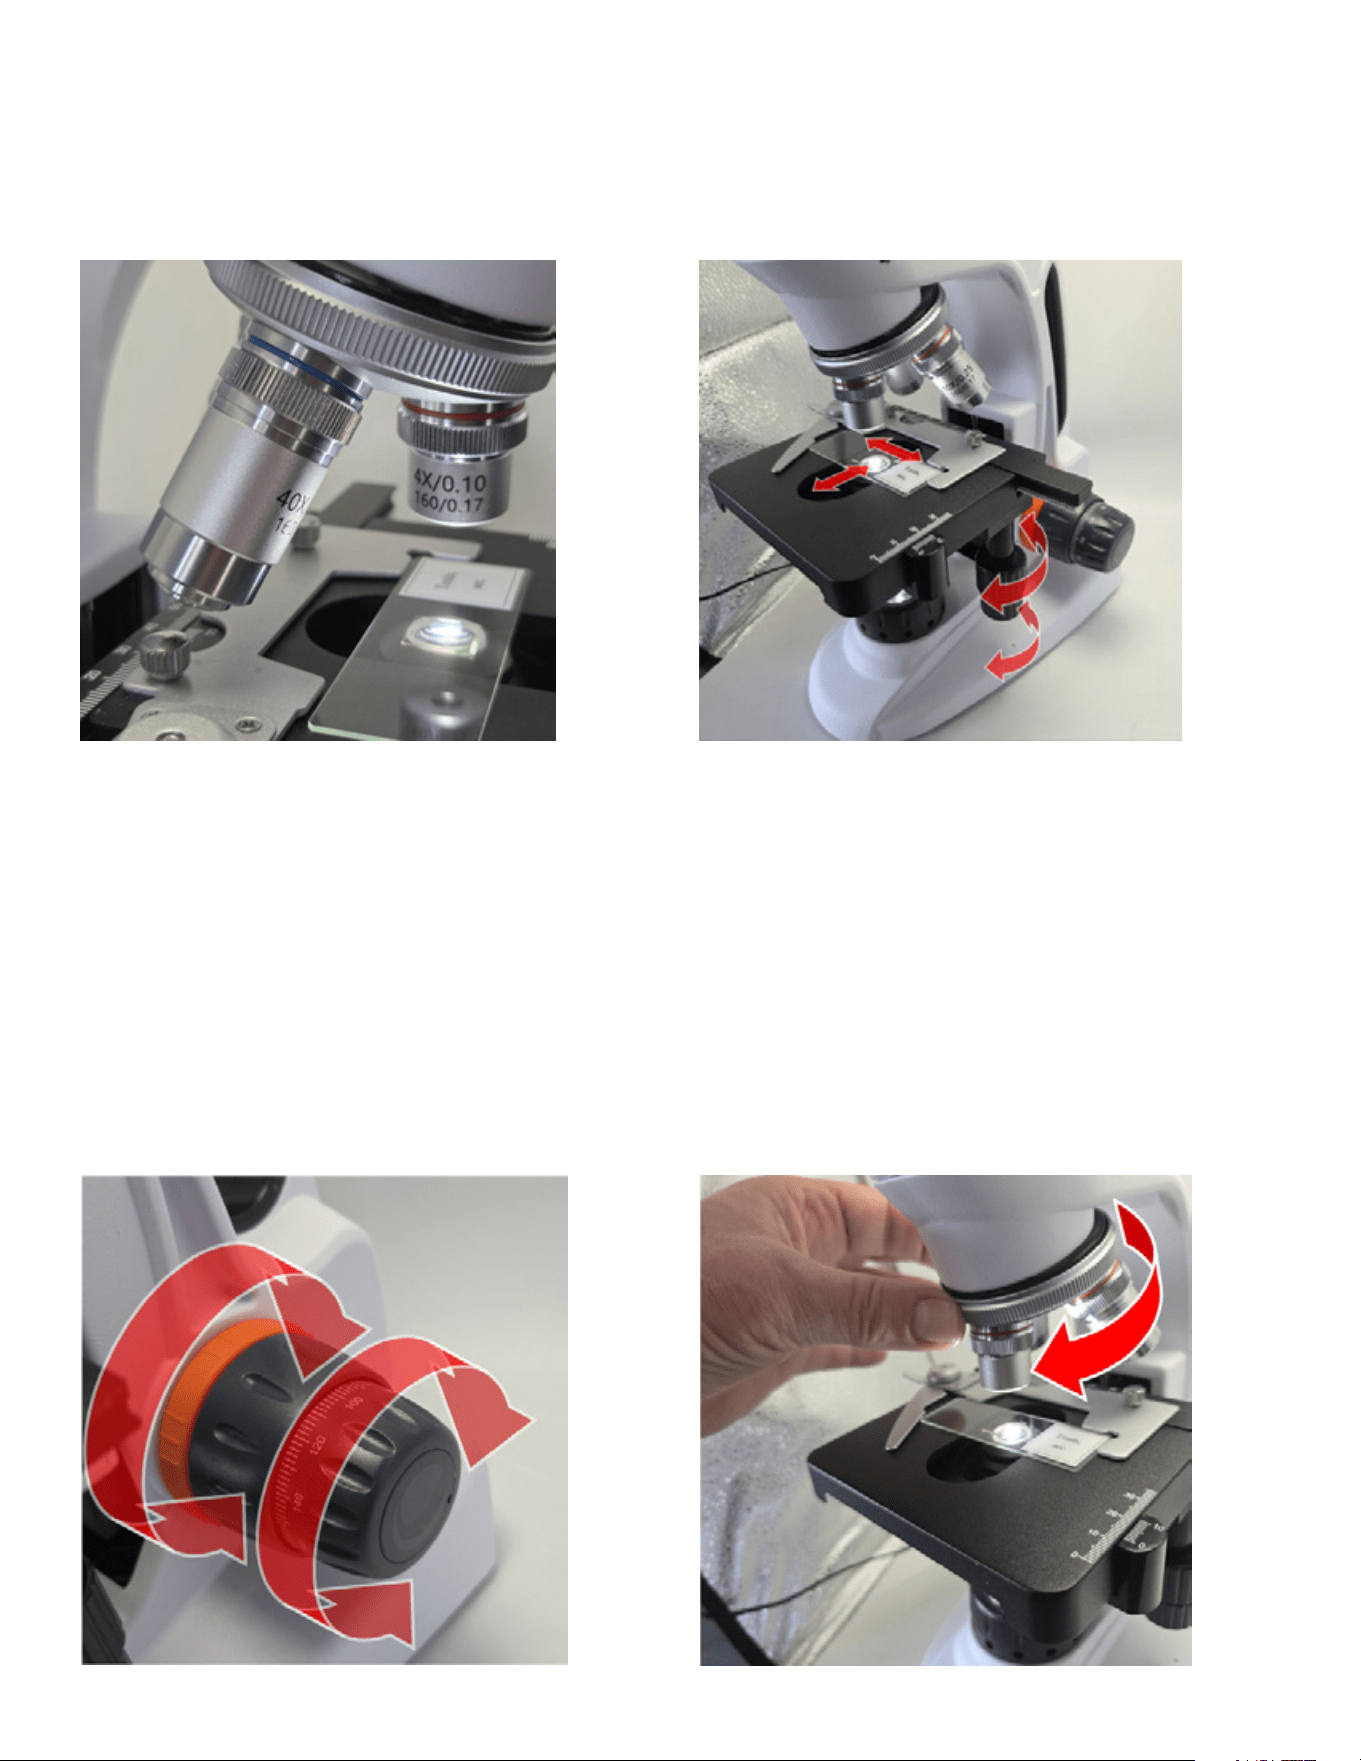
SELECT THE LOWEST OBJECTIVE
Rotate the objective turret to bring the 4x objective into position
above the slide. You will feel it engage.
Starting at the lowest magnification makes it easier to locate
your specimen.
POSITION THE SPECIMEN
Use the X-Y stage control knobs to move the slide until the
specimen appears on screen.
FOCUS THE IMAGE
You will find two focus knobs on the base of your microscopes,
one on each side.
Start with the coarse focus knob (larger knob) to bring the
specimen into a reasonably clear image.
Then use the fine focus knob (smaller knob) to bring the
specimen into crisp, clear focus.
Once the image is sharp, adjust the slide position if needed to
better center the specimen in the field of view. You can then
capture a still image, record video, or continue observing.
INCREASE MAGNIFICATION
To view more detail and look deeper into your specimen, rotate the
objective turret to bring either the 10x or 40x objective forward.
Continue turning until the desired objective engages.
Total magnification is determined by multiplying the objective lens by
the microscope’s built-in sensor magnification (about 12x). With the
included objectives, the total magnification is approximately:
Objective Total Magnification
4x 48x
10x 120x
40x 480x
ENGLISH
|
13
ABBE CONDENSER
Located beneath the stage, between the illuminator and the
stage opening, is the Abbe condenser. The condenser consists
of an optical lens and an adjustable iris diaphragm controlled by
a slide arm.
The condenser gathers light from the illuminator and
concentrates it into a cone that passes through the specimen on
the slide.
Adjusting the iris diaphragm changes the size of that light cone,
allowing you to improve contrast and resolution.
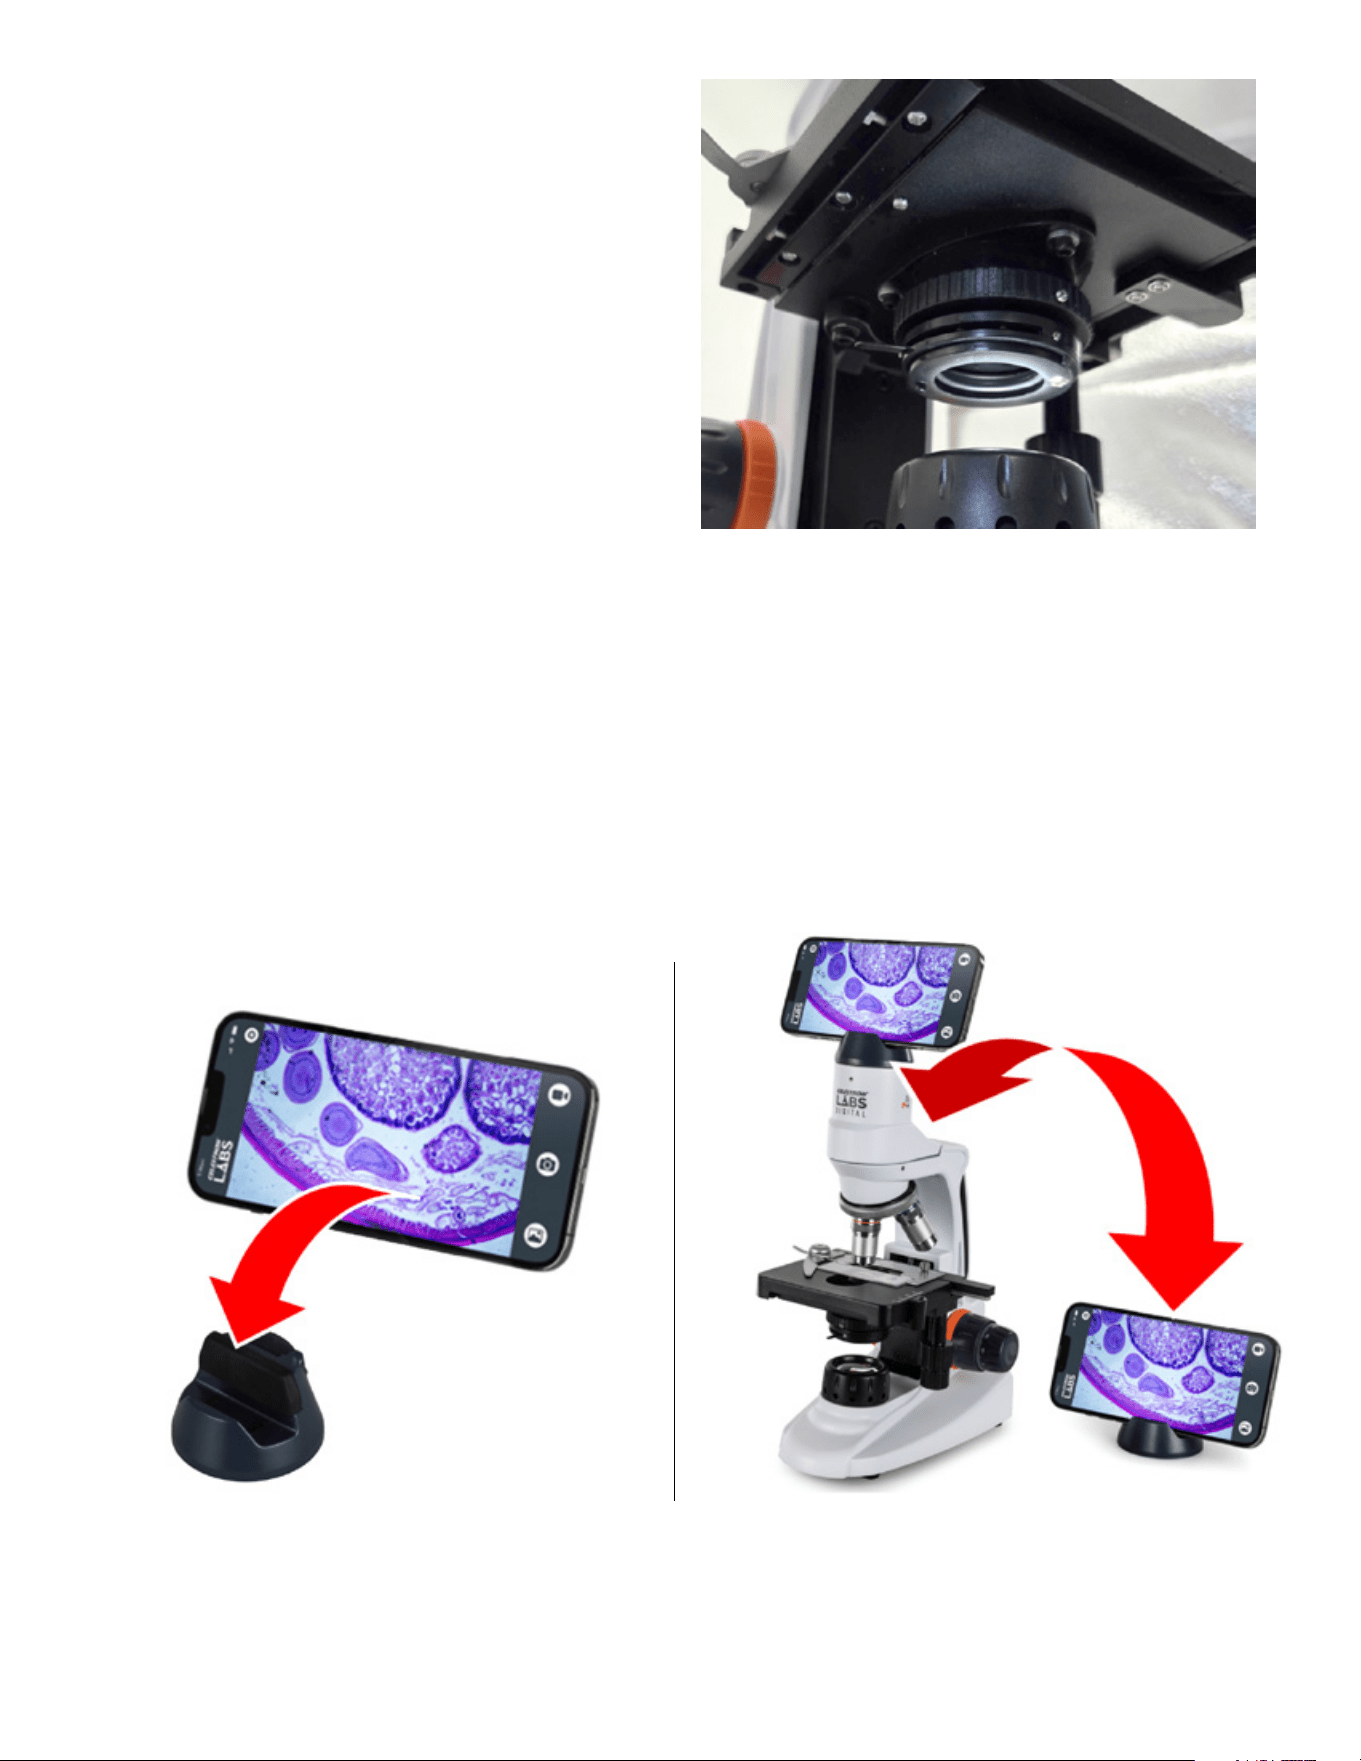
The microscope includes a smart device stand for hands-free viewing. The stand can attach magnetically to the top of the microscope
or sit on a flat surface beside it.
To use the stand without the strap, place your smartphone in the stand base. The weighted base helps keep smaller devices stable
during viewing.
When using a tablet or larger device, we strongly recommend securing it with the included safety hook and strap. This helps keep the
device firmly in place during use.
NOTE: The app is designed for use in landscape orientation.
USING THE SMART DEVICE STAND & STRAP
14
|
ENGLISH
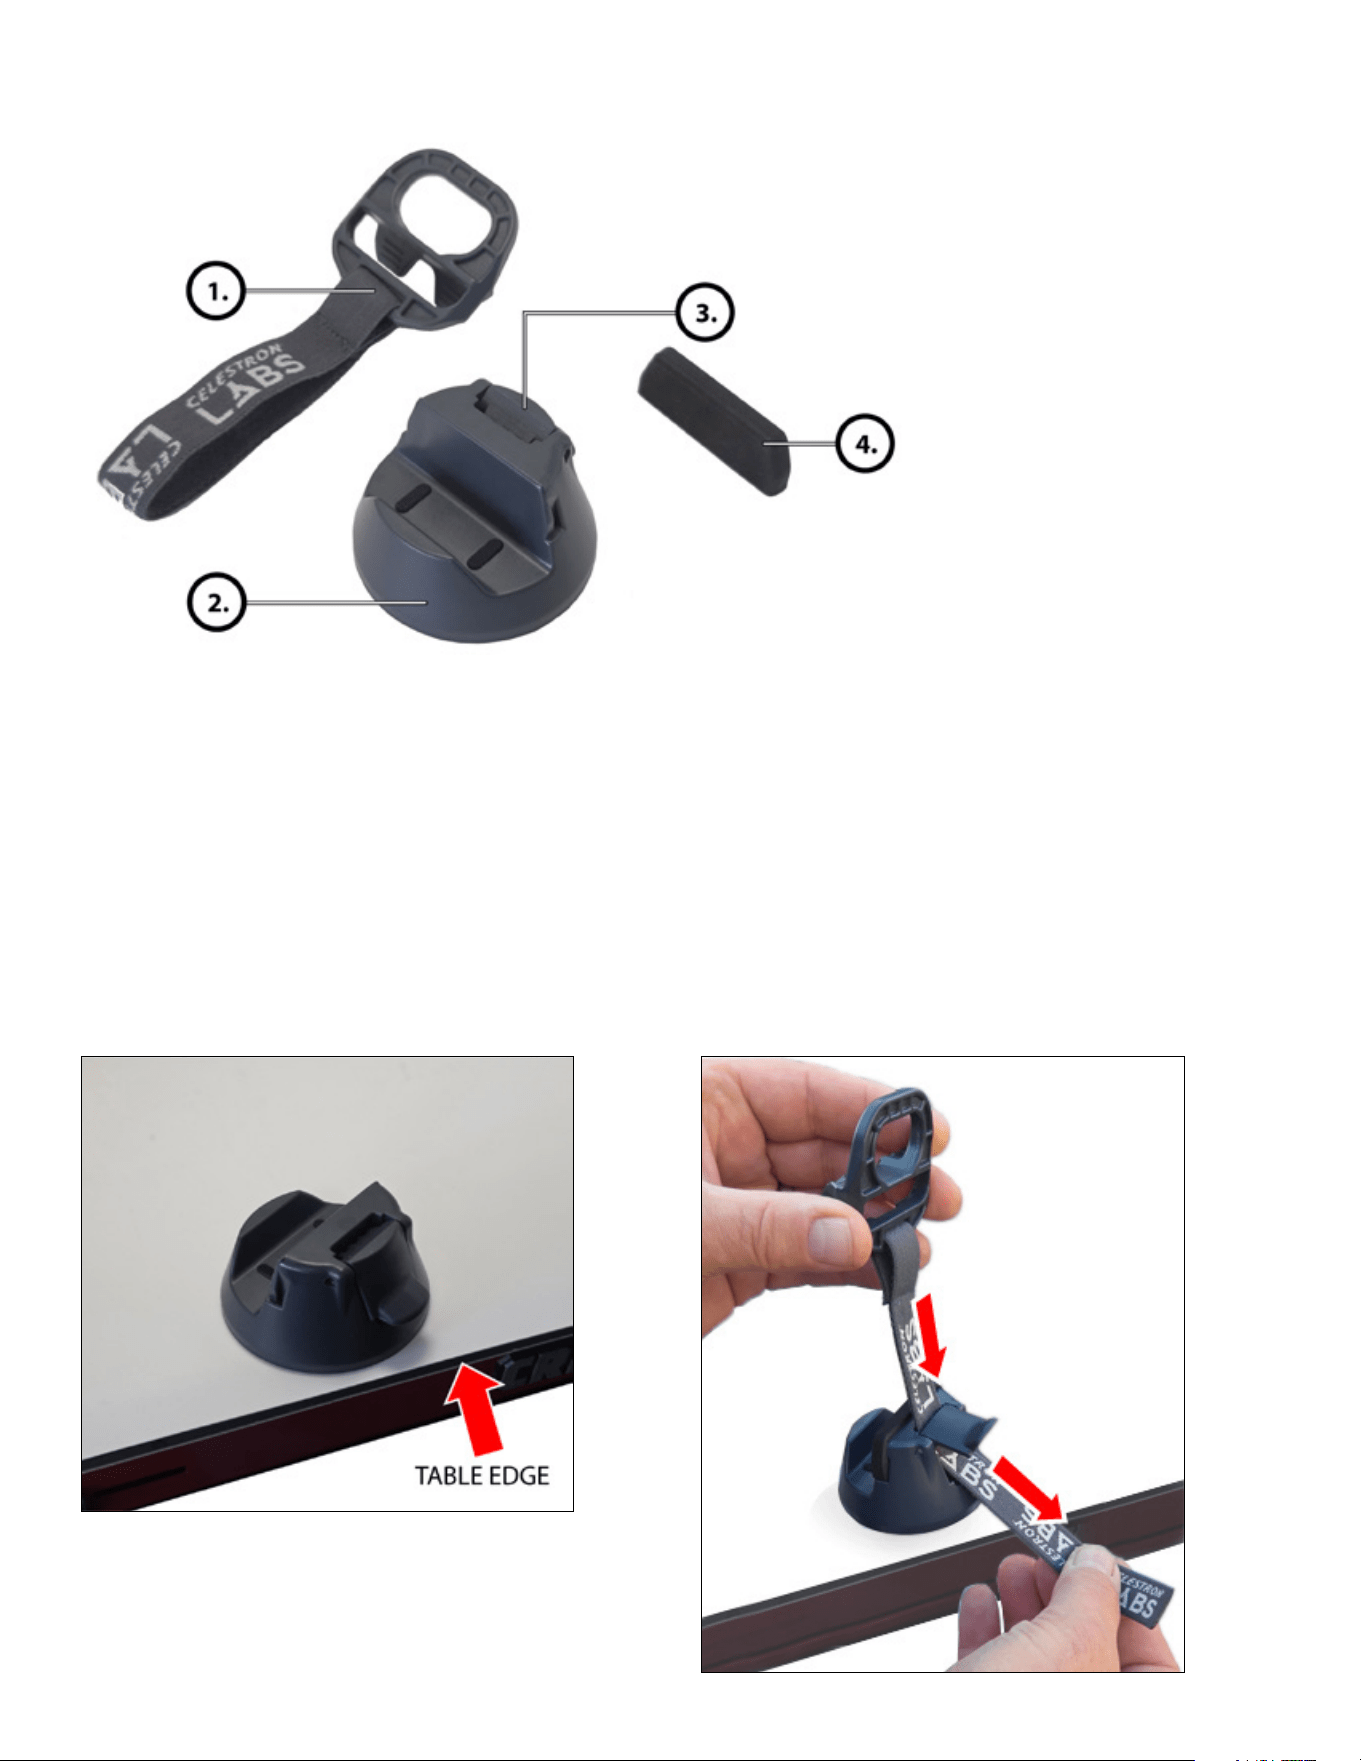
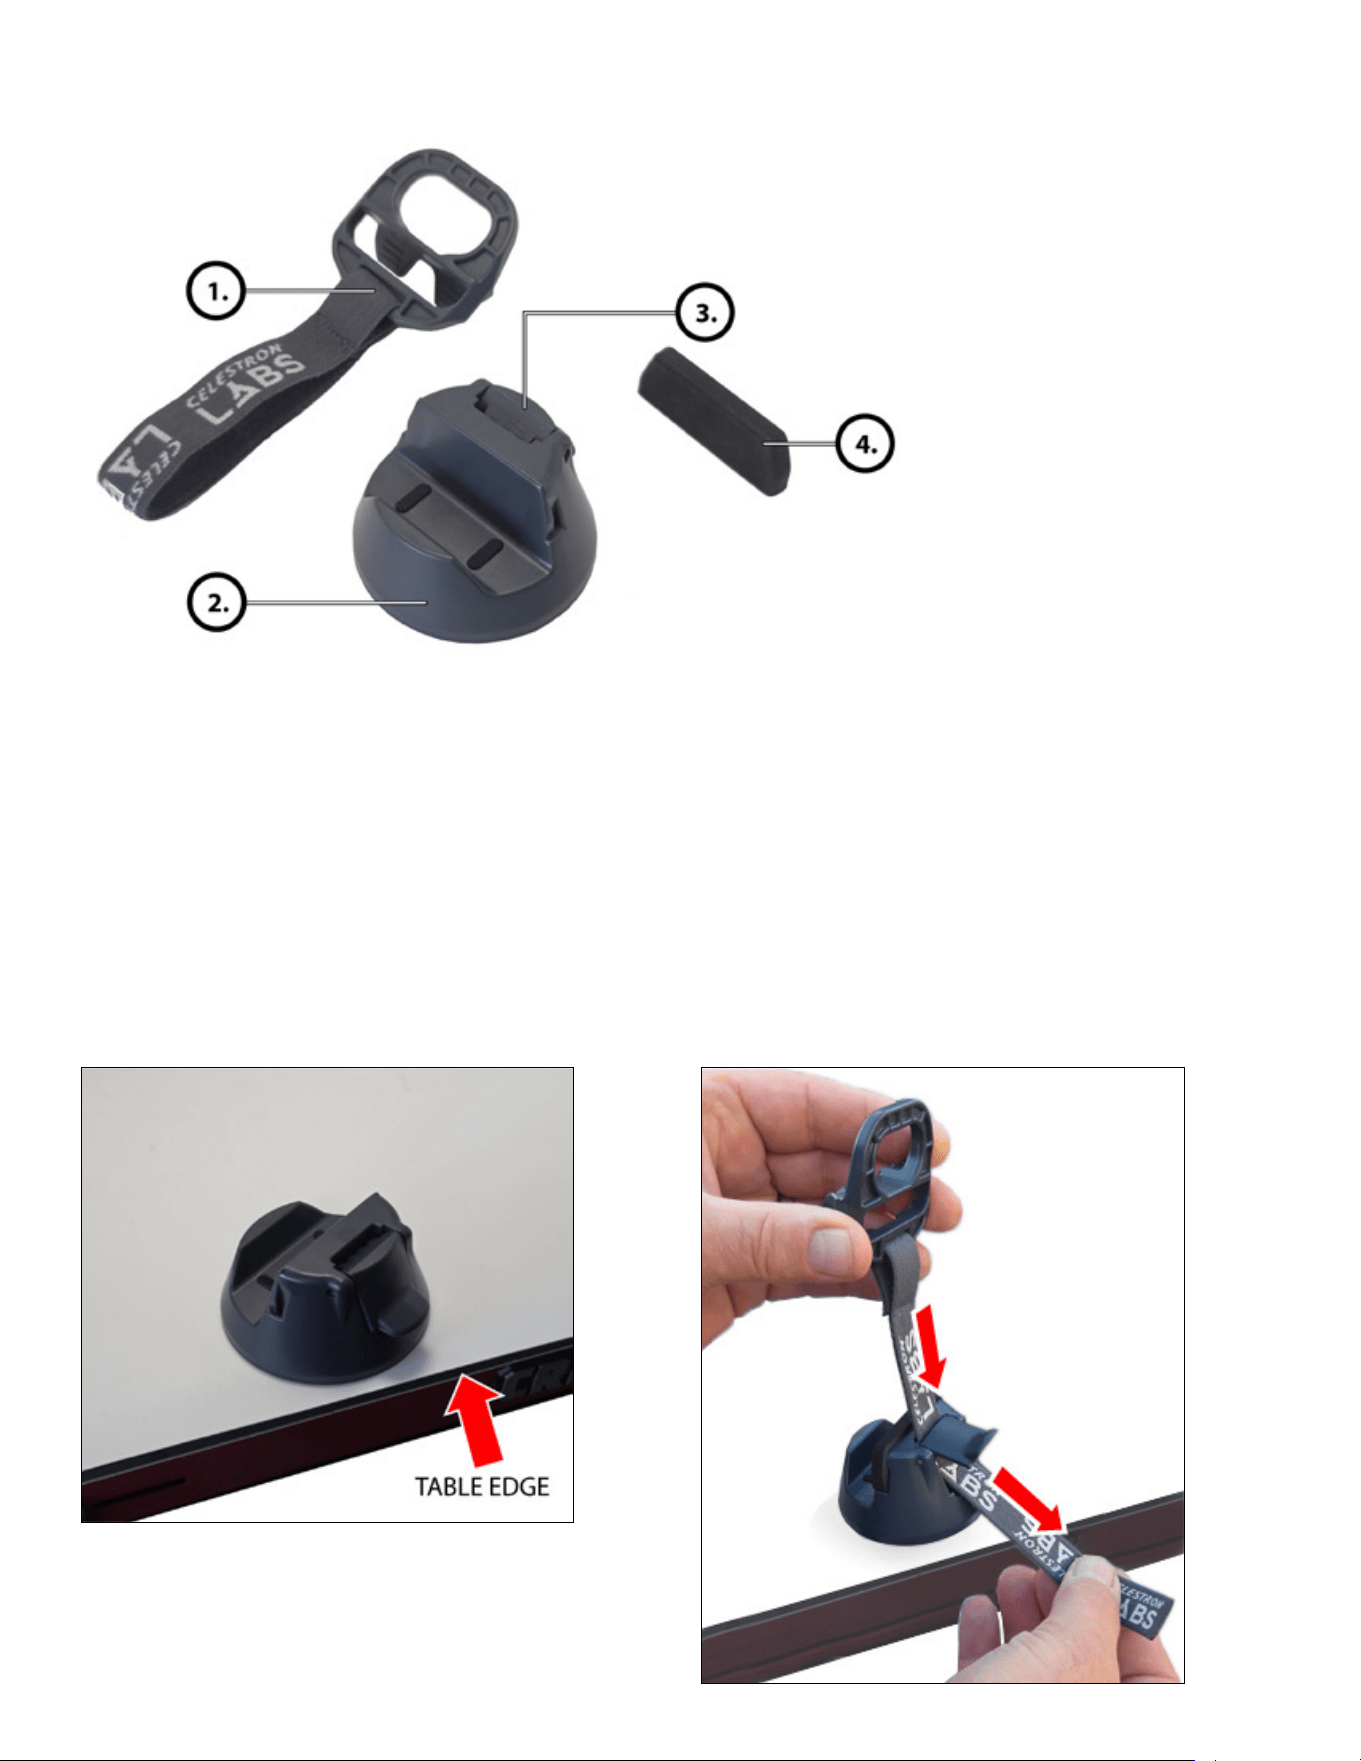
1. Stand Base – Main support platform with weighted metal base
2. Safety Hook and Strap – Plastic hook attached to an elastic strap
3. Cam-Lock Latch – Secures the strap under tension
4. Booster Pad – Rubber insert that provides additional support if
needed (e.g., for devices without protective cases)
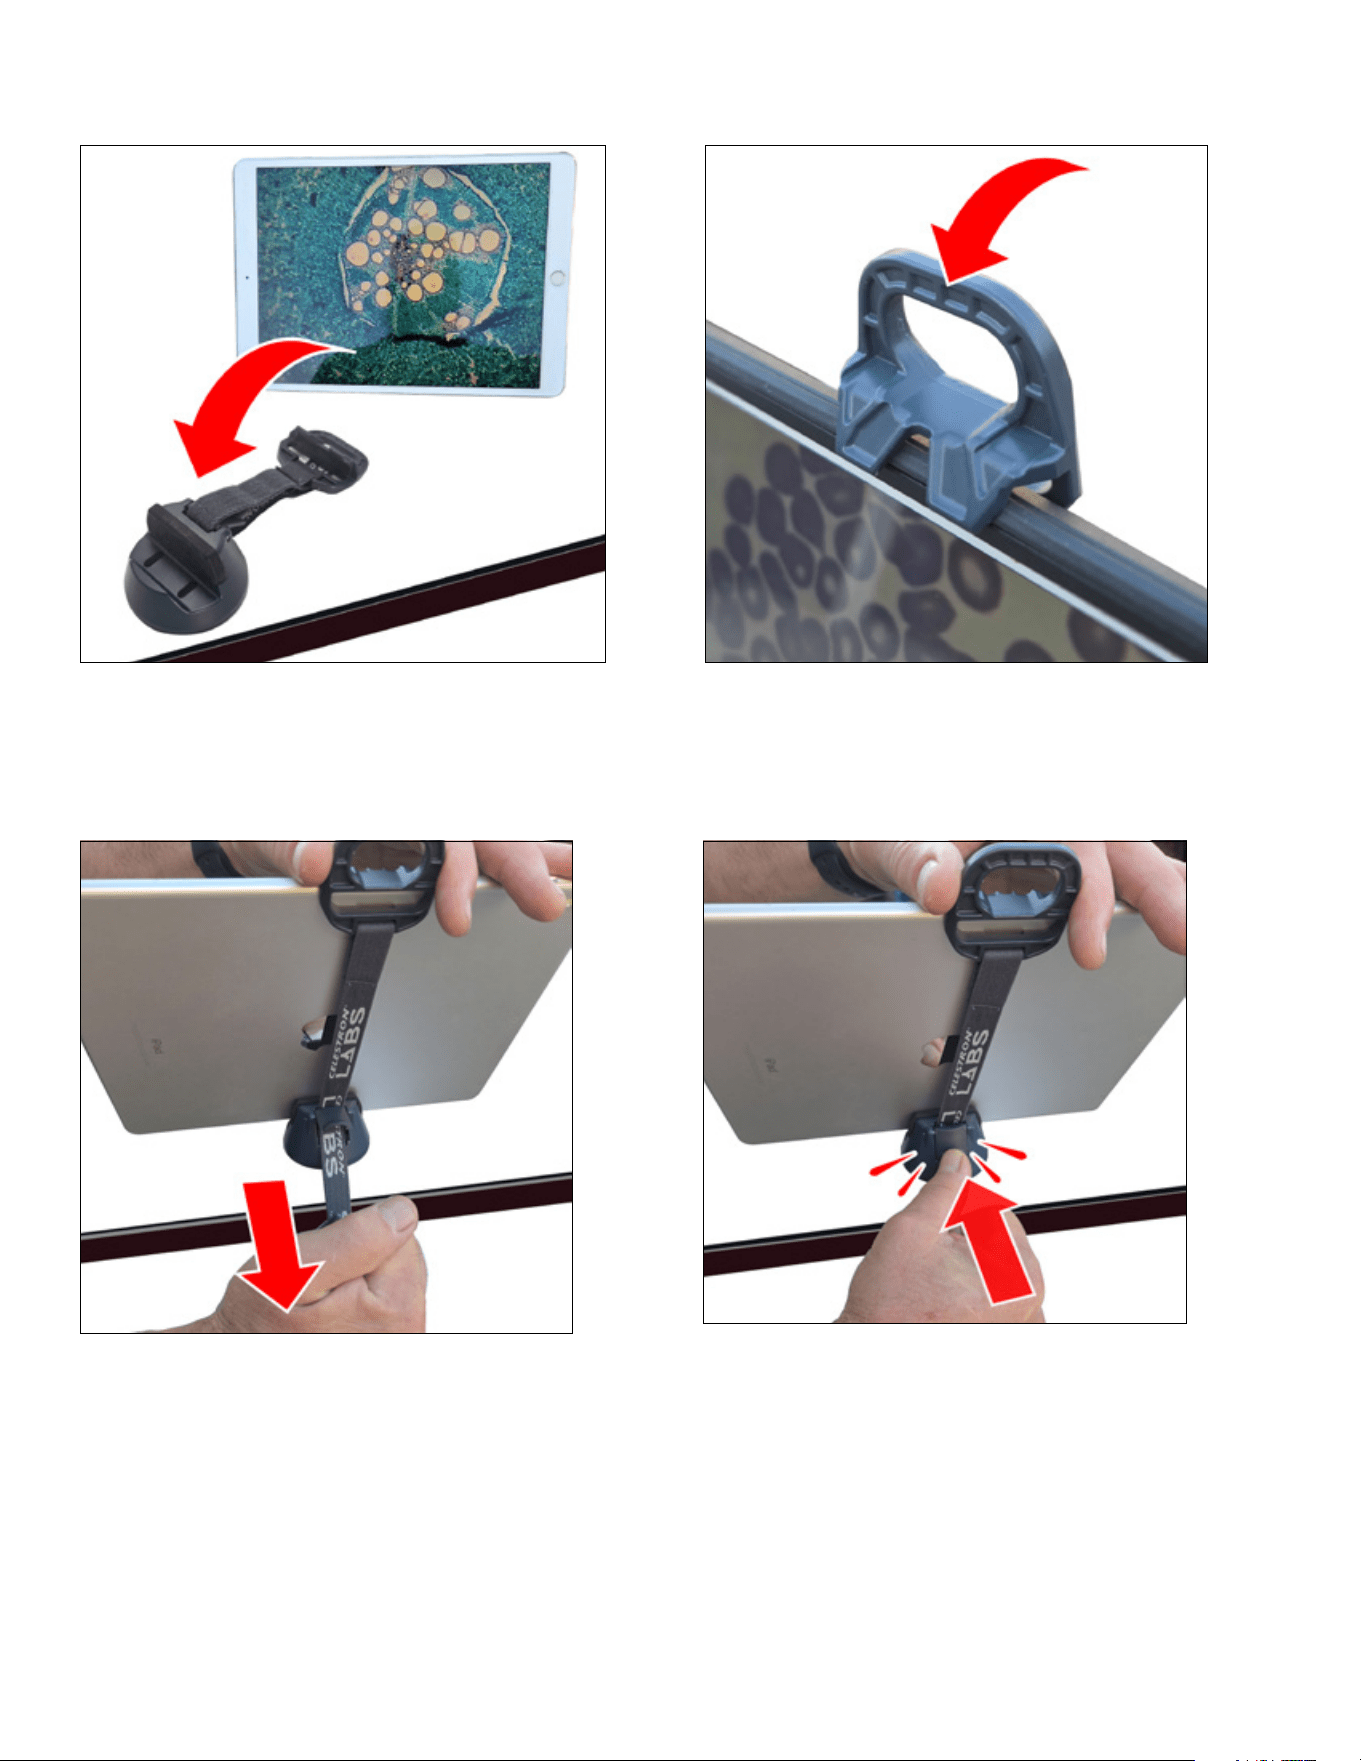
1. Place the stand base on a stable, flat surface, preferably near
the edge of a table.
2. Thread the elastic strap through the cam-lock latch as shown.
PARTS OF THE SMART DEVICE STAND
USING THE SAFETY HOOK AND STRAP
ENGLISH
|
15
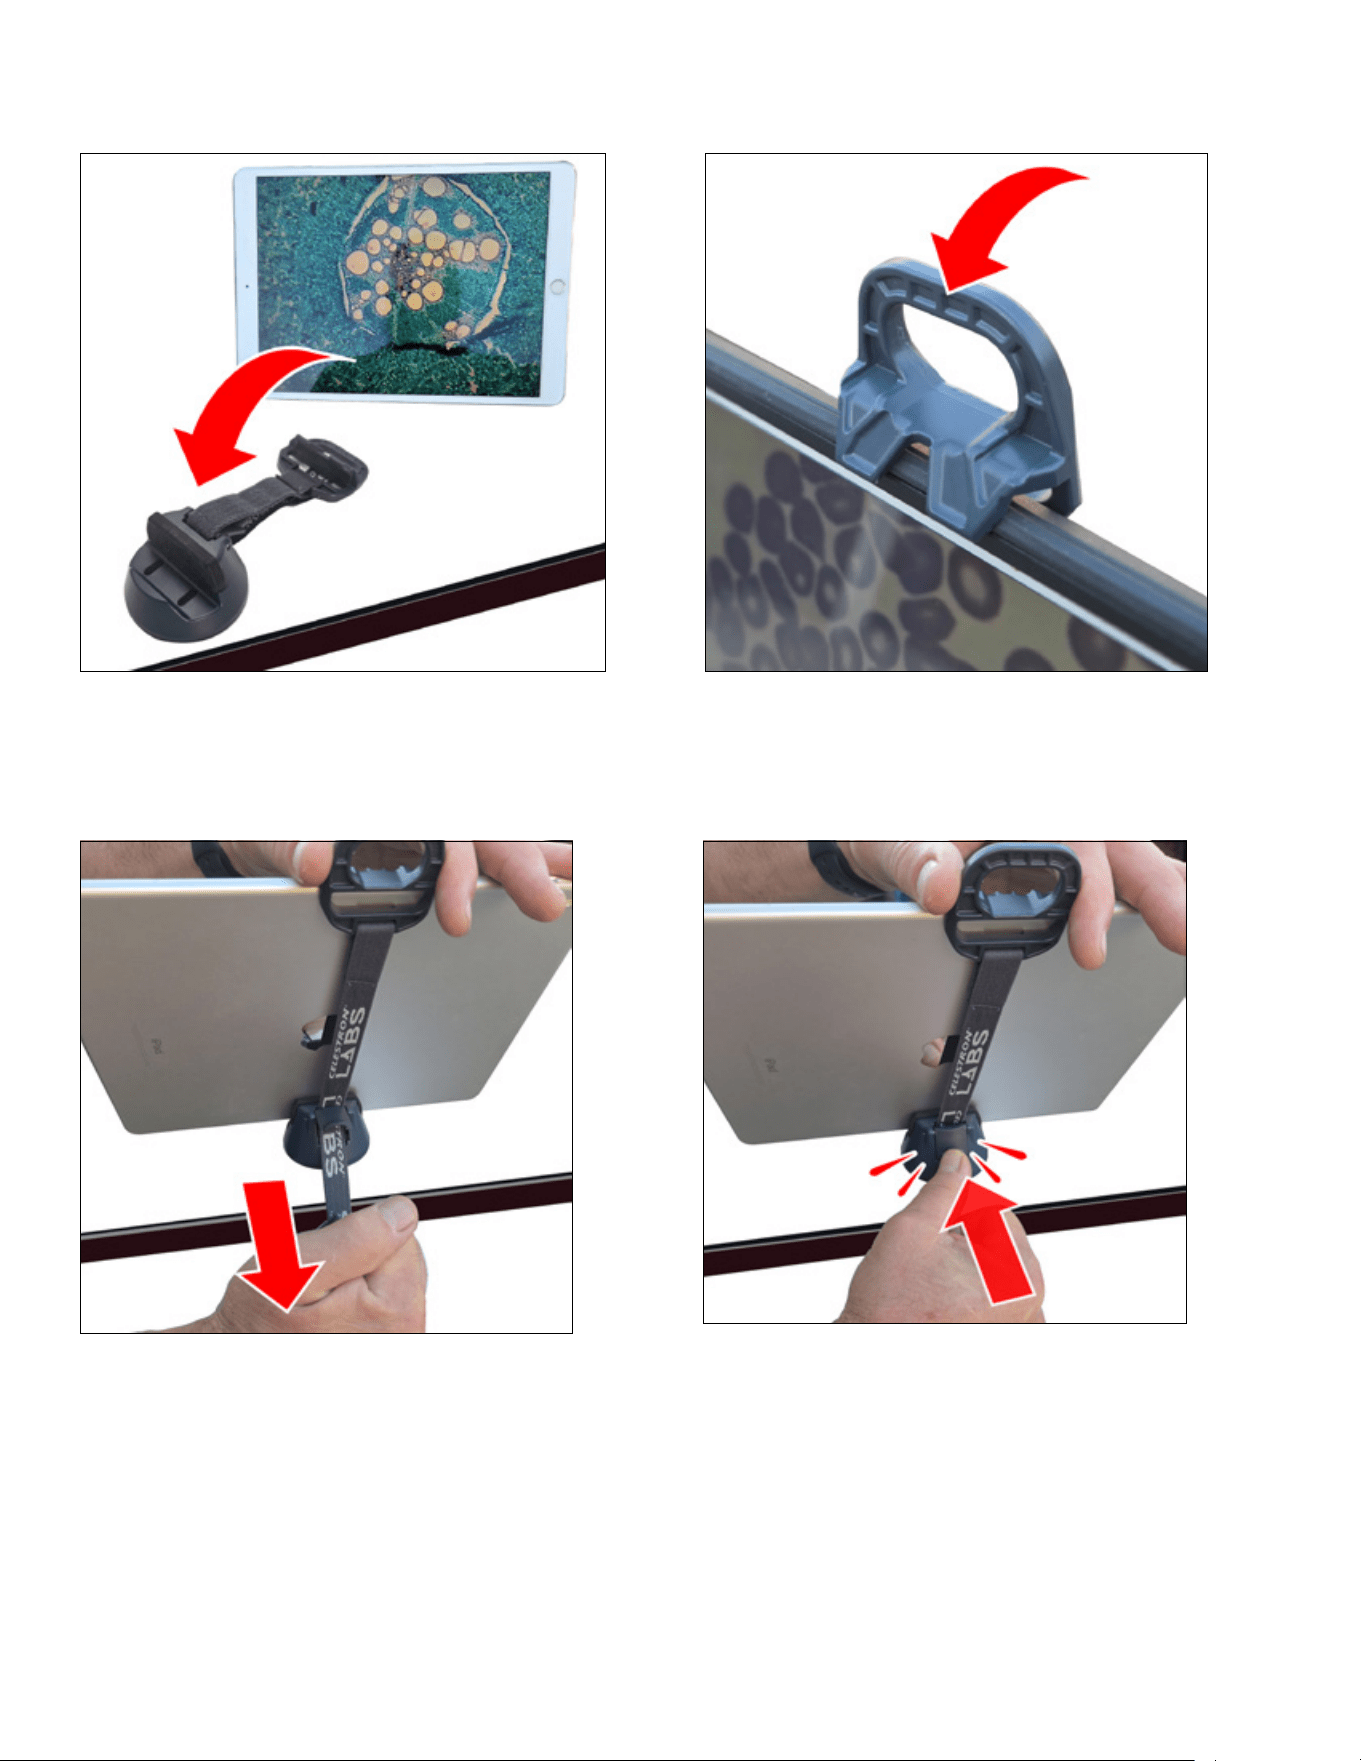
3. Place your smart device on the stand base and position
the hook over the side of the device.
4. Hold the device and hook securely with one hand.
With the other hand, pull the elastic strap downward
to increase tension.
5. While maintaining tension, snap the cam-lock latch
closed to secure the strap in place.
16
|
ENGLISH
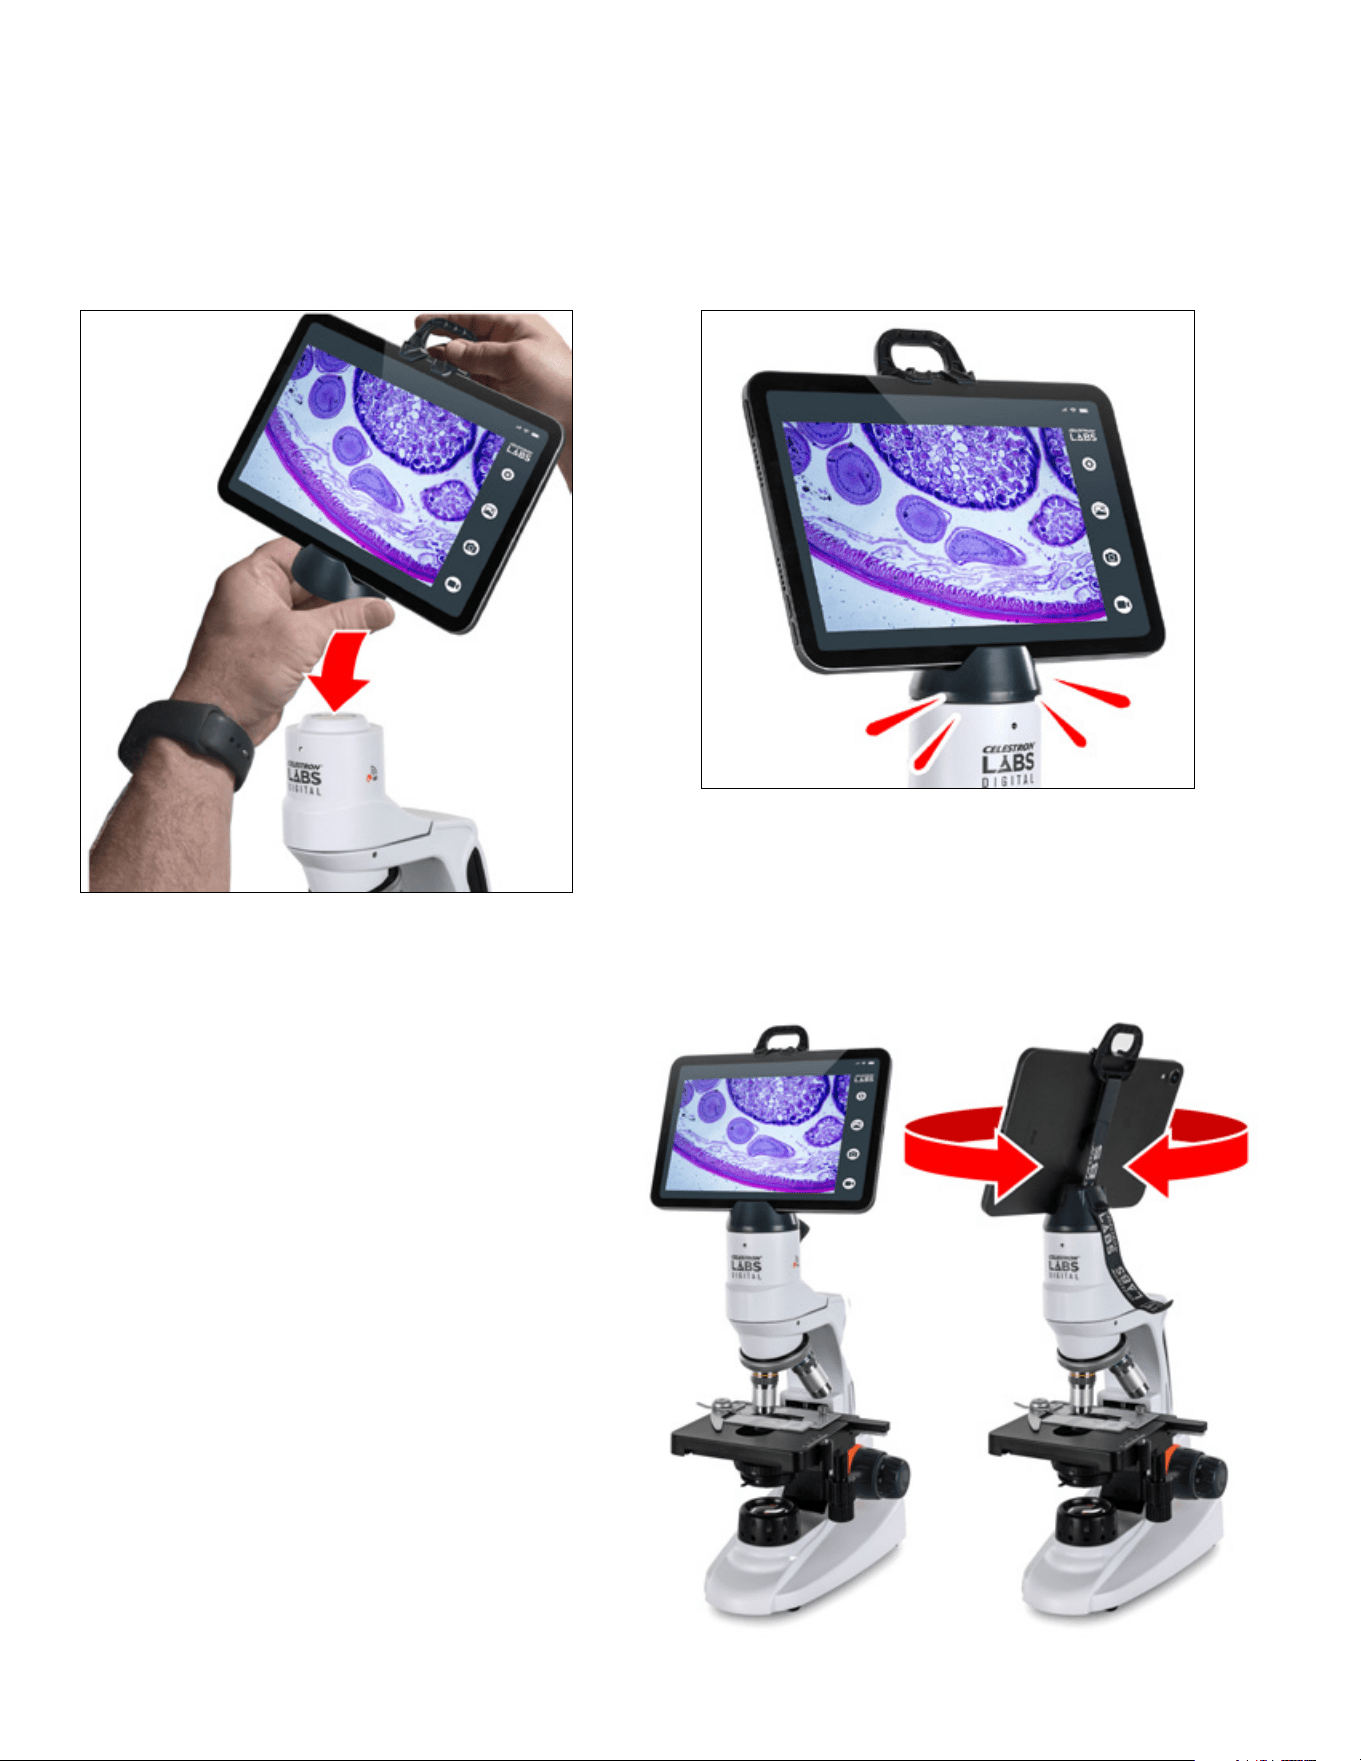
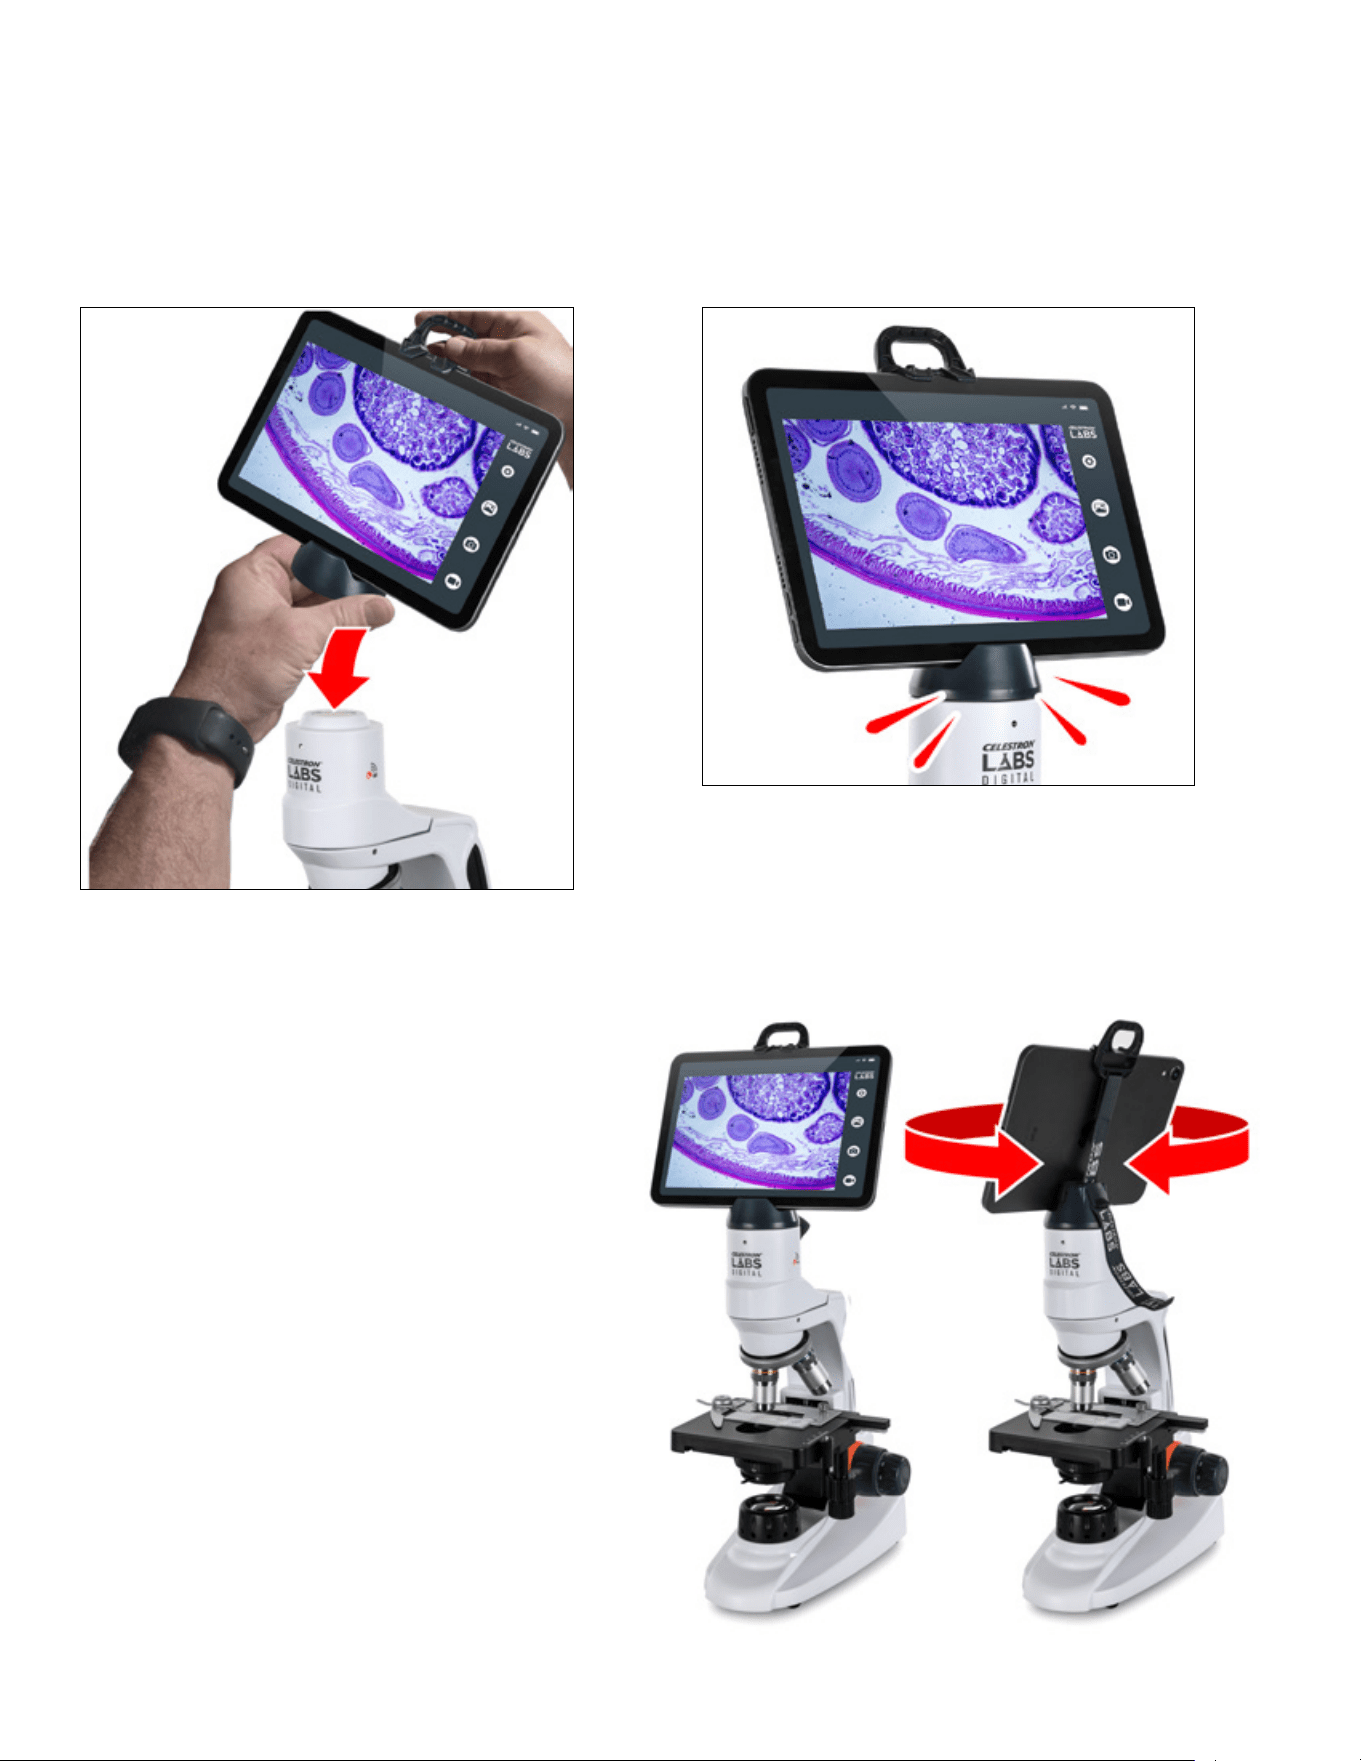
1. Using two hands, position the stand assembly over the
microscope head and align the circular stand base with the
circular shape on the microscope.
ATTACHING THE SMART DEVICE STAND TO THE MICROSCOPE
The microscope head contains an internal magnet. The stand base contains a metal plate.
3. Ensure the stand base is fully seated and stable
before releasing your hands.
When attached, the device can rotate 360°. Rotate
slowly and support the device or stand base as you
turn to reduce the risk of separating the magnetic
connection.
2. As the stand approaches the head, the magnet will attract the
metal plate and guide the stand into position.
ENGLISH
|
17
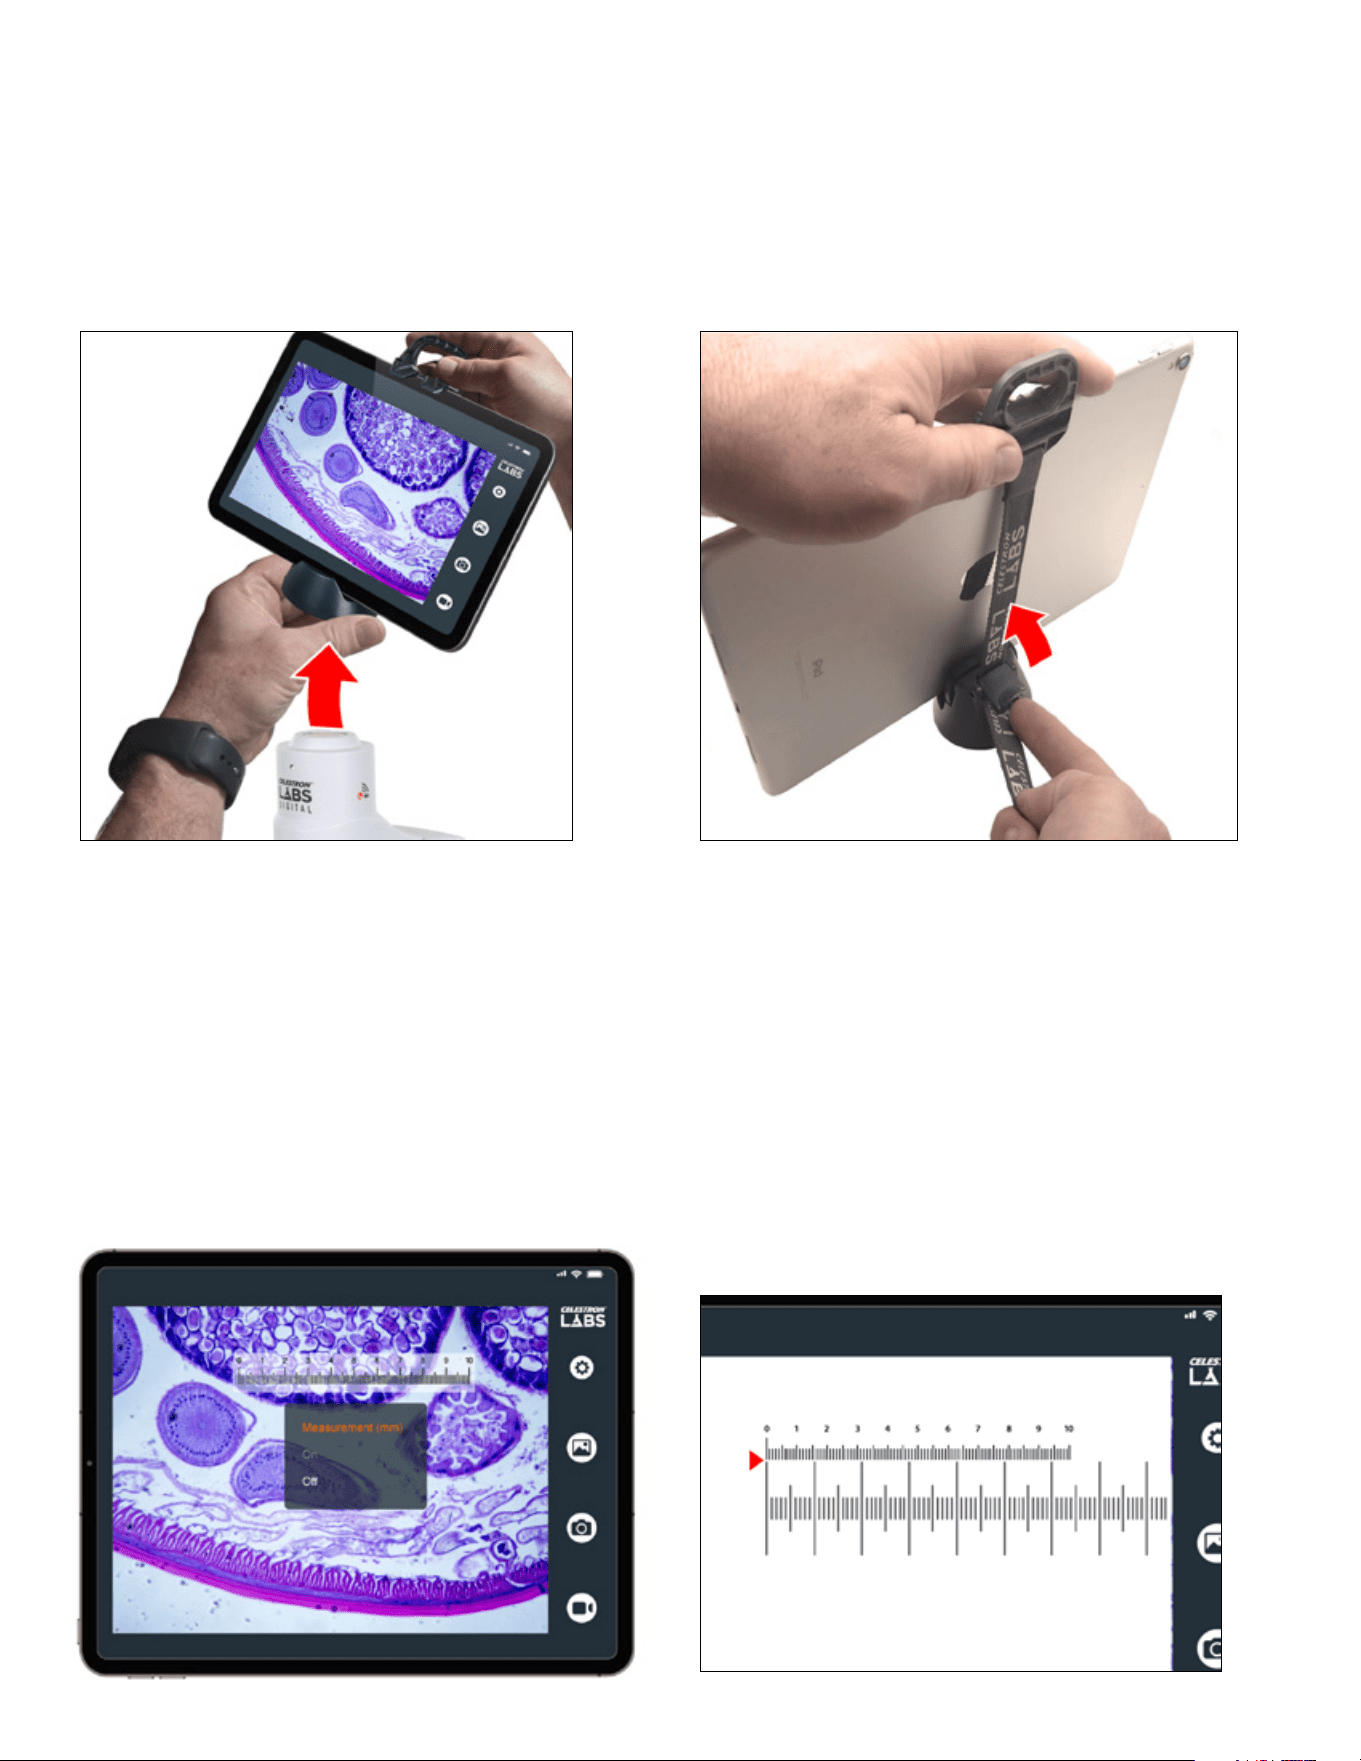
REMOVING THE SMART DEVICE STAND
You may remove either the entire stand assembly or the smart device first. For maximum stability, remove the stand assembly from the
microscope first, then remove the smart device while the stand is resting on a flat surface.
TO REMOVE THE ENTIRE STAND ASSEMBLY:
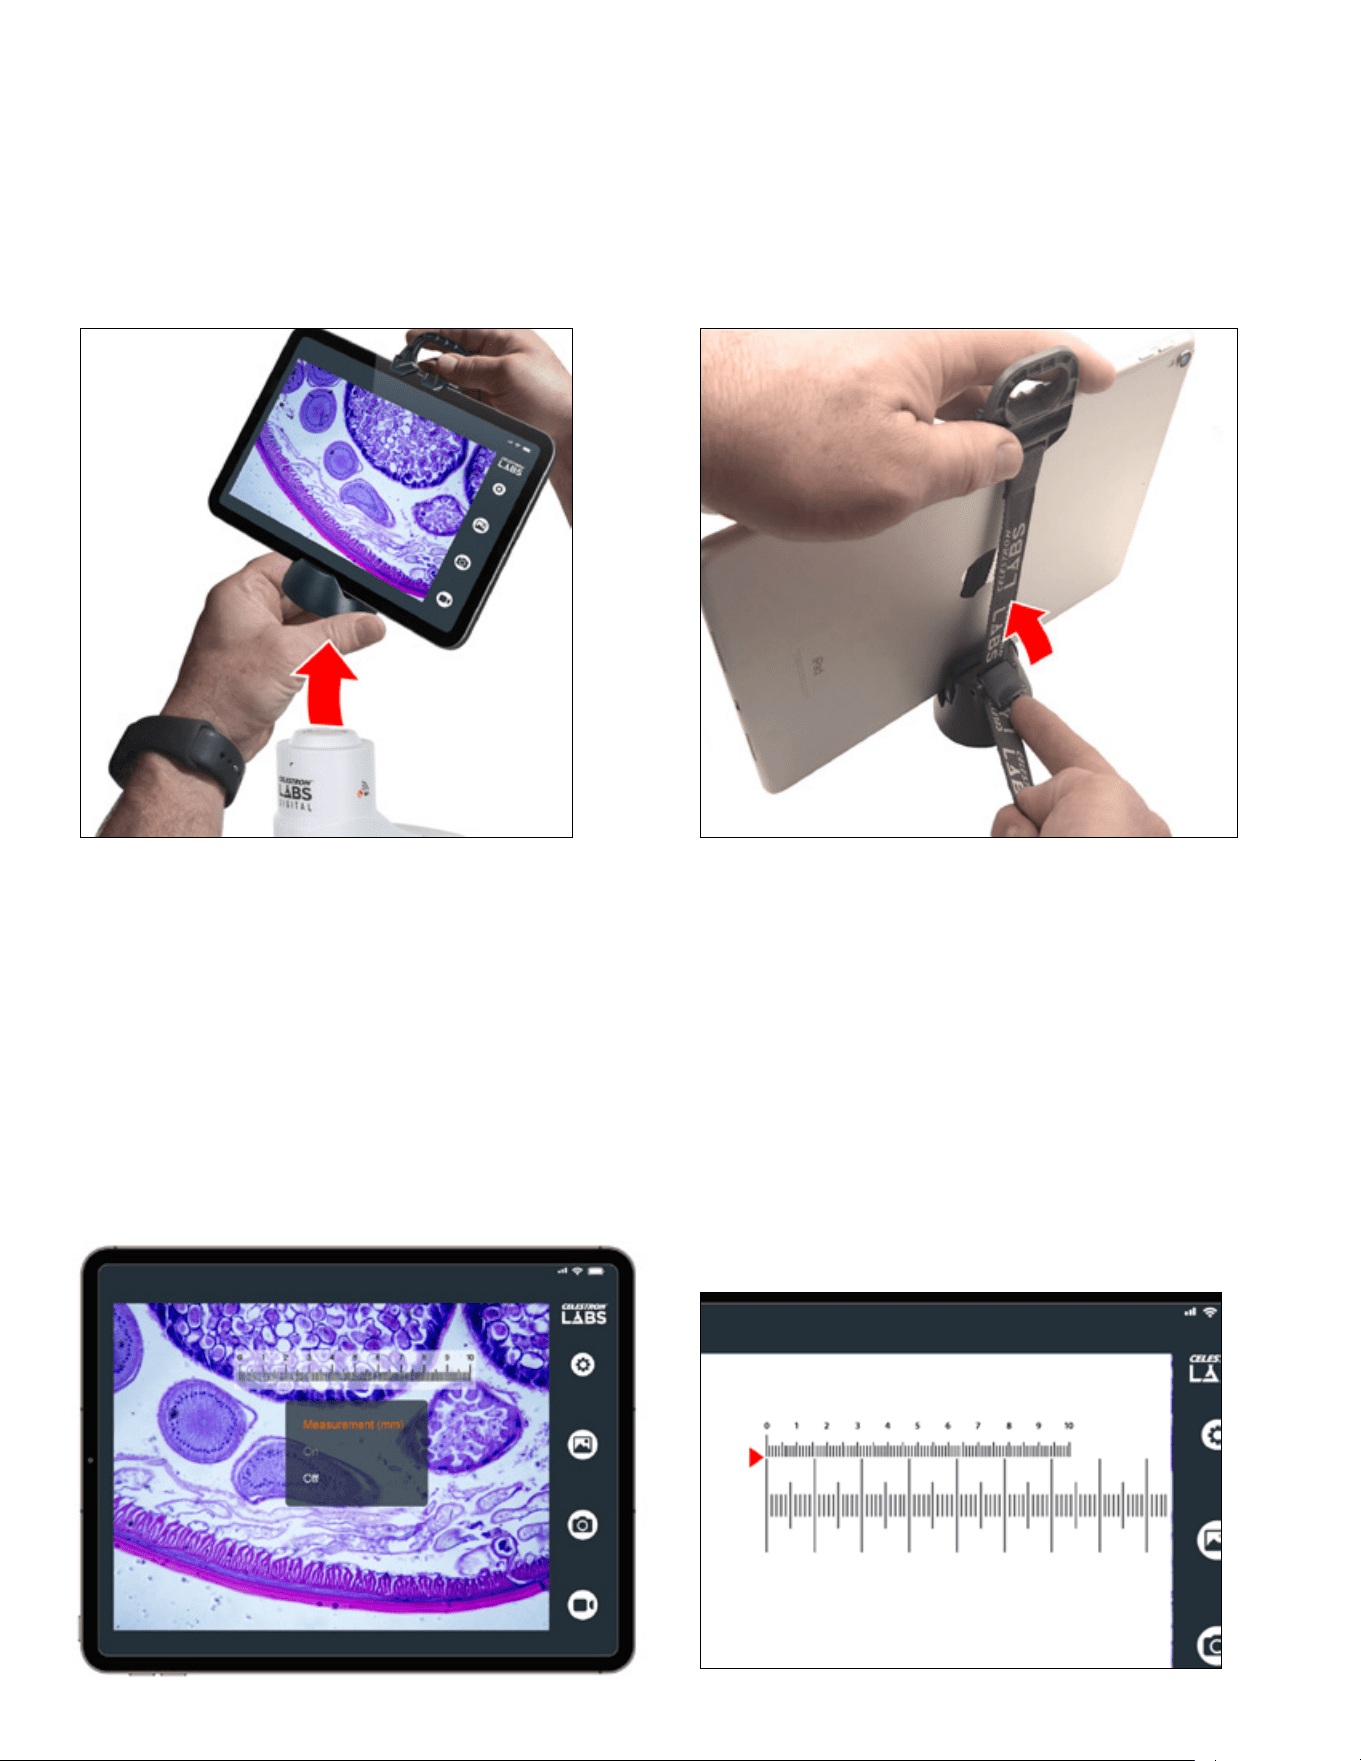
Hold the stand base with one hand and the device or hook
with the other. Twist and lift the stand base to detach it from
the microscope.
TO REMOVE THE SMART DEVICE:
Hold the smart device and hook with one hand. With the other
hand, lift the cam-lock latch to release the strap tension. Once
released, remove the device from the stand base.
The measurement reticle in the app displays evenly spaced lines on the screen. However, the app does not automatically know how much
real-world distance those lines represent at your current magnification. The included calibration slide, also called a stage micrometer,
solves this.
The slide contains a precisely etched ruler. Each small division on the slide equals 0.01mm (10 micrometers). By comparing the known
distances on the calibration slide to the onscreen reticle, you can calculate the actual distance represented by each reticle division.
Calibration is specific to the objective lens you are using. If you change magnification, you must recalibrate before taking new measurements.
USING THE CALIBRATION SLIDE
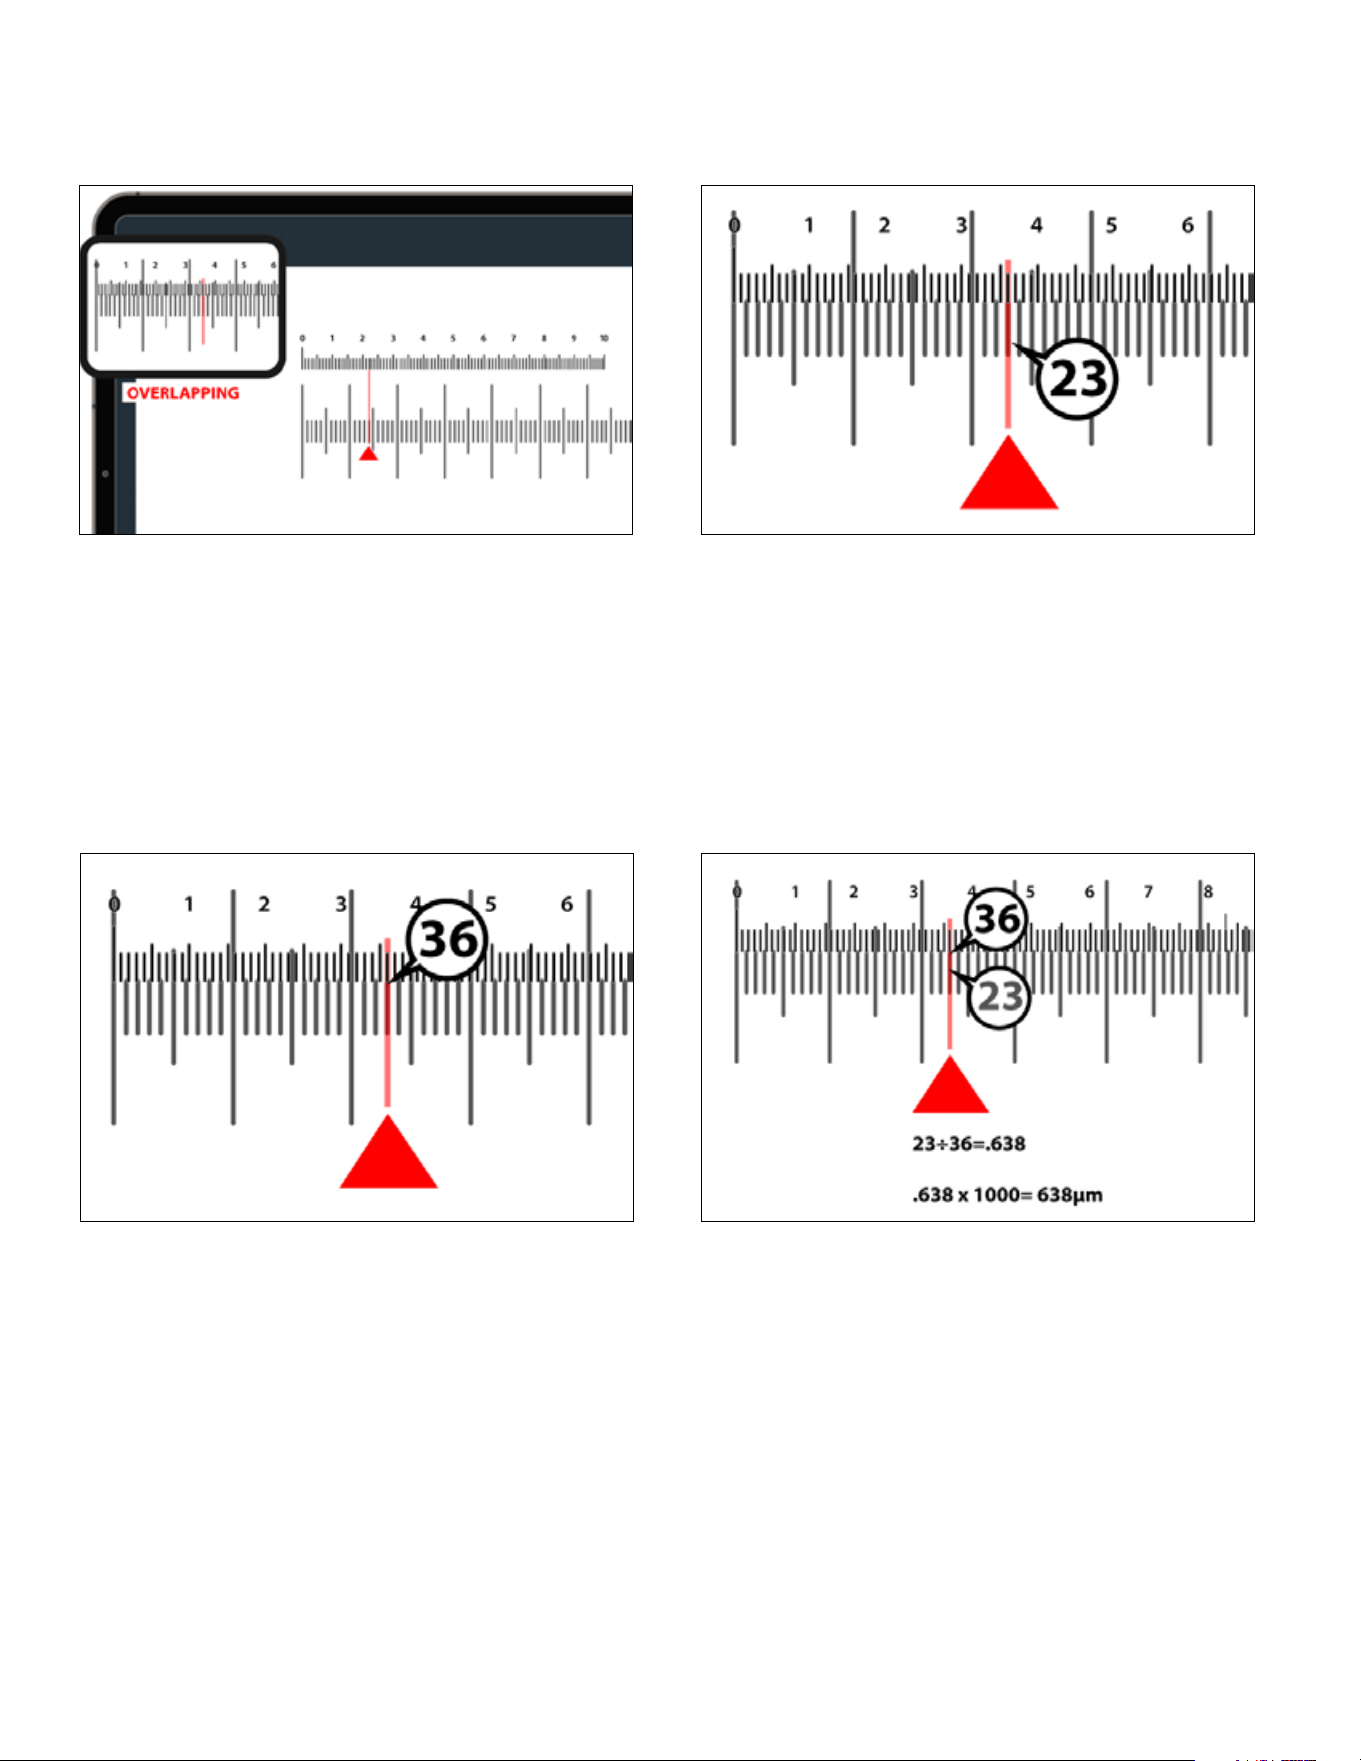
To Calibrate:
1. Place the calibration slide on the microscope stage.
2. In the app, turn the Measurement reticle ON.
3. Adjust the stage so the calibration slide ruler is visible and focus
the microscope until it appears sharp on screen.
4. Align the “0” mark on the digital measurement reticle with the
“0” mark on the calibration slide.
18
|
ENGLISH
5. Without moving the slide, move across the scale and locate the
next point where a line on the digital reticle aligns exactly with a
line on the calibration slide.
6. Count the number of divisions on the calibration slide between
the two aligned points. In this example, it’s 23 divisions.
7. Count the number of divisions on the digital reticle between
those same two aligned points. In this example, it’s 36 divisions.
8. Calculate the size represented by one reticle division.
First, divide the calibration slide divisions by the reticle divisions:
23 ÷ 36 = 0.638
Then, multiply this result by 1000 to convert to micrometers: 0.638
× 1000 = 638 µm
In this example, each division on the digital reticle equals 638 µm.
9. You can now use the calibrated reticle to estimate specimen
dimensions.
Important
If you change objective lenses or magnification, you must
recalibrate before taking new measurements.
ENGLISH
|
19
CARE AND MAINTENANCE
Your Celestron Labs Digital Wi-Fi Desktop Microscope is a precision optical device. Proper care will ensure reliable performance for
years to come.
• Store the microscope in a clean, dry environment when not in use.
• Do not use the microscope in environments where electronic devices are prohibited. Improper use could result in serious accident.
• Operate only within 23° to 120°F (−5° to 50°C). Avoid sudden temperature changes, as condensation may form inside the housing.
• Keep the microscope away from water and other liquids. Moisture poses a risk of fire and electric shock.
• Do not attempt to open or modify the device. Internal components should only be serviced by authorized technicians.
• To clean the exterior, wipe gently with a soft, dry cloth.
celestron.com/pages/warranty
NEED ASSISTANCE? Contact Celestron Technical Support
celestron.com/pages/technical-support
Product design and specifications are subject to change without prior notification.
This product is designed and intended for use by those 14 years of age and older.
©2026 Celestron.
Celestron and Symbol are trademarks of Celestron, LLC. • All rights reserved. • Celestron.com
US: Celestron, 2835 Columbia Street, Torrance, CA 90503 USA
UK: Celestron Global Ltd., Unit 2 Transigo, Gables Way, Thatcham RG19 4JZ, United Kingdom
EU Authorized Representative: AR Experts B.V. is Boeingavenue 209, 1119 PD Schiphol-Rijk, The Netherlands, [email protected]
Made in China | 04-26
FCC NOTICE: This device complies with Part 15 of the FCC Rules. Operation is subject to the following
two conditions: (1) This device may not cause harmful interference, and (2) this device must accept any
interference received, including interference that may cause undesired operation.
EU Note: Celestron hereby declares that the radio equipment type 44351 WiFi Desktop Microscope
complies with Directive 2014/53/EU. The full text of the EU declaration of conformity is available at the
following internet address www.celestron.com/productcompliance.
Product Model Celestron Labs Digital Wi-Fi Microscope #44351
Friendly model name WH-44351
WiFi Standard WiFi4, 802.11b/n
Tri-Band WiFi option 20M
2.4 GHz connected client limit 1
5 GHz connected client Limit None
6 GHz connected client limit None
Maximum data throughput 65M
WPS (WiFi Protected Setup) Not configured
WIFI PARAMETERS
20
|
FRANÇAIS
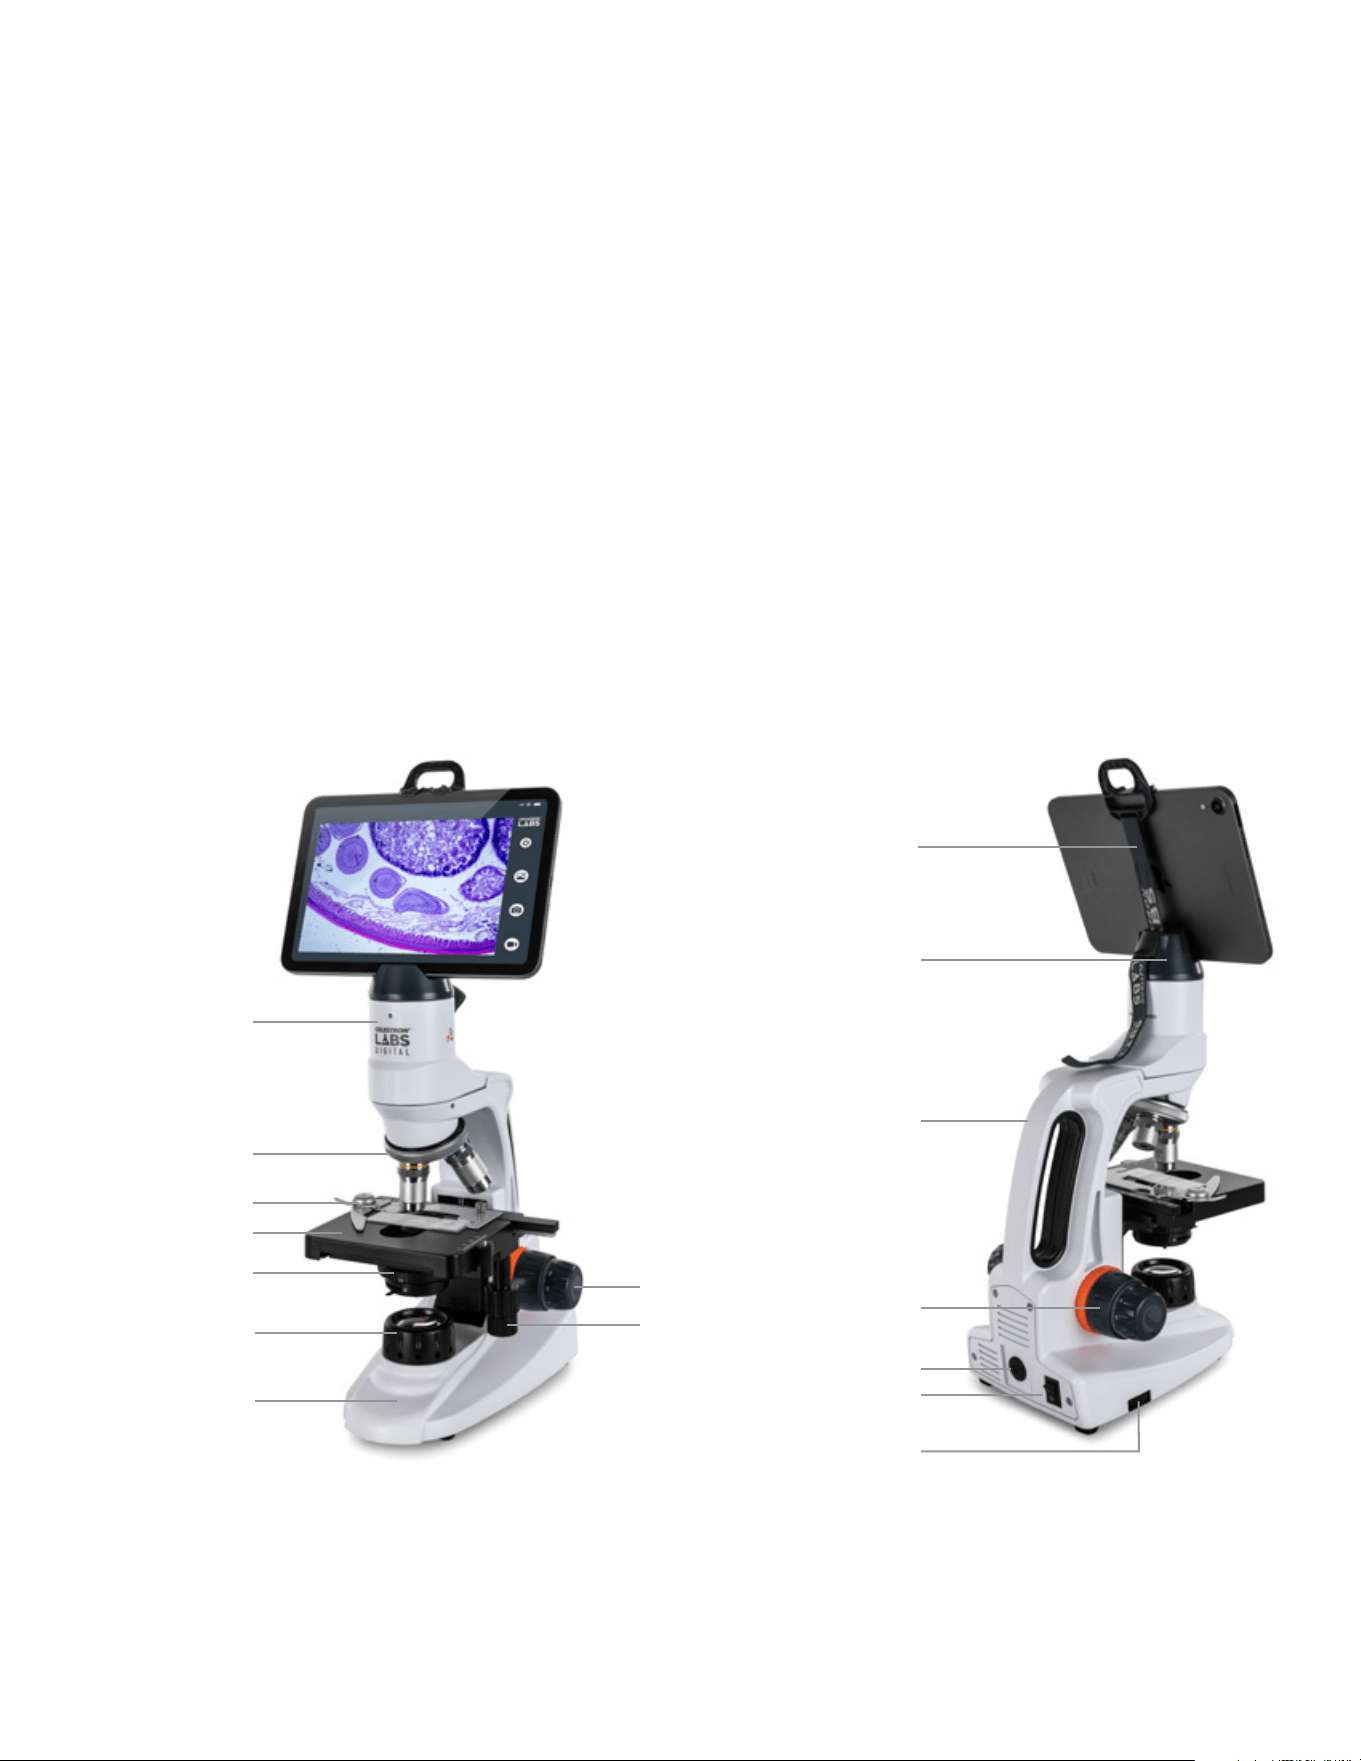
MODÈLE #44351
MODE D’EMPLOI
MICROSCOPE DE TABLE WI-FI
Tablette non incluse
FRANÇAIS
|
21
INTRODUCTION
Merci d’avoir acheté ce microscope de table numérique W-Fi
Celestron Labs.
Contrairement aux microscopes traditionnels, ce modèle utilise un
capteur numérique 2MP intégré au lieu d’un oculaire. Les échantillons
sont visualisés en direct sur votre smartphone ou tablette via le signal
Wi-Fi dédié du microscope. Aucune connexion internet n’est requise.
Ce microscope fournit un grossissement de 48x à 480x et est bien
adapté pour examiner les lames préparées de tissus végétaux et
animaux, fibres, levures, moisissures, bactéries, et autres spécimens
biologiques.
L’application gratuite Celestron Labs Digital Wi-Fi est compatible
avec les appareils iOS et Android. Avec cette dernière, vous pouvez
capturer des images fixes, enregistrer des vidéos, activer des outils de
mesure et enregistrer des fichiers directement sur votre appareil pour
les partager ou les analyser.
Le microscope offre des fonctionnalités haut de gamme traditionnelles,
y compris une platine mécanique entièrement réglable, trois objectifs
achromatiques (4x, 10x et 40x), un condensateur Abbe avec
diaphragme à iris et des commandes de mise au point grossière et fine.
Sont également inclus cinq lames préparées, une lame d’étalonnage,
un adaptateur secteur adapté à de multiples pays et un support pour
appareil intelligent avec sangle de sécurité.
Avant de commencer, veuillez lire attentivement les instructions
d’installation et consulter les schémas de ce manuel. Quelques
minutes de préparation assureront une installation en douceur et les
meilleures performances possibles.
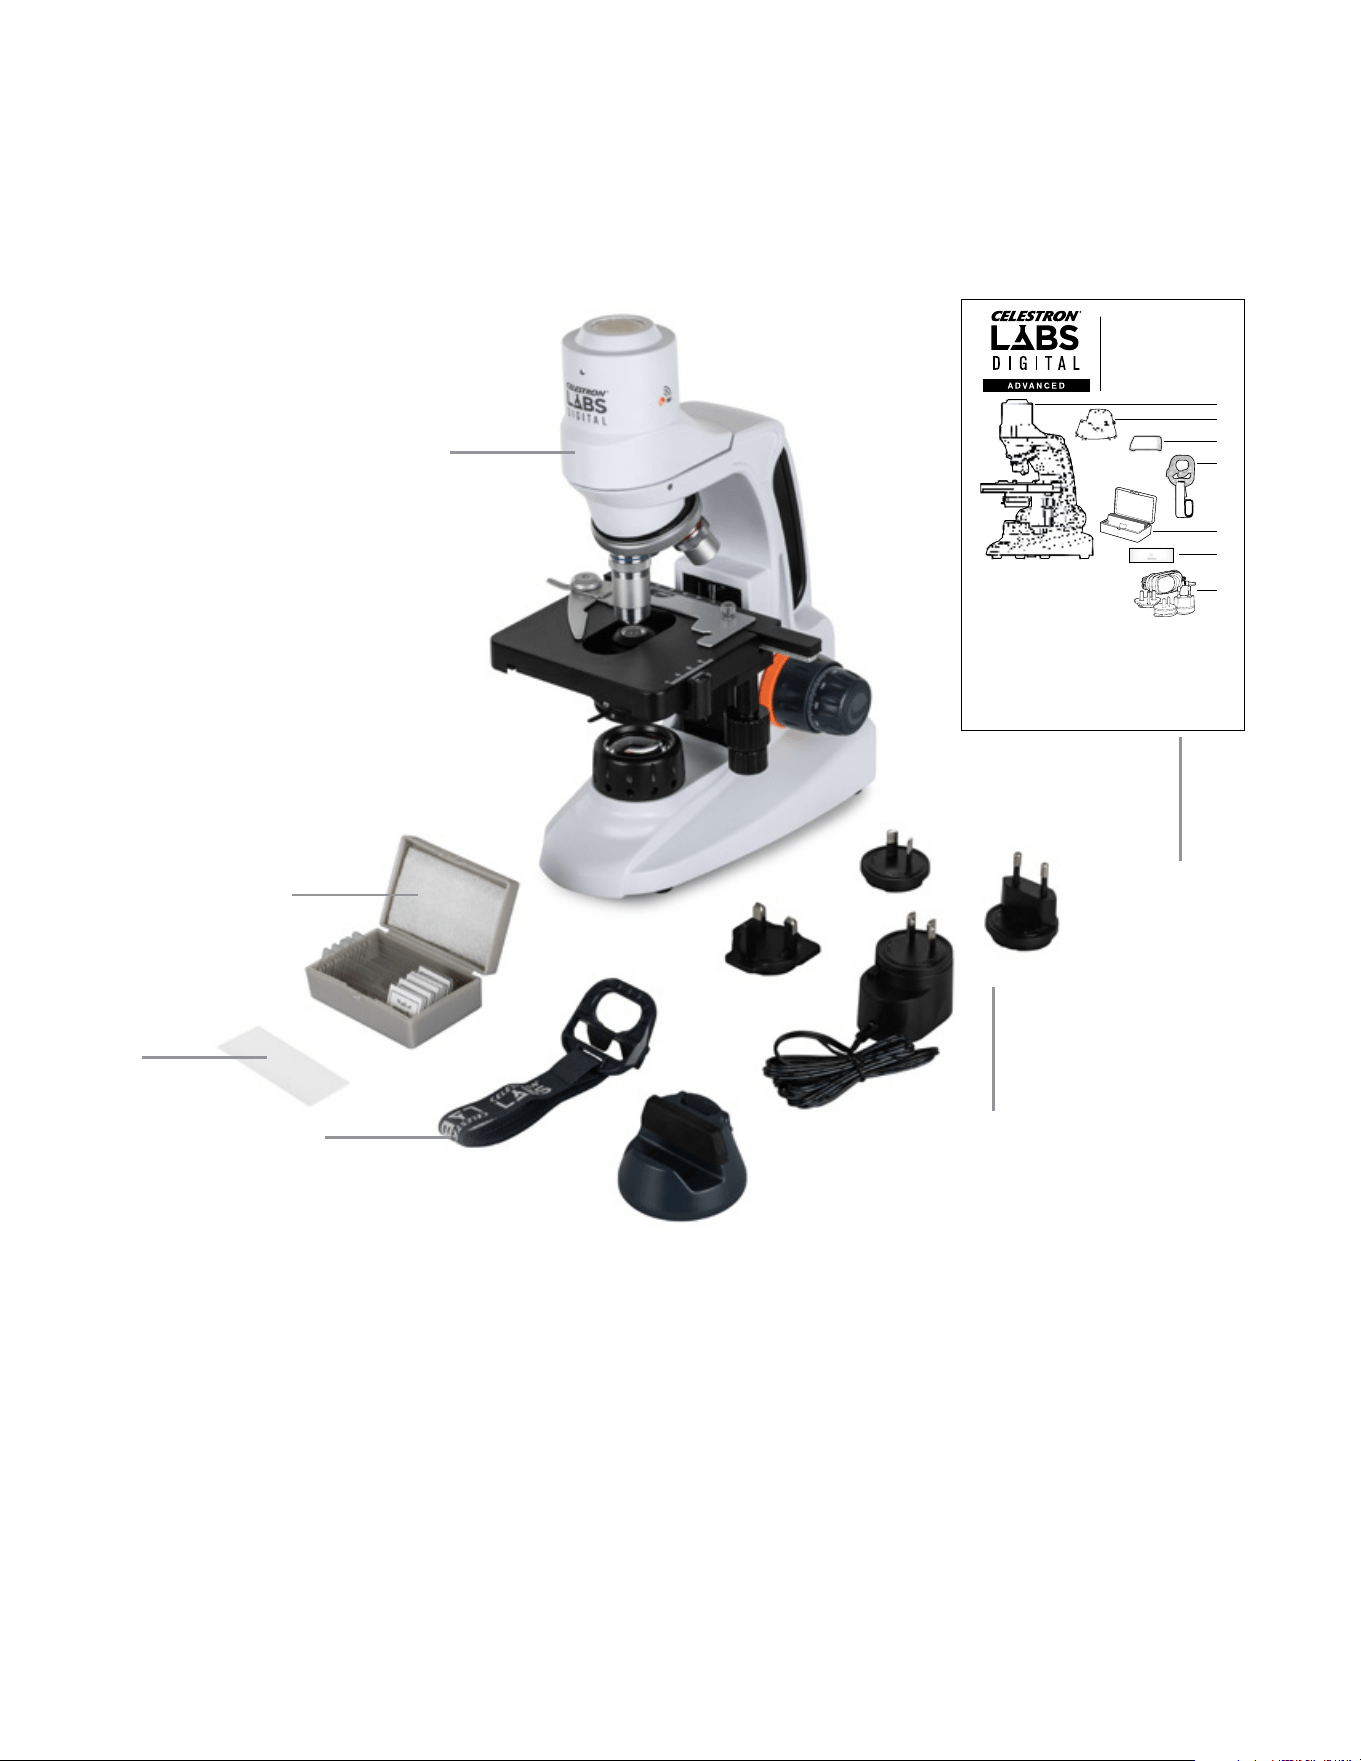
Crochet et sangle de sécurité
Porte-appareil intelligent
Tête de microscope avec capteur
et module Wi-Fi
Tourelle d'objectifs trinoculaires
avec 3 objectifs
Porte-lames
Platine mécanique
Condenseur Abbe
Illuminateur
Base
Molette de mise au
point fine
Boutons de réglage
verticalement et
horizontalement de la platine
Poignée de transport
Molette de mise au point
grossière
Prise d'alimentation 5,5 mm
Interrupteur On/Off
Molette de réglage de l'illuminateur
22
|
FRANÇAIS
Déballez soigneusement votre microscope de table Wi-Fi et vérifiez que tous les éléments répertoriés
ci-dessous sont présents:
[A] Microscope de table Wi-Fi numérique Celestron Labs
[B] Cinq lames préparées
[C] Lame d’étalonnage
[D] Adaptateur secteur multinational avec quatre fiches
[E] Support pour appareil intelligent avec sangle de sécurité
[F] Guide de configuration rapide
A
B
C
E
D
F
MODEL #44351
QUICK START GUIDE
Contenu de la boîte
[A] M icroscope d e table Wi-F i 2MP
Celes tron Labs 2 MP
[B] So cle intellige nt
[C] Ad aptateur d e socle intell igent
[D] Sa ngle de sécuri té de socle int elligent
[E] Boî te de 5 de lame s de spécimens
préparées
[F] Ré glette d’ét alonnage
[G] Ada ptateur se cteur inte rnational
CA 100–2 40 V
What’s in the Box
[A] C elestron L abs 2MP Wi- Fi Deskt op
Microscope
[B] Sm art Device S tand
[C] Sma rt Device S tand Boos ter
[D] Sm art Device S tand Safe ty Strap
[E] Bo x of 5 Prepar ed Specimen Sli des
[F] C alibratio n Slide
[G] Mul ti-count ry 100–240V A C Adapter
Lieferumfang
[A] C elestron L abs 2MP WL AN
Desktopmikro skop
[B] Smart-Geräte-Gestell
[C] Smart-Geräte-Gestellver stärkung
[D] Smart-Geräte-Gestell-Sicherheitsgurt
[E] Bo x mit 5 vorber eiteten Obj ektträ gern
[F] Kalibrierungsobjek tträger
[G] Lä nderübergr eifender 10 0–240 V
AC-Adapter
Contenuto della confezione
[A] M icroscopi o da tavolo Wi -Fi Celest ron
Labs 2 MP
[B] Sup porto per di spositiv o smart
[C] Boo ster per dis positivo s mart
[D] Cing hia di sicure zza per supp orto per
dispositivo smart
[E] Co nfezione da 5 v etrini pre parati
[F] Ve trino di cali brazione
[G] Ada ttator e CA 100-240 V mul ti-paese
Contenido de la caja
[A] M icroscopi o WiFi de escr itorio de 2M P
CelestronLabs
[B] Sop orte de disp ositivo in teligente
[C] Pot enciador de so porte de dis positivo i nteligent e
[D] Cor rea de segur idad del sopor te de dispos itivo
inteligente
[E] Ca ja de 5 portam uestras d e especímene s
preparados
[F] Re gla de calibr ado
[G] Ada ptador 100 -240V CA mult inacional
Wi-Fi DESKTOP MICROSCOPE
ENGL ISH
NEED ASSISTANCE? Contact Celestron Technical Suppor t
celestron.com/pages/technical-support
Produ ct design and s pecificat ions are subj ect to change w ithout pri or
noti fication. • T his product i s designed and i ntended for u se by those
14 year s of age and older.
©2025 C elestro n. Celestr on and Symbol
are tr ademarks o f Celestr on, LLC. • All r ights res erved. • Cele stron.c om
US: Cele stron, 28 35 Columbia S treet, Tor rance, CA 90 503 USA • UK :
Celes tron Globa l Ltd., Unit 2 Tra nsigo, Gabl es Way, Thatch am RG19 4JZ,
Unite d Kingdom • Made i n China | 06-25
FRA NÇAIS
BESOIN D’ASSISTANCE? Contactez le support technique de
Celestron
celestron.com/pages/technical-support
Le des ign et les spéci fications d u produit son t sujette s à modificat ion sans
préa vis. • Ce prod uit est conçu e t prévu pour ê tre utilis é par des pers onnes
âgées d e 14 a ns et plus
©2025 C elestro n. Celestr on et le Symbol s ont
des mar ques dépos ées de Celest ron, LLC. • Tou s droits rés ervés • Cel estron.
com • US: C elestron .com • 2835 Col umbia Stre et, Torrance , CA 90503 U SA •
UK: Cel estron Glo bal Ltd., Uni t 2 Tr ansigo, Gab les Way, That cham RG19 4JZ ,
Royaum e-Uni • Fabr iqué en Chine | 06 -25
DEUTSCH
BENÖTIGEN SIE UNTERSTÜ TZUNG? Wenden Sie sich an die
technische Unterstützung von Celestron unter
celestron.com/pages/technical-support
Produ ktdesign u nd technisch e Daten könne n ohne vorher ige Ankündig ung
geänd ert werden . Dieses Pro dukt ist für P ersonen ab 14 J ahren konzi piert
und vorgesehen.
©2025 C elestro n. Celestr on und Symbol
sind Wa renzeichen v on Celestr on, LLC. Al le Rechte vor behalten. C elestron .
com • US A: Celestr on, 2835 Col umbia Stre et, Torrance , CA 90503 U SA • UK:
Celes tron Globa l Ltd., Einhei t 2 Transigo, Ga bles Way, Tha tcham RG19 4JZ ,
Verein igtes König reich • Herge stellt in Chi na | 06-25
celestron.com/pages/warranty
ITALIANO
BISOGNO DI AIUTO? Contattare il suppor to tecnico Celestron
celestron.com/pages/technical-support
Il desi gn del prodot to e le specifi che sono sogge tti a modifi che senza
prev ia notifica . Questo pr odotto è pro gettat o per essere u tilizza to da
pers one di età par i o superiore a i 14 anni.
©2025 C elestro n. Celetron e S ymbol
sono ma rchi di Celes tron, LLC . • Tu tti i dirit ti riserv ati. • Celes tron.com
• Sta ti Uniti: Cele stron, 28 35 Columbia S treet, Torr ance, CA 90 503 Stat i
Uniti • R egno Unito: Ce lestron Gl obal Ltd., Un it 2 Transigo, G ables Way,
That cham RG18 4JZ Re gno Unito • Pro dotto in Cin a | 06-25
ESPAÑOL
¿NECESITA AYUDA? Contacte con el soporte técnico de
Celestron
celestron.com/pages/technical-support
El dise ño y las especi ficaciones d el producto e stán sujet os a cambios s in
noti ficación pre via. Este p roducto ha s ido diseñado y e stá pensad o para
ser us ado por perso nas de 14 años o más d e edad.
©2025 Celestron. Celestron y su símbolo
son marcas comerciales de Celest ron, LLC. • Todos los derechos reserv ados.
• C elestron .com • EE.UU.: Celestr on, 283 5 Columb ia Str eet, Torr ance, C A
9050 3 EE .UU. • GB: Celes tron Global Ltd., Unit 2 Tr ansigo, Gables Way,
That cham RG19 4JZ, Re ino Unido • Fabric ado en China | 06-25
B
A
C
D
E
F
G
CLICK FOR FULL MANUAL
CLIQUEZ POUR CONSULTER LE MODE D’EMPLOI COMPLET
FÜR DIE VOLLSTÄNDIGE ANLEITUNG KLICKEN
FARE CL IC PER IL MANUALE COMPLETO
PULSE PARA EL MANUAL COMPLETO
QR CODE

ENGLISH
|
23
Type de microscope Wi-Fi Desktop avec triple objectif
Tête: La tête est équipée d’un capteur et
module Wi-Fi pour envoyer des images en
streaming sans fil
Type d'oculaire: Capteur CMOS en place de l'oculaire
(grossissement 12x)
Caractéristiques du
capteur:
2 MP | 1/2,8” SONY IMX290 LQR-XC
Type de platine: Mécanique - Double épaisseur, 115mm
x 125mm (4,52” x 4,92”)
Grossissement du
capteur:
12x
Pas de pixel: 2,9 μm x 2,9 μm
Type de stockage: Aucun stockage: c’est le stockage du
smartphone qui contiendra les images et
les vidéos.
Résolution de capture
d'image fixe:
640x480/ 1280x720/ 1920x1080
Résolution vidéo: 640x480/ 1280x720/ 1920x1080
Position du déclencheur: Dans L'APPLICATION
Logiciel: Application Celestron Labs Digital Wi-Fi
• Photo
• Vidéo
• Fonction de mesure
Compatibilité logicielle: • IOS
• Android
Tourelle: Triple avec arrêt à crans
Types des objectifs: (3) objectifs CF achromatiques à plan fini
sur la tourelle
Objectif(s) Standard: DIN 35 RMS
Grossissement des
objectifs
4x, 10x, 40x
Plage de grossissement: 48x, 120x et 480x (final déterminé
par la taille de l'écran du périphérique.
Spécifications basées sur la base d’un
smartphone de 5 pouces)
CdV • 4x: 37,5mm
• 10x: 6,7mm
• 40x: .65mm
Filetage des objectifs: WJ 4/5” x 1/36”
Types de mise au point: Plan et mise au point précise
Déplacement de la mise
au point (par rotation):
0,7mm - 35,3mm (.027 » à 1,39 »)(env.)
Type d’illumination: LED (3 W/4 V- 220 V/110 V)
Position(s) d'éclairage: Illuminateur inférieur
Mécanisme de réglage
de l’illuminateur:
Cadran de réglage sur la base
Source d'alimentation: Adaptateur secteur universel* 100 à 240 V,
prise multinationale 50/60 hz
Alimentation sur pile: Oui. 3 piles AA pour (2 heures)
d'alimentation de secours - si nécessaire
Platine: Platine mécanique double épaisseur
• Dimensions de la platine: 115 mm ×
125 mm (4,5 po x 4,9 po)
• Plage de déplacement: 70 mm × 30 mm
(2,75 po x 1,18 po)
Type de condenseur: Condenseur Abbe avec diaphragme à iris
et filtre
Condenseur N/A: N/A 1,25
Port(s) d'entrée: Adaptateur secteur / 5-6V DC, entrée
électrique positive de pointe 200-
1000mA. (La fiche doit mesurer 5,5 mm
(.21”) de diamètre extérieur, 2,1 mm (.08”)
de diamètre intérieur et 12,5 mm (.49”)
de long)
Port(s) de sortie: N/A
Adaptateur CA: 5-6V CC, entrée électrique positive de
pointe 200-1000mA. La fiche doit mesurer
5,5 mm (.21”) de diamètre extérieur, 2,1
mm (.08”) de diamètre intérieur et 12,5
mm (.49”) de long
Dimensions du
microscope:
170mm x 140mm x 330mm
(6,7” x 5,5” x 13”)
Poids du microscope: 56oz (1600g)
Éléments inclus: • 5 lames préparées
• Lame d'étalonnage
• Adaptateur secteur (4 prises pour
compatibilité internationale)
• Support d'appareil intelligent unique en
option avec sangle de sécurité
SPÉCIFICATIONS
24
|
FRANÇAIS
1. Placez le microscope et les autres pièces sur une surface stable
et plane.
2. Insérez le petit connecteur de l’adaptateur secteur dans la prise
d’alimentation située à l’arrière du microscope.
3. Sélectionnez la prise adaptée à votre pays et connectez-la à
l’adaptateur.
4. Branchez l’adaptateur secteur 120-240Và une prise murale CA.
CONFIGURATION
ÉTAPE 1: CONNEXION DE L'ALIMENTATION
FRANÇAIS
|
25
L’illuminateur doit s’allumer. Si ce n’est pas le cas, tournez la
molette de luminosité sur le côté de la base pour augmenter
l’éclairage.
Le voyant bleu commence à clignoter. Cela indique que le microscope
diffuse son signal Wi-Fi.
Si la LED bleue ne s’allume pas:
• Vérifiez que l’adaptateur secteur est correctement branché.
• Vérifiez que la prise murale est active.
ÉTAPE 3: INSTALLER L’APPLICATION
L’application compagnon de ce microscope fonctionne avec les
appareils iOS et Android. Scannez le code QR ci-dessous ou
recherchez «Celestron Labs Digital Wi-Fi» dans l’App Store
d’Apple ou Google Play Store.
Téléchargez et installez l’application gratuite.
1. Ouvrez les paramètres Wi-Fi sur votre smartphone ou votre
tablette.
2. Recherchez un réseau nommé:
Celestron LABS Desktop-XXXX
(les quatre X représentent une combinaison unique lettre/chiffre.)
3. Appuyez sur le réseau pour vous connecter.
Une fois connecté, le voyant bleu cesse de clignoter et reste fixe.
Votre appareil peut afficher un message indiquant qu’il n’y a pas de
connexion Internet. Ceci est normal. Le microscope crée sa propre
connexion Wi-Fi directe et n’utilise pas votre réseau Wi-Fi.
ÉTAPE 2: ALLUMER
Allumez l’interrupteur présent sur la base du microscope.
ÉTAPE 4: CONNECTEZ-VOUS AU RÉSEAU WI-FI DU MICROSCOPE
26
|
FRANÇAIS
L’interface principale est illustrée ci-dessous. Les légendes identifient chaque fonctionnalité décrite dans cette section.
UTILISATION DE L’APPLICATION
ÉTAPE 5: COMMENCER
L’OBSERVATION
Ouvrez l’application Celestron Labs Digital Wi-Fi.
La diffusion vidéo en direct devrait commencer après un délai
d’environ 30 secondes.
Si la vidéo n’apparaît pas:
• Vérifiez que votre appareil est connecté au
réseau Celestron LABS Desktop-XXXX.
• Fermez et rouvrez l’application.
FRANÇAIS
|
27
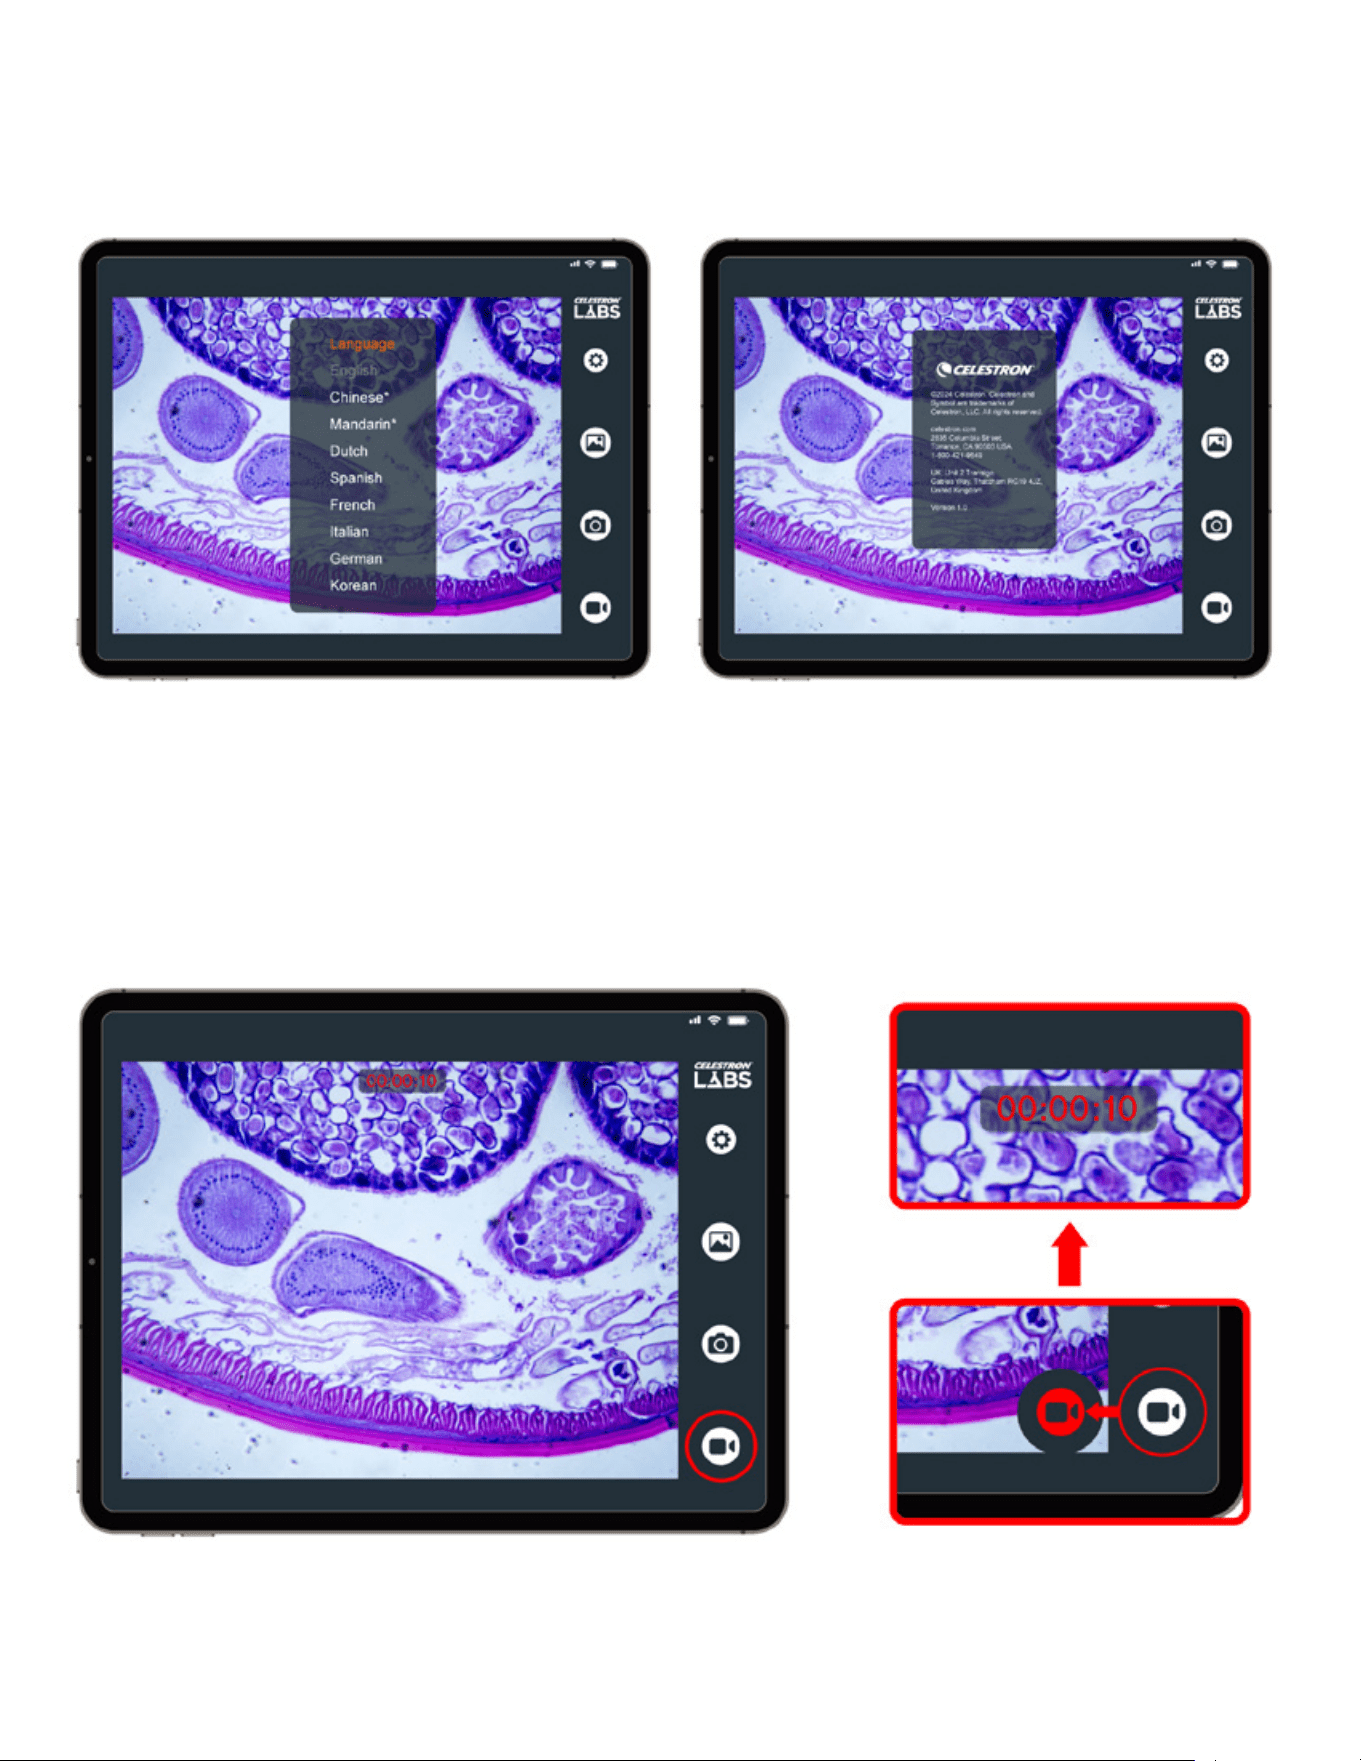
A. RÉGLAGES:
Appuyez sur l’icône Paramètres pour accéder aux options suivantes:
RÉSOLUTION:
Sélectionnez la résolution de l’image et de la vidéo.
Les résolutions plus élevées offrent plus de détails, mais génèrent
des fichiers plus volumineux.
Paramètres disponibles:
• 640 × 480
• 1280 × 720
• 1920 × 1080
• 2048 × 1536 (résolution maximale)
MESURE:
Activer ou désactiver le réticule de mesure numérique.
Vous pouvez l’utiliser comme guide général pour la comparaison ou,
une fois étalonné, estimer les dimensions de l’échantillon directement
à l’écran.
28
|
FRANÇAIS
LANGUE:
Changer la langue de l’interface.
Les options disponibles sont l’anglais (par défaut), le chinois
(simplifié), le chinois (traditionnel), le néerlandais, l’espagnol,
français, italien, allemand et coréen.
À PROPOS
Affiche le numéro de version de l’application, les informations légales
et les coordonnées Celestron.
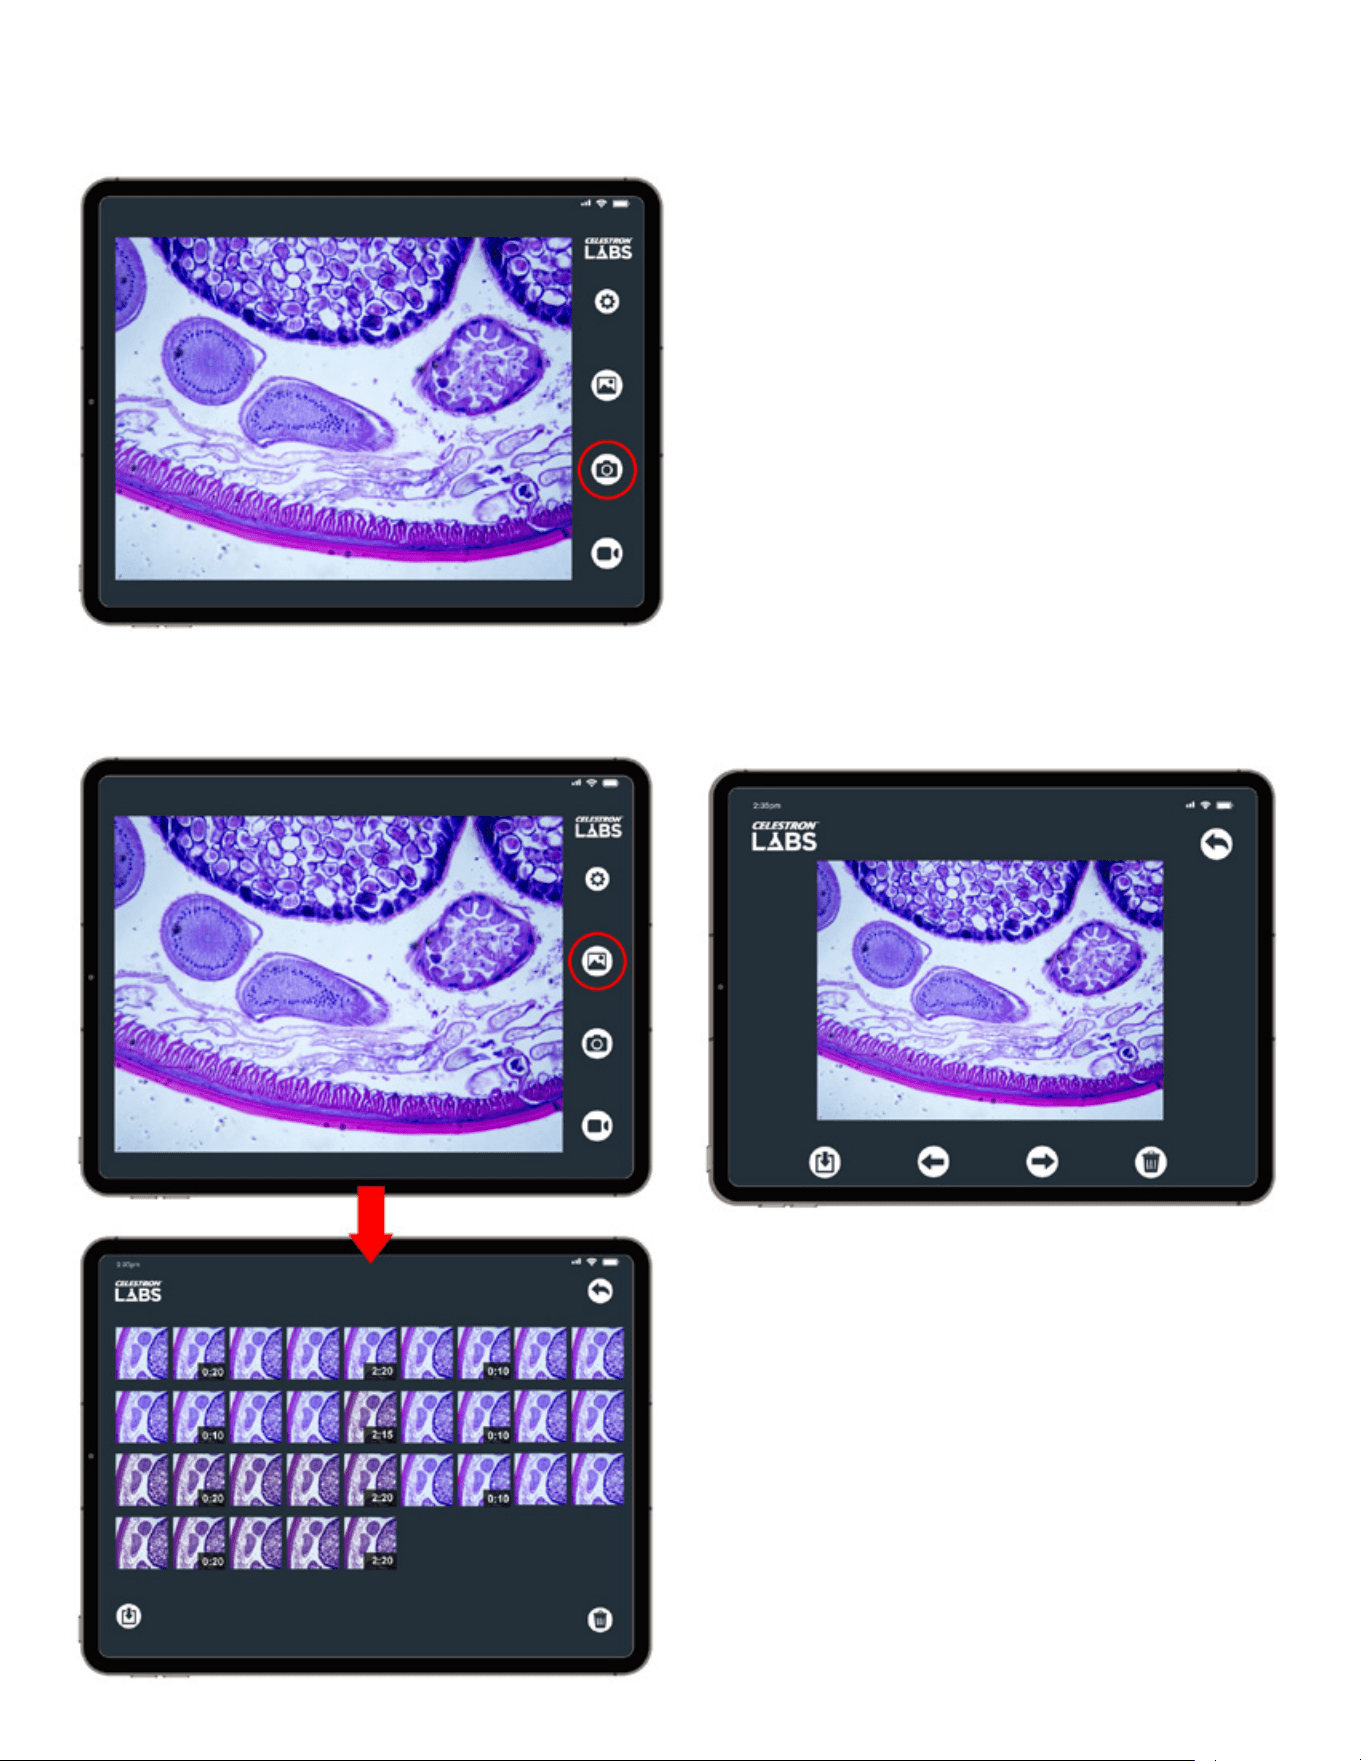
B. ENREGISTREMENT VIDÉO
Appuyez sur l’icône Vidéo pour démarrer l’enregistrement. Un
minuteur apparaîtra en haut de l’écran pendant l’enregistrement.
Appuyez de nouveau sur l’icône pour arrêter l’enregistrement.
Les vidéos sont enregistrées directement sur votre appareil.
FRANÇAIS
|
29
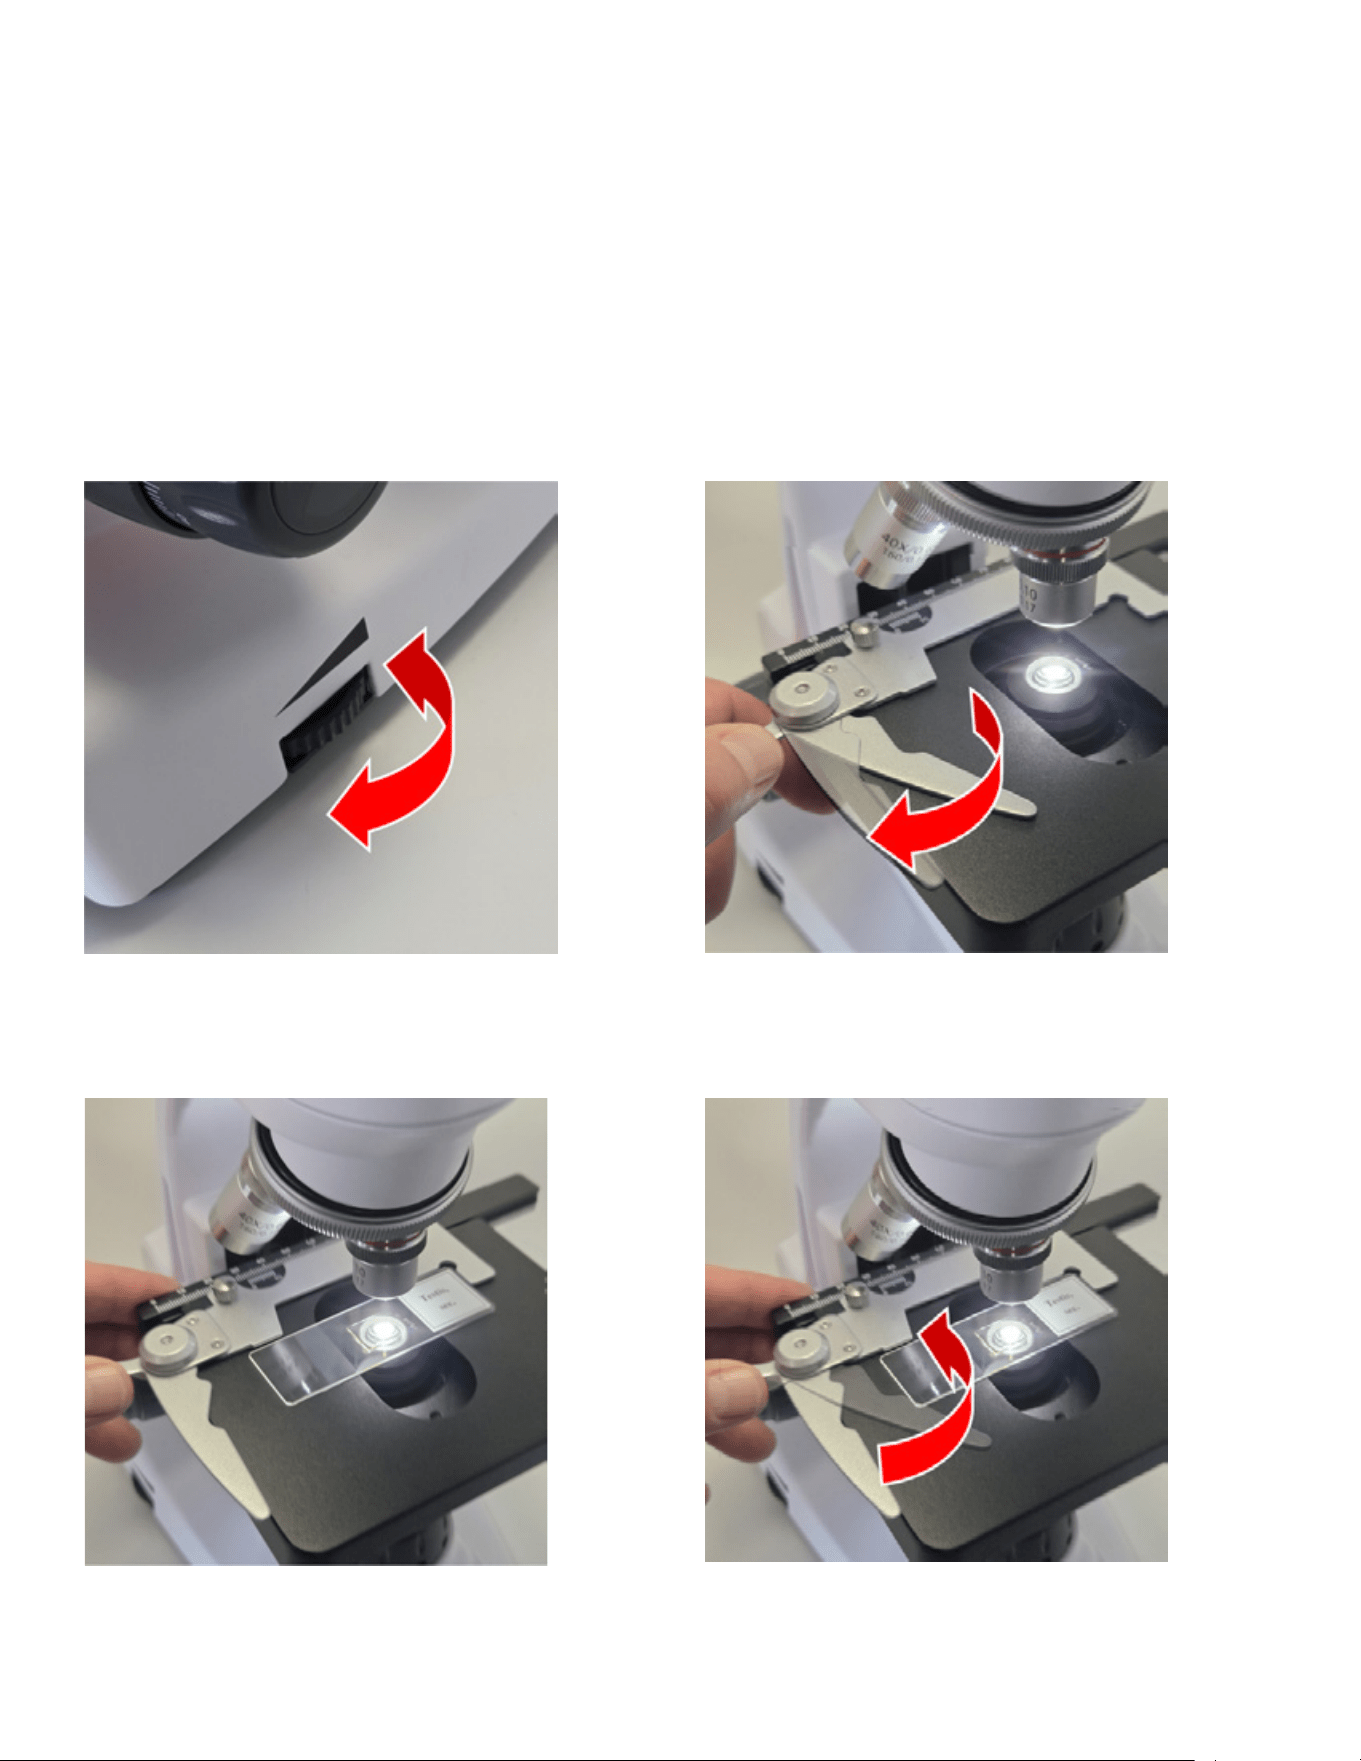
C. PRENDRE DES PHOTOS
Appuyez sur l’icône de photo pour prendre une photo. Les images sont enregistrées directement sur votre appareil.
Appuyez sur l’icône Galerie pour afficher les images et vidéos
enregistrées.
• Appuyez sur une vignette pour afficher en plein écran.
• Balayez vers la gauche ou la droite pour faire défiler les fichiers
enregistrés.
• Pour lire une vidéo, appuyez sur l’écran et sélectionnez Lecture.
DÉCLARATION SUR LES
AUTORISATIONS
Selon les paramètres de votre appareil, il se peut que l’on vous
demande d’autoriser l’application à accéder à vos photos et à vos
fichiers. Un accès complet est requis pour enregistrer des images et
des vidéos.
D. GALERIE
30
|
FRANÇAIS
UTILISER LE MICROSCOPE
Le microscope numérique de bureau Wi-Fi fonctionne comme un microscope optique traditionnel, dont l’occulaire est remplacé par une
caméra.
Avant de procéder à l’observation, vérifier les points suivants:
• Le microscope est sous tension.
• Le voyant bleu est fixe (Wi-Fi connecté).
• L’application est ouverte et en cours de diffusion.
RÉGLEZ L’ÉCLAIRAGE
Tournez la molette de réglage de la luminosité sur la base
du microscope pour activer l’illuminateur et régler l’intensité
lumineuse.
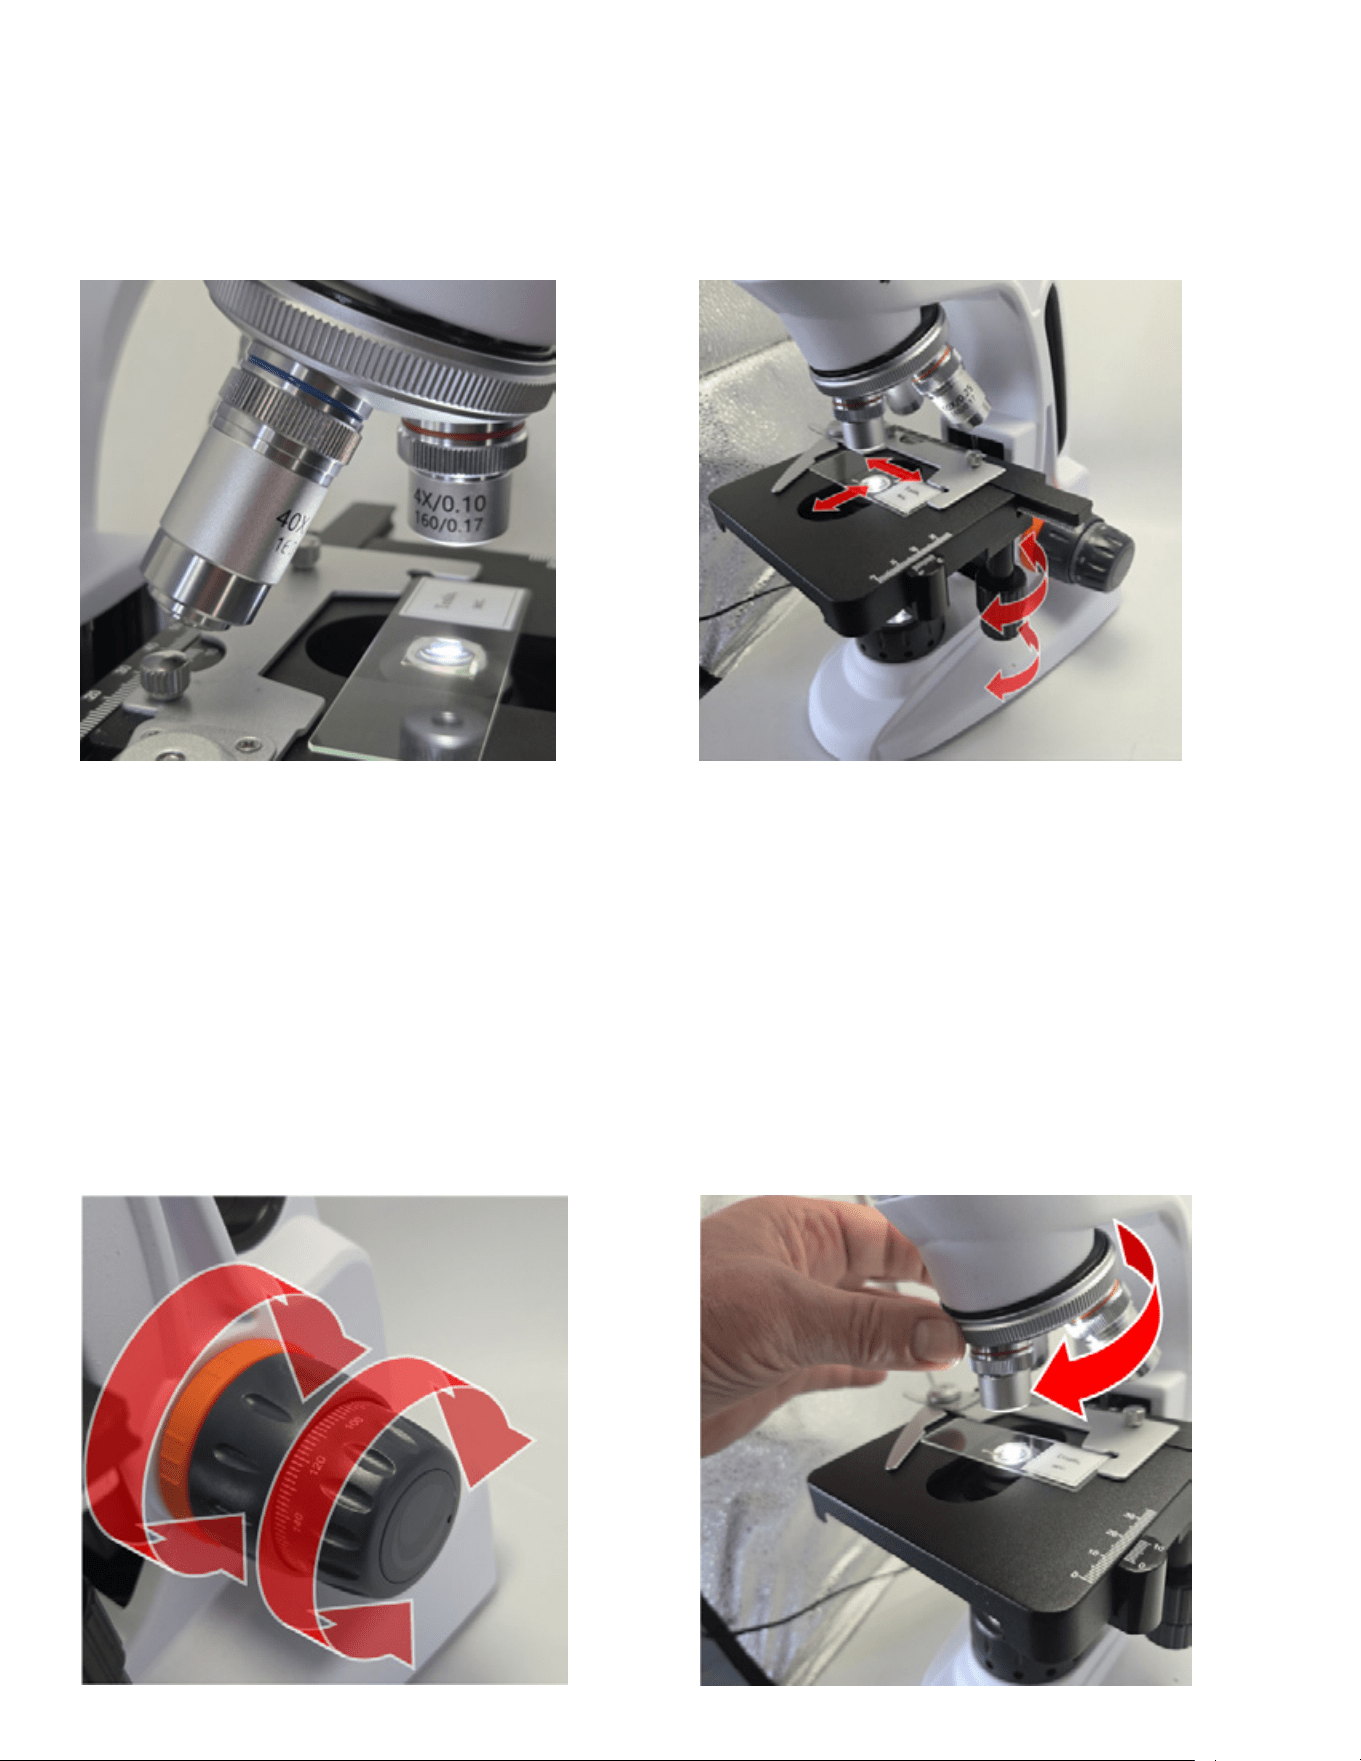
INSÉREZ UNE LAME
1. Faites pivoter le bras de chevalet pour l’ouvrir.
2. Placez la lame à plat sur la platine, le bord droit
touchant le guide du support fixe.
3. Relâchez doucement le bras de chevalet pour fixer la lame.
FRANÇAIS
|
31
SÉLECTIONNEZ L’OBJECTIF LE
PLUS FAIBLE
Faites pivoter la tourelle de l’objectif pour amener l’objectif 4x en
position au-dessus de la lame. Vous le sentirez s’engager.
Commencez par le grossissement le plus bas, pour localiser plus
facilement votre échantillon.
POSITIONNER L’ÉCHANTILLON
Utilisez les boutons de commande de la platine X-Y pour déplacer
la lame jusqu’à ce que l’échantillon apparaisse à l’écran.
EFFECTUEZ LA MISE AU POINT DE
L’IMAGE
Vous trouverez deux boutons de mise au point sur la base de vos
microscopes, un de chaque côté.
Commencez par le bouton de mise au point grossière (bouton
le plus grand) pour obtenir une image raisonnablement claire de
l’échantillon.
Utilisez ensuite le bouton de mise au point fine (bouton plus petit)
pour obtenir une mise au point nette et claire de l’échantillon.
Une fois l’image nette, ajustez la position de la lame si nécessaire
pour mieux centrer l’échantillon dans le champ de vision. Vous
pouvez ensuite capturer une image fixe, enregistrer une vidéo ou
continuer à observer.
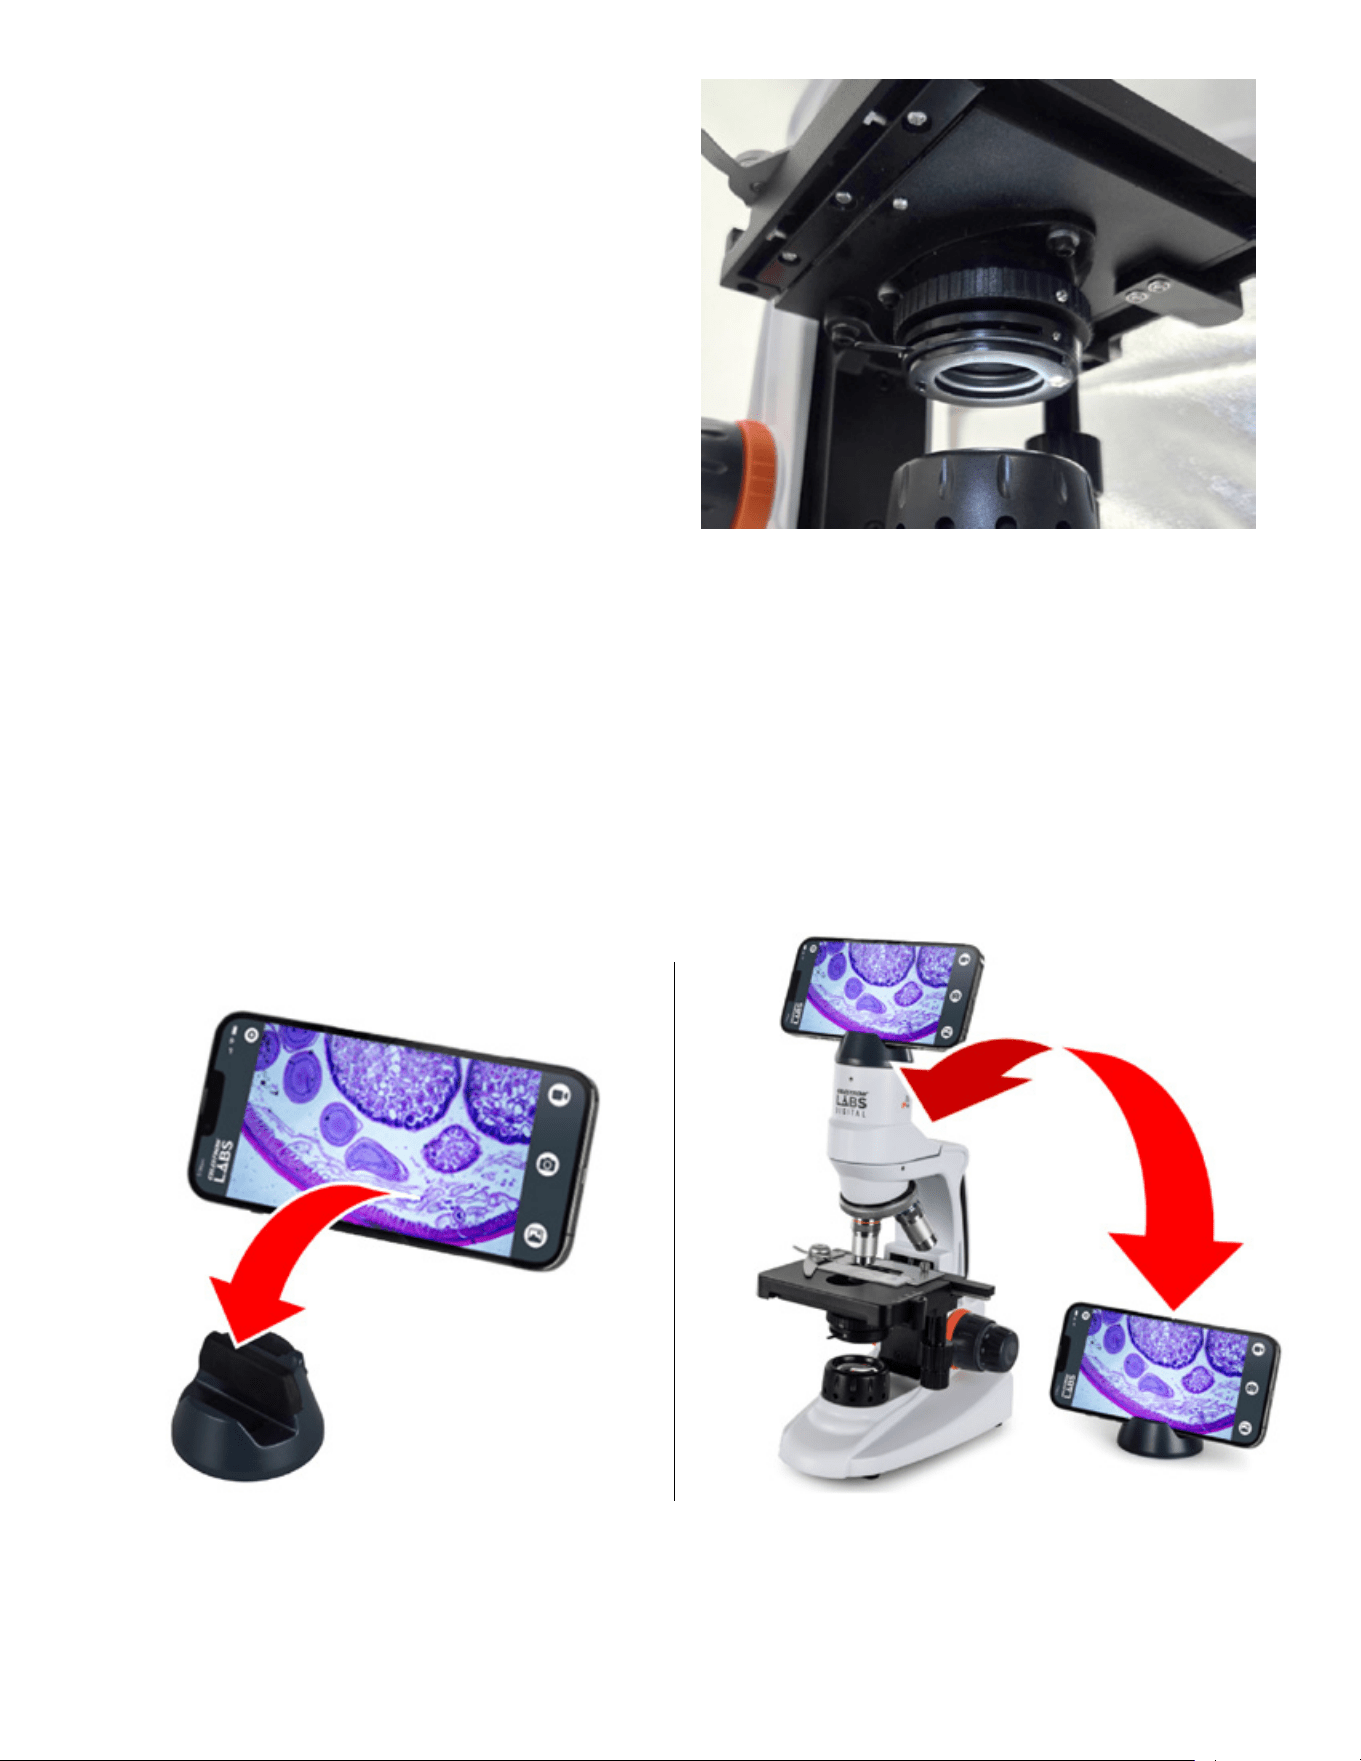
AUGMENTEZ L’AGRANDISSEMENT
Pour afficher plus de détails et approfondir votre spécimen, faites
pivoter la tourelle d’objectif pour avancer l’objectif 10x ou 40x.
Continuez à tourner jusqu’à ce que l’objectif souhaité s’engage.
Le grossissement total est déterminé en multipliant l’objectif par le
grossissement du capteur intégré au microscope (environ 12x).
Avec les objectifs inclus, le grossissement total est d’environ:
Agrandissement total de l’objectif
4x 48x
10x 120x
40x 480x
32
|
FRANÇAIS
CONDENSEUR ABBE
Le condenseur Abbe se situe sous la scène, entre l’illuminateur et
l’ouverture de la scène. Le condenseur est constitué d’une lentille
optique et d’un diaphragme iris réglable commandé par un bras
coulissant.
Le condenseur recueille la lumière de l’illuminateur et la concentre
dans un cône qui traverse l’échantillon sur la lame.
Le réglage du diaphragme à iris modifie la taille de ce cône
lumineux, ce qui vous permet d’améliorer le contraste et la
résolution.
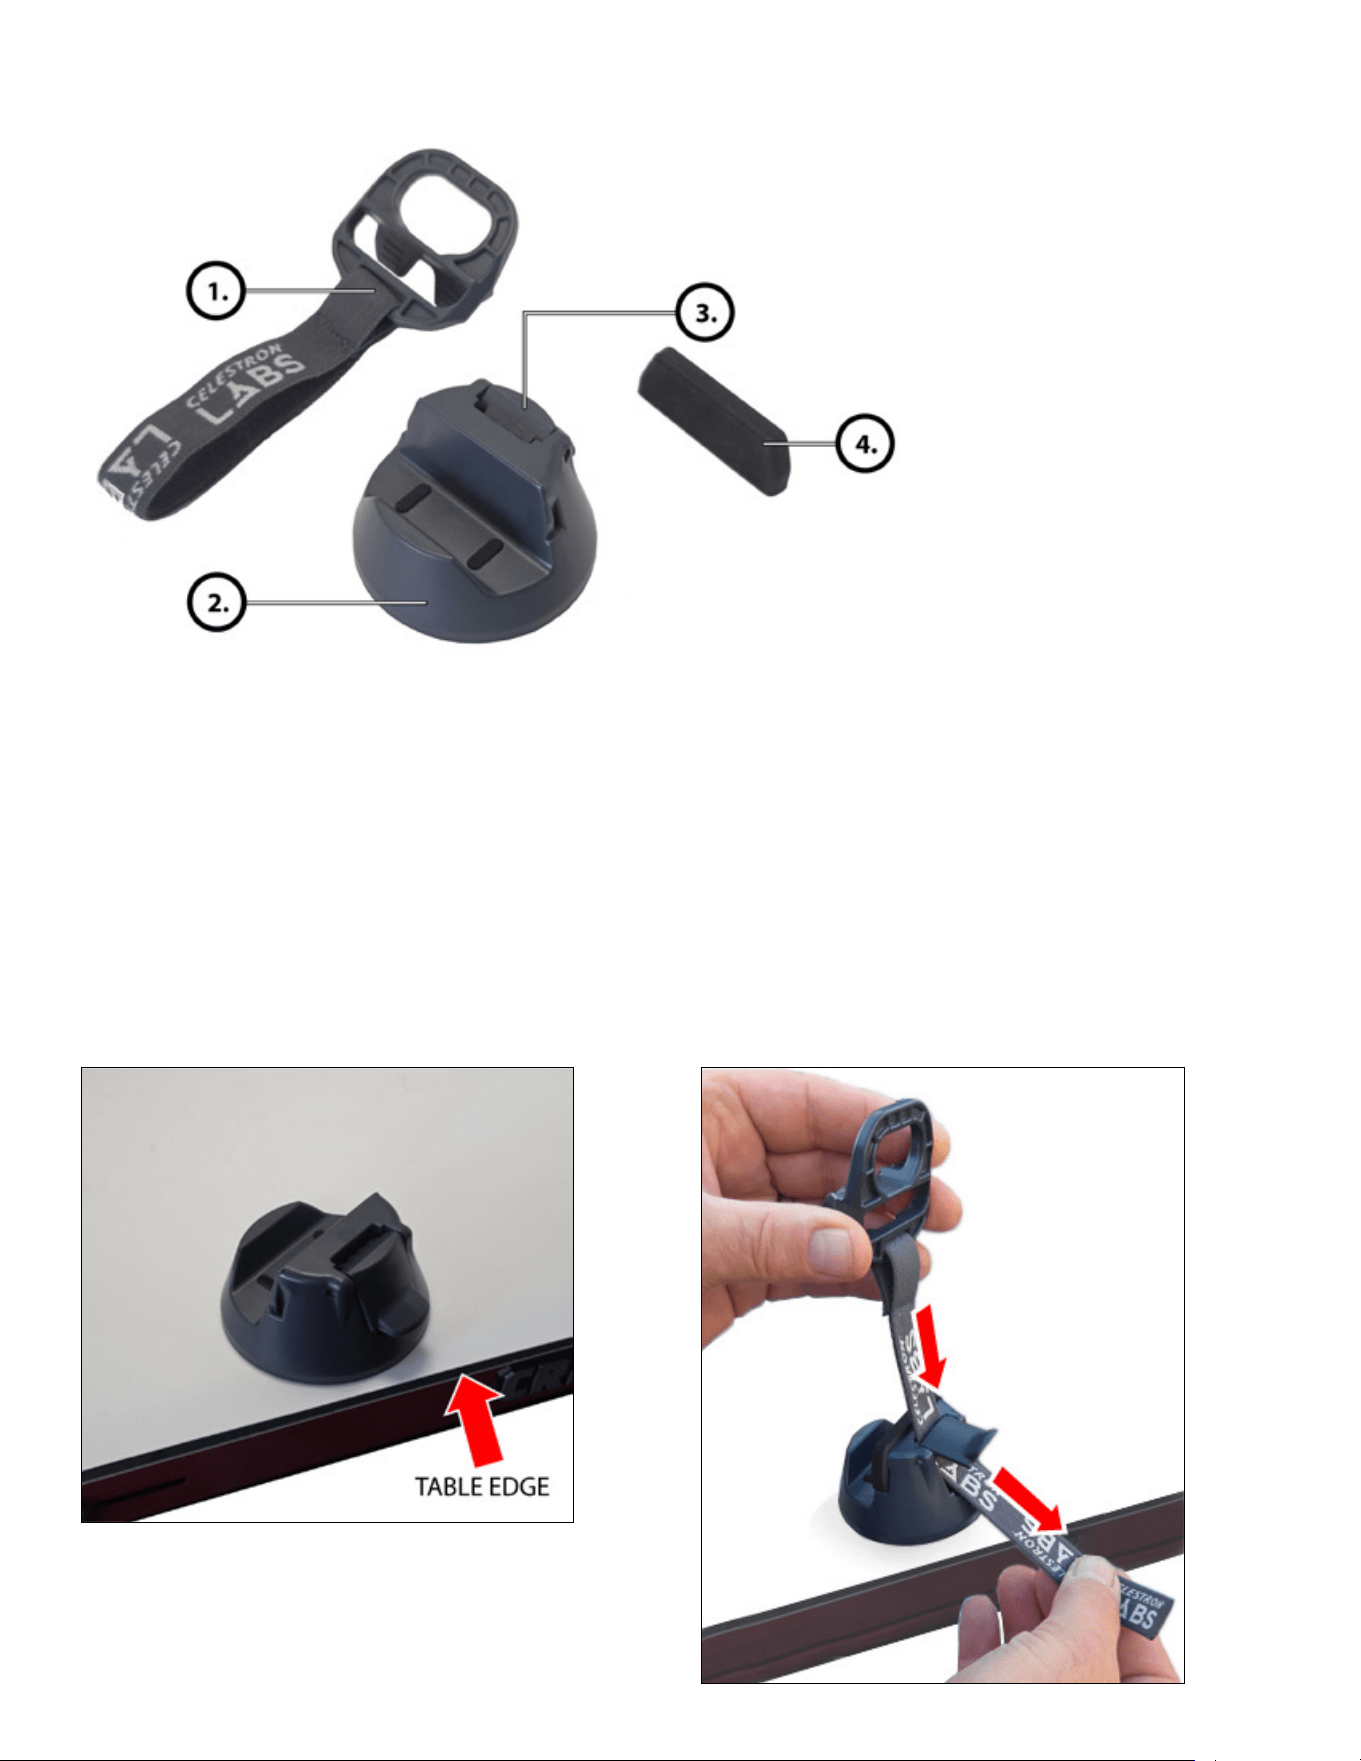
Le microscope comprend un support de dispositif intelligent pour une visualisation mains libres. Le support peut se fixer magnétiquement sur
le dessus du microscope ou s’asseoir sur une surface plane à côté.
Pour utiliser le socle sans la sangle, placez votre smartphone dans la base du socle. La base lestée aide à maintenir les petits appareils
stables pendant la visualisation.
Lorsque vous utilisez une tablette ou un appareil plus grand format, nous vous recommandons fortement de le fixer à l’aide du crochet de
sécurité et de la sangle fournis. Cela permet de maintenir l’appareil fermement en place pendant l’utilisation.
REMARQUE: L’application est conçue pour une utilisation en orientation paysage.
UTILISATION DU SUPPORT ET DE LA SANGLE POUR
APPAREIL INTELLIGENT
FRANÇAIS
|
33
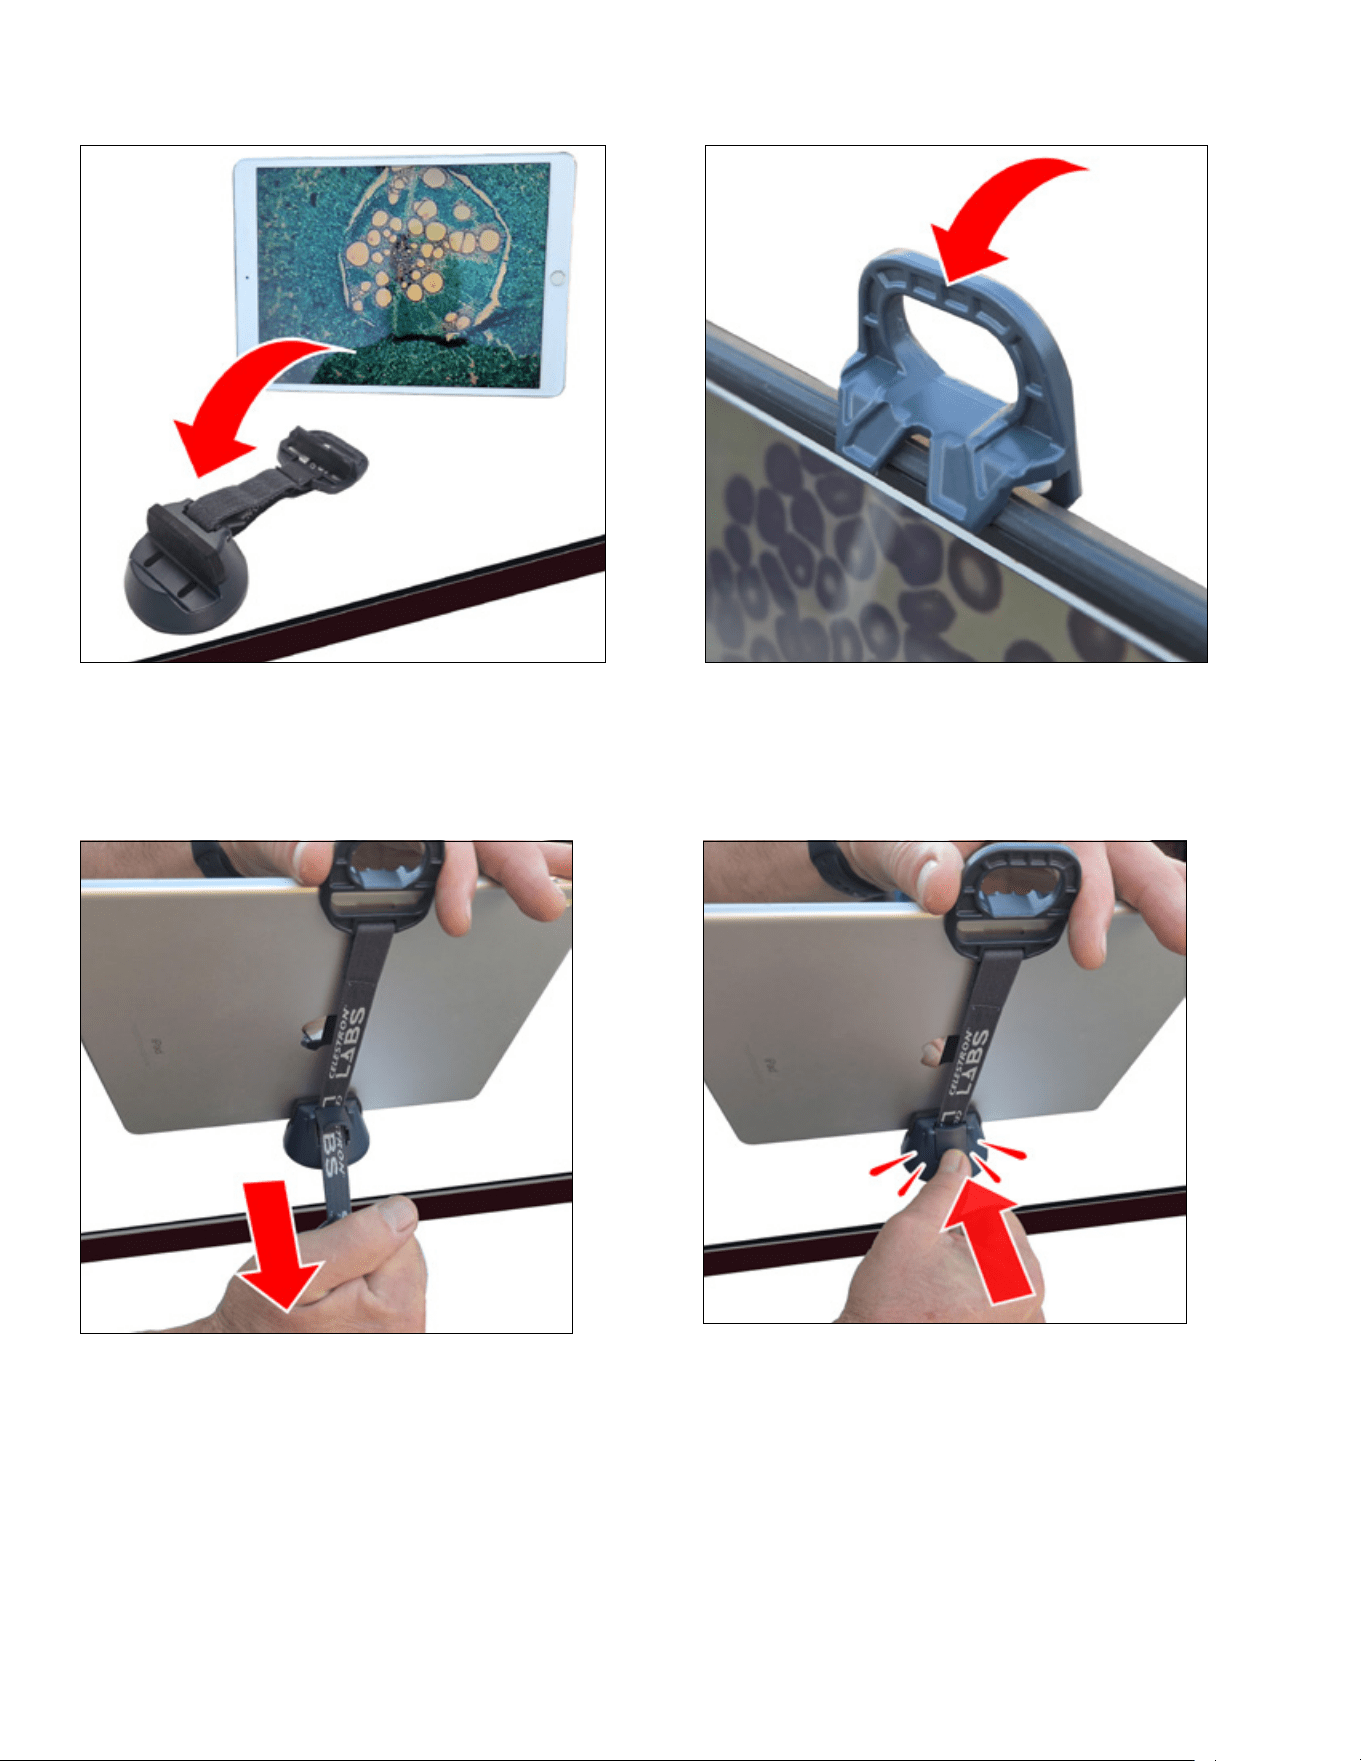
1. Socle – plate-forme de support principale avec socle métallique lesté
2. Crochet et sangle de sécurité – crochet en plastique attaché à une sangle élastique
3. Loquet de verrouillage à came – maintient la sangle sous tension
4. Tampon de réglage d’épaisseur – insert en caoutchouc qui fournit un soutien supplémentaire si
nécessaire (par exemple, pour les appareils sans étui de protection)
1. Placez la base du support sur une surface plane et stable, de
préférence près du bord d’une table.
2. Enfilez la sangle élastique dans le loquet de verrouillage
de came, comme illustré.
PIÈCES DU SOCLE POUR APPAREIL INTELLIGENT
UTILISATION DU CROCHET ET DE LA SANGLE DE SÉCURITÉ
34
|
FRANÇAIS
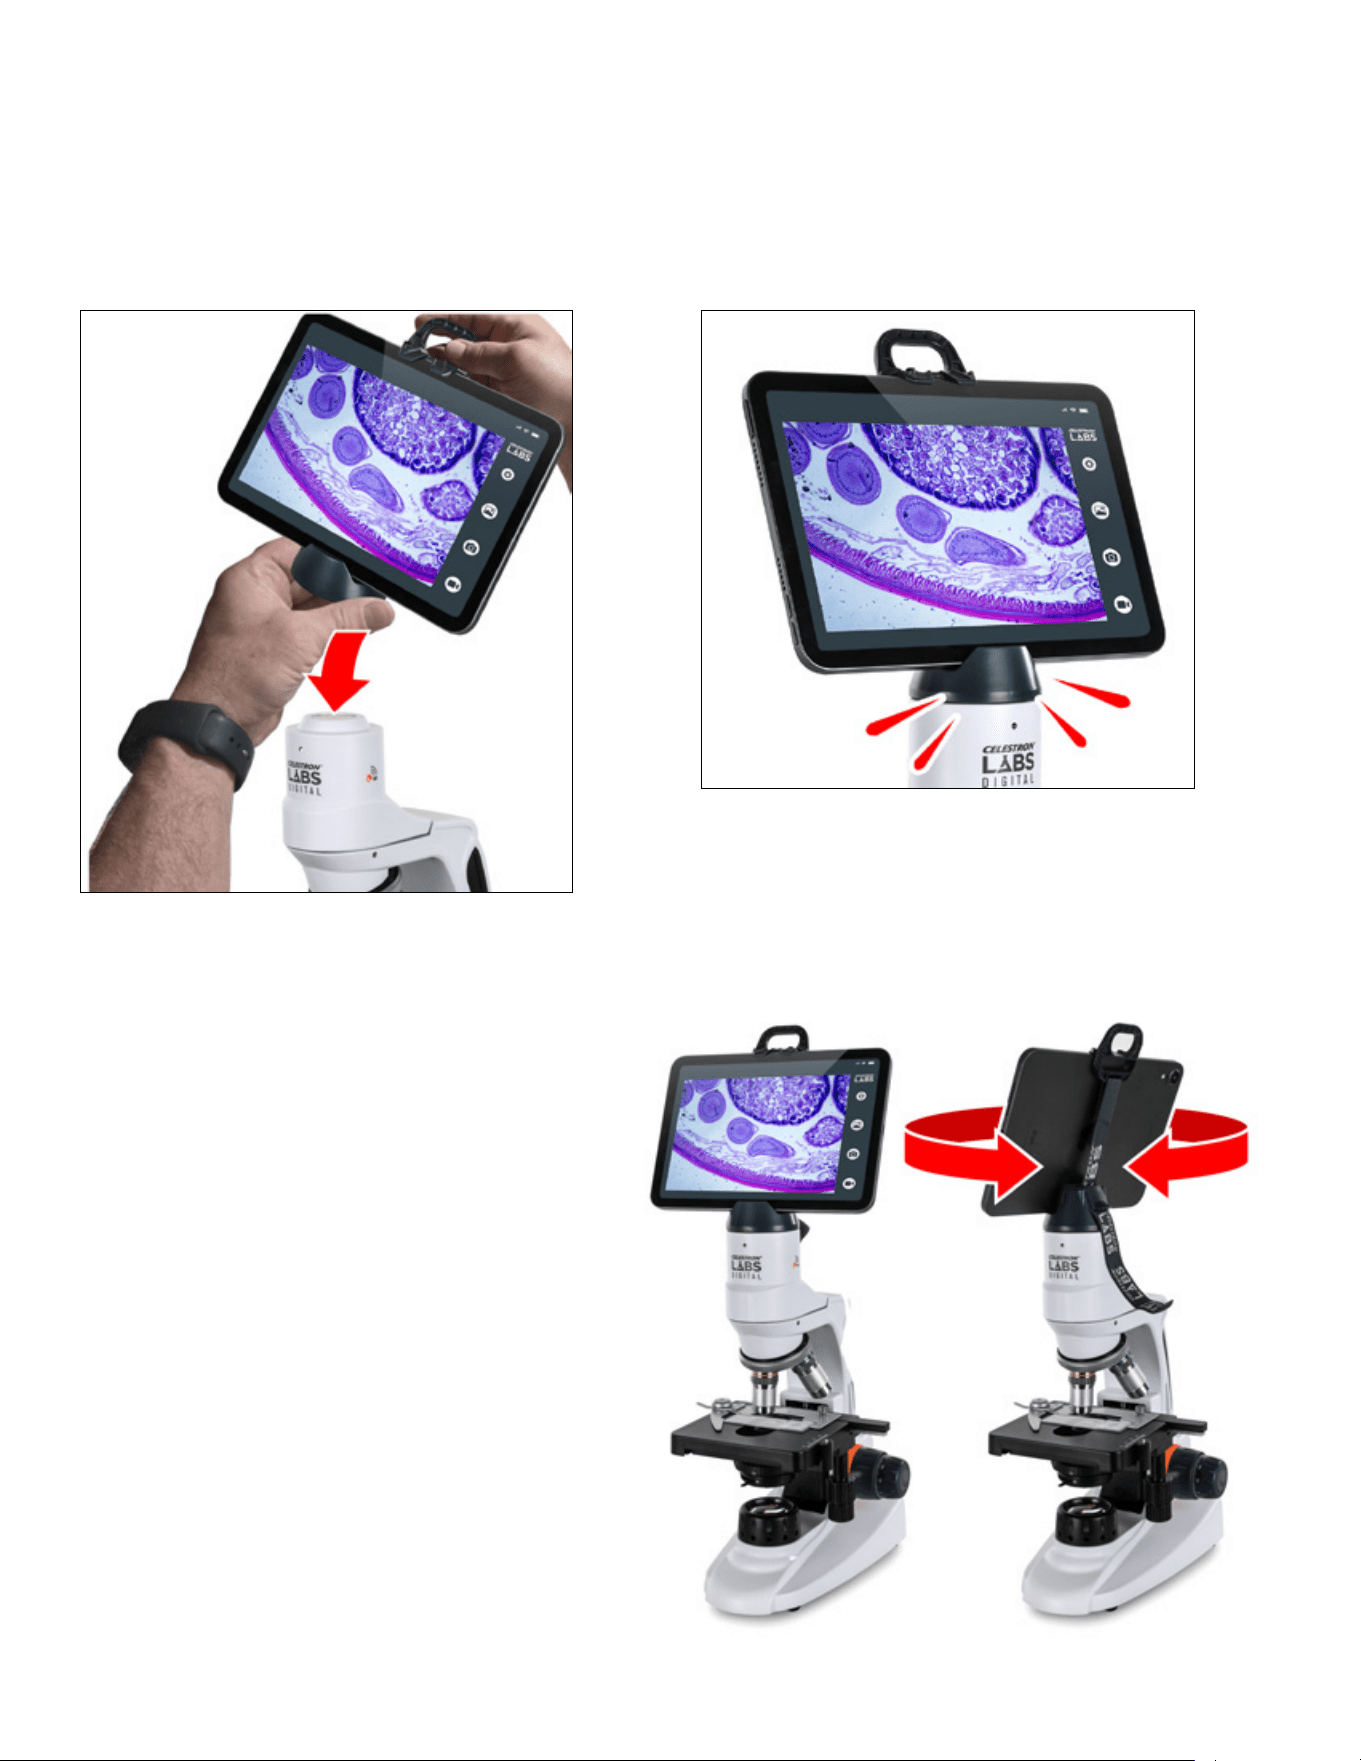
3. Placez votre appareil intelligent sur la base du socle et
positionnez le crochet sur le côté de l’appareil.
4. Tenez l’appareil et accrochez-le fermement d’une main.
De l’autre main, tirez la sangle élastique vers le bas
pour augmenter la tension.
5. Tout en maintenant la tension, enclenchez le loquet de
verrouillage de came pour fixer la sangle en place.
FRANÇAIS
|
35
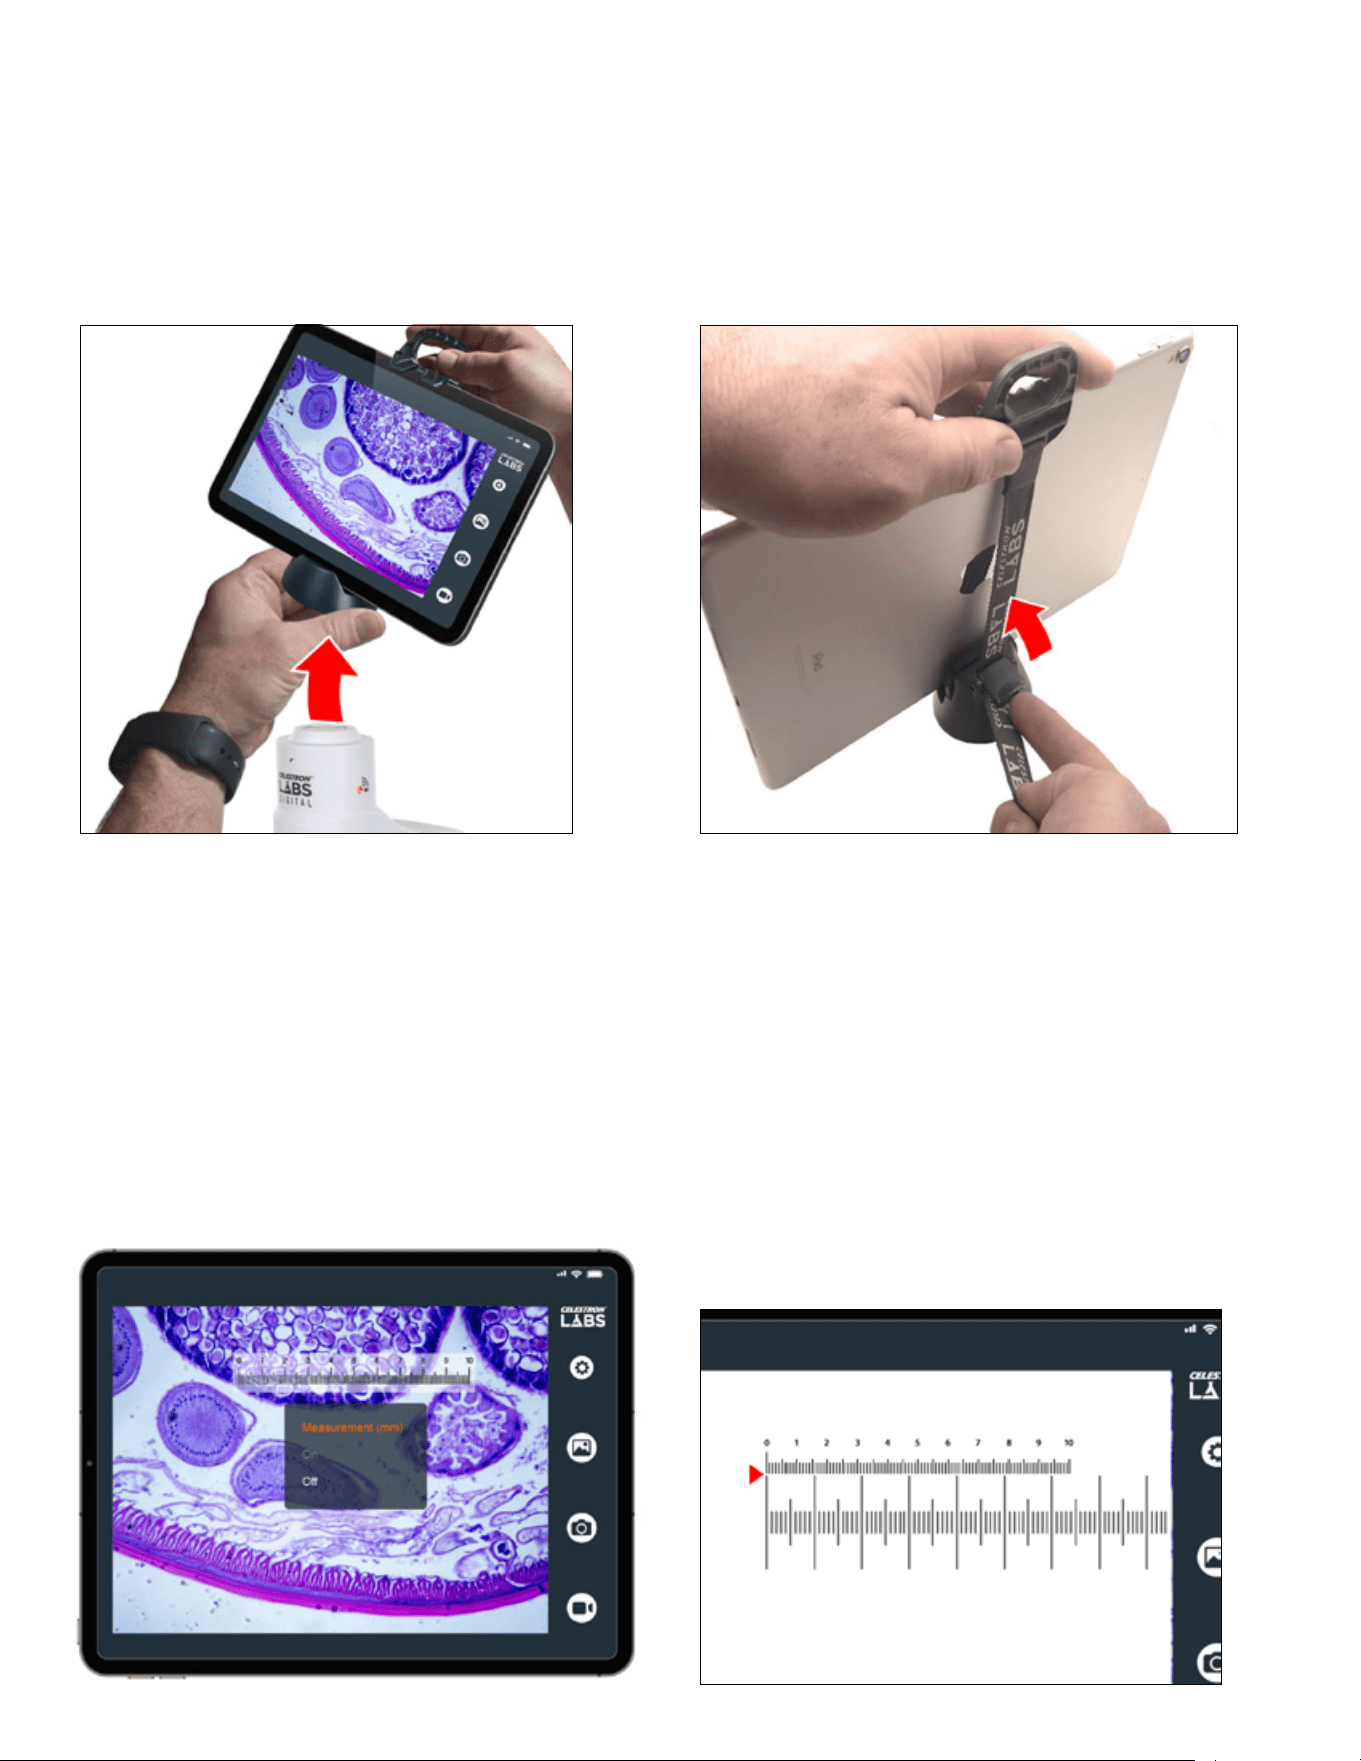
1. Des deux mains, positionnez le support sur la tête du
microscope et alignez la base circulaire du support avec
la forme circulaire du microscope.
FIXATION DU SUPPORT À APPAREIL INTELLIGENT AU MICROSCOPE
La tête de microscope contient un aimant interne. La base du support contient une plaque métallique.
3. Assurez-vous que la base du support est bien en place
et stable avant de relâcher vos mains.
Lorsqu’il est fixé, l’appareil peut pivoter de 360°. Faites
pivoter lentement et soutenez l’appareil ou la base du
support pendant que vous tournez pour réduire le risque
de séparation de la connexion magnétique.
2. Lorsque le support approche de la tête, l’aimant attire la
plaque métallique et guide le support en position.
36
|
FRANÇAIS
RETRAIT DU SOCLE POUR APPAREIL INTELLIGENT
Vous pouvez d’abord retirer l’ensemble du socle ou l’appareil intelligent. Pour une stabilité maximale, retirez d’abord le support du
microscope, puis retirez le dispositif intelligent lorsque le support repose sur une surface plane.
POUR RETIRER L’ENSEMBLE DU SUPPORT:
Tenez la base du support d’une main et l’appareil ou accrochez-
le de l’autre. Tournez et soulevez la base du statif pour la
détacher du microscope.
POUR RETIRER L’APPAREIL INTELLIGENT:
Tenez l’appareil intelligent et tenez-le d’une main. De l’autre
main, soulevez le loquet de verrouillage de came pour relâcher la
tension de la sangle. Une fois relâché, retirez l’appareil de la base
du support.
Le réticule de mesure de l’application affiche des lignes régulièrement espacées à l’écran. Cependant, l’application ne sait pas
automatiquement quelle distance réelle représentent ces lignes à votre niveau de grossissement actuel. La lame de calibration incluse,
également appelée micromètre de platine, résout ce problème.
La lame est dotée de graduations gravées avec précision. Chaque petite graduation sur la lame équivaut à 0,01 mm (10 micromètres). En
comparant les distances connues sur la lame d’étalonnage au réticule à l’écran, vous pouvez calculer la distance réelle représentée par
chaque graduation du réticule.
L’étalonnage est spécifique à l’objectif que vous utilisez. Si vous modifiez le grossissement, vous devez recalibrer l’appareil avant de prendre
de nouvelles mesures.
UTILISATION DE LA LAME D’ÉTALONNAGE
Pour étalonner:
1. Placez la règle d’étalonnage sur la platine du microscope.
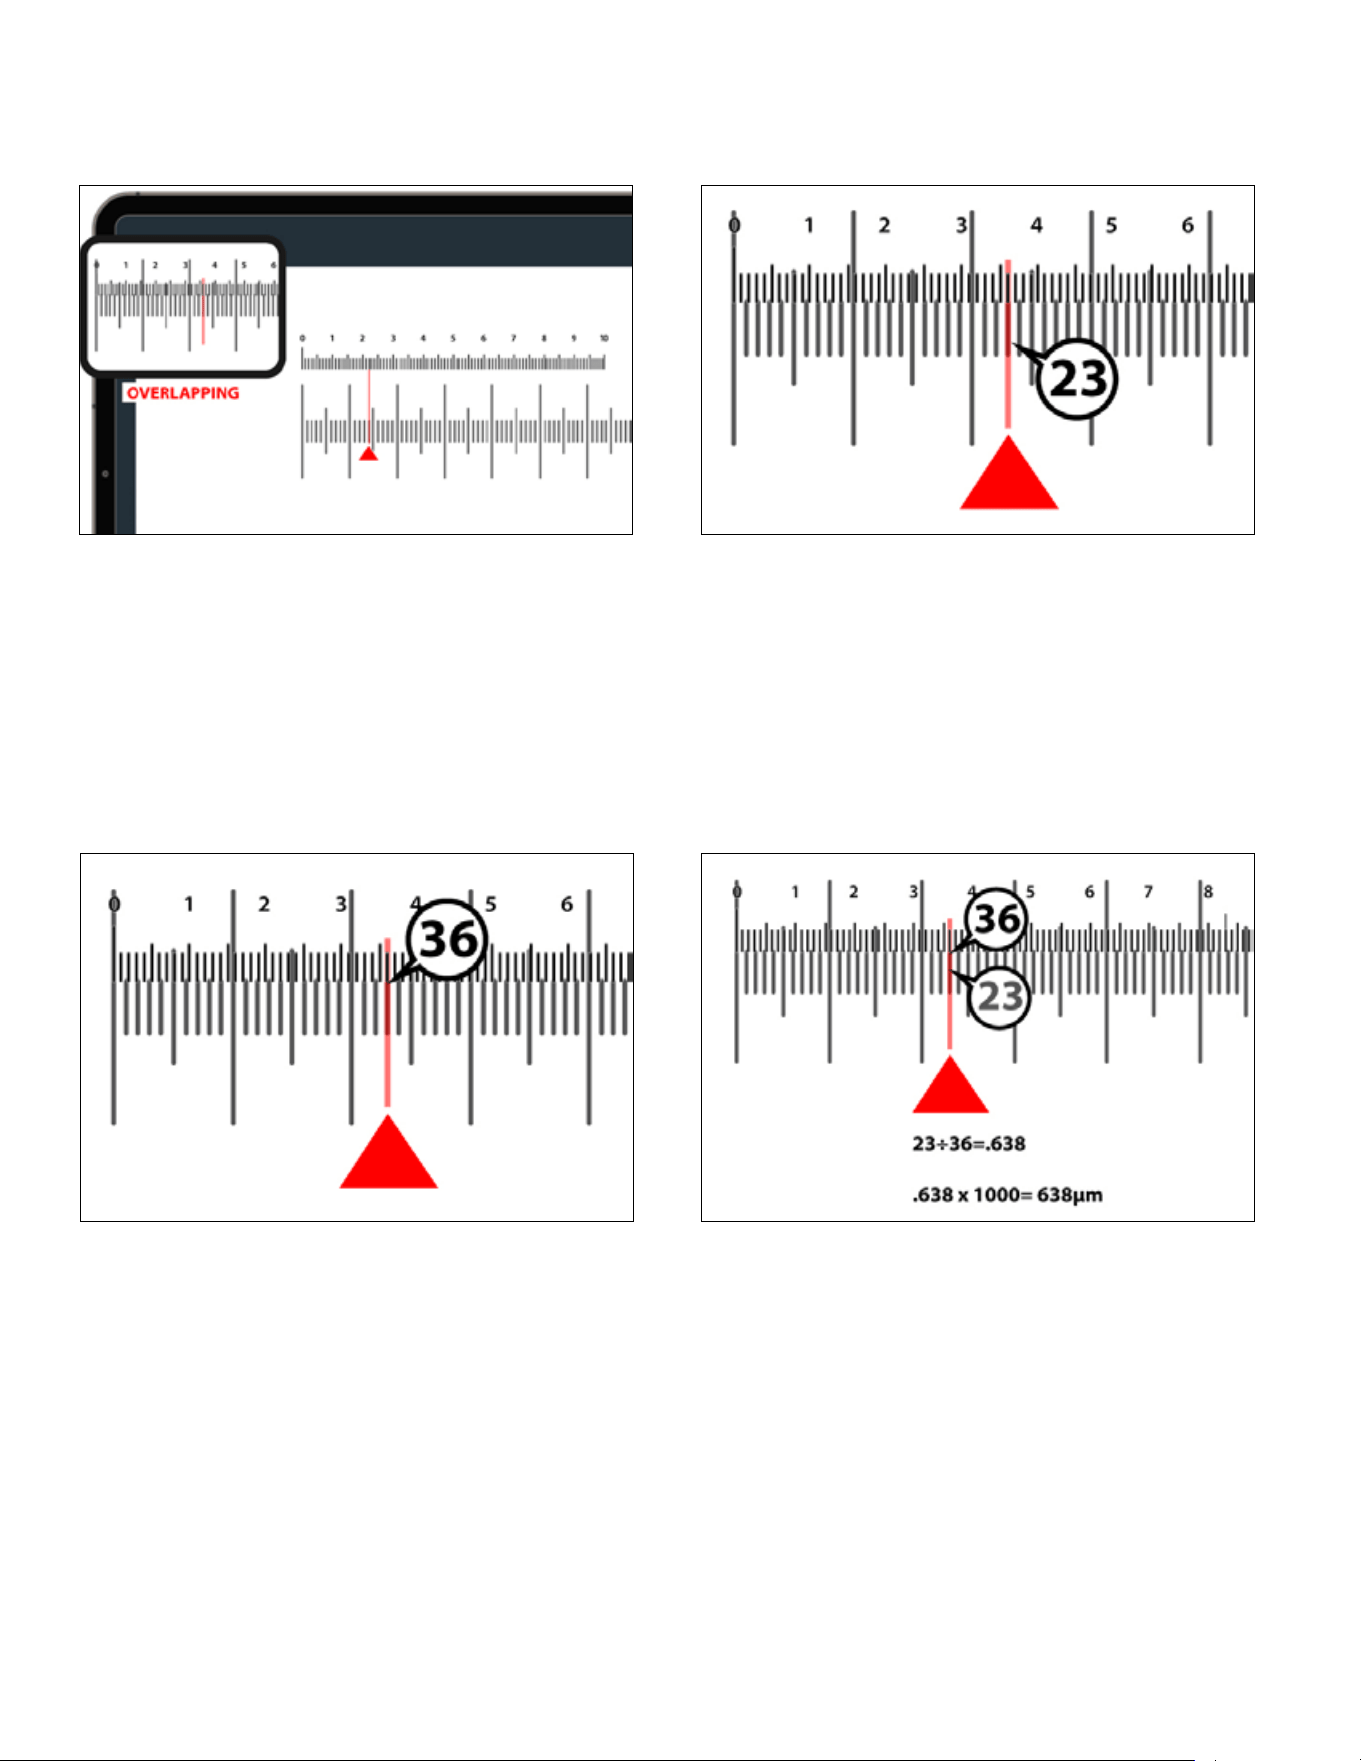
2. Dans l’application, ACTIVEZ le réticule mesure.
3. Réglez la platine de manière à ce que la règle d’étalonnage soit
visible et effectuez la mise au point du microscope jusqu’à ce
qu’elle apparaisse nette à l’écran.
4. Alignez la marque «0» du réticule de mesure numérique avec la
marque «0» de la règle d’étalonnage.
FRANÇAIS
|
37
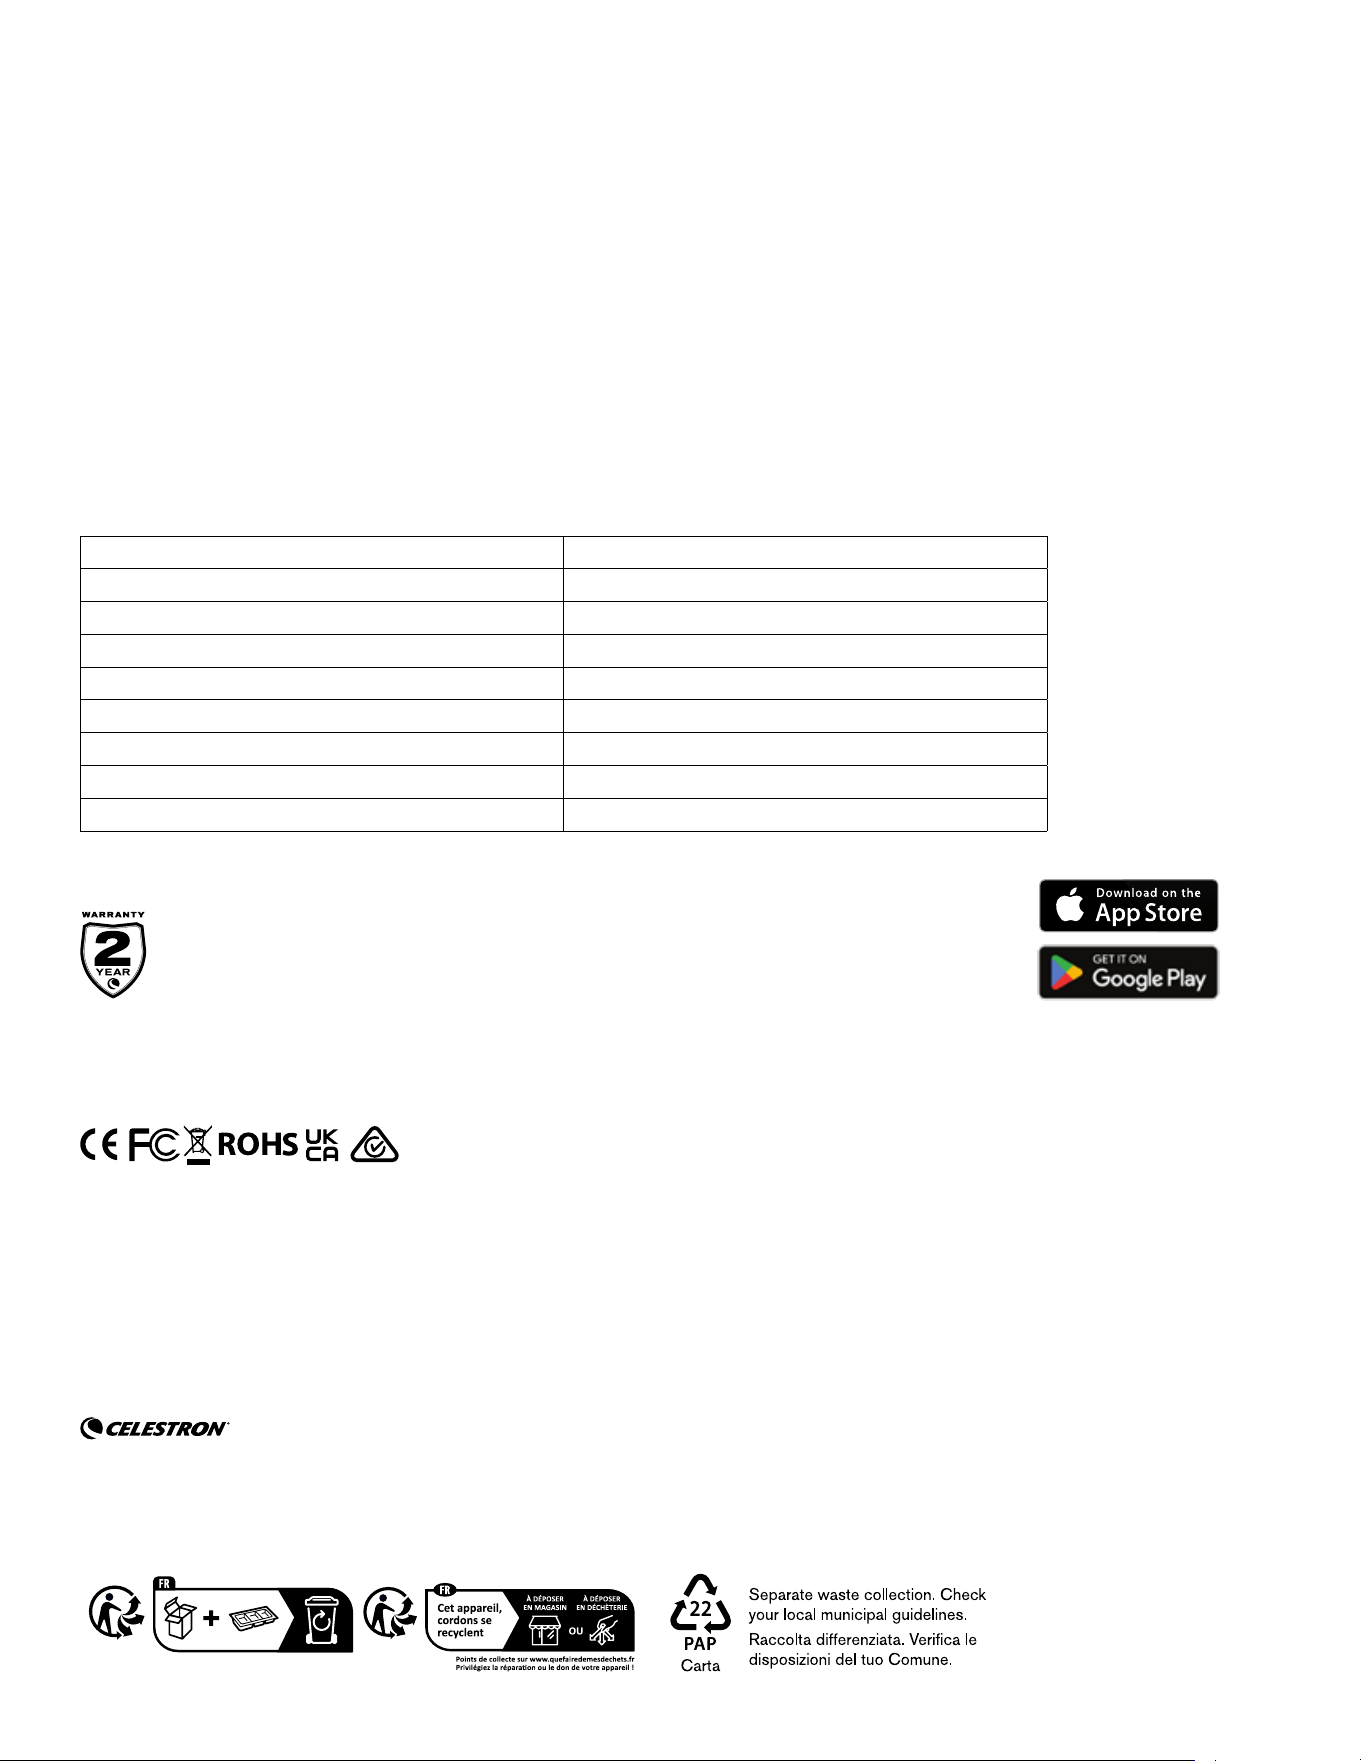
5. Sans déplacer la règle, déplacez la vue le long des graduations
et repérez le prochain point où une ligne sur le réticule numérique
s'aligne exactement avec une ligne sur la règle d'étalonnage.
6. Comptez le nombre de graduations sur la lame d'étalonnage entre
les deux points alignés. Dans cet exemple, il y a 23 graduations.
7. Comptez le nombre de graduations sur le réticule numérique entre
ces deux mêmes points alignés. Dans cet exemple, se trouvent 36
graduations.
8. Calculez la taille représentée par une graduation de réticule.
Premièrement, divisez les graduations de la règle d'étalonnage par
les graduations du réticule: 23 ÷ 36 = 0.638
Multipliez ensuite ce résultat par 1000 pour le convertir en
micromètres: 0.638 × 1000 = 638 µm
Dans cet exemple, chaque graduations sur le réticule numérique est
égale à 638 µm.
9. Vous pouvez maintenant utiliser le réticule calibré pour estimer les
dimensions de l'échantillon.
Important
Si vous changez d'objectif ou de grossissement, vous devez
recalibrer l'appareil avant de prendre de nouvelles mesures.
38
|
FRANÇAIS
ENTRETIEN ET MAINTENANCE
Votre microscope de bureau Wi-Fi numérique Celestron Labs est un appareil optique de précision. Un entretien approprié garantira des
performances fiables pour les années à venir.
• Rangez le microscope dans un environnement propre et sec lorsqu'il n'est pas utilisé.
• N'utilisez pas le microscope dans des environnements où les appareils électroniques sont interdits. Une mauvaise utilisation peut
entraîner des accidents graves.
• Utiliser uniquement entre -5 °C et 50 °C (23 °F et 120 °F). Éviter les variations soudaines de température qui peuvent causer la formation
d'humidité à l'intérieur du boîtier.
• Ne mettez pas votre microscope en contact avec l’eau ou d’autres liquides. L’humidité peut causer des risques d’électrocution ou
d’incendie.
• N'essayez pas d'ouvrir ou de modifier l'appareil. Les composants internes ne doivent être réparés que par des techniciens agréés.
• Pour nettoyer l'extérieur, essuyez délicatement avec un chiffon doux et sec.
celestron.com/pages/warranty
BESOIN D’AIDE? Pour contacter l’assistance technique de Celestron
celestron.com/pages/technical-support
Le design et les spécifications du produit sont sujettes à modification sans préavis.
Ce produit est conçu et prévu pour être utilisé par des personnes âgées de 14 ans et plus.
©2026 Celestron.
Celestron et le Symbol sont des marques déposées de Celestron, LLC. • Tous droits réservés • Celestron.com
US: Celestron, 2835 Columbia Street, Torrance, CA 90503 USA
UK: Celestron Global Ltd., Unit 2 Transigo, Gables Way, Thatcham RG19 4JZ, Royaume Uni
Représentant autorisé UE: Ar experts B.V. est Boeingavenue 209, 1119 PD Schiphol-Rijk, pays-Bas, [email protected]
Fabriqué en Chine | 04- 26
Déclaration de la FCC: Cet appareil respecte la section 15 des règles de la FCC. Son utilisation est sujette aux deux
conditions suivantes: (1) Cet appareil ne doit pas causer d'interférences nuisibles et (2) cet appareil doit accepter
toutes les interférences reçues, y compris celles pouvant entraîner un fonctionnement indésirable.
NOTE DE L’UE: Celestron déclare par la présente que le microscope de bureau WiFi de type 44351 est
conforme à la directive 2014/53/UE. Le texte intégral de la déclaration UE de conformité est disponible à
l’adresse internet suivante: www.celestron.com/productcompliance.
Modèle de produit Celestron Labs Digital Wi-Fi Microscope #44351
Numéro de modèle WH-44351
Standard Wi-Fi WiFi4, 802.11b/n
Option Wi-Fi tri-bande 20M
Limite de clients connectés de 2,4 GHz 1
Limite client connecté de 5 GHz Aucune
Limite de clients connectés de 6 GHz Aucune
Débit de données maximal 65M
WPS (Wi-Fi Protected Setup) Non configuré
PARAMÈTRES WI-FI
DEUTSCH
|
39
MODELL NR. 44351
Tabelle nicht enthalten
BEDIENUNGSANLEITUNG
WLAN DESKTOP MIKROSKOP
40
|
DEUTSCH
EINLEITUNG
Vielen Dank, dass Sie sich für das Celestron Labs Digital WLAN
Desktop Mikroskop entschieden haben.
Im Gegensatz zu traditionellen Mikroskopen verwendet dieses Modell
eine integrierte 2MP Digitalkamera anstelle eines Okulars. Die
Proben werden über das dedizierte WLAN-Signal des Mikroskops
live auf Ihrem Smartphone oder Tablet betrachtet. Es ist keine
Internetverbindung erforderlich.
Dieses Mikroskop bietet eine Vergrößerung von 48x bis 480x
und eignet sich hervorragend zur Untersuchung von vorbereiteten
Objektträgern mit Pflanzen- und Tiergewebe, Fasern, Hefen,
Schimmelpilzen, Bakterien und anderen biologischen Proben.
Die kostenlose Celestron Labs Digital WLAN-App ist mit iOS-
und Android-Geräten kompatibel. Mit ihr können Sie Standbilder
aufnehmen, Videos aufzeichnen, Messwerkzeuge aktivieren und
Dateien direkt auf Ihrem Gerät speichern, um sie zu teilen oder zu
analysieren.
Das Mikroskop bietet traditionelle High-End-Funktionen, darunter einen
vollständig verstellbaren mechanischen Tisch, drei achromatische
Objektive (4x, 10x und 40x), ein Abbe-Kondensor mit Irisblende sowie
Grob- und Feinfokussierung. Ebenfalls im Lieferumfang enthalten
sind fünf vorbereitete Objektträger, ein Kalibrierungsobjektträger, ein
Reiseadapter und ein Ständer für mobile Endgeräte mit Sicherheitsgurt.
Lesen Sie vor dem Start die Einrichtungsanweisungen durch und
überprüfen Sie die Diagramme in diesem Handbuch. Einige Minuten
Vorbereitung gewährleisten einen reibungslosen Aufbau und eine
optimale Leistung.
Sicherheitshaken und -gurt
Smartphone-Halter
Mikroskopkopf mit Sensor
und WLAN-Modul
Trinokularer Objektivrevolver
mit 3 Objektiven
Objektträgerhalter
Mechanischer Objekttisch
Abbe-Kondensor
Beleuchtung
Standfuß
Feinfokussierrad
X-, Y-Tischverstellknöpfe
Tragegriff
Grobfokussierrad
5,5 mm Netzanschlussbuchse
Ein-/Aus-Schalter
Beleuchtungs-Einstellrad
DEUTSCH
|
41
Packen Sie Ihr WLAN Desktop Mikroskop vorsichtig aus und überprüfen Sie, ob alle unten aufgeführten Teile
vorhanden sind:
[A] Celestron Labs Digital WLAN Desktop Mikroskop
[B] Fünf vorbereitete Objektträger
[C] Kalibrierungsobjektträger
[D] Reiseadapter mit vier Steckern
[E] Smartphone-Ständer mit Sicherheitsgurt
[F] Kurzanleitung
A
B
C
E
D
F
MODEL #44351
QUICK START GUIDE
Contenu de la boîte
[A] M icroscope d e table Wi-F i 2MP
Celes tron Labs 2 MP
[B] So cle intellige nt
[C] Ad aptateur d e socle intell igent
[D] Sa ngle de sécuri té de socle int elligent
[E] Boî te de 5 de lame s de spécimens
préparées
[F] Ré glette d’ét alonnage
[G] Ada ptateur se cteur inte rnational
CA 100–2 40 V
What’s in the Box
[A] C elestron L abs 2MP Wi- Fi Deskt op
Microscope
[B] Sm art Device S tand
[C] Sma rt Device S tand Boos ter
[D] Sm art Device S tand Safe ty Strap
[E] Bo x of 5 Prepar ed Specimen Sli des
[F] C alibratio n Slide
[G] Mul ti-count ry 100–240V A C Adapter
Lieferumfang
[A] C elestron L abs 2MP WL AN
Desktopmikro skop
[B] Smart-Geräte-Gestell
[C] Smart-Geräte-Gestellver stärkung
[D] Smart-Geräte-Gestell-Sicherheitsgurt
[E] Bo x mit 5 vorber eiteten Obj ektträ gern
[F] Kalibrierungsobjek tträger
[G] Lä nderübergr eifender 10 0–240 V
AC-Adapter
Contenuto della confezione
[A] M icroscopi o da tavolo Wi -Fi Celest ron
Labs 2 MP
[B] Sup porto per di spositiv o smart
[C] Boo ster per dis positivo s mart
[D] Cing hia di sicure zza per supp orto per
dispositivo smart
[E] Co nfezione da 5 v etrini pre parati
[F] Ve trino di cali brazione
[G] Ada ttator e CA 100-240 V mul ti-paese
Contenido de la caja
[A] M icroscopi o WiFi de escr itorio de 2M P
CelestronLabs
[B] Sop orte de disp ositivo in teligente
[C] Pot enciador de so porte de dis positivo i nteligent e
[D] Cor rea de segur idad del sopor te de dispos itivo
inteligente
[E] Ca ja de 5 portam uestras d e especímene s
preparados
[F] Re gla de calibr ado
[G] Ada ptador 100 -240V CA mult inacional
Wi-Fi DESKTOP MICROSCOPE
ENGL ISH
NEED ASSISTANCE? Contact Celestron Technical Suppor t
celestron.com/pages/technical-support
Produ ct design and s pecificat ions are subj ect to change w ithout pri or
noti fication. • T his product i s designed and i ntended for u se by those
14 year s of age and older.
©2025 C elestro n. Celestr on and Symbol
are tr ademarks o f Celestr on, LLC. • All r ights res erved. • Cele stron.c om
US: Cele stron, 28 35 Columbia S treet, Tor rance, CA 90 503 USA • UK :
Celes tron Globa l Ltd., Unit 2 Tra nsigo, Gabl es Way, Thatch am RG19 4JZ,
Unite d Kingdom • Made i n China | 06-25
FRA NÇAIS
BESOIN D’ASSISTANCE? Contactez le support technique de
Celestron
celestron.com/pages/technical-support
Le des ign et les spéci fications d u produit son t sujette s à modificat ion sans
préa vis. • Ce prod uit est conçu e t prévu pour ê tre utilis é par des pers onnes
âgées d e 14 a ns et plus
©2025 C elestro n. Celestr on et le Symbol s ont
des mar ques dépos ées de Celest ron, LLC. • Tou s droits rés ervés • Cel estron.
com • US: C elestron .com • 2835 Col umbia Stre et, Torrance , CA 90503 U SA •
UK: Cel estron Glo bal Ltd., Uni t 2 Tr ansigo, Gab les Way, That cham RG19 4JZ ,
Royaum e-Uni • Fabr iqué en Chine | 06 -25
DEUTSCH
BENÖTIGEN SIE UNTERSTÜ TZUNG? Wenden Sie sich an die
technische Unterstützung von Celestron unter
celestron.com/pages/technical-support
Produ ktdesign u nd technisch e Daten könne n ohne vorher ige Ankündig ung
geänd ert werden . Dieses Pro dukt ist für P ersonen ab 14 J ahren konzi piert
und vorgesehen.
©2025 C elestro n. Celestr on und Symbol
sind Wa renzeichen v on Celestr on, LLC. Al le Rechte vor behalten. C elestron .
com • US A: Celestr on, 2835 Col umbia Stre et, Torrance , CA 90503 U SA • UK:
Celes tron Globa l Ltd., Einhei t 2 Transigo, Ga bles Way, Tha tcham RG19 4JZ ,
Verein igtes König reich • Herge stellt in Chi na | 06-25
celestron.com/pages/warranty
ITALIANO
BISOGNO DI AIUTO? Contattare il suppor to tecnico Celestron
celestron.com/pages/technical-support
Il desi gn del prodot to e le specifi che sono sogge tti a modifi che senza
prev ia notifica . Questo pr odotto è pro gettat o per essere u tilizza to da
pers one di età par i o superiore a i 14 anni.
©2025 C elestro n. Celetron e S ymbol
sono ma rchi di Celes tron, LLC . • Tu tti i dirit ti riserv ati. • Celes tron.com
• Sta ti Uniti: Cele stron, 28 35 Columbia S treet, Torr ance, CA 90 503 Stat i
Uniti • R egno Unito: Ce lestron Gl obal Ltd., Un it 2 Transigo, G ables Way,
That cham RG18 4JZ Re gno Unito • Pro dotto in Cin a | 06-25
ESPAÑOL
¿NECESITA AYUDA? Contacte con el soporte técnico de
Celestron
celestron.com/pages/technical-support
El dise ño y las especi ficaciones d el producto e stán sujet os a cambios s in
noti ficación pre via. Este p roducto ha s ido diseñado y e stá pensad o para
ser us ado por perso nas de 14 años o más d e edad.
©2025 Celestron. Celestron y su símbolo
son marcas comerciales de Celest ron, LLC. • Todos los derechos reserv ados.
• C elestron .com • EE.UU.: Celestr on, 283 5 Columb ia Str eet, Torr ance, C A
9050 3 EE .UU. • GB: Celes tron Global Ltd., Unit 2 Tr ansigo, Gables Way,
That cham RG19 4JZ, Re ino Unido • Fabric ado en China | 06-25
B
A
C
D
E
F
G
CLICK FOR FULL MANUAL
CLIQUEZ POUR CONSULTER LE MODE D’EMPLOI COMPLET
FÜR DIE VOLLSTÄNDIGE ANLEITUNG KLICKEN
FARE CL IC PER IL MANUALE COMPLETO
PULSE PARA EL MANUAL COMPLETO
QR CODE
42
|
DEUTSCH
Mikroskoptyp: WLAN Desktop mit drei Objektiven
Kopf: Kopf mit Sensor und WLAN-Modul
zur drahtlosen Übertragung von
Videobildern
Okulartyp: CMOS-Sensor anstelle eines
Okulars (12x Vergrößerung)
Sensorgröße: 2MP | 1/2,8" Sony IMX290 LQR-XC
Tischtyp: Mechanisch – Doppelschichtig,
115 mm x 125 mm (4,52" x 4,92")
Sensorvergrößerung: 12x
Pixelgröße: 2,9 μm x 2,9 μm
Speichertyp: Kein Speicher – verwendet den
Speicher des Smart-Geräts zum
Speichern von Bildern und Videos
Standbildaufnahme-Auflösung: 640 x 480/1280 x 720/1920 x 1080
Videoauflösung: 640 x 480/1280 x 720/1920 x 1080
Auslöserposition: In der Geräte-App
Software: Celestron Labs Digital WLAN APP
• Standbild
• Video
• Messfunktion
Softwarekompatibilität: • iOS
• Android
Objektivrevolver: Dreifach mit Klickstopp
Objektivtyp(en): (3) Finite Planachromatische CF-
Objektive auf Revolver
Objektivstandard: DIN 35 RMS
Objektivvergrößerung: 4x, 10x, 40x
Vergrößerungsbereich: 48x, 120x und 480x (Endgültig
bestimmt durch die Bildschirmgröße
des Geräts. Die Angabe basiert auf
einer Displaygröße von 5" eines
Smartphones)
FOV (Sehfeld) • 4x: 37,5 mm
• 10x: 6,7mm
• 40x: 0,65 mm
Objektivgewinde: WJ 4/5” x 1/36”
Fokussiertyp(en): Grob- und Feinfokussierung
Fokussierweg (pro
Umdrehung):
0,7 mm bis 35,3 mm (0.027” bis
1,39”) (geschätzt)
Beleuchtungstyp: LEDs (3 W/4 V – 220 V/110 V)
Beleuchtungsposition(en): Unterbeleuchtung
Beleuchtungsverstellmechanismus:
Einstellrad am Sockel
Stromquelle: Universelles Netzteil* 100–240 V,
50/60 Hz, Reisestecker
Batterieoption: Ja 3 AA-Batterien für (2 Stunden)
Notstrom – falls erforderlich
Objekttisch: Mechanischer doppelschichtiger
Tisch
• Tischgröße: 115 mm × 125 mm
(4,5" x 4,9")
• Bewegungsbereich: 70 mm × 30
mm
(2,75" x 1,18")
Kondensortyp: Abbe-Kondensor mit Irisblende
und Filter
Kondensor N.A. (Numerische
Apertur):
N.A. 1,25
Anschluss Eingang: Netzteil/ 5–6 V DC, 200–1000
mA, Pluspol an der Spitze. (Stecker
sollte 5,5 mm Außendurchmesser,
2,1 mm Innendurchmesser und 12,5
mm lang sein)
Anschluss Ausgang: N/V
Netzteil: 5–6 V DC, 200–1000 mA, Pluspol
an der Spitze. Stecker sollte 5,5
mm Außendurchmesser, 2,1 mm
Innendurchmesser und 12,5 mm
lang sein
Mikroskopabmessungen: 170 mm x 140 mm x 330 mm
(6,7 Zoll × 5,5 Zoll × 13 Zoll)
Mikroskopgewicht: 56 oz (1600 g)
Im Lieferumfang enthalten: • 5 vorbereitete Objektträger
• Kalibrierungsobjektträger
• Netzteil (4 Stecker für
internationale Nutzung)
• Einzigartige, optionale
Halterung für mobile Geräte mit
Sicherheitsgurt
TECHNISCHE DATEN
DEUTSCH
|
43
1. Stellen Sie das Mikroskop und die anderen Teile auf eine stabile,
ebene Fläche.
EINRICHTUNG
SCHRITT 1: STROMVERSORGUNG ANSCHLIESSEN
2. Stecken Sie den kleinen Stecker des Netzteils in die
Netzanschlussbuchse auf der Rückseite des Mikroskops.
3. Wählen Sie den für Ihr Land passenden Stecker aus und
befestigen Sie ihn am Netzteil.
4. Stecken Sie das Netzteil in eine 120-240-V-Wandsteckdose.
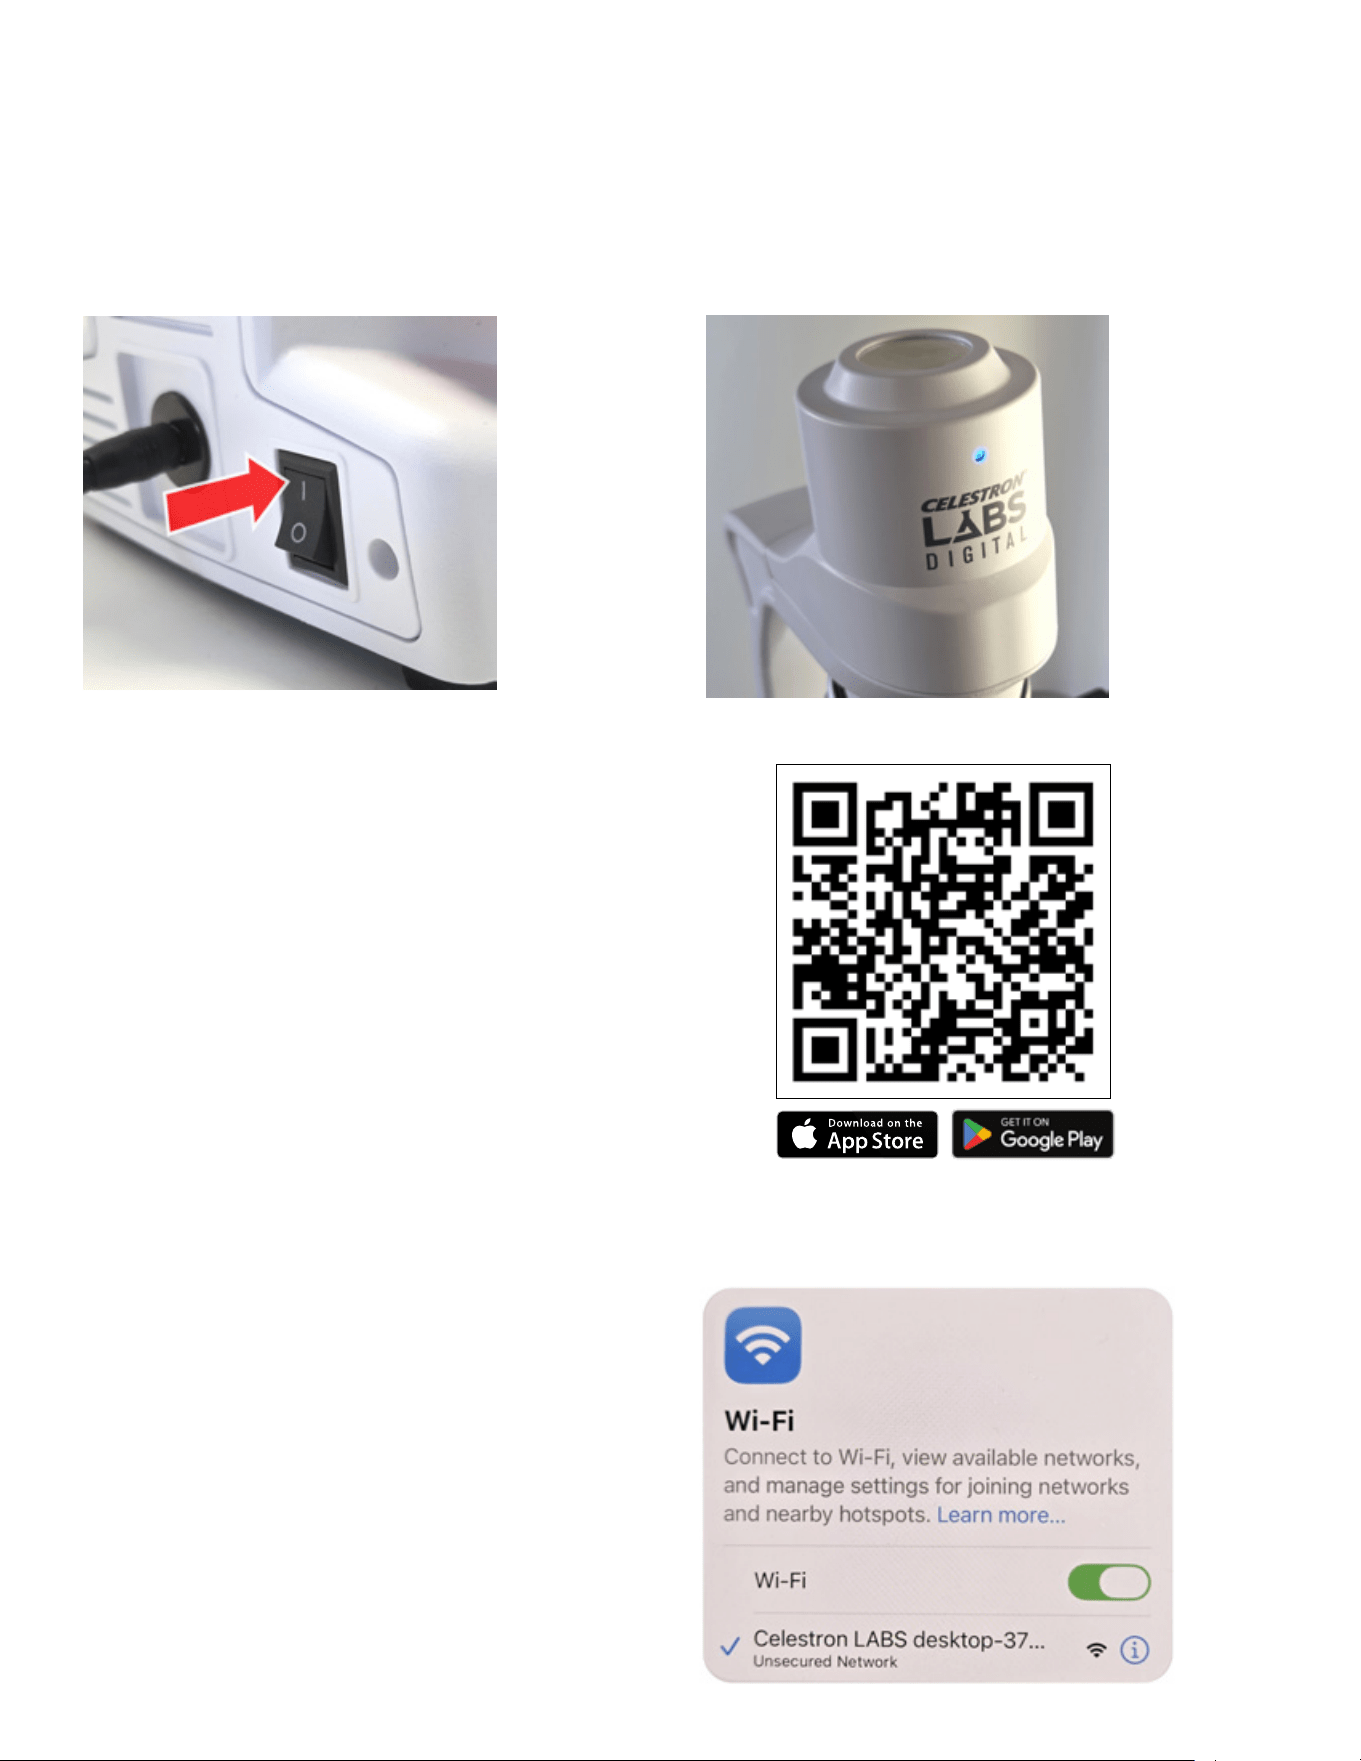
44
|
DEUTSCH
Die Beleuchtung sollte sich einschalten. Sollte dies nicht der
Fall sein, drehen Sie am Helligkeitsregler an der Seite der
Basis, um die Beleuchtung zu erhöhen.
Die blaue LED-Anzeige beginnt zu blinken. Dies zeigt an, dass das
Mikroskop sein WLAN-Signal sendet.
Wenn die blaue LED nicht leuchtet:
• Vergewissern Sie sich, dass das Netzteil fest angeschlossen ist.
• Überprüfen Sie, ob die Wandsteckdose Strom führt.
SCHRITT 3: DIE APP INSTALLIEREN
Die zugehörige App dieses Mikroskops funktioniert mit iOS- und
Android-Geräten. Scannen Sie den untenstehenden QR-Code
oder suchen Sie im Apple App Store oder Google Play Store nach
„Celestron Labs Digital Wi-Fi“.
Laden Sie die kostenlose App herunter und installieren
Sie sie.
1. Öffnen Sie die WLAN-Einstellungen auf Ihrem Smartphone oder
Tablet.
2. Suchen Sie nach einem Netzwerk mit dem Namen:
Celestron LABS Desktop-XXXX
(Die vier X stehen für eine eindeutige Buchstaben-/
Zahlenkombination.)
3. Tippen Sie auf das Netzwerk, um die Verbindung herzustellen.
Sobald die Verbindung hergestellt ist, hört die blaue LED auf zu
blinken und leuchtet dauerhaft.
Ihr Gerät zeigt möglicherweise eine Meldung an, dass keine
Internetverbindung besteht. Dies ist normal. Das Mikroskop stellt
eine eigene, direkte WLAN-Verbindung her und nutzt nicht Ihr
WLAN-Netzwerk.
SCHRITT 2: EINSCHALTEN
Schalten Sie den Netzschalter am Standfuß des Mikroskops ein.
SCHRITT 4: MIT DEM WLAN-NETZWERK DES MIKROSKOPS
VERBINDEN
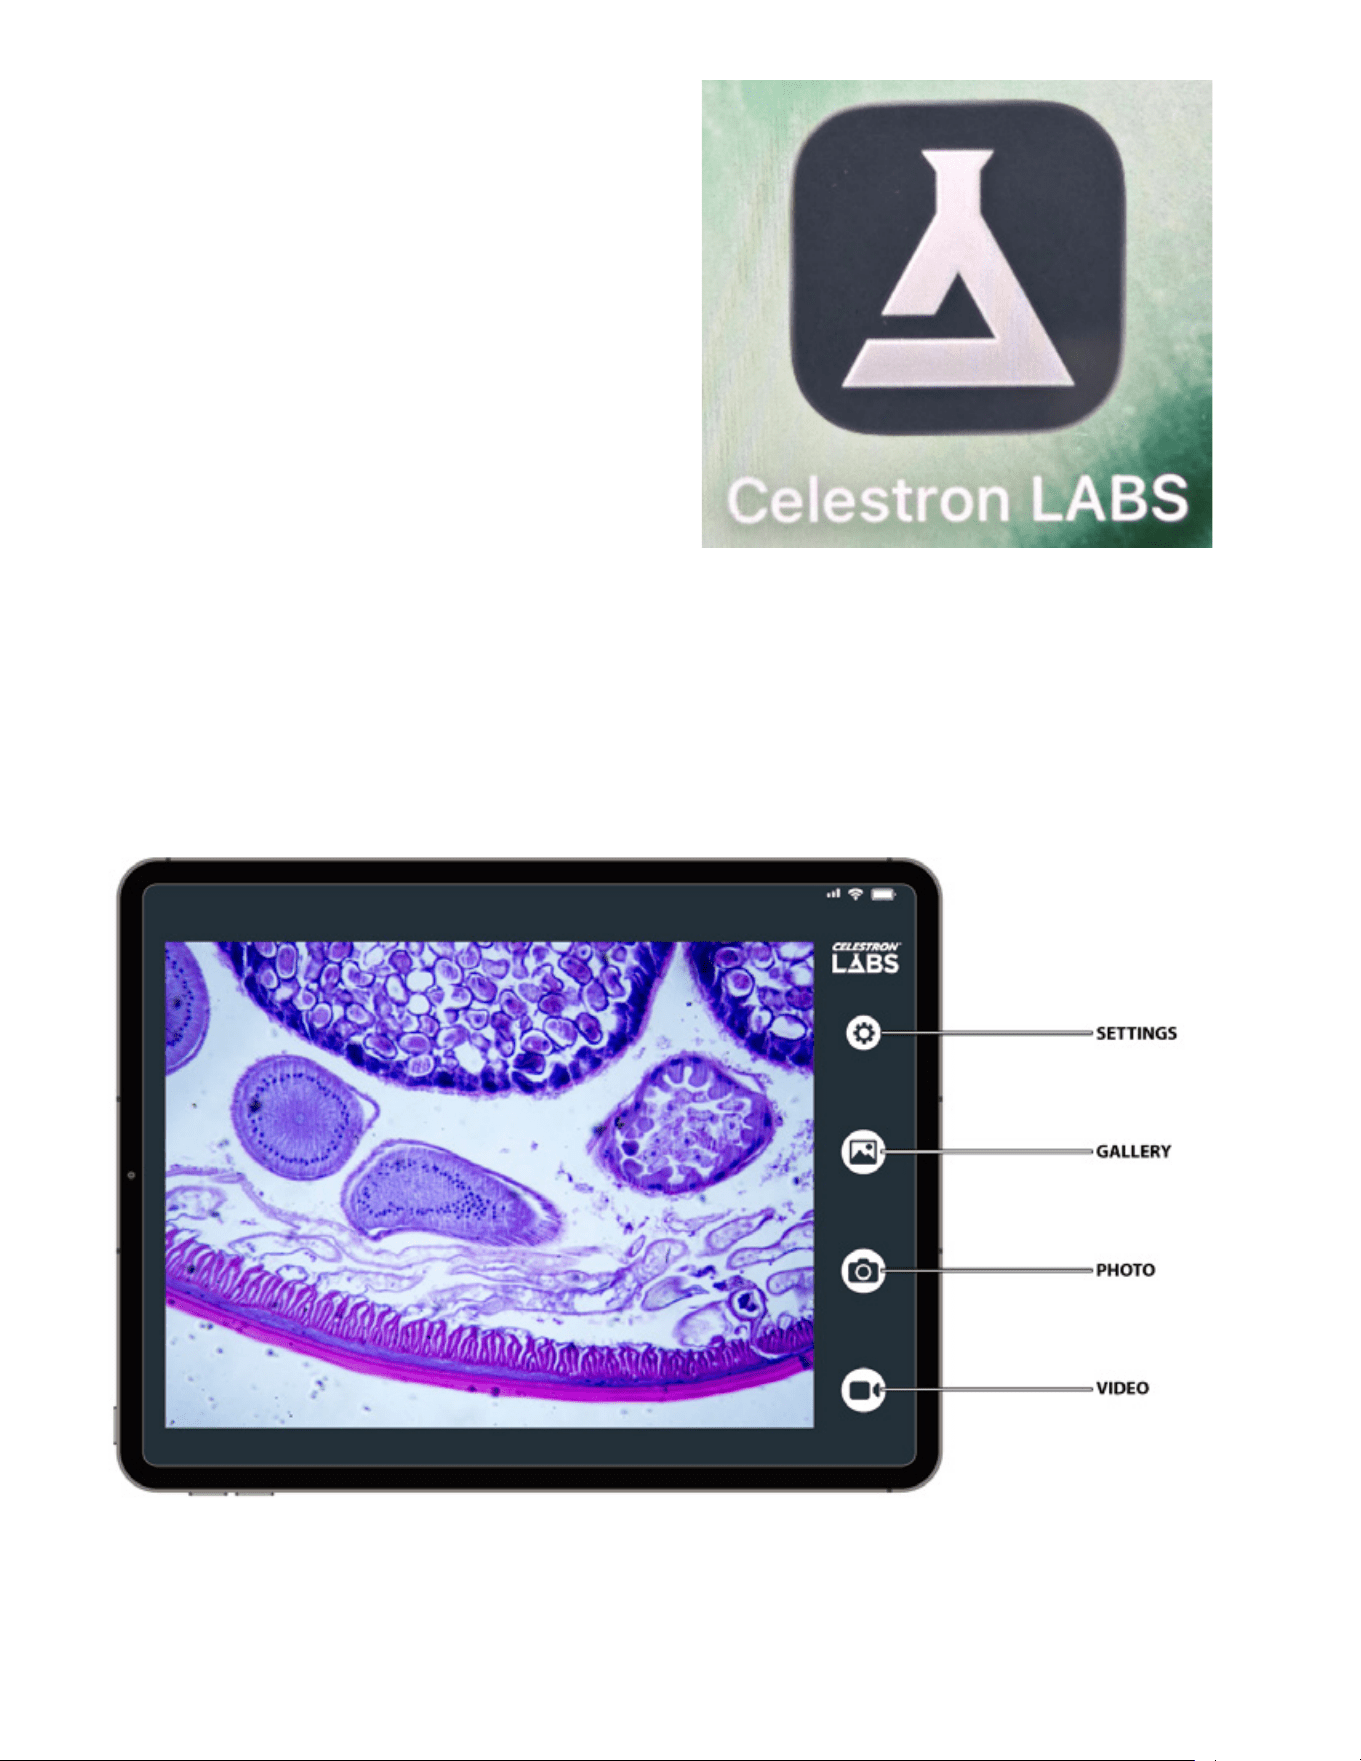
DEUTSCH
|
45
Die Hauptoberfläche ist unten dargestellt. Die beschrifteten Hinweise identifizieren jede in diesem Abschnitt beschriebene Funktion.
VERWENDUNG DER APP
SCHRITT 5: MIT DER
BETRACHTUNG STARTEN
Öffnen Sie die Celestron Labs Digital Wi-Fi App.
Live-Video sollte innerhalb von etwa 30 Sekunden gestreamt
werden.
Falls kein Video angezeigt wird:
• Stellen Sie sicher, dass Ihr Gerät mit dem Netzwerk Celestron
LABS Desktop-XXXX verbunden ist.
• Schließen Sie die App und öffnen Sie sie erneut.
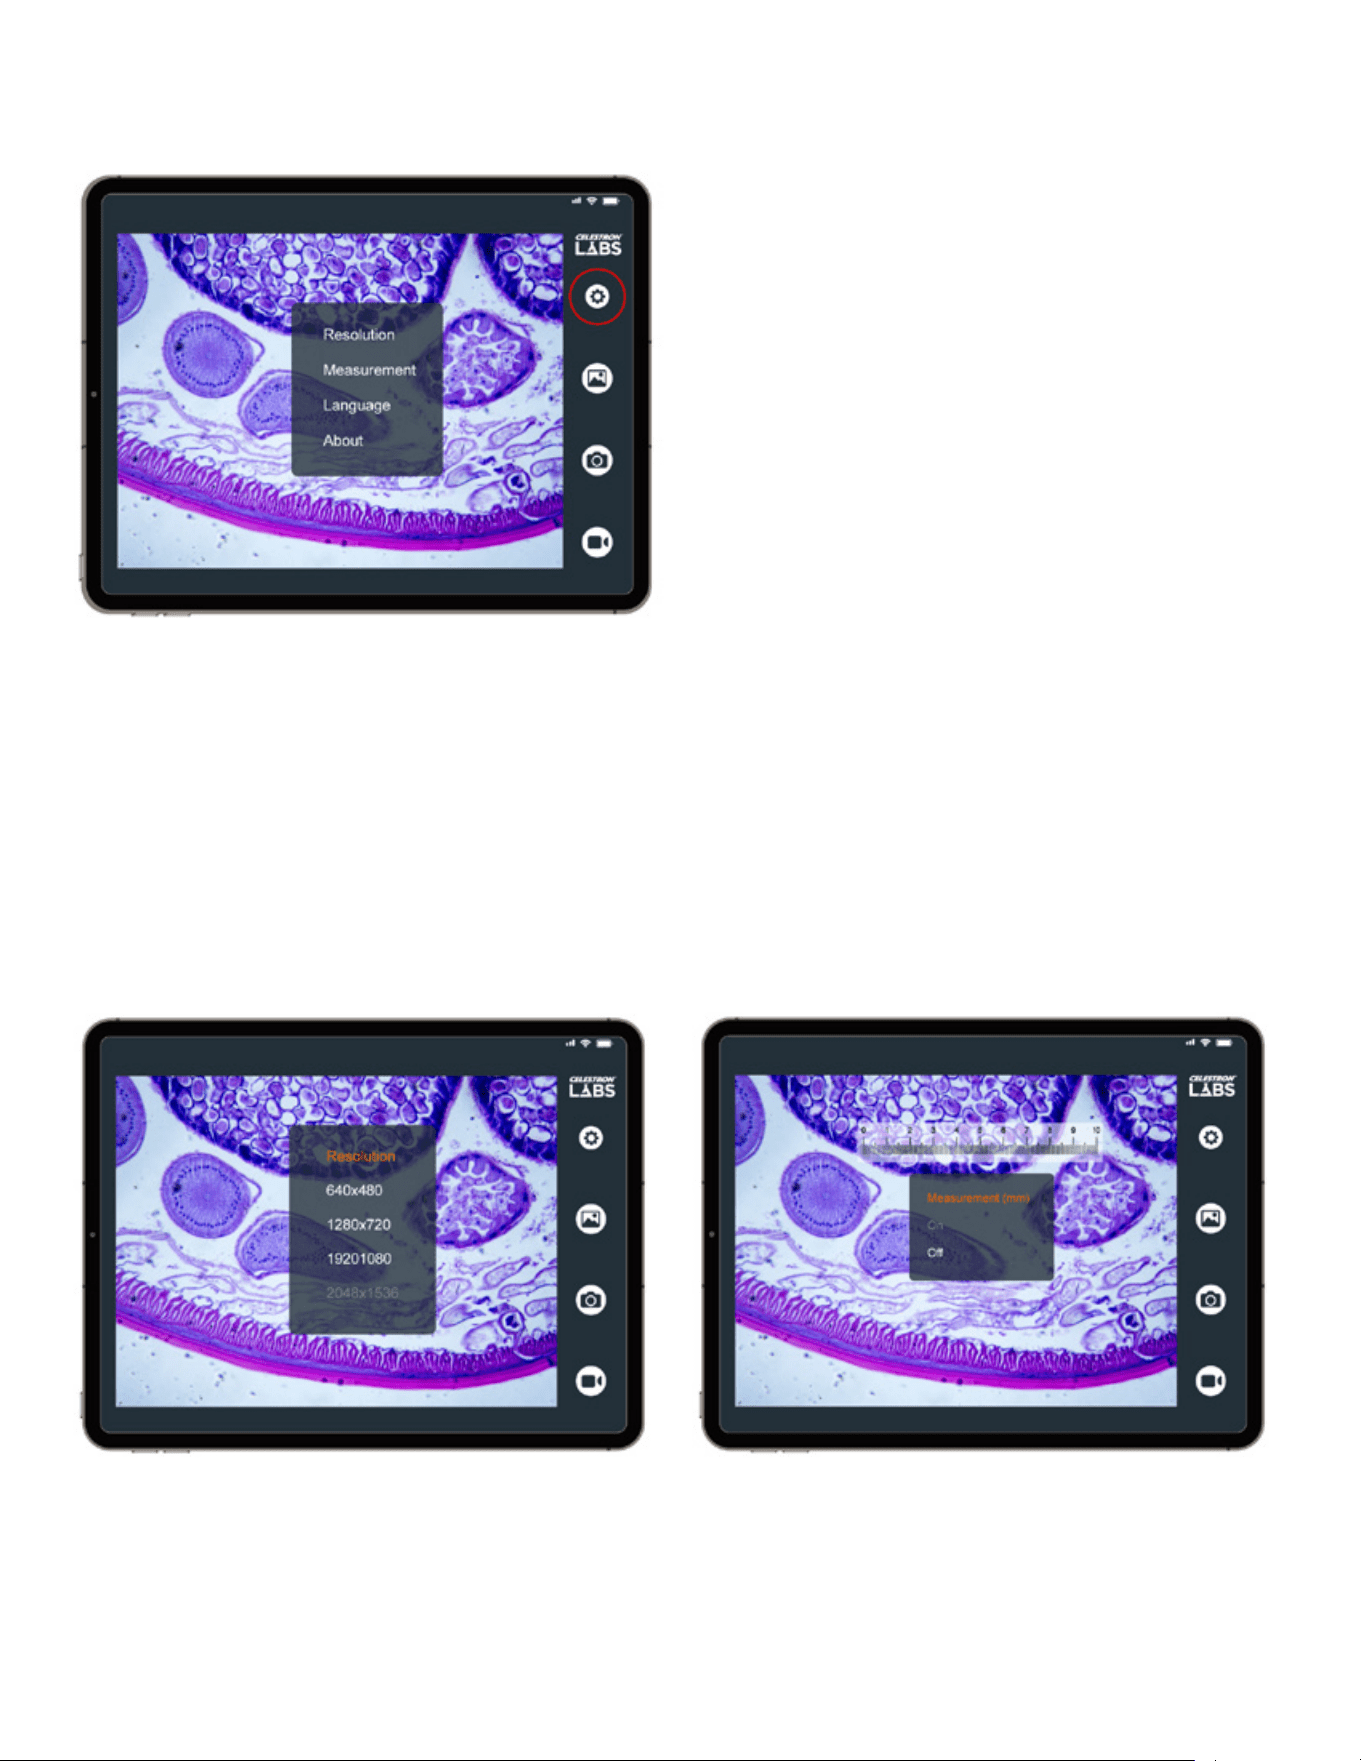
46
|
DEUTSCH
A. EINSTELLUNGEN:
Tippen Sie auf das Einstellungssymbol, um auf die folgenden Optionen zuzugreifen:
AUFLÖSUNG:
Wählen Sie die Bild- und Videoauflösung.
Höhere Auflösungen bieten mehr Detail, erzeugen aber größere
Dateigrößen.
Verfügbare Einstellungen:
• 640 × 480
• 1280 × 720
• 1920 × 1080
• 2048 × 1536 (maximale Auflösung)
ABMESSUNGEN:
Schalten Sie das digitale Messkreuz ein oder aus.
Sie können dies als allgemeine Vergleichshilfe verwenden oder nach
der Kalibrierung, Abmessungen der Probe direkt auf dem Bildschirm
schätzen.
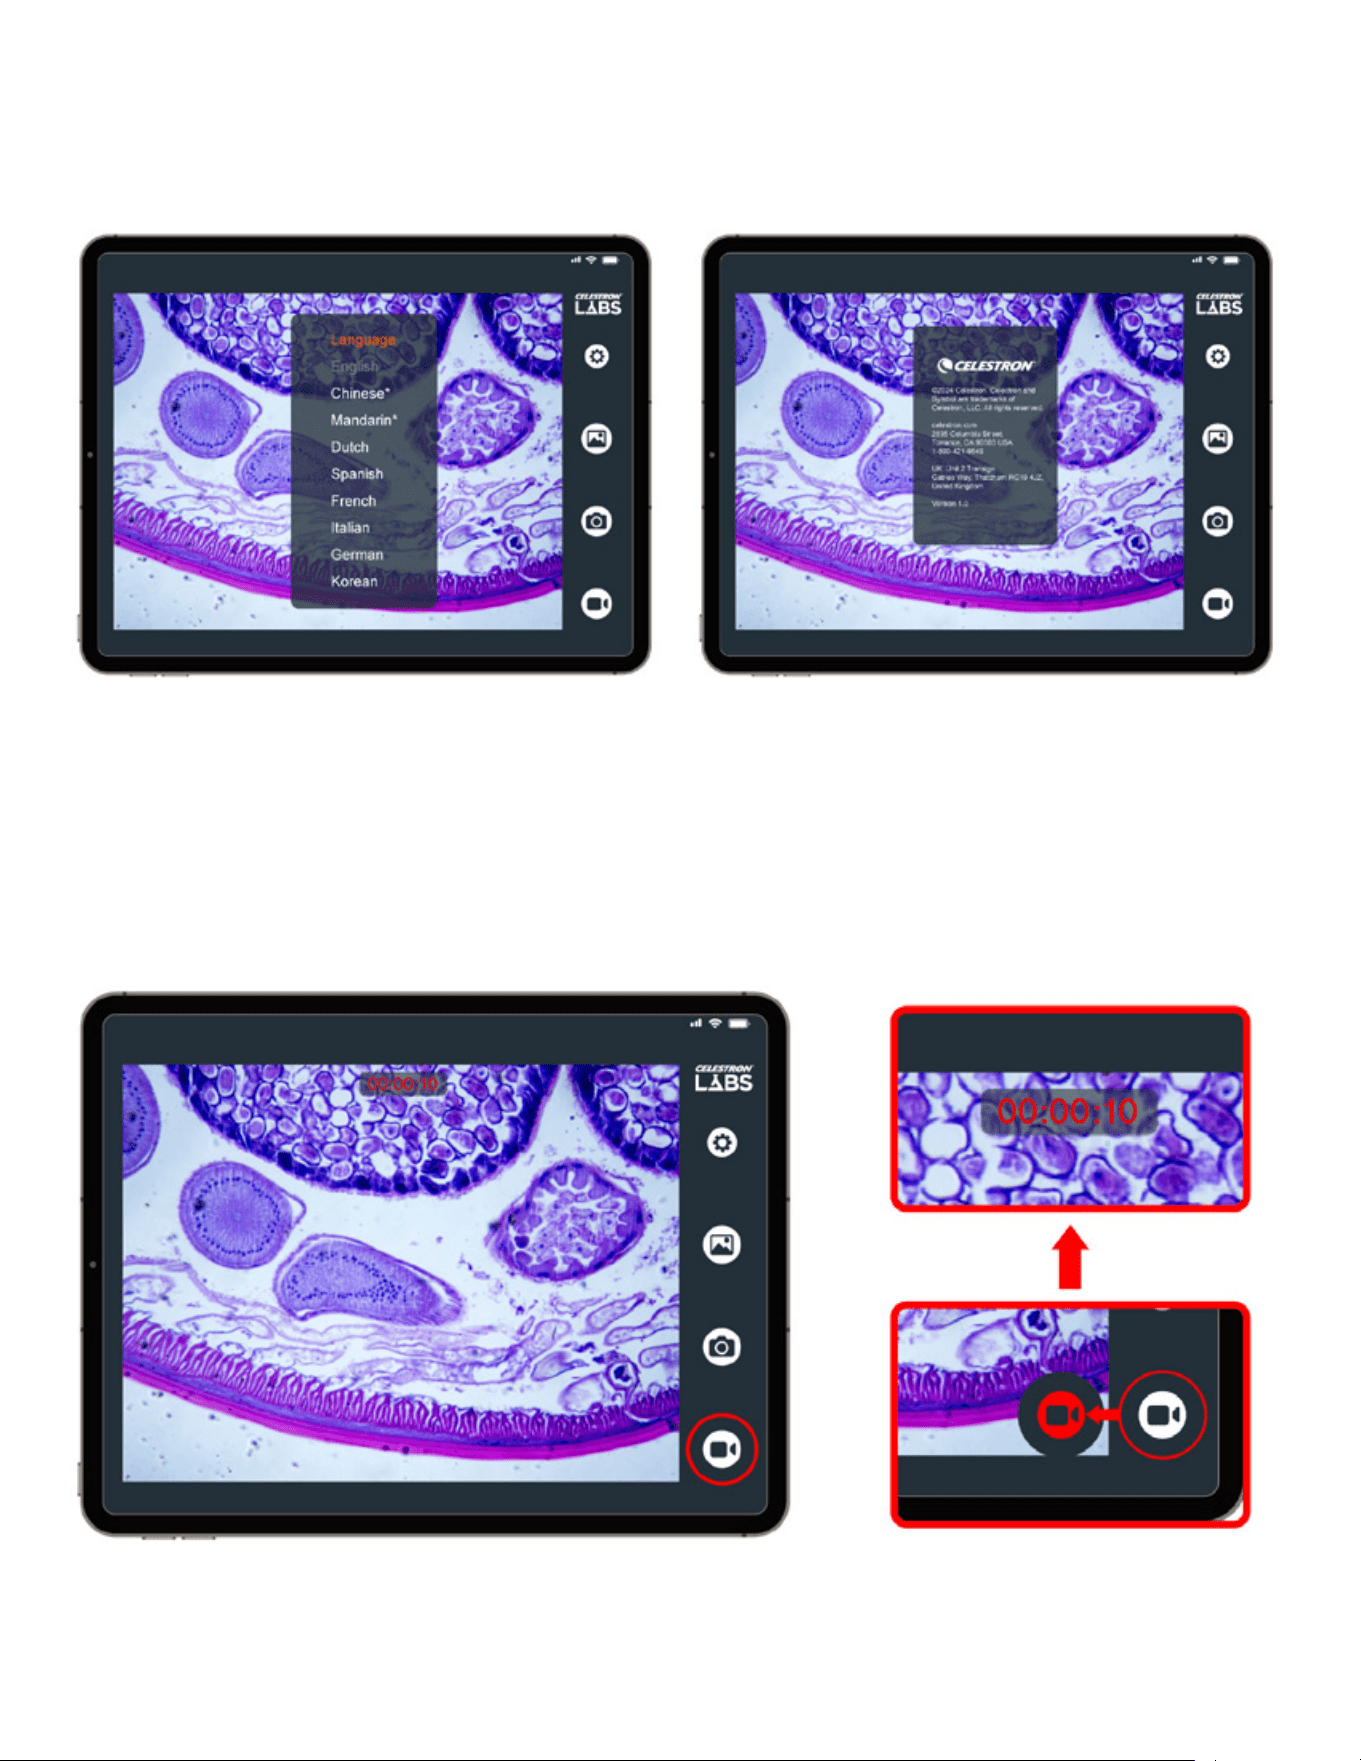
DEUTSCH
|
47
SPRACHE:
Ändern Sie die Sprache der Benutzeroberfläche.
Verfügbare Optionen: Englisch (Standard), Chinesisch
(vereinfacht), Chinesisch (traditionell), Niederländisch, Spanisch,
Französisch, Italienisch, Deutsch und Koreanisch.
ÜBER
Zeigt die App-Versionsnummer, rechtliche Informationen und
Kontaktdaten von Celestron an.
B. VIDEOAUFNAHME
Tippen Sie auf das Video-Symbol, um die Aufnahme zu starten. Ein
Timer erscheint oben auf dem Bildschirm, während die Aufnahme läuft.
Tippen Sie erneut auf das Symbol, um die Aufnahme zu beenden.
Videos werden direkt auf Ihrem Gerät gespeichert.
48
|
DEUTSCH
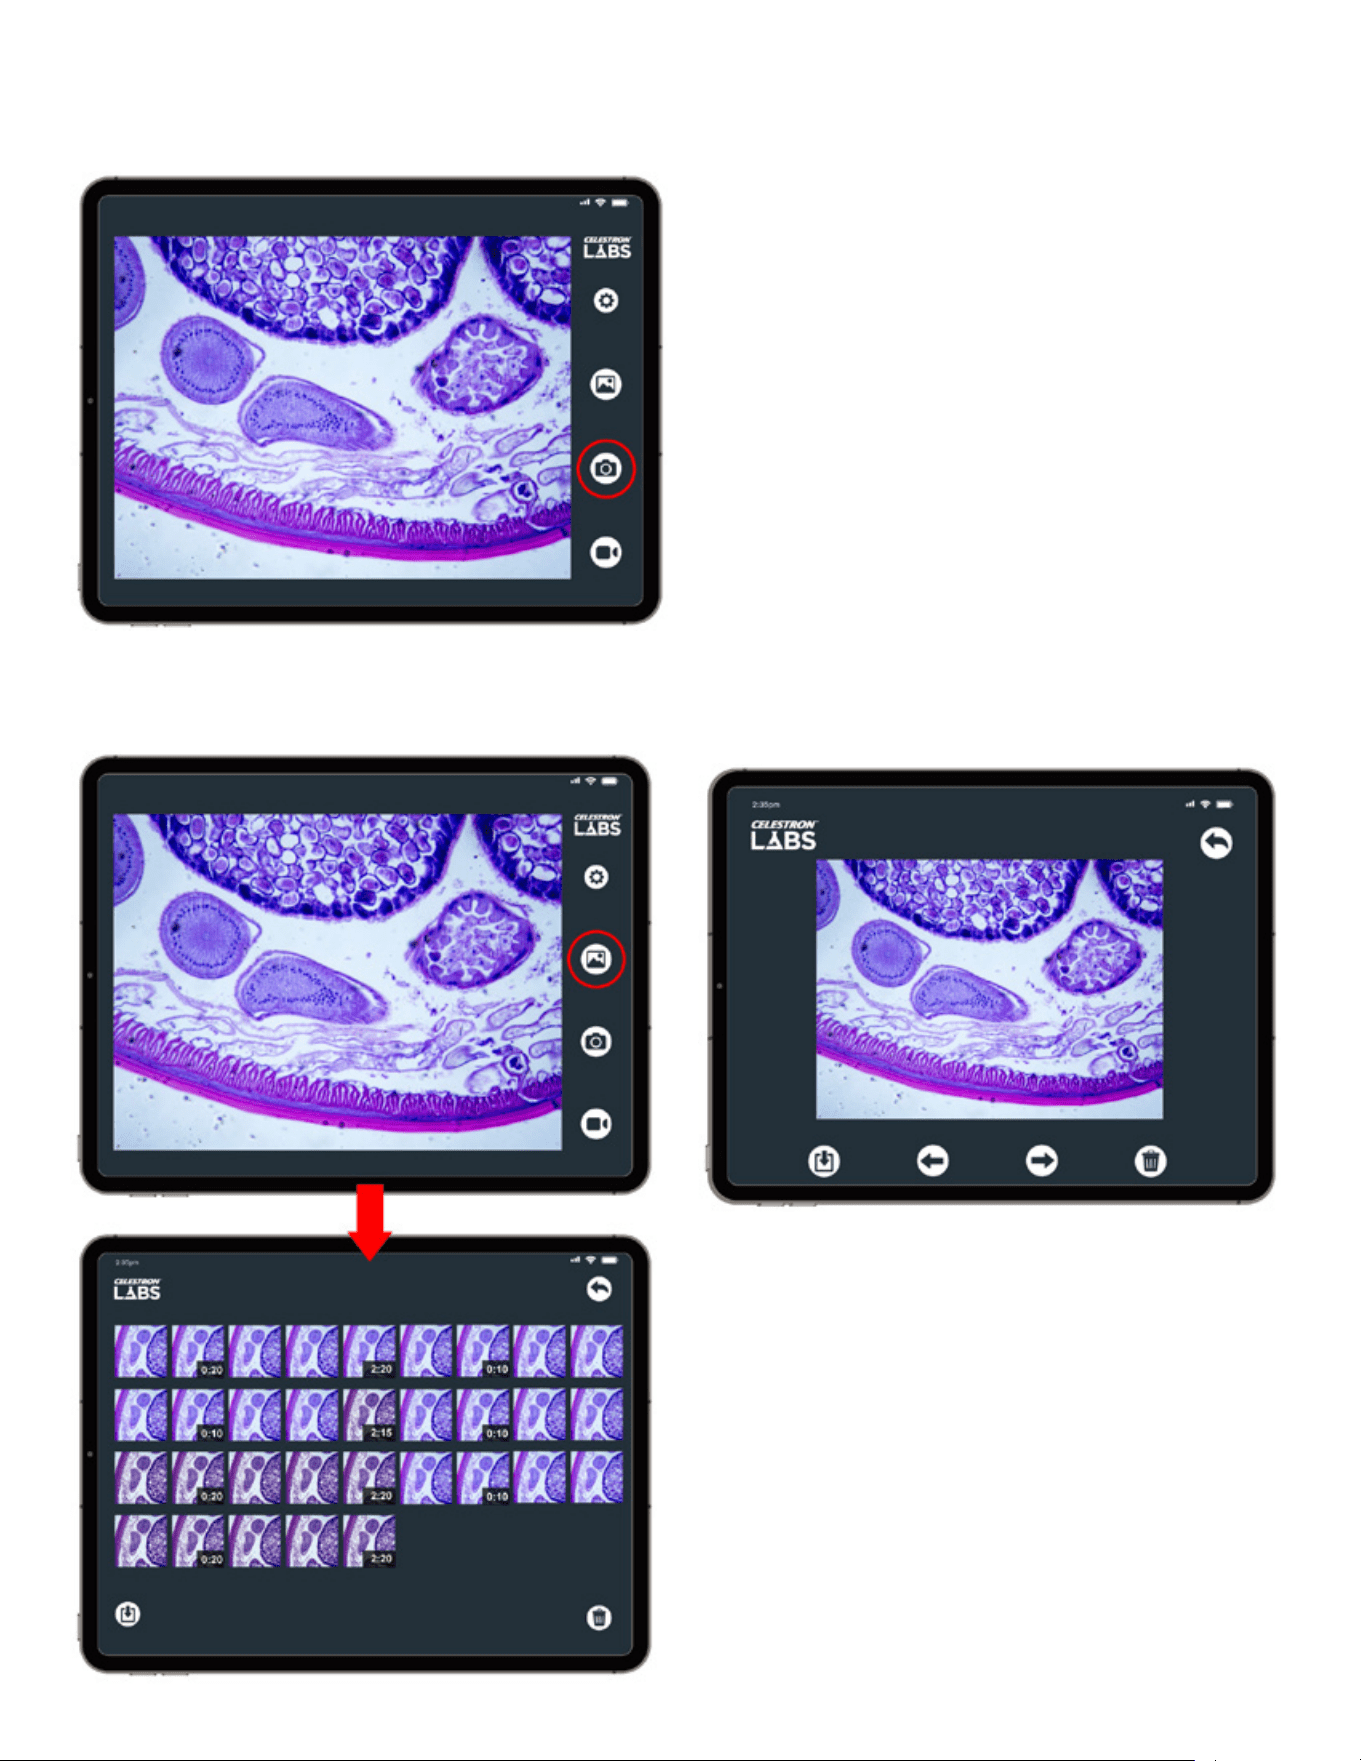
C. FOTOS AUFNEHMEN
Tippen Sie auf das Foto-Symbol, um ein Standbild aufzunehmen. Bilder werden direkt auf Ihrem Gerät gespeichert.
Tippen Sie auf das Galerie-Symbol, um gespeicherte Bilder und
Videos anzuzeigen.
• Tippen Sie auf ein Vorschaubild, um es im Vollbildmodus
anzuzeigen.
• Wischen Sie nach links oder rechts, um durch gespeicherte
Dateien zu blättern.
• Um ein Video abzuspielen, tippen Sie auf den Bildschirm und
wählen Sie Wiedergabe.
WICHTIGER HINWEIS ZU
BERECHTIGUNGEN
Je nach Geräteeinstellungen werden Sie möglicherweise
aufgefordert, der App Zugriff auf Ihre Fotos und Dateien zu
gewähren. Voller Zugriff ist erforderlich, um Bilder und Videos
zu speichern.
D. GALERIE
DEUTSCH
|
49
VERWENDUNG DES MIKROSKOPS
Das digitale WLAN-Tischmikroskop funktioniert wie ein herkömmliches Mikroskop, wobei die integrierte Kamera das Okular ersetzt.
Vor der Beobachtung prüfen Sie bitte Folgendes:
• Das Mikroskop ist eingeschaltet.
• Die blaue LED leuchtet dauerhaft (WLAN-Verbindung besteht).
• Die App ist geöffnet und streamt.
BELEUCHTUNG EINSTELLEN
Drehen Sie am Helligkeitsregler am Fuß des Mikroskops, um die
Beleuchtung einzuschalten und die Lichtintensität anzupassen.
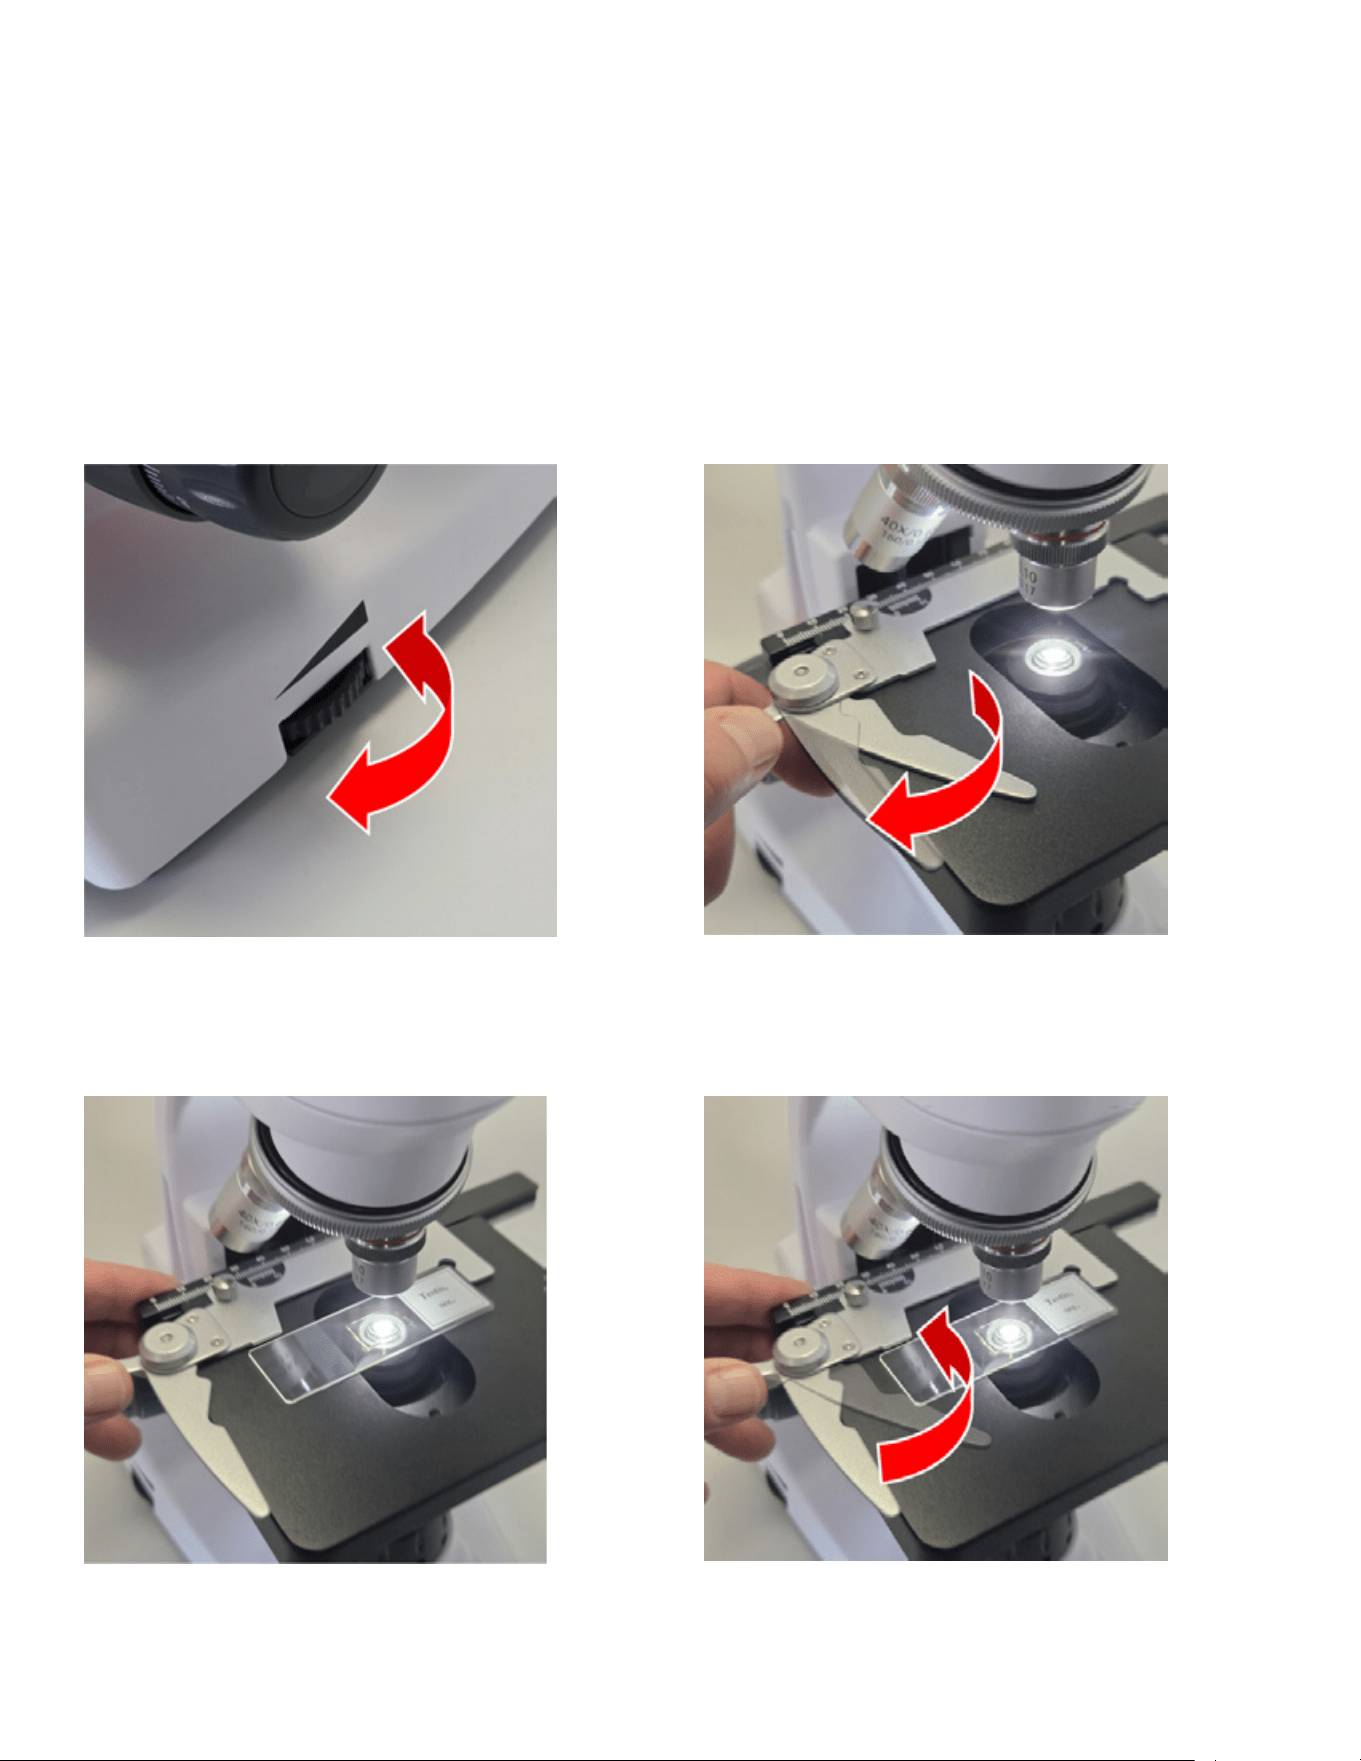
OBJEKTTRÄGER EINLEGEN
1. Klappen Sie den Spannarm des Objektträgerhalters auf.
2. Legen Sie den Objektträger flach auf den Objekttisch, wobei
die rechte Kante die feststehende Führung des Halters
berührt.
3. Lassen Sie den Spannarm vorsichtig los, um den Objektträger
zu fixieren.
50
|
DEUTSCH
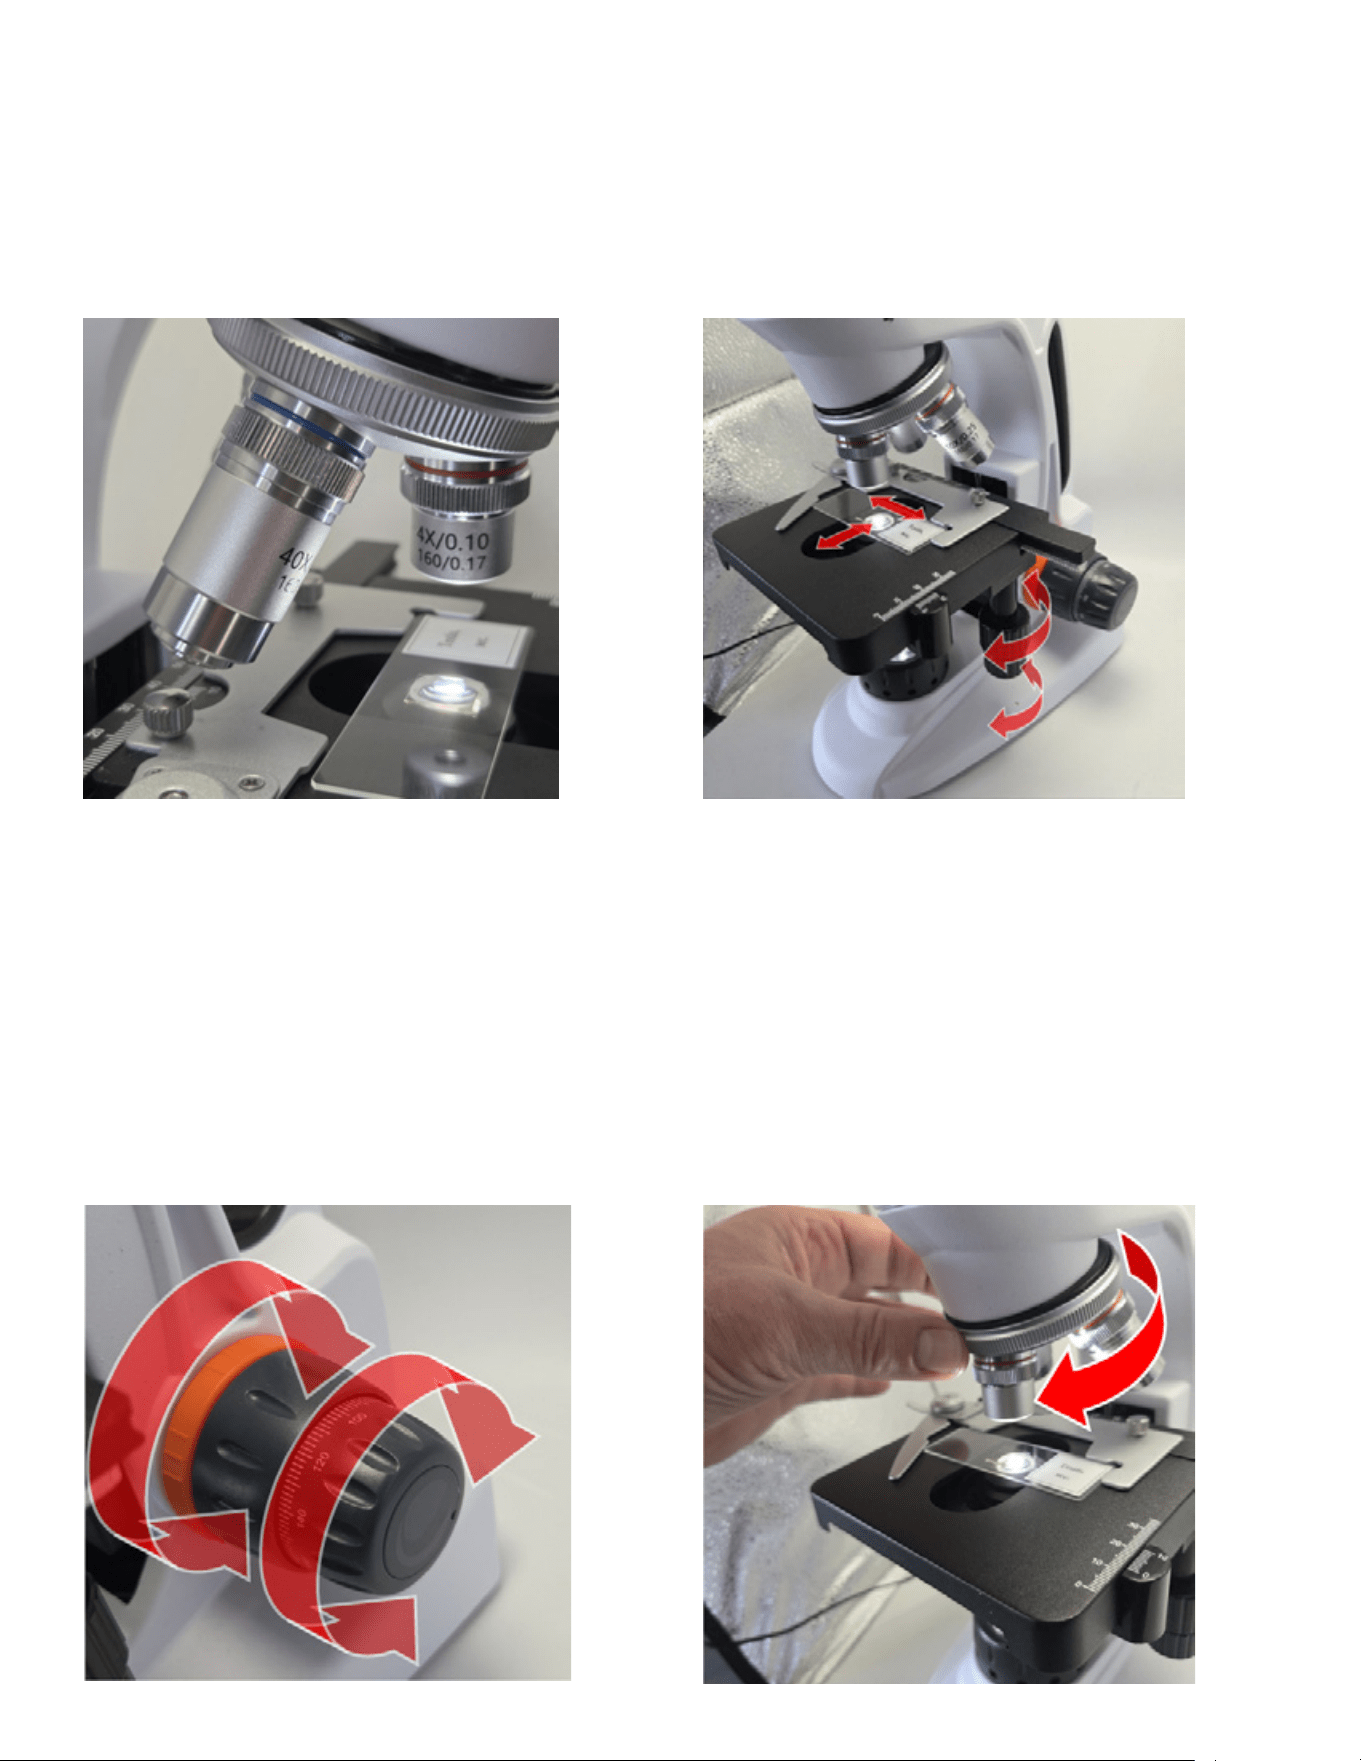
WÄHLEN SIE DAS OBJEKTIV
MIT DER NIEDRIGSTEN
VERGRÖSSERUNG
Drehen Sie den Objektivrevolver, um das 4x-Objektiv über dem
Objektträger in Position zu bringen. Sie werden spüren, wie es
einrastet.
Die niedrigste Vergrößerung erleichtert das Auffinden des
Präparats.
POSITIONIEREN SIE DAS
PRÄPARAT.
Verwenden Sie die X-Y-Tischverstellknöpfe, um den Objektträger
zu bewegen, bis die Probe auf dem Bildschirm erscheint.
FOKUSSIEREN SIE DAS BILD
An der Unterseite Ihres Mikroskops befinden sich zwei
Fokussierknöpfe,
Beginnen Sie mit dem Grobfokussierknopf (dem größeren Knopf),
um die Probe in ein einigermaßen scharf abzubilden.
Verwenden Sie dann den Feinfokussierknopf (den kleineren
Knopf), um die Probe scharf und klar abzubilden.
Sobald das Bild scharf ist, justieren Sie gegebenenfalls die
Position des Objektträgers, um das Präparat besser im Sichtfeld
zu zentrieren. Anschließend können Sie ein Standbild aufnehmen,
ein Video aufzeichnen oder die Beobachtung fortsetzen.
VERGRÖSSERUNG ERHÖHEN
Um mehr Details zu sehen und tiefer in Ihr Präparat einzutauchen,
drehen Sie den Objektivrevolver, um entweder das 10x- oder das
40x-Objektiv nach vorne zu bringen. Drehen Sie weiter, bis das
gewünschte Objektiv einrastet.
Die Gesamtvergrößerung wird durch Multiplikation des Objektivs
mit der eingebauten Sensorvergrößerung des Mikroskops (etwa
12x) bestimmt. Mit den enthaltenen Objektiven beträgt die
Gesamtvergrößerung ungefähr:
Objektiv Gesamtvergrößerung
4x 48x
10x 120x
40x 480x
DEUTSCH
|
51
ABBE-KONDENSOR
Unterhalb des Objekttisches, zwischen der Beleuchtung und
der Objekttischöffnung, befindet sich der Abbe-Kondensor. Der
Kondensor besteht aus einer optischen Linse und einer verstellbaren
Irisblende, die über einen Schieberegler gesteuert wird.
Der Kondensor bündelt das Licht der Beleuchtung und konzentriert es
in einem Kegel, der durch das Präparat auf dem Objektträger verläuft.
Durch das Verstellen der Irisblende ändert sich die Größe dieses
Lichtkegels, sodass Sie Kontrast und Auflösung verbessern können.
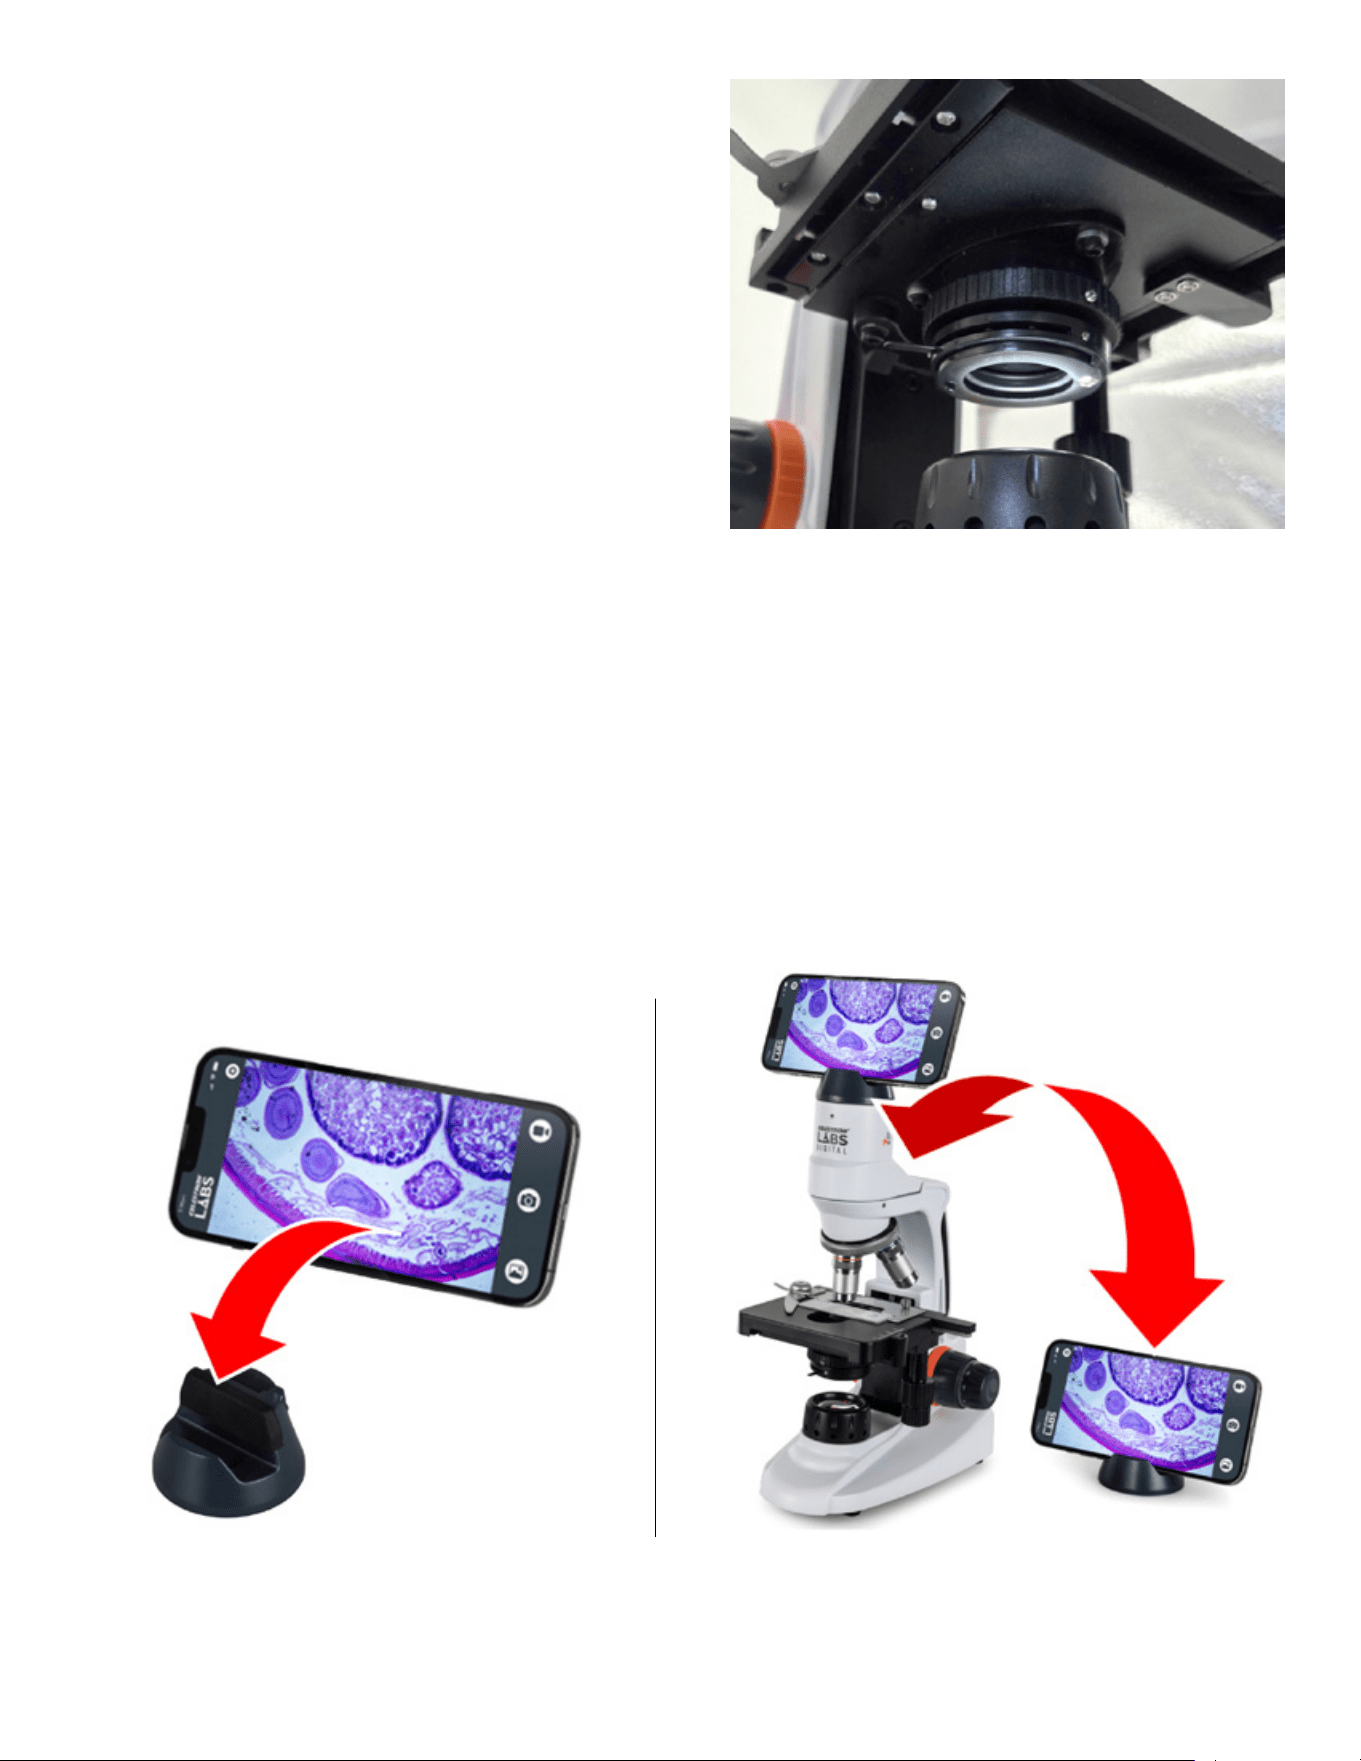
Das Mikroskop verfügt über einen Smartphone-Ständer für ein freihändiges Betrachten. Der Ständer kann magnetisch auf der Oberseite des
Mikroskops befestigt werden oder auf einer ebenen Fläche daneben gestellt werden.
Um den Ständer ohne Gurt zu verwenden, legen Sie Ihr Smartphone in den Standfuß. Der beschwerte Fuß sorgt dafür, dass kleinere Geräte
während der Beobachtung stabil bleiben.
Wenn Sie ein Tablet oder ein größeres Gerät verwenden, empfehlen wir dringend, es mit dem mitgelieferten Sicherheitshaken und -gurt zu
sichern. Dies hilft, das Gerät während des Gebrauchs fest an seinem Platz zu halten.
HINWEIS: Die App ist für die Verwendung im Querformat ausgelegt.
VERWENDUNG DES SMART-GERÄTE-STÄNDERS
UND -GURTS
52
|
DEUTSCH
1. Standfuß – Hauptplattform mit beschwertem Metallfuß
2. Sicherheitshaken und -gurt – Kunststoffhaken an einem elastischen Gurt
3. Camloc Schnellverschlüsse - Sichert den Gurt unter Spannung
4. Verstärkungspolster – Gummieinlage, die bei Bedarf zusätzlichen Halt bietet (z.
B. für Geräte ohne Schutzhülle)
1. Stellen Sie den Ständer auf eine stabile, ebene Fläche,
vorzugsweise in der Nähe einer Tischkante.
2. Fädeln Sie das Gummiband wie abgebildet durch den
Schnellverschluss.
BESTANDTEILE DES SMARTPHONE-STÄNDERS
VERWENDUNG DES SICHERHEITSHAKENS UND -GURTS
DEUTSCH
|
53
3. Legen Sie Ihr Smartphone oder Tablet auf den Standfuß
und hängen den Haken seitlich am Gerät ein.
4. Halten Sie das Gerät und den Haken mit einer Hand
fest. Ziehen Sie mit der anderen Hand am Gummiband
nach unten, um die Spannung zu erhöhen.
5. Halten Sie die Spannung aufrecht und schließen Sie
den Schnellverschluss, um den Gurt zu fixieren.
54
|
DEUTSCH
1. Positionieren Sie die Ständerkonstruktion mit beiden Händen
über dem Mikroskopkopf und richten Sie den runden Standfuß
an der kreisförmigen Form des Mikroskops aus.
DEN SMARTPHONE-STÄNDERS AM MIKROSKOP ANBRINGEN
Der Mikroskopkopf enthält einen internen Magneten. Der Standfuß enthält eine Metallplatte.
3. Vergewissern Sie sich, dass der Standfuß vollständig
aufsitzt und stabil ist, bevor Sie ihn loslassen.
Wenn der Ständer befestigt ist, kann das Gerät um 360°
gedreht werden. Drehen Sie langsam und stützen Sie das
Gerät oder den Standfuß während der Drehung, um ein
Lösen der Magnetverbindung zu vermeiden.
2. Sobald sich der Ständer dem Kopf nähert, wird der Magnet
die Metallplatte anziehen und den Ständer in die richtige
Position führen.
DEUTSCH
|
55
DEN SMARTPHONE-STÄNDER ENTFERNEN
Sie können entweder die gesamte Ständereinheit oder zuerst das Smartphone entfernen. Für maximale Stabilität entfernen Sie zuerst die
Ständereinheit vom Mikroskop und entnehmen Sie dann das Smartgerät, während der Ständer auf einer ebenen Fläche steht.
SO ENTFERNEN SIE DIE GESAMTE STÄNDEREINHEIT
Halten Sie den Standfuß mit einer Hand und das Gerät oder
den Haken mit der anderen. Drehen und heben Sie den
Standfuß an, um ihn vom Mikroskop zu lösen.
ENTFERNUNG DES MOBILGERÄTS:
Halten Sie das Mobilgerät und den Haken mit einer Hand fest.
Heben Sie mit der anderen Hand den Schnellverschluss an,
um die Spannung des Gurtes zu lösen. Nehmen Sie das Gerät
anschließend vom Standfuß ab.
Das Messkreuz in der App zeigt gleichmäßig verteilte Linien auf dem Bildschirm an. Die App weiß jedoch nicht automatisch, welcher realen
Entfernung diese Linien bei Ihrer aktuellen Vergrößerung entsprechen. Das mitgelieferte Kalibrierglas, auch Objektmikrometer genannt, löst
dieses Problem.
Das Glas enthält ein präzise geätztes Lineal. Jede kleine Teilung auf dem Glas entspricht 0,01mm (10 Mikrometer). Indem Sie die bekannten
Abstände auf dem Kalibrierungsobjektträger mit dem Fadenkreuz auf dem Bildschirm vergleichen, können Sie den tatsächlichen Abstand
berechnen, die durch jede Teilung des Fadenkreuzes dargestellt wird.
Die Kalibrierung ist spezifisch für das verwendete Objektiv. Wenn Sie die Vergrößerung ändern, müssen Sie vor neuen Messungen neu
kalibrieren.
VERWENDUNG DES KALIBRIEROBJEKTTRÄGERS
Zum Kalibrieren:
1. Legen Sie das Kalibrierglas auf den Mikroskoptisch.
2. Aktivieren Sie in der App das Messfeld.
3. Stellen Sie den Tisch so ein, dass das Lineal des Kalibrierglases
sichtbar ist, fokussieren Sie das Mikroskop, bis es scharf auf dem
Bildschirm erscheint.
4. Richten Sie die „0"-Markierung auf dem digitalen Messkreuz mit
der „0"-Markierung auf dem Kalibrierglas aus.
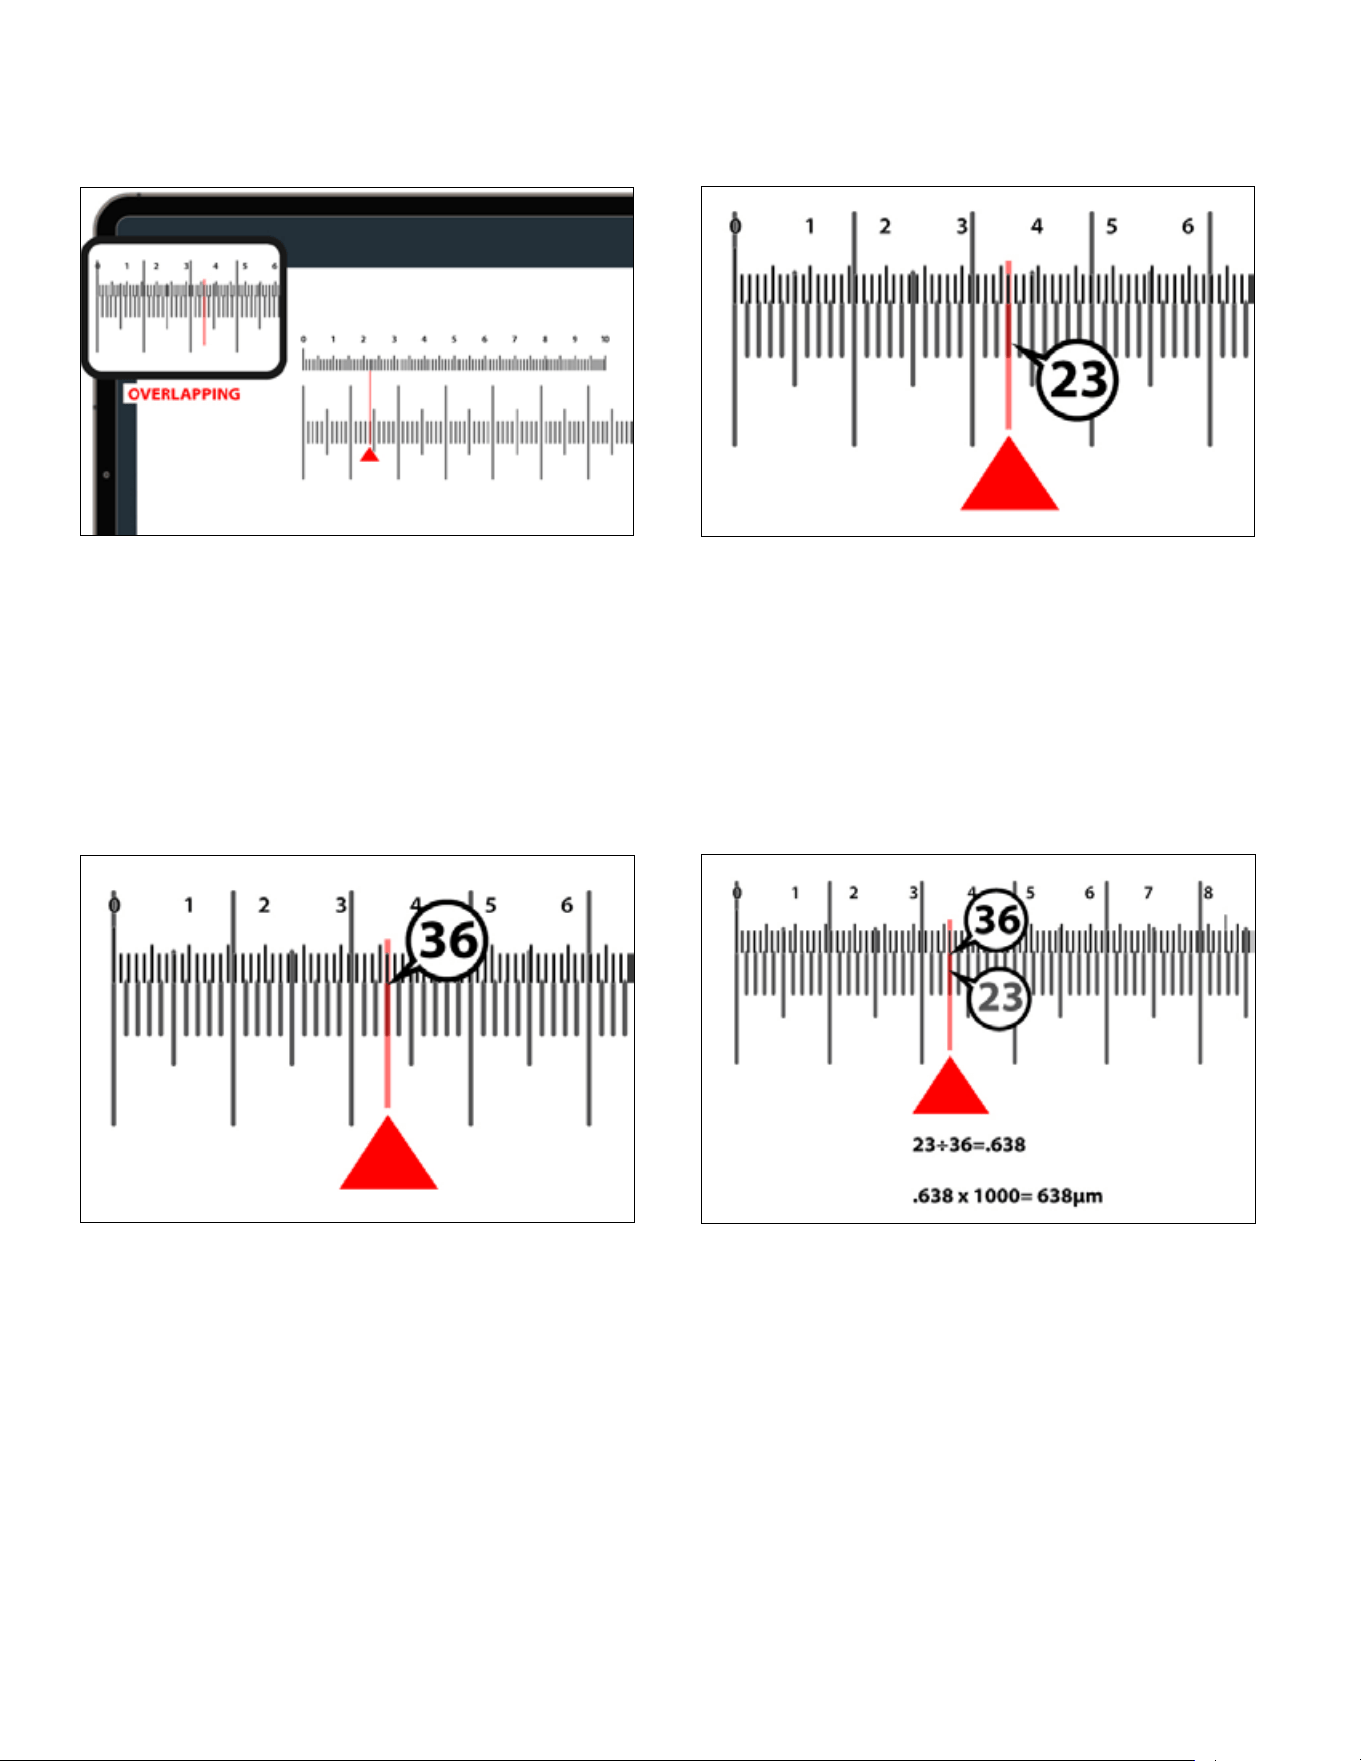
56
|
DEUTSCH
5. Bewegen Sie sich ohne das Glas zu verschieben über die Skala
und finden Sie den nächsten Punkt, an dem eine Linie auf dem
digitalen Messkreuz genau mit einer Linie auf dem Kalibrierglas
übereinstimmt.
6. Zählen Sie die Anzahl der Teilungen auf dem Kalibrierobjektträger
zwischen den beiden ausgerichteten Punkten. In diesem Beispiel
sind es 23 Unterteilungen.
7. Zählen Sie die Anzahl der Teilungen auf dem digitalen Messkreuz
zwischen denselben zwei ausgerichteten Punkten. In diesem
Beispiel sind es 36 Unterteilungen.
8. Berechnen Sie die Größe, die einer Teilung des Fadenkreuzes
entspricht.
Teilen Sie zunächst die Kalibrierglas-Unterteilungen durch die
Messkreuz-Unterteilungen: 23 ÷ 36 = 0,638
Multiplizieren Sie dieses Ergebnis dann mit 1000, um Mikrometer
zu erhalten: 0,638 × 1000 = 638 µm
In diesem Beispiel entspricht jede Teilung des digitalen
Fadenkreuzes 638 µm.
9. Sie können nun das kalibrierte Messkreuz verwenden, um
Probenabmessungen zu schätzen.
Wichtig
Wenn Sie Objektive oder die Vergrößerung wechseln, müssen Sie
vor neuen Messungen neu kalibrieren.
DEUTSCH
|
57
PFLEGE UND WARTUNG
Ihr digitales WLAN-Tischmikroskop von Celestron Labs ist ein optisches Präzisionsgerät. Richtige Pflege gewährleistet zuverlässige
Leistung über Jahre hinweg.
• Bewahren Sie das Mikroskop bei Nichtgebrauch in einer sauberen, trockenen Umgebung auf.
• Verwenden Sie das Mikroskop nicht in Umgebungen, in denen elektronische Geräte verboten sind. Unsachgemäßer Gebrauch kann zu
schweren Unfällen führen.
• Betreiben Sie das Gerät nur innerhalb von 23 °C bis 120 °F (−5 °C bis 50 °C). Vermeiden Sie plötzliche Temperaturänderungen, da sich
Kondenswasser im Gehäuse bilden kann.
• Halten Sie das Mikroskop von Wasser und anderen Flüssigkeiten fern. Feuchtigkeit birgt die Gefahr von Feuer und Stromschlag.
• Versuchen Sie nicht, das Gerät zu öffnen oder zu modifizieren. Interne Komponenten sollten nur von autorisierten Technikern gewartet
werden.
• Reinigen Sie das Äußere mit einem weichen, trockenen Tuch.
celestron.com/pages/warranty
BENÖTIGEN SIE HILFE? Wenden Sie sich an die technische Unterstützung von
celestron.com/pages/technical-support
Produktdesign und technische Daten können ohne vorherige Ankündigung geändert werden.
Dieses Produkt ist für Personen ab 14 Jahren konzipiert und vorgesehen.
©2026 Celestron.
Celestron und Symbol sind Warenzeichen von Celestron, LLC. • Alle Rechte vorbehalten. • Celestron.com
US: Celestron, 2835 Columbia Street, Torrance, CA 90503 USA
UK: Celestron Global Ltd., Einheit 2 Transigo, Gables Way, Thatcham RG19 4JZ, Vereinigtes Königreich
EU-Bevollmächtigter: AR Experts B.V., Boeingavenue 209, 1119 PD Schiphol-Rijk, Die Niederlande, [email protected]
Hergestellt in China | 04-26
FCC-HINWEIS: Dieses Gerät entspricht Teil 15 der FCC-Bestimmungen. Der Betrieb unterliegt den folgenden beiden
Bedingungen: (1) Dieses Gerät darf keine schädlichen Störungen erzeugen und (2) dieses Gerät muss Störungen
von außen akzeptieren, dazu gehören solche Störungen, die einen unerwünschten Betrieb verursachen.
EU-Hinweis: Celestron erklärt hiermit, dass der Funkgerätetyp 44351 Wi-Fi Desktop Mikroskop der
Richtlinie 2014/53/EU entspricht. Der vollständige Text der EU-Konformitätserklärung ist unter der
folgenden Internetadresse verfügbar: www.celestron.com/productcompliance
Produktmodell Celestron Labs Digital Wi-Fi Mikroskop #44351
Benutzerfreundlicher Modellname WH-44351
WLAN-Standard WLAN 4.0 (802.11b/n)
Tri-Band-WLAN-Option 20M
Maximale Anzahl verbundener Clients im 2,4-GHz-
Band
1
Maximale Anzahl verbundener Clients im 5-GHz-Band Keine
Maximale Anzahl verbundener Clients im 6-GHz-Band Keine
Maximaler Datendurchsatz 65M
WPS (WiFi Protected Setup) Nicht konfiguriert
WLAN-PARAMETER
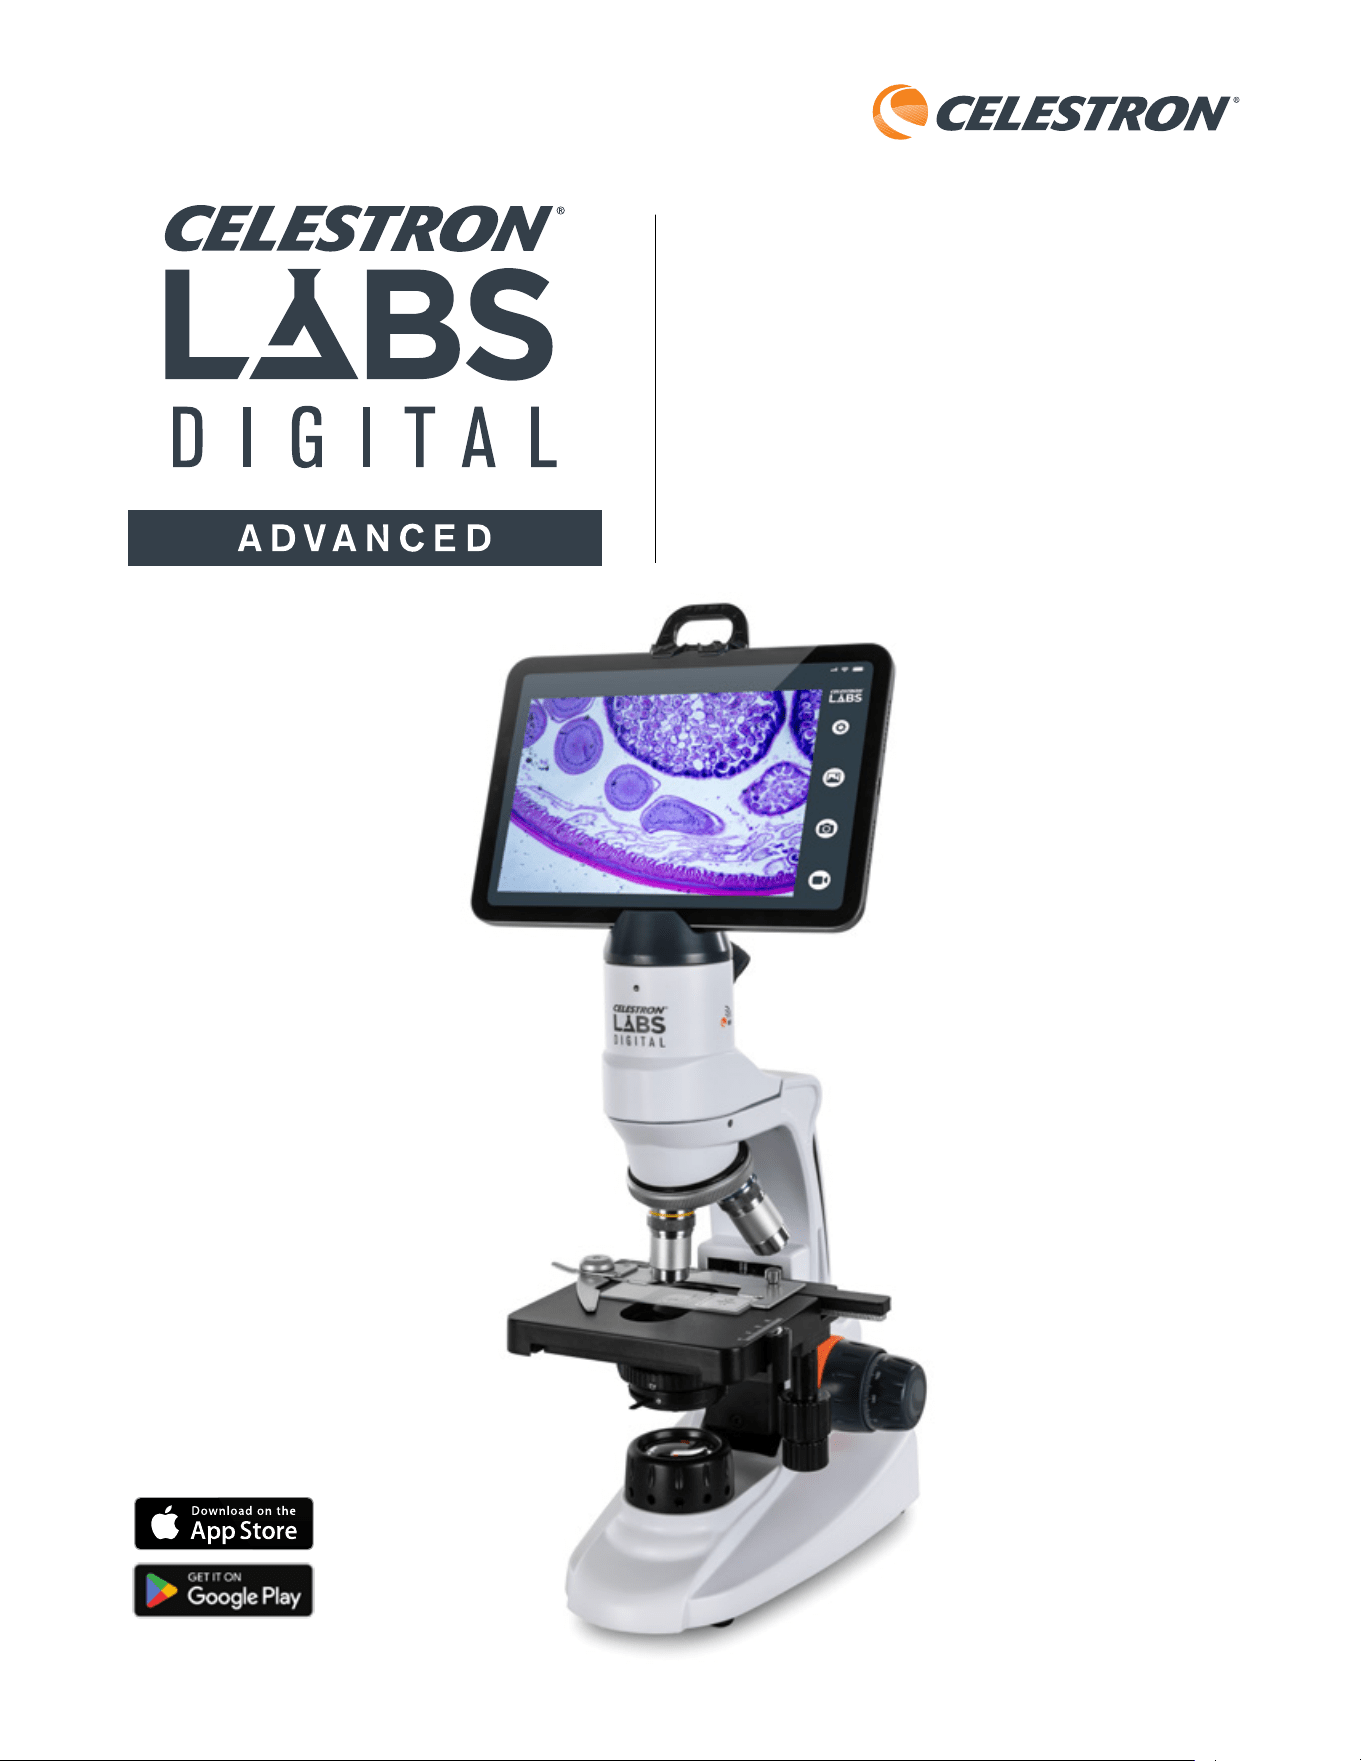
58
|
ITALIANO
MODELLO N. 44351
MANUALE DI ISTRUZIONI
MICROSCOPIO DA TAVOLO Wi-Fi
Tablet non incluso
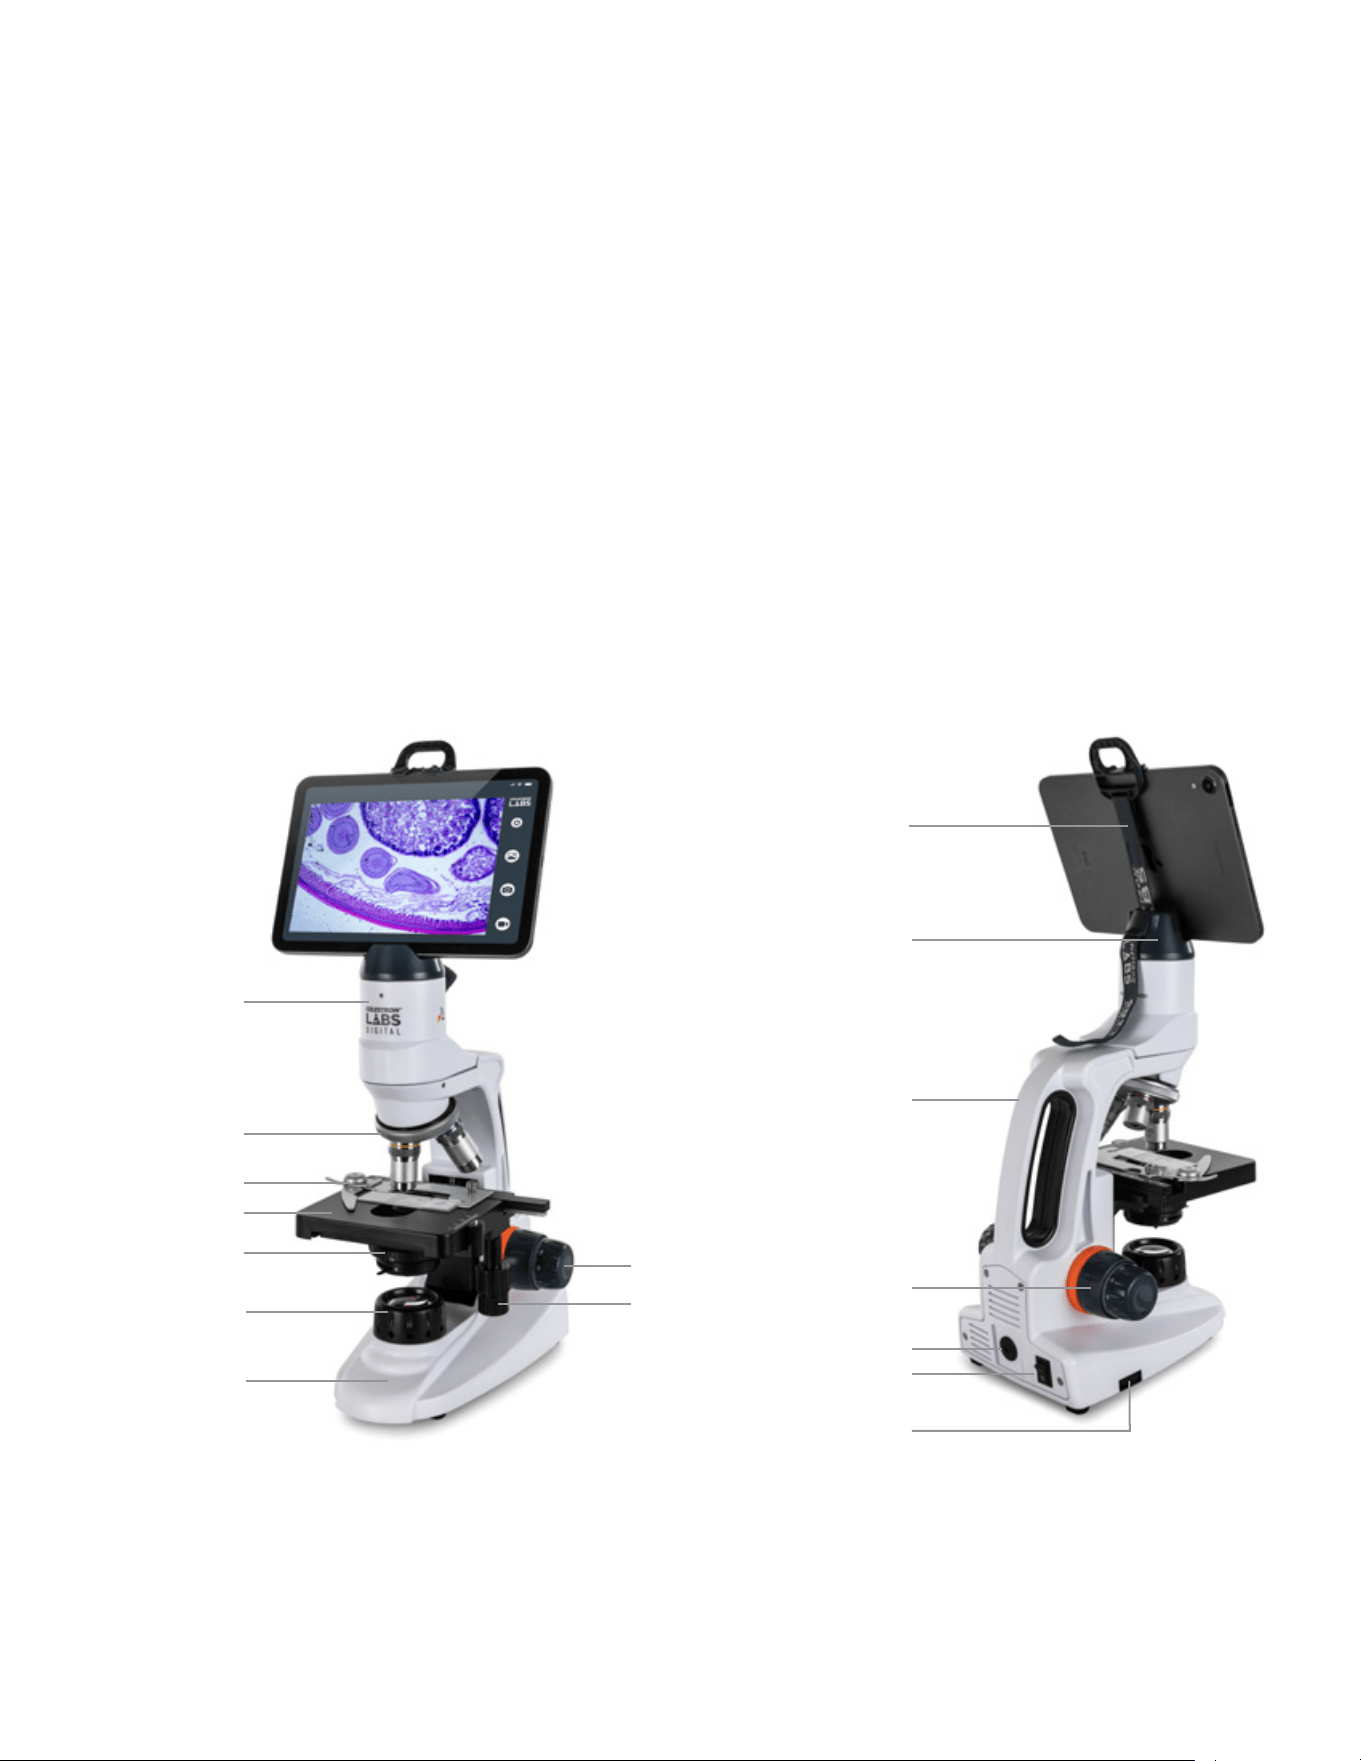
ITALIANO
|
59
INTRODUZIONE
Grazie per avere acquistato il microscopio da tavolo Wi-Fi Celestron
Labs Digital.
A differenza dei microscopi tradizionali, questo modello utilizza una
fotocamera digitale integrata da 2 MP al posto dell’oculare. È possibile
osservare i campioni live su smartphone o tablet mediante il segnale
Wi-Fi dedicato del microscopio. Non occorre alcuna connessione
internet.
Questo microscopio fornisce ingrandimenti da 48x a 480x ed è ideale
per esaminare vetrini già pronti di tessuti di piante e animali, fibre,
lieviti, muffe, batteri e altri campioni biologici.
L’app gratuita Celestron Labs Digital Wi-Fi funziona con dispositivi
iOS e Android. Mediante l’app, è possibile catturare foto, registrare
video, attivare strumenti di misurazione e salvare file direttamente sul
dispositivo per condividerli o analizzarli.
Il microscopio offre caratteristiche tradizionali di alta gamma,
compreso un tavolino meccanico completamente regolabile, tre
obiettivi acromatici (4x, 10x, e 40x), un condensatore Abbe con
diaframma a iride e comandi per macro e micro messa a fuoco. Sono
inoltre in dotazione cinque vetrini già pronti, un vetrino di calibrazione,
un adattatore CA universale e un supporto per dispositivo smart con
fascia di sicurezza.
Prima di iniziare, leggere per intero le istruzioni di configurazione e
consultare le immagini presenti nel presente manuale. Alcuni minuti
di preparazione consentono una configurazione senza problemi e
prestazioni ottimali.
Gancio e fascia di sicurezza
Supporto dispositivo smart
Testa microscopio con sensore e
modulo Wi-Fi
Torretta portaoculari con 3 obiettivi
Porta vetrino
Tavolino meccanico
Condensatore Abbe
Illuminatore
Base
Rotella di messa a fuoco
micrometrica
Manopole di
regolazione tavolino
X,Y
Maniglia di trasporto
Rotella di messa a fuoco
macrometrica
Connettore alimentazione 5,5 mm
Interruttore On/Off
Rotella di regolazione illuminatore
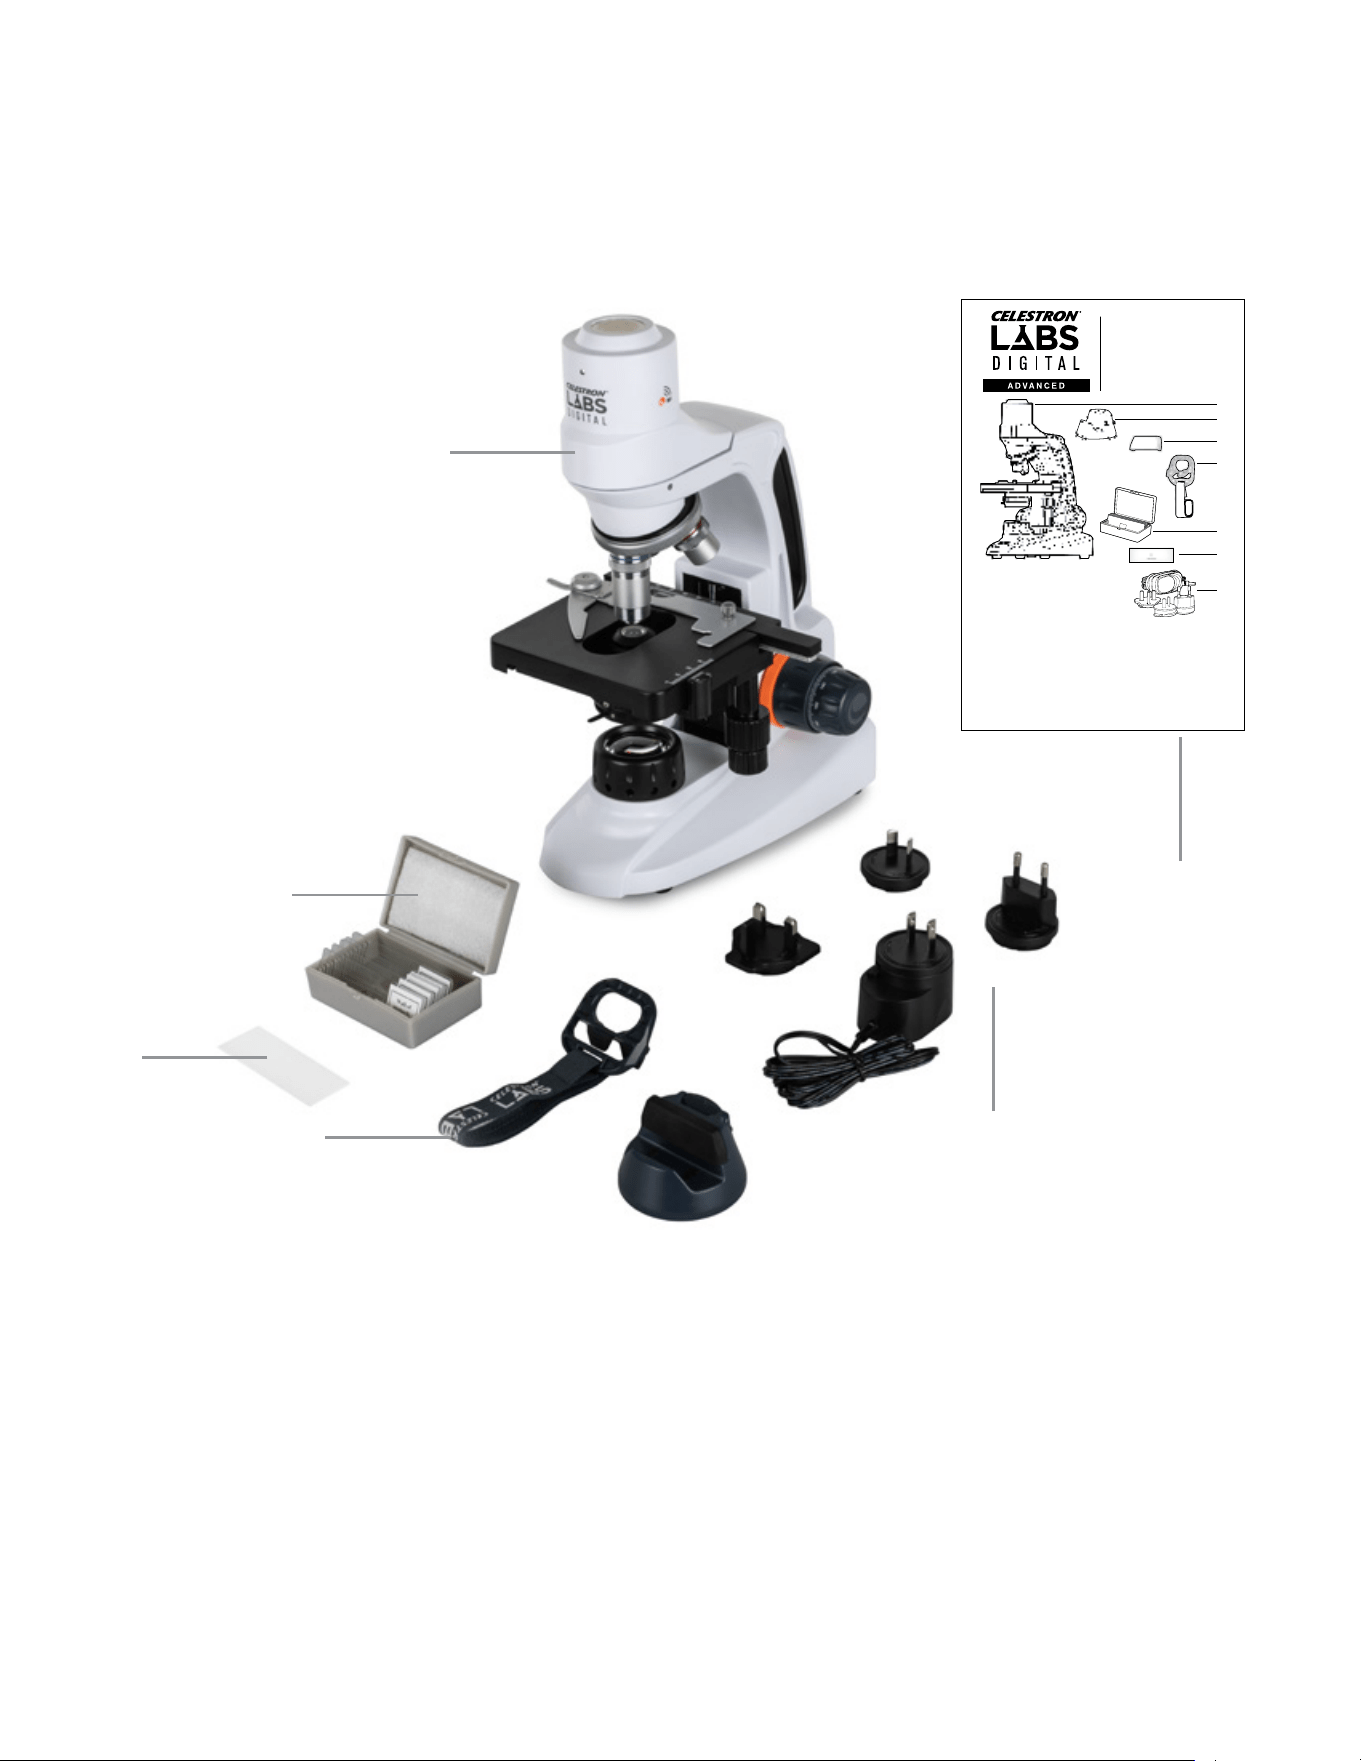
60
|
ITALIANO
Estrarre con cautela dalla confezione il microscopio da tavolo Wi-Fi e verificare la presenza di tutti i componenti:
[A] Microscopio da tavolo Wi-Fi Celestron Labs Digital
[B] Cinque vetrini già pronti
[C] Vetrino di calibrazione
[D] Adattatore CA universale con quattro prese
[E] Supporto dispositivo smart con fascia di sicurezza
[F] Guida rapida
A
B
C
E
D
F
MODEL #44351
QUICK START GUIDE
Contenu de la boîte
[A] M icroscope d e table Wi-F i 2MP
Celes tron Labs 2 MP
[B] So cle intellige nt
[C] Ad aptateur d e socle intell igent
[D] Sa ngle de sécuri té de socle int elligent
[E] Boî te de 5 de lame s de spécimens
préparées
[F] Ré glette d’ét alonnage
[G] Ada ptateur se cteur inte rnational
CA 100–2 40 V
What’s in the Box
[A] C elestron L abs 2MP Wi- Fi Deskt op
Microscope
[B] Sm art Device S tand
[C] Sma rt Device S tand Boos ter
[D] Sm art Device S tand Safe ty Strap
[E] Bo x of 5 Prepar ed Specimen Sli des
[F] C alibratio n Slide
[G] Mul ti-count ry 100–240V A C Adapter
Lieferumfang
[A] C elestron L abs 2MP WL AN
Desktopmikro skop
[B] Smart-Geräte-Gestell
[C] Smart-Geräte-Gestellver stärkung
[D] Smart-Geräte-Gestell-Sicherheitsgurt
[E] Bo x mit 5 vorber eiteten Obj ektträ gern
[F] Kalibrierungsobjek tträger
[G] Lä nderübergr eifender 10 0–240 V
AC-Adapter
Contenuto della confezione
[A] M icroscopi o da tavolo Wi -Fi Celest ron
Labs 2 MP
[B] Sup porto per di spositiv o smart
[C] Boo ster per dis positivo s mart
[D] Cing hia di sicure zza per supp orto per
dispositivo smart
[E] Co nfezione da 5 v etrini pre parati
[F] Ve trino di cali brazione
[G] Ada ttator e CA 100-240 V mul ti-paese
Contenido de la caja
[A] M icroscopi o WiFi de escr itorio de 2M P
CelestronLabs
[B] Sop orte de disp ositivo in teligente
[C] Pot enciador de so porte de dis positivo i nteligent e
[D] Cor rea de segur idad del sopor te de dispos itivo
inteligente
[E] Ca ja de 5 portam uestras d e especímene s
preparados
[F] Re gla de calibr ado
[G] Ada ptador 100 -240V CA mult inacional
Wi-Fi DESKTOP MICROSCOPE
ENGL ISH
NEED ASSISTANCE? Contact Celestron Technical Suppor t
celestron.com/pages/technical-support
Produ ct design and s pecificat ions are subj ect to change w ithout pri or
noti fication. • T his product i s designed and i ntended for u se by those
14 year s of age and older.
©2025 C elestro n. Celestr on and Symbol
are tr ademarks o f Celestr on, LLC. • All r ights res erved. • Cele stron.c om
US: Cele stron, 28 35 Columbia S treet, Tor rance, CA 90 503 USA • UK :
Celes tron Globa l Ltd., Unit 2 Tra nsigo, Gabl es Way, Thatch am RG19 4JZ,
Unite d Kingdom • Made i n China | 06-25
FRA NÇAIS
BESOIN D’ASSISTANCE? Contactez le support technique de
Celestron
celestron.com/pages/technical-support
Le des ign et les spéci fications d u produit son t sujette s à modificat ion sans
préa vis. • Ce prod uit est conçu e t prévu pour ê tre utilis é par des pers onnes
âgées d e 14 a ns et plus
©2025 C elestro n. Celestr on et le Symbol s ont
des mar ques dépos ées de Celest ron, LLC. • Tou s droits rés ervés • Cel estron.
com • US: C elestron .com • 2835 Col umbia Stre et, Torrance , CA 90503 U SA •
UK: Cel estron Glo bal Ltd., Uni t 2 Tr ansigo, Gab les Way, That cham RG19 4JZ ,
Royaum e-Uni • Fabr iqué en Chine | 06 -25
DEUTSCH
BENÖTIGEN SIE UNTERSTÜ TZUNG? Wenden Sie sich an die
technische Unterstützung von Celestron unter
celestron.com/pages/technical-support
Produ ktdesign u nd technisch e Daten könne n ohne vorher ige Ankündig ung
geänd ert werden . Dieses Pro dukt ist für P ersonen ab 14 J ahren konzi piert
und vorgesehen.
©2025 C elestro n. Celestr on und Symbol
sind Wa renzeichen v on Celestr on, LLC. Al le Rechte vor behalten. C elestron .
com • US A: Celestr on, 2835 Col umbia Stre et, Torrance , CA 90503 U SA • UK:
Celes tron Globa l Ltd., Einhei t 2 Transigo, Ga bles Way, Tha tcham RG19 4JZ ,
Verein igtes König reich • Herge stellt in Chi na | 06-25
celestron.com/pages/warranty
ITALIANO
BISOGNO DI AIUTO? Contattare il suppor to tecnico Celestron
celestron.com/pages/technical-support
Il desi gn del prodot to e le specifi che sono sogge tti a modifi che senza
prev ia notifica . Questo pr odotto è pro gettat o per essere u tilizza to da
pers one di età par i o superiore a i 14 anni.
©2025 C elestro n. Celetron e S ymbol
sono ma rchi di Celes tron, LLC . • Tu tti i dirit ti riserv ati. • Celes tron.com
• Sta ti Uniti: Cele stron, 28 35 Columbia S treet, Torr ance, CA 90 503 Stat i
Uniti • R egno Unito: Ce lestron Gl obal Ltd., Un it 2 Transigo, G ables Way,
That cham RG18 4JZ Re gno Unito • Pro dotto in Cin a | 06-25
ESPAÑOL
¿NECESITA AYUDA? Contacte con el soporte técnico de
Celestron
celestron.com/pages/technical-support
El dise ño y las especi ficaciones d el producto e stán sujet os a cambios s in
noti ficación pre via. Este p roducto ha s ido diseñado y e stá pensad o para
ser us ado por perso nas de 14 años o más d e edad.
©2025 Celestron. Celestron y su símbolo
son marcas comerciales de Celest ron, LLC. • Todos los derechos reserv ados.
• C elestron .com • EE.UU.: Celestr on, 283 5 Columb ia Str eet, Torr ance, C A
9050 3 EE .UU. • GB: Celes tron Global Ltd., Unit 2 Tr ansigo, Gables Way,
That cham RG19 4JZ, Re ino Unido • Fabric ado en China | 06-25
B
A
C
D
E
F
G
CLICK FOR FULL MANUAL
CLIQUEZ POUR CONSULTER LE MODE D’EMPLOI COMPLET
FÜR DIE VOLLSTÄNDIGE ANLEITUNG KLICKEN
FARE CL IC PER IL MANUALE COMPLETO
PULSE PARA EL MANUAL COMPLETO
QR CODE

ITALIANO
|
61
Tipo di microscopio: Da tavolo Wi-Fi con tre obiettivi
Testa: La testa è dotata di sensore e modulo Wi-
Fi per inviare immagini in streaming senza
cavo
Tipo di oculare: Sensore CMOS al posto dell’oculare
(ingrandimento 12x)
Dimensione sensore: 2MP | 1/2,8” Sony IMX290 LQR-XC
Tipo tavolino: Meccanico - a due strati, 115 mm
x 125 mm (4,52” x 4,92”)
Ingrandimento sensore: 12x
Dimensione pixel: 2,9 μm x 2,9 μm
Tipo di memoria: Nessuna memoria - utilizza la memoria del
dispositivo smart per salvare immagini e
video
Risoluzione immagine
catturata:
640X480 / 1280x720 / 1920x1080
Risoluzione video: 640X480 / 1280x720 / 1920x1080
Posizione tasto
otturatore:
Nell’app del dispositivo
Software: App Celestron Labs Digital Wi-Fi
• Immagini
• Video
• Funzione di misurazione
Compatibilità software: • iOS
• Android
Revolver degli obiettivi: Triplo con arresto a clic
Tipo di obiettivo: (3) obiettivi CF acromatici su torretta con
planarità di campo definita
Standard obiettivo: DIN 35 RMS
Ingrandimento obiettivo: 4x, 10x, 40x
Intervallo di
ingrandimento:
48x, 120x e 480x (quello finale dipende
dalle dimensioni dello schermo. Spec
basate sulle dimensioni di uno schermo
da 5”)
Campo visivo angolare: • 4x: 37,5 mm
• 10x: 6,7 mm
• 40x: 65 mm
Filettatura obiettivo: WJ 4/5” x 1/36”
Tipo di messa a fuoco: Macro e micrometrica
Distanza messa a fuoco
(per rotazione):
Da 0,7 mm a 35,3 mm (da 0,027” a 1,39”)
(est.)
Tipo di illuminazione: LED (3 W/4 V- 220 V/110 V)
Posizioni di
illuminazione:
Illuminatore inferiore
Meccanismo
di regolazione
illuminazione:
Rotella regolabile sulla base
Alimentazione: Adattatore CA universale* da 100 a 240 V,
50/60 hz
Opzione batteria: Sì 3 batterie AA per (2 ore) alimentazione
di backup - se necessaria
Tavolino: Tavolino meccanico a due strati
• Dimensioni tavolino: 115 mm × 125 mm
(4,5” x 4,9”)
• Intervallo di movimento: 70mm × 30mm
(2,75” x 1,18”)
Tipo di condensatore: Condensatore Abbe con diaframma a iride
& filtro
Condensatore N.A.: N.A. 1,25
Porte ingresso: Ingresso elettrico punta positiva
adattatore CA/ 5-6 V CC, 200-1000
mA. (jack con diametro esterno da 5,5
mm (0,21”), diametro interno da 2,1 mm
(0,08”) e lunghezza da 12,5 mm (0,49”)
Porte uscita: NA
Adattatore CA: Ingresso elettrico punta positiva 5-6 V
CC, 200-1000 mA. Jack con diametro
esterno da 5,5 mm (0,21”), diametro
interno da 2,1 mm (0,08”) e lunghezza da
12,5 mm (0,49”)
Dimensione
microscopio:
170 mm x 140 mm x 330 mm
(6,7” x 5,5” x 13”)
Peso microscopio: 56 oz (1600 g)
Componenti in
dotazione:
• 5 vetrini già pronti
• Vetrino di calibrazione
• Adattatore CA universale (4 prese)
• Supporto esclusivo per dispositivo
smart opzionale con fascia di sicurezza
SPECIFICHE
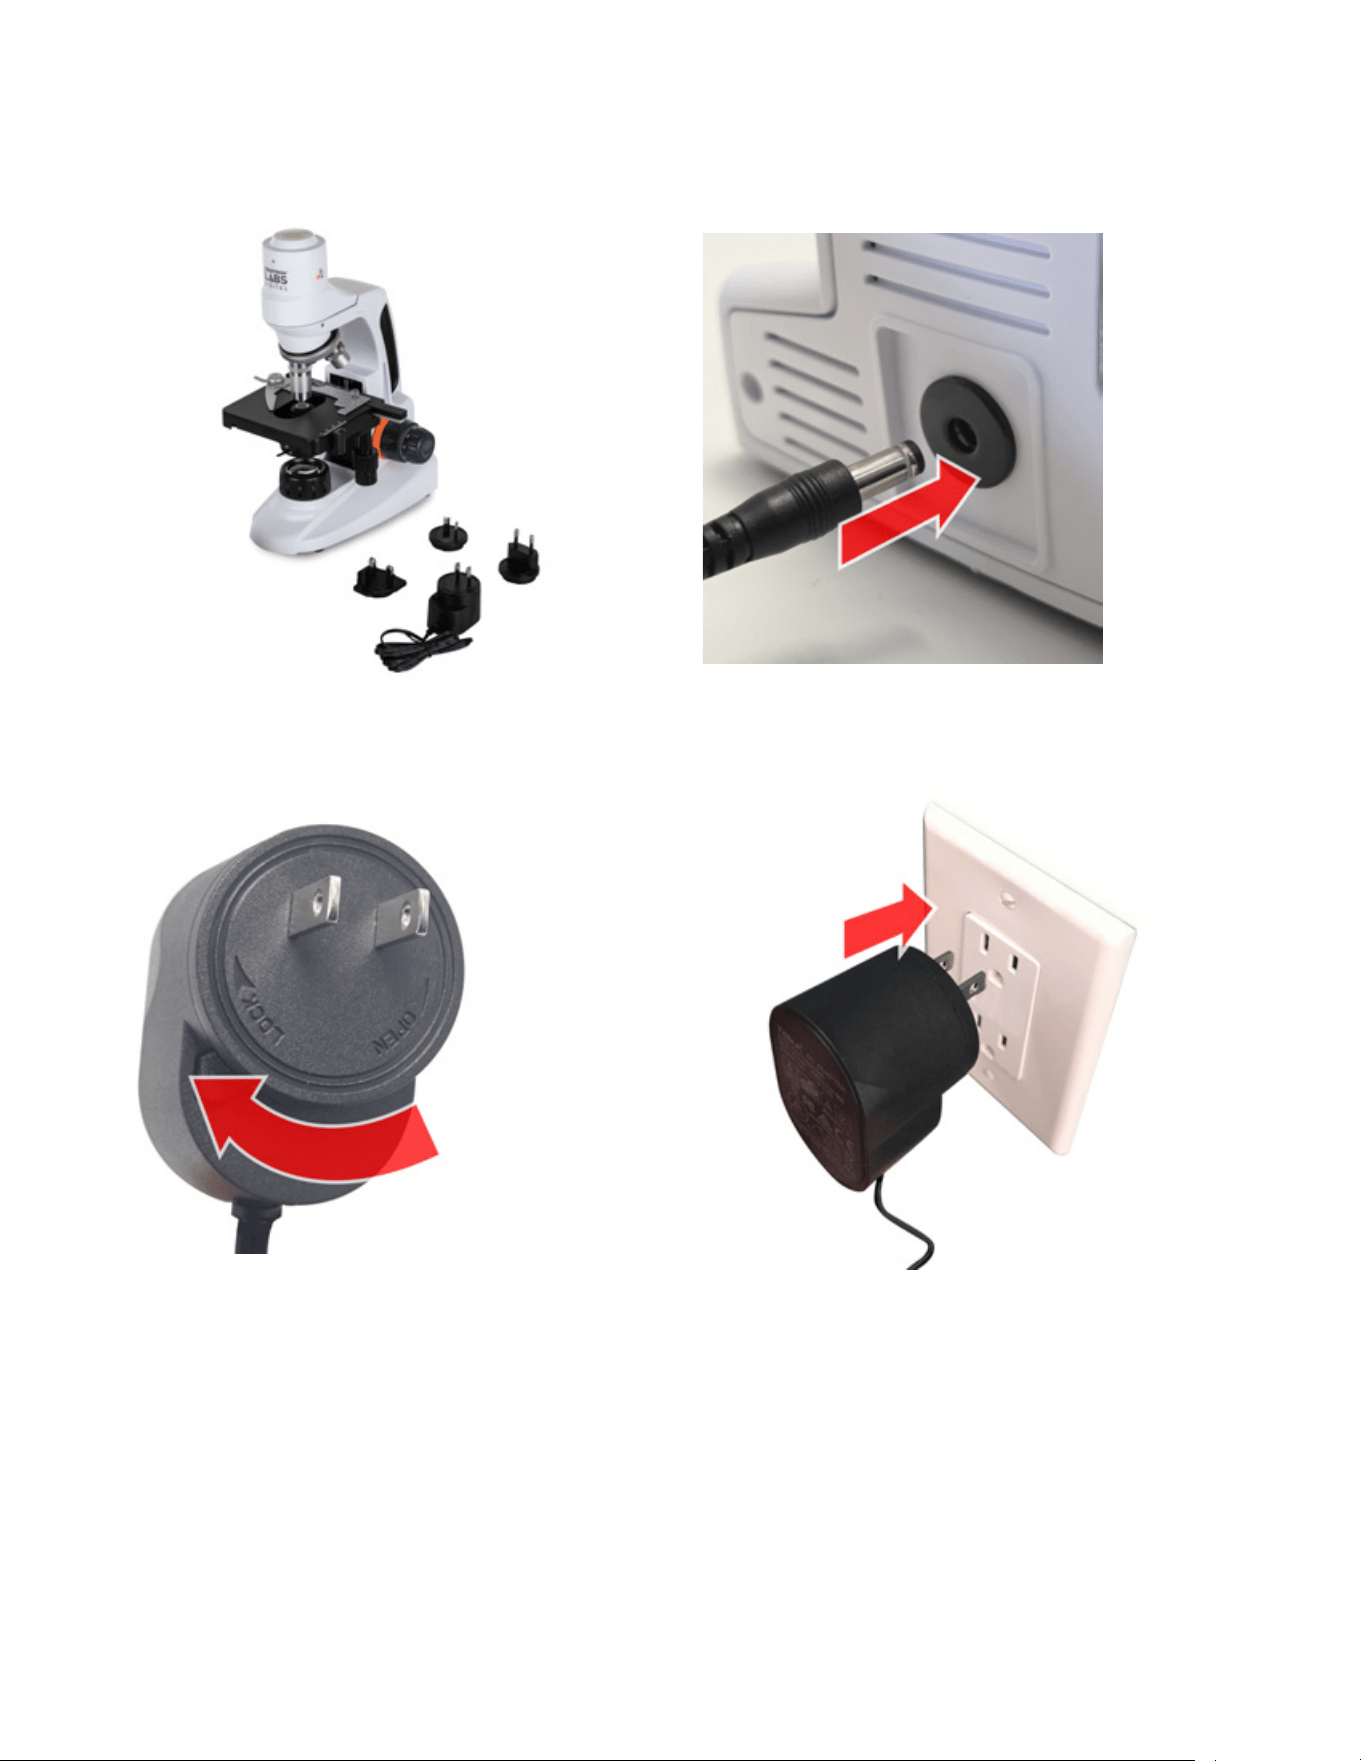
62
|
ITALIANO
1. Sistemare il microscopio e gli altri componenti su una superficie
piana e stabile.
CONFIGURAZIONE
FASE 1: COLLEGAMENTO DELL’ALIMENTAZIONE
2. Inserire il piccolo connettore dell’adattatore CA nella presa di
corrente sul retro del microscopio.
3. Selezionare la spina corretta per il proprio Paese e collegarla
all’adattatore.
4. Collegare l'adattatore alla presa a muro da 120-240 V.
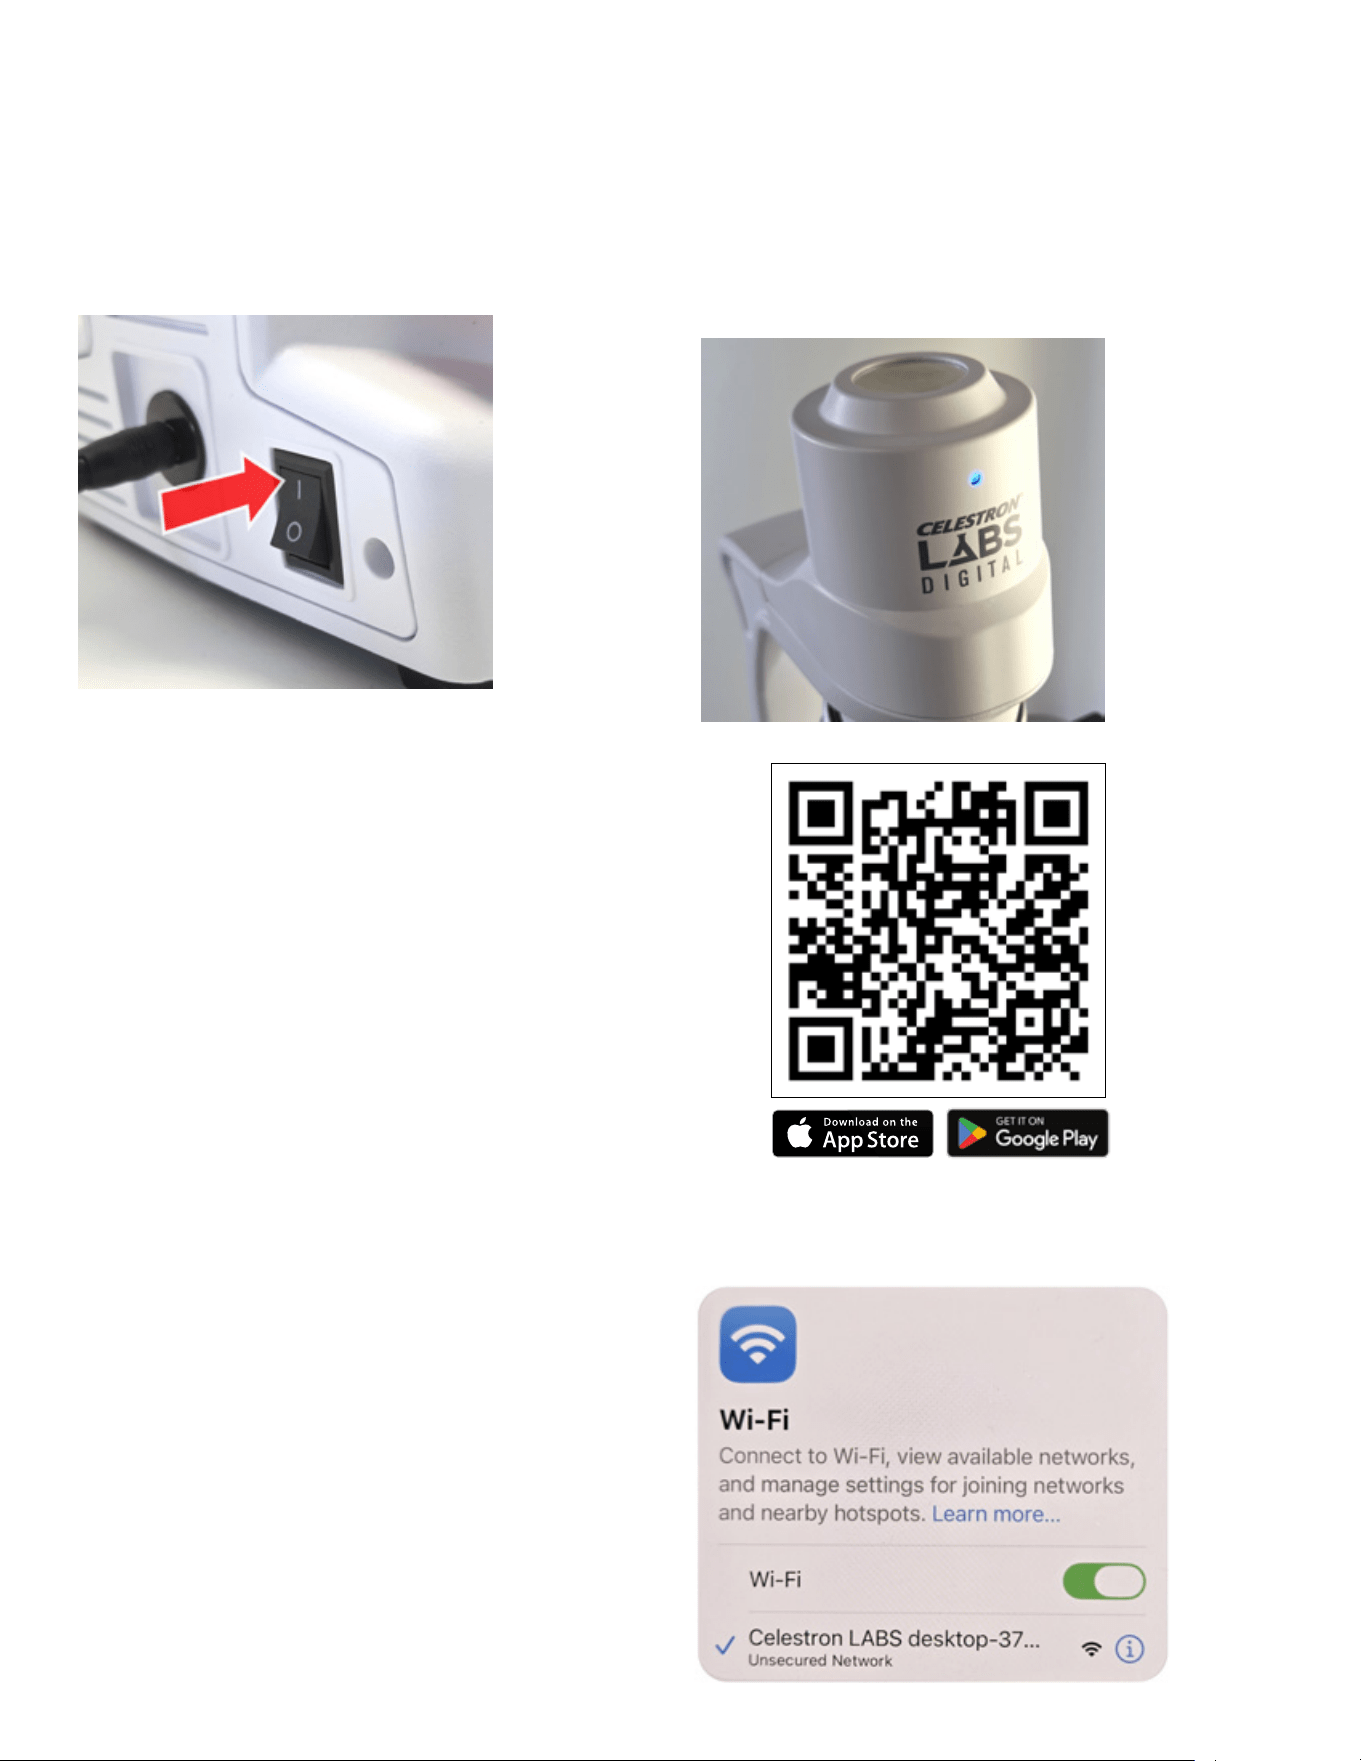
ITALIANO
|
63
L’illuminatore dovrebbe accendersi. In caso contrario, ruotare
la rotella della luminosità a lato della base per aumentare
l’illuminazione.
L’indicatore LED blu inizia a lampeggiare. Ciò significa che il
microscopio sta trasmettendo il suo segnale Wi-Fi.
Se il LED blu non si illumina:
• Verificare che l’adattatore di alimentazione sia collegato
correttamente
• Verificare che la presa a muro sia attiva.
FASE 3: INSTALLAZIONE DELL’APP
L’app collegata al microscopio funziona con dispositivi iOS e
Android. Scansionare il codice QR qui sotto o cercare “Celestron
Labs Digital Wi-Fi” nell’App Store Apple o sul Play Store Google.
Scaricare e installare l’app gratuita.
1. Aprire le impostazioni Wi-Fi sullo smartphone o tablet.
2. Cercare una rete chiamata:
Celestron LABS Desktop-XXXX (le quattro X rappresentano una
combinazione unica di lettere/numeri).
3. Selezionare la rete per collegarsi.
Una volta collegato, il LED blu smette di lampeggiare e rimane
acceso fisso.
Il dispositivo potrebbe mostrare un messaggio che informa che
non è presente alcuna connessione internet. Ciò è normale. Il
microscopio crea la sua connessione diretta Wi-Fi e non utilizza la
rete Wi-Fi presente.
FASE 2: ACCENSIONE
Accendere l’interruttore di alimentazione situato sulla base del microscopio.
FASE 4: COLLEGAMENTO ALLA RETE WI-FI DEL MICROSCOPIO
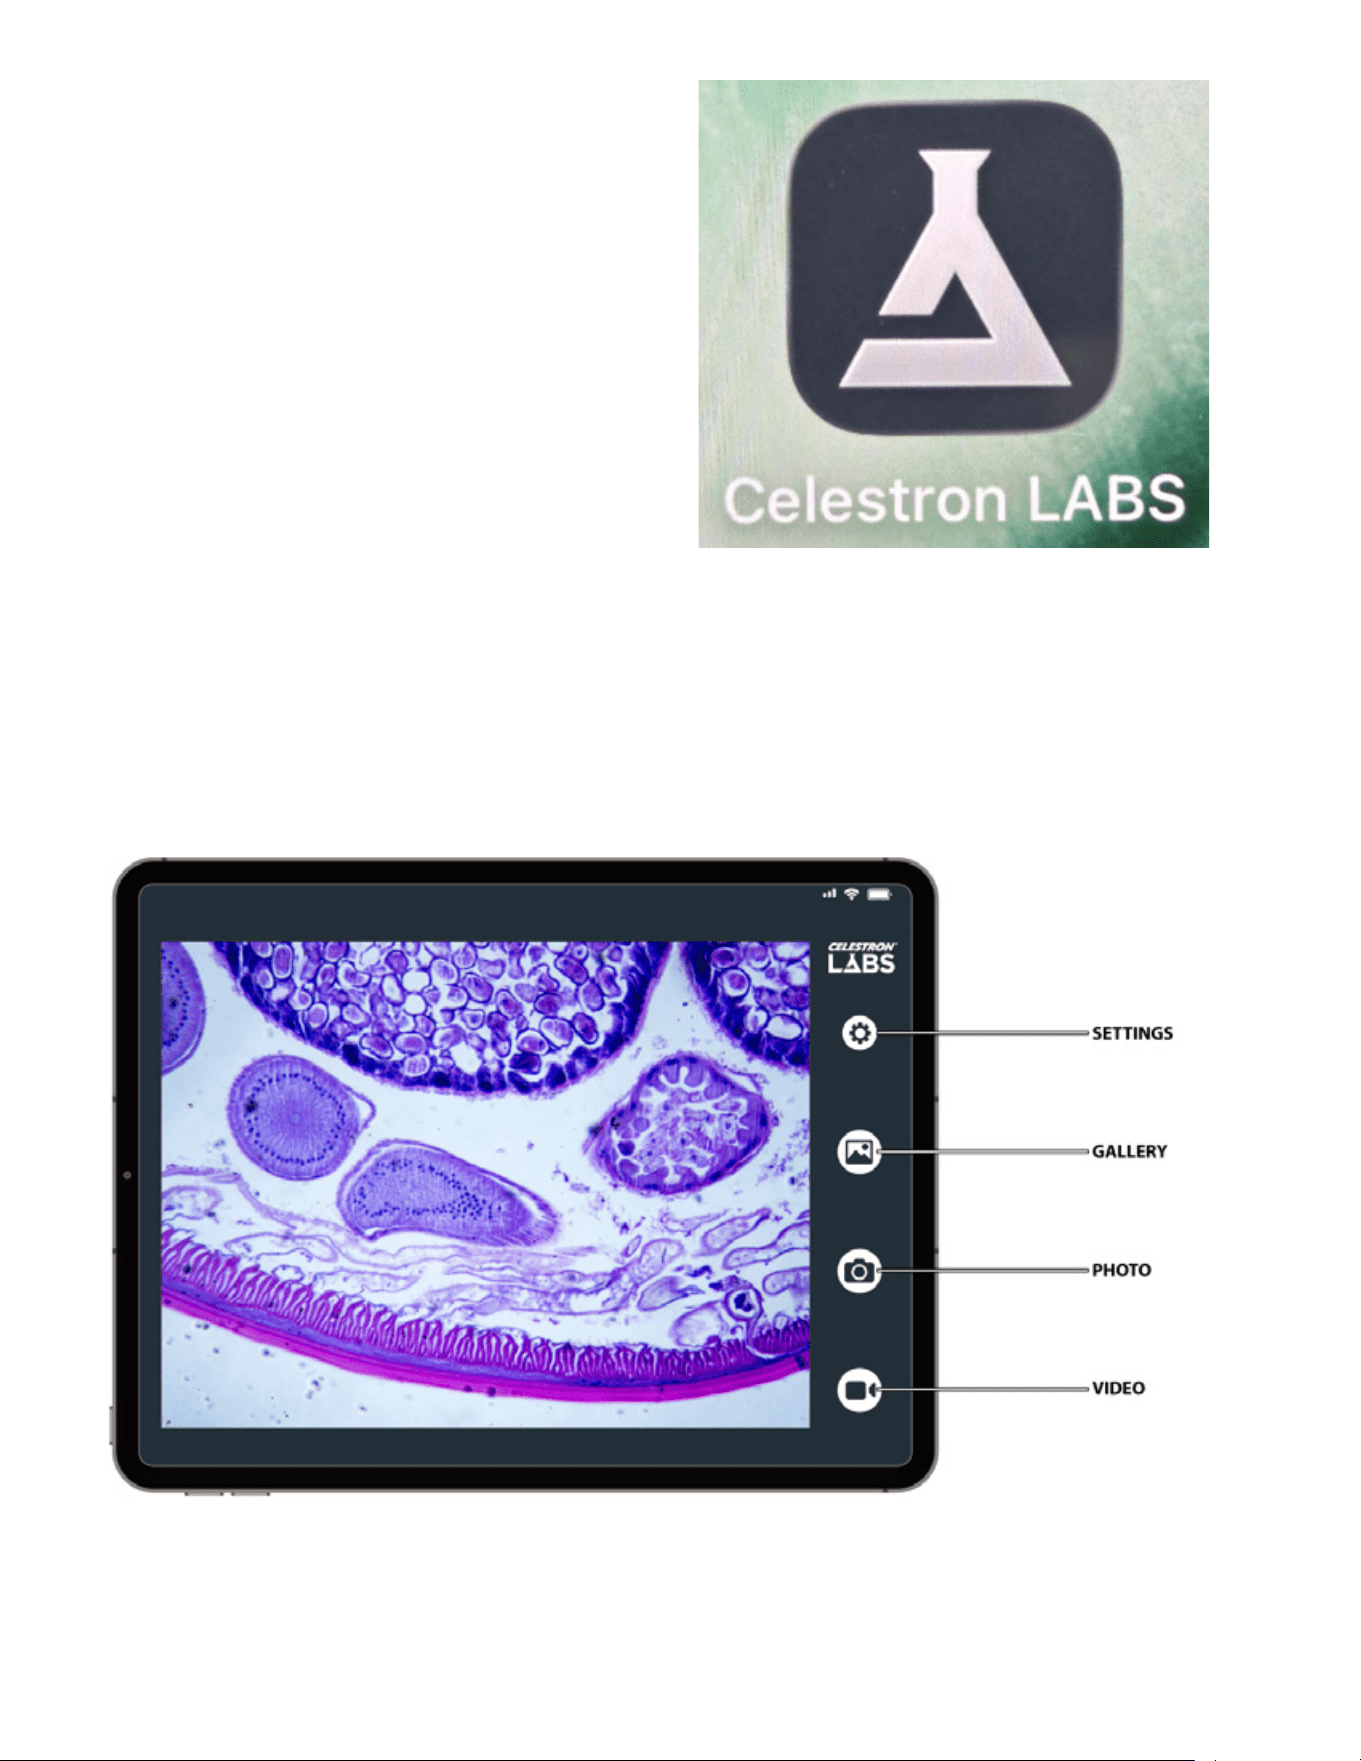
64
|
ITALIANO
L’interfaccia principale è mostrata sotto. Le scritte presenti sull’immagine identificano le diverse funzioni descritte in questa sezione.
UTILIZZO DELL’APP
FASE 5: INIZIO DELLA
VISUALIZZAZIONE
Aprire l’app Celestron Labs Digital Wi-Fi.
Il video live dovrebbe apparire dopo circa 30 secondi.
Nel caso di mancata apparizione del video:
• Verificare che il dispositivo sia collegato alla rete Celestron
LABS Desktop-XXXX.
• Chiudere e aprire nuovamente l’app.
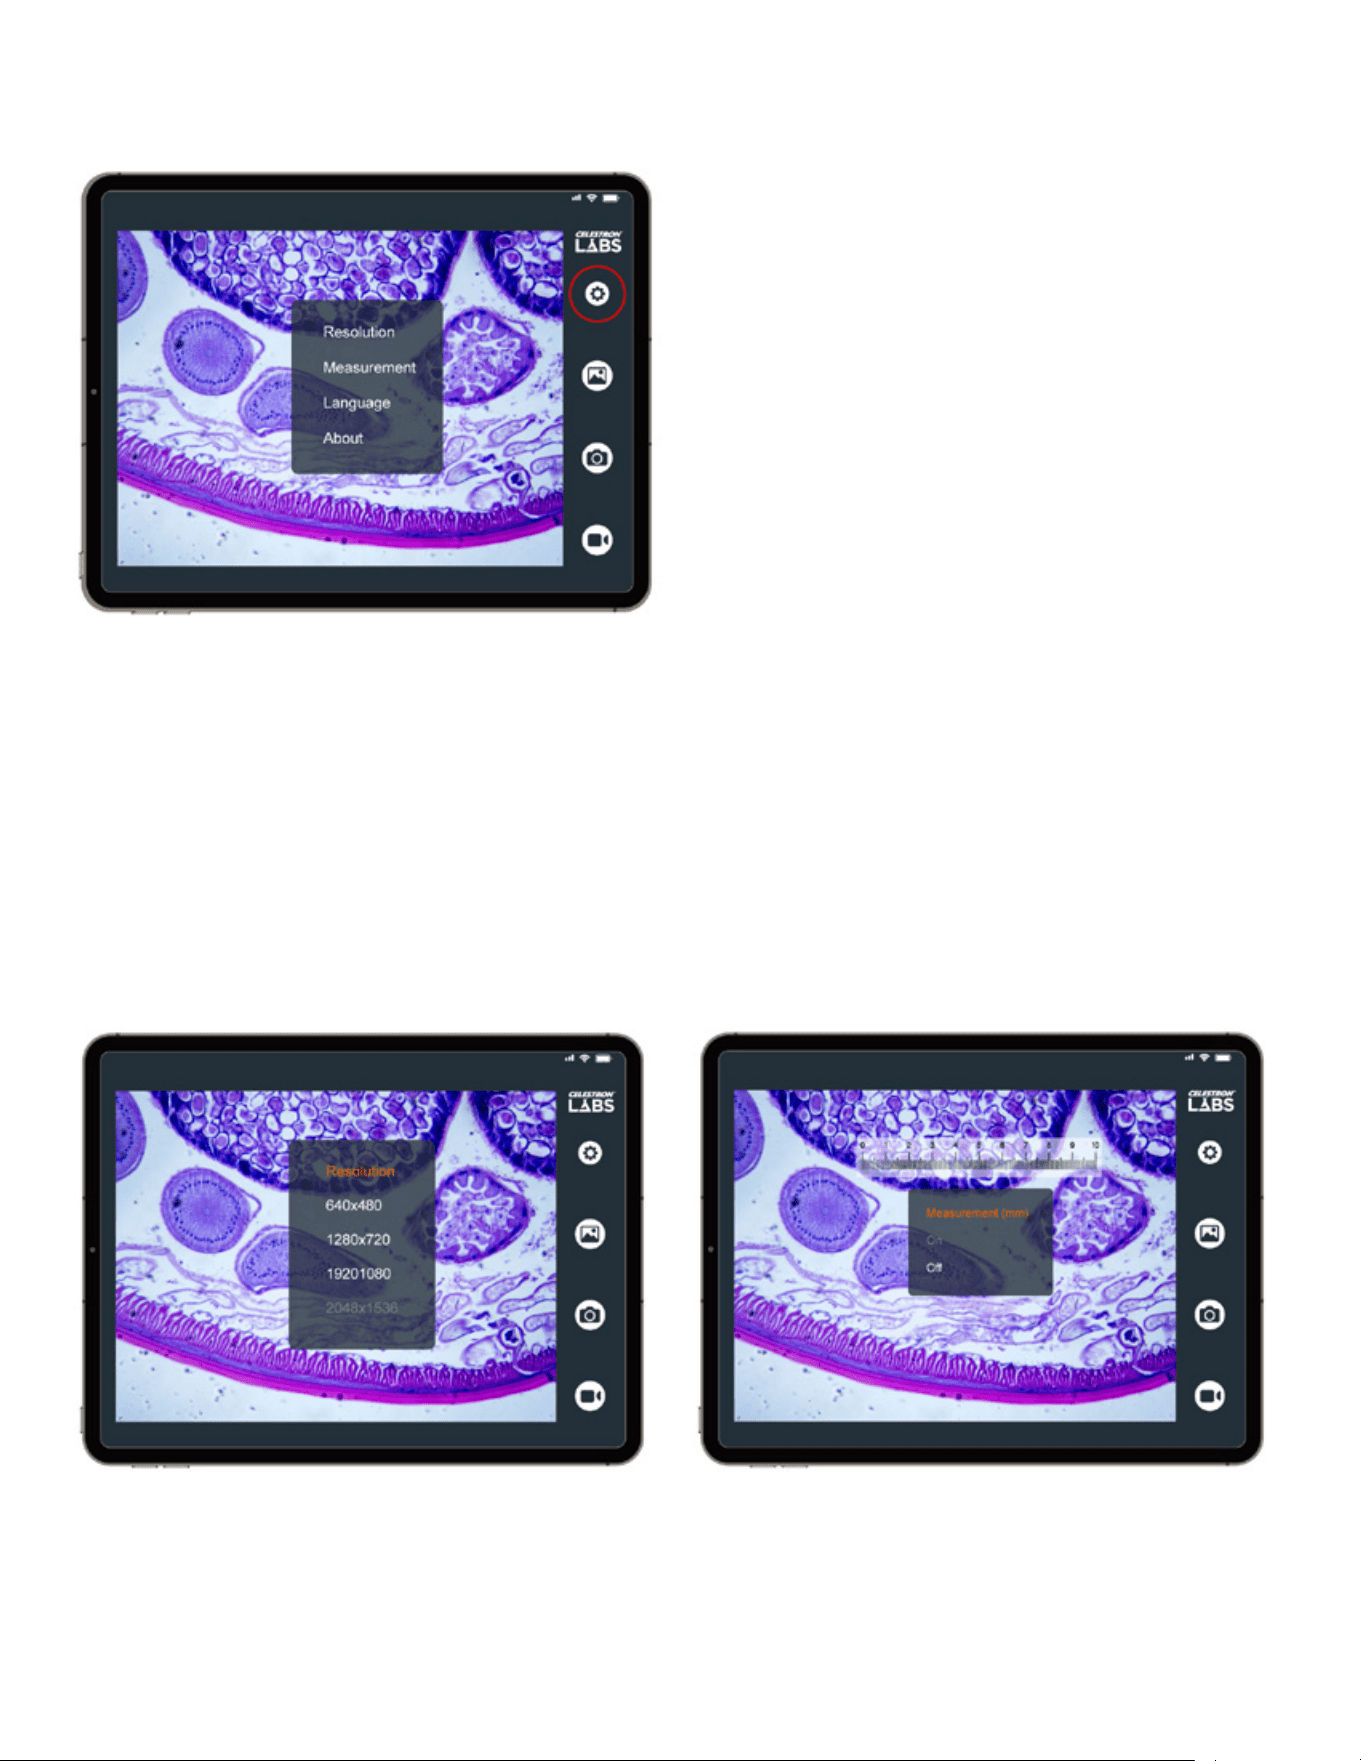
ITALIANO
|
65
A. IMPOSTAZIONI
Toccare l’icona delle impostazioni per accedere alle seguenti opzioni.
RISOLUZIONE:
Selezionare la risoluzione immagine e video.
Risoluzioni più alte forniscono maggiori dettagli, ma creano file di
dimensioni maggiori.
Impostazioni disponibili:
• 640 × 480
• 1280 × 720
• 1920 × 1080
• 2048 × 1536 (risoluzione massima)
MISURAZIONE:
Attivare o disattivare il reticolo di misurazione digitale.
È possibile utilizzare questo strumento come guida per confronto
oppure, una volta calibrato, stimare le dimensioni dei campioni
direttamente sullo schermo.
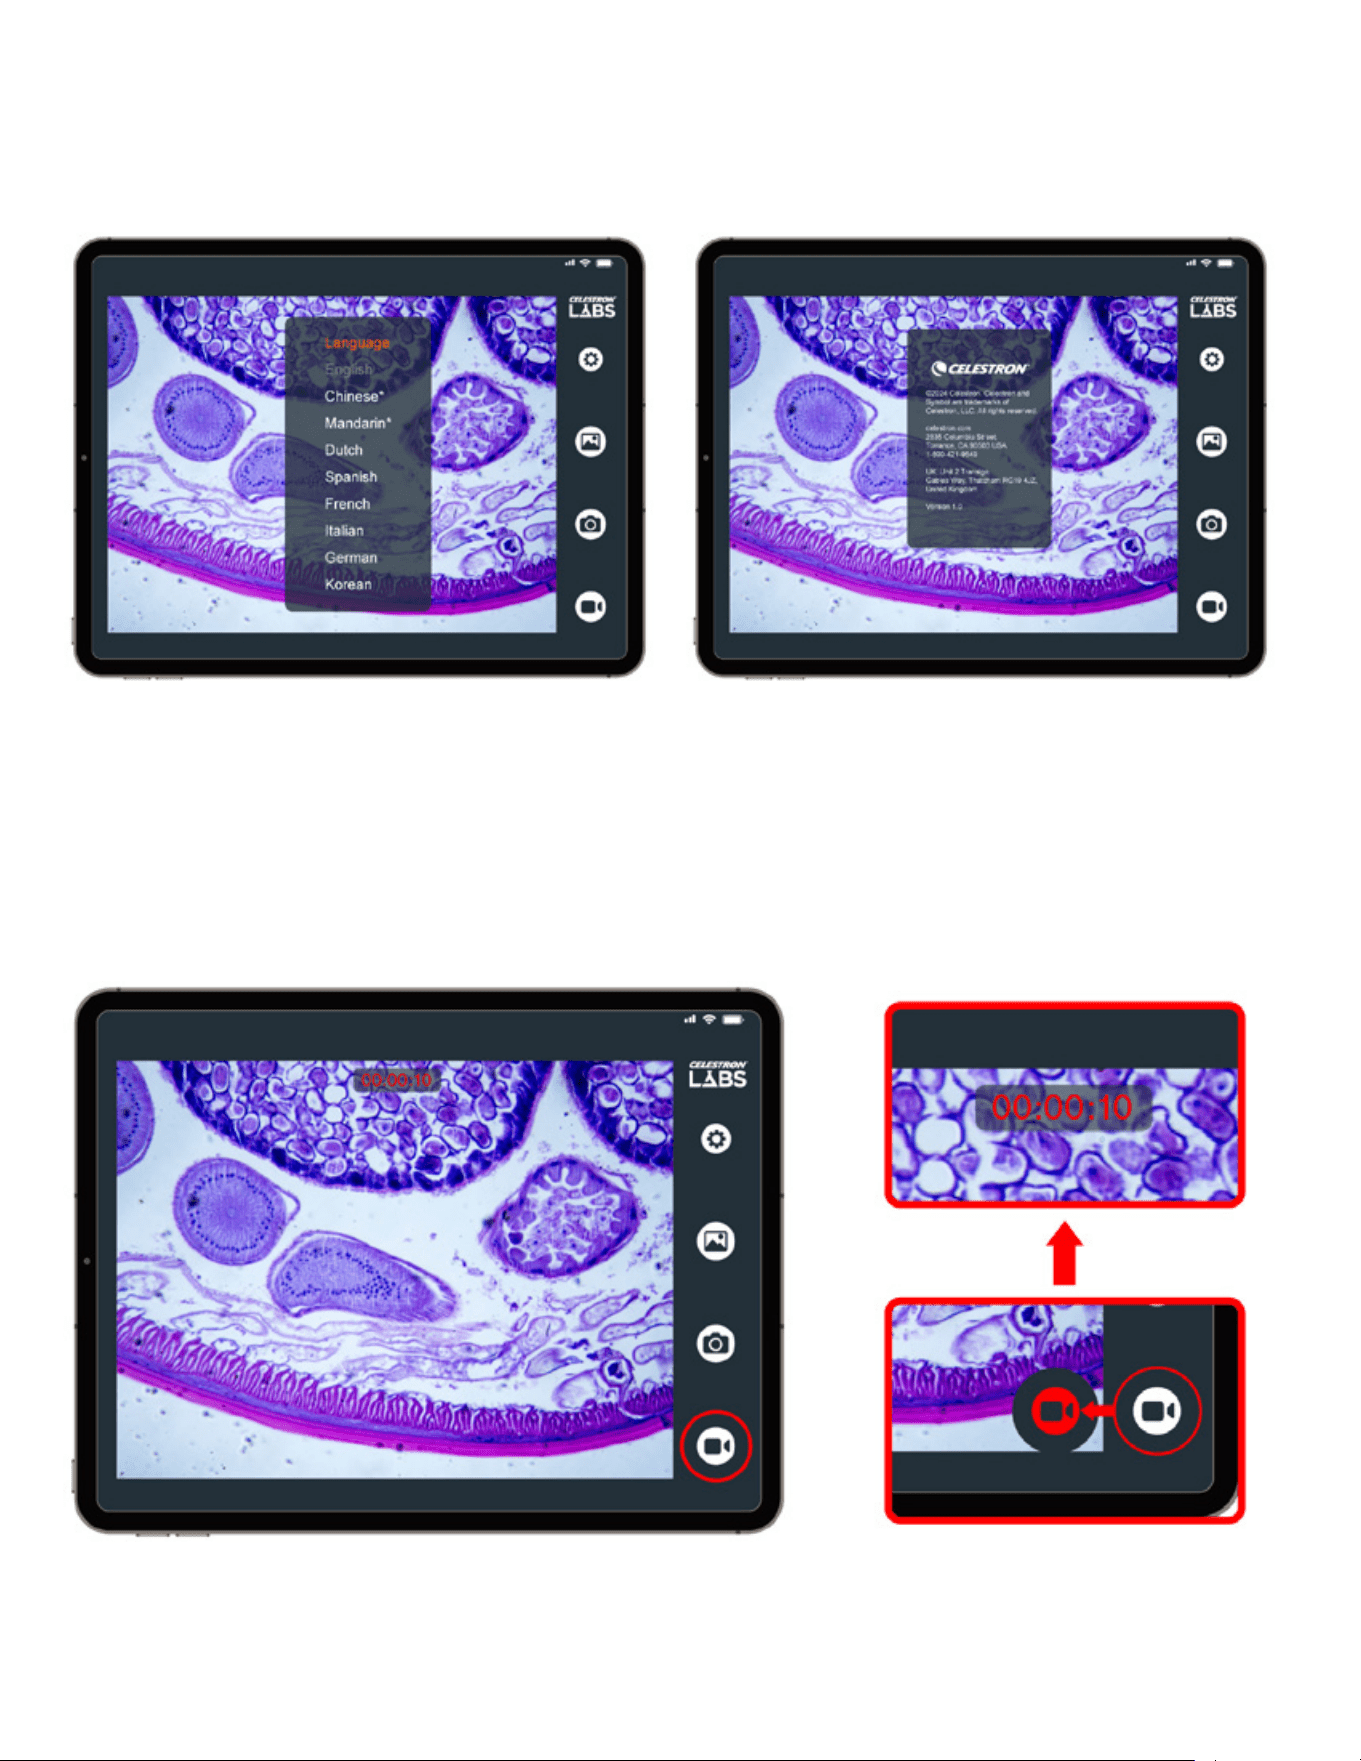
66
|
ITALIANO
LINGUA:
Modificare la lingua dell’interfaccia.
Le opzioni disponibili sono inglese (predefinito), cinese
(semplificato), cinese (tradizionale), olandese, spagnolo,
francese, italiano, tedesco e coreano.
INFORMAZIONI
Mostra la versione dell’app, le informazioni legali e i contatti
Celestron.
B. REGISTRAZIONE VIDEO
Toccare l’icona Video per iniziare la registrazione. Appare un timer
in cima allo schermo durante la registrazione.
Toccare nuovamente l’icona per interrompere la registrazione.
I video vengono salvati direttamente sul dispositivo.
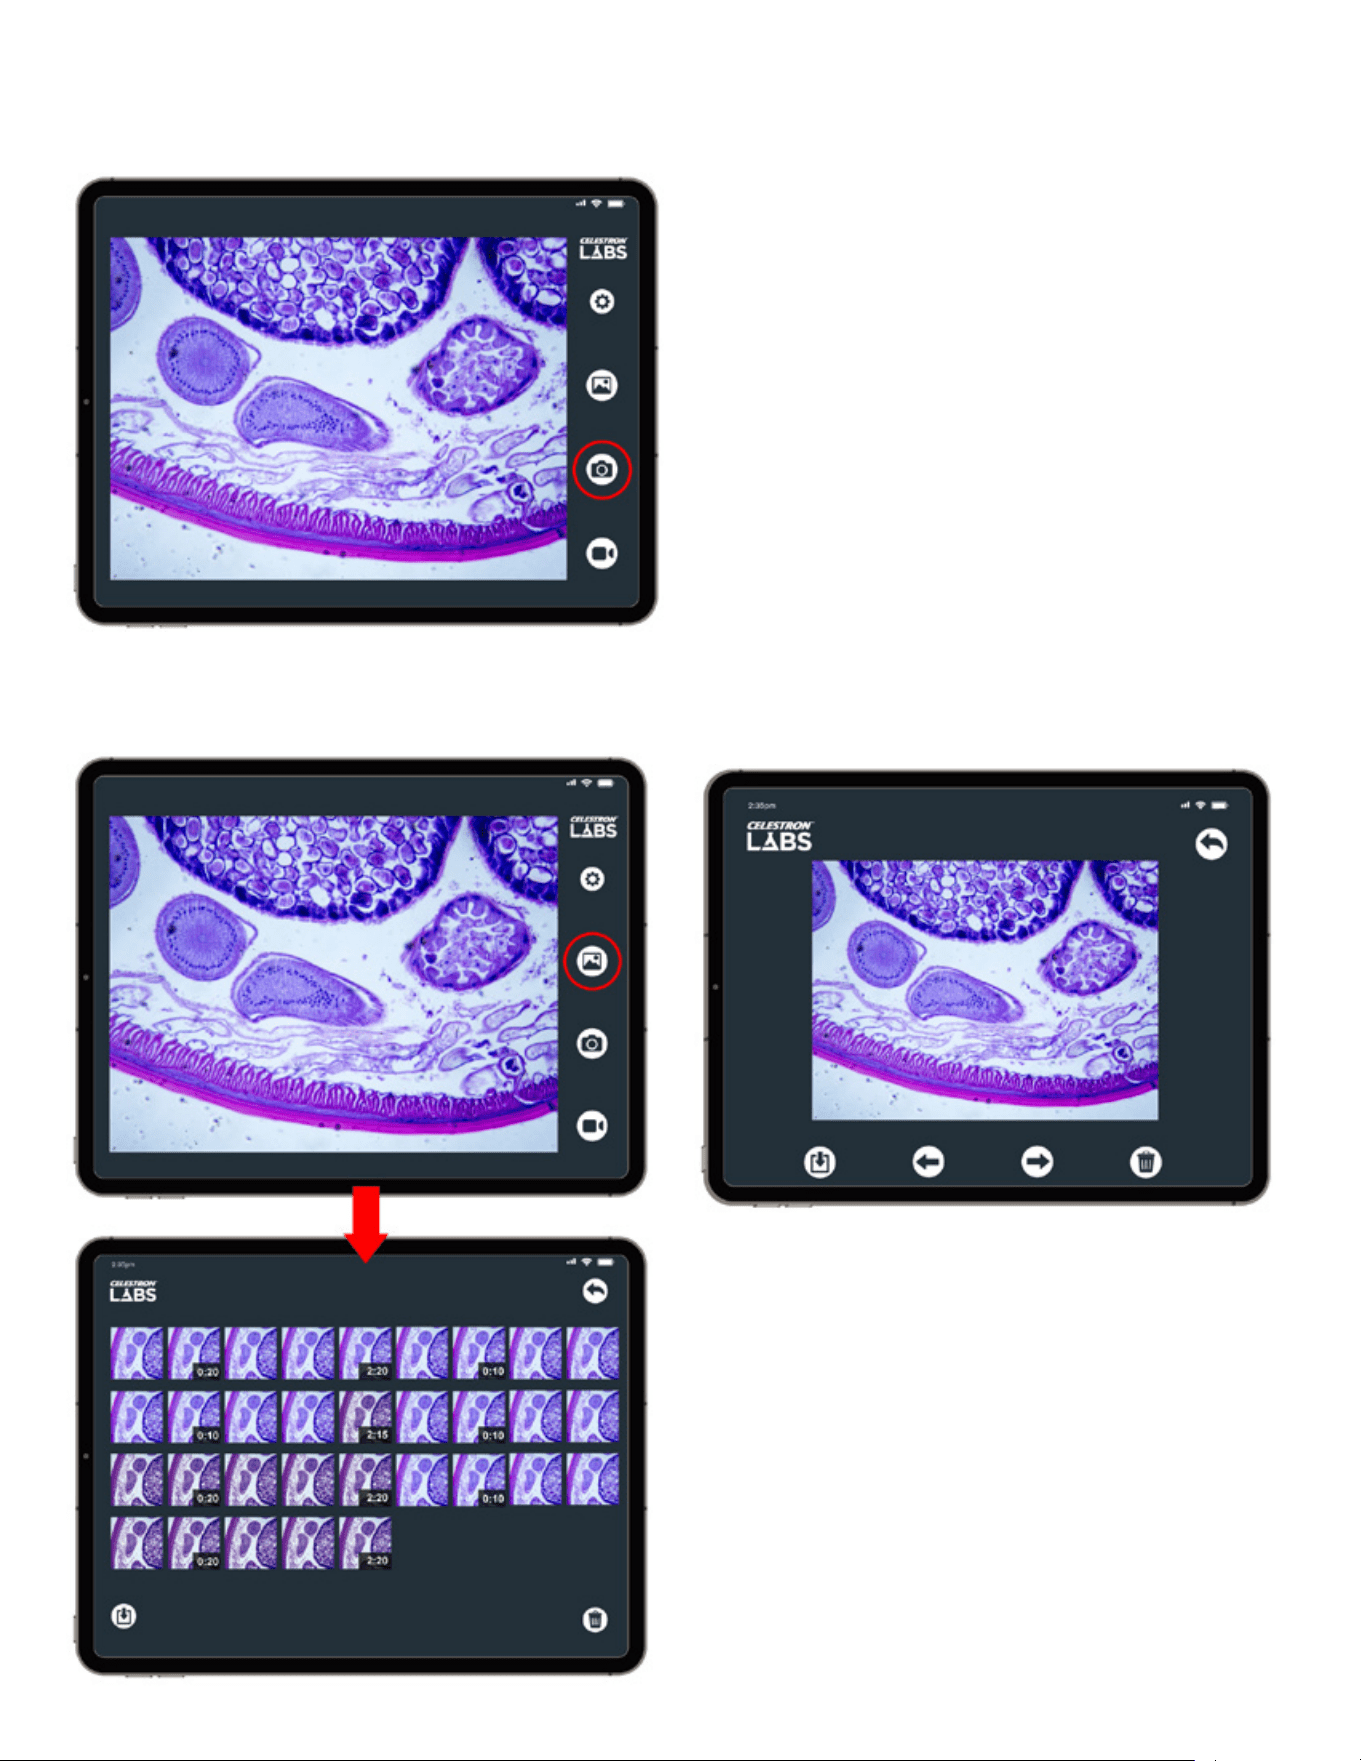
ITALIANO
|
67
C. SCATTARE FOTO
Toccare l’icona Foto per scattare una foto. Le foto vengono salvate direttamente sul dispositivo.
Toccare l’icona Galleria per visualizzare immagini e video salvati.
• Toccare l’anteprima per visualizzarla a schermo intero.
• Scorrere a sinistra o a destra per scorrere tra i file salvati.
• Per riprodurre un video, toccare lo schermo e selezionare Play.
IMPORTANTE NOTA SUI PERMESSI
A seconda delle impostazioni del proprio dispositivo, potrebbe
venire richiesta l’autorizzazione ad accedere a foto e file. È richiesto
l’accesso completo per salvare immagini e video.
D. GALLERIA
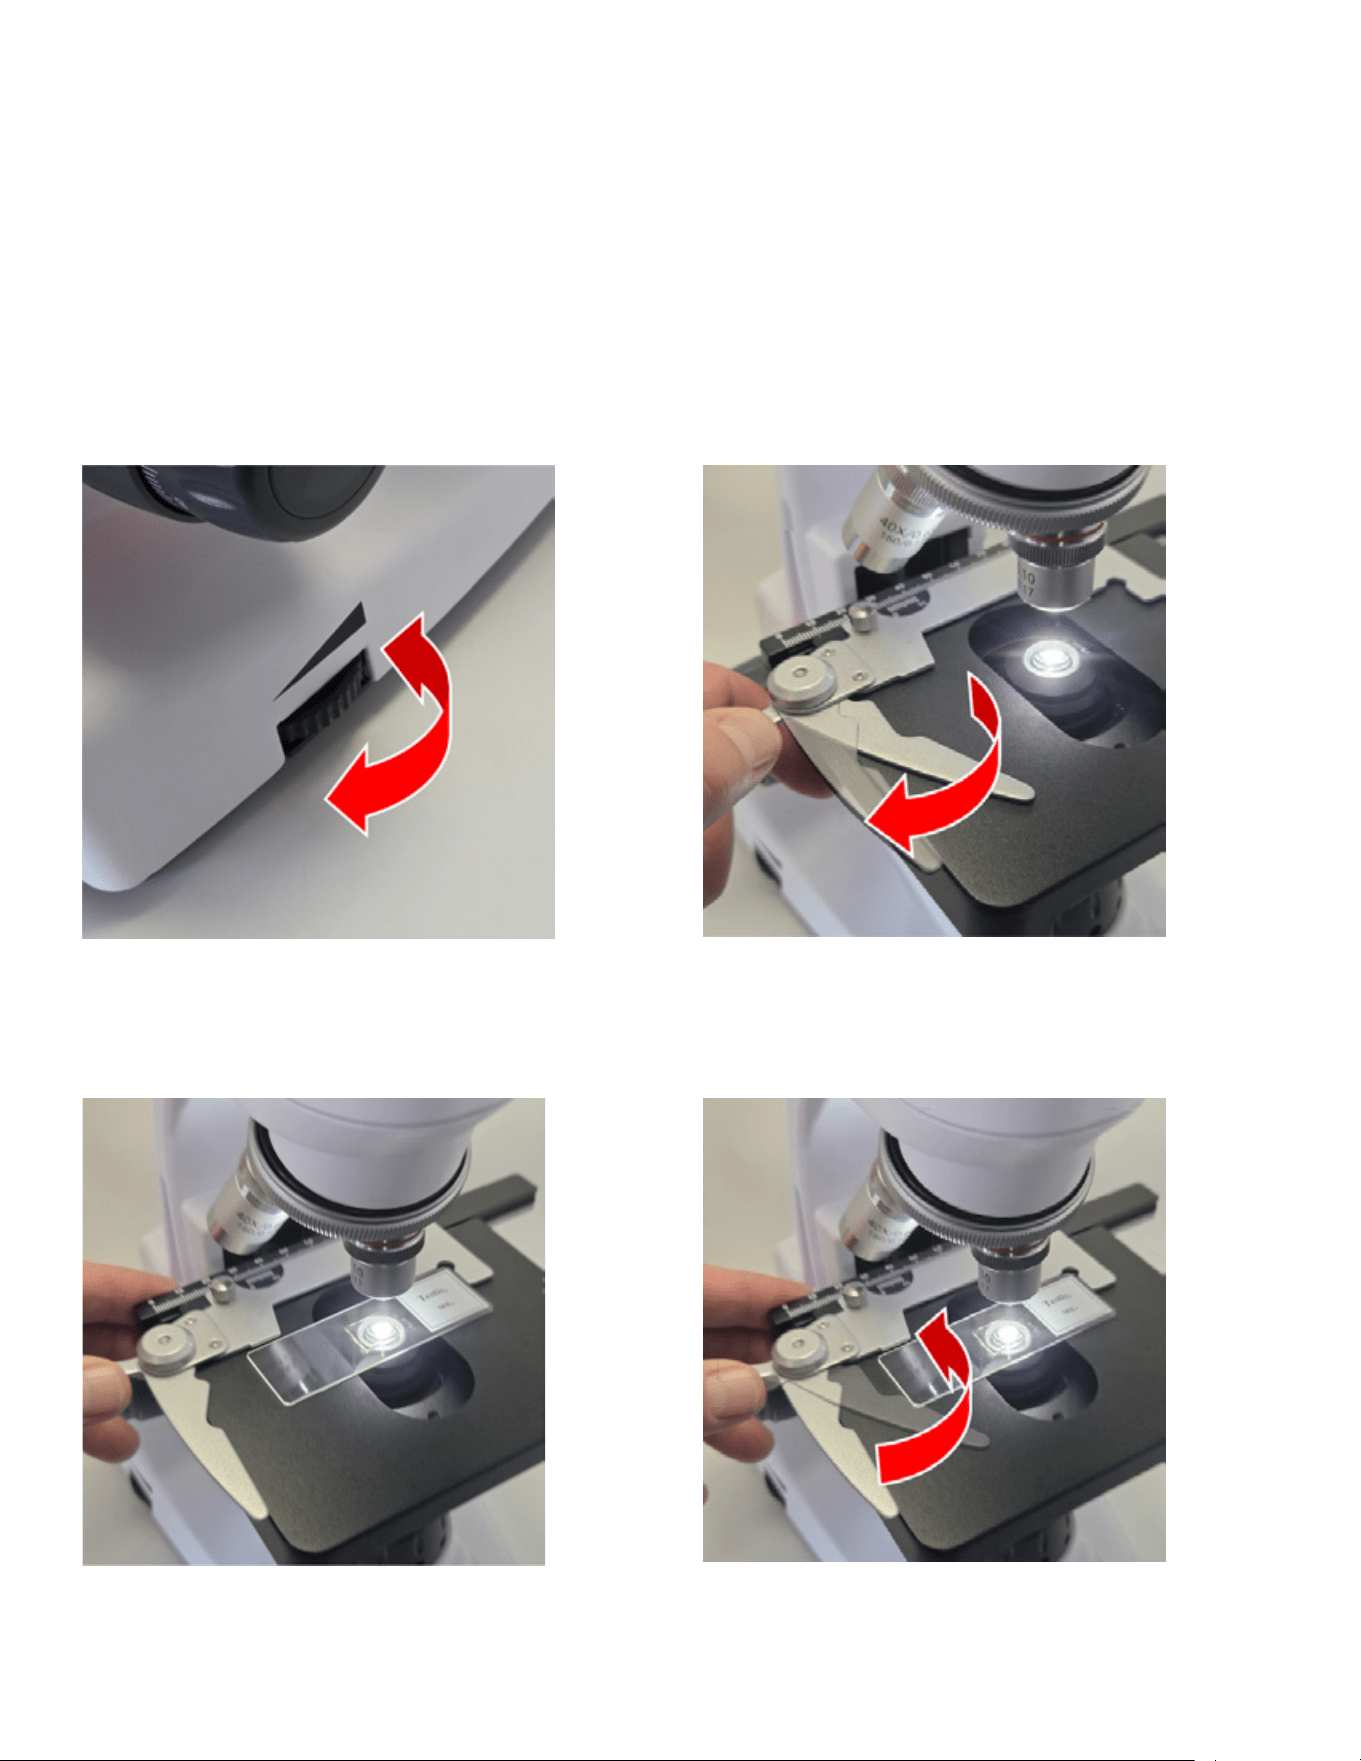
68
|
ESPAÑOL
UTILIZZO DEL MICROSCOPIO
Il microscopio da tavolo digitale Wi-Fi funziona come un microscopio tradizionale, ma è dotato di una fotocamera integrata che sostituisce
l’oculare.
Prima di procedere all’osservazione, verificare quanto segue.
• Il microscopio è acceso.
• Il LED blu è fisso (Wi-Fi collegato).
• L’app è aperta e trasmette immagini.
REGOLARE L’ILLUMINAZIONE
Ruotare la rotella di regolazione della luminosità sulla base
del microscopio per attivare l’illuminatore e regolare l’intensità
della luce.
INSERIRE UN VETRINO
1. Aprire il braccio ferma vetrino.
2. Sistemare il vetrino sul tavolino con il bordo destro a
contatto con la guida fissa.
3. Rilasciare delicatamente il braccio ferma vetrino per
bloccare il vetrino.
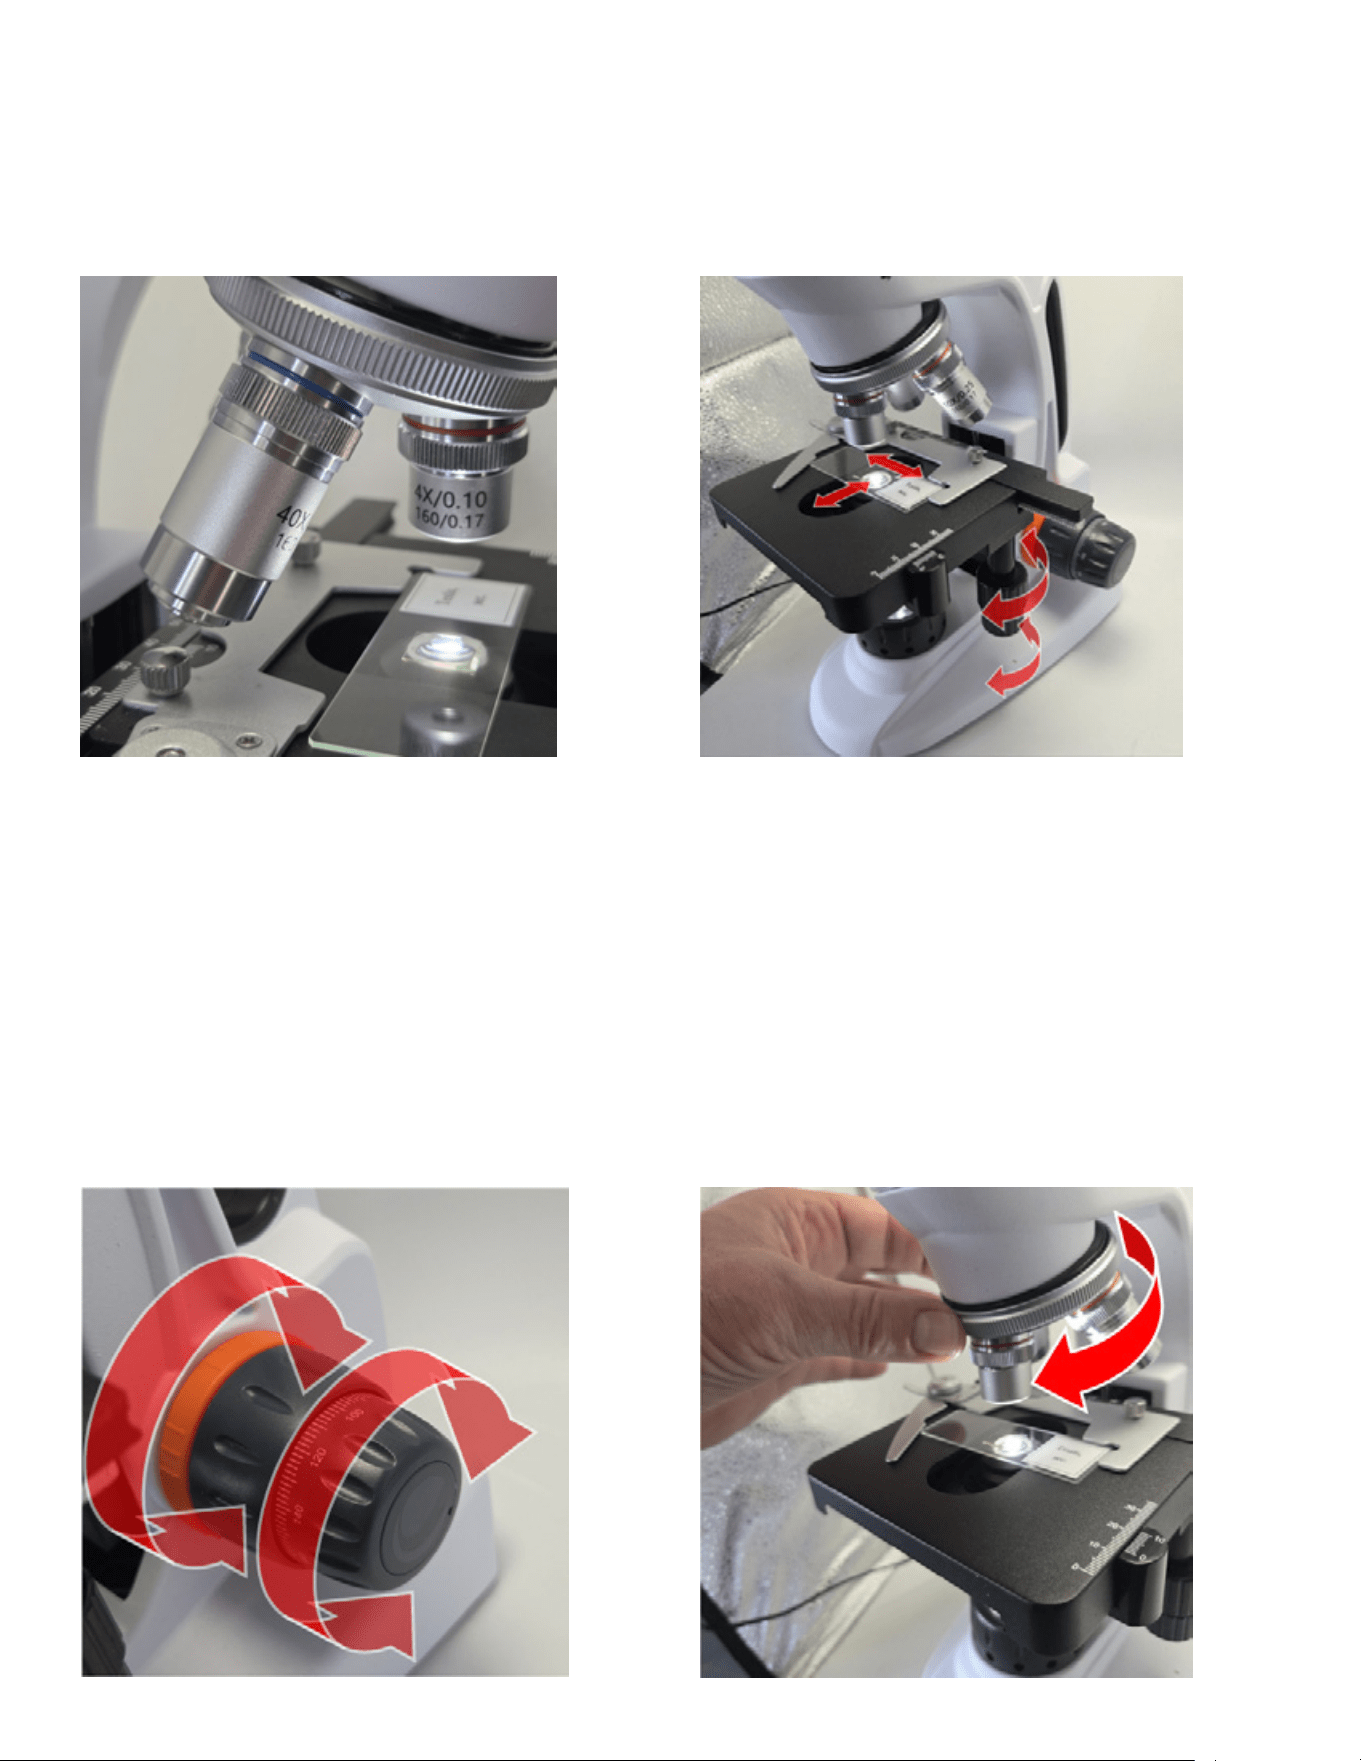
ITALIANO
|
69
SELEZIONARE L’OBIETTIVO CON
INGRANDIMENTO PIÙ BASSO
Ruotare la torretta degli obiettivi per sistemare l’obiettivo 4x in
posizione sul vetrino. Si sentirà scattare in posizione.
Iniziare con l’ingrandimento più basso semplifica la localizzazione
del vetrino.
POSIZIONARE IL VETRINO
Utilizzare le manopole di comando del tavolino X-Y per spostare il
vetrino fino a quando il campione appare sullo schermo.
METTERE A FUOCO L’IMMAGINE
Sono presenti due manopole di messa a fuoco alla base del
microscopio, una su ogni lato.
Iniziare con la manopola di messa a fuoco macrometrica
(manopola più grande) per mettere a fuoco il più possibile il
vetrino.
Utilizzare quindi la manopola di messa a fuoco micrometrica
(manopola più piccola) per ottenere una messa a fuoco precisa e
chiara.
Una volta che l’immagine è nitida, regolare la posizione del
vetrino, se necessario, per centrare meglio il vetrino nel campo
visivo. È quindi possibile catturare immagini, registrare video o
continuare l’osservazione.
AUMENTARE L’INGRANDIMENTO
Per visualizzare maggiori dettagli e osservare più da vicino il
campione, ruotare la torretta degli obiettivi per portare avanti
l’obiettivo da 10x o 40x. Continuare a ruotare fino a quando
l’obiettivo prescelto scatta in posizione.
L’ingrandimento totale è ottenuto moltiplicando l’ingrandimento
dell’obiettivo per l’ingrandimento del sensore integrato
del microscopio (circa 12x). Con gli obiettivi in dotazione,
l’ingrandimento totale è circa:
Ingrandimento totale obiettivo
4x 48x
10x 120x
40x 480x
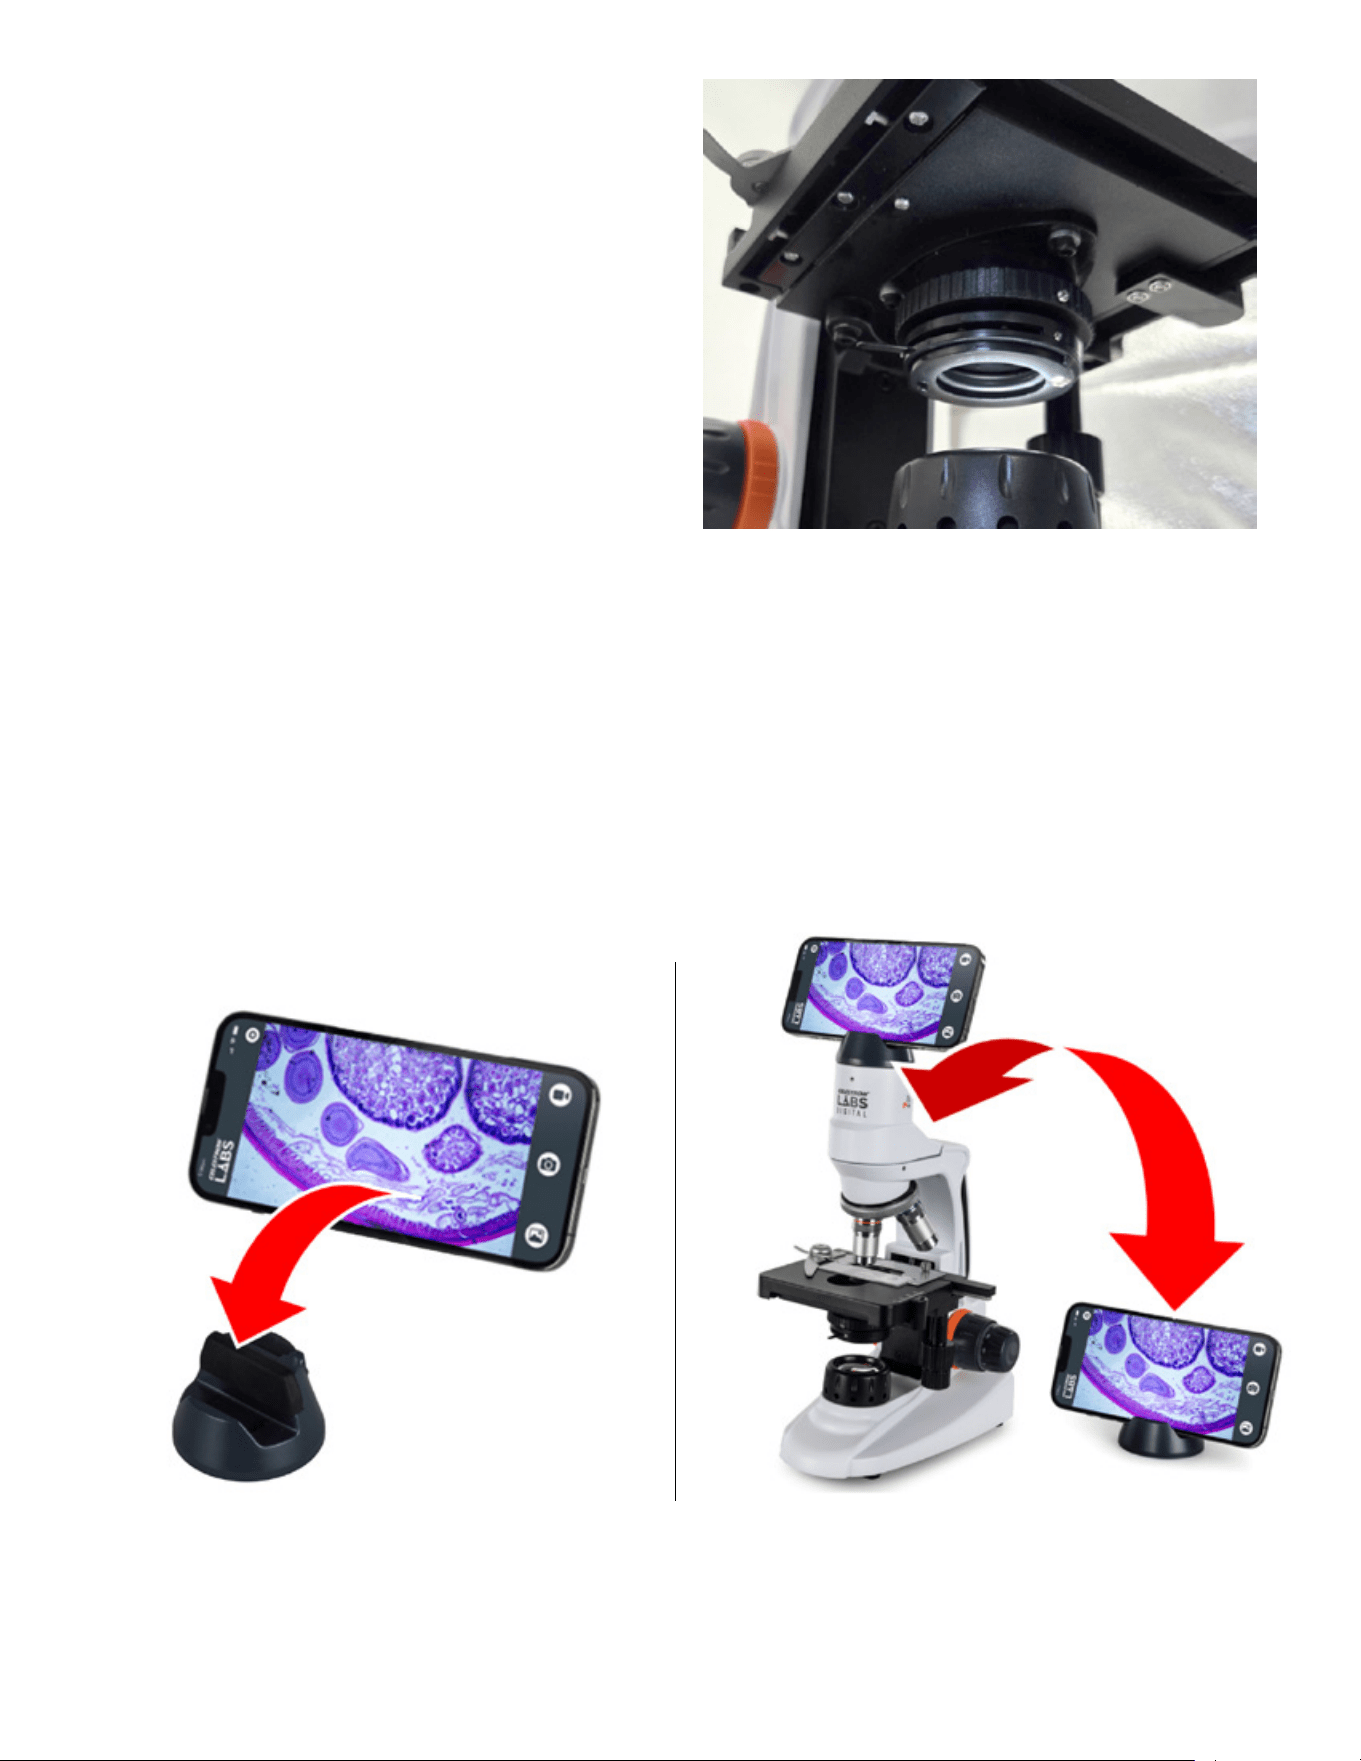
70
|
ITALIANO
CONDENSATORE ABBE
Localizzato sotto il tavolino, tra l’illuminatore e il foro del tavolino,
si trova il condensatore Abbe. Il condensatore consiste di una
lente ottica e di un diaframma a iride regolabile controllato da un
braccio movibile.
Il condensatore cattura la luce dall’illuminatore e la concentra in
un cono che attraversa il campione nel vetrino.
La regolazione del diaframma a iride modifica le dimensioni del
cono di luce, permettendo di migliorare contrasto e risoluzione.
Il microscopio include un supporto per dispositivi smart per un’osservazione a mani libere. Il supporto può essere fissato tramite magnete nella
parte superiore del microscopio oppure poggiare su una superficie piana di fianco.
Per utilizzare il supporto senza la fascia, sistemare lo smartphone sulla base. Il peso della base aiuta a mantenere stabili piccoli dispositivi
durante l’osservazione.
Quando si utilizza un tablet o un dispositivo di dimensioni maggiori, si consiglia vivamente di fissarlo con il gancio e la fascia di sicurezza.
Questo aiuta a mantenere il dispositivo saldamente in posizione durante l’uso.
NOTA: L’app è ideata per essere utilizzata con un orientamento orizzontale.
UTILIZZO DEL SUPPORTO E DELLA FASCIA PER
DISPOSITIVO SMART
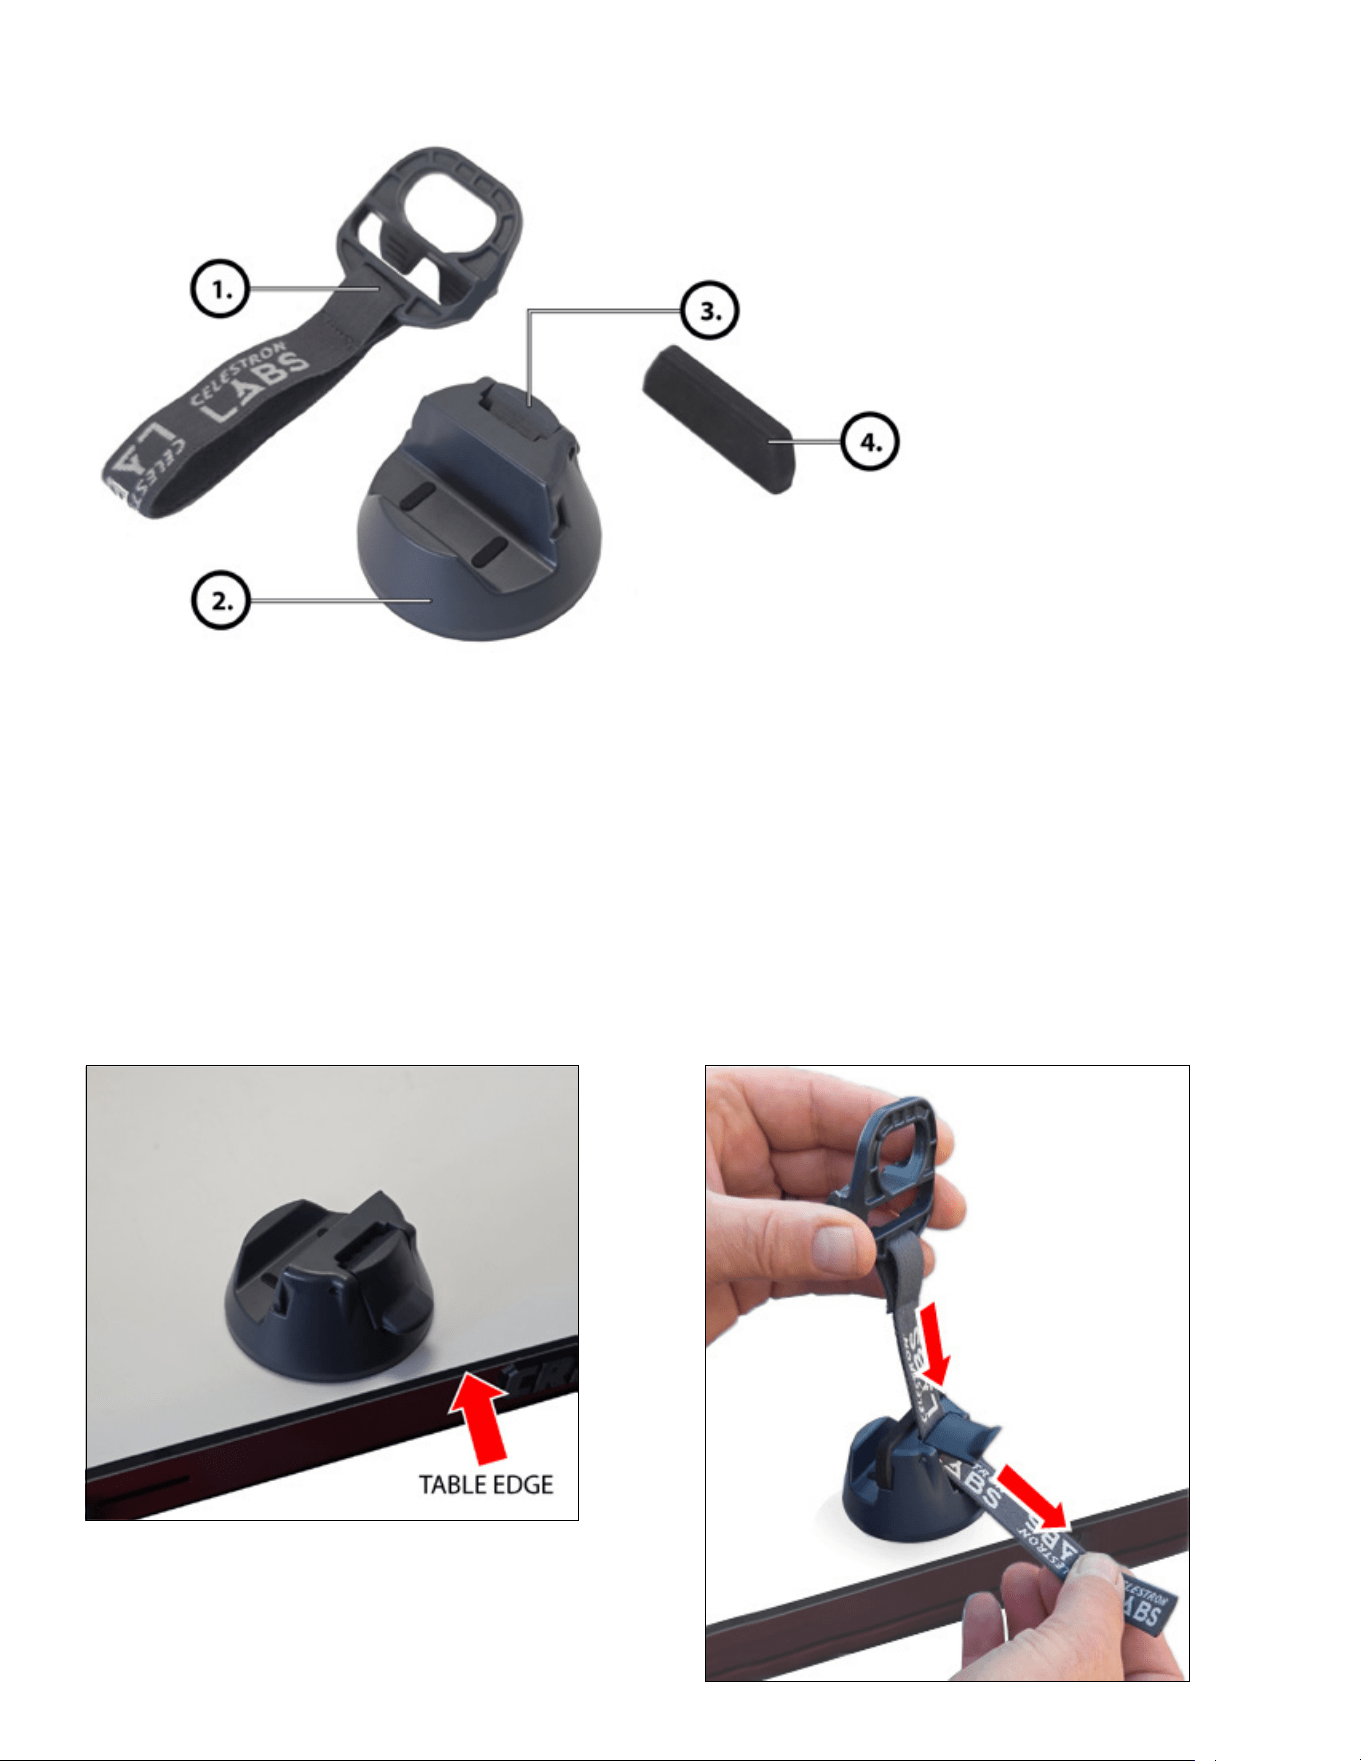
ITALIANO
|
71
1. Base del supporto – Piattaforma di supporto principale con base in metallo
2. Gancio e fascia di sicurezza – Gancio in plastica fissato a fascia elastica
3. Blocco camlock – Per fissare la fascia in tensione
4. Piccolo supporto aggiuntivo – Supporto in gomma ulteriore, ad esempio per
dispositivi non dotati di custodie di protezione
1. Sistemare la base del supporto su una superficie piana e
stabile, preferibilmente vicino al bordo di un tavolo.
2. Far passare la fascia elastica attraverso il blocco camlock
come mostrato.
COMPONENTI DEL SUPPORTO PER DISPOSITIVI SMART
UTILIZZO DEL GANCIO E DELLA FASCIA DI SICUREZZA
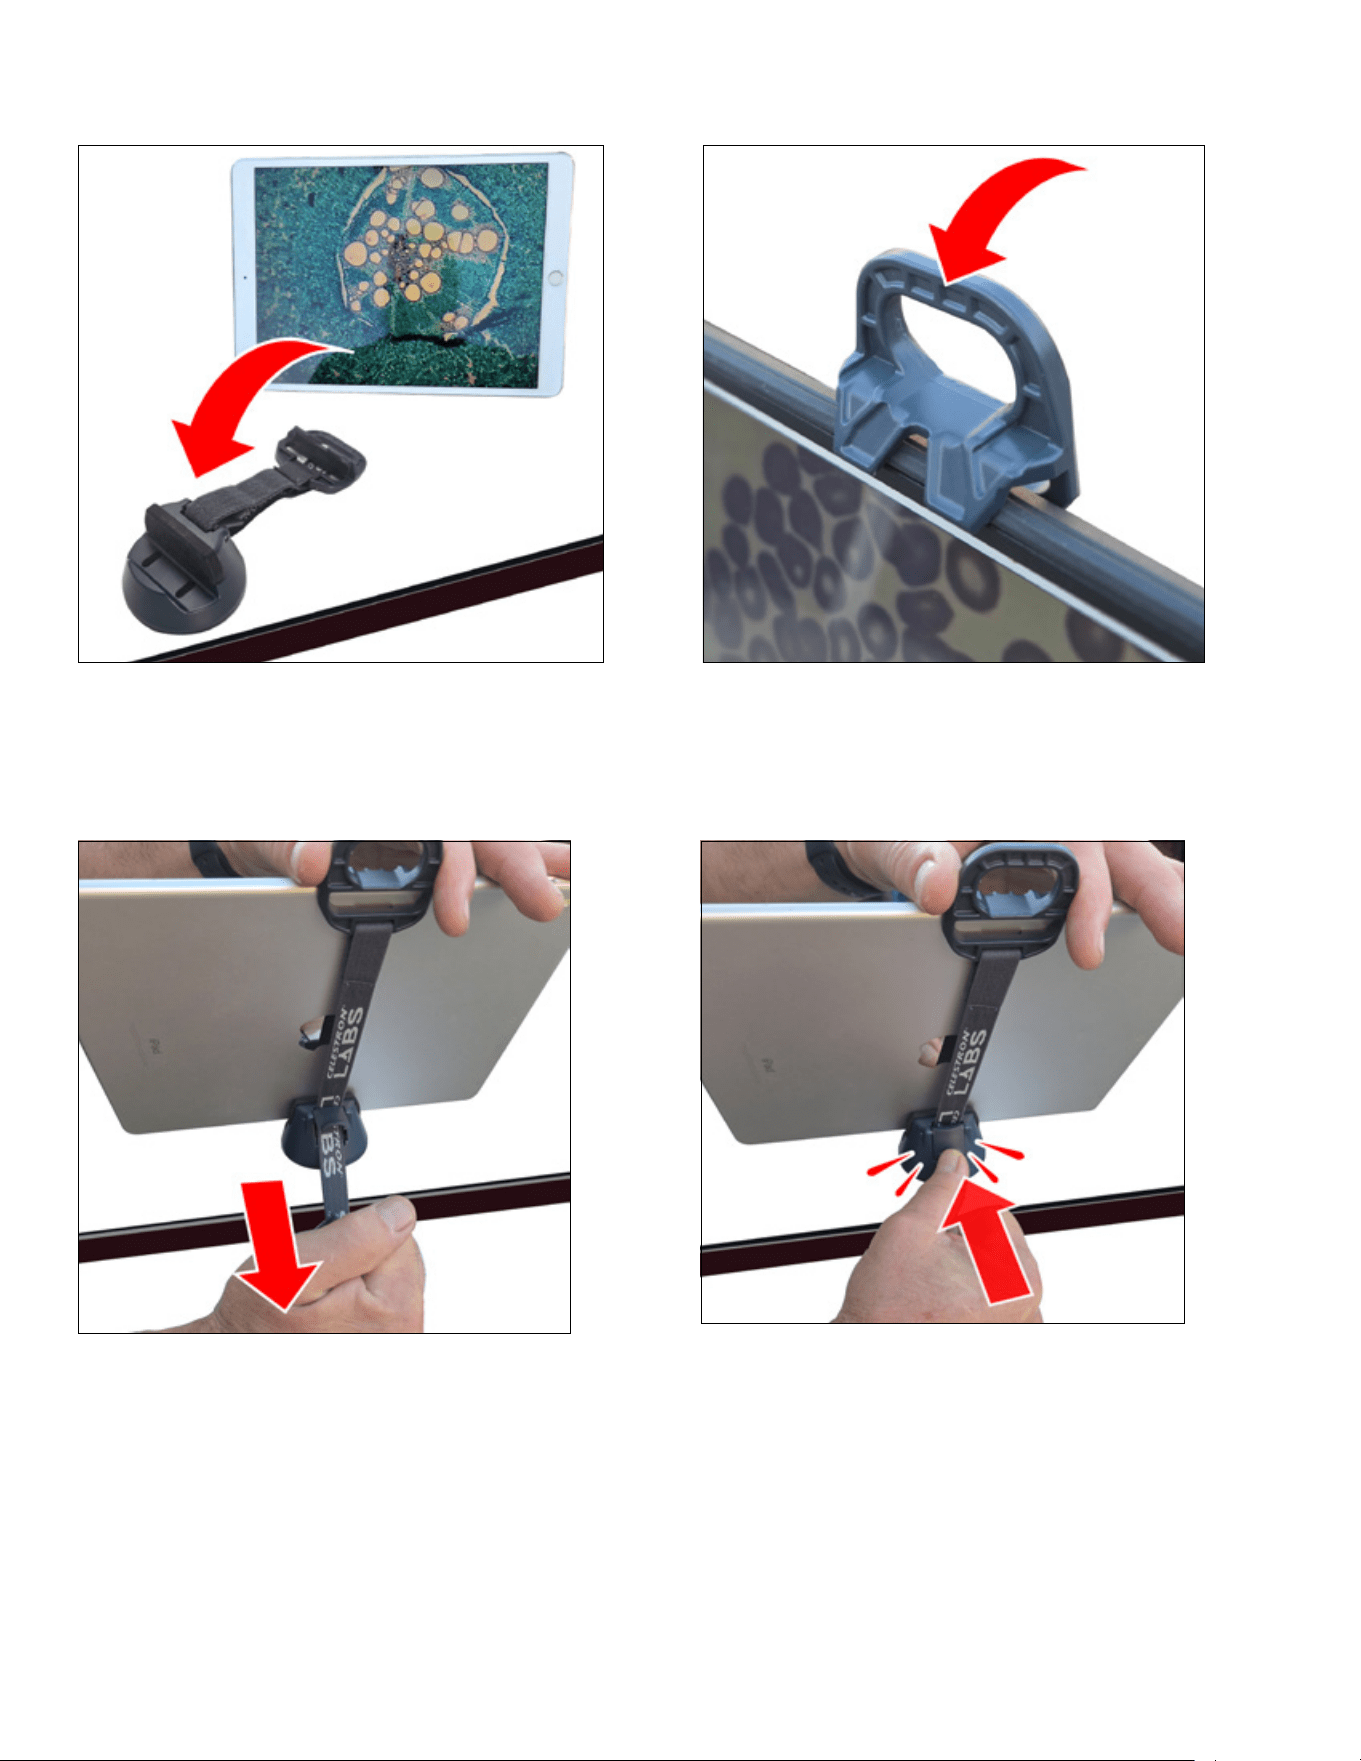
72
|
ITALIANO
3. Posare il dispositivo smart sulla base del supporto e
sistemare il gancio a lato del dispositivo.
4. Sorreggere saldamente il dispositivo e il gancio con
una mano. Con l’altra mano, tirare verso il basso la
fascia elastica per aumentare la tensione.
5. Mentre si mantiene la tensione, chiudere il blocco
camlock per bloccare la fascia in posizione.
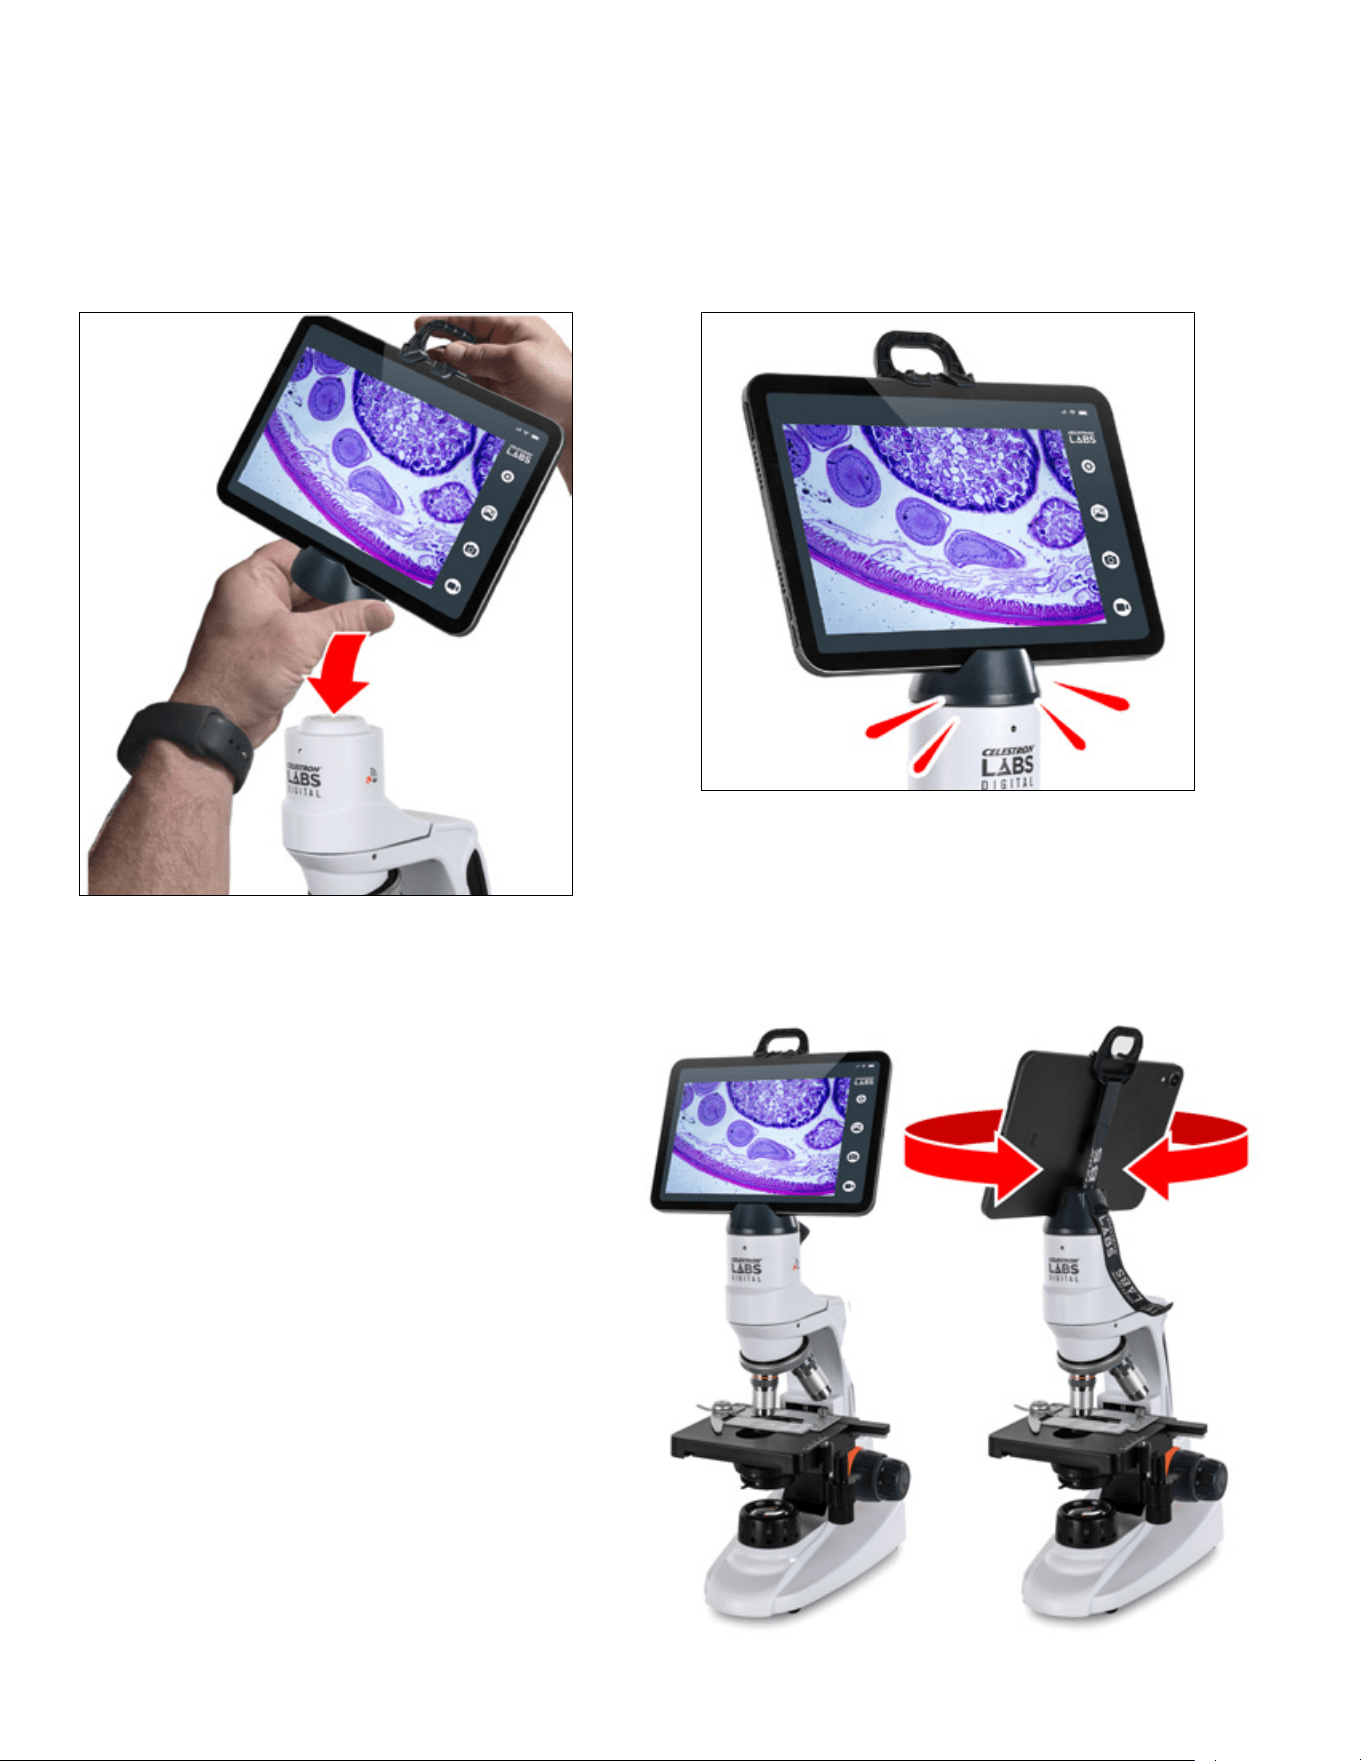
ITALIANO
|
73
1. Utilizzando due mani, sistemare il gruppo del supporto sulla
testa del microscopio e allineare la base circolare con la forma
circolare sul microscopio.
FISSARE IL DISPOSITIVO SMART AL MICROSCOPIO
La testa del microscopio presenta un magnete all’interno. La base del supporto contiene un piastra di metallo.
3. Assicurarsi che la base del supporto sia posata
completamente e sia stabile prima di togliere le mani.
Quando fissato, il dispositivo può ruotare di 360°.
Ruotare lentamente e sostenere il dispositivo o la base
del supporto mentre si ruota per ridurre il rischio di
interrompere il legame magnetico.
2. All’avvicinarsi del supporto alla testa, il magnete attira la piastra
di metallo e guida il supporto in posizione.
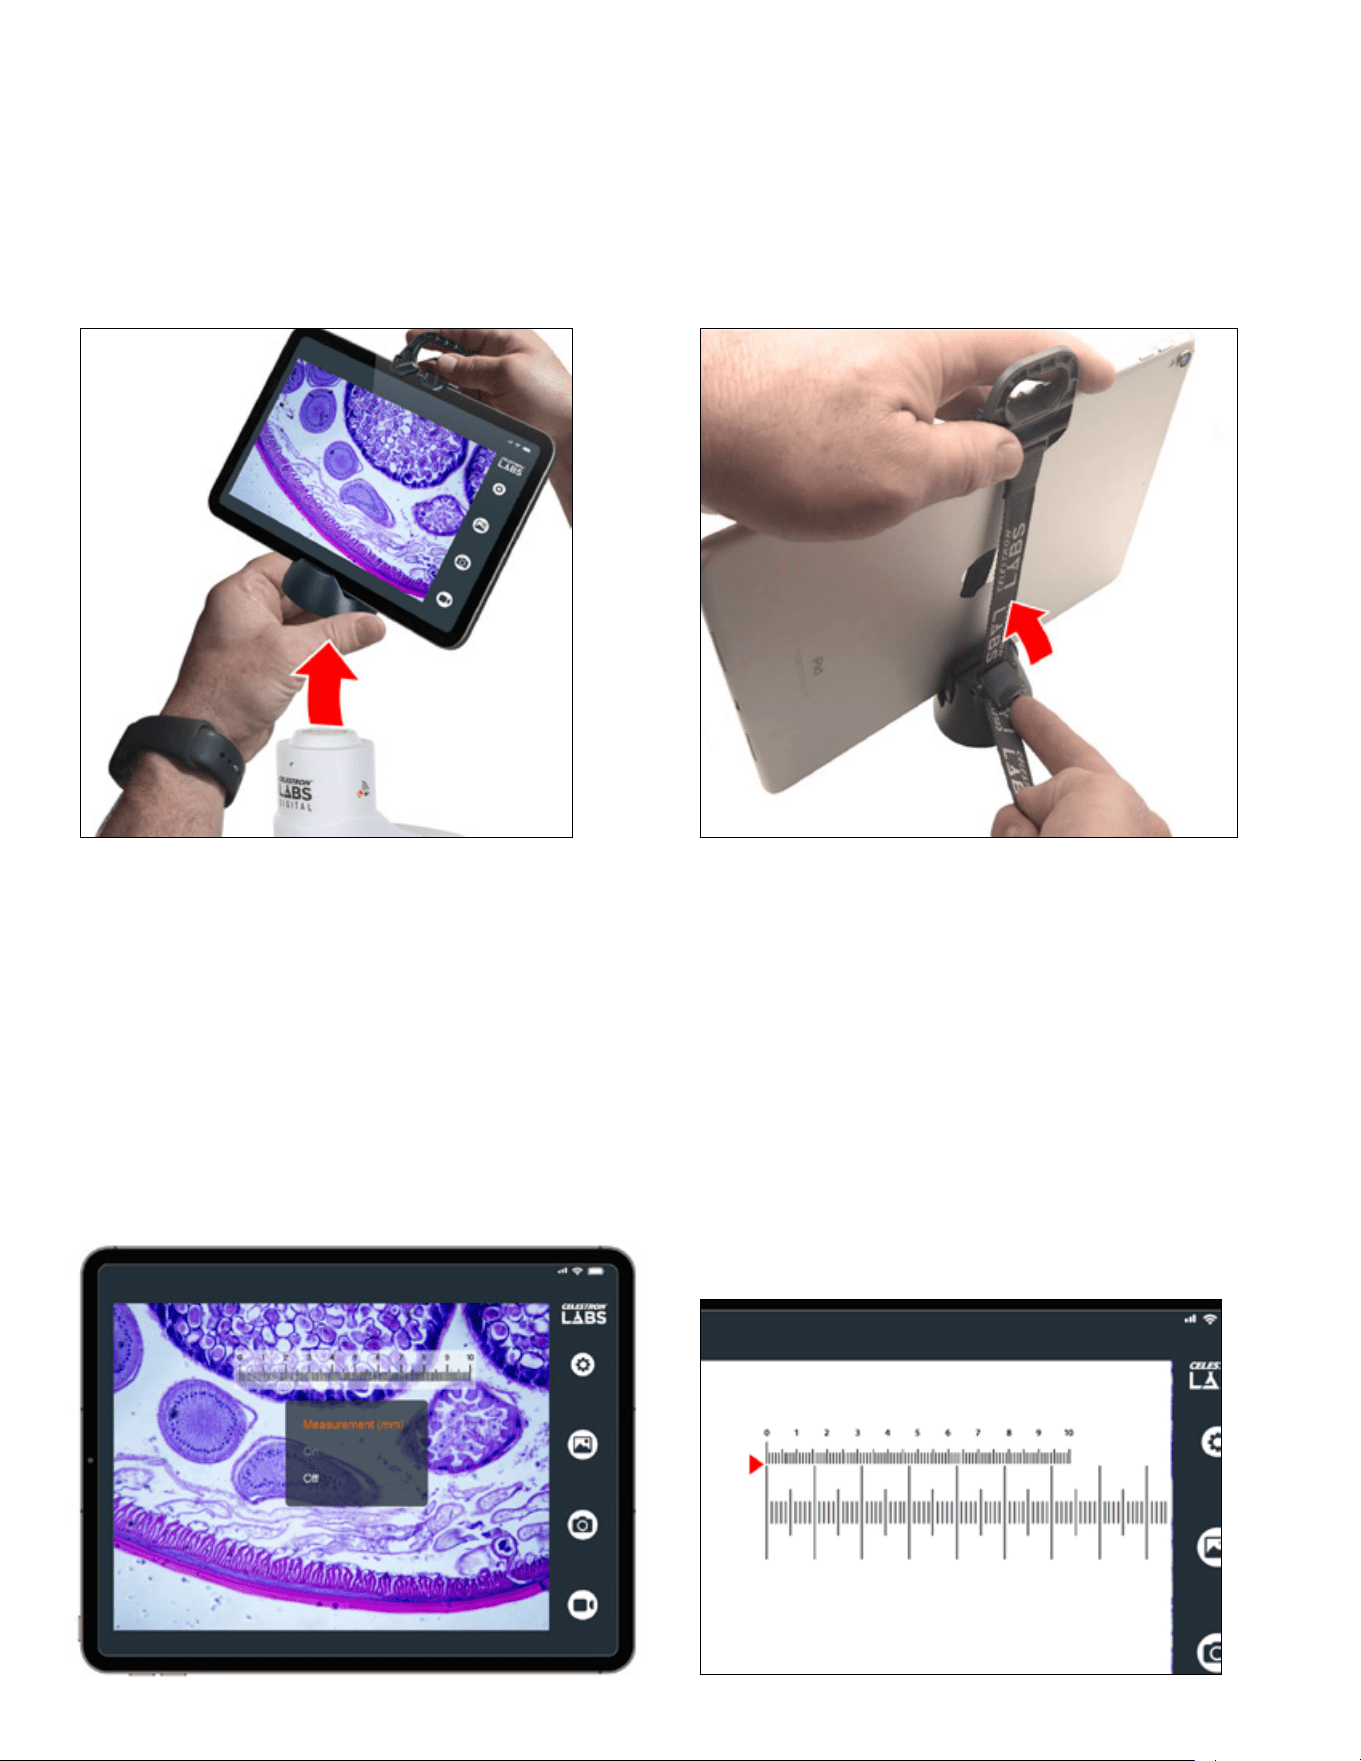
74
|
ITALIANO
RIMUOVERE IL SUPPORTO DEL DISPOSITIVO SMART
È possibile rimuovere prima l’intero gruppo del supporto o il dispositivo smart. Per la massima stabilità, rimuovere prima il gruppo del
supporto dal microscopio, quindi rimuovere il dispositivo smart mentre il supporto è poggiato su una superficie piana.
PER RIMUOVERE L’INTERO GRUPPO DEL SUPPORTO:
Sostenere la base del supporto con una mano e il dispositivo o
il gancio con l’altra. Rotare e sollevare la base del supporto per
scollegarlo dal microscopio.
PER RIMUOVERE IL DISPOSITIVO SMART:
Tenere il dispositivo smart e il gancio con una mano. Con l’altra mano,
sollevare il blocco camlock per rilasciare la tensione della fascia. Una
volta rilasciato, rimuovere il dispositivo dalla base del supporto.
Il reticolo di misurazione dell’app mostra righe a distanza regolare sullo schermo. Tuttavia, l’app non conosce automaticamente le distanze
reali tra le righe che dipendono dall’ingrandimento corrente. Il vetrino di calibrazione in dotazione, chiamato vetrino micrometro, aiuta in questo
senso.
Il vetrino presenta un righello con precise incisioni. Ciascuna piccola porzione del vetrino misura 0,01 mm (10 micrometri). Confrontando
le distanze note sul vetrino di calibrazione con il reticolo sullo schermo, è possibile calcolare l’attuale distanza rappresentata da ciascuna
porzione del reticolo.
La calibrazione è specifica per l’obiettivo che si sta utilizzando. In caso di modifica dell’ingrandimento, occorre calibrare nuovamente prima di
prendere nuove misurazioni.
UTILIZZO DEL VETRINO DI CALIBRAZIONE
Procedura di calibrazione.
1. Sistemare il vetrino di calibrazione sul piano del microscopio.
2. Nell’app, attivare il reticolo di misurazione.
3. Regolare il piano in modo che il vetrino di calibrazione sia visibile
e mettere a fuoco il microscopio fino a quando appare nitido sullo
schermo.
4. Allineare il segno “0” sul reticolo di misurazione digitale con il
segno “0” sul vetrino di calibrazione.
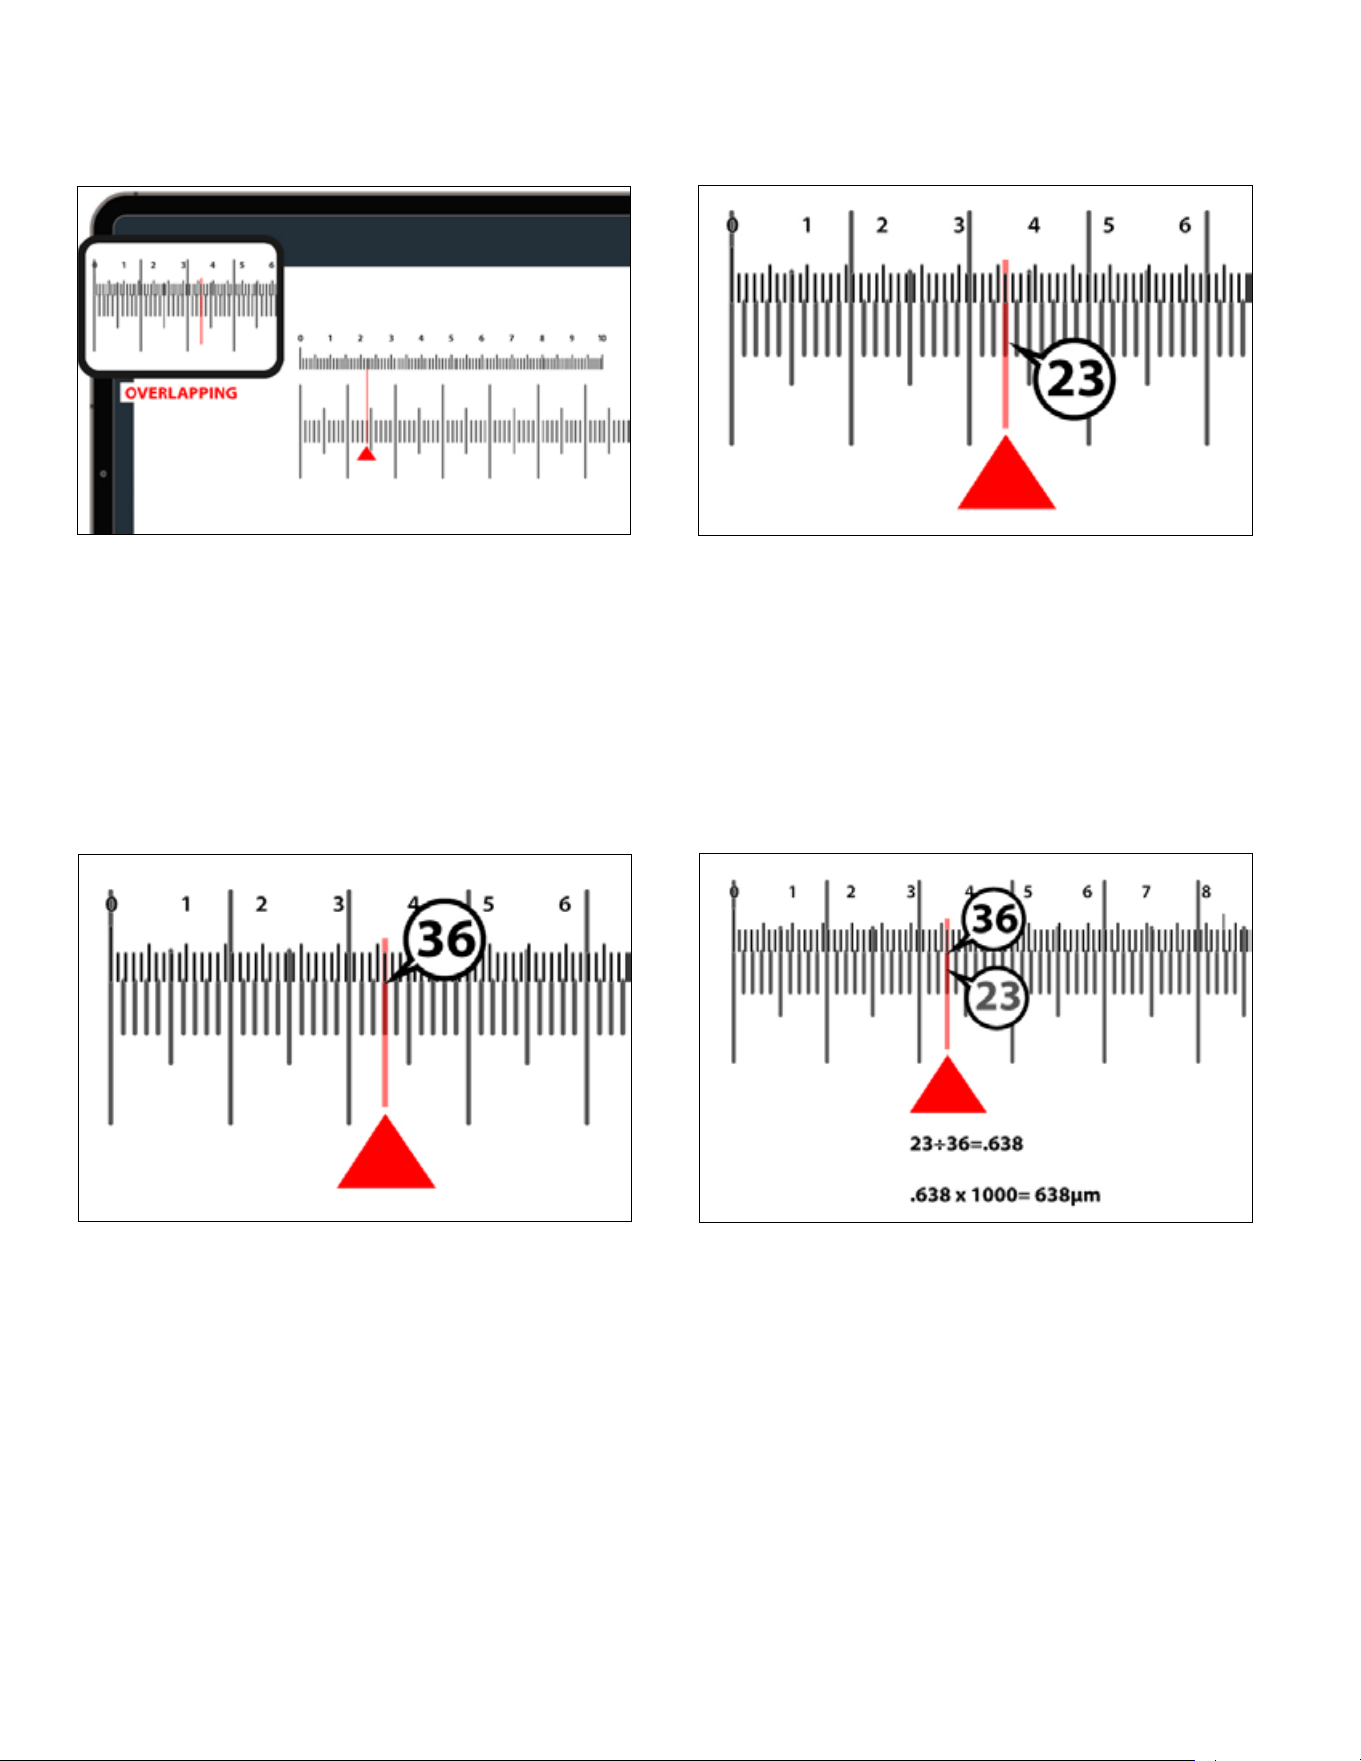
ITALIANO
|
75
5. Senza spostare il vetrino, spostarsi lungo la scala e individuare
il punto successivo dove una riga del reticolo digitale si allinea
esattamente con una riga del vetrino di calibrazione.
6. Contare il numero di porzioni sul vetrino di calibrazione tra i due
punti sovrapposti. In questo esempio, si tratta di 23 porzioni.
7. Contare il numero di porzioni sul reticolo digitale tra gli stessi due
punti sovrapposti. In questo esempio, si tratta di 36 porzioni.
8. Calcolare la dimensione rappresentata da una porzione di reticolo.
Innanzitutto, dividere le porzioni del vetrino di calibrazione per le
porzioni del reticolo: 23 ÷ 36 = 0,638
Quindi, moltiplicare il risultato per 1000 per convertire in micrometri:
0,638 × 1000 = 638 µm
In questo esempio, ciascuna porzione del reticolo digitale è pari a
638 µm.
9. È ora possibile utilizzare il reticolo calibrato per stimare le
dimensioni del campione.
Importante
In caso di modifica dell’obiettivo o dell’ingrandimento, occorre
calibrare nuovamente prima di prendere nuove misurazioni.
76
|
ITALIANO
CURA E MANUTENZIONE
Il microscopio da tavolo Wi-Fi Celestron Labs Digital è uno strumento ottico di precisione. Una cura adeguata garantisce prestazioni
affidabili per lungo tempo.
• Conservare il microscopio in luogo pulito e asciutto quando non in uso.
• Non utilizzare il microscopio in luoghi in cui è vietato l’uso di apparecchi elettronici. Un utilizzo improprio può portare a incidenti gravi.
• Mettere in funzione esclusivamente a temperature comprese tra −5° e 50 °C (da 23° a 120 °F). Evitare sbalzi improvvisi di temperatura,
poiché ciò potrebbe causare la formazione di umidità all’interno.
• Tenere il microscopio lontano da acqua o altri liquidi. L'umidità crea pericoli di incendio e scosse elettriche.
• Non provare ad aprire o a modificare il dispositivo. I componenti interni devono essere oggetto di intervento esclusivamente da parte di
personale tecnico autorizzato.
• Per pulire la parte esterna, strofinare delicatamente con un panno asciutto e morbido.
celestron.com/pages/warranty
BISOGNO DI AIUTO? Contattare l’assistenza tecnica Celestron su
celestron.com/pages/technical-support
Il design del prodotto e le specifiche sono soggetti a modifiche senza previa notifica.
Questo prodotto è progettato per essere utilizzato da persone di età pari o superiore ai 14 anni.
©2026 Celestron.
Celetron e Symbol sono marchi di Celestron, LLC. • Tutti i diritti riservati. • Celestron.com
Stati Uniti: Celestron, 2835 Columbia Street, Torrance, CA 90503 Stati Uniti
Regno Unito: Celestron Global Ltd., Unit 2 Transigo, Gables Way, Thatcham RG19 4JZ, Regno Unito
Rappresentante europeo autorizzato: AR Experts B.V. is Boeingavenue 209, 1119 PD Schiphol-Rijk, Paesi Bassi, [email protected]
Prodotto in Cina | 04-26
NOTA FCC: Il presente dispositivo è conforme alla Parte 15 delle Norme FCC. L'utilizzo è soggetto alle
seguenti due condizioni: (1) Il presente dispositivo non deve causare interferenze dannose, e (2) il presente
dispositivo deve accettare qualsiasi interferenza ricevuta, comprese interferenze che potrebbero causare
un funzionamento indesiderato.
Nota EU: Con la presente Celestron dichiara che l’apparecchiatura radio Microscopio da tavolo Wi-Fi n.
44351 è conforme alla Direttiva 2014/53/UE. Il testo completo della dichiarazione di conformità UE è
disponibile al seguente indirizzo www.celestron.com/productcompliance.
Modello prodotto Microscopio Wi-Fi Celestron Labs Digital n. 44351
Nome modello abbreviato WH-44351
Standard Wi-Fi WiFi4, 802,11 b/n
Opzione Wi-Fi tri-band 20 M
2,4 GHz collegamento limite cliente 1
5 GHz collegamento limite cliente Nessuno
6 GHz collegamento limite cliente Nessuno
Massimo volume dati 65 M
WPS (WiFi Protected Setup) Non configurato
PARAMETRI WI-FI
ESPAÑOL
|
77
MODELO #44351
Tableta no incluida
MANUAL DE INSTRUCCIONES
MICROSCOPIO
DE SOBREMESA Wi-Fi
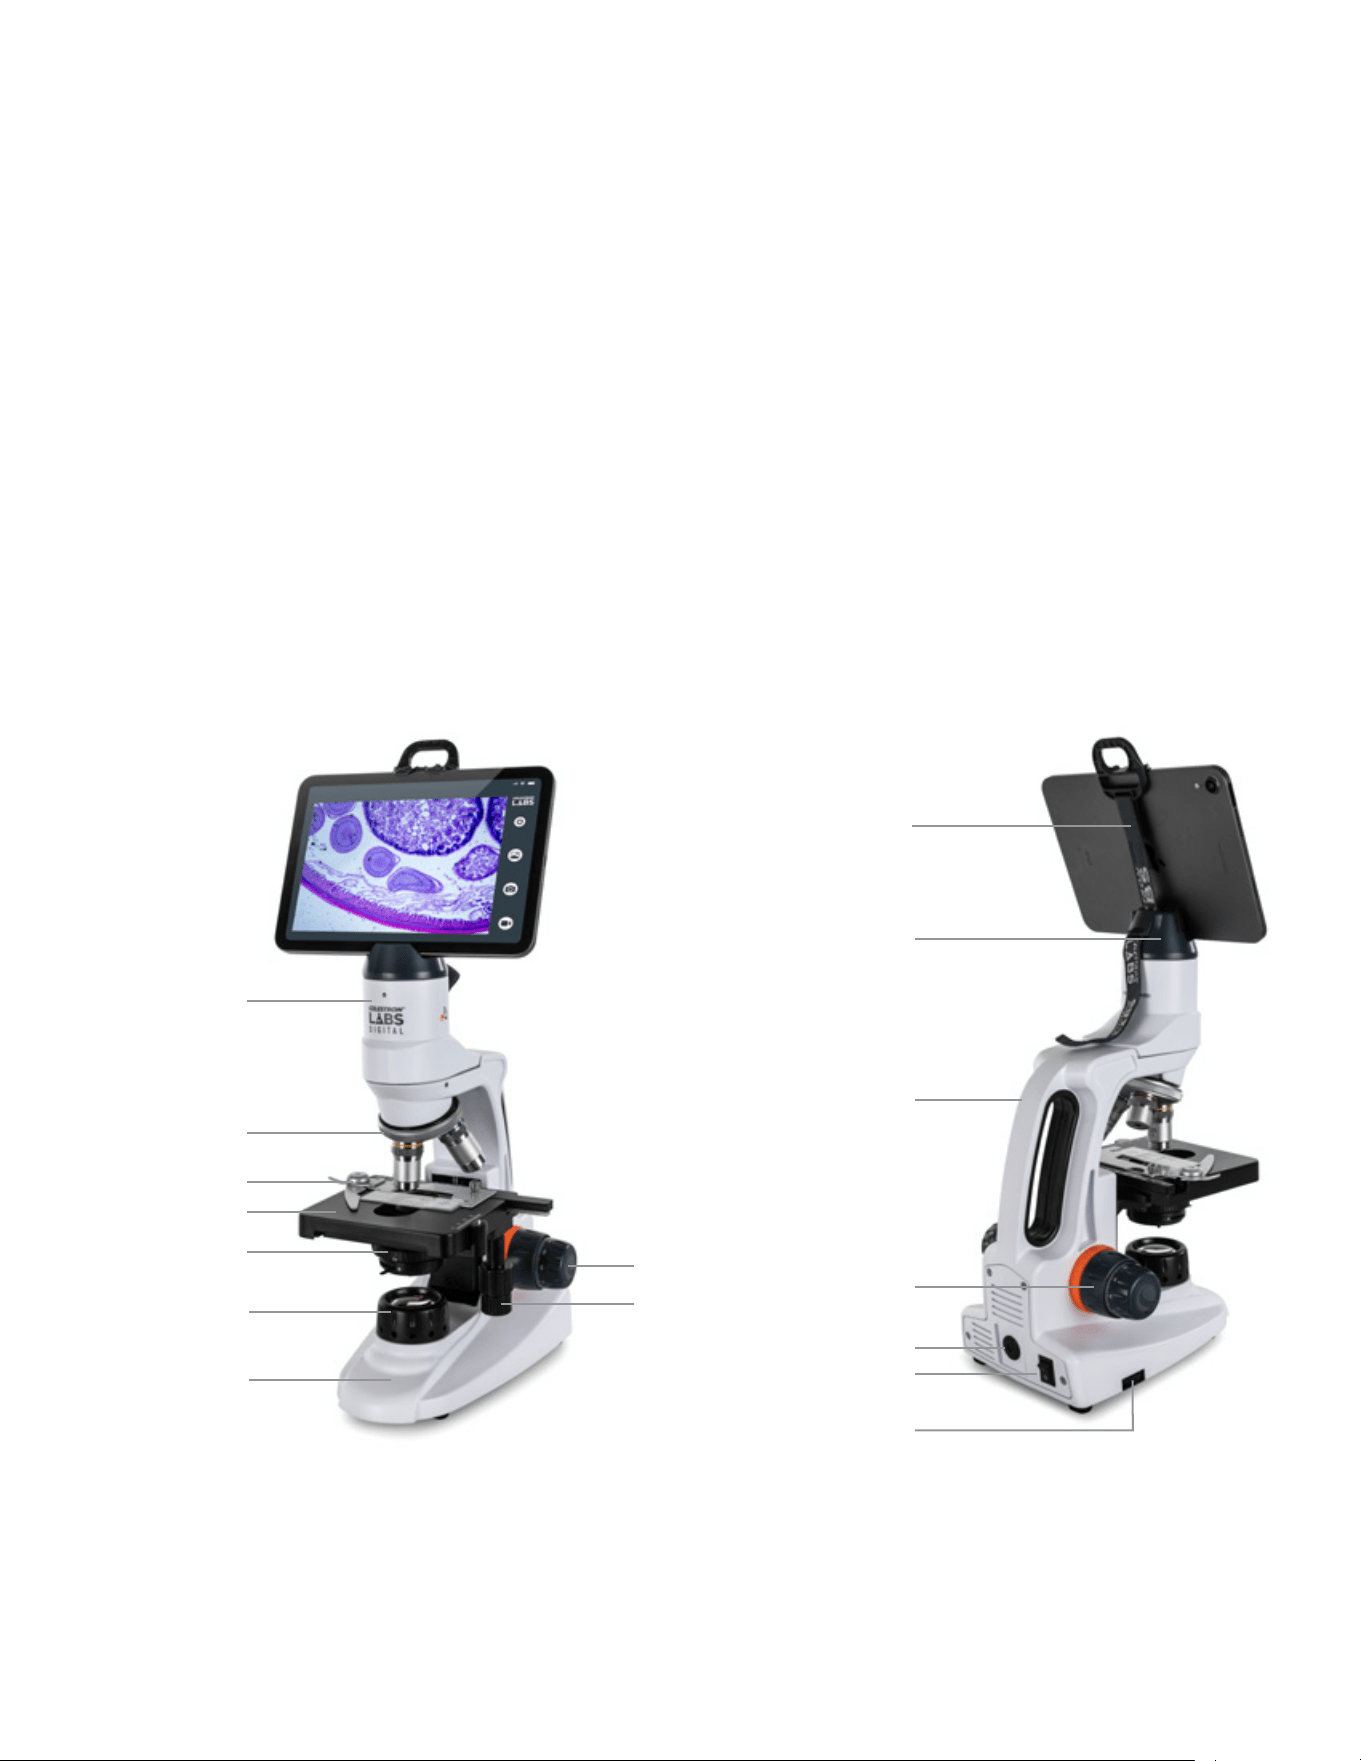
78
|
ESPAÑOL
INTRODUCCIÓN
Gracias por adquirir este microscopio de sobremesa Wi-Fi de
Celestron Labs Digital.
A diferencia de los microscopios tradicionales, este modelo usa
una cámara digital de 2MP integrada en lugar de un ocular. Los
especímenes se ven en directo en su teléfono o tableta mediante
la señal Wi-Fi dedicada del microscopio. No necesita conexión a
internet.
Este microscopio ofrece un aumento de 48x a 480x y es adecuado
para examinar portamuestras preparados de tejido de planta y animal,
fibras, levaduras, mohos, bacterias y otros especímenes biológicos.
La aplicación gratuita Celestron Labs Wi-Fi funciona con dispositivos
iOs y Android. Con ella puede capturar imágenes, grabar video,
habilitar herramientas de medición y guardar archivos directamente
en su dispositivo para compartirlos o analizarlos.
El microscopio ofrece funciones de alta gama tradicionales, incluyendo
un soporte mecánico totalmente ajustable, tres objetivos acromáticos
(4x, 10x y 40x), un condensador Abbe con diafragma de iris, y
controles de enfoque aproximado y preciso. También incluye cinco
portamuestras preparados, una regla de calibración, un adaptador CA
internacional, y un soporte para dispositivo inteligente con correa de
seguridad.
Antes de empezar, lea por completo las instrucciones de instalación
y revise los diagramas de este manual. Unos minutos de preparación
garantizarán una instalación sin problemas y el mejor rendimiento
posible.
Gancho y correa de seguridad
Soporte de dispositivo inteligente
Cabezal de microscopio con
sensor y módulo Wi-Fi
Revólver de objetivo
trinocular con 3 objetivos
Sujeción de portamuestras
Soporte mecánico
Condensador Abbe
Iluminador
Base
Rueda de enfoque
preciso
Mandos de ajuste X,
Y de soporte
Asa de transporte
Rueda de enfoque aproximado
Toma de alimentación de 5,5mm
Interruptor de encendido/
apagado
Rueda de ajuste del iluminador
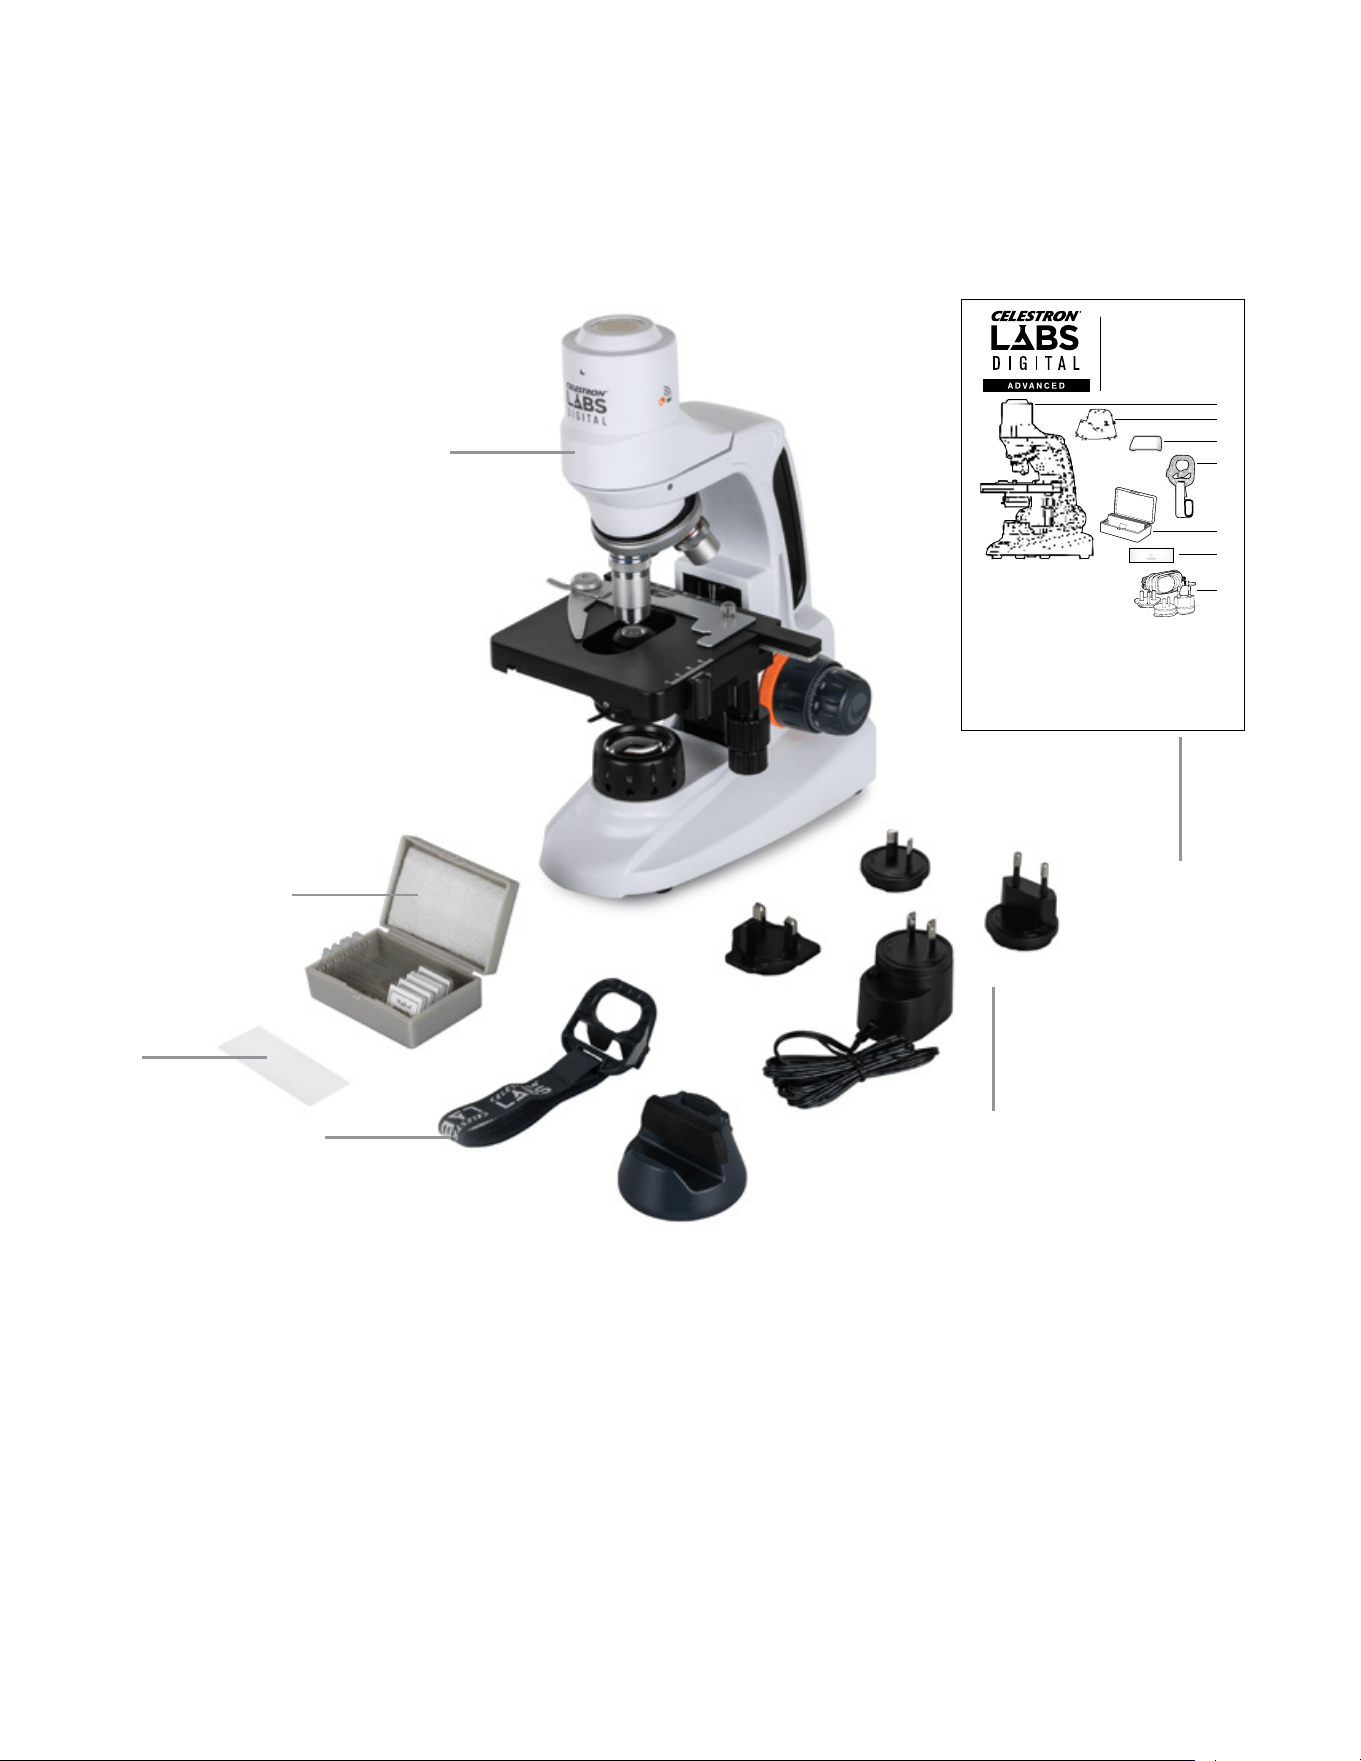
ESPAÑOL
|
79
Desembale cuidadosamente su microscopio de escritorio Wi-Fi y verifique que estén presentes todos los
elementos indicados a continuación:
[A] Microscopio de escritorio Wi-Fi Celestron Labs Digital
[B] Cinco portamuestras preparados
[C] Regla de calibración
[D] Adaptador CA internacional con cuatro enchufes
[E] Soporte de dispositivo inteligente con correa de seguridad
[F] Guía de instalación rápida
A
B
C
E
D
F
MODEL #44351
QUICK START GUIDE
Contenu de la boîte
[A] M icroscope d e table Wi-F i 2MP
Celes tron Labs 2 MP
[B] So cle intellige nt
[C] Ad aptateur d e socle intell igent
[D] Sa ngle de sécuri té de socle int elligent
[E] Boî te de 5 de lame s de spécimens
préparées
[F] Ré glette d’ét alonnage
[G] Ada ptateur se cteur inte rnational
CA 100–2 40 V
What’s in the Box
[A] C elestron L abs 2MP Wi- Fi Deskt op
Microscope
[B] Sm art Device S tand
[C] Sma rt Device S tand Boos ter
[D] Sm art Device S tand Safe ty Strap
[E] Bo x of 5 Prepar ed Specimen Sli des
[F] C alibratio n Slide
[G] Mul ti-count ry 100–240V A C Adapter
Lieferumfang
[A] C elestron L abs 2MP WL AN
Desktopmikro skop
[B] Smart-Geräte-Gestell
[C] Smart-Geräte-Gestellver stärkung
[D] Smart-Geräte-Gestell-Sicherheitsgurt
[E] Bo x mit 5 vorber eiteten Obj ektträ gern
[F] Kalibrierungsobjek tträger
[G] Lä nderübergr eifender 10 0–240 V
AC-Adapter
Contenuto della confezione
[A] M icroscopi o da tavolo Wi -Fi Celest ron
Labs 2 MP
[B] Sup porto per di spositiv o smart
[C] Boo ster per dis positivo s mart
[D] Cing hia di sicure zza per supp orto per
dispositivo smart
[E] Co nfezione da 5 v etrini pre parati
[F] Ve trino di cali brazione
[G] Ada ttator e CA 100-240 V mul ti-paese
Contenido de la caja
[A] M icroscopi o WiFi de escr itorio de 2M P
CelestronLabs
[B] Sop orte de disp ositivo in teligente
[C] Pot enciador de so porte de dis positivo i nteligent e
[D] Cor rea de segur idad del sopor te de dispos itivo
inteligente
[E] Ca ja de 5 portam uestras d e especímene s
preparados
[F] Re gla de calibr ado
[G] Ada ptador 100 -240V CA mult inacional
Wi-Fi DESKTOP MICROSCOPE
ENGL ISH
NEED ASSISTANCE? Contact Celestron Technical Suppor t
celestron.com/pages/technical-support
Produ ct design and s pecificat ions are subj ect to change w ithout pri or
noti fication. • T his product i s designed and i ntended for u se by those
14 year s of age and older.
©2025 C elestro n. Celestr on and Symbol
are tr ademarks o f Celestr on, LLC. • All r ights res erved. • Cele stron.c om
US: Cele stron, 28 35 Columbia S treet, Tor rance, CA 90 503 USA • UK :
Celes tron Globa l Ltd., Unit 2 Tra nsigo, Gabl es Way, Thatch am RG19 4JZ,
Unite d Kingdom • Made i n China | 06-25
FRA NÇAIS
BESOIN D’ASSISTANCE? Contactez le support technique de
Celestron
celestron.com/pages/technical-support
Le des ign et les spéci fications d u produit son t sujette s à modificat ion sans
préa vis. • Ce prod uit est conçu e t prévu pour ê tre utilis é par des pers onnes
âgées d e 14 a ns et plus
©2025 C elestro n. Celestr on et le Symbol s ont
des mar ques dépos ées de Celest ron, LLC. • Tou s droits rés ervés • Cel estron.
com • US: C elestron .com • 2835 Col umbia Stre et, Torrance , CA 90503 U SA •
UK: Cel estron Glo bal Ltd., Uni t 2 Tr ansigo, Gab les Way, That cham RG19 4JZ ,
Royaum e-Uni • Fabr iqué en Chine | 06 -25
DEUTSCH
BENÖTIGEN SIE UNTERSTÜ TZUNG? Wenden Sie sich an die
technische Unterstützung von Celestron unter
celestron.com/pages/technical-support
Produ ktdesign u nd technisch e Daten könne n ohne vorher ige Ankündig ung
geänd ert werden . Dieses Pro dukt ist für P ersonen ab 14 J ahren konzi piert
und vorgesehen.
©2025 C elestro n. Celestr on und Symbol
sind Wa renzeichen v on Celestr on, LLC. Al le Rechte vor behalten. C elestron .
com • US A: Celestr on, 2835 Col umbia Stre et, Torrance , CA 90503 U SA • UK:
Celes tron Globa l Ltd., Einhei t 2 Transigo, Ga bles Way, Tha tcham RG19 4JZ ,
Verein igtes König reich • Herge stellt in Chi na | 06-25
celestron.com/pages/warranty
ITALIANO
BISOGNO DI AIUTO? Contattare il suppor to tecnico Celestron
celestron.com/pages/technical-support
Il desi gn del prodot to e le specifi che sono sogge tti a modifi che senza
prev ia notifica . Questo pr odotto è pro gettat o per essere u tilizza to da
pers one di età par i o superiore a i 14 anni.
©2025 C elestro n. Celetron e S ymbol
sono ma rchi di Celes tron, LLC . • Tu tti i dirit ti riserv ati. • Celes tron.com
• Sta ti Uniti: Cele stron, 28 35 Columbia S treet, Torr ance, CA 90 503 Stat i
Uniti • R egno Unito: Ce lestron Gl obal Ltd., Un it 2 Transigo, G ables Way,
That cham RG18 4JZ Re gno Unito • Pro dotto in Cin a | 06-25
ESPAÑOL
¿NECESITA AYUDA? Contacte con el soporte técnico de
Celestron
celestron.com/pages/technical-support
El dise ño y las especi ficaciones d el producto e stán sujet os a cambios s in
noti ficación pre via. Este p roducto ha s ido diseñado y e stá pensad o para
ser us ado por perso nas de 14 años o más d e edad.
©2025 Celestron. Celestron y su símbolo
son marcas comerciales de Celest ron, LLC. • Todos los derechos reserv ados.
• C elestron .com • EE.UU.: Celestr on, 283 5 Columb ia Str eet, Torr ance, C A
9050 3 EE .UU. • GB: Celes tron Global Ltd., Unit 2 Tr ansigo, Gables Way,
That cham RG19 4JZ, Re ino Unido • Fabric ado en China | 06-25
B
A
C
D
E
F
G
CLICK FOR FULL MANUAL
CLIQUEZ POUR CONSULTER LE MODE D’EMPLOI COMPLET
FÜR DIE VOLLSTÄNDIGE ANLEITUNG KLICKEN
FARE CL IC PER IL MANUALE COMPLETO
PULSE PARA EL MANUAL COMPLETO
QR CODE
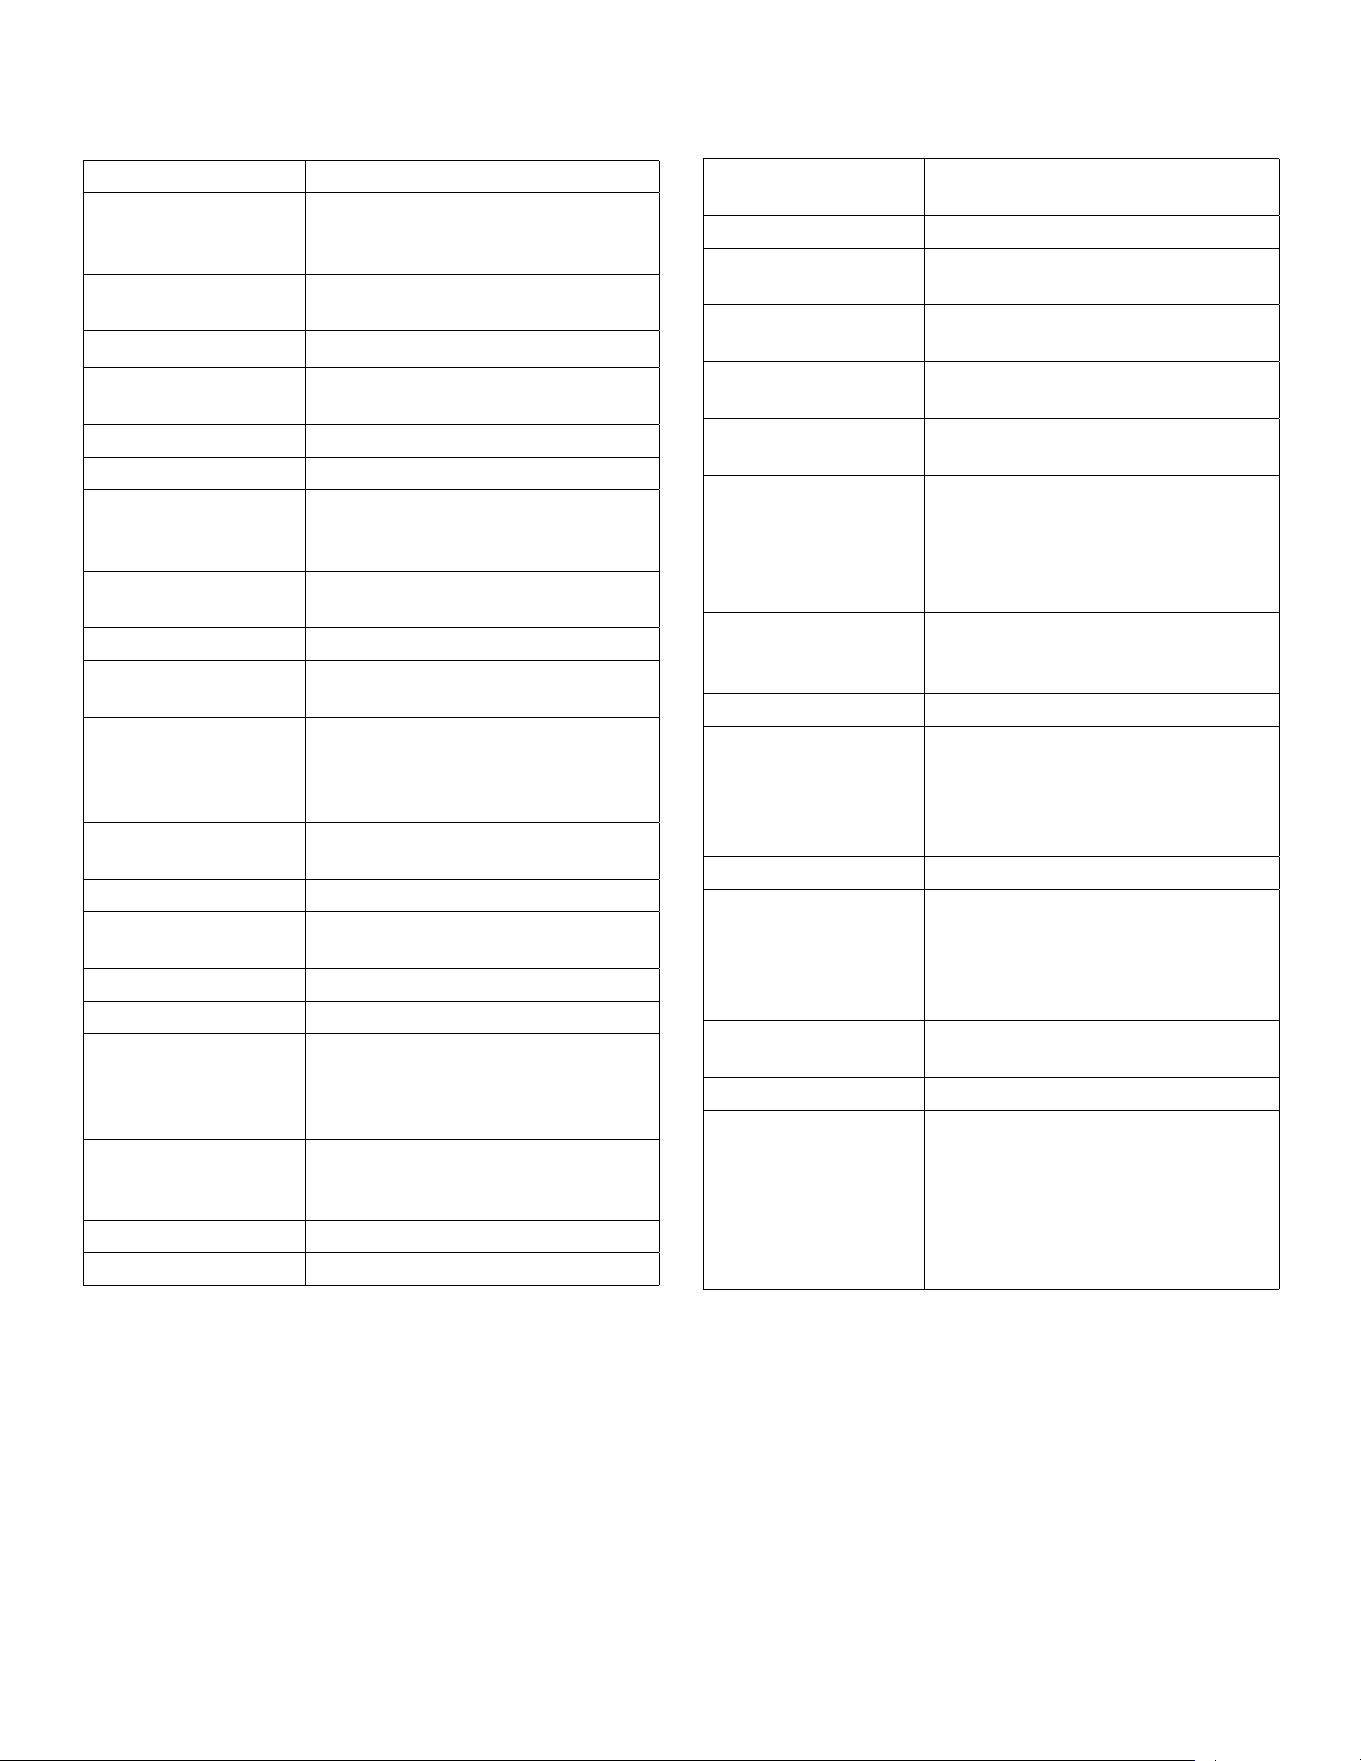
80
|
ESPAÑOL
Tipo de microscopio: Escritorio Wi-Fi con triple objetivo
Cabezal: El cabezal dispone de sensor y
módulo Wi-Fi para emitir imágenes
inalámbricamente
Tipo de ocular: Sensor CMOS en lugar de ocular
(aumento 12x)
Tamaño de sensor: 2MP | 1/2,8” Sony IMX290 LQR-XC
Tipo de soporte: Mecánico - Doble capa, 115mm
x 125mm (4,52” x 4,92”)
Aumento del sensor: 12x
Tamaño de píxel 2,9 μm x 2,9 μm
Tipo de memoria: Sin memoria-usa la memoria del
dispositivo inteligente para guardar
imágenes y video
Resolución de captura
de imagen fija:
640x480/ 1280x720/ 1920x1080
Resolución video: 640x480/ 1280x720/ 1920x1080
Posición del botón del
obturador:
En la aplicación del dispositivo
Software: Aplicación Celestron Labs Digital Wi-Fi
• Imagen fija
• Video
• Función de medición
Compatibilidad de
software:
• iOS
• Android
Portaobjetivos: Triple con detención
Tipo(s) de objetivo(s): (3) objetivos CF acromáticos de plano
finito en el revólver
Estándar de objetivo(s): DIN 35 RMS
Aumento de objetivo(s) 4x, 10x, 40x
Gama de aumento: 48x, 120x, and 480x (Final determinado
por tamaño de pantalla del dispositivo.
Especificaciones basadas en tamaño de
pantalla de teléfono de 5")
CDV • 4x: 37,5mm
• 10x: 6,7mm
• 40x: 0,65mm
Estriado de objetivo(s): WJ 4/5” x 1/36”
Tipo(s) de enfoque: Enfoque aproximado y preciso
Recorrido de enfoque
(por rotación):
0,7mm a 35,3mm (0,027” a 1,39”) (est.)
Tipo de iluminación: LED (3W/4V- 220V/110V)
Posición(es) de
iluminación:
Iluminador inferior
Mecanismo de ajuste de
iluminación:
Dial de iluminación en la base
Fuente de alimentación: Adaptador CA universal* 100 a 240V,
50/60 Hz enchufe internacional
Opción de batería. Sí. 3 baterías AA para energía (de
reserva) - en caso necesario
Soporte: Soporte mecánico de doble capa
• Tamaño de soporte: 115mm×125mm
(4,5” x 4,9”)
• Gama de movimiento: 70mm×30mm
(2,75” x 1,18”)
Tipo de condensador: Condensador Abbe con diafragma de
iris
y filtro
Condensador N.A.: N.A. 1,25
Puerto(s) de entrada: Adaptador CA/ entrada eléctrica de
punta positiva 5-6V CC, 200-1000
mA (El conector debe ser de 5,5mm
(0.21”) OD, 2,1mm (0.08”) ID y
12,5mm (0.49”) de longitud)
Puerto(s) de salida: NA
Adaptador CA: Entrada eléctrica de punta positiva
5-6V CC, 200-1000 mA El conector
debe ser de 5,5mm (0.21”) OD,
2,1mm (0.08”) ID y 12,5mm (0.49”) de
longitud
Dimensiones del
microscopio:
170mm x 140mm x 330mm
(6,7” x 5,5” x 13”)
Peso del microscopio: 56oz (1600 g)
Elementos incluidos: • 5 Portamuestras preparados
• Regla de calibrado
• Adaptador CA (4 enchufes para
internacional)
• Exclusivo soporte de dispositivo
inteligente opcional con correa de
seguridad
ESPECIFICACIONES
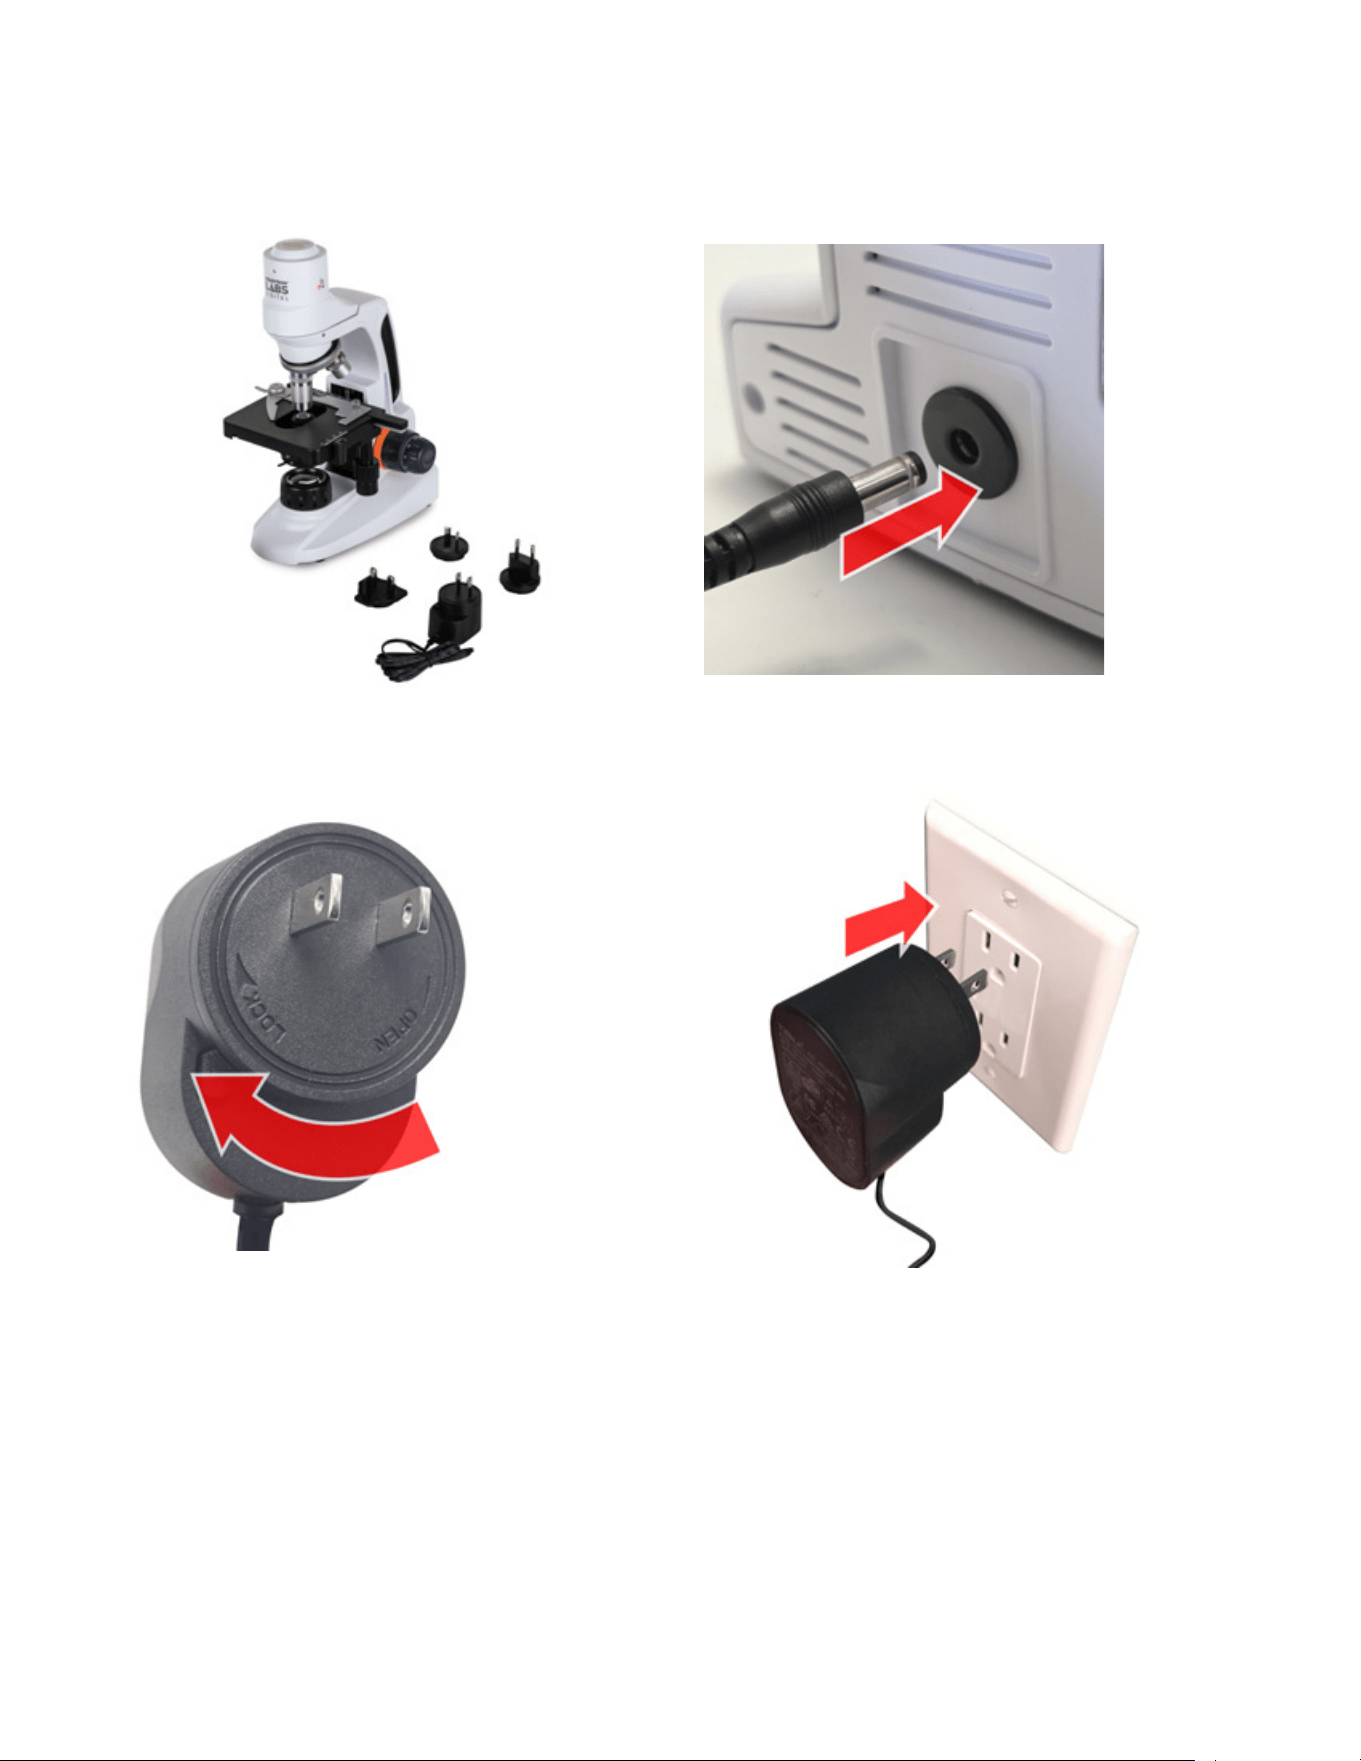
ESPAÑOL
|
81
1. Ponga el microscopio y otras piezas sobre una superficie estable
y plana
INSTALACIÓN
PASO 1: CONECTAR LA ALIMENTACIÓN
2. Inserte el conector pequeño del adaptador CA a la toma de
alimentación en la parte posterior del microscopio.
3. Seleccione el enchufe adecuado para su país e instálelo en el
adaptador.
4. Conecte el adaptador a una toma de corriente de 120-240V.
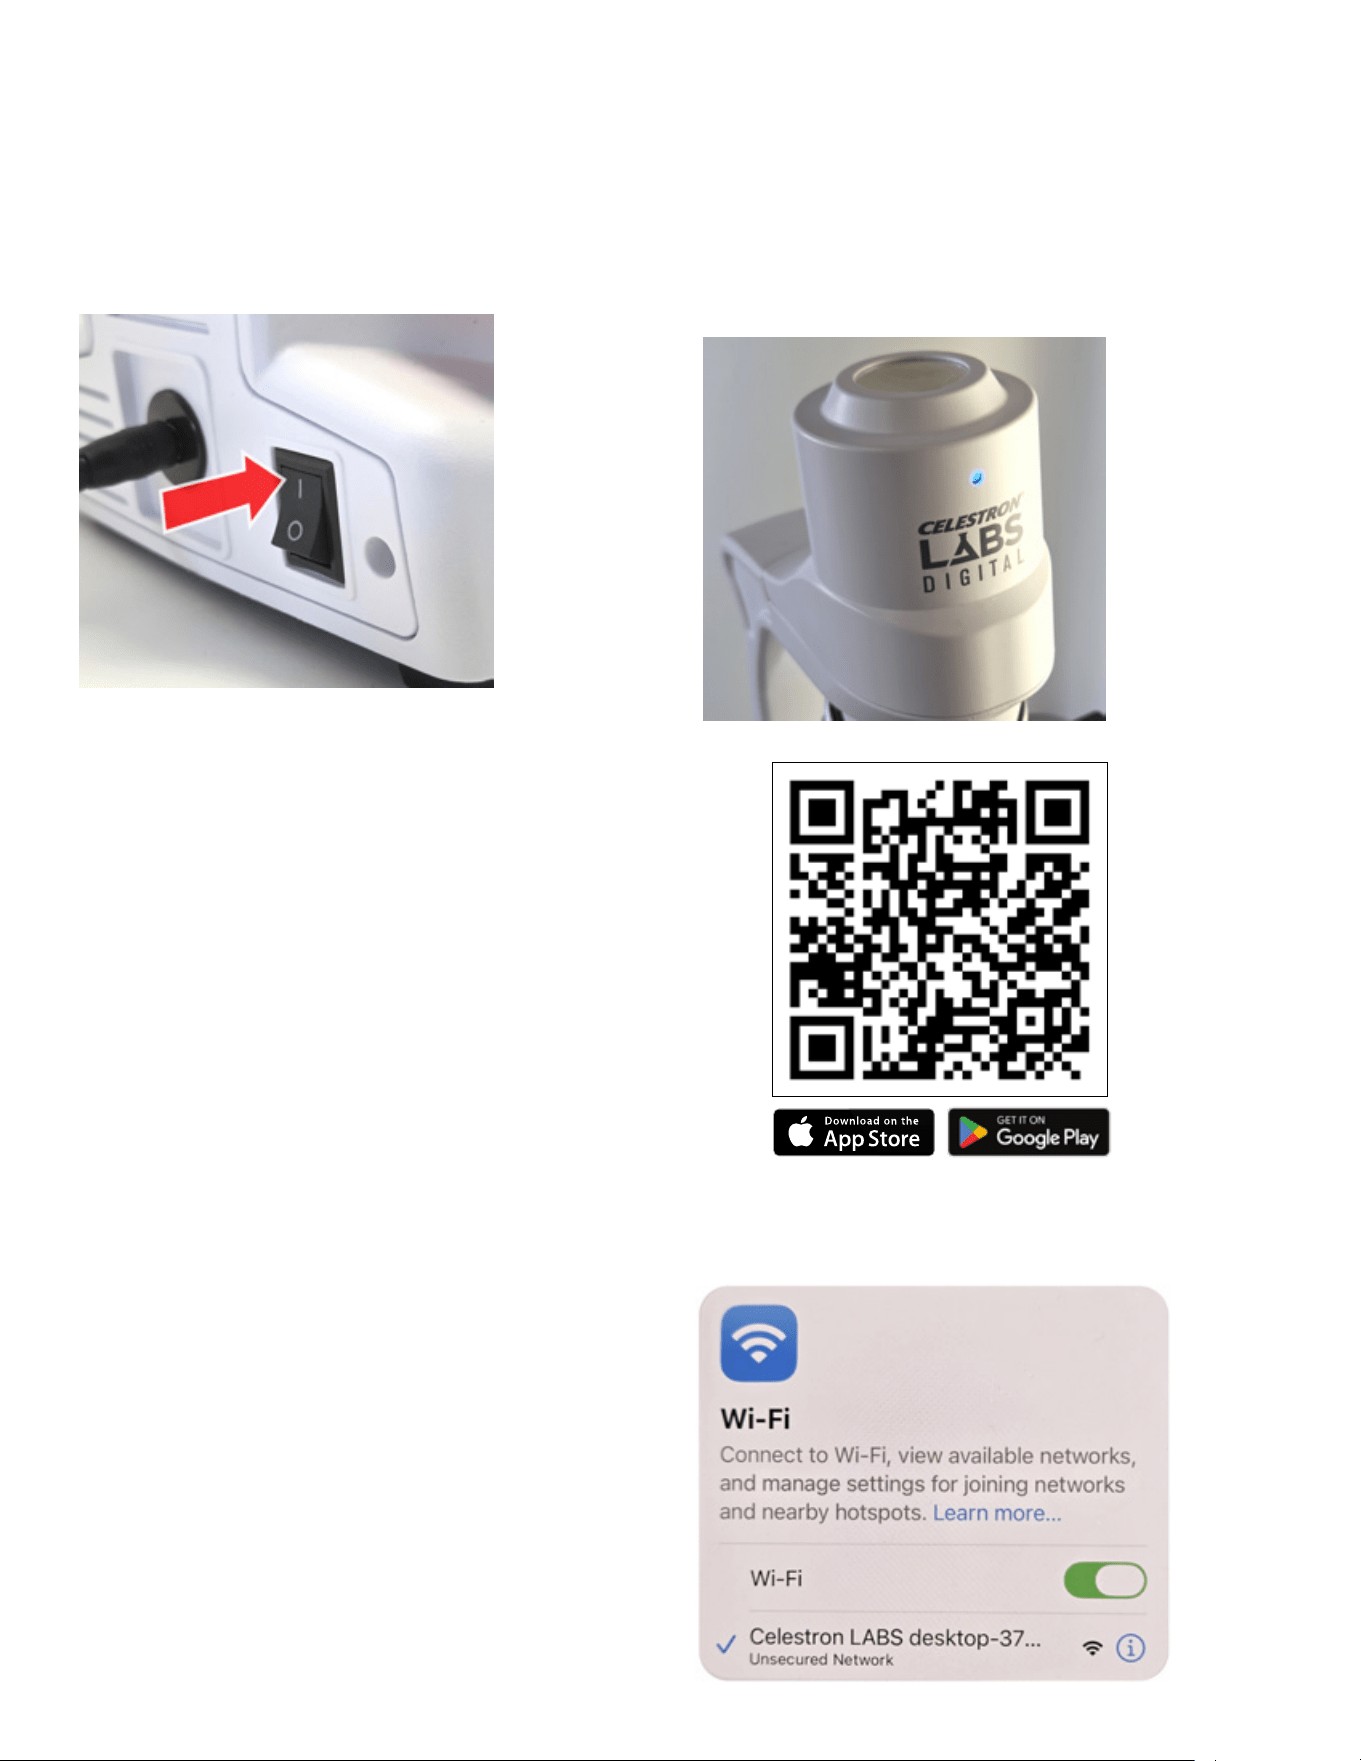
82
|
ESPAÑOL
El iluminador debería encenderse. Si no es el caso, gire
el dial de brillo del lateral de la base para aumentar la
iluminación.
El indicador LED azul comenzará a parpadear. Esto indica que el
microscopio está emitiendo su señal WiFi.
Si el LED azul no se enciende:
• Confirme que el adaptador de alimentación esté conectado con
seguridad.
• Compruebe que la toma de corriente esté activa.
PASO 3: INSTALAR LA APLICACIÓN
La aplicación que acompaña a este microscopio funciona con
dispositivos iOS y Android. Escanee el código QR siguiente o
busque "Celestron Labs Digital Wi-Fi" en Apple App Store o
Google Play Store.
Descargue e instale la aplicación gratuita.
1. Abra la configuración WiFi de su teléfono o tableta.
2. Busque una red con nombre:
Celestron LABS Desktop-XXXX
(Las cuatro X representan una combinación única de letras/
números).
3. Toque la red para conectar.
Una vez conectado, el LED azul dejará de parpadear y quedará fijo.
Su dispositivo puede mostrar un mensaje indicando que no hay
conexión a internet. Es normal. El microscopio crea su propia
conexión Wi-Fi directa y no usa su red Wi-Fi.
PASO 2: ENCENDIDO
Active el interruptor de encendido situado en la base del microscopio.
PASO 4: CONECTE A LA RED WI-FI DEL MICROSCOPIO
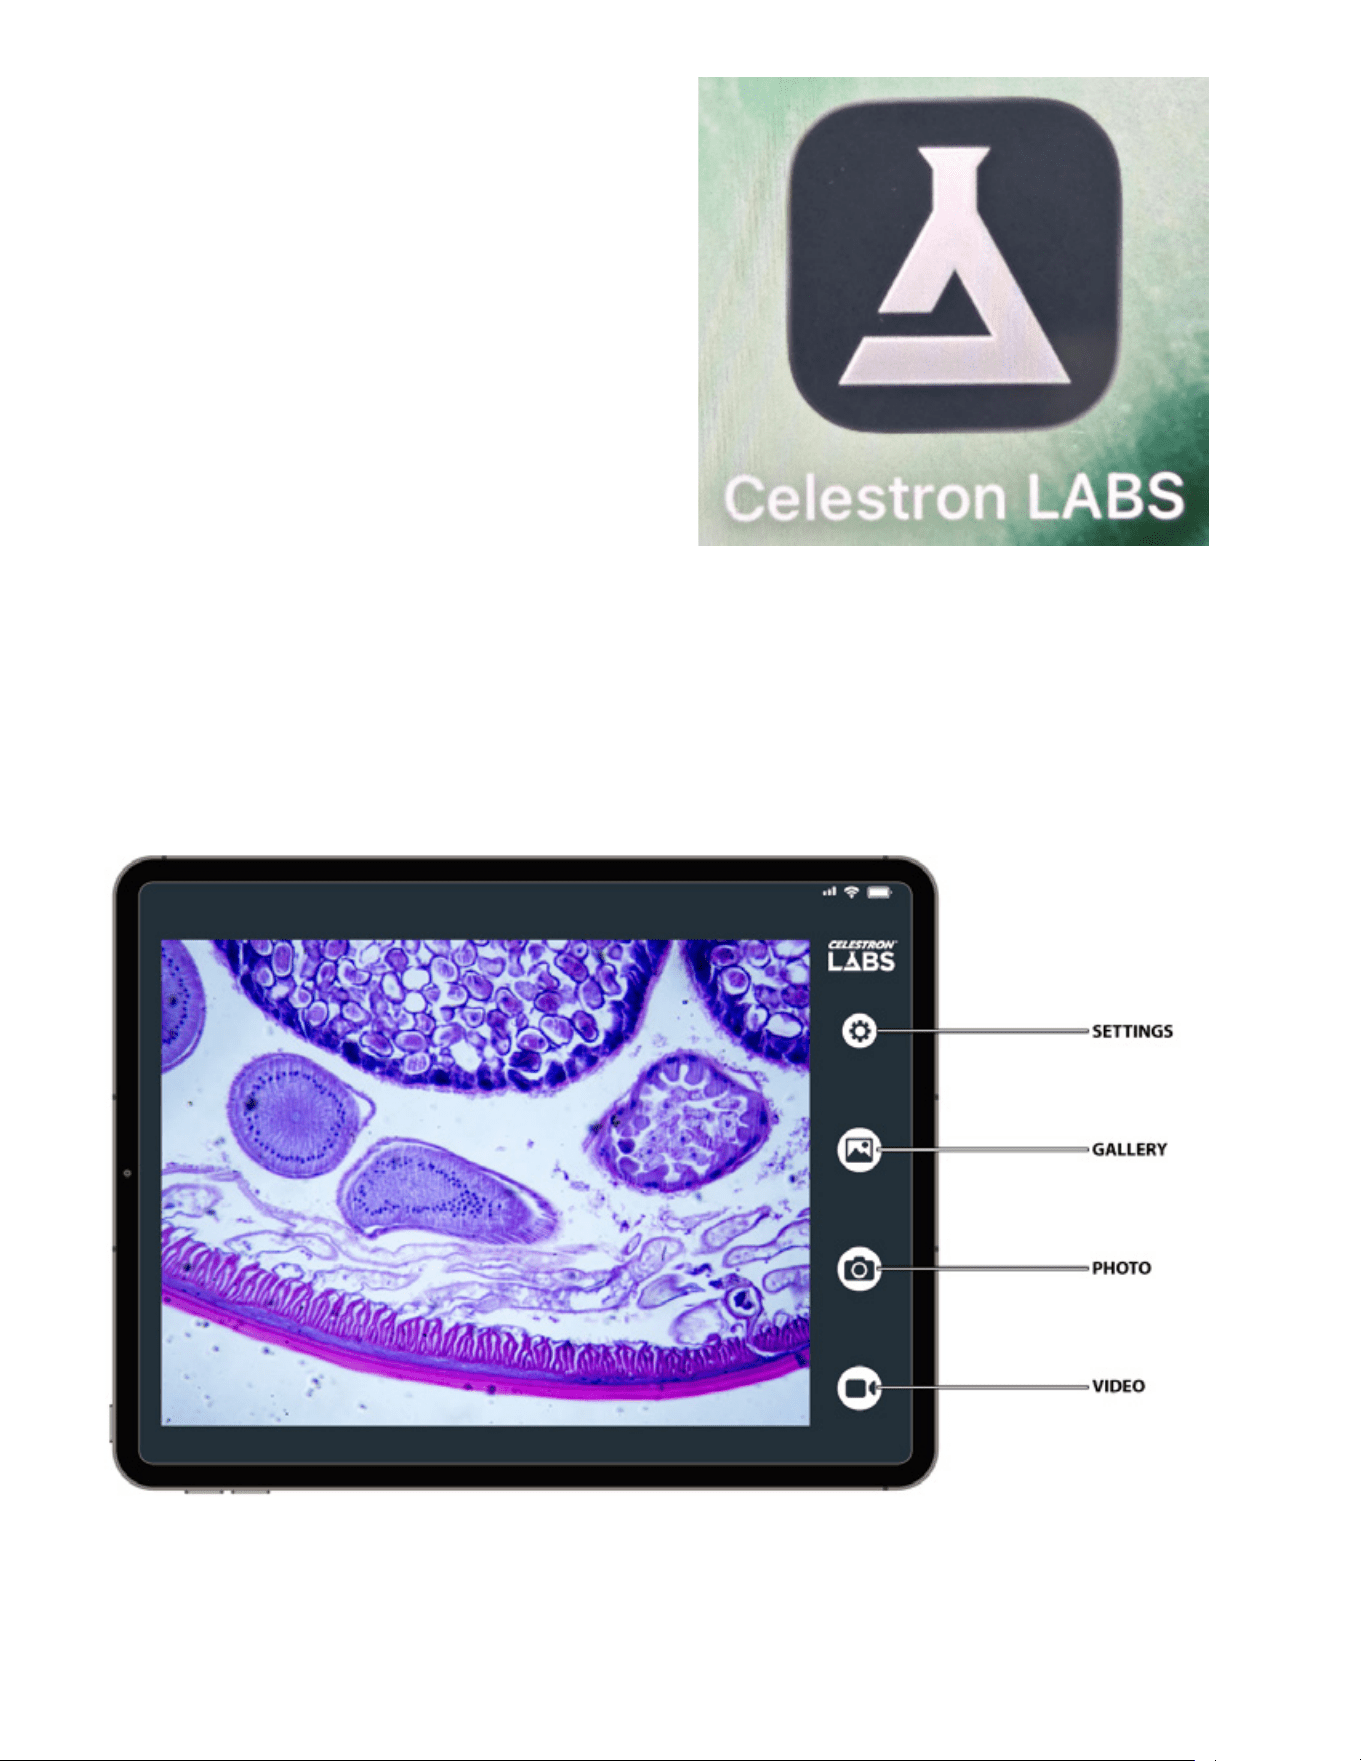
ESPAÑOL
|
83
A continuación se muestra la interfaz principal. Las etiquetas identifican cada característica descrita en esta sección.
USAR LA APLICACIÓN
PASO 5: COMENZAR A OBSERVAR
Abra la aplicación Celestron Labs Digital Wi-Fi.
Debería comenzarse a emitir video en directo en unos 30
segundos.
Si el video no aparece:
• Confirme que su dispositivo está conectado a la red Celestron
LABS Desktop-XXXX.
• Cierre y vuelva a abrir la aplicación.
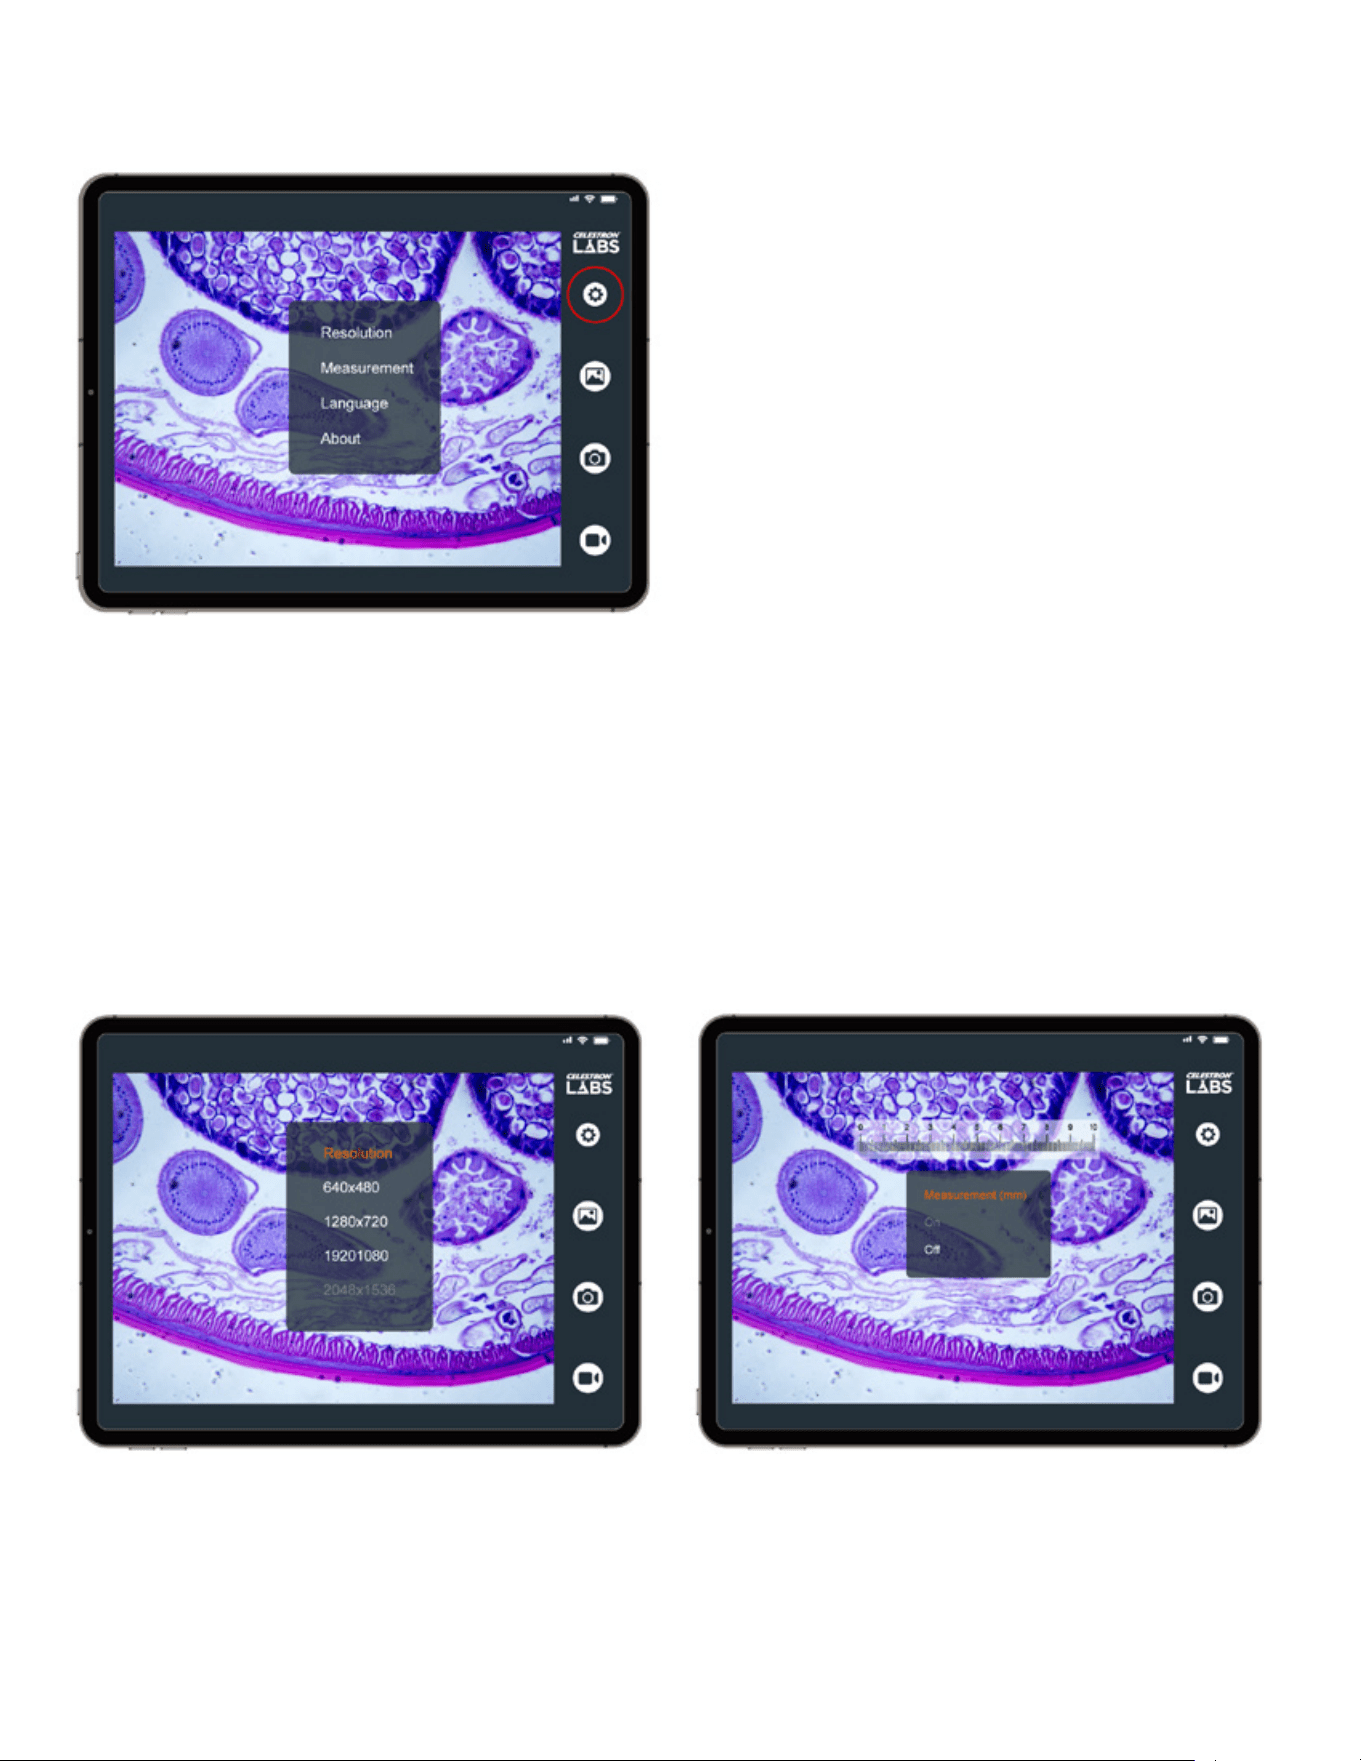
84
|
ESPAÑOL
A. CONFIGURACIÓN:
Toque el icono Configuración para acceder a las opciones siguiente:
RESOLUCIÓN:
Seleccione la resolución de imagen y video.
Las resoluciones más altas proporcionan más detalle, pero crean
archivos más grandes.
Configuraciones disponibles:
• 640 × 480
• 1280 × 720
• 1920 × 1080
• 2048 × 1536 (resolución máxima)
MEDICIÓN:
Activa o desactiva la retícula de medición digital.
Puede usarlo como guía general para comparación o, al calibrarlo,
estimar las dimensiones del espécimen directamente en pantalla.
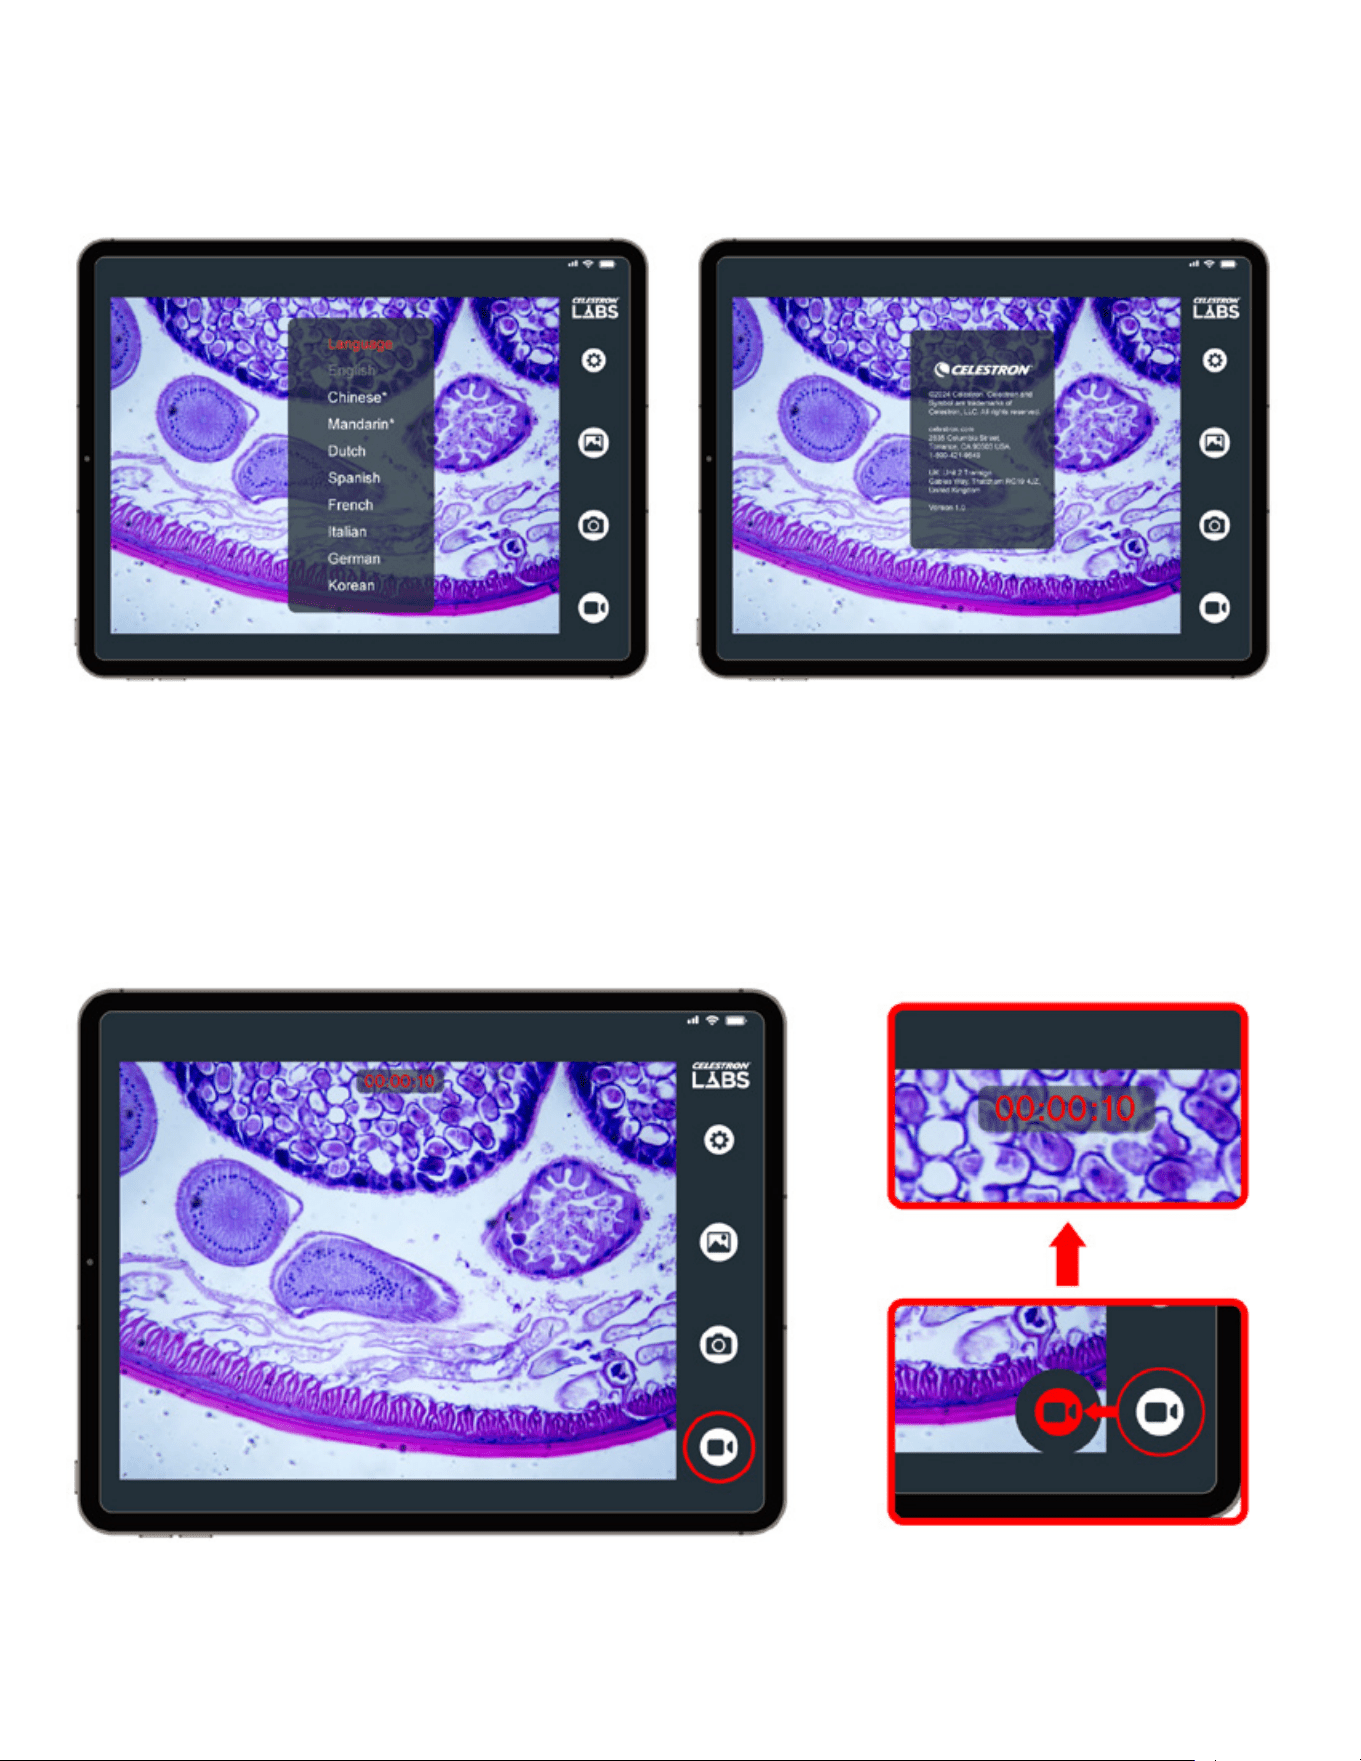
ESPAÑOL
|
85
IDIOMA:
Cambia el idioma de la interfaz.
Las opciones disponibles incluyen: inglés (predeterminado),
chino (simplificado), chino (tradicional), holandés, español,
francés, italiano, alemán y coreano.
ACERCA DE
Muestra el número de versión de la aplicación,
información legal y detalles de contacto de Celestron.
B. GRABACIÓN VIDEO
Toque el icono de video para comenzar a grabar. Aparecerá
un temporizador en la parte superior de la pantalla durante la
grabación.
Toque el icono de nuevo para detener la grabación.
Los videos se guardan directamente en su dispositivo.
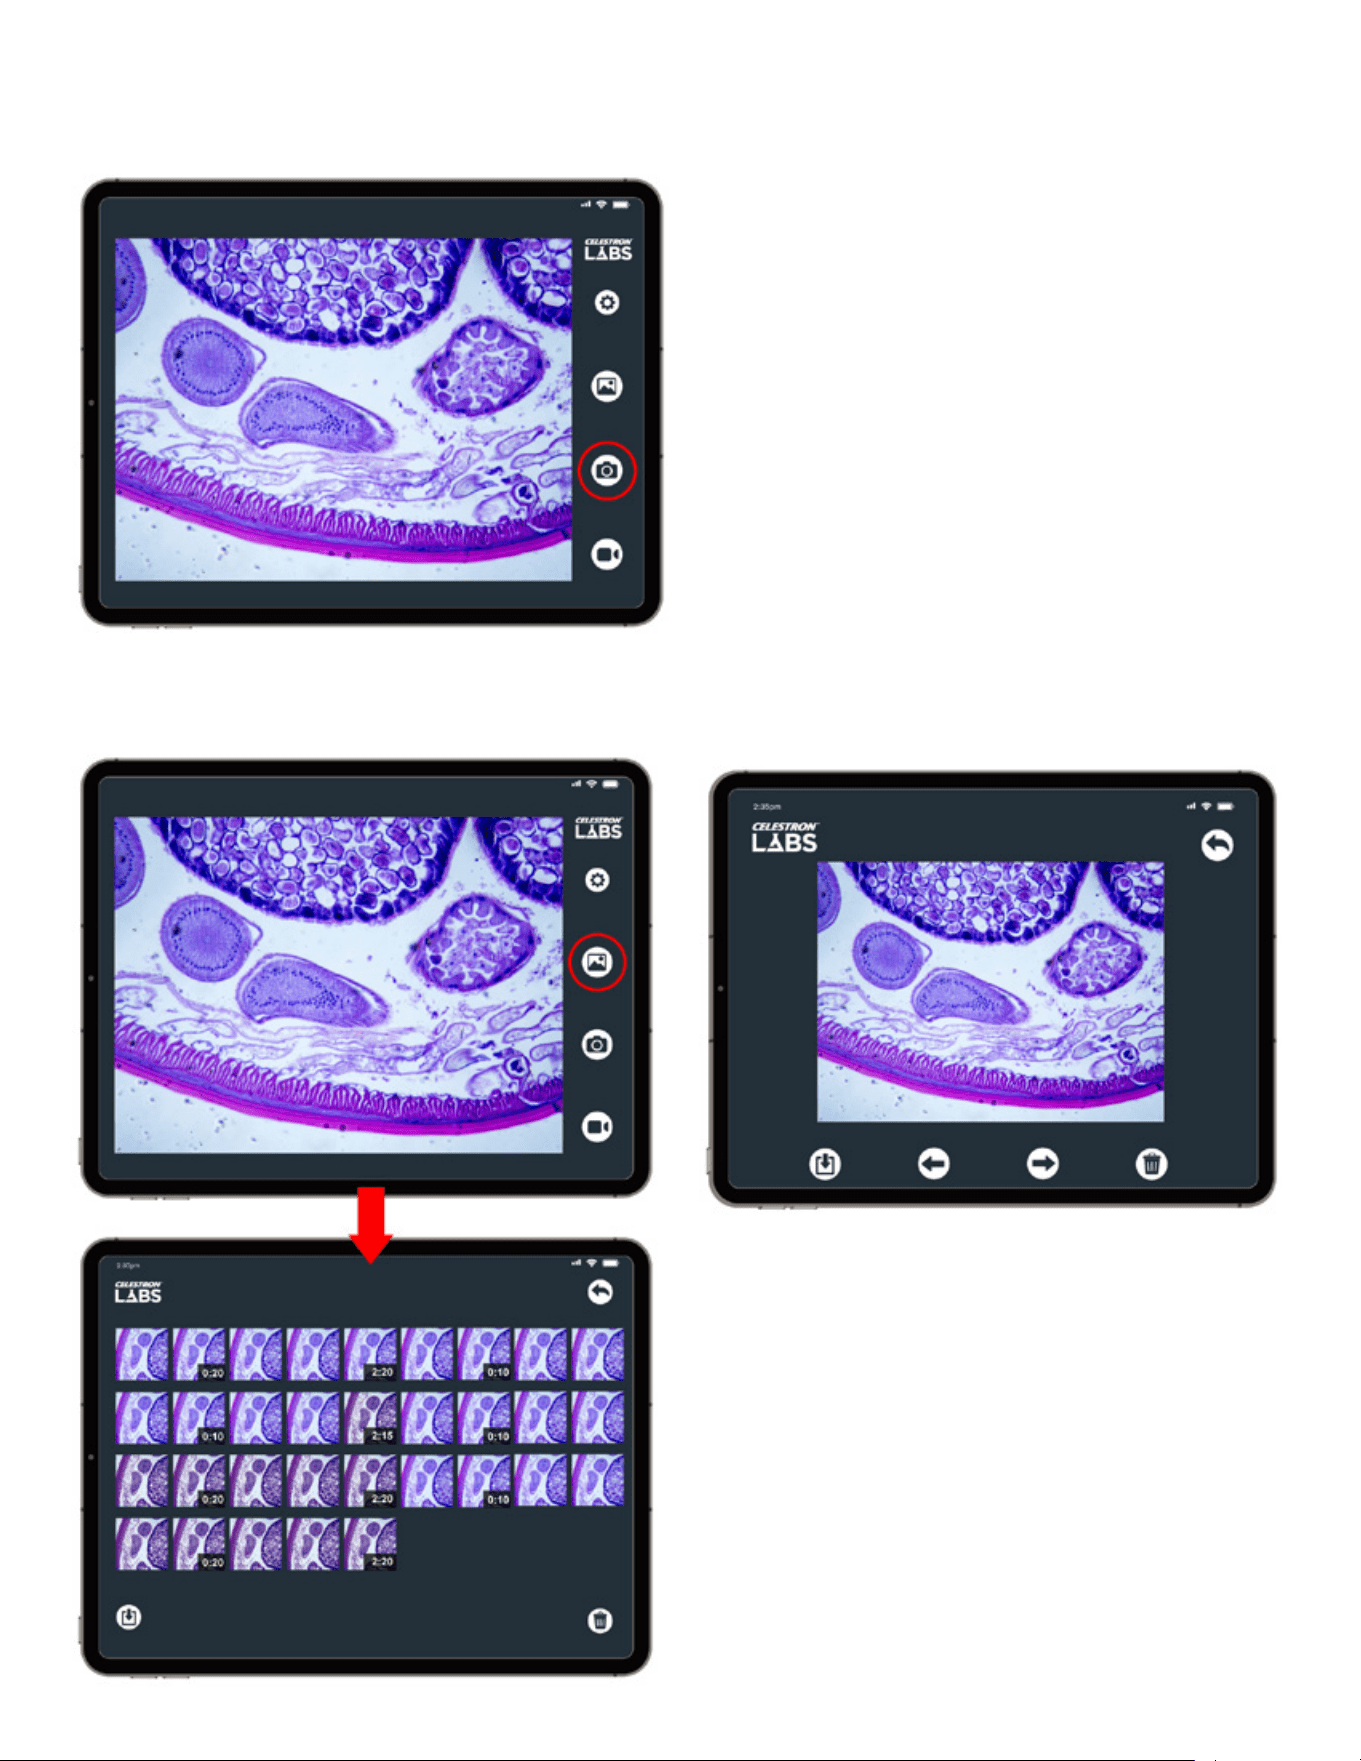
86
|
ESPAÑOL
C. CAPTURA DE FOTOGRAFÍAS
Toque el icono de foto para capturar una imagen fija. Las imágenes se guardan directamente en su dispositivo.
Toque el icono Galería para ver las imágenes y videos guardados.
• Toque una miniatura para verlo a pantalla completa.
• Deslice a izquierda o derecha para desplazarse por los archivos
guardados.
• Para reproducir un video, toque la pantalla y seleccione
Reproducir.
NOTIFICACIÓN IMPORTANTE DE
PERMISOS
Según la configuración de su dispositivo, puede que se solicite
permitir a la aplicación el acceso a sus fotos y archivos. Es
necesario un acceso completo para guardar imágenes y videos.
D. GALERÍA
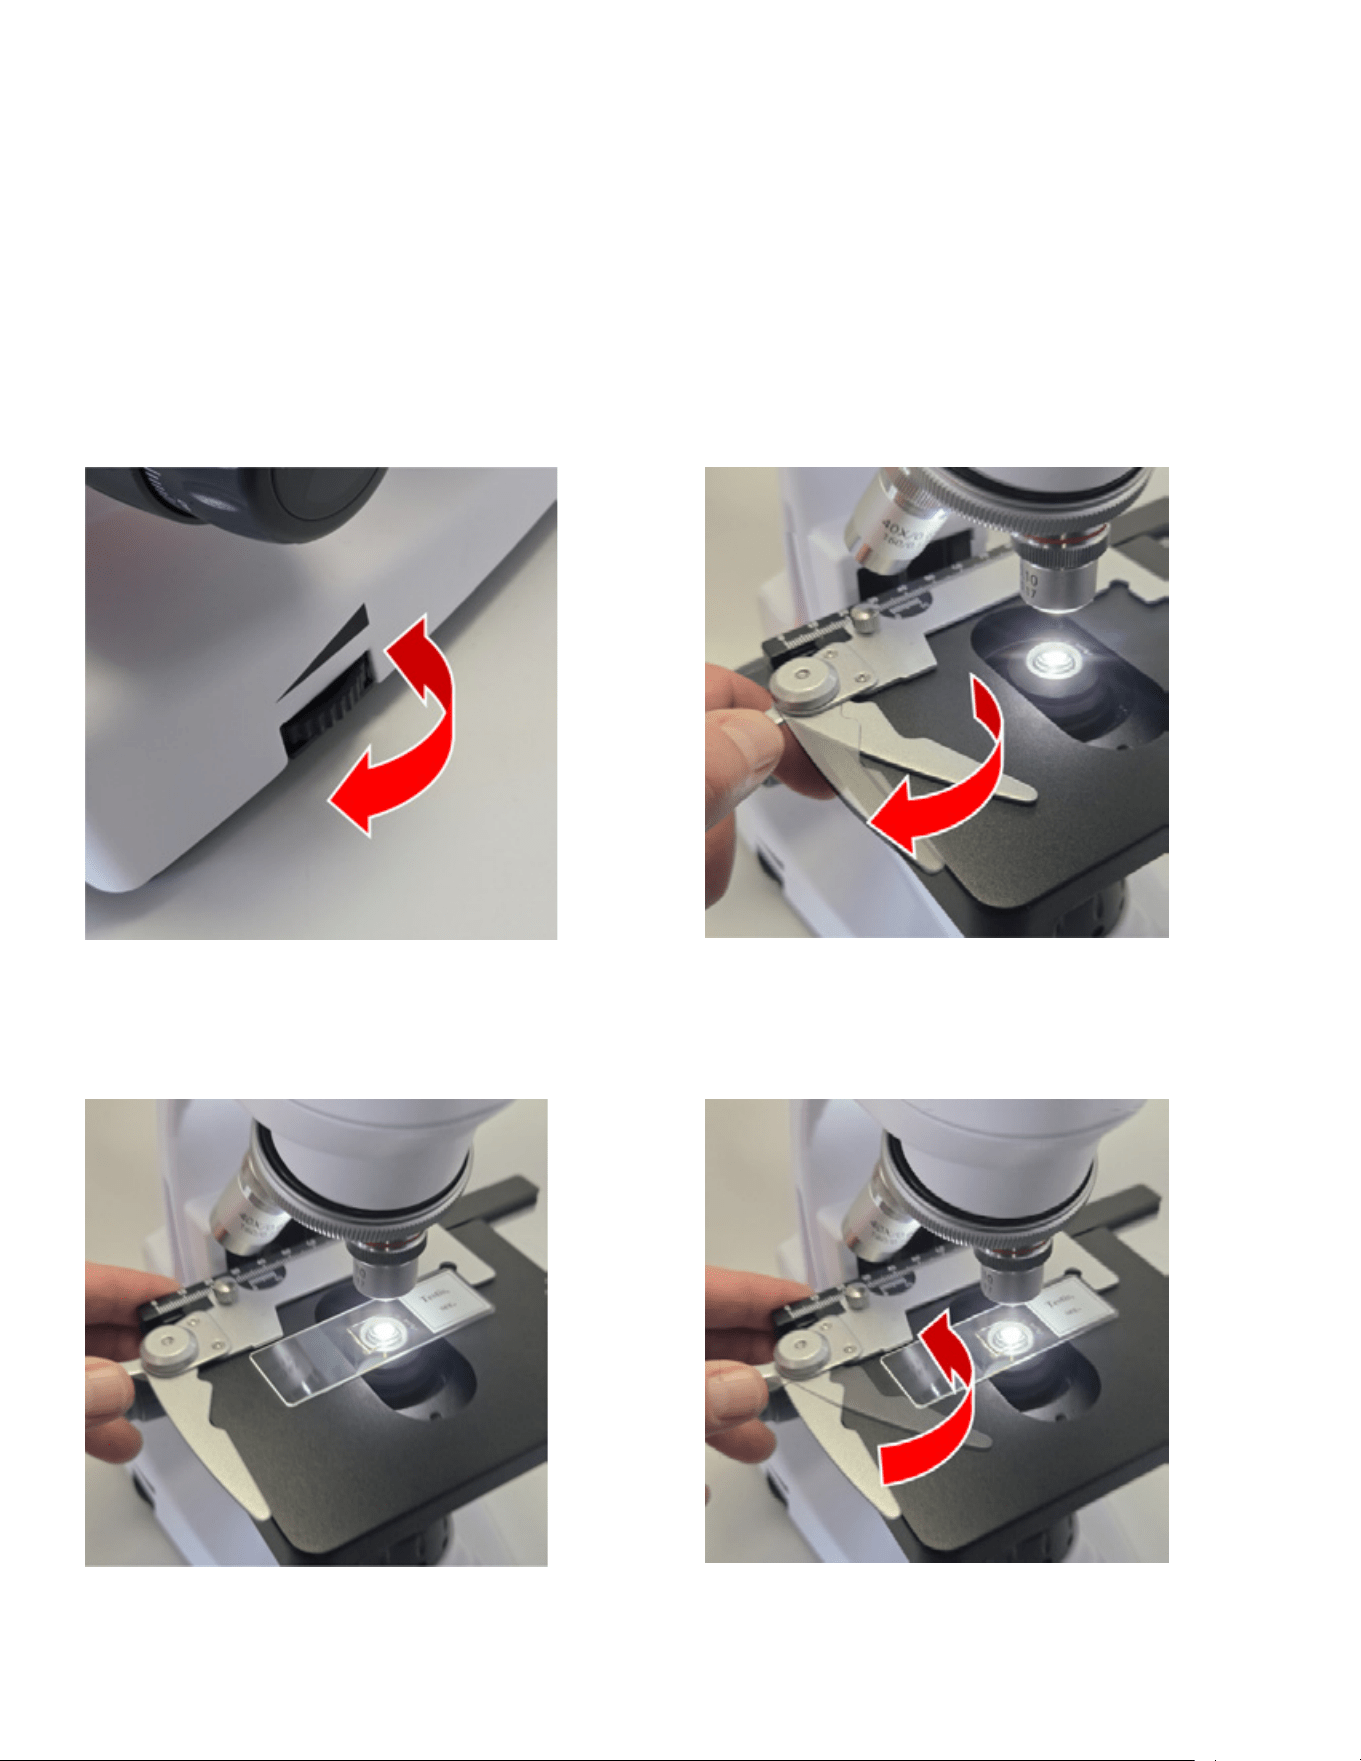
ESPAÑOL
|
87
USO DEL MICROSCOPIO
El microscopio de sobremesa Wi-Fi digital funciona como un microscopio compuesto tradicional, con la cámara integrada
sustituyendo al ocular.
Antes de la observación, confirme:
• El microscopio está encendido.
• El LED azul está encendido fijo (Wi-Fi conectada).
• La aplicación está abierta y emitiendo.
AJUSTE DE ILUMINACIÓN
Gire el dial de control de brillo en la base del microscopio para
activar el iluminador y ajustar la intensidad de la luz.
INSERTAR PORTAMUESTRAS
1. Gire la pinza de retención del portamuestras para abrirla.
2. Ponga el portamuestras sobre el soporte, con el borde
derecho en contacto con la guía de soporte fija.
3. Suelte con suavidad el brazo de la fijación para asegurar el
portamuestras.
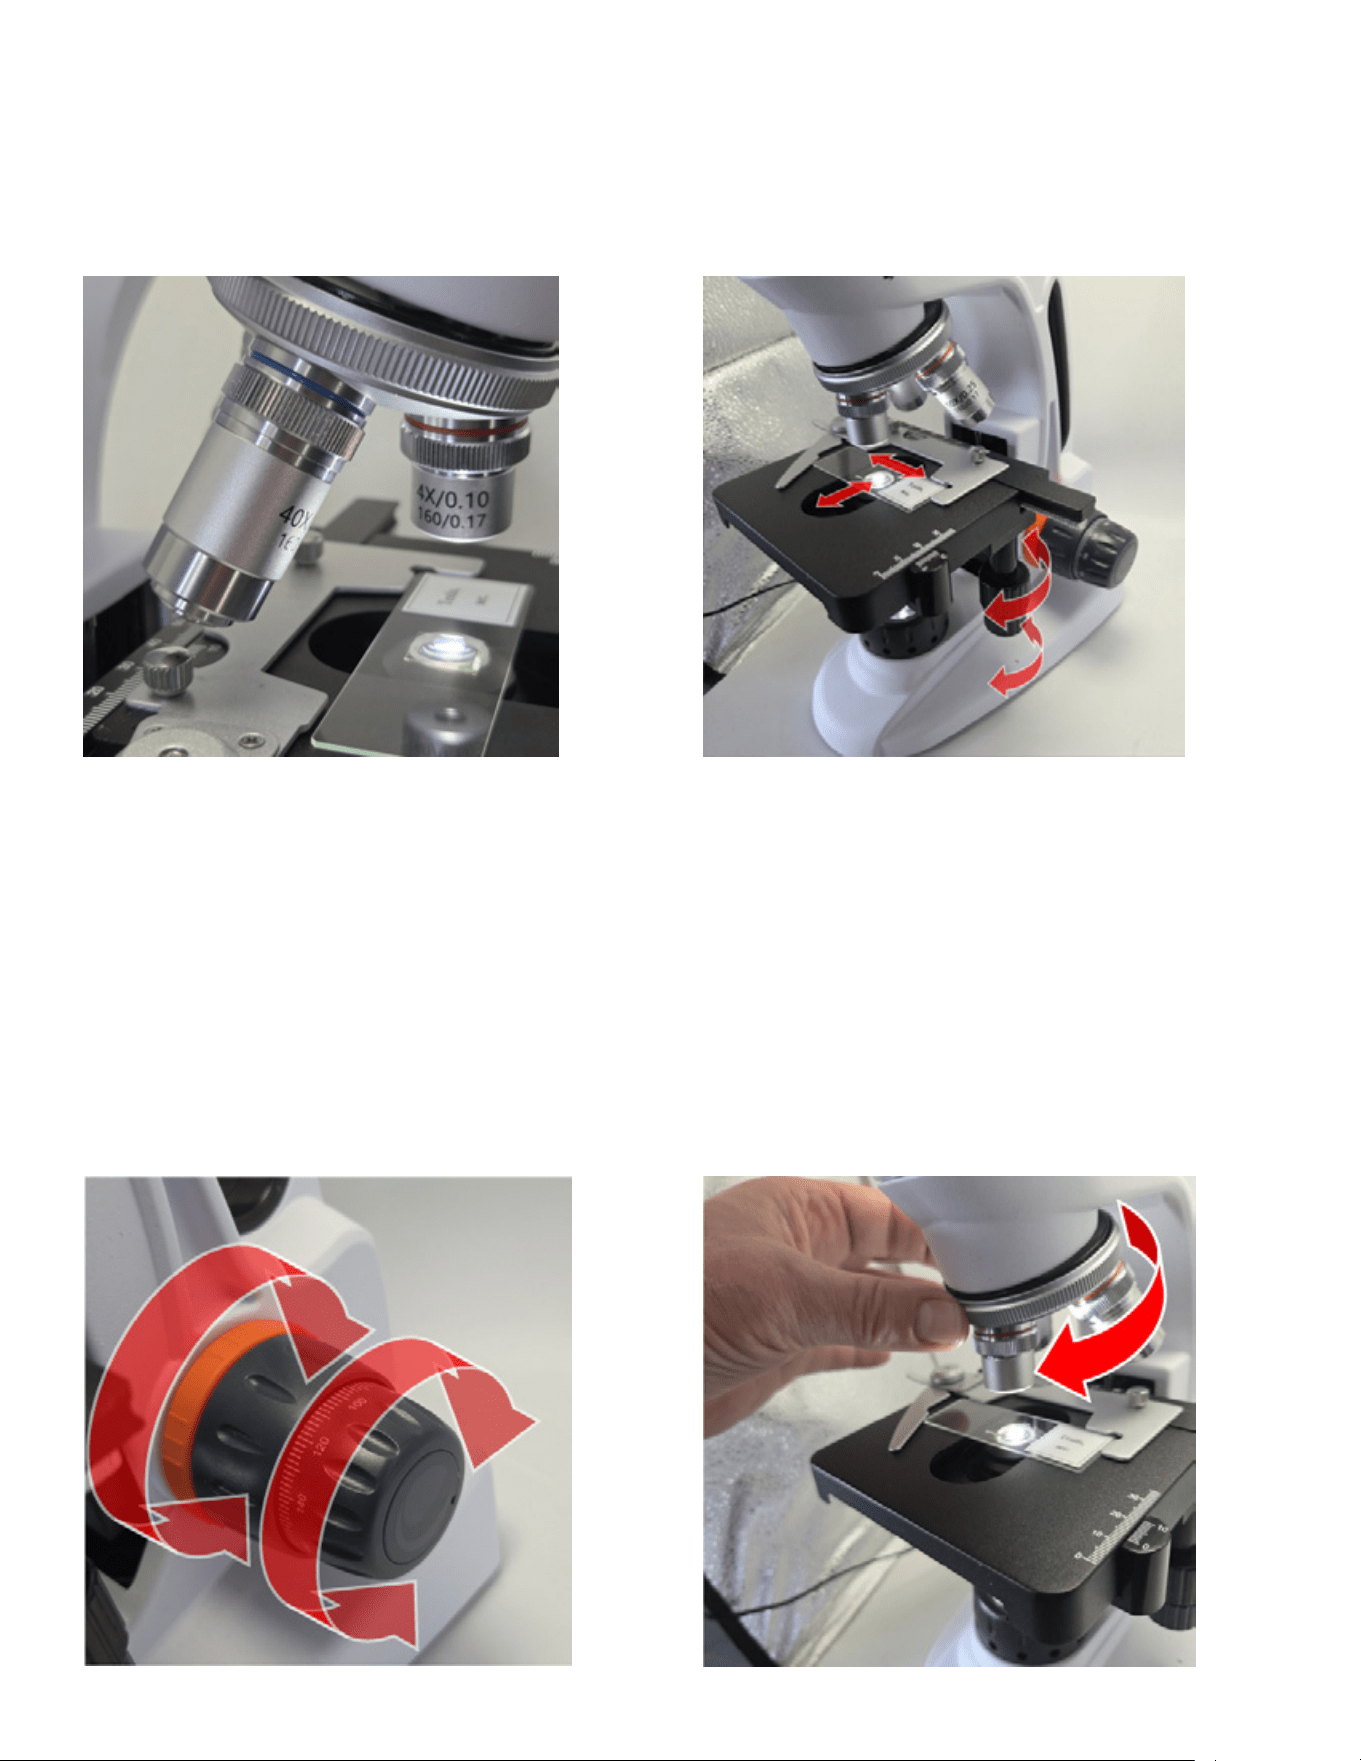
88
|
ESPAÑOL
SELECCIONAR EL OBJETIVO MÁS
BAJO
Gire el revólver del objetivo para poner en posición el objetivo
4x en posición sobre el portamuestras. Notará el encaje.
Comenzar con el aumento más bajo facilita localizar el
espécimen.
POSICIONAR EL ESPÉCIMEN
Use los mandos de control X-Y del soporte para mover el
portamuestras hasta que el espécimen aparezca en pantalla.
ENFOCAR LA IMAGEN
Encontrará dos mandos de enfoque en la base de su
microscopio, uno a cada lado.
Comience con el mando de enfoque aproximado (mando
más grande) para hacer que el espécimen tenga una imagen
razonablemente clara.
Use a continuación el mando de enfoque preciso (mando más
pequeño) para hacer que el espécimen tenga una imagen
definida y clara.
Cuando la imagen esté definida, ajuste la posición del
portamuestras si es necesario para centrar mejor el espécimen en
el campo visual. A continuación podrá capturar una imagen fija,
grabar video, o seguir observando.
AUMENTAR EL AUMENTO
Para ver más detalles i observar mejor su espécimen, gire el revólver
del objetivo para adelantar el objetivo10x o 40x. Siga girando hasta
que el objetivo deseado encaje.
El aumento total se determina multiplicando la lente del objetivo por
el aumento del sensor integrado del microscopio (12x). Con los
objetivos incluidos, el aumento total es aproximadamente:
Aumento total del objetivo
4x 48x
10x 120x
40x 480x
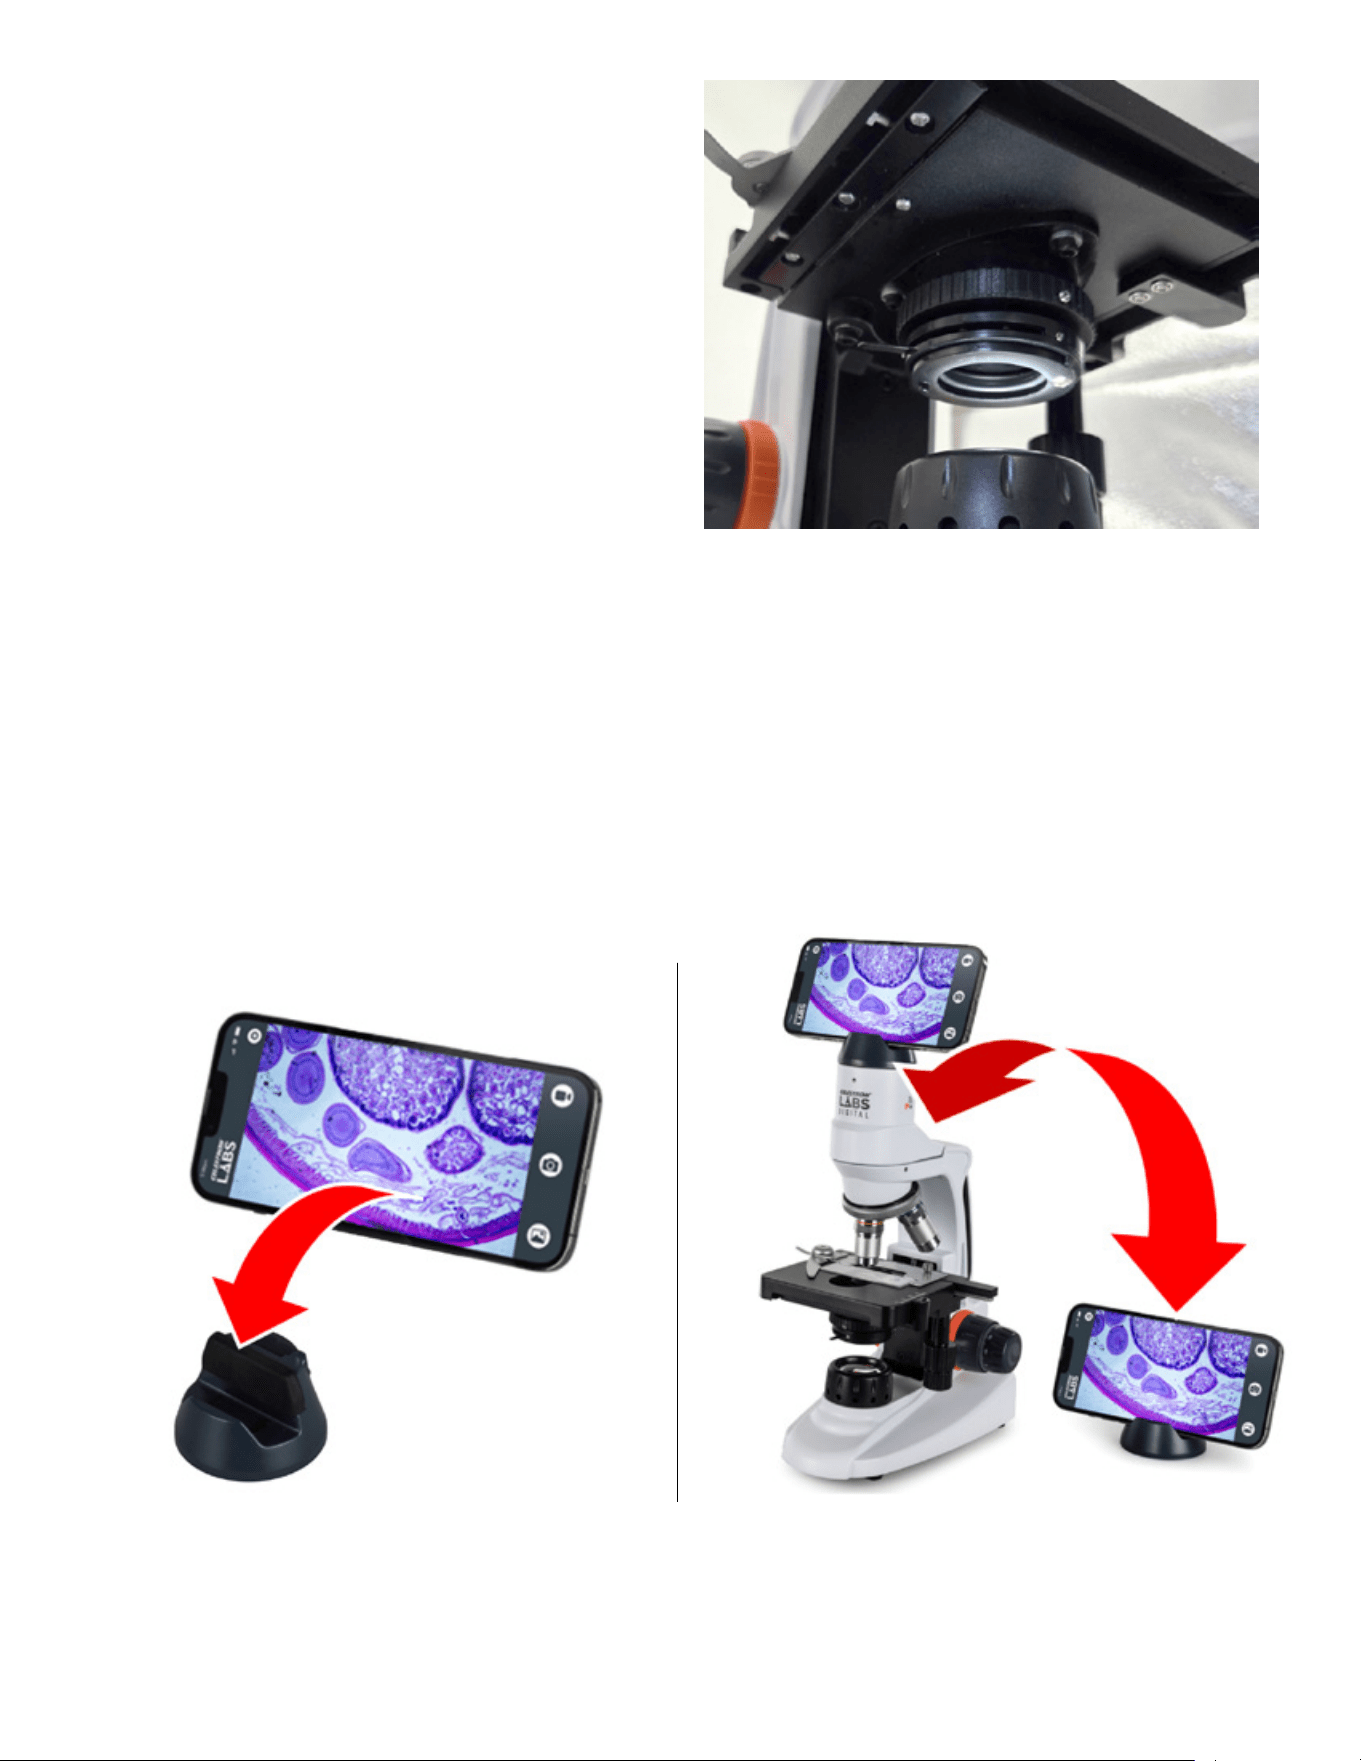
ESPAÑOL
|
89
CONDENSADOR ABBE
Situado bajo el soporte, entre el iluminador y la apertura del
soporte, se encuentra el condensador Abbe. El condensador
consiste en una lente óptica y un diafragma de iris ajustable
controlados por un brazo deslizante.
El condensador captura luz del iluminador y la concentra en un
cono que pasa por el espécimen en el portamuestras.
Ajustar el diafragma de iris cambia el tamaño del cono de luz,
permitiéndole mejorar el contraste y la resolución.
El microscopio incluye un soporte de dispositivo inteligente para observación con manos libres. El soporte puede adherirse
magnéticamente a la parte superior del microscopio o apoyarse en una superficie plana a su lado.
Para usar el soporte con la correa, coloque el teléfono en la base del soporte. La base con peso ayuda a mantener dispositivos más
pequeños estables durante la visualización.
Cuando use una tableta o dispositivo más grande, recomendamos encarecidamente asegurarlo con el gancho y correa de seguridad
incluidos. Ayuda a mantener el dispositivo firmemente en posición durante el uso.
NOTA: La aplicación se ha diseñado para usarse en orientación apaisada.
USAR EL SOPORTE Y LA CORREA DEL DISPOSITIVO
INTELIGENTE
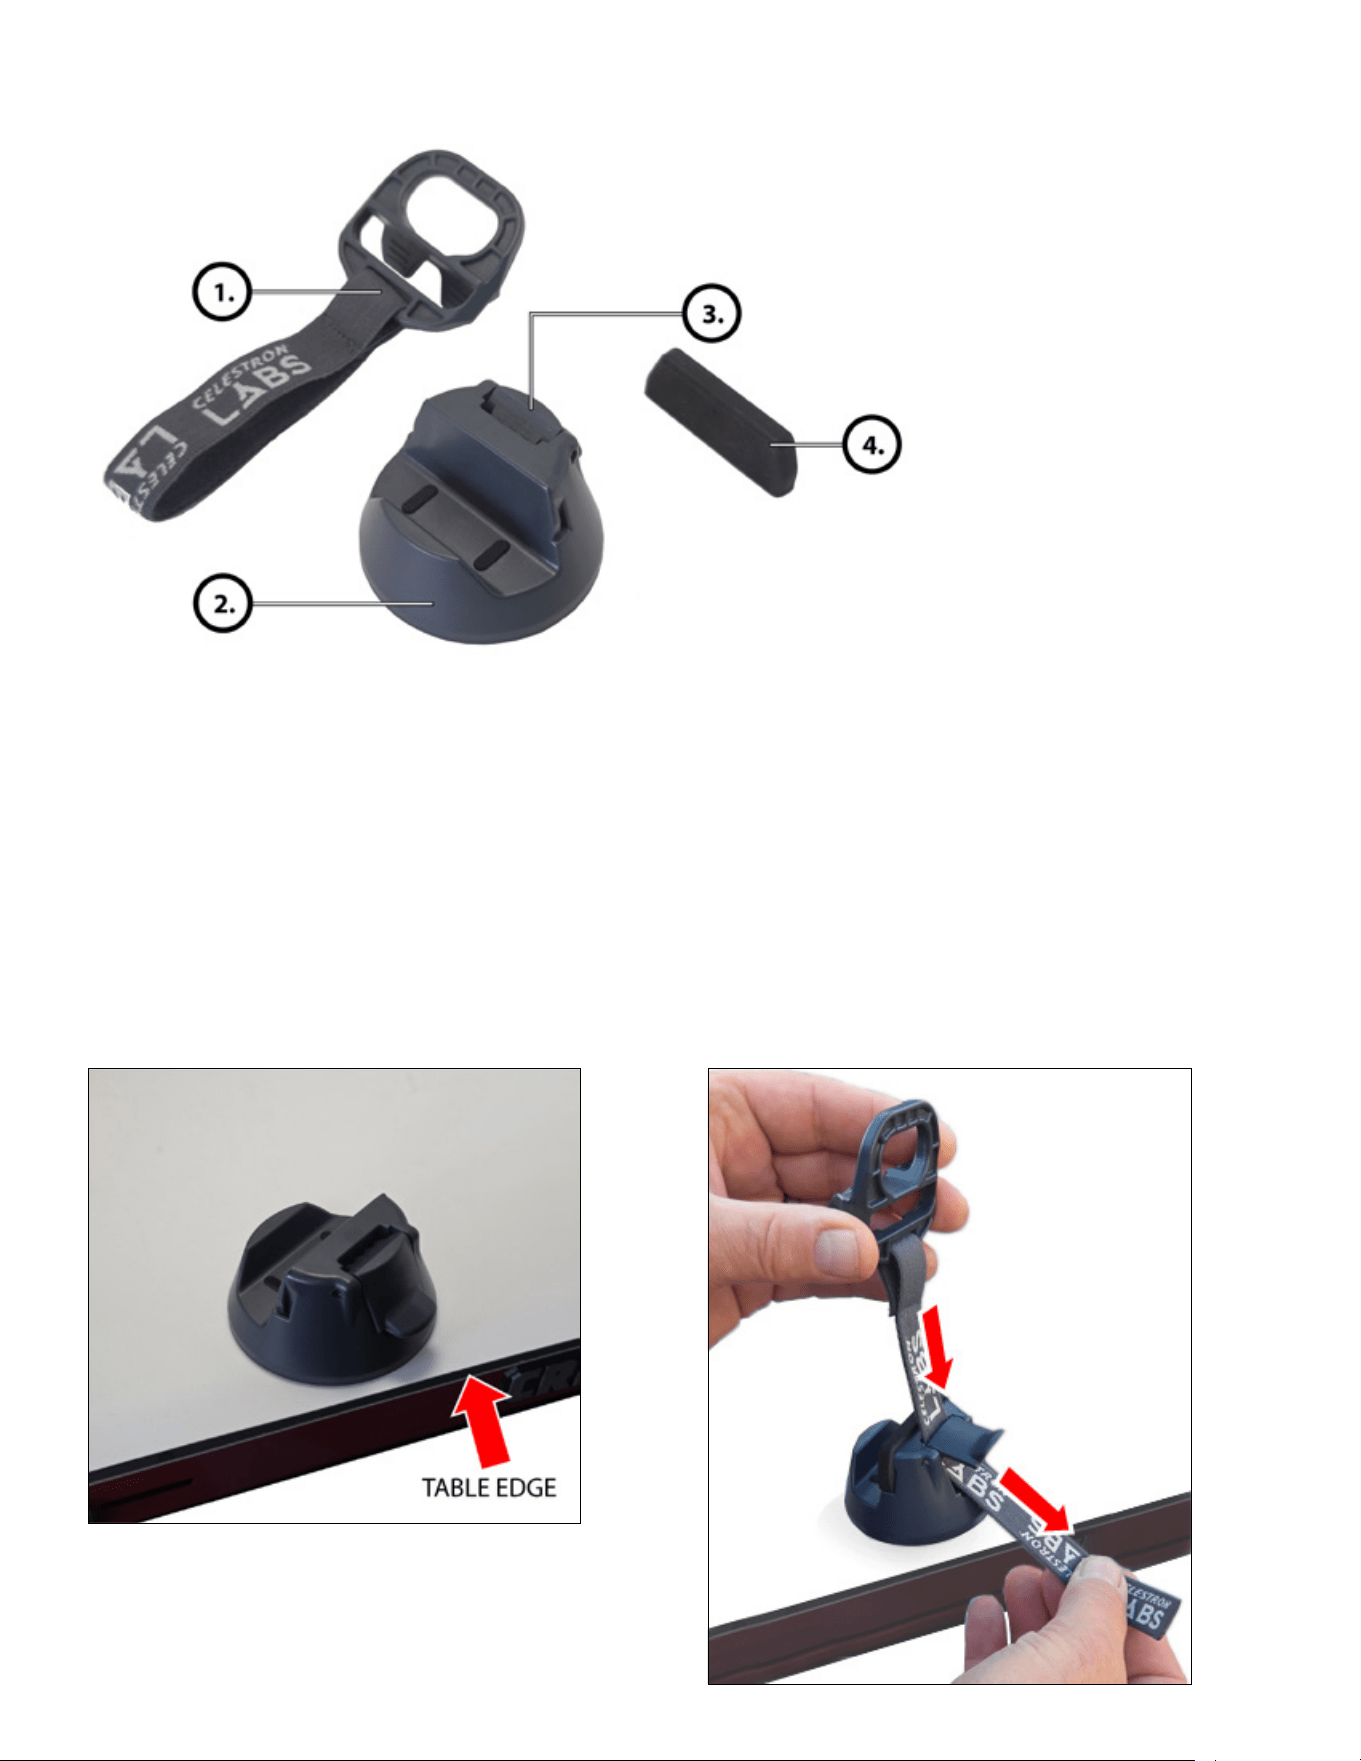
90
|
ESPAÑOL
1. Base del soporte - Plataforma de apoyo principal con base metálica con peso
2. Gancho y correa de seguridad - Gancho de plástico atado a una correa elástica
3. Pestillo de bloqueo - Asegura la correa tensada
4. Alfombrilla potenciadora - Inserto de caucho que proporciona apoyo adicional si es
necesario (p.ej., para dispositivos sin fundas protectoras)
1. Ponga la base del soporte sobre una superficie estable y plana,
preferiblemente cerca del borde de una mesa.
2. Enrosque la correa elástica por el pestillo de bloqueo
como se indica.
PIEZAS DEL SOPORTE DEL DISPOSITIVO INTELIGENTE
USAR EL GANCHO Y CORREA DE SEGURIDAD
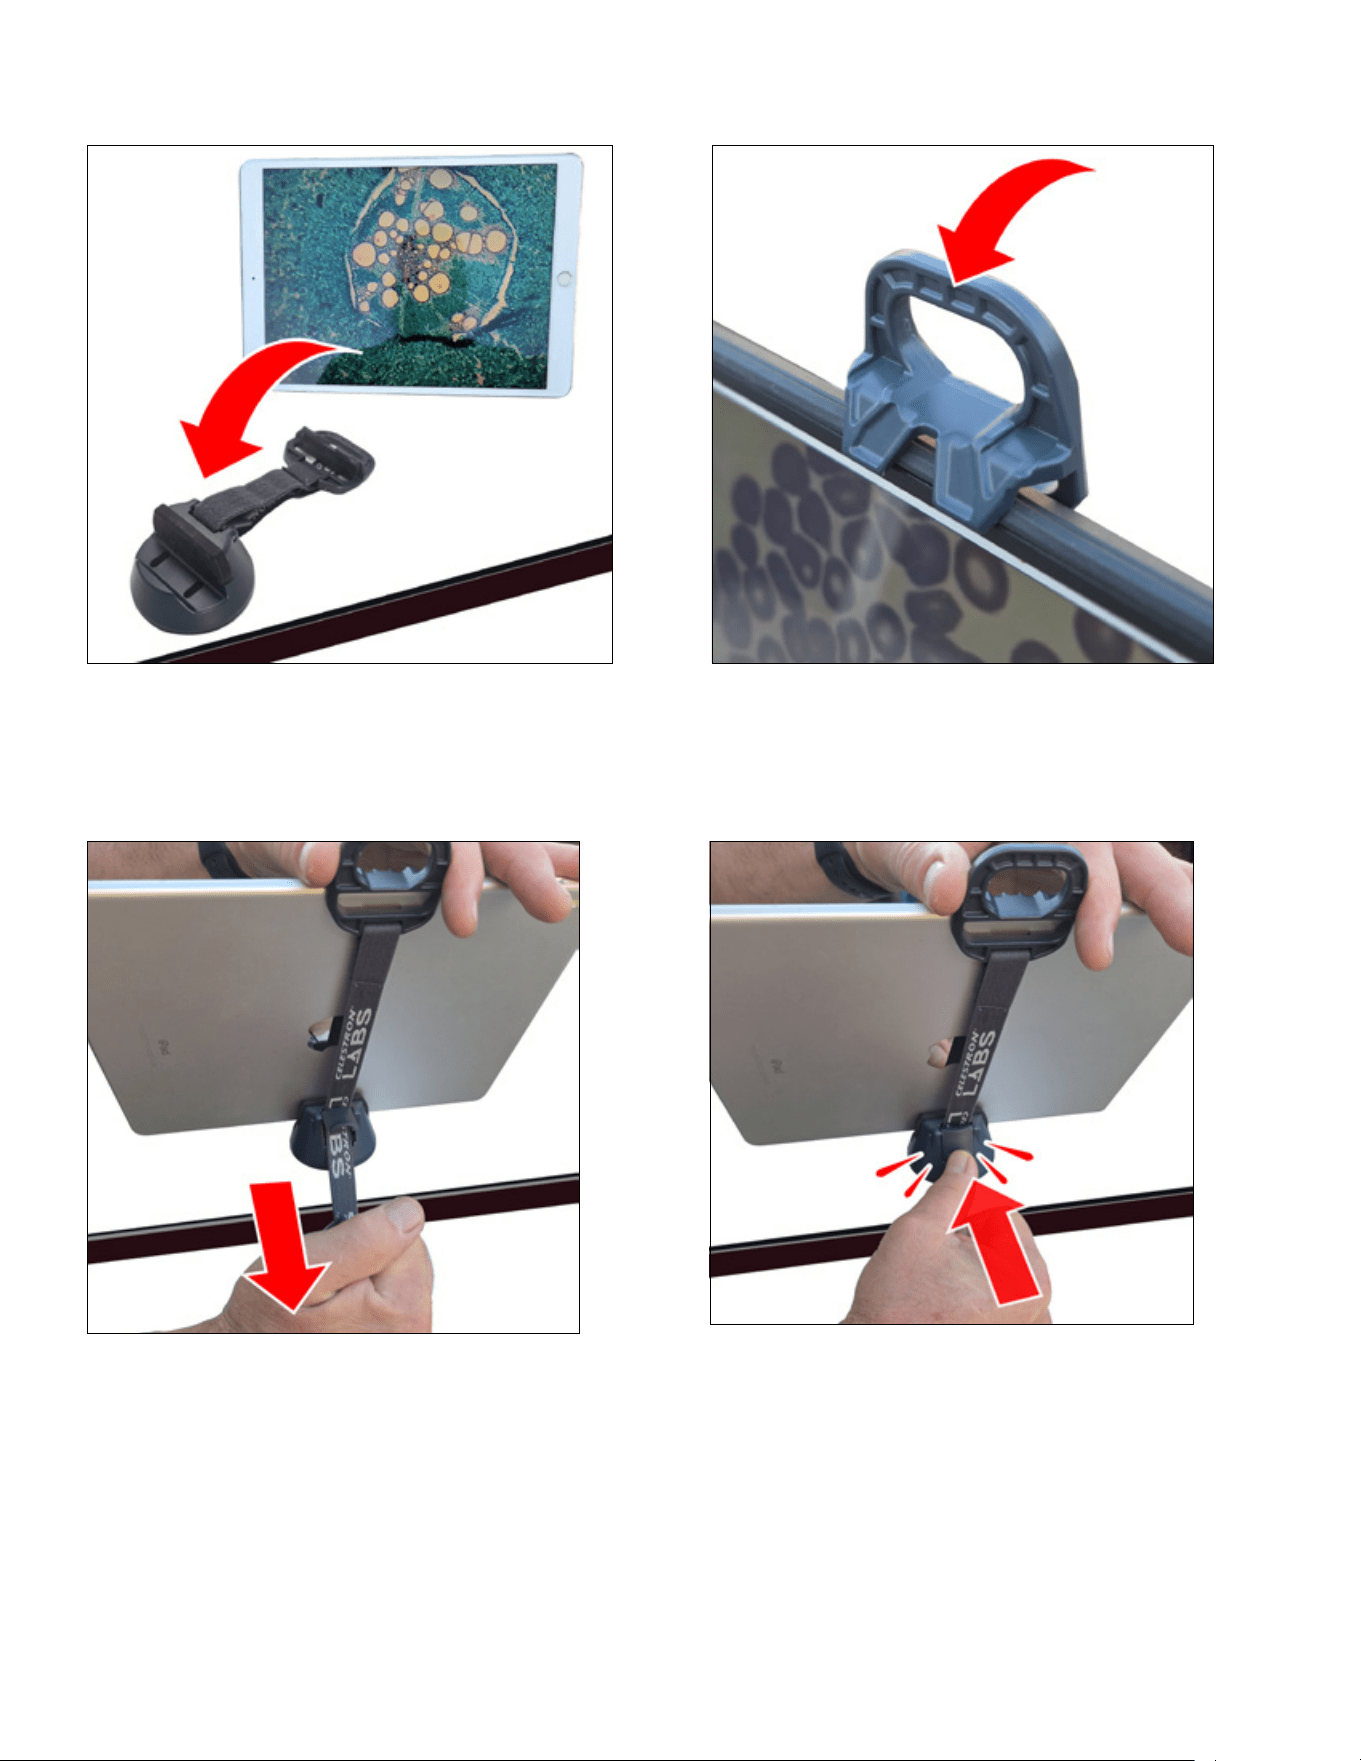
ESPAÑOL
|
91
3. Ponga el dispositivo inteligente sobre la base del soporte y
coloque el gancho sobre el lateral del dispositivo.
4. Aguante el dispositivo y engánchelo con seguridad
con una mano. Con la otra mano, tire hacia abajo de la
correa elástica para aumentar la tensión.
5. Manteniendo la tensión, cierre el pestillo de bloqueo
para asegurar la correa en posición.
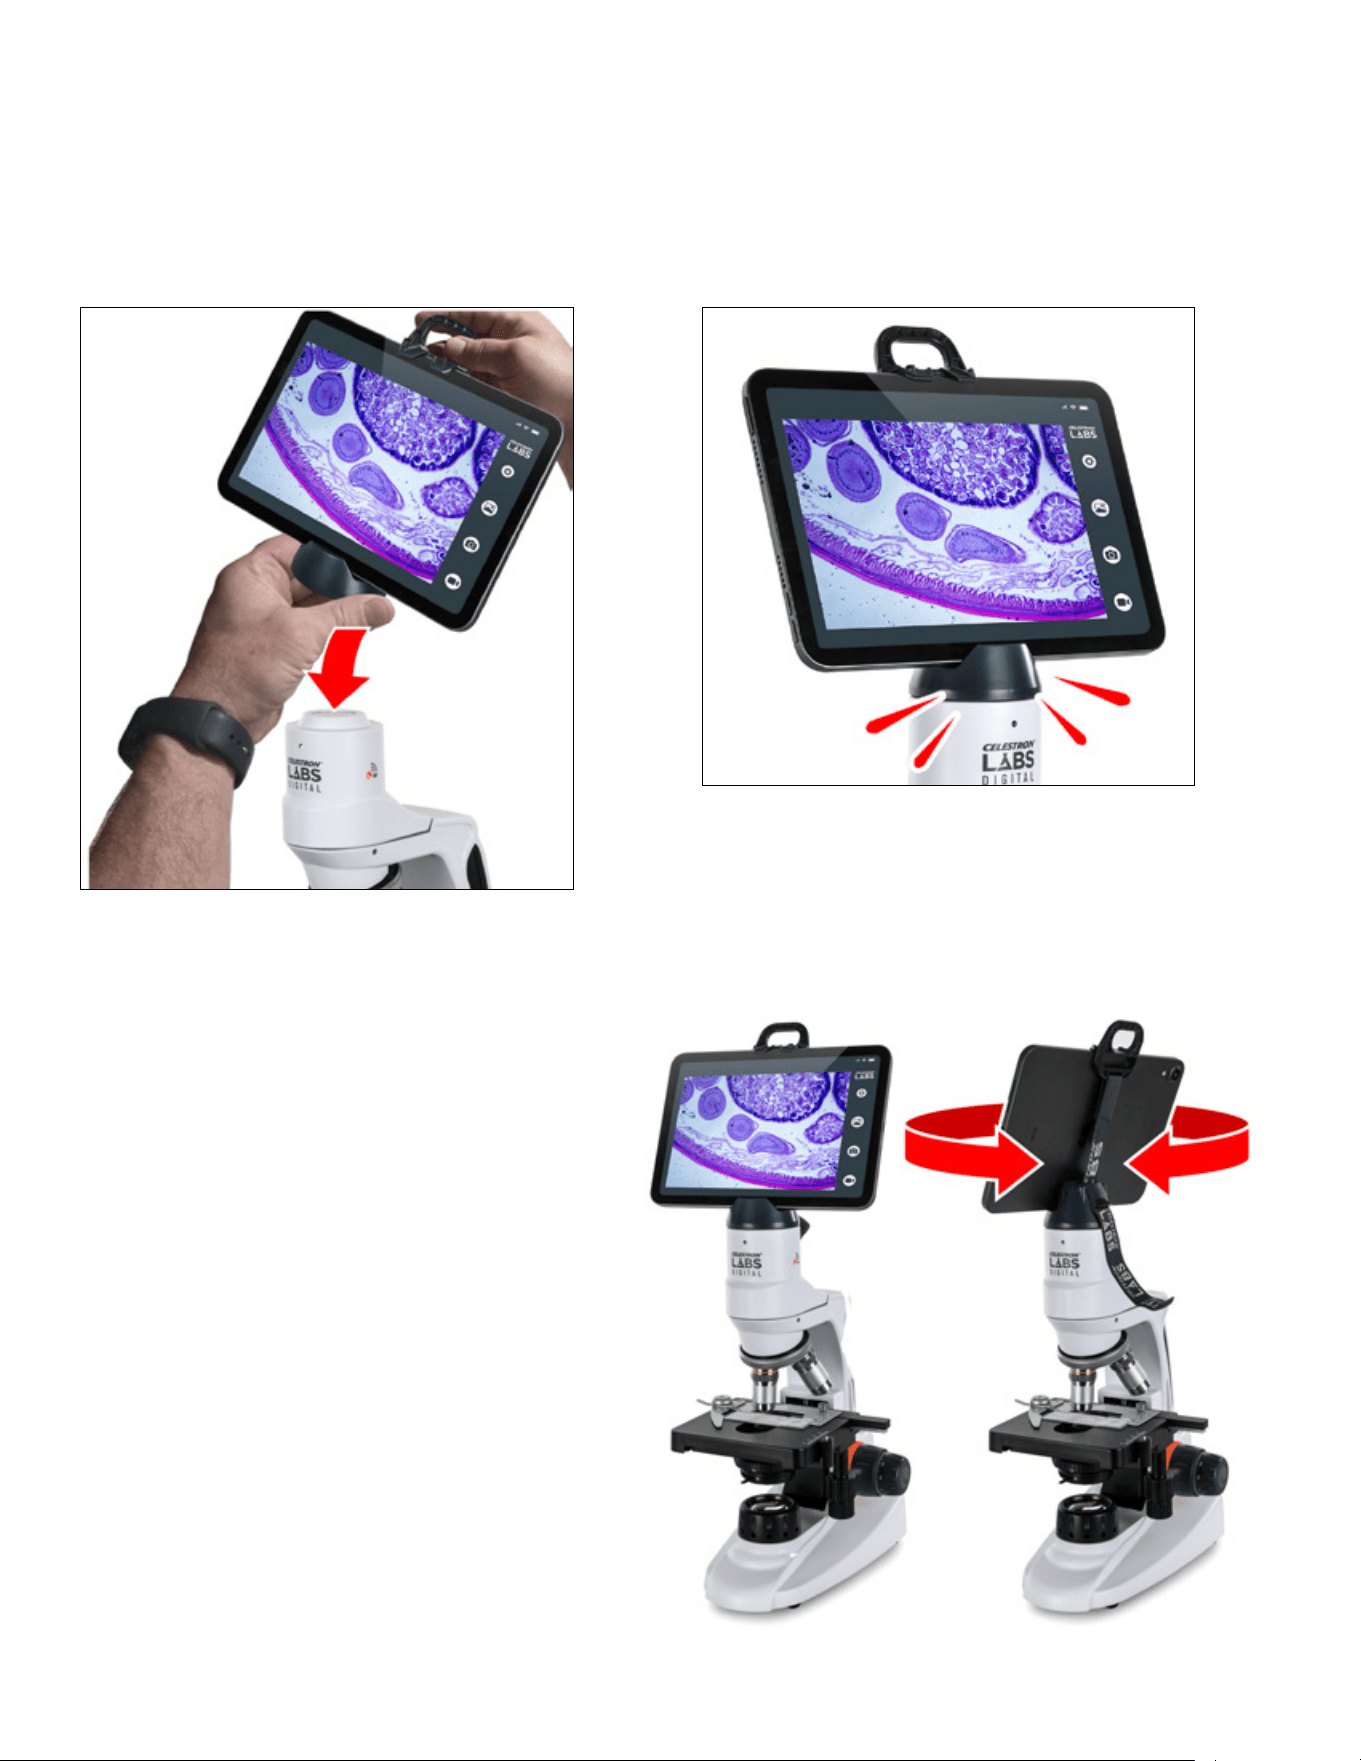
92
|
ESPAÑOL
1. Usando ambas manos, coloque la estructura del soporte sobre
el cabezal del microscopio y alinee la base del soporte circular
con la forma circular en el microscopio.
INSTALAR EL SOPORTE DEL DISPOSITIVO INTELIGENTE AL MICROSCOPIO
El cabezal del microscopio contiene un imán interno. La base del soporte contiene una placa metálica.
3. Asegúrese de que la base del soporte esté totalmente
asentada y estable antes de soltar las manos.
Cuando esté instalado, el dispositivo puede girar en
360°. Gire lentamente y aguante el dispositivo o la base
del soporte durante el giro para reducir el riesgo de
separar la conexión magnética.
2. A medida que el soporte se acerque al cabezal, el imán atraerá
la placa metálica y guiará el soporte en posición.
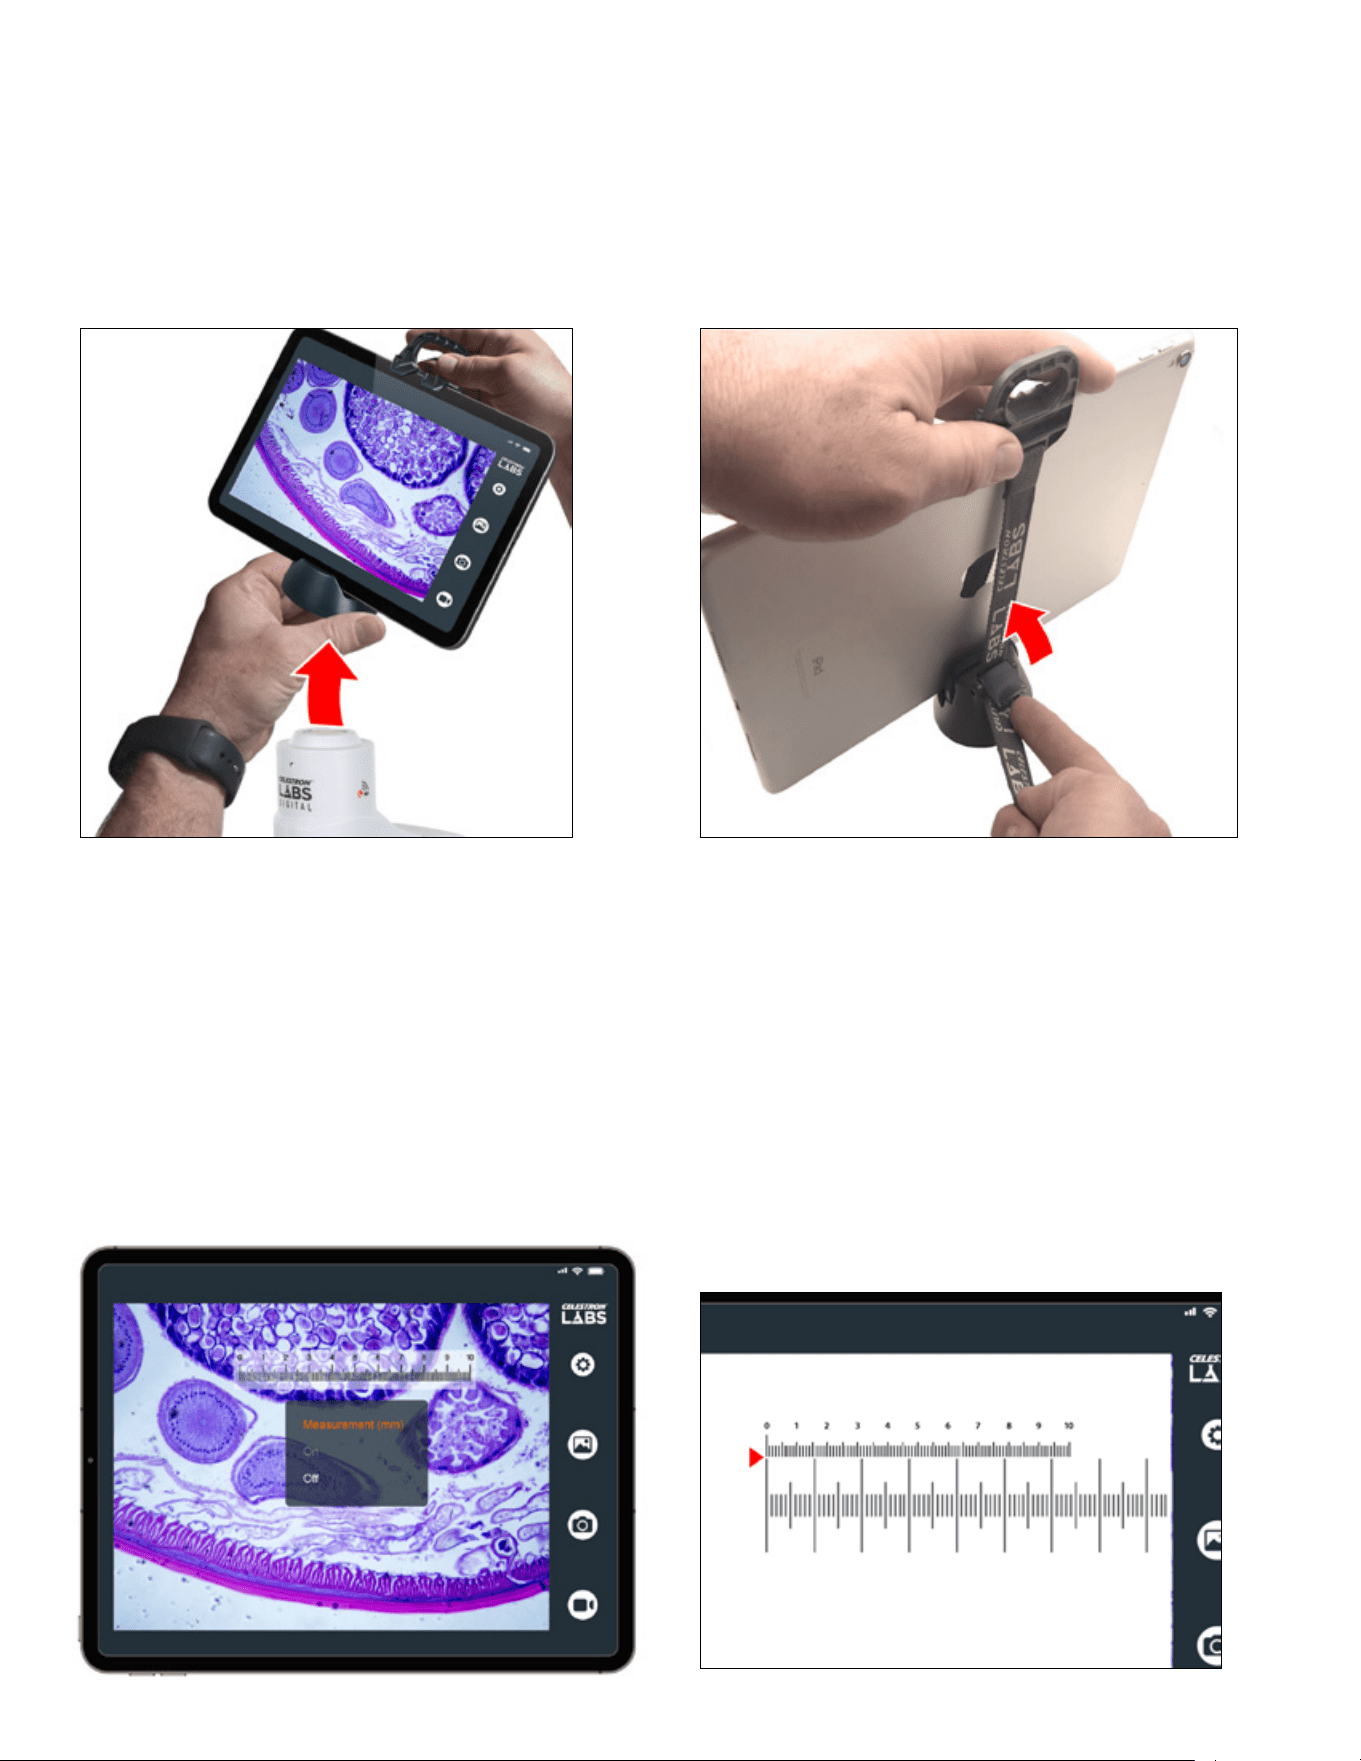
ESPAÑOL
|
93
RETIRAR EL SOPORTE DEL DISPOSITIVO INTELIGENTE
Puede retirar toda la estructura del soporte o el dispositivo inteligente primero. Para la máxima estabilidad, retire la estructura del soporte del
microscopio primero, y a continuación retire el dispositivo inteligente cuando el soporte repose sobre una superficie plana.
PARA RETIRAR TODA LA ESTRUCTURA DEL SOPORTE:
Aguante la base del soporte con una mano y el dispositivo o
gancho con la otra. Gire y levante la base del soporte para
soltarla del microscopio.
PARA RETIRAR EL DISPOSITIVO
Aguante el dispositivo y el gancho con una mano. Con la otra mano,
levante el pestillo de bloqueo para soltar la tensión de la correa. Una
vez soltado, retire el dispositivo de la base del soporte.
La retícula de medición de la aplicación muestra líneas con separación homogénea en pantalla. Sin embargo, la aplicación no conoce
automáticamente la distancia en el mundo real que represenan estas líneas a su aumento actual. La regla de calibración incluida, también
llamada micrómetro de soporte, lo soluciona.
El portamuestras contiene una regla grabada con precisión. Cada pequeña división del portamuestras equivale a 0,01mm (10 micrometros).
Comparando las distancias conocidas en el portamuestras de calibración con la retícula en pantalla, puede calcular la distancia real
representada por cada división de la retícula.
La calibración es específica para la lente de objetivo que use. Si cambia el aumento deberá recalibrar antes de tomar nuevas mediciones.
USO DEL PORTAMUESTRAS DE CALIBRACIÓN
Para calibrar:
1. Coloque el portamuestras de calibración sobre el soporte del
microscopio.
2. En la aplicación, active la retícula de medición.
3. Ajuste el soporte de forma que el portamuestras de calibración
sea visible y enfoque el microscopio hasta que aparezca definido
en pantalla.
4. Alinee la marca "0" en la retícula de medición digital con la marca
"0" del portamuestras de calibración.
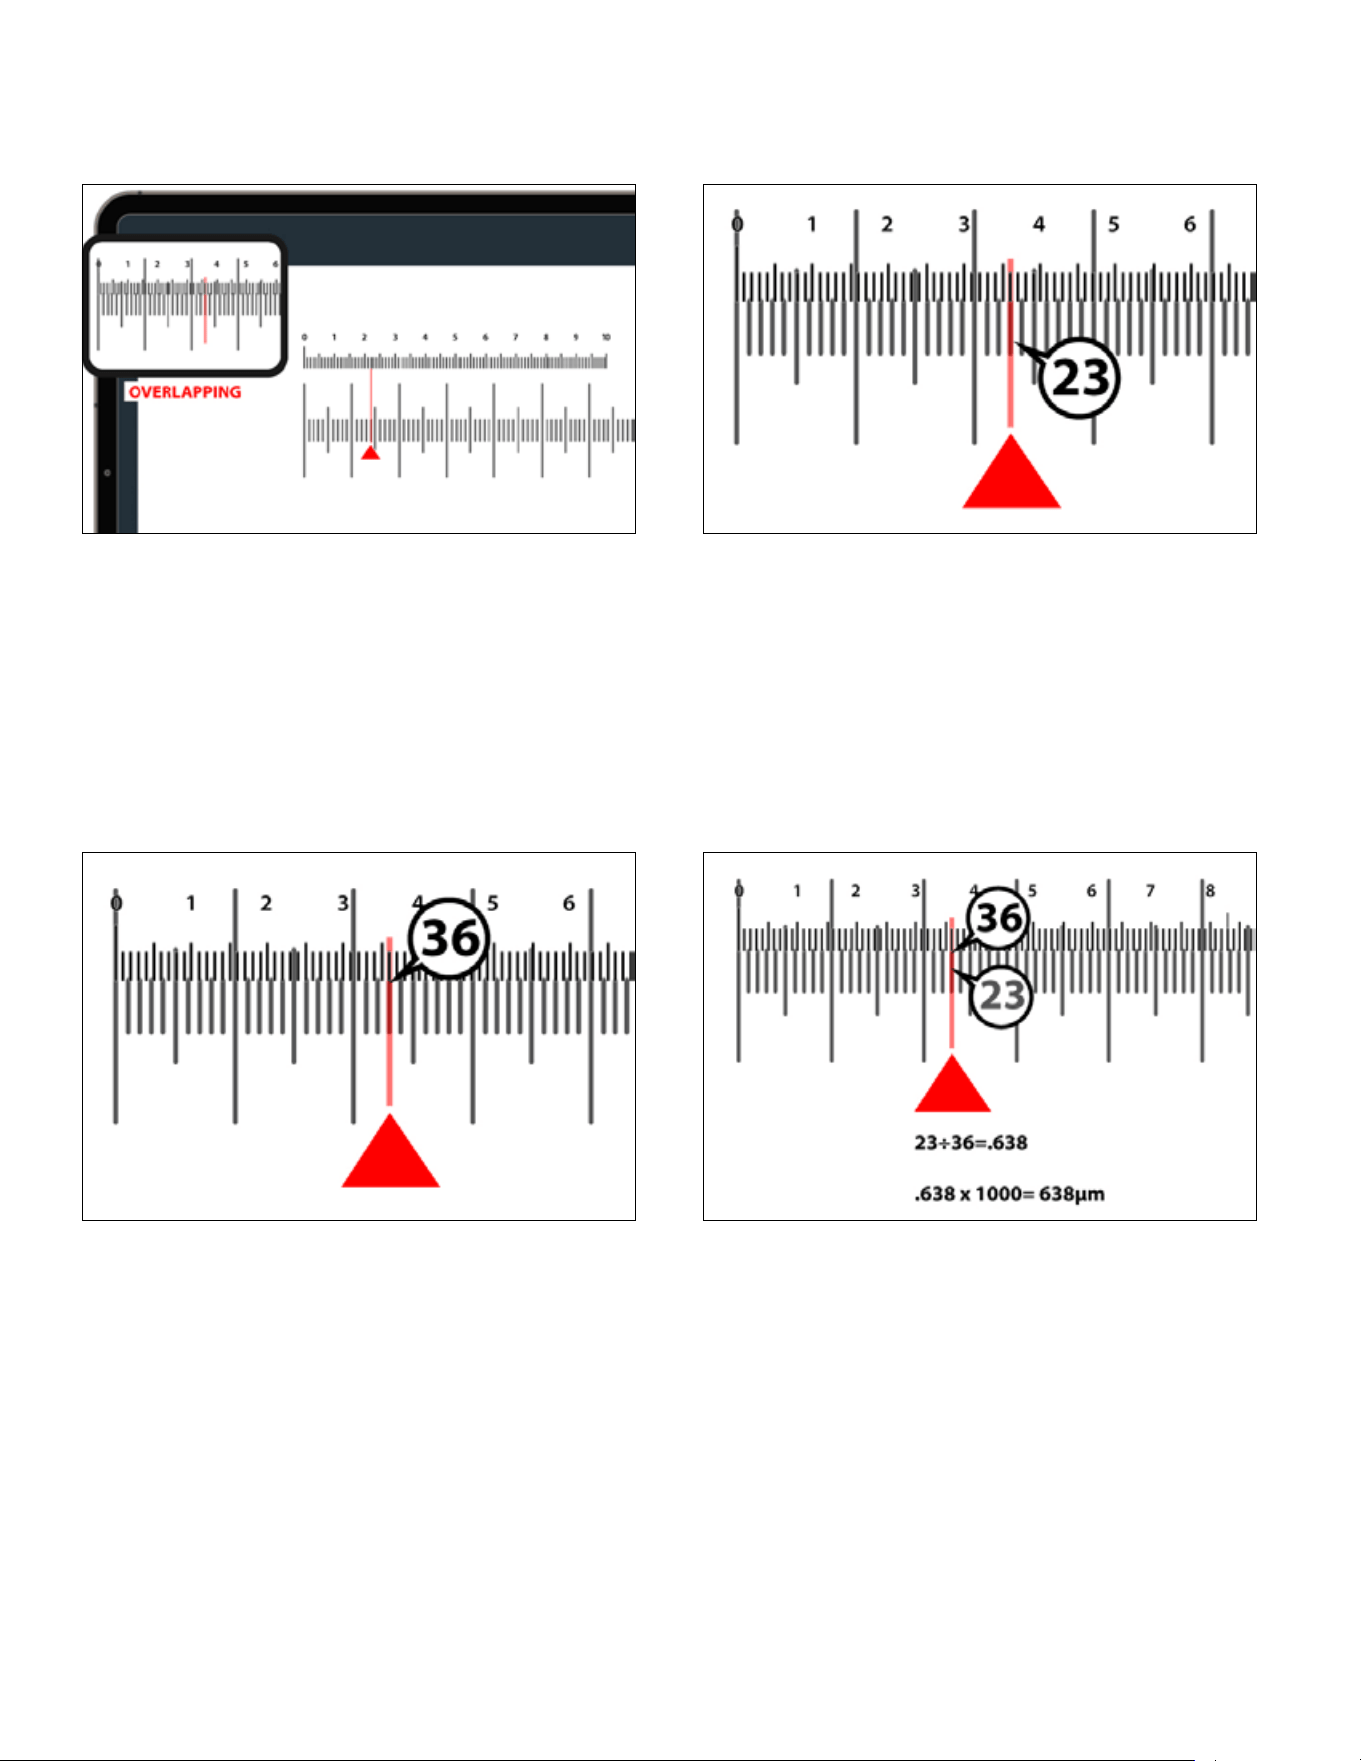
94
|
ESPAÑOL
5. Sin mover el portamuestras, muévase por la escala y localice el
siguiente punto en el que una línea de la retícula digital se alinee
con exactitud con una línea del portamuestras de calibración.
6. Cuente el número de divisiones en el portamuestras de
calibración entre los dos puntos alineados. En este ejemplo, son
23 divisiones.
7. Cuente el número de divisiones en la retícula digital entre estos
dos mismos puntos alineados. En este ejemplo, son 36 divisiones.
8. Calcule el tamaño representado por una división de la retícula.
Divida primero las divisiones del portamuestras de calibración por
las divisiones de la retícula: 23 ÷ 36 = 0,638
A continuación, multiplique este resultado por 1000 para convertirlo
a micrómetros: 0,638 × 1000 = 638 µm
En este ejemplo, cada división de la retícula digital equivale a
638 µm.
9. Ahora puede usar la retícula calibrada para estimar las
dimensiones del espécimen.
Importante
Si cambia de lente de objetivo o aumento, deberá recalibrar antes
de tomar nuevas mediciones.
ESPAÑOL
|
95
CUIDADOS Y MANTENIMIENTO
Su microscopio de escritorio Wi-Fi de Celestron Labs Digital es un dispositivo óptico de precisión. Un cuidado adecuado garantizará
un rendimiento fiable durante años.
• Guarde el microscopio en un entorno limpio y seco cuando no lo use.
• No use el microscopio en entornos donde estén prohibidos los dispositivos electrónicos. Un uso incorrecto puede causar
accidentes graves.
• Úselo exclusivamente entre 23° y 120°F (−5° y 50°C). Evite los cambios de temperatura súbitos, podría causar condensación dentro
de la carcasa.
• Mantenga el microscopio alejado de agua y otros líquidos. La humedad es un riesgo de incendio y electrocución.
• No intente abrir ni modificar el dispositivo. Los componentes internos solamente deben ser atendidos por técnicos autorizados.
• Para limpiar el exterior, frote suavemente con una gamuza suave y seca.
celestron.com/pages/warranty
¿NECESITA AYUDA? Contacte con el soporte técnico de Celestron
celestron.com/pages/technical-support
El diseño y las especificaciones del producto están sujetos a cambios sin notificación previa.
Este producto ha sido diseñado y está pensado para ser usado por personas de 14 años o más de edad.
©2026 Celestron.
Celestron y su símbolo son marcas comerciales de Celestron, LLC. • Todos los derechos reservados. • Celestron.com
EE.UU.: Celestron, 2835 Columbia Street, Torrance, CA 90503 EE.UU.
GB: Celestron Global Ltd., Unit 2 Transigo, Gables Way, Thatcham RG19 4JZ, Reino Unido
Representante autorizado en la UE: AR Experts B.V. es Boeingavenue 209, 1119 PD Schiphol-Rijk, Holanda, [email protected]
Fabricado en China | 04-26
NOTIFICACIÓN FCC: Este dispositivo cumple con el apartado 15 de las normas FCC. Su uso está sujeto a
las dos condiciones siguientes: (1) este dispositivo no puede causar interferencias nocivas, y (2) este
dispositivo debe admitir cualquier interferencia recibida, incluidas las interferencias que puedan causar
un funcionamiento indeseado.
Nota EU: Por la presente, Celestron declara que el equipo de radio tipo 44351 Microscopio de escritorio
WiFi cumple con la directiva 2014/53/UE. El texto completo de la declaración de cumplimiento UE está
disponible en la siguiente dirección de Internet www.celestron.com/productcompliance.
Modelo de producto Microscopio Wi-Fi de Celestron Labs Digital #44351
Nombre de modelo simple WH-44351
Estándar WiFi WiFi4, 802.11b/n
Opción WiFi tribanda 20M
Límite de clientes conectados 2,4 GHz 1
Límite de clientes conectados 5 GHz Ninguno
Límite de clientes conectados 6 GHz Ninguno
Emisión de datos máxima 65M
WPS (coniguración protegida WiFi) No configurado
PARÁMETROS WIFI