User Guide
English
Manual Version 1.1

2
Table of Contents
Introduction .................................................. 3
Box Contents ................................................... 3
Support ............................................................ 3
About This User Guide ................................... 3
Setup ............................................................. 4
Connection Diagram ...................................... 4
Setup with Studio Instrument Collection ..... 5
Setup with Other Software ............................ 5
About MIDI Ports ............................................ 6
Features ........................................................ 7
Operation ................................................... 10
Keyboard Modes .......................................... 11
Chords Mode .................................................... 11
Scales Mode ...................................................... 13
Pad Modes ..................................................... 14
Arpeggiator ................................................... 15
Pattern Mode ..................................................... 17
Note Repeat................................................... 19
Program Edit ................................................. 20
Global Menu .................................................. 21
Appendix .................................................... 23
Technical Specifications ............................... 23
Trademarks & Licenses ................................ 23
3
Introduction
Important: Before you use MPK® mini IV for the first time, we recommend checking for available firmware
updates. These updates add exciting new features and improvements, so staying up-to-date ensures the best
experience with MPK® mini IV. Visit akaipro.com and go to the MPK® mini IV product page to check for available
updates for download, then follow the instructions to update your device.
Box Contents
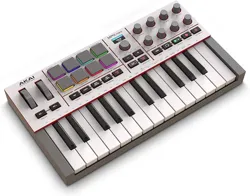
MPK® mini IV
USB-C® Cable
Quickstart Guide
Support
To get started with MPK® mini IV and download your included software, visit inmusic.to/mini4begin.
For additional product support, visit support.akaipro.com.
About This User Guide
This manual should help you get familiar with using your MPK® mini IV. We use specific formatting to indicate
particular topics of significance:
Important/Note/Tip: Important or helpful information on a given topic.
Names of buttons, controls, parameters, settings, and other options are written in bold characters throughout
the manual.
Examples:
Press and hold the SHIFT button and press PAD 5 to enter CHORDS mode for the keyboard.
When you are finished editing, press the PLUGIN/DAW button to exit.
Some parts of this manual refer to other relevant chapters or sections, which are cited in bold, italic blue
characters. Click the text to skip immediately to that section.
Examples:
See the following Operation > Keyboard Modes
section to learn more.
In Chords Mode, each key plays a chord comprised of three or more notes in sync.
You can also click on certain images to jump to specific sections of the manual.
4
Setup
This chapter describes how to set up your MPK® mini IV with other equipment and several kinds of compatible
software.
For an overview of MPK® mini IV’s controls, proceed to the following Features chapter.
For additional information on MPK® mini IV’s features and functions, proceed to the Operation chapter.
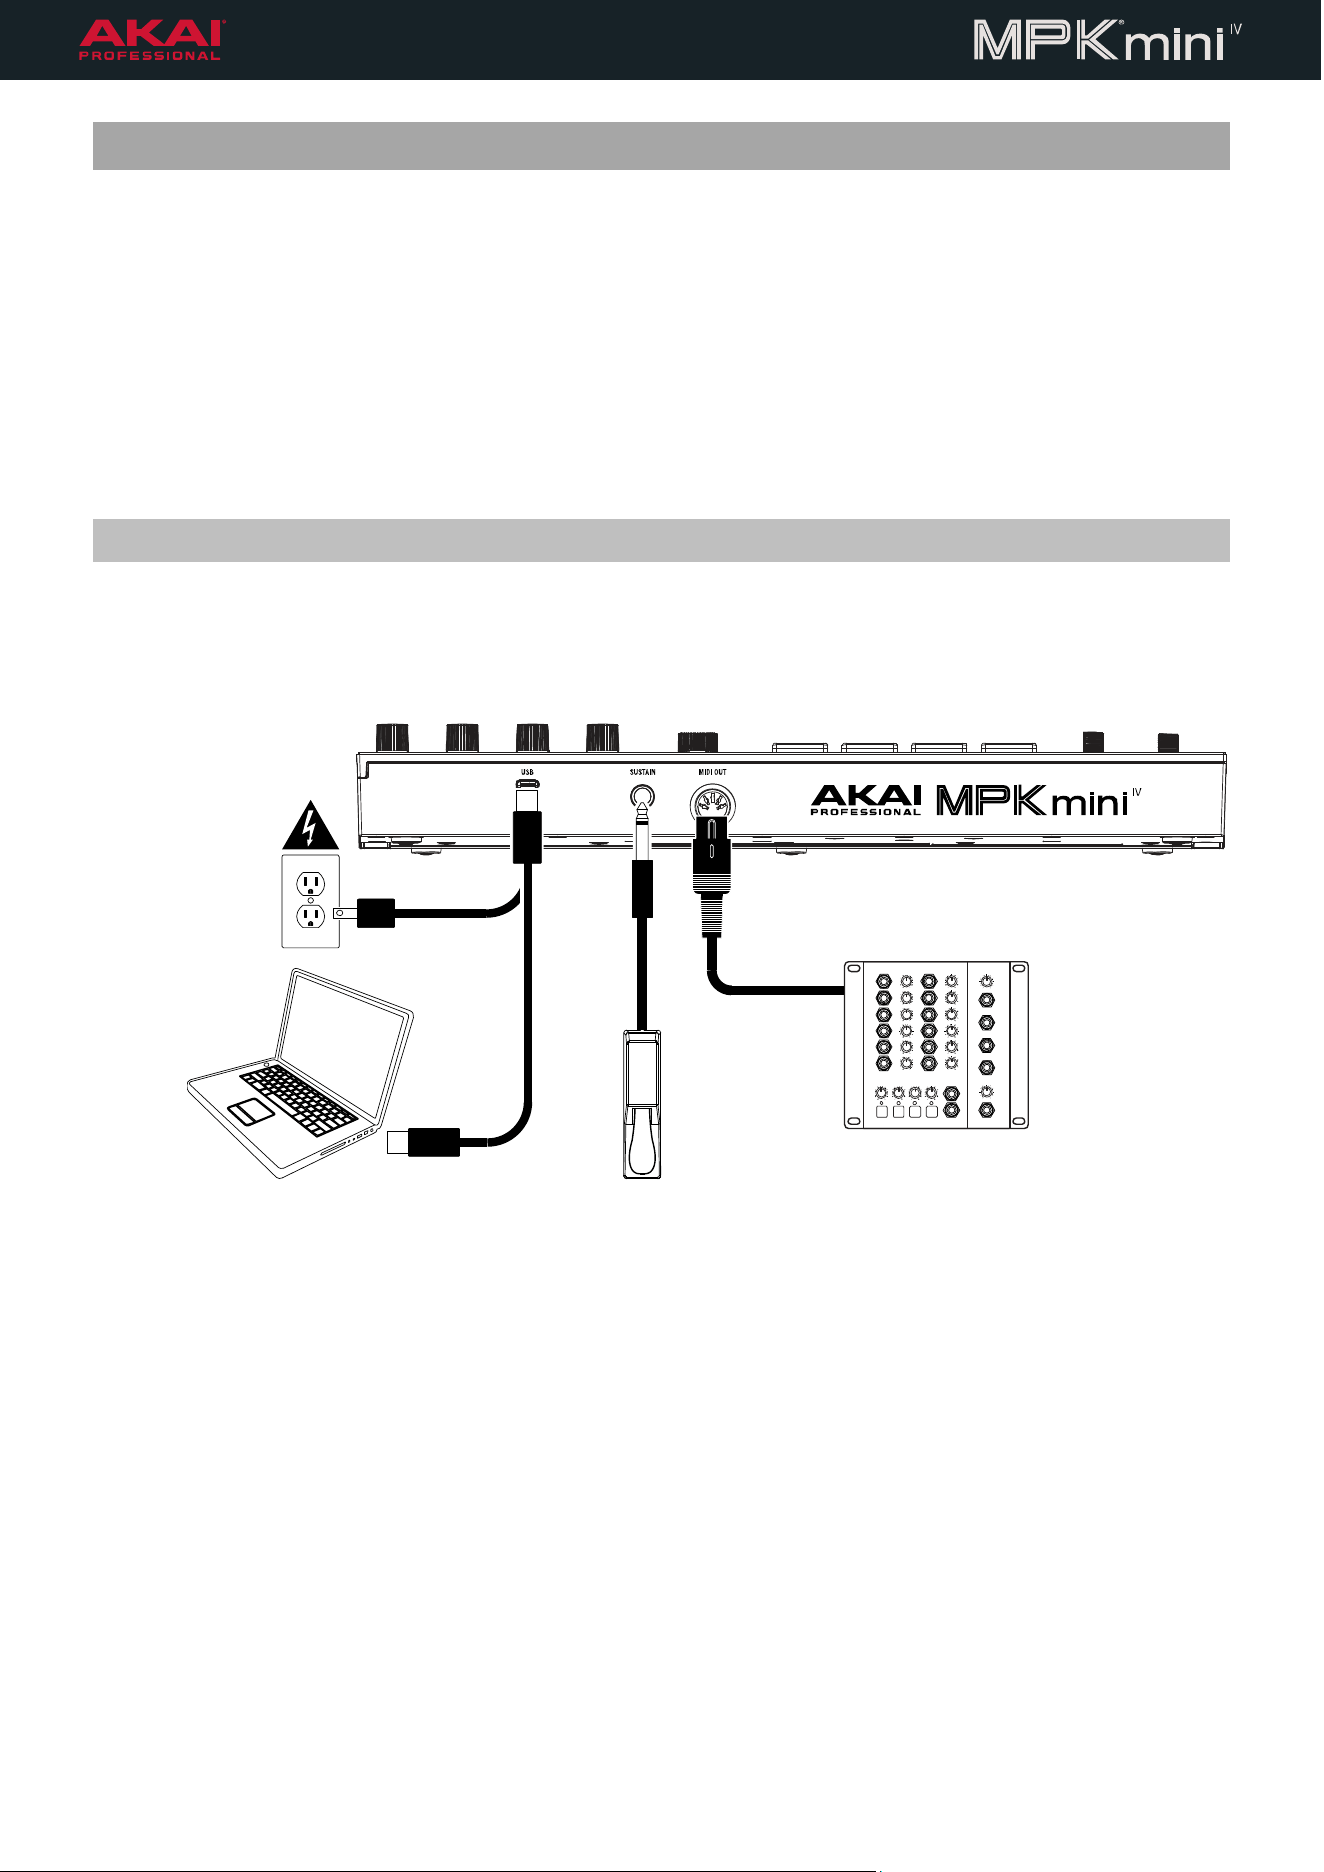
Connection Diagram
Pictured below is an example of how to set up MPK® mini IV with other equipment. Note that items not listed
under the Box Contents are sold separately.
External Sound Module
Sustain Pedal
Computer
Power
(if not powered
by computer)
5
Setup with Studio Instrument Collection
MPK® mini IV includes Studio Instrument Collection, a new virtual instrument that features a vast palette of sounds
from Akai Professional, AIR Music Technology, and Moog.
Studio Instrument Collection works seamlessly with MPK® mini IV. Simply connect the device to your computer,
open the software, and press the PLUGIN/DAW button so the PLUGIN preset is loaded. Studio Instrument
Collection will automatically recognize and connect with your MPK® mini IV which can then be used to browse
presets, adjusts parameters, and trigger sounds from the keys and pads.
For more information on Studio Instrument Collection, open the User Guide included with the software. Click the
link here, or click the ☰ icon in the upper-right corner of Studio Instrument Collection and then select Open
Software Manual.
Setup with Other Software
MPK® mini IV is also compatible with the latest versions of the following software. You must first download and
install the associated control script for each DAW. Click the links below to find detailed setup guides for each
supported program.
• Ableton Live 11 & 12
• FL Studio
• Logic Pro
• GarageBand
• Cubase
6
About MIDI Ports
MPK® mini IV features five different MIDI ports that are used for communication. Understanding what these ports
are used for can help you set it up properly with your software or hardware.
Port # Name Description
1 MPK Mini IV MIDI Port This port will send keybed, drum pad, pitch and modwheel,
sustain pedal, and knob control data.
Messages sent to this port are expected to be recorded and
edited by a Host DAW. Messages received from this port
can be resent to the physical 5-pin MIDI output port,
depending on the settings.
All Presets will send MPK® mini IV performance data on this
port by default.
2 MPK Mini IV DAW Port This port will send all interface controls, screen controls, and
transport controls to a connected supported DAW.
When using the DAW Preset, this port must be enabled in
the DAW software to access the DAW control script.
3 MPK Mini IV Plugin Port This port will send all interface controls, screen controls, and
transport controls to the Studio Instrument Collection (SIC)
software.
When using the Plugin Preset, this port must be enabled in
the SIC software to access the SIC control script.
4 MPK Mini IV Software Control Port This port will send all interface controls, screen controls, and
transport controls for generic mapping.
5 MPK Mini IV Din Port This port is the physical 5-pin MIDI output on the rear panel
of MPK® mini IV.
You can choose to send incoming MIDI data from the USB-
C® port or the internal hardware MIDI data to this port by
adjusting the DINsrc setting in the Global Menu.
7
Features
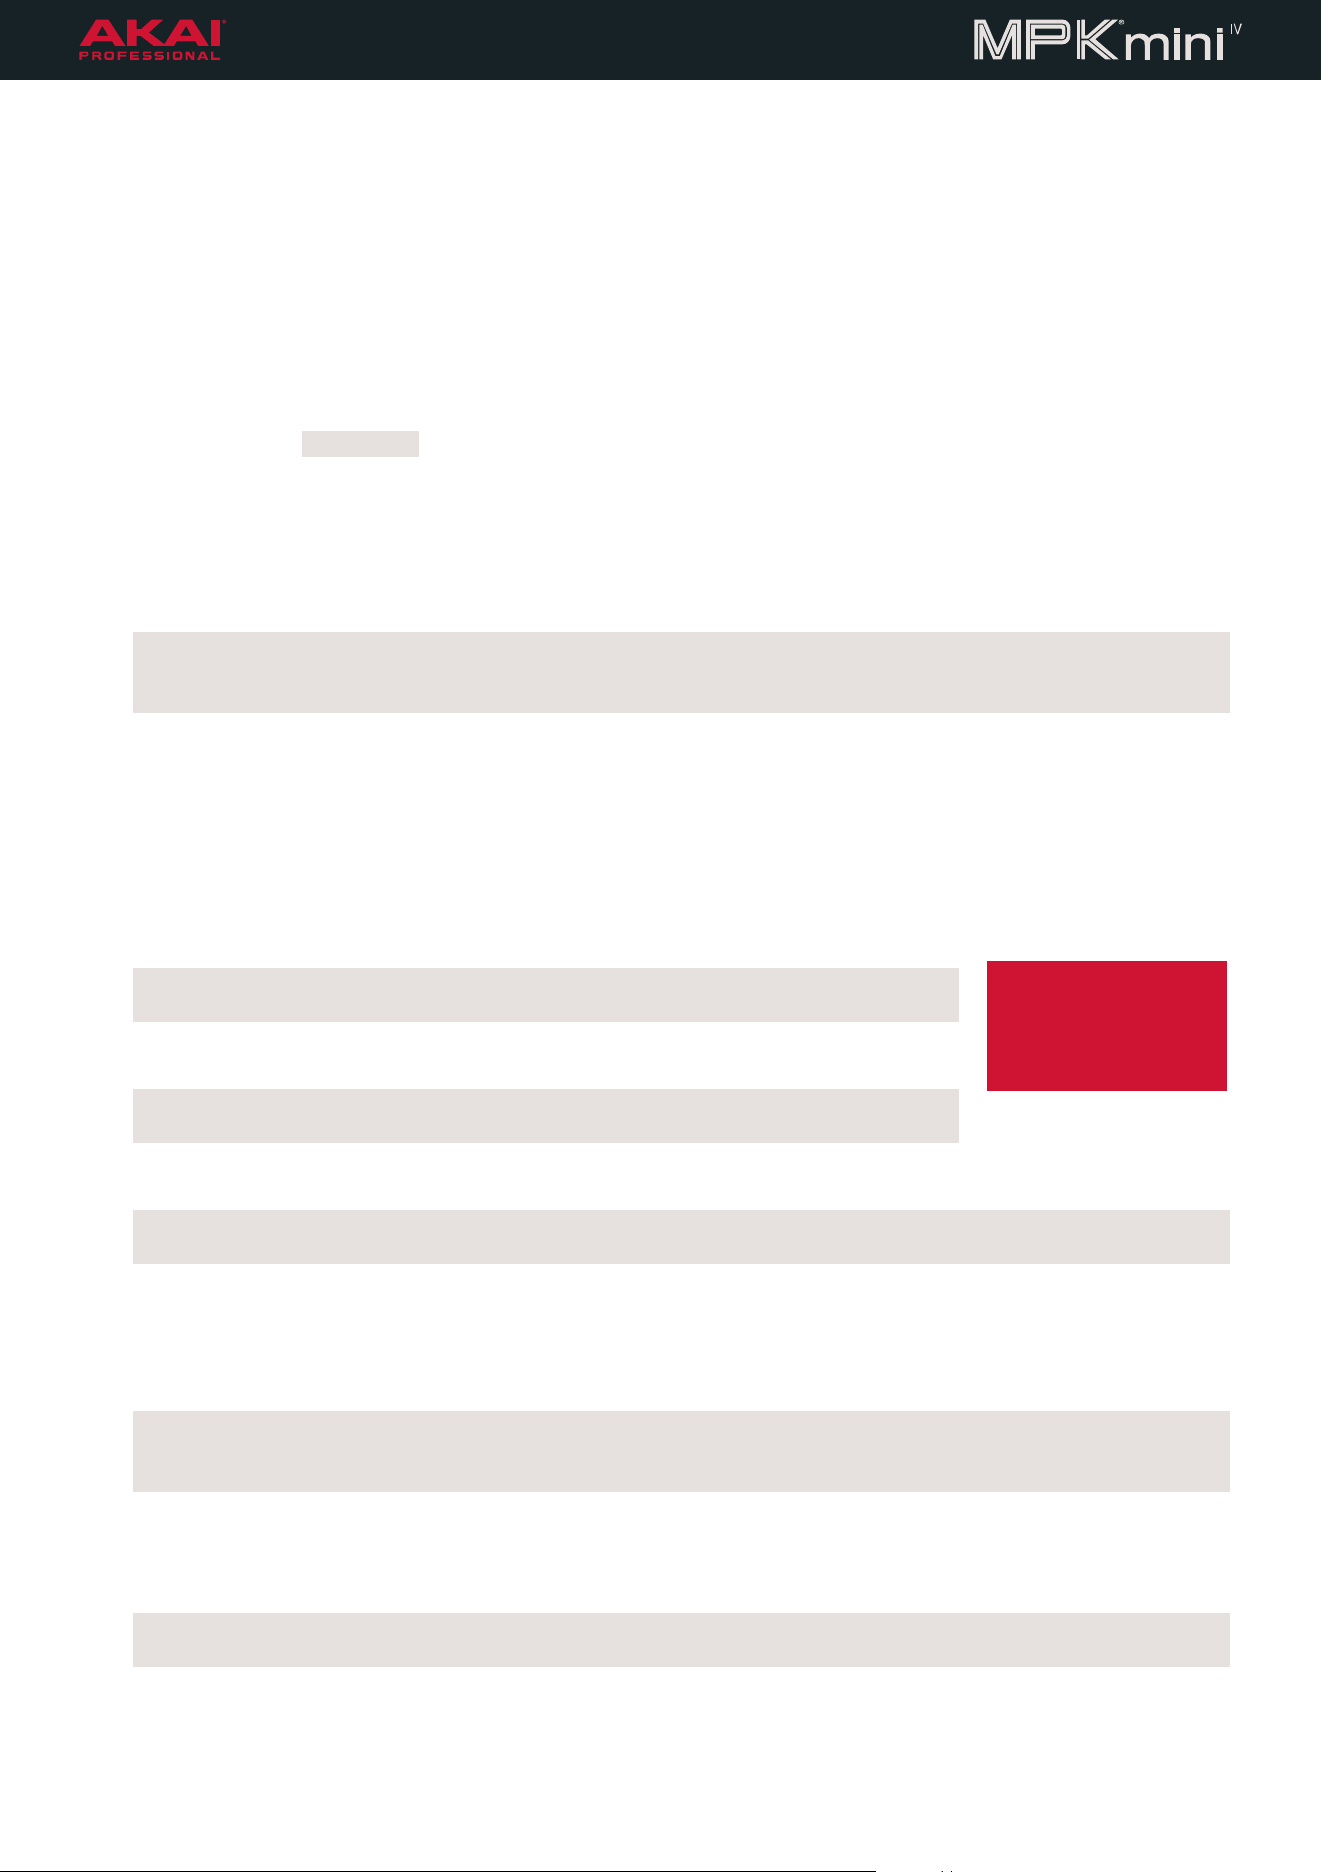
This chapter describes the functions of MPK® mini IV’s controls. Click on the picture to jump directly to the
selected control.
For more information on using some of the features described below, proceed to the following Operation
chapter.
1. USB-C® Port: Use the included cable to connect this port to a USB port on your computer. This will allow you
to send and receive MIDI data and communicate with software, such as the included Studio Instrument
Collection or Ableton Live.
You can also power MPK® mini IV by connecting to a 5V, 0.5A power adapter. This can be useful when using
it in conjunction with other external MIDI equipment.
2. Sustain: Connect an optional 1/4” (6.35 mm) TS sustain pedal to this port. Sustain pedals can be used to hold
the sound you are playing without having to keep your fingers pressed down on the keys.
3. MIDI Out: Connect optional external gear using this 5-pin MIDI DIN output port. This allows you to control
synthesizers, drum machines, or other types of instruments that use MIDI using your MPK® mini IV. You can
use the Global Menu
to determine whether data sent to this port comes from the USB-C® Port or the internal
hardware MIDI.
4. Keyboard: MPK® mini IV features a 25-note, velocity-sensitive keyboard. This means that the keys react to
how hard you play them: the harder you strike, the louder the note.
These keys can also be configured to play individual notes, entire chords of multiple notes, or specific scales
of notes. See the following Operation > Keyboard Modes
section to learn more.
5. Display: The display on MPK® mini IV provides instant visual feedback as you play, and displays information
when connected to supported software like the Studio Instrument Collection. You can also use this display to
edit various settings described in the following Operation chapter.
18
8
6. Encoder: Turn this knob to select and adjust settings options on the display screen and push it to select.
When using editing menus, the encoder functions as follows:
i. Turn the encoder to select a parameter for editing.
ii. Press the encoder to open the options for the selected parameter.
iii. Turn the encoder to browse the options.
iv. Press the encoder to select an option and return to the list of parameters.
7. SHIFT: This button provides access to secondary functions on MPK® mini IV. Press and hold it and then press
another button or pad to access its secondary function. These are printed below or above the selected
control, and are highlighted in the descriptions below.
8. -/+: Press these buttons to decrease or increase the current parameter.
9. PLUGIN/DAW: Press this button to toggle between Plugin and DAW control modes. Use Plugin mode when
using the included Studio Instrument Collection plugin or standalone application for seamless control. Use
DAW mode when using MPK® mini IV with other digital audio workstation software.
USER PRESETS: Hold Shift and press this button to open the User Presets menu on the Display. Turn the
encoder to browse presets, and then press it to load. You can use the Program Edit function to edit user
programs.
10. Pitch Wheel: The pitch bend wheel is primarily used to bend the notes played on the keyboard up or down.
This allows you to play phrases not normally associated with keyboard playing, such as guitar-style riffs.
11. Modulation Wheel: The modulation wheel is typically used to add variation for the sound you are playing.
This type of real-time controller was originally introduced on electronic keyboard instruments to give the
performer options such as adding vibrato, just like the players of acoustic instruments do.
12. OCT -: Press this button to shift the range of the keyboard up down octave at a time.
PROG EDIT: Hold SHIFT and press this button to open the Program Edit menu,
where you can create custom user presets.
13. OCT +: Press this button to shift the range of the keyboard up one octave at a time.
SAVE: Hold SHIFT and press this button to Save the current program as a user
preset.
14. ARP: Press this button to enable the Arpeggiator.
CONFIG: Hold SHIFT and press this button, or hold this button, to open the Arpeggiator Configuration
menu.
15. LATCH: Press this button to enable latch mode for the Arpeggiator. When on, the arpeggiator will continue
even after you lift your fingers. While holding down the keys, you can add more notes to the arpeggiated
chord by pressing down additional keys. If you press the keys, release them, and then press down a new
combination of notes, the Arpeggiator will memorize and arpeggiate the new notes.
FULL LEVEL: Hold SHIFT and press this button to turn Full Level mode on and off. When on, all pads send
full velocity (127) no matter how hard or soft you strike them. When off, the pads’ velocity is determined by
how hard or soft you strike them.
16. NOTE REPEAT: Press this button to turn Note Repeat
mode on and off. When on, strike and hold a pad to
cause it to retrigger at a rate based on the current Time Division and Tempo. You can also press and hold this
button and press one of the Time Division keys to quickly change the setting.
CONFIG: Hold SHIFT and press this button, or hold this button, to open the Note Repeat Configuration
menu.
Tip: Press the OCT –
and OCT + buttons at
the same time to reset
the octave setting.
9
17. TAP TEMPO: Press this button repeatedly in time with the desired tempo to set a new tempo for the internal
clock in BPM (beats per minute).
METRONOME: Hold SHIFT and press this button to turn the metronome on or off in supported software.
18. BANK A/B: Press this button to toggle between Bank A and Bank B for the pads.
19. Pads: These drum pads can be used to trigger drum hits or other samples in your software. The pads are
velocity-sensitive, which makes them very responsive and intuitive to play. You can also configure these pads
to send Program Change messages or MIDI CC messages instead of notes. See the following Pad Modes
section to learn more about this.
20. UNDO: Press this button to undo the last action in supported software.
REDO: Hold SHIFT and press this button to redo the last action undone in supported software.
21. Loop: Press this button to turn loop playback on and off in supported software.
Global: Hold SHIFT and press this button to open the Global Menu, which contains various settings related
to MPK® mini IV’s operation.
22. Stop/Play: Press this button to stop or start playback in supported software.
Continue: Hold SHIFT and press this button to start playback from the current playhead position in
connected software.
23. Record: Press this button to enable recording in supported software.
Quantize: Hold SHIFT and press this button to turn quantization on or off in supported software. This allows
the notes you play to snap to the recording grid according to the current time division.
24. Overdub: Press this button to enable overdub recording in supported software.
Automation: Hold SHIFT and press this button to turn automation on or off in supported software.
25. Knobs: These endless knobs are used to control parameters in supported software.
You can also press and hold the ARP button and turn these knobs to quickly adjust the arpeggiator
parameters shown below each knob.

10
Operation
This chapter describes MPK® mini IV’s functions. Click a link below to jump directly to that section:
Keyboard Modes – Adjust the behavior of the keys to play configurable chords and scales.
Pad Modes – Adjust the behavior of the pads to send notes, Program Changes, or MIDI CC commands.
Arpeggiator – Create note sequence patterns.
Note Repeat – Use and adjust MPC-style Note Repeat with the pads.
Program Edit – Edit the MIDI assignments of MPK® mini IV and create custom presets.
Global Menu – Adjust the internal settings of MPK® mini IV.
For more information on specific controls, refer to the previous Features chapter.
11
Keyboard Modes
MPK® mini IV features three modes for playing melodic content on the keyboard. By default, the keys play one
note at a time like a standard keyboard. In Chords Mode, each key plays a chord comprised of three or more
notes in sync. In Scales Mode, the keys play notes in a set scale.
Chords Mode
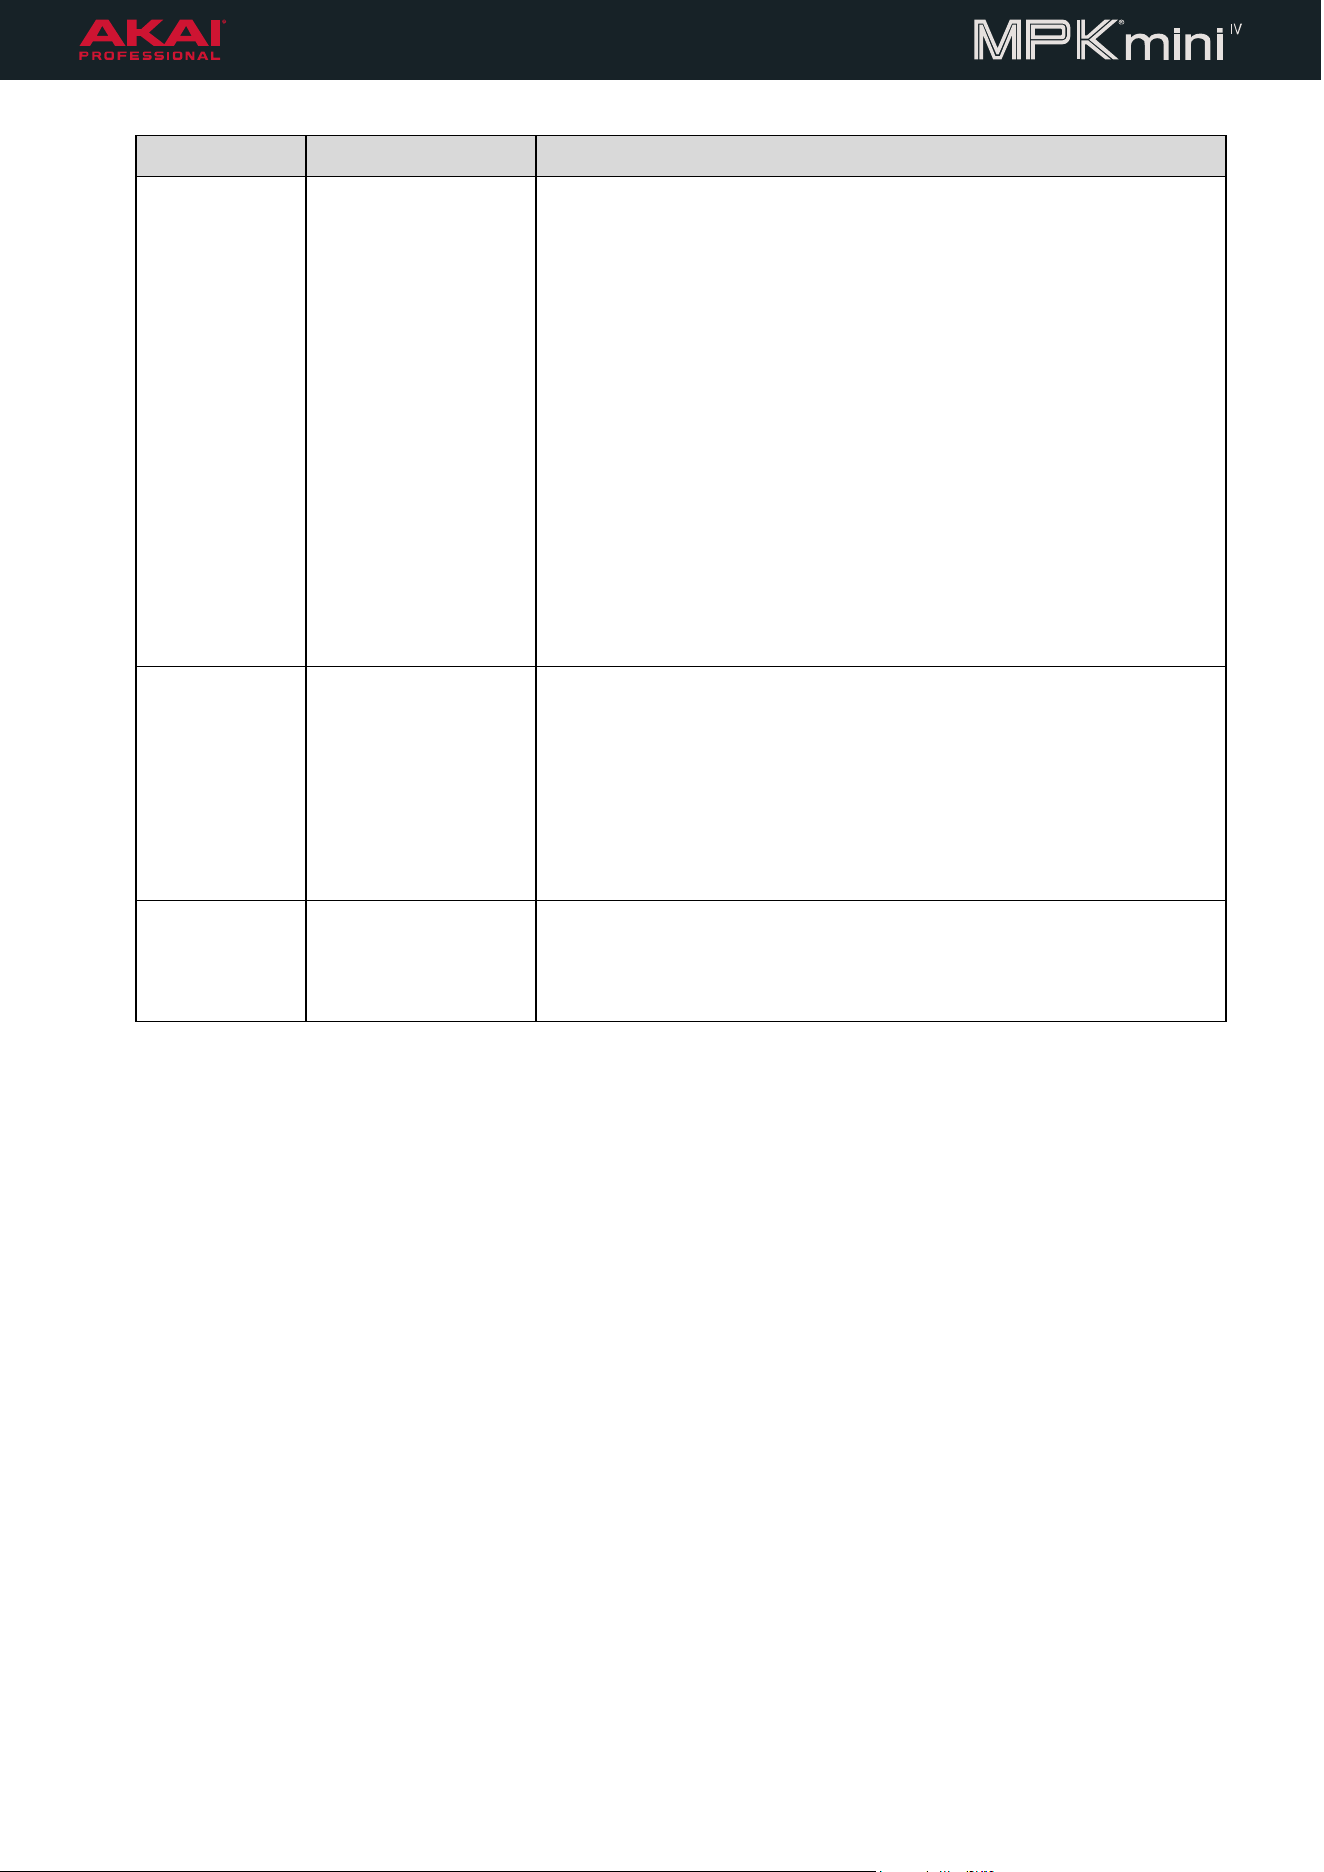
Press and hold the SHIFT button and press PAD 5 to enter CHORDS
mode for the keyboard. In this mode, each key plays a configurable
chord of multiple notes at the same time. When Chords Mode is on,
PAD 5 will be lit green while SHIFT is held down.
To exit Chords Mode, hold the SHIFT button and press PAD 5
again.
Press and hold the SHIFT button and press PAD 6 to open the
CHORDS CONFIGURATION menu on the display. While the Chords
Configuration menu is open, PAD 5 will be lit green while SHIFT is held
down. Use the encoder to browse and edit the settings below.
To exit Chord Configuration Mode, hold SHIFT and press PAD 6
again, or press the PLUGIN/DAW button.
Setting Values Description
Mode Off, On This turns Chord Mode on or off.
Type This is the type of chord played by each key.
1-3-5 A standard triad chord.
+7 A seventh chord.
+7+9 A seventh and ninth chord.
Maj7 A major seventh chord.
Min7 A minor seventh chord.
Dom7 A dominant seventh chord.
Note: The 1-3-5, +7, and +7+9 chords will be fixed to the selected
scale. The Maj7, Min7, and Dom7 chords will transpose each
interval structure through the root notes of your selected scale.
Key C, C#, D, D#, E, F,
F#, G, G#, A, A#, B
This is the key in which each chord is played.
Scale This is the scale the chord is played in.
Chrom Chromatic
Maj Major
Melod Melodic minor
Harm Harmonic minor
Maj P Major pentatonic
Min P Minor pentatonic
Dor Dorian
12
Setting Values Description
Scale
(continued)
Phryg Phrygian
Lydia Lydian
Mixo Mixolydian
Aeol Aeolian
Locr Locrian
Blues Blues
Flmnc Flamenco
Roma Romanian
Hngar Hungarian
Persn Persian
Bebop Bebop
Whole Whole Tone
Inv This determines the position of the chord notes when an Inversion
is played. To play an inversion, hold SHIFT and press a key.
None The root note of the chord is in the lowest position
1st The third scale tone is in the root position.
2nd The fifth scale tone is in the root position.
3rd The seventh scale tone is in the root position.
Non-S Trans, Igno This determines what is done with played notes that fall outside of
the set chord. When set to Trans, these notes will be transposed
to the closest scale tone. When set to Igno, these notes will be
ignored.
13
Scales Mode
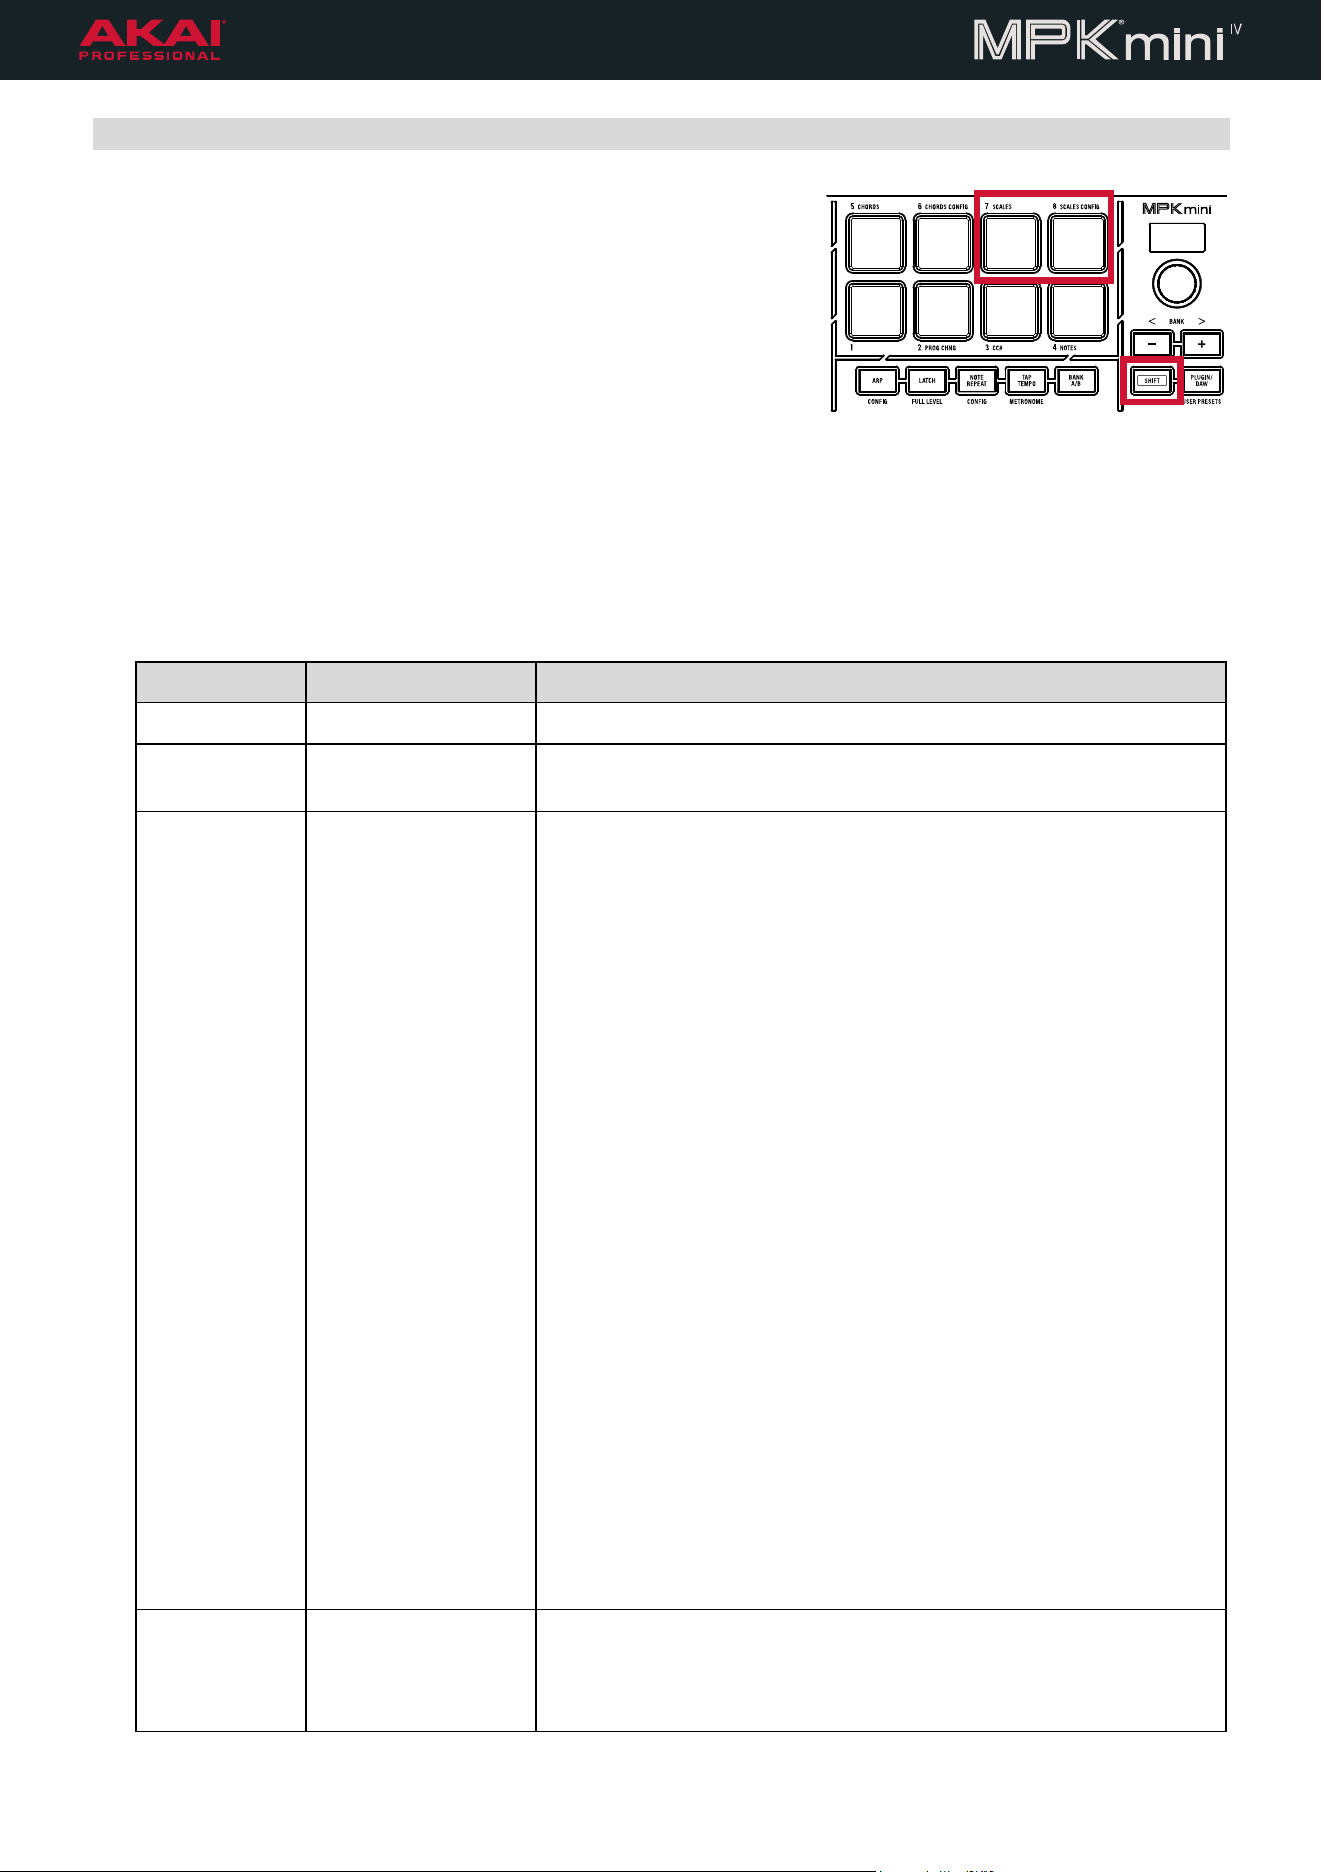
Press and hold the SHIFT button and press PAD 7 to enter SCALES
mode for the keyboard. In this mode, each key plays a single note, but
you are not bound to the traditional piano layout and can instead allow
only certain notes to be played. When Scales Mode is on, PAD 7 will
be lit green while SHIFT is held down.
To exit Scales Mode, hold SHIFT and press PAD 7 again.
Press and hold the SHIFT button and press PAD 8 to open the SCALES
CONFIGURATION menu on the display. While the Scales Configuration
menu is open, PAD 8 will be lit green while SHIFT is held down. Use
the encoder to browse and edit the settings below.
To exit Scales Configuration Mode, hold SHIFT and press PAD 8
again, or press the PLUGIN/DAW button.
Setting Values Description
Mode Off, On This turns Scale Mode on or off.
Key C, C#, D, D#, E, F,
F#, G, G#, A, A#, B
This is the root note of the scale.
Scale This is the scale that the keys play in.
Chrom Chromatic
Maj Major
Melod Melodic minor
Harm Harmonic minor
Maj P Major pentatonic
Min P Minor pentatonic
Dor Dorian
Phryg Phrygian
Lydia Lydian
Mixo Mixolydian
Aeol Aeolian
Locr Locrian
Blues Blues
Flmnc Flamenco
Roma Romanian
Hngar Hungarian
Persn Persian
Bebop Bebop
Whole Whole Tone
Non-S Trans, Igno This determines what is done with played notes that fall outside of
the set scale. When set to Trans, these notes will be transposed to
the closest scale tone. When set to Igno, these notes will be
ignored.
14
Pad Modes
MPK® mini IV also features three modes for using the eight velocity-sensitive pads.
By default, these pads are set to Notes Mode. In Notes Mode, the
pads play individual notes. You can use this to trigger drum samples
in connected software or external MIDI devices like drum machines.
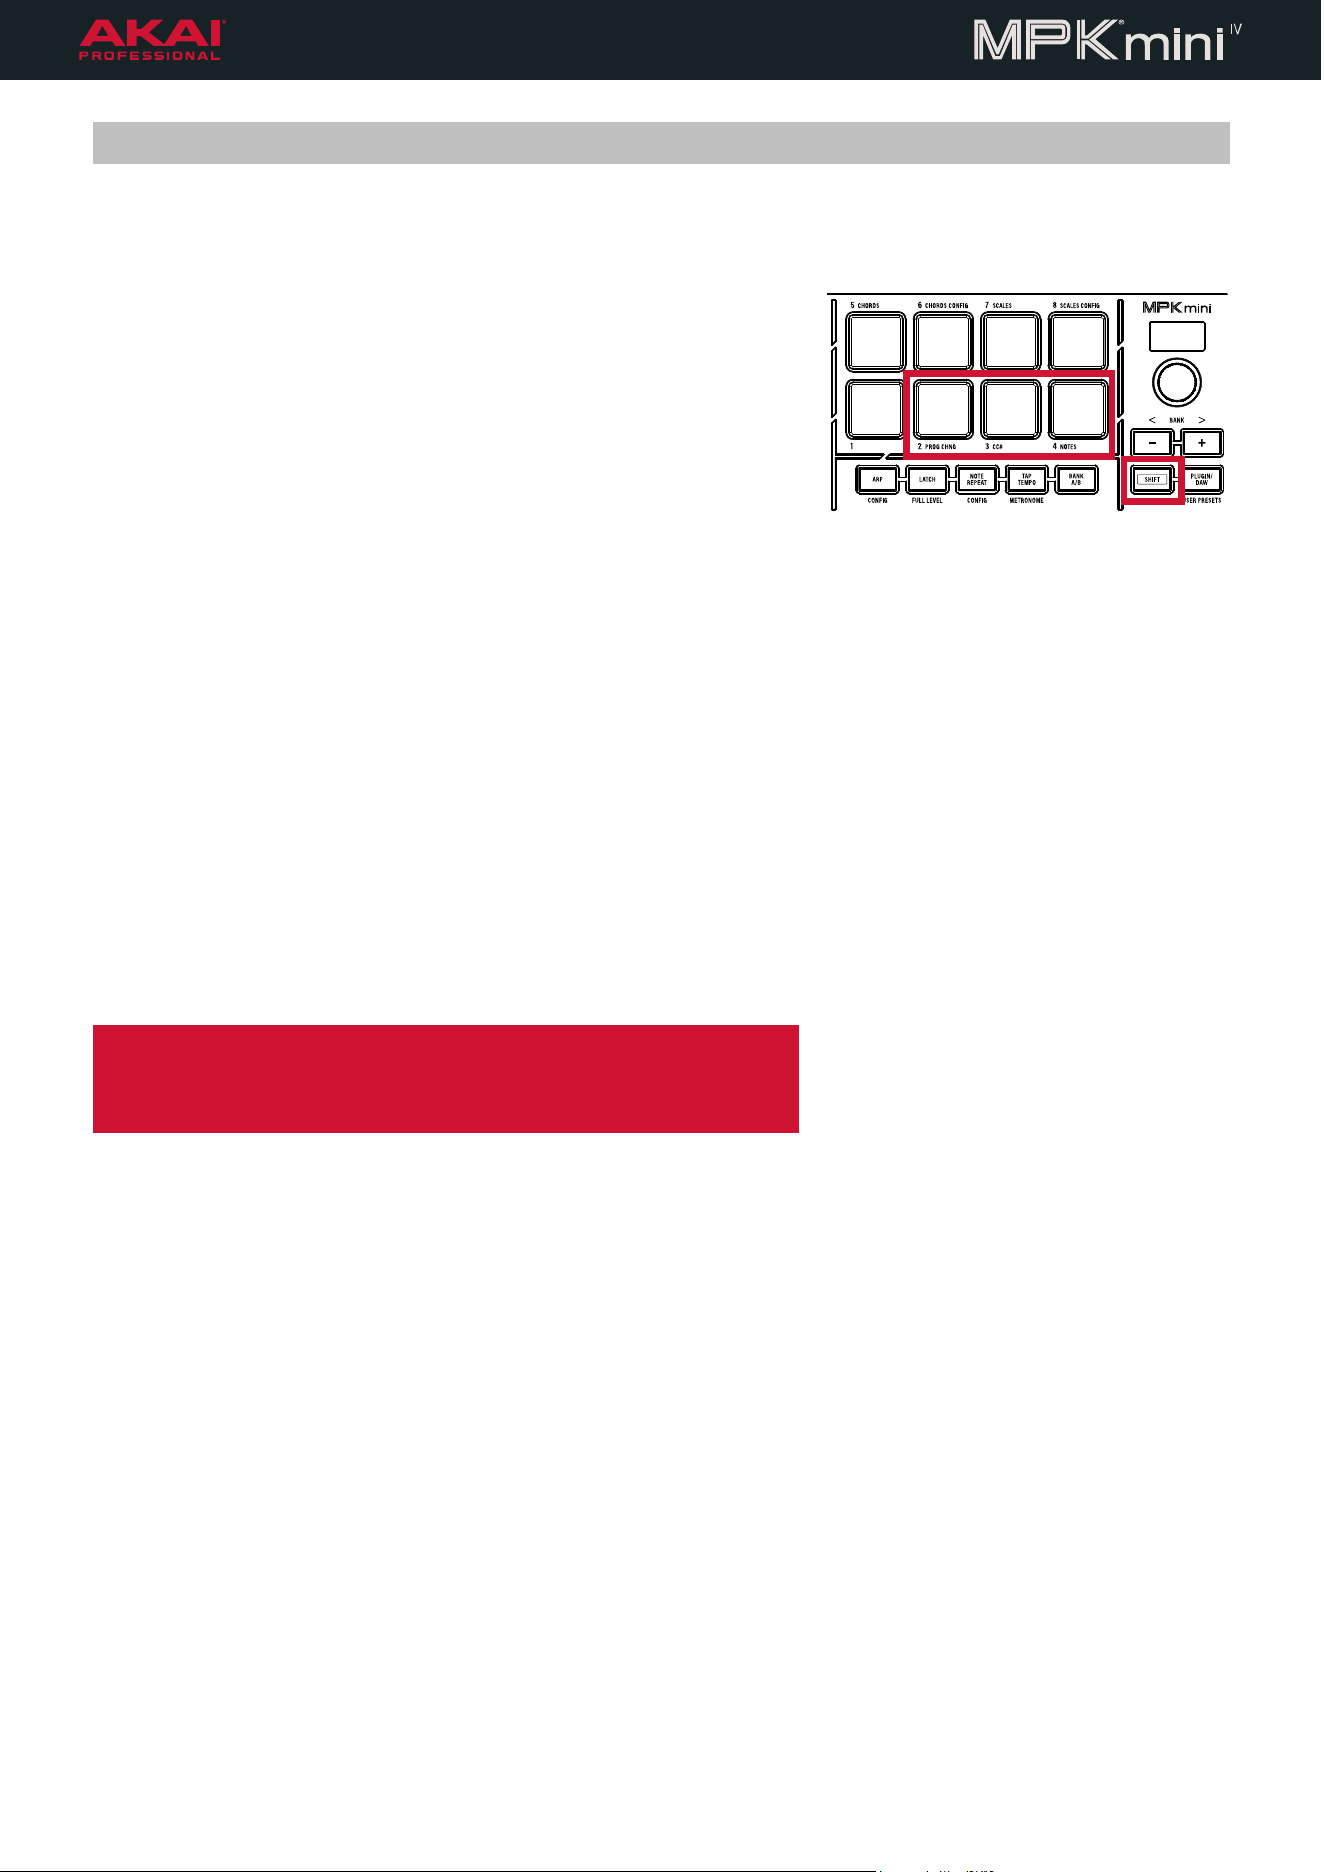
To enable Notes Mode, hold SHIFT and press PAD 4. When Notes
Mode is on, PAD 4 will be lit green while SHIFT is held down.
In CC# Mode, pads send MIDI Control Change (CC) messages. These
messages can be used to control connected software or external MIDI
devices. For example, these could be used to mute or unmute tracks
in a connected DAW, or enable certain functions on connected MIDI
devices like a drum machine or synthesizer.
To enable CC# Mode, hold SHIFT and press PAD 3. When CC#
Mode is on, PAD 3 will be lit green while SHIFT is held down.
In Program Change mode, pads send MIDI Program Change
messages. These messages are used to change presets on connected
software or external MIDI devices. This can be especially useful when
performing live to switch between different sounds on your software
or hardware for different songs.
To enable Program Change Mode, hold SHIFT and press PAD 2.
When Program Change Mode is on, PAD 2 will be lit green while
SHIFT is held down.
Note: CC# and Program Change pad messages cannot be used with
the DAW or Plugin presets as these are mapped to control different
pad modes in the supported software. See Setup with Other Software
and refer to the associated Setup Guide for your software to learn more.
15
Arpeggiator
MPK® mini IV features a powerful built-in arpeggiator. An arpeggiator
takes a series of notes you play on the keyboard and repeats them in a
set pattern.
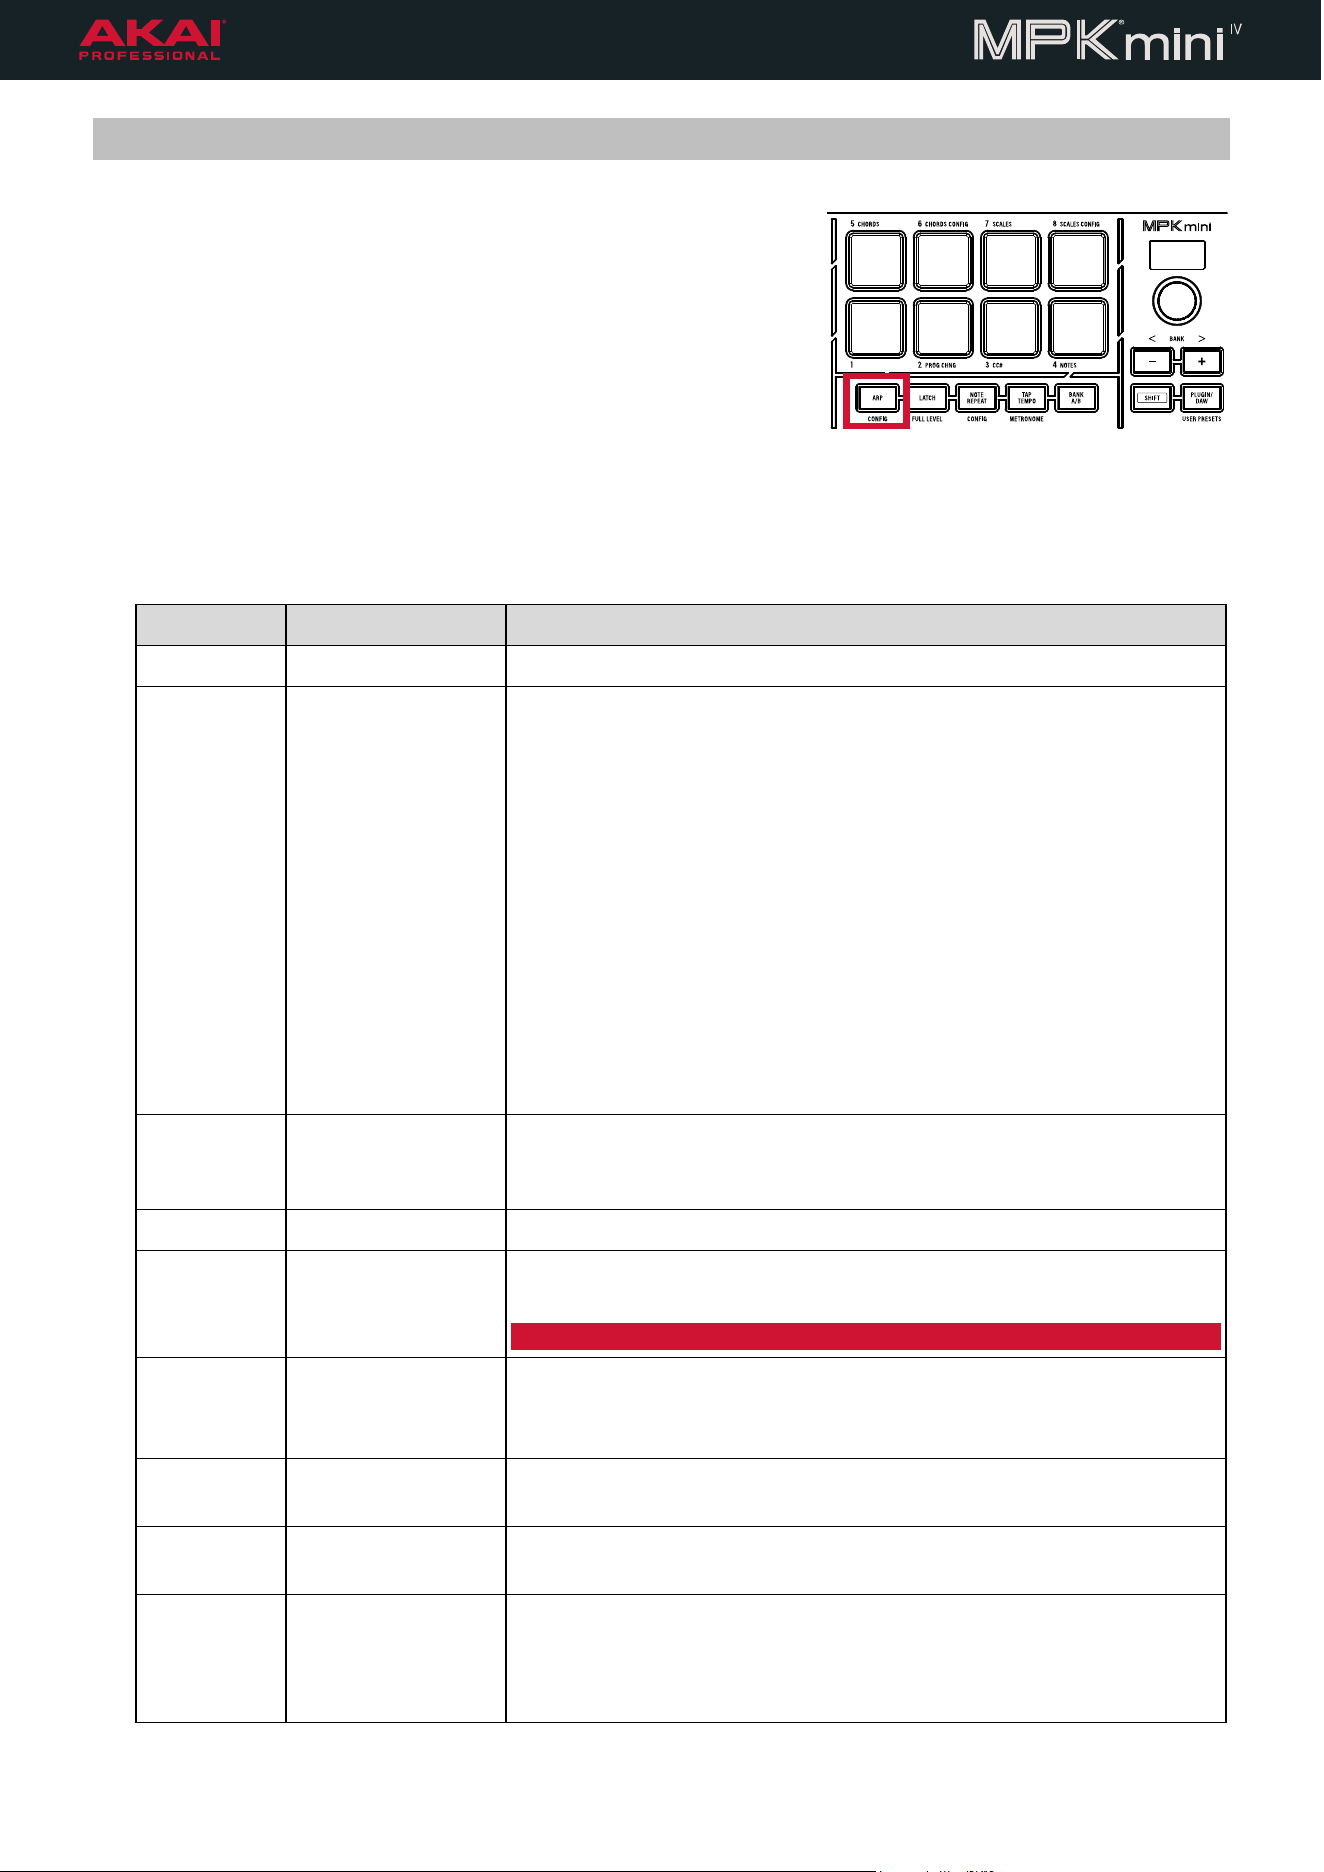
To enable the arpeggiator, press the ARP button.
Press and hold SHIFT and press the ARP button to open the
Arpeggiator Configuration menu on the display. You can also press
and hold the ARP button to temporarily open the Configuration menu
while the button is held. Use the encoder to browse and edit the
settings below.
To exit the Arpeggiator Configuration menu, press the
PLUGIN/DAW button.
Setting Values Description
Enable Off, On This turns the Arpeggiator on or off.
Mode This determines the behavior of the arpeggiator.
Up Notes are played from the lowest to the highest.
Dwn Notes are played from the highest to lowest.
Exc Notes are played from the lowest to the highest, and then back
down. The lowest and highest notes will sound only once at the
directional change.
Inc Notes are played from the lowest to the highest, and then back
down. The lowest and highest notes will sound twice at the
directional change.
Ord Notes are played in the order they are triggered.
Rnd Notes are played in random order.
Chor All notes played are triggered together as a chord.
Div 1/4, 1/4T, 1/8, 1/8T,
1/16, 1/16T, 1/32,
1/32T
This determines the time division of the arpeggiator. Notes will be
played at this rate according to the current tempo. A “T” indicates a
triplet time division.
Oct 1–4 This determines the number of octaves covered by the arpeggiation.
Swing 50–75% This determines the amount of swing applied to notes in the
arpeggiation.
Note: This setting also applies to Note Repeat.
Mutate Off, On This turns the mutate function on or off.
When on, an arpeggiator step will occasionally jump up one octave
from its expected octave.
Mut% 0–99% This determines the probability of the Mutate effect being applied to
the arpeggiation.
Rnd% 1–99% This determines the probability that the arp will play a random note
instead of the next expected note in the arpeggiation.
Clock Int, Ext This determines whether the apreiggator timing is controlled by the
Internal clock or by an External clock, such as a connected DAW.
By default, this is set to Internal for all presets. If you would like your
software to control the clock timing, make sure to set it to External.
16
Setting Values Description
Gate 10–99% This determines the length of each arpeggiator note, relative to the
set Time Division and tempo.
Freeze Off, On This turns Freeze mode on and off.
When on, the Arpeggiator will automatically enable Latch (if it is not
already enabled). Once the initial arpeggio is set, you can then freely
play other notes while the arpeggiation continues.
FrzCH# 2–16 This determines the MIDI Channel on which notes in Freeze mode
are sent.
Latch Off, On This turns the latch feature on or off.
When on, the arpeggiator will continue even after you lift your
fingers. While holding down the keys, you can add more notes to the
arpeggiated chord by pressing down additional keys. If you press the
keys, release them, and then press down a new combination of notes,
the Arpeggiator will memorize and arpeggiate the new notes.
This is the same as using the LATCH button on MPK® mini IV.
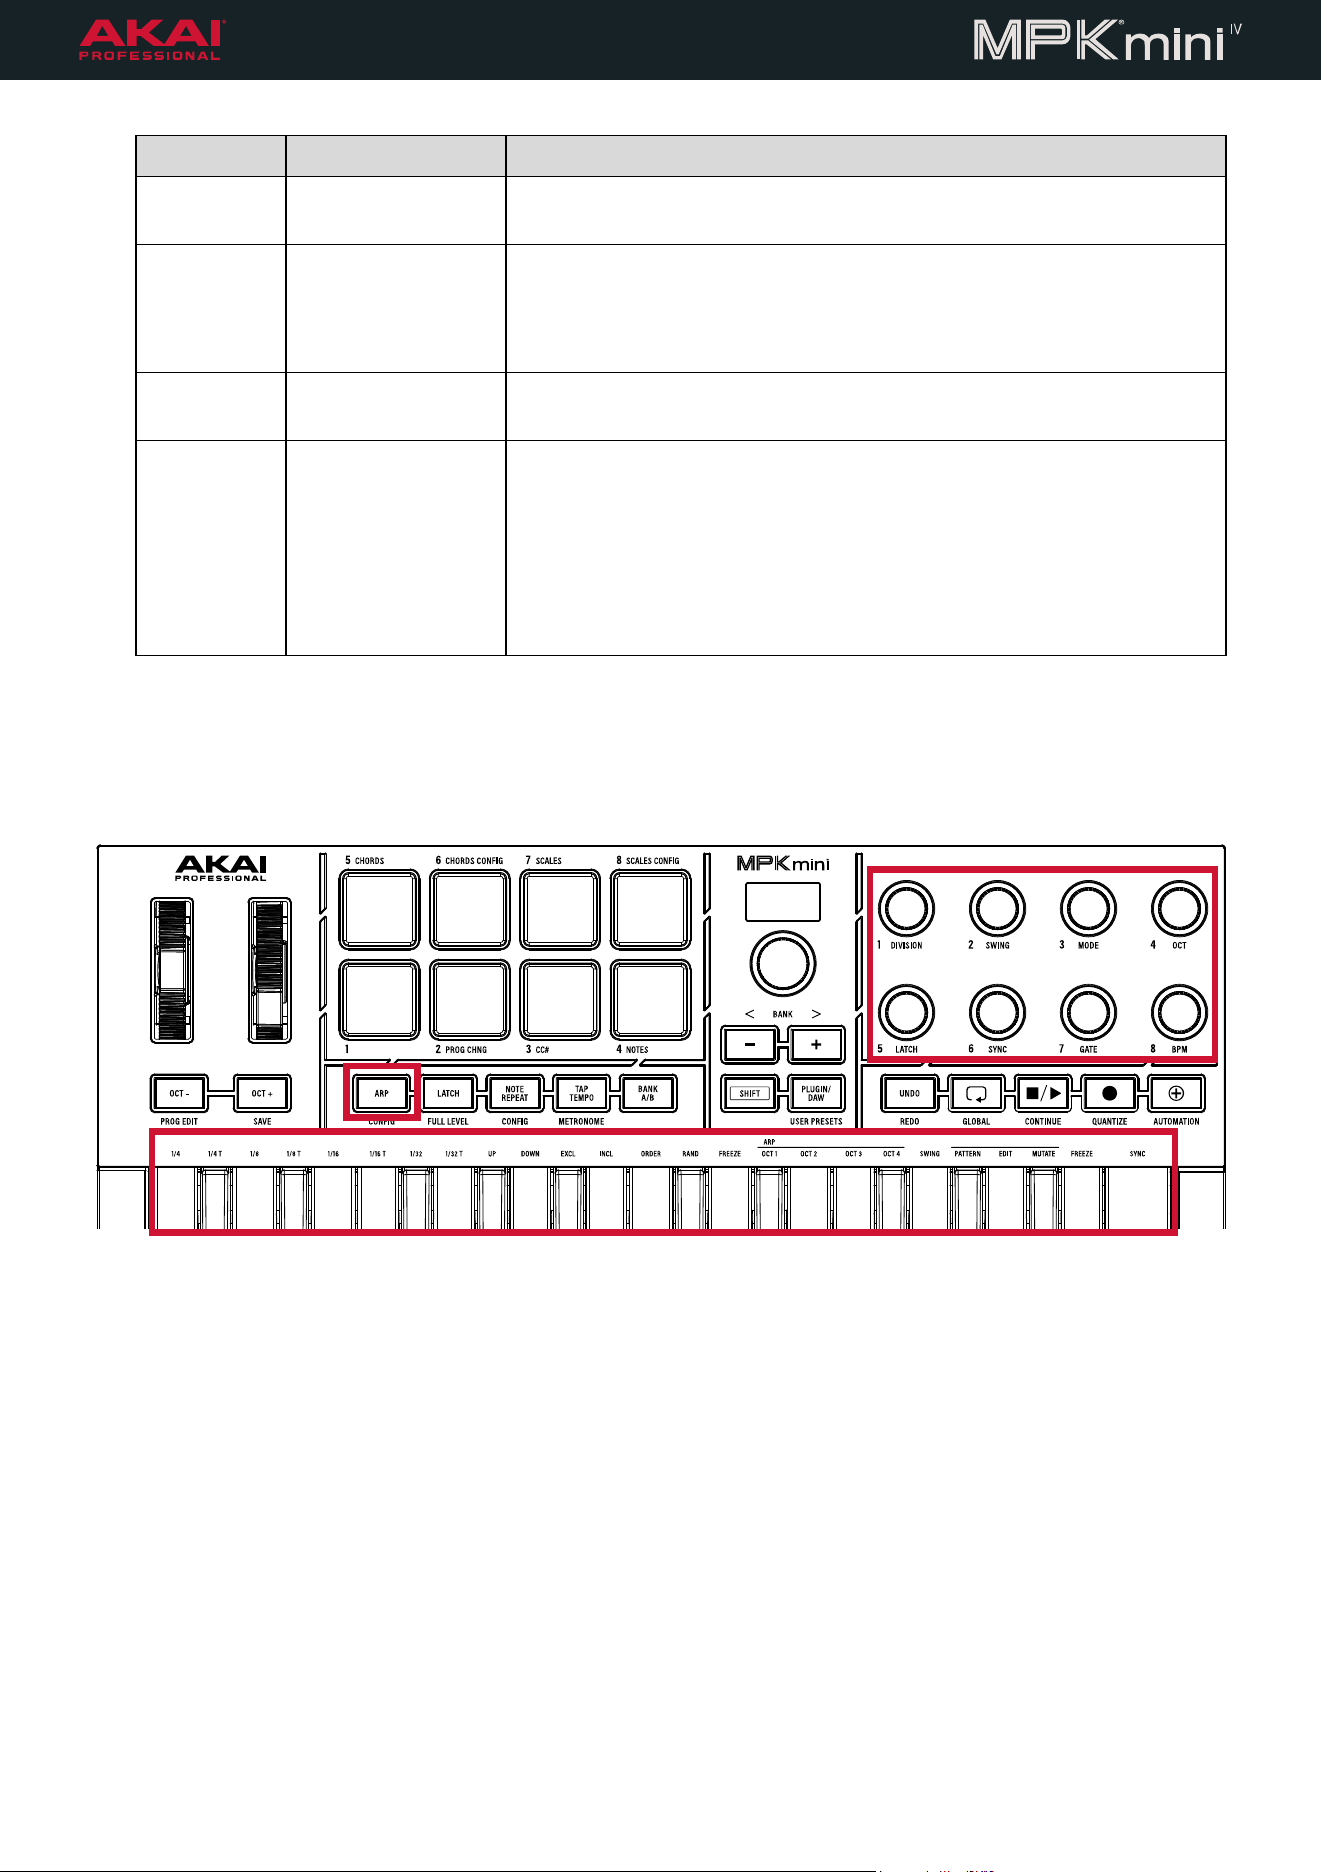
In addition to editing Arpeggiator settings using the Configuration menu, you can also press and hold the ARP
button and use the keyboard or Knobs to edit the noted parameters.
17
Pattern Mode
In addition to standard arpeggiations, MPK® mini IV features a Pattern Editor to create and apply further variations
to the arpeggiator, including accents, off steps, sustain, and ratchet notes. You can create, save, and trigger up
to 16 different arpeggiation patterns, giving you a wealth of options for dynamic sequences.
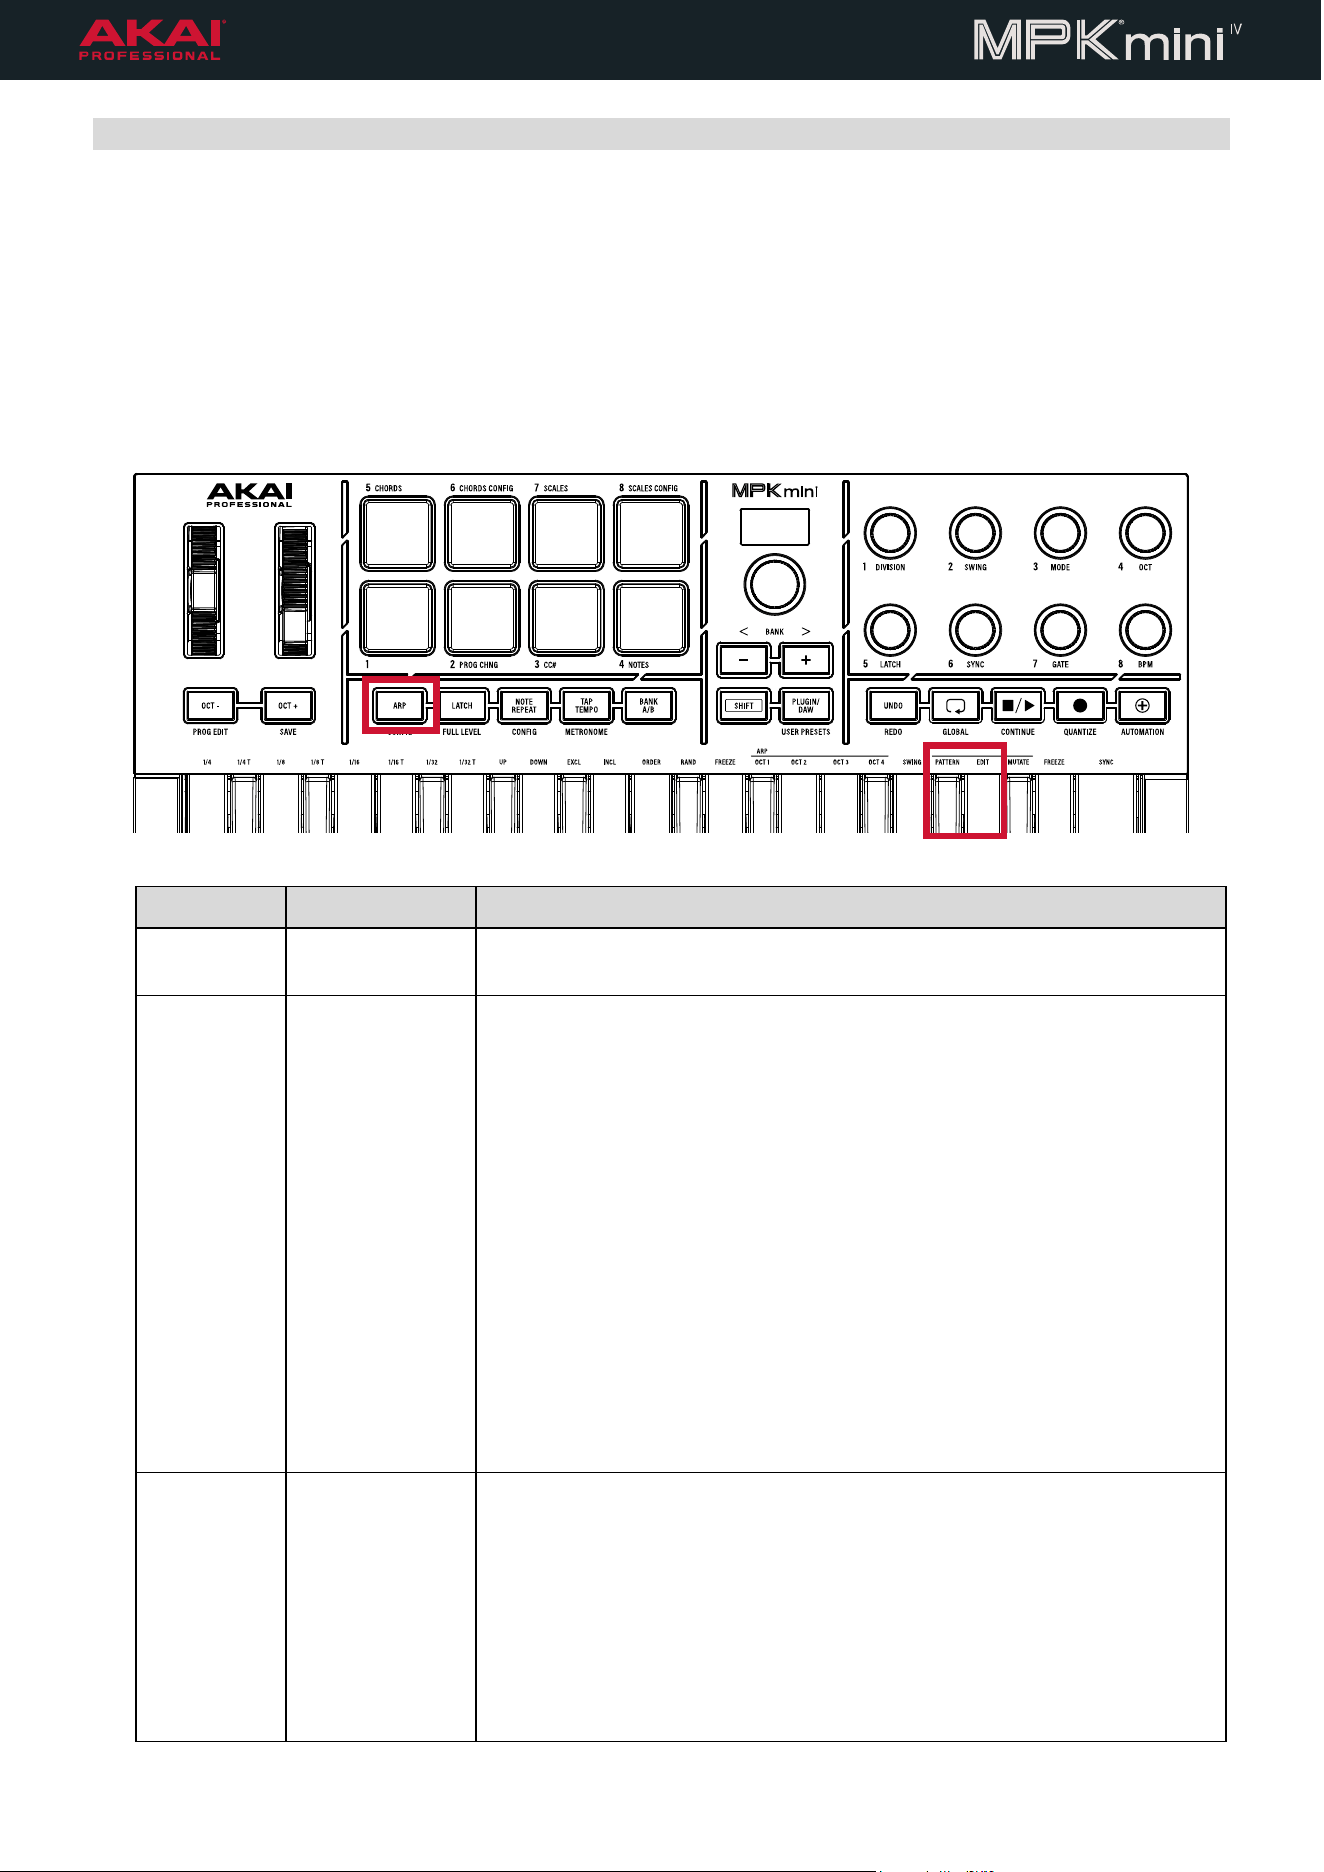
To turn Pattern Mode on or off, hold the ARP button and then tap the key labled PATTERN (G#2).
To enter Pattern Editor, hold the ARP button and then tap the key labled EDIT (A2). Use the encoder to browse
and edit the settings below. Use these settings in conjunction with the Pads to edit pattern as described.
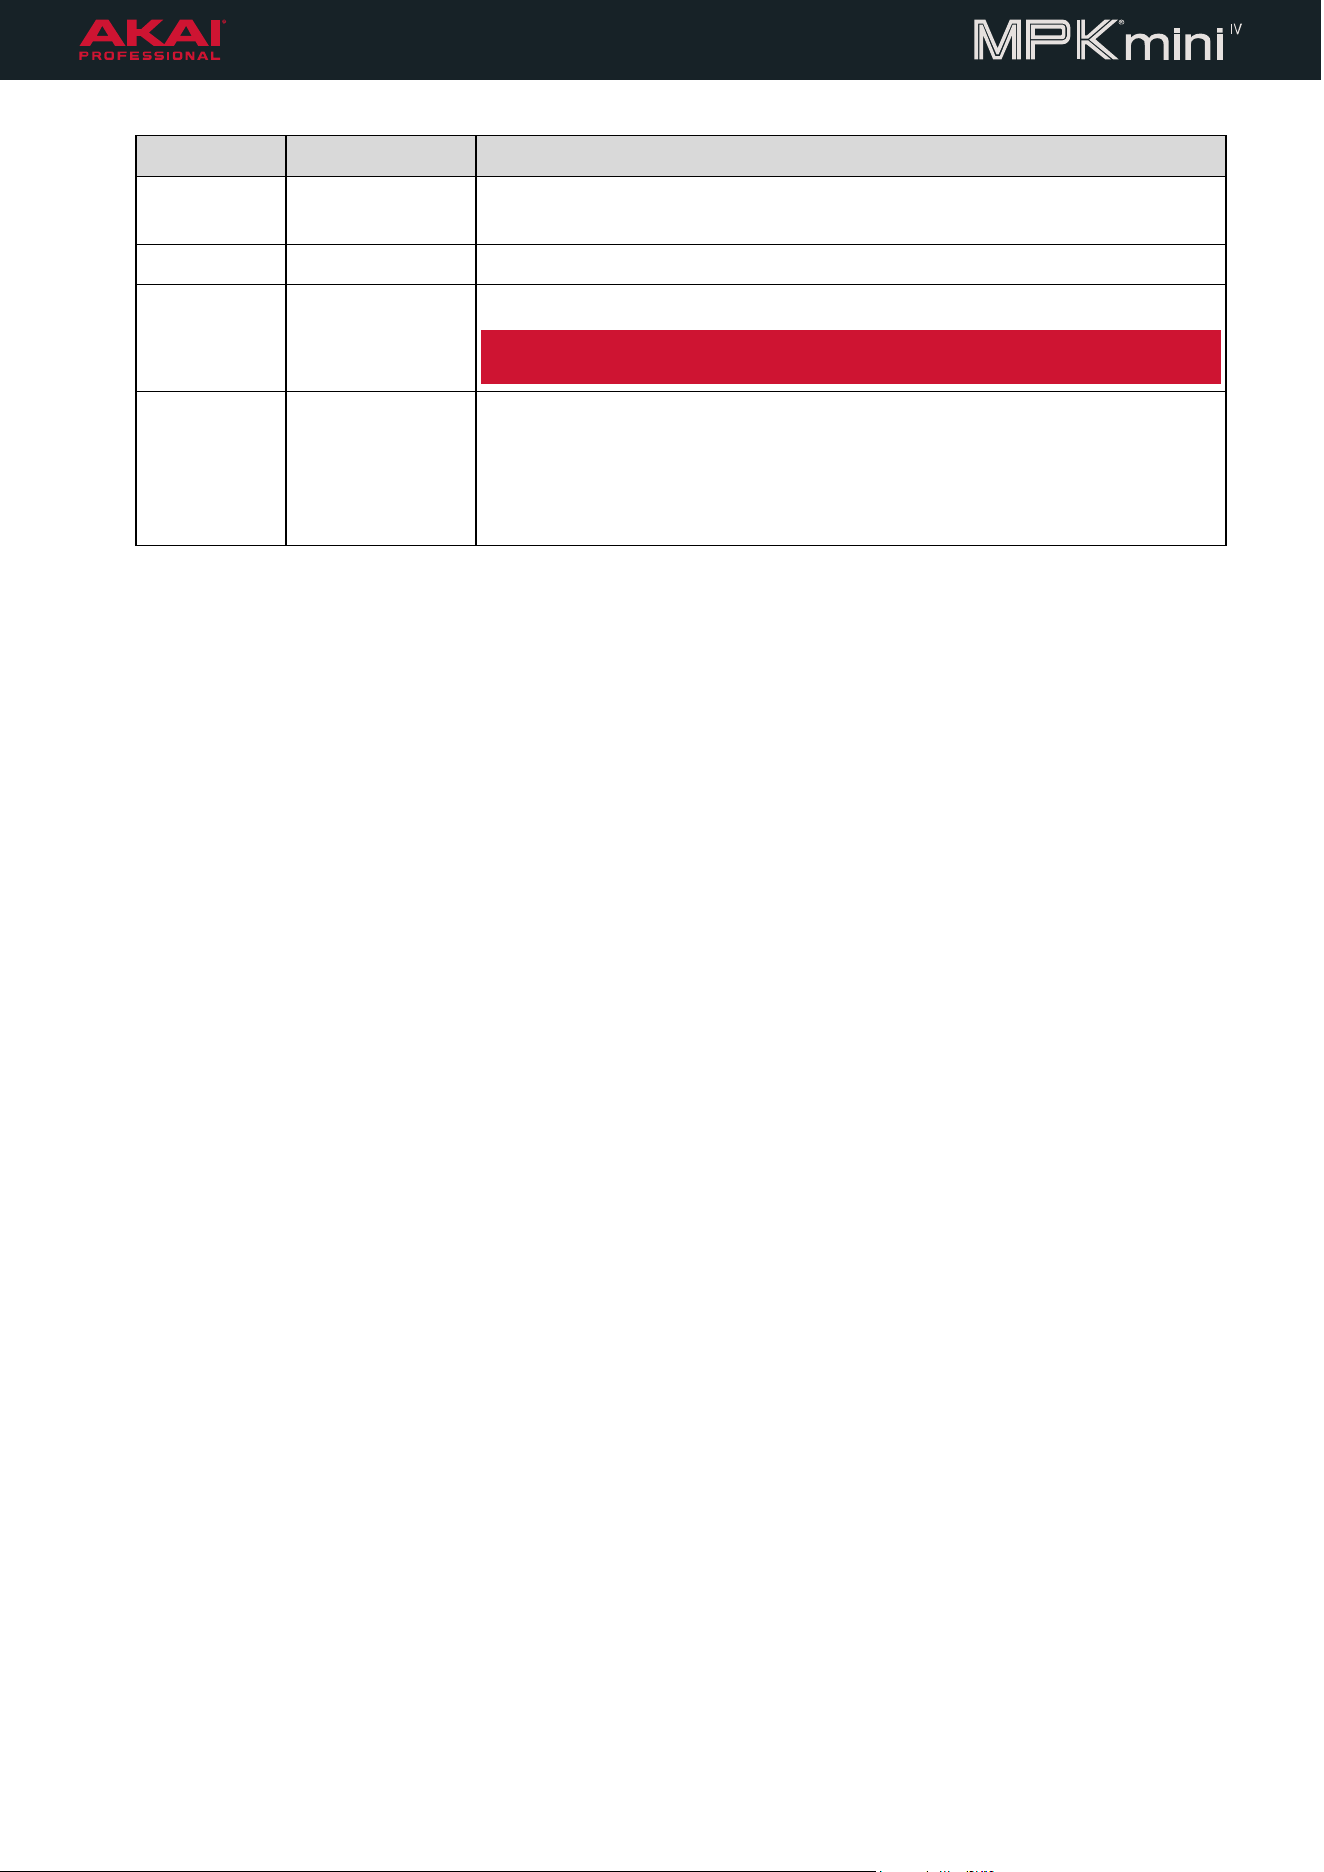
Setting Values Description
Patt Off, On This turns Pattern mode on and off. This is the same as holding the
A
RP
button and pressing the PATTERN key (G#2).
View This determines the current editing view for the pads.
Acc In this mode, the pads add accents to notes and set Off steps.
Tap the pad once to edit the step to add an accent (pad is lit yellow).
Tap the pad again to edit the step to an Off step (pad is unlit).
Tap the pad again to return to an unaccented On step (pad is lit red).
Sust In this mode, tap a pad to edit the step to add sustain to the note (pad is
lit blue).
The current Gate setting will be ignored for a Sustain note, and the note is
instead played with 110% Gate. This causes the note to ring out longer,
potentially overlapping with the next played note in the arp pattern.
Ratch In this mode, tap a pad to edit the step to add a note ratchet (pad is lit
green). This will play two notes at two-times the current time division
setting. For example, if the time division is 1/8, then a ratchet step will
play two notes at 1/16.
Style This determines how the arpeggiator will play when an Off step is
encountered.
Skip In this mode, the next note in line is skipped when an Off step is
encountered. This results in an arpeggio where notes consistently fall on
the same beats, even if Off steps are inserted.
Rest In this mode, the next note in line is held when an Off step is
encountered until the next On step. This results in an arpeggio where
notes do not always fall on the same beats when Off steps are inserted.
18
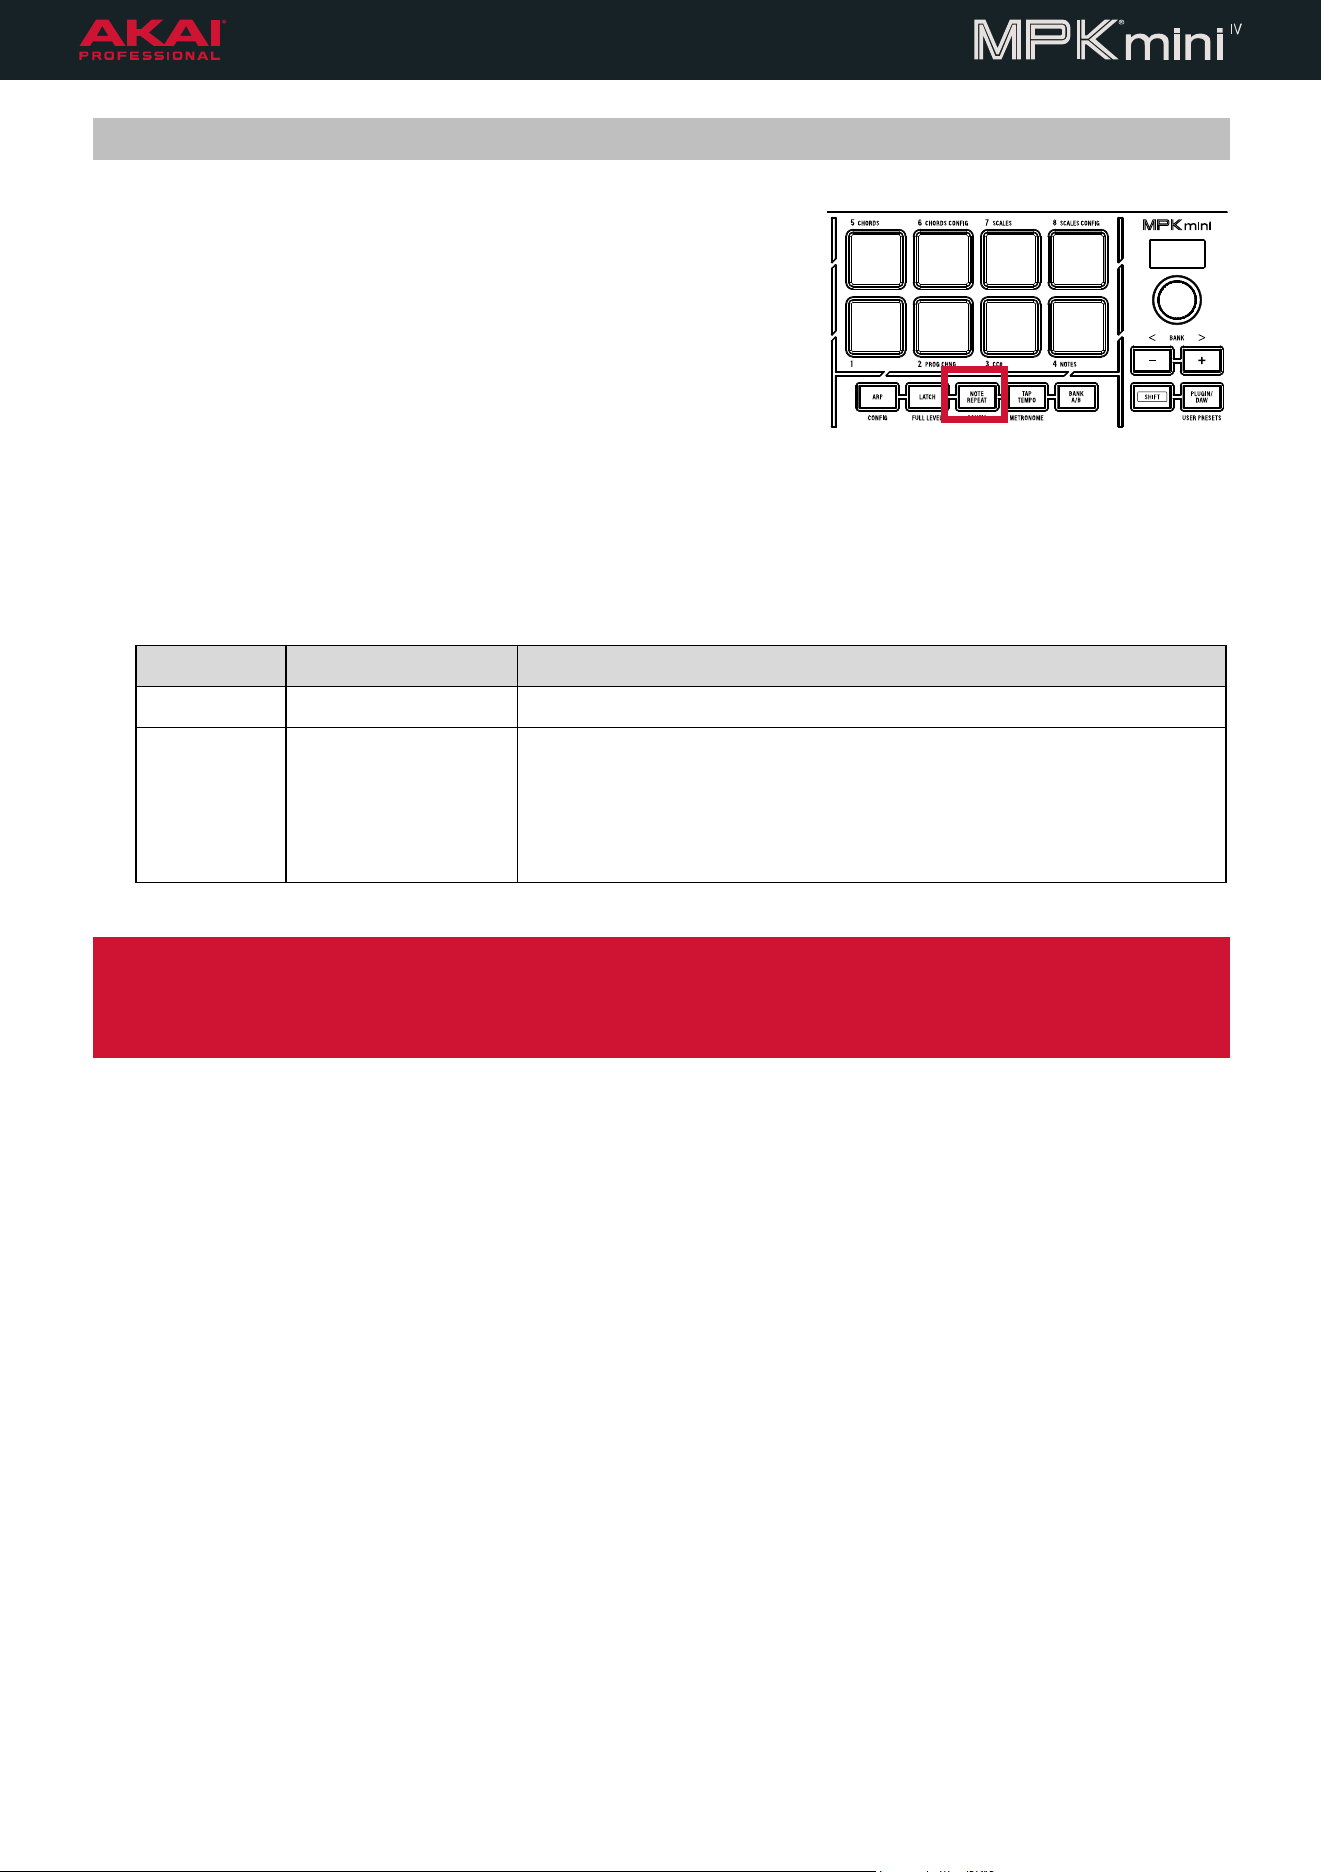
Setting Values Description
Length 8, 16 This determines the length of the pattern. Each step size is determined
by the current arpeggio time division value.
Ac Amt 10–100 This determines the amount of velocity accent applied to notes
Patt# 1–16 This is the current pattern being edited.
Note: Navigating away from the current pattern will discard all unsaved
changes.
Save? Yes, No Select
Y
es to save the current pattern to the current Pattern Number.
Saved patterns will be represented by pink pads when Patt# or this
setting are highlighted. You can tap the pads to trigger patterns in time
with the current arppegiation.
Select No to return to editing the current pattern.
19
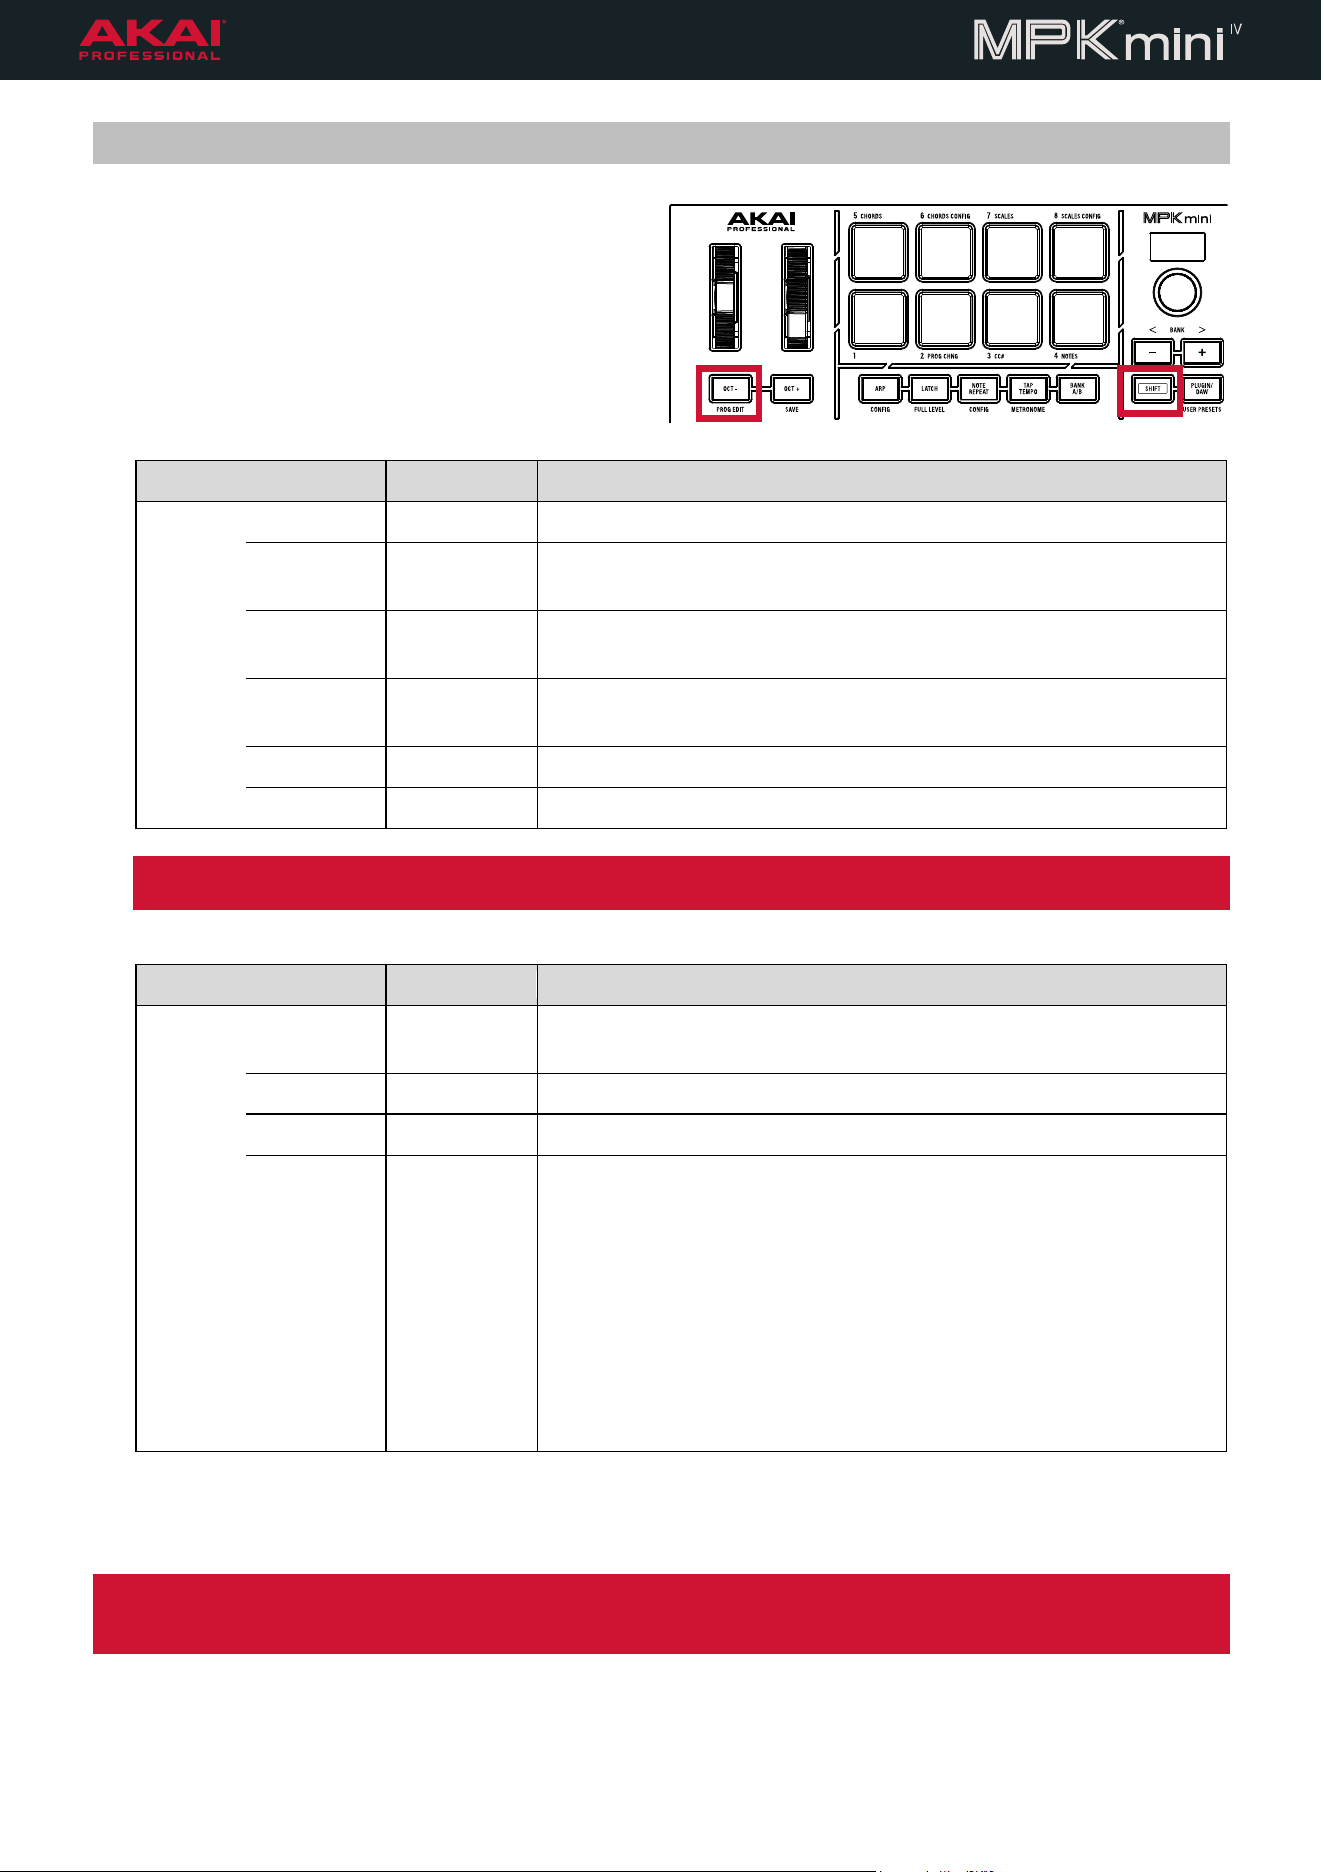
Note Repeat
MPK® mini IV features MPC style Note Repeat, which allows you to
retrigger pads at a set value while they are held. This is useful for
adding rhythmic variations to your beats, such as triplet hi-hat accents.
To enable Note Repeat, press the NOTE REPEAT button.
Press and hold SHIFT and press the NOTE REPEAT button to open
the Note Repeat Configuration menu on the display. You can also
press and hold the NOTE REPEAT button to temporarily open the
Configuration menu while the button is held. Use the encoder to
browse and edit the settings below.
To exit the Note Repeat Configuration menu, press the
PLUGIN/DAW button.
Setting Values Description
Enable Off, On This turns the Note Repeat function on or off.
Div 1/4, 1/4T, 1/8, 1/8T,
1/16, 1/16T, 1/32,
1/32T
This determines the time division of the Note Repeat function. The
pad will trigger at this rate according to the current tempo. A “T”
indicates a triplet time division.
You can also press and hold the NOTE REPEAT button and press
one of the Time Division keys to quickly change this setting.
Note: The Arpeggiator Swing value is also applied to the Note Repeat function.
If you cannot hear the pad triggers when Note Repeat is active, make sure that the Arpeggiator Clock source is
set properly. If it is set to External, playback must be active in the connected DAW to send clock information and
trigger Note Repeat. If you are not connected to a DAW, change the setting back to Internal.
20
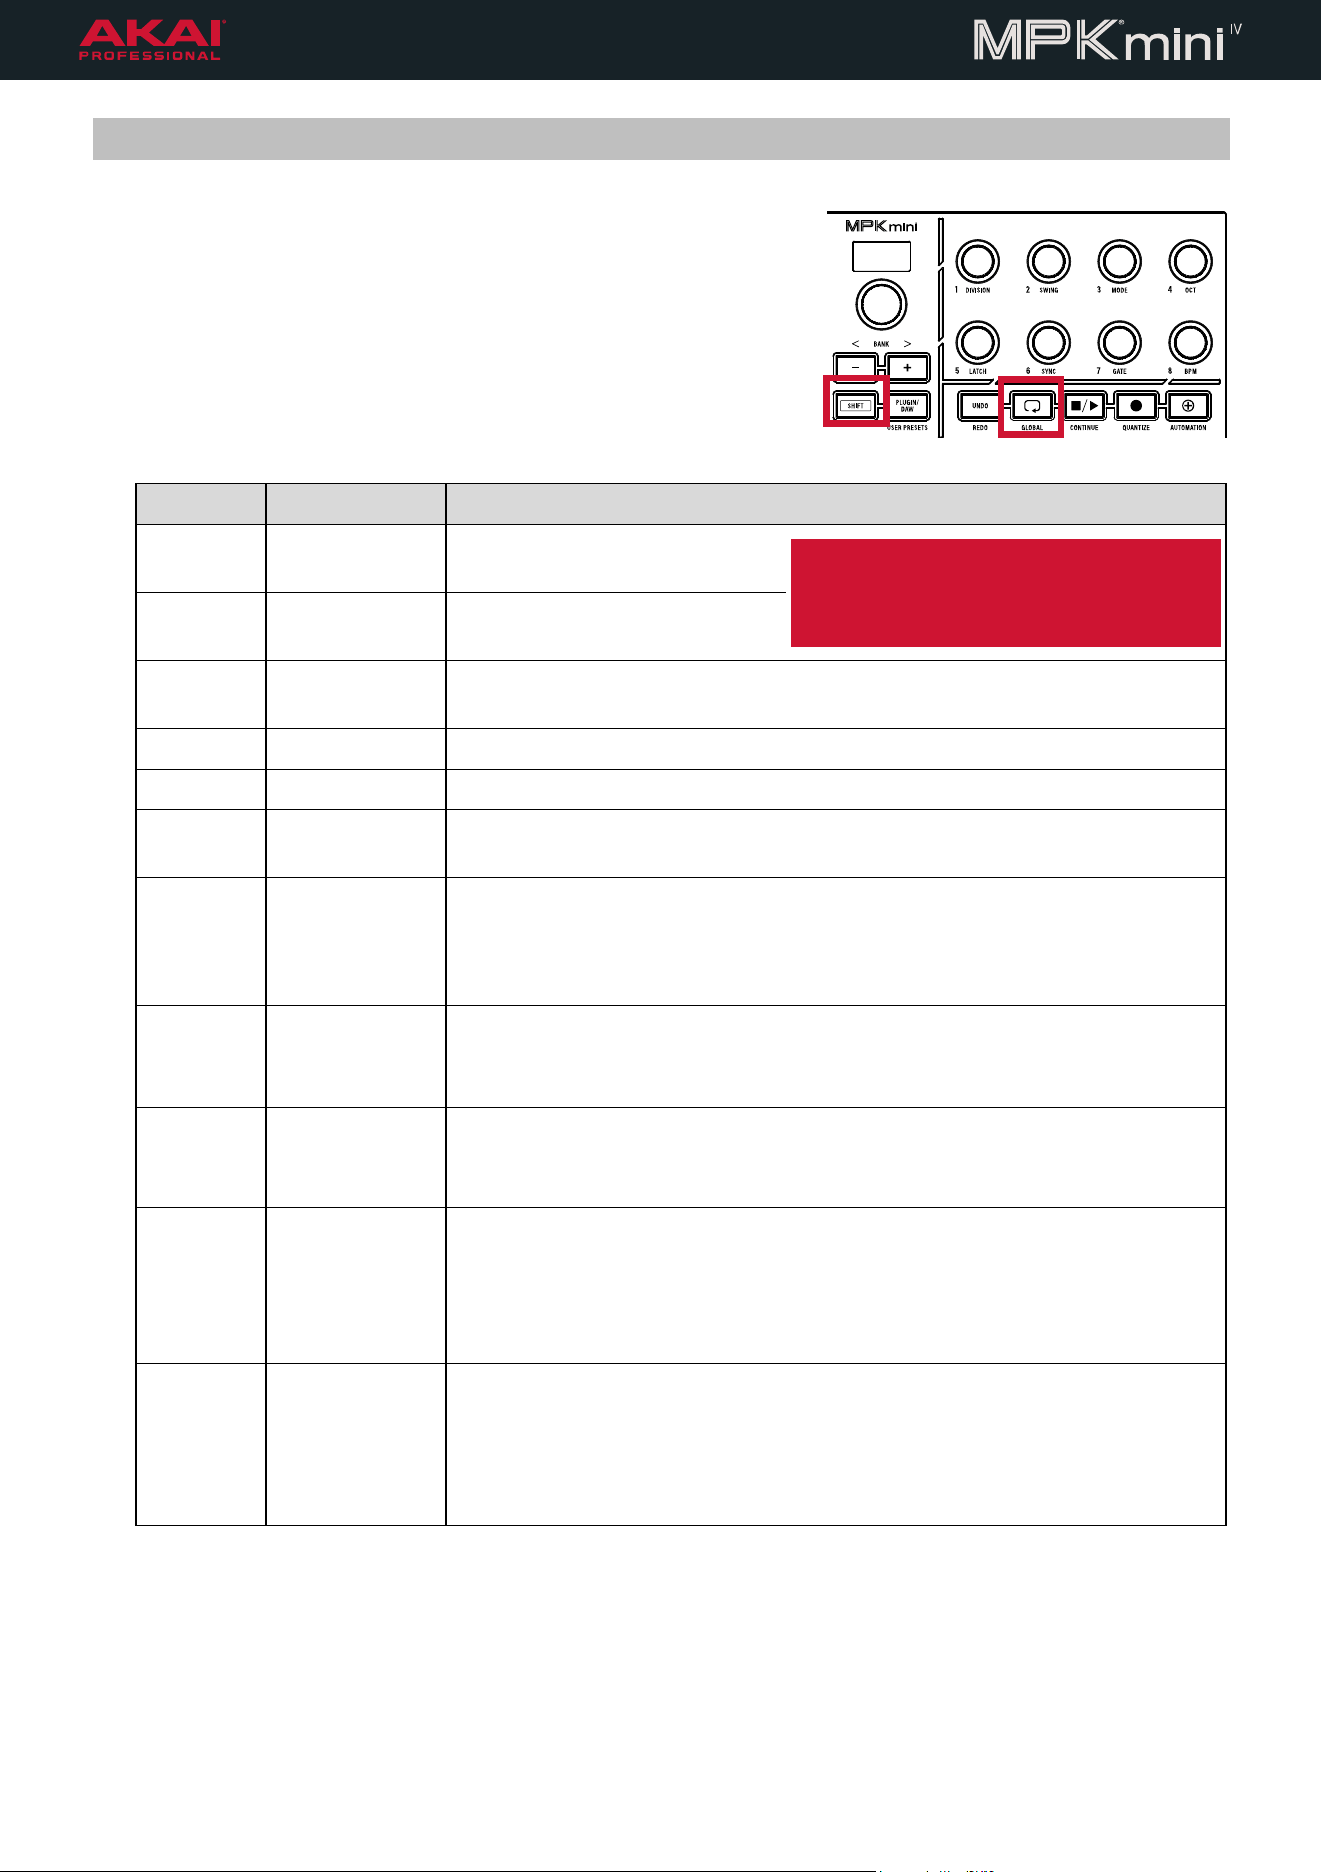
Program Edit
MPK® mini IV’s Program Edit Mode allows you to
modify the functions of the pads and knobs. This
allows you to create programs that can be customized
to other software or external MIDI gear.
To open Program Edit Mode, hold SHIFT and
press the OCT - button. Use the encoder to
browse and edit the settings below.
Setting Values Description
Pads MidiCh 1–16 This is the MIDI channel that the pads send data on.
Note# 0–127 This is the standard MIDI note number assigned to the pad when it
is in Note mode.
PC# 0–127 This is the Program Change value assigned to the pad when the
PROG CHNG function is turned on.
CC# 0–127 This is the standard MIDI Control Change (CC) assigned to the
pad when the CC# function is turned on.
Off C 0–127 This adjusts the color of the pad when it is of
f
On C 0–127 This adjusts the color of the pad when it is on.
Note: CC# and Program Change pad messages cannot be used with the DAW or Plugin presets as these
are mapped to control different pad modes in the supported software.
Setting Values Description
Knobs CC# 0–127 This is the standard MIDI Control Change (CC) number assigned
to the knob.
LoVal 0–127 This is the lowest value sent by the knob.
HiVal 0–127 This is the highest value sent by the knob.
Mode Abs, Rel This determines the behavior of the knob.
When set to Abs (Absolute), the knob always sends a definitive
value between the set LoVal and HiVal, such as between 0 and
127. With endless encoders, this can mean that in certain uses you
may need to spin the encoder to “catch up” to the current control
value, such as when switching between banks of different controls.
When set to Rel (Relative), the knob sends general messages that
either decrease or increase the current value for the assigned
control depending on which way you turn the knob. The speed of
the value change is also relative to how fast you turn the knob.
To save a custom program, hold SHIFT and press the OCT + button. Use the encoder to select a User preset
slot, and then press it to confirm.
Note: Program Edit/Save parameters are not available in DAW and Plugin presets, and you cannot save over
DAW and Plugin presets to maintain script compatibility. Make sure you have loaded a User Preset to edit and
save Programs.
To load a custom program, hold SHIFT and press the PLUGIN/DAW / USER PRESETS button. Use the encoder
to browse and select the desired preset from the list.
21
Global Menu
The Global Menu is used to customize the hardware device settings of
MPK® mini IV.
To open the Global Menu, press and hold SHIFT and then press
the LOOP button. Use the encoder to browse and edit the
following settings.
When you are finished editing, press the PLUGIN/DAW button to
exit.
Setting Values Description
MidiCh 1–16 This is the MIDI channel that the
keys and knobs send data on.
Note: These settings can only be changed
for User Presets. They cannot be changed
while using the DAW or Plugin Presets to
maintain mapping compatibility.
PadCh 1–16 This is the MIDI channel that the
pads send data on.
Oct -4 – 0 – 4 This is the current octave setting for the keys. This is the same as using the
Oct -/+ buttons.
KTrans -12 – 0 – 12 This is the transposition value of the keys.
Tempo 30–240 This is the current BPM (beats per minute) of the internal tempo clock.
Tap 2–4 This is the number of taps required for the Tap Tempo button to set a new
tempo.
Aft Off, Chan, Poly This is the type of Aftertouch message sent by applying pressure to the
pads after the initial Note On.
Chan (Channel Pressure) affects all notes played on the current channel.
Poly (Poly Aftertouch) affects each note individually.
Toggle Off, On This switches the pad modes from momentary behavior to toggle.
When on, hitting the pad triggers a Note On message (or CC value), and it
must be hit again to trigger a Note Off message (or CC 0 value).
FullVel Off, On This setting turns Full Velocity mode on or off for the keys.
When on, all keys send full velocity (127) no matter how hard or soft you
strike them.
Trnspt nOff, wOf
f
This determines the behavior of the Transport buttons (Undo, Loop,
Stop/Play, Record, and Overdub).
When set to nOff, the Transport buttons send a Note On message only
each time they are pressed. When set to wOff, the Transport buttons send
a Note On message when pressed and a Note Off message when released.
KbdCrv Light, Norm,
Heavy
This determines the playing response of the keys.
Light: For players with a lighter touch, notes will reach higher velocity with
less force.
Heavy: For heavier-handed players, notes will require more force to hit
higher velocities.
22
Setting Values Description
KnobM Abs, Rel This determines the default mode for the knobs, affecting all eight at the
same time.
When set to Abs (Absolute), the knob always sends a definitive value
between the set LoVal and HiVal, such as between 0 and 127. With
endless encoders, this can mean that in certain uses you may need to spin
the encoder to “catch up” to the current control value, such as when
switching between banks of different controls.
When set to Rel (Relative), the knob sends general messages that either
decrease or increase the current value for the assigned control depending
on which way you turn the knob. The speed of the value change is also
relative to how fast you turn the knob.
Sust Norm, Inv Depending on the polarity of your sustain pedal, normally open or closed,
you can adjust this setting to ensure sustain messages are correctly
transmitted to MPK® mini IV. If you are having issues with a connected
sustain pedal not working as intended, try changing to the opposite
setting.
DINsrc USB, Int This setting determines the source of data sent to the MIDI Out port. Select
USB to send MIDI coming from the USB-C® port. Select INT to send
internal MIDI data from the MPK® mini IV hardware.
23
Appendix
Technical Specifications
Display 0.96” Color LCD
Note Keys 25 velocity-sensitive keys; +/- 4 octaves with octave up/down buttons
Pads 8 velocity- and pressure-sensitive RGB back-lit pads
Knobs 8 assignable 360° knobs
1 push encoder
Wheels Pitch Bend Wheel
Modulation Wheel
Buttons 14 single-color LED buttons
2 bi-color LED buttons
Connectors 1 USB Type-C
®
Port
1 MIDI DIN Out Port
1 1/4" [6.35 mm] Sustain Input
Power via USB type-C (bus powered or connected to wall adapter [5V, 0.5A; sold separately)
Dimensions
(width x depth x height)
13.7” x 7.6” x 1.5”
34.7 x 19.2 x 3.7 cm
Weight 2.2 lbs.
1 kg
Specifications are subject to change without notice.
Model: AD41
Trademarks & Licenses
Akai Professional is a trademark of inMusic Brands, Inc., registered in the U.S. and other countries.
Ableton is a trademark of Ableton AG.
Cubase is a registered trademark of Steinberg Media Technologies GmbH.
FL Studio is a registered trademark of Image Line NV.
GarageBand, Logic Pro, and macOS are trademarks of Apple Inc., registered in the U.S. and other countries.
macOS is a trademark of Apple Inc., registered in the U.S. and other countries.
Windows is a registered trademark of Microsoft Corporation in the U.S. and other countries.
All other product names, company names, trademarks, or trade names are those of their respective owners.

AKAIPRO.COM
Manual Version 1.1