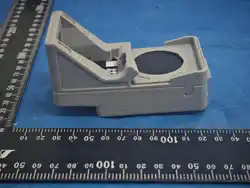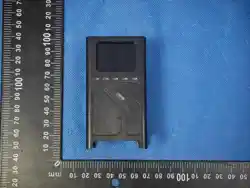

BQDry Mini User Manual
Product Overview:
BQDry Mini is a compact heating module designed for 3D-printing environments. It provides stable active heating
for enclosures that do not have built-in heating. Its modular design allows installation inside devices such as the
Bambu Lab AMS without modifying the original structure or compromising the seal. This adds active
filament-drying capability for filament storage, maintaining a warm environment during printing, and supporting
high-temperature material printing. Multiple BQDry Mini units can also be combined to expand the heating area
for different enclosure sizes. Temperature, duration, and other settings can be precisely controlled through the
Web UI.
Key Features:
1. No-Modification AMS Installation: Designed specifically for the first-generation Bambu Lab AMS. Installs
easily inside the AMS without permanent modification, adding active heating capability.
2. Precise Temperature Control: Adjustable from 35°C to 60°C to meet the drying and print-environment
requirements of different filament types.
3. Versatile Applications: Suitable not only for the AMS, but also for printer chambers, filament storage boxes,
and other enclosed heating applications.
4. Convenient Dual Control: Control the temperature, duration, and operating status using either the physical
buttons or the Web UI.
5. Efficient, Safe Heating: Low-voltage power and multiple safety protections provide reliable heating for stable
long-term operation.
Applications:
Application 1: AMS Filament Drying
For users of the first-generation Bambu Lab AMS. BQDry Mini raises the temperature inside the AMS to actively
dry filament. Its independent power supply allows filament to be dried while printing.
Application 2: Add Chamber Heating
For 3D printers without an actively heated chamber. Adding BQDry Mini provides environmental heating and
expands the range of materials the printer can use.
Application 3: Improve Filament Storage
Install BQDry Mini in another sealed filament box or storage enclosure to reduce moisture exposure and extend
filament storage life.
Specifications
Product: Filament Dryer
Model No.: BQDry Mini
Input: 24 V DC, 5 A
Rated power: 116 W
Operating environment: Ambient temperature: 10-35°C; Relative humidity: <95%
Heating range: 35-60°C (at a standard ambient temperature of 26°C)
Timer: 0-99 h (plus Continuous mode)
Product dimensions: /
Package Contents
Image
Item
Qty.
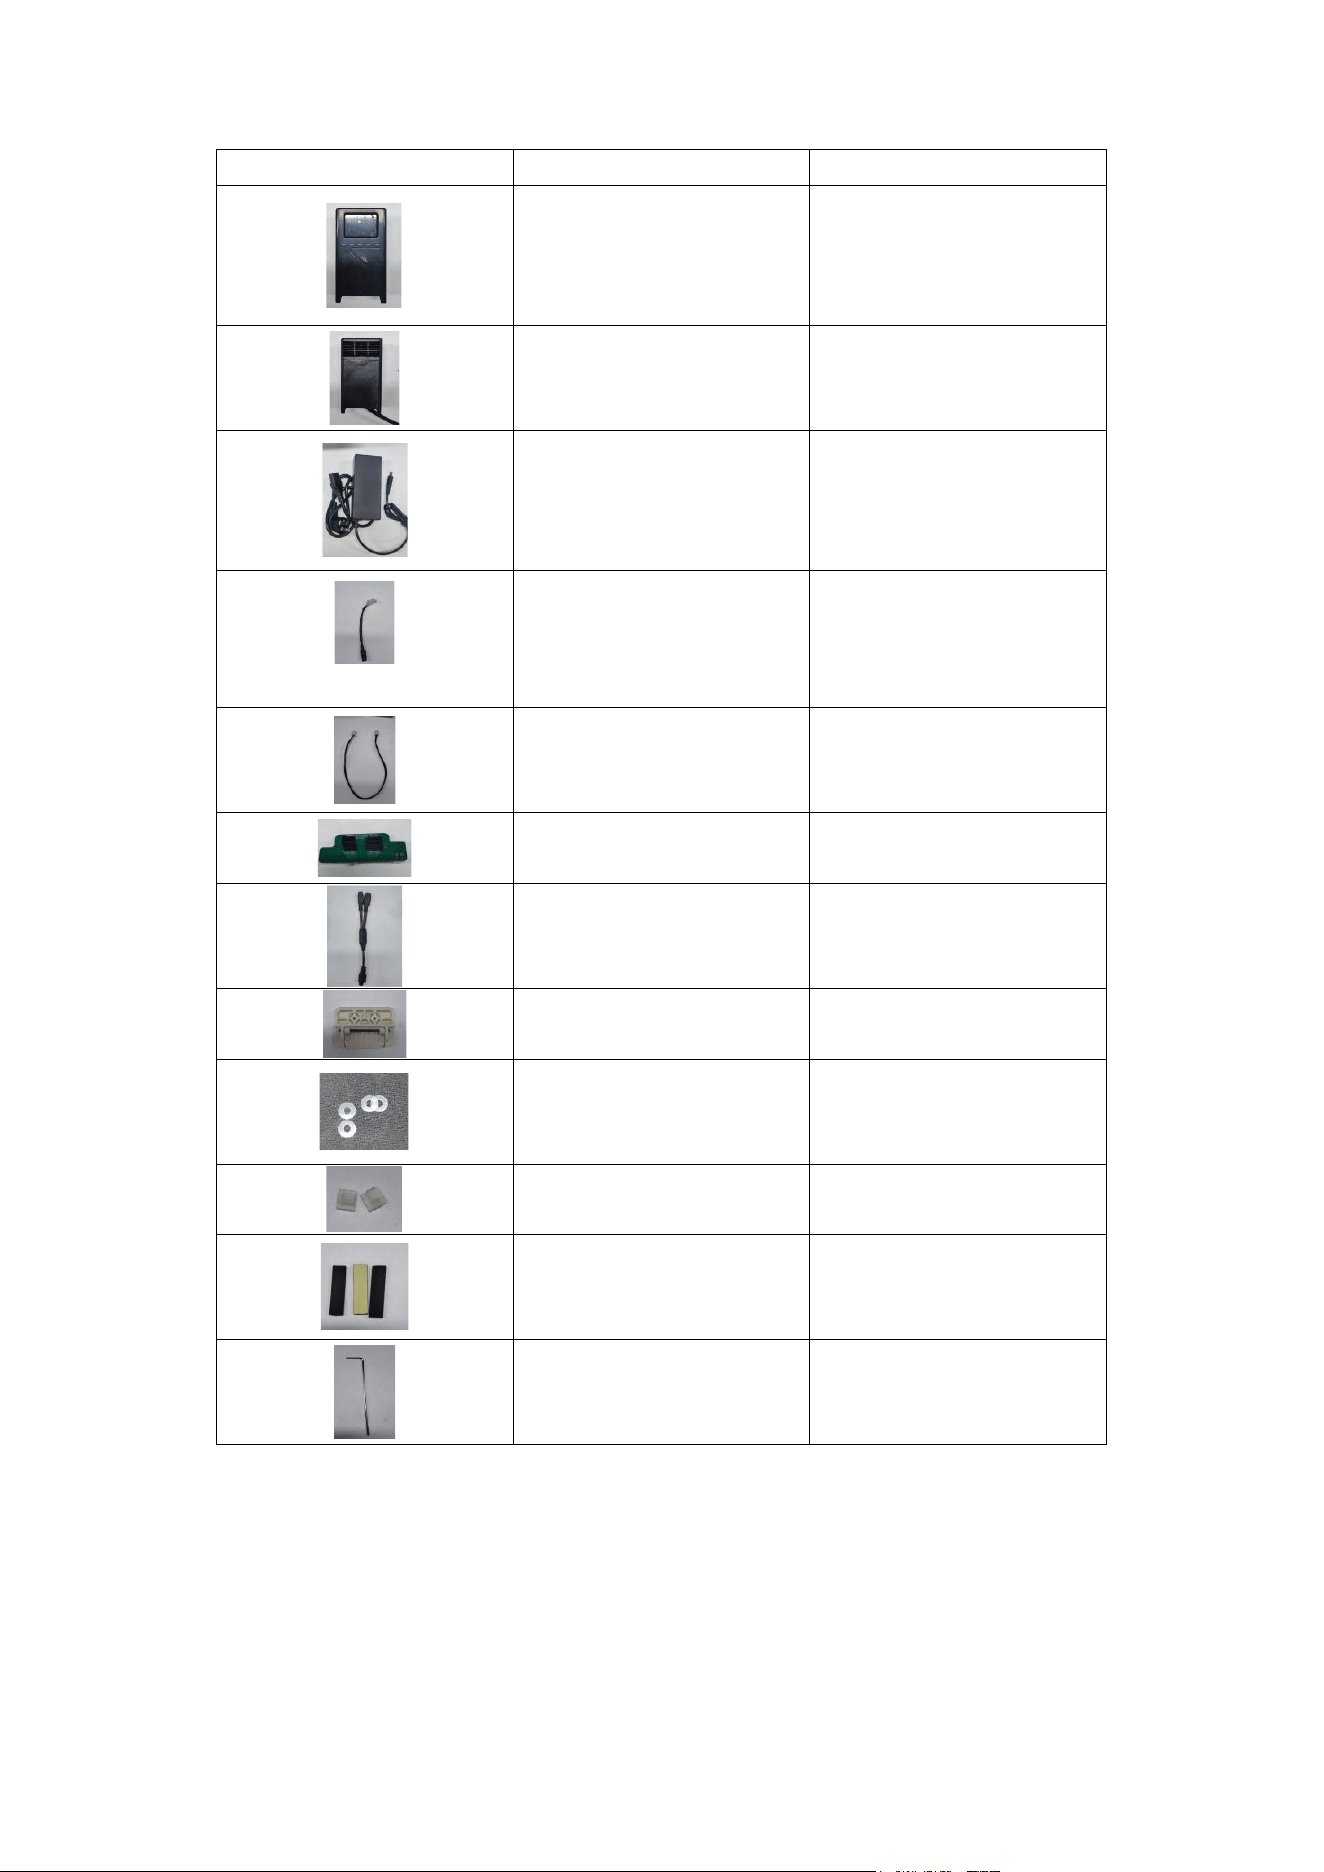
Control module
1
Output module
2
24 V 5 A DC power
adapter
1
DC connector adapter
cable
Control module power
cable
1
AMS replacement power
board
1
Y-cable
1
AMS replacement handle
1
Thin white nylon washers
4
Cable clips
2
Mounting tape
3
1.5 mm L-shaped hex key
1
Installation
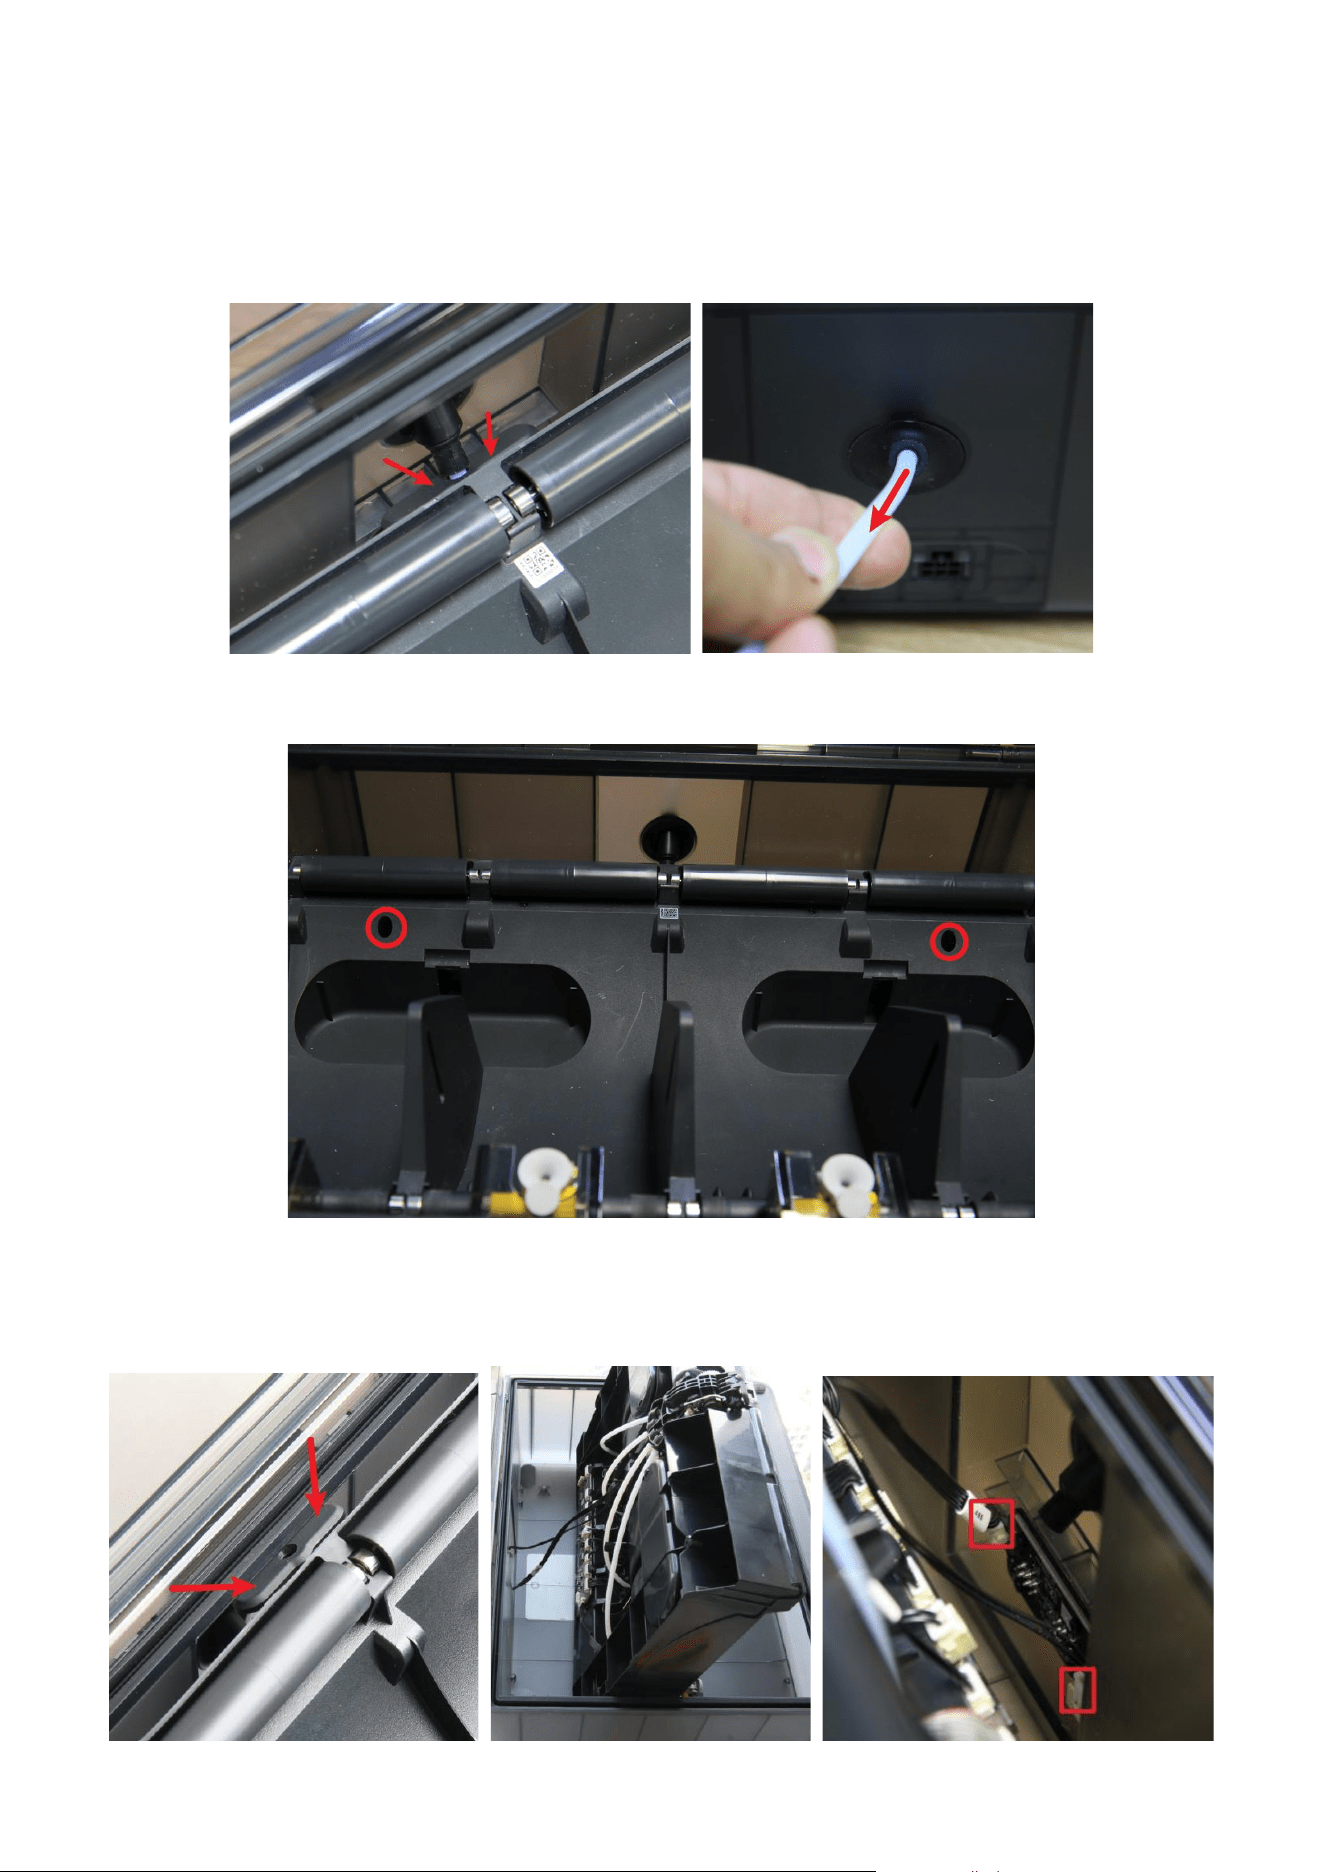
1. Prepare the AMS: Disconnect the cable and PTFE tube between the AMS and the printer. Remove all filament
from the AMS and store it temporarily in a dry location.
2. Remove the Rear PTFE Tube: Open the AMS lid. Press and hold the internal PTFE tube release collar, then
pull the PTFE tube out from the rear of the AMS.
3. Remove the Frame Screws: Use the included hex key to remove the two screws from the AMS main frame,
as shown.
4. Lift the Main Frame: Press the release button on the five-way hub, then fully lift the rear of the main frame.
Note: Internal cables are still connected. Do not pull or lift forcefully.
Disconnect the 485 communication cable and power cable from the AMS power board. Remove the AMS
main-frame assembly and set it aside.
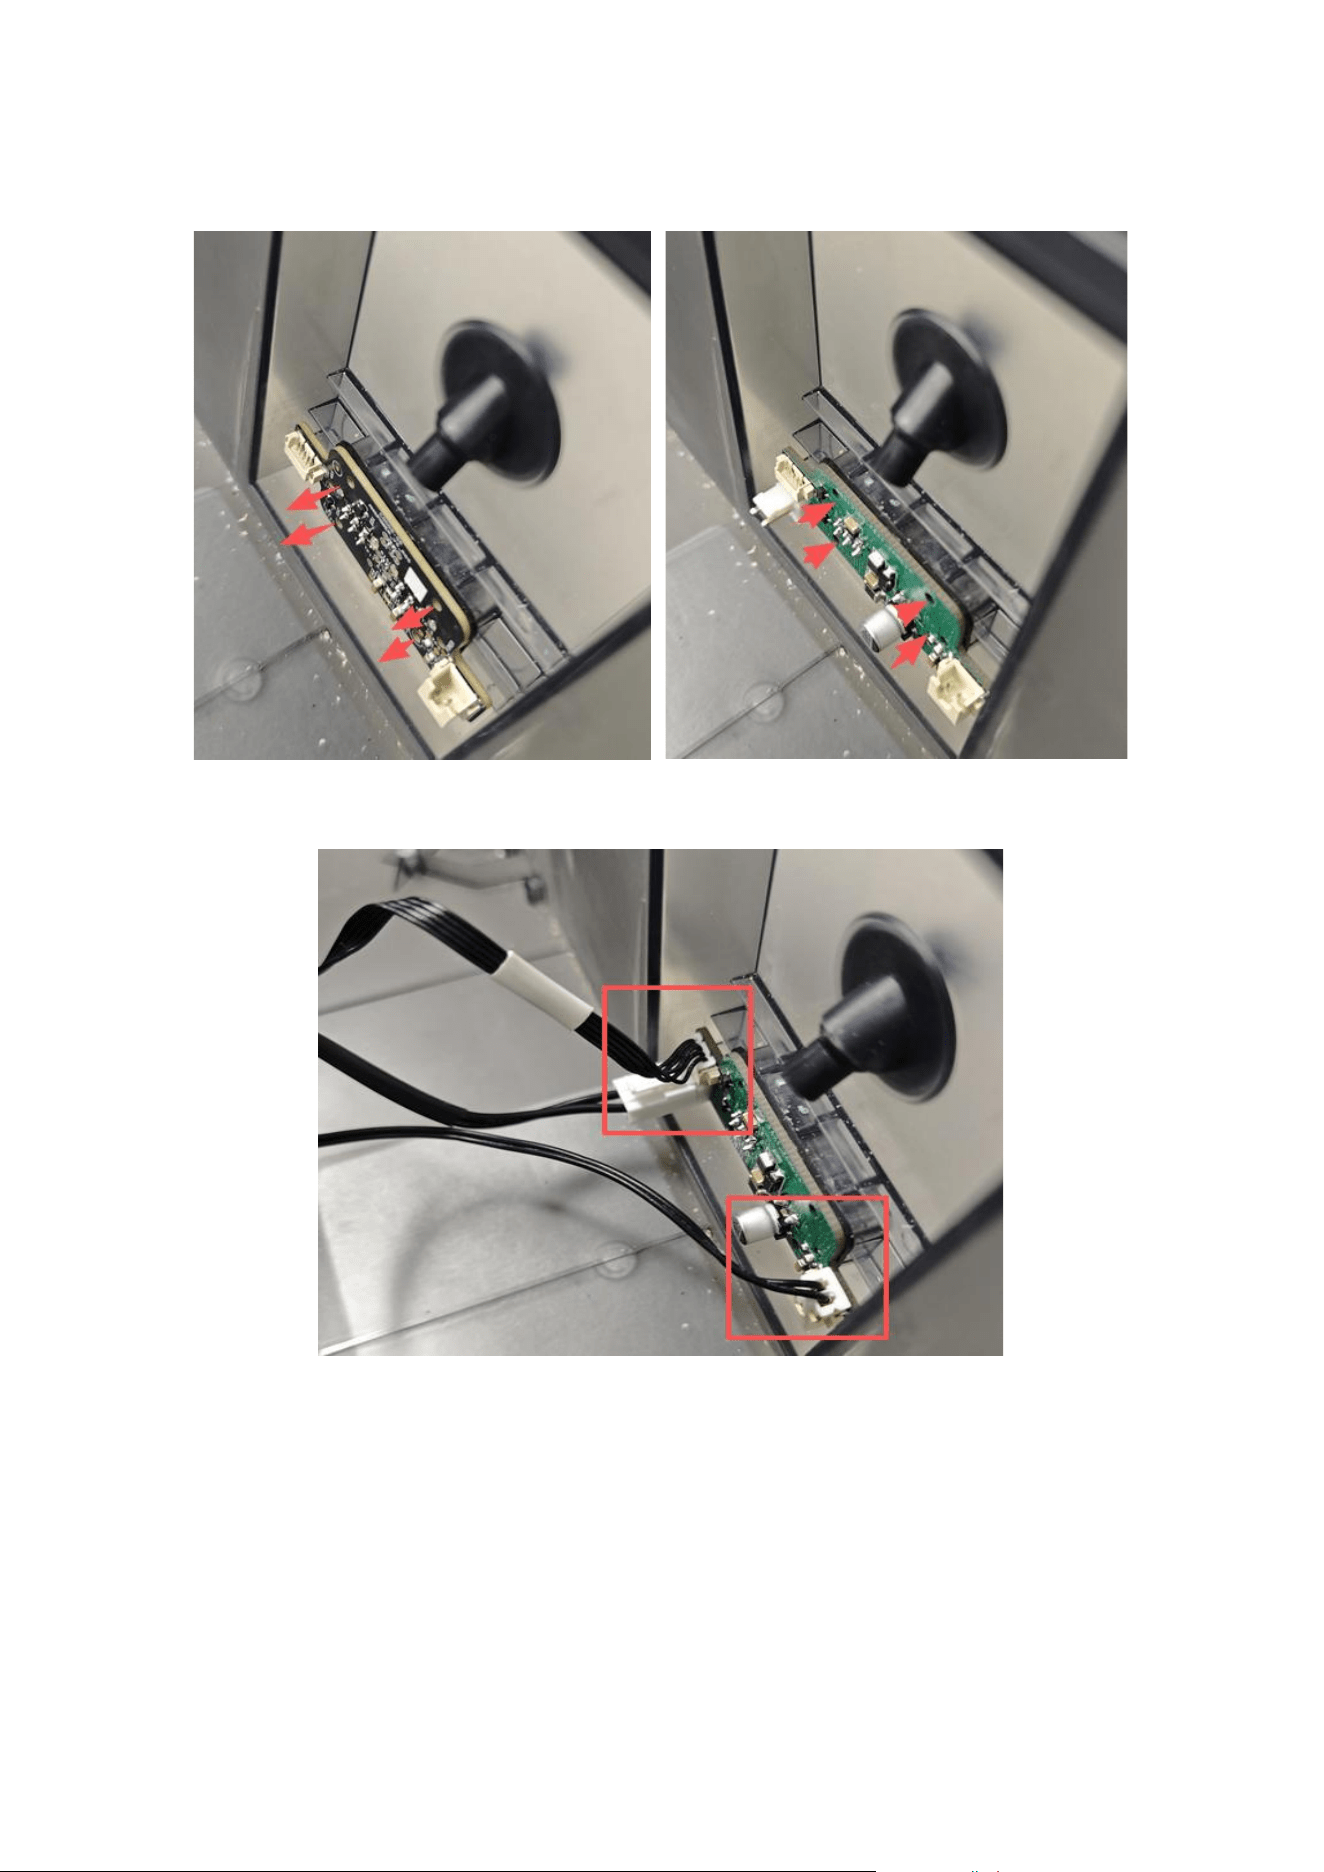
5. Replace the Power Board: Remove the original AMS power board and install the [AMS Replacement Power
Board]. When securing the replacement board, place a nylon washer on the nut side of each screw to prevent
overtightening from damaging the board. Return the original AMS board to its antistatic bag and store it safely.
6. Reconnect the Cables: Reconnect the 485 communication cable and power cable to the new board. Take the
[Control Module Power Cable] from the accessory pack and connect either end to the new power board.
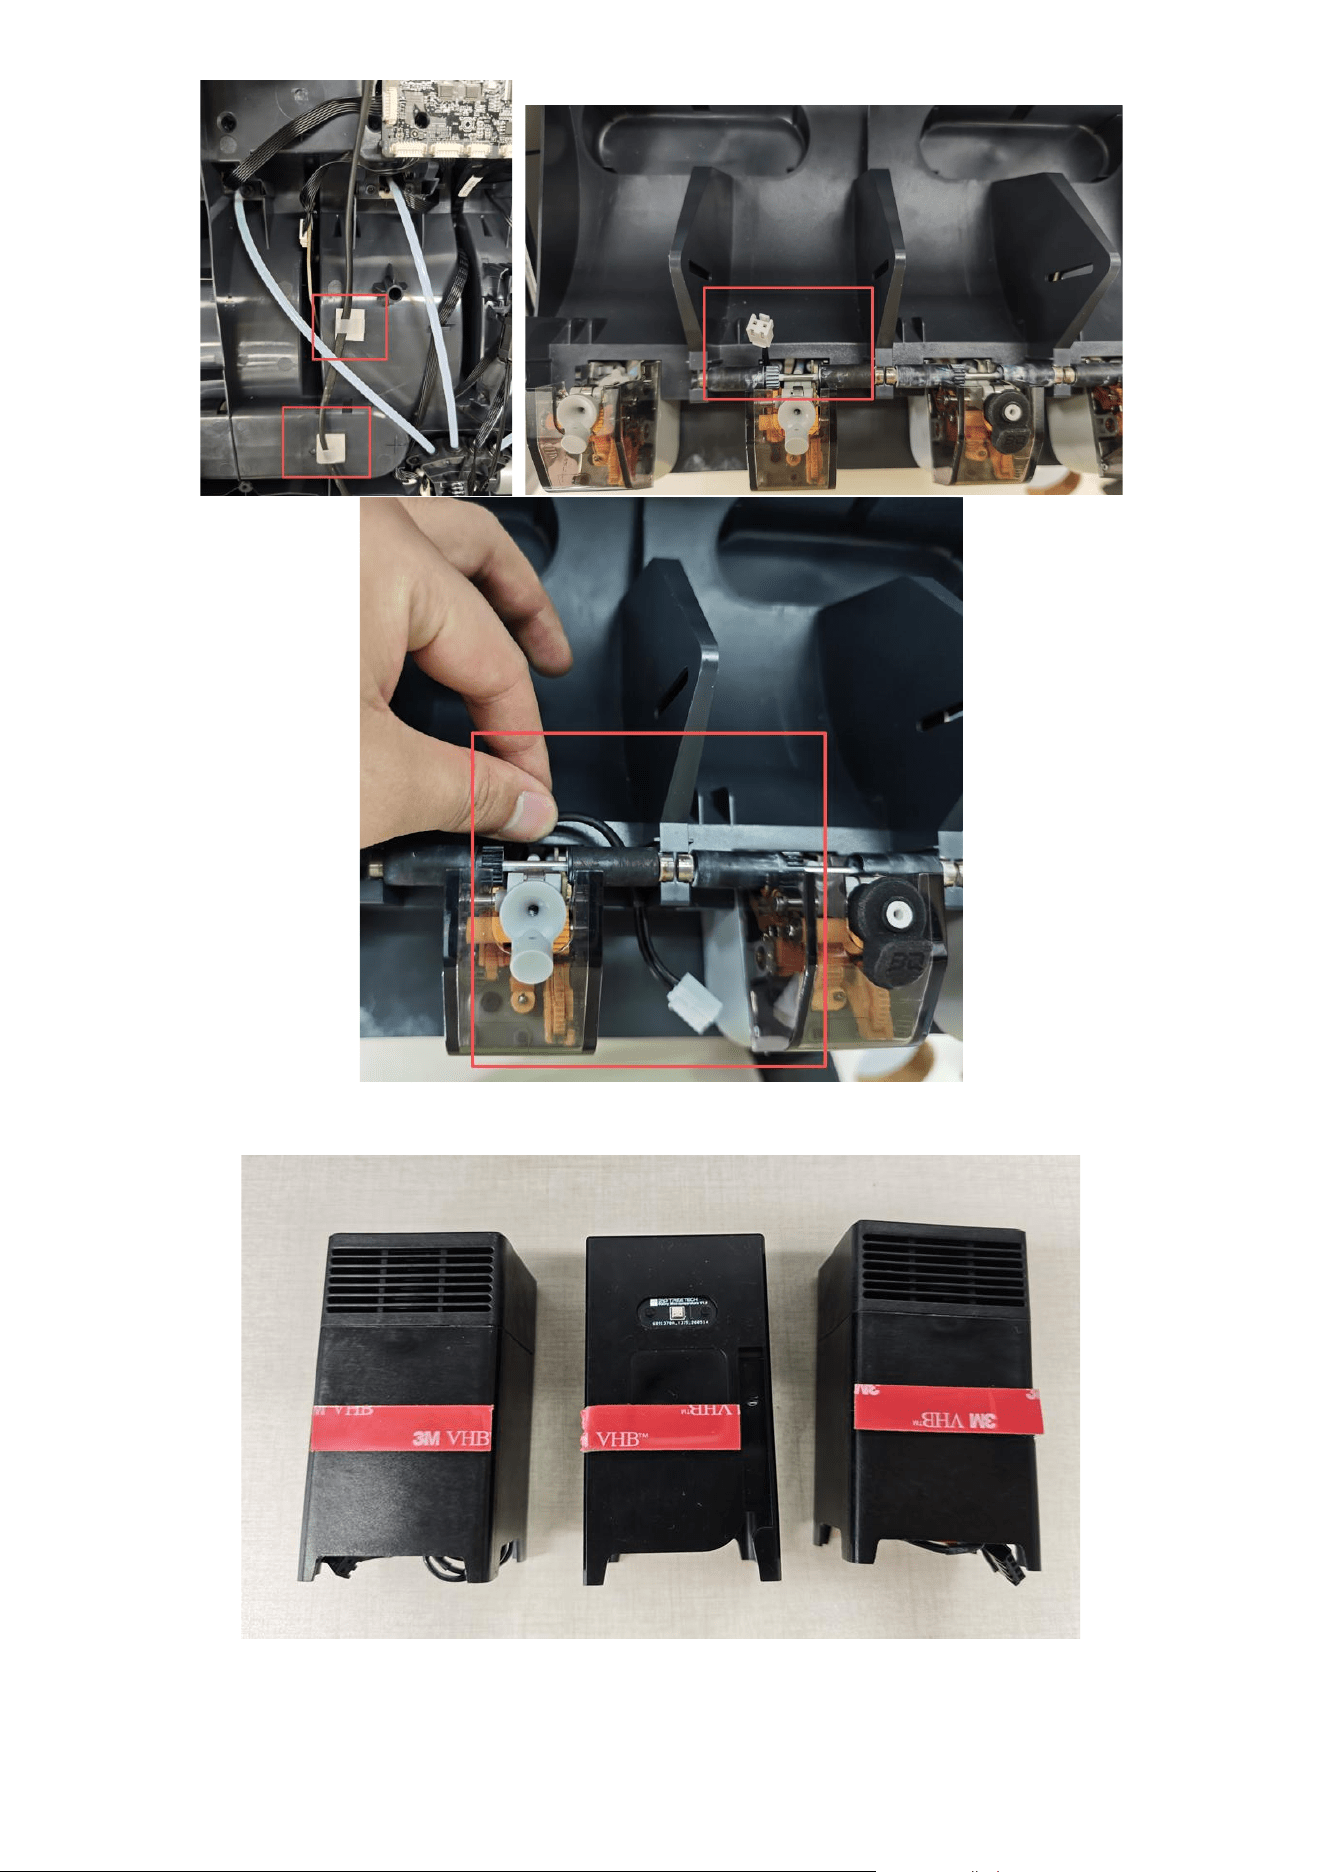
7. Route the Power Cable: Install the two cable clips under the AMS main frame as shown. Secure the [Control
Module Power Cable], then route it from the center of the AMS toward the front, following the illustrated cable
path. Keep the cable clear of the AMS gear assemblies and all moving parts.
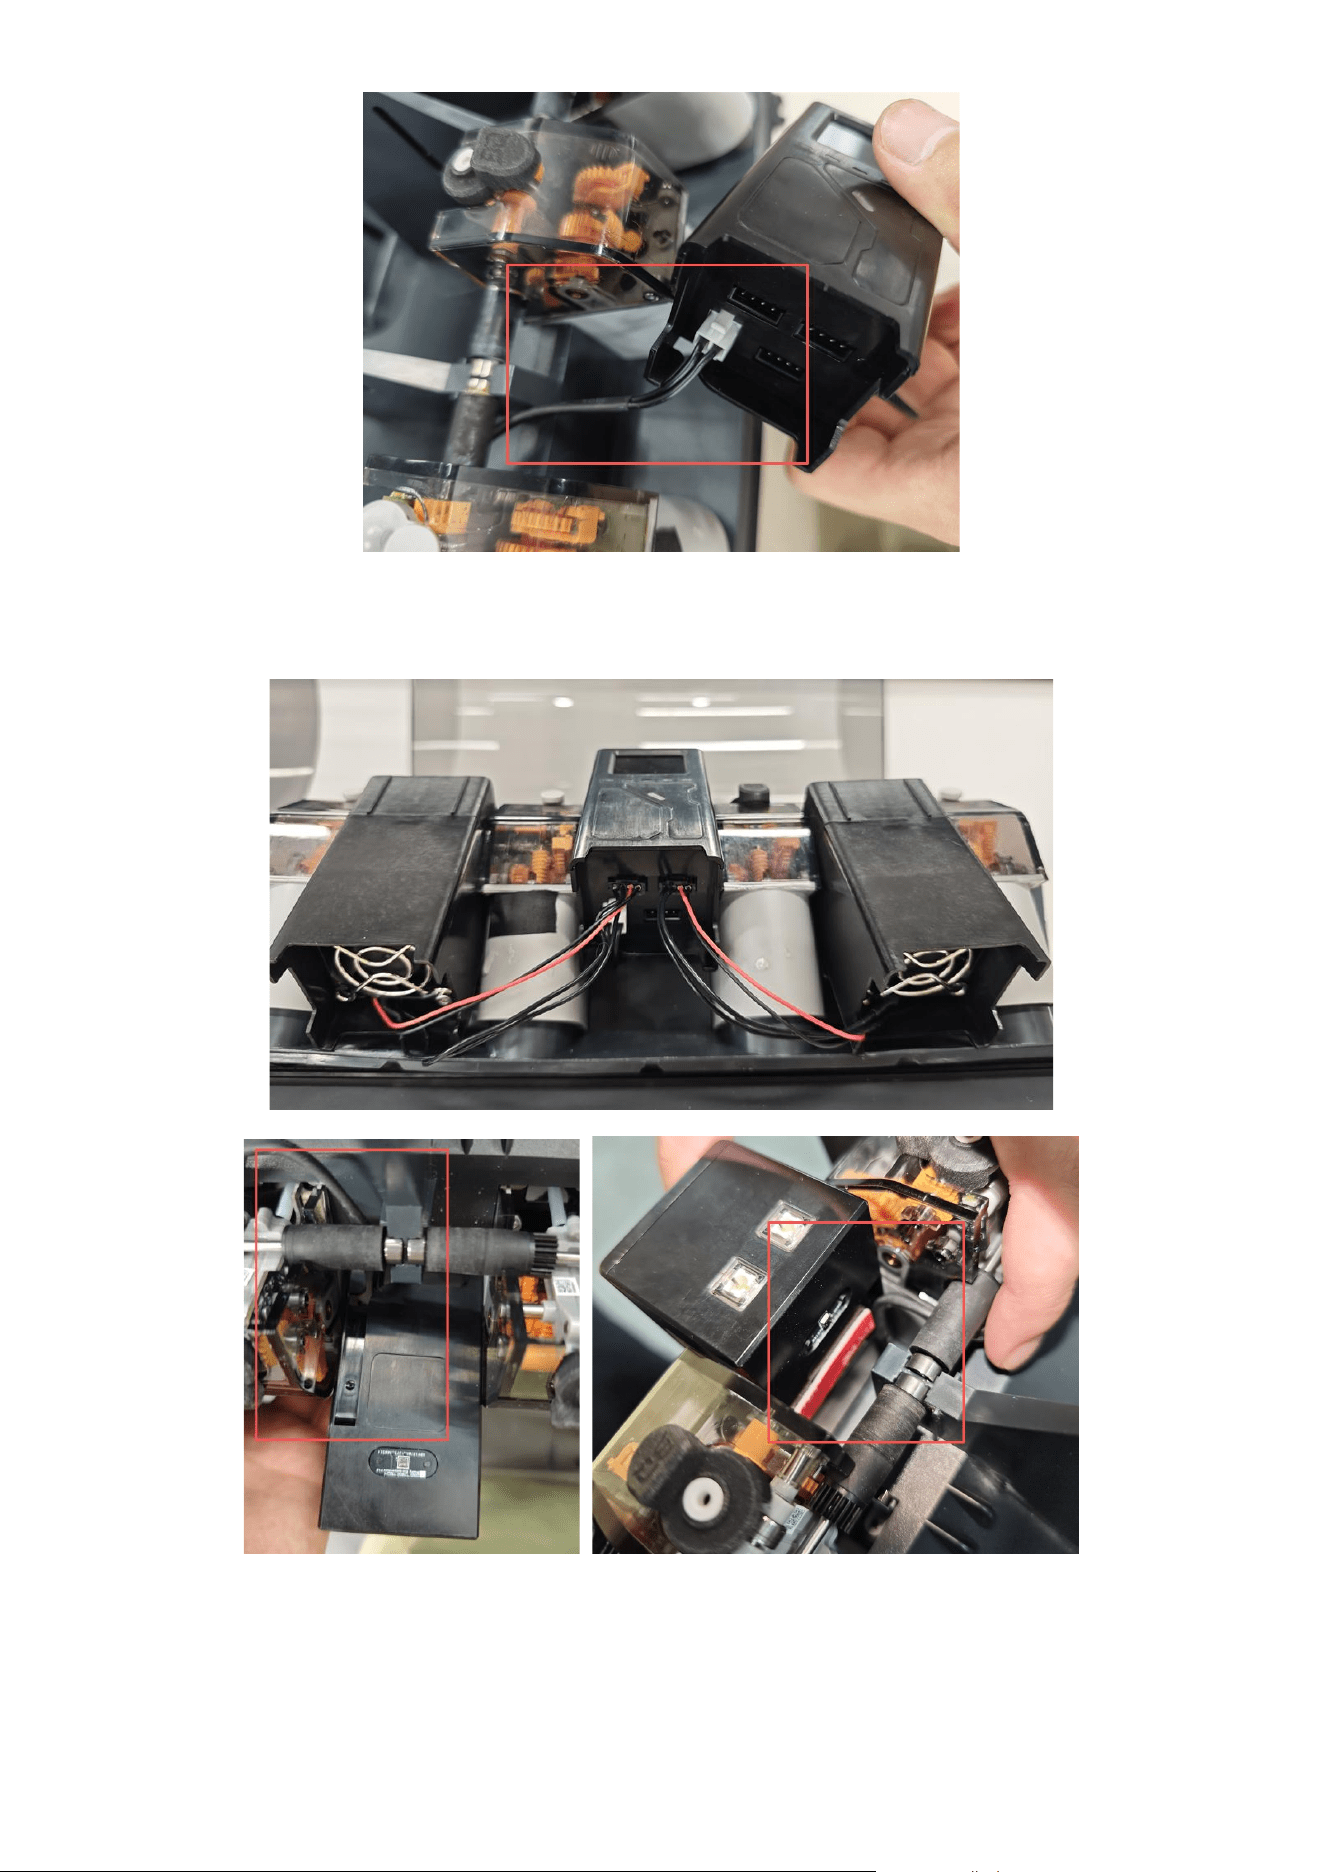
8. Apply Mounting Tape: Apply the double-sided [Mounting Tape] to both [Output Modules] and the [Control
Module] as shown. The tape will secure the modules during installation.
9. Connect the Modules: Connect the [Control Module Power Cable] to the [Control Module]. Connect the two
[Output Modules] to any two of the three identical ports on the control module using their attached cables.
10. Mount the Modules: Peel off the release liners from the mounting tape, then attach the control module and
output modules to the positions shown on the AMS main frame. Note: The rear cover of the control module has a
cable-routing channel for the power cable. Press part of the cable into the channel so the module sits flush.
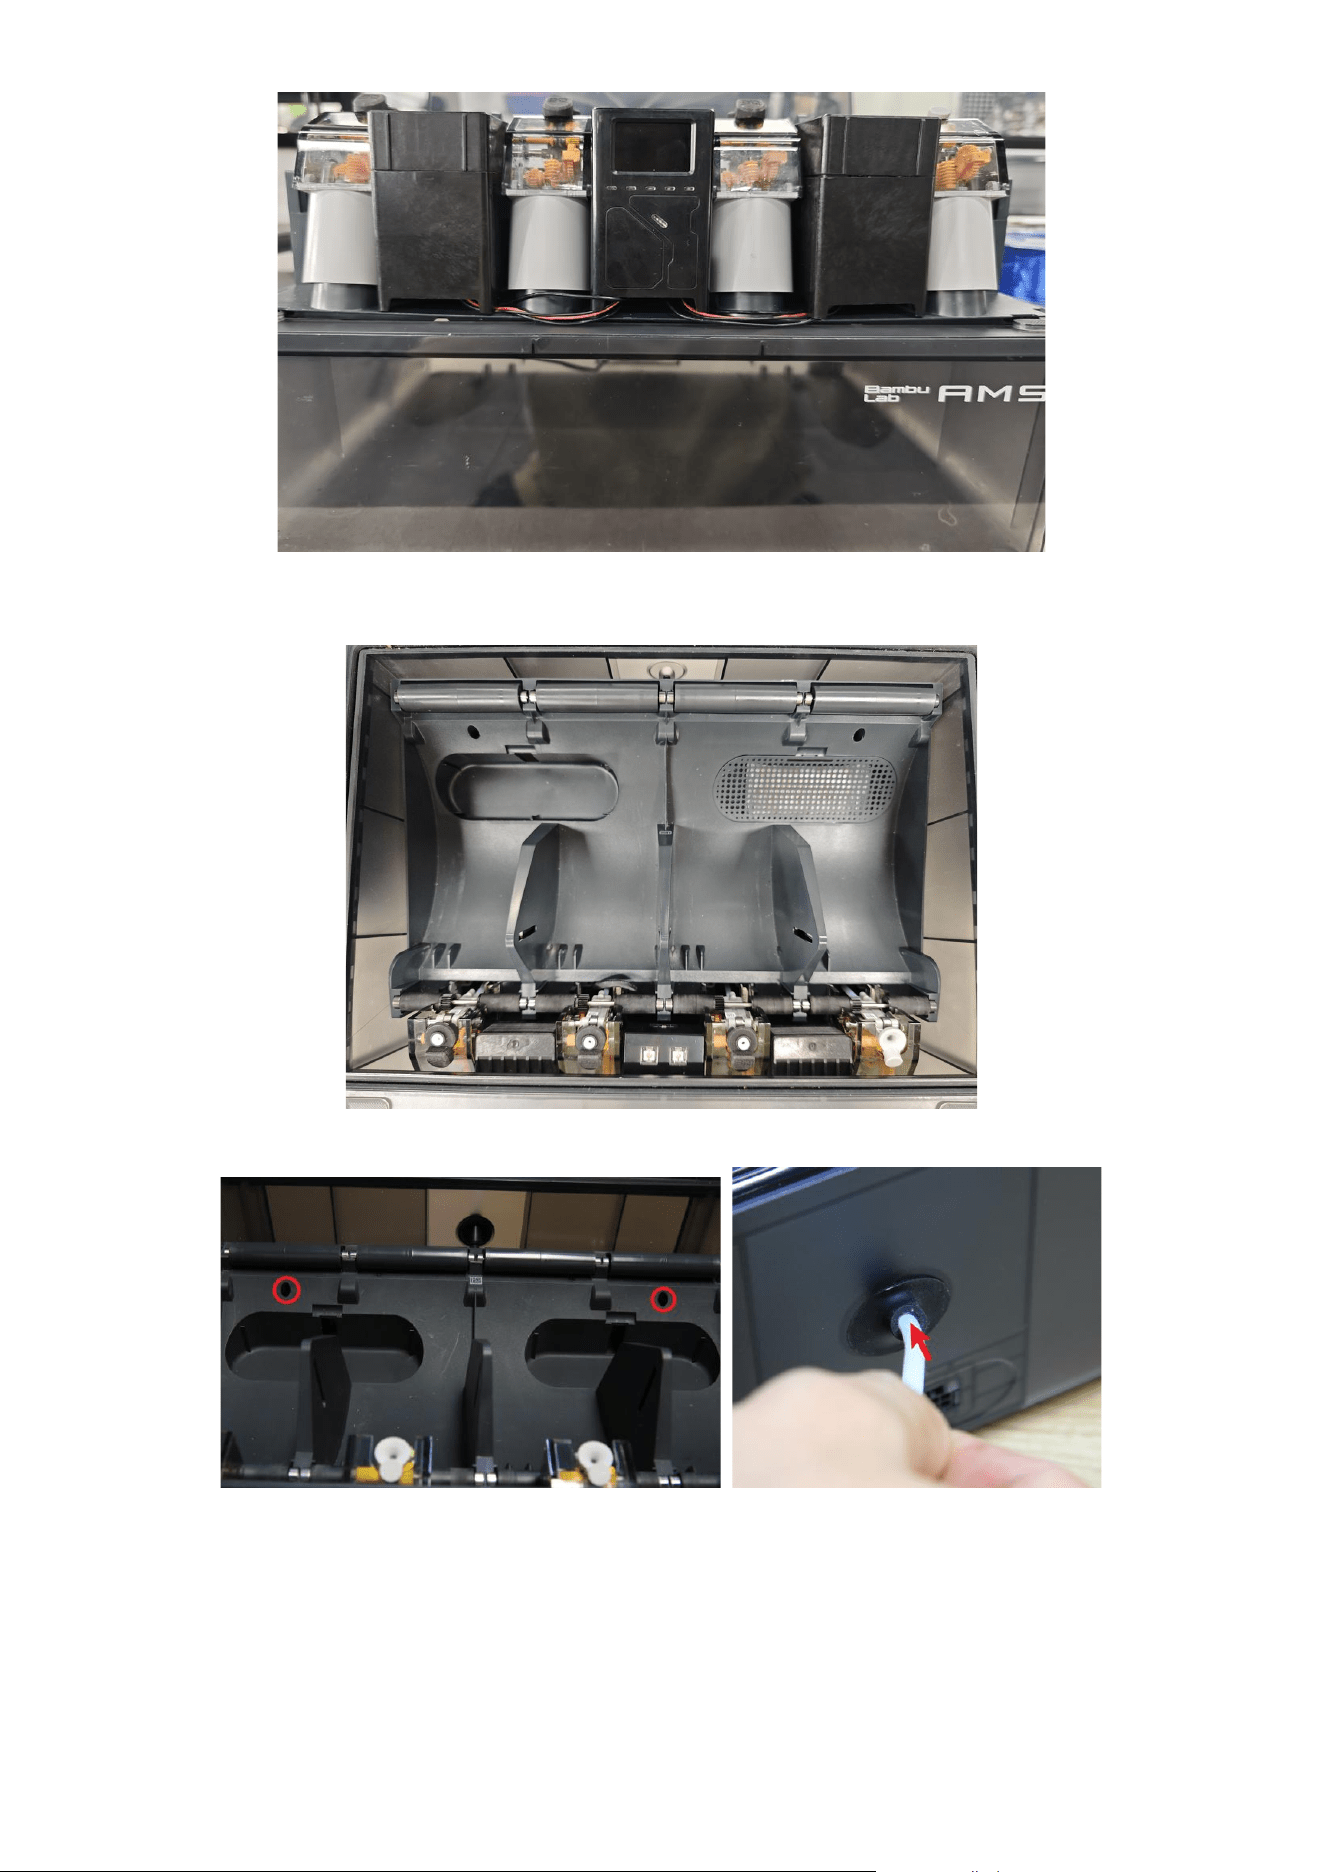
11. Reinstall the Main Frame: Place the AMS main-frame assembly, with the control and output modules
installed, back into the AMS housing as shown.
12. Secure the Main Frame: Reinstall the two screws and the PTFE tube removed earlier.
13. Connect the External Cables: Connect the [Y-Cable] and [DC Connector Adapter Cable]. The Y-cable
preserves support for daisy-chaining multiple AMS units. You may omit it when no AMS daisy chain is required.
The DC connector adapter cable connects the DC power adapter to provide independent power to the BQDry
Mini.
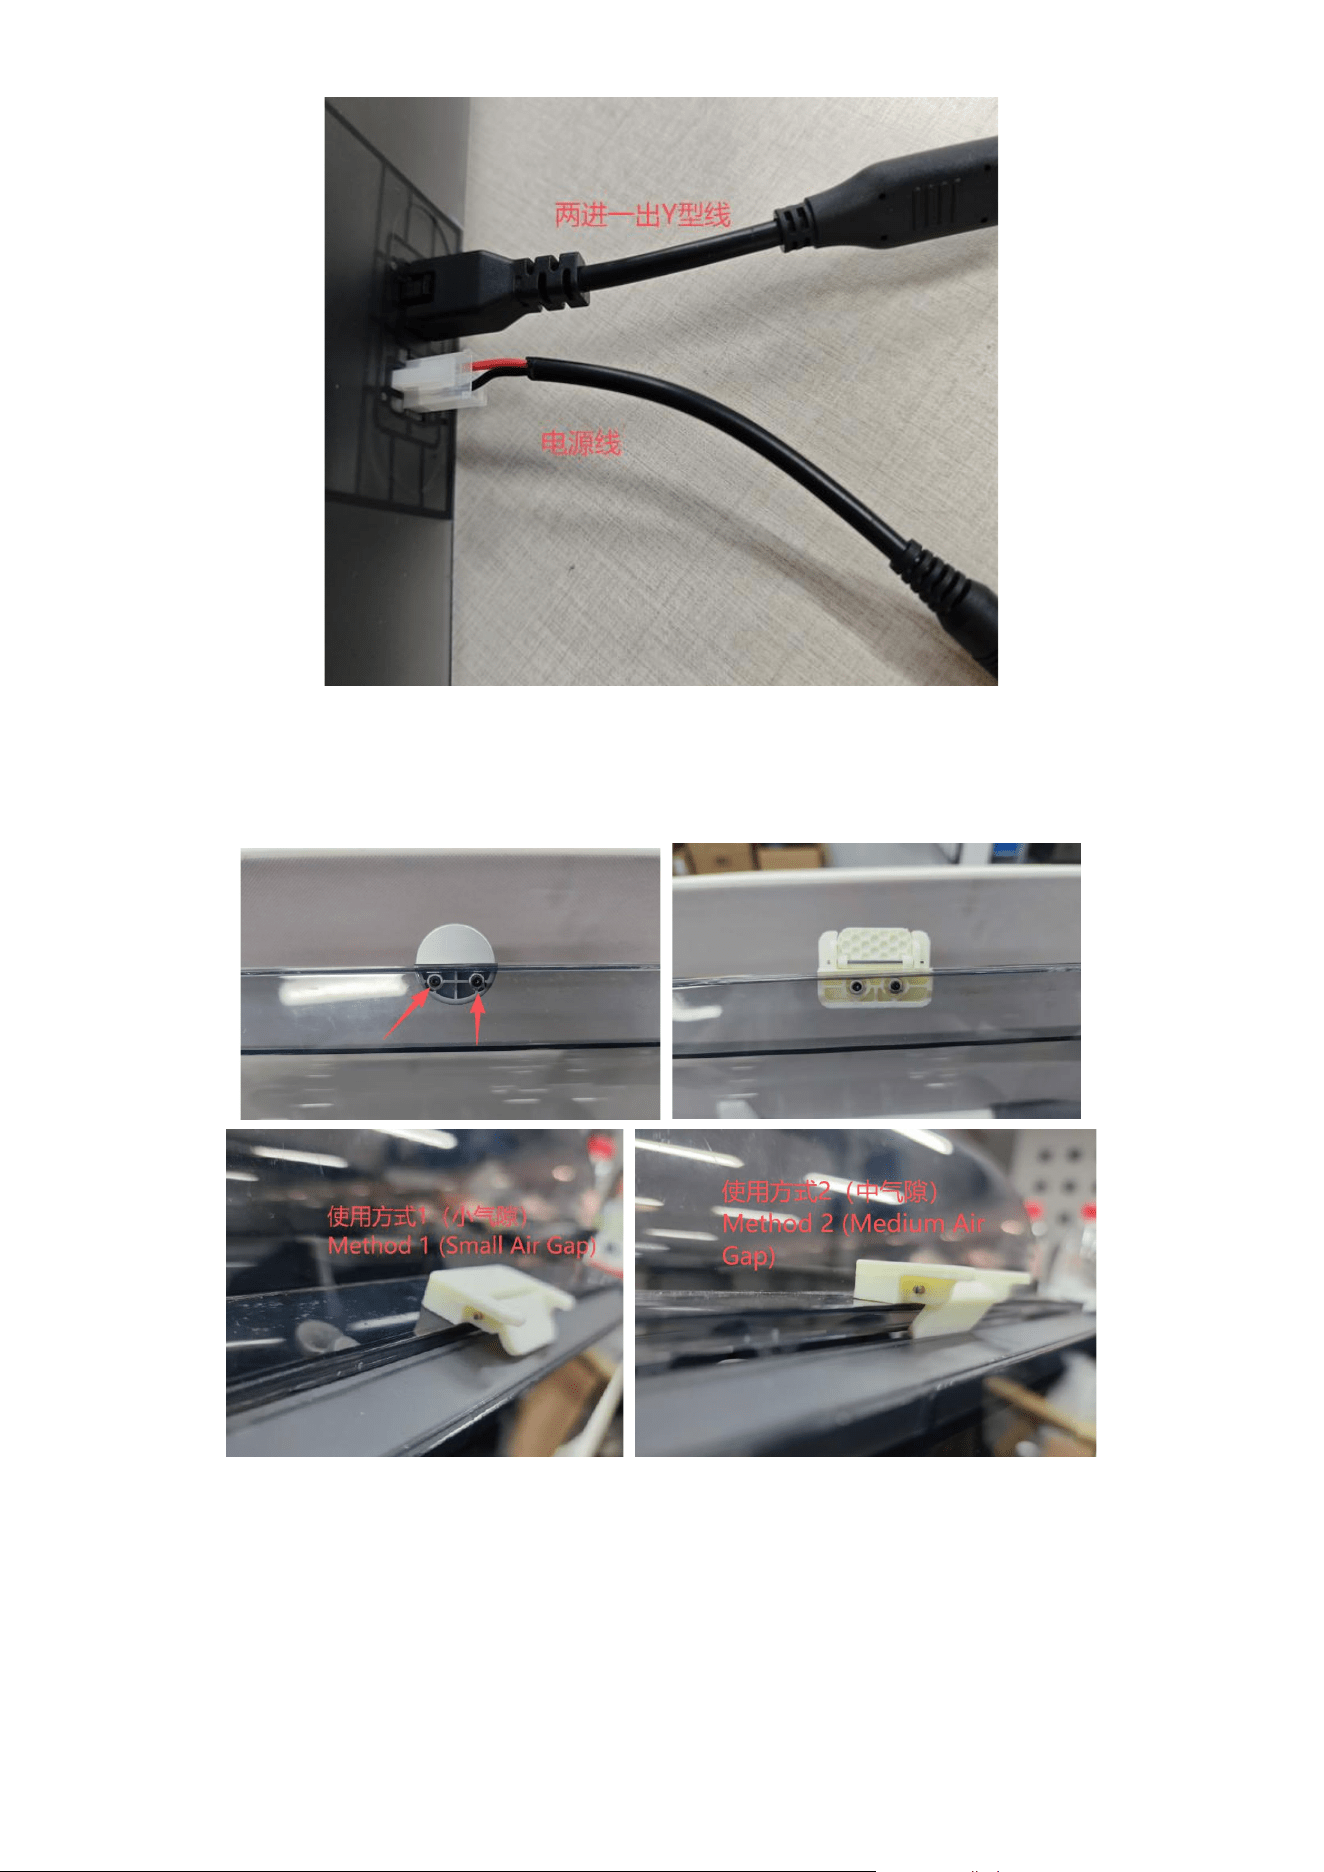
14. Install the Replacement Handle: Use the included L-shaped hex key to remove the original AMS handle and
install the replacement handle. The replacement handle offers two opening positions. Adjust the gap as needed to
create a suitable moisture exhaust path, allowing humid air to escape and helping prevent condensation inside
the AMS.
Installation is now complete. Connect power to begin using the BQDry Mini.
Operation
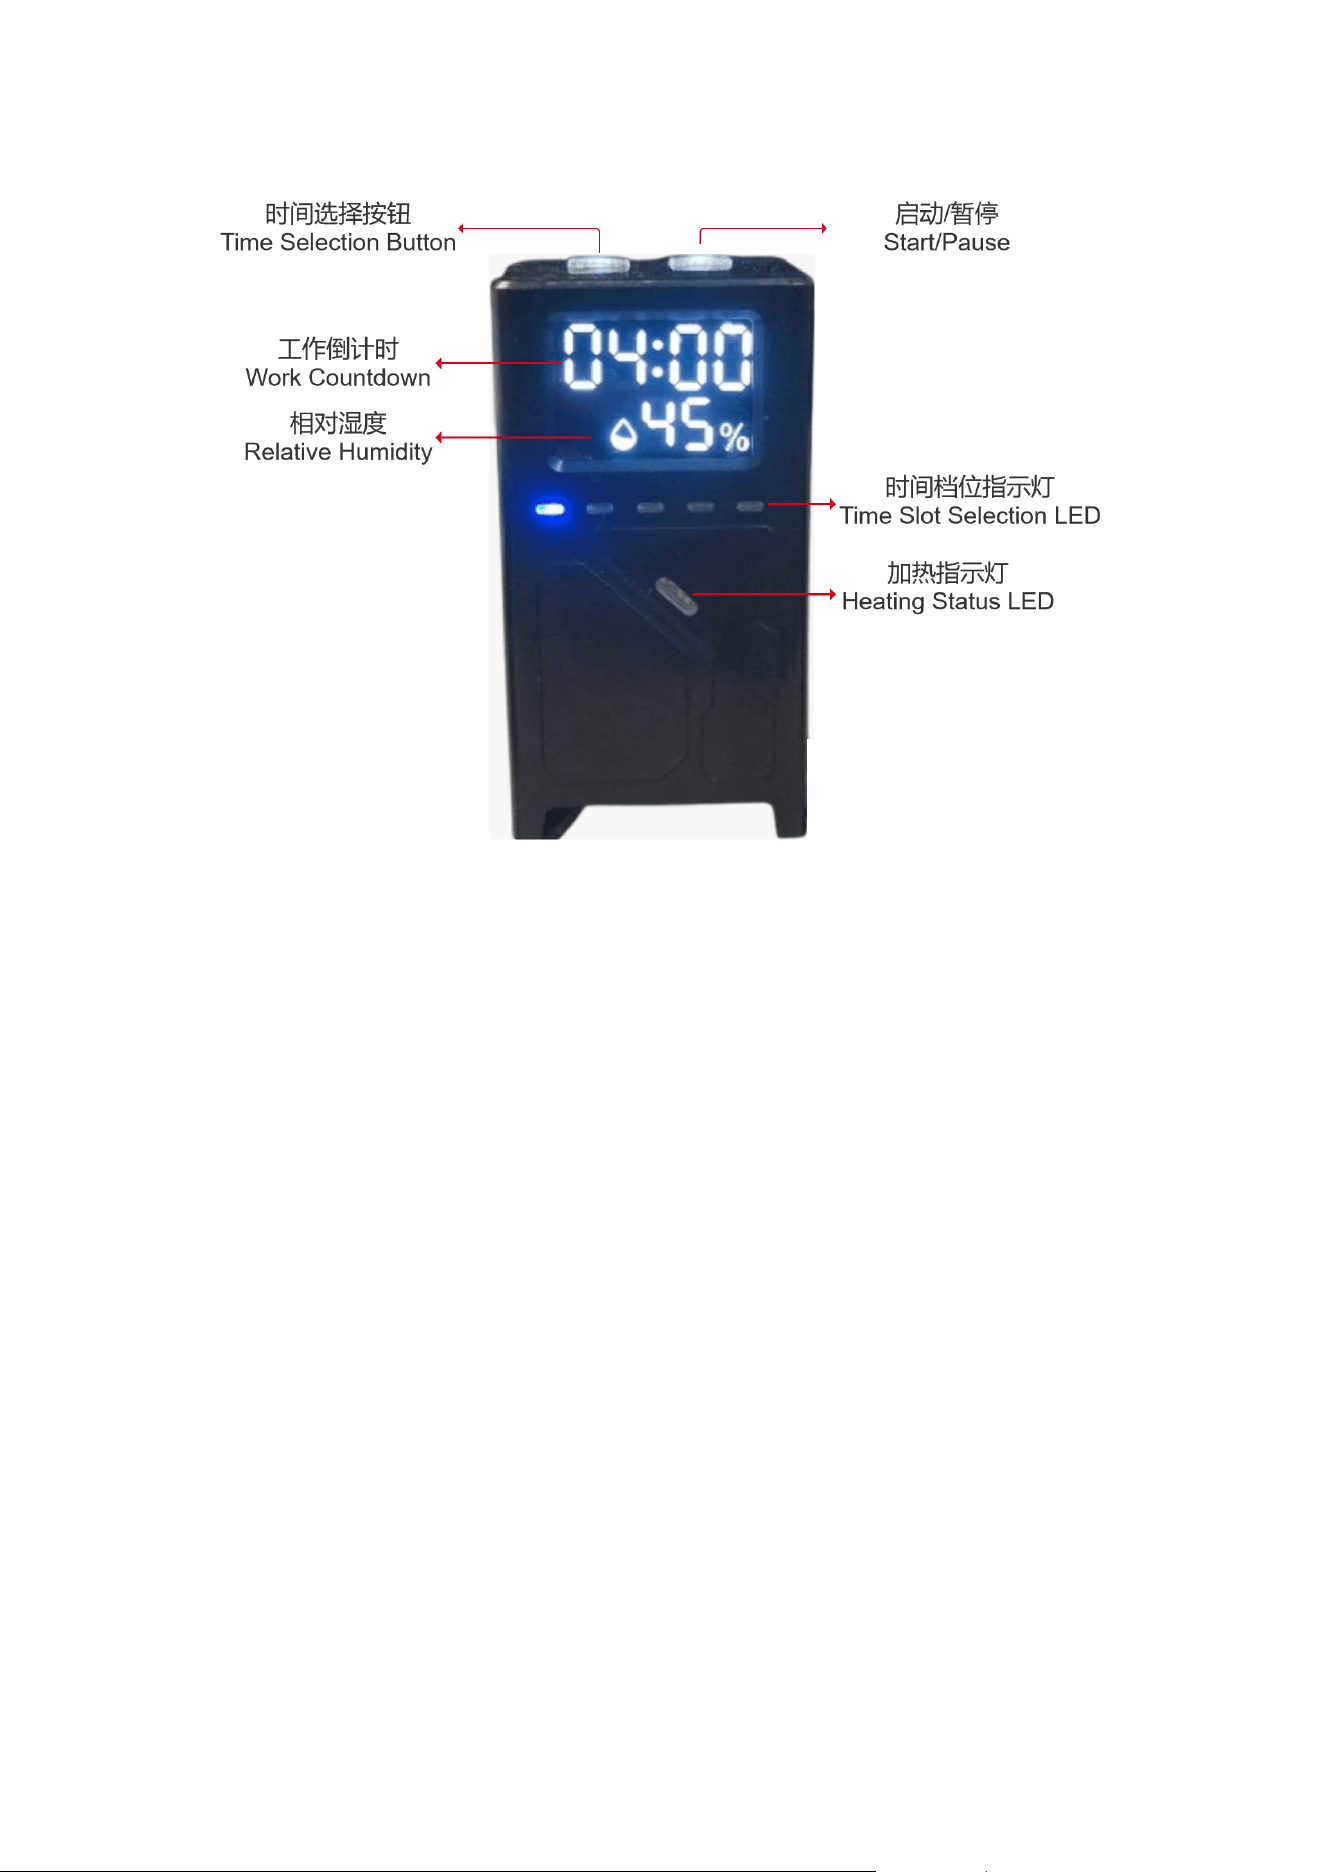
1. One-Touch Start
● Press the [Start/Pause] button once. The device starts heating using the temperature and duration last set in
the Web UI. Heating stops automatically when the countdown ends.
● During heating, briefly press the [Start/Pause] button to pause or resume heating. Press and hold the button to
stop heating.
2. Quick Timed Drying
● Press the [Time Selection] button to select the drying duration. Five settings are available: 4 h, 8 h, 12 h, 24 h,
and Continuous. The display and [Time Setting Indicator LEDs(time slot selection LED)] update to show the
selected setting.
● Press the [Start/Pause] button to begin heating. The device heats at the temperature configured in the Web UI
for the selected duration.
● During heating, briefly press the [Start/Pause] button to pause or resume heating. Press and hold the button to
stop heating.
3. Web UI Remote Control
● Connect the device to a network.
• Connect to the Device AP
o Connect to the BQDry Mini AP.
SSID: BQDry_Mini_XXXXXXXXXX
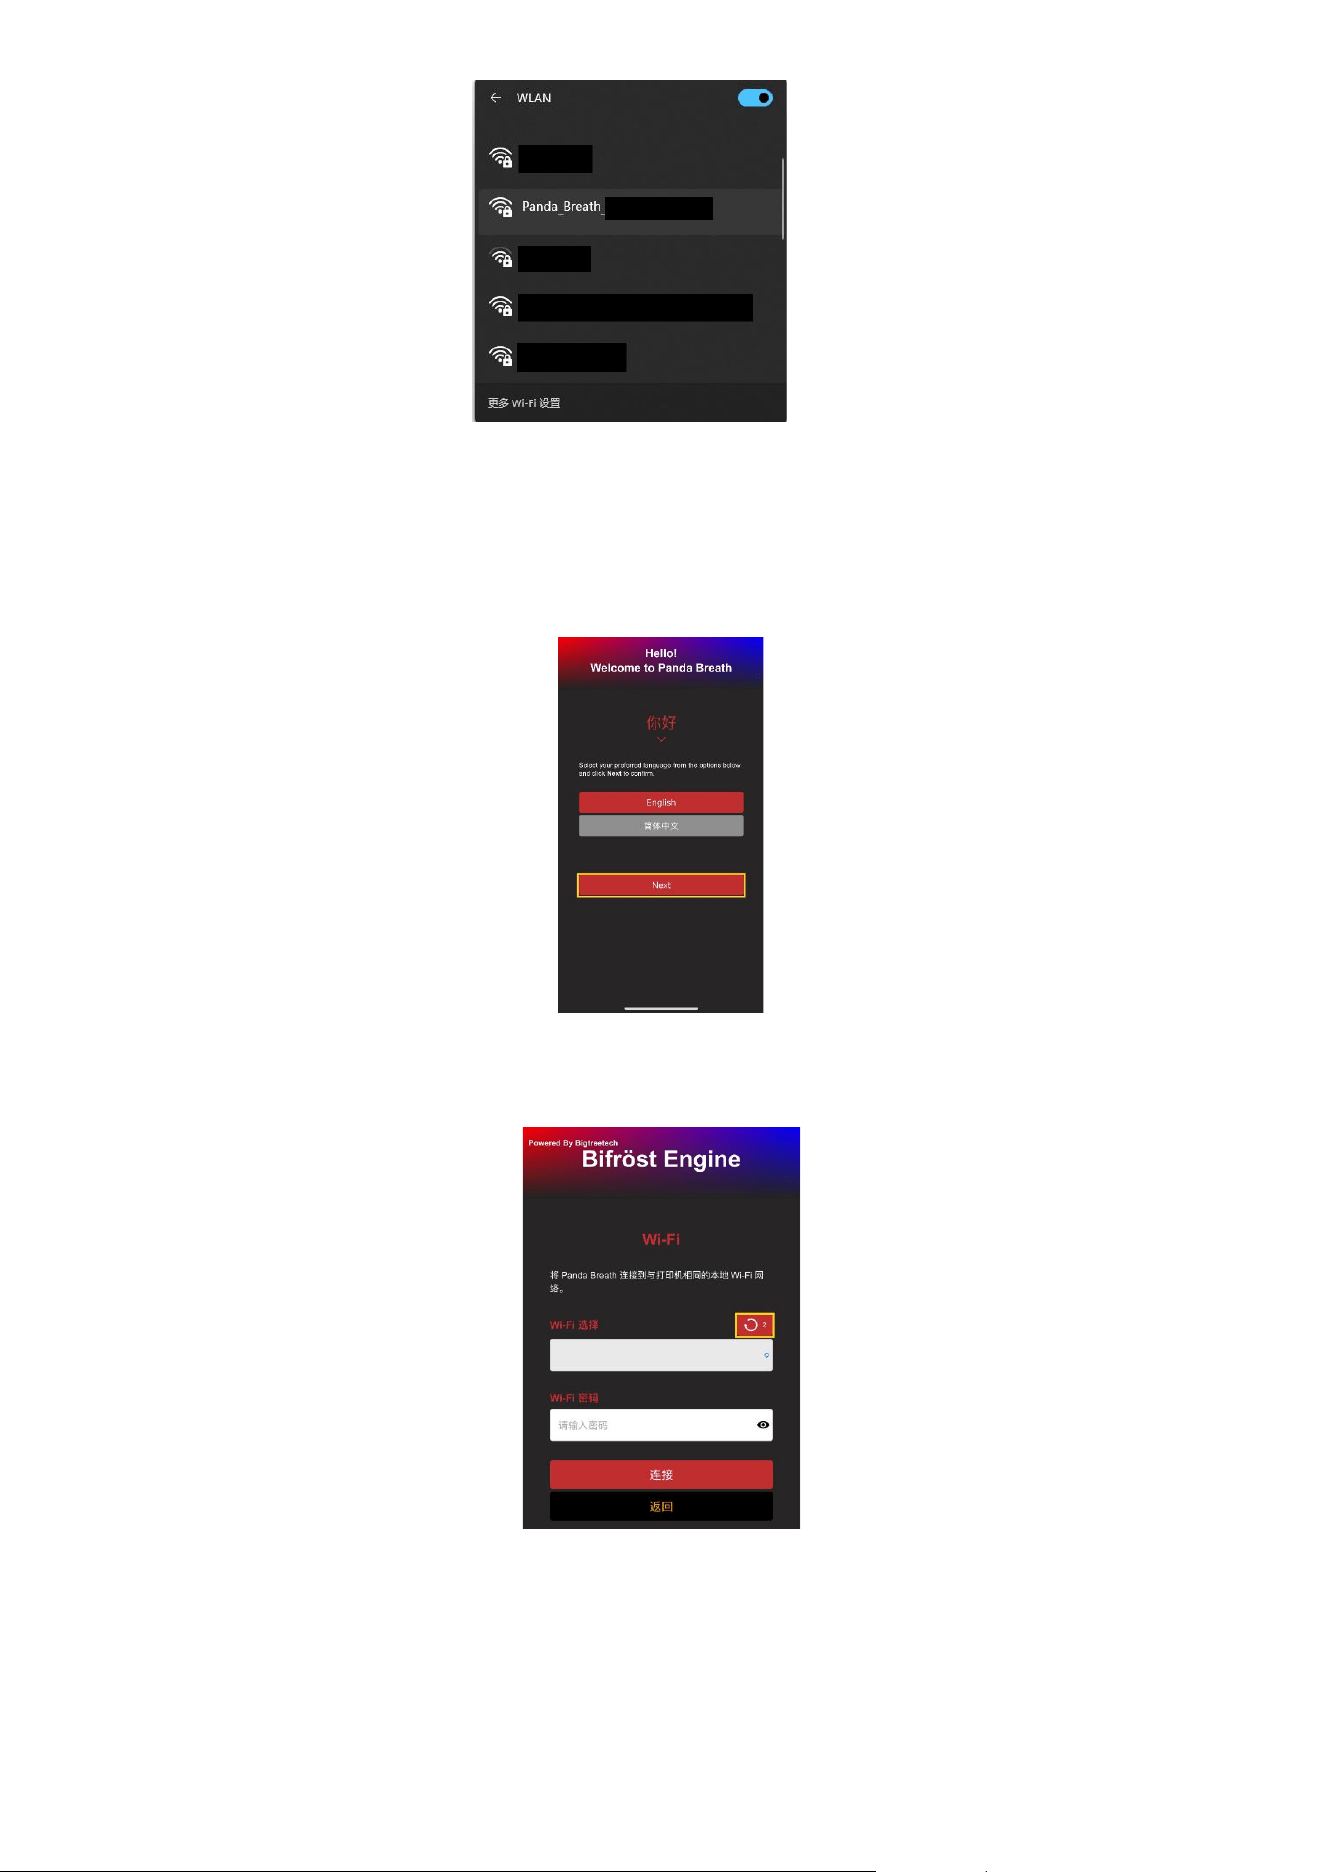
Password: 987654321
• Open the AP Page
o After connecting to the AP, enter the default IP address 192.168.254.1 in a browser on your
computer. On a phone, the BQDry Mini Web UI may open automatically; you can also enter
192.168.254.1 in a browser. Note: This is the factory-default IP address.
• Select a Language (English by Default)
o After selecting a language, click Next.
• Connect to Wi-Fi
o On first use or after a factory reset, this page automatically scans for nearby Wi-Fi networks. You
can also tap Scan to start a scan manually.
o When the scan is complete, a confirmation pop-up appears. Tap OK to close it.
o Open the Wi-Fi list and select the network you want to connect to.
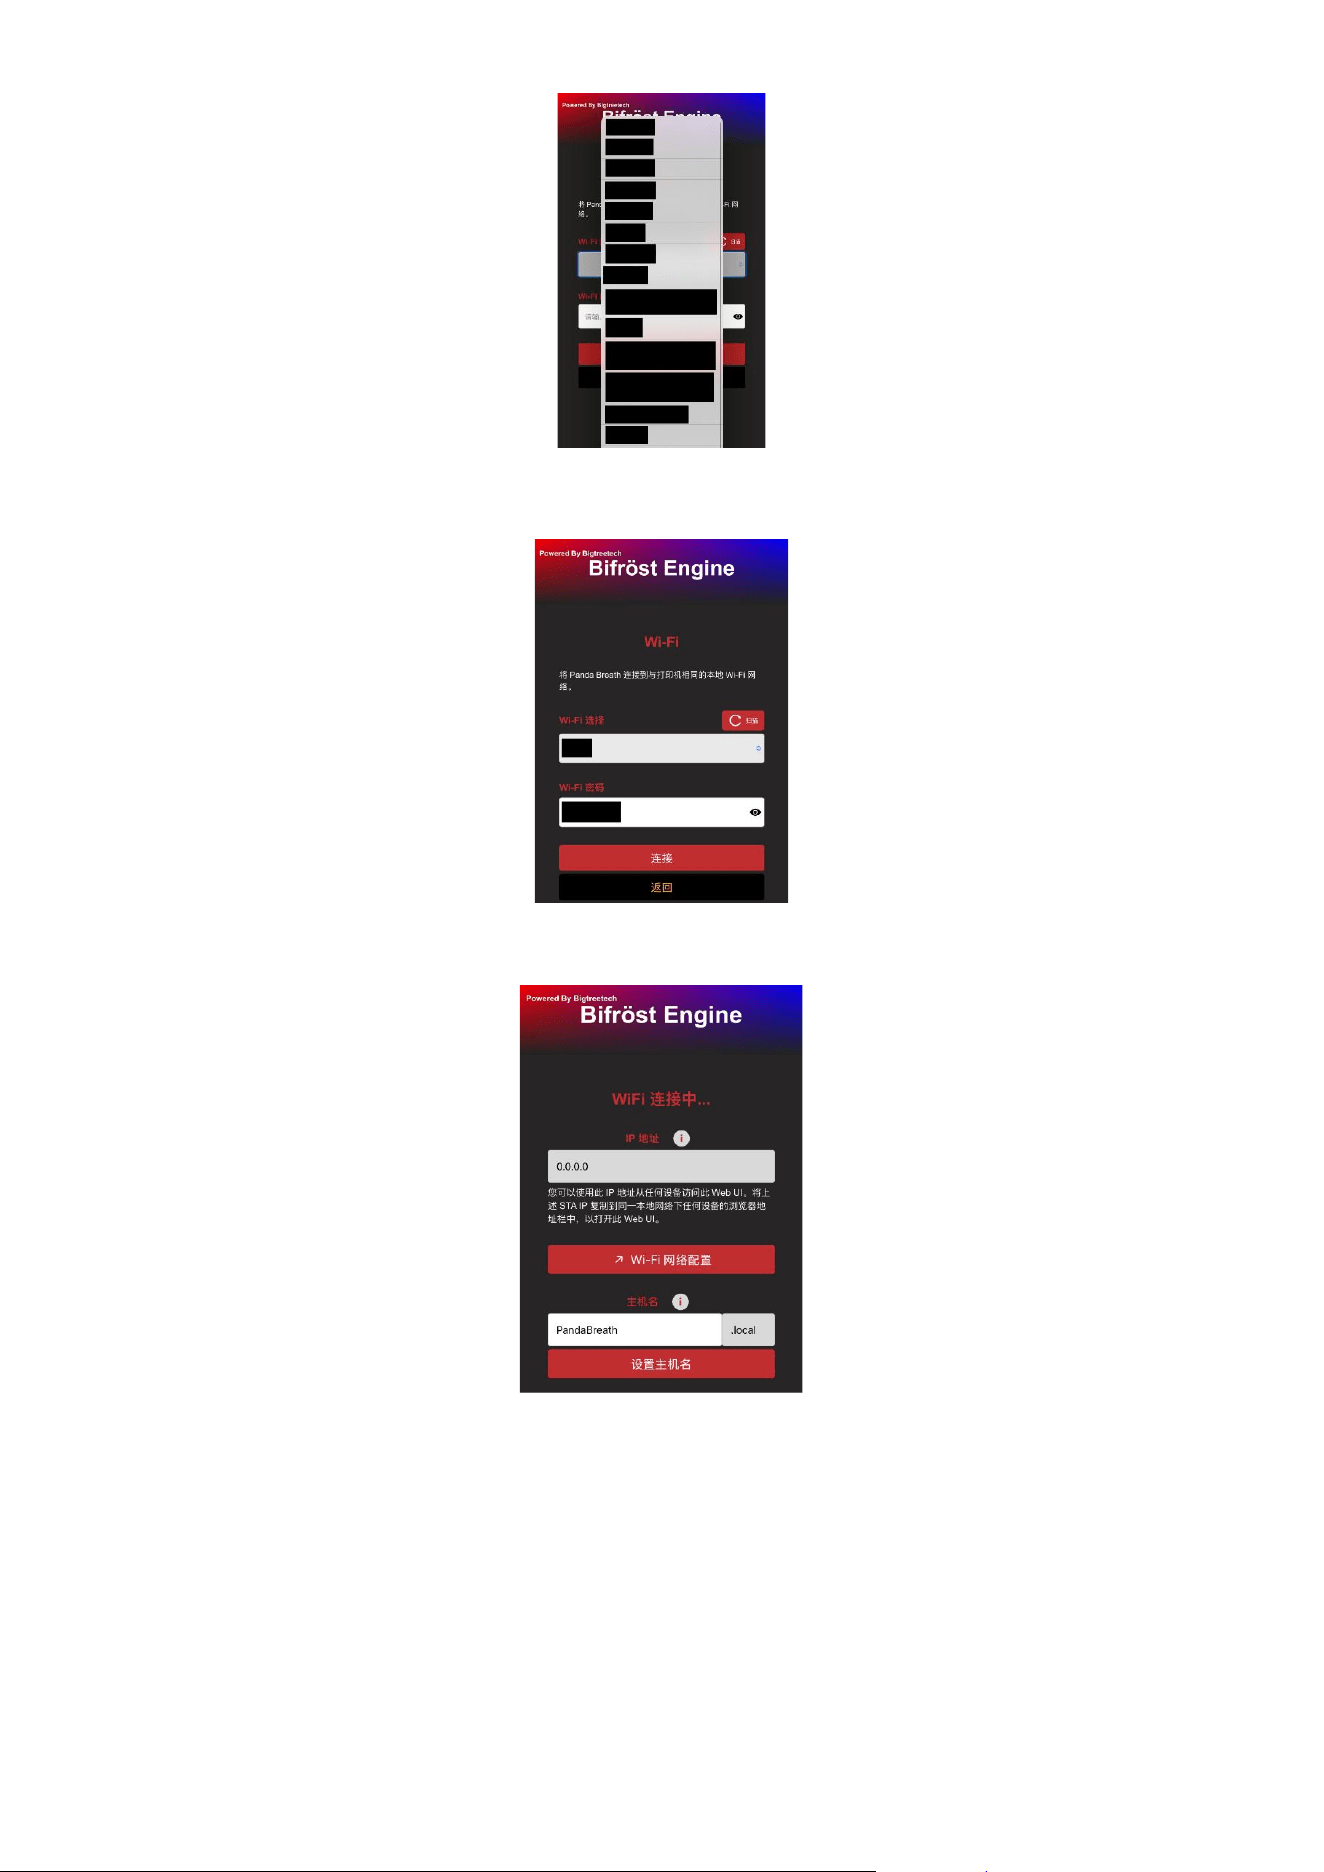
o Enter the Wi-Fi password. Tap the eye icon on the right side of the password field to show or hide
the password.
o Tap Connect. The interface automatically switches to the Wi-Fi page on the control screen and
displays the connection status.
o After a short wait, a pop-up displays the Wi-Fi connection result.
● After the device connects and you sign in successfully, select a drying preset for the filament type in the Web UI,
or set a custom temperature and duration.
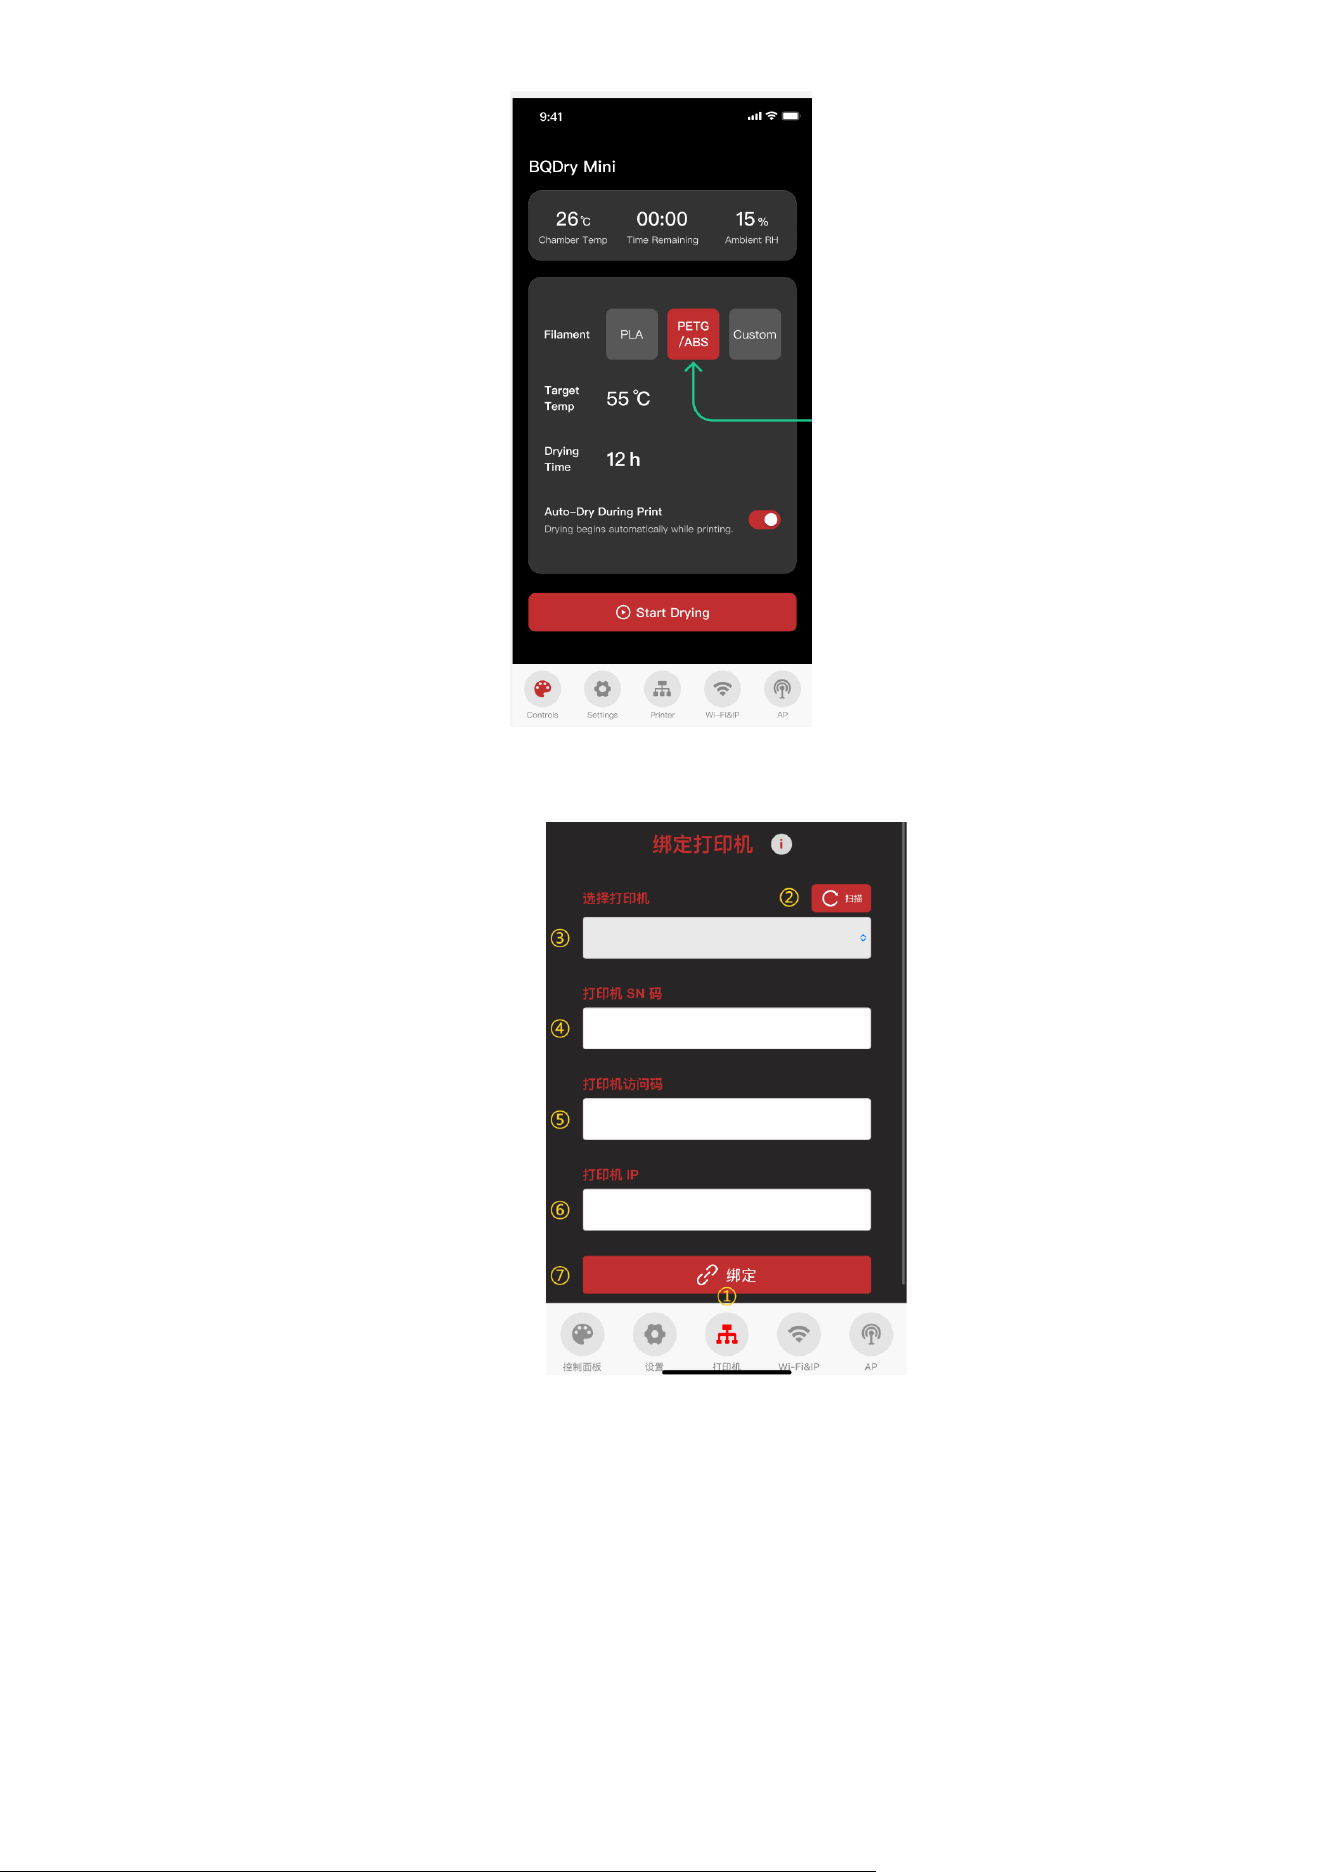
4. Auto-Dry During Print
● After completing the Web UI remote-control setup, pair the printer you want to link.
• ① Open the Printer page. The printer icon turns red when selected, and the
interface switches to the Printer page.
• ② Scan for printers on the same local network.
• ③ Select a detected printer.
• ④ Enter the printer SN.
• ⑤ Enter the printer access code.
• ⑥ Enter the printer IP address.
• ⑦ Confirm to pair the printer.
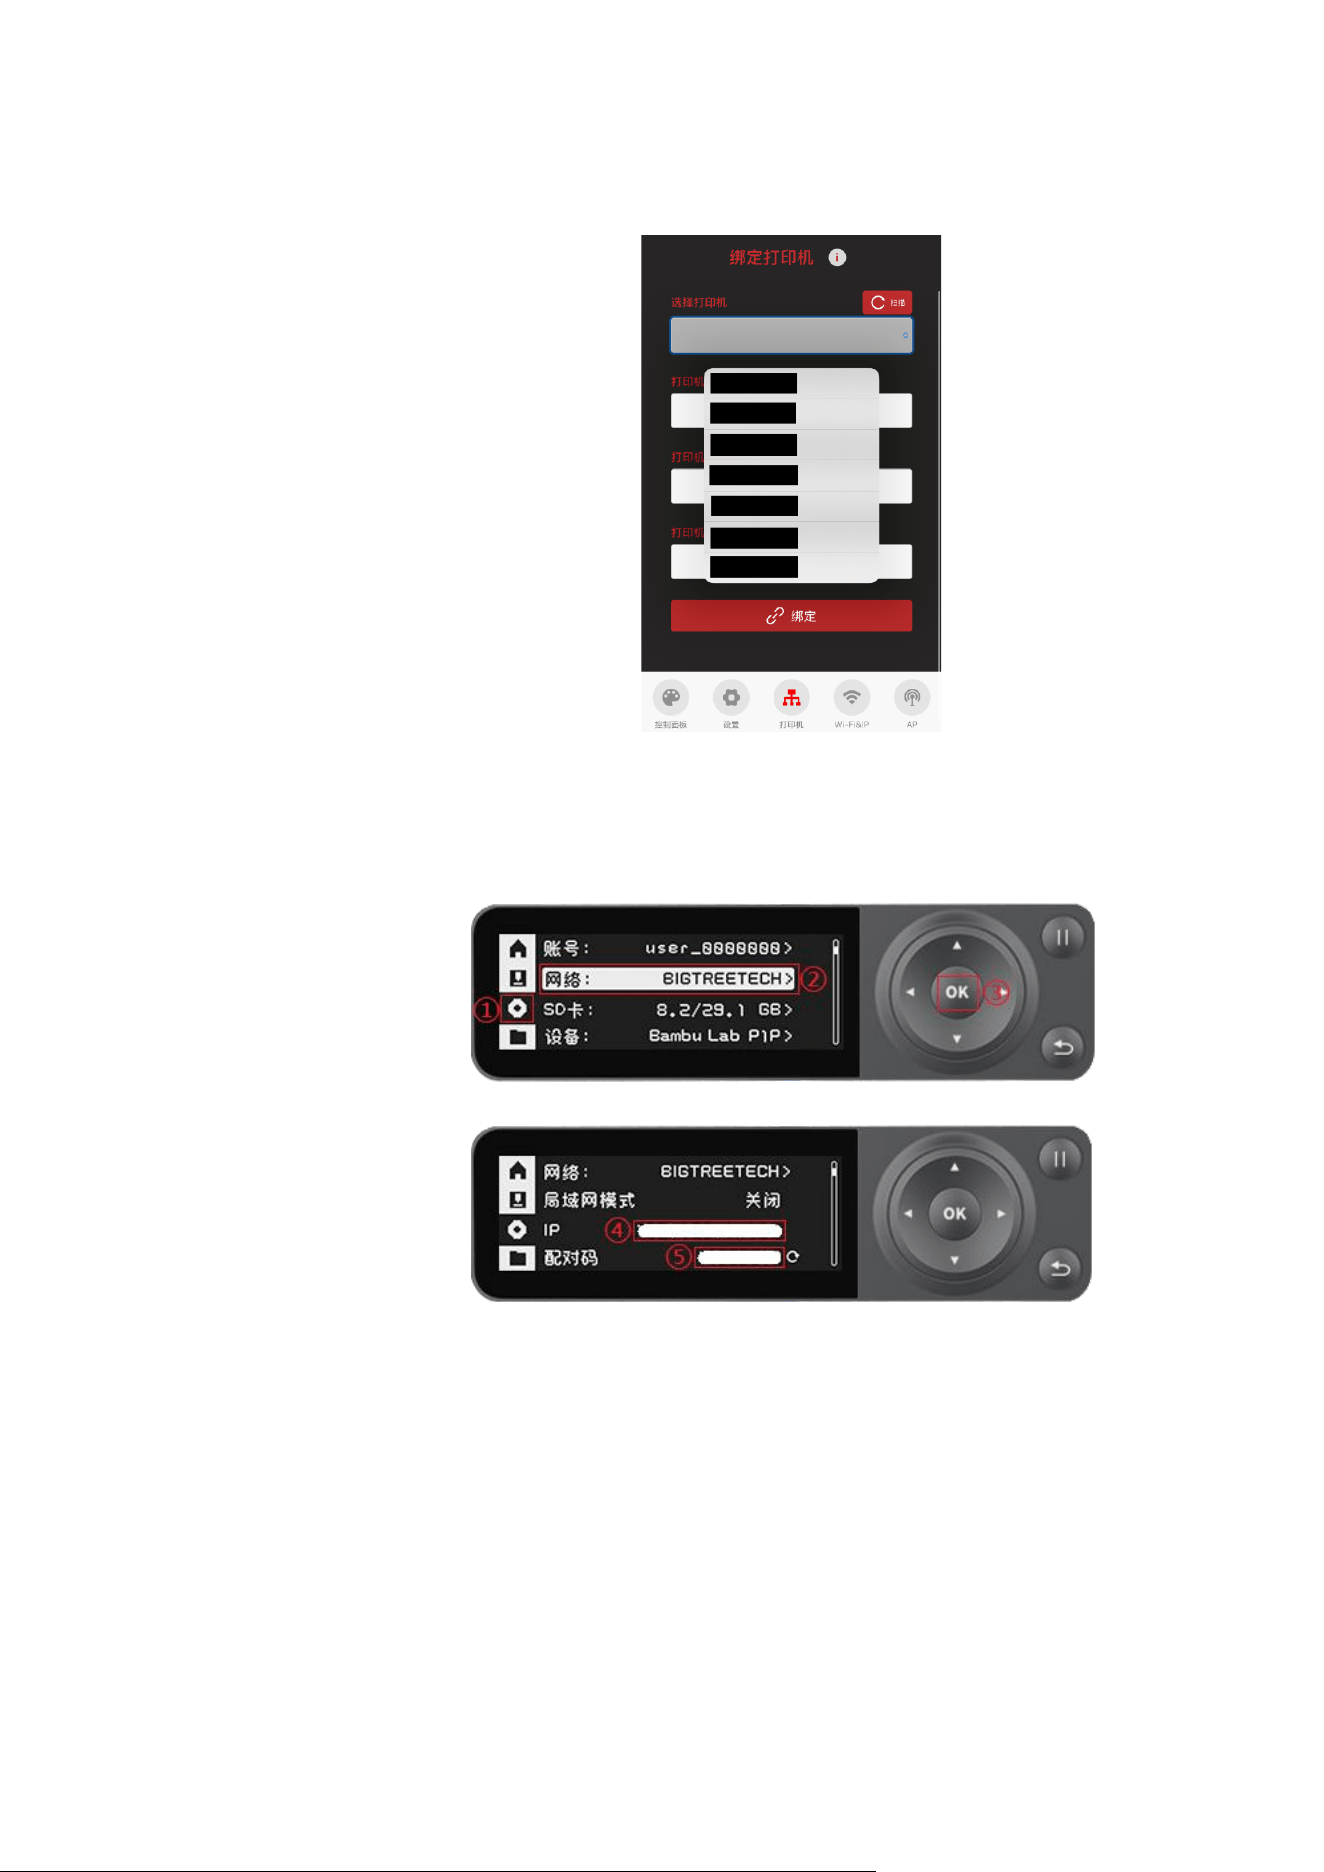
• Pair a Printer
• After scanning for a short time, a scan-complete pop-up appears.
• Select the detected printer. Its SN and IP address are filled in automatically.
• Enter the printer access code.
• Find the pairing code on the printer. The P1 series is used as an
example below.
• Enter the pairing code in the Access code field, then tap Pair to
begin pairing the printer.
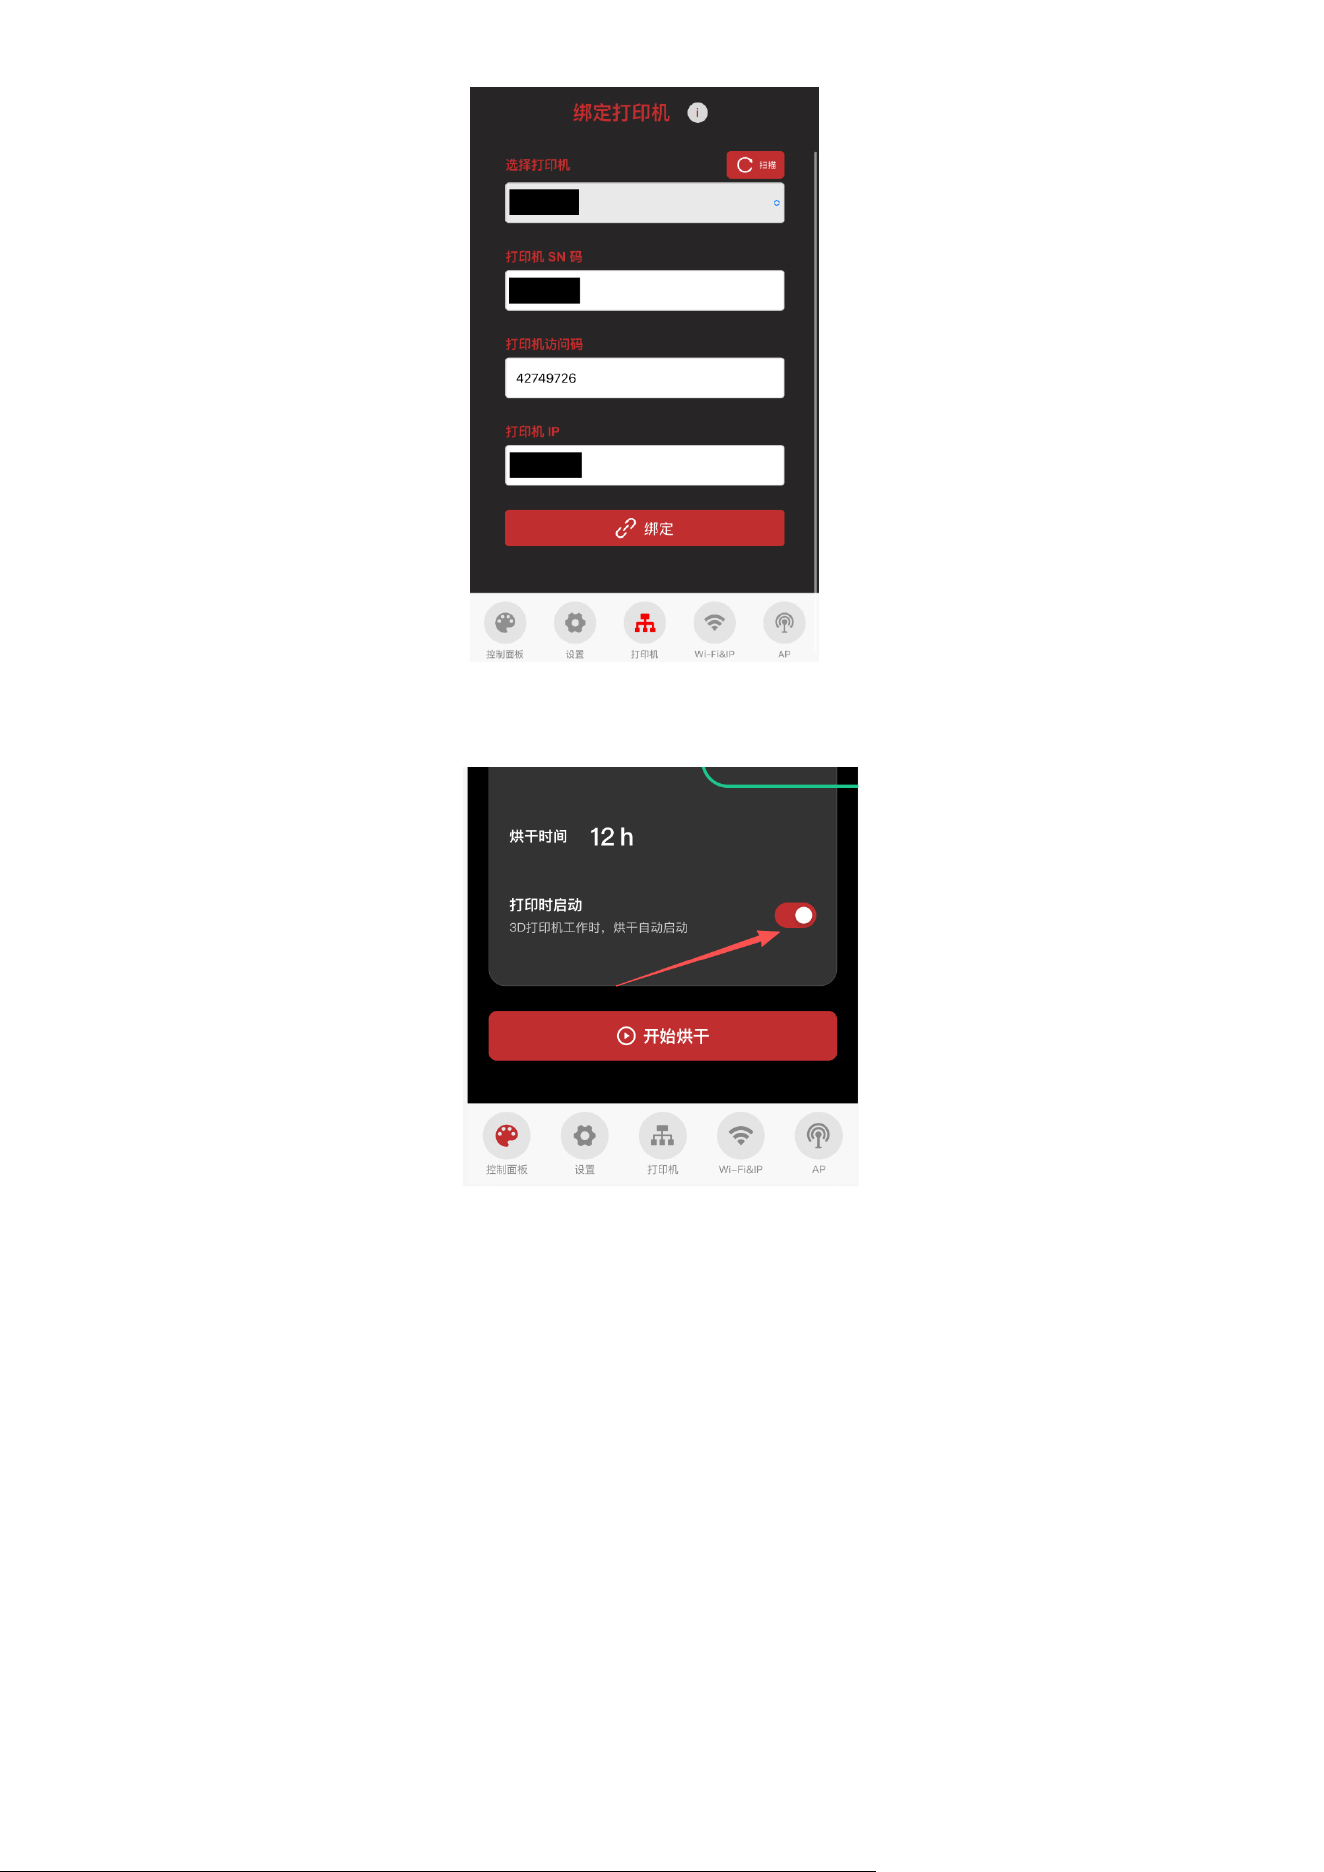
● Turn on [Auto-Dry During Print], as shown. BQDry Mini starts heating and drying the filament when the next
print job begins, then stops heating automatically when the print finishes.

Important Notes
1. Continuous Heating Mode
When Continuous is selected, built-in temperature protection helps protect against abnormal temperature rise.
For safe use, keep the device in an observable, monitored location and do not leave it running unattended for
extended periods.
2. Housing Surface Texture
Scratch-like patterns on the housing surface are normal material characteristics and are not defects. The housing
is made from a nylon + glass fiber (PA-GF) composite. While this material improves heat resistance, structural
strength, and stability, it may show visible fiber texture or surface patterns. This is normal for the material.
FCC Compliance Statement
This device complies with part 15 of the FCC Rules.
Operation is subject to the following two conditions:
(1) This device may not cause harmful interference.
(2) This device must accept any interference received,
including interference that may cause undesired operation.
Warning:
Changes or modifications not expressly approved by the party responsible for compliance could void the
user's authority to operate the equipment.

FCC Statement
Changes or modifications not expressly approved by the party responsible for compliance could void the
user's authority to operate the equipment.
This equipment has been tested and found to comply with the limits for a Class B digital device, pursuant
to Part 15 of the FCC Rules. These limits are designed to provide reasonable protection against harmful
interference in a residential installation. This equipment generates uses and can radiate radio frequency
energy and, if not installed and used in accordance with the instructions, may cause harmful interference
to radio communications. However, there is no guarantee that interference will not occur in a particular
installation. If this equipment does cause harmful interference to radio or television reception, which can
be determined by turning the equipment off and on, the user is encouraged to try to correct the
interference by one or more of the following measures:
-- Reorient or relocate the receiving antenna.
-- Increase the separation between the equipment and receiver.
-- Connect the equipment into an outlet on a circuit different from that to which the receiver is
connected.
-- Consult the dealer or an experienced radio/TV technician for help
This device complies with part 15 of the FCC rules. Operation is subject to the following two conditions (1)
this device may not cause harmful interference, and (2) this device must accept any interference received,
including interference that may cause undesired operation.
This equipment complies with FCC radiation exposure limits set forth for an uncontrolled environment.
This equipment should be installed and operated with minimum distance 20cm between the radiator &
your body.