1
TRAEGER.COM
OWNER’S
MANUAL
WOODRIDGE™ PRO
T14816 - REV A
WOODRIDGE™ PRO
WELCOME TO THE WOOD-FIRED REVOLUTION.
WE WANT YOU TO GET THE MOST OUT OF YOUR TRAEGER.
A MAJOR CAUSE OF FIRES IS FAILURE TO MAINTAIN
REQUIRED CLEARANCES (AIR SPACES) TO COMBUSTIBLE
MATERIALS. IT IS OF UTMOST IMPORTANCE THAT THIS
PRODUCT BE INSTALLED ONLY IN ACCORDANCE WITH
THESE INSTRUCTIONS.
2
A MAJOR CAUSE OF FIRES IS FAILURE TO MAINTAIN REQUIRED CLEARANCES (AIR SPACES) BETWEEN
COMBUSTIBLE MATERIALS AND YOUR GRILL. IT IS OF UTMOST IMPORTANCE THAT THIS PRODUCT BE
INSTALLED ONLY IN ACCORDANCE WITH THESE INSTRUCTIONS.
When properly operated and maintained, cooking with a hardwood re on a Traeger
®
Grill brings years of
enjoyment to you and your friends and family. Your new Traeger
®
Grill is specially designed to make cooking easier
while giving you optimal performance with the most avorful food.
Please read this entire manual before installation and operation. Anyone who uses this grill should also read the
entire manual before operating it. Failure to follow these instructions could result in property damage, bodily injury,
or even death. Contact local building or re ofcials about restrictions and installation inspection requirements
in your area. Save these instructions. If you are installing this unit for someone else, provide this manual
for the owner to read and save for future reference.
w DANGER
Carbon Monoxide Hazard
Burning wood pellets produces carbon monoxide
which may lead to illness, serious injury, and/or death.
Follow these guidelines to prevent this colorless,
odorless gas from poisoning you, your family, your pets,
or others:
• Only use your Traeger
®
Grill outside in a well-
ventilated area. This grill is intended for OUTDOOR
USE ONLY.
• Never use your Traeger
®
Grill in any enclosed area
or any area without adequate ventilation.
• Know the symptoms of carbon monoxide poisoning:
headache, dizziness, weakness, nausea, vomiting,
sleepiness, and confusion. Carbon monoxide
reduces the blood’s ability to carry oxygen.
Low blood oxygen levels can result in loss
of consciousness and death.
• See a doctor if you or others develop cold- or u-like
symptoms. Carbon monoxide poisoning, which can
easily be mistaken for a cold or u, is often detected
too late.
• Alcohol consumption and drug use increase the
effects of carbon monoxide poisoning.
• Carbon monoxide is especially toxic to mother and
child during pregnancy, infants, the elderly, smokers,
and people with blood or circulatory system
problems, such as anemia or heart disease.
w WARNING
Fire Hazard
• When operating your Traeger
®
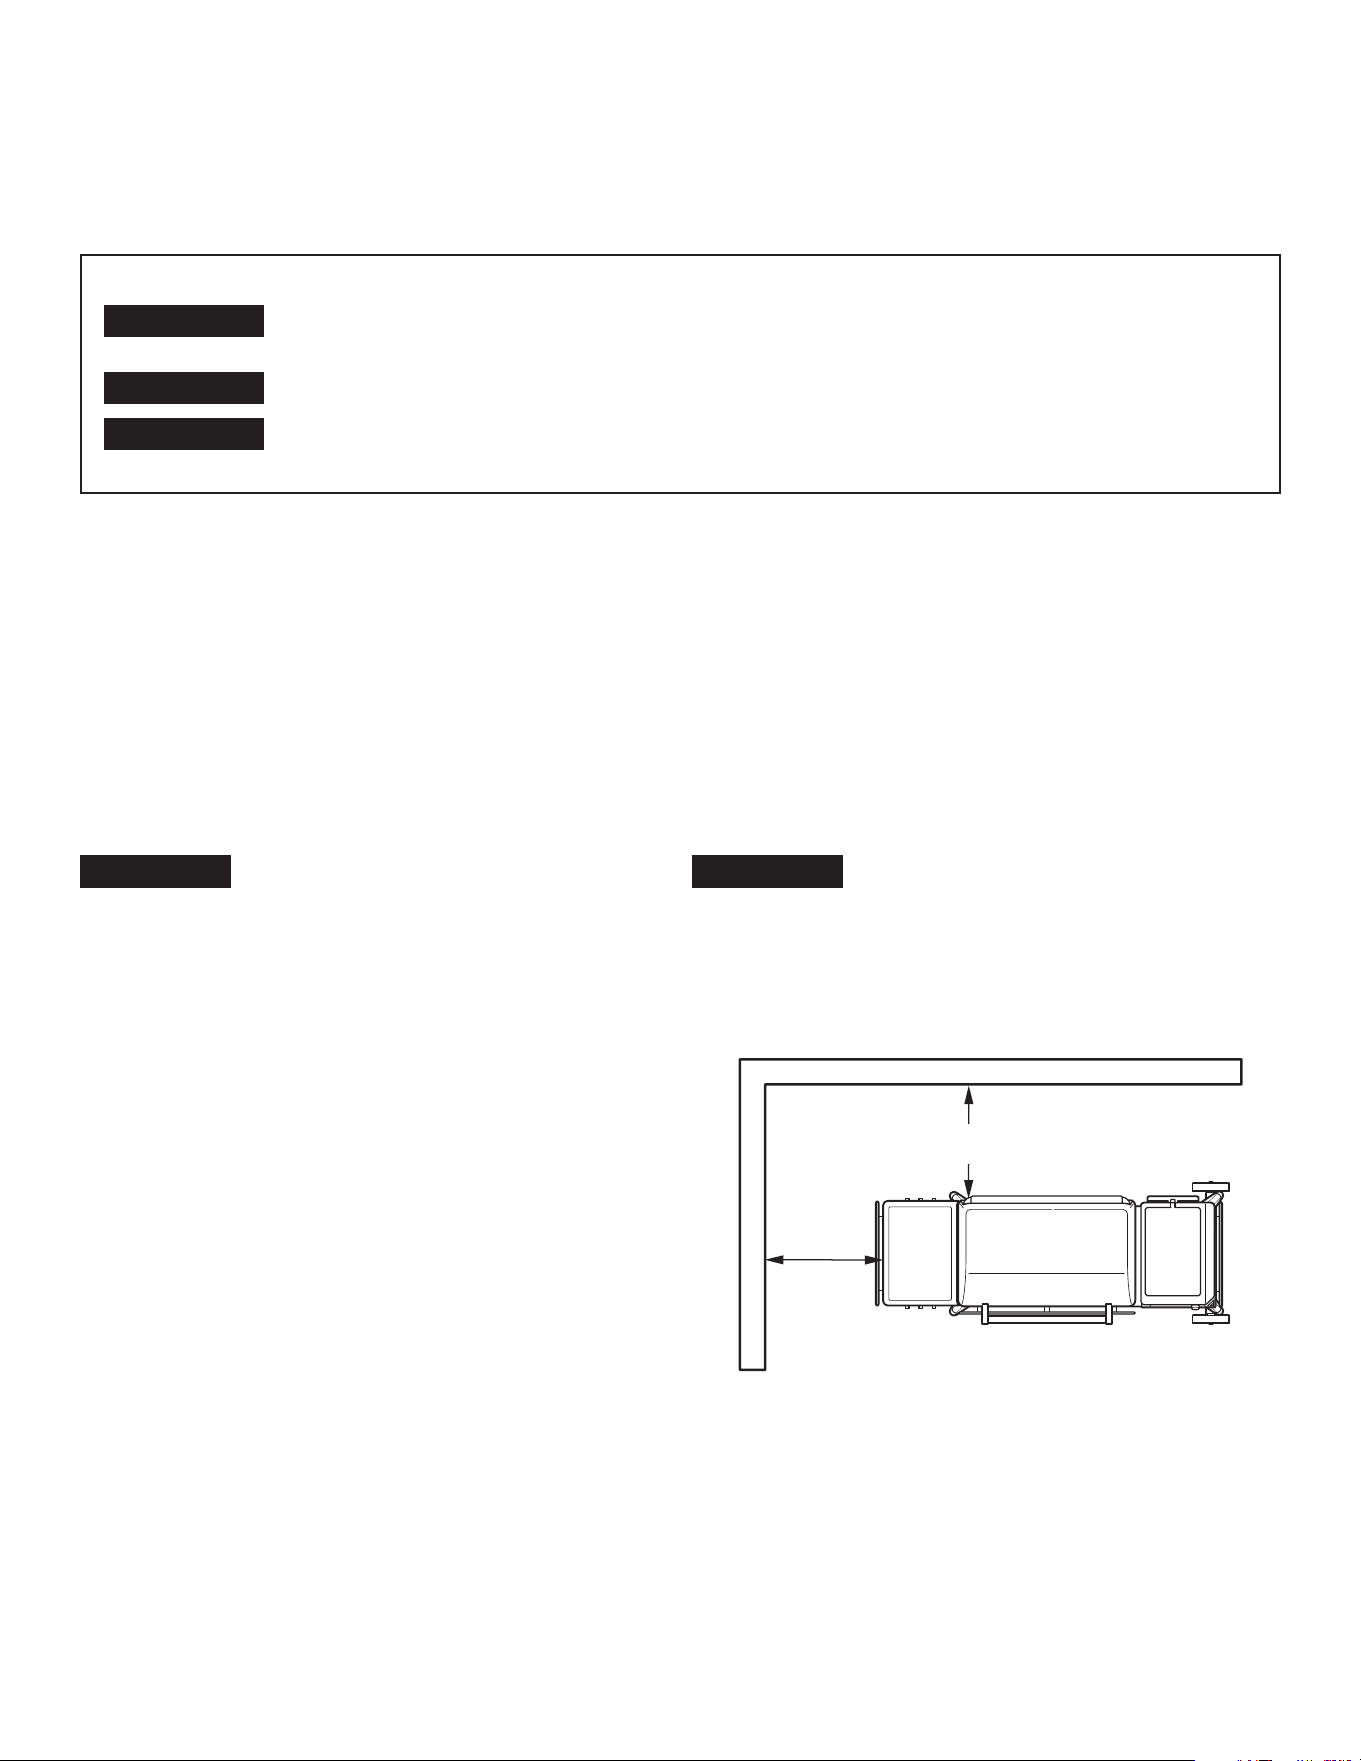
Grill, maintain a
MINIMUM distance of 20 inches (50.8 cm) from the
grill to any nearby combustibles, including wooden
railings, home siding, window frames, furniture, trees,
and trash receptacles, etc.
• Do not install or operate this grill indoors or under
a combustible ceiling or overhang.
• Do not install or operate your Traeger
®
Grill on
combustible oors or surfaces.
• Do not put a grill cover or anything ammable in the
storage space area under the grill.
• To reduce the risk of re, remove pots and pans from
the appliance when it’s operating unattended.
IMPORTANT SAFETY PRECAUTIONS
READ ALL INSTRUCTIONS BEFORE INSTALLING AND USING
YOUR TRAEGER® GRILL
20"
(50.8 cm)
20"
(50.8 cm)
SAFETY ALERT KEY
w DANGER
Indicates an imminently hazardous situation which, if not avoided, may result in death or
serious injury.
w WARNING
Indicates the possibility of serious bodily injury if the instructions are not followed.
w CAUTION
Indicates a potentially hazardous situation which, if not avoided, may result in minor or
moderate injury.

3
TRAEGER.COM
w WARNING
Fire Hazard
• Keep your Traeger
®
Grill clean. Grease res are
caused by not properly maintaining your grill and
failing to clean its Traeger
®
Grease Management
System on a consistent basis (see “Maintaining Your
Grill” on page 34).
• Even if there is ample room in the grill, be cautious
of loading excessive amounts of food or high fat
content foods (e.g., bacon) that can release large
quantities of ammable grease.
• Do not place food near the edges of the grill where
grease drippings may miss the grease drip tray and
fall to the bottom of the grill, where they could come
into contact with embers from the repot and ignite.
• Ensure the auger box is properly installed. If the
auger box is not installed correctly, pellets will not
ow properly into the repot and may accumulate
and cause damage to the grill.
• Always make sure the grease drain chute, heat bafe,
and drip tray are properly seated on their locating
brackets. If not installed correctly, direct heat and
ame from the repot could cause a grease re or
damage the Traeger
®
Grease Management System.
Water could also enter and damage the Traeger
®
Grease Management System.
• Never use gasoline, lantern fuel, kerosene, lighter
uid, or other ammable materials to start or “freshen
up” a re.
• Never use or store ammable liquids or other
combustibles materials near the grill.
• Never attempt to over-re your grill by adding excess
pellets or other combustible materials to the repot
or the hopper.
w DANGER
In the event of a grease re, ensure the
grill lid and hopper lid are closed, and then immediately
unplug the grill if you can do so safely. Move away from
the grill until the re is completely out and the grill has
cooled down. Until the re has extinguished and the grill
has cooled off:
• Do Not move the grill;
• Do Not throw water on the grill;
• Do Not use salt or baking soda to put out a grease
re; and
• Do Not try to smother the re.
With the grill lid and hopper closed, the re will be
starved of oxygen and burn itself out. Never keep the
grill lid or hopper lid open during a grease re; if the grill
lid is open, use a non-combustible tool that will allow
you to close the grill lid while keeping a safe distance
from the grill. An all-class (class ABC) approved re
extinguisher should be used if a re is not contained
within the grill. If an uncontrolled re does occur,
immediately call the Fire Department. When the re
is completely out, allow the grill to cool completely.
Remove everything from the inside of your grill,
including all internal components (grill grates, drip
tray, heat bafe), pots and pans, and food. Clean the
entire grill, including any grease accumulation from the
Traeger
®
Grease Management System and all ash and
pellets from the grill and repot (see “Maintaining Your
Grill” on page 34). Place the grease drain chute, ember
shield, heat bafe, grease drip tray, and grill grates back
into the grill, restart the grill, and resume cooking.
w WARNING
Fire Hazard
Always allow grill to cool completely before using the
auger priming function.
w WARNING
Burn Hazard
Ashes should always be completely cool before
handling. Ashes should be placed in a metal container
with a tight-tting lid. The closed container of ashes
should be placed on a noncombustible oor or on
the ground, well away from all combustible materials,
pending nal disposal. Ashes should be retained in the
closed container until they are disposed.
w WARNING
Burn Hazard
Many parts of the grill become very hot during
operation. During operation of the grill and afterwards,
care must be taken to avoid burns while the grill is hot.
• Never leave the grill unattended when young children
or pets are present.
• Never move the grill when it is operating or hot.
Let the grill cool thoroughly and close the grill lid
before moving or attempting to transport. If you are
transporting your grill in a vehicle after cooking on it,
make sure the re is completely out and the grill is
cold before placing it in any vehicle.
• Never put water into the repot; it will jam the auger.
• Never add pellets by hand to a hot repot. This is
dangerous and you may be seriously burned. If you
run out of pellets and lose your re while cooking,
let the grill cool completely and start again. (See page
33, “Hopper Clean-out” instructions.)
• Grill grates and meat probes are extremely hot
when heated. Please use caution when loading food
onto the grill grates and when inserting, removing,
or adjusting your meat probes.
• Never move the grill with the lid open. Always close
the grill lid prior to moving.
w WARNING
Smoke Hazard
• If there is a delayed start and the smoke from
your grill changes from transparent white smoke to
unusual billowing thick non-transparent white smoke
that turns to a yellow-tinted smoke, immediately turn

4
IMPORTANT SAFETY PRECAUTIONS CONTINUED
off your grill using the main power switch on the back
of the auger box or unplug the power cord.
Do Not initiate the shutdown cycle.
•
w DANGER
Do Not open the grill lid to air out
the grill. Stay away from the grill until smoke clears
and the grill completely cools. This may be the result
of a pellet overow condition, which is caused by
partial ignition of pellets. If allowed to continue long
enough, gases will build up, which can ignite. If these
gases ignite they will combust all at once, making
a loud noise that may startle and/or injure persons
in the immediate vicinity of the grill, and the grill lid
may open and close. This occurrence is sometimes
referred to as a “grill burp” and should be avoided.
If you have not properly maintained your grill, as
described in “Maintaining Your Grill” on pages 34-36,
a hazardous grease re may also result.
• If a “grill burp” occurs, let the grill cool down
completely, remove all internal components (including
grill grates, drip tray, heat bafe, ember shield,
and grease drain chute), and thoroughly clean all
ash and pellets from the grill and repot (see page
35, “Cleaning the Ash from Inside and Around the
Firepot”) and ensure that grease and other buildup
has been removed (see pages 34-36, “Maintaining
Your Grill”). Remove all pellets from the pellet hopper.
Clean all pellets out of the repot. Fill hopper with
new pellets and prime the auger.
•
w DANGER
Do Not stick your hand in or near
the auger located at the bottom of your pellet hopper.
Severe injury will occur if the auger is turning and
your hand is caught in the auger. Do not remove the
safety grate in your pellet hopper. No maintenance
should be performed on or around the auger while
the grill is turned on or plugged into power.
w WARNING
Electrical Shock Hazard
Hazardous voltage is present, which can shock, burn,
or cause death.
• Ground Fault Circuit Interrupter (GFCI) protection
must be provided on the circuit(s) or outlet(s) to be
used for the operation of this Traeger
®
Grill.
• Disconnect the power cord before servicing the grill
unless otherwise noted in this Owner’s Manual.
• If using an extension cord, only use an extension cord
suitable for outdoor use to prevent electric shock
in accordance with the instructions and warnings
accompanying that product. This type of cord is
designated with “W-A” or “W” on the cord’s jacket, such
as an extension cord of cord type: SW-A, SOW-A, STW-A,
STOW-A, SJW-A, SJOW-A, SJTW-A, or SJTOW-A.
• If using an extension cord, be sure to use a No. 18
AWG cord.
• Do not modify the plug on your Traeger
®
Grill, the
extension cord receptacle, or the extension cord plug in
any way, including removing the ground (earth) prong.
• Make sure your extension cord is in good condition.
Inspect extension cords prior to each use for loose or
exposed wires and cut or worn insulation. Replace if
damaged. Never use a damaged extension cord.
• Ensure that the power cord and extension cord are
securely plugged together. Do not plug extension
cords into one another.
• Keep extension cord clear of snow and standing
water.
• Ensure that the power cord and extension cord
do not create a tripping hazard. Do not route an
extension cord through a window or doorway.
• When not in use, the extension cord should be
removed and stored in a location protected from
the sun and out of the reach of children.
w CAUTION
• Never modify this grill or install any parts or
components not authorized by Traeger for use with
this grill. Any modication of this grill or installation
of unauthorized parts or components will void the
warranty and may create a safety hazard including,
without limitation, a re.
• Children should be supervised to ensure they
do not play with the grill.
w CAUTION
Use Correct Pellets
• This grill is designed and approved only for all natural
wood cooking pellets designed for wood pellet grills.
Use of any other type of fuel in this grill will void the
warranty, may lead to the auger becoming jammed,
and may create a safety hazard.
• FOR BEST RESULTS AND FLAVOR, USE
GENUINE TRAEGER
®
BRAND HARDWOOD
PELLETS. Traeger pellets, when stored properly,
have a mean heating value of approximately 8,000
BTUs per pound with approximately ≤2% ash.
Do not use pellet fuel that does not meet these
specications or that has unnatural additives or
binding agents.
• Always store wood pellets in a dry location, away
from heat-producing appliances and other fuel
containers.
w WARNING
Do Not Use Fuel Pellets
Never use heating fuel pellets in the grill because they
may contain hazardous contaminants and additives
and may damage the grill.
5
TRAEGER.COM
w CAUTION
Ambient Temperature
• When the ambient temperature falls below -20°F
(-29°C) or rises above 120°F (49°C), damage to the
controller’s display may occur.
w WARNING
Meat probes must be properly positioned
to take accurate internal temperature readings of food.
If positioned improperly, the temperature may not
reect the actual doneness, and undercooked food can
increase the risk of food-borne illness.
w WARNING
If the fire in the firepot goes out
while cooking, it is important to follow the steps
below. Failure to do so may cause a hazardous
“overring” of your grill due to an excess of unburned
pellets in the repot. This is often caused by improper
start-up procedure and/or running out of pellets.
• Press the main power switch on the back of the
auger box to OFF (O) and disconnect the power
cord. Allow the grill to cool thoroughly. Open the lid
and remove all food, grill grates, drip tray, heat bafe,
ember shield, and grease drain chute.
• Remove all unburned pellets and ash from inside
and around the repot. (See instructions for proper
handling and disposal of ash on pages 35-36.)
• Before replacing the grease drain chute, ember
shield, heat bafe, drip tray, and grill grates, plug the
power cord into a properly grounded/earthed electrical
outlet protected by a Ground Fault Circuit Interrupter
(GFCI), press the main power switch to ON (I), and
start a cook. Pellets should fall into the repot and the
hot rod should begin to heat (it will start to turn red).
w WARNING
Do not touch the hot rod.
• When ames start to come out of the repot, initiate a
shutdown cycle by pressing and holding the shutdown
button (lower left button) for 3 seconds. After shutdown
cycle is complete, press the main power switch to OFF.
Let the grill cool down. Now you’re ready to place the
grease drain chute, ember shield, heat bafe, drip tray,
grill grates, and food back into the grill.
w WARNING
• Press the main power switch to OFF (O) and disconnect
the power cord before initiating any maintenance.
• Make sure that the grill is COLD and ashes are
extinguished and COLD before checking the
EZ-Clean™ Grease + Ash Keg.
• Accumulated grease is easier to clean off when the
grill is still warm—not hot. Be careful not to burn
yourself. Always wear heat-protective gloves
when cleaning.
• A dedicated vacuum cleaner is the best way to
remove ashes from the repot, but this must be done
with extreme care to avoid the risk of re. Again,
cleaning the ash from in and around the repot should
be done only when the grill and ashes are COLD.
• Cleaning the grill grates works best while they are still
warm. Be careful not to burn yourself. Always
wear heat-protective gloves when cleaning. We
recommend keeping a long-handled cleaning brush
near the grill. After removing your food, give the grill
grate a quick brushing. It takes only a minute and it
will be ready the next time you want to use the grill.
FCC Statement
Changes or modications to this unit not expressly
approved by the party responsible for compliance could
void the user’s authority to operate the device.
This device complies with part 15 of the FCC Rules.
Operation is subject to the following two conditions:
(1) this device may not cause harmful interference, and
(2) this device must accept any interference received,
including interference that may cause undesired operation.
This grill has been tested and found to comply with the
limits for Class B digital device, pursuant to part 15 of
the FCC Rules. These limits are designed to provide
reasonable protection against harmful interference in
a residential installation. This equipment generates,
uses, and can radiate radio frequency energy and, if not
installed and used in accordance with the instructions,
may cause harmful interference to radio or television
reception, which can be determined by turning the grill
off and on. The user is encouraged to try to correct the
interference by one or more of the following measures:
• Reorient or relocate the receiving antenna.
• lncrease the separation between the device and receiver.
• Connect the device into an outlet on a circuit different
from that to which the receiver is connected.
• Consult the dealer or an experienced radio/TV
technician for help.
This device complies with FCC radiation exposure limits
set forth for an uncontrolled environment. This device
should be installed and operated with minimum distance
of 8 in. (20 cm) between the device and a person’s body.
This device complies with Industry Canada license-
exempt RSS standard(s). Operation is subject to
the following two conditions: (1) this device may not
cause interference, and (2) this device must accept
any interference, including interference that may cause
undesired operation of the device.
SAVE THESE INSTRUCTIONS
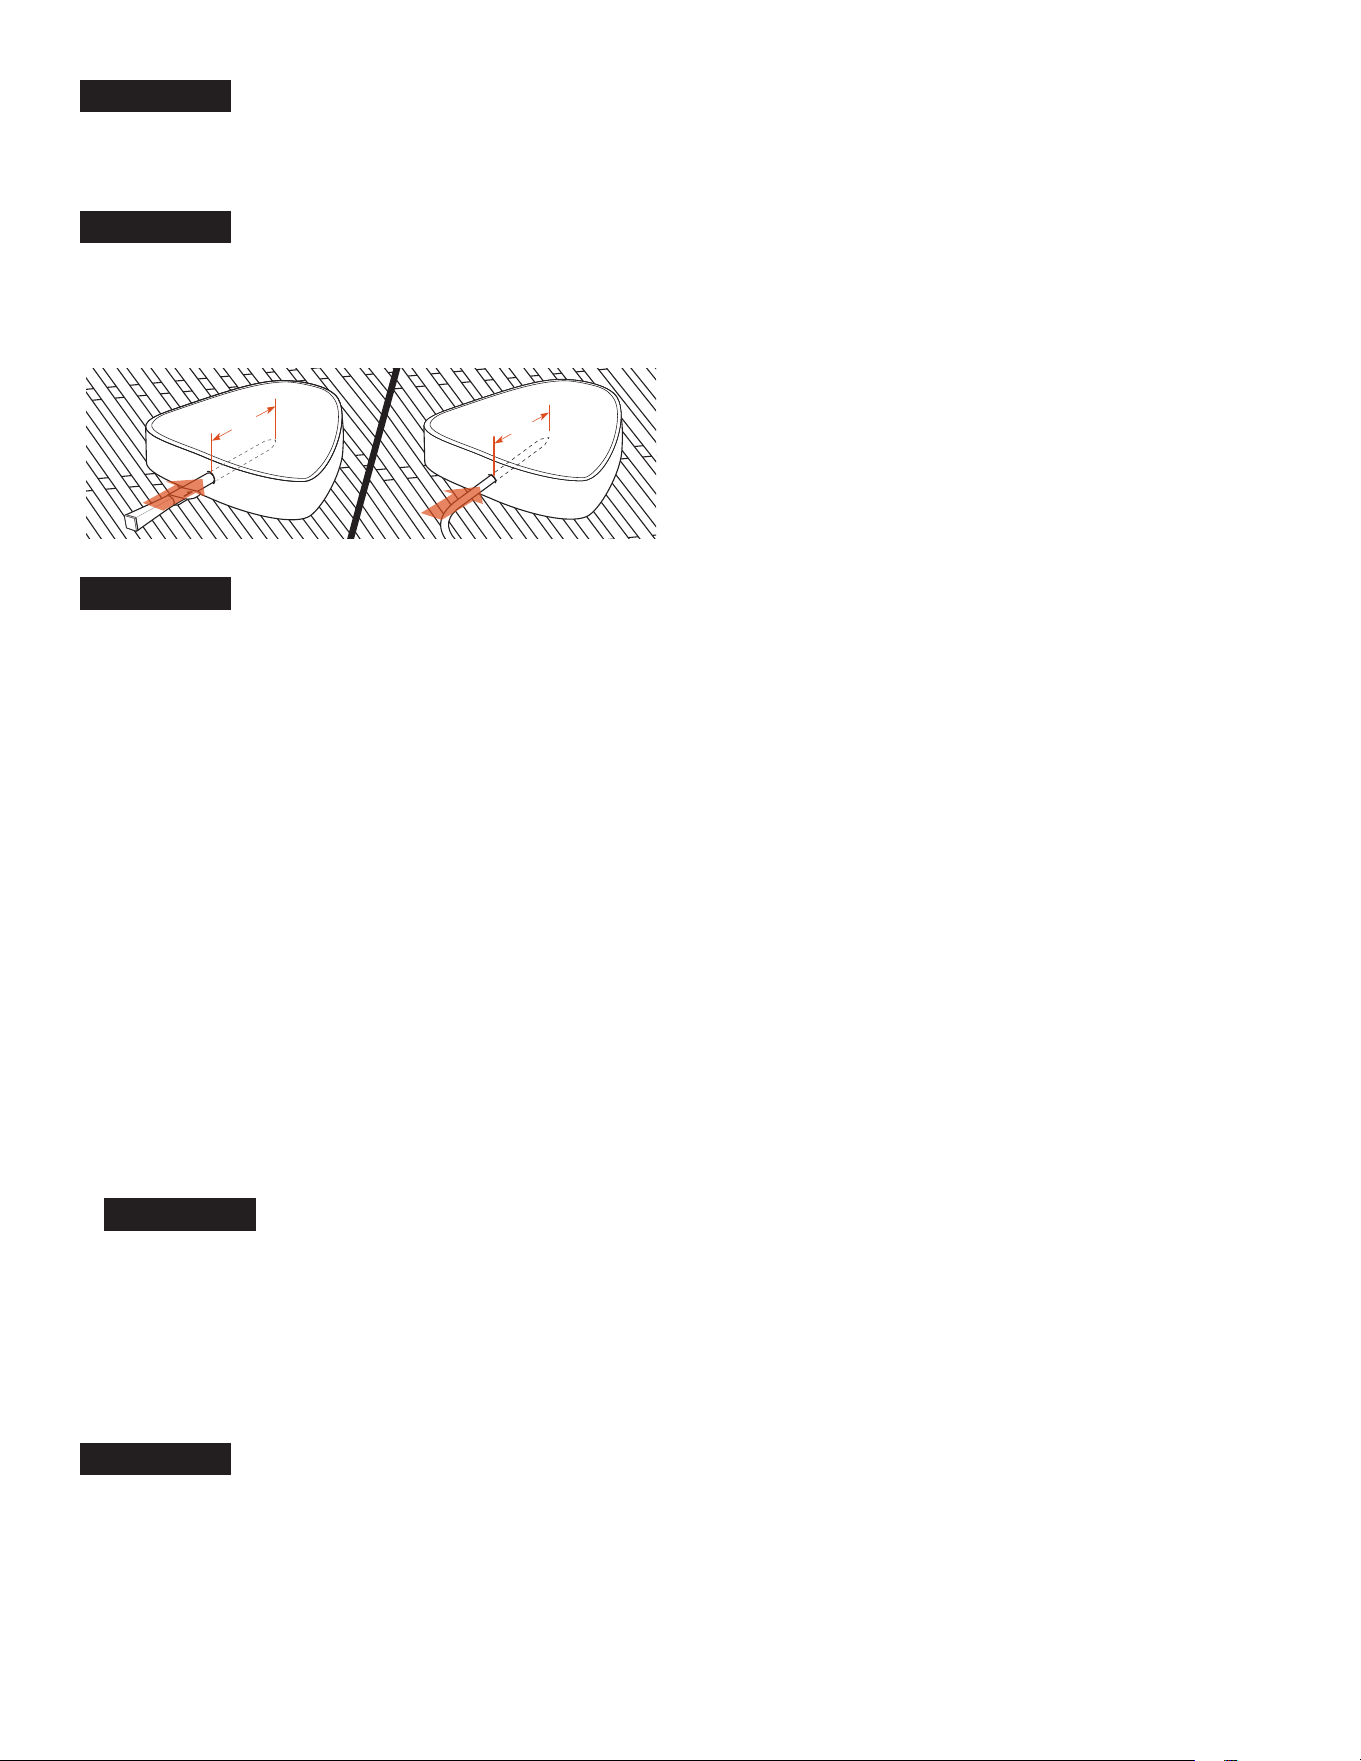
2"
(5.1 cm)
2"
(5.1 cm)
Wired ProbeTraeger® Wireless Meat Thermometer

6
6
L
®

7
TRAEGER.COM 7
L
2 IMPORTANT SAFETY PRECAUTIONS
8 FLAVOR MATTERS
10 GETTING TO KNOW YOUR GRILL
13 QUICK REFERENCE GUIDE
14 FIRST THINGS FIRST
14 ONBOARDING PART 1: CONNECTING
YOUR GRILL
16 ONBOARDING PART 2: SEASONING
YOUR GRILL
19 EVERYDAY TRAEGERING
22 SHUTTING DOWN YOUR GRILL
23 HOW TO USE ADDITIONAL GRILL
FEATURES
33 HOPPER CLEAN-OUT
34 MAINTAINING YOUR GRILL
36 TROUBLESHOOTING
37 OPERATING TIPS
37 SERVICE
38 WARRANTY
TABLE OF CONTENTS

8
8
THE PERFECT
PAIRINGS
Bold cuts of beef need bold wood flavors
to match, like hickory or mesquite.
Our signature blend pellets give your
plain pizza pizzazz.
Pair your pie with cherry or apple pellets
for a fruity, smoky finish.
AMERICAN HARDWOOD
9
TRAEGER.COM
ALL NATURAL
HARDWOOD PELLETS
CONSISTENT PERFORMANCE & FLAVOR
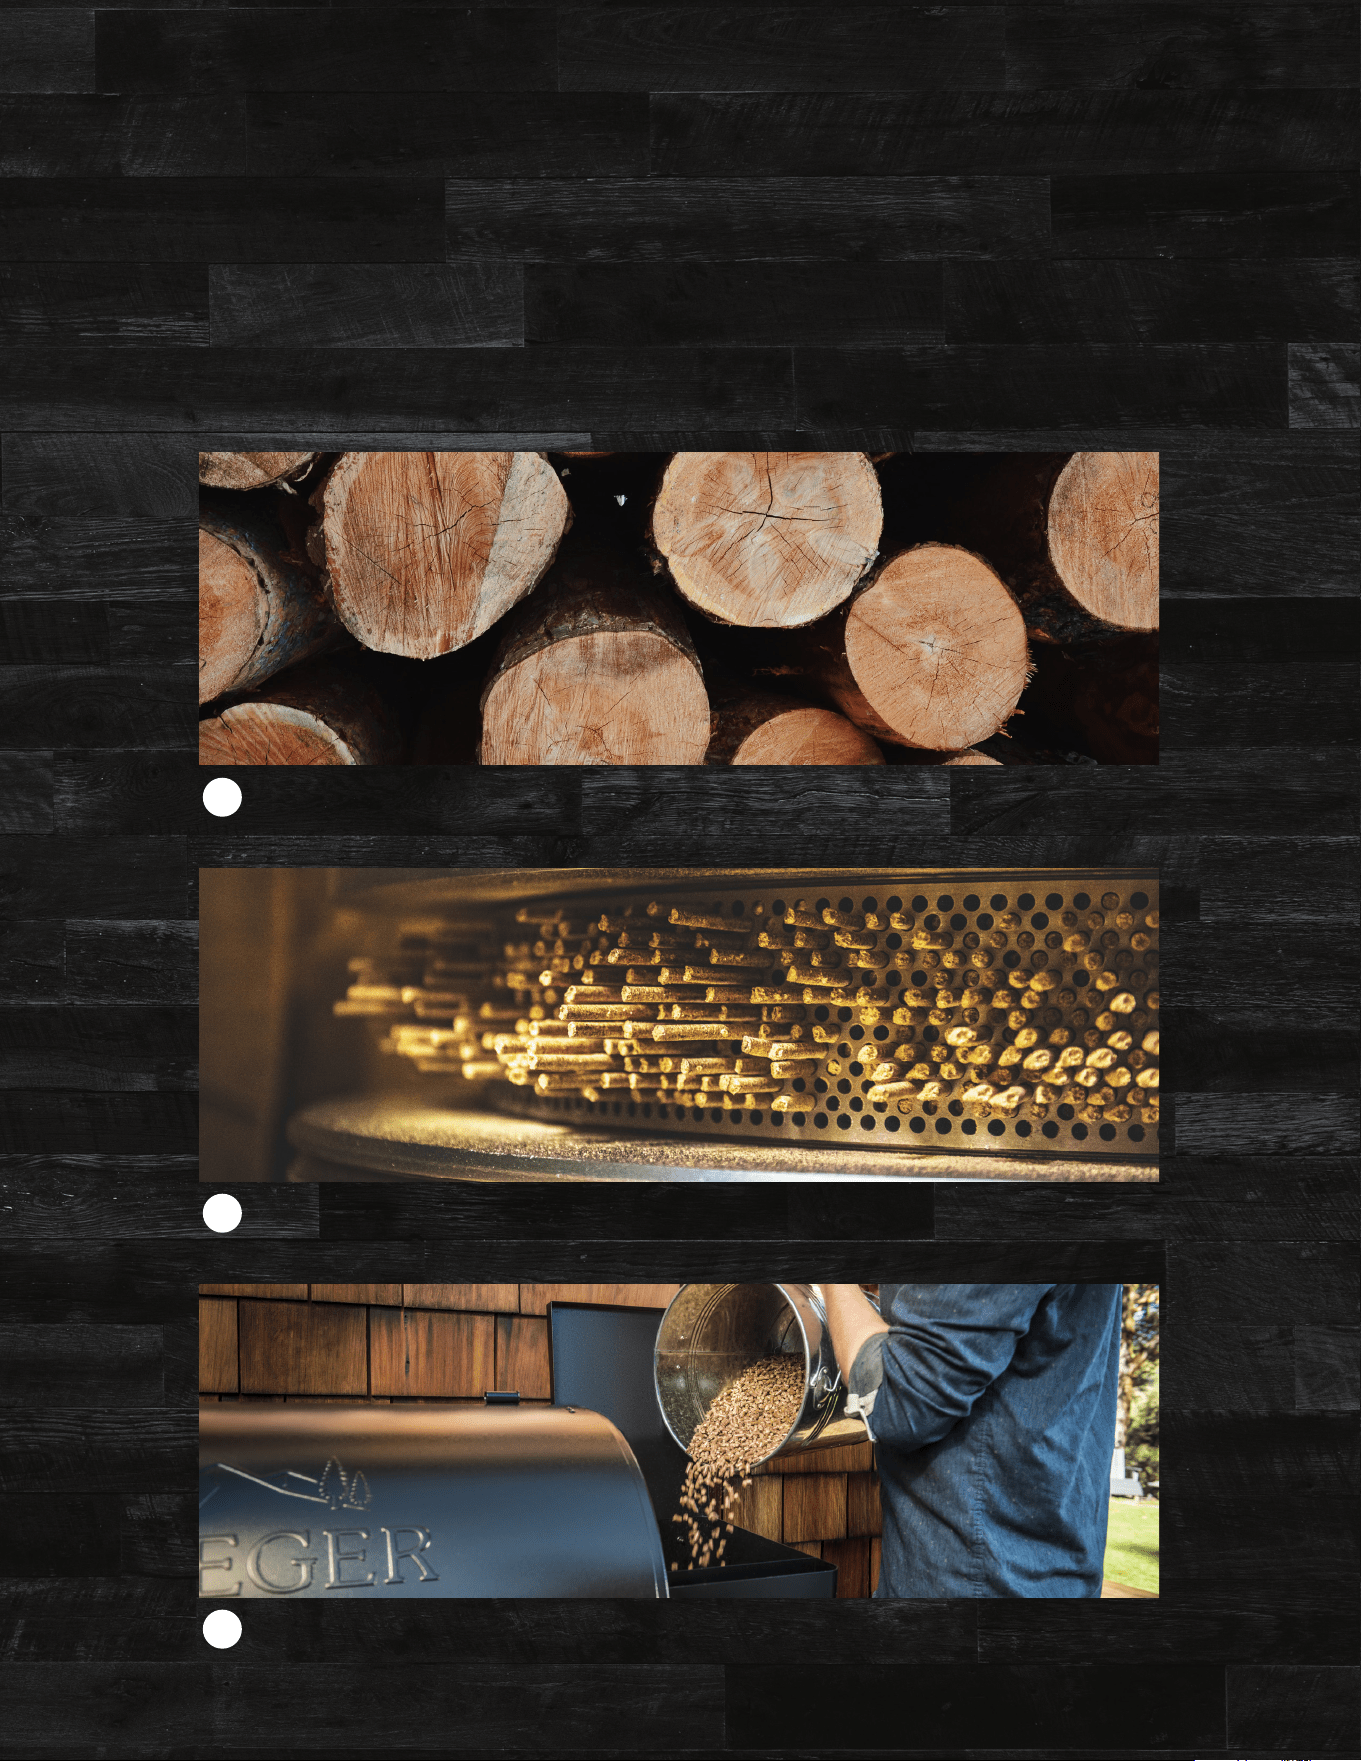
Pellets fuel the fire and add flavor to make meals unforgettable.
3
The sawdust is compressed into pellets using heat and pressure.
2
Traeger pellets are made from all natural hardwood sawdust.
1
9
HOW OUR PELLETS ARE MADE
10
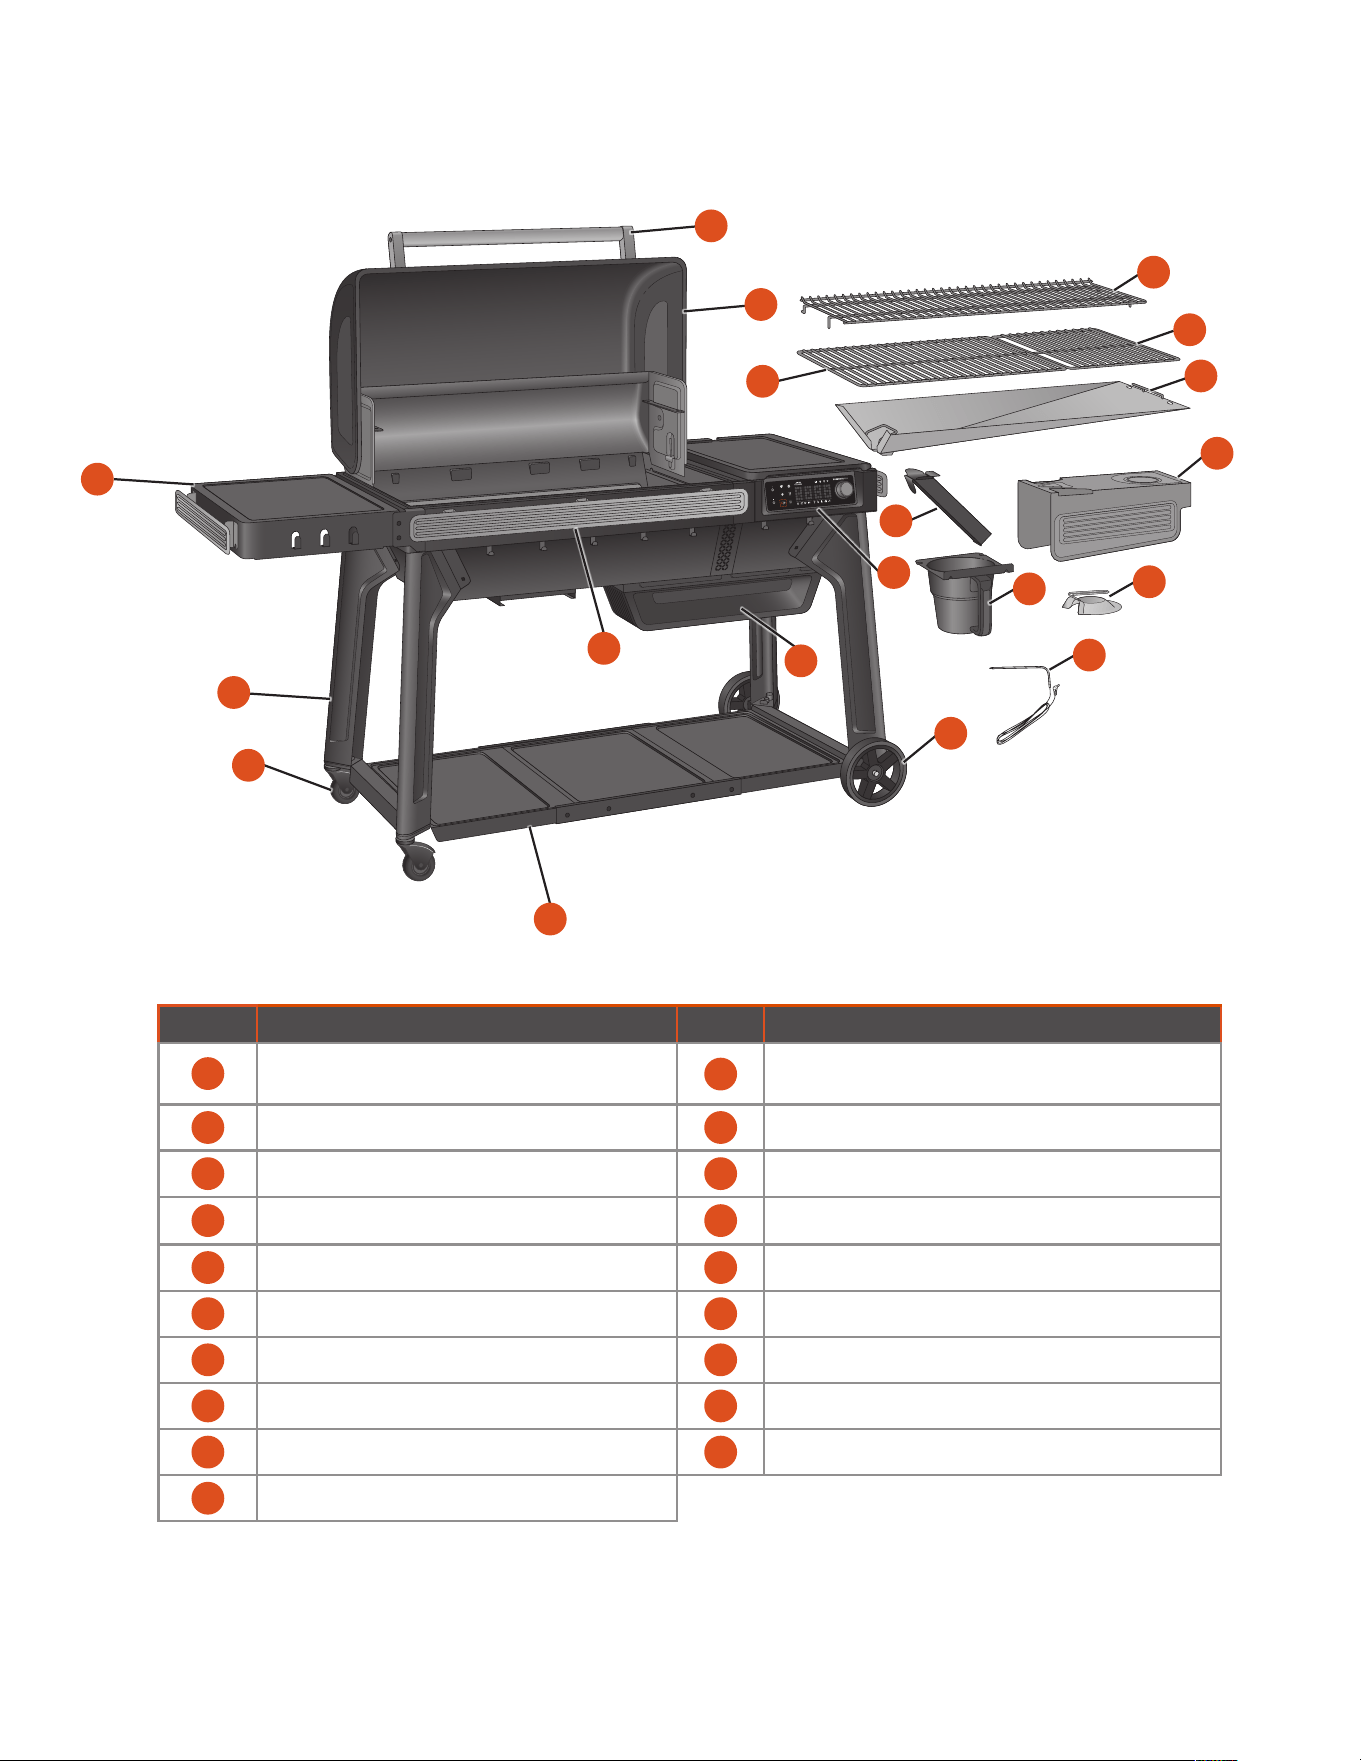
PART DESCRIPTION PART DESCRIPTION
1 UPPER GRILL GRATE
11
LEGS
2 LOWER GRILL GRATE 12 CASTERS
3 MODIFIRE® GRILL GRATE 13 BOTTOM SHELF
4 DRIP TRAY 14 P.A.L. POP-AND-LOCK™ ACCESSORY RAILS
5 HEAT BAFFLE 15 LID HANDLE
6 GREASE DRAIN CHUTE 16 LID
7 EZ-CLEAN™ GREASE + ASH KEG 17 WiFIRE® CONTROLLER
8 EMBER SHIELD 18 AUGER BOX
9 WIRED MEAT PROBE 19 ALL-TERRAIN WHEELS
10 FOLDING SIDE SHELF
WEIGHT CAPACITY
Hopper: 24 lbs (11 kg)
Folding Side Shelf: 50 lbs (23 kg)
Bottom Shelf: 60 lbs (27 kg)
GETTING TO KNOW YOUR GRILL
PARTS AND FEATURES
Refer to the Assembly Guide to assemble your Traeger® Woodridge™ Grill.
15
9
16
5
4
17
7
6
2
18
19
10
11
12
3
1
14
13
8
11
TRAEGER.COM
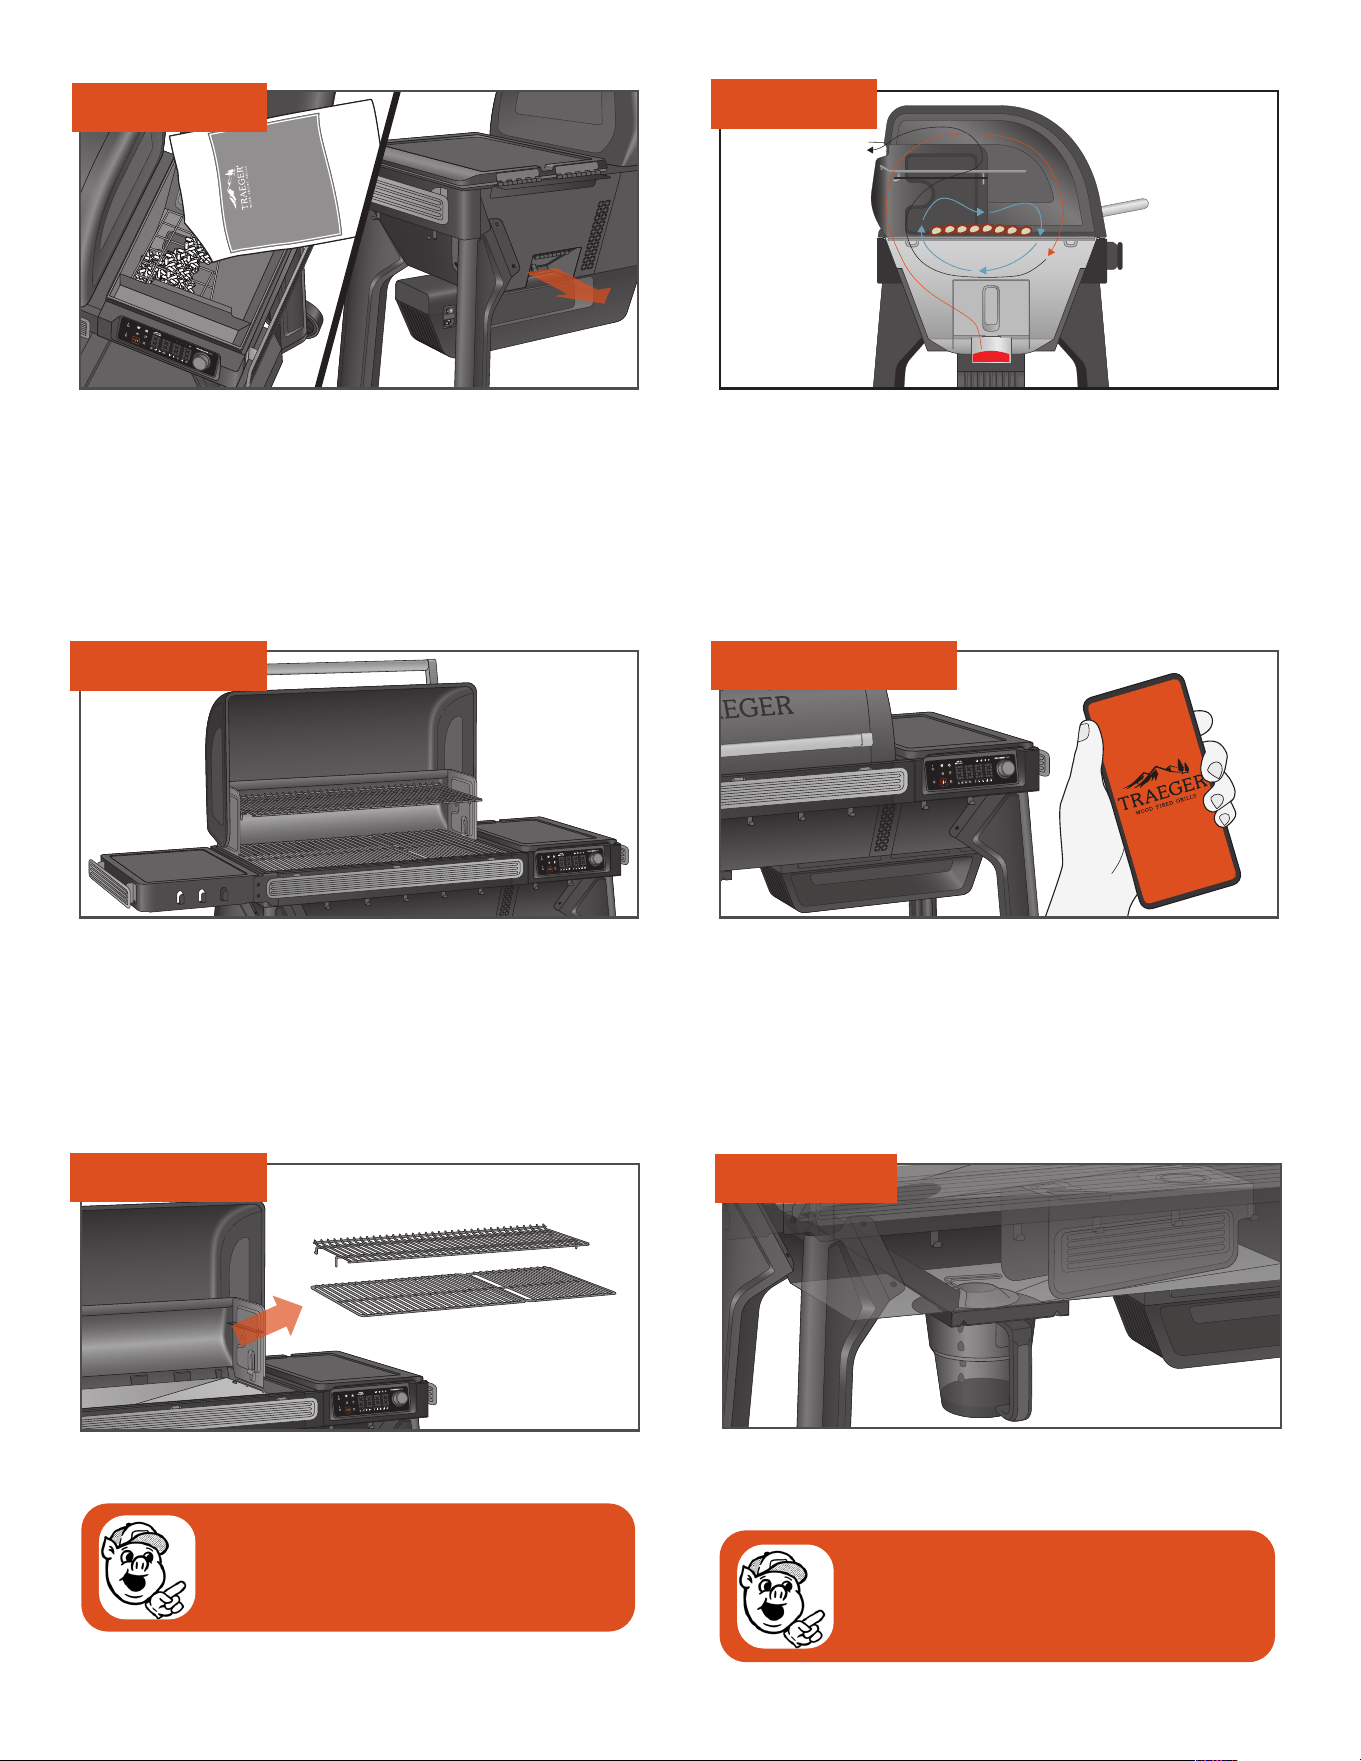
PELLET HOPPER
GRILL SHAPE
GRILLING SPACE
NO FLARE-UPS
WiFIRE® CONNECTIVITY
The hopper’s 24 lb (11 kg) capacity allows for hours of cooking with
no need to refill. Pellets can be emptied through the pellet release
door on the back by unscrewing the knob.
USE ONLY TRAEGER HARDWOOD PELLETS. This product is
developed and tuned using only Traeger pellets. Traeger pellets are
crafted to meet strict quality and performance standards. Using
pellets not manufactured by Traeger may result in inconsistent
performance, poor flavor, and temperature inconsistency.
Your Traeger® Woodridge™ Grill has a unique barrel shape that helps
funnel the smoke in and around your food for better, more flavorful
results.
With 970 in.
2
(0.63 m
2
) of grilling space, your Traeger®
Woodridge™ Grill has the real estate for party-sized orders of
T-bones or racks of ribs, with enough room left over to handle
those side dishes, too.
Download the Traeger App and connect your grill to unlock the
power of Traeger’s WiFIRE® Technology. With the Traeger App you
can remotely control your grill from anywhere, and your grill will also
receive the latest and greatest firmware updates, keeping your grill
operating at peak performance. See “Onboarding Part 1: Connecting
Your Grill” (page 14) for instructions on how to connect your grill to
your phone.
A removable upper grill grate and the lower ModiFIRE® grill grate
oer you the versatility you need to cook anything.
All grease is safely channeled into the EZ-Clean™ Grease + Ash Keg
for disposal. This, combined with regular maintenance, prevents
flareups and nasty fireballs from destroying your food.
VERSATILITY
PRO TIP: The upper grate can be stored on back of
the grill when cooking large items like turkeys (see
page 34 for more information).
PRO TIP: Keep your grill clean. See “Operating Tips”
(page 37) and “Maintaining Your Grill” (page 34).
12
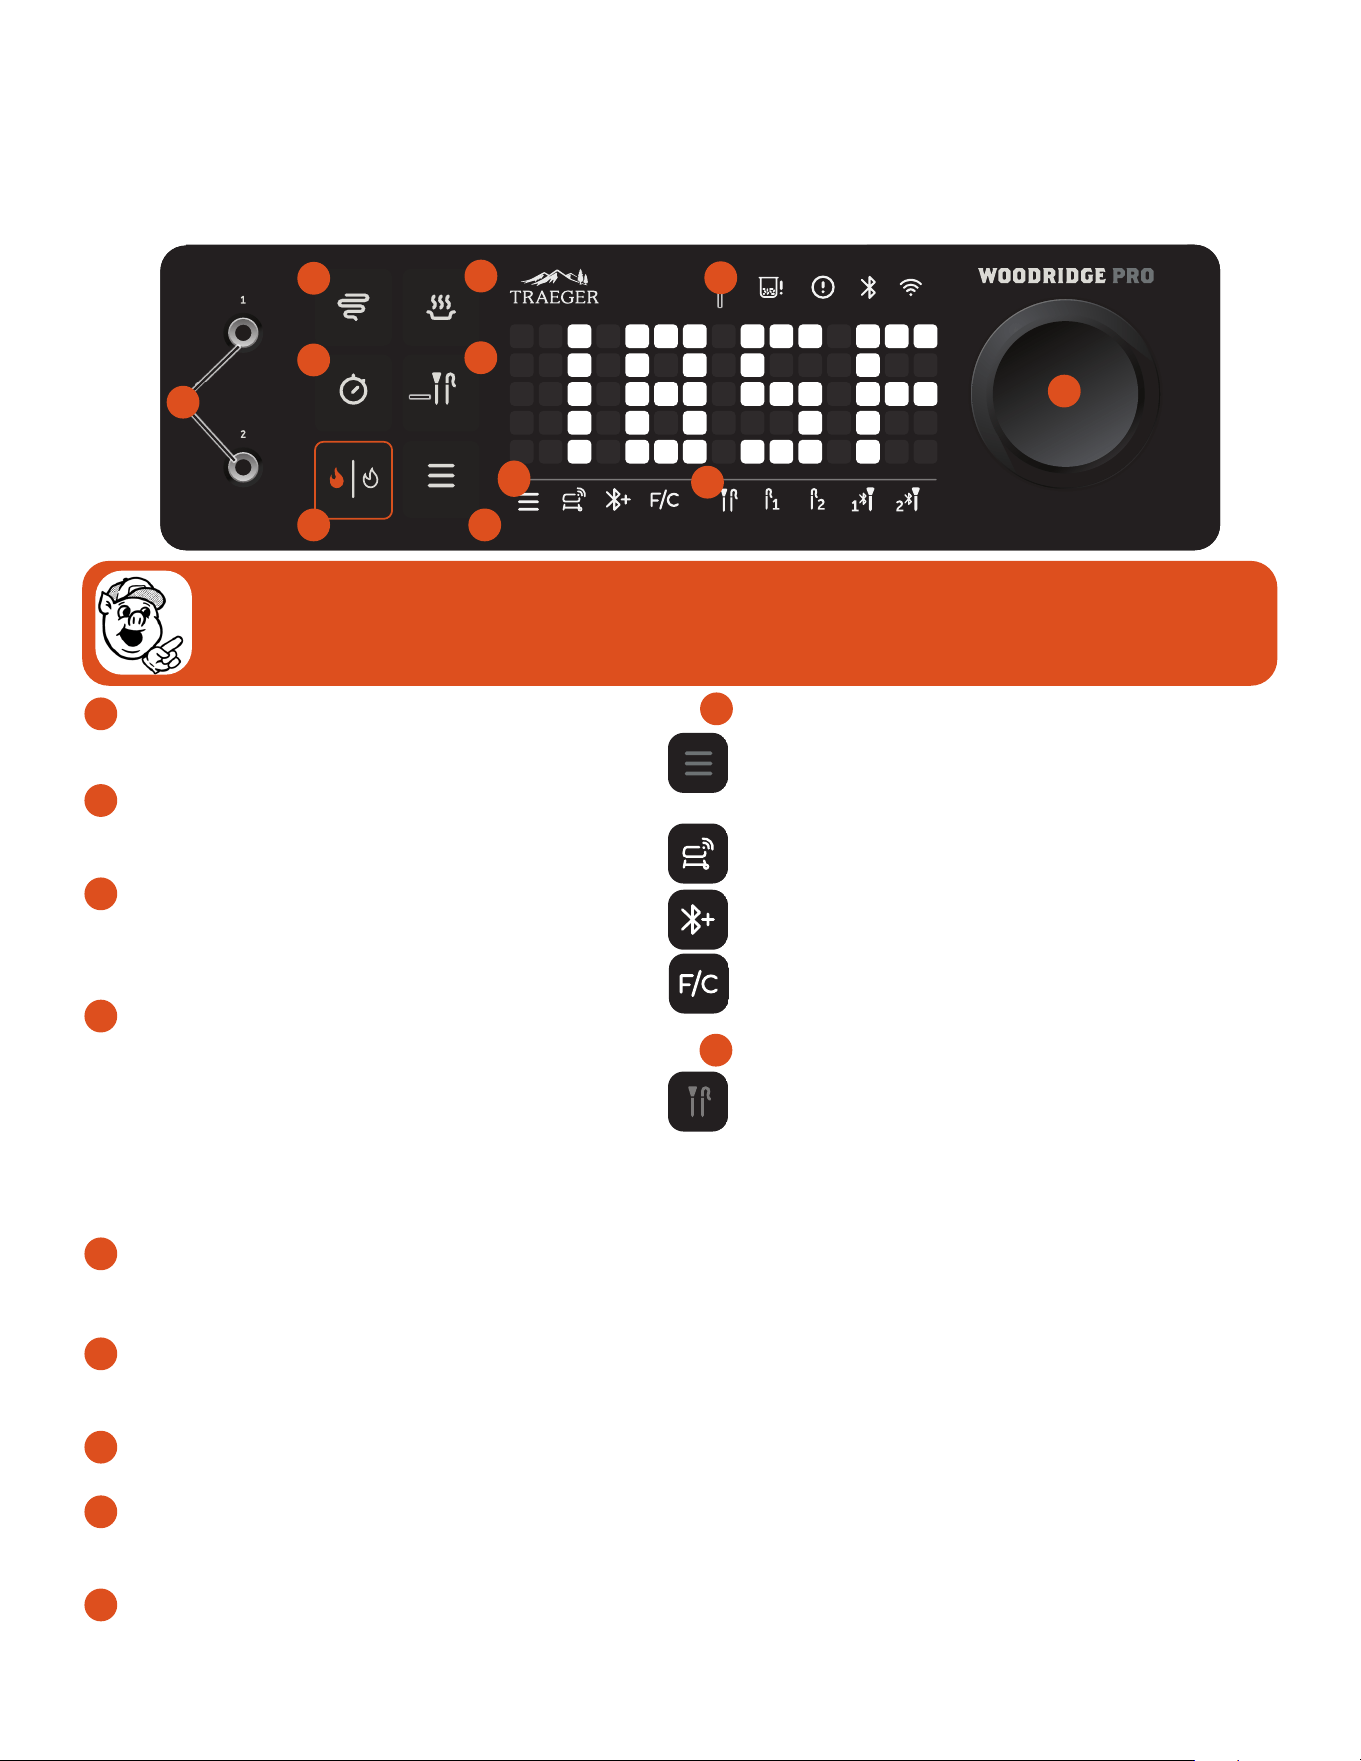
YOUR WiFIRE® DIGITAL CONTROLLER Your Traeger® Woodridge™ Grill is equipped with a state-of-the-art Traeger Controller with WiFIRE® technology
that is Wi-Fi-capable and Bluetooth®-enabled. Before you begin using the grill, familiarize yourself with the dierent features of the controller. Once the main
power switch (located on the back side of the auger box) is ON (I), tap the ignite/shutdown button or turn the selection dial to wake the controller from sleep.
1
IGNITE/SHUTDOWN
Use this button to ignite your grill. If your grill is already running,
press and hold this button to initiate a shutdown cycle.
2
MENU
You can connect your grill to WiFIRE®, connect your Traeger® wireless
meat thermometer, and change temperature units from this menu.
3
TIMER
The timer is for your convenience only; it does not aect grill
operation. For example, if you need to braise your meat for 15 minutes,
set the timer for 15 minutes. A tone will sound when the time is up.
4
PROBES
After connecting any wired probes via probe jacks or any
Traeger® wireless meat thermometers via the menu button, tap
this button to interact with the connected probes. After tapping
this probe button, use the selection dial to toggle between
connected probes. When your desired probe lights up in the
probe menu bar, press the dial to set/modify a probe goal alert
for when a probe has reached the desired internal temperature.
5
SUPER SMOKE™
Use this button to add more smoke flavor to your food.
NOTE: Only available when your grill is set to 225°F or lower.
6
KEEP WARM
Use this button to pause the cook cycle at any time during
grilling and maintain the grill at a low temperature.
7
WIRED PROBE JACKS
Use these jacks to plug in wired temperature probes.
8
STATUS DISPLAY
This dot matrix display shows current grill temperature, status
of cook cycle, and all things related to grill control and function.
9
SELECTION DIAL
Rotate this dial to move up and down through the displayed
menu. Press the center of the dial to make a selection.
MENU BAR
The menu bar icons light up when you tap the menu button to
indicate which setting you are editing. Turn the selection dial to
cycle through these selections.
Grill Connectivity Icon: Lights up when you are adjusting the
WiFIRE® setting on your grill.
Add Bluetooth® Accessory Icon: Lights up when you are pairing
Bluetooth® accessories.
F/C Icon: Lights up when you are adjusting your grill’s
temperature to Fahrenheit or Celsius.
GETTING TO KNOW YOUR GRILL CONTINUED
10
PROBE MENU BAR
The probe menu bar icons will light up as wired or Traeger® wireless
meat thermometers are connected, disconnected, selected, and
activated for goal alerts. You can connect two wired probes and
two Traeger® wireless meat thermometers. Tap the probe button
(middle right button to the left of the status display) to highlight
connected probes in this probe menu one at a time. Use the
selection dial to toggle between probes and press the dial to set/
modify a probe goal alert for an individual probe. See the key below
for probe states:
O: Indicates that this wired probe or Traeger® wireless meat
thermometer is not connected.
Dim: Indicates that this wired probe or Traeger® wireless meat
thermometer is connected but not actively selected.
On: Icons will light up to full brightness when you tap the probe
button. After tapping the button, turn the selection dial to see the
selected probe icon turn to full brightness.
Blue: A probe icon will turn blue when a probe goal alarm has
been set.
Blue + flashing: A probe icon will flash blue when a probe goal has
been reached.
11
9
1
4
8
7
10
2
3
11
6
5
PRO TIP: On a good weather day, it is completely normal for a Traeger® Grill to experience temperature fluctuations of +/- 25°F. These
fluctuations are actually a key component in creating the smoke flavor we at Traeger love. Your Traeger® Grill is designed to manage these
fluctuations on its own. No need to change the set temperature! Any significant fluctuation could be the result of wind, air temperature,
improper use, lack of grill maintenance, or opening the lid too often.
13
TRAEGER.COM
QUICK REFERENCE GUIDE
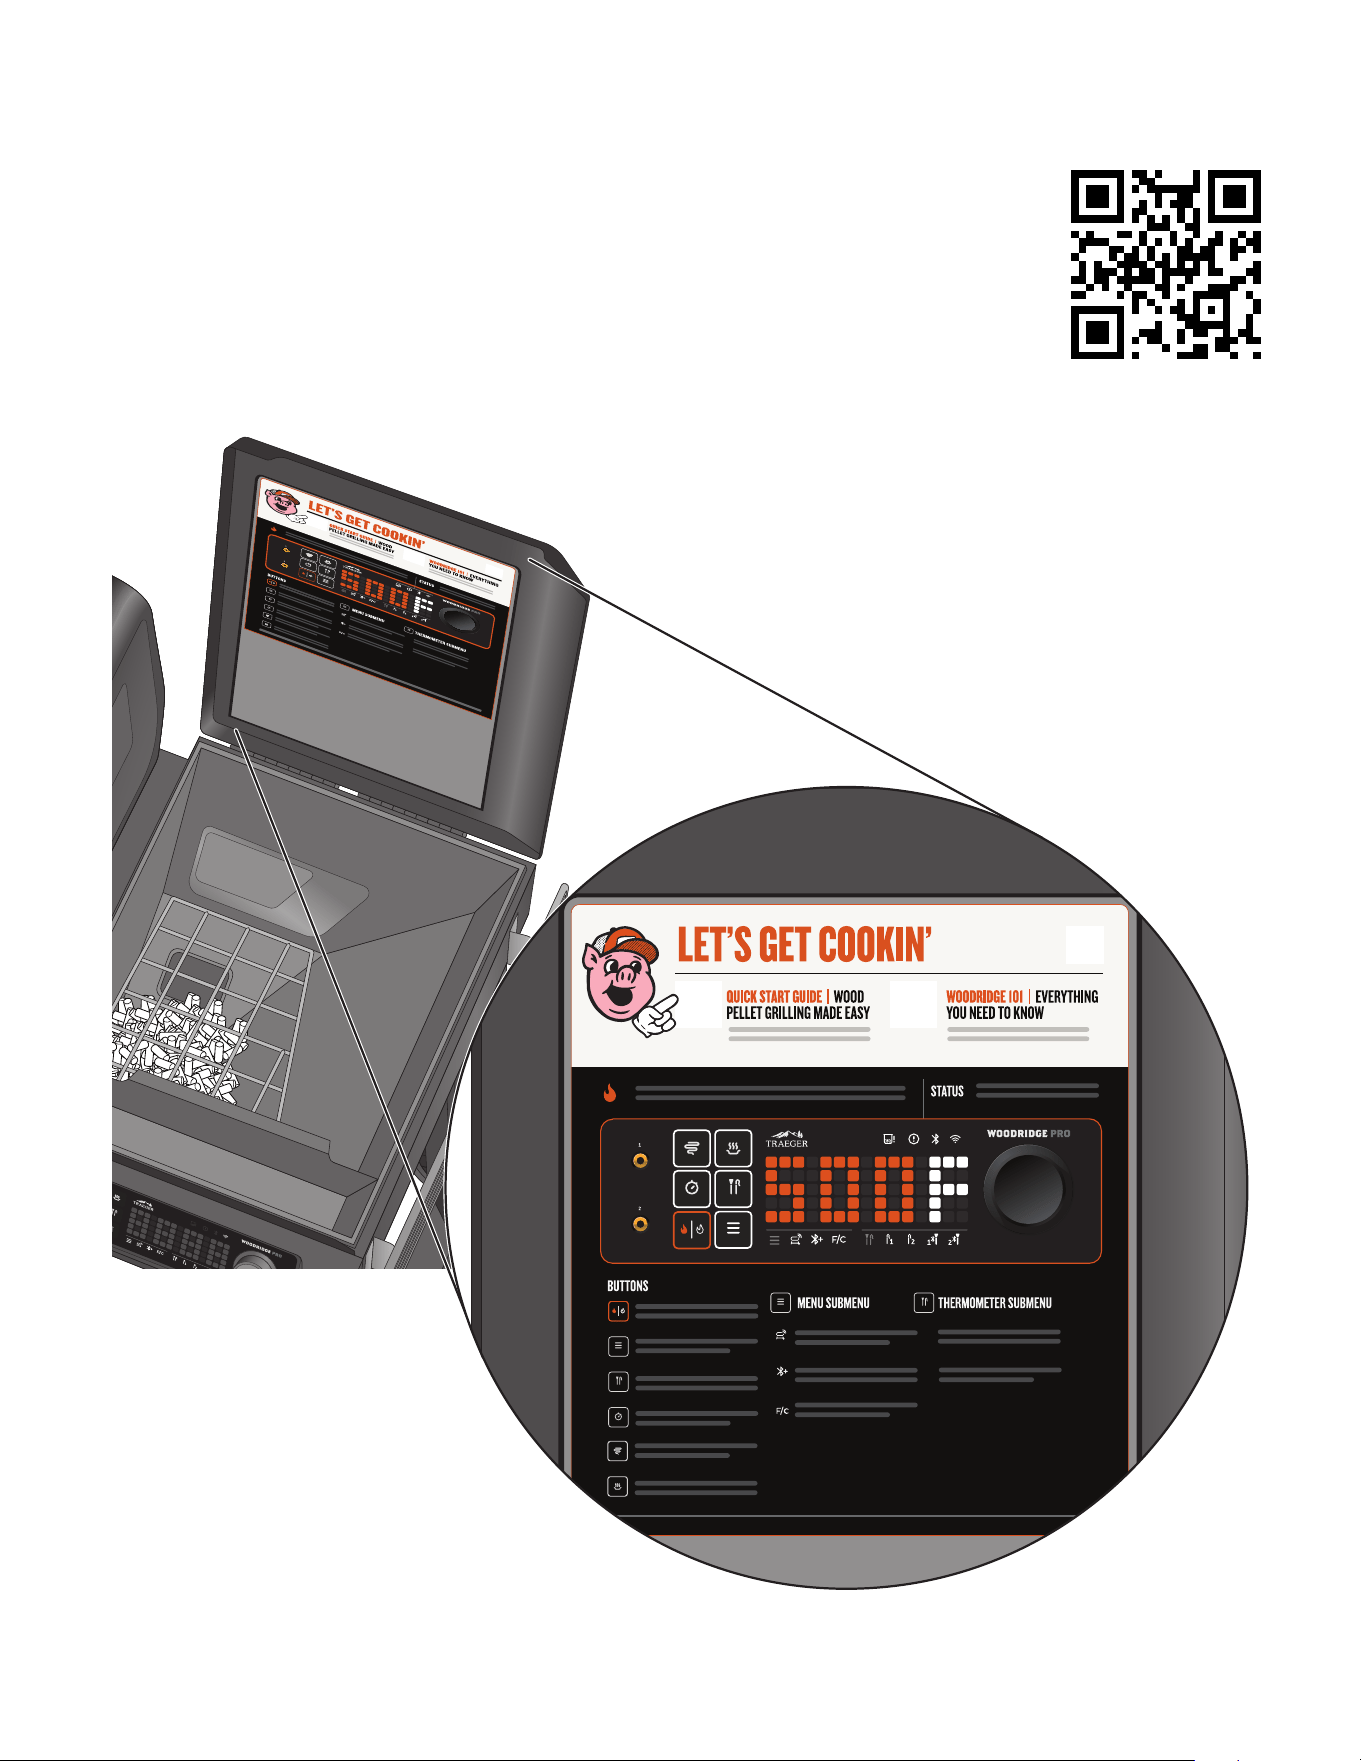
Be sure to check out the underside of the hopper lid for a quick reference to helpful information such as how to use your
controller, how to clean your grill, and how to troubleshoot any error codes that may pop up. Scan the QR code here (or
under your hopper lid) to view a Controller 101 video for a guided demonstration of your controller.
14
1
Connect your WiFIRE® Grill to your home network via the Traeger App.
2
Season your grill.
FIRST THINGS FIRST
ONBOARDING PART 1: CONNECTING YOUR GRILL
Our dedication to delivering world-class products and experiences means we are constantly working to improve grill performance and features.
We highly recommend connecting your Traeger® Woodridge™ Grill to WiFIRE® by following the instructions below. When your grill is connected
and on, updates will automatically download, ensuring your grill is always operating at peak performance.
IMPORTANT:
• Make sure your smart device is running on the latest operating system and that Bluetooth® is turned ON.
• If using an Android device, turn on location services.
• To connect your grill to your home Wi-Fi, your grill must be powered on. Make sure the main power switch is pressed to ON (I) and lit up.
• Your home Wi-Fi router signal must be 2.4 GHz (a dual band router should also work). The 2.4 GHz band is currently industry standard for
connected appliances. It has better range and penetrates walls/ceilings/obstacles better than 5 GHz, which your grill cannot recognize.
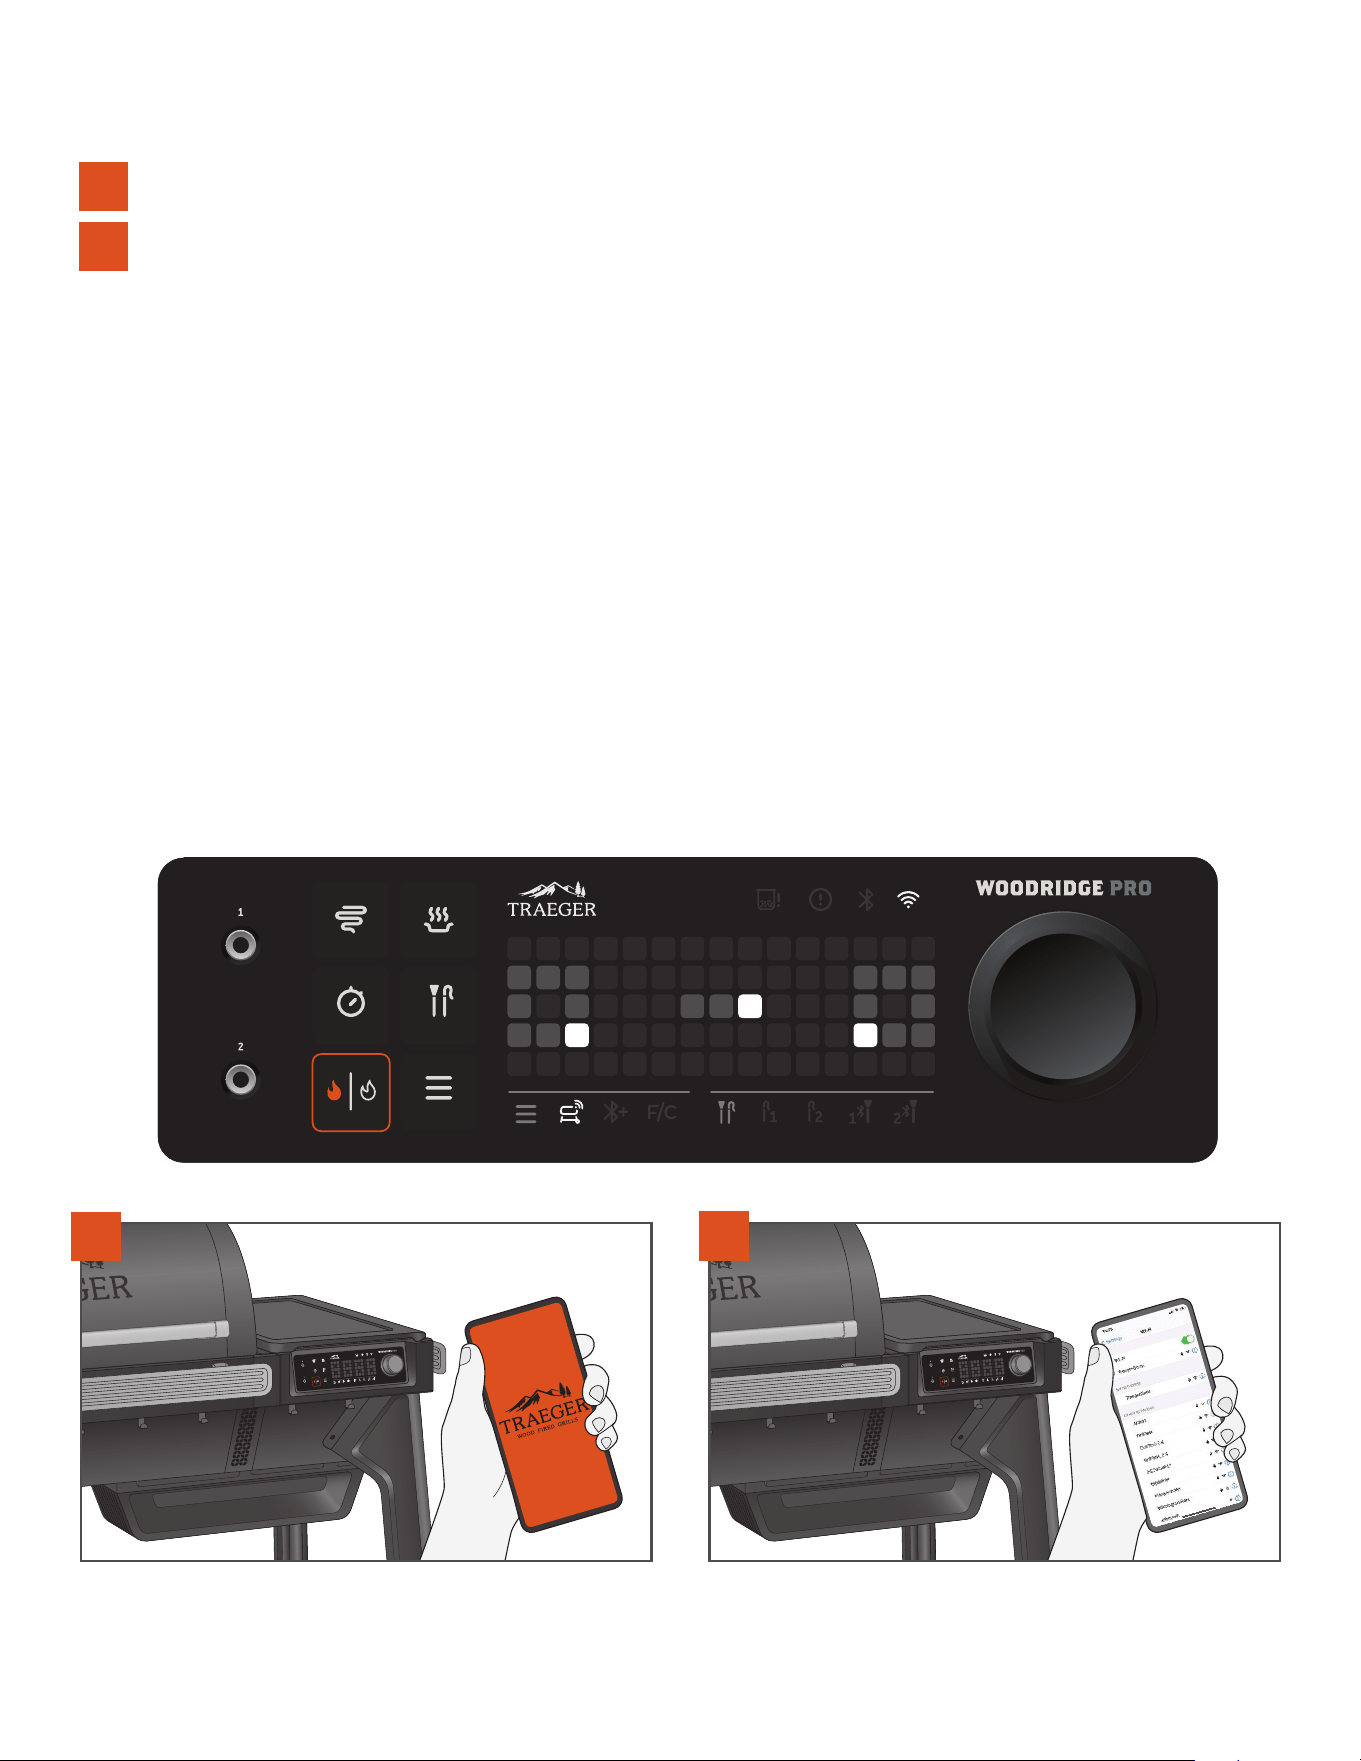
1
Go to the Apple App Store or Android Google Play Store to download
the latest version of the Traeger App.
2
Ensure your smart device is connected to the Wi-Fi network to which
you want your grill connected. The router signal must be 2.4 GHz, as
the grill is not compatible with 5 GHz.
15
TRAEGER.COM
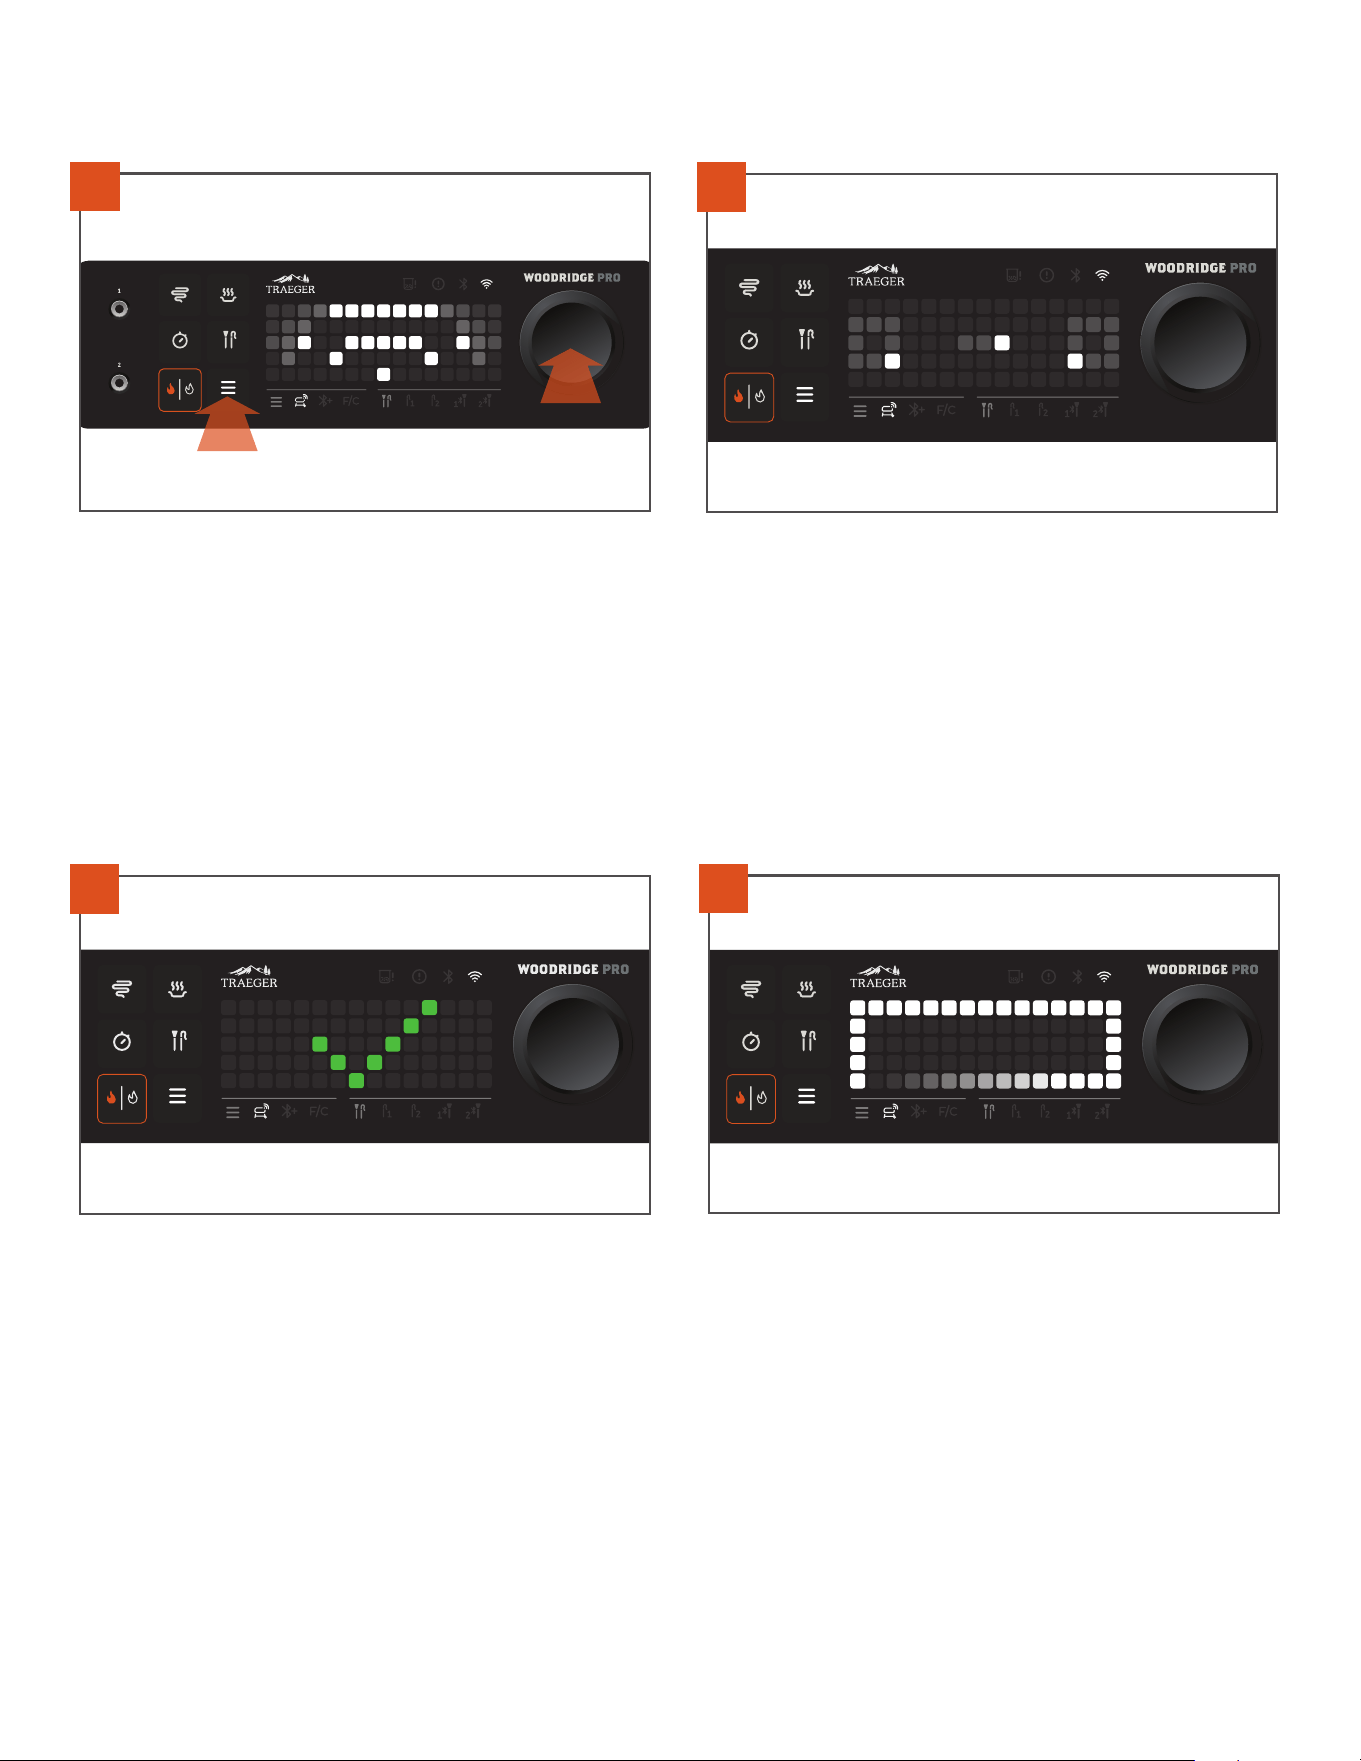
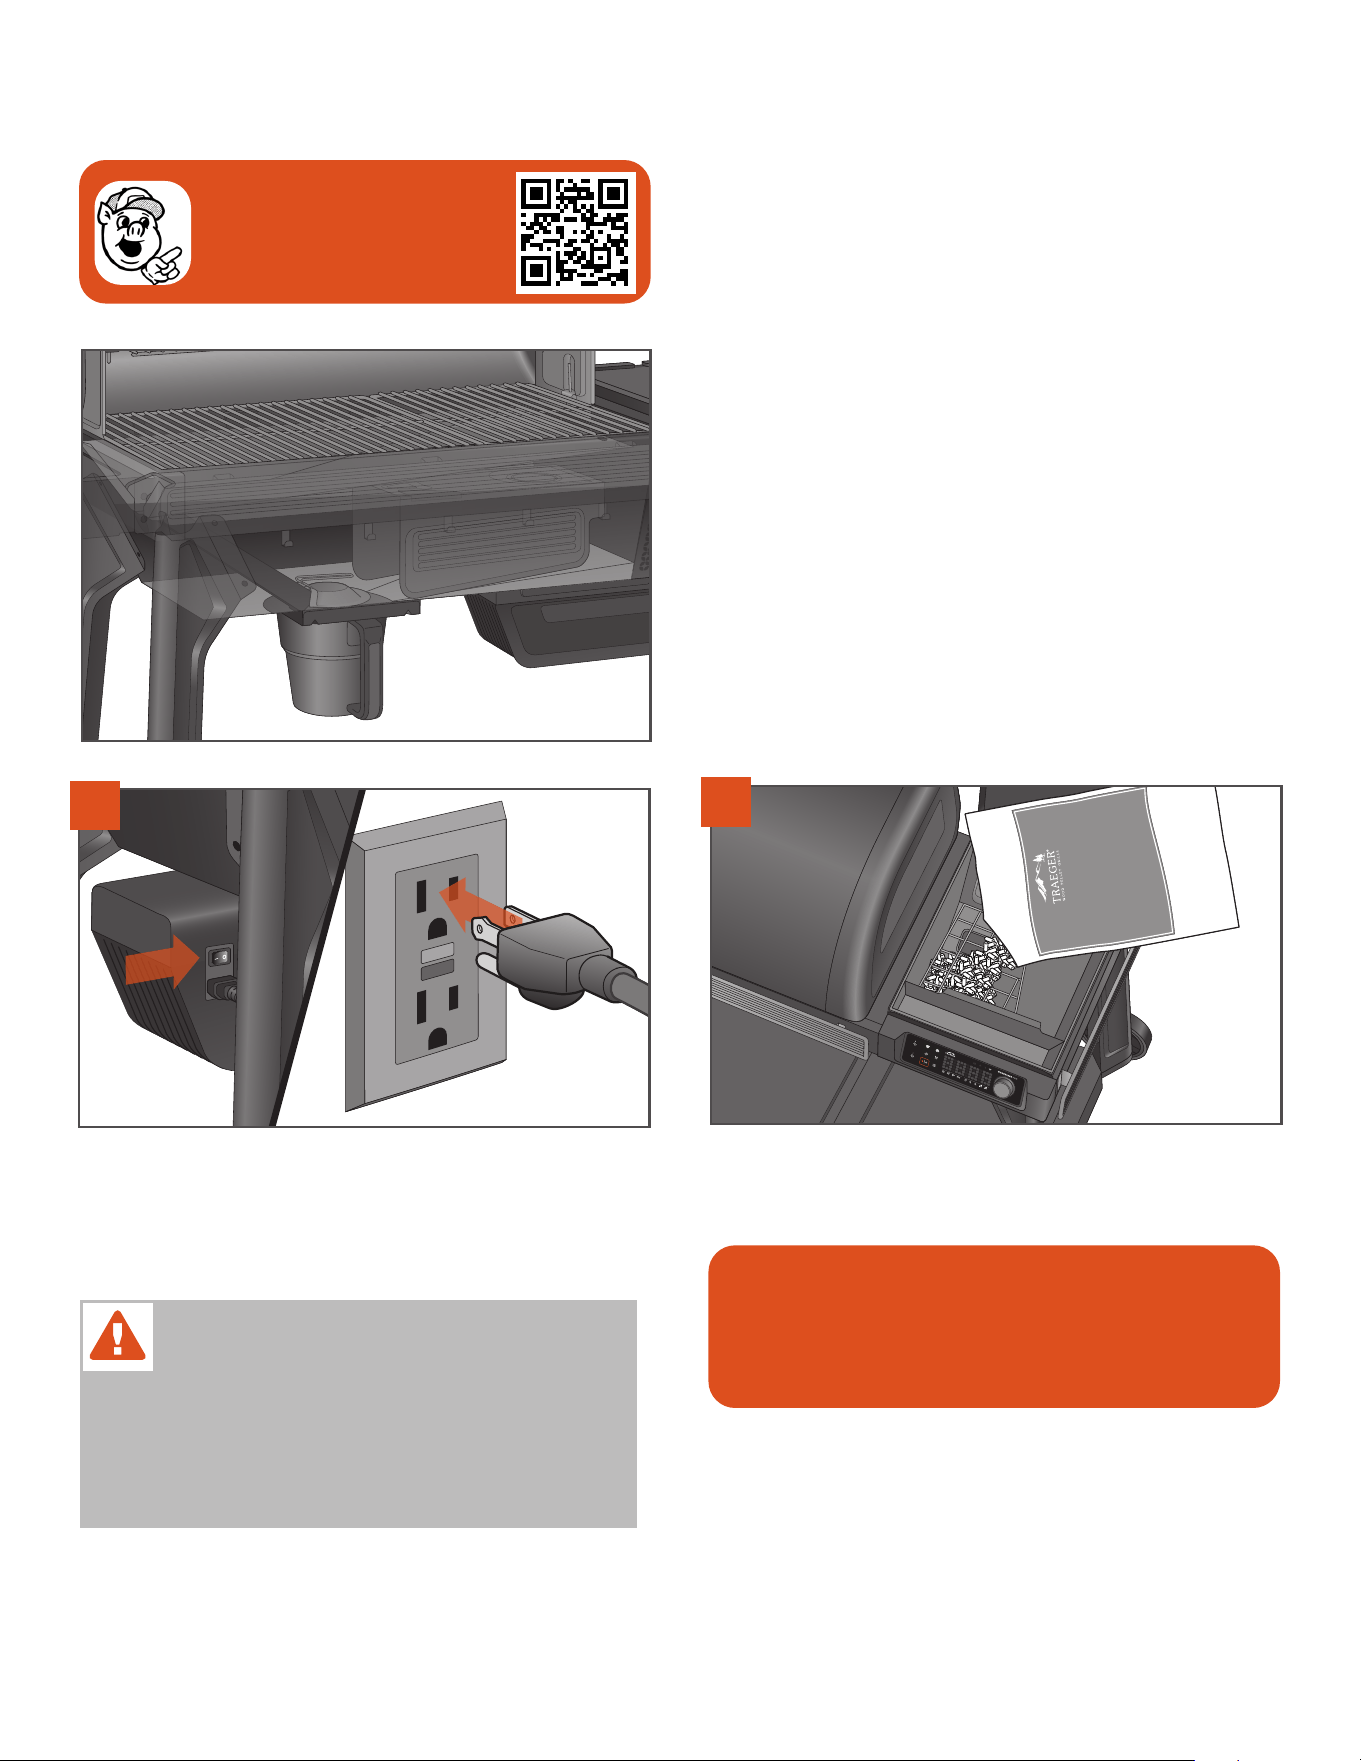
A green checkmark will display on your controller to indicate that
you have successfully connected to WiFIRE®. The Wi-Fi icon in the
top right above the dot matrix display will stay lit up when the grill is
connected.
After selecting WiFIRE®, the pairing animation above will display on
screen, indicating that your grill is broadcasting its Bluetooth® signal
and is ready to pair. Open your smart device to the Traeger App and
sign in to your account. On the home screen of the Traeger App, tap
the grill icon in the lower center of the screen to start connecting.
Follow the instructions on the Traeger App to (1) pair your phone to
your grill (via temporary Bluetooth® connection), (2) connect your
grill to your desired 2.4 GHz home Wi-Fi network, and (3) complete
the grill setup process.
After powering on your grill, tap the menu button. You will see
the Wi-Fi grill icon light up in the menu bar below the dot matrix,
and an animation of a Wi-Fi signal with a question mark will be
displayed. Press the selection dial to select this option and begin
the connection process.
NOTE: You can navigate menu options by turning the selection
dial after tapping the menu button. As you turn the dial, the menu
bar icons below the dot matrix display will light up to indicate your
selection.
3
4
5
Once connected to WiFIRE®, you might see this animation on your
screen. Don’t turn o your grill until you see a green checkmark.
This means that your grill is downloading and applying an update.
Just like your smartphone, these updates keep your grill running
smoothly, securely, and at peak performance. Once the update is
done, you'll see a green checkmark and the grill will return to the
idle mode – let’s cook!
6
16
ONBOARDING PART 2: SEASONING YOUR GRILL
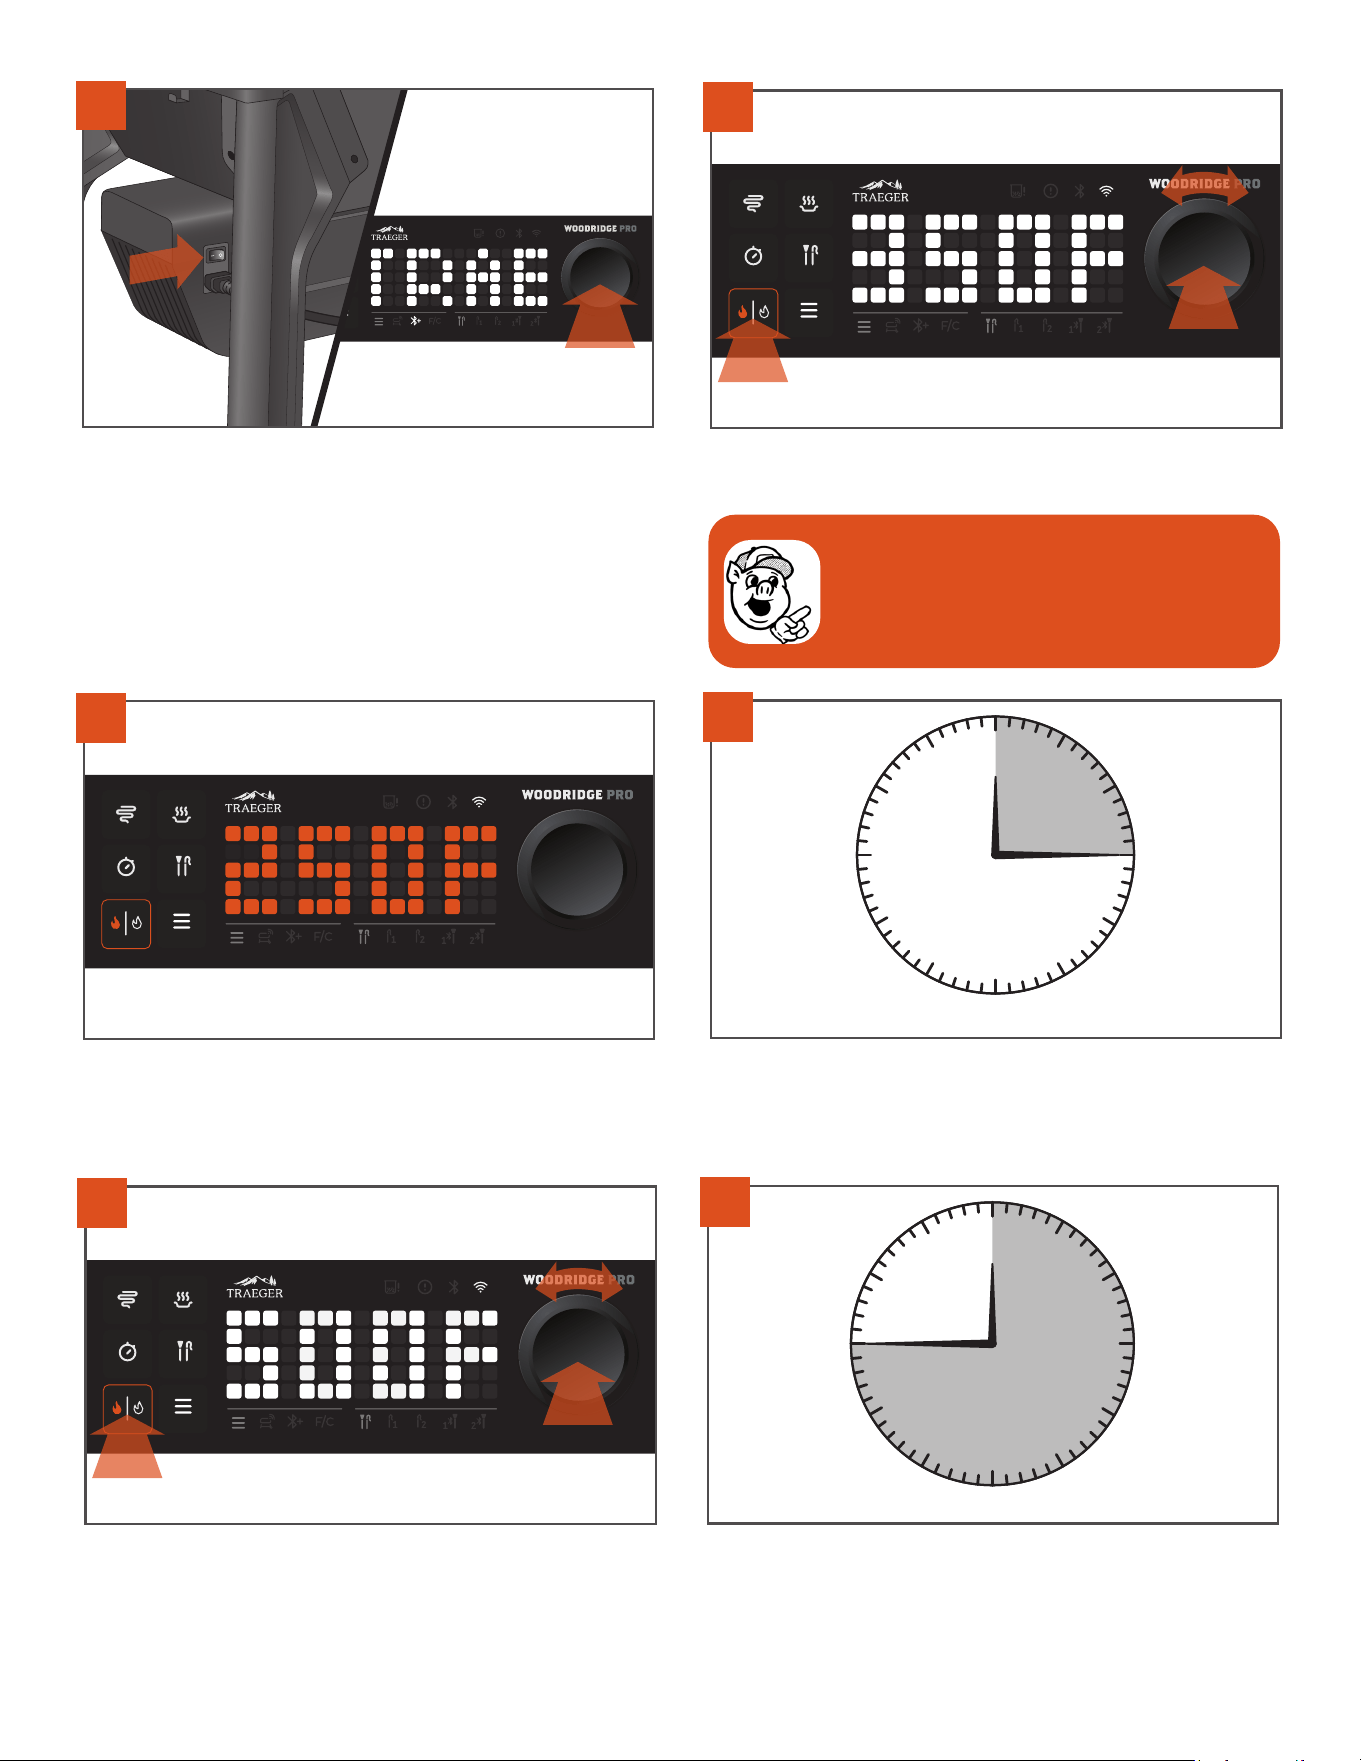
With the main power switch set to OFF (0), connect the power cord to
your grill. Then plug the power cord into a properly grounded/earthed
electrical outlet protected by a Ground Fault Circuit Interrupter (GFCI).
NOTE: Plug appearance may vary by region.
2
To add pellets, open the hopper lid and inspect for any foreign objects
in the auger. Fill the hopper with pellets at least to the safety grate
and close the lid.
IMPORTANT:
• Make sure all components are properly installed in the grill
and that all packaging/shipping materials are removed prior to
seasoning.
• Do not wipe protective grease coating o of components
before seasoning. This coating provides a more durable burn-in
protective layer.
Before you can cook on your grill, the grill must be seasoned. This is a
hands-o process in which the empty grill gets heated to a very high
temperature. This seasoning cycle ensures the grill is cleaned of any
factory residue, primed, and ready for optimal performance.
PRO TIP: Seasoning must be
completed before cooking food on
your grill. For more information, scan
here to access the Seasoning Guide.
1
WARNING! ELECTRICAL SHOCK HAZARD
HAZARDOUS VOLTAGE IS PRESENT, WHICH CAN
SHOCK, BURN, OR CAUSE DEATH.
• GROUND FAULT CIRCUIT INTERRUPTER (GFCI)
PROTECTION MUST BE PROVIDED ON THE CIRCUIT(S)
OR OUTLET(S) TO BE USED FOR THE OPERATION OF THIS
TRAEGER®
GRILL.
USE ONLY TRAEGER HARDWOOD PELLETS. This product is developed
and tuned using only Traeger pellets. Traeger pellets are crafted to
meet strict quality and performance standards. Using pellets not
manufactured by Traeger may result in inconsistent performance,
poor flavor, and temperature inconsistency.
17
TRAEGER.COM
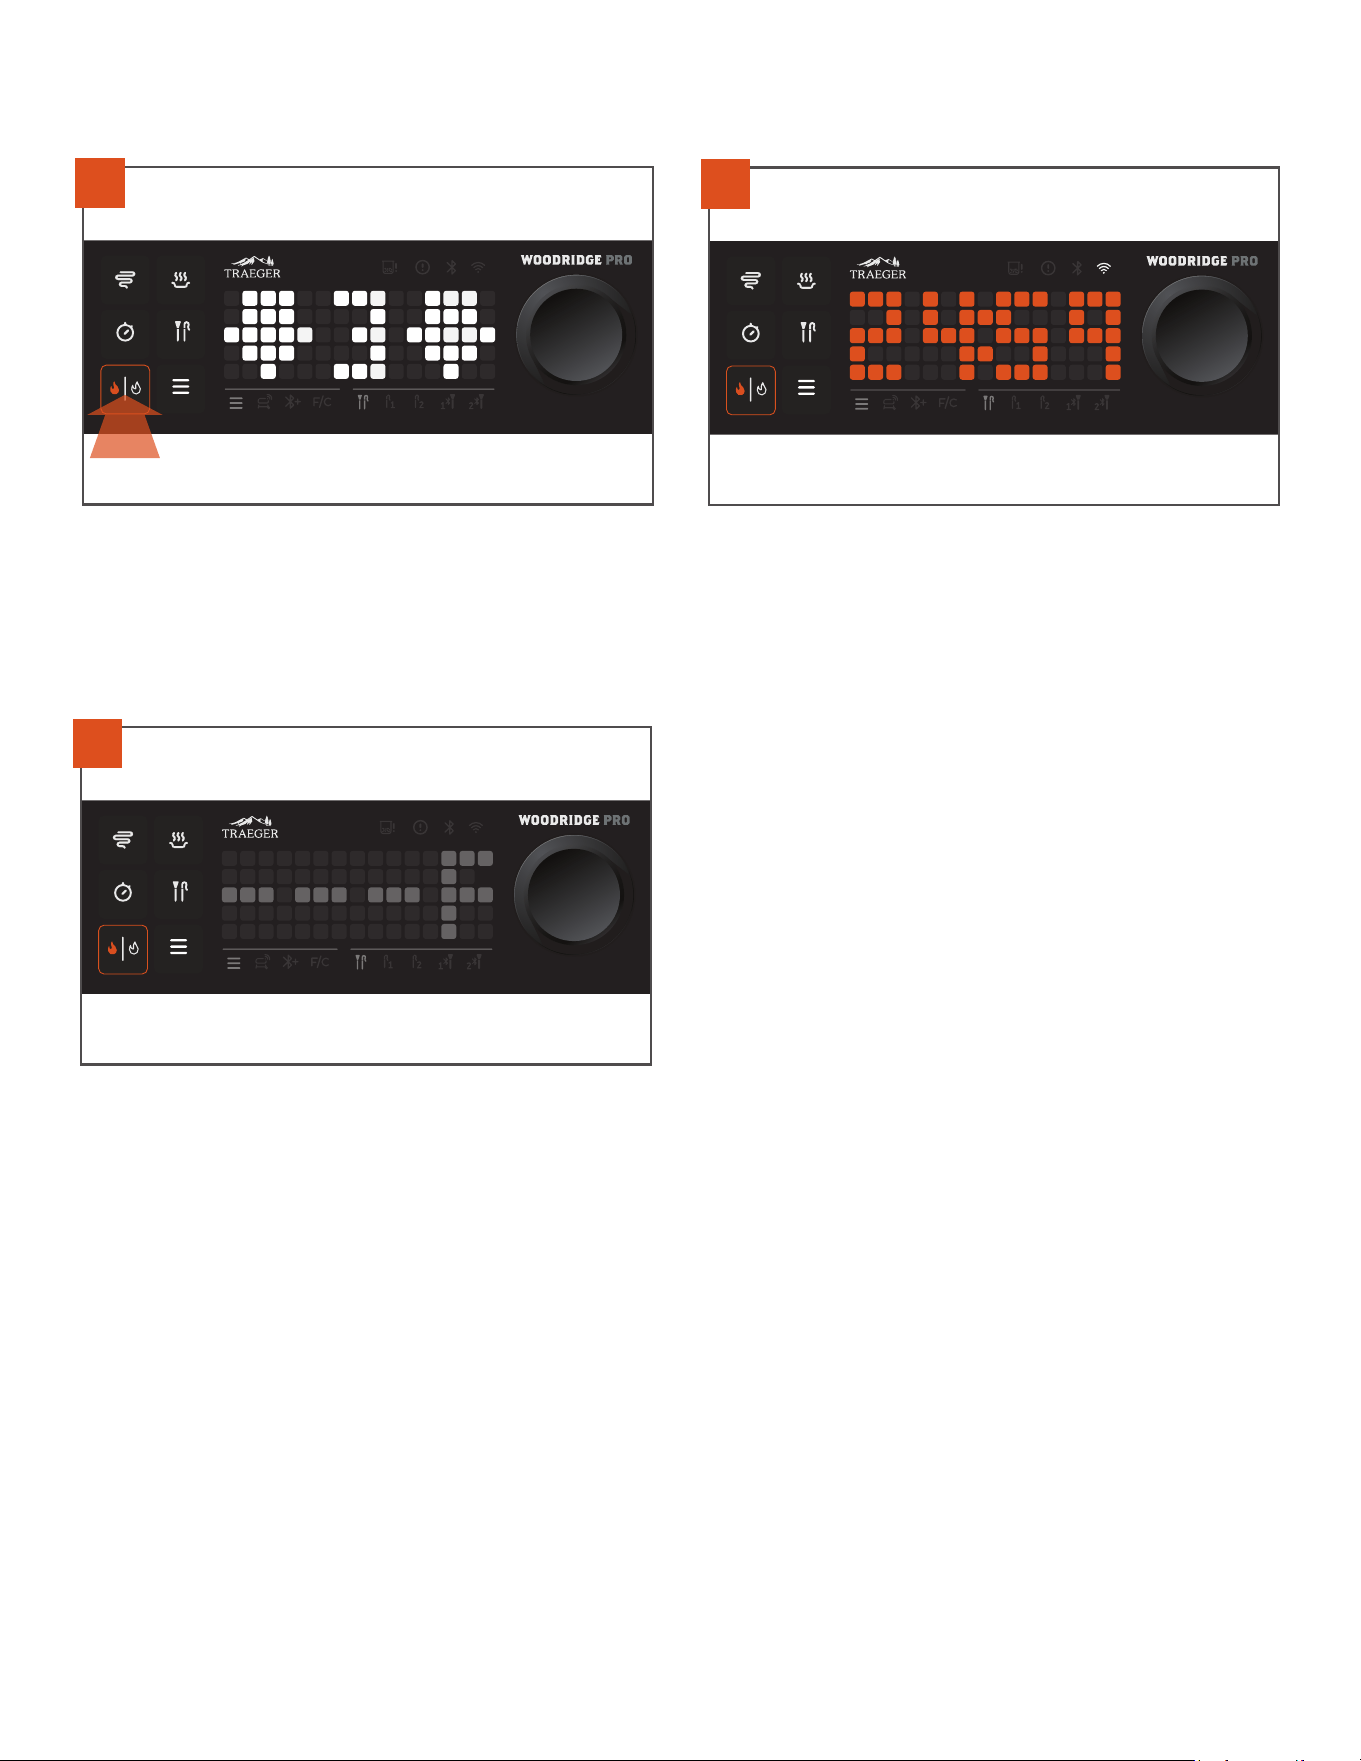
Press the main power switch, located on the back of the auger box, to
ON (I). Press the selection dial to wake up the controller. “TRAEGER”
will scroll across the screen, indicating the grill is on.
Turn the selection dial to set the grill’s temperature to 350°F, then
press the dial. Press the ignite/shutdown button.
4
12
1
2
3
4
5
6
7
8
9
10
11
15 min
6
Once the grill has reached 350°F, let it run for 15 minutes. While the
grill is seasoning, you may see dark or excessive smoke and ash; this
is normal and will be less on future startups.
7
After 15 minutes at 350°F, increase the temperature to 500°F.
3
The grill temperature will display as it increases to the set
temperature.
5
1
2
3
12
1
2
3
4
5
6
7
8
9
10
11
45 min
8
Once the grill has reached 500°F, let it run for another 45 minutes to
ensure seasoning is completed properly.
NOTE: Getting to first-time seasoning temperature may take up to
an hour.
PRO TIP: This seasoning process is important to ensure
proper grill performance. Make sure that all internal
components have been properly installed prior to this
seasoning cycle and that there is no food on the grill
grates during this cycle.
18
10
11
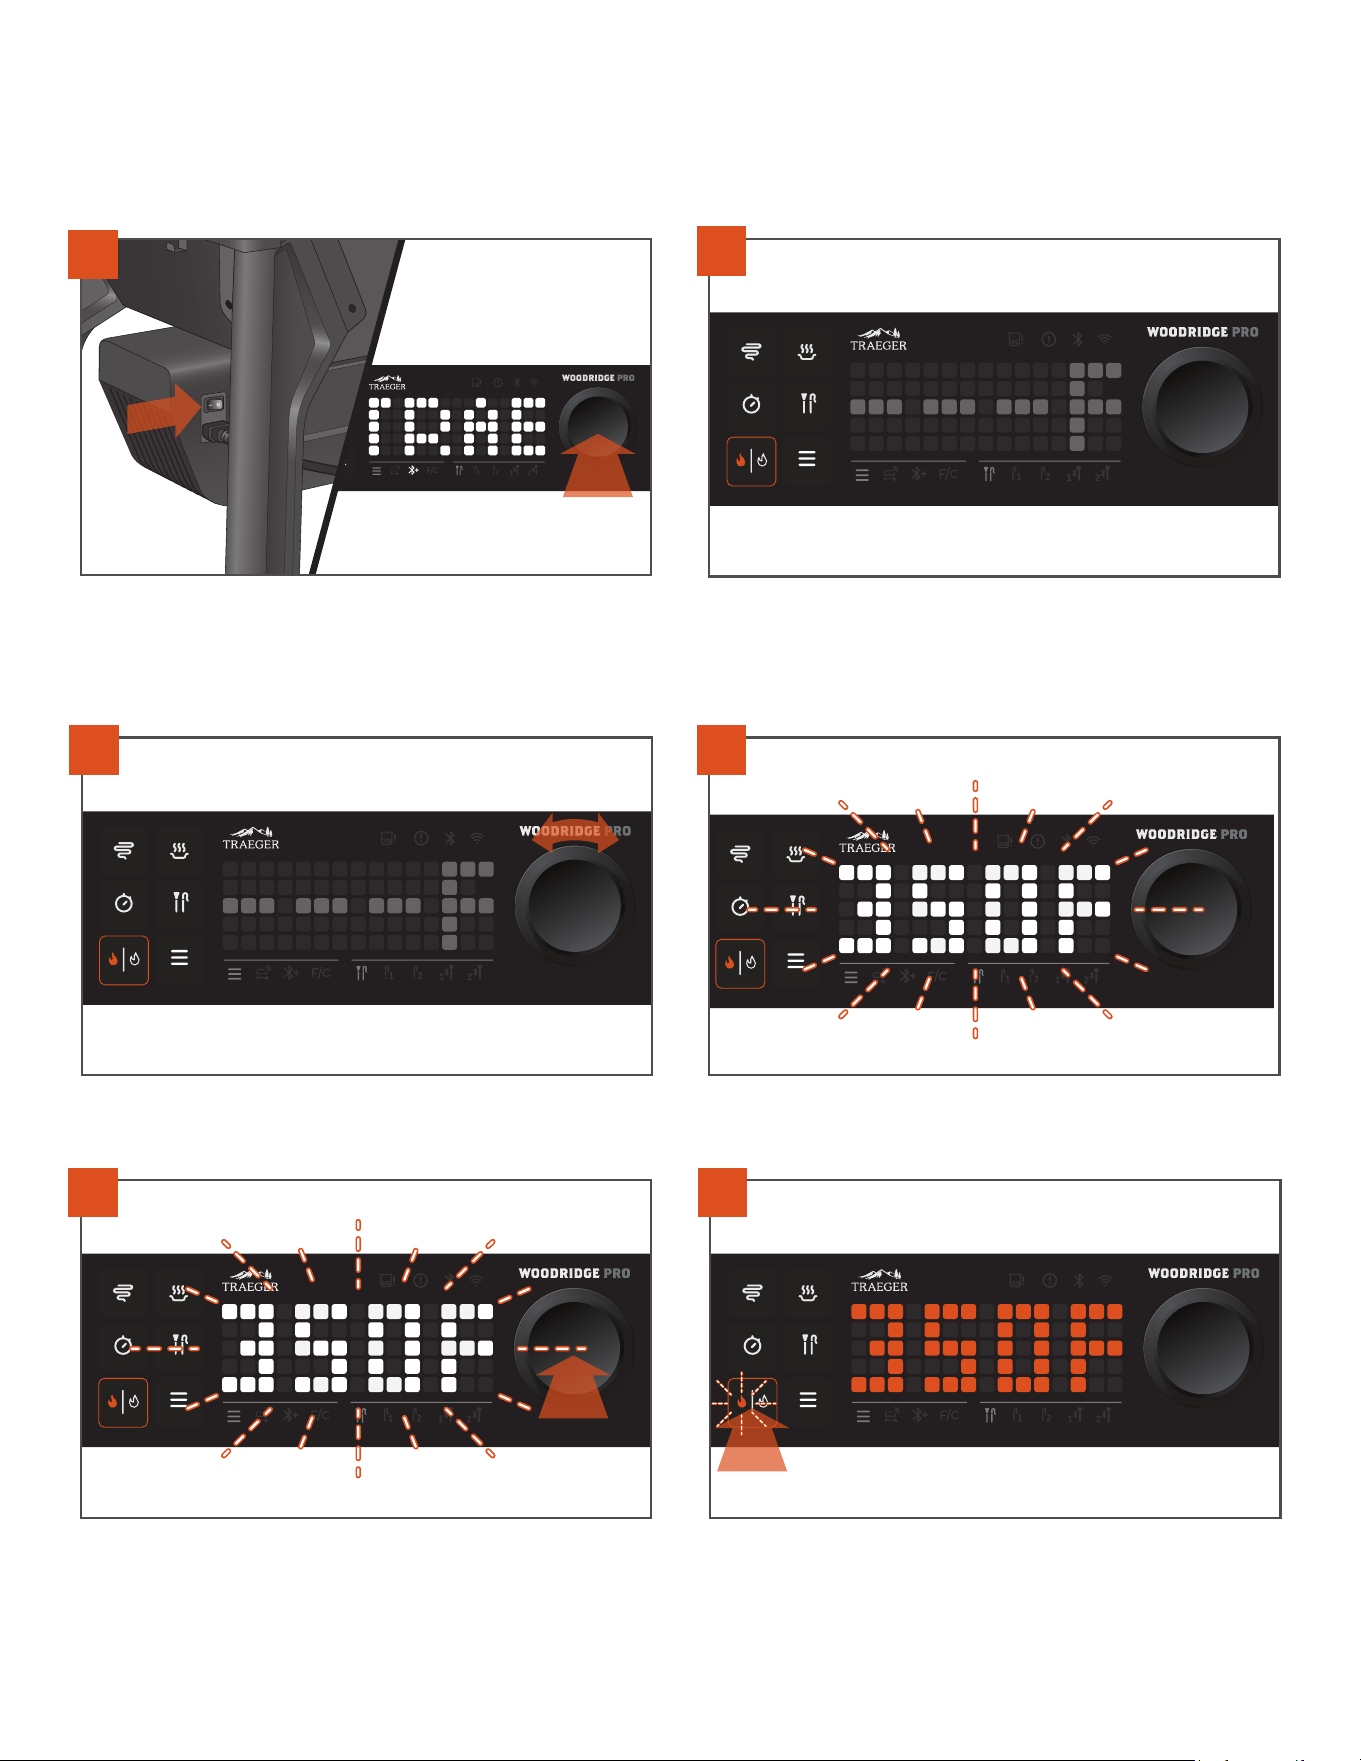
A countdown timer begins while the grill is shutting down. You will
hear the fan continue to run.
Once this countdown is complete, the shutdown cycle is complete.
NOTE: It is normal to observe ash on the drip tray and/or grill grates
after seasoning. Simply wipe away ash on grill grates prior to your
first cook.
ONBOARDING PART 2: SEASONING YOUR GRILL CONTINUED
9
After 45 minutes at 500°F, shut down the grill and let the shutdown
cycle complete. To shut down your grill, press and hold the ignite/
shutdown button or the selection dial for three seconds until the
display shows the shutdown animation.
NOTE: Always initiate a shutdown cycle after each and every cook.

19
TRAEGER.COM
EVERYDAY TRAEGERING
PRE-GRILLING CHECKLIST (YOU WILL NEED TO BEGIN WITH THESE STEPS EVERY TIME YOU USE YOUR GRILL)
1. Is your grill on a level surface?
Having a properly leveled grill ensures that all grease flows into the EZ-Clean™ Grease + Ash Keg, keeping your grill clean and safe.
2. Is your grill clean?
Check to make sure that your grill is clean. Open the lid, brush any residual grease or debris down into the EZ-Clean™ Grease + Ash Keg and
empty for best performance. Regularly inspect your grill for accumulated grease. Grease fires are caused by not properly maintaining the
grill and failing to clean the Traeger® Grease Management System (TGMS) on a consistent basis.
3. Is everything in its place?
Be sure to open the lid and ensure auger box is properly installed and screws are tight, your drip tray is properly installed, and your
EZ-Clean™ Grease + Ash Keg and Ember Shield are in place.
4. What’s on the menu and are your racks in the right place?
Dierent grill rack levels will produce slightly dierent results. To optimize by style of cooking, we recommend:
a. Lower grill grate for high heat cooking (searing, roasting, grilling, etc)
b. Upper grill grate for low and slow cooking (smoking, baking, braising)
c. IMPORTANT: If you’re cooking to high heat, what was the last thing you cooked? If it was a greasy dish (bacon, brisket, buttered-up
corn, etc), make sure to give the grill a good wipe down to clean up any grease. Not maintaining or cleaning up grease and then cooking
at a high temperature is the cause of grease fires.
5. Is your grill empty and the lid closed?
Ignite and preheat your grill with the lid closed and no food on the grates. Adding food before your grill reaches the set temperature can
result in the grill taking longer than usual to achieve your desired temperature.
6. Do you have enough Traeger Hardwood Pellets?
USE ONLY TRAEGER HARDWOOD PELLETS. This product is developed and tuned using only Traeger pellets. Traeger pellets are crafted to
meet strict quality and performance standards. Using pellets not manufactured by Traeger may result in inconsistent performance, poor
flavor, and temperature inconsistency.
7. Is your grill connected to the app and updated to the latest and greatest firmware?
Connecting to the Traeger App not only allows you to remotely monitor and control your grill, but also ensures that your grill is operating on
the latest firmware. Much like your smart device, when a new firmware package is released, your grill will automatically begin downloading
this new release. If the grill is connected and powered on, the update will occur immediately. If the grill is connected but powered o, the grill
will automatically update the next time you power on your grill. We recommend keeping your grill plugged in and powered on to keep update
interruptions to a minimum and to ensure your grill is always operating on the latest firmware. For instructions on checking your firmware
version, visit Support at traeger.com.
8. Cooking a protein?
Use a probe and cook to an internal temperature instead of relying on a suggested time. Trust us – it's the easiest, most foolproof way to get
delicious, consistent and repeatable results, every cook.
Become your neighborhood’s backyard grilling hero in no time! Get familiar with how to cook on your new Traeger® Woodridge™ Grill and learn
how to use your grill’s features to the max.
20
Follow these steps to set and adjust your grill’s temperature.
2
3
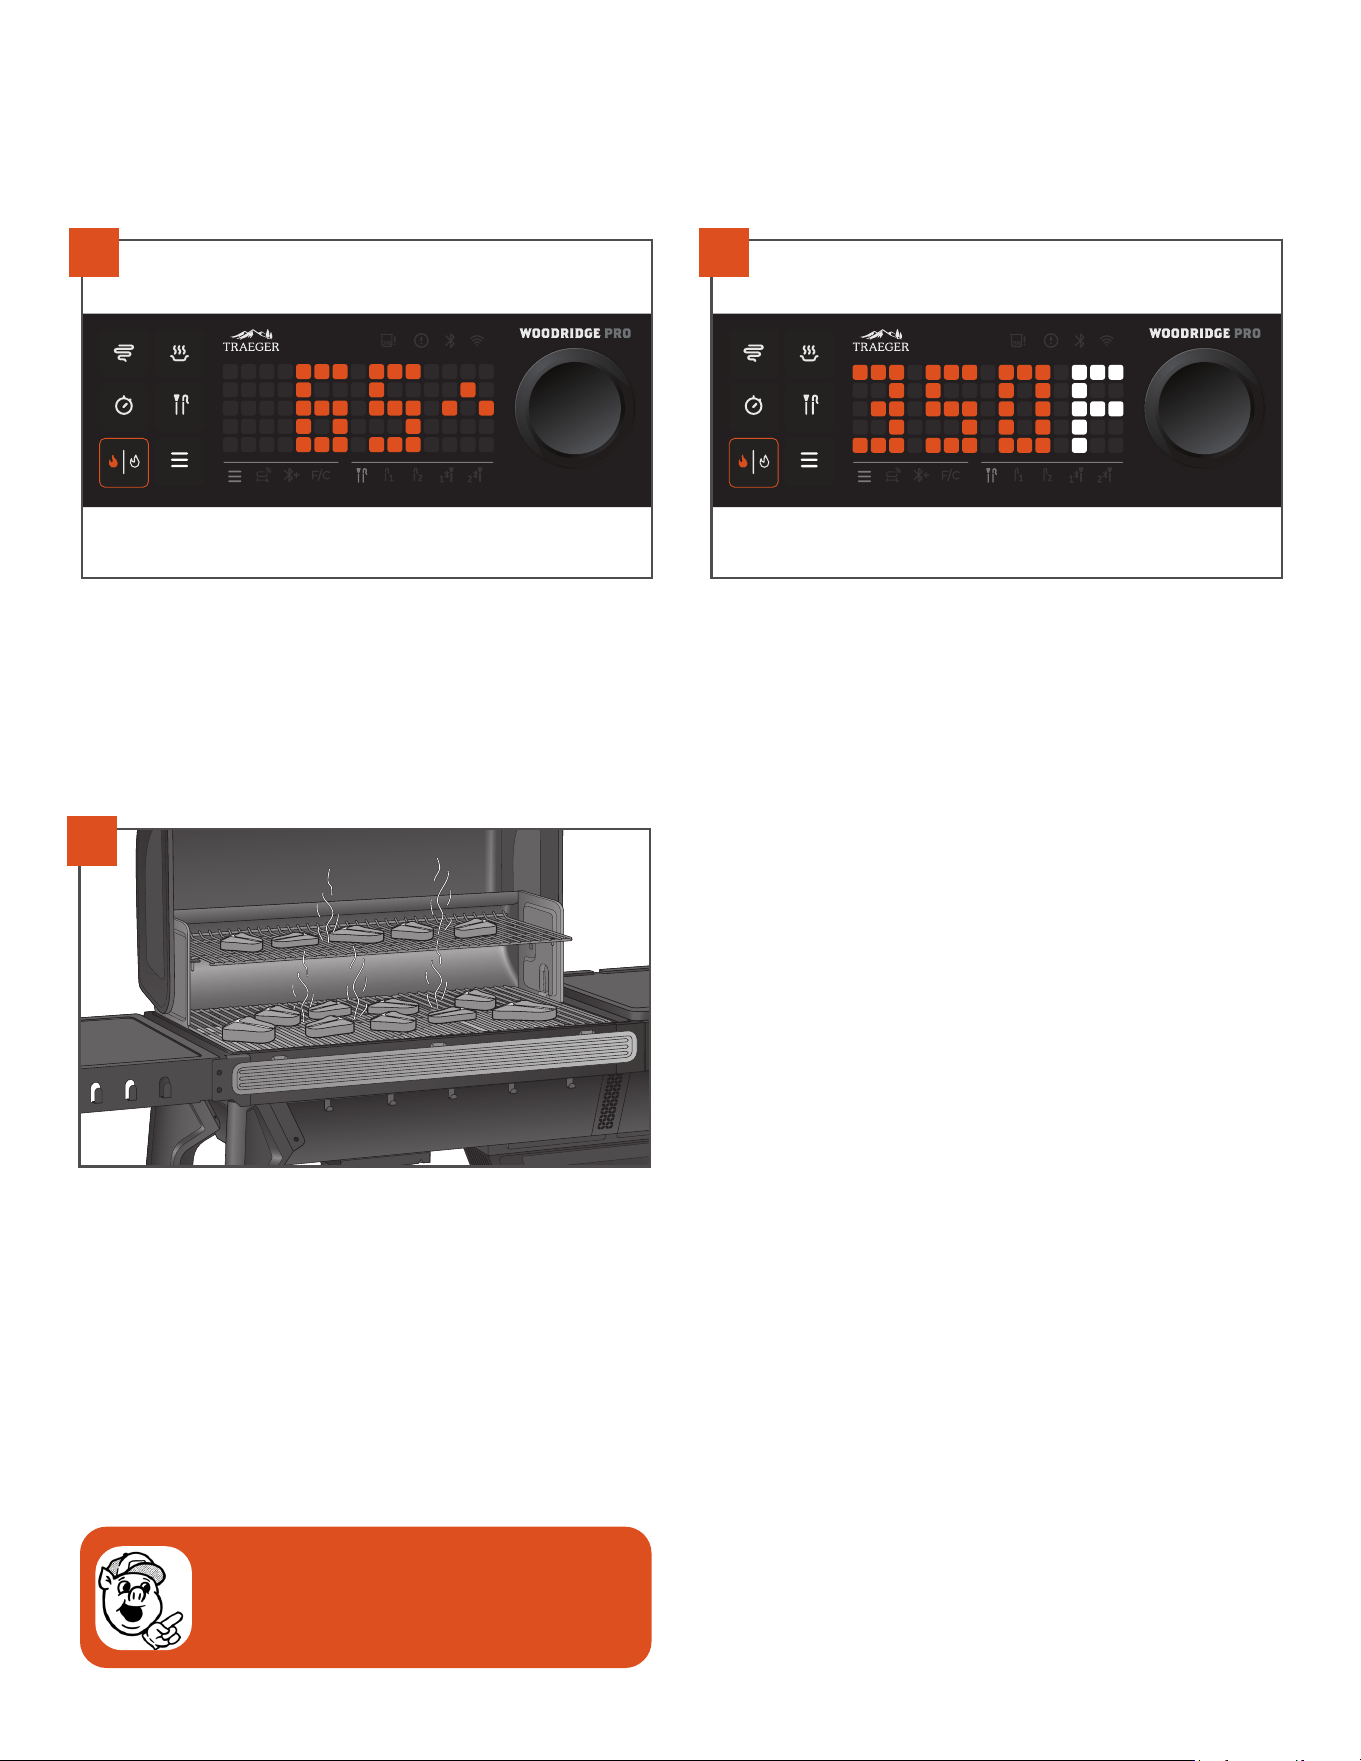
The dot matrix displays three dashes and F or C. This is the home
screen when your grill is idle. You can set a grill temperature directly
from this screen.
To select a temperature, rotate the selection dial to the right to
increase the temperature, or to the left to lower the temperature.
4
The selected temperature will blink on and o.
5
While the temperature is blinking, press the center of the selection
dial to select your desired temperature.
With the lid closed, press the main power switch located on the back
of the auger box to ON (I). Press the selection dial or tap the ignite/
shutdown button to wake the grill. A splash screen will appear
after a few seconds as the grill powers on.
6
Once your temperature is selected, the temperature will change from
white to orange, indicating that your set temperature is locked in.
The ignite/shutdown button will now blink. Tap this button to start
ignition. The grill will now ignite and preheat automatically to reach
the temperature you set.
HOW TO COOK ON YOUR TRAEGER®
1
EVERYDAY TRAEGERING CONTINUED
21
TRAEGER.COM
7
While the grill is preheating, the controller will display an animated
arrow next to the temperature, indicating preheating mode. The
current temperature will climb in 5-degree increments as the grill
heats up.
8
Once the grill has reached the set temperature, the controller will
no longer display the preheating arrow animation, and the current
temperature will continue to hover within +/- 25°F of the set
temperature. These small temperature swings are completely normal
for daily wood pellet grill use and are the natural result of fanning
and monitoring the flame. Do not open the lid or adjust the set
temperature before it is reached. Opening the lid too frequently will
cause your grill temperature to drop, then have to rise again.
9
You are now ready to load up your grill with food and get cooking.
TIPS:
• Keep the grill closed during the preheat cycle so that the grill can reach the desired set temperature.
• Wait until the preheat cycle is complete before you begin cooking your food. Opening the lid before the desired temperature is reached can
prevent you from getting the best cooking results.
• Adding food too early can result in the grill taking longer than usual to achieve your desired set temperature.
• Traeger® Woodridge™ Grills provide real-time temperature readings in five-degree increments, and you should expect to see fluctuations in
temperature.
PRO TIP: Cooking to a desired internal food
temperature is the best-kept secret for getting great
results.
22
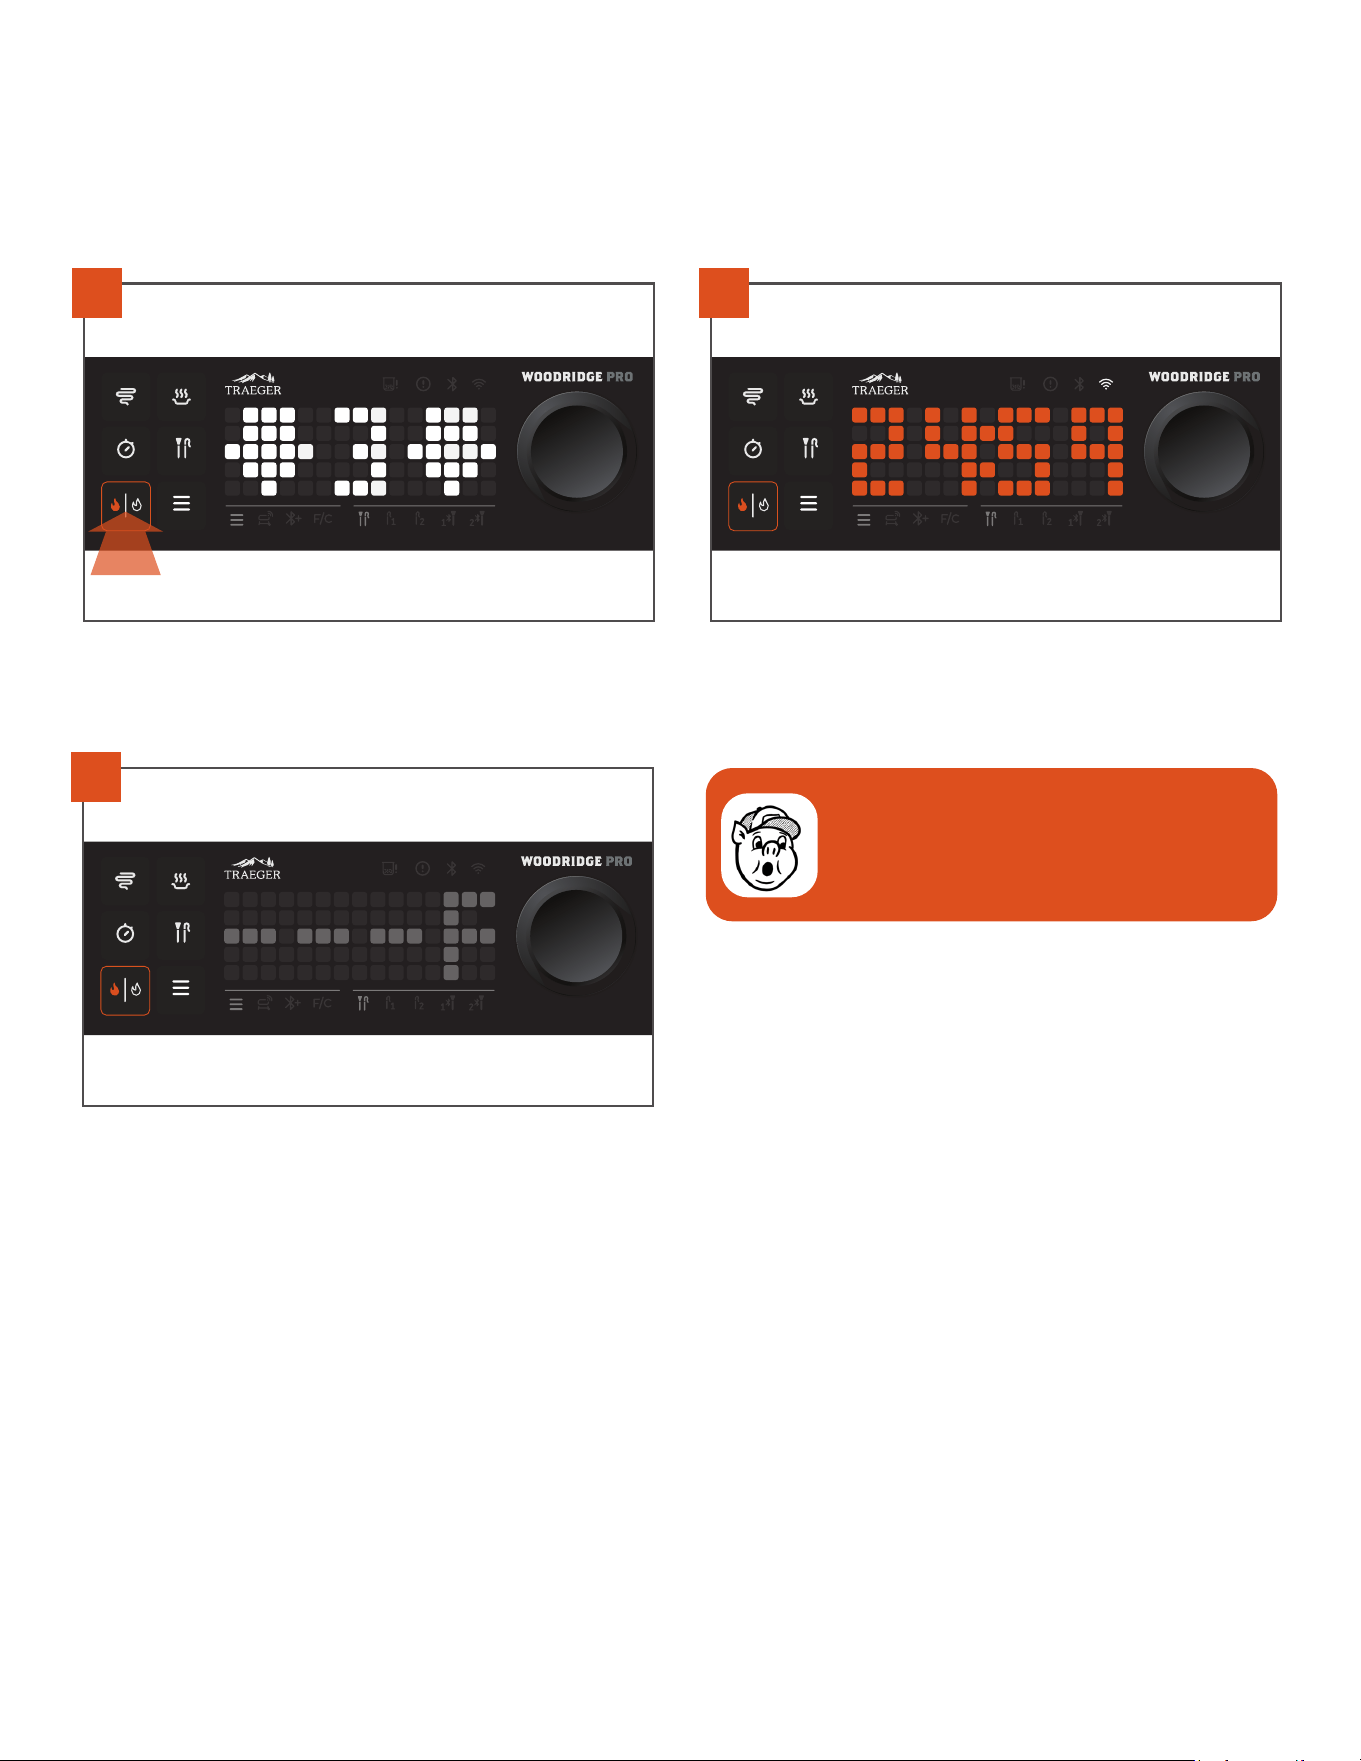
SHUTTING DOWN YOUR GRILL
The shutdown cycle is crucial to the success and high-quality grill performance of your Traeger® Woodridge™ Grill. The shutdown cycle gets your
grill properly set up for your next cook, and prevents future adverse events.
IMPORTANT: Always initiate a shutdown cycle after each and every cook.
Press and hold the ignite/shutdown button down for three seconds.
Your controller will then count down from 3. When it reaches 0, the
shutdown cycle will begin.
1
A countdown timer begins. You will hear your fan running; this is
normal.
2
Once shutdown is complete, your grill will enter standby mode until
you are ready to use it again.
3
NOTES:
• The shutdown cycle minimizes your risk for future adverse events like backburn. Backburn occurs when the fire from the firepot burns pellets
in the auger tube, causing the fire to burn back into the hopper.
• The shutdown cycle will run for approximately 15-25 minutes, depending on the previous set temperature. Allow the shutdown cycle to
complete for the proper operation of your grill. Do not press the main power switch on the back of the auger box to OFF (O) or unplug your grill
prior to completion.
• After your grill completes the shutdown cycle, it will automatically enter sleep mode. The grill should be left on and in sleep mode to download
any firmware updates as they are released.
PRO TIP: DO NOT put your grill cover back on until the
shutdown process is complete. Doing so may cause the
cover to melt from the heat.
23
TRAEGER.COM
TRAEGER APP
The Traeger App puts a world of flavor at your fingertips. Control your grill anytime, anywhere with WiFIRE®. Access over 1600 wood-
fired recipes, learn from the pros, and receive curated content that helps you become a better cook—all right from your phone.
Connecting your grill also ensures your grill operates at peak performance. When connected and powered on, your grill will
automatically be updated with the latest and greatest firmware updates as they are released.
You will need a home internet Wi-Fi connection for your Traeger® Woodridge™ Grill. Your smart device must be running the latest iOS
or Android operating system. If you leave the range of your Wi-Fi networks with your device, a data plan is required. The grill must
remain connected to the internet to receive the latest operating, safety, and security updates. See page 14 for instructions on how
to use your smart device to pair your Traeger® Grill to the Traeger App.
HOW TO USE ADDITIONAL GRILL FEATURES
(Getting the Most Out of Your Grilling Experience!)
PROBES
The Traeger® Woodridge™ Grill comes with one wired meat probe for monitoring internal meat temperatures. For wireless monitoring, there is the Traeger® wireless
meat thermometer, which is sold separately. Follow the instructions below to connect your Traeger® wireless meat thermometer to your Traeger® Woodridge™ Grill.
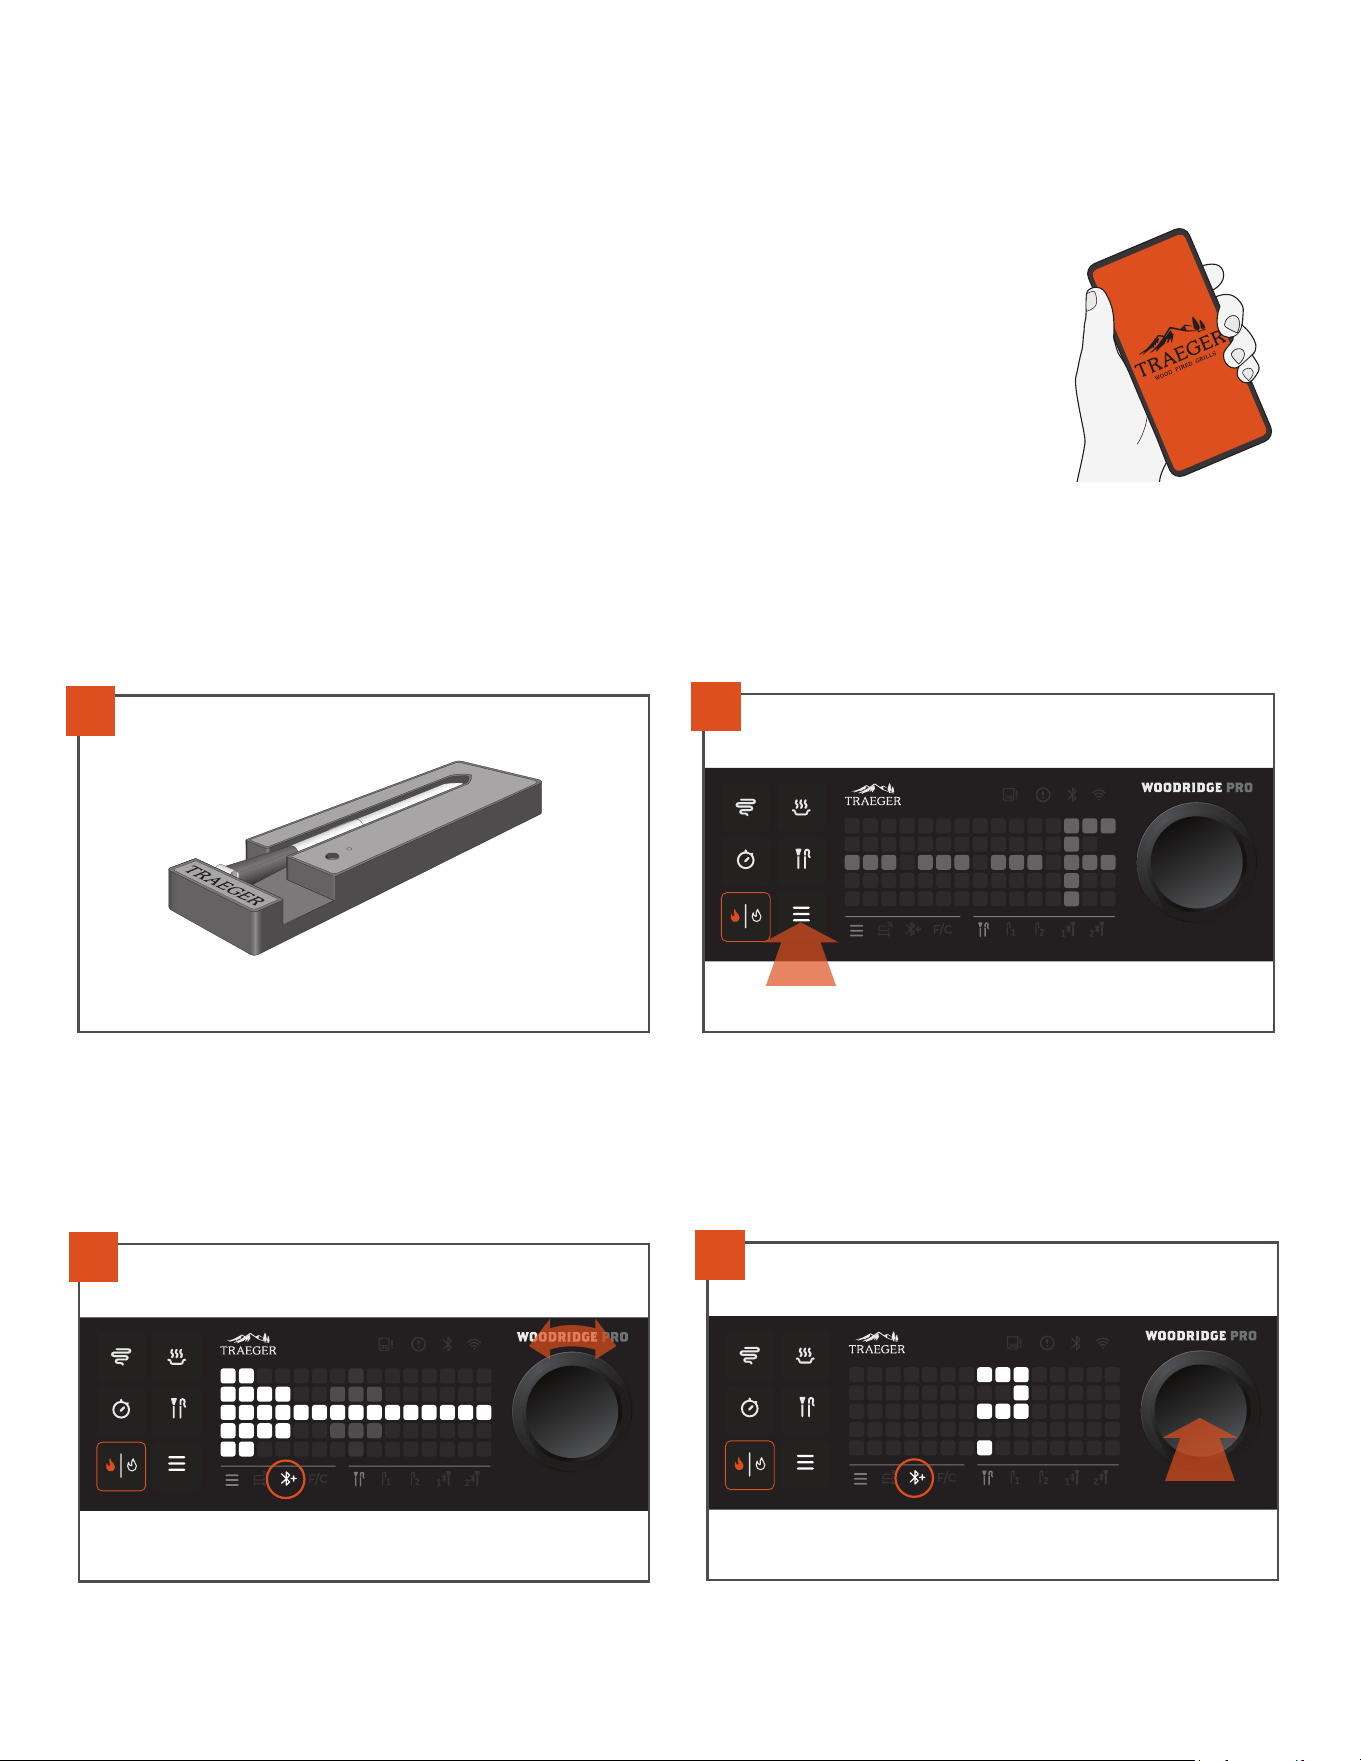
2
Grill should be powered on and in an idle (not-cooking) state. In this
state, tap the menu button.
While in the menu, turn the selection dial until the Add Bluetooth®
Accessory icon lights up in the menu bar and the
meat thermometer
pairing animation above displays on screen
.
4
Press the selection dial to select this option and begin the pairing process.
Make sure the battery in your charging dock is properly installed and full by
pressing the button on the front of the unit. The green LED above the button
will light up. If it does not, check the battery compartment and remove
any packaging to ensure the battery is properly installed. With the battery
properly installed, let your Traeger® wireless meat thermometer charge in the
dock according to the instructions included with your meat thermometer.
1
PAIRING YOUR BLUETOOTH® TRAEGER® WIRELESS MEAT THERMOMETER (sold separately)
Pairing a meat thermometer is a one-time process. Once you have successfully paired a Traeger® wireless meat thermometer to your Traeger®
Woodridge™ Grill, the grill will recognize this meat thermometer when it is active (charged and removed from dock) and within range of your grill.
3
24
6
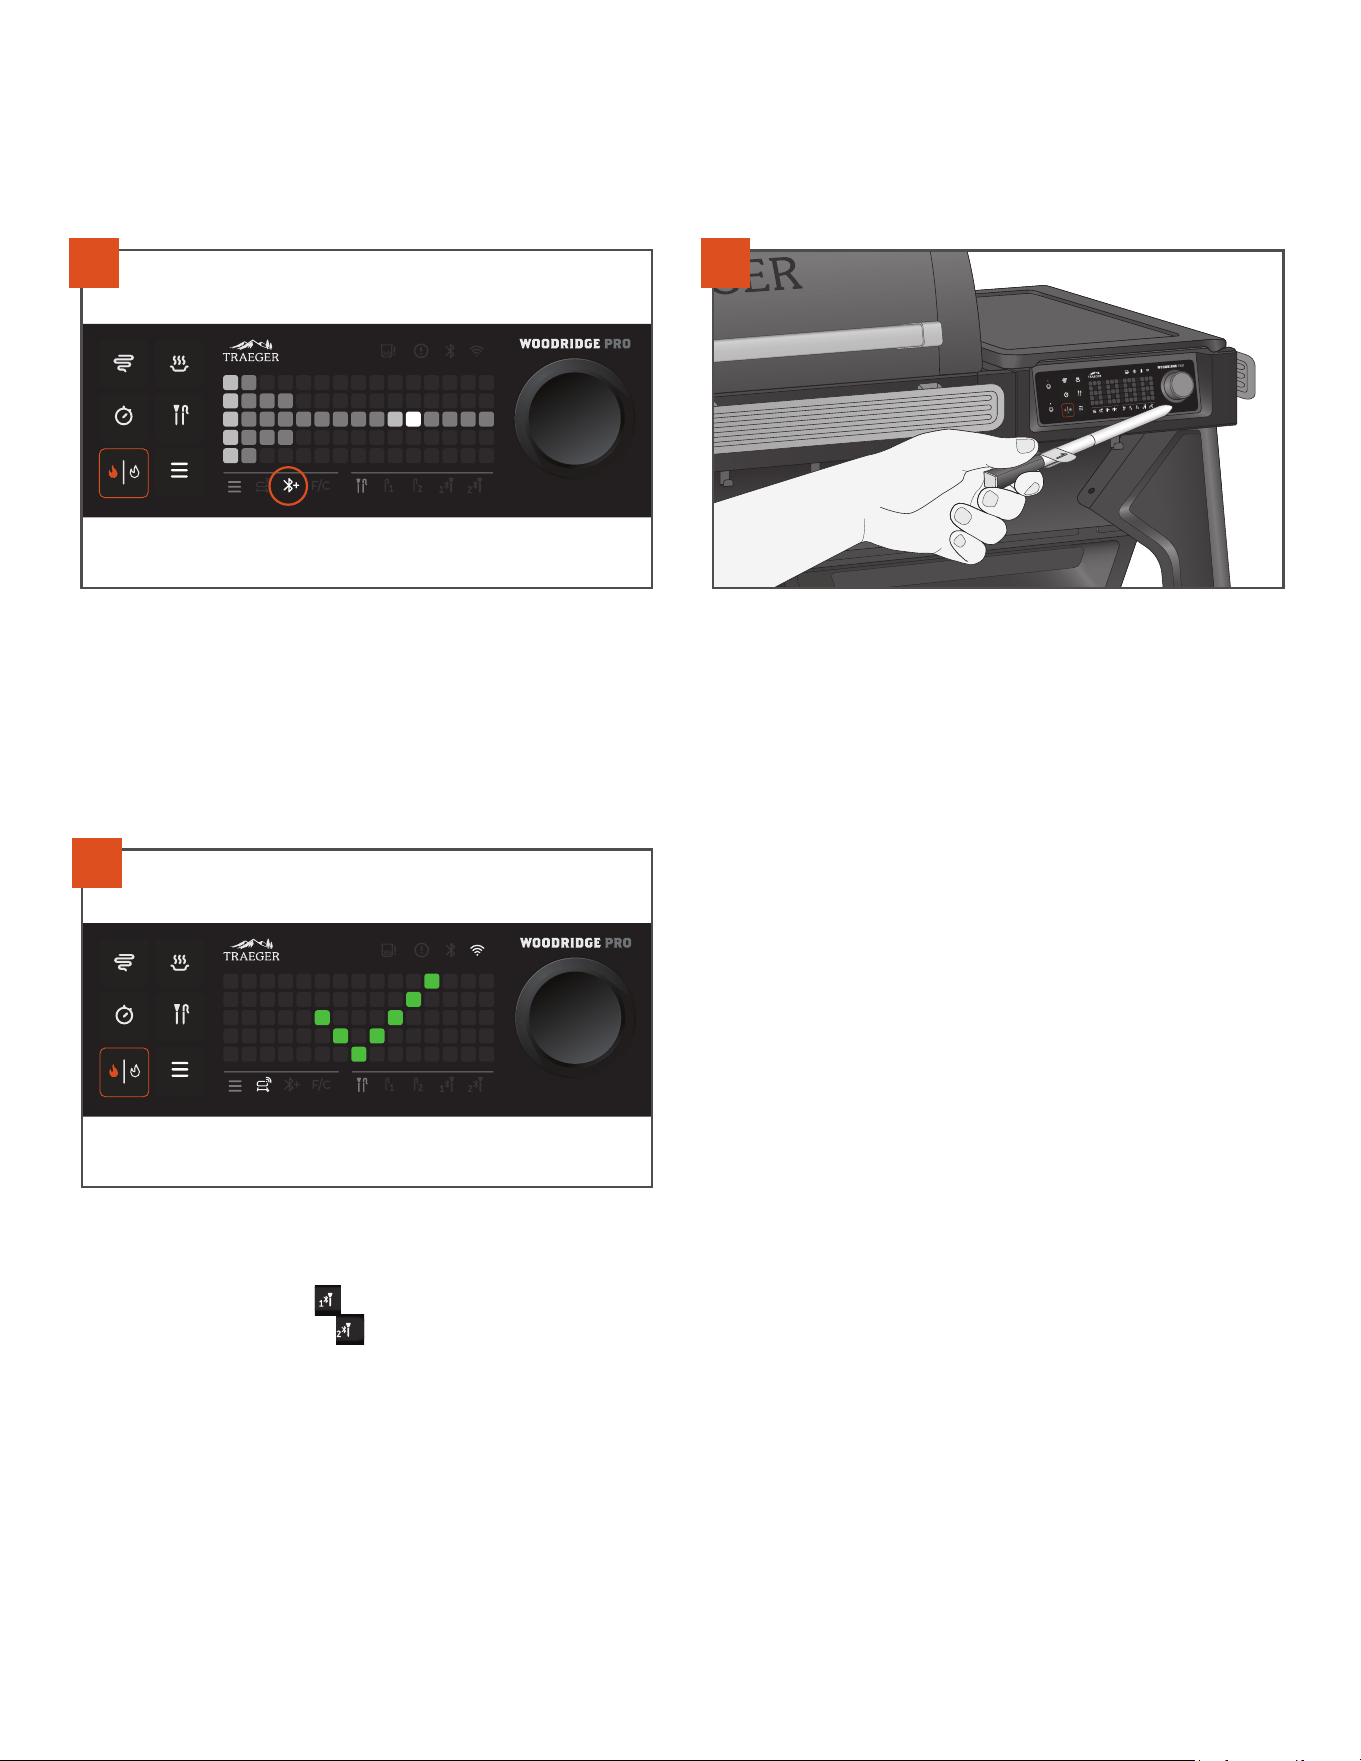
Remove the Traeger® wireless meat thermometer from the dock
and hold it close (within 3 ft) to your Traeger® Woodridge™ Grill
controller.
IMPORTANT: Traeger® wireless meat thermometers must be removed
and paired one at a time and in range of the grill. This will ensure that the
grill will only pick up one Bluetooth® signal at a time. A meat thermometer
begins broadcasting its signal when it is removed from its dock.
The screen will display a pairing animation, indicating that the grill
is currently searching for Traeger® wireless meat thermometer
Bluetooth® signal.
When the grill successfully connects to your Traeger® wireless meat
thermometer, you will see a green check animation on the screen and
a probe icon with a number 1 or 2. If this is the first meat thermometer
you are pairing with the grill, will light up. If it is the second meat
thermometer paired to the grill, will light up.
On the probe menu bar beneath the screen, you will now see
this probe icon lit up (full brightness), indicating that this meat
thermometer is connected. After five seconds, the probe icon will dim,
indicating that it is no longer selected, and the grill will return to the
Add Bluetooth® setting.
You can repeat steps 1-6 to pair a second
meat
thermometer
.
If pairing was not successful, an error message is displayed.
This could be caused by one of the following:
A. The meat thermometer battery could be dead. Check to make
sure the meat thermometer is fully charged and try again. This
may require replacing the battery on your meat thermometer
dock and allowing some time for the meat thermometer to
recharge (we recommend four hours).
B. The grill could be picking up multiple Traeger® wireless meat
thermometer Bluetooth® signals. Make sure that only one meat
thermometer is removed from its dock and within range of the
grill controller (the closer the better). Return any other Traeger®
wireless meat thermometer to its dock to stop it from sending its
Bluetooth® signal.
C. The meat thermometer is already paired to another Traeger®
Woodridge™ Grill. Meat thermometers will only pair with one grill
at a time. If you’d like to stop using a meat thermometer with
another grill and start using it with this grill, you will need to use
the grill control to “forget” the meat thermometer from the prior
grill before initiating the pairing process with this grill (see next
section).
7
NOTE: Pairing is a one-time process. Once you have successfully
paired a Traeger® wireless meat thermometer to your Traeger®
Woodridge™ Grill, the grill will recognize this meat thermometer when
it is active (charged and removed from the dock) and within range of
your grill.
HOW TO USE ADDITIONAL GRILL FEATURES CONTINUED
5
PROBES CONTINUED
PAIRING YOUR BLUETOOTH® TRAEGER® WIRELESS MEAT THERMOMETER CONTINUED
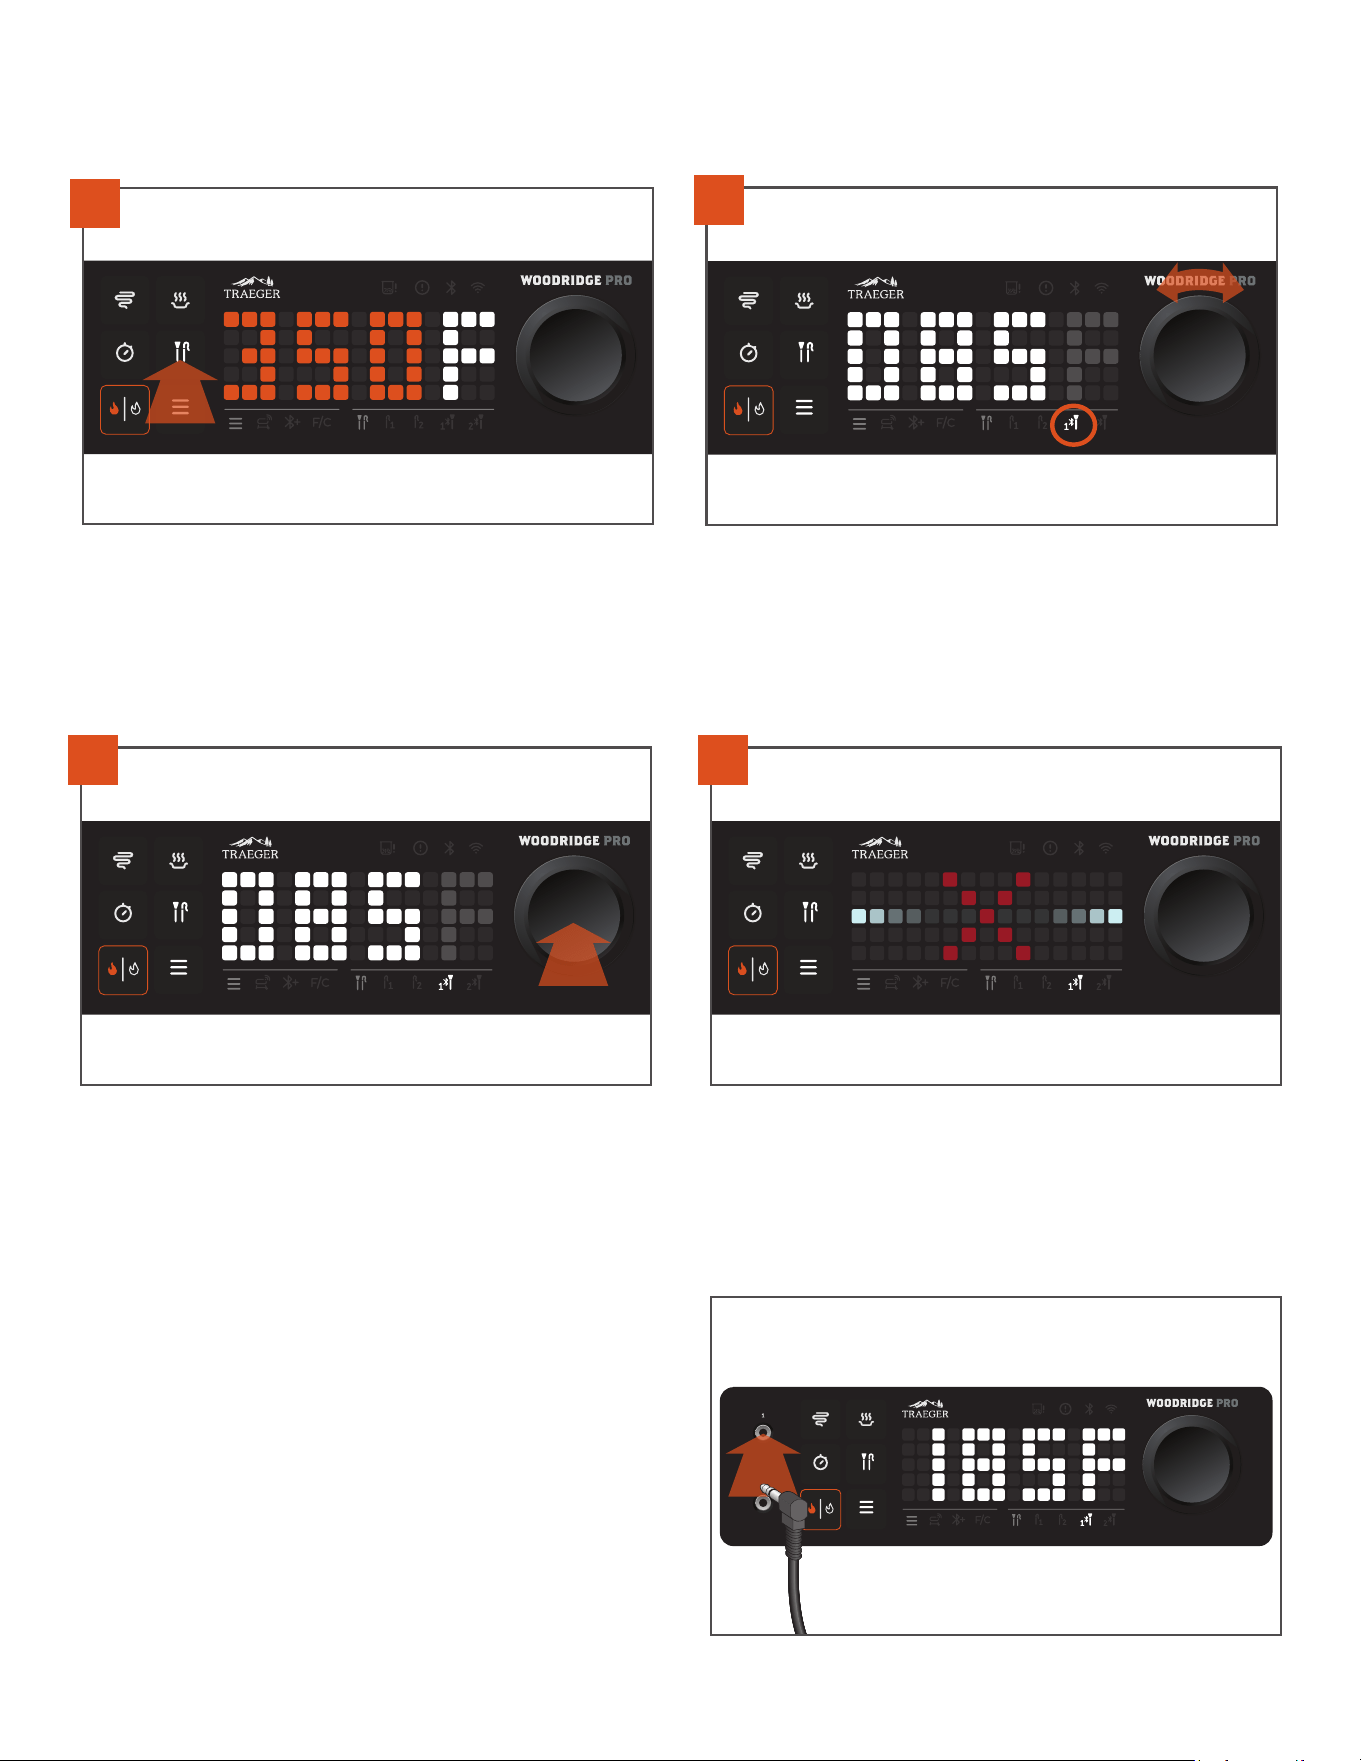
25
TRAEGER.COM
REMOVING A PREVIOUSLY PAIRED TRAEGER® WIRELESS MEAT THERMOMETER FROM YOUR GRILL
2
Turn the selection dial to highlight the Traeger® wireless meat
thermometer that you’d like to disconnect, either meat thermometer
1 or 2.
NOTE: If you want to disconnect a wired probe, simply remove the
probe connection from the jack.
If you’d like to disconnect or unpair your Traeger® wireless meat
thermometer, tap the probe button.
1
3
When the desired meat thermometer is highlighted in the probe
menu bar beneath the dot matrix display (meat thermometer 1 shown
above) and the current meat thermometer temperature is displayed,
press and hold the selection dial for three seconds.
4
If your meat thermometer has been successfully disconnected, you
will hear an audible “disconnected” tone and the display will show
this animation. The probe icon in the probe menu bar will flash and
then turn o.
CONNECTING YOUR WIRED PROBES
Up to two wired probes can be connected using the physical probe
jacks on the left of the controller.
Once plugged in, a wired probe can be used by tapping the probe
button, just like the Bluetooth® Traeger® wireless meat thermometer.
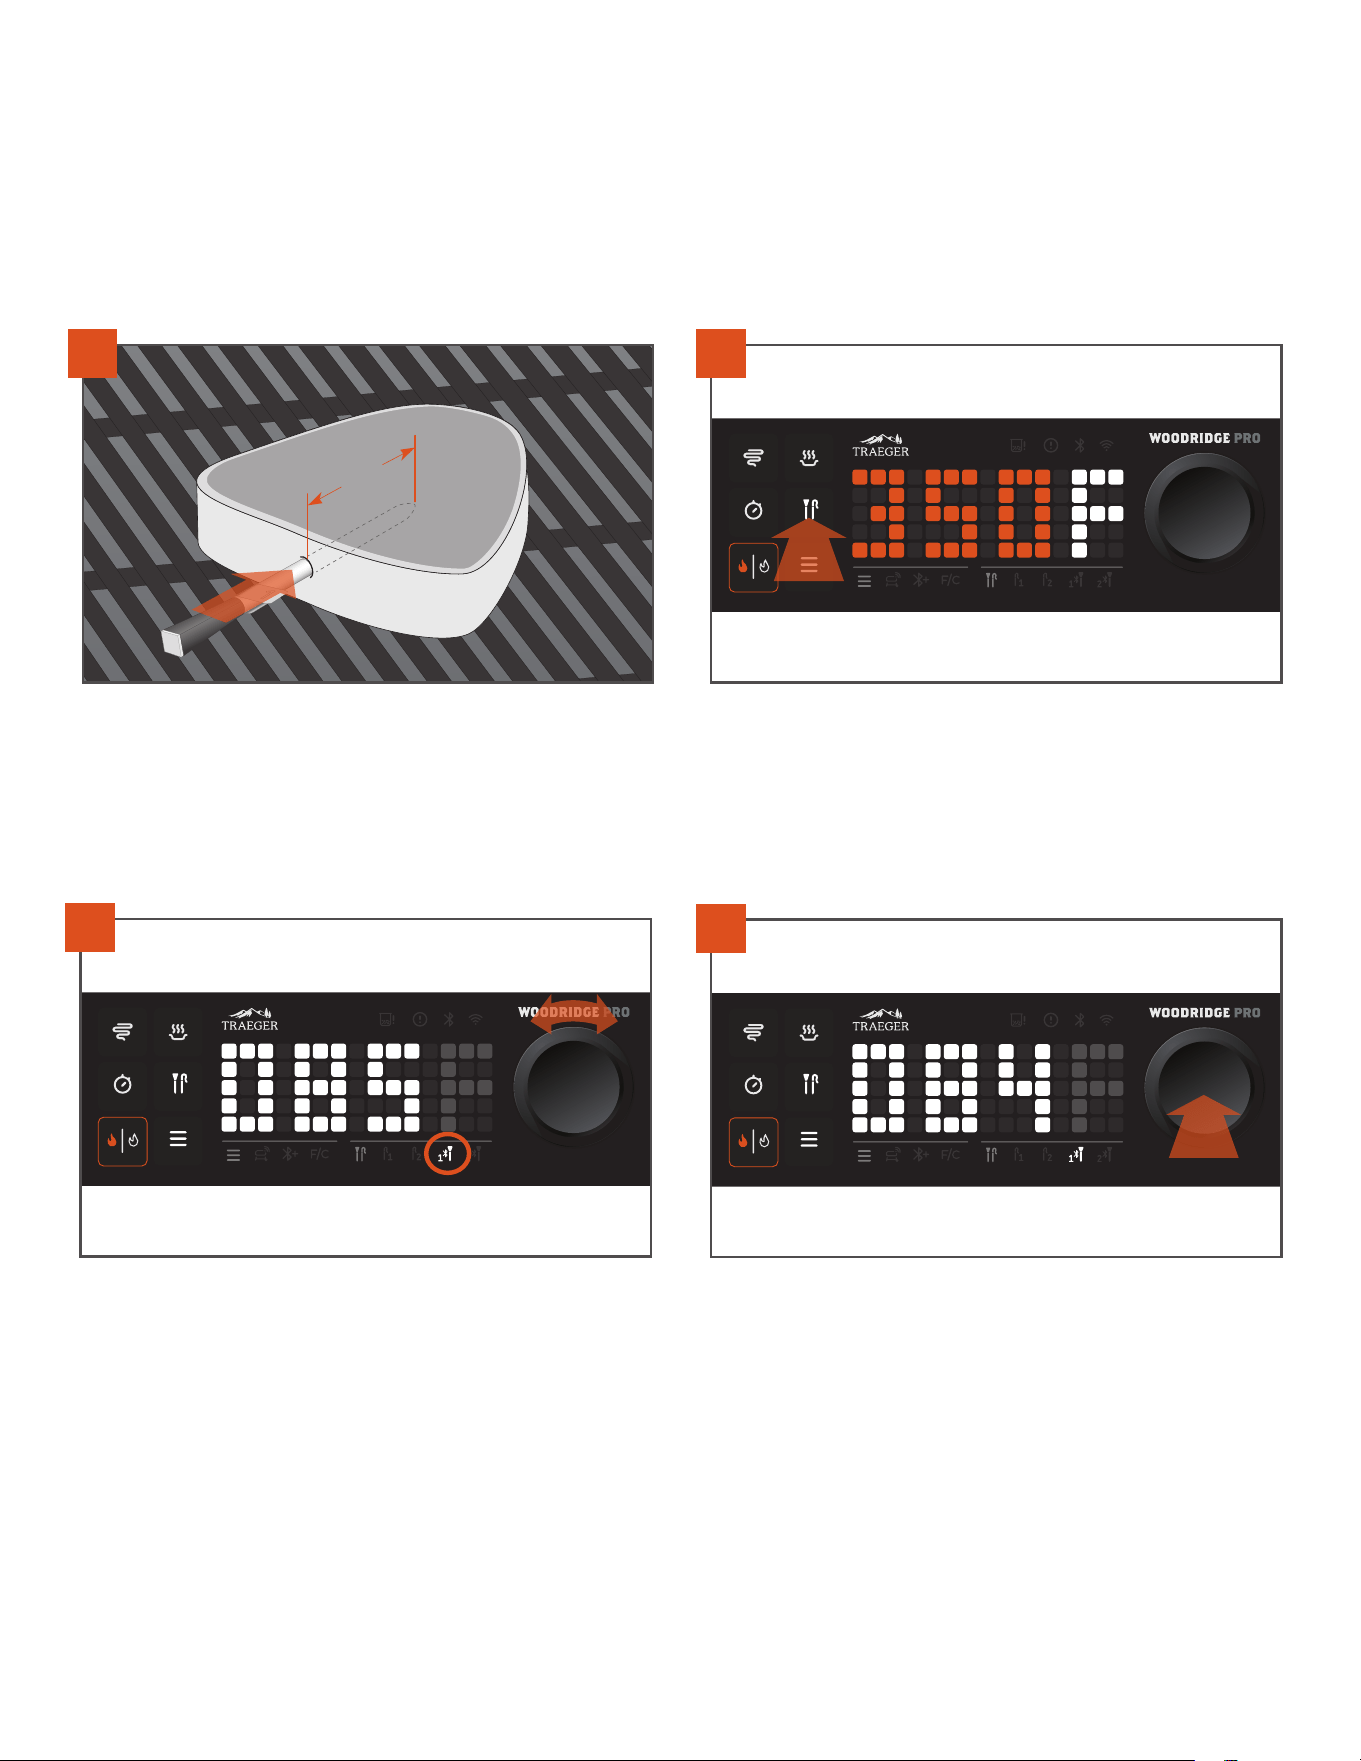
26
SETTING A GOAL TEMPERATURE ALARM FOR YOUR PROBES
Never overcook or undercook your proteins again! Use your controller or the Traeger App to set a probe goal alarm to alert you when your probe
has reached a target internal temperature. You can set a goal for either the wired probes or your Traeger® wireless meat thermometer.
Insert the probe up to the notch, into the thickest part of the protein –
avoid touching any bones or particularly fatty portions of the protein.
The probe needs to be in the protein at least two inches (5.1 cm). This
probe may not be suitable if you cannot insert the probe two inches
(5.1 cm) into the thickest part of the protein. After your probe has
been inserted, load your food onto the preheated grill.
2"
(5.1 cm)
1
Tap the probe button.
NOTE: After tapping this button, if you see “- - - -” displayed instead
of a probe temperature, this means that no probes are currently
connected or active. See “Pairing Your Bluetooth® Traeger® Wireless
Meat Thermometer” for instructions on how to connect/pair.
2
From the probe menu, use the selection dial to cycle through and
highlight any of your probes that are currently connected and active.
You will see the icon light up in the probe menu bar, and the current
probe temperature will be displayed.
3
When the desired probe is highlighted in the probe menu bar, (in this
example, Bluetooth® meat thermometer 1), press the selection dial to
select it.
4
HOW TO USE ADDITIONAL GRILL FEATURES CONTINUED
PROBES CONTINUED
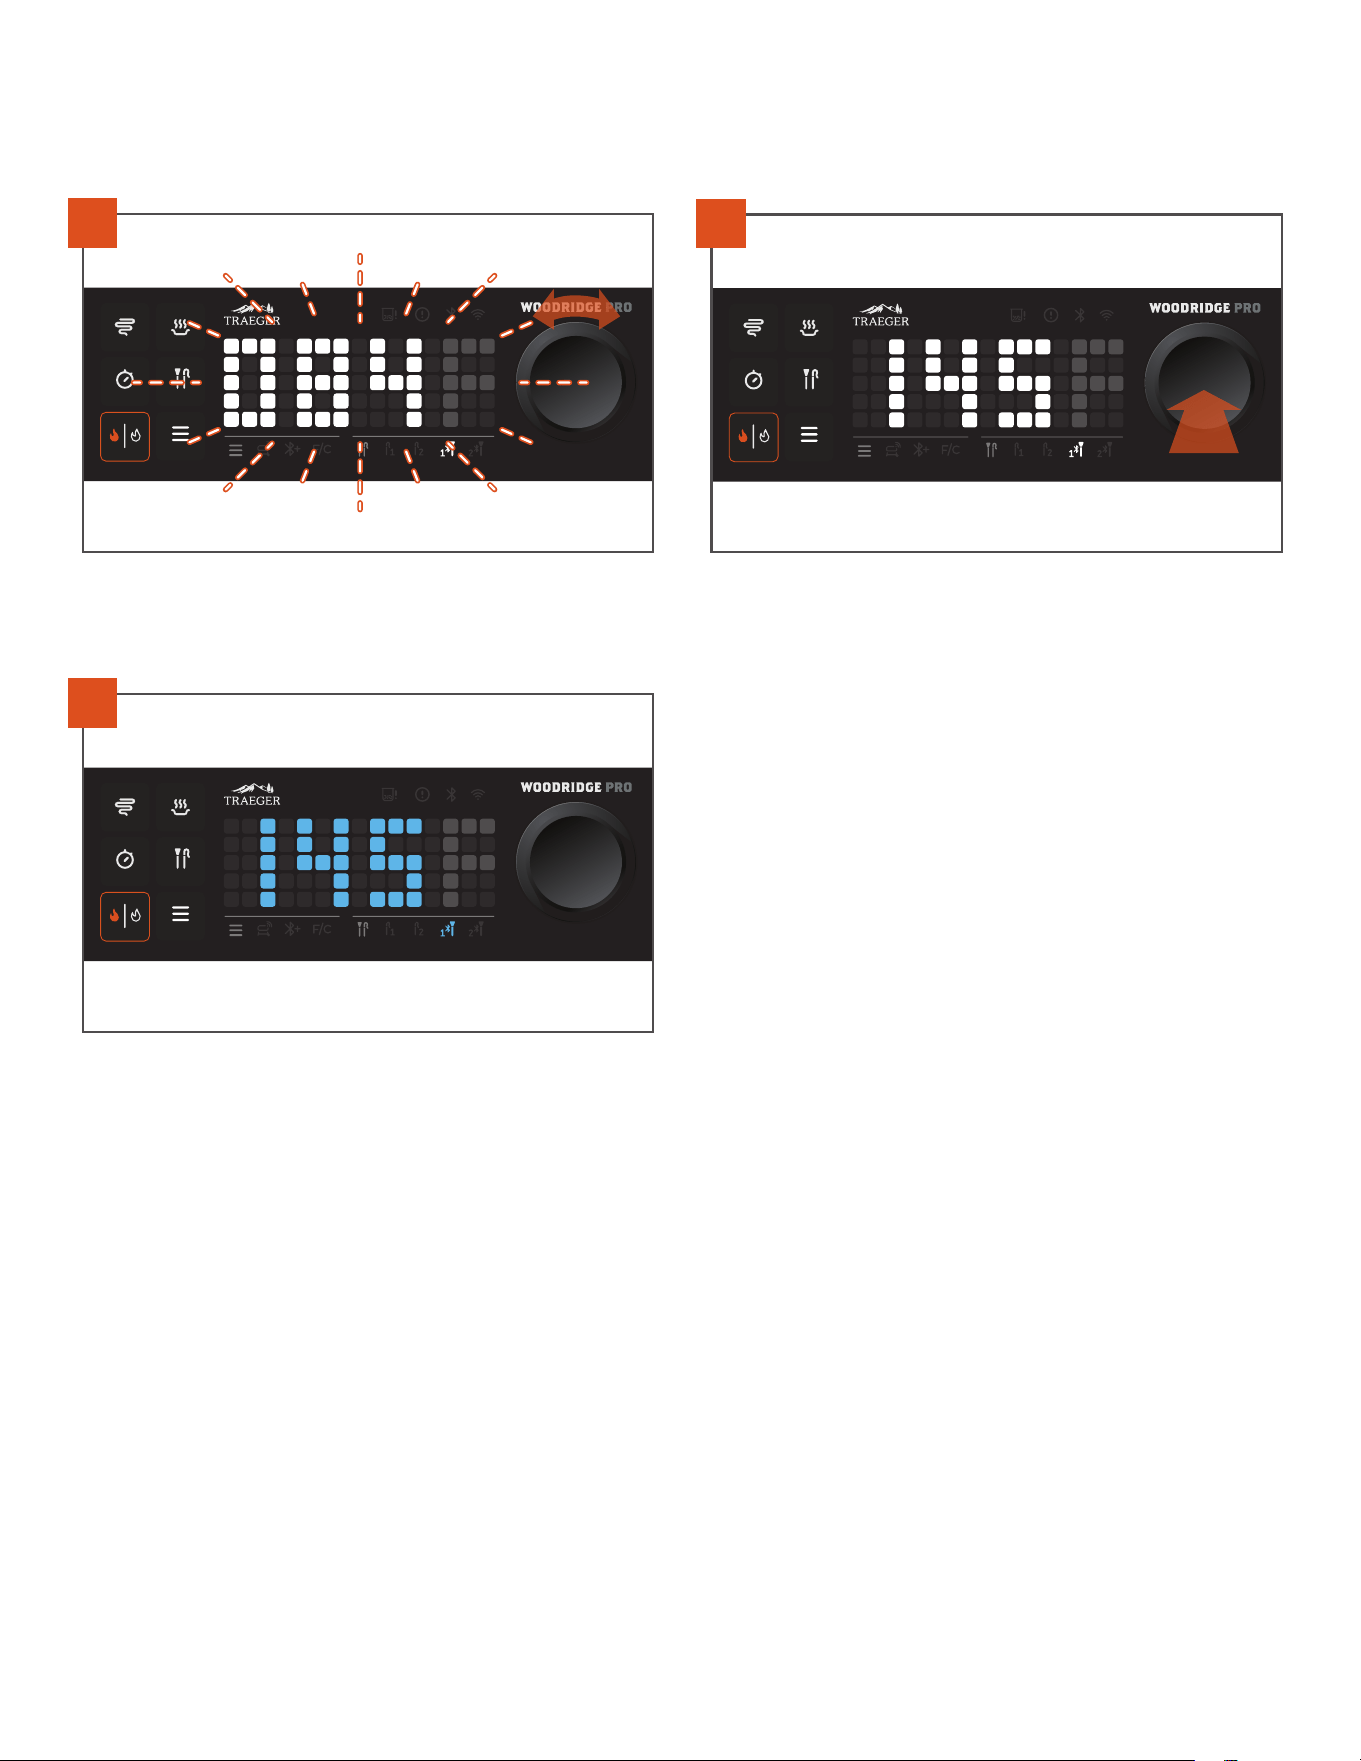
27
TRAEGER.COM
After pressing the selection dial, the numbers on screen will flash,
indicating you are in the selection mode. Turn the selection dial to your
desired internal goal temperature.
5
Press the selection dial to confirm.
6
The goal temperature on screen will turn blue when the selection
has been confirmed. After confirming this goal, the display will now
alternate between showing the goal temperature (in blue) and the
current probe temperature (in white) when this probe is highlighted.
This probe icon in the probe menu bar turns to blue to indicate that a
goal has been set. The controller will alert you when you have reached
your target temperature.
7
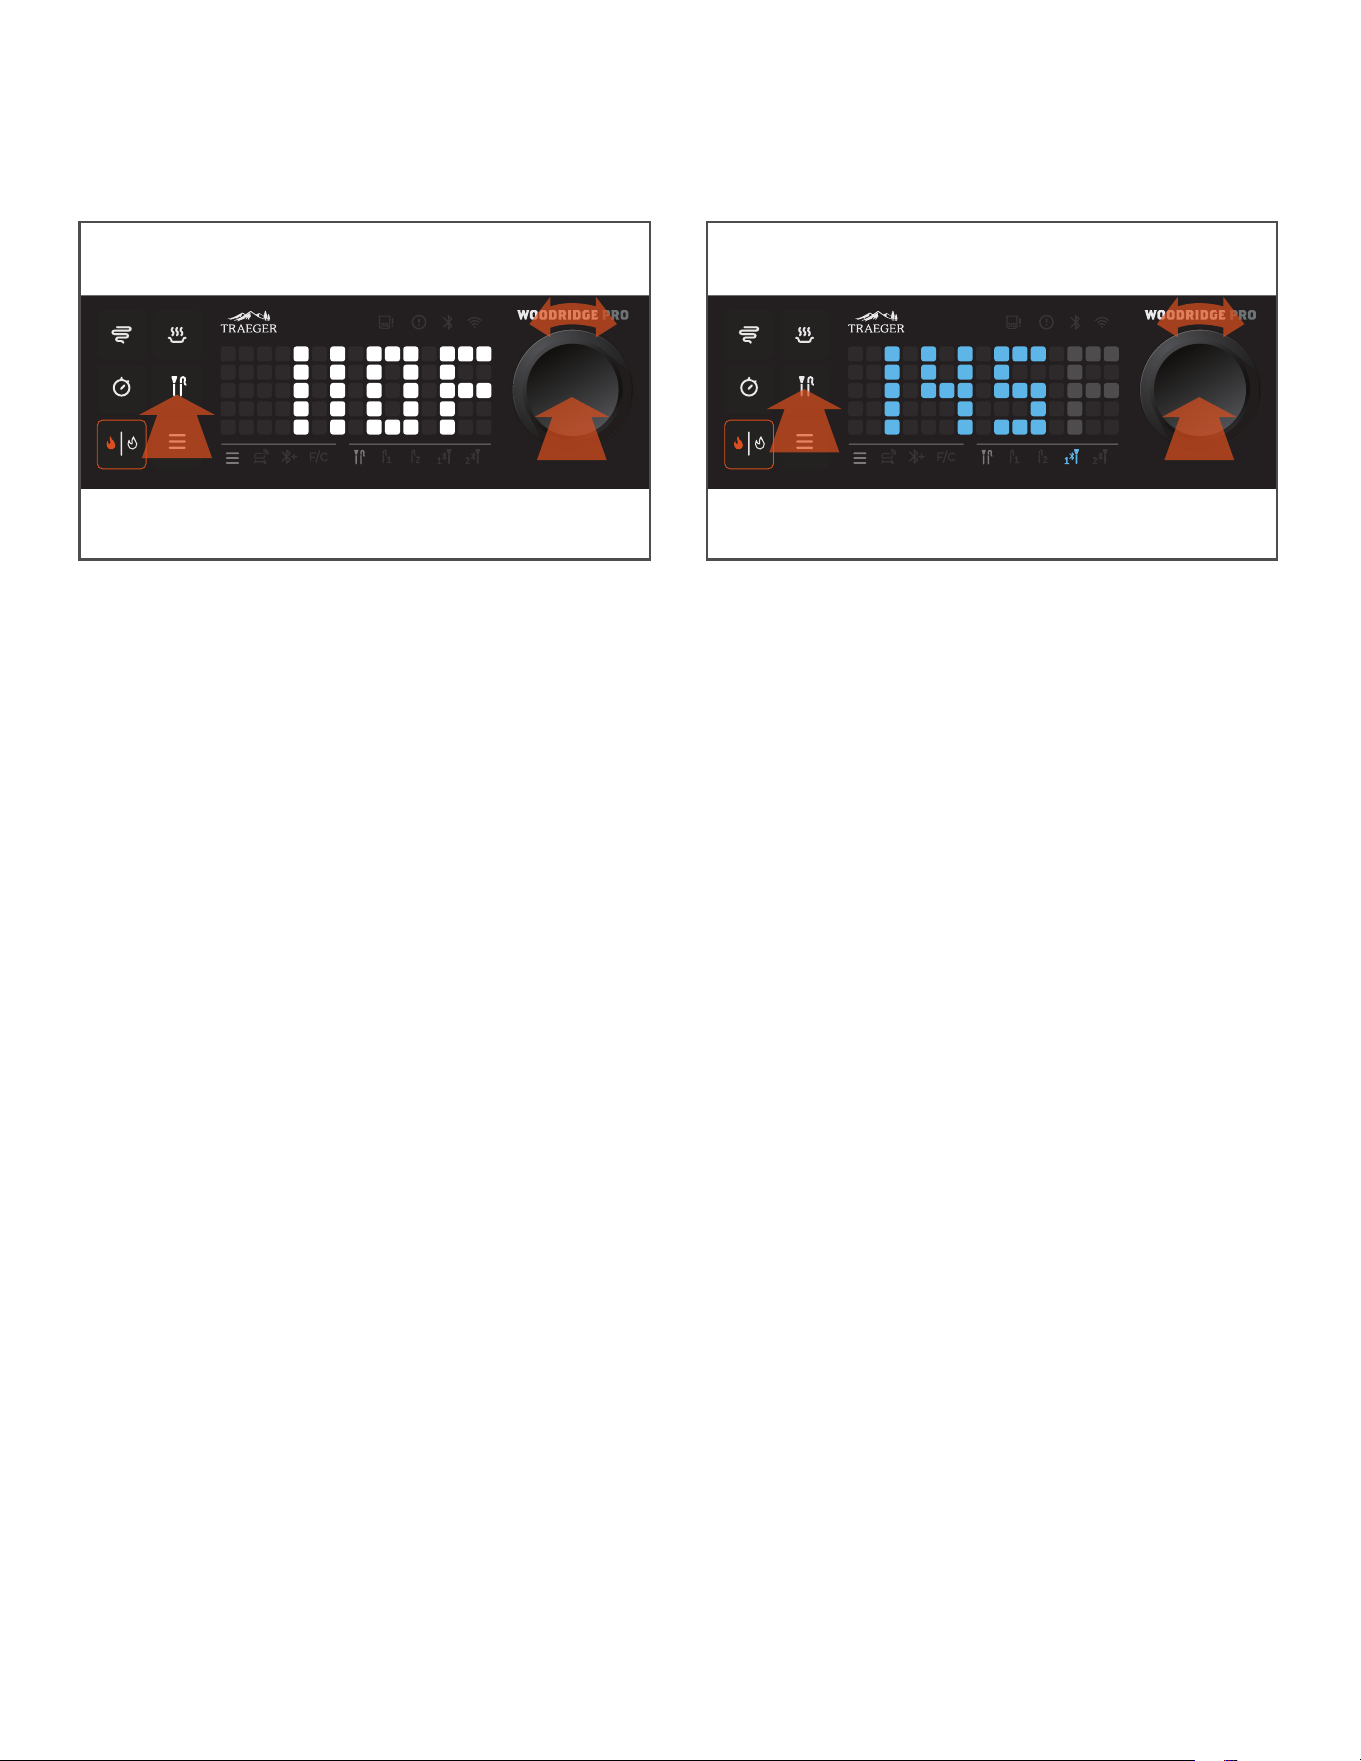
28
EDITING OR CANCELING A GOAL TEMPERATURE ALARM
EDITING: If you’d like to edit a current probe goal alarm, simply tap the
probe button, turn the selection dial to highlight your desired probe in
the probe menu bar, and press the dial. Turn the selection dial to the
desired temperature and press to lock in your setting.
CANCELING: If you’d like to cancel a probe goal alarm, simply tap the
probe button and use the selection dial to navigate to the desired
probe (in this example, Bluetooth® probe 1). Then press and hold
the selection dial for three seconds. After pressing and holding the
selection dial, the goal alarm will be canceled and the numbers will
revert back to white and display the current probe temperature
reading.
HOW TO USE ADDITIONAL GRILL FEATURES CONTINUED
29
TRAEGER.COM
TIMER
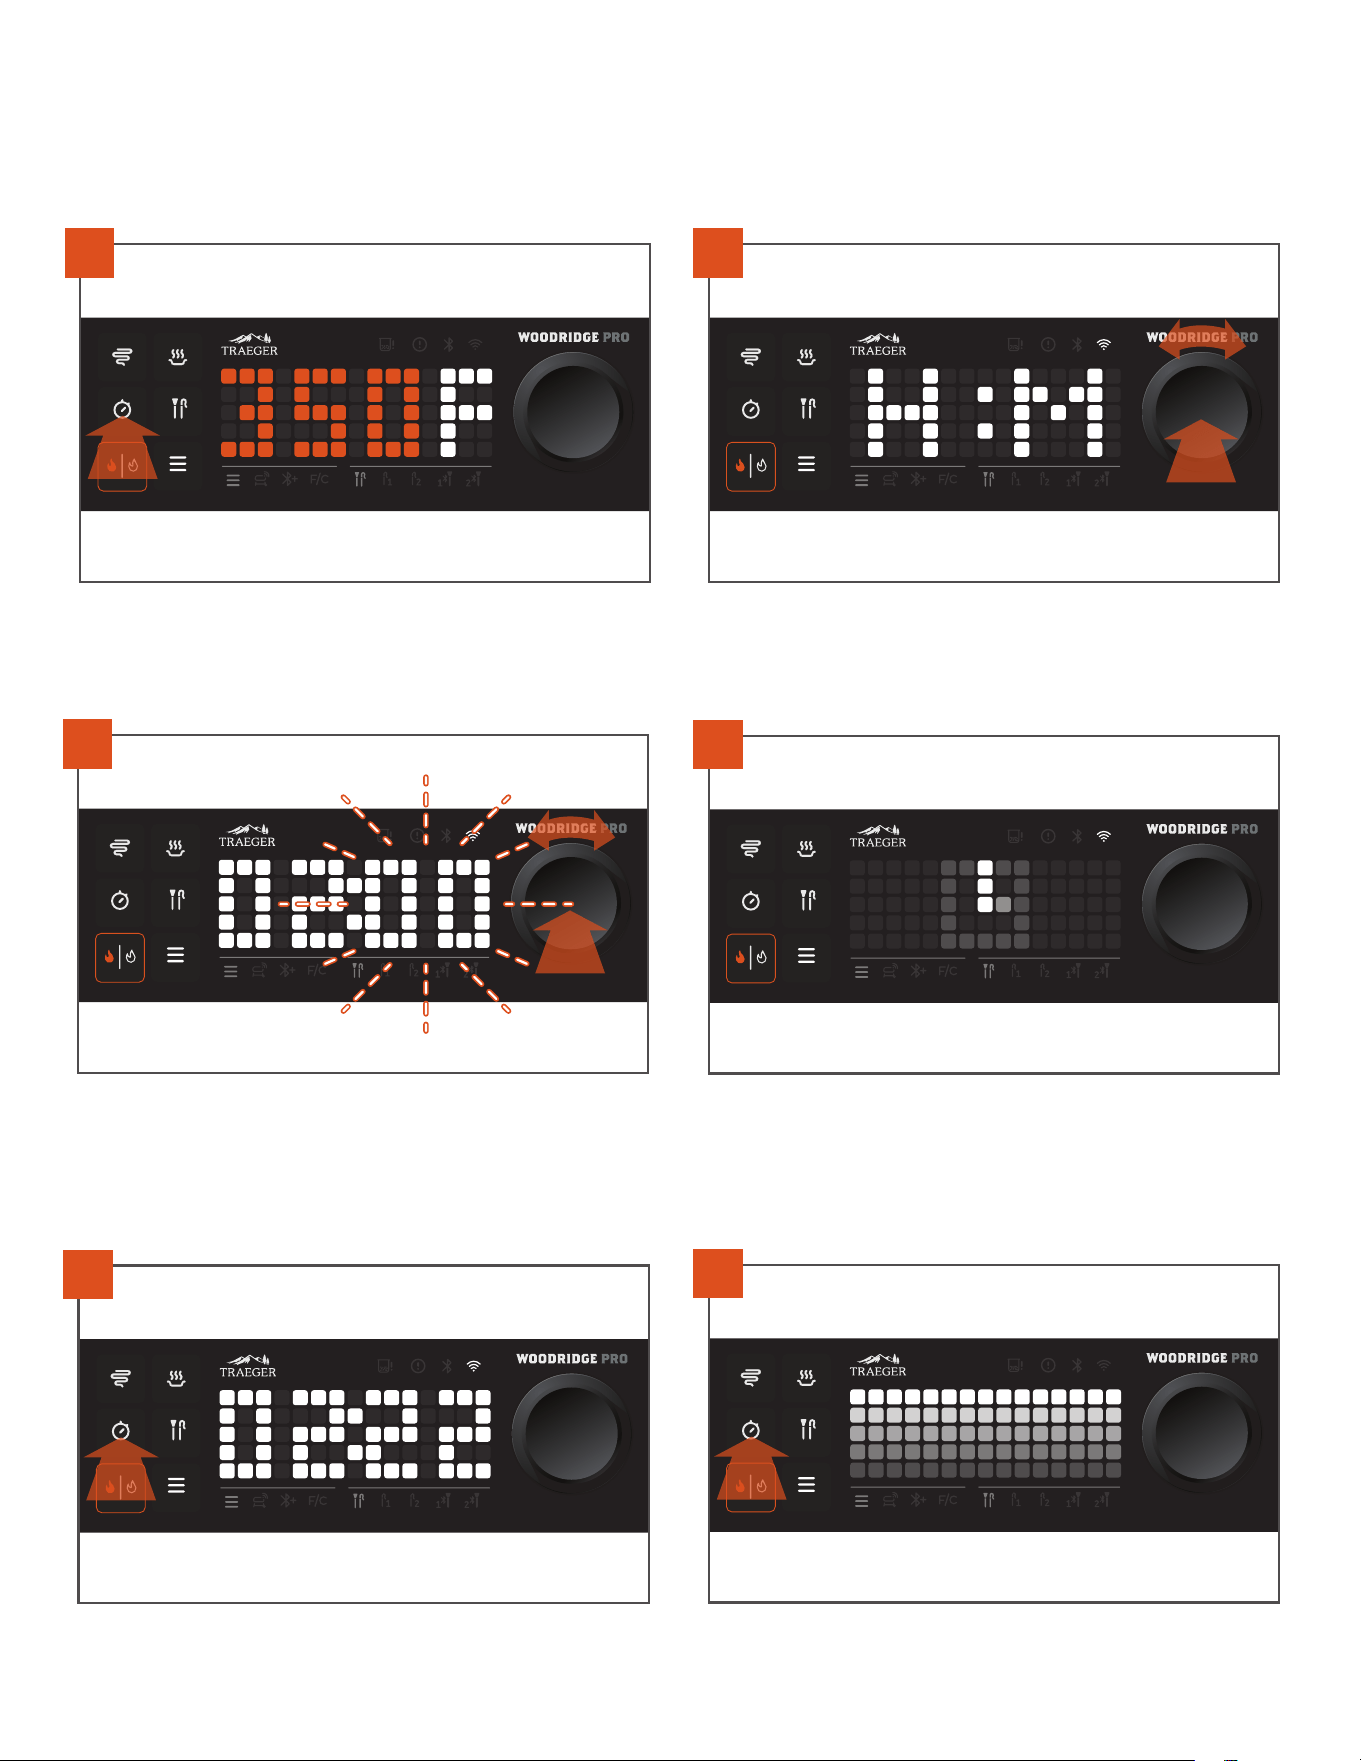
You can set, monitor, edit, or cancel a timer on your controller or within the Traeger App.
TO SET THE TIMER
TO CANCEL THE TIMER
Tap the timer button.
1
H and M will flash briefly, indicating that you can set hours on the left and
minutes on the right. Hours will flash first. Turn the selection dial to your
desired hours, then press the dial to lock in hours. If you do not wish to
set any hours, press the selection dial when the screen displays 00:00.
2
Minutes will now flash. Turn the selection dial to your desired minutes,
then press the dial to lock in the minutes.
3
A timer animation will play on screen to indicate that the timer was
successfully set. The timer LED button will stay lit up while a timer
is set. With timer button selected, the remaining time will display on
the screen. Once the remaining time is under an hour, the display will
switch from showing “hours : minutes” to “minutes : seconds.”
4
Tap the timer button so that the time remaining is displayed.
1
Press and hold the timer button for three seconds to clear the timer.
2
30
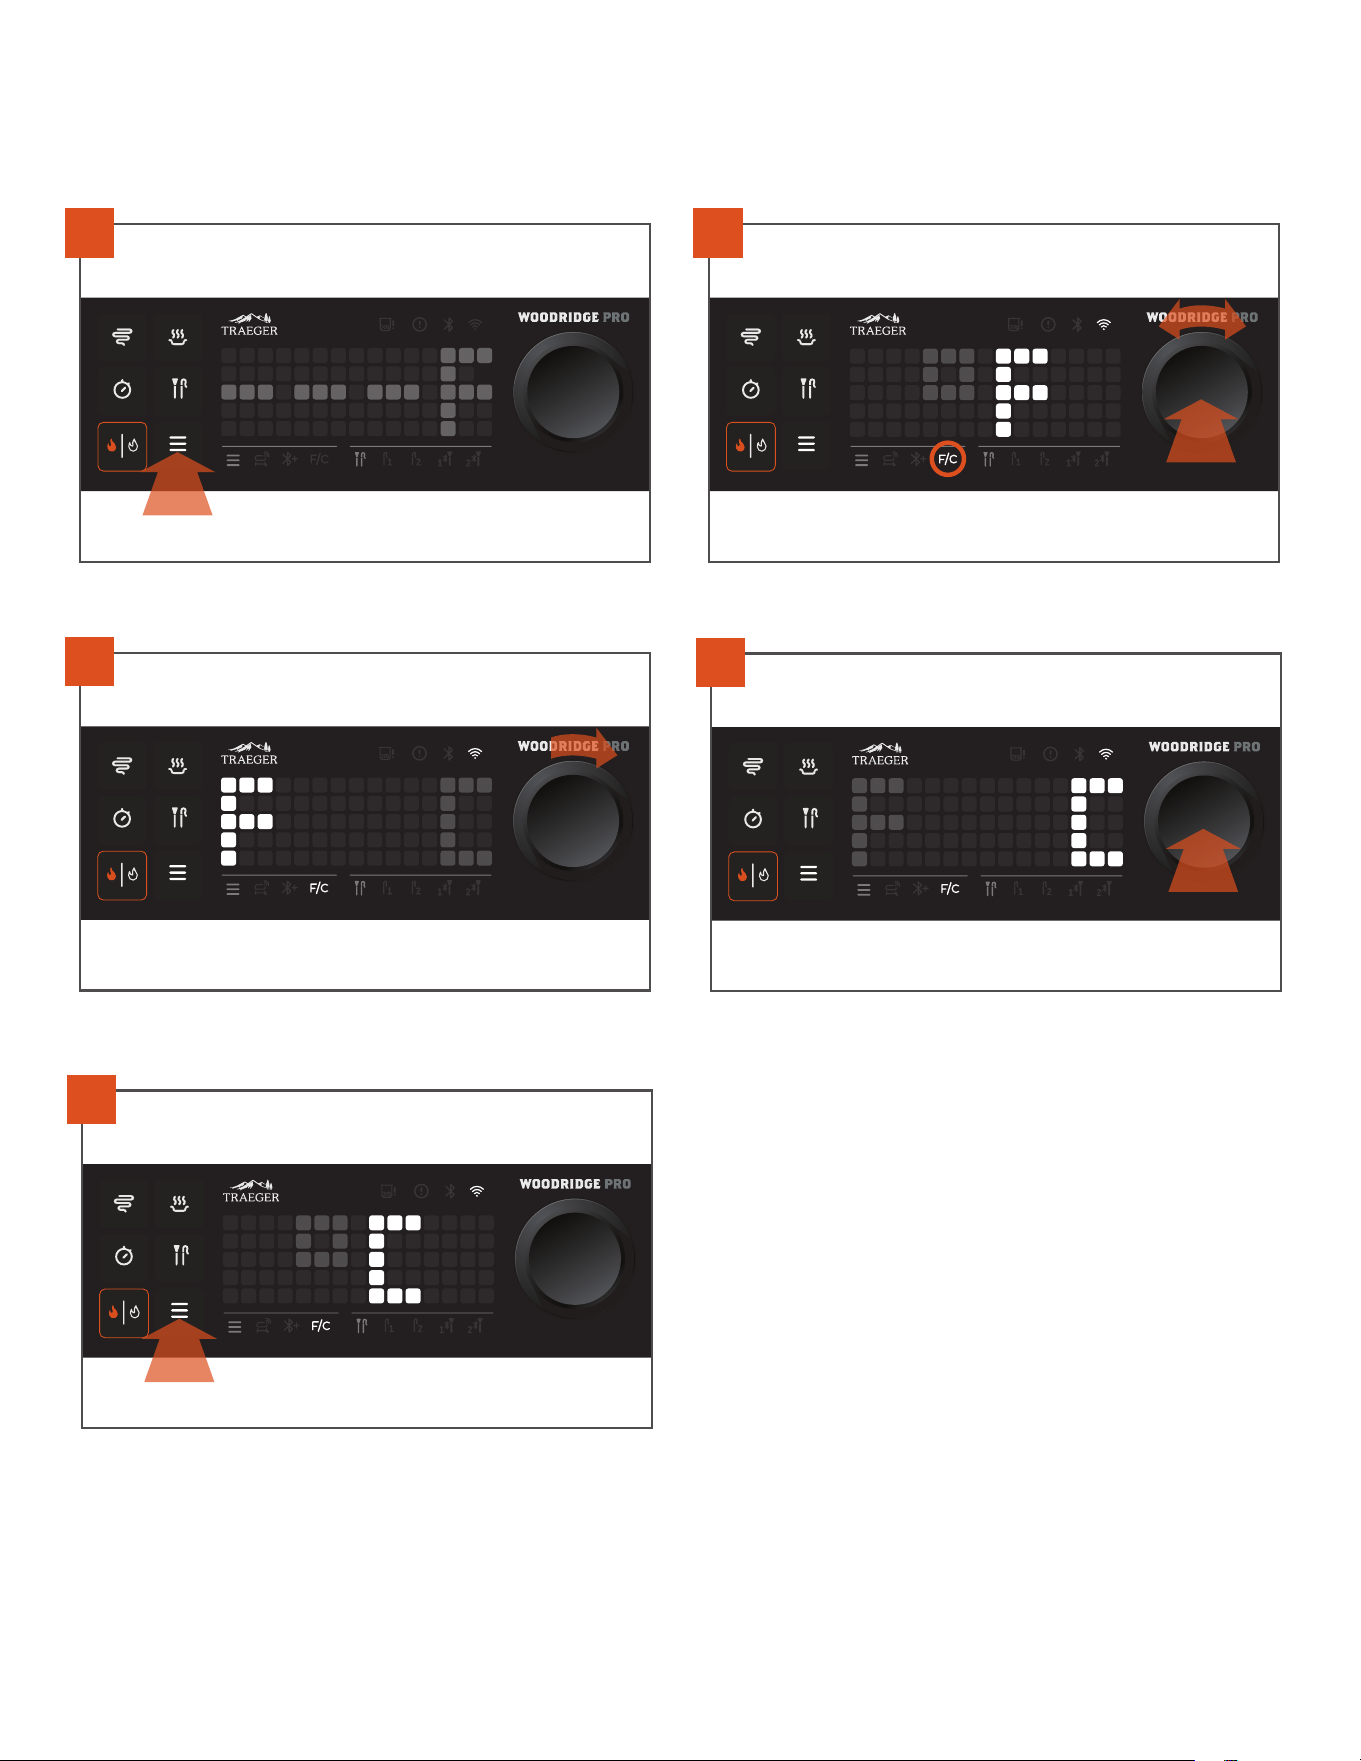
CHANGING TEMPERATURE UNITS
Tap the menu button.
1
Turn the selection dial until the “F/C” icon is lit in the menu bar. Press the
dial to enter the selection mode.
2
Turn the
selection d
ial to the desired selection: F for Fahrenheit or C for
Celsius.
3
Press the
selection d
ial to lock in and confirm your selection.
4
Return to your idle or home screen by tapping the menu button. The
selected units will be displayed.
5
HOW TO USE ADDITIONAL GRILL FEATURES CONTINUED
31
TRAEGER.COM
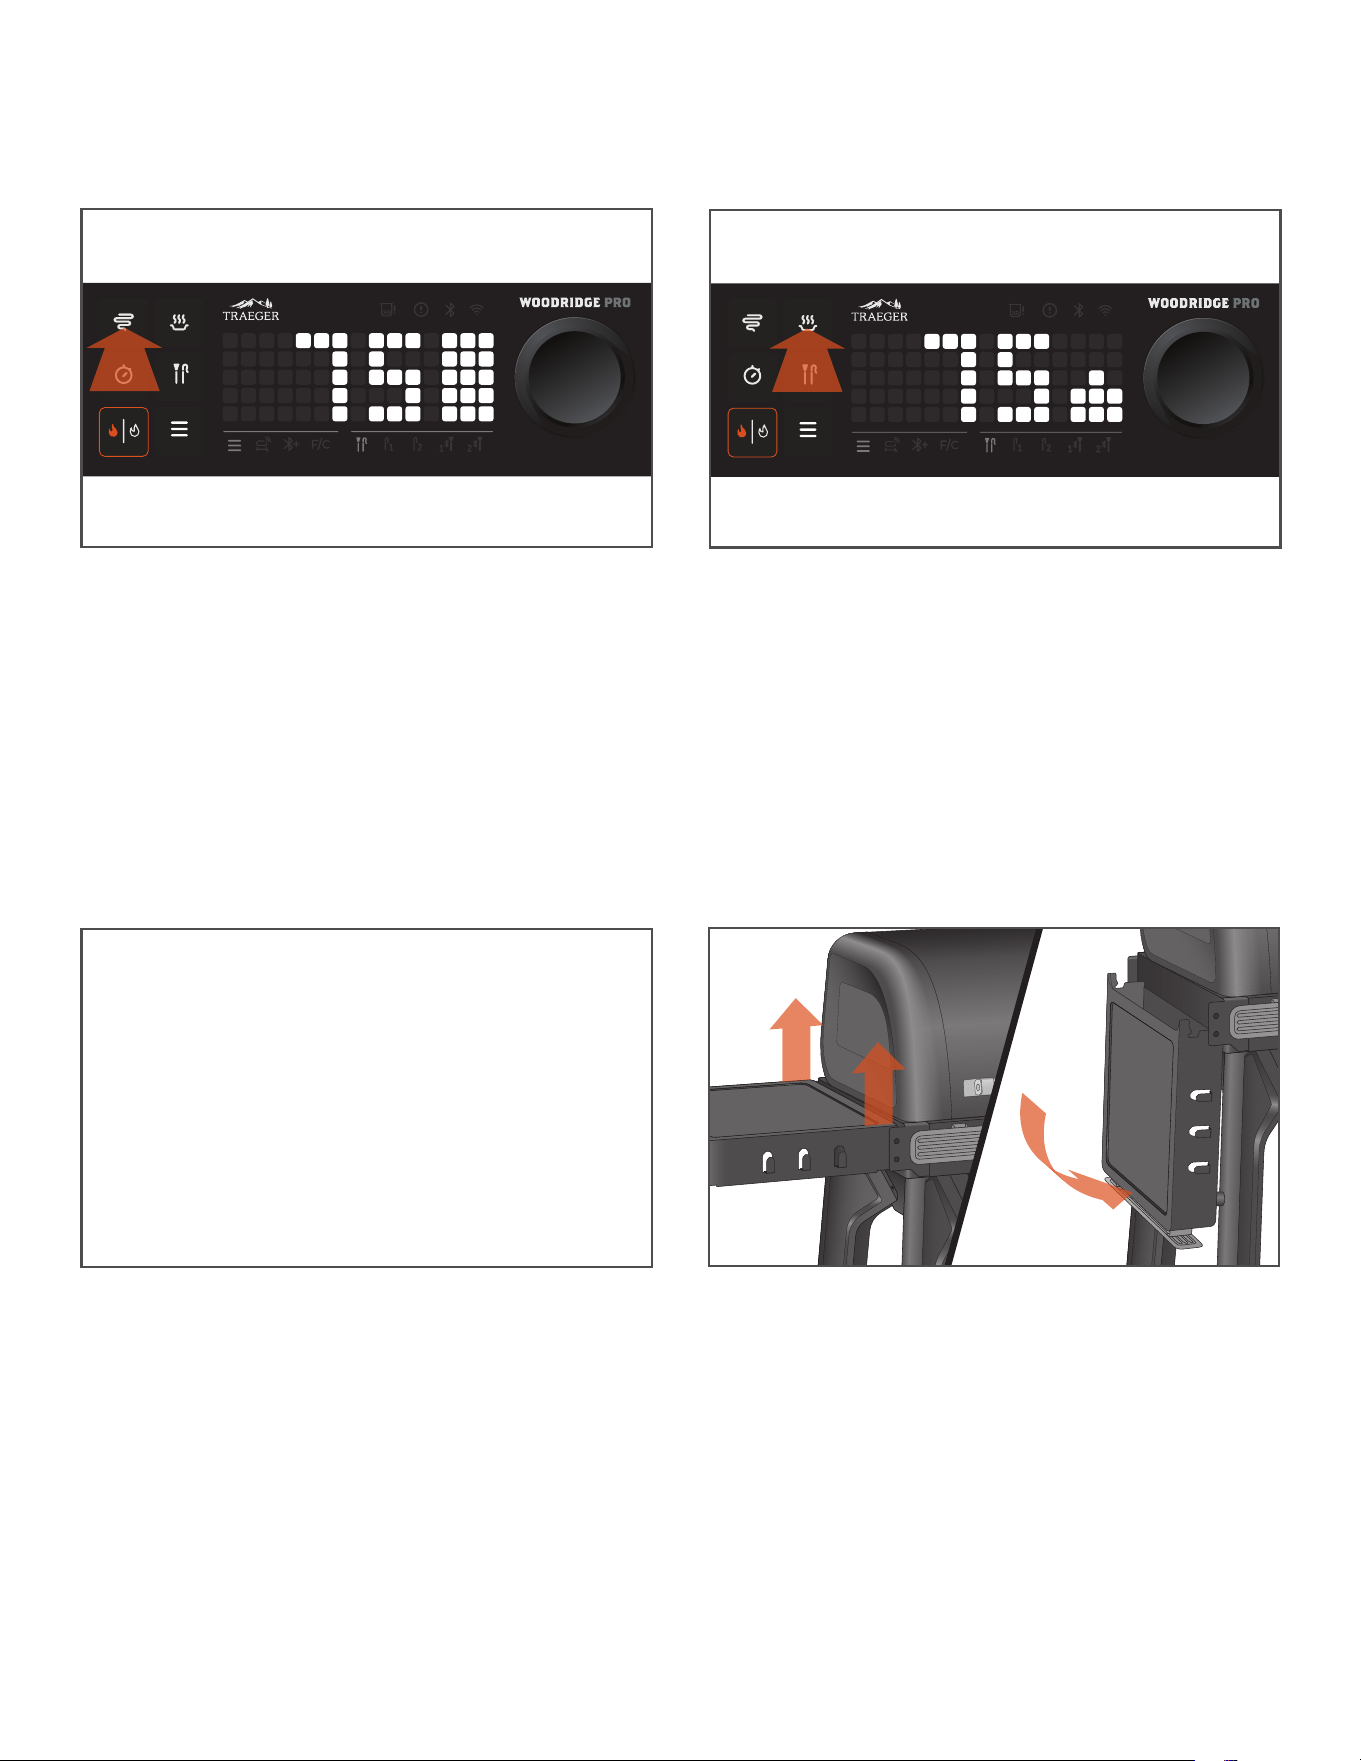
SUPER SMOKE™ OPTION
KEEP WARM FUNCTION
TRAEGER PELLET SENSOR
You can add more smoke flavor to your food by tapping the Super
Smoke button at any time during grilling. Tap it again to cancel. You
can also activate Super Smoke™ using the Traeger App.
NOTES:
• Super Smoke™ can only be activated when the grill temperature is
between 185°–225°F (85°–107°C).
• Smoke will be translucent and blue, not thick and white.
Keep Warm can be used to pause the cook cycle at any time during
grilling and maintain the grill temperature at a low temperature. Tap
the keep warm button to activate the function. Tap the keep warm
button again to resume cooking.
NOTE: The Keep Warm function is not designed to cook your food to
proper food safety standards.
The Traeger pellet sensor monitors the supply of pellets. Once selected
from the menu, it will display the current level of pellets, in 5%
increments.
If the Traeger pellet sensor is properly connected, it will display
“PELLET SENSOR Pellet Level: XXX%.” If the Traeger pellet sensor is
not properly connected, it will display “PELLET SENSOR Disconnected
Pellet Level: 0%.”
The Traeger pellet sensor allows you to check the status of your pellet
level remotely using the Traeger App. This system will send you push
notifications and alarms through the Traeger App on your smart device
when your pellets are getting low, protecting your cook from running
out of fuel.
FOLDING SIDE SHELF
To fold down the side shelf, lift shelf o of top bolts and swing down.
Reverse to return shelf to the normal position.
32
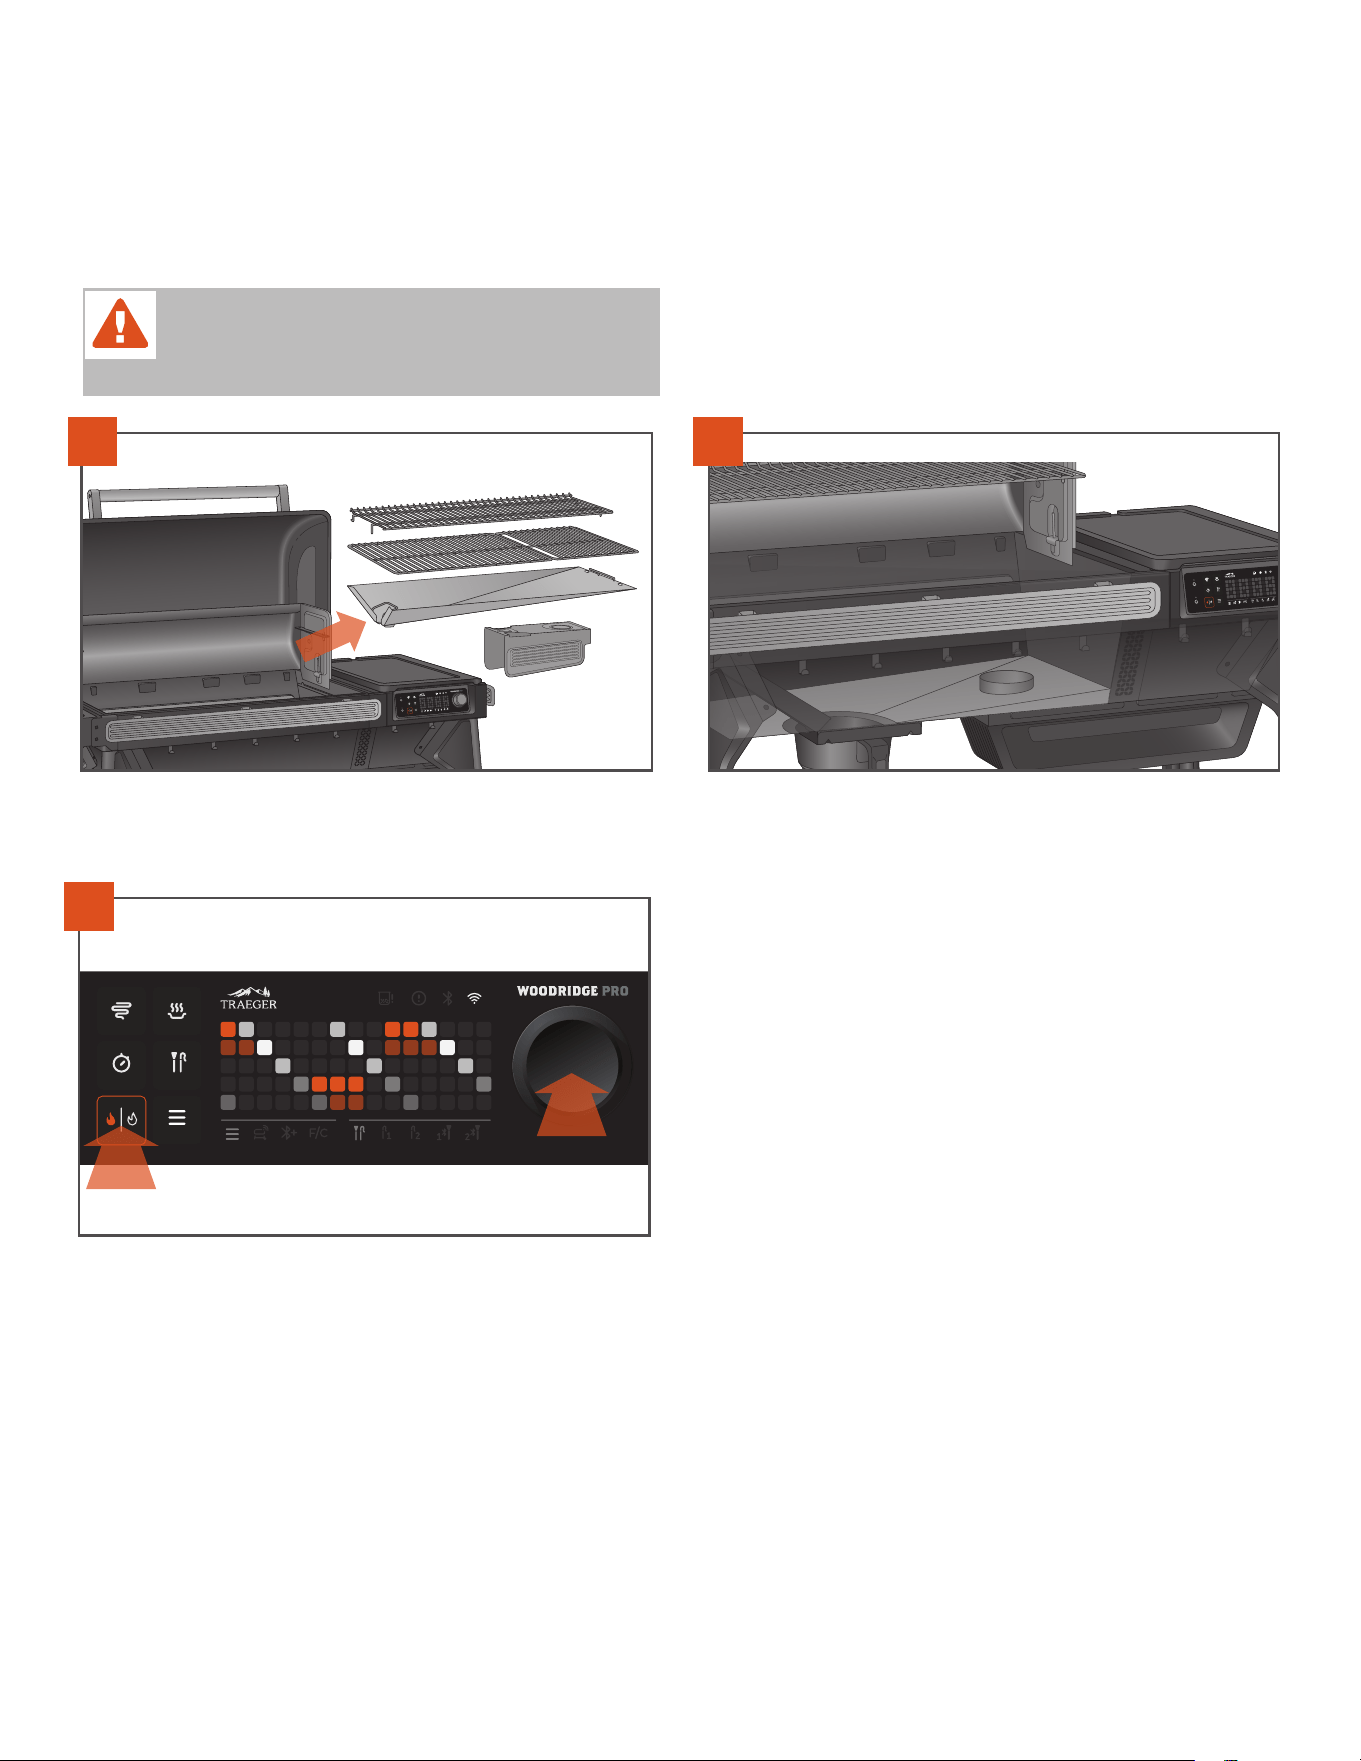
AUGER PRIMING FUNCTION
Priming the auger will allow you to manually move the auger. This function should be used if you need to clear any pellets from the auger tube or if
you want to fill the auger with pellets after running out of them.
Make sure the grill is idle and not cooking. Remove the grill grates, drip
tray, and heat bae.
1
Make sure the firepot is not full of pellets.
2
When the grill is in idle (display showing: - - - F), press and hold both the
ignite/shutdown
button and the
selection
dial. The auger will begin to
move and the screen will display the auger moving animation.
If you are using this function to bring fresh pellets to the firepot,
continuing holding the
ignite/shutdown
and
selection
dial together until
pellets begin to fall into the firepot; then release both buttons. If you are
using this function to clear pellets from the firepot, continue holding the
ignite/shutdown
and
selection
dial together until all pellets have exited.
Once the auger has been primed, check the firepot and remove
anything that fell in. Ensure your firepot is clean and empty before
ignition.
3
HOW TO USE ADDITIONAL GRILL FEATURES CONTINUED
WARNING! FIRE HAZARD
ALWAYS ALLOW GRILL TO COOL COMPLETELY BEFORE
USING THE AUGER PRIMING FUNCTION.
33
TRAEGER.COM
HOPPER CLEAN-OUT
Your Traeger® Grill has a hopper clean-out system that allows you to remove pellets from the pellet hopper or quickly change from one pellet
flavor to another without making a mess.
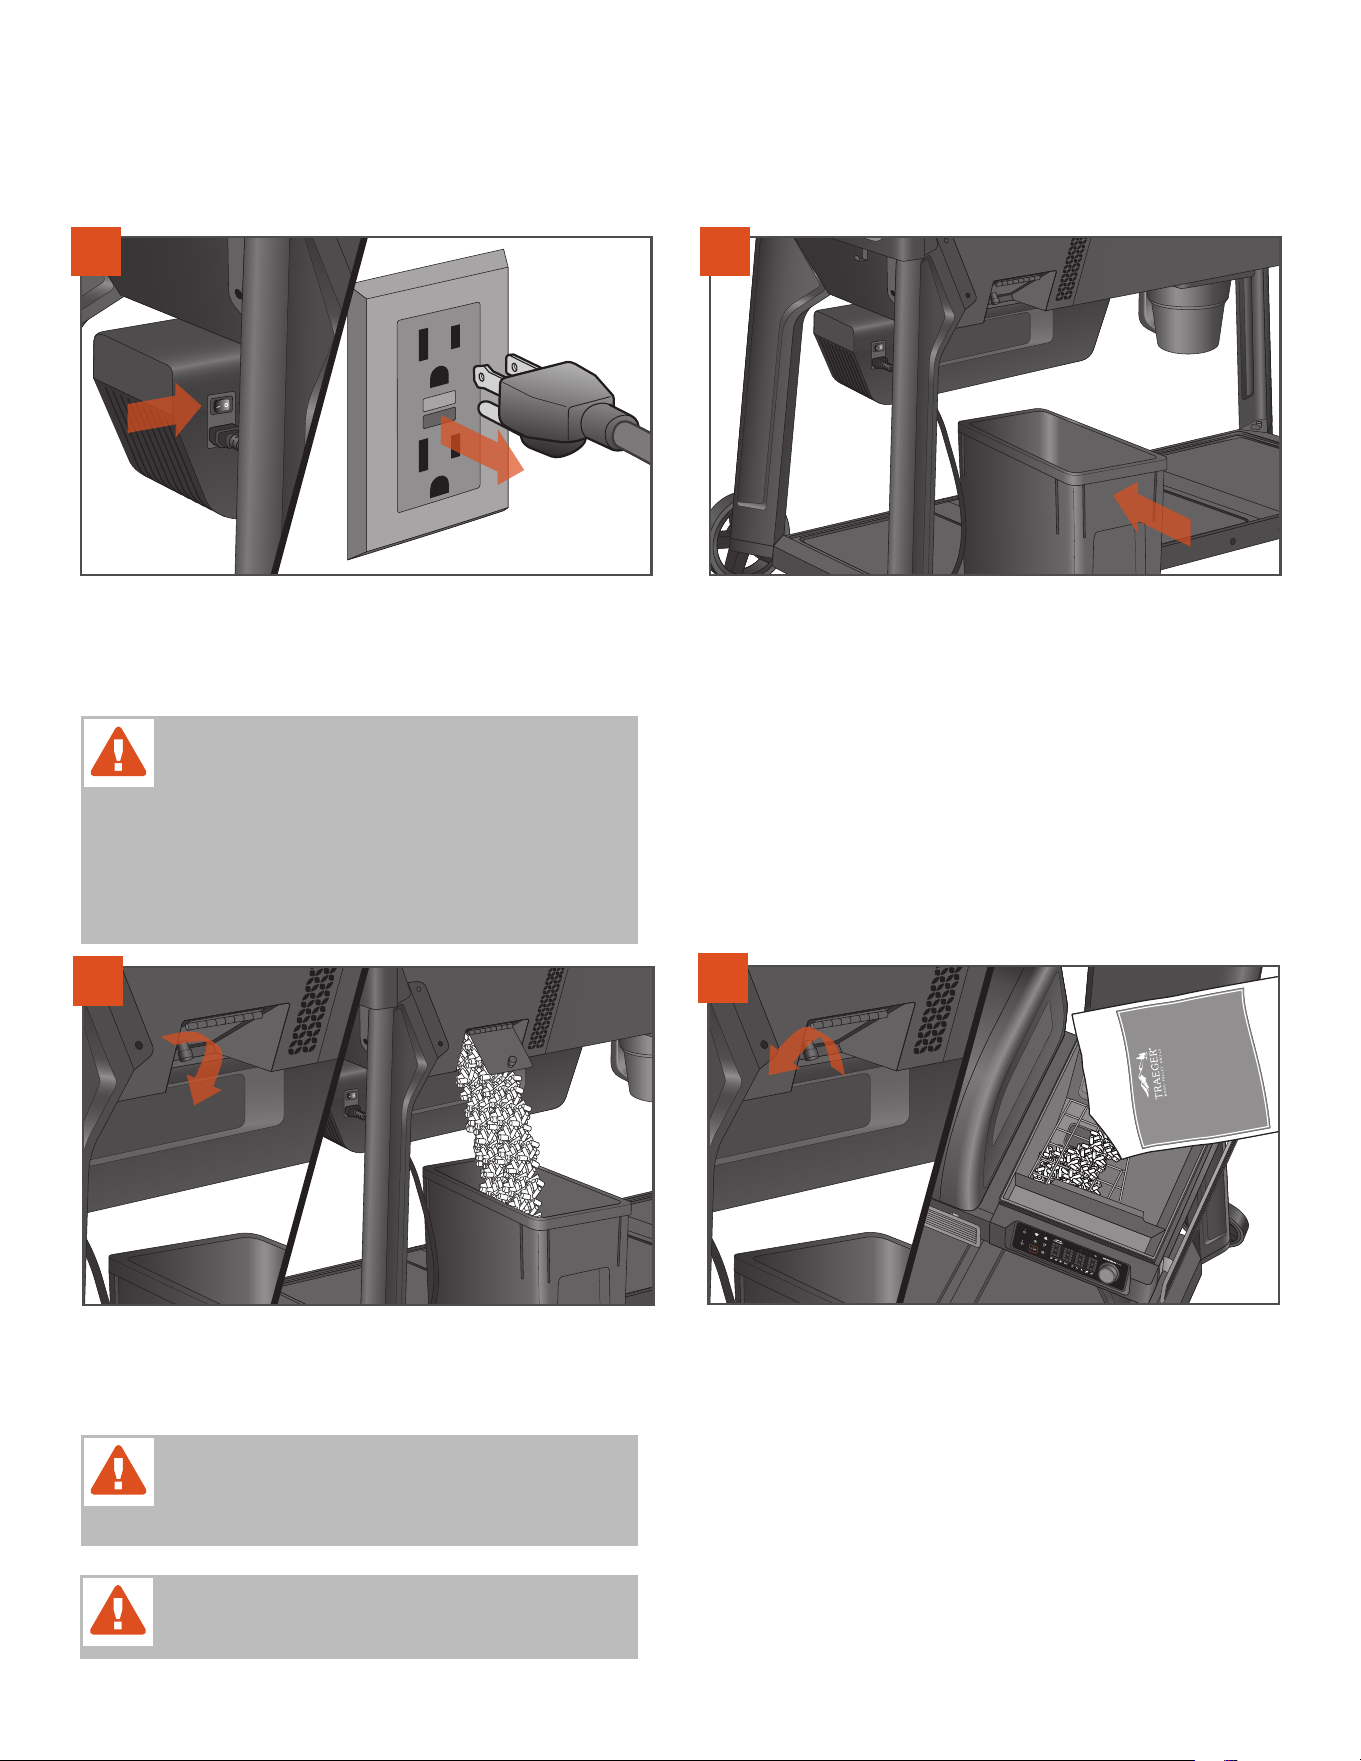
Press the main power switch to OFF (O) and disconnect the power
cord. If the grill is still hot, allow it to cool completely.
NOTE: Plug appearance may vary by region.
Unscrew the knob on the back of the auger box and open the pellet
release door. Pellets will empty into the StayDry™ Pellet Bin. Vacuum
out any remaining sawdust from the hopper.
Once the hopper is empty, close the door and tighten the knob. Refill
the hopper with a dierent flavor of TRAEGER HARDWOOD PELLETS.
Before emptying the hopper, make sure that the Traeger® StayDry™
Pellet Bin (sold separately) is placed directly underneath the pellet
release door.
2
3
4
WARNING! DO NOT EMPTY OUT THE HOPPER UNTIL
GRILL HAS COMPLETELY COOLED AND THE POWER IS
OFF; OTHERWISE, PELLETS MAY BE VERY HOT.
WARNING! DO NOT PLACE YOUR HAND IN THE
HOPPER PAST THE SAFETY GRATE.
1
WARNING! ELECTRICAL SHOCK HAZARD
HAZARDOUS VOLTAGE IS PRESENT, WHICH CAN
SHOCK, BURN, OR CAUSE DEATH.
• GROUND FAULT CIRCUIT INTERRUPTER (GFCI)
PROTECTION MUST BE PROVIDED ON THE CIRCUIT(S)
OR OUTLET(S) TO BE USED FOR THE OPERATION OF THIS
TRAEGER
®
GRILL.
34
MAINTAINING YOUR GRILL
Do you love bacon, sausage, and brisket? We do, too, but after cooking
these fattier cuts, it’s more important than ever to remove grease from
the grill. Fortunately, it’s easy to do. When the grill has cooled to a warm
temperature, scrape grill grates and wipe up this grease from the drip
tray (be careful not to burn yourself). This will ensure that everything
runs smoothly the next time you fire up, especially if you plan to cook
something hot and fast!
w WARNING
Fire Hazard: Grease fires are most frequently
caused by failing to properly maintain the grill by not cleaning the
grease from the grill on a consistent basis.
w WARNING
Press the main power switch to OFF (O) and
disconnect the power cord before initiating any of the maintenance
below.
1. BEFORE EACH COOK:
Remove any buildup from the drip tray, or replace the drip tray liner. Check the
EZ-Clean™ Grease + Ash Keg, empty if full, and replace with a new EZ-Clean™
Grease + Ash Keg liner.
2. AFTER EACH COOK:
After shutdown, remove any excess food from the grates while still warm. Scrape
all grease into the EZ-Clean™ Grease + Ash Keg. Reinstall the Ember Shield.
NOTE: When scraping out grease, do not use a metal scraper.
w WARNING
To avoid injury, ensure all ash is cooled before cleaning.
3. MONTHLY:
Check the firepot and remove ash in, around, and underneath. Vacuum the ash
from the inside of the firepot. Scrape creosote from the backsplash and the back
of the grill lid. Do a final wipe-down of the grill cavity with Traeger® Grill Cleaner.
Remove and clean out the grease drain chute. Remove ash by sweeping it into
the EZ-Clean™ Grease + Ash Keg.
NOTE: When scraping out creosote, do not use a metal scraper.
4. AS NEEDED:
Replace the EZ-Clean™ Grease + Ash Keg liner when full.
PRO TIP: Cover the drip tray only with genuine Traeger branded Drip
Tray Liners. Using foil or other materials will significantly impact the
performance of the grill and could damage the drip tray or grill.

35
TRAEGER.COM
5. CHECKING THE EZ-CLEAN™ GREASE + ASH KEG BEFORE EVERY COOK
w WARNING
Make sure that the grill is COLD and ashes are
extinguished and COLD before checking the EZ-Clean™ Grease +
Ash Keg.
w WARNING
Failure to empty the EZ-Clean™ Grease + Ash
Keg could result in a serious fire.
Underneath the grill body there is a keg that collects both ash
and grease. This should be checked before every cook and emptied
when full. To remove and check the keg, simply grab the keg
with two hands and slide it out. Remove the disposable liner and
replace with a new one. See Step 10, Disposal of Ashes, for proper
ash disposal.
NOTE: Traeger’s keg liners will help keep this a clean and easy task.
6. CLEANING YOUR TRAEGER® GREASE MANAGEMENT SYSTEM (“TGMS”):
During your cooks, grease drippings will fall onto (i) the grease
drip tray and be channeled into (ii) the grease drain chute,
(iii) to be collected in the EZ-Clean™ Grease + Ash Keg. These
three components are the components of the Traeger® Grease
Management System (TGMS). Grease will accumulate in all of these
locations and should be regularly cleaned to reduce the risk of fire.
How often you need to clean the TGMS depends on the fat
content of your food. Fattier foods will require cleaning of the
TGMS more often, and sometimes you will need to clean the
TGMS after every cook.
Visible pieces of food and bits of hardened grease or other
buildup indicate a need for cleaning.
All components of the TGMS should be inspected before each use
for signs of grease buildup.
w WARNING
Accumulated grease is easier to clean o
when the grill is still warm—not hot. Be careful not to burn
yourself. Always wear heat-protective gloves when cleaning.
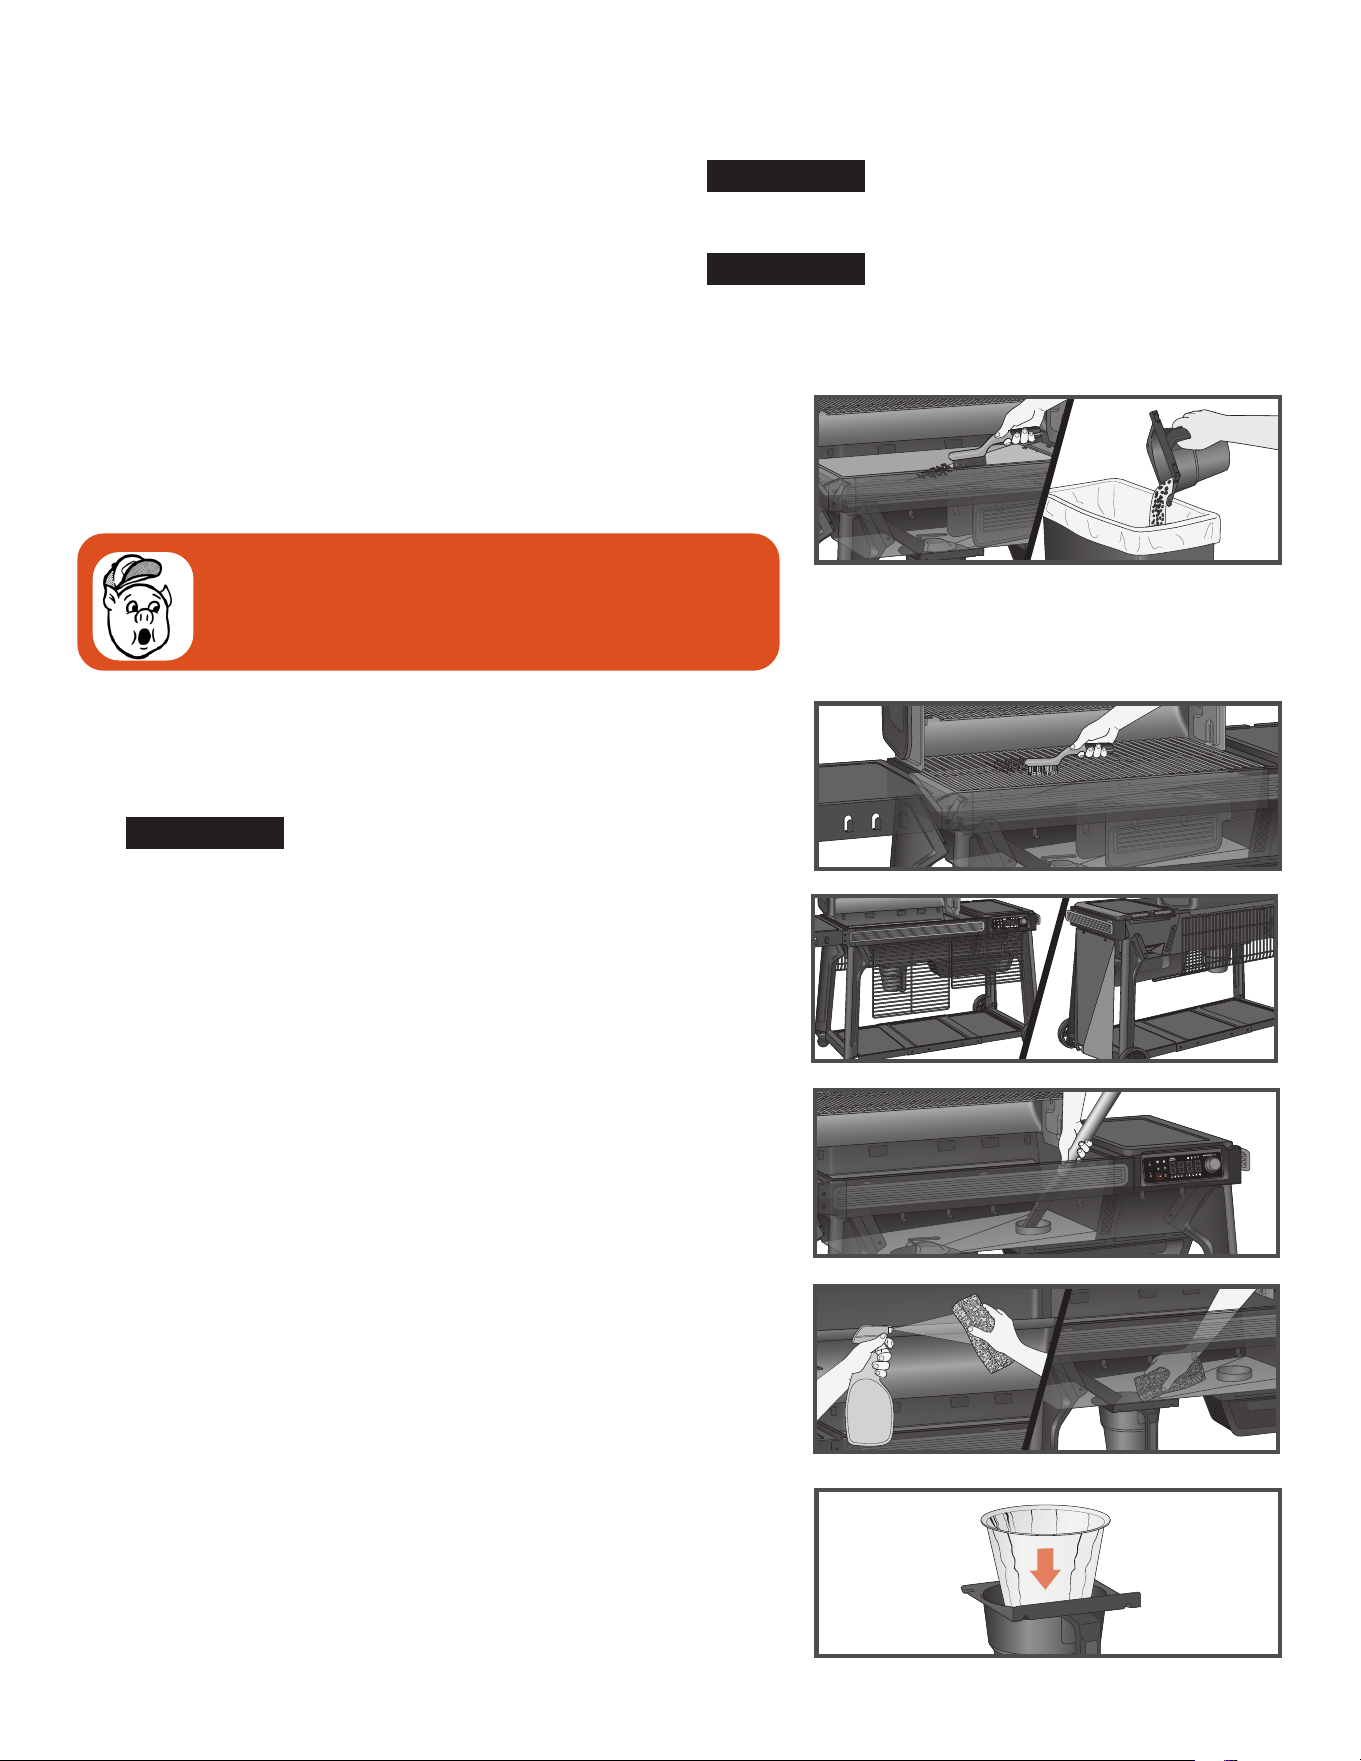
Clean the grease out of the grease drain chute. We recommend
cleaning this location regularly.
Remove all grill grates. This will provide access to the grease
drain chute opening inside the grill. Scrape the grease
accumulated on the drip tray down through the grease drain
chute using a sti, nonmetallic tool. Much of the loosened grease
can be pushed down through the grease drain chute and will fall
into the EZ-Clean™ Grease + Ash Keg. Wipe up remaining grease
residue with paper towels or disposable rags.
Regularly clean the grease out of the grill on the interior bottom and
sides. If grease is allowed to build up, a grease fire could result.
Scrape the grease accumulation from inside the grill using a sti,
nonmetallic tool. Much of the loosened grease can be removed
using paper towels or disposable rags. Excessive scraped-o ash
residue can be cleaned using a vacuum cleaner as described in
Step 9 (below) when cleaning the firepot of ashes.
Inspect and clean the heat bae for any grease or debris.
7. CREOSOTE REMOVAL:
When wood pellets are burned slowly, they produce tar and
other organic vapors that combine with expelled moisture to
form creosote. The creosote vapors condense in the relatively
cool exhaust vent of a slow-burning fire. As a result, creosote
accumulates on the exhaust vent lining. When ignited, creosote
makes an extremely hot fire. Airborne grease particles will travel
through the cooking chamber, and some of this airborne grease
will accumulate on the exhaust vent lining, similar to creosote,
which could contribute to a fire.
Periodically scrape the creosote and grease accumulation from
the back of the backsplash and back of the grill lid. Once the
creosote and grease residue have been loosened from the interior
lining and ventilation gaps in this downdraft system, much of
it can be removed with paper towels or disposable rags. Do not
spray water or other liquid cleaners onto the inside of your grill
to remove creosote.
NOTE: Inspect the Traeger® Exhaust System every time you
refill the hopper with pellets to determine when a creosote and/or
grease buildup has occurred.
When creosote or grease has accumulated, it should be removed
to reduce the risk of a fire.
8. OUTSIDE STORAGE:
w CAUTION
If the grill is stored outside, care should be
taken to ensure that water does not get into the pellet hopper.
Wood pellets expand greatly when wet and will jam your auger.
Always cover your grill when not in use with a Traeger® Grill Cover.
This custom-fit cover can be purchased at traeger.com.
9. CLEANING THE ASH FROM INSIDE AND AROUND THE FIREPOT
(AFTER APPROXIMATELY 20 HOURS OF COOKING):
w WARNING
Make sure that the grill is COLD and ashes are
extinguished and COLD before cleaning the ash.
w WARNING
Disposal of ashes should be done only
according to the following instructions.
Excess ash in the firepot will hamper ignition and may cause your fire
to go out. The firepot should be inspected regularly and cleaned to
remove the ash buildup. Again, cleaning the ash from in and around
the firepot should be done only when the grill and ashes are COLD.
Remove the grill grates, drip tray, heat bae, ember shield, and
grease drain chute to provide access to the firepot and the interior
of the grill. Much of the ash outside of the firepot can be removed
from the grill with an ash vacuum cleaner.
w WARNING
A dedicated vacuum cleaner is the best way to
remove ashes from the firepot, but this must be done with extreme
care to avoid the risk of fire. Again, cleaning the ash from in and
around the firepot should be done only when the grill and ashes
are COLD.
36
TROUBLESHOOTING
Although rare, you may see an error or warning message display on your control panel. Scan the QR code to go to
traeger.com/support for a list of error messages and how to resolve them.
ERROR MESSAGES
FREQUENTLY ASKED QUESTIONS
Scan this QR code to take you to Frequently Asked Questions.
An ash vacuum cleaner having a metal collection canister without
a bag would be best for this task. However, almost any vacuum
cleaner will work safely if this procedure is properly followed.
After ensuring that the ash in the firepot is COLD, vacuum the ash
from the inside of the firepot.
a. If your vacuum cleaner is a bagless model, empty any
previously accumulated debris from the collection chamber.
Then vacuum the ash from the inside of the firepot. Once the
firepot is clean, empty the collection chamber into the metal
container, handled in the manner described below under
Disposal of Ashes, without delay. Make sure that there is no
remaining ash residue left in the collection chamber.
b. If your vacuum cleaner is a model that uses a disposable
bag, install an unused bag in the machine. Then vacuum the
ash from the inside of the firepot. Once the firepot is clean,
remove the bag from the vacuum cleaner and place it in a metal
container, handled in the manner described under Disposal of
Ashes below.
10. DISPOSAL OF ASHES:
w WARNING
Ashes should always be completely cool
before handling. Ashes should be placed in a metal container with
a tight-fitting lid. The closed container of ashes should be placed
on a noncombustible floor or on the ground, well away from all
combustible materials, pending final disposal. Ashes should be
retained in the closed container until they are disposed of.
11. CLEANING THE GRILL GRATES:
w WARNING
Cleaning the grill grates works best while
they are still warm. Be careful not to burn yourself. Always wear
heat-protective gloves when cleaning. We recommend keeping a
scraper near the grill. After removing your food, give the grill grate
a quick brushing. It takes only a minute and it will be ready the
next time you want to use the grill.
12. CLEANING OUTSIDE SURFACES:
w WARNING
Press the main power switch to OFF (O) and
disconnect the power cord before initiating cleaning.
Use a disposable rag or cloth dampened with Traeger® Grill
Cleaner or warm, soapy water to wipe the grease from the outside
of the grill. DO NOT use oven cleaner, abrasive cleansers, or
abrasive cleaning pads on the outside grill surfaces.
13. TESTING THE GRILL AFTER CLEANING:
Before replacing the grease drain chute, ember shield, heat bae,
drip tray, and the grill grates, plug the power cord into a properly
grounded/earthed electrical outlet protected by a Ground Fault
Circuit Interrupter (GFCI) and press the main power switch to ON (I).
Set the temperature and tap the ignite/shutdown button. Pellets
should fall into the firepot and the hot rod should begin to heat
(it will start to turn red).
w WARNING
Do not touch the hot rod.
When flames start to come out of the firepot, run the shutdown
cycle. Let the grill cool down. Now you’re ready to place the grease
drain chute, ember shield, heat bae, drip tray, grill grates, and
food back onto the grill.
14. POWER CORD
If the power supply cord is damaged, it must be replaced by a
special cord assembly available from Traeger.
MAINTAINING YOUR GRILL CONTINUED

37
TRAEGER.COM
OPERATING TIPS
1. We are always working to improve your grill’s performance. Make
sure your grill is connected and has the latest firmware update. For
instructions on checking your firmware version, go to traeger.com.
2. You can change the temperature at any time during grilling to
increase or decrease cooking temperature. However, temperatures
should not be changed frequently; doing so will cause them to vary.
It is best practice to give the grill some time to reach the desired
temperature before making additional temperature changes.
3. To change between Fahrenheit and Celsius: Tap the menu button.
Scroll with the selection dial to the F/C icon. Press the dial to
select. Then select F or C with the selection dial, and press the
dial to confirm.
4. Your Traeger® Grill is designed to operate with the lid closed at all
times. Opening the grill lid greatly lengthens your cooking time
and will cause the temperature to drop. Do not open the lid before
the grill has reached the set temperature.
5. Do not overload the cooking surface with excessive amounts of
food that reach beyond the edges of the footprint of the drip tray.
This can lead to interference with proper cooking airflow and may
lengthen the time to reach the set temperature, causing the grill to
not work properly.
6. Cook to temperature, not to time.
7. Always take into account the type of food you are cooking:
• Generally, thin foods need high heat and shorter cook times,
while thicker foods need low heat and longer cook times.
• Vegetables take longer to cook than meats at the same cooking
temperatures.
• Always check that the internal temperature of the meat that you
are cooking reaches a safe temperature for eating.
• Putting frozen, raw, cold, or otherwise uncooked food on the
grill may result in a temporary drop of your grill’s internal
temperature.
8. Keep the grill clean. Regularly inspect your grill for accumulated
grease. Grease fires are caused by not properly maintaining the
grill and failing to clean the Traeger® Grease Management System
(TGMS) on a consistent basis (see “Maintaining Your Grill” on
pages 34-36). Even if there is ample room in the grill, be cautious
of loading excessive amounts of food that can release large
quantities of grease (for example, more than a pound of bacon).
If the grill has not been well maintained or if your previous cooks
have produced large quantities of grease, you MUST clean the
grease from the grill before using it again.
TRAEGER’S LEGENDARY CUSTOMER SERVICE is the best out there. If you have any questions about
your Traeger® Grill or need tips on cooking your first holiday turkey, our seasoned experts have your back. We’re here for you
365 days a year, including holidays. For assistance with assembly, installation, safe operation, parts, or general customer
service, you can reach us at:
TRAEGER’S CUSTOMER SERVICE
Phone: US/CA: 1-800-TRAEGER 6:00 a.m.–10:00 p.m. MT
Website: support.traeger.com
Address: TRAEGER PELLET GRILLS LLC
533 South 400 West
Salt Lake City, UT 84101
SERVICE
38
10-YEAR LIMITED WARRANTY
Traeger Pellet Grills LLC warrants this Traeger® Grill for the components, coverage, and warranty period listed in the table
below under normal use and proper maintenance. This warranty gives you specific legal rights, and you may also have
other rights which may vary among states and provinces. The warranty period starts from the date of original purchase
from traeger.com or a Traeger authorized dealer. A list of Traeger authorized dealers is available at https://www.traeger.
com/dealers (together each an “Authorized Seller”). The warranty period and coverage for the replacement parts shall be
as follows:
Warranty Periods and Coverage
Components Warranty Period Coverage
Body, Legs, Shelves, and Hopper Cover 10 Years Will not rust through
Controller, Auger Motor, Auger, and Fan 3 Years Material and Manufacturing Defects
Drip Tray, Ember Shield, and Heat Baffle 3 Years Material and Manufacturing Defects
Enameled Grill Grates 3 Years Will not rust through
Hot Rod, Cord, RTD, and Thermocouple 1 Year Material and Manufacturing Defects
Meat Probe and Wireless Meat Thermometers 1 Year Will not rust through
TRAEGER® GRILL WARRANTY

39
TRAEGER.COM
®
Traeger’s entire liability and your exclusive remedy shall be replacement of the defective parts of your Traeger® Grill, if any. Original part(s)
approved for return by Traeger’s Customer Service must be returned prepaid. Traeger may replace defective parts with new or refurbished
parts, at Traeger’s sole discretion on an as available basis within ninety days. Without limiting the exclusions stated above, there is not warranty
coverage for: (i) paint damage caused by grease fires, (ii) UV exposure, (iii) normal wear and tear; and (iv) warping of the drip tray, ember shield,
or heat bae.
Traeger grills are designed to be modular for simple repair by regular users. Traeger’s entire obligation under this warranty shall be to provide
you with replacement of any defective parts and to provide you with instructions on how to make the replacement yourself. Traeger may replace
defective parts with new or refurbished parts. Traeger reserves the right to inspect any grill (shipping paid by Traeger) and to analyze any usage
information including, without limitation, any digital connected grill data (to the extent covered by our data protection policy). To validate and
process a warranty claim Traeger may require that you provide reasonable evidence of your issue, including participating in video chats, phone
conversations, providing photos, and providing other relevant information. Labor charges connected with the replacement of defective parts and
freight charges to ship parts shall be paid at your expense.
The limitations in the following paragraph do not apply to residents of Quebec to whom the Quebec Consumer Protection Act applies.
FOR GREATER CERTAINTY AND TO FULLEST EXTENT PERMITTED BY LAW, TRAEGER PELLET GRILLS LLC SHALL NOT BE LIABLE UNDER THIS
OR ANY IMPLIED WARRANTY FOR INCIDENTAL, CONSEQUENTIAL DAMAGES, INDIRECT, SPECIAL, LOSS OF DATA, EXEMPLARY, PUNITIVE OR
ENHANCED DAMAGES, LOST PROFITS OR REVENUES OR DIMINUTION IN VALUE ARISING OUT OF OR RELATING TO YOUR USE OF YOUR GRILL,
REGARDLESS OF (A) WHETHER SUCH DAMAGES WERE FORESEEABLE, (B) WHETHER OR NOT TRAEGER WAS ADVISED OF THE POSSIBILITY
OF SUCH DAMAGES AND (C) THE LEGAL OR EQUITABLE THEORY (CONTRACT, TORT, OR OTHERWISE) UPON WHICH THE CLAIM IS BASED,
AND NOTWITHSTANDING THE FAILURE OF ANY AGREED OR OTHER REMEDY OF ITS ESSENTIAL PURPOSE. THIS WARRANTY GIVES THE RETAIL
CUSTOMER SPECIFIC LEGAL RIGHTS AND THE CUSTOMER MAY HAVE OTHER RIGHTS WHICH VARY AMONG STATES AND PROVINCES. BOTH
YOU AND TRAEGER INTEND FOR THIS WARRANTY TO BE YOUR EXCLUSIVE REMEDY FOR A DEFECTIVE GRILL.
This warranty shall be void if: (i) the grill is not assembled or operated in accordance with Traeger’s operating instructions provided with this
grill; (ii) the grill is not purchased from an Authorized Seller; (iii) the grill is resold or traded to another owner; (iv) there has been use of any third
party components, parts, or accessories; (v) fuels other than wood pellets designed for wood pellet grills and barbeques have been used with the
grill; (vi) wood stove heating pellets are used in the grill; (vii) the grill has been used in a commercial or food service application; (viii) the user
has allowed the grill to become damaged, abused, or otherwise failed to maintain the grill in accordance with Traeger’s operating instructions; or
(ix) there has been any unapproved modification of this grill.
Please note that because Traeger is unable to oversee or control the quality of its products sold by unauthorized sellers, Traeger’s warranty is
only available if you purchased your grill from an Authorized Seller. Traeger’s warranty extends only to products purchased from an Authorized
Seller.
To process a warranty claim, contact Traeger’s customer service at the phone number or address listed above. Traeger requires proof of your date
of purchase from an Authorized Seller. You should retain your sales slip or invoice along with this manual with your valuable documents.
Customers outside of the United States and Canada should note that NOT all warranty policies stated herein are consistent globally. Customers
should contact the local distributor in their current country from the list at International Support for instructions regarding warranty claims
specific to that country. The process described herein will not work for international warranty requests.
ADDITIONAL IMPORTANT WARRANTY INFORMATION
• We are not responsible for items lost in transit. For this reason, we highly recommend getting a tracking number or delivery confirmation when
shipping your package.
• The product you send to us becomes the possession of Traeger and will not be returned to you.
Traeger will determine if your warranty claim is covered under this warranty policy at Traeger’s sole and complete discretion, and failure to follow
the required procedures may void your warranty claim. This warranty gives you specific legal rights, and you may also have other rights which
vary among states, provinces, and countries.

40
Traeger Pellet Grills LLC
533 South 400 West
Salt Lake City, UT 84101
traeger.com
Patent: www.traeger.com/patents
© 2024 Traeger Pellet Grills LLC. All Rights Reserved.
The Bluetooth® word mark and logos are registered
trademarks owned by Bluetooth SIG, Inc. and any use
of such marks by Traeger is under license.
Other trademarks and trade names are those of their
respective owners.
®