Dongji Automatic Vending Machine Manual
◆ All rights reserved by Dongji Company. No reproduction or distribution without permission. ◆
User Manual
Model: DJ-VEND-100
GUANGDONG DONGJI INTELLIGENT DEVICE CO.,LTD.

Dongji Automatic Vending Machine Manual
◆ All rights reserved by Dongji Company. No reproduction or distribution without permission. ◆
- 1 -
Catalogue
User Manual .......................................................................................................................................................................................... - 1 -
Table of Contents .................................................................................................................................................................................. - 1 -
Preface .................................................................................................................................................................................................. - 1 -
Equipment Peripheral Layout Requirements .................................................................................................................................... - 2 -
I. Cabling Requirements ............................................................................................................................................................... - 2 -
II. Ground Wire ............................................................................................................................................................................ - 2 -
III. Rain Protection ....................................................................................................................................................................... - 2 -
IV. Dehumidification ................................................................................................................................................................... - 2 -
V. Screen ...................................................................................................................................................................................... - 2 -
Chapter 1 Introduction .......................................................................................................................................................................... - 2 -
1. Cabinet parameters: ..................................................................................................................................................................... - 2-
2. Cabinet Performance Overview ................................................................................................................................................... - 2 -
Chapter 2 Handling and Installation ..................................................................................................................................................... - 2 -
1. Precautions for handling and moving: ........................................................................................................................................ - 2 -
2. Unpacking the Machine: ............................................................................................................................................................. - 2 -
3. Machine placement: .................................................................................................................................................................... - 2 -
Chapter 3 Pre-sales Preparation ............................................................................................................................................................ - 5 -
1. Introduction to the Structure of Vending Machine ....................................................................................................................... - 7 -
2. Machine Commissioning .............................................................................................................................................................. - 8 -
3. Invetory Replenishment Specification Requirements ................................................................................................................... - 8 -
4. System Update and Testing ...................................................................................................................................................... - 9 -
Chapter 4 Motor Operation and Maintenance ....................................................................................................................................... - 9 -
1. Applicable Environment ........................................................................................................................................................ - 10 -
2. Basic Performance.................................................................................................................................................................. - 12 -
Chapter 5: Overall Maintenance and Care .......................................................................................................................................... - 11 -
1.1. Cleaning .............................................................................................................................................................................. - 12 -
1.2. Frequently Asked Questions and Troubleshootin ............................................................................................................... - 12 -
Chapter 6: Introduction to Equipment Terminal App Functions......................................................................................................... - 12 -
1. User Purchase/Usage Guide ....................................................................................................................................................... - 13 -
2. Equipment Parameter Setting Function ...................................................................................................................................... - 17 -
3. Parameter Setting ........................................................................................................................................................................ - 21 -
Chapter 7: Backend Management System .......................................................................................................................................... - 23 -
1. User Login .................................................................................................................................................................................. - 23 -
2. Device Management ................................................................................................................................................................... - 23 -
1.1. Open Device Management page .......................................................................................................................................... - 23 -
1.2. Check device status ............................................................................................................................................................. - 23 -
1.3. Remove from Shelves ......................................................................................................................................................... - 24 -
3. Replenishment Management ...................................................................................................................................................... - 24 -

Dongji Automatic Vending Machine Manual
◆ All rights reserved by Dongji Company. No reproduction or distribution without permission. ◆
- 2 -
4. Merchandise Control ................................................................................................................................................................ - 25 -
5. Order Details .............................................................................................................................................................................. - 26 -
6. Account Management ................................................................................................................................................................. - 27 -
7. Remote Update for Device App and Host Machine ................................................................................................................... - 28 -
Chapter 8 Overview of Control Board Product ................................................................................................................................. - 30 -
Chapter 9 Control Board Mainboard Interface Description .............................................................................................................. - 31 -
Chapter 10 Firmware Update Method Description ........................................................................................................................... - 32 -
The company reserves the right to modify the product design. The product you purchased may have been improved and may
not fully match the instructions, but this will not affect its performance or usability. We apologize for any inconvenience.
Dongji after-sales service hotline: 18807503374
Dongji Automatic Vending Machine Manual
◆ All rights reserved by Dongji Company. No reproduction or distribution without permission. ◆
- 3 -
Preface
Thank you for choosing and using our DJ-VEND-100 product. Before using our vending machine, please read the user manual
carefully to ensure optimal performance.
Should you have any questions during use, please contact us using the phone number provided at the end of this manual. We are
always ready to serve you.
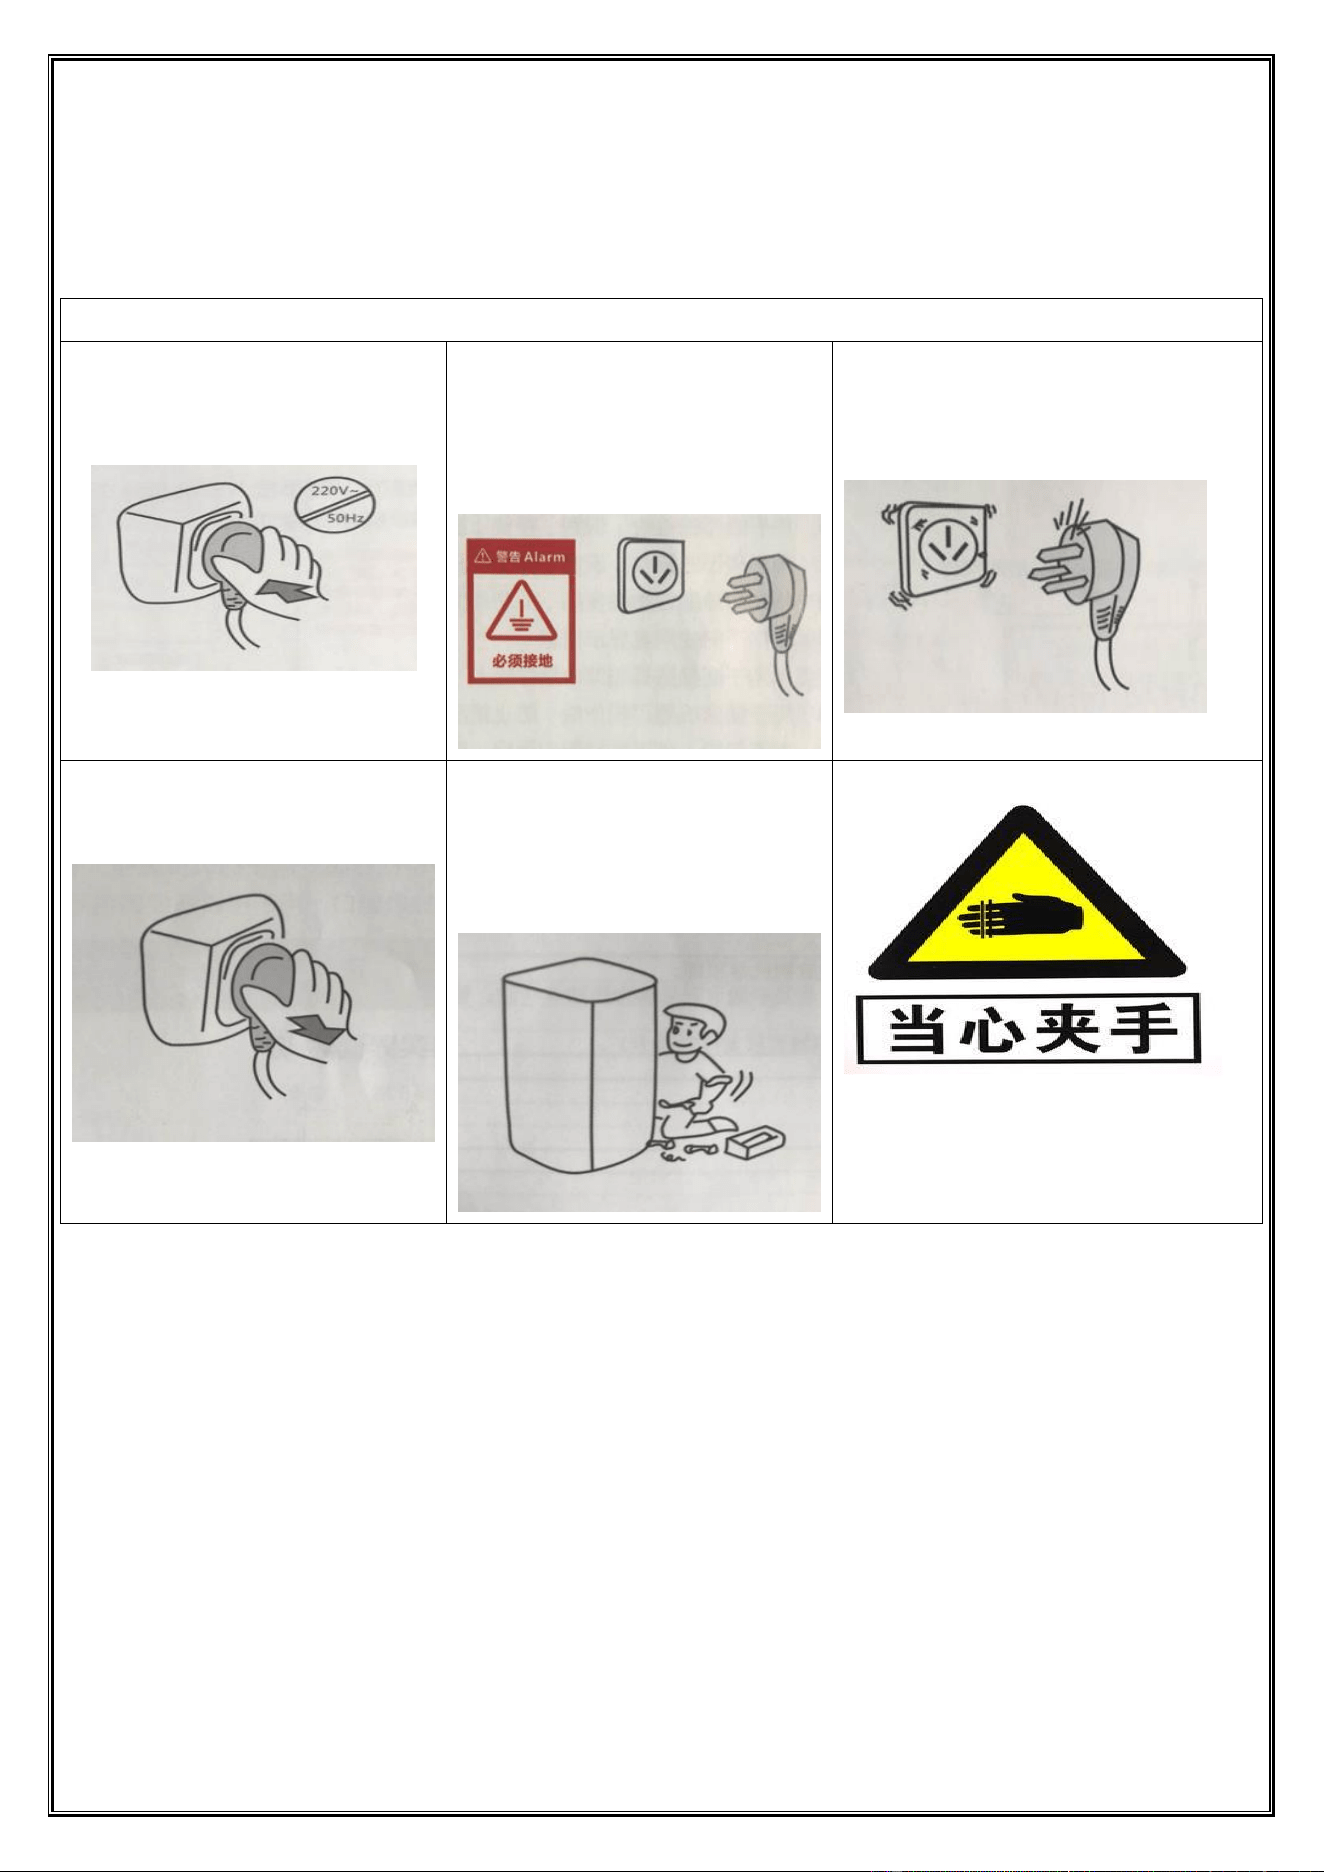
Safety Precautions for Medical Vending Machines
1. Operate on 220V/50Hz AC power supply with
a voltage fluctuation range of 225-235V.
Exceeding this range may cause severe
malfunctions.
2. A reliable 10A three-pin socket with
proper grounding must be used; otherwise,
there is a risk of electric shock. After the
machine is installed in place, the plug should
be easily detachable.
3. Do not damage the power cord; avoid having
the machine press on the power cord or stepping
on it. If the power cord is damaged or shows signs
of wear, notify the manufacturer for replacement.
4. When cleaning, repairing, or replacing
machine parts, unplug the power cord to
prevent electric shock.
5. Unauthorized disassembly or modification
of the cabinet, or alteration of its internal
electrical control circuitry is strictly
prohibited. Any resulting consequences shall
be borne by Party B.
6. Do not place your hand near the cup during
pic
kup to avoid hand entrapment.
Warning:
The machine must not be used in flammable or explosive gas environments. Do not spray oil, paint, or other flammable/explosive
substances near the machine to avoid accidents.
Do not splash water or wash inside/outside the machine. When washing the floor, strictly avoid splashing electrical or mechanical
components.
It is strictly prohibited to use other electrical equipment inside the box.
When the machine is placed near a door or under an eave, attention should be paid to rain protection and sun protection to avoid machine
malfunctions and shortened service life.
The machine should be placed in a location free from moisture and outdoor exposure. Complete exposure to rain and snow is absolutely
prohibited.
It is necessary to clean the dust inside and around the machine every week, especially for electronic components such as the Android
board and control board. Dust covering heat sinks, fans, or component surfaces will hinder heat dissipation, leading to temperature rise,
which may cause reduced component performance (such as CPU throttling) or permanent damage (such as capacitor bulging and chip

Dongji Automatic Vending Machine Manual
◆ All rights reserved by Dongji Company. No reproduction or distribution without permission. ◆
- 4 -
burning).
Dust accumulation in slots and connectors (e.g., memory slots, USB ports) may cause poor contact, leading to device failure or frequent
disconnections.
Equipment Peripheral Layout Requirements
1. Cabling Requirements
The longer the wiring length, the greater the voltage drop. When the voltage falls below a certain threshold (e.g., under 210V), it
may impair equipment operation. To prevent unnecessary user inconvenience, the following wiring requirements must be strictly
followed:
Equipment below 1.5kW:
Within 10 meters: Use 1.5mm² wire
Within 20 meters: Use 2.5mm² wire
Within 30 meters: Use 4mm² wire
Equipment below 3kW:
Within 10 meters: Use 2.5mm² wire
Within 20 meters: Use 4mm² wire
Within 30 meters: Use 6mm² wire
Equipment below 4.5kW:
Within 10 meters: Use 4mm² wire
Within 20 meters: Use 6mm² wire
Within 40 meters: Use 10mm² wire
2. Ground Wire
To prevent electric shock and ensure equipment stability, the device must be grounded. This requires installation by an electrician,
connecting an effective ground wire. Alternatively, a galvanized iron post over 1.5 meters tall can be driven into the ground to serve as
a grounding electrode.
3. Rain Protection
Devices should be installed indoors whenever possible. If outdoor placement is unavoidable, a canopy should be provided.
4. Dehumidification
In humid environments, dust may absorb moisture and form conductive pathways, causing electrical leakage or signal
interference.
5. Screen
The device should not be placed directly in front of the sun, as prolonged exposure to sunlight or rain can damage the screen.
Chapter 1 Introduction
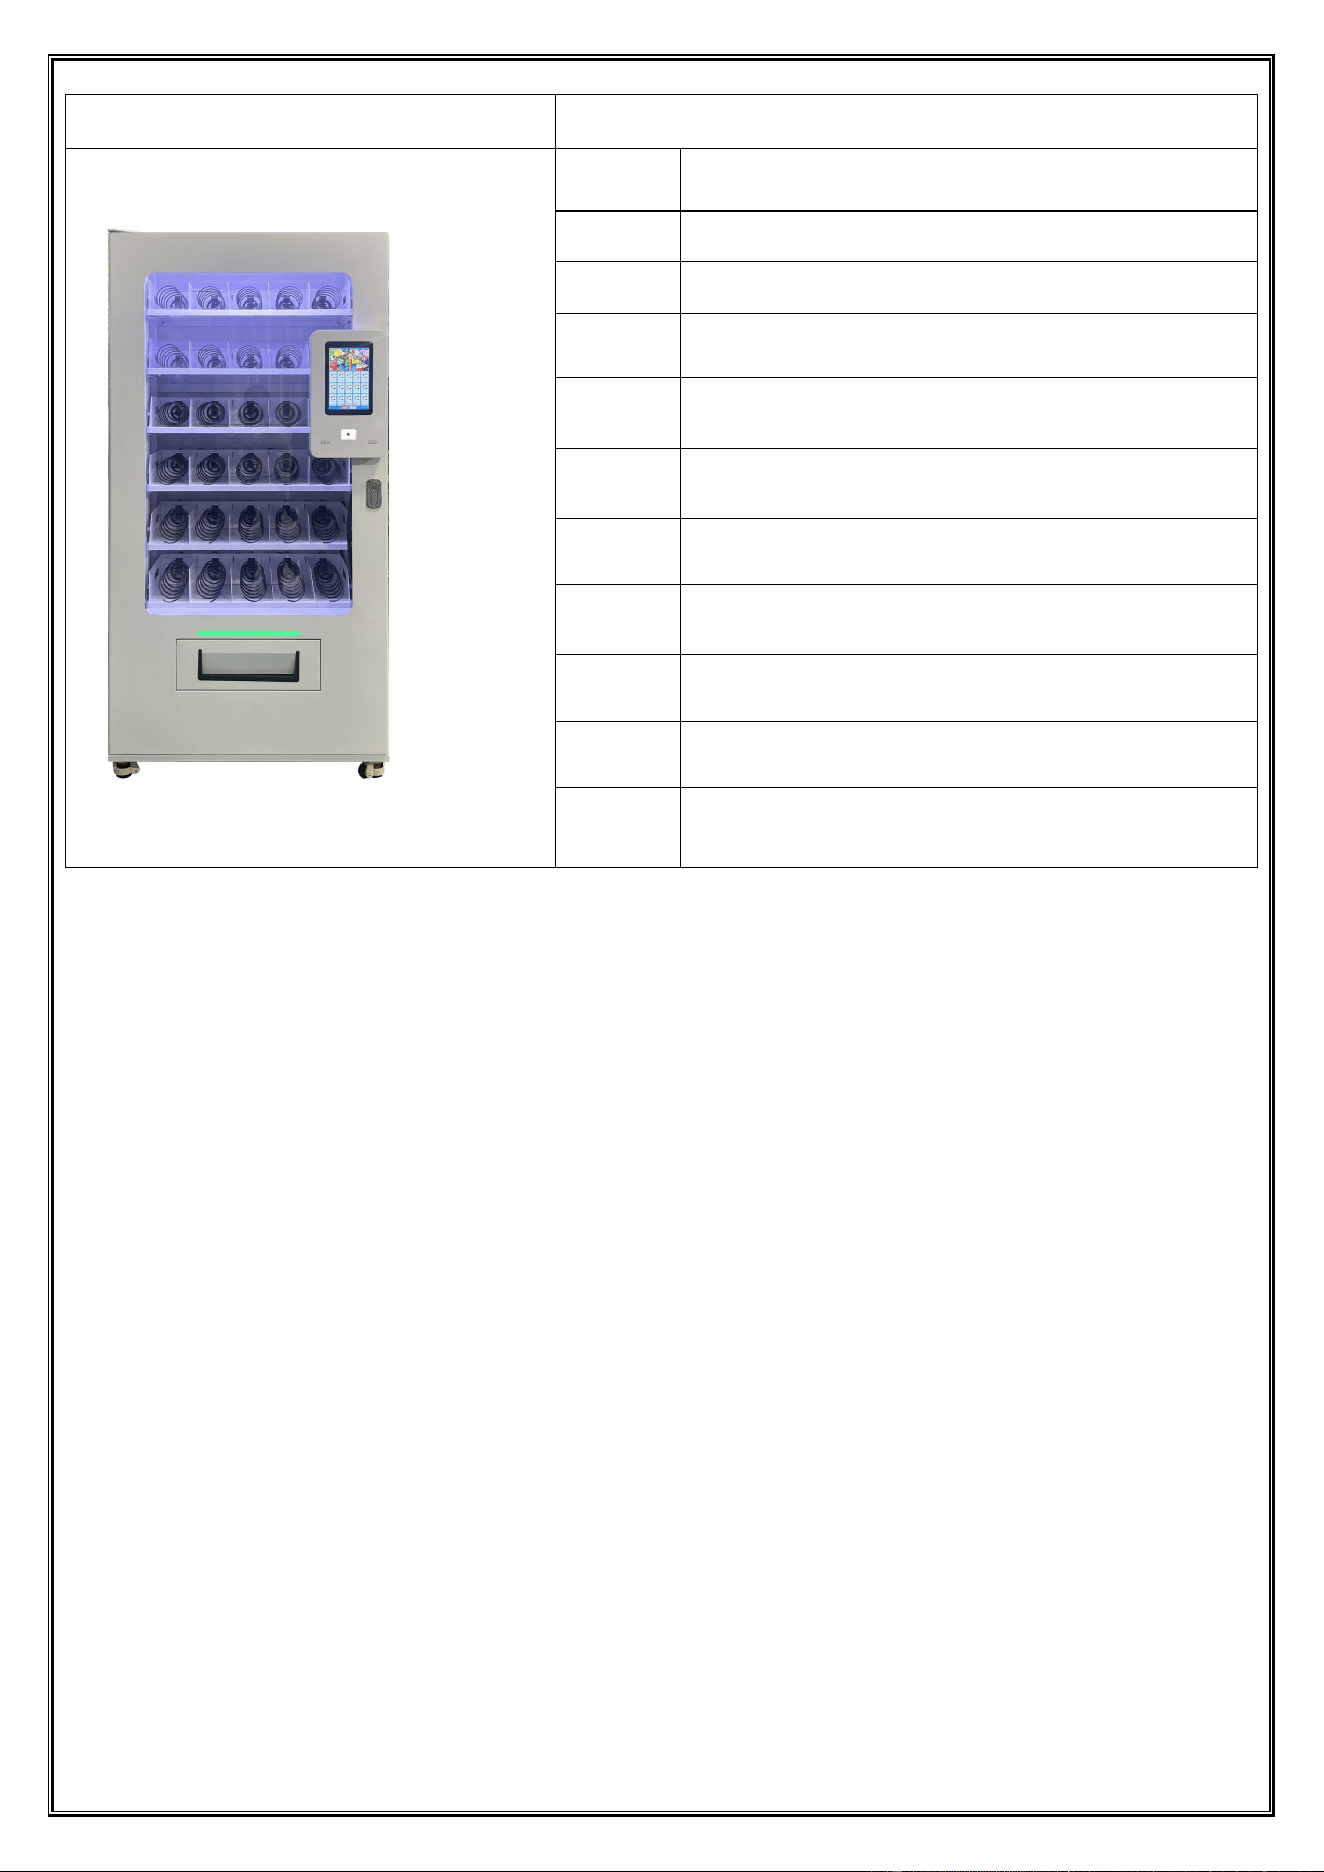
1. Cabinet Parameters:
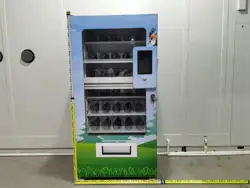
DJ-VEND-100 Vending Machine
Dongji Automatic Vending Machine Manual
◆ All rights reserved by Dongji Company. No reproduction or distribution without permission. ◆
- 5 -
Picture
Main Parameter
Dimensions
970mm (length) x 650mm (width) x 1980mm (height);
Weight
260KG;
Electrical
parameters
AC220V/110V
Products
sold
Medical equipment wire; other materials
Capacity
specificatio
ns
6 layers, 5 columns per layer; commonly used springs can hold 5
boxes per column. Total: 150 boxes
Spring
spacing
Custom springs available in sizes (162 × 136 × 36 mm length ×
width × thickness, 175 × 140 × 40 mm length × width × thickness);
only products up to 40 mm thick can be loaded
Shipment
speed
10 seconds
Cash
register
system
Membership card payment;
Cloud
payment
/
Power
dissipation
120W;
Alarm
function
Query, fault diagnosis, fault records, and abnormal information push
notifications
2. Cabinet Performance Overview
Made of high-strength steel with electrostatic spray coating, sturdy and durable.
10.1-inch touch display screen, featuring a high-definition touchscreen and buttons for simple and intuitive operation.
Fully automated and user-friendly, with straightforward operation.
The system backend functions like a rigorous and efficient "inventory manager," always using the equipment’s inventory
baseline data as a "standard." Whenever an order is generated, it precisely and automatically deducts the inventory for each
order. Then, like a responsible "data messenger," it clearly and intuitively presents the real-time updated remaining inventory in
the backend management interface, the "display window," allowing relevant personnel to monitor inventory status at any time.
After each successful sale, the system automatically reduces the stock quantity of the corresponding vending lane by one.
The weighing system acts as a secondary verification by detecting the weight of the product to confirm successful delivery,
ensuring inventory accuracy.
The delivery port has good elasticity, enabling tight rebound. The automatic opening and closing mechanism features
anti-pinch functionality, which automatically stops or reverses when resistance is encountered during closing.
Industrial-grade heavy-duty caster wheels bear heavy loads, facilitating easy movement and positioning.
Waterproof protection should be observed.
Chapter 2 Handing and Installation
1. Precautions for Handling and Moveing
1.1. Unplug the power plug and retract the power cord into the machine;
Dongji Automatic Vending Machine Manual
◆ All rights reserved by Dongji Company. No reproduction or distribution without permission. ◆
- 6 -
1.2. Be careful not to break the touch screen when moving the machine;
1.3. To prevent machine malfunction, the tilt angle during handling should not exceed 45°, and the machine should not be
inverted.
2. Unpacking the Machine :
2.1. Use scissors or blades to remove the stretch film, foam, and corner protectors, taking care not to scratch the cabinet;
2.2. Check if the cabinet surface is damaged after transportation. If there is damage, contact our after-sales service for resolution;
2.3. Find the corresponding key according to the lock number and open the door panel.
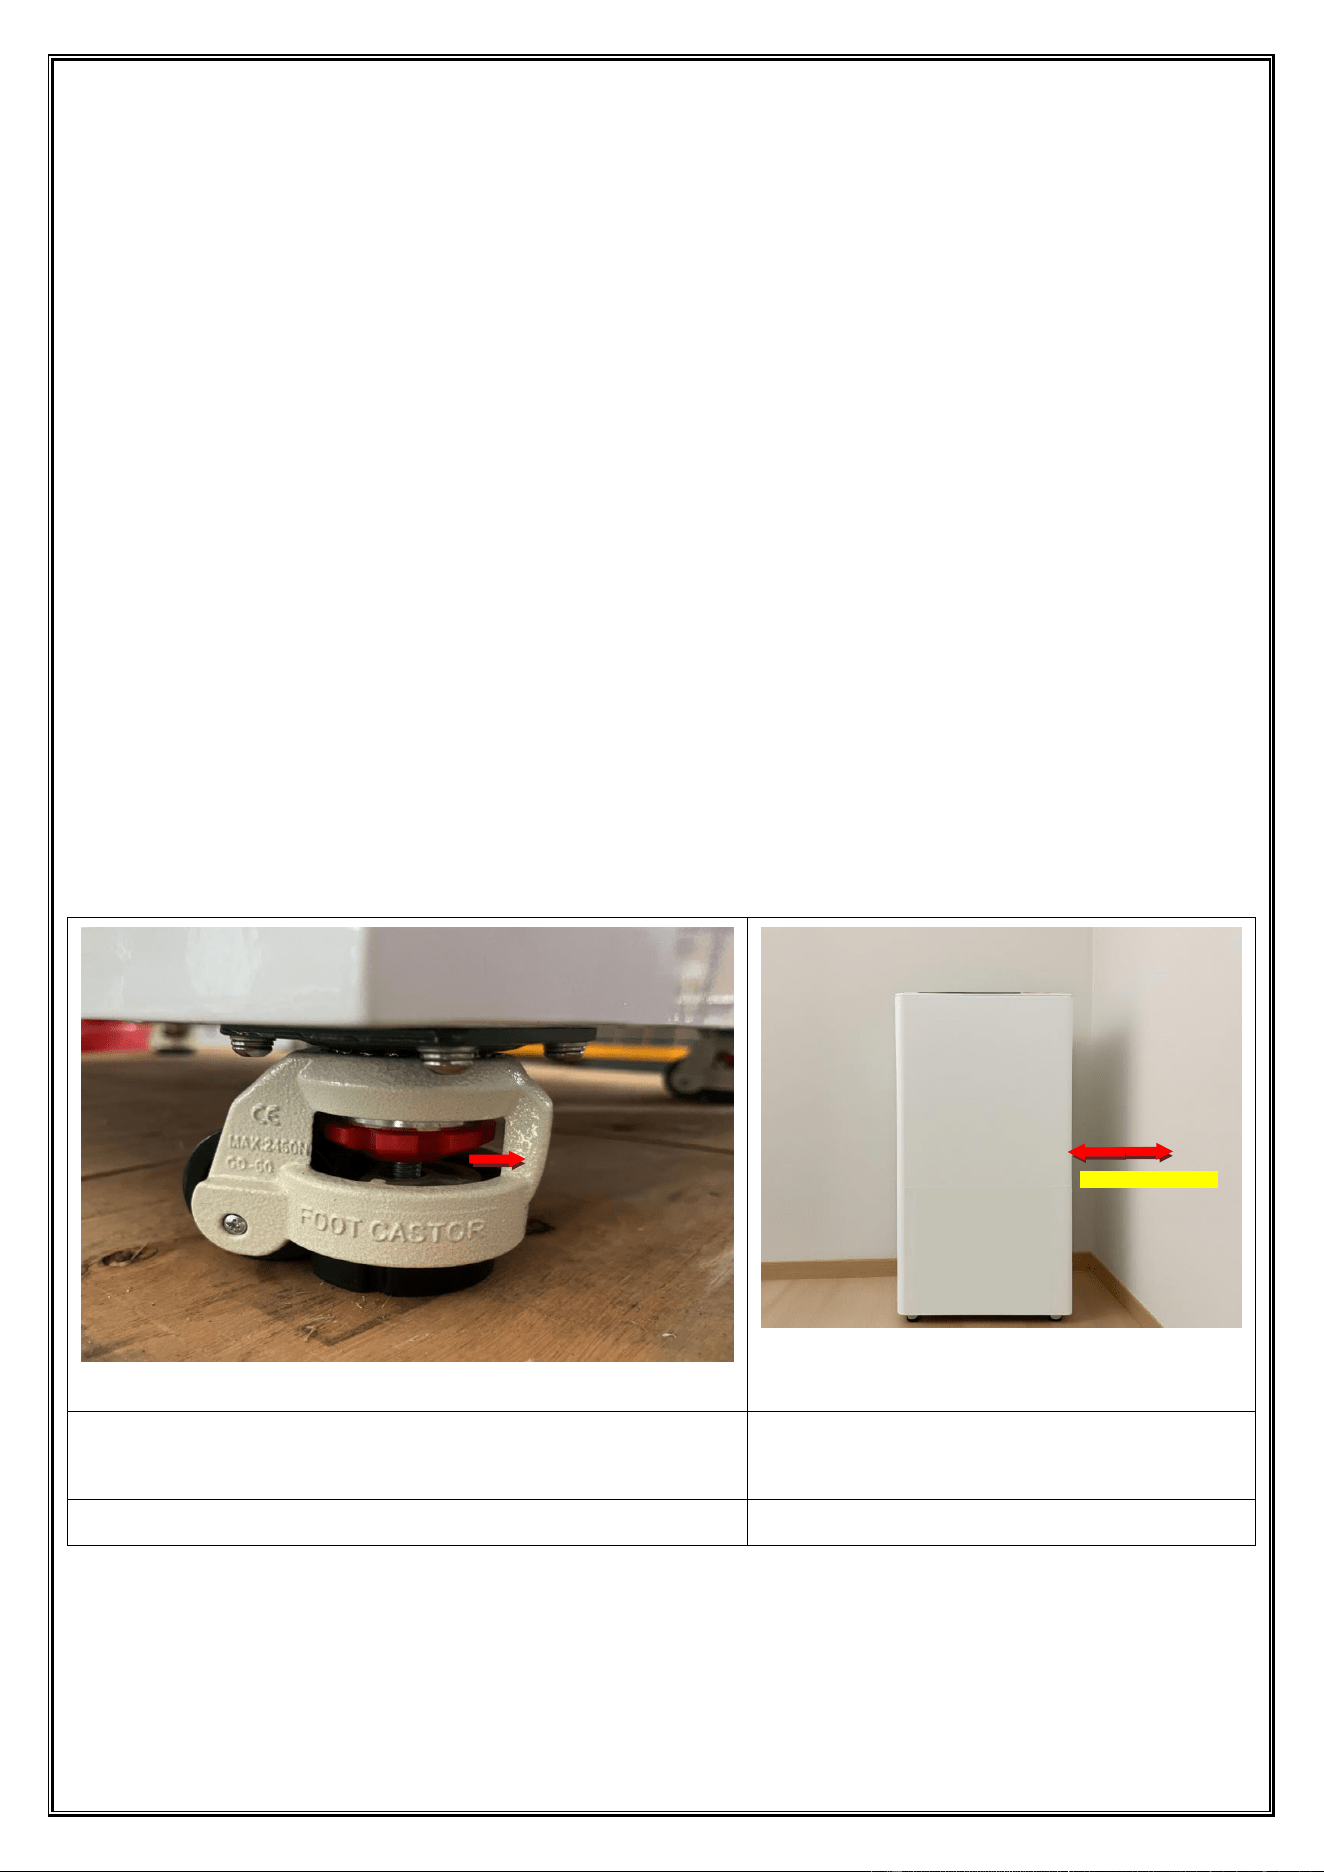
3. Machine Placement:
3.1. The machine must be placed on a flat and solid surface to ensure optimal performance. Improper placement may cause door
malfunctions or permanent structural damage. To adjust the angle: -For clockwise rotation (typically rightward), the Fuma wheel
rises while the device's angle decreases. -For counterclockwise rotation (typically leftward), the Fuma wheel lowers and the
device's angle increases. Adjust diagonally in pairs until the device is nearly level. Recheck repeatedly until complete leveling is
achieved. Once the machine stabilizes, gently push it to confirm no wobbling (as shown in Figure 1).
3.2. The machine must be equipped with adequate ventilation space for the radiator to facilitate loading and maintenance. The
distance between the machine's back and the wall should exceed 30 cm to ensure proper ventilation and heat dissipation;
otherwise, it may lead to performance degradation or even malfunction. The power supply should be a single-phase three-wire
system using a 220V AC three-core power socket, with the machine's grounding wire connected to the socket's ground terminal.
(If the power supply lacks a ground wire, a grounding post must be used, with a resistance below 1Ω.) The power cable should be
a copper-core cable with a diameter of 18AWG or less, and its installation must be performed by a qualified electrician.
Unauthorized installation by non-technical personnel is strictly prohibited, as shown in Figure 2.
After moving the machine into place - lower the Fuma caster support feet and
level the machine - raise and lock the central brake of the Fuma caster - complete
installation
Keep the distance between the back and the wall within
30 cm to ensure proper ventilation and heat dissipation,
preventing overload and malfunctions.
graph 1
graph 2
3.3. Sales Tutorial: The label should be affixed prominently on the front of the machine. If necessary, a brief instruction may be
attached to ensure smooth consumer use.
Keep a 30 cm distance
Turn the handwheel
clockwise (typically right)
to raise the caster wheel
and lower that corner of
the machine.
Turn the handwheel
counterclockwise
(typically left) to lower the
caster wheel and raise that
corner of the machine.

Dongji Automatic Vending Machine Manual
◆ All rights reserved by Dongji Company. No reproduction or distribution without permission. ◆
- 7 -
Chapter 3 Pre-sales Preparation
1. Introduction to the Structure of Vending Machines:
Internal Structure Overview of Automatic Vending
Machine
1. Lighting: DC24V LED tube;
2. Cargo aisle: The first floor (top floor);
3. Cargo aisle: Second floor;
4. Cargo aisle: The third floor;
5. Cargo aisle: 4th floor;
6. Cargo aisle: 5th floor;
7. Cargo aisle: 6th floor (bottom floor);
8. Elevating delivery port: The platform transports goods to
the pickup point and unlocks the platform door.
9. Electrical box module: the machine's circuit control box;
10. Elevating Slide Rail Module: With precision motor
control, the platform achieves rapid, smooth, and accurate
vertical positioning to ensure precise product capture and
delivery to the exit port.
4
10
2
7
1
3
8
5
6
9
Front dimension diagram
Dongji Automatic Vending Machine Manual
◆ All rights reserved by Dongji Company. No reproduction or distribution without permission. ◆
- 8 -
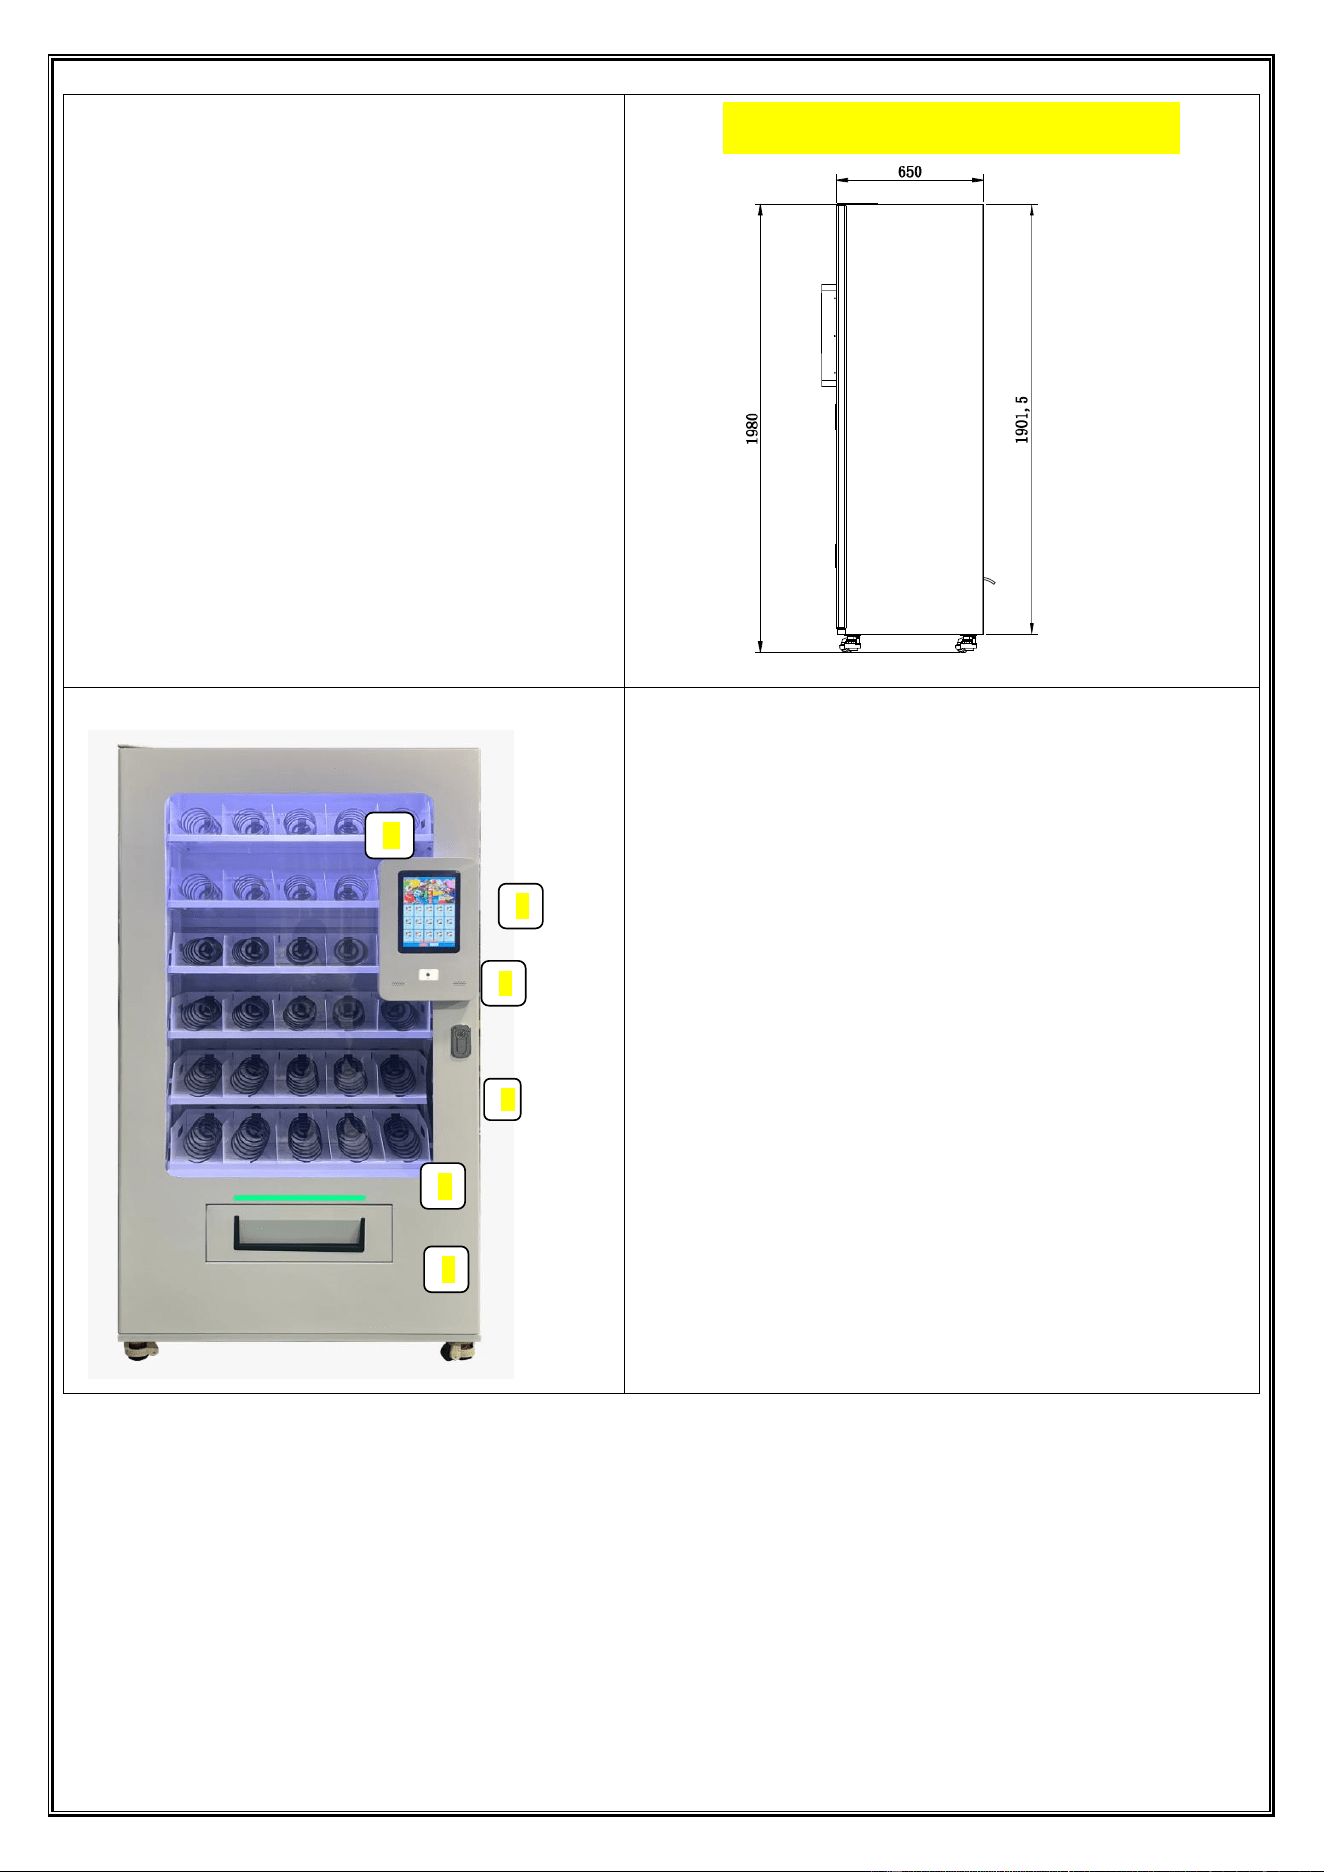
Front Structural Overview of the Vending Machine
1. Tempered Glass Door Observation Window: Used to view the
status of items in the medical equipment line;
2. 10.1-inch Touch Display Screen: Remotely update
advertisements, promotion information, prices and product
introductions on the screen through the background, and play
product pictures and advertisement videos in turn;
3. Two-dimensional Code Scanner: Just display the payment
code on the screen/scanning area;
4. Main Door Lock: Prevent others from opening the equipment
at will;
5. Indicator Light: The indicator light will change color and
flash to remind when delivering goods;
6. Delivery Port: When the lifting platform is transported to the
delivery port, the door lock is automatically unlocked, and
automatically locks after the goods are taken.
Side dimension drawing
3
5
6
1
2
4
Dongji Automatic Vending Machine Manual
◆ All rights reserved by Dongji Company. No reproduction or distribution without permission. ◆
- 9 -
Touch Display Screen Overview
1
2
3
4
6
5
Dongji Automatic Vending Machine Manual
◆ All rights reserved by Dongji Company. No reproduction or distribution without permission. ◆
- 10 -
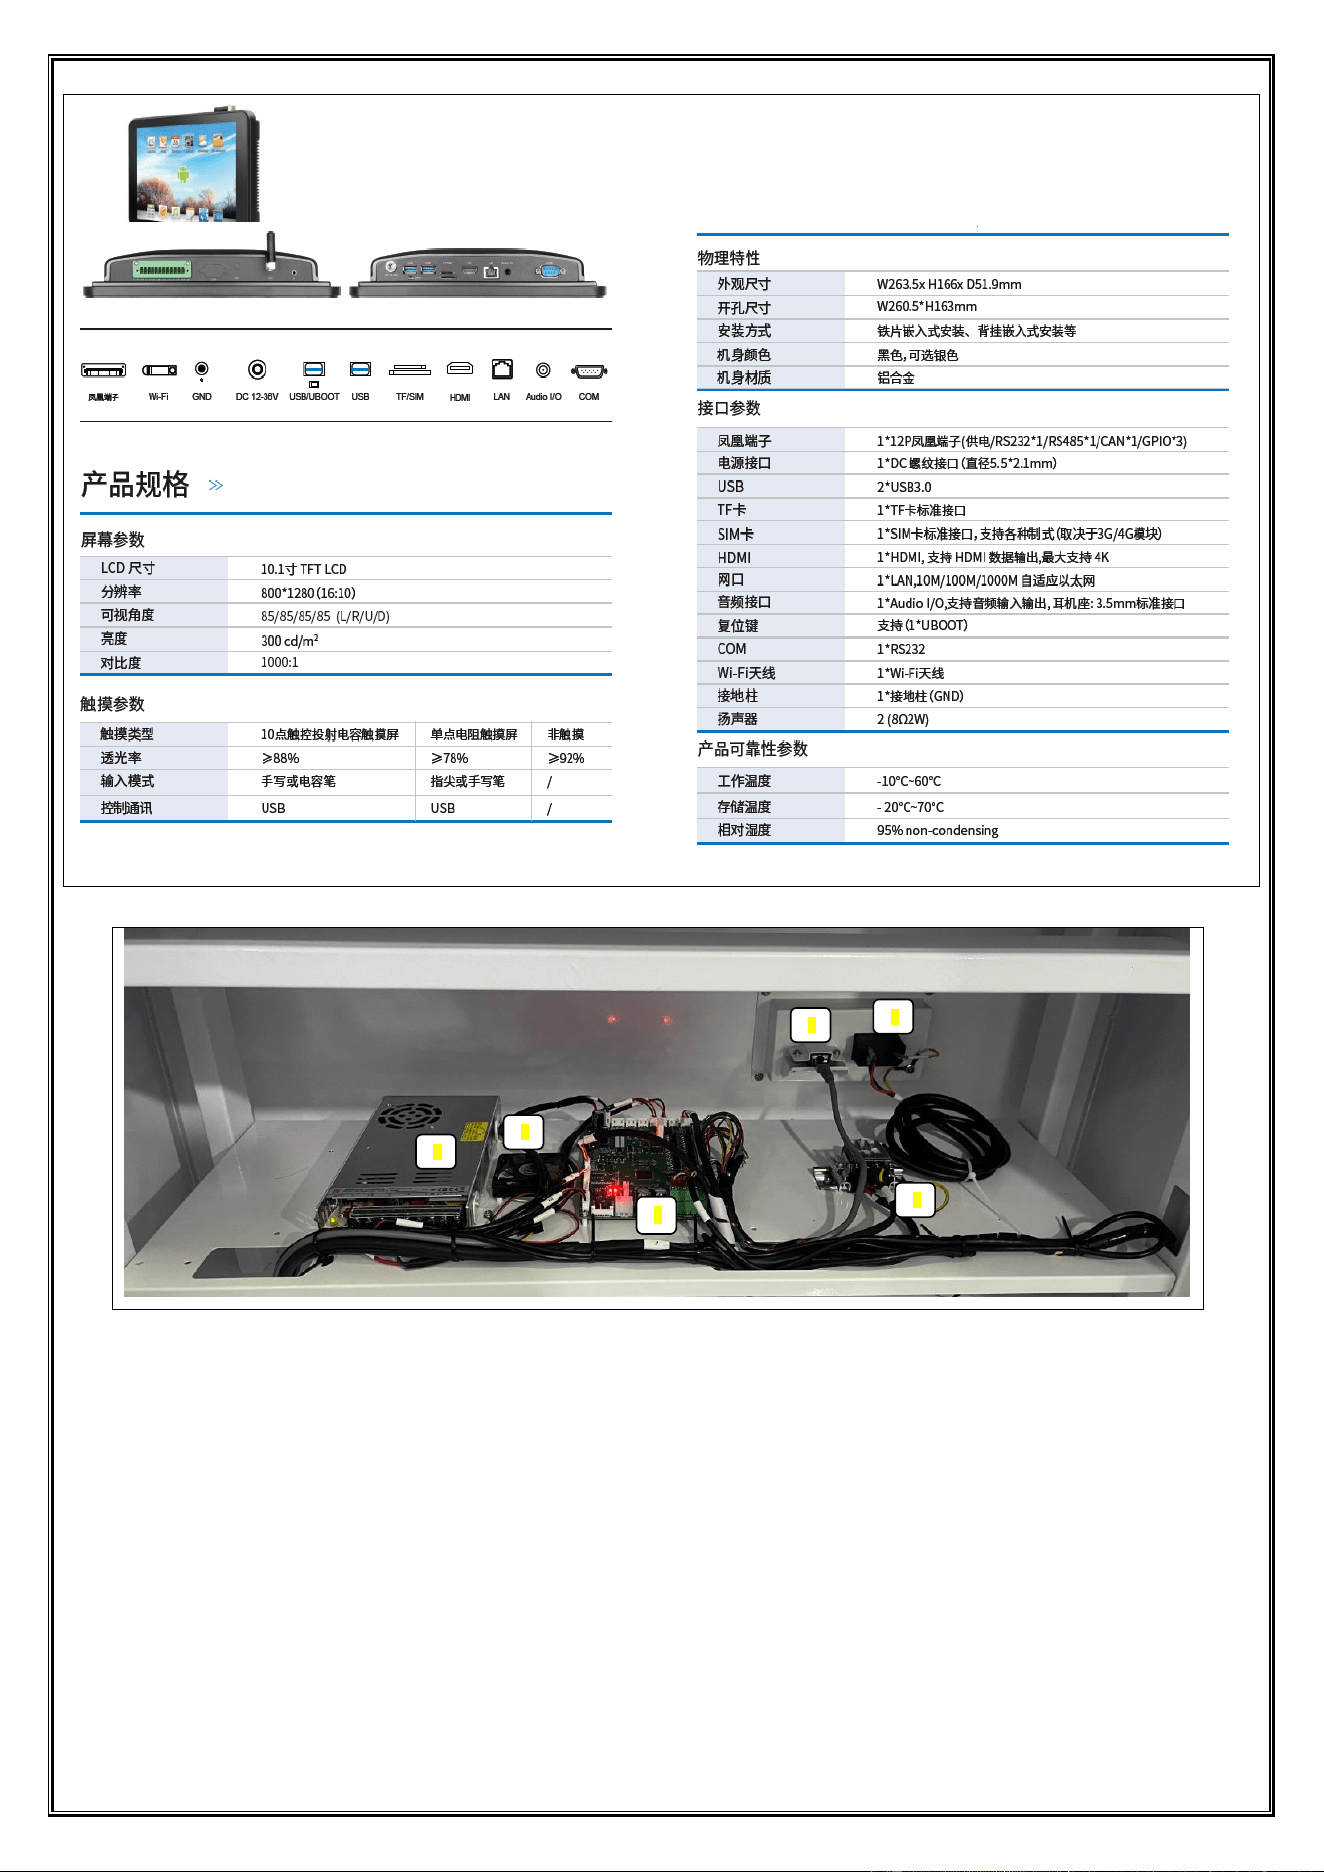
Overview of Medical Vending Machine Electrical Cabinet Structure
1. Network Interface: Connects wired devices to local area networks (LAN) and the internet via network cables;
2. Power Socket: 10A triangular power input socket;
3. 24V Power Switch: Provides DC24V power output;
4. Cooling Fan: Ensures electrical components operate within safe temperature limits through heat dissipation;
5. Control Mainboard: Oversees overall unit operation;
Terminal Block: Connects main power input and output.
graph 3
4. Machine Commissioning
2.1. After positioning the machine appropriately, adjust the levelling feet to ensure stability.
2.2. Insert the key into the lock and turn clockwise to release the handle. Then turn the handle anticlockwise
until the door opens.
2.3. Switch on the main power supply. Press the earth leakage test button on the main switch to verify that
the earth leakage circuit breaker trips correctly.
3. Inventory Replenishment and Specification Requirements
3.1. Inventory Replenishment:
Prepare the goods to be replenished, ensuring they are well-packaged and clean;
In the management menu, select the "Replenish" mode;
Prepare the goods to be replenished according to the inventory list and ensure that the outer packaging
is clean, intact and meets the specification requirements.
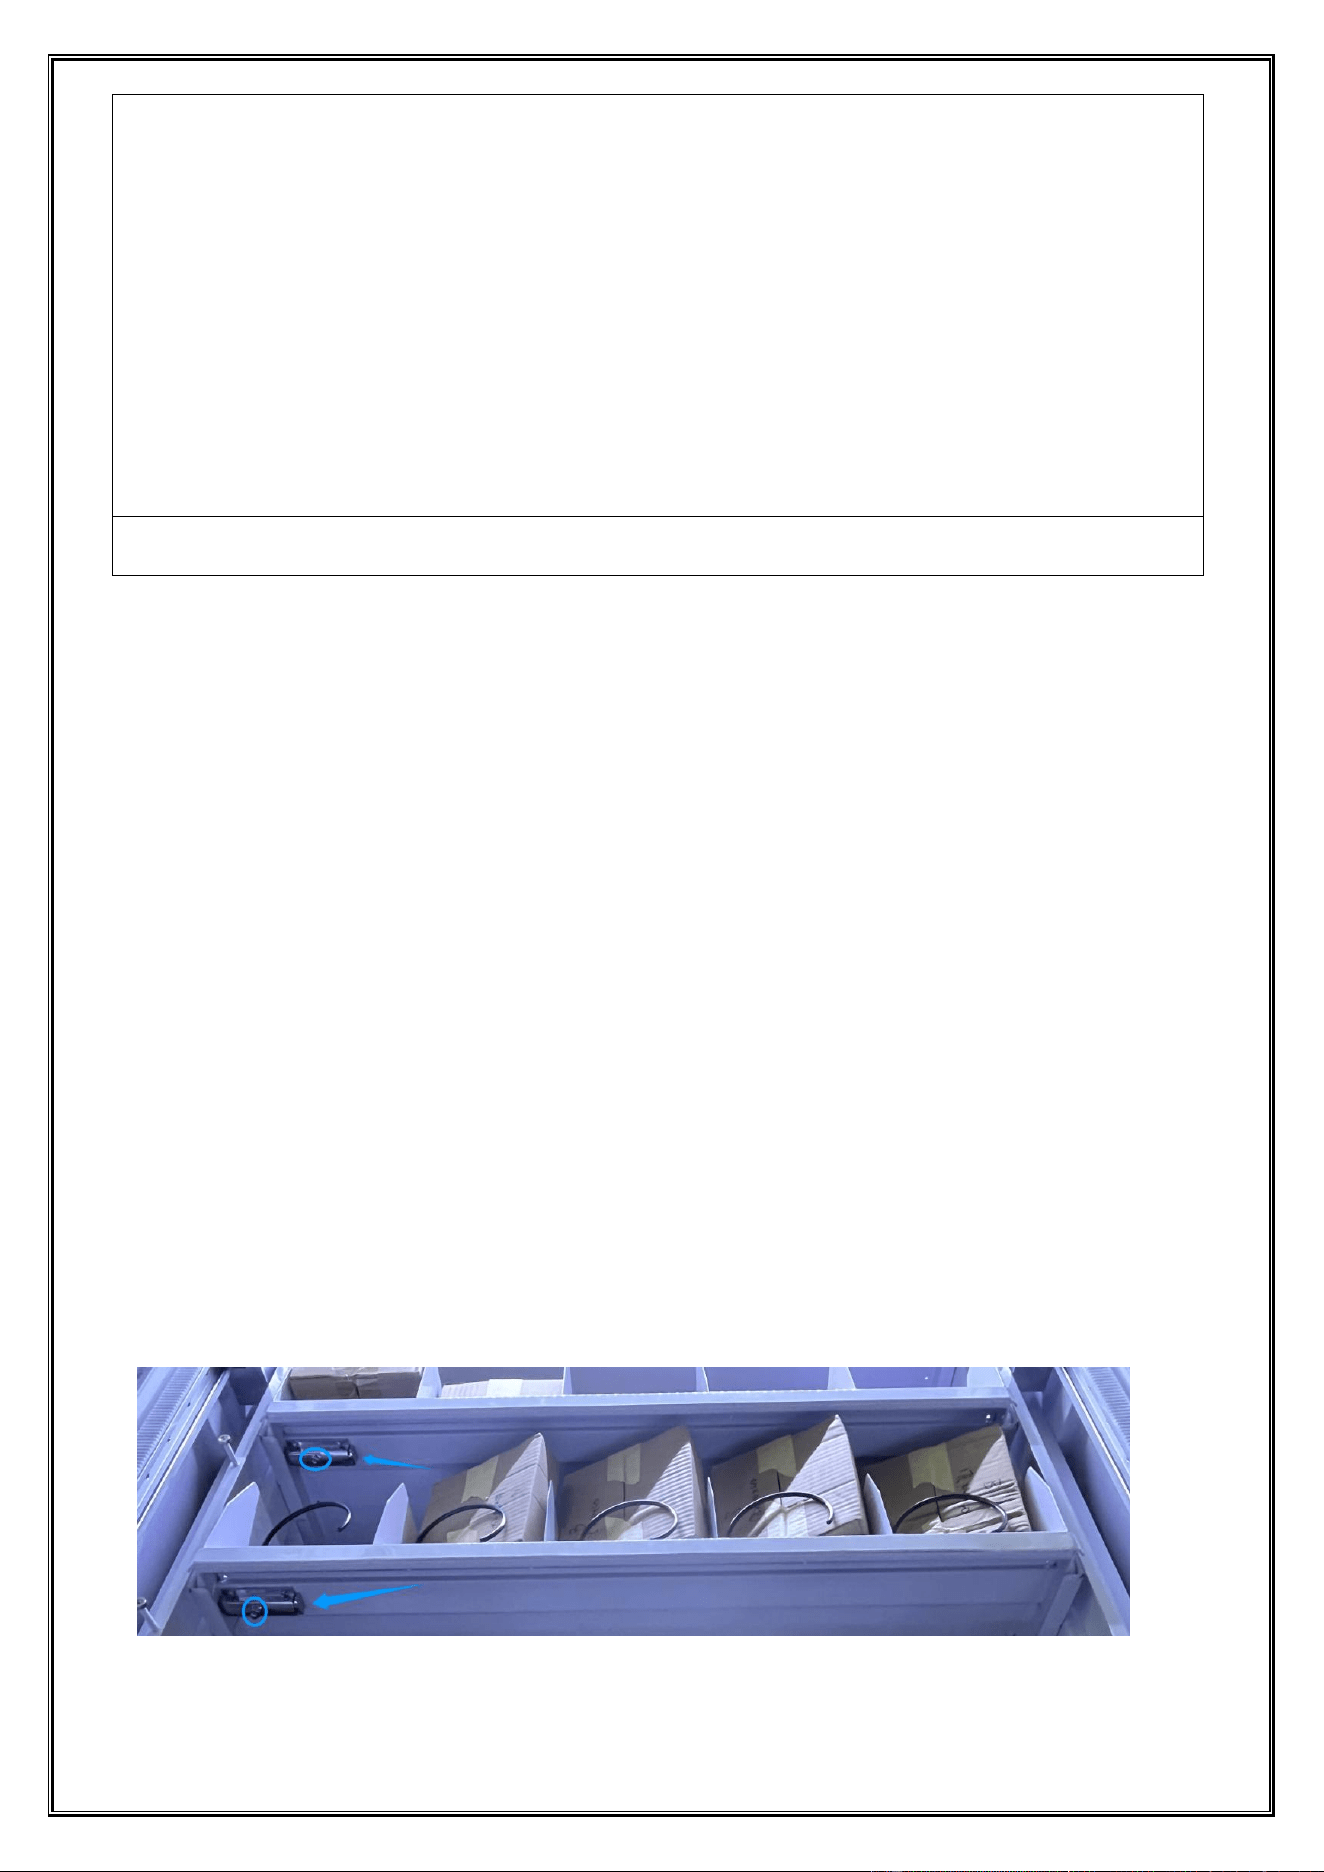
On the right side of the bottom layer of the cargo aisle, there is a latch that can be pressed to unlock and
pull out the aisle for replenishment (as shown in the figure).
Dongji Automatic Vending Machine Manual
◆ All rights reserved by Dongji Company. No reproduction or distribution without permission. ◆
- 11 -
Each cargo lane is assigned a unique number (1-1), which corresponds one-to-one with the lane information in the
management backend.
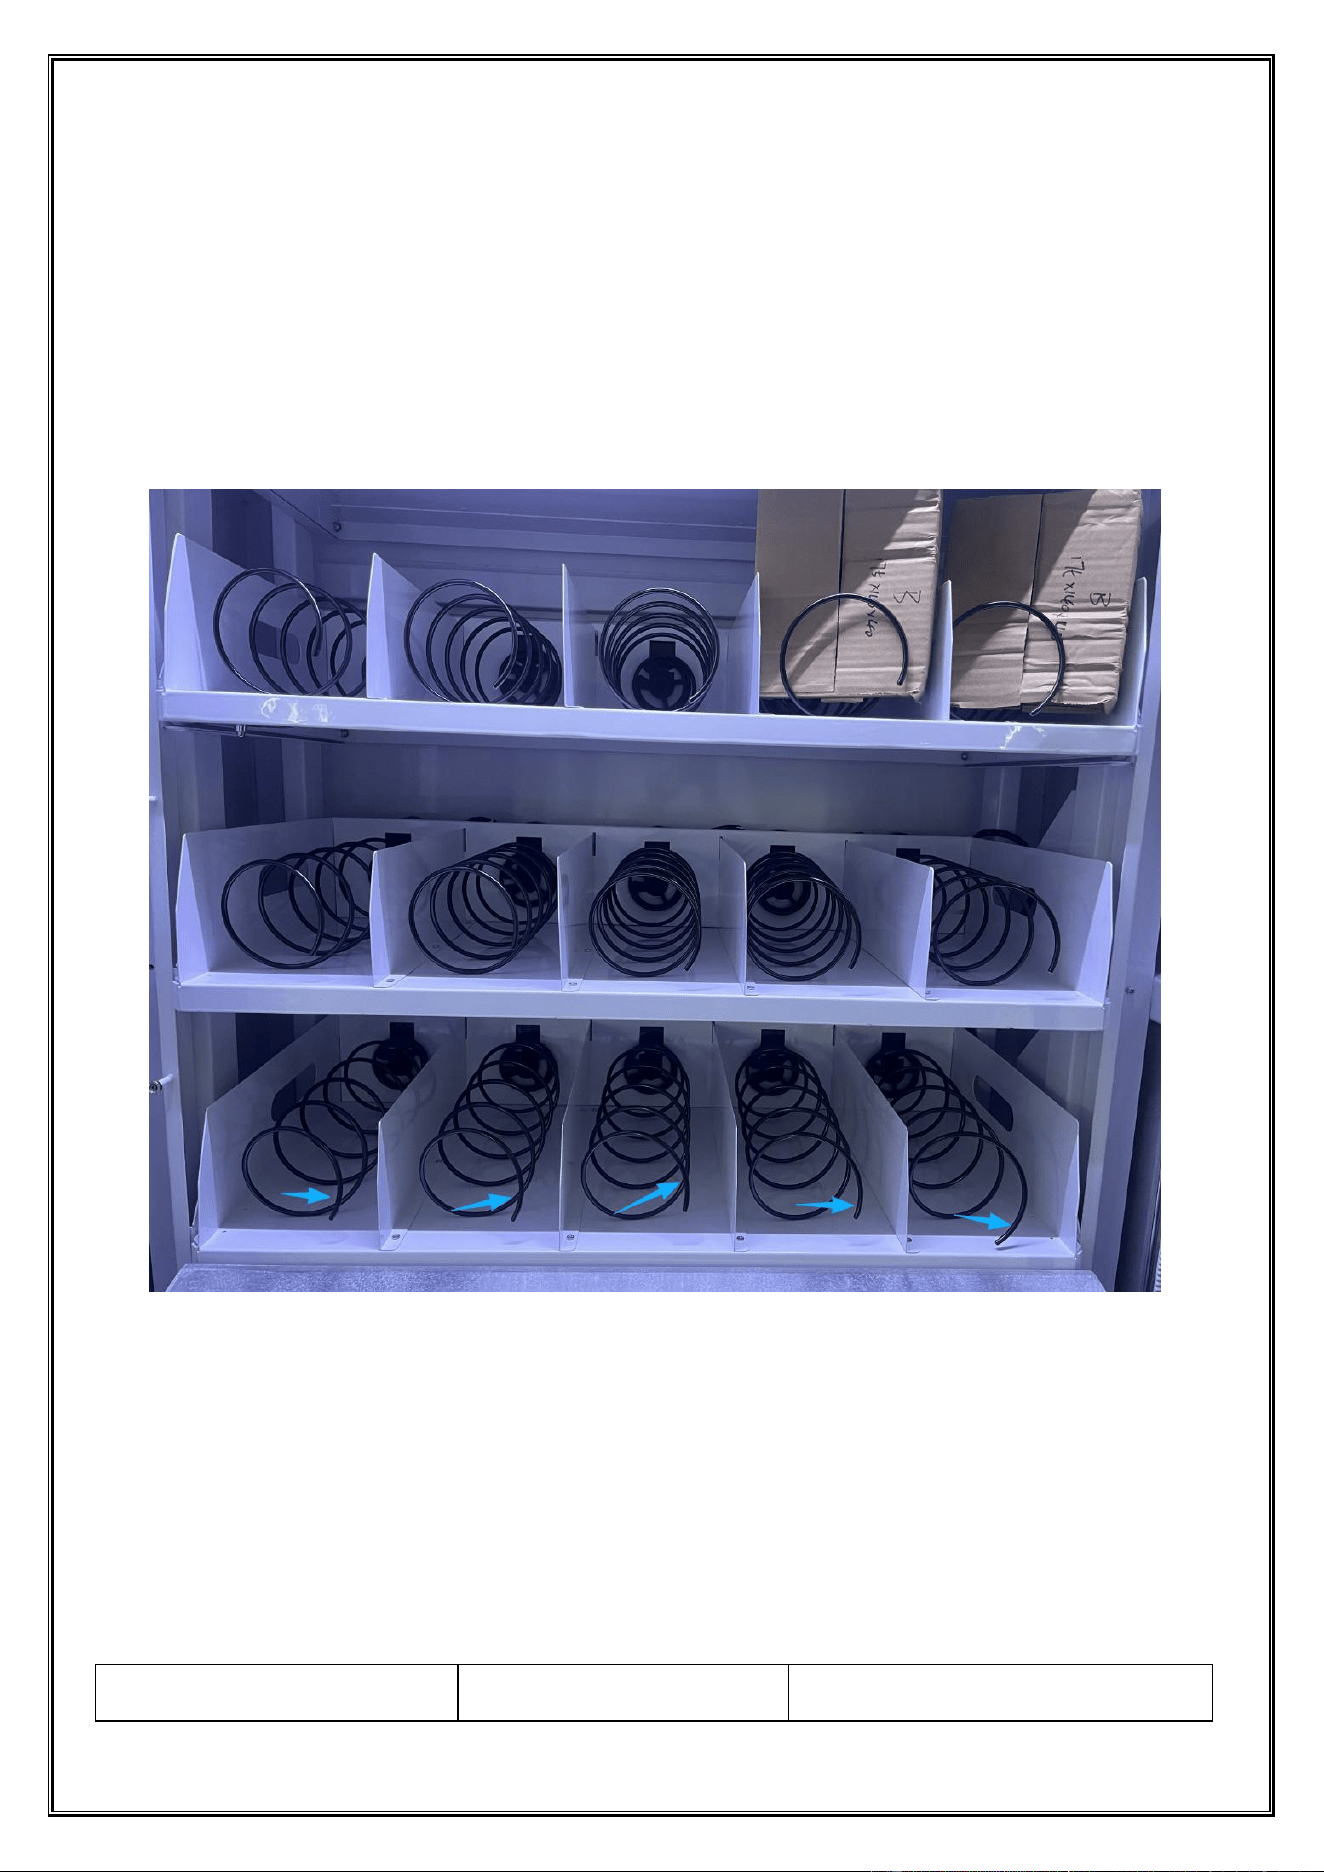
Arrange new goods sequentially, tightly, and neatly on the lane. Ensure the first item is flush against the outbound
baffle—this is critical for smooth dispensing;
In the corresponding product channel settings in the admin console, enter or confirm the quantity for
this replenishment. The system will update inventory based on this quantity.
After restocking, the spring should be in a state of slight compression relative to the product. This
provides sufficient thrust to push the product toward the exit; the spring must be oriented downward (as
shown in the figure).
Ensure all product channels are fully closed and locked (with latches secured);
Use the administrator's “Test Shipment” function, or purchase an item yourself during off-peak hours,
to verify that restocked product channels can ship items normally and smoothly;
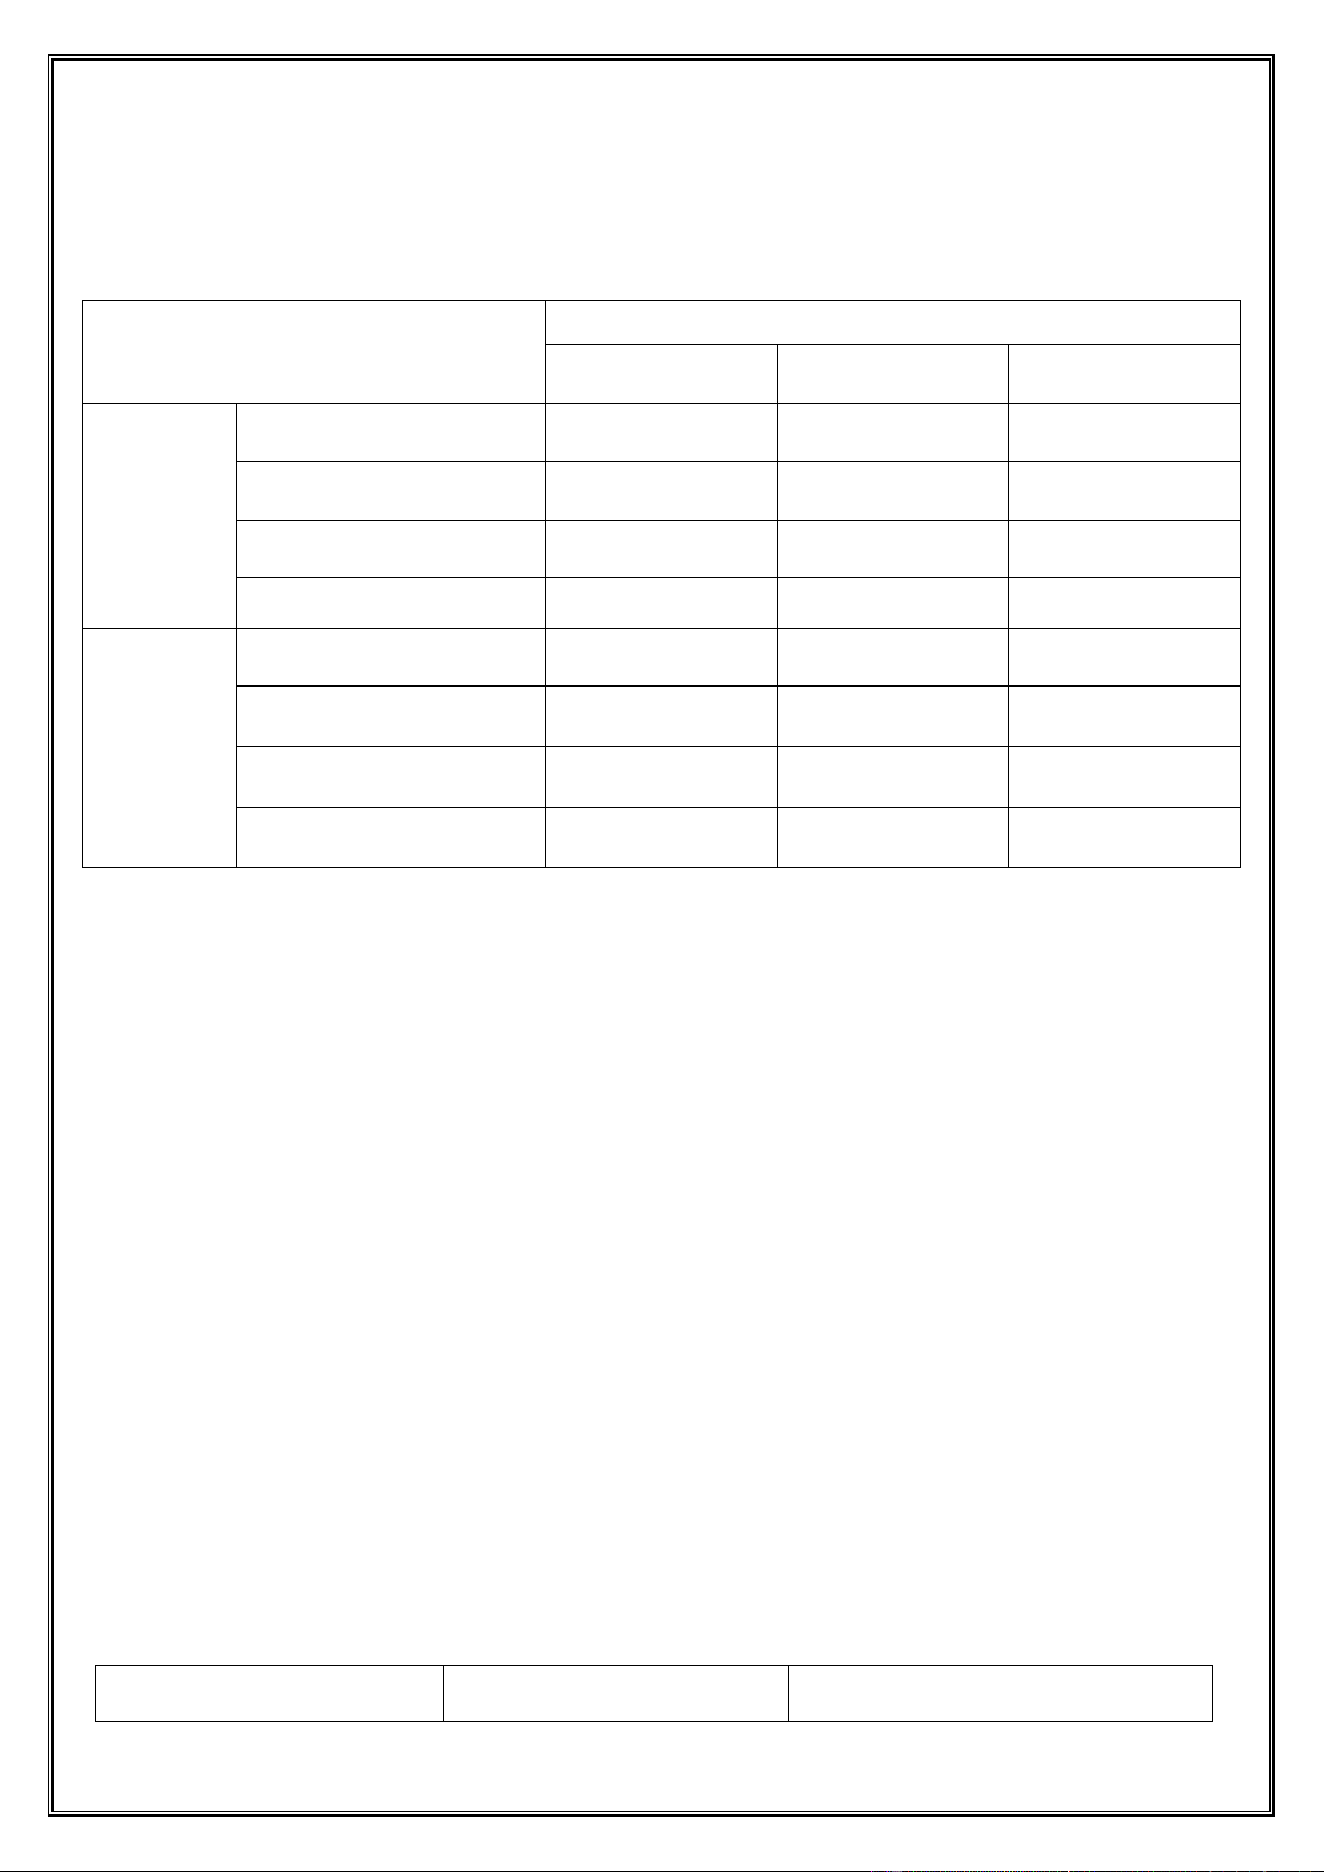
3.2. Specifications Requirements:
The thickness of each individual item must be ≤ 40mm.
For smooth shipment, the product thickness should ideally be between 36mm and 40mm.
dimension
ask
explain
Dongji Automatic Vending Machine Manual
◆ All rights reserved by Dongji Company. No reproduction or distribution without permission. ◆
- 12 -
Thickness (Height)
Strictly ≤40MM
This is a mandatory requirement. The
height of the surface where the product
is pushed by the spring.
width
≤135MM
The goods must fit smoothly into the
aisle with a small gap to prevent
jamming.
length
Recommended ≤160MM
The length of the goods may exceed the
spring length, but excessive length may
cause twisting within the conveyor
channel, increasing the risk of goods
jamming.
4. System Update and Testing
Update the system with replenishment items, quantities, and production batches;
After replenishment is complete, it is advisable to conduct an actual purchase test to verify that the replenished
product lanes can dispense goods normally and smoothly;
Chapter 4 Motor Operation and Maintenance
1. Applicable Environment
The test is generally conducted at room temperature and humidity conditions. If users require, testing may be performed
under 20℃±3℃ conditions.
Ambient temperature: 15℃~35℃;
Fundamental characteristics
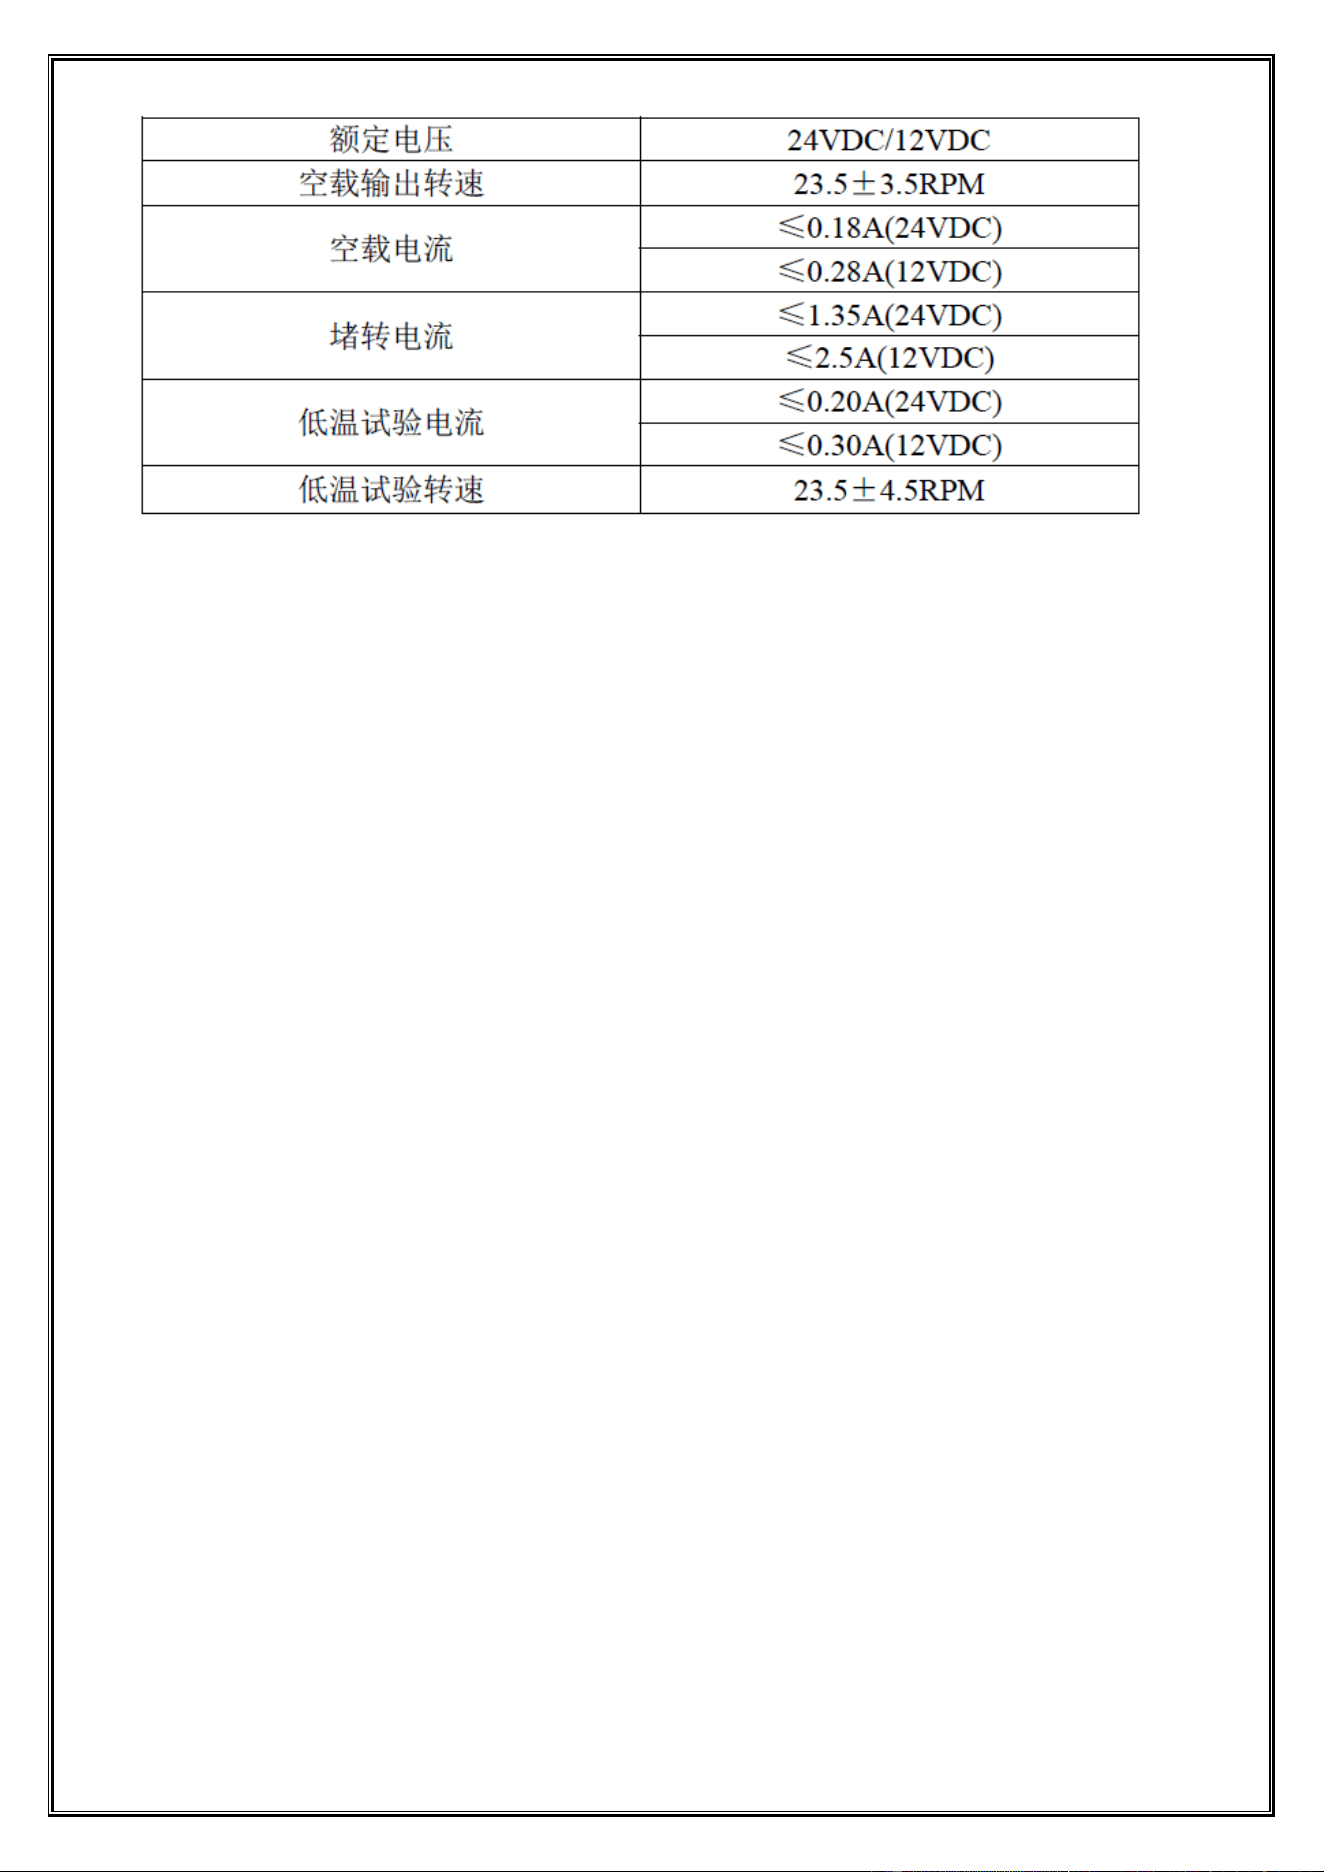
2.1: Rated voltage: See the table below.
2.2: No-load current: See the table below.
2.3: No-load output speed: See Table 1.
2.4: Output shaft rotation:
CW/CCW (single-wheel series, facing the output turntable)
N/W (Dual-wheel series, facing the turntable with the chassis small end positioned below)
N: The two wheels are turning inward.
W: The two wheels rotate outward;
2.5: Noise: ≤65dB, with even, smooth sound and no distortion;
2.6: Maximum output torque of the gearbox: ≥480 N·m;
2.7: Stalled current: See the table below.
2.8: Comprehensive Performance Test: All tests conducted by our factory's dedicated comprehensive performance tester
returned "OK".
Dongji Automatic Vending Machine Manual
◆ All rights reserved by Dongji Company. No reproduction or distribution without permission. ◆
- 13 -
2. Basic Performance
3.1: Appearance
3.1.1: The injection-molded parts shall be free from flash, impurities, cracks, or visible injection defects, and fasteners
shall not exhibit loosening or detachment.
3.1.2: The complete assembly is properly installed with secure fastening, ensuring correct polarity positioning of the
motor. The motor tail shows no welding spatter marks, the circuit board surface is clean, the turntable specifications are
accurate, and the switch contacts are precisely aligned with the E wheel.
3.1.3: Motor and gearbox labels must be affixed correctly, with smooth surfaces and legible text.
3.2: Working Method
The working mode is S3.
3.3: Weight
Single wheel: approximately 135g; Double wheel: approximately 180g
4. Low Temperature Performance Testing
4.1: The product was stored for 4 hours in an environment with temperature ranging from-2℃ to +4℃ and humidity
between 45% and 85%.
The no-load speed and current are shown in Table 1.
4.2: The aforementioned measurement method: After the product is removed from the low-temperature environment, it
is measured within 5 minutes under normal temperature and humidity conditions.
The test is completed, and the measurement sequence is to measure current first, then speed, or both at the same time.
5. Environmental Performance
5.1: Usage Environment
Temperature: -15℃ to +50℃ Relative humidity: 45% to 80%
5.2: Storage Environment
Temperature: -10℃ to +40℃ Relative humidity: 45% to 80%
Exposure to corrosive gases and liquids is not permitted;
Dongji Automatic Vending Machine Manual
◆ All rights reserved by Dongji Company. No reproduction or distribution without permission. ◆
- 14 -
Chapter 5: Overall Maintenance and Care
1.1. Cleaning
project
Inspection time
Each replenishment
Once a month
Once every 6 months
clear
External to the machine
√
Shipment module
√
cargo channel
√
elevating assembly
√
check up
earth leakage protection
√
LED lamp
√
lubrication of transmission
mechanism
√
apply oil
√
1.1.1、If the machine is covered with dust, wipe it with a dry cloth.
1.1.2、Inspect the main discharge port and the lifting hopper for any remaining cargo or foreign objects. Ensure that the
passage is completely unobstructed before cleaning.
1.1.3、If the stain is severe, wipe the affected area with a cloth soaked in water or a diluted neutral dishwashing liquid
solution.
1.1.4、Check the running track of the lifting platform for obstacles, dirt, or wear.
1.1.5、Avoid cleaning with organic solvents or alkaline liquids, as this may cause cracking of the panel.
1.1.6、When cleaning the machine housing, avoid using paint solvents, ammonia, or other chemical substances to prevent
damage or safety hazards.
1.1.7、Monitor the product aisles daily and replenish them when stock levels drop below 20%.
1.1.8、Clean the dust inside the box with a vacuum cleaner monthly to prevent excessive dust buildup that could cause
operational failures.
1.1.9、Perform a monthly leakage protection test by pressing the test button on the residual current device (RCD) to verify
proper operation.
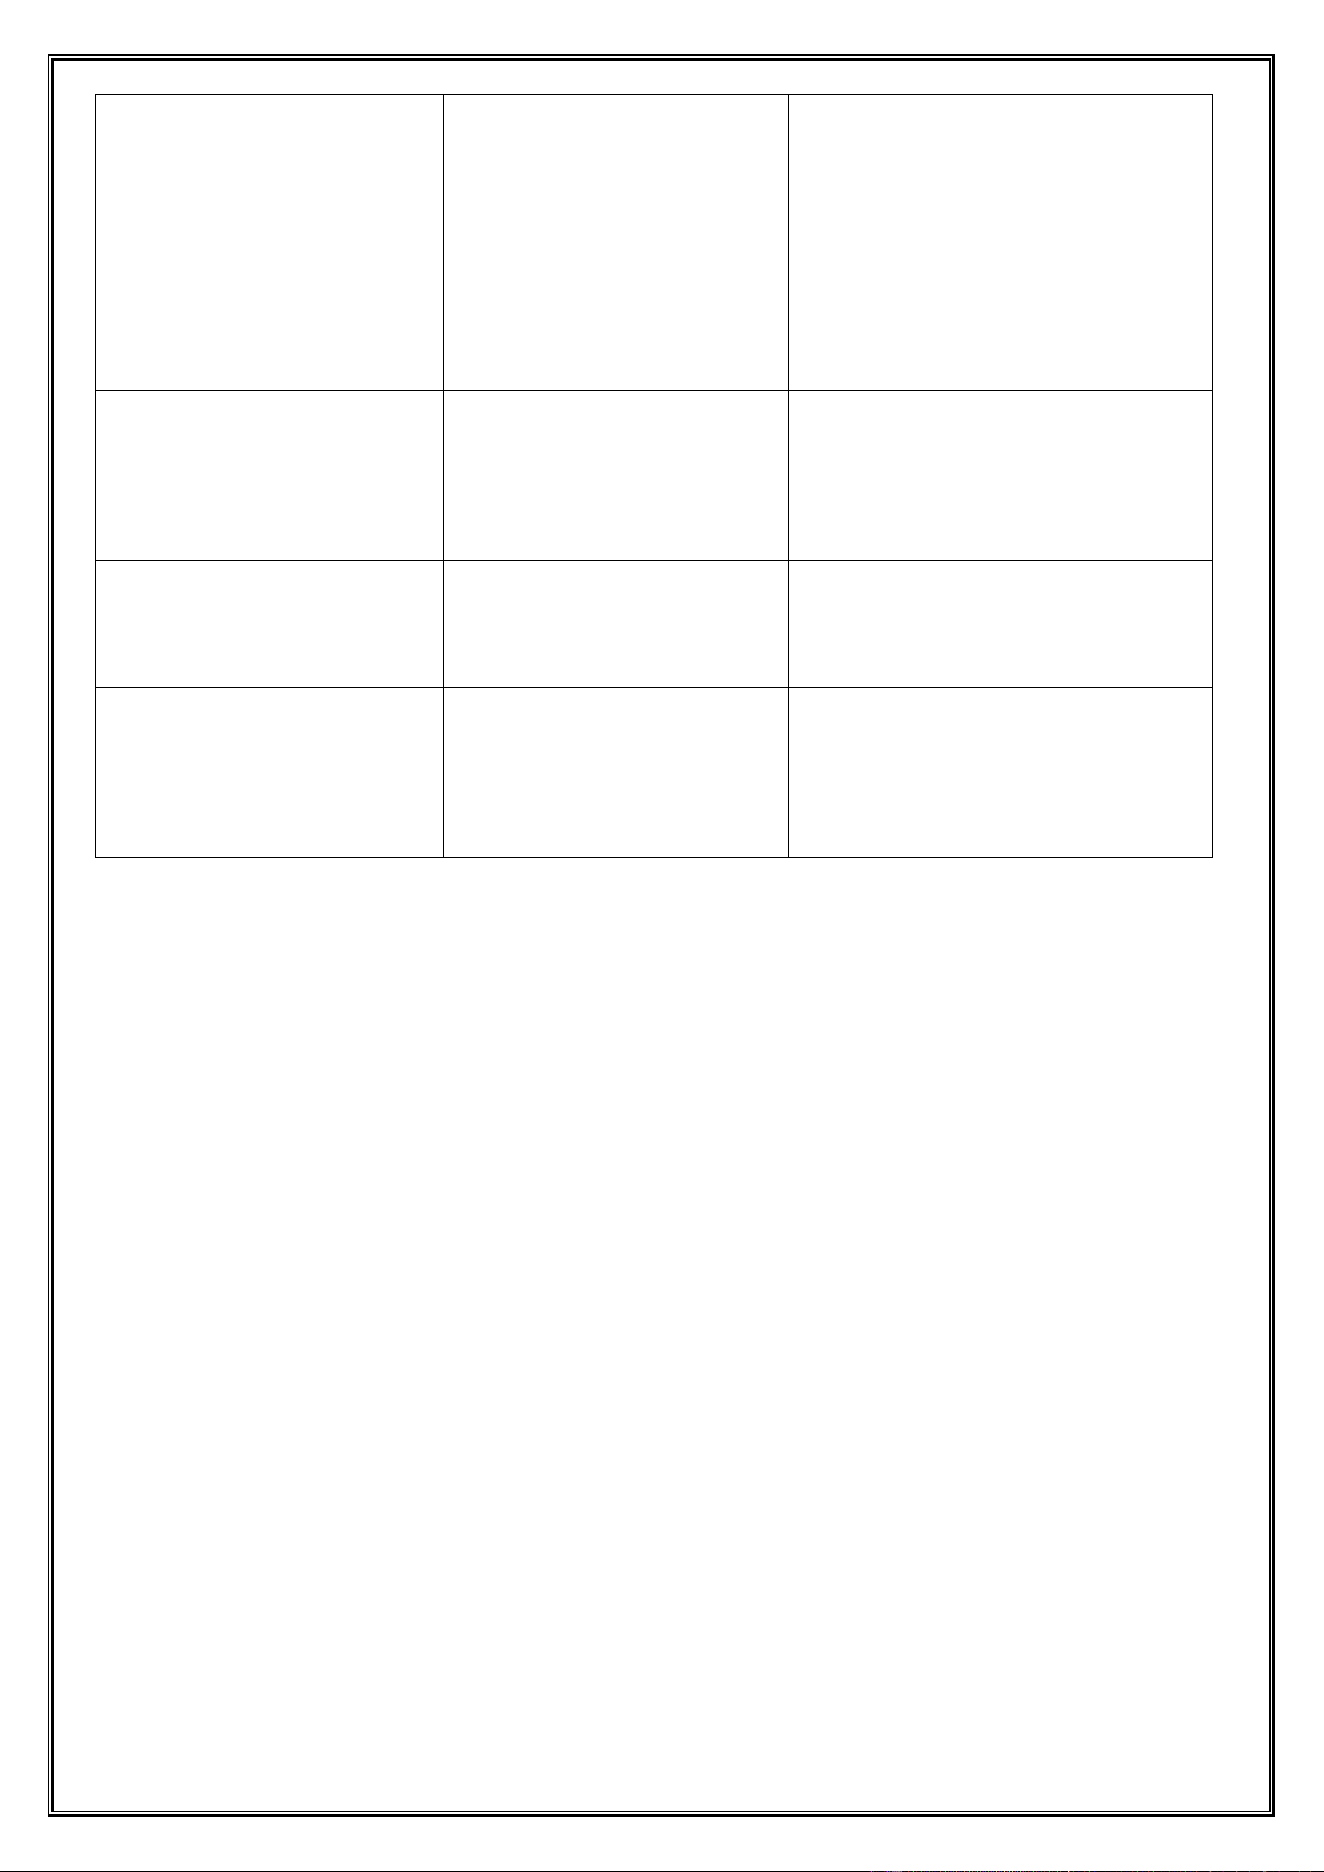
1.2、Frequently Asked Questions and Troubleshootin
phenomenon
Possible reasons
Preliminary treatment measures
Dongji Automatic Vending Machine Manual
◆ All rights reserved by Dongji Company. No reproduction or distribution without permission. ◆
- 15 -
The goods are stuck in the lifting
channel.
1. Product size/shape does not
match
2. Foreign bodies in the duct
3. Sensor contamination or
malfunction
4. Misalignment of the lifting
mechanism
1. Remove stuck items manually after
power outage
2. Check and clean the passage and
sensor
3. Restart the device to observe
4. Contact Technical Support
The noise of the lifting platform
is high
1. The guide rail is out of oil.
2. Obstruction by foreign bodies
3. Loose or worn transmission
components (e.g., belts, chains)
1. Clean and lubricate the guide rail
2. Removal of foreign bodies
3. Contact technical support for
inspection
The touch screen is
unresponsive or malfunctioning.
1. The screen is too dirty.
2. System crash
3. Hardware failure
1. Clean the screen
2. Restart the device
3. Contact technical support
Payment succeeded but the item
was not shipped
1. The inventory of this cargo
lane is zero
2. Loose motor connection cable
3. Spring slippage or fracture
1. Check and update inventory in the
background
2. Check the motor wiring
3. Replace the spring
Dongji Automatic Vending Machine Manual
◆ All rights reserved by Dongji Company. No reproduction or distribution without permission. ◆
- 16 -
Chapter 6: Introduction to Equipment Terminal App Functions
1、User Purchase and Usage Guide
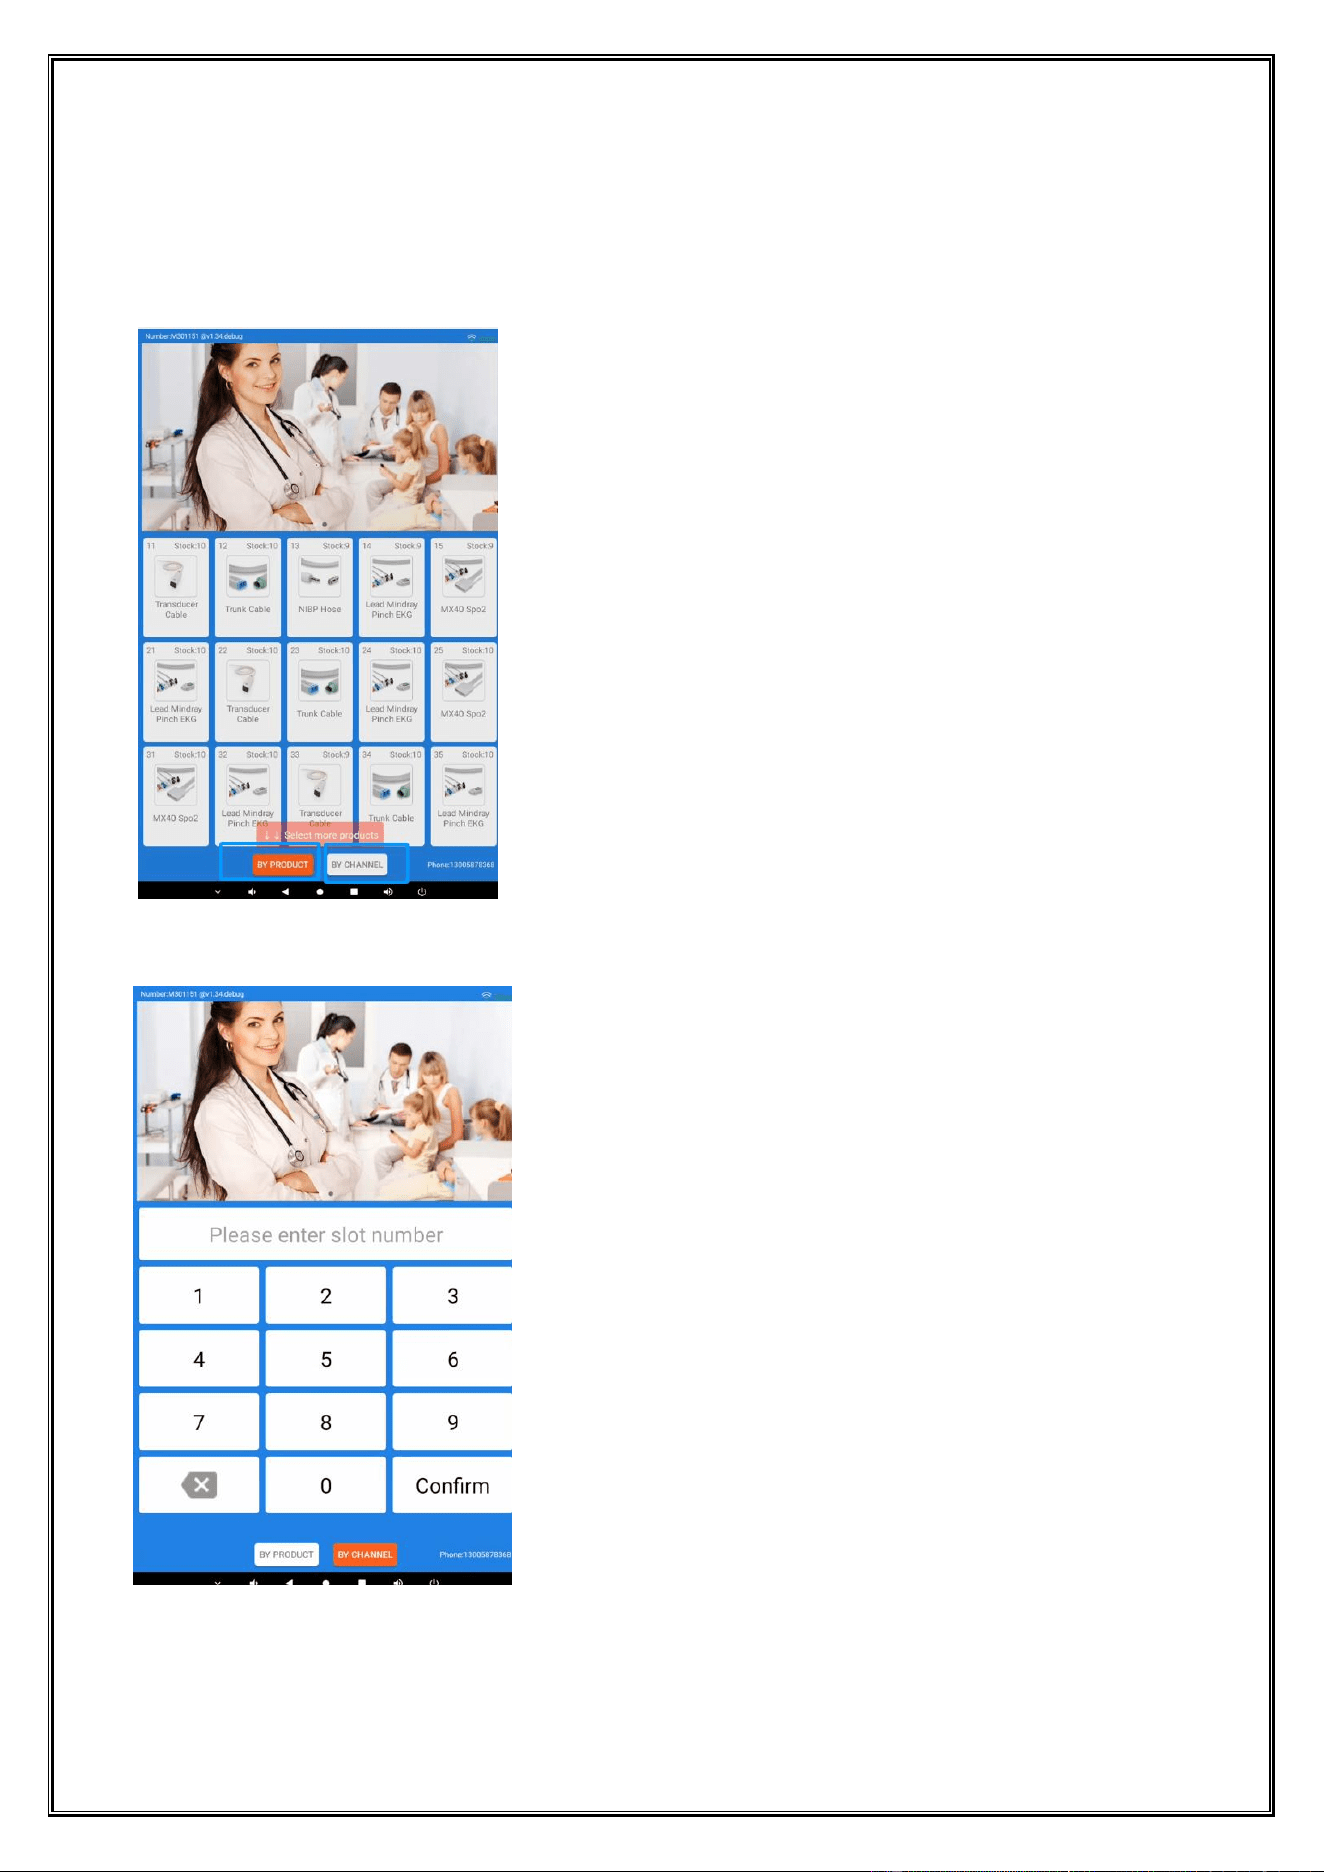
1.1 Purchase or Collection Selection Method
Select product method
1. Directly select the desired product on the screen;
2.Directly enter the product number (e.g., enter A1, B2, C3, etc.)
Dongji Automatic Vending Machine Manual
◆ All rights reserved by Dongji Company. No reproduction or distribution without permission. ◆
- 17 -
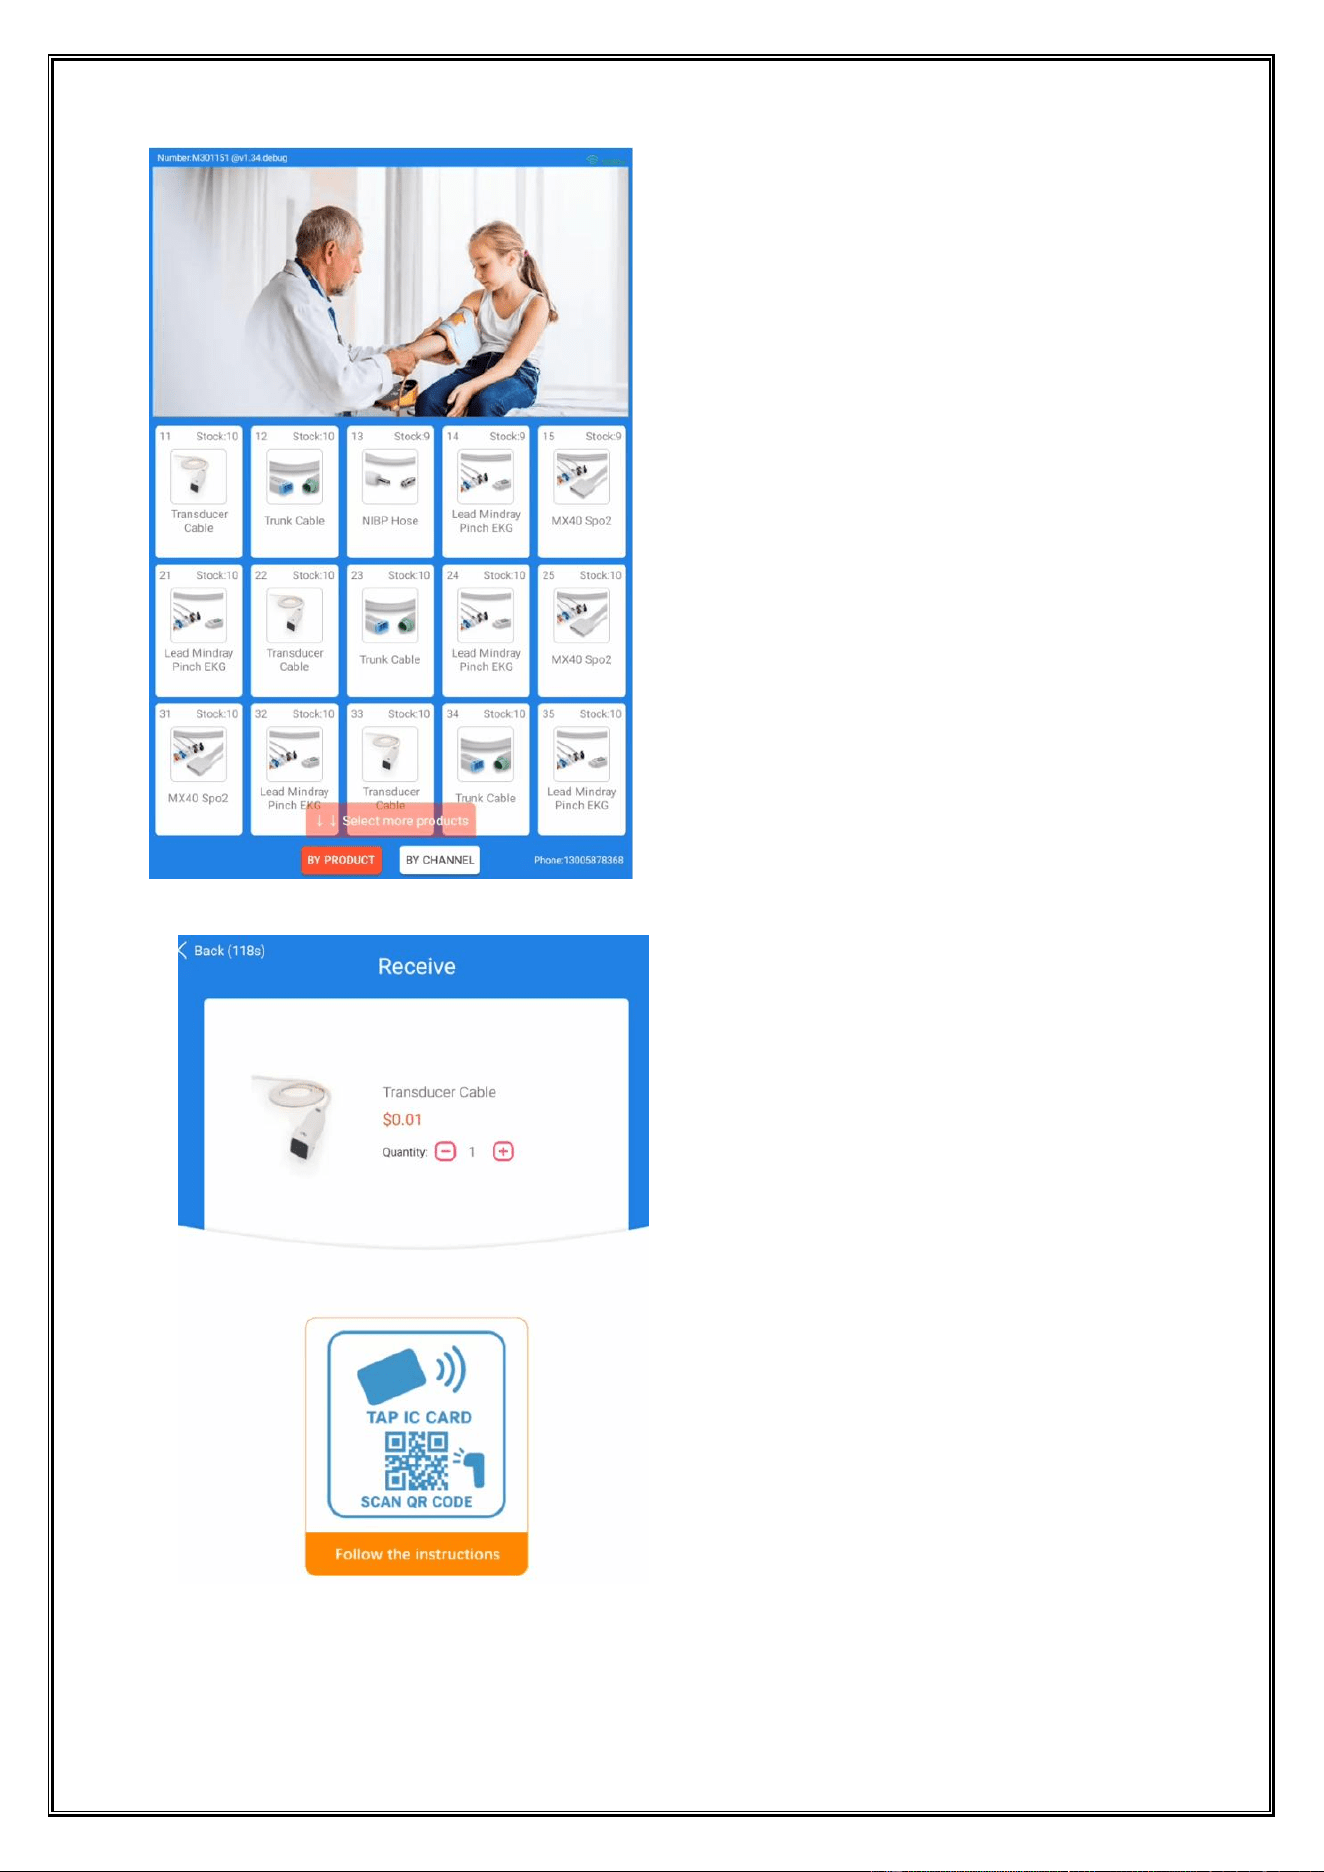
1.2 Purchasing Goods
Select the items to purchase or claim (by code);
.
Select the quantity of the product to be purchased or collected (default is 1 PCS);
Swipe the membership card or scan the QR code for payment and delivery;
Dongji Automatic Vending Machine Manual
◆ All rights reserved by Dongji Company. No reproduction or distribution without permission. ◆
- 18 -
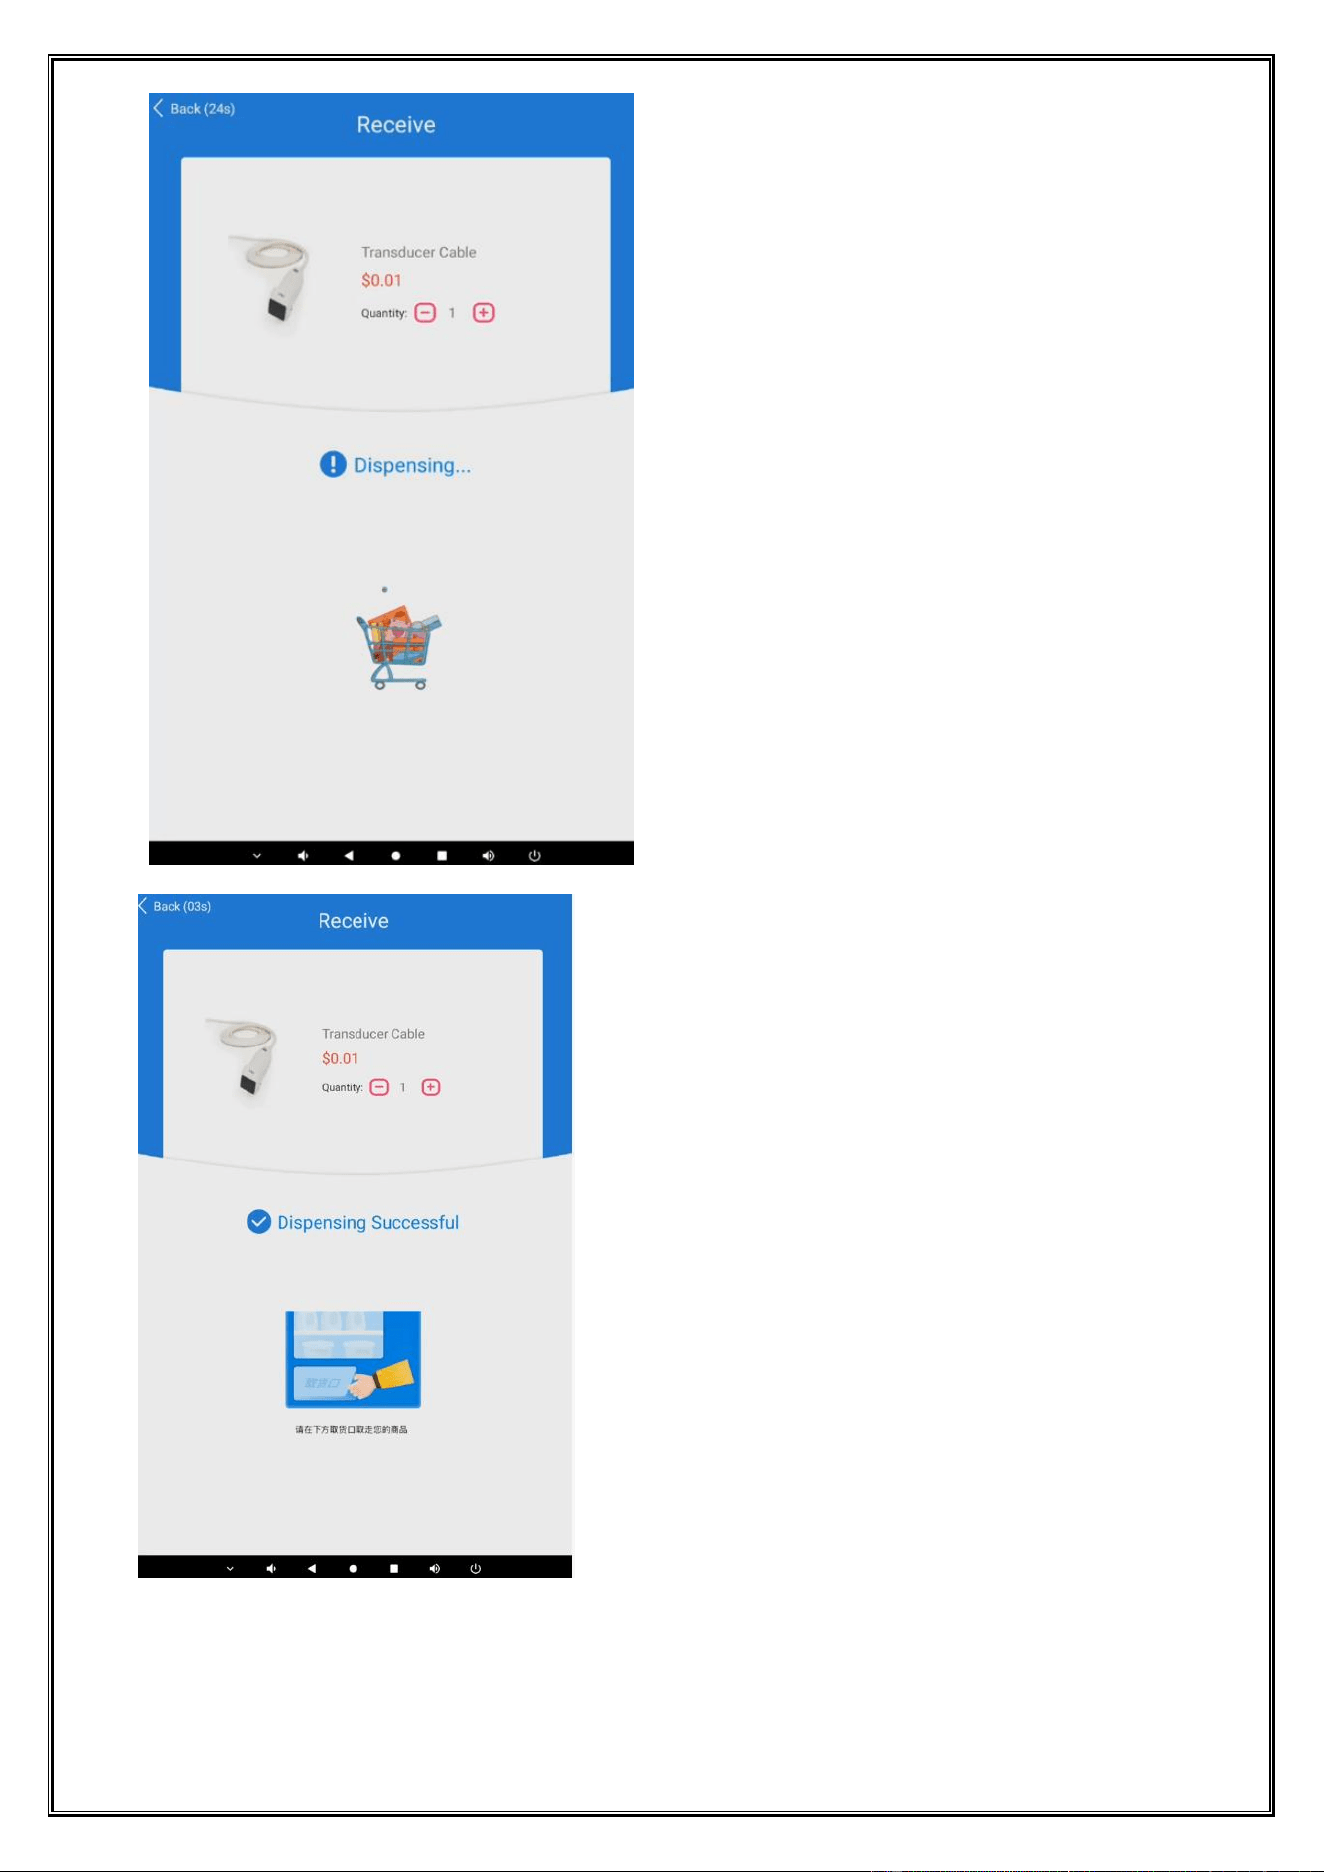
Goods are being delivered;
Please take your goods at the delivery port below;
Dongji Automatic Vending Machine Manual
◆ All rights reserved by Dongji Company. No reproduction or distribution without permission. ◆
- 19 -
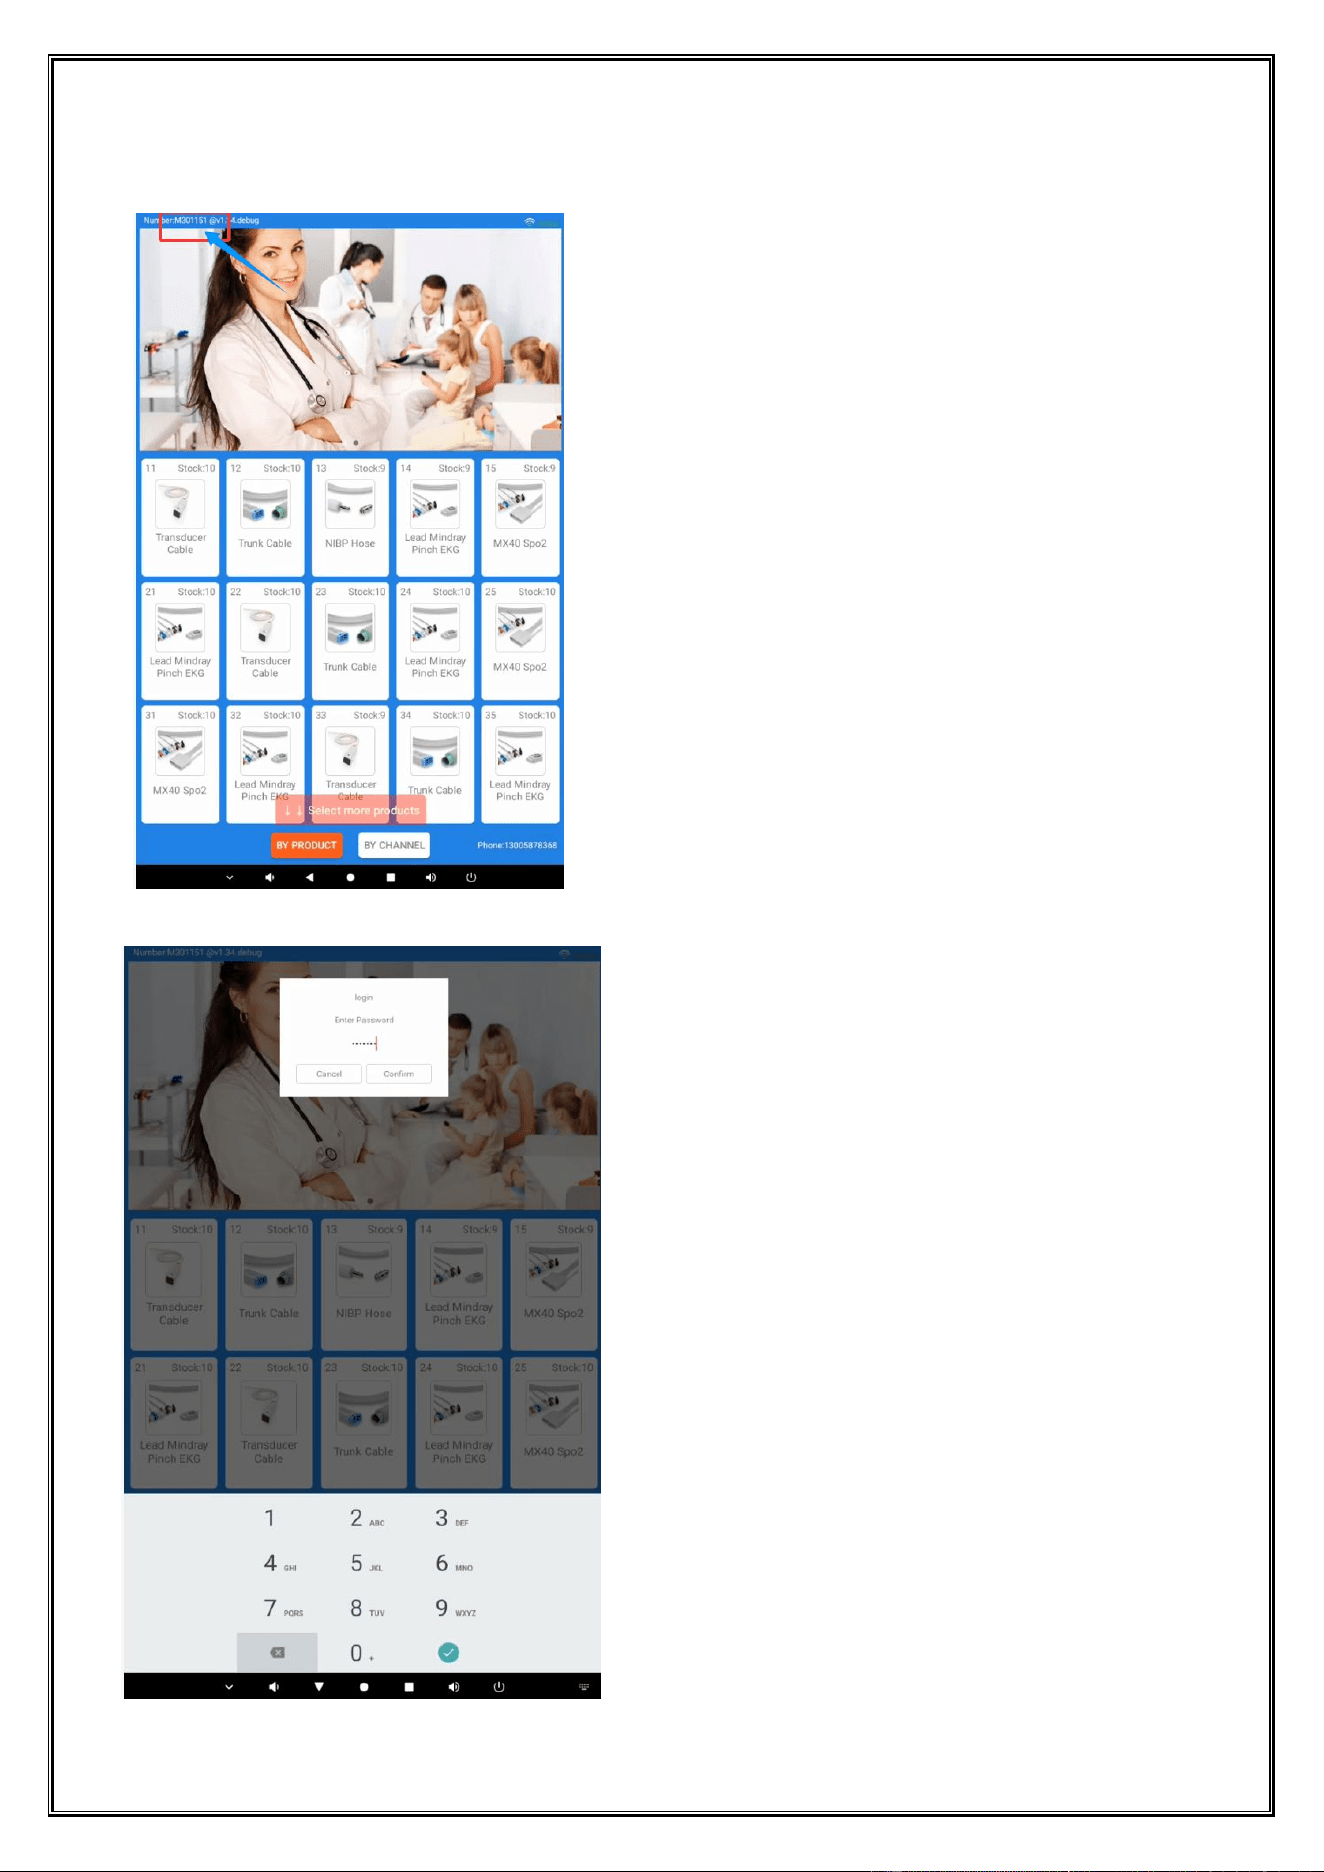
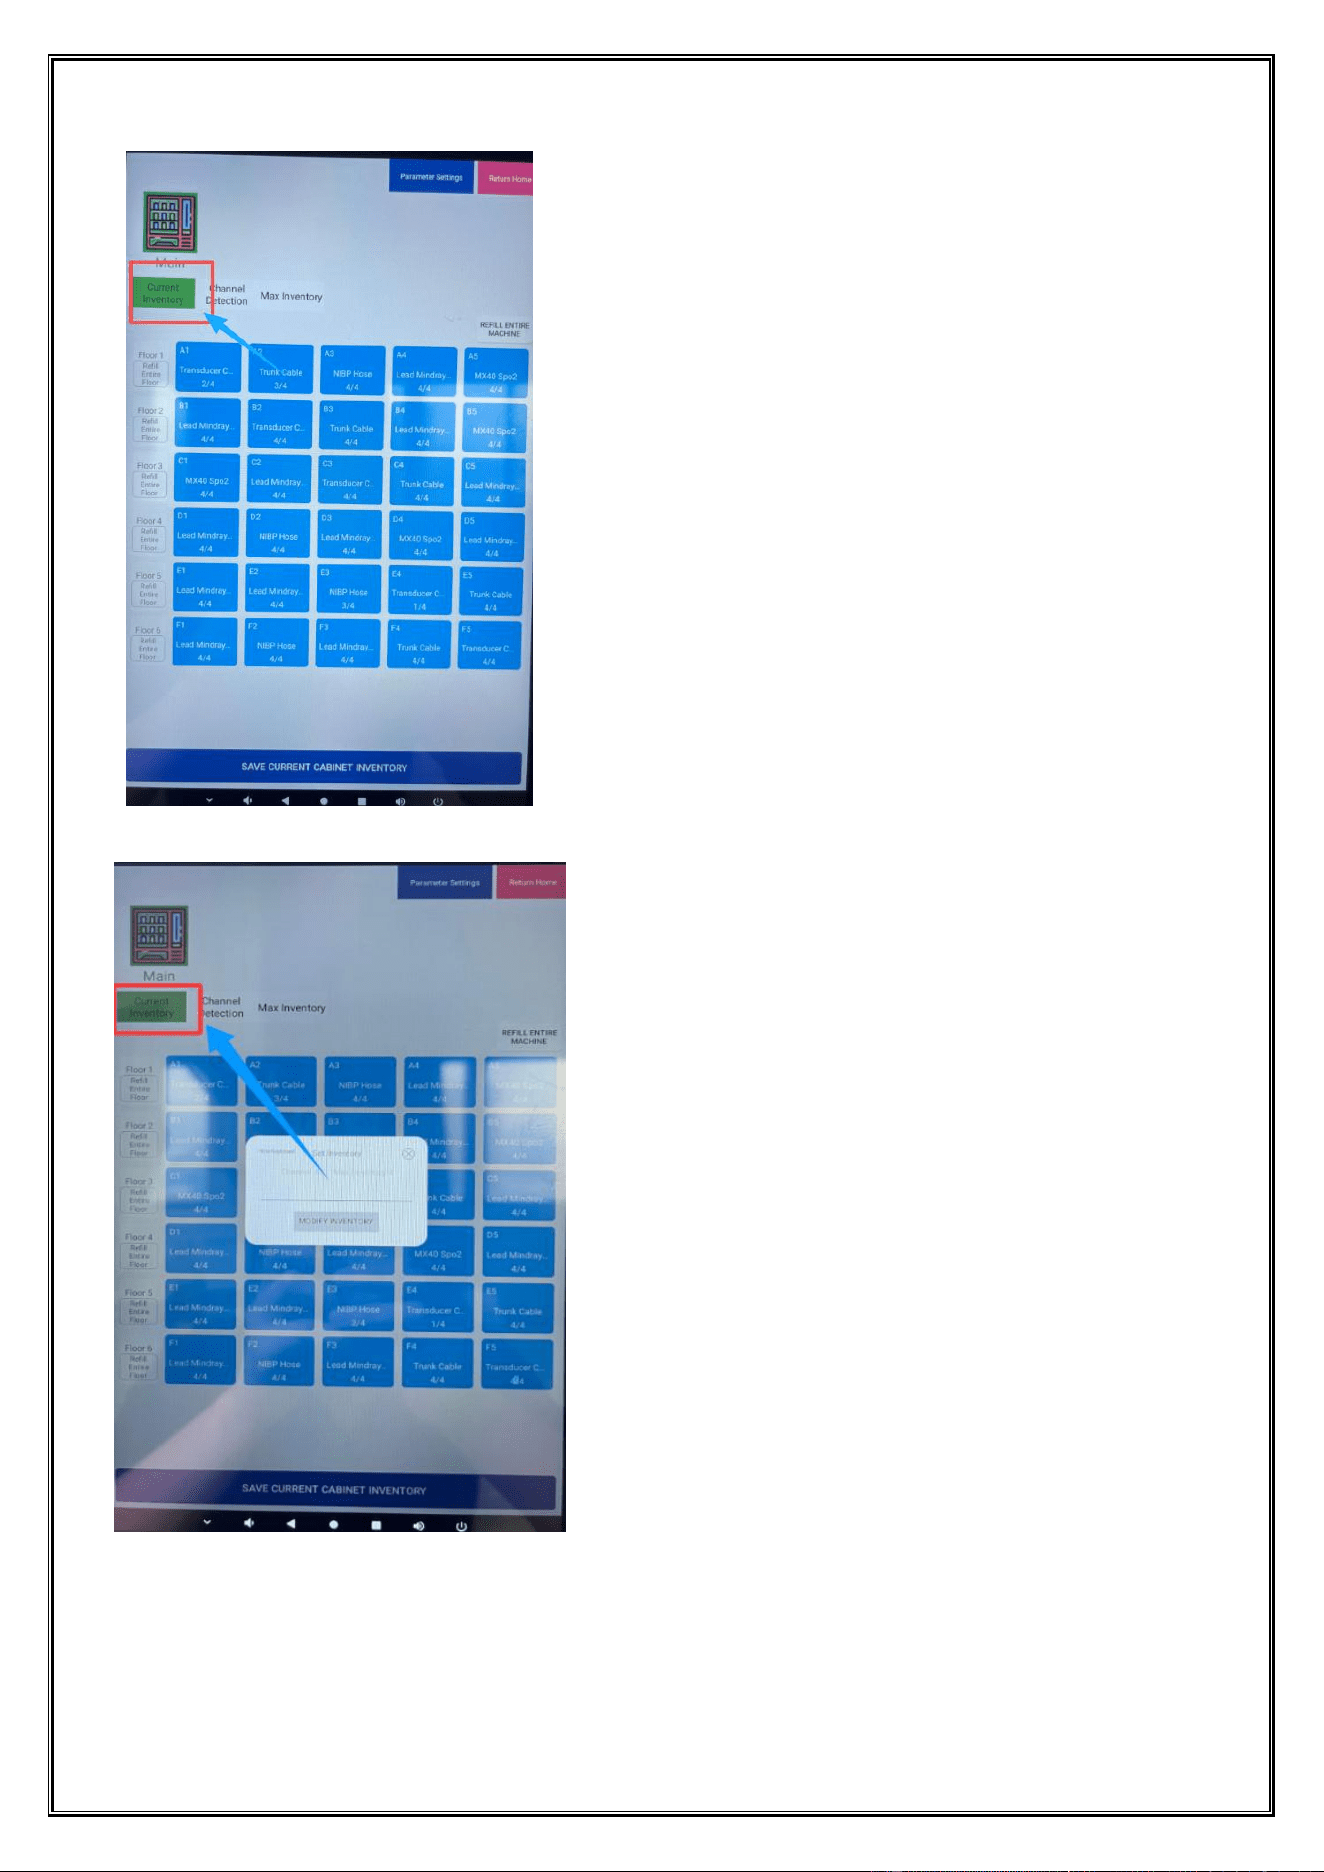
2、Equipment Parameter Setting Function
2.1 On-site replenishment
Tap the account "M30xxx" five times in succession.
Dongji Automatic Vending Machine Manual
◆ All rights reserved by Dongji Company. No reproduction or distribution without permission. ◆
- 20 -
Enter the password (default: 12345678) and confirm to proceed.
After completing on-site replenishment, the correct actual inventory quantity is simultaneously updated in the
display system backend.
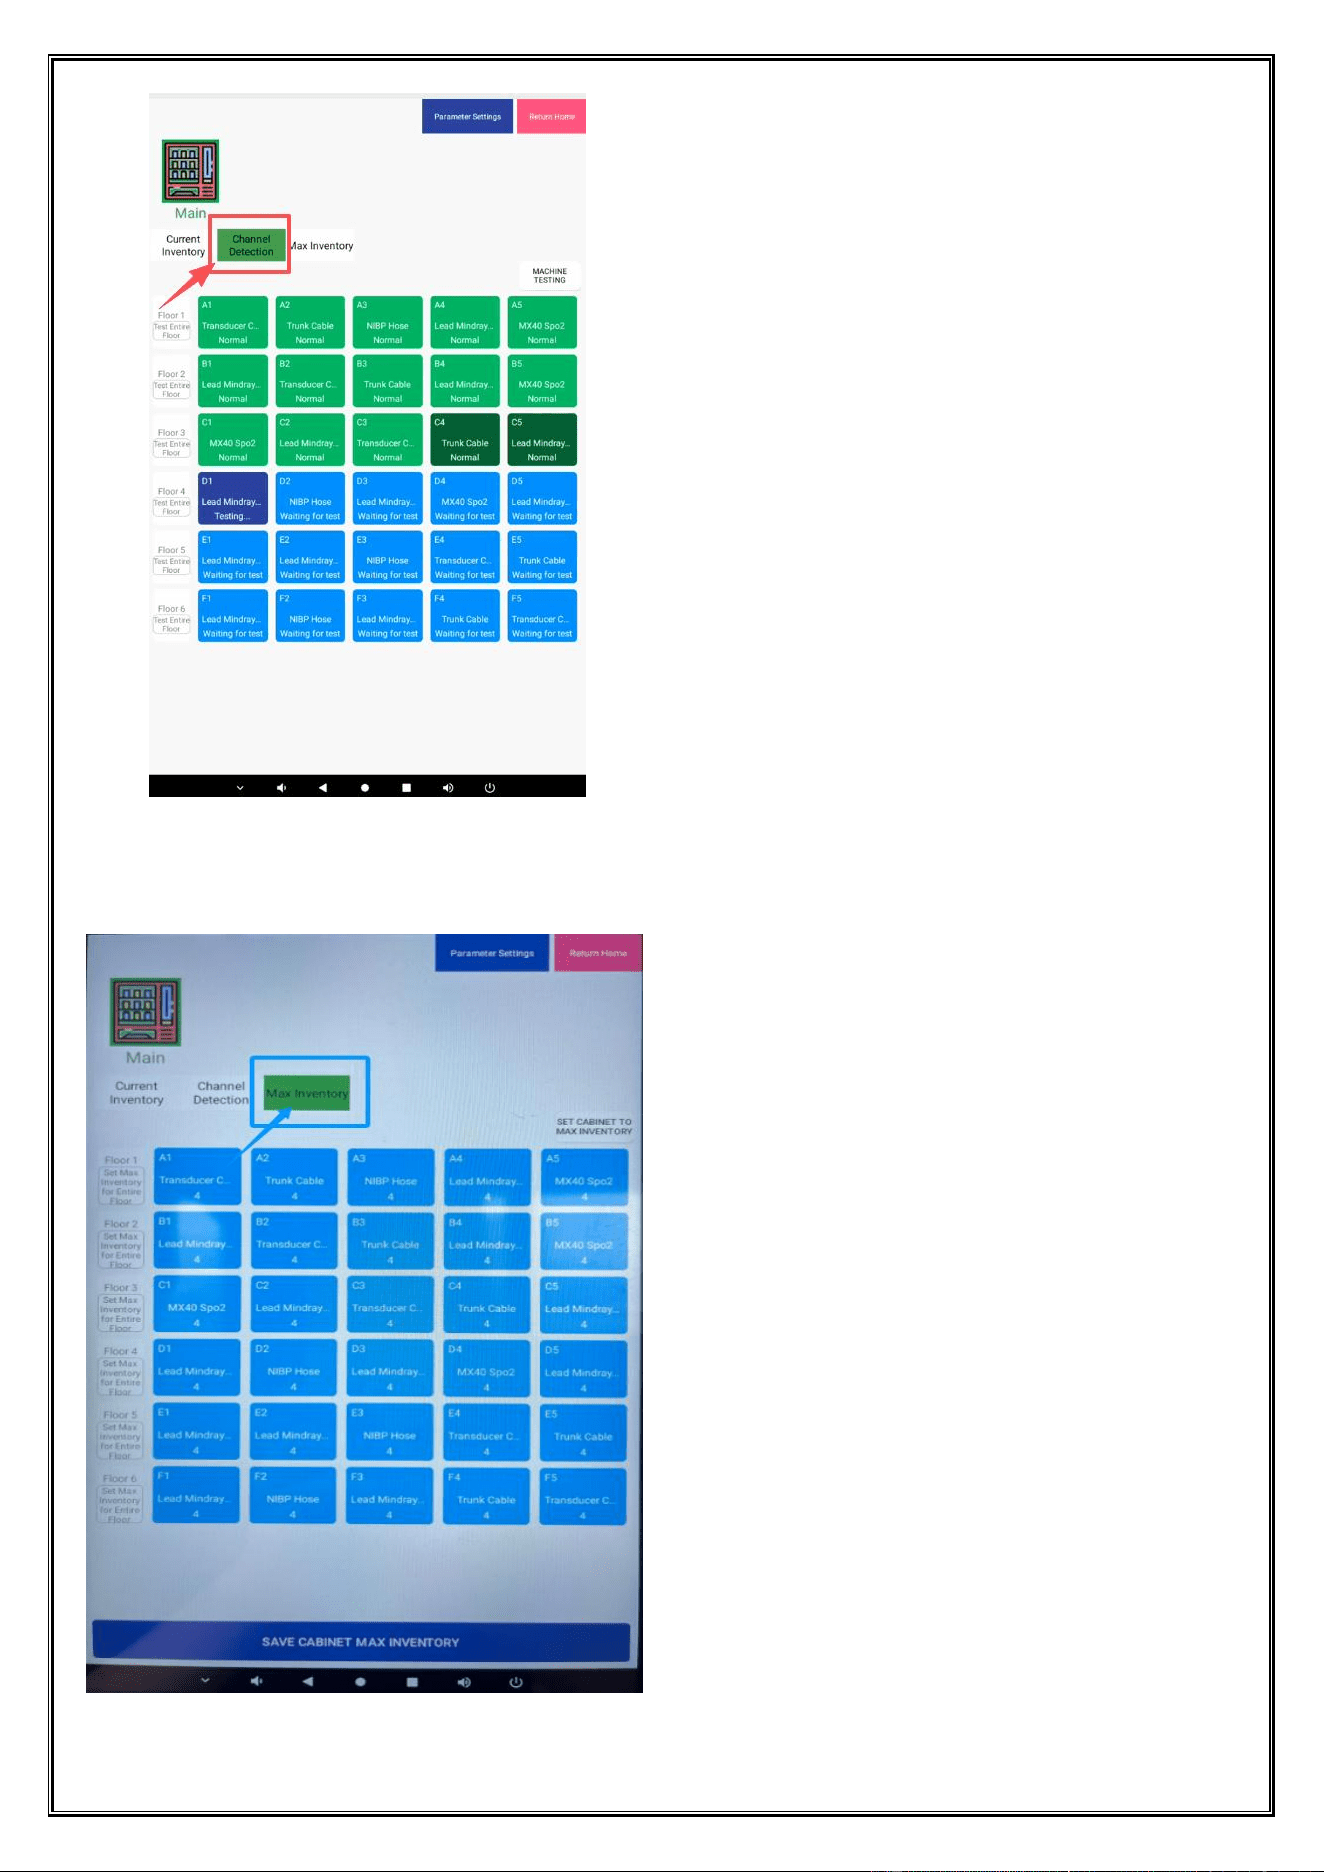
2.2 Automatic Detection
Dongji Automatic Vending Machine Manual
◆ All rights reserved by Dongji Company. No reproduction or distribution without permission. ◆
- 21 -
One-click auto-detection
2.3 Maximum Inventory Settings
Dongji Automatic Vending Machine Manual
◆ All rights reserved by Dongji Company. No reproduction or distribution without permission. ◆
- 22 -
This machine can only load 4 items per lane.
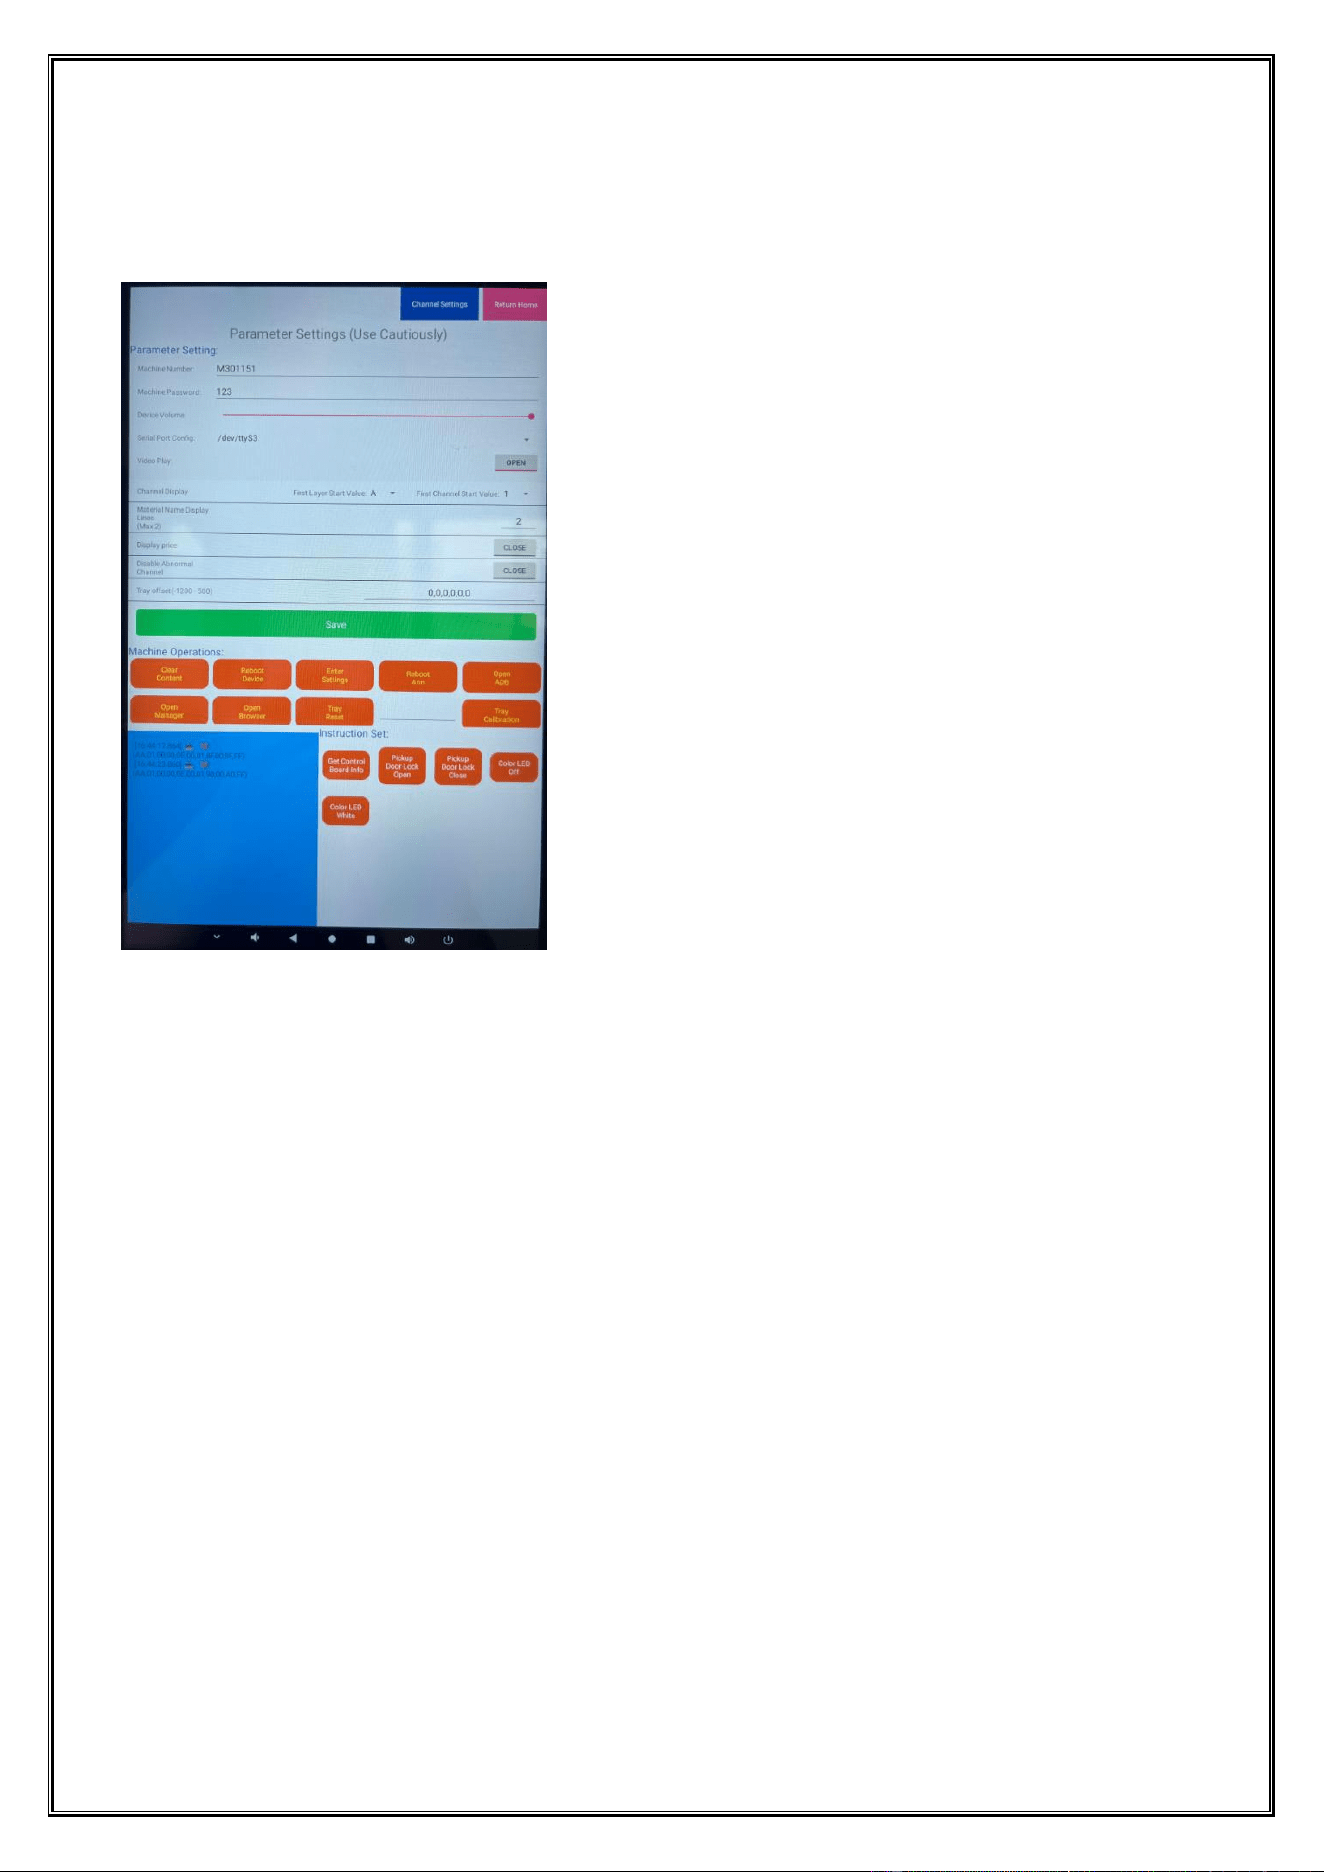
3、Parameter setting
Clear Log button;
Press the restart button on the entire device.
Go to Settings (Android system settings) and tap the button;
Restart the APP button;
Open ADB for temporary use (for technical debugging).
Open the Manager button;
Quickly open the browser interface;
The tray reset button;
Calibrate the pressure sensor. Click the peel button.
Place the 5KG weight;
Enter the code quantity;
Calibrate the tray button; (Calibration complete);
Press the button to get the control board information.
Press the button to open the lock of the door.
Test the button to close the lock of the door.
Press the colored LED button to turn it off.
Press the test button of the color LED;
Dongji Automatic Vending Machine Manual
◆ All rights reserved by Dongji Company. No reproduction or distribution without permission. ◆
- 23 -
Do not modify these settings (contact the manufacturer for adjustments).
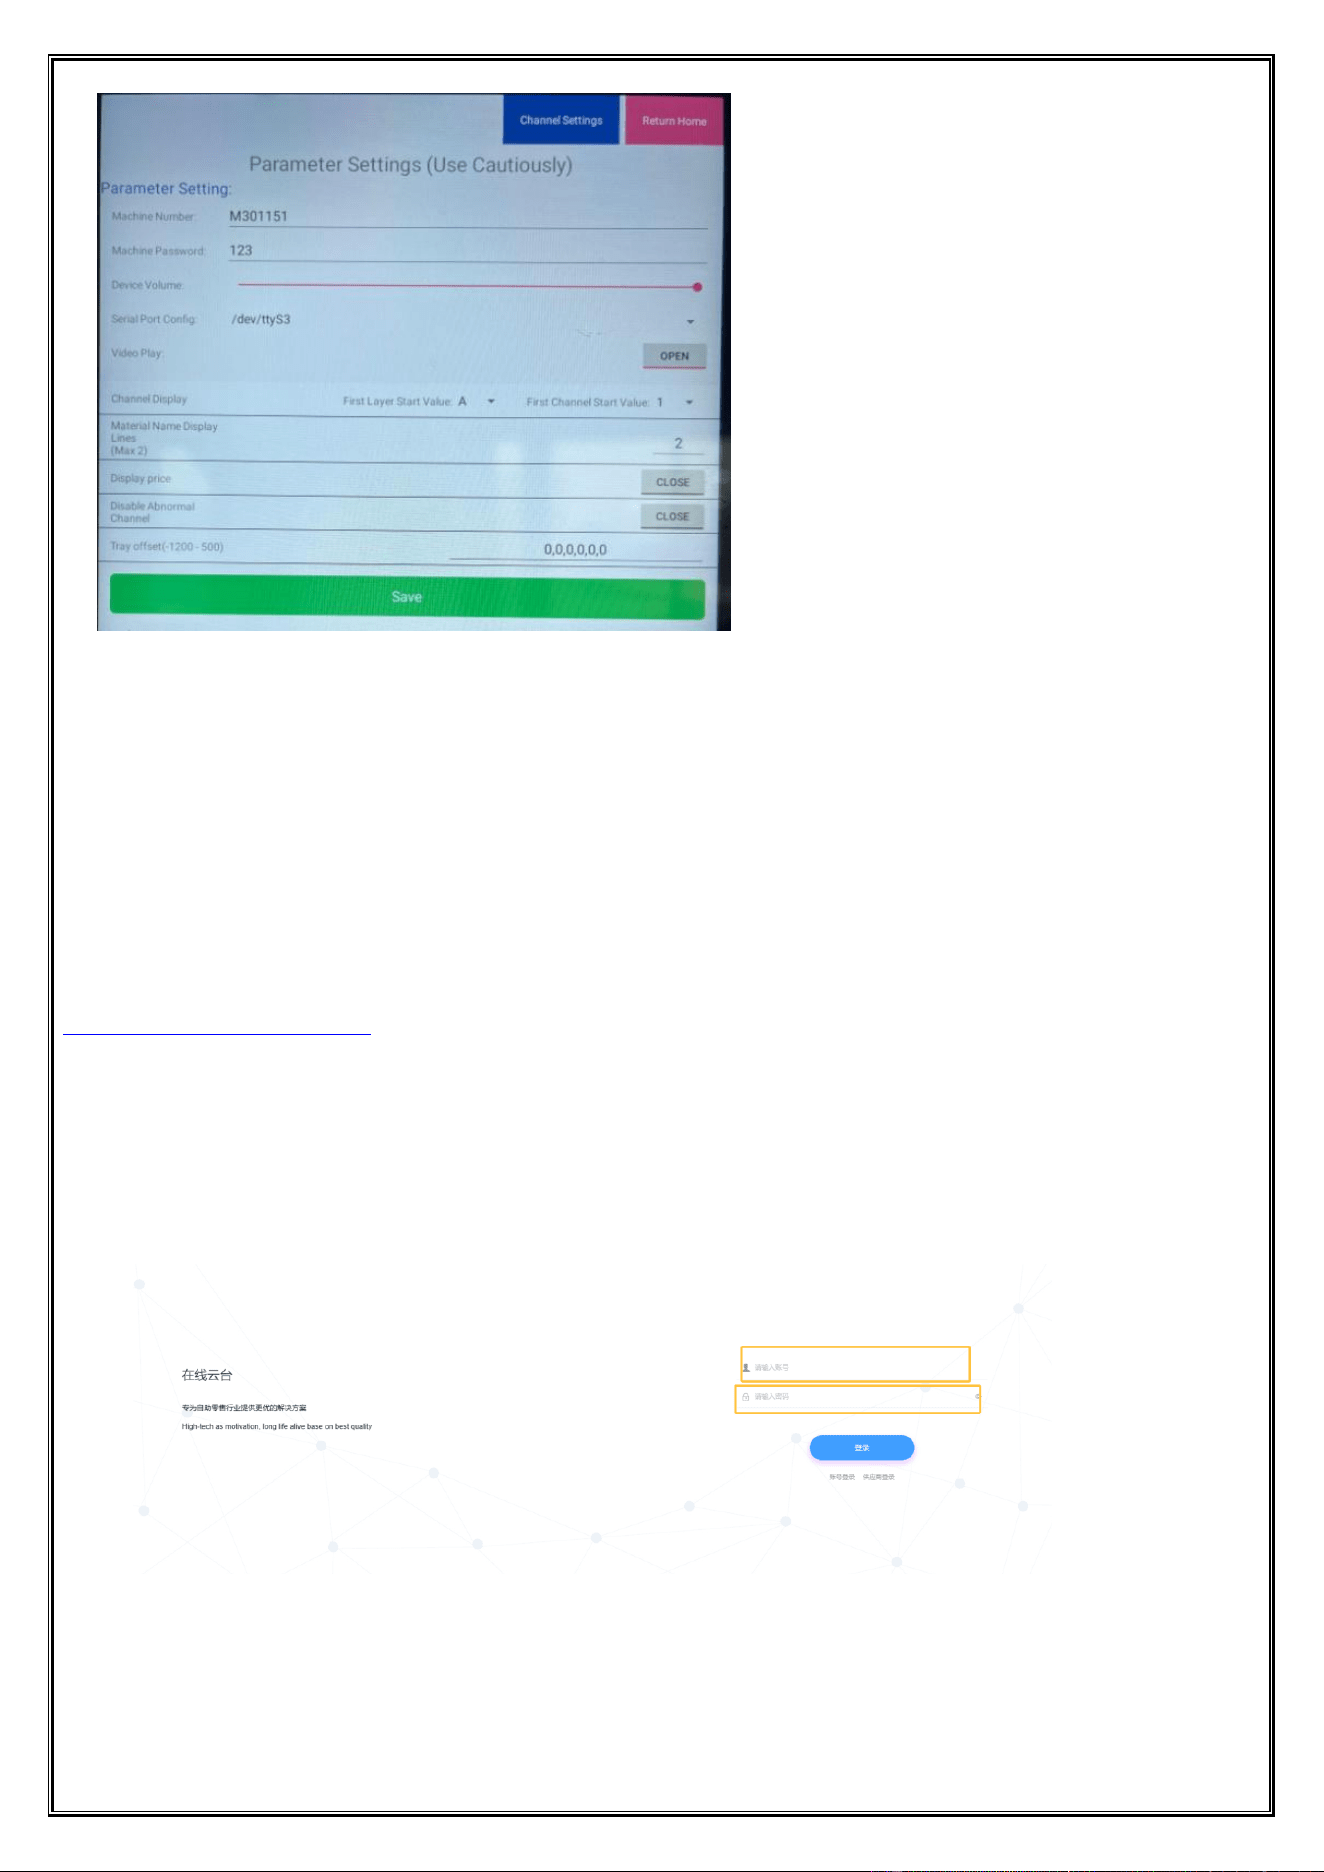
Chapter 7 Backend Management System
1. User login
Open a web browser and enter the Dongji backend management system address:
http://dj.ymiduo.com/#/login
Enter your username, password, and verification code, then click “Submit” to log in.
It is recommended to use a Chrome-based browser. Google Chrome is the preferred option.
If Internet Explorer is used, please ensure the version is IE 8 or later.
Dongji Automatic Vending Machine Manual
◆ All rights reserved by Dongji Company. No reproduction or distribution without permission. ◆
- 24 -
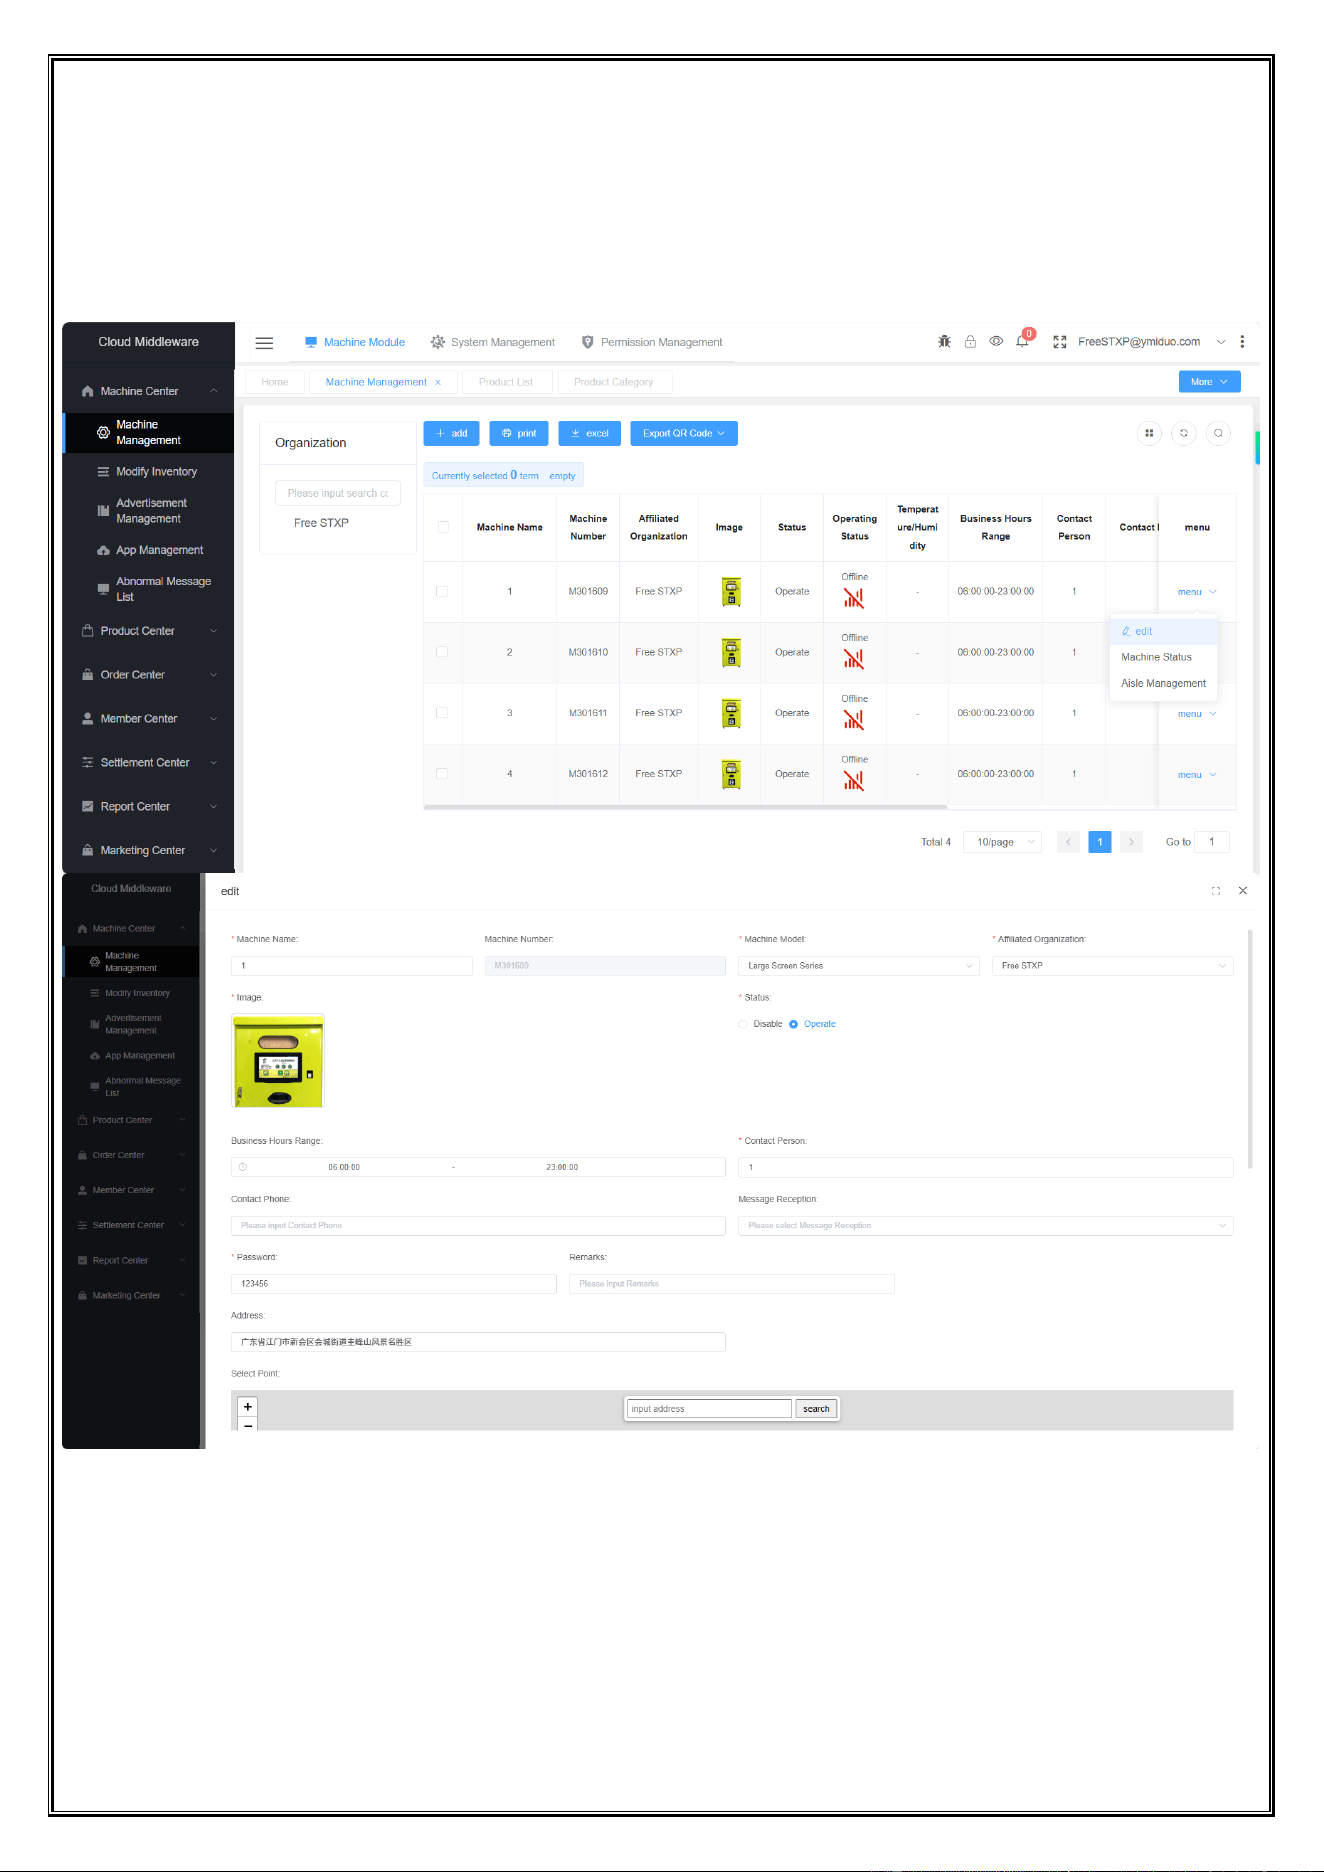
2. Device management
1.1. Open the Device Management Page
Click the Edit button to modify device information
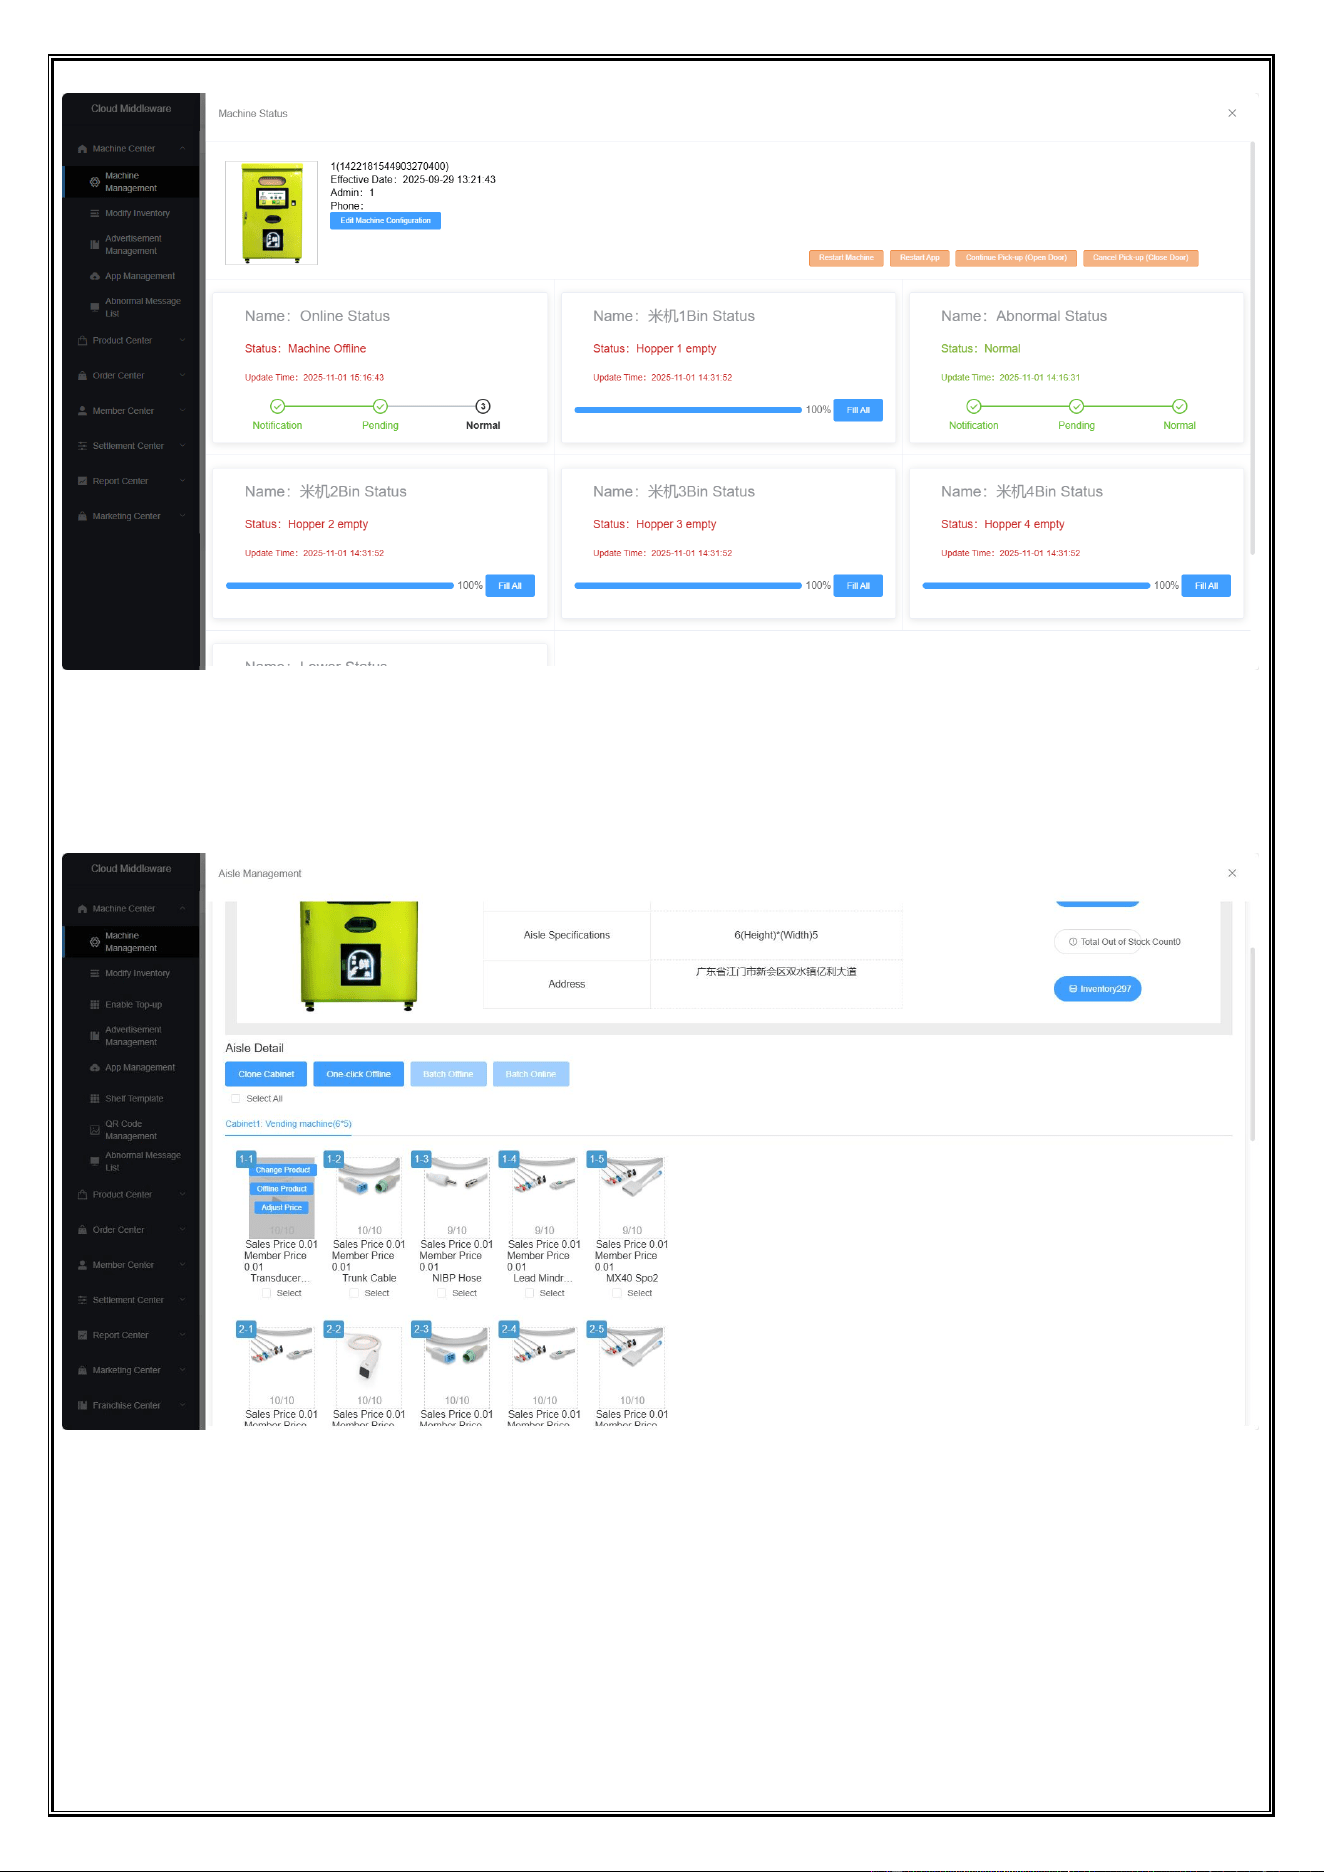
1.2. Check Device Status
Click the device status button
Dongji Automatic Vending Machine Manual
◆ All rights reserved by Dongji Company. No reproduction or distribution without permission. ◆
- 25 -
1.3. Remove from Shelves
Click the lane management, hover over the target area to reveal a floating selection button
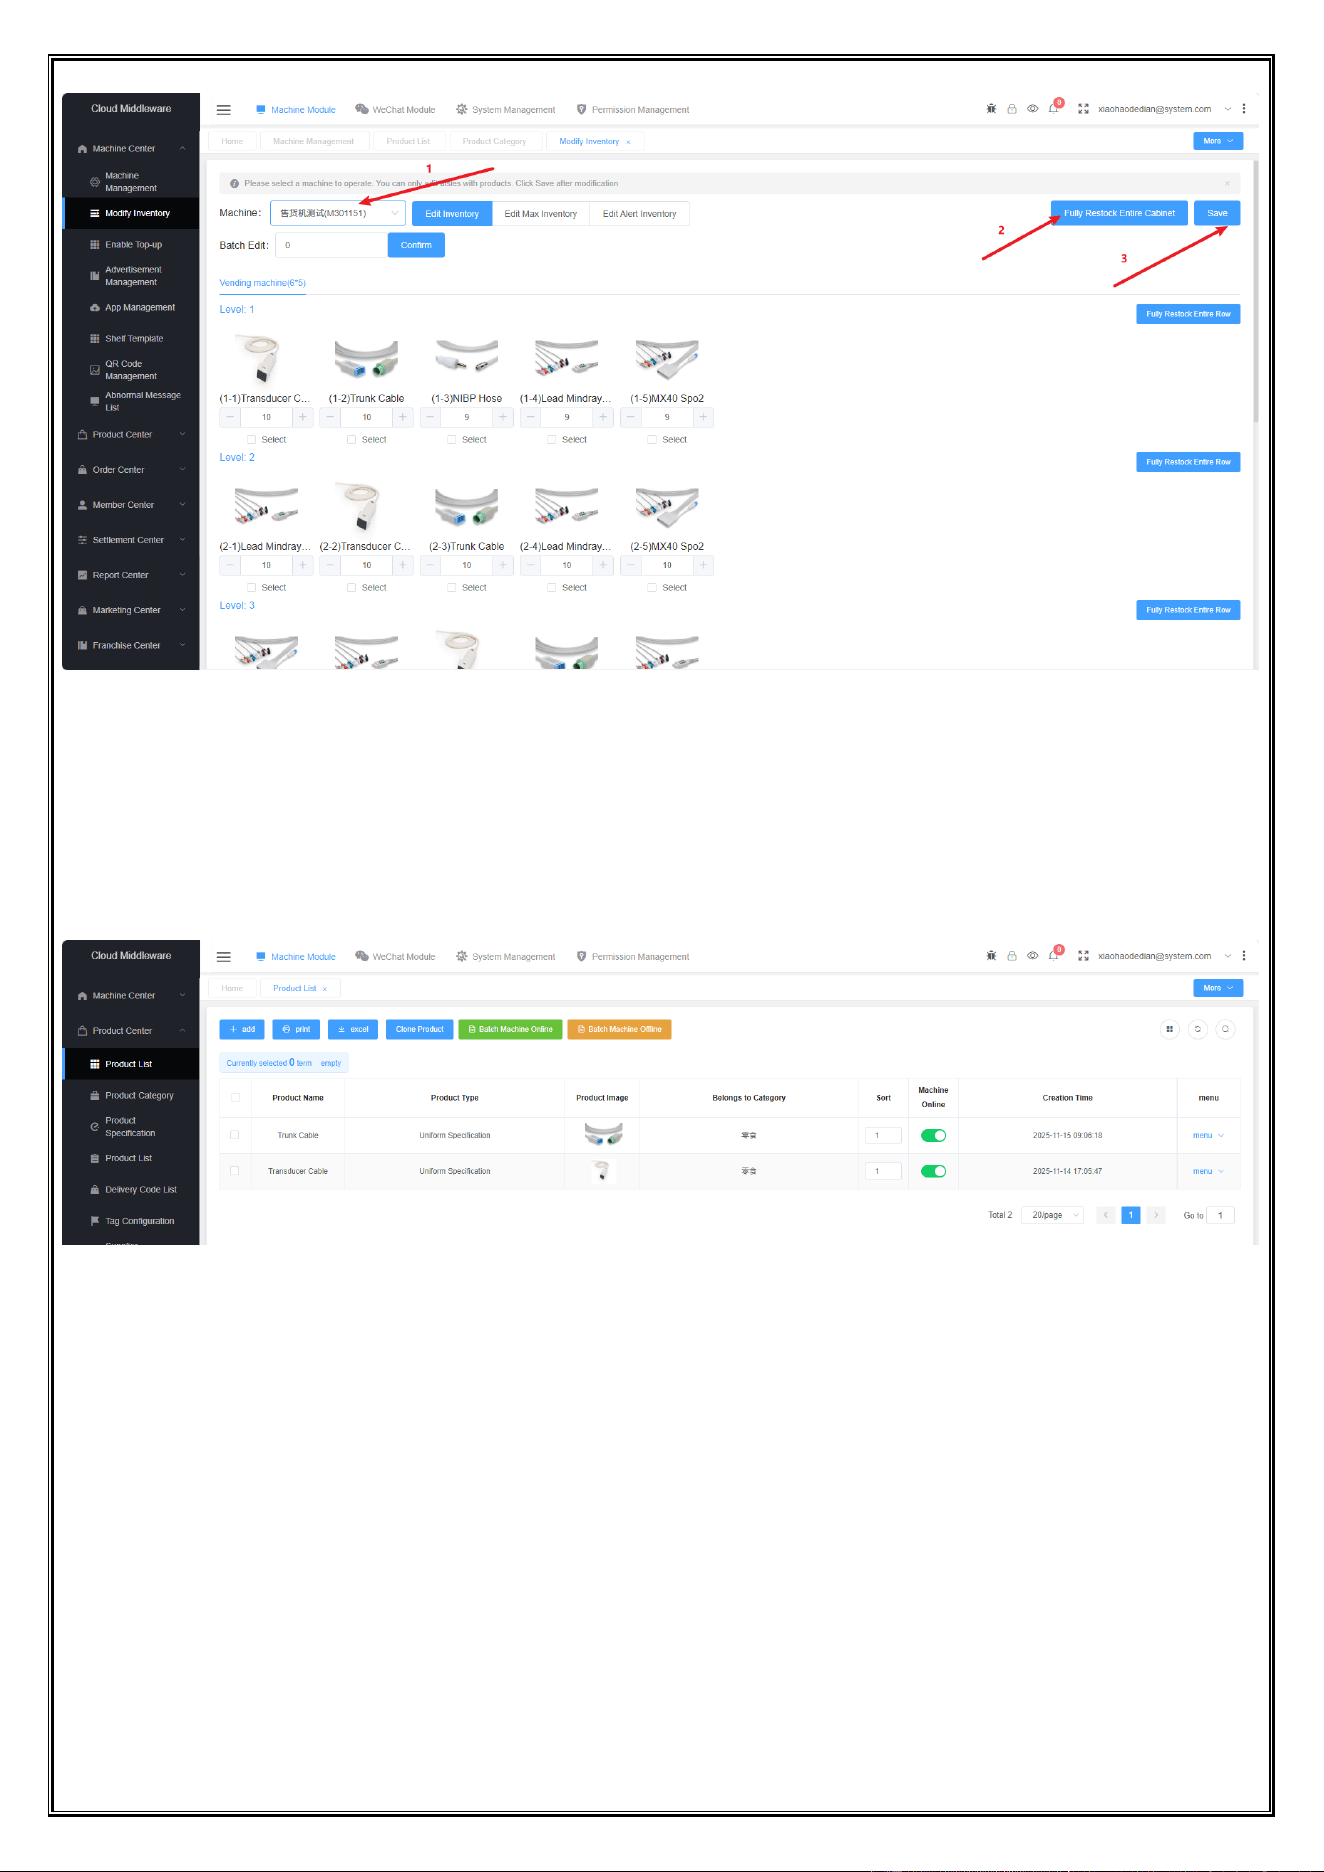
3. Replenishment Management
Open the Modify Inventory page, select one device, click One-Click Inventory Replenishment button, and save
the changes
Dongji Automatic Vending Machine Manual
◆ All rights reserved by Dongji Company. No reproduction or distribution without permission. ◆
- 26 -
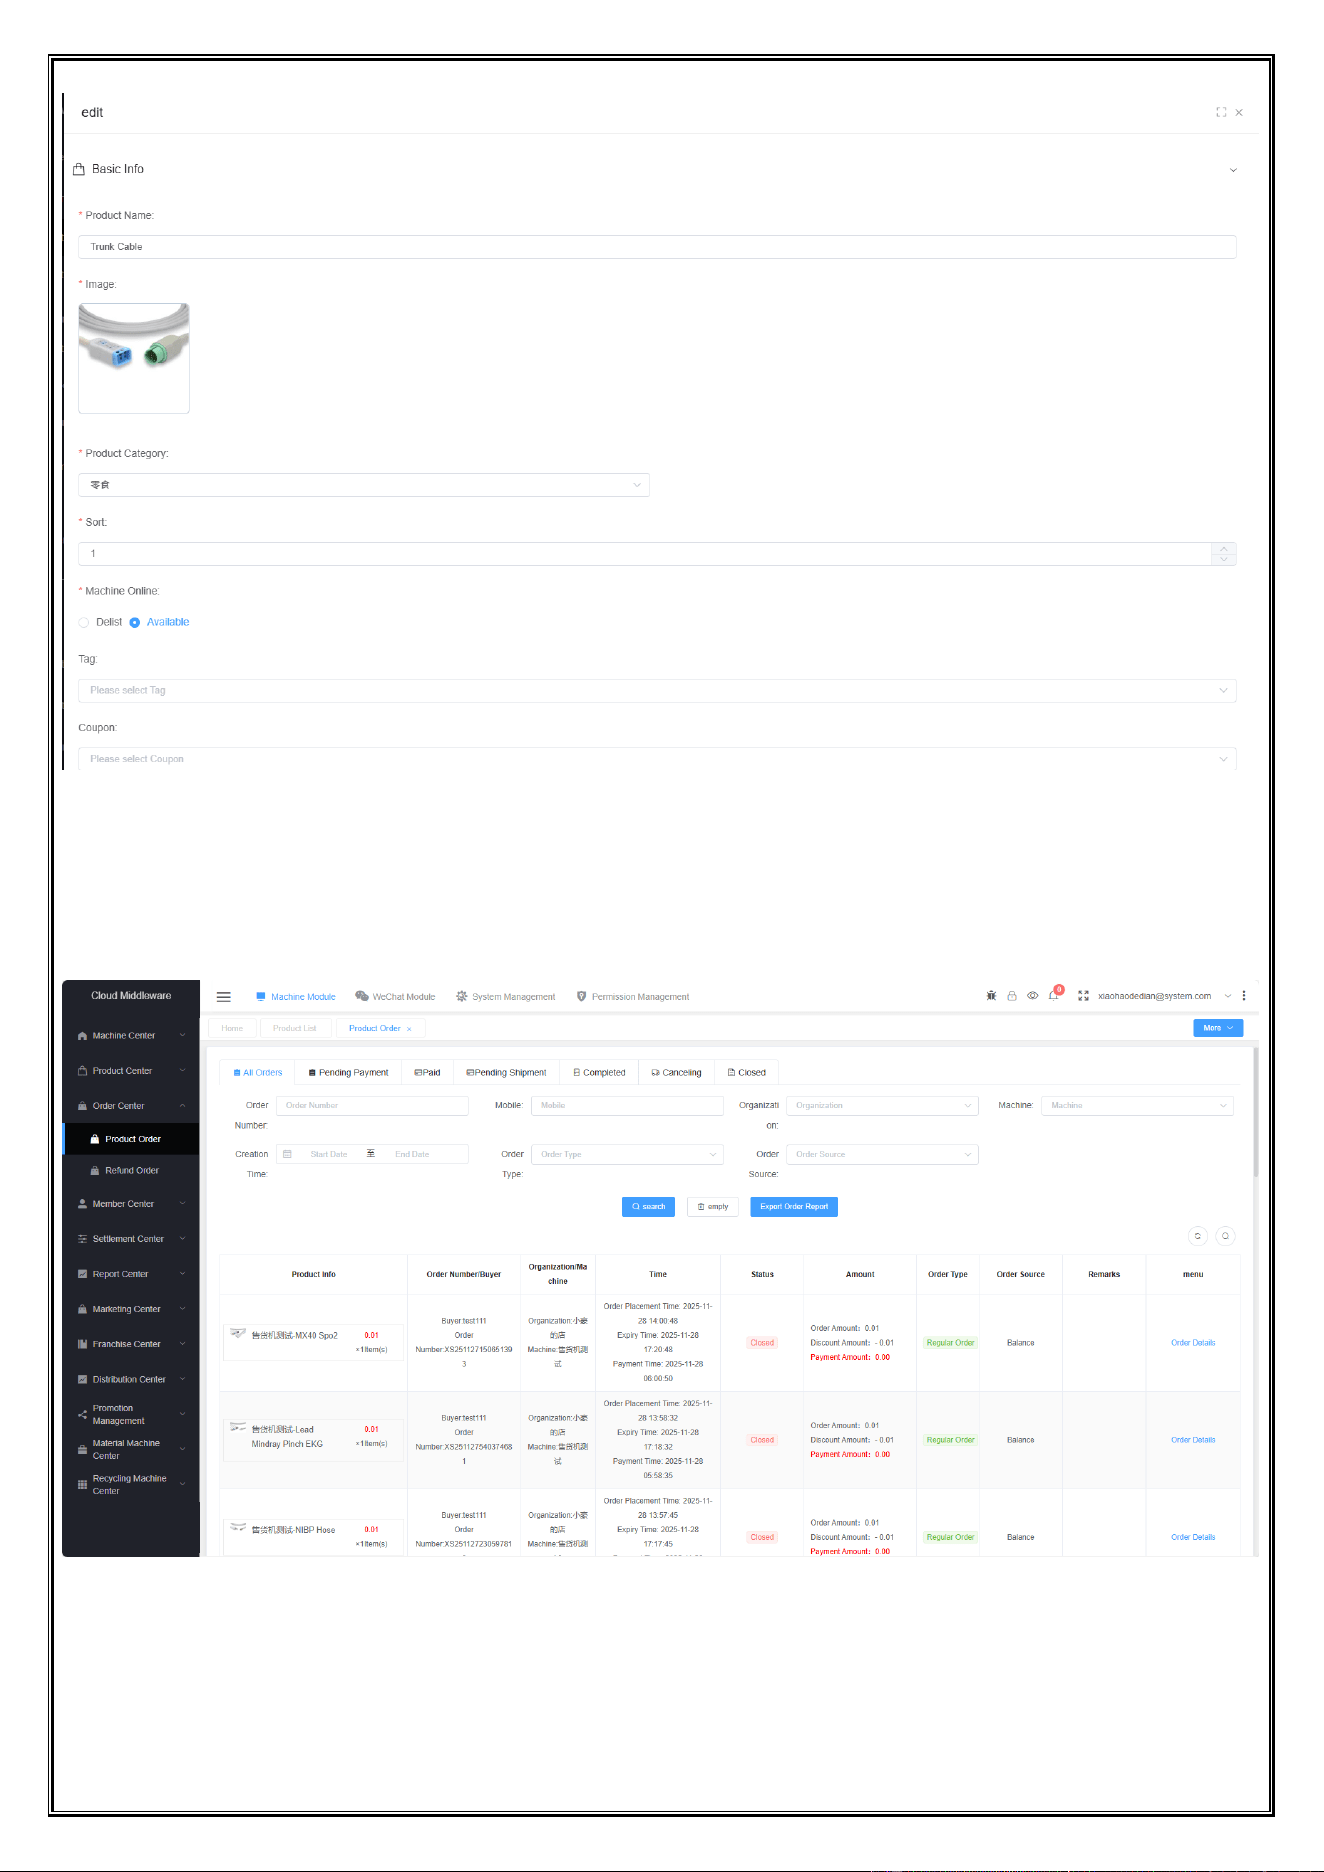
4. Merchandise Control
Click on the product list to view all product information
Click Edit to modify the product
Edit the product image and name
Dongji Automatic Vending Machine Manual
◆ All rights reserved by Dongji Company. No reproduction or distribution without permission. ◆
- 27 -
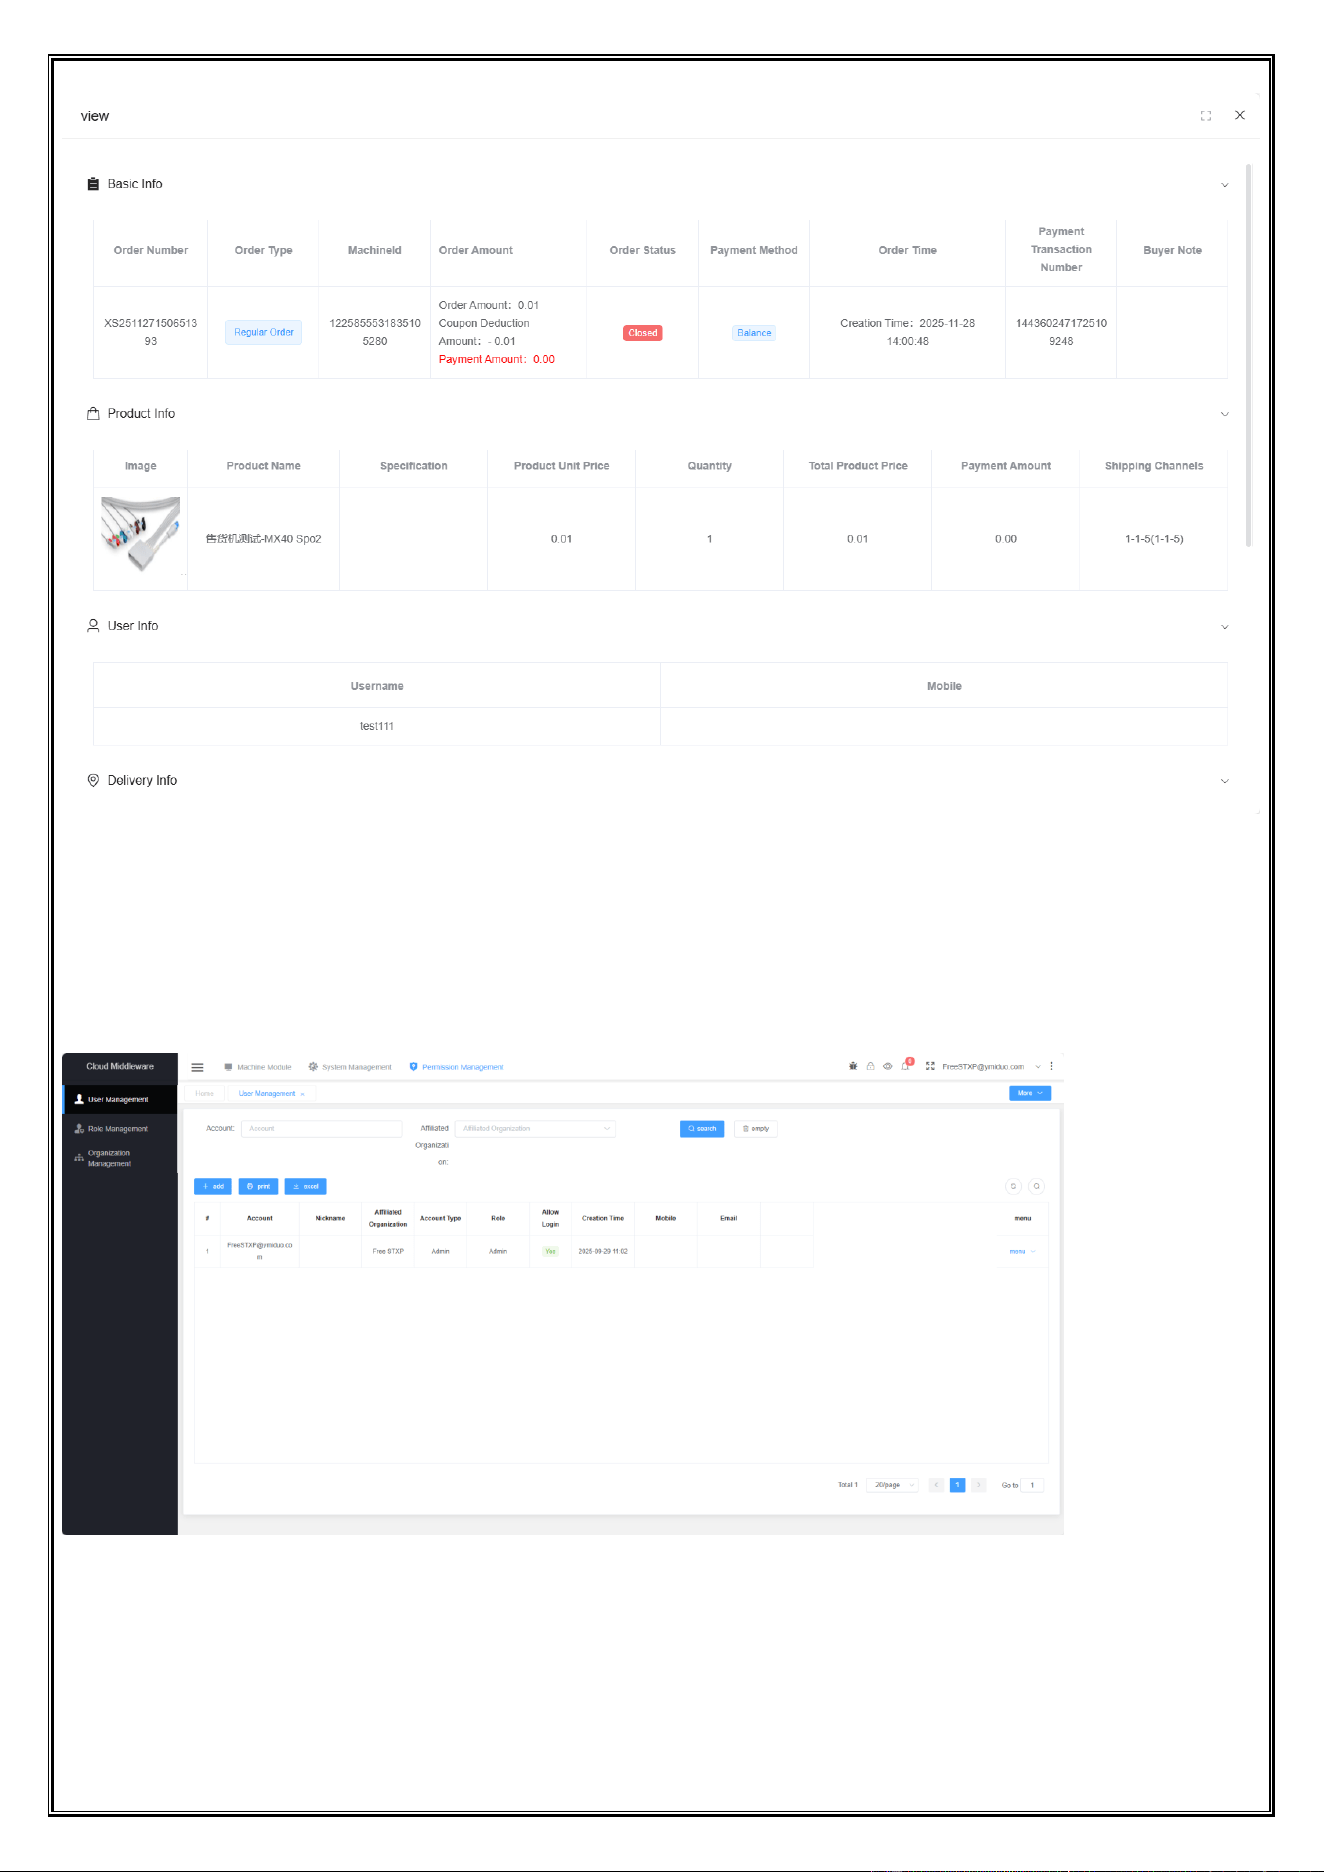
5. Order Details
Click to open and view the product order list
Dongji Automatic Vending Machine Manual
◆ All rights reserved by Dongji Company. No reproduction or distribution without permission. ◆
- 28 -
6. Account Management
Click Permission Management to open the user management page and add or edit account information
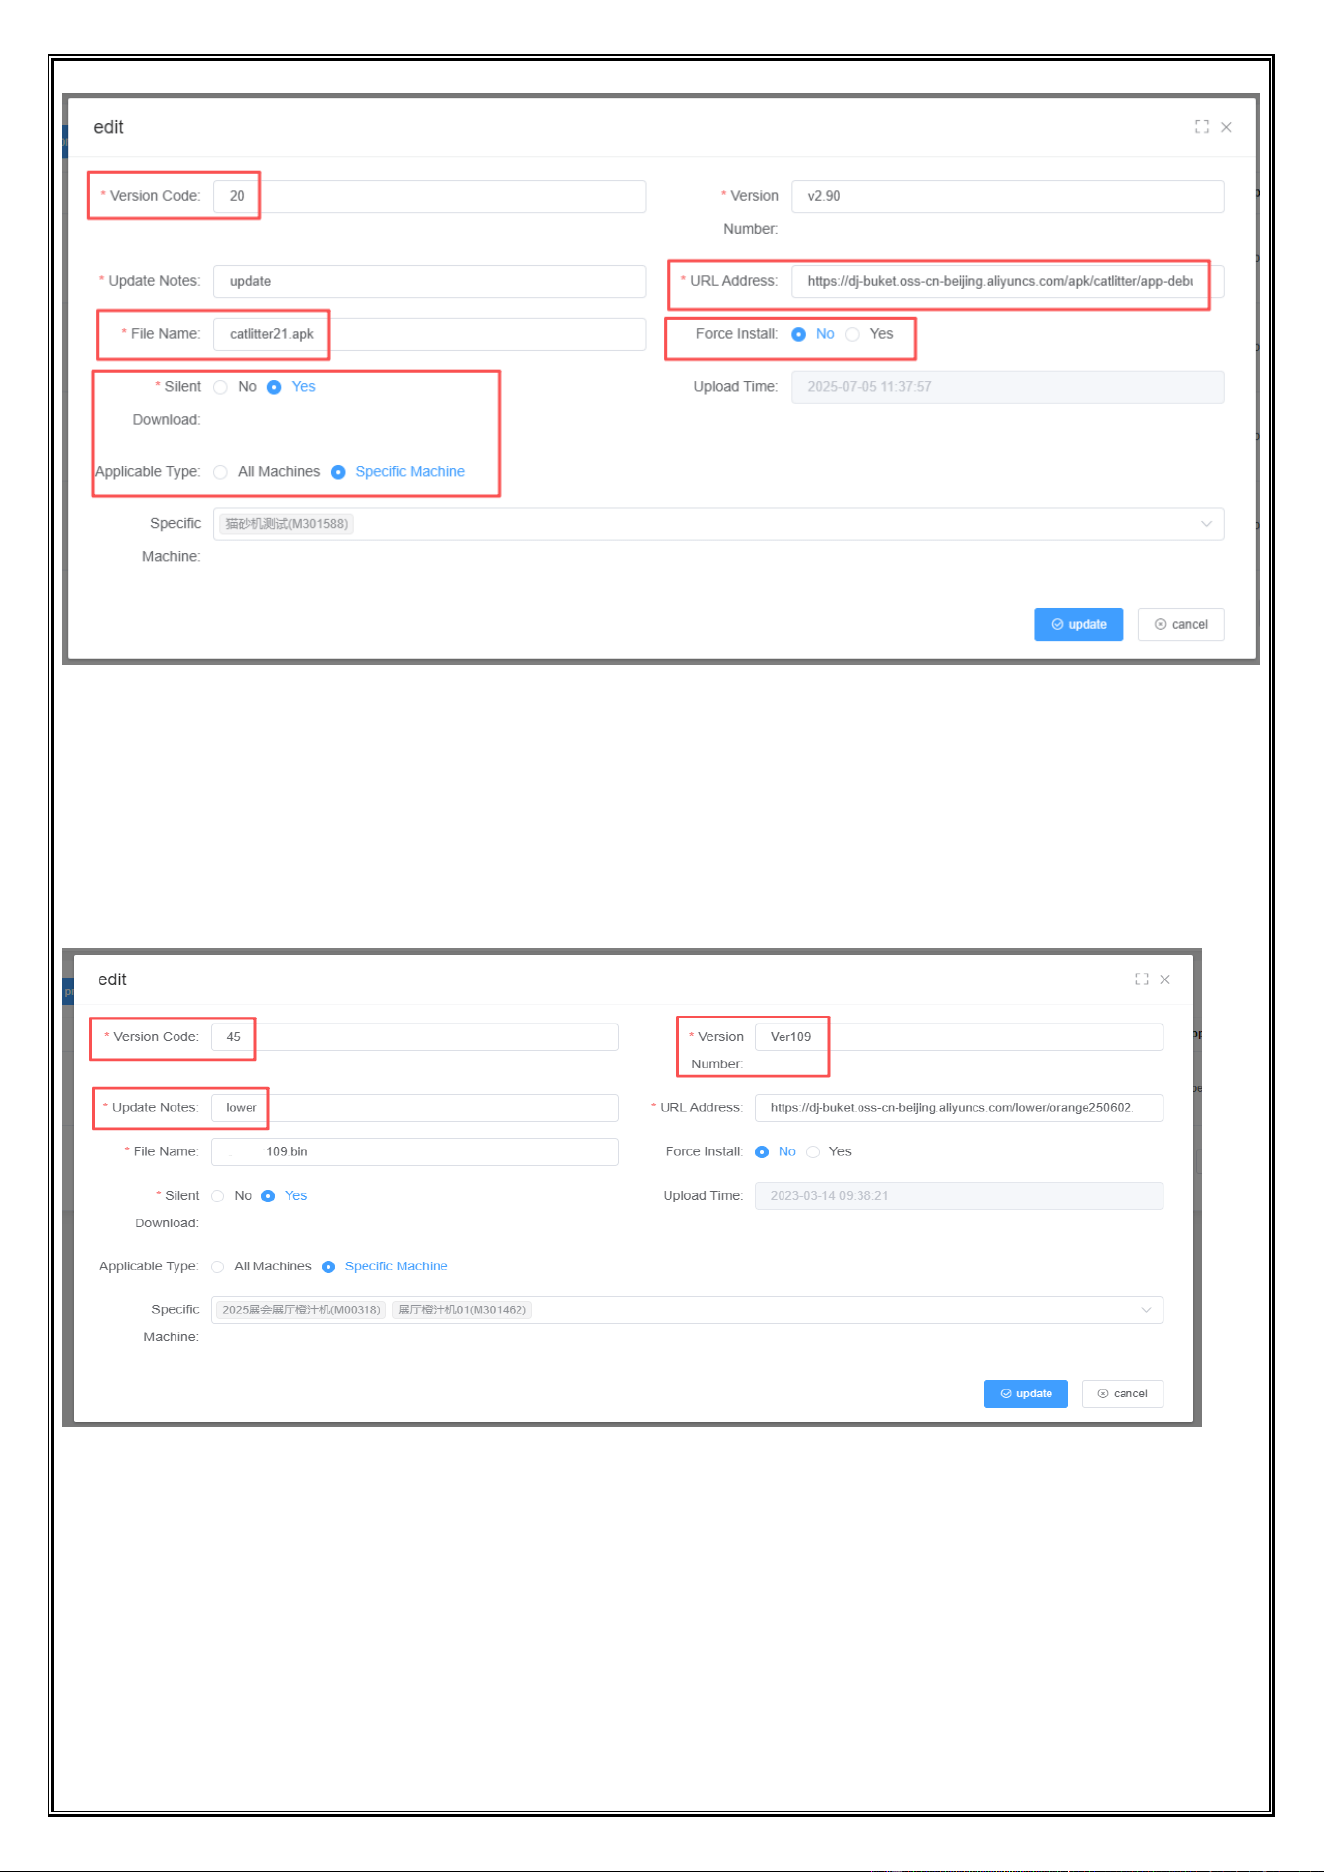
Remote Update for Device App and Host Machine
7.1 Remote update of device app
Dongji Automatic Vending Machine Manual
◆ All rights reserved by Dongji Company. No reproduction or distribution without permission. ◆
- 29 -
The version code should match the app version
Enter the correct remote update link
The file name must end with.apk
Update all devices or only specific devices(when there are many devices, it is recommended to assign specific
updates)
Configure other items in the red box
5.2 Remote Update of Lower-level Machine
The version code must be greater than the software version number.
The version number must differ from the slave machine.
The update content must be “lower”.
Other settings are the same as those the remote update app.
Dongji Automatic Vending Machine Manual
◆ All rights reserved by Dongji Company. No reproduction or distribution without permission. ◆
- 30 -
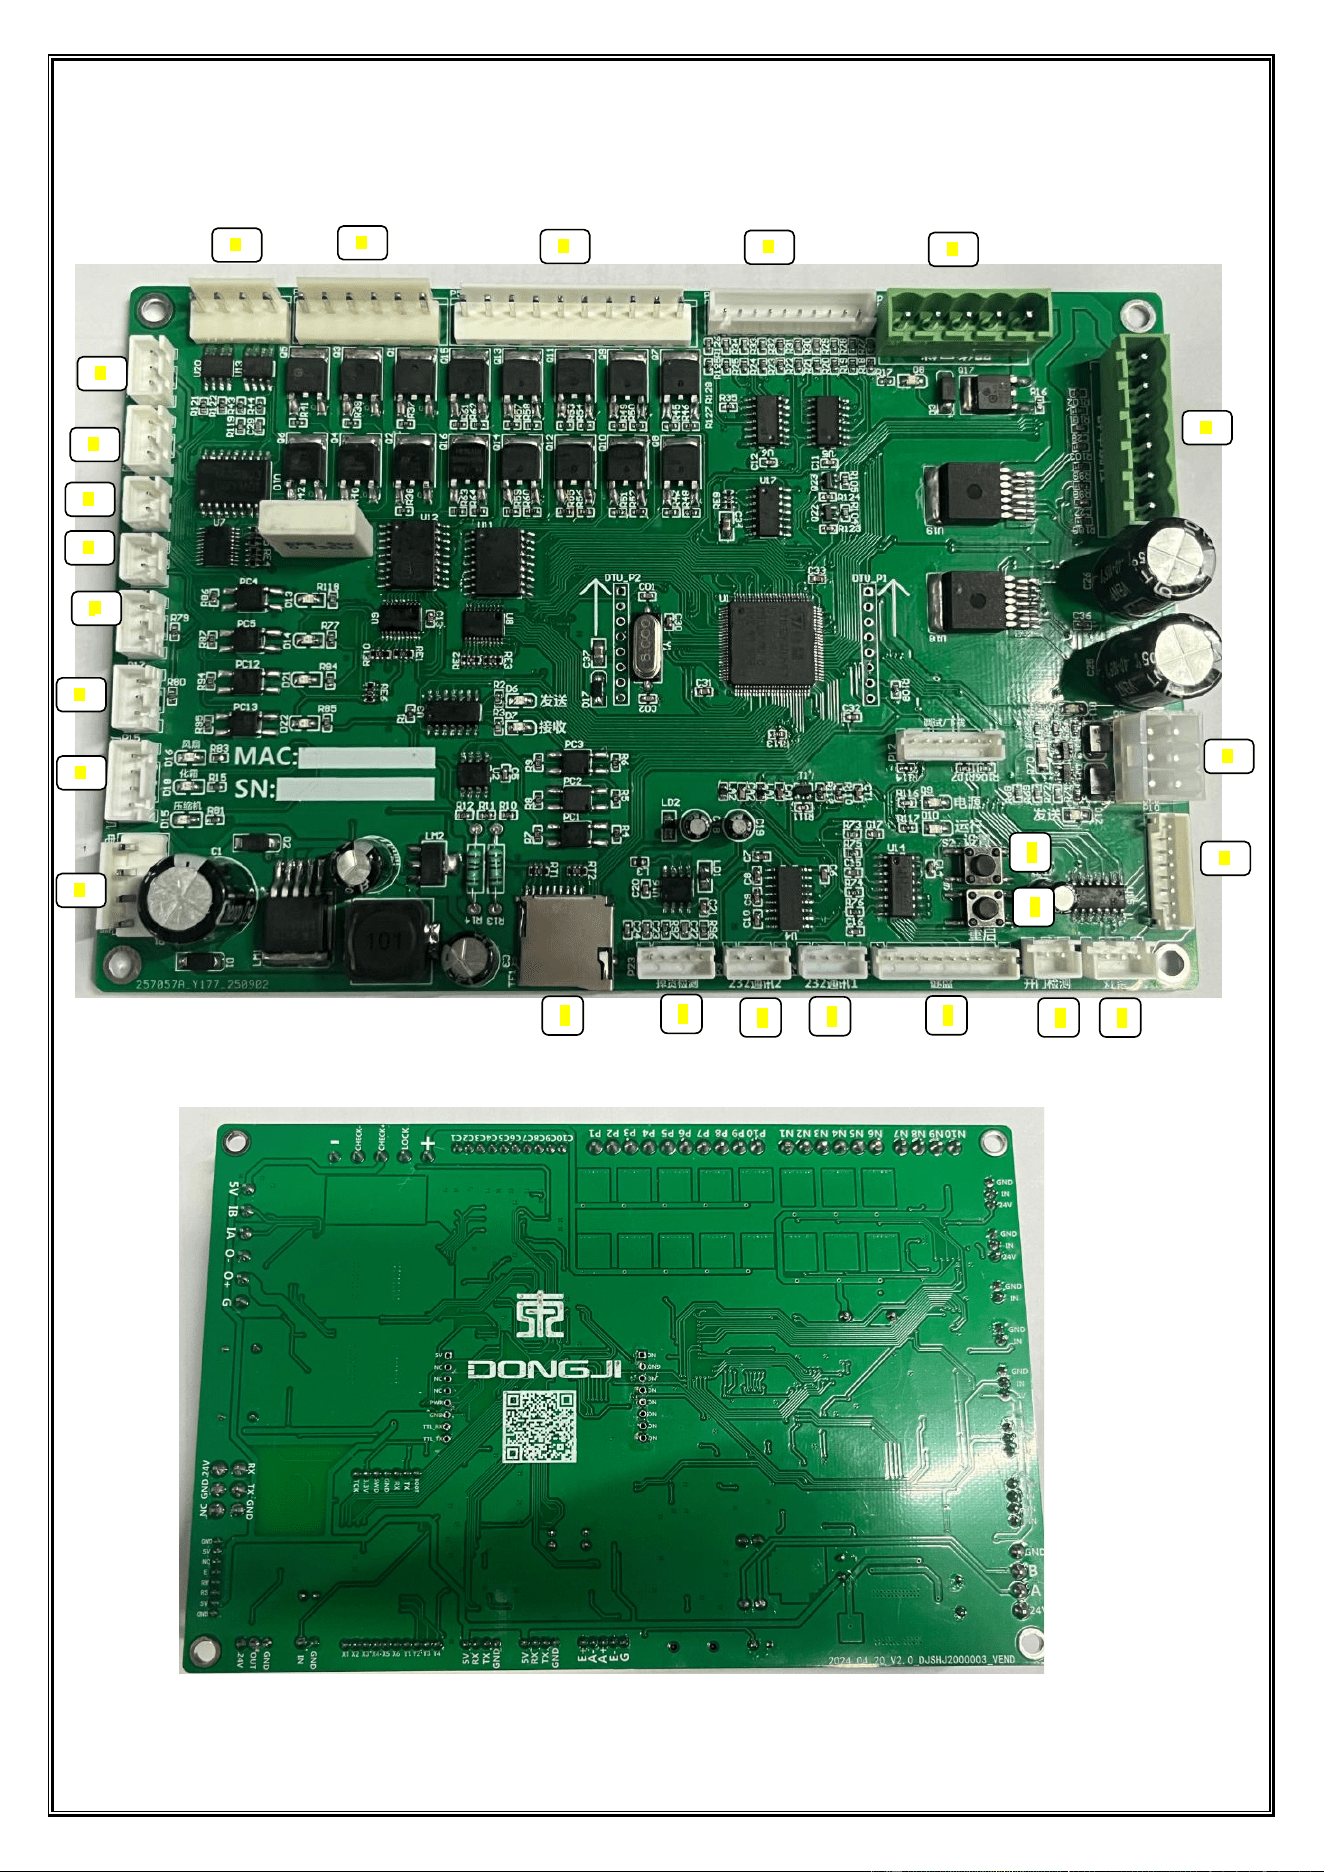
Chapter 8 Overview of Control Board Products
Front of the Control Board
Back of the Control Board
1
2
3
4
5
7
8
9
10
11
12
13
14
15
24
18
19
20
16
17
21
23
22
1
6
25
Dongji Automatic Vending Machine Manual
◆ All rights reserved by Dongji Company. No reproduction or distribution without permission. ◆
- 31 -
Chapter 9 Control Board Mainboard Interface Description
Control Board Interface Description
Serial
Number
Name
Function Description
Remarks
1
TF Card Socket
Interface
Realize remote update of the control board program through TF card
2
Drop Detection
Detect an obvious "blockage-passing" level jump signal
3
232 Communication
2
RS-232 serial communication standard data transmission interface
(backup)
Backup interface
4
232 Communication
1
RS-232 Serial Communication Standard and Data Transmission
Interface of Android Board
5
Keyboard
Connect to the keyboard settings
6
Restart
Quick Restart Button
7
Settings
Quick access to settings button
8
Door Open
Detection
Interface for sensing and responding to the open/closed state of
cabinet doors
9
Light Strip
Interface for lighting functional LED light strips
10
12864 Small Screen
Display
Not applied in this version
Not applied
11
MDB
Automatic sales payment function interface
12
Lifting Motor
The lifting motor is transformed from a simple power component
into an intelligently executable component that can be precisely
commanded and monitored in real-time
13
Pickup Port Lock
Authorized opening, status monitoring, and anti-theft alarm
14
Motor Rotation
Feedback
DetectionReal-time
and accurately
monitor the rotation
angle,
Real-time and accurately monitor the rotation angle, speed, and
direction of the motor shaft
15
common positive
terminal
Common power supply positive terminal. Provide centralized
+5V or +12V power supply for multiple sensors (such as layer
probes, limit switches)
16
Common negative
terminal 1
Common power supply negative/signal ground terminal group 1
17
Common negative
terminal 2
Common power supply negative/signal ground terminal group 2
18
layer probe
Lane layer positioning sensor interface. Connect to infrared or
Hall sensors installed on the side of each layer of the lane to
assist in calibrating or redundantly verifying the floor position of
Dongji Automatic Vending Machine Manual
◆ All rights reserved by Dongji Company. No reproduction or distribution without permission. ◆
- 32 -
the lifting platform
19
Extended detection
Extended function detection interface. Reserved for connecting
extended peripherals such as temperature and humidity sensors,
vibration sensors, and network modules to increase intelligent
equipment management functions
20
Upper Limit
Mechanical upper limit switch interface. Connect to the physical
limit switch installed at the top of the lifting channel. When the
platform touches it, the motor power is cut off immediately to
prevent mechanical overshoot from hitting the top
21
lower limit
Mechanical lower limit switch interface. Connect to the physical
limit switch installed at the bottom of the lifting channel. Used to
define the mechanical zero point and provide protection when the
platform overtravels during descent
22
Refrigeration Probe
Not applied in this version
Not applied
23
Defrost Probe
Not applied in this version
Not applied
24
Fan/Defrosting/Com
pressor
Not applied in this version
Not applied
25
Power input/485
communication
Composite function interface: 1. Power Input: Connect to a DC
regulated power supply (such as DC 24V) to supply power to the
entire control board and some peripherals. 2. 485
Communication: Provide RS-485 bus interface for networking
multiple devices or remote data communication with the backend
management system (such as sales data upload, remote control)
Chapter 10 Firmware Update Method Description
Operation Method: Place the firmware file elev2.bin (note: the file name cannot be changed) in the root directory of
the TF card (ensure the TF card format is FAT or FAT32) → Insert it into the card socket on the control board when the
control board is powered off → Power on → The working indicator light of the circuit board changes from slow flashing
to fast flashing (slow flashing once every 500 milliseconds, fast flashing once every 250 milliseconds) → The working
indicator light changes from fast flashing to slow flashing → Firmware update is completed.

Dongji Automatic Vending Machine Manual
◆ All rights reserved by Dongji Company. No reproduction or distribution without permission. ◆
- 33 -
FCC Warning
This device complies with part 15 of the FCC rules. Operation is subject to the following two conditions: (1) this
device may not cause harmful interference, and (2) this device must accept any inte rference received, including
interference that may cause undesired operation.
Changes or modifications not expressly approved by the party responsible for compliance could void the user's
authority to operate the equipment.
NOTE: This equipment has been tested and found to comply with the limits for a Class B digital device, pursuant to
part 15 of the FCC Rules. These limits are designed to provide reasonable protection against harmful interference in a
residential installation. This equipment generates uses and can radiate radio frequency energy and, if not installed and
used in accordance with the instructions, may cause harmful interference to radio communications. However, there is no
guarantee that interference will not occur in a particular installation. If this equipment does cause harmful interferenceto
radio or television reception, which can be determined by turning the equipment off and on, the user is encouraged to try
to correct the interference by one or more of the following measures:
-Reorient or relocate the receiving antenna.
•Increase the separation between the equipment and receiver.
•Connect the equipment into an outlet on a circuit different from that to which the receiver is connected.
•Consult the dealer or an experienced radio/TV technician for help.
Radiation Exposure Statement
This equipment complies with FCC radiation exposure limits set forth for an uncontrolled environment. This
equipment should be installed and operated with minimum distance 20cm between the radiator and your body.