ASSEMBLY INSTRUCTIONS
Slanted Shelf / Suture Cart /
Merchandising Cart
EG9802 Revised 03/24
CAUTION
INSPECT CONTENTS IMMEDIATELY AND FILE CLAIM WITH DELIVERING
CARRIER FOR ANY DAMAGE
. SAVE YOUR BOX AND ALL PACKING MATERIALS.
YOU ARE RESPONSIBLE FOR DAMAGE TO YOUR UNIT IF RETURNED IMPROPERLY PACKED.
(continued on back page)
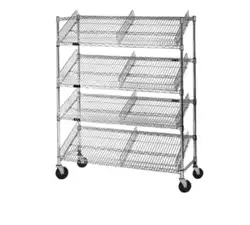
figure 2
post
3-sided truss
(indicating front of unit)
Parts List
4-Shelf Unit: 5-Shelf Unit:
(4) 54˝ Posts (6) Rails (4) 63˝ Posts (8) Rails
(4) Wire Shelves (4) Casters (5) Wire Shelves (4) Casters
(2) 3-Sided Trusses (16) Split Sleeves (2) 3-Sided Trusses (20) Split Sleeves
figure 1
caster
post
split
sleeves
2˝ mark
figure 2a
a. Posts are numbered in 1˝ increments. Snap split sleeves
onto each post at the 2˝ mark as shown in figure 2a. The
thicker part of the taper goes toward the bottom. Make
sure rib in split sleeve is seated into groove on post.
b. Insert post through the collars of the 3-sided truss, and
slide the truss down to the split sleeves. The wider part of
the collar goes toward the bottom.
Note: Long truss of bottom 3-sided truss indicates the FRONT
of the unit.
Step 1)
Attach casters to posts.
Insert caster into bottom of each post and drive in, using a
mallet or hammer, as shown in figure 1.
Step 2)
Install bottom 3-sided truss.
a. Assemble one rail at a time. Refer to figure 3 for location
of split sleeves and rails. Snap split sleeves onto number
on each post (2 sets of split sleeves per rail).
b. Insert post through the rail collars and slide rail down to
split sleeves. Make sure the wider part of the collar goes
toward the bottom.
c. Repeat Steps 3a and 3b to assemble all rails. Refer to
figure 3 for location of split sleeves and rails.
Step 3)
Install rails, working from bottom to top.
INSTRUCTION SHEET
#A213010
Eagle Foodservice Equipment, Eagle MHC, and SpecFAB
®
are divisions of Eagle Group. ©2024 by the Eagle Group
• 100 Industrial Boulevard, Clayton, Delaware 19938-8903 U.S.A.
• Phone: 302/653-3000 • 800/441-8440 • Fax: 302/653-2065
• www.eaglegrp.com • www.eaglemhc.com
rear rail at
11˝ mark
rear rail at
25˝ mark
rear rail at
39˝ mark
front rail at
16˝ mark
front rail at
30˝ mark
front rail at
44˝ mark
figure 3
4-Shelf Units with 54˝ posts
rear rail at
12˝ mark
rear rail at
24˝ mark
rear rail at
36˝ mark
rear rail at
48˝ mark
front rail at
14˝ mark
front rail at
26˝ mark
front rail at
38˝ mark
front rail at
50˝ mark
5-Shelf Units with 63˝ posts
(FRONT
SIDE OF
CART)
SIDE VIEW SIDE VIEW
(FRONT
SIDE OF
CART)
(REAR
SIDE OF
CART)
(REAR
SIDE OF
CART)
ASSEMBLY INSTRUCTIONS
Slanted Shelf / Suture Cart / Merchandising Cart
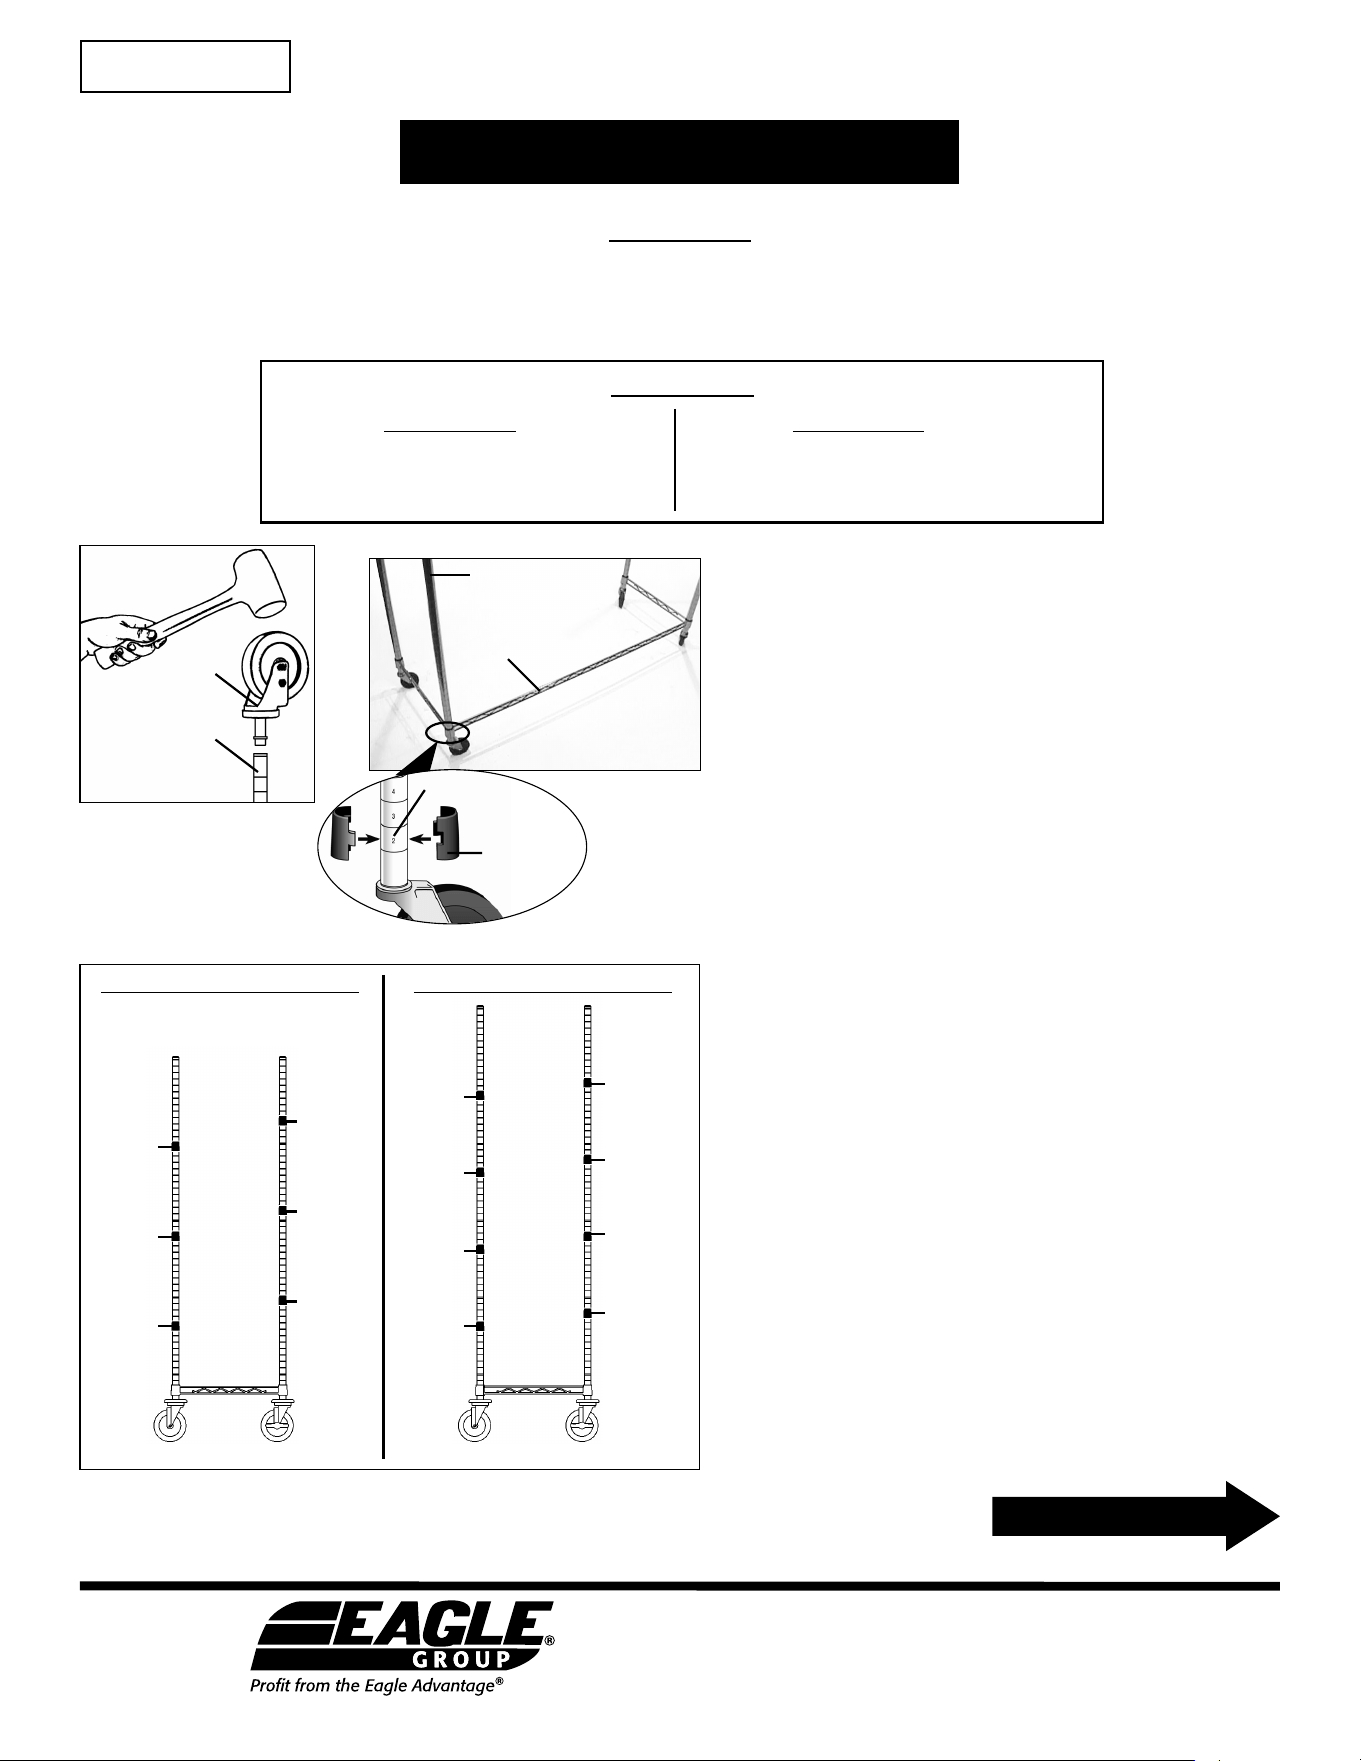
top truss at
53˝ mark for
4-shelf unit,
60˝ mark for
5-shelf unit
figure 4
figure 5
shelf
top truss
front
rear
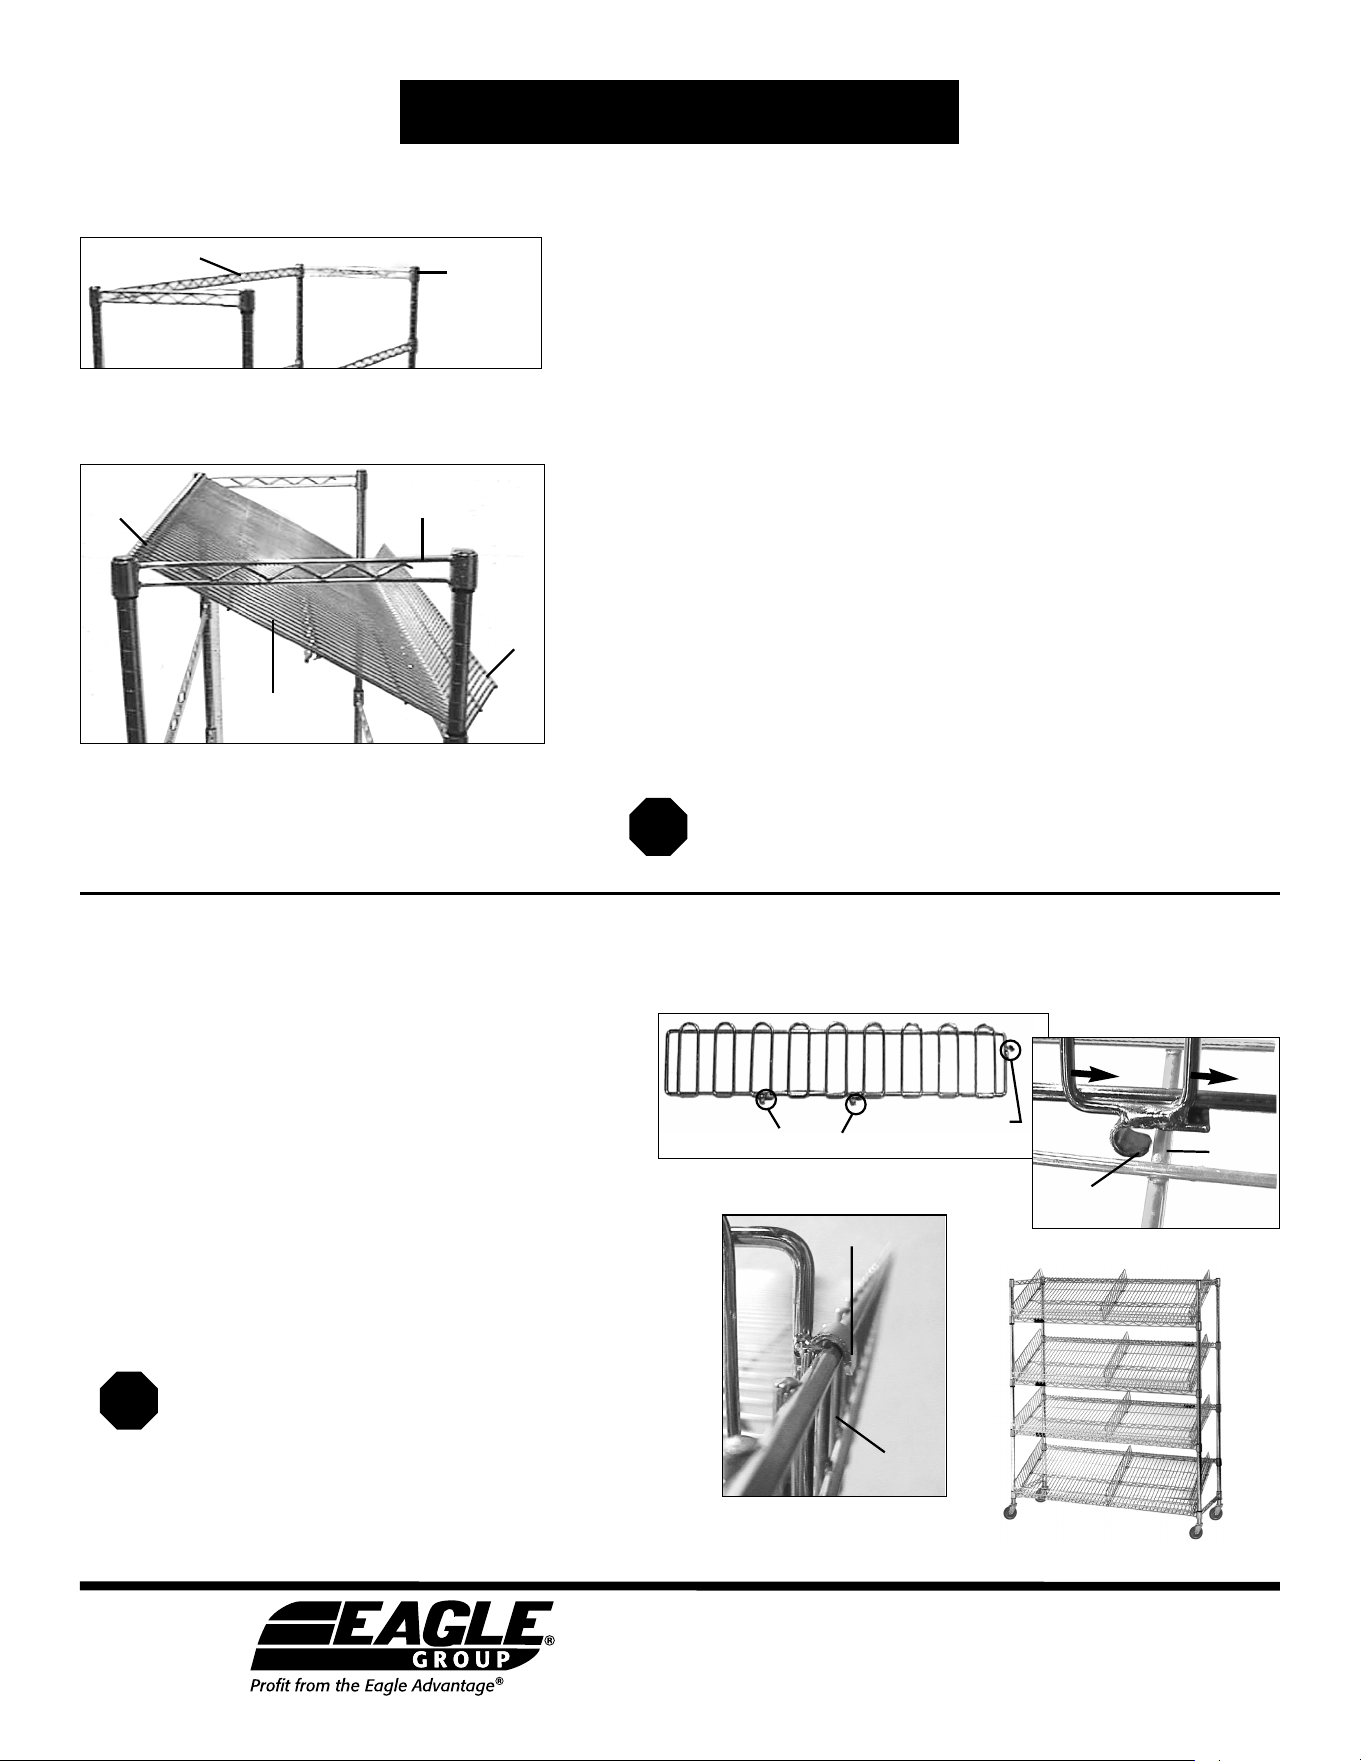
Dividers
figure 6
figure 7
figure 8
bottom tabs
front
tab
bottom tab
wire shelf
front tab
wire
shelf
Divider assembly is complete.
Attach as many dividers as desired to finish
cart assembly (see photo at right).
Cart assembly is complete.
cart with dividers
back of cart
a. Snap split sleeves onto each post, as shown in figure 4 for location of
split sleeves and top 3-sided truss.
b. Position top truss OPPOSITE of bottom truss.
c. Insert posts through truss collars and slide truss down to split sleeves.
The wider part of each collar goes toward the bottom.
Step 4)
Install top truss.
Note: Large upturn on shelf is located on the front of the unit.
a. Start with the bottom shelf. Hook shelf downturn over bottommost
rear rail.
b. Rest front of shelf on front of bottom truss. Shelf should be
approximately at a 30˚ angle, as shown in figure 5.
c. Repeat Steps 5a and 5b to assemble all remaining shelves.
Note: Downturn of topmost shelf should hook over top truss, as shown in
figure 5.
Step 5)
Install shelves.
To assemble the dividers, locate the two bottom
tabs, as shown in figure 6. Place divider on shelf
with front tab of divider pointing toward the front
upturn of shelf.
(if ordered model with dividers)
Step 1)
Pull divider toward the front of the shelf. Both bottom
tabs should catch the wire shelf, as shown in figure 7.
Step 2)
Clip the front tab over the wire shelf, as shown in figure 8.
Step 3)
Eagle Foodservice Equipment, Eagle MHC, and SpecFAB
®
are divisions of Eagle Group. ©2024 by the Eagle Group
• 100 Industrial Boulevard, Clayton, Delaware 19938-8903 U.S.A.
• Phone: 302/653-3000 • 800/441-8440 • Fax: 302/653-2065
• www.eaglegrp.com • www.eaglemhc.com
(End)
(End)