
Technical Support and E-Warranty Certificate www.vevor.com/support
BOX STYLE CAT TREES
USER MANUAL
We continue to be committed to provide you tools with competitive price.
"Save Half", "Half Price" or any other similar expressions used by us only represents an
estimate of savings you might benefit from buying certain tools with us compared to the major top
brands and does not necessarily mean to cover all categories of tools offered by us. You are
kindly reminded to verify carefully when you are placing an order with us if you are actually saving
half in comparison with the top major brands.


1
MODEL:SSXG003
NEED HELP? CONTACT US!
Have product questions? Need technical support? Please feel free to contact us:
Technical Support and E-Warranty Certificate www.vevor.com/support
This is the original instruction, please read all manual instructions carefully before
operating. VEVOR reserves a clear interpretation of our user manual. The
appearance of the product shall be subject to the product you received. Please
forgive us that we won't inform you again if there are any technology or software
updates on our product.
BOX STYLE CAT TREES

2
SAFETY INSTRUCTIONS
WARNING:
Read this material before using this product. Failure to do so can
result in serious injury.
Assembly precautions
1. Assemble only according to these instructions. Improper assembly can
create hazards.
2. Wear ANSI-approved safety goggles and heavy-duty work gloves
during assembly.
3. Keep the assembly area clean and well-lit.
4. Keep bystanders out of the area during assembly.
5. Do not assemble if tired or when under the influence of alcohol, drugs
or medication.
6. The product capabilities apply to properly and completely assembled
products only.
7. Assemble on a flat, level, hard and smooth surface capable of safely
supporting the Box Style Cat Trees.
8. For additional information regarding the parts listed in the following
pages, please refer to the Assembly Diagram of this manual. Unwrap
and separate all parts in a clean work area.
Use precautions
1. DO NOT SIT OR STAND ON THIS ITEM.
2. This product is not a toy. Do not allow children to play with or near this
item.
3. Do not exceed specified weight capacities.
4. Use only on a flat, level, hard, and smooth surface that can safely
support a fully loaded Box Style Cat Trees.
5. Use as intended only.
6. Inspect before every use; do not use if parts are loose or damaged.
SAVE THIS MANUAL
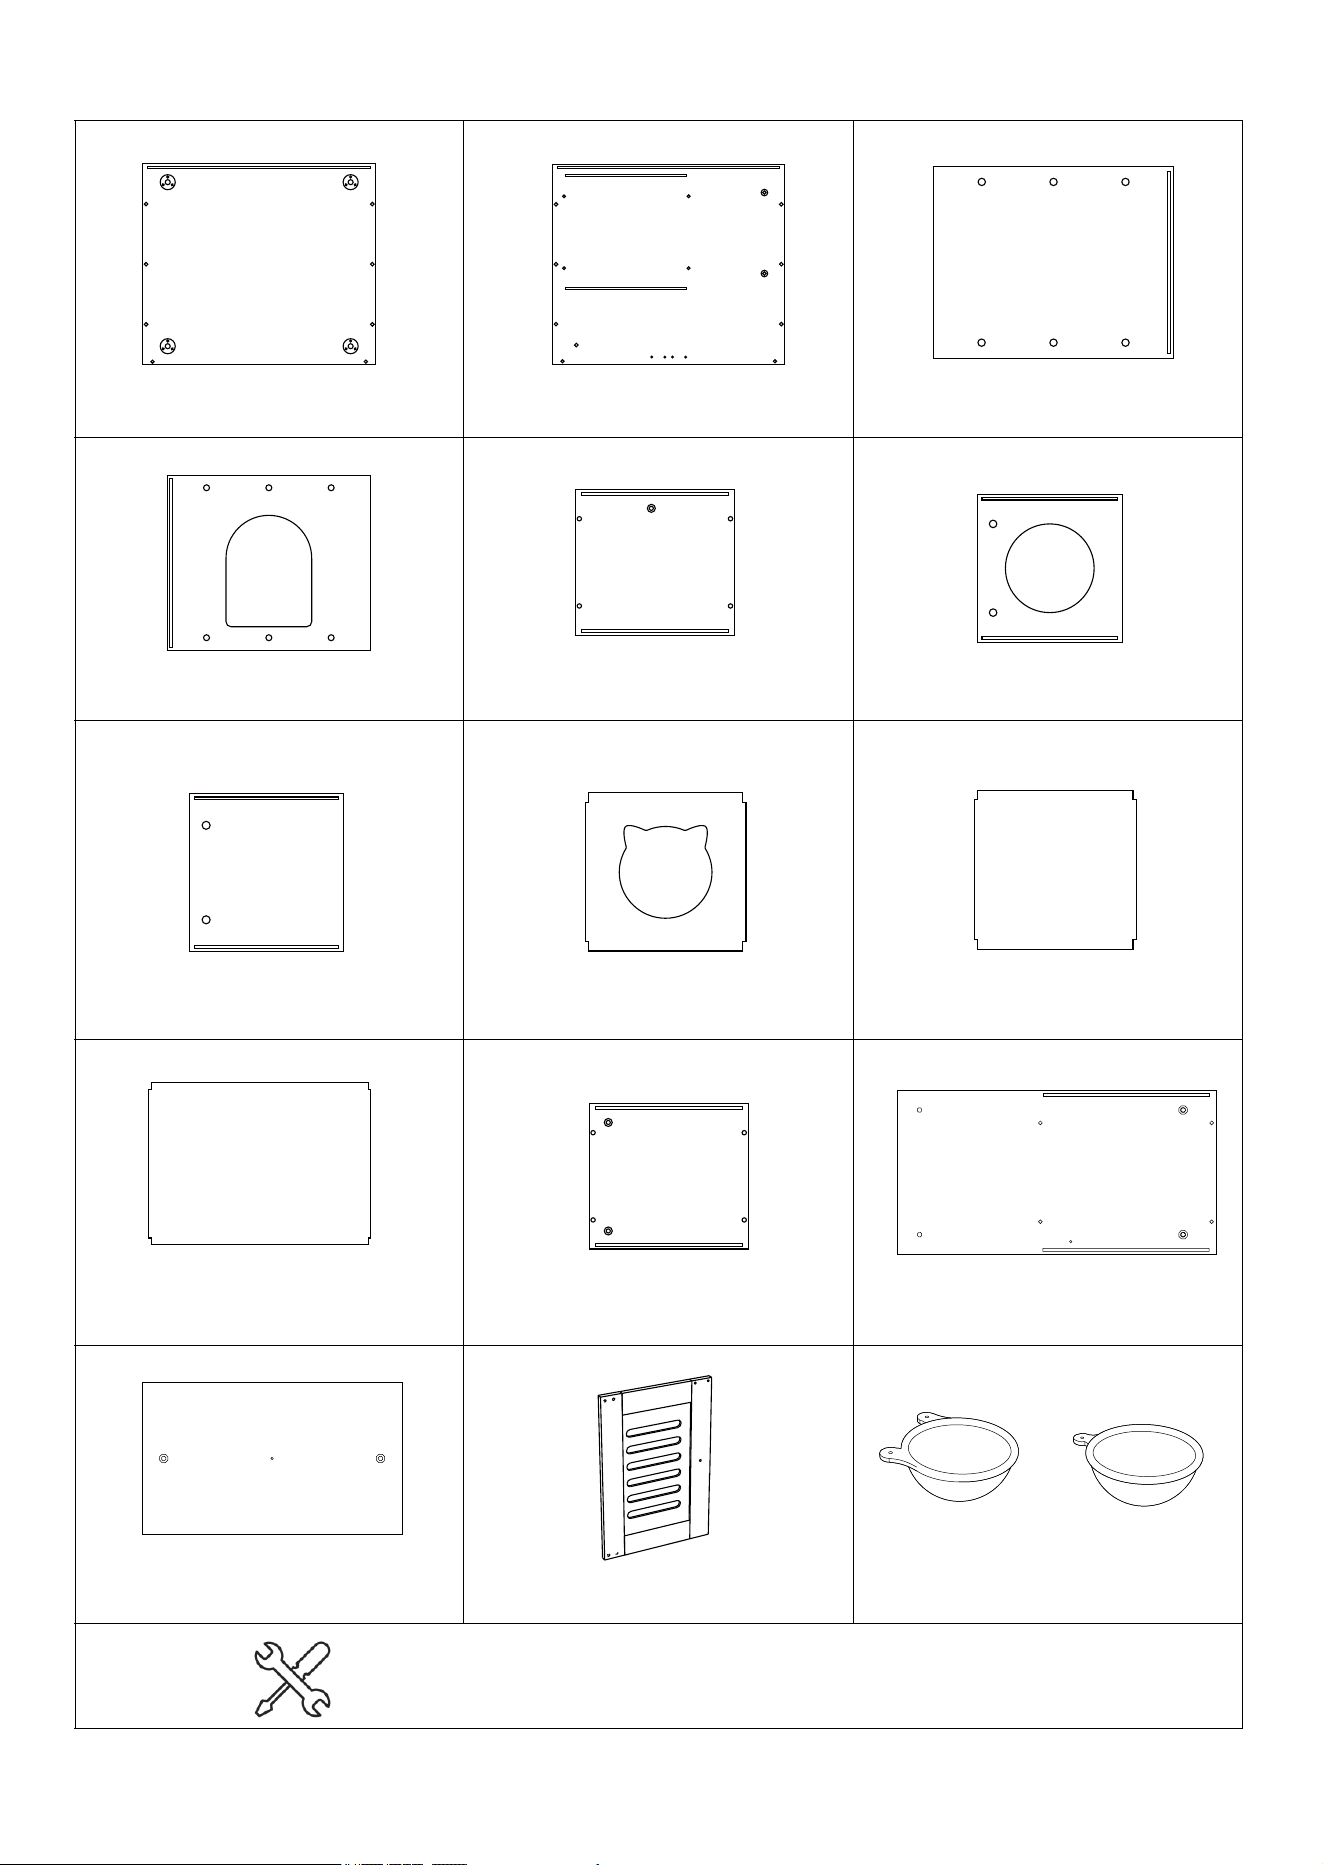
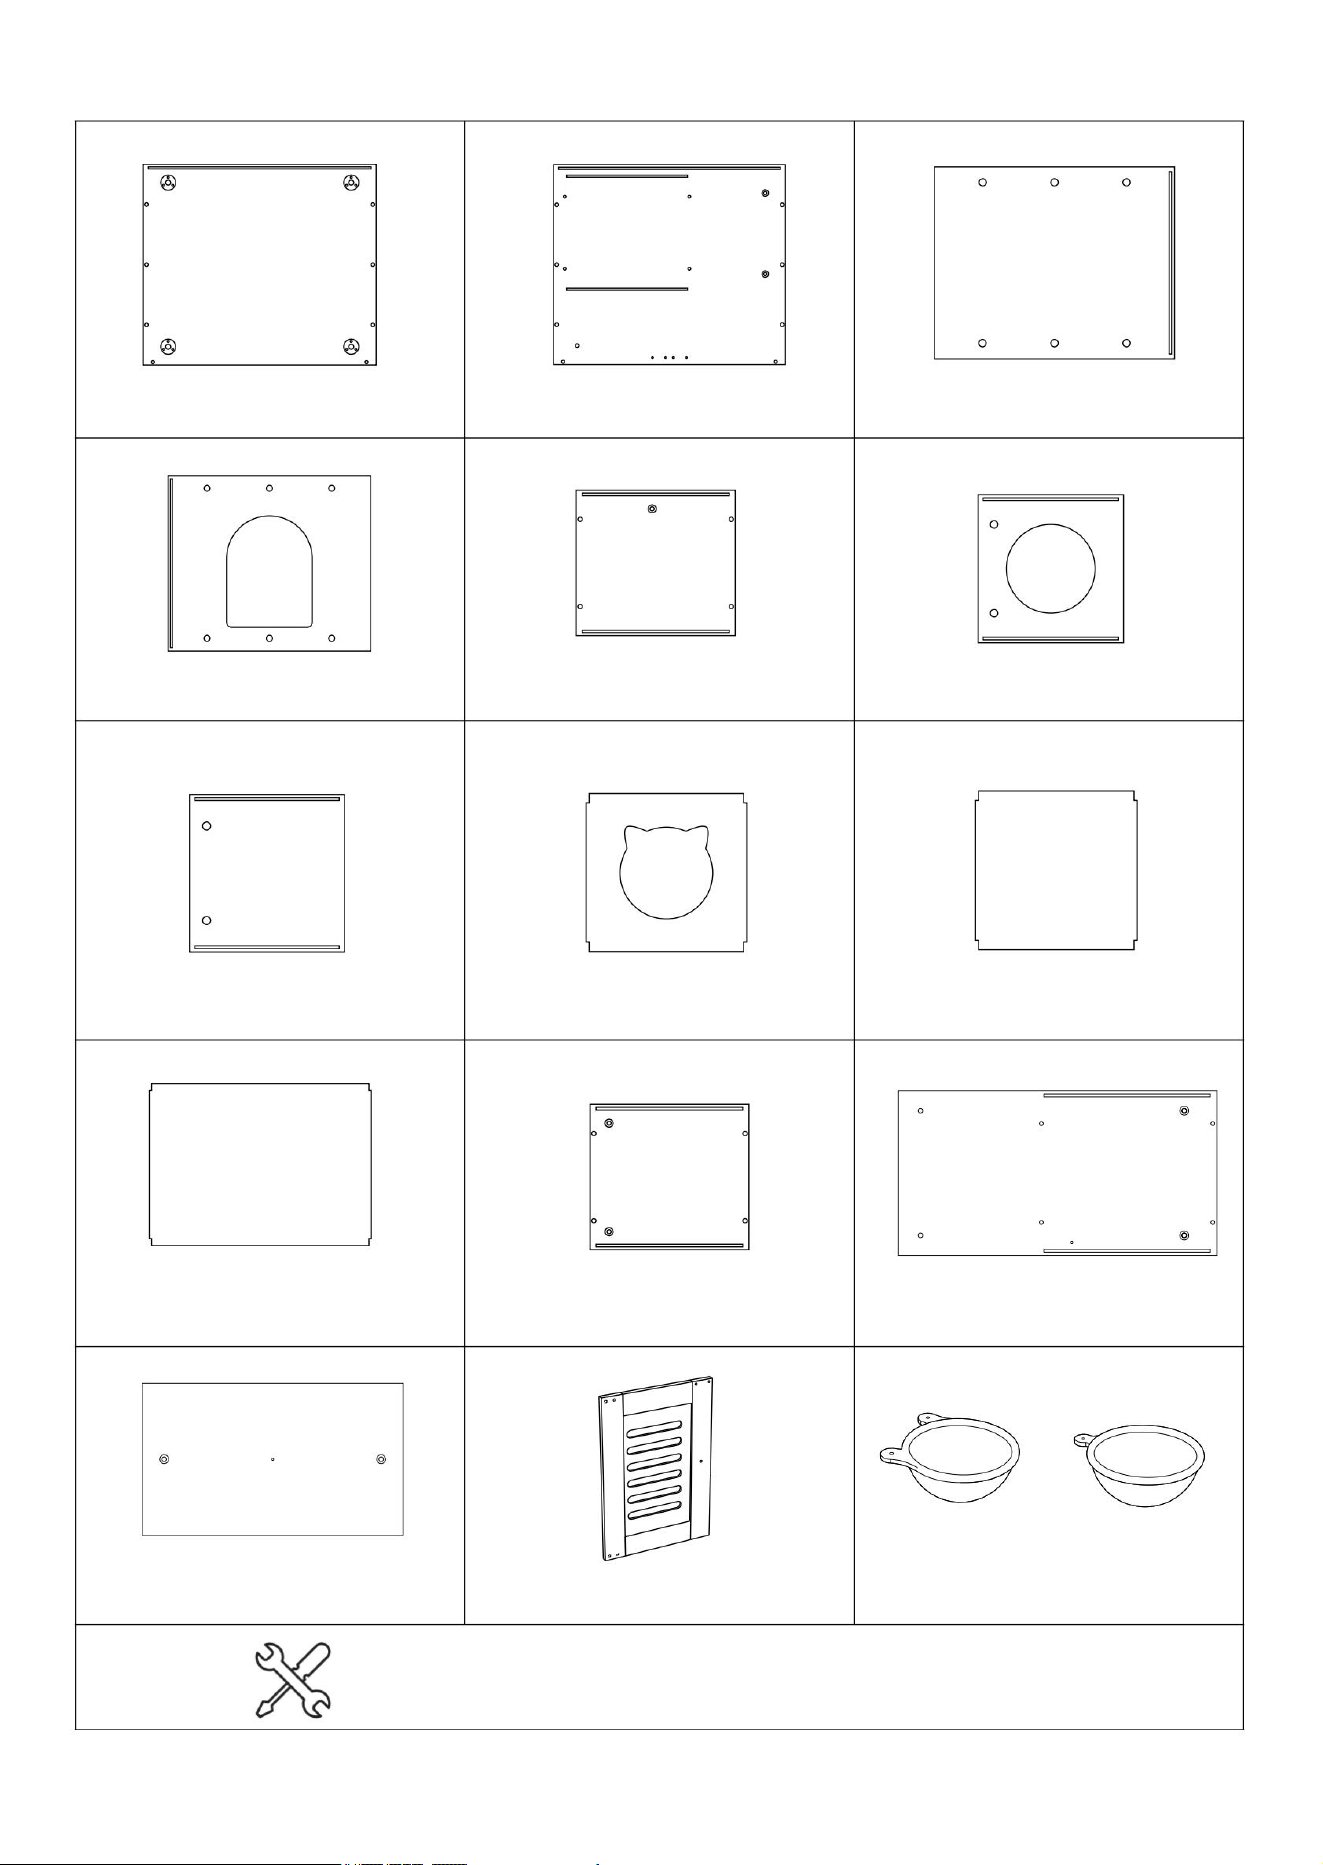
A×1 B×1 C×1
D×1
E×1
F×2
G×2 H×2 I×2
J×1
K×1 L×1
M×1
N×2
O1×1 O2×1
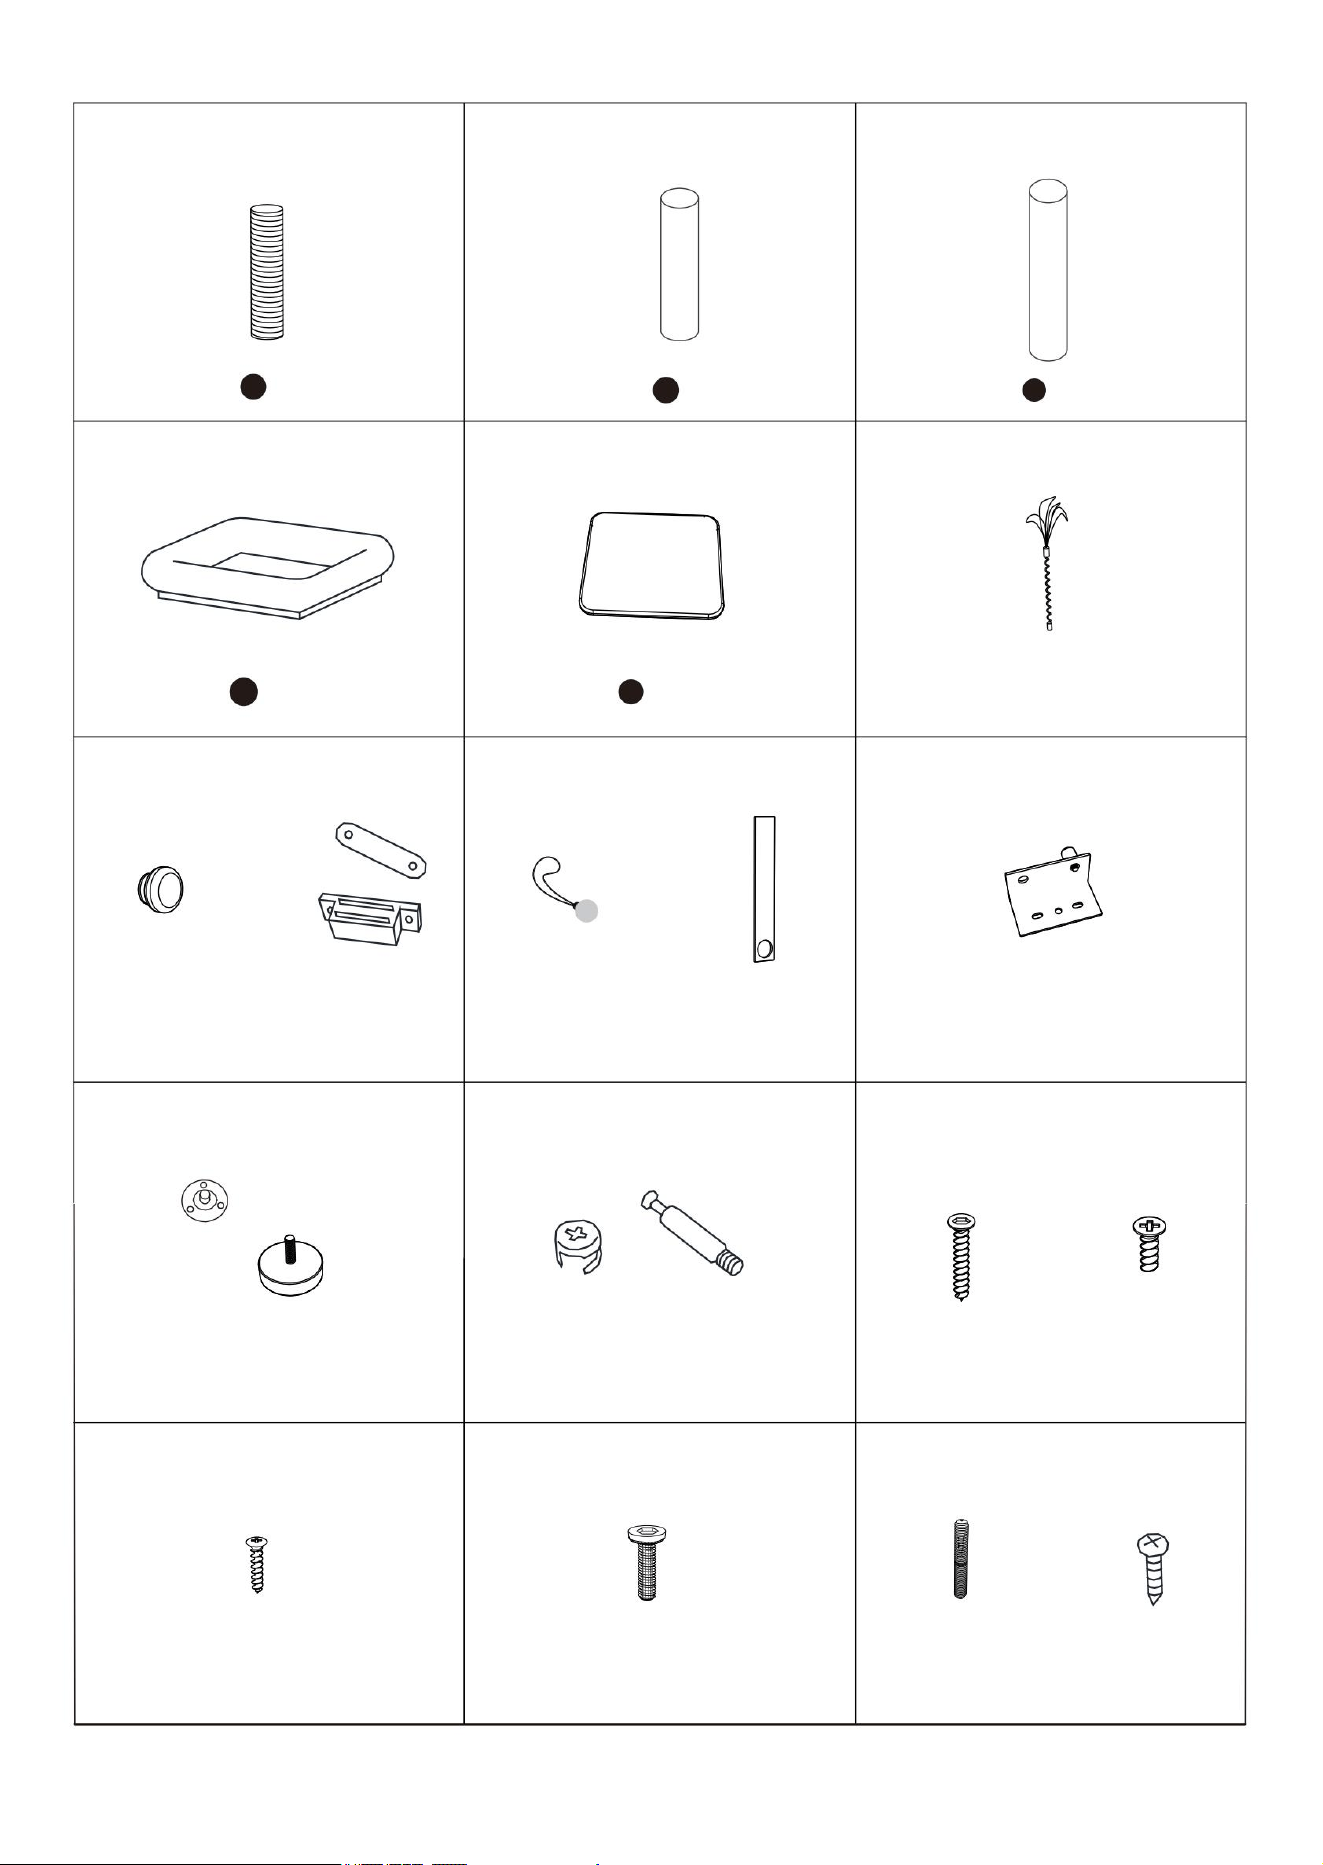
Accessories table
*Each set comes with a screwdriver and wrench
3
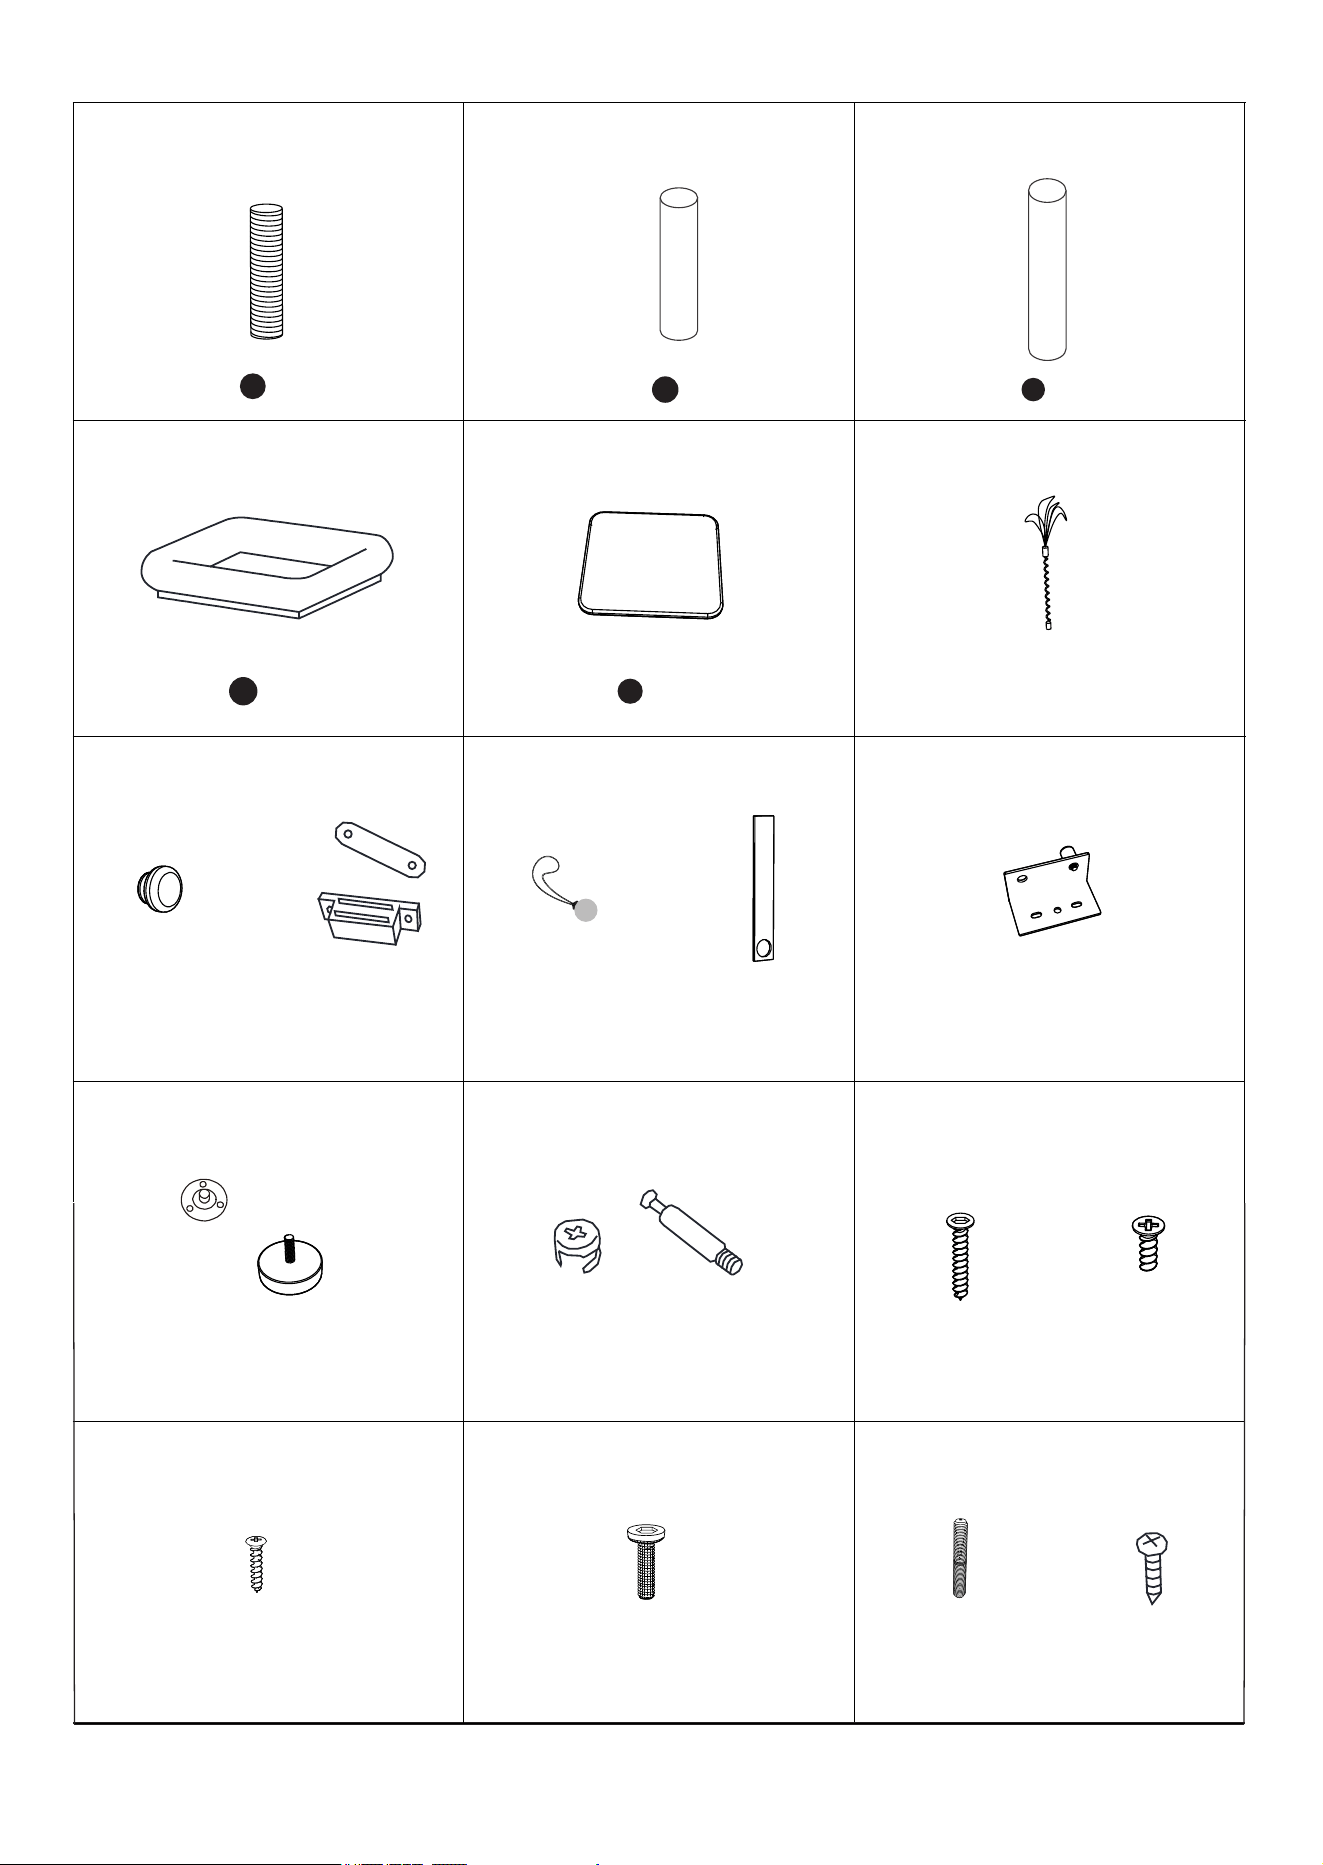
X×1
(M4*12)
(M6*40)
(M8*30)
x10
x12
x4
T2
T1
T3
30cm
30cm
1
2
3
(M8*70)
x8
Q2
x20
Q1
x2
Q3
S×2
U×2
V×2 W×1
Y×4
Z×4
(M4*22)
4
5
×1
×6
×2
(M3*12)
x16T4
37cm
×2×1
Accessories table
(Sisal columns) (Wrap the column)
(cushion) (cushion)
(Spring toys)
(Anti-tipping rope)
(doorknob)
(Furball toys)
(Door stopper)
(Rotating shaft)
(Adjustable footrest)
(3-in-1 screws)
4

U
Z
A
N
V
B
D
C
J
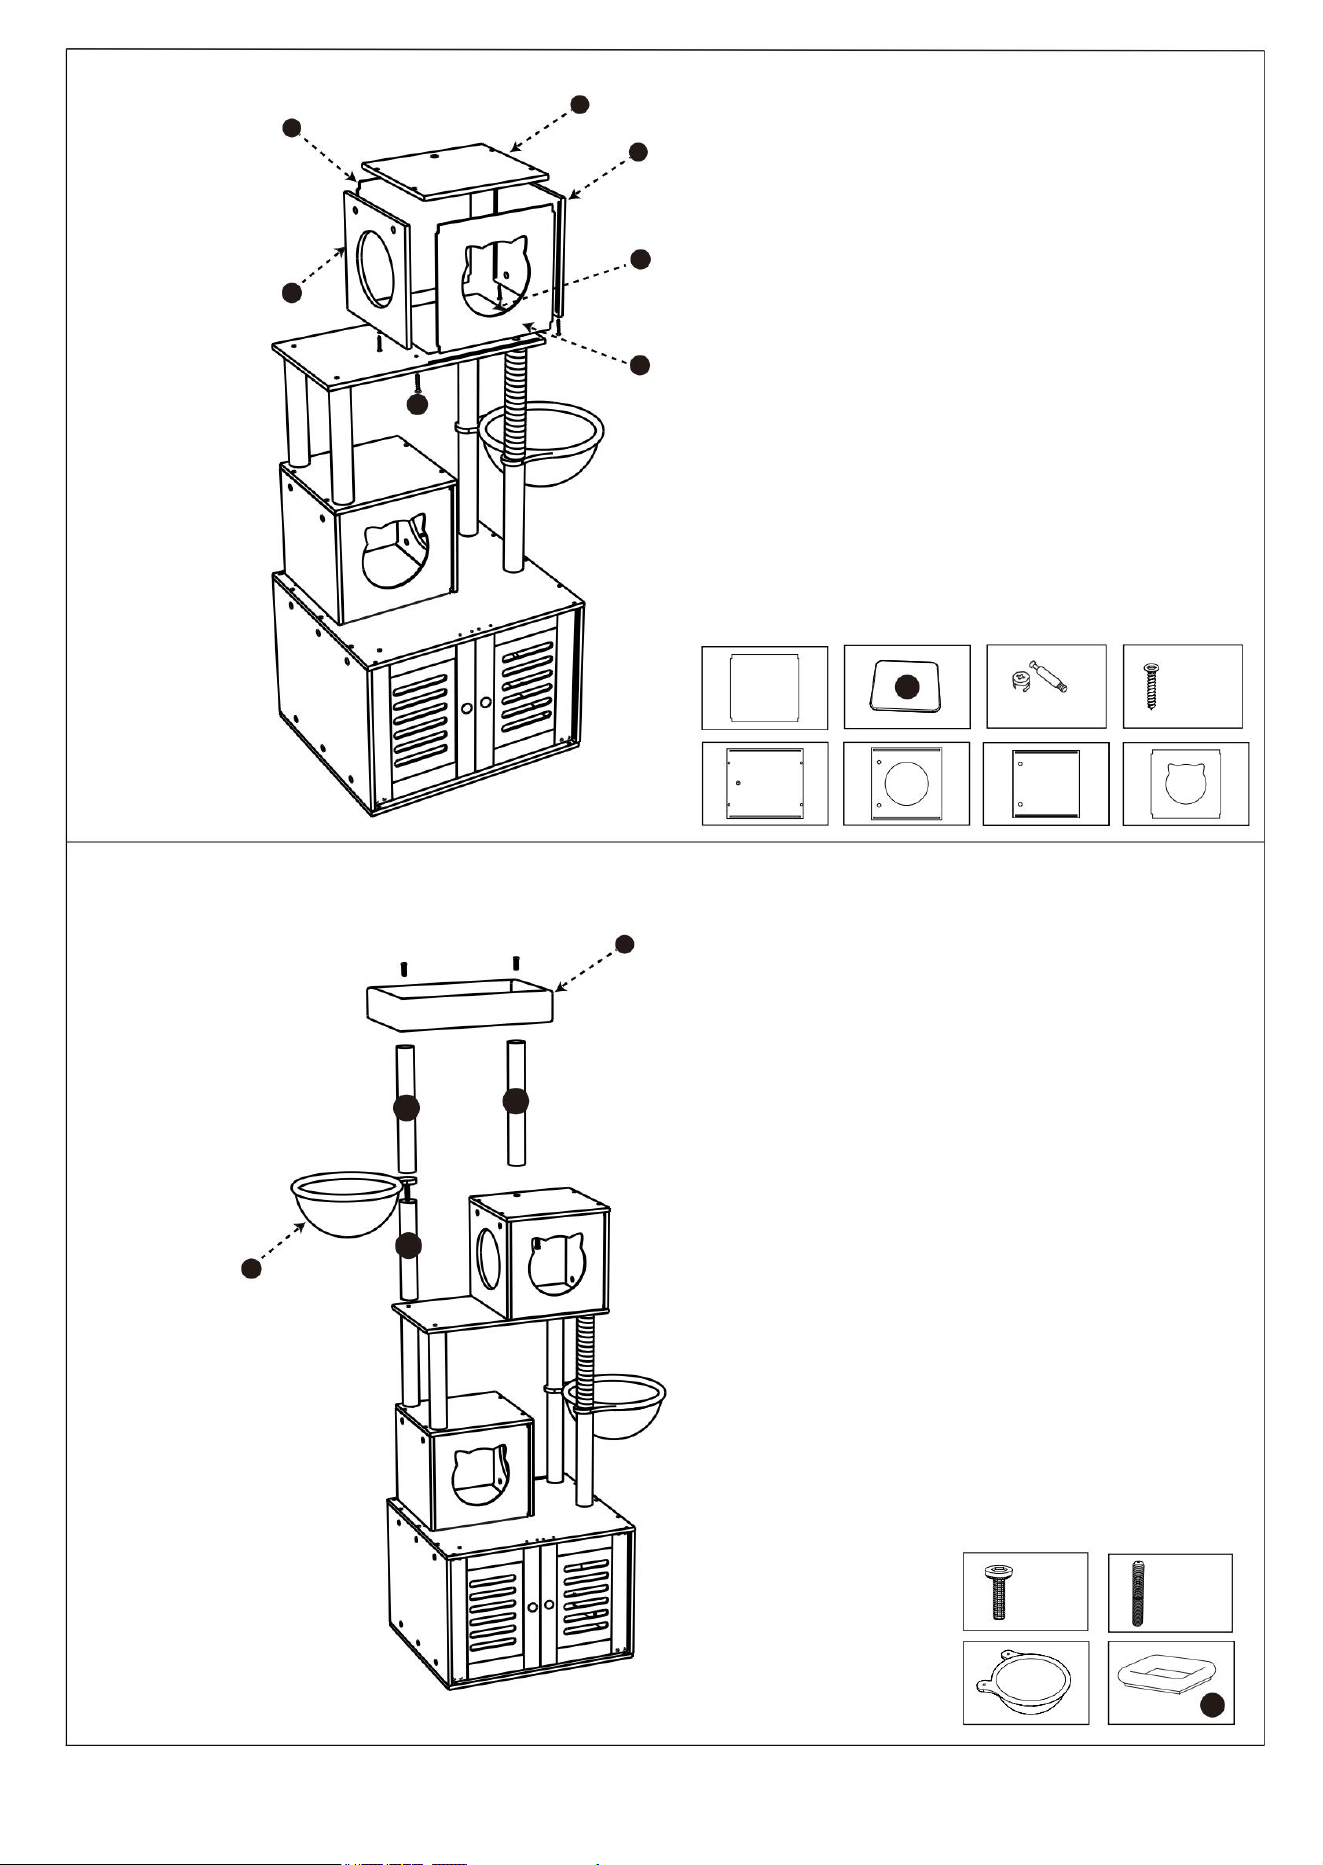
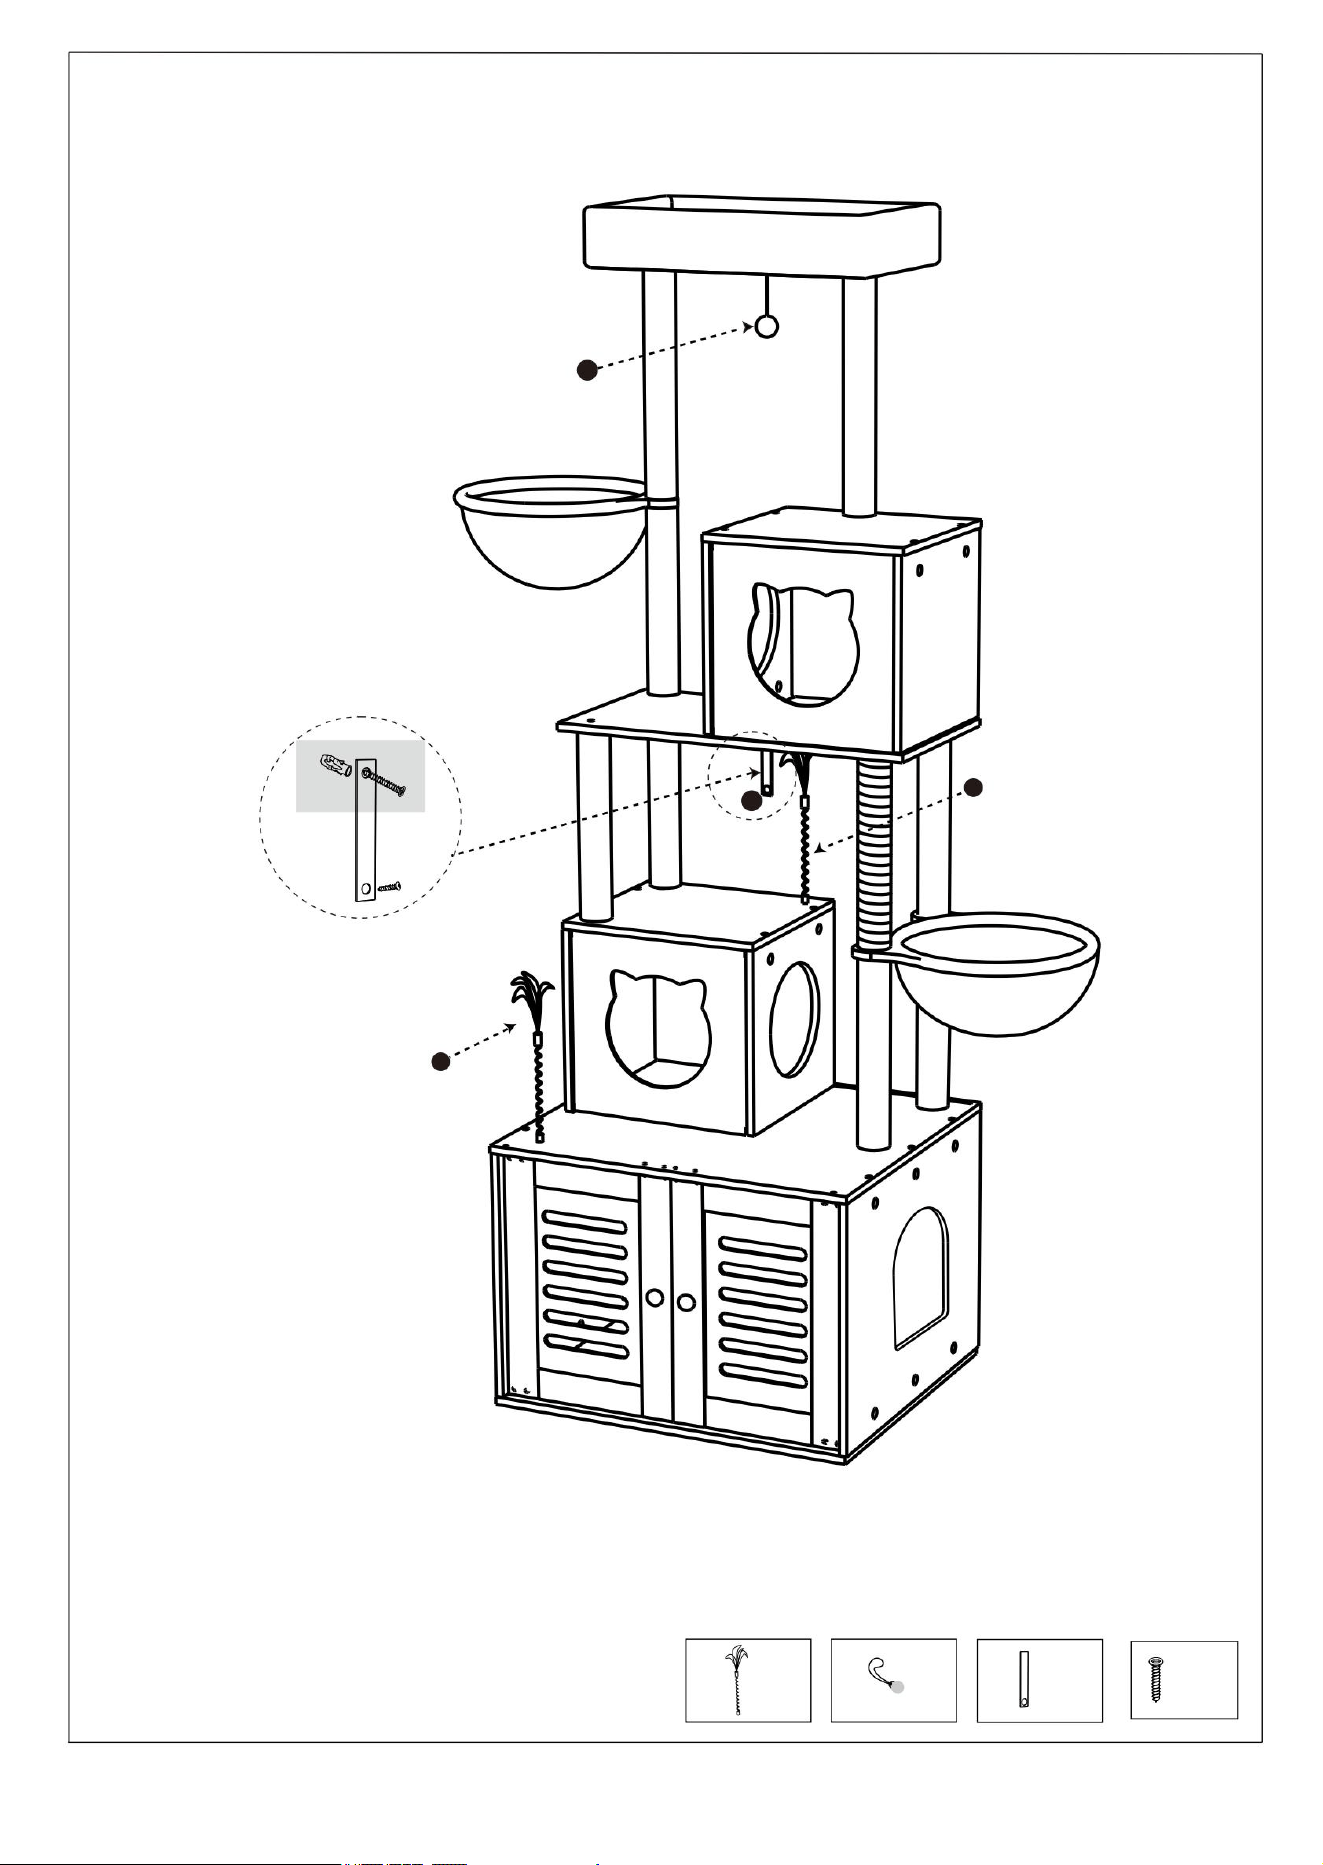
Installation Steps
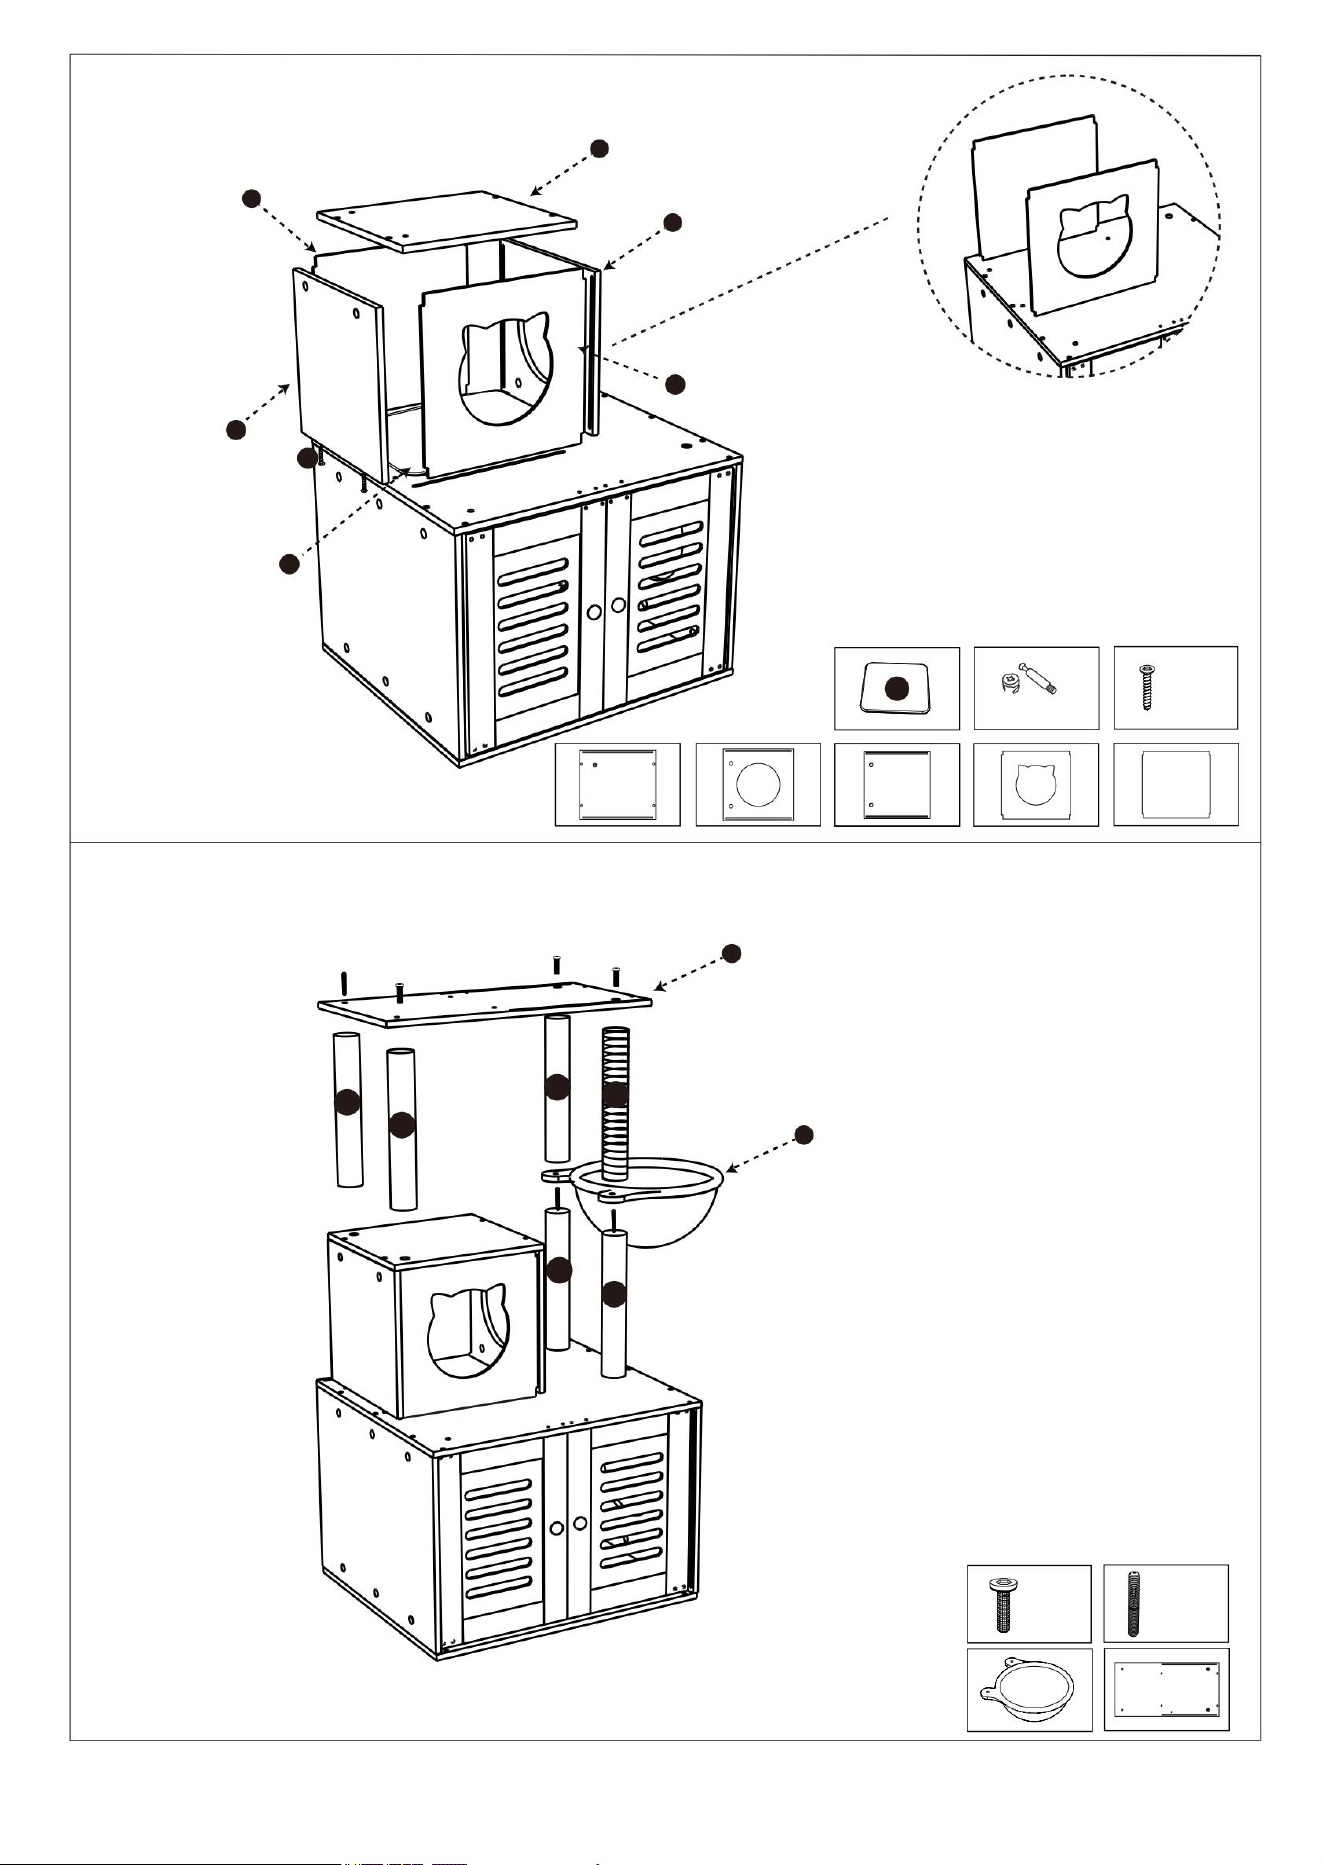
Step 1
Install the adjustable foot pad on the base as illustrated;
Step 2
Step 3
(Note: Align the holes before tightening)
As shown in the figure,
assemble the corresponding
door stopper and the small
black nose U;
Assemble the bottom cabinet first as shown in the figure;
T1X12
Zx4
A
C
J
B
Q1X12
Ux2
Nx2 Vx2
Yx4
Q3x2T4x16
The three-in-one screw installation
method is shown in the figure;;
Put the spindle plate first, and then put the hinge
Place on the door and tighten the screws;
T4
5

Assemble the cat nest above the
cabinet as shown in the figure, and
finally put the mat 5 on;
As shown in the figure, the hammock O1
and the corresponding column are installed,
and finally the wooden board L is installed;
G
K
F
H
L
5
I
O1
2
2
2
2
2
1
Step 4
Step 5
I
H
5
Q1X4
Q2X4
I
GG
H
F
K
Insert the I plate and H plate into
the top groove of the cabinet;
T2x7
T3x3
L
O
6
Q2

Assemble another cat nest on the cabinet as
shown in the figure, and finally put the mat 5 into it;
As shown in the figure, the hammock O2
and the corresponding column are installed,
and finally the mat 4 is installed;
F
E
G
H
5
I
3
3
4
O2
2
Step 6
Step 7
Q1X4 Q2X4
F
I
GG
H
E
5
T2x3
T3x1
4
O2
7
Q2
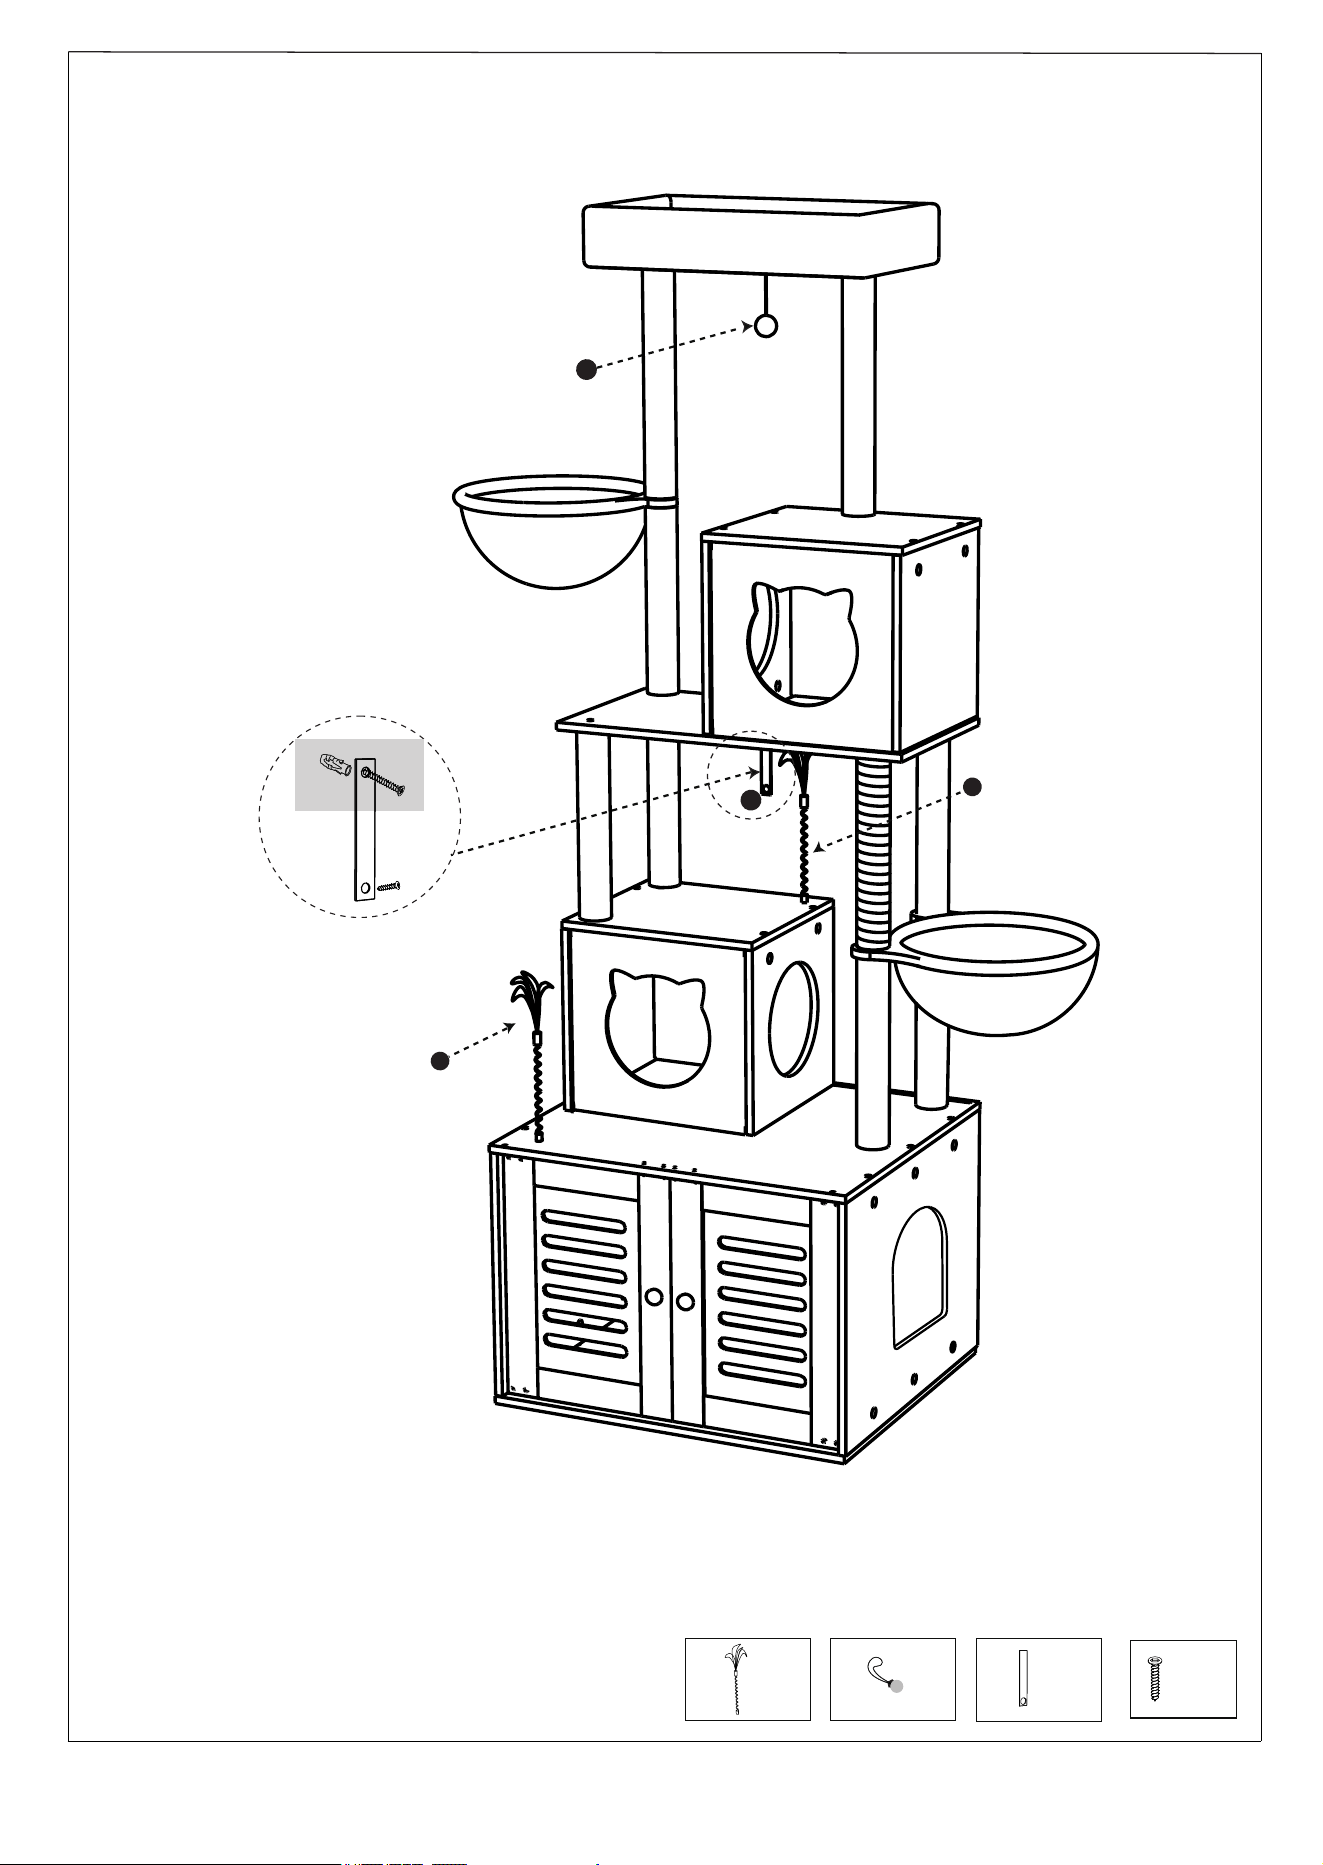
Install the hairball toy and spring toy as shown in the picture, and finally
tighten it so that the screws can be fixed.
S
X
W
S
Step 8
Q2x4
X
W
Sx2
8
walls
Plug the expansion pipe into the wall, and then
fix the anti-tipping rope on the wall with self-tapping wire;
Finally, use screws to fix the other side to the cat climbing frame.
9
PRODUCT PARAMETER
Manufacturer: Shanghaimuxinmuyeyouxiangongsi
Address: Shuangchenglu 803nong11hao1602A-1609shi, baoshanqu,
shanghai 200000 CN.
Imported to AUS: SIHAO PTY LTD. 1 ROKEVA STREETEASTWOOD
NSW 2122 Australia
Imported to USA: Sanven Technology Ltd. Suite 250, 9166 Anaheim
Place, Rancho Cucamonga, CA 91730
Model SSXG003
Colour Gray
Product Size 600*520*1850mm
REPEC
E-CrossStu GmbH
Mainzer Landstr.69, 60329 Frankfurt am Main.
REPUK
YH CONSULTING LIMITED.
C/O YH Consulting Limited Office 147, Centurion
House, London Road, Staines-upon-Thames, Surrey,
TW18 4AX

Technical Support and E-Warranty Certificate
www.vevor.com/support


ALBERI PER TIRAGRAFFI A SCATOLA
MANUALE D'USO
Supporto tecnico e certificato di garanzia elettronica www.vevor.com/support
"Risparmia la metà", "Metà prezzo" o qualsiasi altra espressione simile da noi utilizzata rappresenta
solo una stima del risparmio che potresti ottenere acquistando determinati utensili con noi rispetto ai principali
marchi principali e non significa necessariamente coprire tutte le categorie di utensili da noi offerti. Ti
ricordiamo gentilmente di verificare attentamente quando effettui un ordine con noi se stai effettivamente
risparmiando la metà rispetto ai principali marchi principali.
Continuiamo a impegnarci per fornirvi strumenti a prezzi competitivi.
Machine Translated by Google

Machine Translated by Google

Questa è l'istruzione originale, si prega di leggere attentamente tutte le istruzioni del
manuale prima di utilizzare. VEVOR si riserva una chiara interpretazione del
nostro manuale utente. L'aspetto del prodotto sarà soggetto al prodotto ricevuto. Vi
preghiamo di perdonarci se non vi informeremo di nuovo se ci sono aggiornamenti
tecnologici o software sul nostro prodotto.
Hai domande sul prodotto? Hai bisogno di supporto tecnico? Non esitare a contattarci:
Supporto tecnico e certificato di garanzia elettronica www.vevor.com/support
1
MODELLO:SSXG003
ALBERI PER TIRAGRAFFI A SCATOLA
HAI BISOGNO DI AIUTO? CONTATTACI!
Machine Translated by Google

pagine, fare riferimento allo schema di montaggio di questo manuale. Disimballare e separare tutte
le parti in un'area di lavoro pulita.
4. Tenere gli astanti fuori dall'area durante l'assemblea.
articolo.
SALVA QUESTO MANUALE
3. Mantenere l'area di assemblaggio pulita e ben illuminata.
2. Questo prodotto non è un giocattolo. Non permettere ai bambini di giocare con o vicino a questo
4. Utilizzare solo su una superficie piana, livellata, dura e liscia che possa essere utilizzata in sicurezza
AVVERTIMENTO:
7. Montare su una superficie piana, livellata, dura e liscia in grado di sostenere in modo sicuro
supportare un tiragraffi stile scatola completamente attrezzato.
5. Non presentarsi se si è stanchi o sotto l'effetto di alcol, droghe o farmaci.
6. Le capacità del prodotto si applicano solo ai prodotti correttamente e completamente assemblati.
3. Non superare le capacità di peso specificate.
6. Ispezionare prima di ogni utilizzo; non utilizzare se alcune parti sono allentate o danneggiate.
Precauzioni di montaggio 1.
Montare solo secondo queste istruzioni. Un montaggio non corretto può
8. Per ulteriori informazioni sulle parti elencate di seguito
a sostegno dei tiragraffi Box Style.
Leggere questo materiale prima di utilizzare questo prodotto. La mancata osservanza di questa
precauzione può causare gravi lesioni.
2. Durante il montaggio, indossare occhiali di sicurezza omologati ANSI e guanti da lavoro resistenti.
Usare precauzioni 1.
NON SEDERSI O STARE IN PIEDI SU QUESTO ARTICOLO.
5. Utilizzare solo come previsto.
creare pericoli.
ISTRUZIONI DI SICUREZZA
2
Machine Translated by Google
M×1
Sol×2
O2×1
E×1
O1×1
La×1
Numero di serie 1
Altezza×2 Io×2
C×1
L×1K×1
B×1
F×2
Numero 2
La × 1
*Ogni set è dotato di cacciavite e chiave inglese
Tabella degli accessori
3
Machine Translated by Google

3
5
(Poggiapiedi regolabile)
(Fermaporta) (Giocattoli di pelo) (Corda antiribaltamento) (Albero rotante)
4
1
4
Q3x2
T3 x4
(viti 3 in 1)
×2
(Giocattoli a molla)
(Colonne in sisal)
30cm
(maniglia della porta)
(M3*12)
(M8*30)
L×1
Q1x20
S×2
Y×4
37 centimetri
T4 x16
(cuscino)
(Avvolgi la colonna)
U×2
Q2x8
T2 x10
(M4*22)
(M4*12)
×2
×6 2
(M8*70)
Z×4
×1
×1
V×2
T1 x12
(M6*40)
X×1
30 centimetri
(cuscino)
Tabella degli accessori
Machine Translated by Google

C
La
T4x16
Q1X12
B
Nx2
Zx4
Q3x2
T1X12
UN
C
Yx4
Vx2
J
Ux2
E
D
B
J
UN
Nella figura è illustrato il metodo di
installazione delle viti tre in uno;
Mettere prima la piastra del mandrino e poi mettere la cerniera
Come mostrato in figura,
assemblare il fermaporta
corrispondente e il piccolo naso
nero U;
Installare il piedino regolabile sulla base come illustrato;
Montare prima il mobile inferiore come mostrato in figura;
Posizionare sulla porta e stringere le viti;
Passo 3
Passo 1
Passo 2
Fasi di installazione
N
Io
Tipo 4
(Nota: allineare i fori prima di serrare)
5
Machine Translated by Google

H
5
G
Q2
5
E
F
G
H
Q2X4
Q1X4
H
IO
IO
Lo
L
IO
E
F
Inserire la piastra I e la piastra H nella
scanalatura superiore del mobile;
Passo 5
Montare la cuccia per gatti sopra il
mobile come mostrato in figura e infine
posizionare il tappetino 5;
Passo 4
Come mostrato nella figura, vengono installate
l'amaca O1 e la colonna corrispondente e infine viene
installata la tavola di legno L;
L
2
2
1
2
2
2
O1
T3x3
T2x7
6
Machine Translated by Google

H
Q2
G
E
H
O2
Q1X4
F
Q2X4
IO
4
5
IO
F
5
G
E
4
Passo 7
Montare un altro nido per gatti sul mobile come
mostrato in figura e infine posizionare al suo interno il tappetino 5;
Passo 6
Come mostrato in figura, vengono installate l'amaca
O2 e la relativa colonna, e infine viene installato il
materassino 4;
3
3
2
O2
T3x1
T2x3
7
Machine Translated by Google

S
Installare il giocattolo a forma di palla di pelo e il giocattolo a molla come mostrato nell'immagine e
infine stringere in modo che le viti possano essere fissate.
Sx2
X
L'
Q2x4
8
X
L'
S
muri
Collegare il tubo di espansione al muro, quindi fissare
la corda antiribaltamento al muro con del filo autofilettante; infine,
utilizzare delle viti per fissare l'altro lato alla struttura per arrampicarsi sui gatti.
Passo 8
Machine Translated by Google

Dimensioni del prodotto
SSXG003
Colore
Modello
Grigio
600*520*1850mm
RAPPRESENTANZA DEL REGNO UNITO
Rappresentante della CE
Mainzer Landstr.69, 60329 Francoforte sul Meno.
E-CrossStu GmbH
C/O YH Consulting Limited Ufficio 147, Centurion
Casa, London Road, Staines-upon-Thames, Surrey,
Importato negli USA: Sanven Technology Ltd. Suite 250, 9166 Anaheim Place, Rancho
Cucamonga, CA 91730
CONSULENZA YH LIMITATA.
Importato in AUS: SIHAO PTY LTD. 1 ROKEVA STREETEASTWOOD NSW 2122
Australia
Produttore: Shanghaimuxinmuyeyouxiangongsi Indirizzo:
Shuangchenglu 803nong11hao1602A-1609shi, baoshanqu, shanghai 200000 CN.
Modello TW18 4AX
PARAMETRO PRODOTTO
9
Machine Translated by Google

Supporto tecnico e certificato di garanzia
elettronica www.vevor.com/support
Machine Translated by Google

Machine Translated by Google

INSTRUKCJA OBSŁUGI
DRZEWA DLA KOTA W STYLU PUDEŁKOWYM
Wsparcie techniczne i certyfikat gwarancji elektronicznej www.vevor.com/support
„Oszczędź połowę”, „Połowa ceny” lub inne podobne wyrażenia używane przez nas stanowią
jedynie szacunkowe oszczędności, jakie możesz uzyskać, kupując u nas określone narzędzia w porównaniu
z głównymi markami i niekoniecznie oznaczają one objęcie wszystkich kategorii narzędzi oferowanych
przez nas. Uprzejmie przypominamy, aby dokładnie sprawdzić, czy składając u nas zamówienie faktycznie
oszczędzasz połowę w porównaniu z głównymi markami.
Nadal staramy się oferować Państwu narzędzia w konkurencyjnych cenach.
Machine Translated by Google

Machine Translated by Google

To jest oryginalna instrukcja, przed użyciem należy uważnie przeczytać wszystkie instrukcje.
VEVOR zastrzega sobie jasną interpretację naszej instrukcji obsługi. Wygląd produktu
będzie zależał od produktu, który otrzymałeś. Prosimy o wybaczenie, że nie poinformujemy
Cię ponownie, jeśli w naszym produkcie pojawią się jakiekolwiek aktualizacje technologiczne
lub oprogramowania.
Masz pytania dotyczące produktu? Potrzebujesz wsparcia technicznego? Skontaktuj się z
nami: Wsparcie techniczne i certyfikat E-Gwarancji www.vevor.com/support
1
MODEL:SSXG003
POTRZEBUJESZ POMOCY? SKONTAKTUJ SIĘ Z NAMI!
DRZEWA DLA KOTA W STYLU PUDEŁKOWYM
Machine Translated by Google

3. Utrzymuj miejsce zgromadzenia w czystości i zapewnij dobre oświetlenie.
2. Ten produkt nie jest zabawką. Nie pozwalaj dzieciom bawić się nim ani przebywać w jego pobliżu.
przedmiot.
4. Podczas montażu nie dopuszczaj osób postronnych na teren montażu.
5. Nie przychodź na miejsce zdarzenia, jeśli jesteś zmęczony lub znajdujesz się pod wpływem alkoholu, narkotyków lub
leków.
6. Możliwości produktu odnoszą się wyłącznie do produktów prawidłowo i kompletnie zmontowanych.
3. Nie przekraczać określonego limitu obciążenia.
4. Używać wyłącznie na płaskiej, równej, twardej i gładkiej powierzchni, która może być bezpiecznie używana.
OSTRZEŻENIE:
7. Montaż należy wykonać na płaskiej, równej, twardej i gładkiej powierzchni, która będzie bezpieczna.
obsługuje w pełni załadowane drzewka dla kotów w stylu pudełkowym.
wspieranie drzewek dla kotów w stylu pudełkowym.
Przeczytaj ten materiał przed użyciem tego produktu. Nieprzestrzeganie tego może spowodować poważne obrażenia.
5. Używać wyłącznie zgodnie z przeznaczeniem.
6. Przed każdym użyciem należy przeprowadzić kontrolę. Nie należy używać produktu, jeśli jakieś części są luźne lub uszkodzone.
Środki ostrożności podczas montażu 1.
Montaż należy wykonywać wyłącznie zgodnie z niniejszą instrukcją. Nieprawidłowy montaż może
stwarzać zagrożenia.
8. Aby uzyskać dodatkowe informacje dotyczące części wymienionych poniżej,
strony, zapoznaj się ze schematem montażu w tym podręczniku. Rozpakuj i oddziel wszystkie części w czystym
miejscu pracy.
2. Podczas montażu należy nosić okulary ochronne z atestem ANSI oraz wytrzymałe rękawice robocze.
Zachowaj środki
ostrożności 1. NIE SIADAJ ANI NIE STÓJ NA TYM PRZEDMIOCIE.
ZAPISZ TĘ INSTRUKCJĘ
INSTRUKCJE BEZPIECZEŃSTWA
2
Machine Translated by Google

E×1
O1×1 O2×1
G×2
Wysokość 2 Ja × 2
A×1
Z1
K×1
B×1
Długość × 1
C×1
D×1
M×1
P 2
N×2
Tabela akcesoriów
*Każdy zestaw zawiera śrubokręt i klucz
3
Machine Translated by Google

4
5
(Ogranicznik drzwi) (Zabawki w kształcie kulek futra) (Lina zabezpieczająca przed przewróceniem) (Obrotowy wał)
(Regulowany podnóżek)
1
3
(Zabawki wiosenne)
(klamka)
(M6*40)
T1 x12
X 1
(poduszka)
30cm
Q3x2
T3 x4
×1
×1
W × 2
Z×4
×2
×6 2
(M8*70)
(M4*12)
(M4*22)
(poduszka)
(Owiń kolumnę)
U×2
Q2x8
T2 x10
37cm
Q1x20
S×2
Y×4
T4 x16
Sz×1
(M8*30)
(śruby 3 w 1)
×2
(M3*12)
(Kolumny sizalowe)
30cm
Tabela akcesoriów
4
Machine Translated by Google

C
Z
T4x16
Q1X12
B
C
Zx4
Q3x2
T1X12
A
J
Nx2
Yx4
Ux2
Vx2
V
B
D
J
A
Na rysunku pokazano metodę montażu śrub
trzy w jednym;
Umieścić na drzwiach i dokręcić śruby;
Jak pokazano na rysunku,
złóż odpowiedni ogranicznik
drzwi i mały czarny nosek U;
Zamontuj regulowaną podkładkę pod stopy na podstawie, jak pokazano na ilustracji;
Najpierw złóż dolną szafkę, jak pokazano na rysunku;
Najpierw załóż płytkę wrzeciona, a następnie zawias
Krok 2
Krok 1
Krok 3
Kroki instalacji
5
N
Ty
T4
(Uwaga: Przed dokręceniem należy wyrównać otwory)
Machine Translated by Google

H
5
G
II kwartał
5
K
F
G
L
H
Q1X4
Q2X4
I
O
I
H
I
F
K
Włóż płytę I i płytę H do górnego
rowka szafki;
Złóż legowisko dla kota nad szafką, jak
pokazano na rysunku, a następnie połóż
matę nr 5;
Krok 4
Krok 5
Jak pokazano na rysunku, montuje się hamak
O1 i odpowiadającą mu kolumnę, a na końcu
montuje się deskę drewnianą L;
T3x3
T2x7
L
2
2
1
2
2
2
6
O1
Machine Translated by Google

H
II kwartał
F
G
H
O2
Q1X4
mi
Q2X4
I
5
4
I
F
5
G
mi
4
Złóż kolejne legowisko dla kota na szafce, jak pokazano
na rysunku, a następnie włóż do niego matę nr 5;
Jak pokazano na rysunku, montuje się
hamak O2 i odpowiadającą mu kolumnę, a
na końcu montuje się matę 4;
Krok 7
Krok 6
7
3
3
2
O2
T3x1
T2x3
Machine Translated by Google

S
Zamontuj zabawkę-kulkę i sprężynkę tak, jak pokazano na rysunku, a następnie
dokręć je tak, aby można było zamocować śruby.
W
Sx2
Q2x4
X
8
ściany
Podłącz rurę rozprężną do ściany, a następnie za pomocą drutu
samogwintującego zamocuj linę zabezpieczającą przed przewróceniem się do
ściany. Na koniec za pomocą śrub przymocuj drugą stronę do konstrukcji do wspinania się dla kota.
S
W
X
Krok 8
Machine Translated by Google

Mainzer Landstr.69, 60329 Frankfurt nad Menem.
YH CONSULTING LIMITED.
C/O YH Consulting Limited Biuro 147, Centurion
Dom, London Road, Staines-upon-Thames, Surrey,
Importowane do AUS: SIHAO PTY LTD. 1 ROKEVA STREETEASTWOOD NSW 2122 Australia
E-CrossStu GmbH
Importowane do USA: Sanven Technology Ltd. Suite 250, 9166 Anaheim
Place, Rancho Cucamonga, CA 91730
Producent: Shanghaimuxinmuyeyouxiangongsi Adres:
Shuangchenglu 803nong11hao1602A-1609shi, baoshanqu, szanghaj
200000 CN.
TW18 4AX
REP WIELKIEJ BRYTANII
Przedstawiciel UE
Rozmiar produktu
SSXG003
Kolor
Model
Szary
600*520*1850 mm
PARAMETR PRODUKTU
9
Machine Translated by Google

Wsparcie techniczne i certyfikat gwarancji
elektronicznej www.vevor.com/support
Machine Translated by Google

Machine Translated by Google

KATZENBÄUME IM BOX-STIL
BENUTZERHANDBUCH
Technischer Support und E-Garantie-Zertifikat www.vevor.com/support
„Sparen Sie die Hälfte“, „Halber Preis“ oder andere ähnliche Ausdrücke, die wir verwenden, stellen nur eine
Schätzung der Ersparnis dar, die Sie beim Kauf bestimmter Werkzeuge bei uns im Vergleich zu den großen Topmarken
erzielen können, und decken nicht unbedingt alle von uns angebotenen Werkzeugkategorien ab. Wir möchten Sie
freundlich daran erinnern, bei Ihrer Bestellung bei uns sorgfältig zu prüfen, ob Sie im Vergleich zu den großen
Topmarken tatsächlich die Hälfte sparen.
Wir sind weiterhin bestrebt, Ihnen Werkzeuge zu wettbewerbsfähigen Preisen anzubieten.
Machine Translated by Google

Machine Translated by Google

Dies ist die Originalanleitung. Bitte lesen Sie alle Anweisungen sorgfältig durch, bevor Sie das Gerät
in Betrieb nehmen. VEVOR behält sich eine klare Auslegung unserer Bedienungsanleitung
vor. Das Erscheinungsbild des Produkts richtet sich nach dem Produkt, das Sie erhalten haben.
Bitte verzeihen Sie uns, dass wir Sie nicht erneut informieren, wenn es Technologie- oder Software-
Updates für unser Produkt gibt.
Haben Sie Fragen zum Produkt? Benötigen Sie technischen Support? Bitte kontaktieren Sie uns:
Technischer Support und E-Garantie-Zertifikat www.vevor.com/support
1
MODELL:SSXG003
Brauchen Sie Hilfe? Kontaktieren Sie uns!
KATZENBÄUME IM BOX-STIL
Machine Translated by Google

Seiten finden Sie im Montagediagramm dieses Handbuchs. Packen Sie alle Teile in einem sauberen
Arbeitsbereich aus und trennen Sie sie.
4. Halten Sie während der Montage unbeteiligte Zuschauer vom Bereich fern.
Artikel.
BEWAHREN SIE DIESES HANDBUCH AUF
3. Halten Sie den Versammlungsbereich sauber und gut beleuchtet.
2. Dieses Produkt ist kein Spielzeug. Erlauben Sie Kindern nicht, mit oder in der Nähe dieses
4. Nur auf einer flachen, ebenen, harten und glatten Oberfläche verwenden, die sicher
WARNUNG:
7. Auf einer flachen, ebenen, harten und glatten Oberfläche montieren, die sicher
unterstützt einen voll beladenen Katzenbaum im Boxstil.
5. Nicht zusammenbauen, wenn Sie müde sind oder unter dem Einfluss von Alkohol, Drogen oder
Medikamenten stehen.
6. Die Produkteigenschaften gelten nur für ordnungsgemäß und vollständig montierte Produkte.
3. Überschreiten Sie nicht die angegebene Gewichtskapazität.
6. Vor jedem Gebrauch prüfen; nicht verwenden, wenn Teile lose oder beschädigt sind.
Vorsichtsmaßnahmen bei der
Montage 1. Die Montage muss gemäß dieser Anleitung erfolgen. Eine unsachgemäße Montage kann
8. Weitere Informationen zu den im Folgenden aufgeführten Teilen finden Sie
Unterstützung der Katzenbäume im Box-Stil.
Lesen Sie dieses Material, bevor Sie dieses Produkt verwenden. Andernfalls kann es zu schweren
Verletzungen kommen.
2. Tragen Sie während der Montage eine ANSI-geprüfte Schutzbrille und strapazierfähige Arbeitshandschuhe.
Vorsichtsmaßnahmen
treffen 1. NICHT AUF DIESEM GEGENSTAND SITZEN ODER STEHEN.
5. Nur bestimmungsgemäß verwenden.
Gefahren schaffen.
SICHERHEITSHINWEISE
2
Machine Translated by Google

M×1
G×2
O2×1
E × 1
O1×1
A × 1
J×1
H×2 I×2
C × 1
L × 1K × 1
B×1
F×2
N×2
D×1
*Jedes Set enthält einen Schraubendreher und einen Schraubenschlüssel
Zubehörtabelle
3
Machine Translated by Google

3
5
(Verstellbare Fußstütze)
(Türstopper) (Fellball-Spielzeug) (Kippschutzseil) (Rotierende Welle)
1
4
Frage 3x2
T3 x4
(3-in-1-Schrauben)
×2
(Federspielzeug)
(Sisalsäulen) 30cm
(Türklinke)
(M3*12)
(M8*30)
B×1
Frage 1x20
S×2
Y×4
37 cm
T4 x16
(Kissen)
(Spalte umbrechen)
U×2
Frage 2x8
T2 x10
(M4*22)
(M4*12)
×2
×6 2
(M8*70)
Z×4
×1
×1
V×2
T1 x12
(M6*40)
X×1
30 cm
(Kissen)
Zubehörtabelle
4
Machine Translated by Google

C
Z
T4x16
Frage 1X12
B
Yx4
T1X12
Frage 3x2
Zx4
A
Vx2
C
J
Ux2
Nx2
V
B
D
Schritt 2
Schritt 1
Schritt 3
Die Drei-in-Eins-Schraubeninstallationsmethode
ist in der Abbildung dargestellt;ÿ
Setzen Sie zuerst die Spindelplatte und dann das Scharnier ein
Montieren Sie, wie in der
Abbildung gezeigt, den dazugehörigen
Türstopper und die kleine schwarze
Nase U;
Installieren Sie das verstellbare Fußpolster wie abgebildet auf der Basis.
Montieren Sie zuerst den Unterschrank, wie in der Abbildung gezeigt;
Auf die Tür setzen und die Schrauben festziehen;
A
J
Installationsschritte
N
U
T4
ÿHinweis: Richten Sie die Löcher vor dem Festziehen ausÿ
5
Machine Translated by Google

H
5
G
Fragebogen
5
K
F
ICH
K
F
G
H
H
Frage 1X4
Q2X4
ICH
ICH
O
M
Bauen Sie das Katzennest über dem Schrank
wie in der Abbildung gezeigt zusammen und
legen Sie zum Schluss die Matte 5 auf;
Schritt 5
Setzen Sie die I-Platte und die H-Platte
in die obere Nut des Schranks ein.
Schritt 4
Wie in der Abbildung gezeigt, werden die Hängematte
O1 und die entsprechende Säule installiert und schließlich
wird das Holzbrett L installiert.
T3x3
T2x7
M
2
2
1
2
2
2
6
O1
Machine Translated by Google
H
Fragebogen
G
E
H
O2
Q2X4
F
Frage 1X4
ICH
4
5
4
E
G
5
F
ICH
Schritt 7
Bauen Sie ein weiteres Katzennest auf dem Schrank zusammen,
wie in der Abbildung gezeigt, und legen Sie zum Schluss die Matte 5 hinein;
Schritt 6
Wie in der Abbildung gezeigt, werden die Hängematte
O2 und die entsprechende Säule installiert und schließlich
wird die Matte 4 installiert;
7
3
3
2
O2
T3x1
T2x3
Machine Translated by Google

S
Montieren Sie das Haarballenspielzeug und das Federspielzeug wie in der Abbildung gezeigt und ziehen Sie es
abschließend fest, sodass die Schrauben fixiert werden können.
B
X
Sx2
Frage 2x4
8
B
X
S
Wände
Stecken Sie das Expansionsrohr in die Wand und befestigen Sie
anschließend das Kippschutzseil mit selbstschneidendem Draht an der Wand;
befestigen Sie abschließend die andere Seite mit Schrauben am Katzenklettergerüst.
Schritt 8
Machine Translated by Google
Produktgröße
SSXG003
Farbe
Modell
Grau
600*520*1850 mm
UK REP
Vertreter der EG
Mainzer Landstr.69, 60329 Frankfurt am Main.
E-CrossStu GmbH
C/O YH Consulting Limited Office 147, Centurion
Importiert in die USA: Sanven Technology Ltd. Suite 250, 9166 Anaheim Place,
Rancho Cucamonga, CA 91730
YH CONSULTING LIMITED.
Nach AUS importiert: SIHAO PTY LTD. 1 ROKEVA STREETEASTWOOD NSW 2122
Australien
Hersteller: Shanghaimuxinmuyeyouxiangongsi Adresse:
Shuangchenglu 803nong11hao1602A-1609shi, baoshanqu, Shanghai 200000 CN.
Haus, London Road, Staines-upon-Thames, Surrey,
TW18 4AX
PRODUKTPARAMETER
9
Machine Translated by Google

Technischer Support und E-Garantie-Zertifikat
www.vevor.com/support
Machine Translated by Google

Machine Translated by Google

ARBRESÀCHATDETYPEBOÎTE
MANUELD'UTILISATION
Assistancetechniqueetcertificatdegarantieélectroniquewww.vevor.com/support
«Économisezlamoitié»,«Moitiéprix»outouteautreexpressionsimilaireutiliséeparnousnereprésente
qu'uneestimationdeséconomiesquevouspourriezréaliserenachetantcertainsoutilscheznousparrapportaux
grandesmarquesetnecouvrepasnécessairementtouteslescatégoriesd'outilsquenousproposons.Nous
vousrappelonsdebienvouloirvérifiersoigneusementlorsquevouspassezunecommandecheznoussivous
économisezréellementlamoitiéparrapportauxgrandesmarques.
Nouscontinuonsànousengageràvousfournirdesoutilsàdesprixcompétitifs.
Machine Translated by Google

Machine Translated by Google

Vousavezdesquestionssurnosproduits?Vousavezbesoind'assistancetechnique?N'hésitezpasànous
contacter:Assistancetechniqueetcertificatdegarantieélectroniquewww.vevor.com/support
Ils'agitdelanoticed'utilisationd'origine.Veuillezlireattentivementtouteslesinstructionsdumanuelavantde
l'utiliser.VEVORseréserveledroitd'interpréterclairementnotremanueld'utilisation.L'apparence
duproduitdépendduproduitquevousavezreçu.Veuilleznousexcuser,nousnevousinformeronsplus
encasdemiseàjourtechnologiqueoulogicielledenotreproduit.
1
MODÈLE:SSXG003
BESOIND'AIDE?CONTACTEZNOUS!
ARBRESÀCHATDETYPEBOÎTE
Machine Translated by Google

3.Gardezlazonedemontagepropreetbienéclairée.
2.Ceproduitn'estpasunjouet.Nelaissezpaslesenfantsjoueravecouàproximitédeceproduit.
article.
4.Gardezlesspectateurshorsdelazonependantlemontage.
5.Nemontezpassivousêtesfatiguéousousl'influencedel'alcool,dedroguesoude
médicaments.
6.Lescapacitésduproduits'appliquentuniquementauxproduitscorrectementetcomplètementassemblés.
3.Nepasdépasserlescapacitésdepoidsspécifiées.
4.Utiliseruniquementsurunesurfaceplane,nivelée,dureetlissequipeutêtreutiliséeentoutesécurité.
AVERTISSEMENT:
7.Assemblezsurunesurfaceplane,deniveau,dureetlissecapabledesupporterentoutesécurité
prendenchargeunarbreàchatdestyleboîteentièrementchargé.
soutenirlesarbresàchatdestyleboîte.
Lisezcedocumentavantd'utiliserceproduit.Lenonrespectdecesinstructionspeutentraînerdesblessuresgraves.
5.Utiliseruniquementcommeprévu.
6.Inspectezavantchaqueutilisation;nepasutilisersidespiècessontdesserréesouendommagées.
Précautionsd'assemblage1.
Assemblezuniquementseloncesinstructions.Unassemblageincorrectpeut
créerdesdangers.
8.Pourplusd'informationssurlespiècesrépertoriéescidessous
pages,veuillezvousréférerauschémad'assemblagedecemanuel.Déballezetsépareztouteslespièces
dansunespacedetravailpropre.
2.PortezdeslunettesdesécuritéapprouvéesANSIetdesgantsdetravailrobustespendantl'assemblage.
Précautionsd'utilisation1.
NEPASS'ASSEOIROUSETENIRDEBOUTSURCETARTICLE.
CONSERVERCEMANUEL
CONSIGNESDESÉCURITÉ
2
Machine Translated by Google

E×1
O1×1 O2×1
G×2
H×2 Je×2
Un×1
J×1
K×1
B×1
C×1
D×1
L×1
M×1
F×2
N×2
Tableaudesaccessoires
*Chaqueensembleestlivréavecuntournevisetuneclé
3
Machine Translated by Google

4
5
(Reposepiedsréglable)
(Butéedeporte)(Jouetsboulesdepoils)(Cordeantibasculement)(Arbrerotatif)
1
3
T2x10
(coussin)
(Envelopperlacolonne)
U×2
Q2x8
37cm
Q1x20
S×2
Y×4
T4x16
L×1
(M8*30)
(Jouetsàressort)
(Colonnesen
sisal)30cm
(vis3en1)
×2
(poignéedeporte)
(M3*12)
X×1
30cm
(coussin)
(M6*40)
Q3x2
T1x12
×1
×1
T3x4
V×2
Z×4
×2
×62
(M8*70)
(M4*12)
(M4*22)
Tableaudesaccessoires
4
Machine Translated by Google

C
Z
T4x16
Q1X12
B
Yx4
Zx4
Q3x2
T1X12
UN
Vx2
C
J
Ux2
Nx2
V
D
B
Étape3
Étape1
Étape2
Laméthoded'installationdevistroisenun
estillustréesurlafigure;
Placersurlaporteetserrerlesvis;
Commeindiquésurla
figure,assemblezlabutéede
portecorrespondanteetlepetit
neznoirU;
Installezlereposepiedréglablesurlabasecommeillustré;
Assemblezd’abordl’armoireinférieurecommeindiquésurlafigure;
Placezd'abordlaplaquedebroche,puisplacezlacharnière
UN
J
Étapesd'installation
N
Tu
T4
(Remarque:alignezlestrousavantdeserrer)
5
Machine Translated by Google

H
5
G
T2
5
F
K
je
K
F
G
H
H
Q1X4
Q2X4
je
je
O
L
InsérezlaplaqueIetlaplaqueHdans
larainuresupérieuredel'armoire;
Assemblezlenidpourchataudessusde
l'armoirecommeindiquésurlafigure,et
enfinplacezletapis5dessus;
Étape4
Étape5
Commelemontrelafigure,lehamacO1etla
colonnecorrespondantesontinstallés,etenfinlaplanche
deboisLestinstallée;
T3x3
T2x7
6
O1
L
2
2
1
2
2
2
Machine Translated by Google

H
T2
F
G
H
O2
Q2X4
E
Q1X4
je
4
5
4
E
G
5
F
je
Étape7
Commelemontrelafigure,lehamacO2etla
colonnecorrespondantesontinstallés,etenfinletapis
4estinstallé;
Assemblezunautrenidpourchatsurl'armoirecomme
indiquésurlafigure,etenfinplacezyletapis5;
Étape6
7
T3x1
T2x3
3
3
2
O2
Machine Translated by Google
S
Installezlejouetbouledepoilsetlejouetàressortcommeindiquésurl'image,puis
serrezleenfinpourquelesvispuissentêtrefixées.
L
Sx2
Q2x4
X
8
L
X
S
murs
Branchezletuyaud'expansiondanslemur,puisfixez
lacordeantibasculementsurlemuravecdufilautotaraudeur;
Enfin,utilisezdesvispourfixerl'autrecôtéaucadred'escaladepourchat.
Étape8
Machine Translated by Google

MainzerLandstr.69,60329FrancfortsurleMain.
YHCONSULTINGLIMITÉE.
A/SYHConsultingLimitedBureau147,Centurion
Maison,LondonRoad,StainesuponThames,Surrey,
ImportéenAustralie:SIHAOPTYLTD.1ROKEVASTREETEASTWOODNSW2122
Australie
ECrossStuGmbH
ImportéauxÉtatsUnis:SanvenTechnologyLtd.Suite250,9166AnaheimPlace,
RanchoCucamonga,CA91730
Fabricant:ShanghaimuxinmuyeyouxiangongsiAdresse:
Shuangchenglu803nong11hao1602A1609shi,baoshanqu,shanghai200000CN.
TW184AX
REPRÉSENTANTDUROYAUMEUNI
REPRÉSENTANTDELACE
Tailleduproduit
SSXG003
Couleur
Modèle
Gris
600*520*1850mm
PARAMÈTREDUPRODUIT
9
Machine Translated by Google

Assistancetechniqueetcertificatdegarantie
électroniquewww.vevor.com/support
Machine Translated by Google

Machine Translated by Google

GEBRUIKERSHANDLEIDING
KATTENBOMEN IN DOOSSTIJL
Technische ondersteuning en e-garantiecertificaat www.vevor.com/support
"Save Half", "Half Price" of andere soortgelijke uitdrukkingen die wij gebruiken, geven alleen een schatting van de
besparingen die u kunt behalen door bepaalde gereedschappen bij ons te kopen in vergelijking met de grote topmerken en
betekent niet noodzakelijkerwijs dat alle categorieën gereedschappen die wij aanbieden, worden gedekt. Wij herinneren
u eraan om zorgvuldig te controleren of u daadwerkelijk de helft bespaart in vergelijking met de grote topmerken wanneer u
een bestelling bij ons plaatst.
Wij streven er voortdurend naar om u gereedschappen tegen concurrerende prijzen te leveren.
Machine Translated by Google

Machine Translated by Google

Dit is de originele instructie, lees alle handleidingen zorgvuldig door voordat u het product gebruikt.
VEVOR behoudt zich een duidelijke interpretatie van onze gebruikershandleiding voor. Het
uiterlijk van het product is afhankelijk van het product dat u hebt ontvangen. Vergeef ons dat we u
niet opnieuw zullen informeren als er technologie- of software-updates voor ons product zijn.
Heeft u vragen over het product? Heeft u technische ondersteuning nodig? Neem dan gerust contact
met ons op: Technische ondersteuning en E-garantiecertificaat www.vevor.com/support
1
MODEL:SSXG003
HULP NODIG? NEEM CONTACT MET ONS OP!
KATTENBOMEN IN DOOSSTIJL
Machine Translated by Google

2
VEILIGHEIDSINSTRUCTIES
gevaren creëren.
pagina's, raadpleeg dan het montageschema van deze handleiding. Pak alle onderdelen uit en scheid
ze in een schone werkruimte.
2. Draag tijdens de montage een ANSI-goedgekeurde veiligheidsbril en stevige werkhandschoenen.
Neem
voorzorgsmaatregelen 1. GA NIET OP DIT ITEM ZITTEN OF STAAN.
BEWAAR DEZE HANDLEIDING
ter ondersteuning van de Box Style Cat Trees.
Lees dit materiaal voordat u dit product gebruikt. Als u dit niet doet, kan dit leiden tot ernstig letsel.
5. Gebruik het product alleen zoals bedoeld.
6. Controleer het apparaat voor elk gebruik. Gebruik het niet als er onderdelen loszitten of beschadigd zijn.
Voorzorgsmaatregelen bij de
montage 1. Monteer alleen volgens deze instructies. Onjuiste montage kan
8. Voor aanvullende informatie over de onderdelen die in de volgende lijst staan vermeld,
5. Kom niet bijeen als u moe bent of onder invloed van alcohol, drugs of medicijnen.
6. De producteigenschappen gelden uitsluitend voor correct en volledig gemonteerde producten.
3. Overschrijd het aangegeven draagvermogen niet.
4. Gebruik het alleen op een vlak, egaal, hard en glad oppervlak dat veilig kan worden gebruikt.
WAARSCHUWING:
7. Monteer op een vlak, egaal, hard en glad oppervlak dat veilig kan worden gebruikt
3. Zorg ervoor dat de verzamelplaats schoon en goed verlicht is.
2. Dit product is geen speelgoed. Laat kinderen niet met of in de buurt van dit product spelen.
ondersteunen een volledig uitgeruste Box Style kattenboom.
item.
4. Houd omstanders uit de buurt tijdens de montage.
Machine Translated by Google

3
Accessoires tafel
*Elke set wordt geleverd met een schroevendraaier en een sleutel
D×1
M×1
F×2
N×2
K×1
B×1
C×1
L×1
H×2 Ik×2
Een×1
J×1
E×1
O1×1 O2×1
G×2
Machine Translated by Google

4
5
(Verstelbare voetensteun)
(Deurstopper) (Pluizebal speelgoed) (Anti-kantel touw) (Draaibare as)
37cm
Q1x20
S×2
Jaar × 4
T2x10
T4x16
(kussen)
(De kolom omwikkelen)
U×2
Q2x8
(Lente speelgoed)
(Sisal zuilen) 30cm
(3-in-1 schroeven)
×2
(deurknop)
(M3*12)
Breedte x 1
(M8*30)
×1
×1
V×2
Z×4
X×1
30cm
(kussen)
(M6*40)
Q3x2
T1x12
(M4*12)
(M4*22)
T3x4
×2
×6 2
(M8*70)
3
1
Accessoires tafel
4
Machine Translated by Google

C
Z
T4x16
Q1X12
B
Nx2
T1X12
Q3x2
Zx4
A
C
Jaar 4
Vx2
J
Ux2
V
B
D
A
J
De drie-in-één schroefinstallatiemethode
wordt weergegeven in de afbeelding;
Plaats op de deur en draai de schroeven vast;
Monteer de bijbehorende
deurstopper en de kleine zwarte
neus U zoals afgebeeld in de
afbeelding;
Installeer de verstelbare voetplaat op de basis zoals afgebeeld;
Monteer eerst het onderste kastje zoals aangegeven in de afbeelding;
Plaats eerst de spindelplaat en plaats daarna het scharnier
Stap 2
Stap 1
Stap 3
Installatiestappen
5
N
Ik
T4
(Let op: Lijn de gaten uit voordat u ze vastdraait)
Machine Translated by Google

H
5
G
Q2
5
Ik
F
G
H
H
Q1X4
Q2X4
I
I
O
Ik
I
Ik
F
Plaats de I-plaat en de H-plaat in de
bovenste groef van de kast;
Monteer het kattennest boven het kastje
zoals aangegeven in de afbeelding en leg
er tenslotte de mat 5 op;
Stap 4
Stap 5
Zoals weergegeven in de afbeelding worden de
hangmat O1 en de bijbehorende kolom geïnstalleerd
en tot slot wordt het houten bord L geïnstalleerd;
T3x3
T2x7
6
O1
Ik
2
2
1
2
2
2
Machine Translated by Google

H
Q2
F
G
H
O2
Q2X4
Ik
Q1X4
I
4
5
I
F
5
G
Ik
4
Stap 7
Zoals weergegeven in de afbeelding worden de
hangmat O2 en de bijbehorende kolom geïnstalleerd
en tenslotte wordt de mat 4 geïnstalleerd;
Monteer nog een kattennest op het kastje zoals
aangegeven in de afbeelding en leg er tenslotte de mat 5 in;
Stap 6
7
T3x1
T2x3
2
3
3
O2
Machine Translated by Google

S
Plaats het haarbal- en veerspeelgoed zoals op de afbeelding is aangegeven en draai het ten
slotte vast, zodat de schroeven kunnen worden vastgezet.
W
Sx2
Q2x4
X
8
W
X
S
muren
Steek de expansiebuis in de muur en bevestig het anti-
kantelkoord met zelftappende draad aan de muur. Bevestig ten slotte
de andere kant met schroeven aan het kattenklimrek.
Stap 8
Machine Translated by Google

Productgrootte
SSXG003
Kleur
Model
Grijs
600*520*1850mm
VK REP
EC-REP
Mainzer Landstr.69, 60329 Frankfurt am Main.
YH CONSULTING LIMITED.
C/O YH Consulting Limited Kantoor 147, Centurion
Huis, London Road, Staines-upon-Thames, Surrey,
Geïmporteerd naar AUS: SIHAO PTY LTD. 1 ROKEVA STREETEASTWOOD NSW
2122 Australië
E-CrossStu GmbH
Geïmporteerd naar de VS: Sanven Technology Ltd. Suite 250, 9166 Anaheim Place,
Rancho Cucamonga, CA 91730
Fabrikant: Shanghaimuxinmuyeyouxiangongsi Adres:
Shuangchenglu 803nong11hao1602A-1609shi, baoshanqu, shanghai 200000 CN.
TW18 4AX
PRODUCTPARAMETER
9
Machine Translated by Google

Technische ondersteuning en e-
garantiecertificaat www.vevor.com/support
Machine Translated by Google

Machine Translated by Google

ANVÄNDARMANUAL
KATTTRÄD I LÅDSTYL
Teknisk support och e-garanticertifikat www.vevor.com/support
Vi fortsätter att vara engagerade i att ge dig verktyg till konkurrenskraftiga priser.
"Spara hälften", "halva priset" eller andra liknande uttryck som används av oss representerar
bara en uppskattning av besparingar du kan dra nytta av att köpa vissa verktyg hos oss jämfört med de
stora toppmärkena och betyder inte nödvändigtvis att täcka alla kategorier av verktyg som erbjuds av
oss. Du påminns vänligen om att noggrant kontrollera när du gör en beställning hos oss om du faktiskt
sparar hälften i jämförelse med de främsta stora varumärkena.
Machine Translated by Google

Machine Translated by Google

Detta är den ursprungliga instruktionen, läs alla instruktioner noggrant innan du
använder den. VEVOR reserverar sig för en tydlig tolkning av vår
användarmanual. Utseendet på produkten är beroende av den produkt du fått.
Ursäkta oss att vi inte kommer att informera dig igen om det finns någon teknik eller
mjukvaruuppdateringar på vår produkt.
Har du produktfrågor? Behöver du teknisk support? Kontakta oss gärna: Teknisk
support och e-garanticertifikat www.vevor.com/support
1
MODELL: SSXG003
BEHÖVER HJÄLP? KONTAKTA OSS!
KATTTRÄD I LÅDSTYL
Machine Translated by Google

4. Håll åskådare borta från området under monteringen.
punkt.
SPARA DENNA MANUAL
3. Håll monteringsområdet rent och väl upplyst.
2. Denna produkt är inte en leksak. Låt inte barn leka med eller i närheten av detta
4. Använd endast på en plan, jämn, hård och slät yta som kan säkert
VARNING:
5. Sätt dig inte ihop om du är trött eller påverkad av alkohol, droger eller medicin.
7. Montera på en plan, jämn, hård och slät yta som kan säkert
3. Överskrid inte specificerade viktkapaciteter.
6. Produktens funktioner gäller endast för korrekt och färdigmonterade produkter.
stödja en fullastad Box Style Cat Trees.
Försiktighetsåtgärder vid
montering 1. Montera endast enligt dessa instruktioner. Felaktig montering kan
8. För ytterligare information om delarna som anges nedan
6. Inspektera före varje användning; Använd inte om delar är lösa eller skadade.
Läs detta material innan du använder denna produkt. Underlåtenhet att göra det kan
resultera i allvarliga skador.
stödjer Box Style Cat Trees.
5. Använd endast på avsett sätt.
2. Bär ANSI-godkända skyddsglasögon och kraftiga arbetshandskar vid montering.
Använd
försiktighetsåtgärder 1. SIT ELLER STÅ INTE PÅ DETTA FÖREMÅL.
skapa faror.
sidorna, se monteringsdiagrammet i denna manual. Packa upp och separera alla delar på
ett rent arbetsområde.
SÄKERHETSINSTRUKTIONER
2
Machine Translated by Google

G×2
O2×1
E×1
O1×1
A×1
J×1
H×2 I×2
L×1
C×1
B×1
K×1
F×2
N×2
D×1
M×1
* Varje set levereras med en skruvmejsel och skiftnyckel
Tillbehörsbord
3
Machine Translated by Google

(Justerbart fotstöd)
(Dörrstoppare) (Furball-leksaker) (Tipprep) (Roterande axel)
3
5
1
4
(Slå in kolumnen)
(dämpa)
U×2
Q2x8
T2 x10
37 cm
Y×4
Q1x20
S×2
T4 x16
B×1
(M8*30)
×2
(3-i-1 skruvar)
(M3*12)
(Vårleksaker)
(Sisalpelare) 30cm
(dörrhandtag)
(M6*40)
T1 x12
30 cm
Q3x2
(dämpa)
X×1
T3 x4
×1
Z×4
×1
V×2
×6 2
×2
(M8*70)
(M4*22)
(M4*12)
Tillbehörsbord
4
Machine Translated by Google

C
Z
Q1X12
B
T4x16
Yx4
T1X12
Q3x2
Zx4
A
J
Vx2
Ux2
C
Nx2
V
B
D
J
A
Metoden för montering av tre-i-ett-skruv
visas i figuren;
Sätt spindelplattan först och sätt sedan gångjärnet
Som visas i figuren,
montera motsvarande
dörrstoppare och den lilla
svarta nosen U;
Installera den justerbara fotplattan på basen enligt bilden;
Placera på dörren och dra åt skruvarna;
Montera bottenskåpet först enligt bilden;
Steg 2
Steg 1
Steg 3
Installationssteg
ÿObs: Rikta in hålen innan du drar åtÿ
5
N
U
T4
Machine Translated by Google

H
5
G
Q2
5
K
G
Q1X4
H
Q2X4
F
H
jag
jag
O
L
jag
K
F
Sätt in I-plattan och H-plattan i skåpets
övre skåra;
Steg 5
Sätt ihop kattboet ovanför skåpet enligt
bilden och lägg slutligen på mattan 5;
Steg 4
Som visas i figuren installeras hängmattan O1 och
motsvarande kolumn, och slutligen installeras träskivan
L;
L
O1
T2x7
T3x3
2
2
1
2
2
2
6
Machine Translated by Google

H
Q2
E
H
G
Q2X4
F
Q1X4
jag
O2
4
5
jag
F
5
G
E
4
Steg 7
Montera ytterligare ett kattbo på skåpet som visas i
figuren, och lägg slutligen mattan 5 i det;
Steg 6
Som visas i figuren installeras hängmattan O2 och
motsvarande pelare, och slutligen installeras mattan 4;
3
3
2
T3x1
T2x3
7
O2
Machine Translated by Google

S
Montera hårbollsleksaken och fjäderleksaken som visas på bilden och dra
till sist åt den så att skruvarna kan fixeras.
W
X
Sx2
Q2x4
8
Koppla in expansionsröret i väggen och fäst sedan tippskyddet
på väggen med självgängande tråd; Använd slutligen skruvar för att fästa den
andra sidan på kattens klätterställning.
väggar
S
W
X
Steg 8
Machine Translated by Google

E-CrossStu GmbH
Mainzer Landstr.69, 60329 Frankfurt am Main.
C/O YH Consulting Limited Office 147, Centurion
Importerad till USA: Sanven Technology Ltd. Suite 250, 9166 Anaheim Place, Rancho
Cucamonga, CA 91730
YH CONSULTING LIMITED.
Importerad till AUS: SIHAO PTY LTD. 1 ROKEVA STREETEASTWOOD NSW 2122
Australien
Tillverkare: Shanghaimuxinmuyeyouxiangongsi Adress:
Shuangchenglu 803nong11hao1602A-1609shi, baoshanqu, shanghai 200000 CN.
House, London Road, Staines-upon-Thames, Surrey,
TW18 4AX
UK REP
EC REP
Produktstorlek
SSXG003
Färg
Modell
600*520*1850 mm
Grå
PRODUKTPARAMETER
9
Machine Translated by Google

Teknisk support och e-garanticertifikat
www.vevor.com/support
Machine Translated by Google

Machine Translated by Google

ÁRBOLESPARAGATOSESTILOCAJA
MANUALDELUSUARIO
Soportetécnicoycertificadodegarantíaelectrónicawww.vevor.com/support
"Ahorrelamitad","mitaddeprecio"ocualquierotraexpresiónsimilarqueutilicemossolorepresenta
unaestimacióndelahorroquepodríaobteneralcomprarciertasherramientasconnosotrosencomparacióncon
lasprincipalesmarcasynonecesariamentesignificaquecubratodaslascategoríasdeherramientasque
ofrecemos.Lerecordamosque,alrealizarunpedidoconnosotros,verifiquecuidadosamentesirealmenteestá
ahorrandolamitadencomparaciónconlasprincipalesmarcas.
Seguimoscomprometidosabrindarleherramientasaprecioscompetitivos.
Machine Translated by Google

Machine Translated by Google

Estassonlasinstruccionesoriginales,leaatentamentetodaslasinstruccionesdelmanualantesde
utilizarelproducto.VEVORsereservaunainterpretaciónclaradenuestromanualdeusuario.
Laaparienciadelproductoestarásujetaalproductoquerecibió.Perdónenospornoinformarle
nuevamentesihayactualizacionesdetecnologíaosoftwareennuestroproducto.
¿Tienepreguntassobreelproducto?¿Necesitaasistenciatécnica?Nodudeenponerseencontacto
connosotros:Asistenciatécnicaycertificadodegarantíaelectrónicawww.vevor.com/support
1
MODELO:SSXG003
ÁRBOLESPARAGATOSESTILOCAJA
¿NECESITAAYUDA?¡CONTÁCTENOS!
Machine Translated by Google

3.Mantengaeláreadereuniónlimpiaybieniluminada.
2.Esteproductonoesunjuguete.Nopermitaquelosniñosjueguenconélocercadeél.
artículo.
4.Mantengaalostranseúntesfueradeláreaduranteelmontaje.
5.Nosereúnasiestácansadoobajolainfluenciadelalcohol,drogasomedicamentos.
6.Lascapacidadesdelproductoseaplicanúnicamenteaproductosensambladosdeformacorrectay
completa.
3.Noexcedalascapacidadesdepesoespecificadas.
4.Úseloúnicamentesobreunasuperficieplana,nivelada,duraylisaquepueda
ADVERTENCIA:
7.Montarsobreunasuperficieplana,nivelada,duraylisacapazdesoportarcargasdeformasegura.
Admiteárbolesparagatostipocajacompletamentecargados.
Apoyandolosárbolesparagatosestilocaja.
Leaestematerialantesdeutilizaresteproducto.Nohacerlopuedeprovocarlesionesgraves.
5.Utilíceloúnicamentesegúnloprevisto.
6.Inspeccioneantesdecadauso;noutilicesilaspiezasestánsueltasodañadas.
Precaucionesdemontaje1.Realice
elmontajeúnicamentedeacuerdoconestasinstrucciones.Unmontajeincorrectopuede
crearpeligros
8.Paraobtenerinformaciónadicionalsobrelaspiezasenumeradasacontinuación,
páginas,consulteeldiagramadeensamblajedeestemanual.Desembaleyseparetodaslaspiezas
enunáreadetrabajolimpia.
2.UsegafasdeseguridadaprobadasporANSIyguantesdetrabajoresistentesduranteelmontaje.
Precaucionesdeuso1.
NOSESIENTANISEPARESOBREESTEARTÍCULO.
GUARDEESTEMANUAL
INSTRUCCIONESDESEGURIDAD
2
Machine Translated by Google

3
Mesadeaccesorios
*Cadajuegovieneconundestornilladoryunallave.
E×1
O1×1 O2×1
G×2
H×2 Yo×2
A×1
J×1
K×1
B×1
C×1
D×1
L×1
M×1
F×2
N×2
Machine Translated by Google
4
5
(Topedepuerta)(Juguetesconbolasdepelo)(Cuerdaantivuelco)(Ejegiratorio)
(Reposapiésajustable)
T2x10
(almohadón)
(Envolverlacolumna)
U×2
Q2x8
37centímetros
Q1x20
S×2
Y×4
T4x16
An×1
(M8*30)
(Juguetesdeprimavera)
(Columnasdesisal)
30cm
(Tornillos3en1)
×2
(pomodelapuerta)
(M3*12)
X×1
30centímetros
(almohadón)
(M6*40)
Q3x2
T1x12
×1
×1
T3x4
V×2
Z×4
×2
×62
(M8*70)
(M4*12)
(M4*22)
3
1
Mesadeaccesorios
4
Machine Translated by Google

do
O
T4x16
Q1X12
B
Yx4
Zx4
Q3x2
T1X12
A
Vx2
Yo
do
Ux2
Cx2
V
D
B
Yo
A
Elmétododeinstalacióndetornillostresen
unosemuestraenlafigura;
Colocarenlapuertayapretarlostornillos;
Comosemuestraenla
figura,ensambleeltopedepuerta
correspondienteylapequeña
nariznegraU;
Instalelaalmohadilladepieajustableenlabasecomoseilustra;
Primeroensambleelgabineteinferiorcomosemuestraenlafigura;
Coloqueprimerolaplacadelhusilloyluegocoloquelabisagra.
Paso3
Paso1
Paso2
Pasosdeinstalación
5
T4
tú
norte
Nota:Alineelosorificiosantesdeapretar
Machine Translated by Google
yo
5
GRAMO
Q2
5
K
F
GRAMO
yo
Q2X4
Q1X4
yo
I
I
Oh
yo
I
F
K
InsertelaplacaIylaplacaHen
laranurasuperiordelgabinete;
Monteelnidoparagatosencimadel
mueblecomosemuestraenlafiguray
finalmentecoloquelaalfombra5;
Paso4
Paso5
Comosemuestraenlafigura,seinstalala
hamacaO1ylacolumnacorrespondiente,y
finalmenteseinstalalatablademaderaL;
T3x3
T2x7
6
O1
yo
2
2
1
2
2
2
Machine Translated by Google

yo
Q2
F
GRAMO
yo
O2
Q1X4
mi
Q2X4
I
4
5
I
5
F
GRAMO
mi
4
Paso7
Comosemuestraenlafigura,seinstalala
hamacaO2ylacolumnacorrespondiente,y
finalmenteseinstalalacolchoneta4;
Monteotronidoparagatosenelmueblecomose
muestraenlafiguray,porúltimo,coloquelaalfombra5enél;
Paso6
7
3
3
2
O2
T3x1
T2x3
Machine Translated by Google

S
Instaleeljuguetedeboladepeloyeljuguetederesortecomosemuestraenlaimageny,
finalmente,apriételoparaquesepuedanfijarlostornillos.
Yo
sx2
Q2x4
incógnita
8
Yo
incógnita
S
Conecteeltubodeexpansiónalaparedyluegofijelacuerdaantivuelco
enlaparedconuncableautorroscante;finalmente,usetornillosparafijarelotroladoal
marcodeescaladaparagatos.
paredes
Paso8
Machine Translated by Google

Tamañodelproducto
SSXG003
Color
Modelo
Gris
600*520*1850mm
REPRESENTANTEDELREINOUNIDO
REPRESENTANTECE
MainzerLandstr.69,60329FráncfortdelMeno.
YHCONSULTINGLIMITADA.
C/OYHConsultingLimitedOficina147,Centurion
ImportadoaEE.UU.:SanvenTechnologyLtd.Suite250,9166AnaheimPlace,Rancho
Cucamonga,CA91730
ECrossStuGmbH
ImportadoaAUS:SIHAOPTYLTD.1ROKEVASTREETEASTWOODNSW2122
Australia
Fabricante:ShanghaimuxinmuyeyouxiangongsiDirección:
Shuangchenglu803nong11hao1602A1609shi,baoshanqu,shanghai200000CN.
TW184AX
Casa,LondonRoad,StainesuponThames,Surrey,
PARÁMETRODELPRODUCTO
9
Machine Translated by Google

Soportetécnicoycertificadodegarantía
electrónicawww.vevor.com/support
Machine Translated by Google

Machine Translated by Google
