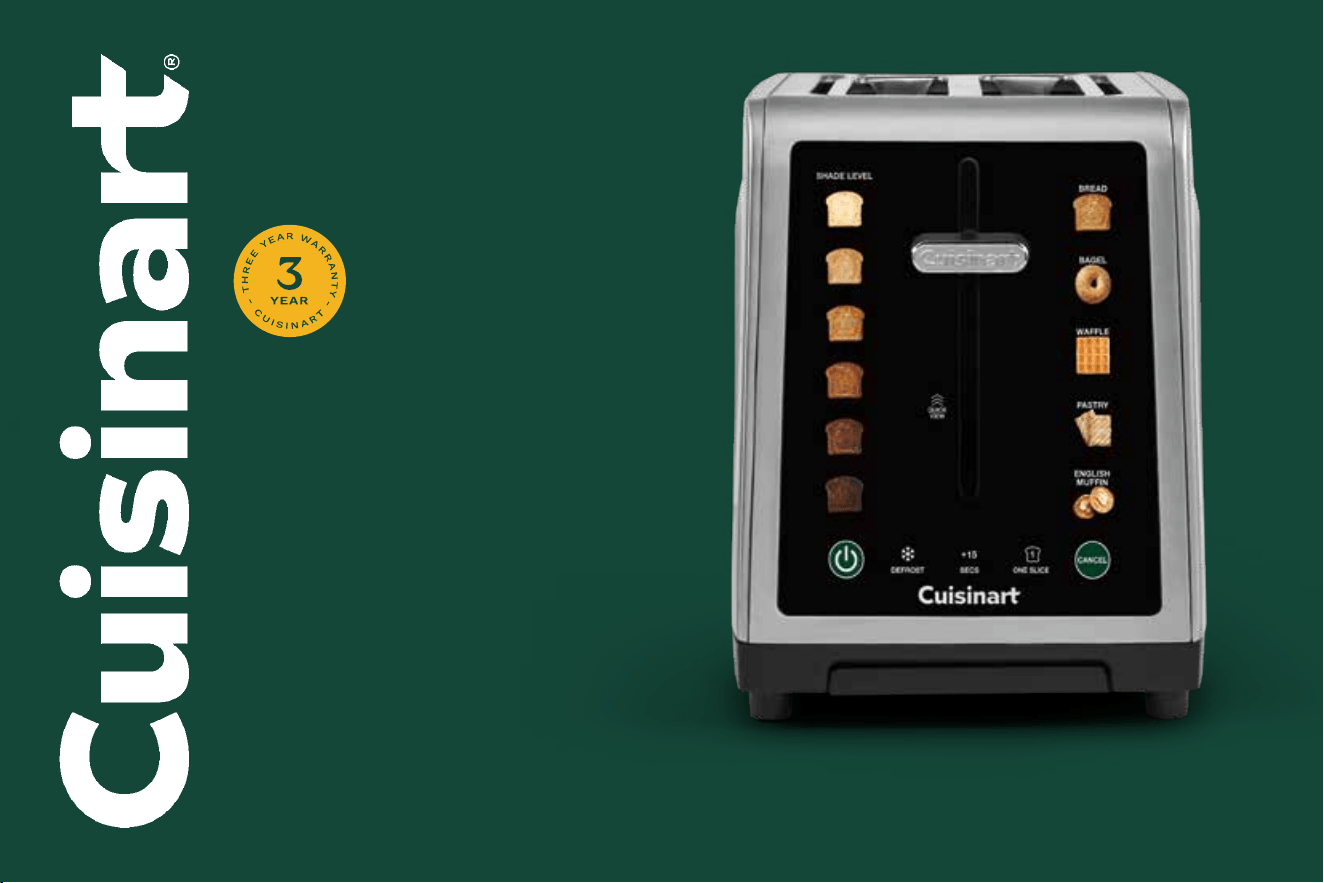
S impliTouch™
XL 2-Slice Toaster
RBT-2200PC2
For your safety and continued enjoyment of this product, always
read the instruction book carefully before using.
Instruction Booklet
ITM./ART. 4333018

2
IMPORTANT SAFEGUARDS
When using an electrical appliance, basic safety precautions should
always be taken, including the following:
1. Read all instructions.
WARNING:
2. Always unplug appliance from outlet when not in use and
before cleaning. Allow to cool before cleaning or handling.
3. Do not touch hot surfaces. Use buttons or levers.
4. To protect against electric shock, do not immerse cord or plug or
place any part of the toaster in water or other liquids. See
instructions for cleaning.
5. Do not operate any appliance with a damaged cord or plug, after
the appliance has malfunctioned or has been dropped or damaged
in any way, or if it is not operating properly.
6. The use of accessory attachments not recommended by Cuisinart
may cause injury.
7. Do not place toaster on or near a hot gas or electric burner or in a
heated oven.
8. Oversize foods, metal foil packages, or utensils must not be
inserted in the toaster, as they may involve a risk of re or electric
shock.
9. A re may occur if the toaster is covered or touching ammable
materials, such as curtains, draperies, or walls, when in operation.
Do not operate under wall cabinets.
10. Do not attempt to dislodge food when the toaster is plugged into an
electrical outlet.
11.
To avoid possibility of re, do not leave toaster unattended during use.
12. To disconnect, push the Cancel button, then remove the plug from
the wall. Unplug from the outlet when not in use and before
cleaning.
13. Do not operate your appliance in an appliance garage or under a
wall cabinet. When storing in an appliance garage, always unplug
the unit from the electrical outlet. Not doing so could create a risk of
re, especially if the appliance touches the walls of the garage or
the door touches the unit as it closes.
14. The bread may burn, therefore do not use the toaster near or below
combustible material, such as curtains.
15. Do not place buttered breads in the toaster, as this could create a
re hazard.
CAUTION:
16. This appliance should not be used by or near children or individuals
with certain disabilities. Close supervision is necessary when any
appliance is used by or near children.
17. Do not use outdoors.
18. Do not let cord hang over the edge of the table or countertop or
touch hot surfaces.
19. Do not use this toaster for anything other than its intended use.
20. When heating toaster pastries, always use the lightest toast color
setting.
21. Toaster is not intended to be operated by means of an external
timer or separate remote-control system.
22. Never force foods into the toasting slots. Foods should t freely
between the guide wires.
23. Children should be supervised to ensure that they do not play with
the appliance.
24. This appliance is not intended for use by persons (including
children) with reduced physical, sensory, or mental capabilities, or
lack of experience and knowledge, unless they have been given
supervision or instruction concerning use of the appliance by a
person responsible for their safety.
IMPORTANT, RETAIN FOR FUTURE
REFERENCE: READ CAREFULLY
3
SPECIAL CORD SET INSTRUCTIONS
A short power-supply cord is provided to reduce the risks resulting from becoming
entangled in or tripping over a longer cord. Longer extension cords are available and may
be used if care is exercised in their use.
If a long extension cord is used, the marked electrical rating of the extension cord should
be at least as great as the electrical rating of the appliance, and the longer cord should be
arranged so that it will not drape over the countertop or tabletop where it can be pulled on
by children or tripped over unintentionally.
NOTICE: This appliance has a polarized plug (one blade is wider than the other).
As a safety feature, this plug will fit in a polarized outlet only one way. If the plug
does not fit fully in the outlet, reverse the plug. If it still does not fit, contact a
qualified electrician. Do not attempt to defeat this safety feature.
CUISINART CONSUMER SERVICE
For customer service assistance for inquiries other than online orders, contact
[email protected] or call 1-800-726-0190.
To better serve you, our Cuisinart Representatives are available to answer your calls
Monday to Friday, 8:00 AM – 10:00 PM EST and Saturday & Sunday, 9:00 AM – 5:30
PM EST.
SERVICIO AL CONSUMIDOR CUISINART
Para asistencia en el servicio al cliente sobre consultas distintas a pedidos en línea,
contacte a [email protected] o llame al 1-800-726-0190.
Para atenderte mejor, nuestros representantes de Cuisinart están disponibles para
contestar tus llamadas de lunes a viernes, de 8:00 AM a 10:00 PM (EST) y los sábados
y domingos, de 9:00 AM a 5:30 PM (EST).
CONTENTS
Important Safeguards.........................................2
Features and Benefits ........................................3
Use and Care ...............................................4
Functions ..................................................4
Tips and Hints ..............................................5
Cleaning and Maintenance ....................................5
Troubleshooting .............................................6
Warranty ...................................................6
3
4
5
2
1
6
7
10
8
9
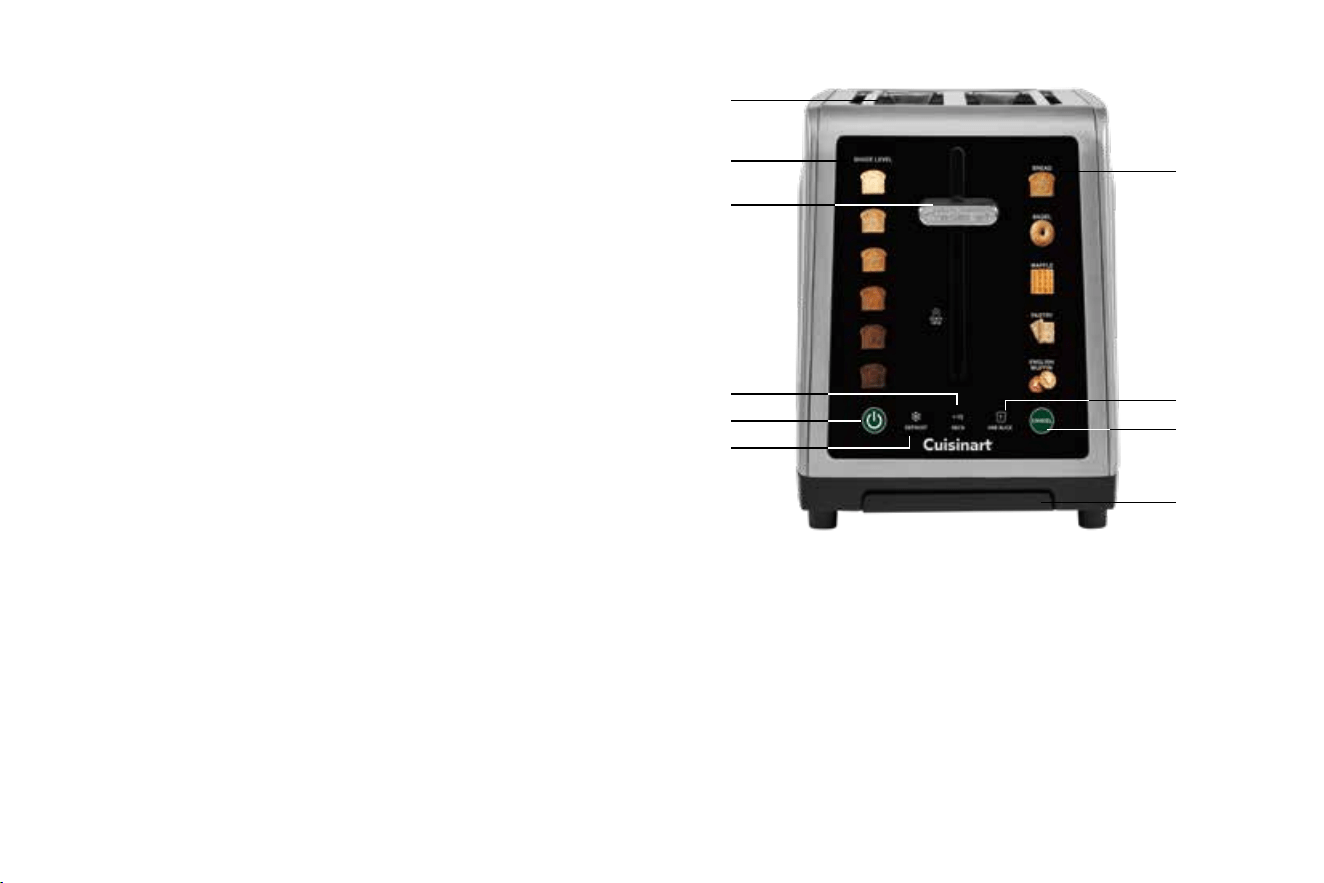
FEATURES AND BENEFITS
1. Power
Press to turn touchscreen controls on or off.
2. High-Lift Lever with QuickView™ Feature
Press the lever down to begin toasting. Lift lever at any time to observe
the browning shade status without interrupting the toasting cycle.
3. XL Toasting Slots
Extra-large toaster slots accommodate a wider variety of breads.
4. Browning Control
Touch a shade icon (1-6) to select your desired browning level.
5. Bread-Type Buttons
Customized settings for Bread, Bagel, Wafe, Pastry, and English
Mufn.

4
6. Defrost Button
Defrosts and toasts frozen items.
7. +15 Seconds
Can be used to extend your selected browning shade setting for an
additional 15 seconds.
8. Single-Slice Button
Evenly toasts single slices,
side to side.
9. Cancel Button
Interrupts toasting process.
10. Slide-Out Front Crumb Tray
Pulls out to remove crumbs that collect in bottom of toaster.
11. Cord Storage (not shown)
Takes up excess cord and keeps countertop neat.
USE AND CARE
Plug the power cord into wall outlet. Press Power button.
1. Insert slice(s) of bread.
Be sure that the carriage is in the up position.
2. Select bread type.
3. Select browning control.
Touch the desired shade level:
Setting Color
1–2 light
3–4 medium
5–6 dark
4. Begin toasting.
Press the carriage lever until it locks into the down position.
Stop cycle.
When the toasting cycle is nished, the toast will be raised. If you wish to
stop the cycle before it is nished, simply touch the Cancel button. After
use, unplug the toaster from the electrical outlet.
NOTE: After 3 minutes of no operation, toaster will go into idle mode and
the display will turn off. To wake toaster, press the power button or push
the start lever down, and the display will turn on.
Functions
QuickView
™
The QuickView
™
feature allows you to check on the toasting progress without
interrupting the cycle. Simply lift the high-lift lever to temporarily raise and view
your bread, and then release lever to automatically lower and continue toasting.
Power
Power control can be used to:
• Turn on the touchscreen controls.
• Power off the toaster.
+15 Seconds
The +15 Secs function allows you to extend the toasting time by 15 seconds.
If selected during toasting cycle:
•
The +15 Secs icon will go from semi-lit to fully lit and start ashing. Current
shade countdown will be paused. Upon completion of the 15-second
cycle, the originally selected browning shade cycle will resume.
If selected after toasting cycle has completed:
• The +15 Secs icon will illuminate. Once the lever is pushed down, the
+15 Secs icon will ash until time has elapsed.
Bagel
This toaster reduces heat on one side of the toasting slot for bagels. This
toasts the cut side of the bagel slightly more than the other side.
An icon located on the top of the toaster shows you the right way to
insert your bagel. (The cut side should always face away from the
center of the pair of toasting slots.)
One-Slice
This 2-slice toaster features One-Slice Technology. Simply press the
One-Slice button to toast a single slice evenly, delivering a balanced, uniform
color on both sides every time. All heating elements engage at full power,
while the non-selected side will reduce power and operate at a reduced level
for precise heat symmetry and energy-conscious performance.
1. Insert slice of bread.
Be sure that the carriage is in the up position.
2. Select bread type.
3. Set browning control.

5
4. Select the single-slice button. White LED indicates the feature is active.
5. Press the high-lift lever until it locks into position.
To stop cycle
When the single-slice cycle is complete, the toaster will raise the bread. If
you wish to stop the cycle before it is nished, simply push the Cancel
button to interrupt. After use, unplug the toaster from the electrical outlet.
Defrost Button
The Defrost button is designed to rst defrost and then toast the bread to
your desired browning shade.
1. Insert slice(s) of bread.
Be sure that the carriage is in the up position.
2. Select bread type.
3. Set browning control.
4.
Select the Defrost button. White LED indicates the feature is
activated.
5. Press the high-lift lever until it locks into position.
To stop cycle
When the Defrost cycle is complete, the toaster will raise the bread. If
you wish to stop the cycle before it is nished, simply push the Cancel
button to interrupt. After use, unplug the toaster from the electrical outlet.
Cancel Button
The Cancel button lets you stop the toasting cycle at anytime.
NOTE: Cancel button will only function during active toasting cycle.
TIPS AND HINTS
Notes on browning
Toasting is a combination of cooking and drying bread. Therefore, differences in
moisture level from one bread to another can result in varying toasting times.
•
The larger slots can accommodate bigger, taller, and thicker slices of bread. If
you’re using smaller slices (around 100x100 mm), they will toast more quickly, so
it’s recommended to lower the toasting shade setting to prevent over-toasting.
• When toasting a second batch immediately, the toast may be darker than the
selected setting, especially if the rst cycle used a darker level; it is
recommended to select a lower setting for the second cycle.
• For slightly dry bread, use a lower setting than you normally would.
• For very fresh bread or whole-wheat bread, use a higher setting than normal.
• Breads with very uneven surfaces (such as English mufns) require a higher
toast setting.
• Thickly cut pieces of bread take longer to toast, sometimes signicantly
longer, since more moisture must be evaporated from the bread before
toasting can occur. Very thick pieces may require two cycles.
•
When toasting raisin or other fruit breads, remove any loose raisins, etc., from
the surface of the bread before placing into the toaster. This will help prevent
fruit pieces from falling into the toaster or sticking on the guide wires in the slots.
• Before toasting bagels, slice each bagel into two equal halves.
•
When toasting a second batch immediately after the rst, the toast may come out
darker than the selected shade—especially if the previous cycle used a higher
setting. For best results, choose a lower shade setting for the second cycle.
Frozen waffles, pancakes, French toast, and bagels
These items should be warmed before toasting, using the Defrost function. Select
the bread type and then your preferred browning shade. Press high-lift lever and
then press Defrost. For example, to toast a frozen bagel, select Bagel and then
the browning level. Press Defrost and then press the high-lift lever down.
Toaster pastries
Exercise caution with toaster pastries; the lling can become quite hot, long
before the surface of the pastry becomes browned. Never leave toaster pastries
unattended while toasting or warming.
For best results
• Uneven toasting is usually due to bread slices of uneven thickness.
• After use, unplug your toaster from the electrical outlet.
CLEANING AND MAINTENANCE
Always allow the toaster to cool completely before cleaning.
1. Always unplug the toaster from the electrical outlet before cleaning.
2. Do not use abrasive cleaners. Simply wipe the exterior with a clean, damp
cloth and dry thoroughly.
3. To remove crumbs, slide out the crumb tray and discard crumbs. Wipe clean
and replace. Never operate the toaster without the crumb tray in place.
6
4. To remove any pieces of bread remaining in the toaster, turn the toaster
upside down and gently shake. Never insert any hard or sharp instruments
into the slots, as this could damage the toaster and cause a safety hazard.
5. Never wrap the cord around the outside of the toaster. Use the cord storage
cleats on the underside of the toaster.
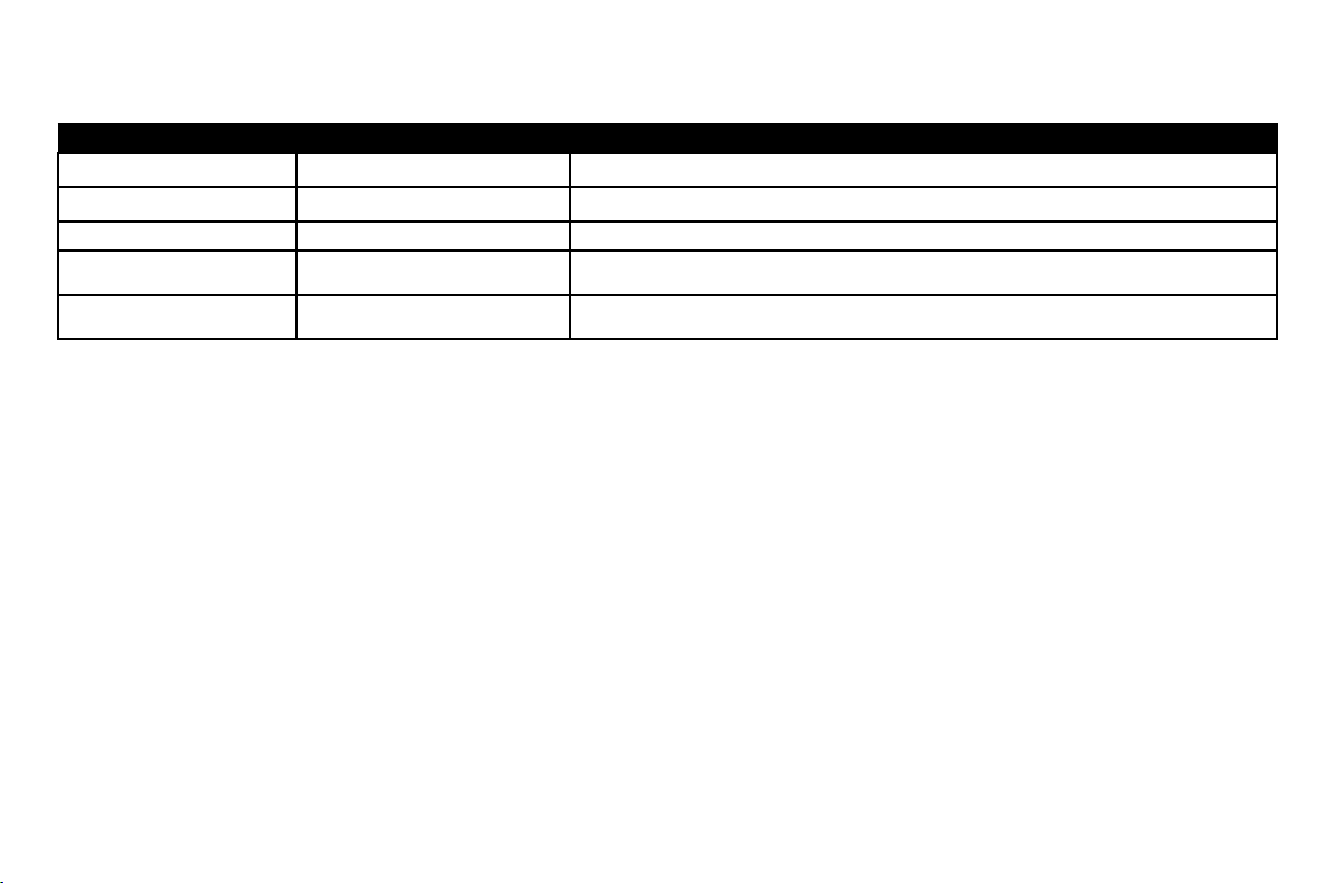
TROUBLESHOOTING
Issue Possible Cause Recommended Action
Toaster Not Heating / No Power No power to outlet Plug a lamp or phone charger into the same outlet to conrm the outlet is functioning properly.
Toaster Not Heating / No Power Tripped GFCI outlet If the toaster is plugged into a kitchen GFCI outlet, press the RESET button to restore power.
Lever Will Not Stay Down Crumb buildup inside toaster
Unplug the toaster and remove the crumb tray. Turn the unit upside down and gently shake to
remove debris.
Burning Smell or Smoke Excess crumbs on heating elements
Press the Cancel button immediately and unplug the unit. Once cooled, clean the crumb tray and
interior to remove accumulated crumbs.
LIMITED WARRANTY
Subject to the exclusions and limitations contained herein, Conair LLC dba
Cuisinart (“Cuisinart”) warrants that the Cuisinart
®
SimpliTouch XL 2-Slice
Toaster (“Product”) will be free from material defects in materials and
workmanship under normal home use conditions for a period of THREE (3)
years beginning on the date the Product was purchased in its original, sealed
packaging, unless otherwise specied in this Limited Warranty. This Limited
Warranty is only for U.S. consumers (dened herein as purchasers at retail for
personal, family, or household use) who originally purchase the Product from
Cuisinart or an authorized Cuisinart
®
reseller (if you are unsure whether a
retailer or other point of sale is an authorized or unauthorized Cuisinart
reseller, contact Cuisinart).
This Limited Warranty does NOT cover:
• Normal wear and tear;
• Any Product purchased by commercial purchasers or for commercial or
non-household uses;
• Accessories, parts, or software added to the Product after the system is
shipped from Cuisinart;
• Any costs associated with the replacement or repair of the Product,
including labor, installation, or other costs incurred by you without prior
Cuisinart approval;
• Damage to the Product, defective conditions, or nonconformities due to:
(1) external causes, including shipping, accidents, problems with
electrical power (Product designed only for use with 120-volt outlets),
abnormal conditions (such as mechanical or environmental); (2) usage
not in accordance with Product instructions; (3) misuse, neglect,
unauthorized alteration, unauthorized repair; and (4) acts of God or other
events beyond Cuisinart’s control;
• Damage caused by you or any nonauthorized third party, even though
necessary repairs and maintenance might be performed by any company;
• Damage caused by accessories or replacement parts not specically
authorized by Cuisinart; and
• Any Product where the original Product identication markings (trademark
or serial number) have been removed, altered, or obliterated.
It is recommended that you visit the website https://www.cuisinart.com/
register-your-product.html for a fast, efcient way to complete your product
registration. However, product registration does not eliminate the need for the
consumer to maintain the original proof of purchase in order to obtain the
warranty benets. In the event that you do not have proof of purchase date,
the purchase date for purposes of this Limited Warranty will be the date of
manufacture.

7
TROUBLESHOOTING
Issue Possible Cause Recommended Action
Toaster Not Heating / No Power No power to outlet Plug a lamp or phone charger into the same outlet to conrm the outlet is functioning properly.
Toaster Not Heating / No Power Tripped GFCI outlet If the toaster is plugged into a kitchen GFCI outlet, press the RESET button to restore power.
Lever Will Not Stay Down Crumb buildup inside toaster
Unplug the toaster and remove the crumb tray. Turn the unit upside down and gently shake to
remove debris.
Burning Smell or Smoke Excess crumbs on heating elements
Press the Cancel button immediately and unplug the unit. Once cooled, clean the crumb tray and
interior to remove accumulated crumbs.
HASSLE-FREE WARRANTY
If the Product that is the subject of this Limited Warranty fails during the
warranty period for reasons covered by this Limited Warranty, Cuisinart will, at
its option, repair the Product, replace the Product with another identical or
reasonably equivalent product, or if Cuisinart is unable to repair or replace the
Product, refund the purchase price, less the amount directly attributable to
the consumer’s prior usage of the Product. To obtain a return shipping label,
email us at https://www.cuisinart.com/customer-care/product-
assistance/product-inquiry/, or call our Consumer Service Center toll-free
at 1-800-726-0190 to speak with a representative. Upon receipt of the
Product, Cuisinart will inspect the Product and, if required under this Limited
Warranty, attempt to repair, replace, or refund the Product within thirty (30)
days. However, there may be delays beyond Cuisinart’s control, in which case
that time period may be extended as reasonably necessary.
IMPORTANT: If the nonconforming product requires service, please contact
our Consumer Service Center at 1-800-726-0190 to verify warranty coverage.
Repairs or modications performed by unauthorized service providers will
void the remaining warranty.
CALIFORNIA RESIDENTS ONLY
The THREE (3) year Limited Warranty period begins on the date the Product
was delivered, which may be different than the date the Product was
purchased. California residents also have the option of obtaining the benets
of this Limited Warranty by bringing the Product to (A) the store where it was
purchased or (B) another retail store that sells Cuisinart products of the same
type. The retail store shall then, according to its preference, either repair the
Product, refer the consumer to an independent repair facility, replace the
Product with another identical or reasonably equivalent product, or refund the
purchase price less the amount directly attributable to the consumer’s prior
usage of the Product. California residents may also, according to their
preference, return nonconforming products directly to Cuisinart for repair or, if
necessary, replacement with another identical or reasonably equivalent
product by calling our Consumer Service Center toll-free at 1-800-726-0190.
Cuisinart will be responsible for the cost of such repair, replacement, and/or
shipping and handling for such nonconforming products under warranty.
THIS LIMITED WARRANTY GIVES YOU SPECIFIC LEGAL RIGHTS, AND
YOU MAY ALSO HAVE OTHER RIGHTS THAT VARY FROM STATE TO
STATE OR BY JURISDICTION. IN THE EVENT THIS LIMITED WARRANTY
IS BREACHED, YOU MAY HAVE CLAIMS FOR REPLACEMENT,
DAMAGES, OR OTHER PENALTIES.
LIMITATIONS OF LIABILITY/ADDITIONAL LIMITATIONS AND
EXCLUSIONS ALL EXPRESS AND IMPLIED WARRANTIES ARE LIMITED
IN DURATION TO THE LIMITED WARRANTY PERIOD. NO WARRANTIES
APPLY AFTER THAT PERIOD. SOME STATES (OR JURISDICTIONS) DO
NOT ALLOW LIMITATIONS ON HOW LONG AN IMPLIED WARRANTY
LASTS, SO THIS LIMITATION MAY NOT APPLY TO YOU. CUISINART’S
RESPONSIBILITY UNDER THIS OR ANY OTHER WARRANTY, IMPLIED
OR EXPRESS, IS LIMITED TO REPAIR, REPLACEMENT, OR REFUND, AS
SET FORTH ABOVE. THESE REMEDIES ARE THE SOLE AND EXCLUSIVE
REMEDIES FOR ANY BREACH OF WARRANTY. TO THE MAXIMUM
EXTENT PERMITTED BY LAW, CUISINART IS NOT RESPONSIBLE FOR
ANY DIRECT, INDIRECT, SPECIAL, INCIDENTAL, OR CONSEQUENTIAL
DAMAGES RESULTING FROM ANY BREACH OF WARRANTY OR UNDER
ANY OTHER LEGAL THEORY (INCLUDING, BUT NOT LIMITED TO, LOST
PROFITS, DOWNTIME, LOSS OF GOODWILL, DAMAGE TO OR
REPLACEMENT OF EQUIPMENT AND PROPERTY, AND ANY COSTS OF
RECOVERING, REPROGRAMMING, OR REPRODUCING ANY PROGRAM
OR DATA STORED IN OR USED WITH A SYSTEM CONTAINING THE
PRODUCT), EVEN IF CUISINART HAS BEEN ADVISED OF THE
POSSIBILITY OF SUCH DAMAGES. SOME STATES (OR JURISDICTIONS)
DO NOT ALLOW THE EXCLUSION OR LIMITATION OF INCIDENTAL OR
CONSEQUENTIAL DAMAGES, SO THE ABOVE LIMITATIONS OR
EXCLUSIONS MAY NOT APPLY TO YOU. ALL EXPRESS AND IMPLIED
WARRANTIES ARE LIMITED IN DURATION TO THE LIMITED WARRANTY
PERIOD. NO WARRANTIES APPLY AFTER THAT PERIOD. SOME STATES
(OR JURISDICTIONS) DO NOT ALLOW LIMITATIONS ON HOW LONG AN
IMPLIED WARRANTY LASTS, SO THIS LIMITATION MAY NOT APPLY TO
YOU.
This Limited Warranty is issued by:
Conair LLC
1 Cummings Point Road
Stamford, CT 06902
1-800-726-0190

©2026 Cuisinart,
a division of Conair LLC
7475 North Glen Harbor Boulevard
Glendale, AZ 85307
IB-26/117
Distributed by:
Costco Wholesale Corporation
P.O. Box 34535
Seattle, WA 98124-1535
USA
1-800 -774-2678
www.costco.com