※
In the interest of product improvement, the specications and/or the content of products (including but not limited to appearances, packaging design, manual content, accessories,
size, parameters and display screen), are subject to change without prior notice. Please check with local supplier for exact oers. Specications and features (including but not limited to
appearances, colors and size) may vary by model owing to environmental factors. and all images are illustrative.
User Manual
For Firmware V1.0.5

Content
Welcome ···········································································································1
Safety Instructions ···························································································1
Overview ··········································································································5
Panel Introduction ····························································································6
Getting Started ································································································8
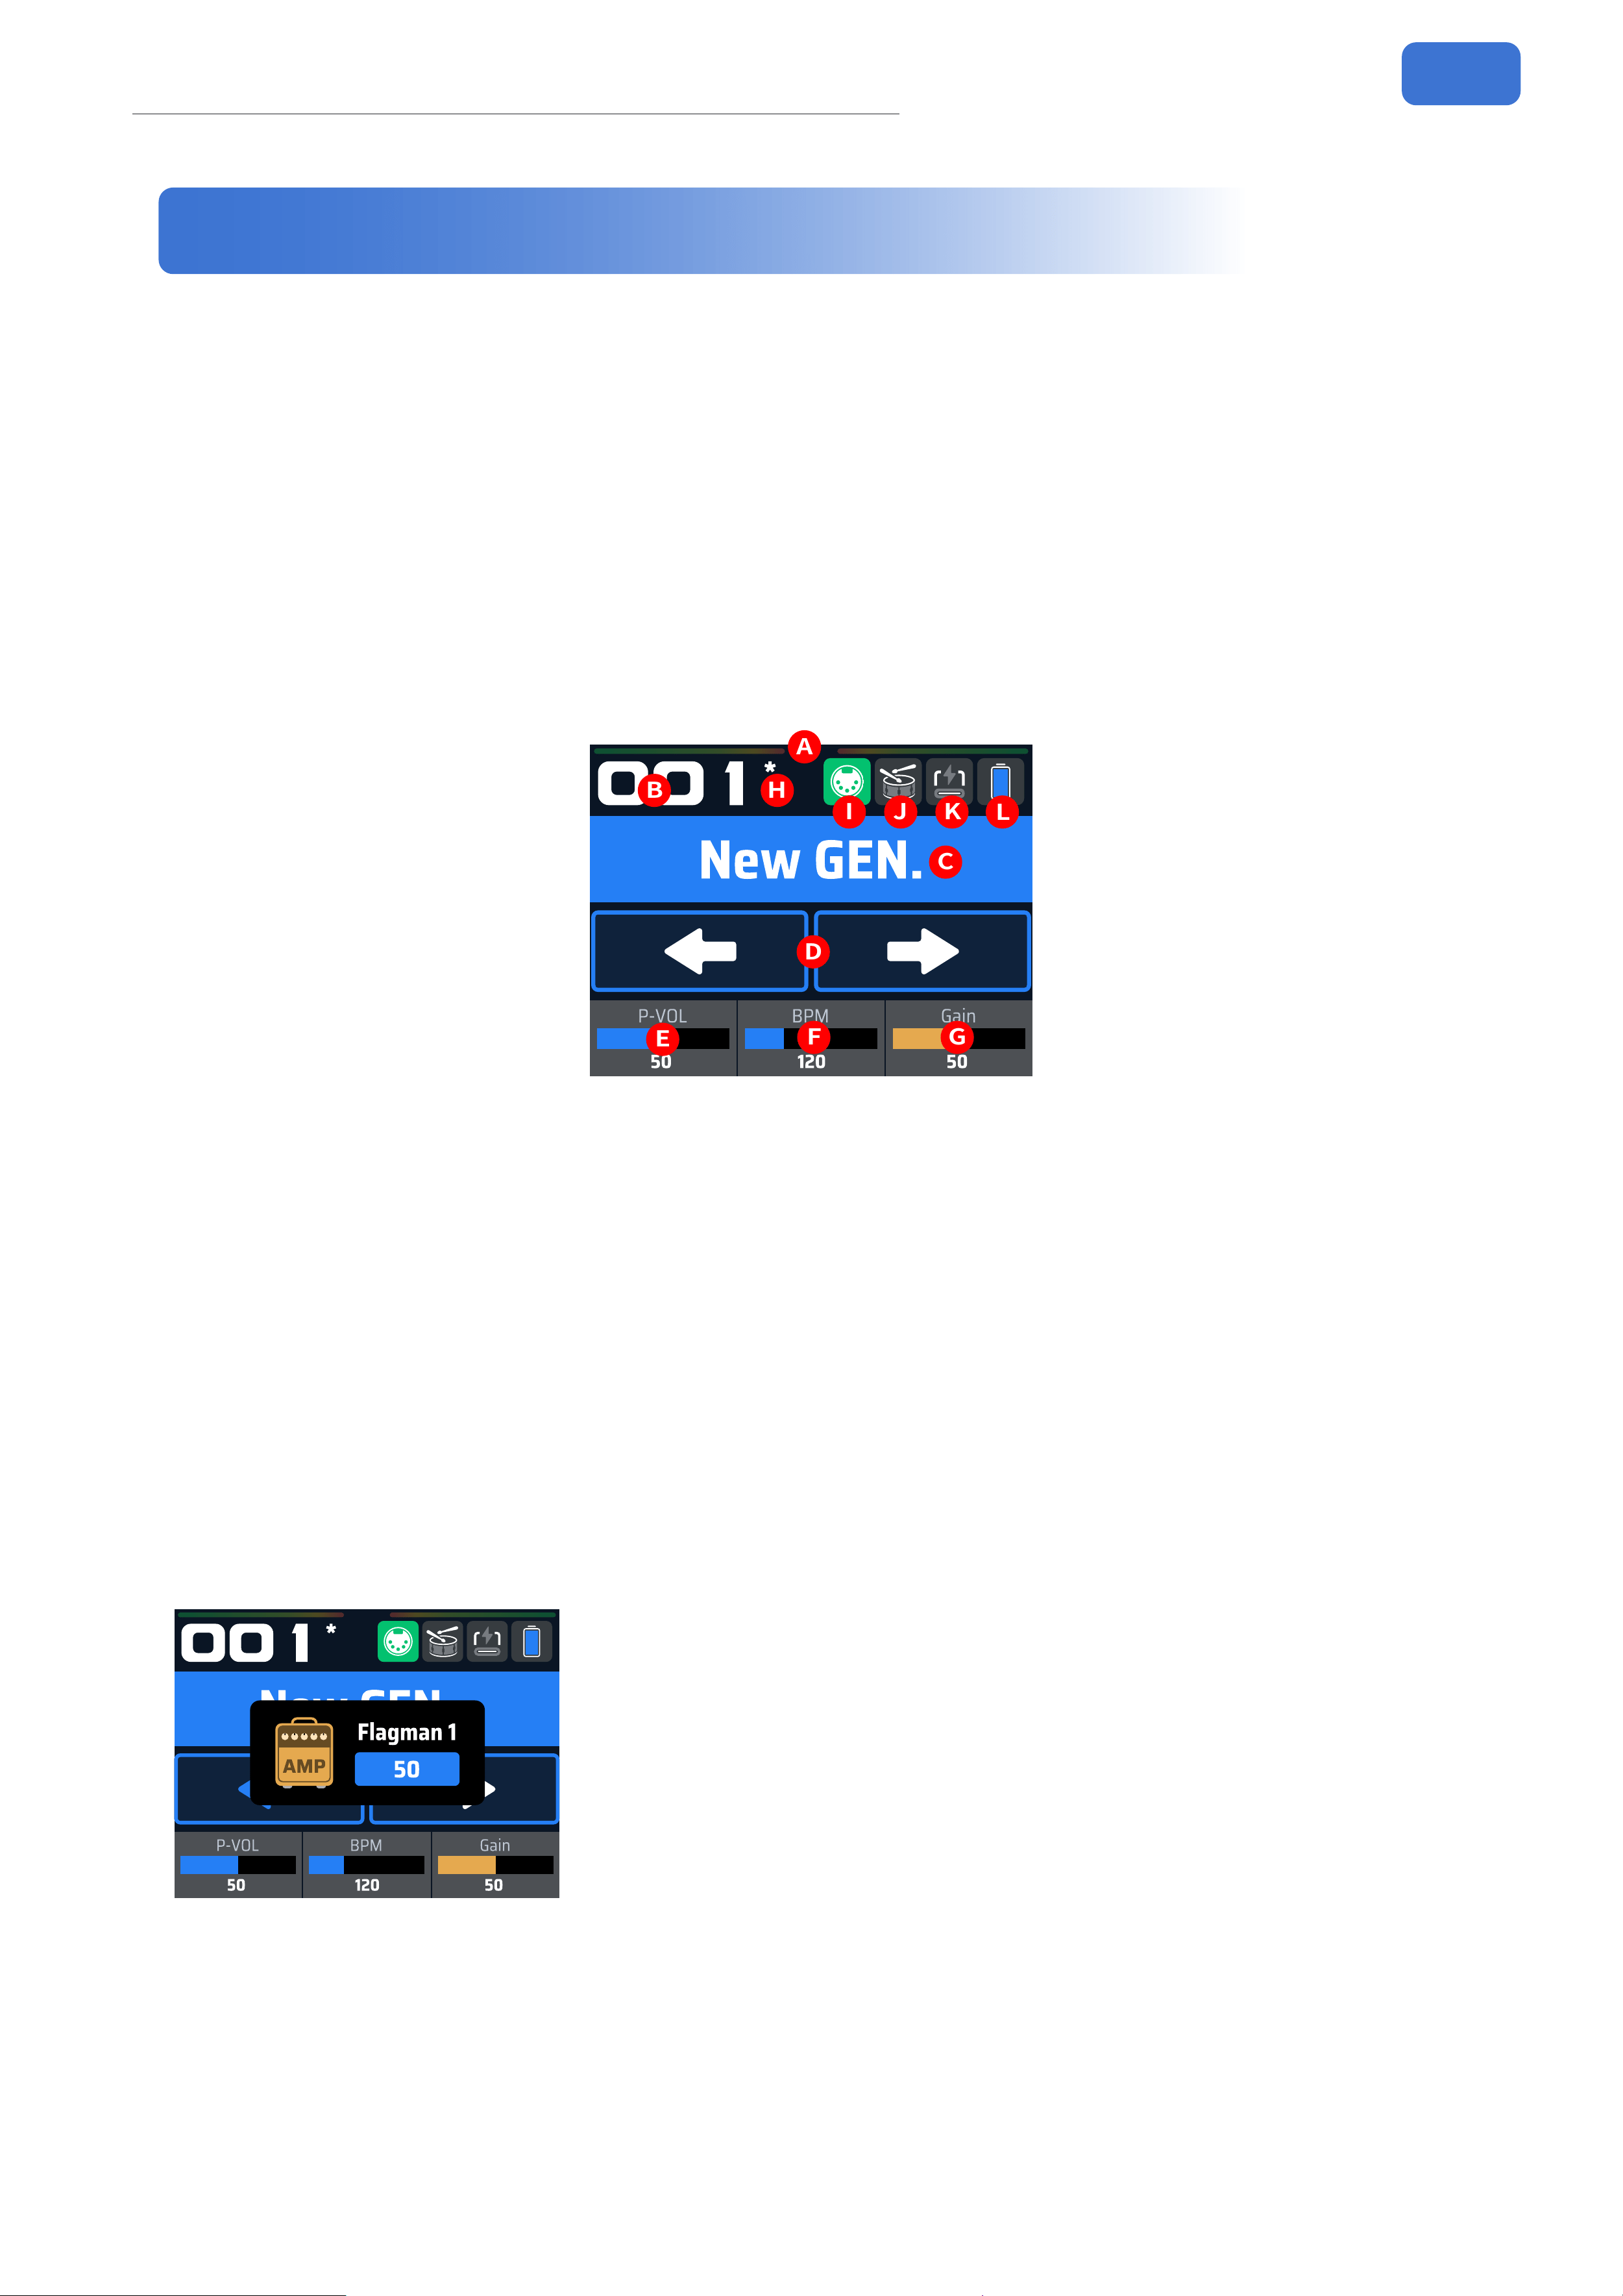
Screen Introduction ··························································································9
Main Screen ····················································································································································9
Tap Tempo (TAP) ········································································································································· 10
Low Battery Warning ································································································································ 10
Tuner Screen ···················································································································································11
Drum Machine Screen ······························································································································· 14
Patch Editing ·································································································· 15
Edit Screen ·····················································································································································15
Effects Chain DSP Load ··························································································································· 16
Patch Settings ············································································································································· 16
Changing Effect Module Order ···············································································································17
Footswitch-Controlled Effect Modules (CTRL) ················································································ 18
Save Screen ·················································································································································· 18
Global Settings ······························································································· 19
Input / Output ··············································································································································· 19
USB Settings ················································································································································ 21
Global EQ ······················································································································································· 23
TAP Settings ················································································································································ 24
EXP Calibrate ·············································································································································· 24
Footswitch ··················································································································································· 25
BT Settings ··················································································································································· 25
Auto Save ····················································································································································· 26
Display ··························································································································································· 26
EXP/FS ····························································································································································27
MIDI Settings ················································································································································27
Auto CAB Match ········································································································································· 28
Factory Reset ·············································································································································· 28
About ······························································································································································ 29
Compatible Software ·····················································································29
Application Scenarios ·····················································································30

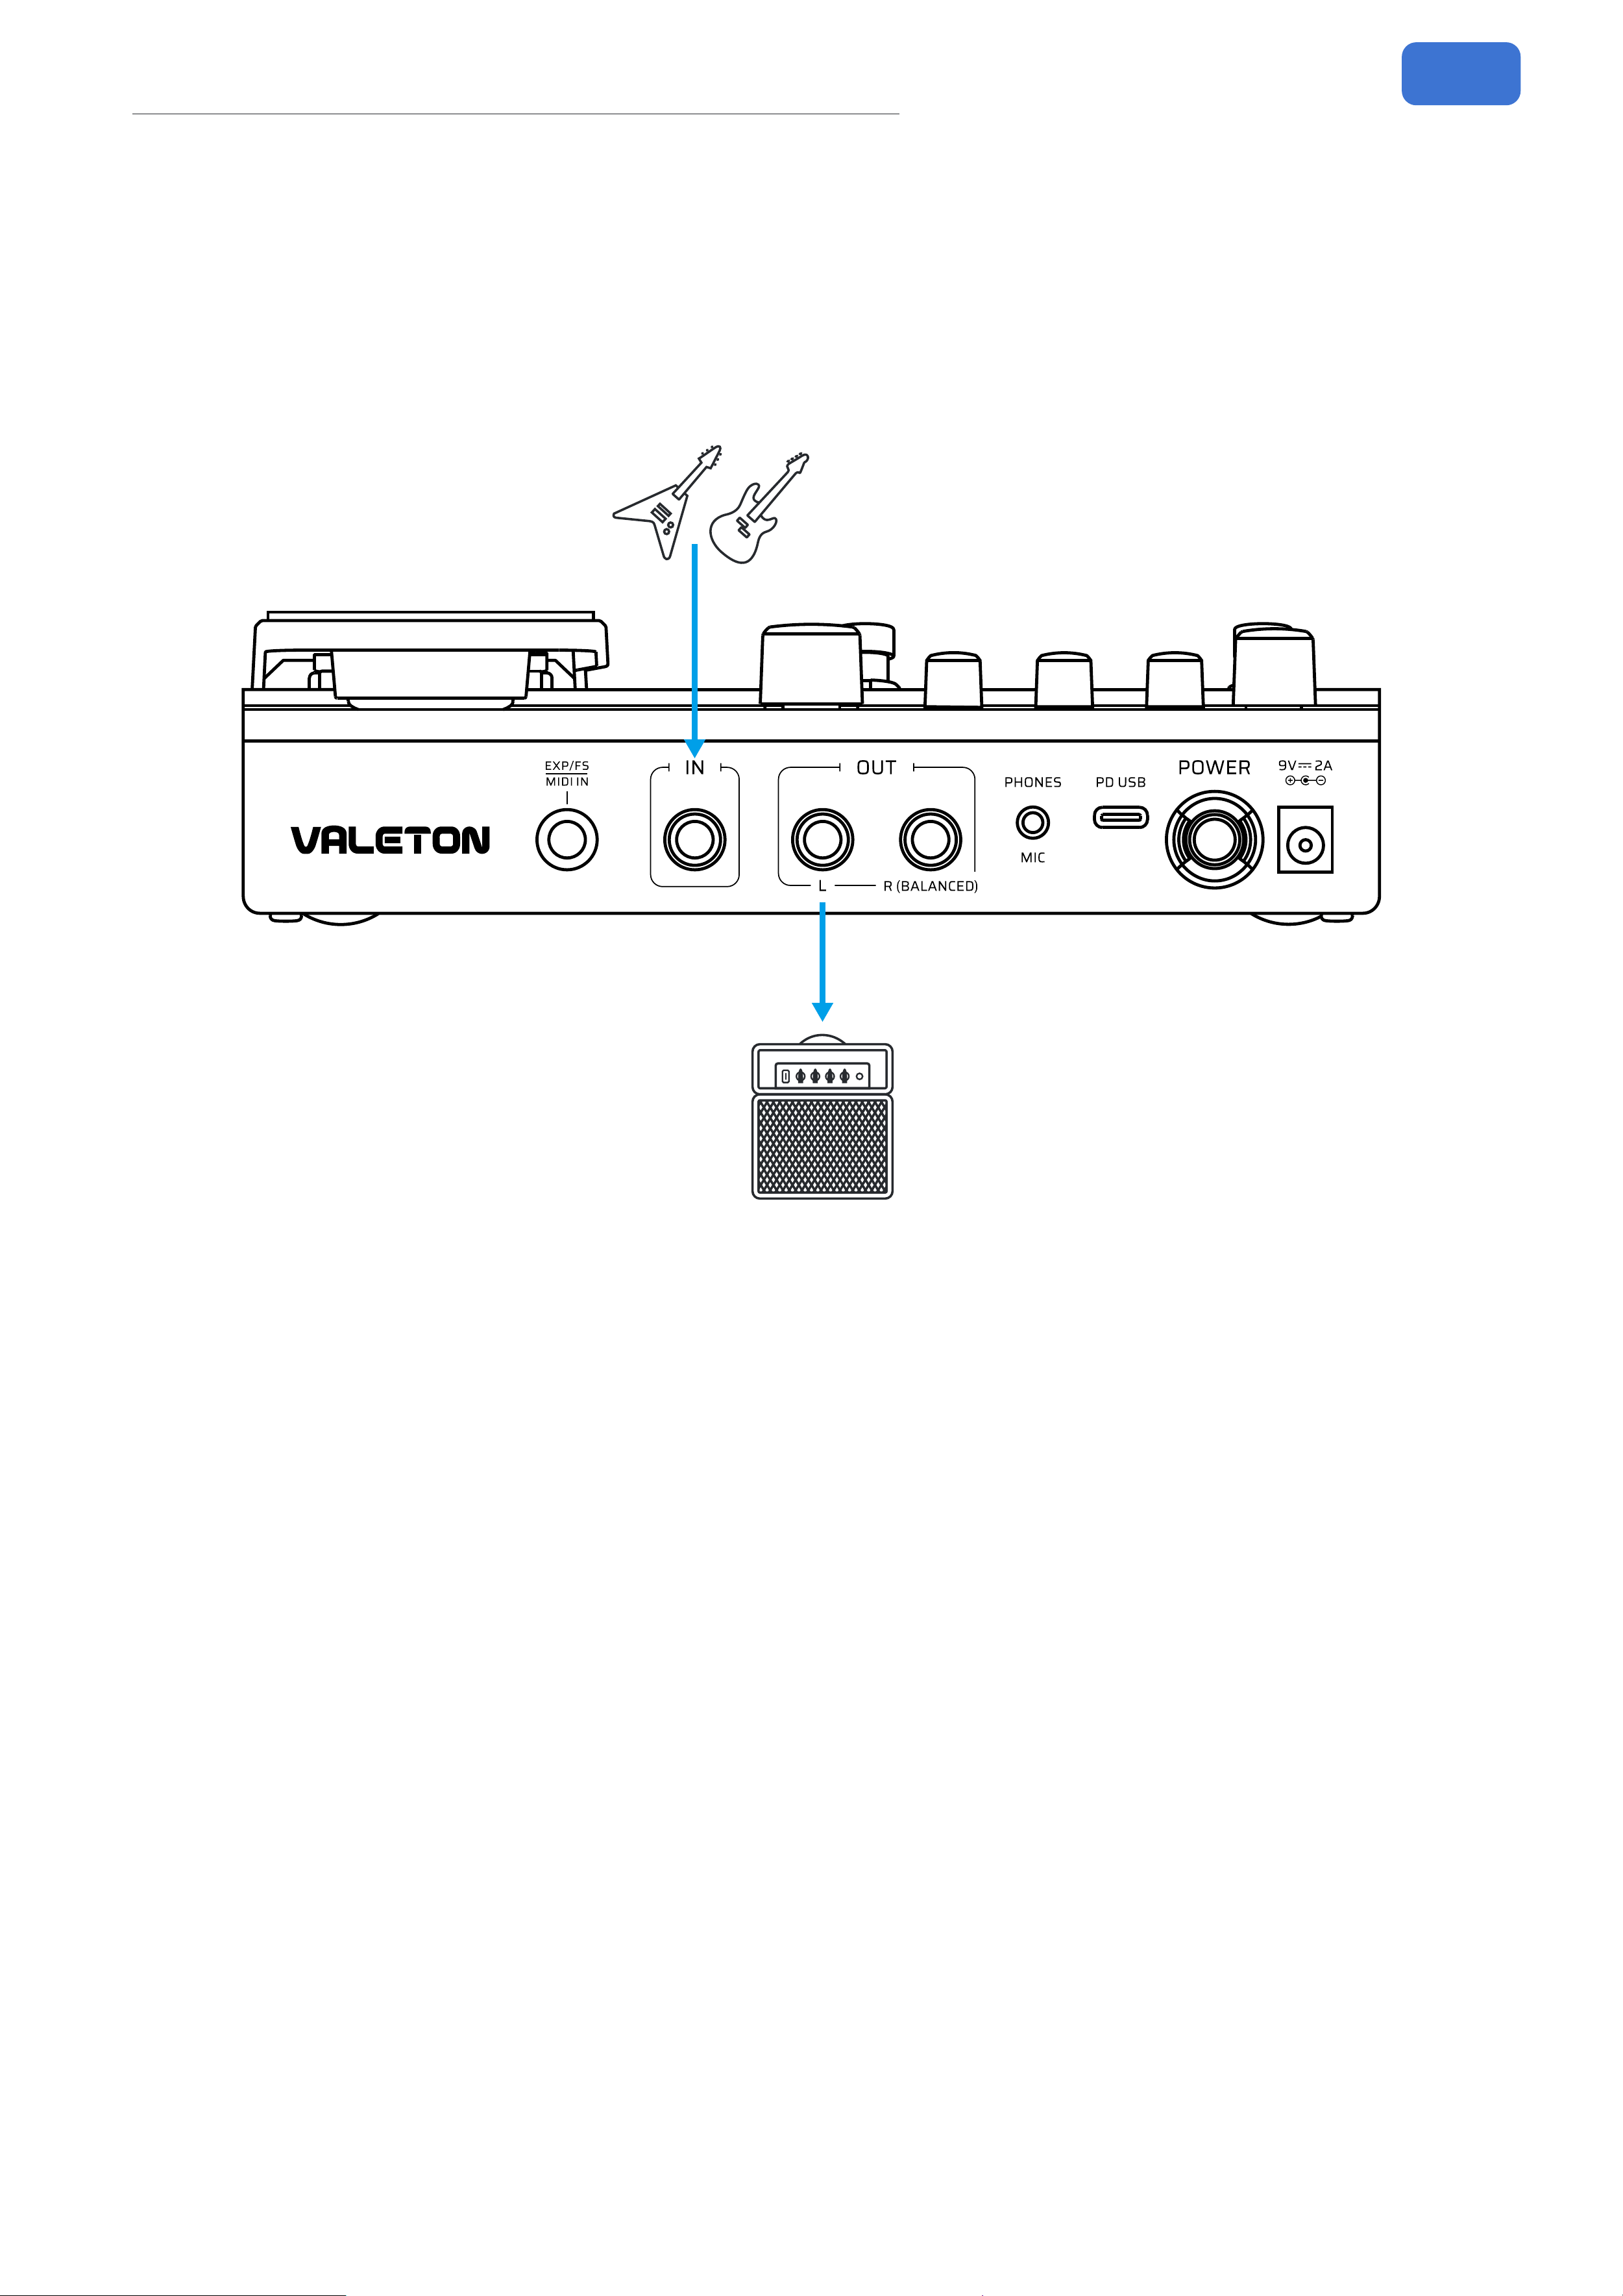
With full-range speaker devices ·········································································································· 30
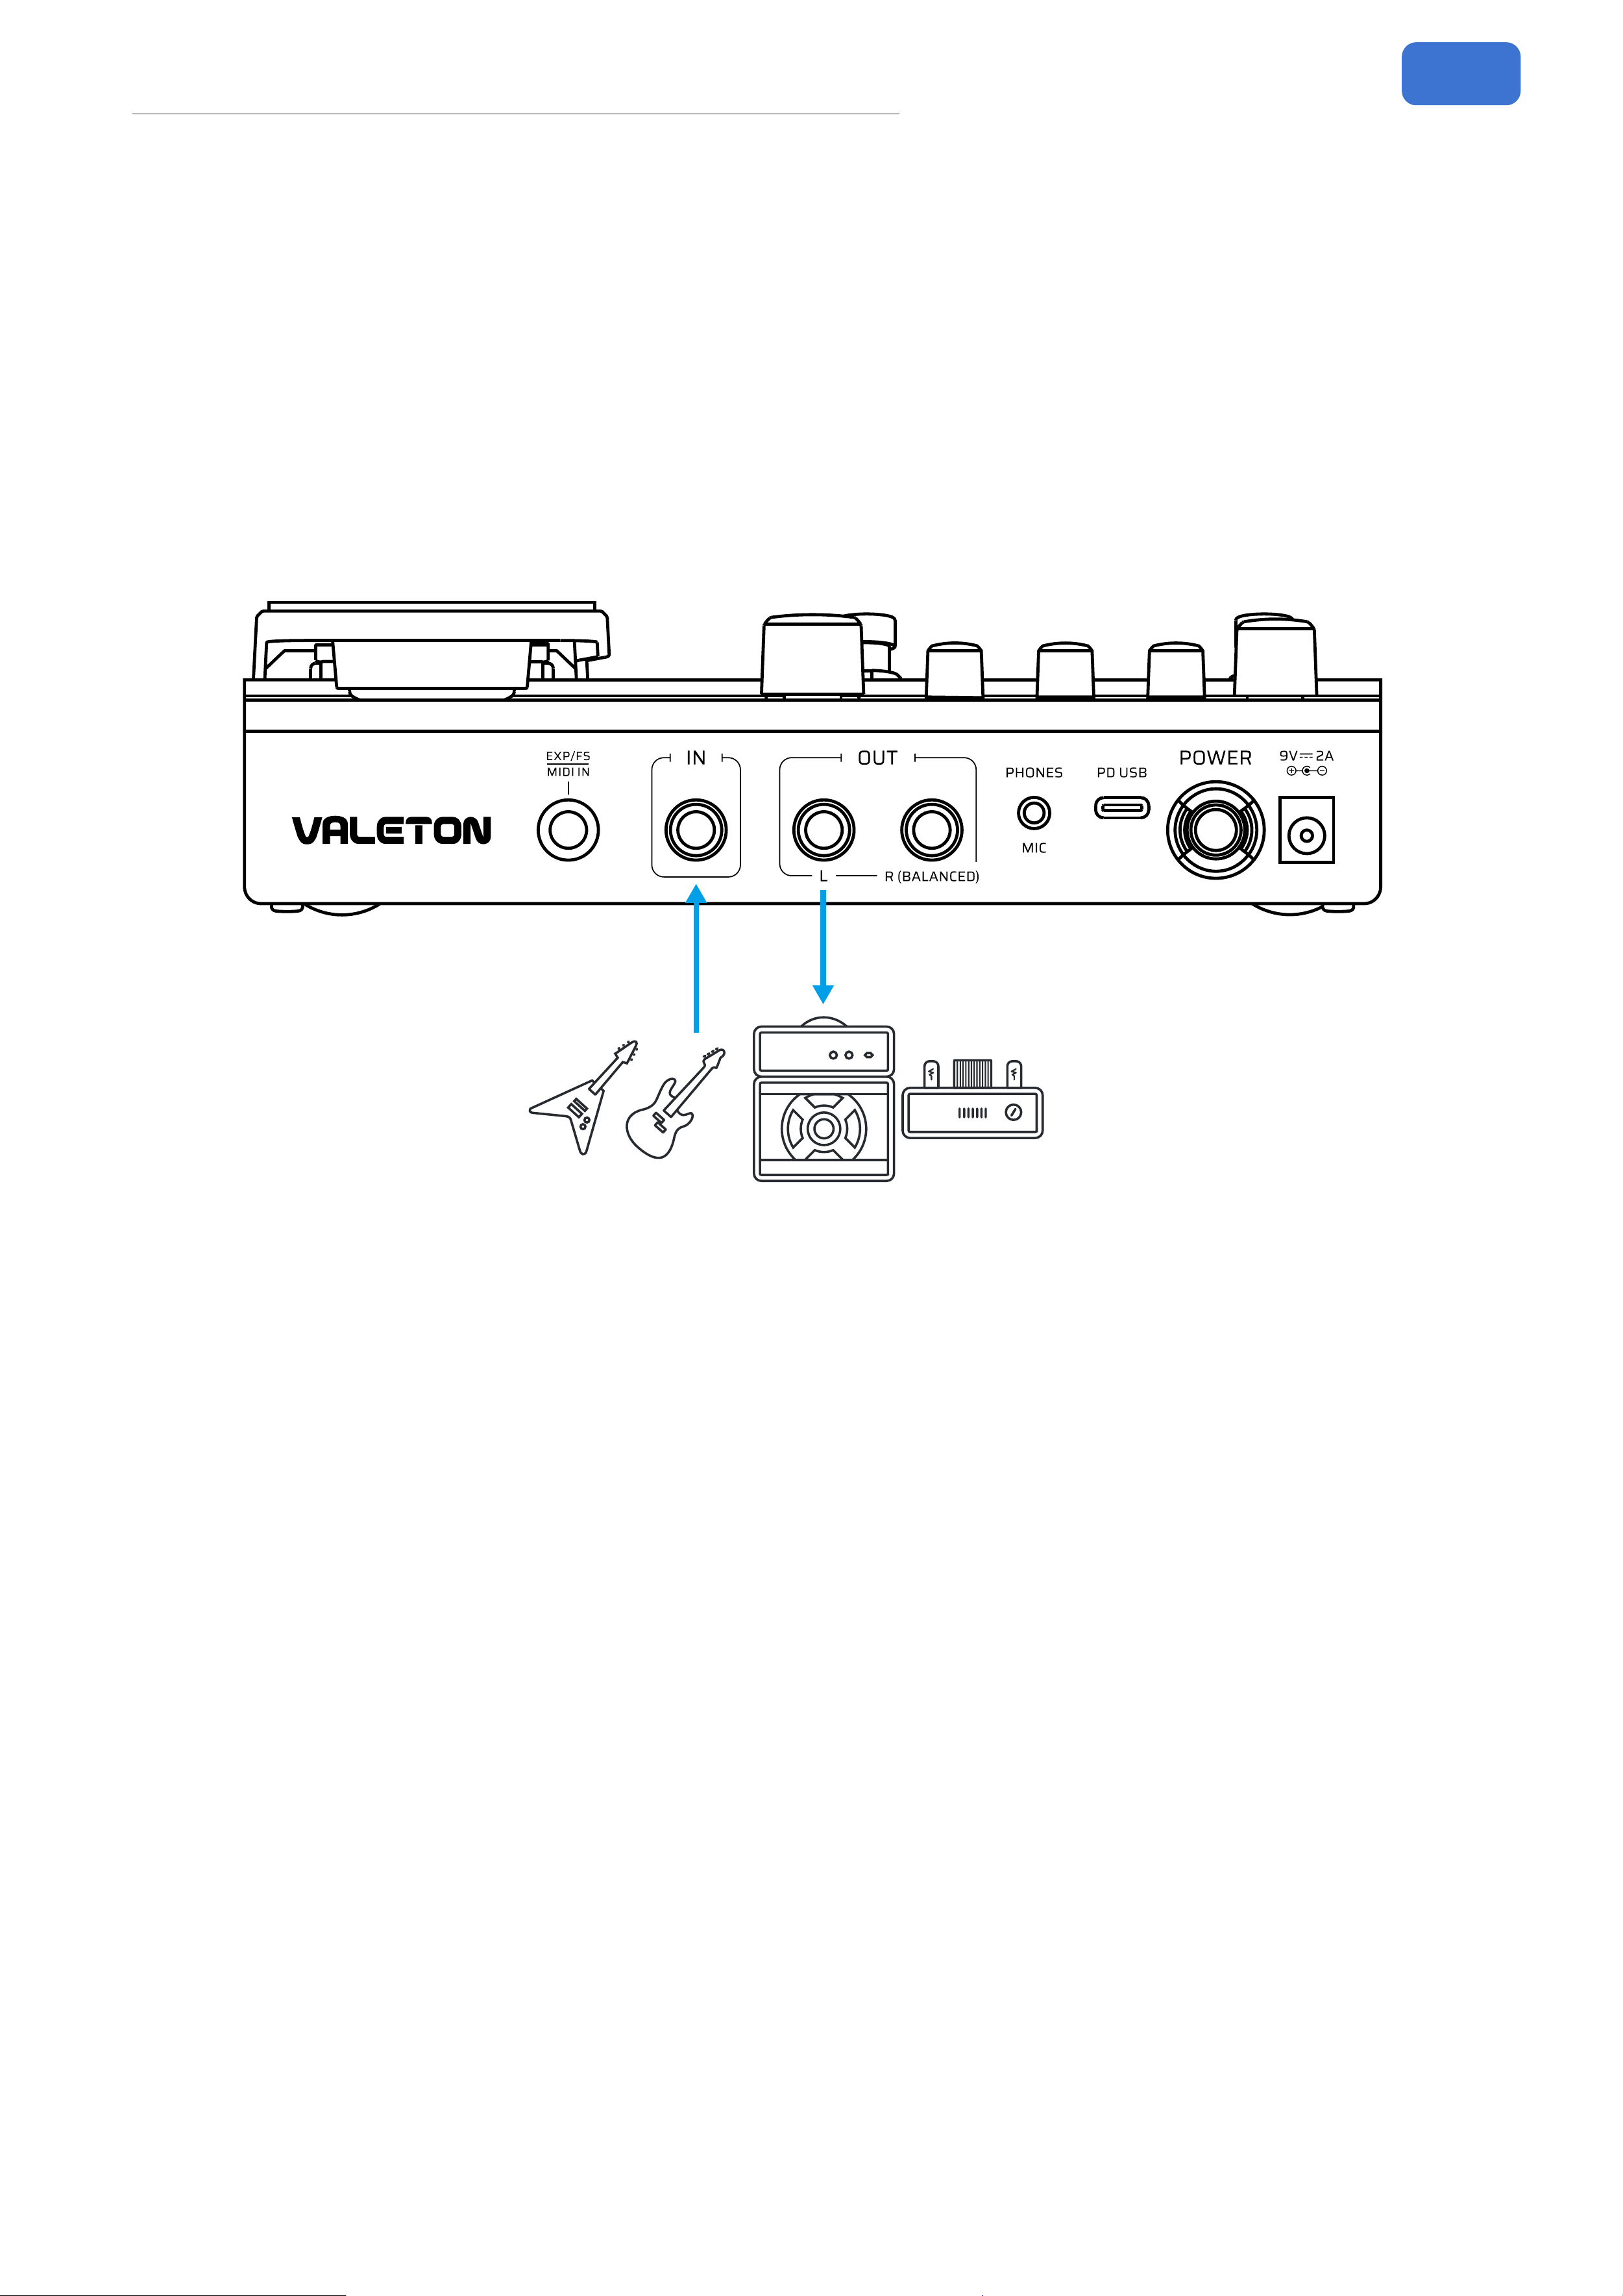
With guitar amps (INPUT jack) ············································································································· 31
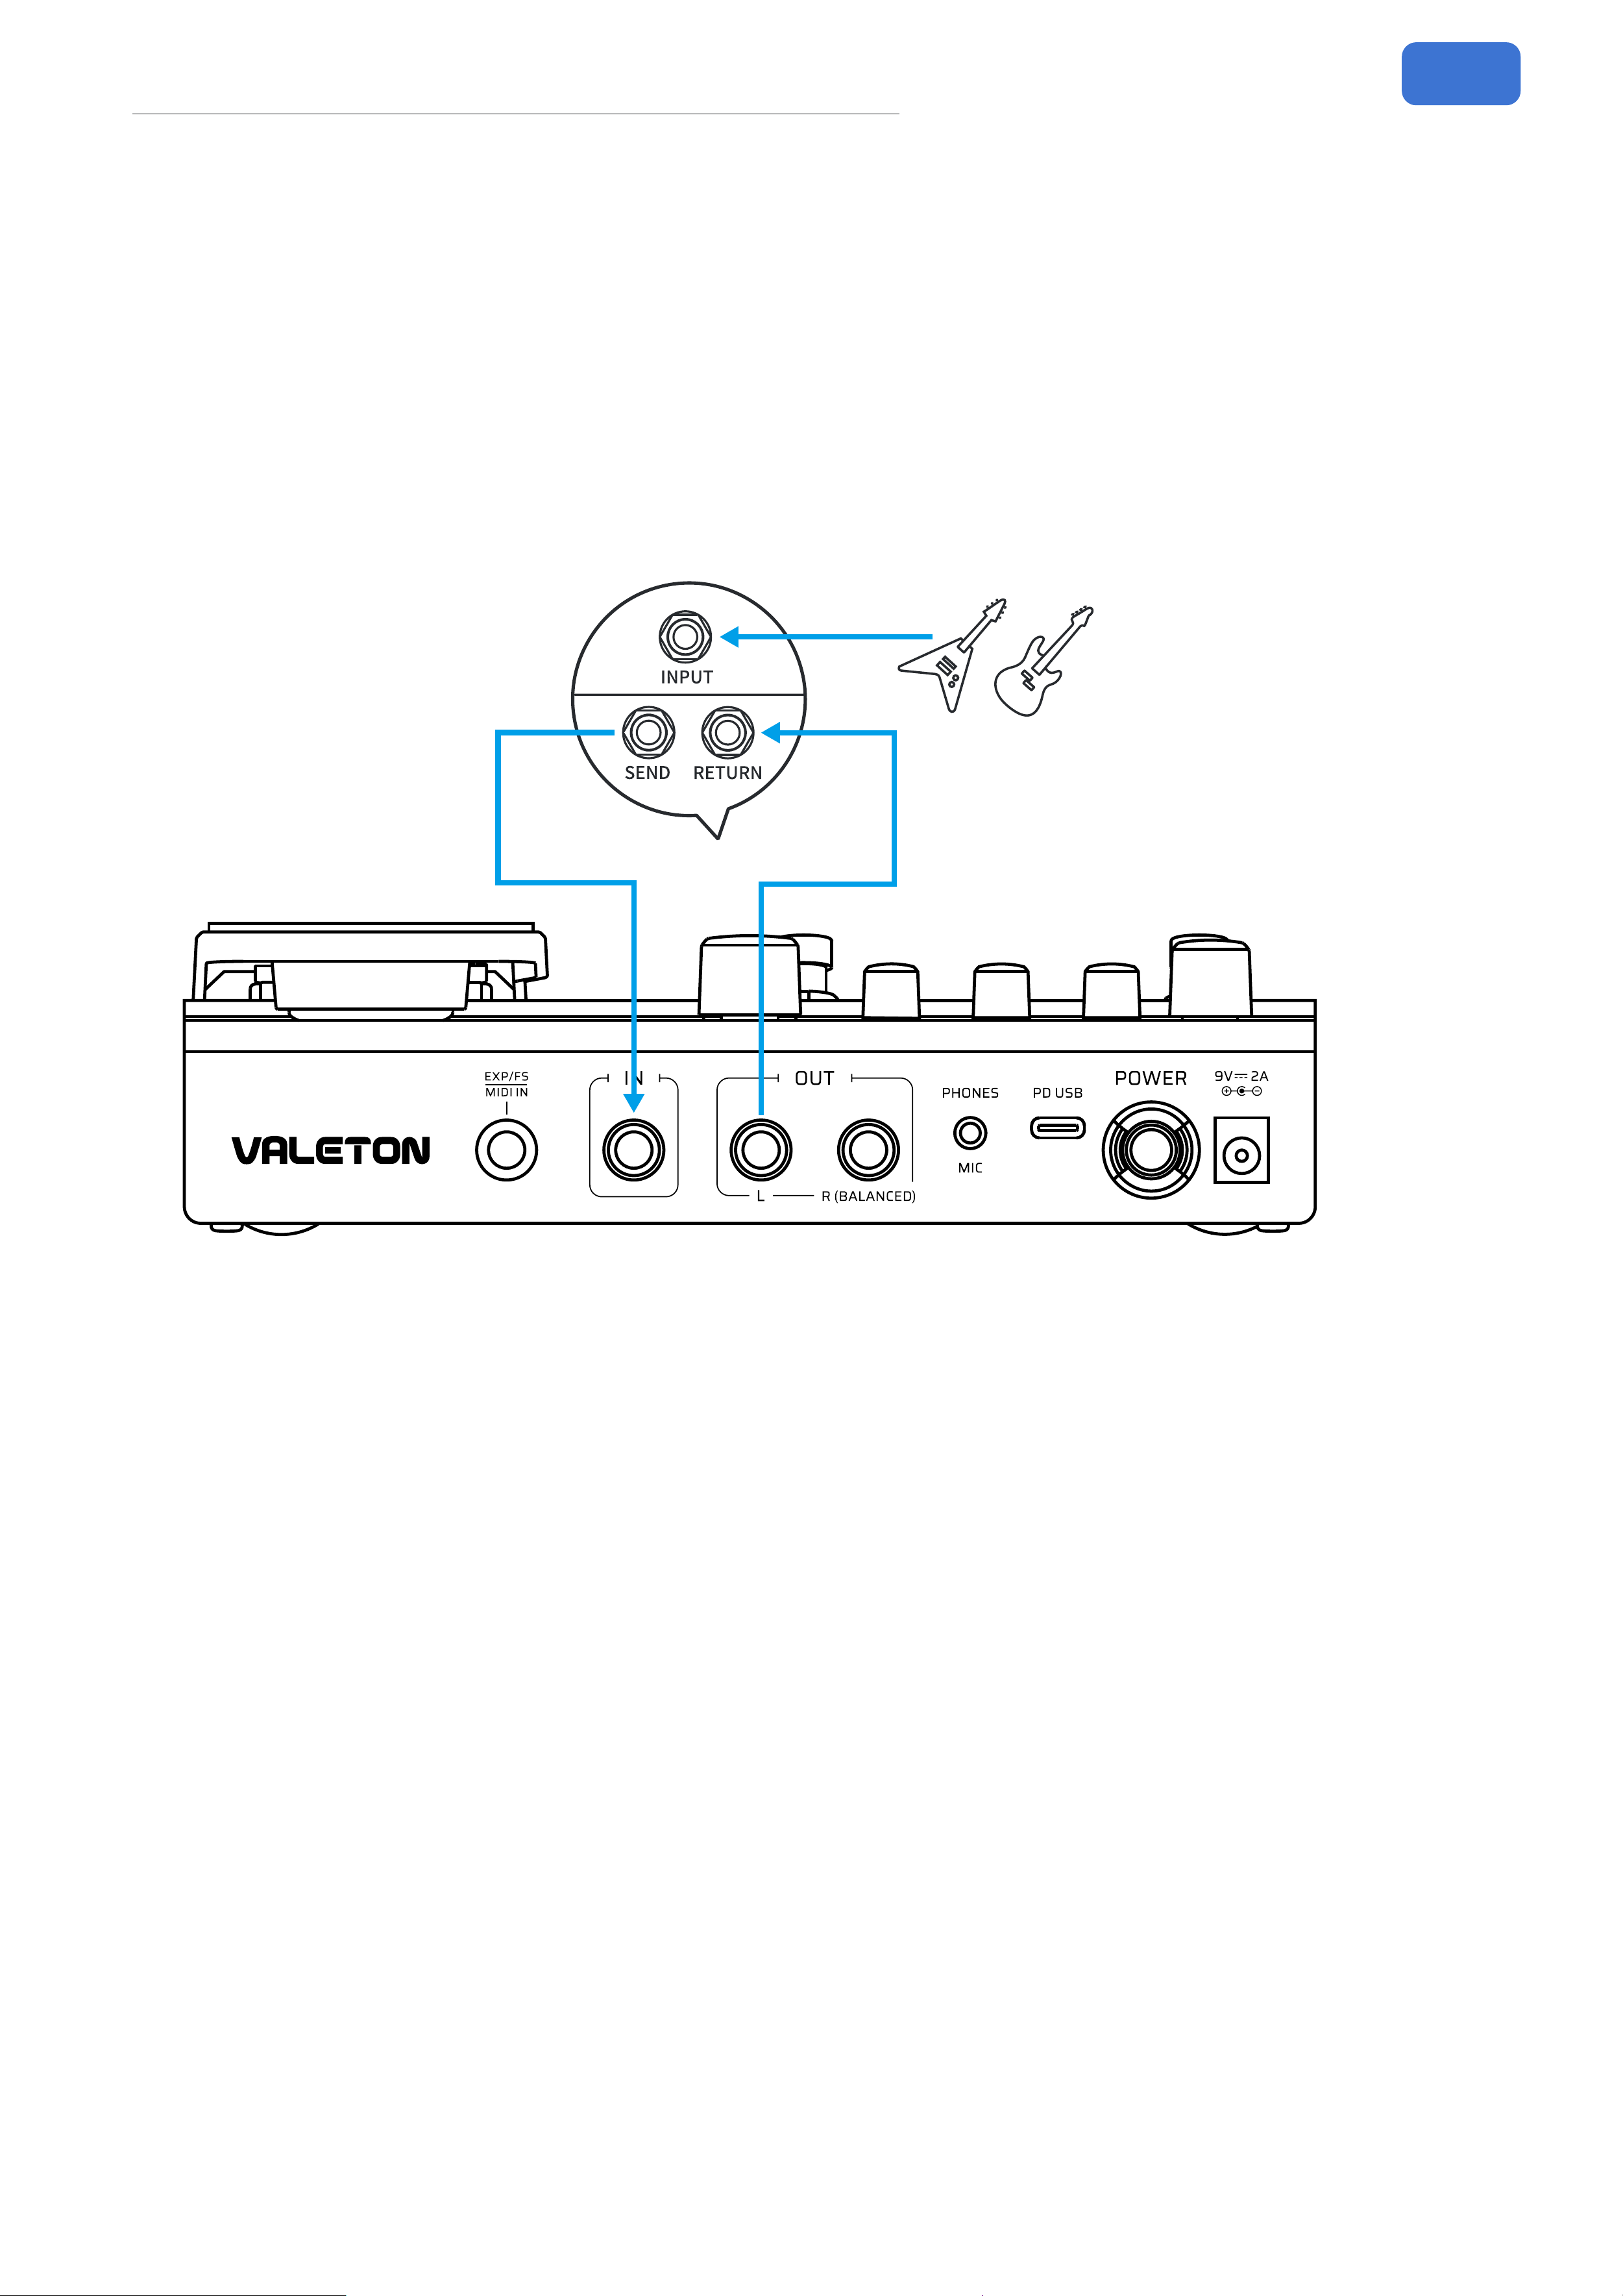
With guitar amps (using FX Loop) ······································································································· 32
With guitar amps (using FX Loop to pre-position the GP-150) ················································33
With External Control Devices ············································································································· 34
Audio Studio (for livestreaming) ········································································································· 35
Effect List ······································································································36
NR ···································································································································································· 36
PRE ·································································································································································· 36
WAH ································································································································································· 41
DST ·································································································································································· 42
N→S ·································································································································································· 47
AMP ··································································································································································47
CAB ··································································································································································· 61
EQ ····································································································································································· 63
MOD ································································································································································64
DLY ··································································································································································· 67
RVB ·································································································································································· 70
VOL ···································································································································································73
Factory SnapTone Files ··················································································· 74
MIDI Control Information List ········································································· 77
Troubleshooting ·····························································································79
Specifications ································································································ 80

1
Welcome
Welcome
Thank you for purchasing a VALETON product.
We know it might be tedious but please read this manual carefully to get the most
out of your GP-150.
Please keep this manual for future reference.
Safety Instructions
Precautions
PLEASE READ CAREFULLY BEFORE OPERATING THE DEVICE.
Please keep this manual in a safe place for future reference.
Please always follow the basic precautions listed below.
These precautions include, but are not limited to, the following:
Denition of intended use
Power supply & power cord
Please check the voltage specication on the device or device power adaptor match
your power supply network.
Please be sure to use the device just with an adequate power supply, such as
original supplied power adaptor.
When using a 3rd party power adapter, please make sure the power adapter ts
the device’s power requirement. Use of an adapter other than that specied could
damage the unit or cause malfunction and pose a safety hazard, such as incorrect
polarity would cause the re hazard.
Valeton will not be responsible for physical injury to you or others, or damage to the
device or other property.
When disconnecting the adapter from an outlet, please always pull the connector
itself. Pulling the cord will cause damage to the unit.
Make sure to separate the power adapter and store in a safe place.
Please remove the electric plug from the outlet when the device is not to be used for
extended periods of time, or during electrical storms.
Please be sure to connect to an appropriate outlet with a protective grounding
connection.
Do not open
This device contains no user-serviceable parts. Do not open the device or attempt to
disassemble the internal parts or modify them in any way.
Opening the case may expose you to dangerous voltages, or other hazards.
Opening the casing or performing self-repairs on this device will result in the loss of
the warranty eligibility for this device.
If it should appear to be malfunctioning, please discontinue use immediately and
contact our service team.

2
Safety Instructions
Water warning
Do not expose the device to rain, use it near water or in damp or wet conditions, or
place on it any containers (such as vases, bottles or glasses) containing liquids which
might spill into any openings. If any liquid such as water seeps into the device, turn
o the power immediately and unplug the power cord from the AC outlet.
Please never insert or remove an electric plug with wet hands.
Fire warning
Please do not place any burning items or open ames near the device, since they
may cause a re hazard.
Electromagnetic elds warning
Please avoid operating the device within signicant electromagnetic elds. Failing to
do so may result in noise, device malfunction, or even loss of data etc.
Hearing loss
Please avoid setting all volume levels to their maximum, specially with using
headphones. Depending on the condition of the connected devices, doing so
may result in feedback that can cause hearing loss and damage the speakers or
headphones.
Before connecting the device to other devices, please turn o the power for all
devices. Also, before turning the power of all devices on or o, please make sure that
all volume levels are set to the minimum. Failing to do so may result in hearing loss,
electric shock, or device damage.
Location
Please keep away form children, or be accompanied by an adult. The following may
cause choking hazard:
• Swallowing of small parts
• Plastic covers and other packaging material
While using, please do not cover the device with any cloth, or block any jack of the
device.
The device and power supply will become warm with extended use.
Please avoid using the device in any of the following conditions that could cause
malfunction:
• Extremely hot or cold places
• Sandy or dusty places
• Contact with corrosive gases or salt air
• Places with extreme vibrations
Before moving the device, please be sure to remove all connected cables, and power
adaptor.
Depending on the material and temperature of the surface on which you place the
device, its rubber feet may discolor or mar the surface.
Maintenance
Please remove the power plug from the AC outlet while cleaning the device.
Please use a soft cloth to clean the panels if they become dirty. If necessary, slightly
moisten the cloth.

3
Safety Instructions
Never use cleansers, wax, or solvents such as paint thinner, benzene or alcohol.
Operation
Please do not apply excessive force to the knobs, switches, jacks, and other controls.
Please do not apply excessive force to the screen (if applicable) or casing, which may
cause malfunction.
Please do not expose the unit to strong impact or drop it.
Please do not place foreign objects (liquid or solid) into the device.
Malfunction
If any of the following problems occur, immediately turn o the device and
disconnect the electric plug from the outlet:
• The device is dropped or damaged
• The power cord or plug becomes frayed or damaged
• The power adaptor malfunction
• Unusual smells or smoke are emitted
• Some object has been dropped into the device
• There is a sudden loss of sound during use of the device
• Cracks or other visible damage appear on the device
• The device has other obvious signs of malfunction (e.g. can not turn on, knobs can
not work, volume is too low, etc.)
Then please contact our service team.
About disposal
While disposing of this product, please take them to applicable collection points, for
proper treatment, in accordance with your national legislation.
Disposal of the packaging material
For the transport and protective packaging, environmentally friendly
materials have been chosen that can be supplied to normal recycling.
Ensure that plastic bags, packaging, etc. are properly disposed of.
Please do not just dispose of these materials with your normal household
waste, but make sure that they are collected for recycling.
Disposal of your old device
This symbol on the products, packaging, and/or accompanying
documents means that used electrical and electronic products should not
be mixed with general household waste.
By disposing of these products correctly, you will help to save valuable
resources and prevent any potential negative eects on human health and the
environment which could otherwise arise from inappropriate waste handling.
For more information about collection and recycling of old products, please contact
your local municipality, your waste disposal service or the point of sale where you
purchased the items.
This product is subject to the European Waste Electrical and Electronic Equipment
Directive (WEEE Directive - Waste Electrical and Electronic Equipment) as amended
from time to time version.

4
Safety Instructions
Observe the disposal note for documentation in France.
Disposal of batteries
Batteries must not be discarded or incinerated, but disposed of in
accordance with local hazardous waste disposal regulations.
Service Contact
Please prepare information including the model name, serial number, specic
symptoms related to the malfunction, your name, address and telephone number,
etc.
You can contact the store where you bought the device, or contact Valeton support
(service@valeton.net)
Please use this device according to the manual provided. Any other use, as well as
use under other operating conditions, is considered improper use.
Valeton cannot be held responsible for damage caused by improper use or
modications to the device.

5
Overview
Overview
Building upon the classic form factor of the GP-100 and upholding its core principle
of high value, Valeton introduces the groundbreaking, new-generation digital multi-
eects processor — GP-150.
GP-150 features a exible signal chain capable of loading up to 12 freely movable
eects modules. These modules oer a selection of over 200 high-quality eects,
all powered by second-generation HD modeling technology. With its processing
algorithm upgraded to a 48kHz sample rate, GP-150 delivers superior sound quality.
It is equipped with SnapTone and cabinet IR loading capabilities, supporting up to 20
third-party IR les (1024/2048 sampling points). It also incorporates Valeton’s latest
SnapTone technology, which enables conversion and import of NAM (Neural Amp
Modeler) les into GP-150. It comes pre-loaded with 50 curated les and supports
storing up to 100 SnapTone les in total.
While retaining a classic form, the GP-150 is fully refreshed. It adopts a higher-
resolution display, supports connection to external footswitches/expression
pedals and MIDI control for more professional applications, and includes companion
editor software for multiple systems (Windows/Mac/iOS/Android) alongside audio
interface functionality. Furthermore, GP-150 features a built-in BT wireless module,
supports headphone/headset output via a TRRS jack, and includes over 100 high-
quality drum machines and a 180s looper.
For all your musical journeys, experience unmatched immersion, anytime, anywhere.
6
Panel Introduction
Panel Introduction
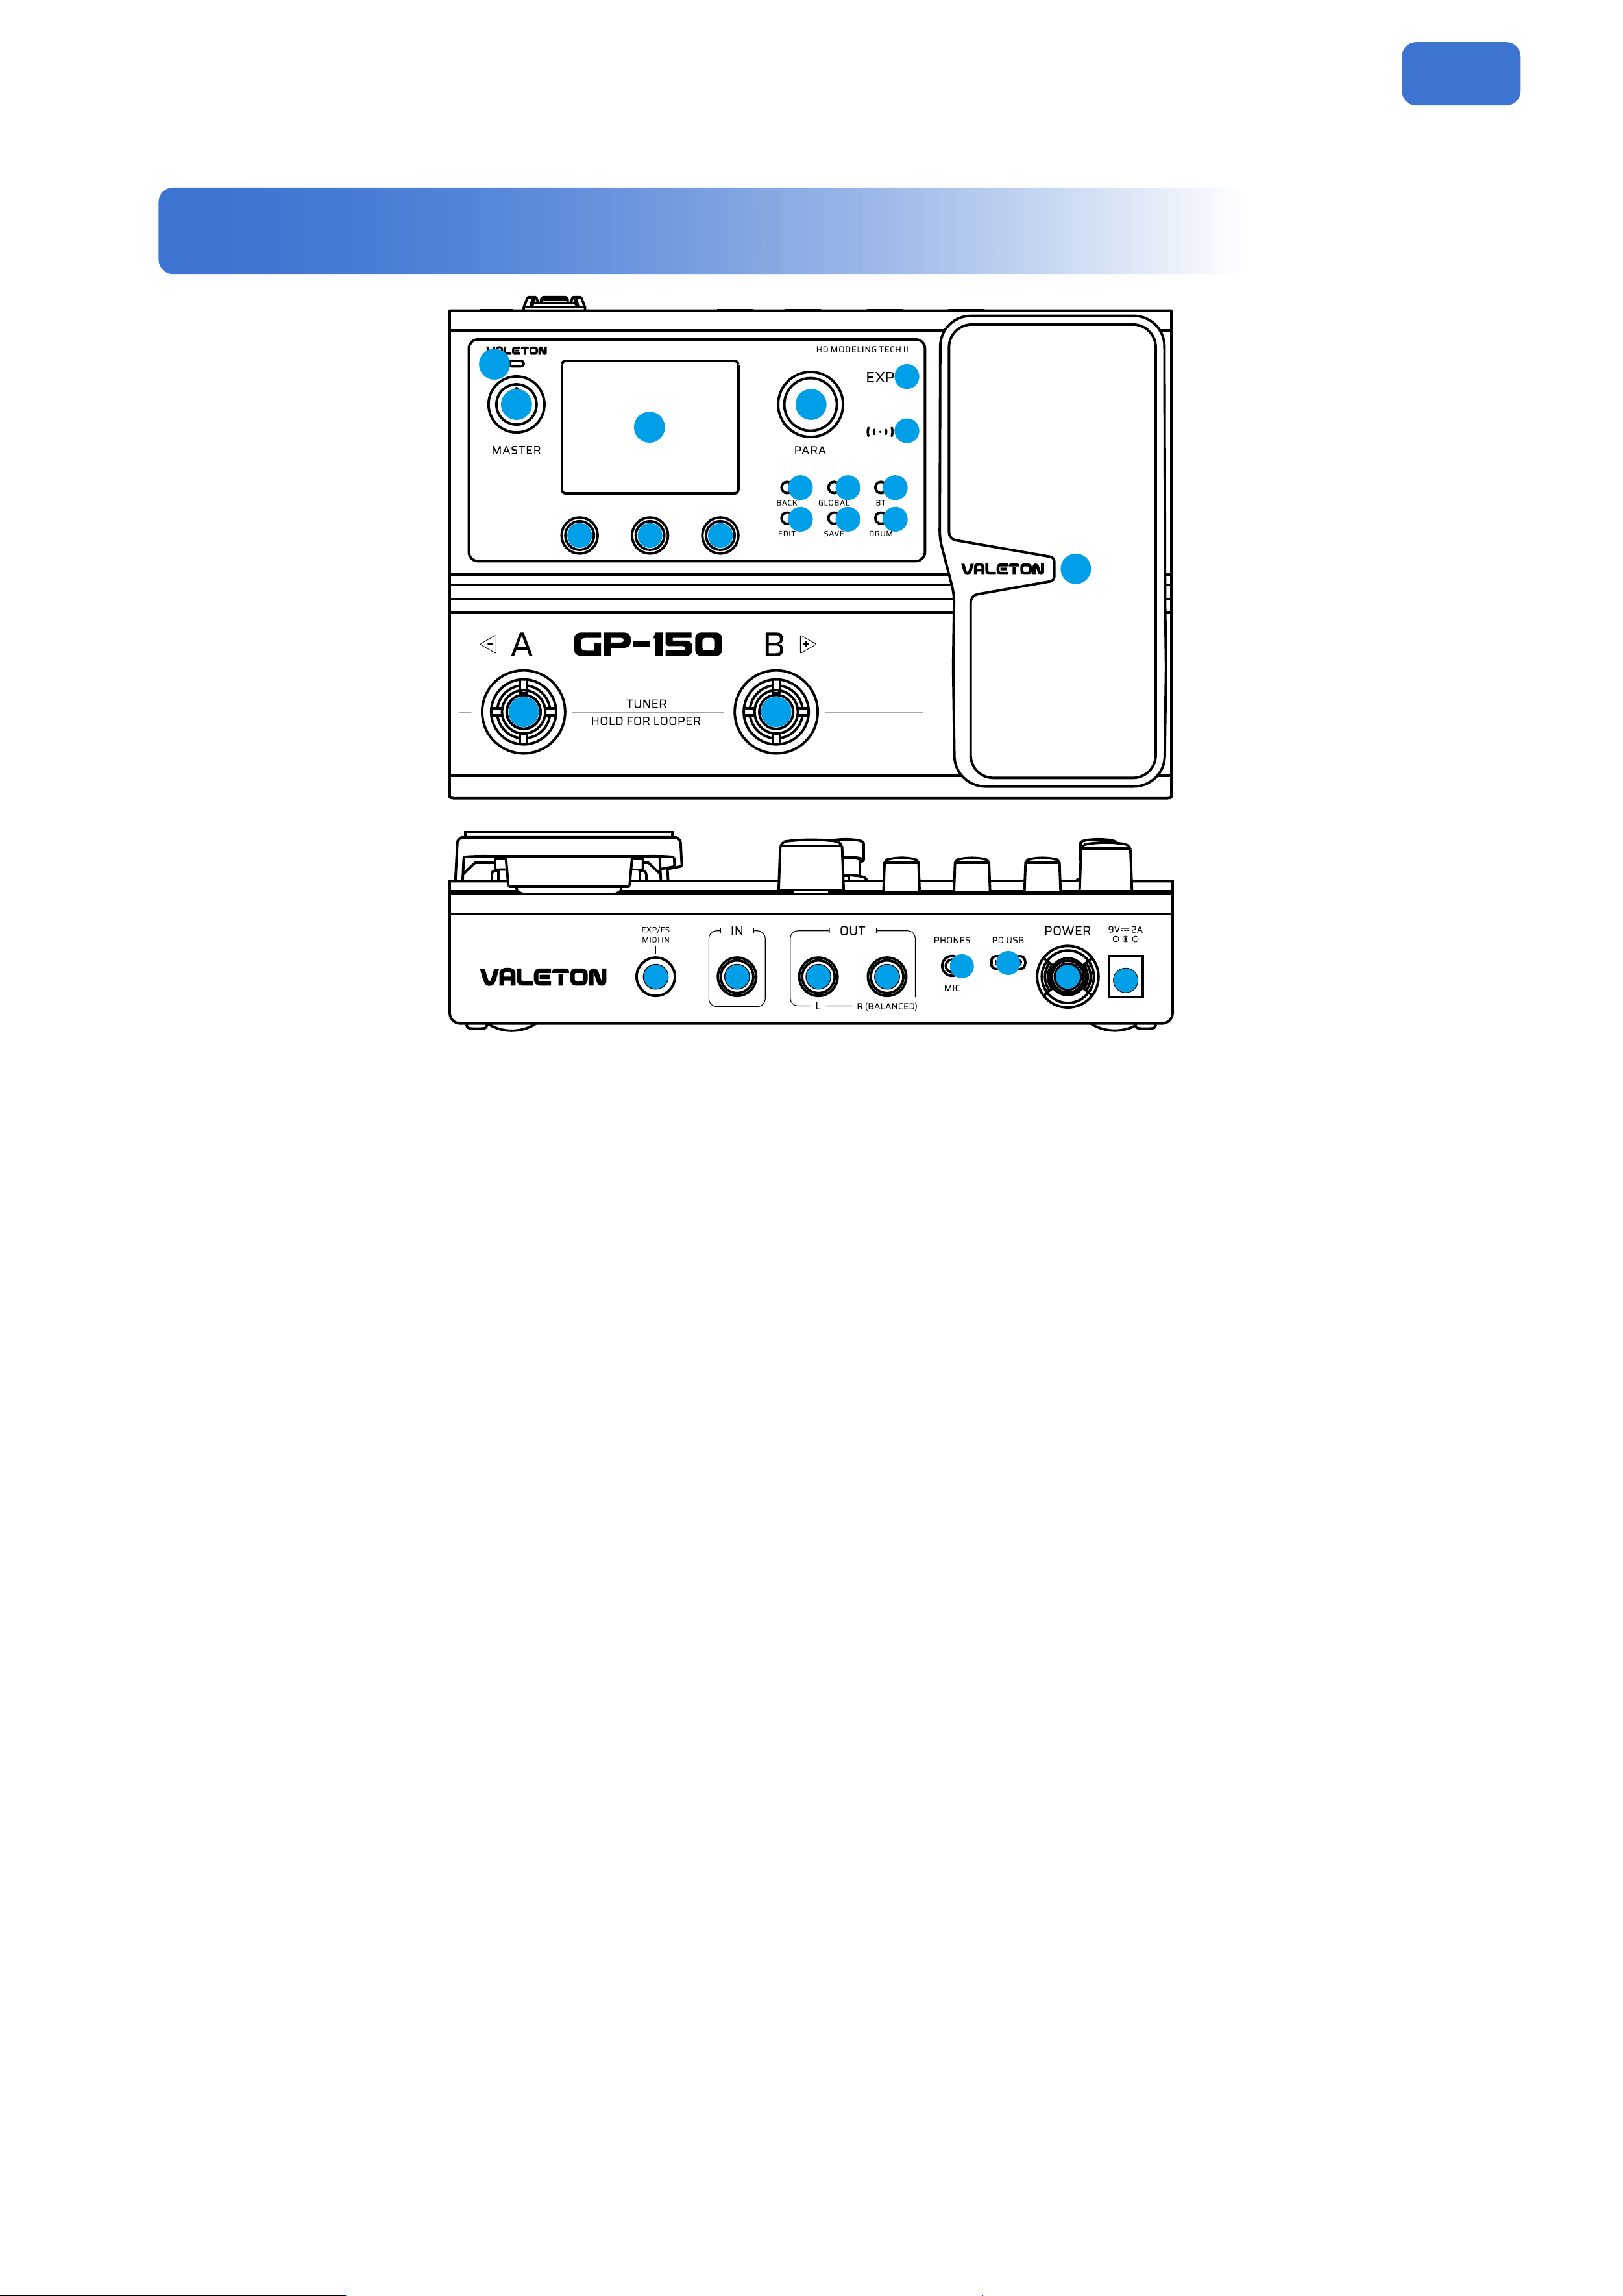
16 17
18
19
20
21
22
23
1
2
3 4
5 5 5
6
9
10 11
14 14
15
12
13
7 8
1. LCD Display
The color LCD displays the GP-150’s patch numbers, patch names, and other
operational information.
2. Charging Indicator
While charging, the Charging Indicator glows red.
3. MASTER Knob
Turn to control GP-150’s main output volume.
4. PARA Knob (with enter button)
On the main display screen, turn to switch patches. In the edit screen, holding the
knob to change the order of eect modules.
5. Quick Access Knobs
Turn to adjust parameters displayed on the lower part of the screen. Each knob’s
function varies depending on the parameter shown.
6. BACK Button
Press to return to the previous screen.
7. GLOBAL Button
Press to enter the global settings screen, where you can edit the GP-150’s global
parameters.
8. BT Button
Press to toggle the BT wireless function on/o.
9. EDIT Button
Press to enter the edit screen, where you can edit the eect chain.

7
Panel Introduction
10. SAVE Button
Press to store, rename, or copy the patch; press SAVE again to save changes. Hold
SAVE to enable quick-save.
11. DRUM Button
Press to play drums. Hold to enter the drum machine creen, where you can edit drum
parameters.
12. EXP Indicator
The dual-color indicator displays the activation status of the expression pedal.
13. BT Indicator
The indicator displays the BT wireless function status. Flashes when searching for a
connection, remains lit when connected.
14. 2 Footswitches
Use to change patches, turn eects on/o or tap tempo etc.
15. Expression Pedal
Use to control the parameter of one or several eects, including output volume.
Press the pedal toe strongly to switch the EXP status.
16. EXP/FS Jack
1/4 (6.35mm) TRS input for connecting an external expression pedal or footswitch
controller. Compatible with MIDI IN for connecting external MIDI devices.
17. IN Jack
1/4 (6.35mm) TS input connection for guitar or other instruments.
18. OUT (L) Jack
1/4 (6.35mm) TS unbalanced output connections. For mono output, use only the OUT
(L) jack.
19. OUT (R) Jack
1/4 (6.35mm) TRS jack supports both balanced and unbalanced output.
20. PHONES/MIC Jack
1/8 (3.5mm) TRRS output for connecting headphones or headsets.
21. USB Jack
USB 2.0 Type-C port for connecting to a computer for data transfer or as an
audio interface. It can also be connected to a mobile phone as an audio interface.
Additionally, the GP-150 can be powered/charged via USB connection to a power
adapter or power bank, and also functions as a reverse charging source for mobile
phones and other electronic devices.
22. POWER Button
Use to power on/o or reset the device.
23. DC 9V Jack
For powering or charging the device.

8
Getting Started
Getting Started
1. Connect your Device. Plug your guitar into the GP-150’s input jack, and run a
cable from the OUT L to your amp.
Please remember:
• Keep your amp volume down.
• Connect your cable to the amp’s FX Loop Return if it has one.
2. Turn the GP-150 MASTER knob all the way down, then turn on GP-150.
3. Tune your strings. Press and hold A and B footswitches to bring up Tuner screen.
Pluck each string and tune it until the pitch reaches the both sides of the screen
and turns green. When all strings are tuned, Press any footswitch or the BACK
button to exit the Tuner screen.
4. Select a patch. Press the A or B footswitch to cycle through patches. You can also
rotate the PARA knob to quickly browse and select patches.
5. Start playing. Adjust your amp volume and the GP-150’s MASTER knob to desired
levels, then begin playing.
9
Screen Introduction
Screen Introduction
Main Screen
The screen displayed after powering on is called the Main Screen. GP-150 features
two footswitch modes: Patch Mode and Stomp Mode. The display content and
the LED rings around the footswitches (hereafter referred to as LED rings) will
change according to the active mode. You can switch footswitch modes by holding
footswitch B or via the Global Settings.
In Patch Mode (LED rings glow solid blue), the screen primarily displays the patch
number and name.
B
A
H
I
C
D
E
F
G
J
K
L
A. I/O Level Monitoring
B. Patch Number
C. Patch Name
D. Footswitch Function
E. Patch Volume (User Parameter 1)
F. Patch BPM (User Parameter 2)
G. User Parameter 3
H. Save Indicator
I. Expression Pedal State
J. Drum Machine State
K. USB Reverse Power State
L. Battery Level Indicator
In this mode, press footswitch A or B to cycle through patches (the corresponding
LED ring will blink). You can also use the PARA knob to switch patches. Use the
Quick Access Knobs to modify parameters linked to D, E, and F. GP-150 allows you
to customize which parameters are controlled by D, E, and F. For details, see Edit
Screen - Patch Settings below.
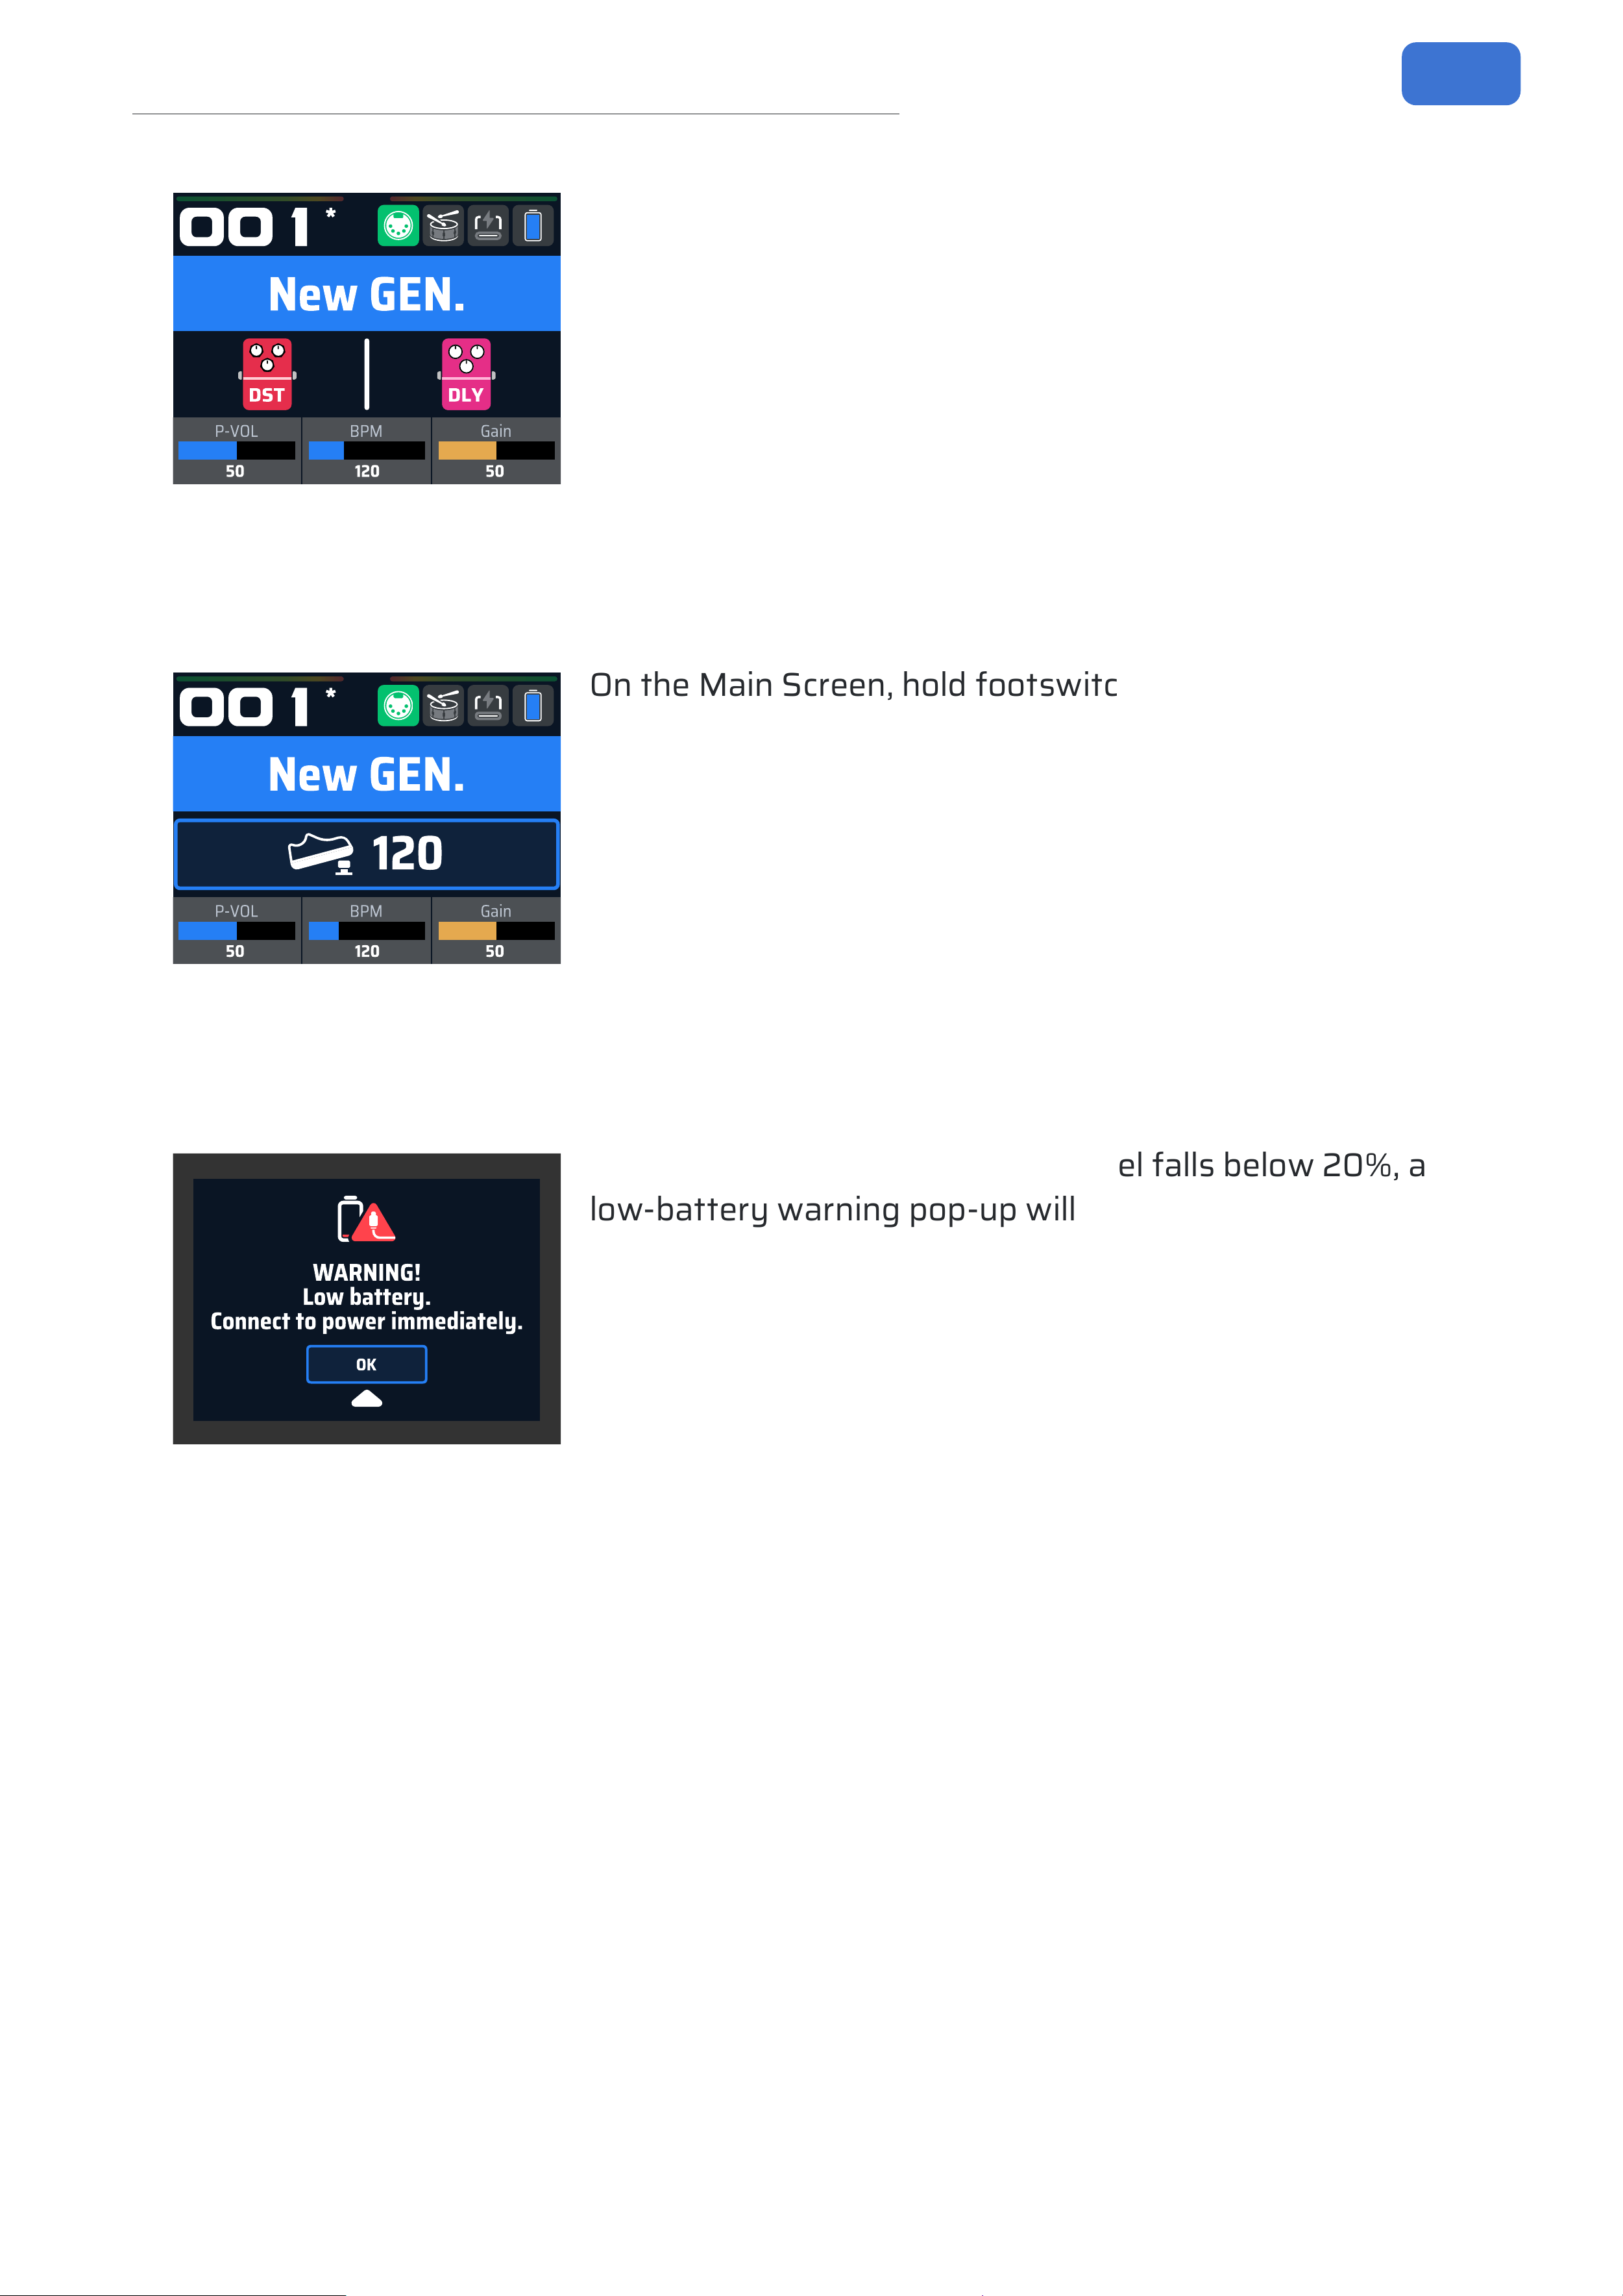
If a parameter linked to a Quick Access Knob belongs to
an eect module (e.g., the Gain parameter in the AMP
module), rotating that knob will temporarily display the
eect module name, eect name, and parameter change
in large font/icons on the screen.
10
Screen Introduction
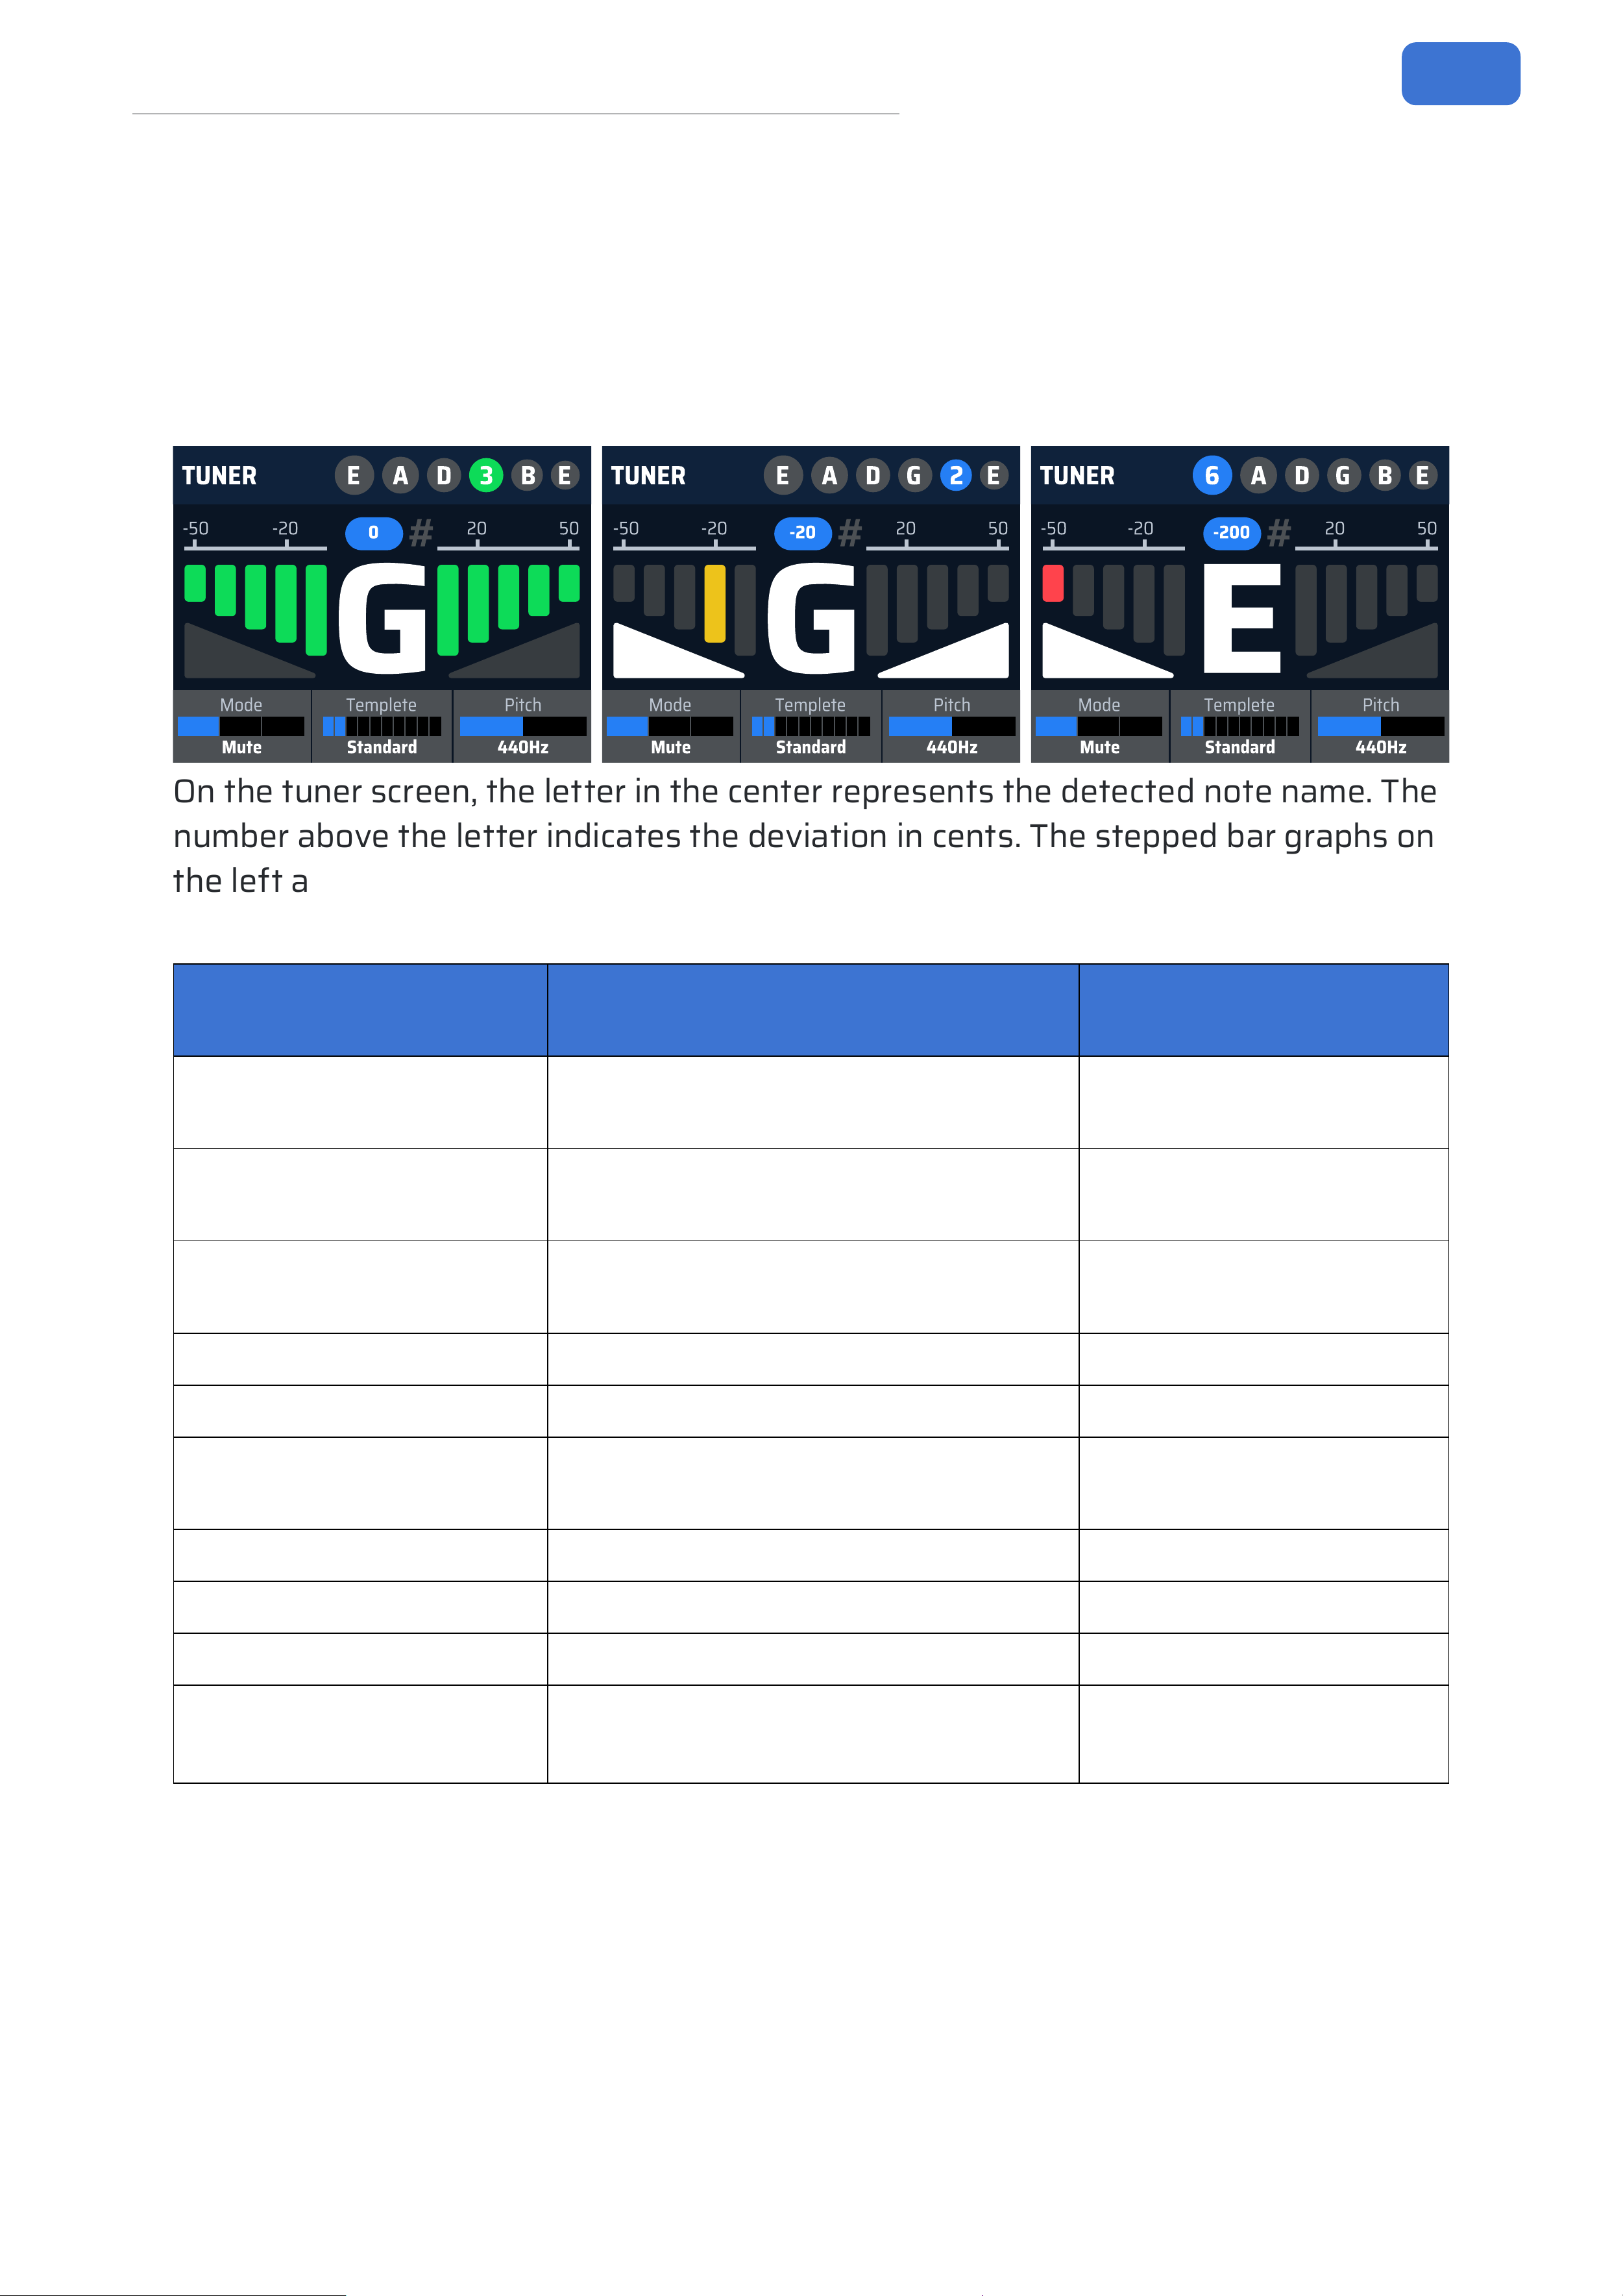
In Stomp Mode (LED rings glow solid green or red), the
screen primarily displays the eect modules within the
current patch that are assigned to the footswitches.
In this mode, pressing a footswitch toggles the on/o
state of its assigned eect module(s), and the LED rings
will switch between red and green accordingly. You can
select which eect modules in a patch are controlled via
the Edit Screen or compatible software.
Tap Tempo (TAP)
0
0
1
*
N
e
w
G
E
N
.
1
2
0
P
-
V
O
L
5
0
B
P
M
1
2
0
G
a
i
n
5
0
On the Main Screen, hold footswitch A to enter/exit Tap
Tempo mode. This function helps you quickly match a
song’s tempo and synchronize the patch’s BPM. In Tap
Tempo mode, GP-150 calculates the BPM in real-time
based on how frequently you press footswitch A or B.
The LED rings ash at the current BPM, and the BPM
value is displayed in the center of the screen. BPM
Range: 40-300.
Low Battery Warning
W
A
R
N
I
N
G
!
L
o
w
b
a
t
t
e
r
y
.
C
o
n
n
e
c
t
t
o
p
o
w
e
r
i
m
m
e
d
i
a
t
e
l
y
.
O
K
When GP-150's internal battery level falls below 20%, a
low-battery warning pop-up will appear. You can press
the PARA knob to dismiss this pop-up. When the battery
level drops below 5%, the warning pop-up will reappear
and cannot be dismissed. When the battery level drops
below 5%, the warning pop-up will reappear on the
screen. At this point, the pop-up cannot be dismissed,
and the device will have no audio output. When a low-battery warning appears,
connect the power adapter promptly to prevent the battery from draining
completely. This protects both your user experience and the battery's lifespan.
11
Screen Introduction
Tuner Screen
Press both footswitch A and B simultaneously to enter the Tuner Screen. GP-150's
tuner is chromatic and includes multiple tuning templates. It responds quickly and
displays cent deviation in real-time within a range of -50 to +50. The reference pitch
is adjustable.
T
U
N
E
R
-
2
0
-
2
0
5
0
-
5
0
2
0
M
o
d
e
M
u
t
e
P
i
t
c
h
4
4
0
H
z
G
#
E
2
G
D
A
E
T
e
m
p
l
e
t
e
S
t
a
n
d
a
r
d
T
U
N
E
R
-
2
0
0
-
2
0
5
0
-
5
0
2
0
M
o
d
e
M
u
t
e
P
i
t
c
h
4
4
0
H
z
E
#
E
B
G
D
A
6
T
e
m
p
l
e
t
e
S
t
a
n
d
a
r
d
G
#
T
U
N
E
R
E
B
3
D
A
E
0
-
2
0
5
0
-
5
0
2
0
M
o
d
e
M
u
t
e
P
i
t
c
h
4
4
0
H
z
T
e
m
p
l
e
t
e
S
t
a
n
d
a
r
d
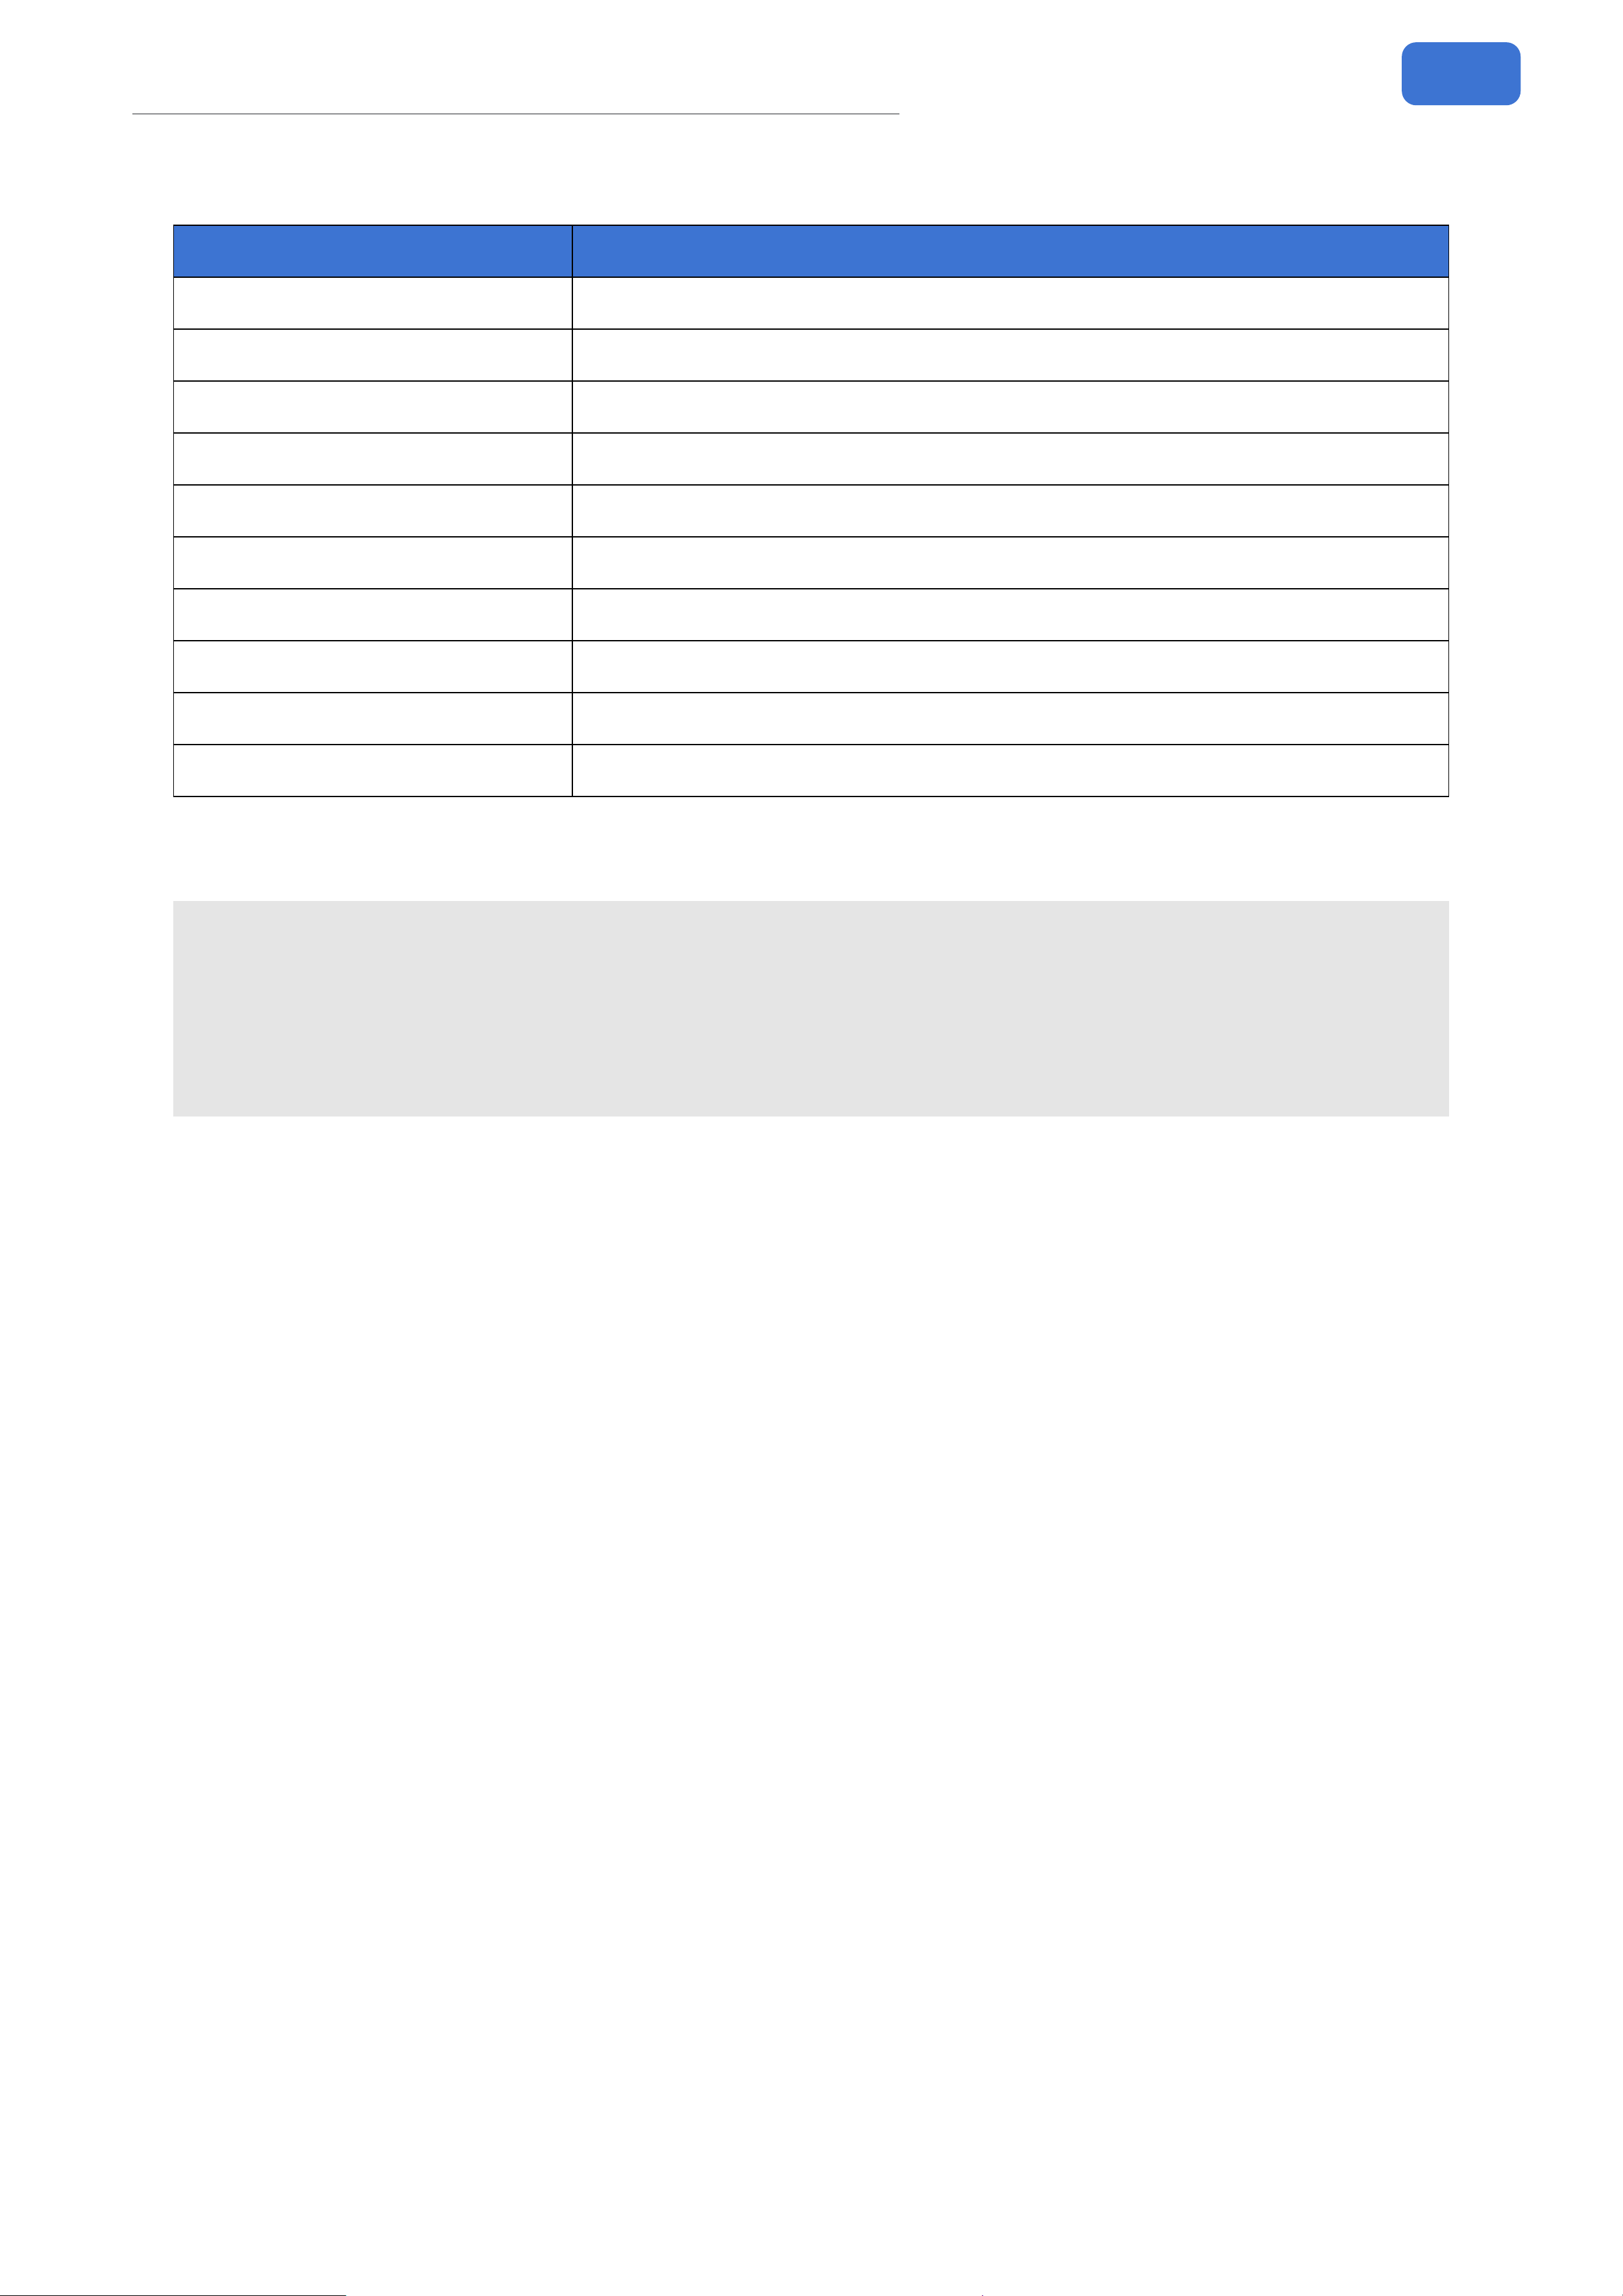
On the tuner screen, the letter in the center represents the detected note name. The
number above the letter indicates the deviation in cents. The stepped bar graphs on
the left and right represent tuning accuracy in real-time.
The following table explains the indicators:
Indicator
(Color, Position, Cents)
Meaning Action
Red Pitch is signicantly out of tune.
Turn the tuners more
considerably.
Yellow Pitch is slightly out of tune.
Make ne adjustments to
the tuners.
Green
Pitch is very close to or perfectly in
tune.
Make a micro-adjustment
or no action needed.
Lights on LEFT Current pitch is at (too low). Tighten the string.
Lights on RIGHT Current pitch is sharp (too high). Loosen the string.
All green segments lit
(Centered)
String is tuned to the target pitch. No action needed.
Negative Cents value Current pitch is at. Tighten the string.
Positive Cents value Current pitch is sharp. Loosen the string.
Cents value is 0 String is tuned to the target pitch. No action needed.
Cents value outside -50 to
+50
Current pitch is more than a semitone
away from the target.
Turn the tuners
signicantly.
Below the tuner display: Rotate the left Quick Access Knob to select the tuner mode:
Bypass or Mute. Default: Mute. Rotate the right Quick Access Knob to set the tuner’s
reference pitch (Standard A4). Range: 435Hz to 445Hz. Default: 440 Hz.
Rotate the center Quick Access Knob to select a tuning template. When a template
other than O is selected, the target note names and corresponding strings (leftmost
= lowest string open note) are shown at the top. Range: O, Standard, Drop D, Drop C,
Drop A, Bass 4, Bass 5, Open D, Open E, Open G. Default: O.
12
Screen Introduction
Tuning Template Reference:
Template Description (Open notes from lowest to highest string)
O Chromatic tuning. Displays the closest semitone.
Standard (Guitar) E A D G B E
Drop D D A D G B E
Drop C C G C F A D
Drop A A E A D #F B
Bass 4 E A D G
Bass 5 B E A D G
Open D D A D #F A D
Open E E B E #G B E
Open G D G D G B D
Press any footswitch or the BACK button to exit the tuner and return to the Main
Screen.
Note:
1. In bypass mode, the USB audio interface function is also bypassed.
2. If you continue holding both footswitches for more than two seconds, you will
enter the Looper Screen.
13
Screen Introduction
Looper Screen
Press and hold both footswitch A and B for over two seconds to enter the looper.
GP-150 supports a maximum of 180 seconds of loop recording/overdubbing, with
auto-record and drum sync features.
Basic Operation:
0
0
1
N
E
W
G
E
N
.
E
m
p
t
y
0
/
1
8
0
s
R
e
c
V
O
L
5
0
P
r
e
/
P
o
s
t
P
r
e
P
l
a
y
V
O
L
5
0
L
o
o
p
e
r
E
x
i
t
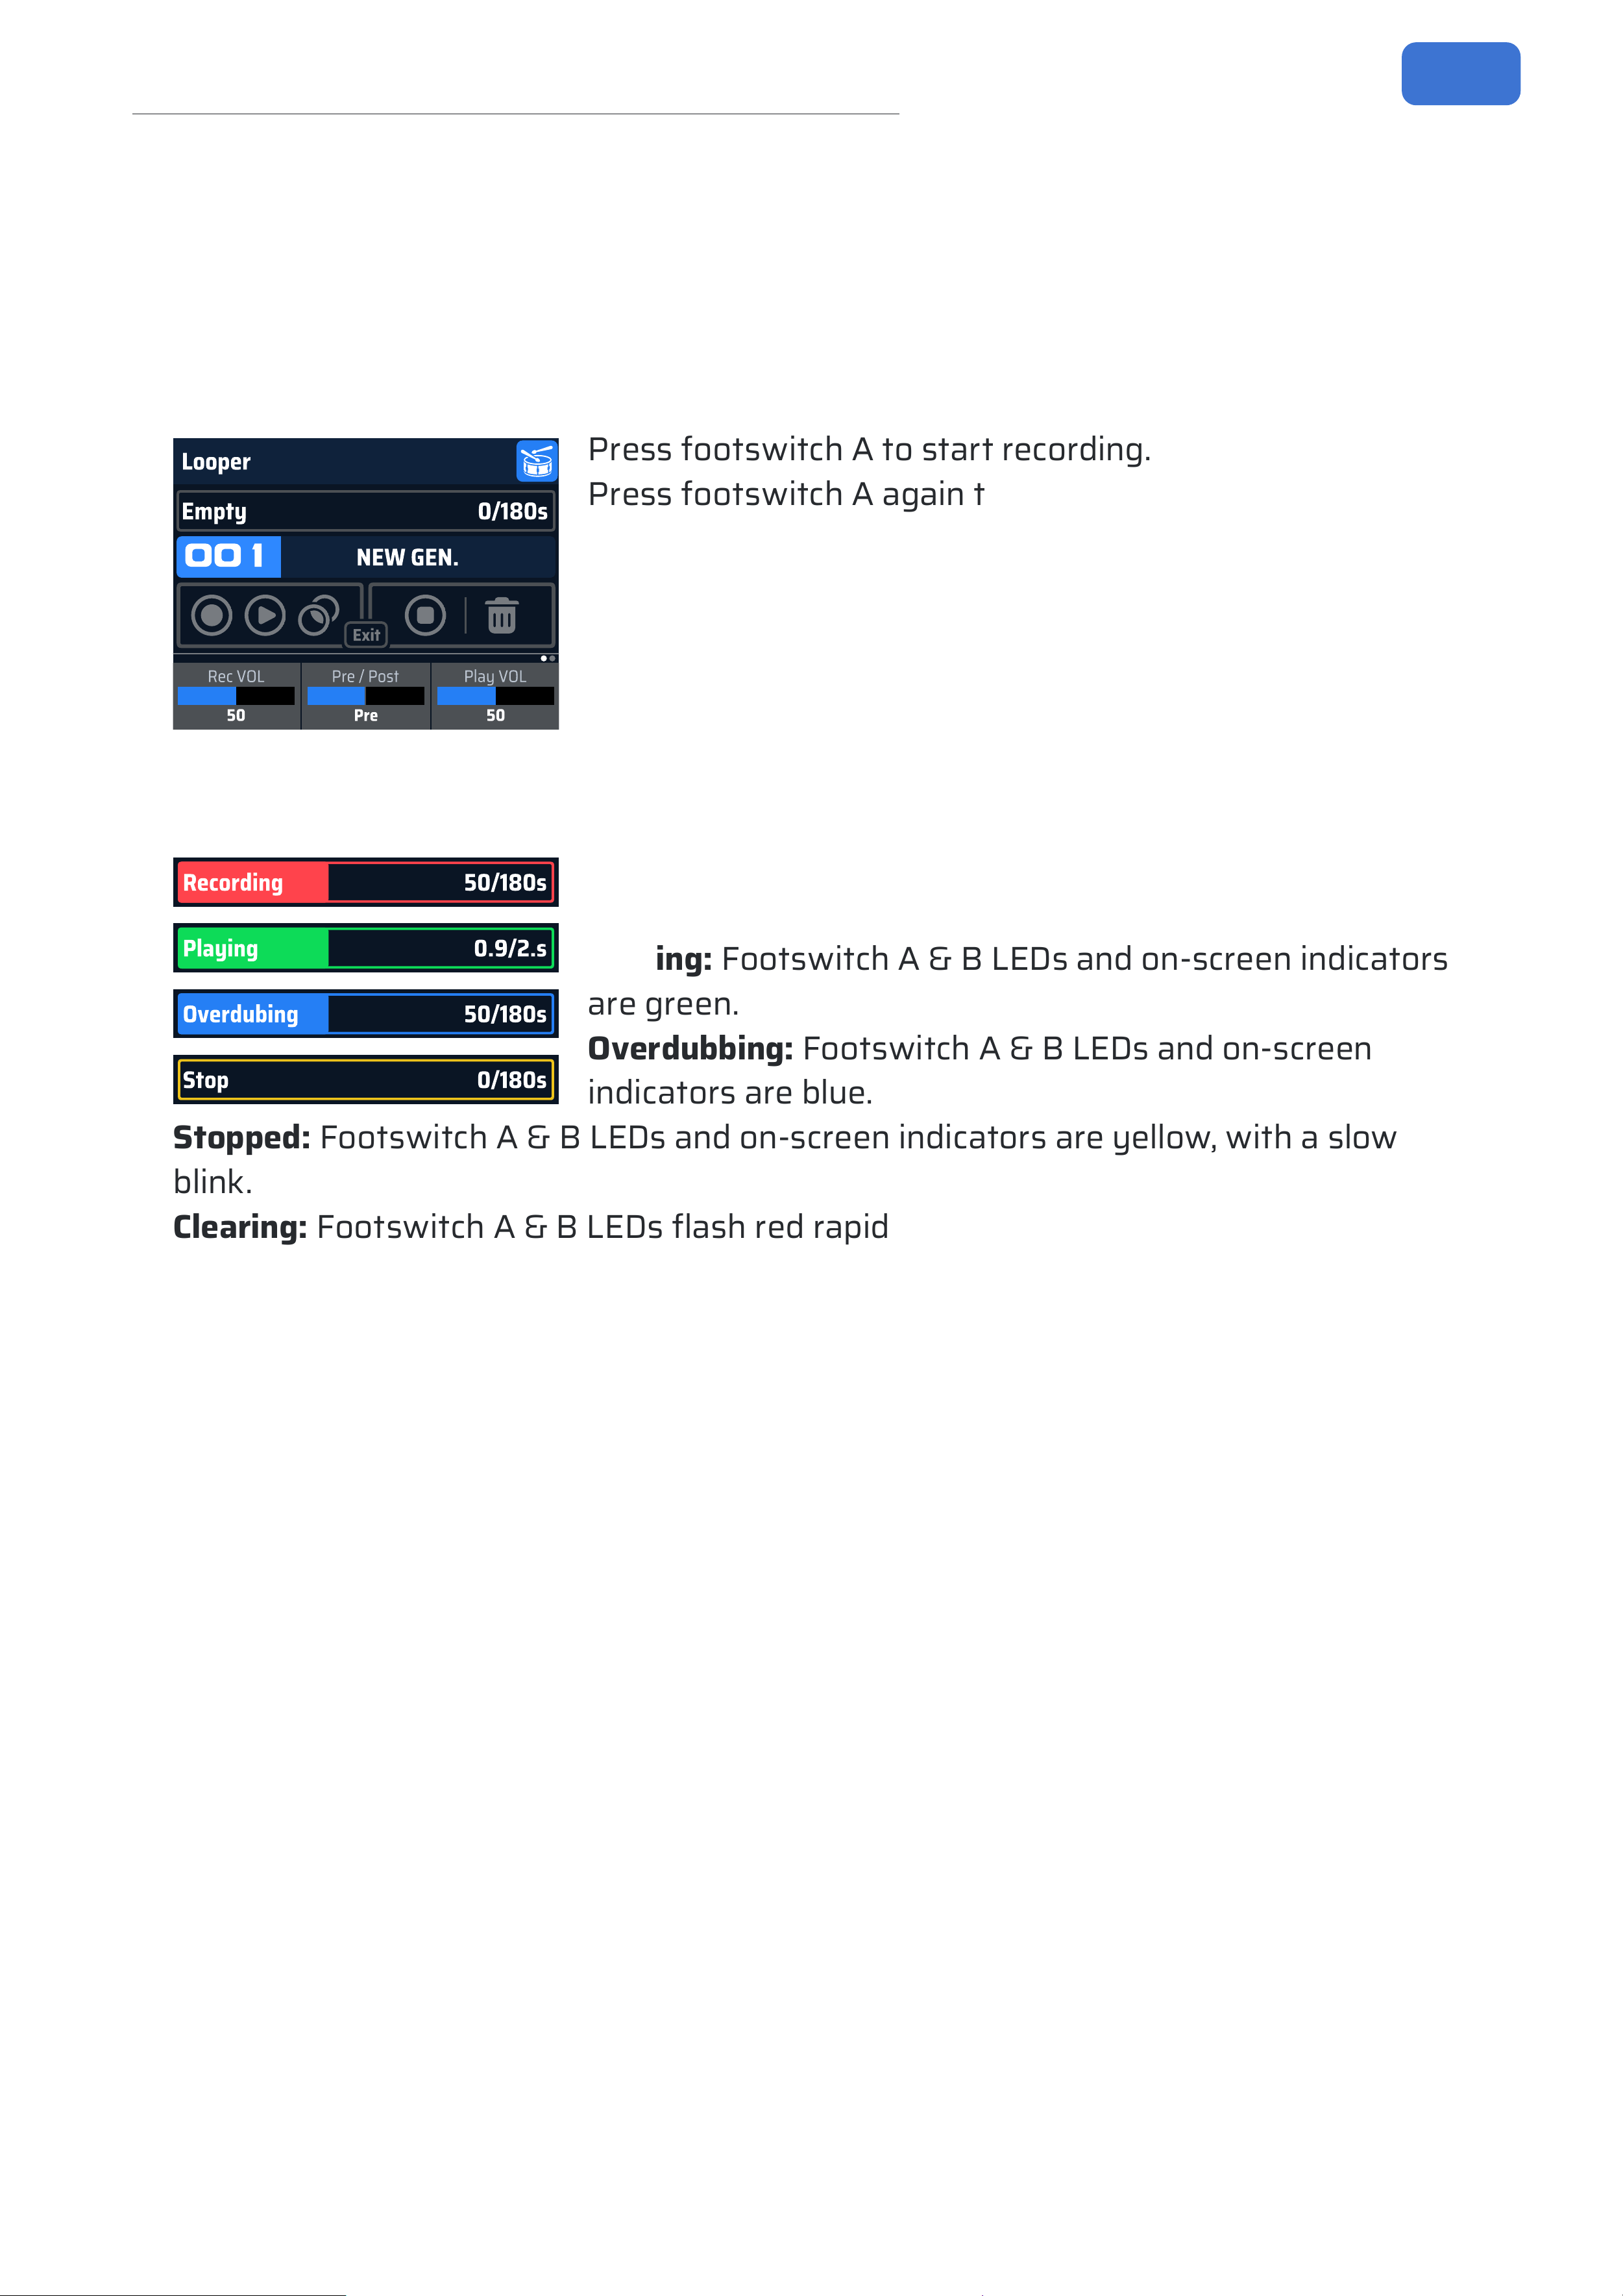
Press footswitch A to start recording.
Press footswitch A again to stop recording and start
playback of the loop.
During playback, press footswitch A to start overdubbing
at the current loop point.
Press footswitch B to stop all actions (recording/playing/
overdubbing).
Hold footswitch B to clear all recorded/overdubbed audio.
Status Indicators:
0
0
1
N
e
w
G
E
N
.
R
e
c
V
O
L
1
0
0
P
r
e
/
P
o
s
t
P
r
e
P
l
a
y
V
O
L
1
0
0
P
l
a
y
i
n
g
0
.
9
/
2
.
s
L
o
o
p
e
r
E
x
i
t
R
e
c
V
O
L
5
0
R
e
c
M
o
d
e
P
r
e
P
l
a
y
V
O
L
5
0
R
e
c
o
r
d
i
n
g
5
0
/
1
8
0
s
L
o
o
p
e
r
0
0
1
N
E
W
G
E
N
.
E
x
i
t
0
0
1
N
E
W
G
E
N
.
R
e
c
V
O
L
5
0
R
e
c
M
o
d
e
P
r
e
P
l
a
y
V
O
L
5
0
O
v
e
r
d
u
b
i
n
g
5
0
/
1
8
0
s
L
o
o
p
e
r
E
x
i
t
0
0
1
N
E
W
G
E
N
.
R
e
c
V
O
L
5
0
R
e
c
M
o
d
e
P
r
e
P
l
a
y
V
O
L
5
0
S
t
o
p
0
/
1
8
0
s
L
o
o
p
e
r
E
x
i
t
Recording: Footswitch A LED and on-screen indicator are
red.
Playing: Footswitch A & B LEDs and on-screen indicators
are green.
Overdubbing: Footswitch A & B LEDs and on-screen
indicators are blue.
Stopped: Footswitch A & B LEDs and on-screen indicators are yellow, with a slow
blink.
Clearing: Footswitch A & B LEDs ash red rapidly.
Parameter Adjustment (Looper Screen): Rotate the PARA knob to select the patch
sound to use with the looper. Press the PARA knob to cycle through parameter
pages.
Page 1: Use the Quick Access Knobs to set record Level, looper position in the eects
chain, and playback level.
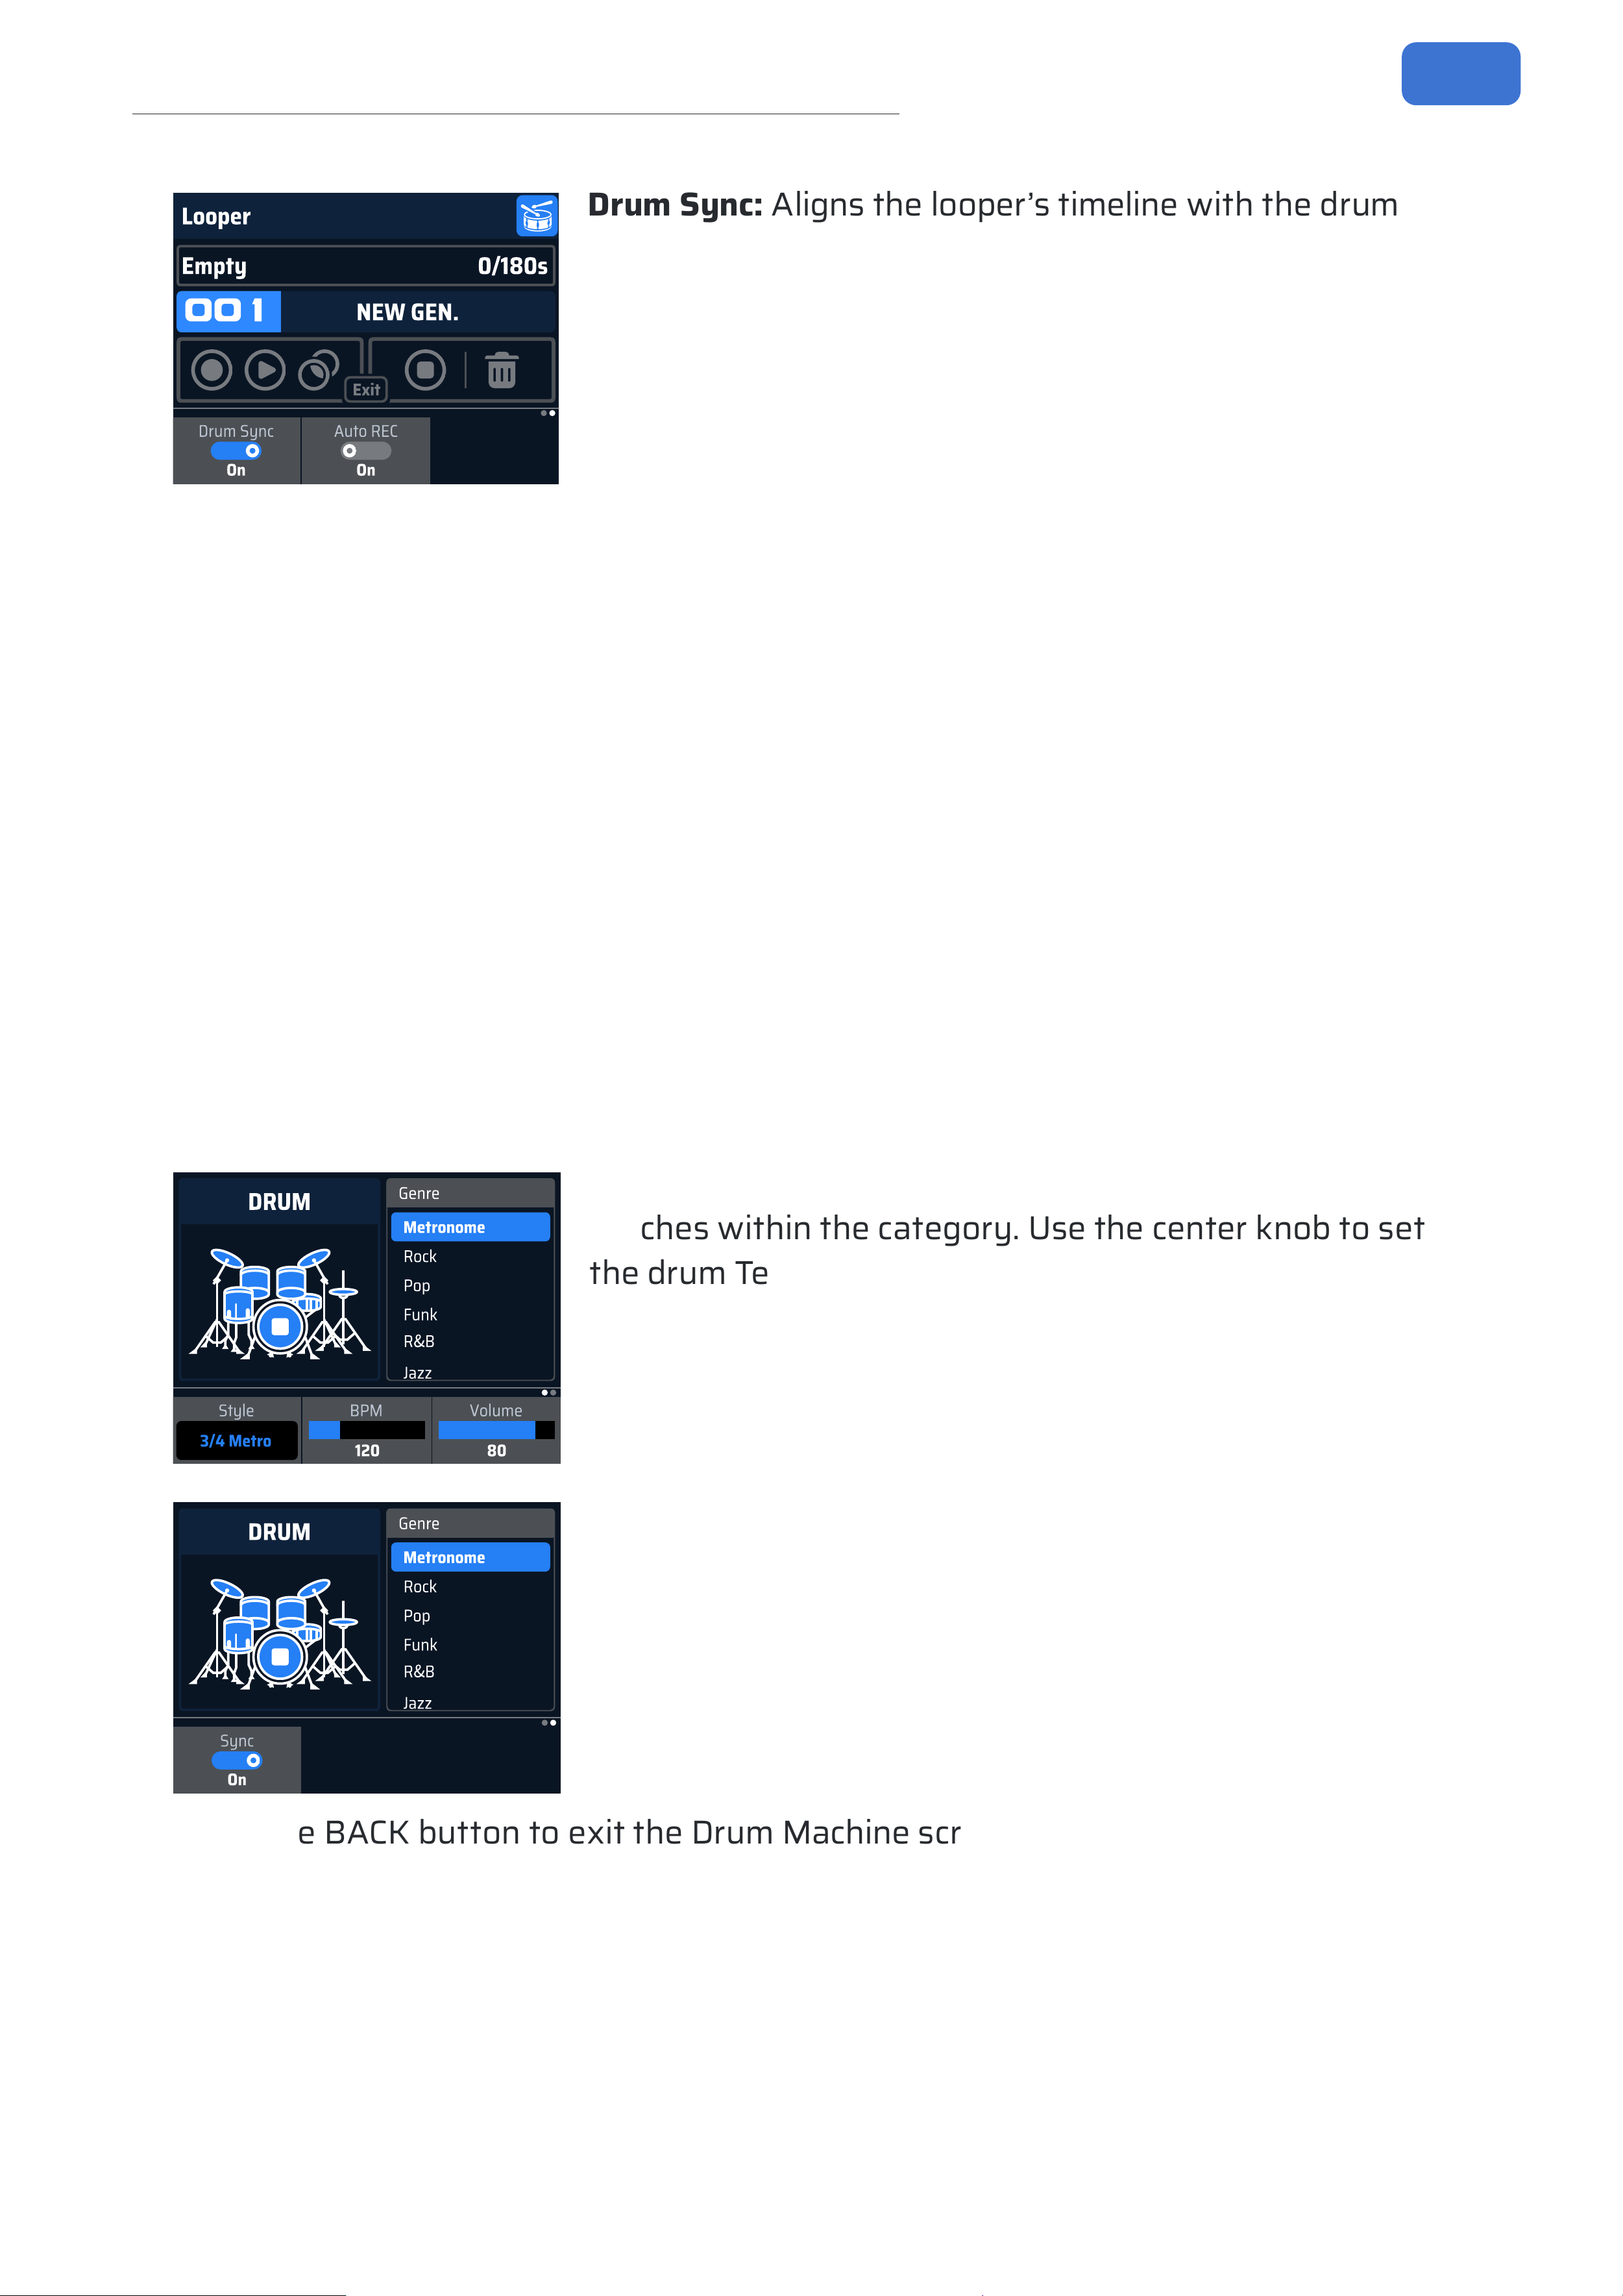
Page 2: Use the Quick Access Knobs to toggle drum sync and auto record.
Parameter Details:
Rec VOL: Changes the looper’s recording input level. Range: 0 to 100. Default: 100.
Pre/Post: Sets the looper’s position in the eects chain. Range: Pre, Post. Default:
Pre. This signicantly aects the recorded sound. Pre: Records a dry, mono signal
without eects. You can freely switch patches, and the loop will reect those
changes. Ideal for tone shaping. Post: Records a wet, stereo signal with eects. Uses
double the memory (max 90 sec recording time).
Play VOL: Changes the looper’s output level. Range: 0 to 100. Default: 100.
14
Screen Introduction
0
0
1
N
E
W
G
E
N
.
E
m
p
t
y
0
/
1
8
0
s
D
r
u
m
S
y
n
c
O
n
A
u
t
o
R
E
C
O
n
E
x
i
t
L
o
o
p
e
r
Drum Sync: Aligns the looper’s timeline with the drum
machine tempo. When enabled with the drum machine
playing, audio undergoes slight time adjustment for
synchronization.
Auto REC: Enables auto-record mode. When enabled,
pressing the record footswitch does not start recording
immediately. Recording begins automatically once GP-
150 detects an input signal above a certain threshold.
Press both footswitch A and B simultaneously or press the BACK button to exit
the Looper Screen. The looper state is maintained upon exit. Ensure it is stopped
or cleared when not in use. The looper is an auxiliary tool; recorded content is not
saved by the system.
Drum Machine Screen
Press the DRUM button to turn the Drum Machine On/O. When on, the drum icon
on the Main Screen lights up. Hold the DRUM button to enter the Drum Machine
screen.
On the Drum Machine screen:
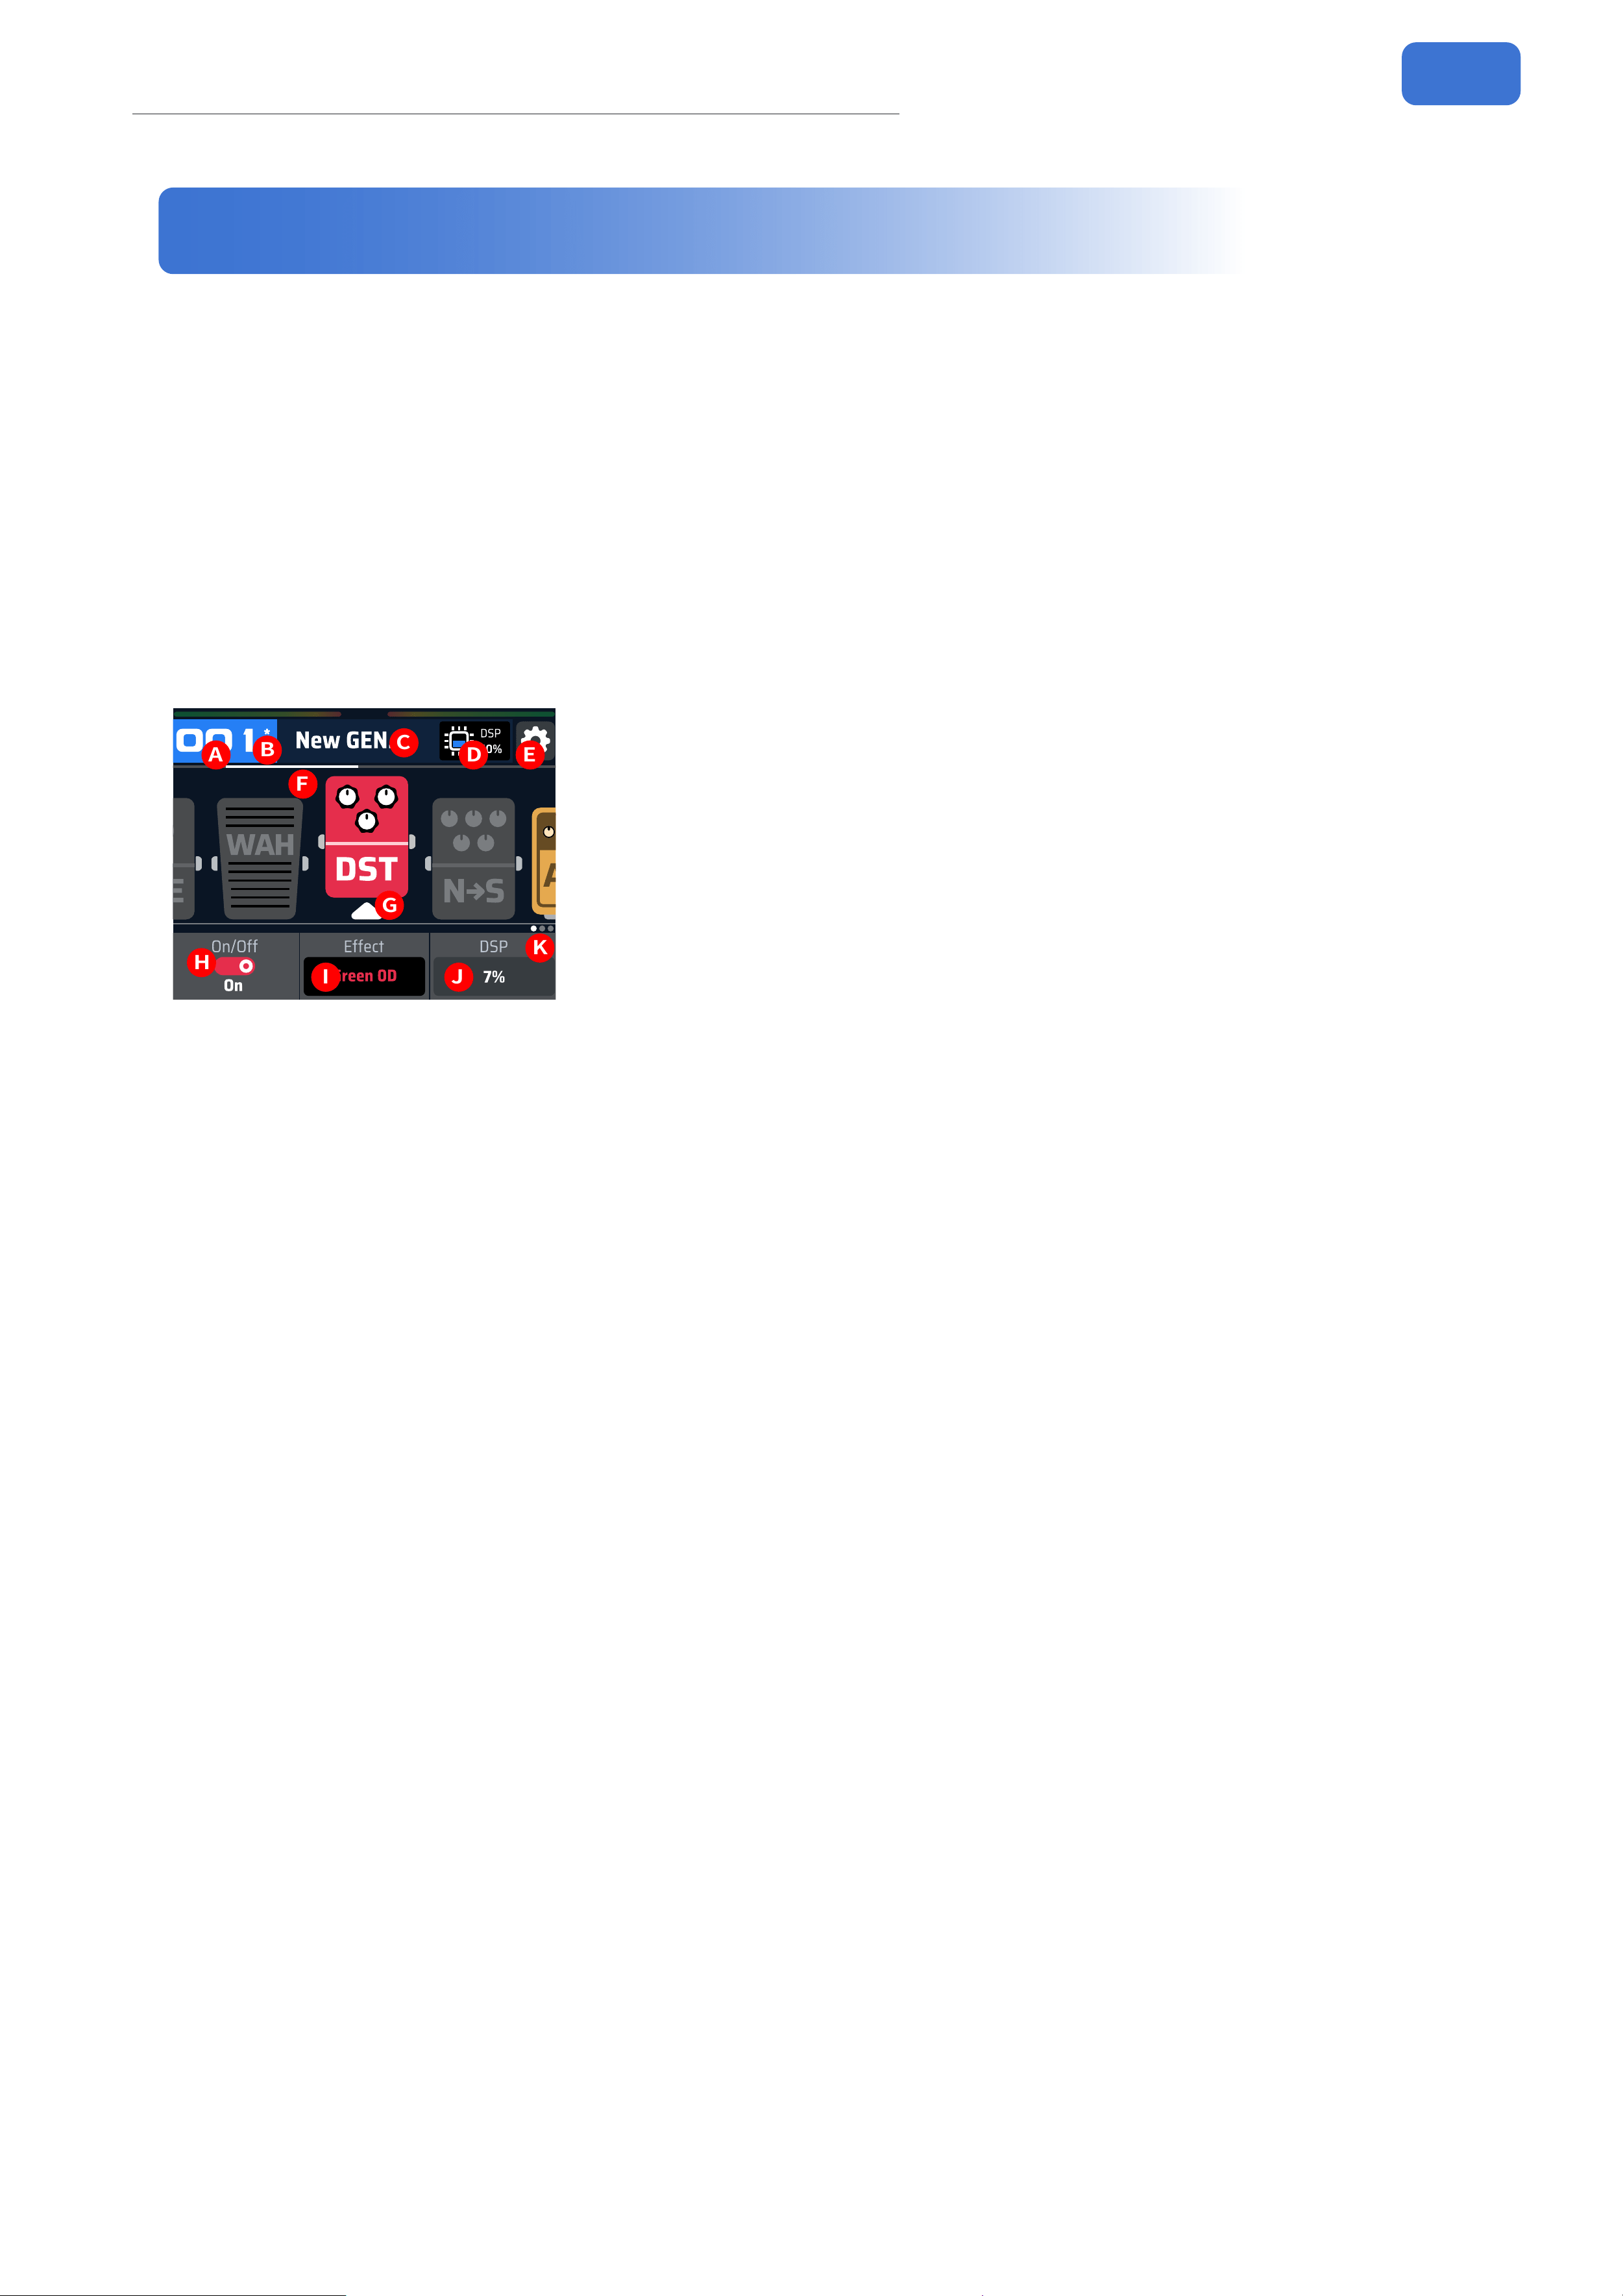
Rotate the PARA knob to cycle through drum style categories. Press the PARA knob
to cycle through parameter pages.
D
R
U
M
G
e
n
r
e
M
e
t
r
o
n
o
m
e
R
o
c
k
P
o
p
F
u
n
k
R
&
B
J
a
z
z
V
o
l
u
m
e
8
0
S
t
y
l
e
3
/
4
M
e
t
r
o
B
P
M
1
2
0
Page 1: Use the left knob to select dierent drum
patches within the category. Use the center knob to set
the drum Tempo (40~300, Default: 120). Use the right
knob to set the drum volume (0 to 100, Default: 80).
D
R
U
M
G
e
n
r
e
M
e
t
r
o
n
o
m
e
R
o
c
k
P
o
p
F
u
n
k
R
&
B
J
a
z
z
S
y
n
c
O
n
Page 2: Toggle the drum sync function. When enabled,
the drum machine tempo syncs to the current patch’s
BPM.
Press the BACK button to exit the Drum Machine screen.
15
Patch Editing
Patch Editing
Edit Screen
Press the EDIT button or press the PARA knob on the Main Screen to enter the
Edit Screen. Press the BACK button to exit. Here, you can toggle eect modules
in GP-150’s eects chain, edit eect parameters, change the module order, set up
expression pedals, and customize Quick Access Knob parameters. The display and
functionality vary slightly between footswitch modes.
The following describes the Edit Screen in Patch Mode:
A
B
C
D
E
F
G
H
I
J
K
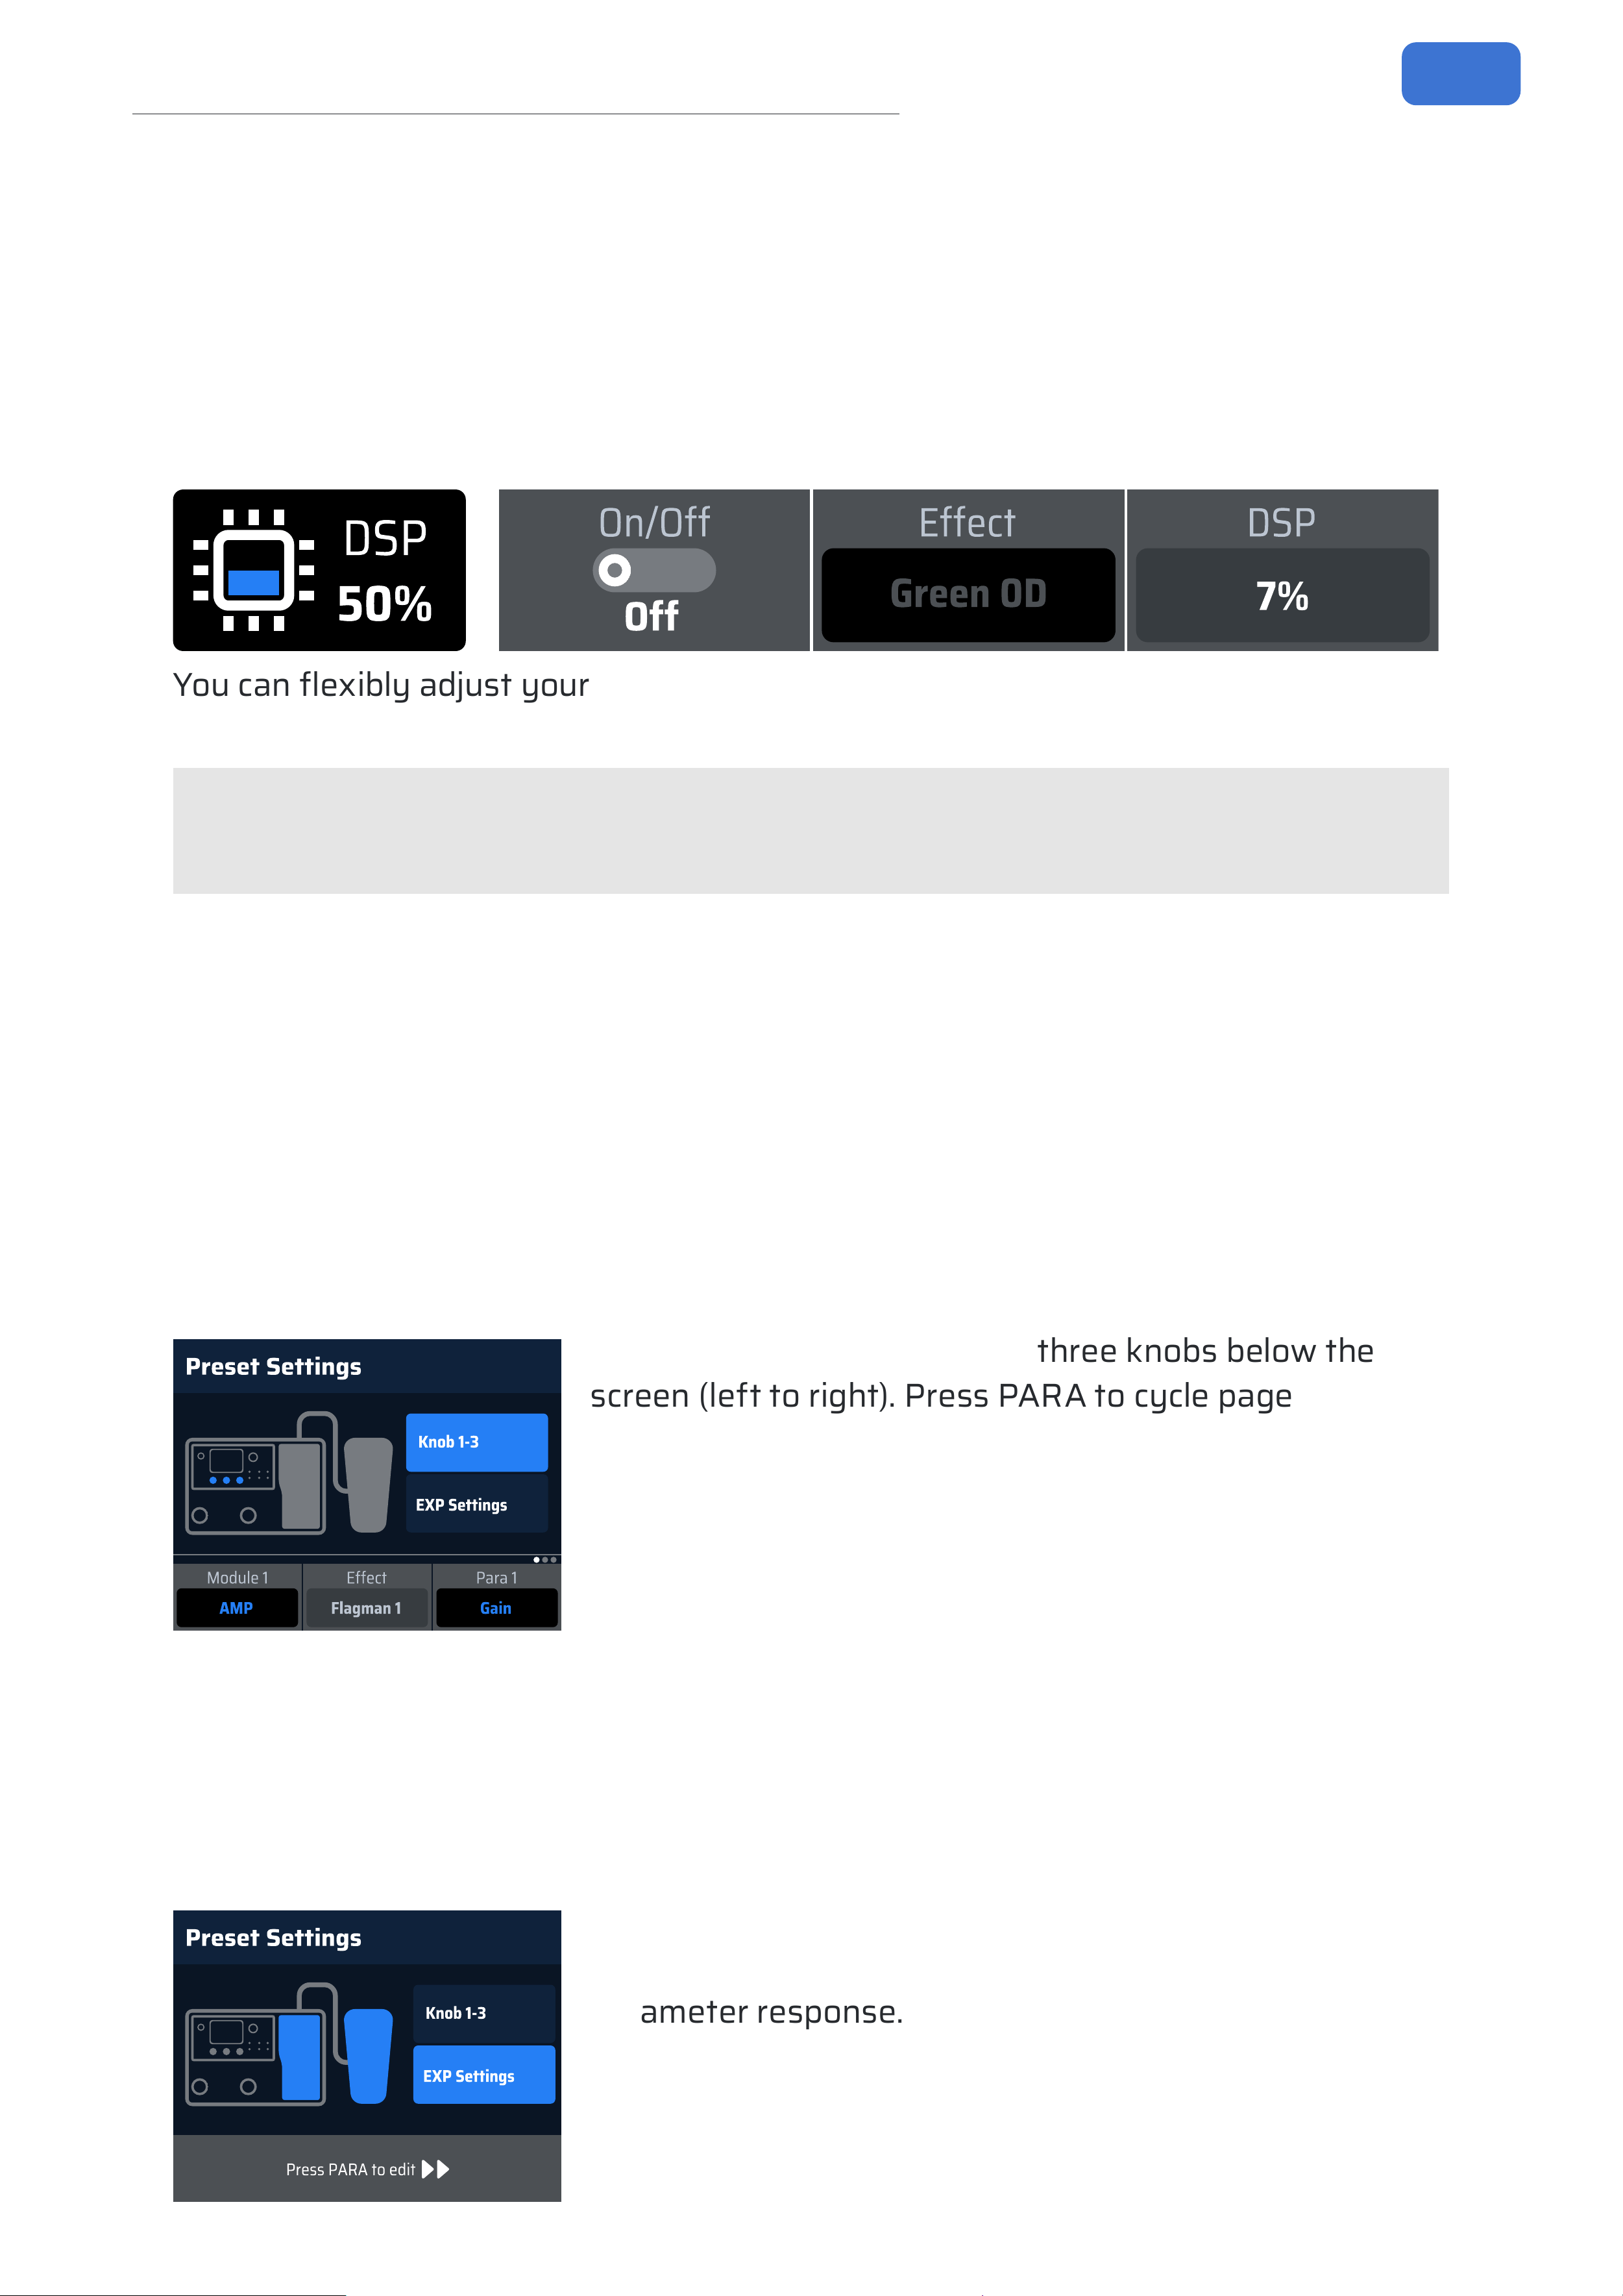
A. Patch Number
B. Save Indicator
C. Patch Name
D. Eects Chain DSP Load
E. Patch Settings
F. Eects Chain Position
G. Currently Selected
Eect Module
H. Eect Module On/O
Toggle
I. Current Eect
J. DSP Load for Current
Eect
K. Eect Parameter Page
The colored modules in the center represent GP-150’s 12 eect module slots. The
signal path they form is called the Eects Chain. The default order is: NR (Noise
Gate) → PRE (Pre-Eects) → WAH (Wah-Wah Pedal) → DST (Distortion/Overdrive)
→ N→S (SnapTone) → AMP (Amp Sim) → CAB (Cab Sim) → EQ (Equalizer) → MOD
(Modulation) → DLY (Delay) → RVB (Reverb) → VOL (Volume Pedal).
Upon entering the Edit Screen, the triangular cursor selects “E” (Patch Settings).
Here, H, I, J correspond to the current patch’s Patch Volume, BPM, and Patch Settings
(expression pedal and Quick Access Knob customization). Use the corresponding
Quick Access Knobs to adjust parameters or enter sub-menus. Patch volume range:
0 to 100 (Default: 50). BPM range: 40~300 (Default: 120). Rotate the PARA knob to
move the cursor into the eects chain.
Rotate the PARA knob to browse eect modules. Enabled modules have lit icons.
Press the PARA knob to cycle through parameter pages for the selected module.
Rotate the Quick Access Knobs to adjust the eect parameters shown in the bottom
parameter bar, which changes based on the selected eect.
16
Patch Editing
Eects Chain DSP Load
To ensure normal sound quality, GP-150 limits the use of certain eects based on
the current DSP (Digital Signal Processing) load. Loading more eects increases the
DSP load percentage. GP-150 calculates in real-time which eects are available. If
an eect name appears grayed out and its module is automatically disabled, the
current DSP load cannot support that eect.
O
n
/
O
f
f
O
f
f
E
f
f
e
c
t
G
r
e
e
n
0
D
D
S
P
7
%
You can exibly adjust your eects chain based on each eect’s DSP usage to
ensure the total load does not exceed 100%.
Note:
Set unused eect modules to None to free up DSP resources.
Patch Settings
As mentioned, select the settings icon in the Edit Screen using the PARA knob, then
rotate the rightmost Quick Access Knob to enter the Patch Settings screen. Here,
you can customize the parameters controlled by GP-150’s Quick Access Knobs and
congure parameters for the built-in and external expression pedals. Quick Access
Knob customization only applies to the Main Screen.
Rotate the PARA knob to select a setting.
P
r
e
s
e
t
S
e
t
t
i
n
g
s
P
a
r
a
1
G
a
i
n
M
o
d
u
l
e
1
A
M
P
K
n
o
b
1
-
3
E
X
P
S
e
t
t
i
n
g
s
E
f
f
e
c
t
F
l
a
g
m
a
n
1
Knobs 1-3: Correspond to the three knobs below the
screen (left to right). Press PARA to cycle pages. Use the
corresponding Quick Access Knobs to select the Module
and the specic Parameter for customization.
Module 1-3 Options: O, Patch Volume, BPM, any eect module in the chain except
VOL. Defaults: Module 1 = P-VOL(Patch Volume), Module 2 = BPM, Module 3 = O.
Eect: Changes based on module selection. If module is O/P-VOL/BPM, these
show O. If an eect module is chosen, they show the corresponding eect and its
adjustable parameter from the patch’s chain.
P
r
e
s
s
P
A
R
A
t
o
e
d
i
t
K
n
o
b
1
-
3
E
X
P
S
e
t
t
i
n
g
s
P
r
e
s
e
t
S
e
t
t
i
n
g
s
EXP Settings: Press PARA to enter the sub-menu to
congure expression pedal control targets and
parameter response.
17
Patch Editing
E
X
P
S
e
t
t
i
n
g
s
D
S
T
V
O
L
A
M
P
V
o
l
u
m
e
G
r
e
e
n
O
D
F
l
a
g
m
a
n
1
E
X
P
1
-
A
E
X
P
1
-
B
E
X
P
2
P
a
r
a
1
V
o
l
u
m
e
M
o
d
u
l
e
1
V
O
L
E
f
f
e
c
t
V
o
l
u
m
e
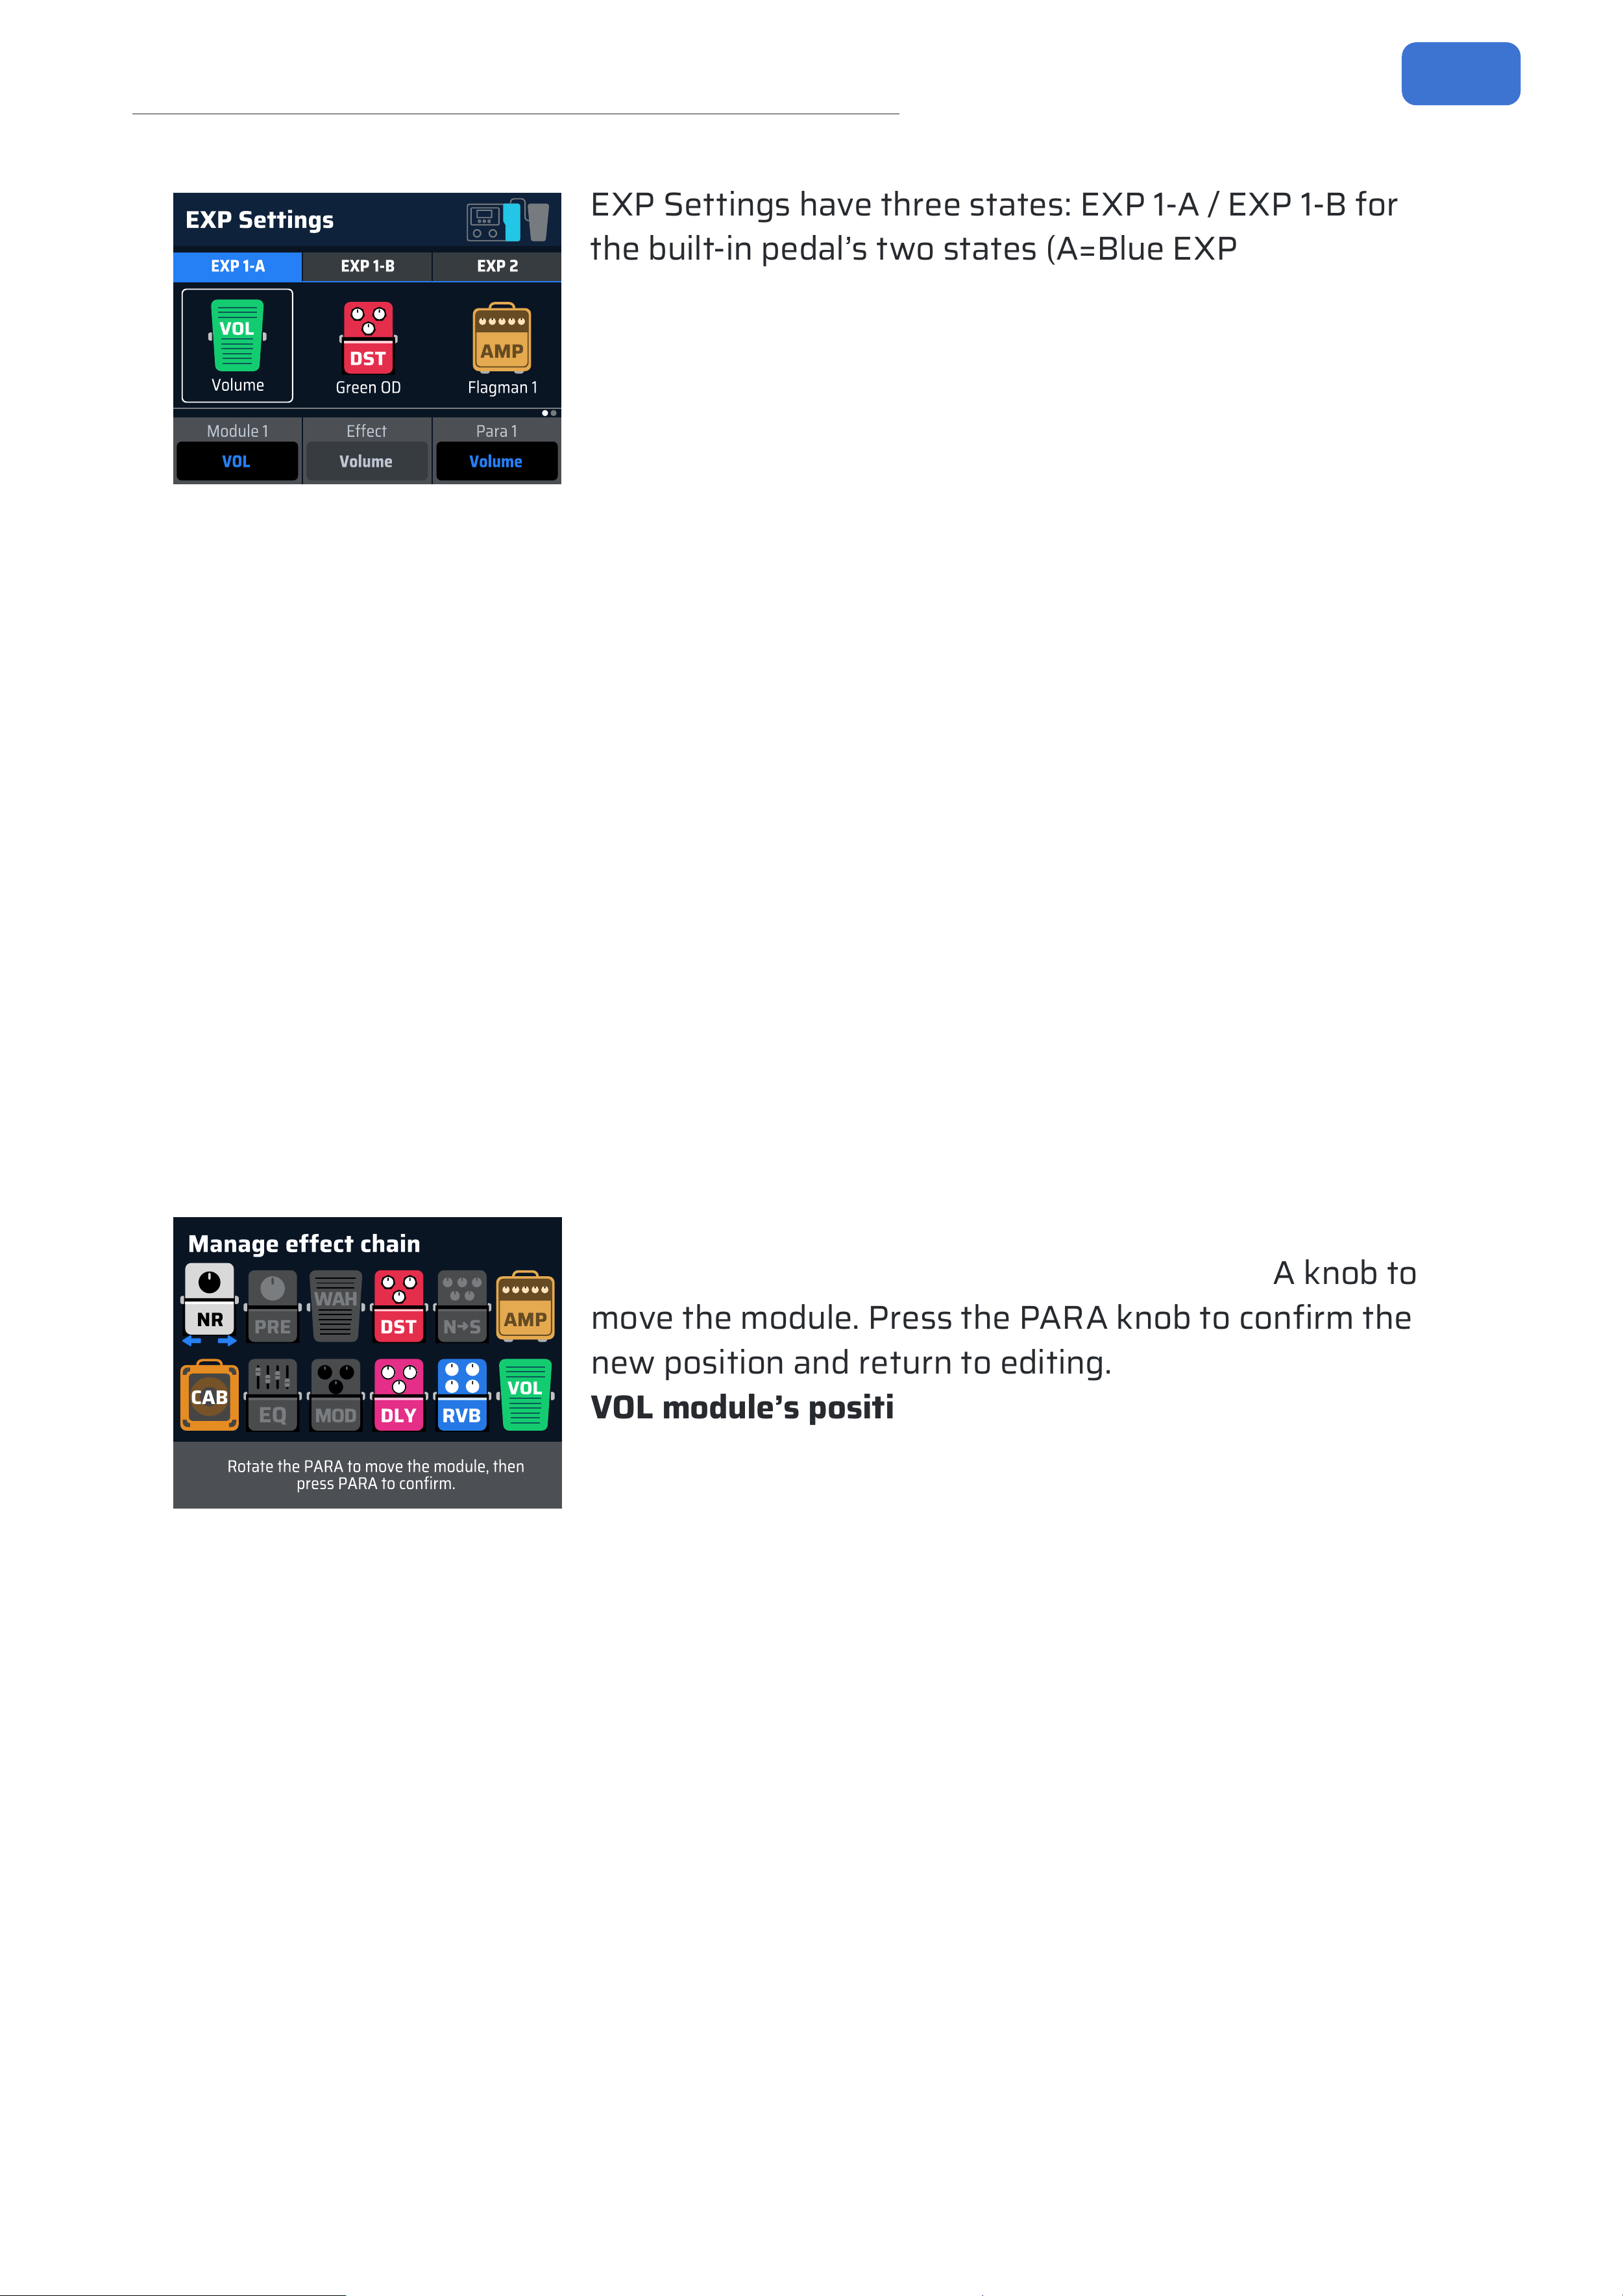
EXP Settings have three states: EXP 1-A / EXP 1-B for
the built-in pedal’s two states (A=Blue EXP LED,
B=Orange EXP LED, toggle by pressing the pedal toe),
and EXP 2 for an external pedal connected via the EXP/
FS jack.
Rotate PARA to select a pedal state. The screen shows its current control
assignments. Each state can control up to three parameters simultaneously. Press
PARA to edit. Rotate PARA to select a parameter slot. Rotate the corresponding
Quick Access Knob to choose the controlled module and its parameter. Press PARA
to cycle pages to set Min and Max values, dening the parameter response at the
heel-down and toe-down positions.
Range: 0 to 100. Default: Min=0, Max=100. Default State: EXP 1-A’s rst parameter
controls the VOL module from 0-100, making the built-in pedal a volume pedal when
the EXP LED is blue.
Press the BACK button to return to the previous screen or the Edit Screen.
Changing Eect Module Order
GP-150 allows you to change the order of modules in the eects chain, which
signicantly impacts your tone.
M
a
n
a
g
e
e
f
f
e
c
t
c
h
a
i
n
R
o
t
a
t
e
t
h
e
P
A
R
A
t
o
m
o
v
e
t
h
e
m
o
d
u
l
e
,
t
h
e
n
p
r
e
s
s
P
A
R
A
t
o
c
o
n
f
i
r
m
.
C
A
B
N
S
N
R
W
A
H
E
Q
R
V
B
D
L
Y
A
M
P
P
R
E
V
O
L
M
O
D
D
S
T
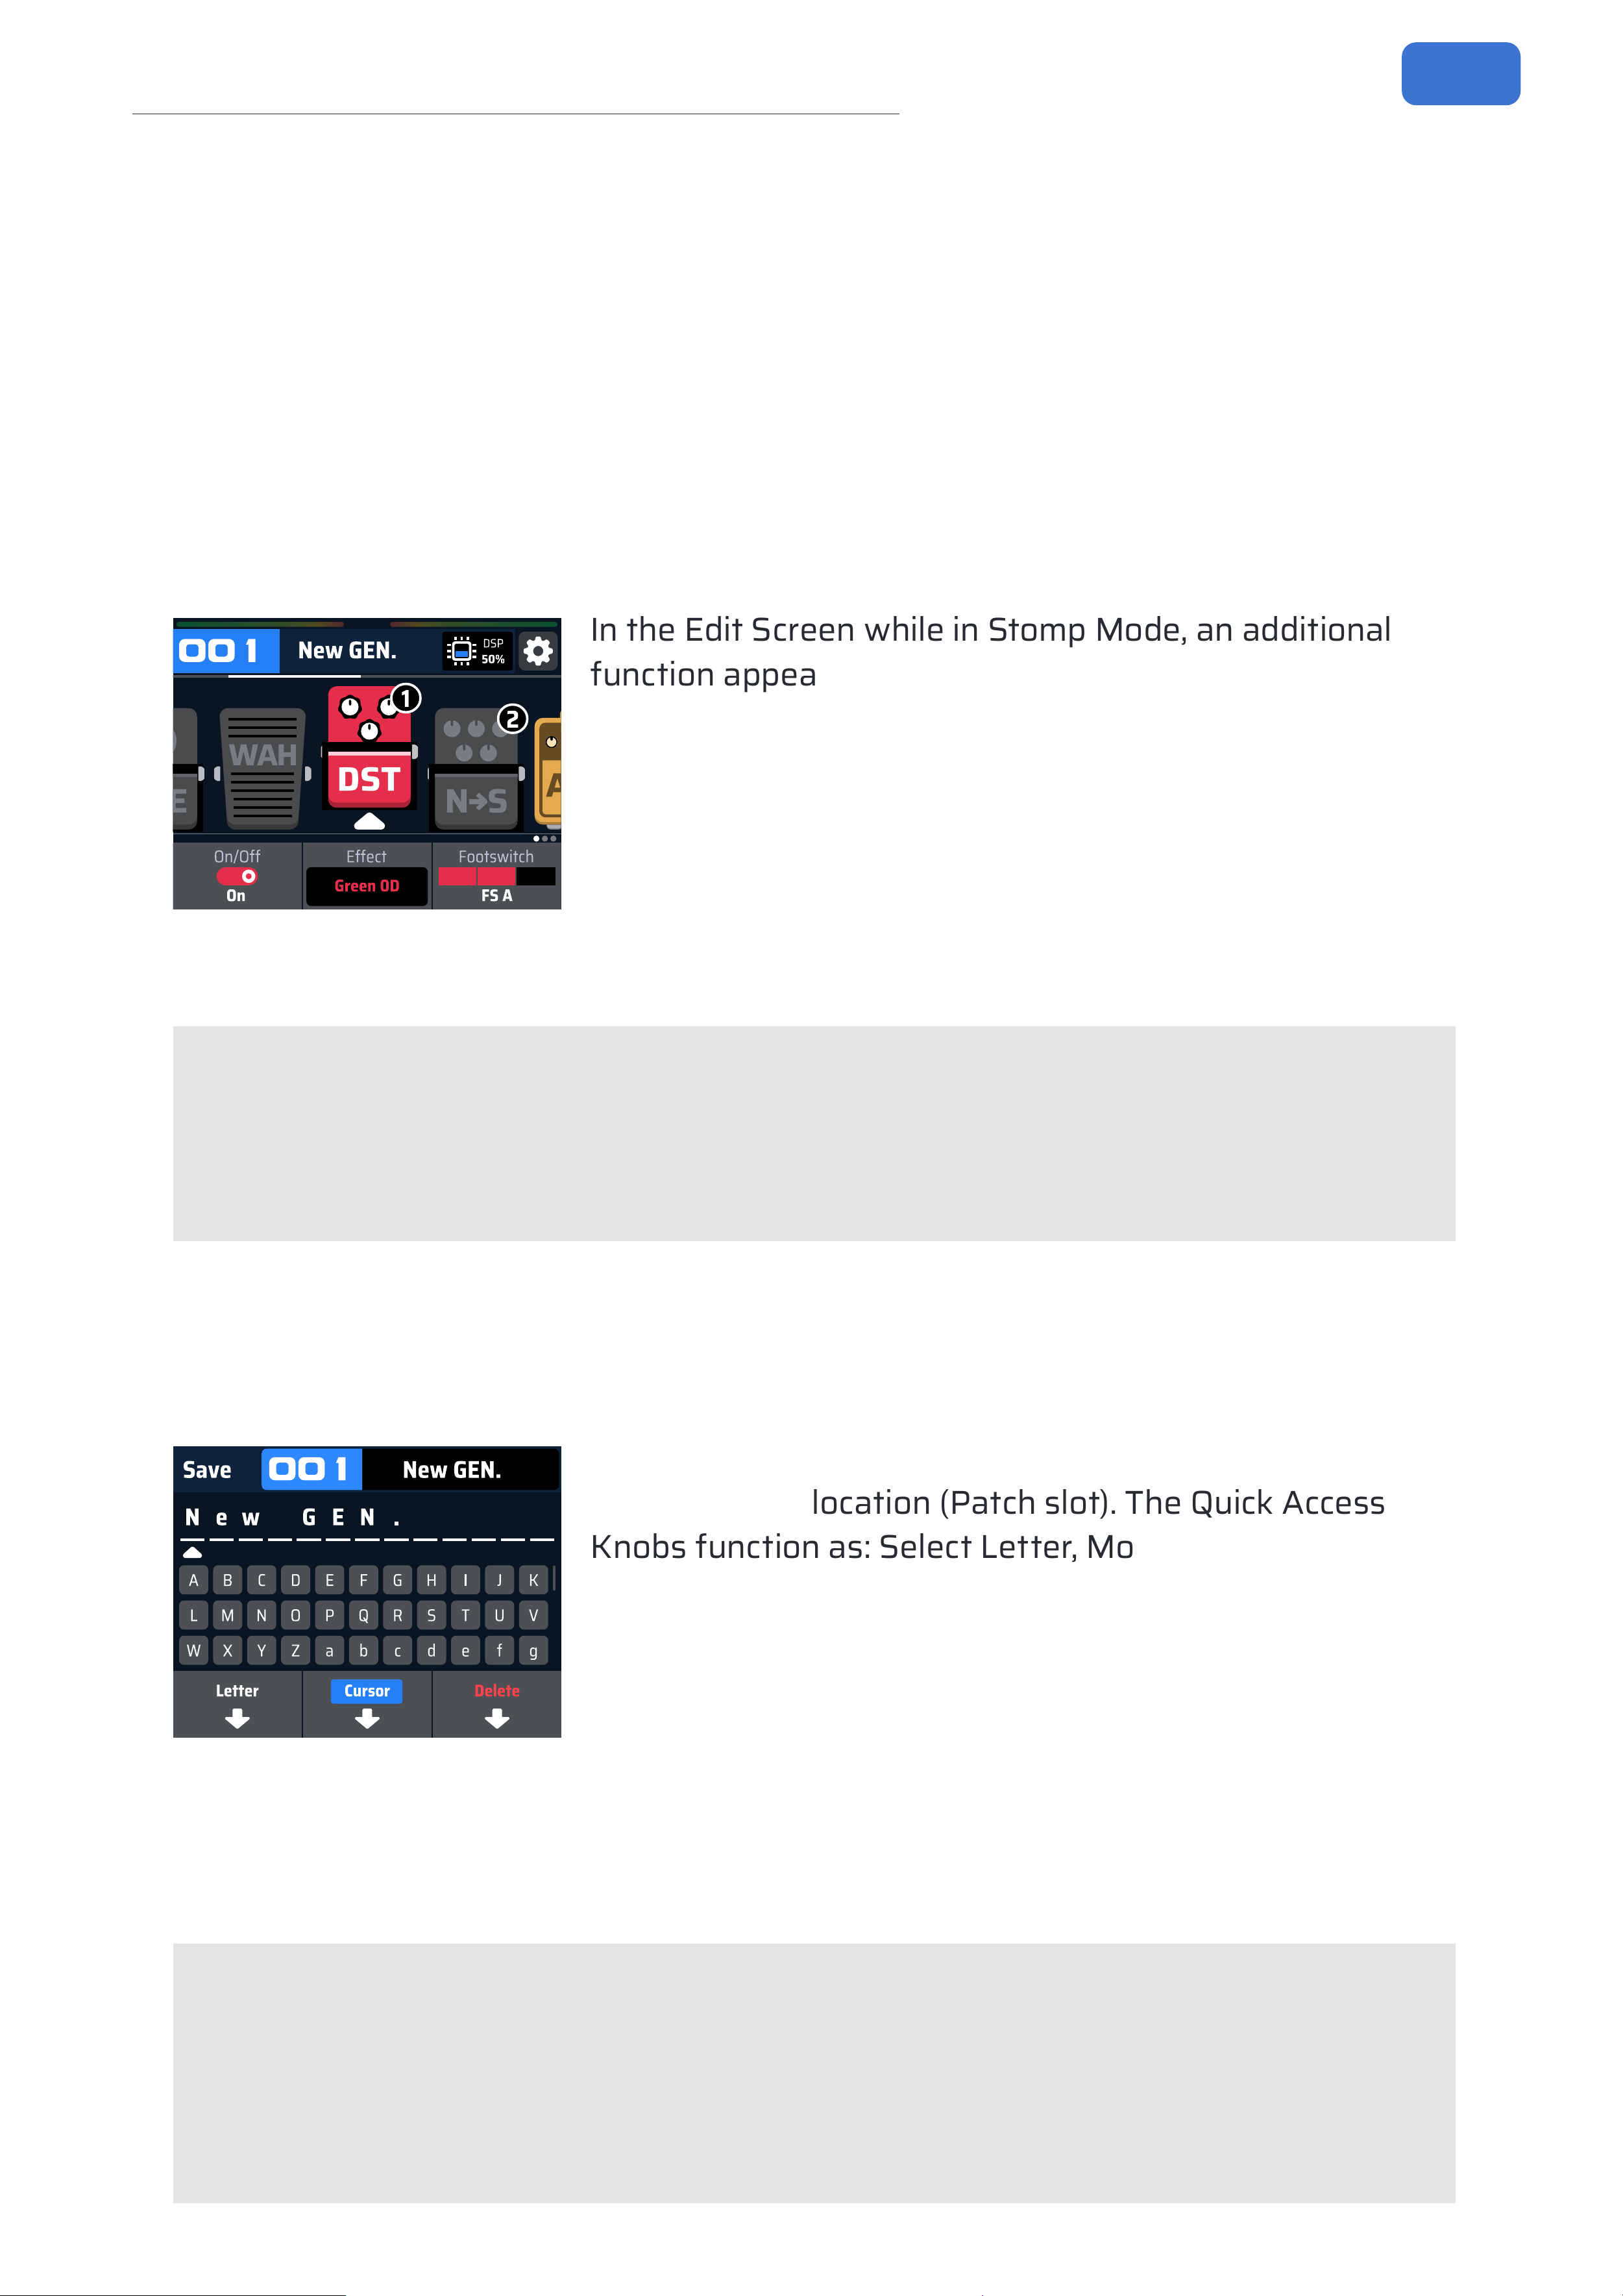
In the Edit Screen, hold the PARA knob on a selected
module to initiate reordering. Rotate the PARA knob to
move the module. Press the PARA knob to conrm the
new position and return to editing.
VOL module’s position: If you use an expression pedal
to control the output volume, the VOL module’s position
aects how sounds decay. If VOL is the last module,
turning the volume down cuts o all sound immediately, including delay/reverb/
modulation tails. For natural decay of these eects, place the VOL module before
them in the chain.
18
Patch Editing
Footswitch-Controlled Eect Modules (CTRL)
GP-150 allows you to control the on/o state of eect modules via the footswitches.
Each patch can have up to six controlled modules. Each module can only be
controlled by one footswitch. Each footswitch can control up to three modules
simultaneously. This is called CTRL (CTRL A for footswitch A, CTRL B for footswitch B).
In Stomp Mode, footswitches perform CTRL operations. Pressing a footswitch
toggles all its assigned modules. The LED ring color (Green/Red) indicates the
combined on/o state of its modules.
E
W
A
H
D
S
T
1
S
N
A
0
0
1
N
e
w
G
E
N
.
D
S
P
5
0
%
D
S
P
O
n
/
O
f
f
O
n
E
f
f
e
c
t
G
r
e
e
n
0
D
F
o
o
t
s
w
i
t
c
h
F
S
A
2
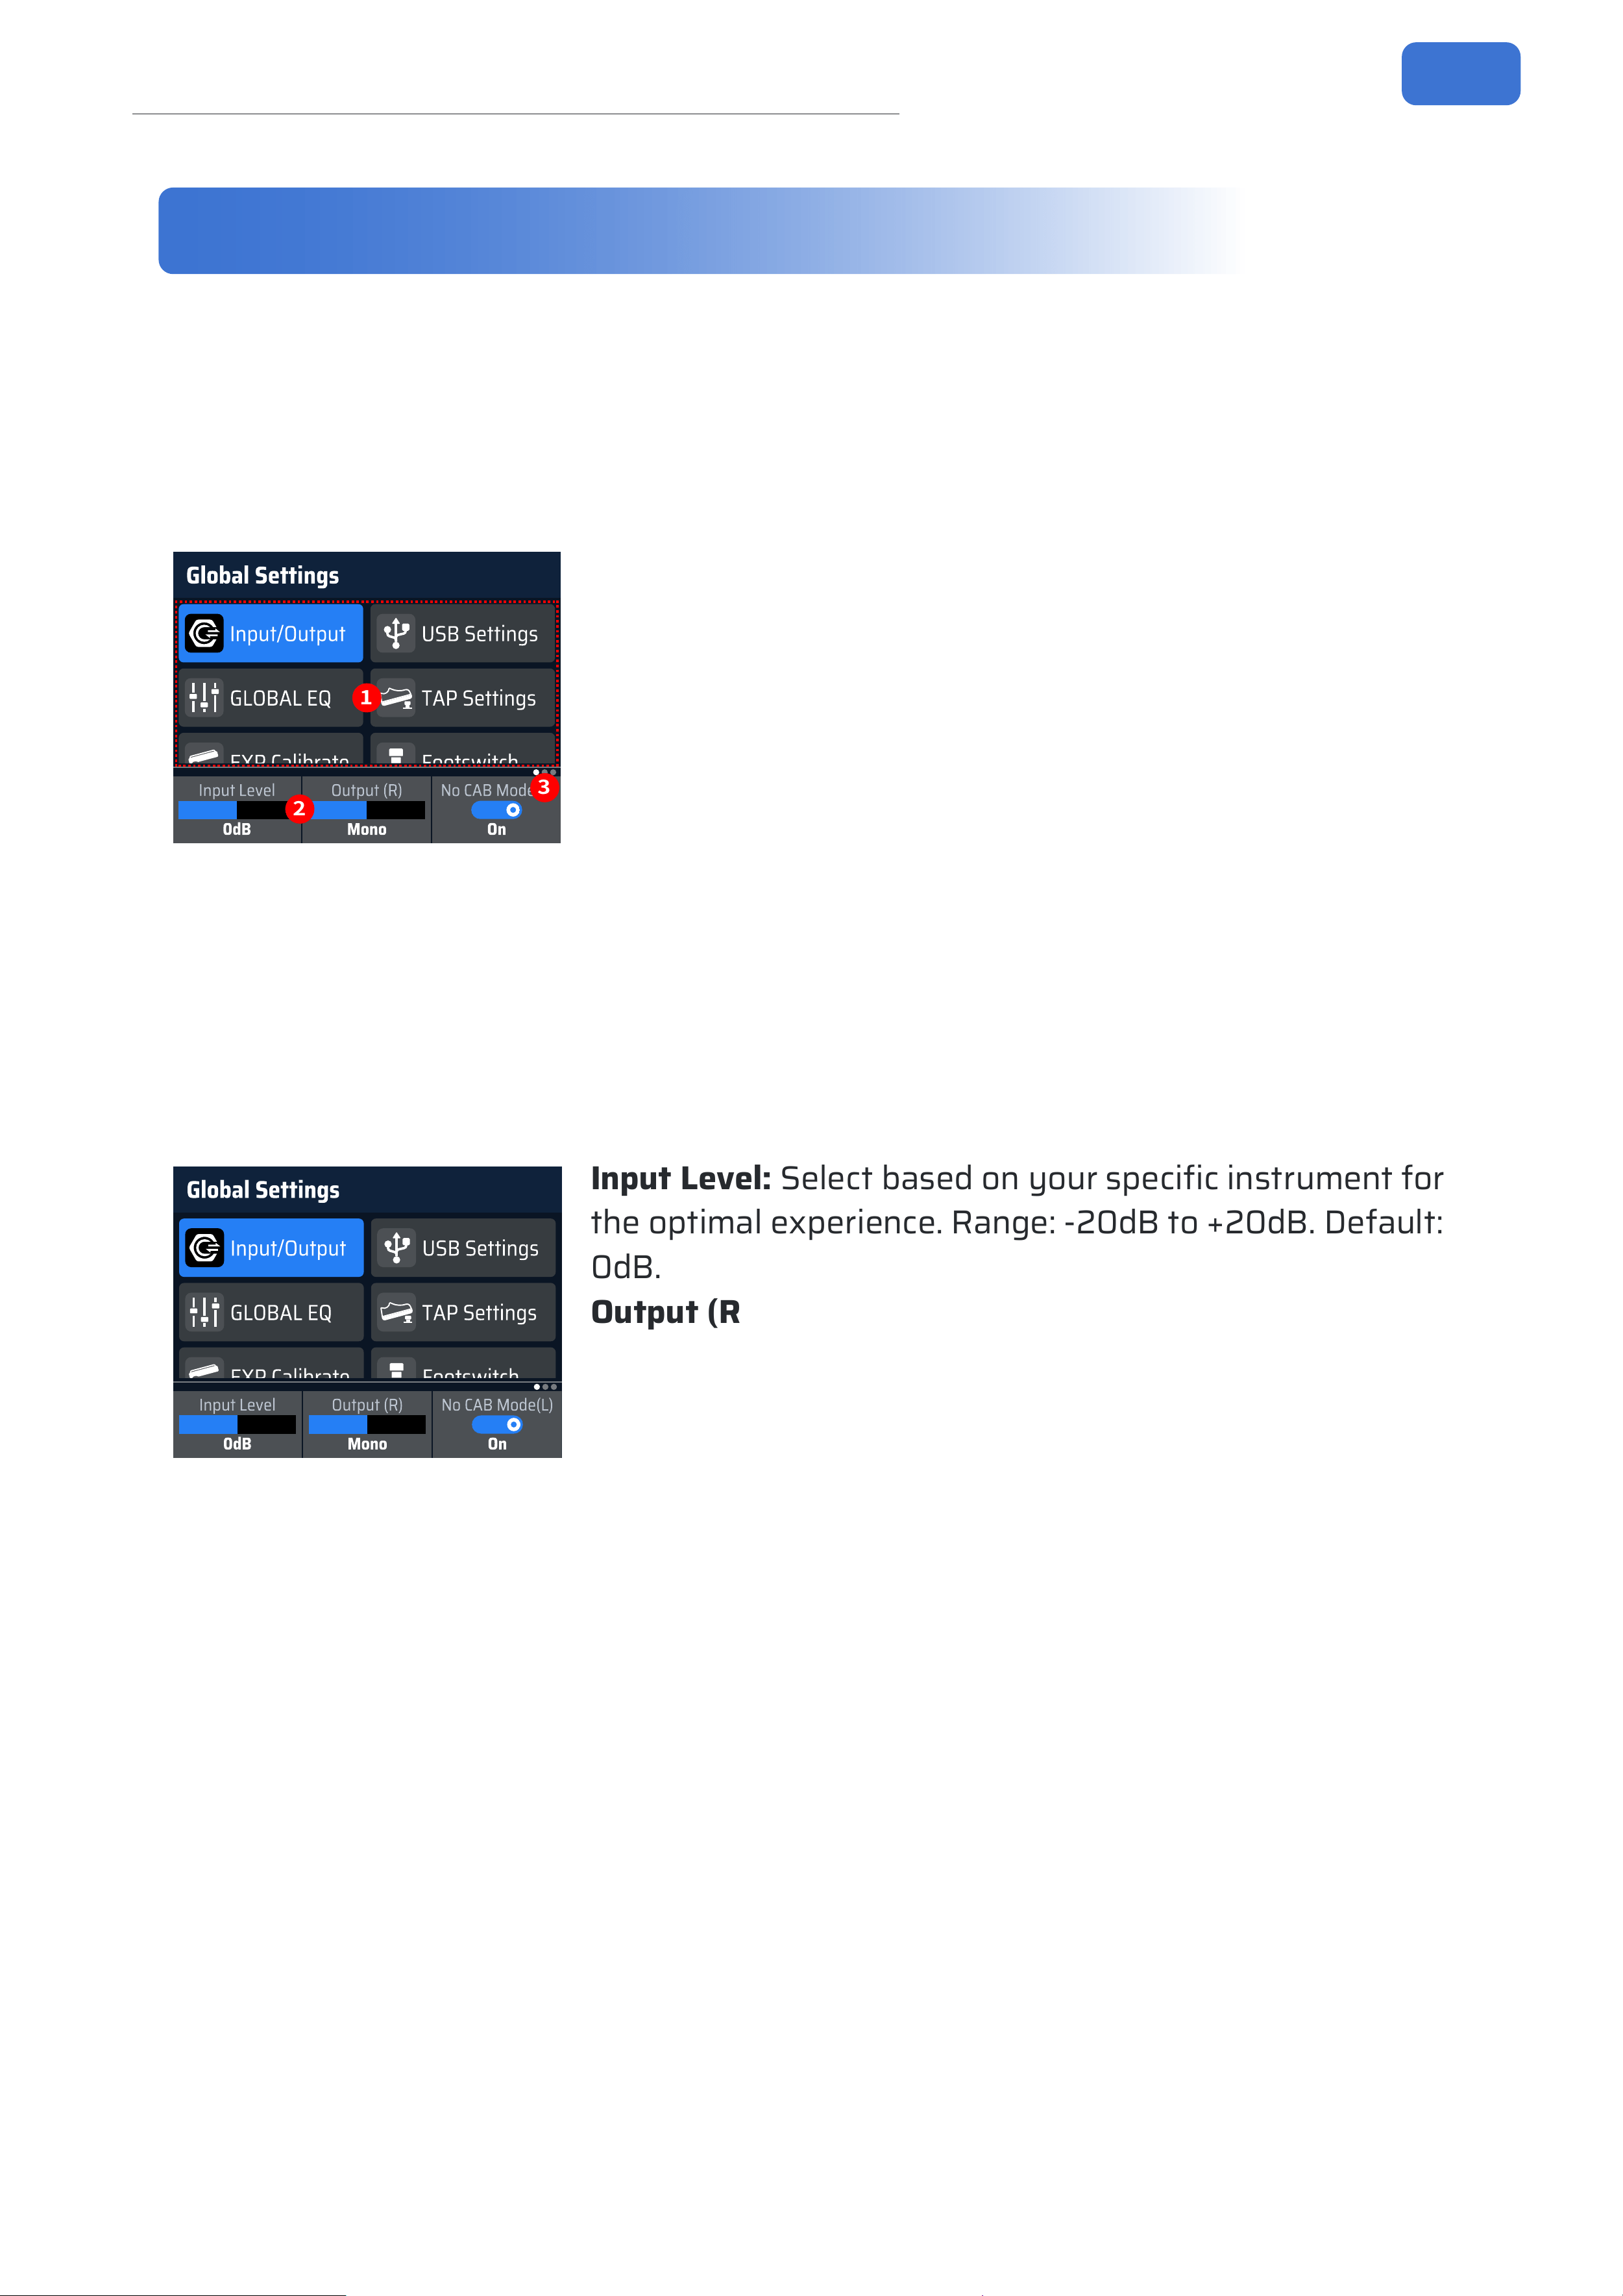
In the Edit Screen while in Stomp Mode, an additional
function appears: assigning modules to footswitches. A
module controlled by a footswitch displays a
①
or
②
in
its top-right corner. Rotate the rightmost Quick Access
Knob to assign: None (no control), FS A (controlled by
footswitch A), or FS B (controlled by footswitch B).
You can use the LED ring color as a quick visual indicator of its assigned modules’
states.
Note:
1. With Auto Save enabled (see Global Settings), CTRL module state changes are
saved immediately.
2. Each eect module can only be controlled by one footswitch.
Save Screen
Press the SAVE button to enter the Save Screen.
S
a
v
e
A
B
C
D
E
F
G
H
I
J
K
L
M
N
O
P
Q
R
S
T
U
V
W
X
Y
Z
a
b
c
d
e
f
g
N
e
w
G
E
N
.
0
0
1
N
e
w
G
E
N
.
L
e
t
t
e
r
C
u
r
s
o
r
D
e
l
e
t
e
Here, you can save your edits. Rotate the PARA knob to
choose a save location (Patch slot). The Quick Access
Knobs function as: Select Letter, Move Cursor, Delete
Character. Patch names can use four character types:
Numbers, Symbols (incl. space), Uppercase Letters,
Lowercase Letters. Using the compatible software for
saving/renaming is more convenient.
After conrming the location and name, press SAVE again to conrm and return to
the Main Screen. Press BACK to cancel and return.
Quick Save: Hold the SAVE button for quick save. GP-150 will save your changes to
the current patch name and location immediately.
Note:
All edits in the Edit Screen apply only to the current patch. If you switch patches
or power o without saving, all unsaved edits will be lost. Always check for the *
save indicator next to the patch number. Save your work after editing, or consider
using the Auto Save function (see Global Settings).
19
Global Settings
Global Settings
In this section, you can congure global functions. Unlike settings within individual
Patches, global settings aect the entire unit’s operation and remain constant
across all Patches. All changes take eect immediately. Here, you can congure
Input/Output, USB Audio, Global EQ, External Devices, Display, and perform a
Factory Reset.
1
2
3
Within this section, use the PARA knob to navigate
through the menu items in Area 1. The adjustable
parameters for the selected item will be displayed in
Area 2 below. You can adjust these parameters using the
three Quick Access Knobs beneath the screen.
If a setting item has more than three adjustable
parameters or functions, Area 3 will display the current
parameter page and your position. Press the PARA knob
to cycle through the pages.
Input / Output
This section is for adjusting parameters related to input, output, and headset
functionality.
G
l
o
b
a
l
S
e
t
t
i
n
g
s
I
n
p
u
t
/
O
u
t
p
u
t
U
S
B
S
e
t
t
i
n
g
s
G
L
O
B
A
L
E
Q
T
A
P
S
e
t
t
i
n
g
s
E
X
P
C
a
l
i
b
r
a
t
e
F
o
o
t
s
w
i
t
c
h
I
n
p
u
t
L
e
v
e
l
0
d
B
O
u
t
p
u
t
(
R
)
M
o
n
o
N
o
C
A
B
M
o
d
e
(
L
)
O
n
Input Level: Select based on your specic instrument for
the optimal experience. Range: -20dB to +20dB. Default:
0dB.
Output (R): Sets the output mode for the OUT R
(BALANCED) jack, useful when using it alone as a
balanced output to dene the audio response channel.
Stereo: The OUT R (BALANCED) jack outputs the right
channel signal. Mono: The OUT R (BALANCED) jack outputs the left channel signal.
If both OUT L and R are used in this mode, they output identical dual left-channel
signals. Range: Mono, Stereo. Default: Stereo.
No CAB Mode (L/R): A one-touch setting to enable/disable the CAB module in the
left and/or right channel of the eects chain. Bypassing the cab sim allows the
corresponding output channel to send audio without cabinet simulation, suitable for
use with dierent external ampliers. Range: On, O. Default: O.
20
Global Settings
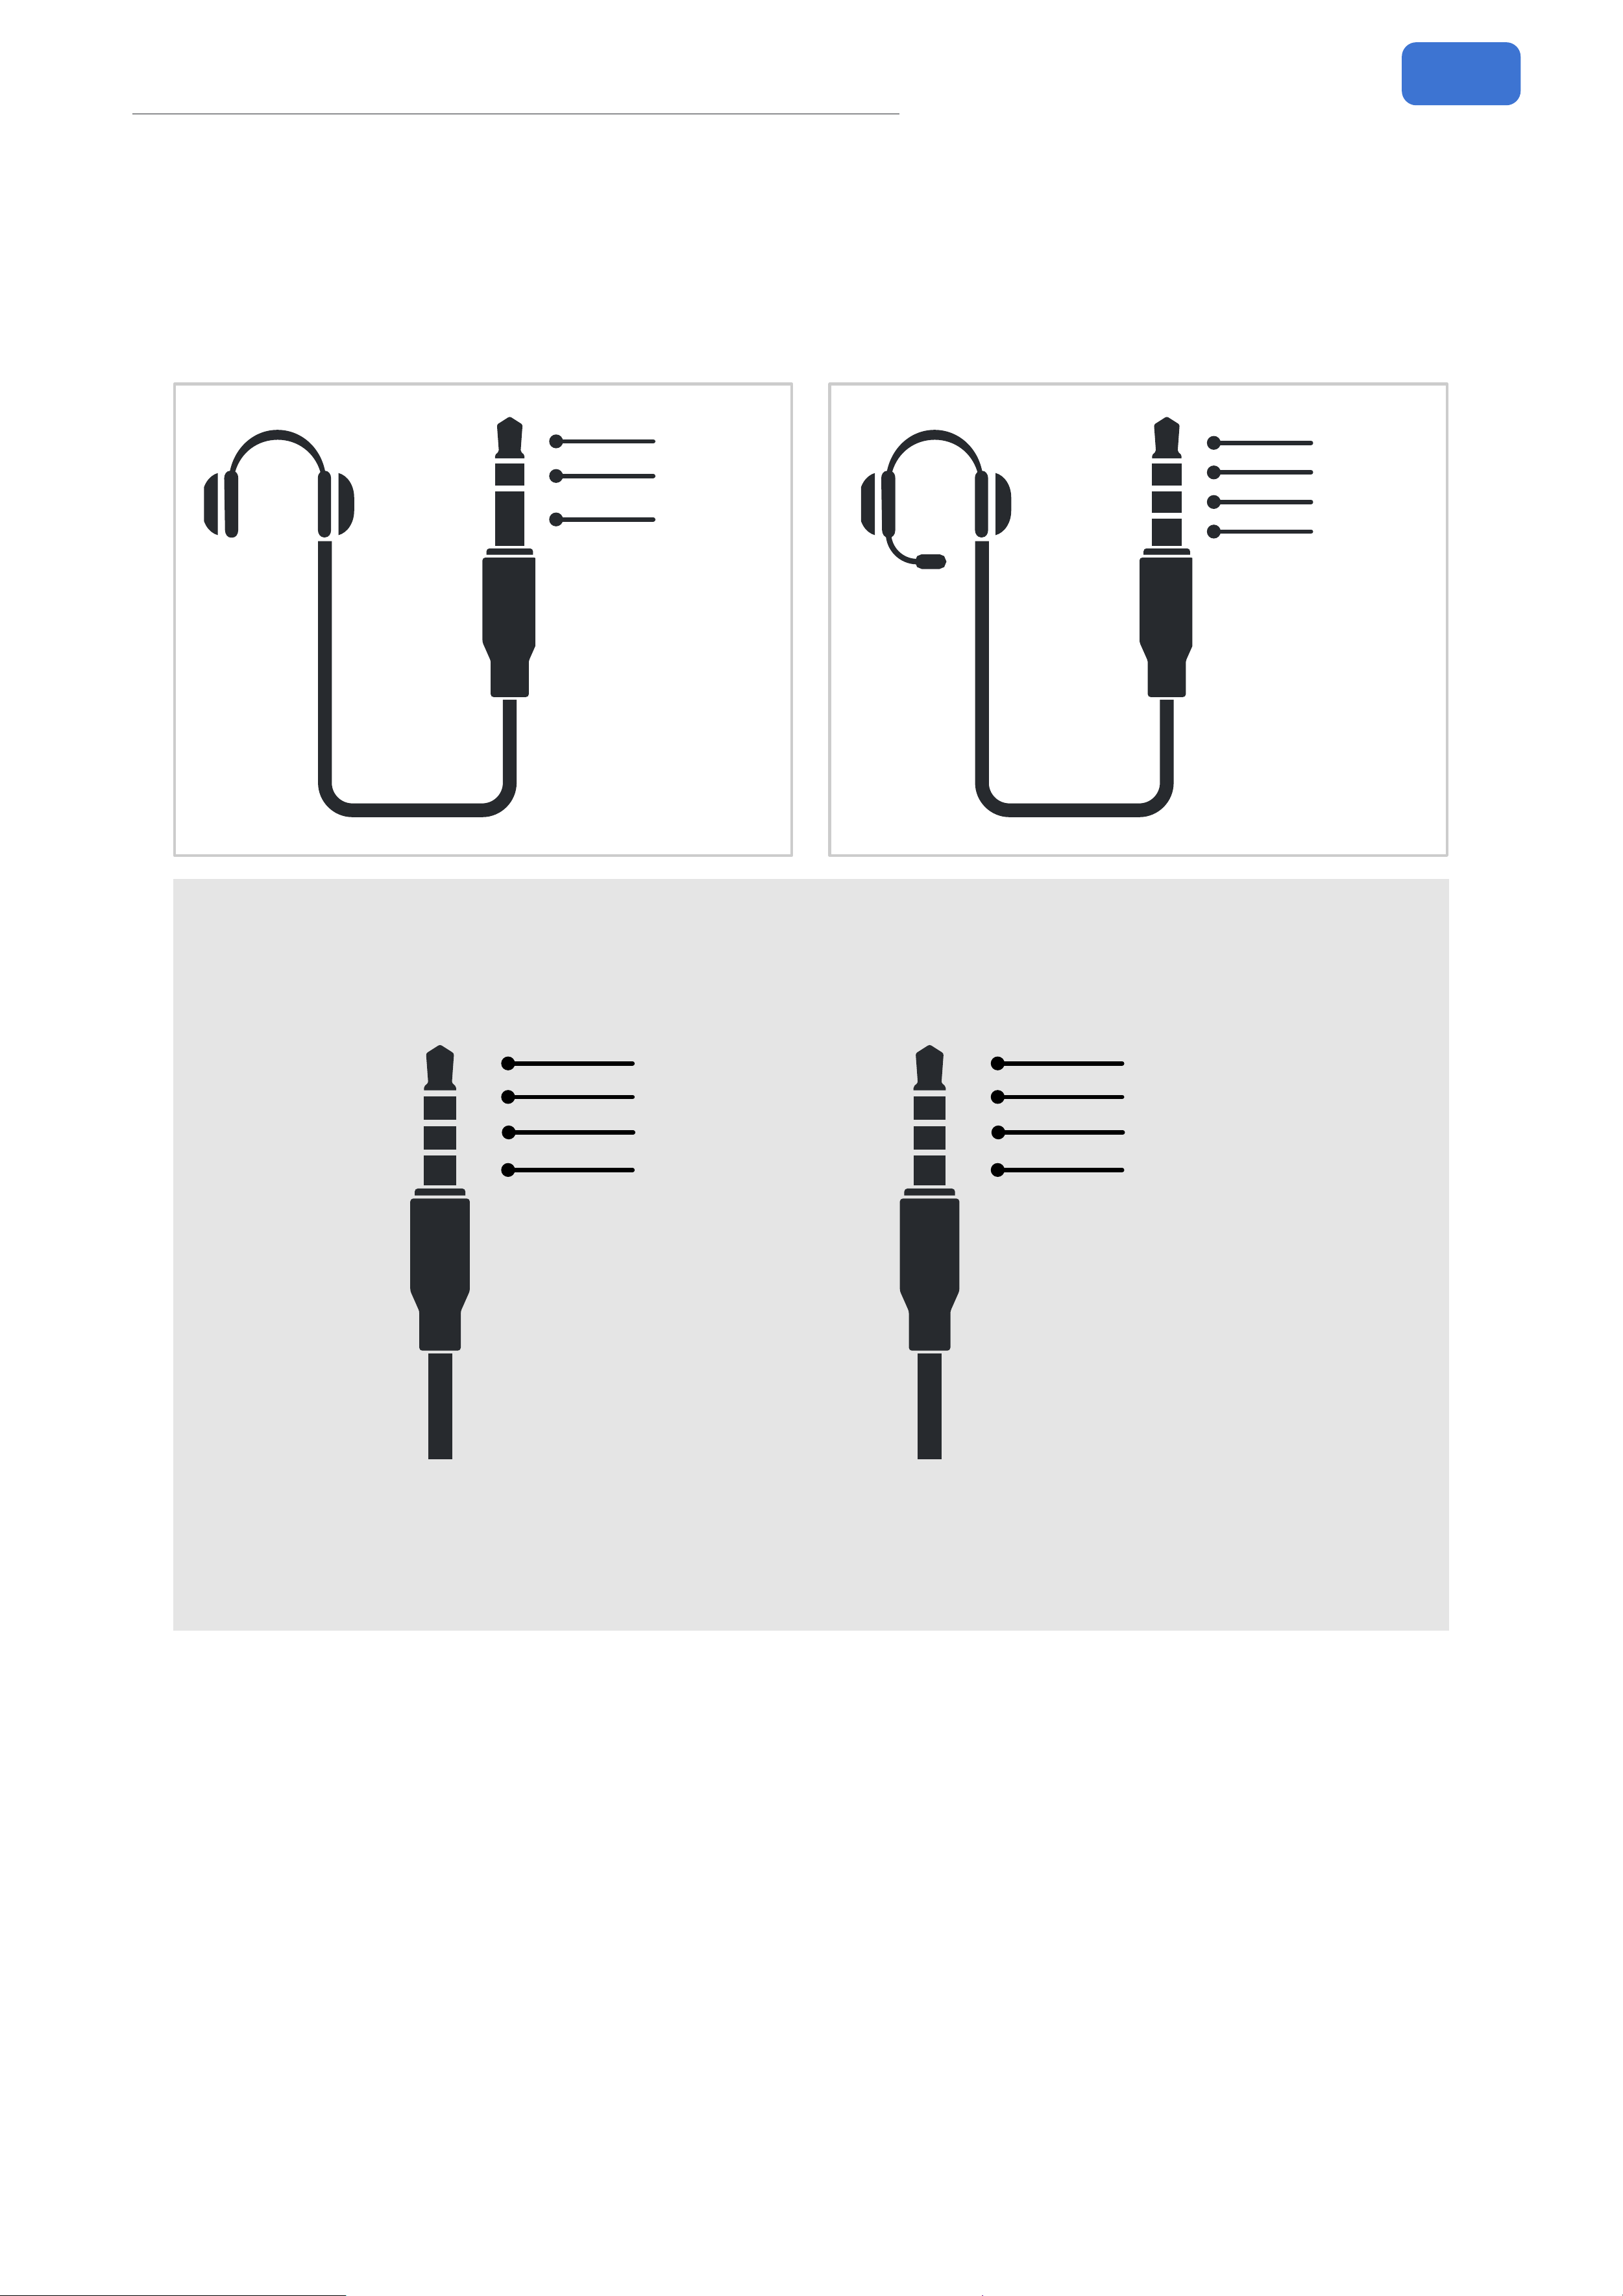
MIC/PHONES: Selects the device type for the PHONES/MIC jack. TRS: Use this for
standard headphones. TRRS: Use this for headsets with a microphone. Default:
TRS. The illustration below shows the physical dierence between TRS and TRRS
connectors for easy identication.
Tip
Ring
Sleeve
(TRS)
Tip
Ring
Sleeve
(TRRS)
Ring
Note:
The PHONES/MIC jack supports automatic switching between CTIA and OMTP
TRRS standards. See illustration for dierences.
L
R
MIC
GND
(OMTP)
L
R
GND
MIC
(CTIA)
When using the PHONES/MIC interface for monitoring, do not plug or unplug
connectors or switch between headsets/headphones (TRRS/TRS) to avoid
instantaneous noise during operation that may aect your monitoring experience.
MIC Level: Adjusts the output volume for the PHONES/MIC jack. Range: 0 to 100.
Default: 50.
MIC Monitor: Enables/disables monitoring of the microphone input on headsets.
Range: On, O. Default: O.

21
Global Settings
USB Settings
This section adjusts parameters for the USB Audio Interface function and USB
power settings.
REC Level: Adjusts the total output volume for USB
recording. Range: -20dB to +20dB. Default: 0dB.
BT REC: Adjusts the recording level for BT audio during
USB recording. Range: O, -20dB to +20dB. Default: O.
Monitor Level: Adjusts the monitoring playback volume
via the USB audio interface. Range: -20dB to +20dB.
Default: 0dB.
MIC REC: Adjusts the recording level for the headset microphone during USB
recording. Range: O, -20dB to +20dB. Default: O.
REC Mode (L/R): Selects the signal type for the USB audio output channels. The unit
features a stereo USB virtual output. Dry: The corresponding channel outputs the
unprocessed, direct signal. Wet: The corresponding channel outputs the processed
signal with eects. Range: Wet, Dry. Default: Wet.
USB Mode: Selects the USB audio interface’s input/output channel conguration.
Normal Mode: 6-in, 4-out channel conguration. Legacy Mode: 2-in, 2-out channel
conguration. Range: Normal Mode, Legacy Mode. Default: Normal Mode.
USB I/O Channel Modes:
6-in, 4-out Mode:
This indicates that the USB audio interface function supports 6 input channels and 4
output channels.
USB Input Channels 1 & 2: Receive the stereo signal (wet/dry) from the eects chain
and the microphone output.
USB Input Channels 3 & 4: Dedicated to receiving only the stereo wet signal from the
eects chain.
USB Input Channels 5 & 6: Used for the LOOPBACK function to record audio from
other applications on your computer.
USB Output Channels 1 & 2: Primarily send the mixed audio signal to the output jacks
and headphone jack for monitoring.
USB Output Channels 3 & 4: Primarily used to send the dry signal back to the eect
processor.
2-in, 2-out Mode:
This channel conguration does not include MIDI data transmission. It is compatible
with the OTG function on most mobile systems, but cannot be used to connect to the
companion software on a computer.
Power Options: Congures the USB port’s power function. Charge: When connected
to a USB power source, charges the unit’s internal battery. NO Power: USB port
only handles data transfer, no power input or output. Reverse: The unit’s USB port
supplies power to external devices. Range: Charge, No Power, Reverse Power.

22
Global Settings
Default: Charge. When powered o, the USB port defaults to Charge mode.
Note:
1. Reverse Power function is only available when the unit is connected to a DC 9V
power adapter.
2. Reverse Power may not function correctly with some devices due to
compatibility issues.
23
Global Settings
Global EQ
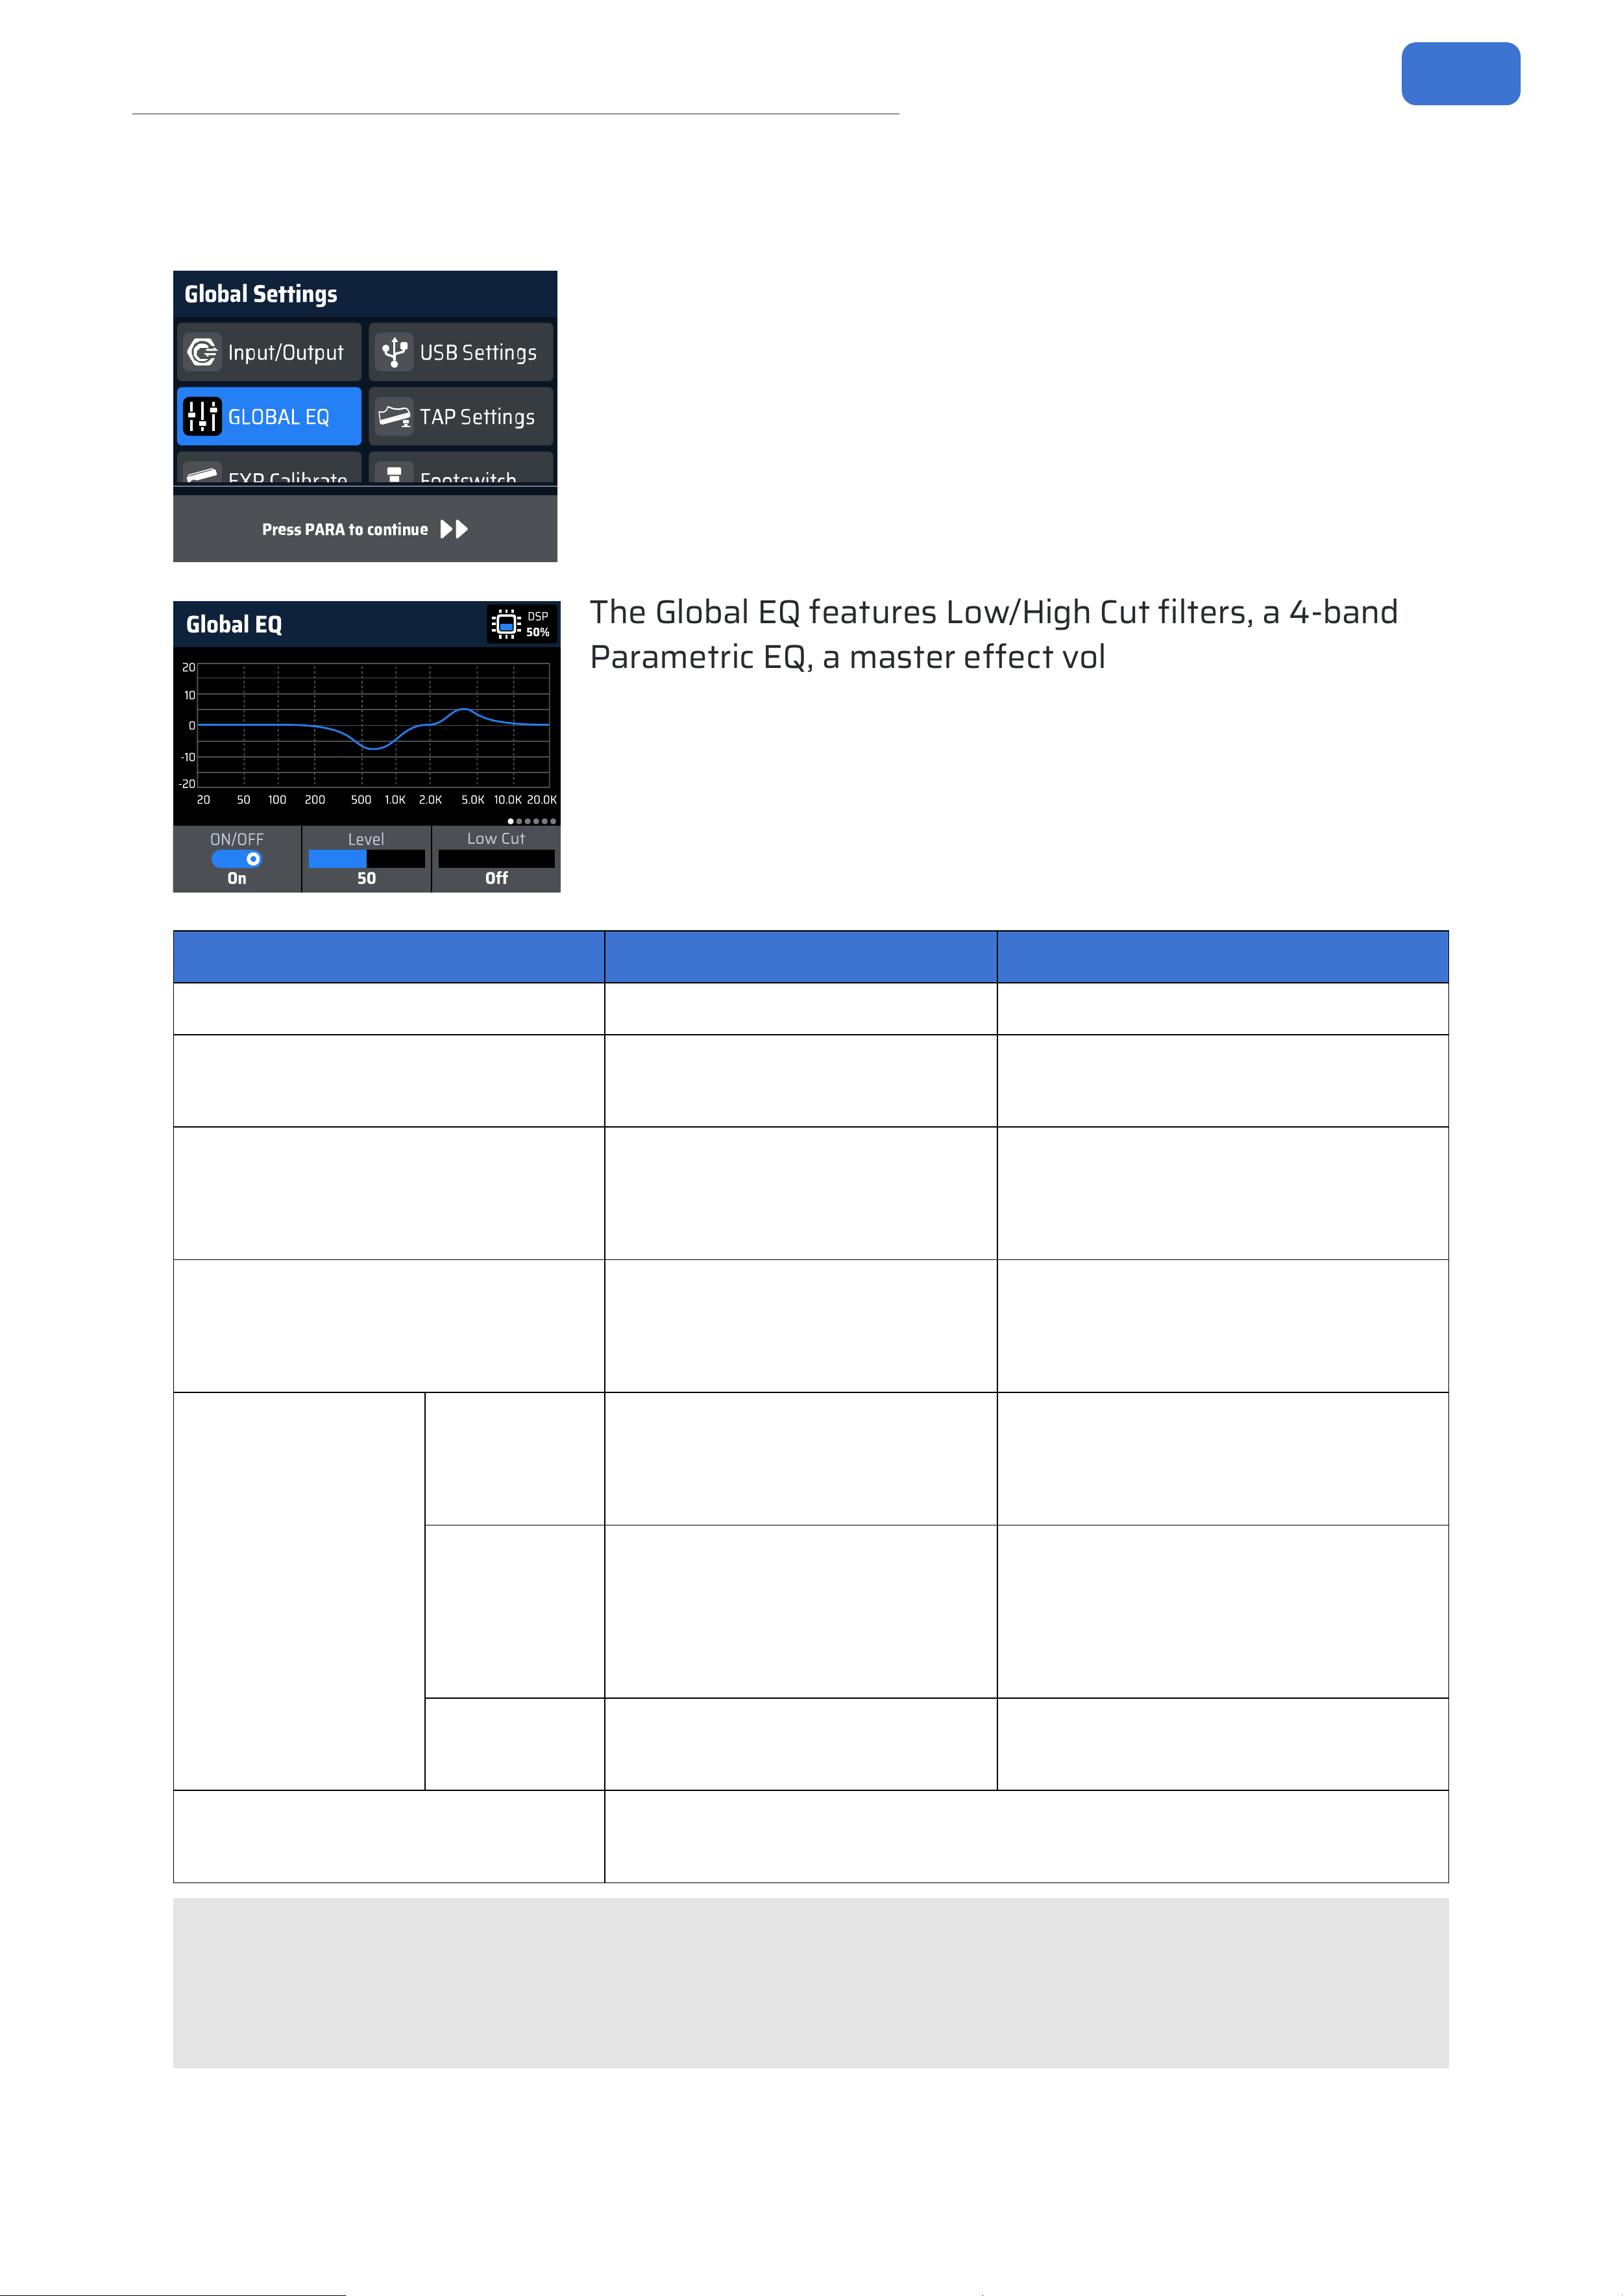
This section congures the Global Equalizer, which
aects the overall tone of the unit’s processed sound.
Press the PARA knob to enter this sub-menu.
Inside, the screen displays a real-time frequency
response graph (20Hz-20kHz) and gain changes (-20dB
to +20dB). Use the PARA knob (rotate or press) to
navigate pages.
G
l
o
b
a
l
E
Q
2
0
-
2
0
-
1
0
0
1
0
2
0
5
0
1
0
0
2
0
0
5
0
0
1
.
0
K
2
.
0
K
5
.
0
K
1
0
.
0
K
2
0
.
0
K
L
o
w
C
u
t
O
f
f
O
N
/
O
F
F
O
n
L
e
v
e
l
5
0
5
0
%
D
S
P
The Global EQ features Low/High Cut lters, a 4-band
Parametric EQ, a master eect volume control, and a
reset function.
Option Adjustment Range Description
On/O On / O (Default: O) Enables/Disables the Global EQ
Level 0 ~ 100 (Default: 50)
Adjusts the Global EQ eect
volume
Low Cut
OFF, 20Hz~20kHz (Default:
OFF)
High-Pass Filter. Cuts
frequencies below the selected
point
High Cut
20Hz~20kHz, OFF (Default:
OFF)
Low-Pass Filter. Cuts
frequencies above the selected
point
Bands 1-4: Four
selectable peak
lters for overall
or ne-tuning of
the frequency
response within
specic ranges
Band 1-4
Freq
20Hz ~ 20kHz
(Defaults: 100Hz, 500Hz,
1kHz, 5kHz)
Adjusts the center frequency for
each Peak Filter band
Band 1-4 Q
0.1 ~ 10.0
(Default: 0.7)
Adjusts lter bandwidth
(sharpness). Higher values =
narrower bandwidth (steeper,
more precise)
Band 1-4
Gain
-20dB ~ +20dB
(Default: 0dB)
Adjusts gain (boost/cut) for each
band
Reset
Clears all settings and restores Global EQ to default
parameters
Note:
1. Adjust Global EQ parameters carefully to protect your equipment and hearing.
2. Global EQ does not aect the unit’s USB audio output.
24
Global Settings
TAP Settings
This section sets the one-touch Tap Tempo synchronization for the PRE, MOD, and
DLY eect modules.
G
l
o
b
a
l
S
e
t
t
i
n
g
s
I
n
p
u
t
/
O
u
t
p
u
t
U
S
B
S
e
t
t
i
n
g
s
G
L
O
B
A
L
E
Q
T
A
P
S
e
t
t
i
n
g
s
E
X
P
C
a
l
i
b
r
a
t
e
F
o
o
t
s
w
i
t
c
h
M
O
D
O
f
f
P
R
E
O
f
f
D
L
Y
O
f
f
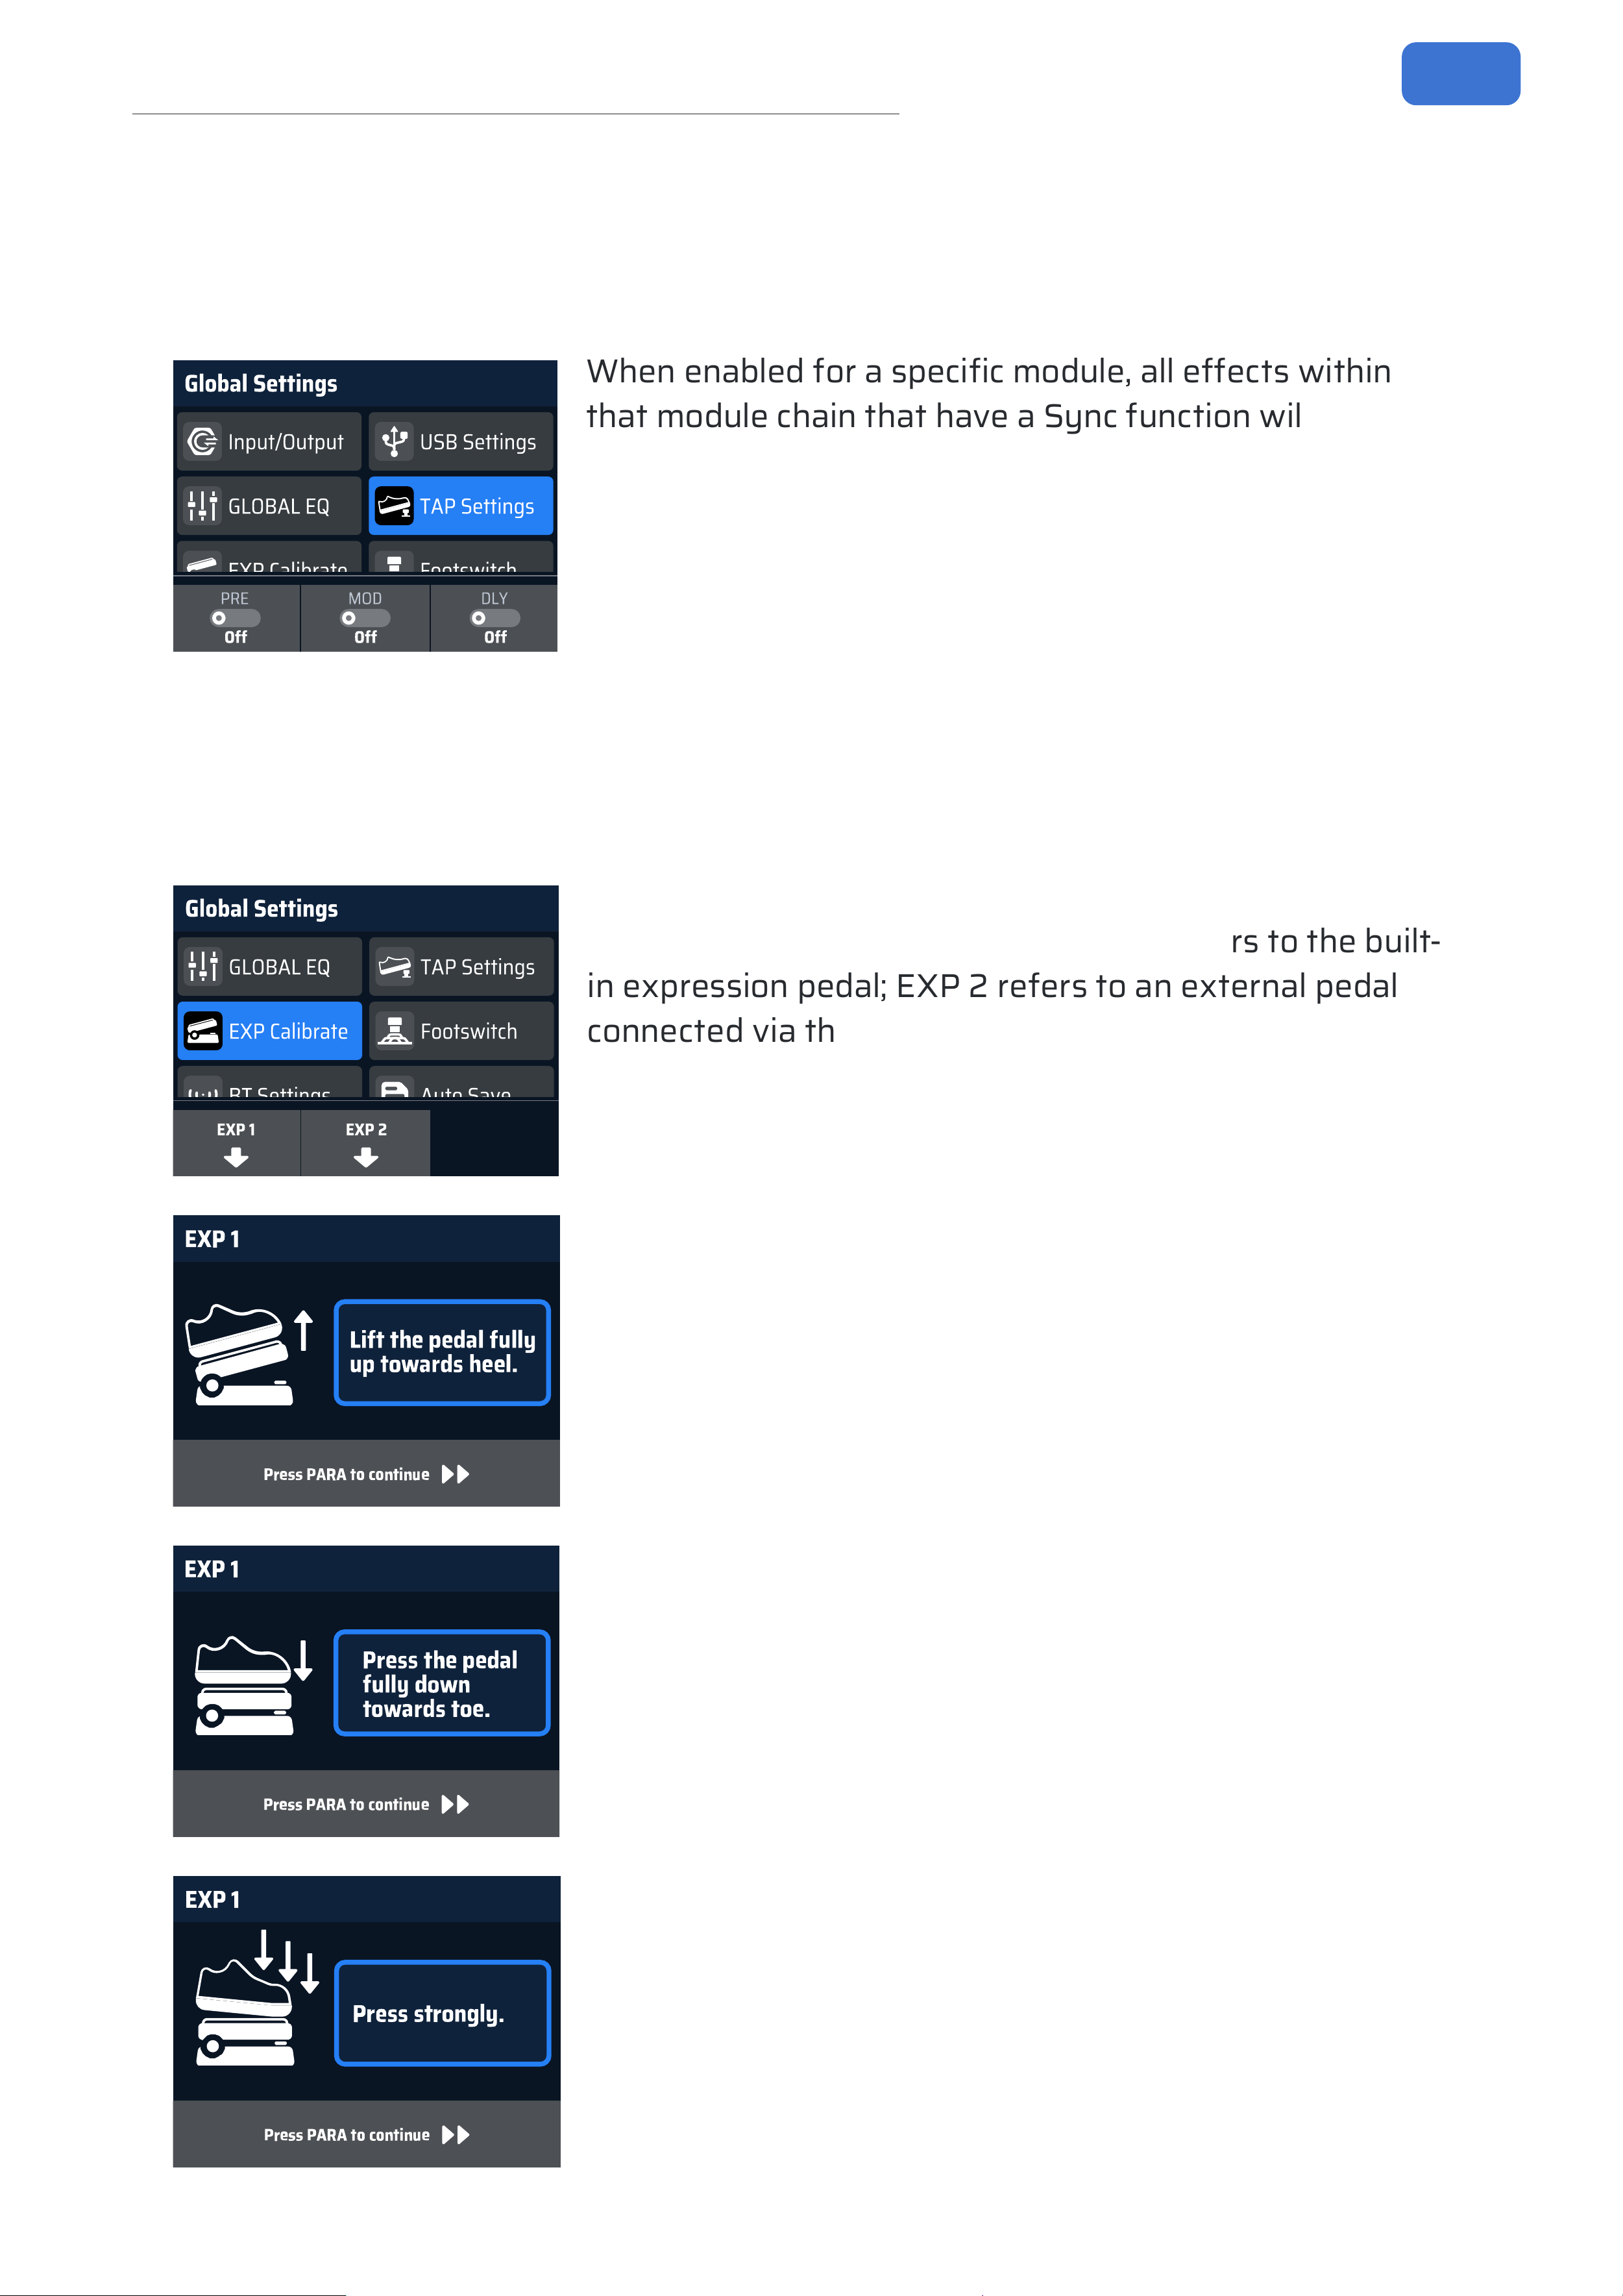
When enabled for a specic module, all eects within
that module chain that have a Sync function will be
forced ON. This means the timing-based eects in that
module will synchronize to the current patch’s BPM
value. Range: On, O. Default: O.
EXP Calibrate
Use this function to calibrate expression pedals. Consider calibration if eect
changes are not noticeable or are too sensitive when lightly pressing the pedal.
G
l
o
b
a
l
S
e
t
t
i
n
g
s
G
L
O
B
A
L
E
Q
T
A
P
S
e
t
t
i
n
g
s
E
X
P
C
a
l
i
b
r
a
t
e
F
o
o
t
s
w
i
t
c
h
B
T
S
e
t
t
i
n
g
s
A
u
t
o
S
a
v
e
E
X
P
2
E
X
P
1
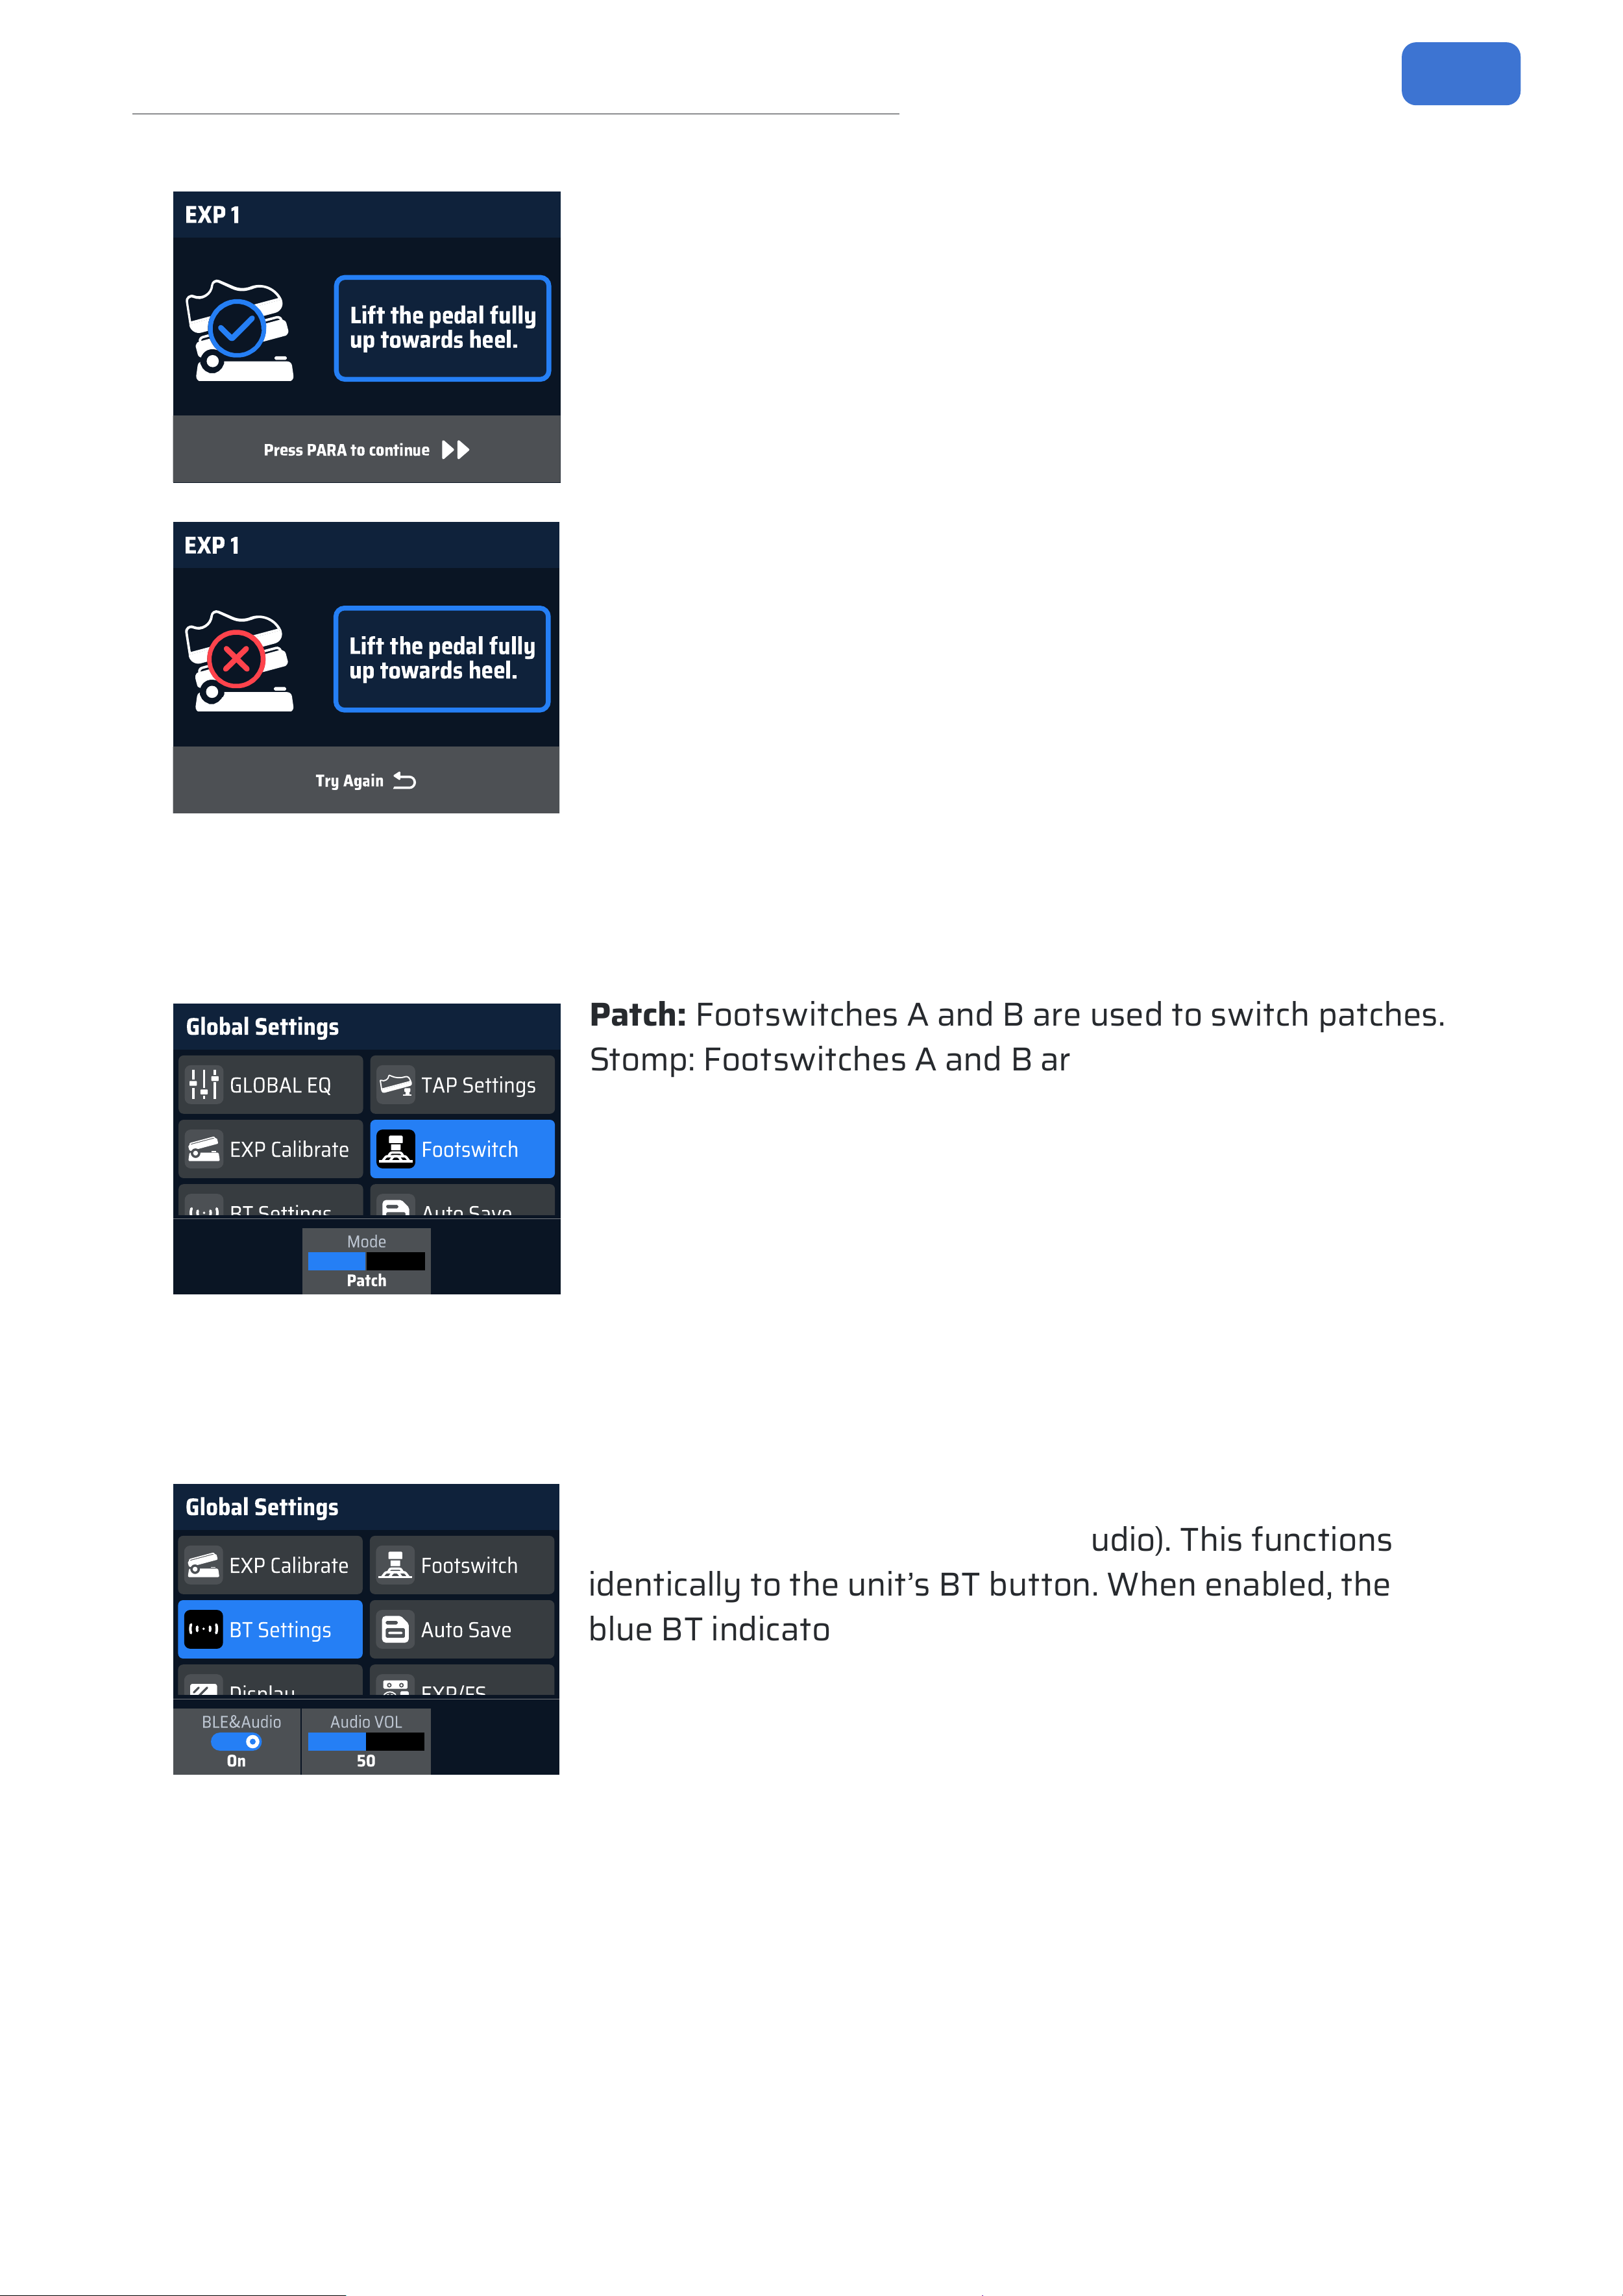
Rotate the corresponding Quick Access Knob to enter the
calibration screen for that pedal. EXP1 refers to the built-
in expression pedal; EXP 2 refers to an external pedal
connected via the EXP/FS jack.
Lift the pedal fully up towards heel, then press the PARA
knob to continue.
Press the pedal fully down towards toe, then press the
PARA knob to continue.
Press strongly, then press the PARA knob to continue.
(For EXP1 only)
25
Global Settings
If calibration is successful, the screen will display a
conrmation. Press the PARA knob or BACK button to
exit.
If calibration fails, the screen will display an error. Repeat
the previous steps to retry, or press the BACK button to
cancel and return.
Footswitch
This selects the footswitch mode for operation on the Main and Edit screens.
G
l
o
b
a
l
S
e
t
t
i
n
g
s
G
L
O
B
A
L
E
Q
T
A
P
S
e
t
t
i
n
g
s
E
X
P
C
a
l
i
b
r
a
t
e
F
o
o
t
s
w
i
t
c
h
B
T
S
e
t
t
i
n
g
s
A
u
t
o
S
a
v
e
M
o
d
e
P
a
t
c
h
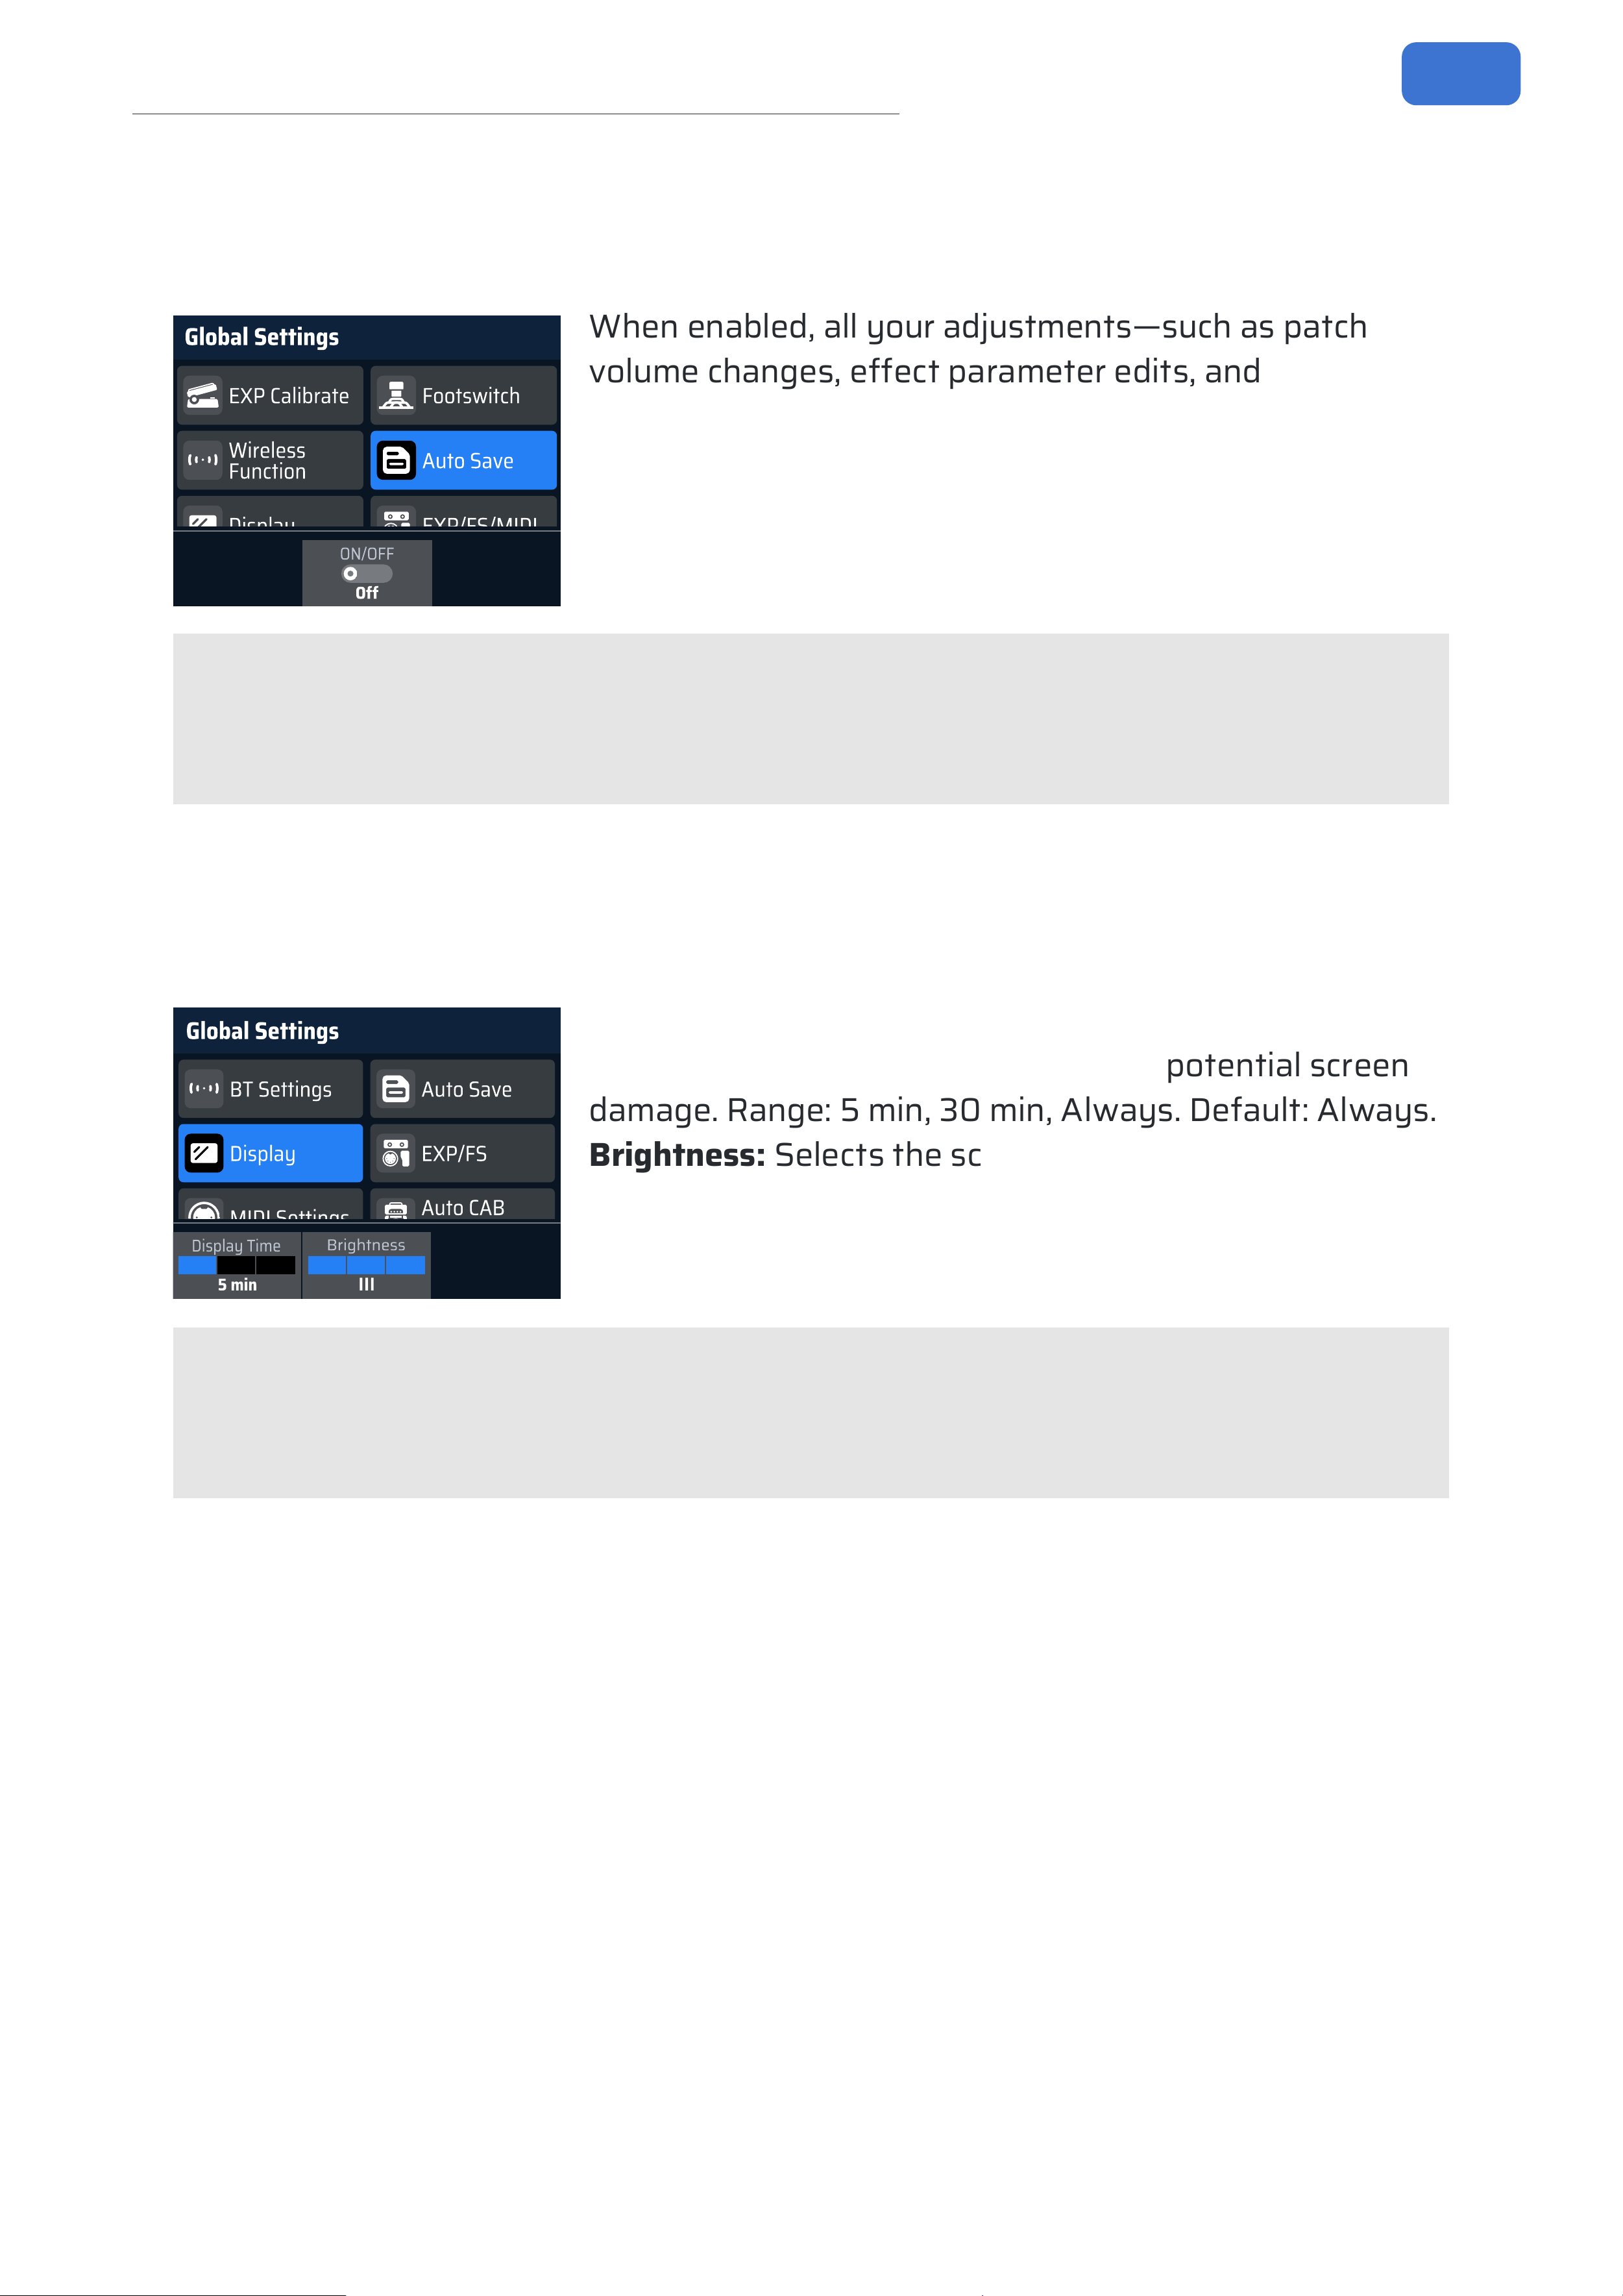
Patch: Footswitches A and B are used to switch patches.
Stomp: Footswitches A and B are used to toggle the
state of their assigned eect modules. Range: Patch,
Stomp. Default: Patch. (This setting has the same eect
as holding footswitch B on the Main Screen).
BT Settings
This section congures the built-in BT wireless module.
G
l
o
b
a
l
S
e
t
t
i
n
g
s
E
X
P
C
a
l
i
b
r
a
t
e
F
o
o
t
s
w
i
t
c
h
B
T
S
e
t
t
i
n
g
s
A
u
t
o
S
a
v
e
D
i
s
p
l
a
y
E
X
P
/
F
S
B
L
E
&
A
u
d
i
o
O
n
A
u
d
i
o
V
O
L
5
0
BLE & Audio: Enables/disables the BT wireless module
(for both data transmission and audio). This functions
identically to the unit’s BT button. When enabled, the
blue BT indicator lights up (ashing: searching/paring;
solid: connected).
Audio VOL: Adjusts the output volume for BT audio.
Available only when the above function is enabled.
Range: 0 to100. Default: 50.
26
Global Settings
Auto Save
This enables/disables the unit’s auto save function.
G
l
o
b
a
l
S
e
t
t
i
n
g
s
E
X
P
C
a
l
i
b
r
a
t
e
F
o
o
t
s
w
i
t
c
h
W
i
r
e
l
e
s
s
F
u
n
c
t
i
o
n
A
u
t
o
S
a
v
e
D
i
s
p
l
a
y
E
X
P
/
F
S
/
M
I
D
I
O
N
/
O
F
F
O
f
f
When enabled, all your adjustments—such as patch
volume changes, eect parameter edits, and eect
module state toggles—will be saved in real-time. The *
unsaved change indicator will not appear. Default: O.
Note:
This is an overwrite operation and cannot be undone. Please consider the
implications before enabling this function.
Display
This section adjusts display-related parameters.
G
l
o
b
a
l
S
e
t
t
i
n
g
s
D
i
s
p
l
a
y
T
i
m
e
5
m
i
n
B
r
i
g
h
t
n
e
s
s
Ⅲ
B
T
S
e
t
t
i
n
g
s
A
u
t
o
S
a
v
e
D
i
s
p
l
a
y
E
X
P
/
F
S
M
I
D
I
S
e
t
t
i
n
g
s
A
u
t
o
C
A
B
h
Display Time: Sets the time before the screen enters
sleep mode after inactivity to prevent potential screen
damage. Range: 5 min, 30 min, Always. Default: Always.
Brightness: Selects the screen brightness level.
Range: I, II, III (Brightest). Default: III.
Note:
1.Setting a display time and lowering brightness helps conserve battery life.
2.The screen sleep state does not aect the audio in/out of GP-150
27
Global Settings
EXP/FS
This section congures devices connected to the EXP/FS/MIDI IN jack.
G
l
o
b
a
l
S
e
t
t
i
n
g
s
T
y
p
e
S
i
n
g
l
e
F
S
E
X
T
F
S
1
N
o
n
e
B
T
S
e
t
t
i
n
g
s
A
u
t
o
S
a
v
e
D
i
s
p
l
a
y
E
X
P
/
F
S
M
I
D
I
S
e
t
t
i
n
g
s
A
u
t
o
C
A
B
h
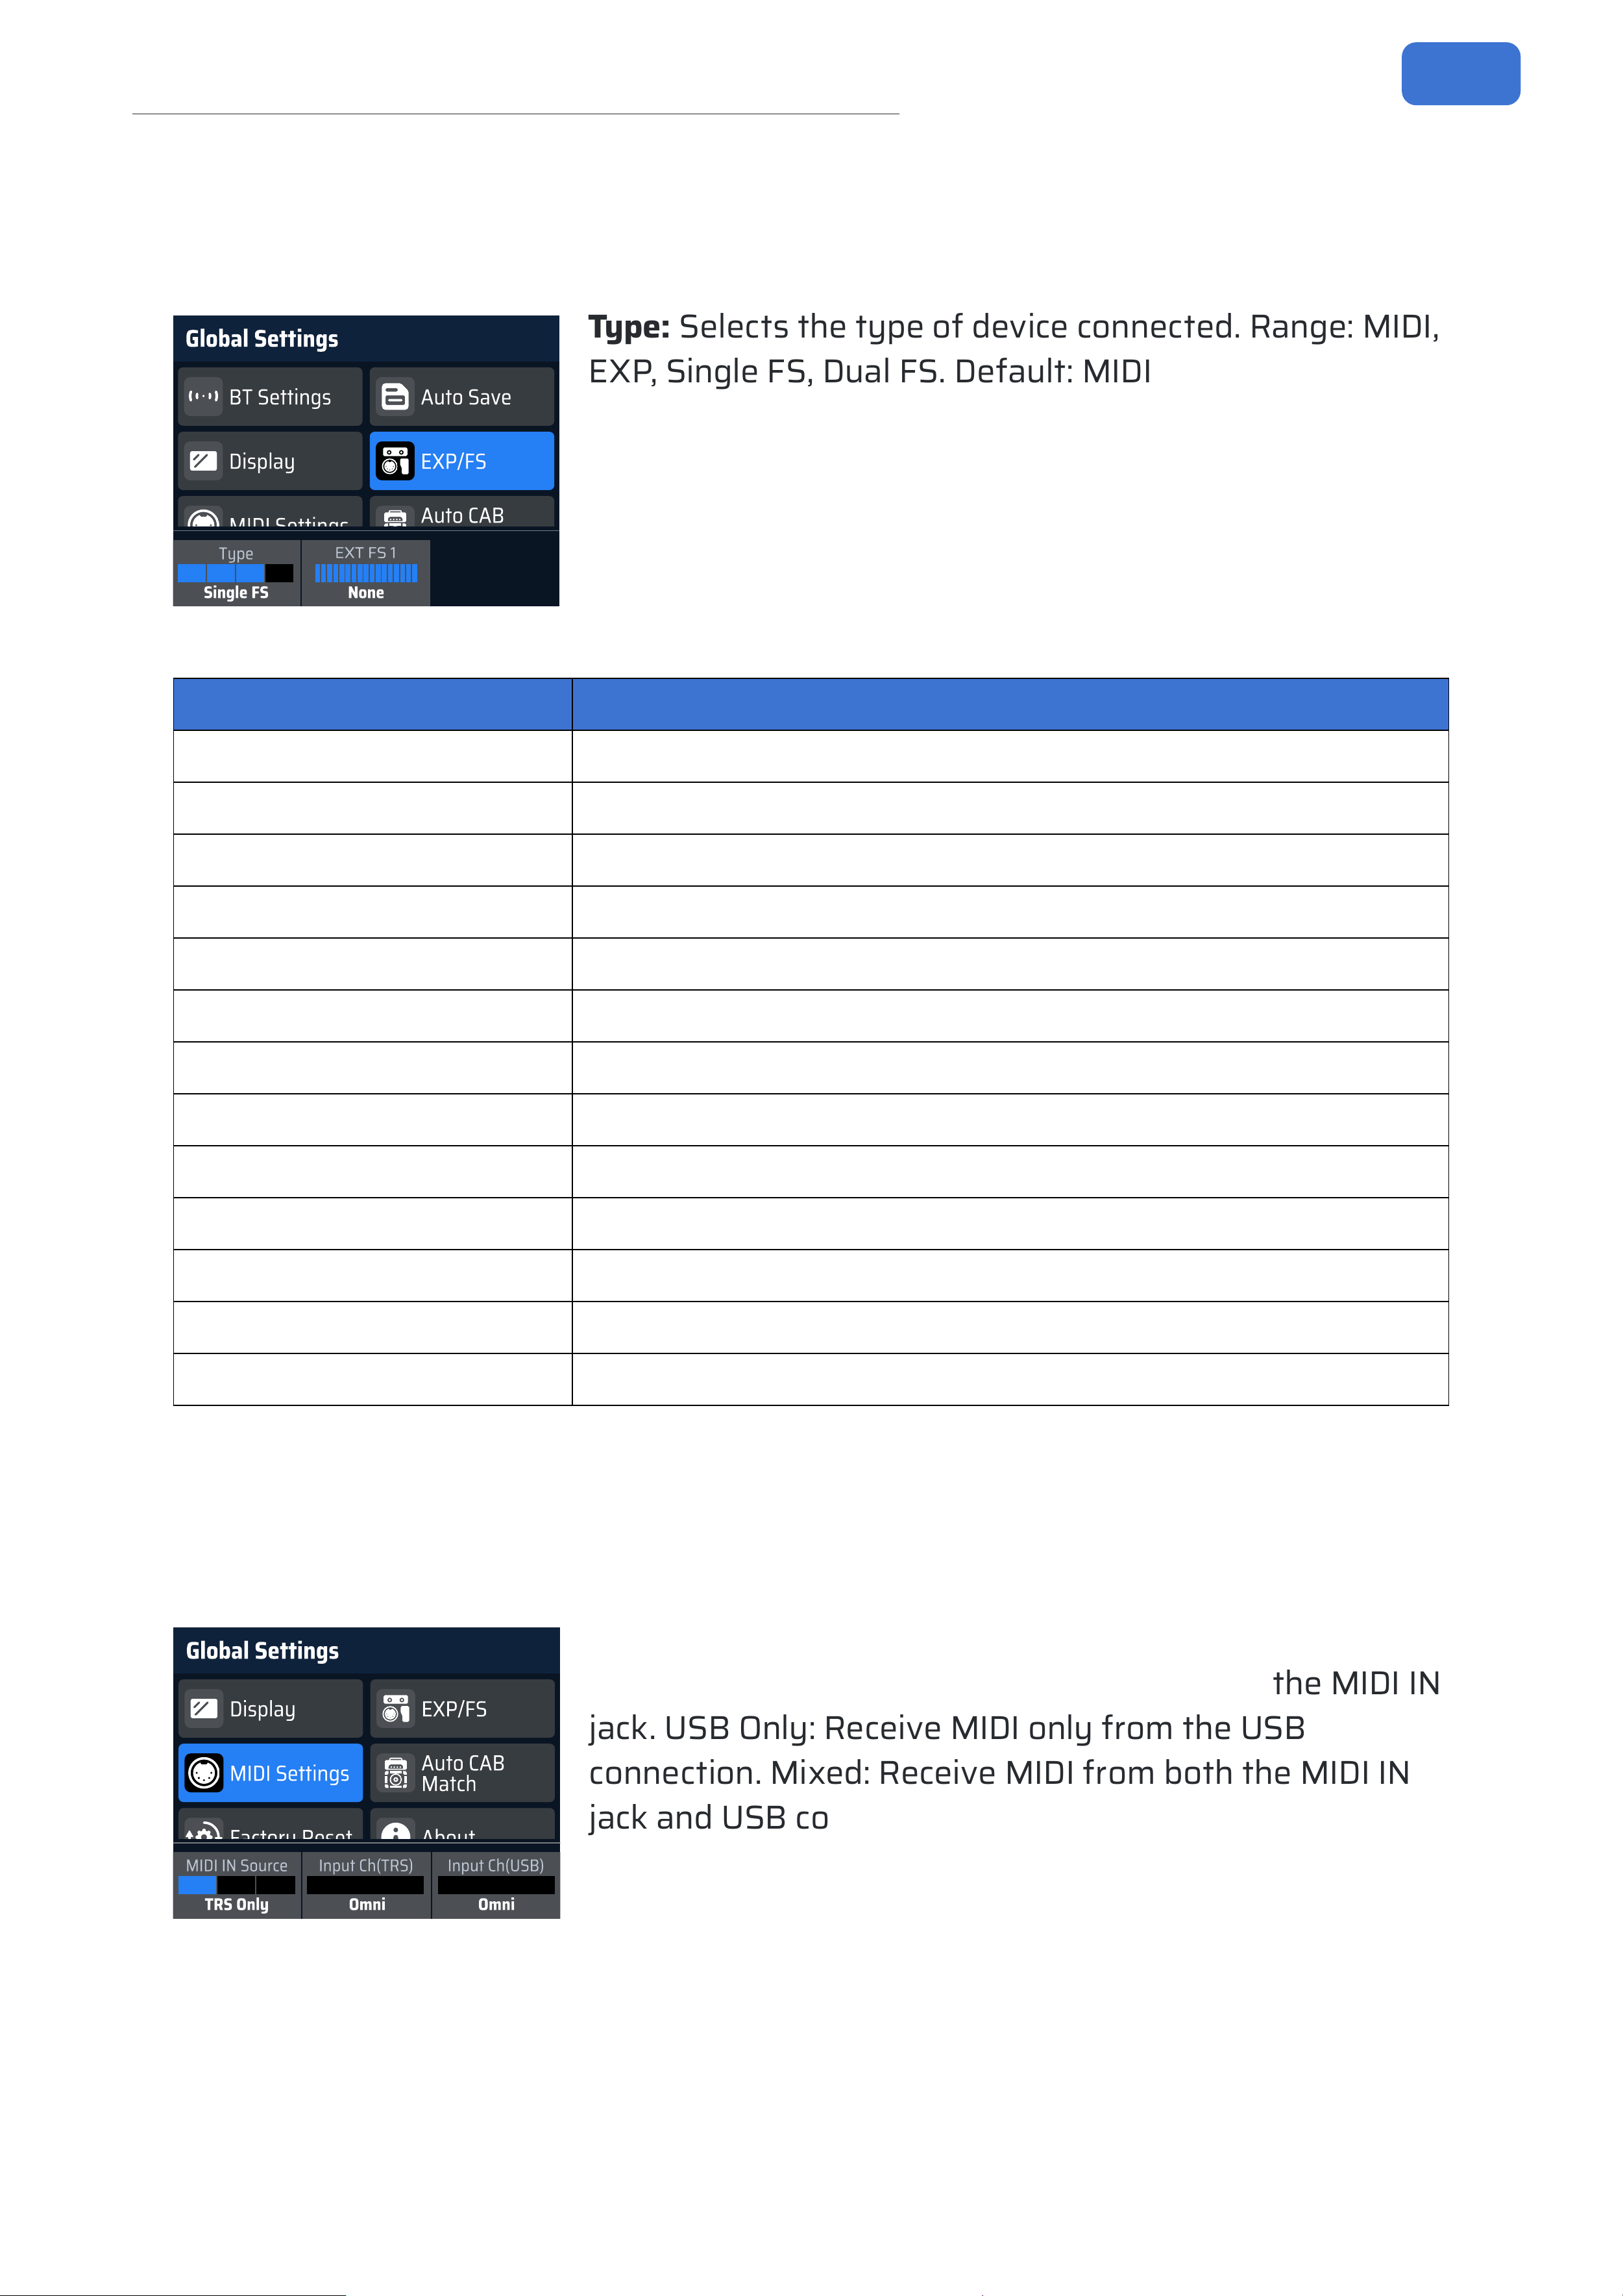
Type: Selects the type of device connected. Range: MIDI,
EXP, Single FS, Dual FS. Default: MIDI.
EXT. FS1 & EXT. FS2: When the Type is set to Single or
Dual FS, use the corresponding Quick Access Knobs to
assign a function. For dual footswitches, FS1 corresponds
to the left switch, and FS2 to the right.
The following footswitch functions are available:
Function Description
None (Default) No assigned function.
Patch + Switch to next patch.
Patch - Switch to previous patch.
CTRL A Toggle state of eect module assigned to Footswitch A.
CTRL B Toggle state of eect module assigned to Footswitch B.
EXP1 A/B Toggle the built-in pedal between its A and B states.
TAP Set patch BPM by tapping.
Drum Enter/Exit Drum screen.
Drum On/O Turn Drum On/O.
Drum + Switch to next drum patch.
Drum - Switch to previous drum patch.
Tuner Enter/Exit Tuner screen.
Looper Enter/Exit Looper screen.
MIDI Settings
This section congures MIDI functions. Ensure the EXP/FS Type is set to MIDI when
using the top panel MIDI IN jack.
G
l
o
b
a
l
S
e
t
t
i
n
g
s
D
i
s
p
l
a
y
E
X
P
/
F
S
M
I
D
I
S
e
t
t
i
n
g
s
A
u
t
o
C
A
B
M
a
t
c
h
F
a
c
t
o
r
y
R
e
s
e
t
A
b
o
u
t
I
n
p
u
t
C
h
(
T
R
S
)
O
m
n
i
I
n
p
u
t
C
h
(
U
S
B
)
O
m
n
i
M
I
D
I
I
N
S
o
u
r
c
e
T
R
S
O
n
l
y
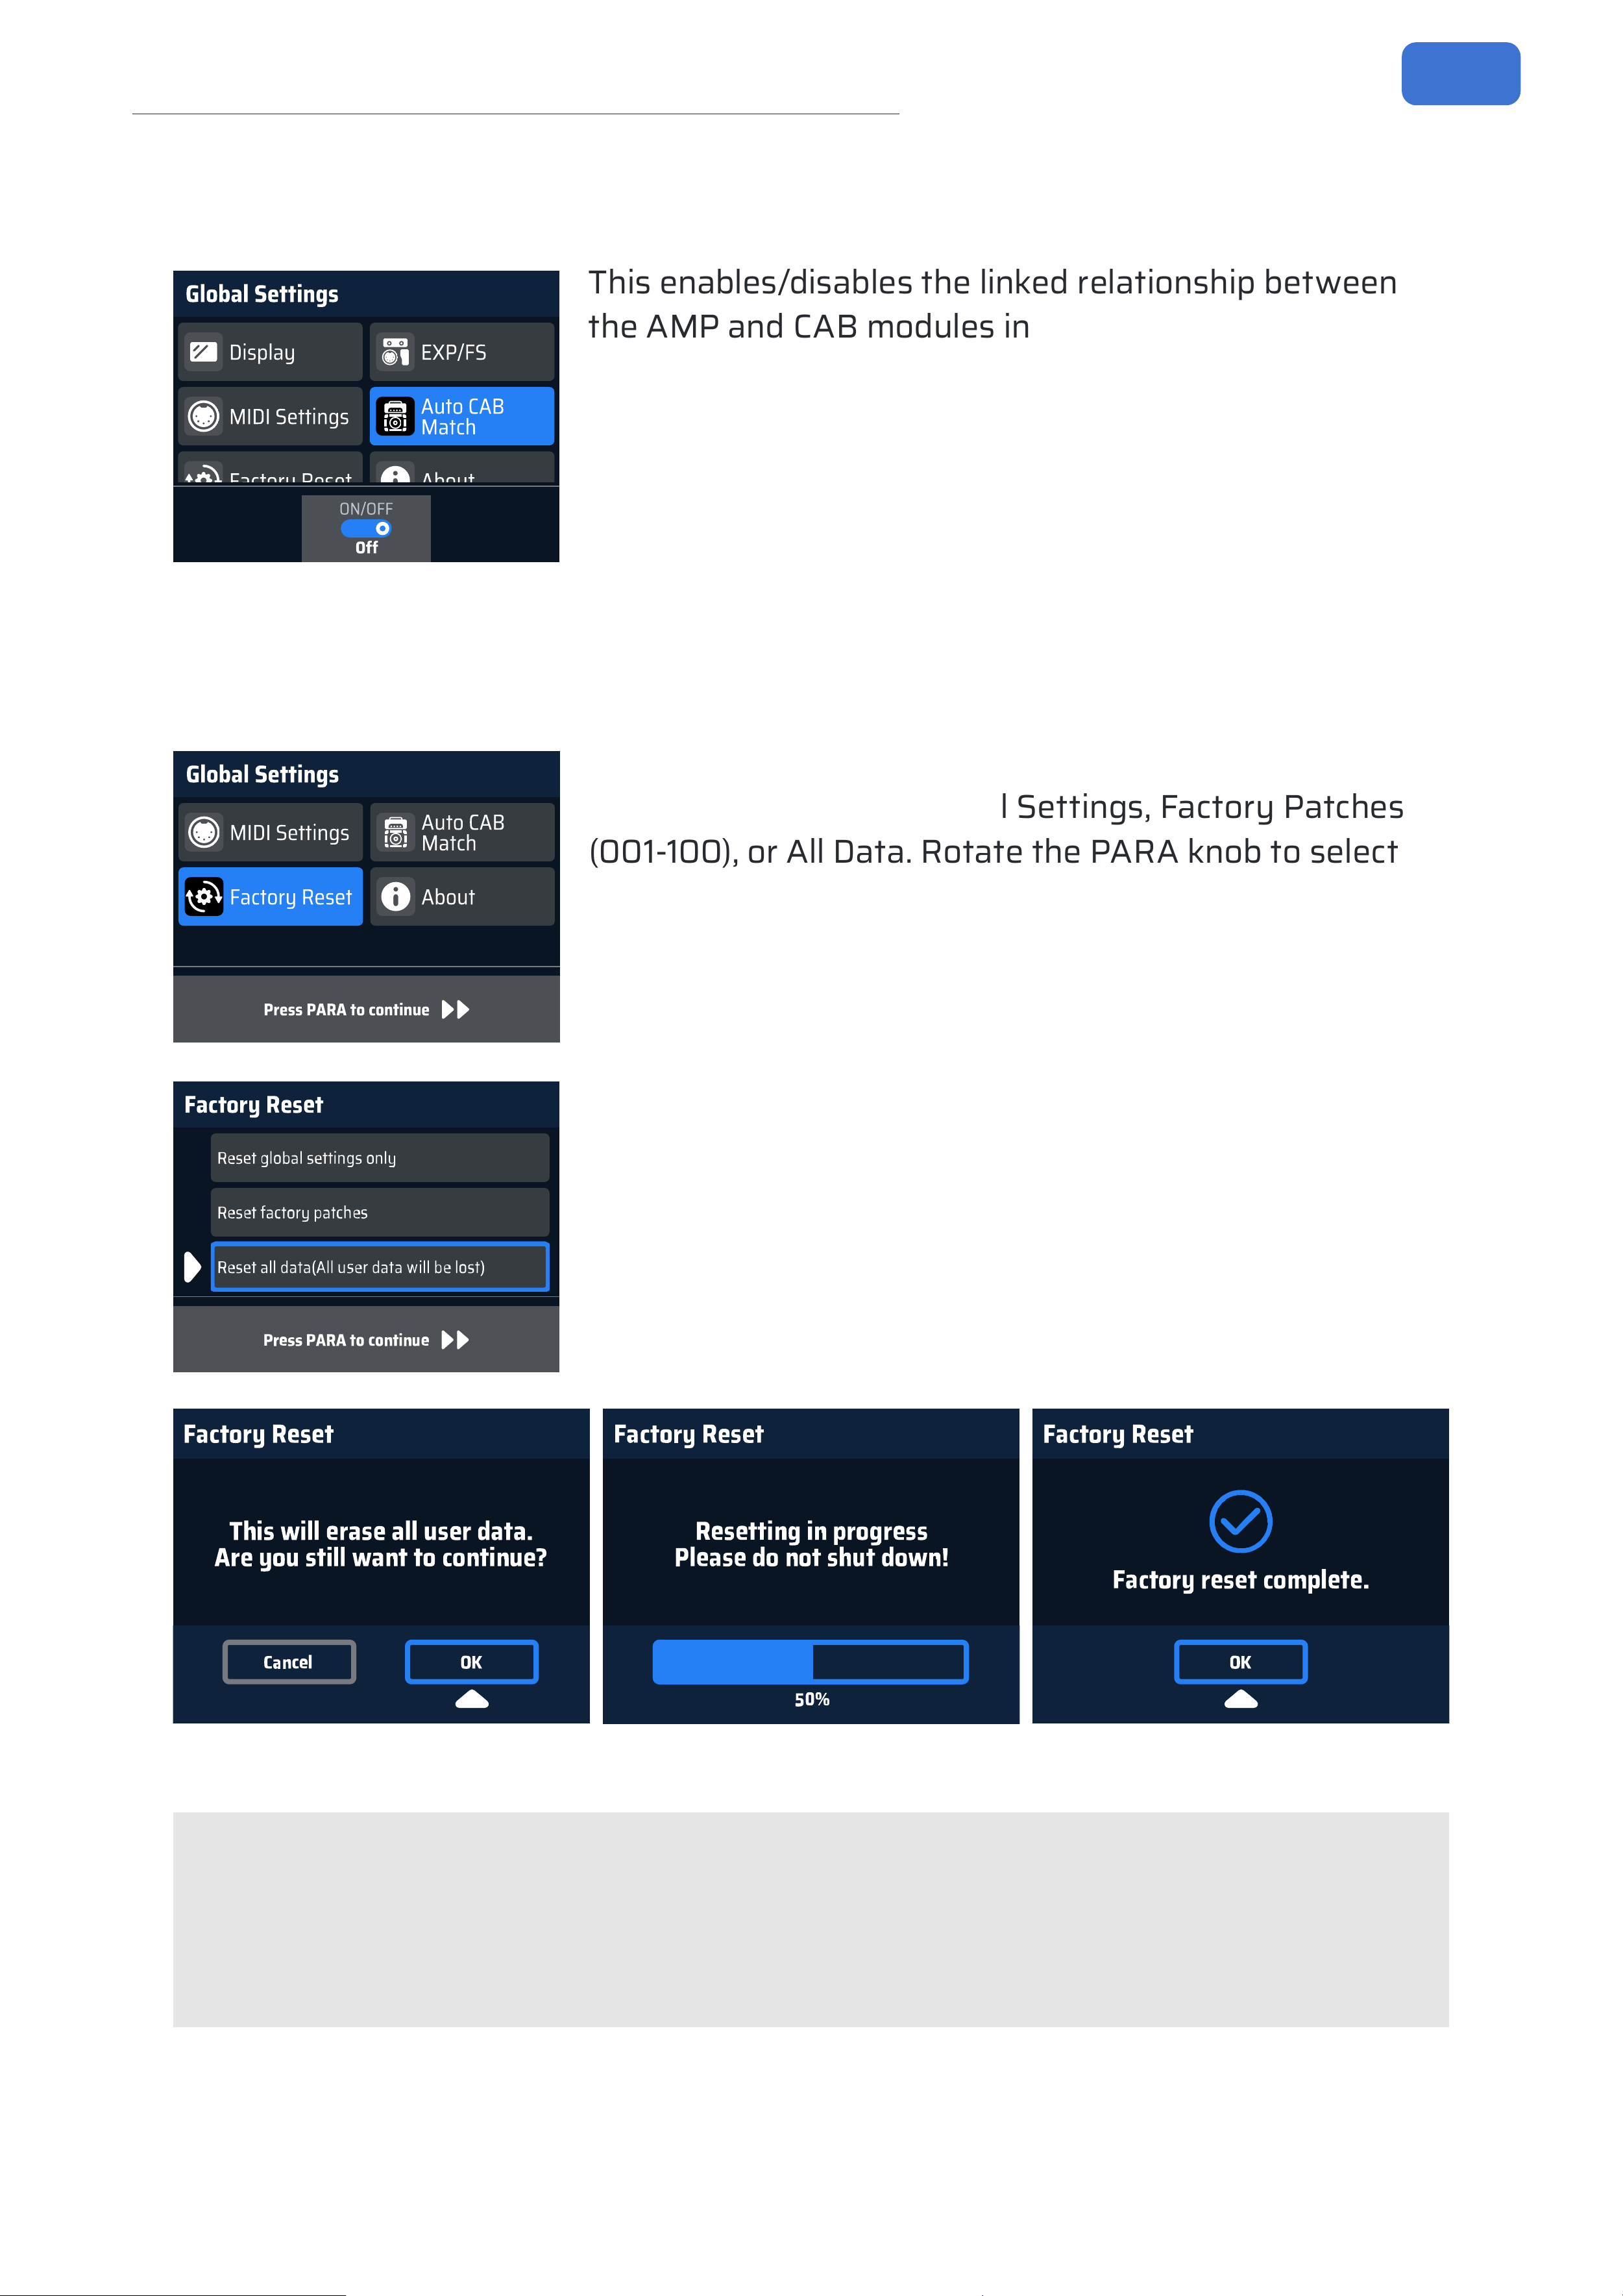
MIDI IN Source: Selects the source of incoming MIDI
messages. TRS Only: Receive MIDI only from the MIDI IN
jack. USB Only: Receive MIDI only from the USB
connection. Mixed: Receive MIDI from both the MIDI IN
jack and USB connection simultaneously. Range: TRS
Only, USB Only, Mixed. Default: Mixed.
Input Ch (TRS): Sets the MIDI channel for messages
received via the MIDI IN jack. Range: Omni, 1 to 16. Default: Omni.
Input Ch (USB): Sets the MIDI channel for messages received via the USB
connection. Range: Omni, 1 to 16. Default: Omni.
28
Global Settings
Auto CAB Match
G
l
o
b
a
l
S
e
t
t
i
n
g
s
D
i
s
p
l
a
y
E
X
P
/
F
S
M
I
D
I
S
e
t
t
i
n
g
s
A
u
t
o
C
A
B
M
a
t
c
h
F
a
c
t
o
r
y
R
e
s
e
t
A
b
o
u
t
O
N
/
O
F
F
O
f
f
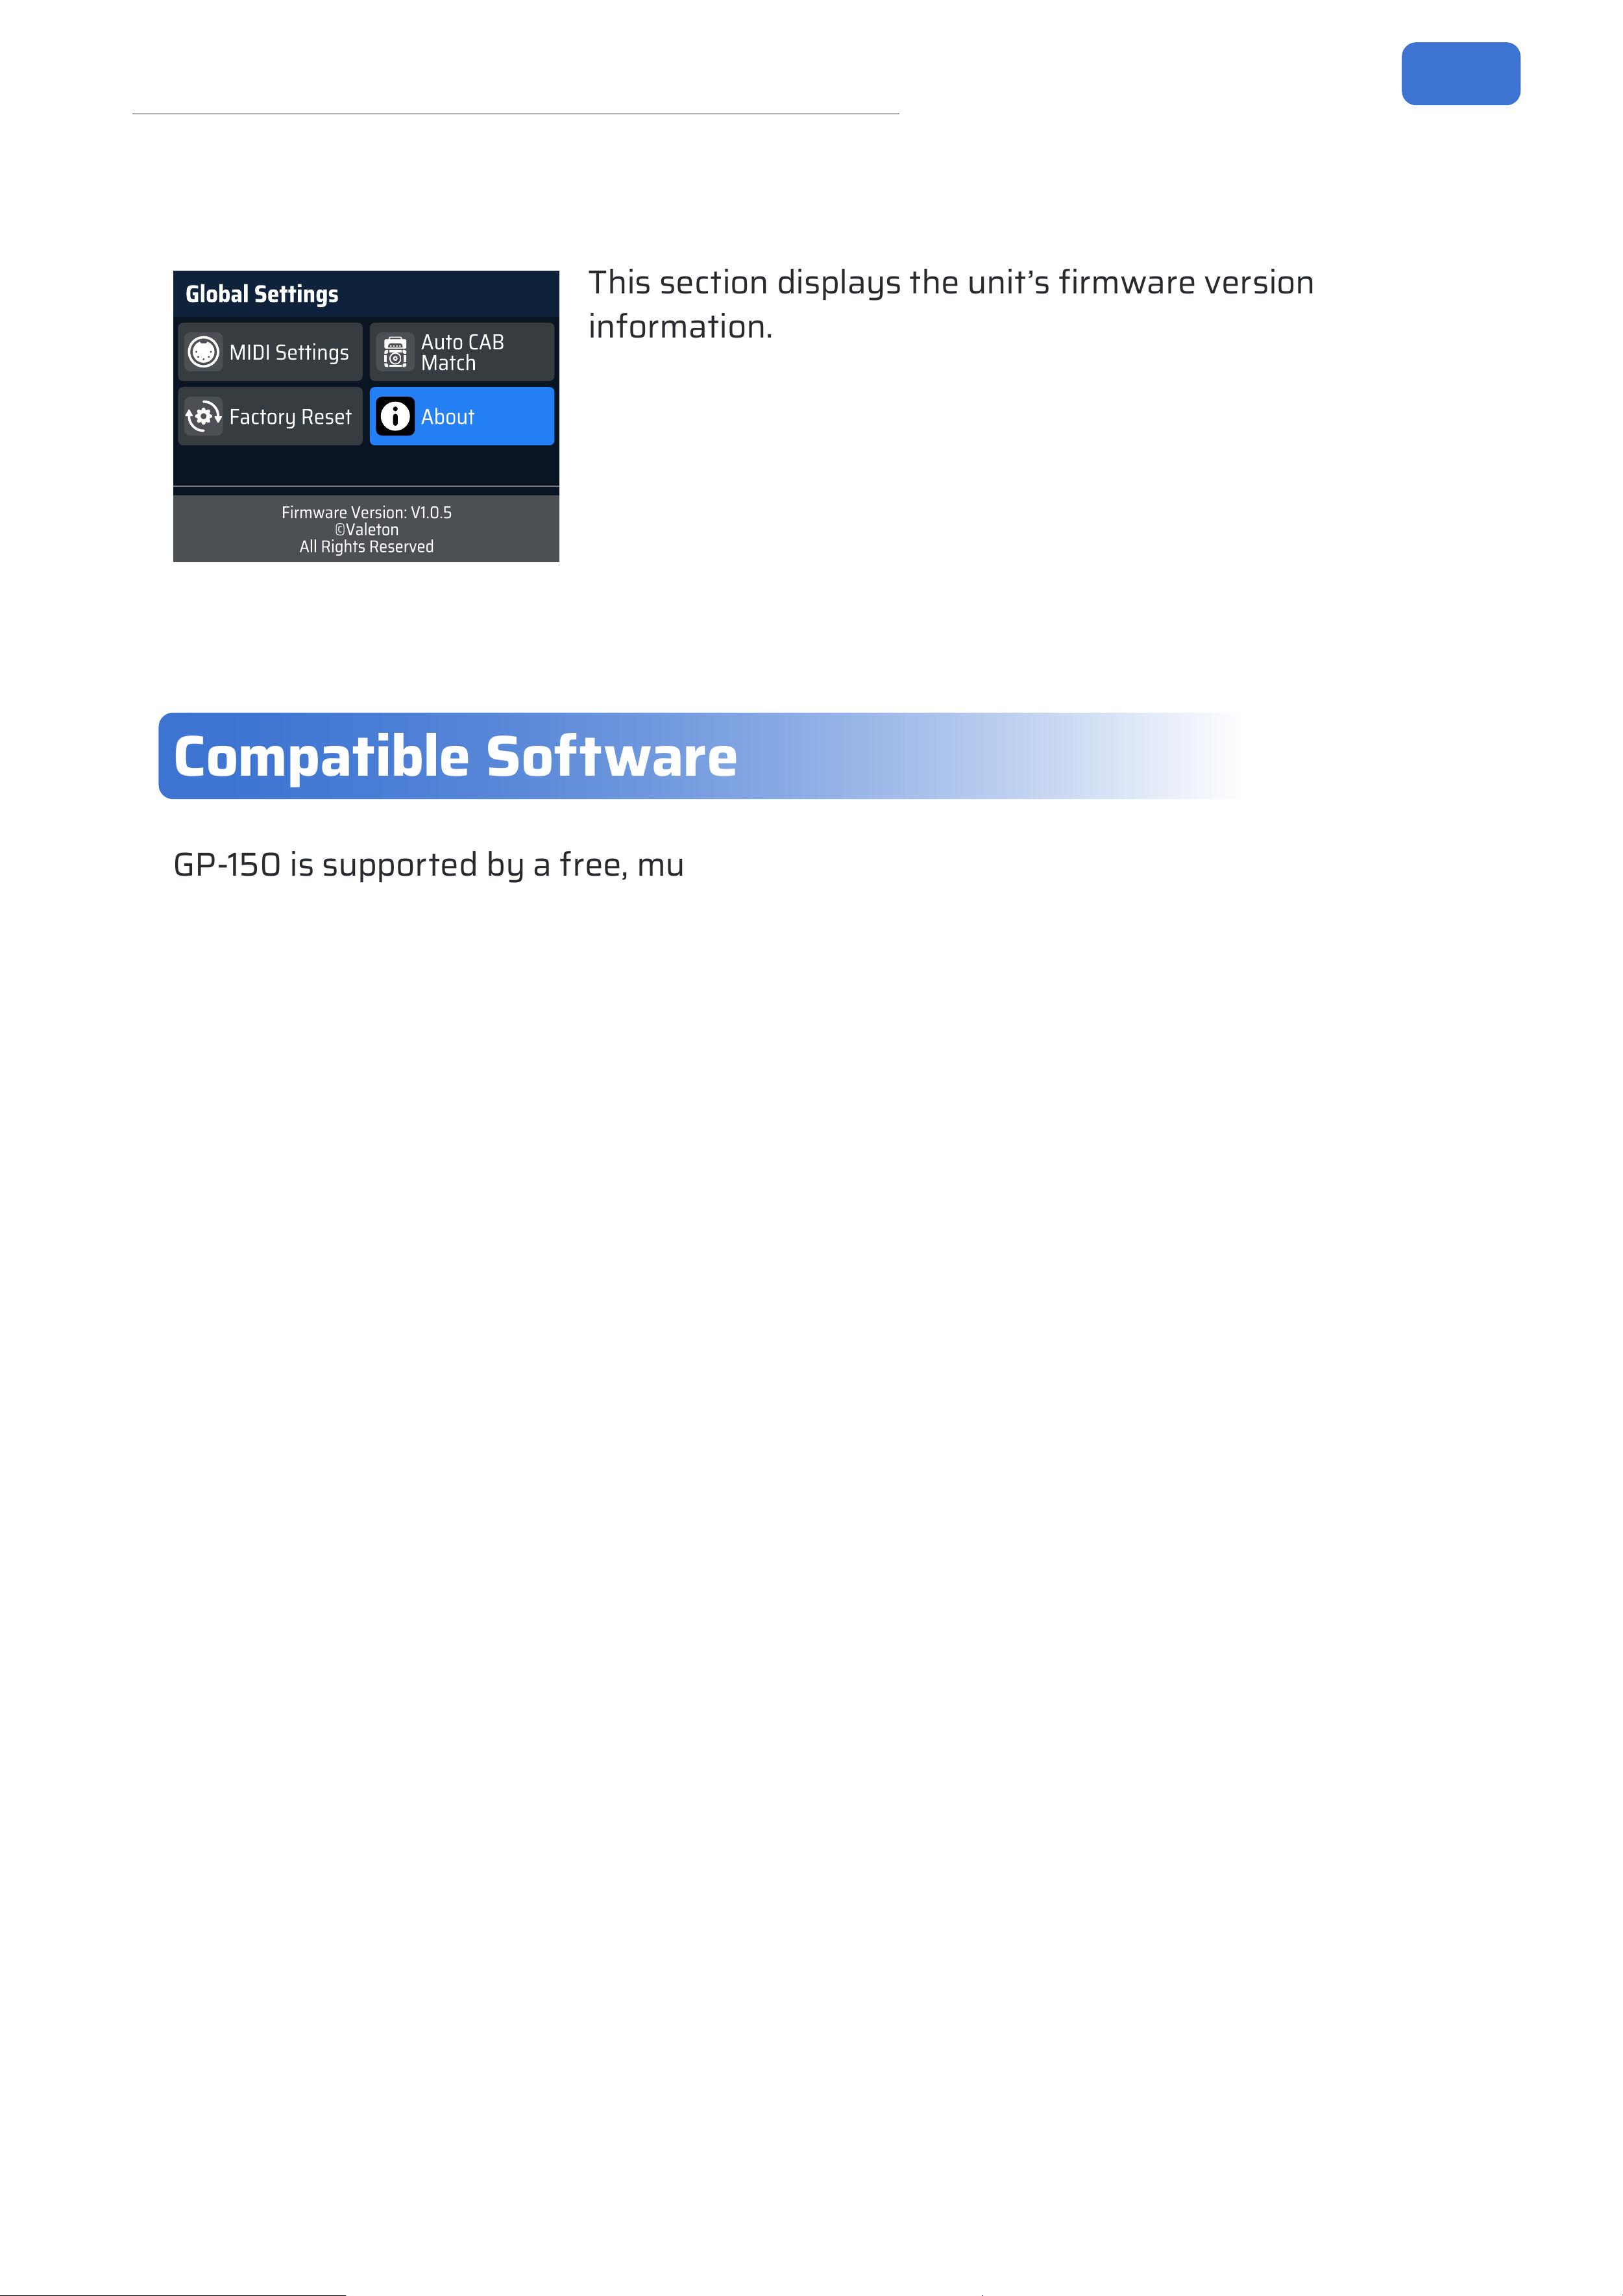
This enables/disables the linked relationship between
the AMP and CAB modules in the eects chain.
When enabled, the CAB module’s selection automatically
changes in response to changes in the AMP module
selection. Range: On, O. Default: On.
Factory Reset
This resets your unit to its original factory state.
G
l
o
b
a
l
S
e
t
t
i
n
g
s
M
I
D
I
S
e
t
t
i
n
g
s
A
u
t
o
C
A
B
M
a
t
c
h
F
a
c
t
o
r
y
R
e
s
e
t
A
b
o
u
t
P
r
e
s
s
P
A
R
A
t
o
c
o
n
t
i
n
u
e
Press the PARA knob to enter the sub-menu. Here, you
can selectively reset: Global Settings, Factory Patches
(001-100), or All Data. Rotate the PARA knob to select,
then press it to enter the nal conrmation screen for
your choice.
On the nal screen, rotate the PARA knob to select
Cancel or OK, then press to execute. Selecting Conrm
begins the reset process (a progress bar is shown). Do
not power o the unit and ensure it has suicient
battery during this process.
After resetting, press the PARA knob to return to the Main Screen.
Note:
Factory Reset erases all your edited parameters and personalized settings. This
action is irreversible. It is strongly recommended to back up your data before
proceeding.
29
Compatible Software
About
G
l
o
b
a
l
S
e
t
t
i
n
g
s
M
I
D
I
S
e
t
t
i
n
g
s
A
u
t
o
C
A
B
M
a
t
c
h
F
a
c
t
o
r
y
R
e
s
e
t
A
b
o
u
t
F
i
r
m
w
a
r
e
V
e
r
s
i
o
n
:
V
1
.
0
.
5
©
V
a
l
e
t
o
n
A
l
l
R
i
g
h
t
s
R
e
s
e
r
v
e
d
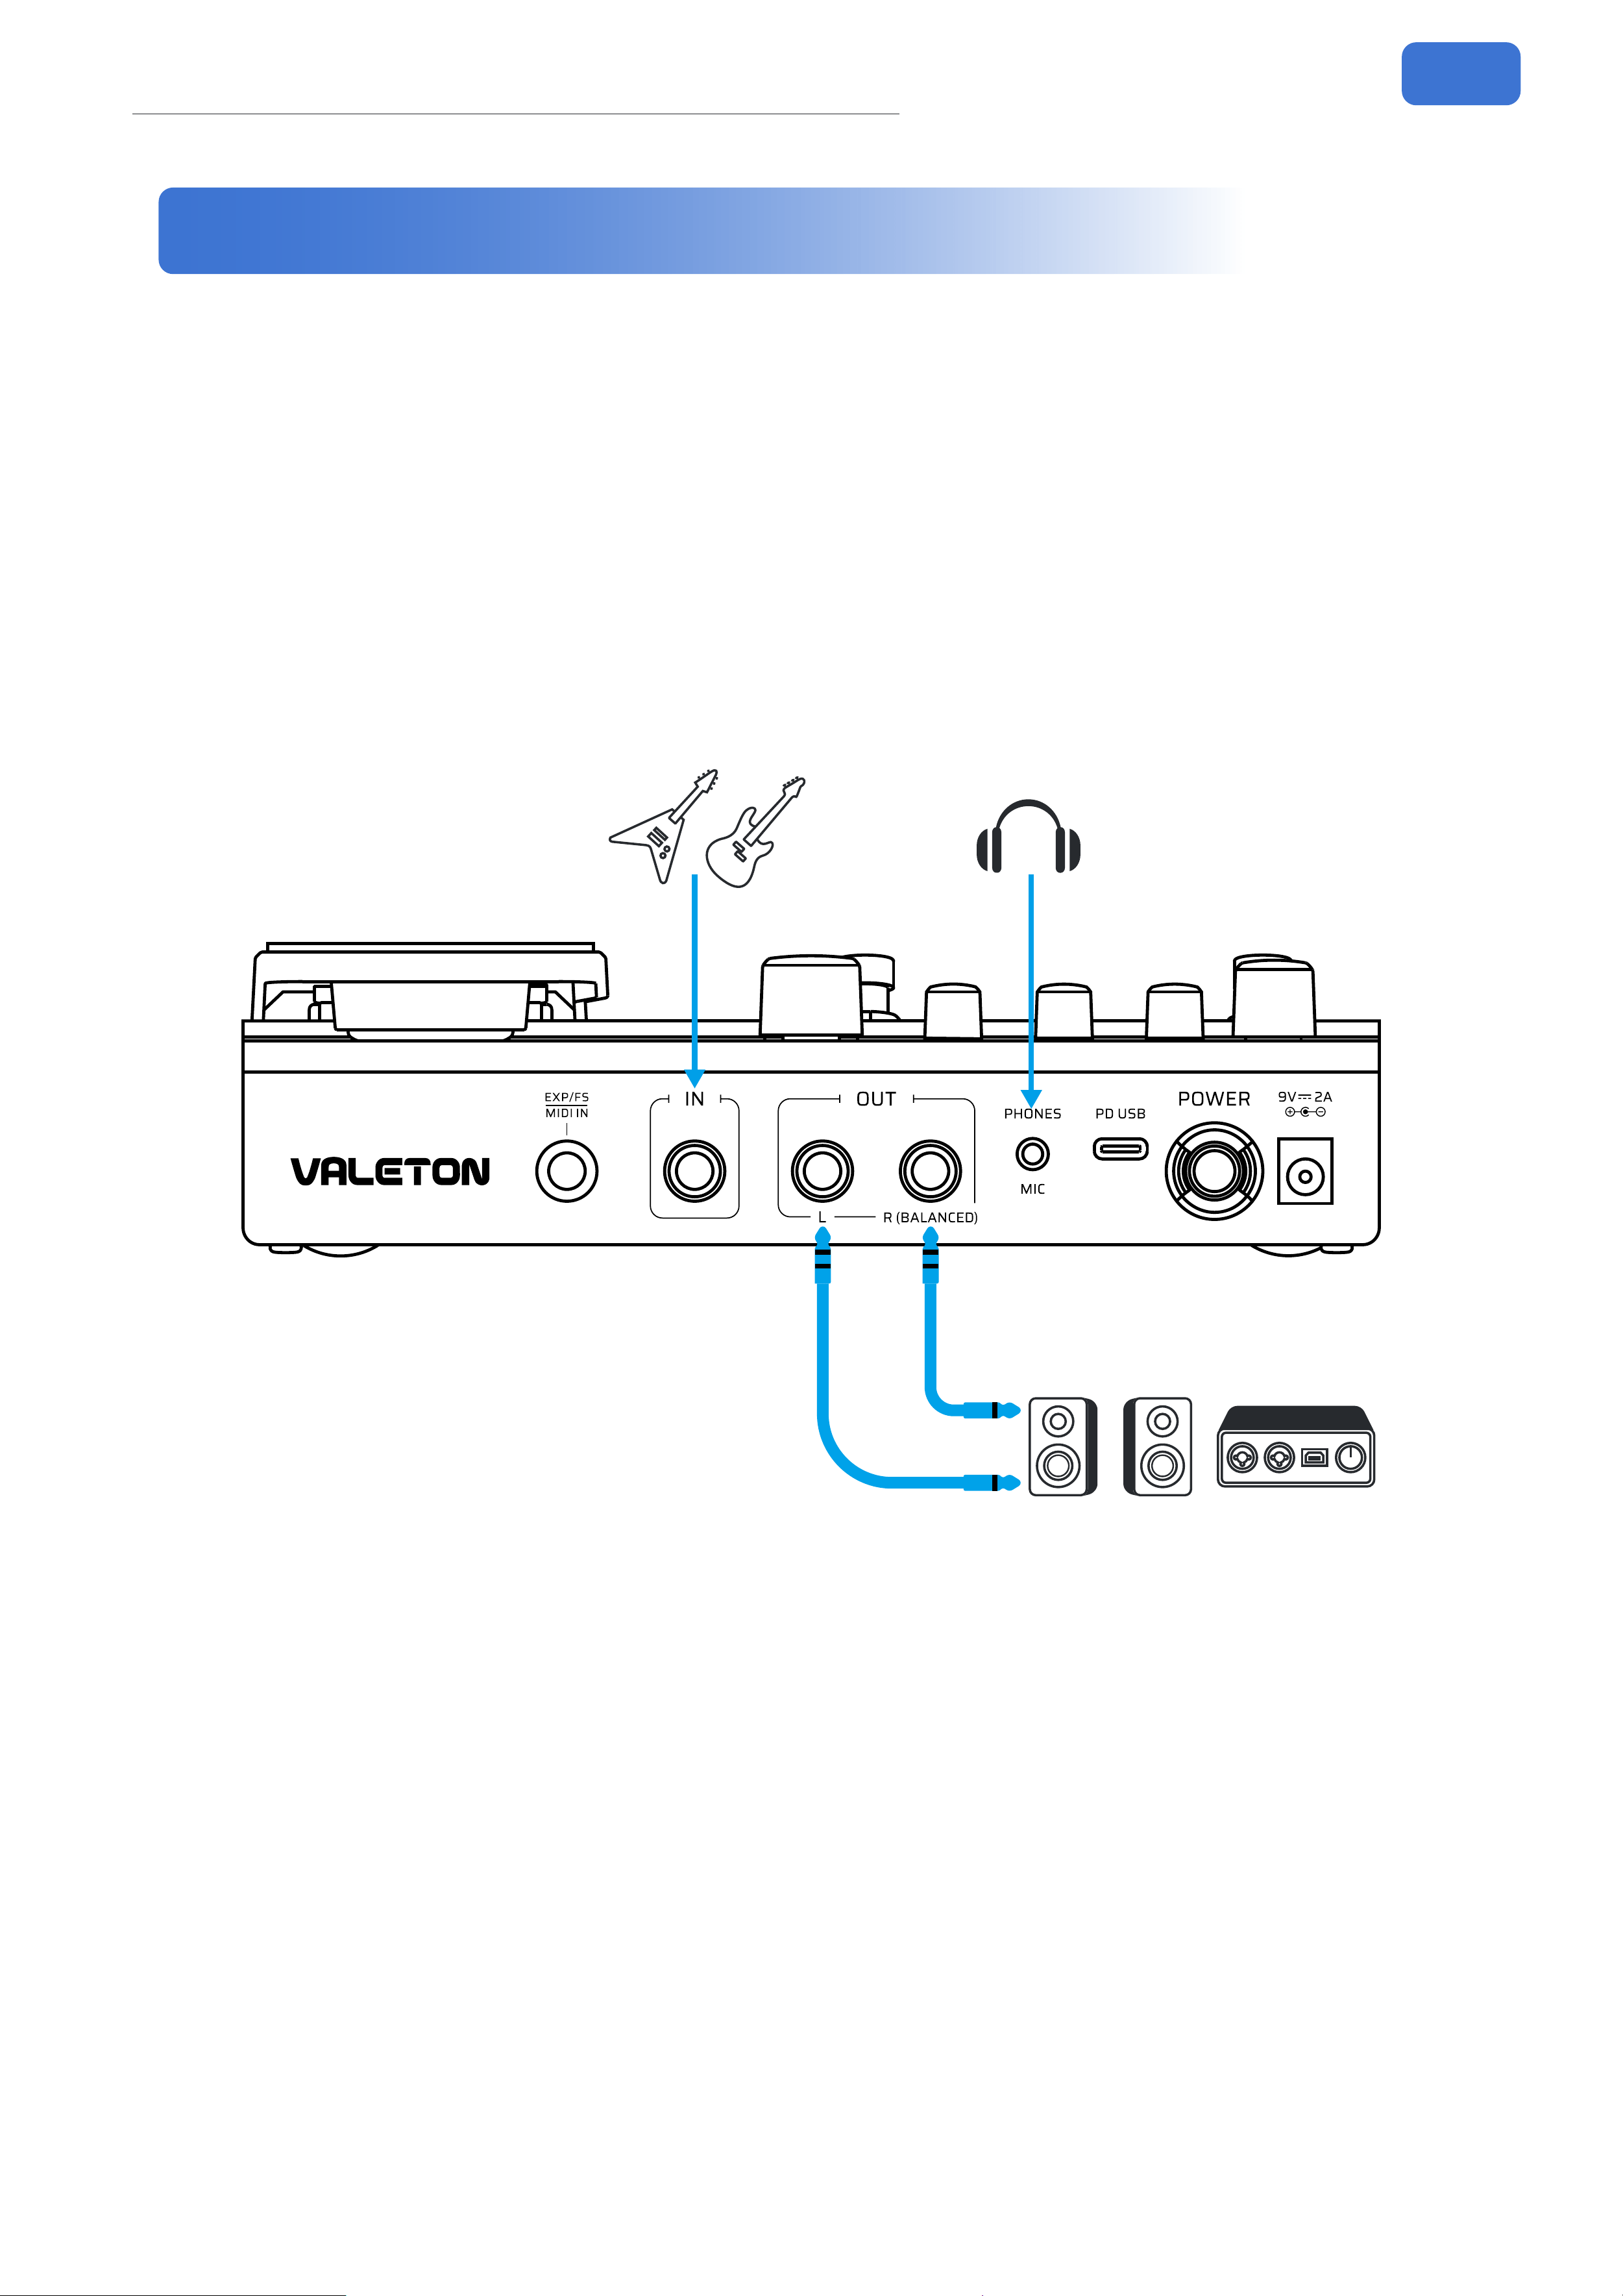
This section displays the unit’s rmware version
information.
Compatible Software
GP-150 is supported by a free, multi-platform companion application for Windows,
Mac, iOS, and Android. This software provides a more convenient interface for
editing, batch management of SnapTone and IR les, and performing rmware
updates.
For Mobile Devices (iOS/Android): Please search for Valeton Suite in your device’s
respective app store to download and install the application. Android users can also
download the installation package directly from the oicial Valeton website.
For Computers (Windows/Mac): Please visit www.valeton.net/software/ and
download the Valeton Suite software from the relevant page. Install the application
on your computer to begin using it.
30
Application Scenarios
Application Scenarios
In this section, we will introduce the connection methods of GP-150 in common
usage scenarios.
With full-range speaker devices
Full-range devices include audio interface, studio monitor, PA system, headphones
etc. In this scenario, the output jacks of the GP-150 can be connected based on the
requirements of the downstream device’s input interfaces. To get the best tonal
performance, keep the AMP and CAB modules ON and keep the No CAB Mode o.
31
Application Scenarios
With guitar amps (INPUT jack)
In this scenario, directly connect the GP-150’s OUT L to the guitar amp’s INPUT using
TS cable. To get the best tonal performance, keep the AMP and CAB modules o to
avoid adverse eects on the tone.
32
Application Scenarios
With guitar amps (using FX Loop)
In this scenario, connect the GP-150’s IN and OUT L to the guitar amp’s SEND and
RETURN jacks respectively using TS cables. This conguration places the GP-150
eects between the amplier’s preamp and power amp sections. For optimal
performance, it is recommended to use only the EQ, MOD, DLY, and RVB modules of
the GP-150. To get the best tonal performance, keep the AMP and CAB modules o
to avoid adverse eects on the tone.
33
Application Scenarios
With guitar amps (using FX Loop to pre-position the GP-
150)
In this scenario, connect the GP-150’s OUT L to a guitar amp’s RETURN using TS
cable. This way, by bypassing the preamp and using the power amp of the guitar
amp to pair with dozens of rened eects in the AMP/ N→S module, you’ll get the
more realistic sound. To get the best tone performance, keep the CAB module o or
turn on theNo CAB Modemode to avoid adverse eects on the tone.
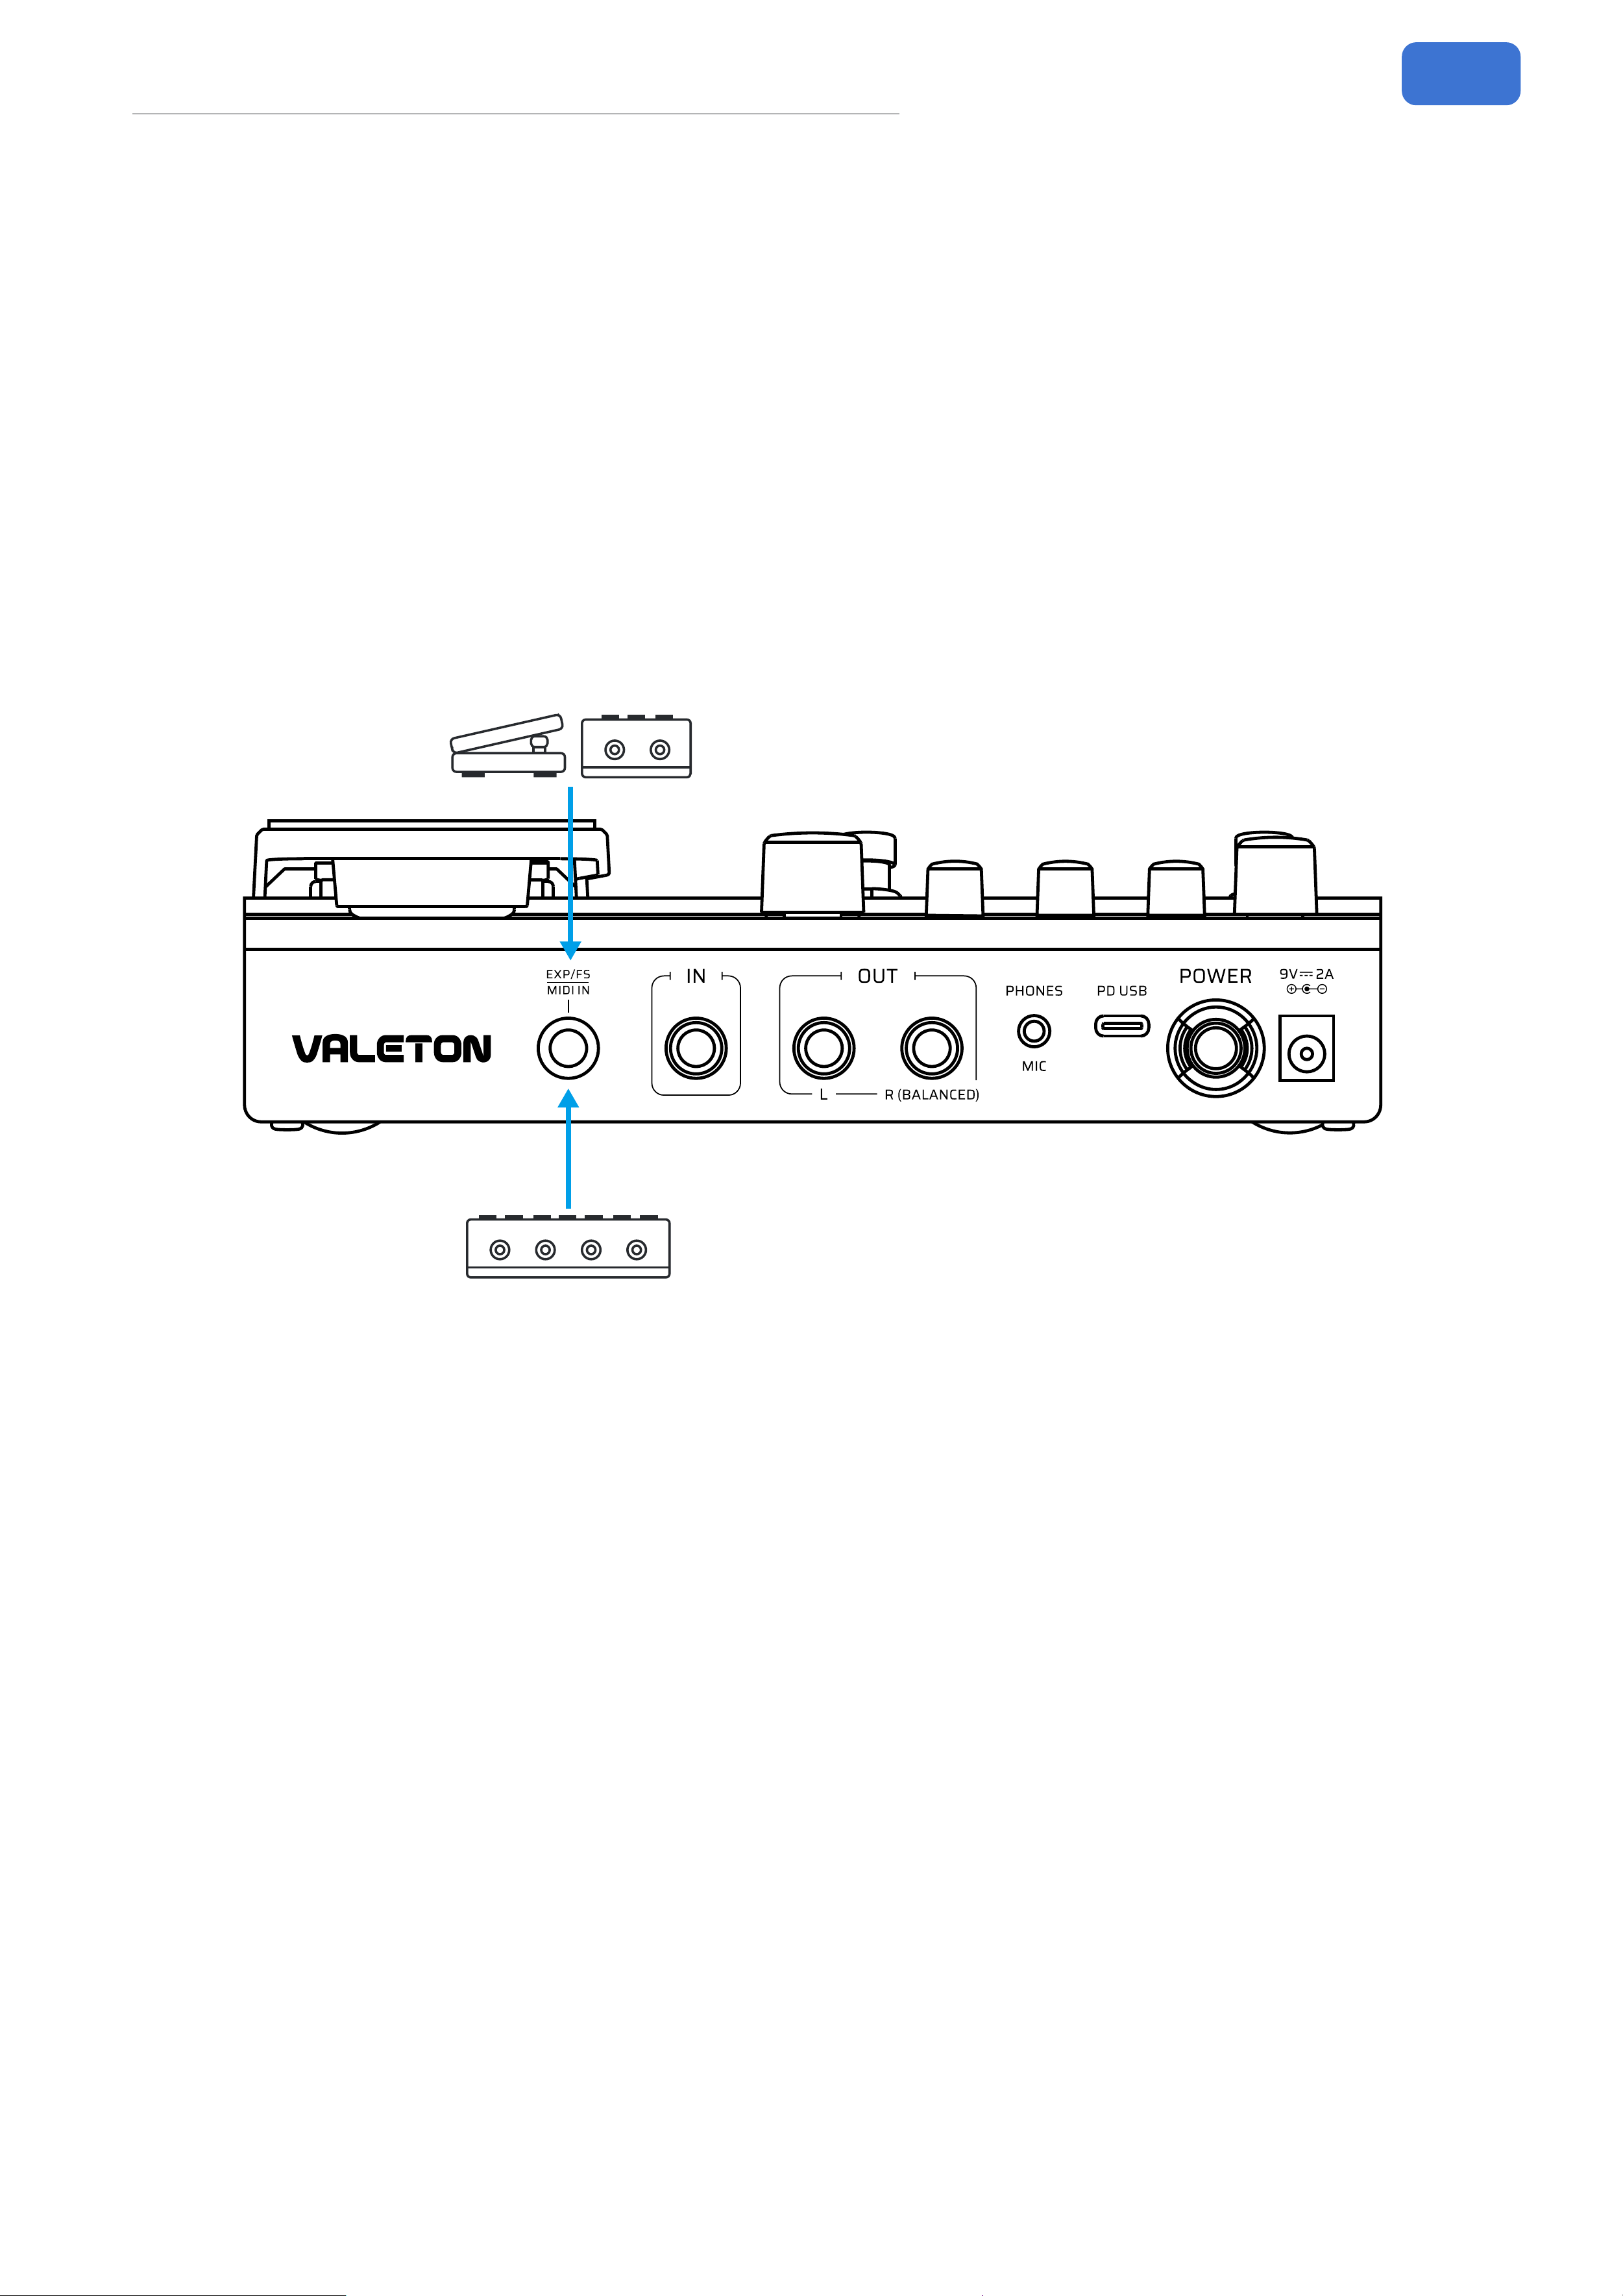
34
Application Scenarios
With External Control Devices
External control devices include: expression pedal, external footswitches, MIDI
controllers, etc. In this scenario, connect the GP-150’s EXP/FS/MIDI jack to an
expression pedal or external expansion footswitch using a TRS cable. You can
congure the expression pedal control function and external footswitch function in
the Edit Interface or Global Settings, enabling more convenient parameter control
and feature selection. Additionally, connect the GP-150’s EXP/FS/MIDI port to
your MIDI controller using a 1/4(6.35mm) TRS cable. In the Global Settings, select
the compatible MIDI input source and channel for your controller to ensure proper
communication.
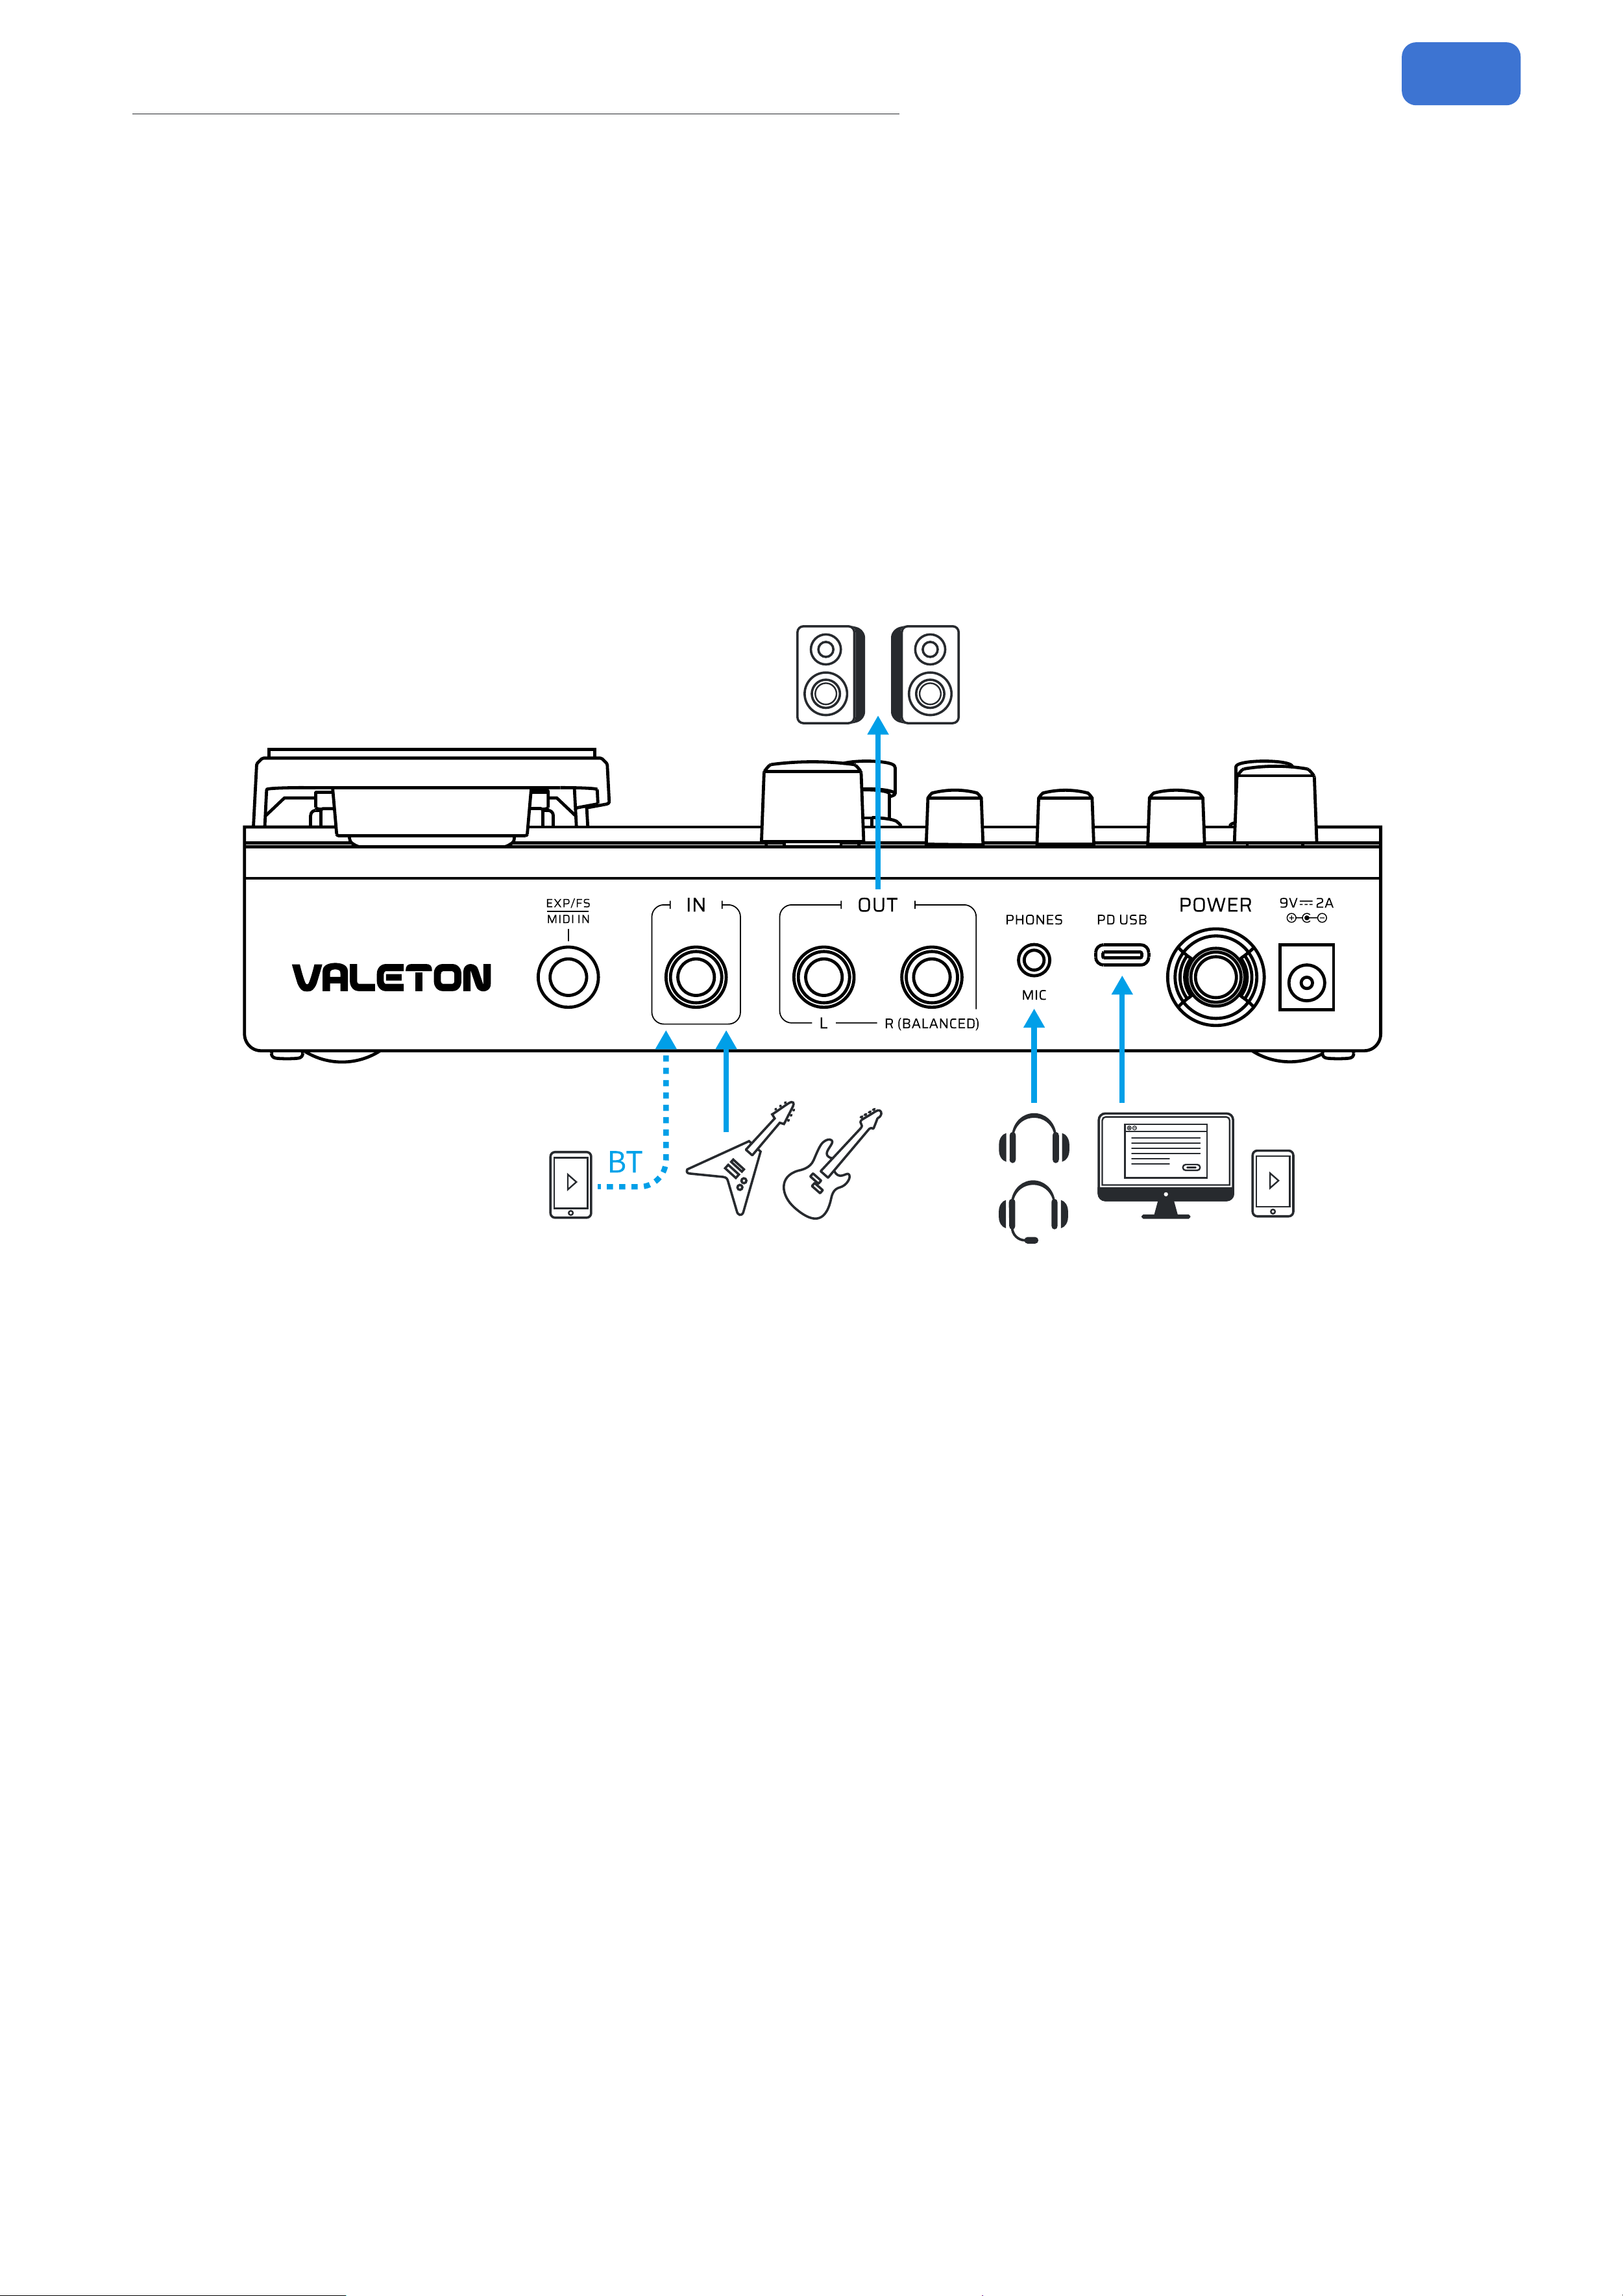
35
Application Scenarios
Audio Studio (for livestreaming)
In this scenario, the GP-150 will be functioned as an audio interface for a computer
or a mobile phone. Use the supplied USB cable to connect to the computer; if
connecting to a mobile phone, an additional OTG adapter cable may be required.
When under Windows system, it needs to be used with the ASIO driver available for
downloading on the Valeton oicial website; while on MacOS, iOS, Android system,
it can be easily plugged in and played. The eects chain signal and the BT wireless
audio signal of the GP-150 can be used by the connected devices.

36
Eect List
Eect List
FX Title Type Description Parameter Description
NR
Gate 1 Gate
Based on famous ISP
®
Decimator™* noise gate
pedal. The Decimator
features improvements in
the expander tracking with
their new Linearized Time
Vector Processing™. This
novel improvement provides
a more linear release time-
constant response for the
exponential release curve of
the downward expander.
Threshold: Controls the gate trigger
level
Gate 2 Gate
Flexible noise gate with attack
and release control.
Threshold: Controls the gate trigger
level
Attack: Controls how soon the gate
starts to process the signal
Release: Controls the noise fade-out
duration time after the level drops
below the threshold
Gate 3 Gate
A new generation of original
noise gate algorithm, the
Inverse Expander can control
noise accurately and agilely,
which can not only eectively
remove noise, but also retain
sustain and dynamics well.
Threshold: Controls the gate trigger
level
Attack: Controls how soon the gate
starts to process the signal
Release: Controls the noise fade-out
duration time after the level drops
below the threshold
Hold: Controls the noise gate hold
time for the previous state
PRE
COMP Comp
Based on the legendary
Ross™ Compressor. This is
the originator of the guitar
compression eect. It brings
the guitar compression eect
to the public and becomes
an important element in the
future. It has a very natural
and mellow compression
eect.
Sustain: Controls the compression
amount
Volume: Controls the eect output
*The mentioned manufacturers and product names are trademarks or registered trademarks of the respective owners.
The trademarks were used merely to identify the sound character of this product.

37
Eect List
FX Title Type Description Parameter Description
COMP4 Comp
Based on the Keeley
®
C4
4-knob compressor*. A
recording studio - level
compression eect.Clear
sense of hierarchy, the right
amount of high frequency
makes your guitar sound
brighter.
Sustain: Controls the compression
amount
Attack: Controls how soon the
compressor starts to process the
signal
Volume: Controls the eect output
Clipping: Controls the input sensitivity
Micro
Boost
Boost
Based on the legendary MXR
®
M133 Micro Amp2 pedal.
Providing up to 20dB of gain,
the Micro Boost elevates your
amp sound without changing
its tonal character.
Gain: Controls the gain amount
B-Boost Boost
Any guitarist can benet
from the Xotic
®
BB Preamp*
overdrive pedal. The pedal
works equally well for getting
thick and creamy overdrive
tones with great sustain as
it does for pushing the clean
front end of an already driven
amp with up to 30dB of boost.
Gain: Controls the distortion amount
Volume: Controls the eect output
Bass/Treble: 2-band EQ that controls
the eect tone
14 Boost Boost
Based famous on Fortin
®
Grind*. It gives you up to
+20dB of boost that will
tighten up and add aggression
to any tube or solid-state
amplier. The GRIND’s
surprising low noise oor and
high input Z lets every nuance
of instrument character come
through unaltered.
Gain: Controls the gain amount
Boost Boost
Based on famous Xotic
®
EP
Booster* pedal. Provides
+20dB of pure stimulation lift,
strong low frequency, bright
high frequency, making clear
sound more pleasant.
Gain: Controls the gain amount
+3dB: Selects the minimum boost
amount from 0dB (o) to +3dB (on)
Bright: Selects the sound character
from vintage (Bright o) to at (Bright
on)
*The mentioned manufacturers and product names are trademarks or registered trademarks of the respective owners.
The trademarks were used merely to identify the sound character of this product.

38
Eect List
FX Title Type Description Parameter Description
OD 9
Overdrive
(OD)
The Ibanez
®
Tube Screamer
®
is synonymous with the
transparent overdrive tone
used by many of today's top
guitarists. The TS9 pedal
boosts the guitar signal
enough to drive the preamp
stage of your amp, giving a
very natural-sounding and
pure overdrive and crisp
rhythm crunch.
Gain: Controls the overdrive amount
Tone: Controls the eect tone
Volume: Controls the eect output
Yellow OD
Overdrive
(OD)
Artist of the 70's was mostly
using a fuzz distortion sound
and the overdrive produced
by it was not typical. It was
however soon accepted as the
new standard of guitar sound.
It features an asymmetric
circuit where the positive
and negative halves of the
waveform isn't distorted
equally. The sound is therefore
still close to the original even
though distortion have been
added.
Gain: Controls the overdrive amount
Volume: Controls the eect output
Penesas
Overdrive
(OD)
Based on the legendary Klon
®
Centaur*, this overdrive model
gives you an authentic amp-
in-a-box feel with full, rich
sound character that is not
harsh or boomy at all. Turn
Gain knob to minimum you get
a superb clean boost.
Gain: Controls the gain amount
Tone: Controls the eect tone
Volume: Controls the eect output
Super OD
Overdrive
(OD)
The unique asymmetric
overdrive eect circuit adds
warm and pleasant overdrive
eect to the traditional guitar
timbre.
Gain: Controls the overdrive amount
Tone: Controls the eect tone
Volume: Controls the eect output
*The mentioned manufacturers and product names are trademarks or registered trademarks of the respective owners.
The trademarks were used merely to identify the sound character of this product.

39
Eect List
FX Title Type Description Parameter Description
Blues OD
Overdrive
(OD)
Whether it's warm and
natural overdrive or full open
distortion, it gives your guitar
the most expression, makes it
easy to control the tone, and
allows for subtle variations in
your personal playing style.
Gain: Controls the distortion amount
Tone: Controls the eect tone
Volume: Controls the eect output
T-Wah Filter
Control the wah sound by
playing intensity. A wide range
envelope lter (a.k.a. touch
wah) designed for guitarists
and bassists that is touch-
sensitive and exible. Sens:
Controls the eect sensitivity
Sens: Controls the eect sensitivity
Range: Controls the frequency range
of the lter
Q: Controls the sharpness of the lter
Mix: Controls the wet/dry signal ratio
Mode: Selects from two modes:
Guitar/Bass
A-Wah
Auto
Filter
Set the rate to make the
wah pedal work regularly.
Providing a variable auto wah
eect for both guitars and
basses.
Depth: Controls the eect depth
Rate: Controls the eect speed
Volume: Controls the output level
Low: Controls the bottom point of
center frequency (low freq)
High: Controls the top point of center
frequency (high freq)
Q: Controls the sharpness of the lter
Sync: Switches Tap Tempo sync on/o
Step Filter Filter
A 4-step auto lter machine
for creating synth-like sounds.
Step 1-4: Controls the lter center
frequency of each step
Rate: Controls the sequencing speed
Sync: Switches Tap Tempo sync on/o
OCTA Pitch
Provides polyphonic octave
eect.
Low Oct: Controls the volume of lower
octave (1 oct down)
High Oct: Controls the volume of
higher octave (1 oct up)
Dry: Controls the dry signal level
Pitch Pitch
Polyphonic pitch shifter/
harmonizer.
Low/Hi Pitch: Controls the low/high
pitch shifting range by semitones
Dry: Controls the dry signal level
Low/Hi Vol: Controls the low/high
pitch volume
P-Bend Pitch
Polyphonic pitch shifter/
harmonizer.
Low/Hi Pitch: Controls the low/high
pitch shifting range by semitones
Wet: Controls the wet signal level
Dry: Controls the dry signal level
Range: Controls the pitch range of
harmony eect
*The mentioned manufacturers and product names are trademarks or registered trademarks of the respective owners.
The trademarks were used merely to identify the sound character of this product.

40
Eect List
FX Title Type Description Parameter Description
Hammy Pitch
Based on classic Whammy
®
*
monophonic pitch shifter
pedal. Assign the Position
parameter to expression
pedal, then move the pedal to
get the eect.
Range: Controls the pitch shifting
range
Harmony: Switches Harmony
mode (dry and wet signals output
simultaneously) on/o
Volume: Controls the eect output
volume
Position: Control the changes in pitch
Ring Mod Special
A ring modulator for creating
intresting inharmonic
frequency spectra (like bells
and chimes).
Mix: Controls the wet/dry signal ratio
Freq: Controls the overall modulation
frequency
Fine: Fine tune the modulation
frequency by +/- 50Hz
Tone: Controls the eect tone
Saturate Special
Vintage tape saturation
simulater providing analog
warmth and natural distortion.
Mix: Controls the eect wet/dry signal
ratio
Volume: Controls the eect output
volume
Mix: Controls the wet/dry signal ratio
High Cut: Cuts the eect high
frequency signal
AC Sim
Simulator
(Sim)
Acoustic guitar simulator
designed for guitars. Its
prototype comes from a
classic acoustic guitar analog
stompbox.
Body: Controls the body resonance
(low frequency response)
Top: Controls the upper harmonics
(high frequency response)
Volume: Controls the eect output
level
Mode: Selects from 4 dierent sound
characters:
Standard: Simulates the tonal
characteristics of a standard acoustic
guitar
Jumbo: Simulates the tonal
characteristics of a jumbo acoustic
guitar
Enhanced: Simulates the tonal
characteristics of an acoustic guitar
with enhanced attack
Piezo: Simulates the sound of a piezo
pickup
H to S
Simulator
(Sim)
Pickup simulator that
simulates the bridge pickup of
classic ST-style guitar.
V o l u m e : C o n t r o l s t h e e e c t o u t p u t
Tone
:
Controls the eect tone
*The mentioned manufacturers and product names are trademarks or registered trademarks of the respective owners.
The trademarks were used merely to identify the sound character of this product.

41
Eect List
FX Title Type Description Parameter Description
S to H
Simulator
(Sim)
Pickup simulator that
simulates the bridge pickup of
classic LP-style guitar.
V o l u m e : C o n t r o l s t h e e e c t o u t p u t
Tone: Controls the eect tone
WAH
V-Wah Wah
Based on legendary VOX
®
V846* wah pedal. The earliest
wa-wah pedal was originally
designed to allow the wind
instrument passing through it
to produce a more emotionally
expressive wa-wah sound.The
amplitude is small and acts
between medium and high
frequency.
Range: Controls the wah lter
frequency range
Q: Controls the wah resonance (lter
Q)
Volume: Controls the eect output
When using the EXP pedal as a wah
pedal, remember to rst assign the
position parameters, then turn on and
press the pedal to get the eect.
C-Wah Wah
Based on legendary VOX
®
V846* wah pedal. The earliest
wa-wah pedal was originally
designed to allow the wind
instrument passing through it
to produce a more emotionally
expressive wa-wah sound.The
amplitude is small and acts
between medium and high
frequency.
Range: Controls the wah lter
frequency range
Q: Controls the wah resonance (lter
Q)
Volume: Controls the eect output
When using the EXP pedal as a wah
pedal, remember to rst assign the
position parameters, then turn on and
press the pedal to get the eect.
B-Wah Wah Wah designed for basses.
Range: Controls the wah lter
frequency range
Q: Controls the wah resonance (lter
Q)
Volume: Controls the eect output
When using the EXP pedal as a wah
pedal, remember to rst assign the
position parameters, then turn on and
press the pedal to get the eect.
Hammy Pitch
Based on classic Whammy
®
*
monophonic pitch shifter
pedal. Assign the Position
parameter to expression
pedal, then move the pedal to
get the eect.
Range: Controls the pitch shifting
range
Harmony: Switches Harmony
mode (dry and wet signals output
simultaneously) on/o
Volume: Controls the eect output
volume
Position: Control the changes in pitch
*The mentioned manufacturers and product names are trademarks or registered trademarks of the respective owners.
The trademarks were used merely to identify the sound character of this product.

42
Eect List
FX Title Type Description Parameter Description
DST
Green OD
Overdrive
(OD)
Based on legenary Ibanez
®
TS-808 Tube Screamer
®
*
overdrive pedal. Since it was
rst shown to the world in
1979, TS808 has opened
up a new world. There are
countless guitarists who
love it. It is a warm, delicate
overdrive eect.Can be used
as either an overdrive or a
Boost, can be used in a variety
of musical styles.
Gain: Controls the overdrive amount
Tone: Controls the eect tone
Volume: Controls the eect output
OD 9
Overdrive
(OD)
The Ibanez
®
Tube Screamer
®
is synonymous with the
transparent overdrive tone
used by many of today's top
guitarists. The TS9 pedal
boosts the guitar signal
enough to drive the preamp
stage of your amp, giving a
very natural-sounding and
pure overdrive and crisp
rhythm crunch.
Gain: Controls the overdrive amount
Tone: Controls the eect tone
Volume: Controls the eect output
Yellow OD
Overdrive
(OD)
Artist of the 70's was mostly
using a fuzz distortion sound
and the overdrive produced
by it was not typical. It was
however soon accepted as the
new standard of guitar sound.
It features an asymmetric
circuit where the positive
and negative halves of the
waveform isn't distorted
equally. The sound is therefore
still close to the original even
though distortion have been
added.
Gain: Controls the overdrive amount
Volume: Controls the eect output
*The mentioned manufacturers and product names are trademarks or registered trademarks of the respective owners.
The trademarks were used merely to identify the sound character of this product.

43
Eect List
FX Title Type Description Parameter Description
Penesas
Overdrive
(OD)
Based on the legendary Klon
®
Centaur*, this overdrive model
gives you an authentic amp-
in-a-box feel with full, rich
sound character that is not
harsh or boomy at all. Turn
Gain knob to minimum you get
a superb clean boost.
Gain: Controls the gain amount
Tone: Controls the eect tone
Volume: Controls the eect output
Super OD
Overdrive
(OD)
The unique asymmetric
overdrive eect circuit adds
warm and pleasant overdrive
eect to the traditional guitar
timbre.
Gain: Controls the overdrive amount
Tone: Controls the eect tone
Volume: Controls the eect output
Scream OD
Overdrive
(OD)
Based on Tube Screamer
®
Style overdrive pedal, with
unique timbre characteristics.
Gain: Controls the overdrive amount
Volume: Controls the eect output
Tone: Controls the eect tone
Fat: Switches extra resonance on/o
Blues OD
Overdrive
(OD)
Whether it's warm and
natural overdrive or full open
distortion, it gives your guitar
the most expression, makes it
easy to control the tone, and
allows for subtle variations in
your personal playing style.
Gain: Controls the distortion amount
Tone: Controls the eect tone
Volume: Controls the eect output
Force
Overdrive
(OD)
Fulltone
®
OCD* sounds like
nding the sweet spot on
your favorite amp. It produces
overdriven tones that sound
warm and full, with genuine
tube-like response. There’s
no shortage of usable drive,
meaning it dynamically
ramps up overdriven grit from
dirty overtones to saturated
distortion in the smooth range
of its drive control.
Gain: Controls the distortion amount
Tone: Controls the eect tone
Volume: Controls the eect output
Mode: Selects from two dierent
sound characters: HP (High Peak
mode with more bottom end and
distortion), LP (Low Peak mode
without changing your original tone)
Tube
Clipper
Overdrive
(OD)
Based on a overdrive pedal
using
12AX7 tube, providing a very
smooth
overdrive and violin like
sustain, full of
rich and sweet overtones.
Gain: Controls the gain amount
VOL: Controls the eect output
volume
Bass: Controls the low frequency
amount
Treble: Controls the high frequency
amount
*The mentioned manufacturers and product names are trademarks or registered trademarks of the respective owners.
The trademarks were used merely to identify the sound character of this product.

44
Eect List
FX Title Type Description Parameter Description
TaiChi OD
Overdrive
(OD)
Hermida
®
Zendrive
®
rose to
fame because of its tube-
like tone. To get the perfect
balance of saturation and
harmonics required to result
in all of the 'in-tangibles' that
make a pedal overdrive sound
like a real amp overdrive.
Things like touch sensitivity
and response to guitar tone
and volume control changes.
Gain: Controls the overdrive amount
Tone: Controls the eect tone
Volume: Controls the eect output
Voice: Controls the upper harmonics
character
Lazaro Fuzz
Based on legendary Electro-
Harmonix
®
Big Mu Pi
®
*fuzz/
distortion pedal. It is very
individual, warm and thick
sound wall, restless but full of
beauty.
Sustain: Controls the gain amount
Tone: Controls the eect tone
Volume: Controls the eect output
Red Haze Fuzz
Based on legendary Dallas-
Arbiter
®
Fuzz Face
®
* fuzz
pedal. Dallas Arbiter conjured
the sound of rock and roll for
half a century in 1966 with a
few simple transistors. The
sound of Fuzz Face was heavy
and sharp, and its sound
inuenced countless famous
musicians.
Fuzz: Controls the gain amount
Volume: Controls the eect output
Plustortion Distortion
This little yellow box has
produced lots of great
soundings in countless classic
studio albums. Yeah, we’re
talking the legendary MXR
®
M104 Distortion +*, and this
M104-based Plustortion. The
Plustortion recreated the
Germanium-powered soft
clipping distortion, like what
Randy Rhoads and other hard
rockers do!
Gain: Controls the distortion amount
Volume: Controls the eect output
SM Dist Distortion
It is based on a classic orange
three-knob distortion eector,
which can be used to easily
get the timbre characteristics
of the 70s-80s.
Gain: Controls the distortion amount
Tone: Controls the eect tone
Volume: Controls the eect output
*The mentioned manufacturers and product names are trademarks or registered trademarks of the respective owners.
The trademarks were used merely to identify the sound character of this product.

45
Eect List
FX Title Type Description Parameter Description
Darktale Distortion
Based on legendary ProCo™
The Rat* distortion (early
LM308 OP-amp version). The
Rat* has come to life thanks to
its wide range of Filter knob,
bright and compact sound
head, full end and strong
plasticity, making it a favorite
of many musicians.
Gain: Controls the distortion amount
Filter: Counterclockwise controls the
eect tone
Volume: Controls the eect output
Chief Distortion
The Marshall
®
Guv'nor*
was released in 1988 and in
production during 4 years.
This overdrive/distortion Made
in England eect replicates
the classic tube Marshall
®
Amp sound into compact and
solid state box featuring a
sustainable gain with a touch
of compression.
Gain: Controls the distortion amount
Volume: Controls the eect output
Bass/Middle/Treble: 3-band EQ that
controls the eect tone
La Charger Distortion
The Marshall
®
Guv'nor*
was released in 1988 and in
production during 4 years.
This overdrive/distortion Made
in England eect replicates
the classic tube Marshall
®
Amp sound into compact and
solid state box featuring a
sustainable gain with a touch
of compression.
Gain: Controls the distortion amount
Tone: Controls the eect tone
Volume: Controls the eect output
Flagman
Dist
Distortion
This model is based on a
famous dirt box recreating,
perfect reproduction of
modern British high-gain
timbre, rich tunability, intuitive
operation to provide the
perfect boost to your music.
Gain: Controls the gain amount
Volume: Controls the eect output
Bass/Treble: 2-band EQ that controls
the
eect tone
Presence: Controls the eect
headroom
Tight: Controls the low bottom
resonance
*The mentioned manufacturers and product names are trademarks or registered trademarks of the respective owners.
The trademarks were used merely to identify the sound character of this product.

46
Eect List
FX Title Type Description Parameter Description
Flex OD
Bass
Overdrive
A simple and eective
distortion eect for guitars
and basses.
Gain: Controls the overdrive amount
Tone: Controls the eect tone
Volume: Controls the eect output
Mode: Selects from 3 dierent sound
characters: Normal (neutral sound),
Scoop (mid-scooped sound), Edge
(edgy sound)
Blend: Controls the wet/dry signal
ratio
Bass OD
Bass
Overdrive
This is an overload eect
device specially designed for
bass. It combines the original
bass sound with a unique
overdrive eect to make a
very good distortion eect
while ensuring The original
bass dynamic tone. It can
also be used as a pretty good
boost.
Gain: Controls the distortion amount
Blend: Controls the wet/dry signal
ratio
Volume: Controls the eect output
Bass/Treble: 2-band EQ that controls
the eect tone
Black Bass
Bass
Preamp
Based on the Darkglass
®
Microtubes B7K*. Takes the
powerful dynamic saturation
circuit and adds a four-band
equalizer and a balanced
line driver for even greater
versatility. Designed for both
studio and live use, it will take
your direct sound to a whole
new level.
Gain: Controls the distortion amount
Blend: Controls the wet/dry signal
ratio
Volume: Controls the eect output
Low/Lo-mid/Hi-mid/Treble: 2-band EQ
that controls the eect tone
Attack(Cut,Boost,Flat): Controls the
eect high frequency tone
Bass
Hammer
Bass
Preamp
Based on the famous Aguilar
®
Tone Hammer* Front eect,
with two sounds
Color, three-stage equalization
and mid-frequency sweep
frequency regulation, high
timbre regulation, is a good
shape for timbre.
Gain: Controls the gain amount
Master: Controls the eect output
Bass/Middle/Treble: 3-band EQ that
controls the eect tone
Mid Freq: Controls the range of middle
frequency
Drive: Turn on for extra gain stage
Micro
Boost
Boost
Based on the legendary MXR
®
M133 Micro Amp2 pedal.
Providing up to 20dB of gain,
the Micro Boost elevates your
amp sound without changing
its tonal character.
Gain: Controls the gain amount
*The mentioned manufacturers and product names are trademarks or registered trademarks of the respective owners.
The trademarks were used merely to identify the sound character of this product.

47
Eect List
FX Title Type Description Parameter Description
B-Boost Boost
Based on the legendary MXR
®
M133 Micro Amp2 pedal.
Providing up to 20dB of gain,
the Micro Boost elevates your
amp sound without changing
its tonal character.
Gain: Controls the distortion amount
Volume: Controls the eect output
Bass/Treble: 2-band EQ that controls
the eect tone
14 Boost Boost
Based famous on
Fortin
®
Grind*. It gives you up
to +20dB of boost that will
tighten up and add aggression
to any tube or solid-state
amplier. The GRIND’s
surprising low noise oor and
high input Z lets every nuance
of instrument character come
through unaltered.
Gain: Controls the gain amount
Boost Boost
Based on famous Xotic
®
EP
Booster* pedal. Provides
+20dB of pure stimulation lift,
strong low frequency, bright
high frequency, making clear
sound more pleasant.
Gain: Controls the gain amount
+3dB: Selects the minimum boost
amount from 0dB (o) to +3dB (on)
Bright: Selects the sound character
from vintage (Bright o) to at (Bright
on)
N→S
Empty
1-50
SnapTone
For loading SnapTone le
converted by NAM.
Gain: Controls the gain amount
VOL: Controls the output volume
Bass/Middle/Treble: 3-band EQ that
controls the eect tone
Presence: Controls the eect
headroom
AMP
The “Type” column in the table below indicates the tonal characteristic at default settings. The
actual tone performance will change as you adjust the Gain. Distortion types that are not high-
gain (e.g., Distortion, Crunch) are also grouped under the Overdrive type here.
Tweedy Clean
Based on Fender
®
Tweed
Deluxe*. This amplier with a
dynamic range from clean to
wild overdrive, from country
rock to distortion, the Fender
®
Tweed Deluxe* has been a
totem in every style for more
than 60 years.
Gain: Controls the gain amount (pre
gain)
Tone: Controls the eect tone
Volume: Controls the output volume
(post gain)
*The mentioned manufacturers and product names are trademarks or registered trademarks of the respective owners.
The trademarks were used merely to identify the sound character of this product.

48
Eect List
FX Title Type Description Parameter Description
Bellman
59N
Clean
Based on Fender
®
’59
Bassman
®
* Normal CH. The
most dramatic speaker in the
history of Rock&Roll, originally
designed for bass, has
become the most classic guitar
speaker.As clear as water,
Vacuum tubemakes the sound
more beautiful,make musical
instrument manufacturers are
eager to imitate the product.
Gain: Controls the gain amount (pre
gain)
Presence: Controls the eect
headroom
Volume: Controls the output volume
(post gain)
Bass/Middle/Treble: 3-band EQ that
controls the eect tone
Bellman
59B
Overdrive
Based on Fender
®
’59
Bassman
®
* Bright CH. The
most dramatic speaker in the
history of Rock&Roll, originally
designed for bass, has
become the most classic guitar
speaker.As clear as water,
Vacuum tubemakes the sound
more beautiful,make musical
instrument manufacturers are
eager to imitate the product.
Gain: Controls the gain amount (pre
gain)
Presence: Controls the eect
headroom
Volume: Controls the output volume
(post gain)
Bass/Middle/Treble: 3-band EQ that
controls the eect tone
Dark Twin Clean
Based on Fender
®
’65
Twin Reverb
®
*. With a
Stratocaster*, the classic
sound can be easily restored
in both country jazz and rock
music.
Gain: Controls the gain amount (pre
gain)
Volume: Controls the output volume
(post gain)
Bass/Middle/Treble: 3-band EQ that
controls the eect tone
Bright: Switches extra brightness on/
o
Silver Twin Clean
Fender
®
Silverface Twin
Reverb* ampliers were built
between 1967 and 1981. It
makes the sound of history.
Gain: Controls the gain amount (pre
gain)
Volume: Controls the output volume
(post gain)
Bass/Treble: 2-band EQ that controls
the eect tone
*The mentioned manufacturers and product names are trademarks or registered trademarks of the respective owners.
The trademarks were used merely to identify the sound character of this product.

49
Eect List
FX Title Type Description Parameter Description
SUPDual
CL
Clean
Based on the Supro
®
Dual-
Tone 1624T* (CH1
,
clean tone).
In the mid 60’s , vintage 1624T
amps have been sought-
after for decades because
the Dual-Tone’s volume knob
is turned beyond noon, a fat
and compressed clean tone
evolves into an immediately
recognizable grind that
remains articulate and
listenable even when turned
up to full blast.
Gain: Controls the gain amount (pre
gain)
Volume: Controls the output volume
(post gain)
Tone: Controls the eect tone
SUPDual
OD
Overdrive
Based on the Supro
®
Dual-
Tone 1624T* (CH1+2, dirty
tone). In the mid 60’s , vintage
1624T amps have been
sought-after for decades
because the Dual-Tone’s
volume knob is turned beyond
noon, a fat and compressed
clean tone evolves into an
immediately recognizable
grind that remains articulate
and listenable even when
turned up to full blast.
Gain 1/2: Controls the eect gain
amount
Tone 1/2: Controls the eect tone
Volume: Controls the eect output
and gain amount
Foxy 30N Clean
Based on VOX
®
AC30HW*
(normal channel). The symbolic
clear sound and warm and
sharp overdrive, since the
day of its birth, has become
the Shadows, The Beatles,
the Rolling Stones and other
group's favorite speaker. The
British band led the British
Invasion has made VOX
®
speaker a household name as
a British rock icon.Even in hard
rock and British rock.
Gain: Controls the gain amount (pre
gain)
Volume: Controls the output volume
(post gain)
Tone cut: Counterclockwise controls
the eect tone
Bright: Switches extra brightness on/
o Radiohead, Suede, Oasis and other
super groups are preferred.
*The mentioned manufacturers and product names are trademarks or registered trademarks of the respective owners.
The trademarks were used merely to identify the sound character of this product.

50
Eect List
FX Title Type Description Parameter Description
Foxy 30TB Overdrive
Based on VOX
®
AC30HW*
(Top Boost channel).
Gain: Controls the gain amount (pre
gain)
Tone cut: Counterclockwise controls
the eect tone
Volume: Controls the output volume
(post gain)
Bass/Treble: 2-band EQ that controls
the eect tone
Char: Selects from two sound
characters: Cool (lower gain)/Hot
(higher gain)
J-120 CL Clean
Based on the legendary Jazz
Chorus solid state combo.
When it came out in 1975, it
is the rst musical instrument
speaker equipped with Chorus
eect. It was famous for its
pure sound and stereo chorus
eect.
Gain: Controls the eect gain/output
amount
Bright: Switches extra presence on/
o
Bass/Middle/Treble: 3-band EQ that
controls the eect tone
Match CL Clean
Based Matchless™ Chieftain
212 combo* (clean tone).
MATCHLESS
®
's philosophy
since its founding in 1989 has
been to make as many top-
notch, all-purpose speakers as
possible.The crisp graininess
and perfect dynamic feedback
will make your playing easy.
Gain: Controls the gain amount (pre
gain)
Presence: Controls the eect
headroom
Volume: Controls the output volume
(post gain)
Bass/Middle/Treble: 3-band EQ that
controls the eect tone
Match OD Overdrive
Based Matchless™ Chieftain
212 combo* (overdrive tone).
Gain: Controls the gain amount (pre
gain)
Presence: Controls the eect
headroom
Volume: Controls the output volume
(post gain)
Bass/Middle/Treble: 3-band EQ that
controls the eect tone
*The mentioned manufacturers and product names are trademarks or registered trademarks of the respective owners.
The trademarks were used merely to identify the sound character of this product.

51
Eect List
FX Title Type Description Parameter Description
L-Star CL Clean
Based on Mesa/Boogie
®
Lone Star
®
*(CH1). The pre-
amp circuit has extraordinary
expressive power, the
comprehensive timbre
and intuitive operation are
indicative of Mesa/Boogie
®
's
far superior technical
capabilities.An engaging and
lively timbre experience.It has
a more compressed, balanced,
soft mid frequency sound,
and its high-frequency like
gorgeous bell.
Gain: Controls the gain amount (pre
gain)
Presence: Controls the eect
headroom
Volume: Controls the output volume
(post gain)
Bass/Middle/Treble: 3-band EQ that
controls the eect tone
L-Star OD Overdrive
Based on Mesa/Boogie
®
Lone
Star
®
*(CH2).
Gain: Controls the eect drive amount
Presence: Controls the eect
headroom
Volume: Controls the output volume
(post gain)
Bass/Middle/Treble: 3-band EQ that
controls the eect tone
BogSV CL Clean
Based on Bogner
®
Shiva*
(20th Anniversary version,
CH1.) Modern optimized circuit,
with a double channel treasure
house of sound, excellent
circuit design makes it have
high-frequency transparent
and exible low frequency,
crystal clear sound, British
higain compact and gorgeous.
Gain: Controls the gain amount (pre
gain)
Presence: Controls the eect
headroom
Volume: Controls the output volume
(post gain)
Bass/Treble: 2-band EQ that controls
the eect tone
Bright: Switches extra brightness on/
o
BogSV OD Overdrive
Based on Bogner
®
Shiva*
(20th Anniversary version,
CH2.)
Gain: Controls the gain amount (pre
gain)
Presence: Controls the eect
headroom
Volume: Controls the output volume
(post gain)
Bass/Middle/Treble: 3-band EQ that
controls the eect tone
*The mentioned manufacturers and product names are trademarks or registered trademarks of the respective owners.
The trademarks were used merely to identify the sound character of this product.

52
Eect List
FX Title Type Description Parameter Description
Bog BlueV Overdrive
Bogner
®
XTC blue channel
(Vintage) is popular for its
highly recognizable classic
rock and roll sound. Its loud
and handsome plexi voice has
extraordinary attainments.
Gain: Controls the gain amount (pre
gain)
Presence: Controls the eect
headroom
Volume: Controls the output volume
(post gain)
Bass/Middle/Treble: 3-band EQ that
controls the eect tone
Bog BlueM Overdrive
Bogner
®
XTC blue channel
(Modern) is popular for its
highly recognizable classic
rock and roll sound. Its loud
and handsome plexi voice has
extraordinary attainments.
Gain: Controls the gain amount (pre
gain)
Presence: Controls the eect
headroom
Volume: Controls the output volume
(post gain)
Bass/Middle/Treble: 3-band EQ that
controls the eect tone
Bog RedV Hi Gain
The Bogner
®
XTC red channel
(Vintage) is known for its ery
high gain distortion and the
main timbre.
Gain: Controls the gain amount (pre
gain)
Presence: Controls the eect
headroom
Volume: Controls the output volume
(post gain)
Bass/Middle/Treble: 3-band EQ that
controls the eect tone
Bog RedM Hi Gain
The Bogner
®
XTC red channel
(Modern) is known for its ery
high gain distortion and the
main timbre.
Gain: Controls the gain amount (pre
gain)
Presence: Controls the eect
headroom
Volume: Controls the output volume
(post gain)
Bass/Middle/Treble: 3-band EQ that
controls the eect tone
Z38 CL Clean
Based on Dr. Z
®
Maz 38 Sr.*
combo (clean sound). With its
varied sound, wide frequency
response and dynamic range,
it is not only an excellent
single platform, but it can
meet your needs whether you
are a British or An American
fan.
Gain: Controls the output volume (pre
gain)
Tone cut: Counterclockwise controls
the eect tone
Volume: Controls the output volume
(post gain)
Bass/Middle/Treble: 3-band EQ that
controls the eect tone
*The mentioned manufacturers and product names are trademarks or registered trademarks of the respective owners.
The trademarks were used merely to identify the sound character of this product.

53
Eect List
FX Title Type Description Parameter Description
Z38 OD Overdrive
Based on Dr. Z
®
Maz 38 Sr.*
combo (overdrive sound).
Gain: Controls the output volume (pre
gain)
Tone cut: Counterclockwise controls
the eect tone
Volume: Controls the output volume
(post gain)
Bass/Middle/Treble: 3-band EQ that
controls the eect tone
Knights CL Clean
Based on Grindrod
®
Pendragon PG20C* (Normal
channel, bright o). If you're
a big fan of British sound/
overdrive, this is a sound you
can't miss.It can bring the pure
British style, sound full of
penetrating power.
Gain: Controls the gain amount (pre
gain)
Volume: Controls the eect output
(post gain)
Bass/Middle/Treble: 3-band EQ that
controls the eect tone
Knights
CL+
Clean
Based on Grindrod
®
Pendragon PG20C* (Normal
channel, bright on). If you're
a big fan of British sound/
overdrive, this is a sound you
can't miss.It can bring the pure
British style, sound full of
penetrating power.
Gain: Controls the gain amount (pre
gain)
Volume: Controls the eect output
(post gain)
Bass/Middle/Treble: 3-band EQ that
controls the eect tone
Knights
OD
Overdrive
Based on Grindrod
®
Pendragon PG20C* (Drive
channel). If you're a big fan of
British sound/overdrive, this is
a sound you can't miss.It can
bring the pure British style,
sound full of penetrating
power.
Gain: Controls the gain amount (pre
gain)
Volume: Controls the eect output
(post gain)
Bass/Middle/Treble: 3-band EQ that
controls the eect tone
Bad-KT CL Clean
Based on Bad Cat
®
Hot Cat
30* (clean channel). As the
world's rst use of Class A
circuit design guitar speakers,
the sound quality has been
greatly improved.It combines
British and American styles,
with rich harmonics and
suicient headroom.
Gain: Controls the gain amount (pre
gain)
Presence: Controls the eect
headroom
Volume: Controls the output volume
(post gain)
*The mentioned manufacturers and product names are trademarks or registered trademarks of the respective owners.
The trademarks were used merely to identify the sound character of this product.

54
Eect List
FX Title Type Description Parameter Description
Bad-KT OD Overdrive
Based on Bad Cat
®
Hot Cat
30* (overdrive channel).
Gain: Controls the gain amount (pre
gain)
Presence: Controls the eect
headroom
Volume: Controls the output volume
(post gain)
Edge: Controls the high and high-mid
tone character
Bass/Treble: 2-band EQ that controls
the eect tone
Solo100 CL Clean
Based on Soldano
®
SLO100*
(clean channel).
Gain: Controls the gain amount (pre
gain)
Presence: Controls the eect
headroom
Volume: Controls the output volume
(post gain)
Bass/Middle/Treble: 3-band EQ that
controls the eect tone
Solo100
OD
Overdrive
Based on Soldano
®
SLO100*
(crunch channel).
Gain: Controls the gain amount (pre
gain)
Presence: Controls the eect
headroom
Volume: Controls the output volume
(post gain)
Bass/Middle/Treble: 3-band EQ that
controls the eect tone
Solo100
LD
Hi Gain
Based on Soldano
®
SLO100*
(overdrive channel). Also from
Eddie Van Halen's Brown
Sound, Steve Vai's classic
album Passion & Warfare was
recorded in SLO100*.
Gain: Controls the gain amount (pre
gain)
Presence: Controls the eect
headroom
Volume: Controls the output volume
(post gain)
Bass/Middle/Treble: 3-band EQ that
controls the eect tone
UK 45 Overdrive
Based on Marshall
®
JTM45*
(normal channel). In 1962,
Marshall
®
introduced the rst
guitar speakers specically
designed for rock music, and
its powerful sound laid the
foundation for rock music. So
its panel material plexiglas as
the most classic 1960s sound
specic name--- Plexi.
Gain: Controls the gain amount (pre
gain)
Presence: Controls the eect
headroom
Volume: Controls the output volume
(post gain)
Bass/Middle/Treble: 3-band EQ that
controls the eect tone
*The mentioned manufacturers and product names are trademarks or registered trademarks of the respective owners.
The trademarks were used merely to identify the sound character of this product.

55
Eect List
FX Title Type Description Parameter Description
UK 45+ Overdrive
Based on Marshall
®
JTM45*
(bright channel). In 1962,
Marshall
®
introduced the rst
guitar speakers specically
designed for rock music, and
its powerful sound laid the
foundation for rock music. So
its panel material plexiglas as
the most classic 1960s sound
specic name--- Plexi.
Gain: Controls the gain amount (pre
gain)
Presence: Controls the eect
headroom
Volume: Controls the output volume
(post gain)
Bass/Middle/Treble: 3-band EQ that
controls the eect tone
UK 45JP Overdrive
Based on Marshall
®
JTM45*
(Jump connection). In 1962,
Marshall
®
introduced the rst
guitar speakers specically
designed for rock music, and
its powerful sound laid the
foundation for rock music. So
its panel material plexiglas as
the most classic 1960s sound
specic name--- Plexi.
Gain1: Controls the gain (normal
channel) amount (post gain)
Presence: Controls the eect
headroom
Volume: Controls the output volume
(post gain)
Bass/Middle/Treble: 3-band EQ that
controls the eect tone
Gain2: Controls the gain (bright
channel) amount (post gain)
UK 50 Overdrive
Based on Marshall
®
JMP50*
(normal channel). Through
the adjustment of JTM45*'s
rectier tube, the power was
improved. In 1966, Marshall
company launched JTM50*,
and the Plexi sound obtained
utilizing the overdrive by more
people. The timbre is more full
compared to JTM45*.
Gain: Controls the gain amount (pre
gain)
Presence: Controls the eect
headroom
Volume: Controls the output volume
(post gain)
Bass/Middle/Treble: 3-band EQ that
controls the eect tone
UK 50+ Overdrive
Based on Marshall
®
JMP50*
(bright channel). Through
the adjustment of JTM45*'s
rectier tube, the power was
improved. In 1966, Marshall
company launched JTM50*,
and the Plexi sound obtained
utilizing the overdrive by more
people. The timbre is more full
compared to JTM45*.
Gain: Controls the gain amount (pre
gain)
Presence: Controls the eect
headroom
Volume: Controls the output volume
(post gain)
Bass/Middle/Treble: 3-band EQ that
controls the eect tone
*The mentioned manufacturers and product names are trademarks or registered trademarks of the respective owners.
The trademarks were used merely to identify the sound character of this product.

56
Eect List
FX Title Type Description Parameter Description
UK 50JP Overdrive
Based on Marshall
®
JMP50*
(Jump connection). Through
the adjustment of JTM45*'s
rectier tube, the power was
improved. In 1966, Marshall
company launched JTM50*,
and the Plexi sound obtained
utilizing the overdrive by more
people. The timbre is more full
compared to JTM45*.
Gain1: Controls the gain (normal
channel) amount (post gain)
Presence: Controls the eect
headroom
Volume: Controls the output volume
(post gain)
Bass/Middle/Treble: 3-band EQ that
controls the eect tone
Gain2: Controls the gain (bright
channel) amount (post gain)
UK SLP Overdrive
The 1959HWTM* is a line right
back to the celebrated era
of the mid to late 1960s, the
original was born when Pete
Townshend asked Jim Marshall
if he could make it louder.
This re-issue delivers that
classic Marshall tone with the
same overdrive and crunch,
using the authentic parts and
methods to construct.
Gain: Controls the gain amount (pre
gain)
Presence: Controls the eect
headroom
Volume: Controls the output volume
(post gain)
Bass/Middle/Treble: 3-band EQ that
controls the eect tone
UK 800 Overdrive
Based on Marshall
®
JCM800
®
*. In 1981, the
JCM800
®
* quickly became the
rock and metal sound of the
'80s with its excellent higain
sound.The founders named
it after their own license
plate number, inheriting and
continuing the legend of
Plexi*.
Gain: Controls the gain amount (pre
gain)
Presence: Controls the eect
headroom
Volume: Controls the output volume
(post gain)
Bass/Middle/Treble: 3-band EQ that
controls the eect tone
UK 900 Hi Gain
The JCM900
®
is the evolution
of the JCM800
®
* adding
another channel, two reverb
options and two gain features.
Tube Set consists of 3 x
12AX7 preamp tubes, and 4 x
6L6/5881 power tubes.
Known for its tone and
workhorse roadworthiness,
the JCM900 has many fans
due to its feature set and
versatility.
Gain: Controls the gain amount (pre
gain)
Presence: Controls the eect
headroom
Volume: Controls the output volume
(post gain)
Bass/Middle/Treble: 3-band EQ that
controls the eect tone
*The mentioned manufacturers and product names are trademarks or registered trademarks of the respective owners.
The trademarks were used merely to identify the sound character of this product.

57
Eect List
FX Title Type Description Parameter Description
Flagman 1 Overdrive
Based on the famousBrown
EyeUK-style boutique
amp head (BE channel).
Improvement on Marshall
®
Plexi* basis. It has smooth
high frequency, tight low
frequency and high frequency
gain function. It can be used in
many musical styles.
Gain: Controls the gain amount (pre
gain)
Presence: Controls the eect
headroom
Volume: Controls the output volume
(post gain)
Bass/Middle/Treble: 3-band EQ that
controls the eect tone
Flagman+
1
Hi Gain
Based on the famousBrown
EyeUK-style boutique amp
head (HBE channel).
Gain: Controls the gain amount (pre
gain)
Presence: Controls the eect
headroom
Volume: Controls the output volume
(post gain)
Bass/Middle/Treble: 3-band EQ that
controls the eect tone
Mess2C+ 1 Overdrive
Based on Mesa/Boogie
®
Mark
II C+™ (Lead channel) with
2 dierent onboard switch
combinations. In the 1980s,
Mark II C + *established the
position of Mesa / Boogie
®
metal style, and its voice
appeared in the albums of
Metallica and Dream Theater,
and become a classic of
American Higain.
Gain: Controls the gain amount (pre
gain)
Presence: Controls the eect
headroom
Volume: Controls the output volume
(post gain)
Bass/Middle/Treble: 3-band EQ that
controls the eect tone
Mess2C+ 2 Overdrive
Based on Mesa/Boogie
®
Mark
II C+™ (Lead channel) with
2 dierent onboard switch
combinations. In the 1980s,
Mark II C + *established the
position of Mesa / Boogie
®
metal style, and its voice
appeared in the albums of
Metallica and Dream Theater,
and become a classic of
American Higain.
Gain: Controls the gain amount (pre
gain)
Presence: Controls the eect
headroom
Volume: Controls the output volume
(post gain)
Bass/Middle/Treble: 3-band EQ that
controls the eect tone
Mess 2C+
3
Overdrive
Gain: Controls the gain amount (pre
gain)
Presence: Controls the eect
headroom
Volume: Controls the output volume
(post gain)
Bass/Middle/Treble: 3-band EQ that
controls the eect tone
*The mentioned manufacturers and product names are trademarks or registered trademarks of the respective owners.
The trademarks were used merely to identify the sound character of this product.

58
Eect List
FX Title Type Description Parameter Description
Mess4 LD Hi Gain
Based on Mesa/Boogie
®
Mark
IV™ (Lead channel). Based on
the classic upgrade, it inherits
the omnipotence of Mesa /
Boogie
®
, with rich harmonics
and sustain from the voiceless
tone to the sharp dark morden
higain timbre.
Gain: Controls the gain amount (pre
gain)
Presence: Controls the eect
headroom
Volume: Controls the output volume
(post gain)
Bass/Middle/Treble: 3-band EQ that
controls the eect tone
Mess
DualV
Hi Gain
Based on Mesa/Boogie Dual
Rectier(Vintage mode). The
distortion of Rectier series
is warm, and the distortion of
Rectier series is very wide,
which is more thick and solid
than Mark.
Gain: Controls the gain amount (pre
gain)
Presence: Controls the eect
headroom
Volume: Controls the output volume
(post gain)
Bass/Middle/Treble: 3-band EQ that
controls the eect tone
Mess
DualM
Hi Gain
Based on Mesa/Boogie Dual
Rectier(Modern mode). The
distortion of Rectier series
is warm, and the distortion of
Rectier series is very wide,
which is more thick and solid
than Mark.
Gain: Controls the gain amount (pre
gain)
Presence: Controls the eect
headroom
Volume: Controls the output volume
(post gain)
Bass/Middle/Treble: 3-band EQ that
controls the eect tone
Juice R100 Hi Gain
Based on Orange
®
Rockerverb
100™* (Dirty channel). Once
launched, this amplier has
become a new favorite of
rock musicians. Its sound is
unique, and its timbre can
be controlled from warm
and sweet clear tone to
heavy music, which will bring
surprise to the performers.
Gain: Controls the gain amount (pre
gain)
Volume: Controls the output volume
(post gain)
Bass/Middle/Treble: 3-band EQ that
controls the eect tone
EV 51 Hi Gain
Based on Peavey
®
5150
®
(LEAD channel). Guitarist
Eddie Van Halen, who began
working with Peavey
®
in the
1980s, loved the sound and
took the album's title 5150
to the world with its metallic
sound.
Gain: Controls the gain amount (pre
gain)
Presence: Controls the eect
headroom
Volume: Controls the output volume
(post gain)
Bass/Middle/Treble: 3-band EQ that
controls the eect tone
*The mentioned manufacturers and product names are trademarks or registered trademarks of the respective owners.
The trademarks were used merely to identify the sound character of this product.

59
Eect List
FX Title Type Description Parameter Description
Eagle 120 Hi Gain
ENGL
®
Savage 120 Amplier
embodies ENGL’s rich legacy
of creating metal machines
for delivering truly punishing
tones, with clear dynamics
and tremendous sonic variety.
This incredible tonal exibility
comes from the 4 channel
layout of the amp, with a
dedicated Clean channel, two
separate Crunch channels,
and a super-saturated Lead
channel, all supported by
two discrete EQs and a
wide selection of additional
features.
Gain: Controls the gain amount (pre
gain)
Presence: Controls the eect
headroom
Volume: Controls the output volume
(post gain)
Bass/Middle/Treble: 3-band EQ that
controls the eect tone
Power LD Hi Gain
Based on ENGL
®
Powerball
II E645/2* (CH4). It can bring
you extremely compact low
frequency, a lot of gain and
precise dynamic response,
which is very suitable for
modern rock and metal music.
Gain: Controls the gain amount (pre
gain)
Presence: Controls the eect
headroom
Volume: Controls the output volume
(post gain)
Bass/Middle/Treble: 3-band EQ that
controls the eect tone
Dizz VH Hi Gain
Based on Diezel
®
VH4*. Born
in Germany in the 1990s, its
timbre and multifunction have
attracted countless guitar
masters.The unique Modern
Higain quickly conquered
many musicians.
Gain: Controls the gain amount (pre
gain)
Presence: Controls the eect
headroom
Volume: Controls the output volume
(post gain)
Bass/Middle/Treble: 3-band EQ that
controls the eect tone
Classic
Bass
Bass
Based on Ampeg
®
SVT*
bass amp. Launched in 1969,
Ampeg SVT has always been
the most mainstream bass
speaker, Have a strong ability
to sound shape.
Gain: Controls the gain amount
Midrange: Selects the center
frequency of Midrange control:
220Hz/450Hz/800Hz/1.6kHz/3kHz
Volume: Controls the output volume
(post gain)
Bass/Midrange/Treble: 3-band EQ
that controls the eect tone
*The mentioned manufacturers and product names are trademarks or registered trademarks of the respective owners.
The trademarks were used merely to identify the sound character of this product.

60
Eect List
FX Title Type Description Parameter Description
Foxy Bass Bass
Based on vintage VOX
®
* AC-
100* bass amp. In 1963, the
Beatles was in urgent need of
a bass speaker with a volume
greater than that of the club's
crazy shouting, and the AC-
100* came into being. With
100W power and 4x12 box,
it has successfully become
the most representative bass
voice in the 1960s.
Volume: Controls the eect gain/
output amount
Bass/Treble: 2-band EQ that controls
the eect tone
Mess Bass Bass
Based on Mesa/Boogie
®
Bass 400* amp. You can hear
the sound of the early bass
speakers in many albums.
Gain: Controls the gain amount
Volume: Controls the output volume
(post gain)
Bass/Middle/Treble: 3-band EQ that
controls the eect tone
Mini Bass Bass
Based on Ampeg
®
B-15* Flip
Top bass amp. The B-15* was
conceived by legendary Jess
Oliver in 1958. It can be seen
from the early clubs to the
world's top studios. B-15*
can be said to be a landmark
product that is hard to be
ignored.
Volume: Controls the eect gain/
output amount
Bass/Treble: 2-band EQ that controls
the eect tone
Bass Pre Bass
Based on Alembic™ F-2B*
preamp.In the 1960s, inspired
by the Fender
®
speaker, the
circuit was transformed in an
all-round way, which brought
the extremely advanced
adjustment mode at that time,
which was loved by many
musicians, thus leaving a
strong mark in the history of
rock music.
Volume: Controls the eect gain/
output amount
Bright: Switches extra brightness on/
o
Bass/Middle/Treble: 3-band EQ that
controls the eect tone
*The mentioned manufacturers and product names are trademarks or registered trademarks of the respective owners.
The trademarks were used merely to identify the sound character of this product.
61
Eect List
FX Title Type Description Parameter Description
AC Pre Acoustic
Based on AER
®
Colourizer 2*
acoustic preamp. Originated
in Germany, it is a preamp
designed for acoustic guitar
sound reinforcement. It will
bring richer dynamics and
overtones to your acoustic
guitar, making the sound more
three-dimensional and vivid.
Volume: Controls the eect gain/
output amount
Tone: Controls the brightness
Balance: Controls the tone control
balance; set to 0 to disable tone
control
EQ Freq: Controls the EQ center
frequency from 90Hz to 1.6kHz
EQ Q: Controls the EQ bandwidth
EQ Gain: Controls the EQ boost/cut
amount; set to 50 to keep neutral
CAB
The numbers in the table below indicate the speaker conguration of the cabinet. For example:
1x12 or 1 x 12″ indicates a cabinet with one 12-inch speaker.
LUX 1x12 1 x 12″
Vintage Fender
®
DeluxeReverb* 1x12 cabinet.
V o l u m e : C o n t r o l s t h e o u t p u t v o l u m e
Low Cut
:
High-pass lter, used to
cut low frequency signals below the
s e l e c t e d f r e q u e n c y
High Cut
:
Low-pass lter, used to cut
high frequency signals above the
selected frequency
Precision
:
Switches CAB precision
from regular (1024 points) to high
(2048 points)
TWD LUX
1x12
1 x 12″
Vintage Fender
®
TweedDeluxe5E3* 1x12
cabinet.
Twin 2x12 2 x 12″
Vintage Fender
®
’65 Twin
Reverb* 2x12 cabinet.
Bellman
4x10
4 x 10″
Fender
®
'59 Bassman
®
* 4x10
cabinet.
Foxy 1x12 1 x 12″
Vintage VOX
®
AC15* 1x12
cabinet.
Foxy 2x12 2 x 12″
Vintage VOX
®
AC30* 2x12
cabinet.
UK 2x12 2 x 12″ Marshall
®
1936* 2x12 cabinet.
UK
Vintage
4x12
4 x 12″
Marshall
®
1982B* 4x12
cabinet.
UK Basket
4x12
4 x 12″
Marshall
®
Basketweave 1975*
4x12 cabinet.
UK 30
4x12
4 x 12″
Marshall
®
1960A* 4x12
cabinet.
REV 2x12 2 x 12″ Revv
®
* 2x12 cabinet.
J-120 2x12 2 x 12″
Legendary Jazz Chorus 2x12
cabinet.
Bog 2x12 2 x 12″
Bogner
®
* 2x12 cabinet with
Celestion
®
G12M
®
* speakers.
*The mentioned manufacturers and product names are trademarks or registered trademarks of the respective owners.
The trademarks were used merely to identify the sound character of this product.

62
Eect List
FX Title Type Description Parameter Description
Bog 4x12 4 x 12″
Bogner
®
* 4x12 cabinet with
Celestion
®
V30
®
* speakers.
V o l u m e : C o n t r o l s t h e o u t p u t v o l u m e
Low Cut
:
High-pass lter, used to
cut low frequency signals below the
s e l e c t e d f r e q u e n c y
High Cut
:
Low-pass lter, used to cut
high frequency signals above the
selected frequency
Precision
:
Switches CAB precision
from regular (1024 points) to high
(2048 points)
L-Star
2x12
2 x 12″
Mesa/Boogie
®
Lonestar* 2x12
cabinet.
Mess 4x12 4 x 12″
Mesa/Boogie
®
OS* 4x12
cabinet.
Dizz 4x12 4 x 12″ Diezel
®
* 4x12 cabinet.
Eagle 4x12 4 x 12″ ENGL
®
* 4x12 cabinet.
Flagman
4x12
4 x 12″
Brown Eye4x12 cabinet with
Celestion
®
V30
®
* speakers.
Solo 4x12 4 x 12″ Soldano
®
* 4x12 caninet.
Juice 4x12 4 x 12″
Orange
®
PPC412* 4x12
cabinet.
Bellman
2x12
2 x 12″
Fender
®
1967 Bassman
®
*
2x12 cabinet.
AMPG
2x12
2 x 12″
Ampeg
®
SVT* 2x12 bass
cabinet.
AMPG
4x10
4 x 10″
Ampeg
®
SVT* 4x10 bass
cabinet.
AMPG
8x10
8 x 10″
Ampeg
®
Classic* 8x10 bass
cabinet.
MAT T
2x12
2 x 12″
Markbass
®
New York*
2x12bass cabinet.
MAT T
2x10
2 x 10″
Markbass
®
Standard 102
Limited Edition* 2x10 bass
cabinet.
Tracy 4x10 4 x 10″
TraceElliot
®
* 4x10 bass
cabinet.
Mess BS
1x12
1 x 12″
MesaBoogie
®
SubwayLite*
1x12 bass cabinet.
Mess BS
2x10
2 x 10″
MesaBoogie
®
SubwayLite*
2x10 bass cabinet.
AC Acoustic
Dreadnought guitar simulation
1.
OM Acoustic
Simulates an OM type acoustic
guitar.
JUMBO Acoustic
Simulates a jumbo acoustic
guitar.
*The mentioned manufacturers and product names are trademarks or registered trademarks of the respective owners.
The trademarks were used merely to identify the sound character of this product.

63
Eect List
FX Title Type Description Parameter Description
Bird Acoustic
Simulates the iconic H-Bird
acoustic guitar.
V o l u m e : C o n t r o l s t h e o u t p u t v o l u m e
Low Cut
:
High-pass lter, used to
cut low frequency signals below the
s e l e c t e d f r e q u e n c y
High Cut
:
Low-pass lter, used to cut
high frequency signals above the
selected frequency
Precision
:
Switches CAB precision
from regular (1024 points) to high
(2048 points)
GA Acoustic
Simulates a GA type acoustic
guitar.
User IR
1-20
User IR User IR.
EQ
Guitar EQ 1 EQ Equalizer designed for guitars.
Band 1: 125Hz
Band 2: 400Hz
Band 3: 800Hz
Band 4: 1.6kHz
Band 5: 4kHz
Use the ve bands above to control
the EQ level.
Volume: Controls the output level
Guitar EQ
2
EQ Equalizer designed for guitars.
Band 1: 100Hz
Band 2: 500Hz
Band 3: 1kHz
Band 4: 3kHz
Band 5: 6kHz
Use the ve bands above to control
the EQ level.
Volume: Controls the output level
Bass EQ 1 EQ Equalizer designed for basses.
Band 1: 33Hz
Band 2: 150Hz
Band 3: 600Hz
Band 4: 2kHz
Band 5: 8kHz
Use the ve bands above to control
the EQ level.
Volume: Controls the output level
Mess EQ EQ
Based on the 5-band EQ
module on Mesa/Boogie
®
*
amps, can easily realize the
classic boogie V-shaped
sound.
Band 1: 80Hz
Band 2: 240Hz
Band 3: 750Hz
Band 4: 2.2kHz
Band 5: 6.6kHz
Use the ve bands above to control
the EQ level.
*The mentioned manufacturers and product names are trademarks or registered trademarks of the respective owners.
The trademarks were used merely to identify the sound character of this product.

64
Eect List
FX Title Type Description Parameter Description
MOD
G-Chorus Chorus
Based on the legendary huge
ensemble
chorus pedal born in late
1970s (chorus mode),
producing rich, shimmering
vintage analog chorus tone.
Warm, rich, and dreamlike
analog chorus sound.
Depth: Controls the chorus depth
Rate: Controls the chorus rate
Volume: Controls the eect level
Sync: Switches Tap Tempo sync on/o
C-Chorus Chorus
Based on a legendary
4-button purple stereo chorus
pedal, providing detailed rich
chorus tone that expands
sonic dimensions.
Mode: Select from 4 dierent chorus
modes
B-Chorus Chorus
Based on a legendary
4-button purple stereo chorus
pedal, providing detailed rich
chorus tone that expands
sonic dimensions.
Depth: Controls the vibrato depth
Rate: Controls the vibrato rate
Volume: Controls the eect level
Sync: Switches Tap Tempo sync on/o
Jet Flanger
Classic anger eect,
producing rich and natural
anger tone.
Depth: Controls the anger depth
Rate: Controls the anger speed
Pre Delay: Controls the pre delay time
Feedback: Controls the amount of
feedback
Sync: Switches Tap Tempo sync on/o
B-Jet Flanger
Classic anging eect tuned
for basses.
Depth: Controls the anger depth
Rate: Controls the anger speed
Pre Delay: Controls the pre delay time
Feedback: Controls the amount of
feedback
Sync: Switches Tap Tempo sync on/o
V-Roto Vibrato
Based on a BBD-based blue
vibrato pedal, producing
natural analog vibrato sound.
Depth: Controls the vibrato depth
Rate: Controls the vibrato rate
Sync: Switches Tap Tempo sync on/o
Vibrato Vibrato
A classic vibrato eect with
wide adjustable range.
Depth: Controls the vibrato depth
Rate: Controls the vibrato speed
Volume: Controls the eect level
Sync: Switches Tap Tempo sync on/o
*The mentioned manufacturers and product names are trademarks or registered trademarks of the respective owners.
The trademarks were used merely to identify the sound character of this product.

65
Eect List
FX Title Type Description Parameter Description
O-Phase Phaser
Based on legendary MXR
®
M101 Phase 90*. Have you
heard the guitar sound in
Eddie Van Halen's Eruption?
That distorted tone with a
sense of rotation is realized
by Phase 90.
Rate: Controls the vibrato speed
Sync: Switches Tap Tempo sync on/o
Vibe Phaser
The Shin-Ei Uni-Vibe is a
classic phase shifter(chorus)
eect made famous by Jimi
Hendrix, David Gilmour, Robin
Trower and many more.
The rich chorus eect that
it’s famous for has become
a staple in a classic rock
guitarist’s rig. While the Uni-
Vibe’s construction is closely
copied by many companies,
many players conrm that
there’s just nothing like the
real thing!
Depth: Controls the eect depth
Rate: Controls the eect speed
Volume: Controls the eect output
Mode: Select from 2 dierent vibe
modes: Chorus and Vibrato
Sync: Switches Tap Tempo sync on/o
O-Trem Tremolo
Based on legendary Demeter
®
TRM-1Tremulator*,oering
classical opto tremolo sound.
In 1982, rock pioneer Ry
Cooder approached James
Demeter to ask whether the
tremolo sound of the Fender
®
twin series speakers could
be made into a pedal eect
device, and this classic eect
device was born.
Depth: Controls the tremolo depth
Rate: Controls the tremolo speed
Sync: Switches Tap Tempo sync on/o
Sine Trem Tremolo
Sine tremolo waveforms and
super wide tonal range.
Depth: Controls the eect depth
Rate: Controls the eect speed
Volume: Controls the eect output
Sync: Switches Tap Tempo sync on/o
Triangle
Trem
Tremolo
Triangle tremolo waveforms
and super wide tonal range.
Depth: Controls the eect depth
Rate: Controls the eect speed
Volume: Controls the eect output
Sync: Switches Tap Tempo sync on/o
*The mentioned manufacturers and product names are trademarks or registered trademarks of the respective owners.
The trademarks were used merely to identify the sound character of this product.

66
Eect List
FX Title Type Description Parameter Description
Bias Trem Tremolo
Bias tremolo waveforms and
super wide tonal range.
Depth: Controls the eect depth
Rate: Controls the eect speed
Volume: Controls the eect output
Sync: Switches Tap Tempo sync on/o
Bias
:
Adjust the oset change of the
waveform
Detune Pitch
This is a detuning eect that
combines a slightly shifted
signal with the original signal
to create a chorus-like tone.
Dry/Wet: Controls the dry/wet signal
level
Detune: Controls the detune amount
from -50 to +50 cents
Auto Swell Special
This is an auto swell eect
with two parameters that are
easy to understand and use. It
can make the guitar sound like
a violin.
Attack: Controls how fast the eect
swells the input signal
Curve: Selects the volume swell curve
(Line, Exp, Log)
Hold Special
This is a freeze eect that can
freeze the sound for a short
period of time before the
eect is activated and make
it play in a loop. The Activate
parameter can be assigned
to the expression pedal to
activate and deactivate the
eect; You can also turn on
the Activate parameter and
use CTRL to directly control
the On/O of the eect
module.
Volume: Controls the eect output
volume
Activate: Switches the eect on/o
Freeze Special
This is a freeze eect that
can freeze the sound at
the moment of activation
and keep it playing when
the eect is activated. The
Activate parameter can be
assigned to the expression
pedal to activate and
deactivate the eect; You
can also turn on the Activate
parameter and use CTRL to
directly control the On/O of
the eect module.
Volume: Controls the eect output
volume
Attack: Controls how fast the eect
volume fades in
Release: Controls how fast the eect
volume fades out
Activate: Switches the eect on/o
*The mentioned manufacturers and product names are trademarks or registered trademarks of the respective owners.
The trademarks were used merely to identify the sound character of this product.

67
Eect List
FX Title Type Description Parameter Description
DLY
BBD Delay
S
Delay
This is a stereo analog delay
model that captures the sound
of a BBD based analog delay
machine that is warm, smooth,
rounded due to the limitation
of BBD chips.
Mix: Controls the wet/dry signal ratio
Feedback: Controls the amount of
feedback
Time: Controls the delay time of left
channel
Time R%: Controls the delay time
of right channel (time ratio of left
channel)
Spread: Controls the eect stereo
width
Level: Controls the eect output
Sync: Switches Tap Tempo sync on/o
Trail: Switched eect trail on/o when
the eect is bypassed
Digital
Delay S
Delay
This model is a stereo digital
delay that
produces a pure clean delay
sound, clear
and accurate.
Mix: Controls the wet/dry signal ratio
Feedback: Controls the amount of
feedback
Time: Controls the delay time of left
channel
Time R%: Controls the delay time of
right channel
(time ratio of left channel)
Spread: Controls the eect stereo
width
Level: Controls the eect output
Sync: Switches Tap Tempo sync on/o
Trail: Switched eect trail on/o when
the eect is
bypassed
Pure Delay
Produce pure, precised delay
sound.
Mix: Controls the wet/dry signal ratio
Feedback: Controls the amount of
feedback
Time: Controls the delay time
Sync: Switches Tap Tempo sync on/o
Trail: Switched eect trail on/o when
the eect is bypassed
*The mentioned manufacturers and product names are trademarks or registered trademarks of the respective owners.
The trademarks were used merely to identify the sound character of this product.

68
Eect List
FX Title Type Description Parameter Description
Tape Delay
Simulates solid-state tape
echo sound
Mix: Controls the wet/dry signal ratio
Feedback: Controls the amount of
feedback
Time: Controls the delay time
Sync: Switches Tap Tempo sync on/o
Trail: Switched eect trail on/o when
the eect is bypassed
Ping Pong Delay
A ping-pong delay producing
stereo feedbadk bounces back
and forth between left and
right channels.
Mix: Controls the wet/dry signal ratio
Feedback: Controls the amount of
feedback
Time: Controls the delay time
Sync: Switches Tap Tempo sync on/o
Trail: Switched eect trail on/o when
the eect is bypassed
Slapback Delay
Simulates the classic slapback
echo eect.
Mix: Controls the delay wet/dry signal
ratio
Feedback: Controls the amount of
feedback
Time: Controls the delay time
Trail: Switched eect trail on/o when
the eect is bypassed
Sweep
Echo
Delay
Producing a delay eect with
sweeping lter
modulated repeats.
Mix: Controls the wet/dry signal ratio
Feedback: Controls the amount of
feedback
Time: Controls the delay time
Sweep Depth: Controls the sweep
lter depth
Sweep Rate: Controls the sweep lter
speed
Swp Sync: Switches sweep lter Tap
Tempo sync on/o
Time Sync: Switches delay Tap Tempo
sync on/o
Trail: Switched eect trail on/o when
the eect is bypassed
*The mentioned manufacturers and product names are trademarks or registered trademarks of the respective owners.
The trademarks were used merely to identify the sound character of this product.

69
Eect List
FX Title Type Description Parameter Description
Ring Echo Delay
Producing a delay eect with
ring modulated repeats.
Dly Mix: Controls the delay wet/dry
signal ratio
Feedback: Controls the amount of
feedback
Time: Controls the delay time
Ring Mix: Controls the ring mod wet/
dry signal ratio
Freq: Controls the ring mod frequency
Tone: Controls the ring mod tone
Sync: Switches Tap Tempo sync on/o
Trail: Switched eect trail on/o when
the eect is bypassed
Tube Delay
Simulates tube-driven tape
echo sound.
Mix: Controls the wet/dry signal ratio
Feedback: Controls the amount of
feedback
Time: Controls the delay time
Sync: Switches Tap Tempo sync on/o
Trail: Switched eect trail on/o when
the eect is bypassed
Sweet
Echo
Delay
This analog delay pedal was
sold from 1981 to 1984 and
is still sought after thanks
to its warm, natural sound.
Produces a delay time ranging
from 20 to 300 milliseconds.
Mix: Controls the wet/dry signal ratio
Feedback: Controls the amount of
feedback
Time: Controls the delay time
Sync: Switches Tap Tempo sync on/o
Trail: Switched eect trail on/o when
the eect is bypassed
999 Echo Delay
Based on Maxon
®
AD900
Analog Delay*, providing
warm, accurate delay sound.
100% Analog Delay, dynamic
distortion on Delay repeats,
gorgeous, warm, organic delay
tone.
Mix: Controls the wet/dry signal ratio
Feedback: Controls the amount of
feedback
Time: Controls the delay time
Sync: Switches Tap Tempo sync on/o
Trail: Switched eect trail on/o when
the eect is bypassed
Vintage
Rack
Delay
Reproduces the sound of a
vintage 1980's rack-mount
delay
machine with slightly sample-
reduced feedback.
Mix: Controls the wet/dry signal ratio
Feedback: Controls the amount of
feedback
Time: Controls the delay time
Mod: Controls the eect modulation
amount
Tone: Controls the eect tone
Sync: Switches Tap Tempo sync on/o
Trail: Switched eect trail on/o when
the eect is bypassed
*The mentioned manufacturers and product names are trademarks or registered trademarks of the respective owners.
The trademarks were used merely to identify the sound character of this product.
70
Eect List
FX Title Type Description Parameter Description
Rev Echo Delay
Producing a special delay
eect with reversed feedback.
Mix: Controls the wet/dry signal ratio
Feedback: Controls the amount of
feedback
Time: Controls the delay time
Volume
:
Controls the eect output
volume
Sync: Switches Tap Tempo sync on/o
Trail: Switched eect trail on/o when
the eect is bypassed
Dual Echo Delay
Producing a pure dual
delay eect with Dual Echo
separated L/R channel signal
proessing.
Mix A:Contols the delay A wet/dry
signal ratio
FB A:Controls the feedback amount of
delay A
Time A: Controls the delay time of
delay A
Mix B: Contols the delay B wet/dry
signal ratio
FB B: Controls the feedback amount
of delay B
Time B: Controls the delay time of
delay B
A Sync: Switches delay A Tap Tempo
sync on/o
B Sync: Switches delay B Tap Tempo
sync on/o
Trail: Switches eect trail on/o
RVB
Room Reverb
Simulates the spaciousness of
a room.
Mix: Controls the wet/dry signal ratio
Pre Delay: Controls the amount of
time between the dry signal and the
audible onset of early reections and
the reverb tail
Decay: Controls the duration of reverb
time
Trail: Switched eect trail on/o when
the eect is bypassed
*The mentioned manufacturers and product names are trademarks or registered trademarks of the respective owners.
The trademarks were used merely to identify the sound character of this product.

71
Eect List
FX Title Type Description Parameter Description
Hall Reverb
Simulates the spaciousness of
a performance hall.
Mix: Controls the wet/dry signal ratio
Pre Delay: Controls the amount of
time between the dry signal and the
audible onset of early reections and
the reverb tail
Decay: Controls the duration of reverb
time
Trail: Switched eect trail on/o when
the eect is bypassed
Church Reverb
Simulates the spaciousness of
a church.
Mix: Controls the wet/dry signal ratio
Pre Delay: Controls the amount of
time between the dry signal and the
audible onset of early reections and
the reverb tail
Decay: Controls the duration of reverb
time
Trail: Switched eect trail on/o when
the eect is bypassed
Plate Reverb
Simulates the sound character
produced by a vintage plate
reverberator.
Mix: Controls the wet/dry signal ratio
Decay: Controls the duration of reverb
time
High Damp: Controls the low pass
lter frequency
Trail: Switched eect trail on/o when
the eect is bypassed
Spring Reverb
Simulates the sound character
produced by a vintage spring
reverberator.
Mix: Controls the wet/dry signal ratio
Decay: Controls the duration of reverb
time
Tone: Controls the eect tone
Trail: Switched eect trail on/o when
the eect is bypassed
Tube
Spring
Reverb
This reverb model simulates
the sound coming from a
vintage tube driven spring
reverb unit.
Mix: Controls the wet/dry signal ratio
Pre Delay: Controls the amount of
time between the dry signal and the
audible onset of early reections and
the reverb tail
Decay: Controls the duration of reverb
time
Low Damp/Hi Damp: Dampens the
eect low/high frequency amount
Mod: Controls the eect modulation
amount
Trail: Switched eect trail on/o when
the eect is bypassed
*The mentioned manufacturers and product names are trademarks or registered trademarks of the respective owners.
The trademarks were used merely to identify the sound character of this product.

72
Eect List
FX Title Type Description Parameter Description
Concert Reverb
This reverb model recreates
the spaciousness of a concert
hall.
Mix: Controls the wet/dry signal ratio
Pre Delay: Controls the amount of
time between the dry signal and the
audible onset of early reections and
the reverb tail
Decay: Controls the duration of reverb
time
Low Damp/Hi Damp: Dampens the
eect low/high frequency amount
Mod: Controls the eect modulation
amount
Trail: Switched eect trail on/o when
the eect is bypassed
N-Star Reverb
Special-tuned reverb eect
with lush, bright decays.
Mix: Controls the wet/dry signal ratio
Decay: Controls the duration of reverb
time
Trail: Switched eect trail on/o when
the eect is bypassed
Deepsea Reverb
Special-tuned reverb eect
with huge, deep decays.
Mix: Controls the wet/dry signal ratio
Decay: Controls the duration of reverb
time
Trail: Switched eect trail on/o when
the eect is bypassed
Sweet
Space
Reverb
Produces a modulated reverb
eect that is lush and sweet.
Mix: Controls the wet/dry signal ratio
Pre Delay: Controls the amount of
time between the dry signal and the
audible onset of early reections and
the reverb tail
Decay: Controls the duration of reverb
time
Low End: Controls the low frequency
amount
High End: Controls the high pass lter
frequency
Trail: Switched eect trail on/o when
the eect is bypassed
*The mentioned manufacturers and product names are trademarks or registered trademarks of the respective owners.
The trademarks were used merely to identify the sound character of this product.

73
Eect List
FX Title Type Description Parameter Description
Shimmer Reverb
Produce a rich, shimmering
reverb eect.
Mix: Controls the wet/dry signal ratio
Pre Delay: Controls the amount of
time between the dry signal and the
audible onset of early reections and
the reverb tail
Decay: Controls the duration of reverb
time
Low End: Controls the low frequency
amount
High End: Controls the high pass lter
frequency
Trail: Switched eect trail on/o when
the eect is bypassed
VOL
Volume Volume
Pure volume control without
adding any tone.
Volume: Adjust the output volume
*The mentioned manufacturers and product names are trademarks or registered trademarks of the respective owners.
The trademarks were used merely to identify the sound character of this product.

74
Factory SnapTone Files
Factory SnapTone Files
Type Name Description
Clean Amp
Head
Dark CL
This SnapTone le is modeled after the Fender
®
1965 Blackface
Bassman
®
* clean tone
Band CL
This SnapTone le is modeled after the Fender
®
1964
Bandmaster
®
* normal channel's clean tone
Match 35
CL
This SnapTone le is modeled after the Matchless
®
Clubman 35*
clean tone
EV53 CH1 This SnapTone le is modeled after the EVH
®
5150III
®
* channel 1
Mess JP2C
CH1
This SnapTone le is modeled after the Mesa/Boogie
®
JP-2C™*
channel 1
Overdrive
Amp Head
ARC OD
This SnapTone le is modeled after the PRS
®
Archon Classic 50*
lead channel
Bad KT OD
This SnapTone le is modeled after the BadCat
®
Lynx 50* channel
2
Band OD
This SnapTone le is modeled after the Fender
®
1964
Bandmaster
®
* normal channel's overdrive tone
Boger OD
This SnapTone le is modeled after the Bogner
®
Uberschall*
overdrive tone
Dark OD
This SnapTone le is modeled after the Fender
®
1965 Blackface
Bassman
®
* overdrive tone
EV53 CH2 This SnapTone le is modeled after the EVH
®
5150III
®
* channel 2
Hiway OD
This SnapTone le is modeled after the Hiwatt
®
Custom 100*
overdrive tone
Match 35
OD
This SnapTone le is modeled after the Matchless
®
Clubman 35*
overdrive tone
Mess JP2C
CH2
This SnapTone le is modeled after the Mesa Boogie
®
JP-2C™*
channel 2
ToneK OD
This SnapTone le is modeled after the Tone King
®
Imperial MKII*
overdrive tone
UK Force
This SnapTone le is modeled after the Marshall
®
neoclassical
signature amp' s overdrive tone
Distortion
Amp Head
Boger LD
This SnapTone le is modeled after the Bogner
®
Uberschall*
distortion tone
Eagle RB
This SnapTone le is modeled after the ENGL
®
E650 Ritchie
Blackmore* signature amp' s distortion tone
Eagle Sava
This SnapTone le is modeled after the ENGL
®
Savage 120 MKII*
distortion tone
*The mentioned manufacturers and product names are trademarks or registered trademarks of the respective owners.
The trademarks were used merely to identify the sound character of this product.

75
Factory SnapTone Files
Type Name Description
Distortion
Amp Head
Eagle SM
This SnapTone le is modeled after the ENGL
®
E656 Steve Morse*
signature amp' s distortion tone
EV53 CH3 This SnapTone le is modeled after the EVH
®
5150III
®
* channel 3
Distortion
Amp Head
Flagman BE
This SnapTone le is modeled after the famous UK-style boutique
amp BE channel
H&K 40 LD
This SnapTone le is modeled after the Hughes Kettner
®
TubeMeister Deluxe 40* lead channel
Mess JP2C
CH3
This SnapTone le is modeled after the Mesa/Boogie
®
JP-2C™*
channel 3
Rev Green
This SnapTone le is modeled after the Revv
®
Generator 120 MKIII*
green channel
Rev Purple
This SnapTone le is modeled after the Revv
®
Generator 120 MKIII*
purple channel
Rev Red
This SnapTone le is modeled after the Revv
®
Generator 120 MKIII*
red channel
Victor Krak
This SnapTone le is modeled after the Victory
®
Kraken* distortion
tone
Pedal
14 OD
This SnapTone le is modeled after the Fortin
®
Fourteen* pedal' s
overdrive tone
Force OCD
This SnapTone le is modeled after the Fulltone
®
OCD* pedal' s
overdrive tone
Glass Bass
Pre
This SnapTone le is modeled after the Darkglass
®
B7K Bass
Preamp* pedal
J-RAY OD
This SnapTone le is modeled after the Vemuram
®
Jan Ray Mateus
Asato* signature pedal
KOT OD
This SnapTone le is modeled after the ANALOG.MAN
®
King of
Tone pedal' s overdrive tone
Mouse DST
This SnapTone le is modeled after the ProCo™ The Rat* pedal' s
distortion tone
Twin Rock
JM
This SnapTone le is modeled after the Peace Hill FX
®
TRJM* pedal'
s overdrive tone
Guitar Amp
Dark DLX
This SnapTone le is modeled after the Fender
®
'65 Deluxe
Reverb
®
* with 2x12 cabnient
Dark PRI
This SnapTone le is modeled after the Fender
®
'65 Princeton
®
Reverb* with 2x12 cabnient
Foxy CL
This SnapTone le is modeled after the VOX
®
AC30* clean tone
with 2x12 cabnient
Foxy OD
This SnapTone le is modeled after the VOX
®
AC30* overdrive tone
with 2x12 cabnient
*The mentioned manufacturers and product names are trademarks or registered trademarks of the respective owners.
The trademarks were used merely to identify the sound character of this product.

76
Factory SnapTone Files
Type Name Description
Guitar Amp
J-120 Bright
This SnapTone le is modeled after the legendary Jazz Chorus solid
state combobright onchannal with 2x12 cabnient
Juice
Rock50
This SnapTone le is modeled after the Orange
®
Rockerverb 50*
distortion tone with 4x12 cabnient
Guitar Amp
L-Star CH1
This SnapTone le is modeled after the Mesa/Boogie
®
Lone Star
®
100* channel 1 with 4x12 cabnient
L-Star CH2
This SnapTone le is modeled after the Mesa/Boogie
®
Lone Star
®
100* channel 2 with 4x12 cabnient
UK 900
This SnapTone le is modeled after the Marshall
®
JCM900™*
distortion tone with 4x12 cabnient
Bass AMP
AMPG
BASS
This SnapTone le is modeled after the Ampeg
®
SVT Classic* with
6x10 cabnient
AGUI BASS
This SnapTone le is modeled after the Aguilar
®
DB751* with 4x10
cabnient
Hark BASS
This SnapTone le is modeled after the Hartke
®
LH1000* clean tone
with 4x10 cabnient
Hark OD
BASS
This SnapTone le is modeled after the Hartke
®
LH1000* overdrive
tone with 4x10 cabnient
MAT T
BASS
This SnapTone le is modeled after the Markbass
®
Standard
104HF* overdrive tone with 4x10 cabnient
SBE BASS
This SnapTone le is modeled after the EBS
®
HD350* overdrive
tone with 4x10 cabnient
*The mentioned manufacturers and product names are trademarks or registered trademarks of the respective owners.
The trademarks were used merely to identify the sound character of this product.

77
MIDI Control Information List
MIDI Control Information List
CC# Value Range Explain
0 0-1
PATCH MSB:
001~128: CC0=0,PC=0-127
129~200: CC0=1,PC=0-71
7 0-100 Patch Volume
11 0-100 EXP1 Parameter
12 0-100 EXP2 Parameter
13 0-127
EXP1 State Switching:
0-63: A, 64-127: B
16 0-100 Quick Access Para 1
17 0-127
Quick Access Knob 1 parameter adjustment:
0-63:Turn down by 1 step, 64-127: Turn up by 1 step
18 0-100 Quick Access Knob 2
19 0-127
Quick Access Knob 2 parameter adjustment:
0-63:Turn down by 1 step, 64-127: Turn up by 1 step
20 0-100 Quick Access Knob 3
21 0-127
Quick Access Knob 3 parameter adjustment:
0-63:Turn down by 1 step, 64-127: Turn up by 1 step
24 0-127 Patch -
25 0-127 Patch +
28 0-127
Unit Mode:
0-63: Patch Mode, 64-127: Stomp Mode
48 0-127
NR Module on/o:
0-63: o, 64-127: on
49 0-127
PRE Module on/o:
0-63: o, 64-127: on
50 0-127
WAH Module on/o:
0-63: o, 64-127: on
51 0-127
DST Module on/o:
0-63: o, 64-127: on
52 0-127
NS Module on/o:
0-63: o, 64-127: on
53 0-127
AMP Module on/o:
0-63: o, 64-127: on
54 0-127
CAB Module on/o:
0-63: o, 64-127: on
55 0-127
EQ Module on/o:
0-63: o, 64-127: on
56 0-127
MOD Module on/o:
0-63: o, 64-127: on
57 0-127
DLY Module on/o:
0-63: o, 64-127: on
78
MIDI Control Information List
CC# Value Range Explain
58 0-127
RVB Module on/o:
0-63: o, 64-127: on
59 0-127
VOL Module on/o:
0-63: o, 64-127: on
60 0-127 Tuner Module
61 0-127 Looper
62 0-127 Looper Record
63 0-127 Looper Auto Record
64 0-127
Looper Play/Stop
0-63: o, 64-127: on
65 0-127 Delete Loop
66 0-100 Looper Recording Volume
67 0-100 Looper Playback Volume
68 0-127
Looper Placement
0-63: Post, 64-127: Pre
69 0-127 CTRL A
70 0-127 CTRL B
73 0-2 Tempo MSB, Used with CC74
74 0-127
CC73=0,CC74=40-127:
40BPM-127BPM
CC73=1,CC74=0-127:
128BPM-255BPM
CC73=2,CC74=0-44:
256BPM-300BPM
75 0-127 Tap Tempo
92 0-127 Drum Machine Menu
93 0-127
Drum Machine Play/Stop
0-63: Stop, 64-127: Play
94 0-1 Drum Machine Type MSB, Used with CC95
95 0-127
Drum Machine Type
001~128: CC94=0,CC95=0-127
129: CC94=1,CC95=0
96 0-100 Drum Machine Volume

79
Troubleshooting
Troubleshooting
Device Won’t Turn On
• Make sure the power supply is properly connected
• Check if the power adapter is working properly
• Check if you’re using the correct power adapter
• Please check whether the battery has suicient power
No Sound Or Slight Sound
• Make sure your cables are connected properly
• Make sure the volume knob is adjusted properly
• Check the master volume settings
• Check the eects module volume settings
• Check the patch volume settings
• Make sure your input device is not muted
Noise
• Make sure your cables are connected properly
• Check your instrument output jack
• If the noise is coming from your instrument, try using the noise reduction module
to reduce it
Sound Problems
• Make sure your cables are connected properly
• Check your instrument output jack
• If you’re using an external expression pedal to control distortion or other similar
parameter
• check to see if the expression pedal is set up properly
• Check your eects parameter setup. If eects are set to extremes, GP-50 may
have abnormal noise

80
Specications
Specications
Supported Sampling Accuracy: 24-bit
Supported Sample Rate: 48kHz
SNR: 110dB
Module: 12
Patch Memory: 200 Patch slots (100 factory patches included)
Analog Input Connection
IN: 1/4 (6.35mm) TS jack, 1M Ohms
EXP/FS: 1/4 (6.35mm) TRS jack
Analog Output Connection
OUT (L): 1/4 (6.35mm) TS jack, 1k Ohms
OUT (R): 1/4 (6.35mm) TRS jack, 1k Ohms
PHONES/MIC: 1/8 (3.5mm) TRRS jack, 22 Ohms
Digital Connections
USB Port: USB 2.0 Type-C Port
MIDI IN: 1/4 (6.35mm) TRS jack, compatible with EXP/FS jack
USB Recording Specication
Sample Rate: 48kHz
Bit Depth: 24-bit
Size and Weight
Dimensions: 200mm(W) x 139mm(D) x 55mm(H)
Unit Weight: 958g
Power
DC Power Requirements:
DC 9V (center negative), 5.5×2.1mm plug
≥1.5A (Min. operating current: 1A; Max. supply current: 2A)
USB-C Power Requirements:
Interface: Type-C, DC 5V
≥1A (Min. operating current: 1A; PD fast-charging current: 3A; Reverse charging
current: 1A)
Battery
Capacity: 3000mAh/3.7V