Save the user manual for future reference. If you have any
questions, please contact us to get suppo.
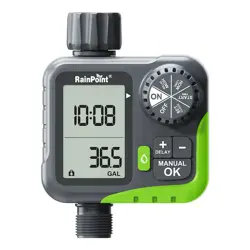
USER MANUAL
1-Zone Digital Hose Timer
Model No. ITV117

Don’t use the water timer when the temperature is
below 37.4°F (3°C), and please store the timer indoors
to avoid potential freezing damage.
The lter traps di paicles, preventing them from
entering the timer and causing clogging. Please clean
the lter regularly and replace it if worn.
Please read before use:
Warm Tips
If you encounter any problems during use,
please contact our suppo:
To ensure a longer lifespan, please use 2 new AA
alkaline batteries (not included). Don’t mix new and old
alkaline, standard (carbon-zinc), or rechargeable
batteries.
Please activate the water timer before rst use or after
a period of inactivity (Refer to page 7: ACTIVATE THE
TIMER BEFORE USE).
Web: www.rainpointonline.com
Email: suppo@rainpointonline.com
Only use with clean cold water.
EN
Contents
1. Contents in the box
2. Introduction
2.1 Product Oveiew
2.2 Specication
2.3 Product Features
3. Timer Programming
3.1 Product Installation
3.2 Programming Your Timer
3.3 Additional Functions
3.4 Cleaning Your Timer
4. Troubleshooting
5. Precautions
6. Warranty Policy
7. Customer Suppo
01
02
02
03
03
04
04
08
14
20
21
22
23
23
EN
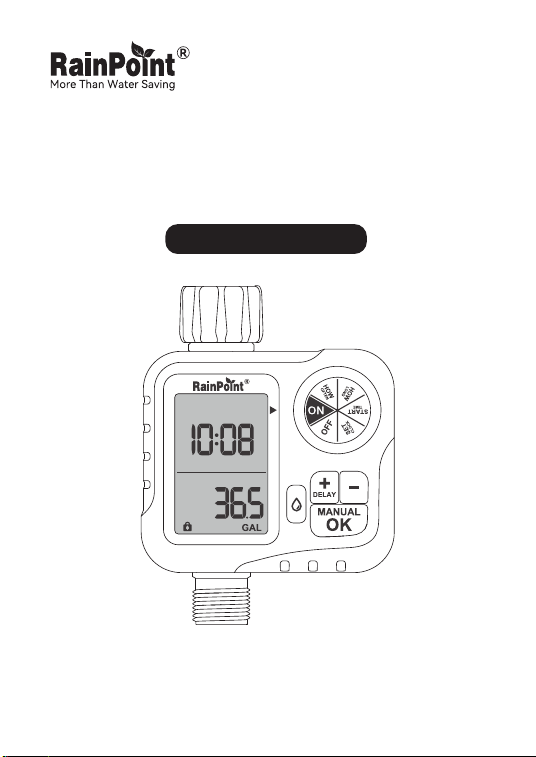
ITV117 1-Zone Digital Hose Timer
User Manual
Quick Guide
Sealing Tap
Warranty Card
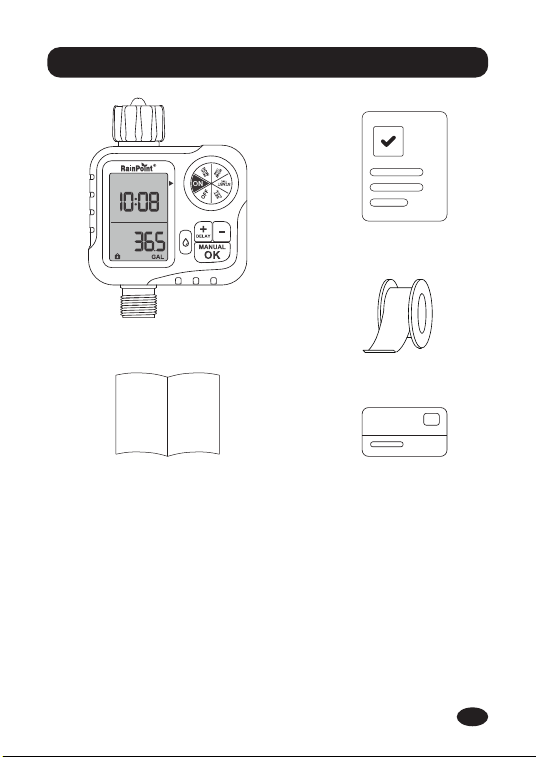
1. Contents in the box
-01-
1.
2.
3.
4.
5.
1
3
4
52
EN
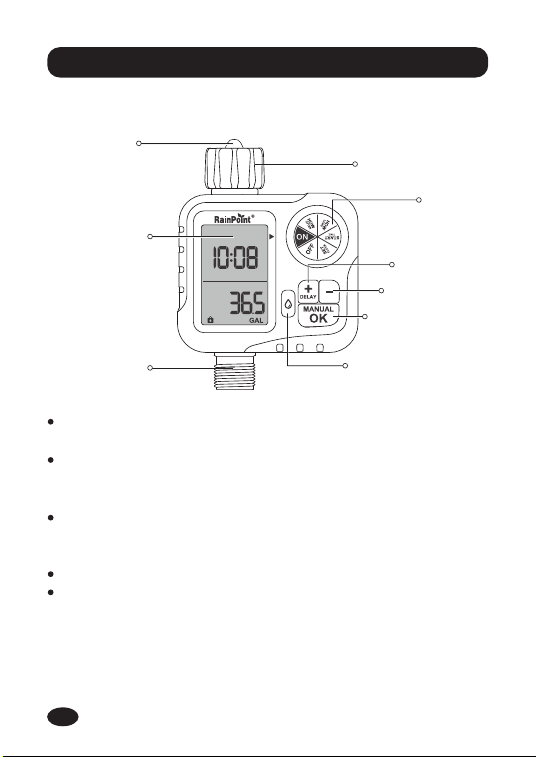
2. Introduction
DIAL: Rotate the dial to customize your watering
schedule.
OK/MANUAL BUTTON: Use the "OK" button to conrm
the time; When the dial is turned to "ON", press and hold
down "MANUAL" to enter the manual watering Settings.
DELAY /+ BUTTON: Use the "+" button to adjust the
time; When the dial is turned to "ON", hold down
"DELAY" to activate the rainy day delay.
- BUTTON: Use the "-" button to adjust the time.
FLOW BUTTON: Sho press switch ow meter display
function, press and hold to switch units in LAST mode,
press and hold in TOTAL mode to clear data.
2.1 Product Oveiew
DIAL
BIG LCD
SCREEN
OK/MANUAL
BUTTON
- BUTTON
FLOW BUTTON
DELAY/+
BUTTON
FILTER
-02-
HOSE TAP
CONNECTION
OUTTER
EN
2.2 Specication
2.3 Product Features
Working Water Pressure 0.5 bar to 8 bar (7.25-116.03 PSI)
Watering Frequency 12h or 1-7 day
0-9999L (0-2641Gal)
Flowmeter measuring
range
22L/Min (5.8Gal/Min)Max Flow Rate
2*AA Alkaline Batte (Not included)Power By
00/24/48/72hRain Delay
NH (US) for 3/4" taps
BSP (EU) 3/4"or 1" taps
Water Inlet
For 3/4" standard garden hoseWater Outlet
-03-
Low Power Ale.
Rain Delay Function.
Next irrigation plan reminder.
Easy to turn o all plans.
Setting the upper limit for saving water function.
Water calibration function.
L/Gal water unit switchable.
EN
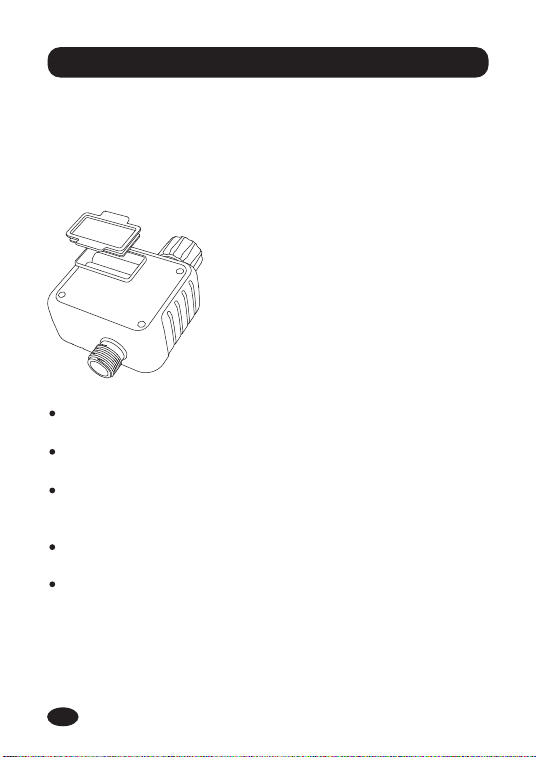
3. Timer Programming
3.1 Product Installation
3.1.1 Installing The Batteries
Note:
After installing the batte, securely install the batte
cover to ensure water resistance.
If the timer is not used for a long time, take out the
batte and dispose of it properly.
Replace the batte when the low batte indicator
appears on the display. After you done it, please
remember to reset your watering plan.
Don’t dispose of batteries in re. Batteries may explode
or leak.
To ensure a longer seice life, use 2 new AA alkaline
batteries (not included). Do not mix old and new alkaline
batteries, standard batteries (carbon-zinc batteries) or
rechargeable batteries.
-04-
Open the batte compa-
ment cover on the back of the
timer.
Inse 2 new AA (1.5V)
alkaline batteries (not
included).
Put the batte compament
cover on and press rmly to
ensure it is completely sealed.
1.
2.
3.
Install the batte on the timer and you will see the screen light
up:
EN
Note:
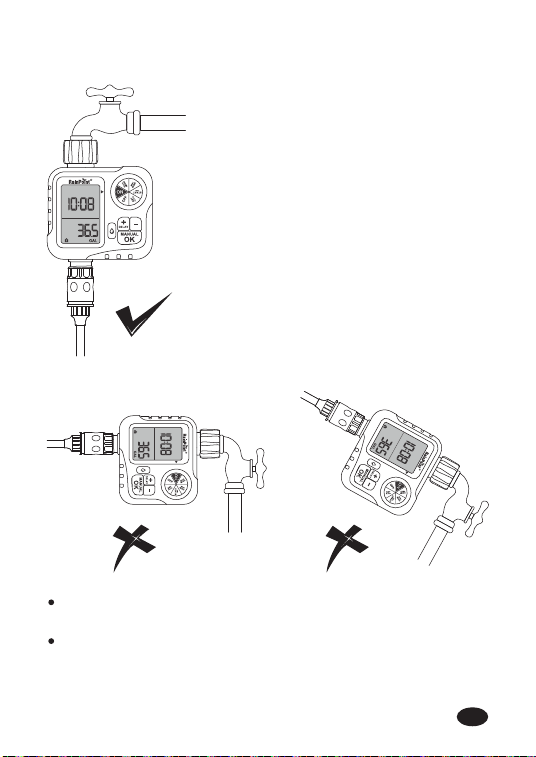
T mounting the timer veically on the faucet, rather
than at an Angle or horizontally.
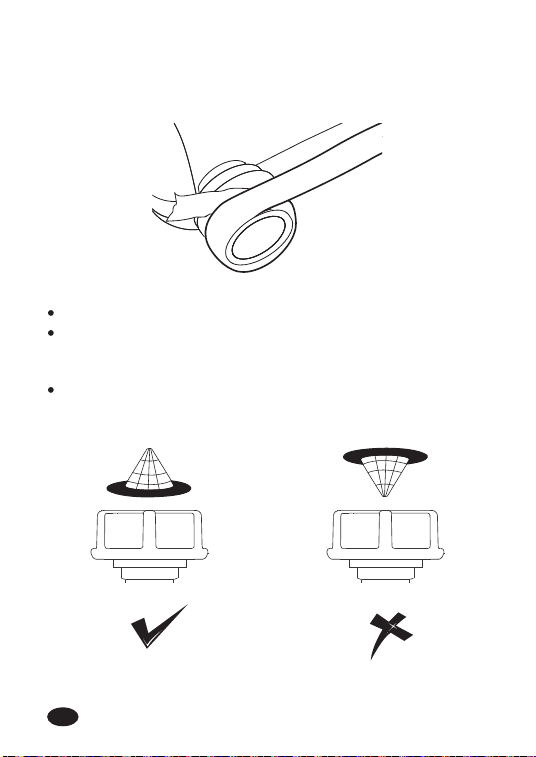
Wrap the thread tape and align it with the thread to
avoid leakage, if the faucet thread does not tighten to
the bottom of the timer inlet, add a rubber washer.
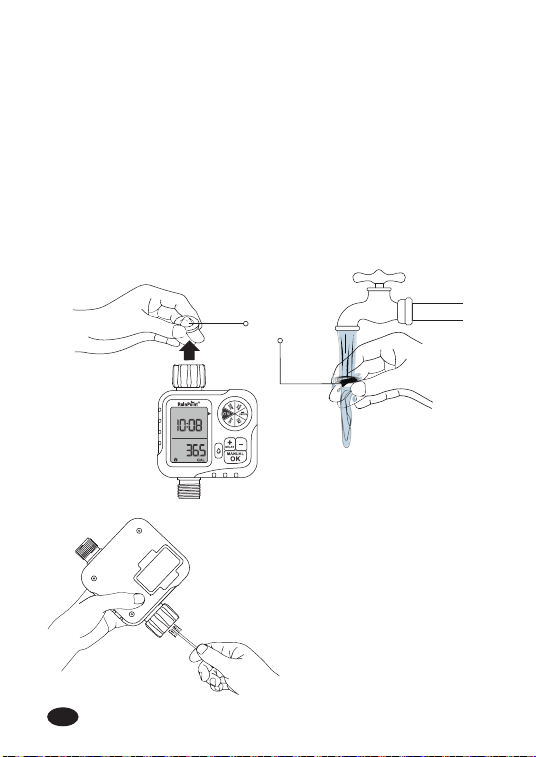
3.1.2 Installing The Timer
Turn o the garden tap.
Wrap teon tape around the
faucet wire.
Screw the timer on the garden
faucet so that the display is as
perpendicular to the ground as
possible to prevent rainwater
from accumulating and leaking
indoors.
Wrap teon tape with thread
from timer outlet.
Screw the garden hose to the
timer outlet.
Program the timer and turn on
the faucet.
-05-
1.
2.
3.
4.
5.
6.
EN
Note:
Please do not use tools, only install the timer by hand.
When expecting freezing temperatures, timers should be
removed from the hose faucet and stored indoors to
avoid potential freeze damage.
Please install the lter properly and keep it clean as
follows.
Tips: lf the connection between the timer and the faucet or
hose is not tight or leaking, wrap more Sealing Tap (thread
seal tape) to make them tight.
-06-
EN
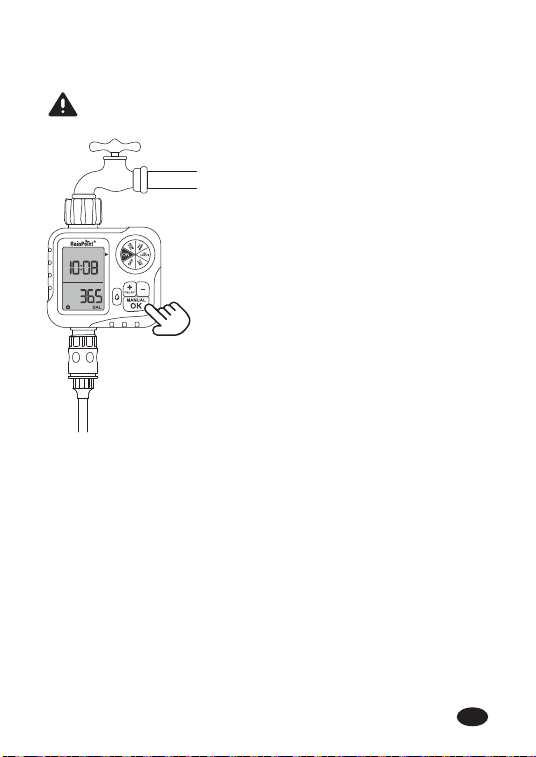
3.1.3 Activate The Timer Before Use
Keep the garden tap turned o.
Turn the timer dial to "ON".
Press and hold the "MANUAL"
button for 3-5 seconds to enter
manual watering mode.
When the screen ashes, press
the "OK" button to sta
watering manually.
After hearing a "click" sound or
waiting for about 5 seconds,
the valve in the timer opens,
and then change the dial to
"OFF" to close the valve.
Repeat steps 2-5, 3-5 times.
Test: Turn on the faucet
slightly, then repeat steps 2-5
to check if the water is
expected to ow out or turn o.
Congratulations!
You have connected and installed the timer.
If the timer valve is normal, please feel free to use it!
If something goes wrong, repeat the above steps several
times or contact after-sales seice immediately.
Note: When testing, please stay away from the water timer
outlet to avoid splashing and moisture.
Please activate the device before using it for the rst
time or after a period of inactivity.
-07-
1.
2.
3.
4.
5.
6.
7.
EN
-08-
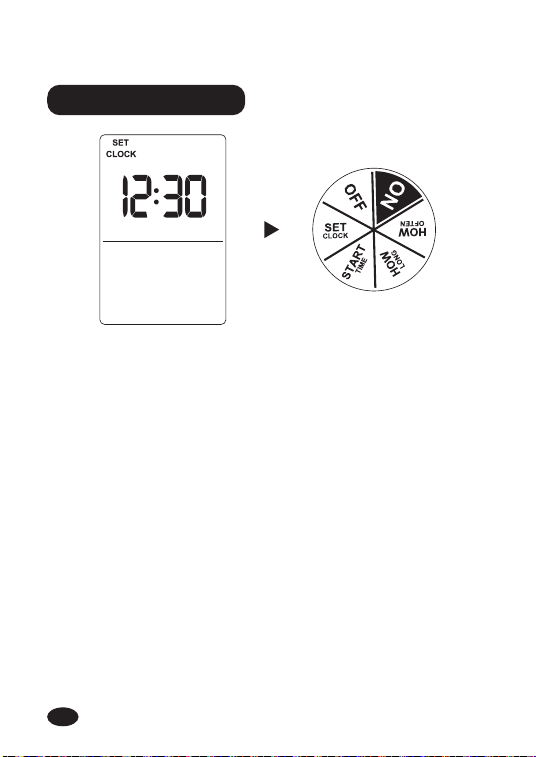
Turn the dial to "SET CLOCK".
Use the "+" or "-" button to adjust the time.
Use the "OK" button to switch hours to minutes and
conrm your settings.
The default is 24-hour format. During any setting in this
mode (including after conrmation), press and hold
"OK" to switch to 12/24-hour format.
Turn the dial clockwise to save the changes in this step
and proceed to the next step.
NOTE: When the hours and minutes no longer ash, press the
"+" or "-" button again, the hours sta ashing, and the time
can be reset.
STEP 1: SET CLOCK
1.
2.
3.
4.
5.
3.2 Programming Your Timer
EN
-09-
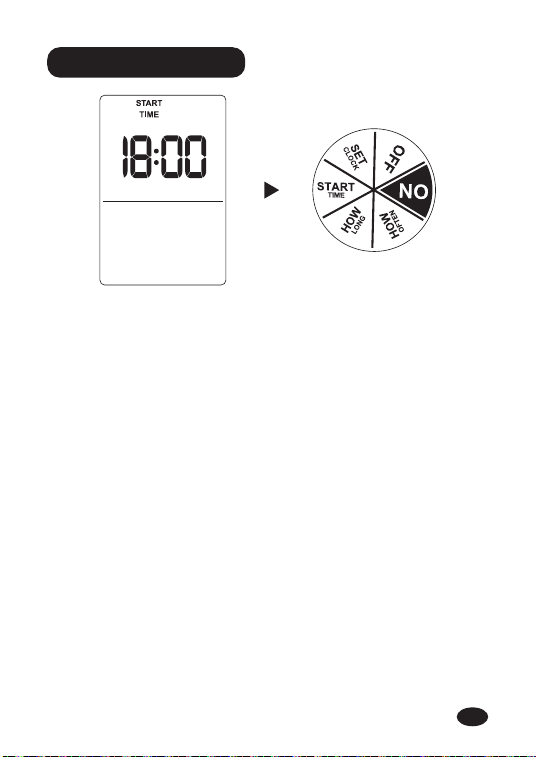
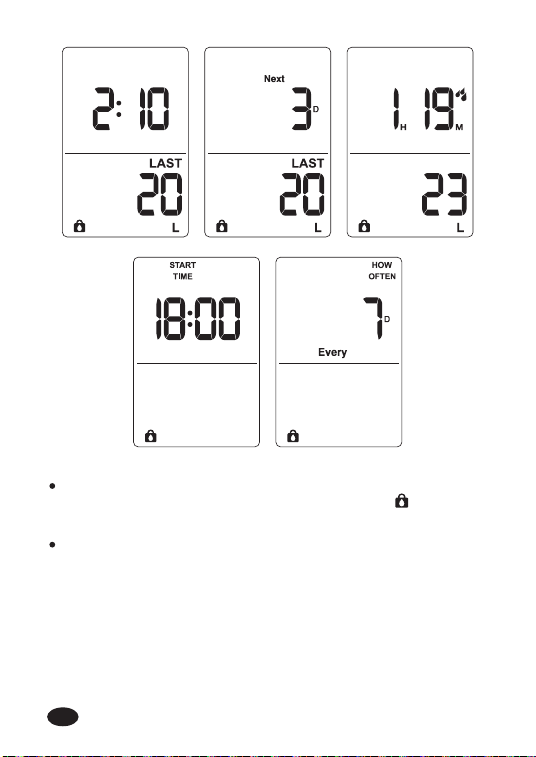
STEP 2: START TIME
Turn dial to "START TIME".
Use the "+" and "-" buttons to set the time you want to
sta watering.
Use the "OK" button to switch hours to minutes and
conrm your settings.
Turn the dial clockwise to save the changes in this step
and proceed to the next step.
NOTE: When the hours and minutes no longer ash, press the
"+" or "-" button again, the hours sta ashing, and the sta
time can be set again.
1.
2.
3.
4.
EN
-10-
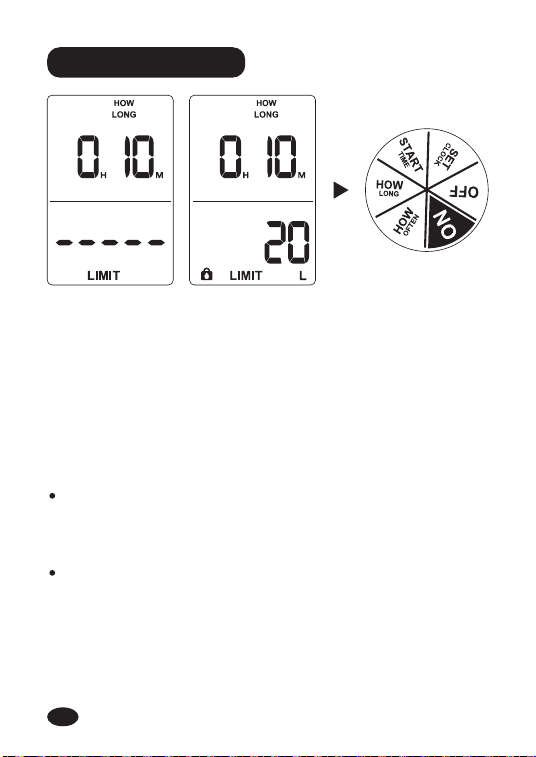
STEP 3: HOW LONG
Turn dial to "HOW LONG".
Use the "+" and "-" buttons to select watering time from
0 minutes to 3 hours and 59 minutes, ow rate from 0
liters to 9999 liters (0 gallons to 2639 gallons).
Use the "OK" button to switch hours to minutes and
then to ow rate limits, and conrm your settings.
Turn the dial clockwise to save the changes in this step
and go to the next step.
1.
2.
3.
4.
Note:
When the hours, minutes and ow limit are no longer
ashing, press the "+" or "-" button again, the hour will
sta ashing, and the duration and ow limit can be
reset.
The unit cannot be switched when setting the ow rate,
and the ow button cannot be used during setting. After
setting the ow rate limit, the ow rate limit icon will
always be displayed.
EN
-11-
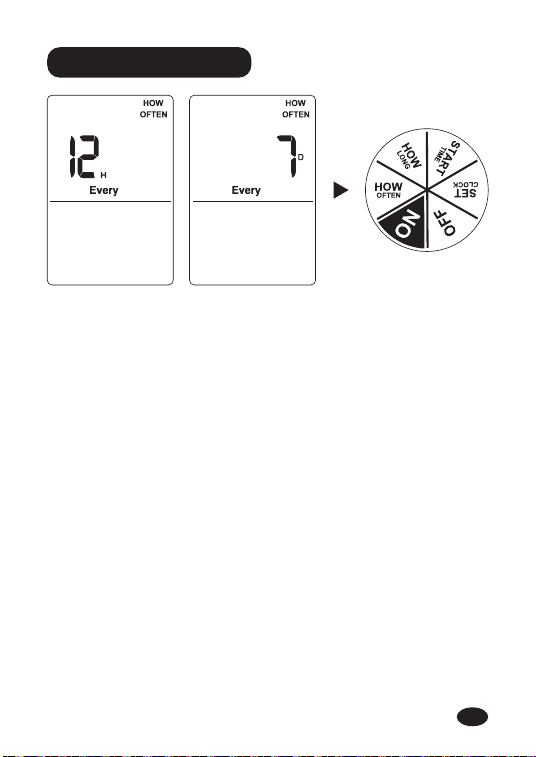
Turn the dial to "HOW OFTEN".
Use the "+" and "-" buttons to set your watering
frequency. You can choose eve 12 hours, 1 day, 2
days‧‧‧‧‧‧ 7 days, and press the "OK" button to conrm
your settings.
Turn the dial clockwise to save the changes in this step
and go to the next step.
1.
2.
3.
STEP 4: HOW OFTEN
NOTE: When the time no longer ashes, press the "+" or "-"
button again, the time will sta ashing again, and the
frequency can be reset.
EN
-12-
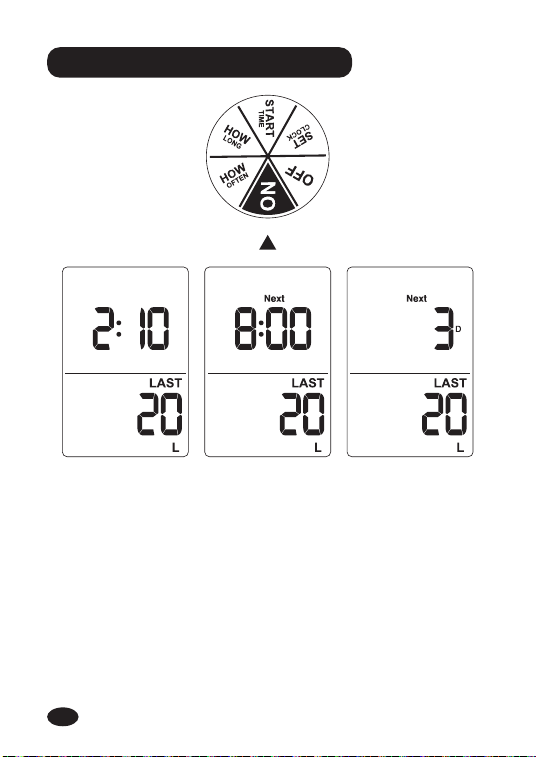
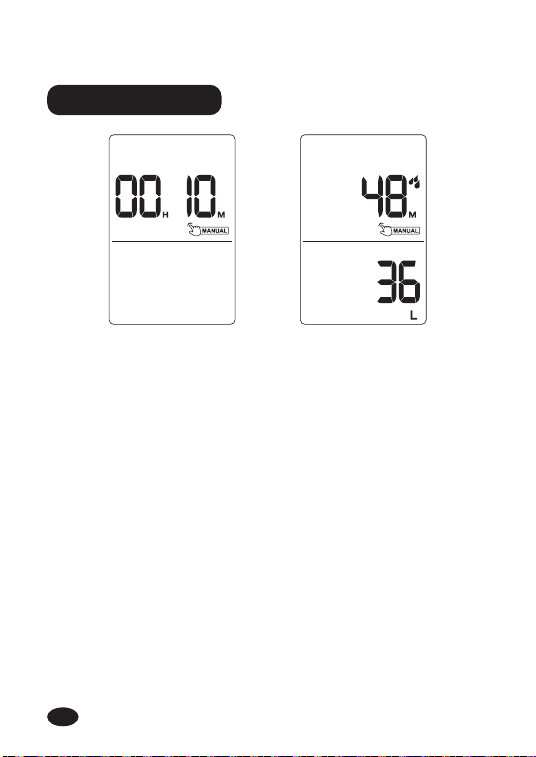
STEP 5: AUTOMATIC WATERING
Turn the dial to "ON".
The LCD screen will display the current time, the next
sta watering time, and the amount of water used for
the last irrigation.The number of days is shown if the
time between the next plan is more than one day, and if
less than one day, the next sta watering time will show
on the screen.
1.
2.
EN
-13-
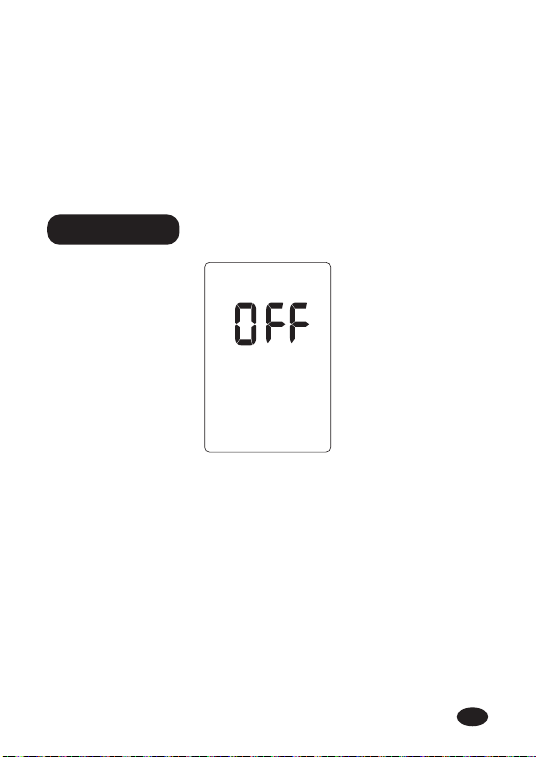
If you want to stop the watering plan for a long time,
turn the dial to "OFF". (Your settings have been saved)
In OFF mode, the water timer will not water automatical-
ly. (The screen will display the word OFF in large letters)
To sta watering automatically again, turn the dial back
to "ON" to resume your programmed watering schedule.
1.
3.
2.
STEP 6: OFF
NOTE: Any rotation of the knob or a long press of the "OK"
button will cancel this watering and close the valve, and the
plan will be re-sta based on that day. For example: If you
set the watering plan for eve 3 days on Monday, but next
day you turn the knob to any position and then turn it back to
"ON" without changing the plan, the watering plan will resta
from the next day. That is, sta watering eve 3 days from
the second day.
EN
3.3 Additional Functions
WATER MANUAL
-14-
Set up
manual watering
Peorm
manual watering
Using the manual watering function will not interrupt your
watering plan. To use this function, follow these steps:
Turn the dial to "ON".
Press and hold the "MANUAL" button for 3-5 seconds
to enter manual watering mode.
Press the "+" or "-" button to adjust the manual
watering time from 0 minutes to 7 hours and 59 minutes.
(Default manual watering time is 10 minutes)
After setting the watering time, press the "OK" button or
if there is no operation within 5 seconds, manual
watering will sta by default. The manual icon, water
consumption, and manual watering time countdown will
be displayed on the screen.
If you need to stop manual watering, please press and
hold the "MANUAL" button for 3-5 seconds or turn the
knob to OFF to exit the manual watering mode and
resta the original watering plan.
1.
2.
3.
4.
5.
EN
-15-
RAIN DELAY
Set up
manual watering
Peorm
manual watering
The rain delay function allows you to delay the watering time
without stop your watering plan. To enter rain delay function,
follow these steps:
NOTE: During the rainy day delay period, there is no response
when the knob is turned to any position or any button is
pressed. OFF is displayed only when turned to "OFF".
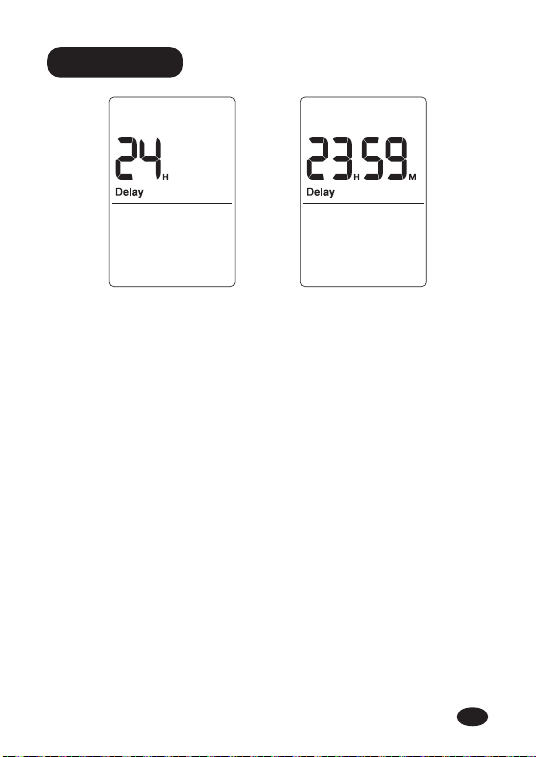
When the dial is on "ON", press the "DELAY" button for
3-5 seconds to sta the rain delay function.
There will be a delay time on the screen, the default is
"24H". You can press the "+" or "-" to select the delay
time staing from 24H, 48H, 72H, 00H. (At 00 H, the rain
delay plan will not be staed)
After selecting the delay time, press the "OK" button to
run the delay function or if there is no operation within 5
seconds, the delay plan will sta by default, and all
watering plans will be skipped during this period.
To cancel the rain delay, press and hold the "DELAY"
button again for 3-5 seconds to resume your watering plan.
1.
2.
3.
4.
EN
-16-
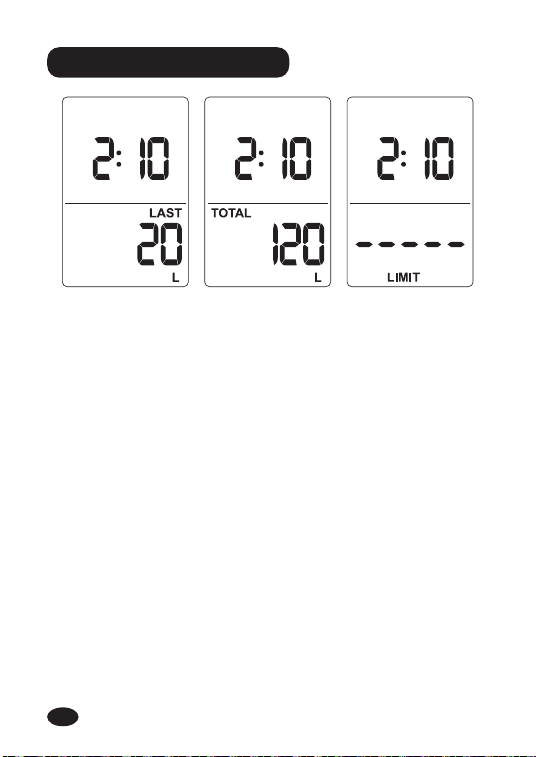
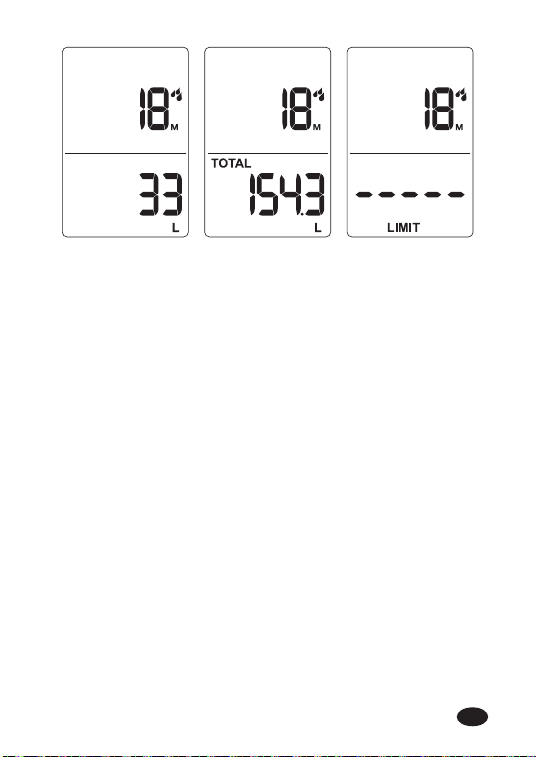
Last ow Total ow Flow limit
FLOW METER FUNCTION
The ow meter functional area displays three functions:
last ow, total ow, and ow limit.
When the water timer does not open the valve, that is,
the ow meter does not work, the ow function area will
always display the last water consumption by default.
When the ow button is pressed, the display content can
be switched, and the LCD displays in sequence:
LAST FLOW → TOTAL FLOW → FLOW LIMIT →
LAST FLOW‧‧‧‧‧‧
In "LAST" mode, press and hold the ow button to
switch between L/GAL units.
1.
2.
3.
4.
EN
-17-
Last ow Total ow Flow limit
Remark: When the plan or manual watering is being run, the
water consumption will be displayed in the ow display area.
Click the ow button to switch the display.
Note: Switching does not aect the normal counting of
current water consumption by the ow meter.
EN
-18-
Note:
When the user sta the ow limit function, that is, after
the setting is completed, the ow limit icon will light
up.
Except for the rain delay, manual watering, ow
calibration and shutdown icons that are not displayed,
all other situations will be displayed, including when
entering the plan settings again.
EN

Low Power
BATTERY STATUS
Batte status will be displayed as following:
Note: When the low batte indicator appears, the valve
will close automatically to avoid leakage. Please replace the
batte to recove.
-19-
EN
After a period of use, impurities or di in the water may
accumulate in the timer. Therefore, the timer should be
cleaned regularly to ensure its proper operation. Please follow
these steps to clean the timer.
-20-
3.4 Cleaning Your Timer
Turn o the garden faucet and remove the timer. Check
whether the lter at the timer water inlet has accumu-
lated impurities.
lf the lter is diy, please take it out of the timer and
rinse it with runningwater.
Turn on the Manual
Watering Mode of the
timer to open the valve
and check whether the
water pipe of the timer
is blocked. lf it is
blocked, please clean it
gently with a small
cleaning brush.
FILTER
1.
2.
3.
EN
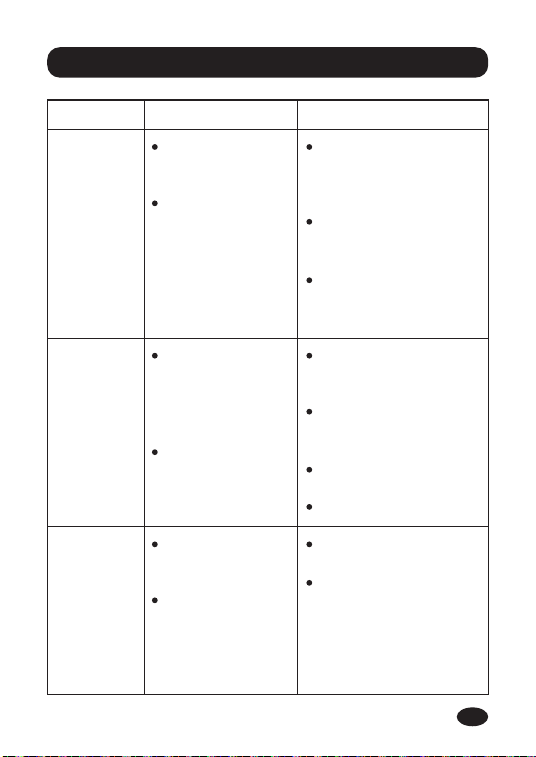
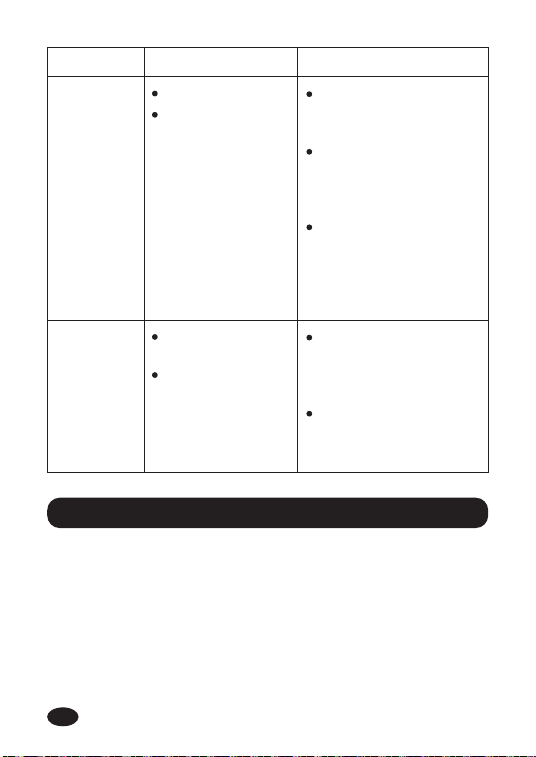
4. Troubleshooting
Problem Possible Cause Possible Solution
The water
inlet
leakage
No Filter or not
placed
horizontally.
The faucet is
not the
standard 3/4".
Add a lter and
make sure it’s a
placed horizontally
in the inlet.
Make sure the faucet
is a standard 3/4"
faucet.
Wrap Teon tape on
the tap making it
tight.
The water
won’t stop/
ow out
Long time in
storage and
transpoation
make the valve
inactive.
Valve blockage.
Keep the tap turned
o and turn the
timer dial to ON.
Run the manual
watering for 5-7s
and stop it.
Repeat the Steps 2
for 3 to 5 times.
T using it normally.
Sho
batte life
Mixed use of
old and new
batteries.
Use the carbon
batteries or
rechargeable
batteries.
Use new alkaline
batteries.
Rechargeable
batteries and carbon
batteries have a
sho life, use the
alkaline batteries
instead of them.
-21-
EN
5. Precautions
Do not mix old and new batteries or batteries of
dierent types.
Avoid using the water timer in temperature higher than
122℉ (50℃) or less than 37.4℉ (3℃).
The mesh lter prevents di paicles. In order to extend
the seice life of the hose timer, please clean the lter
regularly and replace it if it is worn.
-22-
Problem Possible Cause Possible Solution
Low water
pressure
Filter blockage.
Inlet pressure
not sucient to
suppo
watering needs.
Check if the lter is
clogged, if so, clean
or replace the lter.
Make sure the timer
is installed properly
and not
cross-threaded.
Installation of a
booster pump or
other auxilia
equipment of
increasing pressure.
LCD screen
does not
display
The batte is
exhausted.
The display is
exposed to
direct sunlight.
Replace new 2*AA
alkaline batteries
and installed
correctly.
Avoid direct sunlight,
and obsee if the
batte is too low.
1.
2.
3.
EN
7. Customer Suppo
Still have trouble with setup, please search for "RainPoint"
on YouTube for installation videos!
If the user manual doesn't have what You’re looking for or
you need other help, please contact us before returning the
product to the store and let us know the LOT NO. of your
device. LOT NO.: XXXXXX (on the back of the timer)
-23-
6. Warranty Policy
RainPoint provide a 1-year limited warranty against
manufacturing defects in materials and workmanship.
During the warranty period, well replace free of charge the
product found to be defective under reasonable use and
seice as determined solely by RainPoint.
To place a warranty request, please email us with your order
ID at suppo@rainpointonline.com and we’ll respond within
24 hours.
EN

Need Help ?
or Email:
suppo@rainpointonline.com
Scan the QR code for more help.
V1
