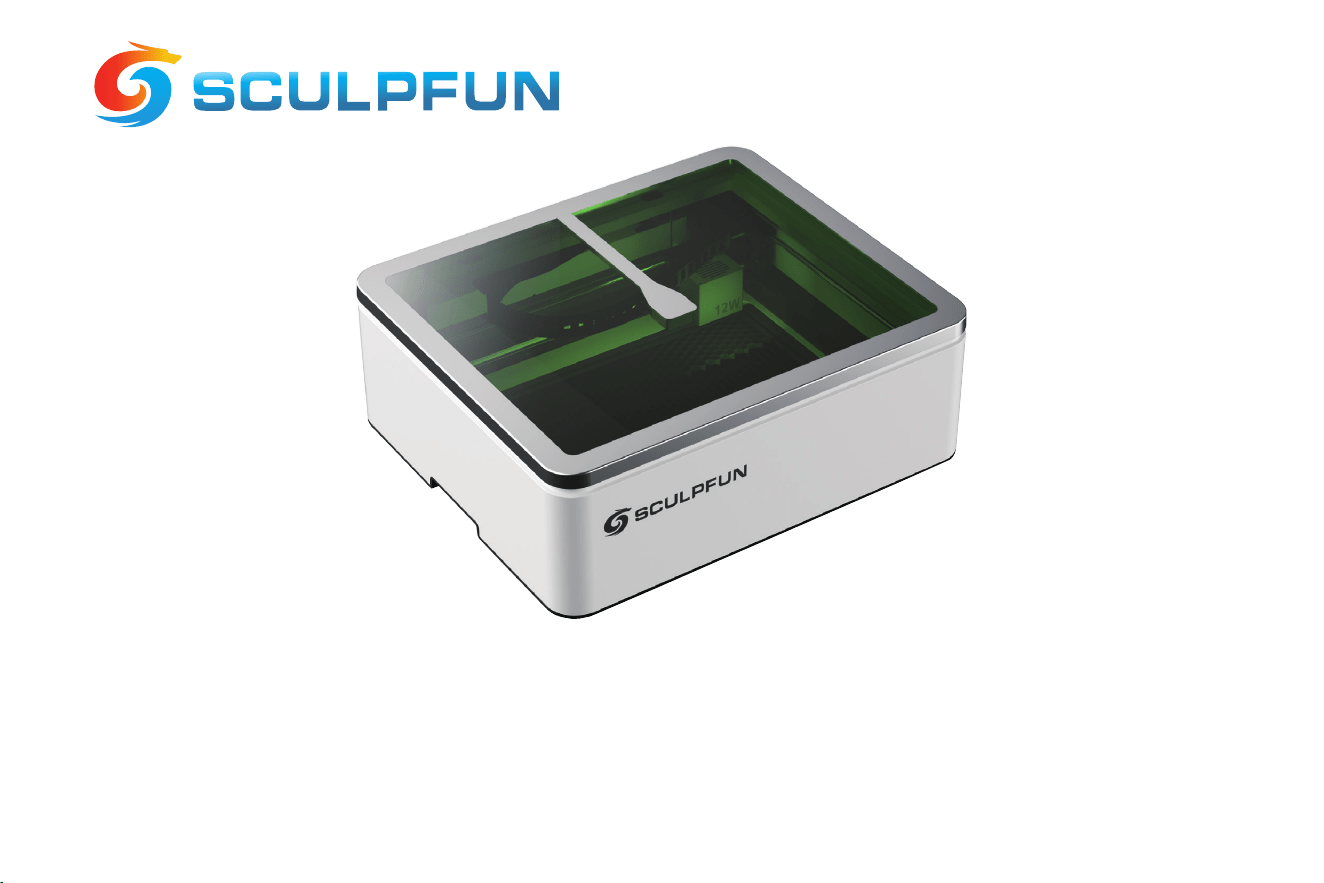
Sculpfun E1 Series
User Manual V1.0

FCC Caution:
Any Changes or modications not expressly approved by the pay responsible for compliance could void the user's authority to operate the equipment.
This device complies with pa 15 of the FCC Rules. Operation is subject to the following two conditions: (1) This device may not cause harmful inteerence,
and (2) this device must accept any inteerence received, including inteerence that may cause undesired operation.
Note: This equipment has been tested and found to comply with the limits for a Class B digital device, pursuant to pa 15 of the FCC Rules. These limits are
designed to provide reasonable protection against harmful inteerence in a residential installation. This equipment generates, uses and can radiate radio
frequency energy and, if not installed and used in accordance with the instructions, may cause harmful inteerence to radio communications. However, there
is no guarantee that inteerence will not occur in a paicular installation. If this equipment does cause harmful inteerence to radio or television reception,
which can be determined by turning the equipment o and on, the user is encouraged to t to correct the inteerence by one or more of the following
measures:
—Reorient or relocate the receiving antenna.
—Increase the separation between the equipment and receiver.
—Connect the equipment into an outlet on a circuit dierent from that to which the receiver is connected.
—Consult the dealer or an experienced radio/TV technician for help.
FCC Radiation Exposure Statement:
This equipment complies with FCC radiation exposure limits set foh for an uncontrolled environment. This equipment should be installed and operated with
minimum distance 20cm between the radiator& your body.
CE
Frequency and power
2412-2472MHzMHz(14.11 dBm)
Manufacturer
Shenzhen Sculpfun Technology Co., Ltd.
Room 401, Building 13, No. 140, Guanlan Avenue, Sihe Community, Fucheng Street, Longhua District, Shenzhen City, China

01
Operation Guide
1
Product Assembly
Follow the assembly instructions in this manual to assemble the
product. You can also watch the step-by-step assembly video at:
https://wiki.sculpfun.com/
6
Place the Material
Place the material to be engraved within the machine’s working
area.
2
Download and install the CH340 driver and engraving software
(Sculpfun Space / LightBurn). You can also scan the QR code to
download them directly, or visit the Wiki to access the software.
Software Installation
7
Laser Focusing
Lower the focusing lever on the laser head. Adjust the height of
the laser head until the lever touches the suace of the material,
then raise the focusing lever back into place.
3
Connect to Computer
Connect the engraving machine to your computer using the USB
cable, then launch the engraving software.
8
Positioning
After completing the setup, use the Frame function in the software
to preview and conrm the the position of the design and
material.
4
Impo Engraving Image
Impo the image you want to engrave. A higher-quality image will
produce better engraving results.
9
Close the Lid
Once the position is conrmed, close the. The machine will not
sta engraving unless the lid is closed.
5
Set Parameters
Adjust the engraving parameters in the software. You can scan the
QR code or visit the Wiki to access the recommended material
parameter settings.
10
Sta Engraving
After closing the lid, click Sta in the software to begin the
engraving process.
01
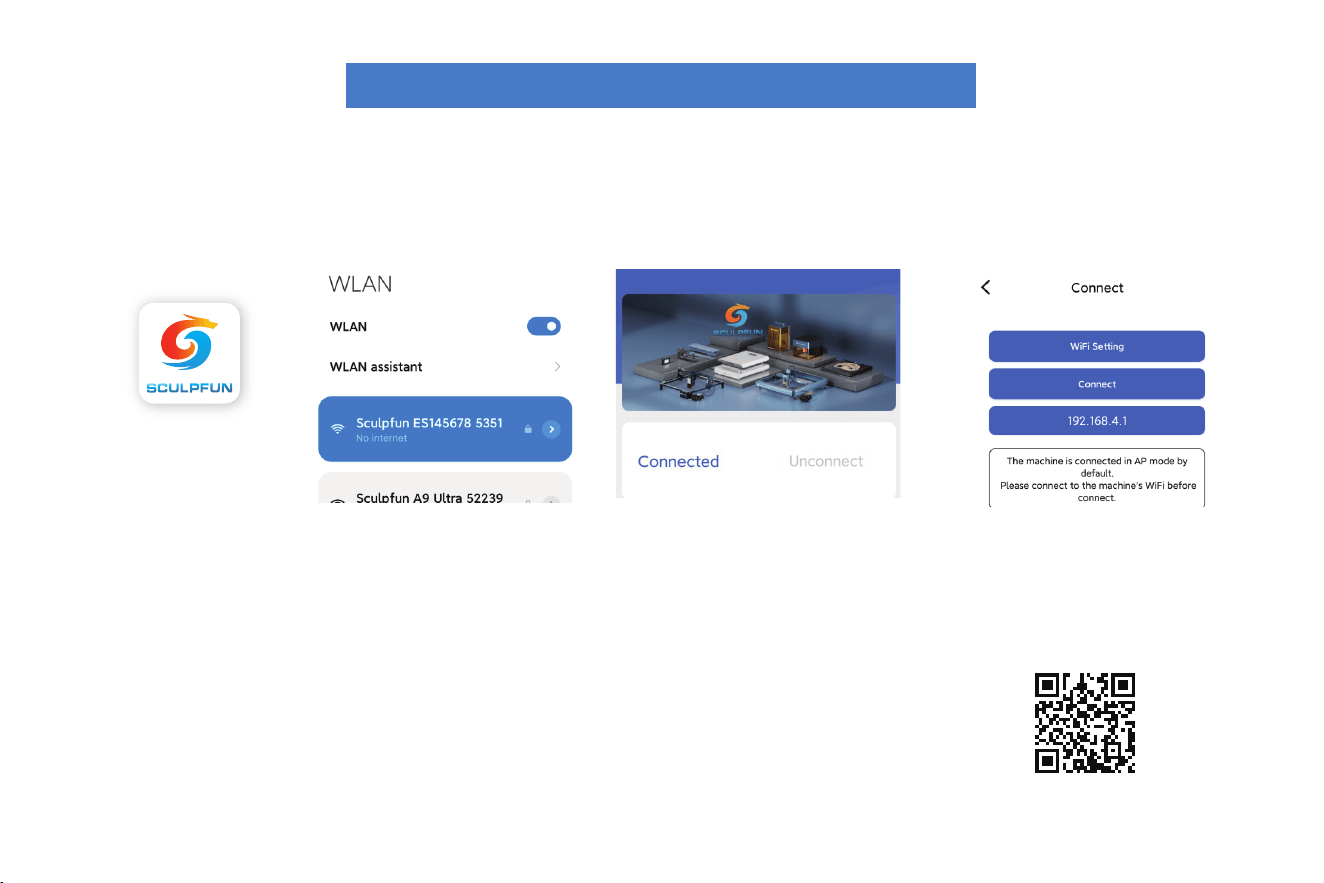
APP
02
Scan the QR code to access the E1
related software and information
On your phone,
connect to the E1
network. Default
password: 12345678
Open the app and tap
‘Connected’
Download the
Sculpfun App
Google play
App store
Enter the IP address 192.168.4.1
and tap Connect. You can now
control the engraving machine
from your phone.
03
Thank You Letter!
Dear User,
Thank you for choosing Sculpfun. We hope our product helps you bring your ideas to life
and create projects you truly enjoy. You can follow Sculpfun on social media platforms
such as Facebook, Instagram, and TikTok. There you can share your creations, discover
new ideas, and nd inspiration from other creators to explore even more possibilities.
The Sculpfun Team is always ready to provide you with reliable suppo. If you encounter
any issues during use, please contact us via the email address provided in this manual.
For more instructions and tutorial videos, please visit our Wiki:
https://wiki.sculpfun.com/

Table of Contents
04
1. Safety Instructions
2. Packing List
3. Assembly Steps
4. Laser Module Removal & Installation
5. Product Structure
6. Product Specications
7. Operating Instructions
8. Maintenance
9. Troubleshooting
- - - - - - - - - - - - - - - - - - - - - - - - - - 05
- - - - - - - - - - - - - - - - - - - - - - - - - - - - - - 06
- - - - - - - - - - - - - - - - - - - - - - - - - - - - 08
- - - - - - - - - - - - - - - - 10
- - - - - - - - - - - - - - - - - - - - - - - - - - - 13
- - - - - - - - - - - - - - - - - - - - - - - - 15
- - - - - - - - - - - - - - - - - - - - - - - - 16
- - - - - - - - - - - - - - - - - - - - - - - - - - - - - - 17
- - - - - - - - - - - - - - - - - - - - - - - - - - - - 18

Ⅰ. Safety Instructions
05
The laser engraver uses a high-density laser beam to irradiate materials during engraving or cutting, generating high temperatures on the material suace to
vaporize it without burning. However, most materials are inherently ammable and may catch re, producing an open ame that can damage the machine and
its surrounding environment.
Please follow the guidelines below when using the laser engraver:
1. Do not place this product near ammable or explosive materials, volatile solvents, or high heat sources. Always operate the machine in a well-ventilated, cool,
and low-dust environment.
2. Do not replace the power cable with other cables. Use only the power cable provided with this product.
3. Caution—use of controls or adjustments or peormance of procedures other than those specied herein may result in hazardous radiation exposure.
4. Whether or not you use air assist, always connect the silicone hose to the laser module to prevent lens contamination.
5. The recommended operating temperature is 5°C–35°C. Avoid using the machine in humid conditions and never use it during thunderstorms.
6. If the machine will not be used for an extended period, turn it o and unplug the power cable.
7. Do not disassemble any pas of the machine while it is powered on. Avoid touching any electronic components with your hands or tools.
8. Do not touch moving mechanical pas or the laser module while the machine is in operation.
9. Always place a non-laser-penetrable suace (e.g., aluminum plate) beneath the material being processed.
10. Wear protective goggles during laser engraving to avoid eye inju from direct laser exposure.
11. Some smoke or fumes may be produced during engraving or cutting. Operate the machine in a well-ventilated area.
12. Children under 10 years old must not use this product without adult supeision to prevent personal inju.
13. Keep a re extinguisher nearby and maintain and inspect it regularly.
14. Never leave the machine unattended while it is running.
15. Users shall comply with the laws and regulations of the count or region where the equipment is located (place of use), adhere to professional ethics,
obsee safety obligations, and are strictly prohibited from using our company's products or equipment for any illegal purposes. The company is not responsible
for any illegal use.
16. Users under 18 years old must operate the laser engraver under adult supeision.
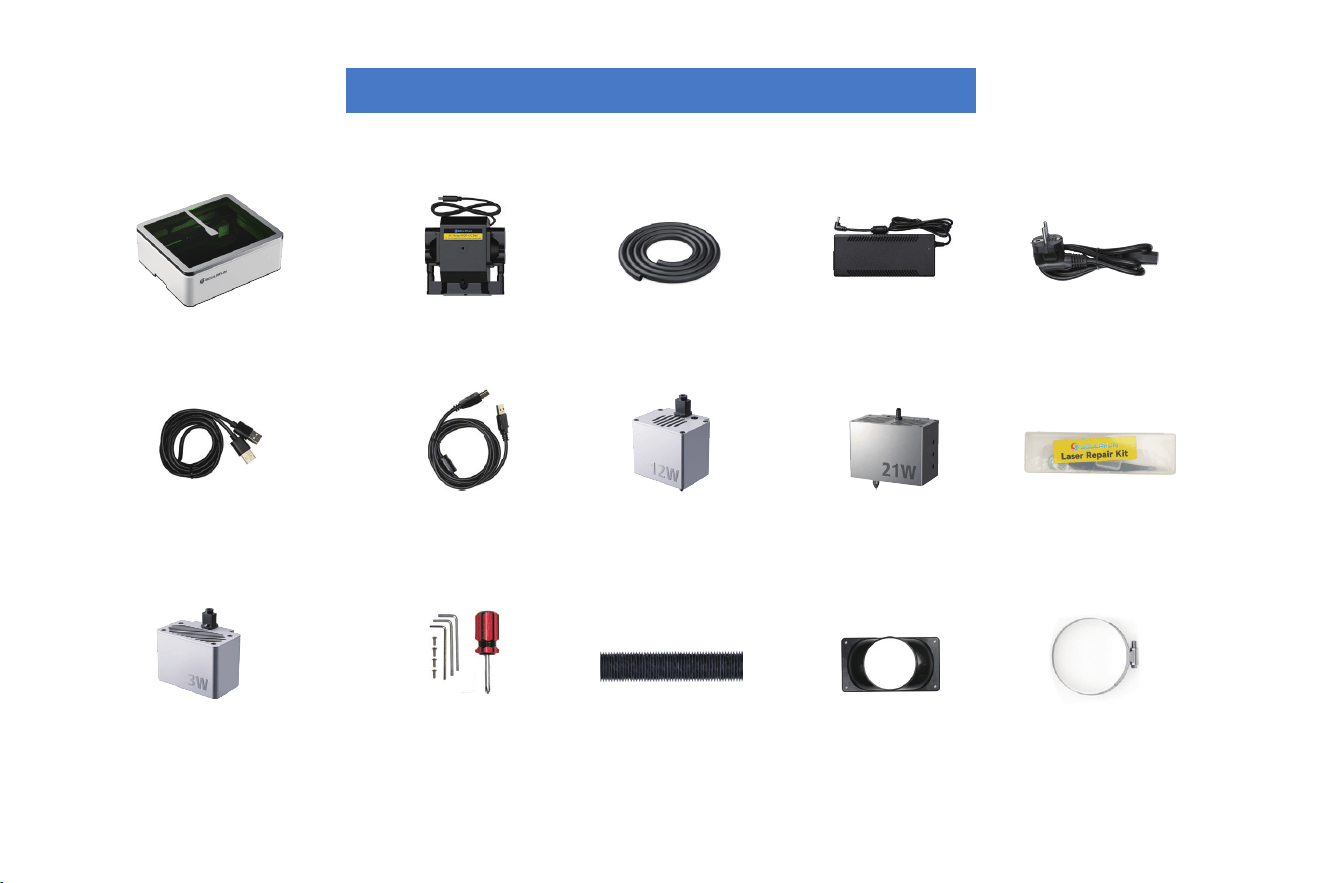
Ⅱ. Packing List
06
USB CableCamera Data Cable 12W Blue Laser Module
(E1 version only)
21W Blue Laser Module
(E1 Pro version only)
Blue Laser Module Lens
Phillips Screwdriver
Hex Wrench
(1.5mm, 2mm, 2.5mm)
IR3 Infrared Laser Module
(included with Dual version only)
Exhaust Hose Flange Hose Clamp
Main Unit Air Pump Air Hose Power CablePower Adapter
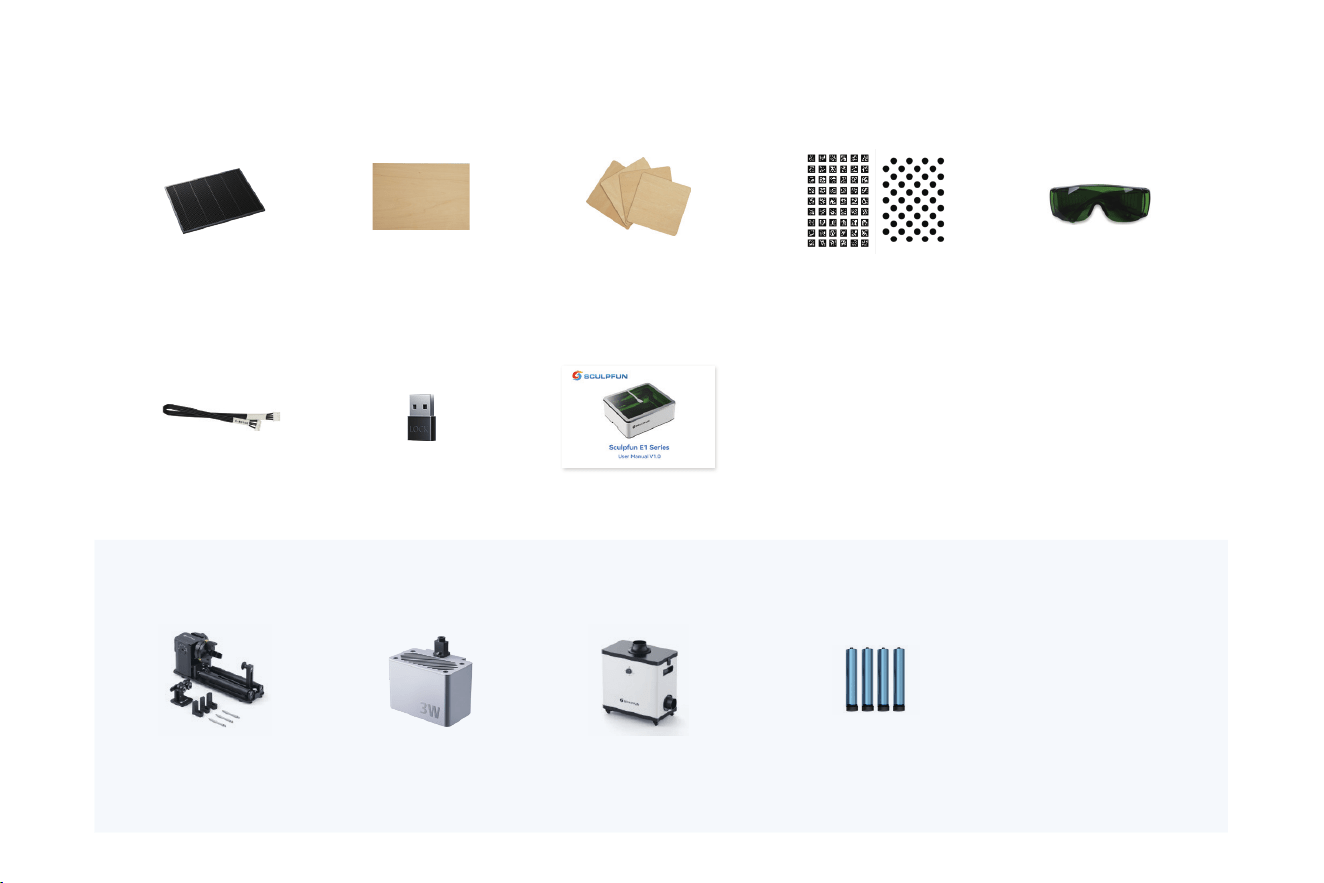
07
300 × 200
Basswood Sheet
Honeycomb Panel 100 × 100 Basswood Sheets ×4
(for camera calibration)
Safety Goggles
USB DongleRota Cable
(rota sold separately)
User Manual
IR3 Infrared Laser Module
(available separately
for non-Dual versions)
Rota Attachment Air Purier
Optional (sold separately)
Riser Base
(for use with the rota attachment)
A5 Calibration Cards ×2
(dierent patterns)
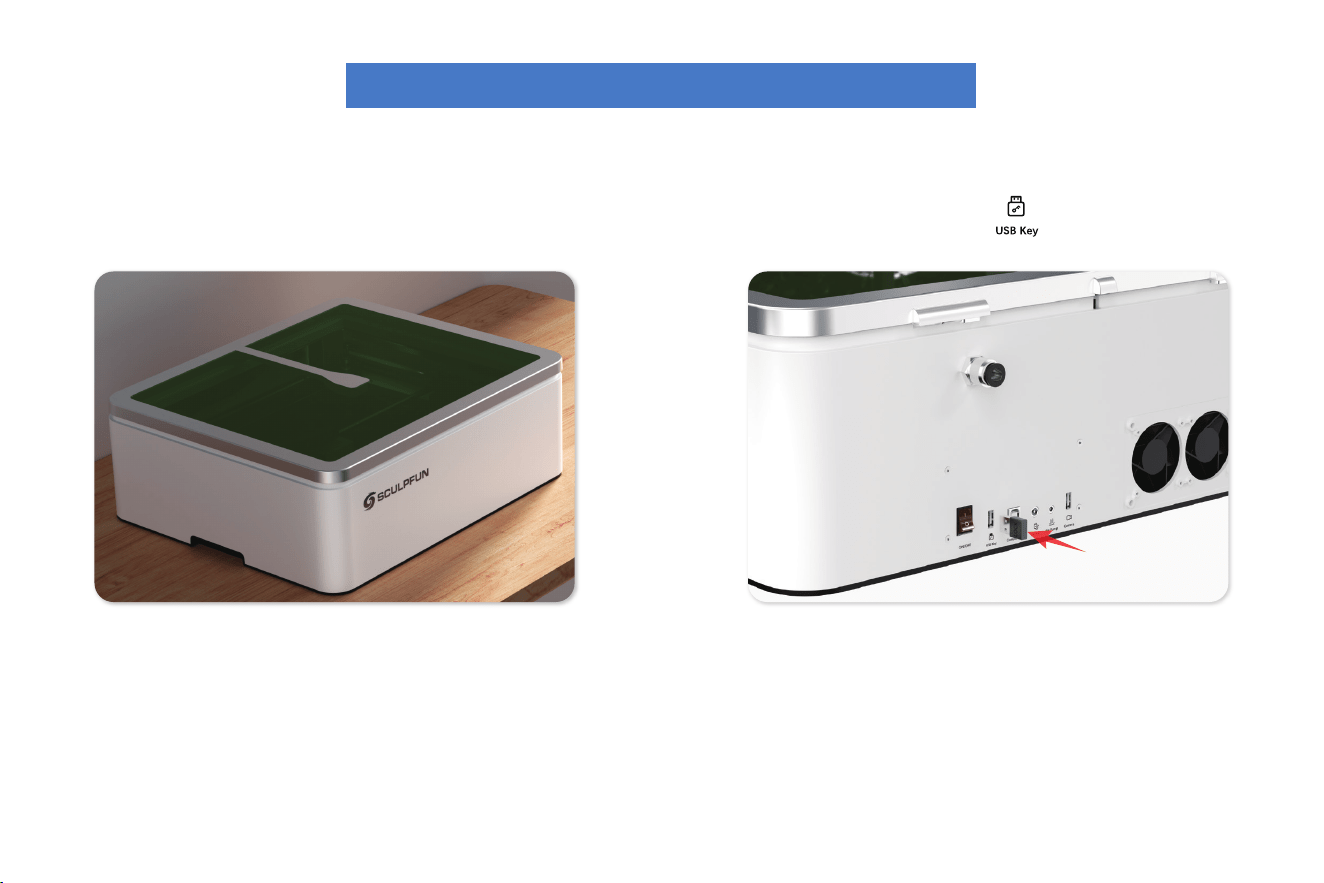
Ⅲ. Assembly Steps
08
1. After unpacking, remove the main unit and place it on a stable
table. Open the cover and take out all items inside.
2. Take the USB dongle and inse it into the corresponding po
on the machine.
09
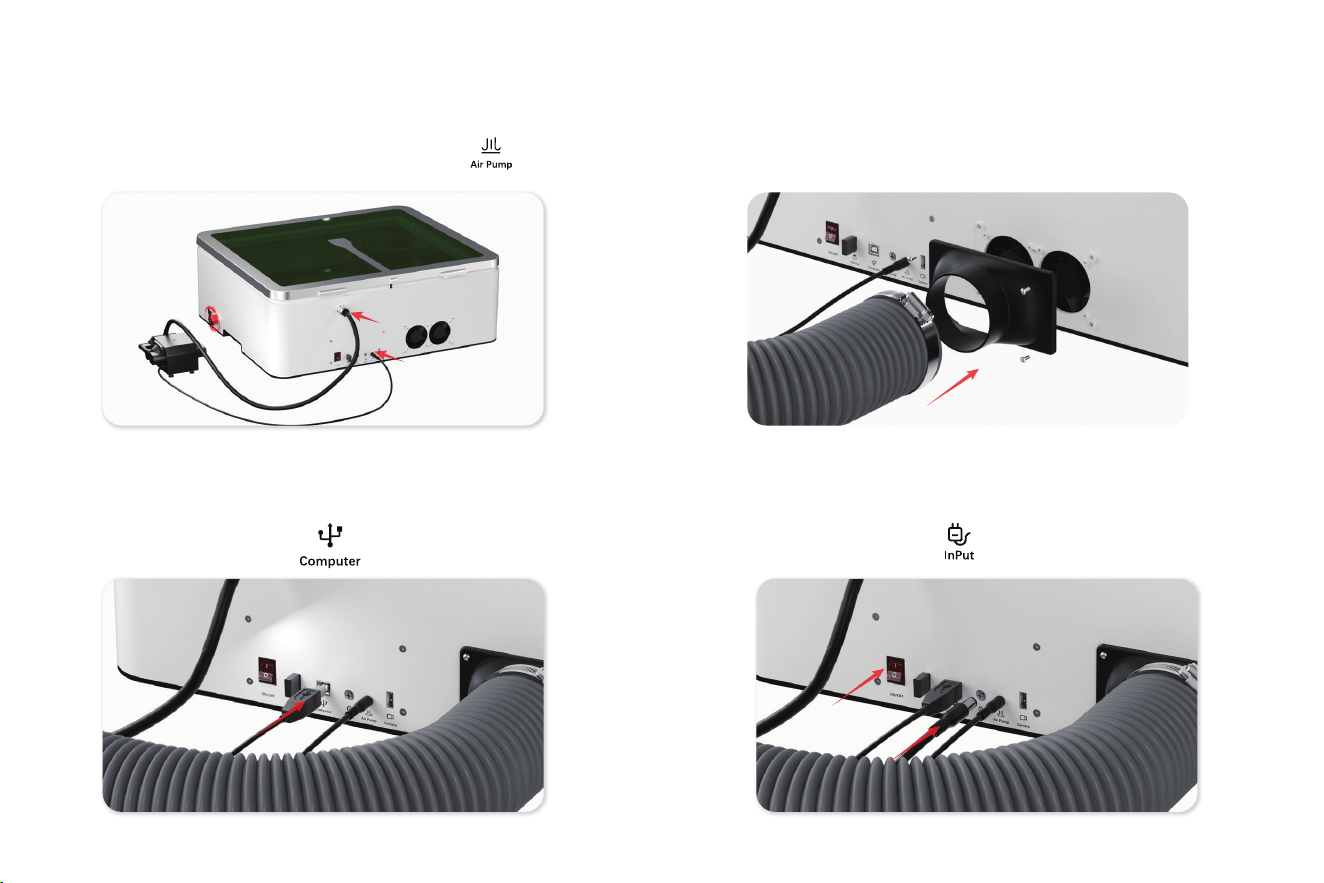
3. Take the air hose and air pump, and connect to the corresponding
po on the machine.
Make sure to release the emergency stop switch.
4. Attach the ange and tighten the four screws with a
screwdriver. Then install the exhaust hose and the hose clamp,
using the screwdriver to secure.
5. Inse one end of the USB cable into the machine and the other
end into your computer.
6. Plug the power cable into the machine and turn on the power
switch.
10
Ⅳ. Laser Module Removal & Installation & Focusing
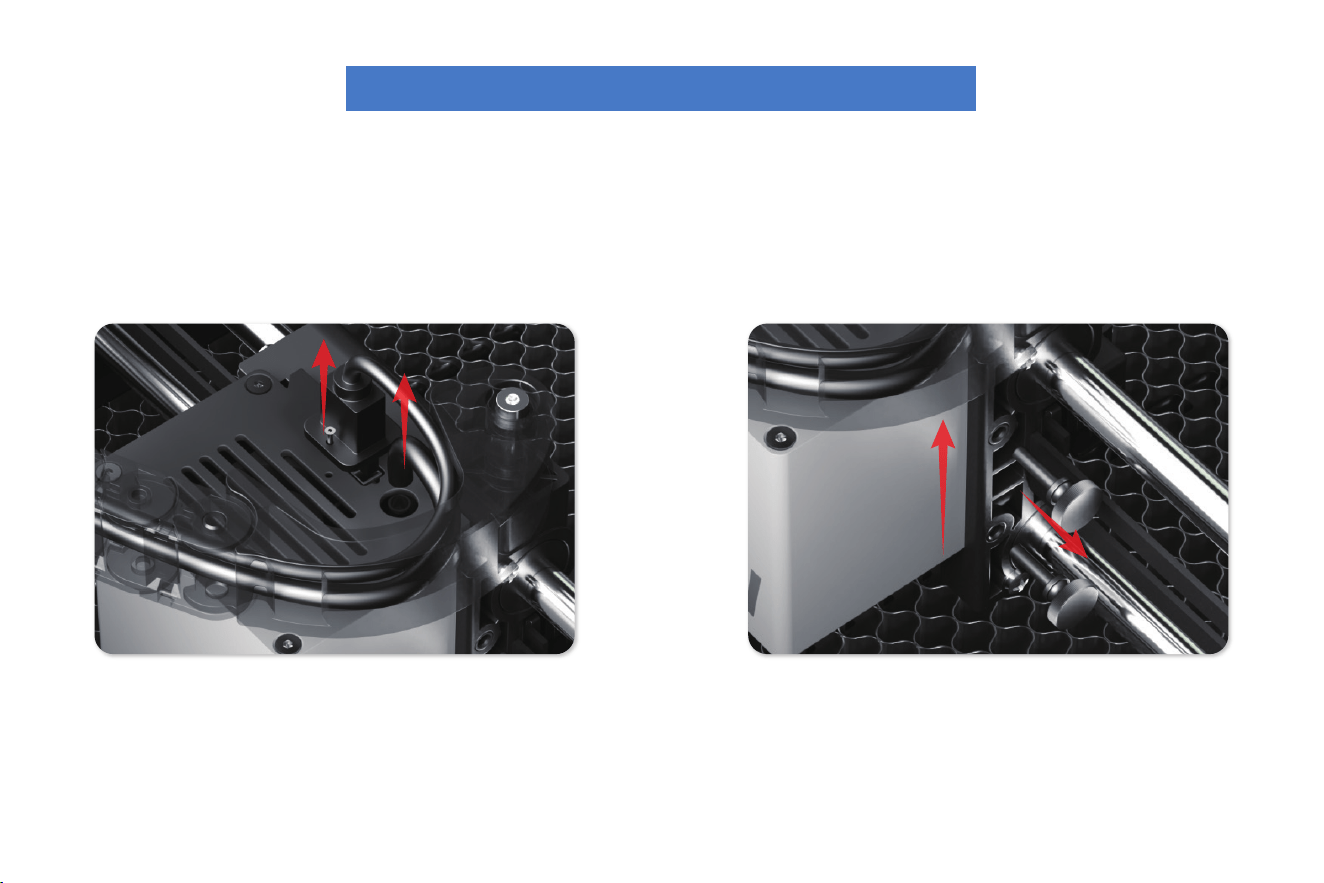
1. Unplug the laser module’s cable and remove the air hose, be
sure to remove the screws securing the cables.
2. Unscrew the handle screw on the right side. Carefully lift the
laser module upward to remove it from the machine.
Laser Module Removal
11
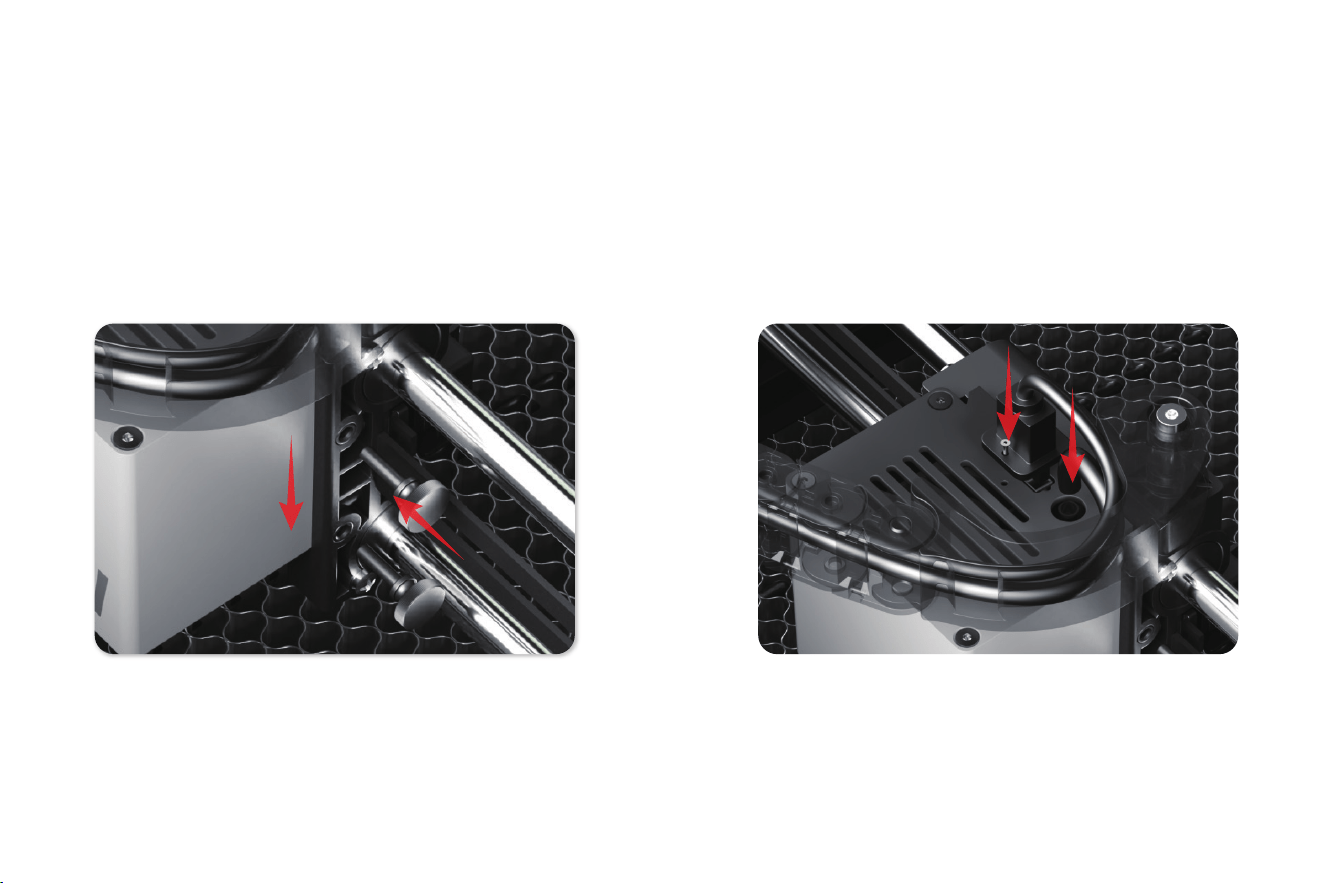
1. Inse the laser module into the mounting slot. Once it is in the correct
position, tighten the two thumb screws to secure the module.
2. Connect the air hose and the laser module cable. Tighten the
screw to secure the laser module cable.
Laser Module Installation
12
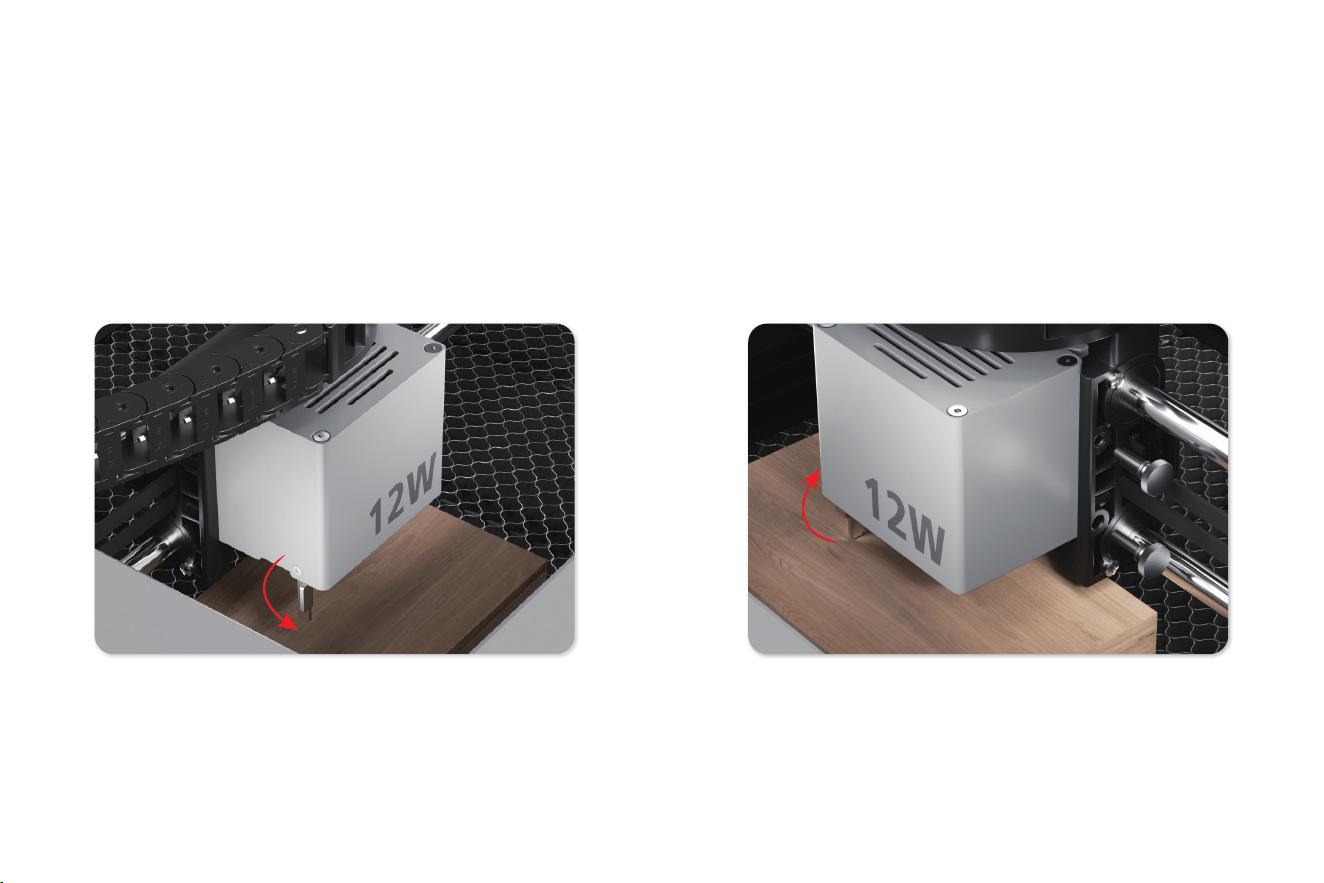
1. Place the material to be engraved in the machine’s working
area. Lower the focusing lever on the laser module.
2. Loosen the two thumb screws on the laser module. Adjust the
laser module height until the focusing lever touches material
suace. Tighten the thumb screws to secure the laser, then fold
the focusing lever back.
Tip: If the material is positioned low, it is normal that only the
bottom thumb screw can secure the laser module.
Focusing the Laser
13
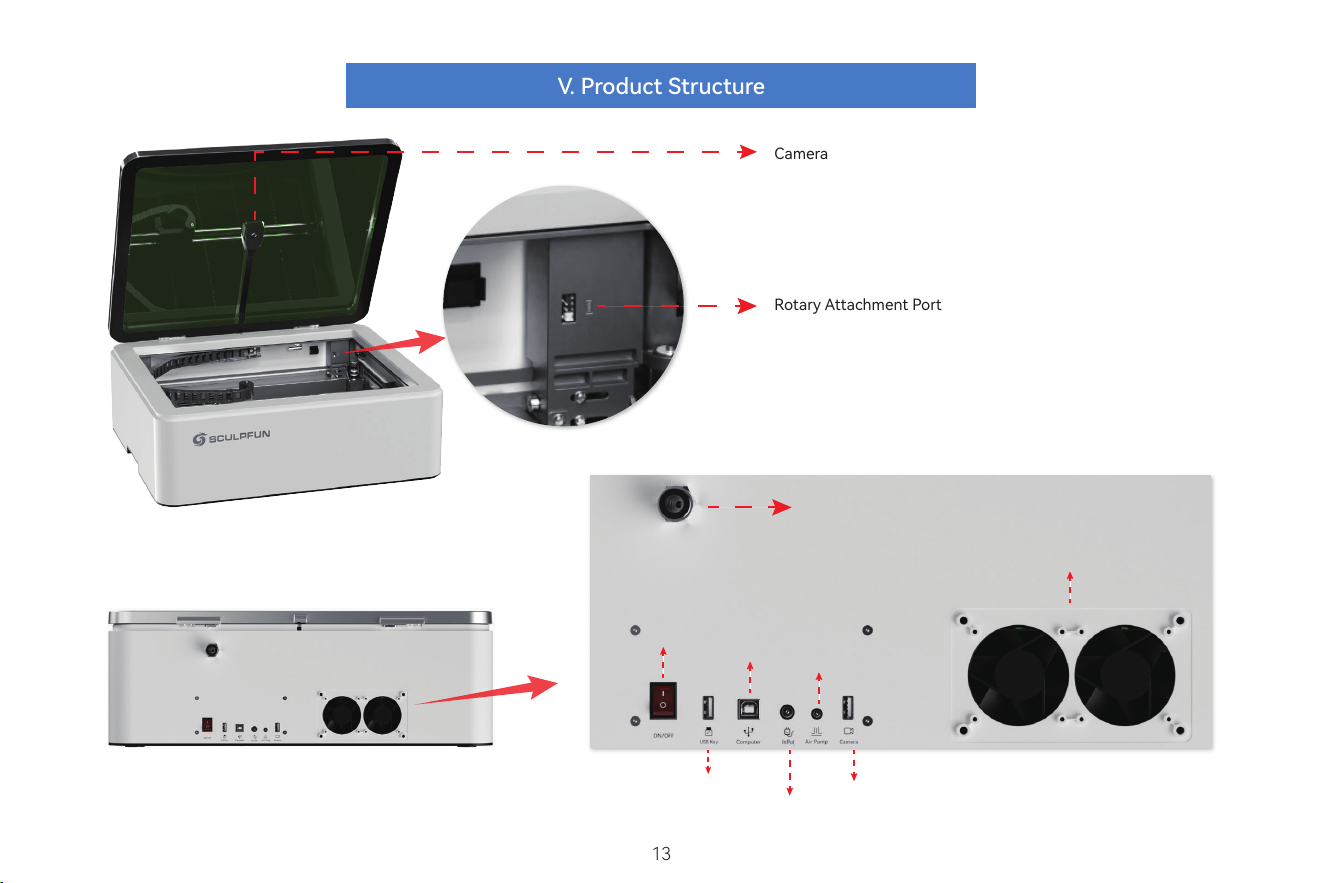
Ⅴ. Product Structure
Camera
Rota Attachment Po
Air Hose Po
Exhaust Po
Power Switch
Computer Po
Air Pump Po
USB Dongle Po
Power Input
Camera
14
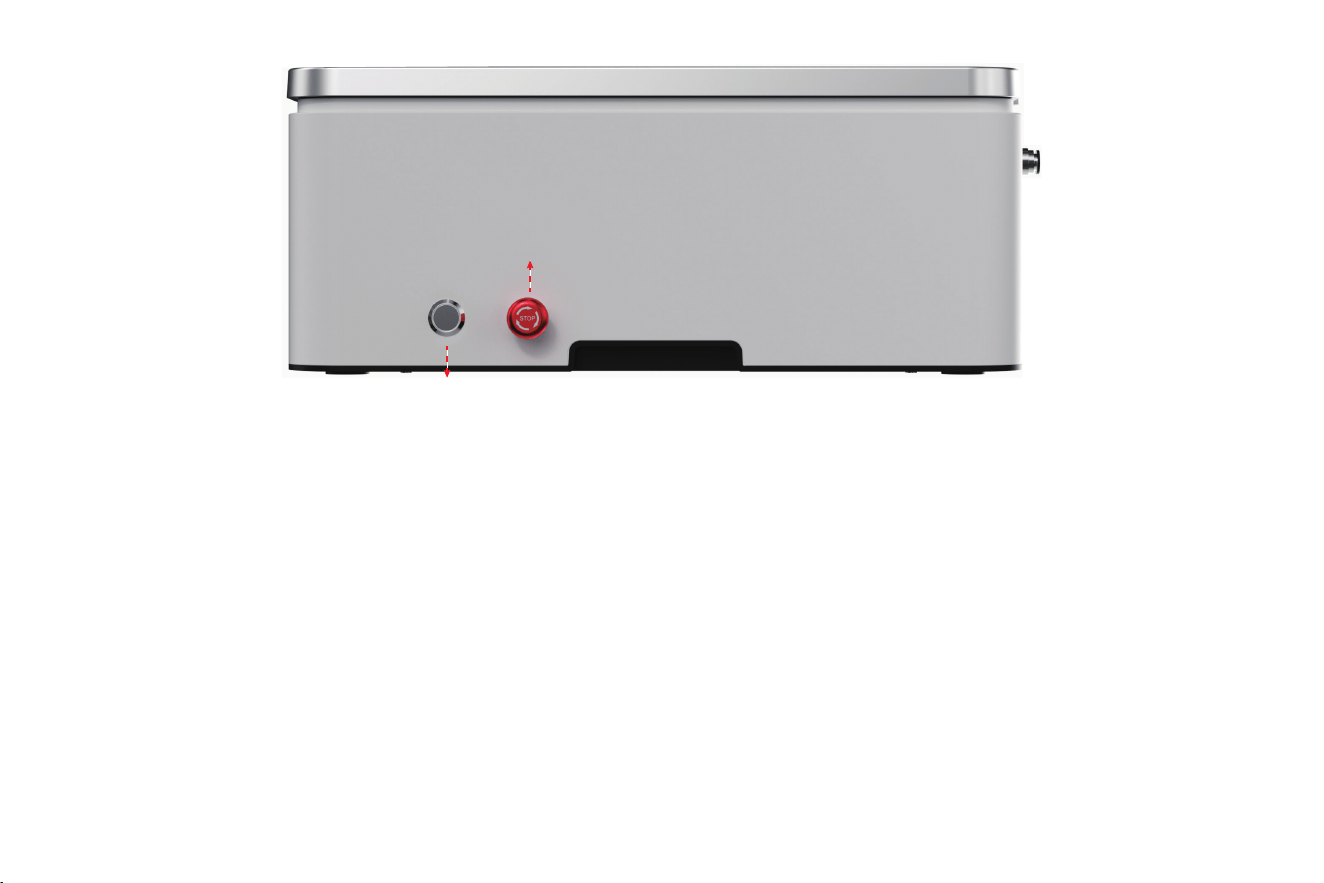
E1 Button Functions
1. Double-click: Return to home.
2. Single-click (during homing): Interrupt homing.
3. Single-click (during operation): Pause.
4. Single-click (during pause): Resume.
5. Single-click (after safety door closed): Release safety lock.
6. Long press (5 s): Toggle safety door enable.
7. Hold button when open the lid to trigger the
Safety Positioning Function*.
*Safety Positioning Function: When the safety door and safety
positioning function are enabled, opening the door will trigger
the safety positioning function. The laser module records its current
position and moves to the top-left corner. After closing the safety door,
the laser module will return to the recorded position.
E1 Status Indicator Lights
1. Green-Breathing: Standby / Engraving completed
2. Green-Solid: Engraving in progress
3. Blue-Breathing: Engraving paused
4. Blue-Solid: Safety door open
5. Red-Blinking: Error
6. O: Machine powered o
Emergency Stop Switch
E1 Button
15
Ⅵ. Product Specications
Note: Avoid processing highly reective mirror-like
materials, as this may damage the laser module.
3W Infrared Laser Module (for dual version or purchased separately)
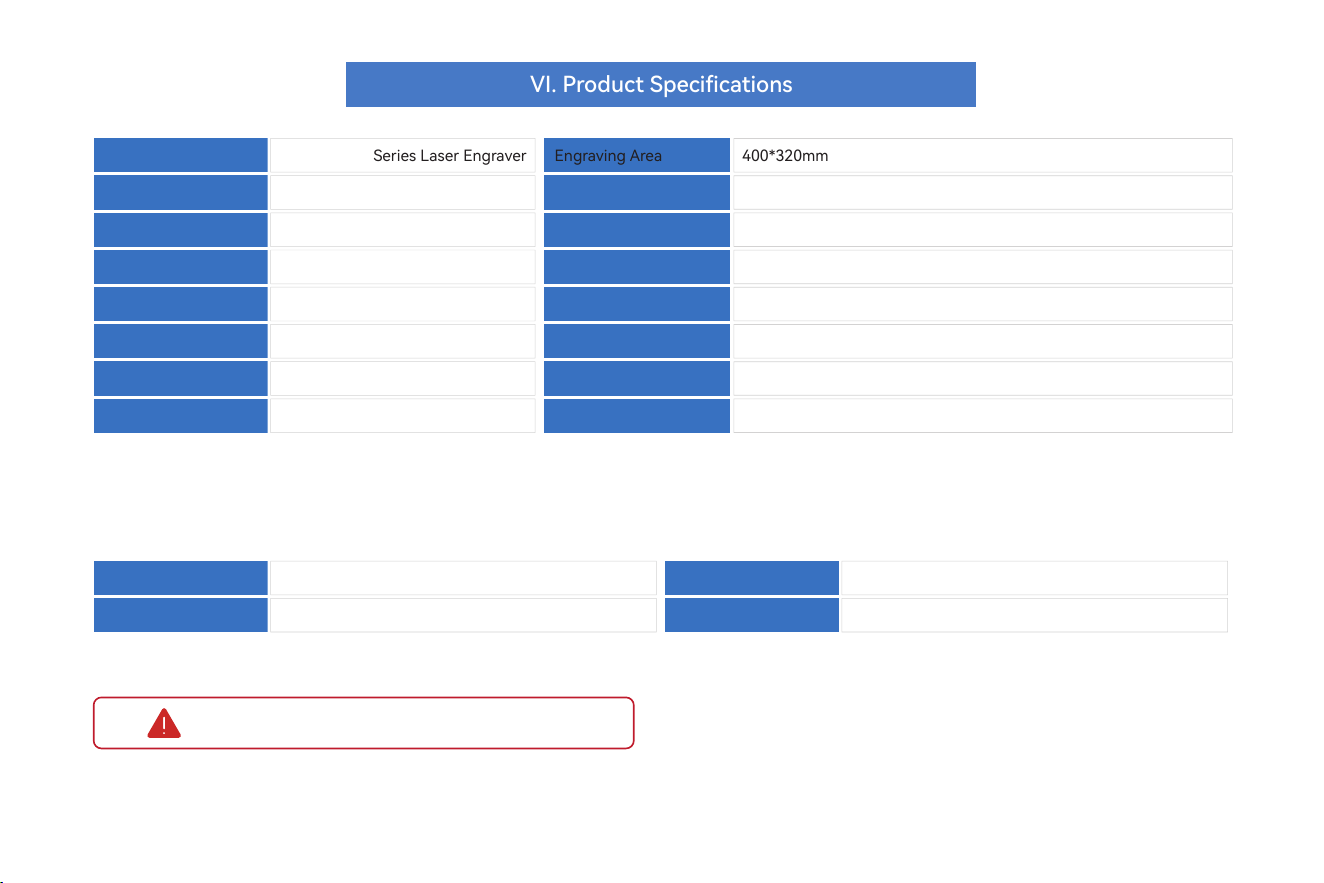
Product Name
Laser Power
Product Dimensions
Net Weight
Voltage
Operating Temperature
Ceications
Camera Specs
Engraving Area
Laser Wavelength
Safety Class
Software
Operating System
Suppoed File Formats
Suppoed Materials
Camera Accuracy
Sculpfun E1 Series Laser Engraver
12W(E1)/ 21W(E1 Pro)
590*500*205mm
11.95KG
24V 6A
5℃-35℃
CE / FCC / ROHS / IEC60825
5MP
Laser Source
Laser Power
Solid-State Laser
3W
Laser Wavelength
Suppoed Materials
1064±1nm
Various metals, plastics, stone, etc.
400*320mm
450±5nm
Class 1
Sculpfun Space / LaserGRBL / LightBurn
Windows / MacOS (Lightburn)
JPEG, PNG, JPG, BMP, SVG, DXF, etc.
Cardboard, Wood, Rubber, Leather, Fabric, Plastic, Coated Metal, etc.
0.5-1.0mm (depending on calibration score)

16
1. Refocus the laser using the focusing lever each time you change the material.
2. Basic parameter settings for the laser engraver can be found on the Wiki: wiki.sculpfun.com
3. For software installation and operation, you can connect the machine to a computer via a USB cable and use Sculpfun Space, LightBurn (paid), or
LaserGRBL. You can also use the mobile app for simple engraving tasks. For detailed tutorials, please refer to the Wiki.
Ⅶ. Operating Instructions
Note: You can nd additional product resources on the Wiki, including the user manual, assembly videos, camera
calibration and alignment guides, recommended parameter tables, software tutorials, and FAQs.
17
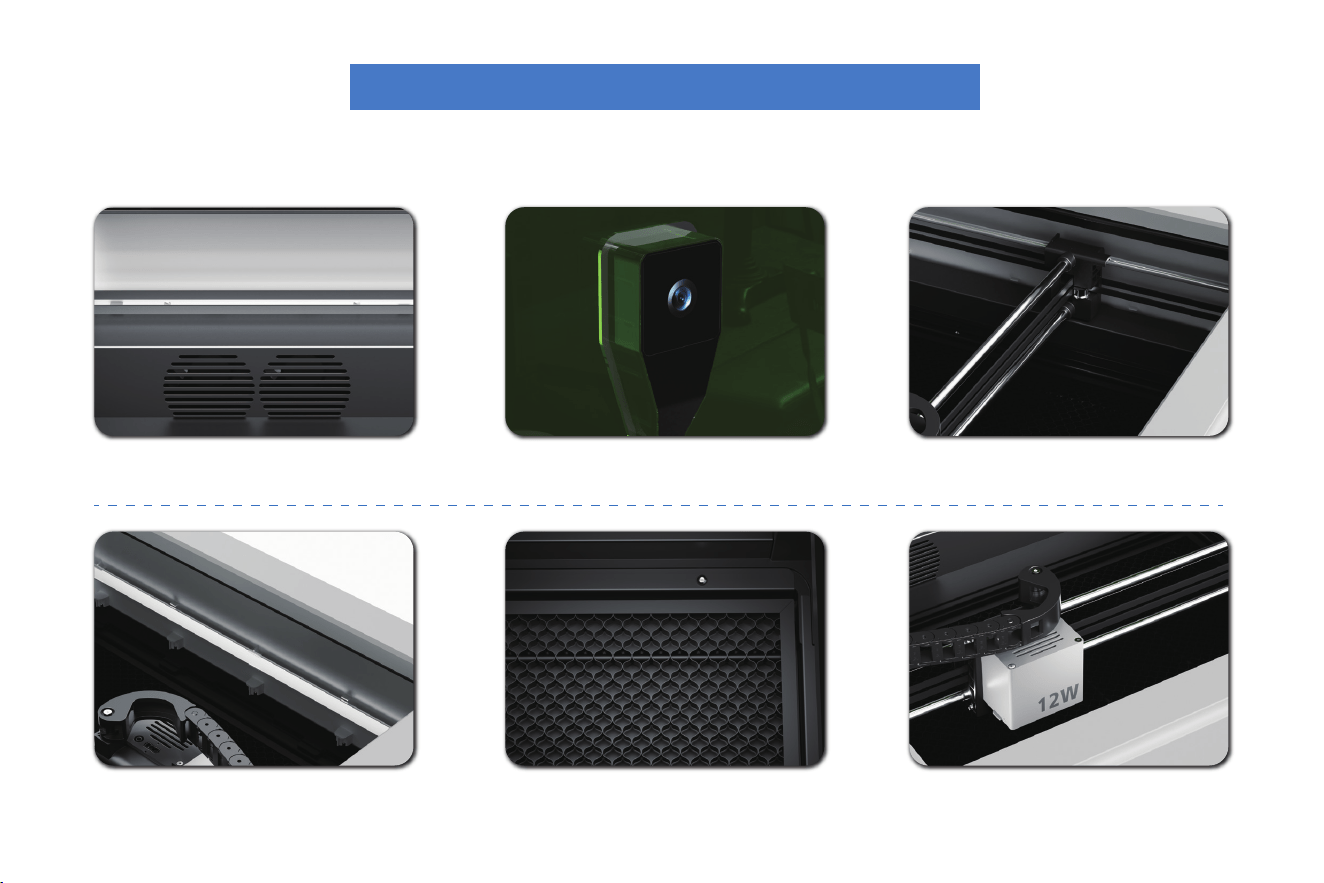
Ⅷ. Maintenance
Dust may accumulate inside the machine during long-term use.
It is recommended to peorm internal cleaning and maintenance once a month.
1. Fan air inlet. 2. Camera cleaning. 3. Motion frame optical shafts
4. Light cover 5. Clean the tray regularly and do not allow
debris or scraps to accumulate.
6. Laser module cleaning and mainte-
nance. Clean the laser module fan eve
3–6 months. Clean the laser lens once a
week to maintain stable laser power.

18
Issue 1: Machine Not Working / No Response
Check whether the power cable is properly connected and the power
switch is turned on.
Check whether the USB dongle is inseed.
Check whether the emergency stop button is released (rotate
clockwise to release).
Check whether the safety door / enclosure is fully closed.
Issue 2: Inaccurate Camera Positioning
Check whether the camera is clean. Clean it regularly.
If the engraving height changes signicantly, recalibrate the camera.
Issue 3: No Laser Output / Shallow Engraving
Check if the power setting in the software is too low.
Check if the laser lens is diy; clean it gently with a dust-free cloth.
Check if the laser module cable is loose.
Check if the material is too thick or dense; increase power or reduce
speed.
Issue 4: Misaligned Engraving / Skipped Steps
Check if the synchronous belt is loose.
Check if the work platform is stable and properly secured.
Check if the driver current is set correctly or if the speed is too high.
Check if the design le path is too complex. Simplify the design and
t again.
Issue 5: Noise / Vibration During Operation
Check if the sliders and guide rails are not moving smoothly; apply
lubricant if necessa.
Check if the pulleys and mounting screws are loose.
Reduce the operating speed and obsee if the issue improves.
Issue 6: Computer Cannot Connect to Machine
Check if the USB / data cable is properly connected; t using a
dierent cable if needed.
Check if the driver is installed correctly.
Check if the software po is selected correctly.
Resta both the computer and the machine and t reconnecting.
Issue 7: Machine Does Not Pause When Safety
Door is Opened
Check if the safety door switch is damaged.
Check if the safety door switch cable is properly connected.
Resta the machine and test the safety function.
For fuher assistance, please refer to the Wiki or
contact us by email:
wiki.sculpfun.com
suppo@sculpfun.com
Ⅸ. Troubleshooting

E-mail: suppo@sculpfun.com
Website: sculpfun.com
Room 401, Building 13, No. 140, Guanlan Avenue, Sihe Community,
Fucheng Street, Longhua District, Shenzhen City, China
Shenzhen Sculpfun Technology Co., Ltd.

