Operating Instructions
Manuel d’utilisation
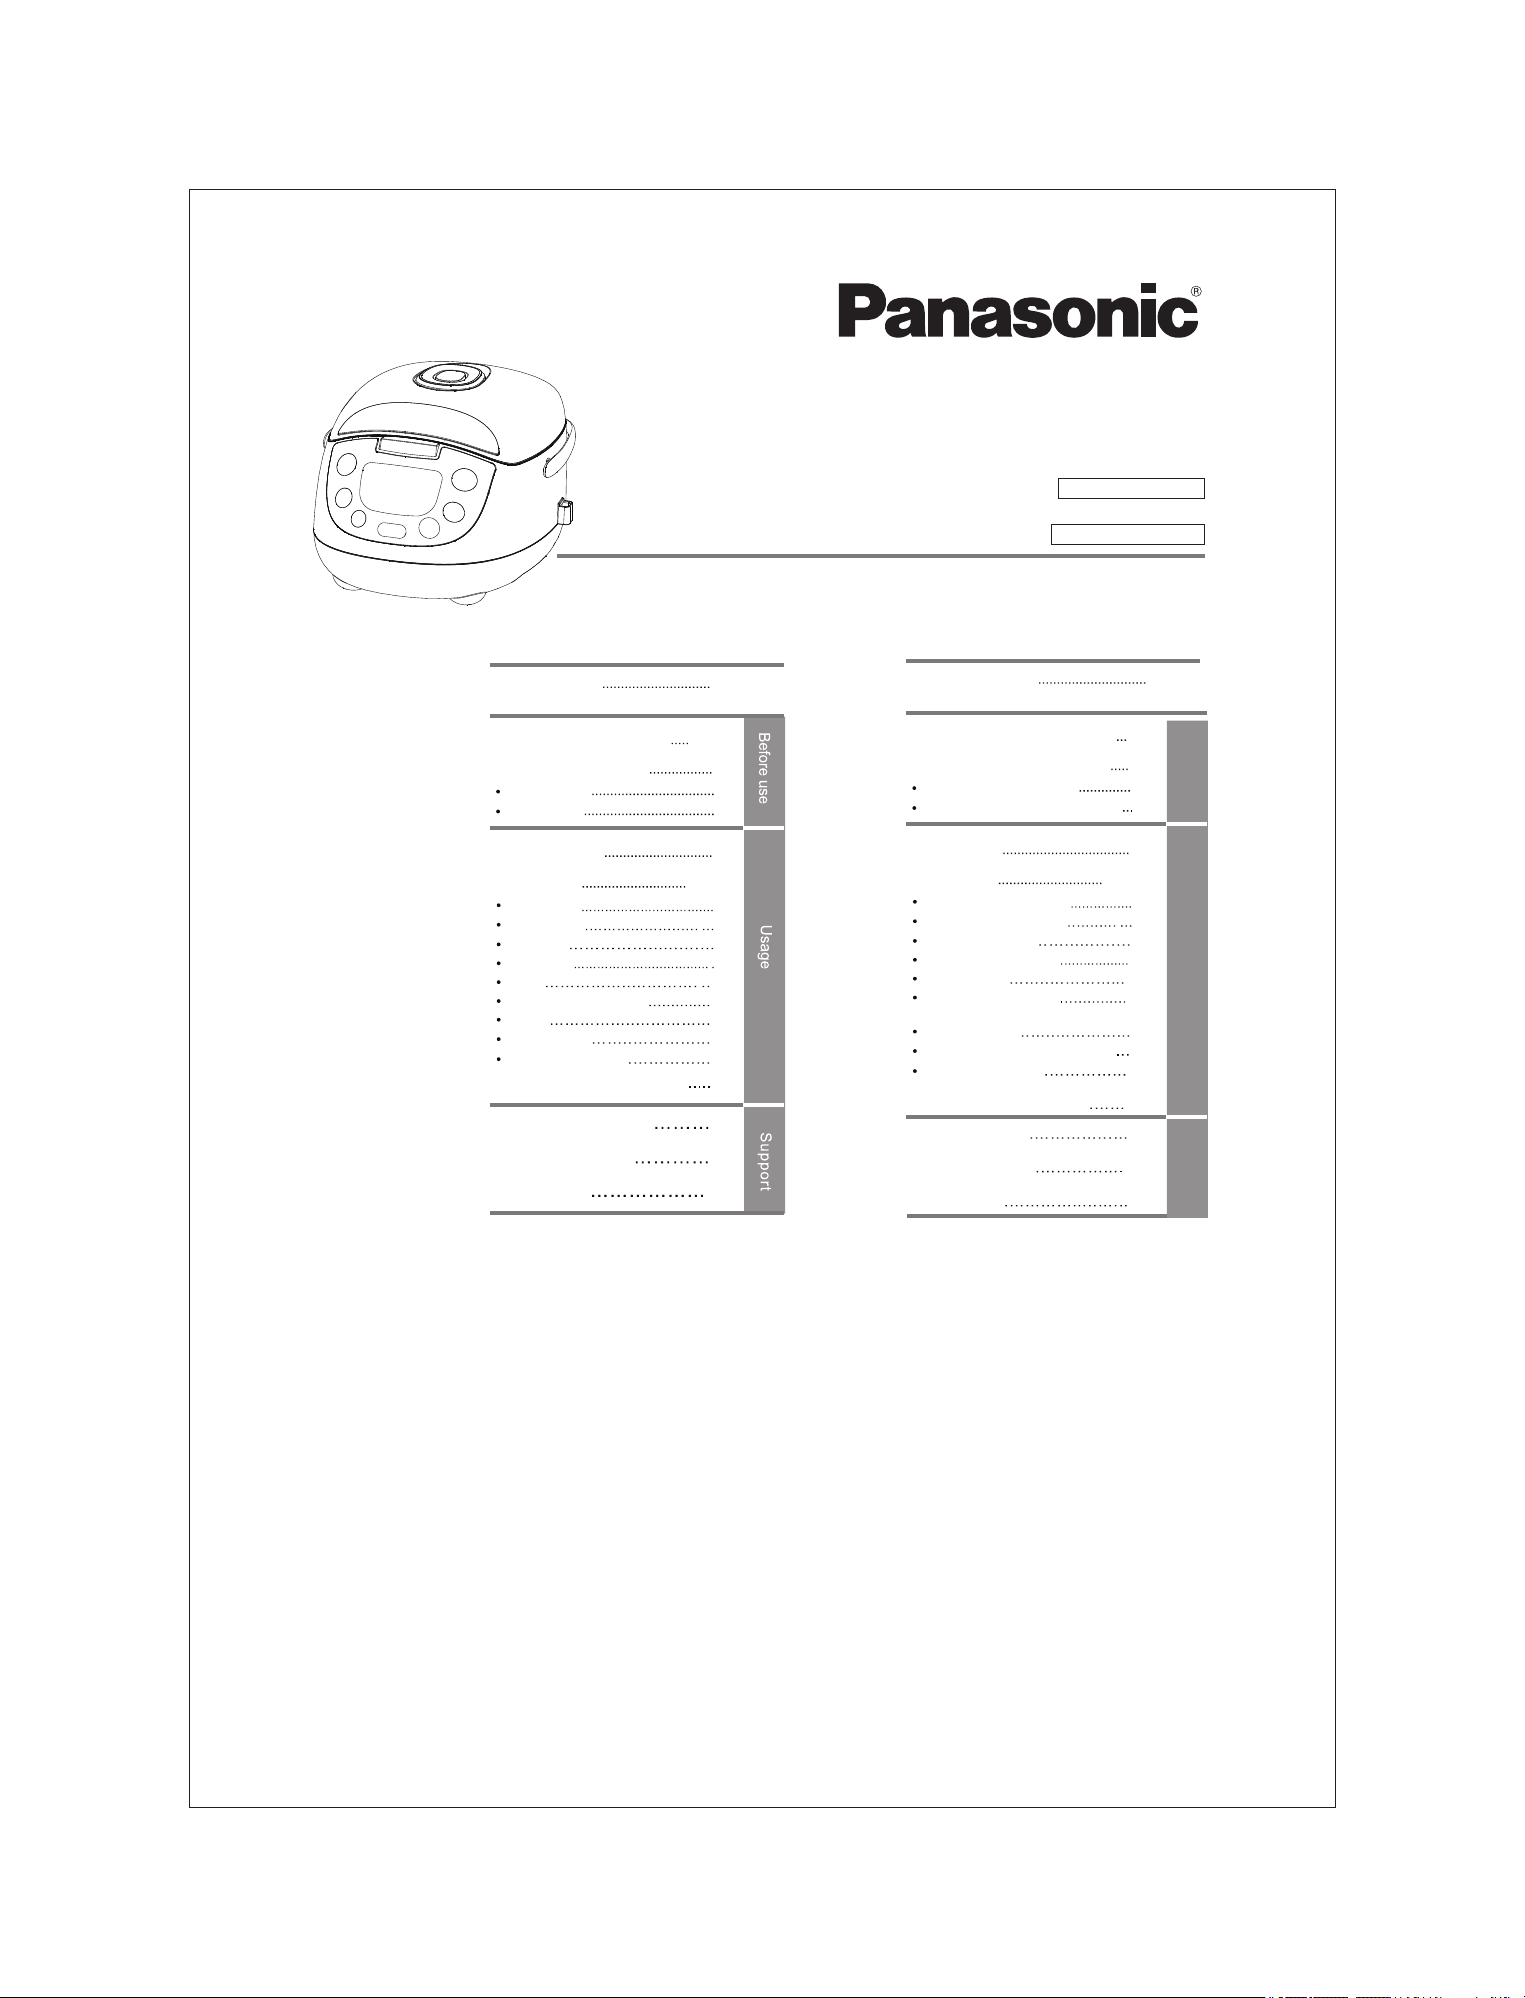
SR-ZC123L
SR-ZC123N
Multi Function Rice Cooker
Cuiseur de riz multifonctionnel
Model No./N° de modèle
Household Use Only
Utilisation domestique
Table of Contents
IMPORTANT
3
SAFEGUARDS
Safety Precautions
4~5
Parts identification
Control panel
Entire unit
6
6
6
Preparations
Functions
7
8~12
White Rice
8
Brown Rice
9
9
9
Porridge
Multi-grain
Soup
10
10
10
Quick cook/Slow cook
Steam
Cake/Yogurt
11
Reheat/Keep warm
12
Cleaning and maintenance
13
15
Troubleshooting
14
14
Specifications
Warranty
Table des matières
IMPORTANTES
3
MESURES DE SÉCURITÉ
Précautions à prendre
4~5
Identification des pièces
Panneau de commandes
Vue d’ensemble de l’appareil
6
6
6
Préparatifs
Fonctions
7
White Rice (Riz blanc)
8
Brown Rice (Riz brun)
9
9
9
Porridge (Gruau)
Multi-grain (Multigrain)
Soup (Soupe)
10
10
10
Quick cook/Slow cook
(Cuisson rapide/Cuisson lente)
Steam (Vapeur)
Cake/Yogurt (Gâteau/Yogourt)
11
Reheat/Keep warm
(Réchauffage/Maintien au chaud)
12
Nettoyage et entretien
13
15
Dépannage
14
14
Spécifications
Garantie
8~12
Soutien
Utilisation
Avant
utilisation
Thank you for purchasing this Panasonic product.
This product is intended for household use only.
Please read these instructions carefully and follow safety precautions when using this product.
Before using this product please pay special attention to “ IMPORTANT SAFEGUARDS” and Safety
Precautions”( Page 4~5 )
Please make sure the date and name of store and date of purchase are stamped and keep it
with this Operating Instructions.
Keep this manual for future use
Merci d’avoir acheté ce produit Panasonic.
Ce produit est conçu uniquement pour une utilisation domestique.
Veuillez lire ces instructions attentivement et suivre les précautions à prendre lors de
l’utilisation de ce produit.
Avant d’utiliser ce produit, veuillez porter une attention particulière aux « IMPORTANTES
MESURES DE SÉCURITÉ » et « Précautions à prendre » (Pages 4~5).
Assurez-vous que la date de l’achat et le nom du magasin où vous avez acheté le produit
sont indiqués et conservez ces informations avec ce manuel d’utilisation.
Conservez ce manuel d’utilisation pour un usage ultérieur
“
,
,

IMPORTANT SAFEGUARDS
When using electrical appliances, basic safety precautions should always be followed
including the following
Read all instructions
Do not touch hot surfaces. Use handles or knobs
To protect against electrical shock do not immerse cord, plugs, or Rice Cooker
except the pan
in water or other liquid
Close supervision is necessary when any appliance is used by or near children
Unplug from outlet when the appliance is not in use, before putting on or taking off
parts, and before cleaning Allow to cool before handling
Do not operate any appliance with a damaged cord or plug or after the appliance
malfunctions or has been damaged in any manner. Return appliance to the nearest
authorized service facility for examination, repair, or adjustment
The use of accessory attachments not recommended by the appliance manufacturer may
cause injuries
Do not use outdoors
Do not let cord hang over edge of table or counter, or touch hot surfaces
Do not place on or near a hot gas or electric burner, or in a heated oven
Extreme caution must be used when moving an appliance containing hot oil or other hot
liquids
Always attach plug to appliance before plugging cord into wall outlet
To disconnect, turn the control to “ off ” plug from wall outlet, thenremove
Do not use appliance for other than intended use
This product is intended for household use only
Discard the paper placed at the heating plate before using this product.This paper
is for shipping purpose only.
SAVE THESE INSTRUCTIONS
CAUTION
A short power-supply cord is provided to reduce
the risk resulting from becoming entangled in or tripping over a long er cord
(or detachable power-supply cord)
The cord should be arranged so that it will not drape over the countertop or tabletop
where it can be pulled on by children or tripped over unintentionally
The use of extension cords is not recommended
INTERFERENCE
This Multi Function Rice Cooker uses digital circuitry and can radiate radio frequency energy
which could cause interference to radio communications such as TV and radio. Interference
can be confirmed by turning the Multi Function Rice Cooker off and on
If present, the user is encouraged to try to connect by taking one or more of the following
countermeasures
Reorient or relocate the receiving antenna
Increase the separation between the Multi Function Rice Cooker and receiver
Connect the Multi Function Rice Cooker into an outlet on a circuit different from that to
which the receiver is connected
Consult the dealer or an experienced radio/TV technician for help
15.
Safety Precautions
Must be followed
To prevent accidents or injuries to users, other people, or damage to property
follow the instructions below
The Following charts indicate the degree of damage caused by incorrect operation
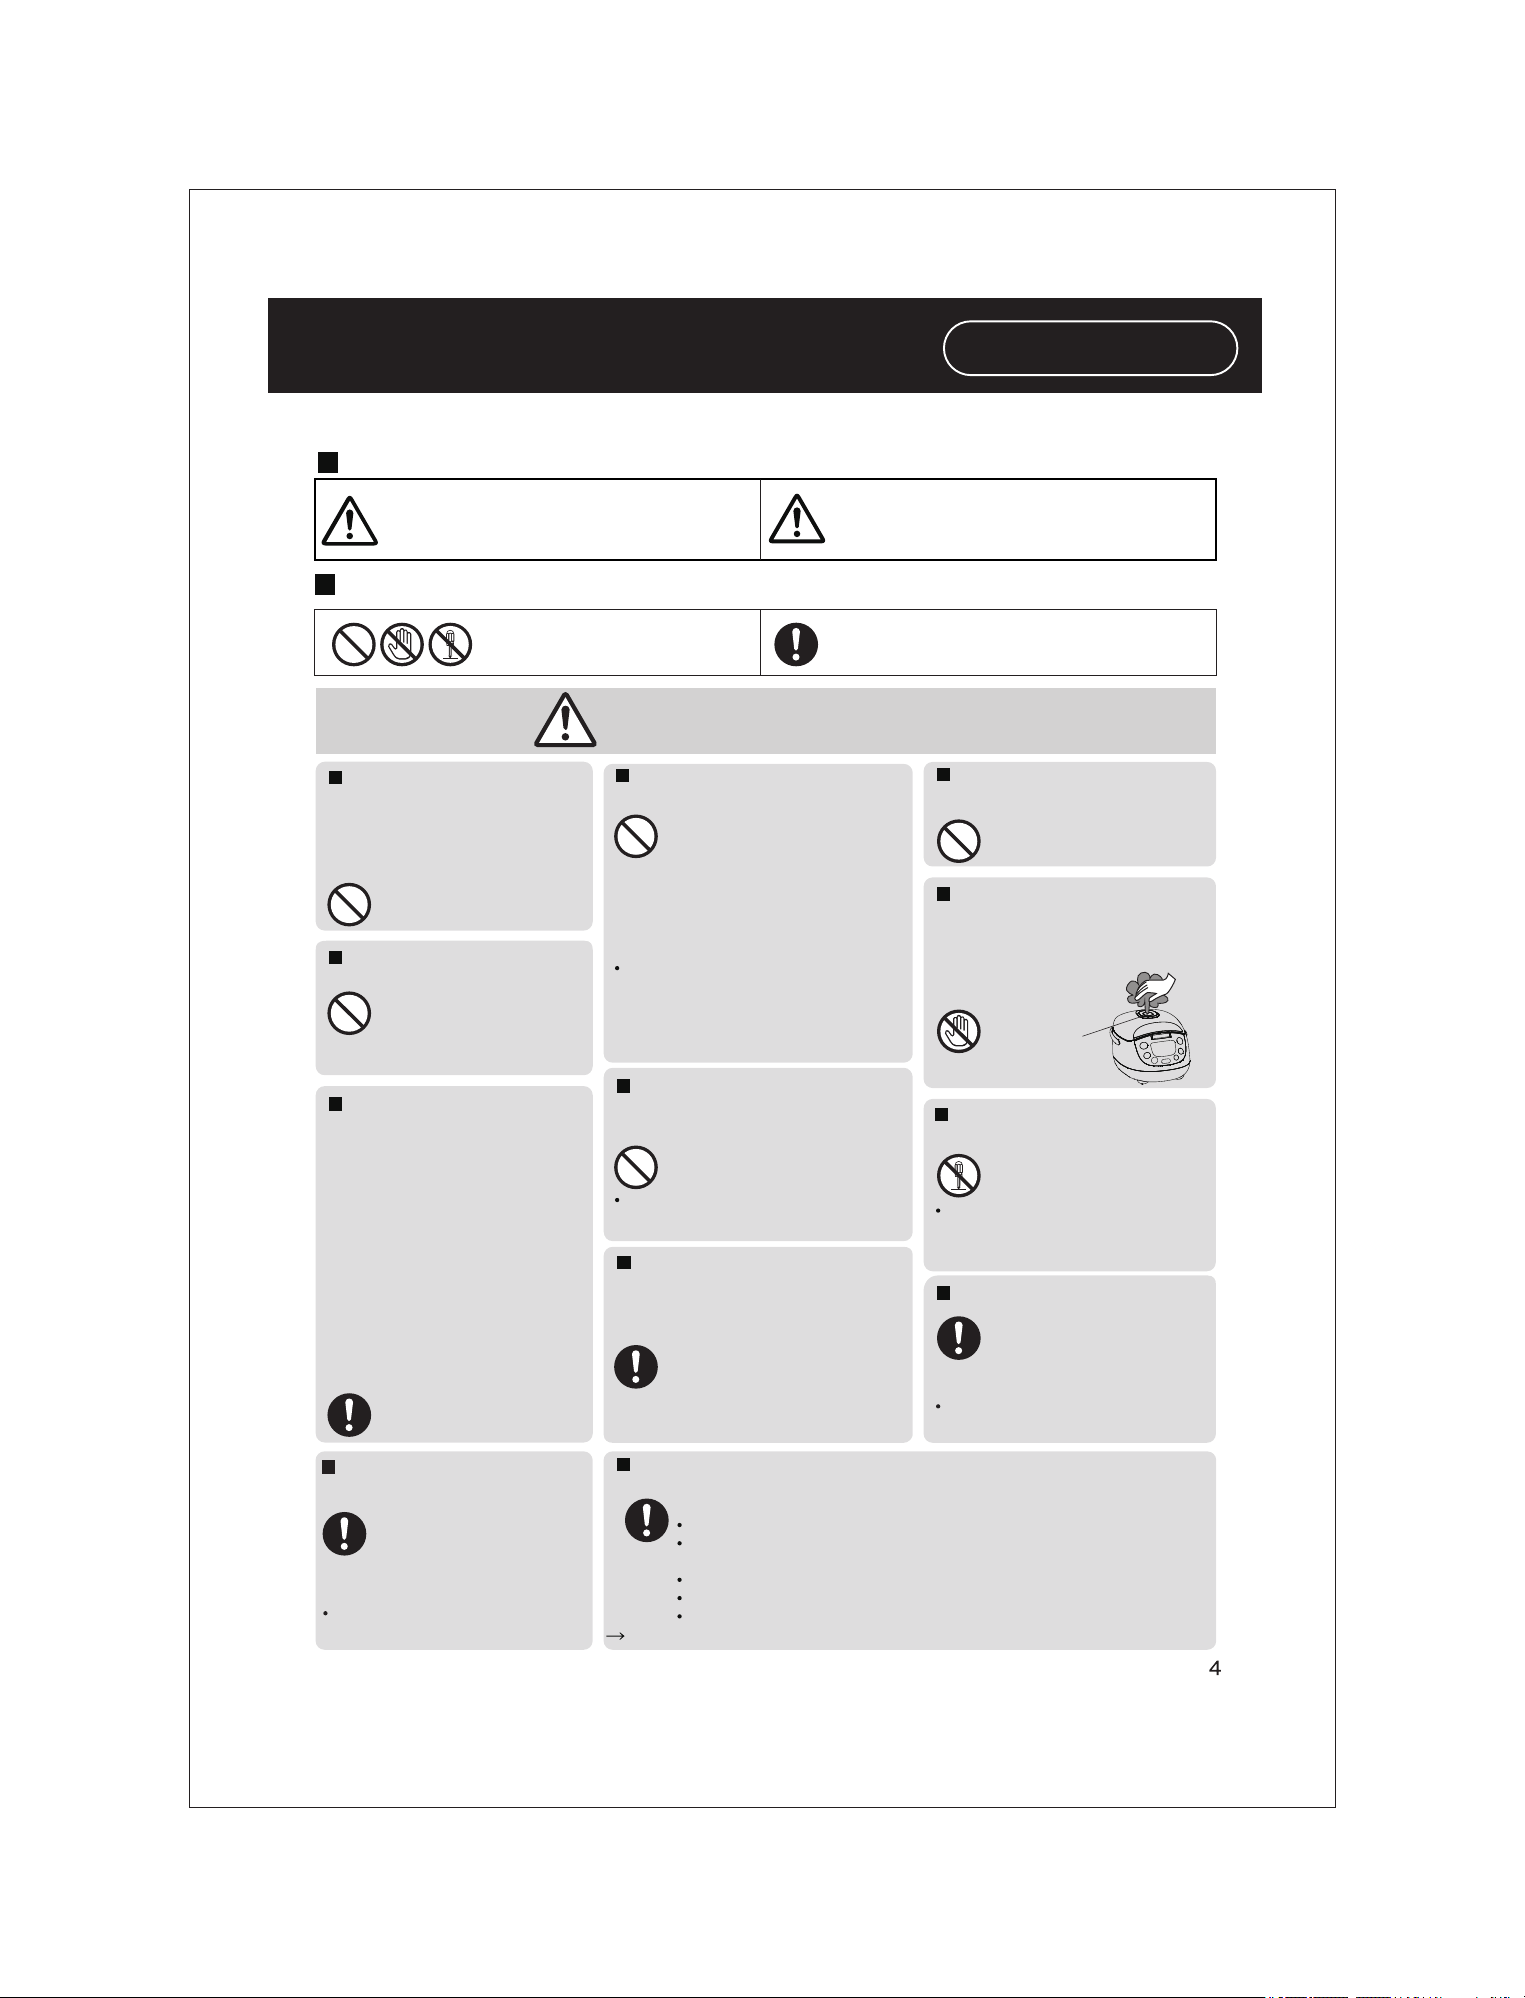
WARNING
Indicates serious
injury or death
CAUTION
Indicates risk of
injury or property
damage
These symbols are
classified and explained as follows
These symbols indicate
actions that are prohibited
This symbol indicates an action
that must be followed
WARNING
Do not use the appliance
if the power cord or
power plug is damaged
or the power plug is
loosely connected to the
power outlet
It may cause an electric
shock or fire
Do not insert any objects
in the vent or gap
Especially metal objects
such as pins or wires
It may cause an electric
shock or malfunction
This appliance is not
intended for use by
persons(including
children) with reduced
physical, sensory or
mental capabilities, or lack
of experience and knowl
edge, unless they have
been given supervision or
instruction concerning use
of the appliance by a
person responsible for
their safety. Children
should be supervised to
ensure that they do not
play with the appliance
It may cause burn or injury
Do not immerse the
appliance in water or
splash it with water
It may cause a fire caused by
short circuit or electric shock
Please enquire with an authorized
dealer if water gets inside the appliance
Use a power outlet rated at a
minimum of 15Amps, 120Volts
AC.
Do not plug multiple
appliances in the same outlet.
Do not modify, disassemble
or repair this appliance.
It may cause a fire
electric shock or injury
Please make enquiries at the
store or the repair department
of an authorised dealer
Insert the instrument plug and
the power plug firmly
Otherwise it may cause an
electric shock and fire caused
by the heat that may generate around
the instrument plug or the power plug
Do not use a broken power plug
or a loose power outlet
Clean the power plug
regularly
A soiled power plug may
cause insufficient insulation
due to the moisture, and
may cause a fire
Unplug the power plug, and
wipe with a dry cloth
Discontinue using the appliance immediately and unplug the power
connector in cases of abnormal situations and breaking down
It may cause smoking, a fire, or electric shock
The power plug and the power cord become abnormally hot
The power cord is damaged or power failure occurs when is touched
The main body is deformed or abnormally hot
The unit gives out smoke or scorching smell
There are cracks, looseness or wobbles of the appliance
The heating plate is warped or the pan is deformed
e.g. for abnormal
situations or
breaking down
Please make enquiries
at Panasonic authorized service center for inspection and repair immediately
Do not damage the power
cord or power plug
Following actions are strictly
prohibited
Modifying, placing near heating
elements, bending, twisting, pulling,
putting heavy objects on top, and
bundling the cord
may
cause an electric
shock or fire caused by short circuit
If the supply cord is damaged, it
must be replaced by a special cord
or assembly available from the
manufacturer or its service agent
Do not plug or unplug the
power plug with wet hands
It may cause an electric
shock
Do not get your face close
to the steam vent or touch
it with your hand. Keep the
steam vent out of reach of
small children
Steam vent
It may cause a burn
or any purposes other than cooking.
commercial or industrial purposes
only. Do not use it for any
Must be followed
Safety Precautions
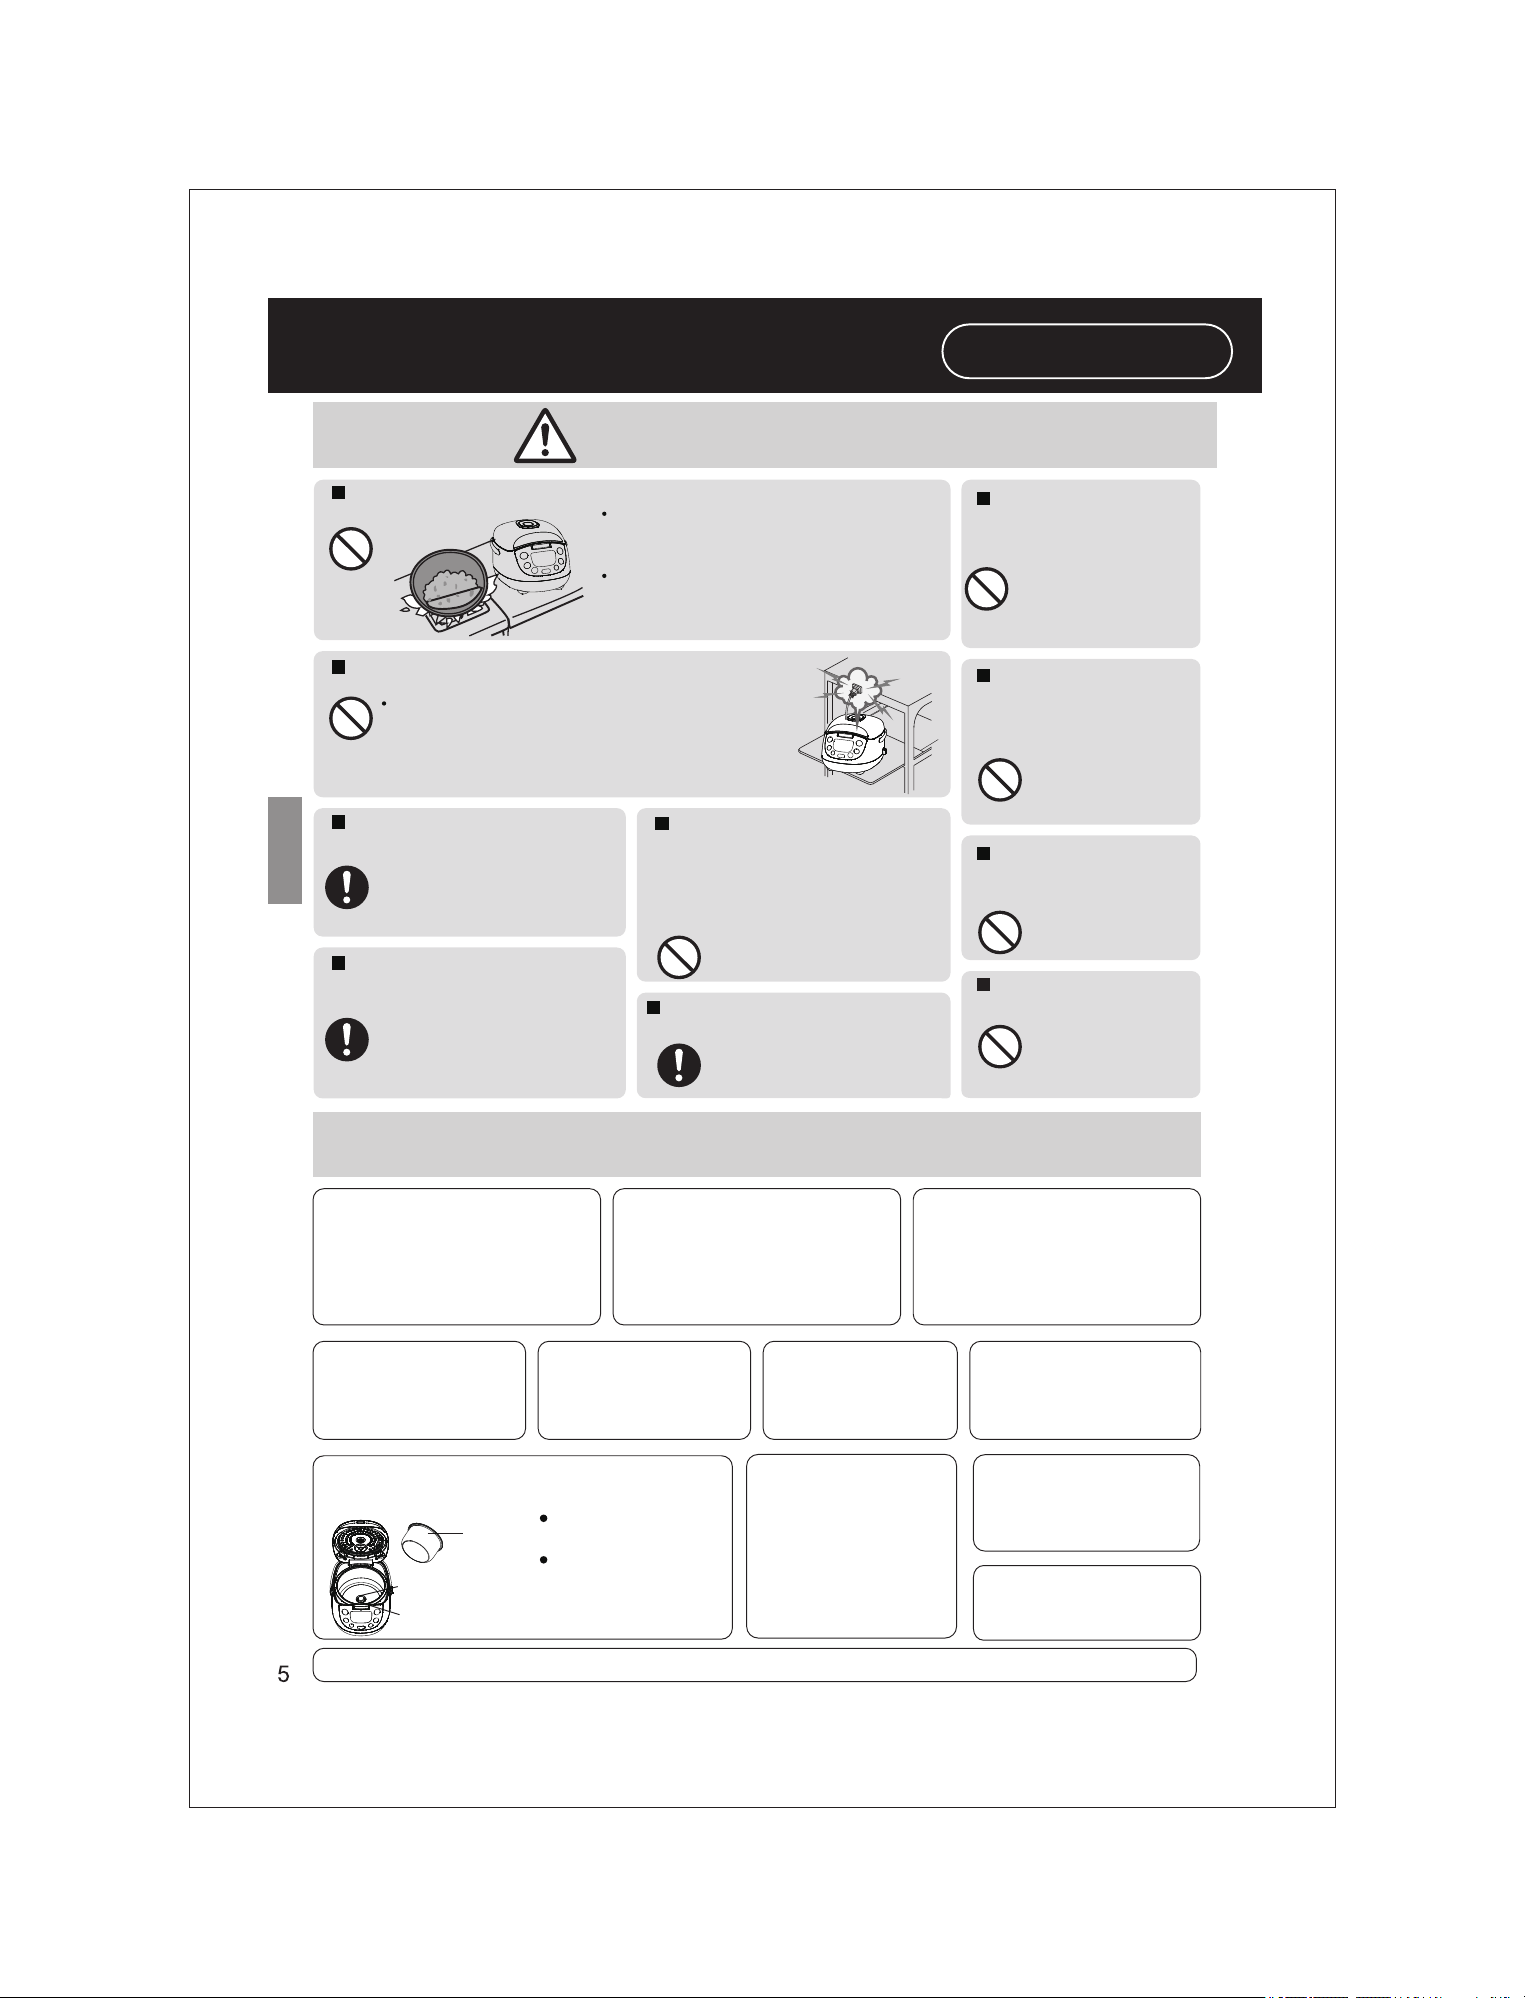
CAUTION
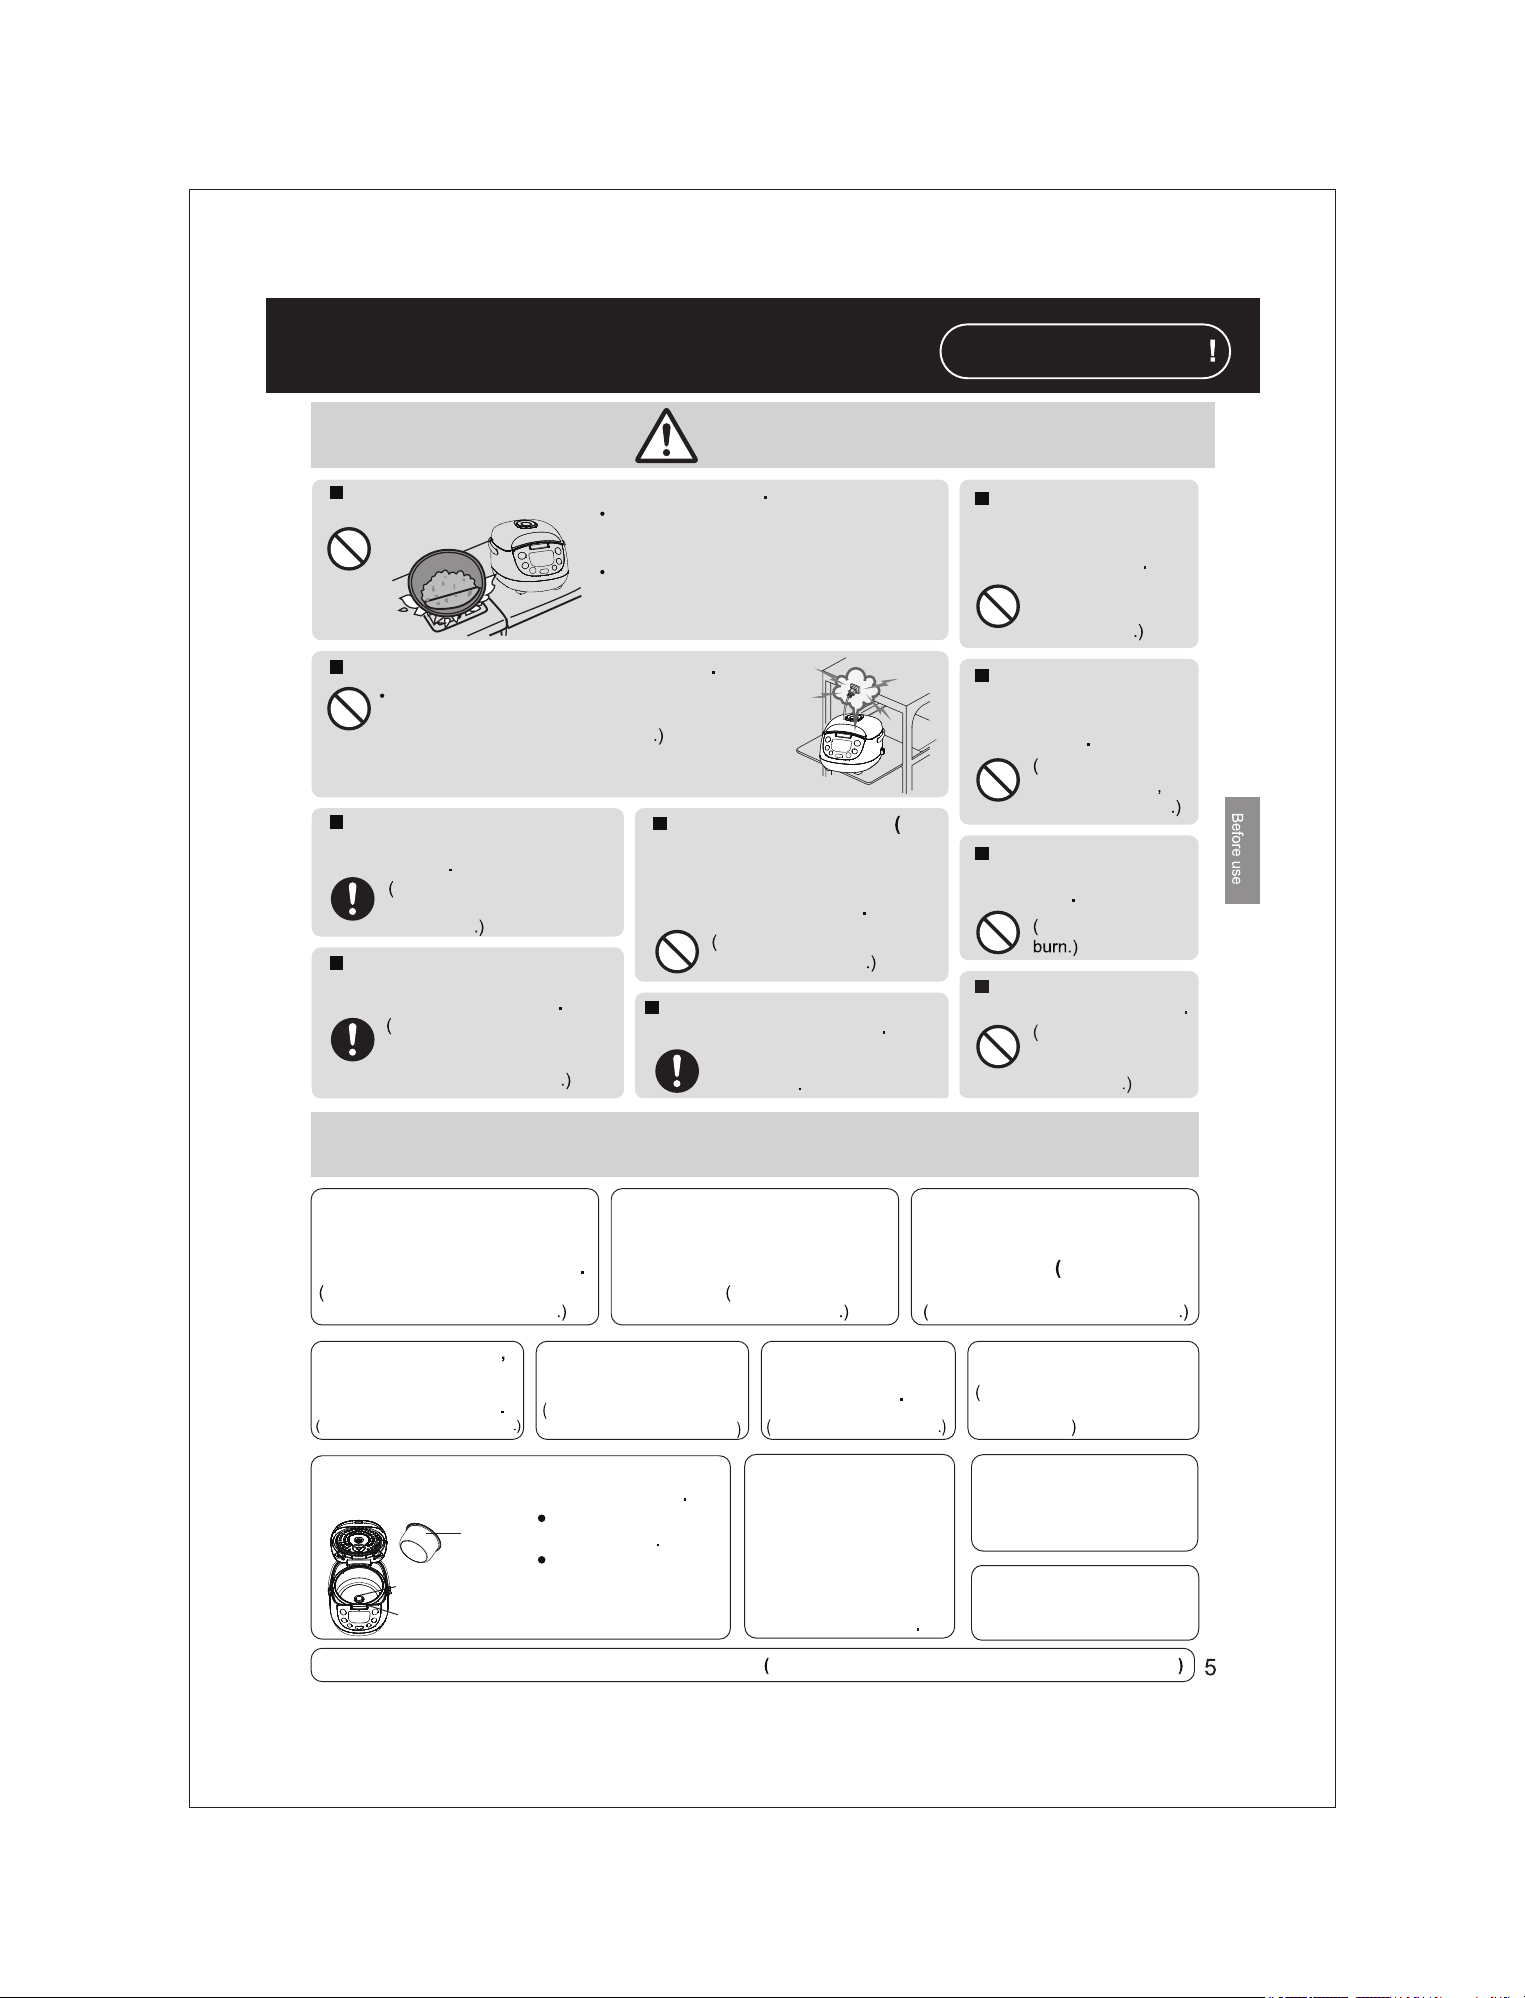
Do not use the appliance on following places
The place where it may be splashed with
water or near a heat source.
It may cause
a fire caused by
short circuit or electric shock
An unstable surface or carpet, table cloths
(ethylene plastic) or other object that cannot
resist high temperature. It may cause an
injury, burn, or fire.)
Do not touch heating
elements while the
appliance is in use
or after cooking
Especially the
heating plate
(It may
cause a burn
Do not expose the power plug to steam
Do not expose the power plug to steam and do not let
water spill on the connector of
the
power plug.
(It may
cause a fire caused by short circuit
When using a cabinet with sliding table, use the appliance
where the power plug cannot be exposed to steam.
Do not touch the
hook button while
moving the
appliance
It may cause the
outer lid to open
resulting in a burn
Be sure to
hold the instrument
plug or the power plug when
unplugging
Otherwise it may cause an
electric shock or fire caused by
short circuit
Do not use the cord set
for
instrument plug and power
plug) that is not specified for
use with this appliance.
Also
do not transfer them
It may cause an electric
shock, leak, and fire
Do not open the
outer lid while
cooking
It may cause a
burn.
Unplug the power plug from
the power outlet when the
appliance is not in use
Otherwise it may cause an
electric shock and fire caused
by a short circuit due to the
insulation deterioration
Heating
element is subjectted
to residual heat after use
Please allow the appliance
to cool down before
cleaning it
Do not use other pans
than the one specified
It may cause a
burn and injury due
to overheat or
malfunction
Precautions for Use
Please put in correct amount
of rice and water and select
functions correctly according
to the operating instructions
So as to avoid overflow of rice water
half-cooked rice or scorched rice
Do not put ingredients to be
cooked directly into the
appliance in which no pan is
placed.
Do not cook without
the pan.
So as to prevent any
impurities from causing failure
Do not use the appliance on
any heat labile object such as
carpet, electric heating carpet
and tablecloth made of vinyl
plastics), etc.
So as to avoid poor cooking or fire
Before using the appliance
the anti-tamish paper
between the pan and the cast
heater should be removed
So as to avoid poor cooking or fire
Do not cover the outer lid
with cloth or other objects
when the appliance is in use.
So as to avoid deformation, color
change of the outer lid or failure.
Avoid using the
appliance under
direct sunlight
So as to avoid color change
Do not serve out rice
with any metal object.
So as to avoid scratching the
pan coating and causing peeling
of the coating.
Please always clean the foreign objects such as rice
on the pan, cast heater and temperature sensor
Pan
Cast heater
Temperature sensor
Do not tilt or overturn
the appliance
Before cleaning, turn
off the power switch
and pull out the power
plug.
When there is any overflow
of rice water from the steam
vent, pull out the power plug
immediately to disconnect
the power supply. Do not
resume the use until the rice
water on the power plug and
the instrument plug is
cleaned with a dry cloth
The appliance is for household use
When power failure occurs during
the operation of the appliance, the
cooking result may be affected.
All removal parts should be washed prior to first time use
So as to rid the product of any debris, machine oil, etc
PRESET
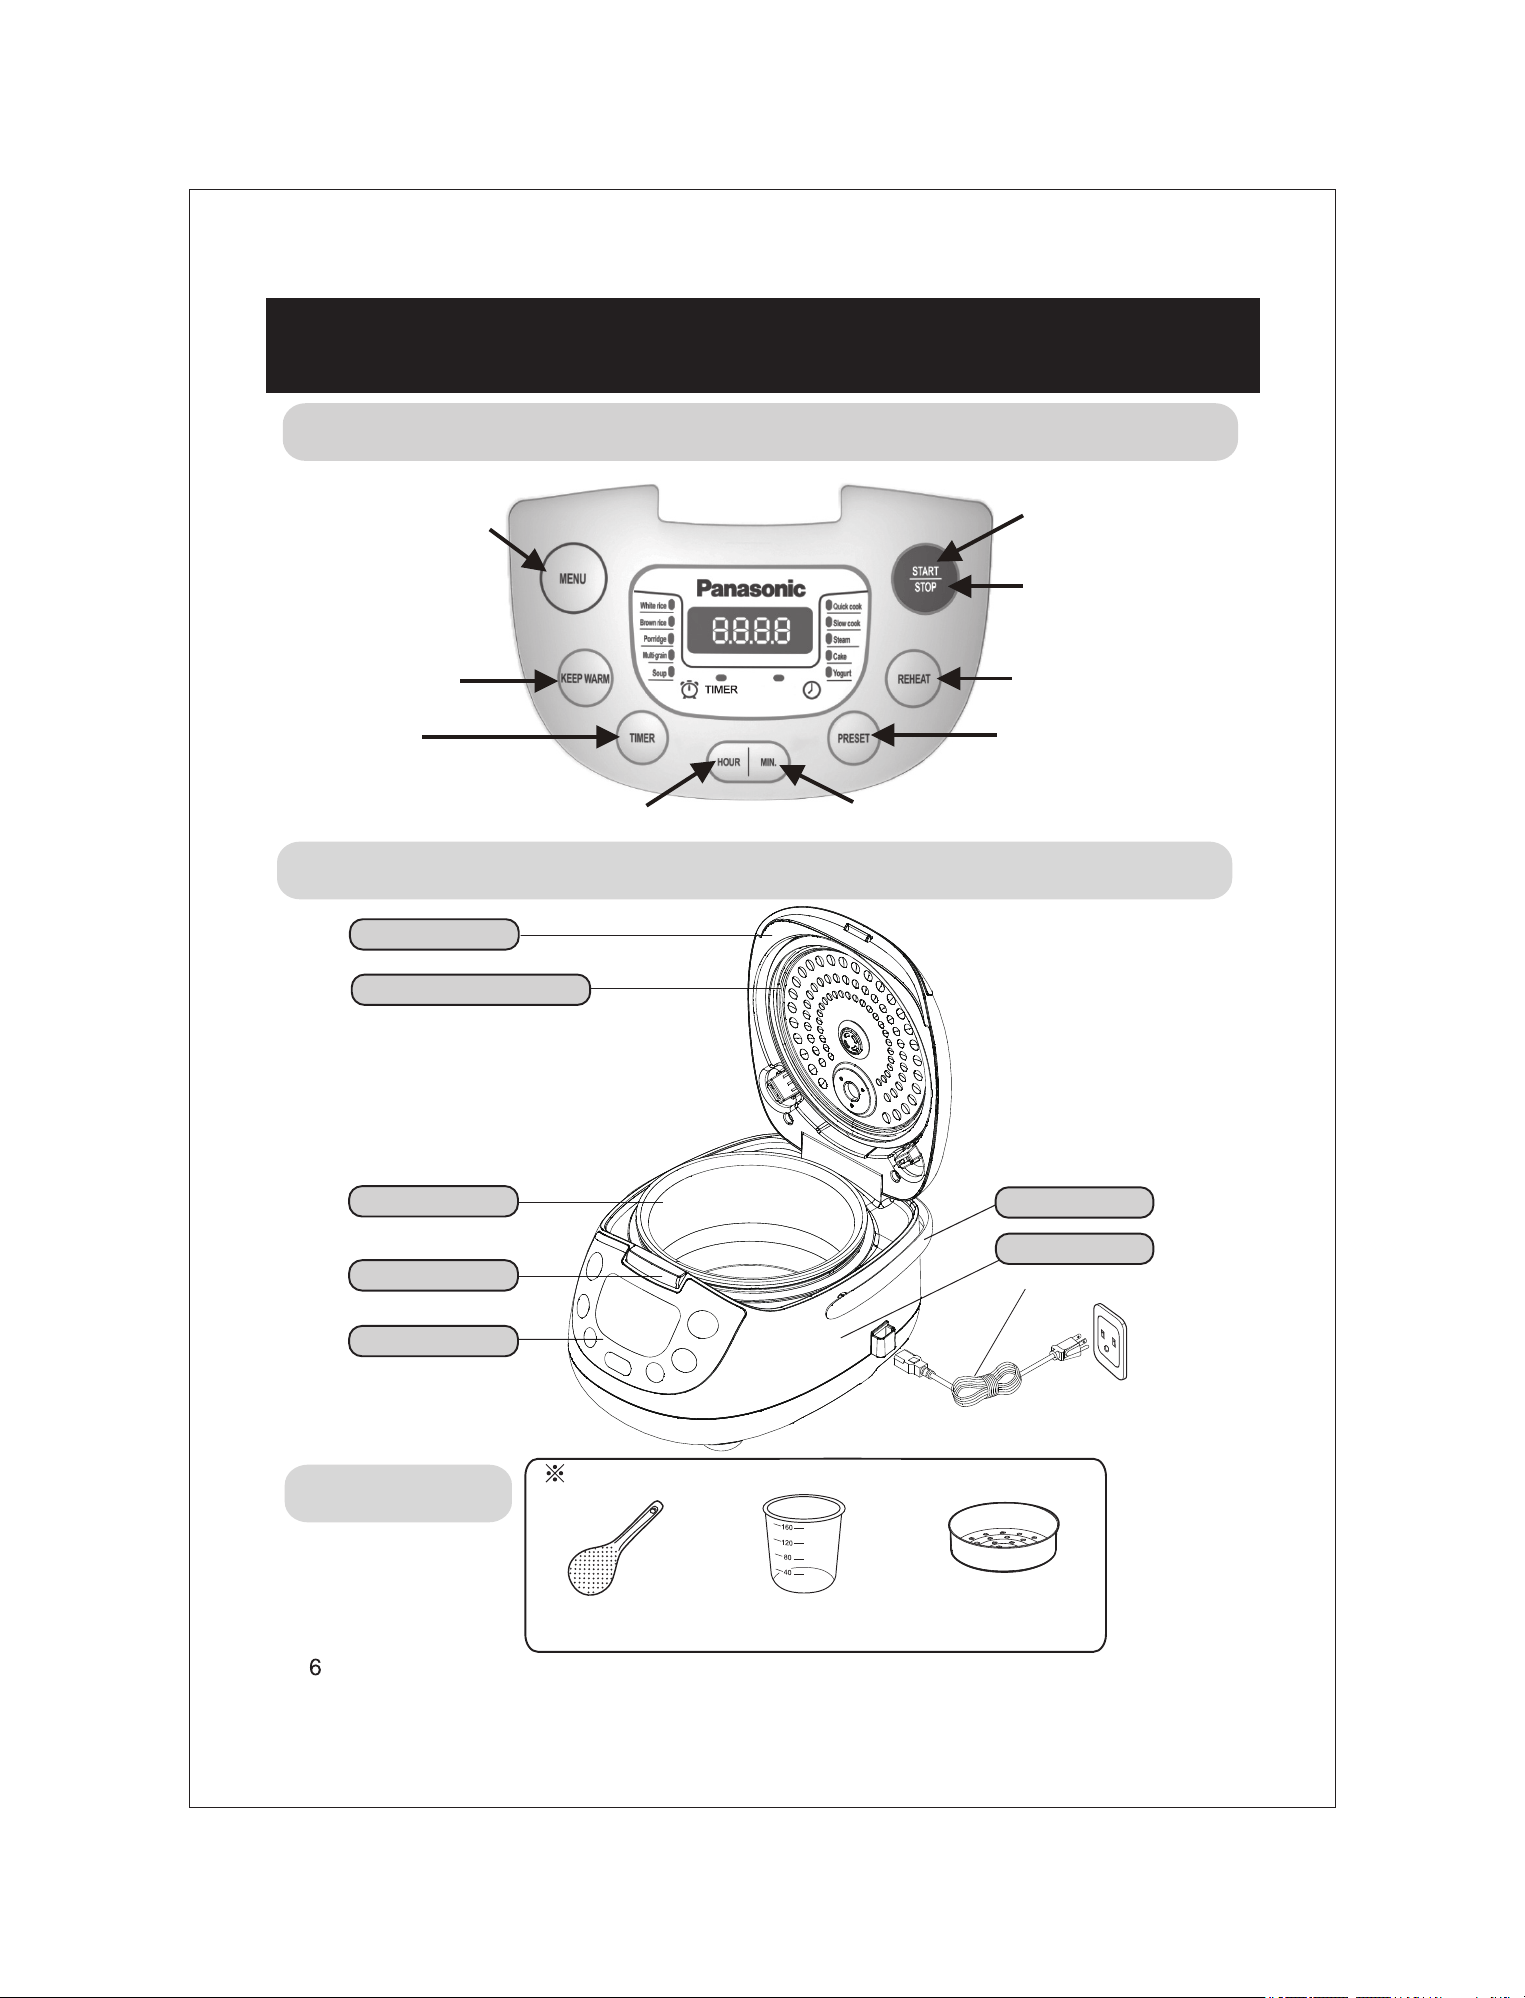
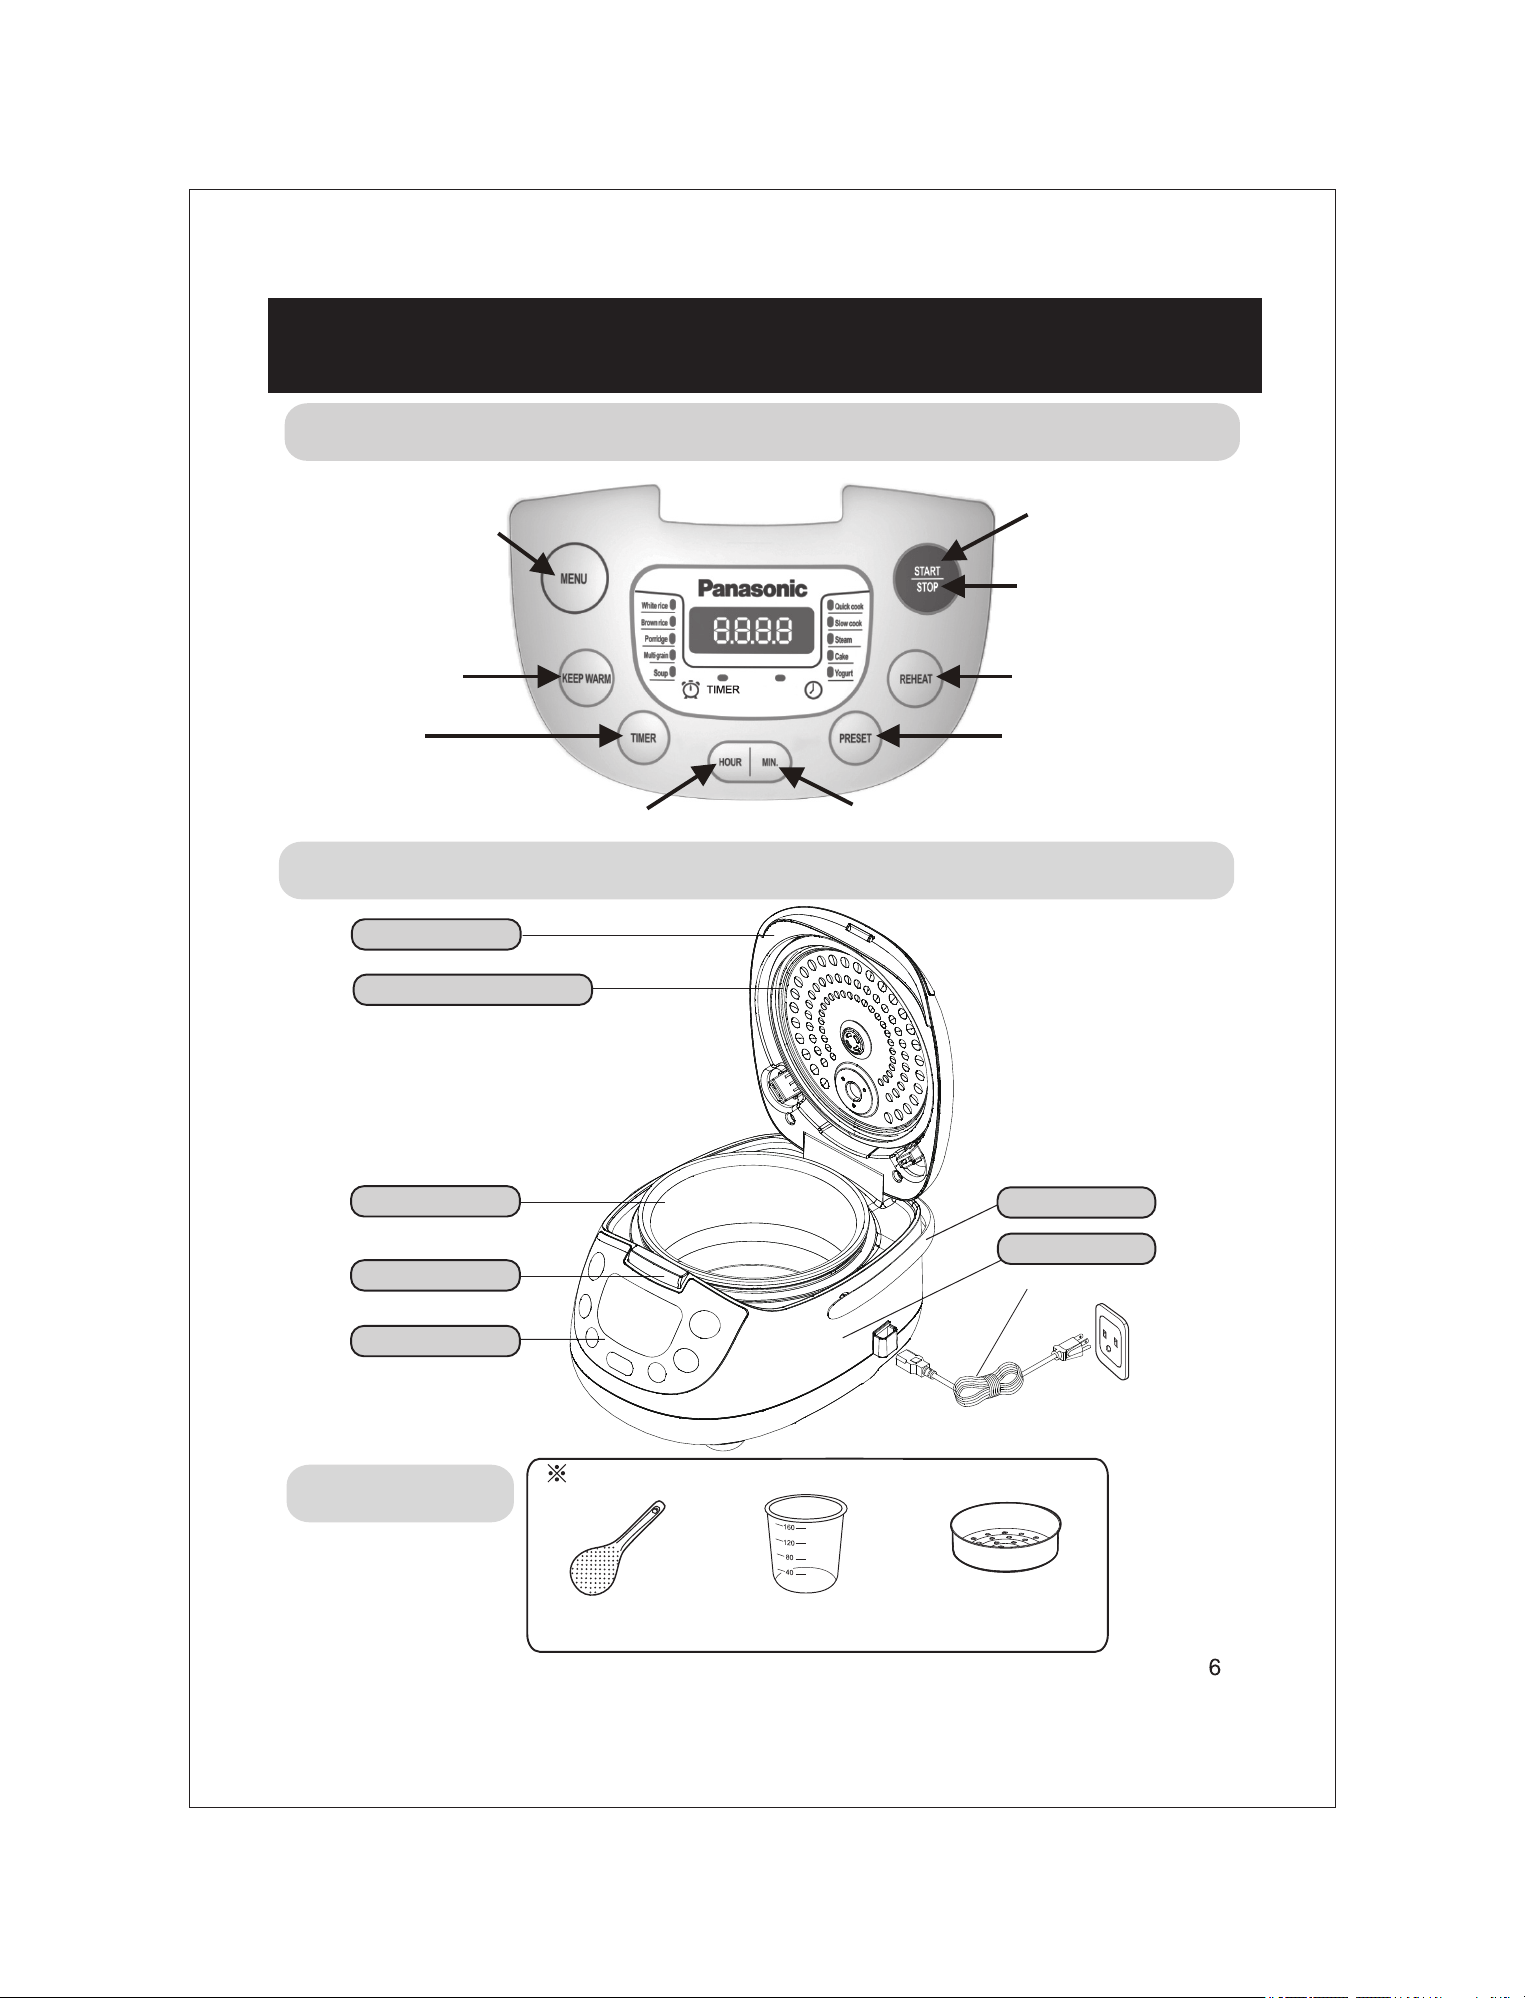
Parts identification
Control panel
Press to select among the 10
cooking programs: white rice/
brown rice/porridge/multi-grain/
soup/quick cook/slow cook/
steam/cake/yogurt.
When programs are completed,
the cooker will automatically
switch to keep warm except with
yogurt and cake function.
Adjust cooking time.
Adjust cooking time in hours.
Start for activating selected
cooking program.
Stop for cancel selected cooking
program and reselect cooking
program.
Press to reheat food.
Preset setting is available to 7
cooking programs: white rice/brown
rice/porridge/multi-grain/ soup/quick
cook/steam.
Adjust cooking time in minutes.
Entire unit
Outer lid
Detachable inner lid
PAN
Lock button
Control panel
Handle
Body
Power cord
Accessories
Please clean the accessories before using.
Rice
scoop
(1)
Measuring cup
(about 180
mL) (1)
Steaming
Basket
(1)
Preparations
for
rice
cooking
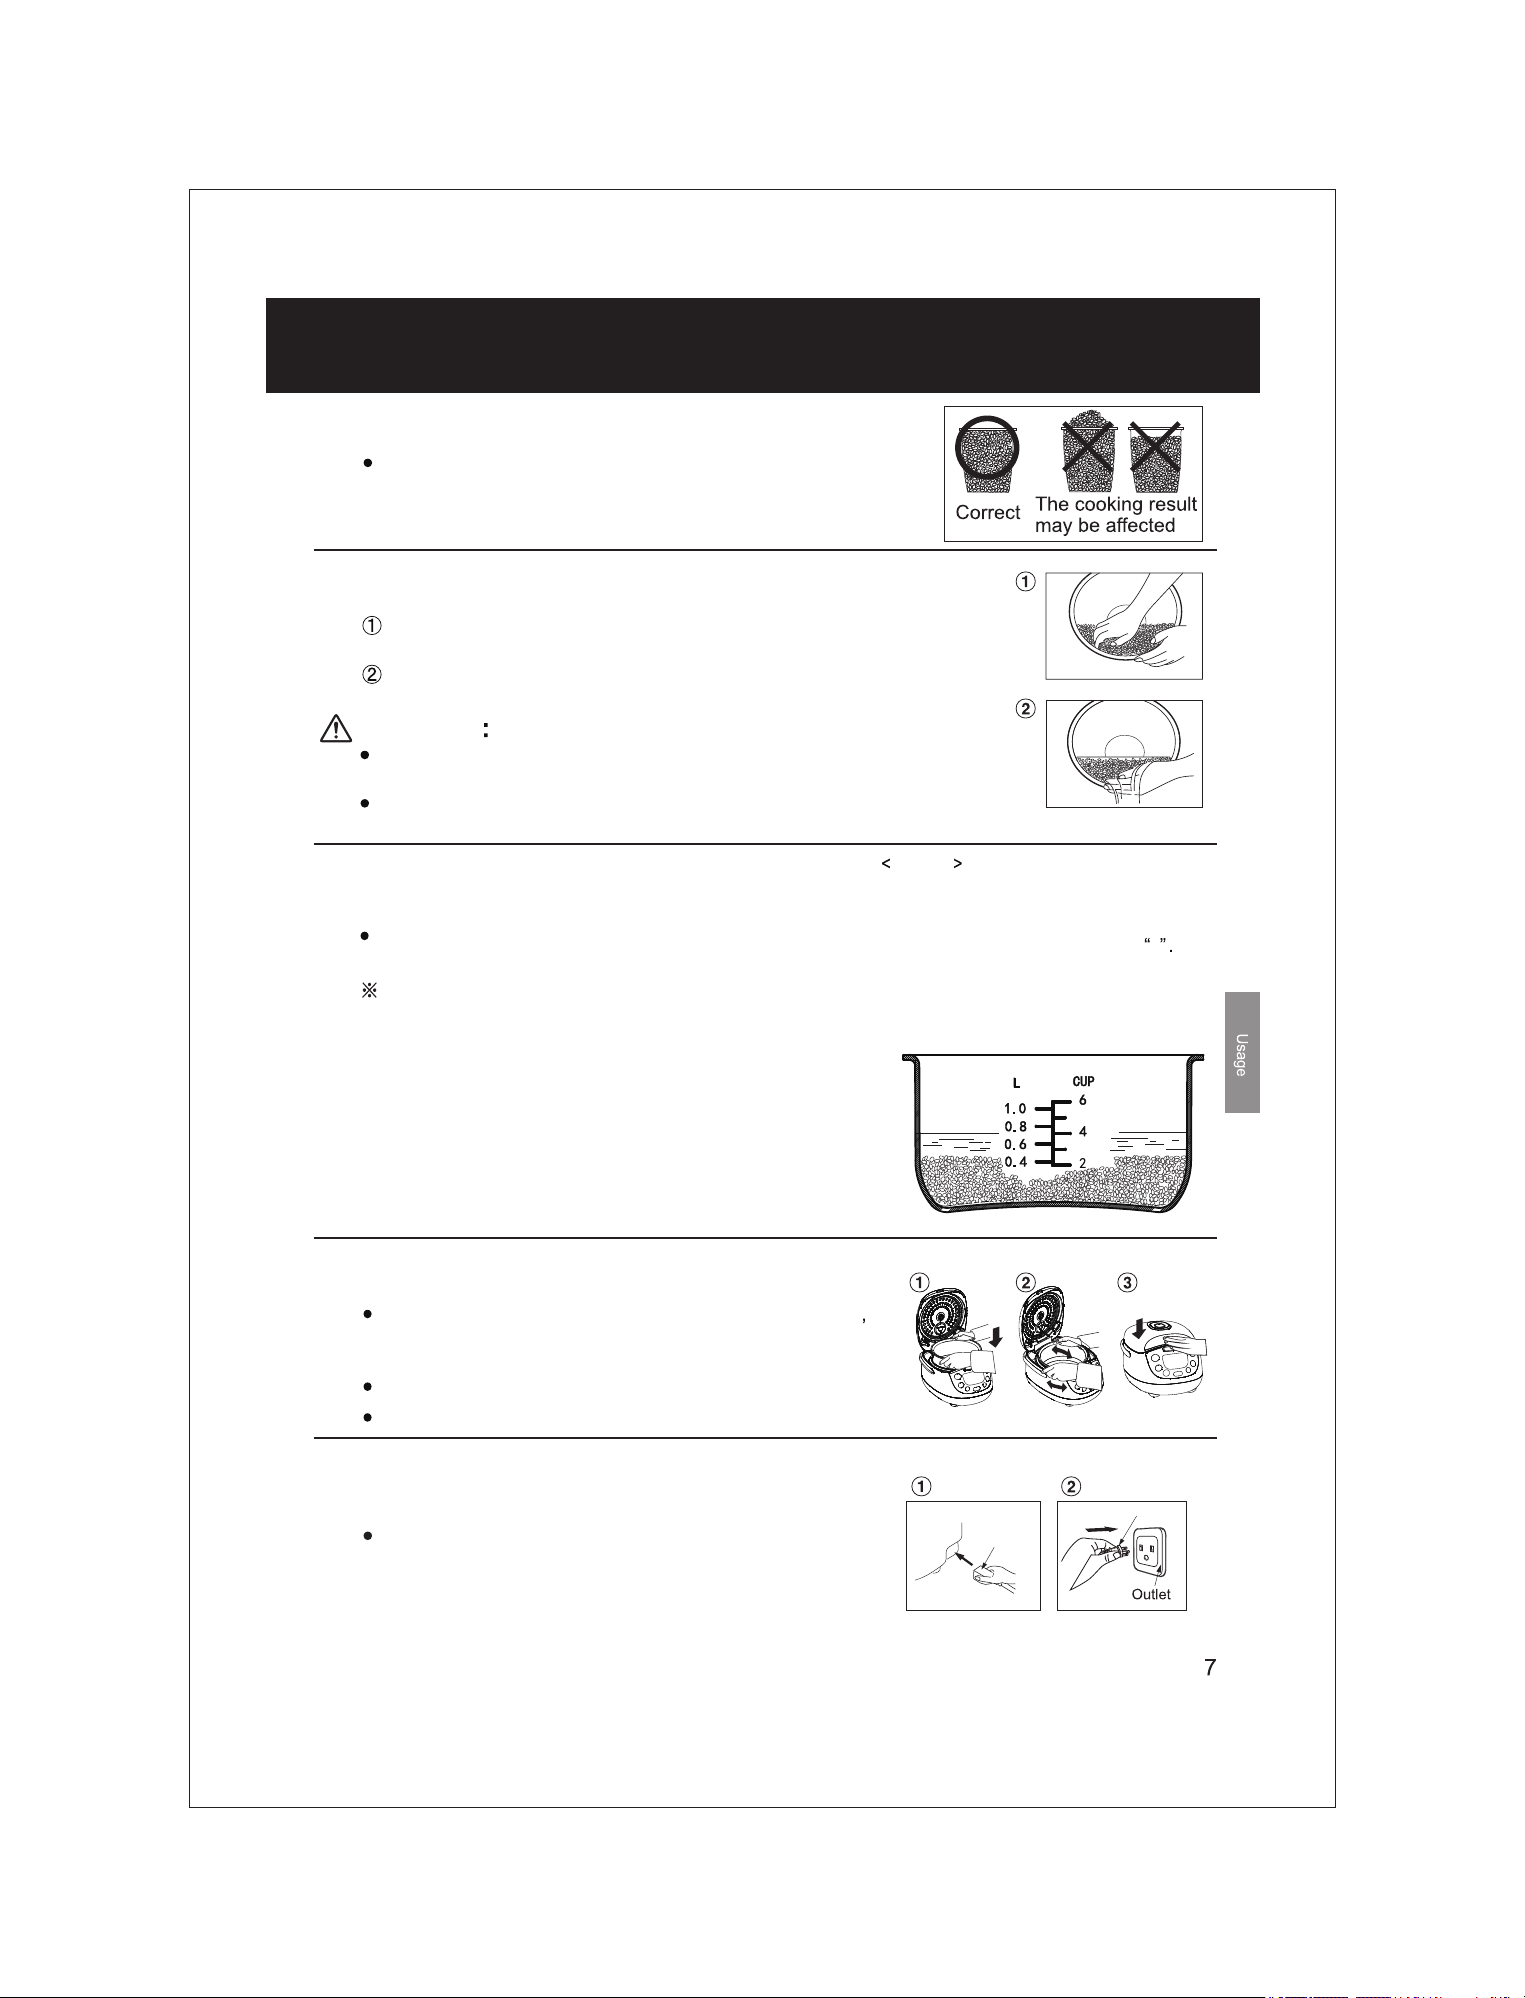
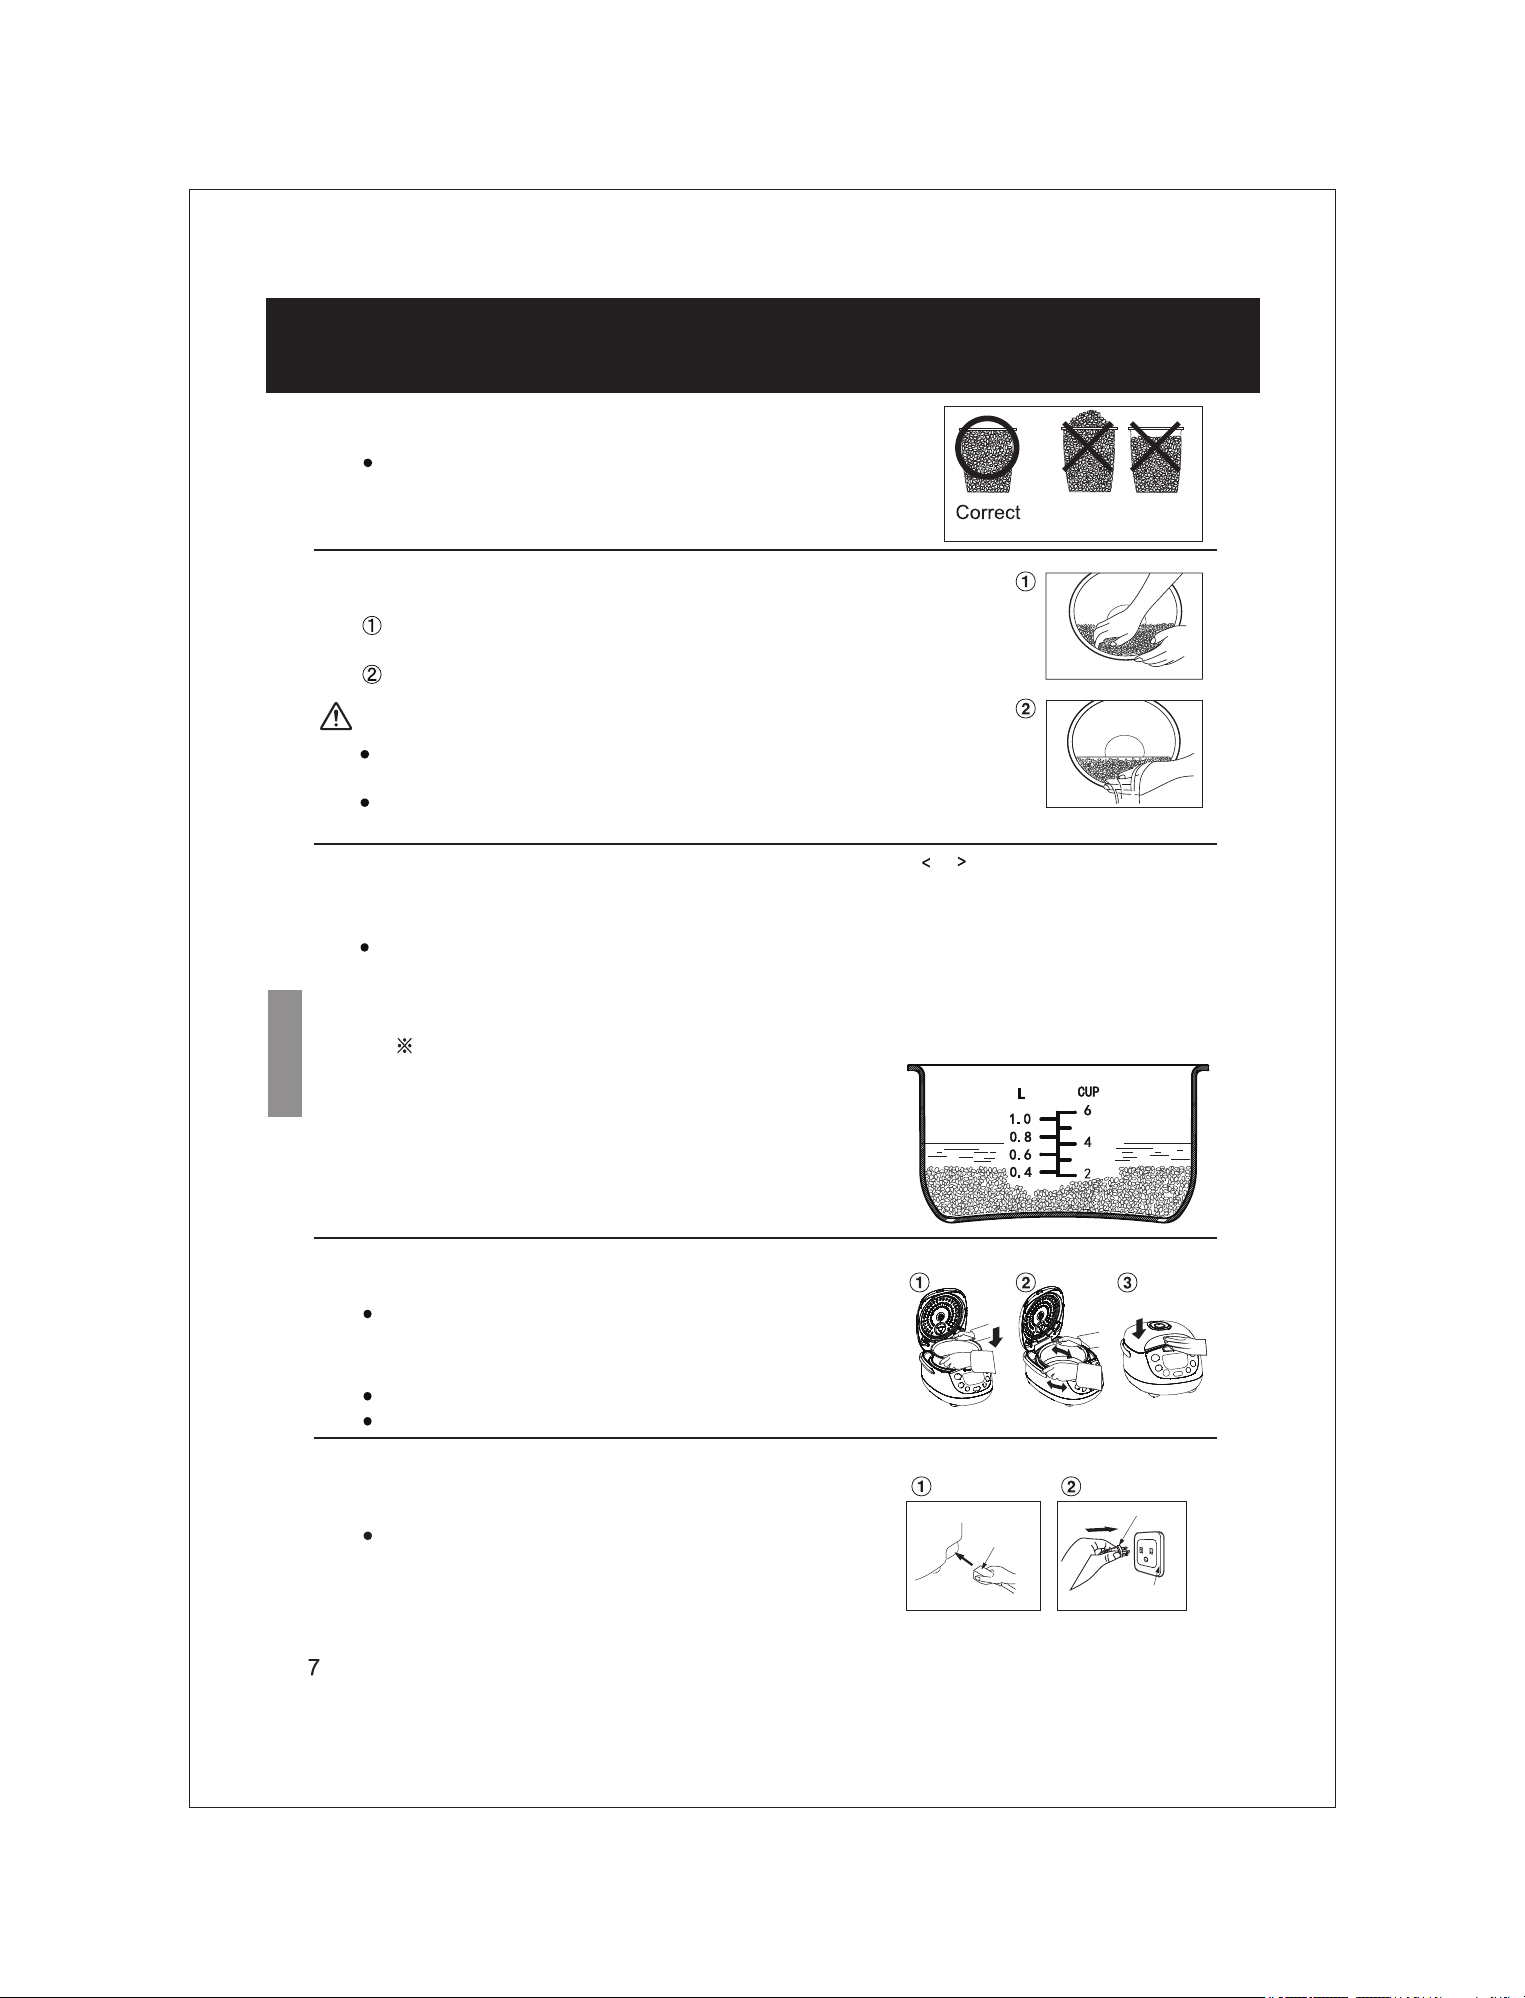
Measure rice with the measuring cup provided
The volume of the measuring cup is about 180 mL
(150 g).
1
Wash the rice until the water turns relatively clear
Wash the rice quickly with plenty of water while stirring the rice gently to
wash it while changing water.
Repeat several times [wash the rice
-
-
>
pour out the water], until the water is
relatively clear.
2
CAUTION
To avoid scratching the non-stick coating on the pan surface, do not wash
rice in the pan.
Wash the rice thoroughly. Otherwise, rice crust may appear and the residual
rice bran may affect the taste of the rice.
3
Place the washed rice into the pan
Add water until the corresponding waterline and dry the outside of the pan.
When adding water,
place pan on level surface,
pay attention to the scale
on side, and keep it at the same height.
The above water quantities can be increased or decreased according
to personal preference.
Example
When the white rice quantity is 4
measuring cups, wash the rice
and put into the pan,
then add
water into the pan until the water
surface reaches level
4
4
Put the pan into the body and close the outer lid
To ensure proper contact between the pan and the cast heater
rotate the pan along the direction indicated by the arrow for 2 or 3
times.
Check whether the steam vent is correctly positioned.
When closing the outer lid, confirm that there is a “click” sound.
5
Connect the plugs
Connect the plug to the body first, and then connect the power
plug. Make sure that both plugs are firmly connected.
Body
Instrument
plug
Power plug
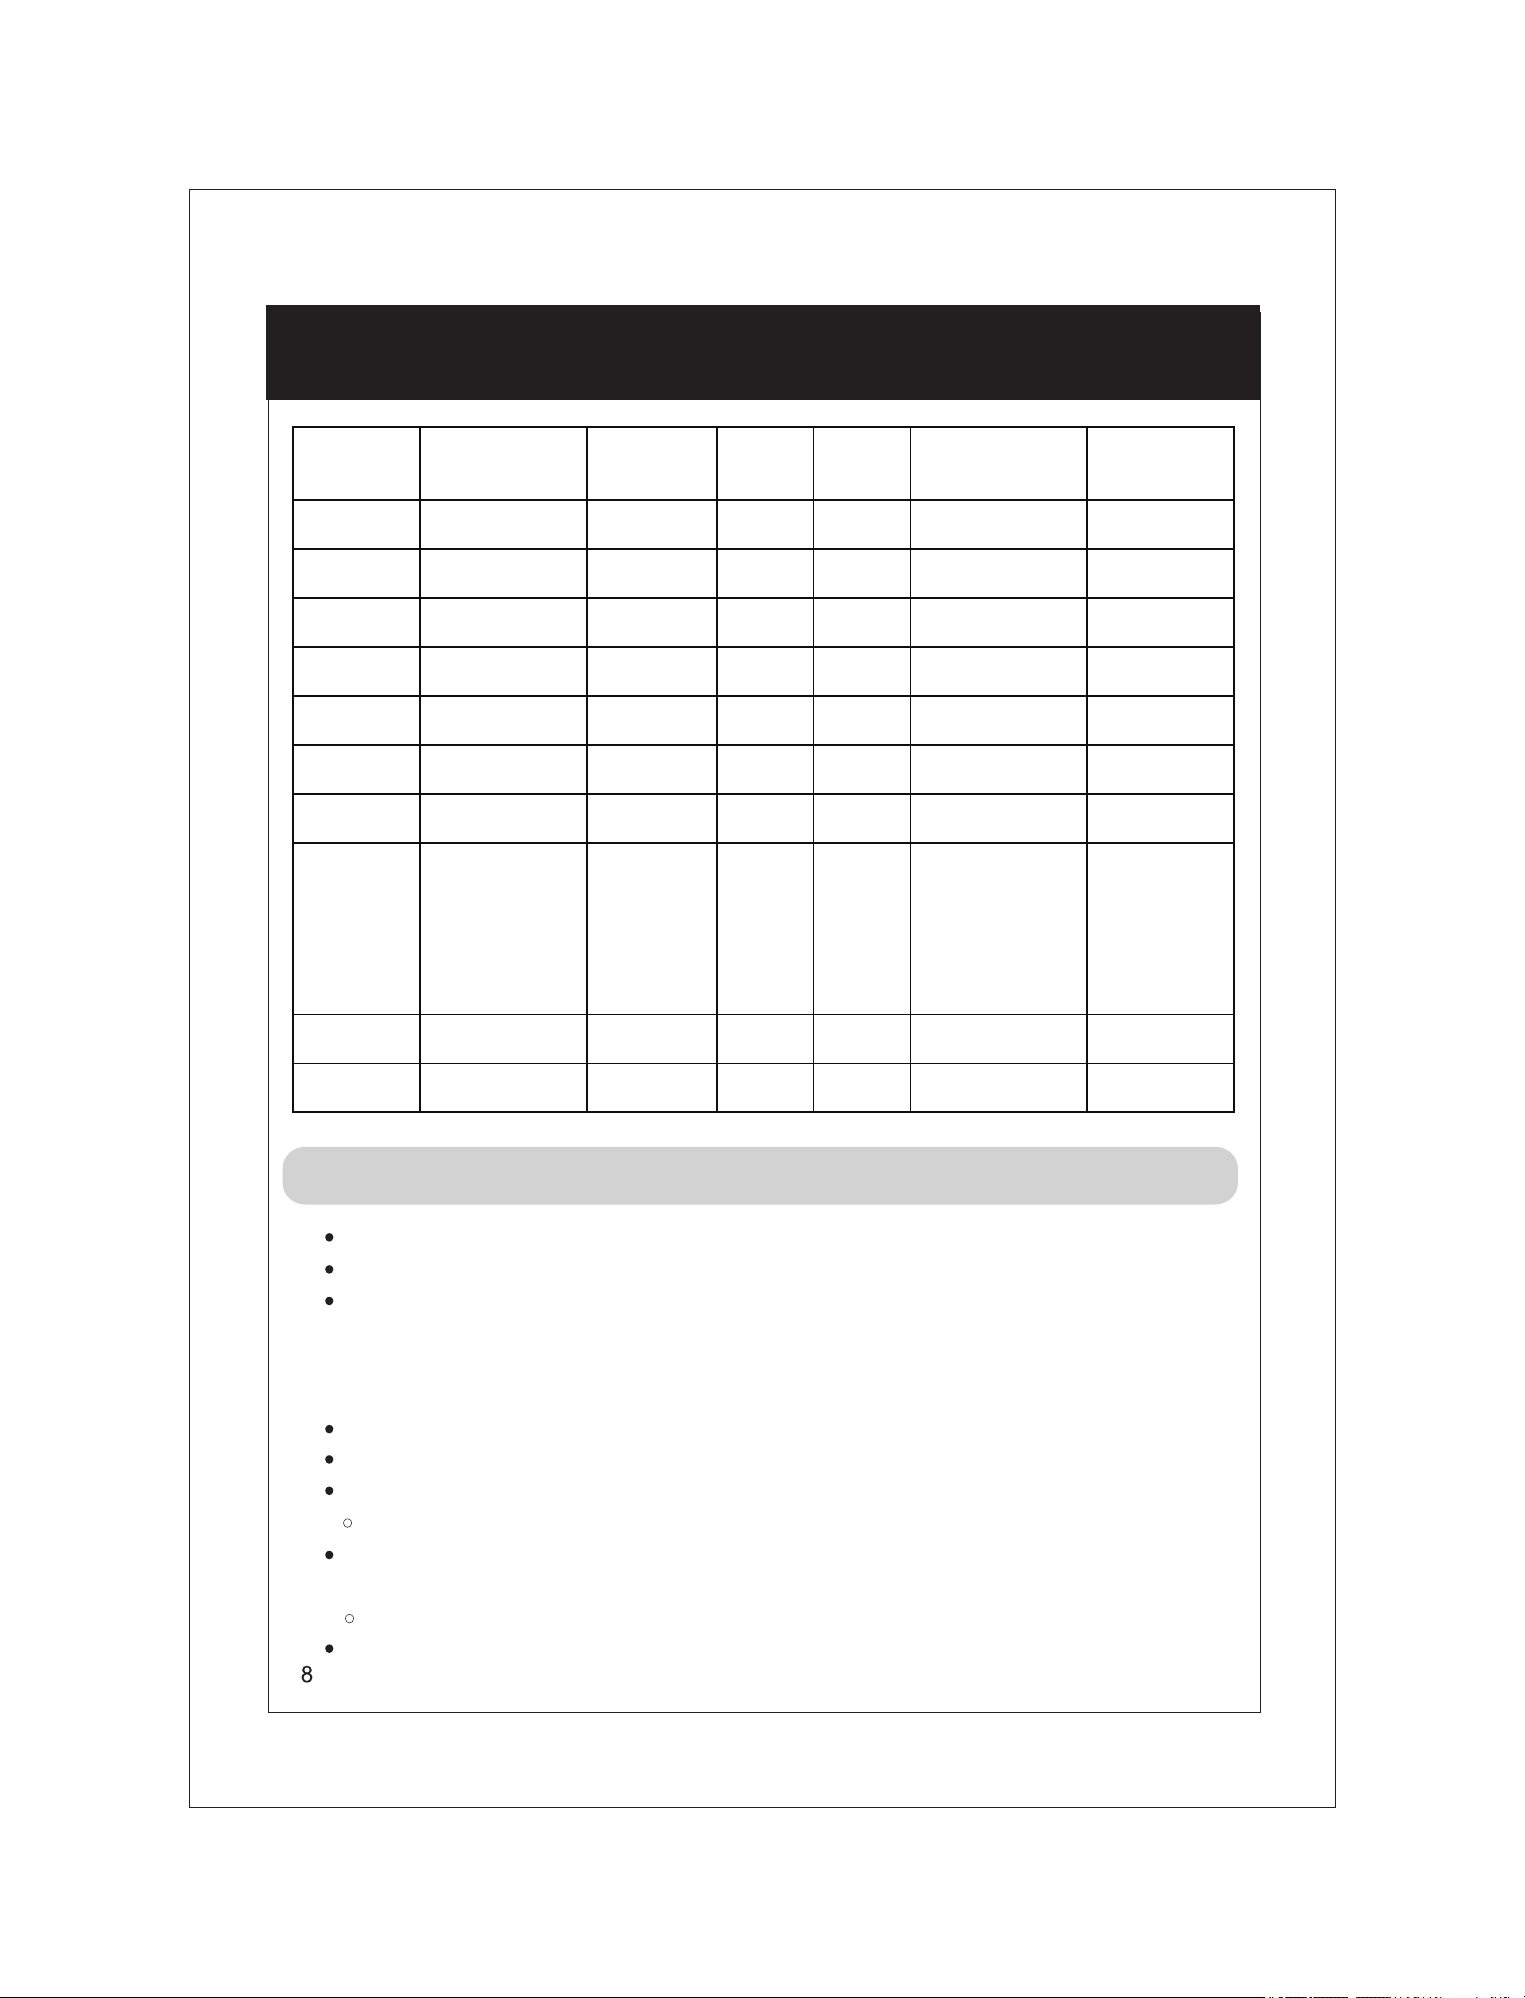
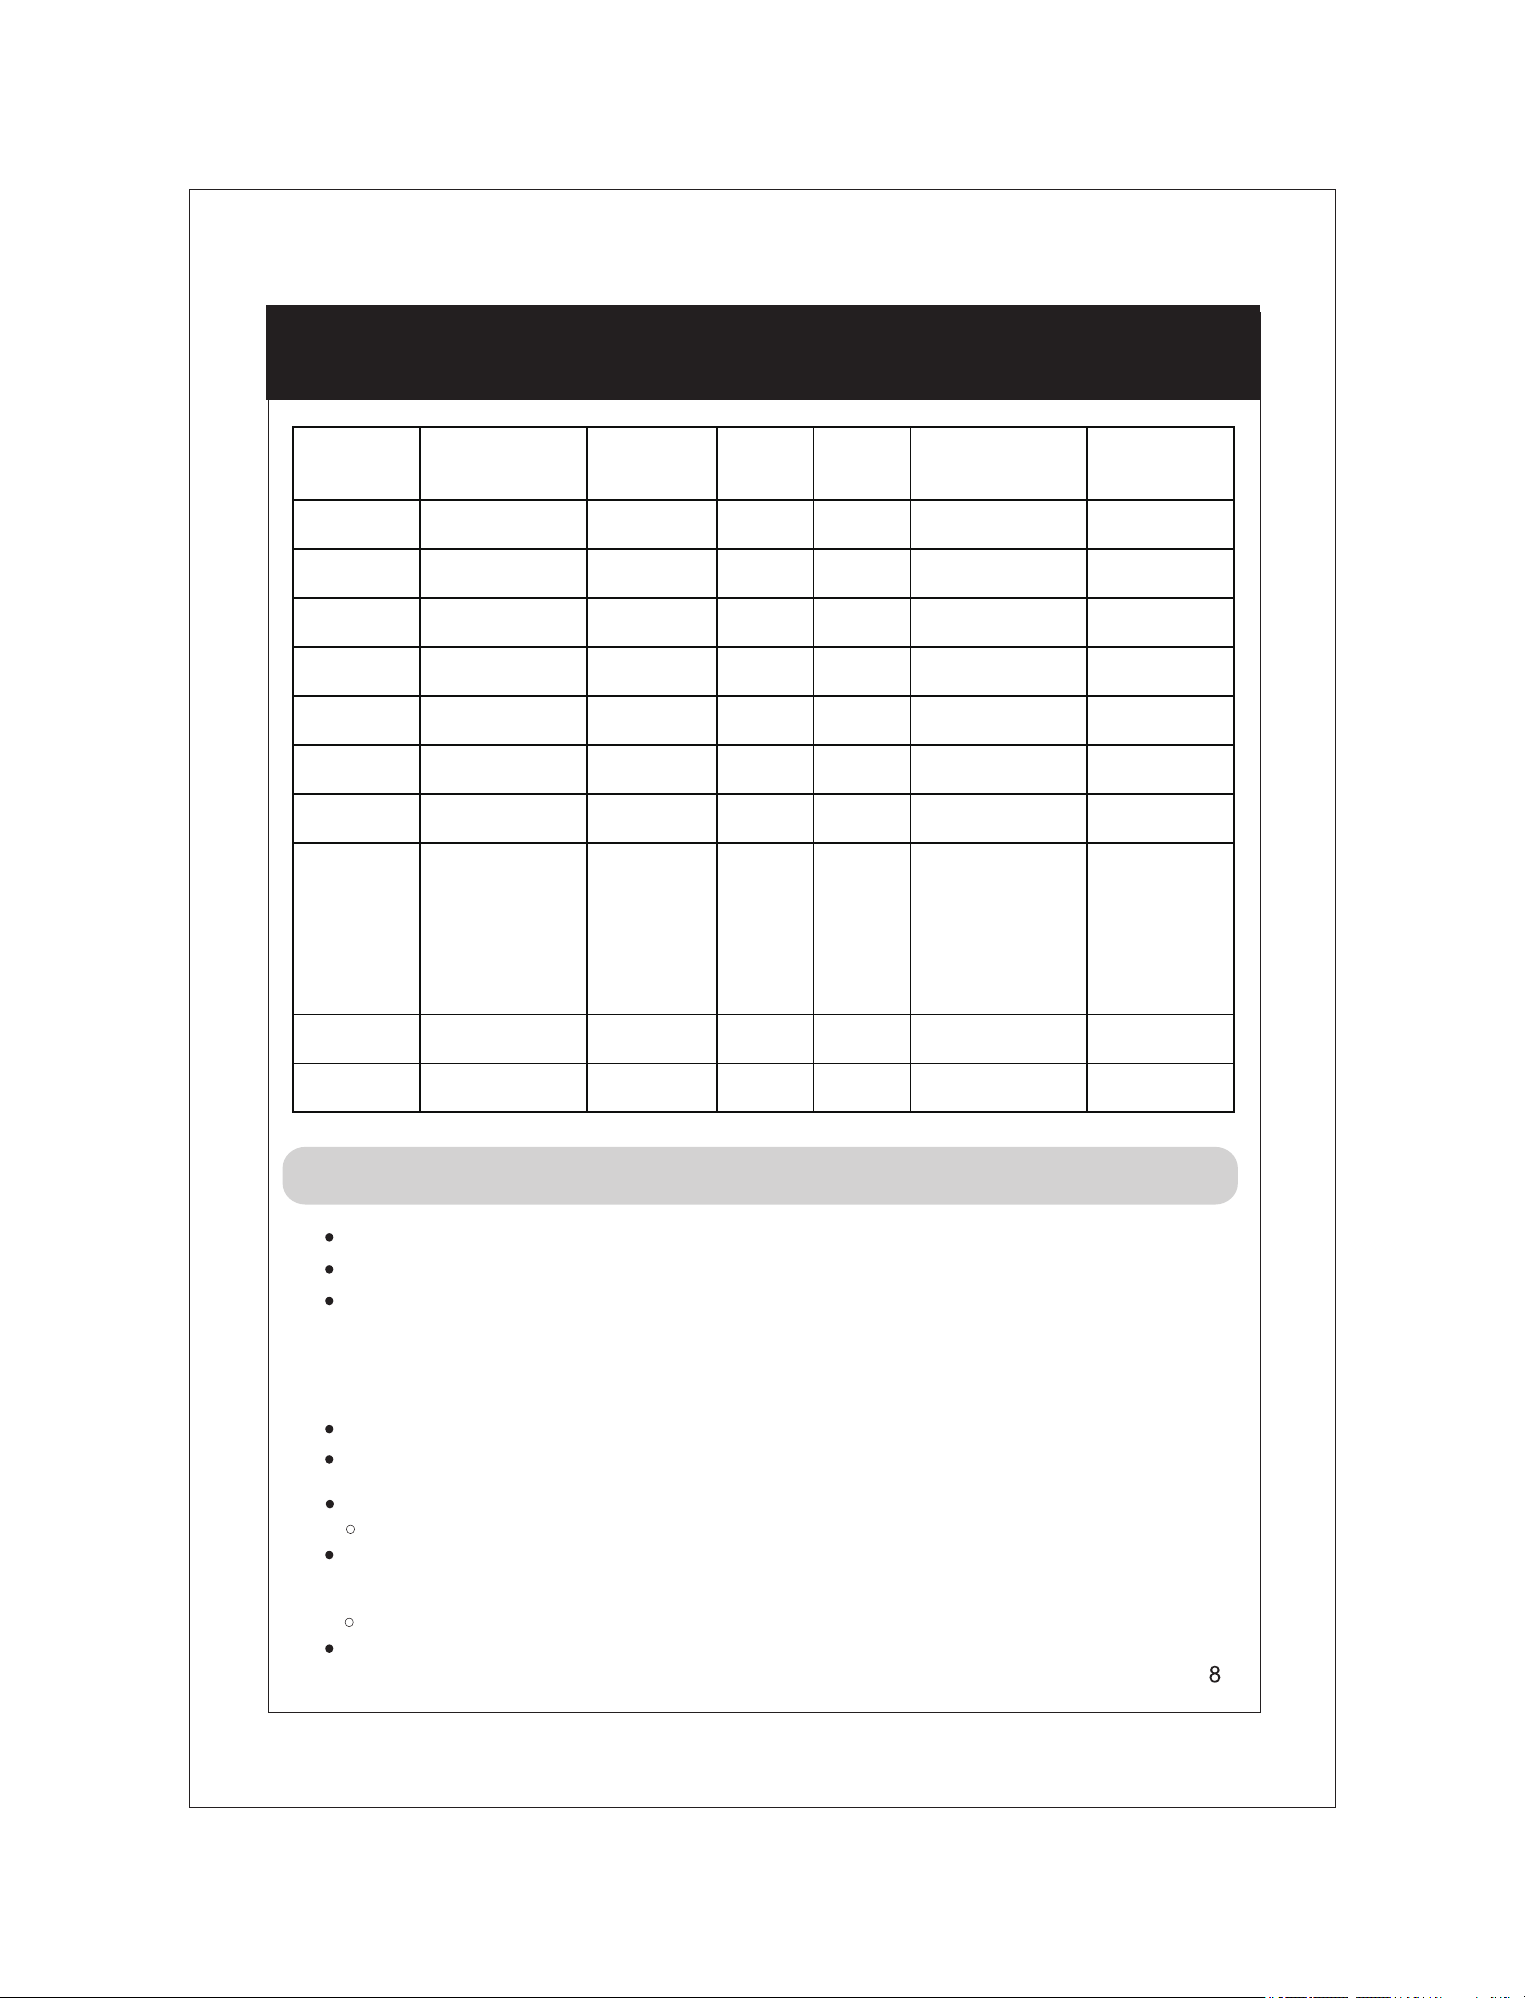
Functions
Funct ion
White rice
Brown rice
Porridge
Mult -graini
Soup
Quick cook
Slow cook
Steam
Cake
Yogurt
Default Time
N/A
N/A
N/A
N/A
1 and half hours
2 hours
4 hours
15 mins
45 mins
8 hours
Time Range
N/A N/A
N/A
N/A
N/A
N/A
N/AN/A
N/A
N/A
N/A
N/A
1-2 hours
1-4 hours
2-6 hours
5 min-1 hour
45 min-2 hours
5-12 hours
Increment
(Hour)
1
1
1
11
1
1
USE SUPPLIED MEASURING CUP ONLY.
Add rice to the pan using the supplied measuring cup.
For each cup of rice added to the pan, add water to the corresponding number marked on the
inside of the pan.
White Rice
Example: After adding 4 cups of rice to the pan, fill with water level to the 4 CUP mark on the
inside of the pan.
DO NOT FILL PAN ABOVE THE 6 CUP LEVEL
Close lid and press “ MENU” button to highlight “WHITE RICE” on the LED display.
Press “ START”
Indicator light will flash in a clockwise direction indicating cooking has begun
When cooking nears completion, the display will indicate 15 minutes and count down to
“0000” at which time the multicooker will automatically switch to the keep warm mode.
The display will now indicate the amount of time the unit has been in the keep warm mode.
Do not keep rice warm for more than 4 hours.
.
countdown t ime
appears on display:
Increment
(min)
10
10
10
5
30
Is only displayed for the
last 15 minutes.
Is only displayed for the
last 15 minutes.
Is displayed as soon as
cooking begins.
Is only displayed for the
last 20 minutes.
Is displayed as soon as
cooking begins.
Is only displayed for the
last 11 minutes.
Is displayed as soon as
cooking begins.
Is displayed clockwise
before boiling,
two beeps
are heard after boiling,
then the 15 minute
countdown appears.
Is displayed as soon as
cooking begins.
Is displayed as soon as
cooking begins.
Switch to keep warm
after program
completed?
Yes
Yes
Yes
Yes
Yes
Yes
Yes
Yes
No
No
.
Brown Rice
USE SUPPLIED MEASURING CUP ONLY.
Add rice to the pan using the supplied measuring cup.
For each cup of rice added to the pan, add water to the corresponding number marked on the
inside of the pan.
Example: After adding 4 cups of rice to the pan, fill with water level to the 4 CUP mark on the
inside of the pan.
DO NOT FILL PAN ABOVE THE 6 CUP LEVEL
Close lid and press “ MENU” button to highlight “BROWN RICE” on the LED display.
Press “ START ”.
Indicator light will flash in a clockwise direction indicating cooking has begun.
The display will now indicate the amount of time the unit has been in the keep warm mode.
Do not keep rice warm for more than 4 hours.
Porridge
Use supplied measuring cup to measure BOTH rice and water.
Example, if you
add
1 cup of rice to the pan, you will need to 7 cups of water the
pan (1:7 ratio) .
Please note that the MAXIMUM amount of rice that can be used is 1 cup.
Close lid and press “ MENU” button to highlight “PORRIDGE” on the LED display.
The indicator LED will flash “ 01:30 ”.
Press “ START ”.
When cooking is completed, the will indicate to “0000” at which t me the multicooker
will automatically switch to the keep warm mode.
The display will now indicate the amount of time the unit has been in the keep warm mode.
Mult -grain
i
USE SUPPLIED MEASURING CUP ONLY.
Add rice to the pan using the supplied measuring cup.
For each cup of rice added to the pan, add water to the corresponding number marked on the
inside of the pan.
Example: After adding 4 cups of rice to the pan, fill with water level to the 4 CUP mark on the
inside of the pan.
DO NOT FILL PAN ABOVE THE 6 CUP LEVEL
Close lid and press “ MENU” button to highlight “MULTI-GRAIN” on the LED display.
Press “ START ”.
Indicator light will flash in a clockwise direction indicating cooking has begun.
.
“0000” at which time the multicooker will automatically switch to the keep warm mode.
When cooking nears completion, the display will indicate 15 minutes and count down to
display
to
add
i
When cooking nears completion, the display will indicate 20 minutes and count down to
“0000” at which time the multicooker will automatically switch to the keep warm mode.
The display will now indicate the amount of time the unit has been in the keep warm mode.
Do not keep rice warm for more than 4 hours.
Soup
Place food
into the pan after washing,
add water to the corresponding
number marked on the
please note that the MAXIMUM amount
of water should not go over the
1.08L scale level
marked in the pan.
Close lid and press “ MENU” button to highlight “ SOUP” on the LED display.
The indicator LED will flash “ 02:00.”
Press “ START”.
When cooking is completed, the display will indicate to “0000” at which time the
multicooker will automatically switch to the keep warm mode.
The display will now indicate the amount of time the unit has been in the keep warm mode.
Quick cook/Slow cook
The Quick cook mode is normally used to cook rice and shortens the amount of time needed to
cook rice.
Press “ MENU ” button to highlight “ QUICK COOK ” on the LED display, indicator light will flash in a
clockwise direction, press START to start cooking.
" "
When cooking nears completion, the display will indicate 11 minutes and count down to “0000”
at which time the multicooker will automatically switch to the keep warm mode.
The Slow cook mode is used for slow cooking.
Press “ MENU ” button to highlight “ SLOW COOK” on the LED display, the indicator LED will flash
“04:00” hours.
Press “START ”.
When cooking is completed, the display will indicate to “ 0000 ” at which t me the multicooker
i
will automatically switch to the keep warm mode.
Steam
With the measuring cup provided, put 4 cups of water into the pan.
Place the steaming basket into the pan.
Place the pan into the body.
Place food into the steaming basket. (Place the food in separate dish if required).
Do not put too much food as the outer lid may not be closed properly.
the outer lid, press the “ MENU” button to highlight “ STEAM ” on the LED display, indicator light
will flash in a direction, press START to start cooking.
Indicator light will flash in a clockwise direction before boiling, beeps are heard
af er
t
boiling and then the 15 minute countdown appears.
When cooking is completed, the display will indicate to “0000” at which t me thei
multicooker will automat cally switch to the keep warm mode.
clockwiVe
i
inside of the pan
,
Close
The display will now indicate the amount of time the unit has been in the keep warm mode.
Take the food out, followed the steaming basket, and finally pour out the water from the pan.
Cake
When baking a cake in the multicooker, please note that the MAXIMUM amount of cake powder
that can be used is 350 g .
Follow package directions. This generally involves mixing wet and dry ingredients
separately, then combining them.
Spray or coat pan (if desired) as it will help prevent the cake from sticking.
Add batter to the pan and insert pan into the multicooker.
Close lid and press “ MENU ” button repeatedly to highlight “ CAKE ” on the LED display.
The display LED will flash “00:45”.
Press “START”.
When baking is completed, you can remove the cake from the multicooker and place
it on a wire rack to cool.
Most cake mix packages contain between 450 to 550 g or dry ingredients. A suggestion
here would be to mix the entire package of cake mix and use 1/2 of the batter, and bake two cakes
which can be used to make a layer cake.
Yogurt
Heat milk to 190ºF (88°C) or above (Do not boil).
Stir while heating.
Cool scalded milk to 100-105°F (38-41°C).
Measure 500-1000 g of pure milk, well mix with 1 g yogurt starter.
Place the milk with yogurt starter mixture into the pan and insert the pan into the multicooker.
Closed the lid and press “MENU” button repeatedly to highlight
8 hours (cooking time) will flash.
“YOGURT” on the LED display.
Press “START”.
Immediately after the 8 hours, transfer yogurt inter a clean and sanitized container, cover and
refrigerate.
Keep covered, refrigerate for up to 5 days.
***
Reheat/Keep warm
Reheat mode is used for reheating food. Press the REHEAT button in the standby mode or the function selecting
mode, and the buzzer will sound "Beep" ,
then press “START” button to enter the operation of the reheat function, indicator
light will flash in a clockwise direction indicating cooking has begun.
When the preset temperature is reached, a 12-minute countdown will be displayed and count down to “0000” at
which t me the multicooker will automatically switch to the keep warm mode.
i
Keep warm mode is use for warming food.
When programs are completed, the cooker will automatically switch to keep warm except with yogurt and cake
funct on
i
In standby mode or function selecting mode, press the "KEEP WARM" button, and the buzzer will make a "Beep" sound,
then press “ START ” button to enter the keep warm function. The display will show "0000" and start the timing in hours.
When "0001-0012" is displayed, the maximum "KEEP WARM" time is 12 hours.
Note: In addition, in the "CAKE" and "YOGURT" functions, the KEEP WARM mode will not be activated after cooking is
completed, but the cooker will switch directly to standby mode. Other functions will switch to KEEP WARM once cooking
is completed.

Cleaning and maintenance
CAUTION:
%HIRUHFOHDQLQJDQGPDLQWHQDQFHSOHDVHUHPRYHWKHSOXJIURPWKHRXWOHWILUVW'RQRWFOHDQWKHDSSOLDQFHERG\
XQWLOLWFRROV
GRZQ
:KHQFOHDQLQJWKHDSSOLDQFHERG\ZLSHGRZQZLWKDGDPSFORWK'RQRWLPPHUVHLWLQWRZDWHURUFOHDQLWZLWK
ODFTXHUWKLQQHUDOFRKROFOHDQLQJSRZGHURUKDUGEUXVKHWF
'RQRWXVHGLVKZDVKHU
Steam vent unpacking and assembling instruction.
6WHDP&DS
9DOYHKROGHU
CAUTION
7KHVWHDPYHQWDQGLQQHUOLGPD\
EHUHPRYHGIURPWKHDSSOLDQFH
&OHDQLWDIWHUHYHU\XVH
'RQRWSODFHLWLQDGLVKZDVKHU
2WKHUZLVHWKHPDWHULDOPD\GHIRUP
RUFUDFN
:KHQLQVWDOOLQJLWDIWHUFOHDQLQJ
SOHDVHPDNHVXUHWKDWWKHSDUWV
KDYHEHHQLQVWDOOHGSURSHUO\
Detachable inner lid
Pan
&OHDQZLWKGLOXWHGGHWHUJHQWDQGVRIWVSRQJH:LSHRII
DQ\ZDWHURQWKHSDQ
&RORUFKDQJHVRUVWULSHVPD\DSSHDURQWKHIOXRULGL]HG
FRDWLQJVXUIDFHZKLFKZLOOQRWDIIHFWKXPDQKHDOWKRU
QRUPDOIXQFWLRQVRIWKHDSSOLDQFH
'HSHQGLQJRQWKHIUHTXHQF\RIXVHUXEELQJWUDFHV
PD\DSSHDURQWKHRXWVLGHRIWKHSDQZKLFKZLOOQRW
DIIHFWWKHSHUIRUPDQFHRIWKHDSSOLDQFH
Temperature sensor
Cast heater
,IWKHUHLVDQ\GHEULVDGKHULQJWRVXFKSDUWV
JHQWO\VFUXELWDZD\ZLWKDQRQPHWDOOLF
VFUXEELQJSDGRUGU\FORWK
Accessories
&OHDQZLWKGLOXWHGGHWHUJHQWDQGVRIWVSRQJH
5LFHVFRRS
0HDVXULQJFXS
6WHDPLQJ
%DVNHW
①
②
$WWDFKWKH9DOYH+ROGHUDQGWXUQ
FORFNZLVHXQWLOLWDOLJQVZLWK6WHDP
&DSWULDQJOHPDUN
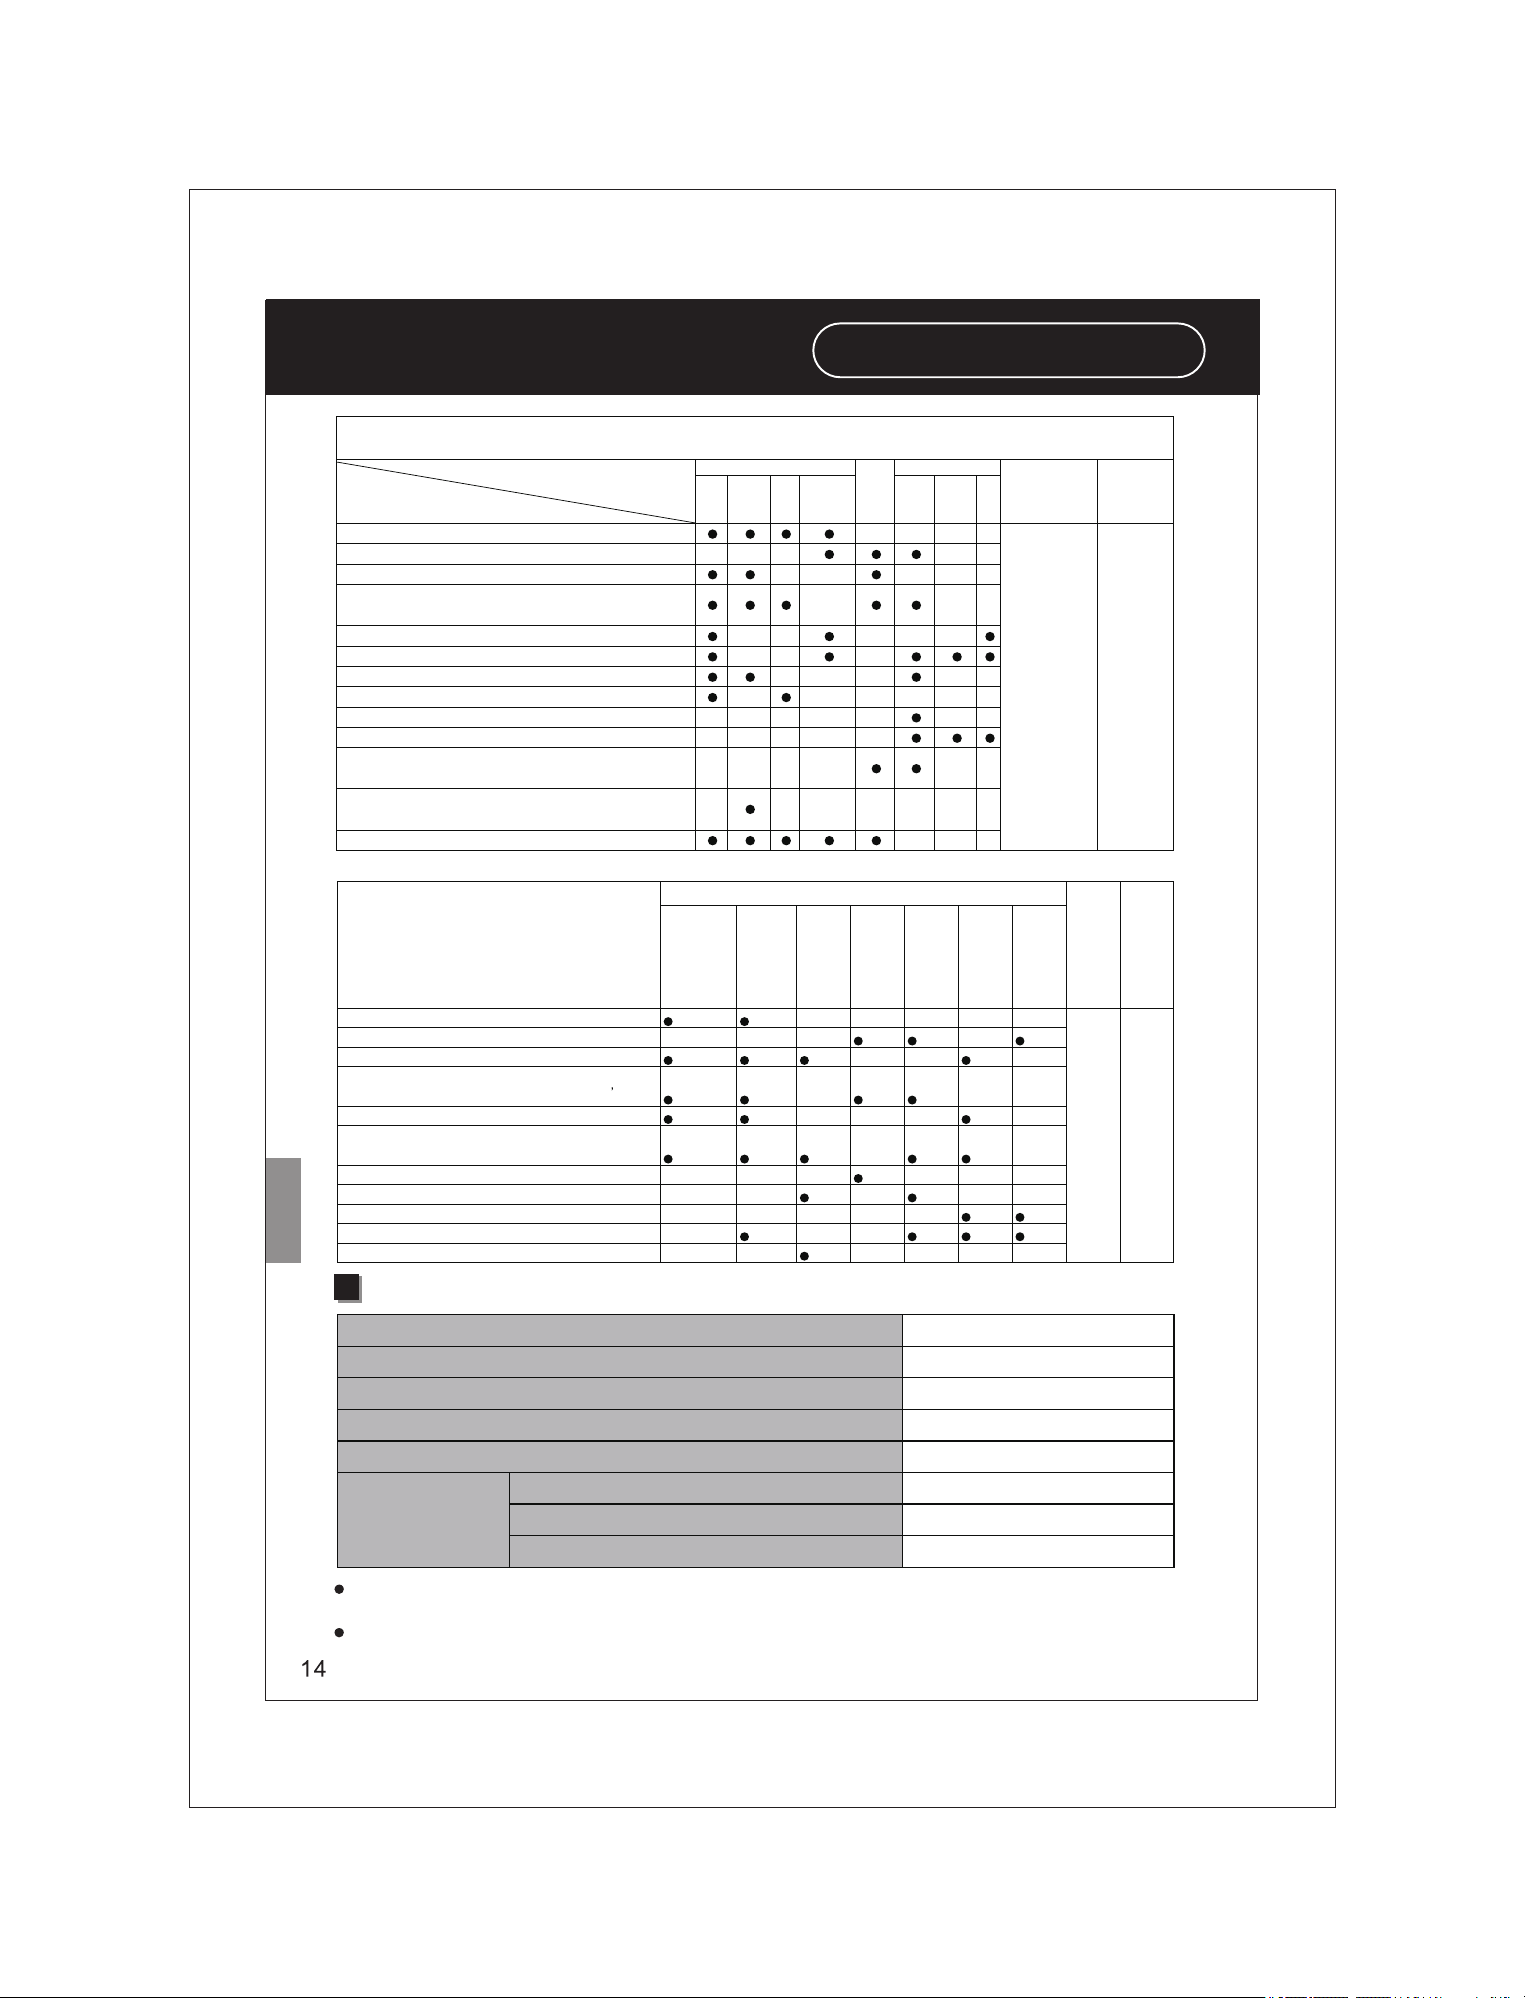
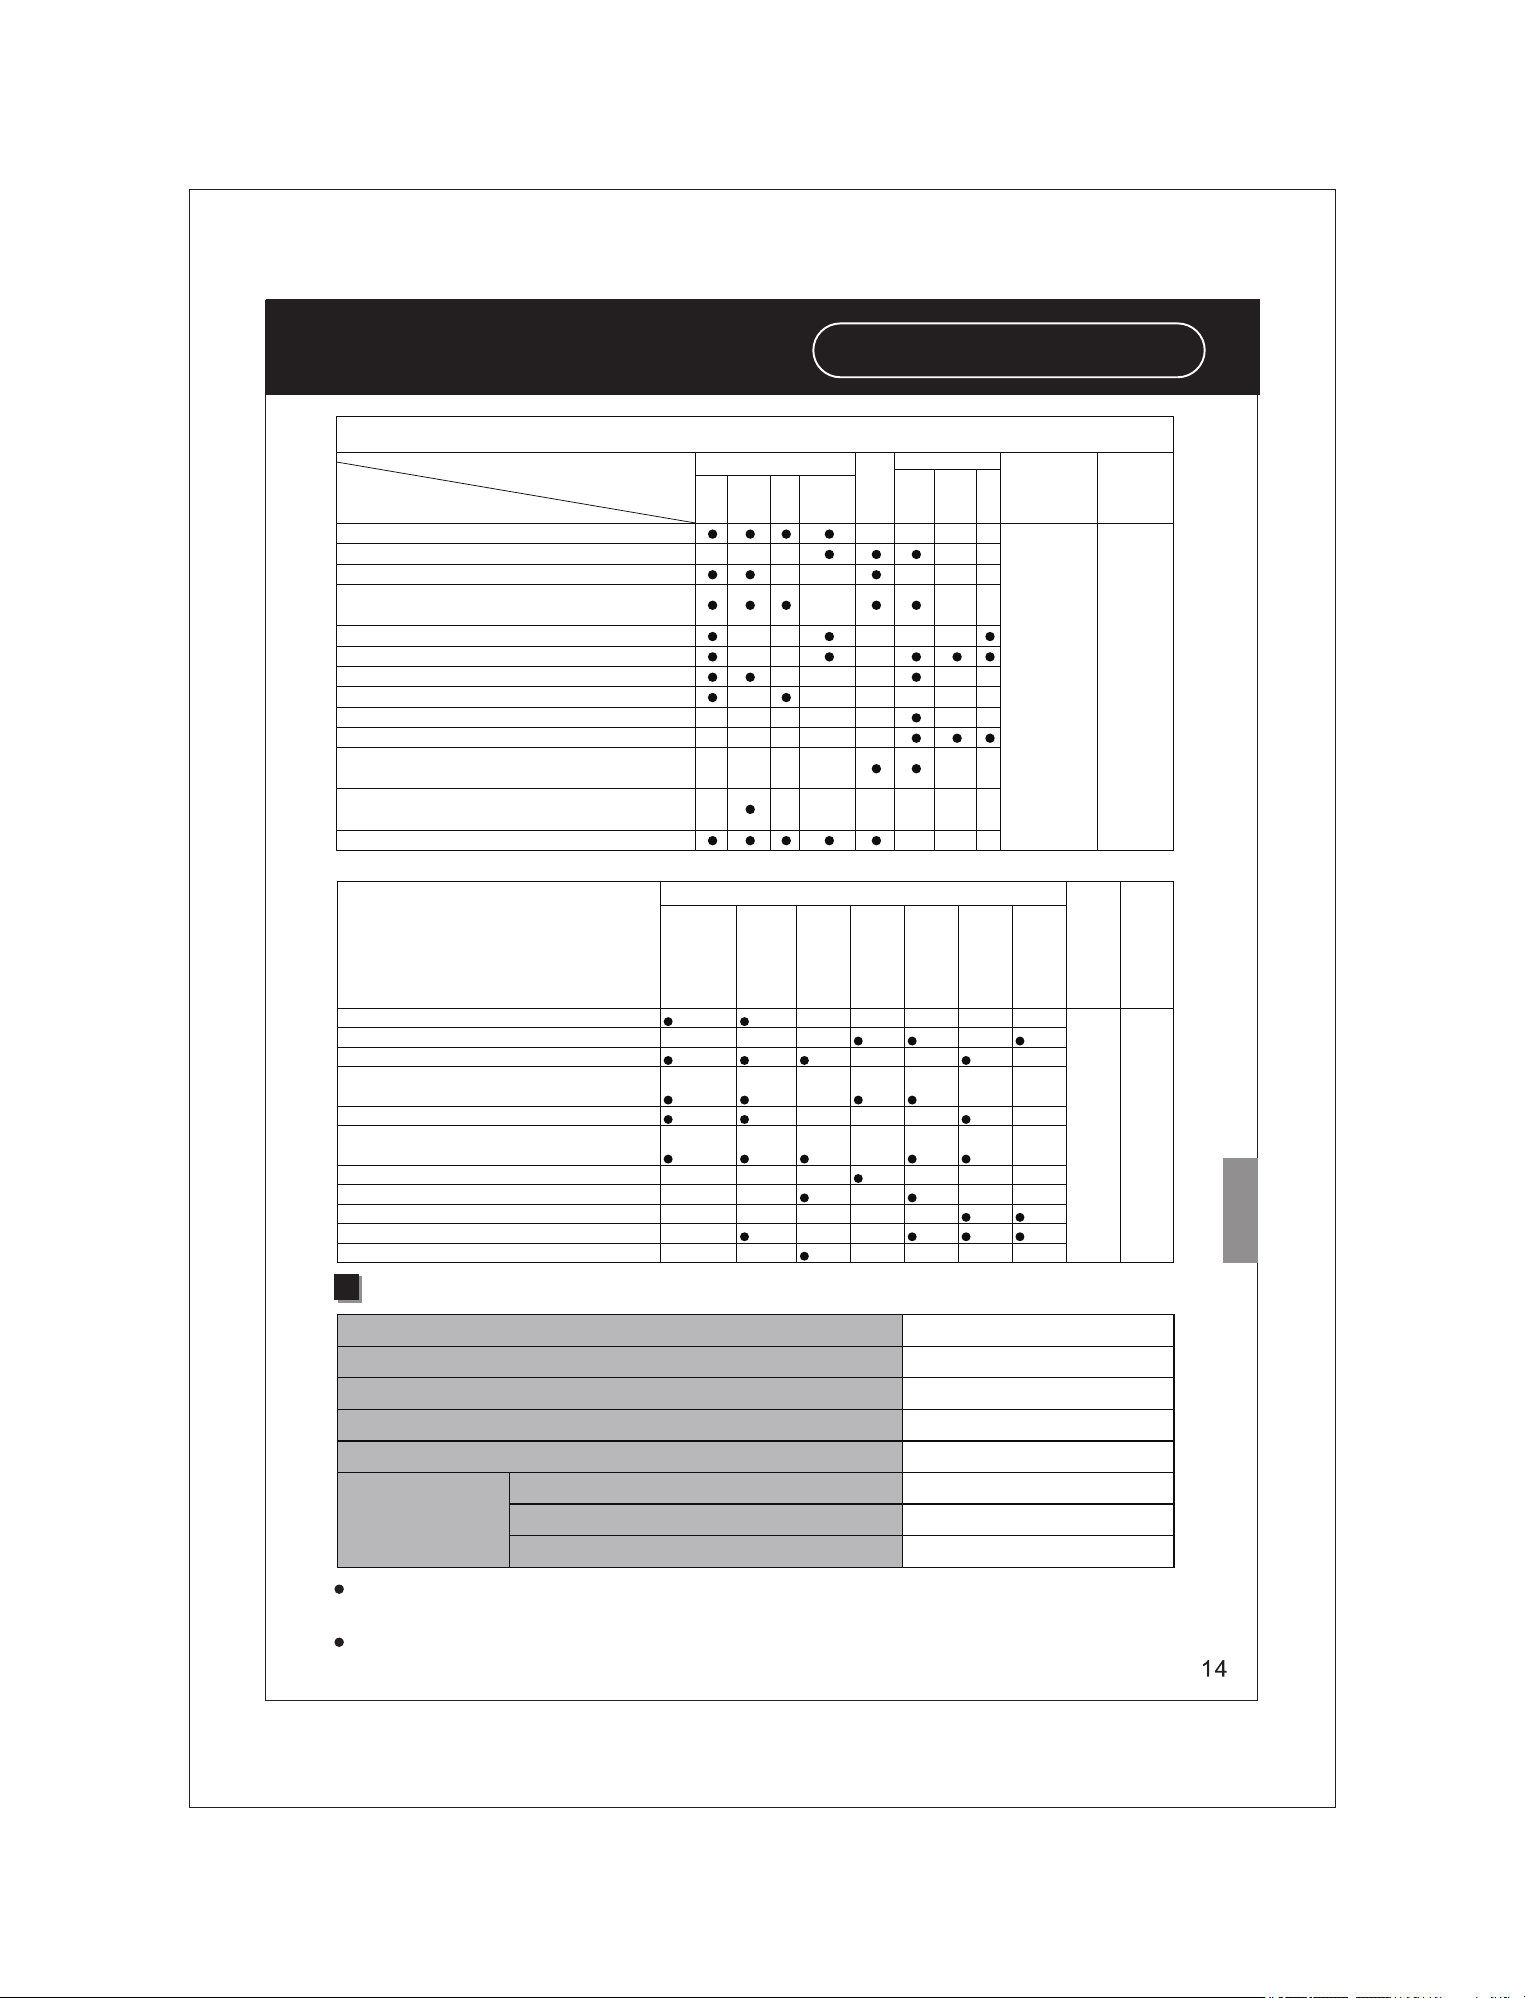
Troubleshooting
Please
check
the
following
items
Rice
Troubleshooting
In the following events
Items for checking
Incorrect rice quantity or water quantity
Rice is not fully washed
The bottom of pan is uneven
Foreign matter or debris in between the pan, cast heater or
temperature sensor
The outer lid is not correctly closed
The detachable inner lid is not correctly installed
Grease is added while cooking rice
After cooking is finished, the rice is not fluffed
The rice paddle is left in the pan while the rice is kept warm
The cold rice is kept warm
The outer lid is not firmly closed
The pan is not cleaned
While in cooking mode, the plug is pulled out or the off button is
touched
Wrong button is pressed
Strange
sounds
occurs
Sound occurs because of water that has stuck to
pan
Pressing
buttons
does not
work
The plug is pulled out or loosely connected to the power
outlet
Rice kept warm
Dry
Color
change
Strange
smell
Rice crust
scorched
Rice
Rice
water
overflow
Softer
Half-
cooked
Harder
Cake/Bread Baking
Details
Too much dough amount
Not enough mixing before baking
Used with incompatible cake mix
Used with cake mix that contains too much chocolate, sugar
or fruit ingredients
Outer lid not closed while cooking
Foreign matter or debris in between the pan, cast heater or
temperature sensor
Not enough butter or cooking oil at the bottom of the pan
Cake/Bread left in the pan too long
Inadequate mixing or mixed too long
Wrong ingredient quantity
Too much cake mix/batter
Baking Cake/Bread problems
Strange sounds occurs
Sound occurs because of water that has stuck to
pan
No power
Pull out plug and check the socket
Crumbly
Not fluffed
Bottom of the
Cake
/
/
/
/
/
/
Bread burnt
The Cake
Bread
sticks to the base
of pan
Wet Cake
Bread
Undercooked
Cake
Bread
Undone Cake
Bread
Specifications
Model No.
SR-ZC123L/SR-ZC123N
Power
rated frequency
120 VAC, 60 Hz, 650 W
Rated power(rice cooking)
650 W
Power cord length
(approx.)
(in)
29.52
Product weight
(approx.)
(lbs)
Dimensions
7.27
(approx.)
(in)
Width
(in)
Length
(in)
Height
(in)
10.43
13.54
8.66
For power cord replacement and product repair, please contact a Panasonic authorized
service center.
The design and specifcations are intended to change without prior notice.
Support
Panasonic Canada Inc.
5770 Ambler Drive, Mississauga, Ontario L4W 2T3
PANASONIC PRODUCT - LIMITED WARRANTY
EXCHANGE PROGRAM
Panasonic Canada Inc. warrants this product to be free from defects in material and workmanship under normal use
and for a period as stated below from the date of original purchase agrees to, at its option either (a) repair your product
with new or refurbished parts, (b) replace it with a new or a refurbished equivalent value product, or (c) refund your
purchase price. The decision to repair, replace or refund will be made by Panasonic Canada Inc.
Electric Rice Cooker
One (1) year
This warranty is given only to the original purchaser, or the person for whom it was purchased as a gift, of a Panasonic brand product
mentioned above sold by an authorized Panasonic dealer in Canada and purchased and used in Canada, which product was not sold
as is
and which product was delivered to you in new condition in the original packaging.
IN ORDER TO BE ELIGIBLE TO RECEIVE WARRANTY SERVICE HEREUNDER, A PURCHASE RECEIPT OR
OTHER PROOF OF DATE OF ORIGINAL PURCHASE,
SHOWING AMOUNT PAID AND PLACE OF PURCHASE IS
REQUIRED
LIMITATIONS AND EXCLUSIONS
This warranty ONLY COVERS failures due to defects in materials or workmanship, and DOES NOT COVER normal
wear and tear or cosmetic damage. The warranty ALSO DOES NOT COVER damages which occurred in shipment, or
failures which are caused by products not supplied by Panasonic Canada Inc., or failures which result from accidents,
misuse,abuse,neglect,mishandling,misapplication,alteration,faulty installation,set-up adjustments,misadjustment
of consumer controls, improper maintenance, power line surge, lightning damage, modification, introduction of sand,
humidity or liquids, commercial use such as hotel, office, restaurant, or other business or rental use of the product, or
service by anyone other than a Authorized Servicer, or damage that is attributable to acts of God.
THIS EXPRESS, LIMITED WARRANTY IS IN LIEU OF ALL OTHER WARRANTIES, EXPRESS OR IMPLIED,
INCLUDING ANY IMPLIED WARRANTIES OF MERCHANTABILITY AND FITNESS FOR A PARTICULAR
PURPOSE. IN NO EVENT WILL PANASONIC CANADA INC. BE LIABLE FOR ANY SPECIAL, INDIRECT OR
CONSEQUENTIAL DAMAGES RESULTING FROM THE USE OF THIS PRODUCT OR ARISING OUT OF ANY
BREACH OF ANY EXPRESS OR IMPLIED WARRANTY.
(
As examples, this warranty excludes damagesfor lost time, travel to and
from the Authorized Servicer, loss of or damage to media or images,
data or other memory or recorded content. This list of items is not exhaustive,
but for illustration only.)
In certain instances, some jurisdictions do not allow the exclusion or limitation of incidental or consequential
damages, or the exclusion of implied warranties, so the above limitations and exclusions may not be applicable.
This warranty gives you specific legal rights and you may have other rights which vary depending on your province
or territory.
CONTACT INFORMATION
For product information and operation assistance, please visit our Support page:
www.panasonic.ca/english/support
For defective product exchange within the warranty period, please contact the original dealer.
IMPORTANTES MESURES DE SÉCURITÉ
Lors de l’utilisation de tout appareil électrique, il est toujours recommandé de prendre certaines
précautions, dont les suivantes :
Lire toutes les instructions.
Éviter de toucher aux surfaces chaudes. Toujours utiliser les poignées ou les anses.
Afin de prévenir tout risque de choc électrique, ne pas immerger les cordons, les fiches
ou l’appareil dans l’eau ou tout autre liquide, à l’exception du panier de cuisson.
Ne jamais laisser des enfants utiliser I’appareil sans surveillance.
Après usage et avant le nettoyage, toujours débrancher I’appareil. Laisser refroidir avant
de retirer des pièces ou de les remettre en place.
Ne jamais utiliser I’appareil si sa fiche ou son cordon sont endommagés ou après avoir
constaté une défectuosité ou des dommages. Le cas échéant, I’appareil doit être retourné
au centre de service le plus près pour vérification, réparation ou ajustement.
L’utilisation d’accessoires non recommandés par le fabricant peut représenter un risque de
dommages.
Ne pas utiliser I’appareil à I’extérieur.
Ne pas laisser le cordon pendre d’une table ou d’un comptoir, ni le mettre en contact avec
une surface chaude.
Ne pas placer I’appareil sur le dessus ou à proximité d’un appareil de chauffage, ni dans un
four chaud.
chaude ou tout autre liquide chaud.
S’assurer d’être extrêmement prudent lors du déplacement d’un appareil contenant de I’huile
Toujours brancher le cordon d’alimentation à I’appareil avant d’en brancher la fiche dans une
prise secteur. Avant de débrancher, couper le contact, puis retirer la fiche de la prise secteur.
N’utiliser I’appareil qu’aux fins recommandées
Cet appareil est conçu seulement pour I’utilisation domestique
Jeter le papier placé sur la plaque chauffante avant d’utiliser ce produit.
Ce papier sert uniquement à l’expédition.
Conserver ces instructions
Attention
Un cordon d’alimentation court (ou cordon amovible) est fourni pour réduire le risque
d’emmêlement et de trébuchement.
Bien arranger le cordon d’alimentation sur la table et le garder hors de la portée des
enfants.
Ne pas utiliser de rallonge électrique avec cet appareil
INTERFÉRENCES
Ce cuiseur de riz multifonctionnel comporte des circuits numériques et peut émettre de I’énergie
de fréquence radio pouvant causer des interférences nuisibles aux communications radio émises
par certains téléviseurs ou radios. Pour vérifier la présence d’interférences, mettez le cuiseur de
riz multifonctionnel hors marche puis en marche. S’il y a interférence, nous vous encourageons à
corriger la situation en prenant I’une ou plusieurs des mesures suivantes :
Réorientez ou repositionnez I’antenne de réception.
Augmentez la distance séparant le cuiseur de riz multifonctionnel du récepteur.
Branchez le cuiseur de riz multifonctionnel sur un circuit électrique différent de
celui branché au récepteur.
Consultez le détaillant ou un technicien spécialisé en radio/télévision pour obtenir de I’aide.
15.
Précautions à prendre
À suivre obligatorement!
Pour éviter les accidents ou les blessures aux utilisateurs ou autres personnes et les dommages
matériels, veuillez suivre les instructions ci-dessous.
Les tableaux ci-dessous indiquent les niveaux de dommages causés par une utilisation incorrecte.
AVERTISSEMENT :
Indique des
blessures graves
ou mortelles.
MISE EN GARDE :
Indique un risque
de blessures ou de
dommages matériels.
Les symboles sont classés et expliqués comme suit :
Ces symboles indiquent
une interdiction.
Ce symbole indique une action qui
doit être effectuée.
AVERTISSEMENT
N‘utilisez pas I’appareil si
le cordon d’alimentation
ou la fiche sont endommagés
ou branchés incorrectement
à la prise de courant.
(Cela pourrait causer un incendie
ou un choc électrique.)
N’introduisez pas d’objet
dans I’évent ou I’interstice.
Plus particulièrement des
objets métalliques tels que
des broches ou des câbles.
(Risque de choc électrique
ou de dysfonctionnement.)
Cet appareil ne doit pas être
utilisé par des personnes
(incluant les enfants)
inexpérimentées ou avec
capacités physiques,
sensorielles ou mentales
réduites, à moins d’avoir été
supervisées et préparées par
une personne responsable
de leur sécurité. Surveillez
les enfants pour vous assurer
qu’ils ne jouent pas avec
I’appareil.
(Ils risqueraient de se brûler
ou de se blesser.)
N’immergez pas I’appareil
dans I’eau et ne I’éclaboussez
pas.
(Risque d’incendie provoqué par un
court-circuit ou un choc électrique.)
Si de I’eau s’introduit à I’intérieur de
I’appareil, communiquez avec un
détaillant autorisé.
Utilisez une prise de courant
d’au moins 15 ampères délivrant
un courant électrique alternatif
de 120 volts.
Ne branchez pas plusieurs
appareils dans la même prise
de courant.
Ne modifiez, ne démontez et
ne réparez pas cet appareil.
(Cela pourrait entraîner un
incendie, un choc électrique
ou une blessure.)
Veuillez vous renseigner en
magasin ou auprès du service
de réparation d’un détaillant
autorisé.
Insérez fermement la fiche côté
appareil et la fiche d’alimentation.
(Sinon, il pourrait y avoir un
risque de choc électrique ou
d’incendie causé par la chaleur
générée autour des fiches.)
(N’utilisez pas une fiche d’alimentation
endommagée ou une prise de courant
en mauvais état.
Nettoyez la fiche d’alimentation
régulièrement.
(Une fiche d’alimentation
comportant des saletés
pourrait causer une isolation
insuffisante en raison de
I’humidité et provoquer un
incendie.)
Débranchez la fiche d’alimentation
et essuyez-la avec un chiffon sec.
Cessez immédiatement d’utiliser I’appareil et débranchez la fiche
d’alimentation en cas d’anomalie ou de panne.
(Cela pourrait causer de la fumée, un incendie ou un choc électrique.)
La fiche et le cordon d’alimentation deviennent anormalement chauds.
Le cordon d’alimentation est endommagé ou une panne de courant survient
en cas de contact avec celui-ci.
Le boîtier de I’appareil est déformé ou anormalement chaud.
L’appareil produit de la fumée ou une odeur de brûlé.
La plaque chauffante est tordue ou le panier de cuisson est déformé.
(exemples
d’anomalies
ou de
pannes)
Communiquez immédiatement avec un centre de service autorisé par Panasonic pour faire examiner et réparer le produit.
N’endommagez pas le cordon
d’alimentation ou la fiche
d’alimentation.
Les actions suivantes sont
strictement interdites :
(Cela pourrait entraîner un
choc électrique.)
Modifier le cordon, le placer à proximité
des éléments chauffants, le plier, le tordre,
le tirer, le placer sous des objets lourds et
I’enrouler (cela pourrait causer un choc
électrique ou un incendie provoqué par un
court-circuit.)
Si le cordon d’alimentation est endommagé,
il doit être remplacé par un raccord
d’alimentation ou un cordon spécial
disponible auprès du fabricant ou son
représentant.
Ne branchez et ne débranchez
pas la fiche d’alimentation si vos
mains sont humides.
N’approchez pas votre visage de
I’évent à vapeur et ne touchez
pas à celui-ci. Tenez I’évent à
vapeur hors de la portée des
enfants.
Évent à vapeur
(Risque de brûlure.)
À suivre obligatorement!
Précautions à prendre
MISE EN GARDE!
N’utilisez pas I’appareil dans les endroits suivants.
Là où il pourrait être éclaboussé par de I’eau ou
à proximité d’une source de chaleur. Cela pourrait
entraîner un incendie provoqué par un court-circuit
ou un choc électrique.
Sur une surface irrégulière, un tapis, une nappe
(en plastique d’éthylène) ou tout autre objet ne
résistant pas à la chaleur. (Cela pourrait entraîner
une blessure, une brûlure ou un incendie.)
Ne touchez pas les éléments
chauffants pendant l’utilisation
de l’appareil ou après la
cuisson.
Plus particulièrement la plaque
chauffante (cela pourrait causer
des brûlures.)
N’exposez pas la fiche d’alimentation à la vapeur.
N’exposez pas la fiche d’alimentation à la vapeur et ne laissez
pas de I’eau entrer en contact avec la fiche. (Cela pourrait
entraîner un incendie provoqué par un court-circuit.)
Si vous utilisez un meuble équipé d’une table coulissante,
placez I’appareil à un endroit où la fiche d’alimentation
n’est pas exposée à la vapeur.
Ne touchez pas au
bouton d’ouverture
pendant que vous
déplacez I’appareil.
(Cela pourrait provoquer
I’ouverture du couvercle
extérieur et causer des
brûlures.)
Tenez fermement la fiche de l’appareil
ou la fiche d’alimentation lorsque vous
la débranchez.
(Sinon, un court-circuit pourrait risquer
de provoquer un choc électrique ou un
incendie.)
N’utilisez pas un cordon
d’alimentation (pour fiche
de l’appareil et fiche
d’alimentation) qui n’est pas
conçu pour I’utilisation avec
cet appareil. De plus, ne les
transférez pas.
(Cela pourrait causer un choc
électrique, une fuite ou un incendie.)
N’ouvrez pas le couvercle
extérieur pendant la
cuisson.
(Cela pourrait causer des
brûlures.)
Débranchez la fiche d’alimentation
de la prise de courant lorsque vous
n’utilisez pas I’appareil.
(Sinon, un court-circuit résultant de
la détérioration de I’isolation pourrait
risquer de provoquer un choc
électrique ou un incendie.)
La plaque chauffante peut demeurer
chaude après utilisation.
Veuillez laisser I’appareil
refroidir avant de le nettoyer.
N'utilisez pas un panier de
cuisson autre que celui
spécifié.
(Cela pourrait causer
des brûlures ou des
blessures provoquées
par une surchauffe ou
une défaillance.)
Précautions d’emploi
Versez les quantités de riz et d’eau
appropriées, puis sélectionnez les
fonctions en respectant les instructions
du manuel d’utilisation. (Pour éviter le
débordement d’eau de riz, la cuisson
insuffisante du riz ou I’obtention d’un riz brûlé.)
Ne mettez pas les ingrédients à cuire
directement dans I’appareil sans y
avoir placé le panier de cuisson. Ne
faites rien cuire sans le panier de
cuisson. (Pour éviter que des impuretés
causent une défaillance.)
N’utilisez pas I’appareil sur un objet
sensible à la chaleur tel qu’un tapis,
un tapis chauffant électrique ou une
nappe (en plastique de vinyle), etc.
(Pour éviter une cuisson inadéquate ou
un incendie.)
Avant d’utiliser I’appareil, retirez le
plastique de protection du panier de
cuisson et le papier antiternissure
placé entre le panier de cuisson et le
dispositif chauffant. [Pour éviter une
cuisson inadéquate ou un incendie.]
Ne recouvrez pas le couvercle extérieur
avec un chiffon ou d’autres objets lorsque
I’appareil est en cours d’utilisation.
(Pour éviter toute déformation, décoloration du
couvercle extérieur ou défaillance.)
Évitez d’utiliser I’appareil dans
un endroit exposé à la lumière
directe du soleil. (Pour éviter
toute décoloration.)
Ne servez pas le riz avec un objet
métallique. (Pour éviter d’égratigner le
revêtement du panier de cuisson et
causer le décollement de ce dernier.)
Nettoyez toujours les corps étrangers tels que le riz
sur le panier de cuisson, la plaque chauffante et le
capteur de température.
Panier de
cuisson
Plaque chauffante
Capteur de température
Ne penchez ou ne
pas l'appareil.
En cas de débordement d’eau de riz
par I’évent à vapeur, débranchez
immédiatement la fiche
d’alimentation afin de couper
I’alimentation. Ne réutilisez pas
I’appareil avant d’avoir essuyé I’eau
de riz se trouvant sur la fiche
d’alimentation et la fiche du cuiseur
à I’aide d’un chiffon sec.
Cet appareil est conçu uniquement pour une
utilisation domestique. Ne I’utilisez pas pour
des usages commerciaux ou industriels, ni
pour des tâches autres que la cuisson.
Les pannes de courant survenant pendant
I’utilisation de I’appareil peuvent affecter le
résultat de la cuisson.
Toutes les pièces amovibles doivent être lavées avant I’utilisation initiale de I’appareil (afin de nettoyer les débris, I’huile de machine, etc.)
Avant le nettoyage,
mettez I’appareil hors
marche et débranchez
la fiche d’alimentation.
retournez
Utilisation
PRESET
Identification des pièces
Panneau de commandes
Pour sélectionner parmi les 10
programmes de cuisson : riz blanc/
riz brun/gruau/multigrain/
soupe/cuisson rapide/cuisson lente/
vapeur/gâteau/yogourt.
Une fois les programmes terminés,
le cuiseur passe automatiquement
en mode maintien au
chaud, sauf pour les fonctions de
yogourt et de gâteau.
Pour régler la durée
de cuisson.
Pour régler la durée de cuisson en heures.
Pour activer le programme
de cuisson sélectionné.
Pour annuler le programme de cuisson
sélectionné et resélectionner un
programme de cuisson.
Pour réchauffer les aliments.
Pour sélectionner parmi les sept
préréglages : riz blanc/riz brun/
gruau/multigrain/soupe/cuisson
rapide/vapeur.
Pour régler la durée de cuisson en minutes.
Vue d’ensemble de l’appareil
Couvercle externe
Couvercle intérieur amovible
Panier de cuisson
Touche de verrouillage
Panneau de commandes
Poignée
Boîtier
Cordon d’alimentation
Accessoires
Veuillez nettoyer les accessoires avant utilisation.
Cuillère
à riz (1)
Verre mesureur
(environ 180 ml) (1)
Panier
d’étuvage (1)
Préparatifs avant la cuisson du riz
Mesurez le riz à I’aide du verre mesureur fourni.
Le volume du verre mesureur est d’environ 180 ml (150 g).
Le résultat de la cuisson
peut être affecté
1
Lavez le riz jusqu’ à ce que I’eau devienne
relativement claire.
Lavez le riz rapidement avec une grande quantité d'eau et remuez le
riz égèrement pour le laver pendant que vous changez l'eau.
Répétez l'opération plusieurs fois (lavez le riz --> jetez l'eau), jusqu'à ce que l'eau
devienne relativement claire.
2
MISE EN GARDE :
Pour éviter d’égratigner le revêtement antiadhésif sur la surface du panier
de cuisson, ne lavez pas le riz dans le panier de cuisson.
Lavez bien le riz. Sinon, de la croûte risque de se former et le son de riz
résiduel pourrait affecter le goût du riz.
3
Versez le riz lavé dans le panier de cuisson.
Ajoutez de I’eau jusqu’au niveau requis et séchez I’extérieur du panier
de cuisson.
Lorsque vous ajoutez de I’eau, portez une attention particulière aux
échelles graduées des deux côtés et maintenez-les au même niveau.
Vous pouvez augmenter ou réduire les quantités d’eau ci-dessus selon
vos préférences personnelles.
Ex.
Lorsque la quantité de riz correspond
à trois verres mesureur, lavez le riz et
versez-le dans le panier de cuisson,
puis ajoutez de I’eau dans le panier
de cuisson jusqu’à ce que la surface
de I’eau atteigne le niveau « 4 ».
4
Placez le panier de cuisson dans le boîtier de
I’appareil et fermez le couvercle extérieur.
Pour que le fond du panier de cuisson puisse se fixer
correctement à la plaque chauffante, faites tourner le
panier de cuisson deux ou trois fois dans le sens indiqué
par la flèche.
Assurez-vous que I’évent à vapeur est correctement positionné.
Lorsque vous fermez le couvercle extérieur, assurez-vous qu’il produise un « clic ».
5
Branchez les fiches.
Branchez la fiche de l’appareil au boîtier en premier, puis la fiche
d’alimentation. Assurez-vous de brancher correctement les deux
fiches.
Boîtier
Fiche de
l’appareil
Fiche d’alimentation
Prise secteur
l
Utilisation
Fonctions
Fonctions
White rice
(Riz blanc)
Brown rice
(Riz brun)
Porridge
(Gruau)
Mult -grain
(Multigrain)
i
Soup (Soupe)
Quick cook
(Cuisson rapide)
Slow cook
(Cuisson lente)
Steam (Vapeur)
Cake (Gâteau)
Yogurt (Yogourt)
Durée par défaut
S.O.
S.O.
S.O.
S.O.
1,5 heure
2 heures
4 heures
15 min
45 min
8 heures
Plage temporelle
S.O. S.O.
S.O.
S.O.
S.O.
S.O.
S.O.S.O.
S.O.
S.O.
S.O.
S.O.
1 à 2 heures
1 à 4 heures
2 à 6 heures
5 min à 1 heure
45 min à 2 heures
5 à 12 heures
Échelon
(heure)
1
1
1
11
1
1
UTILISEZ SEULEMENT LE VERRE MESUREUR FOURNI.
Ajoutez du riz dans le panier de cuisson à l’aide du verre mesureur fourni.
Pour chaque verre de riz ajouté au panier de cuisson, ajoutez de l’eau jusqu’au
numéro correspondant indiqué à l’intérieur du panier.
Riz blanc
Exemple : après avoir ajouté 4 verres mesureur de riz dans le panier de cuisson,
versez de l’eau jusqu’à la mention « 4 CUP » (4 VERRES) indiquée à l’intérieur du panier de cuisson.
NE REMPLISSEZ PAS LE PANIER DE CUSSION AU-DESSUS DE LA MENTION 6.
Fermez le couvercle et appuyez sur le bouton « MENU » afin d’afficher « WHITE RICE »
(RIZ BLANC) à l’afficheur à DEL.
Appuyez sur « START » (DÉMARRER).
Les voyants clignotent dans le sens horaire indiquant que la cuisson a commencé.
Lorsque la cuisson est presque terminée, l’afficheur indique 15 minutes et effectue un
compte à rebours jusqu’à « 0000 ». Le cuiseur multifonctionnel passe ensuite automatiquement
en mode maintien au chaud.
L’afficheur indique maintenant la durée du maintien au chaud.
Ne gardez pas le riz au chaud plus de 4 heures.
Affichage du compte
à rebours
Échelon
(min)
10
10
10
5
30
S’affiche uniquement
pendant les 15 dernières
minutes.
S’affiche uniquement
pendant les 15 dernières
minutes.
S’affiche dès le début
de la cuisson.
S’affiche uniquement pendant
les 20 dernières minutes.
S’affiche dès le début
de la cuisson.
S’affiche uniquement pendant
les 11 dernières minutes.
S’affiche dès le début
de la cuisson.
S’affiche en sens horaire
avant l’ébullition, deux bips
sont émis après l’ébullition,
puis le compte à rebours
de 15 minutes s’affiche.
S’affiche dès le début
de la cuisson.
S’affiche dès le début
de la cuisson.
Passe au mode
maintien au chaud
lorsque la cuisson
est teminée?
Oui
Oui
Oui
Oui
Oui
Oui
Oui
Oui
Non
Non
Riz brun
UTILISEZ SEULEMENT LE VERRE MESUREUR FOURNI.
Ajoutez du riz dans le panier de cuisson à l’aide du verre mesureur fourni.
Pour chaque verre de riz ajouté au panier de cuisson, ajoutez de l’eau jusqu’au
numéro correspondant indiqué à l’intérieur du panier.
Exemple : après avoir ajouté 4 verres mesureur de riz dans le panier de cuisson,
versez de l’eau jusqu’à la mention « 4 CUP » (4 VERRES) indiquée à l’intérieur du panier de cuisson.
NE REMPLISSEZ PAS LE PANIER DE CUSSION AU-DESSUS DE LA MENTION 6.
Fermez le couvercle et appuyez sur le bouton « MENU » afin d’afficher « BROWN RICE » (RIZ BRUN) à l’afficheur à DEL.
Appuyez sur « START » (DÉMARRER).
Les voyants clignotent dans le sens horaire indiquant que la cuisson a commencé.
Lorsque la cuisson est presque terminée, l’afficheur indique 15 minutes et effectue
un compte à rebours jusqu’à « 0000 ». Le cuiseur multifonctionnel passe ensuite
automatiquement en mode maintien au chaud.
L’afficheur indique maintenant la durée du maintien au chaud.
Ne gardez pas le riz au chaud plus de 4 heures.
Gruau
Utilisez le verre mesureur fourni pour mesurer le riz ET l’eau.
Exemple : si vous ajoutez 1 verre mesureur de riz au panier de cuisson,
vous devrez ajouter 7 verres d’eau (rapport 1:7).
Veuillez noter que la quantité MAXIMALE pouvant être utilisée est de 1 verre.
Fermez le couvercle et appuyez sur le bouton « MENU » afin d’afficher « PORRIDGE »
(GRUAU) à l’afficheur à DEL.
L’indication «
01:30
» clignote.
Appuyez sur « START » (DÉMARRER).
Une fois la cuisson terminée, l’afficheur indique « 0000 ». Le cuiseur multifonctionnel passe ensuite
automatiquement en mode maintien au chaud.
L’afficheur indique maintenant la durée du maintien au chaud.
Mult grain
i
UTILISEZ SEULEMENT LE VERRE MESUREUR FOURNI.
Ajoutez du riz dans le panier de cuisson à l’aide du verre mesureur fourni.
Pour chaque verre de riz ajouté au panier de cuisson, ajoutez de l’eau jusqu’au
numéro correspondant indiqué à l’intérieur du panier.
Exemple : après avoir ajouté 4 verres mesureur de riz dans le panier de cuisson,
versez de l’eau jusqu’à la mention « 4 CUP » (4 VERRES) indiquée à l’intérieur du panier de cuisson.
NE REMPLISSEZ PAS LE PANIER DE CUSSION AU-DESSUS DE LA MENTION 6.
Fermez le couvercle et appuyez sur le bouton « MENU » afin d’afficher « MULTI-GRAN »
(MULTIGRAIN) à l’afficheur à DEL.
Appuyez sur « START » (DÉMARRER).
Les voyants clignotent dans le sens horaire indiquant que la cuisson a commencé.
Lorsque la cuisson est presque terminée, l’afficheur indique 20 minutes et effectue un compte à
rebours jusqu’à « 0000 ». Le cuiseur multifonctionnel passe ensuite automatiquement en mode
maintien au chaud.
L’afficheur indique maintenant la durée du maintien au chaud.
Ne gardez pas le riz au chaud plus de 4 heures.
Soupe
Placez les aliments dans le panier de cuisson après le lavage, ajoutez de l’eau jusqu’au
numéro correspondant indiqué à l’intérieur du panier, ne dépassez pas le niveau de 1,08 L
indiqué dans le panier de cuisson.
Fermez le couvercle et appuyez sur le bouton « MENU » afin d’afficher « SOUP » (SOUPE) à l’afficheur à DEL.
L’indication « » clignote.
Appuyez sur « START » (DÉMARRER).
Une fois la cuisson terminée, l’afficheur indique « 0000 ». Le cuiseur multifonctionnel passe ensuite
automatiquement en mode maintien au chaud.
L’afficheur indique maintenant la durée du maintien au chaud.
Cuisson rapide/Cuisson lente
Le mode de cuisson rapide est normalement utilisé pour cuire le riz plus rapidement qu’en temps normal.
Appuyez sur le bouton « MENU » afin d’afficher « QUICK COOK » ( CUISSON RAPIDE ) à l’afficheur à DEL, les voyants
clignotent dans le sens horaire, appuyez sur « START » (DÉMARRER) pour commencer la cuisson.
Lorsque la cuisson est presque terminée, l’afficheur indique 20 minutes et effectue un compte à rebours jusqu’à « 0000 ».
Le cuiseur multifonctionnel passe ensuite automatiquement en mode maintien au chaud.
Le mode de cuisson lente est utilisé pour la cuisson lente.
Appuyez sur le bouton « MENU » afin d’afficher « SLOW COOK » (CUISSON LENTE) à l’afficheur à DEL, l’indication
« 04:00 » clignote.
Appuyez sur « START » (DÉMARRER).
Une fois la cuisson terminée, l’afficheur indique « 0000 ». Le cuiseur multifonctionnel passe ensuite automatiquement
en mode maintien au chaud.
Vapeur
Avec le verre mesureur fourni, ajoutez 4 verres d’eau dans le panier de cuisson.
Placez le panier d’étuvage dans le panier de cuisson.
Placez le panier de cuisson dans le boîtier.
Placez les aliments dans le panier d’étuvage. (Placez les aliments dans un plat séparé, au besoin).
Ne mettez pas trop d’aliments car le couvercle extérieur peut ne pas se fermer correctement.
Fermez le couvercle extérieur, appuyez sur le bouton « MENU »
Les voyants clignotent dans le sens horaire avant l’ébullition. Des bips sont émis après l’ébullition,
puis le compte à rebours de 15 minutes s’affiche.
Une fois la cuisson terminée, l’afficheur indique « 0000 ». Le cuiseur multifonctionnel passe ensuite
automatiquement en mode maintien au chaud.
MAXIMAL
02:00
afin d'afficher « STEAM » (VAPEUR)
à l'afficheur à DEL, les voyants clignotent dans le sens horaire, appuyez sur « START » (DÉMARRER)
pour commencer la cuisson.
L’afficheur indique maintenant la durée du maintien au chaud.
Sortez les aliments, suivi par le panier d’étuvage, et vider l’eau du panier de cuisson.
Gâteau
Lors de la cuisson d’un gâteau dans le cuiseur multifonctionnel, ne dépassez pas la quantité MAXIMALE
de poudre de gâteau de 350 g.
Suivez les directives sur l’emballage. En règle générale, il faudra mélanger les ingrédients secs et
humides séparément, puis les combiner.
Si désiré, vaporisez ou enduisez d’huile le panier de cuisson afin d’empêcher le gâteau de coller.
Ajoutez de la pâte dans le panier de cuisson et insérez ce dernier dans le cuiseur multifonctionnel.
Fermez le couvercle et appuyez sur le bouton « MENU » à plusieurs reprises afin d’afficher « CAKE » (GÂTEAU)
à l’afficheur à DEL.
L’indication « » clignote.
Appuyez sur « START » (DÉMARRER).
Une fois la cuisson terminée, vous pouvez retirer le gâteau du cuiseur multifonctionnel et le faire refroidir sur une grille
en métal.
La plupart des préparations à gâteaux contiennent entre 450 à 550 g ou des d’ingrédients secs. Nous vous
suggérons de mélanger toute la préparation à gâteau et d’utiliser la moitié de la pâte afin d’avoir deux gâteaux
et de faire un gâteau étagé.
Yogurt
Chauffez le lait à 88 ºC (190 ºF) ou plus (ne le faites pas bouillir).
Remuez pendant le réchauffage.
Refroidissez le lait caillé à 38 à 41 ºC (100 à 105 ºF).
Mesurez 500 à 1 000 g de ce lait, bien mélangez avec 1 g de culture de yogourt.
Placez le lait avec la culture de yogourt dans le panier de cuisson et insérez ce dernier dans le cuiseur multifonctionnel.
Fermez le couvercle et appuyez sur le bouton « MENU » à plusieurs reprises afin d’afficher « YOGURT » à
l’afficheur à DEL.
La durée de cuisson de 8 heures clignote.
Appuyez sur « START » (DÉMARRER).
Une fois les 8 heures écoulées, transvidez immédiatement le yogourt dans un contenant propre et aseptisé, couvrez et
réfrigérez le tout.
Gardez à couvert, réfrigérez jusqu’à 5 jours.
***
(YOGO8RT)
0
0:45
Réchauffage/Maintien au chaud
Le mode de réchauffage est utilisé pour réchauffer les aliments. Appuyez sur le bouton « REHEAT » (RÉCHAUFFAGE)
en mode veille ou en mode de sélection de fonction, et un bip est émis, puis appuyez sur le bouton « START »
(DÉMARRER) pour activer la fonction de réchauffage, les voyants clignotent dans le sens horaire indiquant que
la cuisson a commencé.
Lorsque la température préréglée est atteinte, un compte à rebours de 12 minutes s’affiche jusqu’à « 0000 ». Le cuiseur
multifonctionnel passe ensuite automatiquement en mode maintien au chaud.
Une fois les programmes terminés, le cuiseur passe automatiquement en mode maintien au chaud, sauf avec les fonctions
yogourt et gâteau.
Le mode maintien au chaud est utilisé pour réchauffer les aliments.
En mode veille ou mode de sélection de fonction, appuyez sur le bouton « KEEP WARM » (MAINTIEN AU CHAUD), et
un bip est émis, puis appuyez sur le bouton « START » (DÉMARRER) pour activer la fonction maintien au chaud.
L’afficheur indique « 0000 » et commence le compte en rebours en heures. Lorsque « 0001-0012 » s’affiche, la durée
maximale de maintien au chaud de 12 heures est atteinte.
Nota : en plus, dans les fonctions gâteau et yogourt, le mode maintien au chaud n’est pas activé une fois la cuisson
terminée, mais le cuiseur passe directement à l’état de veille. D’autres fonctions passent en mode maintien au chaud
une fois la cuisson terminée.

Nettoyage et entretien
MISE EN GARDE :
$YDQWOHQHWWR\DJHHW,¶HQWUHWLHQYHXLOOH]GpEUDQFKHUODILFKHGHODSULVH1HQHWWR\H]SDVOHERvWLHUGH,¶DSSDUHLODYDQW
TX¶LOQHVRLWUHIURLGL
/RUVTXHYRXVQHWWR\H]OHERvWLHUGH,¶DSSDUHLOHVVX\H]OHDYHFXQOLQJHKXPLGH1¶LPPHUJH]SDV,¶DSSDUHLOGDQV
GH,¶HDXRXQHOHQHWWR\H]SDVDYHFXQGLOXDQWjSHLQWXUHODTXHGH,¶DOFRROGHODSRXGUHGHQHWWR\DJHXQH
EURVVHGXUHHWF
1HSODFH]SDV,¶DSSDUHLODXODYHYDLVVHOOH
Instructions de déballage et d’assemblage de l’évent de vapeur
&DSXFKRQG¶pFKDSSHPHQW
GHYDSHXU
7RXUQH]OHVXSSRUWGHVRXSDSHGDQV
OHVHQVDQWLKRUDLUHSRXUOHVpSDUHUGX
FDSXFKRQG¶pFKDSSHPHQWGHYDSHXU
HWQHWWR\H]OHVGHX[SDUWLHV
)L[H]OHVXSSRUWGHVRXSDSHHW
WRXUQH]GDQVOHVHQVKRUDLUHMXVTX¶j
FHTX¶LOV¶DOLJQHVXUOHUHSqUHWULDQJOH
GXFDSXFKRQG¶pFKDSSHPHQWGHYDSHXU
6XSSRUWGHVRXSDSH
MISE EN GARDE
/¶pYHQWjYDSHXUHWOHFRXYHUFOHLQWpULHXU
SHXYHQWrWUHUHWLUpVGH,¶DSSDUHLO
1HWWR\H]OHVDSUqVFKDTXHXWLOLVDWLRQ
1HSODFH]SDVOHVSLqFHVGDQVOH
ODYHYDLVVHOOH
/HODYHYDLVVHOOHSRXUUDLWGpIRUPHURX
FUDTXHUOHPDWpULDX
/RUVTXHYRXVLQVWDOOH]OHVSLqFHVDSUqV
OHQHWWR\DJHDVVXUH]YRXVTX¶HOOHVVRQW
ELHQLQVWDOOpHV
Couvercle intérieur amovible
Panier de cuisson
1HWWR\H]DYHFGXGpWHUJHQWGLOXpHWXQHpSRQJHGRXFH
(VVX\H]WRXWH,¶HDXVHWURXYDQWVXUOHSDQLHUGHFXLVVRQ
,,HVWSRVVLEOHTXHODFRXOHXUFKDQJHRXTXHGHVVWULHV
DSSDUDLVVHQWVXUODVXUIDFHjUHYrWHPHQWIOXRUp&HV
FKDQJHPHQWVQ¶DXURQWDXFXQHLQFLGHQFHVXUODVDQWp
KXPDLQHRXVXUOHIRQFWLRQQHPHQWQRUPDOGH,¶DSSDUHLO
6HORQODIUpTXHQFHG¶XWLOLVDWLRQLOVHSHXWTXHGHVWUDFHVGH
IURWWHPHQWDSSDUDLVVHQWj,¶H[WpULHXUGXSDQLHUGHFXLVVRQ
&HOOHVFLQ¶DXURQWDXFXQHLQFLGHQFHVXUOHUHQGHPHQWGH,¶DSSDUHLO
Capteur de température Plaque chauffante
6LGHVGpEULVDGKqUHQWjFHVSLqFHVHQOHYH]OHVHQ
OHVIURWWDQWGRXFHPHQWDYHFXQWDPSRQjODYHUQRQ
PpWDOOLTXHRXDYHFXQOLQJHKXPLGH
Accessoires
1HWWR\H]DYHFGXGpWHUJHQWGLOXpHWXQHpSRQJHGRXFH
&XLOOqUHjUL]
9HUUHPHVXUHXU
3DQLHU
G¶pWXYDJH
①
②
Utilisation
Dépannage
Veuillez vérifier ce qui suit
Riz
Dépannage
Dans la situation suivante
Vérifiez ce qui suit
Quantité incorrecte de riz ou d’eau
Le riz n’est pas entièrement lavé
Le fond du panier est inégal
Matière étrangère ou débris logé entre le panier, la plaque
chauffante ou le capteur de température
Le couvercle extérieur n’est pas bien fermé
Le couvercle intérieur amovible n’est pas bien installé
De la graisse est ajoutée pendant la cuisson du riz
Une fois la cuisson terminée, le riz n’est pas gonflé
La cuillère à riz est laissée dans le panier pendant que le riz est maintenu au chaud
Le riz froid est maintenu au chaud
Le couvercle extérieur n’est pas fermé fermement
Le panier n’a pas été nettoyé
En mode de cuisson, fiche retirée de la prise ou bouton de mise
hors marche appuyé
Mauvais bouton utilisé
Un son
inhabituel est
entendu
Le son se produit en raison de I’eau collée au panier
Les boutons
ne
fonctionnent
pas
La fiche est retirée de la prise ou est mal branchée dans
la prise
Riz maintenu au chaud
Riz sec
Change-
ment de
couleur
O
deur
inhabituelle
Croûte de
riz brûlée
Riz
Déborde-
ment de
I’eau du
riz
Trop mou
À moitié
cuit
Trop dur
Cuisson de gâteau ou de pain
Renseignements
Trop grande quantité de pâte
Le produit n’a pas été suffisamment mélangé avant la cuisson
Utilisation avec une préparation à gâteau incompatible
Utilisation avec une préparation à gâteau contenant trop
d’ingrédients chocolatés, sucrés ou fruités
Couvercle extérieur non fermé pendant la cuisson
Matière étrangère ou débris logé entre le panier, la plaque
chauffante ou le capteur de température
Quantité de beurre ou d’huile de cuisson insuffisante au fond
Gâteau ou pain laissé dans le panier trop longtemps
Le produit a été trop ou pas assez mélangé
Mauvaise quantité d’ingrédients
Trop de pâte ou de préparation à gâteau
Problèmes liés à la cuisson de gâteau ou de pain
Un son inhabituel est
entendu
Le son se produit en raison de I’eau collée au
panier
Pas de courant
Retirez la fiche et vérifiez la prise
Friable
Non gonflé
La partie inférieure
du gâteau ou du pain
est brûlée
Le gâteau ou le pain
colle à la base du
panier
Gâteau ou pain
humide
Gâteau ou pain
mal cuit
Gâteau ou pain non
cuit
Spécifications
Numéro de modèle
SR-ZC123L/SR-ZC123N
Alimentation/fréquence nominale
120 V .c , 60 Hz, 650 W
Puissance nominale (cuisson du riz)
650 W
Longueur du cordon d’alimentation (environ) cm (po)
75 (29,52)
Poids de I’appareil (environ) kg (lb)
Dimensions
(environ)
3,3 (7,27)
Largeur cm (po)
Profondeur cm (po)
Hauteur cm (po)
26,5 (10,43)
34,4 (13,54)
22 (8,66)
Pour le remplacement du cordon d’alimentation et la réparation de l’appareil, veuillez
communiquer avec un centre de service autorisé de Panasonic.
La conception et les spécifications peuvent être modifiées sans préavis.
.a
Soutien
Panasonic Canada Inc.
5770 Ambler Drive, Mississauga, Ontario L4W 2T3
PRODUCT PANASONIC-GARANTIE LIMITÉE
PROGRAMME DE REMPLACEMENT
Panasonic Canada Inc. garantit que ce produit est exempt de défauts de matériaux et de main-d’œuvre dans un
contexte d’utilisation normale pendant la période indiquée ci-après à compter de la date d’achat original et, dans
I’éventualité d’une défectuosité, accepte, à sa discrétion, de (a) réparer le produit avec des pièces neuves ou
remises à neuf, (b) remplacer le produit par un produit neuf ou remis à neuf d’une valeur équivalente ou (c)
embourser le prix d’achat. La décision de réparer, remplacer ou rembourser appartient à Panasonic Canada Inc.
Cuiseurs de riz électriques
Un (1) an
La présente garantie n’est fournie qu’à I’acheteur original d’un des produits de marque Panasonic indiqués plus haut, ou à la personnel I’ayant
reçu en cadeau, vendu par un détaillant Panasonic agréé au Canada et utilisé au Canada. Le produit ne doit pas avoir été « vendu tel quel » et
doit avoir été livré à I’état neuf dans son emballage d’origine.
POUR ÊTRE ADMISSIBLE AUX SERVICES AU TITRE DE LA PRÉSENTE GARANTIE, LA PRÉSENTATION
D’UN REÇU D’ACHAT OU DE TOUTE AUTRE PIÈCE JUSTIFICATIVE DE LA DATE D’ACHAT ORIGINAL, INDIQUANT
LE MONTANT PAYÉ ET LE LIEU DE L’ACHAT, EST REQUISE.
RESTRICTIONS ET EXCLUSIONS
La présente garantie COUVRE SEULEMENT les défaillances attribuables à un défaut des matériaux ou à un vice de
fabrication et NE COUVRE PAS I’usure normale ni les dommages esthétiques. La présente garantie NE COUVRE PAS
NON PLUS les dommages subis pendant le transport, les défaillances causées par des produits non fournis par Panasonic
Canada Inc., ni celles résultant d’un accident, d’un usage abusif ou impropre, de négligence, d’une manutention
inadéquate, d’une mauvaise application, d’une altération, d’une installation ou de réglages impropres, d’un mauvais
réglage des contrôles de I’utilisateur, d’un mauvais entretien, d’une surtension temporaire, de la foudre, d’une
modification, de la pénétration de sable, de liquides ou d’humidité, d’une utilisation commerciale (dans un hôtel, un
bureau, un restaurant ou tout autre usage par affaire ou en location), d’une réparation effectuée par une entité autre
qu’un centre de service Panasonic agréé ou encore d’une catastrophe naturelle.
CETTE GARANTIE LIMTÉE ET EXPRESSE REMPLACE TOUTE AUTRE GARANTIE, EXPRESSE OU
IMPLICITE, INCLUANT LES GARANTIES IMPLICITES DU CARACTÈRE ADÉQUAT POUR LA
COMMERCIALISATION ET UN USAGE PARTICULIER. PANASONIC CANADA INC. N’AURA
D’OBLIGATION EN AUCUNE CIRCONSTANCE POUR TOUT DOMMAGE DIRECT, INDIRECT OU
CONSÉCUTIF RÉSULTANT DE L’UTILISATION DE CE PRODUIT OU DÉCOULANT DE TOUTE
DÉROGATION À UNE GARANTIE EXPRESSE OU IMPLICITE.
(À titre d’exemples, cette garantie exclut les
Certaines juridictions ne reconnaissent pas les exclusions ou limitations de dommages indirects
ou consécutifs, ou les exclusions de garanties implicites. Dans de tels cas, les limitations stipulées
ci-dessus peuvent ne pas être applicables. La présente garantie vous confère des droits précis;
vous pourriez aussi avoir d’autres droits pouvant varier selon votre province ou territoire de résidence.
DEMANDE DE RENSEIGNEMENTS
Pour tout renseignement sur les produits et de I’assistance technique, veuillez visiter notre page Soutien :
www.panasonic.ca/french/support
Pour le remplacement d’un produit défectueux couvert par la garantie, veuillez communiquer avec le
revendeur d’origine.
dommages relatifs à une perte de temps, le transport jusqu’à et depuis un centre de service agréé, la perte ou la détérioration de supports
ou d’images, de données ou de tout autre contenu en mémoire ou enregistré. Cette liste n’est pas exhaustive et n’est fournie qu’à des fins
explicatives.)