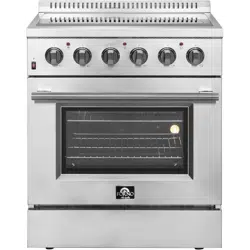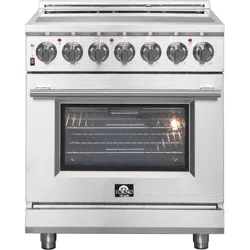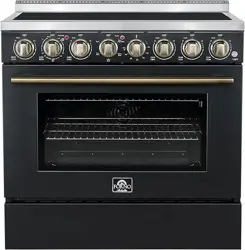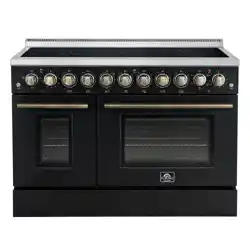
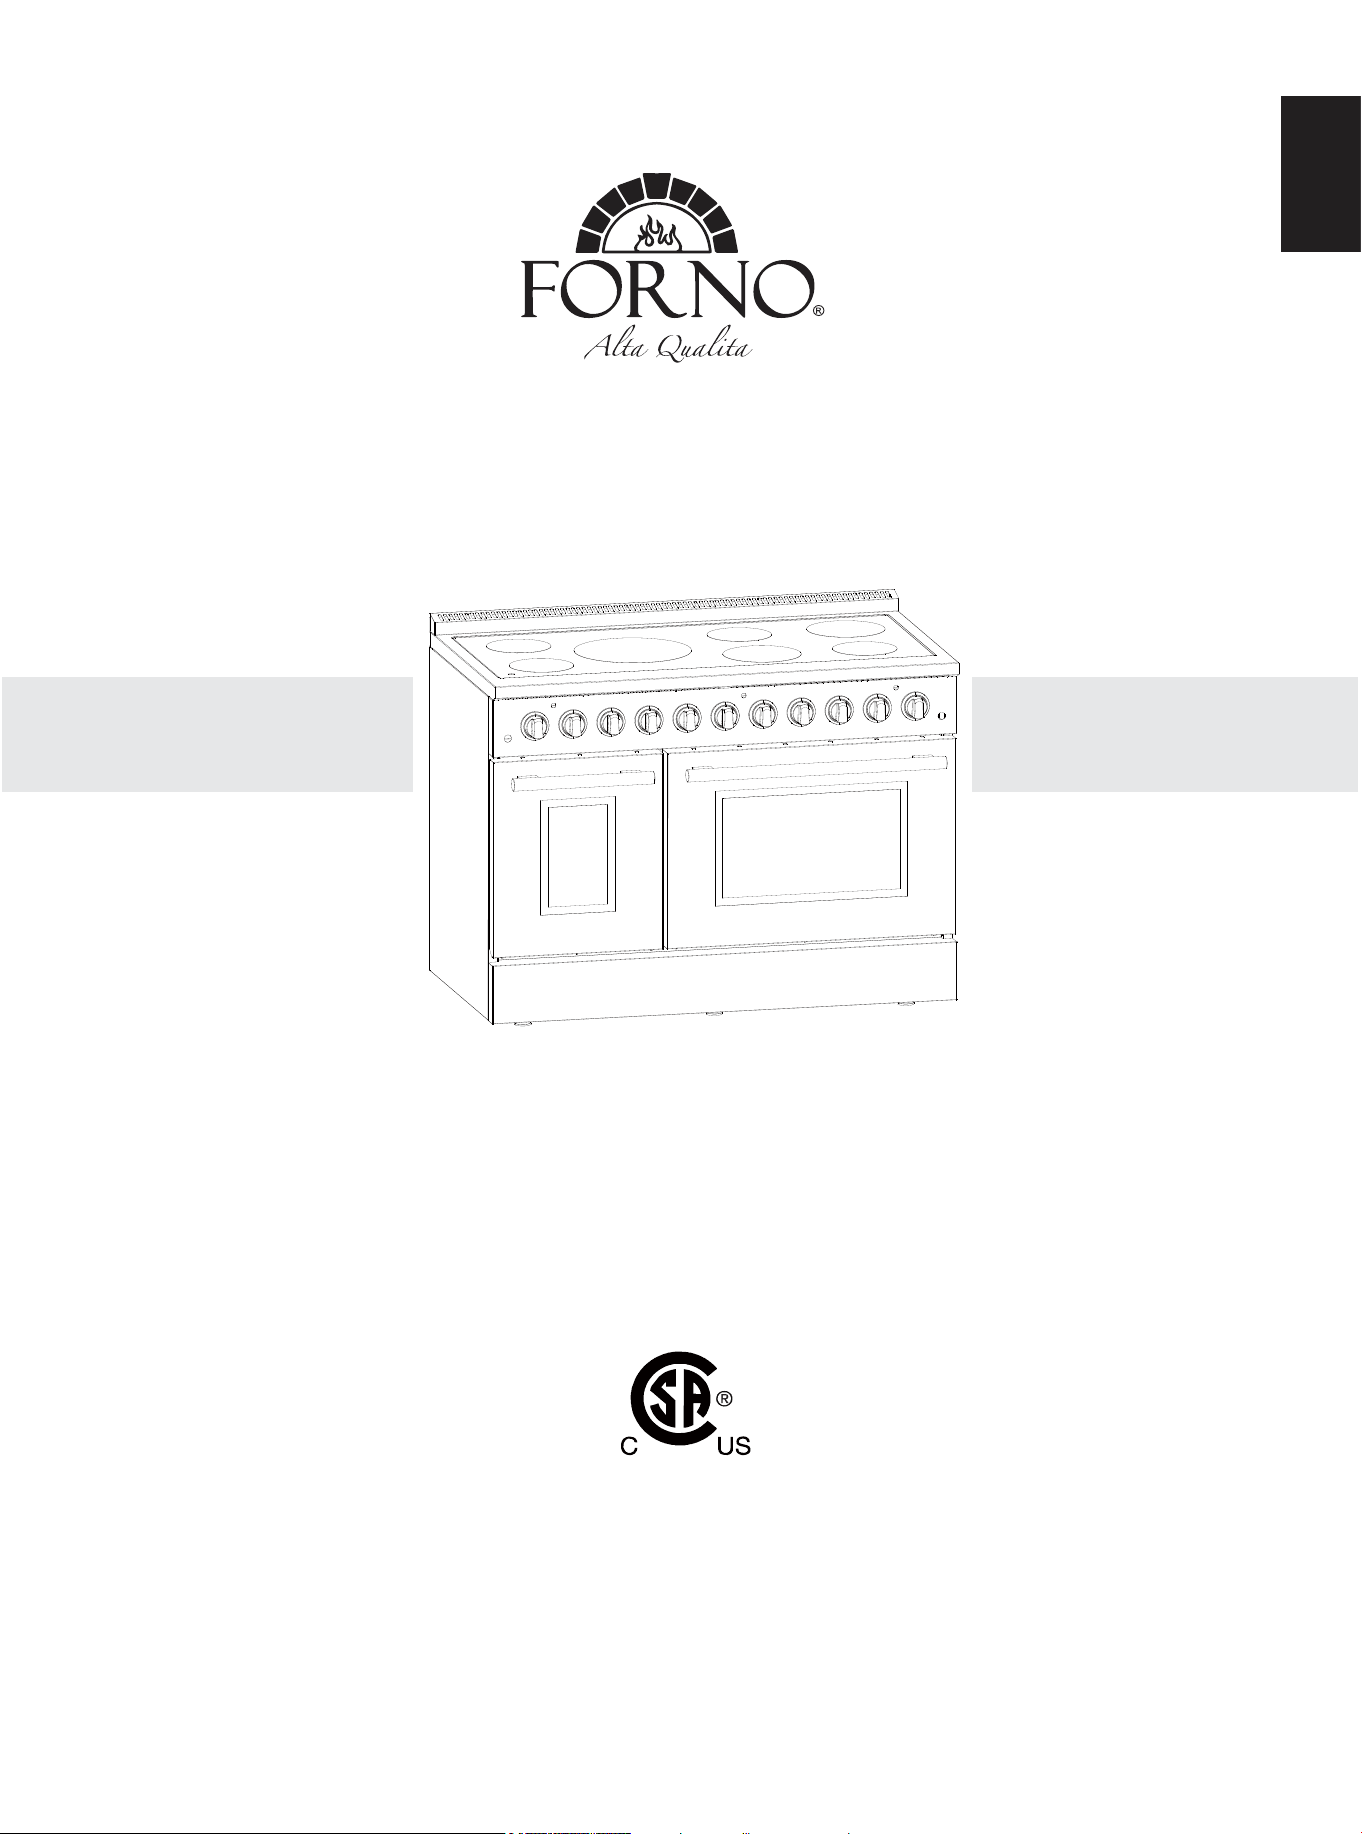
FORNO 48” Electric Range
FFSEL6011-48
FFSEL6011-48WHT
FFSEL6011-48BLK
Read these instructions carefully before using your appliance, and keep it carefully.
If you follow the instrcutions, your appliance will provide you with many years of good service.
INSTRUCTION MANUAL
ENGLISHENGLISH
1
This product can expose you to chemicals including [Lead and lead
compounds], which is [are] known to the State of California to cause cancer
and birth defects or other reproductive harm. For more information go to
WWW.P65Warnings.ca.gov.
WARNING
ENGLISH
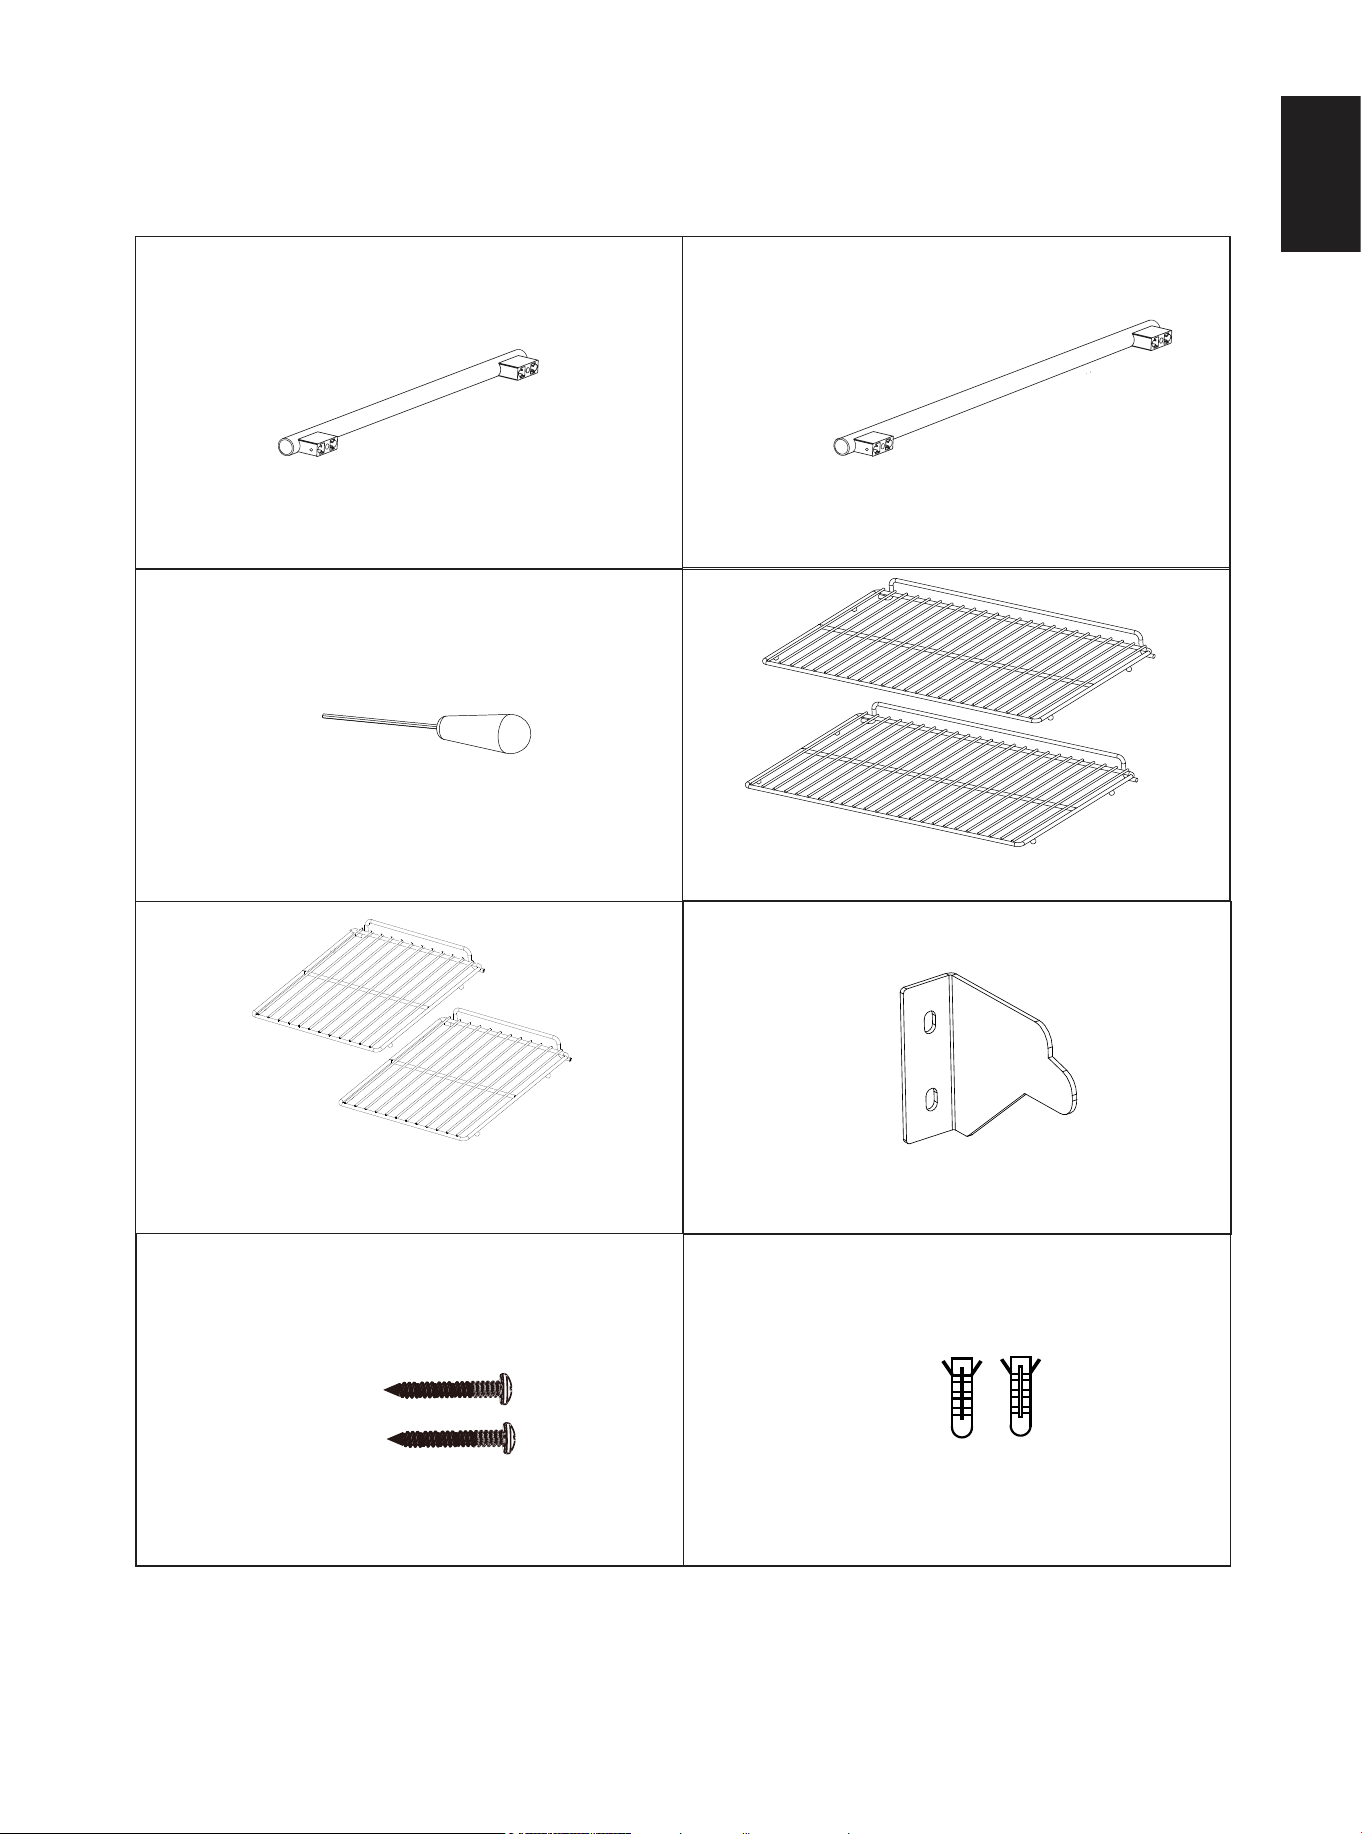
ST 6/25”x 1 3/5”Screws (2pcs)
18” Oven Door Handle (1pc) 30” Oven Door Handle (1pc)
18” Oven Shelf (2pcs)
30” Oven Shelf (2pcs)
2
SUPPLIED PARTS
Anti-tip Bracket (1pc)
Screw Driver (1pc)
SUPPLIED PARTS
ENGLISH
Expansion tube(2pcs)
3
Thank you for purchasing a Forno product. Please read the entire instruction manual before operating your new
appliance for the first time. Whether you are an occasional user or an expert, it will be beneficial to familiarize yourself
with the safety practices, features, operation and care recommendations of your appliance.
Both the model and serial number are listed inside the product. For warranty purposes, you will also need the date of
purchase .
Services in Canada and Untied States
Keep the instruction manual handy to answer your questions. If you don’t understand something or need more
assistance, please visit our website for fast support. Please provide us your name, number, address,serial number
of the product that troubleshooting, proof of purchase, and a short description of the issue. A customer service
representative will contact you as soon as possible. All warranty work needs to be authorized by FORNO customer
service. All our authorized service providers are carefully selected and rigorously trained by us.
Product Information Service Information
Model Number : _________________________________________
Use these numbers in any
correspondence or services calls
concerning your product.
If you received a damaged product,
immediately contact Forno.
To save time and money, before
you call for serviced, check the
troubleshooting guide. It listed the
causes of minor operation problems
that you can correct yourself.
Serial Number : __________________________________________
Date of Purchase :________________________________________
Purchase Address And Phone : _____________________________
_______________________________________________________
_______________________________________________________
Customer Care
“Need some quick help? Simply scan the qr code and get access
to our fast support form. We’re always here to assist you with any
questions or concerns you may have. So, don’t hesitate to reach out!”
ENGLISH

IMPORTANT SAFETY INSTRUCTIONS
GENERAL SAFETY
CONDITION SAFETY
CHILDREN SAFETY
COOKING SAFETY
COOKING ON TOP SAFETY
OVEN COOKING SAFETY
CLEAN SAFETY
PLACEMENT SAFETY
POWER CORD SAFETY
ENVIRONMENTAL SAFETY
RATING LABEL
INSTALLATION ADJACENT TO KITCHEN CABINETS
ADJUST THE RANGE HEIGHT
INSTALLATION INSTRUCTIONS
INSTALLING THE ANTI-TIP BRACKET
ELECTRIC POWER RATING
ELECTRICAL GROUNDING
POWER SUPPLY CONNECTION
INSTALLATION CHECKLIST
FINAL PREPARATION
USING RANGE FOR THE FIRST TIME
OPERATION
COOKTOP COOKING
OVEN COOKING
MAINTENANCE AND CLEANING
REPLACING THE OVEN BULB
OVEN DOOR REMOVAL
CLEANING
TROUBLESHOOTING
WARRANTY
5
5
6
7
7
8
9
9
10
11
11
12
13
13
14
14
15
15
16
17
17
17
18
18
22
25
25
25
27
29
32
TABLE OF CONTENTS
4
ENGLISH
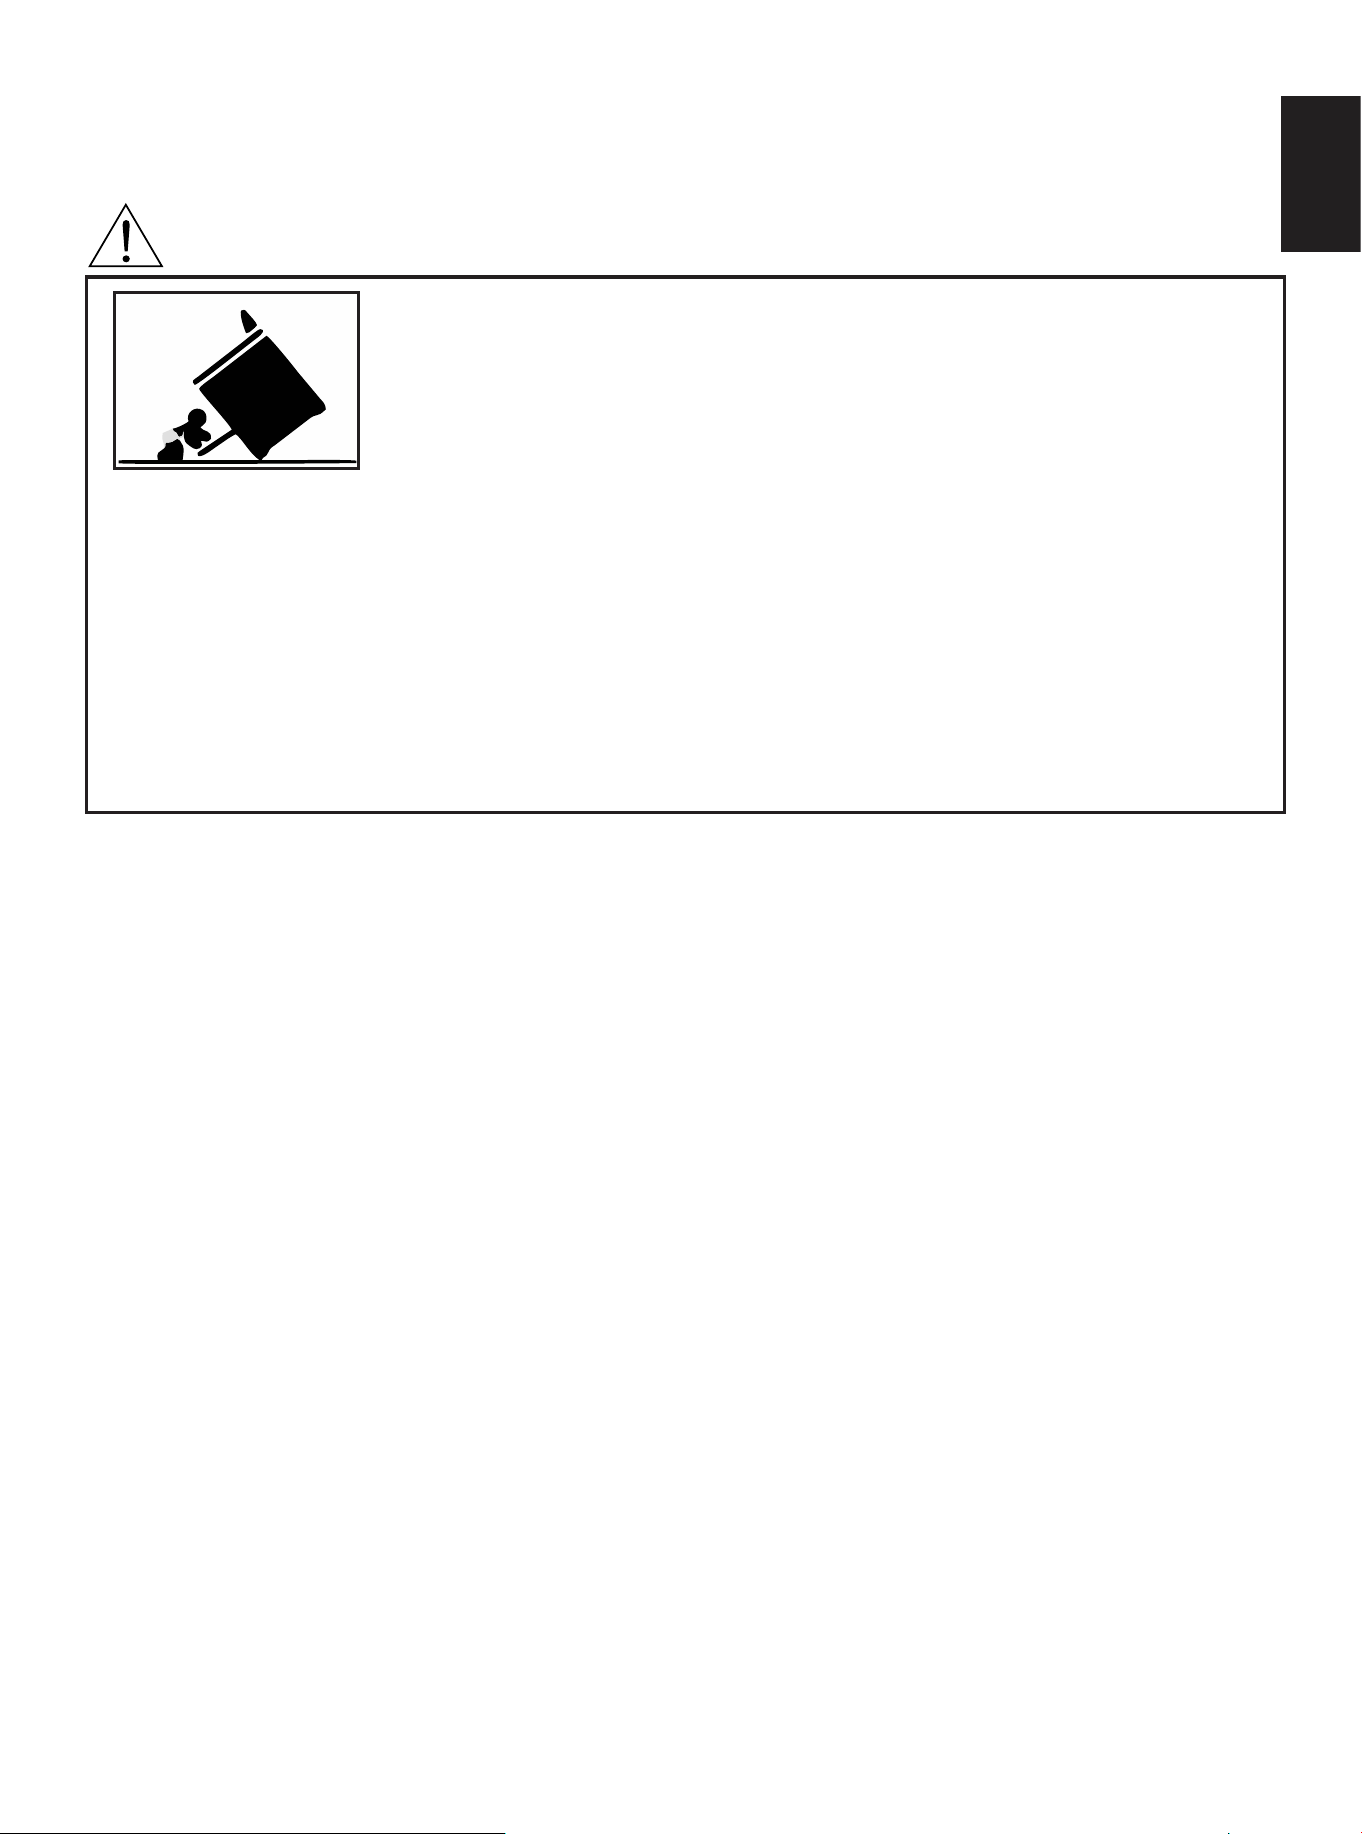
To reduce the risk of tipping the range, the range must be secured
by a properly installed Anti Tip device. AFTER THE RANGE
HAS BEEN INSTALLED, CONFIRM THAT THE ANTI-TIP
DEVICE HAS BEEN PROPERLY INSTALLED AND VERIFY
THAT THE ANTI TIP DEVICE IS PROPERLY ENGAGED.
Refer to the installation manual for instructions.
a) If the anti-tip device is not installed, a child or adult can tip the range and be killed.
b)Verify that the anti-tip device has been properly installed and engaged at the rear
of the range bottom.
c) If you move the range and then move it back into place, ensure the anti tip device
is re-engaged at rear of the range back side.
d) Do not operate the range without the anti-tip device in place and engaged.
e) Failure to do so can result in death or serious burns to children or adults.
GENERAL SAFETY
·Read all instructions before installing or using the oven for the first time. Only use the
appliance for its intended purpose.
·This appliance complies with current safety requirements. Improper use of the
appliance can lead to personal injury and material damage.
☆Proper Installation - Be sure your appliance is properly installed and grounded by a
qualified technician.
·In Massachusetts, installation must be performed by a "Massachusetts" licensed
plumber.
·The manufacturer reserves the right to make changes to its products when considered
necessary and useful, without affecting the essential safety and operating
characteristics.
·This appliance has been designed for non-professional, domestic use only.
·If the information in this manual is not followed exactly, a fire or explosion may result
causing property damage, personal injury, or death. seller cannot be held liable for
damage occurring as a result of non-compliance with the instructions.
·Please observe all local and national codes and ordinances.
·Keep these operating instructions in a safe place and pass them on to any future
user.
5
IMPORTANT SAFETY INSTRUCTIONS
WARNING:
ENGLISH
6
IMPORTANT SAFETY INSTRUCTIONS
GENERAL SAFETY
CONDITION SAFETY
IMPORTANT:
Do not cook on broken cooktop. If the cooktop breaks, cleaning solutions and
spillovers may penetrate the broken cooktop and create a risk of electric shock.
·Note to the installer: Please give these installation instructions to the consumer for
the local electrical inspector.
·An air curtain or other overhead range/range top/cooktop hood, which operates by
blowing a downward airflow onto a range, shall not be used/ installed in conjunction
with this range.
·To prevent accidents and achieve optimal ventilation, allow for sufficient space
around the cooking area.
·The installation of appliance designed for manufactured(mobile)home installation
Must confrom with the Manufactured Home Construction and Safety Standard ,Title
24CFR,Part 3280[formerly the Federal Standard for Mobile Home Construction and
safety, Title 24, HUD(Part280)]or with local codes where applicable.
·Electrical installation must be in accordance with the National Electrical Code,
NFPA70 - latest edition and/or local codes.
·IN CANADA: Installation must be in accordance with the current Electrical
installation must be in accordance with the current CSA C22.1 Canadian Electrical
Codes Part 1 and/or local codes.
☆User Servicing - Do not repair or replace any part of the appliance unless specifically
recommended in the manual. All other servicing should be referred to a qualified
technician.
WARNING:
Do not operate any appliance if:
·The cord is damaged
·The appliance malfunctions
·The appliance is damaged
Return appliance to the nearest authorized service facility
for examination, repair, or adjustment in event of damage.
ENGLISH
CHILDREN SAFETY
COOKING SAFETY
☆Do Not Leave Children Alone - Children should not be left alone or unattended in
area where appliance is in use. They should never be allowed to sit or stand on
any part of the appliance.
·Do not allow children to touch or play in, on, or near the oven.
☆CAUTION - Do not store items of interest to children in cabinets above the range
Or on the backguard of a range - children climbing on the range to reach items
could get seriously injured.
·Danger of burns: The oven gets hot at the oven door glass, the vapor vent, the
handle, and the operating controls. Children's skin is more sensitive to high
temperatures than that of adults.
☆Wear Proper Apparel — Loose-fitting or hanging garments should never be worn
while using the appliance.
·Aluminum foil linings may also trap heat, causing a fire hazard.
☆Do not allow aluminum foil, paper, or cloth to come in contact with a hot element.
·Avoid preparing food in aluminum foil or plastic containers over the hot cooking zones.
Never pour cold water onto hot surfaces in a hot oven. The steam created could
·cause serious burns or scalding and the sudden change in temperature can damage
the enamel in the oven.
☆Do not use water on grease fires — Smother fire or flame or use dry chemical or
foam-type extinguisher.
·Do Not Soak Removable Heating Elements- Heating elements should never be
immersed in water.
☆Storage in or on Appliance — Flammable materials should not be stored in an oven or
near surface units.
☆Use Only Dry Potholders-Moist or damp potholders on hot surfaces may result in
burns from steam. Do not let potholder touch hot heating elements. Do not use a
towel or other bulky cloth.
·This appliance is designed for built-in household use only.
·Do not use outdoors.
WARNING:
Never use your Appliance for warming or Heating the Room.
7
IMPORTANT SAFETY INSTRUCTIONS
ENGLISH
8
IMPORTANT SAFETY INSTRUCTIONS
COOKING ON TOP SAFETY
☆Use Proper Pan Size —This appliance is equipped with one or more surface units
of different size. Select utensils having flat bottoms large enough to cover the surface
unit heating element. The use of undersized utensils will expose a portion of the
heating element to direct contact and may result in ignition of clothing. Proper
relationship of utensil to burner will also improve efficiency.
·Do not place metallic objects such as knives, forks, spoons and lids on the cooktop
surface since they can get hot.
·Do not allow pans to boil dry or empty.
☆Never Leave surface units unattended at High Heat settings—Boilover causes
smoking and greasy spillovers that may ignite.
☆Protective Liners- Do not use aluminum foil to line surface unit drip bowls or oven
bottoms, except as suggested in the manual. Improper installation of these liners
may result in a risk of electric shock, or fire.
☆Glazed Cooking Utensils -Only certain types of glass, glass/ceramic, ceramic,
earthenware, or other glazed utensils are suitable for range-top service without
breaking due to the sudden change in temperature.
☆Utensil Handles Should Be Turned Inward and Not Extend over Adjacent Surface
Units - To reduce the risk of burns, ignition of flammable materials, and spillage
due to unintentional contact with the utensil, the handle of a utensil should be
positioned so that it is turned inward, and does not extend over adjacent surface
units.
·When the unit is on, do not touch outside the control panel, as the surface may
contain residua heat. It is important to be aware that the units surface will remain
hot for a short period of time after use. DO not touch hot surfaces.
☆DO Not Cook on Broken Cook-Top- If cook-top should break, cleaning solutions
and spillover s may penetrate the broken cook-top and create a risk of electric shock.
contact a qualified technician immediately
WARNING:
DO NOT TOUCH SURFACE UNITS OR AREAS NEAR UNITS
Surface units may be hot even though they are dark in color. Areas near
surface unit s may become hot enough to cause burns. During and after use,
do not touch, or let clothing or other flammable materials contact surface units
or are as near units until they have had sufficient time to cool. Among these
areas are (identification of areas-for example, the cook-top and surfaces facing
the cook-top).
ENGLISH
9
IMPORTANT SAFETY INSTRUCTlONS
OVEN COOKING SAFETY
CLEAN SAFETY
☆Use Care When Opening Door- Let hot air or steam escape before removing
or replacing food.
·DO not place any pot or pan on the open oven door.The door is made of glass and
it can break if loaded with a weight.
·DO Not Heat Unopened Food Containers — Build-up of pressure may cause
container to burst and result in injury.
☆Keep Oven Vent Ducts Unobstructed.
☆Placement of Oven Racks — Always place oven racks in desired location while oven
is cool. If rack must be moved while oven is hot, do not let potholder contact hot
heating element in oven.
☆IMPORTANT: Make sure drip pans are in place — Absence of these pans during
cooking may subject wiring or components underneath to damage.
☆Do not use steam cleaners or high-pressure cleaners to clean the cooktop as
this may result in electric shock.
·Clean Cook-Top With Caution - If a wet sponge or cloth is used to wipe spills
on a hot cooking area, be careful to avoid steam burn. Some cleaners can
produce noxious fumes if applied to a hot surface.
WARNING:
DO NOT TOUCH HEATING ELEMENTS OR INTERIOR
SURFACES OF OVEN
Heating elements may be hot even though they are dark in color.Interior
surfaces of an oven become hot enough to cause burns. During and after use,
do not touch, or let clothing or other flammable materials contact heating
elements or interior surfaces of oven until they have had sufficient time to cool.
other surfaces of the appliance may become hot enough to cause burns
among these surfaces are (identification of surfaces - for example oven vent
openings and surfaces near these openings, oven doors, and windows of oven
doors).
ENGLISH

10
INSTALLATION INSTRUCTIONS
PLACEMENT SAFETY
IMPORTANT: Do not carry or lift the range by the oven door handle or the control panel.
·To reduce the risk of fire, do not let any objects (glass paper, etc.) obstruct the
inlet and outlet of your cooktop.
·To reduce the risk of electric shock, do not mount unit over a sink.
·To reduce the risk of fire, do not store anything directly on top of the appliance
surface when the appliance is in operation.
·Always have a working smoke detector in or near the kitchen.
·Do not place rough or uneven objects on the units as they may damage the surface.
CAUTION -Do not leave lids or other metal objects such as knives, forks or
spoons on the cooktop. If the cooktop is turned on, these objects can heat up
quickly and may cause burns.
·If the cooktop is near a window, ensure that curtains do not blow over or near the unit.
·Do not use the cooktop as a work surface. Certain substances such as salt, sugar, or
sand can scratch the glass ceramic surface.
·Do not store hard or pointed objects over the cooktop as they can damage the
unit if they fall on top.
CAUTION - While cooking, any overflowed fat or oil on the cook top may ignite.
There is a risk of burning and fire.Control the cooking process at all times.
·The use of accessory attachments that are not recommended by ours may
cause injuries.
CAUTION - To eliminate the risk of burns or fire by reaching over heated
surface units, cabinet storage space located above the surface units should be
avoided. If cabinet storage is used, the risk can be reduced by installing a range
hood that projects horizontally a minimum of 5 inches beyond the bottom of the
cabinets.
ENGLISH

11
IMPORTANT SAFETY INSTRUCTIONS
POWER CORD SAFETY
ENVIRONMENTAL SAFETY
CAUTION — Ensure the range is properly grounded.
·The marked electrical rating should be at least as great as the electrical rating on
the appliance.
·The plug should always be accessible.
·CAUTION — To protect against electric shock, do not immerse cord or main
body in water or any other liquid.
·Do not let cord hang over edge of table or counter. The cord should be arranged
so that it will not drape over the counter top where it can be pulled on by
Children or tripped over.
·Do not allow cord to touch hot surface.
A short power supply cord or detachable power supply cord should be used to
reduce the risk of becoming entangled in or tripping over a longer cord.
·Always attach plug to appliance first then plug cord into the wall outlet.
To disconnect, turn any control to off, then remove plug from wall outlet.
·CAUTION - No attempt should be made to operate the appliance during power
failure.
·This product may not be treated as household waste. Instead it should be
handed over to the applicable collection point for the recycling of electrical
and electronic equipment.
·By ensuring this product is disposed of correctly, You will help prevent potential
negative consequences for the environment and human health, which could
otherwise be cause d by inappropriate waste handling of this product.
·For more detailed information about recycling of this product, please contact
your local city office, your household waste disposal service or the shop where
you purchased the product.
ENGLISH
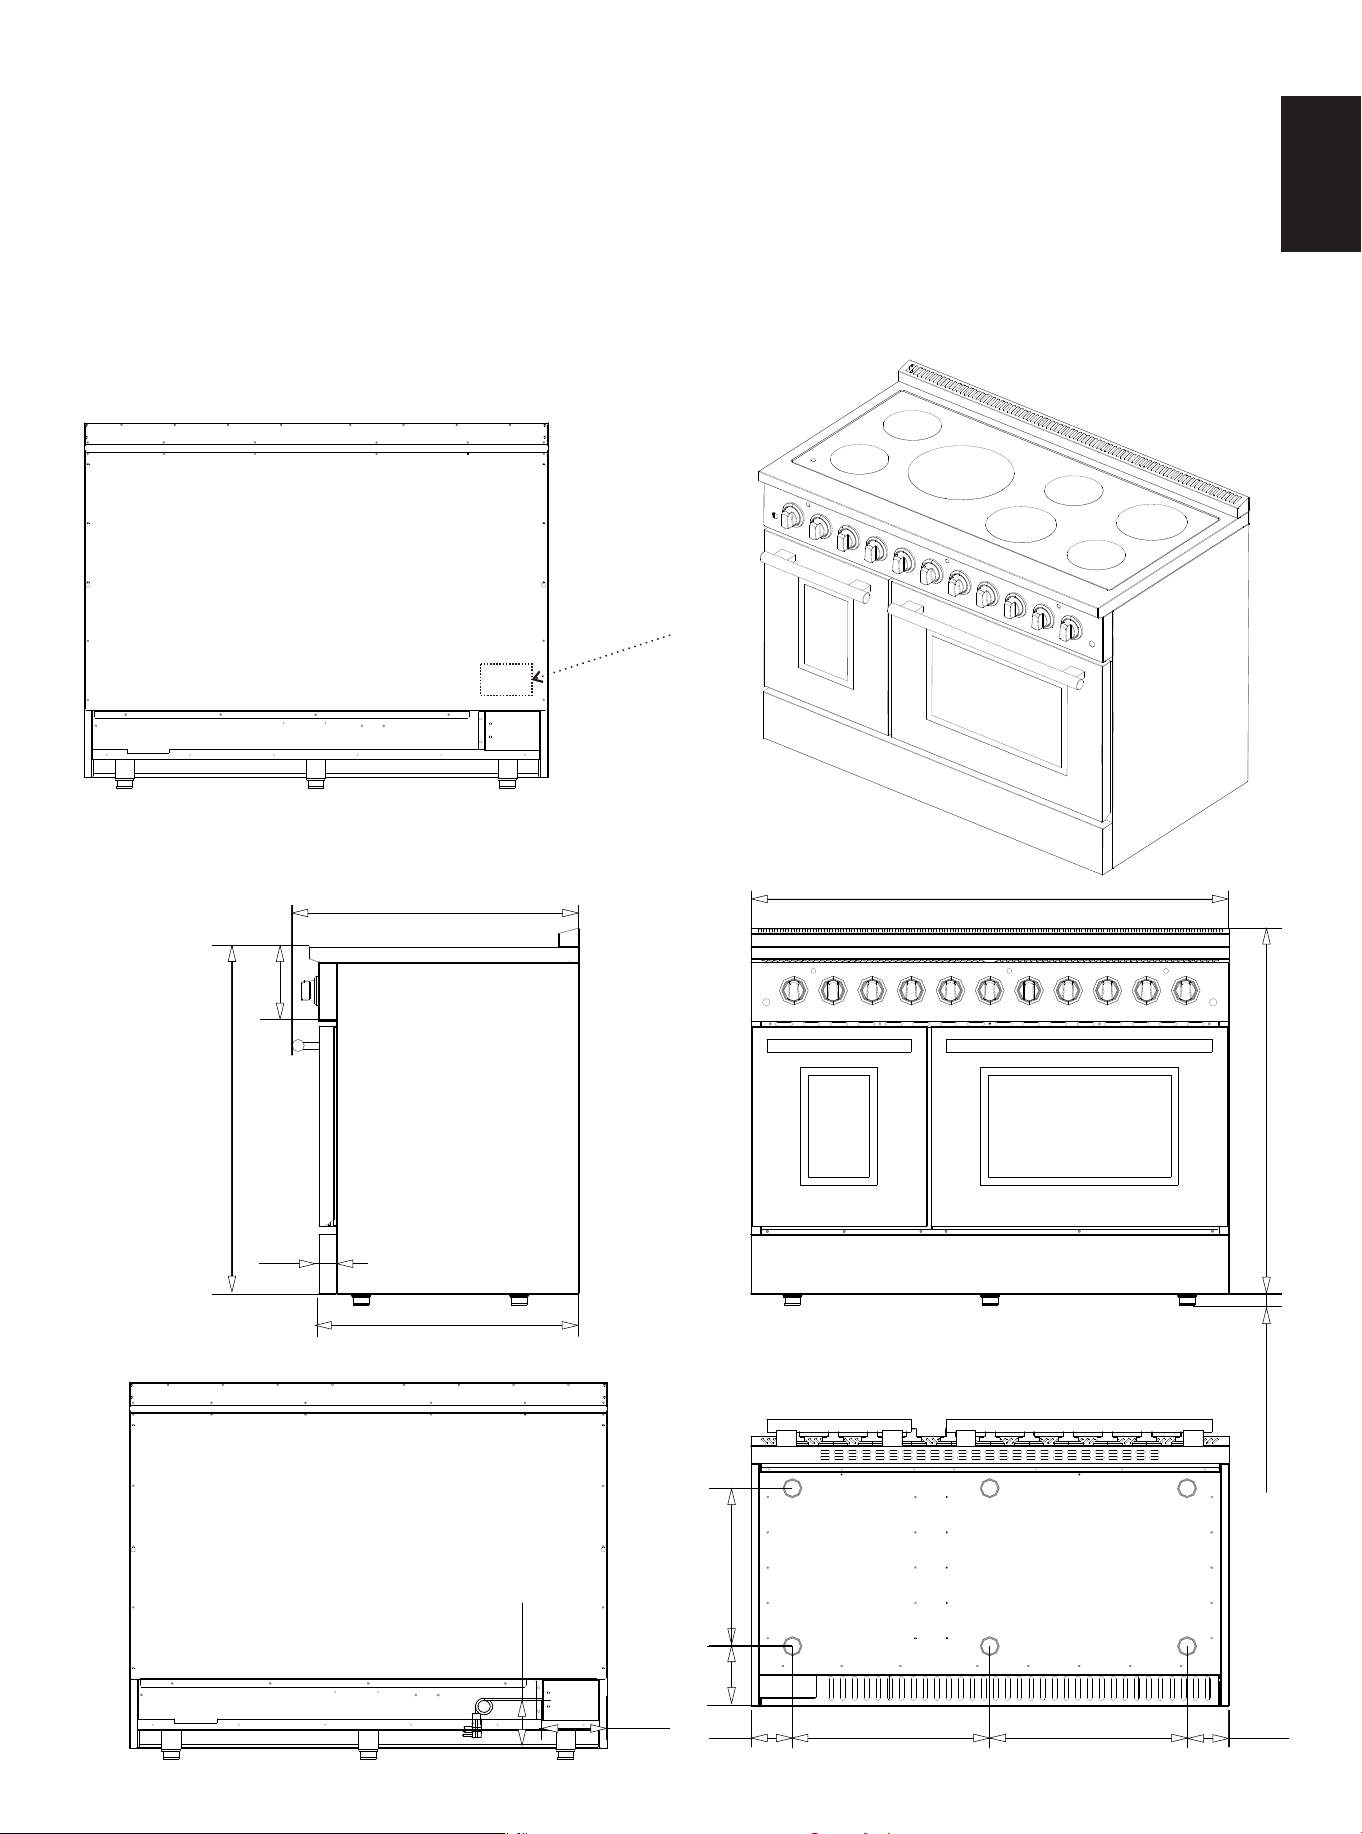
IMPORTANT SAFETY INSTRUCTIONS
RATING LABEL
PRODUCT DIMENSIONS
IMPORTANT: The rating tag shows the model and serial number of your
range. The tag is located on the front or back, or both side of the range. Do not
remove permanently affixed labels, warnings, or plates from the product. This
will void the warranty.
100W
1200W
1200W
1200W
2000W
2000W
3300W
48”
36 7/10”1 3/20”(adjustable)
28 4/5”
7 1/2”
34 17/20”
1 3/4”
26”
4 1/5” 19 4/5”
19 4/5”
4 1/5”
15 4/5”
6”
4 4/5”
6 1/2”
12
Rating label
ENGLISH
IMPORTANT SAFETY INSTRUCTIONS
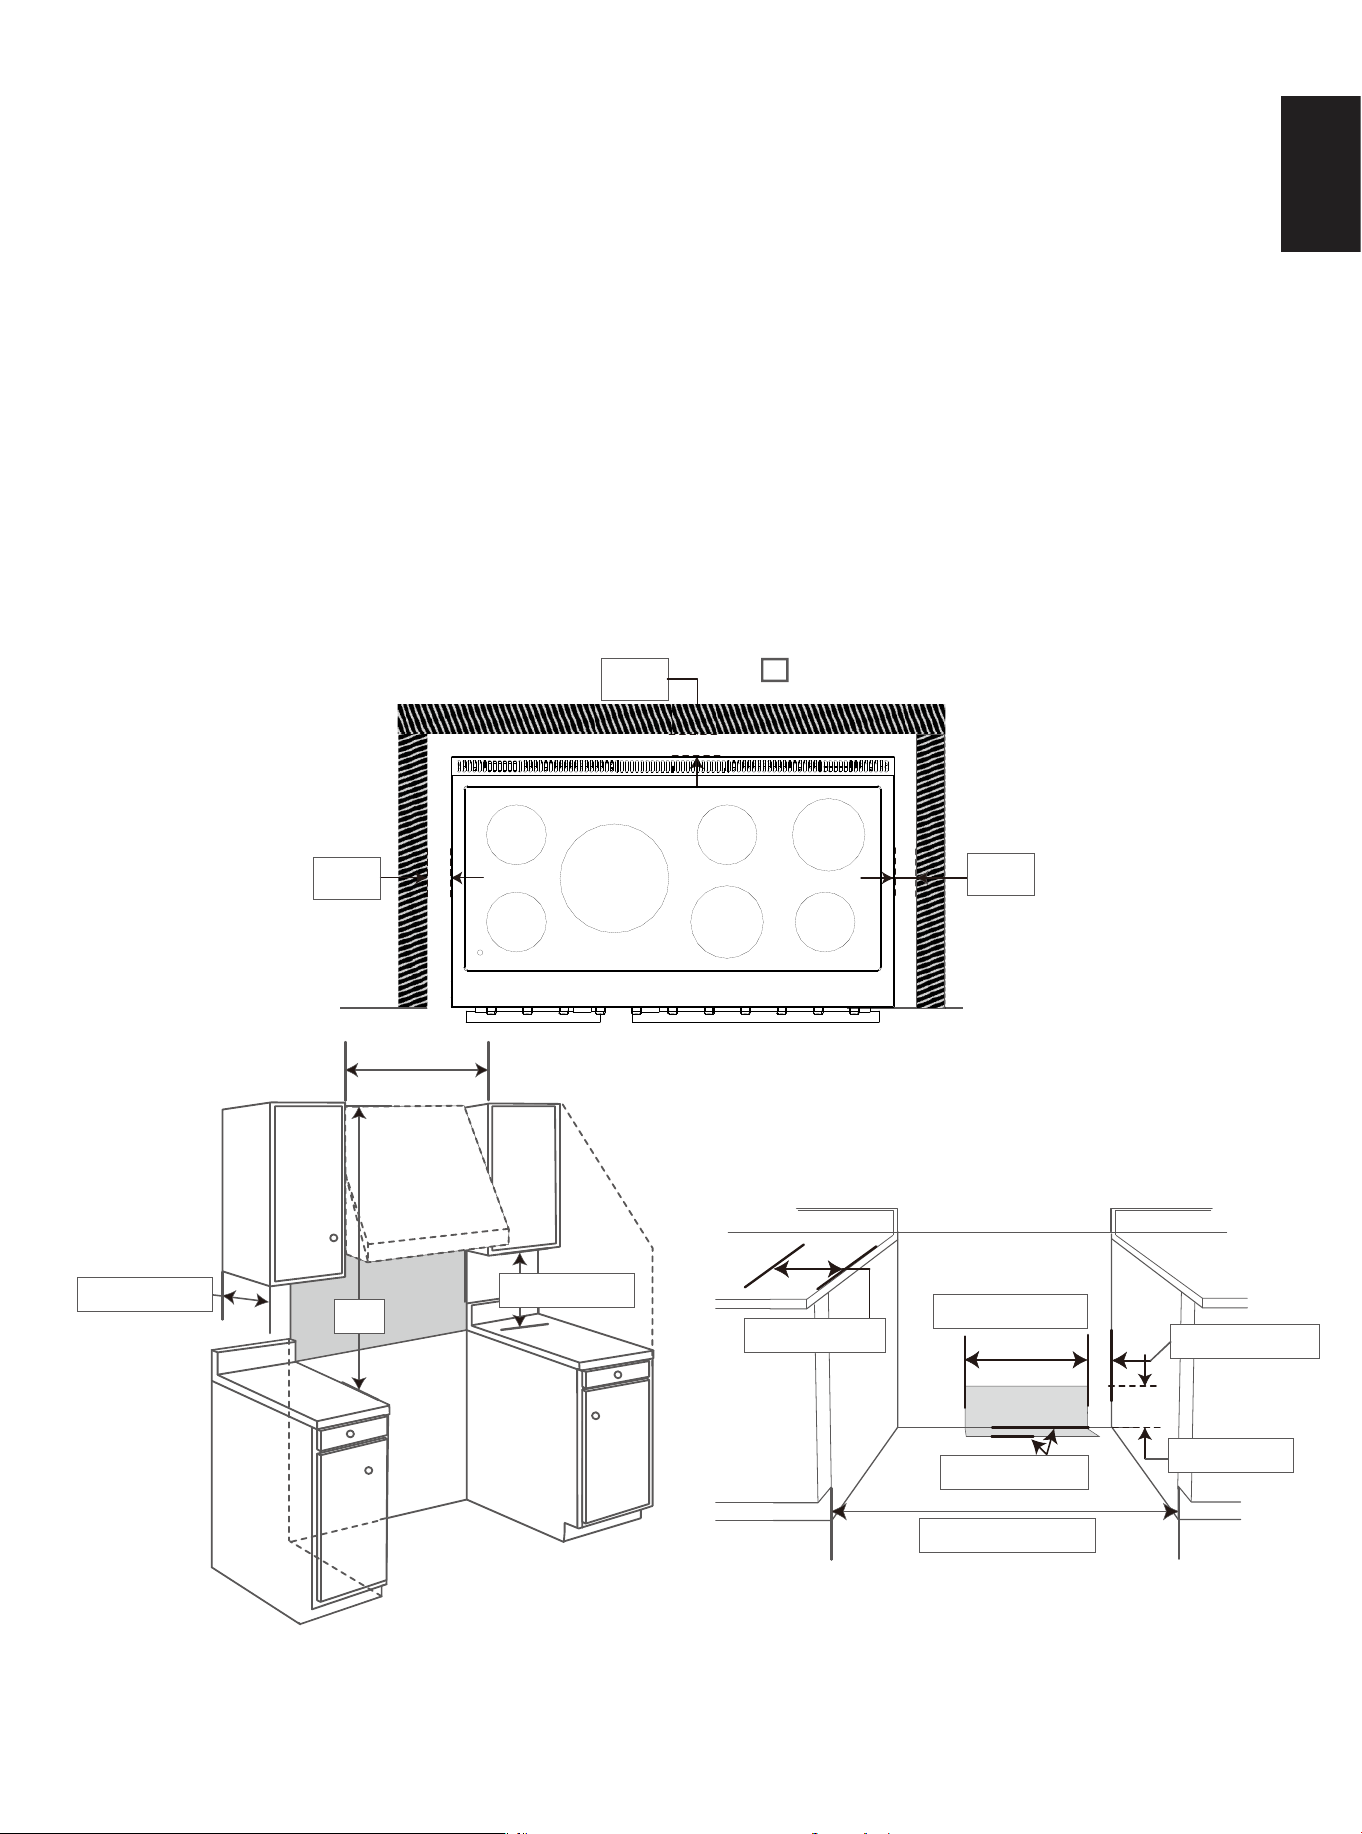
INSTALLATION ADJACENT TO KITCHEN CABINETS
ADJUST THE RANGE HEIGHT
1”
Counter Top
48”(1220mm)
48 1/2”(1232mm)
Counter Top
4”(100mm)
31 1/2”(800mm)
A = 30 inches(760mm) minimum clearance between
the top of the cooking surface and the bottom
of an unprotected wood or metal cabinet
A
13
Important — Save for the local electrical inspector’s use.
The range may be installed directly adjacent to existing countertop height cabinets
(36”) from the floor.
For the best look, the worktop should be level with the cabinet countertop. This
can be accomplished by raising the unit using the adjustment spindles on the legs.
ATTENTION: The range CANNOT be installed directly adjacent to kitchen walls,
tall cabinets, tall appliances, or other vertical surfaces above 36” high. The
minimum side clearance in such cases is 6”.
Wall cabinets with minimum side clearance must be installed 18” above the
countertop with countertop height between 36” and 38”. The maximum
depth of wall cabinets above the range shall be 13”.
WALL
1/4”
1/4”
13”(330mm)
18”(457mm)
6”(150mm)
8”(200mm)
3 3/5”(90mm)
ELECTRIC
UTILITY LOCATIONS
The range height can be adjusted by turning the six feet.
ENGLISH
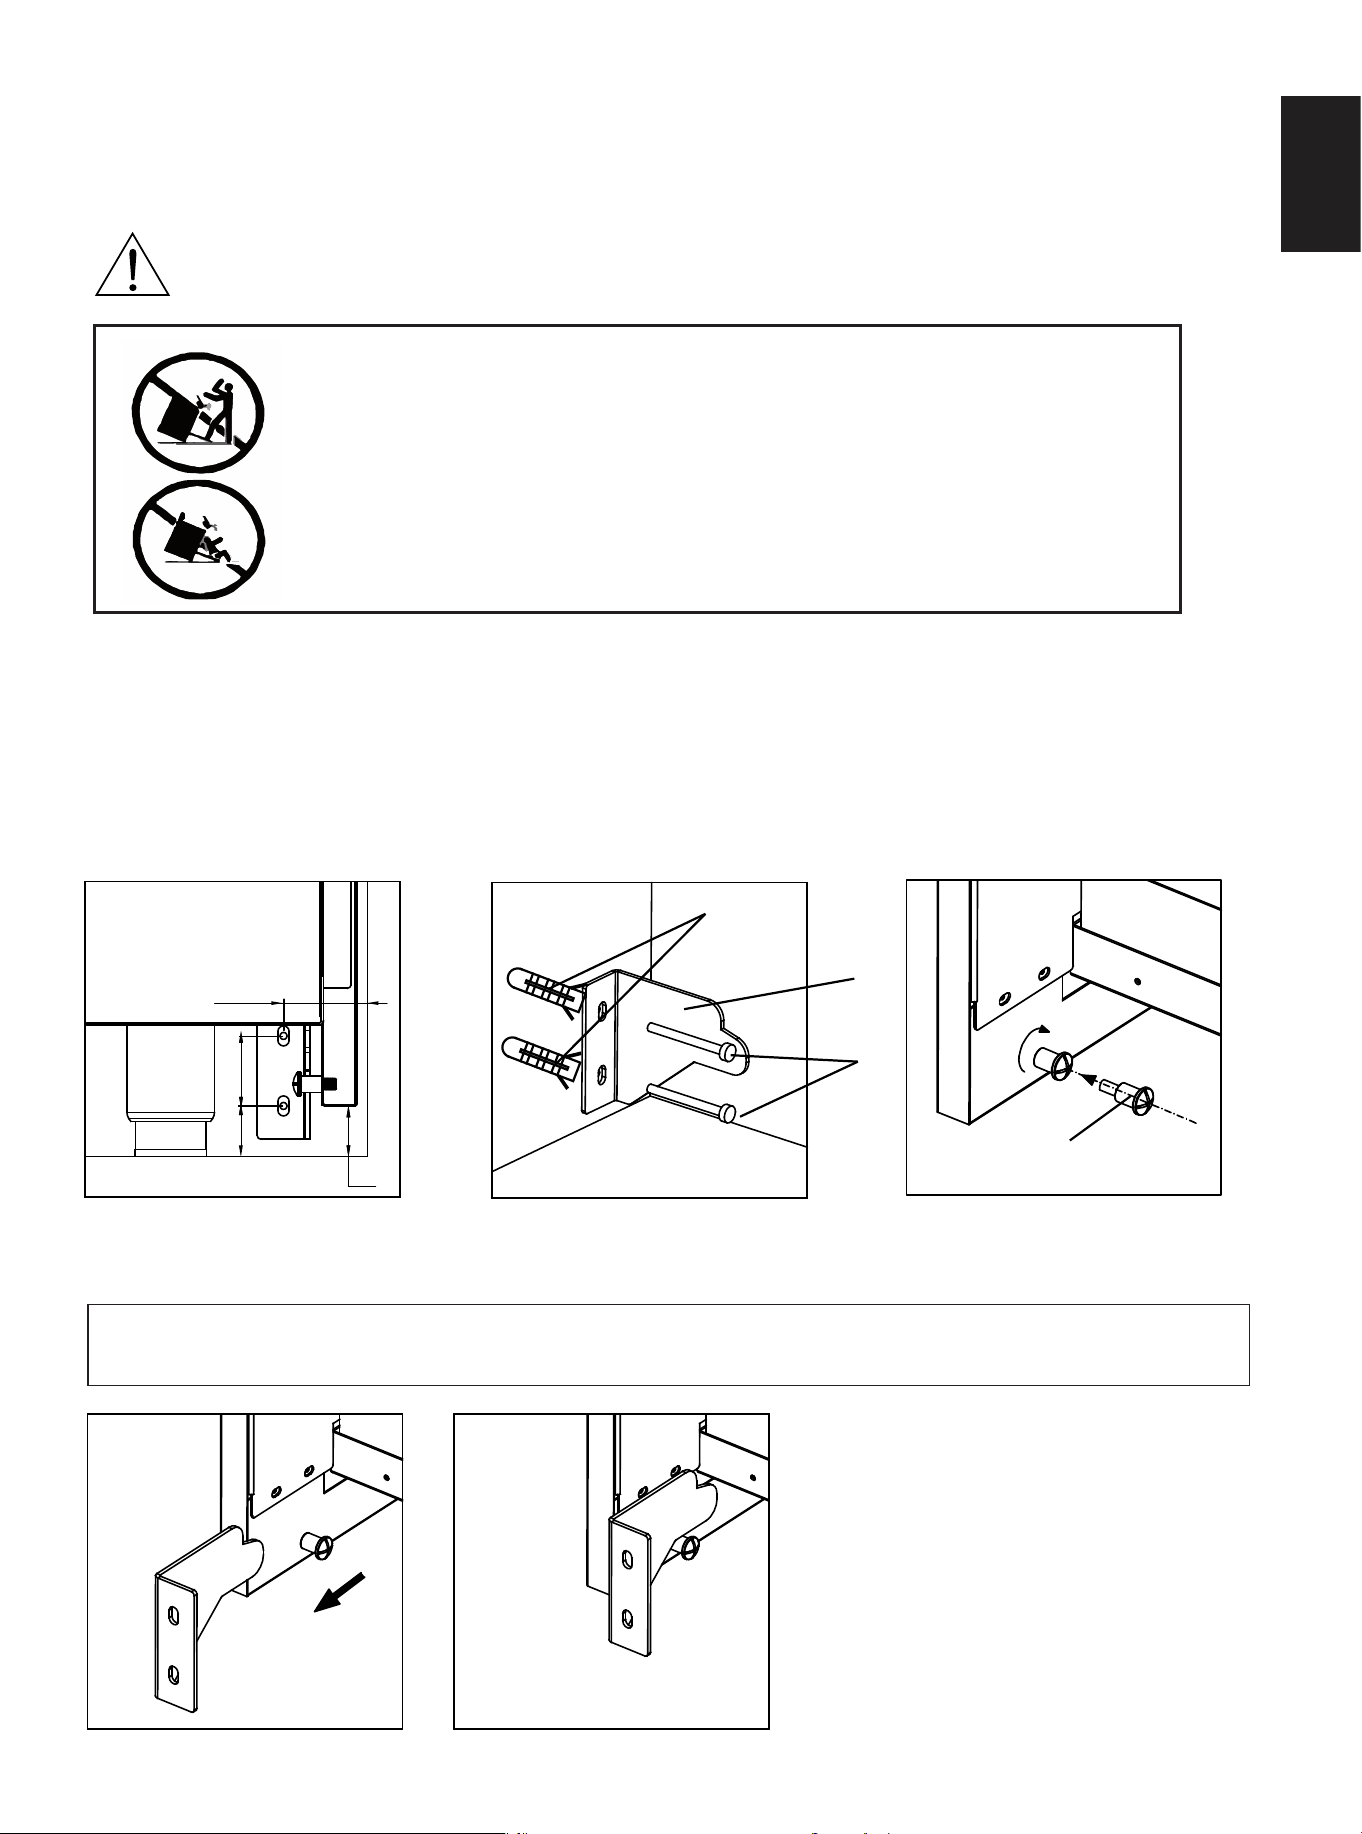
A)Locate the installation
position of the anti-tip bracket
on the wall.
NOTE:
① Anti-tip Bracket (1)
②
ST 6/25”x 1 3/5”Screws (2)
④ M6 Step Screw (1)(It has been
preinstalled on the side panels)
④
B)The anti-tip bracket must be
securely mounted to the wall.
C)Make sure the step screw is
tightened in the nut hole of
the side panel.
D)Move the range against the
wall and make sure the step
screw is under the anti-tip bracket.
14
INSTALLATION INSTRUCTIONS
INSTALLING THE ANTI-TIP BRACKET
To reduce the risk of tipping the appliance, the appliance must be secured by
properly installed anti-tip device packed with the appliance. All ranges can tip and cause
injuries. Install anti-tip device packaged with range.Follow all Installation Instructions.
Make sure the anti-tip bracket is installed.
Make sure the anti-tip bracket is securely attached to the wall behind the range.
Safely move the range against the wall, make sure the step screw under the bracket.
WARNING:
A child or adult can tip the range and be killed and be fatally
injured.
Reconnect the anti-tip bracket, if the range is moved.
Failure to follow these instructions can result in death or serious
burns to children and adults
ENGLISH
③ Expansion tube (2)
NOTE:After adjusting the height of the range, measure the height from the bottom edge of
the side panel to the ground, then you get the height of A.
A
A
1 1/2”
1 9/10”
①
②
③
15
INSTALLATION INSTRUCTIONS
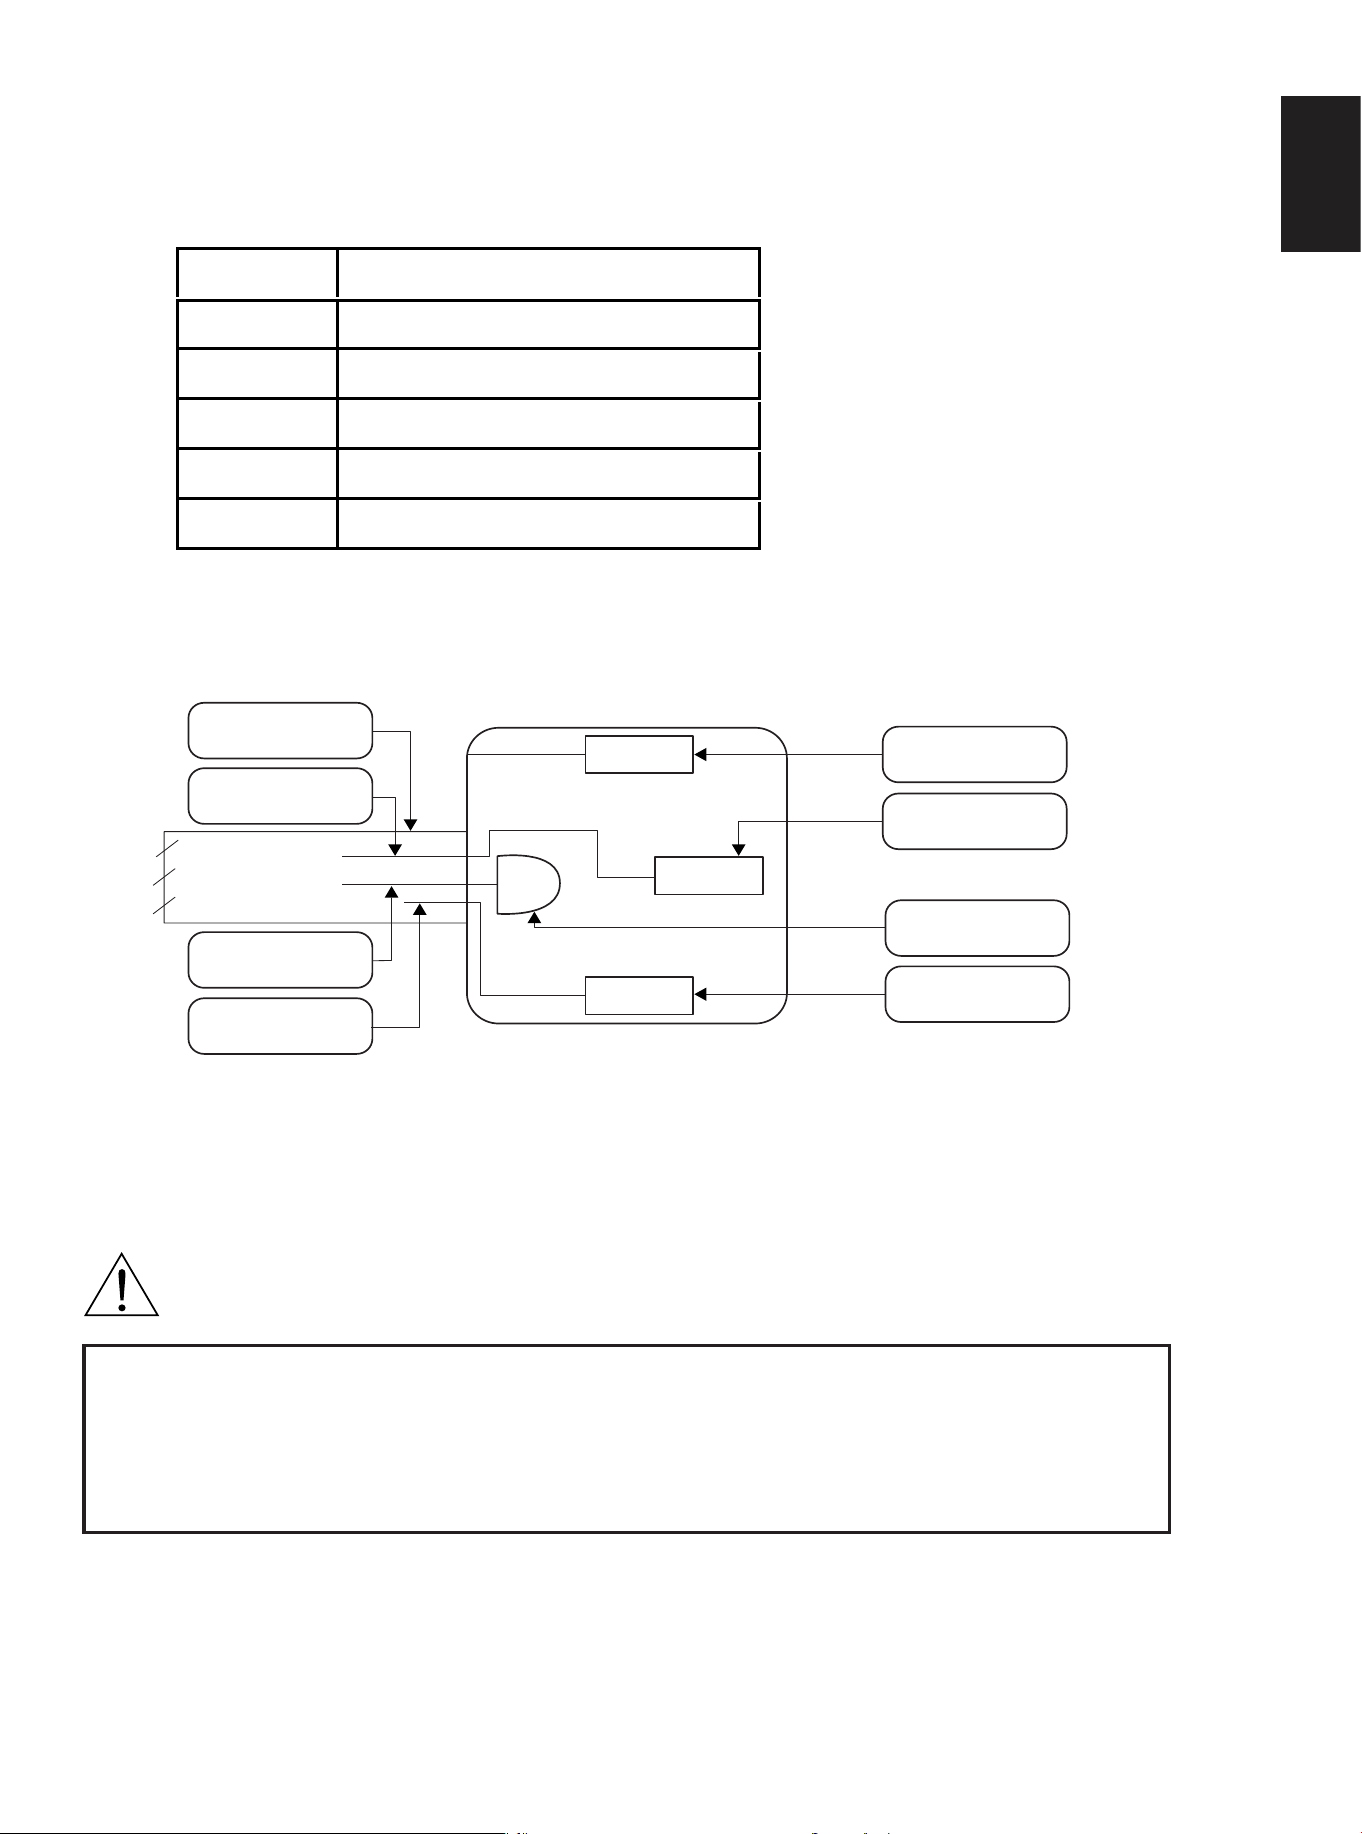
ELECTRIC POWER RATING
ELECTRIC POWER RATING
This oven is equipped with a four-prong plug for protection against shock hazard and
should be plugged directly into a properly grounded receptacle. Do not cut or remove
the prong from this plug.
Label all wires prior to disconnecting when servicing controls. Wiring errors can
cause improper and dangerous operation. Verify proper operation after servicing.
Disconnect electrical power at the circuit breaker box or fuse box before
installing the appliance.
provide appropriate ground for the appliance. Use copper conductors only.
No attempt should be made to operate the appliance during power failure.
FFSEL6011-48
Model
120/240
VAC
NEMA 14-50P(50 AMP plug)
Plug
50
Amps
60
Hz
17000
W
Four-Wire Connection
Receptacle
NEMA 14-50R
L2(red)
N(white)
G(green)
L1(black)
L2(red)
N(white)
G(green)
L1(black)
WARNING:
ENGLISH
16
INSTALLATION INSTRUCTIONS
POWER SUPPLY CONNECTION
POWER SUPPLY CONNECTION
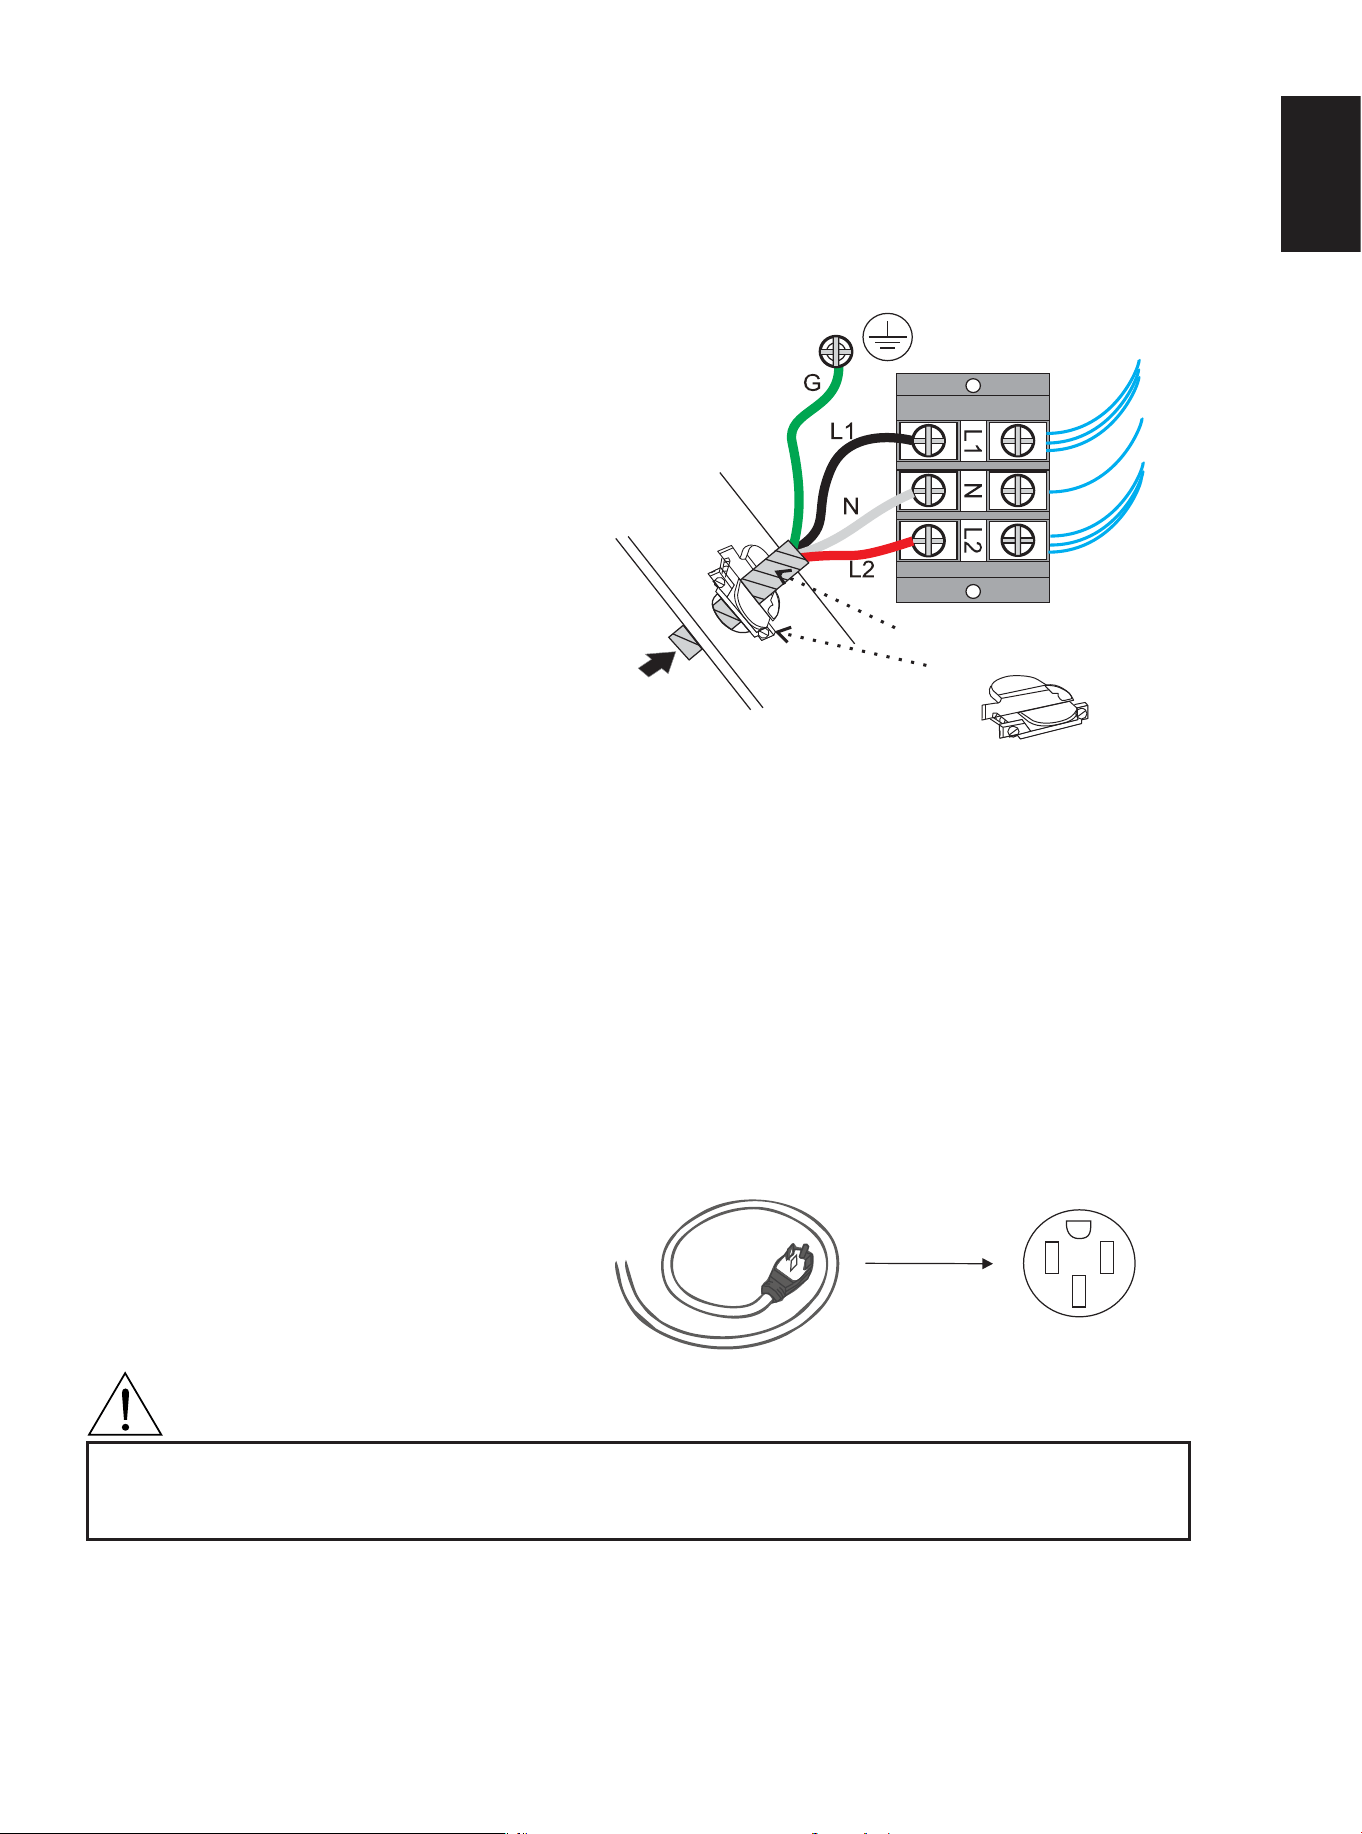
IMPORTANT: FOUR WIRES CONNECTION (UNGROUNDED NEUTRAL)
should be used in grounding the receptacle power supply connections.USA only.
1. Disconnect power.
2. Remove the screws fastening the
power supply box on the right back
of the range. Can find the electrical
terminal block located inside.
3. Install a UL listed strain relief (not
provided) to the power cord (not
provided) opening in the power
supply box , and then completely
tighten the screws.
4. Connect the power cord to
the electrical terminal block as below
5. Tighten the screws completely, and then verify the connection.
6. Gently, pull the excess power cord to the outside and position the power
supply box of the range.
7. Replace the back panel s crews, and then fully tighten the screws.
8. Plug range into grounded outlet.
9. Tuck excess power cord under the range.
This range is equipped with a CSA
intentional Certifed Power Cord intended to
be plugged into a standard 4-wire receptacle
(NEMAtype14-50R) wall receptacle. Be sure
the wall receptacle is within reach of range's
final location.
1) Connect the L1 receptacle terminal to the incoming BLACK electrical supply wire (L1-hot wire).
2) Connect the L2 receptacle terminal to the incoming RED electrical supply wire (L2-hot wire).
3) Connect the NEUTRAL receptacle terminal to the incoming NEUTRAL (WHITE) electrical supply wire.
4) Connect the GROUND receptacle terminal to the incoming GROUND (GREEN) electrical supply wire.
DO NOT USE EXTENSION CORDS WITH THIS APPLIANCE AS IT MAY
RESULT IN FIRE , ELECTRIC SHOCK OR OTHER type of PERSONAL INJURY.
NOTE: Electric supply cord set 4 wires type with ring terminals (L1 , L2, N, Ground)
suitable for range use UL/CSA listed type SRDT/DRT 2x6/2x8 AWG (LI , L2, N, G)
rated 300v, 50A with fused plug type NEMA 14-50p; cable length 3.6 ft.
In case the supply cord set must be replaced, it shall be replaced with an identical set
having the same technic a specifications
WARNING:
plug into
UL Listed Strain Relief
Power cord
Power supply box
ENGLISH
17
INSTALLATION INSTRUCTIONS
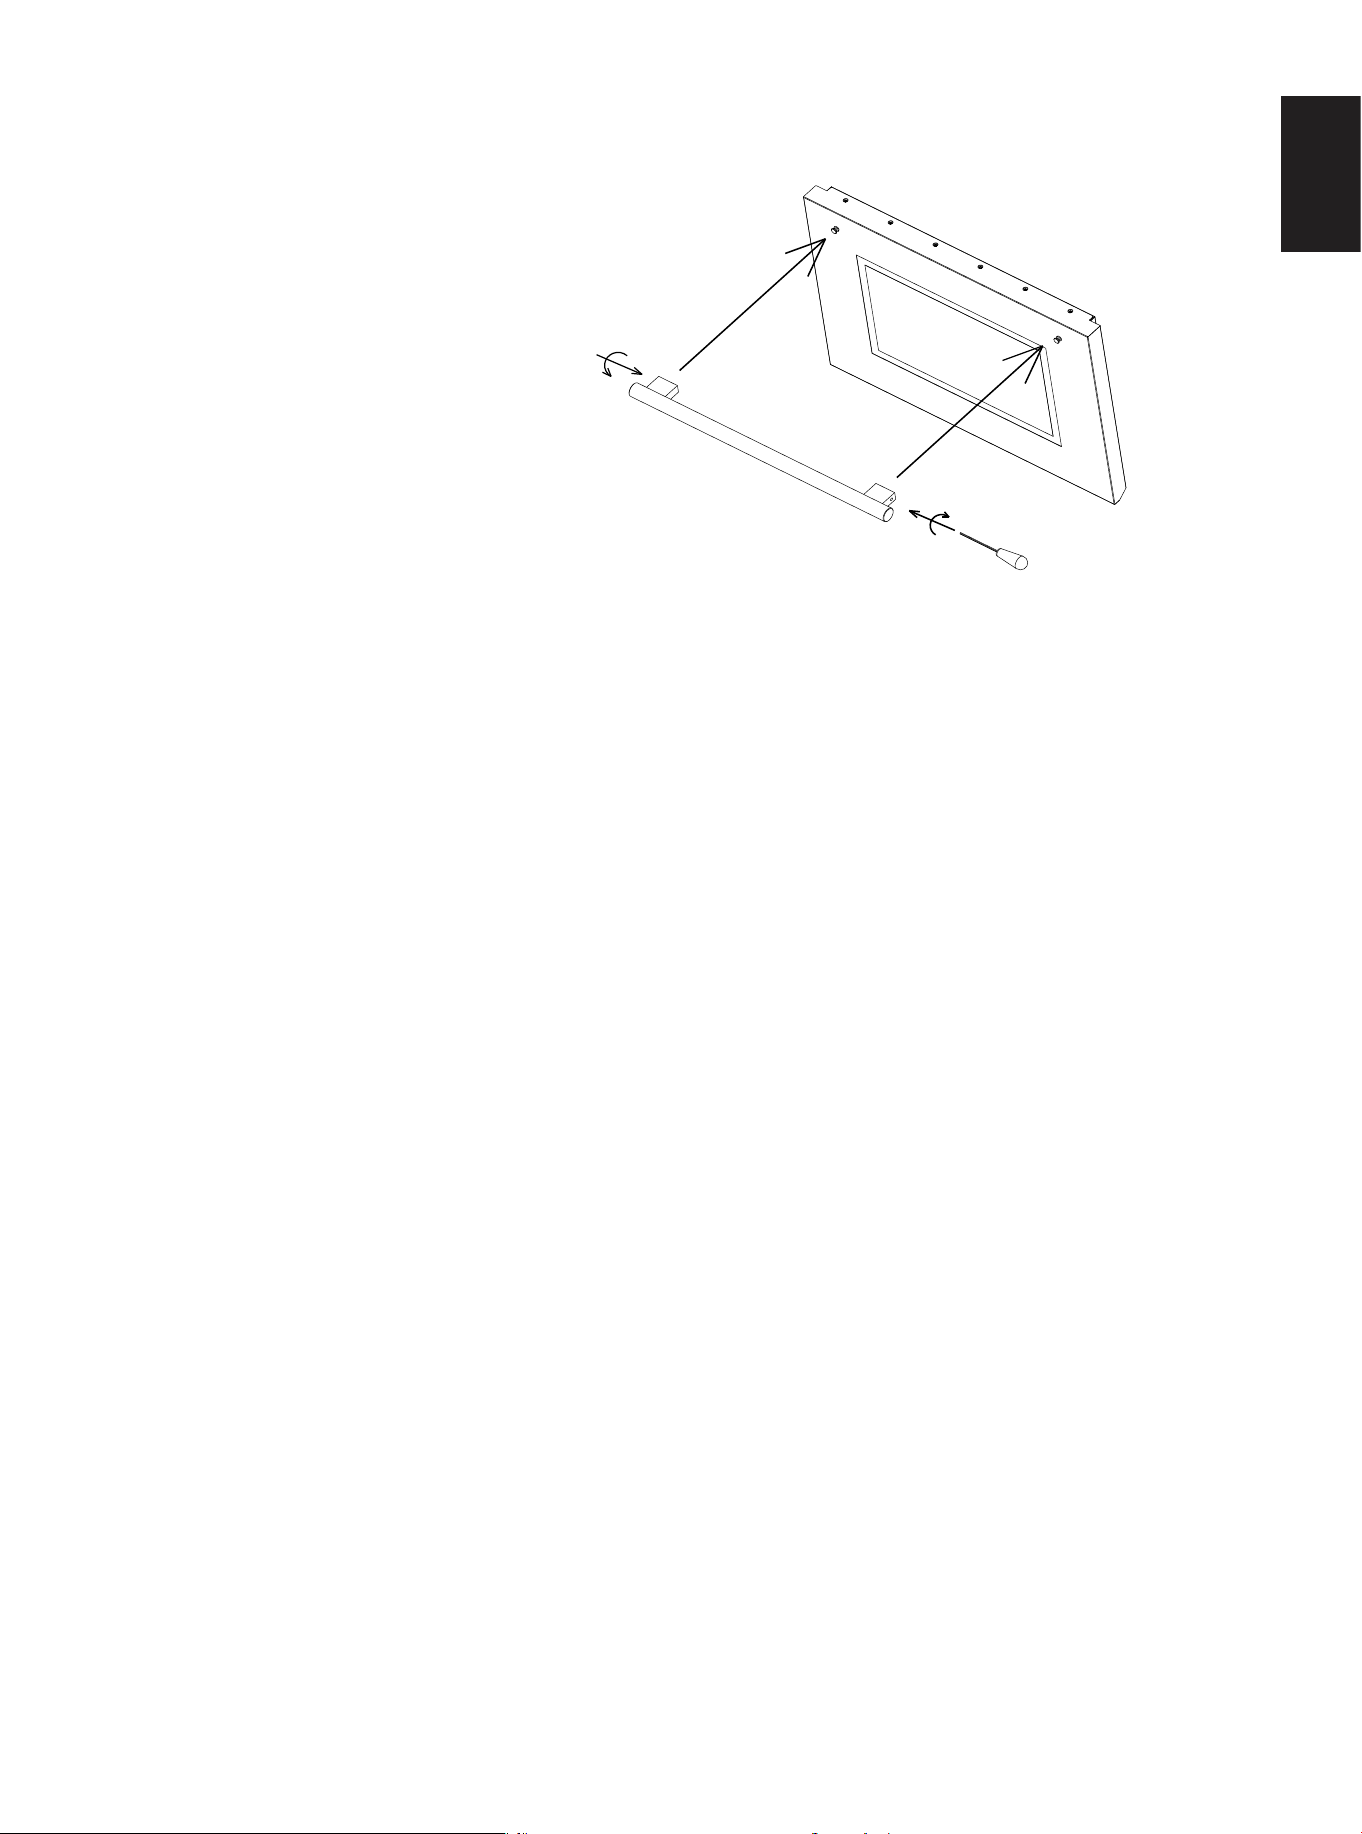
OVEN DOOR HANDLE INSTALLATED
INSTALLATION CHECKLIST
1. Make the handle inserted to
the pins on the oven door.
2. Tight these two screws in
both sides of handle by a
driver which included.
1. Is the rang height adjusted ?
2. Is the anti-tip bracket securely and properly inserted to the range ?
3.Does the clearance from the side cabinets comply with the manufacturers’ direction ?
4. Is the electricity properly grounded ?
FINAL PREPARATION
·All stainless steel body parts should be wiped with hot, soapy water and with a
stainless steel cleanser.
·If build-up occurs, do not use steel wool, abrasive cloths, cleaners, or powders.
If it is necessary to scrape stainless steel to remove encrusted materials, soak
with hot, wet cloths to loosen the material, and then use a wood or nylon
scraper.DO NOT use a metal knife, or any other metal tool to scrape stainless
steel ! Scratches are almost impossible to remove.
·Before using the oven for food preparation, clean thoroughly with a warm soap
and water solution to remove film residues and any dust or debris from
installation, then rinse and wipe dry.
USING RANGE FOR THE FIRST TIME
·We recommend that before you cook in your new range you heat the oven to
380 °F for 2 hrs to run in BAKE mode. After the oven cools wipe it out with hot
water and a mild detergent. We also recommend cleaning the racks and
shelves before use.
·When using the range for the first time you may notice the following:
---There may be a smell. This is quite normal when the range is first heated as
residual oil from production of parts will be burnt off quickly.
---There may be noises. This is also quite normal, as new parts move and
settle into place during the initial heating process.
ENGLISH
18
OPERATION
COOKTOP COOKING
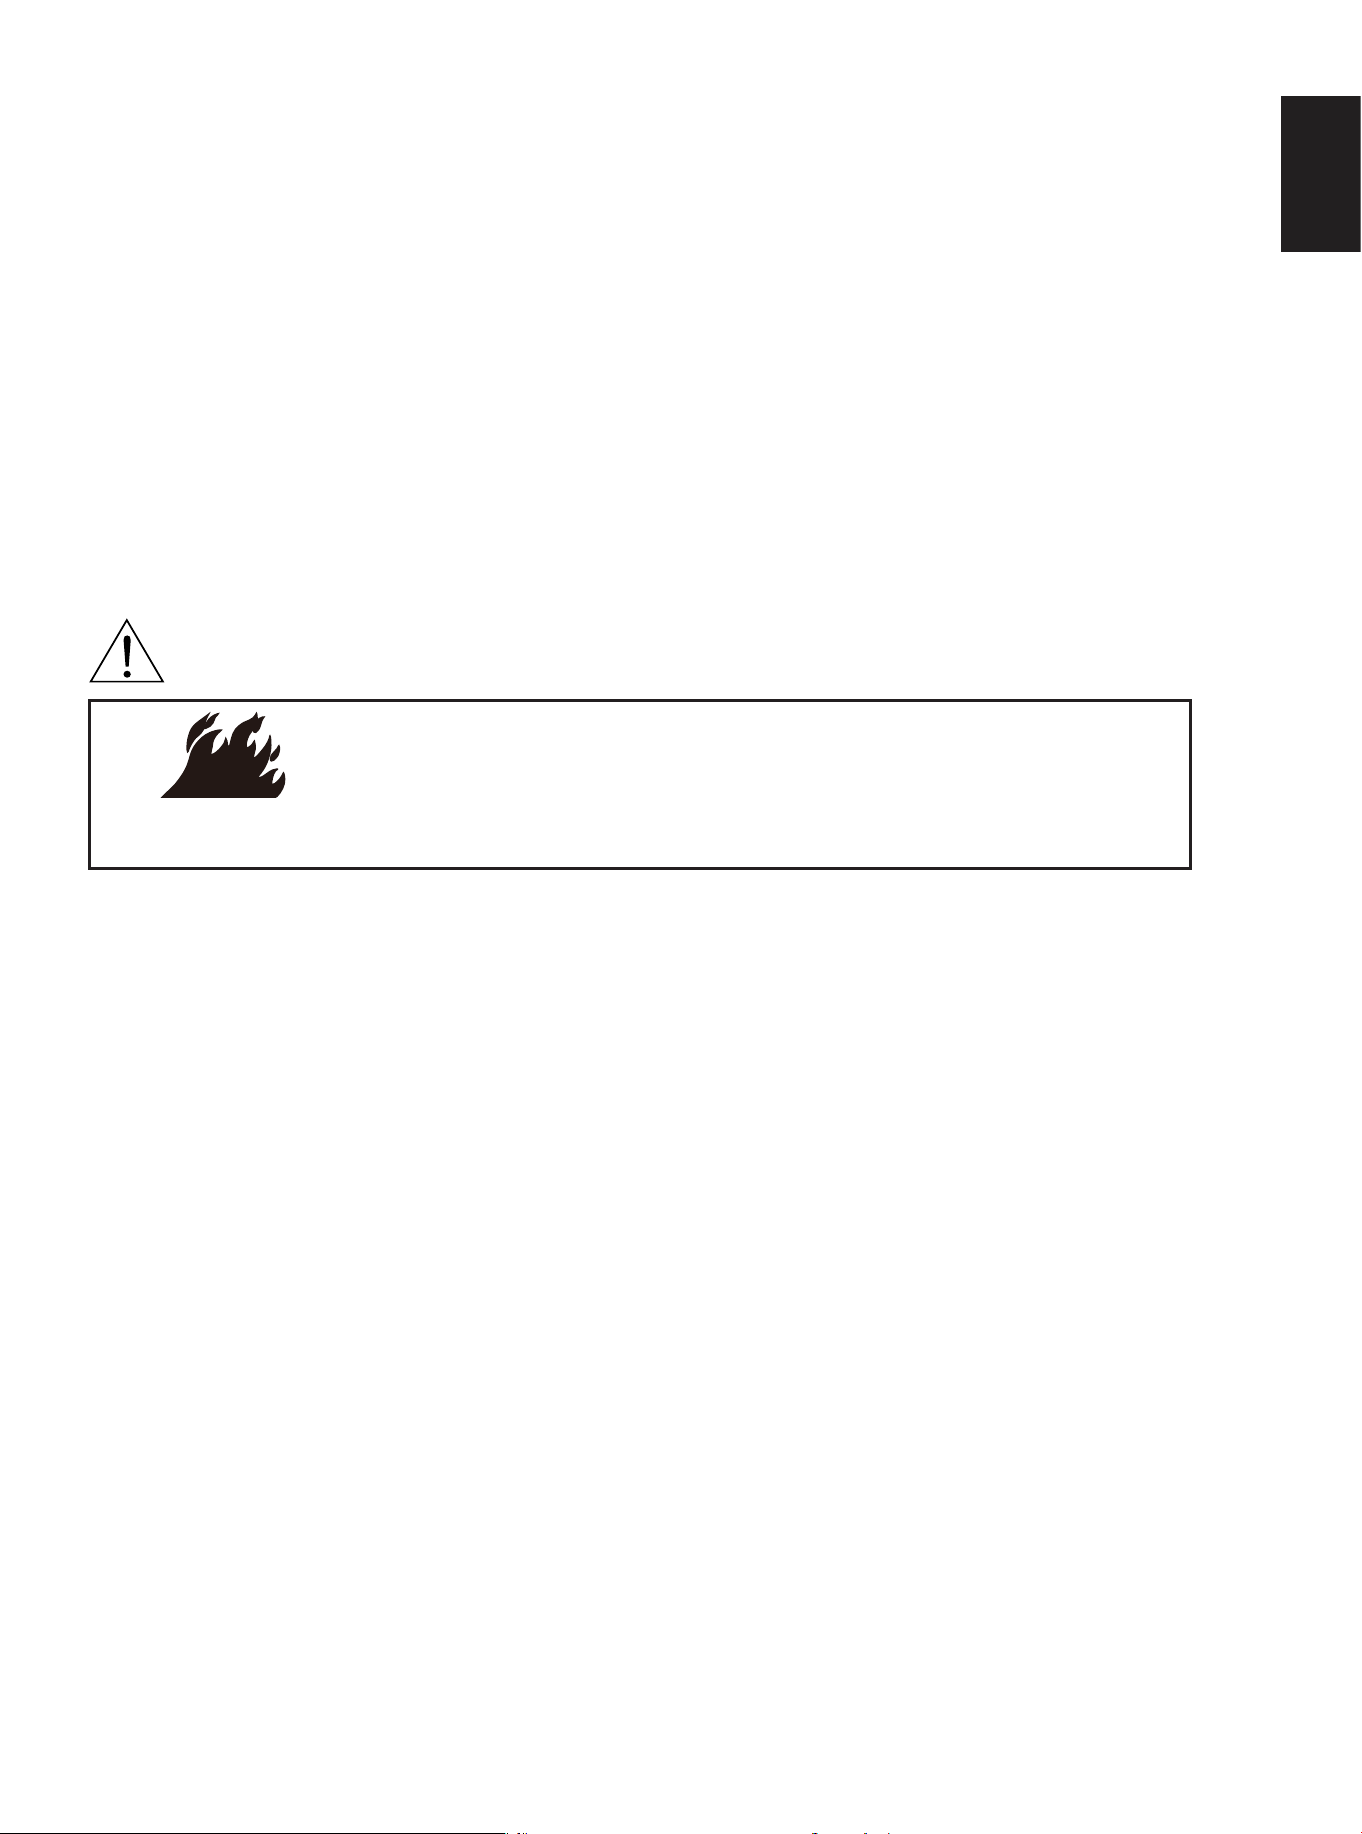
Always ensure that the knobs are in the off
position when the appliance is not in use.
Failure to do so can result in death or fire.
·This product is intended for the cooking of food and must not be used for other
purposes.
HEATING ELEMENTS
ENERGY REGULATOR
Each radiant cooker element has its own energy regulator, which is used to control
the working frequency of the radiant element to achieve different heating effects.
From LO to HI, the working frequency is gradually increased, and the heating time
is also increased.
RADIANT ELEMENT
This type of electric element uses a wire ribbon located under the glass surface to
provide the heat for cooking. Turn the knob from LO to HI, the radiant element will
be turn on and off frequently with the working time.
·Unstable or deformed pans should not be placed on the cooktop in order to avoid
accidents caused by spill over.
·Particular care should be taken when cooking with oil or fat.
·There may be a slight odor during the first several users: this is normal and will
dissipate.
·Before maintenance and cleaning, disconnect the appliance and allow cooling
down. For reasons of hygiene and safety this appliance must always be kept clean.
WARNING:
Fire Hazard
ENGLISH
LO
HI
HI
HI
LO
LO
Push
OFF OFF
HI
LO
Push
Cooktop
19
SUPPLIED PARTS
HOT SURFACE INDICATOR LIGHT
Each element features a hot surface indicator light to show when the cooking area
is ON or hot. The signal light will turn on automatically in the area marked with a
circle. The light remains on as long as the surface cooking area is too hot to touch
even after the surface cooking area is turned off.
NOTE: Once the element is turned off, the Hot surface
indicator light (Located on control pane or under
cooktop glass, near the "Hot surface" marking) will
remain illuminated until the surface temperature of the
element has cooled.
The cooking surface will hold the heat and remain hot
over 20 minutes after the elements have been turned off.
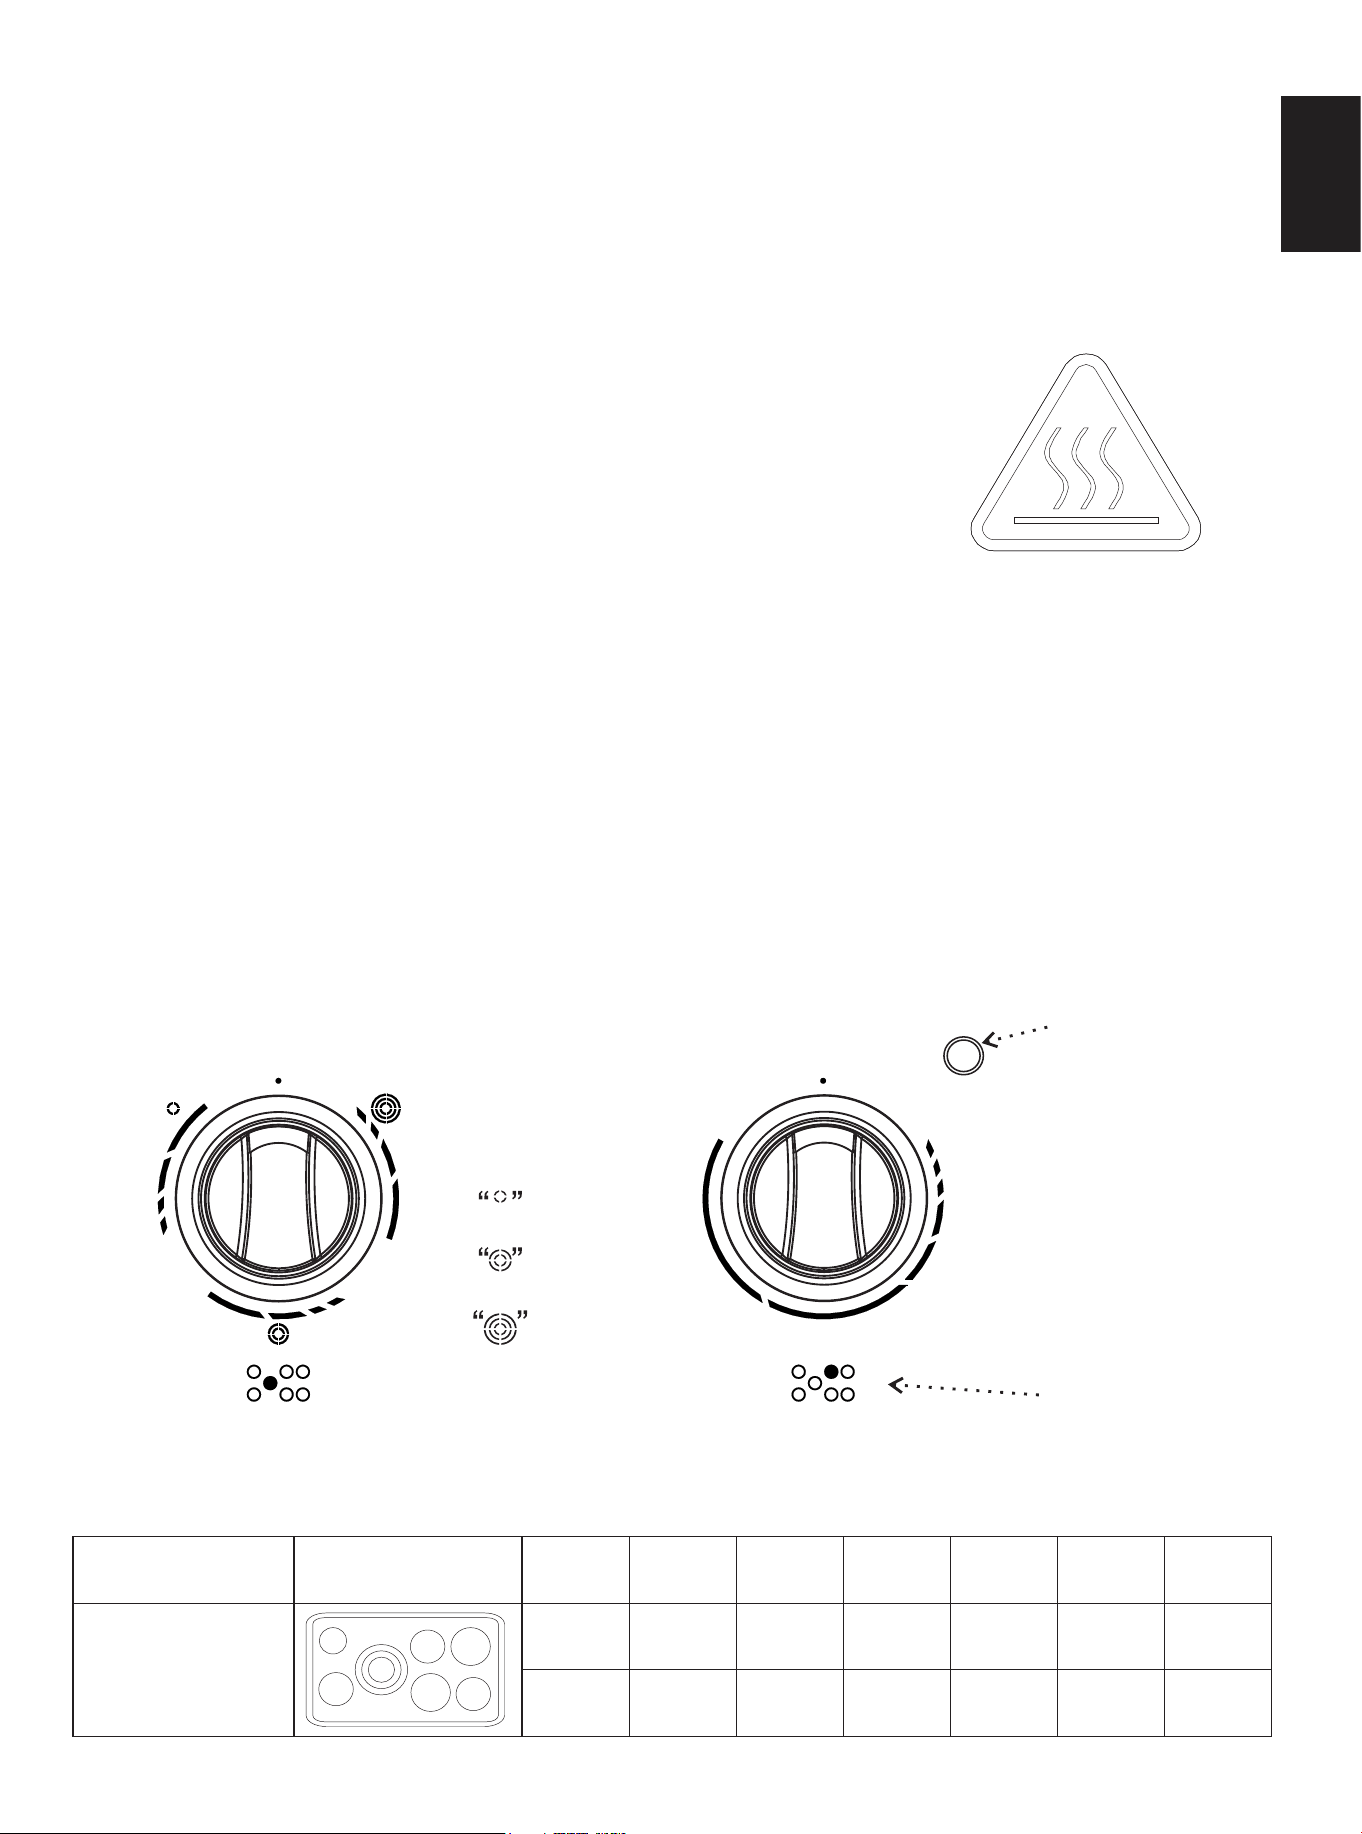
CONTROL KNOBS
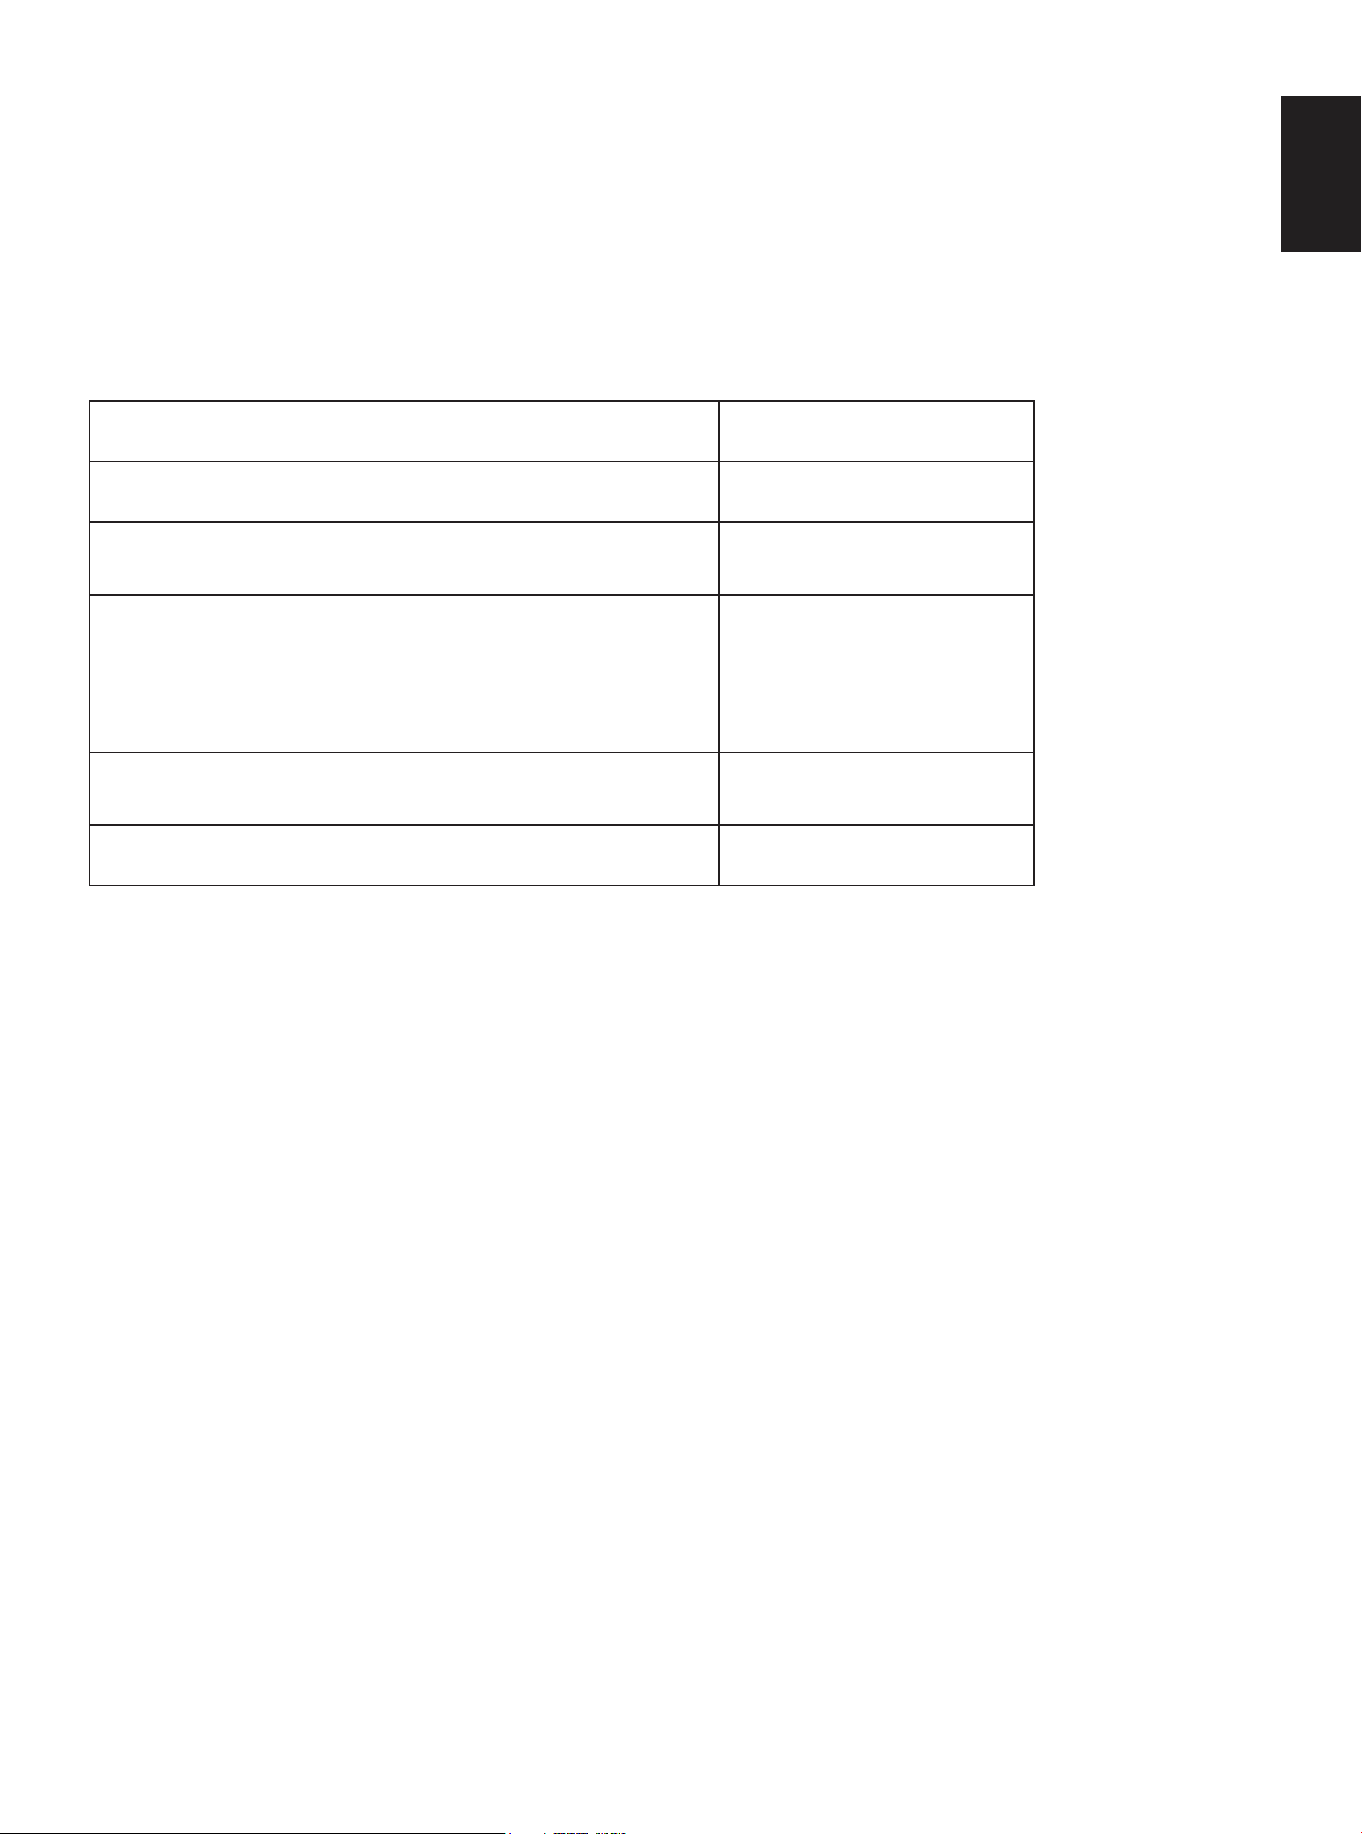
POWER RATING AND SIZE OF ELEMENT
The control knobs turn in either direction and from any position to the desired
temperature setting or to OFF.
The placement of each knob corresponds to the placement of the heating
element that it controls.
To Turn on Any Heating Element: PUSH DOWN on the knob and TURN in
either direction to desired heat setting. And then the cooktop lighting is on.
FFSEL6011-48
Model Position Drawing
Left
Rear
Left
Front
Middle
Middle
Rear
Middle
Front
Right
Rear
Right
Front
100w
7”
1200w
7”
3300w
12”
1200w
7”
2000w
8”
2000w
8”
1200w
7”
Lighting
Heat element
location marking
Inner ring
Inner and middle rings
Triple rings
TRIPLE RING RADIANT
ELEMENT KNOB
SINGLE RADIANT
ELEMENT KNOB
Hot Surface marking
ENGLISH
20
OPERATION
RECOMMENDED HEATING ELEMENT SETTINGS
Heating elements do not require preheating.
A range of heating settings is listed in the following chart because the required
temperature depends on : Type and quality of pan / Type, quantity and
temperature of the food / Element used and cook's preferences.
COOKWARE
The choice of pan directly affects the cooking performance (speed and uniformity).
For best results, select pans with the following features.
GENERAL
The glass ceramic cooking surface is a durable material resistant to impact, but
not unbreakable if a pan or other object is dropped on it.
Do not slide cook ware across cooking surface it may scratch the glass. Rough
finishes may scratch the cooktop.
Using cast iron cook ware on the glass cooktop is not recommended. Cast iron
retains heat and may result in cooktop damage.
Food packaged in aluminum foil should not be placed directly on the glass ceramic
surface for cooking; Aluminum foil will melt and cause permanent damage to the
glass surface.
DO not allow pans to boil dry. This can damage the pan, element and /or cooktop.
Never cook food directly on the glass.
Type of food
Heat setting
Boiling water for vegetables, pasta
Braising meat, pan frying meat, fish, eggs, stir
frying, quickly brown or sear meats, hold rapid boil
Cooking vegetables, fish broths , eggs-fried or
scrambled-pasta, milk, pancakes, pudding
simmering meats, steaming vegetables, popcorn,
bacon, stewing meat Soup, Medium sauteed
vegetables, spaghetti sauces
Delicate sauce, rice, simmering sauces with butter
and egg yolk
Melting butter, chocolate
HI
MID to HI
MID
LO to MID
LO
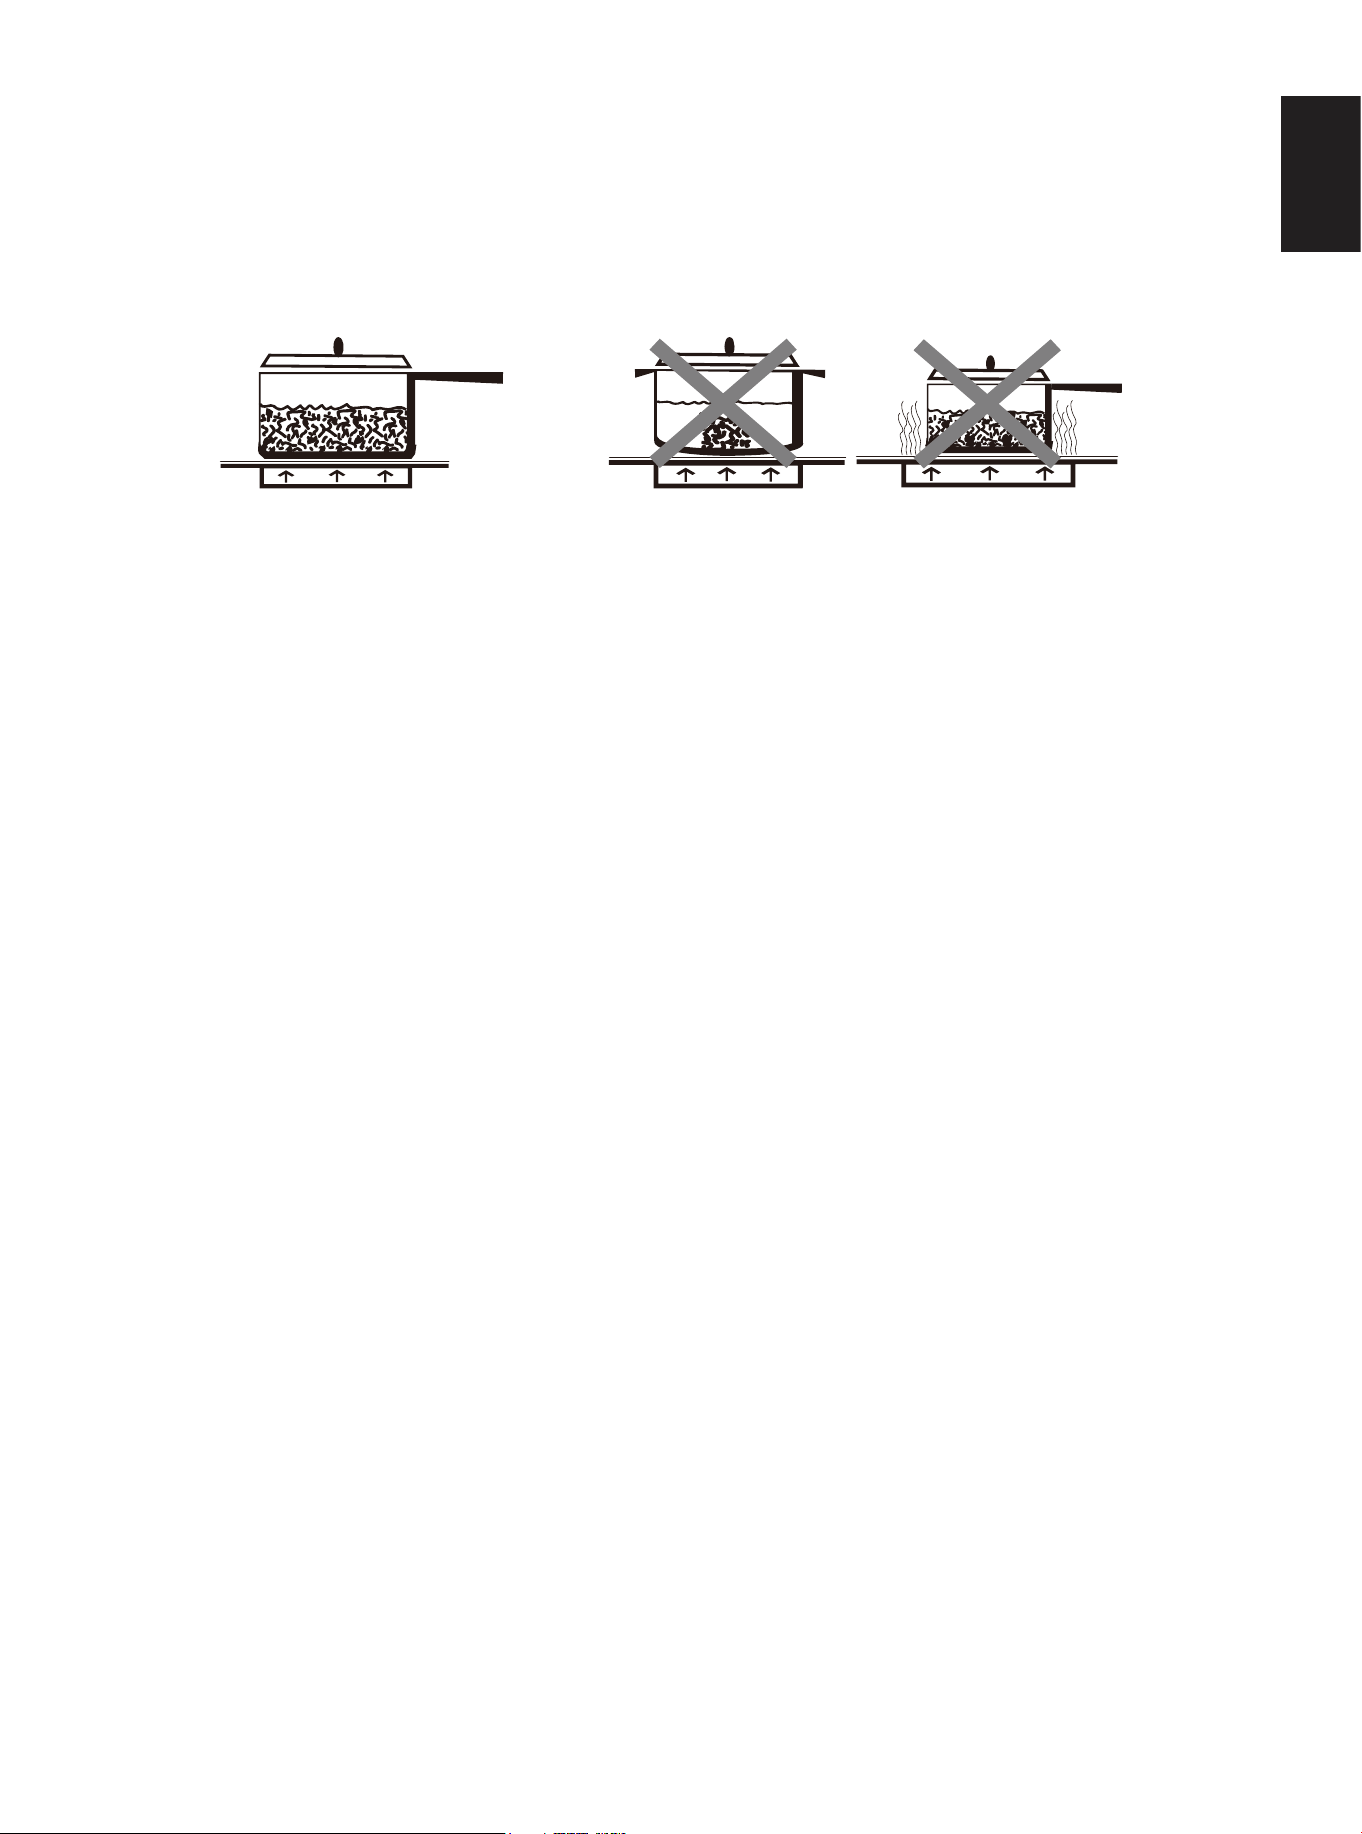
FLAT BASE
When a pan is hot, the base (pan bottom)should rest evenly on the surface without
wobbling(rocking). ldeal cookware should have a flat bottom, straight sides, a well
fitting lid and the material should be of medium to heavy thickness.
ENGLISH
21
OPERATION
MATCH PAN DIAMETER TO ELEMENT
The base of the pan should cover or match the diameter of the element being used.
COOKWARE CHARACTERISTICS
Cast Iron: on a glass cook top heats and cools slowly, but retains heat and cooks
evenly. Not recommended.
CANNING
Pots that extend beyond one of the surface unit's circle are not recommended for
most surface cooking. However, when canning with water-bath or pressure canner,
larger-diameter pots may be used. This is because boiling water temperatures (even
under pressure) are not harmful to the cook top surfaces surrounding the surface units.
CAUTION:
Remember that canning is a process that generates large amounts of steam. To
avoid burns from steam or heat, be careful when canning.
DO not use large diameter canners or other large-diameter pots for frying or boiling
foods other than water.
Flat-bottomed canners must be used.
Enamel ware: response depends on base metal. Not recommended. Imperfections
in enamel may scratch cooktop.
Glass ceramic: heats and cools slowly· Not recommended. Heats too slowly.
Imperfections in enamel may scratch cook top.
Aluminum: heats and cools quickly. Frying, braising, roasting May leave metal
markings on glass.
Copper: heats and cools quickly. Gourmet cooking, wine sauces, egg dishes.
Stainless Steel: heats and cools orderately. Soups, sauces, vegetables, and
general cooking.
BALANCE PAN
UNBALANCE PAN
ENGLISH

22
OPERATION
OVEN COOKING
·This oven is intended for the cooking of food and must not be used for other
purposes.
·Keep oven vent ducts unobstructed. Ensure good ventilation of the room,
keep adequate natural ventilation or install an extractor hood with a discharge tube.
·Take care when using cleaning products in spray form never direct the spray
onto the electrical wiring, thermostat and bulb.
·When placing food in the oven, or when removing a large quantity of oil, juice,
etc., any spills onto the bottom of the oven must be cleaned before starting to cook to
avoid unpleasant smoke and also the possibility of these substances catching fire.
·Ensure that the oven grids are inserted correctly.
·DO NOT TOUCH HEATING ELEMENTS OR INTERIOR SURFACE OF OVEN .
Heating elements may be hot even though they are dark in color. Interior surfaces of
an oven become hot enough to cause burns.
·During and after use, do not touch, or let clothing or other flammable materials come
into contact with the heating elements or interior surfaces of the oven until they have
had sufficient time to cool.
·Other surfaces of the appliance may become hot enough to cause burns, for
example, oven vent openings and surfaces near these openings, oven doors, and oven
glass window.
·Before maintenance and cleaning, disconnect the appliance and allow cooling down.
In case of doubt ask installer for advice.
·In case of electric power failure reset oven/broiler controls to the OFF position, do not
attempt to use oven/ broiler until the power has been restored.
·Always ensure that the bottom and handles of pans do not protrude over the worktop.
when cooking with flammable fat, such as oil, do not leave the range unattended.
·Use care when opening door. Let hot air or steam escape before removing or placing
food.
·DO NOT heat unopened food containers. Pressure build-up may cause container to
burst and result in injury.
·DO NOT CLEAN DOOR GASKETS. The door gasket is essential for a good seal.
care should be taken not to rub, damage, or move the gasket.
·DO NOT USE ABRASIVE OVEN CLEANERS. NO commercial oven cleaner or
liner protective coating of and kind should be used in or around any part of the oven.
clean only the parts listed in the manual, before cleaning the oven, remove broiler
pan and other utensils.
ENGLISH
23
OPERATION
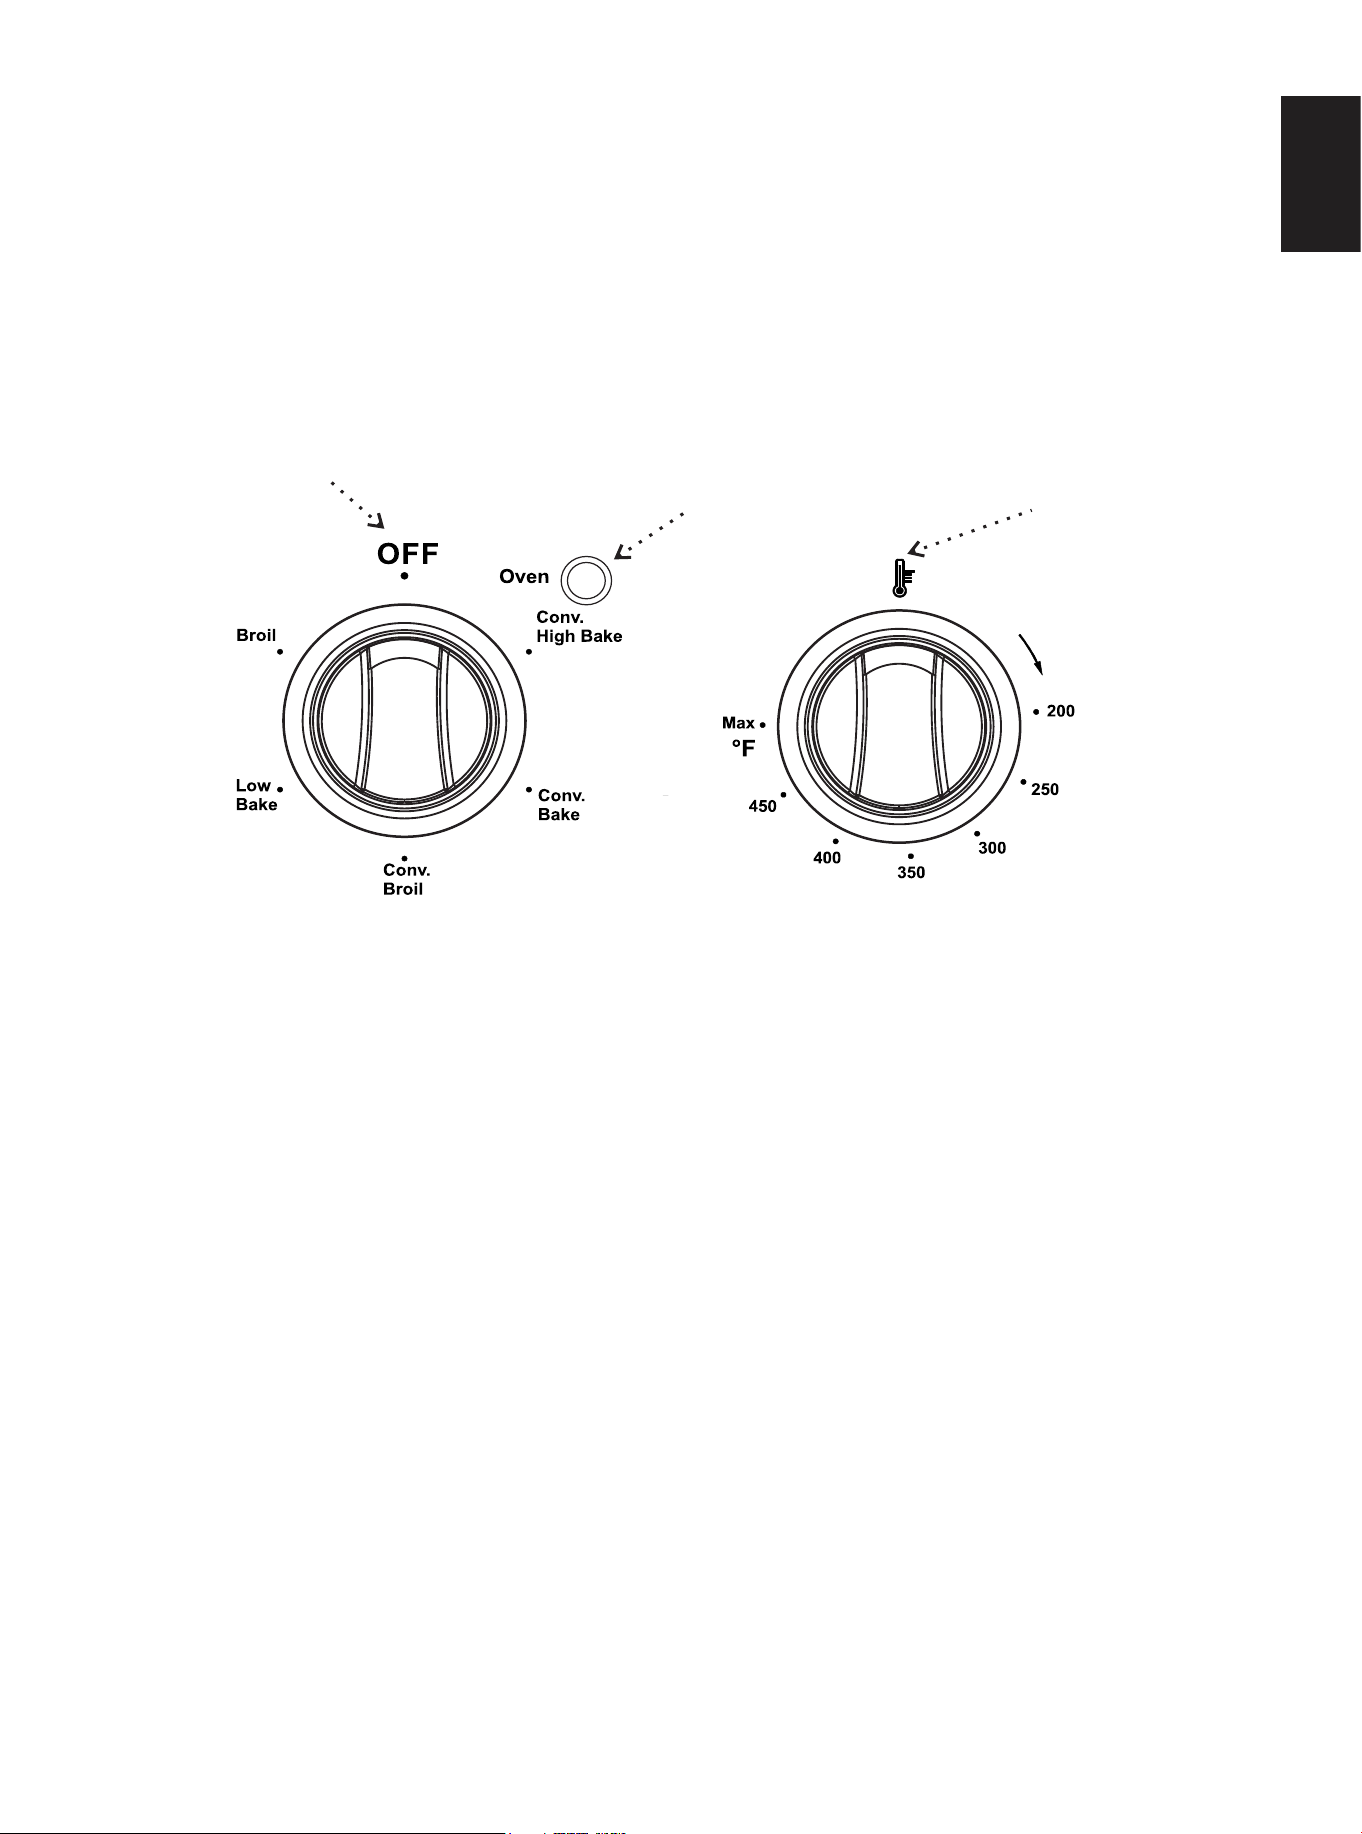
The Thermostat knob can be turn in clockwise for setting cooking temperature.
The control knob can be turn both side for setting cooking function. After the knob
turn on, the indicator light is on.
Both of these two knobs turn on together, the oven working indicator light (red light)
is illuminated on, cooking is on. The light is off when the temperature inside
the oven reach the setting temperature.
Convection High Bake: Use this setting for preheating the oven is helpful for
other cooking function. This setting uses the top outer heating element , bottom
heating element and convection fan. This setting is not only for preheating.
It is also for convection roast but caution burning of food may result.
Convection Bake: This setting uses the rear heating element , the bottom
heating element and the convection fan.
Convection Broil: This setting uses both the top heating element and the
convection fan.
Low Bake:This setting uses only the bottom heating element.
Broil: This setting uses both the top inner and outer heating element.
NOTE: Take care to reset all worktop/ oven controls to the OFF position after use of
the appliance.
30” OVEN CONTROL KNOBS
OVEN FUNCTION INSTRUCTION
Oven control
Oven working
indicator light
Thermostat
marking
ENGLISH
Max
450
400
350
300
250
200
°F
OFF
Conv.
High
Bake
Conv.
Bake
Conv.
Broil
Oven
24
OPERATION
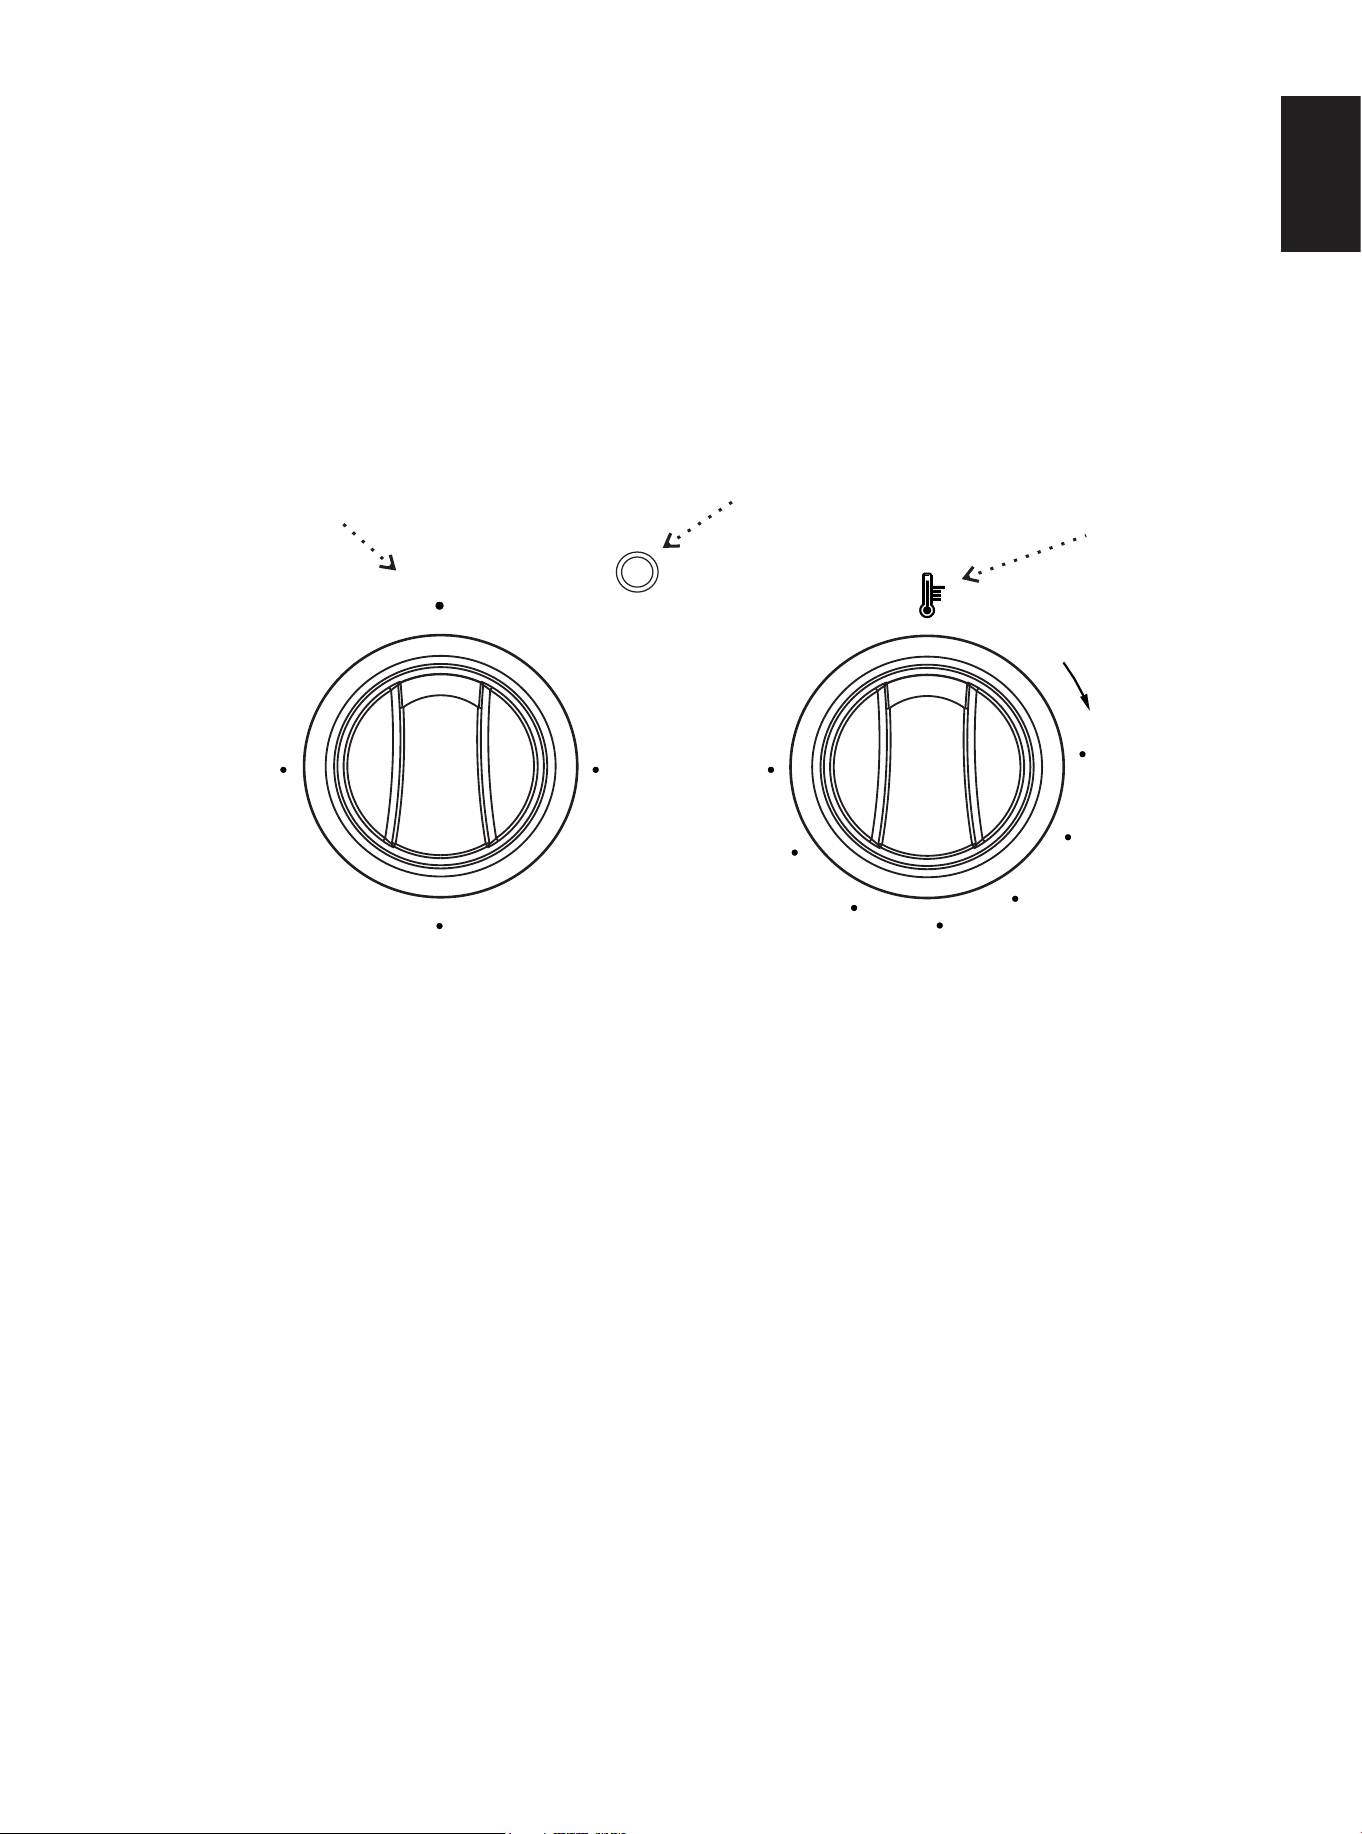
The Thermostat knob can be turn in clockwise for setting cooking temperature.
The control knob can be turn both side for setting cooking function. After the knob
turn on, the indicator light is on.
Both of these two knobs turn on together, the oven working indicator light (red light)
is illuminated on, cooking is on. The light is off when the temperature inside
the oven reach the setting temperature.
Convection High Bake: Use this setting for preheating the oven is helpful for
other cooking function. This setting uses the top heating element , bottom
heating element and convection fan.
Convection Bake: This setting uses the bottom heating element and the
convection fan.
Convection Broil: This setting uses the top heating element and the
convection fan.
NOTE: Take care to reset all worktop/ oven controls to the OFF position after use of
the appliance.
18” OVEN CONTROL KNOBS
OVEN FUNCTION INSTRUCTION
Oven control
Oven working
indicator light
Thermostat
marking
ENGLISH
25
MAINTENANCE AND CLEANING
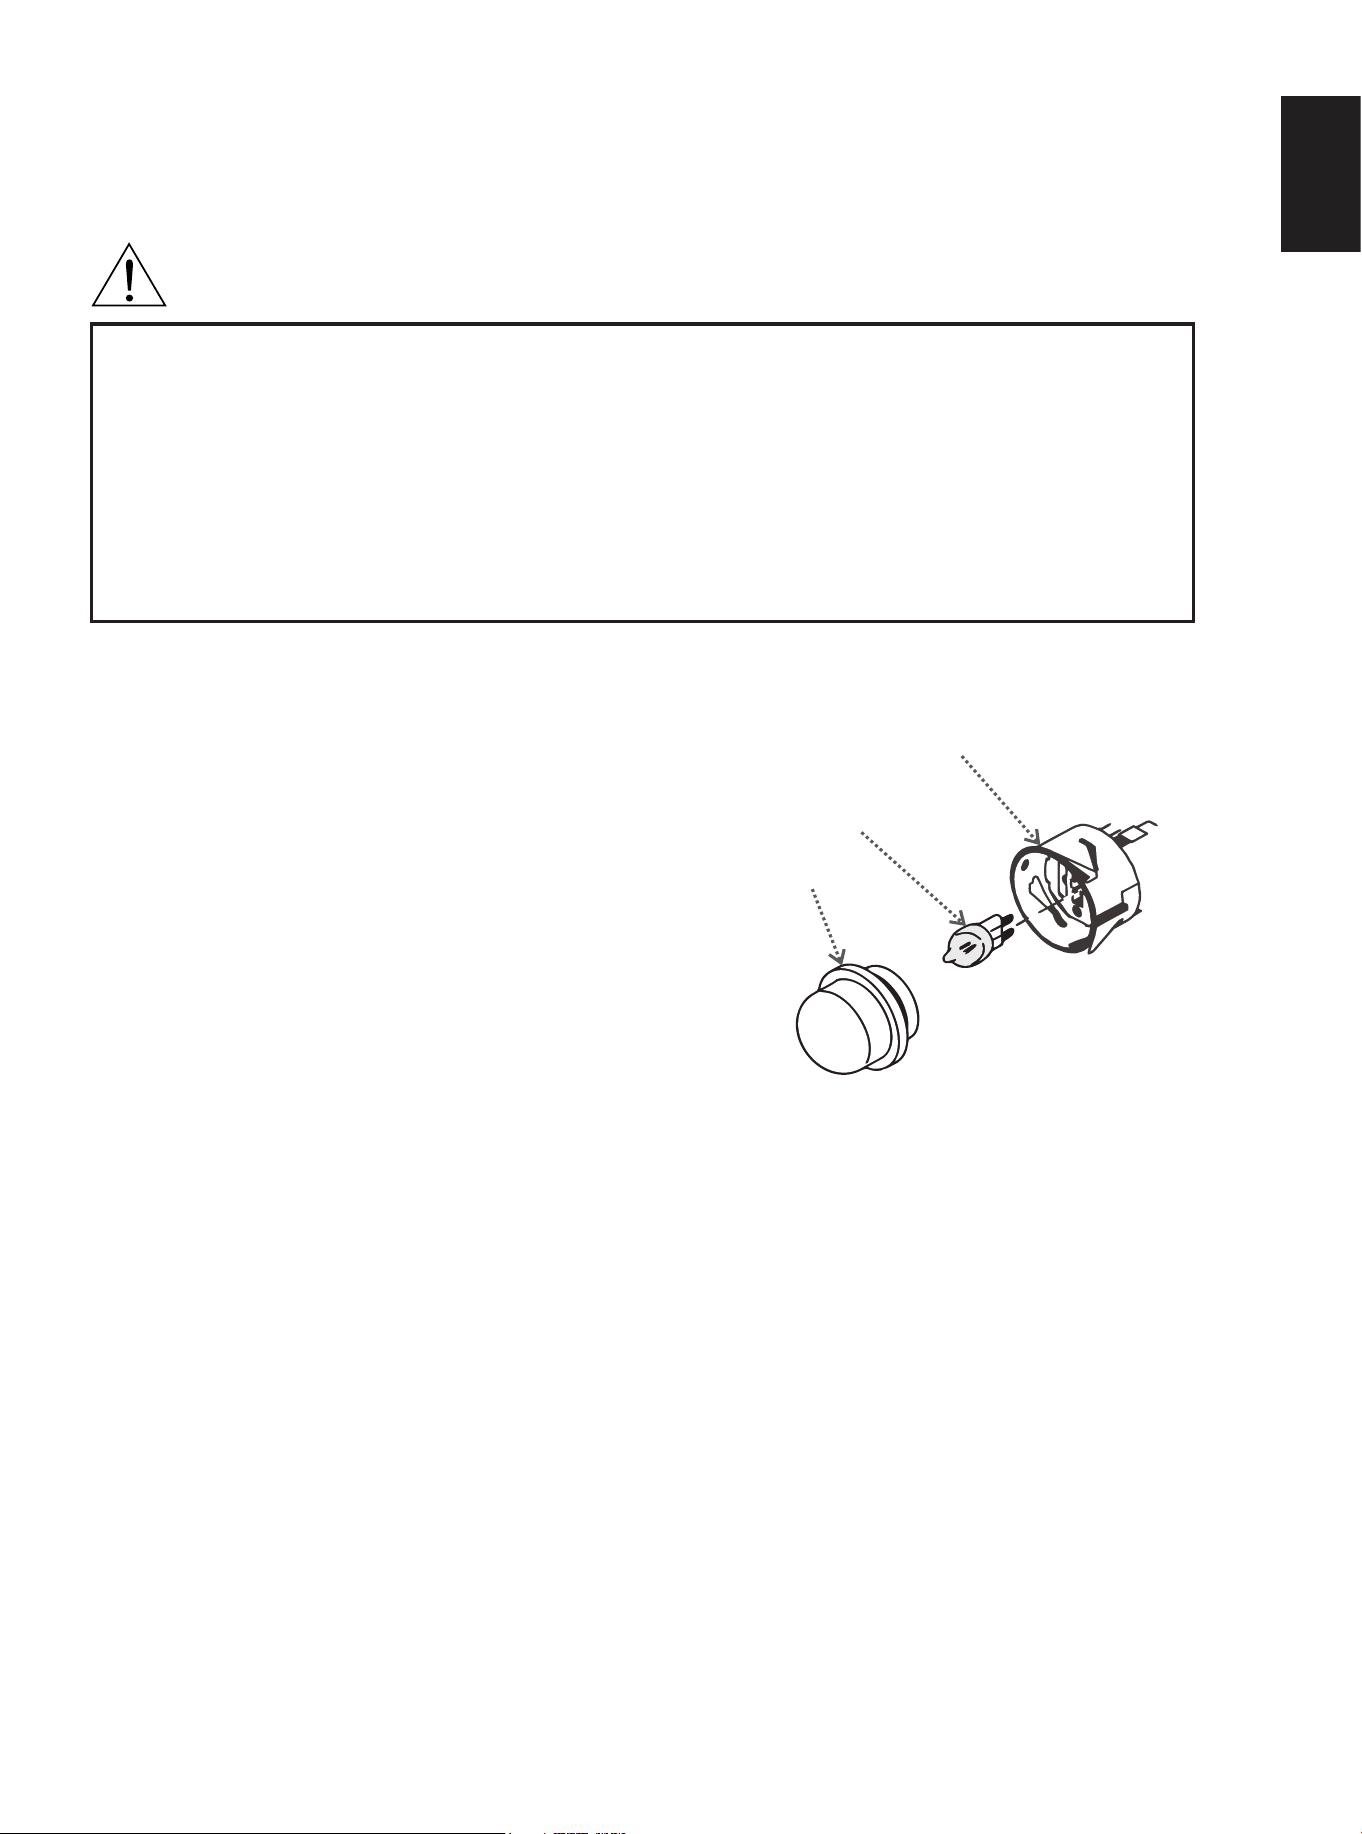
REPLACING THE OVEN BULB
Make sure the oven and lights are cool and power to the oven has been
turned off before replacing the light bulb(s).
The lens must be in place when using the oven.
The lens serves to protect the light bulb from breaking.
The lens is made of glass.Handle carefully to avoid breakage.
Failure to do so could result in death, electric shock, cuts or burns.
WARNING:
IMPORTANT: The light bulb in your oven is Type:G9, 120V and 25W.
You must replace this bulb with an appliance bulb of the same
type, voltage and wattage.
TO Replace the Light Bulb:
1 .Make sure oven is turned off and cool.
2. Disconnect power at the main
power supply (fuse or breaker box).
3. Unscrew the lens and remove.
4. Pull the burned-out bulb from the socket,
and then replace it with an appliance bulb
of the same type, voltage and wattage.
5. Replace the lens.
6. Turn on power at the main power supply
(fuse or breaker box).
For ease of installation and more thorough cleaning, some oven doors maybe
removed.
IMPORTANT: Make sure oven is cool and power to the oven has been turned
off before removing the door.
The oven door is heavy and fragile, and the door front is glass.
To avoid oven door glass breakage, use both hands, and grasp only the sides
of the oven door to remove.
Be sure that both levers are securely in place before removing the door.
Do not force door open or closed.
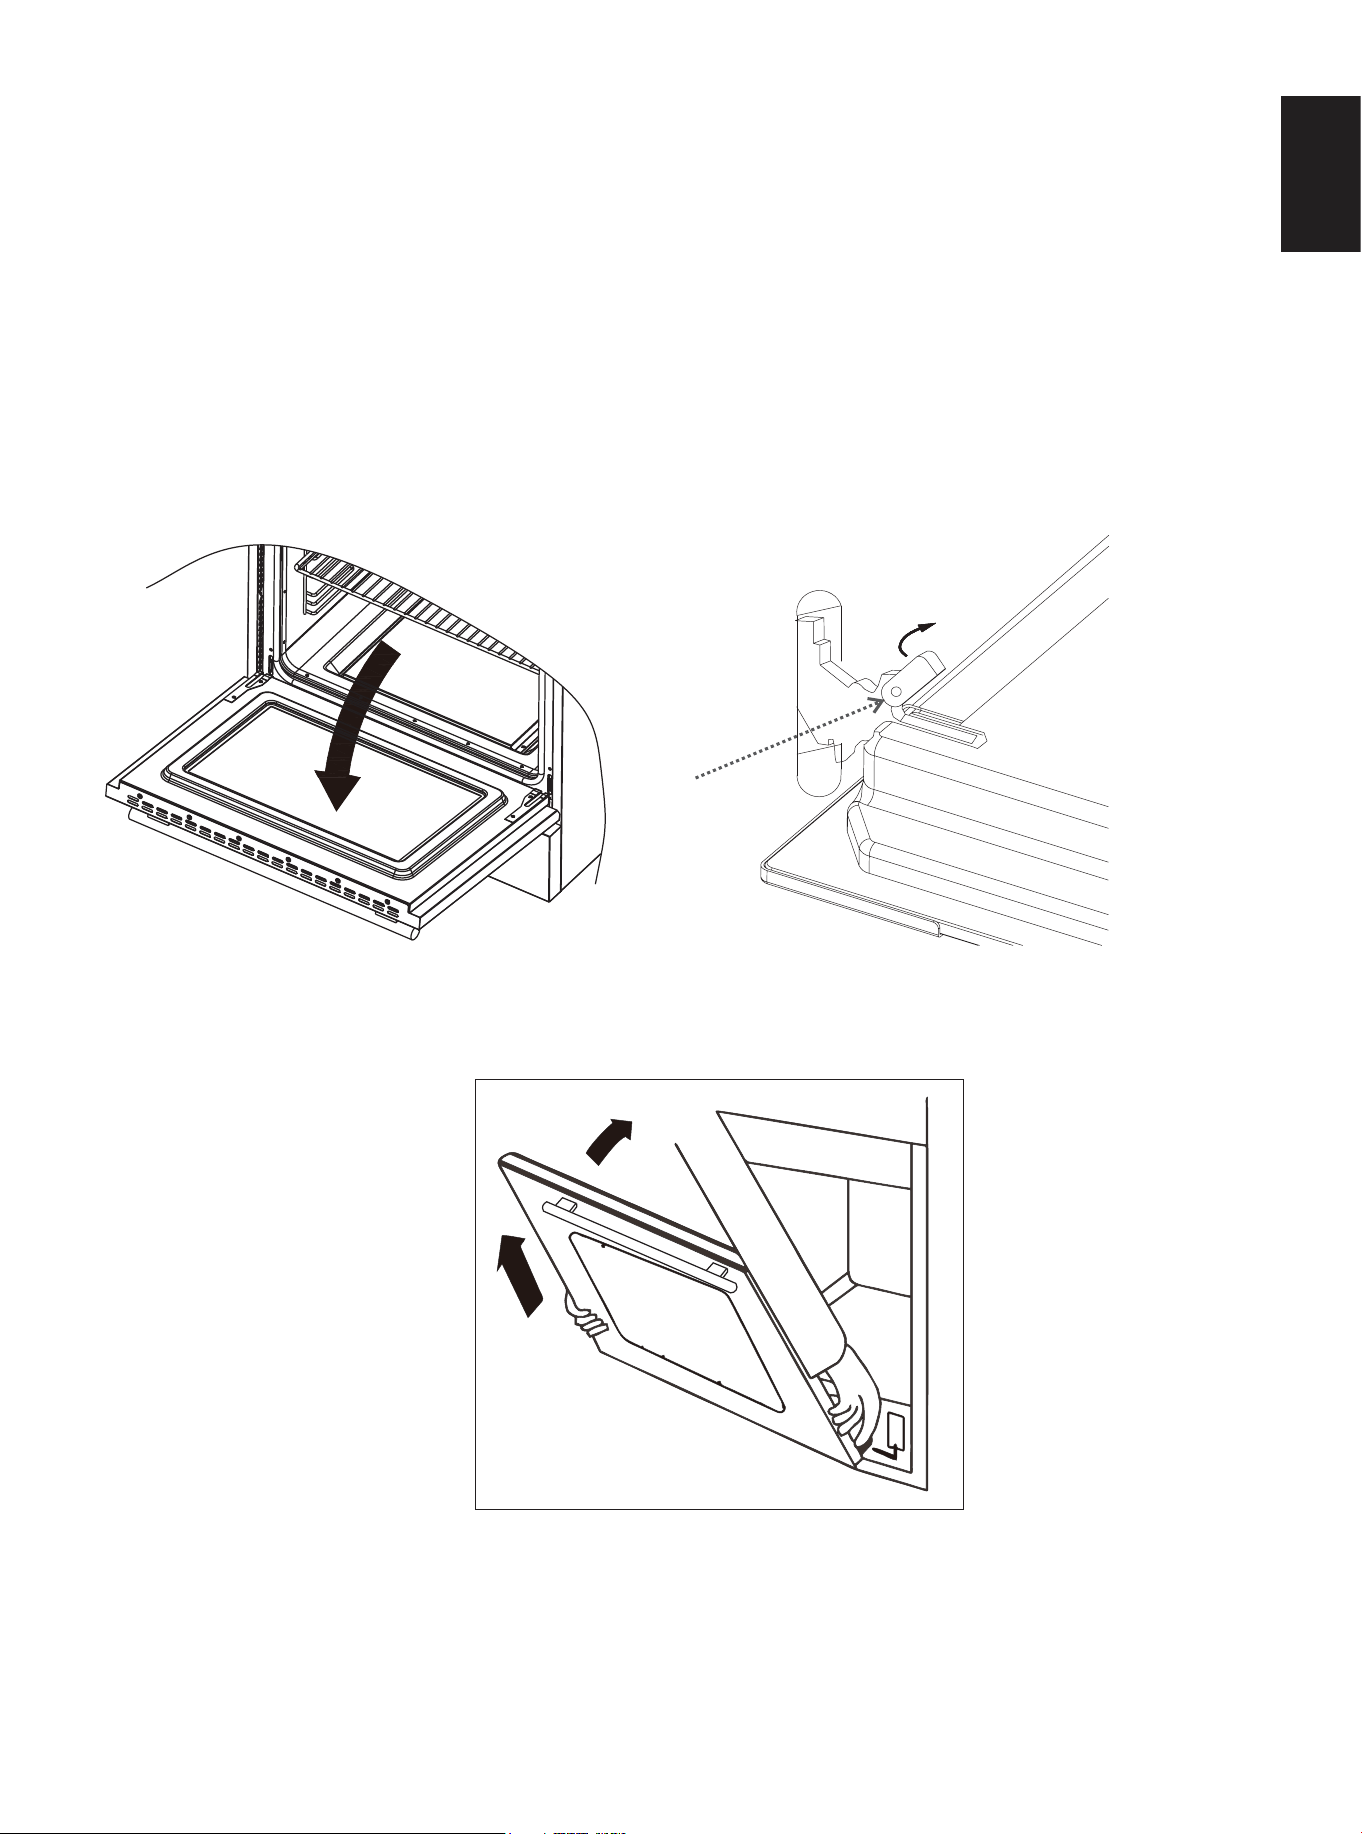
OVEN DOOR REMOVAL
Lens
Bulb
Socket
ENGLISH
26
MAINTENANCE AND CLEANING
1.Open the door fully.
2.Lift up and turn the small levers situated on the two hinges.
3.Grasp the door by its two outer edges, and then close it slowly but not completely.
4.Pull the door toward you, pulling it out of the hinge receivers located in the frame.
5.Replace the door by reversing the previous steps.
To Remove the Oven Door
Step 1 Step 2
Step 3
small lever
ENGLISH

27
MAINTENANCE AND CLEANING
IMPORTANT: Before cleaning, make sure all controls are off and the
oven and cook top are cool. Always follow label instructions on cleaning
products. soap, water and a soft cloth or sponge are suggested first
unless s otherwise noted. Do not use abrasive cleaning products.
CLEANING
Food spills containing acids, such as vinegar and tomato should be cleaned
as soon as the entire appliance is cool. These spills may affect the finish.
Cleaning Method: Glass cleaner, mild liquid cleaner or nonabrasive
scrubbing pad:Gently clean around the model and seria number plate
because scrubbing may remove numbers.
EXTERIOR PORCELAIN ENAMEL SURFACES
NOTE: Do not use soap-filled scouring pads, abrasive cleaners, Cooktop Polishing
cream, steel-wool pads, gritty wash cloths or some paper towels. Damage may occur,
even with one-time or limited use. Rub in direction of grain to avoid damaging.
NOTE: Do not use abrasive or corrosive detergents, cleansers. oven sprays, spot
removers, or steel-wool scouring pads.
Cleaning Method: Liquid detergent or all-purpose cleaner: Rinse well with
clean water and dry with soft, lint-free cloth. Stainless steel cleaner and polish
vinegar for hard water spots.
EXTERIOR STAINLESS STEEL
The ceramic glass should be cleaned regularly, preferably after each use, as
soon as the Hot Surface warning lighting have turned off. Remove any
burned residues immediately after cooking.
Cleaning Method: Rinse with water and dry with a clean, soft cloth. Apply a glass
cooktop cleaner. Use a damp cloth and dry with a paper towel.
Cleaning Method: A cloth dampened in vinegar.
RADIANT COOK TOP
SMUDGES FROM PANS WITH AN ALUMINUM BOTTOM
Cleaning Method: Glass cleaner and paper towels or nonabrasive plastic scrubbing
pad: Apply glass cleaner to soft cloth or sponge, not directly on panel.
OVEN DOOR EXTERIOR
ENGLISH

28
MAINTENANCE AND CLEANING
NOTE: Do not use steel wool abrasive cleansers or oven cleaner. Do not soak knobs.
Pull knobs straight away from control panel to remove. When replacing knobs,
make sure knobs are in the OFF position.
Food spills should be cleaned when oven cools. At high temperatures, foods
react with porcelain, so staining, etching pitting or faint white spots can result.
Cleaning Method: Soap and water or dishwasher.
COOKTOP CONTROL KNOBS
NOTE: Do not use abrasive cleaners, steel-wool pads, gritty wash cloths or some
paper towels. Damage may occur.
Cleaning Method: Glass cleaner and soft cloth or sponge: Apply glass cleaner to
soft cloth or sponge not directly on panel.
CONTROL PANEL
NOTE: DO not use oven cleaners.
Cleaning Method: Mild detergent and warm water.
Cleaning Method: Steel-wool pad.
OVEN CAVITY
OVEN RACKS AND ROASTING RACKS
ENGLISH
29
MAINTENANCE AND CLEANING
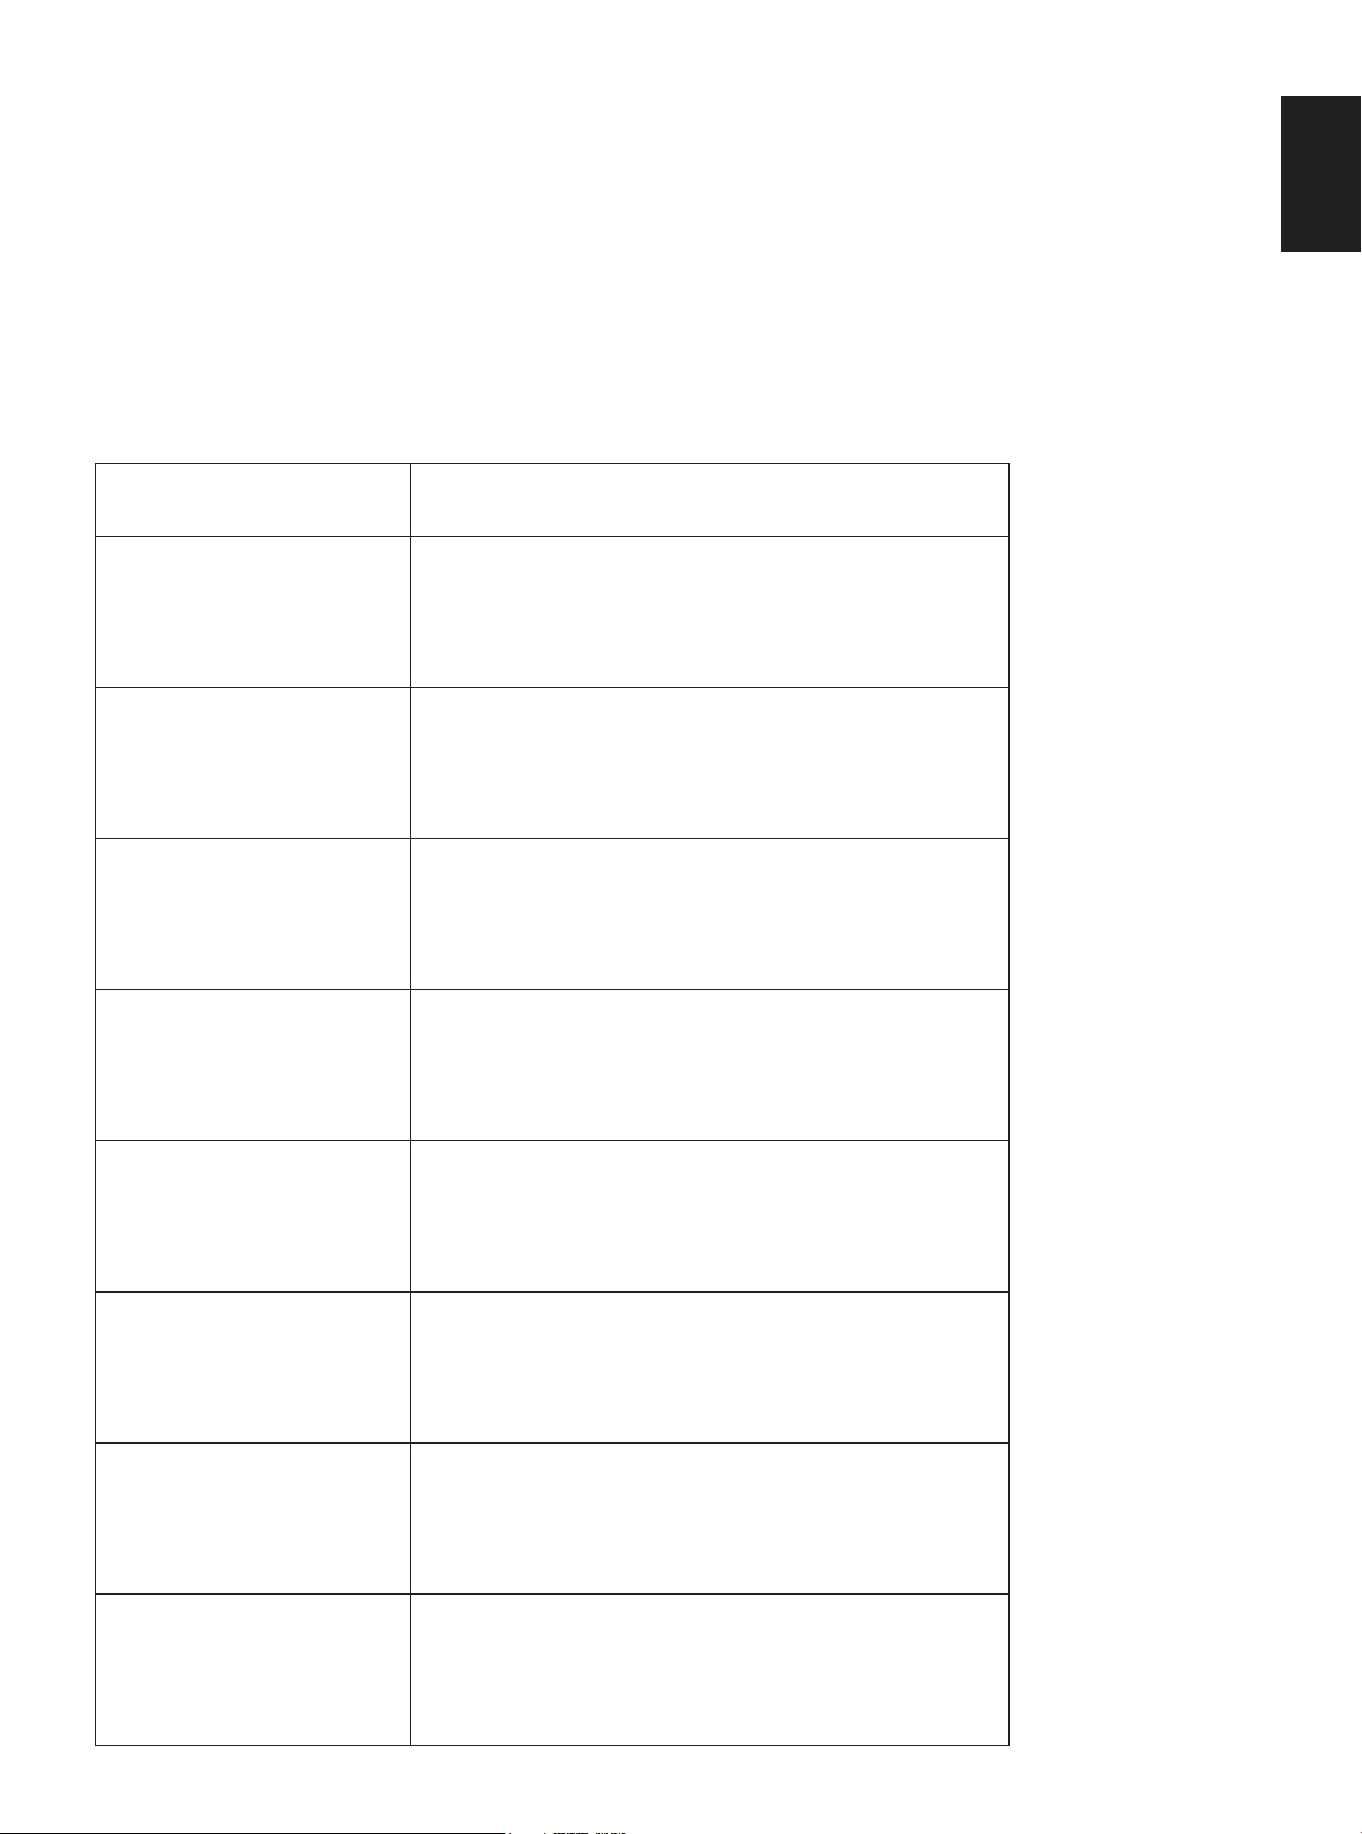
TROUBLESHOOTING
With any oven setting poor results can occur for many reasons other than a
malfunction of the oven. Check the chart below for causes of the most common
problems since the size, shape and material of baking utensils directly affect
the baking results, the best solution may be to replace old baking utensils that
have darkened and warped with age and use.
BAKING AND ROASTING PROBLEMS
BAKING PROBLEM
Food browns unevenly
Oven not preheated
Aluminum foil on oven rack or oven bottom
Baking utensil too large for recipe
Pans touching each other or oven walls
Food too brown on bottom
Oven not preheated
Using glass, dull or darkened metal pans
Incorrect rack position
Pans touching each other oroven walls
Food is dryor has
shrunk excessively
Oven temperature too high
Baking time too long
Oven door opened frequently
Pan size too large
Food is baking or
roasting too slowly
Oven temperature too low
Oven not preheated
Oven door opened frequently
Tightly sealed with aluminum foil
Pan size too small
Piecrusts do not brown on
bottom or crust is soggy
Baking time not long enough
Using shiny steel pans
Incorrect rack position
Oven temperature is too low
Cakes pale, flat and
may not be done inside
Oven temperature too low
Incorrect baking time
Cake tested too soon
Oven door opened too often
Pan size maybe too large
Cakes high in middle with
crack on top
Oven temperature too high
Baking time too long
Pans touching each other or oven walls
Incorrectrack position
Pan size too small
Piecrust edges too brown
Oven temperature too high
Edges of crust too thin
CAUSE
ENGLISH
30
MAINTENANCE AND CLEANING
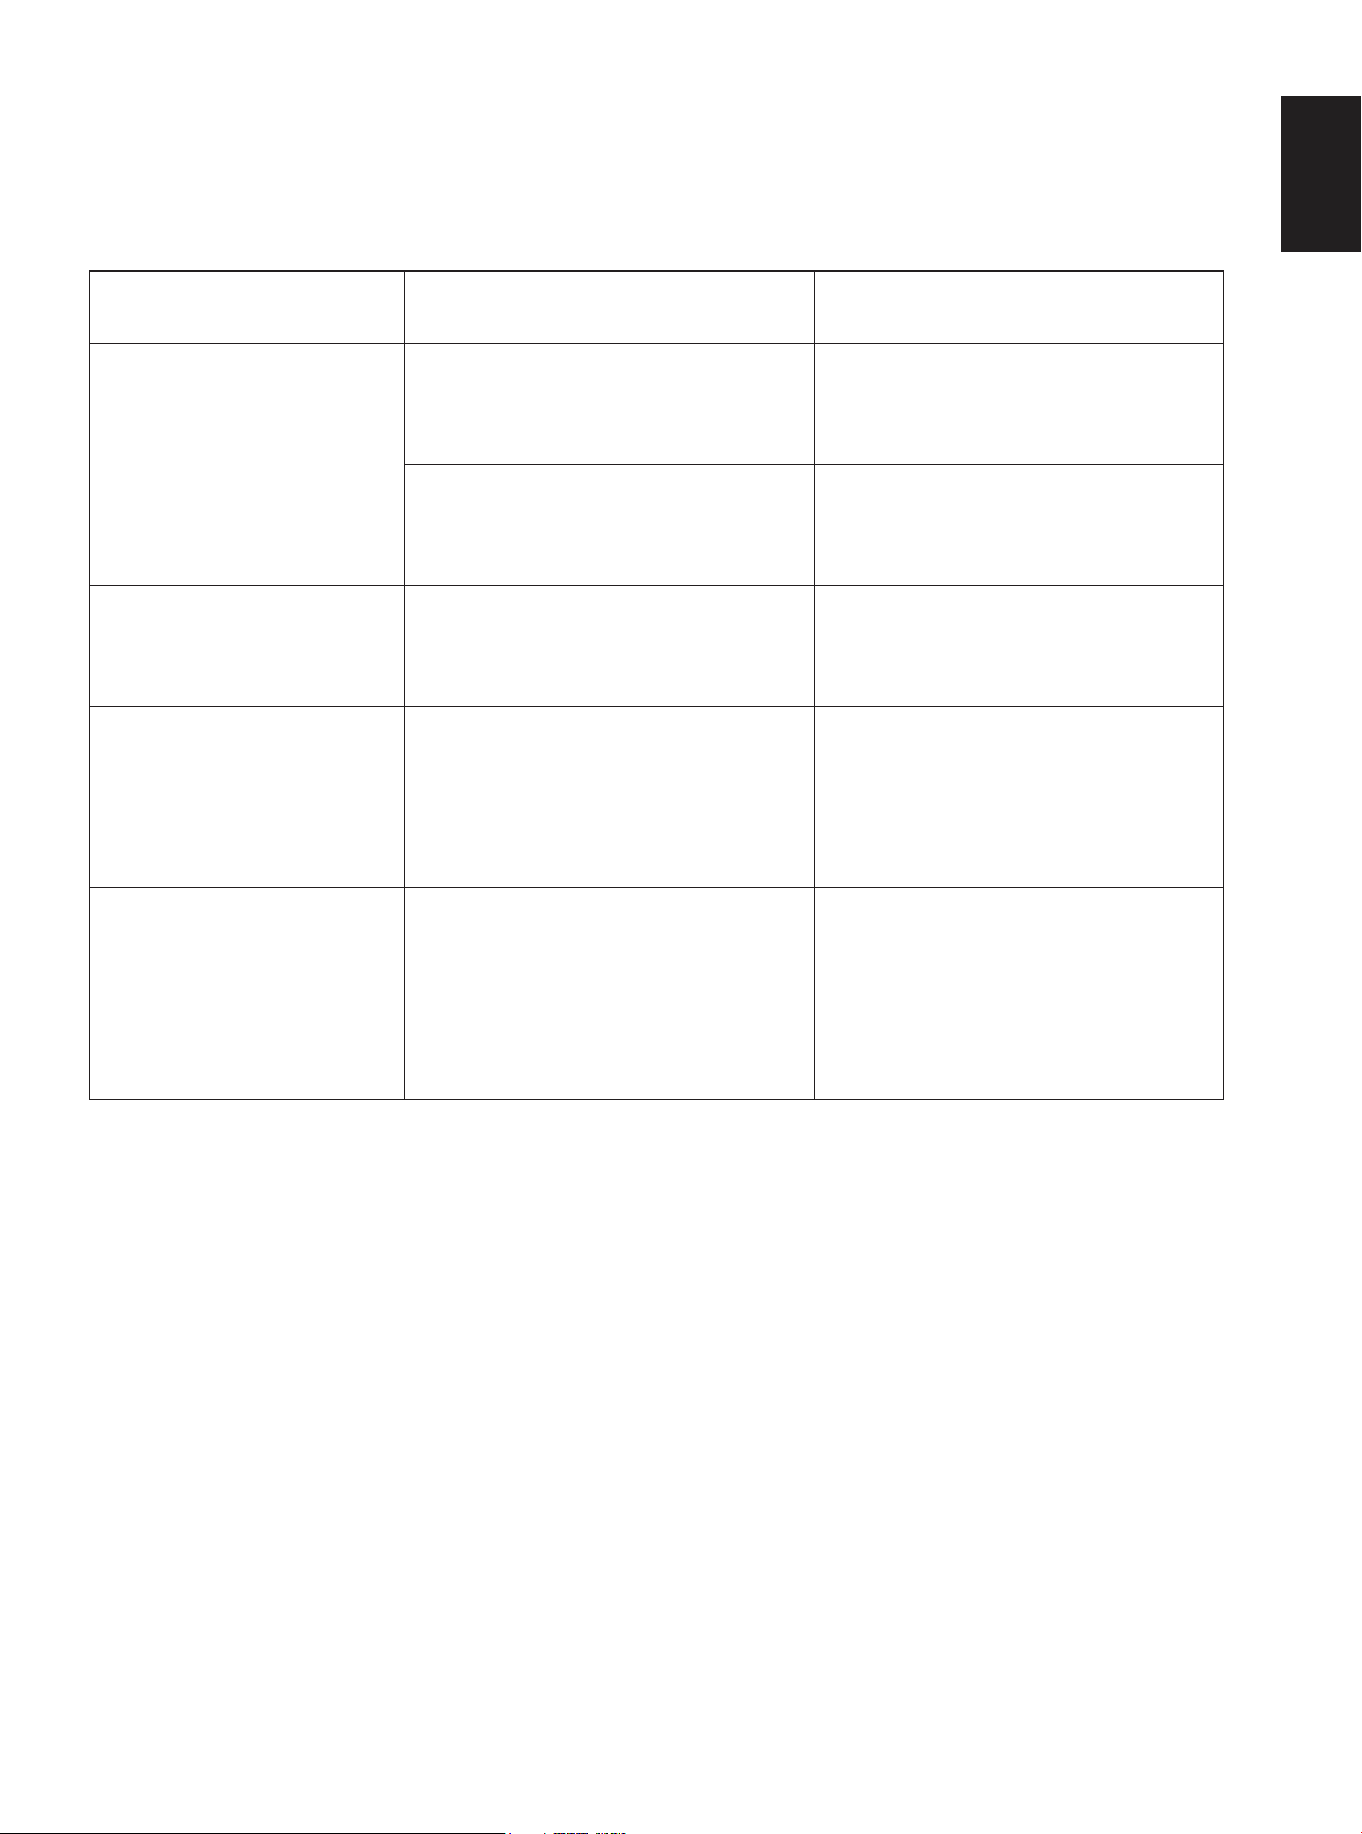
COOKTOP
PROBLEM
Heating elements and
controls do not work.
POSSIB LE CAUSE
POSSIBLE CAUSE
Fuse is blown or circuit breaker
is tripped.
No electricity to the cooktop.
Replace the fuse or reset the circuit
breaker. if the problem continues,
call an electrician.
Have electrician check your
power supply.
Heating elements and
controls do not work.
Improper cookware is being used. Select proper cook ware.
See”Cookware”. If the problem
continues call for service.
Heating elements cycle off
even when elements are
turned to their
highest settings.
Heating element
temperature limiters are
temporarily shutting off the
elements due to exceeding the
maximum allowable temperature.
This is a normal operating
condition, especially during rapid
heat-up operations. The element
will cycle back on automatically
after it has cooled sufficiently.
Glass ceramic surface
is see through or
appears to be red in color.
Under director bright lighting, you
will sometimes be able to
nee through the glass and into the
chassis due to its. transparent
quality. You may also notice a red
tint under these conditions.
These are normal properties
of black ceramic glass panels.
ENGLISH
31
MAINTENANCE AND CLEANING
OVEN
PROBLEM
POSSIB LE CAUSE
POSSIBLE CAUSE
Oven is not heating.
No power to the oven.
Oven control not turned on.
Replace the fuse or reset the
circuit breaker. If the problem
continues, call an electrician.
Make sure the oven
temperature has been selected.
Oven is not cooking
evenly.
Not using the correct bake
ware or oven rack position.
Refer to cook charts for
recommended rack position.
Always reduce recipe
temperature by 25'F(15°C) when
baking with convention Bake mode.
Oven light is not
working properly.
Light bulb loose or burned-out. Reinsert or replace the light
bulb. Touching the bulb with
fingers may cause the bulb
to burn out.
Can not remove
lens cover.
Soil build-up around the lens cover.
Wipe lens cover area with a
clean, dry towel prior to
attempting to remove the lens
cover.
Excessive Moisture.
When using bake mode preheat
the oven first.
Convection Bake will eliminate
any moisture in the oven.
Porcelain Chips.
Porcelain interior is bumped
by oven racks.
When removing and replacing
oven racks, always tilt racks
upward and do not force them
to avoid chipping the porcelain.
Oven working indicator
lighting stays off.
Power interruption.
Oven temperature reaches
setting temperature.
Turn off power at the main
power supply (fuse or breaker box).
Turn breaker back on. If condition
persists, call for service.
This is a normal operating
condition during oven working.
The lighting will be cycle back
on automatically after the oven
has heated sufficiently.
ENGLISH

32
WARRANTY
What this limited warranty covers:
The warranty coverage provided by Forno Appliances in this statement applies exclusively to the original Forno
appliance ("product")sold to the consumer ("purchaser") by an authorized Forno dealer/distributor/retailer, purchased
and installed in the united states or Canada , and which has always remained within the original country of purchase
(the United States or Canada). Warranty coverage is activated on the date of the product's original retail purchase and
has a duration of two (2) years.
Warranty coverage is non-transferable. In the event of replacement of parts or of the entire product, the replacement
Product (or parts) shall assume the remaining original Warranty activated with the original retail purchase document. This
Warranty shall not be extended with respect to such replacement. Forno Appliances will repair or replace any component/
part which fails or proves defective due to materials and/or workmanship within 2 years of the date of the original retail
purchase and under conditions of ordinary residential , non-commercial use . Repair or replacement will be free of charge ,
including labor at standard rates and shipping expenses. Purchaser is responsible for making the product reasonably
accessible for service. Repair service must be performed by a Forno Authorized service company during normal working
hours.
Important
Retain proof of original purchase to establish warranty period. Forno's liability on any claim of any kind , with respect to
the goods and/or services provided, shall in no event exceed the value of the goods or service or part there of which has
given rise to the claim.
30 -Day cosmetic warranty
The purchaser must inspect the product at the time of delivery. Forno warrants that the Product is free from manufacturing
defects in materials and workmanship for a period of thirty (30) days from date of the original retail purchase of the
Product.
This coverage includes:
·Paint blemishes
·Chips
·Macroscopic finish defects
Cosmetic warranty does NOT cover:
·lssues resulting from incorrect transport, handling and/or installation (e.g . : dents , broken , warped or deformed
structures or components , cracked or otherwise damaged glass components);
·Slight color variations on painted/enameled components;
·Differences caused by natural or artificial lighting, location or other analogous factors; > stains/corrosion/discoloration
caused by external substances and / or environmental factors; > labor costs, display, floor, B-stock, out- of-box,"as is"
appliances and demo units.
How to receive service
To receive warranty services , the Purchaser must contact the Forno Support department in order to determine the
problem and the required service procedures. Troubleshooting with a customer service representative will be necessary
before moving forward with the service. Model number, serial number and date of original retail purchase will be
requested.
ENGLISH

33
WARRANTY
Warranty Exclusions: What ls Not covered.
cosmetic warranty does NOT cover:
·Use of the Product in any non-residential , commercial
application.
·Use of the Product for anything other than its intended
purpose.
·Repair services provided by anyone other than a
Forno Authorized Service agency.
·Damages or repair services to correct services
provided by unauthorized parties or the use of unauthorized
parts.
·Installation not in accordance with local/state/city/
county fire codes, electrical codes, gas codes,
plumbing codes , building codes , laws or regulations.
·Defects or damage due to improper storage of the product.
·Defects , damage or missing parts on products sold
out of the original factory packaging or from displays. >Service
calls or repairs to correct an incorrect installation of the Product
and/or related accessories.
·Replacement of parts/service calls to connect, convert or
otherwise repair the electrical wiring and/or gas line in order
to properly use the product.
·Replacement of parts/service calls to provide
instructions and information on the use of the product.
·Replacement of parts/service calls to correct issues
arising from the product being used in a manner other
than what is normal and customary for residential use .
·Replacement of parts/service calls due to wear
and tear of components such as seals , knobs , pan supports ,
shelving , cutlery baskets , buttons , touch displays , scratched
or broken ceramic-glass tops.
·Replacement of parts/service calls for lack of/improper
maintenance , including but not limited to: build up of
residues, stains, scratches, discoloration, corrosion .
·Defects and damages arising from accidents ,
alteration, misuse, abuse or improper installation.
·Defects and damages arising from product transport,
logistics and handling. Inspection of the product
must be made at time of delivery. Following receipt and inspection ,
the selling dealer/delivery company must be notified of any
issues arising from handling, transport and logistics.
· Defects and damages arising from external forces beyond
the control of Forno Appliances , including
but not limited to wind, rain, sand, fires, floods,
mudslides, freezing temperatures, excessive moisture
or extended exposure to humidity, power surges,
lightning , structural failures surrounding the appliance
and other acts of God.
· Products whose serial number has been altered/
damaged/tampered with. In no case shall Forno be
held liable or responsible for damage to surrounding
property, including furniture, cabinetry, flooring, panels,
and other structures surrounding the product. Forno is
neither liable nor responsible for the product if it is located
in a remote area or an area where certified
trained technicians are not reasonably available.
Purchaser must bear any transportation and delivery
costs of the product to the nearest Authorized Service
Center or the additional travel expenses of a certified
trained technician
THERE ARE NO EXPRESS WARRANTIES OTHER THAN THOSE LISTED AND DESCRIBED ABOVE , AND NO WARRANTIES , EITHER EXPRESS OR IMPLIED ,
INCLUDING , BUT NOT LIMITED TO , ANY IMPLIED WARRANTIES OF MERCHANTABILITY OR FITNESS FOR A PARTICULAR PURPOSE THAT SHALL APPLY
AFTER THE EXPRESS WARRANTY PERIODS STATED ABOVE , AND NO OTHER EXPRESS WARRANTY OR GUARANTEE GIVEN BY ANY PERSON , FIRM
OR CORPORATION WITH RESPECT TO THIS PRODUCT SHALL BE BINDING ON FORNO. FORNO SHALL NOT BE LIABLE FOR LOSS OF REVENUE OR
PROFITS , FAILURE TO REALIZE SAVINGS OR OTHER BENEFITS , TIME AWAY FROM WORK, MEALS, LOSS OF FOOD OR BEVERAGES, TRAVELING OR
HOTEL EXPENSES , EXPENSES TO RENT OR PURCHASE APPLIANCES , REMODELING/CONSTRUCTION EXPENSES IN EXCESS OF DIRECT DAMAGES
WHICH ARE UNDENIABLY CAUSED EXCLUSIVELY BY FORNO OR ANY THER SPECIAL , INCIDENTAL OR CNSEQUENTIAL DAMAGES CAUSED BY THE
USE , MISUSE OR INABILITY TO USE THIS PRODUCT, REGARDLESS OF THE LEGAL THEORY ON WHICH THE CLAIM IS BASED , AND EVEN IF FORNO
HAS BEEN ADVISED OF THE POSSIBILITY OF SUCH DAMAGES. NOR SHALL RECOVERY OF ANY KIND AGAINST FORNO BE GREATER IN AMOUNT
THAN THE PURCHASE PRICE OF THE PRODUCTSOLD BY FORNO AND CAUSING THE ALLEGED DAMAGE. WITHOUT PREJUDICE TO THE FOREGOING ,
PURCHASERASSUMESALL RISKAND LIABILITY FOR LOSS , DAMAGE OR INJURY T PURCHASER AND PURCHASER'S PROPERTY AND OTHERS
AND THEIR PROPERTY ARISING FROM THE USE , MISUSE , OR INABILITY TO USE THIS PRODUCT SOLD BY FORNO THAT IS NOT A DIRECT RESULT OF
NEGLIGENCE ON THE PART OF FORNO THIS LIMITED WARRANTY SHALL NOT EXTEND TO ANYONE OTHER THAN THE ORIGINAL PURCHASER OF THIS
PRODUCT, IS NON-TRANSFERABLE , AND STATES YOUR EXCLUSIVE REMEDY.
ENGLISH