Shenzhen Meyatek Technology Co.,LTD
深圳市名雅科技有限公司
HK Meyatek Technology Co., Ltd
Product Manual
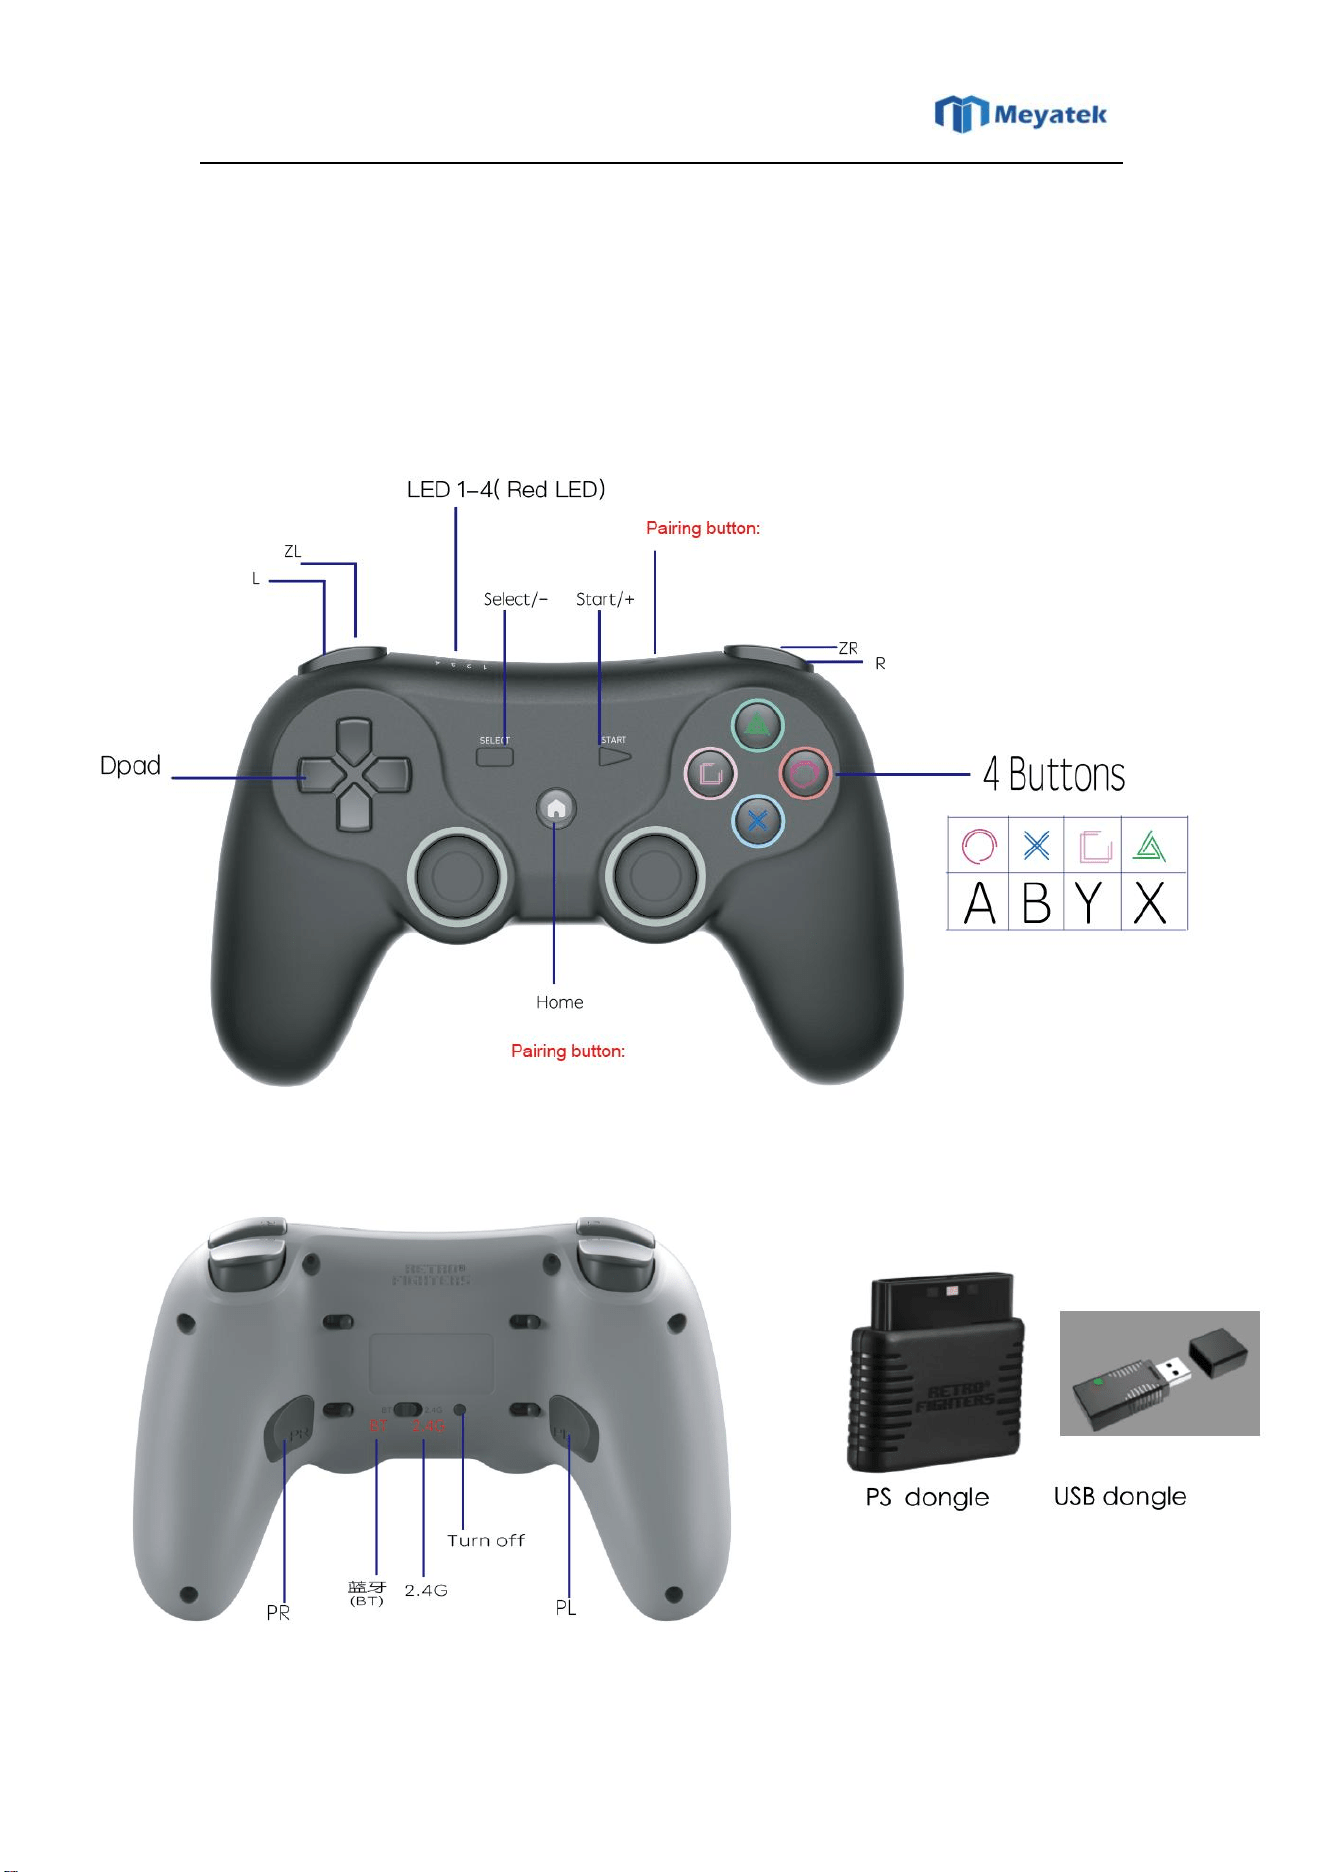
1. Product Images:

Shenzhen Meyatek Technology Co.,LTD
深圳市名雅科技有限公司
HK Meyatek Technology Co., Ltd
2. Features:
• 2.4g wireless dongle to support PS1/PS2/PS2SLIM
• 2.4g USB dongle to support PC/NS1/NS2/STEAM and PS classic+PS3
• Bluetooth supports NS1/NS2 + PC + Andriod + PS3
• Wired supports PC/STEAM/NS1/NS2
• Hall 3D
• Wired with 1000hz Max. polling rate
• 125hz max. for 2.4G USB
• PL+PR Programming buttons
3. Mode and Connection way:
3.1 PC Wired:
• Gamepad defaults Xinput
• Press “Select” and “Start” buttons 3 seconds to swap Dinput
• Xinput LED indicator: LED1 + LED3
• Dinput LED indicator: Digital mode: LED2+4; Analog mode: LED2
*Digital mode and analog mode swapping by pressing HOME button
Shenzhen Meyatek Technology Co.,LTD
深圳市名雅科技有限公司
HK Meyatek Technology Co., Ltd
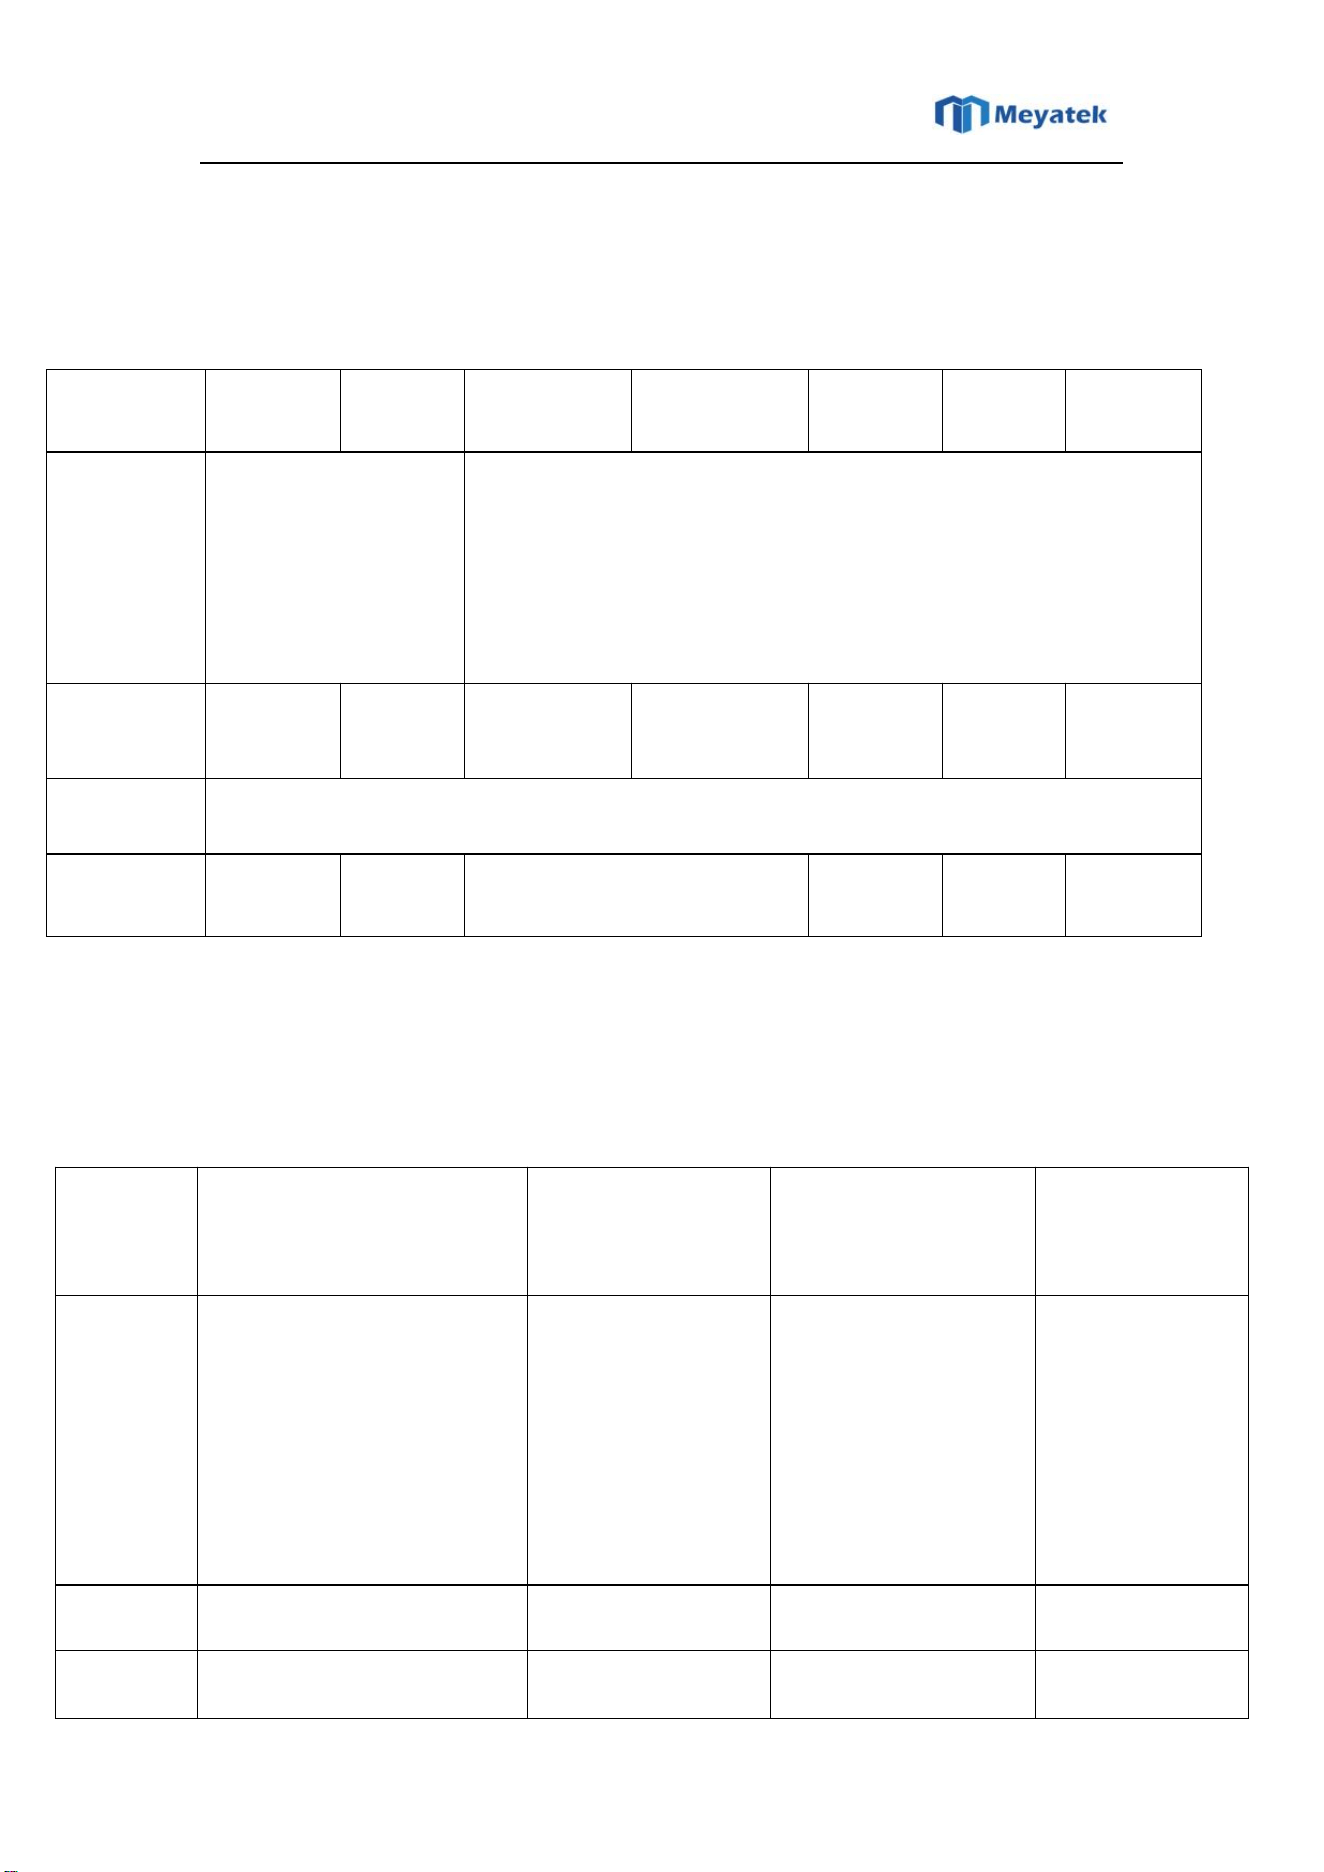
3.2 2.4G connection:
3.2 Bluetooth Connection:
System
PS1
PS2
PC-xinput
PC-Dinput
Switch
PS3
PS classic
Power on
• Plug dongle to system,
• Dongle LED flashes quickly(2
times/second)
• press “Home”button 3 seconds,
LED1-2-3-4 flashes quickly in order
• Rumble one time once paired
• Plug dongle to system, Dongle LED flashes quickly(2 times/second)
• press “Home”button 3 seconds, LED1-2-3-4 flashes quickly in order
• gamepad rumble one time once paired
LED
LED1:Digital
LED1+2:Analog
LED1
LED1+3
LED2+4 (Dig.)
LED 2 (Ana.)
• press HOME to swap
Auto
Auto
LED2
Reconnection
short pressing Home button: in turn off status, press home button to reconnect
Remark
press Home
button one time
to swap
• Rress”select”+”start 3 seconds to swap”
• Default xinput
plug and play
automatically
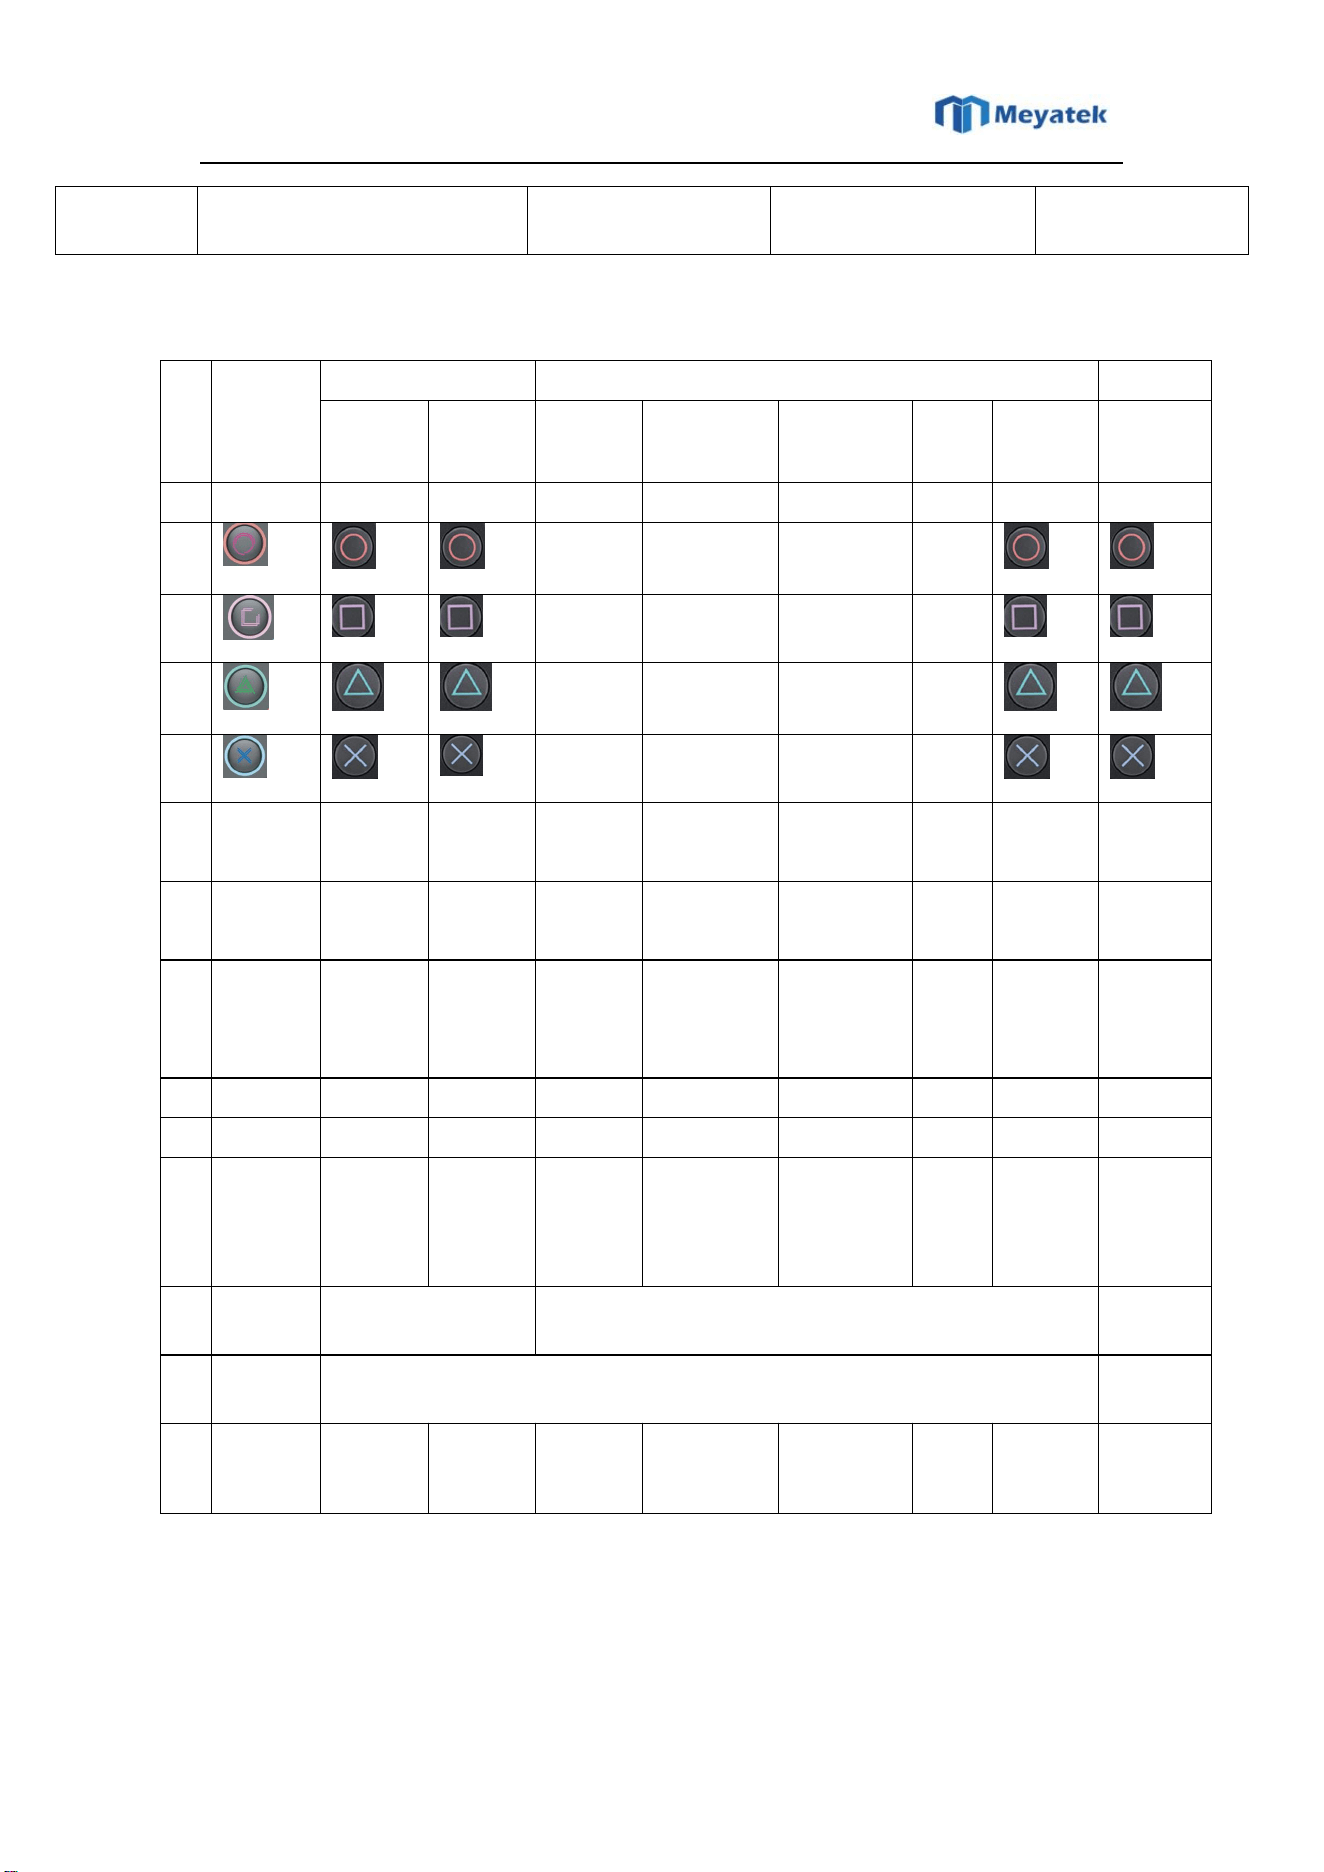
System
PC/steam/Android
(Xbox 360 mode)
PC/steam/Android
(Switch mode)
PS3
Switch
Power on
• Press “O” and “pairing” button on
gamepad top to enter pairing mode.
• LED1-2-3-4 flashes quickly.
• gamepad rumble one time once paired
• press top “Pairing”
button to enter pairing status
• use cable to connect gamepad
with PS3 for first time connection
• unplug cable, and LED1-2-3-4
flashes quickly, gamepad
automatically connects to ps3
• gamepad rumble one time
once paired
• press Home to connect ps3
after connected with PS3 first
time.
• press the gamepad top
•LED1-2-3-4 flashes
quickly.
• gamepad rumble one
time once paired
LED
LED 1+ 3
LED1
auto
auto
remark
press and hold Home button to
macro: Select and
Shenzhen Meyatek Technology Co.,LTD
深圳市名雅科技有限公司
HK Meyatek Technology Co., Ltd
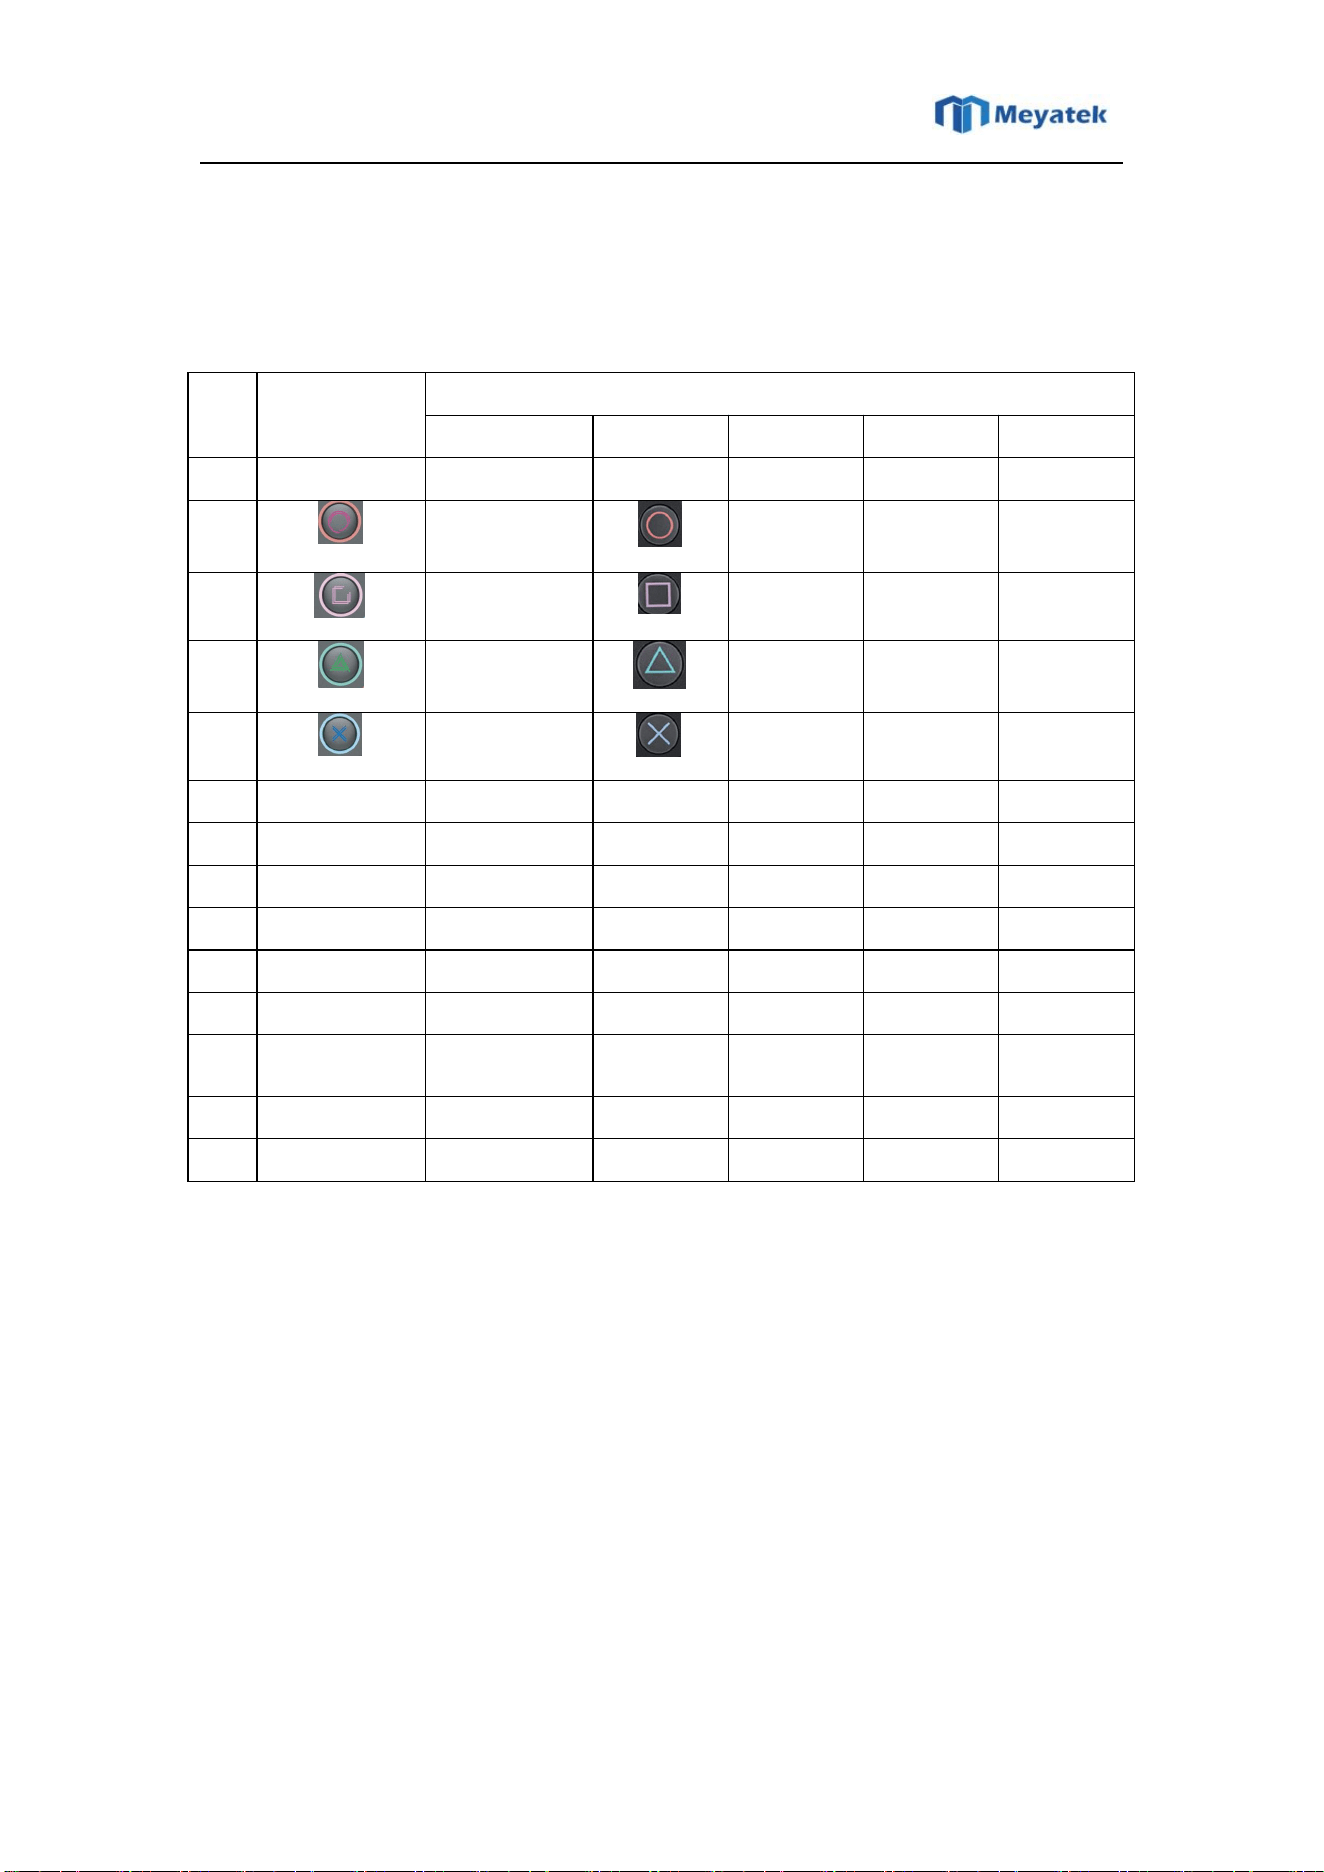
4. Key mapping:
4.1 2.4G:
enter “system off” window
R3=screenshot
Sys
.
Gamepad
2.4G
2.4G
PS1
PS2
PC-XINPUT
PC-DINPUT
(analog)
PC-DINPUT
(digital)
SWITC
H
PS3
PS Classic
1
Dpad
Dpad
Dpad
Dpad
Dpad
Dpad
Dpad
Dpad
Dpad
2
B
2
2
B
3
X
4
4
X
4
Y
1
1
Y
5
A
3
3
A
6
L/R
L/R
L/R
L/R
L:5
R:6
L:5
R:6
L:5
R:6
L/R
L/R
7
ZL/ZR
ZL/ZR
ZL/ZR
ZL/ZR
ZL:7
ZR:8
ZL:7
ZR:8
ZL:7
ZR:8
ZL/ZR
ZL/ZR
8
left/right
joystick
left/right
joystick
left/right
joystick
left/right
joystick
left joystick : XY
axis
right joystick
:
Z
axis
left joystick :XY
axis
right joystick
:
1-2-3-4
left/right
joystick
left/right
joystick
left/right
joystick
9
Select
Select
Select
Select
9
9
-
Select
Select
10
start
start
start
start
10
10
+
start
start
11
HOME
non
HOME
1.Home
2. press 3
seconds to
pair
1.Home
2. press 3
seconds to pair
1.Home
2. press 3
seconds to pair
1.Home
2. press
3
seconds
to pair
1. press 3
seconds to
pair
1. press 3
seconds to
pair
12
top pairing
button
/
/
/
13
turn off
button
turn off gamepad
rem
ark
no home
button for
original
gamepad
no home
button for
original
gamepad
Shenzhen Meyatek Technology Co.,LTD
深圳市名雅科技有限公司
HK Meyatek Technology Co., Ltd
4.2 Bluetooth
S/N
PSPRO gamepad
bluetooth connection
PC-xinput
PS3
SWITCH
Android
remarks
1
dpad
dpad
dpad
2
B
A
B
3
X
Y
X
4
Y
X
Y
5
A
B
A
6
L/R
L/R
L/R
L/R
L/R
7
ZL/ZR
ZL/ZR
ZL/ZR
ZL/ZR
ZL/ZR
8
left/right joystick
left/right joystick
left/right joystick
left/right joystick
left/right joystick
9
Select
Select
Select
-
Select
10
start
start
start
+
start
11
HOME
Home
Home
Home
Home
12
top pairing button
macros: paring button +O
/
pairing
macros: paring button
+O
13
turn off button
turn off
turn off
turn off
turn off
turn off
remakrs
5. Motor power adjustment:
• Macors: left joystick up/down and “START”button
• 0 ---- 30% ----70%----100%
• Defaults 70% and resume to 70% for recoonection
. left joystick up and“Start(+)”to increase
. left joystick down and“Start(+)”to descrease
6. Programming:
6.1 setting
• “Select” + “PL”:to program PL

Shenzhen Meyatek Technology Co.,LTD
深圳市名雅科技有限公司
HK Meyatek Technology Co., Ltd
• “Select” +”PR”:to program PR
* For example(PR+A):
• Rress “select”and “PR”to enter programming mode, motors rumble one time to remide.
• The LED now flashes quickly----press “A”button---press PR button to finish PR programming step
• LED stop flashing, and gamepad enter normal working status. when PR programmed, motors
rumble one time to remind.
6.2. Clean up
• press “select”and “PR”to enter programming mode, motors rumble one time to remide.
• press again “PR” button, motors rumble one time to show “clean up”finished.
7. Auto-Sleep & Power-Saving Features
• in turn on status, If no successful pairing within 1 minute after power-on, the controller enters sleep
mode (power-saving protection).
• in Reconnection Mode,If reconnection fails within 1 minute after power-on, the controller enters
sleep mode (power-saving protection).
• in connected State (Active Use), If no user input is detected for 10 minutes while paired, the
controller enters sleep mode (power-saving protection).
• USB Receiver Behavior, after powering on, if no controller pairs within 1 minutes, the USB
receiver’s LED turns off, but it remains in search mode.
• Once a controller is detected, the LED reactivates, and normal connection resumes.
• Low Battery & Sleep Indicators: Low Battery Warning: The current channel LED blinks to indicate
low voltage.
• Sleep Time: Activates after 10 minutes of inactivity.
8. Calibration:
• press Home button to turn on gamepad
• press Select button and then press A+B buttons
• 4 LED flashes at the same time to enter calibration mode
• Rotate two joysticks 3 times; three times to press trigger with suitable pwoer
• Press “O” button to save and exit calibration mode
9. Sensor Calibration:
• Put gamepad on flat desk
• press and hold “+” button firstly; and then press “Home” button, LED1 and LED4 will light up and
turn off immediately, then finish senser calibration
10. Low Battery Warning:
• When the controller's battery voltage drops below 3.6V, the current channel indicator flashes rapidly
(4 times per second) as a charging reminder. Note: This function is only active during operation.

Shenzhen Meyatek Technology Co.,LTD
深圳市名雅科技有限公司
HK Meyatek Technology Co., Ltd
• Auto-Shutdown Protection: The controller automatically powers off if the battery voltage falls below
3.3V to prevent over-discharge.
This device complies with part 15 of the FCC Rules. Operation is subject to the following two conditions:
(1) This device may not cause harmful interference, and
(2) this device must accept any interference received, including interference that may cause undesired
operation.
Any Changes or modifications not expressly approved by the party responsible for compliance could void
the user's authority to operate the equipment.
Note: This equipment has been tested and found to comply with the limits for a Class B digital device,
pursuant to part 15 of the FCC Rules. These limits are designed to provide reasonable protection against
harmful interference in a residential installation. This equipment generates uses and can radiate radio
frequency energy and, if not installed and used in accordance with the instructions, may cause harmful
interference to radio communications. However, there is no guarantee that interference will not occur in a
particular installation. If this equipment does cause harmful interference to radio or television reception,
which can be determined by turning the equipment off and on, the user is encouraged to try to correct the
interference by one or more of the following measures:
-Reorient or relocate the receiving antenna.
-Increase the separation between the equipment and receiver.
-Connect the equipment into an outlet on a circuit different from that to which the receiver is connected.
-Consult the dealer or an experienced radio/TV technician for help.
The device has been evaluated to meet general RF exposure requirement. The device can be
used in portable exposure condition without restriction.