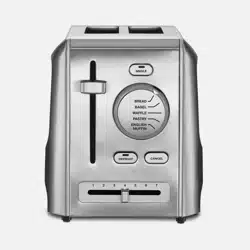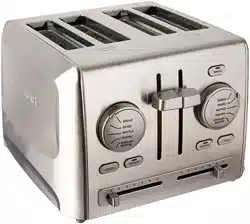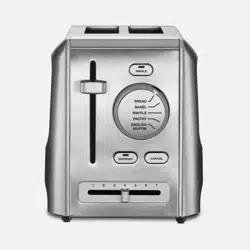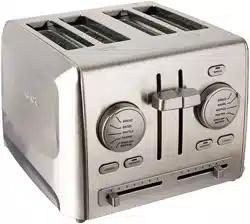
Cuisinart
®
Custom Select
™
4-Slice Toaster RBT-1350PC
For your safety and continued enjoyment of this product, always read the instruction book carefully before using.
INSTRUCTION
BOOKLET

2
IMPORTANT SAFEGUARDS
When using an electrical appliance, basic safety precautions should always be taken,
including the following:
1. Read all instructions.
2. Always unplug appliance from outlet when not in use and before cleaning.
Allow to cool before cleaning or handling.
3. Do not touch hot surfaces. Use buttons or levers.
4. To protect against electric shock, do not immerse cord or plug or place any part of
the toaster in water or other liquids. See instructions for cleaning.
5. This appliance should not be used by or near children or individuals with
certain disabilities. Close supervision is necessary when any appliance is used by
or near children.
6. Do not operate any appliance with a damaged cord or plug, or after the appliance
has malfunctioned or has been dropped or damaged in any way, or if it is not
operating properly. Return the toaster to the store or retailer where purchased for
examination or repair.
7. The use of accessory attachments not recommended by Cuisinart may
cause injury.
8. Do not use outdoors.
9. Do not let cord hang over the edge of the table or countertop or touch
hot surfaces.
10. Do not place toaster on or near a hot gas or electric burner or in
a heated oven.
11. Do not use this toaster for anything other than its intended use.
12. Oversize foods, metal foil packages or utensils must not be inserted in the toaster,
as they may involve a risk of re or electric shock.
13. A re may occur if the toaster is covered or touching ammable materials,
such as curtains, draperies or walls, when in operation. Do not operate under
wall cabinets.
14. Do not attempt to dislodge food when the toaster is plugged into an
electrical outlet.
15. To avoid possibility of re, do not leave toaster unattended during use.
16. To disconnect, push the Cancel button, then remove plug from wall. Unplug from
outlet when not in use and before cleaning. Allow to cool before putting on or
taking off parts.
17. Do not operate your appliance in an appliance garage or under a wall cabinet.
When storing in an appliance garage, always unplug the unit from the
electrical outlet. Not doing so could create a risk of re, especially if the appli-
ance touches the walls of the garage or the door touches the unit as it closes.
SAVE THESE INSTRUCTIONS
FOR HOUSEHOLD USE ONLY
SPECIAL CORD SET INSTRUCTIONS
A short power-supply cord is provided to reduce the risks resulting from becoming
entangled in or tripping over a longer cord. Longer extension cords are available and
may be used if care is exercised in their use.
If a long extension cord is used, the marked electrical rating of the extension cord
should be at least as great as the electrical rating of the appliance, and the longer cord
should be arranged so that it will not drape over the countertop or tabletop where it can
be pulled on by children or tripped over unintentionally.
NOTICE: This appliance has a polarized plug (one blade is wider than the other).
As a safety feature, this plug will fit in a polarized outlet only one way. If the plug
does not fit fully in the outlet, reverse the plug. If it still does not fit, contact a
qualified electrician. Do not attempt to defeat this safety feature.
CONTENTS
Important Safeguards................................................. 2
Features and Benefits ................................................ 3
Use and Care ....................................................... 4
Cleaning and Maintenance ............................................ 5
Warranty ........................................................... 6
3
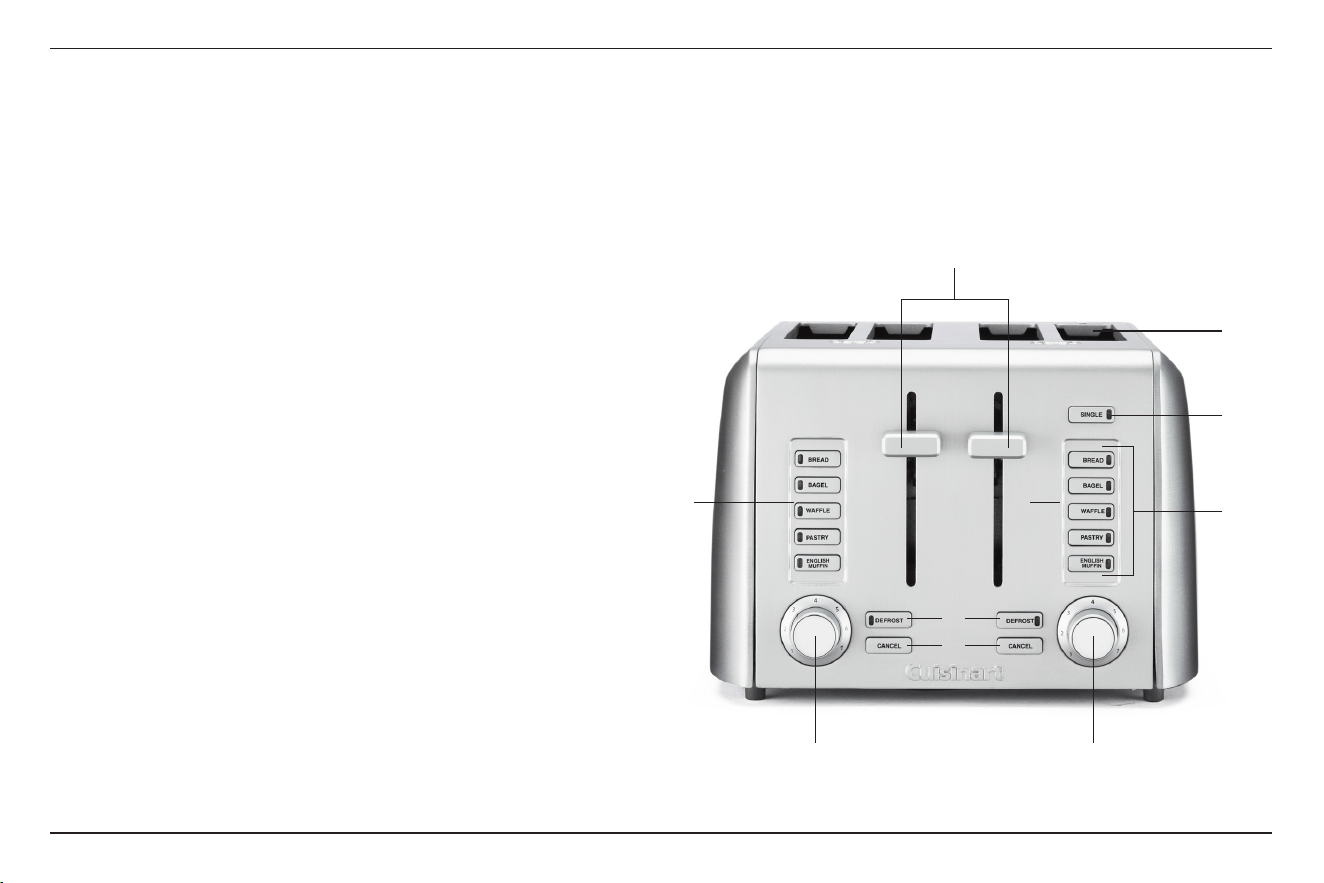
Two sets of controls toast
breads on different settings.
Use controls and carriage lever
on the side you are toasting.
2. Extra-Lift Carriage
Control Lever
Brings the toast close to the top
of the toaster, making it easy to
remove the smallest items.
3. 1½" Toasting Slots
Wide toaster slots toast a variety
of items.
4. Bread Selection Buttons
Customized settings for Bread,
Bagel, Wafe ,Pastry, and
English Mufn.
5. Single Slice Button
Evenly toasts, side to side.
LED lights when selected.
6. Browning Control
Rotate dial to select shade from
light to dark (1–7).
7. Defrost Button
Defrosts and toasts frozen items.
LED lights when selected.
8. Cancel Button
Interrupts toasting process.
9. Slide-Out Crumb Tray
(not shown)
Pulls out to clean crumbs that
collect in bottom of toaster.
10. Cord Storage (not shown)
Takes up excess cord and keeps
countertop neat.
FEATURES AND BENEFITS
1. Dual Control Panels
INTRODUCTION
Your new Custom Select™ Toaster is designed to ensure that everything toasts to the precise shade you like best. With preset settings for Wafes, Bagels, Pastries, Bread, and
English Mufns, this toaster knows just how long to toast for your selection. Depending on sugar content, density, and thickness, breads may toast a little faster or slower, so you
might want to experiment with lighter or darker shade settings. And if you want to toast something that’s frozen, the Defrost button thaws it before the toaster starts toasting. When
making just one slice, the Single function gives you the perfect shade, side to side. Everybody loves toast just their way, and this is a toaster everybody will love!
1
2
3
5
4
6 6
1
7
8
4
USE AND CARE
Unwind the power cord. Check that the crumb tray is in place and that there is nothing
in the toaster slots. Plug power cord into the wall outlet.
1. Insert slice(s) of bread.
Be sure that the carriage is in the up position.
2. Select bread type.
3. Select browning control.
Rotate dial to desired shade:
Setting Color
1–2 light
3–5 medium
6–7 dark
Note: Use controls and carriage lever on the left to toast items in the left slots. Use
controls and carriage lever on the right to toast items in the right slots.
4. To begin toasting
Press the carriage lever until it locks into the down position.
To stop cycle
When the toasting cycle is nished, the toast will be raised. If you wish to stop
the cycle before it is nished, simply push the Cancel button.
After use, unplug the
toaster from the electrical outlet.
Some notes on browning:
Toasting is a combination of cooking and drying of the bread. Therefore, differences in
moisture level from one bread to another can result in varying toasting times.
• For slightly dry bread, use a lower setting than you normally would.
• For very fresh bread or whole wheat bread, use a higher setting than normal.
• Breads with very uneven surfaces (such as English mufns) will require a higher
toast setting.
• Thickly cut pieces of bread will take longer to toast, sometimes signicantly longer,
since more moisture must be evaporated from the bread before toasting can occur.
Very thick pieces may require two cycles.
• When toasting raisin or other fruit breads, remove any loose raisins, etc., from the
surface of the bread before placing into the toaster. This will help prevent fruit pieces
from falling into the toaster or sticking on the guide wires in the slots.
• Before toasting bagels, slice each bagel into two equal halves.
Bagel
This toaster reduces heat on one side of the toasting slot for bagels. This toasts the cut
side of the bagel slightly more than the other side.
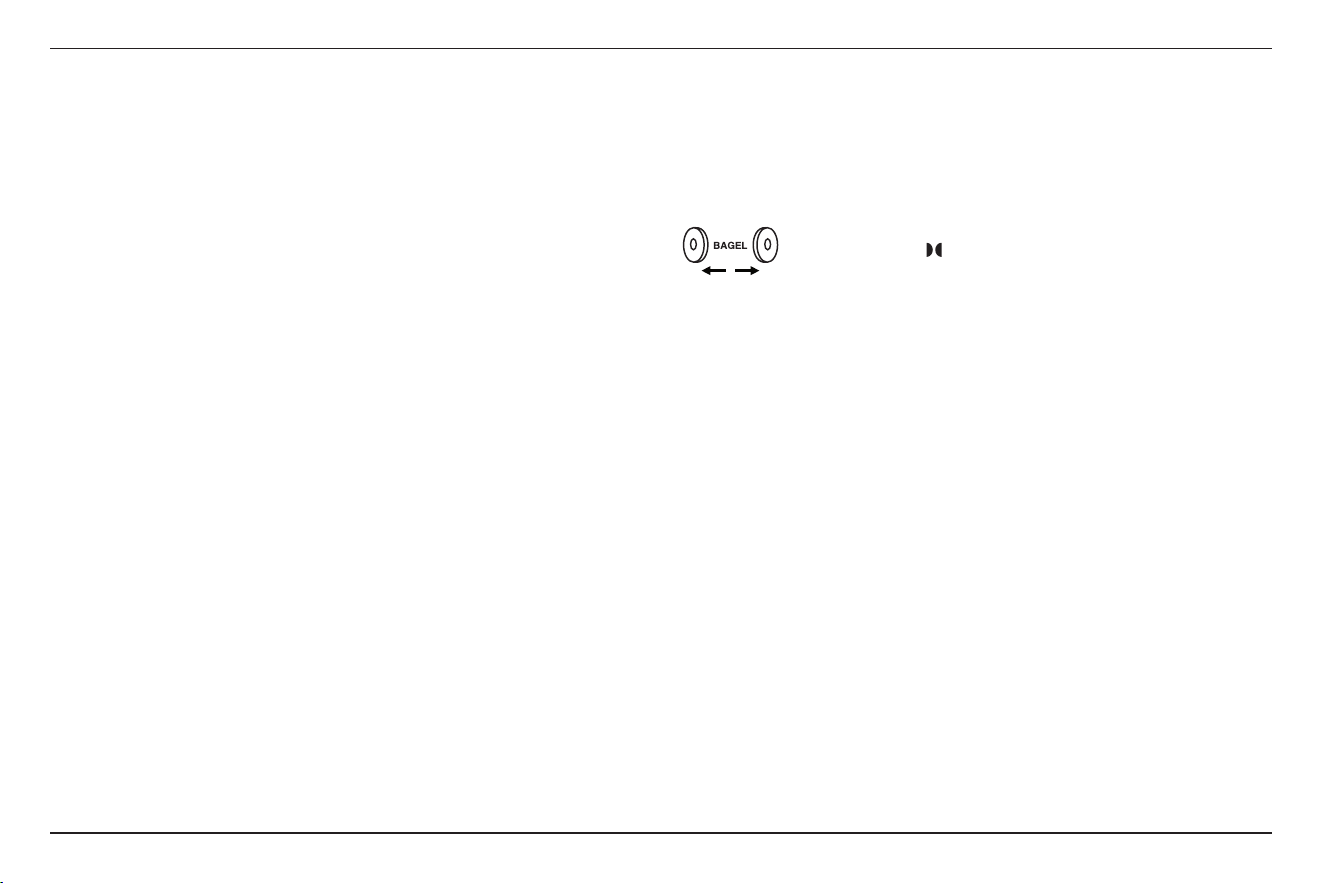
An embossed icon ( ) located on the top of the toaster shows you the
right way to insert your bagel. (The cut side should always face away
from the center of the pair of toasting slots.)
Frozen waffles, pancakes, French toast and bagels
These items should be warmed before toasting, using the Defrost function.
Select bread type and then your preferred browning shade. Press carriage lever
and then press Defrost. For example, when toasting a frozen bagel, select Bagel,
and then select the browning level, press carriage lever and Defrost.
Toaster pastries
Exercise caution with toaster pastries; the lling can become quite hot, long before the
surface of the pastry becomes browned. Never leave toaster pastries unattended while
toasting or warming.
Tips
• Never force foods into the toasting slots. Foods should t freely between the
guide wires.
• Do not place buttered breads in the toaster, as this could create a re hazard.
• Uneven toasting is usually due to bread slices of uneven thickness.
• After use, unplug your toaster from the electrical outlet.
5
Single Slice Button
The Single Slice function evenly toasts one slice of bread, side to side.
An embossed icon located on top of toaster shows you which slot to use for
single slice.
1. Insert slice of bread.
Be sure that the carriage is in the up position.
2. Select bread type.
3. Set browning control.
4. Press the carriage control level until it locks into position.
5. Push the Single Slice button. Blue LED indicates feature is active.
To Stop Cycle
When the Single Slice cycle is complete, the toaster will raise the bread. If you wish to
stop the cycle before it is nished, simply push the Cancel button to interrupt. After use,
unplug the toaster from the electrical outlet.
Defrost Button
The Defrost button is designed to rst defrost and then toast the bread to your desired
browning shade.
1. Insert slice(s) of bread.
Be sure that the carriage is in the up position.
2. Select bread type.
3. Set browning control.
4. Press the carriage control lever until it locks into position.
5. Push the Defrost button. Blue LED indicates feature is activated.
To stop cycle
When the Defrost cycle is complete, the toaster will raise the bread. If you wish
to stop the cycle before it is nished, simply push the Cancel button to interrupt.
After use, unplug the toaster from the electrical outlet.
CLEANING AND MAINTENANCE
Always allow the toaster to cool completely before cleaning.
1. Always unplug the toaster from the electrical outlet before cleaning.
2. Do not use abrasive cleaners. Simply wipe the exterior with a clean, damp cloth
and dry thoroughly.
3. To remove crumbs, slide out the crumb tray and discard crumbs. Wipe clean and
replace. Never operate the toaster without the crumb tray in place.
4. To remove any pieces of bread remaining in the toaster, turn the toaster upside down
and gently shake. Never insert any hard or sharp instruments into the slots,
as this could damage the toaster and cause a safety hazard.
5. Never wrap the cord around the outside of the toaster.
Use the cord storage cleats on the underside of the toaster
.
6. Any other servicing should be performed by an authorized service representative.

6
WARRANTY
Limited Three-Year Warranty
This warranty is available to U.S. consumers only. You are a consumer if
you own a Cuisinart
®
Custom Select™ 4-Slice Toaster that was
purchased at retail for personal, family or household use. Except as
otherwise required under applicable law, this warranty is not available to
retailers or other commercial purchasers or owners. We warrant that
your Cuisinart
®
Custom Select™ 4-Slice Toaster will be free of defects
in materials and workmanship under normal home use for 3 years from
the date of original purchase.
We recommend that you visit our website, cuisinart.com for a fast,
efficient way to complete your product registration. However, product
registration does not eliminate the need for the consumer to maintain
the original proof of purchase in order to obtain the warranty benefits. In
the event that you do not have proof of purchase date, the purchase
date for purposes of this warranty will be the date of manufacture.
CALIFORNIA RESIDENTS ONLY
California law provides that for In-Warranty Service, California residents
have the option of returning a nonconforming product (A) to the store
where it was purchased or (B) to another retail store that sells Cuisinart
products of the same type. The retail store shall then, according to its
preference, either repair the product, refer the consumer to an
independent repair facility, replace the product, or refund the purchase
price less the amount directly attributable to the consumer’s prior usage
of the product. If neither of the above two options results in the
appropriate relief to the consumer, the consumer may then take the
product to an independent repair facility, if service or repair can be
economically accomplished. Cuisinart and not the consumer will be
responsible for the reasonable cost of such service, repair, replacement,
or refund for nonconforming products under warranty. California
residents may also, according to their preference, return nonconforming
products directly to Cuisinart for repair or, if necessary, replacement by
calling our Consumer Service Center toll-free at 800-726-0190.
Cuisinart will be responsible for the cost of the repair, replacement,
and shipping and handling for such nonconforming products
under warranty.
HASSLE-FREE REPLACEMENT WARRANTY
Your ultimate satisfaction in Cuisinart products is our goal, so if your
Cuisinart
®
Custom Select™ 4-Slice Toaster should fail within the
generous warranty period, we will repair it or, if necessary, replace it
at no cost to you. To obtain a return shipping label, email us at
cuisinart.com/customer-care/product-return.
Or call our toll-free customer service department at 1-800-726-0190 to
speak with a representative.
Your Cuisinart
®
Custom Select™ 4-Slice Toaster has been
manufactured to the strictest specifications and has been designed for
use only in 120-volt outlets and only with authorized accessories and
replacement parts. This warranty expressly excludes any defects or
damages caused by attempted use of this unit with a converter, as well
as use with accessories, replacement parts or repair service other than
those authorized by Cuisinart. This warranty does not cover any
damage caused by accident, misuse, shipment or other than ordinary
household use. This warranty excludes all incidental or consequential
damages. Some states do not allow the exclusion or limitation of these
damages, so these exclusions may not apply to you. You may also have
other rights, which vary from state to state.
Important:
If the nonconforming product is to be serviced by someone
other than Cuisinart’s Authorized Service Center, please remind the
servicer to call our Consumer Service Center at 1-800-726-0190 to
ensure that the problem is properly diagnosed, the product is
serviced with the correct parts, and to ensure that the product
is still under warranty.

7
NOTES:

©2021 Cuisinart
East Windsor, NJ 08520
Printed in China
20CE075804
IB-17036