USER MANUAL
Outdoor Kitchen Island with Sink,
Storage Cabinets and Outdoor Re-
frigerator.
Model: KM-OKS-BQHUB, KM-OKS-BQHUB-
BK
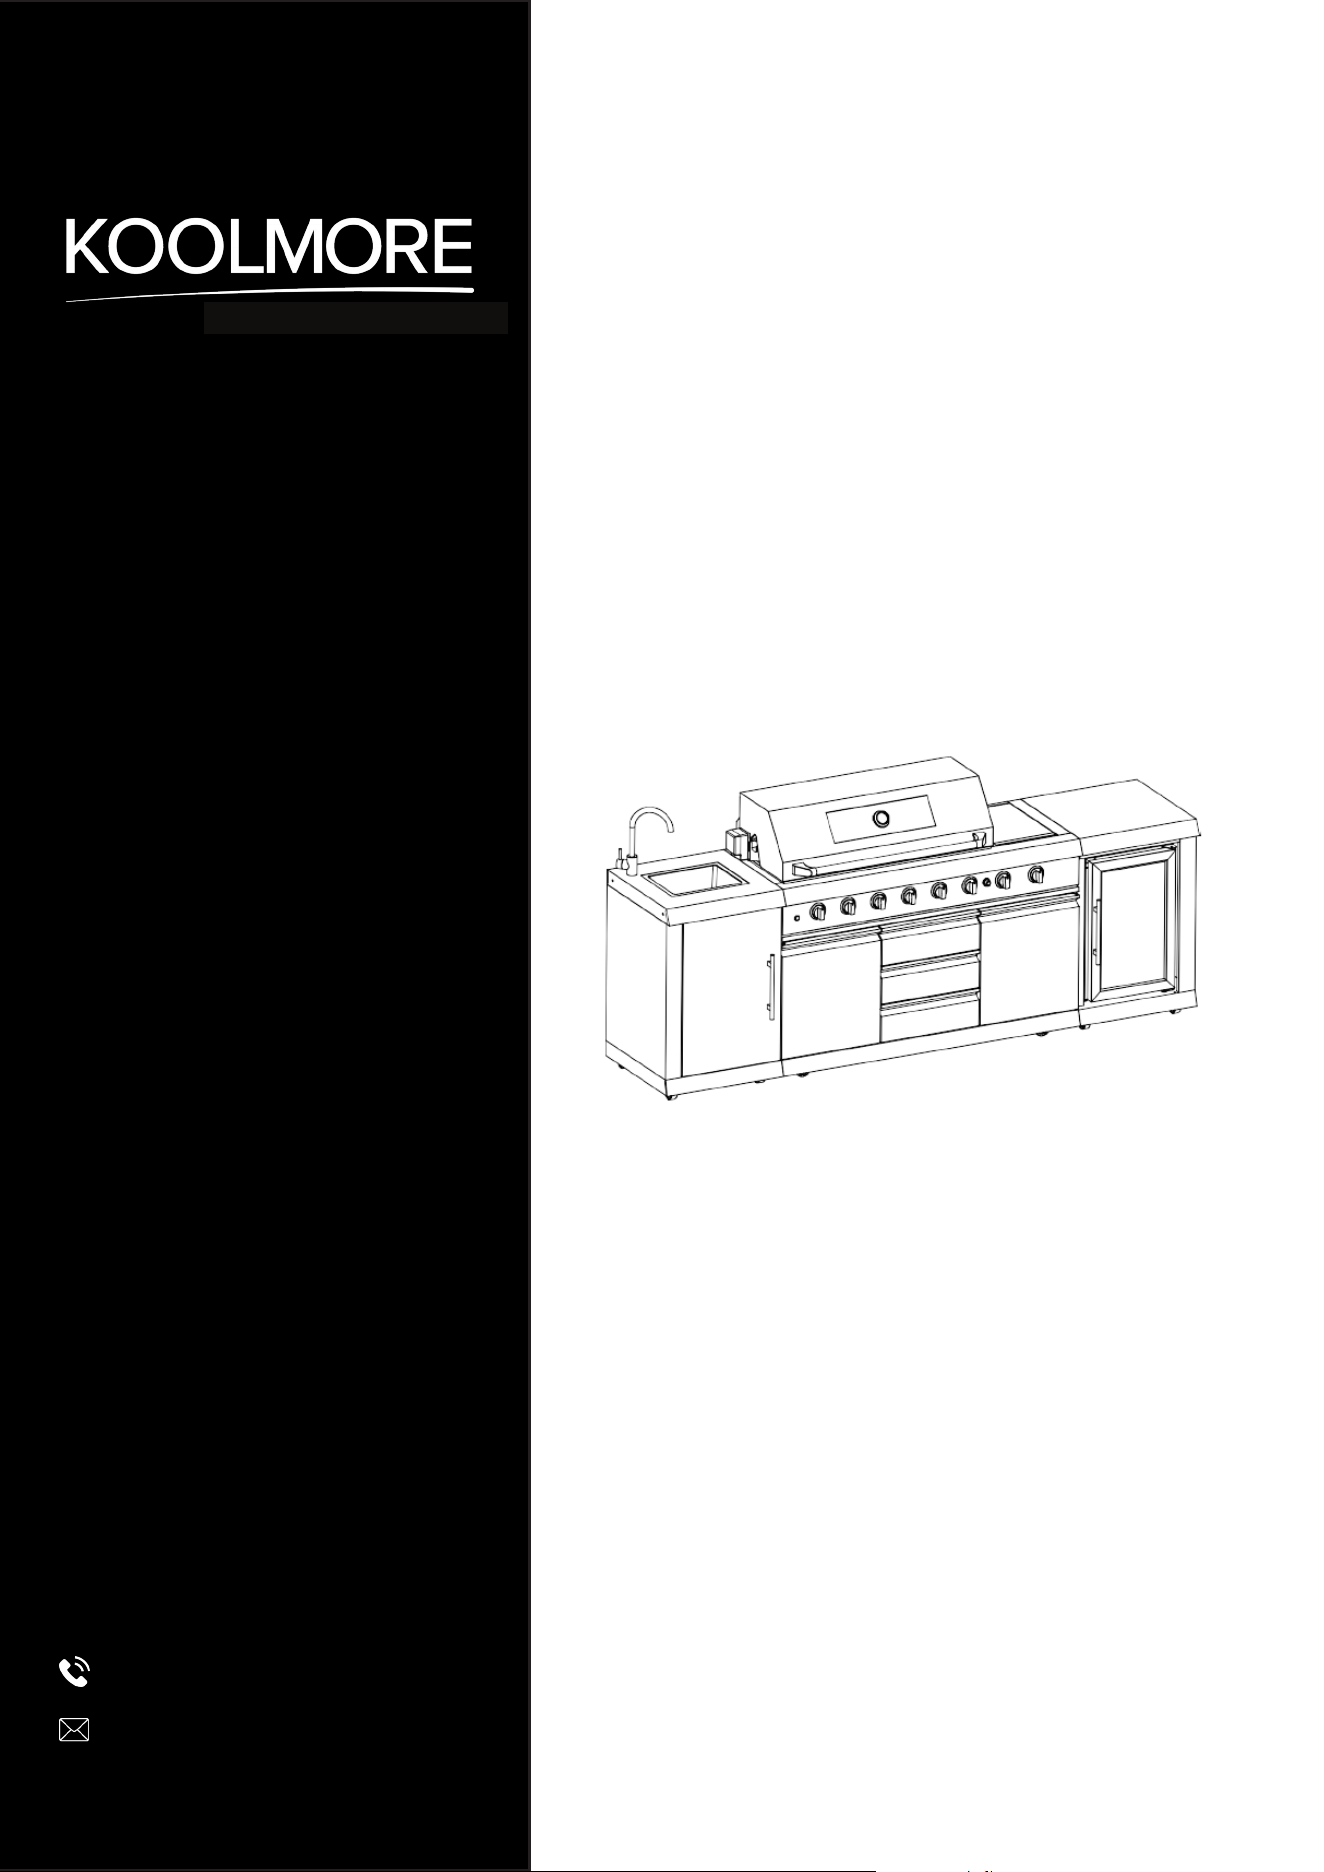
For any service related
issues, please contact us:
For your safety and the best performance,
read all operating instructions thoroughly
before using the appliance.
718-576-6342
suppor[email protected]
RESERVE
Stay informed with the latest information for your
KoolMore Appliance.
Scan the QR code below to access the most recent user manual
on our website, which is constantly being updated and improved.
If you need any assistance or have questions, our customer support
team is here to help.
Phone- 718-576-6342 Email- suppor[email protected]
Please write down the model number and serial number below for future reference. Both numbers are located on the
rating label on the back of your unit or inside of the unit and are needed to obtain warranty service. You may also
want to staple your receipt to this manual as it is your proof of purchase and may also be needed for service
under warranty.
Model Number:
Serial Number:
Date of Purchase:
To better serve you, please do the following before contacting customer service:
If you received a damaged product, immediately contact the retailer or dealer that sold you the product.
Read and follow this User Manual carefully to help you install, use, and maintain your unit.
Refer to the Troubleshooting section of this manual as it will help you diagnose and solve many common issues.

3
Contents
Installation ..................................................................................... 4
Setup .............................................................................................. 10
Operation ....................................................................................... 15
Troubleshooting .............................................................................. 22
Warranty ......................................................................................... 23
4
Installation
WARNING:
• If the instructions in this manual are not followed exactly, a re or explosion may result, caus-
ing property damage, personal injury, or death.
• Do not store or use gasoline or other ammable substances and liquids near this or any other
appliance.
• Installation of this appliance must be done by a qualied service agency or gas supplier.
What to do if you smell gas
• Do not light any appliance.
• Do not touch any electrical switch.
• Immediately call your gas supplier from a a safe location.
• Follow the gas supplier’s instructions.
• If you cannot reach your gas supplier, call the re department.
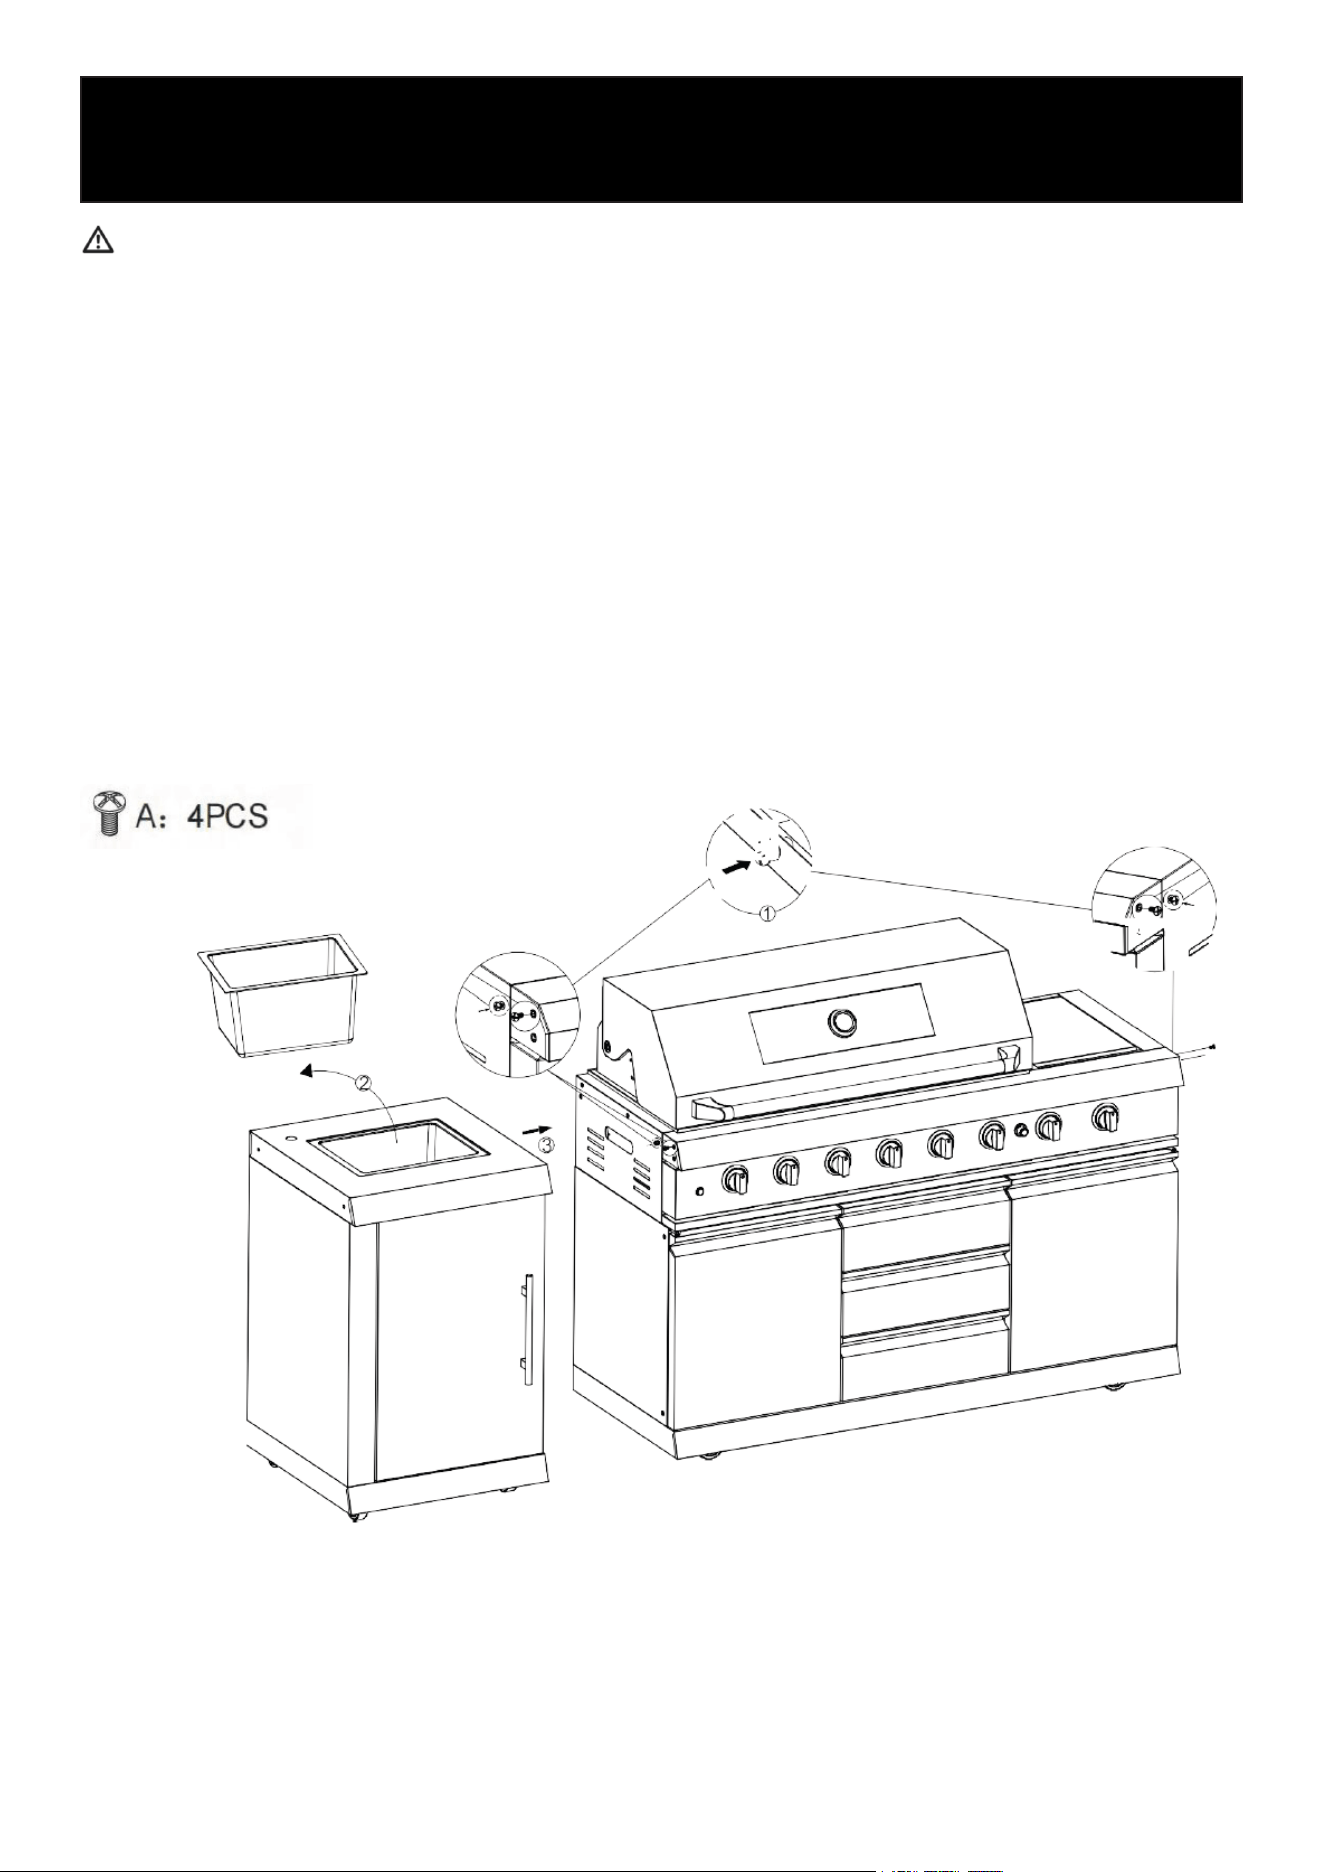
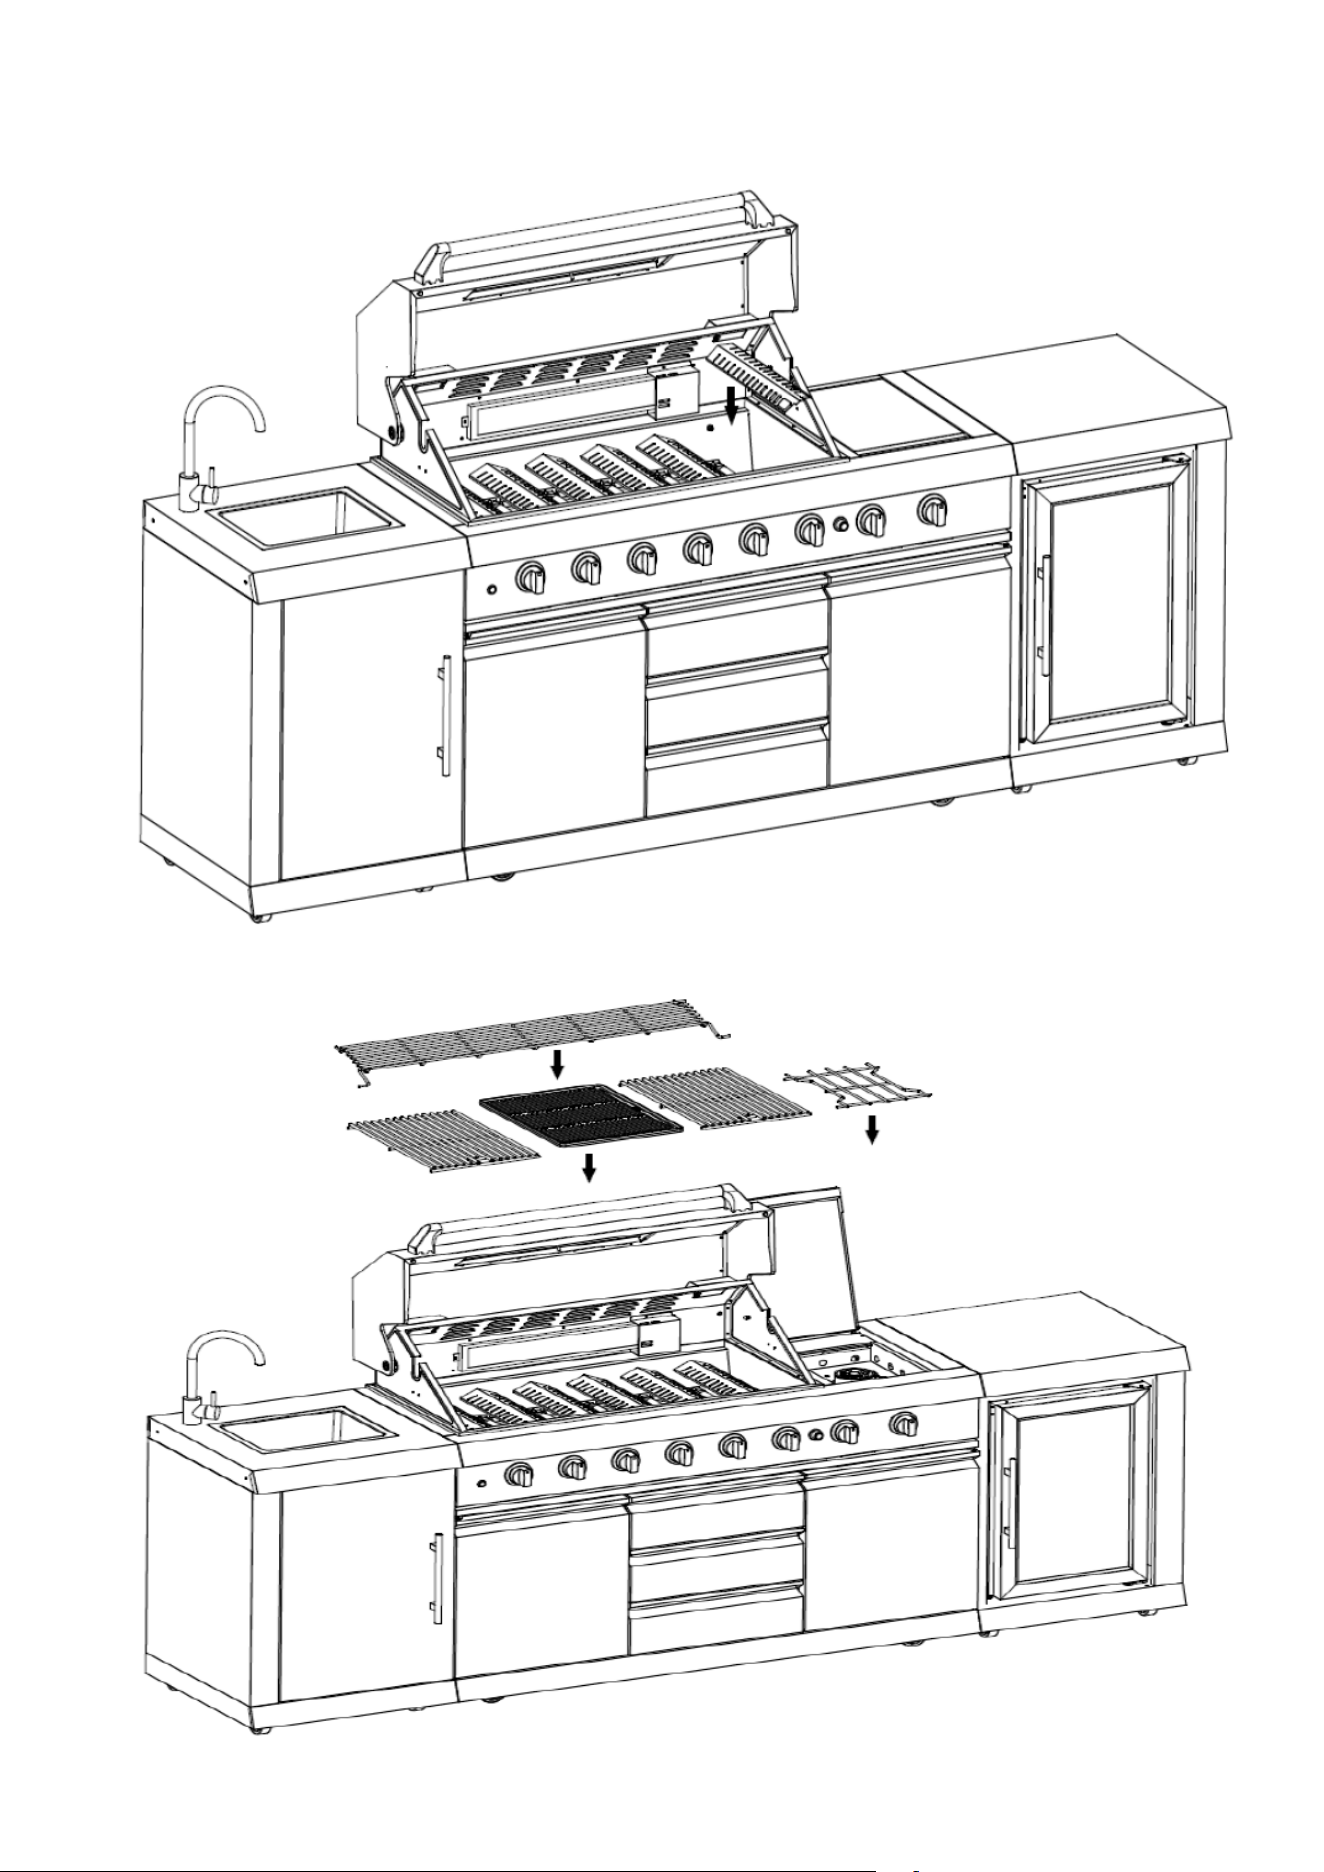
Step 1
5
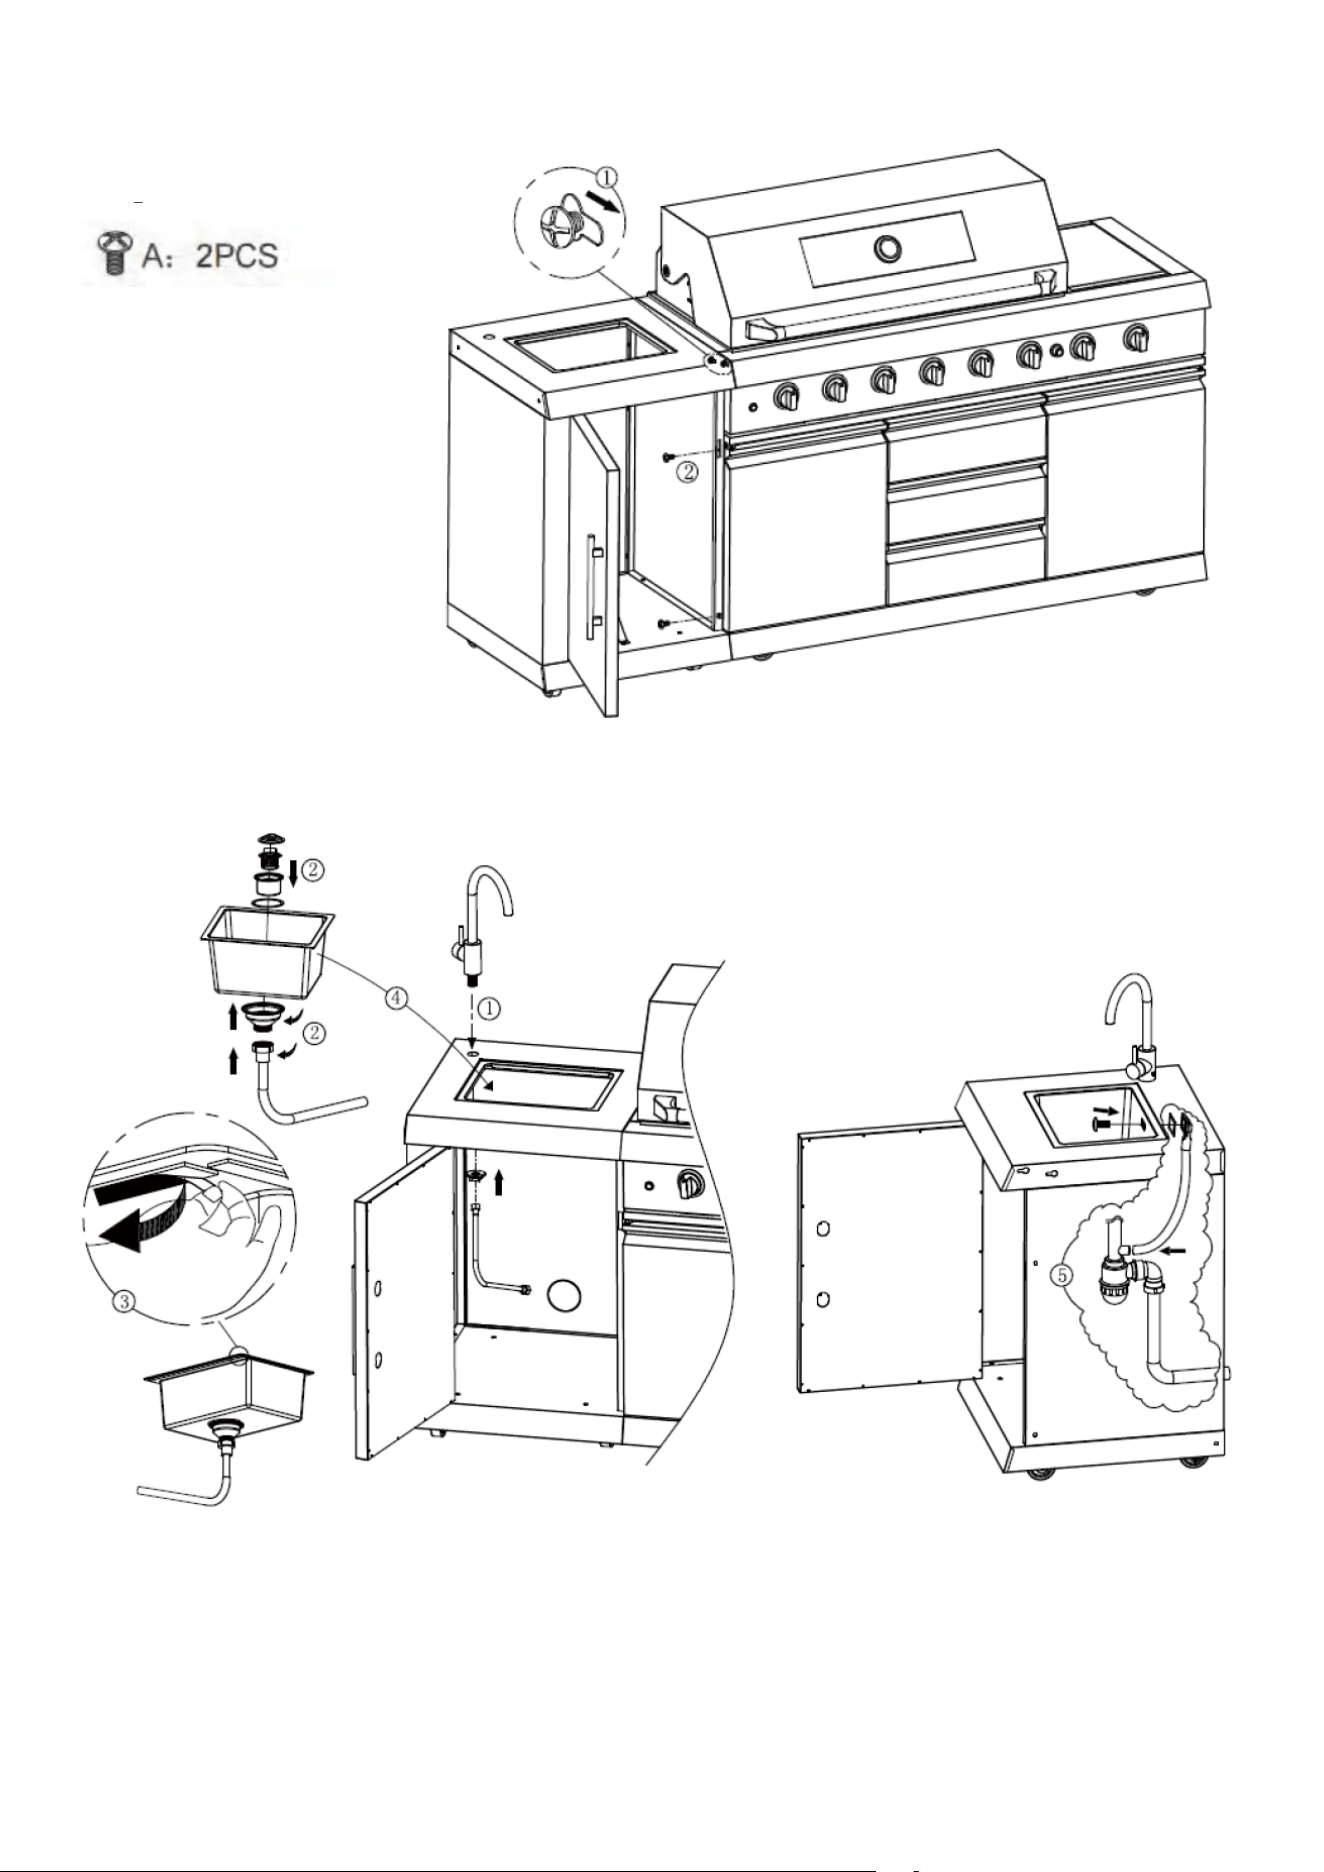
Step 2
Step 3
6
1. Unscrew the four screws on the back with a screwdriver.
2. Then remove the refrigerator from the front.
3. Take out the Styrofoam.
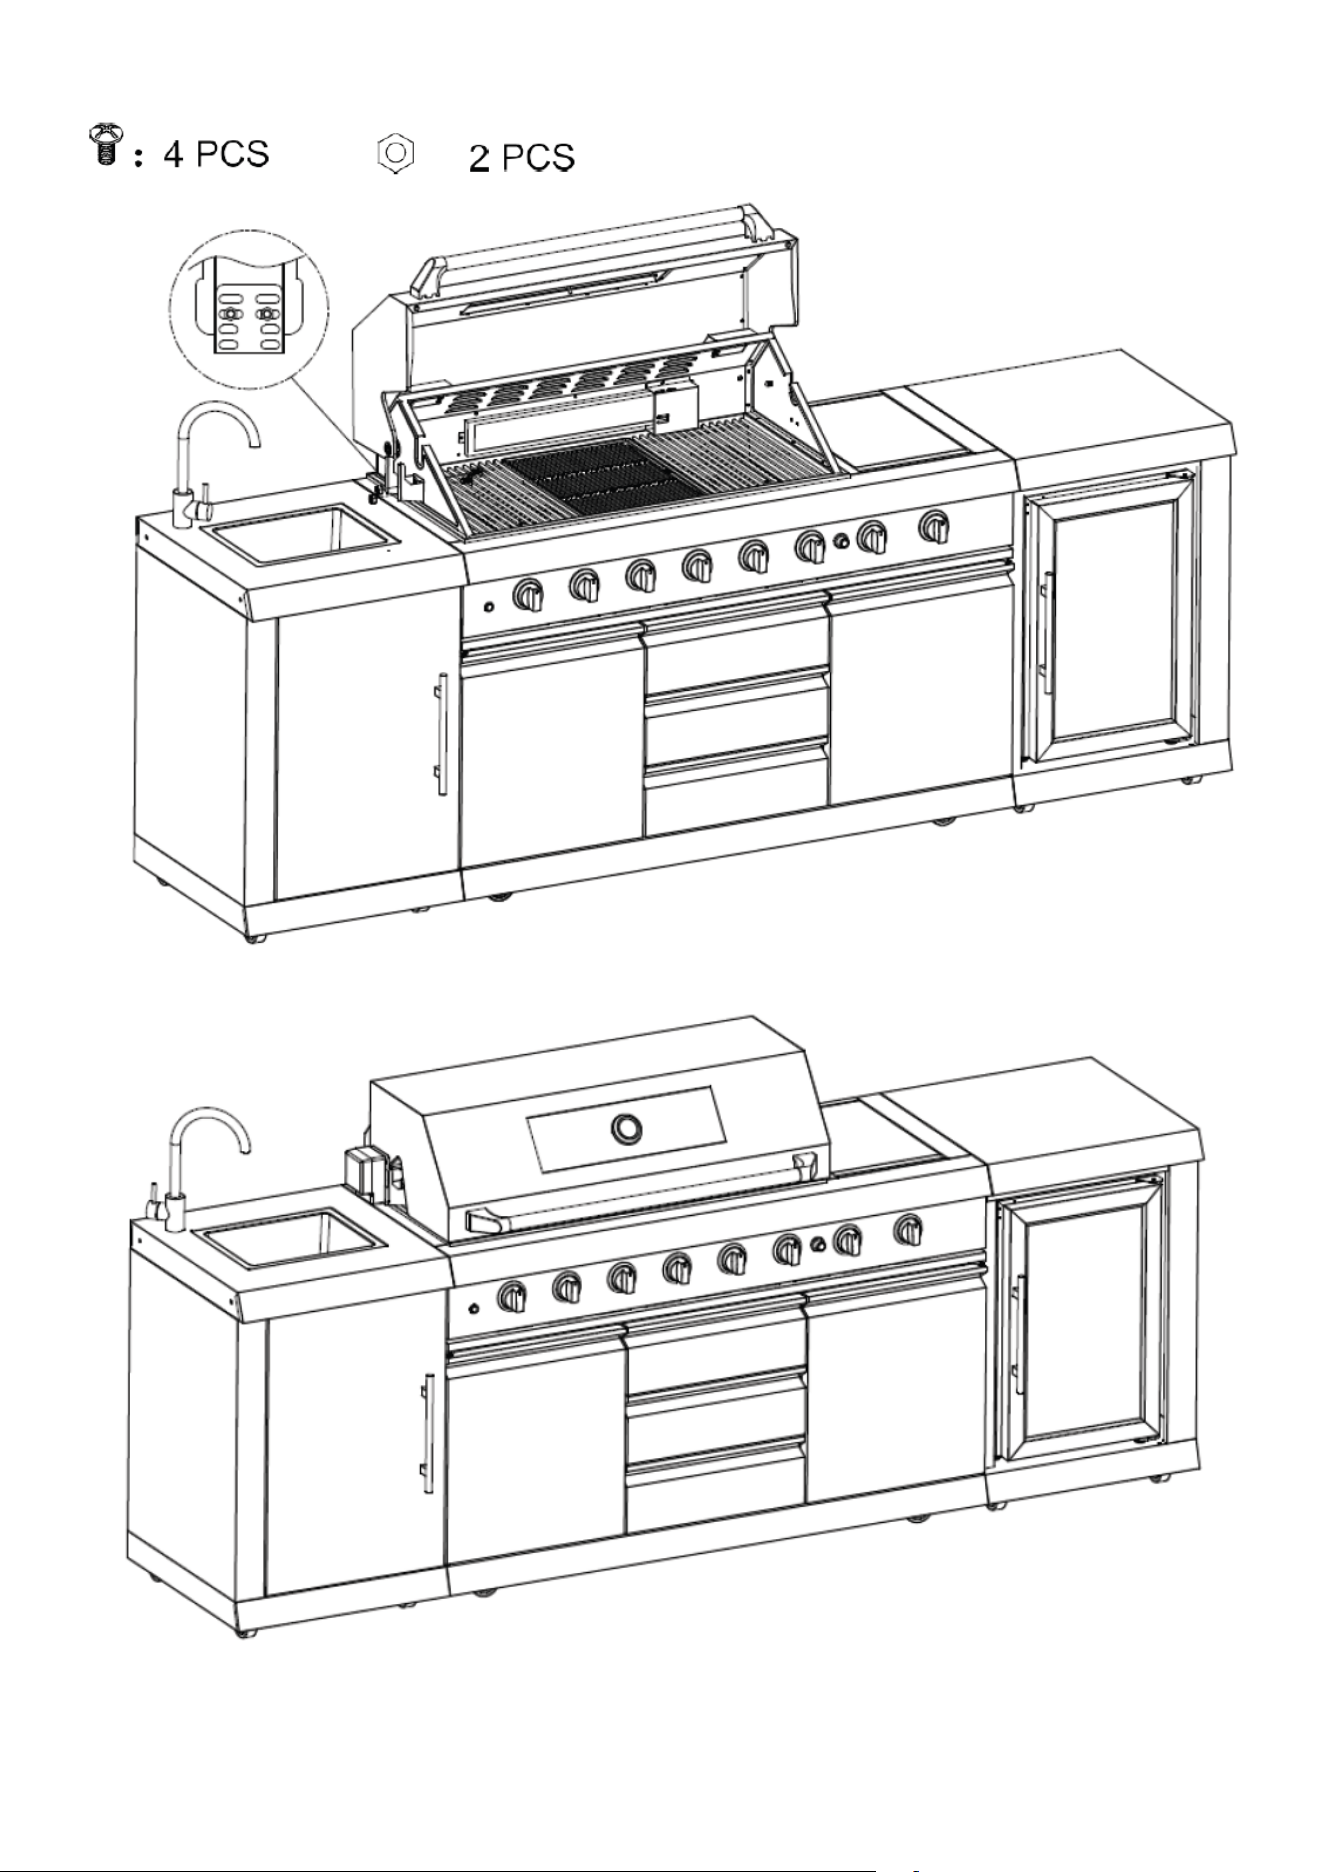
Steps 5
Step 4
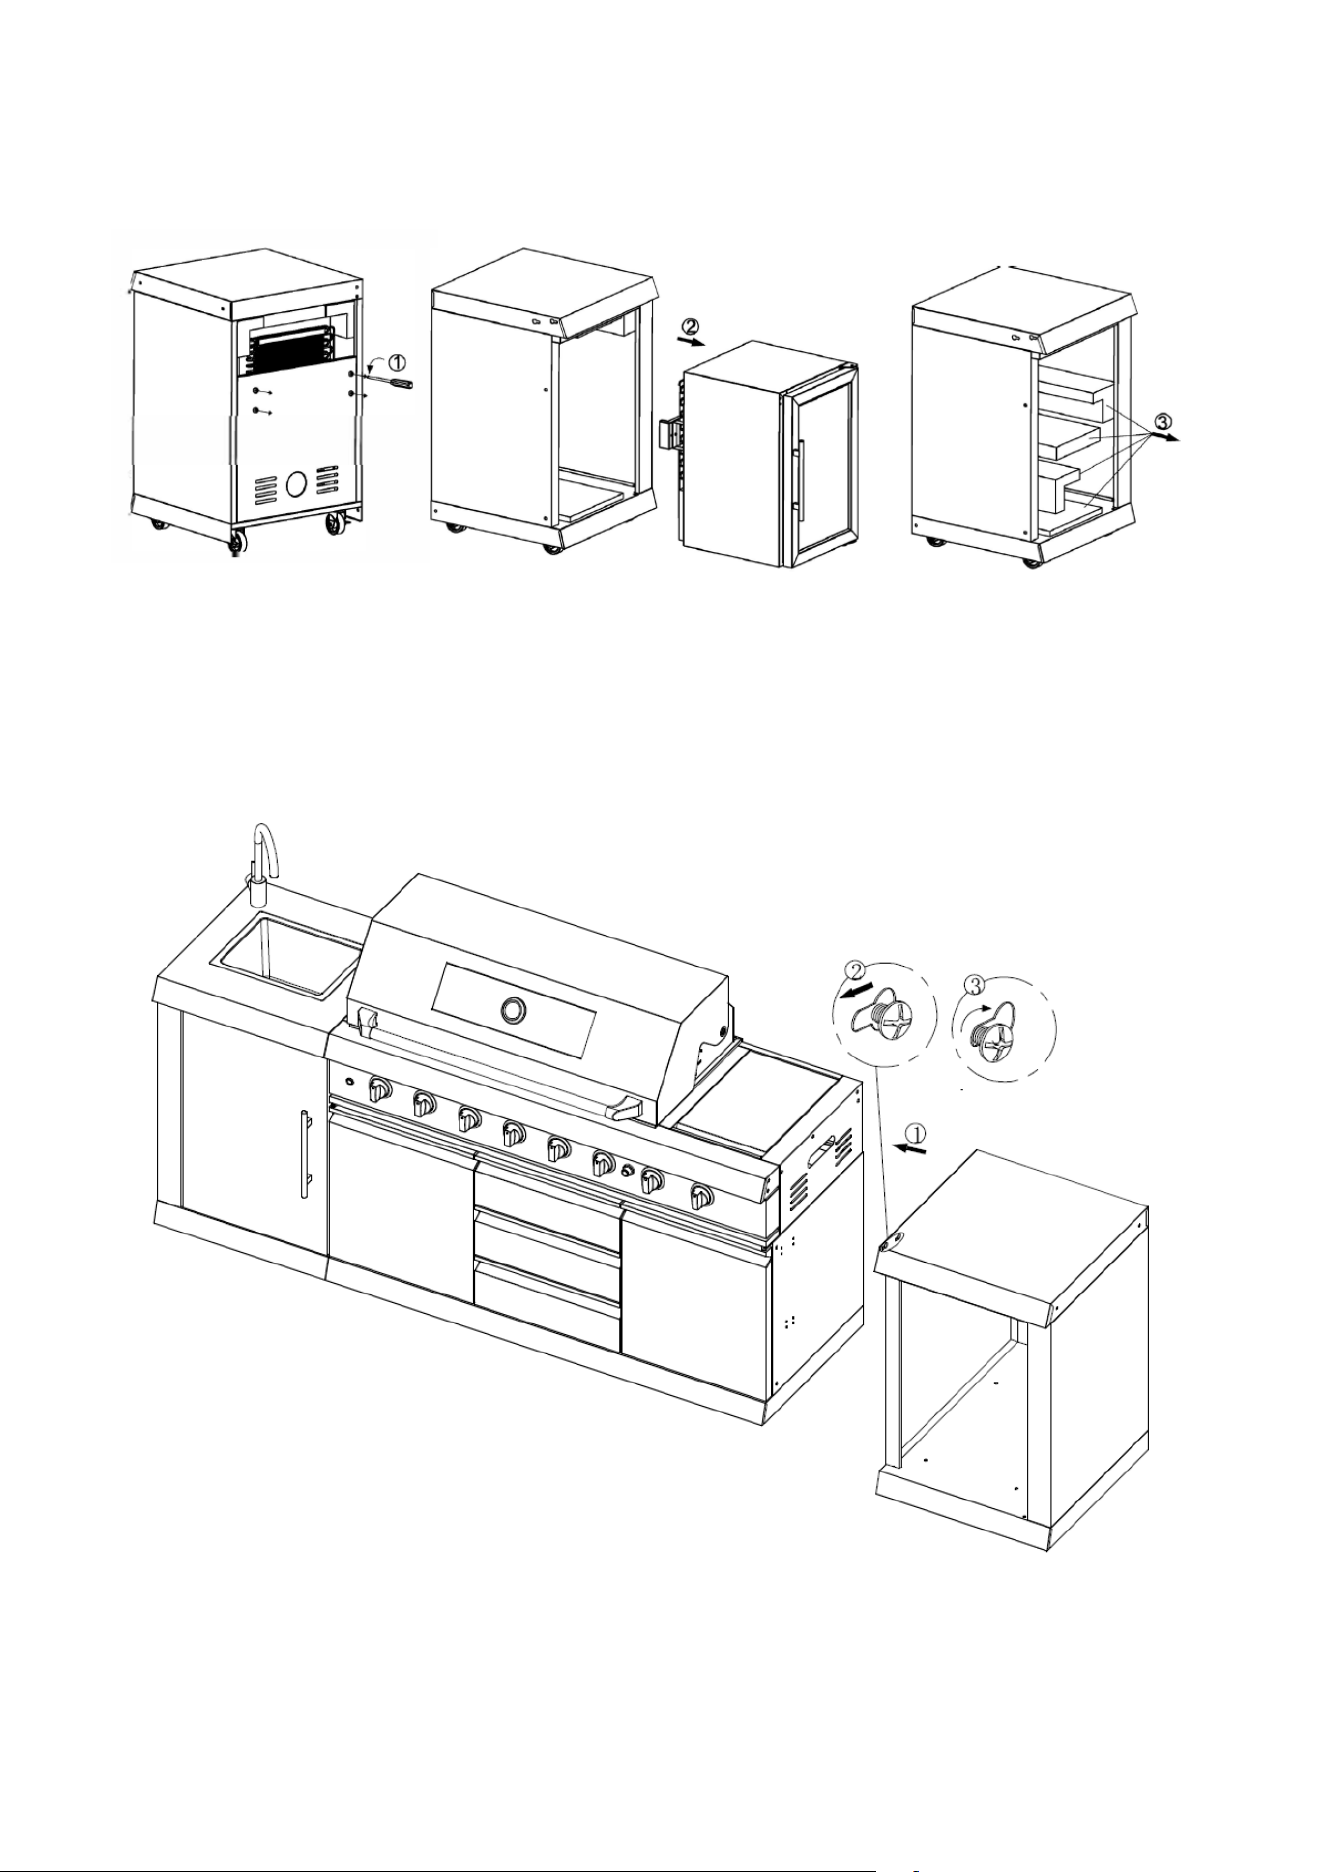
7
Step 6
Step 7
1. Open the refrigerator door and remove the foot pads.
2. Attach the foot pads to the refrigerator.
3. Place the refrigerator back into the electrical cabinet box.
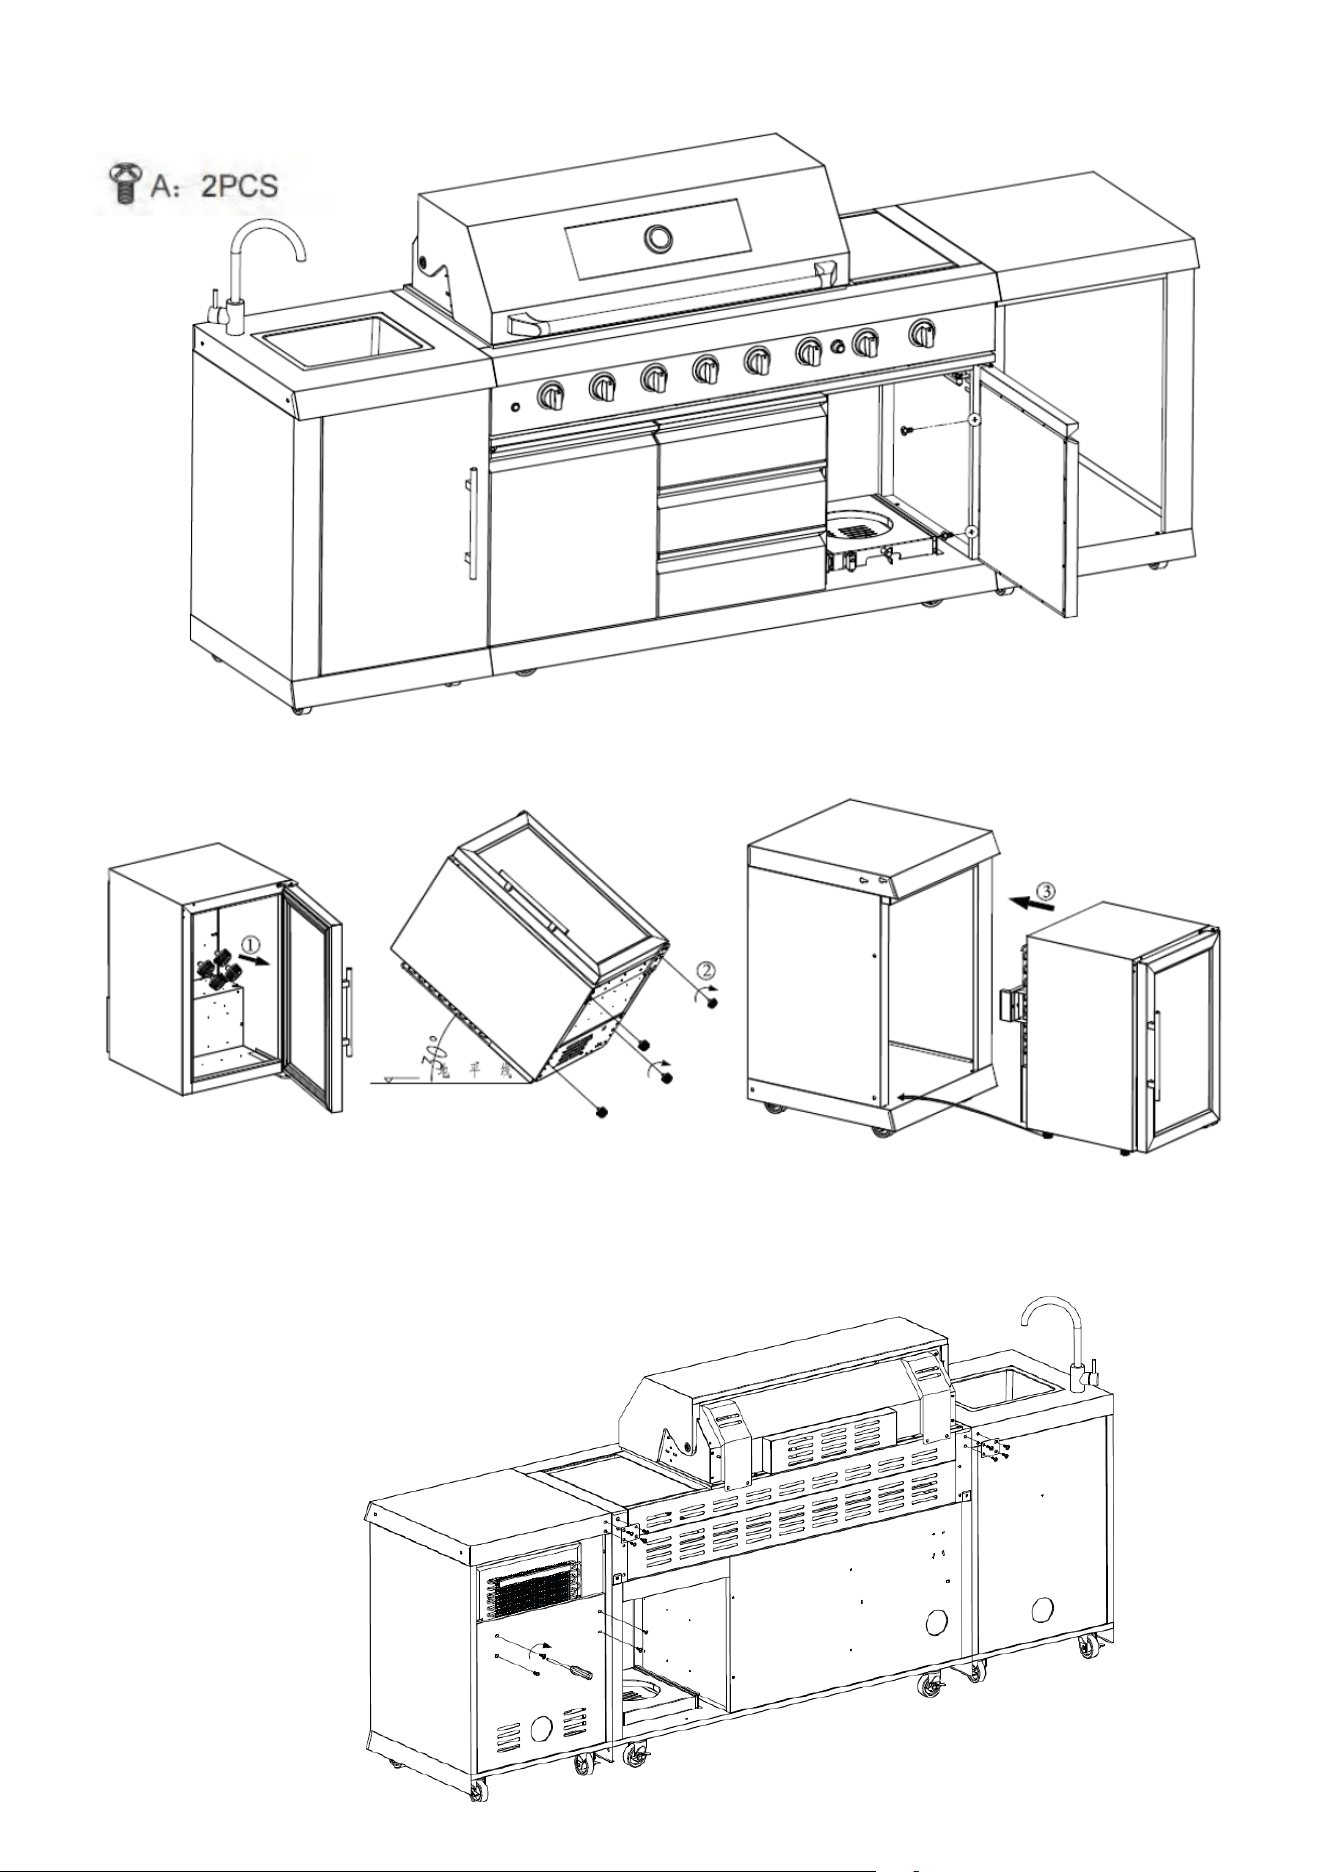
Step 8
8
Use a screwdriver to tighten the screws and secure them in place.
Step 9
Step 10
9
Step 11
Step 12
10
Gas Requirements
CAUTION:
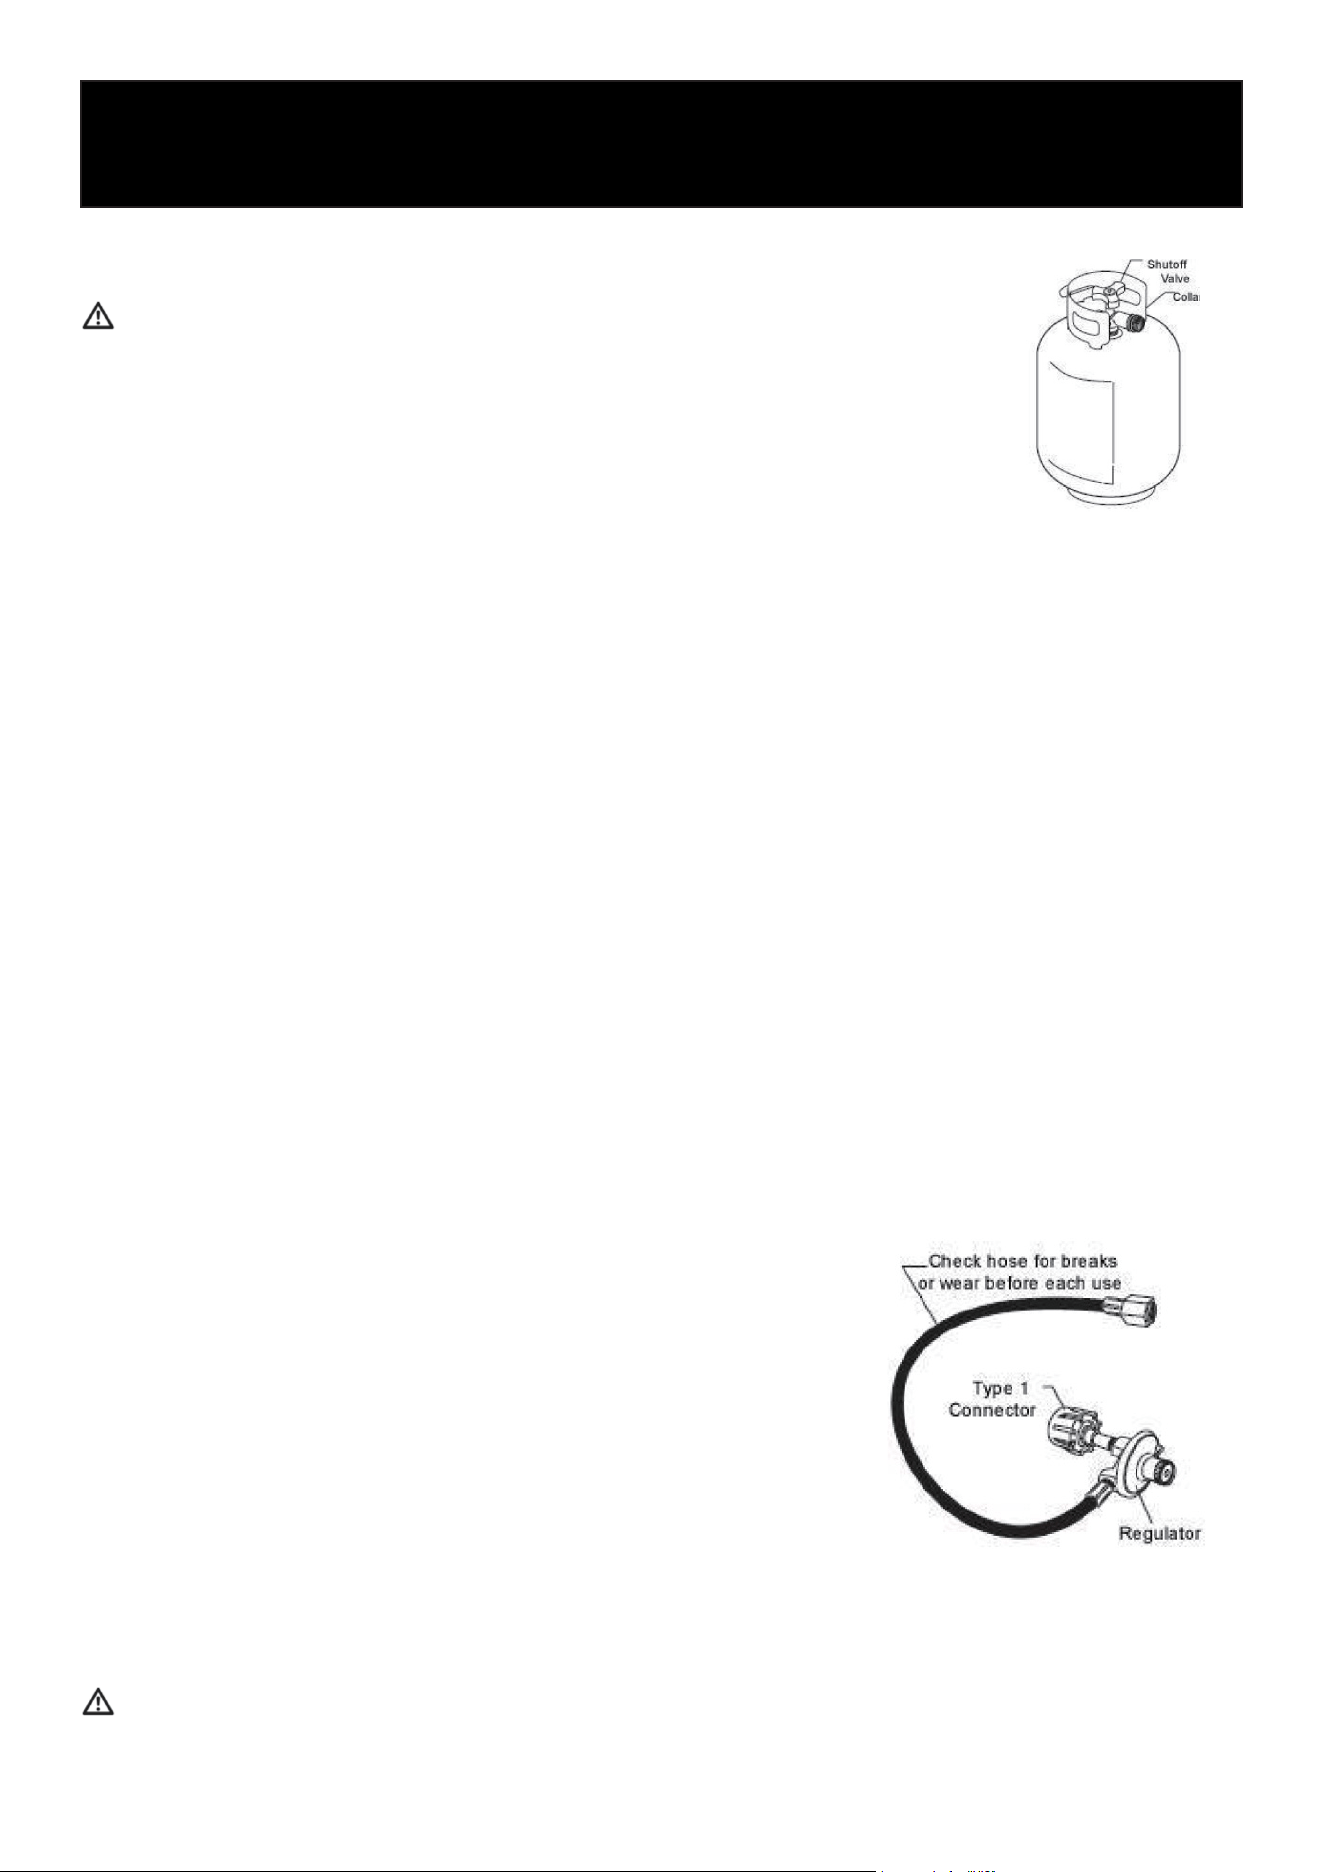
Gas Tank Specications
• Any L.P. gas supply cylinder used with this gas BBQ Grill must be
approximately 12 inches in diameter and 18 inches high. The
maximum fuel capacity is 80% and is approximately 20 pounds of propane.
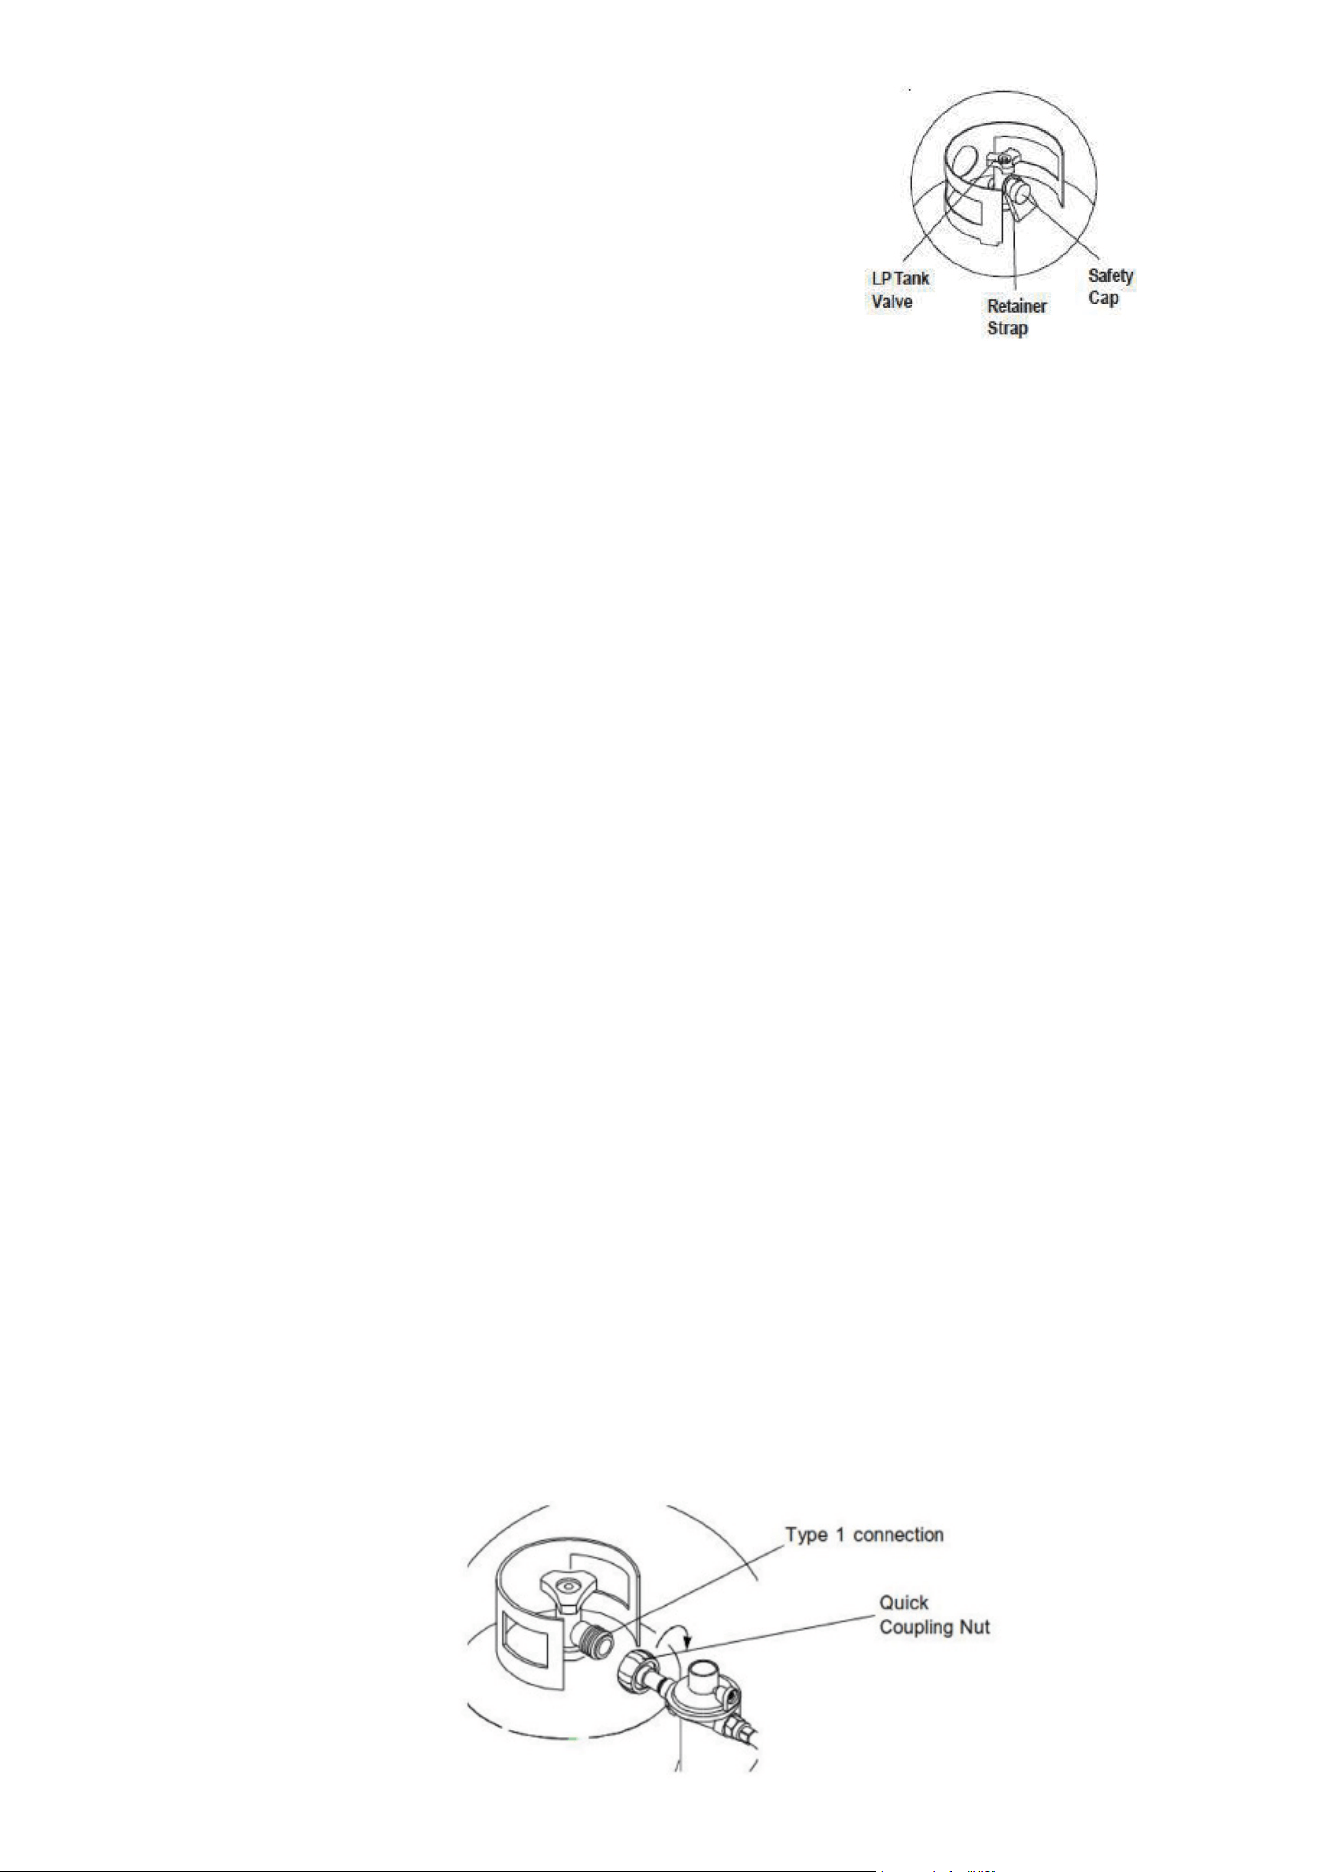
• The L.P. cylinder must have a shut-off valve (see picture) terminating in a Type 1 L.P. connec-
tion.
• A Type 1 compatible cylinder with a Type 1-cylinder valve has a back-check valve which does
not permit gas ow until a positive seal has been obtained.
• The cylinder must be arranged for vapor withdrawal. It must also include a collar to protect the
cylinder valve. A safety relief device having direct communication with the vapor space of the
cylinder must be provided. This will expel high-pressure gas if the cylinder is overlled or over-
heated which could result in re or explosion.
• All L.P. gas cylinders used with this appliance shall be constructed and marked in accordance
with the specications for L.P. gas cylinders of the US Department of Transportation (DOT) or
the National Standard of Canada, CAN/CSA-B339, Cylinders, Spheres, and Tubes for Transpor-
tation of Dangerous Goods; and Commission, as applicable; and shall be provided with a listed
overlling prevention device.
• Read labels on the L.P. Gas Supply Cylinder.
• New cylinders are always shipped empty for safety.
• Allow only qualied L.P. gas dealers to ll or repair your L.P. gas supply cylinder.
• Inform the gas dealer if it is a new or used cylinder to be lled.
• After lling, have the gas dealer check for leaks to ensure the relief valve remains effective and
in good condition.
Hose and Regulator (Comes standard with the Gas BBQ Grill)
The Type 1 connection system has the following features:
• The rear burner will not allow gas to ow until a positive
connection has been made. The cylinder control valve must be
turned off before any connection is made or removed.
• The rear burner has a thermal element that will shut off the
ow of gas in the event of a re.
• The rear burner has a ow limiting device which, when
activated, will limit the ow of gas to 4 cubic feet per hour.
• NEVER use gas BBQ Grill without leak testing this connection.
Pre-Operation Leak Testing
DANGER:
Do not insert any tool into the valve outlet or safety relief valve. You may damage the valve and
cause a leak. Leaking propane may result in explosion, re, severe personal injury, or death.
Setup
11
If a leak is detected at any time, or you cannot stop a gas leak, immediately close the tank’s shut-
off valve (gas supply from LP tank to the gas BBQ Grill) and call your LP gas supplier or your re
department.
Check all gas supply ttings before each use and each time the gas supply cylinder is connected
to the regulator. Have a qualied service technician leak test the gas BBQ Grill any time a part of
the gas system is replaced.
WARNING:
Never attempt to attach this gas BBQ Grill to the self-contained LP gas system. Do not use the gas
BBQ Grill until leak testing has been completed.
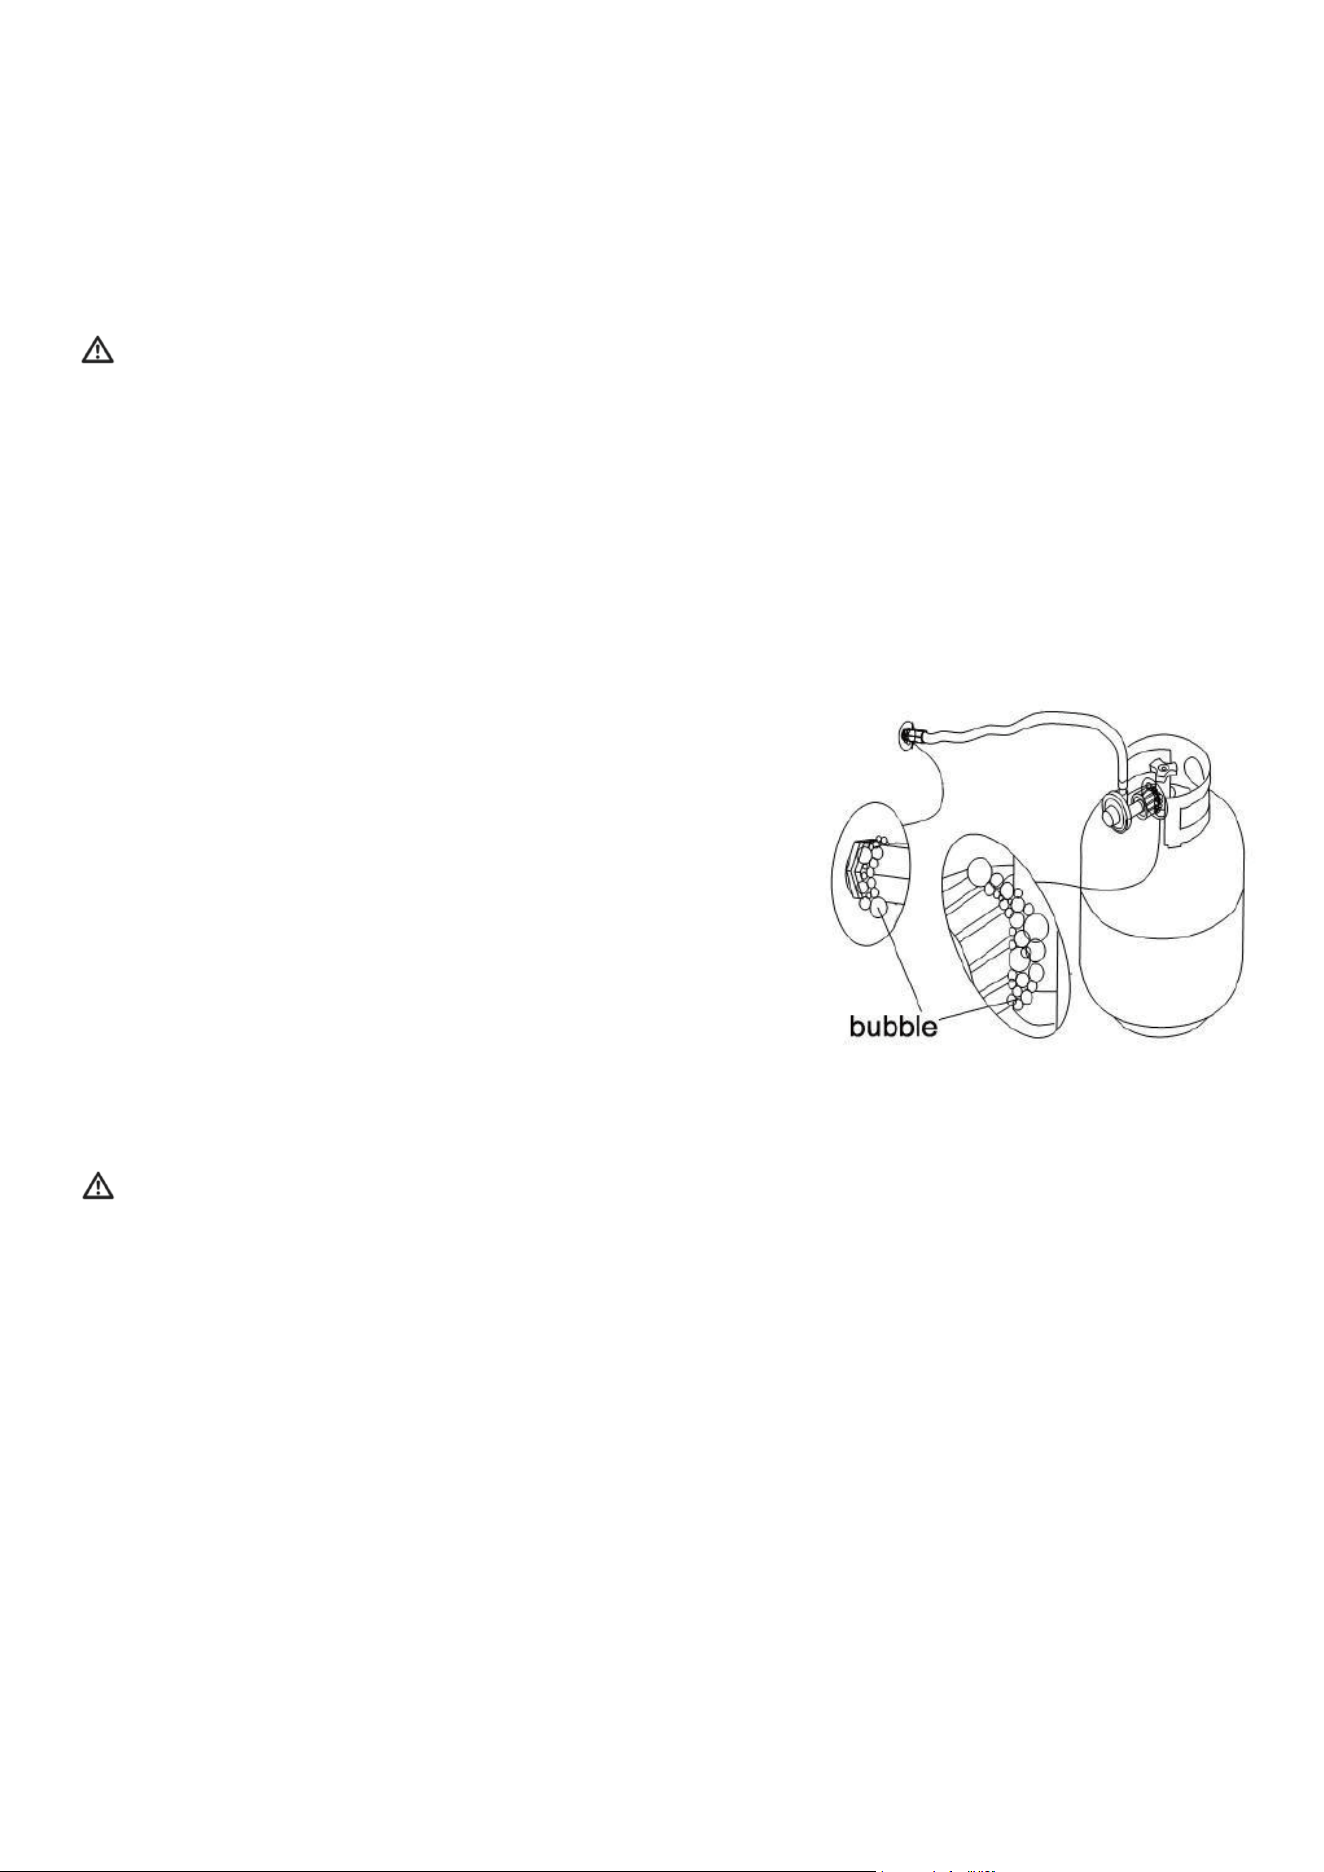
Leak Testing for Valves, Hose, and Regulator
1. NEVER smoke while leak testing.
2. Extinguish all open ames. Never leak test with an open
ame.
3. Mix a solution of equal parts mild detergent or liquid soap
and water.
4. Turn control knobs to OFF. Ensure that the connections
from the regulator to the gas BBQ Grill and tank are tight
and secure (see picture).
5. Completely open the LP tank valve by turning the cylinder
valve knob counterclockwise (right to left).
6. If you hear a rushing sound, turn the gas off immediately.
There is a major leak at the connection.
7. If no rushing sound, brush the soapy solution onto areas
where bubbles are shown in the LP tank (see picture).
8. If “growing” bubbles appear, there is a leak. Close the LP
tank valve immediately and retighten connections.
9. Always close the LP tank valve after performing the leak
test by turning the cylinder valve knob clockwise.
WARNING:
NOTE: When performing leak testing on this appliance, make sure to tighten and test all loose con-
nections. A slight leak in the system can result in a low ame or a hazardous condition that could
result in a re or explosion.
LP Gas Supply Cylinder Disconnection
In order to disconnect the LP tank from the gas BBQ Grill:
1. Turn the burner valves off.
2. Turn the tank valve off (Turn shut-off clockwise to stop).
3. Detach the regulator assembly from the tank valve by turning the quick coupling nut counter-
clockwise.
12
LP Tank Removal, Transportation, and Storage
• Turn off all control knobs and the LP tank valve.
Turn the coupling nut counterclockwise by hand
only—do not use tools to disconnect. Install a
safety cap onto the LP tank valve. Always use the
cap and strap supplied with the valve. Failure to
use the safety cap as directed may result in seri-
ous personal injury and/or property damage.
• Place the dust cap on the cylinder valve outlet whenever the cylinder is not in use. Only install
the type of dust cap on the cylinder valve outlet that is provided with the cylinder valve. Other
types of caps or plugs may result in leakage of propane.
• Never leave an LP tank inside a motor vehicle. (Heating the vehicle could cause an increase in
gas pressure which may open the valve allowing gas to escape, resulting in a serious risk of
re or explosion.)
• Do not store an LP tank in enclosed spaces such as a carport, garage, porch, covered patio, or
other building.
• Do not store the LP tank in an area where children play.
LP Tank Exchange
• Exchange your Type 1 cylinder for an OPD safety feature-equipped replacement tank ONLY.
• Always keep new and exchanged LP tanks in an upright position during use, transit, or storage.
Leak test new and exchanged LP tanks BEFORE connecting to the gas BBQ Grill.
• Never connect the gas BBQ Grill to an unregulated gas supply.
LP Gas Connection
Gas Pressure Regulator
The gas pressure regulator supplied with this grill must be used. The inlet (supplied) pressure to
the regulator should be as follows for proper operation.
Connect Regulator with Hose to your LP Gas Tank
• Turn all control knobs to the OFF position.
Inspect the valve connection port and regulator assembly for damage or debris. Remove any
debris.
• Never use damaged equipment.
Connect the regulator assembly to the tank valve and HAND TIGHTEN the nut clockwise to a
full stop.
• DO NOT use a wrench to tighten because it could damage the Quick Coupling Nut and result in
a gas leak/re hazard.
• Open the tank valve 1/4 to 1/2 of a full turn (counterclockwise) and use a soapy water solution
to check all connections for leaks before attempting to light your grill. See “Check All Connec-
tions for LP Gas Leaks.” If a leak is found, turn the tank valve off and do not use your grill until
the leak is repaired.
13
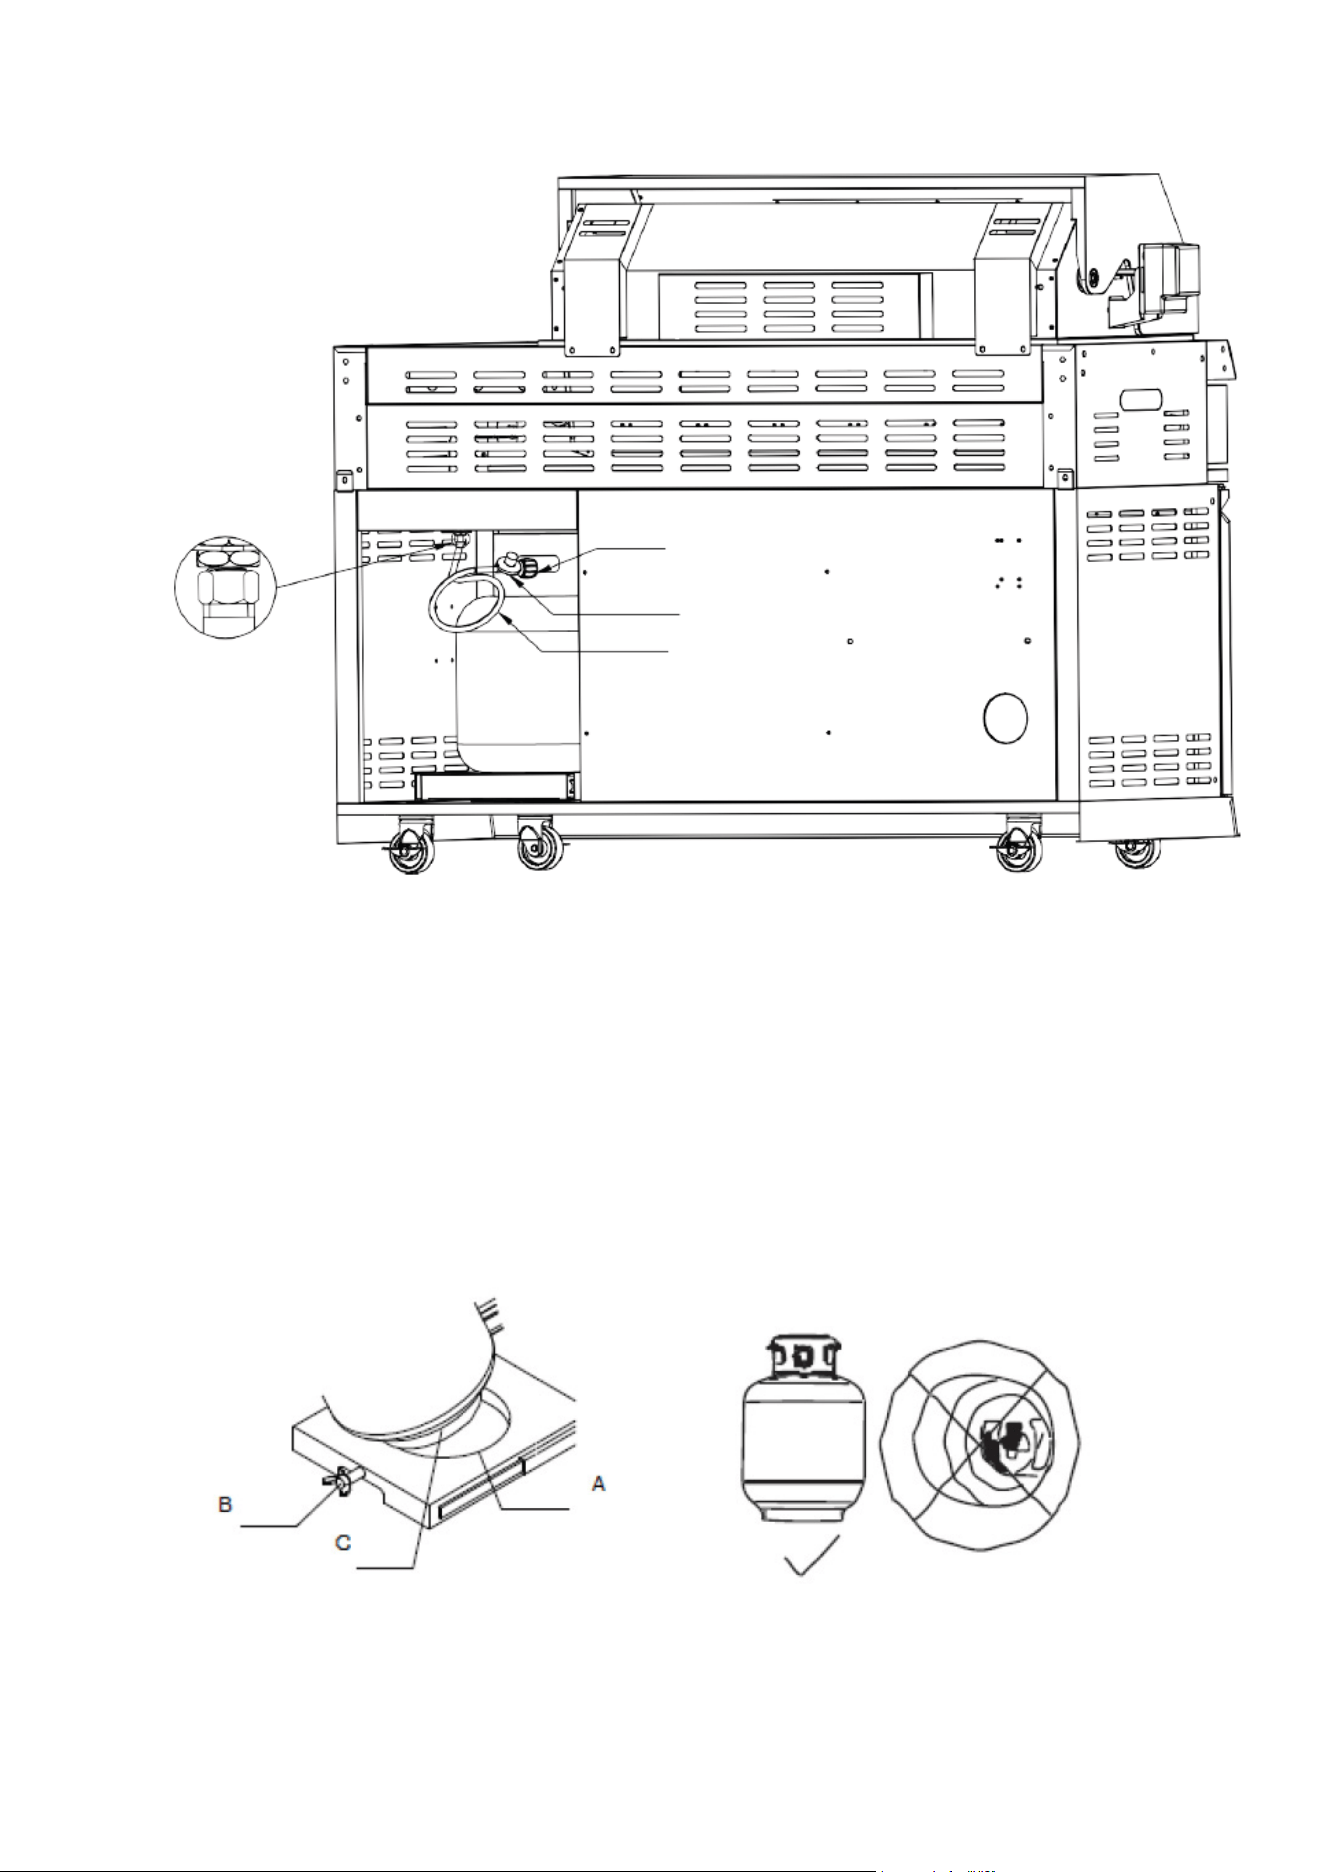
Install Propane Tank
LP Tank Installation Layout
1. This grill is equipped with a propane tank (not supplied). A gas pressure regulator/hose assem-
bly is supplied.
2. The grill tank tray is compatible with most propane tanks on the market. The propane tank
must be mounted and secured.
3. Open the cabinet doors.
4. Loosen the tank tray locking screw.
5. Put the propane tank into the tank tray under the grill.
6. Tighten the locking screw clockwise against the bottom collar of the propane tank to secure
the tank (for detailed info, please see the above picture – LP Tank Installation Layout).
7. For easy installation, position the tank so the cylinder valve faces the right side.
A. Locking screw
B. Tank tray
C. 20lb LP gas fuel tank tray
Cylinder must be arranged to provide vapor withdrawal.

14
Electrical Safety
Electrical equipment provided with the outdoor cooking gas appliance shall have the following
instructions:
a) To protect against electric shock, do not immerse cords or plugs in water or other liquids.
b) Unplug from the outlet when not in use and before cleaning. Allow to cool before putting on or
taking off parts.
c) Do not operate any outdoor cooking gas appliance with a damaged cord, plug, or after the appli-
ance malfunctions or has been damaged in any manner. Contact the manufacturer for repair.
d) Do not let the cord hang over the edge of a table or touch hot surfaces.
e) Do not use an outdoor cooking gas appliance for purposes other than intended.
f) When connecting, rst connect the plug to the outdoor cooking gas appliance, then plug the
appliance into the outlet.
g) Use only a Ground Fault Interrupter (GFI) protected circuit with this outdoor cooking gas appli-
ance.
h) Never remove the grounding plug or use an adapter of 2 prongs.
i) Use only extension cords with a 3-prong grounding plug, rated for the power of the equipment,
and approved for outdoor use with a W-A marking.
15
Grill Instructions
The grill you have purchased may have some or all of the features listed below. The locations and
appearances of the features shown here may not match what you have on your model.
Operation
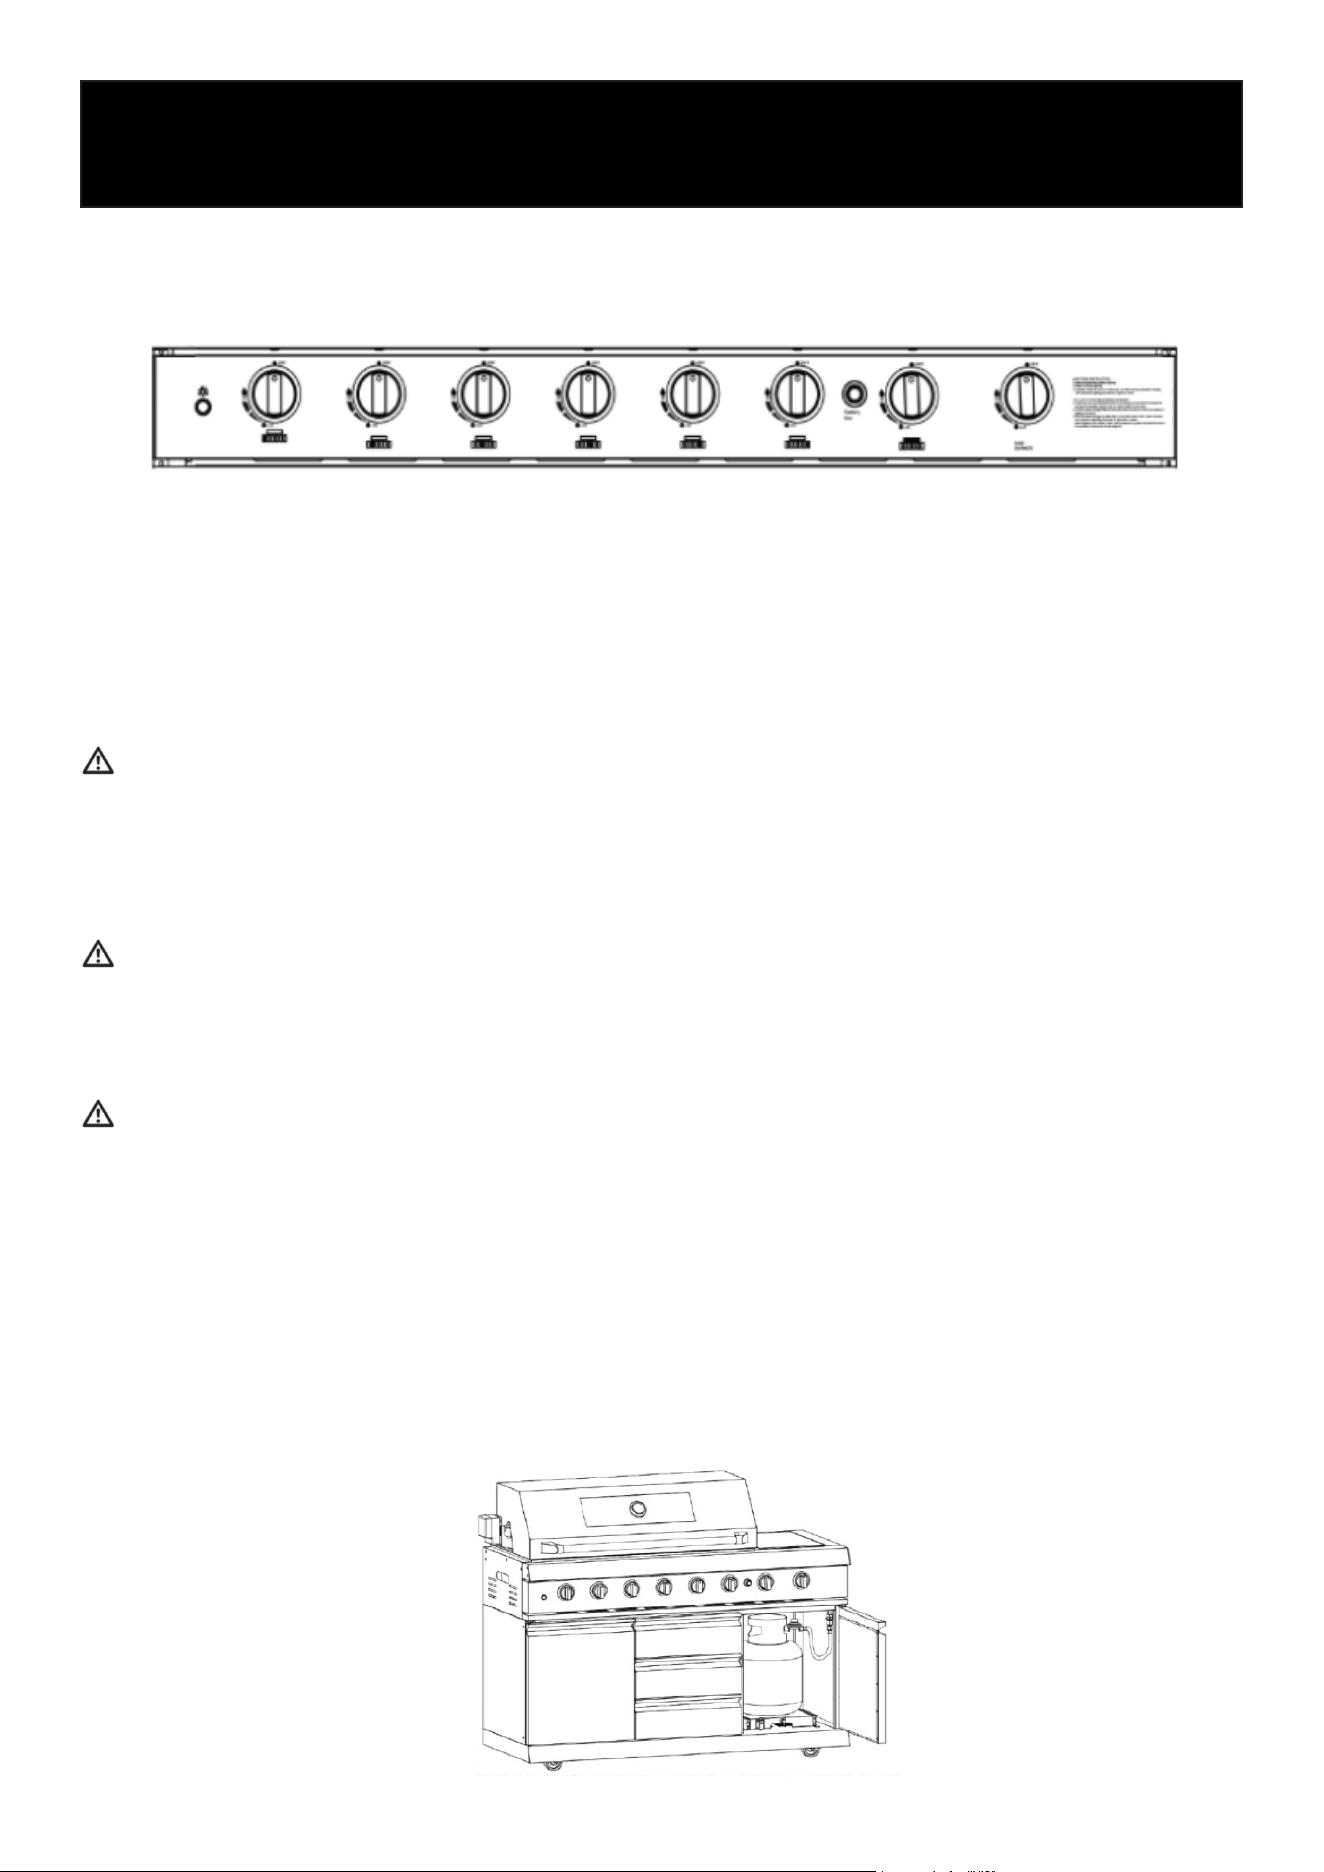
Control Panel
A. Grill Knob Light Switch B. Front Left Tube Burner Knob C. Front Left Tube Burner Knob D. Front
Left Tube Burner Knob
E. Front Left Tube Burner Knob F. Front Left Tube Burner Knob G. Front Left Tube Burner Knob
H. Battery (for Ignition) Box J. Back Broil Burner Knob (Rotisserie Burner) K. Side Burner Knob
Using your Outdoor Grill
WARNING:
Explosion Hazard
Do not store the fuel tank in a garage or indoors.
Do not store the grill with the fuel tank in a garage or indoors. Failure to follow these instructions
can result in death, explosion, or re.
WARNING:
Fire Hazard
Do not use the grill near combustible materials. Do not store combustible materials near the grill.
Doing so can result in death or re.
WARNING:
Food Poisoning Hazard
Do not let food sit for more than one hour before or after cooking. Doing so can result in food poi-
soning or sickness.
Inspect the Gas Fuel Tank Supply Hose
• Inspect the gas pressure regulator/hose assembly before each use.
• If it is evident there is excessive abrasion or wear, or the hose is cut, it must be replaced prior to
the outdoor cooking gas appliance being put into operation. The replacement hose assembly
shall be that specied by the manufacturer.
16
Prepare the Gas Supply
1. Make sure control knobs are turned to OFF. The drip tray
must be in place and pushed all the way to the back.
Turn the Gas Supply On
1. For outdoor grills using a propane tank: Slowly open the tank
valve.
NOTE: If the ow limiting device activates, your grill may not
light. If your grill does light, the ames will be low and will not
heat properly. Turn the tank valve and all control knobs off and
wait 30 seconds. After shutting off the tank, very slowly open
the tank valve and wait 5 seconds before lighting.
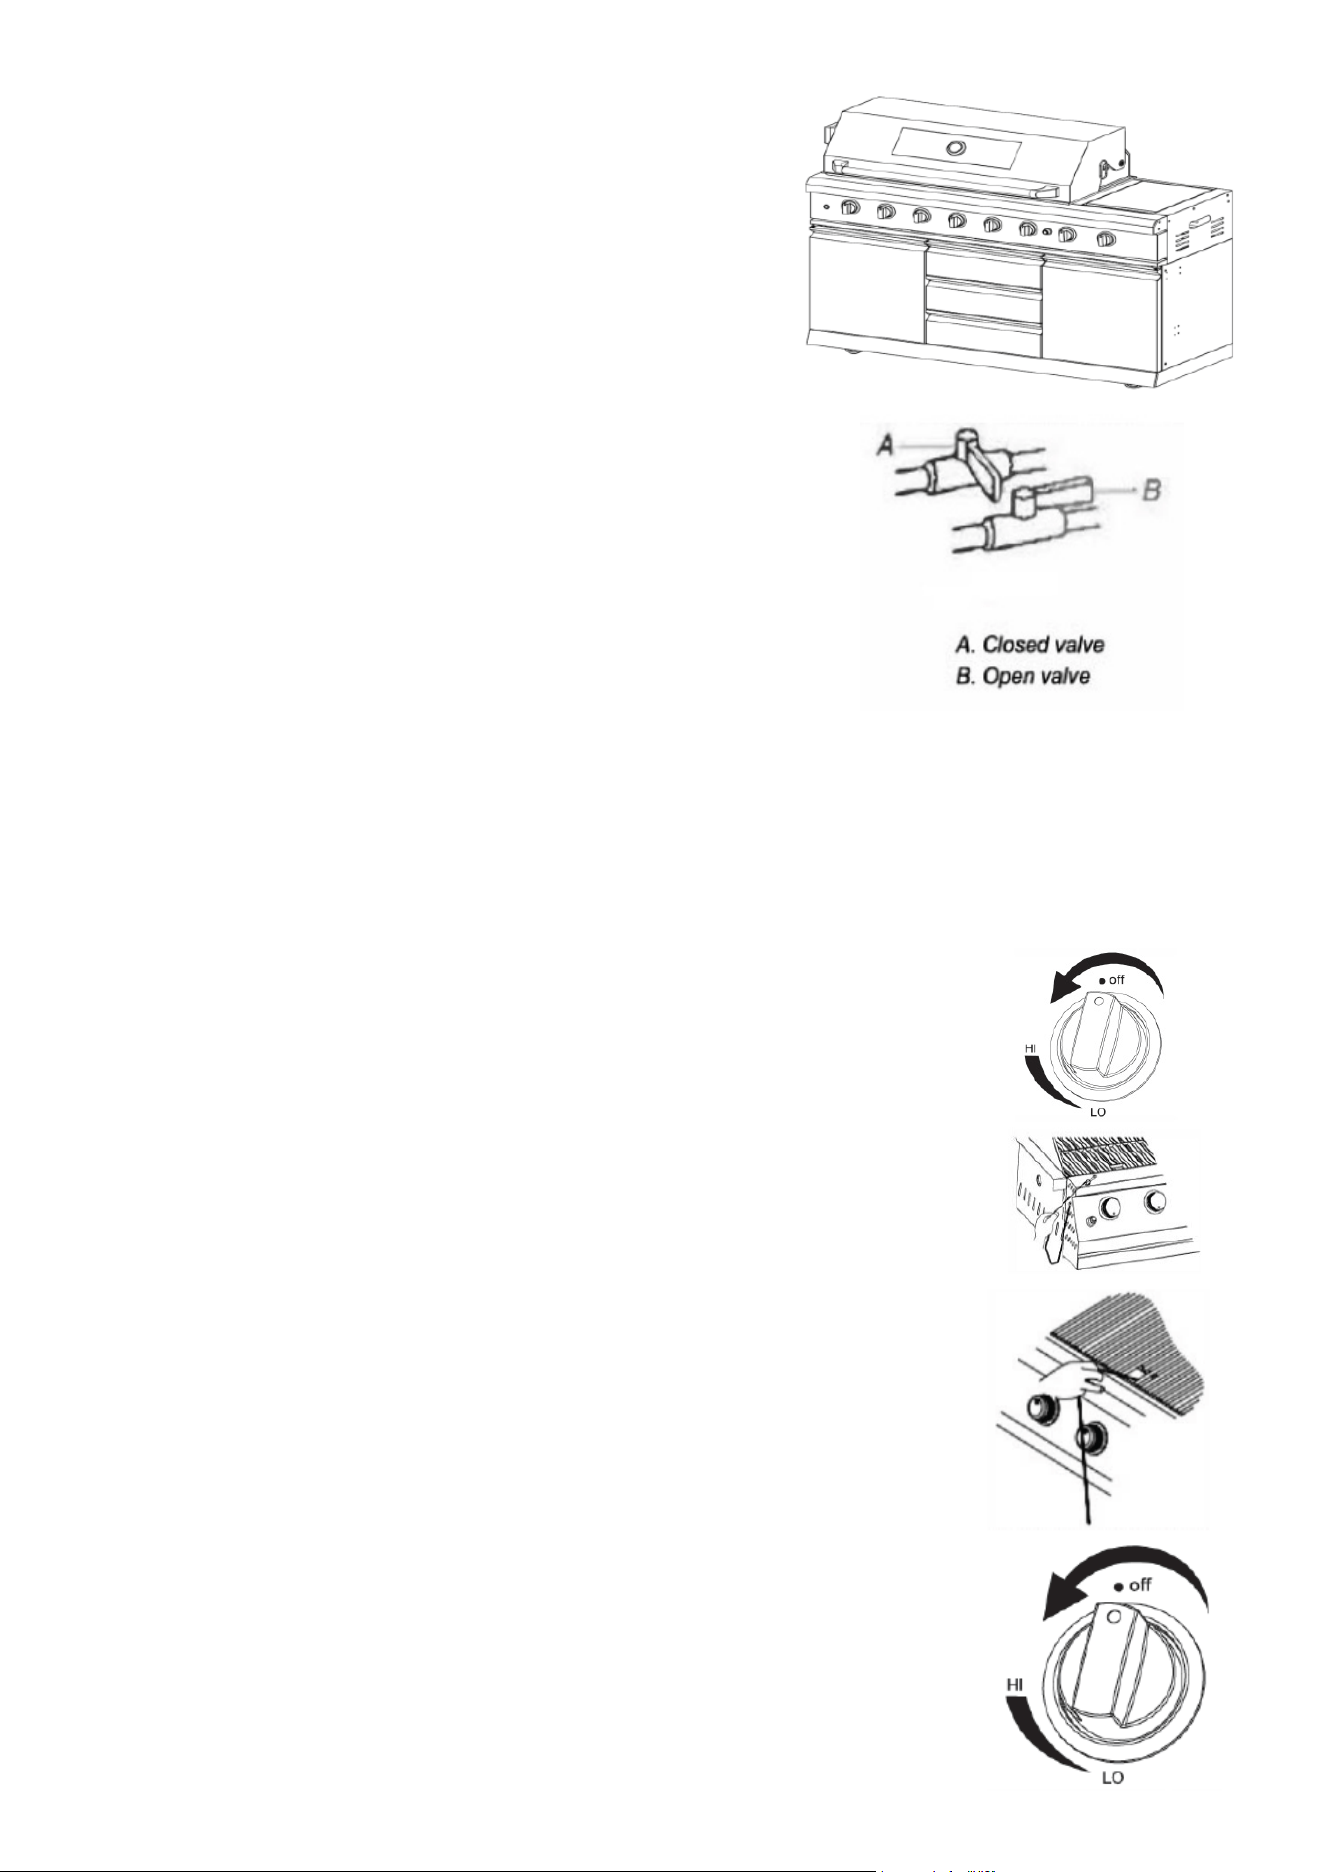
2. For outdoor grills using natural gas supply (if applicable):
Open the manual shut-off valve in the gas supply line. The valve is open when the handle is parallel
to the gas pipe.
Lighting the Main Grill
IMPORTANT: If the burner does not light immediately, turn the burner knob to OFF and wait 5 min-
utes before relighting.
1. Do not lean over the grill.
2. Select the burner you want to light. Push the pulse ignitor module
and push in and turn the grill burner control knob to IGNITE/HI, while
continuing to hold it in.
3. You will hear the “snapping” sound of the spark. When the burner is
lit, release the knob. Turn the knob to the desired setting.
4. Repeat for each of the other burners as needed.
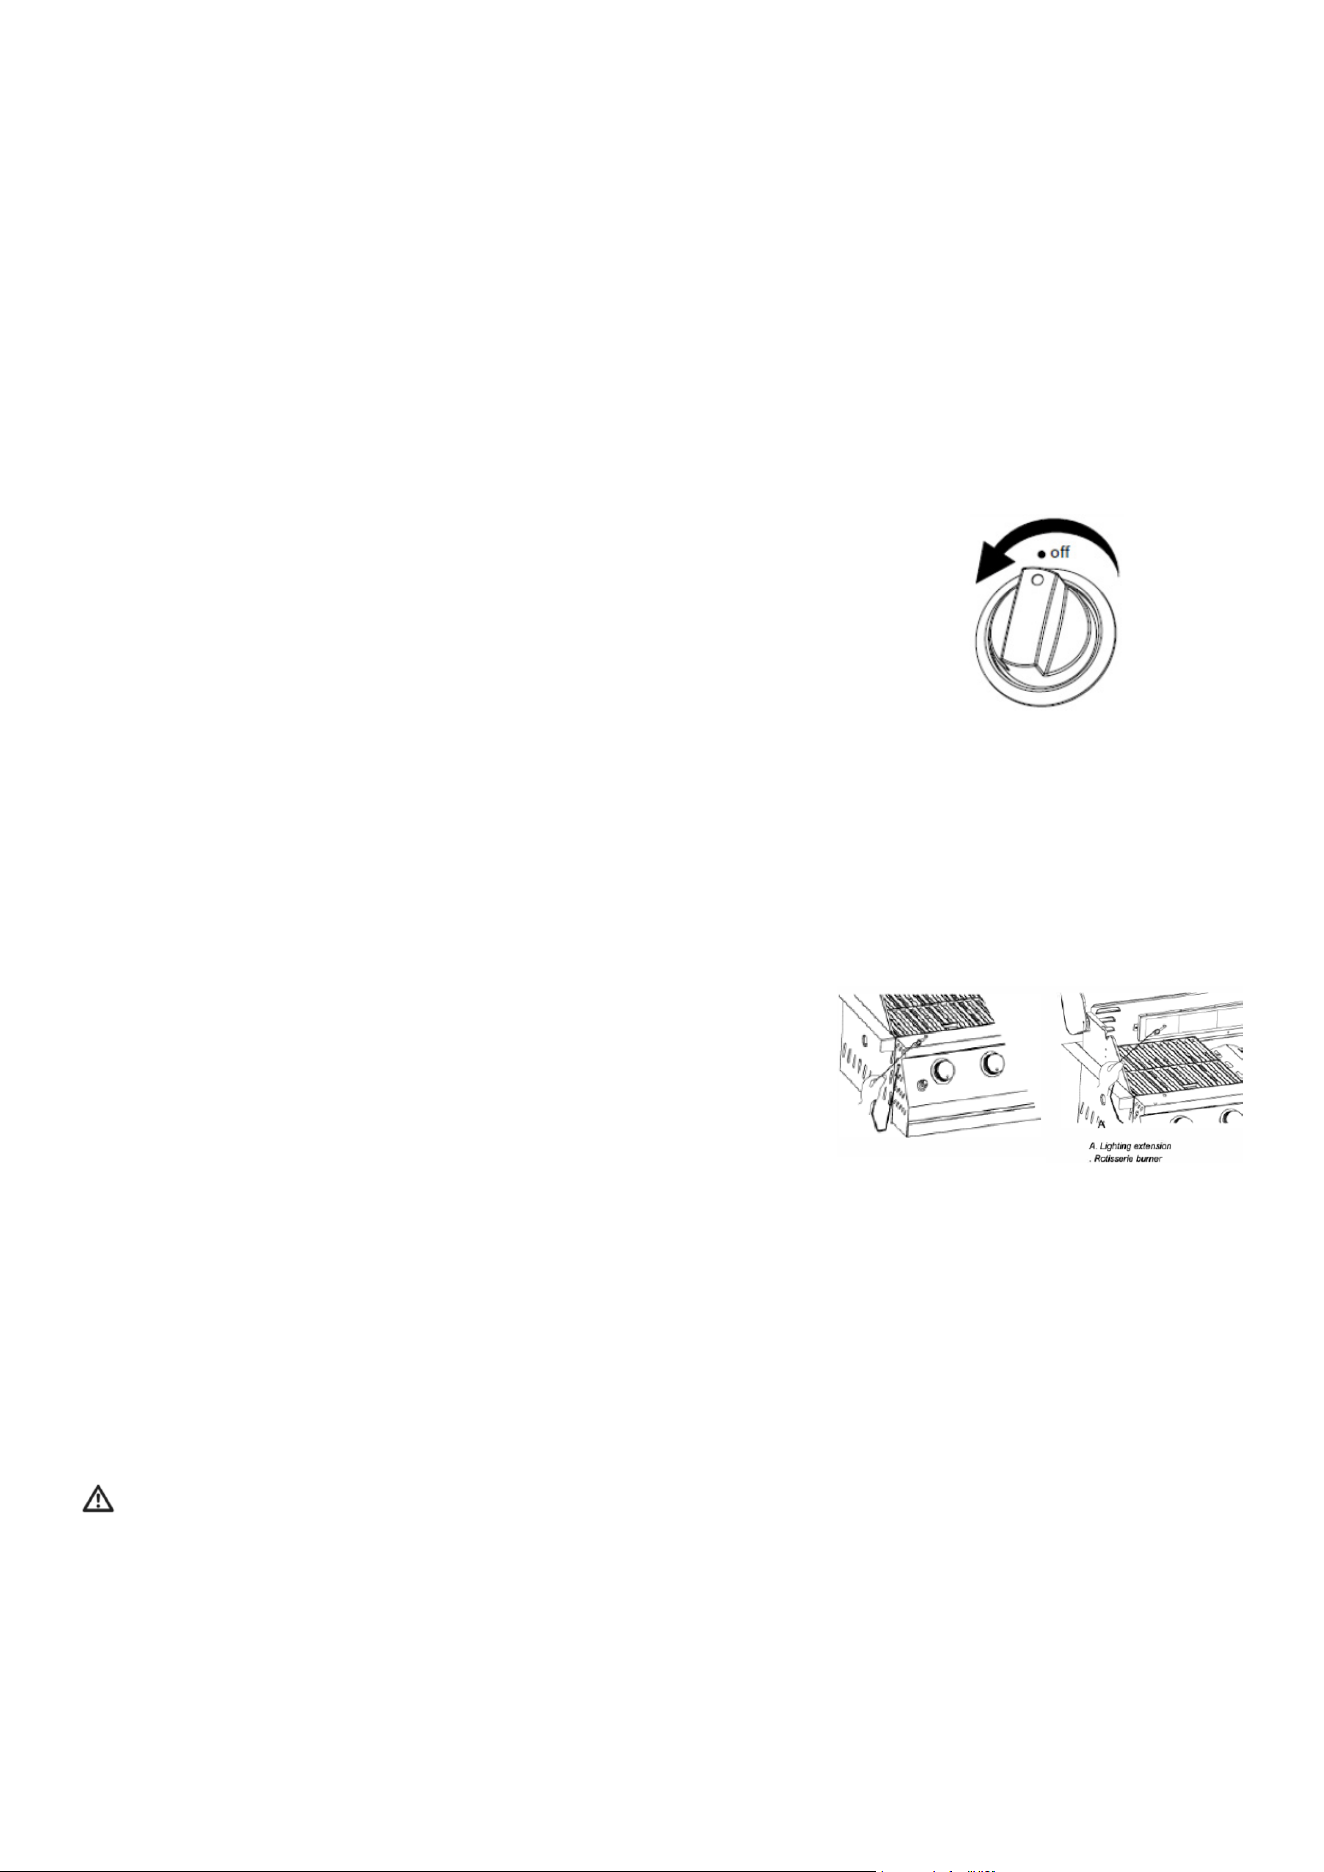
Manually Lighting the Main Grill
1. Do not lean over the grill.
2. Remove the manual lighting extension (see following illustration)
and attach a match to the split ring.
3. Strike the match to light it.
4. Guide the lit match under the grill grate.
5. Push the pulse ignitor module, push in and turn the burner knob to
IGNITE/HI for the burner closest to the lit match. The burner will light
immediately. When the burner is lit, turn the knob to the desired setting.
6. Repeat steps 2 through 5 for each main burner.
7. Remove the match and replace the manual lighting extension on the
right side panel.
17
IMPORTANT:
If the burner does not light immediately, turn the burner knob to OFF and wait 5 minutes before
relighting.
If any burners do not light after attempting to light them manually, contact Customer Service. See
the “Assistance” section.
Warning (After use):
Storage of an outdoor cooking gas appliance indoors is permissible only if the cylinder is discon-
nected and removed from the outdoor cooking gas appliance.
Using Your Rotisserie Burner
To avoid damage to the warming rack, remove it from the grill when using the rotisserie burner. Do
not use the main burners when the rotisserie burner is in use.
Lighting the Rotisserie Burner
1. Do not lean over the grill.
2. Push the pulse ignitor module. Push and turn the rear
burner knob slowly to IGNITE/HI. You will hear the “snapping”
sound of the spark.
3. When the rotisserie burner ignites, continue to hold the knob in for another 15 seconds, then
release the knob and the burner will stay lit. You will hear the “snapping” sound of the spark until
the knob is released.
IMPORTANT: If the rotisserie burner does not light immediately, turn the burner knob to OFF and
wait 5 minutes before relighting.
4. Please note that the rotisserie burner has a high setting only.
Manually Lighting the Rotisserie Burner
1. Do not lean over the grill.
2. Remove the manual lighting extension
(see following illustration) and attach a match to the split ring.
3. Strike the match to light it.
4. Gently hold the lit match close to the rotisserie burner.
5. Push the pulse ignitor module and push in and turn the control knob to IGNITE/HI. Hold this
knob in for 15 seconds after the burner is lit. You will hear the “snapping” sound of the spark until
after the knob is released.
IMPORTANT: If the rotisserie burner does not light immediately, turn the rotisserie burner control
knob to OFF and wait 5 minutes before relighting.
6. Remove the match and replace the manual lighting extension inside the cabinet door.
WARNING:
Do not let food sit for more than one hour before or after cooking. Doing so can result in food poi-
soning or sickness.
It is suggested to use protective gloves when handling particularly hot components. Parts sealed
by the manufacturer must not be altered or changed by the end user.

18
CAUTION:
When using a match to light the grill, make sure to use the attached lighting rod.
WARNING:
• When lighting, keep your face and hands as far away from the grill as possible.
• Before lighting, please check the connection with proper procedure. If there is a leak, turn the
gas off.
• This appliance will be hot during and after use. Use insulated oven mitts or gloves for protec-
tion from hot surfaces or splatter from cooking liquids.
• Do not store a spare LP-Gas cylinder under or near the appliance.
• Never ll the cylinder beyond 80 percent full.
• If the information in the above warnings is not followed exactly, a re causing death or serious
injury.
CAUTION:
• Failure to open the lid prior to igniting the barbecue’s burners, or not waiting 5 minutes to allow
the gas to clear if the barbecue does not light, may result in an explosive ame-up which can
cause serious injury or death.
• NEVER use the grill if there is a gas odor present.
• NEVER stand with your head, body, or arms over the grill when lighting.
• ALWAYS inspect the hose before using the grill. If there is excessive abrasion or wear, or if the
hose is cut, it must be replaced prior to the outdoor cooking gas appliance being put into oper-
ation. The replacement hose assembly shall be that specied by the manufacturer.
• ALWAYS ensure the area around the barbecue is clear of ammable substances such as gaso-
line, yard debris, wood or other combustible items.
• ALWAYS ensure there is no blockage of the airow through the vent space located below the
face of the unit.
• Keep the ventilation opening(s) of the cylinder enclosure free and clear from debris.
Rotisserie Chart
Use a portable meat thermometer to check the internal doneness of the food.
Turn off the rotisserie burner when the meat thermometer reads 5°F/3°C lower than the desired
internal temperature. Continue rotating, hood closed, for 10 minutes before carving.
Cooking Time can be affected by weather conditions such as wind and outside temperature.
Food Weight
Internal Doneness or Tem-
perature (°F/°C)
Approximate Grilling
Time (min/lb)
Beef
Roasts 4-6 lbs (1.5-2.2 kg) Medium-rare (145°F/63°C) 15-20
Rib Eye Medium (160°F/71°C) 20-25
Sirloin Tip
Rib, boneless
Poultry
Chicken 3-6 lbs (1.1-2.2 kg)
• Breast (170°F/77°C)
• Thigh (180°F/82°C)
• 25-30
• 25-30
Turkey, whole 7-10 lbs (2.6-3.7 kg)
• Breast (170°F/77°C)
• Thigh (180°F/82°C)
• 11-20
• 11-20
Lamb
Boneless leg 4-7 lbs (1.5-2.6 kg) Medium (160°F/71°C) 20-25

19
Tips for Outdoor Grilling
WARNING:
Food Poisoning Hazard
Do not let food sit for more than one hour before or after cooking. Doing so can result in food poi-
soning or sickness.
Before Grilling
• Thaw food items before grilling.
• Preheat grill on high (use all grill burners) for 10 minutes. The hood must be closed during pre-
heating. Preheating provides the high heat needed to brown and seal the juices.
During Grilling
• Turn foods only once. Juices are lost when meat is turned several times.
• Turn meat just when juices begin to appear on the surface.
• Avoid puncturing or cutting the meat to test doneness. This allows juices to escape.
• It may be necessary to lower the heat setting for foods that cook a long time or are marinated
or basted in a sugary sauce.
• If using a high ame, add barbecue sauce only during the last 10 minutes of cooking to avoid
burning the sauce.
• The degree of doneness is inuenced by the type of meat, cut of meat (size, shape, and thick-
ness), heat setting selected, and length of time on the grill.
• Cooking time will be longer with an open grill cover.
Cooking Methods
Direct Heat
Cooking by direct heat, means the food is placed on grill grates directly above lighted burners.
Hood position can be up or down. If the hood is in the up position, total cooking times may be
longer.
Direct heat sears the food. Searing is a process that seals natural juices in food by cooking with
intense heat for a short period of time. While juices stay inside, the outside is browned with a a-
vorful grilled coating.
Indirect Heat
For best results, do not select the indirect heat cooking method when it is windy.
Cooking by indirect heat means the food is placed on the grill grate above an unheated burner,
allowing heat from lighted burner(s) on either side to cook the food.
If possible, turn on 2 burners. Cook with the hood down. This will shorten the cooking time.
Food Weight
Internal Doneness or Tem-
perature (°F/°C)
Approximate Grilling
Time (min/lb)
Pork
Loin roast, boneless 4-6 lbs (1.5-2.2 kg) Medium (160°F/71°C) 20-23

20
Outdoor Grill Care
Replacing the Igniter Battery
1. If igniters stop sparking, the battery should be replaced.
2. Unscrew the igniter button cap counterclockwise to remove.
Remove the battery from the battery compartment.
3. Replace it with a new alkaline “AA” size battery. Install the battery with the negative end in rst.
4. Screw the igniter button cap clockwise into place.
General Cleaning
IMPORTANT: Before cleaning, make sure all controls are off and the grill is cool. Always follow
label instructions on cleaning products.
For routine cleaning, wash with soap and water using a soft cloth or sponge. Rinse with clean wa-
ter and dry at once with a soft, lint-free cloth to avoid spots and streaks.
Do not use steel wool to clean the grill, as it will scratch the surface.
To avoid weather damage to the nish, use a vinyl grill cover. See the “Assistance” section to order.
Grill Grates
IMPORTANT: To avoid damage to grill grates, do not use a steel or ber scraper. Immediately after
you are nished cooking, loosen food soil with a brass bristle brush. Turn all burners to HI for 10-
15 minutes with the hood closed to burn off food soil. Turn off all burners, raise the hood, and let
the grates cool. Use the brass bristle brush to remove ash from the grill grates.
When completely cool, grill racks can be removed for thorough cleaning. Clean them with a mild
detergent and warm water.
For baked-on food, prepare a solution of 1 cup (250 ml) ammonia to 1 gallon (3.75 L) water. Soak
grates for 20 minutes, then rinse with water and dry completely.
Warming Rack
Cleaning Method:
• Liquid detergent or an all-purpose cleaner.
• Rinse with clean water and dry with a soft, lint-free cloth.
• For tough spots or baked-on grease, use a commercial degreaser designed for stainless steel.
IMPORTANT: Make sure the gas supply is off and all control knobs are in the OFF position.
Exterior
The quality of this material resists most stains and pitting, provided that the surface is kept clean,
polished, and covered.
Apply stainless steel polish to all non-cooking areas before rst use. Reapply after each cleaning
to avoid permanent damage to the surface.
Burners
Cleaning Method:
• Clean the exterior of the burner with a wire brush.
Clear any clogged burner ports with a straightened paper clip.
• Do not use a toothpick as it may break off and clog the port.
• Check and clean burner/venturi tubes:

21
1. Remove grill grates and ame tamers.
2. Remove the 2 screws that hold the burner in place. Remove
the gas burner from the grill.
3. Use a ashlight to inspect the burner through the burner inlet
to ensure there is no blockage. If any obstruction is seen,
use a metal coat hanger that has been straightened to clear
them.
4. After inspecting the inside of the burner for blockage, re-
assemble the burner by sliding the middle tube of the gas
burner over the gas orice.
5. Reattach the gas burner using 2 screws.
Rotisserie Burner
Cleaning Method:
1. Light the rotisserie burner. See the “Using Your Rotisserie Burner” section.
2. Close the grill hood.
3. Leave the burner on high for approximately 30 minutes.
4. Turn the knob to OFF and let it cool completely.
5. Brush off ash particles from the rotisserie burner.
Drip Tray
IMPORTANT: The drip tray should only be removed when the grill is completely cool. The full-width
drip tray collects grease and food particles that fall through the grill. Clean often to avoid grease
buildup.
Cleaning Method:
• Remove the tray and set it on a at surface.
• Wipe excess grease with paper towels.
• Use mild detergent and warm water. Rinse and dry thoroughly.
• Replace the tray.
Knobs and Flange Area
IMPORTANT: To avoid damage to knobs or ange area around knobs, do not use steel wool, abra-
sive cleaners, or oven cleaner. Do not soak knobs.
Cleaning Method:
1. Use mild detergent, a soft cloth, and warm water.
2. Rinse and dry.
Control Panel Graphics
IMPORTANT: To avoid damage to control panel graphics, do not use steel wool, abrasive cleaners,
or oven cleaner. Do not spray cleaner directly onto the panel.
Cleaning Method:
1. Clean around the burner labels gently; scrubbing may remove printing.
2. Use mild detergent, a soft cloth, and warm water.
3. Rinse and dry.

22
Troubleshooting
Issue Possible Cause
Solution
Grill will not light
• Is the propane tank valve turned off?
• Is the grill properly connected to the
gas supply?
• Is there any gas in the propane tank?
• Is the igniter working?
• If the igniter is not sparking at the tip
of the electrode, you might need to
replace the igniter.
• Turn on the valve.
• Check installation instructions.
• Check the gas level before using the grill.
• Check if the igniter battery is properly in-
stalled, also check if the battery needs to be
replaced.
• Check if the grill will be lit by match.
• Check if there’s any debris blocking the elec-
trode.
• Replace the igniter if necessary.
Burner Flame will not
stay lit
• Is the gas supply valve turned on at
the correct position?
• Is gas supply in the fuel gas tank
low?
• Is the burner properly installed and in
good condition?
• Check the position of the gas valve, adjust
the gas valve according to the ame perfor-
mance.
• Check the gas level.
• Check that the burner is installed properly.
Check for defects in the burner.
Flame is noisy, low,
or erratic
• Is the gas supply fully turned on?
• Is the gas supply in the propane tank
low?
• Does only one burner appear low?
• Is the gas supply hose bent or
kinked?
• Is the ame noisy or lifting away
from the burner?
• Is the burner ame mostly yellow or
orange?
• Check if the propane tank valve is fully open.
• Check the gas level.
• Check and clean the burner if it’s clogged or
dirty. See “General Cleaning” section.
• Straighten the gas supply hose.
• The burner may be getting too much air.
Check the air shutter adjustment.
• Grill may be in an area that is too windy, or
not receiving enough air. Check the burner air
inlets for obstructions. Check the air shutter
adjustment, see “Check and Adjust Burners”
section.
Excessive are-ups
• Is there excessive fat in the food
being grilled?
• Keep ame on low or turn one burner off.
Keep the hood up when grilling to avoid ex-
cessive are-ups. Move food to the warming
rack until ames subside. To avoid damage
to the grill, do not spray water on gas ames.
Low heat LP Gas
• For outdoor grills using a propane
tank, slowly open the tank valve.
NOTE: If the ow limiting device activates, your
grill may not light. If your grill does light, the
ames will be low and will not heat properly.
1. Turn the tank valve and all control knobs off
and wait 30 seconds.
2. After shutting off the tank, slowly open the
tank valve and wait 5 seconds before lighting
3. Light one burner at a time. See “Lighting the
Main Grill” section.
Replacing light
bulb
1. Take out the grease tray and nd the connec-
tor of the grill light bulb.
2. Take out the 5 screws on the lamp cover to
get access to the bulb.

23
LIMITED WARRANTY
KoolMore Supply Inc. extends a limited warranty to the original purchaser, guaranteeing that this KoolMore product is
free from manufacturing defects in material or workmanship for three years from the date of purchase.
Should you discover any such defect within the warranty period, KoolMore Supply Inc. reserves the right to repair or re-
place the product without charge, or to cover the cost of replacement parts and repair labor needed to correct defects
present at the time of purchase or resulting from regular usage, when the appliance has been installed, operated, and
maintained as per the instructions provided.
At its sole discretion, KoolMore Supply Inc. may decide to replace the product. In such an event, your replacement
appliance will carry the warranty for the remaining term of the original unit’s warranty period.
This warranty is valid exclusively to the original purchaser of the product and only applicable within the United States.
The warranty commences from the date of original consumer purchase. Proof of the original purchase date will be
required to obtain service under this warranty.
Under this limited warranty, your sole and exclusive remedy will be product repair, as outlined above. All services must
be provided by a KoolMore designated service company.
To claim warranty or request repair service:
Email [email protected]. Please include your name, address, phone number, warranty repair request, and a copy
of your proof of purchase receipt. Alternatively, visit koolmore.com and use the Contact Us page. A KoolMore custom-
er service representative will promptly arrange service for your appliance.
We thank you for choosing KoolMore.
WARRANTY EXCLUSIONS
This limited warranty will not cover:
1. Failure of the product to perform during power failures or interruptions,
or due to inadequate electrical service.
2. Damage incurred during transportation or handling.
3. Damage caused by accidents, vermin, lightning, winds, re, oods, or acts of God.
4. Damage resulting from accidents, alterations, misuse, abuse, improper installation, repair, or maintenance. This
includes using any external device that alters or converts the voltage or frequency of electricity.
5. Unauthorized product modications, repairs by unauthorized centers, or use of non-approved replacement parts.
6. Abnormal cleaning and maintenance not aligned with the user’s manual.
7. Use of incompatible accessories or components.
8. Any costs associated with repairs or replacements under these excluded circumstances shall be the responsibility
of the consumer.
WARRANTY