DĒZL
™
DUALVIEW
Rugged Side Camera System
Owner's
Manual

Table of Contents
Getting Started................................. 3
Camera System Overview................. 4
Installation....................................... 5
Mounting Considerations.................. 5
Testing the Camera and Transmitter
Locations....................................... 5
Mounting the Camera Screw-Down Base
Plate............................................. 6
Mounting the Camera Adhesive Base
Plate............................................. 6
Securing the Camera to the Base
Plate............................................. 7
Connecting the Camera Cables...........7
Mounting the Transmitter Box............ 8
Installing a Memory Card in the
Transmitter Box............................8
Connecting the Turn Signal Wires........9
Power Connection............................9
In-line Fuse Cable..........................9
Adjusting the Camera Lens.............. 10
Video Recording............................. 12
Incident Detection.......................... 12
Driver Awareness Features and
Alerts............................................. 13
Blind Spot Monitoring......................13
Parking Guard............................... 13
The dēzl
™
DualView Camera System
and the Garmin Drive
™
App............. 15
Pairing the Camera System with a Phone
or Tablet...................................... 15
Connecting Your Camera to a Wi‑Fi
®
Network....................................... 15
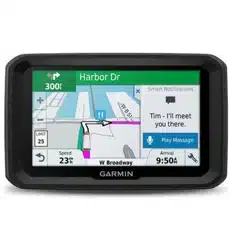
Viewing the Live Video Feed............. 16
Viewing the Live Video Feed
Remotely................................... 16
Saving a Video...............................16
Viewing Videos on Your Smartphone..16
Editing and Exporting a Video........... 16
Deleting a Video Using Your
Smartphone.................................. 16
Settings....................................... 17
Recording Settings...................... 17
Setup Settings............................ 17
Safety and Security Settings.......... 17
System Settings..........................17
Device Settings...........................17
Vault Storage................................. 18
Subscribing to Vault........................18
Sharing a Video............................. 18
Disabling a Shared Video Link........ 18
Removing a Video from the Vault.......18
The dēzl
™
DualView System and
Garmin
®
Navigators........................ 19
Pairing the Camera System with a
Garmin
®
Navigator.......................... 19
Viewing the Video Feed On Your Garmin
®
Navigator..................................... 19
Saving a Video Using Your Garmin
®
Navigator..................................... 19
dēzl
™
DualView Camera Status..........19
Camera Settings On Your Garmin
®
Navigator..................................... 19
Restoring dēzl
™
DualView
Camera Settings......................... 19
Device Information......................... 20
Garmin
®
Support Center................... 20
Device Care...................................20
Cleaning the Camera Lens............ 20
Cleaning the Device..................... 20
Status LED....................................20
Specifications............................... 21
Memory Card Specifications.............21
Troubleshooting............................. 22
The camera system takes a long time to
connect or does not connect............ 22
Getting Started
WARNING
See the Important Safety and Product Information guide in the product box for product warnings and other
important information.
Garmin
®
strongly recommends having an experienced installer with the proper knowledge of electrical systems
install the device. Incorrectly wiring the power cable can result in damage to the vehicle, the battery, or the
device and can cause bodily injury.
This device must be installed according to these instructions. Failure to install this device in accordance with
these instructions could result in serious personal injury, damage to the device and/or vehicle, or poor product
performance.
Always choose installation options that do not compromise your vehicle's safety. You assume full responsibility
and risk for any vehicle modifications that may impair vehicle functionality.
This device is intended to enhance your situational awareness when used properly. If used improperly, you
could become distracted by the connected display, which could lead to an accident causing serious personal
injury or death.
CAUTION
To avoid possible personal injury, always wear safety goggles, ear protection, and a dust mask when drilling,
cutting, or sanding.
NOTICE
When drilling or cutting, always check what is on the opposite side of the surface to avoid damaging the vehicle.
You should always select installation options that do not violate local laws or any applicable lease agreements.
It is your responsibility to know and follow all applicable laws in the jurisdictions where the device is intended to
be used.
For questions specific to your vehicle, you should contact the vehicle manufacturer. These installation
instructions do not apply to a specific vehicle type, and are meant as a guide when installing this product
on your vehicle. This list provides an overview of the installation and setup tasks.
1 Test the camera locations and plan your installation (Testing the Camera and Transmitter Locations,
page5).
2 Install the cameras (Mounting the Camera Screw-Down Base Plate, page6).
3 Install the transmitter box (Mounting the Transmitter Box, page8).
4 Connect the turn signal wires (Connecting the Turn Signal Wires, page9).
5 Connect the transmitter box to power (Power Connection, page9).
6 Pair the transmitter box with your phone or tablet (Pairing the Camera System with a Phone or Tablet,
page15).
7 Adjust the cameras (Adjusting the Camera Lens, page10).
8 Pair the transmitter box with your compatible Garmin navigator (optional) (Pairing the Camera System with a
Garmin
®
Navigator, page19).
Getting Started
dēzl™ DualView Rugged Side Camera System
Owner's Manual
3
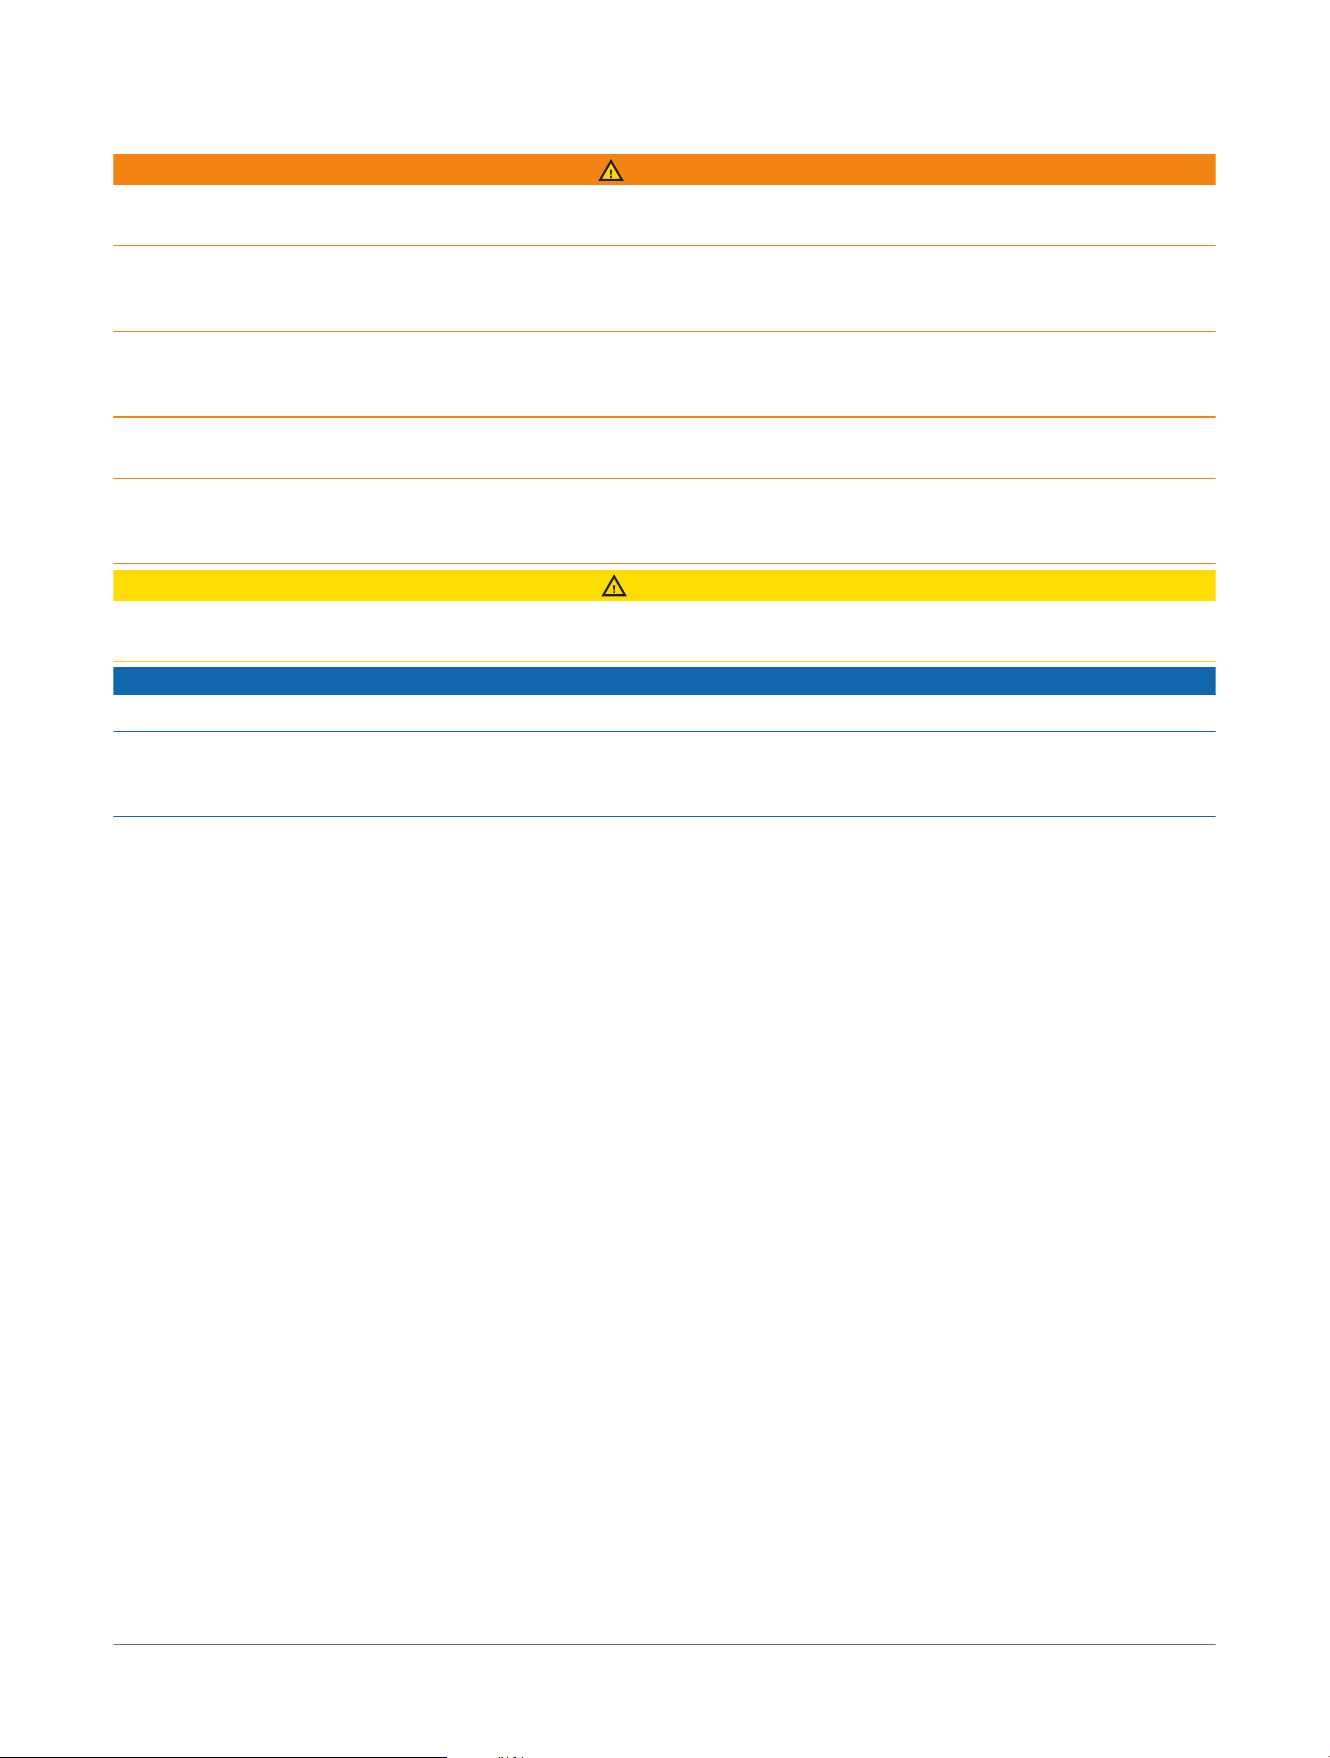
Camera System Overview
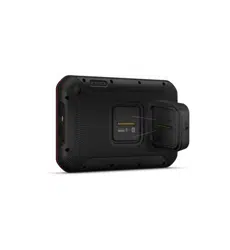
Item Description
1
Transmitter box
2
System power
3
Cameras
4
Turn signal connections
4 dēzl™ DualView Rugged Side Camera System
Owner's Manual
Camera System Overview
Installation
Mounting Considerations
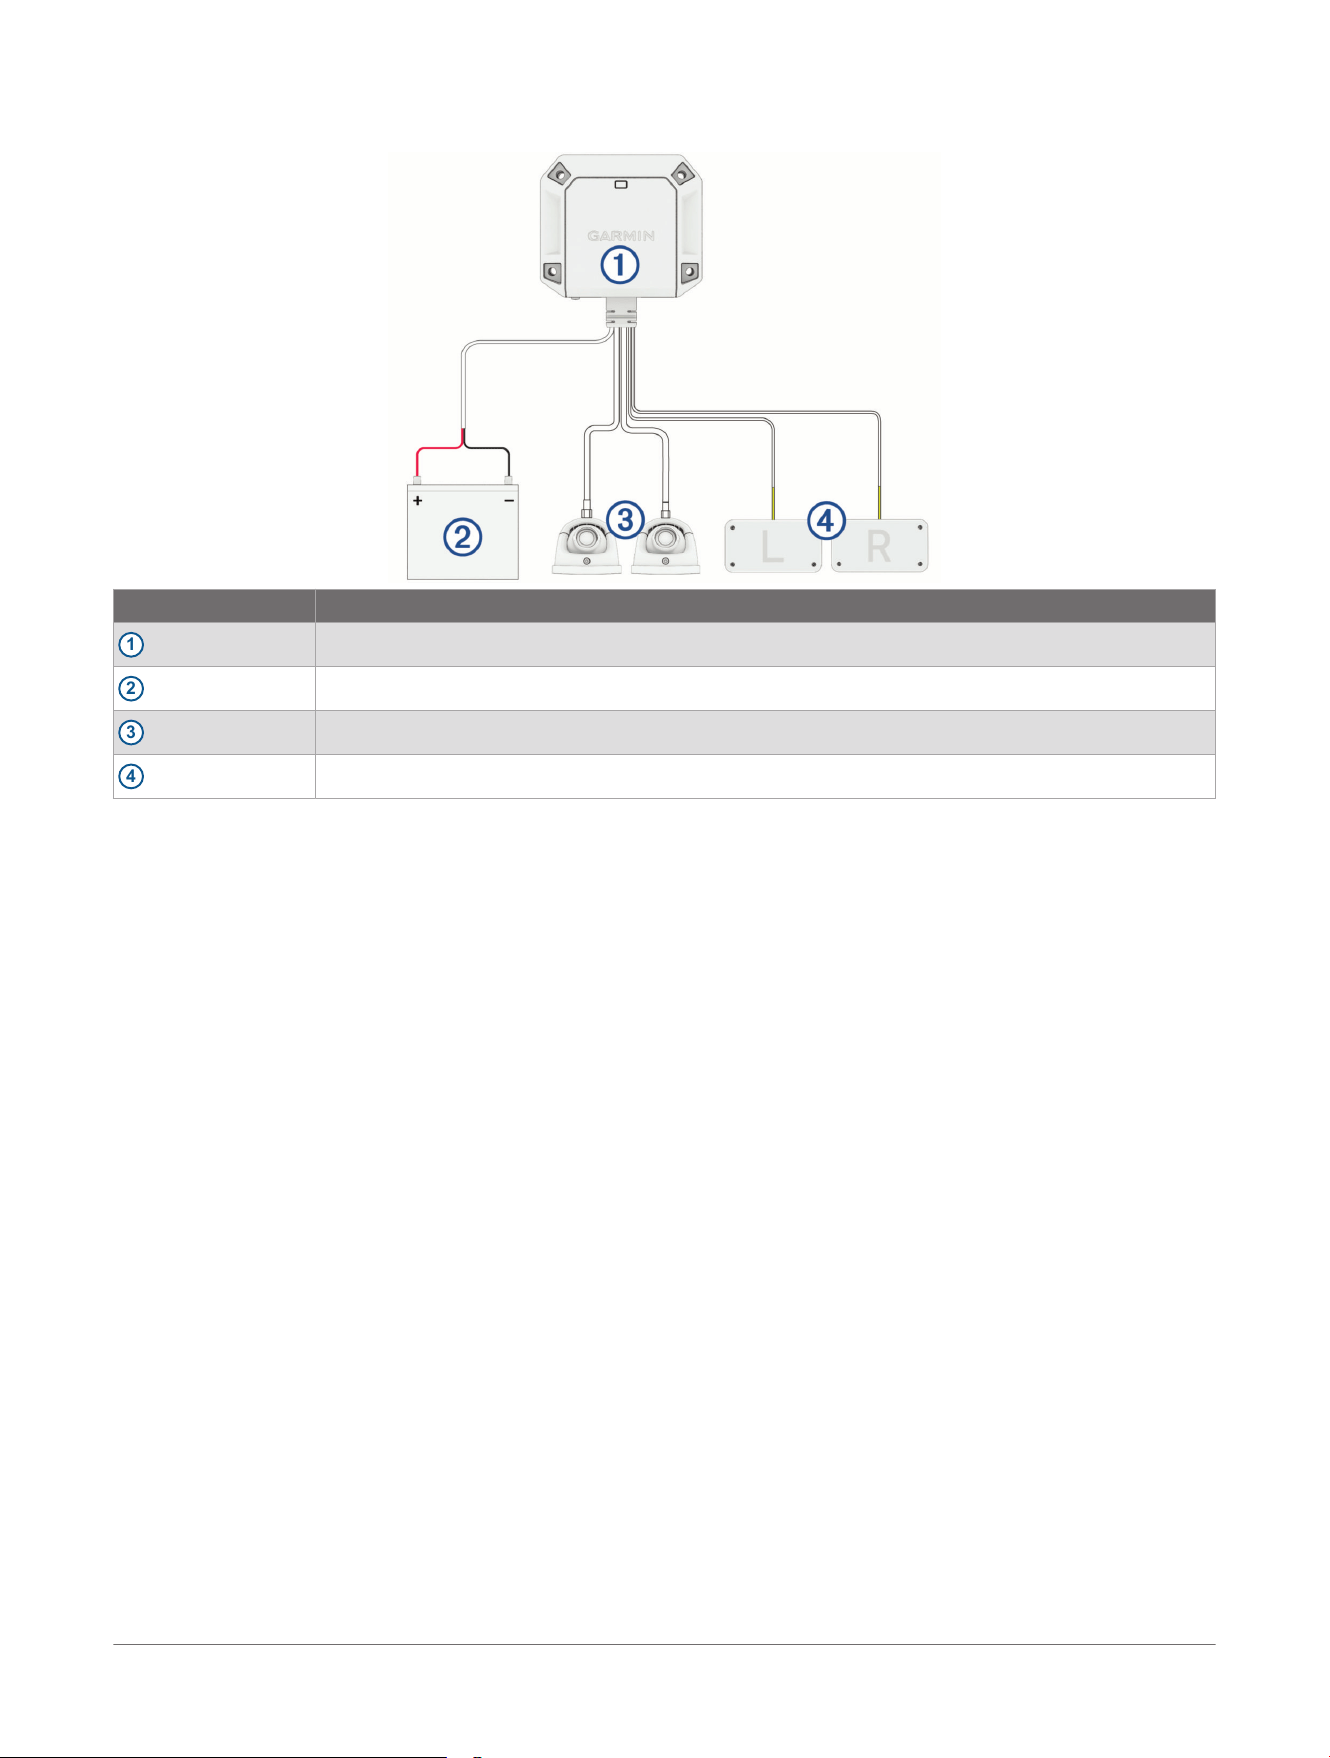
When selecting locations to mount the cameras and transmitter box, observe these considerations.
● You can mount the cameras to the side mirrors
1
or to any stable, flat surface
2
with a good view of the
side of your vehicle or trailer.
● You should mount the cameras at a height of at least 120cm (4ft.) and no more than 240cm (8ft.) from the
road surface.
● You should mount the cameras in locations that provide sufficient clearance to route cables and use
installation tools.
● You should test a mounting location before you permanently mount the cameras.
● You should ensure the transmitter box is placed within 3 m (10 ft.) of your phone, tablet, or navigator.
● You should mount the transmitter box securely to a rigid surface inside of your vehicle that allows access to
the memory card.
● You should ensure the transmitter box is placed within reach of the camera cables. Make sure to consider
cable routing and cable management to ensure you have sufficient cable before permanently mounting the
transmitter box.
● The transmitter box gets hot during extended use. You should mount the transmitter box to an
unupholstered surface with good airflow.
● When routing cables, protect them from sharp objects. You should use rubber grommets (not included)
when routing cables through metal panels to protect the cables.
Testing the Camera and Transmitter Locations
You should test the camera and transmitter locations to plan a permanent installation.
1 Temporarily secure the cameras in the preferred mounting locations using masking tape.
2 Temporarily place the transmitter box in the preferred installation location, and connect it to the cameras.
3 Connect the transmitter box to a 12V or 24V power source (Power Connection, page9).
TIP: If you do not want to splice into the wiring of your vehicle for this test, you can connect the transmitter
box to a 12Vdc battery.
4 Test the transmitter for correct operation by viewing the video feed on a paired phone while inside your
vehicle.
You must pair the transmitter box with the Garmin Drive
™
app before you can view the video feed and test the
transmitter location (Pairing the Camera System with a Phone or Tablet, page15).
5 Test the camera view by observing the video feed on your phone.
6 If the cameras do not provide the optimal view for your vehicle, move them to another location and test them
again.
7 Repeat steps 5 and 6 until the camera mounting locations provide the optimal view for your vehicle.
TIP: Make note of the orientation of the cameras when you are testing the camera view to ensure correct
permanent installation (Adjusting the Camera Lens, page10).
Installation
dēzl™ DualView Rugged Side Camera System
Owner's Manual
5
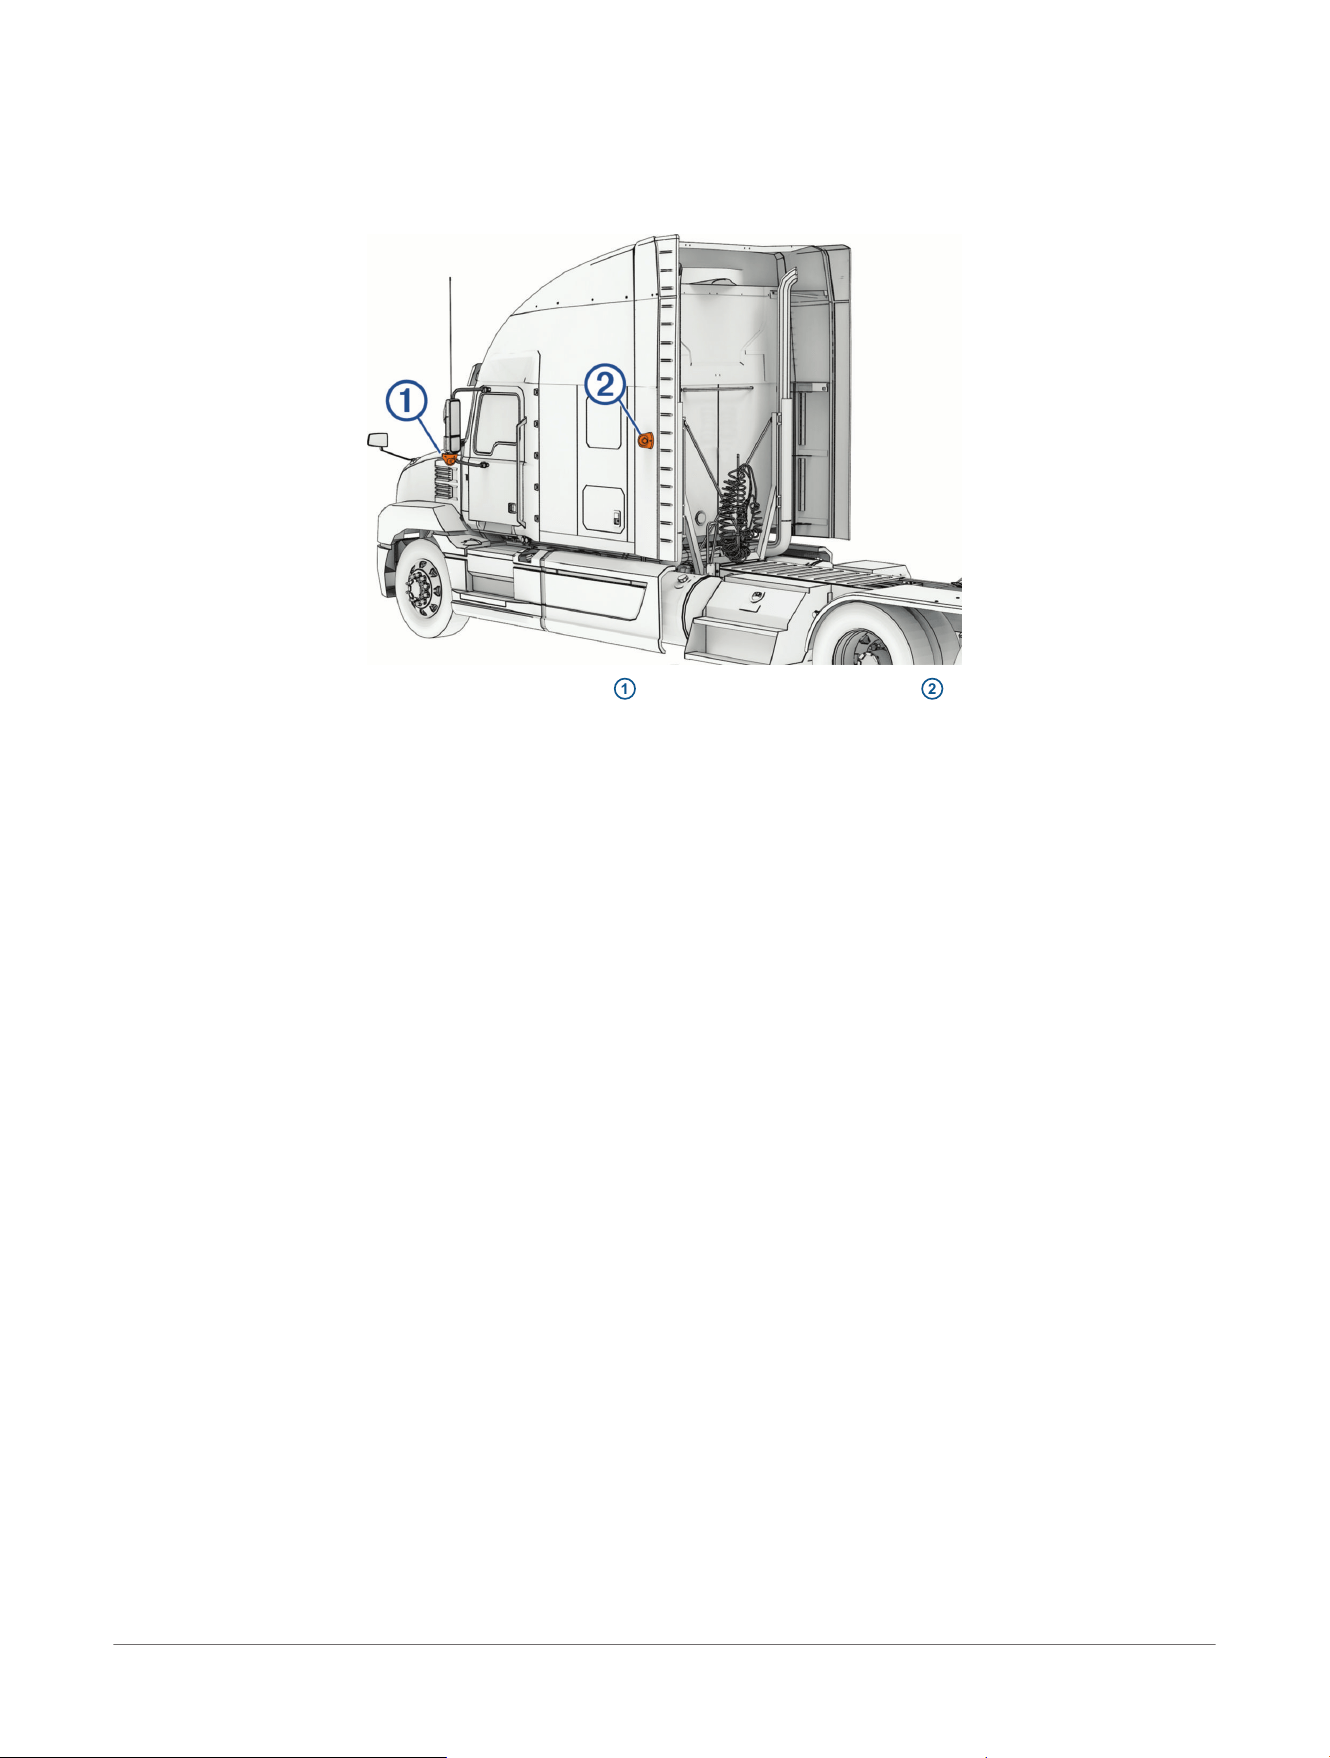
Mounting the Camera Screw-Down Base Plate
Before you can mount the camera screw-down base plate using the included hardware, you must select a
mounting location where you can access both sides of the mounting surface.
1 Remove the camera screw-down base plate
1
from the camera.
2 Using the camera screw-down base plate as a mounting template, mark the mounting surface with the three
screw locations
2
.
3 If you plan to route the camera cable through the mounting surface, mark the location of the cable hole
3
(optional).
4 Remove the camera screw-down base plate from the mounting surface.
5 Using a
3
/
16
in. (4.8 mm) drill bit appropriate for your selected mounting surface, drill 3 pilot holes.
6 Using a
1
/
2
in. (13 mm) drill bit appropriate for your selected mounting surface, drill the cable hole (optional).
7 Secure the camera base plate to the mounting surface using the included screws, washers, and nuts
4
.
Mounting the Camera Adhesive Base Plate
NOTICE
The adhesive base plate is intended for a long-term installation and can be difficult to remove. You should
carefully consider the mounting location before you install the base plate.
For the best results, the ambient temperature should be from 21° to 38°C (from 70° to 100°F) while installing
the adhesive base plate on your vehicle. The adhesive may not bond correctly if the temperature is outside of
this range. If you need to install the base plate at lower temperatures, you must clear all snow, ice, and moisture
from the mounting surface and warm the surface before installing the base plate.
Before you install the adhesive base plate onto your vehicle, you should review the mounting considerations.
1 Clean the surface using water or alcohol, and a lint-free cloth.
The surface must be free of dust, wax, oils, or coatings.
2 After you have selected a mounting location with a clear view, remove the protective film
1
from the bottom
of the base plate
2
.
6
dēzl™ DualView Rugged Side Camera System
Owner's Manual
Installation
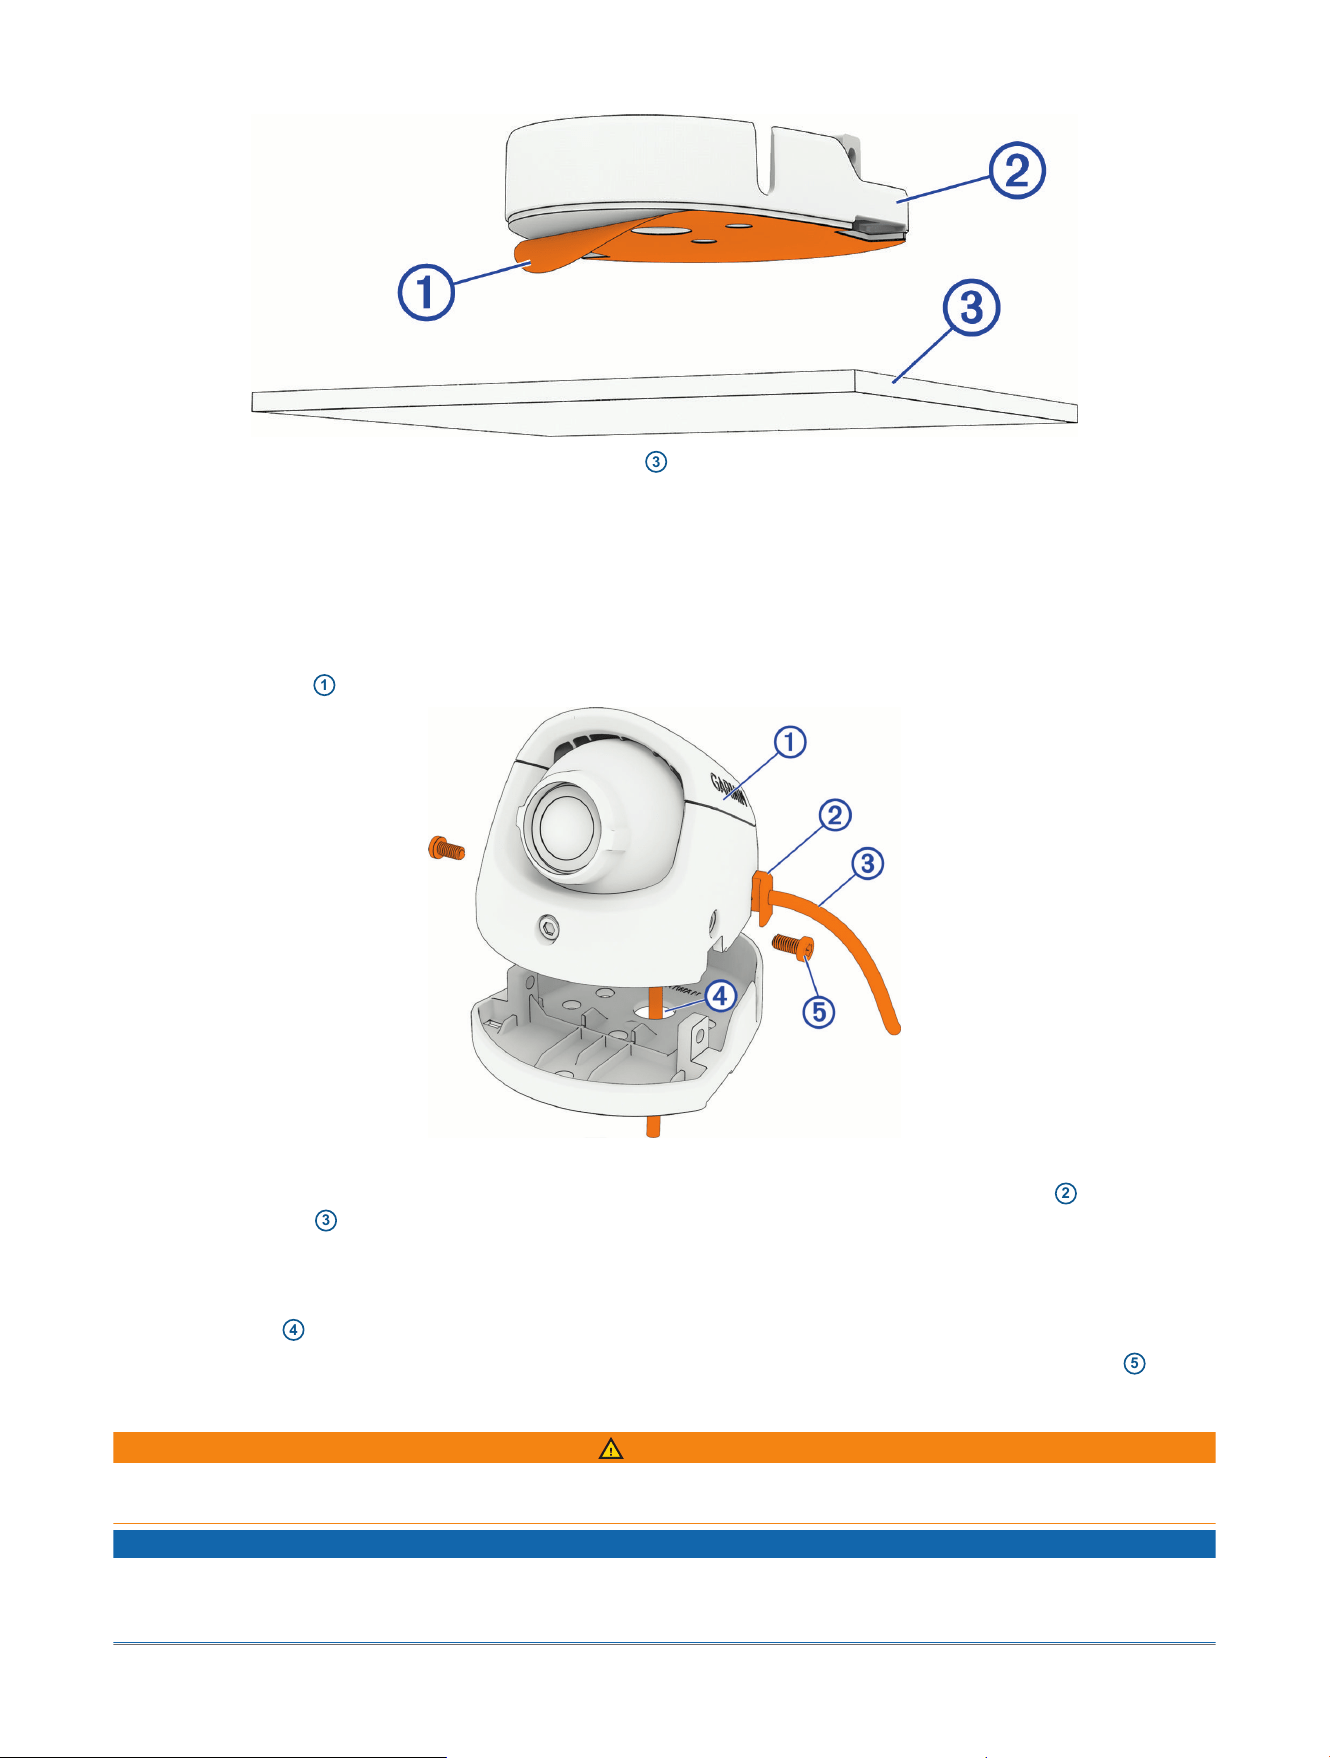
3 Position the base plate over the mounting location
3
.
TIP: The adhesive is extremely sticky. Avoid touching the adhesive to the mounting surface until the mount
is properly positioned.
4 Press the base plate firmly onto the mounting surface, and maintain pressure for 30 seconds.
Securing the Camera to the Base Plate
Depending on your installation, you can route the camera cable either through the base plate and the mounting
surface, or through the slot in the side of the camera.
1 Hold the camera
1
over the base plate.
2 Select an option:
● If you are routing the camera cable through the side of the camera, position the grommet
2
and the
camera cable
3
so the grommet sits within the grooves of the camera and base plate.
TIP: The grommet should be positioned with one side on the inside of the camera housing and one side
on the outside of the camera base plate.
● If you are routing the camera cable through the mounting surface, feed the camera cable through the
cable hole
4
in the base plate.
3 Fit the camera over the base plate and secure it from the sides using the included star drive screws
5
.
Connecting the Camera Cables
WARNING
Only use the heat gun to apply heat to the heat-shrink tubing in a well-ventilated area. Do not use the heat gun
near clothing or bare skin. Doing so can result in property damage or serious injury.
NOTICE
You must apply heat shrink tubing to the camera cable connection point to protect the cameras from
electrostatic discharge and/or an electrical short circuit. Failure to install heat shrink tubing could result in
damage to the cameras or poor product performance.
Installation
dēzl™ DualView Rugged Side Camera System
Owner's Manual
7
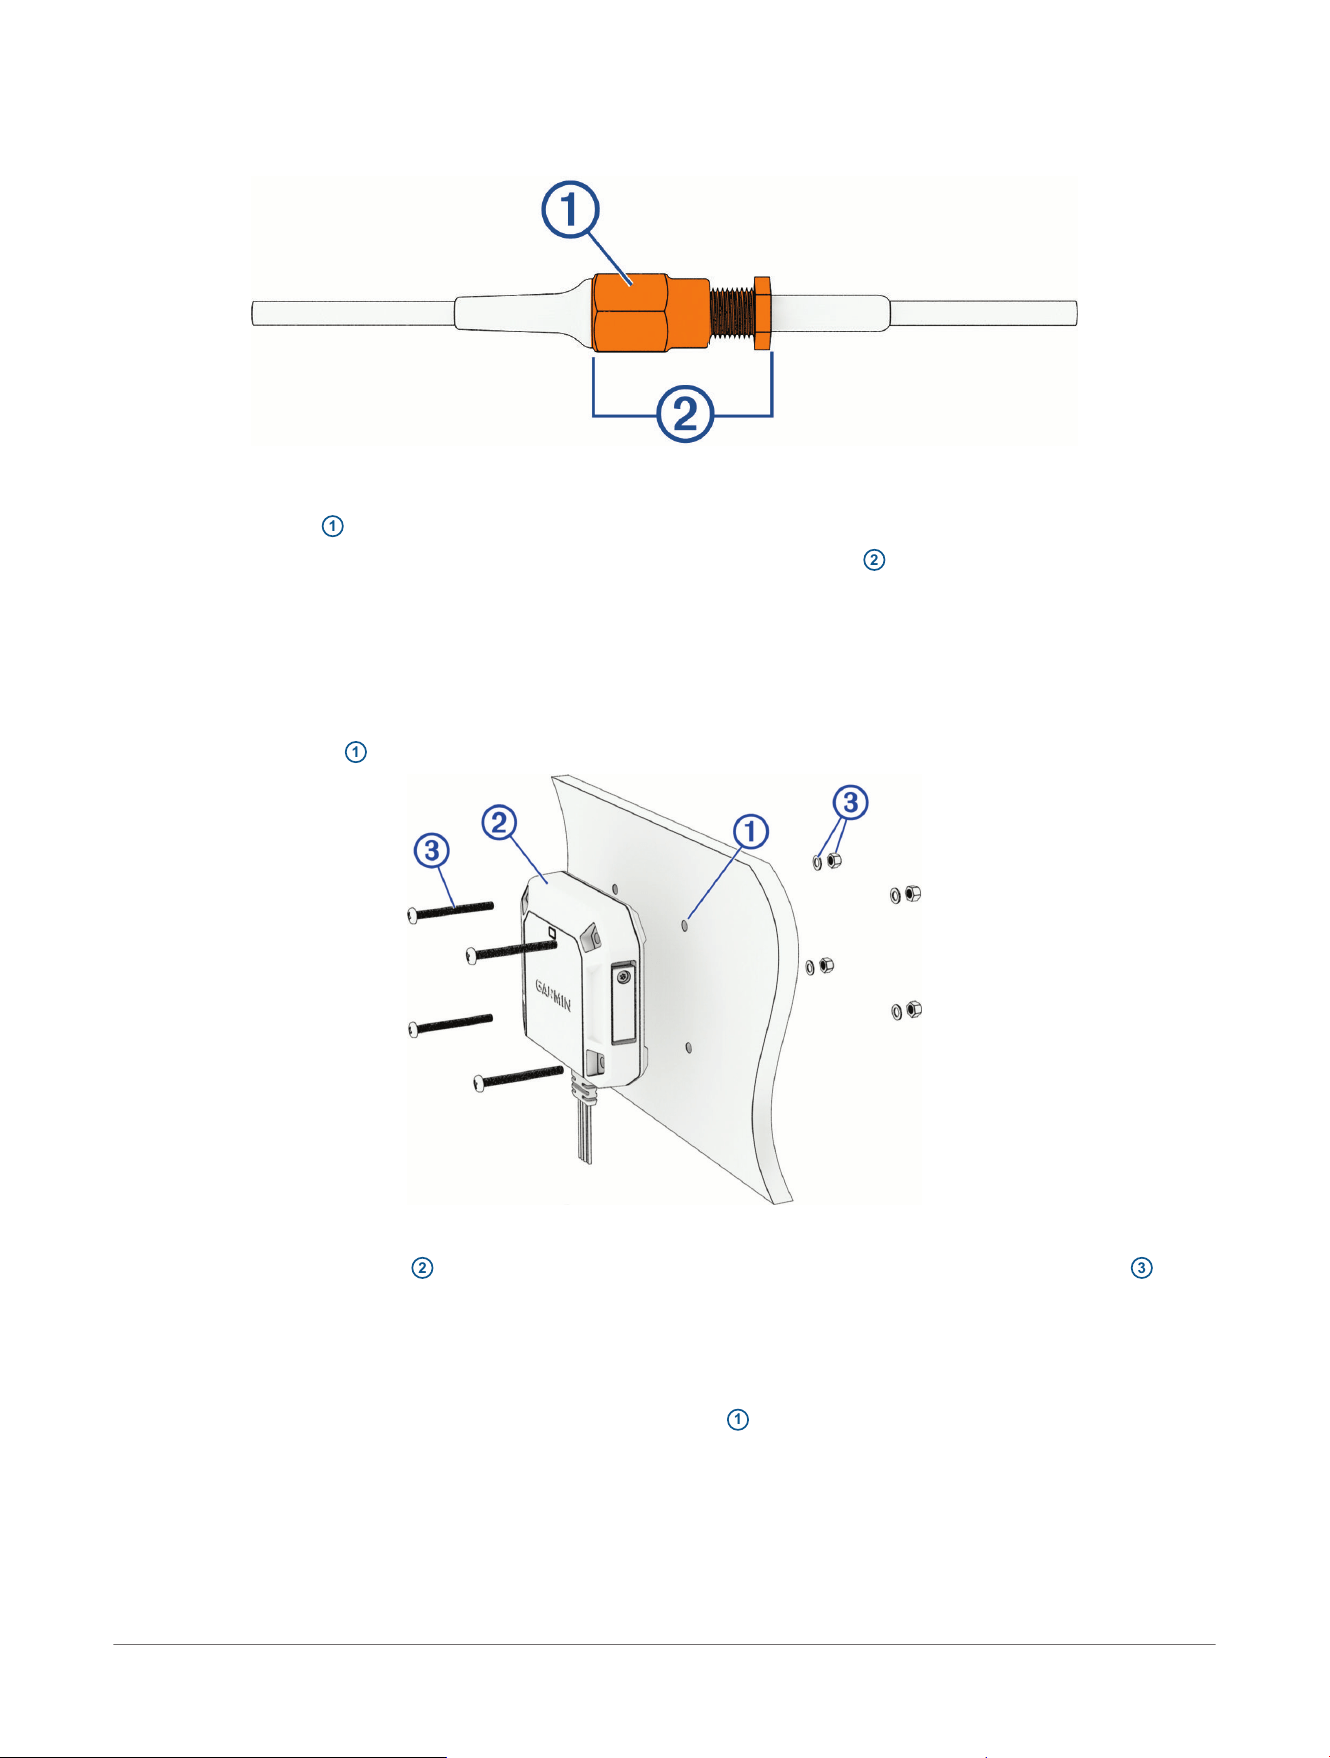
1 Slide a piece of the included heat shrink tubing over the coaxial cable from each camera.
2 Connect the coaxial cable from each camera to the coaxial cables on the transmitter box.
TIP: The cables are not labeled for the left or right sides. You can set which camera is on the left or right side
using the Garmin Drive
™
app.
3 Tighten the collar
1
on each coaxial cable connection to a maximum torque of 9 kgf-cm (7.81 lbf-in.).
4 Apply the heat shrink tubing over the connection between the two cables
2
using a heat gun at 100°C
(212°F).
You should make sure all exposed metal at the cable connection point is covered by the heat shrink tubing.
Mounting the Transmitter Box
Before you can mount the transmitter box using the included hardware, you must select a rigid mounting
surface inside your vehicle where you can access both sides of the mounting surface.
1 Mark the pilot holes
1
using the included mounting template.
2 Using a
3
/
16
in. (4.8 mm) bit appropriate for your mounting surface, drill the pilot holes.
3 Secure the transmitter box
2
to the mounting surface using the included screws, nuts, and washers
3
.
Installing a Memory Card in the Transmitter Box
To record video, you must install a compatible memory card (not included). You can use microSDHC or
microSDXC memory cards from 16 to 512 GB with a speed rating of class 10 or faster. Memory cards must be
formatted with the exFAT file system.
1 Using the included star drive screwdriver, loosen the screw
1
securing the weathercap door to the
transmitter box.
8
dēzl™ DualView Rugged Side Camera System
Owner's Manual
Installation
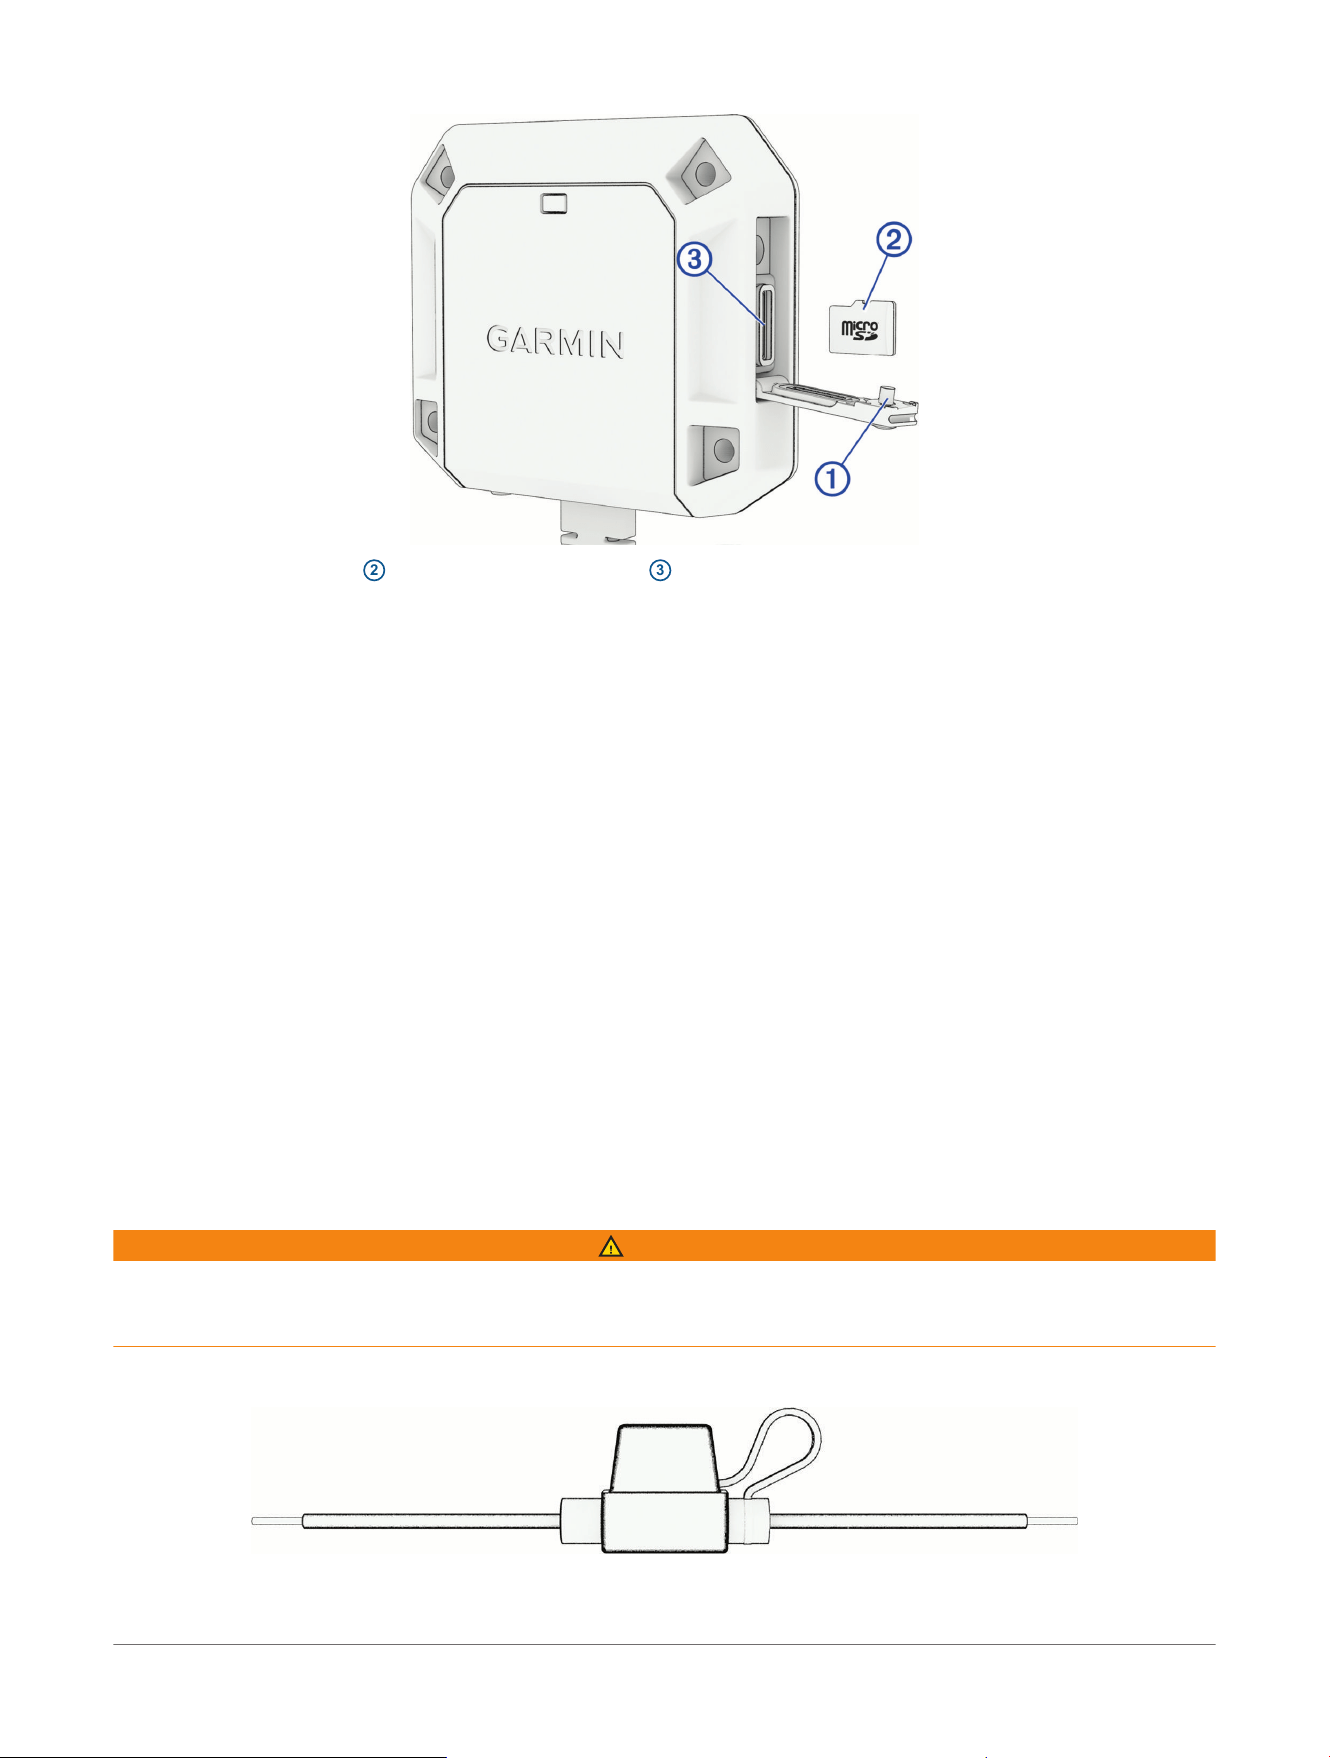
2 Insert a microSD card
2
into the memory card slot
3
.
3 Close the weathercap door and tighten the screw.
Connecting the Turn Signal Wires
You can connect the turn signal wires from the transmitter box to the left and right turn signals in your vehicle.
The
dēzl
™
DualView system includes tap splice connectors to help you connect to your turn signals without
needing to cut and splice the wires manually. You can set the wires for the left or right sides using the Garmin
Drive
™
app.
For most installations, you can connect to the positive wires on the turn signal lights located on the sides of
your vehicle. Contact your vehicle manufacturer for specific questions related to turn signal connections in your
vehicle.
Power Connection
When connecting the device to power, you must connect the red and black wires to the power source.
Red wire:
● This wire provides power to the device.
● If it is necessary to extend this wire, use wire that is at least 22AWG (0.34mm
2
).
● If your installation requires a fuse, you can connect the included fuse to this wire (In-line Fuse Cable,
page9). The fuse should be installed as close to the power source as possible.
Black wire:
● This is the ground wire, and you must connect it to the negative terminal of the power source or to a
common ground.
● If it is necessary to extend this wire, use wire that is at least 22AWG (0.34mm
2
).
In-line Fuse Cable
WARNING
Garmin
®
strongly recommends having an experienced installer with the proper knowledge of electrical systems
install the in-line fuse cable. Incorrectly wiring the power cable or the in-line fuse cable can result in damage to
the vehicle or the battery and can cause bodily injury.
In many cases, you must install the included in-line fuse cable on the device power cable to protect the device
from excessive electrical current.
● You must install the included in-line fuse cable if you are connecting the power cable directly to the vehicle
battery.
Installation
dēzl™ DualView Rugged Side Camera System
Owner's Manual
9

● If you are connecting the power cable to an accessory power source or bus bar that already has a suitable
fuse or a protective circuit, installing the included in-line fuse is not necessary.
● When installing the in-line fuse cable, you should connect it to the red system power wire using the included
splice connector.
Adjusting the Camera Lens
The cameras use an adjustable lens module
1
inside an enclosure mounted to a base plate. The adjustable
lens module can tilt up to 45degrees and roll clockwise or counterclockwise up to 180 degrees. The markings
at the edges of the lens
2
indicate the horizon line. After you have verified the field of view on your connected
screen, you must lock the camera into its configuration by tightening the locking screw
3
using the included
hex wrench.
TIP: You should remove the camera from the base plate before making large adjustments to the camera's
rotation.
1 During initial setup in the Garmin Drive
™
app, verify that both sides of your vehicle
4
appear in the center of
the video feed.
2 If the video feed shows the sides of your vehicle on the outside edges of the camera image, select Swap
Sides.
3 While viewing the video feed, move the camera lenses so you can clearly see the road
5
and the back of
your vehicle or trailer
6
.
4 Tighten the locking screw until the camera lens does not move in the housing.
NOTICE
To prevent damage to the locking mechanism, you should tighten the screw no more than 5 full turns.
10
dēzl™ DualView Rugged Side Camera System
Owner's Manual
Installation

TIP: You should monitor the position of the camera lens as you tighten the screw to ensure the lens does not
shift position.
Installation dēzl™ DualView Rugged Side Camera System
Owner's Manual
11

Video Recording
NOTICE
Some jurisdictions may prohibit or regulate recording video. Jurisdictions may require that all parties have
knowledge of the recording and provide consent before you record video. It is your responsibility to know and
comply with all laws, regulations, and any other restrictions in your jurisdiction.
The cameras record video to the memory card (Installing a Memory Card in the Transmitter Box, page8). By
default, the device immediately starts recording video when it turns on, and it continues recording until it is
turned off. If the memory card is full, the device automatically deletes the oldest recorded videos to create
space for new video.
When the option to promptly delete unsaved video is enabled, the device continually deletes unsaved video
more than three minutes old and deletes all unsaved video each time it is powered off. You can enable or
disable this feature in the camera settings (Settings, page17).
You can save a video recording to prevent it from being automatically overwritten or deleted (Saving a Video,
page16). You should export your saved videos to your phone or tablet for long term storage (Editing and
Exporting a Video, page16).
Incident Detection
By default, the device uses a sensor to detect possible incidents and automatically saves video footage
recorded before, during, and after the detected event. The video footage is stamped with the time and date of
the event.
12 dēzl™ DualView Rugged Side Camera System
Owner's Manual
Video Recording
Driver Awareness Features and Alerts
WARNING
The device can improve situational awareness. It is not a replacement for driver attentiveness, good judgment,
or checking mirrors and blind spots. Always maintain awareness of your surroundings, and operate the vehicle
in a safe manner. Failure to do so could result in serious injury or death.
Your device provides features that can help encourage more attentive driving, even when you are driving in a
familiar area. When paired with the Garmin Drive
™
app on your phone or a compatible Garmin
®
navigator, you
can customize the device features and alerts.
Blind Spot Monitoring
WARNING
Accurate blind spot monitoring is possible only if your dēzl
™
DualView camera system has been installed
properly and the lenses have been aligned using the onboarding process in the Garmin Drive
™
app on your
paired phone or tablet.
NOTICE
Before you can use the merge alert feature, you must connect the turn signal wires to the turn signals on your
vehicle (Connecting the Turn Signal Wires, page9).
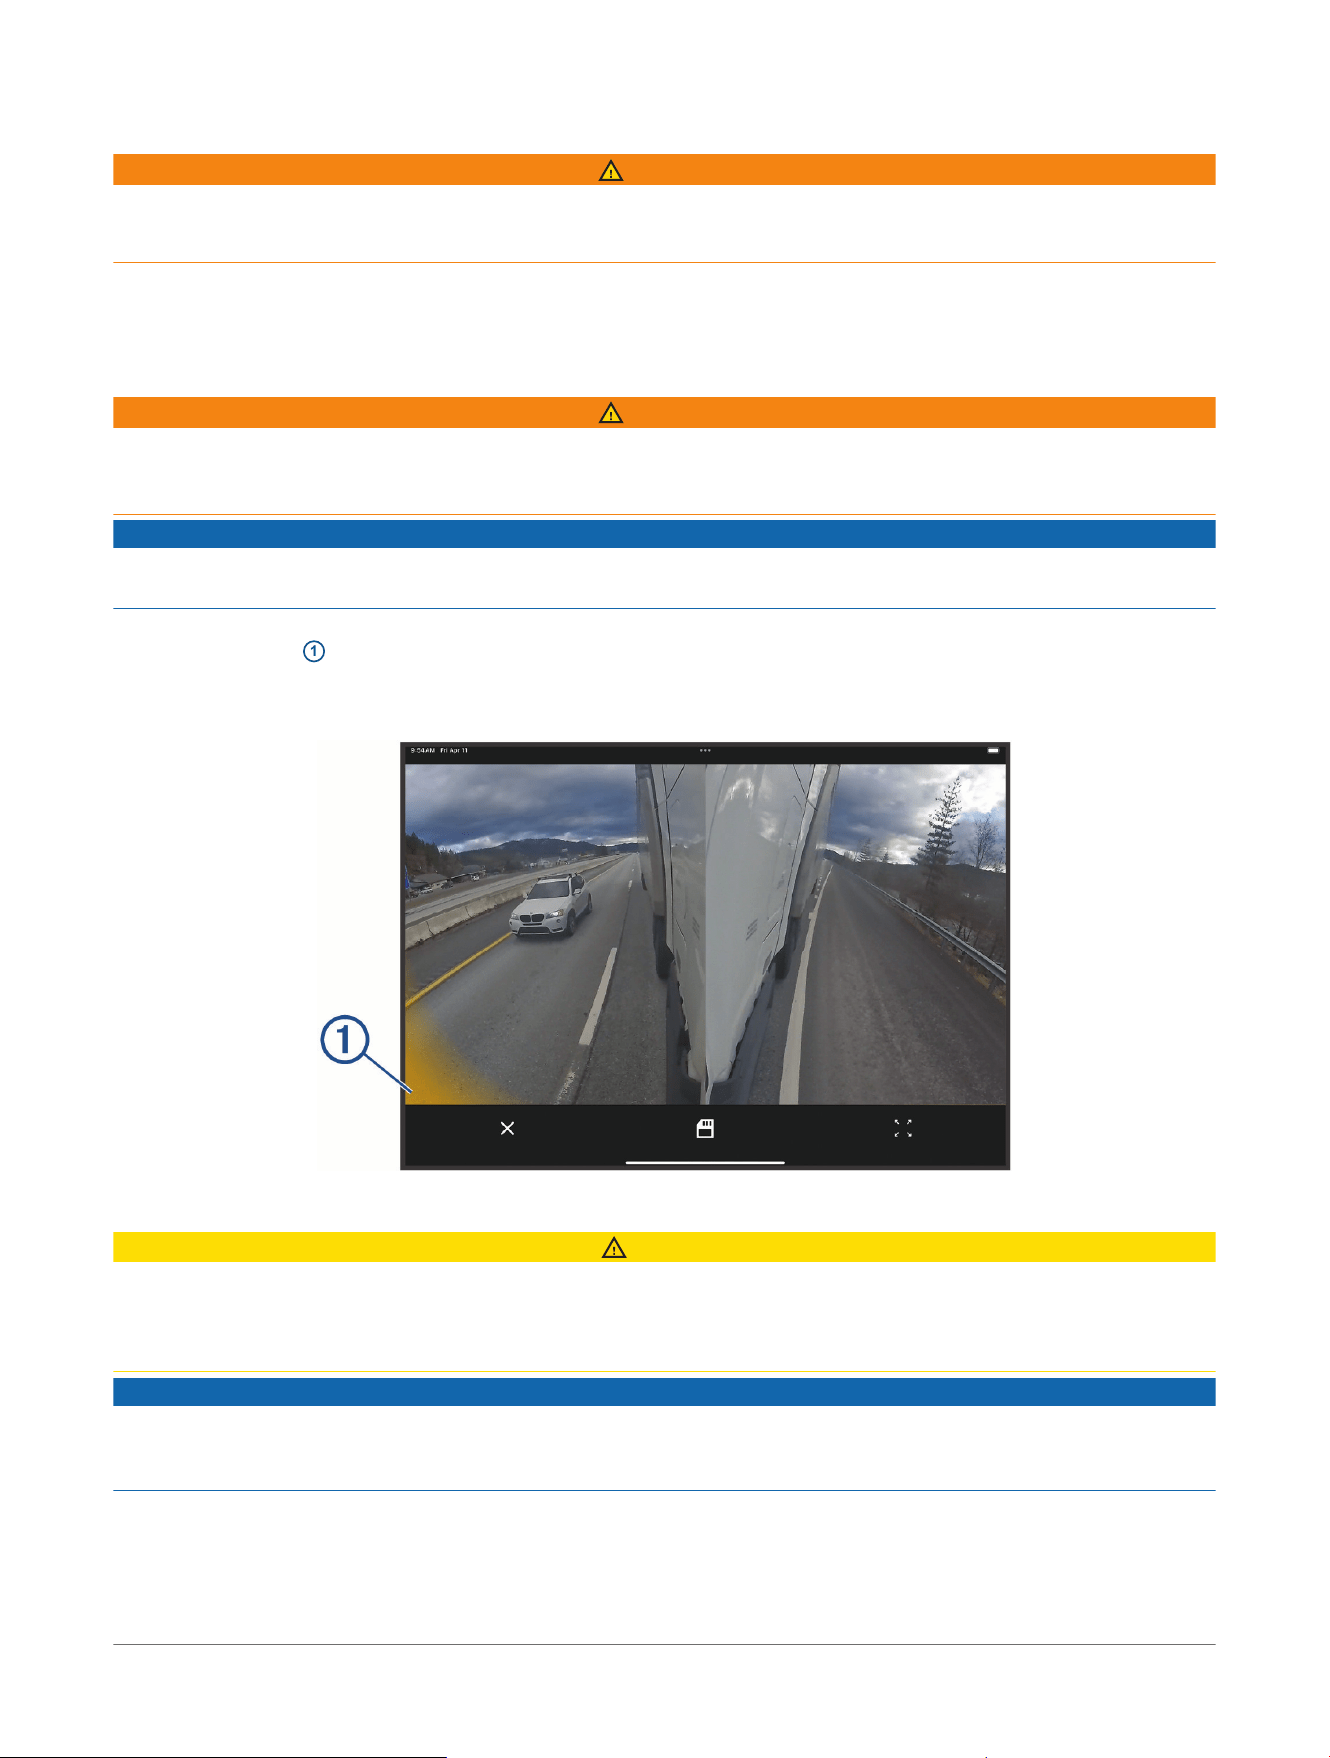
The device alerts you when it detects a vehicle in the lane next to you while you are driving. Alerts appear as
a colored indicator
1
at the edges of the video feed. When you activate the corresponding turn signal while
the colored indicator is present, your paired Garmin
®
navigator plays an audible merge alert tone to notify you
about the adjacent vehicle. You can enable or disable blind spot monitoring using the Garmin Drive app on your
smartphone (Settings, page17).
Parking Guard
CAUTION
The Parking Guard feature is supplemental and should not be relied upon as a primary method to monitor your
vehicle. The functionality, reliability, availability, or timeliness of any recorded video or associated notifications
depends on a number of factors that are beyond Garmin
®
's control, including but not limited to data connectivity
and device power.
NOTICE
Some jurisdictions may prohibit or regulate recording video. Jurisdictions may require that all parties have
knowledge of the recording and provide consent before you record video. It is your responsibility to know and
comply with all laws, regulations, and any other restrictions in your jurisdiction.
This feature allows the camera system to record video more selectively while your vehicle is parked. When you
park your vehicle, the camera automatically enters parked recording mode after five minutes. While in parked
recording mode, the camera automatically records video each time it detects an incident. If you have an active
Vault subscription, the camera sends a notification to your phone when the camera is connected to a Wi‑Fi
®
Driver Awareness Features and
Alerts
dēzl™ DualView Rugged Side Camera System
Owner's Manual
13

network and an incident is detected. You can manage Parking Guard settings using the Garmin Drive
™
app on
your smartphone (Settings, page17).
NOTE: You must connect the transmitter box to a continuous power source to use Parking Guard features.
14 dēzl™ DualView Rugged Side Camera System
Owner's Manual
Driver Awareness Features and
Alerts
The dēzl
™
DualView Camera System and the Garmin Drive
™
App
The Garmin Drive app connects to your dēzl DualView system using Bluetooth
®
and Wi‑Fi
®
technology. The app
displays the video feed, shows alerts, and configures settings.
● After pairing, the app displays the video feed.
● You can enable blind spot monitoring and incident detection.
● Firmware updates are sent to the dēzl DualView camera system from the Garmin Drive app.
Pairing the Camera System with a Phone or Tablet
You can pair your camera system with your phone or tablet and the Garmin Drive
™
app. The Garmin Drive app
allows you to change camera settings, and to view, edit, and save videos. You can also upload, manage, and
share footage on a secure, online storage service using the Vault. You can pair the camera system with only one
phone or tablet at a time.
NOTE: Vault features require a paid subscription. Go to garmin.com/vault for more information.
1 From the app store on your phone or tablet, install the Garmin Drive app.
garmin.com/driveapp
2 Place the transmitter box and your phone or tablet within 3m (10ft.) of each other.
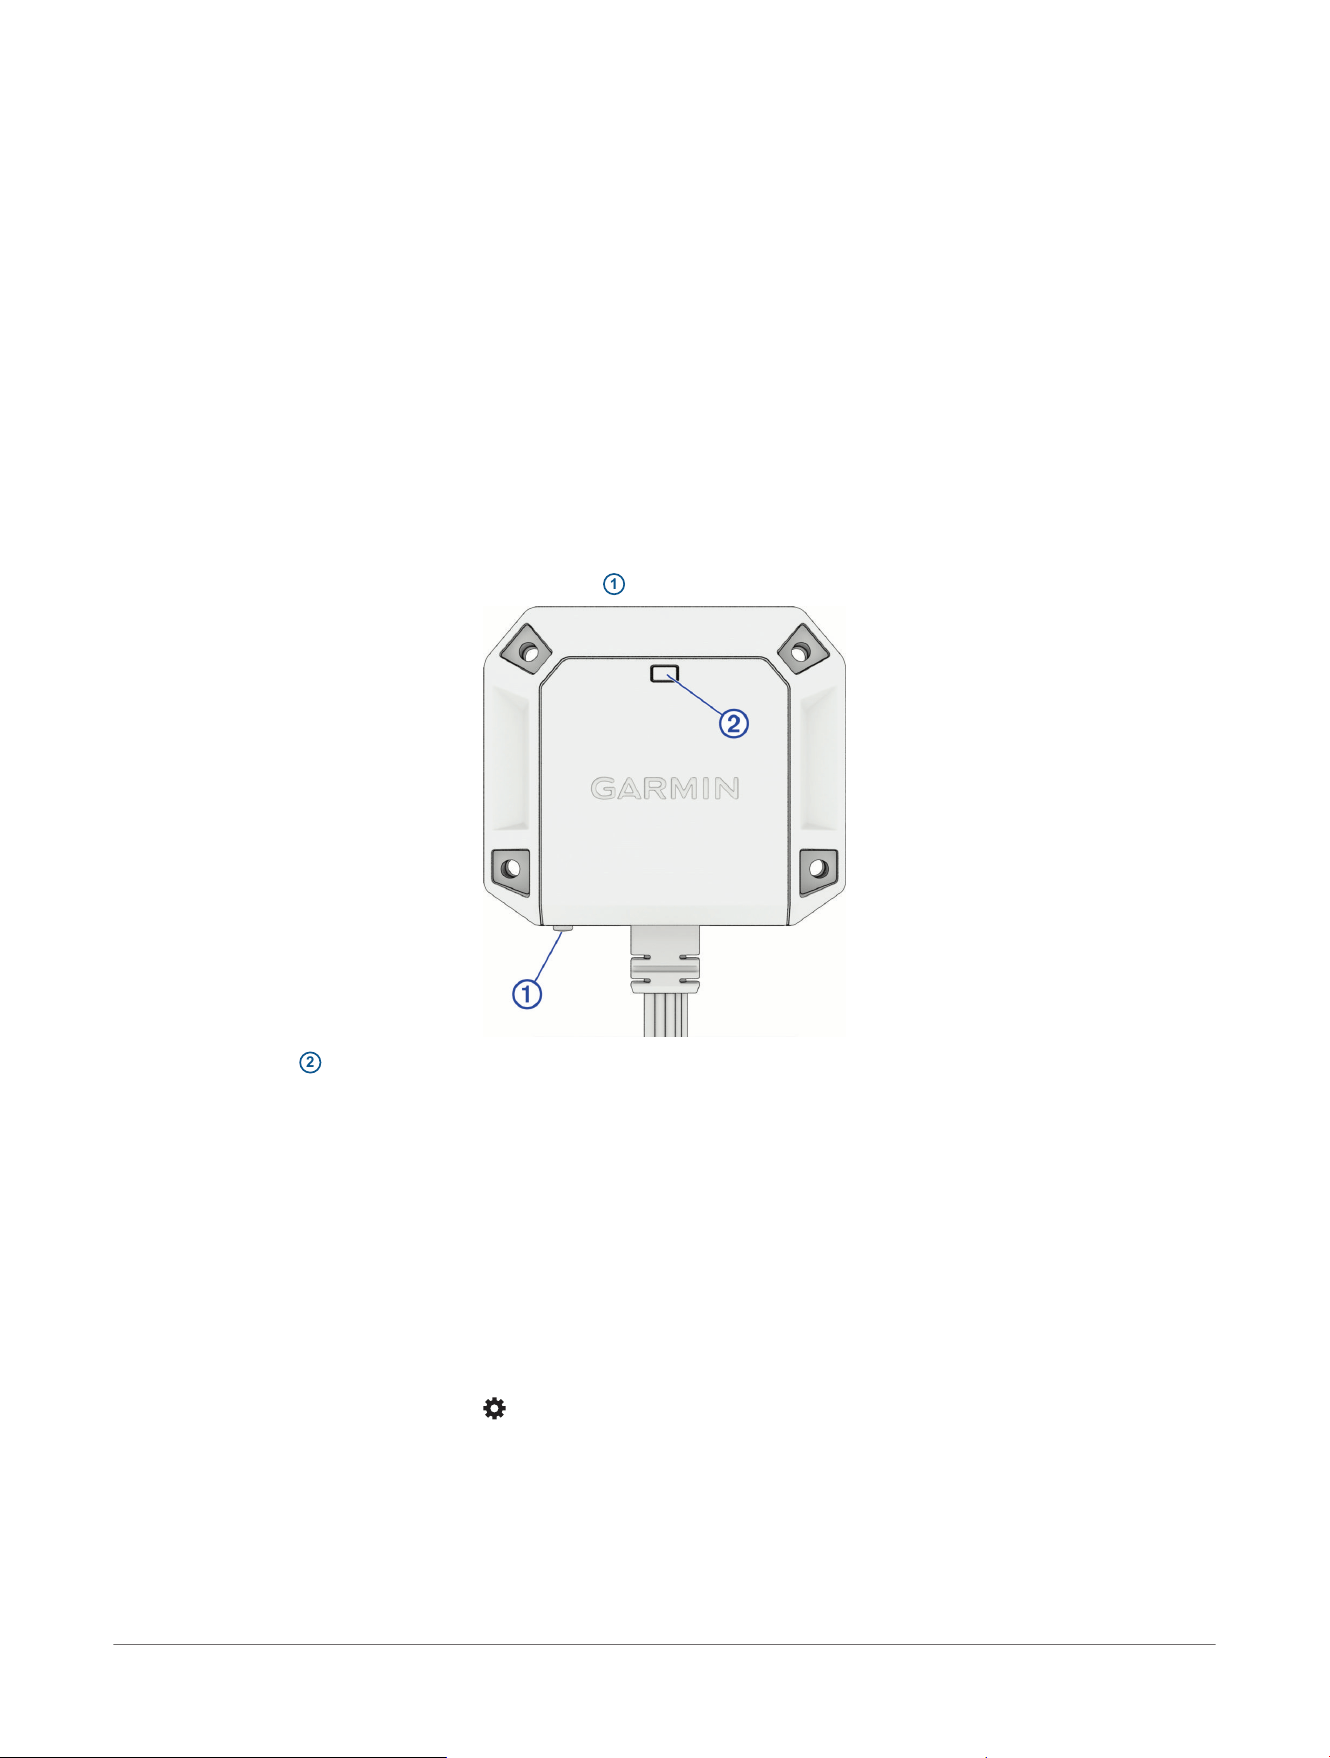
3 On the transmitter box, hold the pairing button
1
for 3 seconds.
The status LED
2
flashes blue.
4 From the Garmin Drive app, select dēzl
™
DualView.
5 Follow the on-screen instructions on your phone or tablet to complete the pairing and setup process.
Connecting Your Camera to a Wi‑Fi
®
Network
NOTE: Vault features require a paid subscription (Subscribing to Vault, page18).
Before you can connect the camera to an existing Wi‑Fi network, You must set up the network to allow
connected devices to see and communicate with each other.
You can use the Garmin Drive
™
app to connect your camera to a Wi‑Fi network.
While connected to a Wi‑Fi network, your camera automatically uploads full-resolution videos to the Vault when
it detects an incident.
1 Connect your camera to the Garmin Drive app (Pairing the Camera System with a Phone or Tablet, page15).
2 From the Garmin Drive app, select , and select your vehicle and camera name.
3 Select Wi-Fi Connections.
A list of nearby Wi‑Fi access points appears.
4 Select your Wi‑Fi network, and enter the network password.
The camera connects to the Wi‑Fi network.
The camera saves the network information and connects automatically the next time the camera enters Parking
Guard mode within range of the network.
The dēzl
™
DualView Camera
System and the Garmin Drive
™
App
dēzl™ DualView Rugged Side Camera System
Owner's Manual
15
Viewing the Live Video Feed
1 From the Garmin Drive
™
app, select your vehicle.
2 Select Show DualView.
Viewing the Live Video Feed Remotely
Before you can view the video feed remotely, you must have an active Vault subscription and you must connect
your camera system to a Wi‑Fi
®
network (Connecting Your Camera to a Wi‑Fi
®
Network, page15).
From the Garmin Drive
™
app on your smartphone, select Show DualView.
Saving a Video
Before you can save a video, you must install a compatible memory card in the transmitter box (Installing a
Memory Card in the Transmitter Box, page8).
1 From the Garmin Drive
™
app, select your vehicle.
2 Select Save Video.
The dēzl
™
DualView camera system saves video footage recorded before, during, and after you selected Save
Video.
Viewing Videos on Your Smartphone
Before you can view videos on your smartphone, you must pair your dēzl
™
DualView device with the Garmin
Drive
™
app (Pairing the Camera System with a Phone or Tablet, page15).
NOTE: The device stops recording and alerts are disabled while viewing videos.
1 From the Garmin Drive app on your smartphone, select Review Video.
2 Select an option:
● To view a video you saved, select a file from the Saved category.
● To view recent video footage that has not been saved, select a video from the Temporary category.
Editing and Exporting a Video
You can trim the length of your video to remove unnecessary footage before exporting it.
NOTE: Videos stored in the Vault cannot be trimmed.
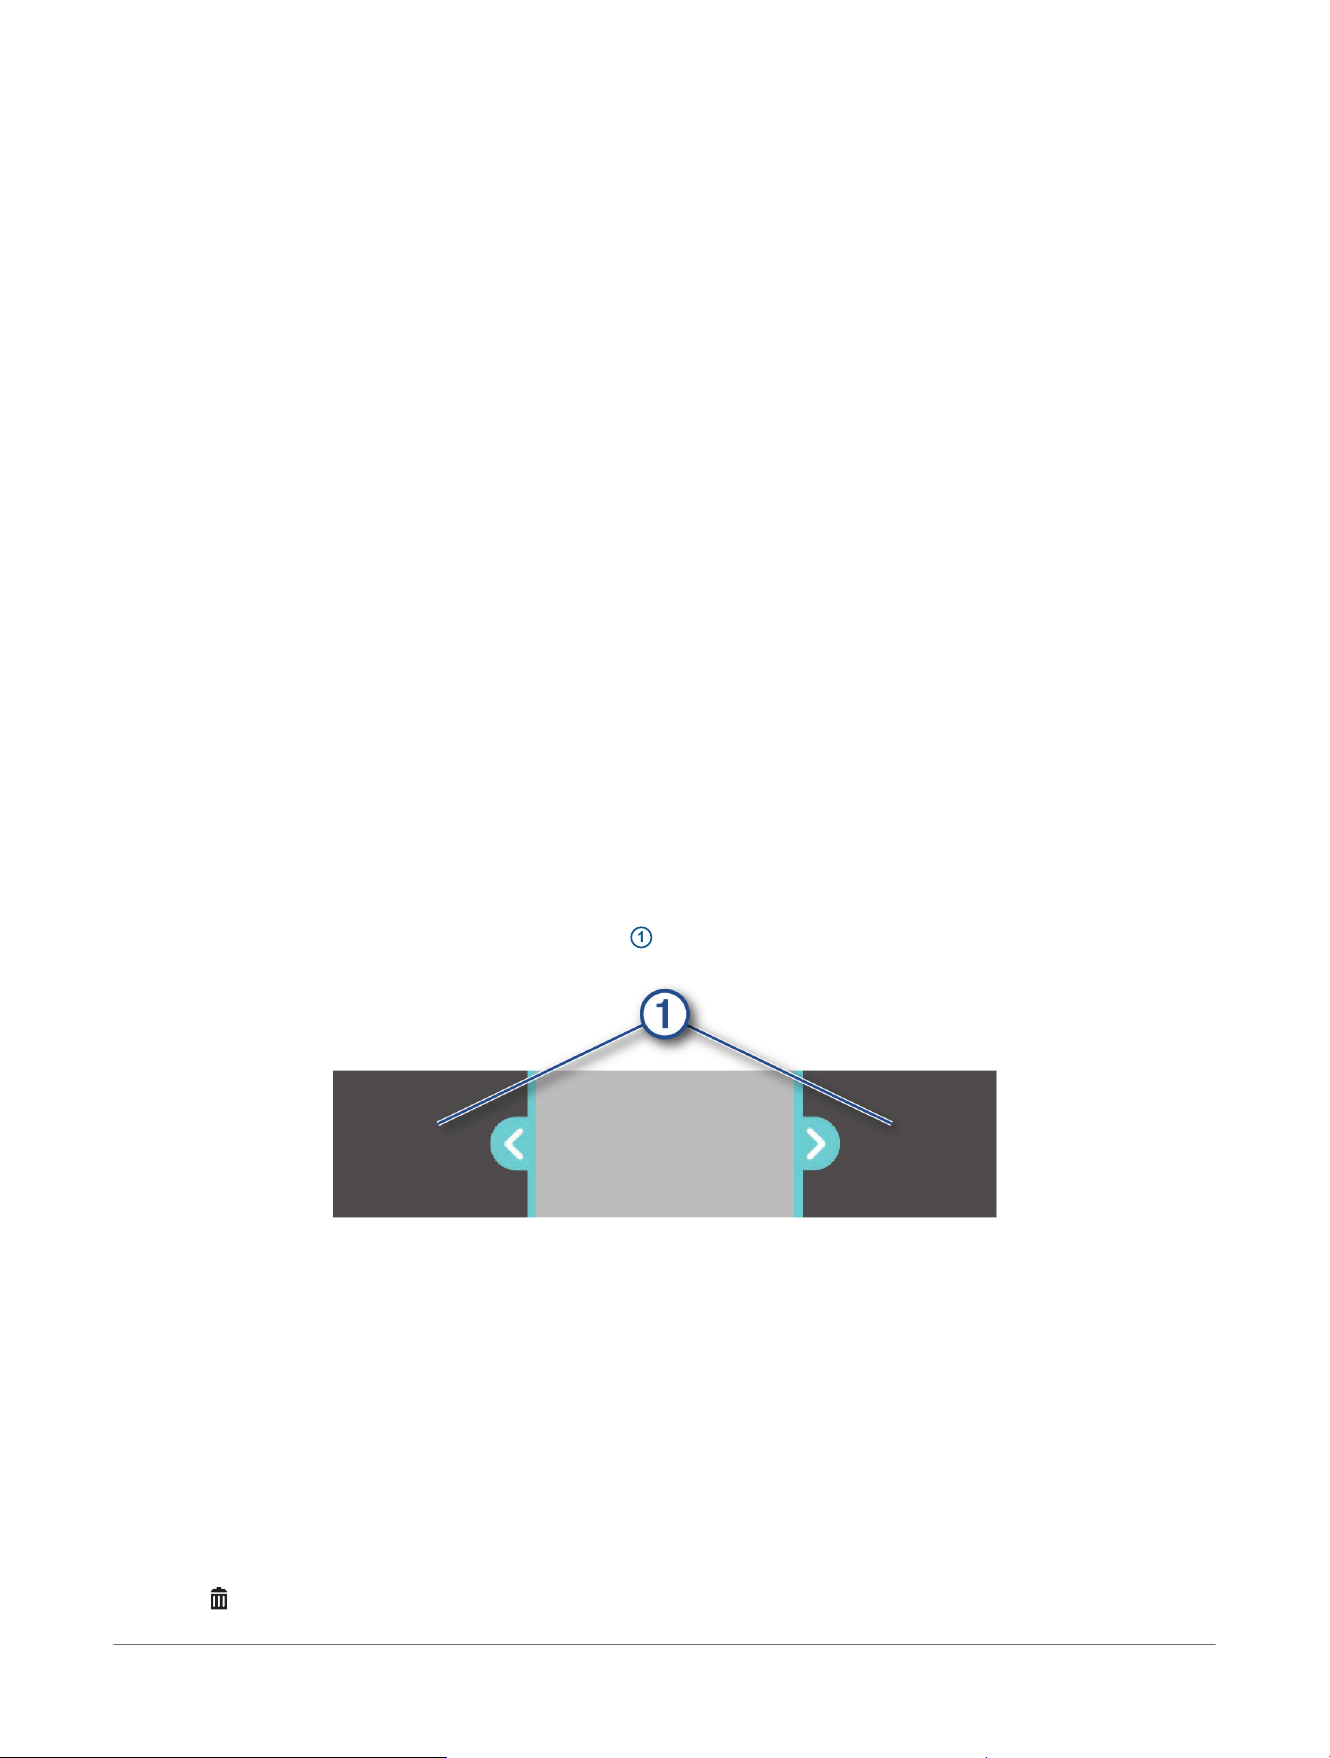
1 While viewing a video, drag the trimming handles
1
on the video progress bar left or right to trim the video
length.
2 Select Export.
NOTE: You must keep the app in the foreground while exporting a video.
The app exports the trimmed video.
3 After the video export is complete, select an option:
● To save the video to your phone, select Save to Phone.
● To remove the video from the camera memory card, select Remove FromCamera.
● To return to the gallery, select Done.
Deleting a Video Using Your Smartphone
1 When you are viewing the list of saved videos on your smartphone, select Select.
2 Select one or more files.
3 Select .
16
dēzl™ DualView Rugged Side Camera System
Owner's Manual
The dēzl
™
DualView Camera
System and the Garmin Drive
™
App

Settings
The settings for your dēzl
™
DualView camera system are configured using the Garmin Drive
™
app. Before you
can configure settings, you must pair your transmitter box with the Garmin Drive app (Pairing the Camera
System with a Phone or Tablet, page15).
From the Garmin Drive app, select your camera name, and select Settings.
Recording Settings
Data Overlay: Sets whether the camera system overlays the date and time on recorded videos.
Exposure Value: Sets the level of light exposure in recorded videos.
Incident Detection: Sets the sensitivity level for incident detection.
Resolution: Displays the video resolution.
Blind Spot Monitoring: Sets whether the device alerts you when a vehicle is detected in your blind spot.
Unsaved Videos: Sets when the device deletes unsaved video footage. When you select the Delete When Full
option, the device deletes the oldest unsaved video when the memory card storage is full. When you select
the Promptly Delete option, the device continually deletes unsaved video more than three minutes old and
deletes all unsaved video each time it is powered off. This is useful to help protect data privacy.
Setup Settings
Finish Setup: Enables you to finish setup steps that may not have been completed during installation.
Vault: Provides options for available Vault subscriptions.
Wi-Fi Connections: Shows the wireless network connection status.
Camera Alignment: Shows the video feed and provides instructions for aligning the cameras.
Turn Signal Setup: Enables you to test whether your turn signals are properly connected to your dēzl
™
DualView
camera system.
Rename Camera: Enables you to change the name of your camera that appears in the Garmin Drive
™
app.
Safety and Security Settings
Parking Guard: Sets options for Parking Guard recording settings.
System Settings
Units and Time: Adjusts settings for the units of measure and the date and time format.
Device Settings
About Device: Displays the camera software version and unit ID.
Check for Updates: Checks the device for software updates.
Reassign to a Different Vehicle: Changes the vehicle your camera is associated with in the Garmin Drive
™
app.
Format SD Card: Formats the memory card and deletes all videos, photos, and data on the card.
Help: Opens the product support page for the device.
Restore: Restores the device to factory default settings and unpairs the device from the Garmin Drive app.
Forget Device: Unpairs the device from the Garmin Drive app.
Updating Your Device Using the Garmin Drive
™
App
The Garmin Drive app notifies you when a software update is available for your device. You can also check for
updates at any time.
1 From the Garmin Drive app, select your dēzl
™
DualView device.
2 Select Settings> Check for Updates.
3 Select Install Now.
The software update is sent to your device. You are notified when the transfer is complete.
The device installs the software and restarts automatically.
NOTE: Video is not recorded while the software is updating.
The dēzl
™
DualView Camera
System and the Garmin Drive
™
App
dēzl™ DualView Rugged Side Camera System
Owner's Manual
17

Vault Storage
NOTE: This feature requires an active Vault subscription. Vault features are not available for all countries.
You can upload, manage, and share recorded videos on a secure, online storage drive using the Vault. With a
paid subscription, the camera uploads saved videos to the Vault automatically while it is connected to a Wi‑Fi
®
network and a continuous power source.
You can purchase a Vault subscription from the Garmin Drive
™
app on your smartphone.
NOTE: Your camera must be connected to a Wi‑Fi network to use this feature.
Subscribing to Vault
You can purchase a Vault subscription to store your videos in a secure online storage drive.
1 From the Garmin Drive
™
app on your smartphone, select your device.
2 Select Settings> Vault> Choose a Plan.
3 Follow the on-screen instructions.
Sharing a Video
You can share a secure link to a video from the Vault.
NOTE: An active Vault subscription is required to use this feature.
1 From the Garmin Drive
™
app on your smartphone, select Vault.
2 Select a video, and select Secure Share.
3 Follow the on-screen instructions.
Disabling a Shared Video Link
You can disable a link to a video that you previously shared from the Vault. When you disable a shared video
link, the video is set to private and the shared link and passcode are disabled.
1 From the Garmin Drive
™
app on your smartphone, select Vault.
2 Select a video, and select Disable Link> Continue.
Removing a Video from the Vault
1 From the Garmin Drive
™
app on your smartphone, select Vault.
2 Select a video, and select Remove From Vault> Continue.
18
dēzl™ DualView Rugged Side Camera System
Owner's Manual
Vault Storage
The dēzl
™
DualView System and Garmin
®
Navigators
You can remotely control your dēzl DualView system and customize settings using a compatible Garmin
navigator. Go to buy.garmin.com for more information about compatible navigators.
Pairing the Camera System with a Garmin
®
Navigator
Before you can pair your camera system with a Garmin navigator, you must pair the camera system with a
compatible phone or tablet using the Garmin Drive
™
app (Pairing the Camera System with a Phone or Tablet,
page15).
You can pair your camera system with a compatible Garmin navigator to view the video feed and receive
camera notifications as you navigate.
1 Update your navigation device to the latest software.
Your device may not support the dēzl
™
DualView camera without the latest software. For more information
about updating the software, see the owner's manual for your Garmin navigator.
2 Select an option:
● From the apps menu on your navigator, select dēzl™ DualView.
● From the main menu on your navigator, select > Tools> Cameras> dēzl™ DualView.
3 Using your phone or tablet, scan the QR code on the navigator's screen.
4 Follow the on-screen instructions on your phone or tablet and your Garmin navigator.
Viewing the Video Feed On Your Garmin
®
Navigator
From the home screen or the map, select .
TIP: If your navigator includes voice command features, you can also say "OK Garmin, show video." to
display the video feed from any screen.
Saving a Video Using Your Garmin
®
Navigator
Before you can save a video, you must install a compatible memory card in the transmitter box (Installing a
Memory Card in the Transmitter Box, page8).
While viewing the video feed on your navigator, select .
dēzl
™
DualView Camera Status
Active. The camera detects vehicles while the vehicle is moving faster than 32 km/h (20 mph).
Limited. The camera is powered on, but is not detecting vehicles. Check your Bluetooth
®
connection.
Disconnected. The camera is not connected to the navigator. Check your wireless and power connections.
Disabled. Camera alerts are turned off.
Camera Settings On Your Garmin
®
Navigator
While viewing the video feed, select .
Automatic Activation: Sets options to display the video feed automatically. You can select the Slow Speed
option to display the video feed while the vehicle is moving below 16 km/h (10 mph). You can select the Turn
Signal option to display the video feed when the vehicle's turn signal is active.
Blind Spot Monitoring: Alerts you of vehicles in your blind spot while the vehicle is moving faster than 32 km/h
(20 mph).
Rename: Sets the name of the connected camera.
Unpair: Disconnects the dēzl
™
DualView camera system from the navigator and removes all pairing information.
Restoring dēzl
™
DualView Camera Settings
You can return all of the dēzl DualView camera settings on your navigator to default values.
NOTE: Restoring settings on the navigator does not reset settings configured using the Garmin Drive
™
app on
your paired phone or tablet.
While viewing the camera feed, select > > Restore.
The dēzl
™
DualView System and
Garmin
®
Navigators
dēzl™ DualView Rugged Side Camera System
Owner's Manual
19
Device Information
Garmin
®
Support Center
Go to support.garmin.com for help and information, such as product manuals, frequently asked questions,
videos, and customer support.
Device Care
NOTICE
Avoid contact with chemical cleaners, solvents, gasoline, oil, insect repellents, or sunscreen. These chemicals
can damage plastic components and finish.
Thoroughly rinse the device with fresh water as soon as possible after exposure to chlorine, salt water,
sunscreen, cosmetics, alcohol, or other harsh chemicals. Prolonged exposure to these substances can damage
the plastic components and finish.
Do not store the device where prolonged exposure to extreme temperatures can occur, because it can cause
permanent damage.
Cleaning the Camera Lens
NOTICE
Avoid chemical cleaners and solvents that can damage plastic components.
You should clean the camera lens regularly to keep the camera lens free of dirt and debris.
1 Wipe the lens with a non-scratch lens cloth, optionally dampened with isopropyl alcohol.
2 Allow the lens to air dry.
Cleaning the Device
1 Dampen a soft, clean, lint-free cloth with fresh water.
2 Gently wipe the device.
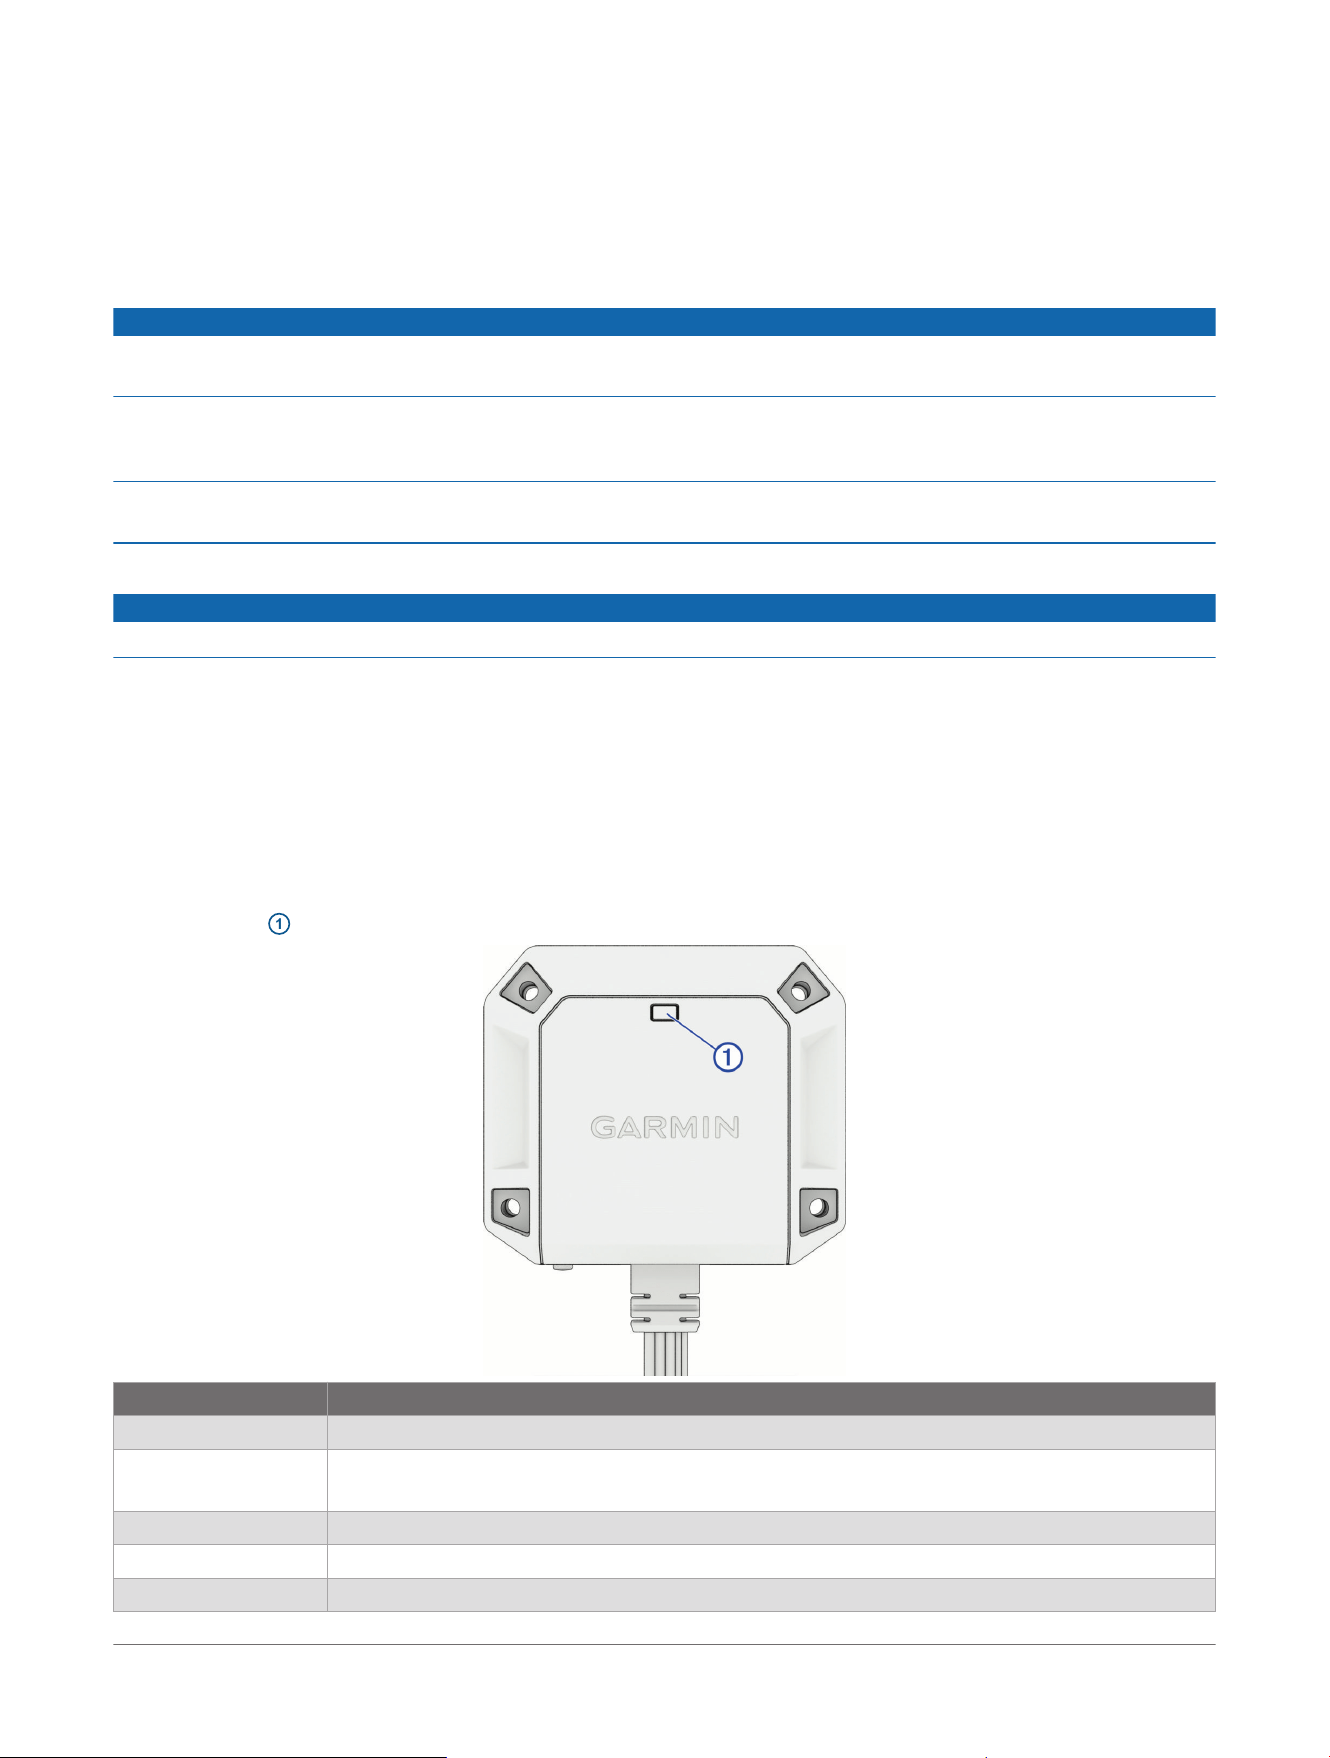
Status LED
The status LED
1
indicates the device status.
Status LED Activity Status
Solid red Video is recording.
Flashing red A video is being saved.
The camera is applying a software update.
Flashing red, slowly The camera is in Parking Guard mode.
Flashing blue The system is in Bluetooth
®
pairing mode.
Flashing yellow A memory card is not installed.
20 dēzl™ DualView Rugged Side Camera System
Owner's Manual
Device Information
Status LED Activity Status
Solid green The device is powering on.
The memory card is being formatted.
Flashing green The camera software is booting.
One or both cameras are physically disconnected.
Off The device is powered off.
Videos are being viewed, exported, or deleted, and the camera is not recording video.
Specifications
Camera and transmitter input voltage From 9 to 28Vdc
Camera and transmitter current usage 1 A
Water rating (camera and transmitter)
IEC60529 IPX7
1
Operating temperature range From -15° to 60°C (from 5° to 140°F)
Wireless frequency 2400 – 2483,5 MHz: <20dBm
Memory Card Specifications
The camera requires a memory card with these specifications. Go to garmin.com/dashcamcards to view a list
of recommended memory cards.
Type microSDHCor microSDXC
Capacity From 16 to 512 GB
Speed class Class 10 or higher
File system exFAT
1
The device withstands incidental exposure to water of up to 1m for up to 30min. For more information, go to www.garmin.com/waterrating.
Device Information dēzl™ DualView Rugged Side Camera System
Owner's Manual
21

Troubleshooting
The camera system takes a long time to connect or does not connect
The transmitter box may have a weak wireless connection to your phone, tablet, or navigator. Interference with
the connection can be caused by other wireless signals, vehicle wiring, or structural elements of your vehicle.
You can try these options to help improve the stability of the wireless connection between the transmitter box
and your phone or navigator.
● Verify the transmitter box is connected to power and turned on.
● Move the phone, tablet, or navigator to a different location on your dash or windshield.
● Mount the transmitter box to a different location in your vehicle.
For example, if your transmitter box is surrounded by metal panels, you can try moving it to a location where
it has a more direct path to your phone or navigator.
22 dēzl™ DualView Rugged Side Camera System
Owner's Manual
Troubleshooting


support.garmin.com
© 2025 Garmin Ltd. or its subsidiaries
Garmin
®
and the Garmin logo are trademarks of Garmin Ltd. or its subsidiaries, registered in the USA and other countries. dēzl
™
and Garmin Drive
™
are
trademarks of Garmin Ltd. or its subsidiaries. These trademarks may not be used without the express permission of Garmin.
The Bluetooth
®
word mark and logos are owned by the Bluetooth SIG, Inc., and any use of such word mark or logo by Garmin is under license. Wi‑Fi
®
is a
registered trademark of Wi-Fi Alliance. Other trademarks and trade names are those of their respective owners.
M/N: A04879
January 2026 GUID-41AB4C2D-E75E-460B-A06B-930BF002AAB8 v1