
Epson
®
SureColor
®
F6370 User's Guide


3
Contents
Epson SureColor F6370 User's Guide ....................................................................................................... 7
Introduction to Your Printer........................................................................................................................ 8
Notations Used in the Documentation .................................................................................................. 8
Printer Part Locations........................................................................................................................... 8
Product Parts - Front and Side ........................................................................................................ 9
Product Parts - Inside .................................................................................................................... 11
Control Panel Parts ....................................................................................................................... 13
Consumables and Replacement Parts............................................................................................... 16
Printer Usage Guidelines ................................................................................................................... 17
Using Your Printer ......................................................................................................................... 18
Handling Ink Packs and Ink Tanks................................................................................................. 19
Handling Media.............................................................................................................................. 19
Storing Your Printer ....................................................................................................................... 20
Media Handling.......................................................................................................................................... 21
Loading Media.................................................................................................................................... 21
Viewing and Changing Media Settings............................................................................................... 29
Saving Sets of Media Settings............................................................................................................ 30
Printable Area and Paper Size Checking ........................................................................................... 31
Media Feed Adjustment ..................................................................................................................... 33
Adjusting the Media Feed.............................................................................................................. 33
Adjusting the Media Feed During Printing ..................................................................................... 35
Cutting Media ..................................................................................................................................... 35
Removing Media ................................................................................................................................ 36
Using the Auto Take-up Reel ............................................................................................................. 39
About the Auto Take-up Reel ........................................................................................................ 39
Attaching the Take-up Roll Core to the Auto Take-up Reel ........................................................... 39
Take Up with the Printable Side In................................................................................................. 45
Removing Media from the Auto Take-up Reel............................................................................... 48
Using the Control Panel Menus................................................................................................................ 51
Accessing the Printer's Menus ........................................................................................................... 51

4
Paper Menu Settings.......................................................................................................................... 51
Maintenance Menu Settings............................................................................................................... 54
Setup Menu Settings.......................................................................................................................... 55
Maintenance............................................................................................................................................... 60
When to Maintain Your Product ......................................................................................................... 60
Preparing for Maintenance................................................................................................................. 61
Maintenance Supplies ................................................................................................................... 62
Maintenance Precautions.............................................................................................................. 64
Stirring High Density Black Ink ........................................................................................................... 65
Replacing the Ink and Chip Unit ......................................................................................................... 68
About Ink and Chip Unit Replacement........................................................................................... 68
Ink and Chip Unit Precautions ....................................................................................................... 69
Replacing the Chip Unit and Refilling Ink....................................................................................... 70
Print Head Maintenance..................................................................................................................... 80
Checking for Clogged Print Head Nozzles..................................................................................... 81
Cleaning the Print Head................................................................................................................. 82
Aligning the Print Head.................................................................................................................. 83
Performing Head Maintenance...................................................................................................... 86
Cleaning the Anti-drying Caps............................................................................................................ 89
Cleaning the Platen............................................................................................................................ 95
Replacing the Waste Ink Bottle .......................................................................................................... 97
Replacing the Cutter......................................................................................................................... 100
Replacing the Head Cleaning Set .................................................................................................... 103
Moving or Transporting the Product ..................................................................................................... 108
Prepare to Move the Product............................................................................................................ 108
Setting Up the Product After Moving ................................................................................................ 108
Solving Problems .................................................................................................................................... 110
Product Status Messages ................................................................................................................ 110
Solving Printer Problems.................................................................................................................. 113
Printer Does Not Turn On ............................................................................................................ 113
Product Turns Off Automatically .................................................................................................. 113
LCD Screen Shuts Off ................................................................................................................. 113
Forgot the Administrator Password ............................................................................................. 114

5
Red Light Shines Inside the Printer ............................................................................................. 114
Solving Printing Problems ................................................................................................................ 114
Nothing Prints.............................................................................................................................. 114
Cannot Print Over a Network....................................................................................................... 115
Print Head Moves But Nothing Prints .......................................................................................... 115
Removing Jammed Media........................................................................................................... 116
Media Does Not Feed or Eject Correctly...................................................................................... 118
Media Does Not Cut Cleanly ....................................................................................................... 118
Solving Print Quality Problems......................................................................................................... 118
Nozzle Check Pattern Prints Incorrectly ...................................................................................... 119
Overall Print Quality Is Poor ........................................................................................................ 119
Printed Media Is Stained or Marred ............................................................................................. 120
Image is not Positioned Correctly on the Media........................................................................... 121
Where to Get Help............................................................................................................................ 121
Technical Specifications ........................................................................................................................ 123
Windows System Requirements ...................................................................................................... 123
Printing Specifications...................................................................................................................... 124
Electrical Specifications ................................................................................................................... 124
Environmental Specifications ........................................................................................................... 125
Dimension Specifications ................................................................................................................. 125
Interface Specifications .................................................................................................................... 125
Ink Pack Specifications .................................................................................................................... 126
Media Specifications ........................................................................................................................ 126
Safety and Approvals Specifications ................................................................................................ 126
Notices ..................................................................................................................................................... 128
Important Safety Instructions............................................................................................................ 128
General Product Safety Instructions ............................................................................................ 128
Ink Pack Safety Instructions ........................................................................................................ 130
FCC Compliance Statement............................................................................................................. 130
Binding Arbitration and Class Waiver ............................................................................................... 131
Trademarks...................................................................................................................................... 134
Copyright Notice............................................................................................................................... 134
A Note Concerning Responsible Use of Copyrighted Materials................................................... 135


7
Epson SureColor F6370 User's Guide
Welcome to the Epson SureColor F6370 User's Guide.
For a printable PDF copy of this guide, click here.

8
Introduction to Your Printer
Refer to these sections to learn more about your printer and this manual.
Notations Used in the Documentation
Printer Part Locations
Consumables and Replacement Parts
Printer Usage Guidelines
Notations Used in the Documentation
Follow the guidelines in these notations as you read your documentation:
• Warnings must be followed carefully to avoid bodily injury.
• Cautions must be observed to avoid damage to your equipment.
• Notes contain important information about your printer.
• Tips contain additional printing information.
Parent topic: Introduction to Your Printer
Printer Part Locations
Check the printer part illustrations to learn about the parts on your printer.
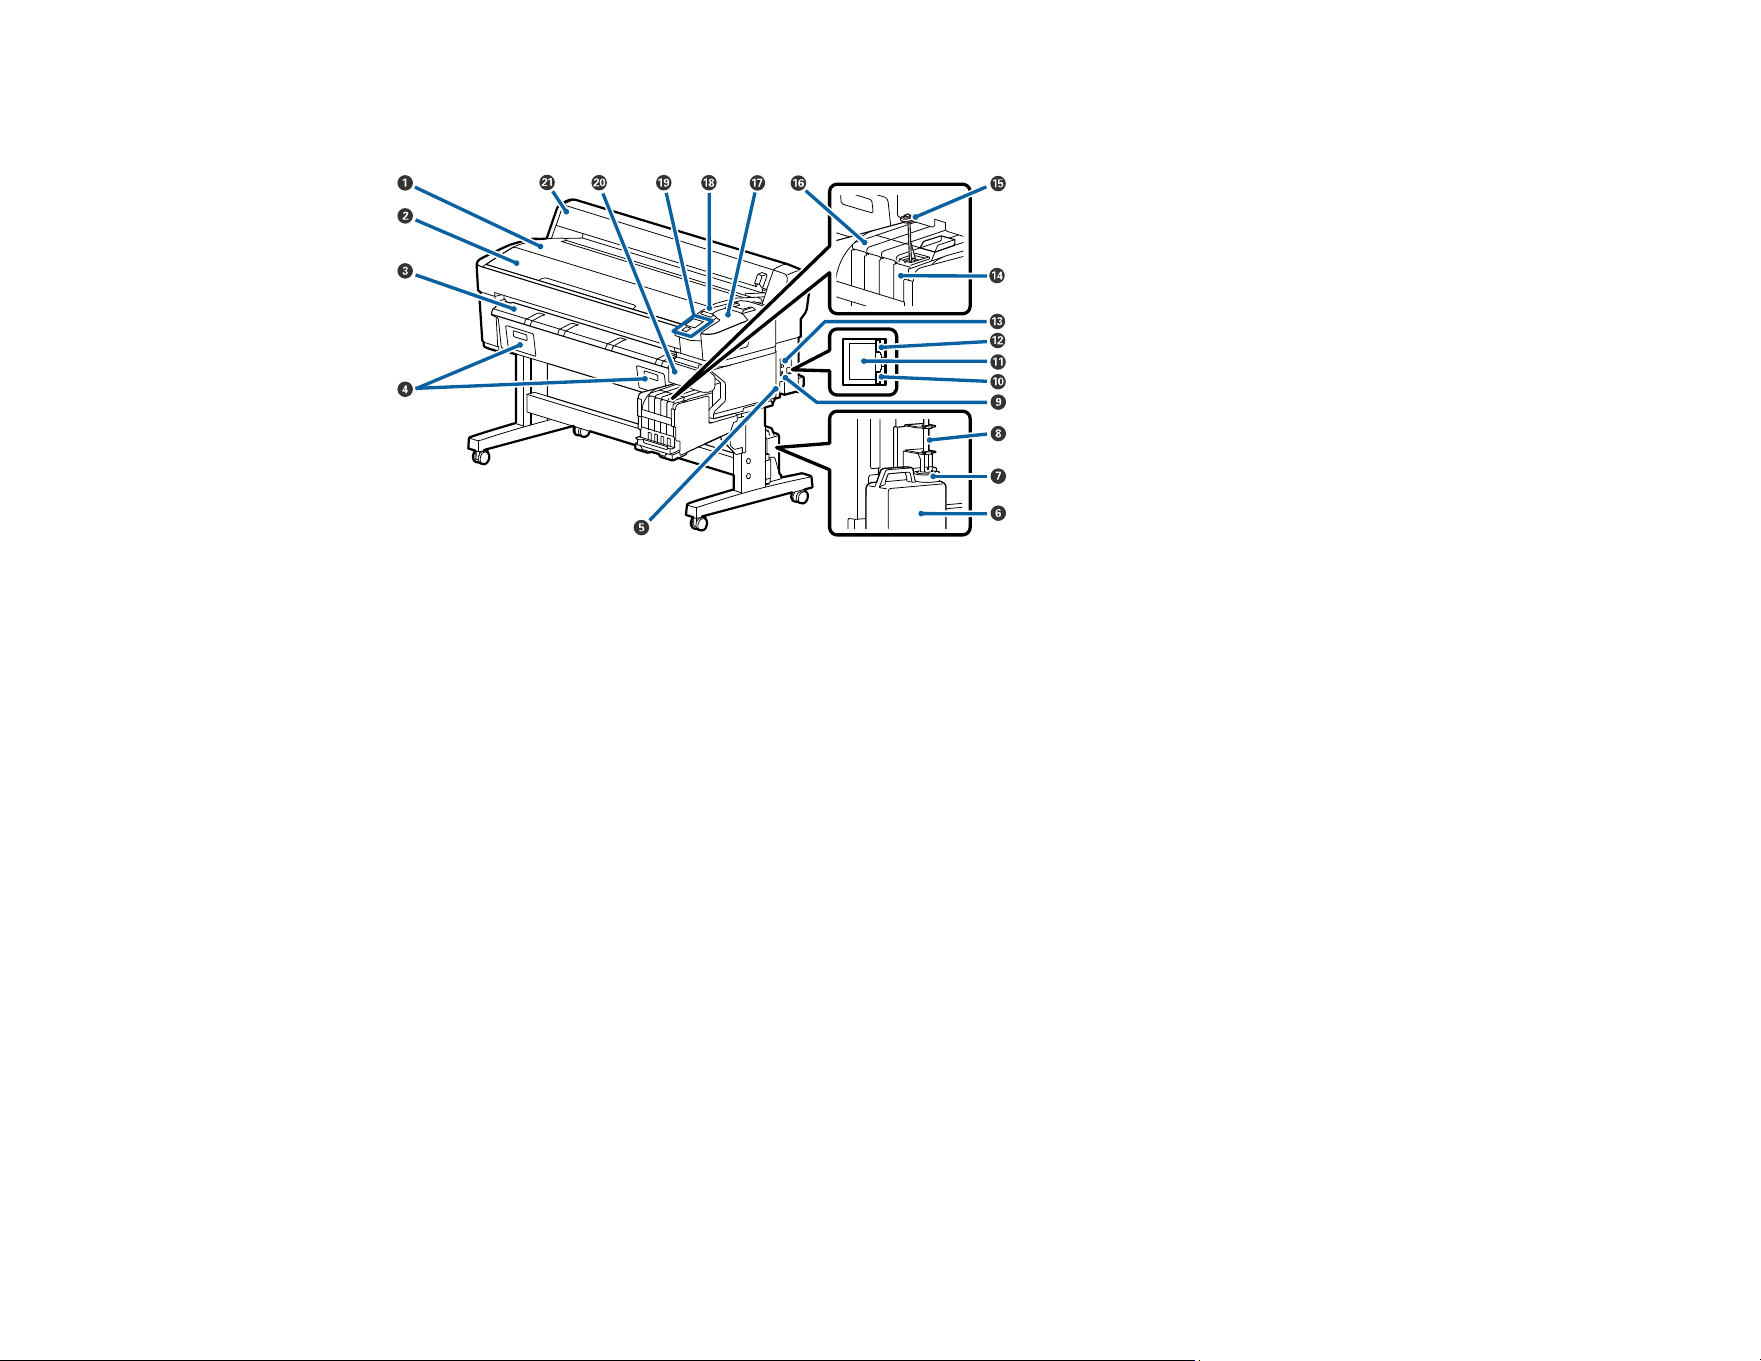
Product Parts - Front and Side
Product Parts - Inside
Control Panel Parts
Parent topic: Introduction to Your Printer
9
Product Parts - Front and Side
1 Roll rest
2 Printer cover
3 Paper eject guide
4 Maintenance box covers (not used for this product)
5 AC inlet
6 Waste ink bottle
7 Waste ink bottle stopper
8 Waste ink tube
9 Option port
10 Data light
11 LAN port
12 Status light
13 USB port
14 Ink tank
15 Stirring stick
10
16 Slider (chip holder)
17 Maintenance cover
18 Alert light
19 Control panel
20 Side cover
21 Roll paper cover
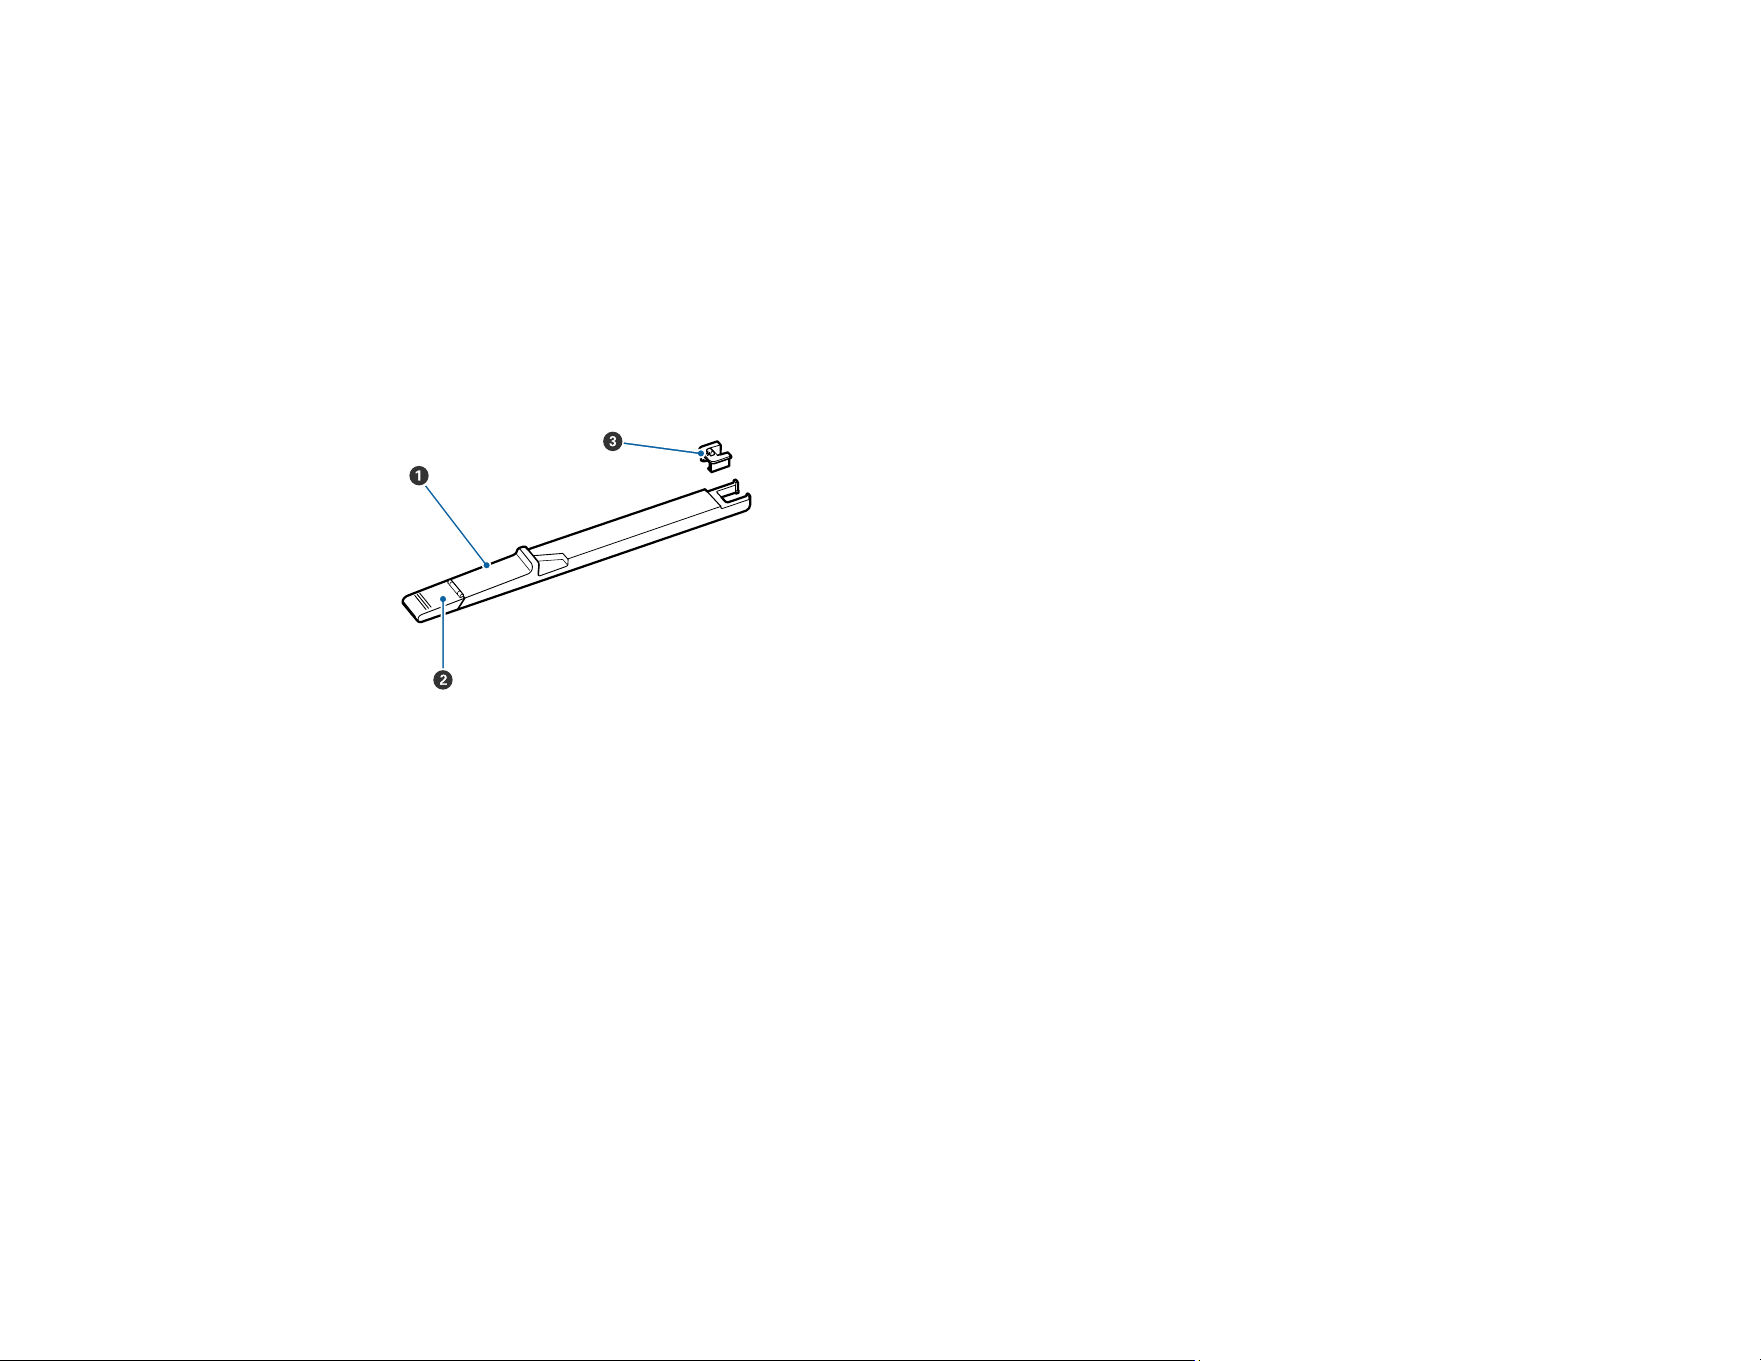
Slider (Chip Holder) Parts
1 Slider
2 Ink inlet cover
3 Chip unit

13
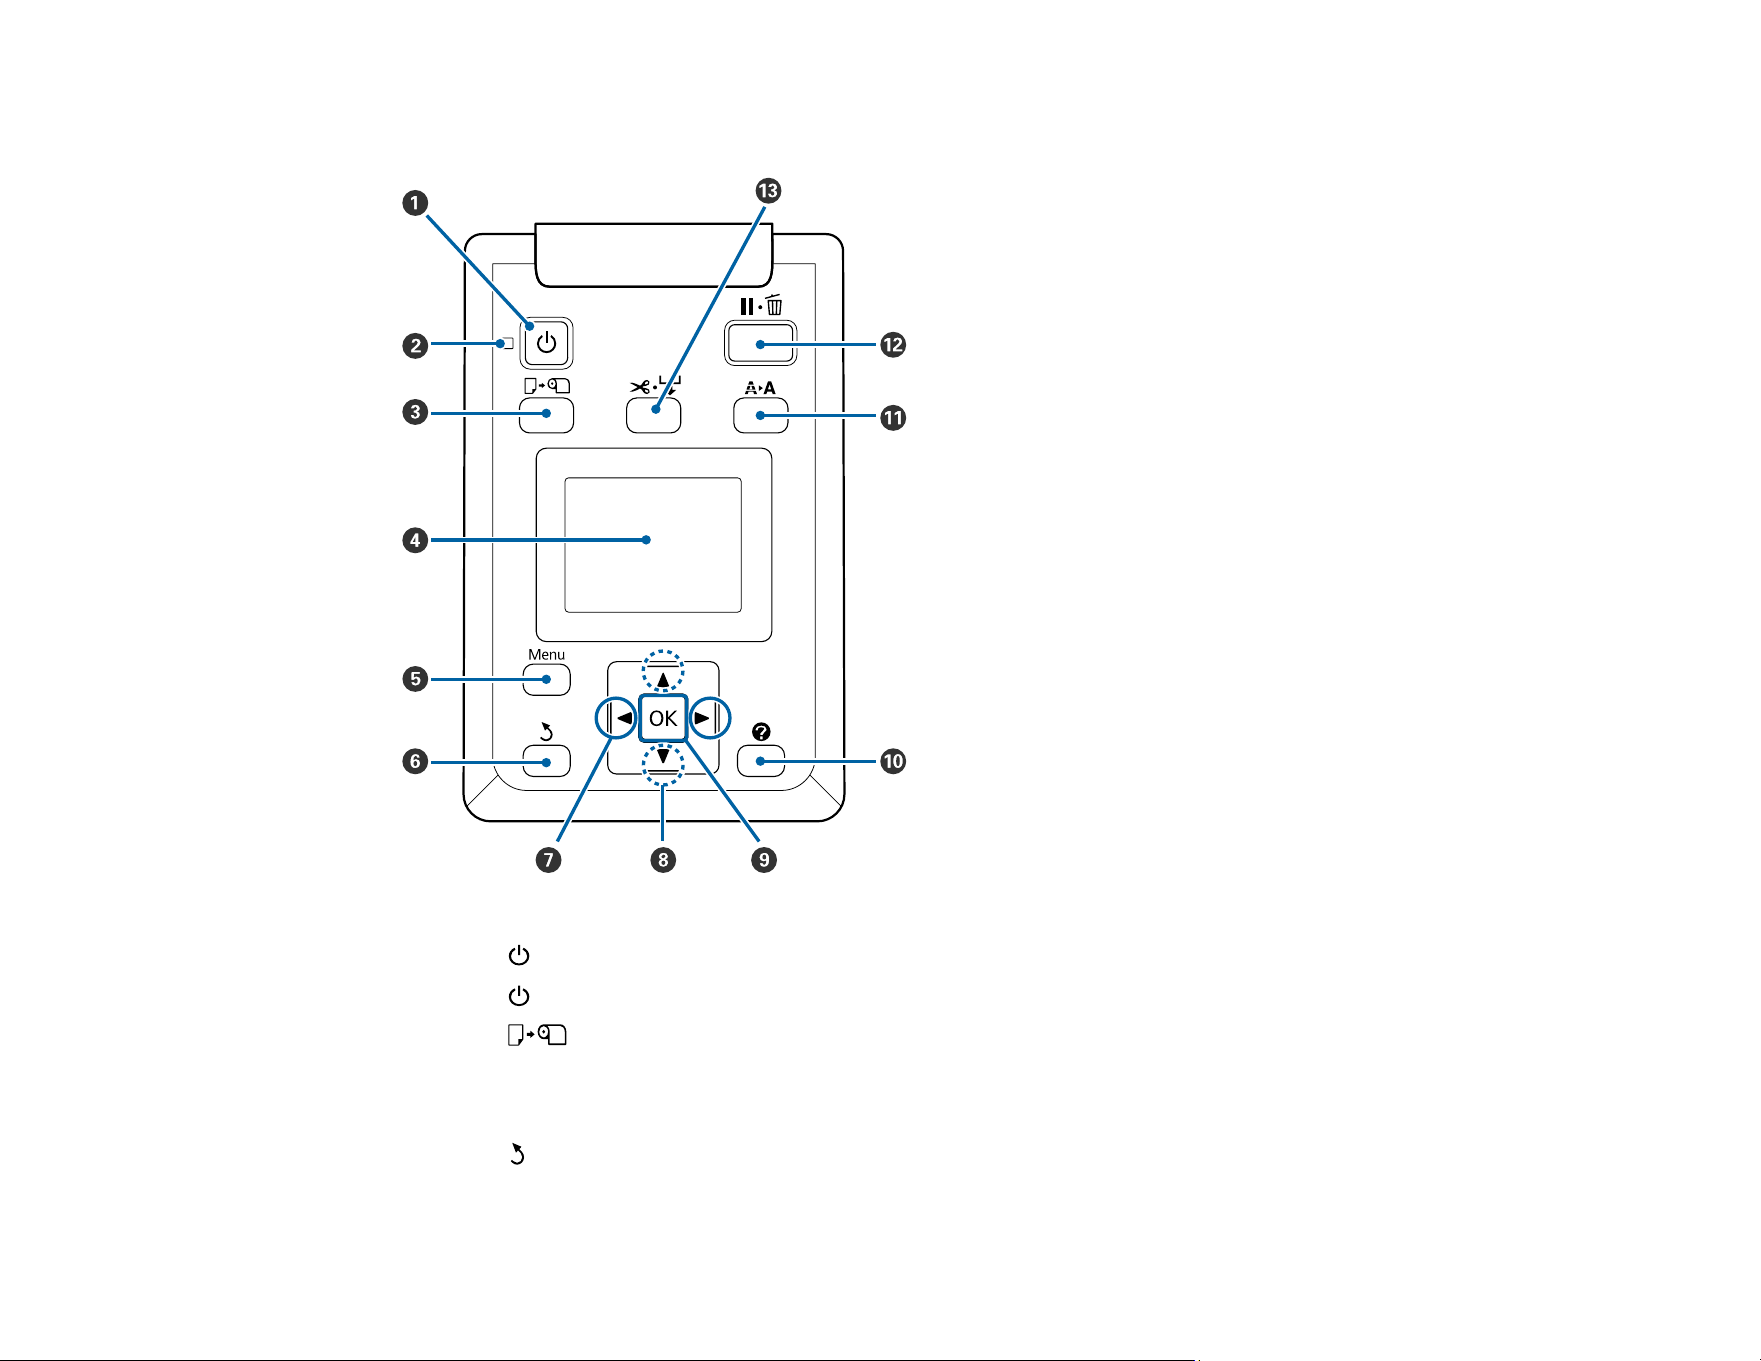
Control Panel Parts
1
The power button
2
The power light
3 The load/remove paper button
4 LCD screen
5 The Menu button
6
The back button
7 The left and right arrow buttons
14
8 The up and down arrow buttons
9 The OK button
10 The ink tab info button
11 The maintenance button
12
The pause/cancel button
13
The cut/feed media button
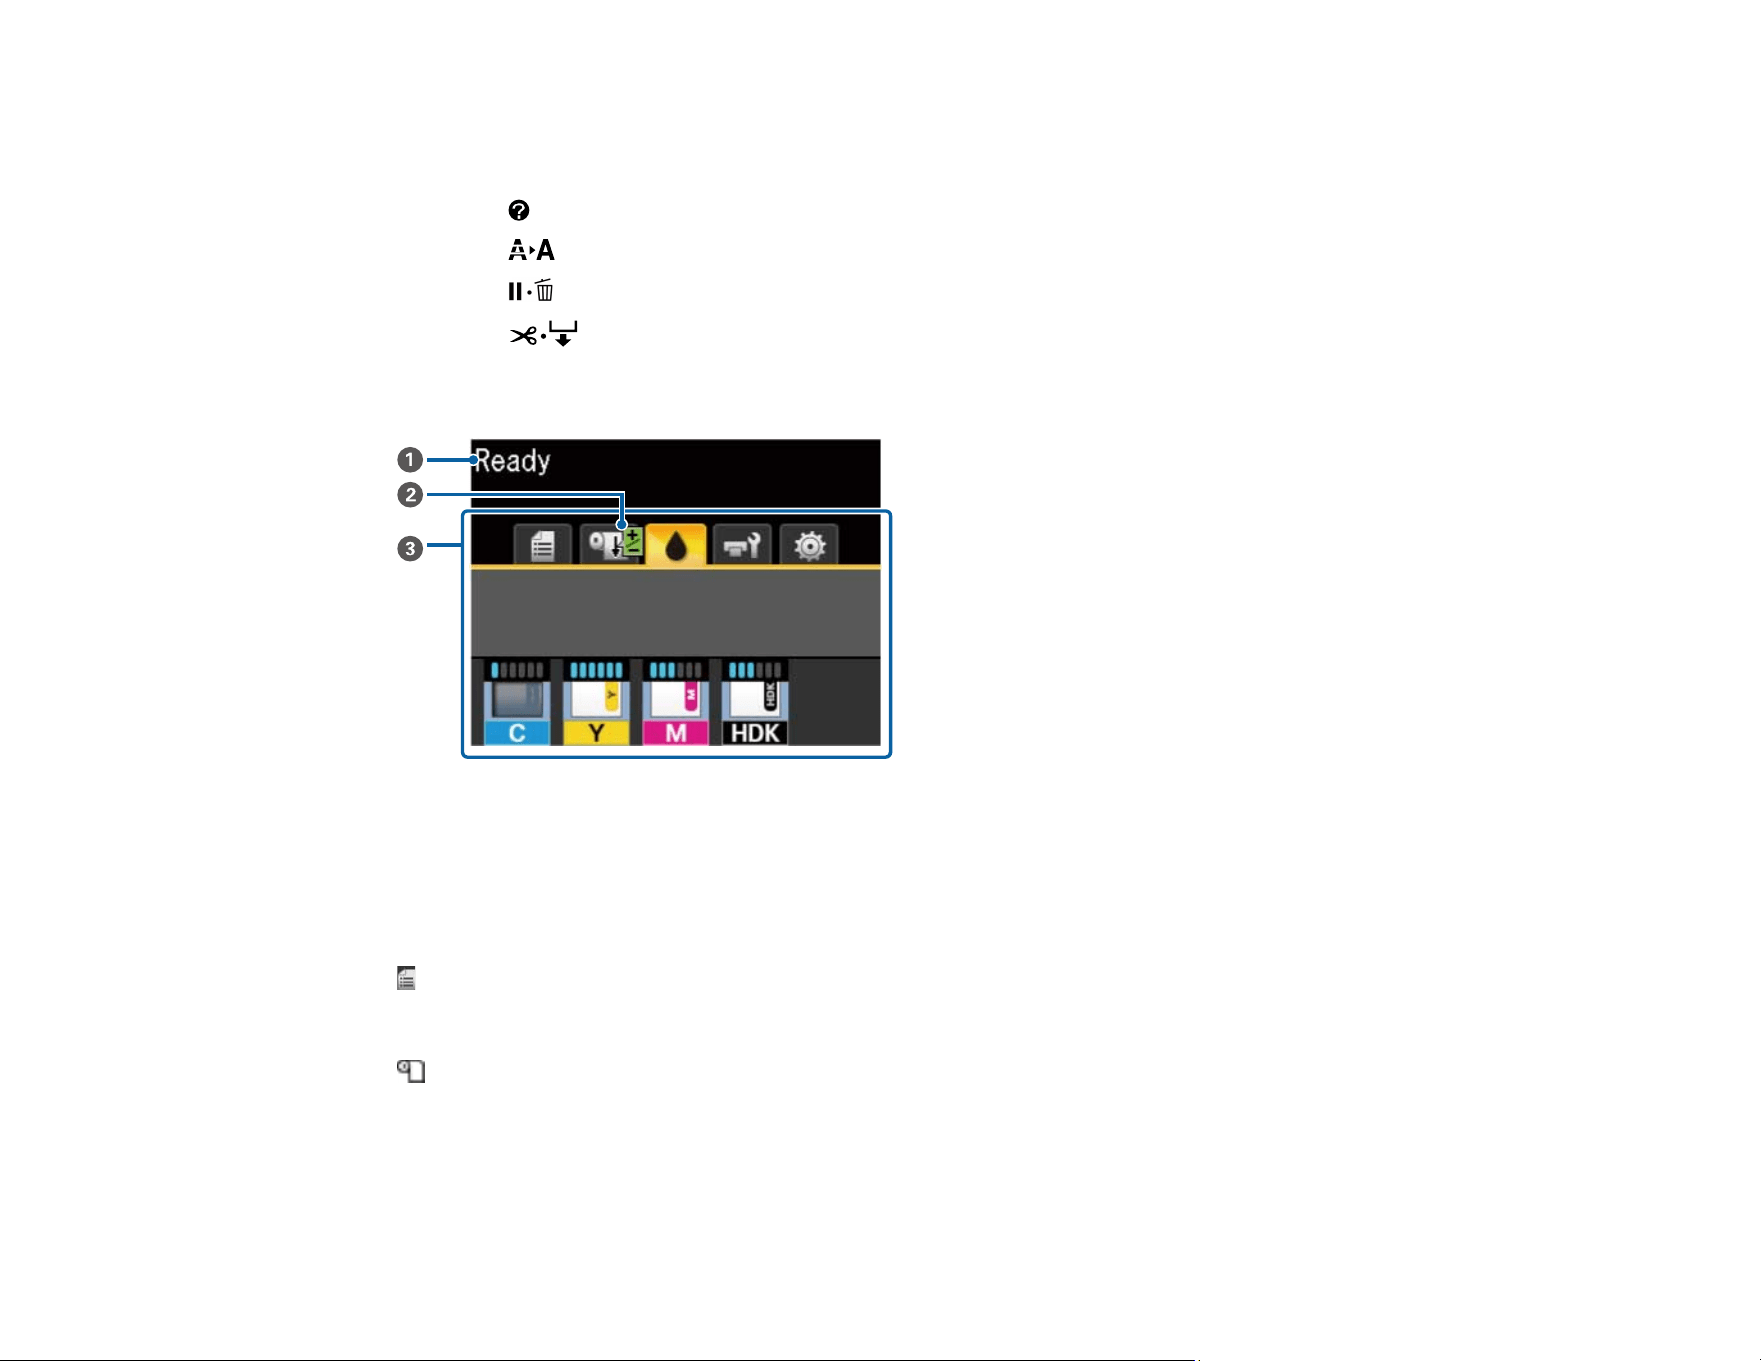
LCD Screen Display
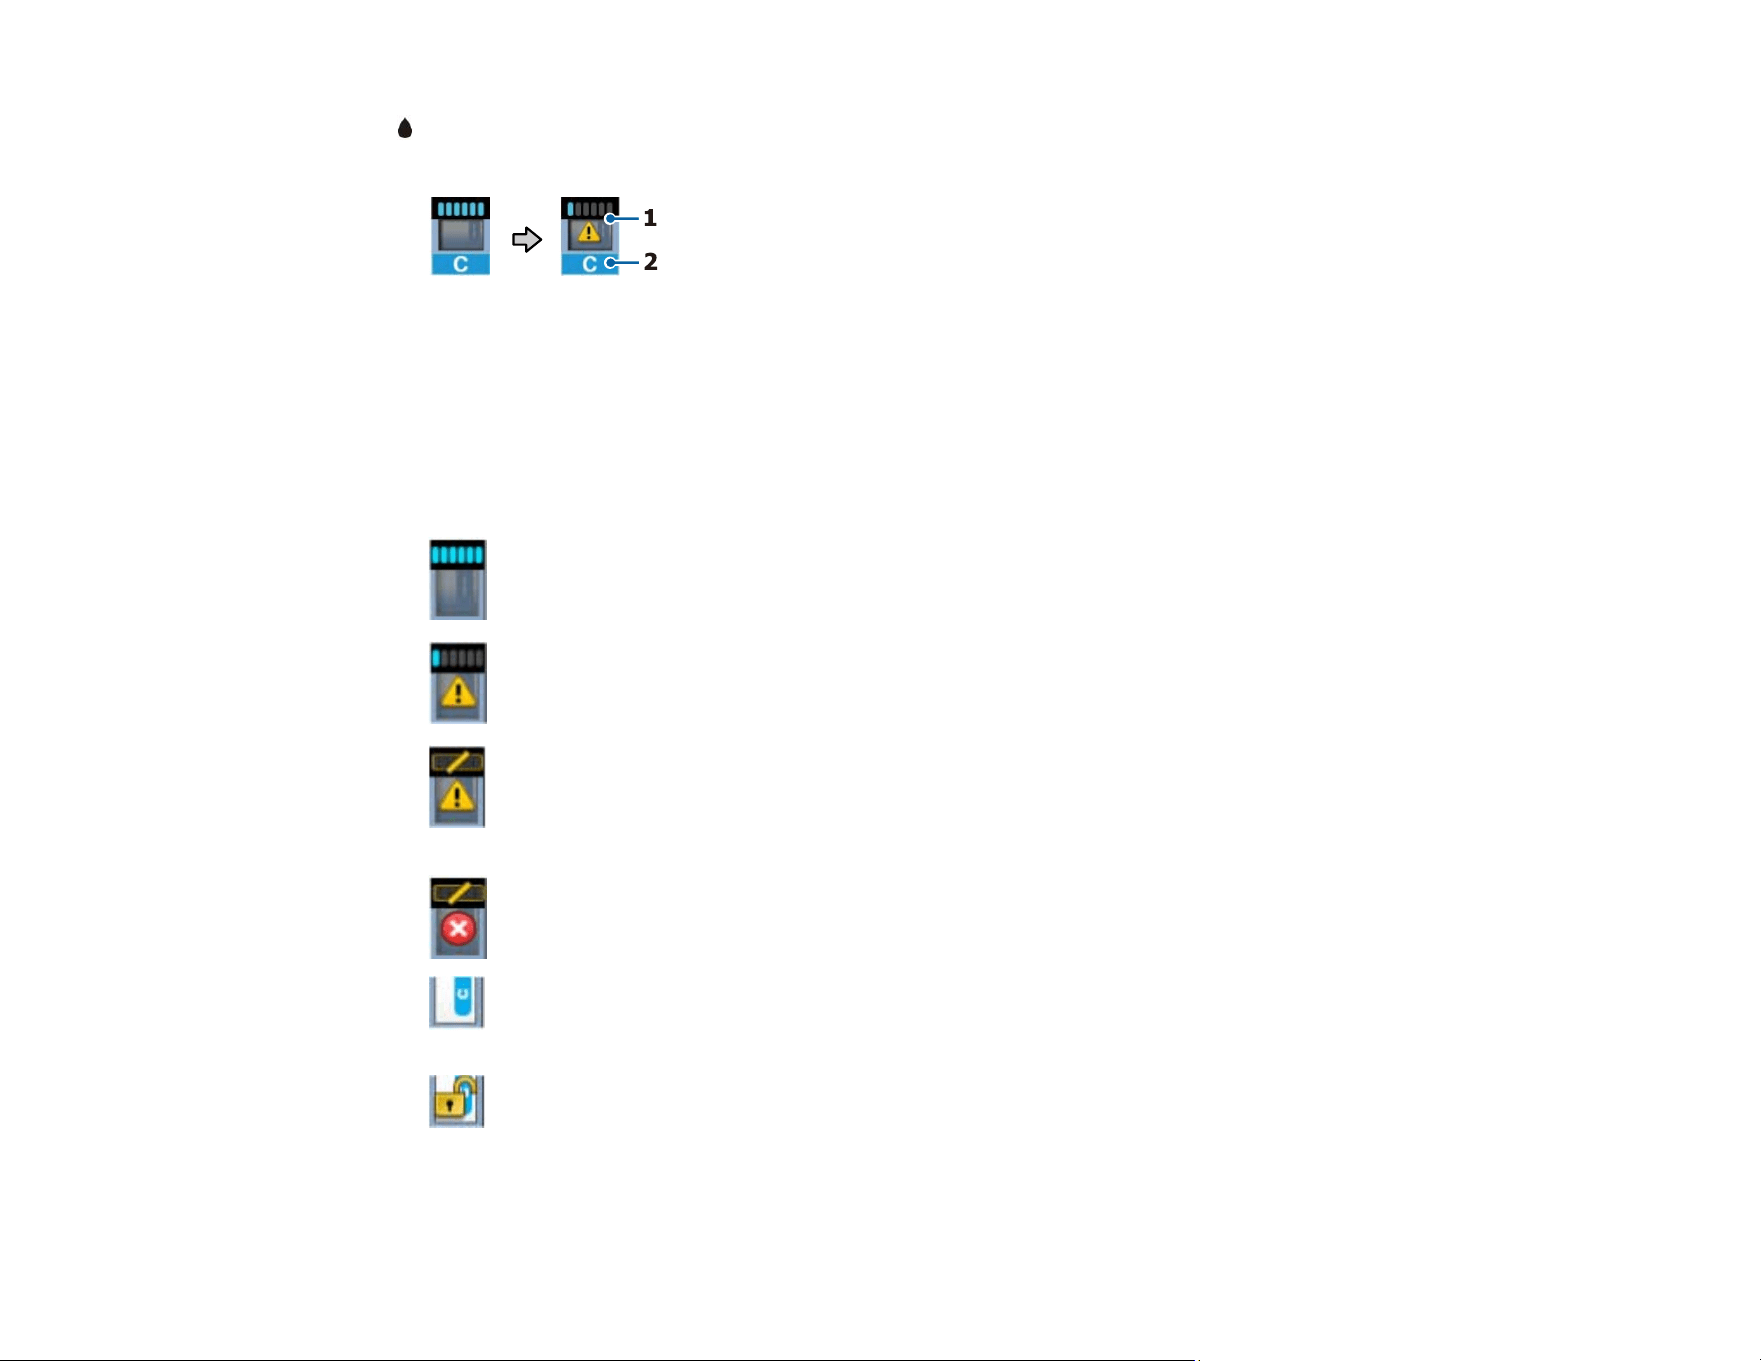
1 Status messages
2 Feed adjustment information, if you have entered a value during printing
3 Information display area with the 5 tabs described in the next table
Print status tab
Displays information about the print jobs in the print queue. Press the OK button to display the Print
Job menu.
Paper status tab
Displays information about the loaded paper, such as roll width and amount of paper remaining.
Press the OK button to display the Paper menu.
15
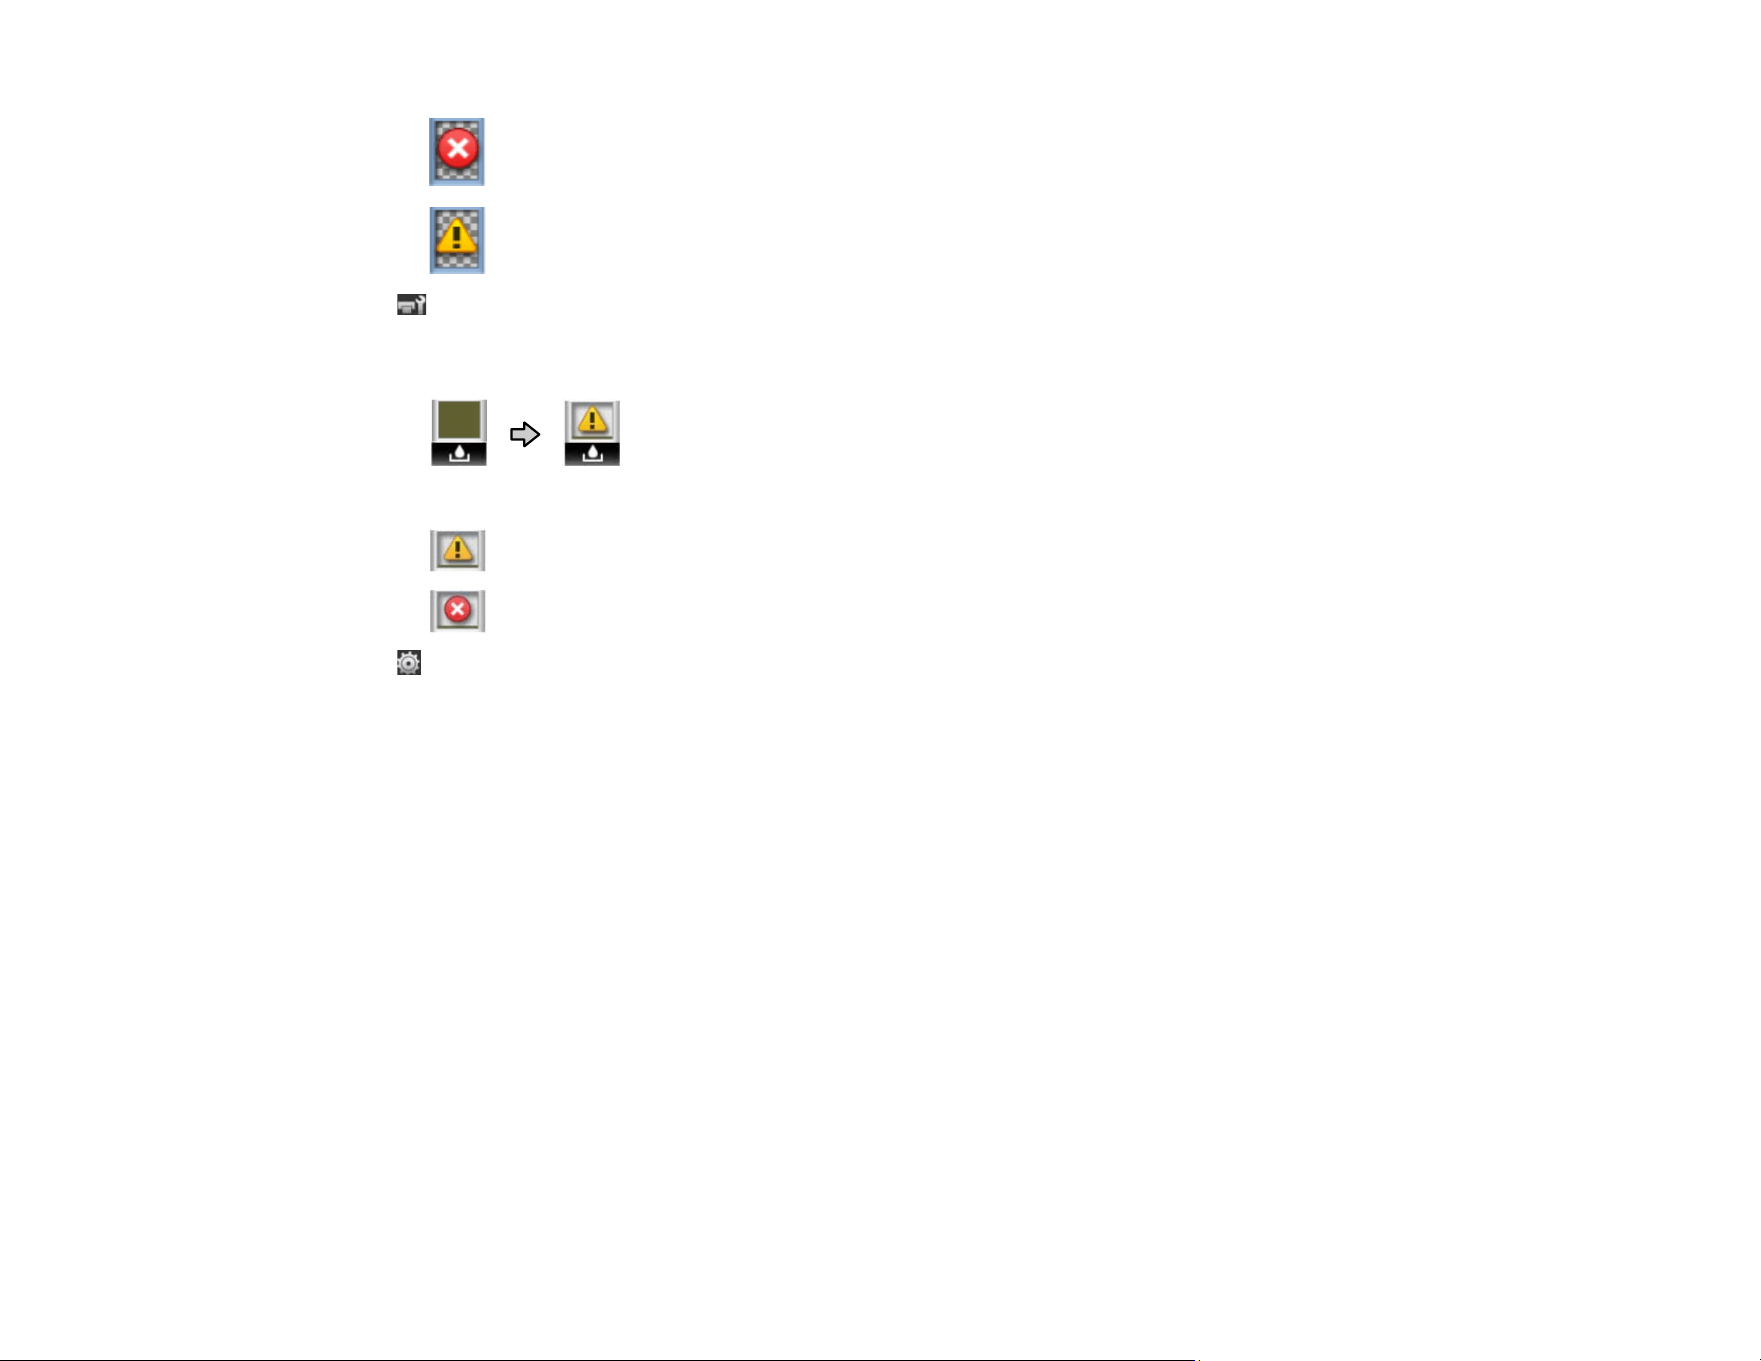
Chip unit status tab
The chip unit status (1) changes from normal (left) to warning or error status (right) if necessary.
The ink color is shown below (2).
• HDK: High Density Black
• Y: Yellow
• M: Magenta
• C: Cyan
: Remaining ink level indicators
: Ink is low
: Ink is nearing the end of its life. Check the remaining ink in the ink tank using the top edge of
the metal plate or the scale on the ink pack and, if necessary, refill the ink and replace the chip unit.
: Ink is out and printing is stopped. Replace the chip unit and refill the ink.
: A chip unit for automatic charging is mounted. When ink gets low, a low ink warning does not
appear. If the icon is flashing, the chip has been removed.
: The side cover is open; automatic charging cannot occur. Lower the side cover.
16
: The chip unit is mounted incorrectly or incompatible.
: Check the displayed chip unit message.
Waste ink bottle status tab
The waste ink bottle status indicates the waste ink level and changes from normal (left) to warning or
error status (right) if necessary. Press the OK button to display the Maintenance menu.
: Waste ink bottle is almost full; prepare a new waste ink bottle
: Waste ink bottle is full; replace the waste ink bottle
Setup tab
Displays the product's IP address and menus for various settings. Press the OK button to display the
Setup menu.
Parent topic: Printer Part Locations
Related references
Paper Menu Settings
Related tasks
Replacing the Waste Ink Bottle
Related topics
Replacing the Ink and Chip Unit
Consumables and Replacement Parts
You can purchase genuine Epson ink, paper, and accessories from an Epson authorized reseller. To
find the nearest reseller, visit proimaging.epson.com (U.S.) or proimaging.epson.ca (Canada), select
your product series and product, and click the Where to Buy button. Or call 800-GO-EPSON (800-463-
7766) in the U.S. or 800-807-7766 in Canada.
17
Caution: Using ink from an non-genuine ink pack may result in a malfunction. Epson shall not be held
responsible for any damages or problems with the product that may occur when using non-genuine ink
packs.
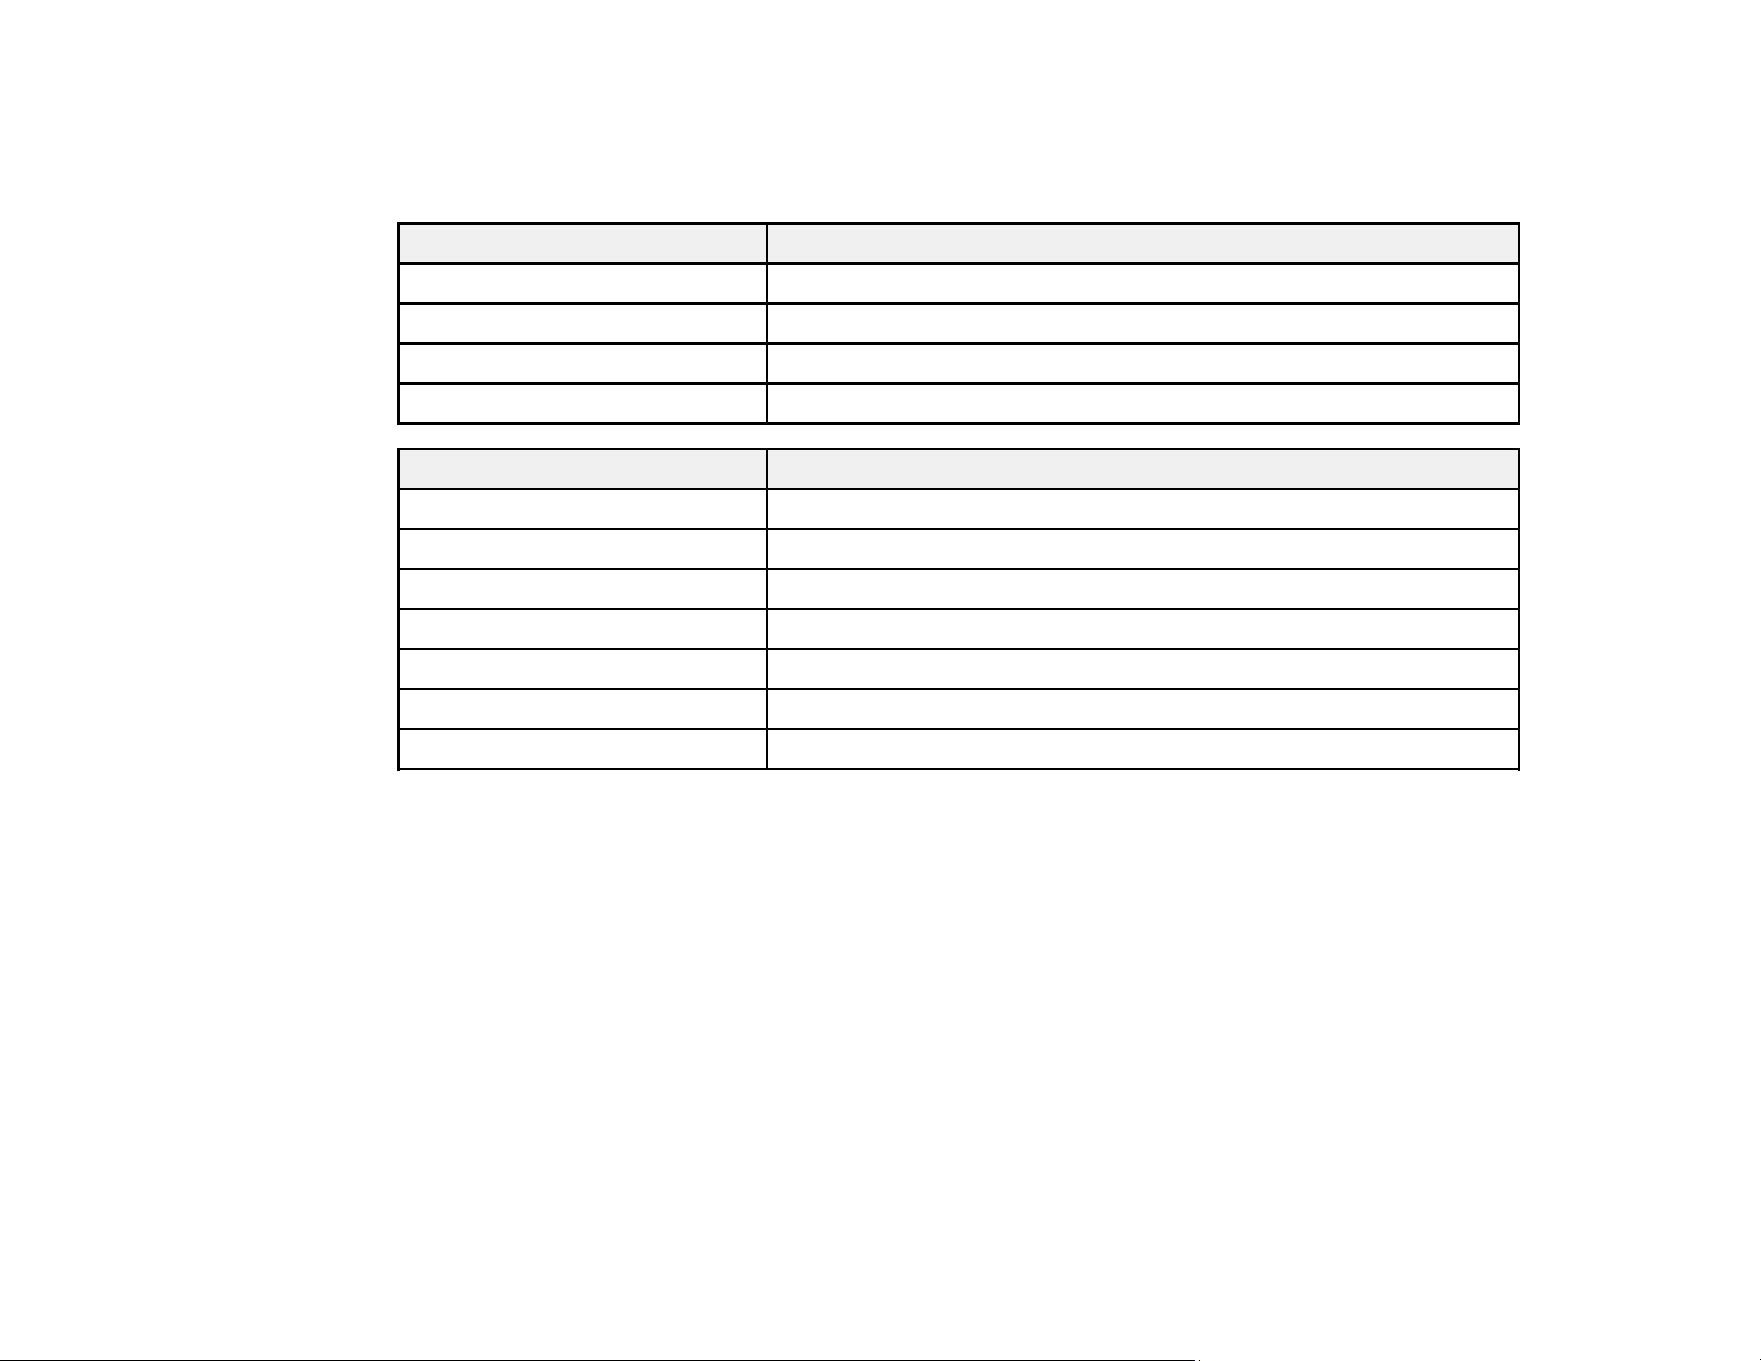
Consumable Part number
High-Density Black T46C820
Cyan T46C220
Magenta T46C320
Yellow T46C420
Replacement part Part number
Auto cutter spare blade C13S902006
Auto take-up reel unit C12C934671
Cap cleaning kit C13S210054
Head maintenance kit C13S210043
Roll adapter C12C934711
Waste ink bottle C13T724000
Wiper kit C13S210096
Parent topic: Introduction to Your Printer
Printer Usage Guidelines
Follow the guidelines in these sections as you use your printer, consumables, and print media.
Using Your Printer
Handling Ink Packs and Ink Tanks
Handling Media
Storing Your Printer
Parent topic: Introduction to Your Printer

18
Using Your Printer
Follow these guidelines as you use your printer:
• Operate the printer only within the specified operating temperature and humidity range for your
product and your media.
• Check to make sure you maintain the specified humidity range, especially in dry areas or air
conditioned environments.
• Do not install the printer next to heat sources or directly in the path of exhaust from a ventilator or air
conditioner. Failure to observe this precaution could result in the print head nozzles drying out and
clogging.
• Make sure the product work space is kept free of dust or lint that could damage your product or clog
the print head nozzles.
• Use the product in a sufficiently ventilated area.
• Perform maintenance operations according to usage frequency or at the recommended intervals.
Failure to perform regular maintenance could reduce print quality or damage the print head.
• Do not bend or pull on the waste ink tube. Otherwise ink may leak inside or outside the printer.
• Be sure that the waste ink bottle is installed whenever the printer is turned on.
• If an error occurs and the printer is turned off without first resolving the error, the print head may not be
in the home position, which may cause the print head to dry out. In this case, turn on the power and
wait until the carriage is in the home position.
• When the printer is on, do not disconnect the power cable or cut the power at the circuit breaker. The
print head may not be in the home position. In this case, turn on the power and wait a while until the
print head is in the home position.
• For consistent color, maintain a constant room temperature between 59 °F (15 °C) and 77 °F (25 °C).
• Operate the product at altitudes below 6561 ft (2000 m).
Note: To keep the print head in the optimum operating condition, ink is used in maintenance operations
such as head cleaning in addition to printing.
Parent topic: Printer Usage Guidelines
Related references
Environmental Specifications

19
Handling Ink Packs and Ink Tanks
Follow these guidelines as you handle the ink packs and ink tanks:
• Do not remove the ink tanks. Ink tanks are calibrated at installation and removing them can decrease
their functionality.
• Do not place items on an ink tank or subject the ink tanks to strong impacts, or the tank may detach. If
an ink tank comes off, contact Epson support.
• Store ink packs at room temperature, out of direct sunlight.
• To ensure print quality, use all the ink in the ink pack before the date printed on the ink pack or within
25 days of refilling the ink tank, whichever is earlier.
• Allow ink packs that have been stored at low temperatures for an extended period of time to return to
room temperature for four hours before use.
• Refill the ink tank as soon as possible after opening an ink pack.
• When refilling an ink tank, use all of the ink in the ink pack at once.
Parent topic: Printer Usage Guidelines
Related references
Ink Pack Specifications
Handling Media
Follow these guidelines as you handle or store media:
• Read and follow the guidelines provided with each type of media.
• Keep the media in its packaging until just before loading the roll in the product.
• Do not fold the media or otherwise damage its printable surface.
• Do not touch the printable surface. This prevents oil from your hands from causing print quality
problems.
• When handling media, hold it by both edges, preferably while wearing cotton gloves.
• Do not carry media with the surface pressed against your clothing.
• Keep the media dry and avoid storage locations subject to direct sunlight, excessive heat, and high
humidity.
• Retain the media packaging materials so you can use it to store unused media.
• After printing, do not touch, rub, or scratch the printed surface to avoid removing the ink.

20
• Dry printed media completely before folding or stacking it, or the printed surface may be damaged.
• Keep printed media out of direct sunlight.
• Display and store printed media as instructed in the media documentation.
• When you are not printing on media, remove it from the printer and place it in its original packaging to
prevent deterioration.
Parent topic: Printer Usage Guidelines
Storing Your Printer
Follow these guidelines if you need to store your printer for a long period:
• If the printer is not used for an extended period of time with the power off, clean the print head nozzles.
Turn the printer on at least once every two weeks to automatically clean the print head and prevent the
nozzles from clogging. If you do not turn on the printer for a long time, the printer may malfunction.
• If you will not use the printer for a prolonged period of time, maintenance must be performed by a
service engineer before and after this period. Contact Epson support.
• Even if the printer is not turned on, ink that has accumulated in the waste ink tube may leak out. Make
sure the waste ink bottle is installed even when the printer is not on.
• Remove any loaded media before storing the printer to prevent the pressure rollers from causing
creases in the media, which may cause jams or damage to the print head.
• Make sure that the print head is in the home position before storing the printer. If it is left away from the
home position for a long time, the print quality may decline.
• Close all the covers on the printer to prevent dust and debris from getting in. If the printer will be not be
used for an extended period of time, protect it with an anti-static cloth or other cover. The print head
nozzles can become clogged if fine dust gets on the print head, and you may not be able to print
properly.
• Store the printer on a level surface; do not store it on angle, on its end, or upside down.
Parent topic: Printer Usage Guidelines
Related references
Where to Get Help
Related tasks
Cutting Media
Cleaning the Print Head
21
Media Handling
See these sections to load and handle media on your product.
Loading Media
Viewing and Changing Media Settings
Saving Sets of Media Settings
Printable Area and Paper Size Checking
Media Feed Adjustment
Cutting Media
Removing Media
Using the Auto Take-up Reel
Loading Media
Before loading media in your printer, review and follow the media handling guidelines for the best results.
Caution: Wait until just before printing to load media. This avoids creases in the media that may be
caused by the pressure rollers. Creased, wavy, or curled media could cause it to jam inside the printer or
contact the print head.
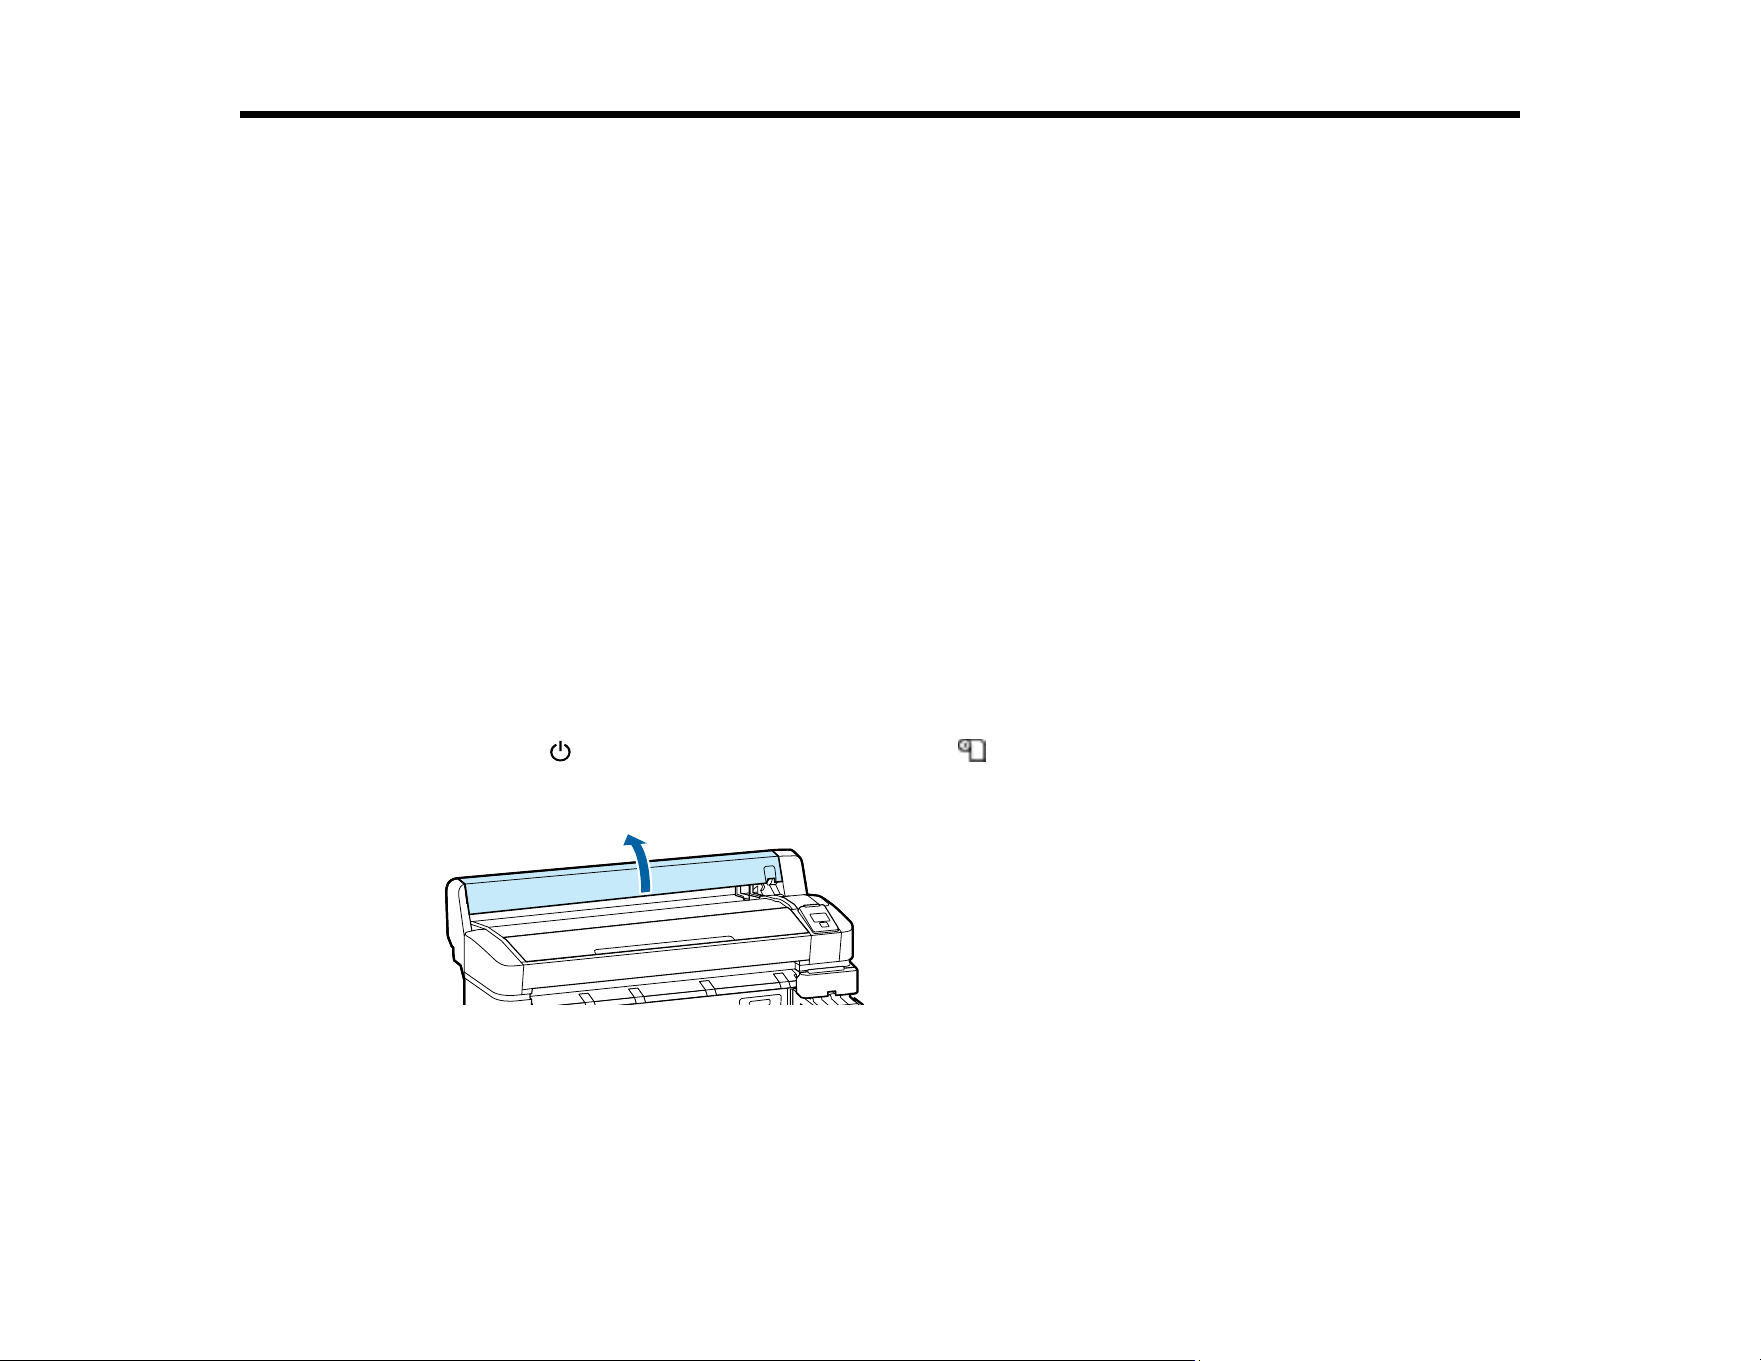
1. Press the power button and check that Press and load paper is displayed.
2. Open the roll paper cover.
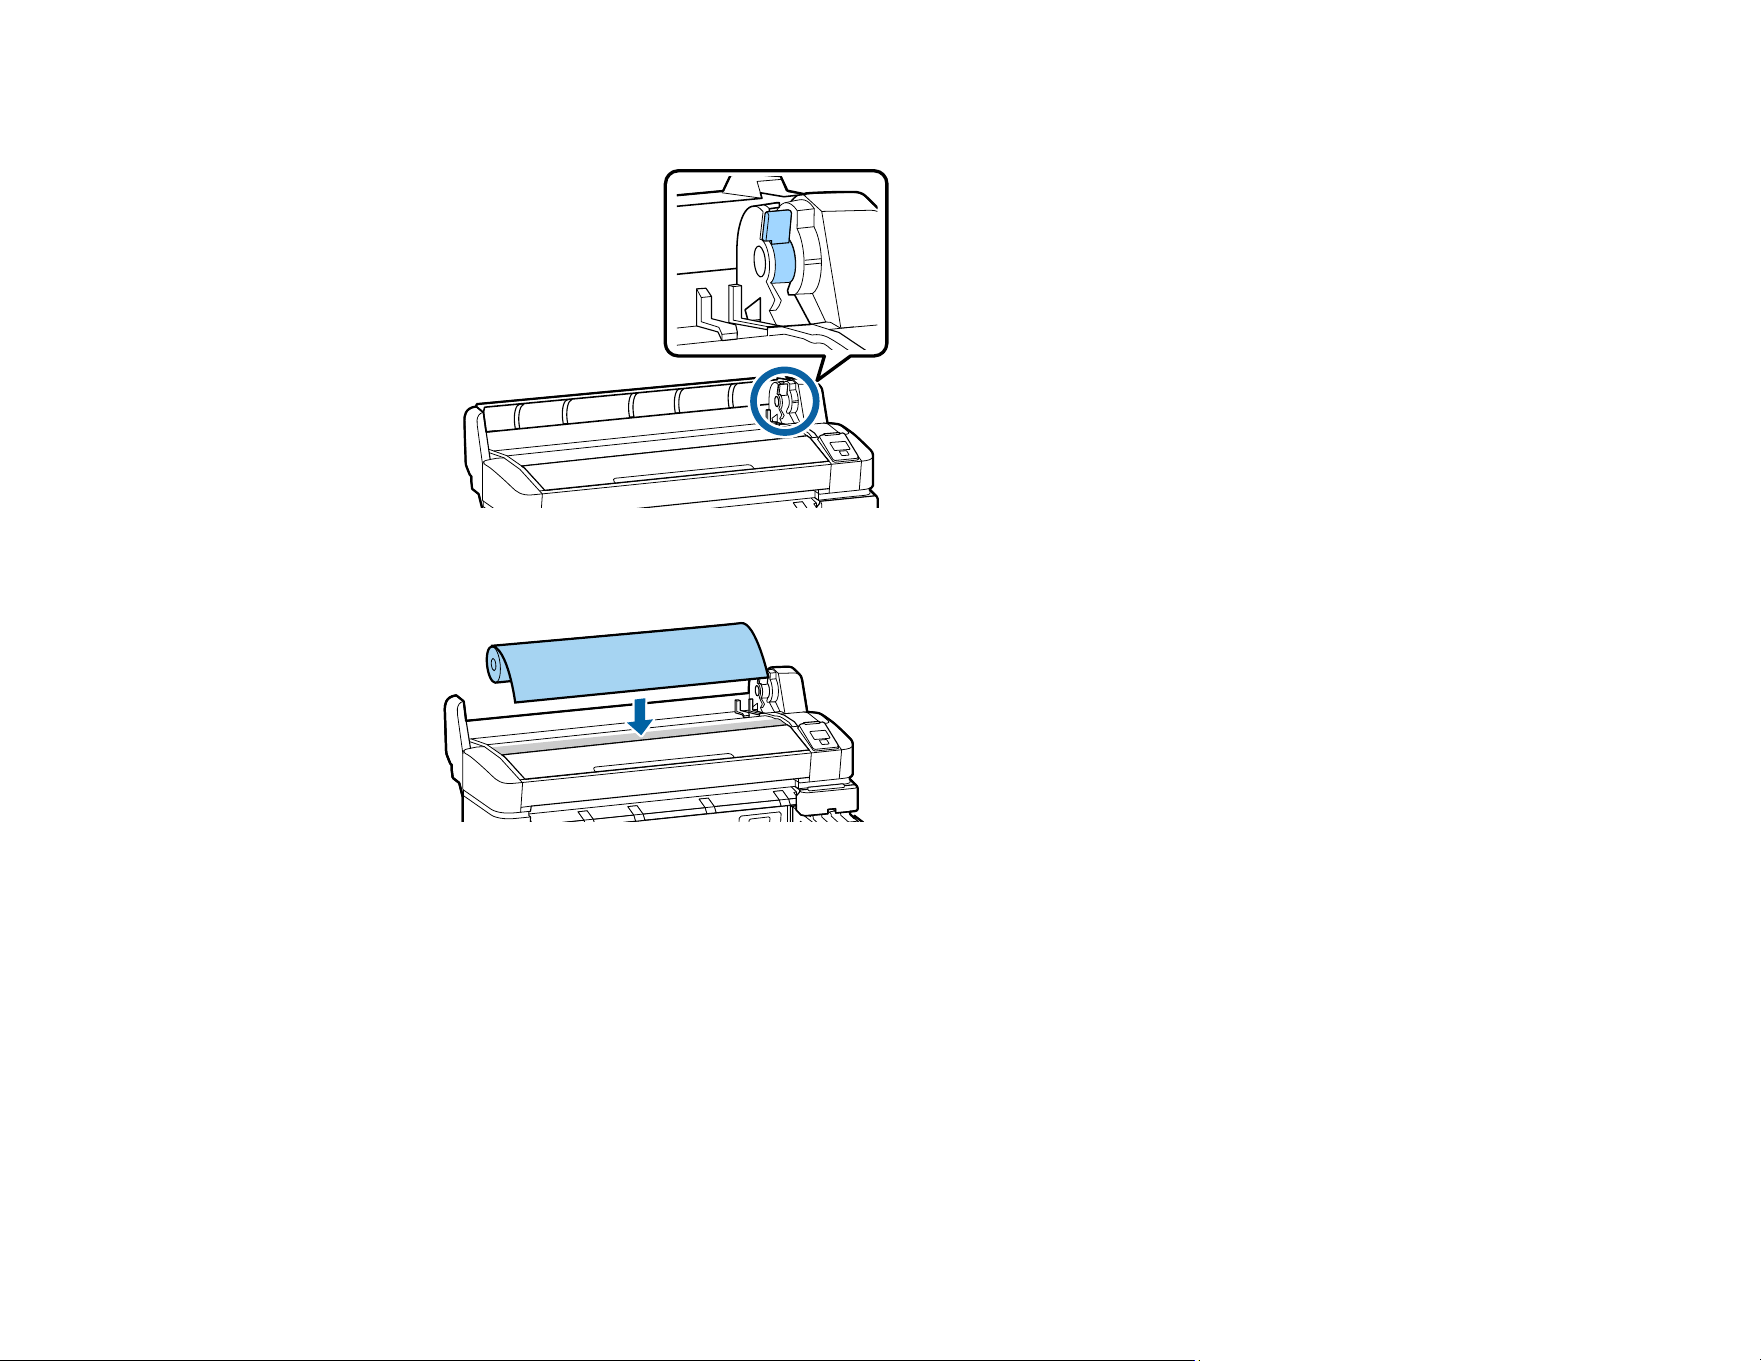
22
3. Lift up the adapter holder lock lever.
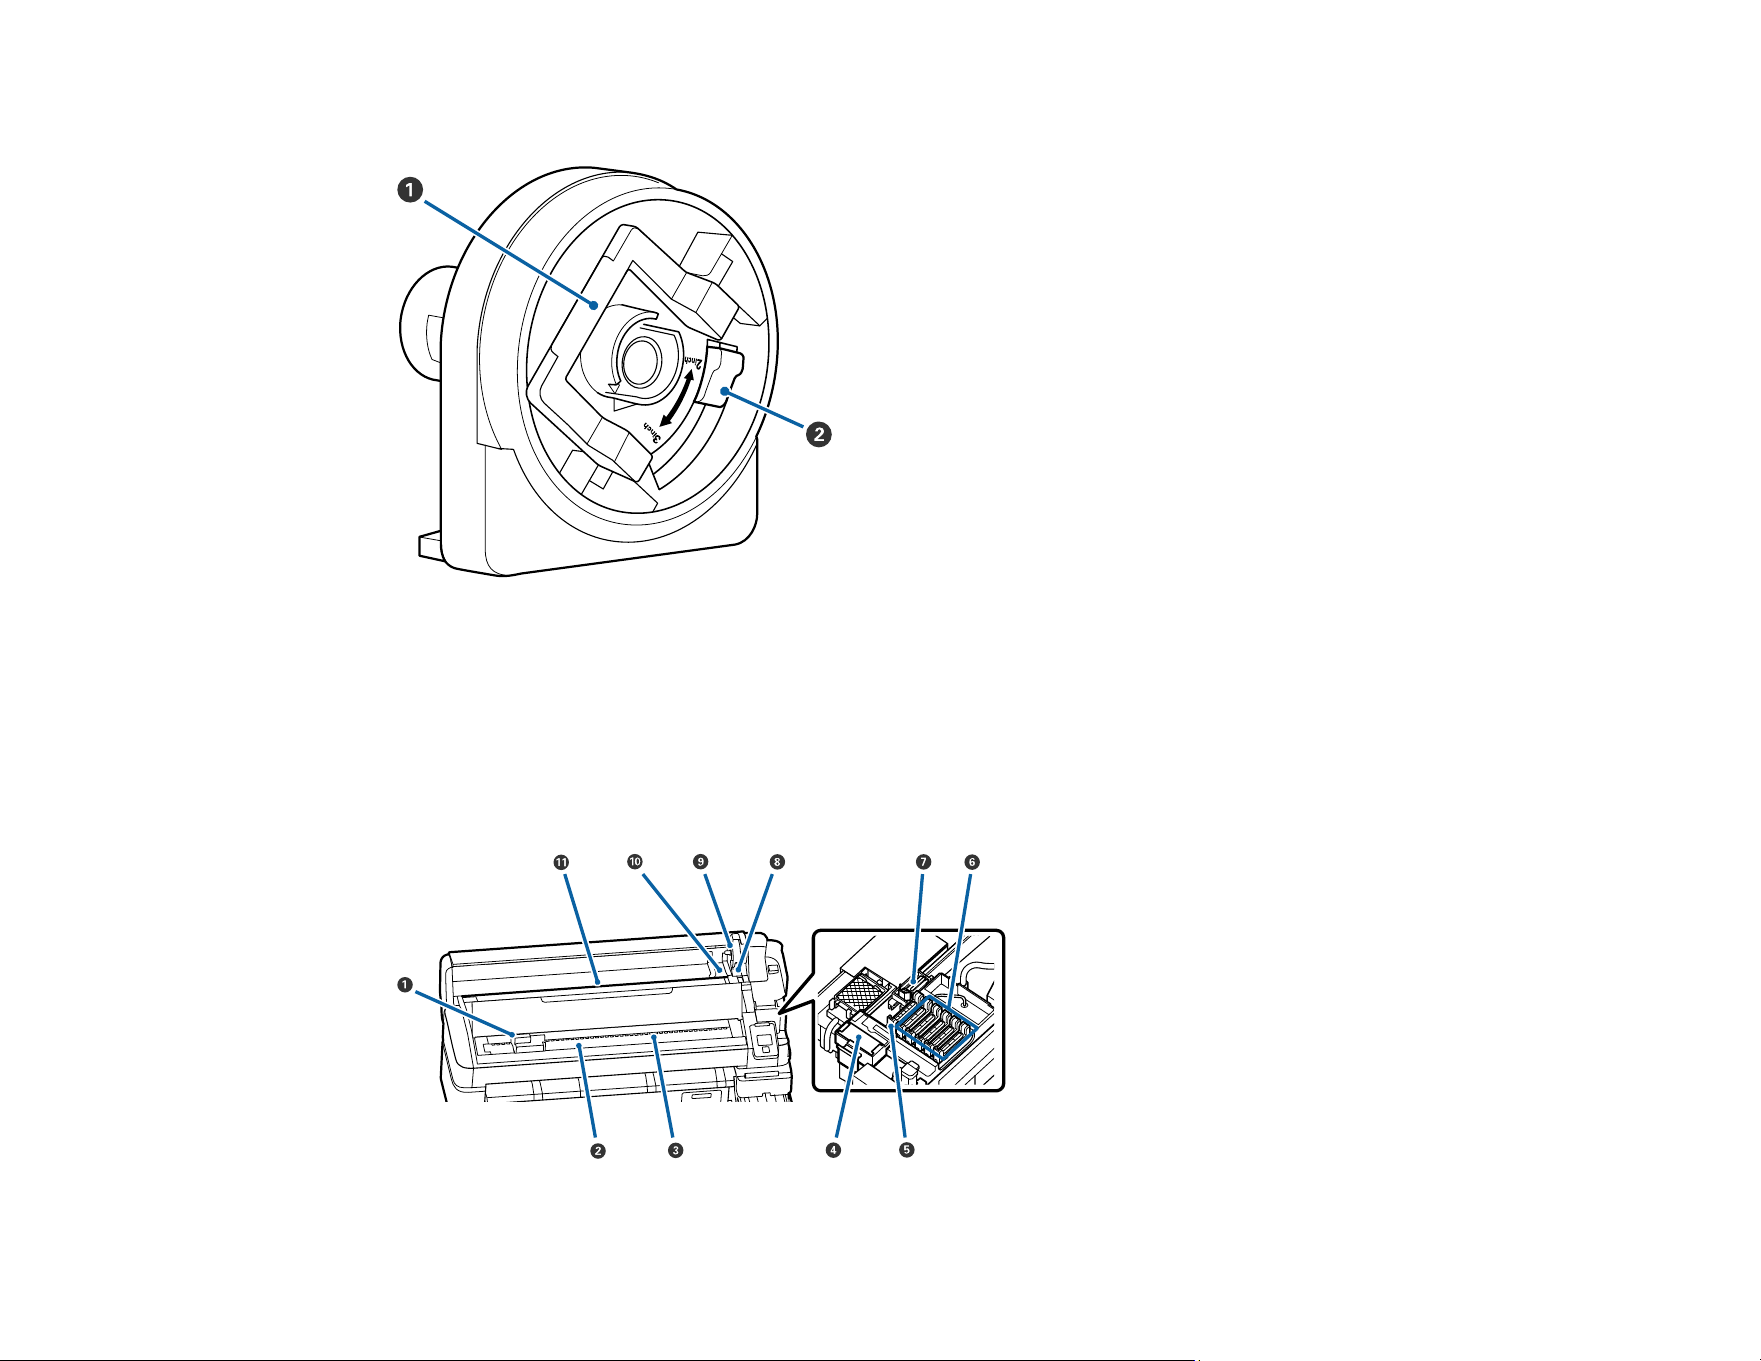
4. Place your media on the roll rest temporarily.
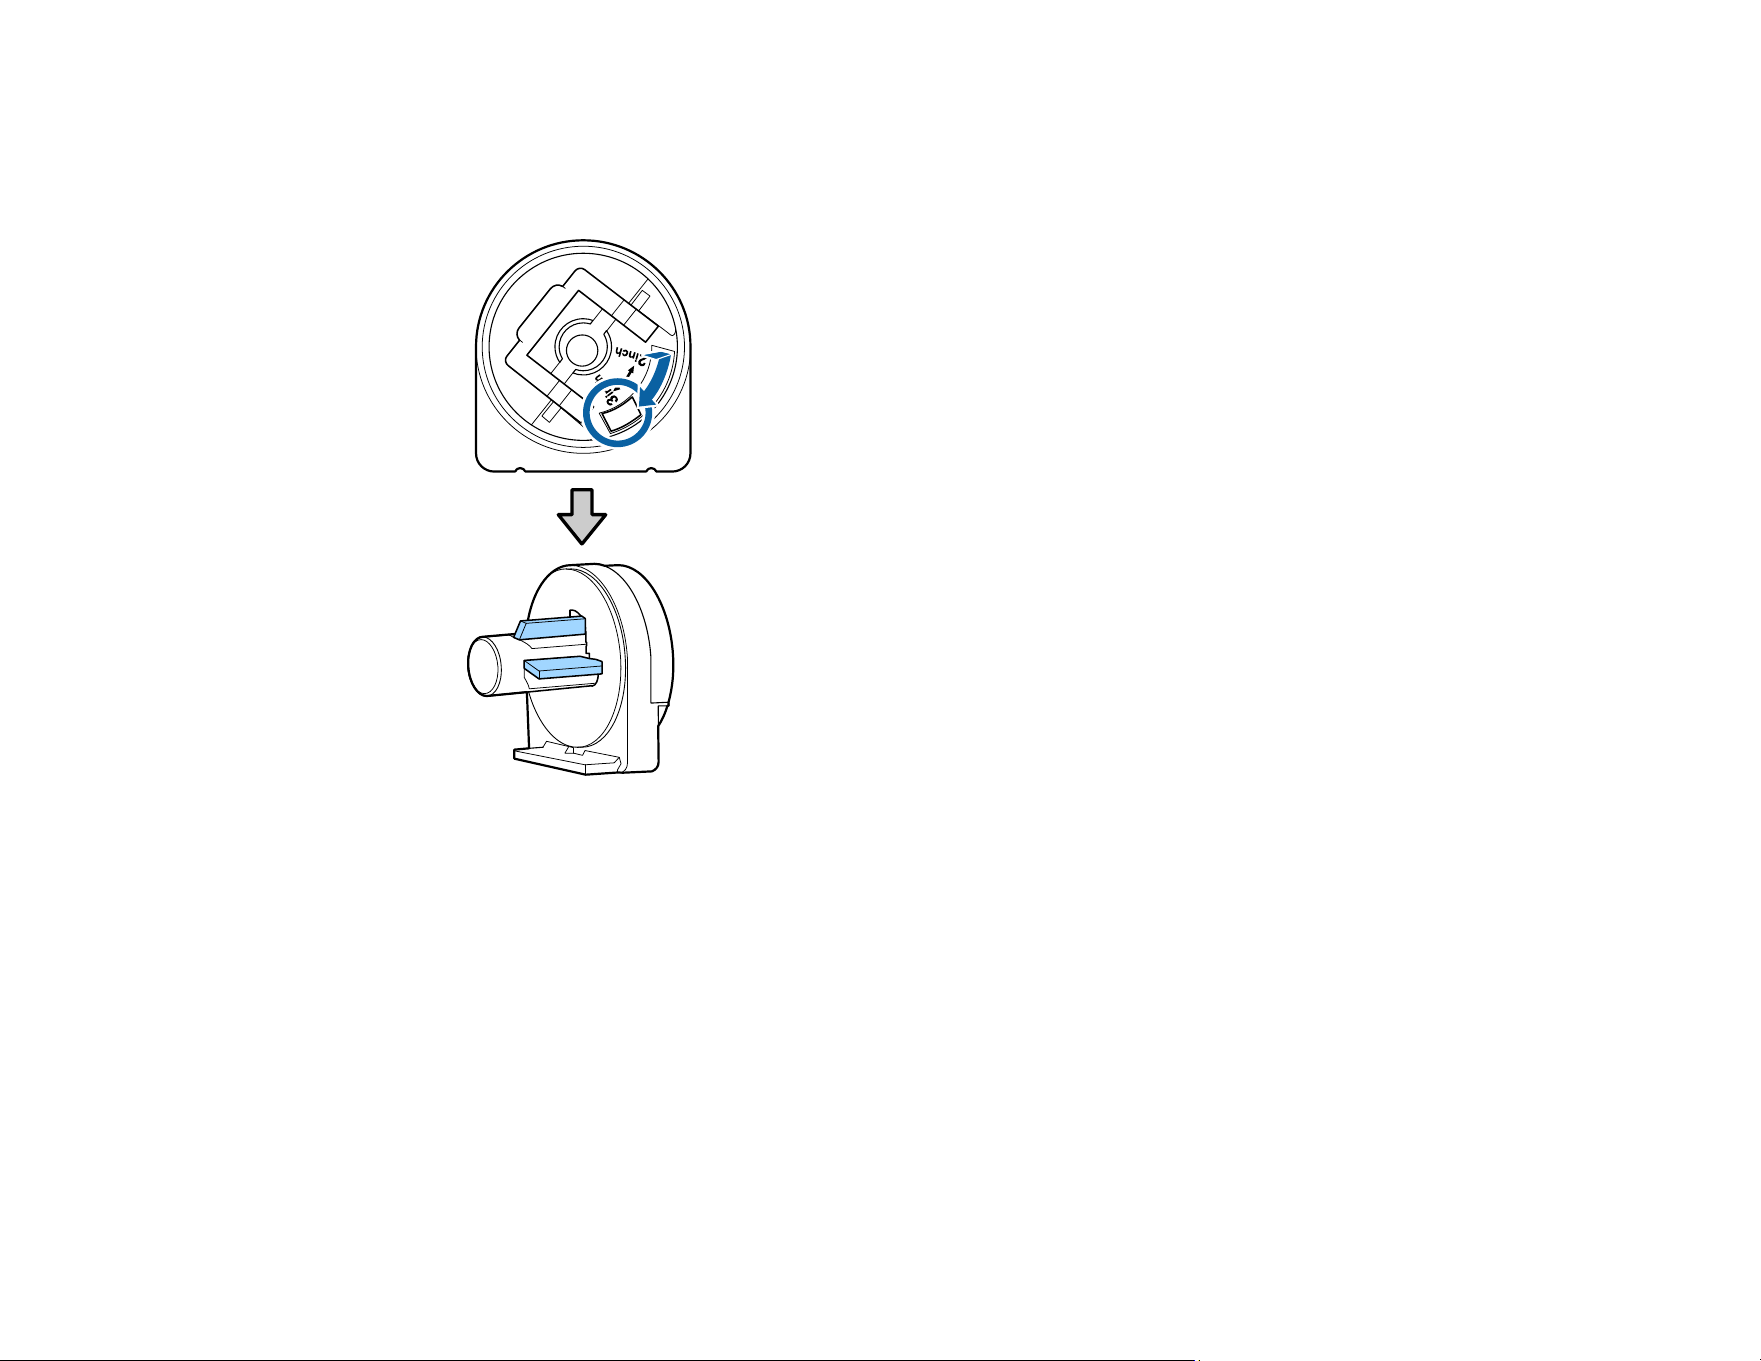
23
5. On the roll paper adapters, slide the size lever to the position for the size of the roll core on the
media you are loading.
• 3-inch core
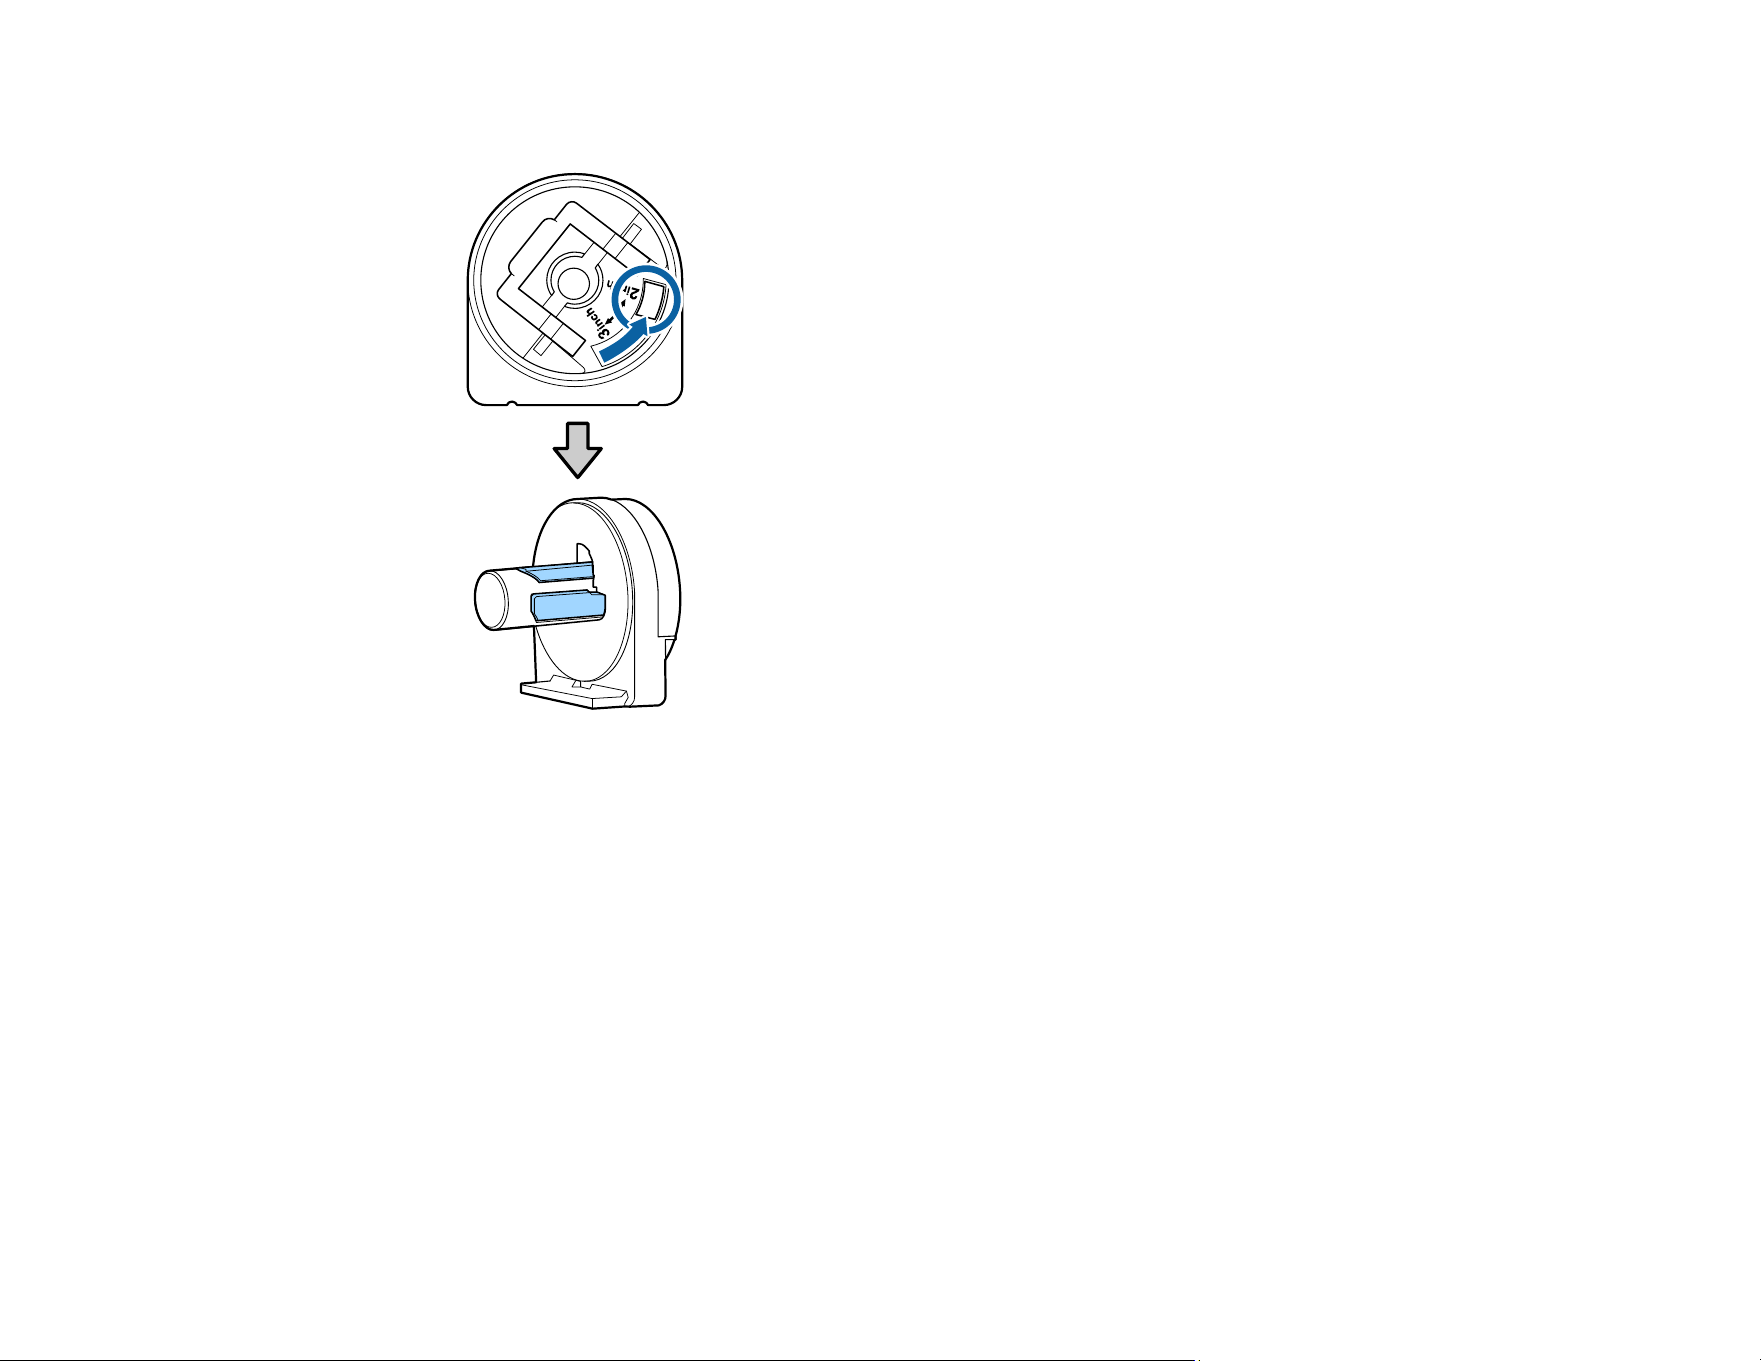
24
• 2-inch core
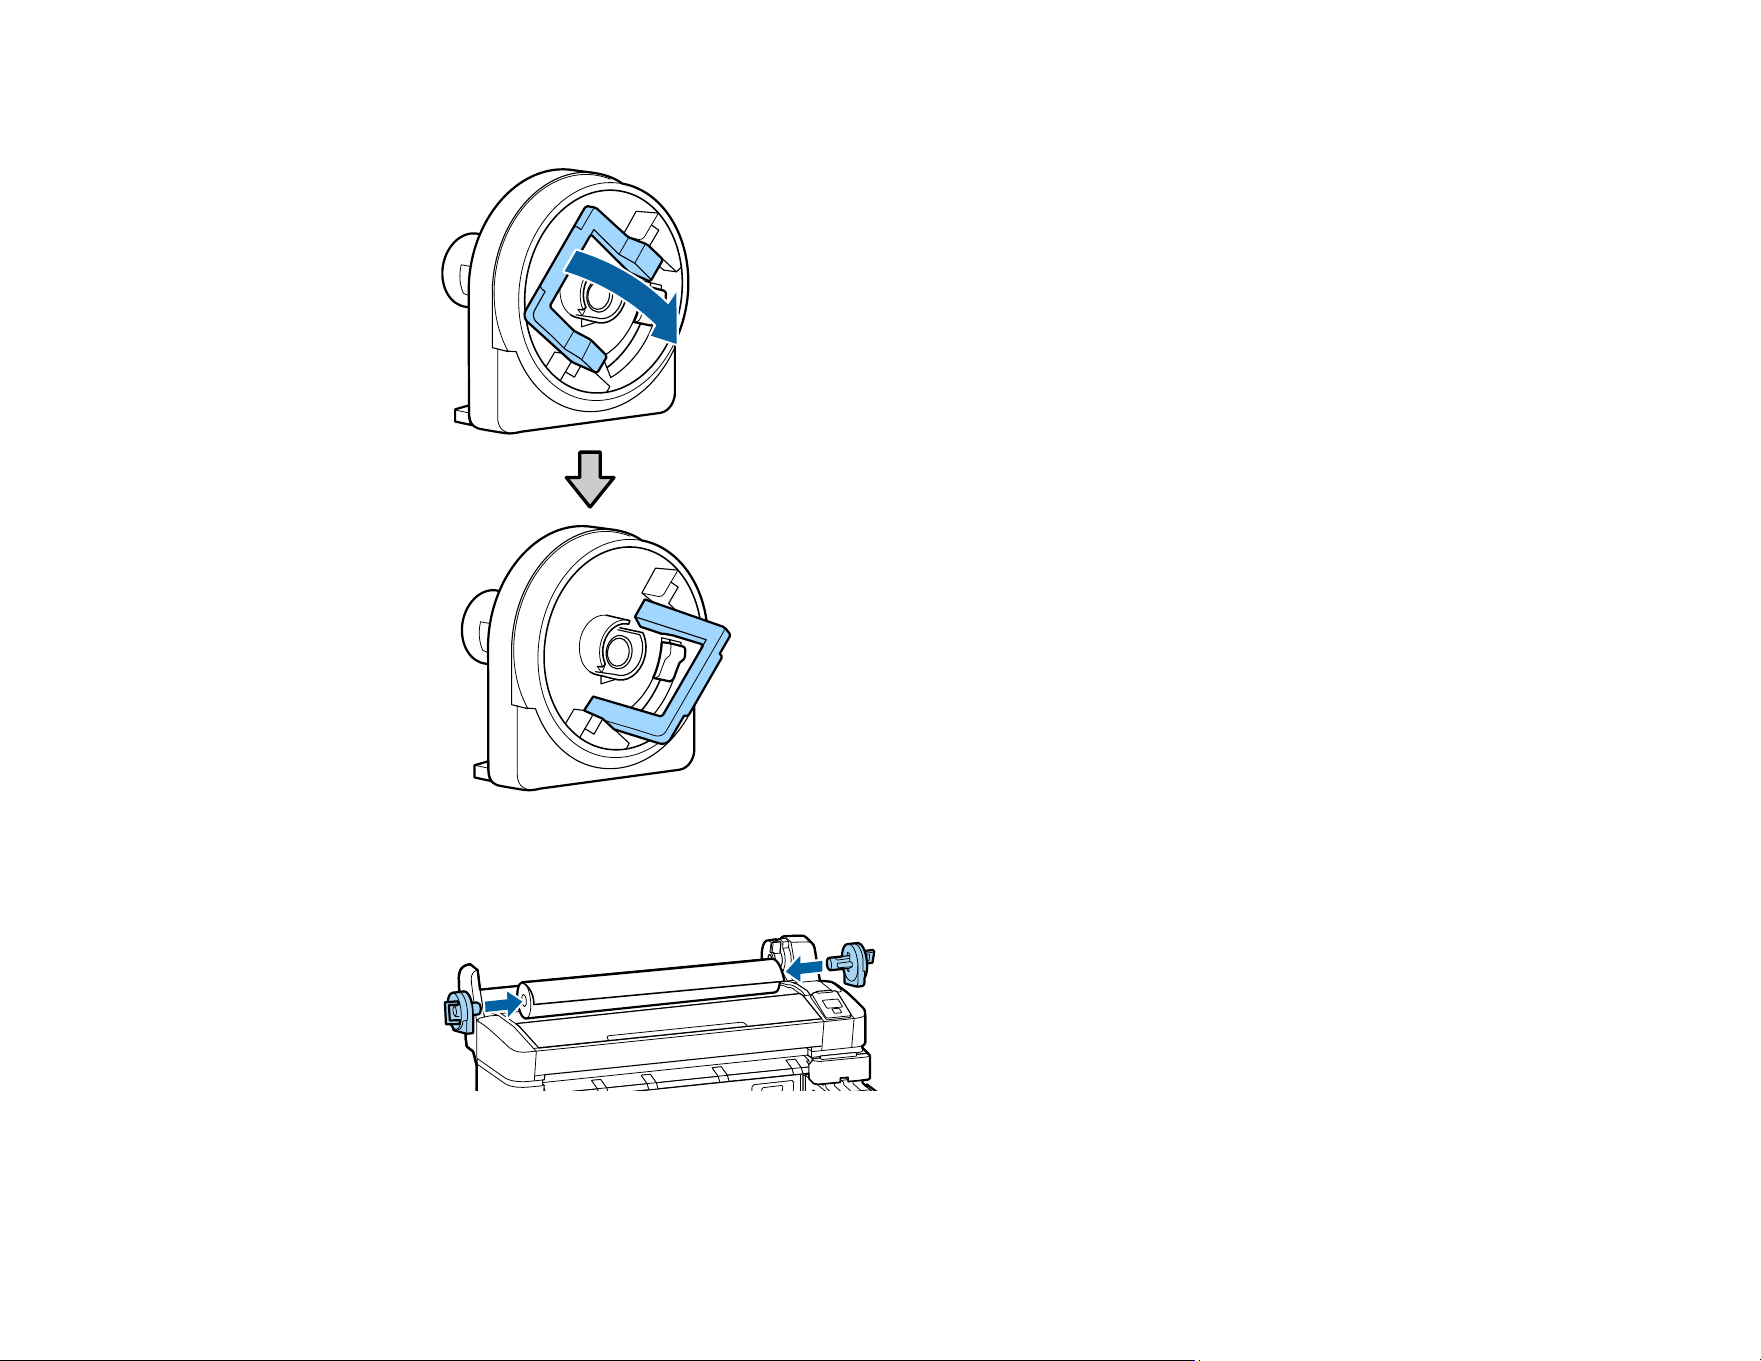
25
6. Lift up the lock levers on both roll paper adapters.
7. Attach the roll paper adapters to each end of your media roll and press them in until they are fully
inserted.
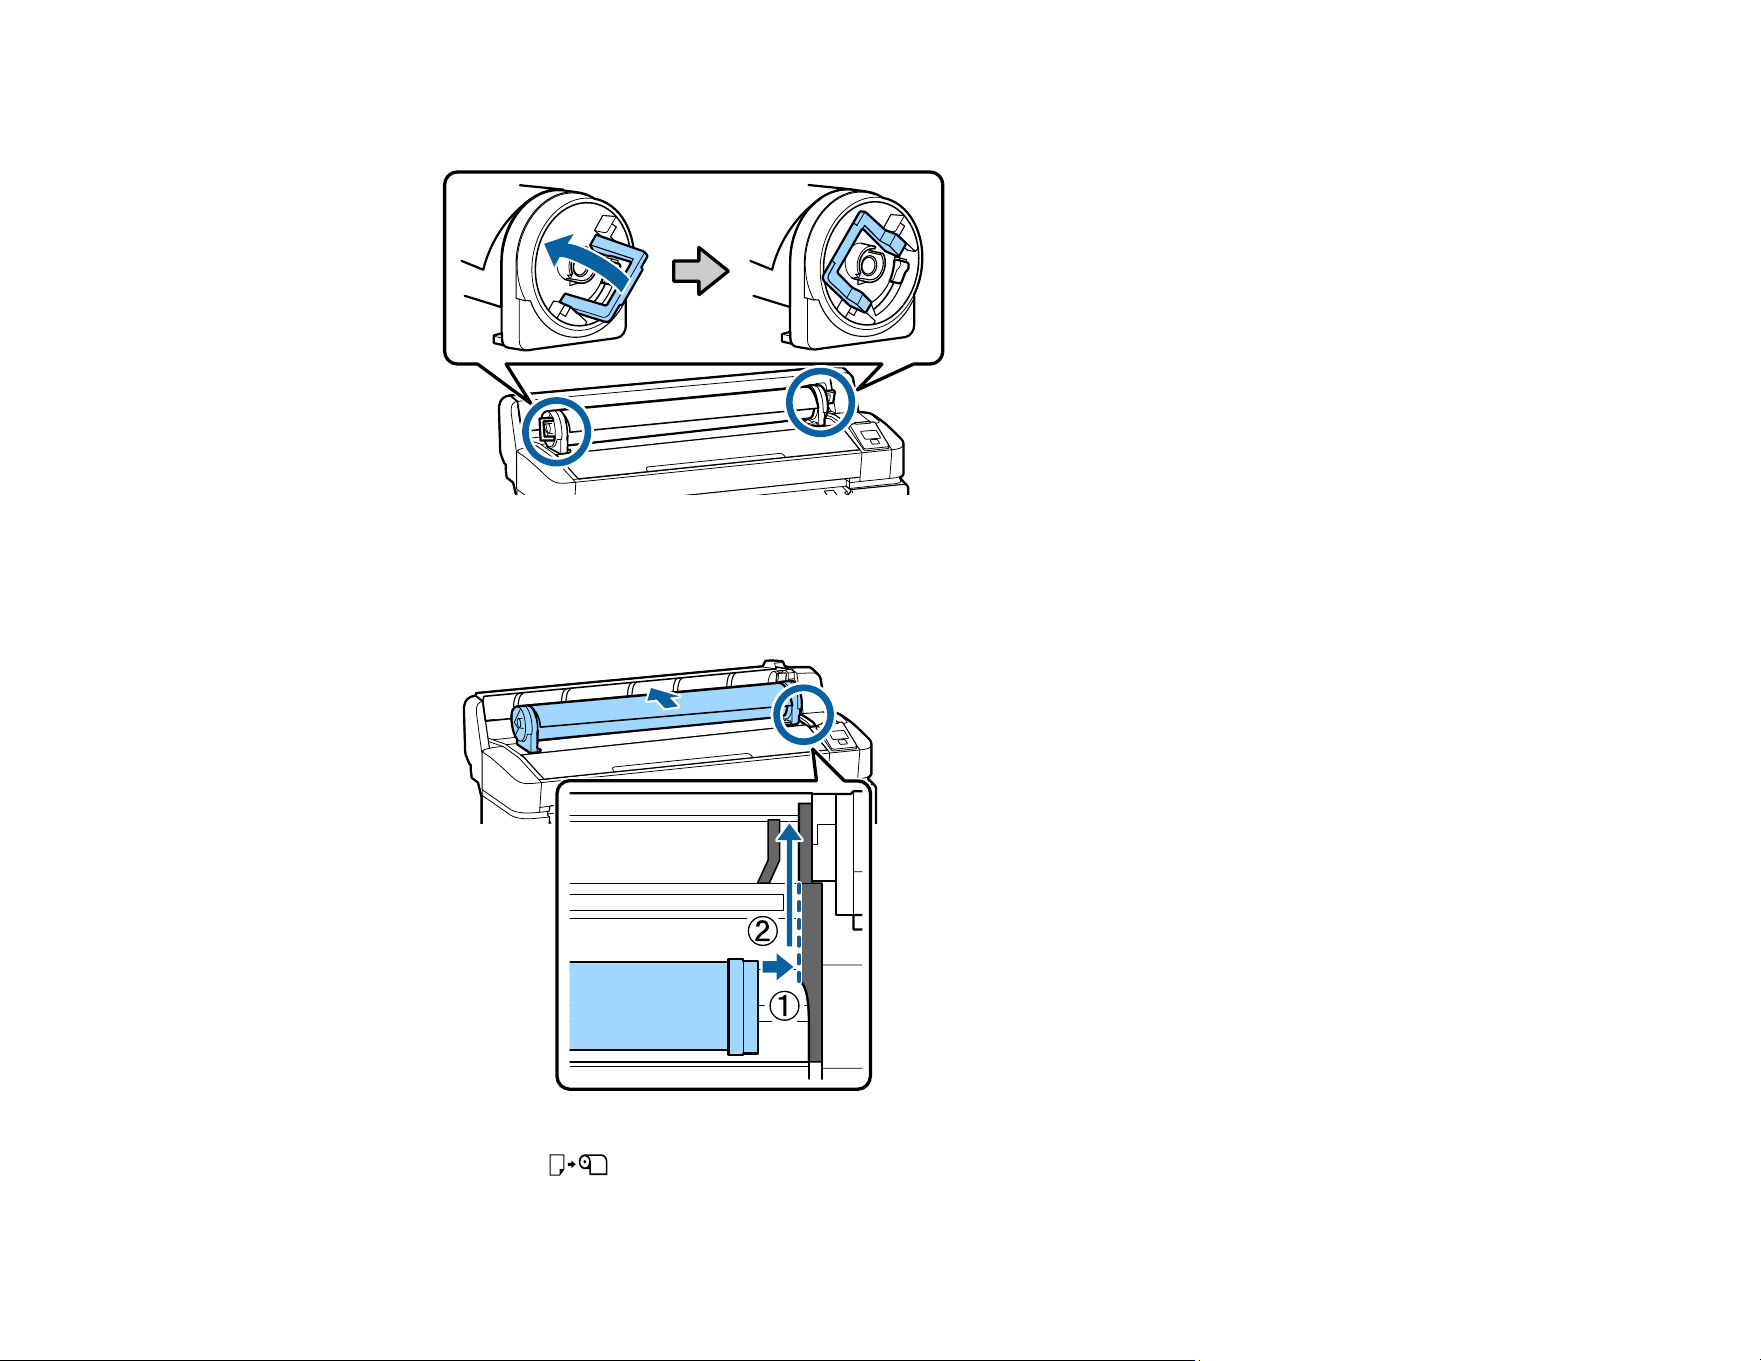
26
8. Lower the lock levers on both roll paper adapters.
9. Slide the roll paper right until it contacts the adapter guide, then slowly roll it backward following the
adapter guide.
10. Press the load/remove paper button on the product control panel.
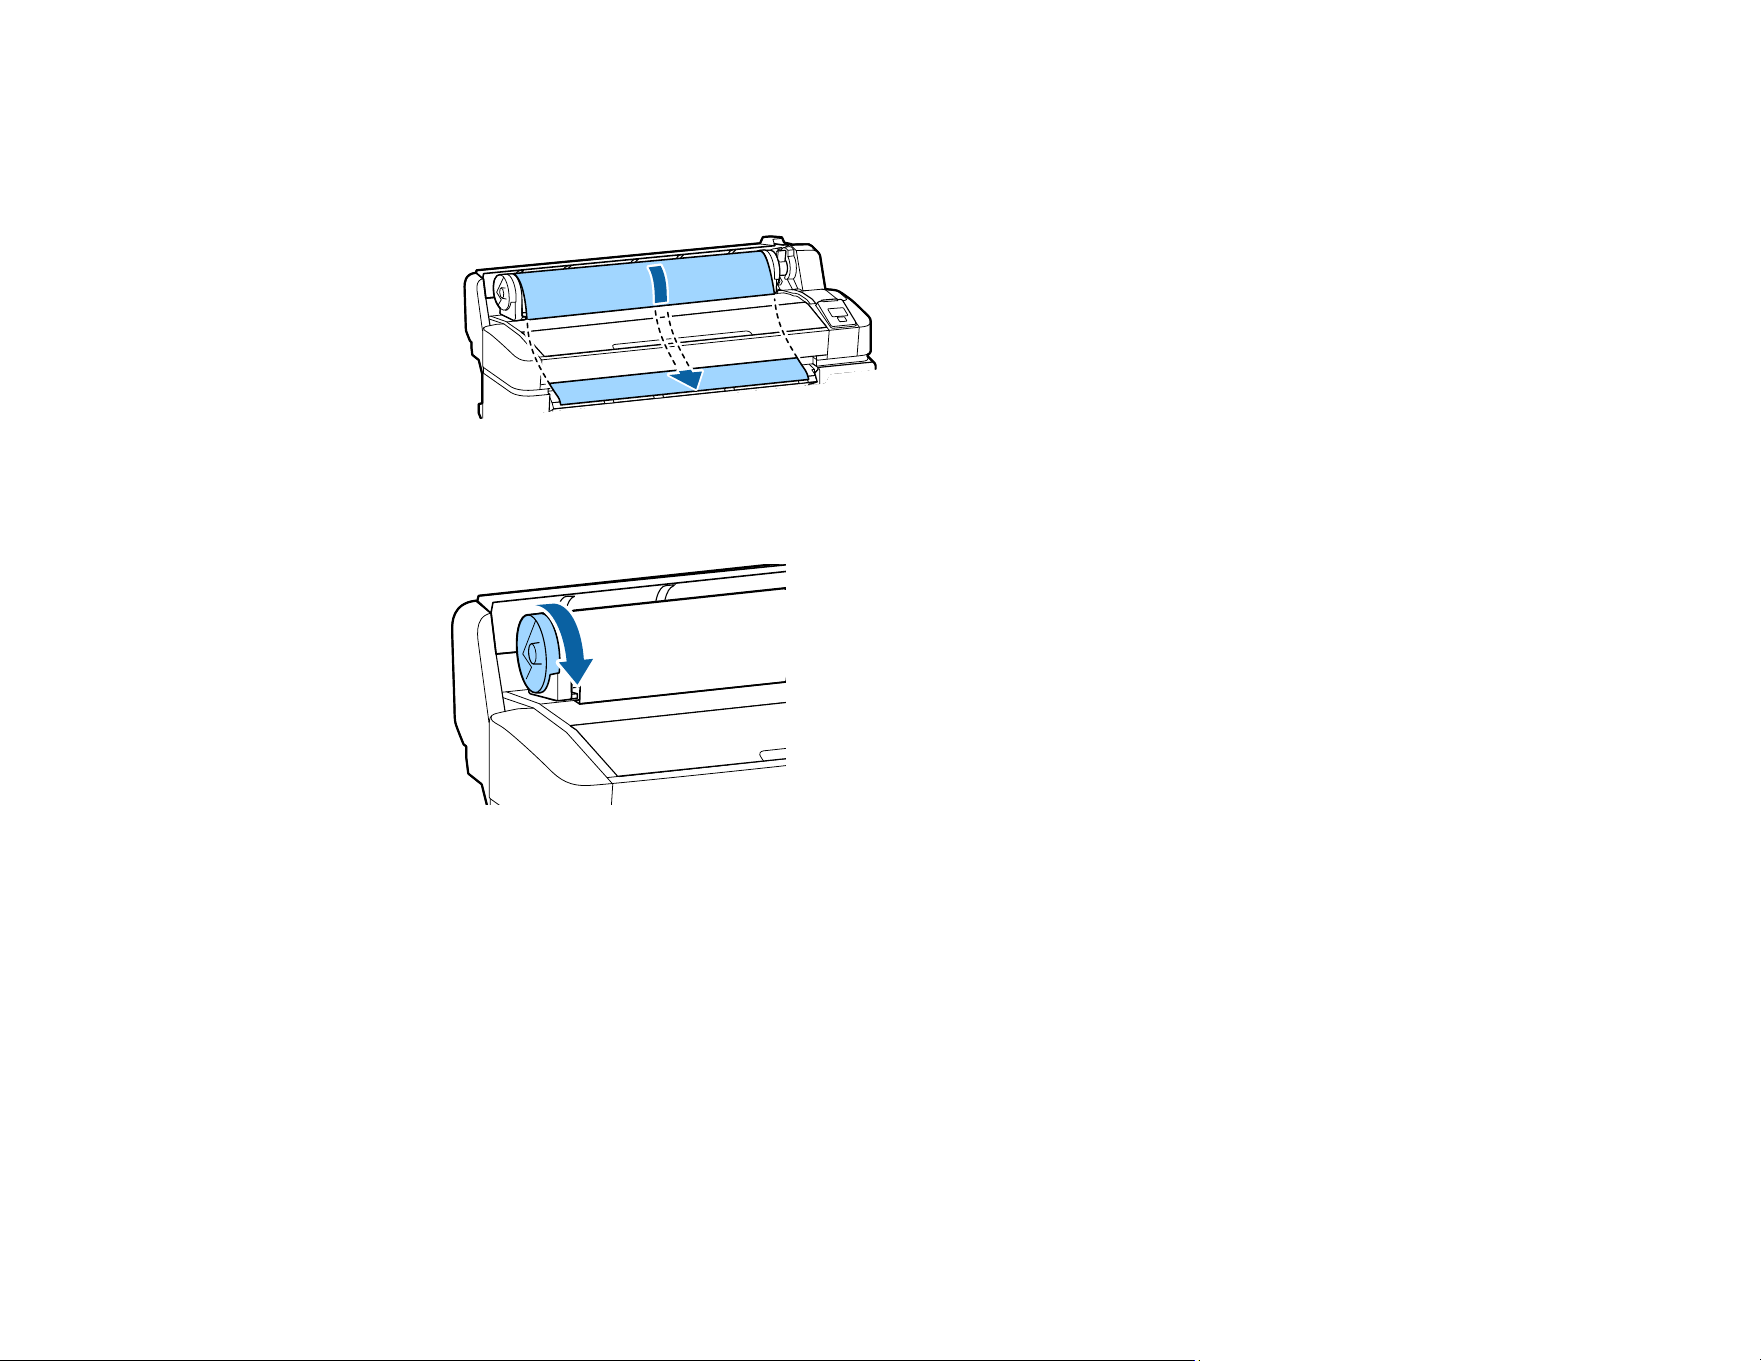
27
You see the Roll Paper message on the product control panel screen. Press the OK button.
11. Insert the roll paper into the opening in the product and pull it through, making sure there is no slack
in the paper and the ends do not fold.
Note: Avoid touching the printable surface of the paper. Rotate the roll paper adapters as shown to
feed paper.
Warning: Do not rub your hands along the edges of the media. The edges are sharp and can cause
injury.
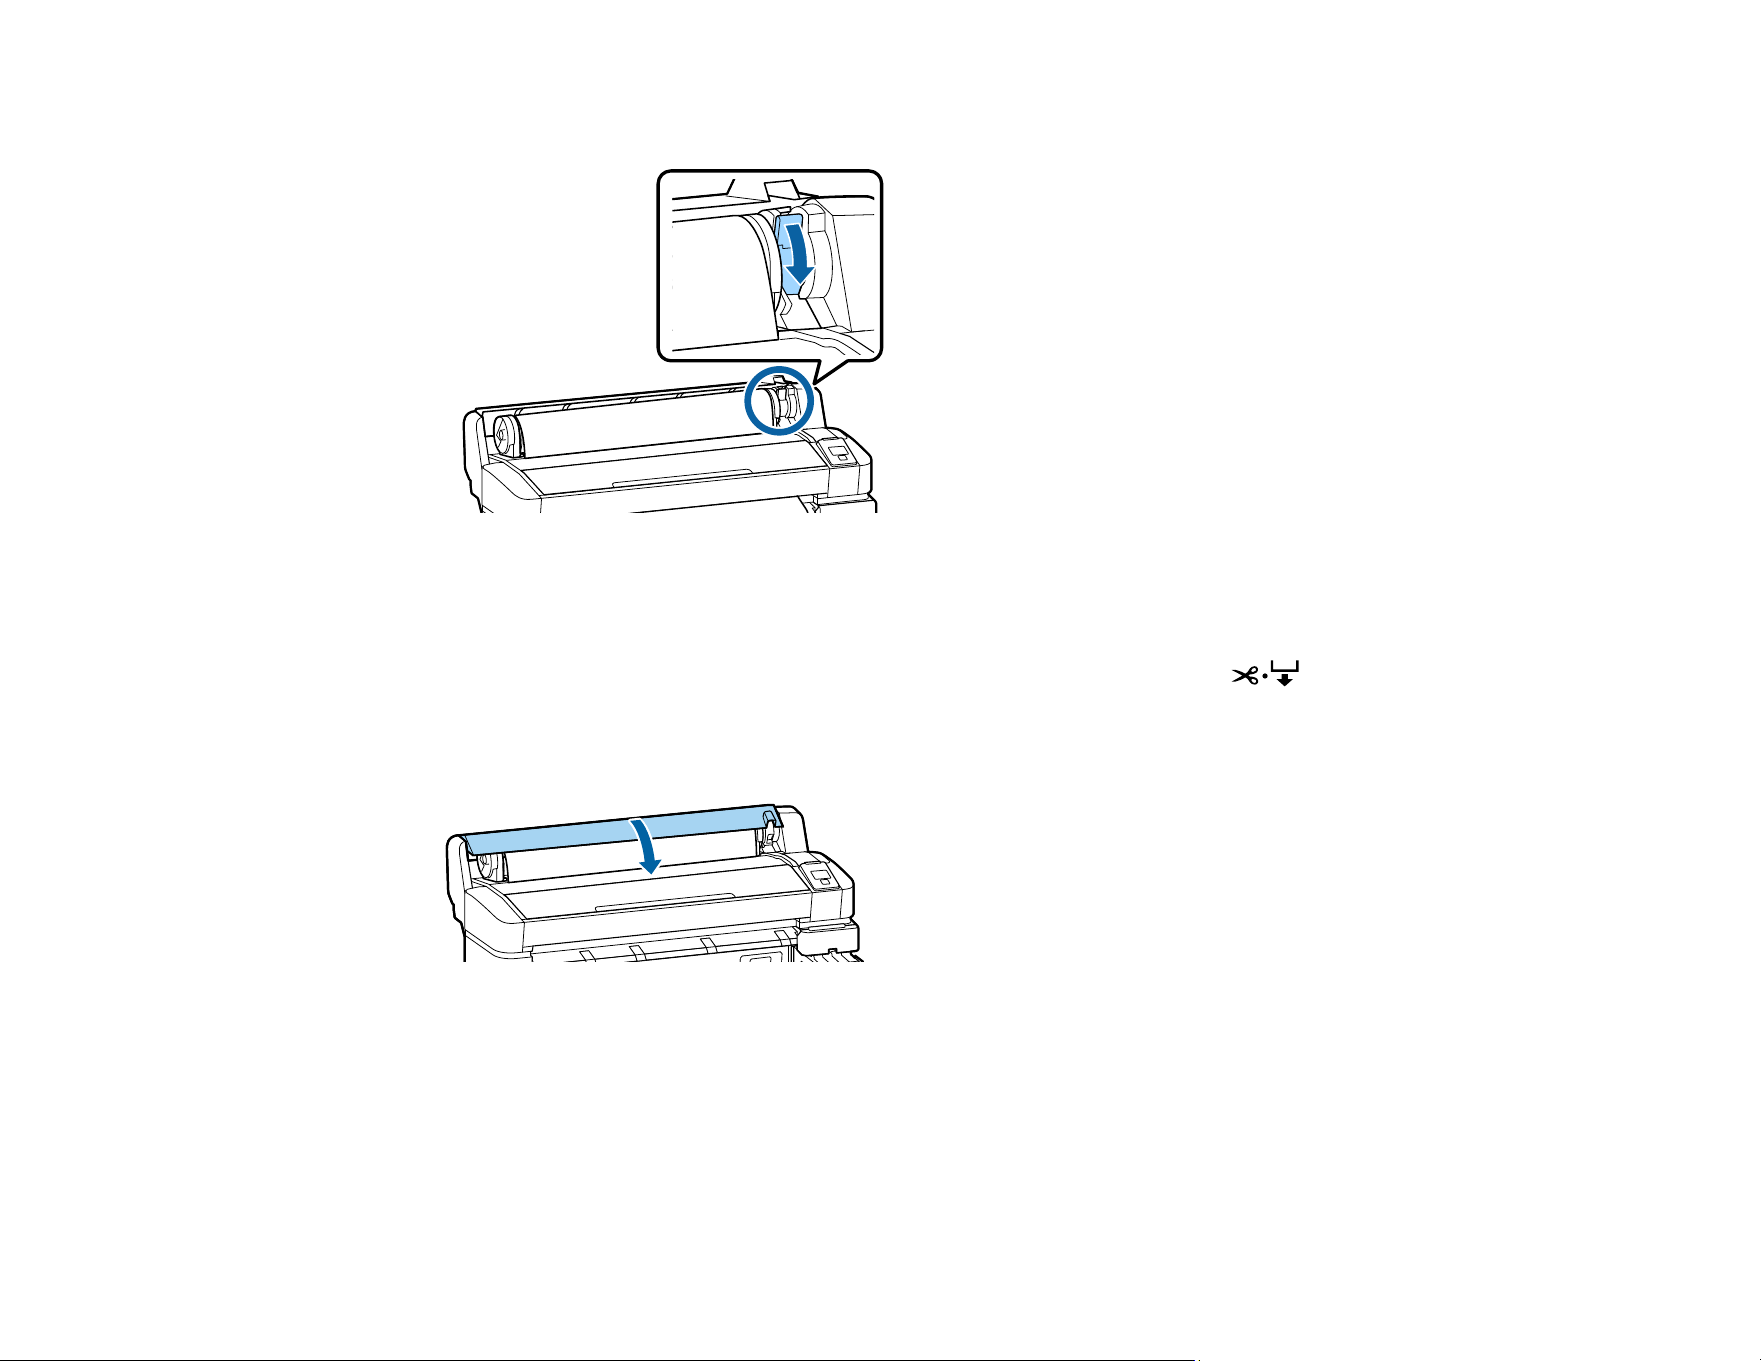
28
12. Lower the adapter holder lock lever and press the OK button.
Paper feeds into the product.
Note: If the leading edge of the paper is not horizontal or cut neatly, you can cut the edge of the roll
paper with the built-in cutter by pressing the OK button, then pressing the cut/feed media
button within five seconds.
13. Close the roll paper cover.
14. Select your media settings on the control panel.
Parent topic: Media Handling
Related references
Handling Media
29
Related tasks
Viewing and Changing Media Settings
Viewing and Changing Media Settings
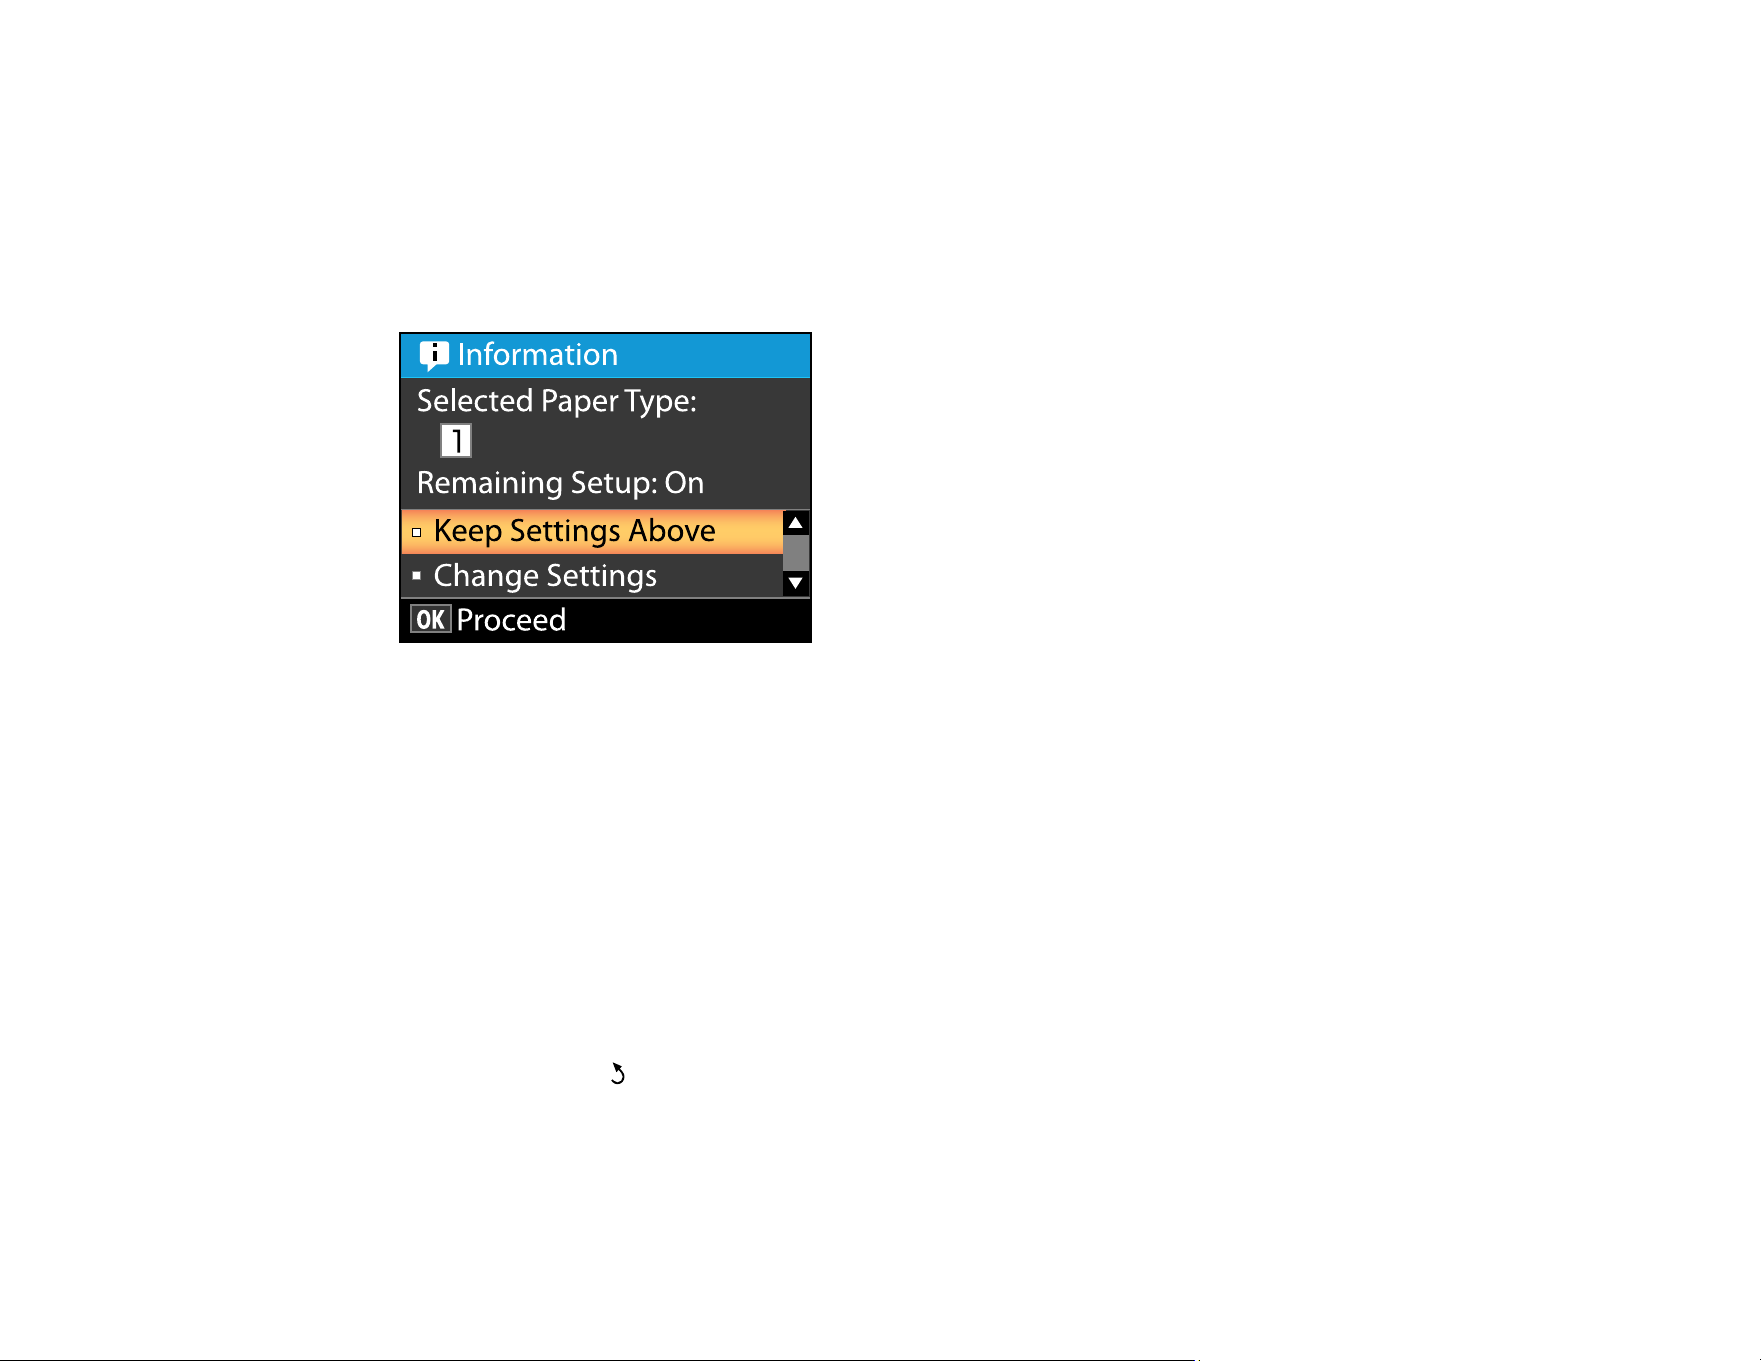
After you load media in your product, you see a screen like this on your product control panel which lets
you view or change your media settings:
The media settings include the options selected and stored for each media bank or RIP setting you
created.
1. Do one of the following:
• If the displayed media settings are correct for the media you loaded, press the up or down arrow
button to select Keep Settings Above and press the OK button.
• If you need to change the media settings, press the up or down arrow button to select Change
Settings and press the OK button.
2. If you want your product to calculate the amount of media remaining based on the length of the roll
and the amount already printed, and display the approximate results on the product control panel,
set the Remaining Setup setting to On.
3. To change your media settings, select the setting you want to change and press the OK button.
Then press the back button and repeat this step to select additional settings as necessary.
4. When you finish changing media settings, press the up or down arrow button to select Exit and
press the OK button.

30
5. If you turned on the Remaining Setup setting, you see a prompt to enter the length of the current
media.
6. Press the up or down arrow button to select a roll length from 15 to 3000 feet (5 to 999.5 m) long and
press the OK button.
Note: You can select the roll length in 19.7 inch (0.5 m) increments.
After a moment you see the message Ready on the product control panel indicating that it is ready
to print.
Parent topic: Media Handling
Related tasks
Saving Sets of Media Settings
Saving Sets of Media Settings
You can store sets of media settings for each type of media you use. This lets you quickly select all the
necessary settings whenever you print on that media type.
The media settings include the options selected and stored for each media bank or RIP setting you
created.
Note: Make sure that you loaded the media type for which you are selecting settings.
1. On the product control panel, press the left or right arrow button to select the tab and press the
OK button.
The Paper menu appears.
2. Press the up or down arrow button to select Custom Paper Setting and press the OK button.
The Custom Paper Setting menu appears.
3. Press the up or down arrow button to select a number for the set of media settings (from 1 to 10) and
press the OK button.
4. To select a reference media type that is close to the characteristics of the media you are adding,
select Select Reference Paper and press the OK button.
5. Press the up or down arrow button to select Yes and press the OK button.
6. Press the up or down arrow button to select the reference media thickness and press the OK button.
7. Press the back button to return to the paper settings menu.

31
8. Press the up or down arrow button to select Setting Name and press the OK button.
9. Press the up or down arrow button to display the letters and symbols you can use to name the media
setting. When you see the desired character, press the right arrow button to move to the next
character position and repeat this step as necessary to complete the setting name. When you finish,
press the back button.
Note: If you need to delete the previous character, press the left arrow button.
10. Press the up or down arrow button as necessary to select each available media setting and press
the OK button. If necessary, press the back button to return to the menu to select additional
settings.
11. Press the pause/cancel button to exit the menus.
Parent topic: Media Handling
Related tasks
Loading Media
Printable Area and Paper Size Checking
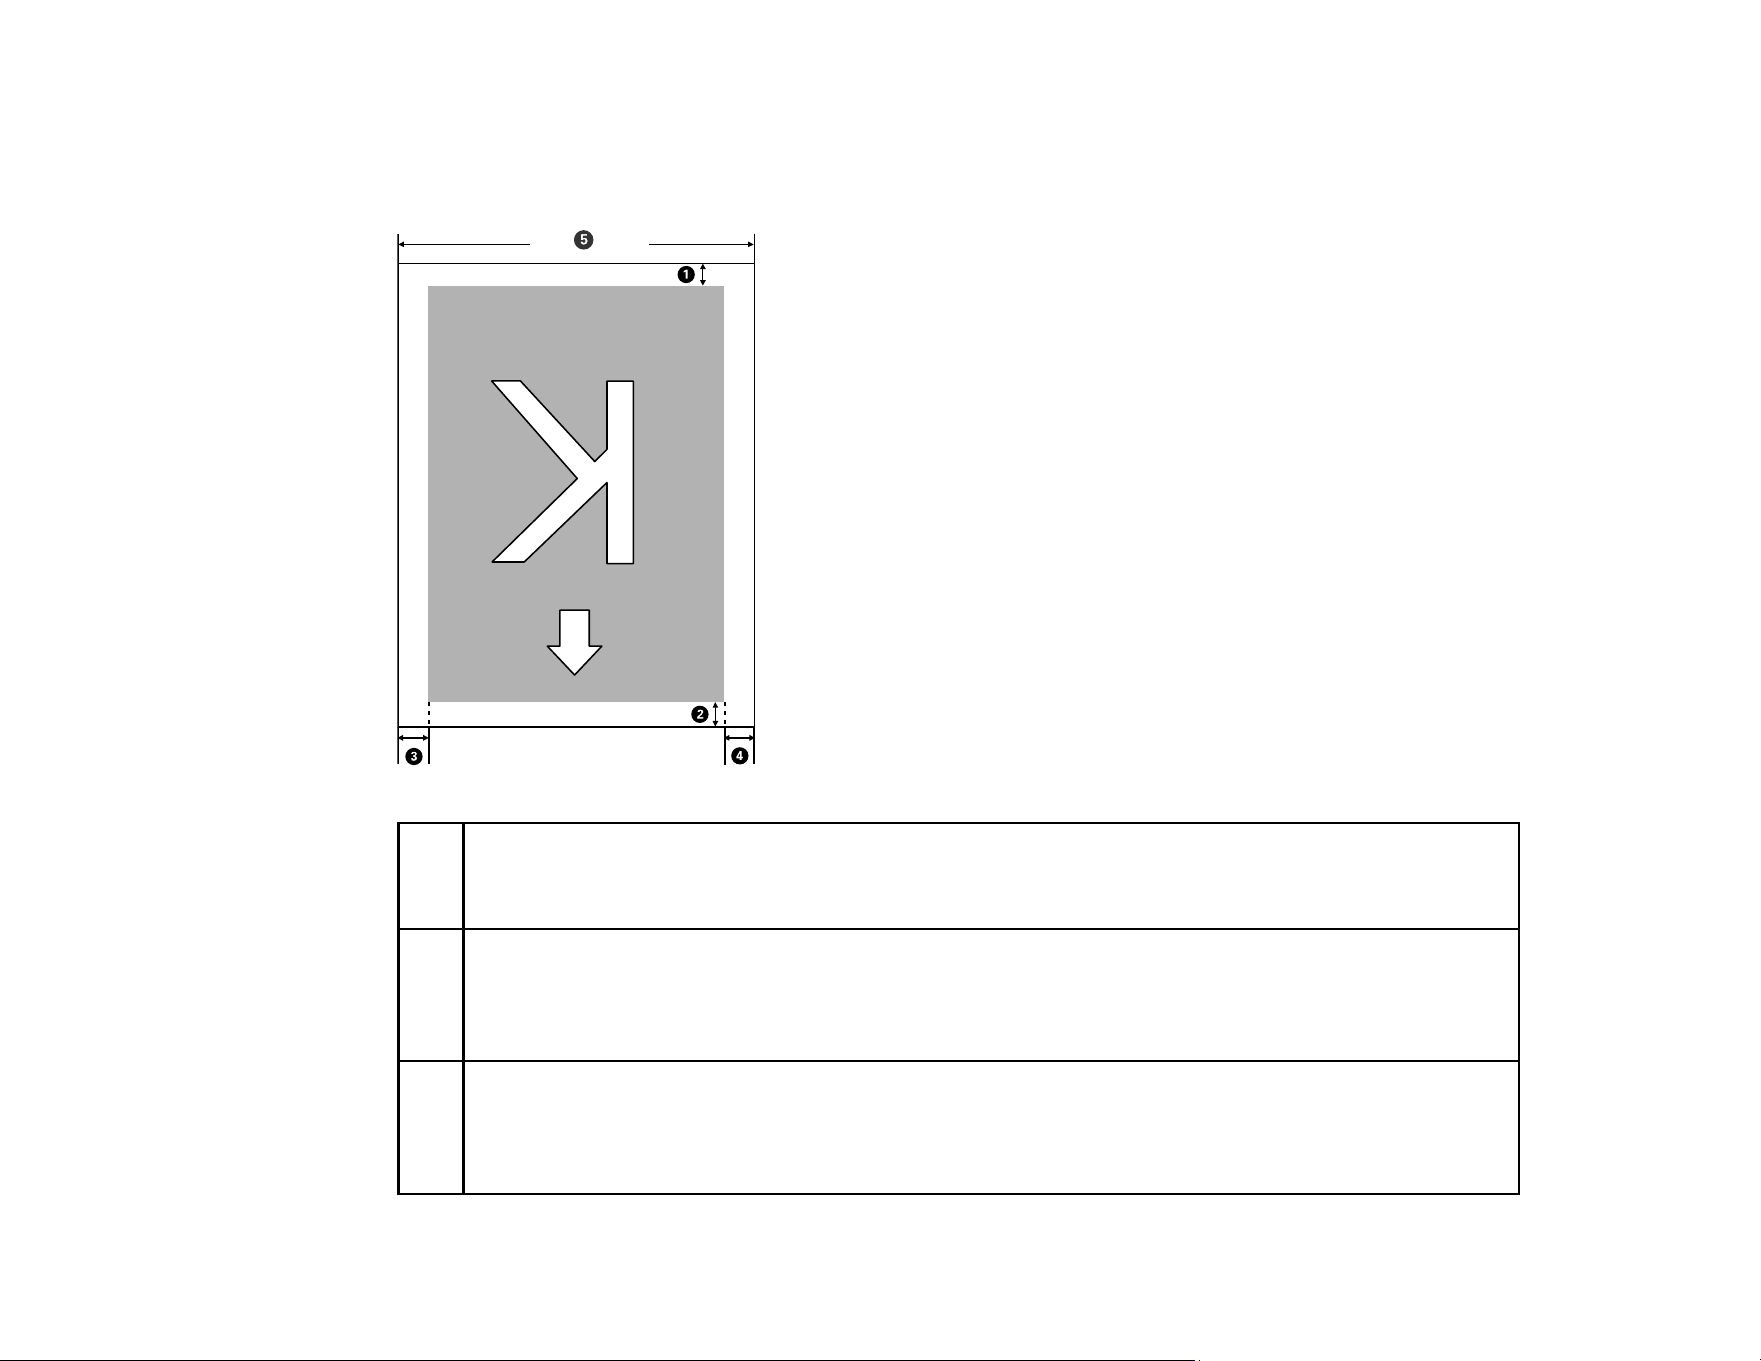
The left and right edges of media recognized by your product vary depending on the Paper Size Check
setting.
• When the Paper Size Check setting is turned on, your product automatically detects the left and right
edges of the media.
• When the Paper Size Check setting is turned off, the left edge of the media is determined to be
44 inches (1118 mm) from the standard position for the right edge, no matter the width of the loaded
media. The printable area ranges for the media are described in the table below.
32
Note: If you turn off the Paper Size Check setting, printing may occur outside the edges of your
media, causing ink to stain the product. Make sure your print data width does not exceed the loaded
media width.
1 Bottom margin
1
You can configure this margin in the RIP software from 0.2 inch (5 mm) or more; if you set it
below 0.2 inch (5 mm), it is changed to 0.2 inch (5 mm) to maintain feeding accuracy.
2 Top margin
1
You can configure this margin in the RIP software from 0.2 inch (5 mm) or more; if you set it
below 0.2 inch (5 mm), it is changed to 0.2 inch (5 mm) to maintain feeding accuracy. The margin
differs based on how far you pulled the media during loading.
3, 4 Left/Right margins
2
,
3
You select this margin as the Side value of the Roll Paper Margin setting on the product control
panel. The default setting is 0.12 inch (3 mm), but you can select from 0.12 inch (3 mm) or
0.6 inch (15 mm).

33
5 Media width
10 to 44 inches (254 to 1118 mm); if Paper Size Check is off, the product assumes this is
44 inches (1118 mm) regardless of the actual width.
1
The configured margin and the actual print results may differ depending on the RIP software you use.
Contact the RIP manufacturer for more information.
2
Depending on the RIP software, you may be able to use it to set these margins. Contact the RIP
manufacturer for more information.
3
If the total of the print data width and left and right margins exceeds the printable area, a portion of the
print data will not print.
Parent topic: Media Handling
Related references
Paper Menu Settings
Setup Menu Settings
Media Feed Adjustment
If your printouts contain horizontal banding, uneven tint, or stripes, you need to adjust the feed of the
media. You do this by printing and examining a test pattern, and then selecting the feed adjustments you
need.
Adjust the feed using the same media type and print conditions you use for printing. For example, if you
are using the auto take-up reel, you should use it during feed adjustment. You may need to adjust the
feed again if you load media of a different width, change the feeding or take-up tension, or adjust the
suction.
Before adjusting the feed, make sure you have correctly loaded the media you plan to print on and
selected all the options you plan to use for printing.
Note: You can also adjust the feed during printing without printing a test pattern.
Adjusting the Media Feed
Adjusting the Media Feed During Printing
Parent topic: Media Handling
Adjusting the Media Feed
You can perform a manual feed adjustment from the product control panel.
34
1. On the product control panel, press the left or right arrow button to select the tab and press the
OK button.
The Paper menu appears.
2. Press the up or down arrow button to select Custom Paper Setting and press the OK button.
The Custom Paper Setting menu appears.
3. Press the up or down arrow button to select a number for the set of media settings (from 1 to 10) and
press the OK button.
4. Press the up or down arrow button to select Paper Feed Adjust and press the OK button.
5. Do one of the following:
• To print an adjustment pattern, select Pattern and press the OK button. Press the OK button
again to print an adjustment pattern and go to the next step.
• To manually enter an adjustment value, select Value and press the OK button. Press the up or
down arrow buttons to select an adjustment value and press the OK button.
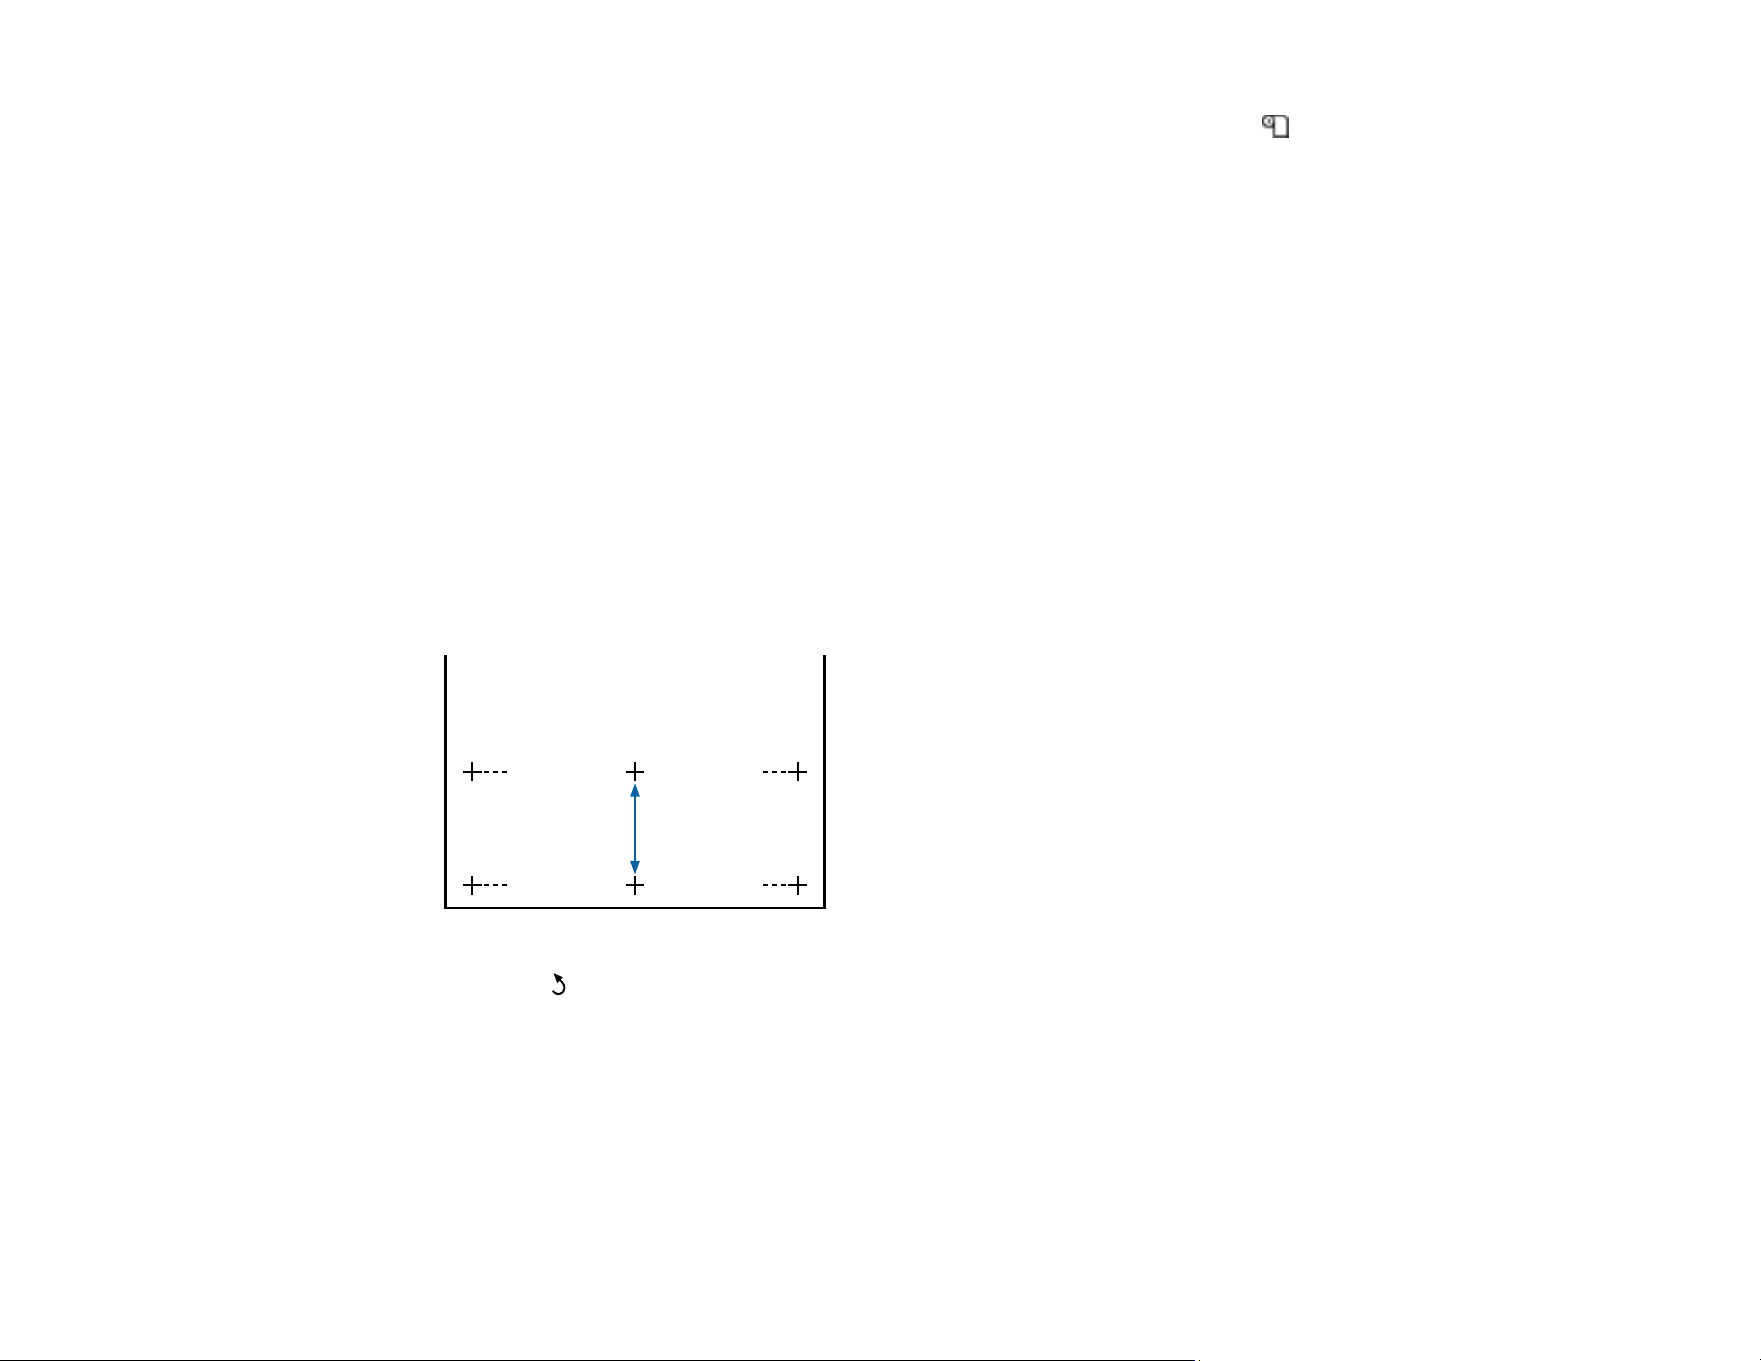
6. Measure the distance between the + symbols, or take the average of the distances between the left,
center, and right symbols in the printed test pattern.
7. Press the back button to return to the menu.
8. Press the up or down arrow button to select the measured distance and press the OK button.
Parent topic: Media Feed Adjustment
Related tasks
Loading Media

35
Adjusting the Media Feed During Printing
Follow the steps here to adjust the feed during printing without printing a test pattern.
1. During printing, press the cut/feed media button.
The product control panel displays an adjustment value.
2. Press the up or down arrow button to adjust the feed depending on these banding results in your
printout:
• If black bands or dark stripes appear, press the up arrow button to increase the feed amount.
• If white bands or pale stripes appear, press the down arrow button to decrease the feed amount.
3. Check the results in your printout and do one of the following:
• If further adjustment is necessary, repeat the last step.
• If the print quality is good, press the OK button.
Parent topic: Media Feed Adjustment
Cutting Media
When you finish printing, do one of the following to cut the media:
• If you turned on the Auto Cut setting on the product control panel, your product automatically cuts the
media after printing each page.
• If you did not turn on the Auto Cut setting, follow the instructions here to cut the media manually.
Warning: Be careful not to cut yourself when using cutters or other sharp blades.
Note: The minimum length of paper that you can cut with the built-in cutter is 2.36 inches (60 mm). If
your printed image is smaller, the built-in cutter must leave a margin that you can trim using a
commercially available cutter after removing the media from the product.
36
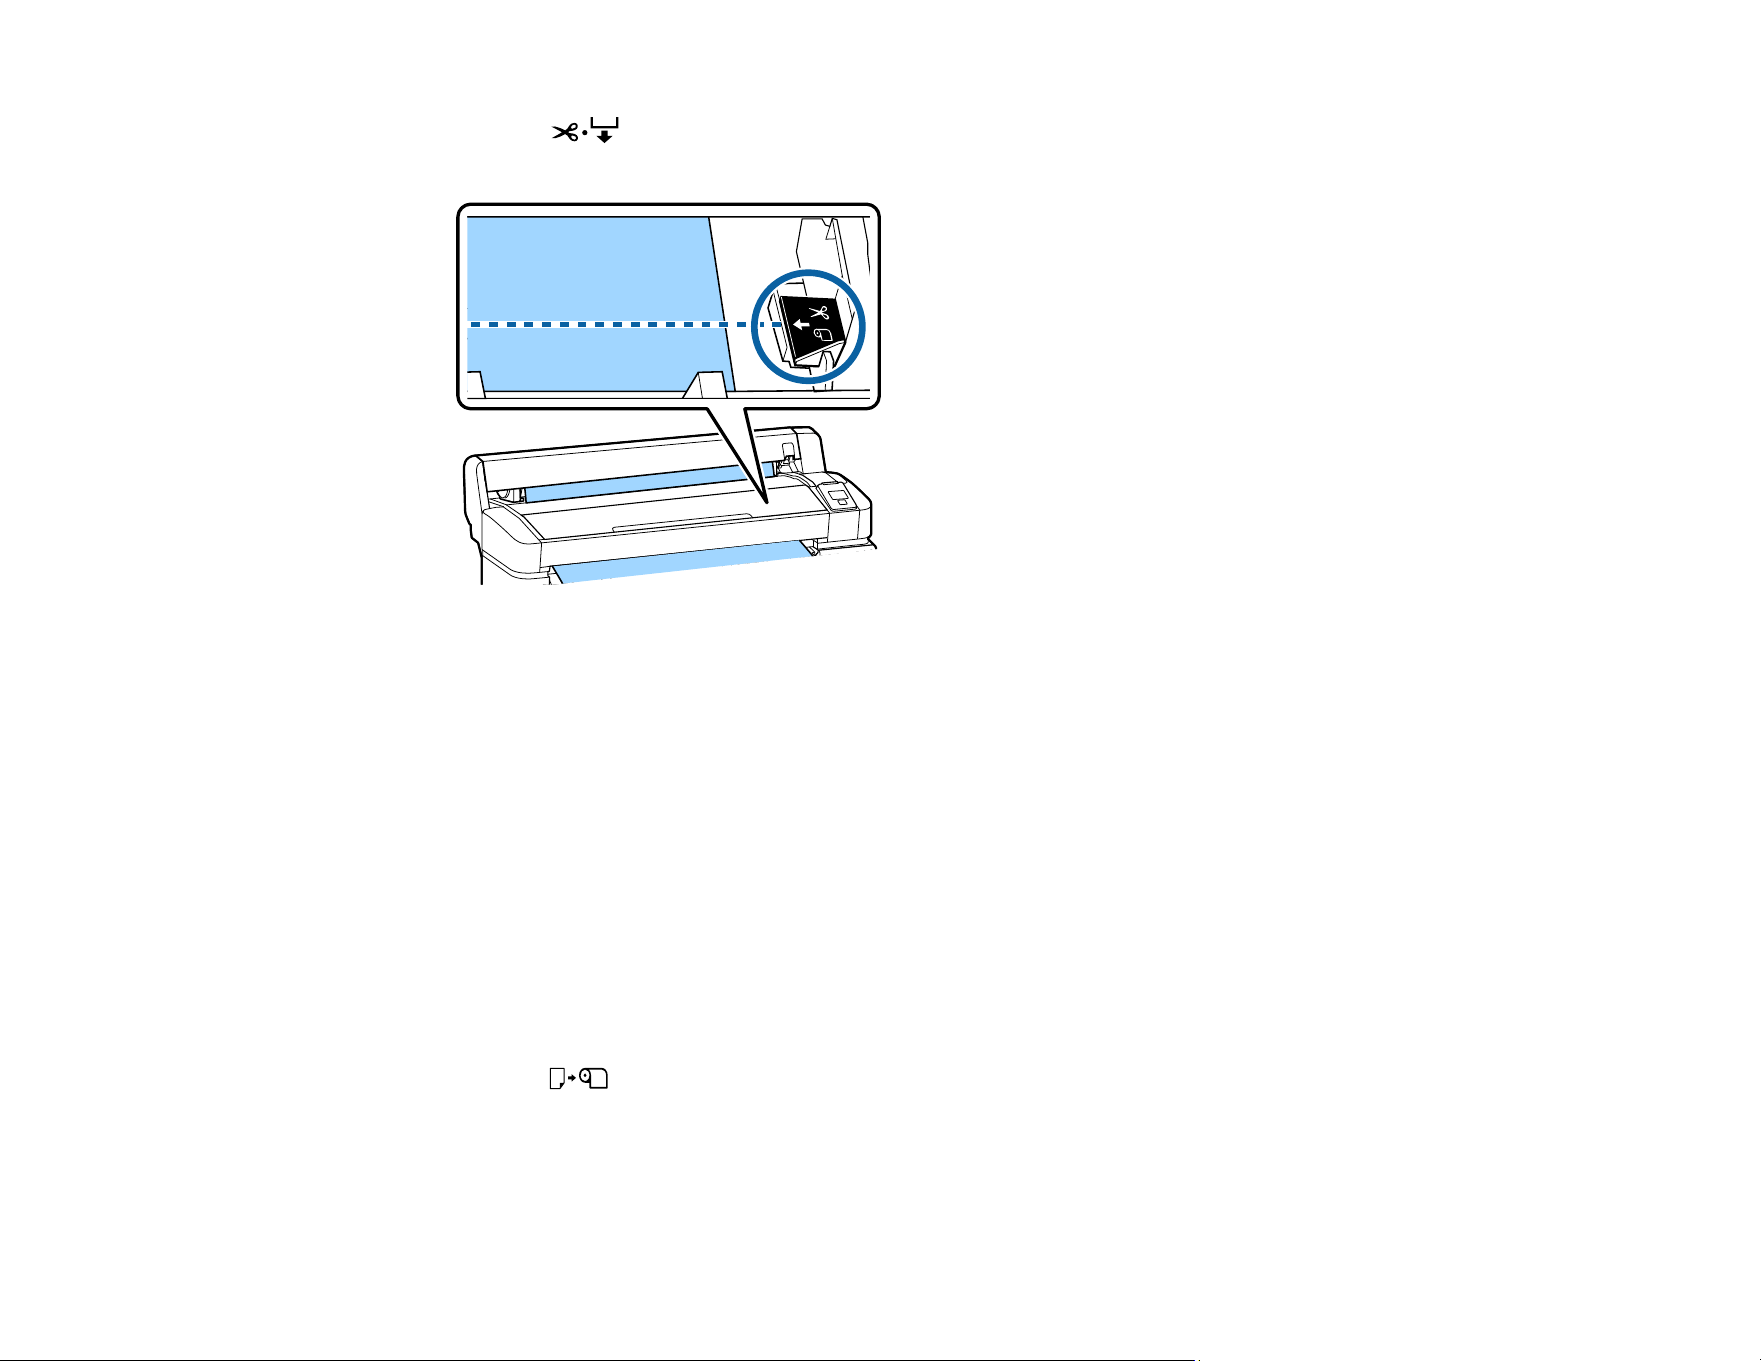
1. Press the cut/feed media button, look through the printer cover, and press the down arrow
button as necessary to align the cut position with the arrow inside the printer.
2. Press the OK button.
The printer slowly cuts the media.
Parent topic: Media Handling
Related references
Setup Menu Settings
Removing Media
After printing, remove the roll paper from your product for the best results.
Caution: Always remove media after printing. This avoids creases in the media that may be caused by
the pressure rollers. Creased, wavy, or curled media could cause it to jam inside the printer or contact
the print head.
1. Press the load/remove paper button.
The Load/Remove Paper menu appears on the product control panel screen.
37
2. Press the up or down arrow button to select Remove Paper and press the OK button.
Note: To perform accurate remaining roll paper management, select the tab and record the
amount of roll paper remaining when you replace the roll paper. Enter the length of the roll the next
time it is used.
The printer automatically rewinds the paper onto the roll and displays this message: Press and
load paper.
Note: If you see a message telling you to turn the roll paper adapter, rewind the paper by hand using
the adapter instead.
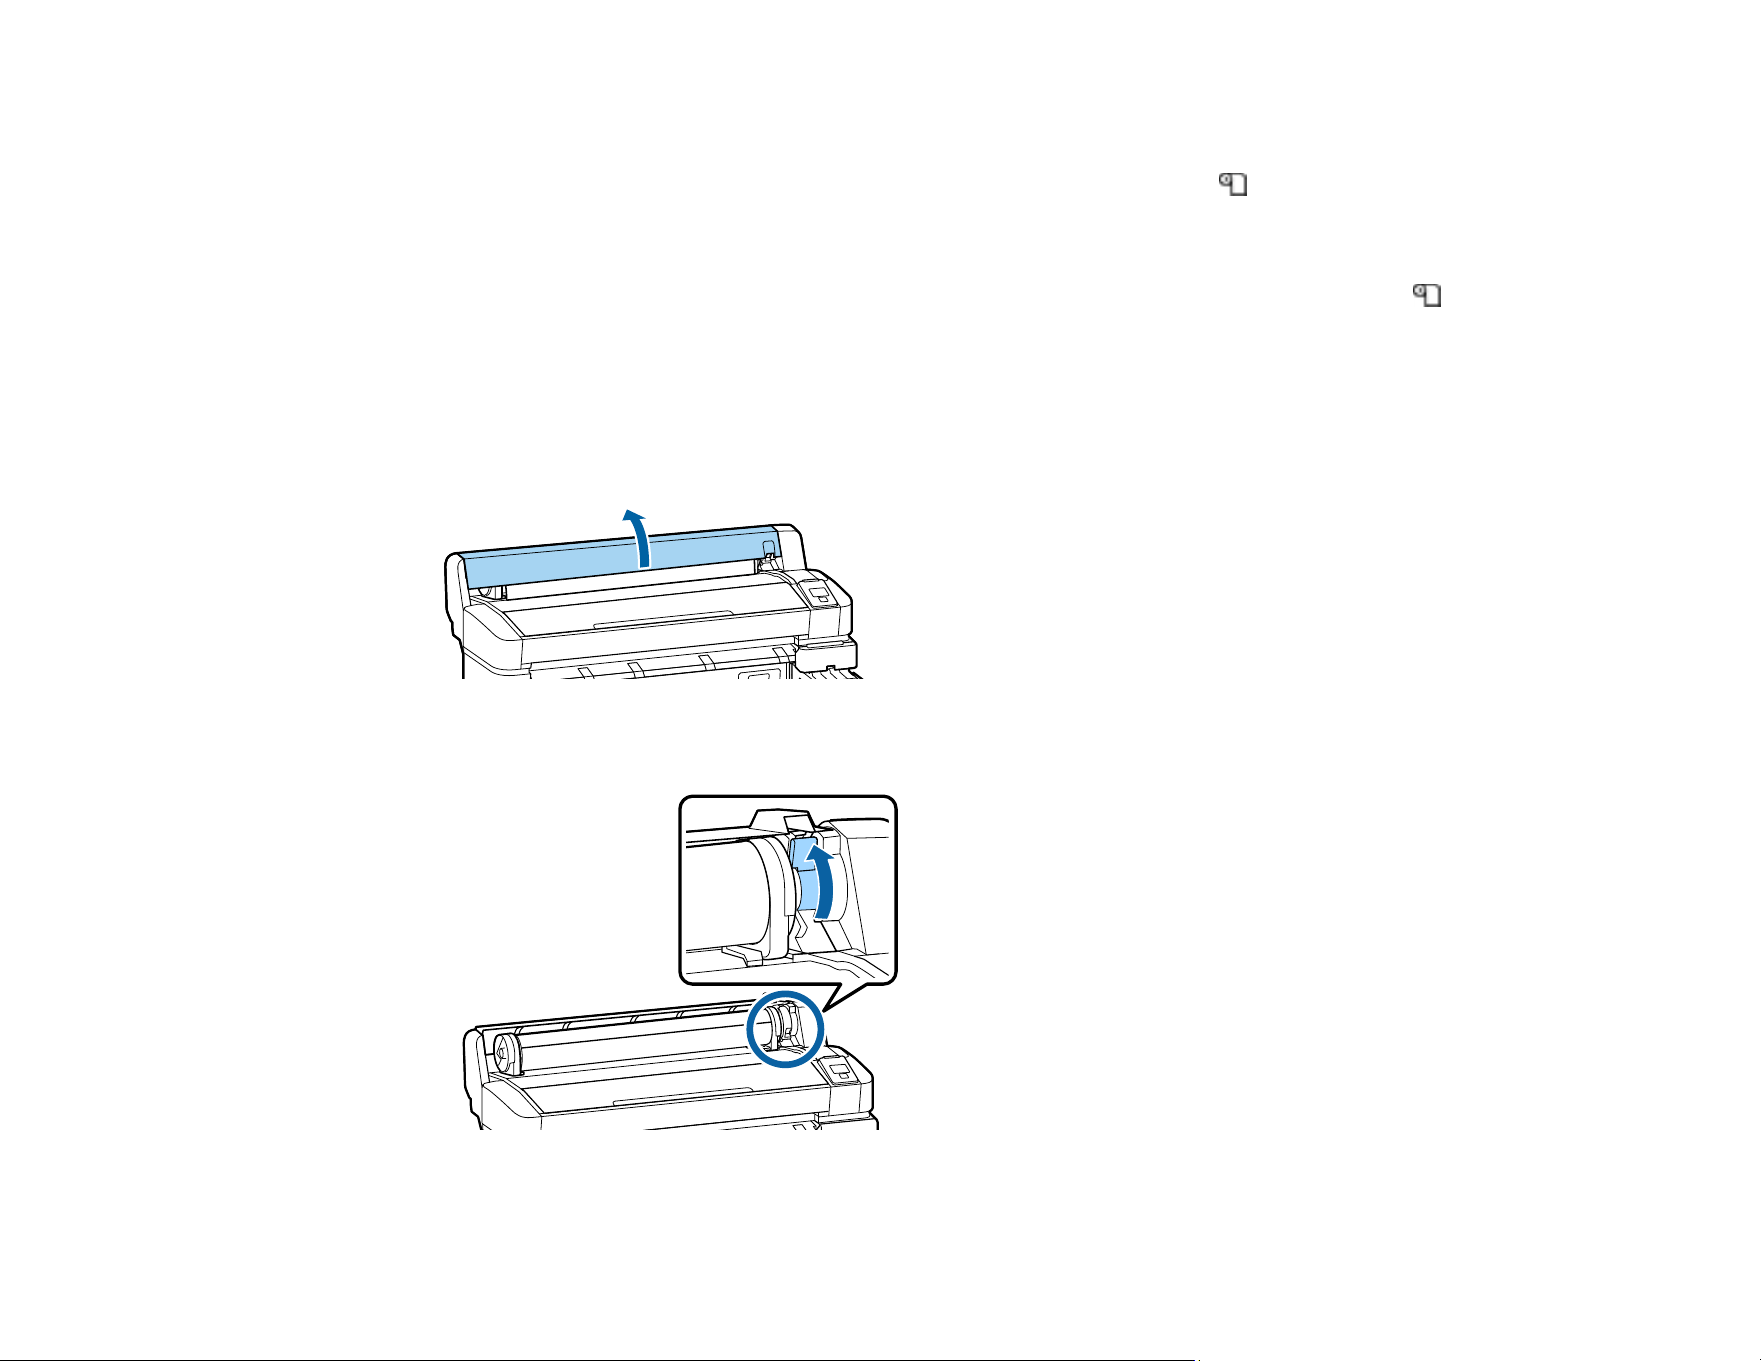
3. Open the roll paper cover.
4. Lift up the adapter holder lock lever.
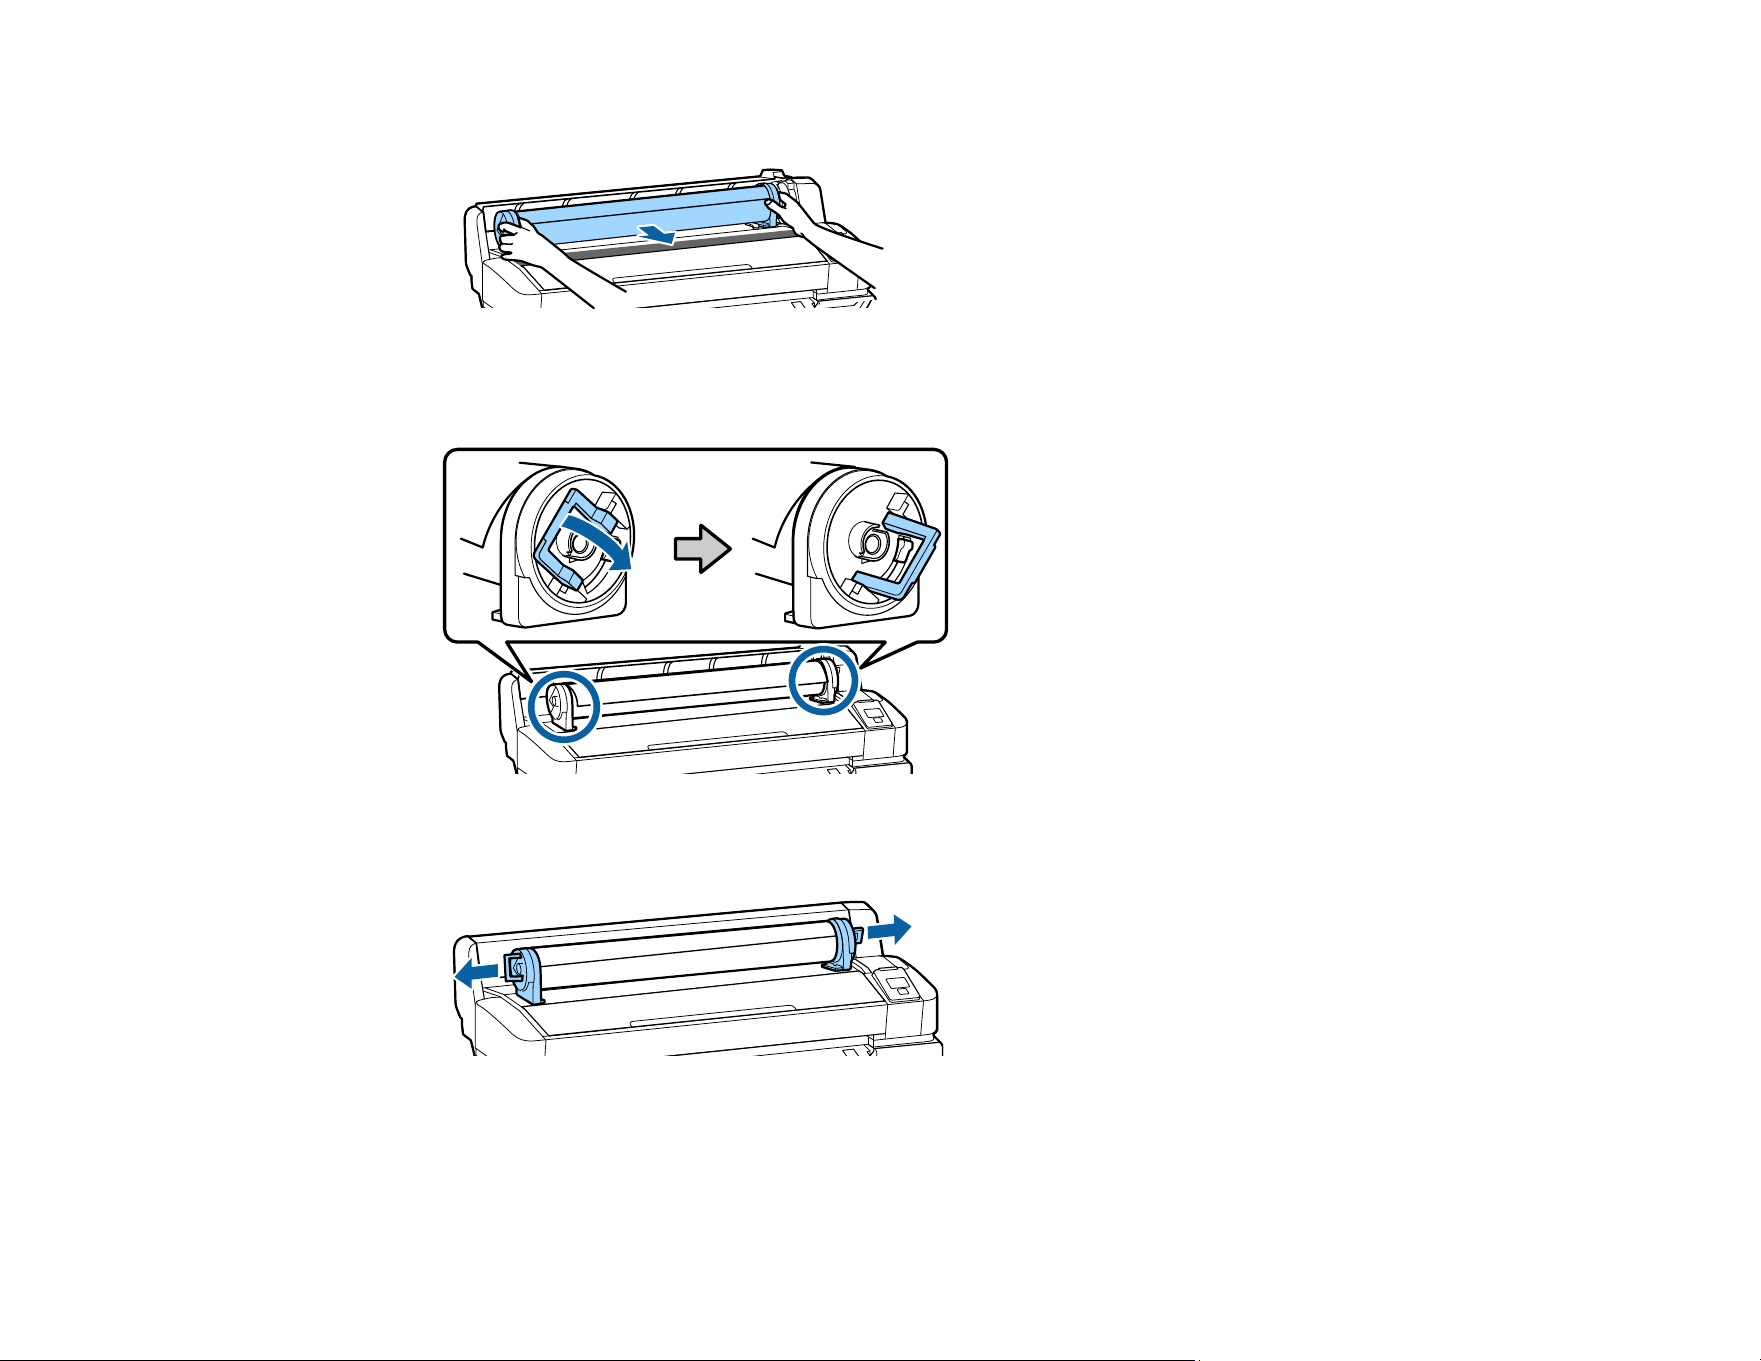
38
5. Holding the roll by the roll paper adapters, move the media to the roll rest temporarily.
6. Lift up the lock levers on both roll paper adapters.
7. Remove the roll paper adapters from each end of your media roll.
8. Carefully rewind the media onto the roll and store it in its original packaging.
9. Close the roll paper cover.

39
Parent topic: Media Handling
Using the Auto Take-up Reel
See these sections to use the auto take-up reel with your product.
Note: The auto take-up reel may not be available in all markets.
About the Auto Take-up Reel
Attaching the Take-up Roll Core to the Auto Take-up Reel
Take Up with the Printable Side In
Removing Media from the Auto Take-up Reel
Parent topic: Media Handling
About the Auto Take-up Reel
The auto take-up reel automatically rolls up printed media as you print.
It is best to do the following when using the auto take-up reel:
• Load media with the printable side in.
• Use a take-up roll core that is the same width as your media so the core does not bend or take up
media incorrectly.
• Do not attach take-up roll cores with worn or deformed edges. The media may not wind correctly,
causing banding in the print results.
• Use any commercially available tape to attach your media to the roll core.
Parent topic: Using the Auto Take-up Reel
Attaching the Take-up Roll Core to the Auto Take-up Reel
Be sure to attach a take-up roll core that is the same width as your media.
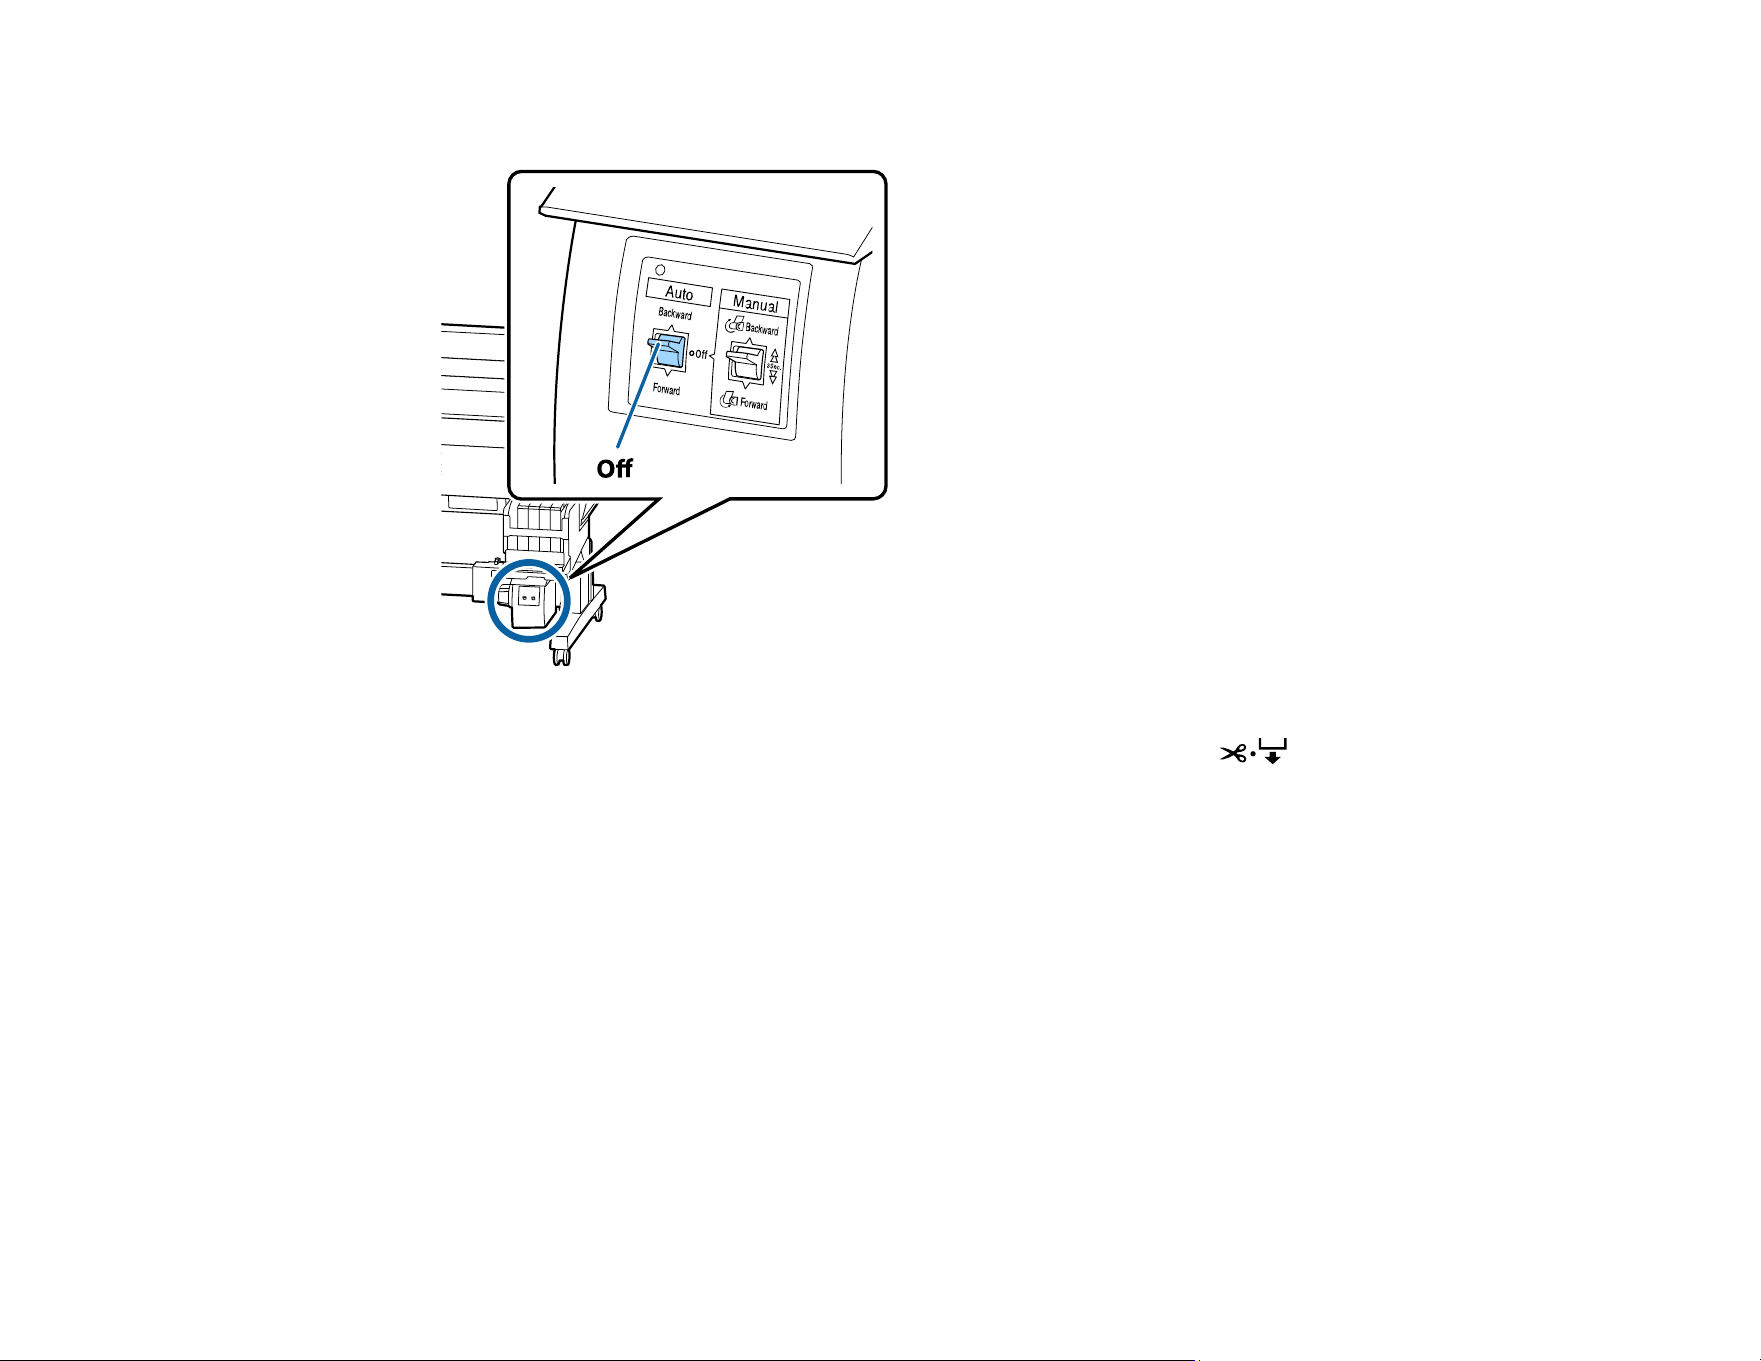
40
1. Set the Auto switch on the auto take-up reel unit to Off.
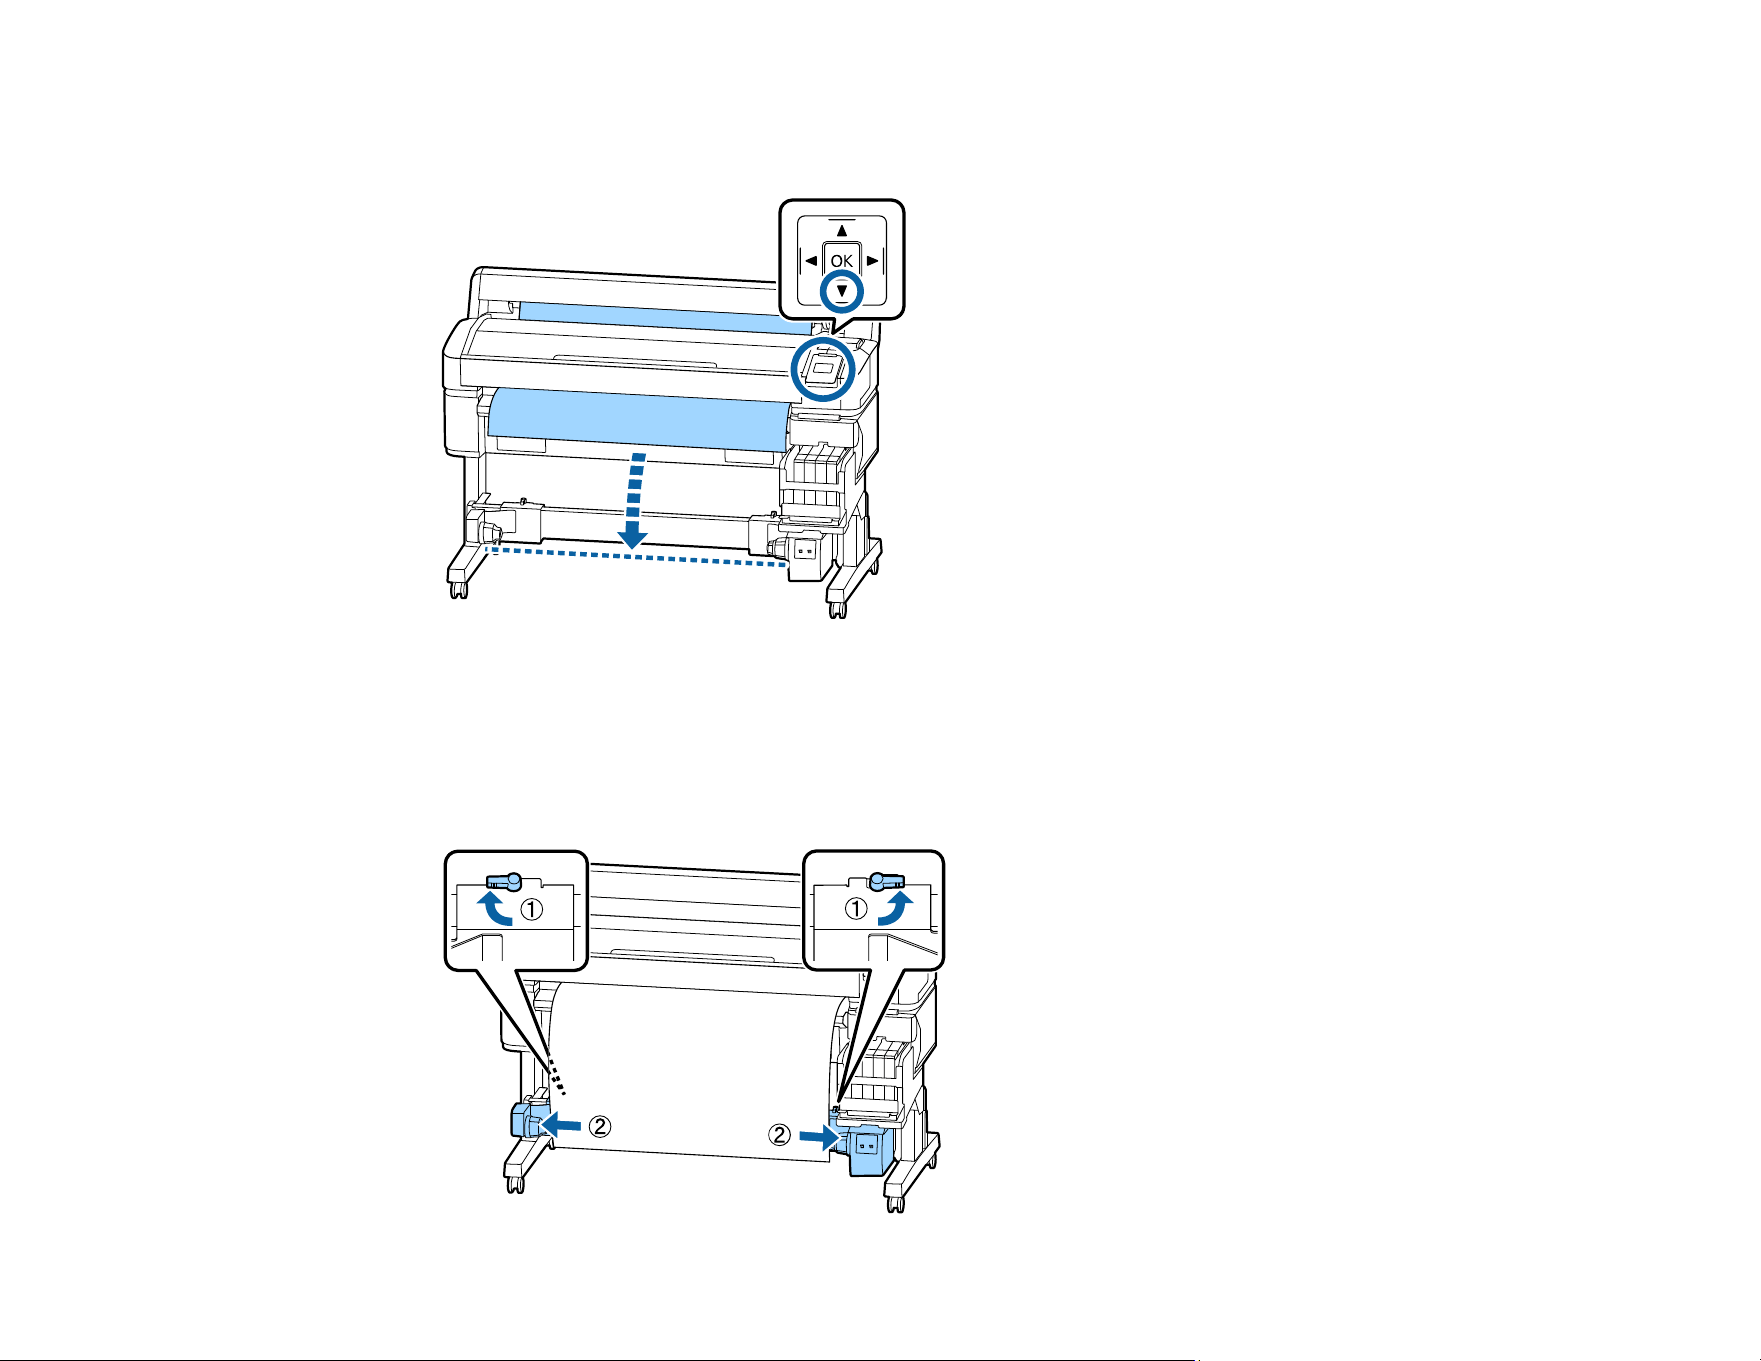
2. Make sure the media roll is loaded correctly in the product and press the cut/feed media
button on the control panel.
41
3. Press and hold the down arrow button until the edge of the loaded media reaches the roll core
holders.
Note: Always use the down arrow button to feed loaded media or the media may twist during take-
up.
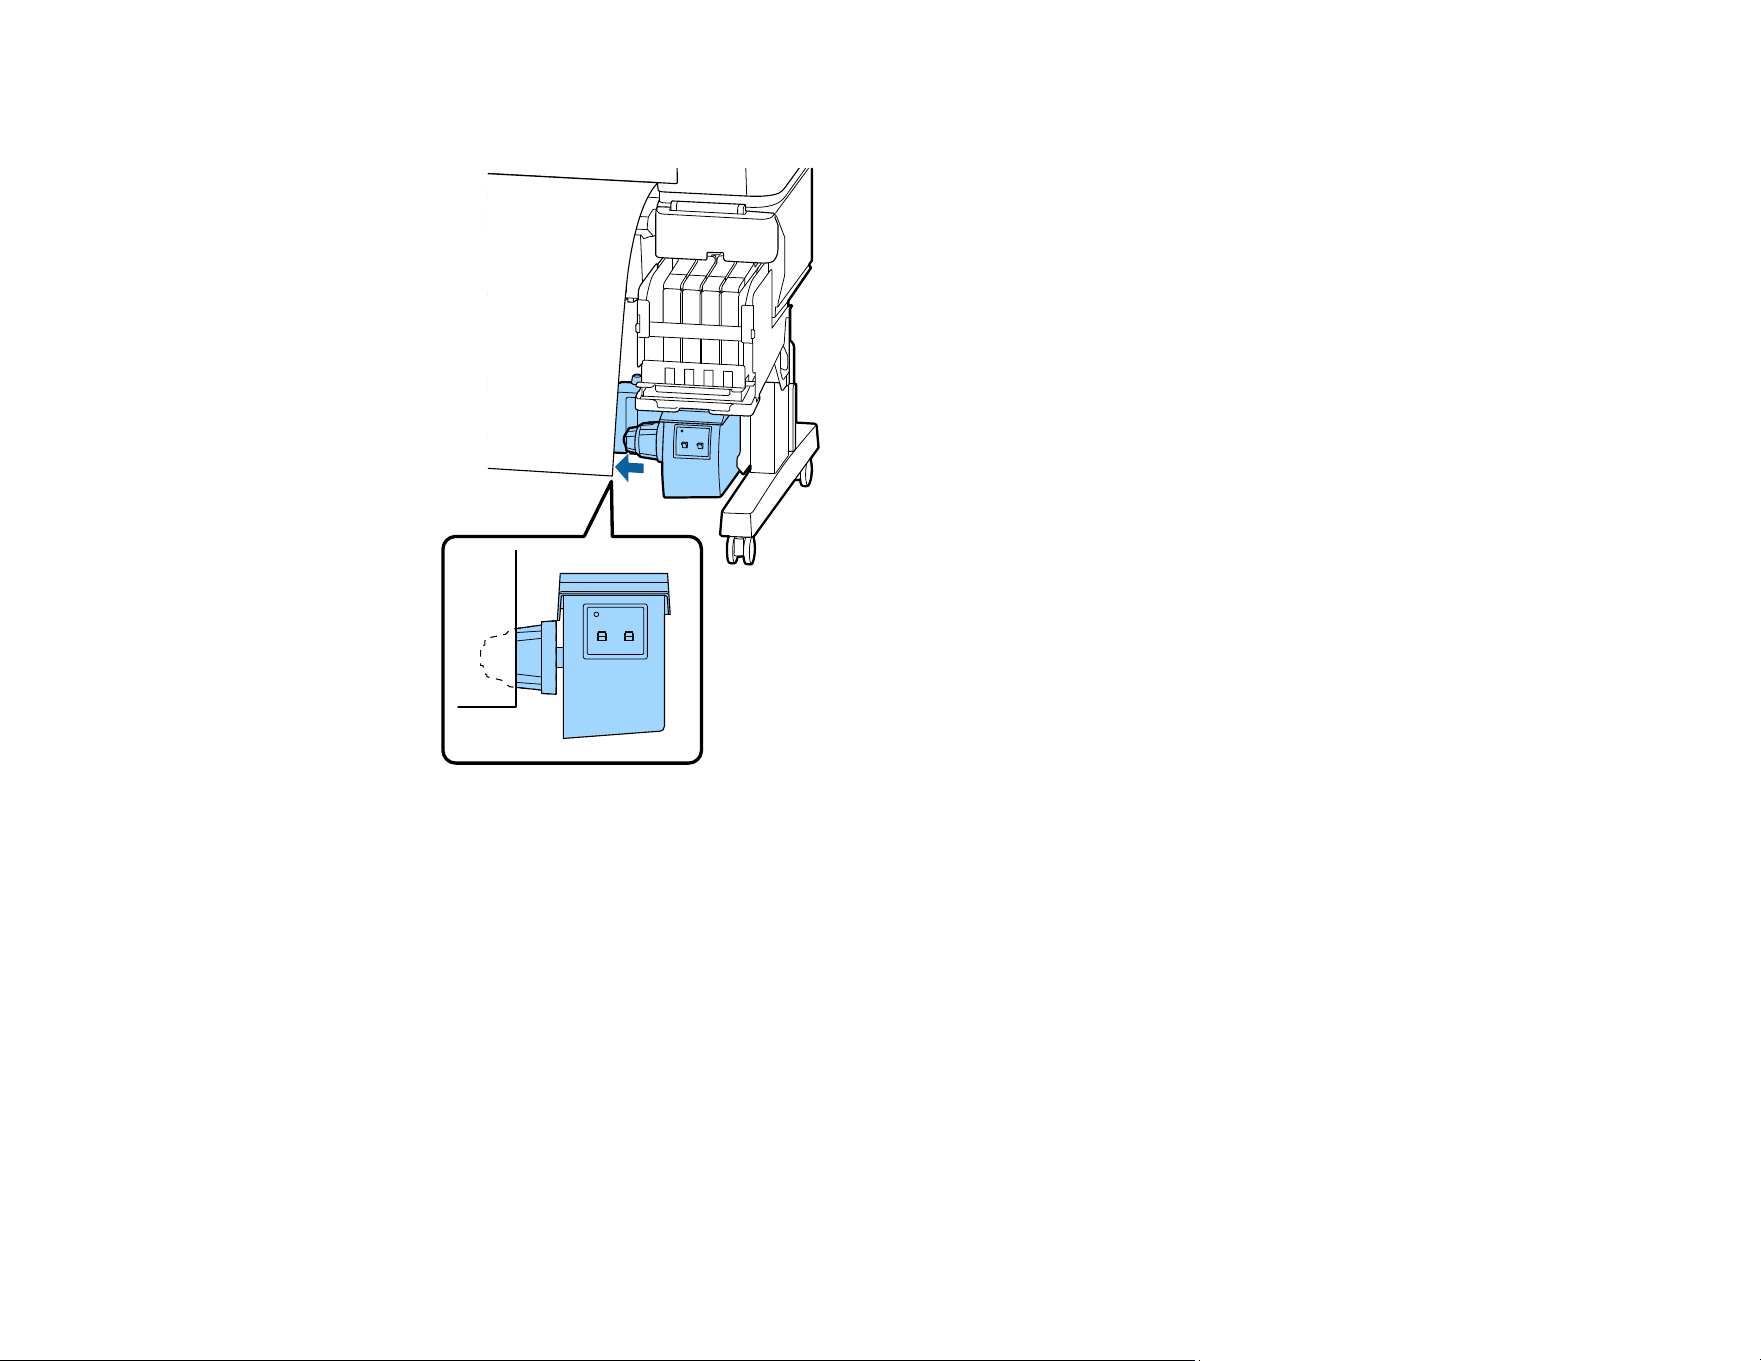
4. Unlock the roll core holder lock levers and adjust the roll core holders so they are wider than your
media.
42
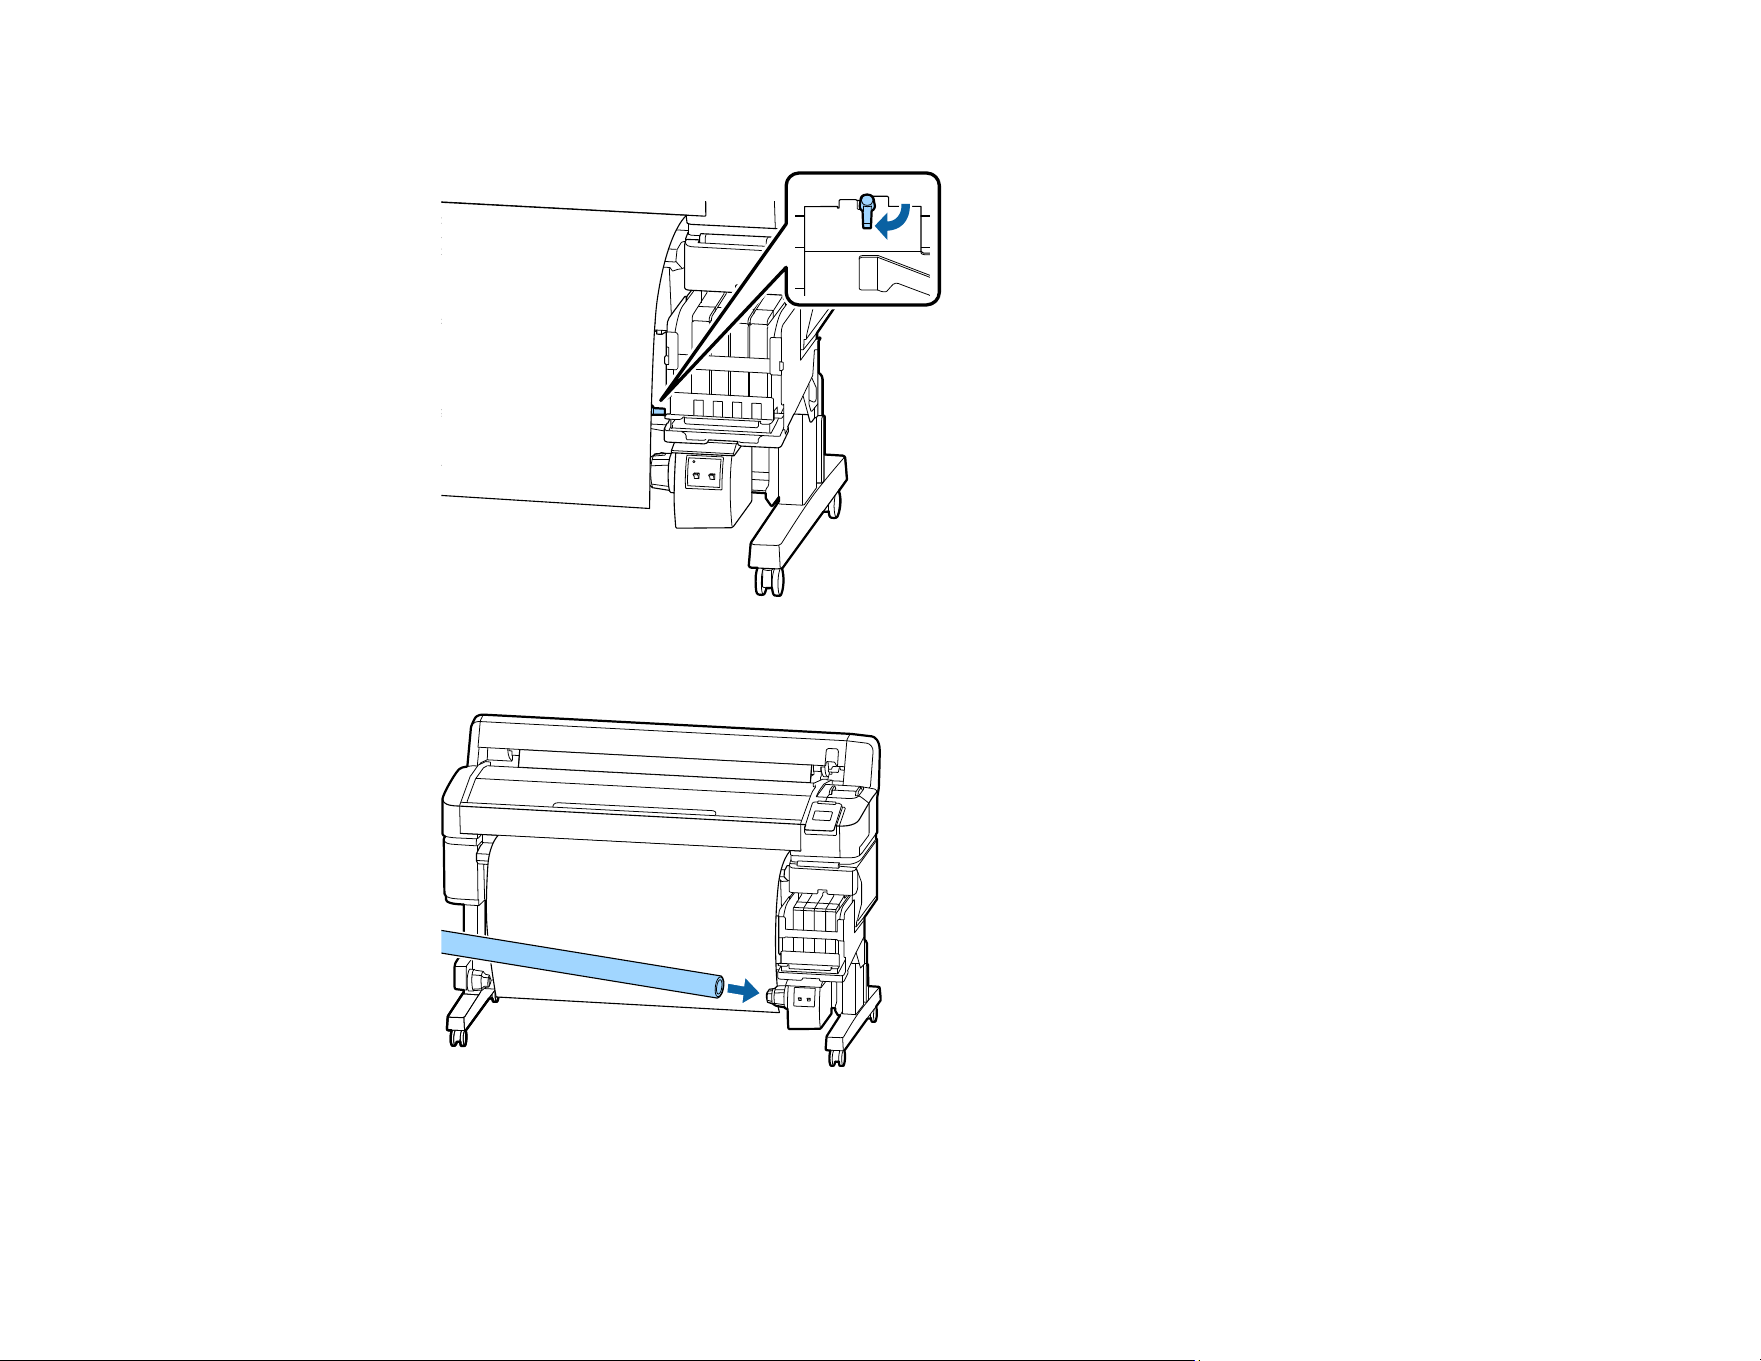
5. Align the right roll core holder with the right edge of the media.
43
6. Lock the right roll core holder lock lever so the roll core holder does not move.
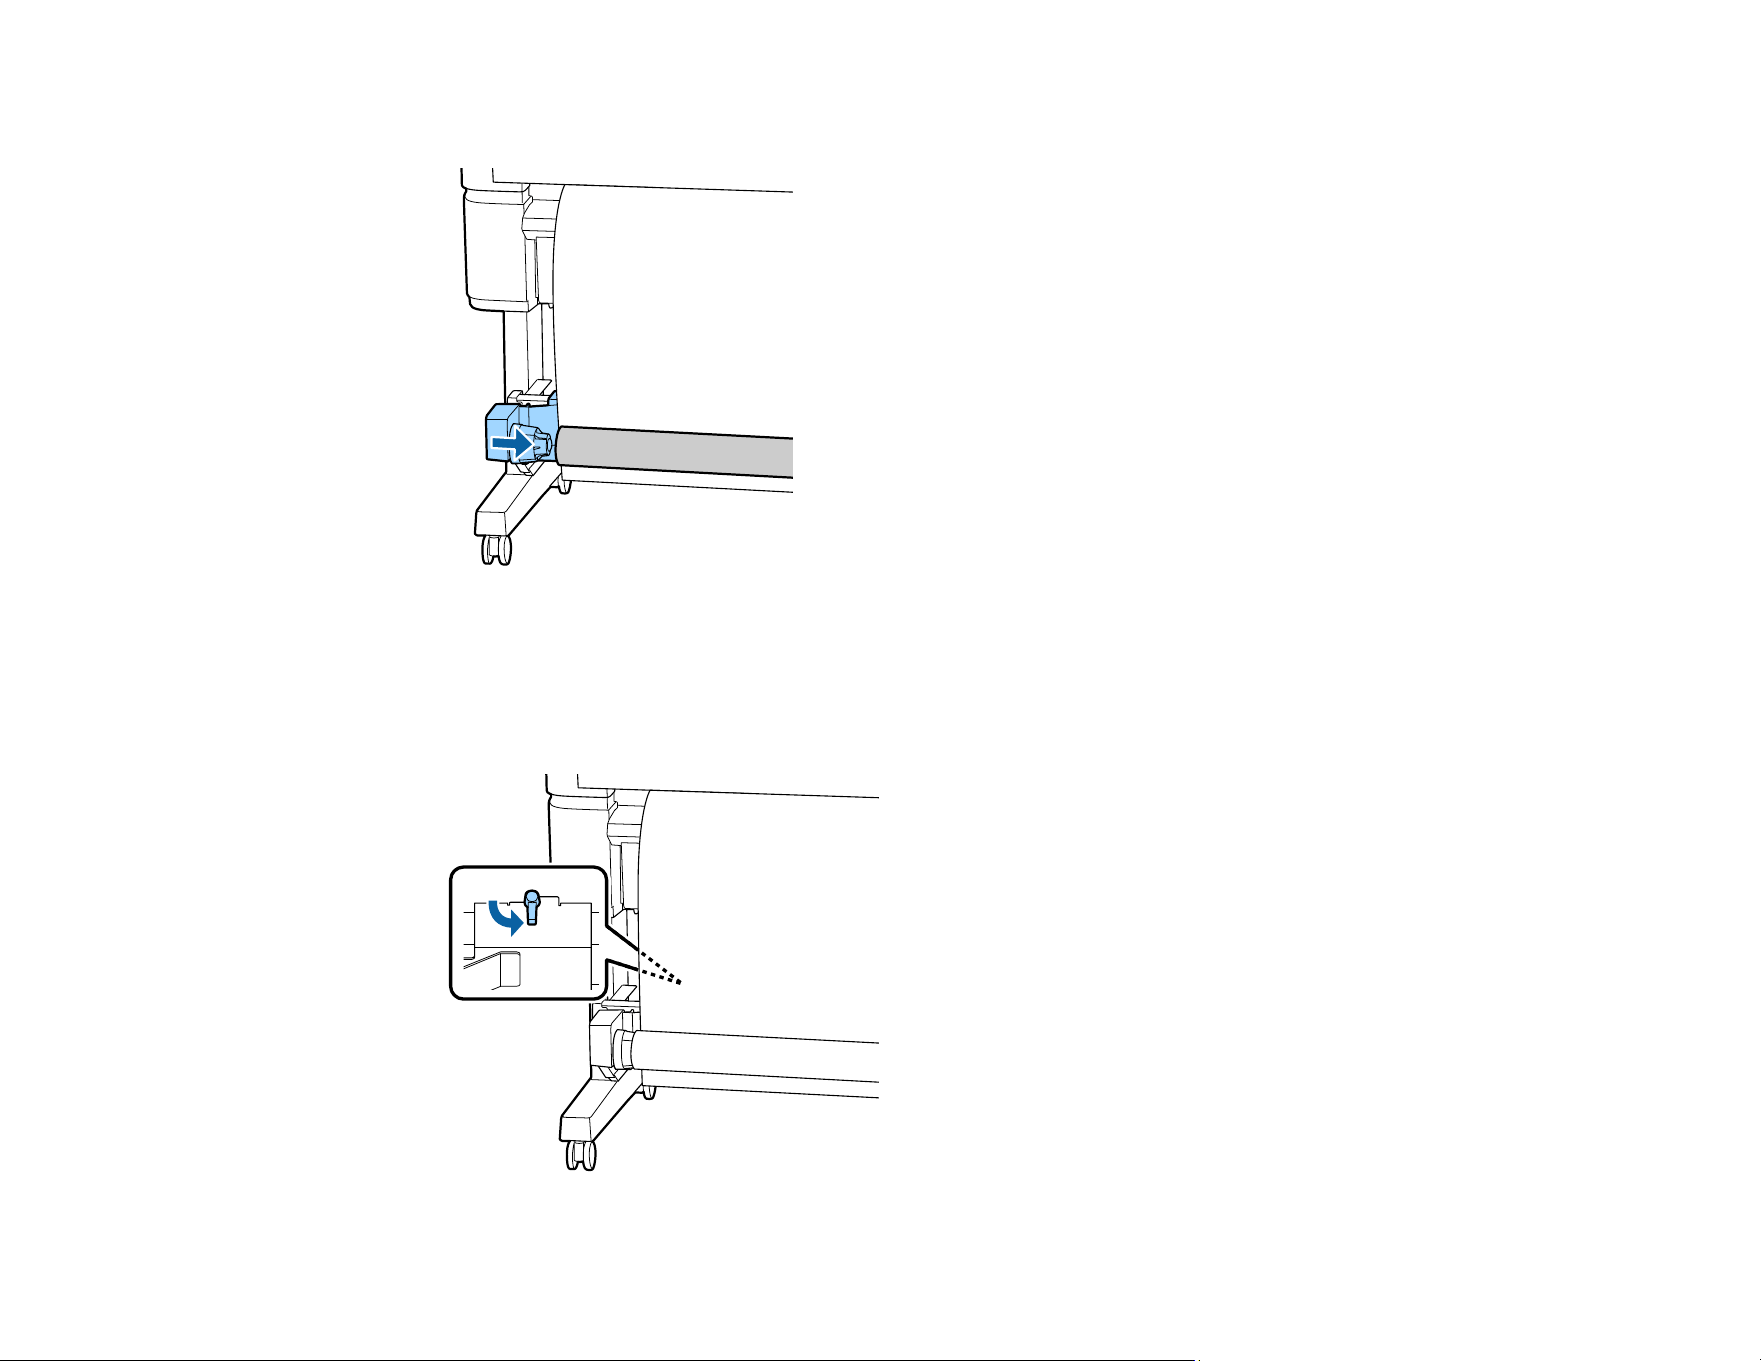
7. Insert the roll core onto the right roll core holder.
44
8. Insert the left side of the roll core fully onto the left roll core holder.
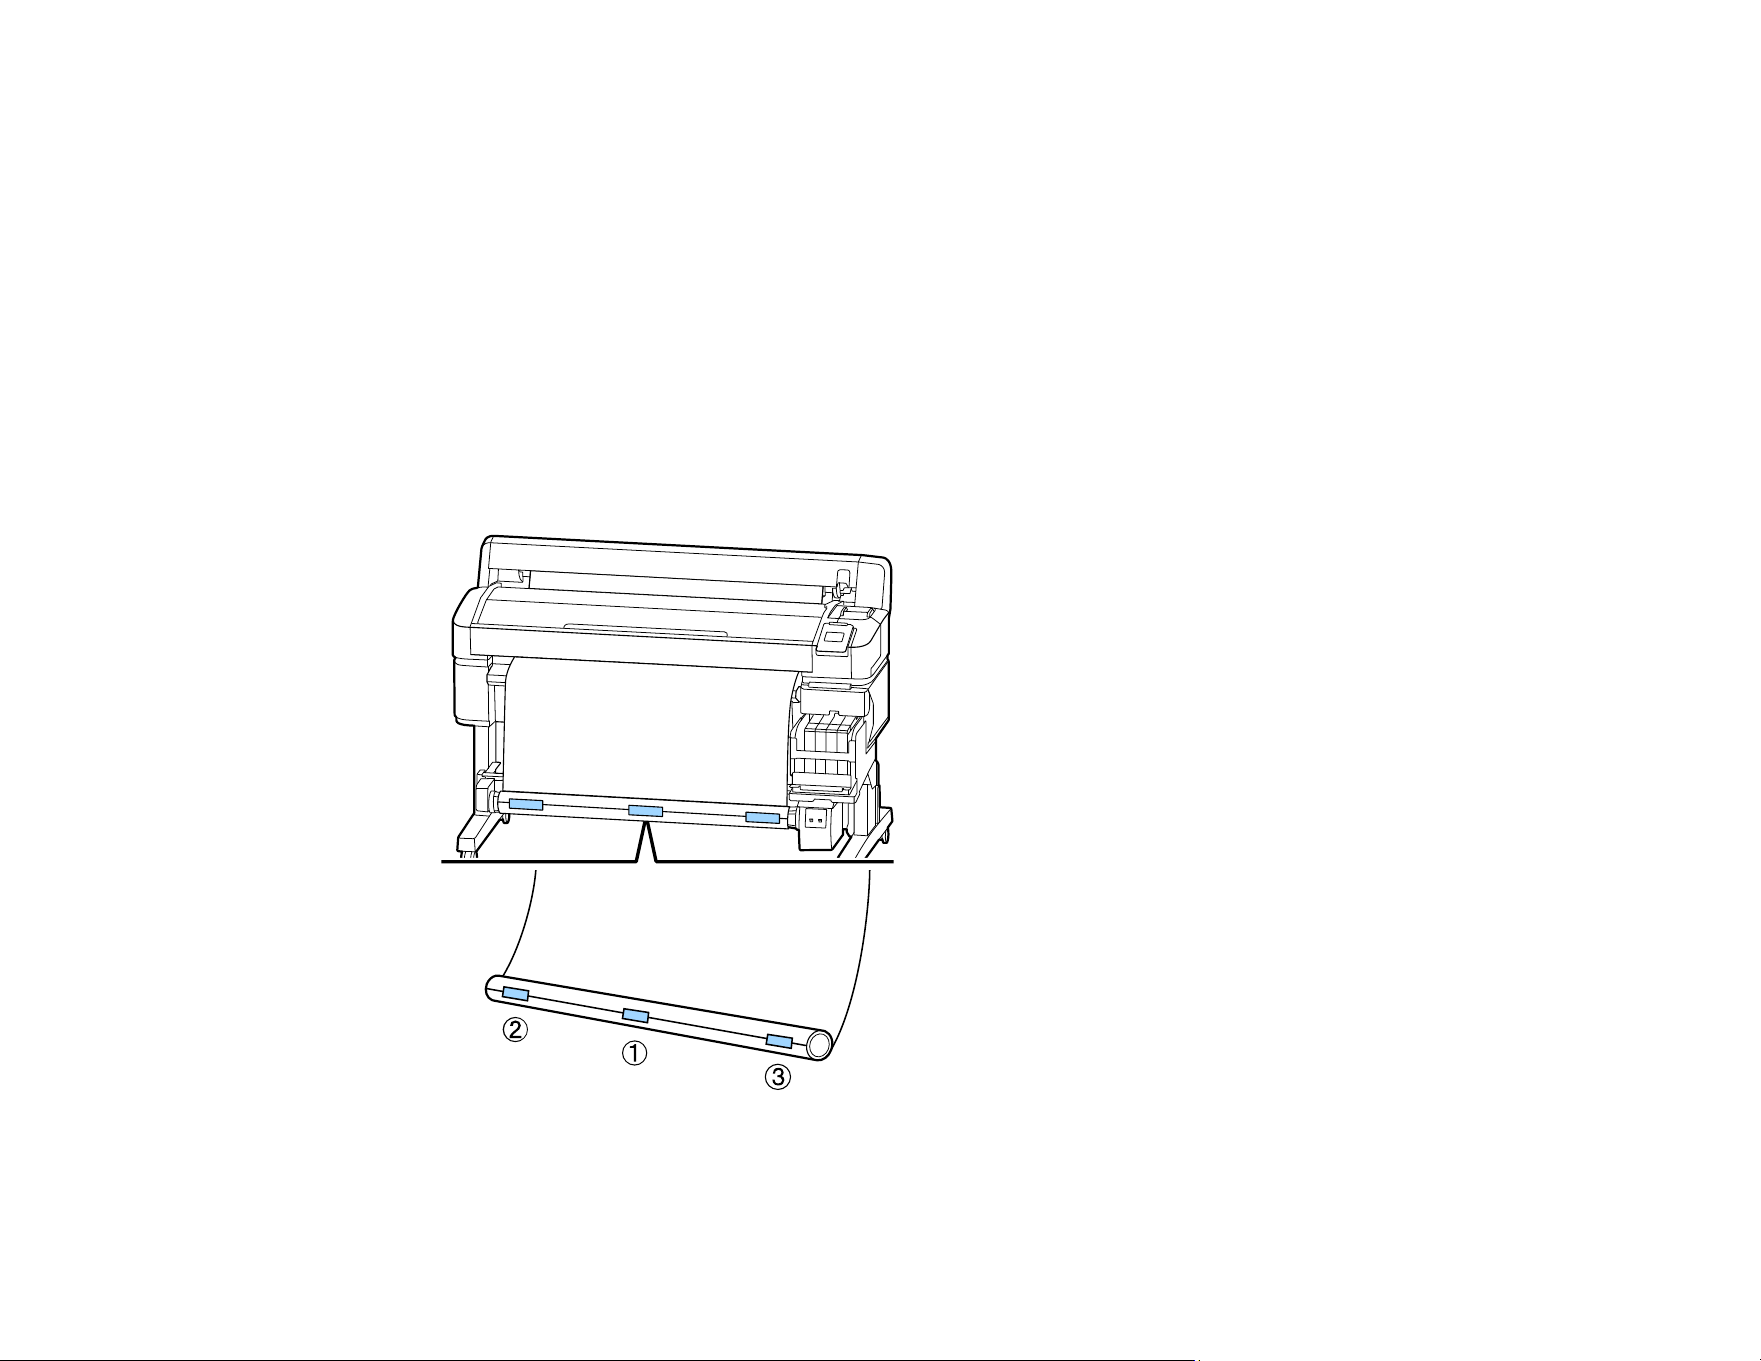
9. Confirm that the roll core and the edges of the media are aligned. If they are misaligned, loosen the
right roll core holder locking screw and repeat these steps to attach the roll core again.
10. Lock the left roll core holder lock lever so the roll core holder does not move.
45
Parent topic: Using the Auto Take-up Reel
Related tasks
Loading Media
Take Up with the Printable Side In
After attaching the roll core on the auto take-up reel, follow these steps to take up media with the
printable side in.
Note: Before proceeding, select Off as the Auto Cut setting. Using the auto take-up reel when On is
selected will cause errors.
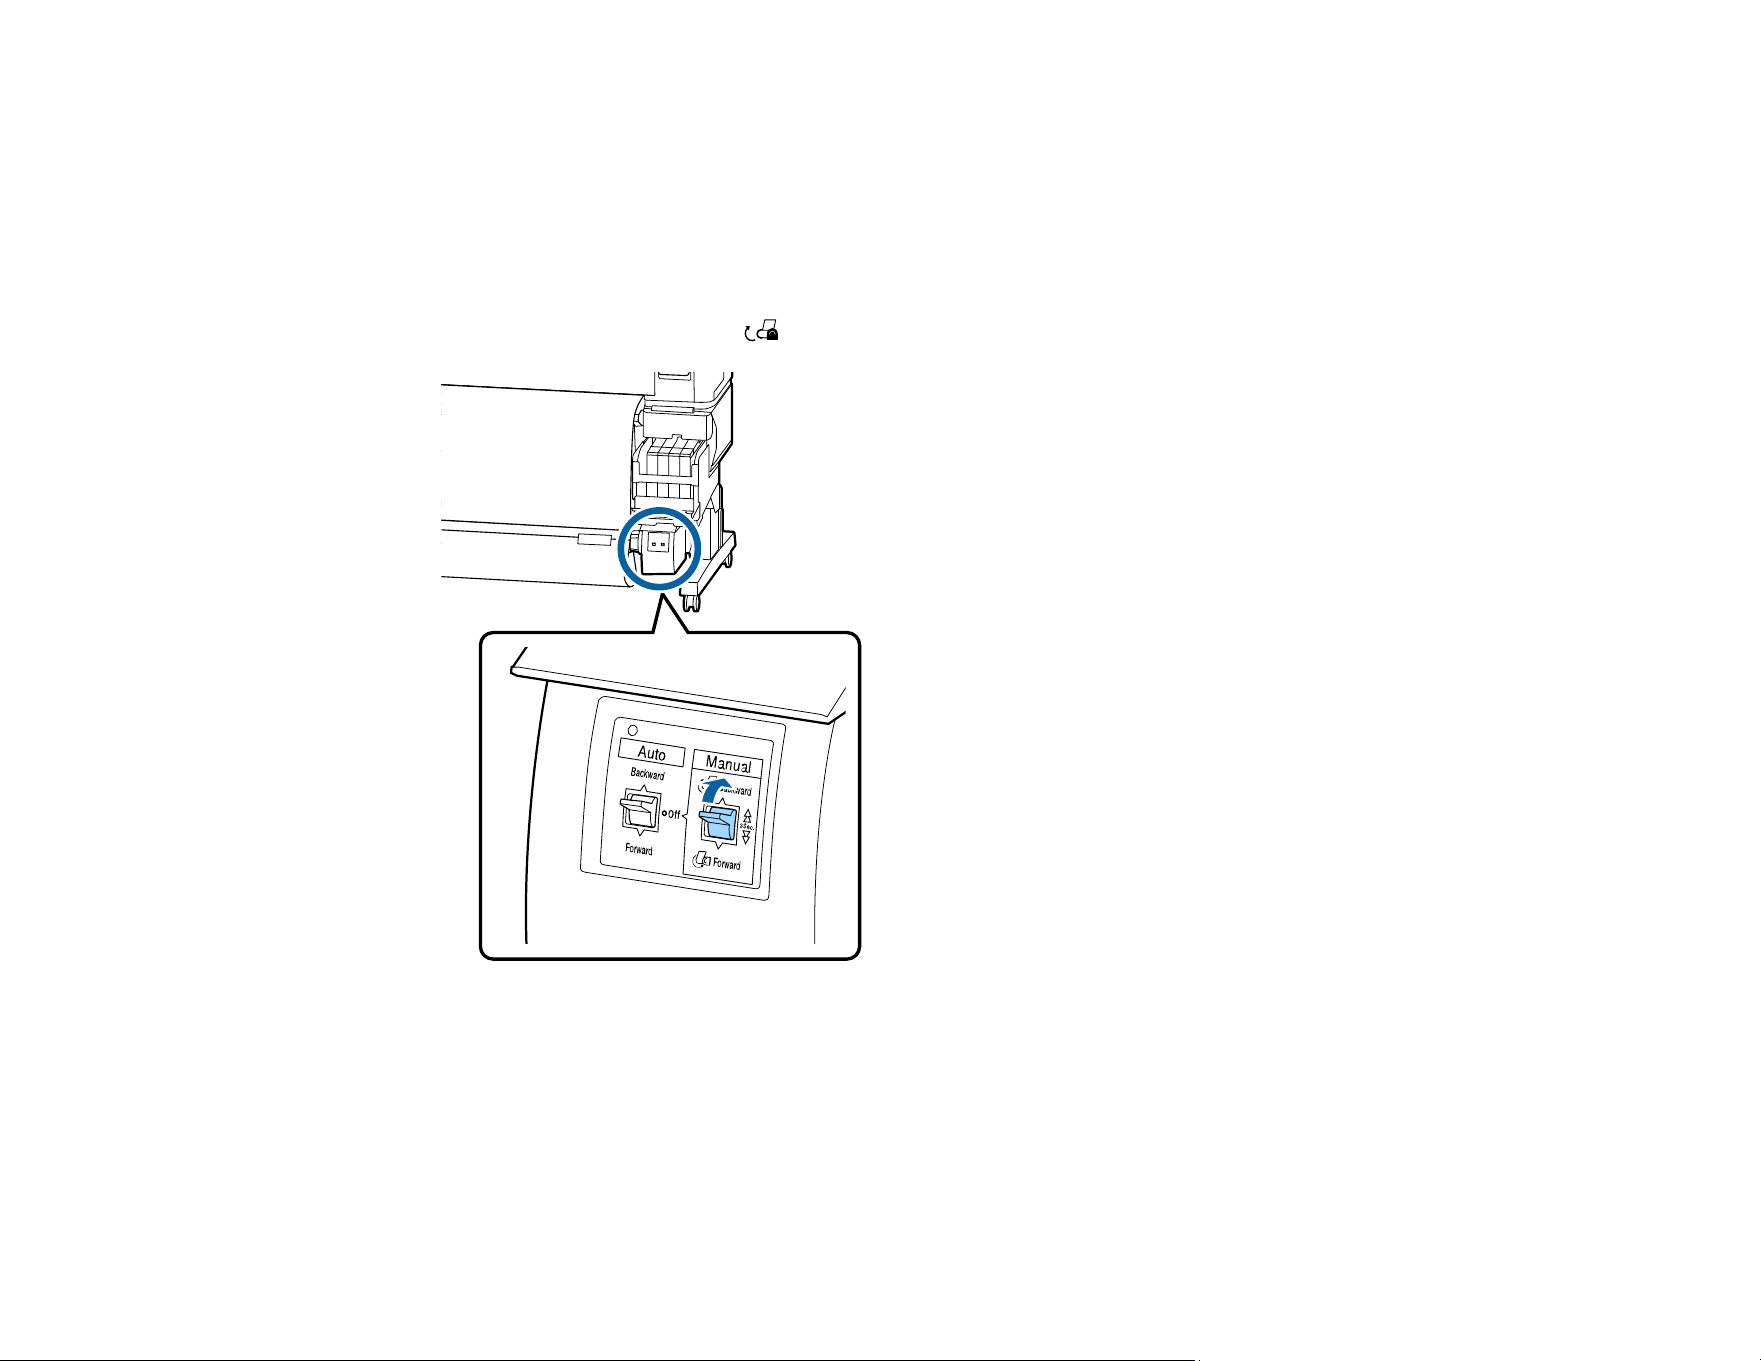
1. Guide your loaded media behind the roll core, then attach the media to the roll core with tape in the
order shown here.
46
Note: Make sure the media lays flat across the roll core without any gaps. When attaching tape in
the center, pull the center of the paper straight. When attaching tape on the left and right sides, pull
the paper to the corresponding sides.
2. Press and hold the down arrow button on the control panel to feed enough media for it to wrap once
around the roll core.
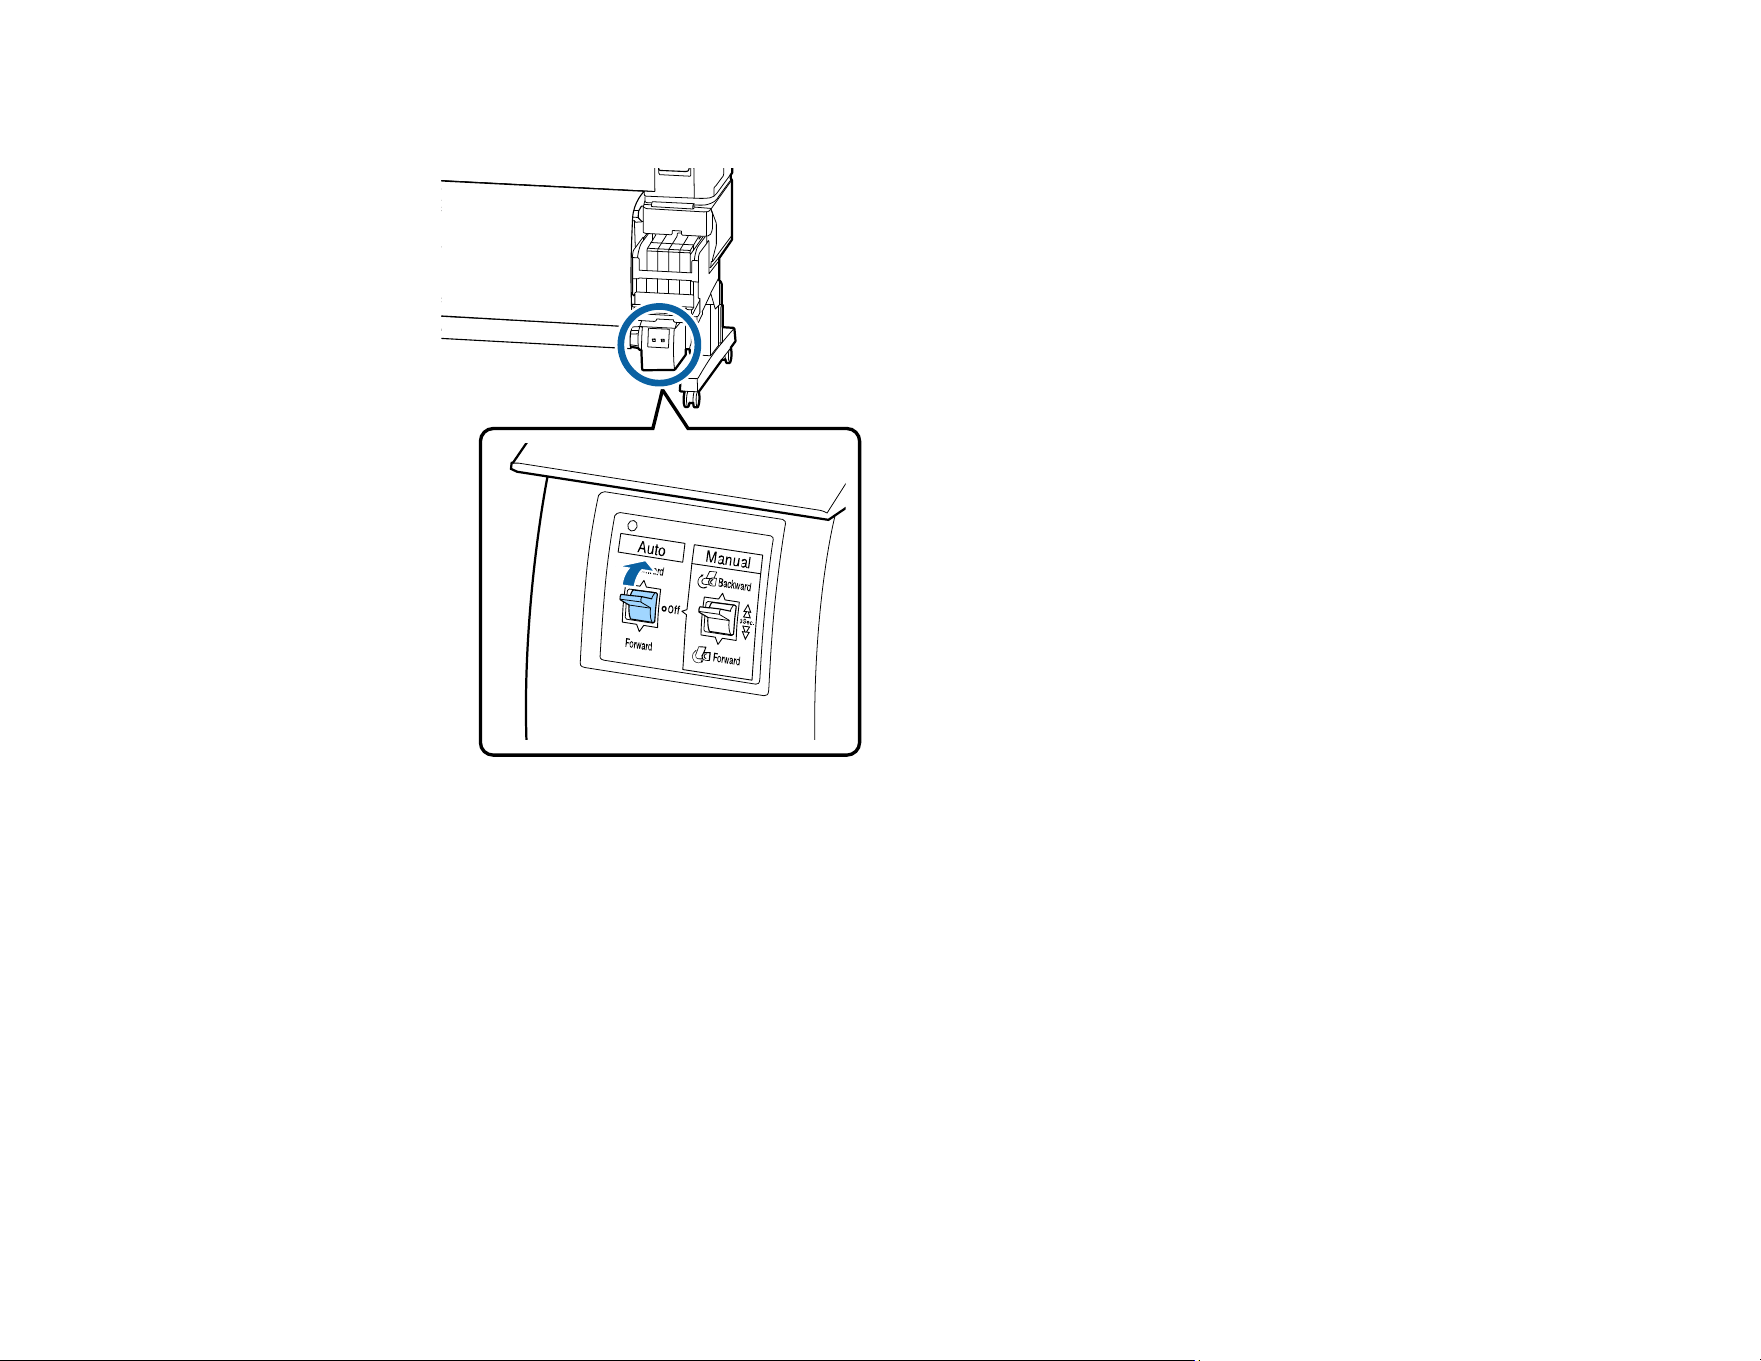
3. Confirm that the Auto switch on the auto take-up reel is set to the Off position, then push and hold
the Manual switch up to the Backward position to wind the media around the roll core.
47
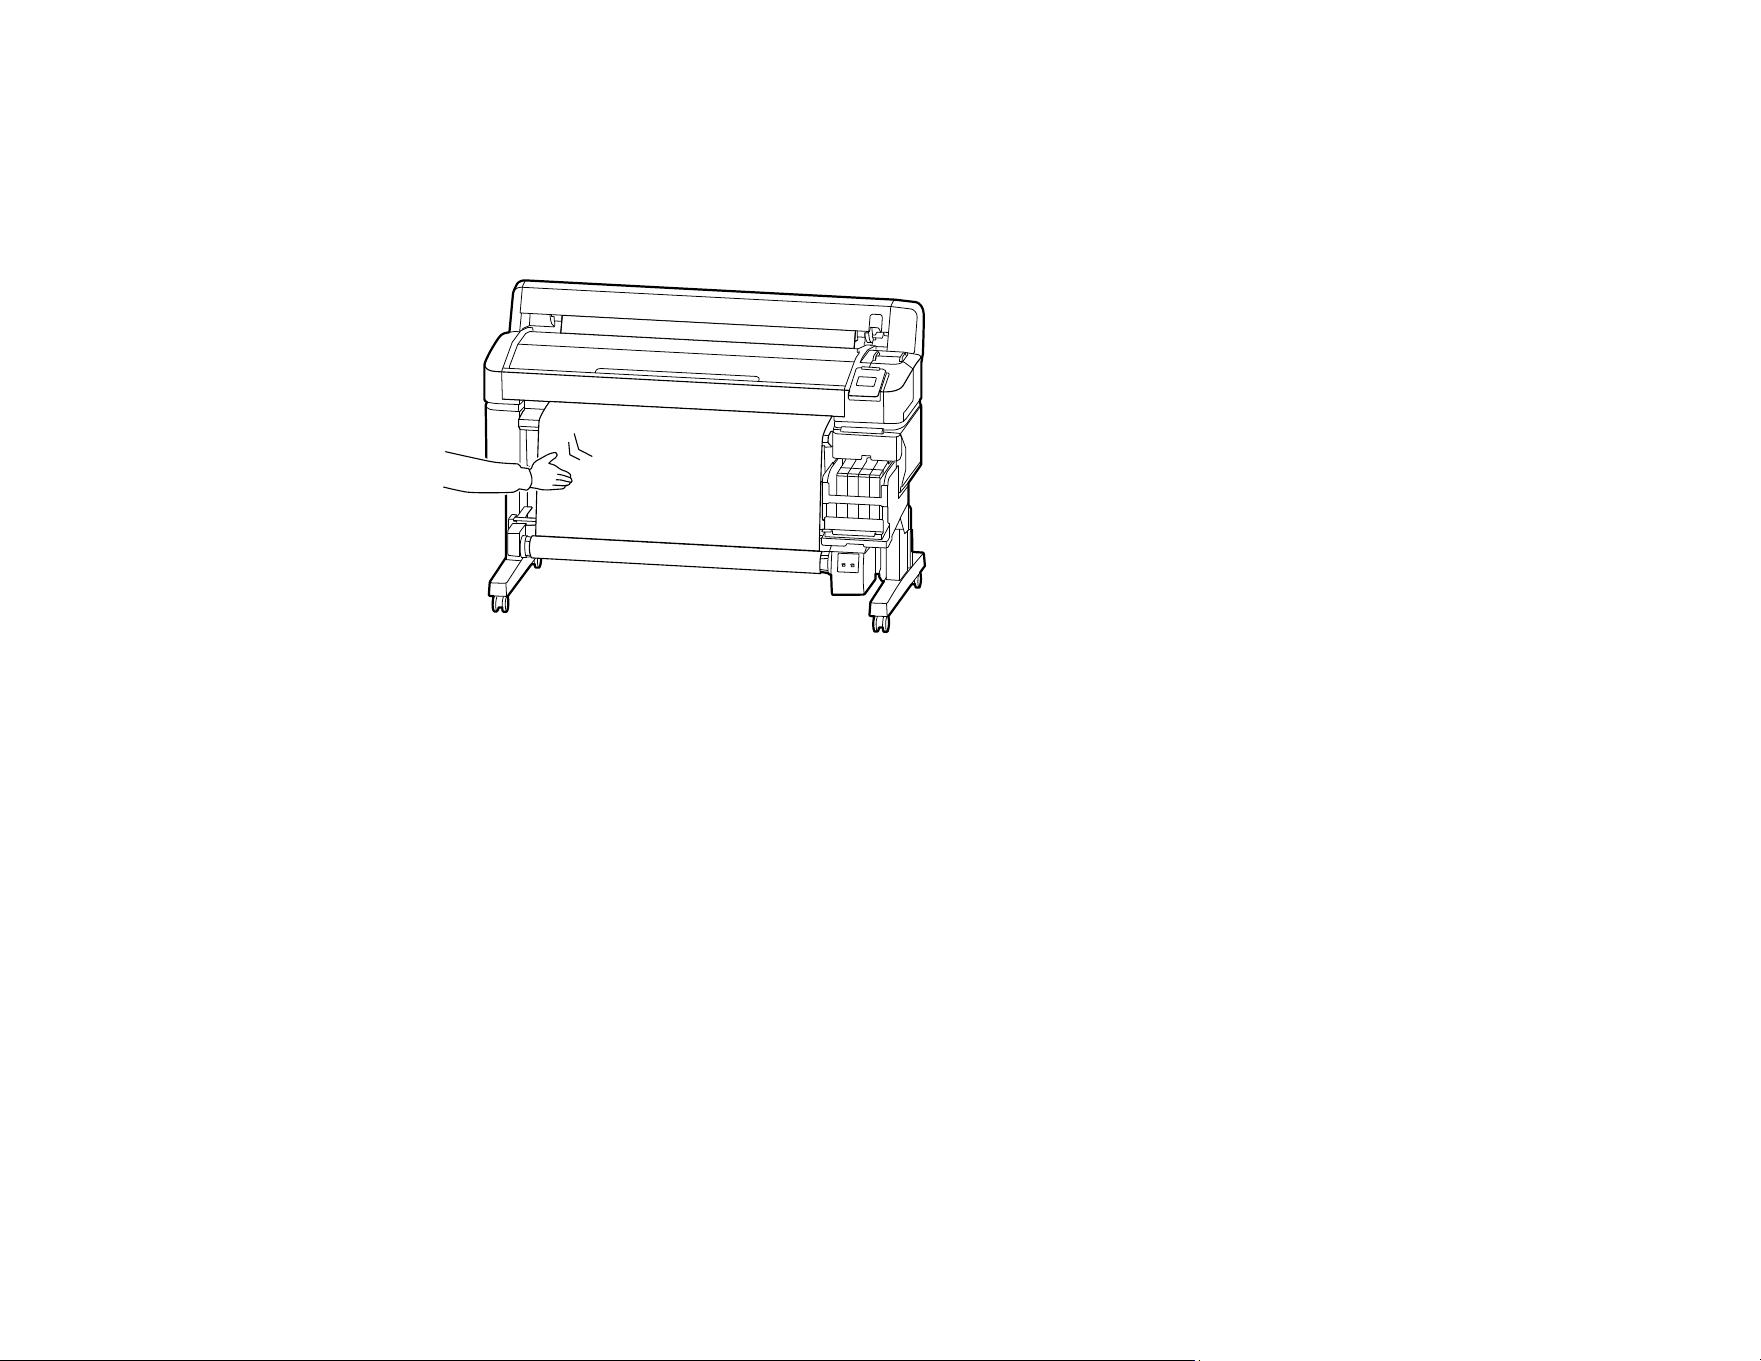
4. Move the Auto switch up to the Backward position.
48
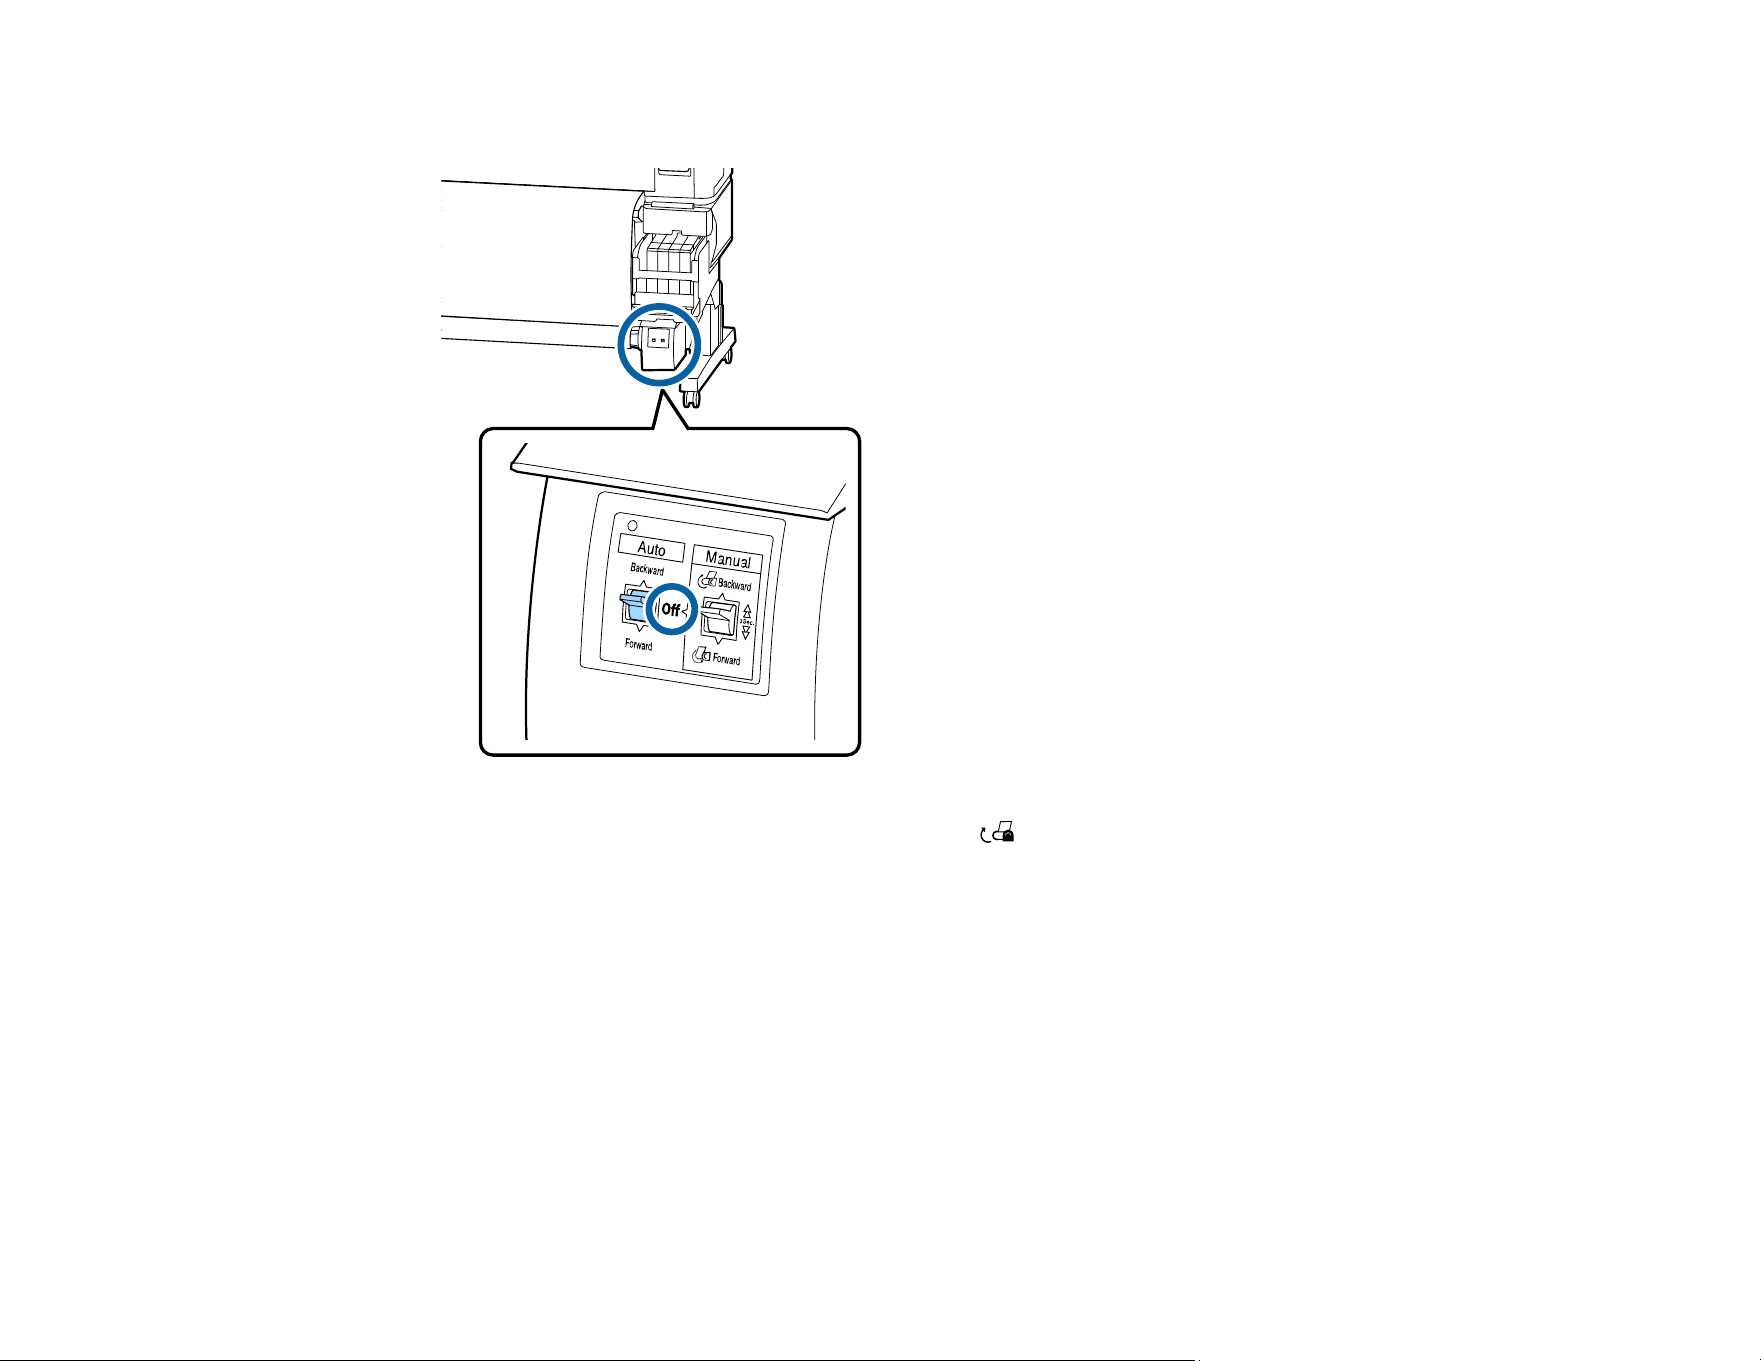
5. Make sure the media is taut and confirm that the tension is even by lightly tapping the media on both
sides as shown here.
Note: If the media is looser on one side than the other, the media cannot be taken up correctly.
Repeat these steps to reload the media on the auto take-up reel.
Parent topic: Using the Auto Take-up Reel
Removing Media from the Auto Take-up Reel
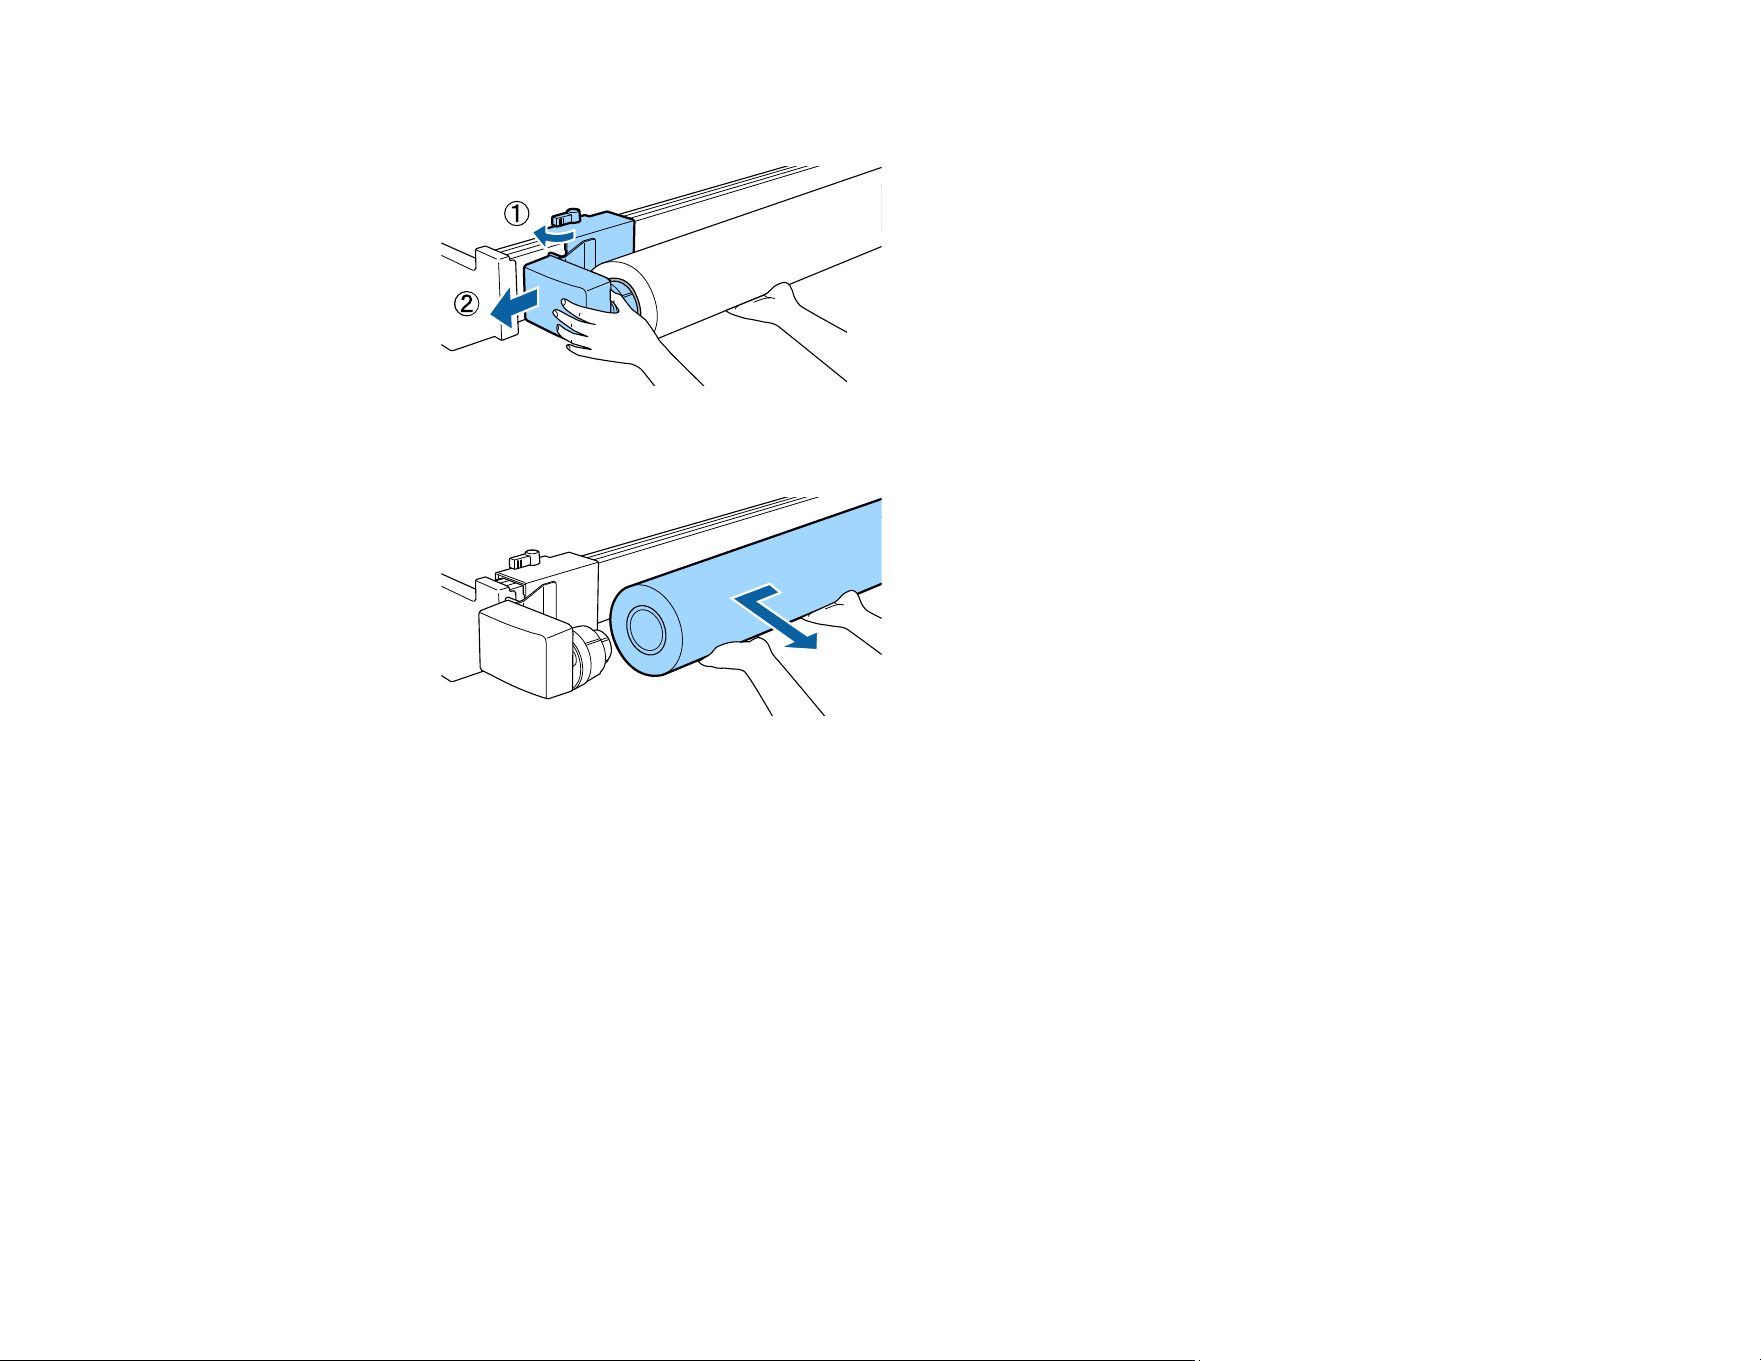
After printing on media loaded on auto take-up reel, follow these steps to remove it.
Caution: Remove media from the auto take-up reel with two people, one on each end of the roll.
Removing media by yourself could result in injury.
Note: Make sure the media is cut before removing it from the auto take-up reel.
49
1. Set the Auto switch to the Off position.
2. Cut the media and move the Manual switch to the Backward position and hold it until all the
media is on the take-up reel.
Note: After cutting the media, support the cut edge to prevent it from touching the floor until all the
media is taken up.

51
Using the Control Panel Menus
Follow the instructions in these sections to access the printer menu system and select settings.
Accessing the Printer's Menus
Paper Menu Settings
Maintenance Menu Settings
Setup Menu Settings
Accessing the Printer's Menus
You can use the printer menus to adjust the settings that control how your product works.
1. Press the Menu button on the control panel.
You see the menu for the current tab on the LCD screen.
2. Press the up or down arrow button to scroll through the settings.
Note: Press the back button to go back.
3. To change the highlighted setting, press the OK button.
4. Press the up or down arrow button to scroll through the options.
5. To select an option, press the OK button.
6. Press the right or left arrow button to switch between tabs. You can also use these buttons to
position the cursor when entering data on the screen.
7. When you finish changing settings on a menu, press the pause/cancel button to exit the menu.
Parent topic: Using the Control Panel Menus
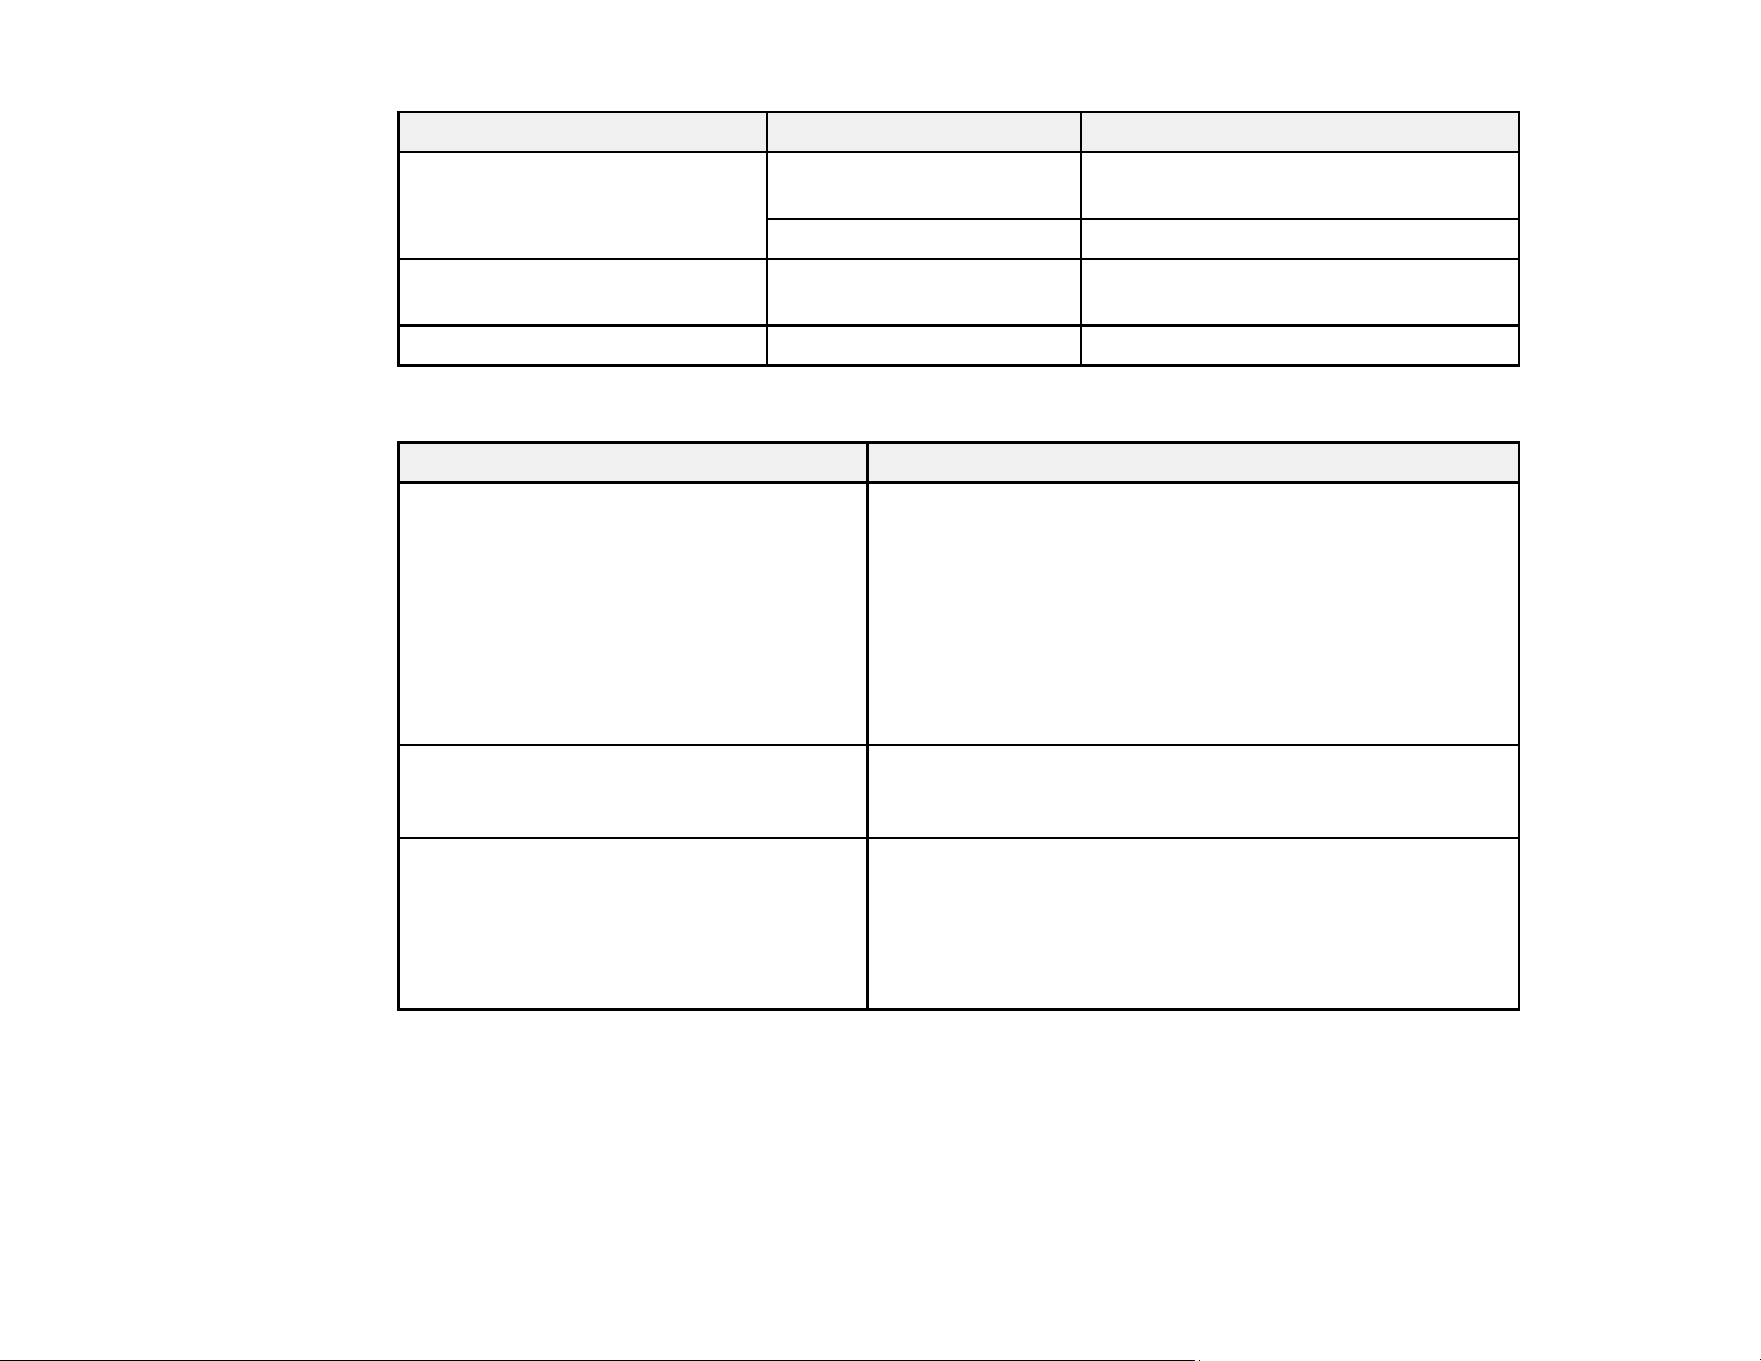
Paper Menu Settings
Settings on the Paper menu let you customize various adjustments for up to 10 different types of paper.
Caution: Follow the instructions in the topic links below the table to use these menu settings correctly.
52
Setting Options Description
Load/Remove Paper Remove Paper Displays instructions for removing
paper.
Roll Paper Displays instructions for loading paper.
Select Paper Type 1 to 10 (Paper Settings
Number)
Lists the names of user-defined paper
types.
Custom Paper Setting — See the next table.
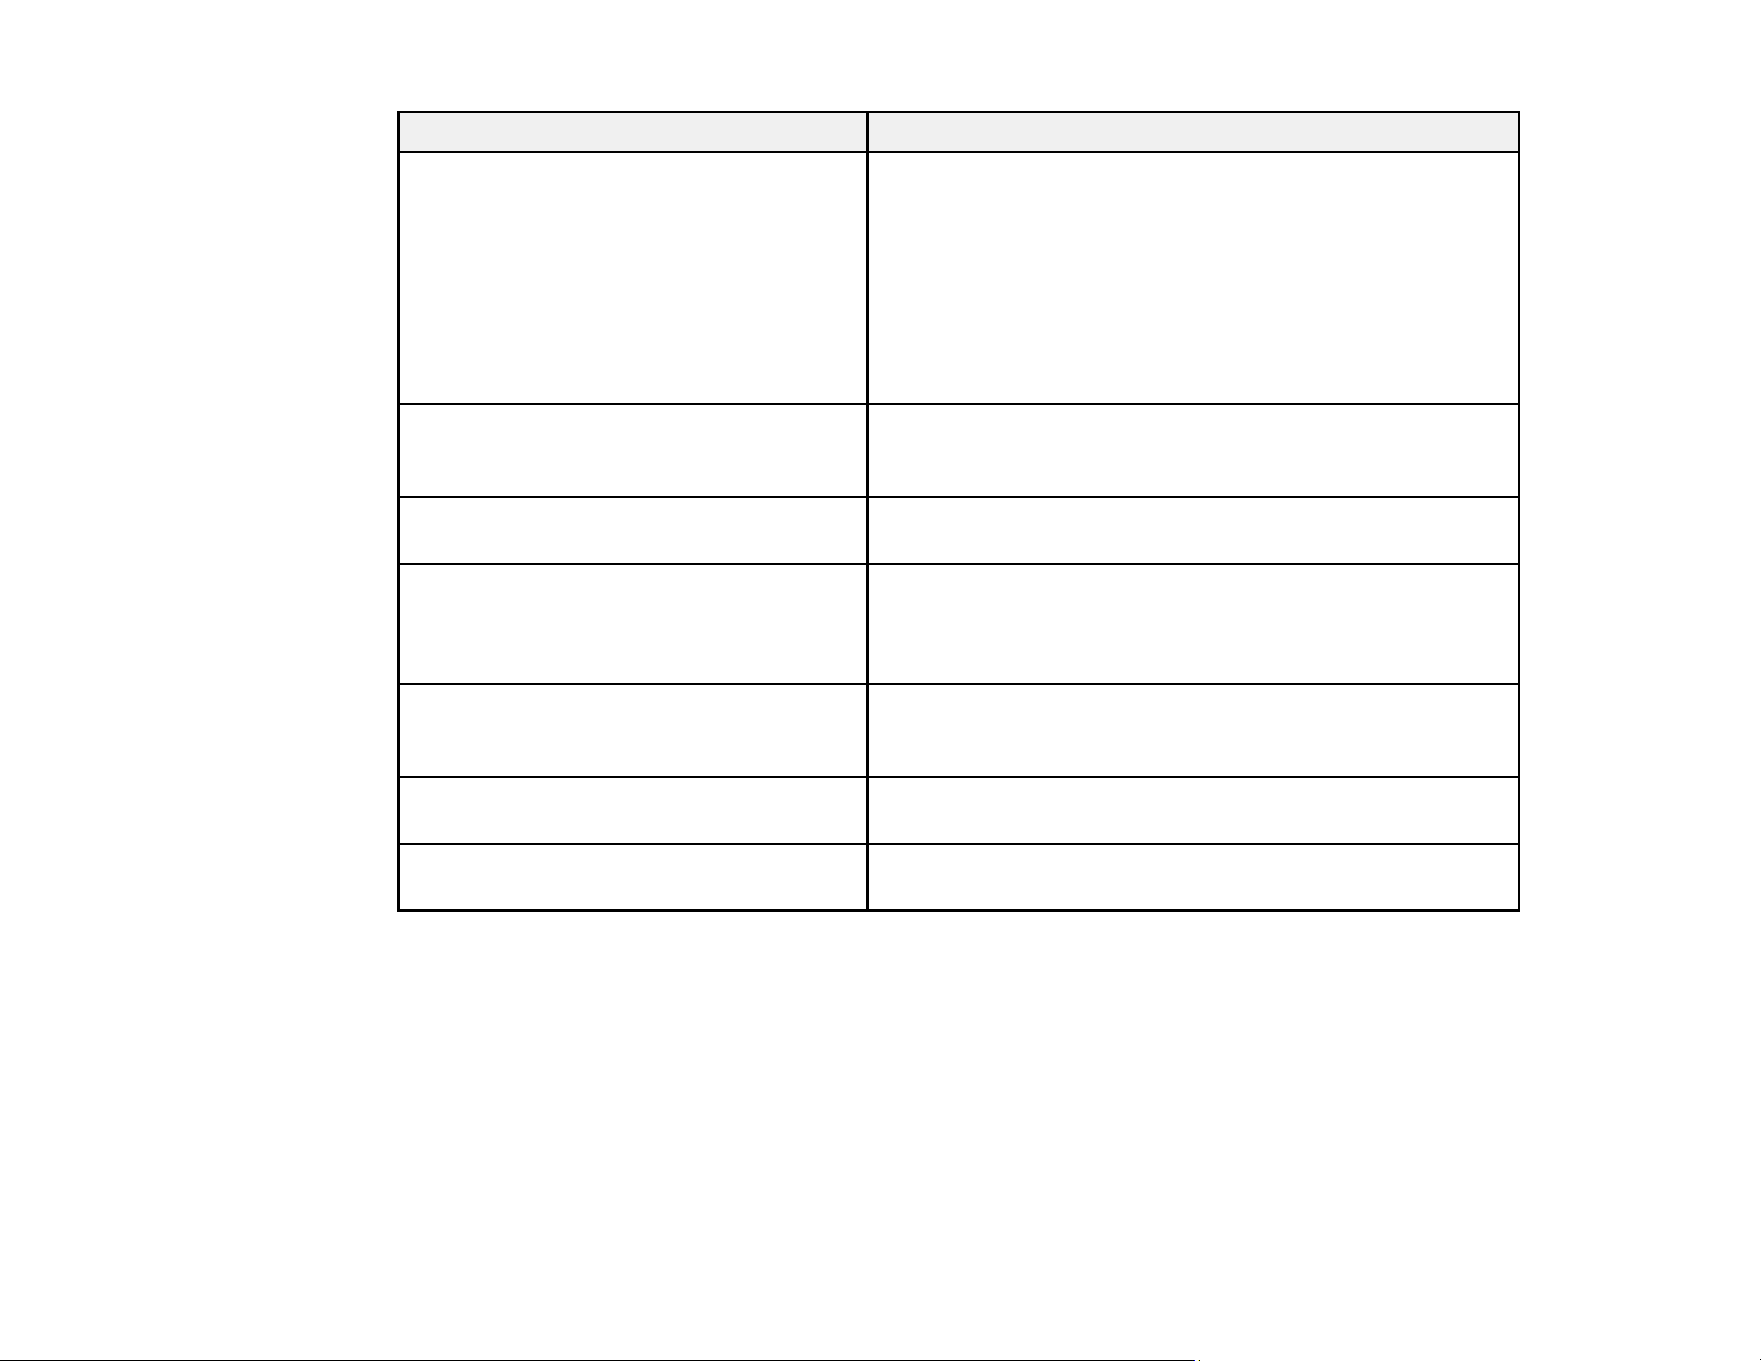
Custom Paper Setting options
Options Description
Select Reference Paper Select the type of paper that is closest to the paper you are
using:
Thinnest
Thin
Thick
Thickest
Adhesive
Platen Gap Select 1.6 for most media. Select 1.2 if head alignment
does not completely align the print head. Select 2.0 or 2.5 if
printouts are smeared.
Head Alignment Select when print results are grainy or out of focus:
Manual(Uni-D): when printing in one direction.
Manual(Bi-D): when printing in both directions. If head
alignment with this setting does not correct the problem,
select Manual(Uni-D).
53
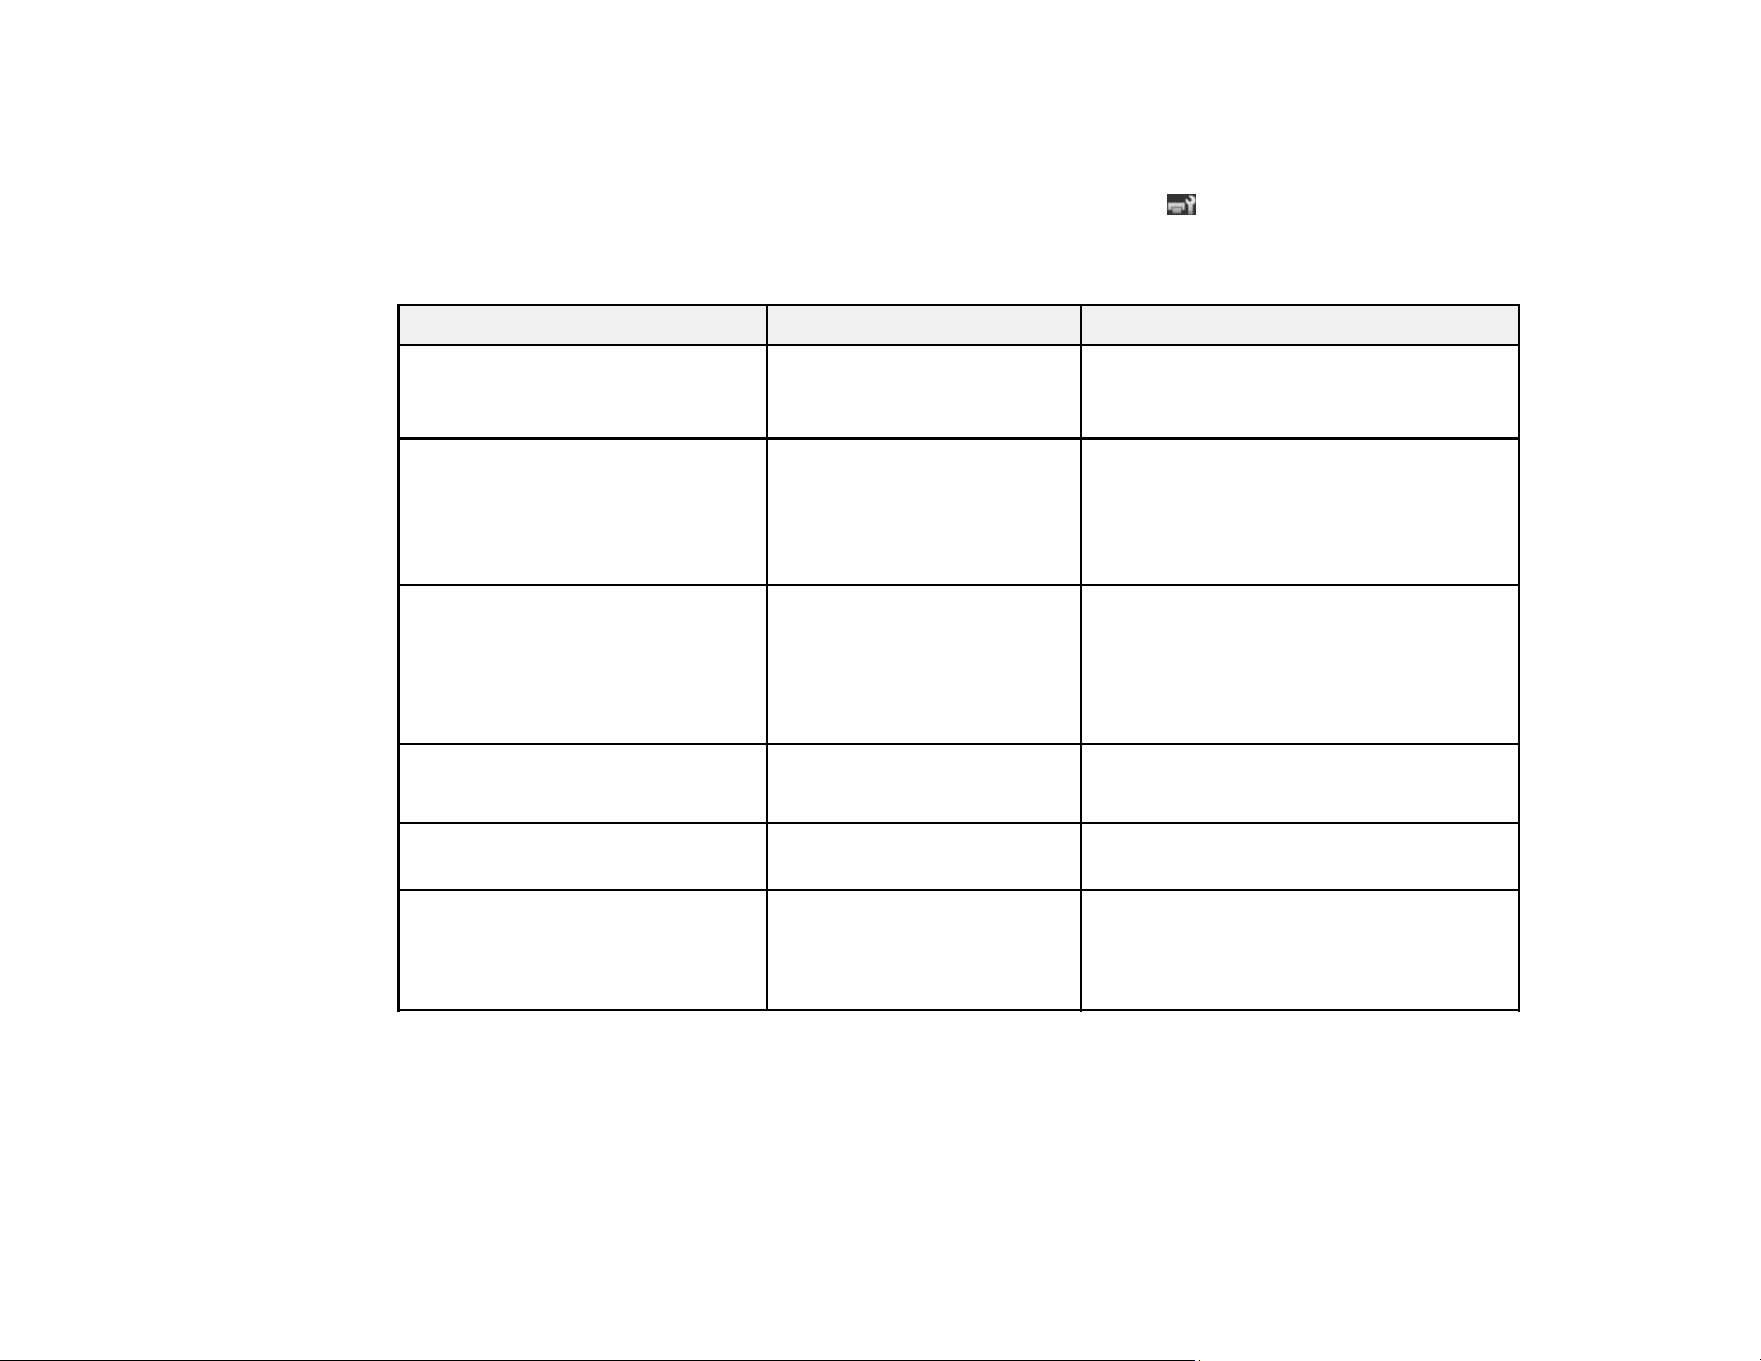
Options Description
Paper Feed Adjust Use this setting if you are unable to resolve banding issues
even after head cleaning and alignment. Select one of the
following:
Pattern: prints an adjustment pattern that you can
measure and then enter the measured distance.
Value: lets you choose an adjustment between –0.70 and
+0.70%. Select a higher value to reduce dark bands, or a
lower value to reduce white bands.
Paper Suction Set from –4 to 0 to increase the gap between the print head
and thin or soft paper. If print quality is reduced or media
does not feed correctly, you may need to lower the suction.
Feeding Tension Set from Lv1 to Lv5. Increase the value if creases appear
in media during printing.
Take-up Tension (if the take-up reel is
installed)
Set from Lv1 to Lv4. Decrease the value if creases appear
in media during printing or ink adheres to the back of the
take-up roll. Increase the value if there is too much slack in
the media or thick media cannot be wound correctly.
Prevent Sticking Select On only if the media sticks to the platen when the
product is turned on or when printing starts. Select Off for
normal printing.
Setting Name Enter a name up to 22 characters for the custom paper
settings.
Restore Settings Select Yes to return all settings for the selected custom
paper to their default values.
Parent topic: Using the Control Panel Menus
Related tasks
Loading Media
Saving Sets of Media Settings
Adjusting the Media Feed
54
Maintenance Menu Settings
The Maintenance menu lets you run nozzle checks, cleaning cycles, and other maintenance operations.
You can access the menu by pressing the OK or Menu button while the tab is selected.
Caution: Follow the instructions in the topic links below the table to use these menu settings correctly.
Setting Options Description
Nozzle Check — Prints a nozzle check pattern that you
can visually inspect and then run head
cleaning if necessary.
Head Cleaning
All Nozzles
Selected Nozzles
Execute (Light)
Execute (Medium)
Execute (Heavy)
Lets you clean all or selected nozzles,
based on the nozzle check pattern.
Select the lightest cleaning level first. If
nozzles are still clogged, select a
heavier cleaning.
Cutter Maintenance Adjust Cut Position
Replace Cutter
Adjusts the cutter position in
increments of 0.039 inch (1 mm), from
–0.12 to 0.12 inch (–3 to 3 mm).
Replace Cutter: positions the cutter for
replacement.
Head Maintenance Yes
No
Positions the print head for cleaning
using the head maintenance kit.
Head Cap Cleaning — Positions the print head to allow access
to the caps for cleaning.
Waste Ink Counter — Lets you reset the waste ink counter if
you replace the waste ink bottle before
being prompted by a message on the
control panel.
Parent topic: Using the Control Panel Menus
Related tasks
Replacing the Waste Ink Bottle
Aligning the Print Head
Replacing the Cutter

55
Performing Head Maintenance
Cleaning the Print Head
Checking for Clogged Print Head Nozzles
Setup Menu Settings
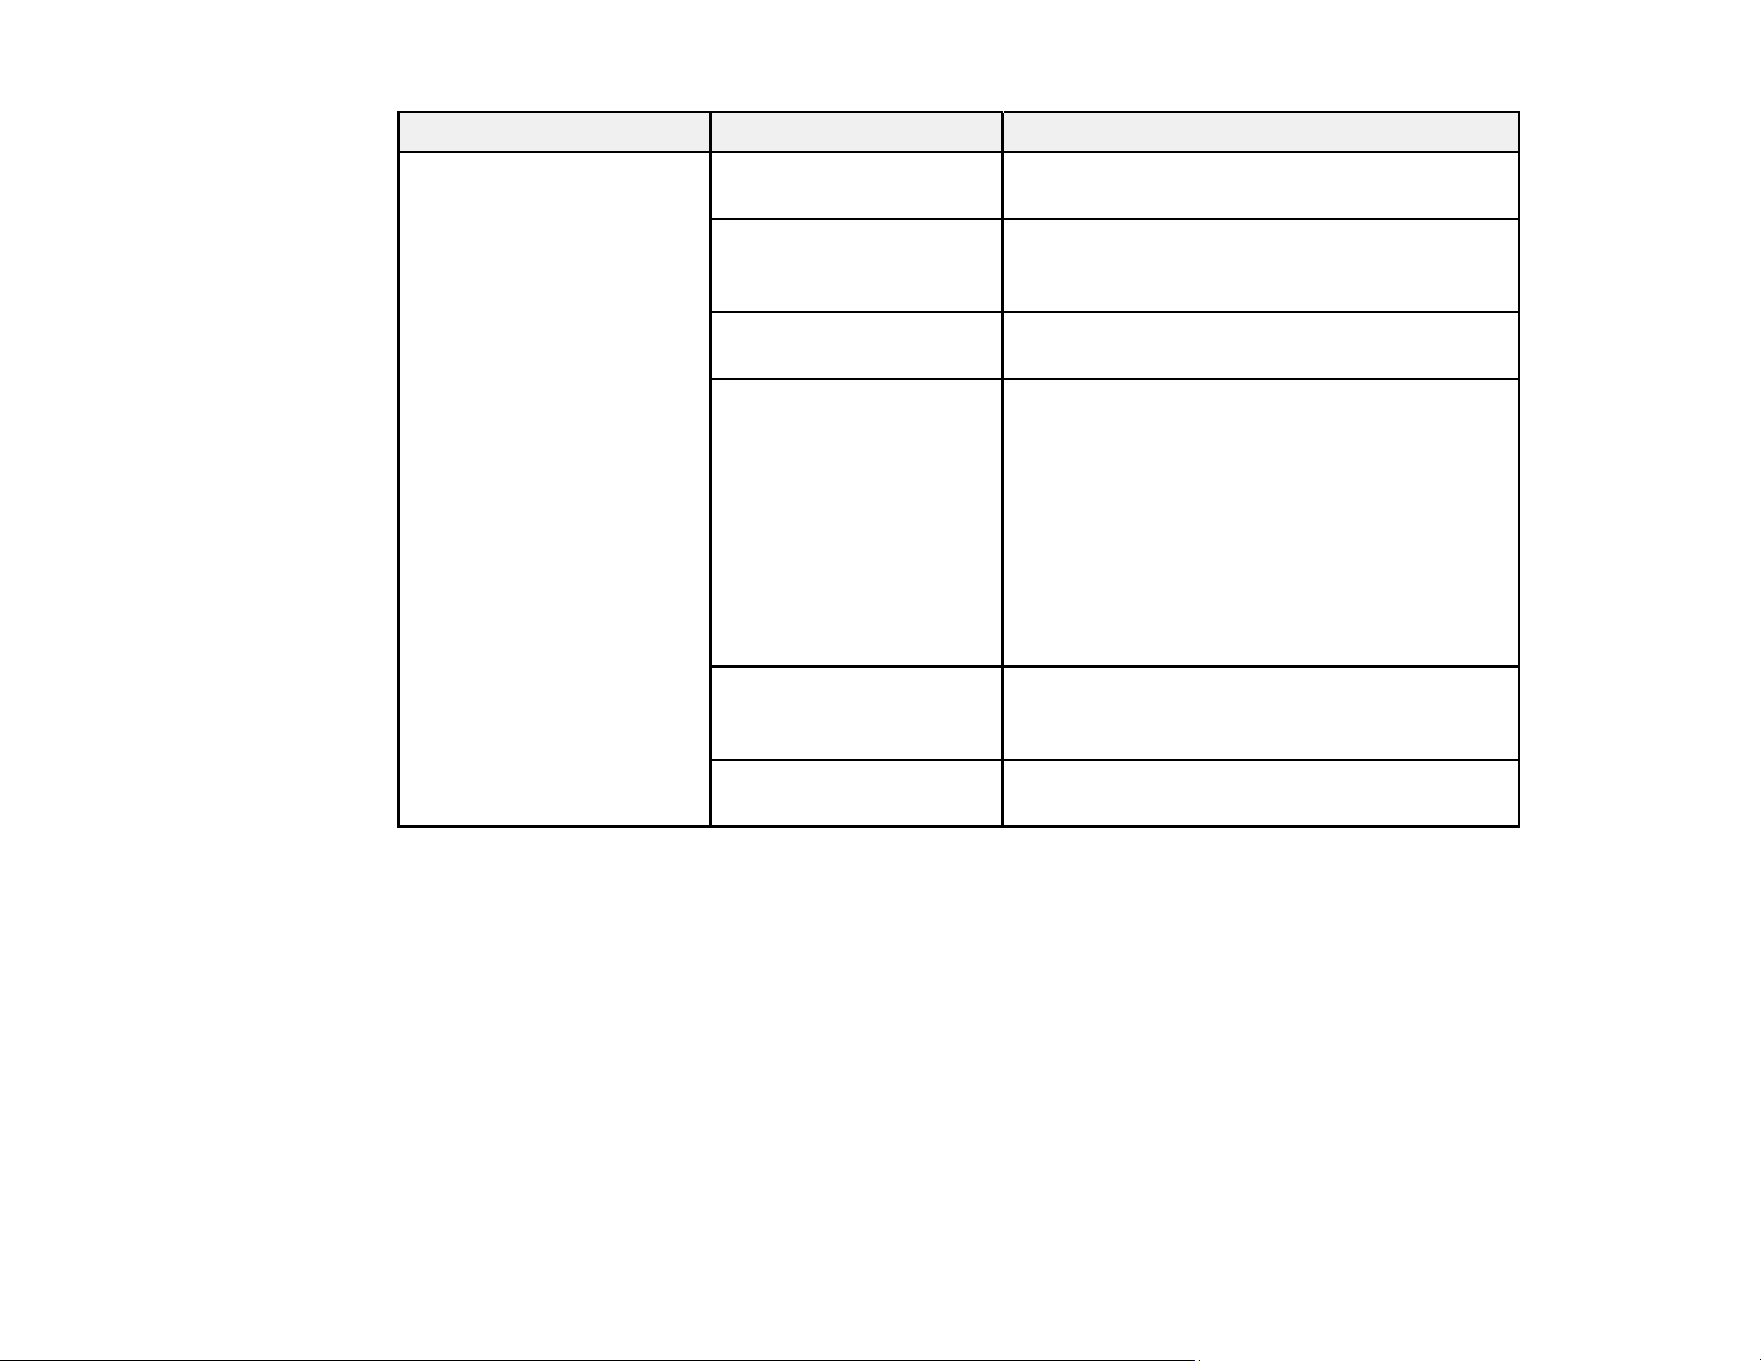
The Setup menu lets you configure and monitor the following aspects of your product:
• Printer setup
• Printer status
• Network setup
• Power settings
• General preferences
• Date and time settings
Caution: Follow the instructions in the topic links below the tables to use these menu settings correctly.
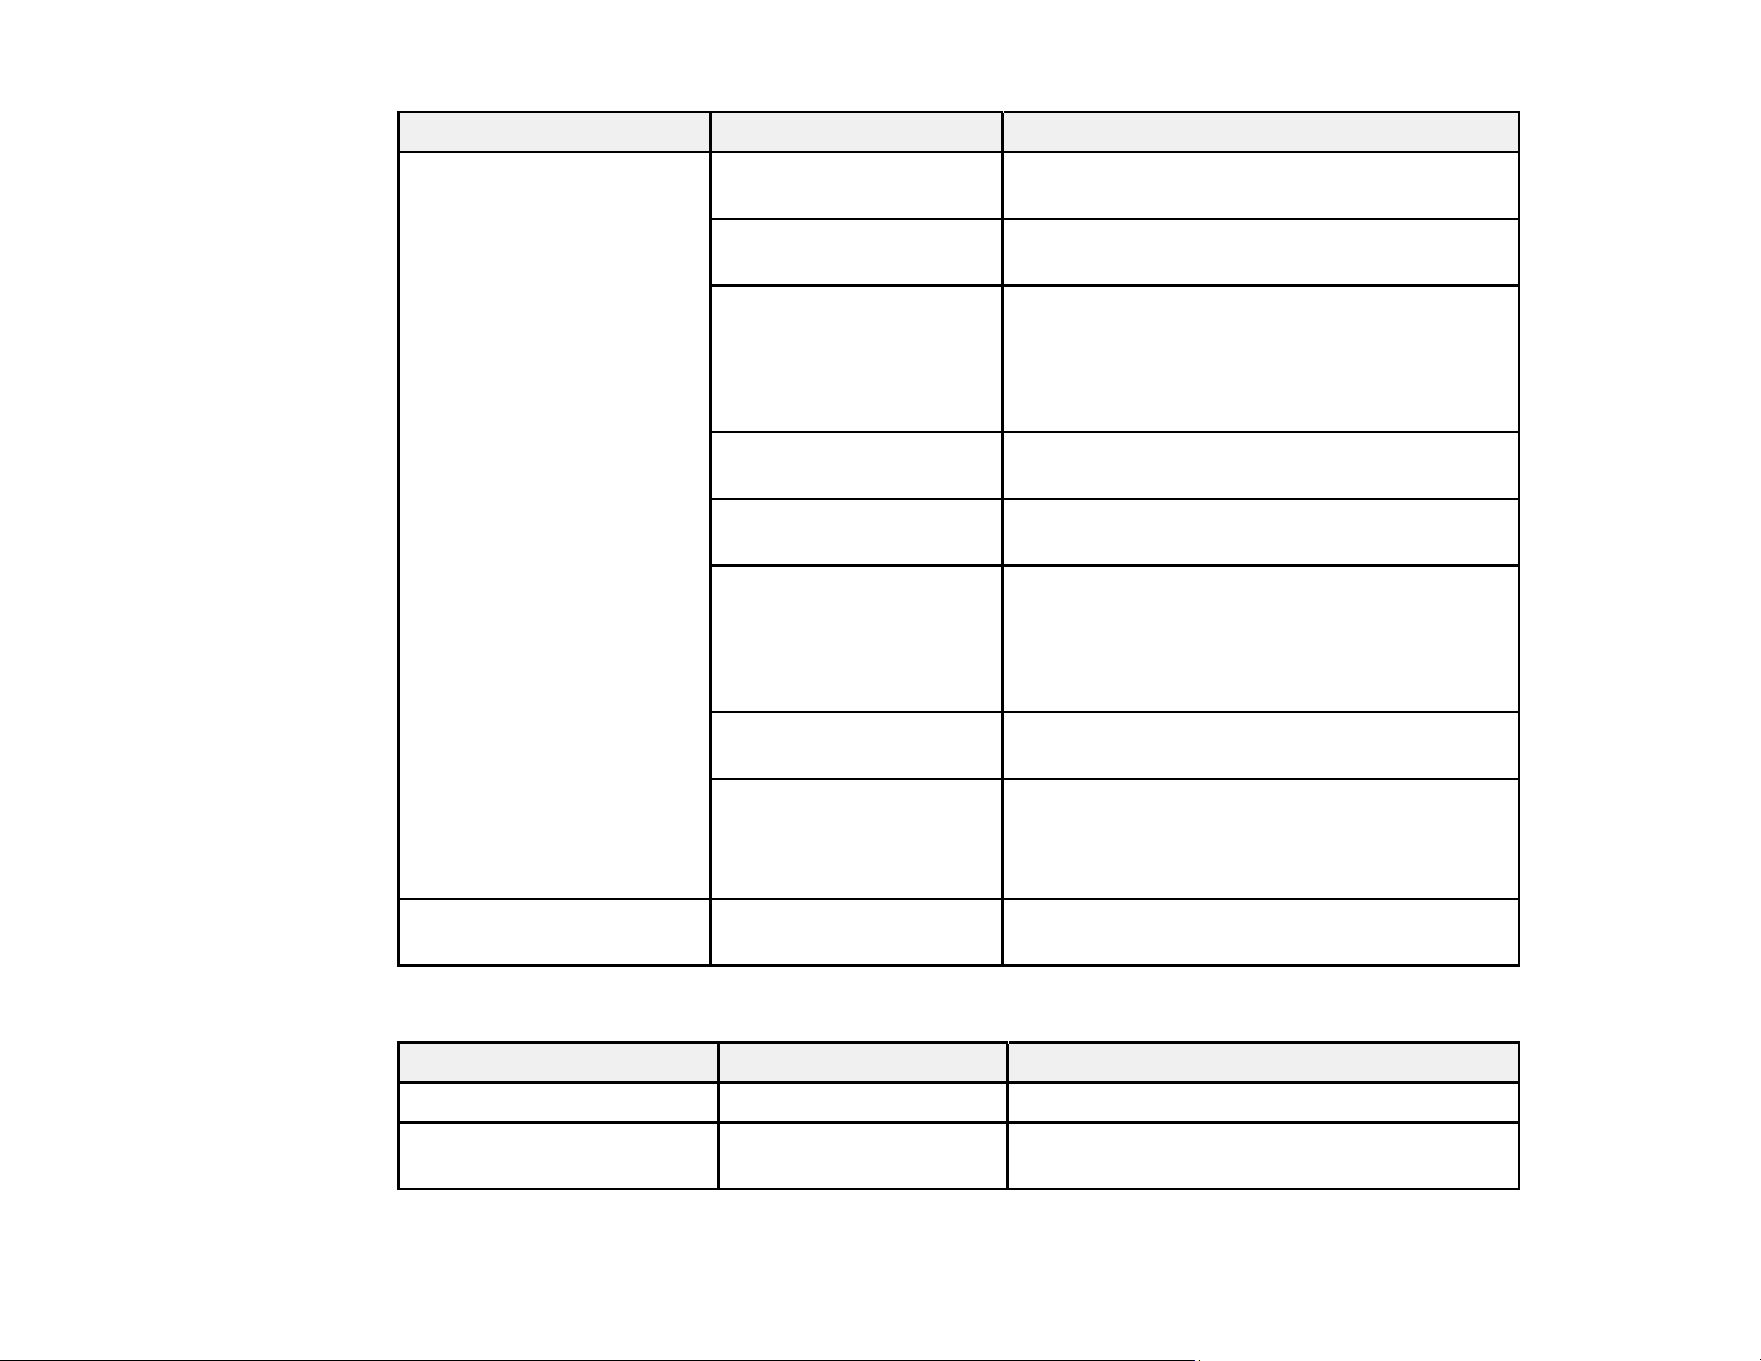
Printer Setup Settings
56
Setting Options Description
Roll Paper Setup Auto Cut Automatically cuts the roll paper as each page
is printed.
Refresh Margin Automatically trims the leading edge to
remove any ink stains that may have been left
from the previous print job.
Page Line Prints a cut line between pages if Auto Cut is
off.
Roll Paper Margin Sets the margins for each page.
Note: Settings made using the RIP software
take priority over these settings.
Side: 3mm (0.12 in.) or 15mm (0.59 in.)
Top: 5mm (0.2 in.) or 15mm (0.59 in.)
Bottom: 5mm (0.2 in.), 15mm (0.59 in.), or
150mm (5.9 in.)
Roll Paper Remaining Displays and records the amount of paper
remaining on a roll (after you enter the total roll
length).
Remaining Alert Enter the length at which the printer will alert
you, from 4 to 50 ft (1 to 15 m).
57
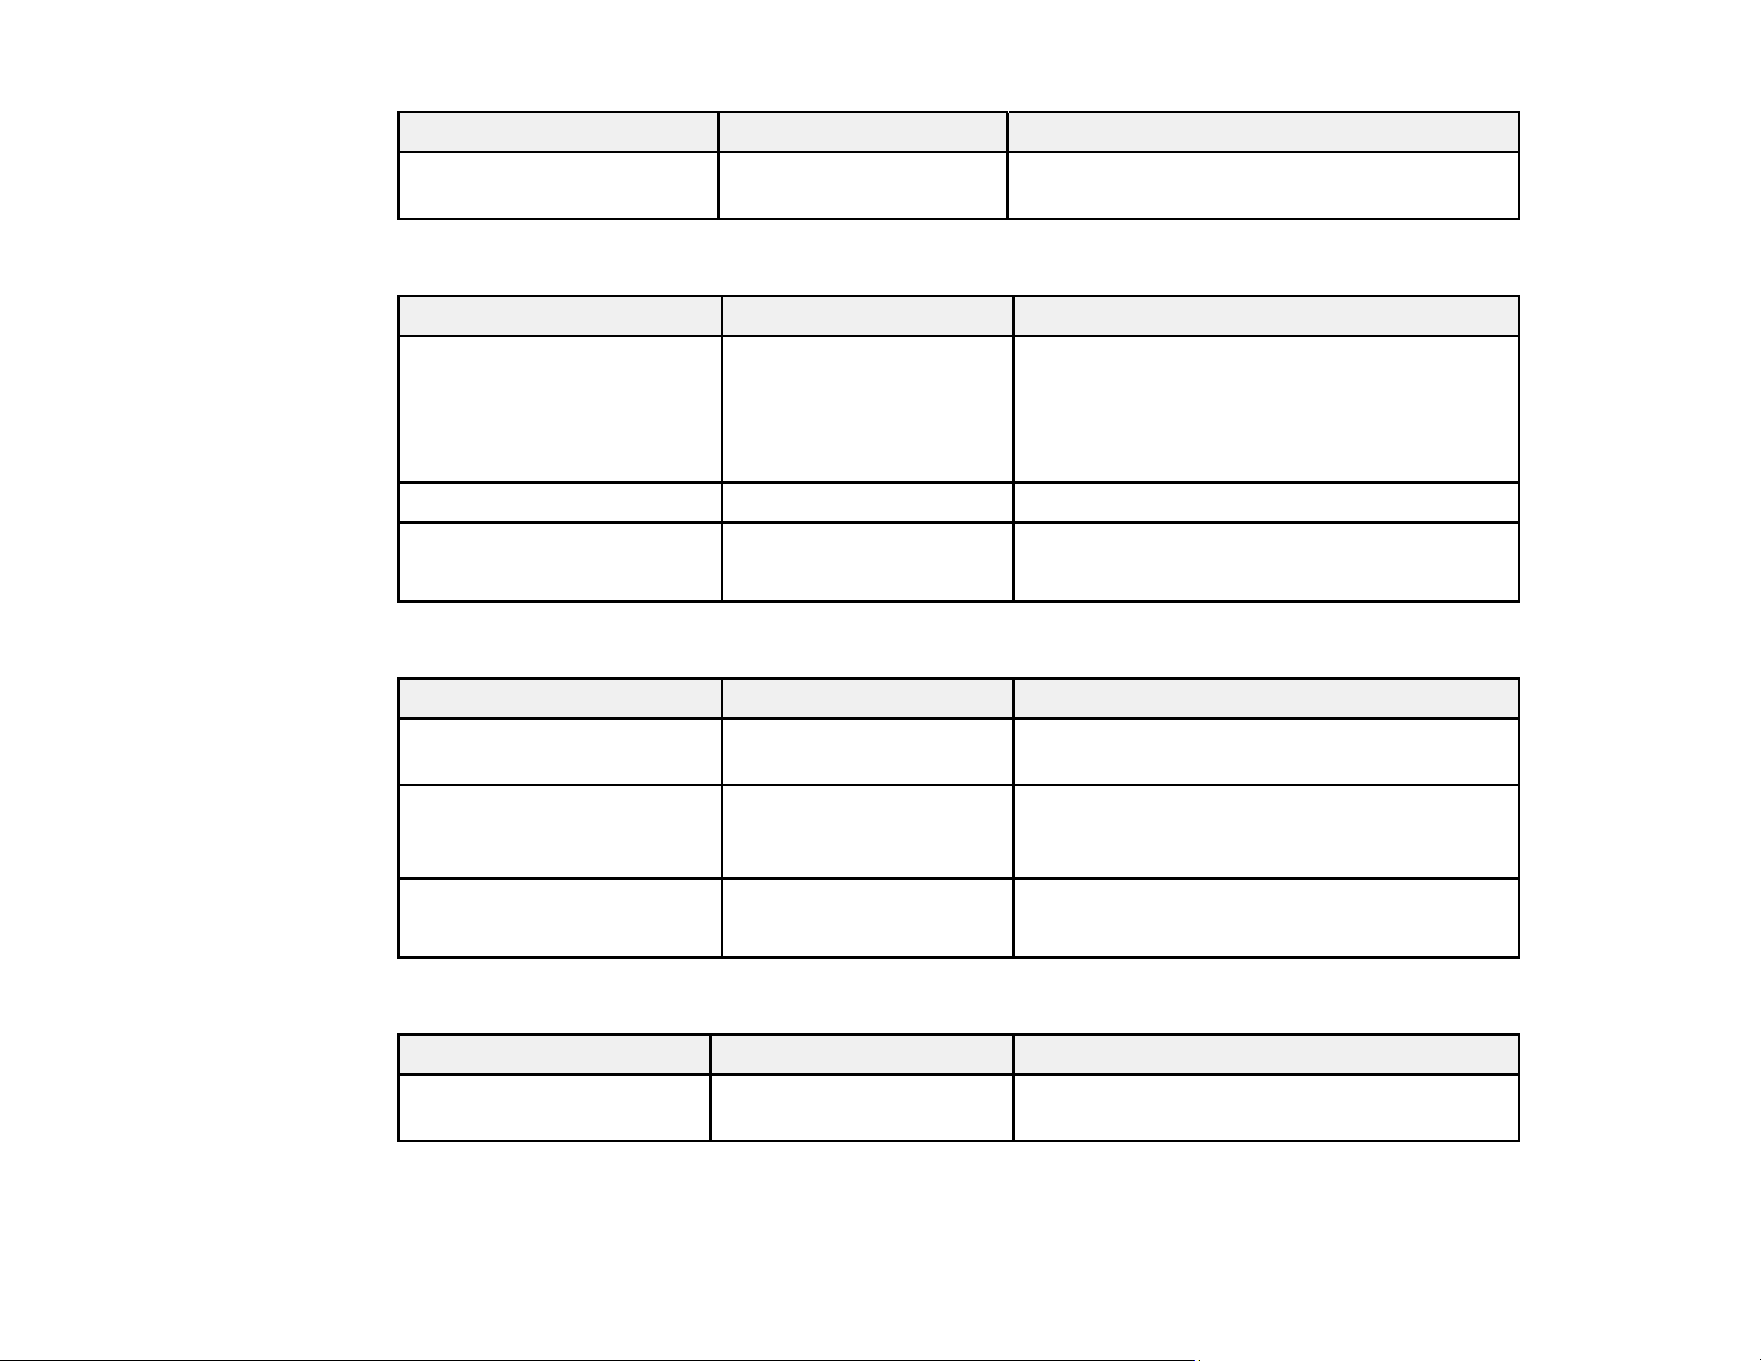
Setting Options Description
Advanced Settings Remove Skew Performs skew correction for loaded media.
Disable if media shows traces from the rollers.
Drying Time Per Page If ink blurs on the paper, set a time from 0.5 to
60 minutes.
Paper Size Check Automatically detects the edges of the paper.
Turn off this setting only if the printer displays
a paper setting error when media is loaded
correctly. Changed settings take effect when
paper is reloaded.
Paper Skew Check Stops printing when skewed paper is detected.
Leave this setting On to avoid paper jams.
Print Nozzle Pattern Selects how often to print an automatic nozzle
check pattern (from 1 to 10 pages).
Periodical Cleaning Selects the strength (Light, Medium, or
Heavy) and frequency of automatic head
cleaning cycles. Even when Off, the printer
automatically cleans the print head at set
intervals to prevent clogging.
Cleaning Cycle Selects the frequency of automatic head
cleaning cycles (OFF or from 1 to 10 pages).
Charge Setting Adjusts the chip unit if there is a discrepancy
between the estimated ink level indicator on
the LCD screen and the actual amount of
remaining ink.
Restore Settings — Returns all printer settings to their default
values.
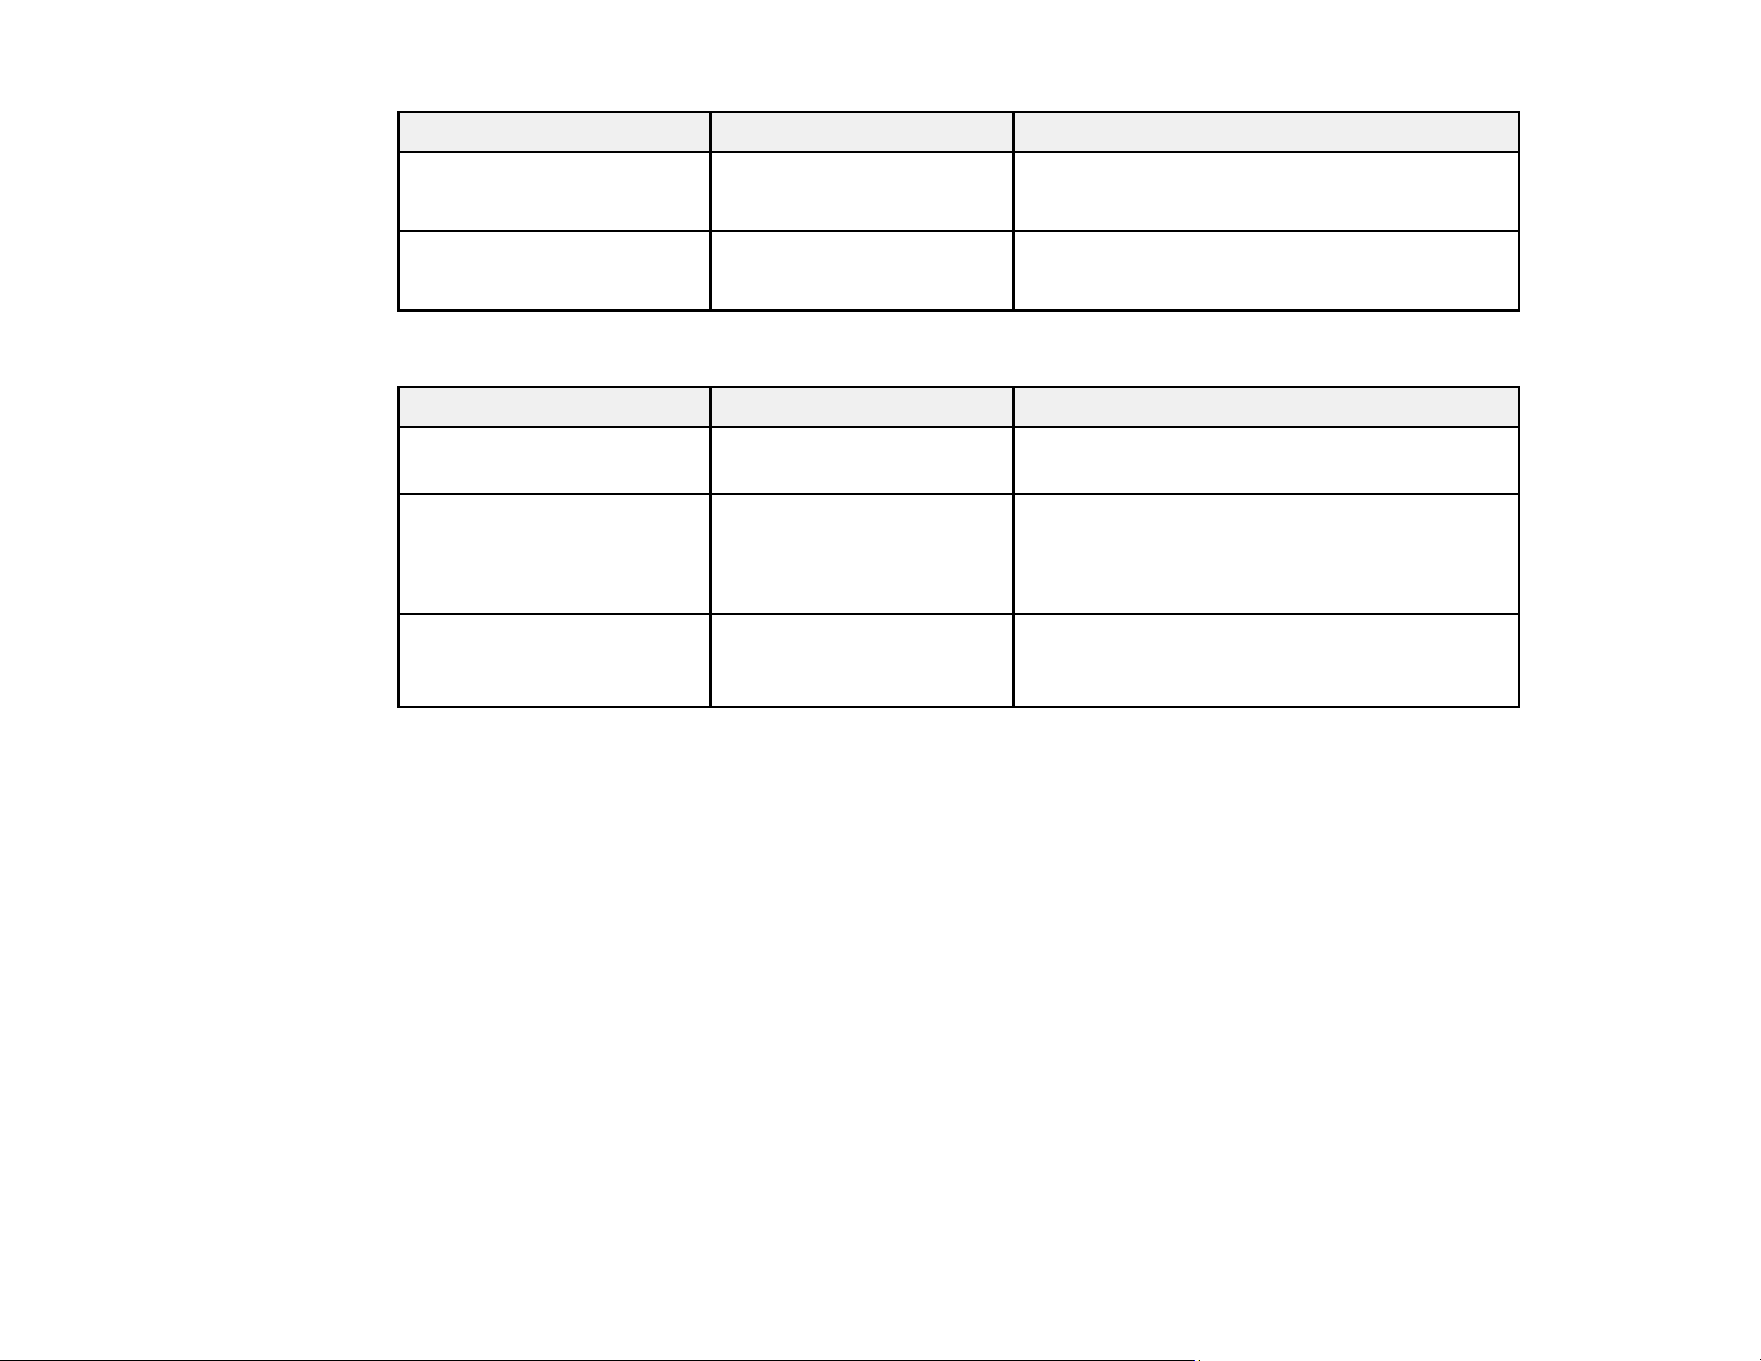
Printer Status Settings
Setting Options Description
Firmware Version — Displays the printer's firmware version.
Option Status — Displays the name of the device connected to
the product.
58
Setting Options Description
Carriage passes — Displays the current number of carriage
passes.
Network Setup Settings
Setting Options Description
IP Address Setting Auto
Panel
Determines whether IP addresses are
obtained automatically through DHCP or
manually. Select Panel to enter an IP
address, subnet mask, and default gateway
address.
Print Status Sheet — Prints the current network status and settings.
Restore Settings Yes
No
Restores all network settings to their defaults.
Power Settings
Setting Options Description
Sleep Mode 5 to 240 minutes Selects the interval before the printer enters
sleep mode. Default is 15 minutes.
Power Off Timer Off
1 to 24 hours
Selects the interval before the printer turns off
automatically when it is idle. Default is 8
hours.
Restore Settings Yes
No
Restores all Power settings to their defaults.
Preferences Settings
Setting Options Description
Language Various languages Selects the language used on the control
panel display.
59
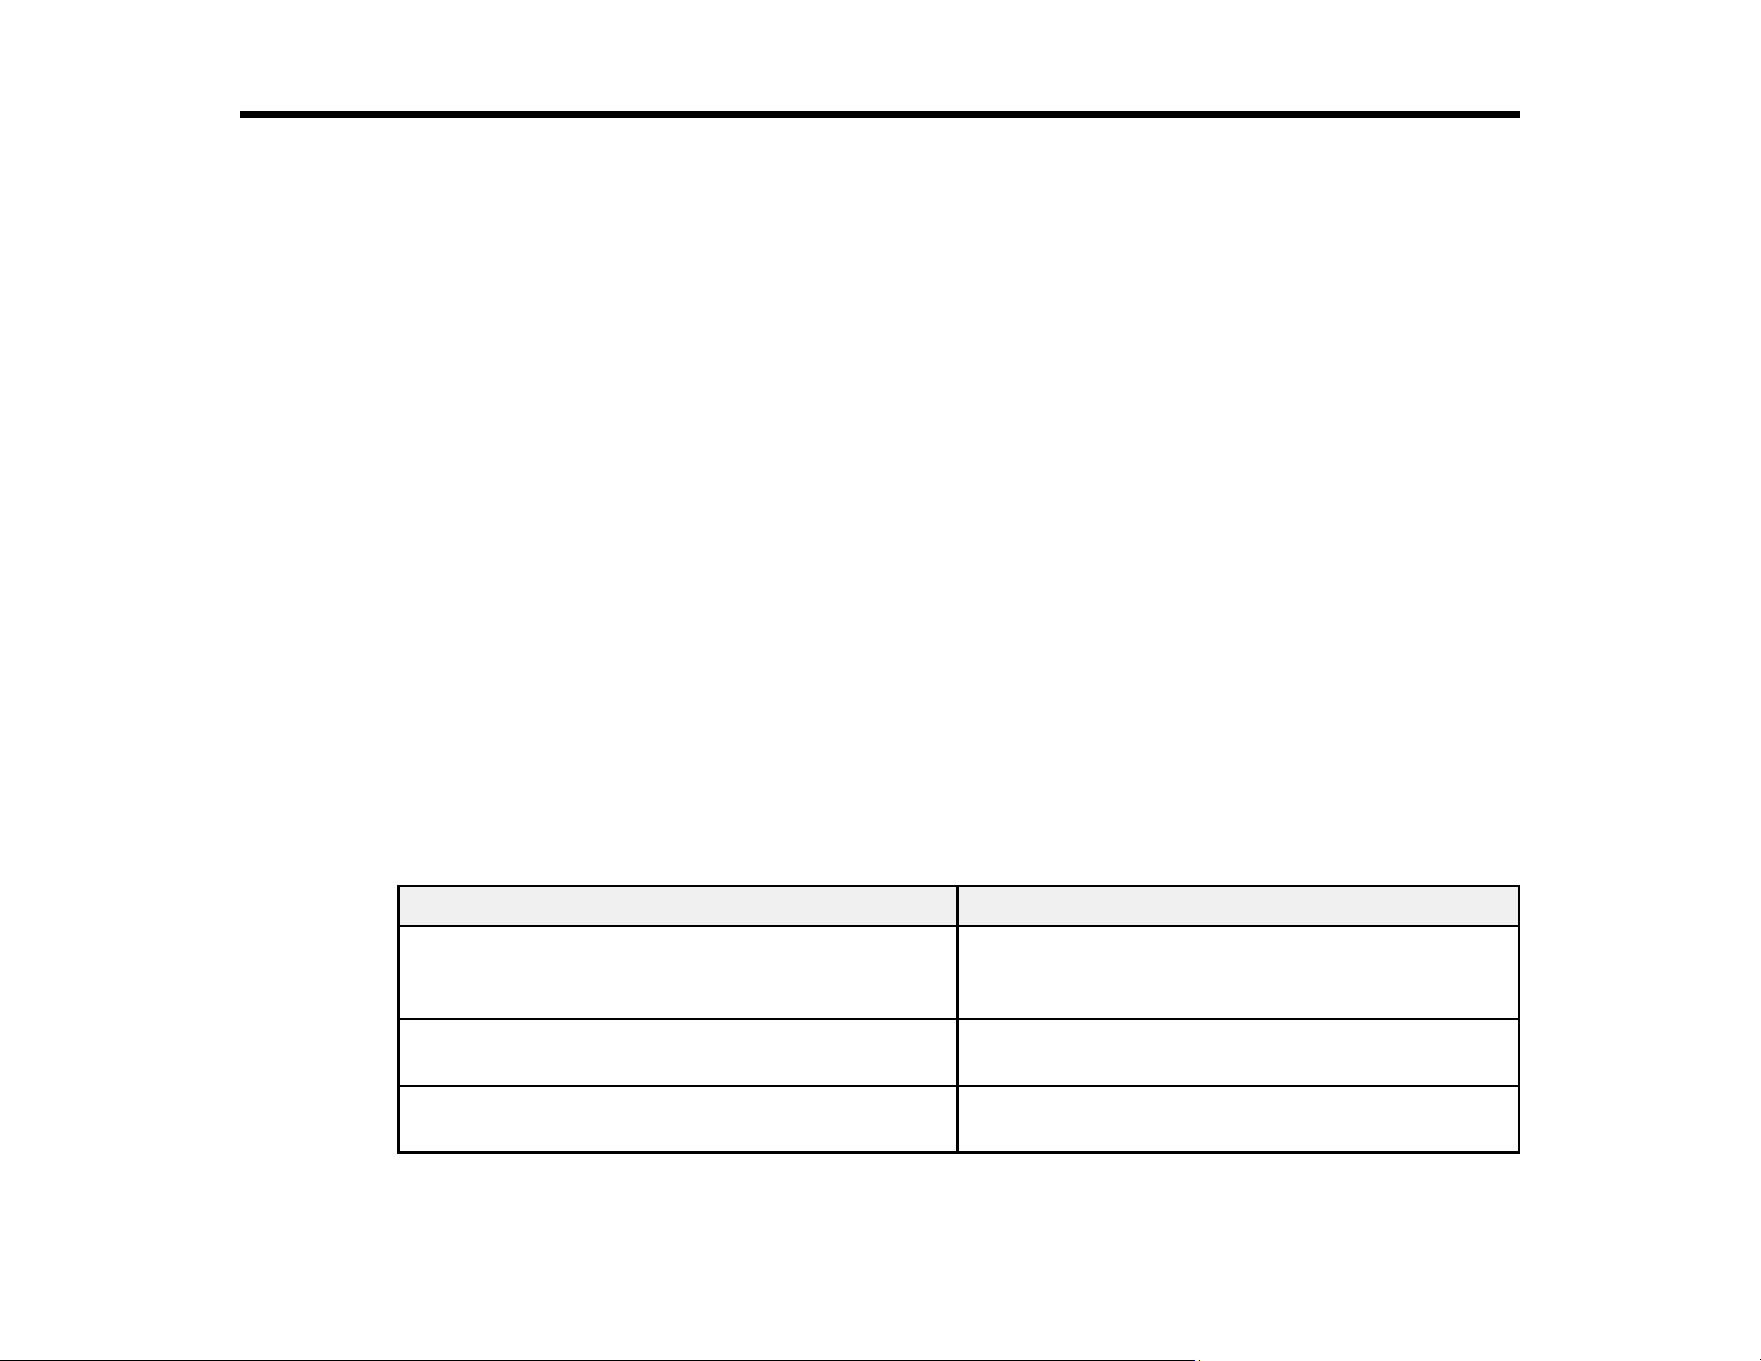
Setting Options Description
Unit: Length m
ft/in
Selects the unit of length used on the control
panel display and when printing test patterns.
Alert Lamp Setting On
Off
Enables the alert light when an error occurs.
Administrator Menu Settings
Setting Options Description
Date And Time MM/DD/YY HH:MM Sets the printer's built-in clock. The time and
date are used in logs and status sheets.
Time Zone — Enter the difference between your time zone
and GMT. The time zone is used in email
notifications sent by the Remote Manager
utility.
Reset All Settings Yes
No
Restores all Setup menu settings to their
defaults (except Date and Time, Language,
and Unit: Length).
Parent topic: Using the Control Panel Menus
Related references
Printable Area and Paper Size Checking
Related tasks
Saving Sets of Media Settings
Cutting Media
Cleaning the Print Head
Checking for Clogged Print Head Nozzles
60
Maintenance
See the instructions in these sections to maintain your printer for optimum results.
When to Maintain Your Product
Preparing for Maintenance
Stirring High Density Black Ink
Replacing the Ink and Chip Unit
Print Head Maintenance
Cleaning the Anti-drying Caps
Cleaning the Platen
Replacing the Waste Ink Bottle
Replacing the Cutter
Replacing the Head Cleaning Set
When to Maintain Your Product
See the guidelines here to determine when you perform maintenance operations on your product or
replace or refill consumables. If you need to perform an operation, use the links at the end of this topic.
Caution: To prevent sedimentation and incorrect colors in your printouts, stir the High Density Black ink
in the ink tank once a week.
Note: You can set up certain maintenance operations to run automatically using settings on your product
control panel.
Symptom Maintenance or consumable operation
Regular ink maintenance Stir the High Density Black ink in the ink tank and
clean the anti-drying caps once a week. Clean the
platen once a month.
A low ink warning appears on the LCD screen. Check if you need to replace an ink and chip unit
for the indicated color.
A prepare and replacement message appears on
the LCD screen.
Replace the waste ink bottle.
61
Symptom Maintenance or consumable operation
You want to check the print quality for clogged
nozzles.
Run a nozzle check to print a check pattern.
A nozzle check pattern indicates clogged nozzles. Clean the print head.
Print quality has declined.
Printed media is faint, or contains horizontal
stripes or uneven colors.
Even after cleaning the print head several times,
print quality has declined.
Perform the following as necessary:
• Clean the anti-drying caps.
• Replace the head cleaning set.
Printed media is smudged.
Ink, paper particles, or lint from the media
accumulate on the platen.
Clean the platen as necessary.
Parent topic: Maintenance
Related tasks
Cleaning the Print Head
Checking for Clogged Print Head Nozzles
Replacing the Chip Unit and Refilling Ink
Replacing the Waste Ink Bottle
Cleaning the Anti-drying Caps
Cleaning the Platen
Replacing the Head Cleaning Set
Stirring High Density Black Ink
Preparing for Maintenance
Before you perform any maintenance procedures, see these sections to prepare for maintenance.
Maintenance Supplies
Maintenance Precautions
Parent topic: Maintenance
62
Maintenance Supplies
Before performing any maintenance tasks or replacing ink, make sure you have the maintenance
supplies listed here.
Protective eyewear
Obtain commercially available eyewear to protect your eyes from ink and ink cleaner.
Mask
Obtain a commercially available mask to protect your mouth and nose from ink and ink cleaner.
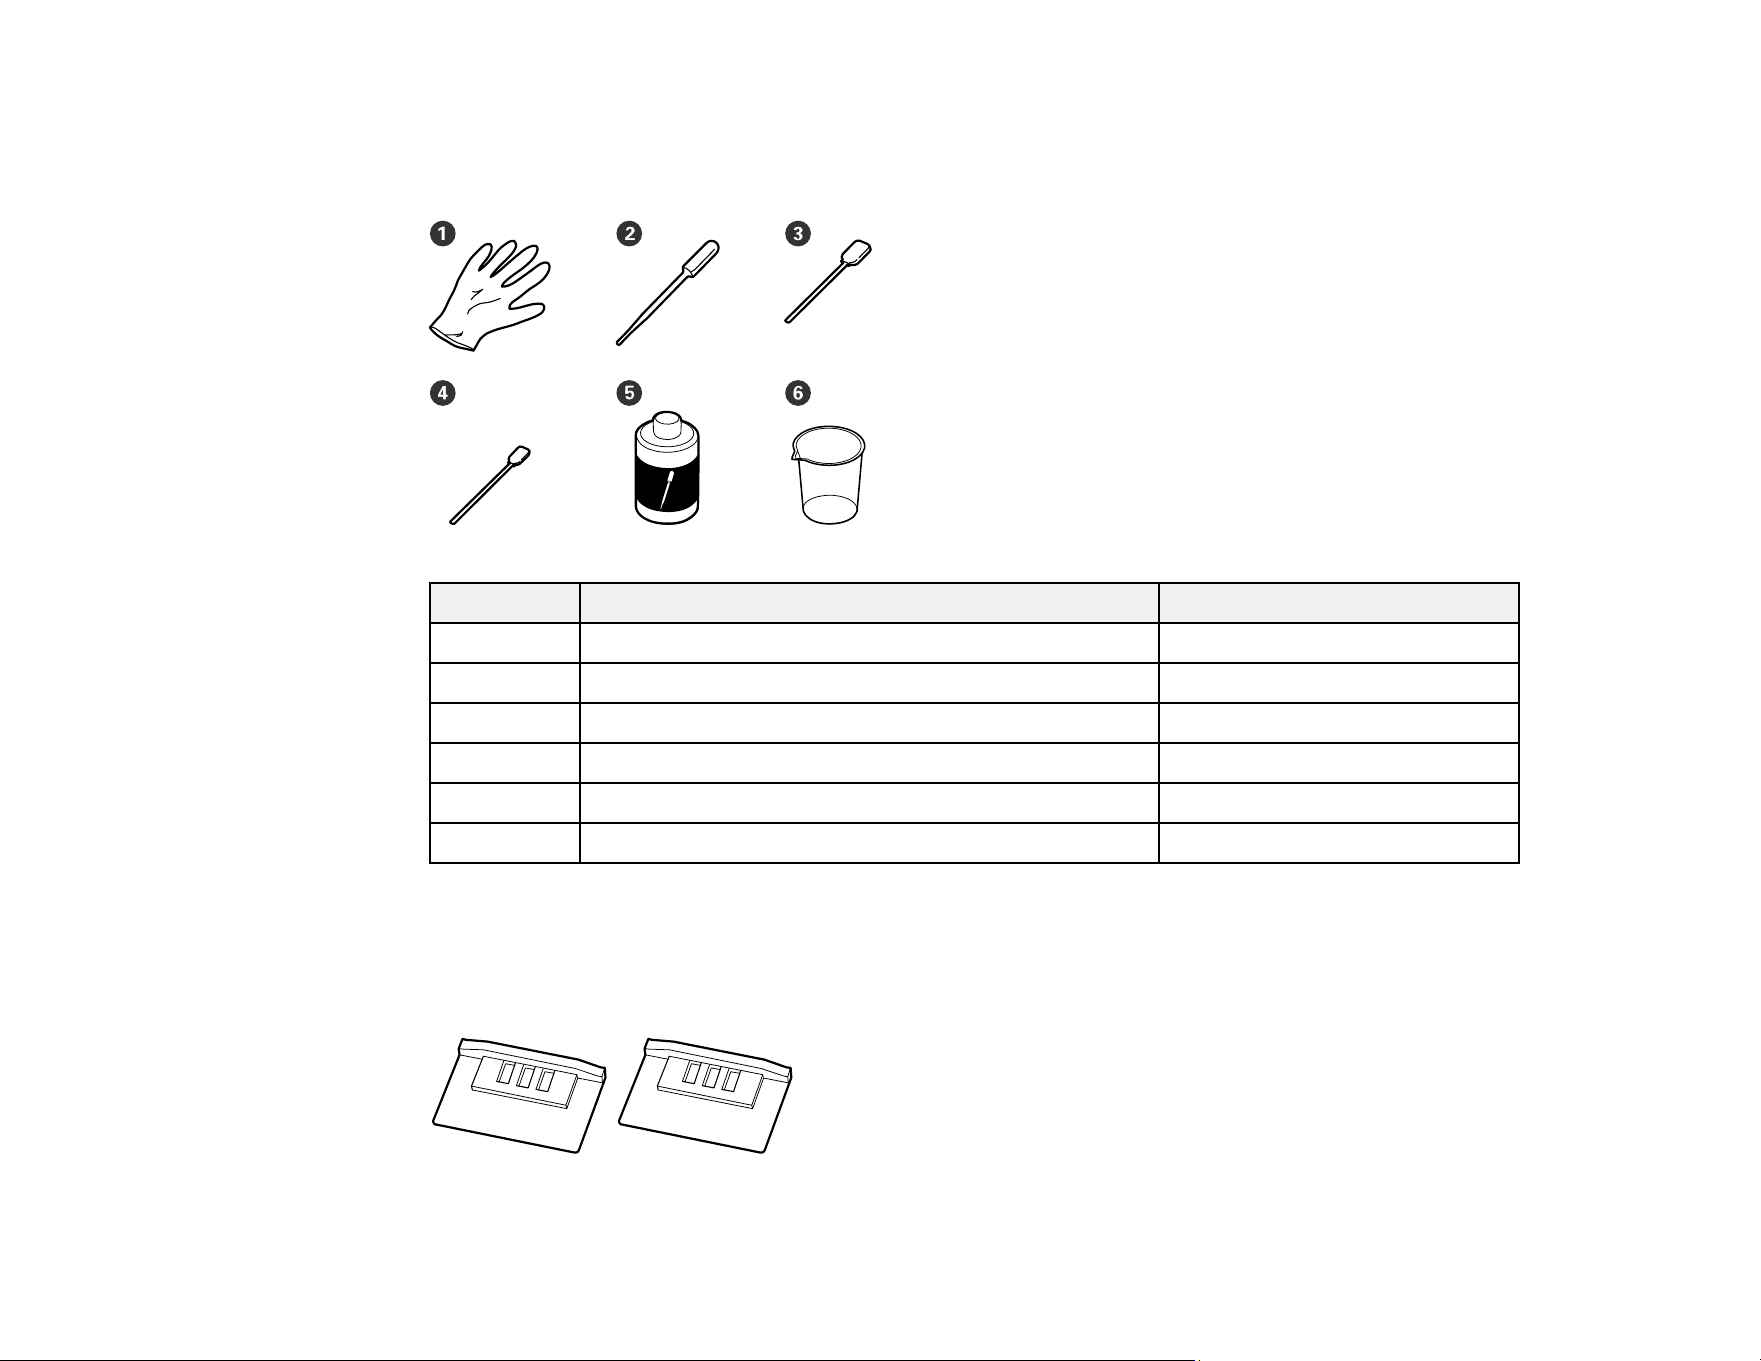
Wiper kit
Use the wiper kit that came with your product to replace the wiper and wiper cleaner.
Number Part Quantity
1 Gloves 2
2 Wiper 2
3 Wiper cleaner 2
63
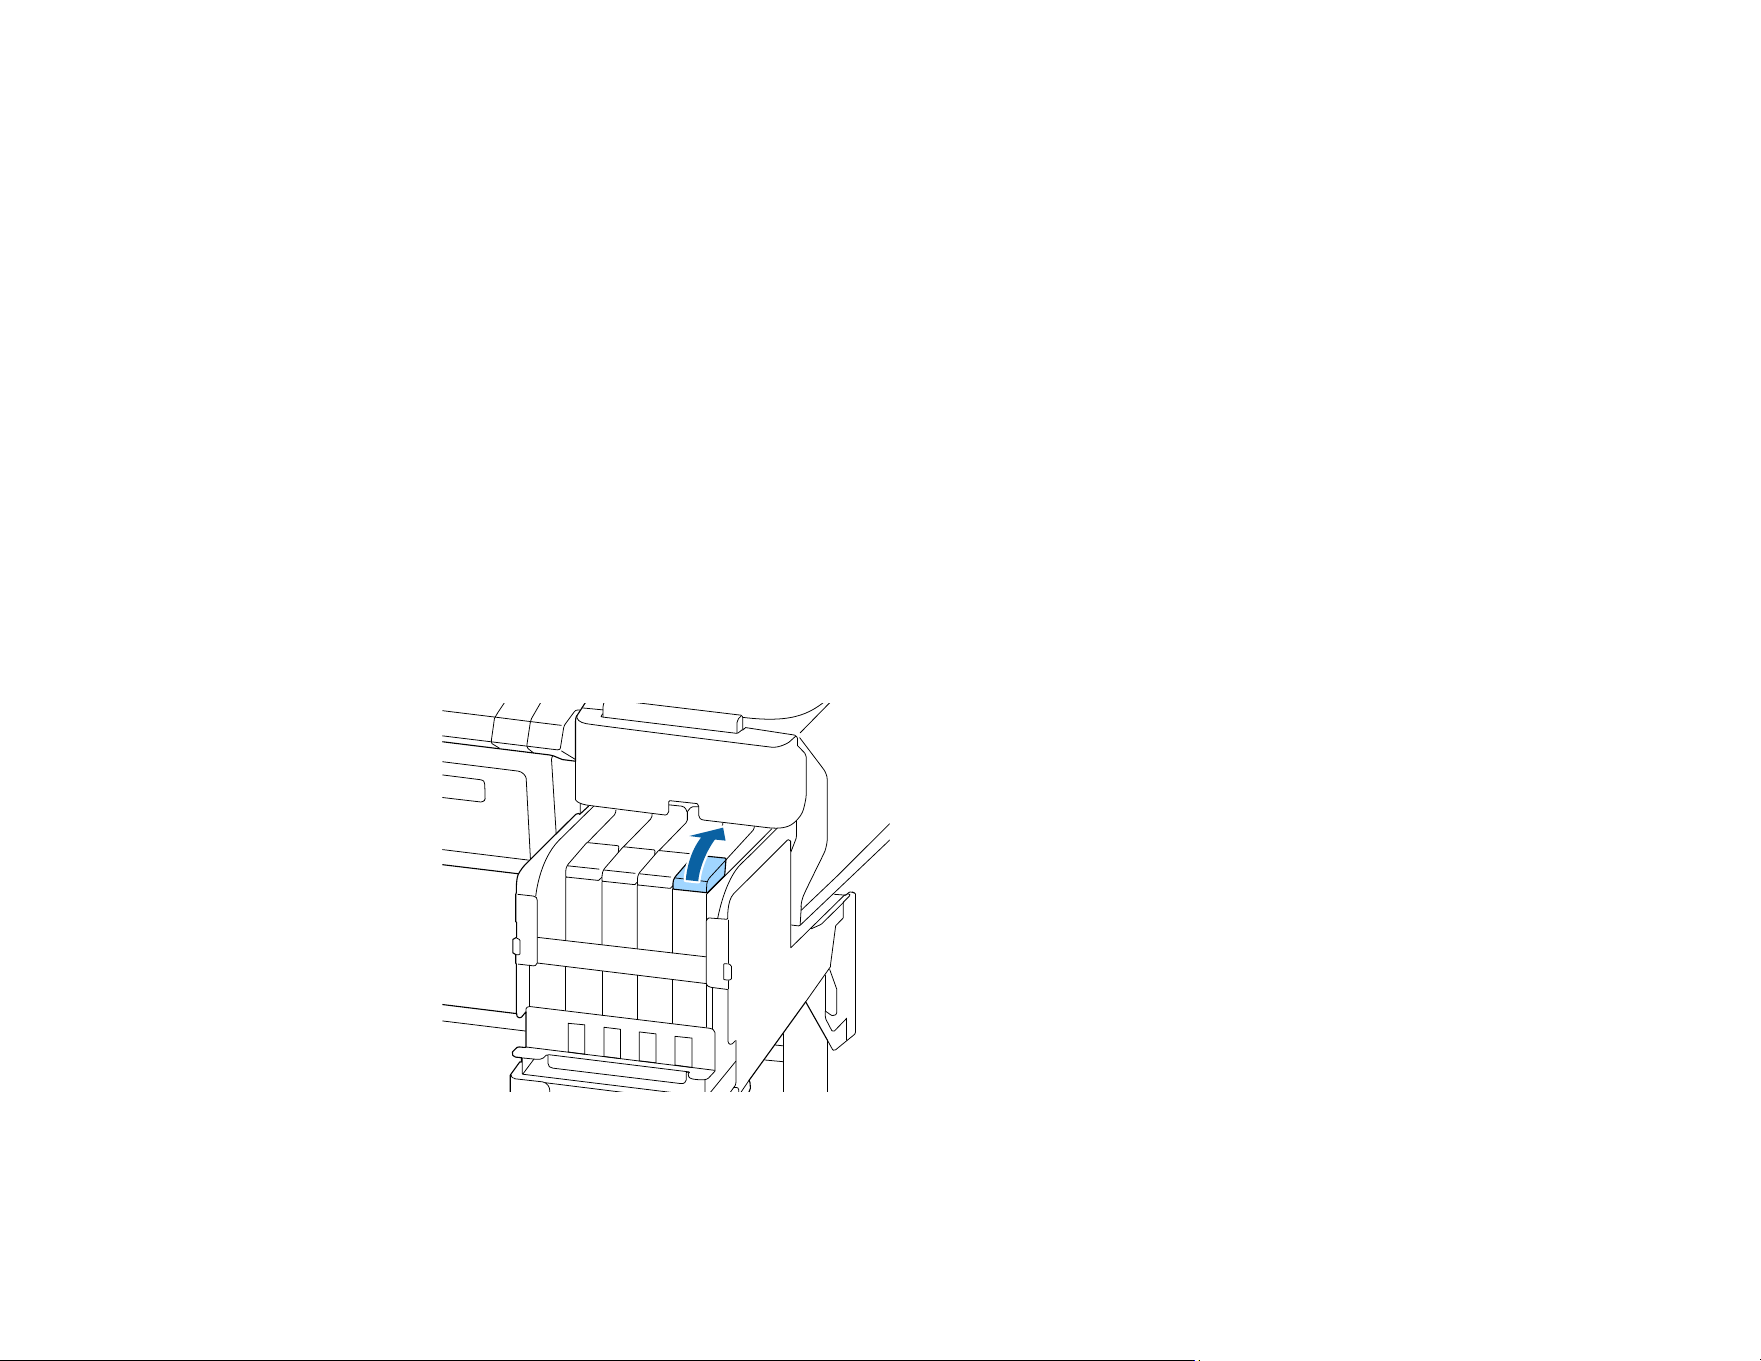
Cap Cleaning Kit
Use the cap cleaning kit that came with your product for cleaning ink stains. The kit contains the
following items:
Number Part Quantity
1 Gloves 2
2 Dropper 2
3 Cleaning stick (wide) 50
4 Cleaning stick (narrow) 25
5 Cap cleaning liquid 1
6 Cup 1
Metal or plastic tray
Obtain a metal or plastic tray to hold cleaning tools and removed consumables.
Head Maintenance Kit
Use the head maintenance kit that came with your product to clean the print head.

64
Soft cloth
Obtain a commercially available static-free, lint-free soft cloth to clean inside the product.
Parent topic: Preparing for Maintenance
Related references
Consumables and Replacement Parts
Maintenance Precautions
Follow these precautions as you maintain your product:
• Remove loaded media from the product before performing any maintenance tasks.
• Touch a metal object to discharge any static electricity before performing any maintenance tasks.
• Never touch the belts, cables, circuit boards, or other parts not covered in the maintenance task steps
or you could adversely affect the print quality or damage your product.
• Use only the cleaning sticks included in the product maintenance kit to clean your product to avoid
damaging the print head.
• Do not reuse cleaning sticks.
• Do not touch the ends of the cleaning sticks to prevent oil from your hands from damaging the print
head.
• Use only the cap cleaning liquid specified to clean the caps. Using anything else could damage your
product or reduce print quality.
• Do not use alcohol or water to clean the nozzle surface, caps, or wiper or you may damage your
product.
• Store ink packs, waste ink, and ink cleaner out of the reach of children.
• Wear protective eyewear, gloves, and a mask when performing maintenance tasks.
• Wash your hands after performing maintenance.
• Always use fresh cleaning pads.
Warning: If ink, waste ink or ink cleaner contact your skin, or get into your eyes or mouth, immediately
do the following:
• Thoroughly wash the substance from your skin with large volumes of soapy water. If your skin
becomes irritated or discolored, contact a doctor.
• Immediately rinse the substance from your eyes with water to avoid bloodshot eyes or mild
inflammation. If you experience eye problems, contact a doctor.
65
• If a substance gets in your mouth, contact a doctor immediately.
• If you swallow a substance, do not induce vomiting and contact a doctor immediately. Inducing
vomiting may cause material to get in your windpipe and cause injury.
Caution: Waste ink is classified as industrial waste. Dispose of waste ink according to your local laws
and regulations, such as entrusting it to an industrial waste disposal company. When handing over the
waste ink to the industrial waste disposal company, make sure you include the Safety Data Sheet (SDS)
found on the Epson support website.
Parent topic: Preparing for Maintenance
Related tasks
Performing Head Maintenance
Removing Media
Stirring High Density Black Ink
To prevent sedimentation and incorrect colors in your printed media, stir the High Density Black ink in
the ink tank once a week.
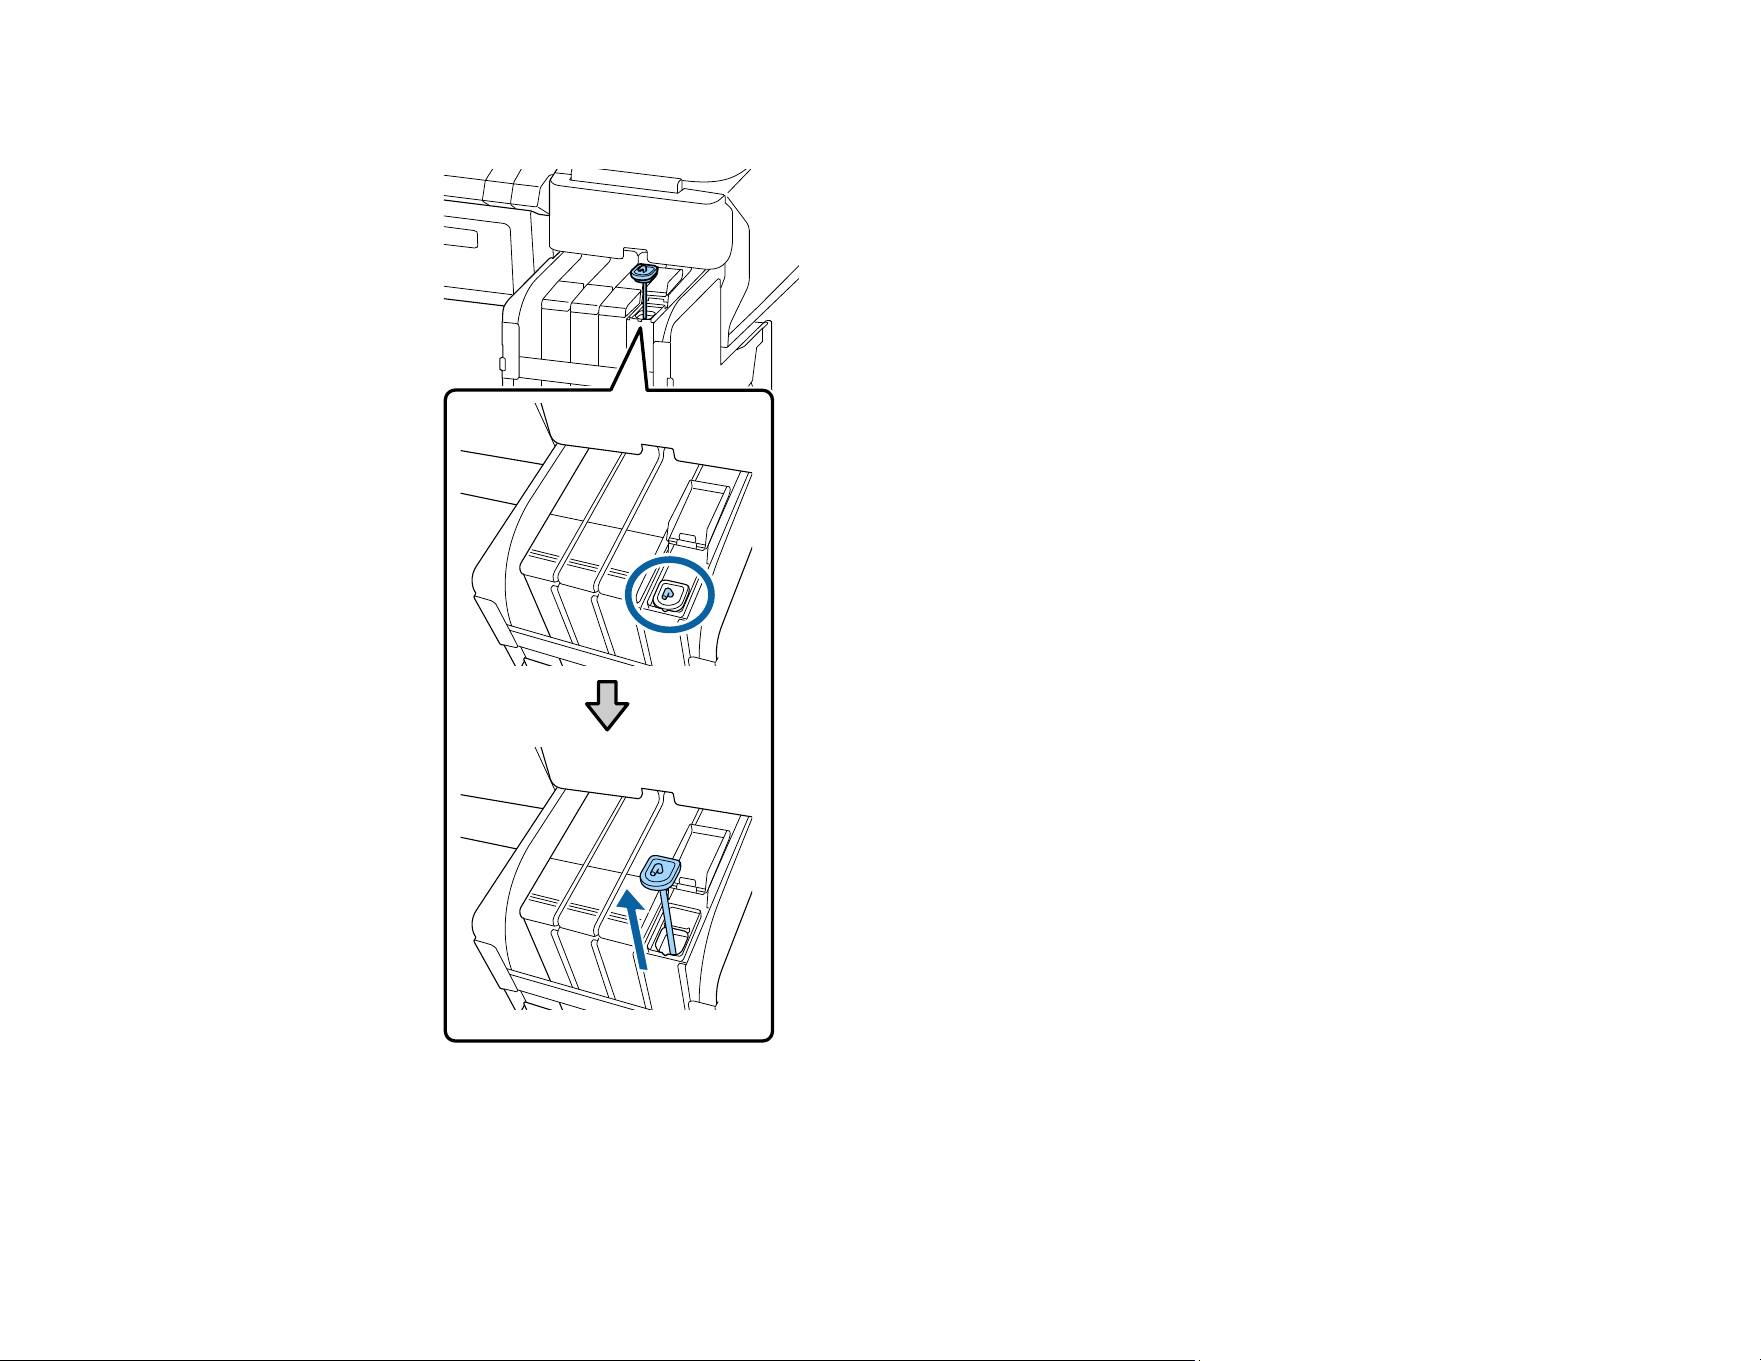
1. Open the ink inlet cover for the High Density Black ink shown here.
66
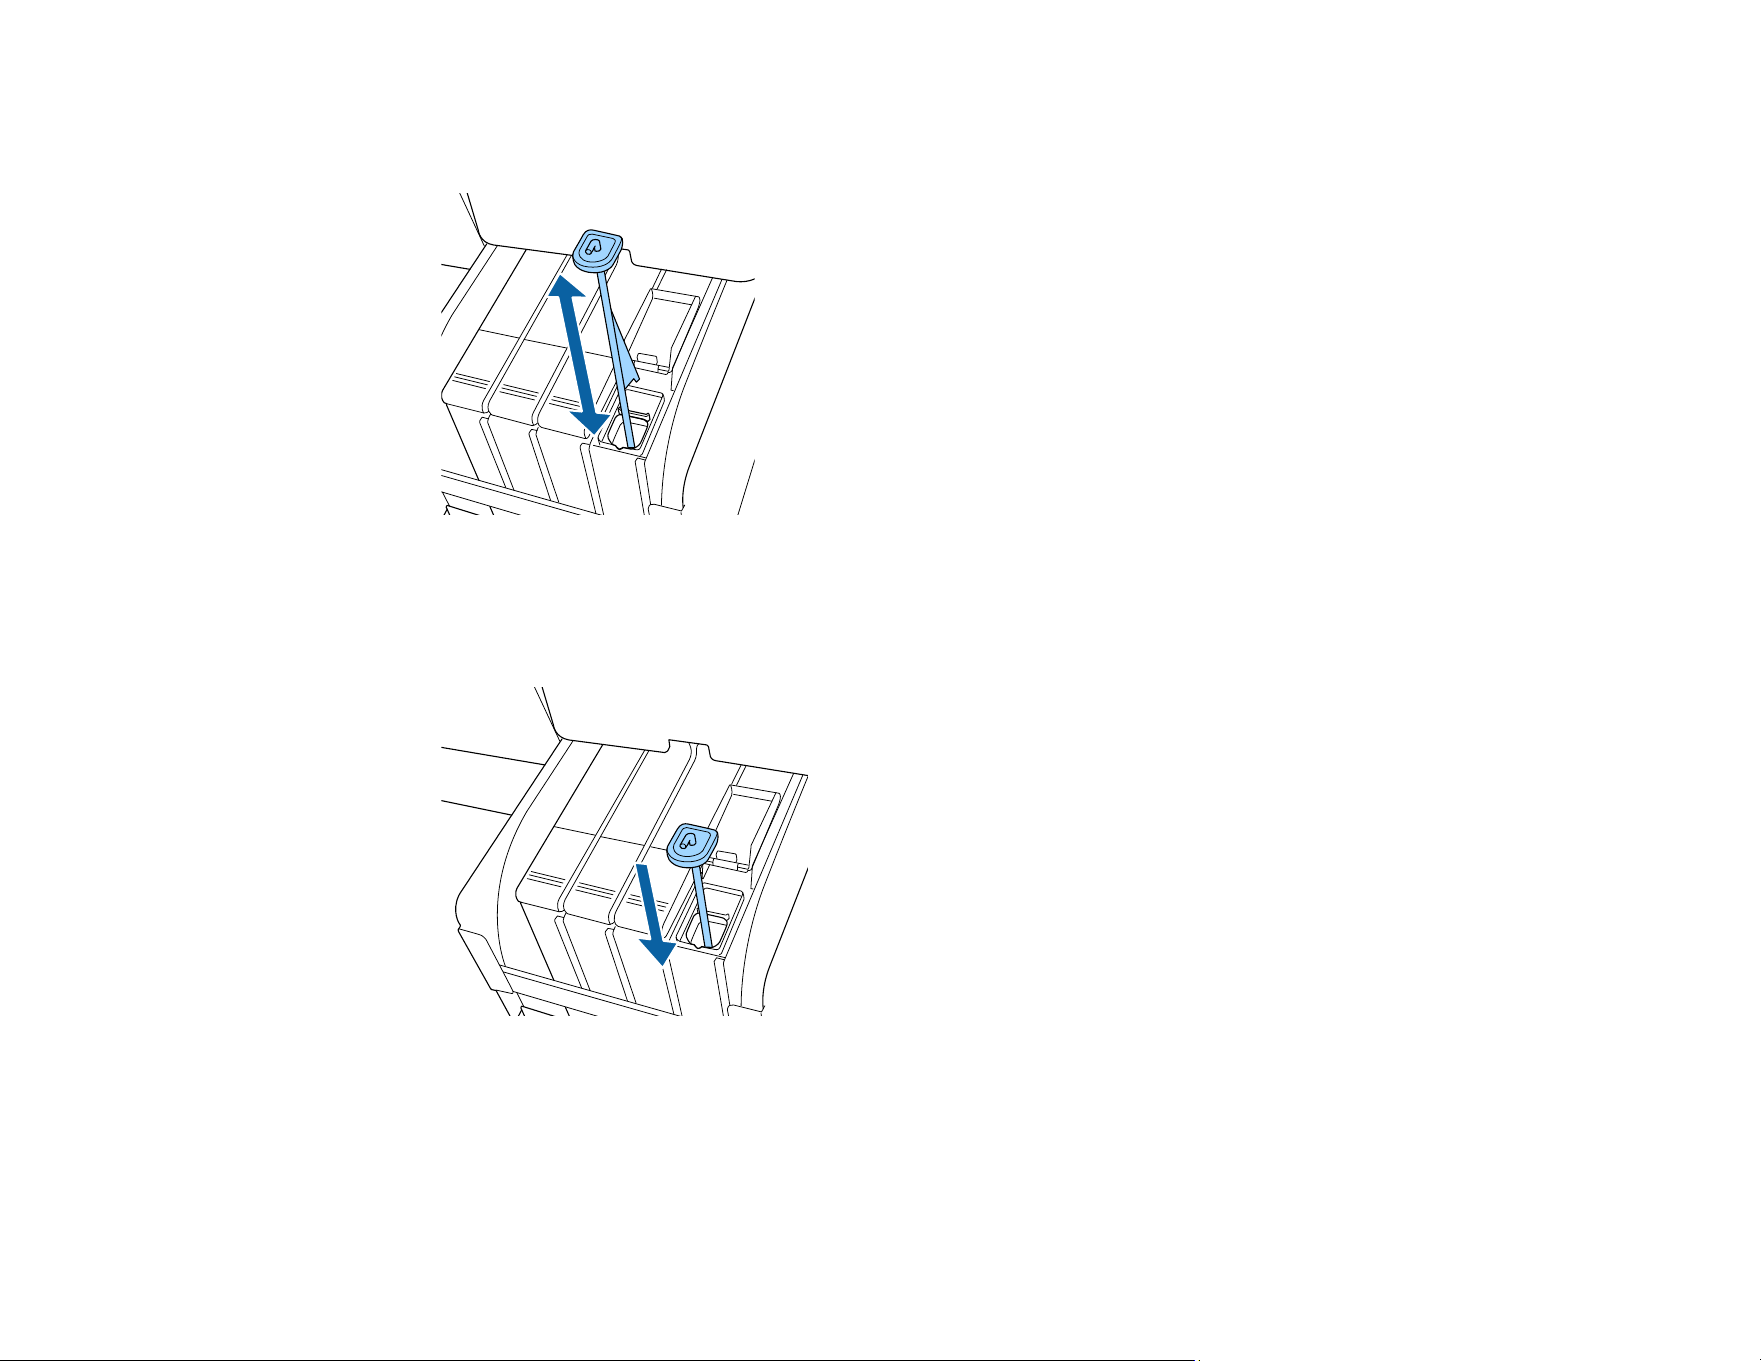
2. Grasp the loop at the top of the ink inlet cap and slowly remove the ink inlet cap.
67
3. Move the stirring stick up and down 15 times. Insert the stick completely into the ink tank and raise
the stick up to the top each time.
Caution: Move the stick slowly and steadily, or ink may splatter.
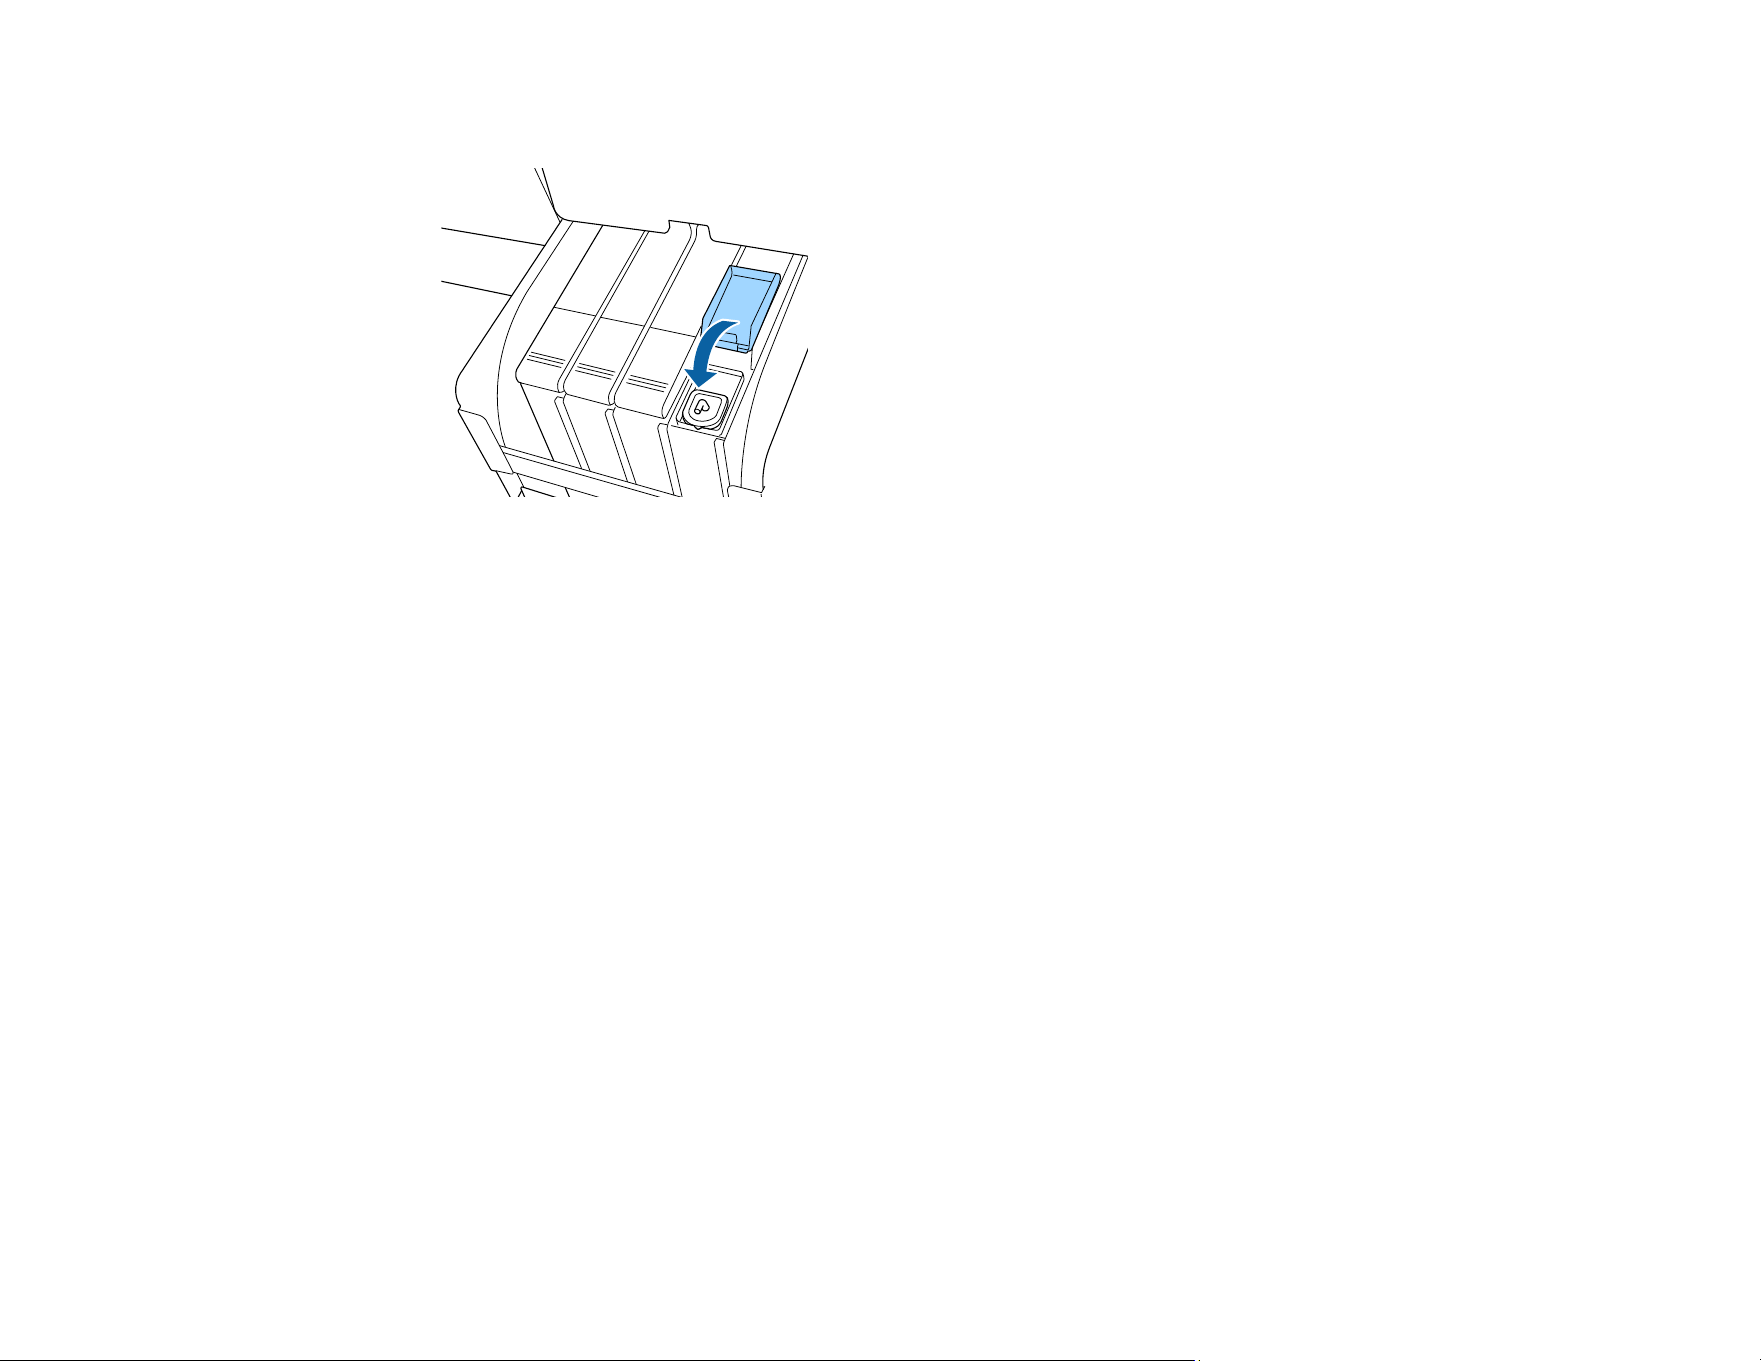
4. Insert the stirring stick into the ink tank and replace the ink inlet cap
Caution: Press the ink inlet cap down firmly. If the slider comes into contact with the ink inlet cap
when pulling it out, the cap could get damaged.
68
5. Close the ink inlet cover.
Parent topic: Maintenance
Related references
Maintenance Precautions
Replacing the Ink and Chip Unit
See these sections to replace the ink chip unit in your product.
About Ink and Chip Unit Replacement
Ink and Chip Unit Precautions
Replacing the Chip Unit and Refilling Ink
Parent topic: Maintenance
About Ink and Chip Unit Replacement
When the message Check Ink Levels is displayed on the control panel screen, you need to refill the ink
and replace the chip unit soon. Obtain an ink pack of the appropriate color as soon as possible.
You will be unable to print if a chip unit needs to be replaced. If the Check Ink Levels message is
displayed during a print job, the print job pauses while you refill the ink and replace the chip unit. You can
use the same procedure to refill the ink and replace chip units for all colors.
Note: When the message Refill Ink Tank is displayed on the control panel screen and the remaining ink
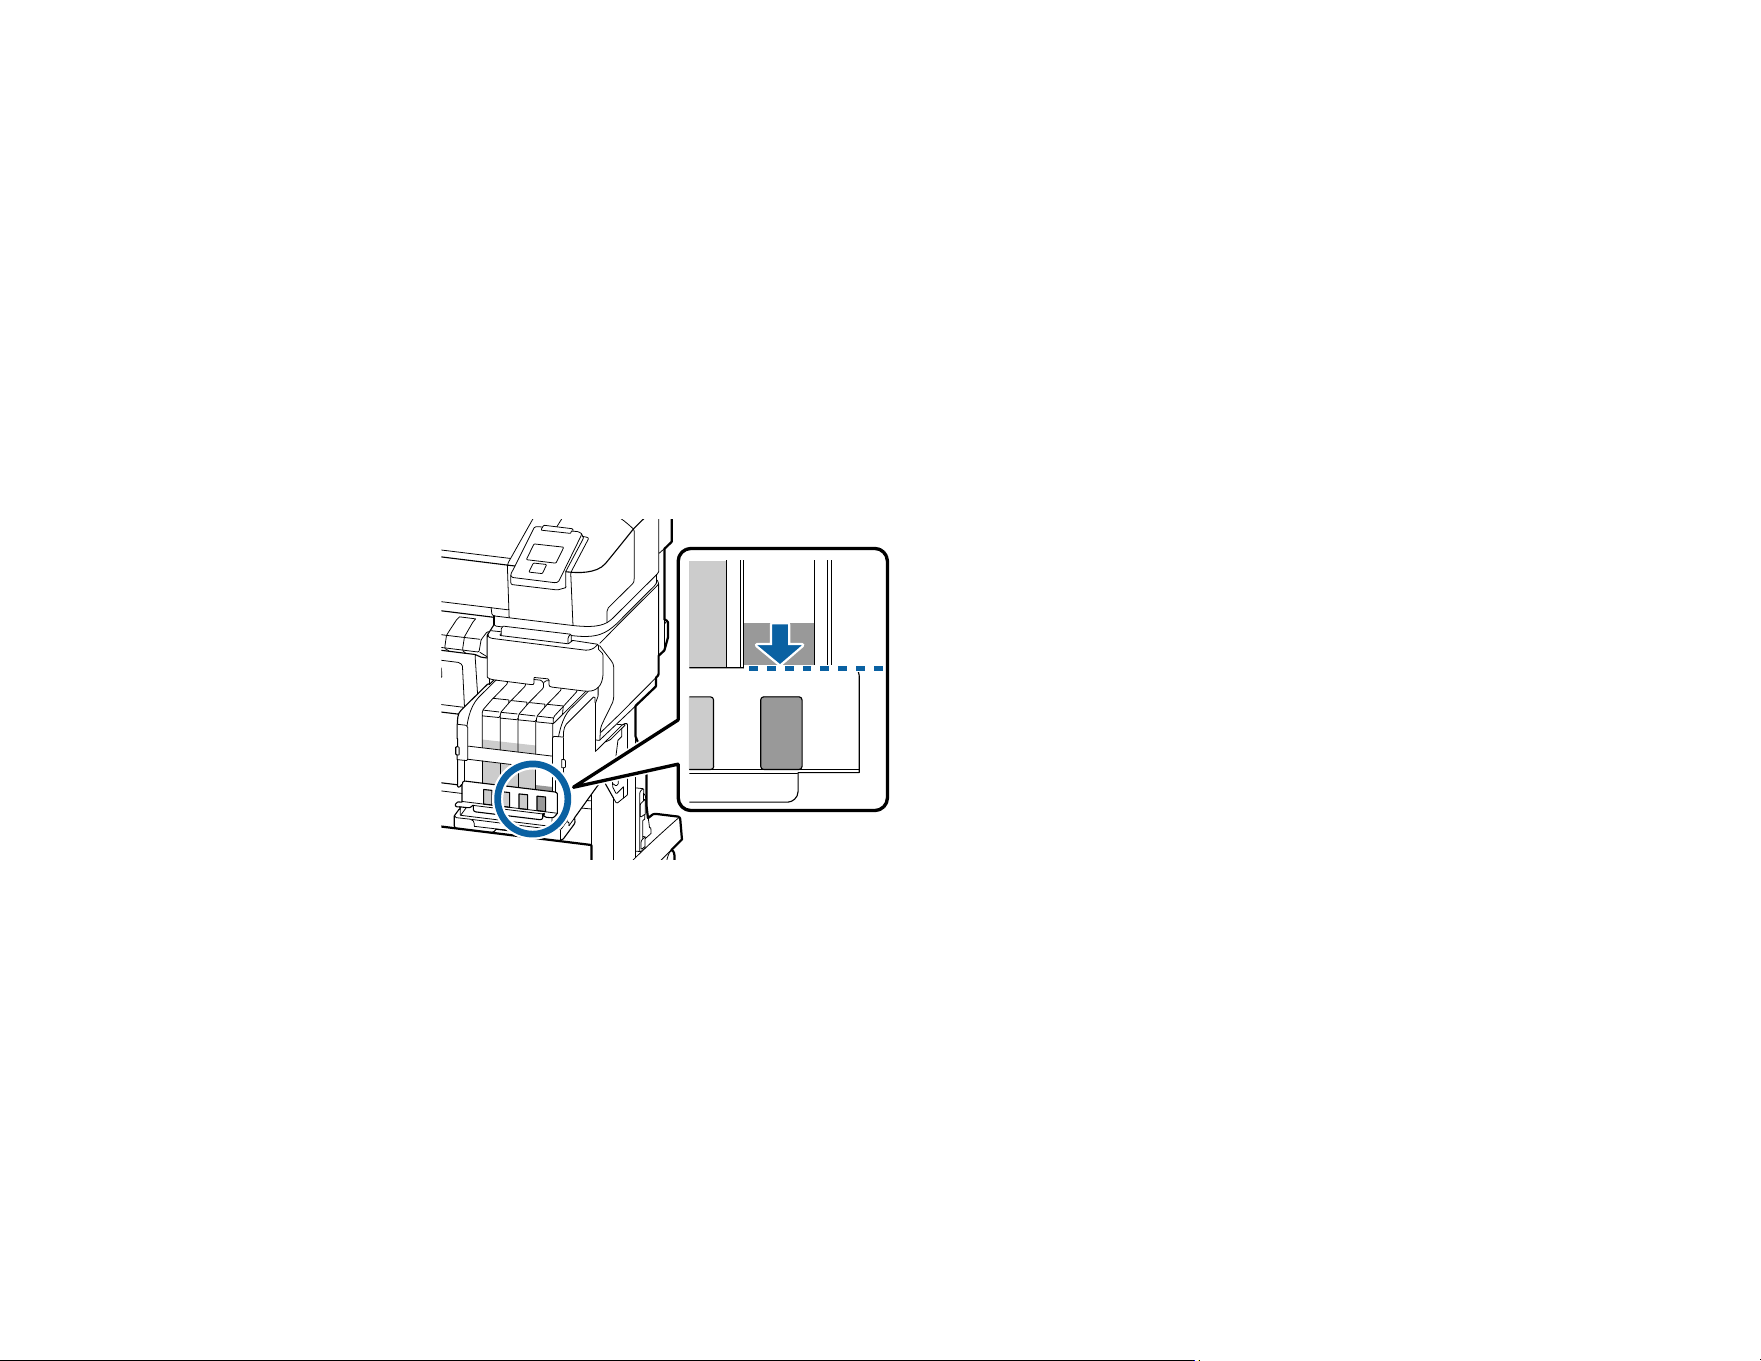
level is above the top edge of the metal plate or greater than 1.9 in. (50 mm) from the base of the ink

69
tank, it is time to replace the ink tank. The ink tank must be replaced because fine dirt, dust, and other
foreign material may cause the ink tank’s filter to malfunction. The ink tank replacement interval depends
on the usage environment and conditions. Contact Epson support for information on replacing
components.
Note: This printer has a remaining ink warning system. This system does not directly detect the amount
of ink remaining in the ink tank. Instead, the amount of ink remaining is estimated based on the ink
usage conditions and displayed as a message. The accuracy of this system depends on consistent and
proper ink refills.
If the procedure for refilling the ink and replacing the chip unit is not followed correctly, the remaining ink
warning system may not function properly. To prevent this, replace the chip unit and refill the ink as soon
as possible once the remaining ink level falls below 1.9 in. (50 mm) from the base of the ink tank.
Parent topic: Replacing the Ink and Chip Unit
Related tasks
Replacing the Chip Unit and Refilling Ink
Ink and Chip Unit Precautions
Follow these precautions as you refill the ink in your product:
• Store ink packs and waste ink in a location out of the reach of children.
• Wear protective eyewear, gloves, and a mask when refilling ink.
• Be sure to read the Safety Data Sheet (SDS) before using ink packs. To download it, visit
epson.com/support/sds (U.S.) or epson.ca/support/sds (Canada) and select your product.
• Gently cut or tear off the ink pack spout seal. If you cut the ink pack spout seal too quickly, ink may
splatter.
• Do not squeeze open ink packs. Ink may spill.
• Gently tilt the ink pack when pouring ink into the ink tank.
• Do not place anything on the ink tank or subject it to strong impacts, or the ink tank could detach.
Warning: Should ink contact your skin or enter your eyes or mouth, immediately take the following
actions:
• If fluid contacts your skin, immediately wash it off using large volumes of soapy water. Consult a
physician if the skin appears irritated or discolored.
70
• If fluid enters your eyes, rinse them immediately with water. Failure to observe this precaution could
result in bloodshot eyes or mild inflammation. If problems persist, consult with a physician.
• If fluid enters your mouth, consult with a physician.
• If swallowed, do not induce vomiting and consult with a physician immediately. Inducing vomiting may
cause material to get in your windpipe and cause injury.
Parent topic: Replacing the Ink and Chip Unit
Replacing the Chip Unit and Refilling Ink
Follow the steps here to replace the chip unit and refill the ink in your product.
1. When the message Check Ink Levels appears on the control panel screen, check how much ink is
left in the ink tank.
If the remaining ink level is above the top edge of the metal plate or greater than 1.9 in. (50 mm) from
the base of the ink tank, continue to use the printer until the remaining ink level is below the top edge
of the metal plate or less than 1.9 in. (50 mm) from the base of the ink tank so that you can use all
the ink in a new ink pack to refill the ink tank.
If the remaining ink level is 1.9 inches (50 mm) or less, go to the next step.
Note: When the message Refill Ink Tank is displayed on the control panel screen and the
remaining ink level is above the top edge of the metal plate or greater than 1.9 in. (50 mm) from the
base of the ink tank, it is time to replace the ink tank. The ink tank must be replaced because fine
dirt, dust, and other foreign material may cause the ink tank’s filter to malfunction. The ink tank
71
replacement interval depends on the usage environment and conditions. Contact Epson Support for
information on replacing components.
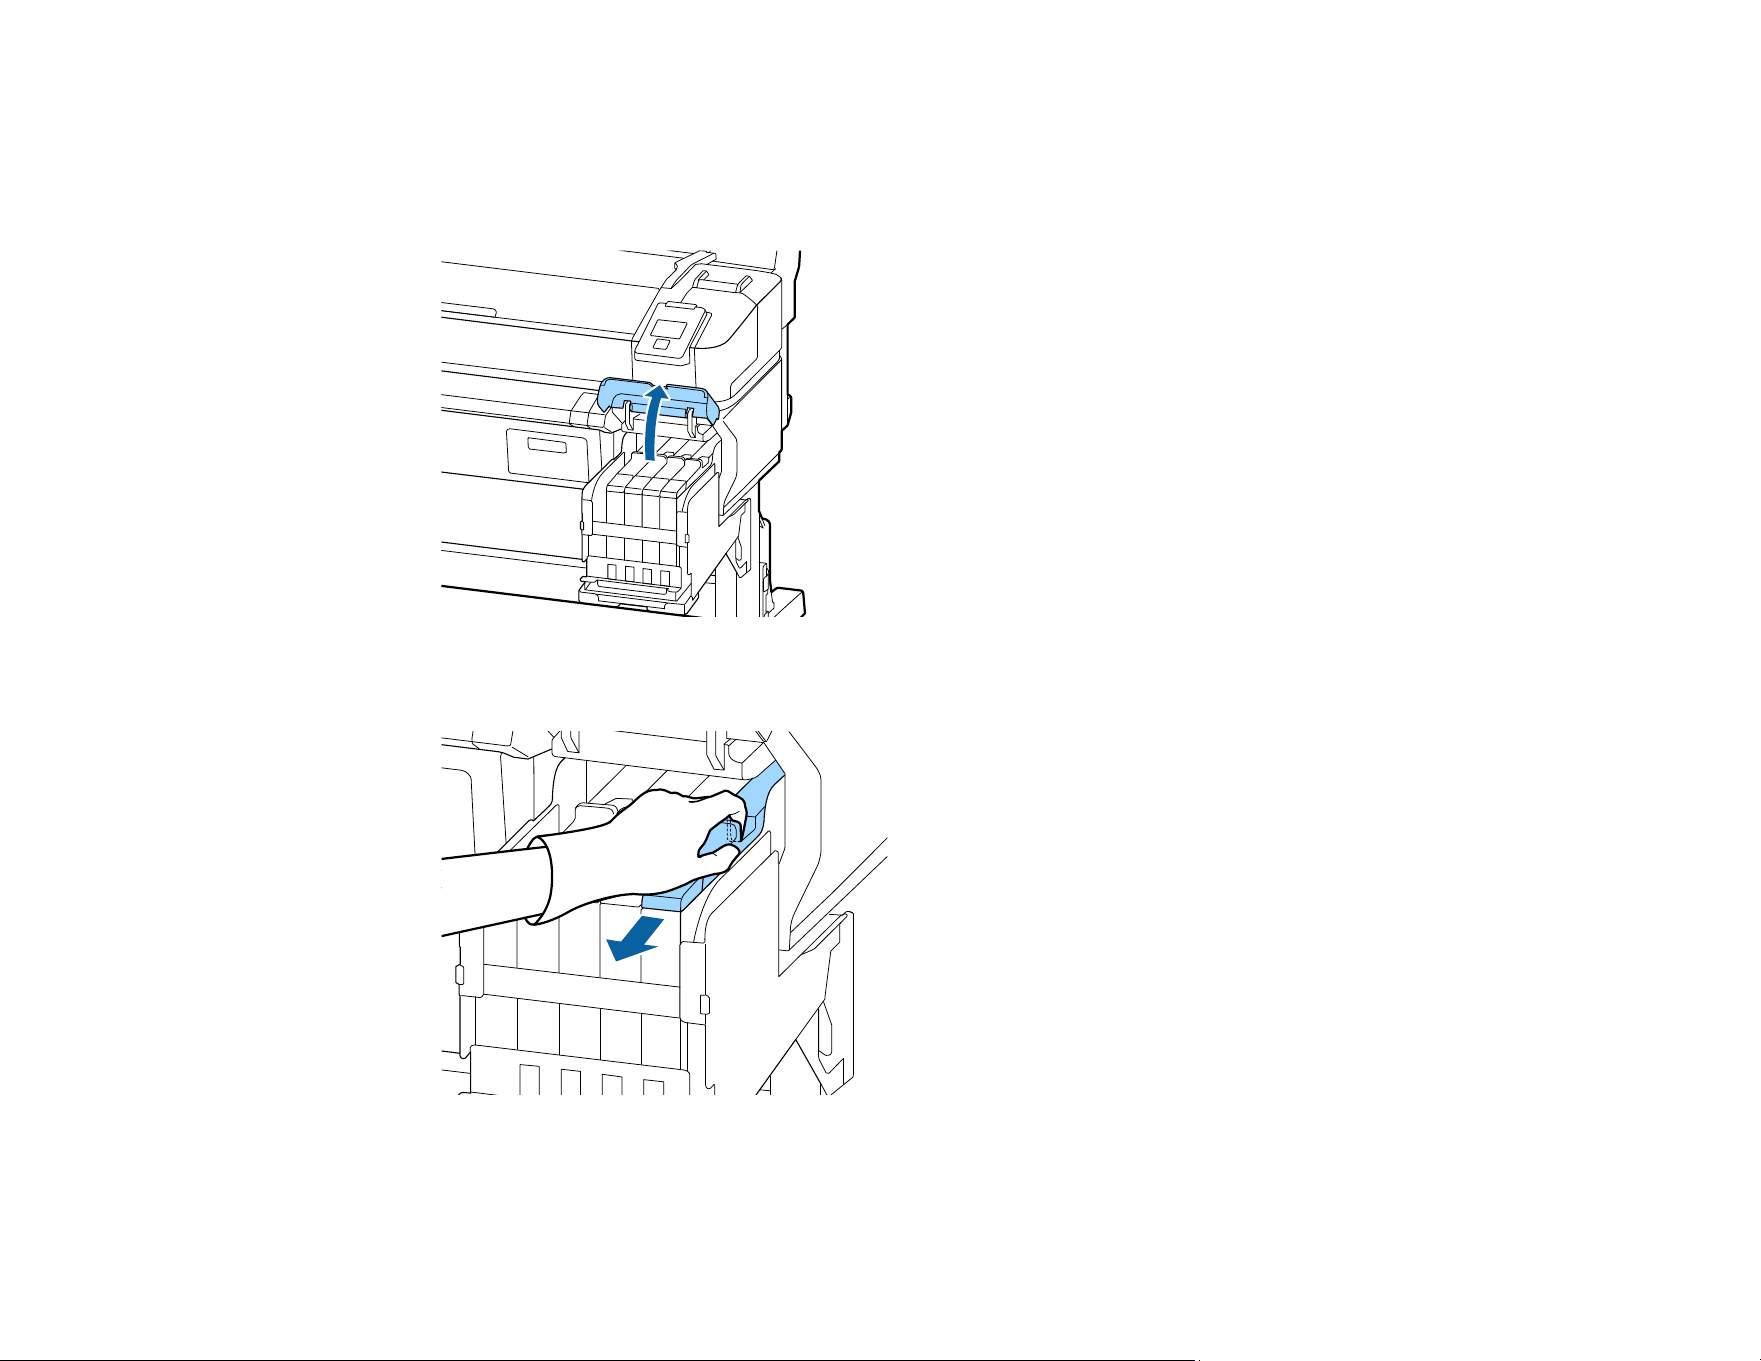
2. Open the ink tank cover.
3. Insert a finger into the groove on the top of the slider and pull it straight out.
Caution: Do not tilt the slider. If you drop the chip unit, it may break.
72
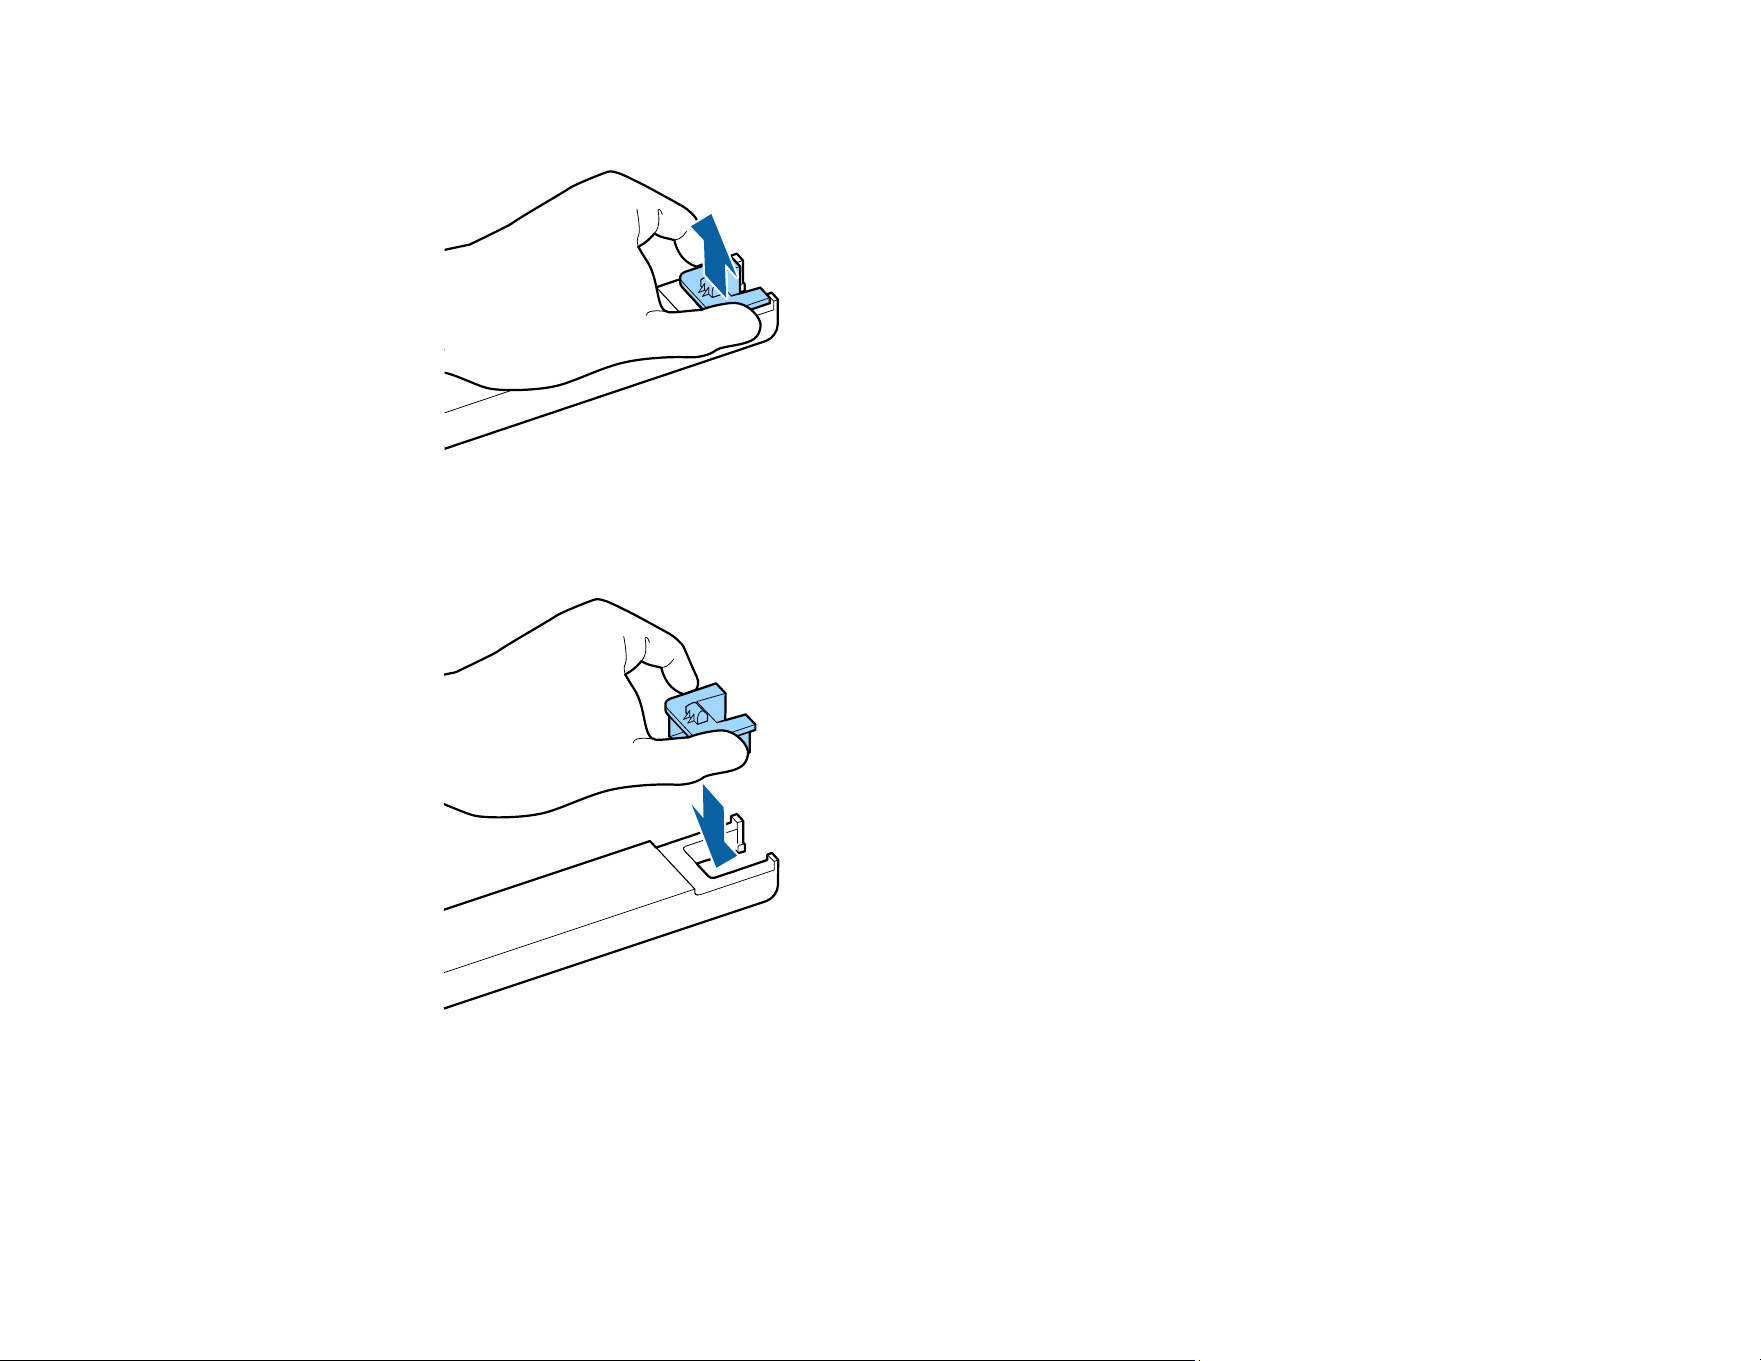
4. Remove the chip unit from the slider.
5. Confirm that the label color on the slider matches the label on the new ink pack. Then attach the chip
unit supplied with the new ink pack to the slider.
73
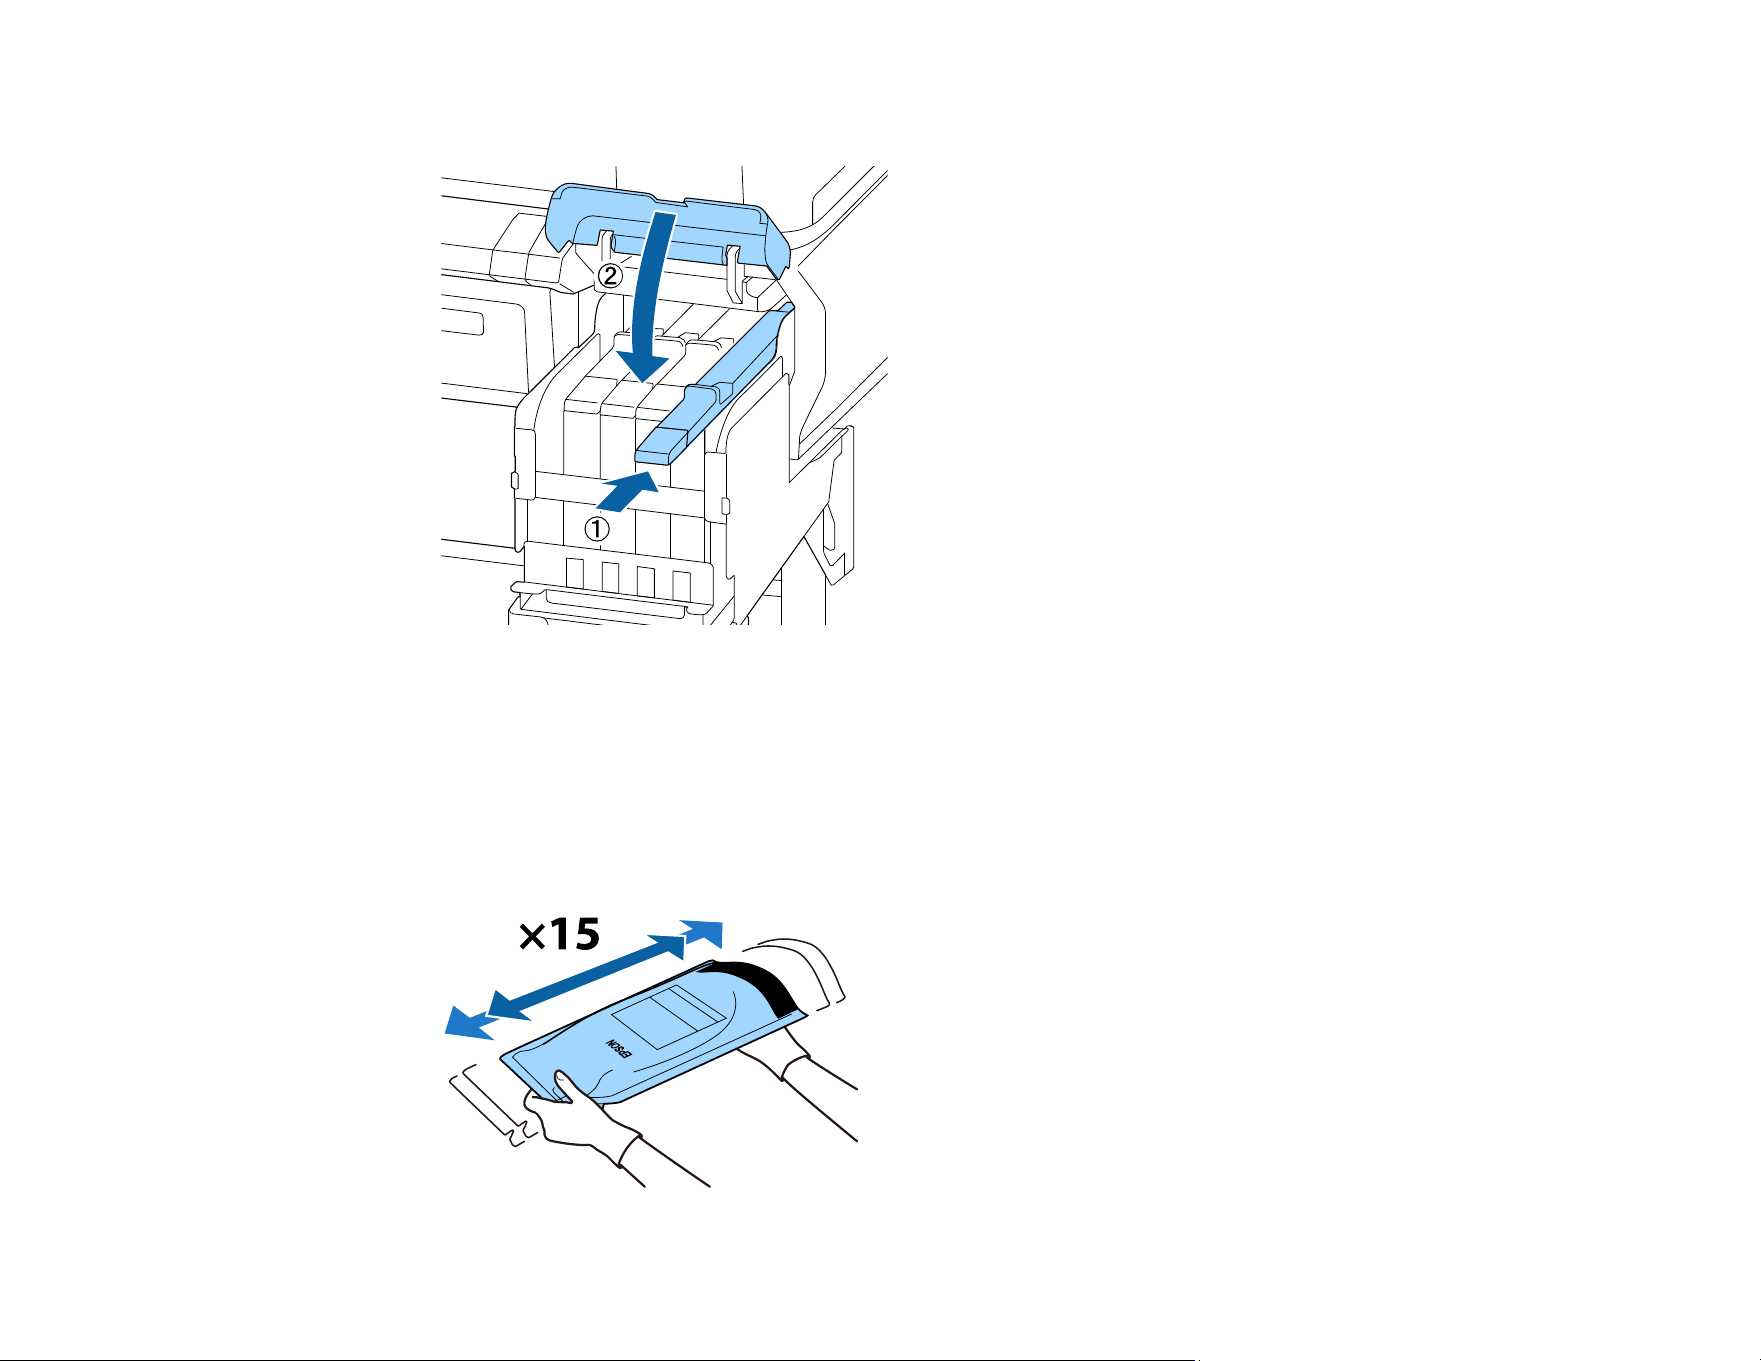
6. Hold the slider level and insert it. Then close the ink tank cover.
Caution: Do not push the slider in with too much force. Failure to observe this precaution could
damage the printer.
The new chip unit is automatically charged when the charge status is expended and no blue bars
remain on the product's control panel screen.
7. Shake the new ink pack horizontally approximately 2 inches (5 cm) left and right for 5 seconds
(approximately 15 times).
74
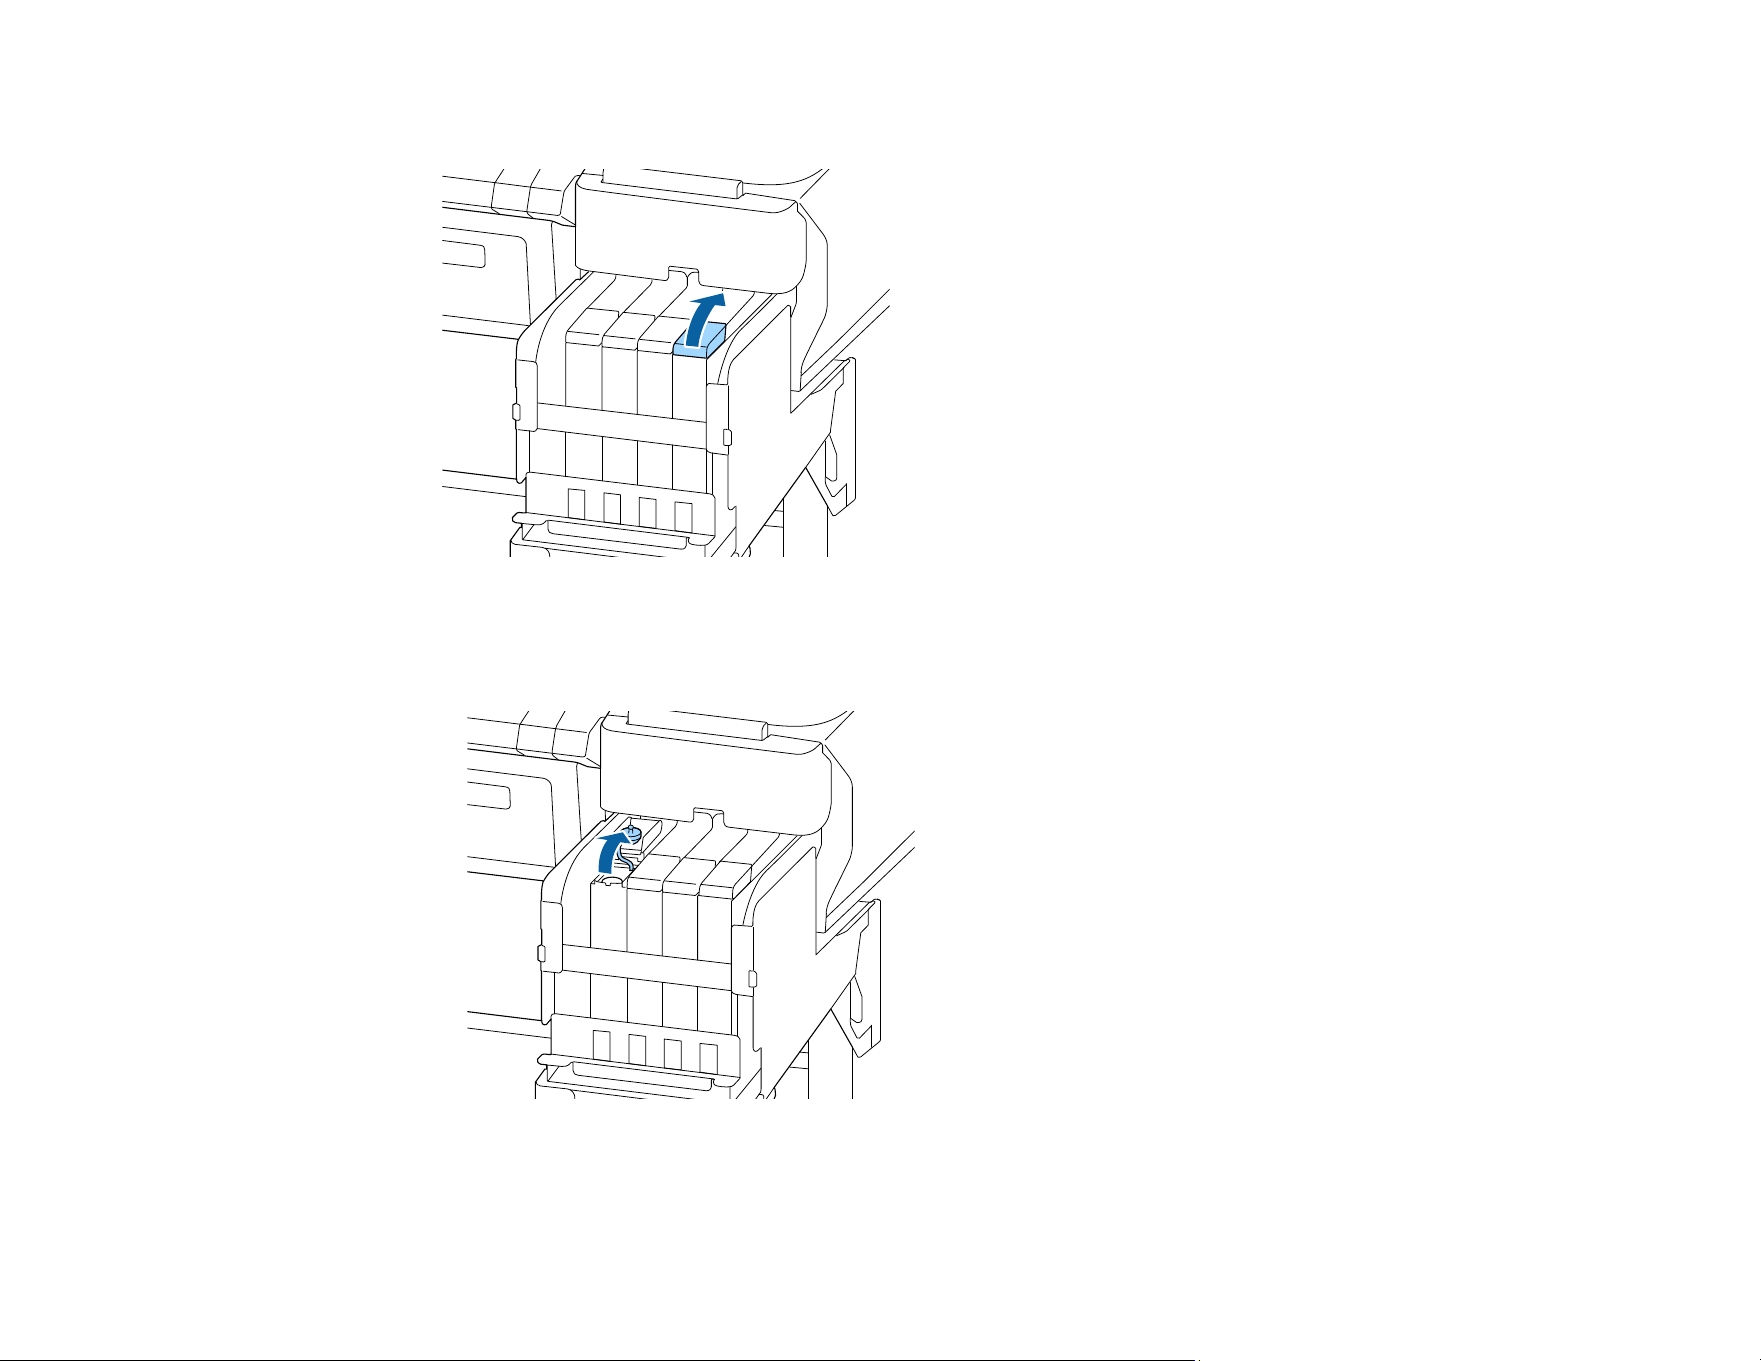
8. Open the ink inlet cover.
9. Do the following:
• For all ink colors except High Density Black ink, remove the ink inlet cap from the ink tank.
75
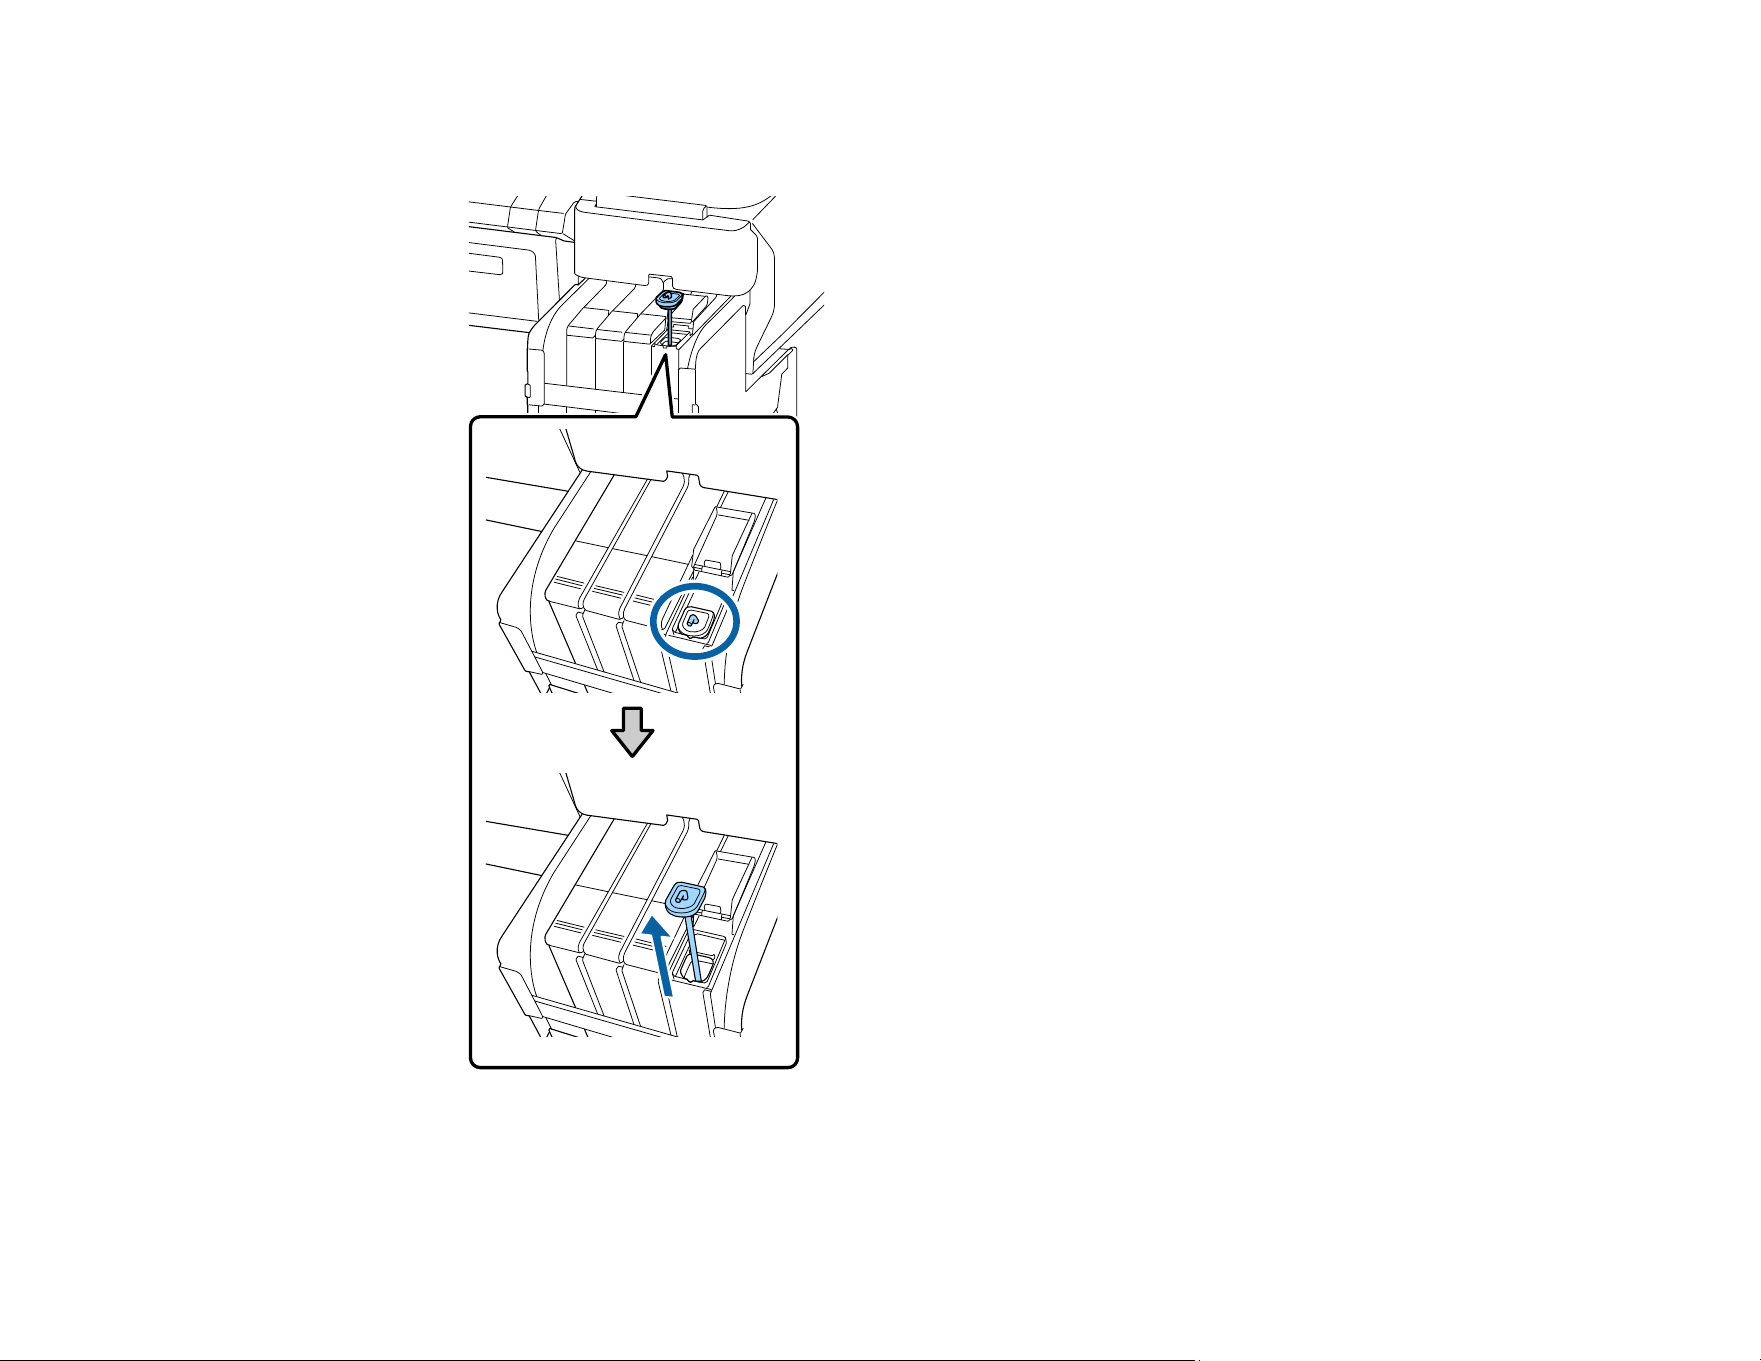
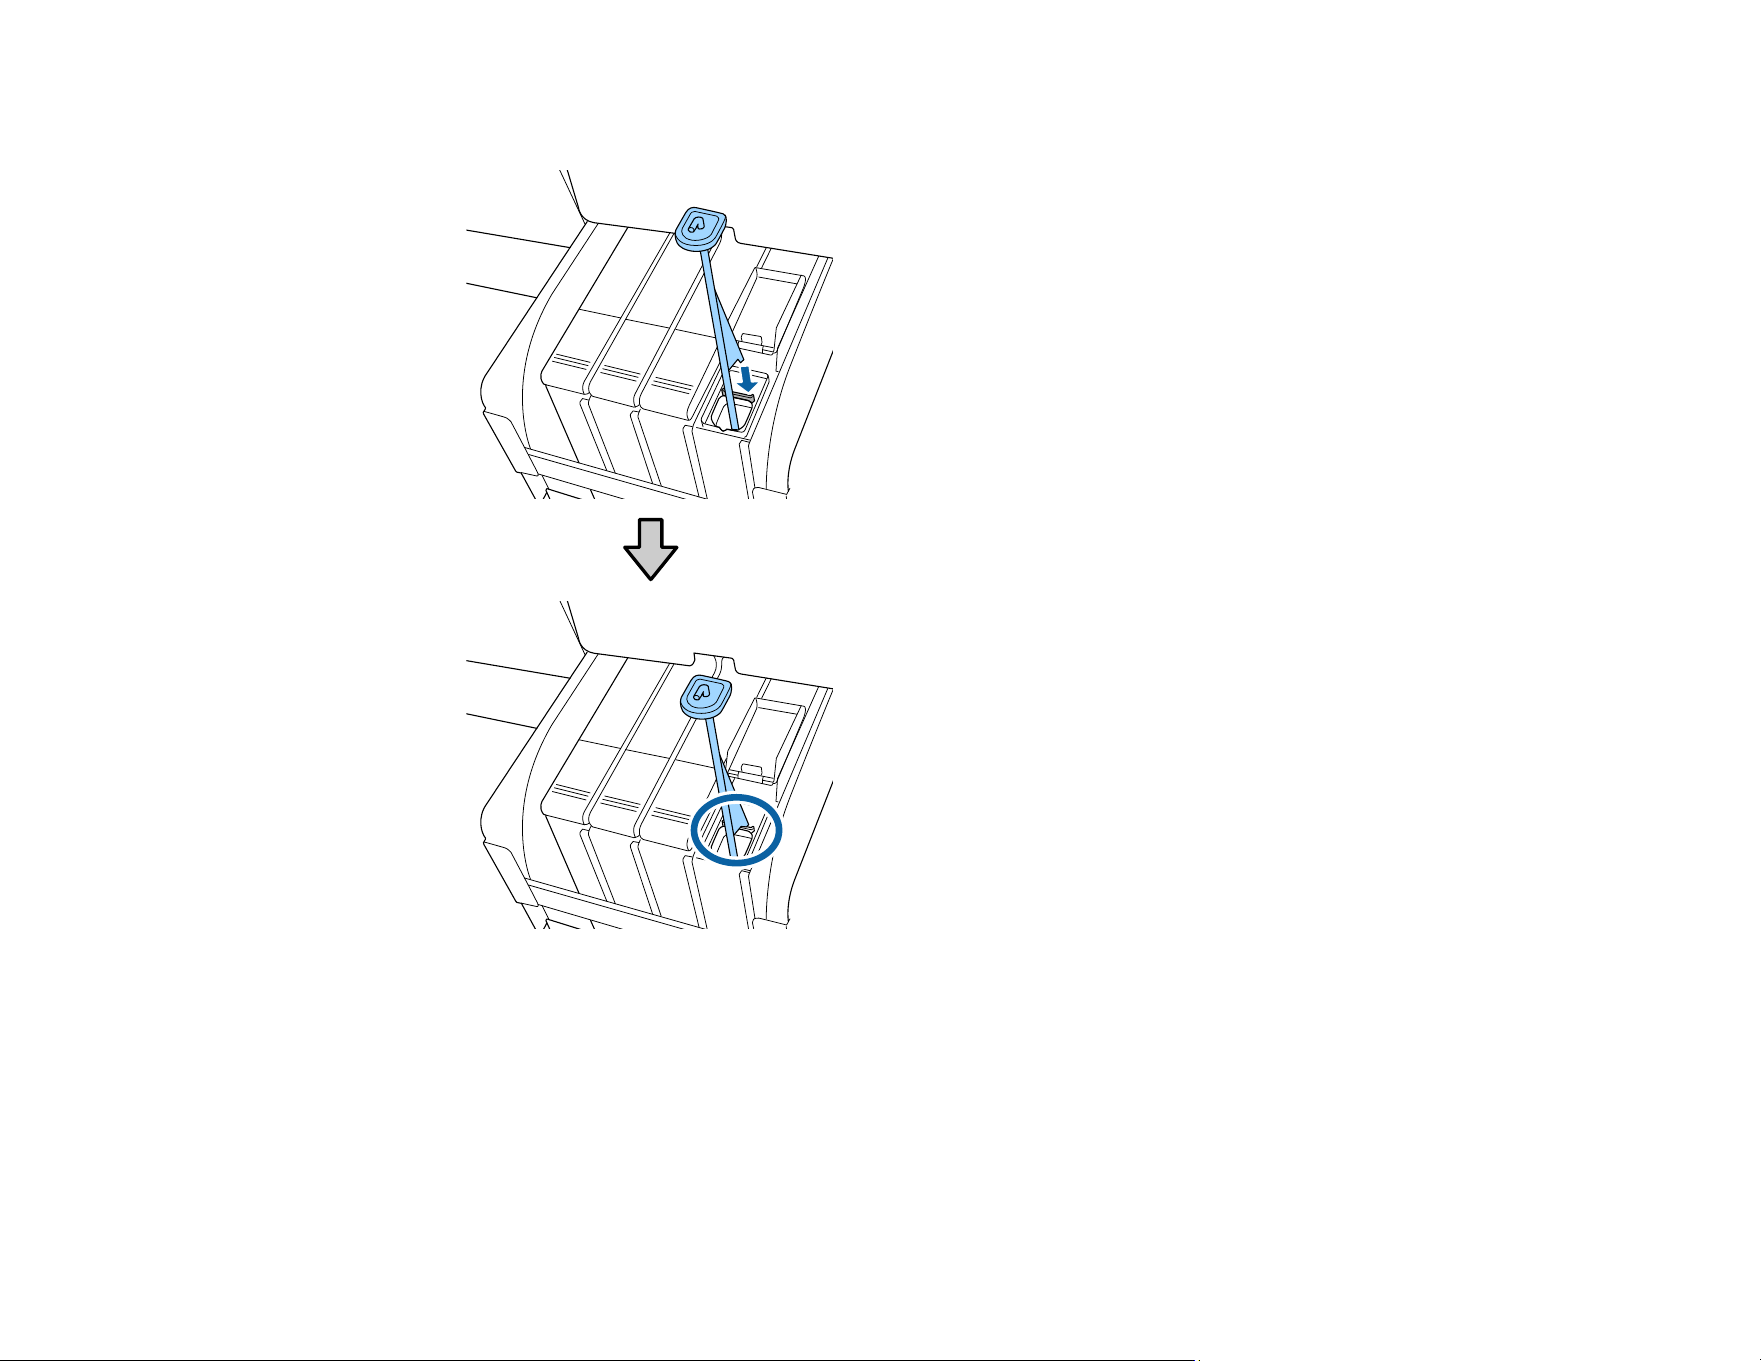
• For High Density Black ink, grasp the loop at the top of the ink inlet cap and slowly remove the ink
inlet cap.
76
Rest the stirring stick on the tab at the edge of the tank as shown.
77
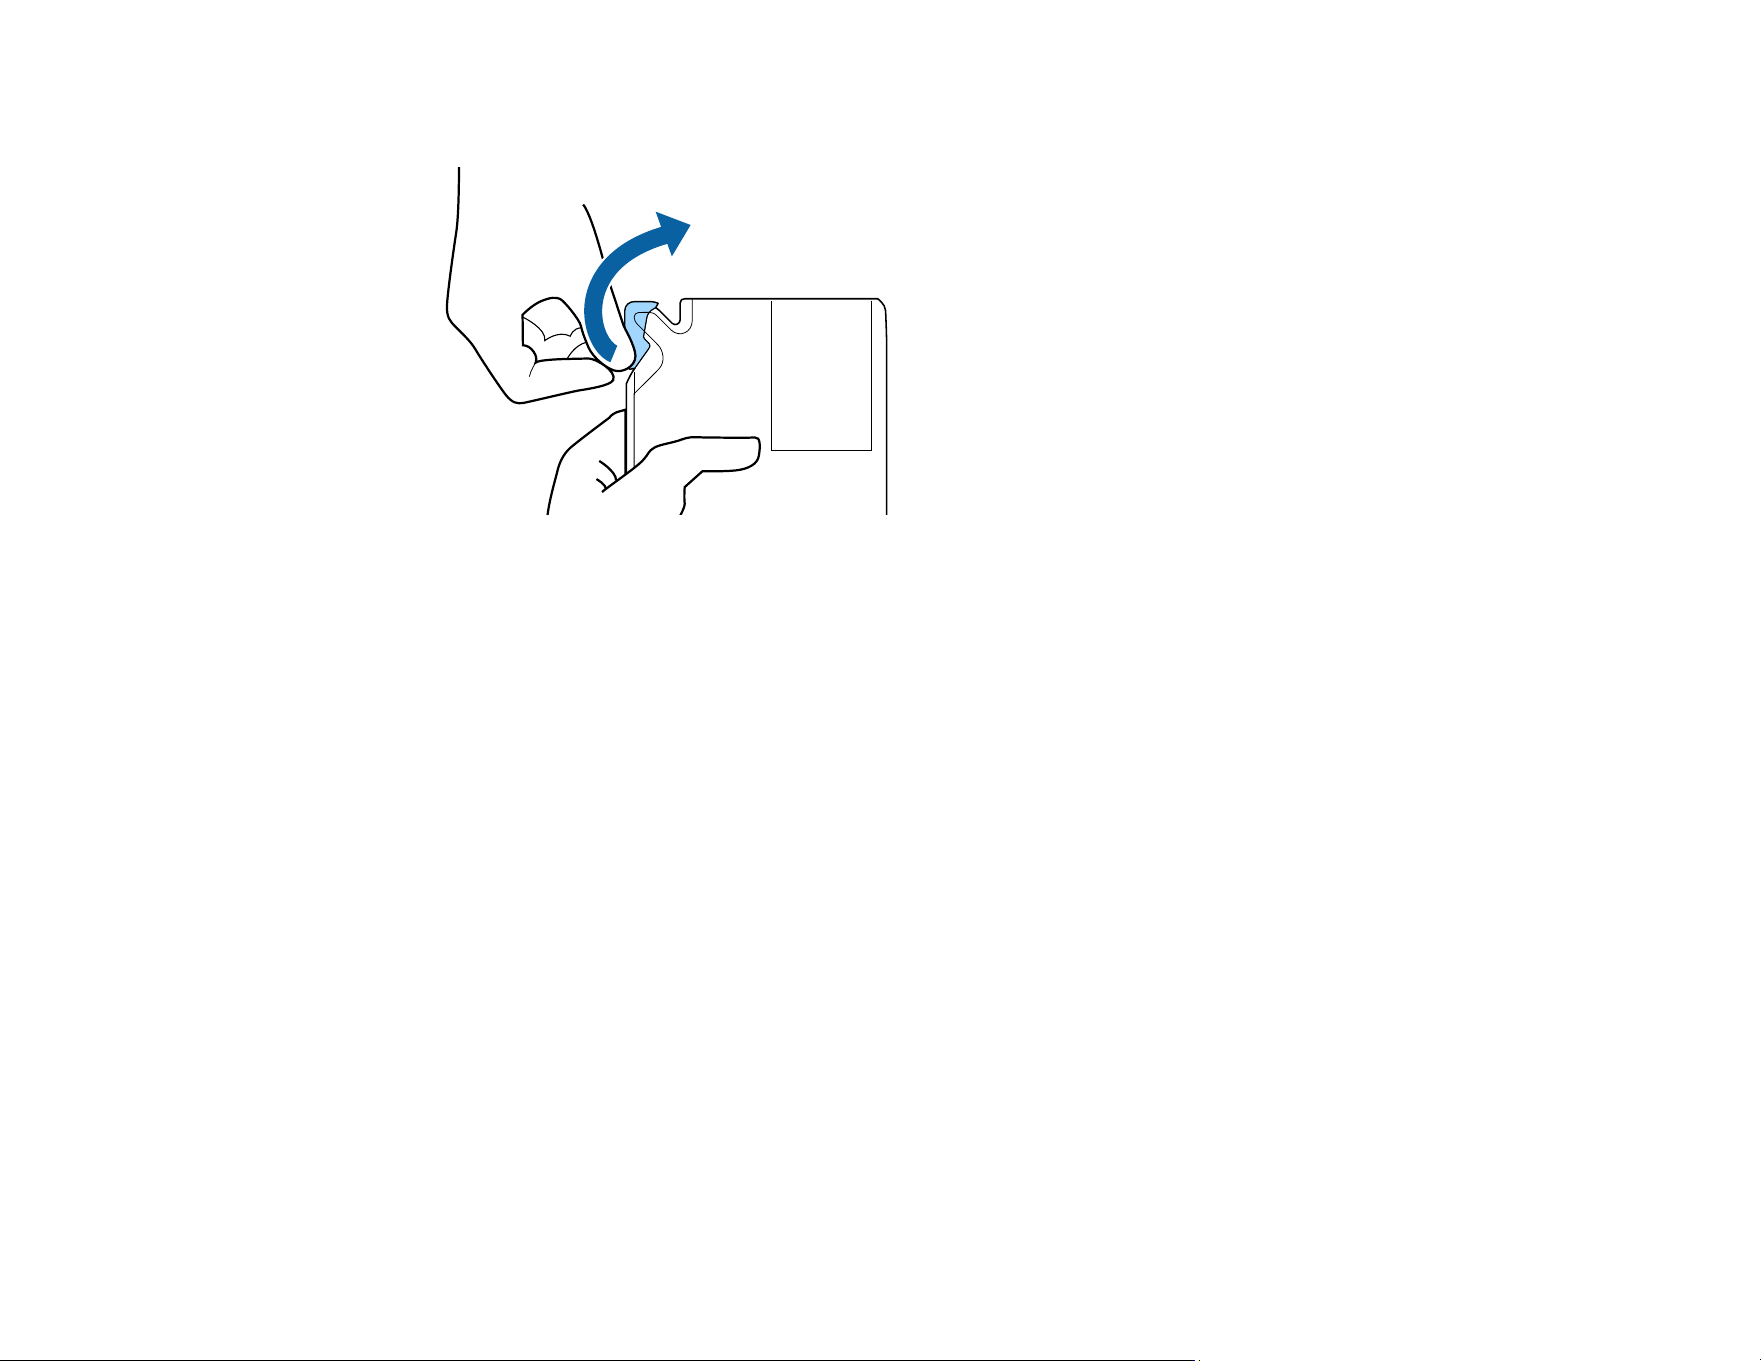
10. Cut or tear off the ink pack spout seal.
78
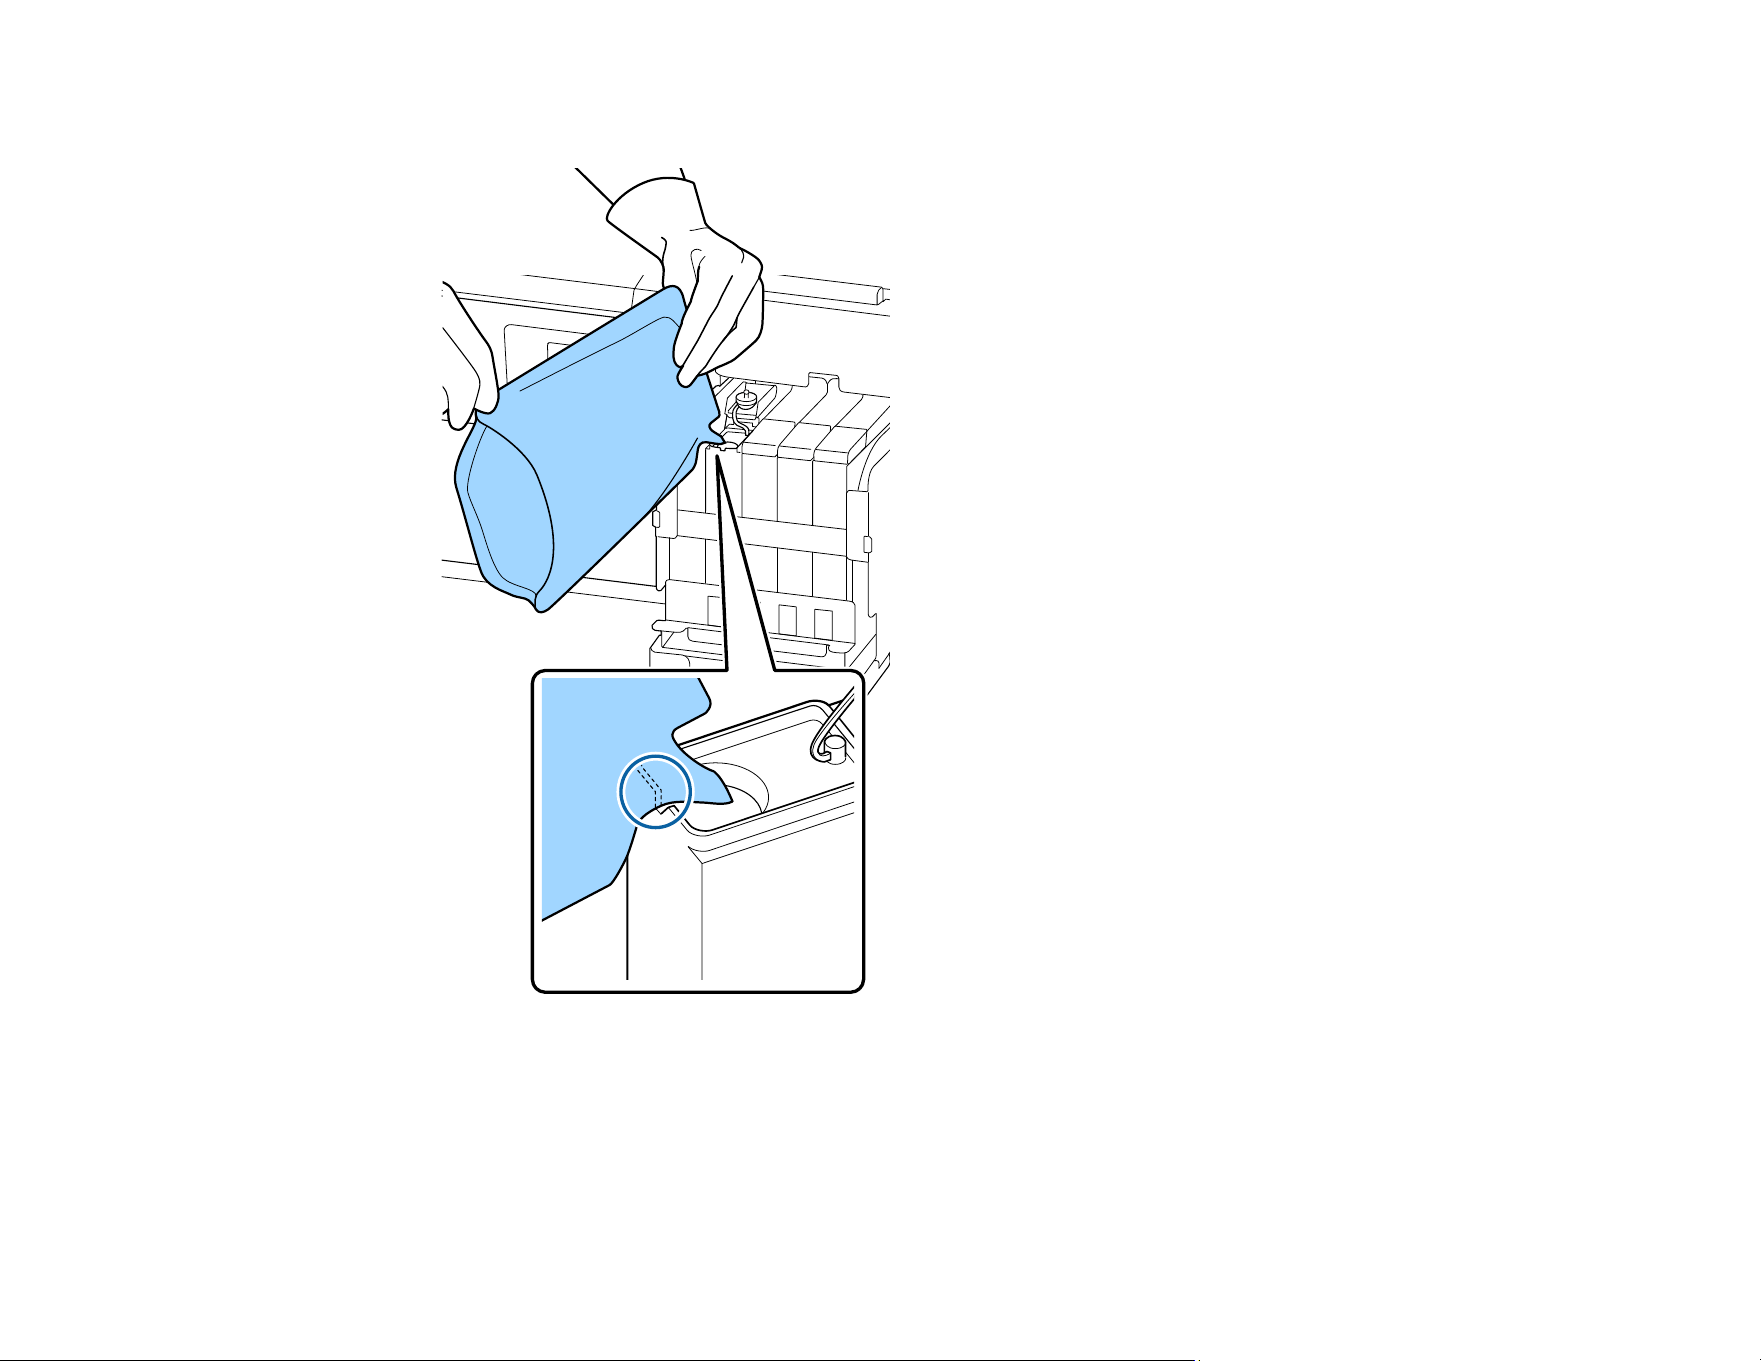
11. Insert the spout of the ink pack into the groove and slowly tilt it to pour the ink.
Note: Be sure to completely empty the ink pack into the tank. Do not use an ink pack to refill multiple
ink tanks. This can prevent the proper display of messages from the remaining ink warning system.
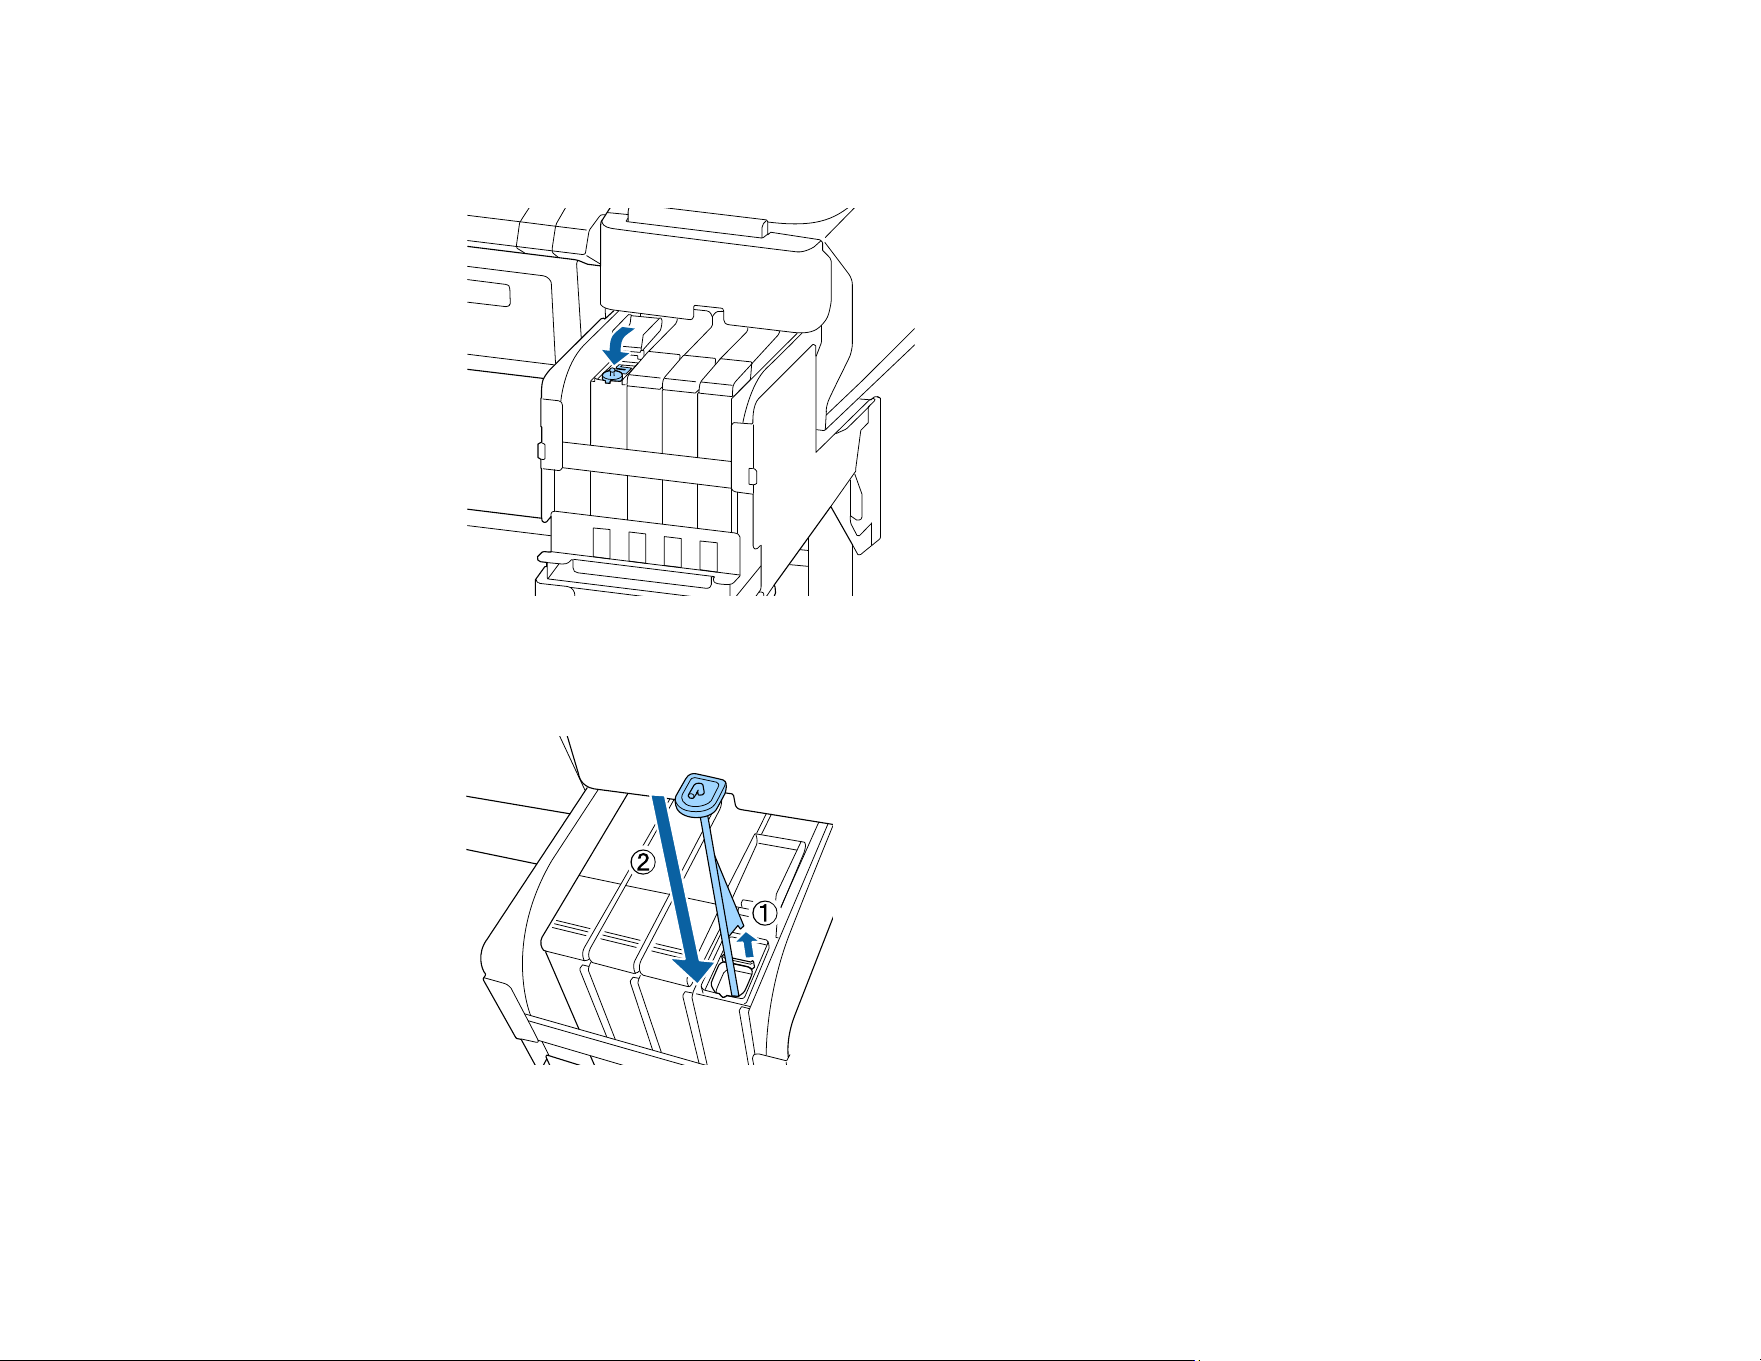
79
12. Do the following:
• For all ink colors except High Density Black ink, replace the ink inlet cap.
• For the High Density Black ink, lift up the stirring stick, guide it into the ink tank, and replace the ink
inlet cap as shown.
Caution: Press down the ink inlet cap firmly so it does not interfere with the slider and damage the
ink inlet cap.
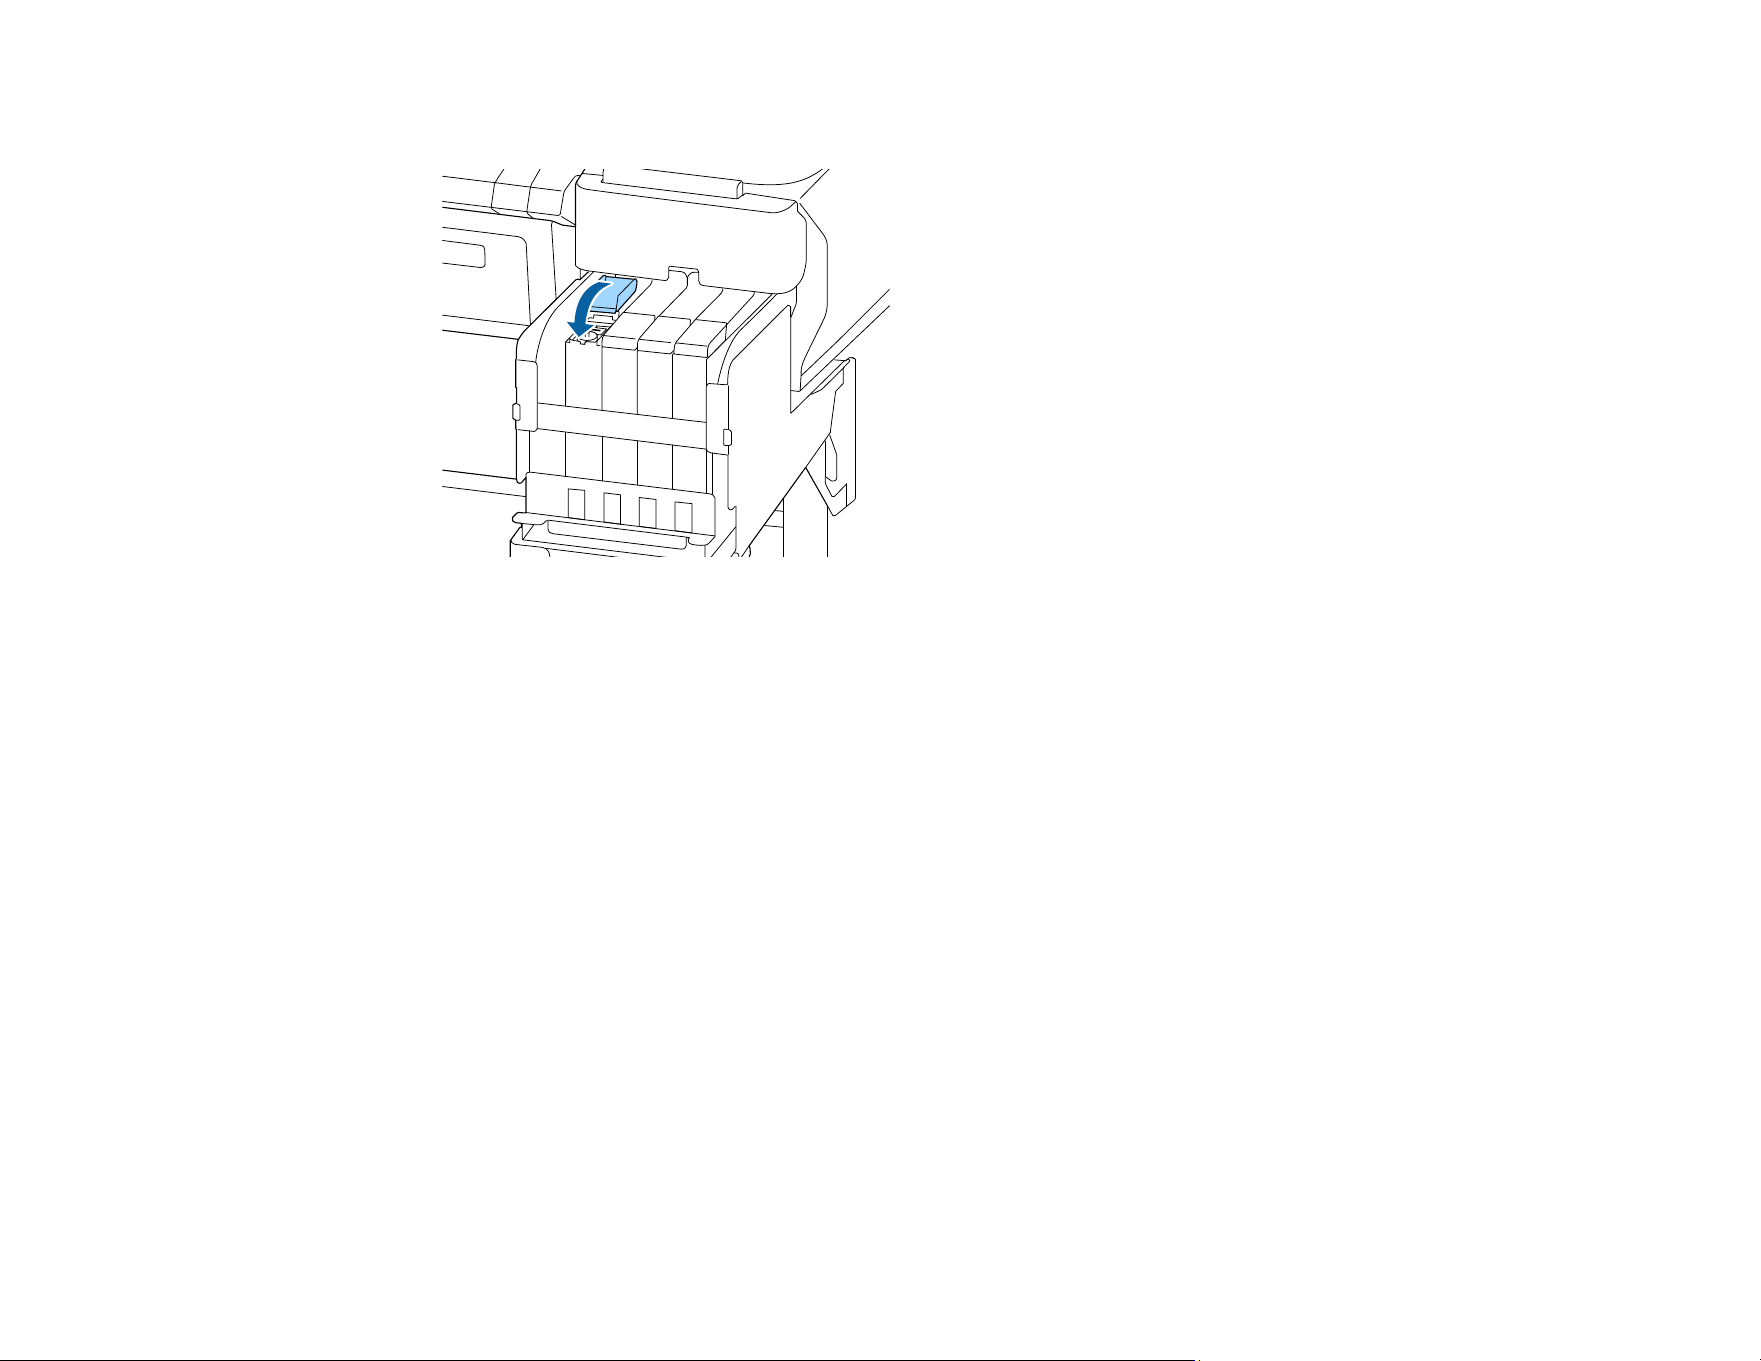
80
13. Close the ink inlet cover.
Parent topic: Replacing the Ink and Chip Unit
Related concepts
About Ink and Chip Unit Replacement
Related references
Consumables and Replacement Parts
Ink and Chip Unit Precautions
Print Head Maintenance
Print head maintenance ensures the best print quality.
Perform the following maintenance as necessary:
• Nozzle Check: Check for clogged nozzles before each print job or if you have not used the printer for
an extended period of time. Inspect the printed check pattern and clean the print head if you notice
faint or missing areas.
• Head Cleaning: Clean the print head if you notice faint areas or gaps in the printed result.
• Head Alignment: Align the print head if your printouts are grainy or out of focus.
• Head Maintenance: Perform head maintenance if ink smears on your printouts even after cleaning
the print head.

81
Checking for Clogged Print Head Nozzles
Cleaning the Print Head
Aligning the Print Head
Performing Head Maintenance
Parent topic: Maintenance
Checking for Clogged Print Head Nozzles
To maintain optimum print quality, perform a nozzle check before printing. This lets you visually inspect
the printed check pattern and clean the nozzles, if necessary.
There are two ways to check the nozzles:
• Set up the product to automatically print a check pattern before each print job. You can select how
often the product performs a nozzle check in the Setup menu.
• Manually run a nozzle check from the product control panel, as described here.
1. Load roll paper and select the matching paper type on the product control panel.
2. Press the maintenance button.
You see the Maintenance menu on the product control panel screen.
3. Select Nozzle Check and press the OK button.
You see a confirmation message.
4. Press the OK button.
The product prints a nozzle check pattern.
5. Check the printed pattern to see if there are gaps in the lines.
Nozzles are clean
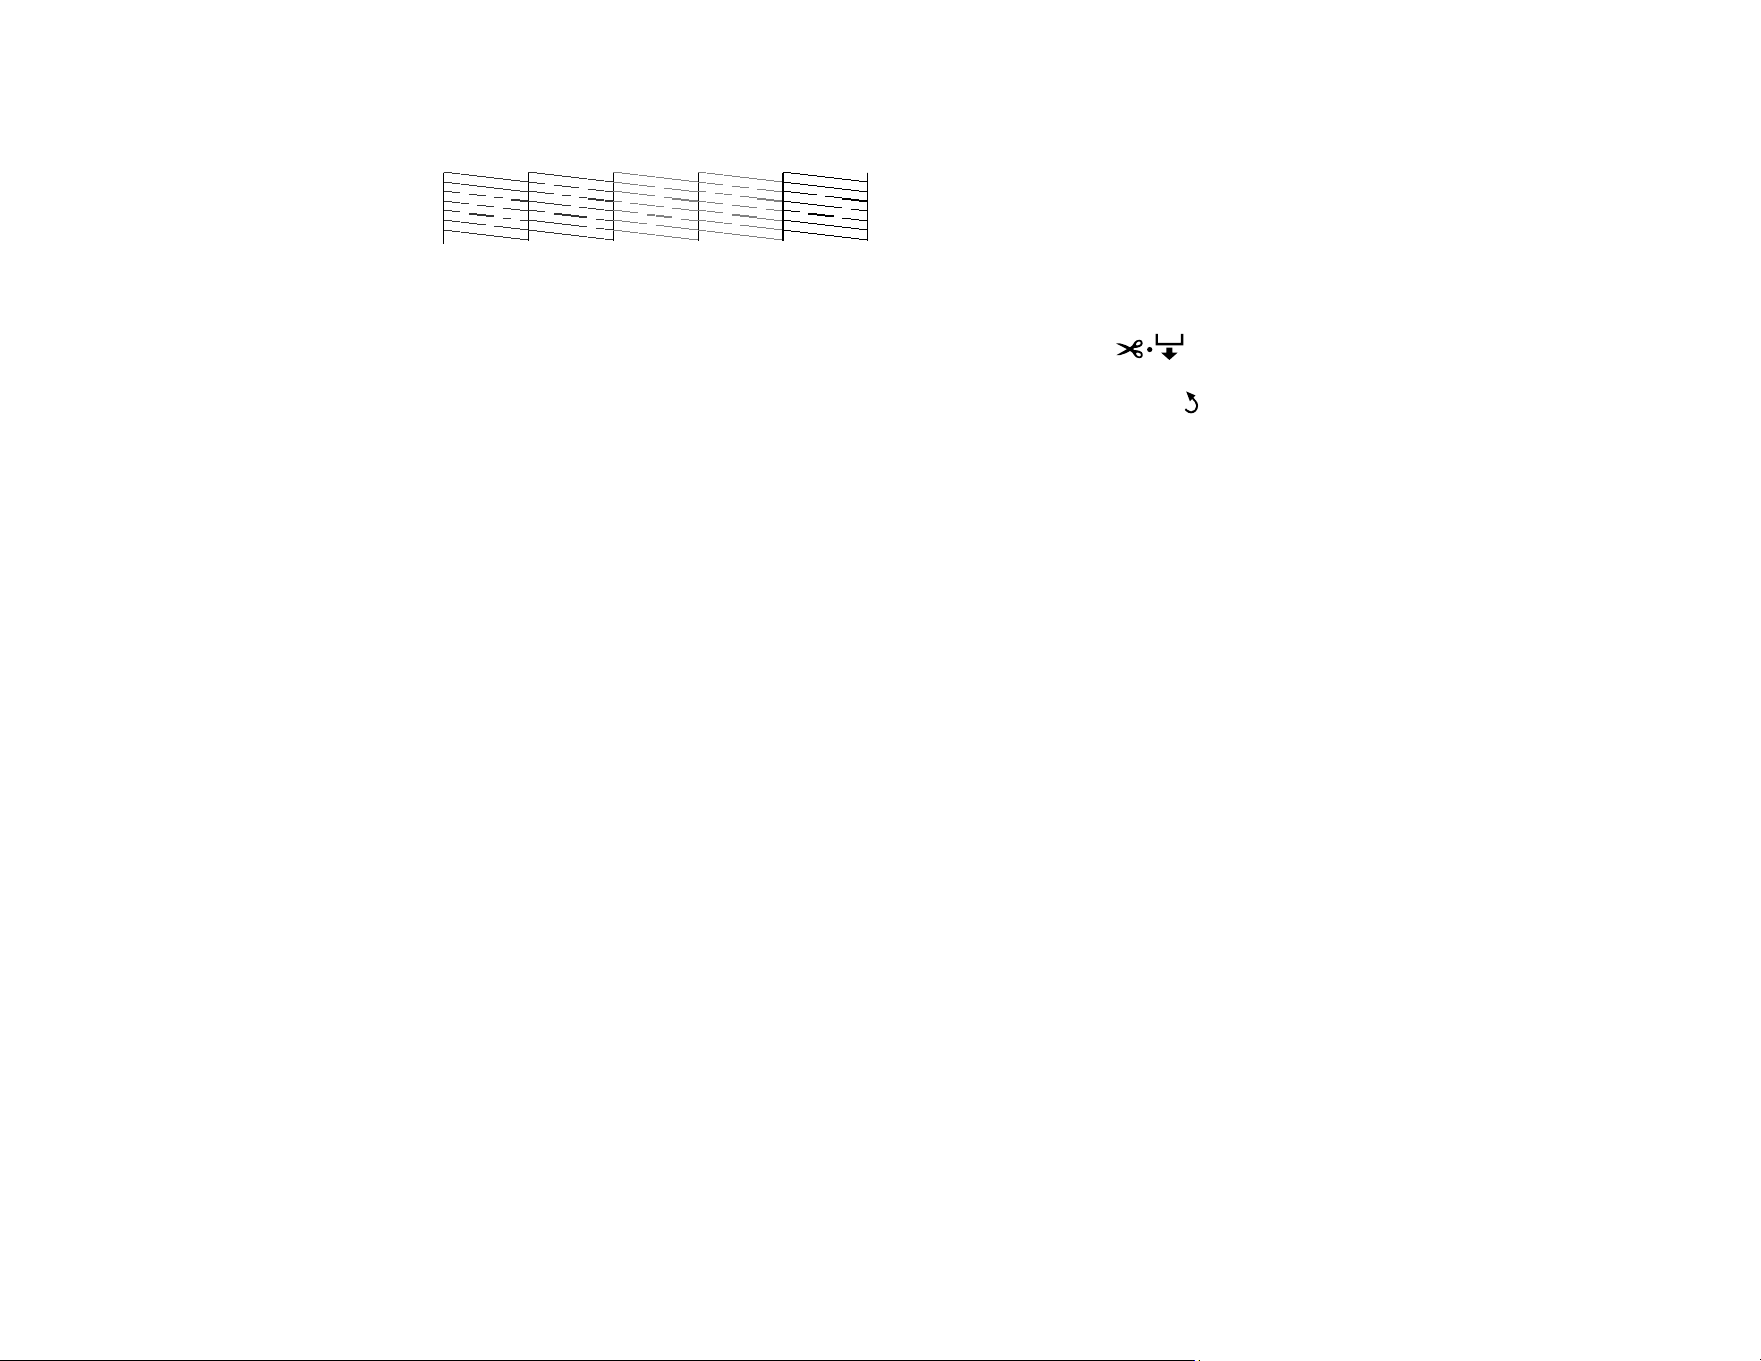
82
Nozzles need cleaning
Note: When paper is loaded in the auto take-up reel, the paper is not automatically cut after printing
the check pattern. If the check pattern is hard to see, press the cut/feed media button then
press the down arrow button until the check pattern is easily visible. After checking the printed
pattern, press the up arrow button to rewind the paper then press the back button to return to the
menu.
6. If there are no gaps, the print head is clean and you can continue printing.
If there are gaps or the pattern is faint, clean the print head.
Parent topic: Print Head Maintenance
Related references
Setup Menu Settings
Maintenance Menu Settings
Related tasks
Loading Media
Viewing and Changing Media Settings
Cleaning the Print Head
Cleaning the Print Head
If printouts are faint or have gaps, you should clean the print head to clear the clogged nozzles. Clean
the print head only if print quality declines or image colors are incorrect.
Note: You can also set up the product to automatically clean the print head at selected intervals using
the Periodical Cleaning and Cleaning Cycle settings in the Setup menu.
You can select from three levels of head cleaning:
• Light: Use this cleaning level first.
• Medium: Use this cleaning level if you cannot clear the clogged nozzles after cleaning with the light
level.

83
• Heavy: Use this cleaning level if you cannot clear the clogged nozzles after cleaning with the medium
level.
1. Press the maintenance button on the control panel.
You see the Maintenance menu.
2. Press the up or down arrow button to select Head Cleaning and press the OK button.
3. Press the up or down arrow button to choose one of the following cleaning options:
• All Nozzles: Select this option when you see faint printing or gaps in all rows of nozzles in the
check pattern. Go to step 5.
• Selected Nozzles: Select this option when you see faint printing or gaps in only certain rows of
nozzles in the check pattern. You can select to clean multiple nozzle rows, if necessary.
4. To select the nozzle rows for cleaning, press the up or down arrow button to highlight the row colors
and press the OK button. Repeat for each row you want to clean. When you finish, select Proceed
and press the OK button.
5. Press the up or down arrow button to select the cleaning level and press the OK button.
Print head cleaning starts. When it is complete, the menu closes.
6. Print a nozzle check pattern or check your printout to confirm that the nozzles are cleared.
Parent topic: Print Head Maintenance
Related references
Setup Menu Settings
Related tasks
Checking for Clogged Print Head Nozzles
Aligning the Print Head
If your printouts are grainy or blurry, you need to align the print head. The thickness of your print media
determines the alignment options you select. You can store separate alignment values for each type of
media you use for quick selection.
Before aligning the print head, make sure you have correctly loaded the media you plan to print on and
that the correct setting name is selected from Custom Paper Setting. Also check that the print head
nozzles are not clogged.
1. On the product control panel, press the left or right arrow button to select the tab and press the
OK button.
The Paper menu appears.
84
2. Press the up or down button to select Custom Paper Setting and press the OK button.
3. Press the up or down button to select the paper type you want to set alignment values for and press
the OK button.
4. Press the up or down arrow button to select Head Alignment and press the OK button.
5. Press the up or down arrow button to select one of these adjustment methods and press the OK
button:
• If you are printing bidirectionally on your media, select the Manual(Bi-D) setting. If the print quality
has not improved, repeat the steps here and select the Manual(Uni-D) setting.
• If you are printing unidirectionally on your media, select the Manual(Uni-D) setting.
6. Press the OK button to print an alignment test pattern.
Note: When paper is loaded in the auto take-up reel, the paper is not automatically cut after printing
the alignment pattern. If the alignment pattern is hard to see, press the cut/feed media button
then press the down arrow button until the alignment pattern is easily visible. After checking the
printed pattern, press the up arrow button to rewind the paper then press the back button to return
to the menu.
85
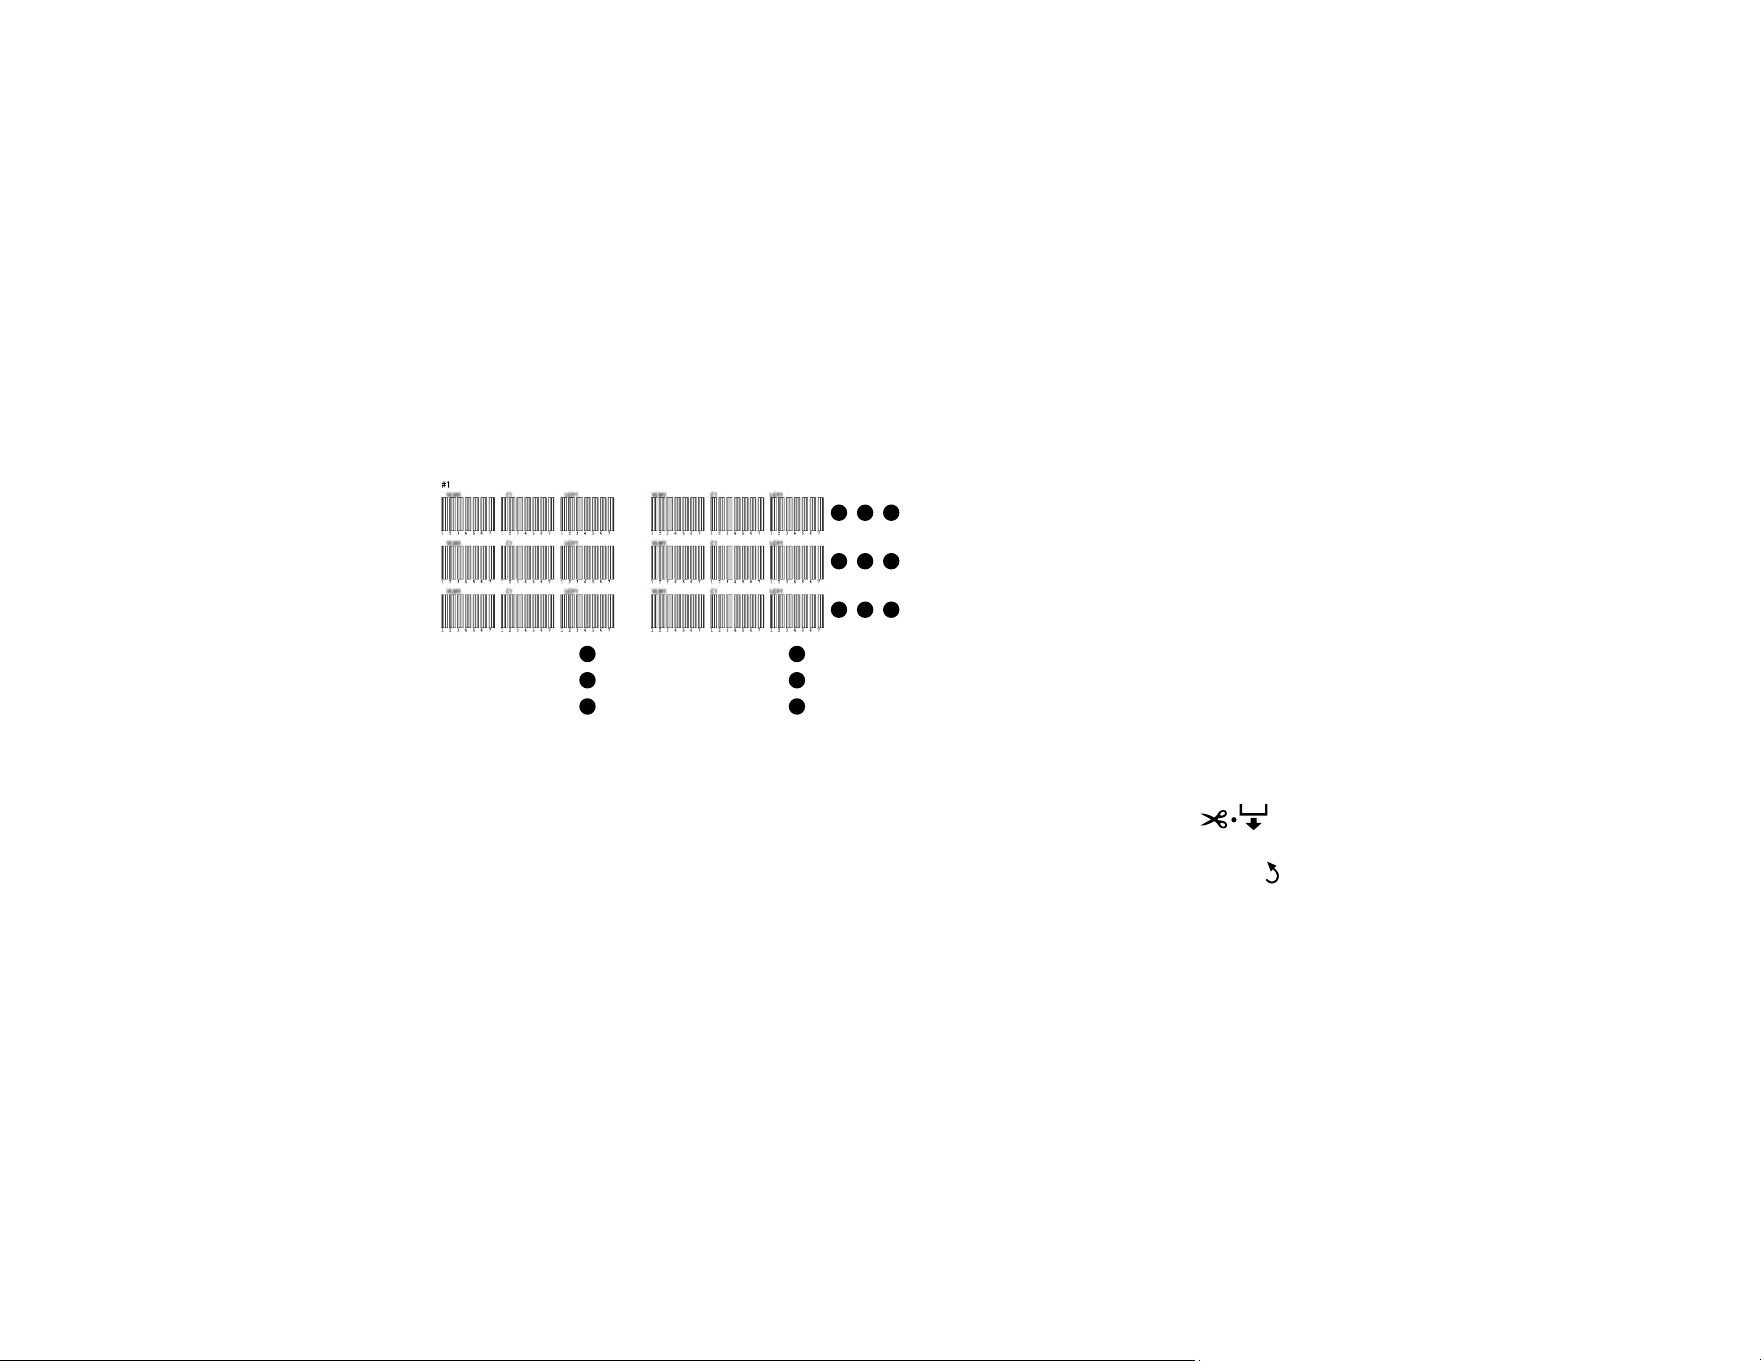
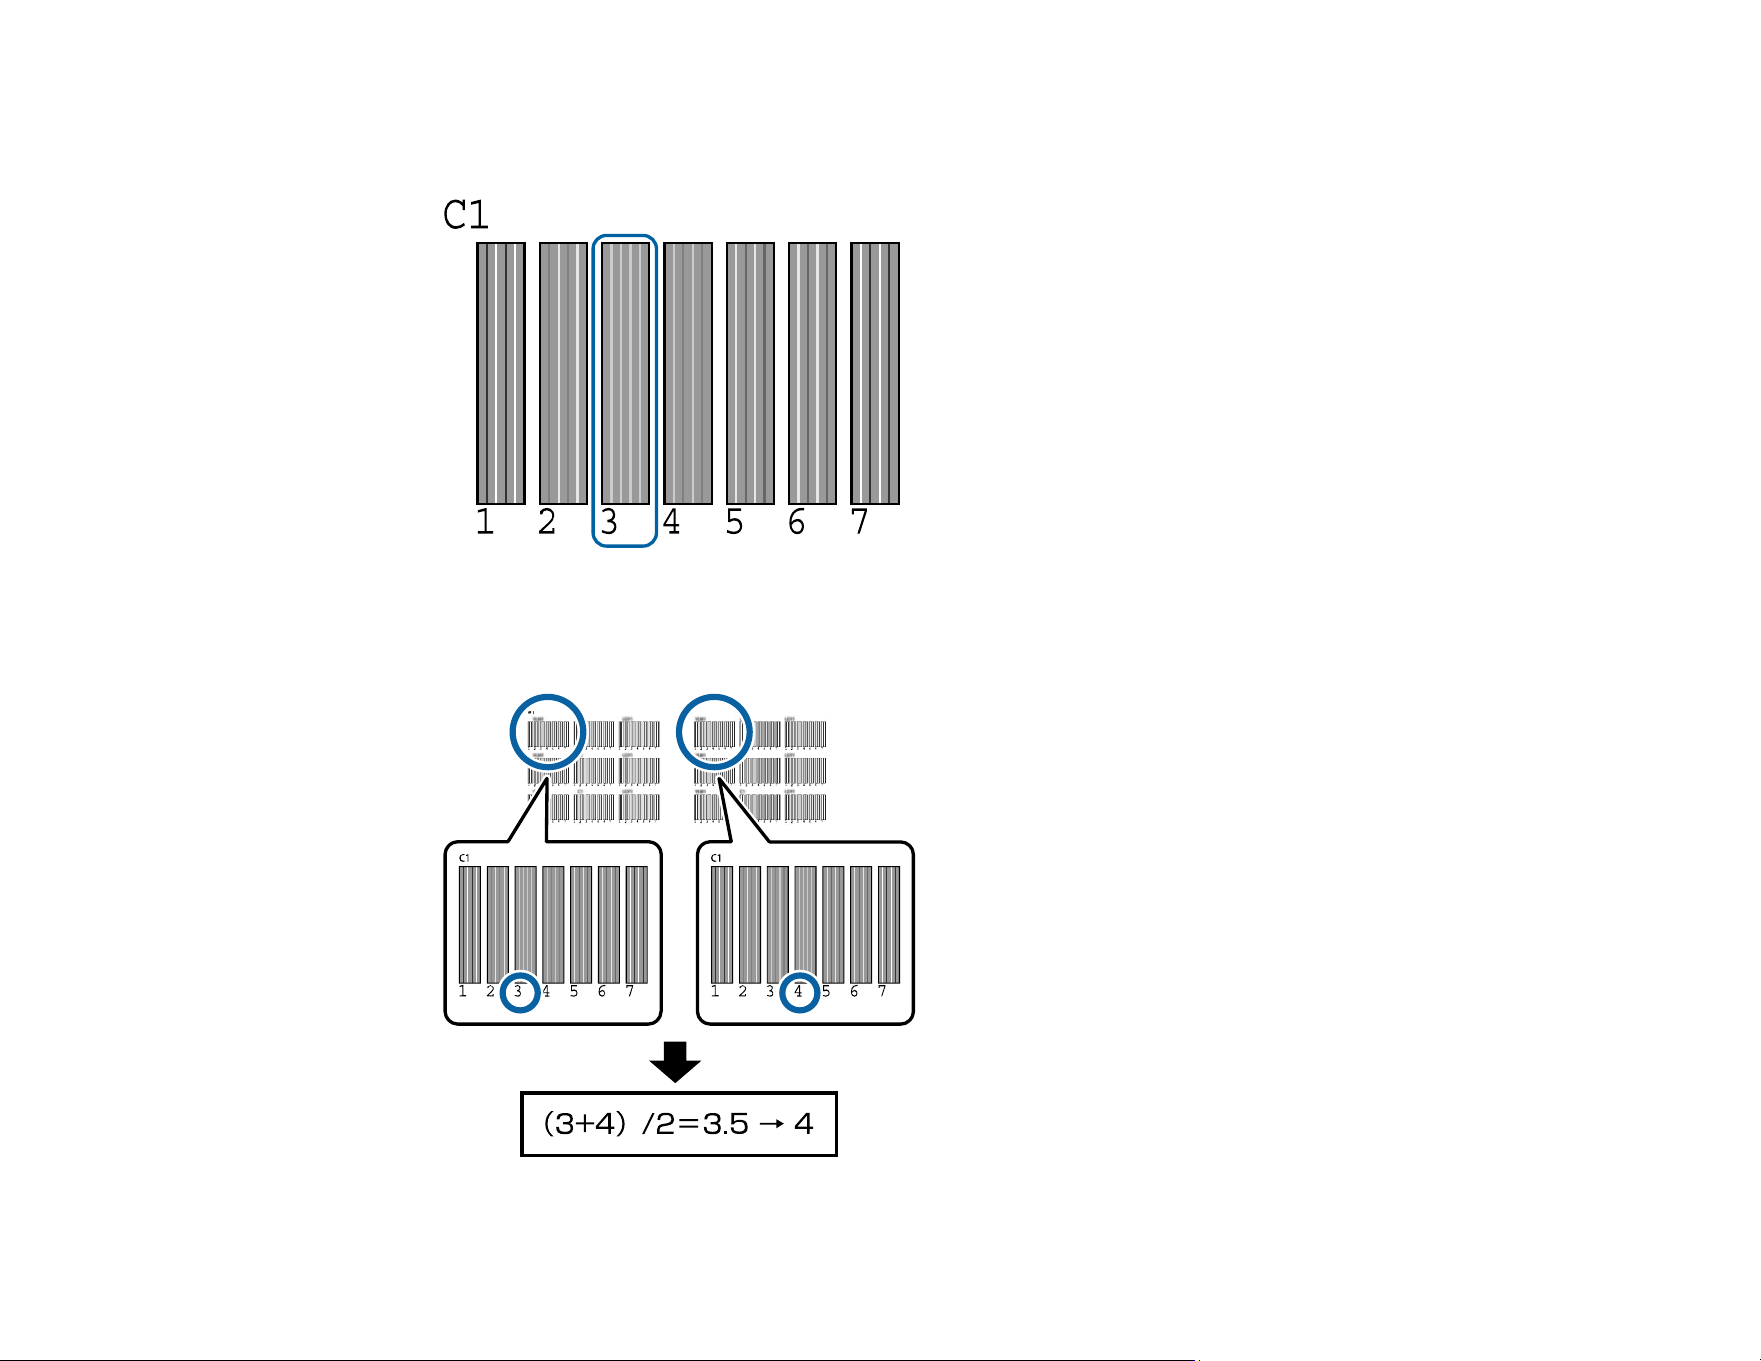
7. Examine the alignment test pattern to select the pattern number with the least visible white lines, as
in pattern 3 shown here.
8. Take the average number for each row and color in the alignment patterns, as shown in the example
below:
86
9. If the product control panel displays C1, press the up or down arrow button to select the number of
the best pattern in C1 and press the OK button. Repeat this step for all the color patterns.
After you select the final color pattern number, the control panel returns to its ready status.
Parent topic: Print Head Maintenance
Related references
Maintenance Menu Settings
Related tasks
Loading Media
Checking for Clogged Print Head Nozzles
Performing Head Maintenance
If ink smears onto your printed media even after cleaning the print head, you should perform head
maintenance to clean inside the product near the print head.
Use the head maintenance kit that came with your product to perform head maintenance.
1. Remove any paper loaded in the product.
2. Press the left or right arrow on the product control panel to highlight the tab and press the OK
button.
You see the Maintenance menu on the product control panel screen.
3. Select Head Maintenance and press the OK button.
You see a message asking you to prepare the head maintenance kit.
4. Press the up or down arrow button to select Yes then press the OK button.
The product moves the print head out of the way.
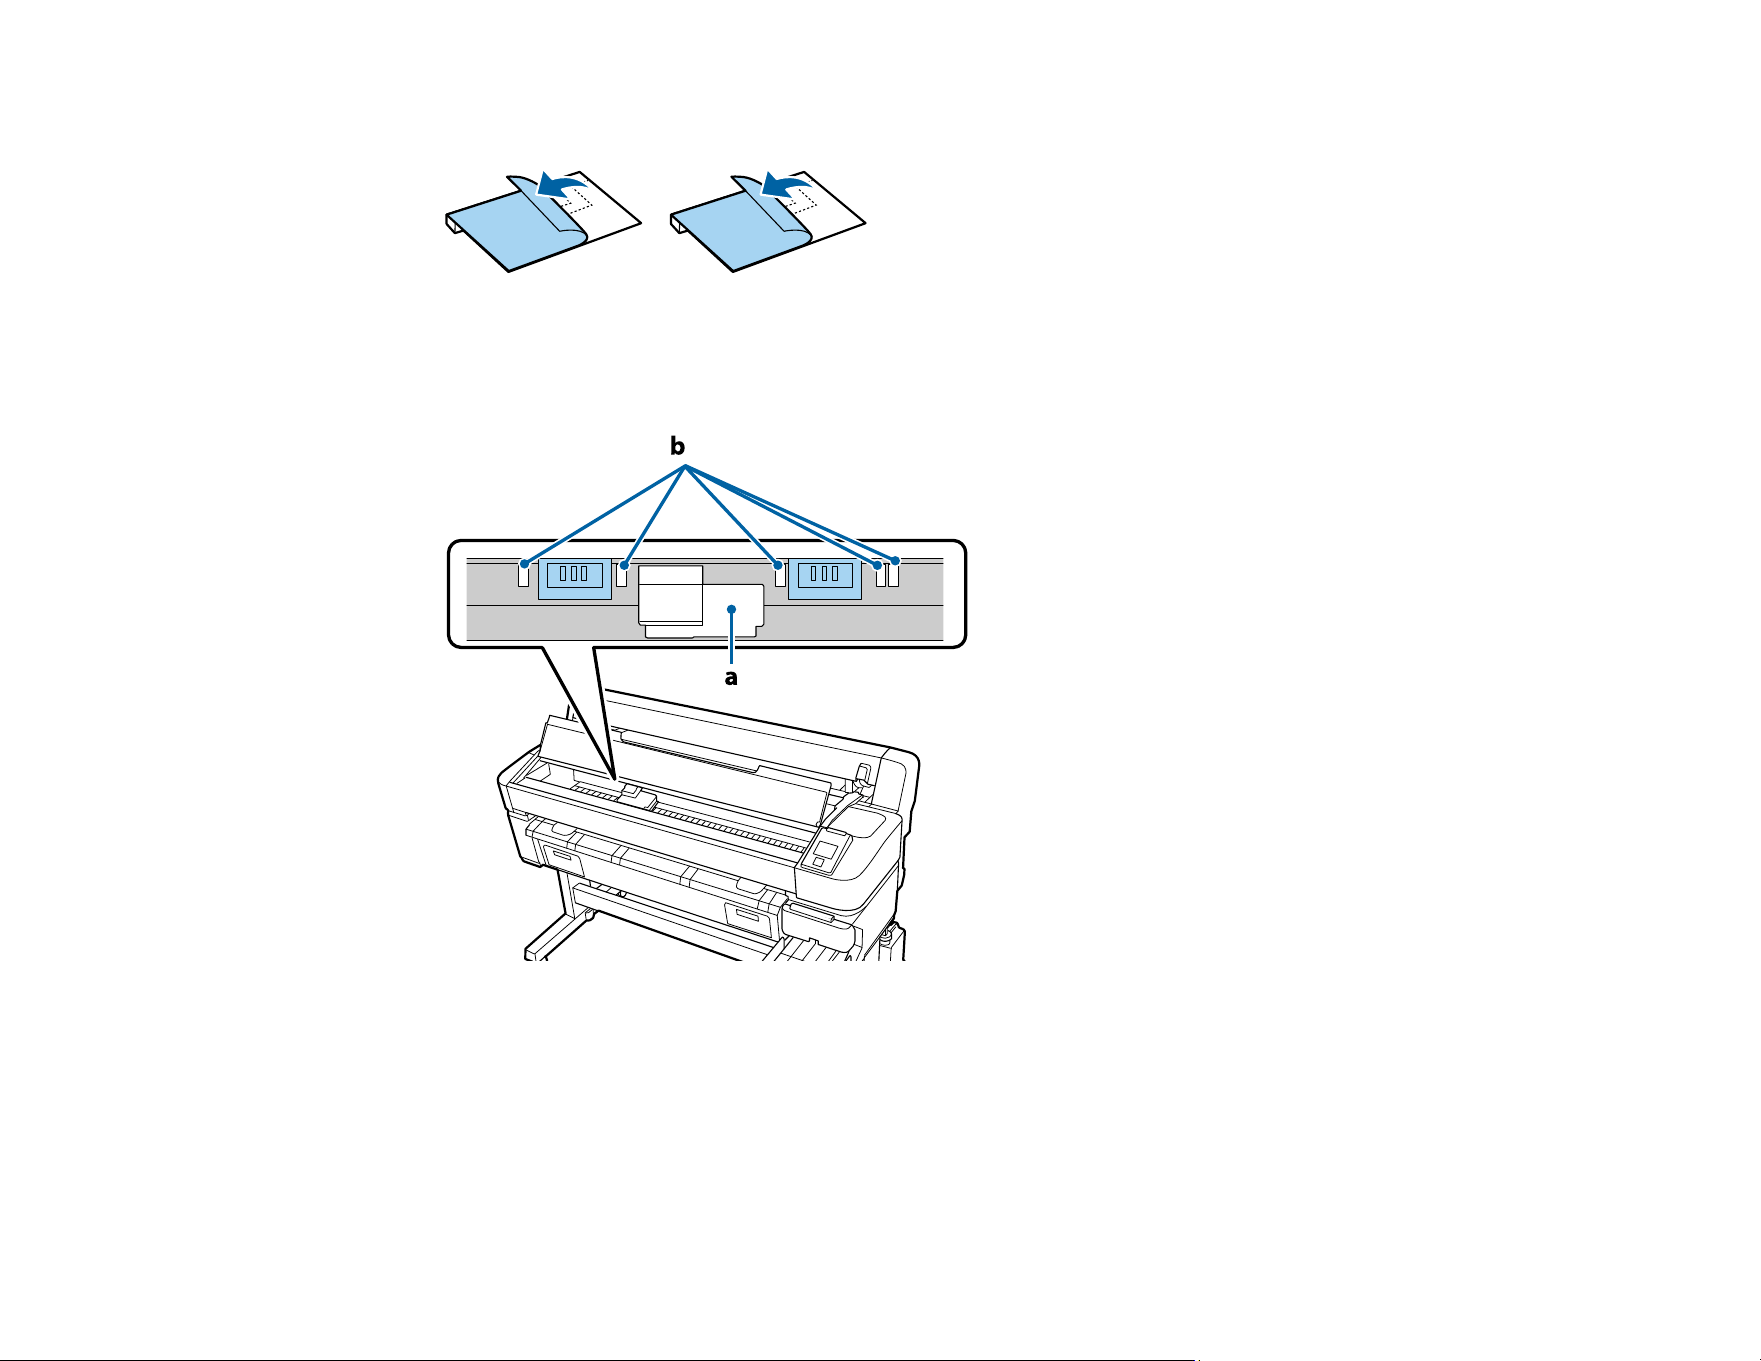
87
5. Peel the backing off of the pads in the head maintenance kit.
6. Open the printer cover.
7. Place the pads on the platen on both sides of the print head (a).
Caution: Make sure the pads do not cover the ink absorbing areas (b) on the platen so the pads do
not stick to them. Do not move the print head by hand; this can damage your product.
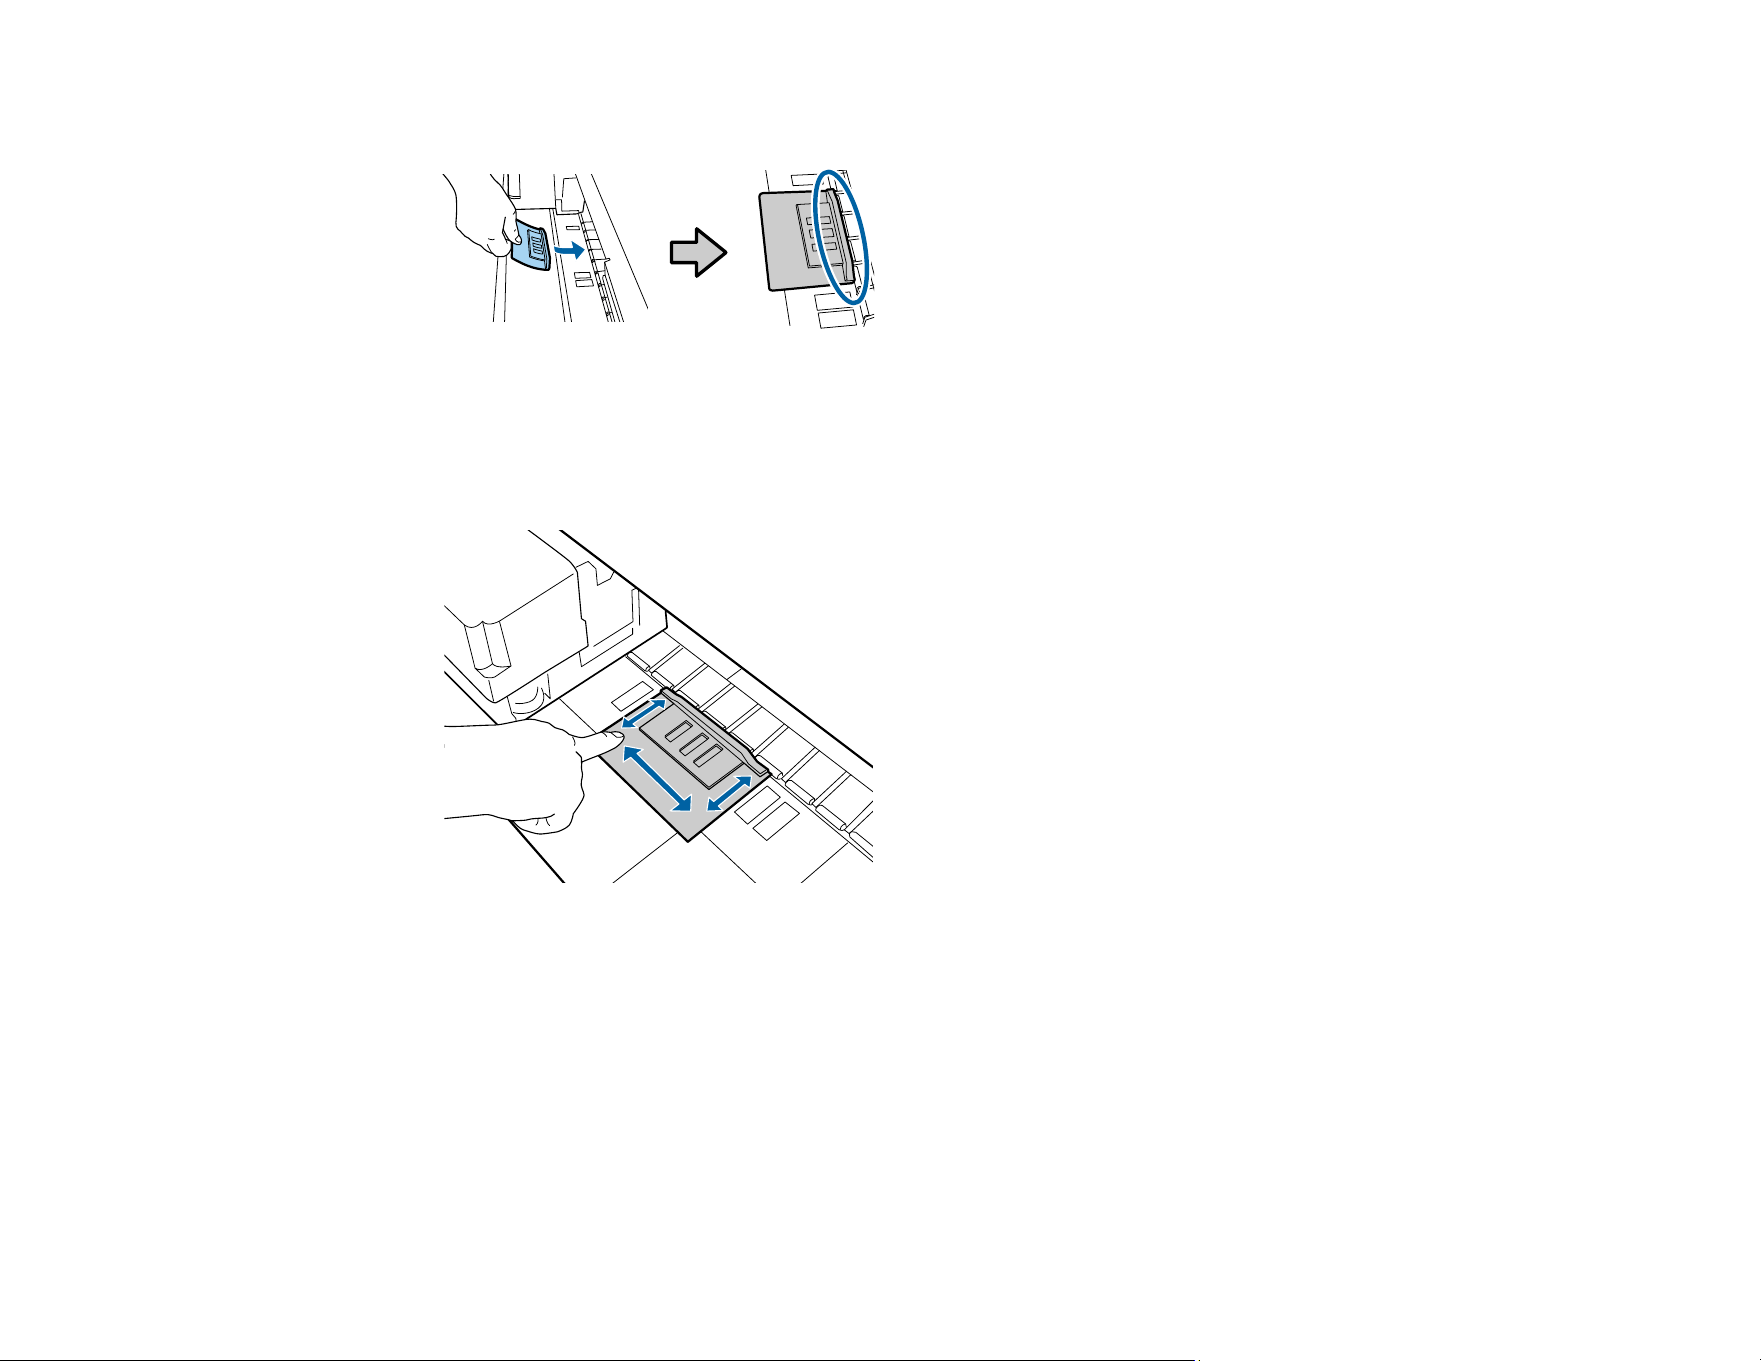
88
8. Press the edge of each pad against the rollers as shown.
Note: Make sure there are no gaps between the pads and the rollers or head maintenance will not
be performed properly.
9. Rub the areas shown here to secure the pads to the platen.
Caution: Do not press too hard on the pad or you could damage the platen.
10. Close the printer cover.
Note: Do not open the printer cover during head maintenance or the procedure will stop.
11. Press the OK button.
The head maintenance procedure begins.
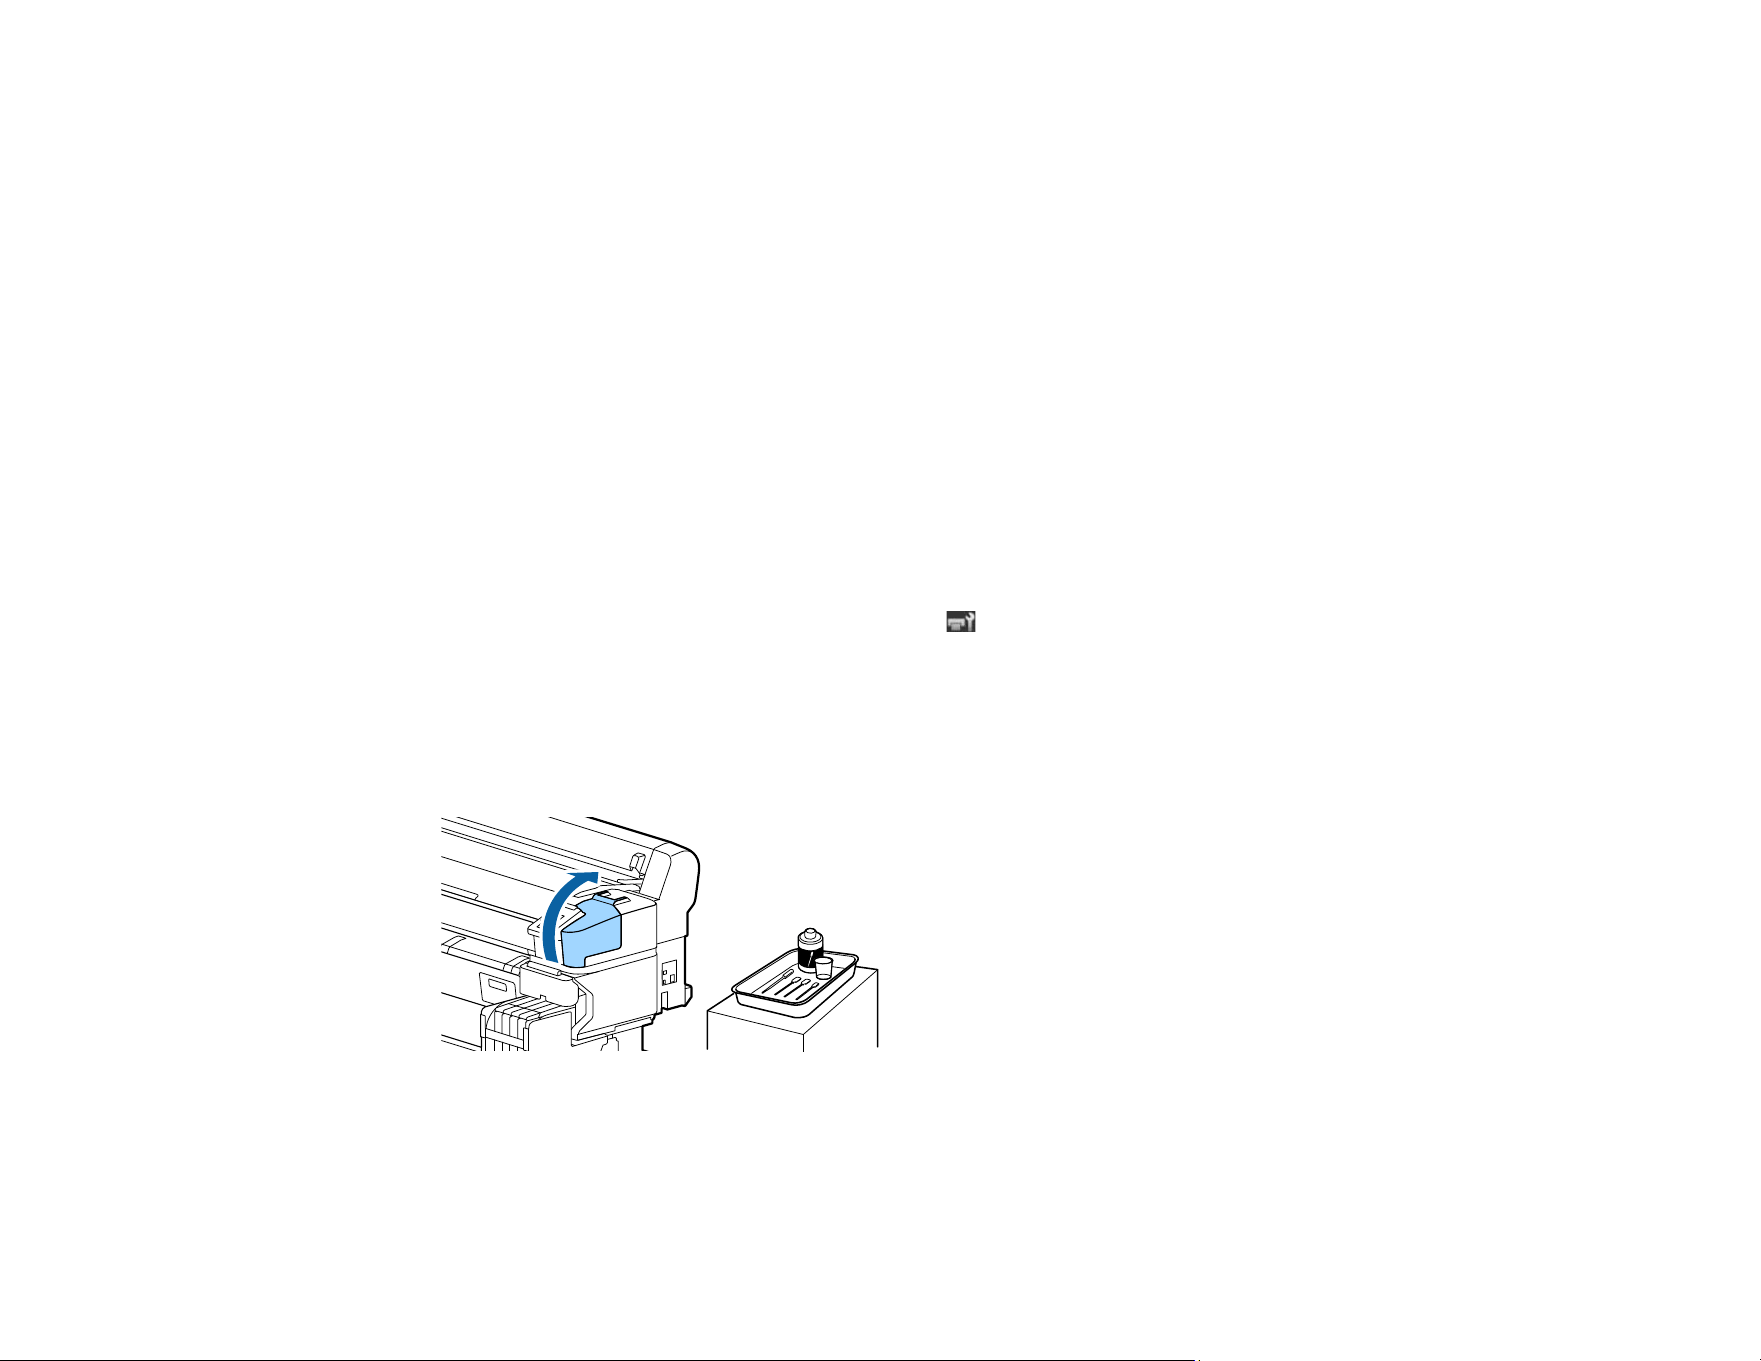
89
12. Follow the instructions on the product control panel screen to open the printer cover and carefully
remove the pads when head maintenance finishes.
Note: Do not reuse the pads.
13. Close the printer cover and press the OK button to clean the print head.
Parent topic: Print Head Maintenance
Related references
Maintenance Precautions
Related tasks
Removing Media
Cleaning the Anti-drying Caps
Clean the anti-drying caps at least once a week to remove any ink that may affect print quality. Be sure
you have a Cap Cleaning Kit handy.
1. Press the left or right arrow button to select the tab and press the OK button.
The Maintenance menu is displayed.
2. Press the up or down arrow button to select Head Cap Cleaning and press the OK button.
The print head moves to the cleaning position.
3. Follow the on-screen instructions to open the maintenance cover.
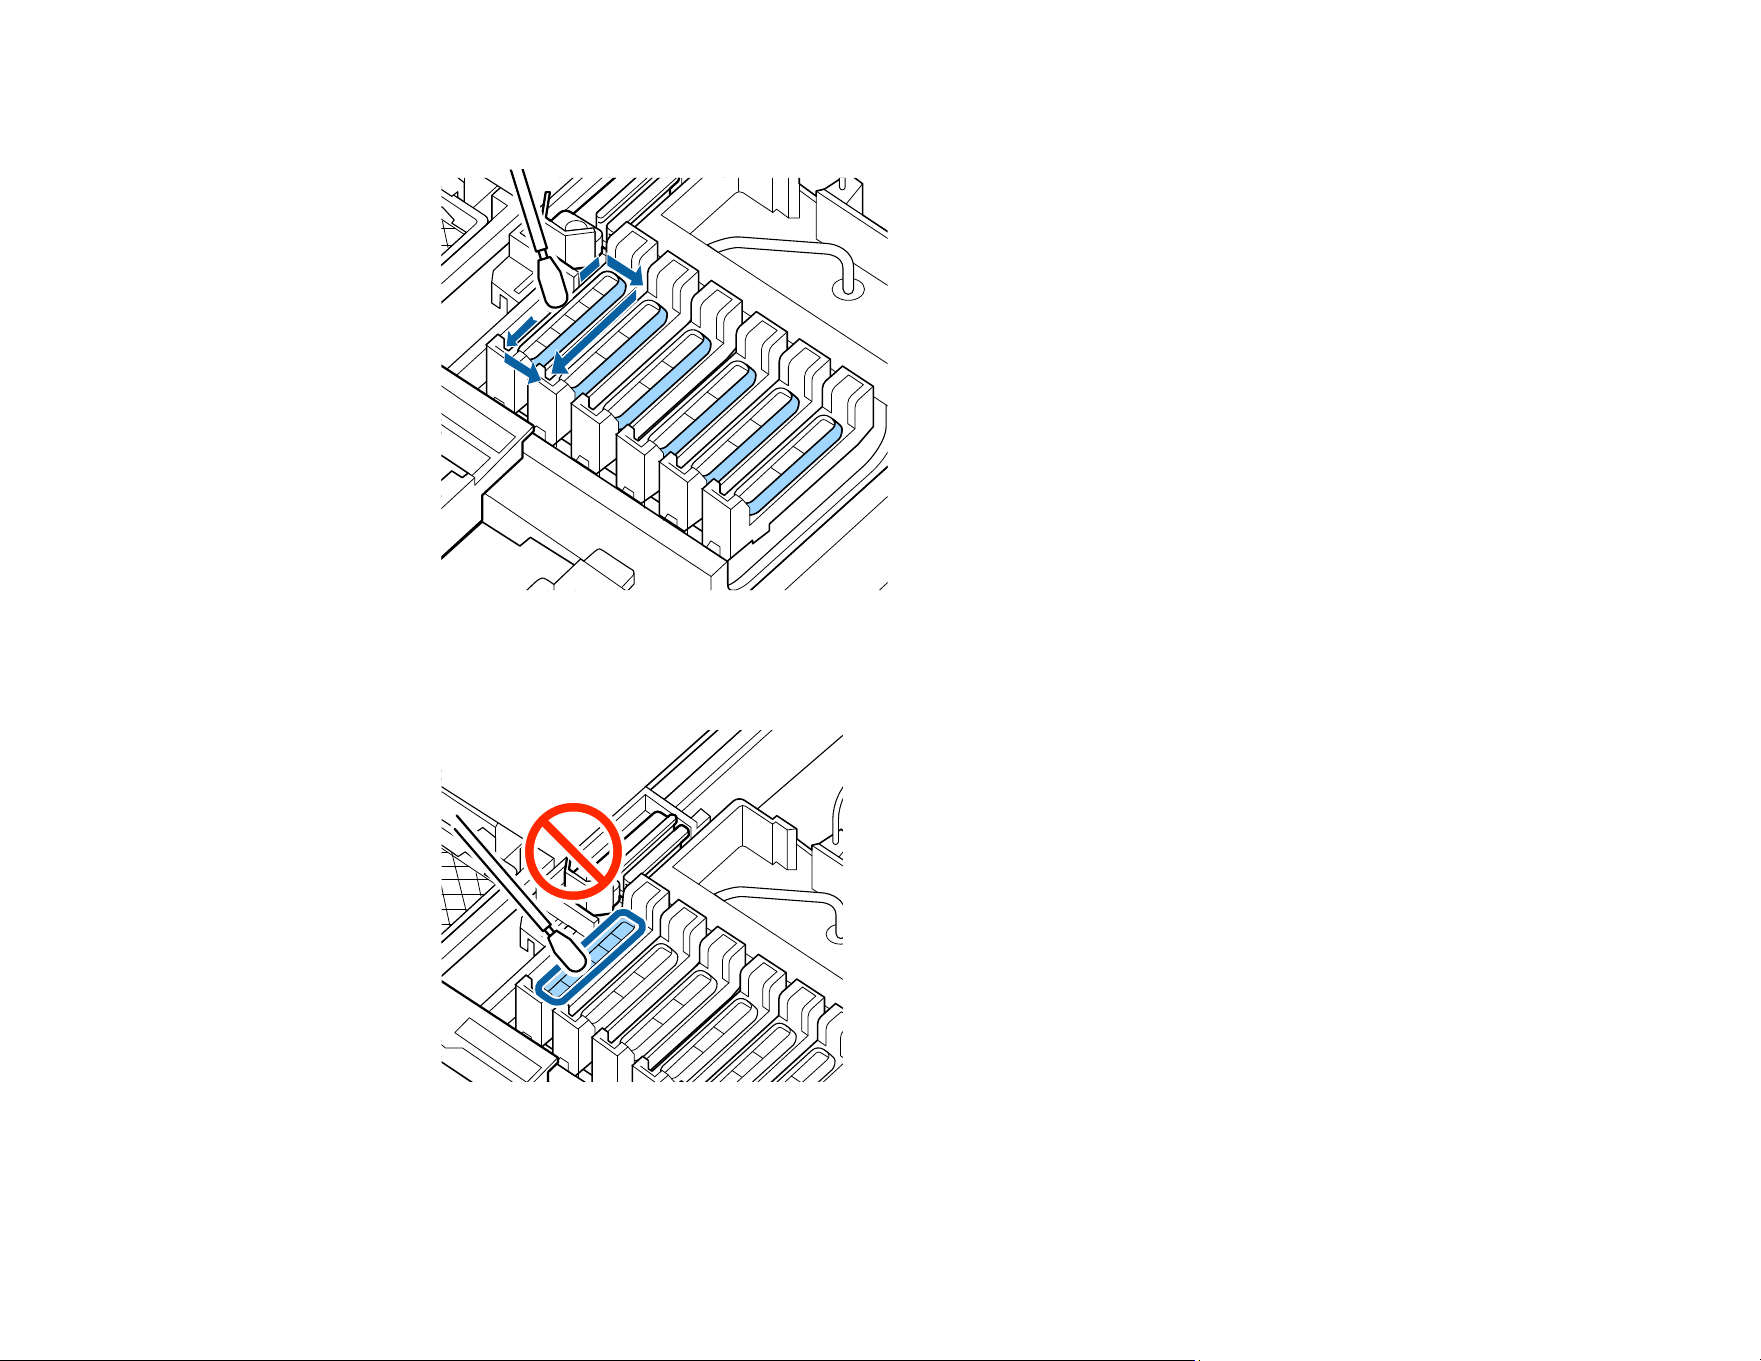
90
4. Hold a narrow cleaning stick perpendicularly and wipe off any ink around the outsides of the caps.
Note: Do not touch the inside of the caps shown here to avoid damaging the caps and preventing
the print head from capping correctly.
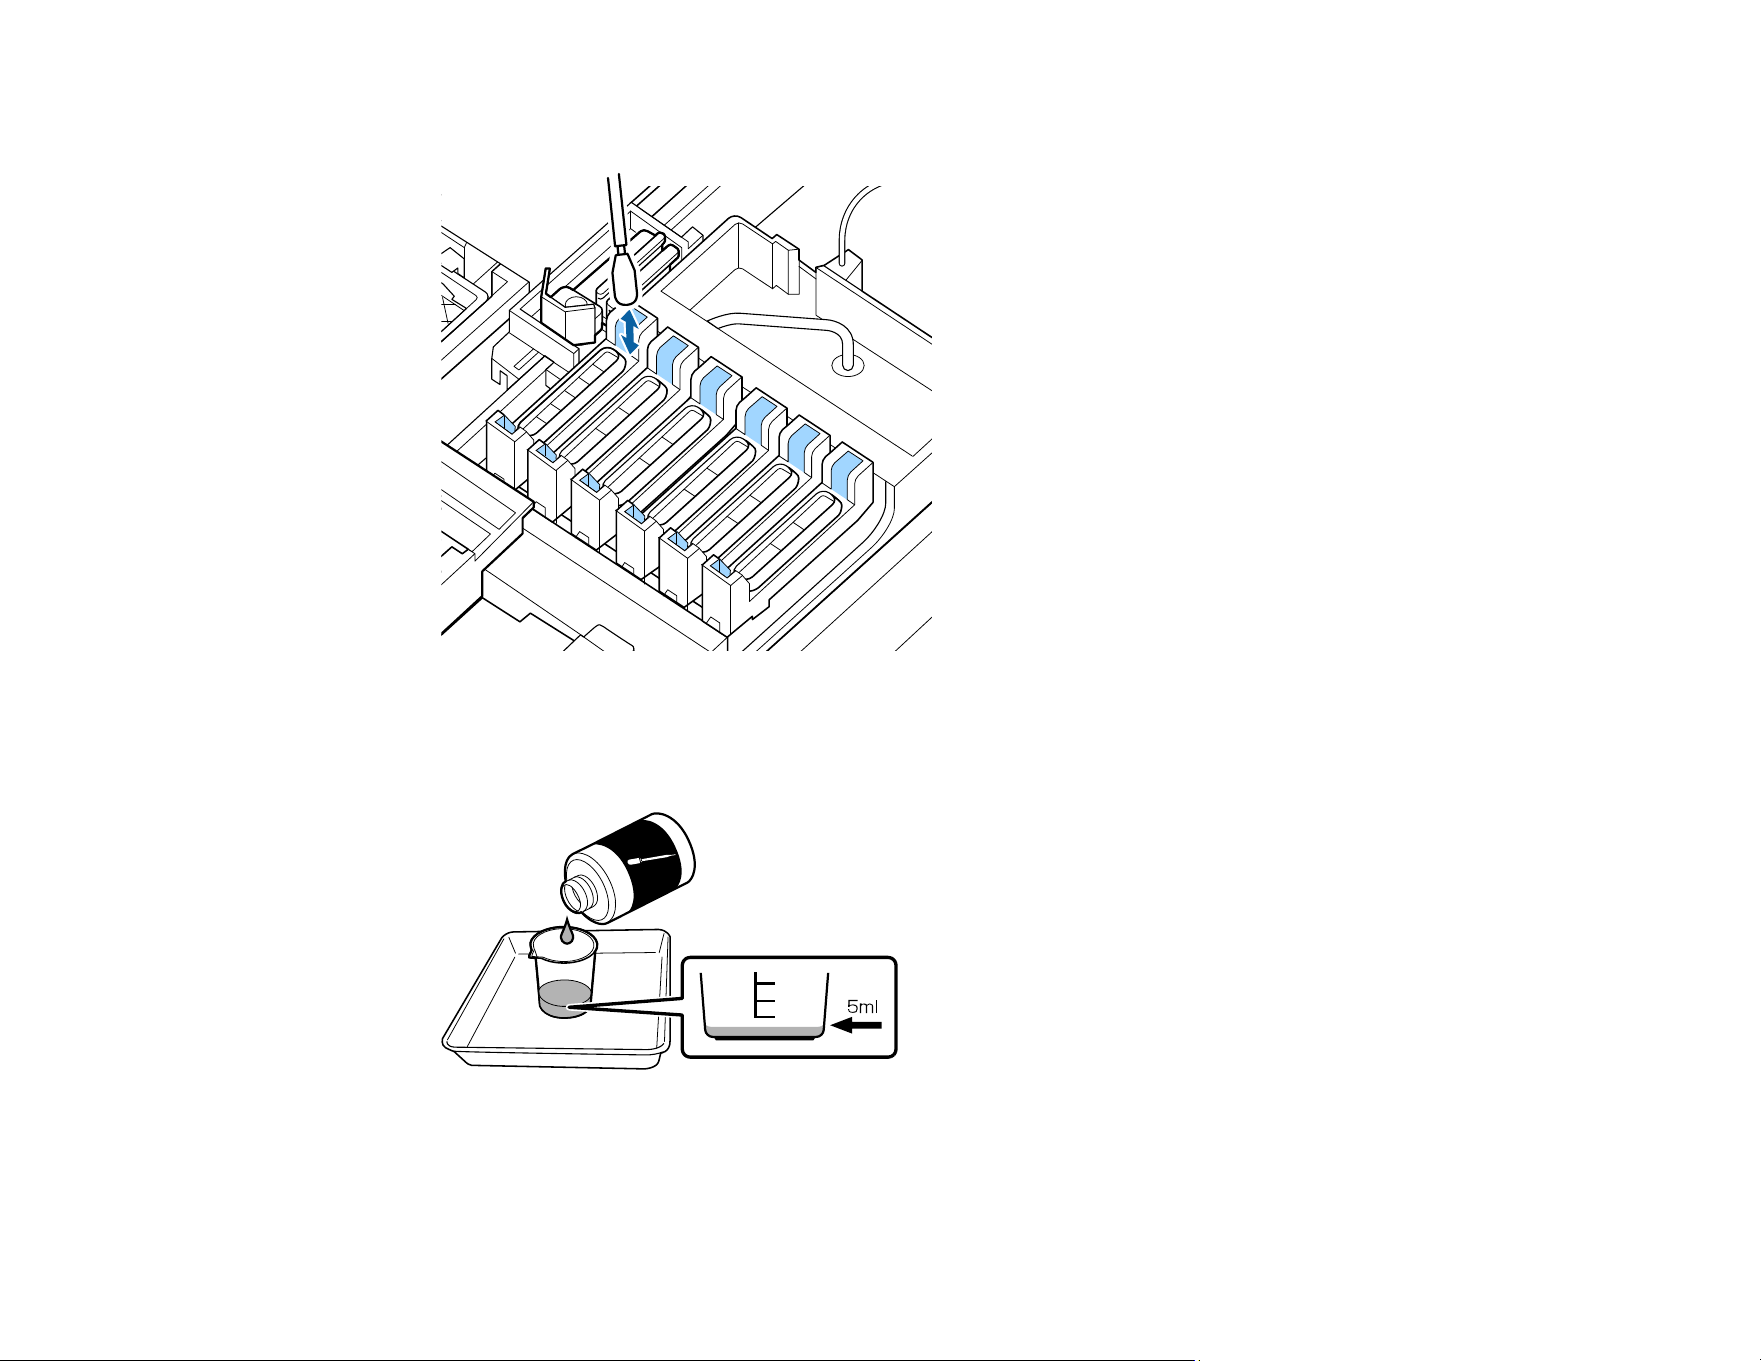
91
5. Wipe inside the guides as shown here.
6. Place the cup supplied in the cap cleaning kit on a tray and pour approximately 0.17 ounce (5 ml) of
cap cleaning liquid into the cup.
7. Recap the ink cleaner bottle.
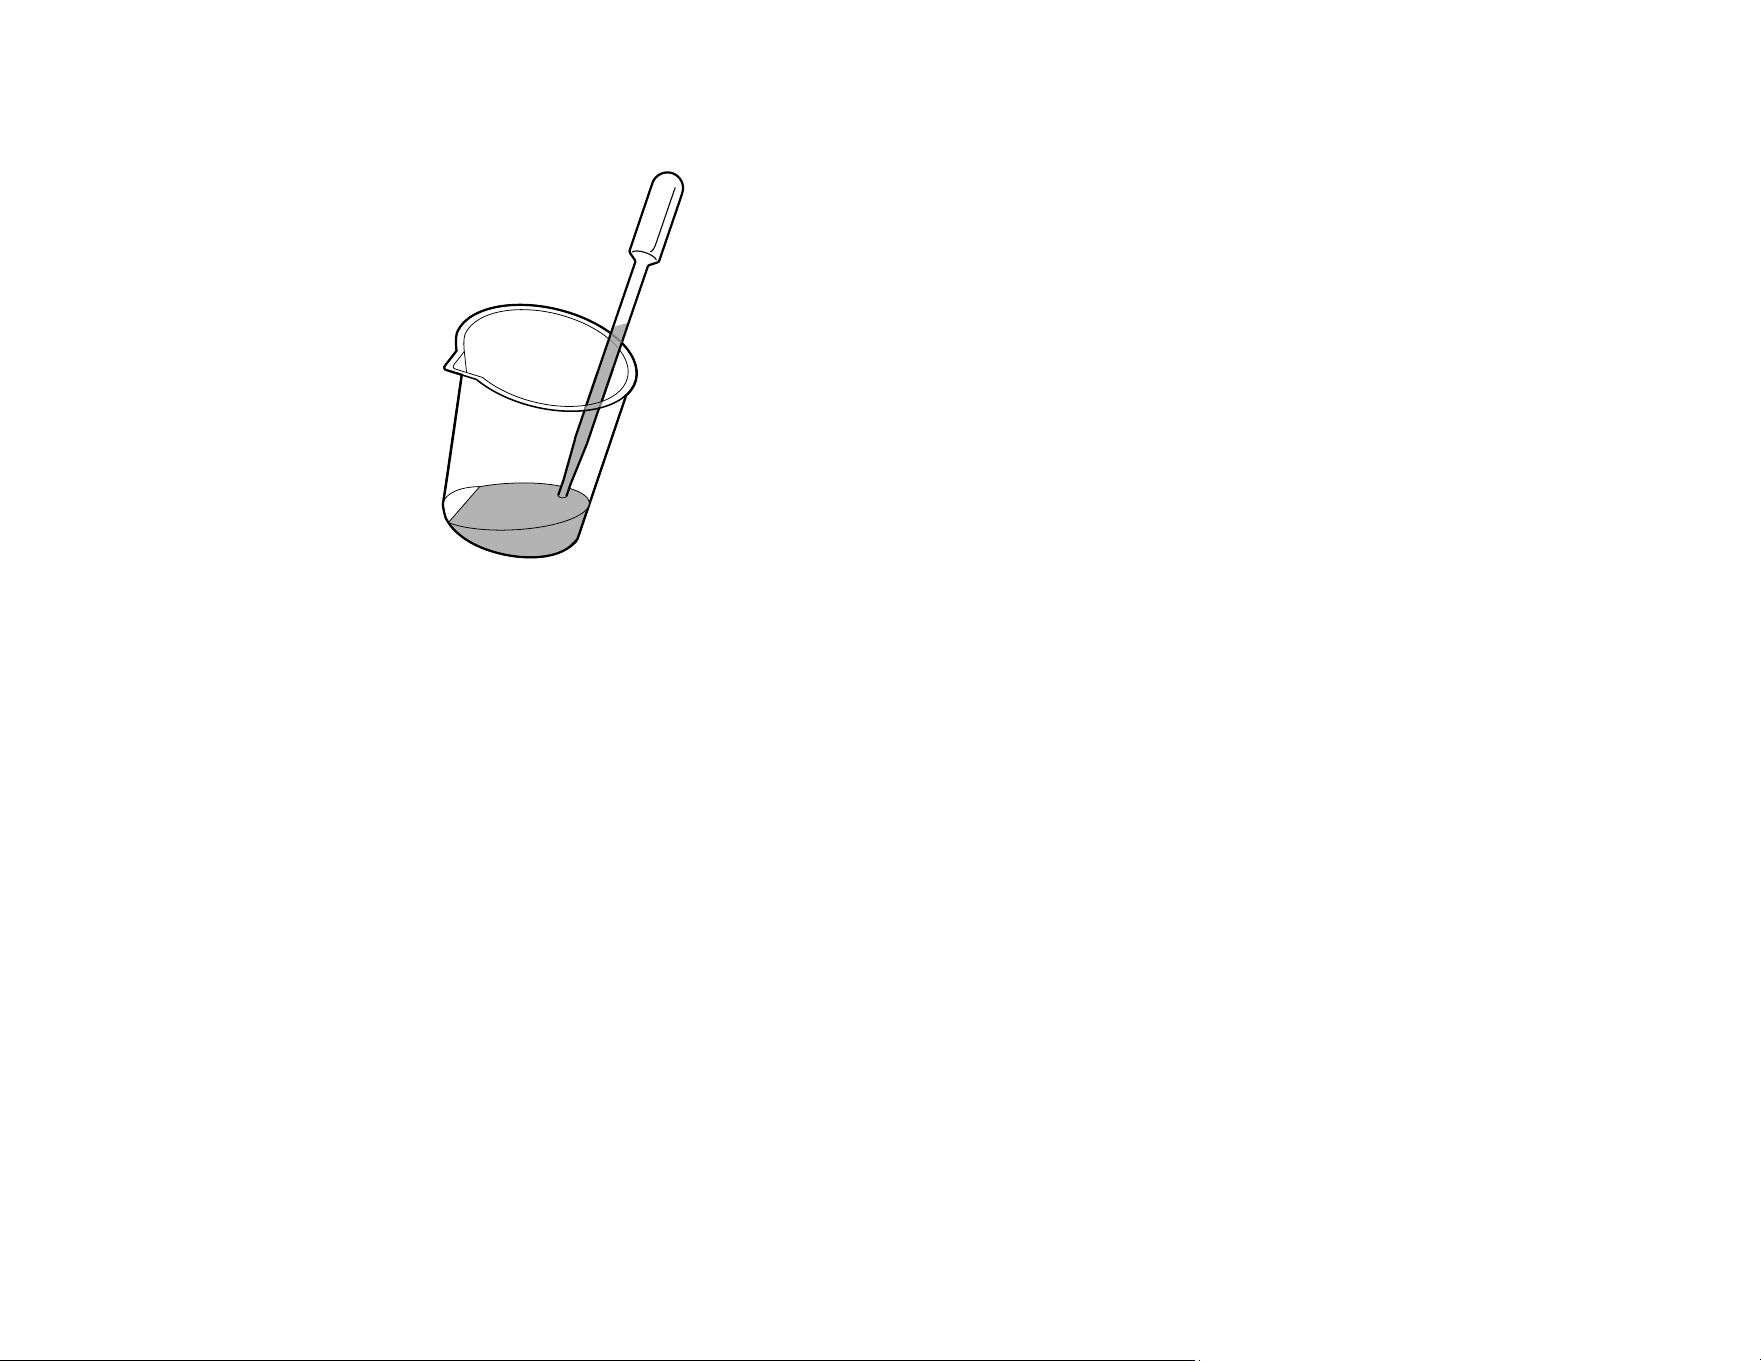
92
8. Draw some cap cleaning liquid with the dropper.
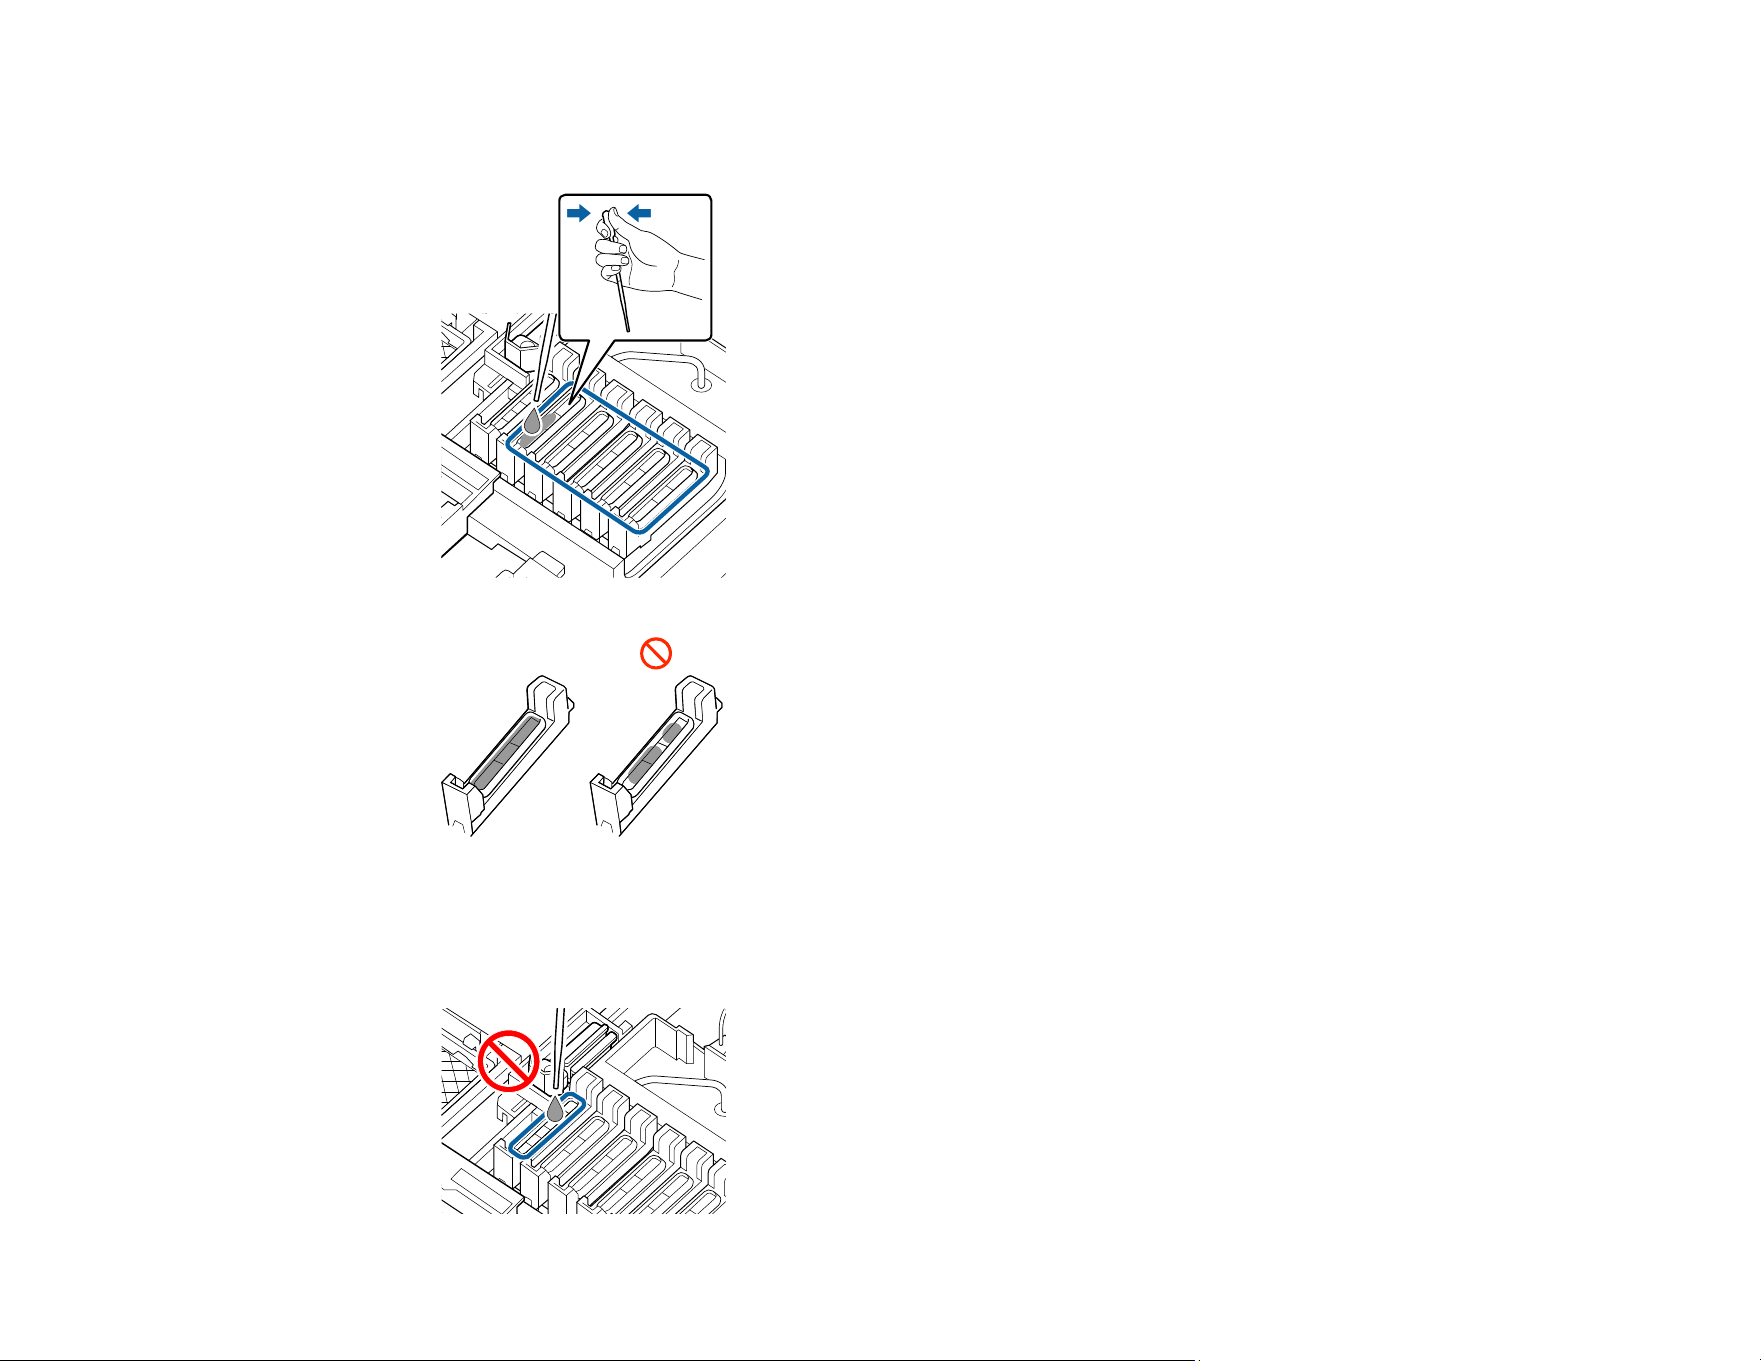
93
9. Starting with the second cap from the left, squeeze drops onto each cap until the inside is full, but not
overflowing.
Caution: Do not add cap cleaning liquid to the first cap on the left. This is the suction cap and adding
cleaning liquid to it may cause the product to malfunction. If you added cleaning liquid to the suction
cap, do not try to wipe it up. Touching the inside of the suction cap may prevent proper capping.
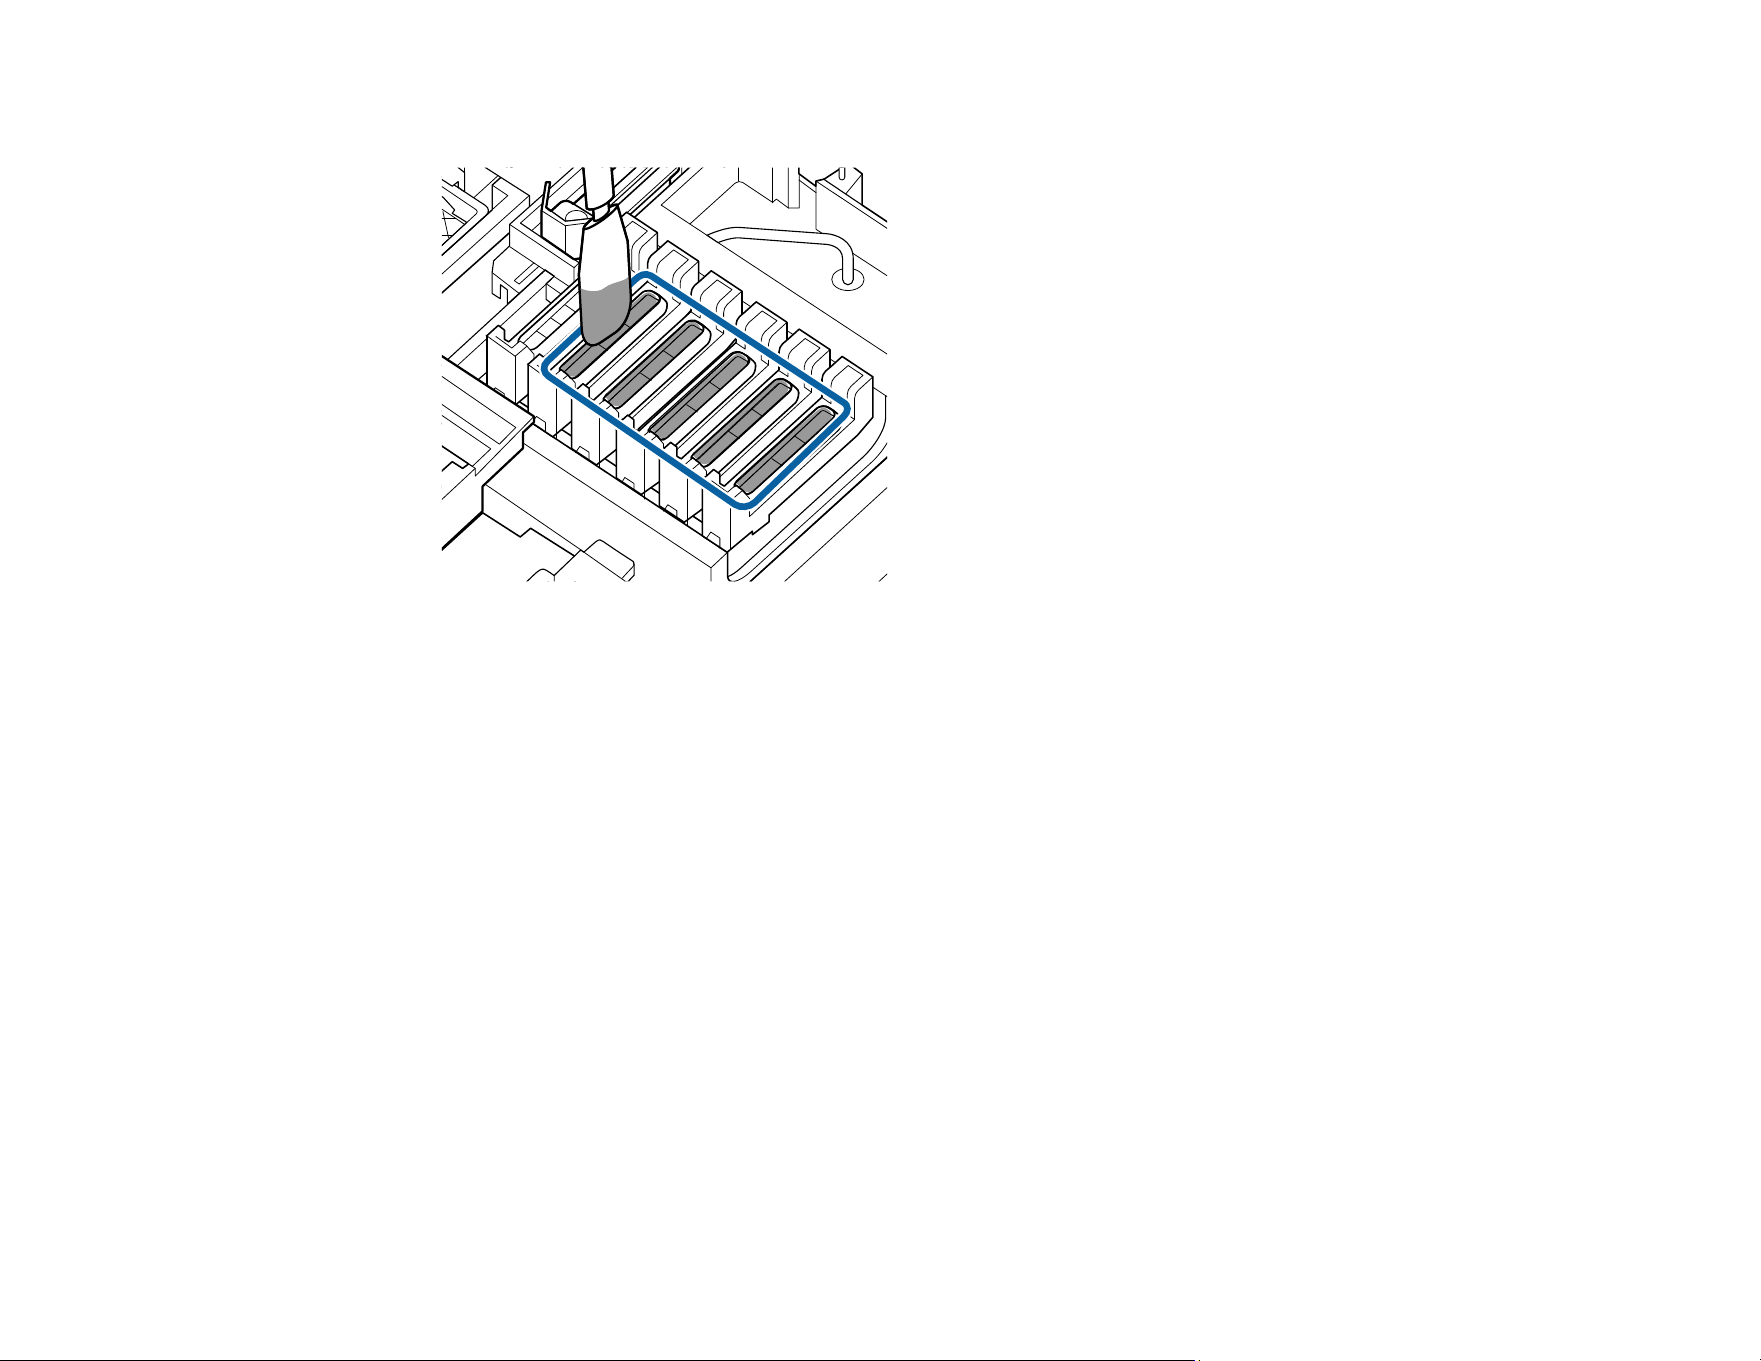
94
10. Use a new, dry cleaning stick (wide) to soak up the cap cleaning liquid from the anti-drying caps.
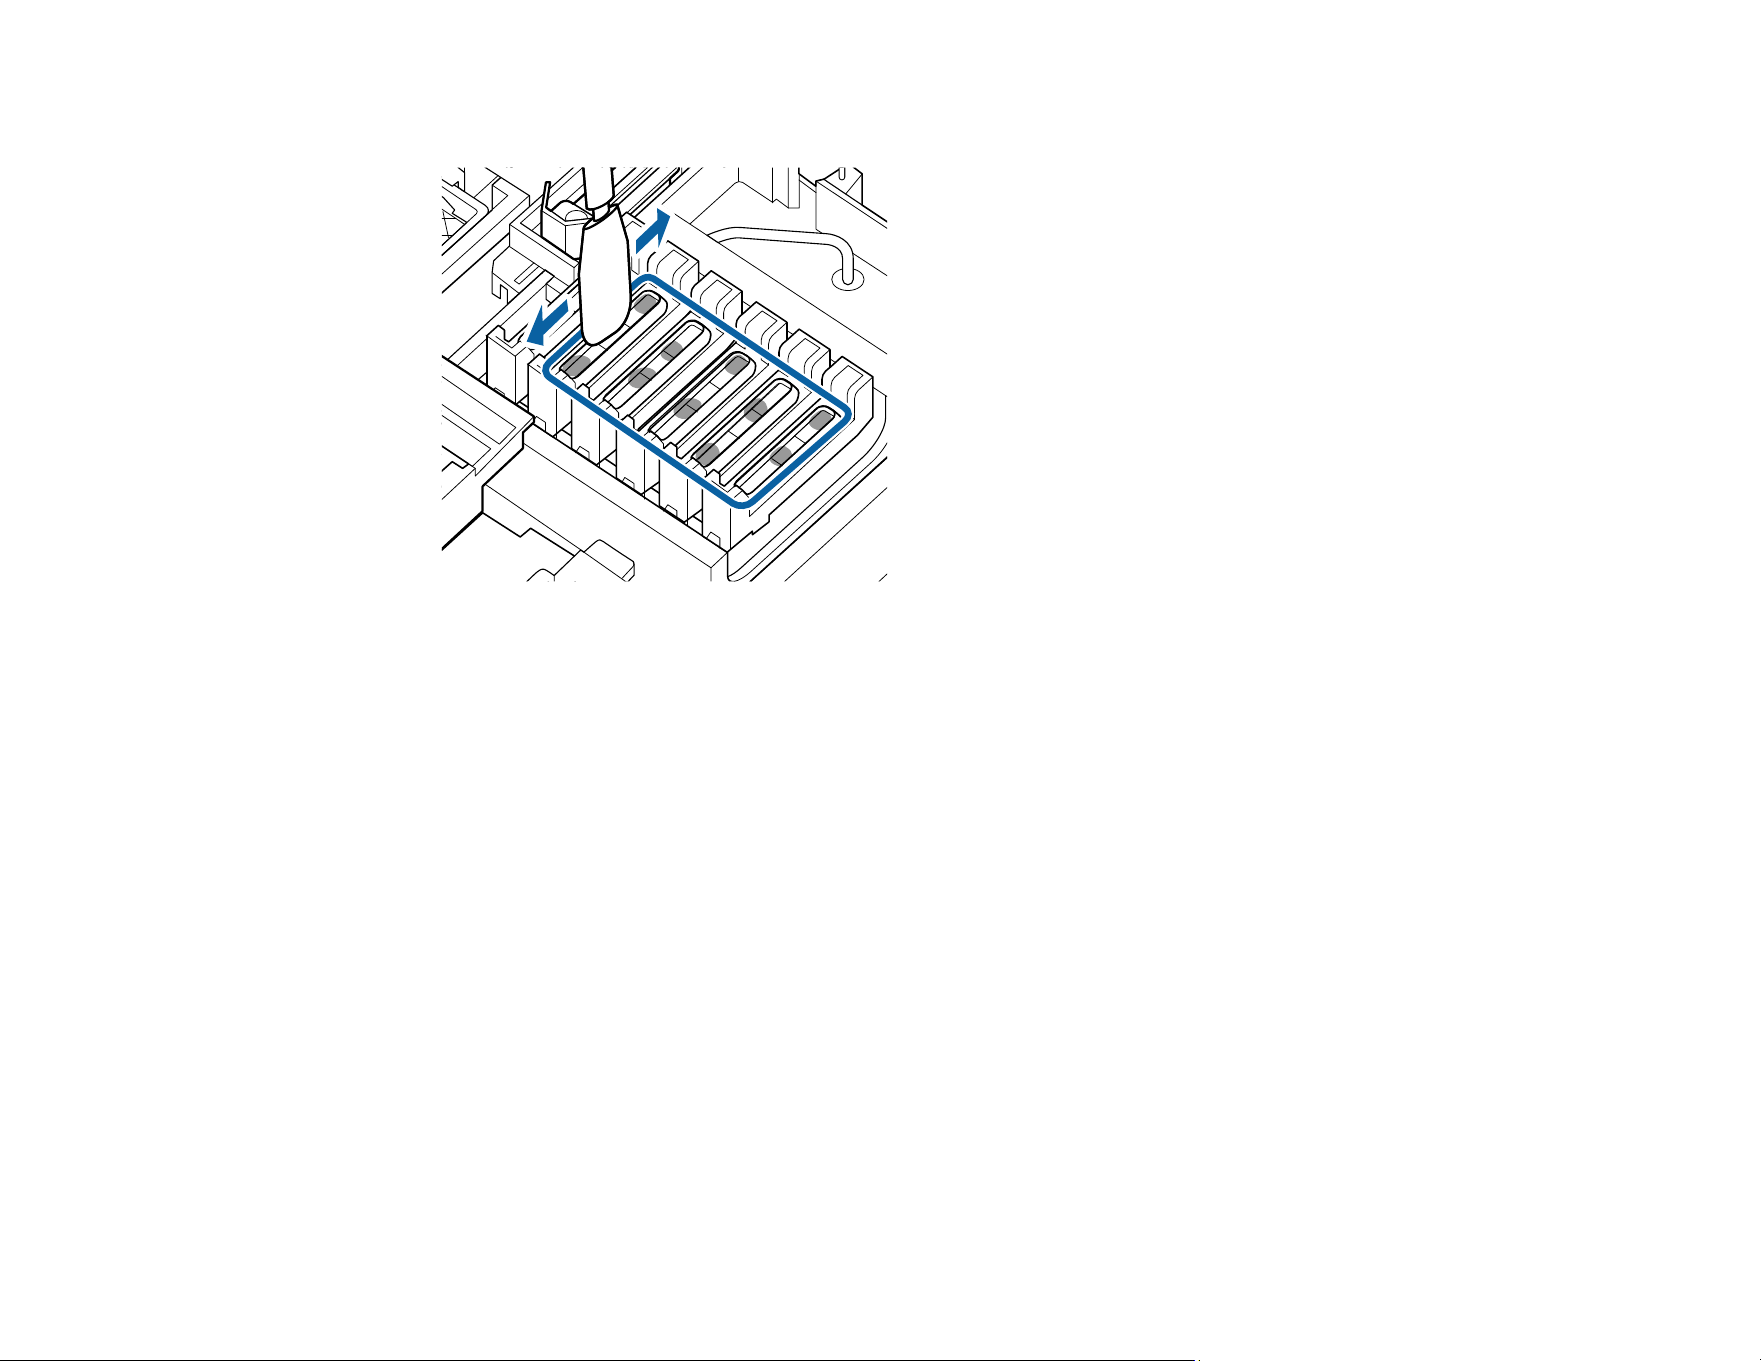
95
11. Use another new, dry cleaning stick (wide) to wipe up any remaining cap cleaning liquid.
Caution: Any ink or cap cleaning liquid left on the inside of the anti-drying caps may clog the
nozzles.
12. When you are finished, close the maintenance cover and press the OK button twice.
Parent topic: Maintenance
Related references
Consumables and Replacement Parts
Maintenance Supplies
Maintenance Menu Settings
Maintenance Precautions
Cleaning the Platen
Carefully follow the steps here to clean the platen to remove ink, paper particles, and lint. We
recommend cleaning these parts once a month. Clean these parts more frequently depending on the
environment and media being used.
Caution: If dust or other particles remain on the platen inside the product, the print head nozzles may
clog or the print head may be damaged.
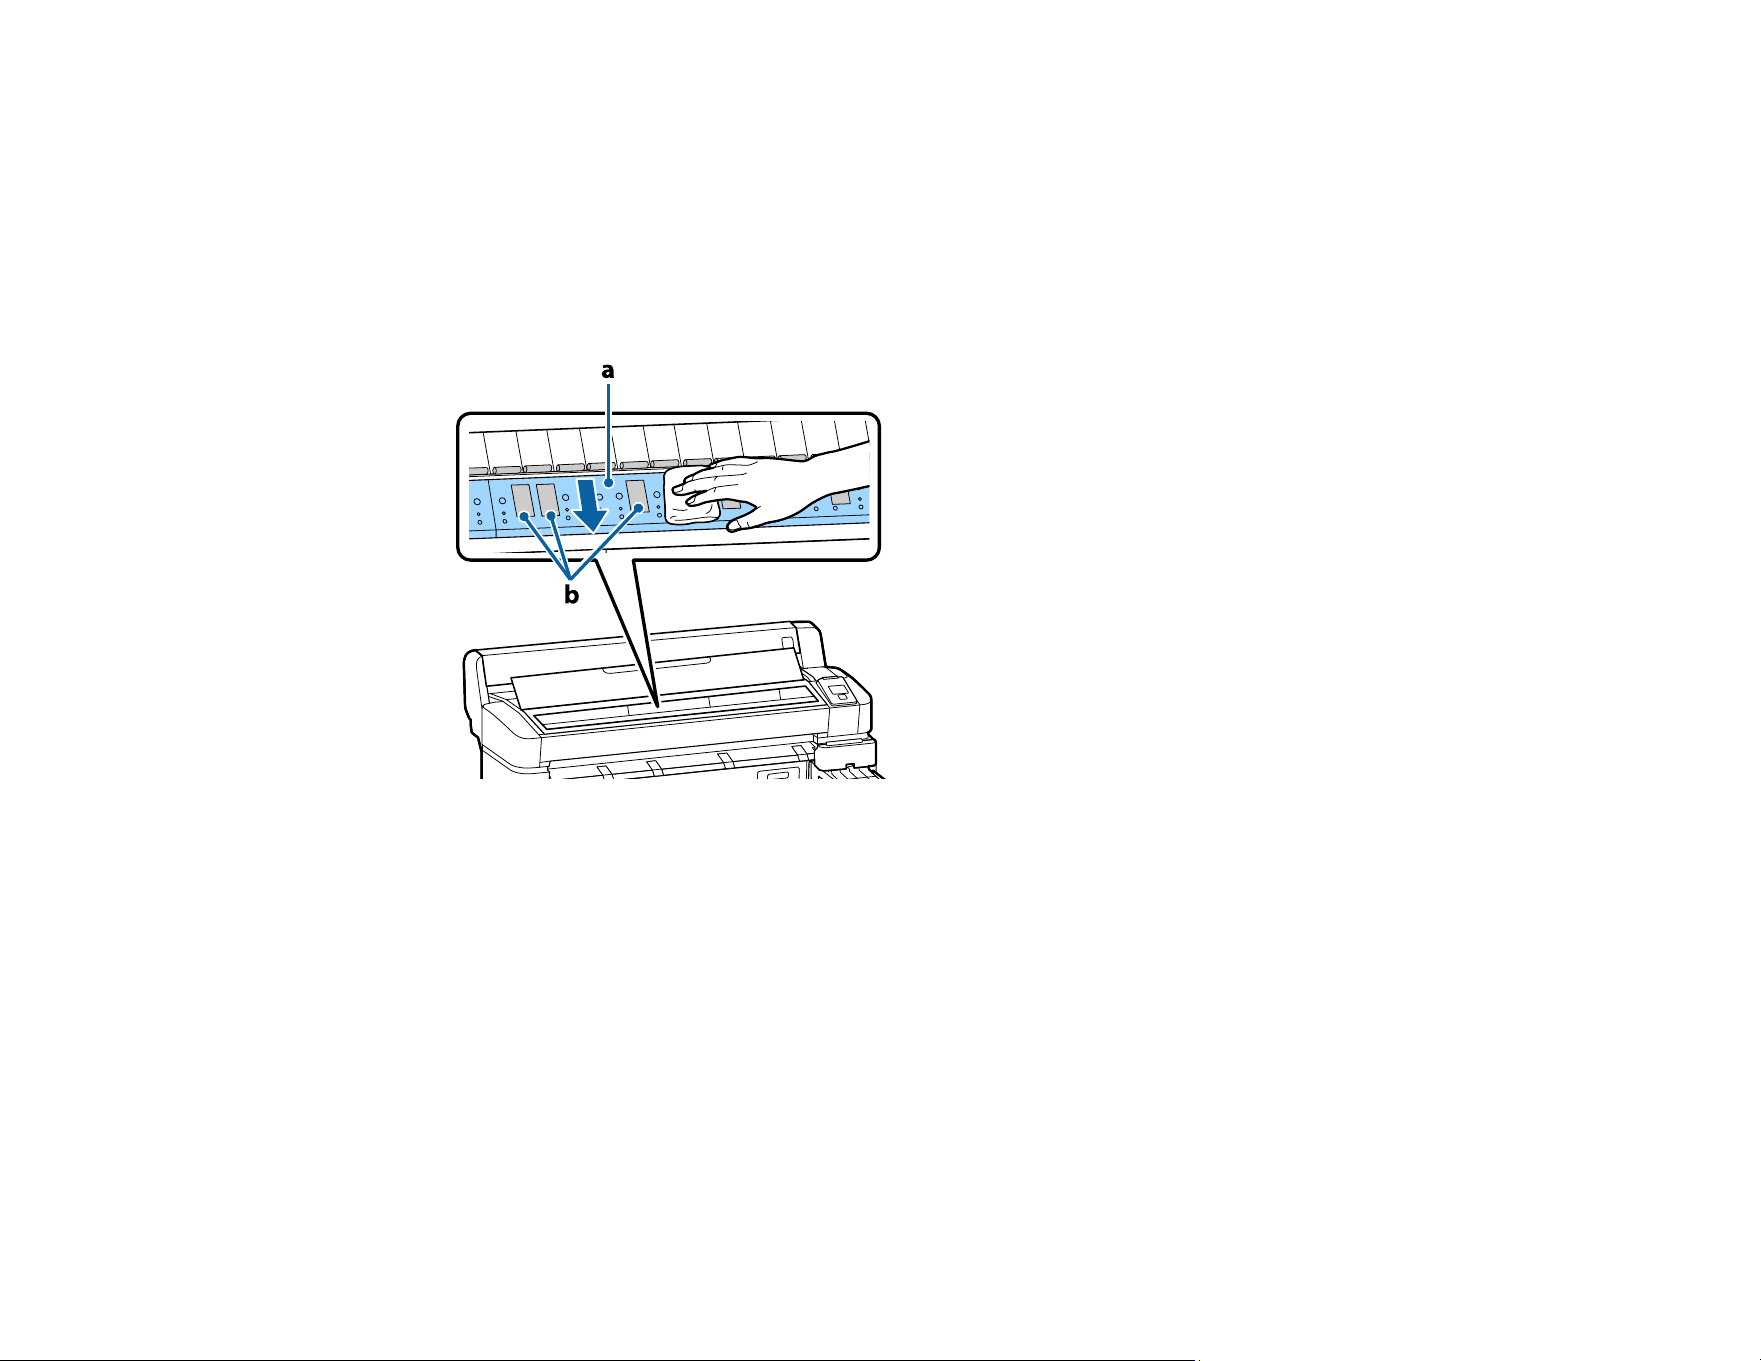
96
1. Remove any media from the product.
2. Turn off the product, wait for the LCD screen to turn off, and unplug the power cable from the
electrical outlet.
3. Wait for one minute after unplugging the power cable then open the printer cover and use a soft,
clean cloth to clean away any dust or dirt inside the product.
4. Open the printer cover and use a soft, clean cloth to carefully clean platen area (a) as shown here.
Wipe from the inside of the printer toward the outside to avoid spreading dirt.
Caution: As you clean, do not touch the ink tubes, rollers, or platen area (b) shown here to avoid
staining future prints. If necessary, clean area (a) using a cloth dampened with mild detergent and
wipe dry with a soft cloth.
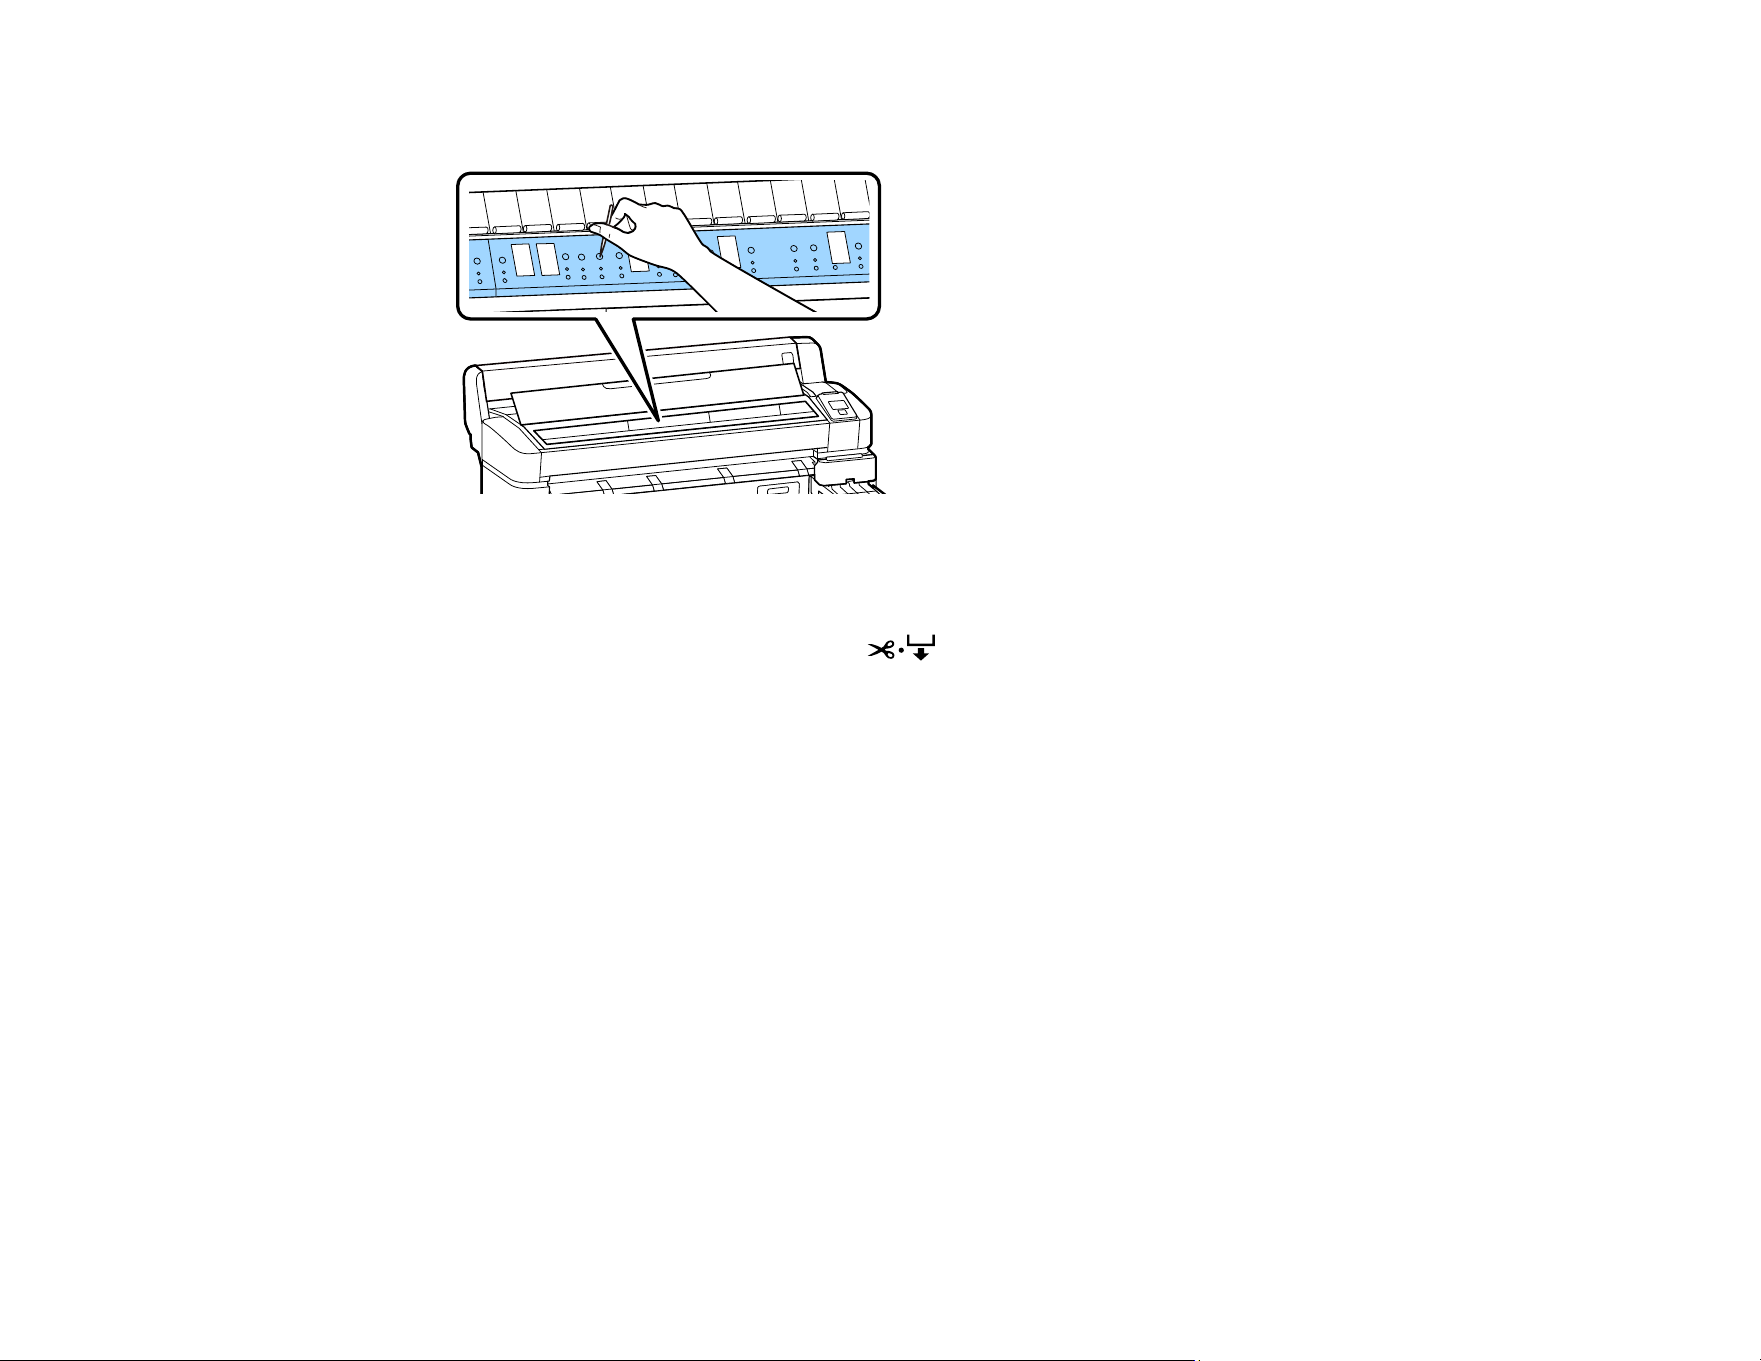
97
5. If any paper dust accumulates in the platen holes, gently remove it using a pointed object.
6. Close the printer cover.
7. Plug in and turn on the product, then load roll paper.
8. To clean the pressure rollers, press the cut/feed media button, then hold down the down
arrow button to feed paper over the rollers.
9. Cut the media after feeding.
Parent topic: Maintenance
Related references
Maintenance Precautions
Related tasks
Cutting Media
Removing Media
Replacing the Waste Ink Bottle
When you see one of these messages on the product control panel screen, you need to replace the
waste ink bottle:
• Prepare empty waste ink bottle
• Replace waste ink bottle and press OK
Wait until the product is not printing or cleaning the print head before replacing the waste ink bottle.
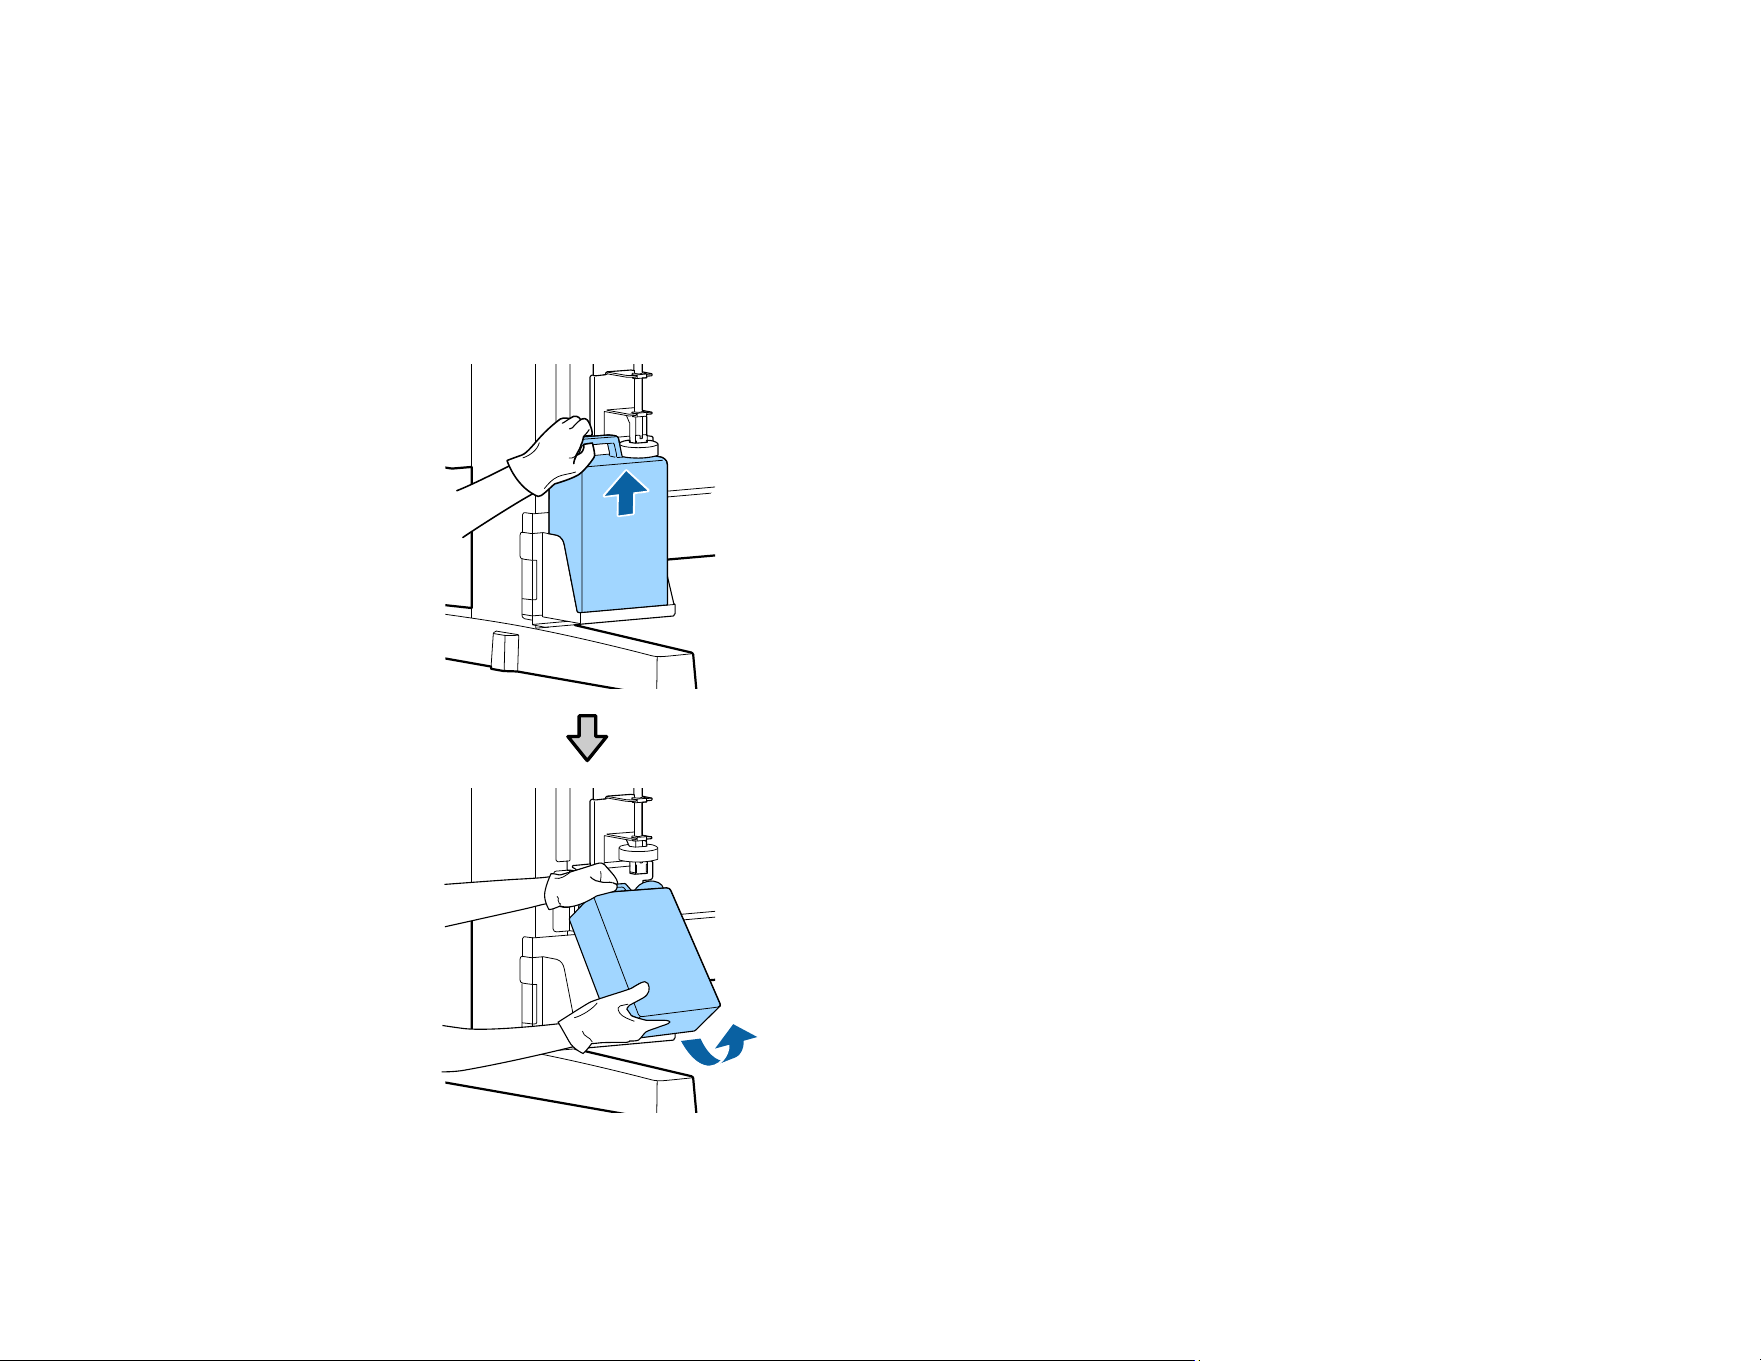
98
Caution: Replacing the waste ink bottle during printing or cleaning could cause waste ink to leak. When
replacing the waste ink bottle, always wear the gloves included in the maintenance kit. Leave the waste
ink in the bottle for disposal and do not transfer it to another container.
Note: You will need the lid for the waste ink bottle when disposing of waste ink. Keep the lid in a safe
place and do not throw it out.
1. Lift up the waste ink bottle and remove it from the holder as shown here:
Note: If the back of the stopper is stained, wipe it.
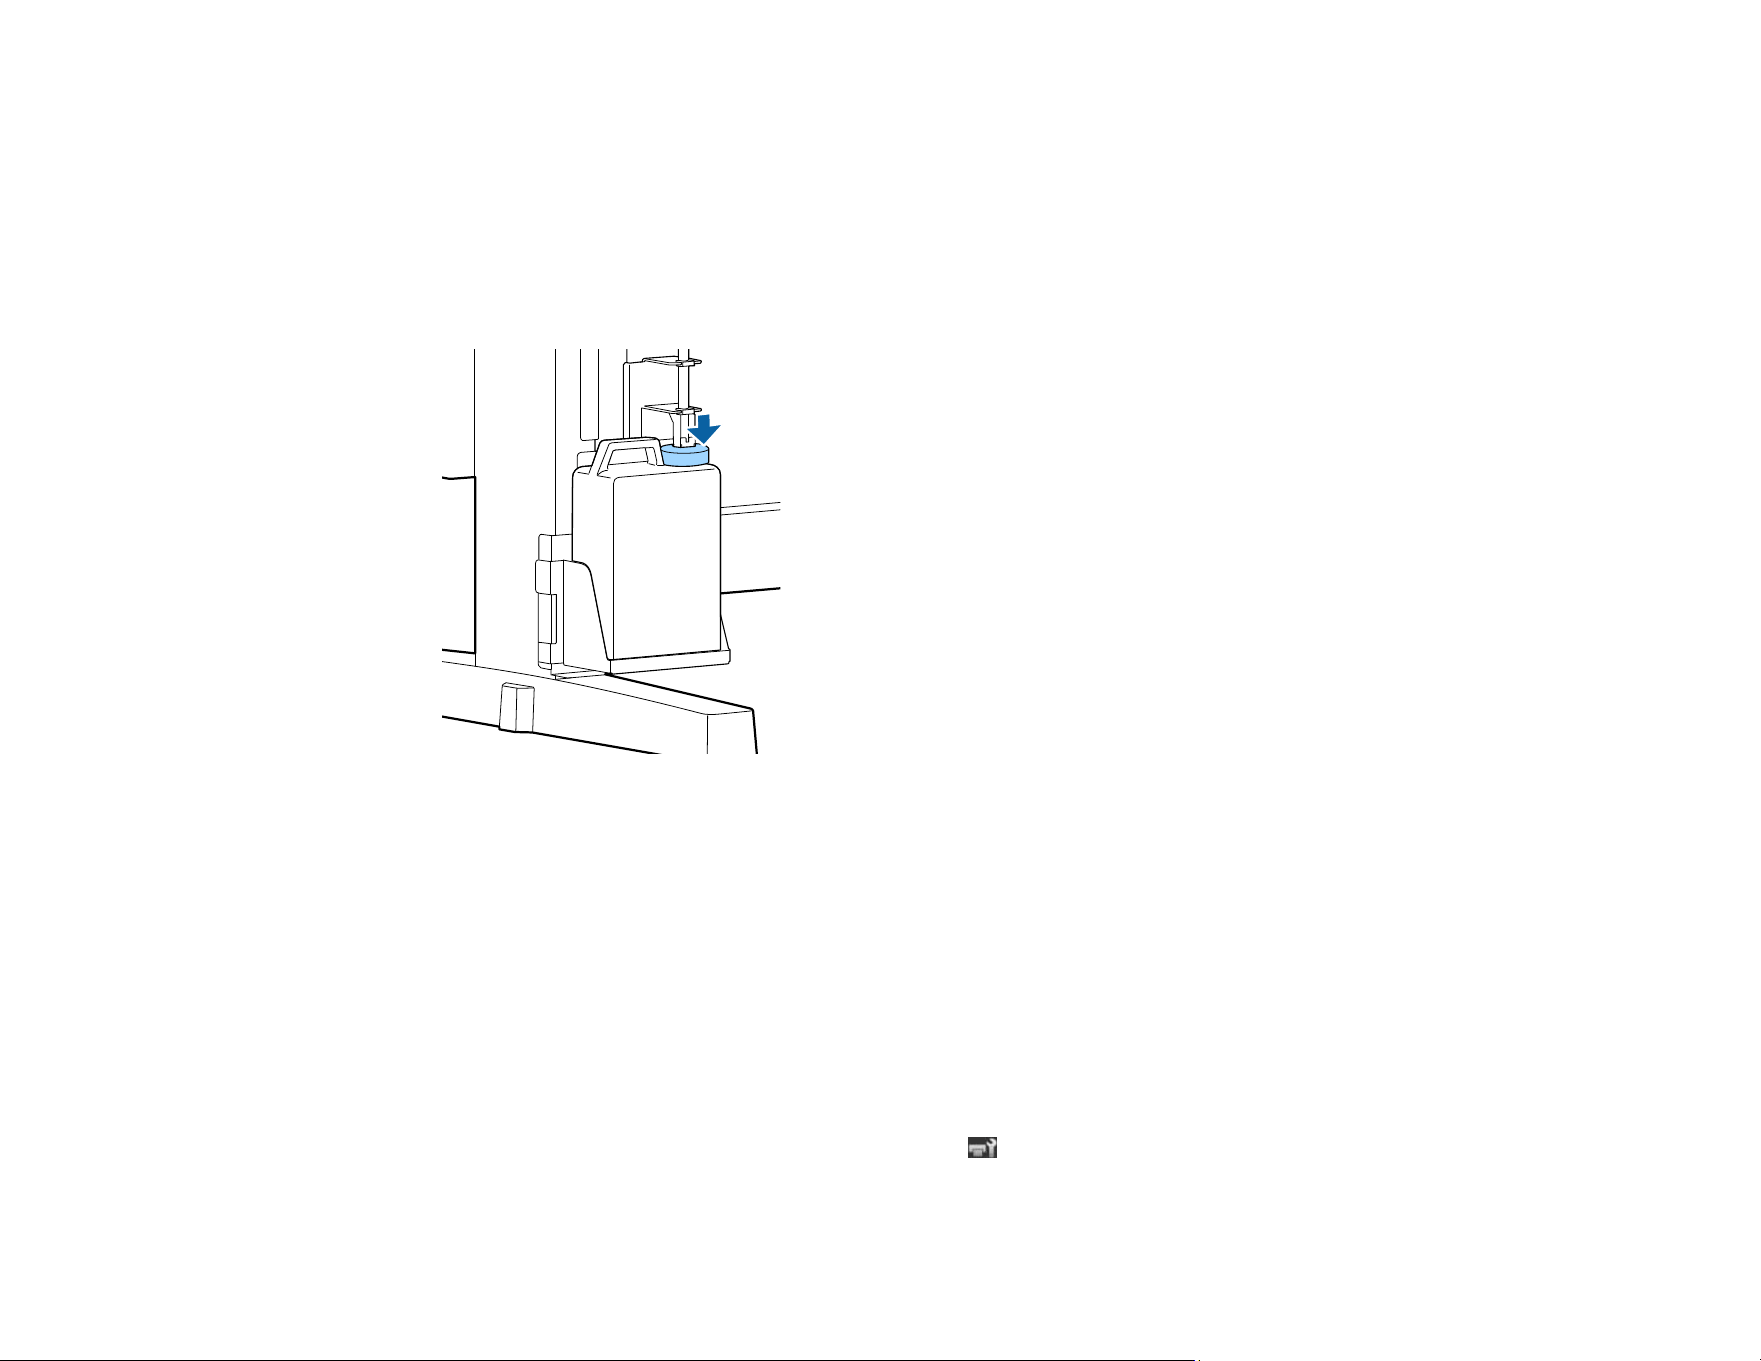
99
2. Put the inner seal and cap on the used waste ink bottle.
3. Insert the waste ink tube into the new waste ink bottle and place the bottle in the holder.
Note: Be sure the waste ink tube is inserted in the waste ink bottle or waste ink could spill onto your
product.
4. Lower the stopper onto the waste ink bottle and make sure it firmly seals to the mouth of the bottle.
Note: If the stopper does not firmly seal, waste ink could spill onto your product.
5. Press the OK button on the product control panel.
6. Press the OK button again to reset the waste ink counter.
Caution: Waste ink is classified as industrial waste. Dispose of waste ink according to your local
laws and regulations, such as entrusting it to an industrial waste disposal company. When handing
over the waste ink to the industrial waste disposal company, make sure you include the Safety Data
Sheet (SDS) found on the Epson support website.
Note: If you replaced the waste ink bottle before the replacement message appeared on the control
panel, press the OK or Menu button while on the tab and select Waste Ink Counter to clear the
waste ink counter.

100
Parent topic: Maintenance
Related references
Maintenance Menu Settings
Maintenance Precautions
Replacing the Cutter
If the cutter stops cutting paper cleanly, it is time to replace the cutter.
Make sure you have a Phillips-head screwdriver before you begin.
1. Remove any paper loaded in the product.
2. Press the left or right arrow on the product control panel to highlight the tab and press the OK
button.
The Maintenance menu appears.
3. Press the up or down arrow button to select Cutter Maintenance and press the OK button.
4. Press the up or down arrow button to select Replace Cutter and press the OK button twice.
The cutter moves into replacement position.
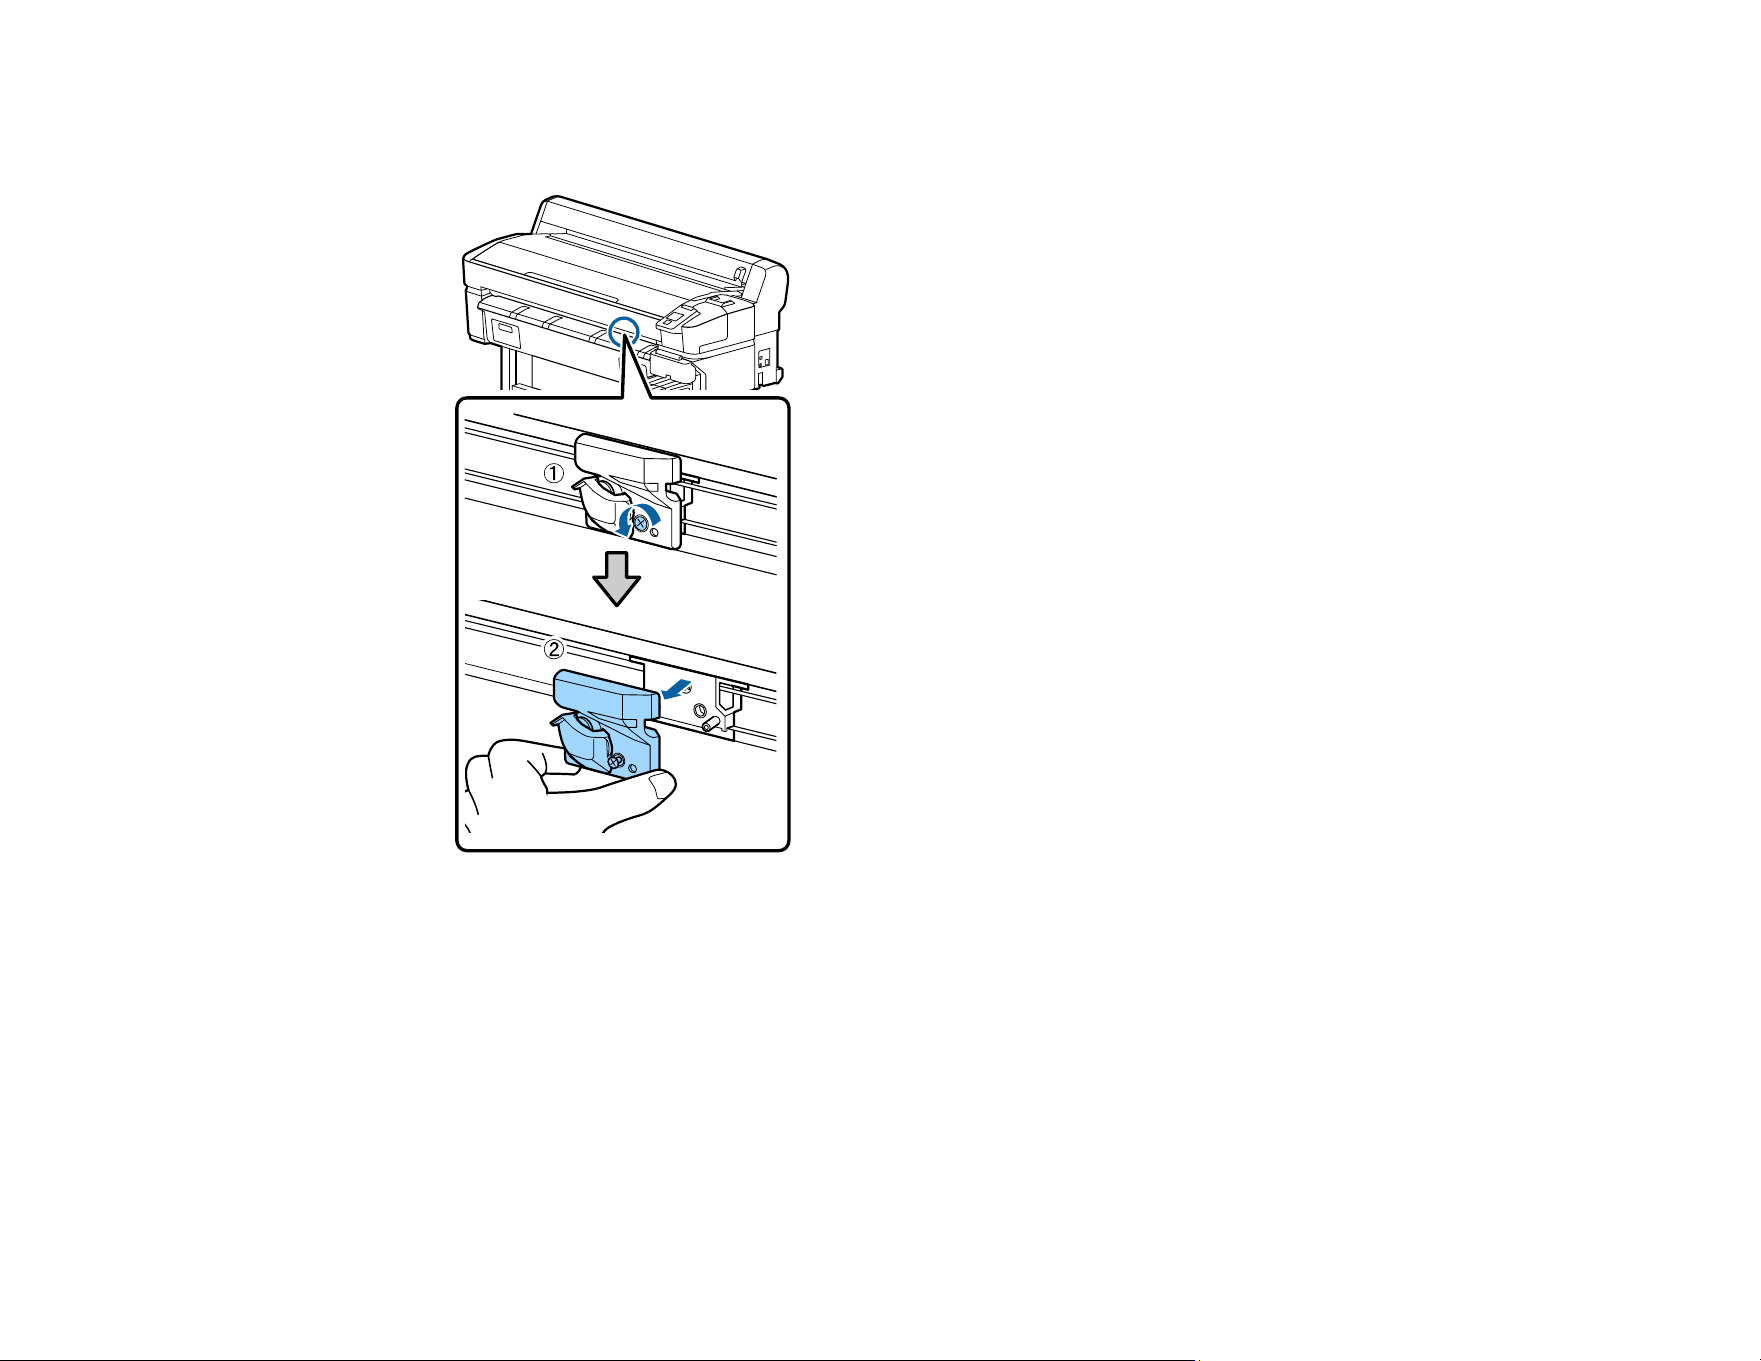
101
5. Using a Phillips-head screwdriver, loosen the screw holding the cutter in place and carefully pull the
cutter straight out.
Warning: Keep the cutter out of the reach of children. The blade is sharp and can cause injury.
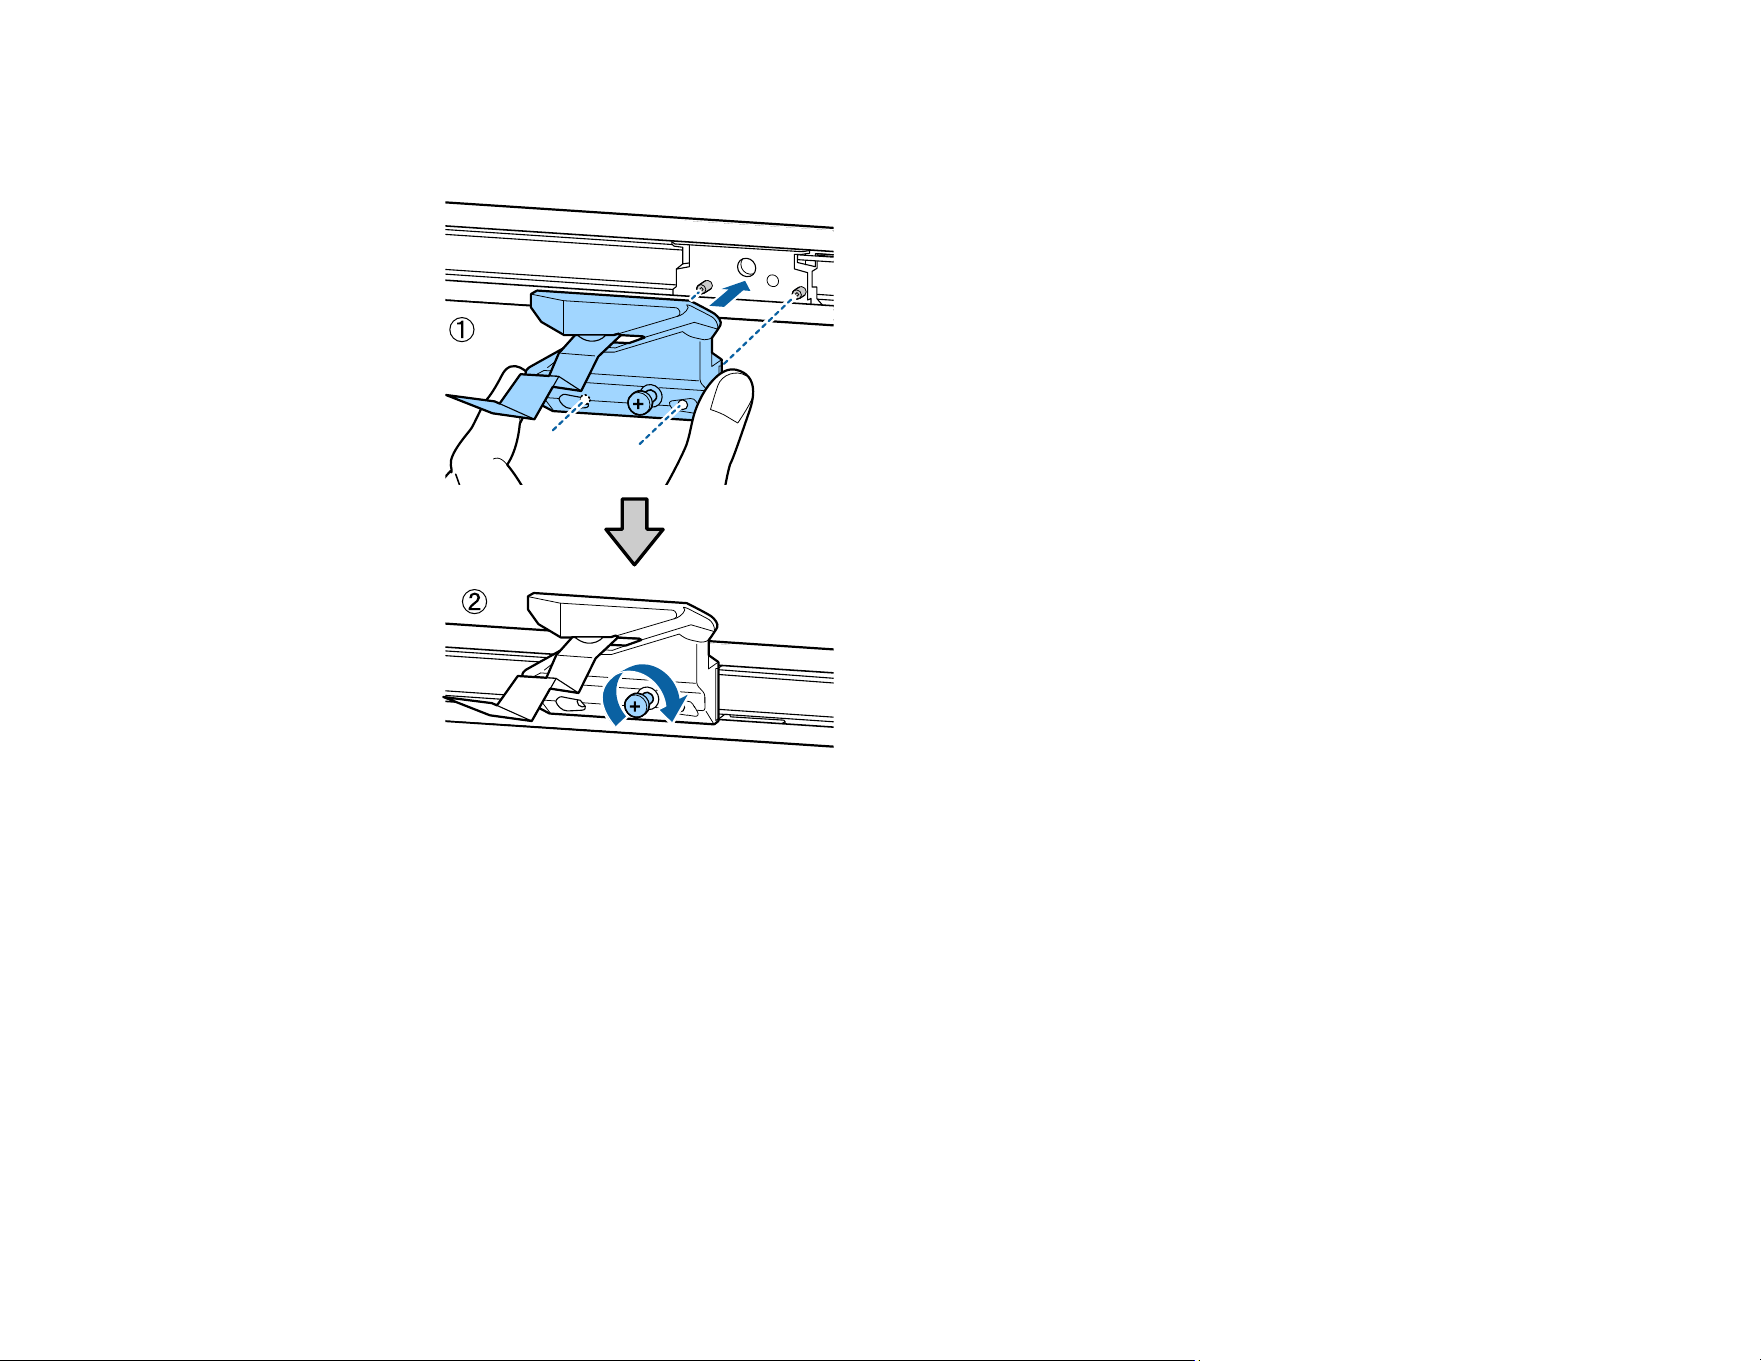
102
6. Align the holes in the new cutter with the pins on the product. Then fully tighten the screw to secure
the cutter.
Note: Tighten the cutter screw securely so the cutter does not shift position.
7. Press the OK button.
The cutter returns to its original position and the product is ready to print.
Parent topic: Maintenance
Related references
Consumables and Replacement Parts
Maintenance Menu Settings
Related tasks
Cutting Media
Removing Media
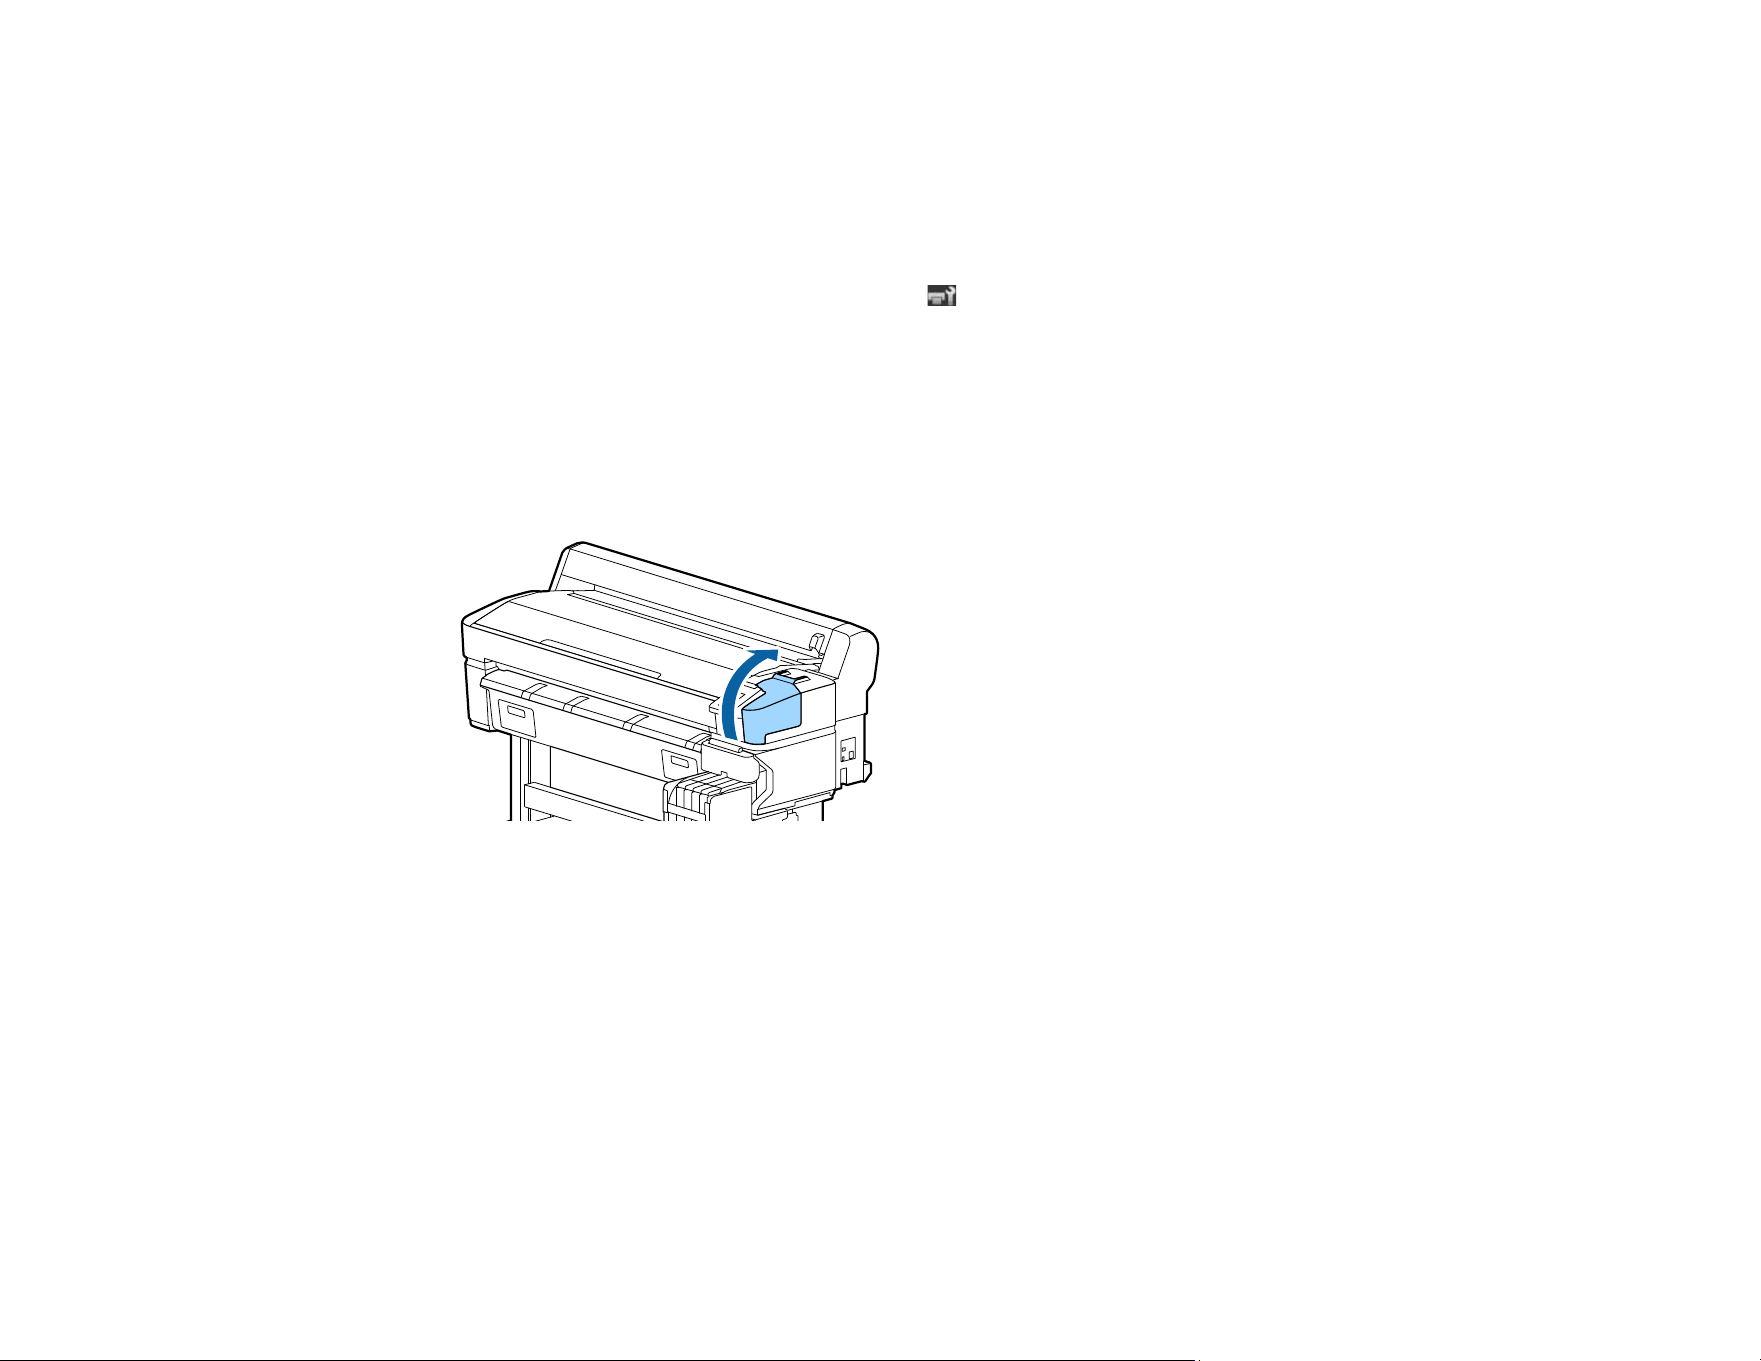
103
Replacing the Head Cleaning Set
If you notice any of the following, you need to replace the head cleaning set:
• Your printouts are faint or smudged.
• Segments are missing even after cleaning the print head.
1. Use the left or right arrow button to select the tab and press the OK button
The Maintenance menu is displayed.
2. Use the up or down arrow button to select Head Cap Cleaning and press the OK button.
The print head moves to the cleaning position.
3. Before you replace the head cleaning set, move the print heads into maintenance position.
4. Follow the on-screen instructions to open the maintenance cover.
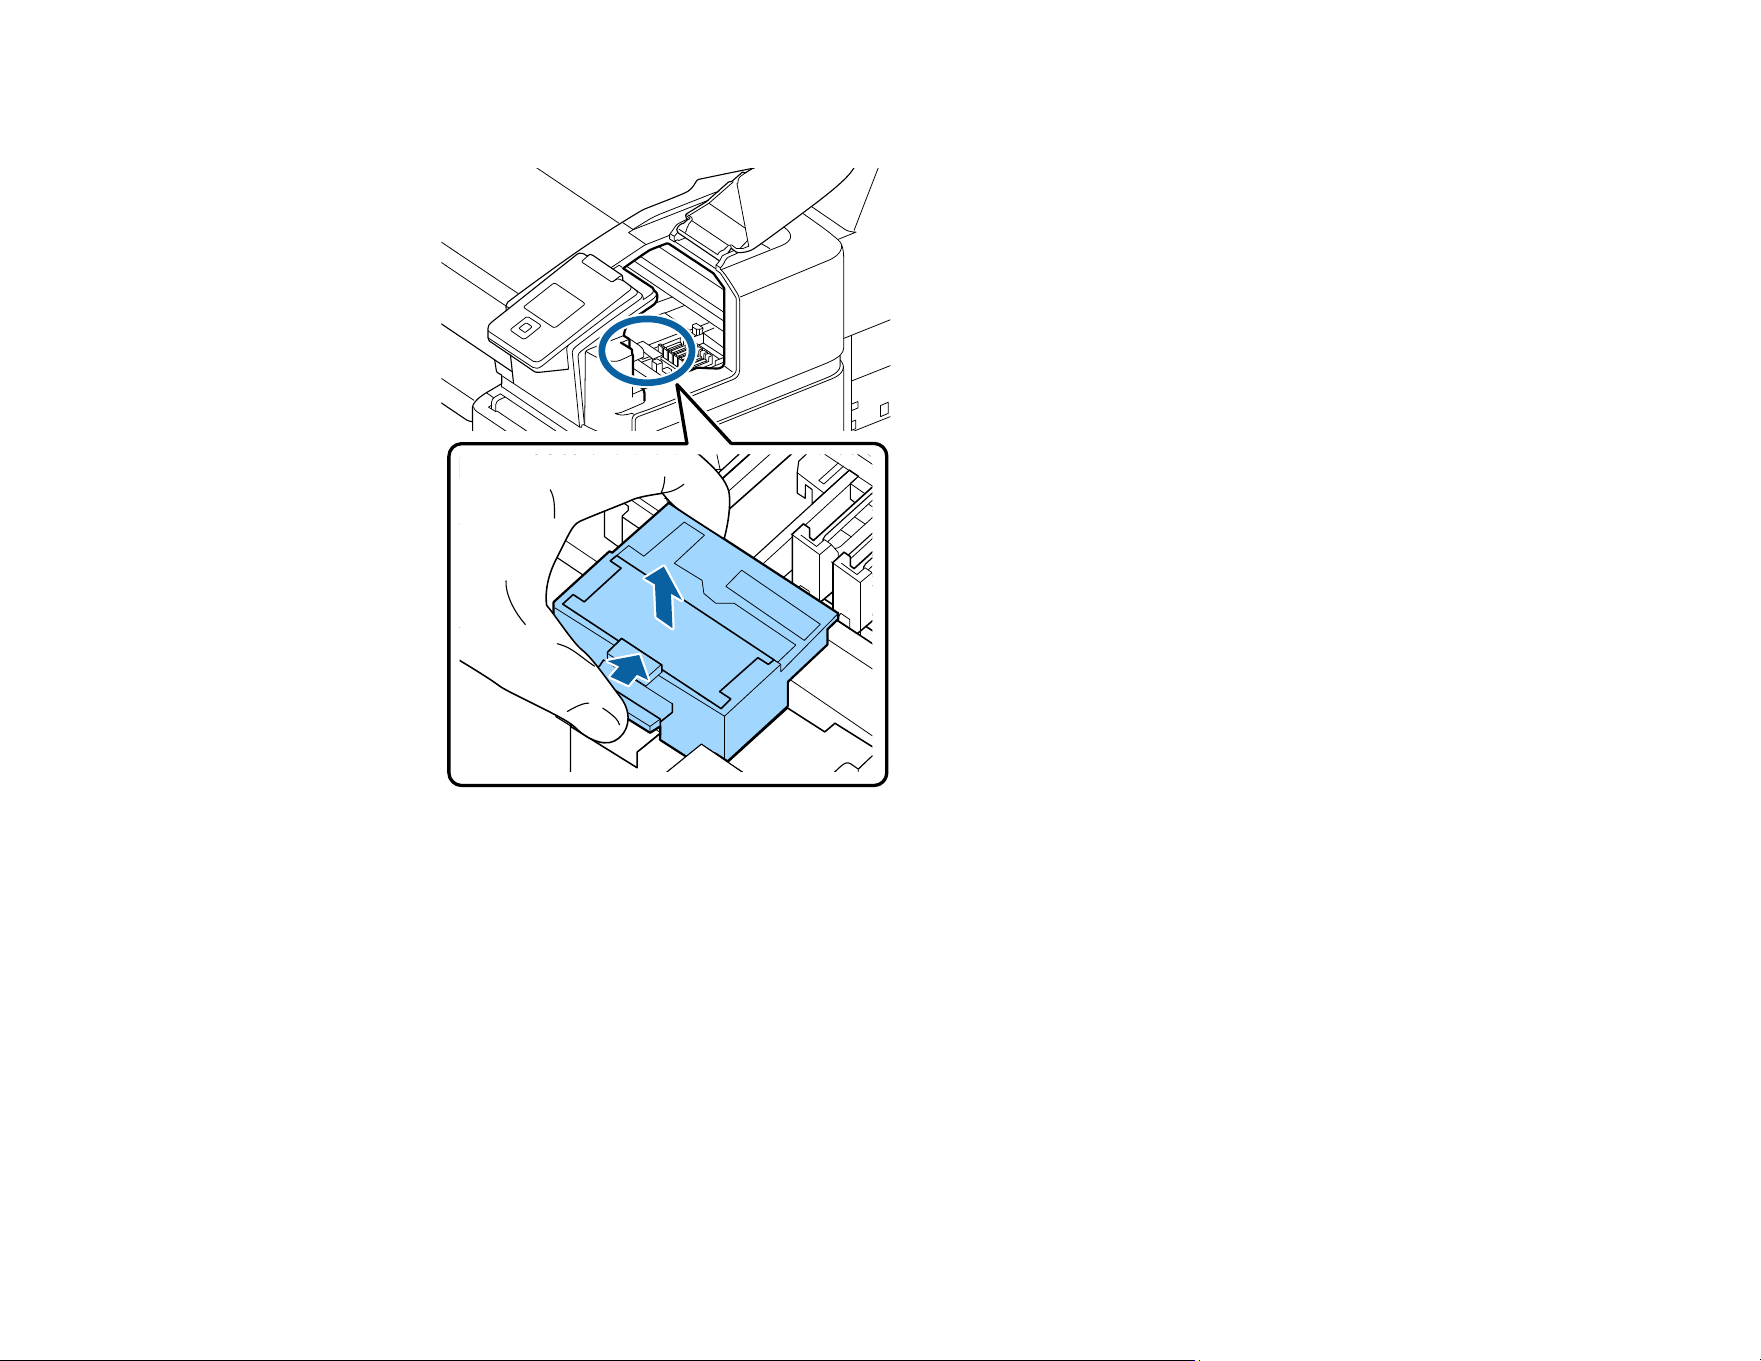
104
5. Grip the wiper cleaner as shown and remove it from the product.
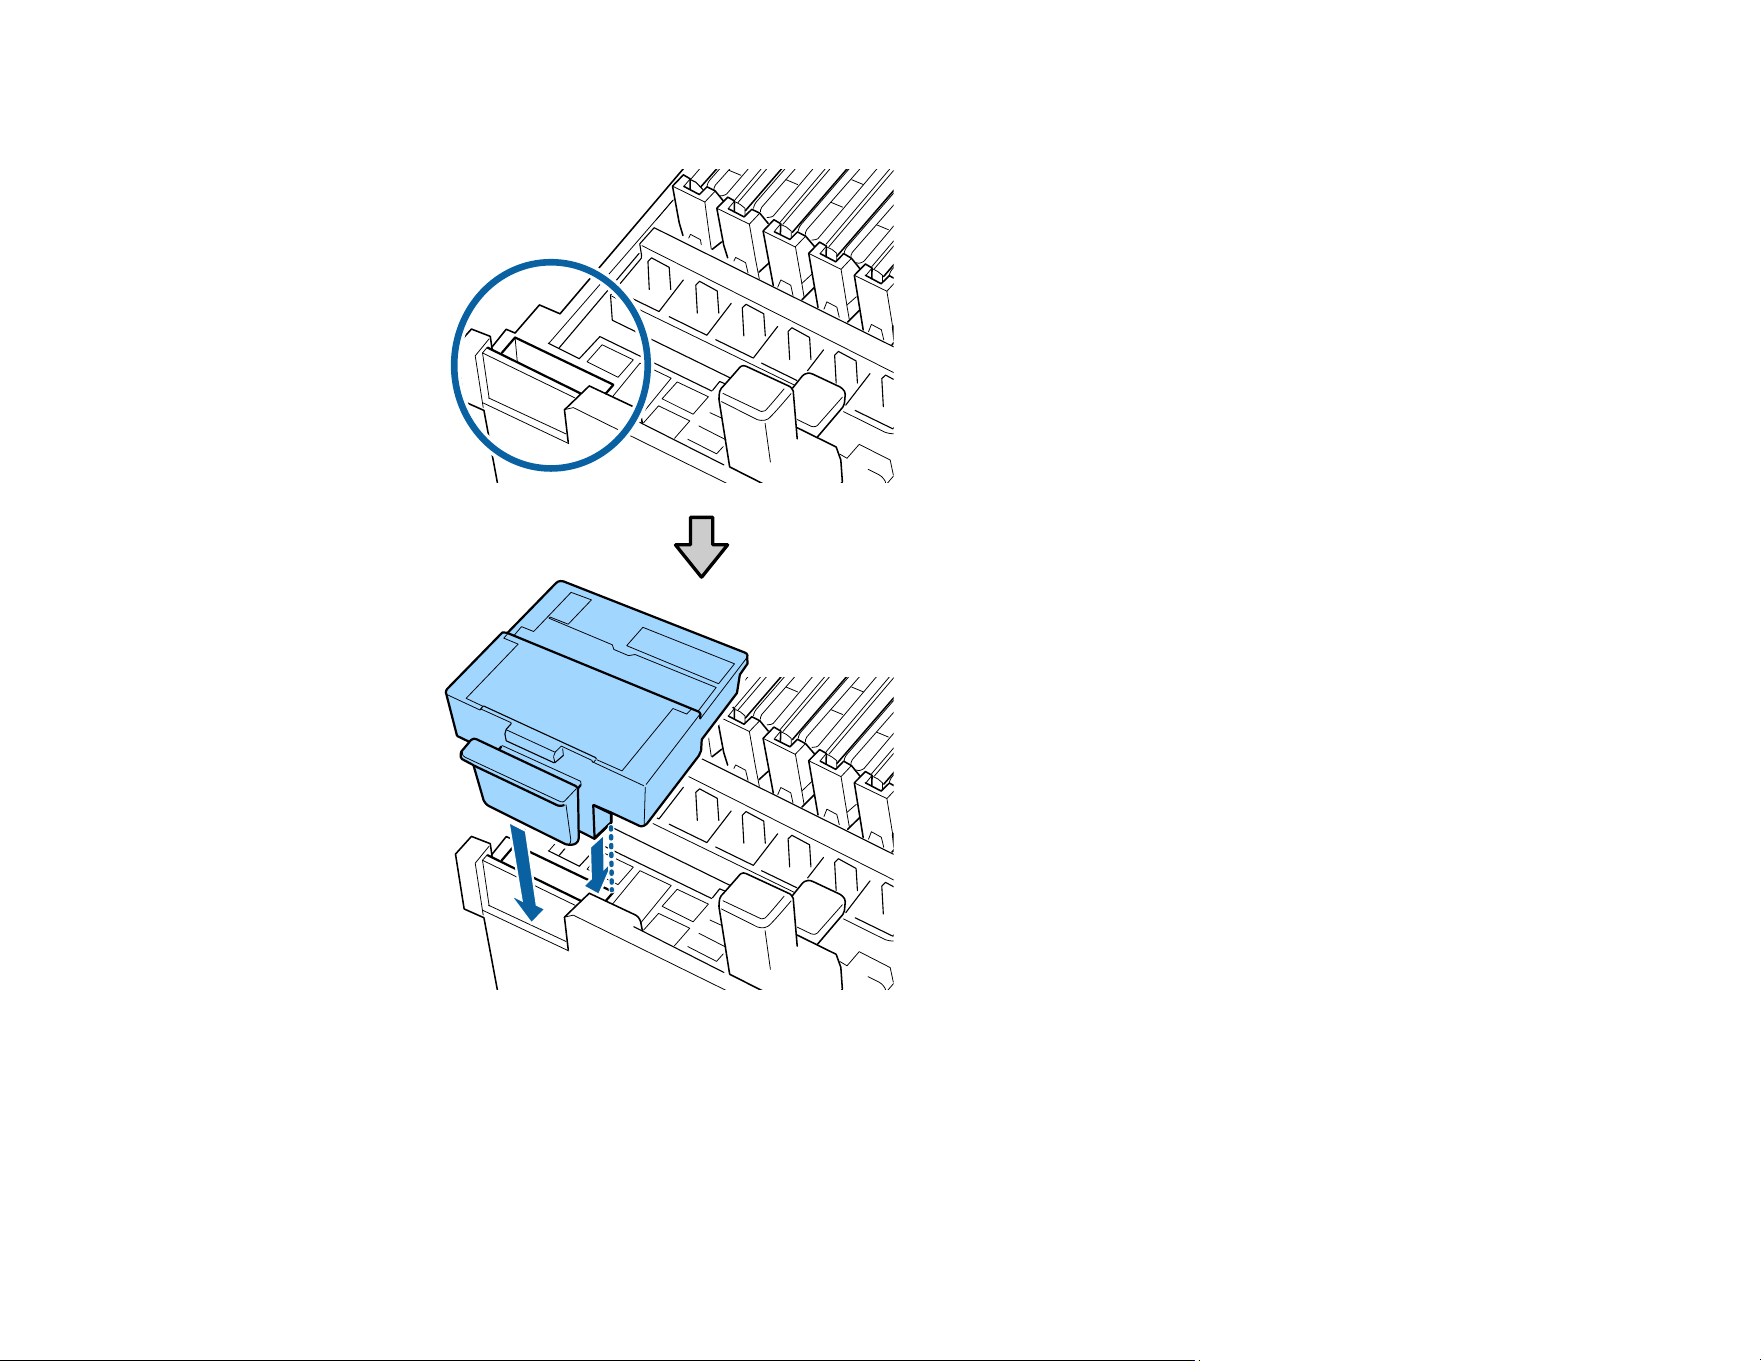
105
6. Place the new wiper unit on the attachment point and press it down until it clicks into place.
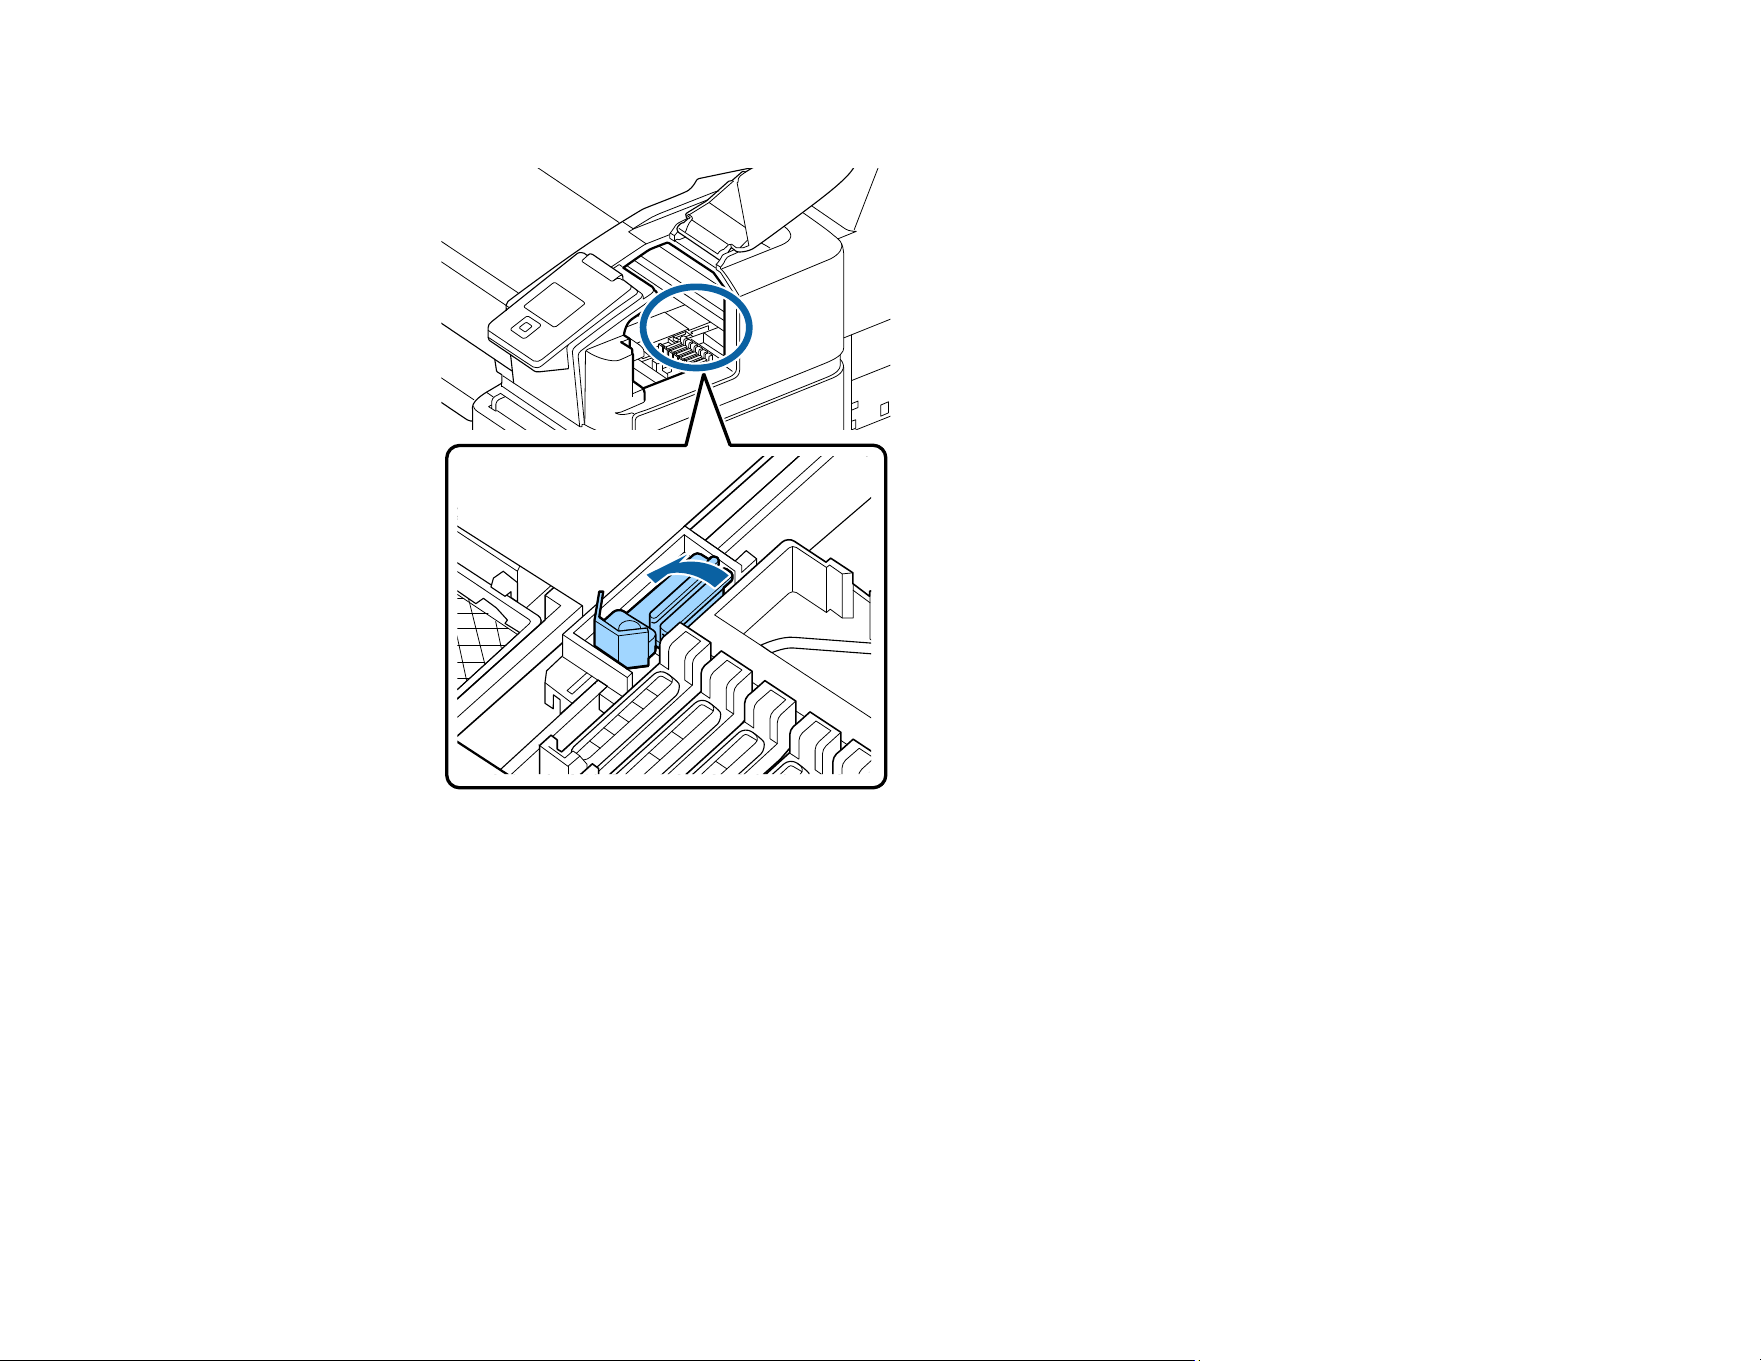
106
7. Remove the wiper by holding it at the attachment point, tilting it left, and lifting it out.
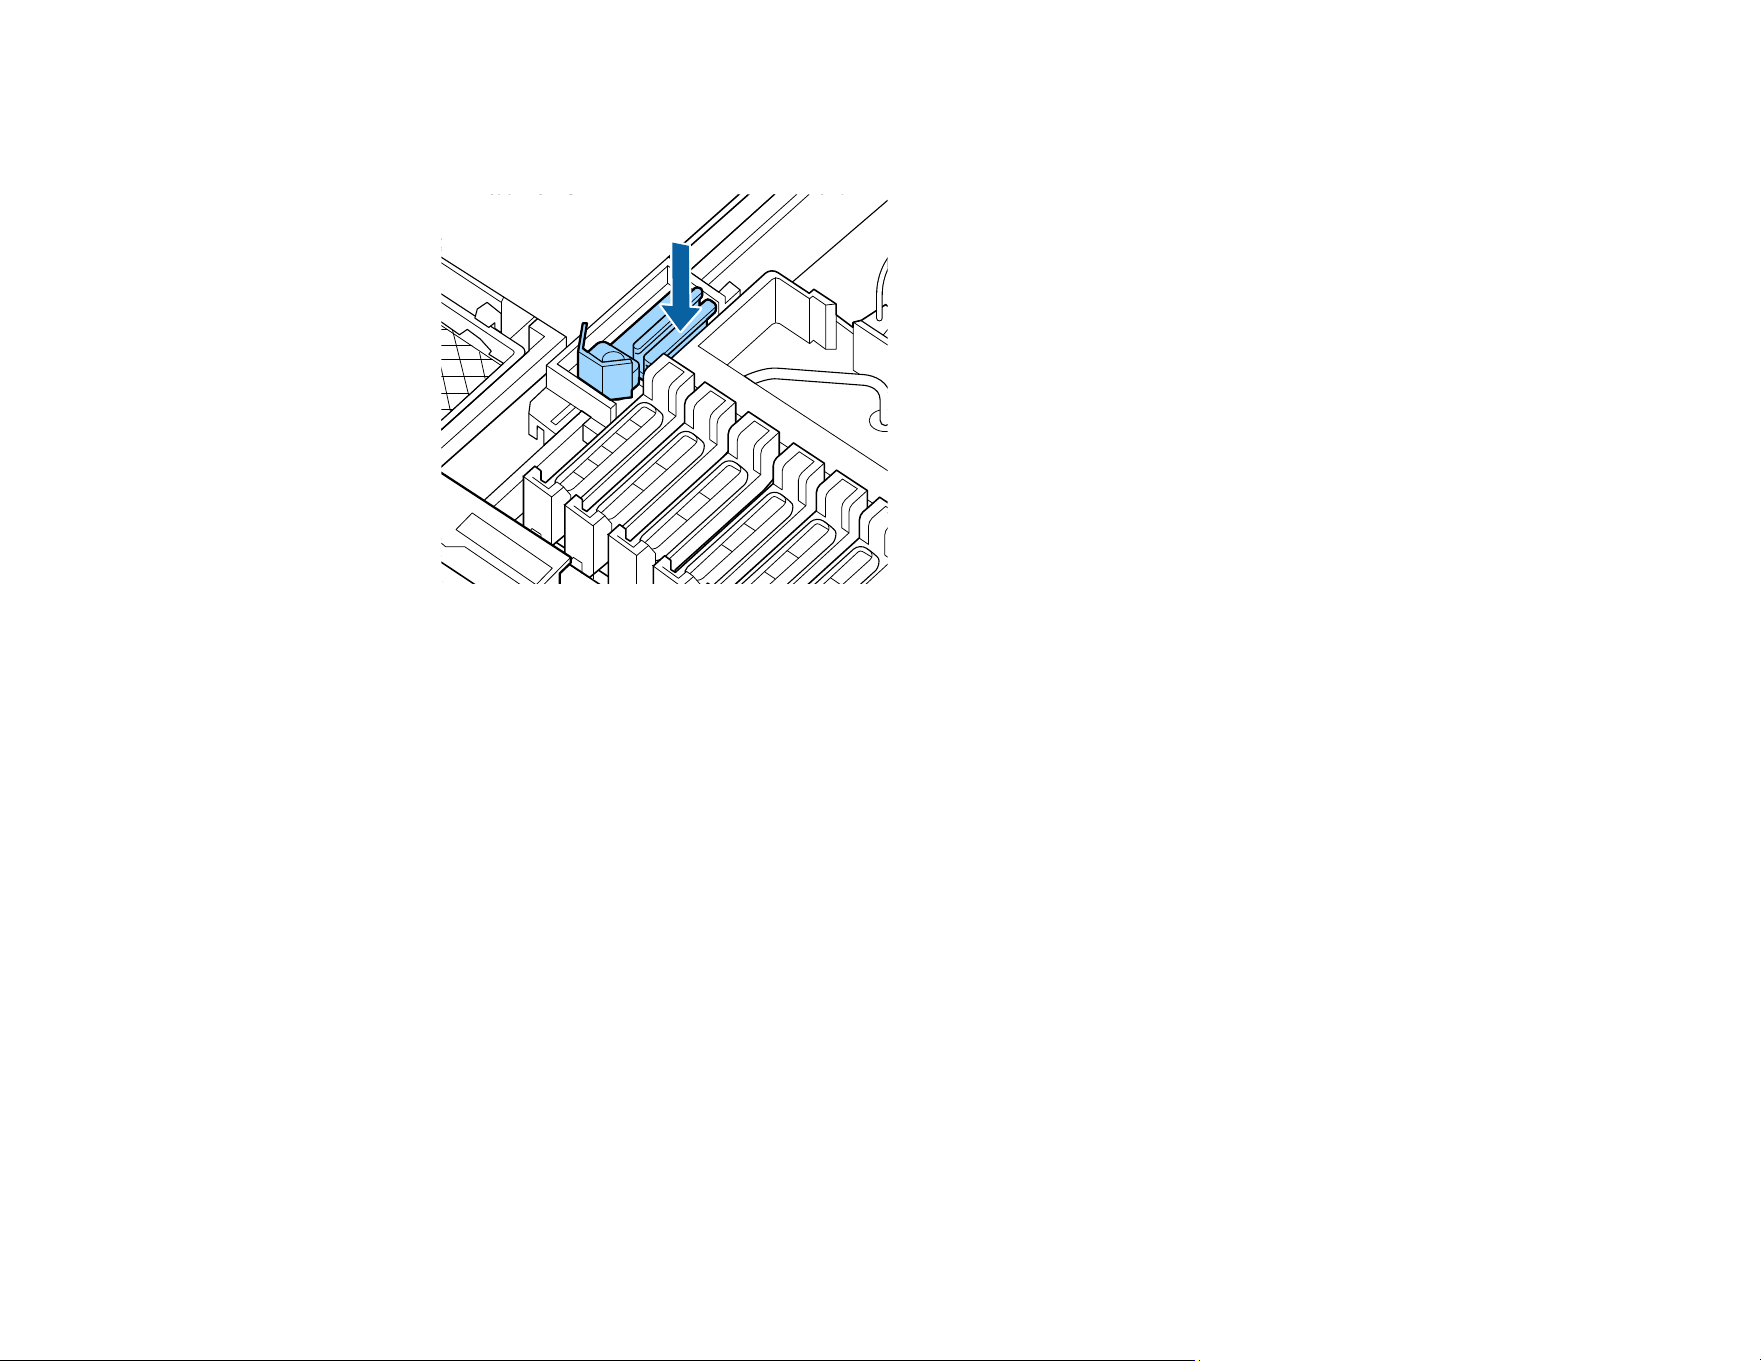
107
8. Remove the cap from the wiping part of the new wiper, place it on the attachment point and press
down until you hear a click.
9. Close the maintenance cover and press the OK button twice.
Parent topic: Maintenance
Related references
Consumables and Replacement Parts
Maintenance Menu Settings
Maintenance Precautions

108
Moving or Transporting the Product
When moving the product, see these sections to prepare and move the product, and set it back up after
moving it.
If you need to transport the product a long distance, contact Epson support.
Prepare to Move the Product
Setting Up the Product After Moving
Prepare to Move the Product
Do the following before moving the product:
1. Remove any loaded media from the feeding unit and auto take-up reel, if installed.
2. Turn off the product.
3. Remove the waste ink bottle.
4. Remove all cables.
5. Release the locks on the product stand.
Caution: Do not try to move the stand while the casters are locked. Roll the product for only a short
distance over a level floor. Do not tilt the product more than 10° in any direction or the product may fall
over.
Parent topic: Moving or Transporting the Product
Related tasks
Replacing the Waste Ink Bottle
Removing Media
Setting Up the Product After Moving
Follow these steps to set up the product after moving it.
1. Verify that the location is suitable for installation.
2. Install the waste ink bottle.
3. Connect the power cable to an electrical outlet and turn on the printer.
4. Load media in the product.

109
5. Perform a nozzle check and confirm that there are no clogged nozzles.
6. Align the print head and check the print quality.
Parent topic: Moving or Transporting the Product
Related tasks
Loading Media
Checking for Clogged Print Head Nozzles
Aligning the Print Head
Cleaning the Print Head
Replacing the Waste Ink Bottle
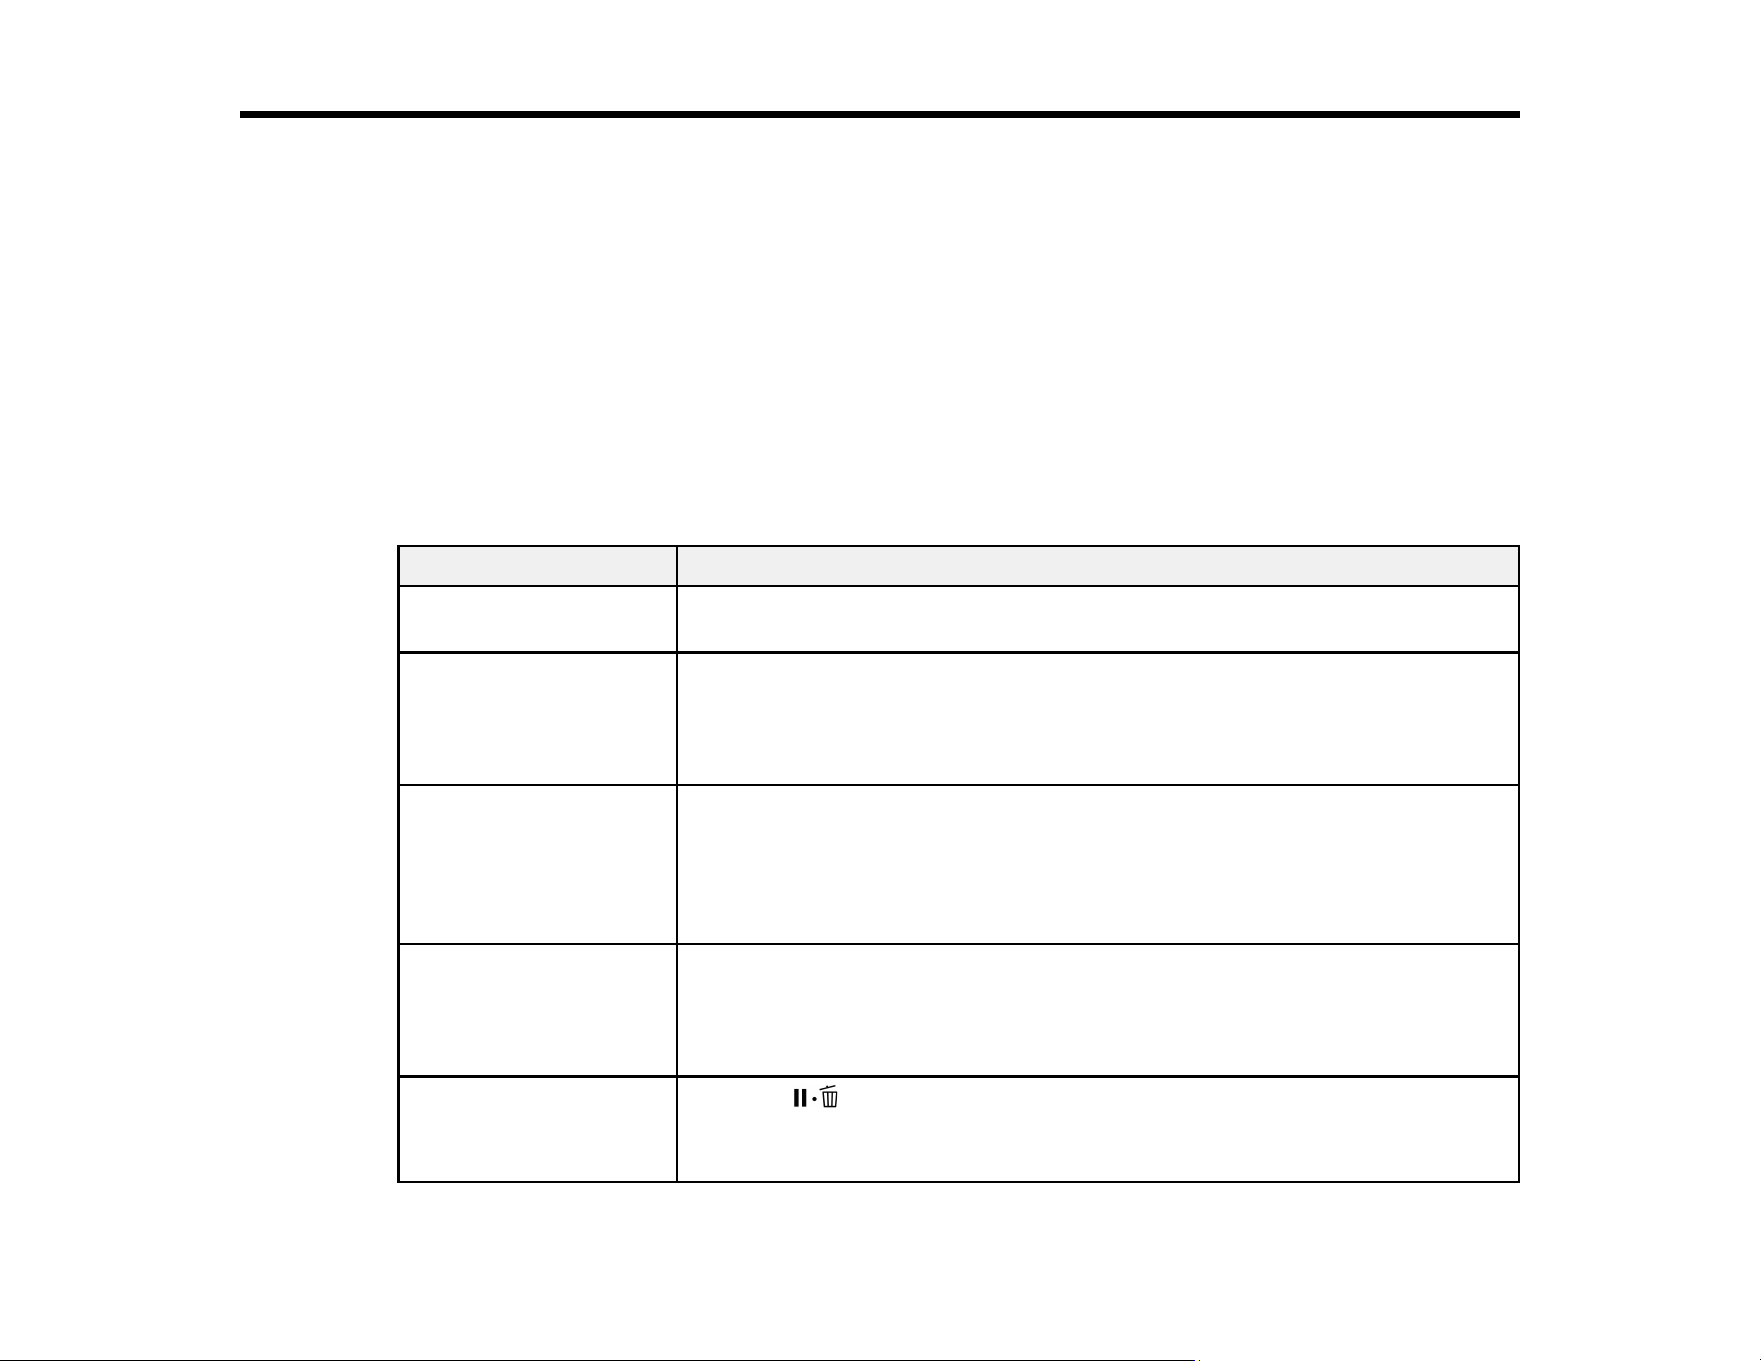
110
Solving Problems
Check these sections for solutions to problems you may have using your product.
Product Status Messages
Solving Printer Problems
Solving Printing Problems
Solving Print Quality Problems
Where to Get Help
Product Status Messages
You can often diagnose problems with your product by checking the messages or icons on its LCD
screen.
Error messages Solution
Prepare empty waste ink
bottle.
The waste ink bottle is almost full. Make sure you have a replacement waste
ink bottle handy.
Chip Unit Error
Chip unit not
recognized. Reattach or
replace.
Remove and reinstall the chip unit. If the error recurs, replace the chip unit
with a new one.
Condensation may have formed on the chip unit. Make sure the ink is at
room temperature for at least four hours.
Chip Unit Error
Chip unit not
recognized. Refill after
matching ink pack with
label?
Use only chip units from the Epson ink packs specified for this product.
Check Ink Levels The chip unit is nearing the end of its service life. Make sure you have a
replacement ink pack in the correct color handy.
Check the remaining ink in the ink tank using the top edge of the metal plate
or the scale on the ink pack and, if necessary, refill the ink.
Command Error
Check print settings on
RIP.
Press the pause/cancel button and select Job Cancel. Make sure the
installed RIP software is compatible with the product.

111
Error messages Solution
F/W Install Error
Firmware update failed.
Restart the printer.
Turn off the product, wait a few minutes, and turn it on again. Then reinstall
the firmware again using Epson LFP Remote Panel 2.
If this message persists, contact Epson for support.
Take-up Error
Check Auto Take-up
Reel Unit and restart
printer.
Turn off the product, wait a few minutes, and turn it on again. If this message
persists, contact Epson for support.
Reel Unit Error
Turn off the Auto switch
to cancel the error.
Paper has not been wound correctly on the auto take-up reel. Set the Auto
switch on the auto take-up reel to Off and perform the following operations:
When the leading edge of the paper has come off the take-up roll core
Tape the leading edge of the paper to the take-up roll core.
When an error is displayed during take-up and printing
Press the down arrow button to feed the paper, then use scissors or a
commercially available cutter to cut the paper after the final print out.
Remove the paper from the take-up reel. Install a new take-up roll core and
use tape to secure the leading edge of the paper to the core. Set the Auto
switch on the auto take-up reel to the Backward position and press the OK
button.
Reel Unit Error
Connect Auto Take-up
Reel Unit cable and
restart printer.
Reconnect the auto take-up reel cable to the product and turn the product off
and on again.
Reel Unit Disconnected
Auto Take-up Reel Unit
is disconnected. Do you
continue?
The auto take-up reel is not connected. Reconnect the auto take-up reel
cable to the product and select No to turn the product off. Wait a few minutes
and turn it on again. To continue printing without using the auto take-up reel,
select Yes.
Paper Cut Error
Remove uncut paper.
Press the OK button, pull out the paper, and cut the media using scissors or
a third-party cutting tool. Pull the edge of the paper straight out of the product
then press the OK button.
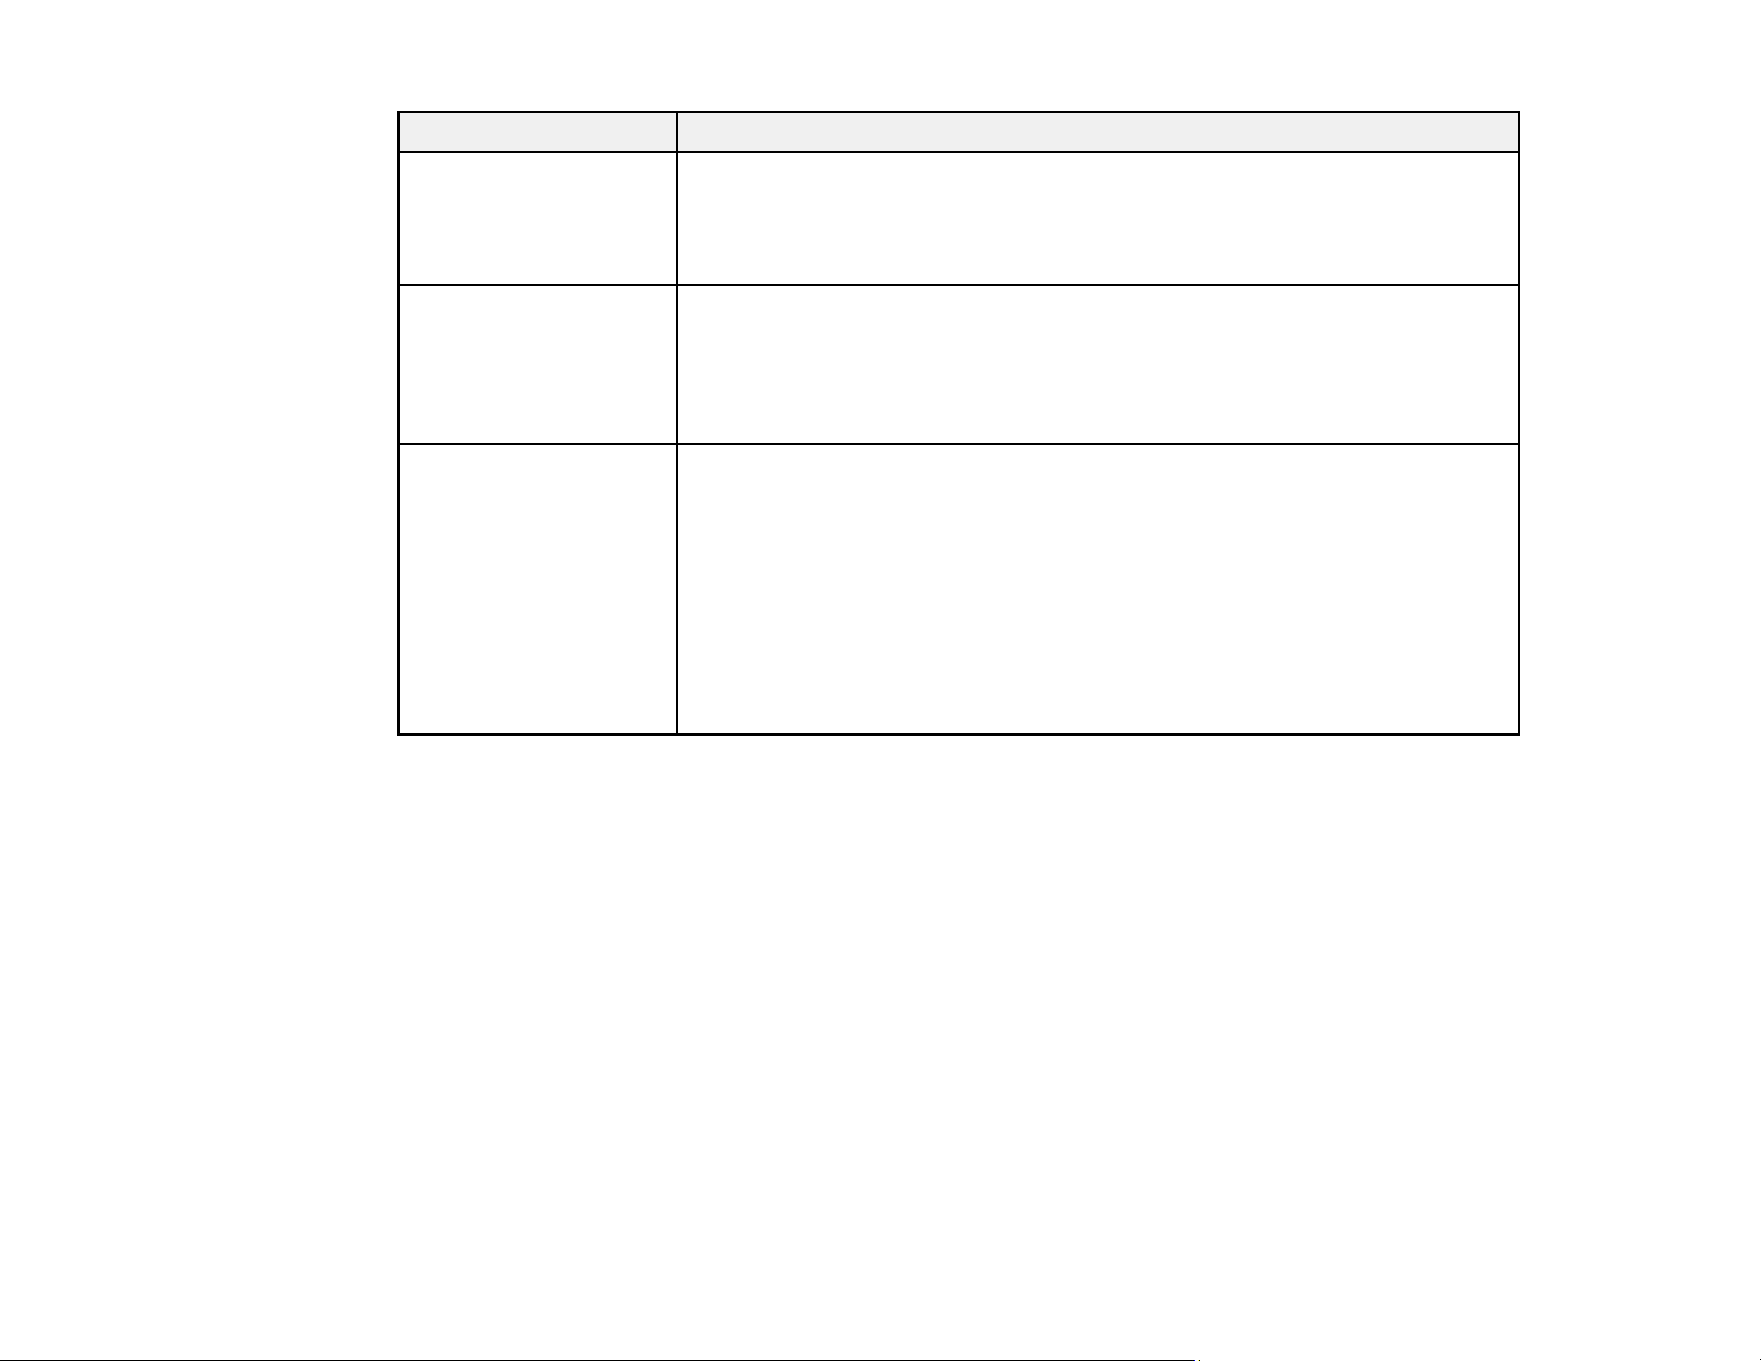
112
Error messages Solution
Paper Size Error
Loaded paper is not
supported size.
Press the OK button and remove the currently loaded media. Be sure the
media is at least 10 inches (254 mm) wide.
If this message appears even when the media is the correct width, turn off
the Paper Size Check setting and try printing again.
Maintenance Request
Replace Part
Now/Replace Part Soon
XXXXXXXXXX
The product part indicated is nearing or at the end of its service life. Contact
Epson for support and provide them with the service code shown on the LCD
screen.
You must replace the part before printing again. If you continue to print, a call
for service occurs.
Call For Service
XXXX Error XXXX
Power off and then on. If
this doesn't work, note
the code and call for
service.
A call for service occurs when:
• The power cable is not connected securely
• An error occurs that cannot be cleared
When a call for service has occurred, the product automatically stops
printing. Turn off the product, disconnect the power cable from both the outlet
and the product, and then reconnect them. Turn the product on and off
several times. If the same call for service is displayed on the LCD screen,
contact Epson for support and provide them with the service code shown on
the LCD screen.
Parent topic: Solving Problems
Related references
Setup Menu Settings
Where to Get Help
Related tasks
Replacing the Waste Ink Bottle
Replacing the Chip Unit and Refilling Ink
Cutting Media
Attaching the Take-up Roll Core to the Auto Take-up Reel
Related topics
Replacing the Ink and Chip Unit

113
Solving Printer Problems
Check these sections if you have problems operating your product.
Printer Does Not Turn On
Product Turns Off Automatically
LCD Screen Shuts Off
Forgot the Administrator Password
Red Light Shines Inside the Printer
Parent topic: Solving Problems
Printer Does Not Turn On
If the printer does not turn on, try these solutions:
• Make sure the power cable is securely connected.
• Make sure the power outlet works by connecting the power cable for another electronic device.
Parent topic: Solving Printer Problems
Product Turns Off Automatically
If your product turns off automatically, it may be in power off mode. Turn off or adjust the Power Off
Timer setting as necessary.
Parent topic: Solving Printer Problems
Related references
Setup Menu Settings
LCD Screen Shuts Off
If the LCD screen shuts off intermittently, the printer may be in sleep mode. Try these solutions:
• Press the power button to exit sleep mode.
• You can adjust the delay time before the product enters sleep mode in the Power Settings menu.
Parent topic: Solving Printer Problems
Related references
Setup Menu Settings

114
Forgot the Administrator Password
If you forgot the administrator password you created during network setup, contact Epson for support.
Parent topic: Solving Printer Problems
Related references
Where to Get Help
Red Light Shines Inside the Printer
The red light always shines inside the printer. This is normal.
Parent topic: Solving Printer Problems
Solving Printing Problems
Check these sections if you have problems printing with your product.
Nothing Prints
Cannot Print Over a Network
Print Head Moves But Nothing Prints
Removing Jammed Media
Media Does Not Feed or Eject Correctly
Media Does Not Cut Cleanly
Parent topic: Solving Problems
Nothing Prints
If you have sent a print job and nothing prints, try these solutions:
• Make sure your printer is turned on.
• Make sure any interface cables are connected securely at both ends. If you have a spare cable, try
connecting with the spare cable.
• Check the model and specifications of the interface cable to see if the cable is appropriate for your
computer and printer.
• If you connected your printer to a USB hub, make sure it is a first-tier hub. If it still does not print,
connect your printer directly to your computer instead of the hub.
• Make sure the USB hub is recognized correctly on the computer. Disconnect all USB hubs from the
computer and connect the printer directly to the computer's USB port.

115
• Make sure the USB cable length does not exceed 10 feet (3 m).
Parent topic: Solving Printing Problems
Related references
Interface Specifications
Cannot Print Over a Network
If you cannot print over a network, try these solutions:
• Make sure that your printer is turned on.
• If you are using TCP/IP, make sure the printer's IP address is set correctly for your network. If your
network does not assign IP addresses using DHCP, set the IP address manually.
• Check your wired LAN router or access point to see if the LED for the port to which your printer is
connected is on or flashing. If the link LED is off, try the following:
• Make sure the Ethernet cable is securely connected to your printer and to your router, access point,
switch, or hub.
• Try connecting your printer to a different port or a different router, access point, switch, or hub.
• Try connecting with a different Ethernet cable.
• Try printing to your printer from another computer on the network.
Parent topic: Solving Printing Problems
Related references
Setup Menu Settings
Print Head Moves But Nothing Prints
If the print head is moving and nothing prints, try these solutions:
• Print a nozzle check pattern. If the pattern does not print correctly, clean the print head again. (If the
printer has not been used for a long time the nozzles may be clogged.)
• If you see the message Motor Self Adjustment on the product control panel screen, the printer is
adjusting its internal motor. Wait a few moments for the message to disappear and do not turn off the
printer.
Parent topic: Solving Printing Problems
Related tasks
Cleaning the Print Head
Checking for Clogged Print Head Nozzles
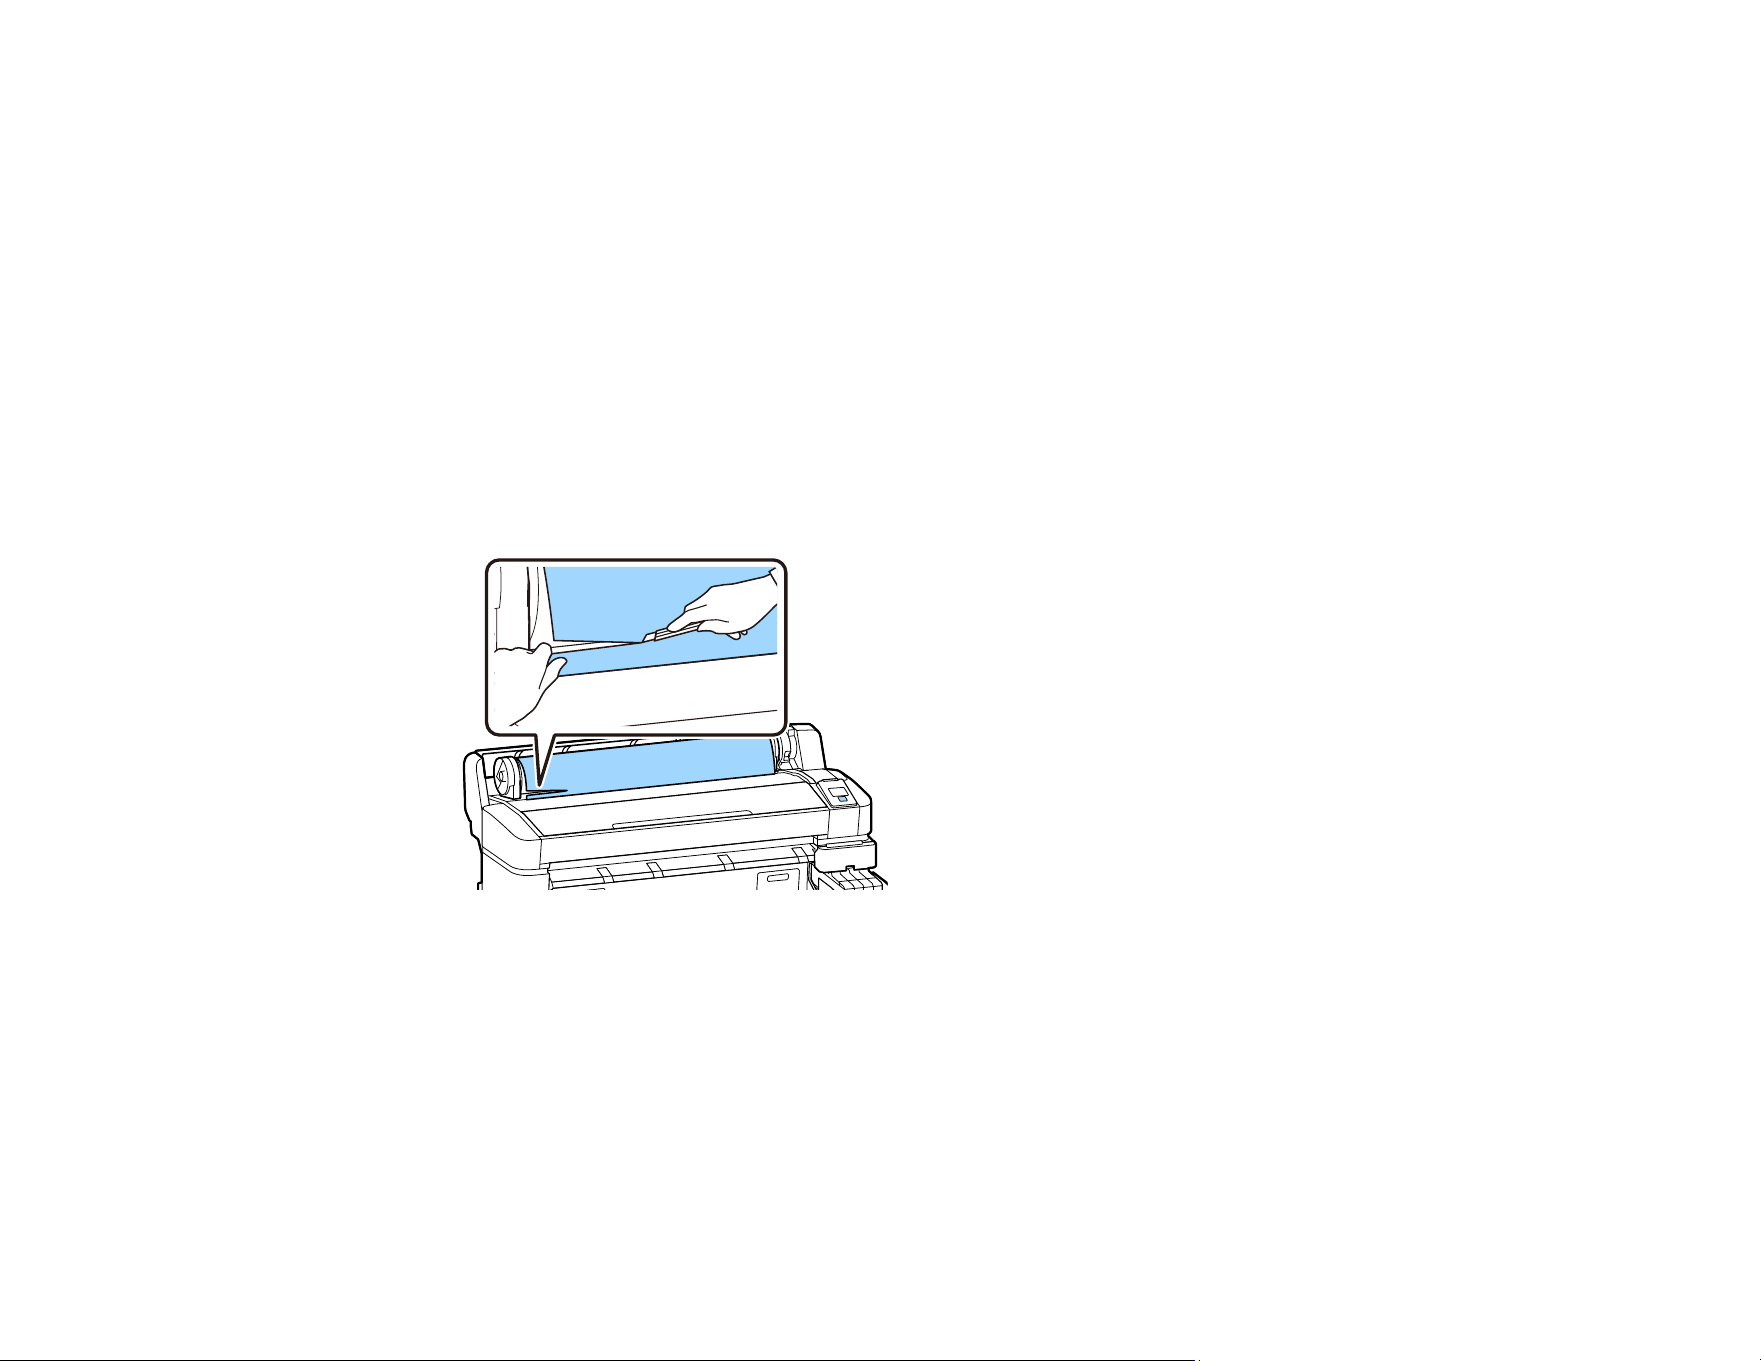
116
Removing Jammed Media
If media jams in the printer, check the following:
• Make sure the media is not curled, creased, or folded on the leading edge. Do not use media that
exhibits these problems.
• Check the media specifications to make sure you can use the media with your printer and your RIP
software. Check the RIP software manufacturers media guidelines.
Follow the steps here if media becomes jammed in the product.
1. Turn off the product, wait a moment, and turn it back on.
After a moment, you see a message telling you to open the printer cover on the product control
panel screen.
2. Pull the media toward you and cut off any torn or creased media from the roll using scissors or a
third-party cutting tool.
3. Press the OK button.
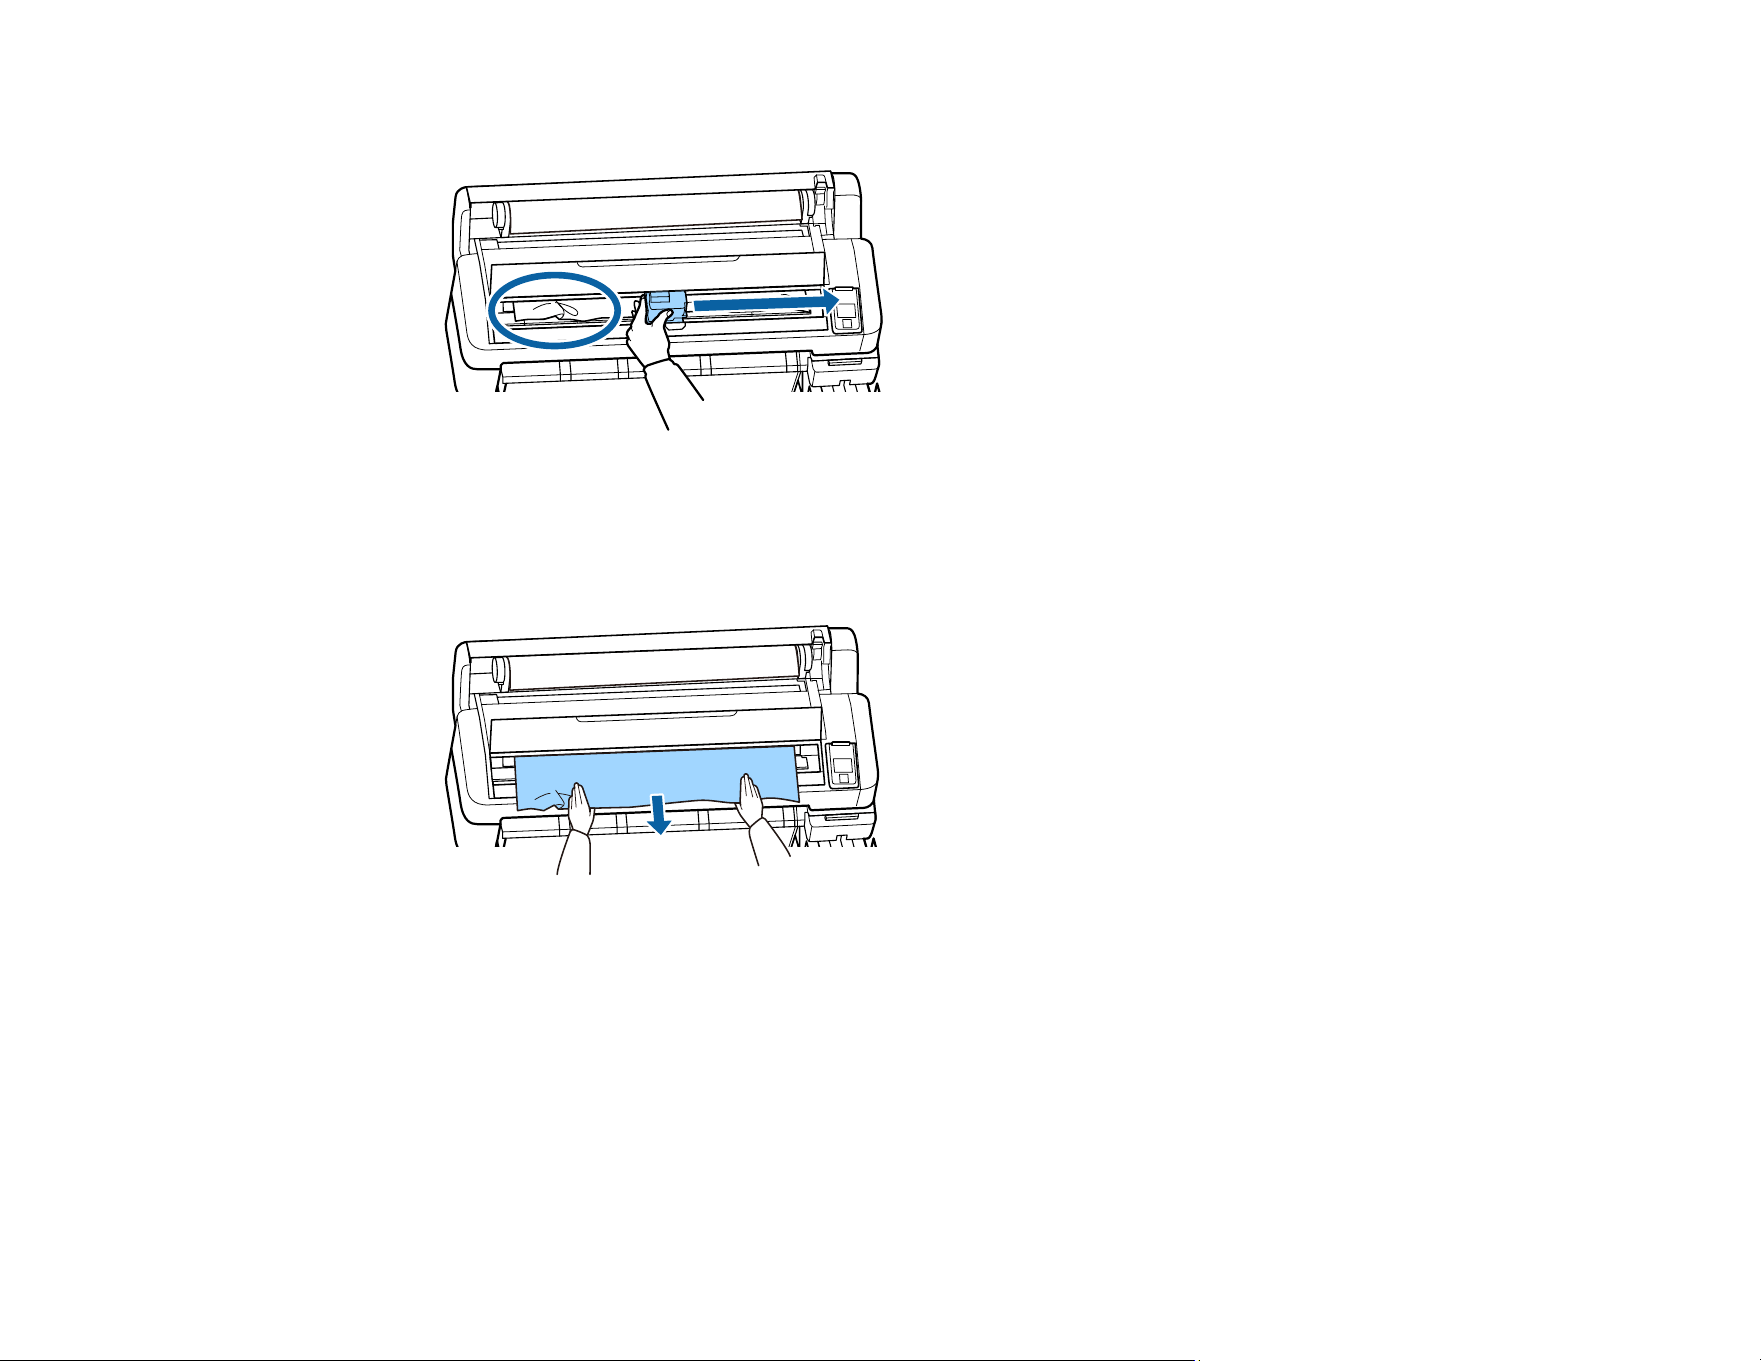
117
4. Open the printer cover and move the print head away from the jammed paper by hand.
5. Press the OK button.
6. Press and hold the down arrow button to eject the cut paper.
7. Remove the ejected paper.
8. Close the printer cover and press the OK button.
9. Reload the media when instructed on the LCD screen and resume printing.
Note: Before you reload the media roll, cut the edge straight horizontally. Cut off any wavy or
creased sections. If there is a problem at the edge, print quality may be affected and paper jams may
occur.
Parent topic: Solving Printing Problems

118
Related tasks
Cleaning the Print Head
Checking for Clogged Print Head Nozzles
Media Does Not Feed or Eject Correctly
If media does not feed straight or eject from the product correctly, try these solutions:
• Make sure the media is loaded correctly, and is not creased, folded, or jammed in the product.
• Make sure your media is not too thick or thin, and the paper settings match the media. Check the
media specifications and your RIP software documentation.
• If you continue to have problems ejecting certain media, check that the Paper Suction setting on the
product control panel is not too strong.
Parent topic: Solving Printing Problems
Related references
Paper Menu Settings
Media Specifications
Related tasks
Loading Media
Media Does Not Cut Cleanly
If the built-in cutter does not cleanly cut your media, replace the cutter.
Parent topic: Solving Printing Problems
Related tasks
Replacing the Cutter
Cutting Media
Solving Print Quality Problems
Check these sections if you have problems with print quality.
Nozzle Check Pattern Prints Incorrectly
Overall Print Quality Is Poor
Printed Media Is Stained or Marred
Image is not Positioned Correctly on the Media
Parent topic: Solving Problems

119
Nozzle Check Pattern Prints Incorrectly
If the nozzle check pattern does not print correctly, try these solutions:
• If nozzles are still clogged after head cleaning at the strongest level, leave the product turned off
overnight and check the nozzles again. If you still cannot clear the nozzles, contact Epson support.
• Clean the print head and print the check pattern again.
• If the printer has not been used for a long time, nozzles may be dried and clogged. Turn the printer on
at least once every two weeks to prevent the nozzles from clogging.
• Lint may have adhered to the platen near the print head. Clean the area using the maintenance kit.
Parent topic: Solving Print Quality Problems
Related tasks
Cleaning the Print Head
Checking for Clogged Print Head Nozzles
Performing Head Maintenance
Overall Print Quality Is Poor
If you notice that your print quality is uneven, too light, too dark, or there are vertical or horizontal lines in
the print (banding), try these solutions:
• Run a nozzle check to see if any of the print head nozzles are clogged. Then clean the print head, if
necessary.
• Align the print head.
• Make sure to use genuine Epson ink packs. Using any other type of ink pack may result in reduced
print quality.
• Use a new ink pack. Print quality declines when using an old ink pack. Use all the ink in the ink pack
before the date printed on the ink pack.
• Make sure the media settings in your RIP software or product control panel match the media you
loaded.
• If you are comparing the print result with the image on your computer screen, the colors may not
match. Since monitors and printers produce colors differently, printed colors and screen colors do not
always look the same.
• Make sure that the front cover is closed. Do not open any covers during printing. This can cause the
print head to stop abruptly, resulting in uneven color.
Parent topic: Solving Print Quality Problems

120
Related references
Consumables and Replacement Parts
Related tasks
Cleaning the Print Head
Checking for Clogged Print Head Nozzles
Aligning the Print Head
Viewing and Changing Media Settings
Printed Media Is Stained or Marred
If the printed media is stained or the surface is marred, try these solutions:
• Make sure the media is not too thick or thin. Check that it meets the media specifications for your
product and RIP software.
• Check that the media is not creased or folded, causing it to contact the print head. If necessary, load
new media.
• Clean the print head, wiper, and caps as necessary to remove ink that may have stained these parts
and transferred to your printout.
• Adjust the Platen Gap setting on the product control panel to prevent the print head from striking the
media as you print.
• If the edge of the media is marred, set the Top value of the Roll Paper Margin setting on the product
control panel to the 15mm setting. If the bottom edge of the media is marred, set the Bottom value of
the Roll Paper Margin setting to 150mm.
• Feed and eject paper to clean the rollers inside the product.
Parent topic: Solving Print Quality Problems
Related references
Paper Menu Settings
Media Specifications
Setup Menu Settings
Related tasks
Loading Media
Cleaning the Anti-drying Caps
Replacing the Head Cleaning Set
Cleaning the Platen

121
Image is not Positioned Correctly on the Media
If the printed image is not positioned correctly on your media, try these solutions:
• Make sure you loaded the media correctly and selected the correct margin settings for it on the
product control panel.
• Make sure you specified the correct print area in your printing software.
• Turn on the Paper Skew Check and Paper Size Check settings on the product control panel to
prevent your image from printing outside the printable area.
Parent topic: Solving Print Quality Problems
Related references
Setup Menu Settings
Printable Area and Paper Size Checking
Related tasks
Loading Media
Where to Get Help
Epson provides technical support and information on the installation, configuration, and operation of
professional printing products through the Epson Preferred Limited Warranty Plan. Dial (888) 377-6611,
6 AM to 6 PM, Pacific Time, Monday through Friday. Days and hours of support are subject to change
without notice.
Note: If you experience difficulty with the toll-free number, call (562) 276-1305 (U.S.).
Before you call, make sure you have your printer serial number and proof of purchase.
Visit epson.com/support (U.S.) or epson.ca/support (Canada) and select your product for solutions to
common problems. You can download drivers, firmware, and documentation, get FAQs and
troubleshooting advice, or e-mail Epson with your questions.
Note: For help using any other software on your system, see the documentation for that software for
technical support information.
Purchase Supplies and Accessories
You can purchase genuine Epson ink, paper, and accessories from an Epson authorized reseller. To
find the nearest reseller, visit proimaging.epson.com (U.S.) or proimaging.epson.ca (Canada), select

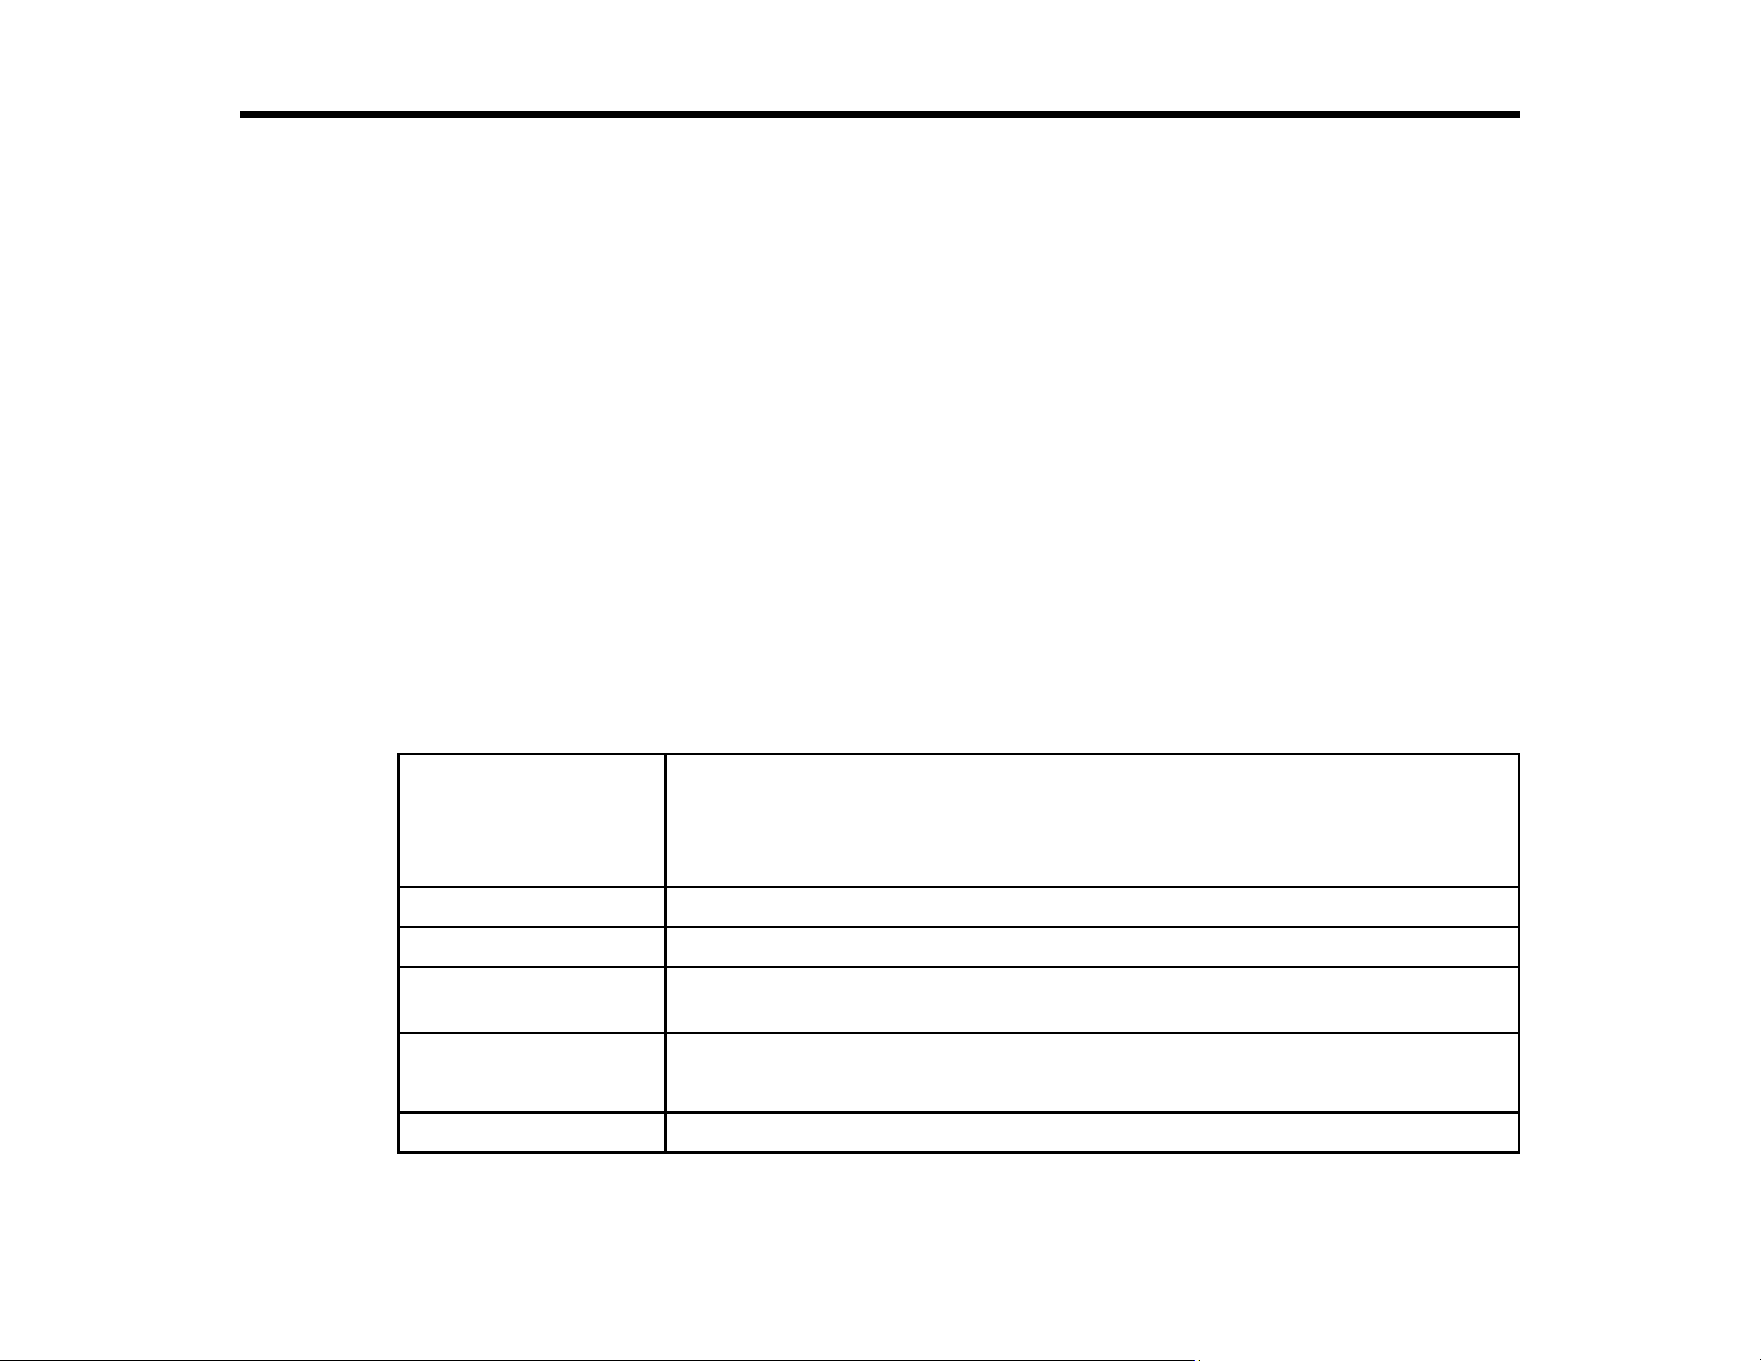
123
Technical Specifications
These sections list the technical specifications for your product.
Note: Epson offers a recycling program for end of life Epson products. Please go to this site (U.S) or this
site (Canada) for information on how to return your Epson products for proper disposal.
Windows System Requirements
Printing Specifications
Electrical Specifications
Environmental Specifications
Dimension Specifications
Interface Specifications
Ink Pack Specifications
Media Specifications
Safety and Approvals Specifications
Windows System Requirements
To use your product and its software, your computer should meet these requirements.
Microsoft Windows OS
version
(32- and 64-bit
compatible)
Windows 10, Windows 8.x, Windows 7
CPU Core 2 Duo 3.05 GHz or better
Memory 2GB or more
Hard disk space
available
50GB or more
Interface Hi-Speed USB,
Ethernet 100BASE-TX/1000BASE-T
Display resolution SXGA (1280 × 1024) or higher

124
Note: For the latest product software available for your operating system, visit the Epson support site at
epson.com/support (U.S.), epson.ca/support (Canada), or epson.com.jm/support (Caribbean), select
your product, and select Downloads.
Parent topic: Technical Specifications
Printing Specifications
Printing method On-demand ink jet
Nozzle configuration 360 nozzles × 2 rows × 4 colors
Resolution 720 × 1440 dpi maximum
Control code ESC/P raster (undisclosed command)
Media feed method Friction feed
Built-in memory Main memory: 512MB
Network: 128MB
Parent topic: Technical Specifications
Electrical Specifications
Power supply rating 100 to 120 V
Rated frequency range 50/60 Hz
Rated current 0.5 to 1.0 A
Power consumption Printing: 65 W (ISO/IEC24712)
Sleep mode: 3 W
Power off mode: 0.4 W
Parent topic: Technical Specifications

125
Environmental Specifications
Temperature Operating: 59 to 95 °F (15 to 35 °C); 59 to 77 °F (15 to 25 °C)
recommended)
Storage (before unpacking): –4 to 140 °F (–20 to 60 °C), no more
than 120 hours at 140 °F (60 °C), within a month at 104 °F (40 °C)
Storage (after unpacking): –4 to 104 °F (–20 to 40 °C), within a
month at 104 °F (40 °C)
Humidity
(non-condensing)
Operating: 20 to 80% RH; 40 to 60% RH recommended
Storage (before and after unpacking): 5 to 85% RH
Parent topic: Technical Specifications
Dimension Specifications
Height 44.4 inches (1128 mm)
Width 63.3 inches (1608 mm)
Depth 36.0 inches (914 mm)
Weight
(without ink)
207.2 lb (94 kg)
Parent topic: Technical Specifications
Interface Specifications
USB Interface Hi-Speed USB-Compatible with the Universal Serial Bus
Specifications Revision 2.0
Network Interface 100BASE-TX/1000BASE-T (requires a shielded twisted pair cable,
category 5 or higher)
Parent topic: Technical Specifications

126
Ink Pack Specifications
Sublimation transfer ink color High Density Black, Cyan, Magenta, Yellow
Ink life Do not use if the date on the package has expired
Print quality guarantee 25 days (from the day the ink tank was refilled from the ink pack)
Temperature
In storage (opened): 41 to 95 °F (5 to 35 °C); 59 to 77 °F (15 to 25
°C) recommended for use
Capacity 1100 ml
Parent topic: Technical Specifications
Related references
Consumables and Replacement Parts
Media Specifications
Note: Since the quality of any particular brand or type of paper may be changed by the manufacturer at
any time, Epson cannot guarantee the quality of any non-Epson brand or type of paper. Always test a
sample of paper stock before purchasing large quantities or printing large jobs. Do not use paper that is
wrinkled, scratched, torn, or dirty.
Roll core size 2 or 3 inches
Roll outer diameter Up to 5.9 inches (150 mm)
Media width
(with auto take-up reel installed)
10 to 44 inches (254 to 1118 mm)
17 to 44 inches (432 to 1118 mm)
Media thickness Up to 0.04 inch (1 mm)
Parent topic: Technical Specifications
Safety and Approvals Specifications
United States Safety: UL60950-1
EMC: FCC Part15 Subpart B Class A


128
Notices
Check these sections for important notices about your product.
Note: Epson offers a recycling program for end of life Epson products. Please go to this site (U.S) or this
site (Canada) for information on how to return your Epson products for proper disposal.
Important Safety Instructions
FCC Compliance Statement
Binding Arbitration and Class Waiver
Trademarks
Copyright Notice
Important Safety Instructions
Before using your Epson product, read and follow these safety instructions.
General Product Safety Instructions
Ink Pack Safety Instructions
Parent topic: Notices
General Product Safety Instructions
• Be sure to follow all warnings and instructions marked on the product.
• Use only the type of power source indicated on the product's label.
• Use only the power cord that comes with the product. Use of another cord may cause fires or shock.
Do not use the cord with any other equipment.
• Place the product near a wall outlet where the plug can be easily unplugged.
• Connect your product to a properly grounded power outlet. Avoid plugging the product into an outlet
on the same circuit as a photo copier or air control system that regularly switches on and off, or on an
outlet controlled by a wall switch or timer.
• Do not let the power cord become damaged or frayed. Place it to avoid abrasions, cuts, fraying,
crimping, and kinking. Do not place objects on top of it and do not allow it to be stepped on or run over.
Be careful to keep the cord straight at each end.
• If you use an extension cord with the product, make sure the total ampere rating of the devices
plugged into the extension cord does not exceed the cord's ampere rating. Also, make sure the total

129
ampere rating of all devices plugged into the wall outlet does not exceed the wall outlet's ampere
rating.
• If damage occurs to the plug, replace the cord set or consult a qualified electrician. If there are fuses in
the plug, make sure you replace them with fuses of the correct size and rating.
• Always turn off the product using the power button, and wait until the power light stops flashing before
unplugging the product or cutting off power to the electrical outlet.
• If you will not be using the product for a long period, unplug the power cord from the electrical outlet.
• Place the product on a flat, stable surface that extends beyond its base in all directions. It will not
operate properly if it is tilted or at an angle.
• Avoid locations that are subject to rapid changes in heat or humidity, shocks or vibrations, or dust.
• Do not place or store the product outdoors.
• Do not place the product near excessive heat sources or in direct sunlight.
• Leave enough room around the product for sufficient ventilation. Do not block or cover openings in the
cabinet or insert objects through the slots.
• Keep the product away from potential sources of electromagnetic interference, such as loudspeakers
or the base units of cordless telephones.
• When connecting the product to a computer or other device with a cable, ensure the correct
orientation of the connectors. Each connector has only one correct orientation. Inserting a connector
in the wrong orientation may damage both devices connected by the cable.
• Do not spill liquid on the product or use the product with wet hands.
• Do not use aerosol products that contain flammable gases inside or around the product. Doing so may
cause fire.
• Except as specifically explained in your documentation, do not attempt to service the product yourself.
• Unplug the product and refer servicing to qualified service personnel under the following conditions: if
the power cord or plug is damaged; if liquid has entered the product; if the product has been dropped
or the cabinet damaged; if the product does not operate normally or exhibits a distinct change in
performance. Adjust only those controls that are covered by the operating instructions.
• When storing or transporting the product, do not tilt it, stand it on its side, or turn it upside down;
otherwise ink may leak.
Note: The lithium batteries in this product contain Perchlorate Material - special handling may apply.
Click here for details.
Parent topic: Important Safety Instructions

130
Ink Pack Safety Instructions
• Keep ink packs out of the reach of children and do not drink the ink.
• Wear protective eyewear, gloves, and a mask when performing maintenance.
• Should ink touch your skin or enter your eyes or mouth, immediately take the following actions:
• If fluid touches your skin, wash it off immediately with large volumes of soapy water. Consult a
physician if the skin appears irritated or discolored.
• If fluid gets in your eyes, rinse immediately with water. Failure to observe this precaution could
result in bloodshot eyes or mild inflammation. If problems persist, consult with a physician.
• If swallowed, do not induce vomiting and consult with a physician as soon as possible.
• If fluid gets in your mouth, consult a physician as soon as possible.
Parent topic: Important Safety Instructions
FCC Compliance Statement
For United States Users
This equipment has been tested and found to comply with the limits for a Class A digital device, pursuant
to Part 15 of the FCC Rules. These limits are designed to provide reasonable protection against harmful
interference when the equipment is operated in a commercial environment. This equipment generates,
uses, and can radiate radio frequency energy and, if not installed and used in accordance with the
instruction manual, may cause harmful interference to radio communications. Operation of this
equipment in a residential area is likely to cause harmful interference, in which case the user will be
required to correct the interference at his own expense.
This device complies with Part 15 of the FCC Rules. Operation is subject to the following two conditions:
1. this device may not cause harmful interference, and
2. this device must accept any interference received, including interference that may cause undesired
operation.
WARNING
The connection of a non-shielded equipment interface cable to this equipment will invalidate the FCC
Certification of this device and may cause interference levels which exceed the limits established by the
FCC for this equipment. It is the responsibility of the user to obtain and use a shielded equipment
interface cable with this device. If this equipment has more than one interface connector, do not leave
cables connected to unused interfaces. Changes or modifications not expressly approved by the
manufacturer could void the user’s authority to operate the equipment.

131
For Canadian Users
This Class A digital apparatus complies with Canadian ICES-003.
Cet appareil numérique de la classe A est conforme à la norme NMB-003 du Canada.
WARNING
This is a Class A product. In a domestic environment this product may cause radio interference, in which
case the user may be required to take adequate measures.
Parent topic: Notices
Binding Arbitration and Class Waiver
1. DISPUTES, BINDING INDIVIDUAL ARBITRATION, AND WAIVER OF CLASS ACTIONS AND
CLASS ARBITRATIONS
1.1 Disputes. The terms of this Section 1 shall apply to all Disputes between you and Epson. The term
"Dispute" is meant to have the broadest meaning permissible under law and includes any dispute, claim,
controversy or action between you and Epson arising out of or relating to this Agreement, Epson
branded products (hardware and including any related software), or other transaction involving you and
Epson, whether in contract, warranty, misrepresentation, fraud, tort, intentional tort, statute, regulation,
ordinance, or any other legal or equitable basis. "DISPUTE" DOES NOT INCLUDE IP CLAIMS, or more
specifically, a claim or cause of action for (a) trademark infringement or dilution, (b) patent infringement,
(c) copyright infringement or misuse, or (d) trade secret misappropriation (an "IP Claim"). You and Epson
also agree, notwithstanding Section 1.6,that a court, not an arbitrator, may decide if a claim or cause of
action is for an IP Claim.
1.2 Binding Arbitration. You and Epson agree that all Disputes shall be resolved by binding arbitration
according to this Agreement. ARBITRATION MEANS THAT YOU WAIVE YOUR RIGHT TO A JUDGE
OR JURY IN A COURT PROCEEDING AND YOUR GROUNDS FOR APPEAL ARE LIMITED.
Pursuant to this Agreement, binding arbitration shall be administered by JAMS, a nationally recognized
arbitration authority, pursuant to its code of procedures then in effect for consumer related disputes, but
excluding any rules that permit joinder or class actions in arbitration (for more detail on procedure, see
Section 1.6 below). You and Epson understand and agree that (a) the Federal Arbitration Act (9 U.S.C.
§1, et seq.) governs the interpretation and enforcement of this Section 1, (b) this Agreement
memorializes a transaction in interstate commerce, and (c) this Section 1 shall survive termination of this
Agreement.
1.3 Pre-Arbitration Steps and Notice. Before submitting a claim for arbitration, you and Epson agree to
try, for sixty (60) days, to resolve any Dispute informally. If Epson and you do not reach an agreement to
resolve the Dispute within the sixty (60) days), you or Epson may commence an arbitration. Notice to
Epson must be addressed to: Epson America, Inc., ATTN: Legal Department, 3840 Kilroy Airport Way,

132
Long Beach, CA 90806 (the "Epson Address"). The Dispute Notice to you will be sent to the most recent
address Epson has in its records for you. For this reason, it is important to notify us if your address
the Dispute shall include the sender's name, address and contact information, the facts giving rise to the
Dispute, and the relief requested (the "Dispute Notice"). Following receipt of the Dispute Notice, Epson
and you agree to act in good faith to resolve the Dispute before commencing arbitration.
1.4 Small Claims Court. Notwithstanding the foregoing, you may bring an individual action in the small
claims court of your state or municipality if the action is within that court's jurisdiction and is pending only
in that court.
1.5 WAIVER OF CLASS ACTIONS AND CLASS ARBITRATIONS. YOU AND EPSON AGREE THAT
EACH PARTY MAY BRING DISPUTES AGAINST THE OTHER PARTY ONLY IN AN INDIVIDUAL
CAPACITY, AND NOT AS A PLAINTIFF OR CLASS MEMBER IN ANY CLASS OR
REPRESENTATIVE PROCEEDING, INCLUDING WITHOUT LIMITATION FEDERAL OR STATE
CLASS ACTIONS, OR CLASS ARBITRATIONS. CLASS ACTION LAWSUITS, CLASS-WIDE
ARBITRATIONS, PRIVATE ATTORNEY-GENERAL ACTIONS, AND ANY OTHER PROCEEDING
WHERE SOMEONE ACTS IN A REPRESENTATIVE CAPACITY ARE NOT ALLOWED.
ACCORDINGLY, UNDER THE ARBITRATION PROCEDURES OUTLINED IN THIS SECTION, AN
ARBITRATOR SHALL NOT COMBINE OR CONSOLIDATE MORE THAN ONE PARTY'S CLAIMS
WITHOUT THE WRITTEN CONSENT OF ALL AFFECTED PARTIES TO AN ARBITRATION
PROCEEDING.
1.6 Arbitration Procedure. If you or Epson commences arbitration, the arbitration shall be governed by
the rules of JAMS that are in effect when the arbitration is filed, excluding any rules that permit arbitration
on a class or representative basis (the "JAMS Rules"), available at http://www.jamsadr.com or by calling
1-800-352-5267, and under the rules set forth in this Agreement. All Disputes shall be resolved by a
single neutral arbitrator, and both parties shall have a reasonable opportunity to participate in the
selection of the arbitrator. The arbitrator is bound by the terms of this Agreement. The arbitrator, and not
any federal, state or local court or agency, shall have exclusive authority to resolve all disputes arising
out of or relating to the interpretation, applicability, enforceability or formation of this Agreement,
including any claim that all or any part of this Agreement is void or voidable. Notwithstanding this broad
delegation of authority to the arbitrator, a court may determine the limited question of whether a claim or
cause of action is for an IP Claim, which is excluded from the definition of "Disputes" in Section 1.1
above. The arbitrator shall be empowered to grant whatever relief would be available in a court under
law or in equity. The arbitrator may award you the same damages as a court could, and may award
declaratory or injunctive relief only in favor of the individual party seeking relief and only to the extent
necessary to provide relief warranted by that party's individual claim. In some instances, the costs of
arbitration can exceed the costs of litigation and the right to discovery may be more limited in arbitration
than in court. The arbitrator's award is binding and may be entered as a judgment in any court of
competent jurisdiction.

133
You may choose to engage in arbitration hearings by telephone. Arbitration hearings not conducted by
telephone shall take place in a location reasonably accessible from your primary residence, or in Orange
County, California, at your option.
a) Initiation of Arbitration Proceeding. If either you or Epson decides to arbitrate a Dispute, both parties
agree to the following procedure:
(i) Write a Demand for Arbitration. The demand must include a description of the Dispute and the amount
of damages sought to be recovered. You can find a copy of a Demand for Arbitration at
http://www.jamsadr.com ("Demand for Arbitration").
(ii) Send three copies of the Demand for Arbitration, plus the appropriate filing fee, to: JAMS, 500 North
State College Blvd., Suite 600 Orange, CA 92868, U.S.A.
(iii) Send one copy of the Demand for Arbitration to the other party (same address as the Dispute
Notice), or as otherwise agreed by the parties.
b) Hearing Format. During the arbitration, the amount of any settlement offer made shall not be disclosed
to the arbitrator until after the arbitrator determines the amount, if any, to which you or Epson is entitled.
The discovery or exchange of non-privileged information relevant to the Dispute may be allowed during
the arbitration.
c) Arbitration Fees. Epson shall pay, or (if applicable) reimburse you for, all JAMS filings and arbitrator
fees for any arbitration commenced (by you or Epson) pursuant to provisions of this Agreement.
d) Award in Your Favor. For Disputes in which you or Epson seeks $75,000 or less in damages exclusive
of attorney's fees and costs, if the arbitrator's decision results in an award to you in an amount greater
than Epson's last written offer, if any, to settle the Dispute, Epson will: (i) pay you $1,000 or the amount
of the award, whichever is greater; (ii) pay you twice the amount of your reasonable attorney's fees, if
any; and (iii) reimburse you for any expenses (including expert witness fees and costs) that your attorney
reasonably accrues for investigating, preparing, and pursuing the Dispute in arbitration. Except as
agreed upon by you and Epson in writing, the arbitrator shall determine the amount of fees, costs, and
expenses to be paid by Epson pursuant to this Section 1.6d).
e) Attorney's Fees. Epson will not seek its attorney's fees and expenses for any arbitration commenced
involving a Dispute under this Agreement. Your right to attorney's fees and expenses under Section
1.6d) above does not limit your rights to attorney's fees and expenses under applicable law;
notwithstanding the foregoing, the arbitrator may not award duplicative awards of attorney's fees and
expenses.
1.7 Opt-out. You may elect to opt-out (exclude yourself) from the final, binding, individual
arbitration procedure and waiver of class and representative proceedings specified in this
Agreement by sending a written letter to the Epson Address within thirty (30) days of your assent
to this Agreement (including without limitation the purchase, download, installation of the
Software or other applicable use of Epson Hardware, products and services) that specifies (i)
your name, (ii) your mailing address, and (iii) your request to be excluded from the final, binding

134
individual arbitration procedure and waiver of class and representative proceedings specified in
this Section 1. In the event that you opt-out consistent with the procedure set forth above, all
other terms shall continue to apply, including the requirement to provide notice prior to litigation.
1.8 Amendments to Section 1. Notwithstanding any provision in this Agreement to the contrary, you
and Epson agree that if Epson makes any future amendments to the dispute resolution procedure and
class action waiver provisions (other than a change to Epson's address) in this Agreement, Epson will
obtain your affirmative assent to the applicable amendment. If you do not affirmatively assent to the
applicable amendment, you are agreeing that you will arbitrate any Dispute between the parties in
accordance with the language of this Section 1 (or resolve disputes as provided for in Section 1.7, if you
timely elected to opt-out when you first assented to this Agreement).
1.9 Severability. If any provision in this Section 1 is found to be unenforceable, that provision shall be
severed with the remainder of this Agreement remaining in full force and effect. The foregoing shall not
apply to the prohibition against class or representative actions as provided in Section 1.5. This
means that if Section 1.5 is found to be unenforceable, the entire Section 1 (but only Section 1)
shall be null and void.
Parent topic: Notices
Trademarks
EPSON
®
and SureColor
®
are registered trademarks, and EPSON Exceed Your Vision is a registered
logomark of Seiko Epson Corporation.
Windows is a registered trademark of Microsoft Corporation in the United States and/or other countries.
General Notice: Other product names used herein are for identification purposes only and may be
trademarks of their respective owners. Epson disclaims any and all rights in those marks.
Parent topic: Notices
Copyright Notice
All rights reserved. No part of this publication may be reproduced, stored in a retrieval system, or
transmitted in any form or by any means, electronic, mechanical, photocopying, recording, or otherwise,
without the prior written permission of Seiko Epson Corporation. The information contained herein is
designed only for use with this Epson product. Epson is not responsible for any use of this information as
applied to other products.

135
Neither Seiko Epson Corporation nor its affiliates shall be liable to the purchaser of this product or third
parties for damages, losses, costs, or expenses incurred by purchaser or third parties as a result of:
accident, misuse, or abuse of this product or unauthorized modifications, repairs, or alterations to this
product, or (excluding the U.S.) failure to strictly comply with Seiko Epson Corporation's operating and
maintenance instructions.
Seiko Epson Corporation shall not be liable for any damages or problems arising from the use of any
options or any consumable products other than those designated as Original Epson Products or Epson
Approved Products by Seiko Epson Corporation.
Seiko Epson Corporation shall not be held liable for any damage resulting from electromagnetic
interference that occurs from the use of any interface cables other than those designated as Epson
approved Products by Seiko Epson Corporation.
This information is subject to change without notice.
A Note Concerning Responsible Use of Copyrighted Materials
Copyright Attribution
Parent topic: Notices
A Note Concerning Responsible Use of Copyrighted Materials
Epson encourages each user to be responsible and respectful of the copyright laws when using any
Epson product. While some countries' laws permit limited copying or reuse of copyrighted material in
certain circumstances, those circumstances may not be as broad as some people assume. Contact your
legal advisor for any questions regarding copyright law.
Parent topic: Copyright Notice
Copyright Attribution
© 2019 Epson America, Inc.
6/19
CPD-57331
Parent topic: Copyright Notice