BCN2 User Manual
Rev: 4/2026
For additional support, please contact us at [email protected]
Beacon Technology Solutions, Inc.
111 North Wabash Ave | Suite 100, #3361 | Chicago, IL | 60602
Far-UVC Continuous Disinfection Device

Table of Contents
How Beacon Works
Setting Up Your Beacon
Using Beacon’s App
Beacon Operating FAQs 1
General FAQs 15
Safety & Regulatory Information 17
Contact Support 22
2

How Beacon Works
Overview
Beacon is a continuous Far-UVC 222nm disinfection system that seamlessly adapts to
homes, healthcare facilities, and workplaces.
Its smart mobile app enables real-time monitoring, optimized, energy-efficient
disinfection schedules, and effortless device management—delivering round-the-clock
air and surface protection.
By inactivating up to 99.99% of viruses, bacteria, and mold, Beacon safeguards the
spaces that matter most. Combining patented UV-C technology with intuitive controls, it
provides a powerful, automated layer of protection—designed for maximum safety,
efficiency, and peace of mind.
Features
â—� Long-lasting: 8,000+ hours of operation
â—� Simple installation: No hardwiring or electrician required
â—� Easy to use: Air and surface disinfection with a WiFi-enabled phone app
â—� UL867 Ozone Certification
â—� EPA Establishment: 105810
â—� Intelligent operating modes: The intelligent software senses personnel and
maintains proper exposure limits while maximizing the power of Far-UVC 222nm
disinfection. Beacon also provides users with options to schedule based on
personal and/or facility operation needs, aligning with the latest American
Conference of Governmental Industrial Hygienists (ACGIH) TLV guidelines.
3

Setting Up Your Beacon
What’s Included - Your Beacon comes with:
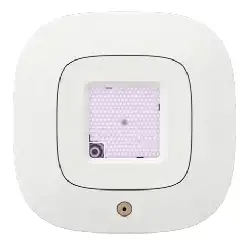
â—� Beacon Far-UVC 222nm disinfecting light
â—� Wall mount, 2 mounting screws, and 2 drywall mounting screws, one mounting
plate
â—� Power cord - extends up to 10 feet
What You Will Need - To mount your beacon, you will need:
â—� A screwdriver or drill
â—� A step stool or ladder
Mounting Instructions - Selecting your desired location
1. Select the room or location in which you wish to install your Beacon and locate a
mounting space that is:
â—� Eight feet (8') above the ground
â—� Within ten feet (10') of an outlet
â—� Minimum four inches (4") from ceiling
â—� Centered on a wall stud, or in drywall using drywall anchors
4

2. Check visibility: For maximum coverage, we recommend the space to be in an
unobstructed location that faces out into the room (i.e. an unobstructed corner)
5

Mounting Instructions - Affixing Beacon to the wall
You can install Beacon yourself with just a screwdriver—no hardwiring or electrician
needed. It is recommended that Beacon be mounted to a stud.
1. Once you’ve chosen the height and location, fasten mount (A) to the wall, tab facing
up, using the two supplied screws.
2. Attach the Beacon disinfecting light to the mounting hardware by screwing onto the
threaded mount (B).
3. Connect the power jack to the Beacon, route the cord around the light as desired.
You can select which direction to run the power cord, up through mount directed above
the device or down through the mount for an outlet below the device.
4. Lower the Beacon so its upper plate hooks onto the wall mount plate.
5. After mounting the Beacon, adjust the angle and use the Beacon app to set your
disinfection schedule.
6. Insert the power cord into the wall outlet.
Turning On Beacon
1. Once you have installed your device and plugged the cord into the nearest 120V
outlet.
2. Turn Beacon on by pressing the “Beacon� button on the bottom of your device.
3. Connect Beacon to the app to complete setup (detailed instructions below).
6

Setting Up Beacon's App
1. Visit the Beacon App Guide Below for full app instructions
2. *Make sure your phone's Bluetooth is on when connecting your device to the
app.*
3. Download Beacon's companion app by clicking the links here or searching your
Google Play or Apple Store for “Beacon Far-UVC�.
4. After installing the app, create a username and password.
5. You will need to verify your account via an email verification code after initial
account creation.
6. Once logged in, follow the prompts to fill in the following information (this
information can be changed at any time):
â—� First and Last Name
â—� Email
7. After completing the steps above, Beacon's app will take you through the process
of adding and customizing your device.
Using Beacon's App
Refer to the App Guide for full instructions on how to use Beacon’s app
Notifications
The following notifications and accounts are available to set for your needs.
- Types of Notifications
- Lamp lifetime usage
- You will be alerted at 5,000 and 8,000 usage hours
- Device is not connected
- E.g. if your device is offline and WiFi is down
- Account owner/viewers receives these notifications
7

Beacon Operating FAQs
How do I install Beacon?
Please refer to the instructions in the "Setting up your Beacon" section above.
Do I need to hire someone to help install Beacon?
Beacon does not require any hardwiring or installation support from a professional electrician;
however, you may desire someone to install on your wall based on your comfort levels of
mounting/installation.
How do I know Beacon is working?
You can check via Beacon's app that your device is working by toggling the on/off switch.
When toggling on - your device LED will turn white
When toggling off - your device LED will turn off
How do I clean my Beacon?
Disconnect power to the unit prior to opening or performing any maintenance.
Wipe off exterior dirt and debris using a soft, clean cloth. A mild detergent and water may be
used if necessary. CAUTION: DO NOT USE ABRASIVE CLEANERS (e.g., Pine oil, cleaning
erasers, powdered cleaners, scrubbing tools, etc.) ON THE LENS. THEIR USE MAY RESULT
IN DAMAGE.
If dust or fingerprints are present, clean the glass with a non-abrasive cleaner. It is
recommended that the glass be cleaned periodically to retain intended Far-UVC
222nm
transmission.
â—� Schedule each individual Beacon as desired and track information for each based on
required usage.
â—� Share your Beacon account with others and update your settings whenever desired.
Why do I have to add Rooms to use my Beacon?
To ensure all proper ACGIH TLVs dosage limits are within the recommended amount, we
ensure we build an intelligent algorithm to ensure that even with multiple units in one room, your
dosage will remain the same.
What are the operating modes?
Beacon has three operating modes:
8

â—� Smart+ Mode dynamically changes output levels based on number of people detected
for reduced energy waste and maximum disinfection effectiveness
â—� Smart Mode maintains consistent output for simplified operation
â—� Manual mode operates without an app connection
Which operating mode is right for me?
This depends on your specific needs. Beacon has optimized output levels in Smart+ Mode
How do I select multiple devices to update the mode or schedule?
â—� Go to List Mode and select the edit pen in the upper right corner
â—� Select the devices you want to update
� Select the mode you want to change the devices to and select “Save�
How do I get to Device Details of a specific Beacon?
� On your “Device� page select the device name if in the list view or the image and name
of the device you want to see in the carousel view.
How do I add another Beacon?
â—� At any point you may add another Beacon to your account by doing the following:
â—� Select the appropriate room in the app. If you are adding a new room, please do so on
the “Room� screen. When there, select the“+� to add in your Room Name.
� Next, select the relevant Device and select the “+� in the upper right corner of the
screen.
â—� Fill in all the relevant information.
Can I stop my Beacon even if it is scheduled to be on?
Yes. Navigate to the device you want to adjust via either from the main carousel page or list
page. After selecting the device, you can toggle it on/off. Note: turning the device off will
override any previously set schedule you may have in place. Once you turn your device on, your
schedule will resume automatically.
What do the button LED colors mean?
Blue
â—� Blinking Blue: This is normal when starting/restarting your Beacon while it is on and
connecting to the cloud. This will stop after 5-10 blinks and will return to a solid color,
indicating normal operations.
â—� Solid Blue: Connected to WiFi
White
â—� Your Beacon is on.
9

No Color
â—� Your Beacon is off.
Red:
â—� Indicates an error state, see below for reasons why,
Note: If you experience any error lights, try turning Beacon off for 5-10 minutes to let it cool
down and then try turning the lamp back on. If the error persists, please contact us at
Why is there an error, or why is the Beacon button flashing red?
â—� This could be for several reasons: There is an obstruction within 1 foot of Beacon (the
device will not operate if an object is detected within 1 foot).
â—� In the event of a blocked sensor, gently wipe off the lens. Do not use abrasives or
scratch the lens, as this will impact the use of your device.
10

General FAQs
In what size space does Beacon work?
Beacon generally recommends one device for up to 1,000 square feet.
What is the wattage?
â—� Wattage on power: 14 Watts
â—� Wattage on Steady State operating: 11 Watts
Is Beacon safe to use around pets?
Research shows that Far-UVC 222nm is safe to be used around pets, though Beacon does not
make any specific representations at this time.
For more information on the safety of Far-UVC,
visit our Science page.
What are the power requirements?
There are no special power requirements. Beacon is powered via a standard 120V outlet.
Is Beacon mobile?
We recommend Beacon be installed according to the installation instructions in the "Setting up
your Beacon" section above.
Can I use Beacon to disinfect my hands/body?
Beacon is a disinfecting device that supports air and surface disinfection. Please follow
mounting instructions to ensure you are within exposure limits. We do not recommend you use
this device specifically for hands/body disinfection; though some disinfection may result if
exposed to the Far-UVC 222nm light.
Can I use Beacon to disinfect my groceries and other objects?
Yes, Beacon will help disinfect the surfaces of items that are placed within its line of sight.
Can I connect Beacon to a battery pack so that it works in mobile locations?
All installation and usage must be done in accordance with Beacon’s installation instructions. It
may be possible to use Beacon in this manner if done properly.
What if my ceilings are only 8 feet tall?
Some spaces only have ceilings at 8 feet tall. Please mount your Beacon as close to the ceiling
as possible. It is also possible to hang your Beacon from the ceiling.
How do I get the app?
You may download the app at Google Play or Apple Store
Does Beacon have a web-based portal?
Beacon currently supports our enterprise customers via our web-based portal. Smaller
businesses and individuals utilize our app for Beacon device management.
11

What functionalities does the app have?
â—� Add, edit, remove rooms, devices at any point.
â—� Share account details
â—� Notifications
What is Far-UVC 222nm?
Please check out our blog here.
What is the difference between Far-UVC 222nm and UVC?
Far-UVC 222nm is part of the UVC spectrum of light, which constitutes light from 100 to 280nm
in wavelength. Far UVC is a subset of UVC spectrum operating from 200-230nm.
What makes Far-UVC 222nm safe?
Far-UVC, specifically 222nm, has been rigorously tested and appears to be unable to penetrate
the outer layers of our skin and eyes. Other wavelengths in the UVC spectrum, like 254nm, can
penetrate these outer layers and may cause harm upon extended exposure.
Please see
Beacon’s website for additional research studies and details.
Does sunlight impact the efficacy of Far-UVC 222nm?
Sunlight has not been shown to impact the efficacy of Far-UVC 222nm.
How quickly does Beacon disinfect?
The speed of disinfection depends on a variety of factors, including:
1. This pathogen you are looking to disinfect
2. The amount of disinfection you are seeking (i.e. 90% vs. 99.9%)
3. The length of usage
4. The conditions in the environment in which you are operating Beacon.
Is Beacon filtered?
Yes, Beacon uses the Eden Park Gen3 Excimer emitter that utilizes a tested filter; this filter
ensures the product emits only 222nm light.
Does Beacon contain or create any VOCs?
Beacon does not contain any VOCs. Far-UVC 222nm is continually being tested to understand
if it creates additional ozone exposure. So far, studies have shown Far-UVC 222nm to operate
safely within OSHA recommended limits.
12

Safety and regulatory information
Any changes or modifications not expressly approved by the party responsible for compliance
could void the user’s authority to operate the equipment.
Note: This equipment has been tested and found to comply with the limits for a Class B digital
device, pursuant to part 15 of the FCC Rules. These limits are designed to provide reasonable
protection against harmful interference in a residential installation. This equipment generates
uses and can radiate radio frequency energy and, if not installed and used in accordance with
the instructions, may cause harmful interference to radio communications. However, there is no
guarantee that interference will not occur in a particular installation. If this equipment does
cause harmful interference to radio or television reception, which can be determined by turning
the equipment off and on, the user is encouraged to try to correct the interference by one or
more of the following measures:
â—� Reorient or relocate the receiving antenna.
â—� Increase the separation between the equipment and receiver.
â—� Connect the equipment into an outlet on a circuit different from that to which the receiver
is connected.
â—� Consult the dealer or an experienced radio/TV technician for help.
This equipment complies with FCC radiation exposure limits set forth for an uncontrolled
environment. This equipment should be installed and operated with minimum distance 20cm
between the radiator & your body.
IMPORTANT SAFETY INSTRUCTIONS
OCCUPIED SPACES DIRECT IRRADIATION UV EQUIPMENT
IMPORTANT SAFEGUARDS
READ AND FOLLOW ALL SAFETY INSTRUCTIONS!
When using electrical equipment, basic safety precautions should always be followed including
the following:
• To reduce the risk of death, personal injury or property damage from fire, electric shock, falling
parts, cuts/abrasions, and other hazards please read all warnings and instructions included with
and on the fixture box and all fixture labels.
• Before installing, servicing, or performing routine maintenance upon this equipment, follow
these general precautions.
• Installation and service of this equipment should be performed by a qualified licensed
electrician.
• This equipment is designed for use with germicidal UV radiation sources and must be installed
in compliance with competent technical directions to prevent risk of personal injury from UV
radiation.
13

• UV radiation can pose a risk of personal injury. Overexposure can result in damage to eyes
and bare skin. To reduce the risk of overexposure
this equipment must be installed in
accordance with the manufacturer’s site planning recommendations. This may include
instructions on the relative location of each germicidal system component, the minimum
distances between UV-generating devices and other objects or surfaces, and protection from
line-of-sight exposure to UV radiation in occupied spaces located above the equipment
mounting area (e. g. upper floor balconies, open staircases, etc.)
• UV and optical radiation can be reflected by surrounding surfaces such as ceilings and walls.
Since the reflective properties of surfaces can vary
widely, it should be considered as part of site
planning. Follow the manufacturer’s recommendations for selecting appropriate ceiling and
wall
finishes.
• IT IS THE RESPONSIBILITY OF THE INSTALLER TO ENSURE THAT PERSONS WILL NOT
BE EXPOSED TO EXCESSIVE UV OR OPTICAL RADIATION DURING EQUIPMENT
OPERATION. THIS WILL REQUIRE THE INSTALLER TO CONDUCT AN ASSESSMENT OF
IRRADIANCE OR ILLUMINANCE
LEVELS IN THE SURROUNDING OCCUPIED SPACES
PRIOR TO OCCUPANCY.
• Equipment should be mounted in locations and at heights where it will not readily be subjected
to tampering.
• Maintenance and servicing of this UV generating equipment shall be performed by authorized
personnel. Service personnel must wear
appropriate Personal Protective Equipment (PPE) if
the equipment will be in operation during the maintenance or servicing work. Contact
the
equipment manufacturer for PPE recommendations and guidance.
• The use of accessory equipment not recommended by the manufacturer may cause an unsafe
condition.
• Do not use this equipment for other than intended use.
• Beacon is not intended for use with wall switches. Connect to an unswitched circuit
intended for 24/7/365 continuous operation.
• All references to “disinfection� are referring generally to the reduction of pathogenic bioburden
and are not intended to refer to any specific definition of the term as may be used for other
purposes by the U.S. Food and Drug Administration or the U.S. Environmental
Protection
Agency. The disinfection technology as incorporated in Beacon products is not for
use as a medical device or for the disinfection of medical devices.
• It is the obligation of the end-user to consult with appropriately qualified Professional
Engineer(s), a Certified Infection Control professional,
and a Certified Industrial Hygienist, as
applicable, to determine whether this equipment and its installation meets the applicable
requirements for system performance, code compliance, safety, suitability and effectiveness for
use in a particular application design. In no event will Beacon be responsible for any loss
resulting from any use of this equipment in an application design.
• DO NOT INSTALL DAMAGED PRODUCT! This equipment has been properly packed so that
no parts should have been damaged during transit.
Inspect to confirm. Any part damaged or
14

broken during or after installation should be replaced. Contact the manufacturer for
replacement.
• Follow all disposal laws when replacing or disposing. Excimer lamps do not contain hazardous
materials and can be recycled by standard
electronics recyclers.
• Do not install below the minimum height specified in these installation instructions.
• This equipment, including the lamp modules, must be stored in a dust-free environment, and
be handled while wearing clean gloves. Since Far UVC radiation is absorbed by proteins and
other organic compounds, accumulation of dust particles or touching of the optical radiation
surface will negatively impact the output of the UV radiation source and its germicidal power.
• Replacement lamp modules must be purchased through Beacon. Contact Beacon when
module reaches end of
life.
• These instructions do not purport to cover all details or variations in equipment nor to provide
every possible contingency to meet in connection with installation, operation, or maintenance.
Should further information be desired, or should problems arise which are not
covered
sufficiently for the purchaser’s or owner’s purposes, please contact Beacon at
15

SA
16

Additional Disclaimers
Your Beacon was designed and tested for quality assurance and in accordance with our
specifications.
â—� 222-nm wavelength filtered Far-UVC is emitted from this product.
â—� It is a violation of Federal Law to use this product in a manner inconsistent with its
labeling.
â—� Please use Beacon in appropriate temperature and dry settings.
o For best performance use between 60-80 degree F and in dry (non-humid)
settings
o Beacon is intended to operate between 32 degrees Fahrenheit and 95 degrees
Fahrenheit - please do not operate the device if it falls outside of this range.
â—� Beacon strongly recommends using its Smart mode that incorporates ACGIH Threshold
Limit Values for Far-UVC. It is at the discretion of the user to opt not to use the
recommended guidelines.
o For germicidal applications, refer to ANSI/IES RP-44-21 for additional safety
information that should be provided to the user upon request.
â—� In the event the user opts not to utilize Smart mode, any and all risks associated with the
operation of the product, without exception and including risk created for 3rd parties for
people or property, will be assumed by the user.
â—� In the event of product tampering or disassembly of any part of the device, your warranty
will be voided. Beacon is not liable for any issues this may cause.
â—� Beacon uses sensors to prohibit operation within one foot of the device. This sensor,
irrespective of what mode you select, will operate continuously. Please do not use
abrasives or scratch the lens. In the event of a lens blockage, gently wipe the lens with a
dry cloth to remove any debris. Beacon is not responsible for any damage to the lens. If
this occurs, please contact the support team to troubleshoot.
â—� Do NOT touch the bulb directly, or indirectly.
â—� Do NOT use an extension cord.
â—� Beacon must be utilized with a standard 120V outlet and the provided adapter. Using
Beacon with any other power voltage or adapter is done so entirely at the risk to the
customer, and Beacon will not be liable for any damages of any kind.
â—� Please make sure to follow all hazard markings, where they exist. Hazards inherent in
the final product, and warnings against foreseeable misuse and abuse, have been made
known to the ultimate user via:
o Warning labels identified in this manual.
o Attachments to the physical device.
o Written instructions.
â—� In the event of an issue or warranty claim, you must return the Beacon product in its
entirety for review, determination, and if necessary, disposal and/or replacement.
â—� Note: Beacon is not intended to diagnose, treat, or prevent any disease. It is not
intended to entirely limit the risk of any disease, including pathogens like fungi, bacteria,
or virus, but will aid in the reduction therein. Beacon is explicitly not responsible for any
illness or disease of any kind, in any scenario, regardless of circumstance upon usage.
â—� Note: Beacon is not intended to treat, disinfect, or mitigate particulates (VOCs, etc.) and
makes no representations, warranties, or claims otherwise.
17

â—� Note: Beacon is not responsible for any damage to your property, including but not
limited to plants, pets, surfaces, materials, etc.
â—� Storage and disposal
o When your device reaches end of life, please dispose of it in appropriate
electronic recycling receptacles that are available in your area. Please reach out
to [email protected] if you require additional assistance or instructions on
disposal.
T
18
Contact us
We’re here to help.
Visit Beacon at www.beaconlight.co for general information, and email us with specific questions
and feedback at [email protected]
Follow Beacon, join our journey, and stay up to date on the latest happenings on our website,
Instagram, X, TikTok, and LinkedIn.
Beacon Technology Solutions, Inc.
111 North Wabash Ave | Suite 100, #3361 | Chicago, IL | 60602
19
Beacon
2
Mobile
App
Guide
20
Introduction
Overview
Beacon is a continuous Far-UVC 222nm disinfection system that seamlessly adapts to
homes, healthcare facilities, and workplaces.
Its smart mobile app enables real-time monitoring, optimized, energy-efficient
disinfection schedules, and effortless device management–delivering round-the-clock
air and surface protection.
By inactivating up to 99.99% of viruses, bacteria, and mold, Beacon safeguards the
spaces that matter most. Combining patented Far-UVC 222nm technology with intuitive
controls, it provides a powerful, automated layer of protection–designed for maximum
safety, efficiency, and peace of mind.
Key Benefits
â—� Continuous cleaning for always-on disinfection
â—� Inactivates up to 99.99% of viruses, bacteria, and mold
â—� Safe for use in occupied spaces
â—� Seamless integration into existing infrastructure
â—� Chemical-free disinfection
â—� WiFi-connected smart control
â—� Scheduling capabilities
â—� Real-time monitoring
Beacon is compatible and compliant with all relevant regulations including:
â—� FCC Class A/B
â—� Supports ASHRAE 241 compliance
â—� Designed to be compliant with:
â—‹ IES/ANSI RP-27.1-22 (TLV tolerance requirements)
22

â—‹ Standard UL mechanical and electrical requirements
23
App
Requirements
Hardware
Requirements
â—� Beacon Far-UVC 222nm device, mount, and mounting equipment
� Power Outlet – Standard 120V AC outlet to power the device.
� WiFi Network – 2.4 GHz or 5 GHz network.
� Compatible Mobile Device – Smartphone or tablet for app control.
Mobile
Device
Requirements
Android
Device
Specifications
â—� Operating System: Android 13.0 (Oreo) or higher.
â—� Bluetooth: Bluetooth 4.2 or Bluetooth Low Energy Support for initial installation.
â—� Location Services: Required for WiFi network verification and device pairing.
â—� WiFi Access: Necessary for communication with the Beacon device.
â—� Storage Access: For saving photos/app access persistence and configuration
data during setup and monitoring.
iOS
Device
Specifications
â—� Operating System: iOS 16 or higher.
â—� Bluetooth: Bluetooth 4.2 or Bluetooth Low Energy Support for initial installation.
â—� Location Services: Used for initial WiFi verification and Bluetooth pairing.
â—� WiFi Access: Required to communicate with the Beacon device.
â—� Storage Access: For saving images/app access persistence and device settings
within the app.
Network
Requirements
1. WiFi Connection: Stable 2.4 Ghz or 5 Ghz WiFi network recommended for
uninterrupted device operation.
2. Bluetooth Capability: Necessary for initial setup and device control via the mobile
app.
3. Local Network Access: Required for communication between the app and
Beacon device within the same network.
24
Beacon
Hardware
Installation
Refer to the official Beacon Hardware Manual.
Beacon
App
Installation
Download the latest Beacon App
â—�
iOS
: Available on the App Store
â—�
Android
: Available on the Play Store
During setup, the app will request the following permissions to ensure proper
functionality
â—�
Location Services
– Required for WiFi verification.
â—�
Bluetooth Access
– Needed for device connectivity and control.
â—�
Local Network Access
– Allows the app to communicate with connected devices
(e.g. sends wifi credential).
â—�
Storage Access
– Enables saving photos and data related to device
configuration.
Note:
Please grant all permissions to enable full app functionality.
Getting
Started
1. Open the Beacon Application
â—� Ensure your device has a stable internet connection before proceeding.
2. Create an Account
â—�
Register
: If you’re a new user, tap “Sign Up� and enter your information,
including your name and email address.
â—�
Email Verification
: After registration, you’ll receive an email with a
verification code. Enter this code in the app to confirm your account.
3. Complete Onboarding and Device Setup
25
â—�
Connect to WiFi
: Follow the on-screen prompts to connect your Beacon
device to your WiFi network. This may require location services for
accurate verification.
â—�
Create a Room
: Designate a room or specific location for your Beacon
device within the app. This helps organize and manage multiple devices if
needed.
â—�
Connect Device via Bluetooth
: Enable Bluetooth on your mobile device to
detect and pair with the Beacon device. Follow the app’s instructions to
ensure successful pairing.
â—�
WiFi Connectivity/Provisioning
: Once the Beacon is connected via
bluetooth, select or manually enter the SSID/Wifi name and password.
â—� Set Up Disinfection Schedules and Device Modes: Configure the
disinfection schedule to automatically run at preferred times. You can also
choose between different device modes, such as
“Smart�(default)
,
“
Manual
�, and “
Unlimited
� based on the disinfection needs of your space.
4. Finalize Setup
â—� Review all settings, including schedules, modes, and room settings, to
ensure accuracy. Once complete, the app will indicate that your Beacon
device is fully configured and ready to use.
By following these steps, you’ll be ready to control and monitor your Beacon device
through the mobile app, ensuring effective disinfection of your space.
Features
&
Functionalities
Device
Management:
Adding New Devices
1. Scan for Available Devices
1. Initiate a scan within the app to detect nearby Beacon devices.
2. Ensure Bluetooth and location services are enabled on your mobile device
for accurate scanning.
2. Connect to Selected Device
â—� Tap the desired device to connect. The app will prompt you to enter WiFi
credentials to establish a connection, linking the device to your home or
facility network.
26
3. Assign to Specific Location/Room for better device management.
â—� Assign each connected device to a designated room or area within the
app, allowing you to easily monitor and manage multiple devices across
various locations.
4. Operating Mode Selection
â—�
Manual
Mode
: Allows you to start and stop disinfection cycles as needed
by utilizing the power button.
â—�
Unlimited
Mode
: Runs continuous disinfection without interruption, ideal
for areas that require ongoing sanitization. Can be set up or adjusted
based on schedule settings.
â—�
Smart
Mode
: Automatically adjusts disinfection intensity and timing based
on real-time data, optimizing performance based on room occupancy and
usage patterns for maximum efficiency.
Each mode is tailored to provide flexible and effective disinfection solutions for various
environments.
Real-Time
Monitoring
3. Device Status Tracking
� View each device’s status (active, and inactive) from the Beacon details to
confirm operational status.
4. Remote Connection Feature
â—� Check the connection status (enabled and disabled) to confirm that each
device is online and responding to commands.
â—� Power Control: Remotely toggle the device on or off from the app for
complete control over its operation. This feature allows you to enable or
disable devices as needed, without altering the existing schedules.
â—� Manual Override: Use the toggle feature as a manual override to pause or
resume disinfection outside of scheduled cycles, providing flexibility for
unexpected changes in room usage.
5. WiFi Reset / WiFi Re-Provision
8. If you need to change the WiFi network or reset connectivity, use the WiFi
reset feature in the app. This option disconnects the device from the
27
current network, allowing you to reconfigure its WiFi settings without
manually resetting the device. This will prompt you to enter new WiFi
credentials, enabling the device to switch networks quickly. This feature is
particularly useful when moving devices between different locations or
networks.
6. Update Device Details
â—� Beacon Information Update: Access device settings to modify key details,
such as the device name, re-assign room or location, and device modes.
This feature is helpful for keeping device records current, especially when
moving devices to different areas or adjusting operating preferences.
7. Delete Device Record
1. Remove Device Permanently: To delete a device, select “Delete Device� in
the Beacon details. This action will permanently erase all historical data
associated with that device, removing it from your Beacon dashboard.
2. Confirm Deletion: You’ll be prompted to confirm the deletion to prevent
accidental removal. Once confirmed, the device will be fully unlinked and
can be added back later if needed.
Schedule
Management
â—� Create Schedule
� Set up a disinfection schedule tailored to each room’s requirements.
â—� Choose specific days (e.g., Monday-Friday) and specify a start and end
time for each disinfection cycle.
â—� Toggle Schedule On/Off
â—� Enable or disable specific schedules as needed. This can be done from
the “Schedule Page� screen under beacon details.
â—� The toggle allows flexibility, making it easy to pause disinfection when the
room is not in use.
â—� Edit Schedule
� To adjust an existing schedule, select the room and go to the “Schedule�
tab.
â—� Update start and end times, modify the days of the week, or change the
operating mode.
28
â—� Delete Schedule
� If a schedule is no longer needed, select it within the Beacon’s schedule
settings and click trash icon.
â—� Confirm deletion to remove the schedule, freeing up the device for other
configurations or manual control.
Profile
Management
1. View Profile Information
â—� Access your profile by clicking the dropdown menu in the top right corner
and selecting "Profile" in dashboard
â—� View your personal information including name, email, and account details
2. Edit Profile
â—� From the Profile screen, tap the "Edit" button.
â—� Update your personal information including first name, last name, and
email.
â—� Click "Save" to confirm your changes or "Cancel" to discard them.
3. Deactivate Account
â—� In the Profile settings, click the "Deactivate Account" button.
â—� A dropdown will appear, confirming the deactivation by specifying the
deactivate
keyword.
â—�
Note
: This action cannot be undone, and all data will be permanently
removed
Settings
Management
â—� Check for Updates
â—� Access Settings through the dropdown menu in the top right corner
â—� Current version is displayed, and option to check for updates.
â—� Tap "Check for Updates" to see if a new version is available
â—� Change Timezone
â—� Navigate to Settings, Select your preferred time zone from the dropdown
list
29
â—� If there is no Beacon registered in your account, you will need to add a
new one before you can change the timezone as it is dependent on
Beacon device data.
â—� View Beacon Usage
â—� Go to Settings, and view daily average usage, and total average per
Beacon devices. Useful for visibility of device usage and Far-UVC 222nm
usage tracking.
Screens
30

Figure
1
. Login Screen
31
Figure
2.
Pre-Signup Screen
32
Figure
3.
Post-Signup Screen
33

34
Figure
4.
(Onboarding) Welcome Screen
Figure
5.
(Onboarding) Space Selection
35
Figure
6.
(Onboarding) Selected Space - Home
36
Figure
7
. (Onboarding) Add Room Screen
37
Figure
8.
(Onboarding) Device Connection Instruction
38
Figure
9.
(Onboarding) Device Bluetooth Scan
39
Figure
10.
(Onboarding) No Device Found
40
Figure
11.
(Onboarding) Wifi Provisioning Screen
41
Figure
12.
(Onboarding) Schedule Settings
42
Figure
13.
(Onboarding) All Set Screen
43
Figure
14.
Edit Profile Screen
44
Figure
15.
Deactivation flow Screen
45
Figure
16.
Contact Support / FAQs Screen
46
Figure
17.
Device Dashboard Screen
47
Figure
18.
Device Details Screen
48
Figure
19.
Room List Screen
49
Figure
20.
Room Details Screen
50
Figure
21.
Edit Room Screen
51
FAQs
/
Troubleshooting
How
do
I
connect
my
Beacon
to
the
app?
â—� Ensure your Beacon is plugged in and powered on
â—� Open the Beacon app
â—� Tap '+' sign on the device dashboard
â—� Follow the in-app instructions to connect via WiFi
â—� Once connected, your Beacon will appear on your dashboard
How
do
I
control
my
Beacon?
You can control your Beacon device through the app in several ways:
â—� Power On/Off: Use the main power toggle on the device page
â—� Schedule: Set up automatic running times in the Schedule tab
â—� Device Mode: Select Device Mode based on your needs
â—� Manual Mode: Will operate only by utilizing the on/off button
â—� Smart Mode: Operates based on all required regulatory tolerance limits
â—� Unlimited Mode: Unlimited use that won't turn off if people/pets enter the room
How
do
I
set
up
cleaning
schedules?
To set up a cleaning schedule:
â—� Select your Beacon device
â—� Tap '+' to add a new schedule
â—� Set your preferred days and times
â—� Save your schedule
What
if
my
Beacon
won't
connect?
1. Ensure your phone's WiFi is on
2. Check that your Beacon is powered on
3. Verify you're connected to a 2.4GHz network
4. Try moving closer to the device
5. Restart both your phone and Beacon
52
6. Try the Wifi Reset feature in the Beacon device page
If problems persist, contact support at [email protected]
What
if
my
device
already
exists
in
another
account?
â—� The previous owner needs to remove the device from their account first
� Go to their Beacon app → Device Settings → Remove Device
â—� Once removed, you can add the device to your account
â—� If you can't contact the previous owner, please contact support with your device
serial number for assistance.
How
do
I
deactivate
my
account?
� Go to Settings → Profile
â—� Select 'Deactivate Account'
â—� Follow the confirmation steps
Note:
This action cannot be undone and will remove all your devices and data.
I
forgot
my
password,
what
should
I
do?
â—� Tap
'Forgot Password
' on the login screen
â—� Enter your email address
â—� Copy and paste the verification code sent to your email into the input field
If you don't receive the email, check your spam folder or contact support.
What
information
should
I
provide
when
contacting
support?
To help us assist you faster, please provide:
â—� Device serial number
â—� Your phone model and OS version
â—� Detailed description of the issue
â—� Any error messages you're seeing
â—� Recent changes or actions taken
53
Screenshots or videos of the issue are always helpful!
Contact
Support
📧
Email
Support
Our primary support channel is email. Reach out to us at:
When
Contacting
Support
Please include the following information in your email:
â—� Device Serial Number
â—� App Version
â—� Phone Model & OS Version
â—� Brief Description of Issue
â—� Steps to Reproduce (if applicable)
â—� Screenshots (if relevant)
Common
Support
Topics
1. Device Connection Issues
â—� WiFi connectivity problems
â—� Bluetooth pairing issues
â—� Device not appearing in app
â—� Connection timeouts
2. Account Management
â—� Account creation
â—� Password reset
54

â—� Profile updates
â—� Device registration
3. App Functionality
â—� Schedule creation/editing
â—� Device settings
â—� Software updates
4. Hardware Support
â—� Device setup
â—� LED indicators
â—� Power issues
â—� Physical maintenance
55

FCC Caution.
This device complies with part 15 of the FCC Rules. Operation is subject to the following two
conditions:
(1) This device may not cause harmful interference, and
(2) this device must accept any interference received, including interference that may cause
undesired operation.
Any Changes or modifications not expressly approved by the party responsible for compliance
could void the user's authority to operate the equipment.
Note: This equipment has been tested and found to comply with the limits for a Class B digital
device, pursuant to part 15 of the FCC Rules. These limits are designed to provide reasonable
protection against harmful interference in a residential installation. This equipment generates
uses and can radiate radio frequency energy and, if not installed and used in accordance with the
instructions, may cause harmful interference to radio communications. However, there is no
guarantee that interference will not occur in a particular installation. If this equipment does
cause harmful interference to radio or television reception, which can be determined by turning
the equipment off and on, the user is encouraged to try to correct the interference by one or
more of the following measures:
-Reorient or relocate the receiving antenna.
-Increase the separation between the equipment and receiver.
-Connect the equipment into an outlet on a circuit different from that to which the receiver is
connected.
-Consult the dealer or an experienced radio/TV technician for help.
This equipment complies with FCC radiation exposure limits set forth for an uncontrolled
environment. This equipment should be installed and operated with minimum distance 20cm
between the radiator & your body.