
2

3
CONTENTS
SAFETY INSTRUCTIONS
4
FEATURES
6
PARTS
7
INSTALLATION
8
OPERATION
10
REMOTE CONTROL
13
WI-FI SMART CONTROL
14
CLEANING AND MAINTENANCE
22
EMPTYING THE INTERNAL WATER TANK
23
TROUBLESHOOTING
24
ERROR CODES
25
TECHNICAL SPECIFICATION
25
SUPPORT
27
4
SAFETY INSTRUCTIONS
Important!
• Carefully read the instrucons before operang the unit.
• This appliance is for indoor use only.
• Rang: This unit must only be connected to a 220-240 V / 50 Hz
earthed outlet. The fuse rang can be found on the plug itself.
• Installaon must be in accordance with the applicable regulaons of the country where the
unit is used.
• If you have any doubt about the suitability of your electrical supply, have it checked and, if
necessary, modied by a qualied electrician.
• This appliance is not intended for use by persons (including children) with reduced physical,
sensory or mental capabilies. It is also not intended for use by those with a lack of
experience and knowledge unless they have been given supervision or instrucon concerning
the use of the appliance by a person responsible for their safety.
• Do not leave children unsupervised with this appliance.
• You must follow the venng and set-up instrucons; Incorrect operaon can result in damage
to the unit, which is not covered under your warranty.
• This air condioner has been tested and is safe to use. However, as with any electrical
appliance, use it with care.
• Do not obstruct any of the venlaon openings.
• The airow should never be restricted, for example, by venng the unit into a condenser box
or reducing the hose diameter, as this can damage the unit.
• Disconnect the power from the appliance before dismantling, assembling or cleaning.
• An authorised service representave should perform any service other than regular cleaning
or lter replacement. Failure to comply could result in a voided warranty.
• Avoid touching any moving parts of the appliance.
• Never insert ngers, pencils or any other objects through the guard.
• WARNING: Do not pierce or burn any part of the unit.
• Do not clean the unit by spraying it or immersing it in water.
• Never connect the unit to an electrical outlet using an extension cord. If an outlet is not
available, one should be installed by a qualied electrician.
• Never operate this appliance if the cord or plug is damaged. Ensure the power cord is not
stretched or exposed to sharp objects/edges.
• A damaged supply cord should be replaced by the manufacturer or a qualied electrician to
avoid a hazard.
• Do not use the appliance for any purpose other than its intended use.
• The air condioner unit must always be stored and transported upright; otherwise,
irreparable damage may be caused to the compressor. If there is doubt, we suggest waing
at least 24 hours before starng the unit.
• Avoid restarng the air condioning unit unless 3 minutes have passed since being turned o.
This prevents damage to the compressor.
5
• Never use the mains plug as a switch to start and turn o the air condioning unit. Use the
provided POWER buon located on the control panel.
• Always place the unit on a dry, stable, at surface.
• The appliance should not be installed in the laundry or wet rooms.
• The appliance must be placed in a room without sources of ignion (for example, open
ames, an operang gas appliance or an operang electric heater).
• R290 refrigerant gas complies with European environmental direcves.
• R290 has a low GWP (Global Warming Potenal) of 3.
• The air condioners contain the following quanty of refrigerant gas:
P18CW
300g
• Do not install or store in an unvenlated space with an area smaller than shown in the table
below per system. Smaller room sizes may be suitable if other safety measures are implemented
and a risk assessment is conducted
P18CW
14.40 m
2
• The room must be designed to prevent the stagnaon of possible refrigerant leaks, as there
could be a re or explosion hazard if the refrigerant comes into contact with electric heaters,
stoves, or other sources of ignion.
• WARNING: The appliance must be stored in a room without connuously operang ignion
sources, for example, open ames, an operang gas appliance or electric heaters.
• Only store and use the unit whilst upright; do not lay it down or p it.
• Do not place the unit near any ovens or other heat sources. This may be dangerous, but it will
lead to the unit working harder and using more energy.
• Do not place the unit in direct sunlight; this can aect its appearance and cause it to work
harder and be less energy ecient.
• Refrigerant gas may be odourless.
• Do not use the product and contact the retailer for advice if damage has occurred to the unit,
which may have compromised the refrigerant system.
• Any repairs or maintenance must only be conducted by a suitably qualied engineer. Before
opening and servicing the unit, the authorised engineer must possess a copy of the
manufacturer’s service manual and follow the safety informaon it contains to minimise all
hazards.
• The refrigerant system should not be perforated or punctured.
• At the end of the unit’s lifeme, always dispose in line with local regulaons.
• Ensure all storage condions in the manual are followed.
• WARNING: Do not use means to accelerate the defrosng process or to clean the unit.
6
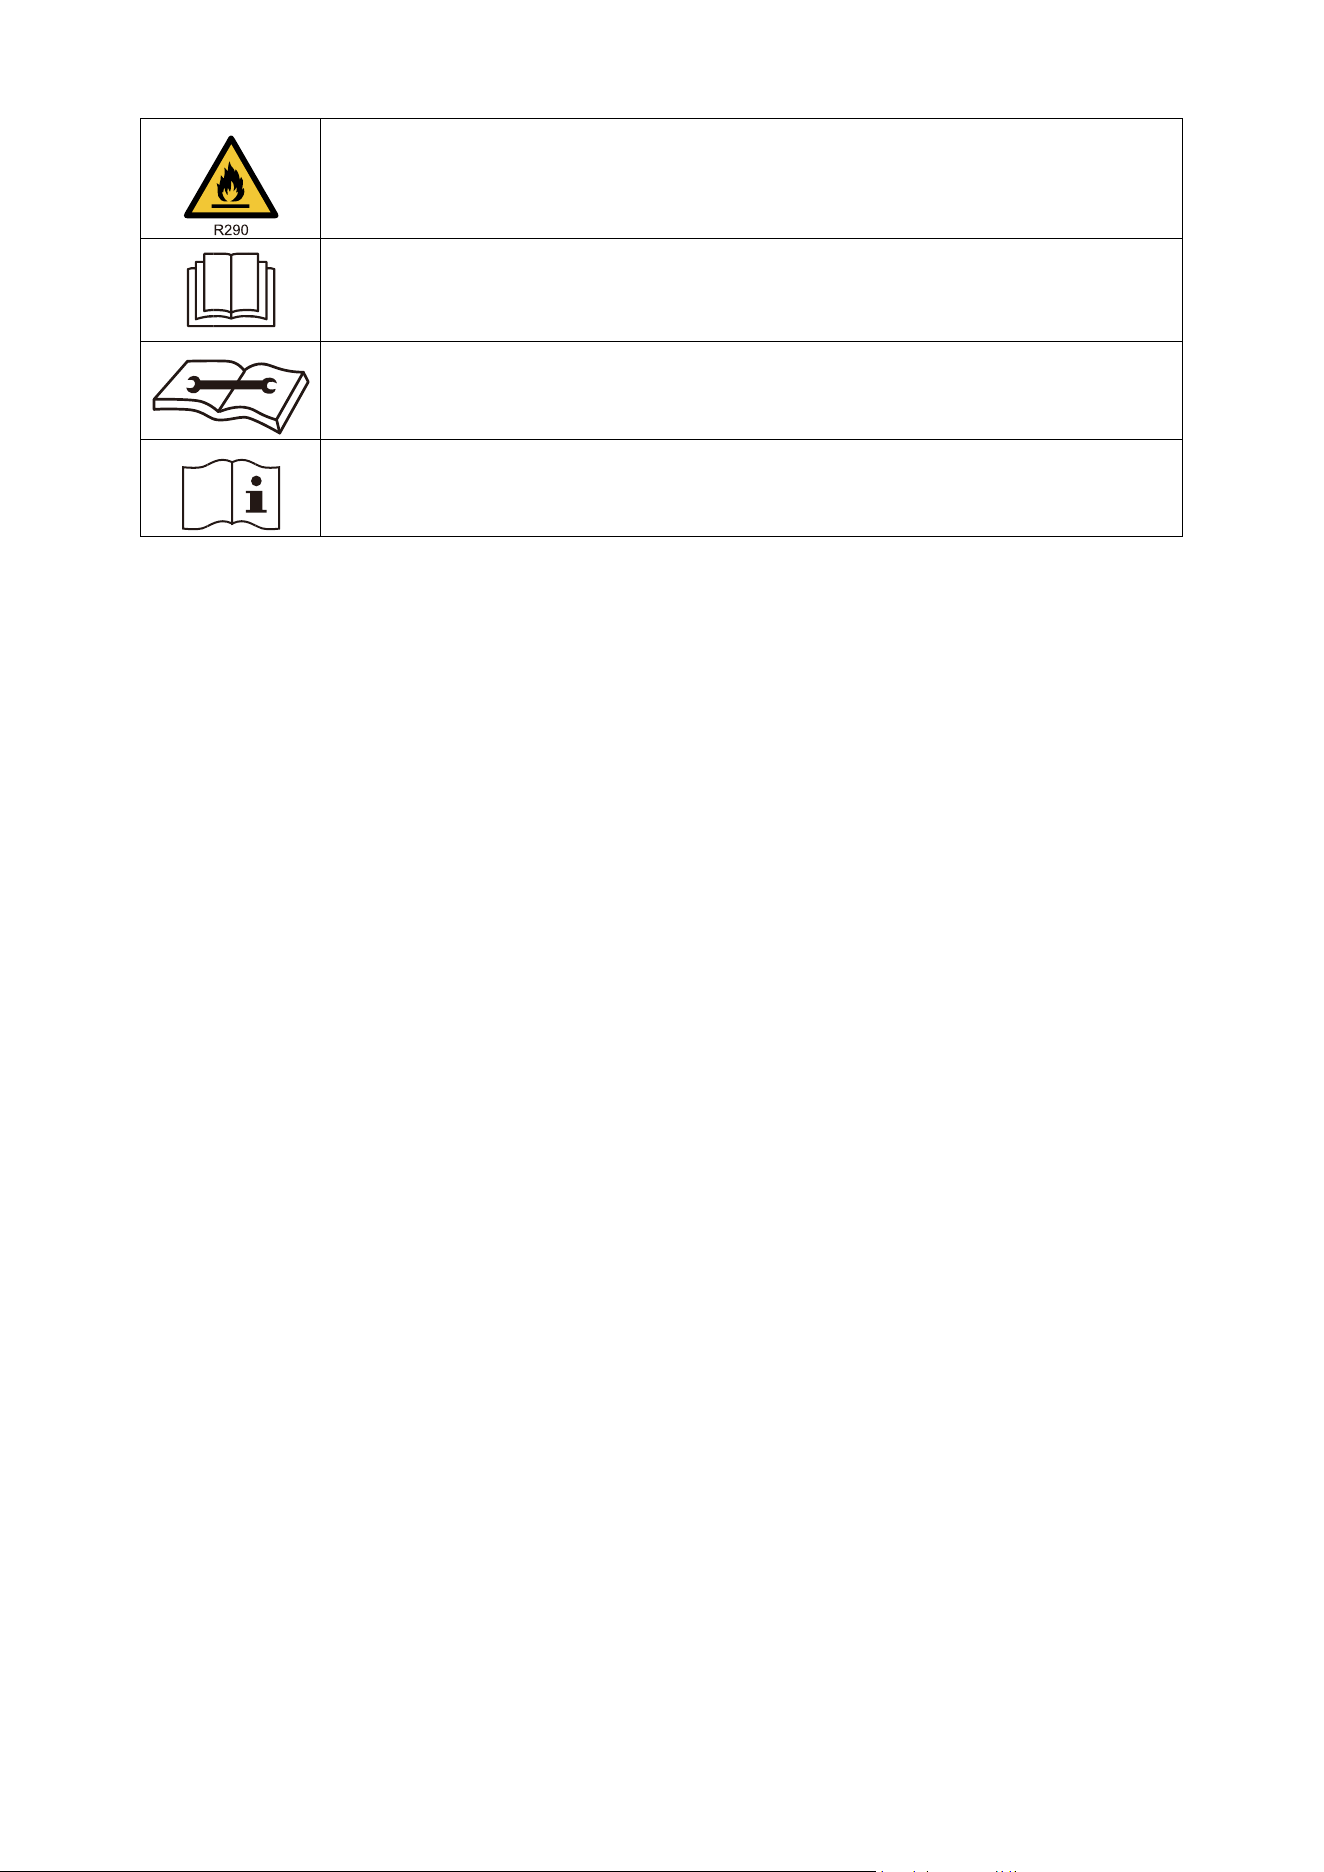
WARNING: This appliance contains ammable refrigerant. If this leaks
and comes into contact with an external ignion source, there is a re
risk.
CAUTION: The operaon manual should be read thoroughly.
CAUTION: Any service personnel working on the unit should read the
service manual prior.
CAUTION: Informaon on operaon and servicing is in the manual.
ENERGY SAVING AND UNIT SAFETY PROTECTION TIPS
• Do not cover or restrict the airow from the outlet or inlet grilles.
• For maximum performance, the minimum distance from a wall or object should be 50cm.
• Keep the lters clean. Under normal condions, lters should only need cleaning once every
three weeks (approximately). Since the lters remove airborne parcles, more frequent
cleaning may be necessary, depending on the air quality.
• For the inial start-up, set the fan speed to maximum and the thermostat to 5 degrees lower
than the current temperature. Aerwards, set the fan switch to low and set the thermostat to
your desired seng.
• To protect the unit, we recommend not using the cooling funcon when the ambient
temperature exceeds 35 °C. The unit's performance may be aected at lower temperatures
than this. If a scorching day is predicted, running the unit overnight in the desired room is
recommended.
FEATURES
•
3 in 1 cooling, fan, and dehumidier.
•
3-speed fan: Balancing quiet operaon with performance.
•
Smart logic for improved energy efficiency.
•
Washable Dust Filter
•
24 Hours Start/Stop Timer
•
Digital Thermostat: Set the temperature between 16°C and 31°C.
•
Wi-Fi app control.
•
Remote Control.
•
Castors and Handle for Enhanced Portability.
7
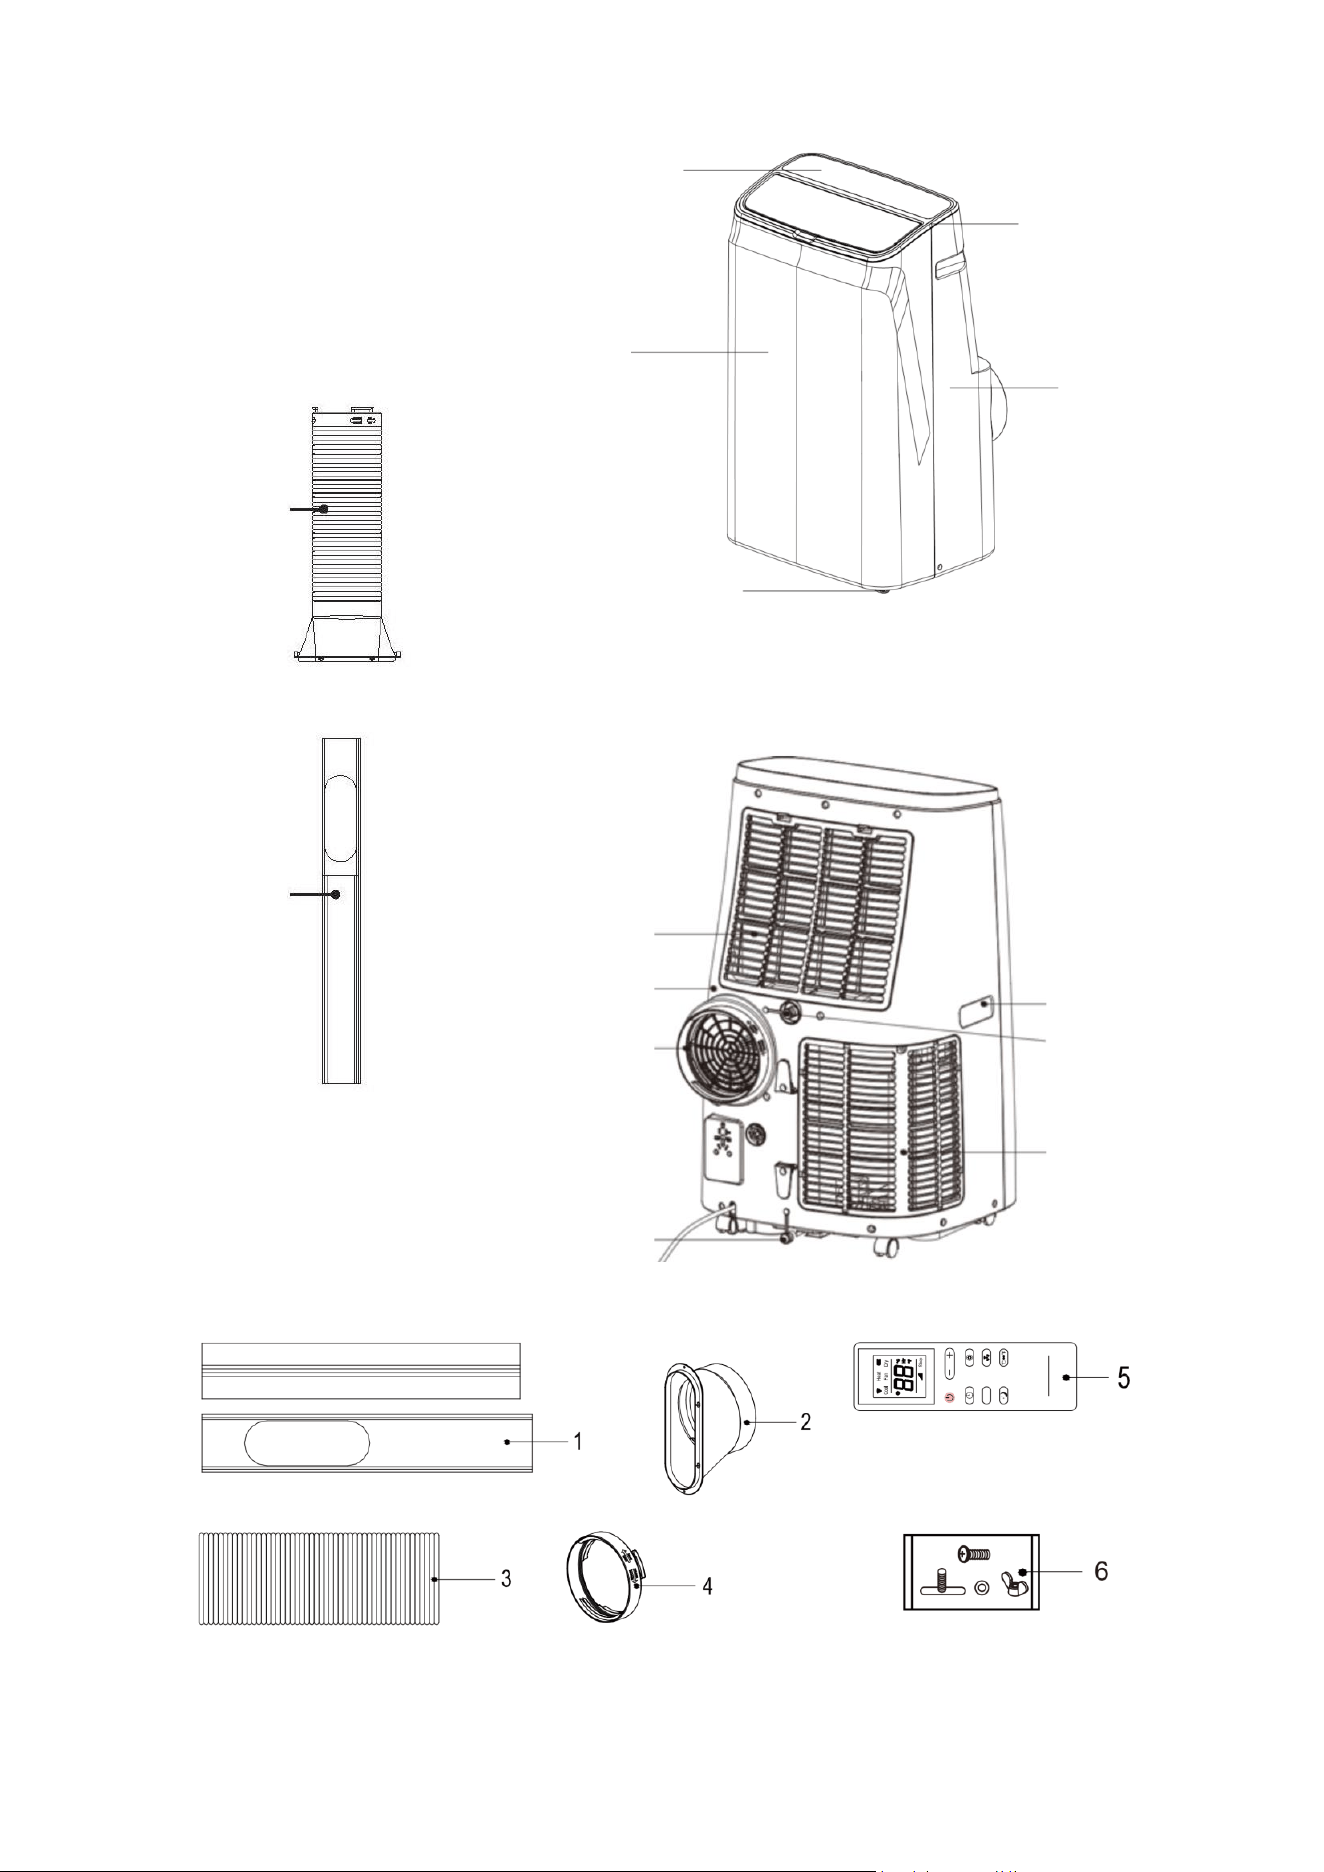
PART LIST
ACCESSORIES
1. Window Slide Bar (Oponal) 2. Fishtail- hose ending 3. Hot Air Exhaust Hose
4. Ducng Adapter 5. Remote Control 6. Slide bar screw set (Oponal)
S
Front Housing
Rear Housing
Exhaust Hose
Window Slide Bar
(Oponal)
Castors
Control Panel
Louvre (Air Outlet)
Power cord & Plug
Lower Air Inlet&
Washable Mesh
Handle
Top Drainage Port
Boom Drainage Port
Exhaust Outlet
Upper Air Inlet&
Washable Mesh
Rear Housing
8
INSTALLATION
WARNING: Before using this unit, please keep it upright for at least 3-4 hours.
This unit can easily be moved from one room to another.
While moving the unit, please keep it upright and place it on an even surface.
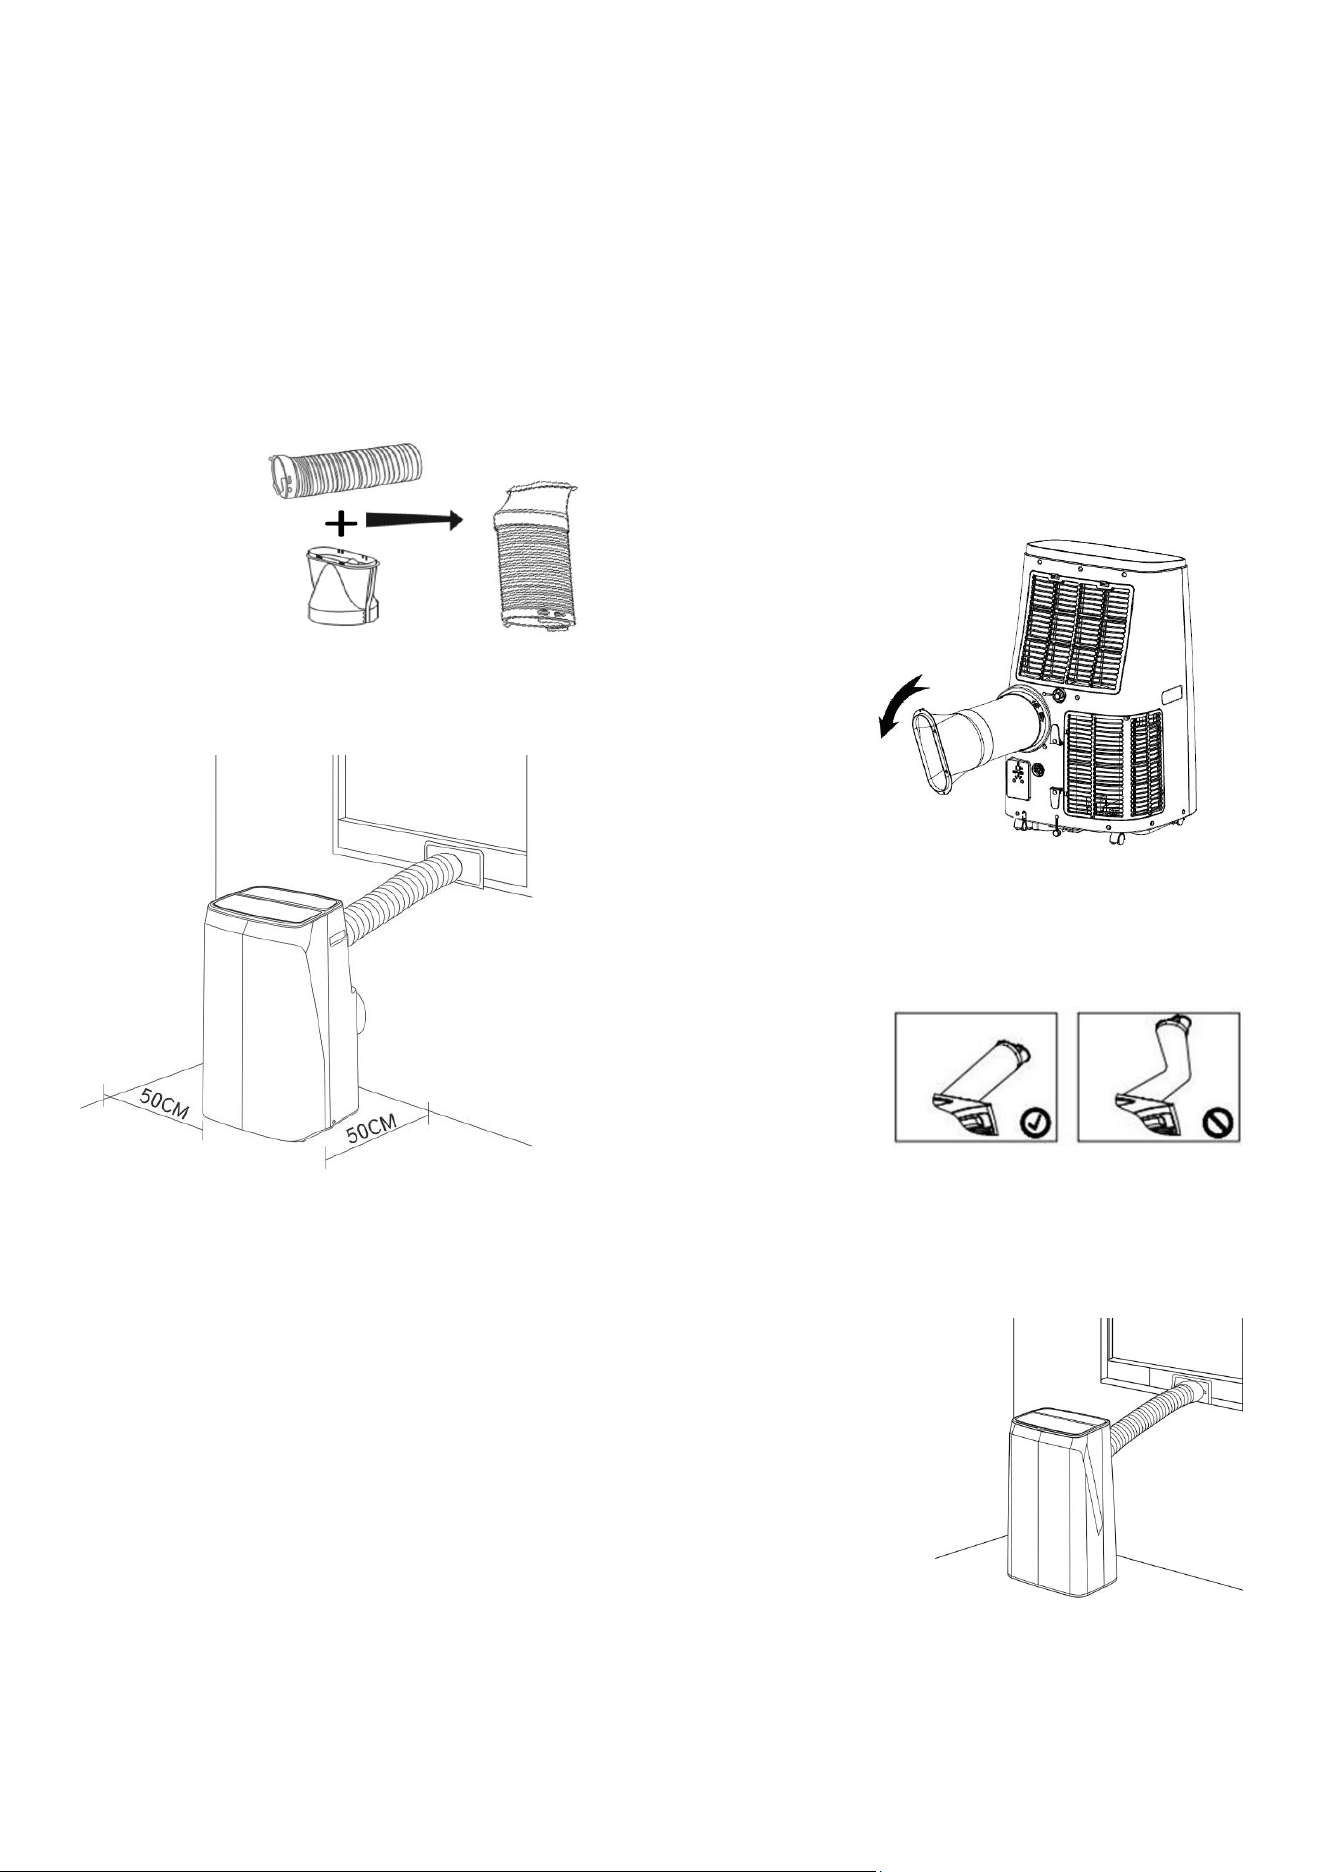
IMPORTANT: The exhaust hose only needs to be fitted in cooling mode.
1. Extend the end of the hose, twist the fishtail
connector firmly into place.
2. Attach the Hose to the Exhaust adaptor in the same way by
extending the end of the hose and twisting until firmly in place
3. Make sure the unit is upright, and there are no
obstructions to the air inlets and outlet grilles, with at least
50cm of space to the sides and rear of the unit.
IMPORTANT SAFEGUARDS
The length of the soft hose extends from approximately 35 cm to 200
cm. If the hose is extended above this length, the unit may malfunction,
which can invalidate the warranty. The outlet vent must be well-
ventilated and unobstructed, or the unit will overheat. Keep the hose as
straight and short as possible and avoid bending the air hose by more
than 30 degrees to maintain the unit's performance. Excessive bends in
the hose may prevent the unit from expelling hot air, leading to internal
damage and invalidating the warranty.
9
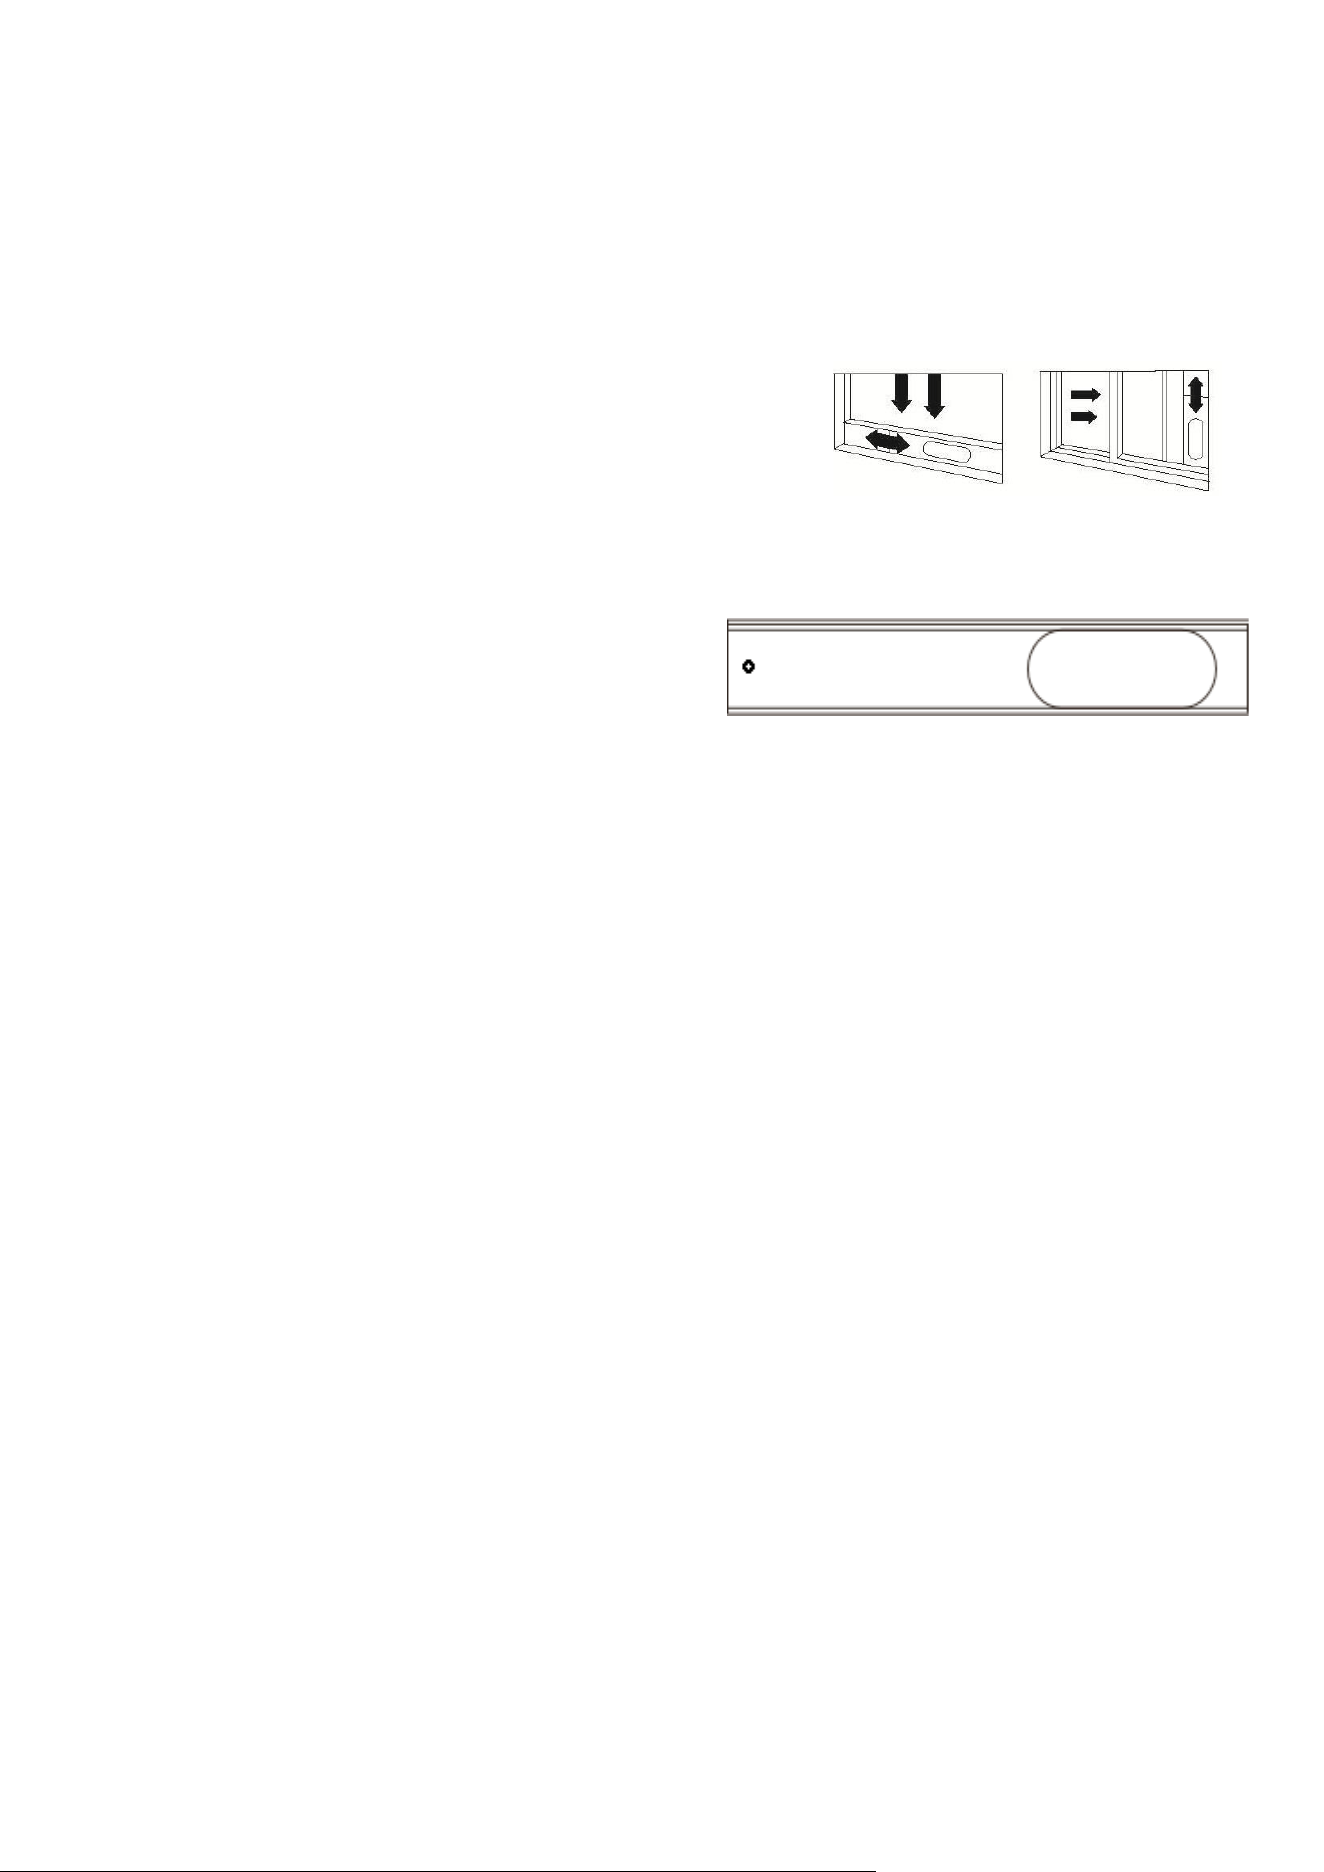
INSTALLATION OF WINDOW KIT (OPTIONAL)
The window kit (slide bar and shtail adaptor) is suitable for use with sliding windows and doors. For other
window types, use the shtail adaptor alone and reduce cooling loss by closing curtains or using a window
seal or blockers such as AC‑AIRLOCK.
1. Slide the rear section of the slide bar onto the front
section, lining up the plate so it runs within the groove.
Extend the bar to the required length and use the
supplied wing nut to secure it.
2. Push the screw thread of the plate through the
hole in the rear of the front slide bar section.
3. Parally open the window and place the extended slide bar in posion before closing the
window onto it.
4. Fix the shtail adaptor into the opening on the slide bar.
NOTES:
•
The window kit is only designed to be installed with sliding or sash windows or
doors. The window kit is not designed to be used with any other style of windows.
•
The shtail adaptor can be used without the slide bar with most windows/doors.
•
When using the air condioner, ensure that the opening around the shtail adaptor
is as small as possible to ensure the unit's eciency is not reduced.
•
The best form of installaon is through a wall duct. By adequately venng, you expel
hot air from your room while eciently cooling it.
•
Your air condioner should be used without the vent hose in dry mode. When
using dry mode, ensure an external water tank is used, monitored, and regularly
emptied to prevent overflow.
10
OPERATION
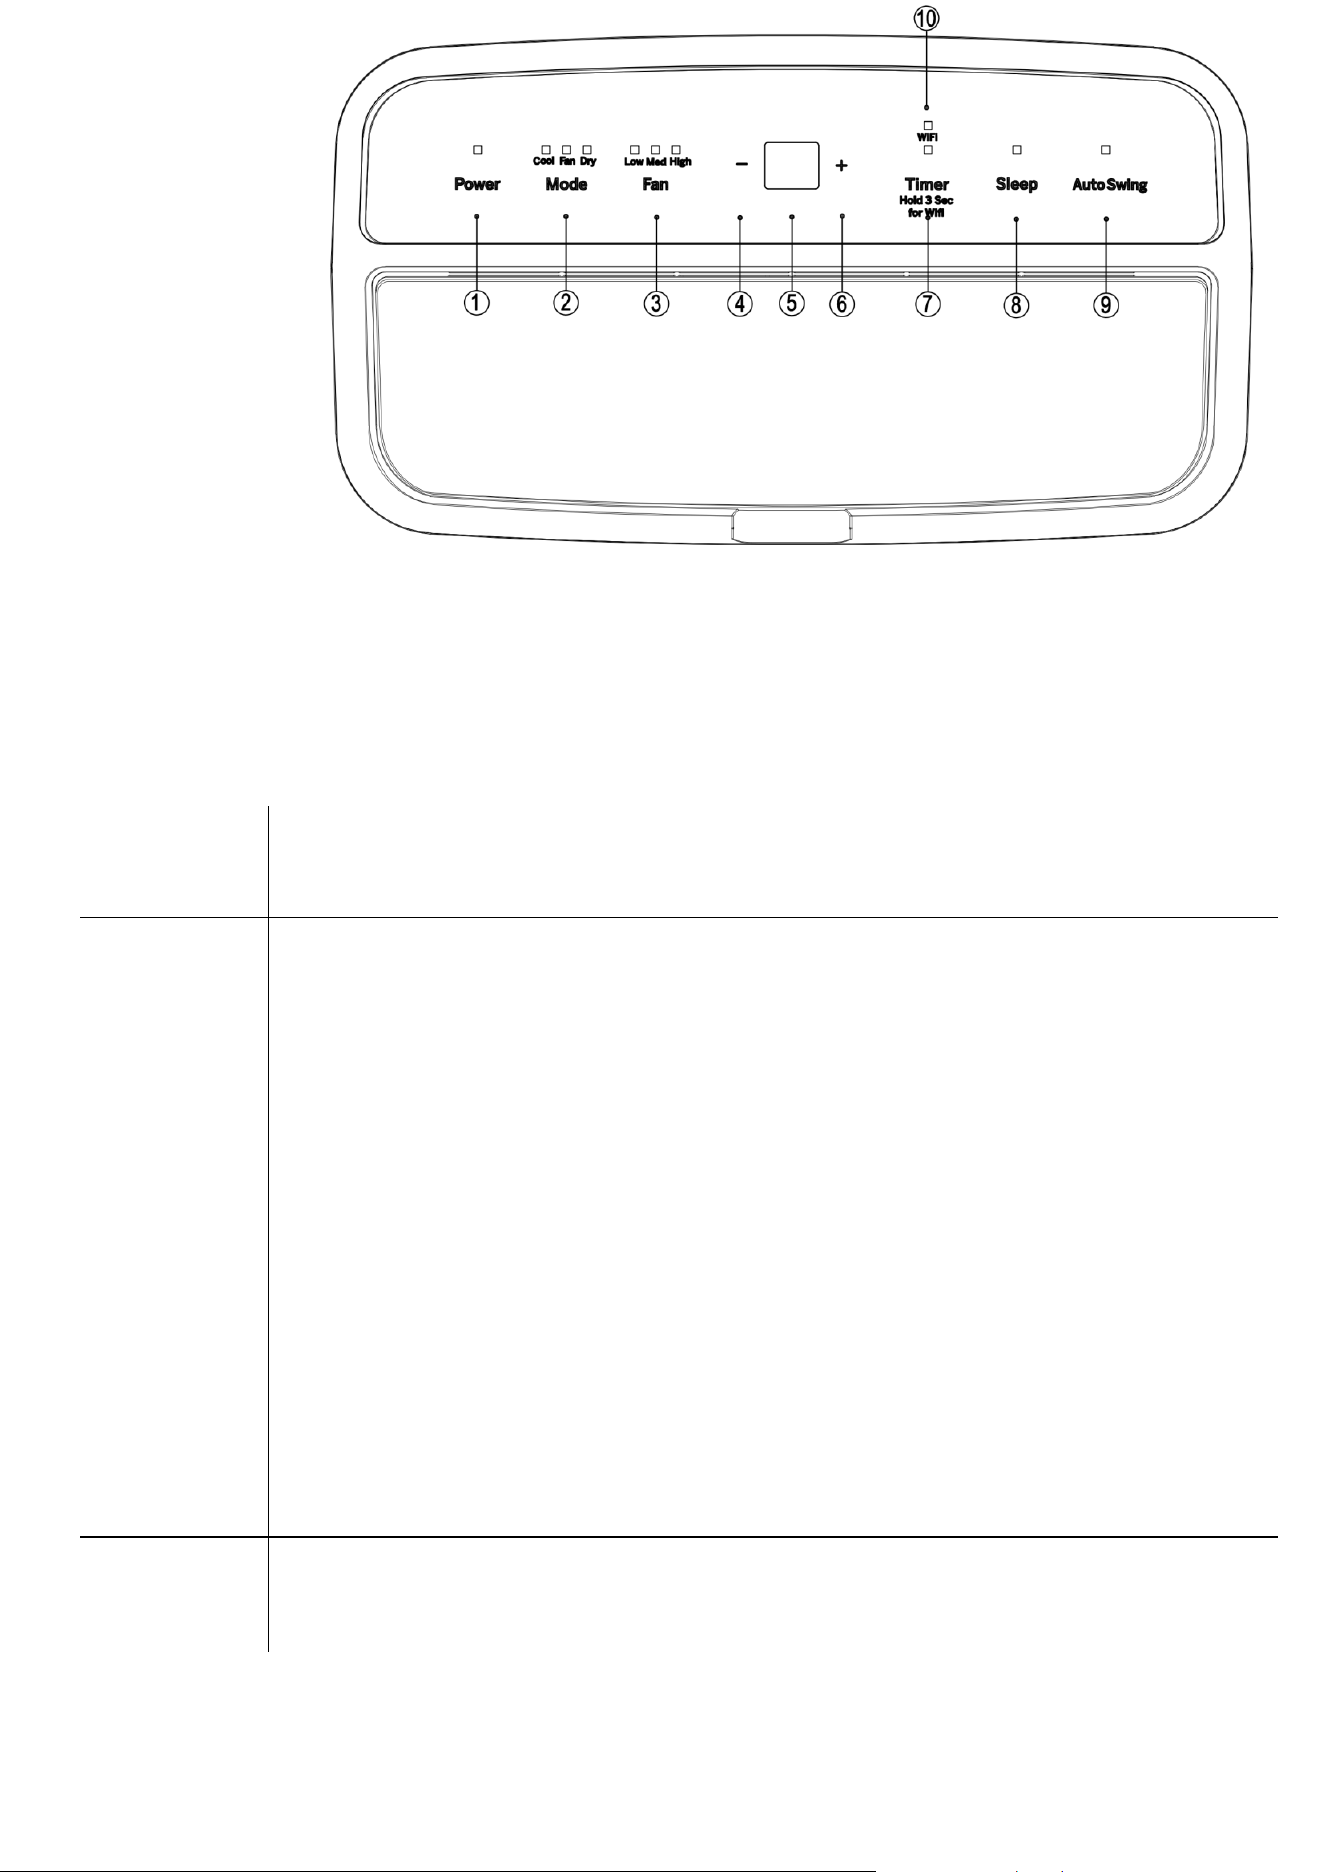
POWER
Press the POWER button to turn the unit ON or OFF.
MODE
Press the MODE button to cycle through the 3 modes; the indicator for the selected mode
will illuminate.
COOL: The room is cooled by cold air expelled through the front air outlet, while hot air is
expelled through the vent hose. The desired room temperature can be set between 16 and
31 degrees using the + and – buttons, and the fan speed can be changed using the FAN
button. The unit will reach 1 degree over the target temperature. The compressor will turn
off when the unit detects that it is 1 degree out of the target temperature. The unit will
restart the compressor.
FAN: Fan speed can be adjusted by pressing the FAN button. Low, Medium, High. Fan
speed adjustment is not available in DRY and SLEEP mode
DRY (DEHUMIDIFY): Should be operated without the vent hose, but with continuous
drainage to remove moisture from the air. The display will show dH while in dry mode. The
fan speed is set to low and is not adjustable. We advise continuous drainage to be set up in
DRY mode.
+
-
Used to adjust the temperature in COOL mode and to set the duration of the TIMER. The
buttons are not used in FAN or DRY modes.
1) Power Button 2) Mode Button 3) Fan Button
4) - Button 5) LED Display 6) + Button
7) Timer Button 8) Sleep Button 9) Swing Button 10) Wi-Fi LED
11
Memory Function: The appliance automatically retains its previous settings in the event of a power
interruption.
FAN
Press the SPEED button to change between the fan speeds. The display and LEDs will
indicate the currently selected fan speed. The fan speed cannot be altered in SMART
COOL and DRY modes.
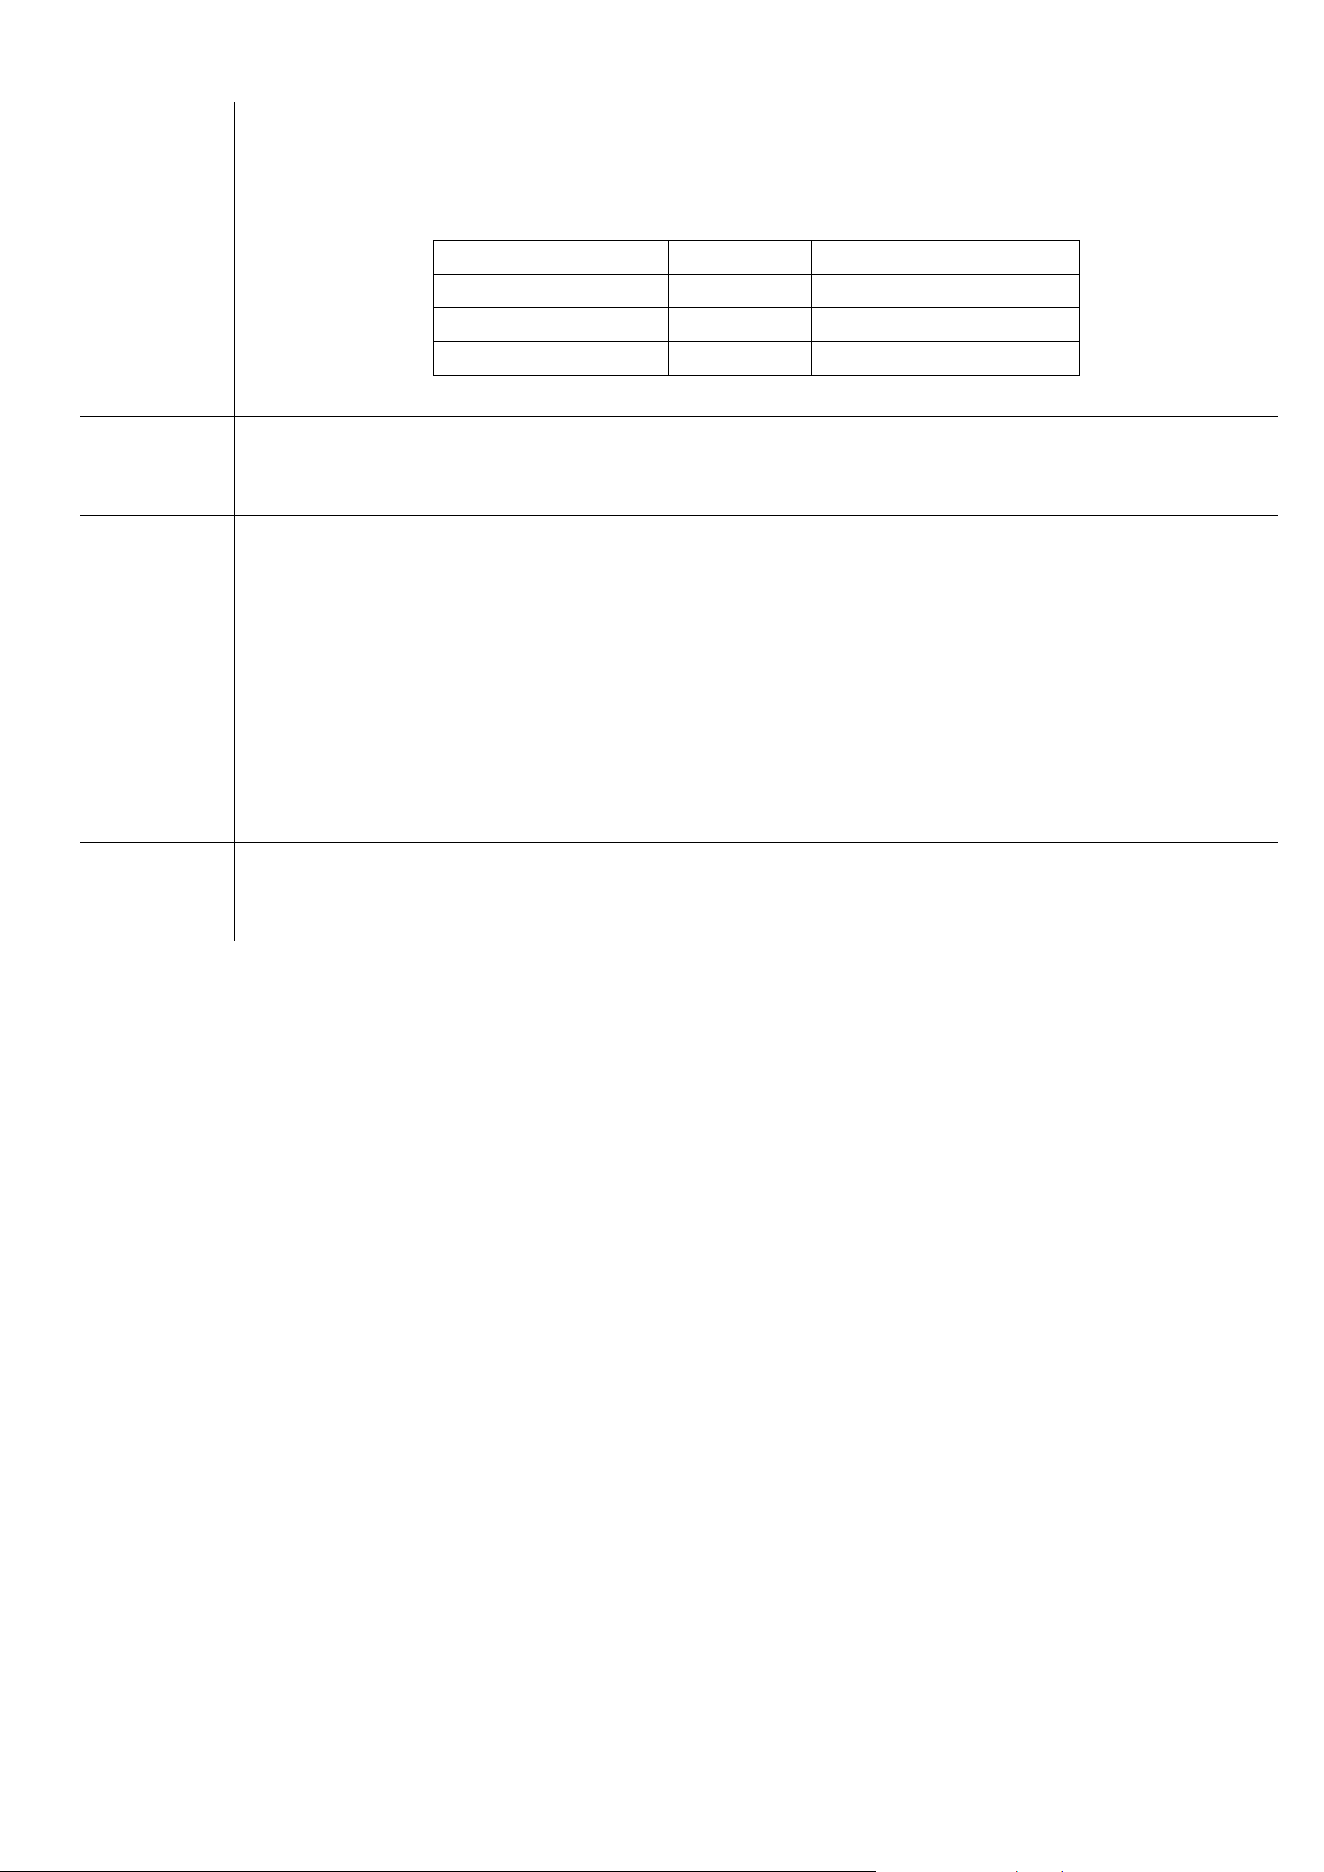
Fan Speed
Display
LEDs Illuminated
Low
F1
Low
Medium
F2
Medium
High
F3
High
SLEEP
Press to enter sleep mode. The sleep indicator will be illuminated, and all other indicators will
be turned off. In sleep mode, the appliance works at low fan speed. Press SLEEP again to exit
sleep mode.
TIMER
The timer functions cannot be combined or repeated.
POWER ON TIMER
With the appliance in standby, press the TIMER button to set the power-on timer. Use the +
and - buttons to adjust the timer's duration (1 to 24 hours). The Timer indicator will turn on,
and the unit will start after the selected number of hours.
POWER OFF TIMER
With the appliance running and set to the desired settings, press the TIMER button to set the
power-off timer. Use the + and - buttons to adjust the timer's duration (1 to 24 hours). The
timer indicator will illuminate, and the unit will stop after a selected number of hours.
Keep TIMER button pressed for 3 seconds to activate Wi-Fi pairing function.
SWING
Press this button to enable the swing function. The louvres will slowly move back and forth.
If the swing is pressed again, the louvres will stop in their current position.
12
REMOTE CONTROL
REPLACING THE BATTERIES
Remove the baery cover, insert two AAA baeries following the correct
polarity, then reaach the baery cover securely. Do not use the remote if the
baery cover does not securely aach.
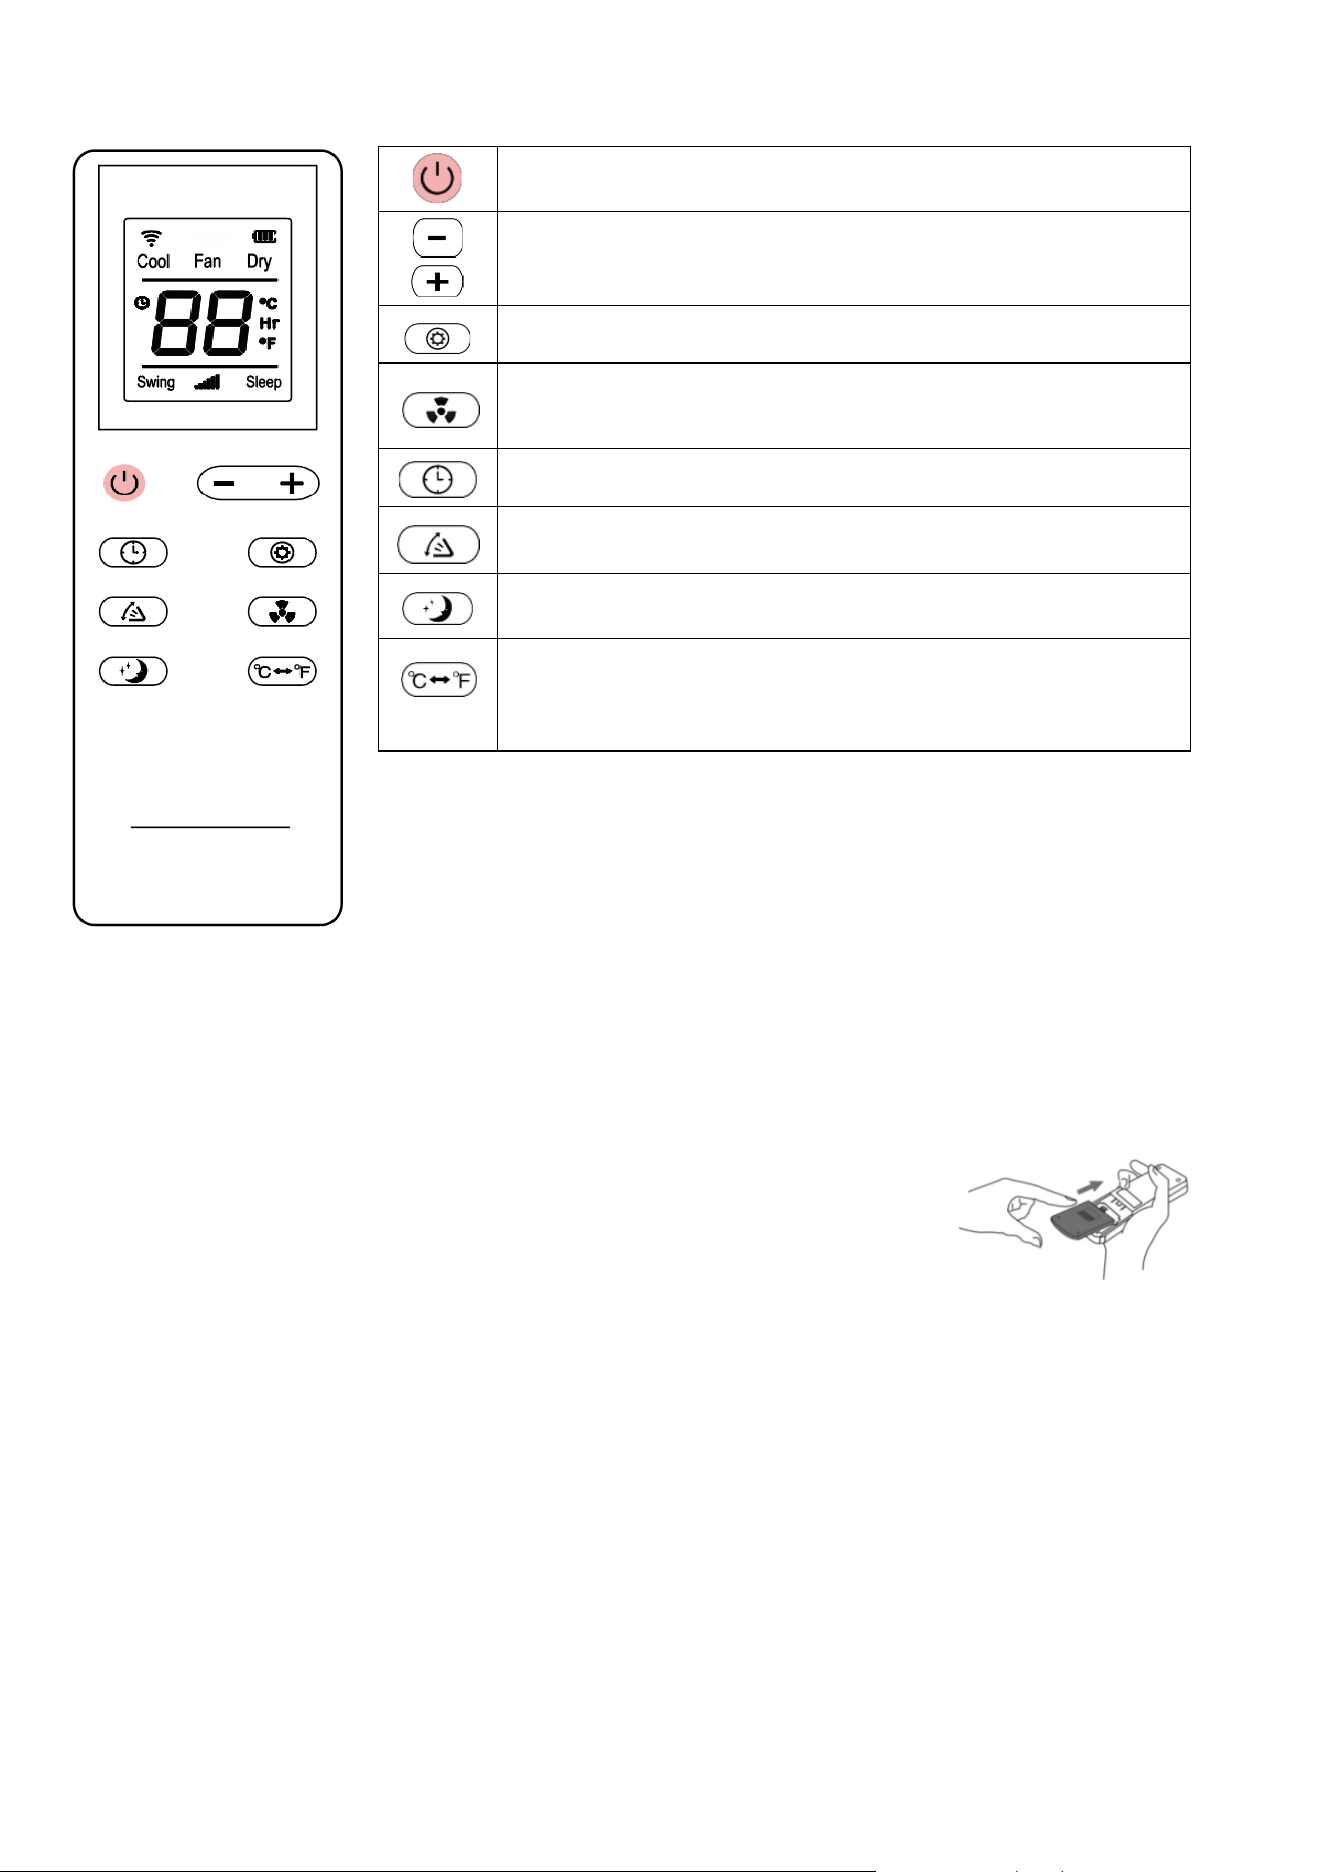
POWER: Press to turn the unit on or o.
Press to increase or decrease the desired temperature or set
the mer duraon.
MODE: Repeatedly press to select your desired mode.
FAN SPEED: Repeatedly press to select your desired fan
speed: Low, Medium, High.
TIMER: Press to set the mer.
SWING: Press to acvate swing mode. Press again, and it will
stop in posion.
SLEEP: Press to enter sleep, press again to exit sleep. Unit will
work in power saving mode on lower fan speed.
Switches the temperature display between Celsius and
Fahrenheit.
13
MULTI PROTECTIVE FUNCTIONS
FROST PROTECTION
In COOL or DRY modes, if the exhaust temperature is too low, the machine will automatically stop until
the temperature rises.
OVERFLOW PROTECTION
When the water in the internal water tank exceeds the warning level, the machine will stop operating and
sound an alarm with the LCD showing "FL". To resume operation, empty the internal water tank. After
emptying the water, the machine will automatically return to its original state.
AUTO-DEFROST
The machine has an automatic defrosting function. If the internal coils' temperature drops too low during
operation, the unit will enter auto defrost.
AUTOMATIC THERMAL PROTECTION
To protect the machine's service life, it features automatic thermal protection. If the temperature within
the unit is outside of the specified range, the compressor and the lower motor will stop operation. After
the machine's temperature returns to normal, the appliance will automatically resume regular operation.
COMPRESSOR PROTECTION
There is a 3-minute delay in starting the protection function to prevent damage to the compressor.
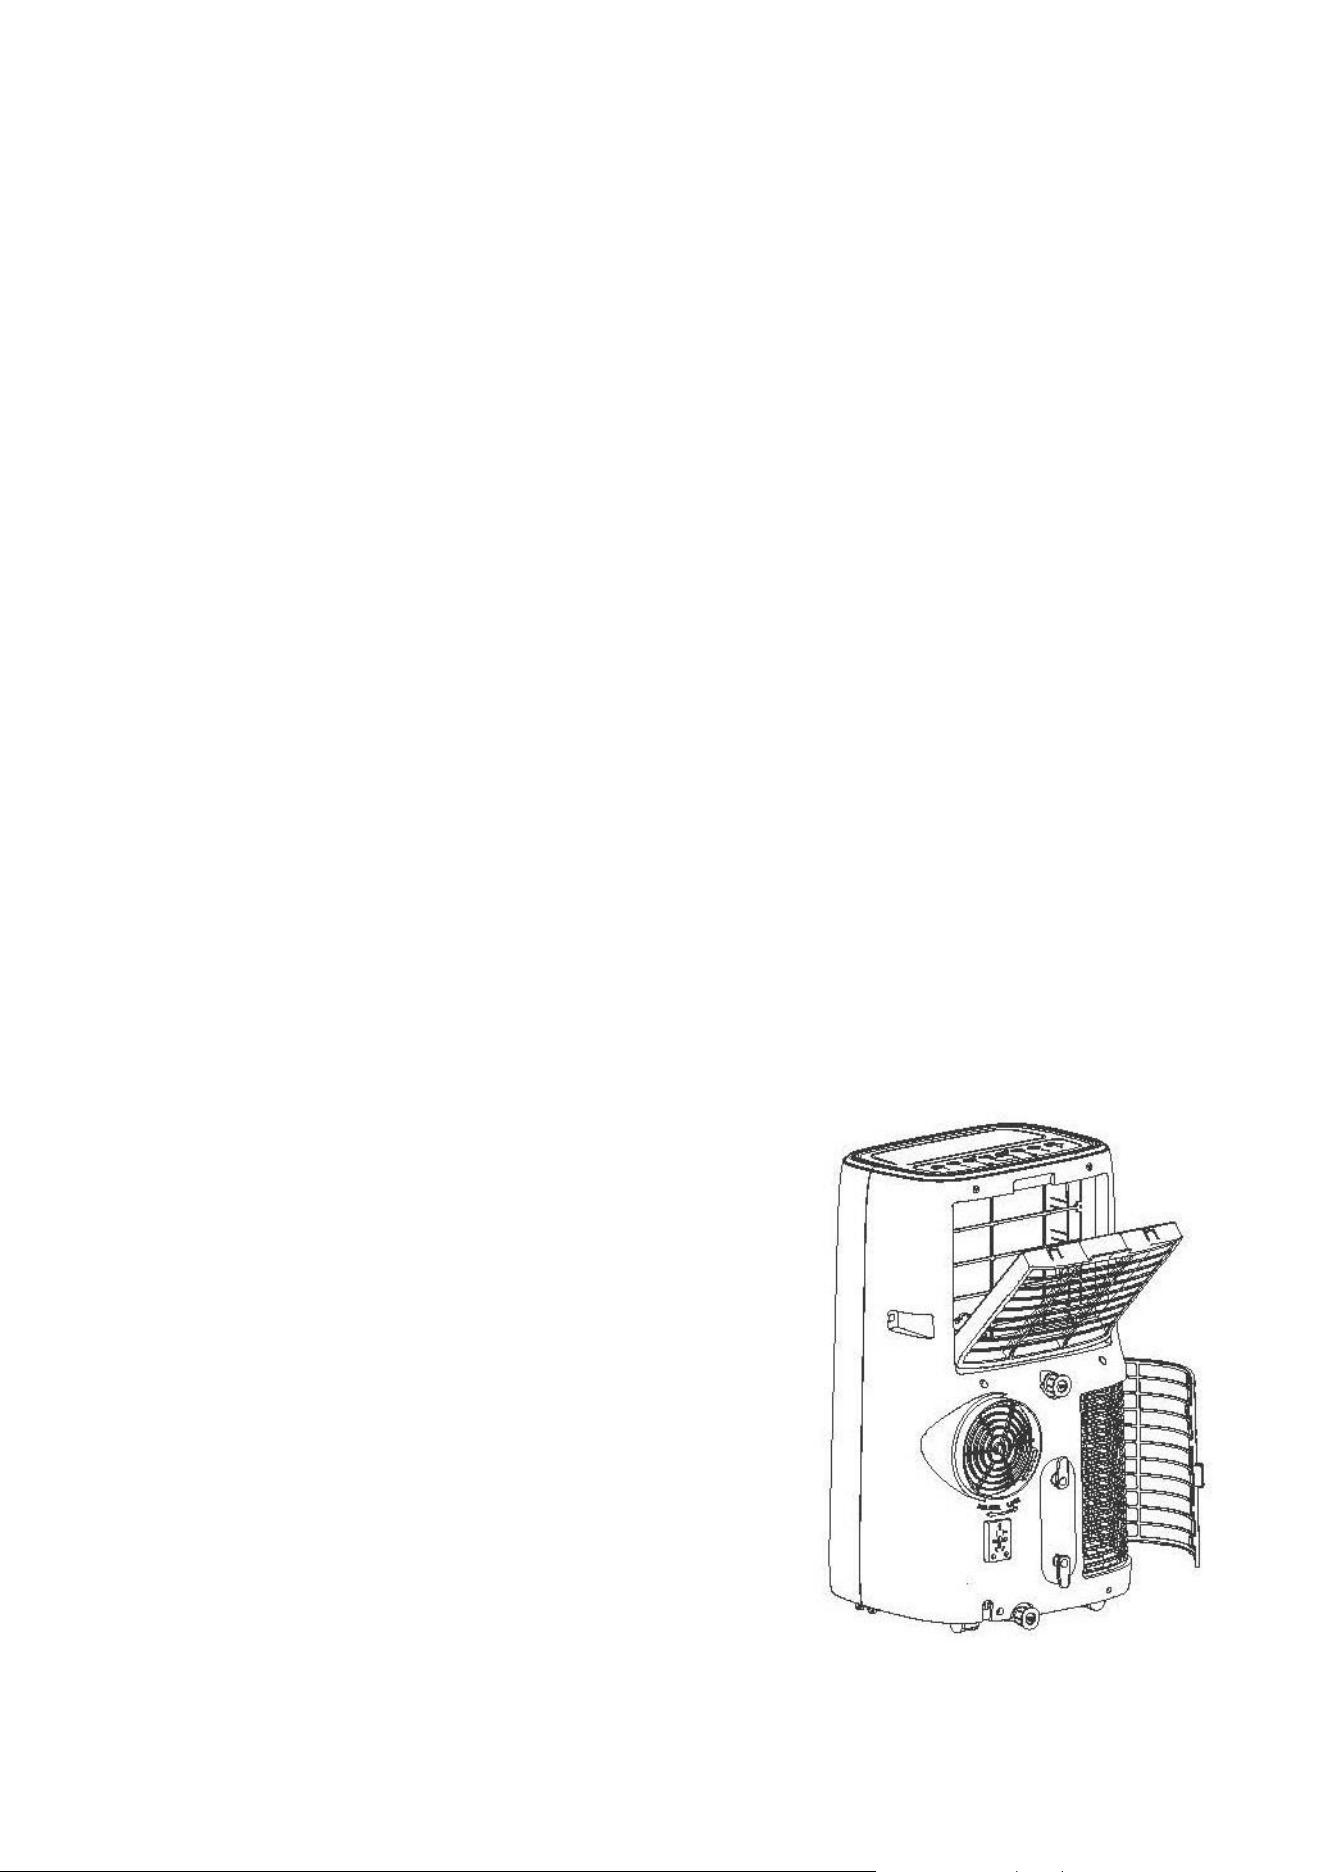
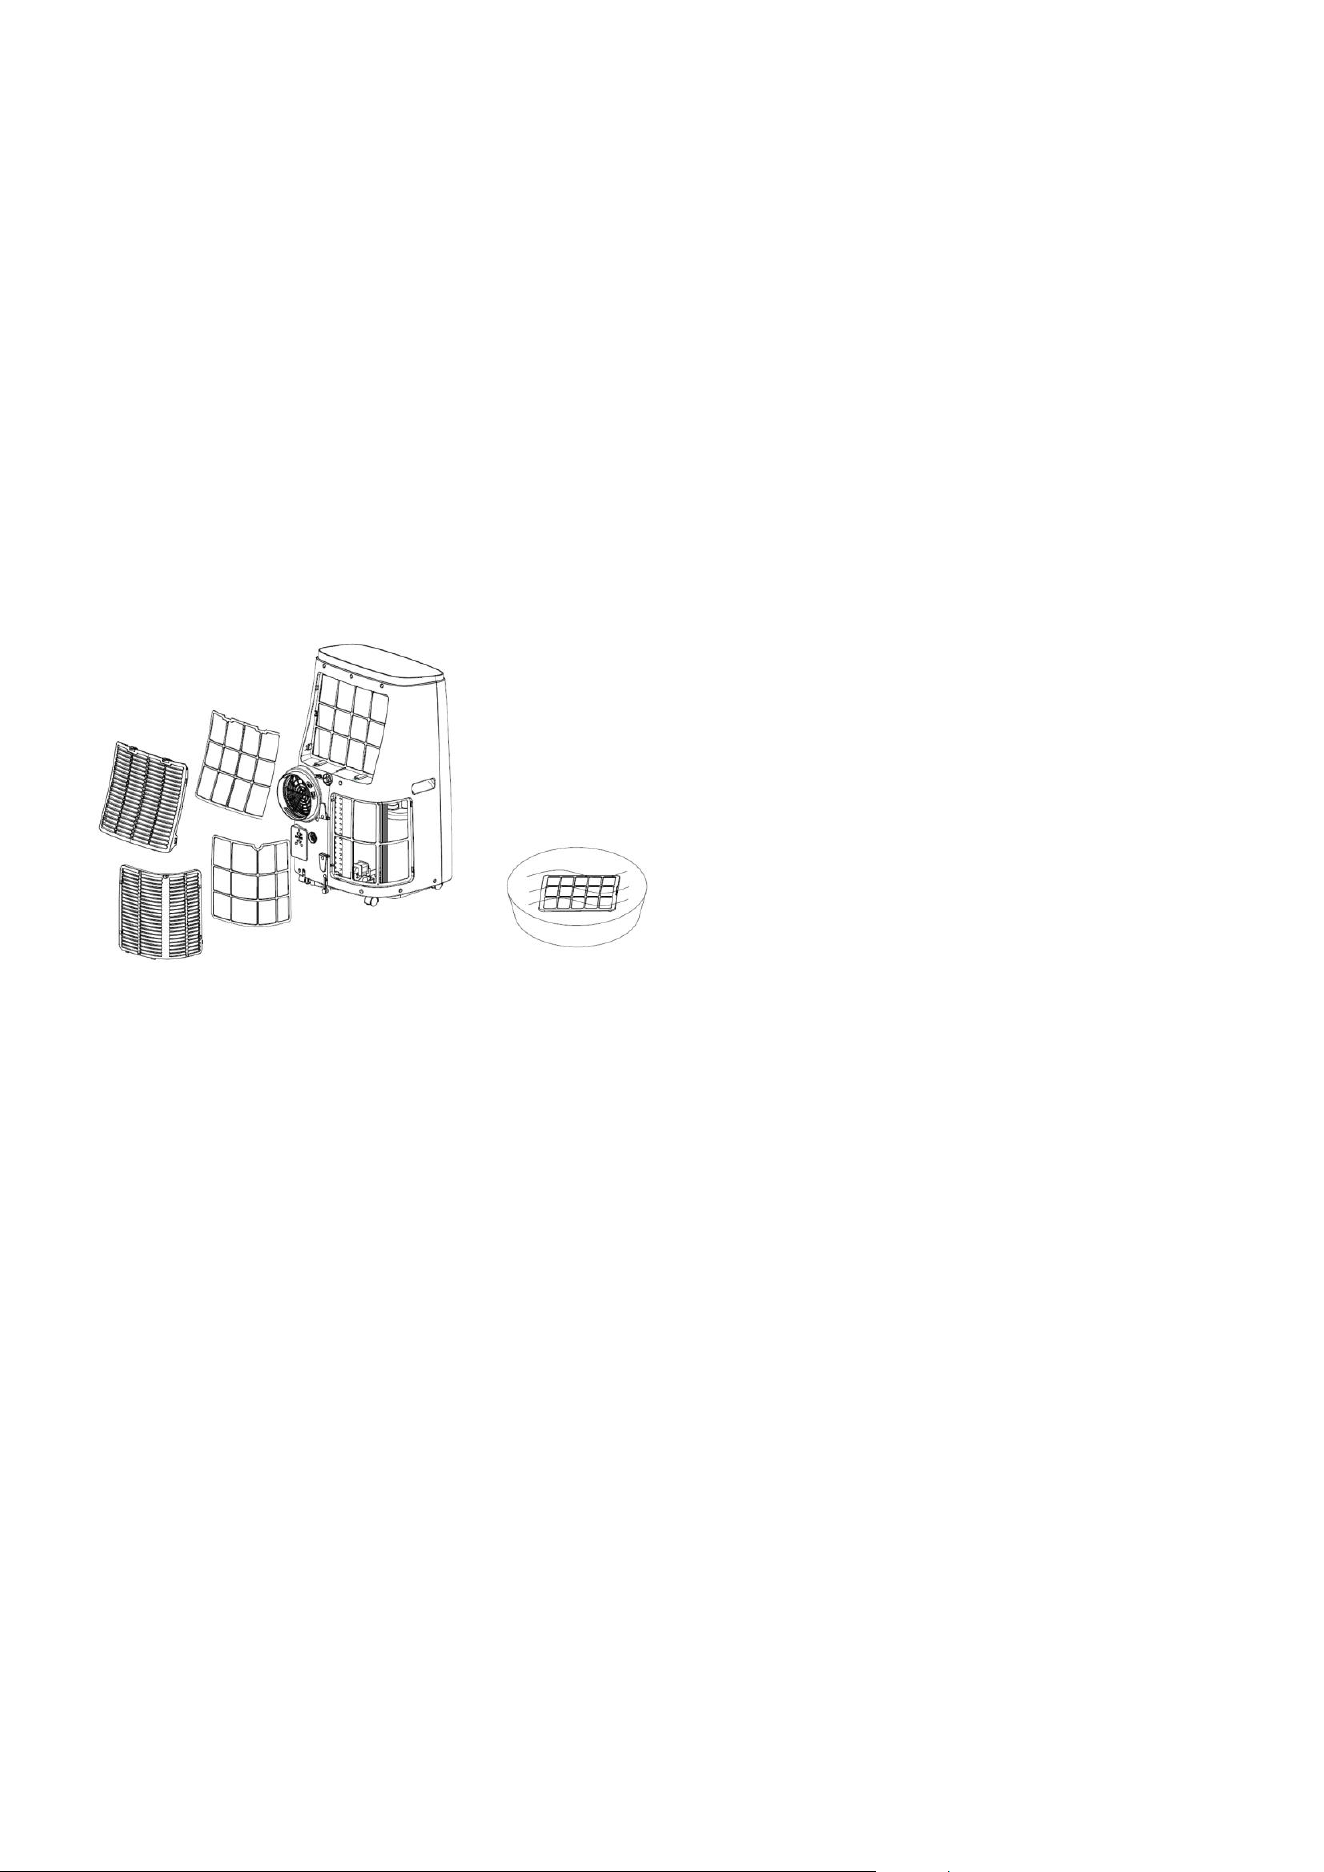
FILTER CLEANING
To clean the mesh filters on a portable air conditioner, begin by
switching off and unplugging the unit. Access both the
evaporator-side and condenser-side filters—typically located
behind separate rear panels as in diagram attached.
Open each panel and carefully remove the mesh filters. Rinse
them under lukewarm water to remove dust and debris; use a
soft brush and mild detergent if needed. Ensure both filters are
completely dry before reinstalling to prevent moisture buildup.
Cleaning both filters every two weeks during active use helps
maintain airflow, cooling efficiency, and prolongs the unit’s
lifespan.
14
Wi-Fi SMART CONTROL
BEFORE YOU START
• Ensure your router provides a standard 2.4Ghz connecon.
• If your router is dual-band, ensure that both networks have dierent network names (SSID). Your
router / Internet service provider can provide advice specic to your router.
• Place the air condioner as close as possible to the router during setup.
• Once the app has been installed on your phone, turn o the data connecon, and ensure your
phone is connected to your router via Wi-Fi and the Bluetooth on your phone is turn on.
DOWNLOAD THE APP TO YOUR PHONE
Download the ”TUYA SMART” app from your chosen app store, using the QR codes below, or by searching
for the app in your chosen store.
Android
CONNECTION METHODS AVAILABLE FOR SETUP
Before starng the setup, with the air condioner plugged in, but turned o, press and hold the TIMER
buon for 3 seconds (unl you hear a beep) to enter the Wi-Fi connecon mode. The Wi-Fi light on the air
condioner will ash to show it is ready to connect.
When connecng the Air Condioner to your Wi-Fi network there are two ways your network details can
be uploaded to the appliance:
Bluetooth method: If you have turned on Bluetooth and GPS on your phone, the app will detect the Air
Condioner and guide you through the simple setup process.
AP connecon method: Uses a direct local Wi-Fi connecon between your phone and the air condioner,
allowing the app to upload the network details. This is ideal when you do not have a Bluetooth enabled
device or encounter problems following the Bluetooth setup.
IOS
15
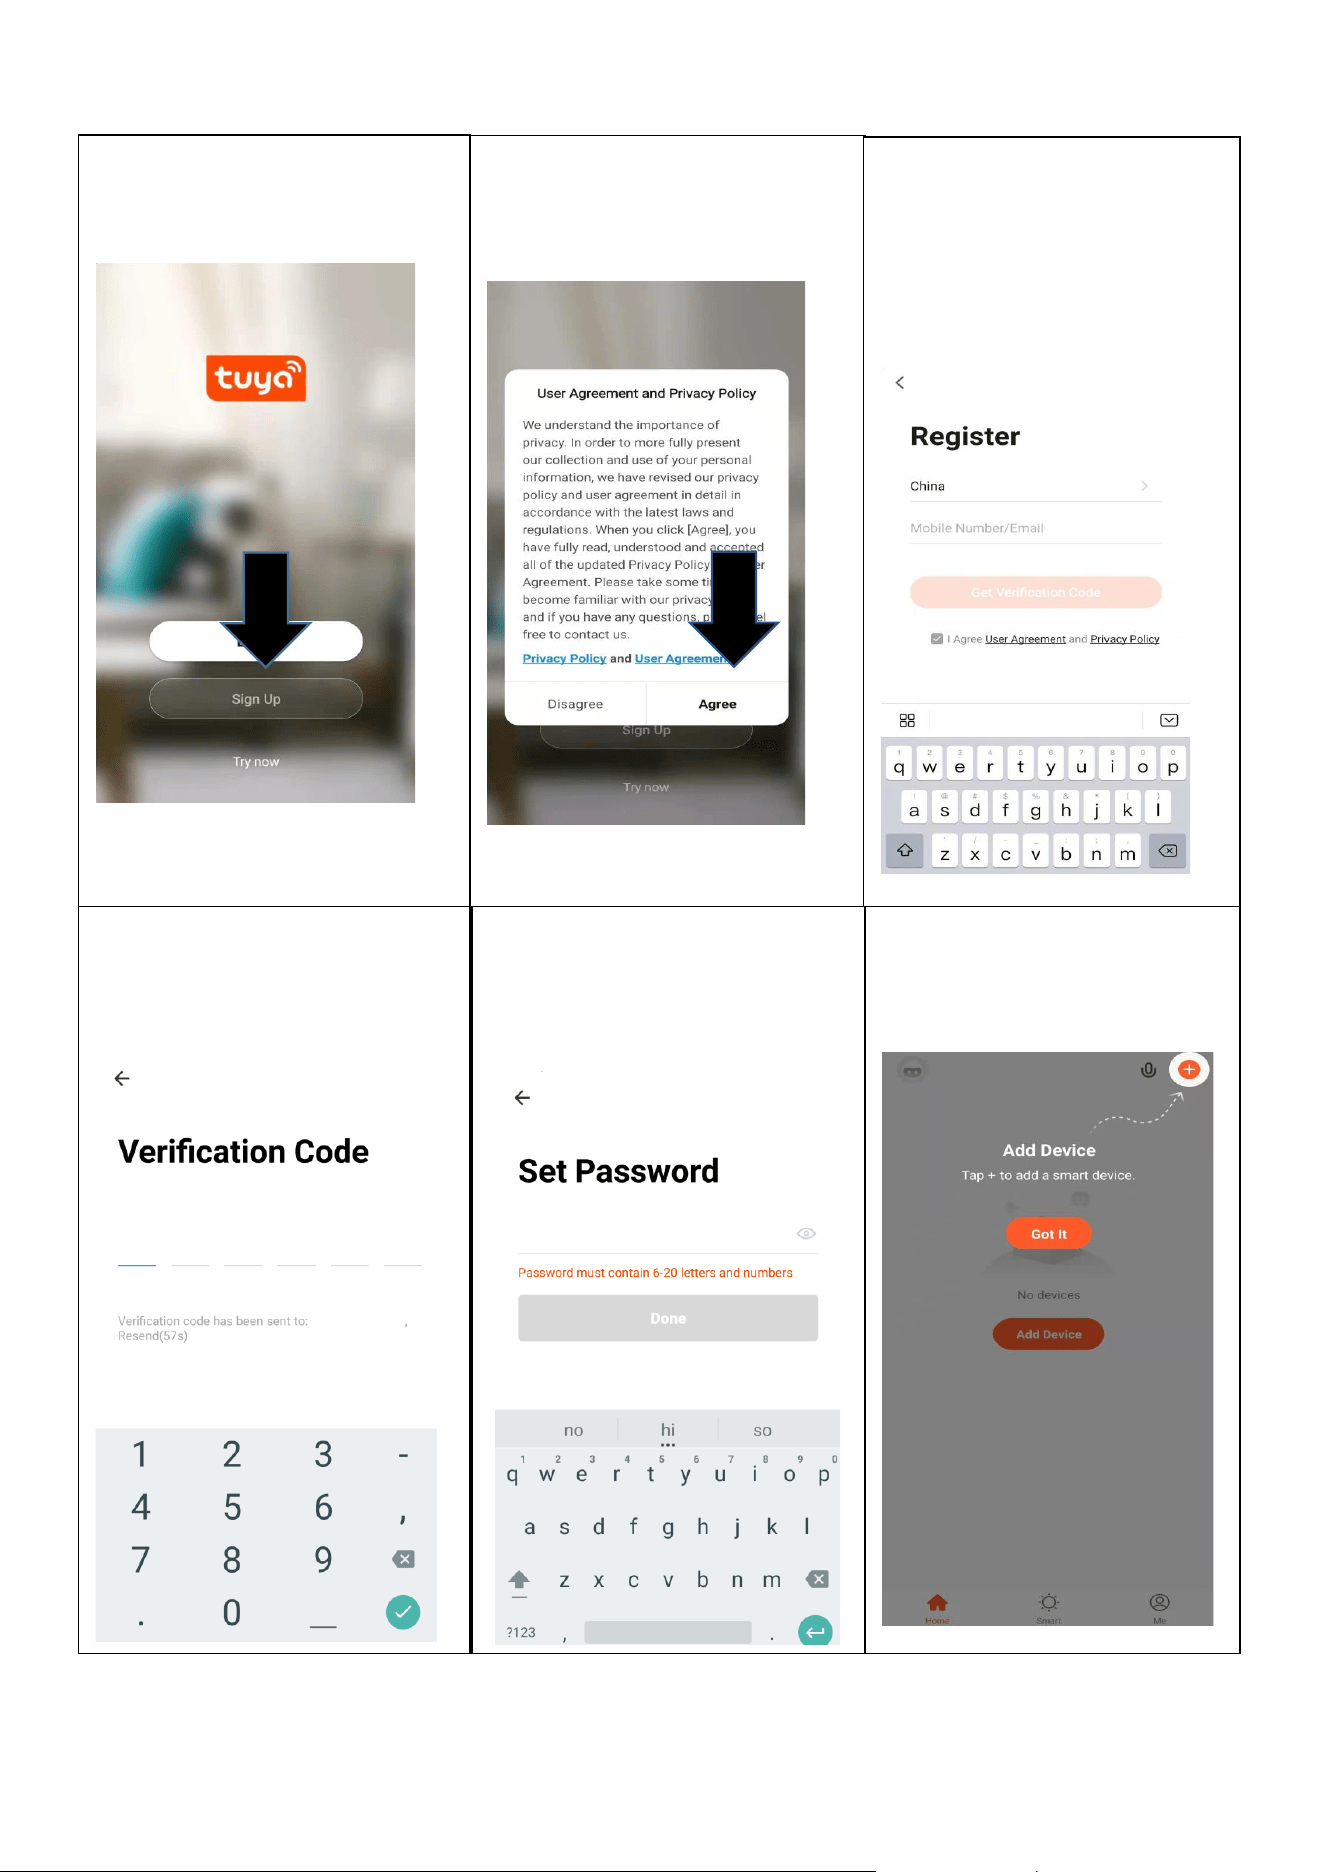
REGISTER THE APP
1. Press on the Sign Up buon
at the boom of the screen.
2. Read the Privacy policy and
press the Agree Buon.
3. Enter your email address or
phone number and press
connue to register.
4. A vericaon code will be
sent by the method selected
in step 3. Enter the code into
the app.
6. The app is now registered.
It will automacally log you
in following registraon.
5. Type in the password you
would like to create. This
needs to be 6-20 characters,
with leers and numbers.
16
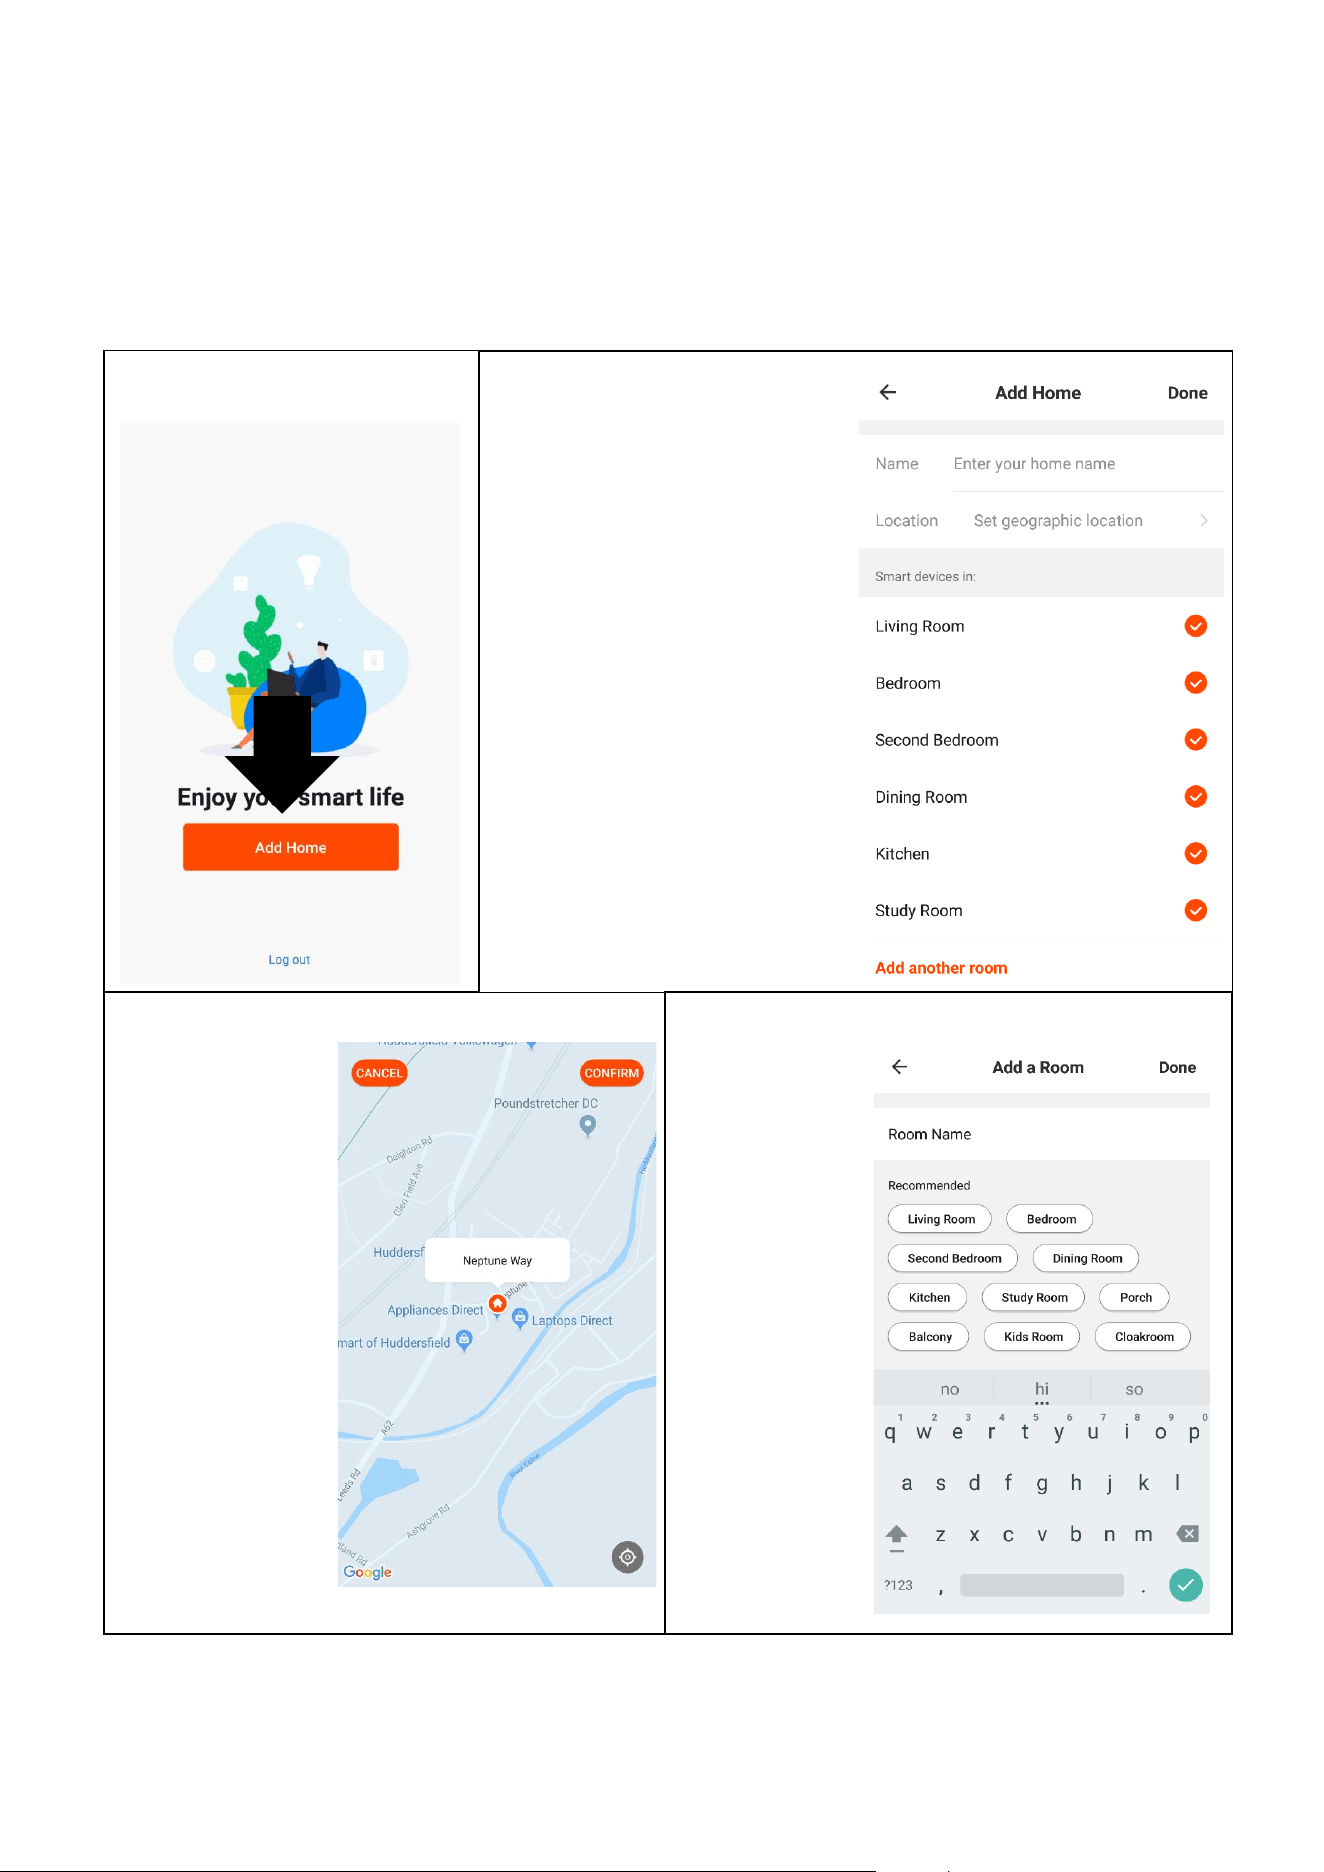
SETTING UP YOUR HOME WITHIN THE APP
TUYA is designed to work with a large number of compable smart devices within your home and mulple
devices within dierent houses. As such, during setup, the app requires that dierent areas be created and
named to make it easier to manage all your devices. When devices are added, they are assigned to one of
the rooms you have created.
CREATING ROOMS
1. Press on the ADD HOME
buon.
2. Type in a name for your home
3. Press on the locaon buon
to select the locaon of your
home. (See SETTING YOUR
LOCATION below)
4. New rooms can be added by
pressing the ADD ANOTHER
ROOM opon at the boom.
(See ADD ANOTHER ROOM
below)
5. Unck any rooms that are not
required on the app.
6. Press DONE in the top right
corner.
SETTING YOUR LOCATION
Use your nger to
move the orange
HOME symbol.
When the symbol is
in the approximate
locaon of your
home, press the
conrm buon in
the top right corner.
ADD ANOTHER ROOM
Type in the name
of the room, and
press Done in
the top right
corner
17
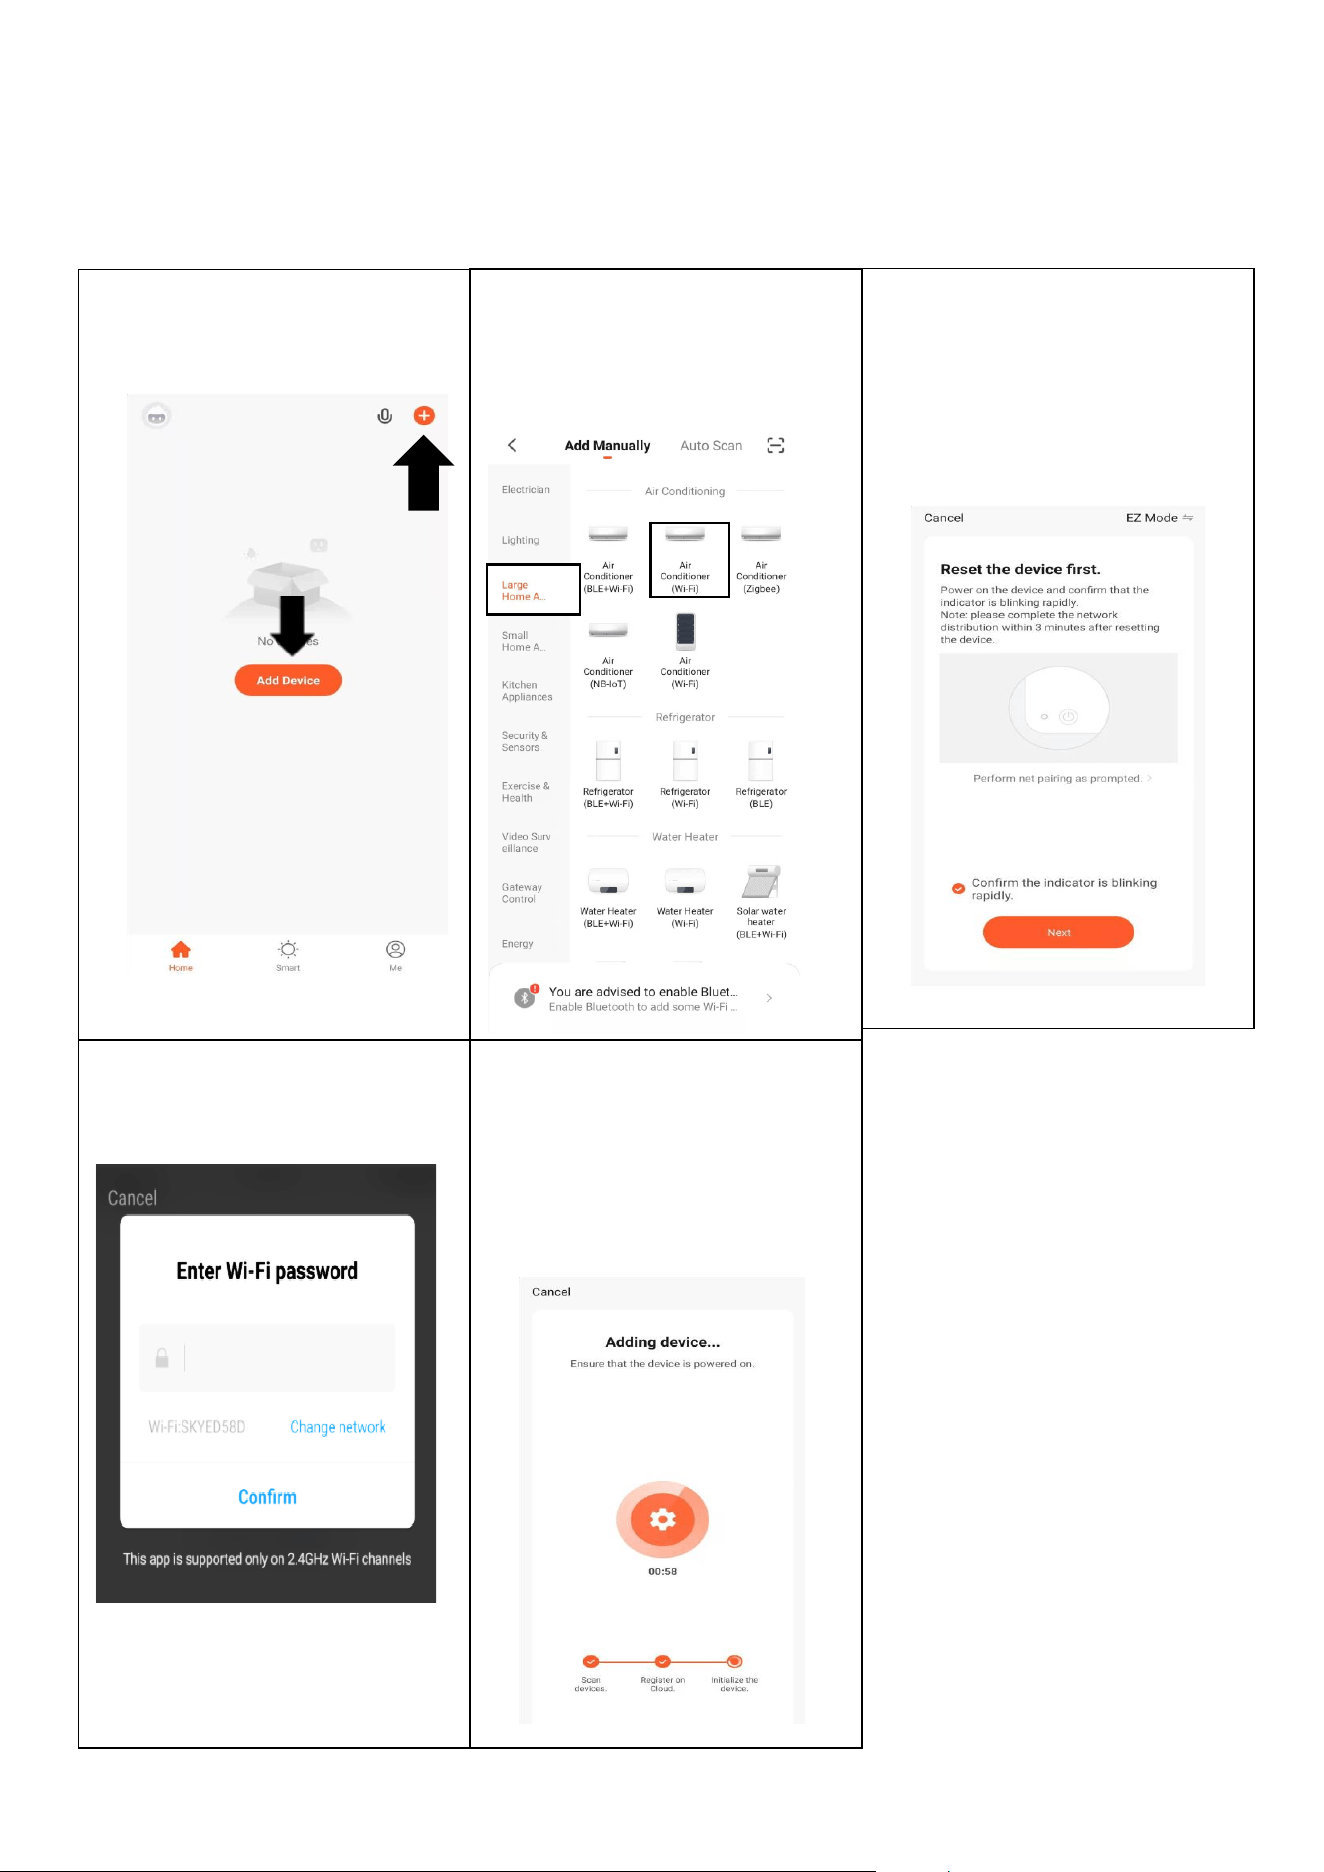
CONNECTING USING EZ (QUICK CONNECTION) MODE
Before iniang the connecon, make sure the unit is in standby mode and that the Wi-Fi light is ashing
twice per second. If not, follow the instrucons for changing the connecon mode. Also, ensure your
phone is connected to the Wi-Fi network. (We advise turning mobile data o during setup)
1. Open the app and press “+”
to add device
2. Select the type of device
as “Air Condioner (Wi-Fi)”
within the Large Home
Appliance tab.
3. Ensure the Wi-Fi light
on the air condioner is
ashing twice per
second then press on
the orange buon at
the boom of the
screen to conrm
4. Select your network, enter
your Wi-Fi password and
press Next.
5. This will then transfer the
sengs to the air condioner.
Wait for this to complete. If
this fails, retry. If sll
unsuccessful, please review
the troubleshoong secon
for further help.
18
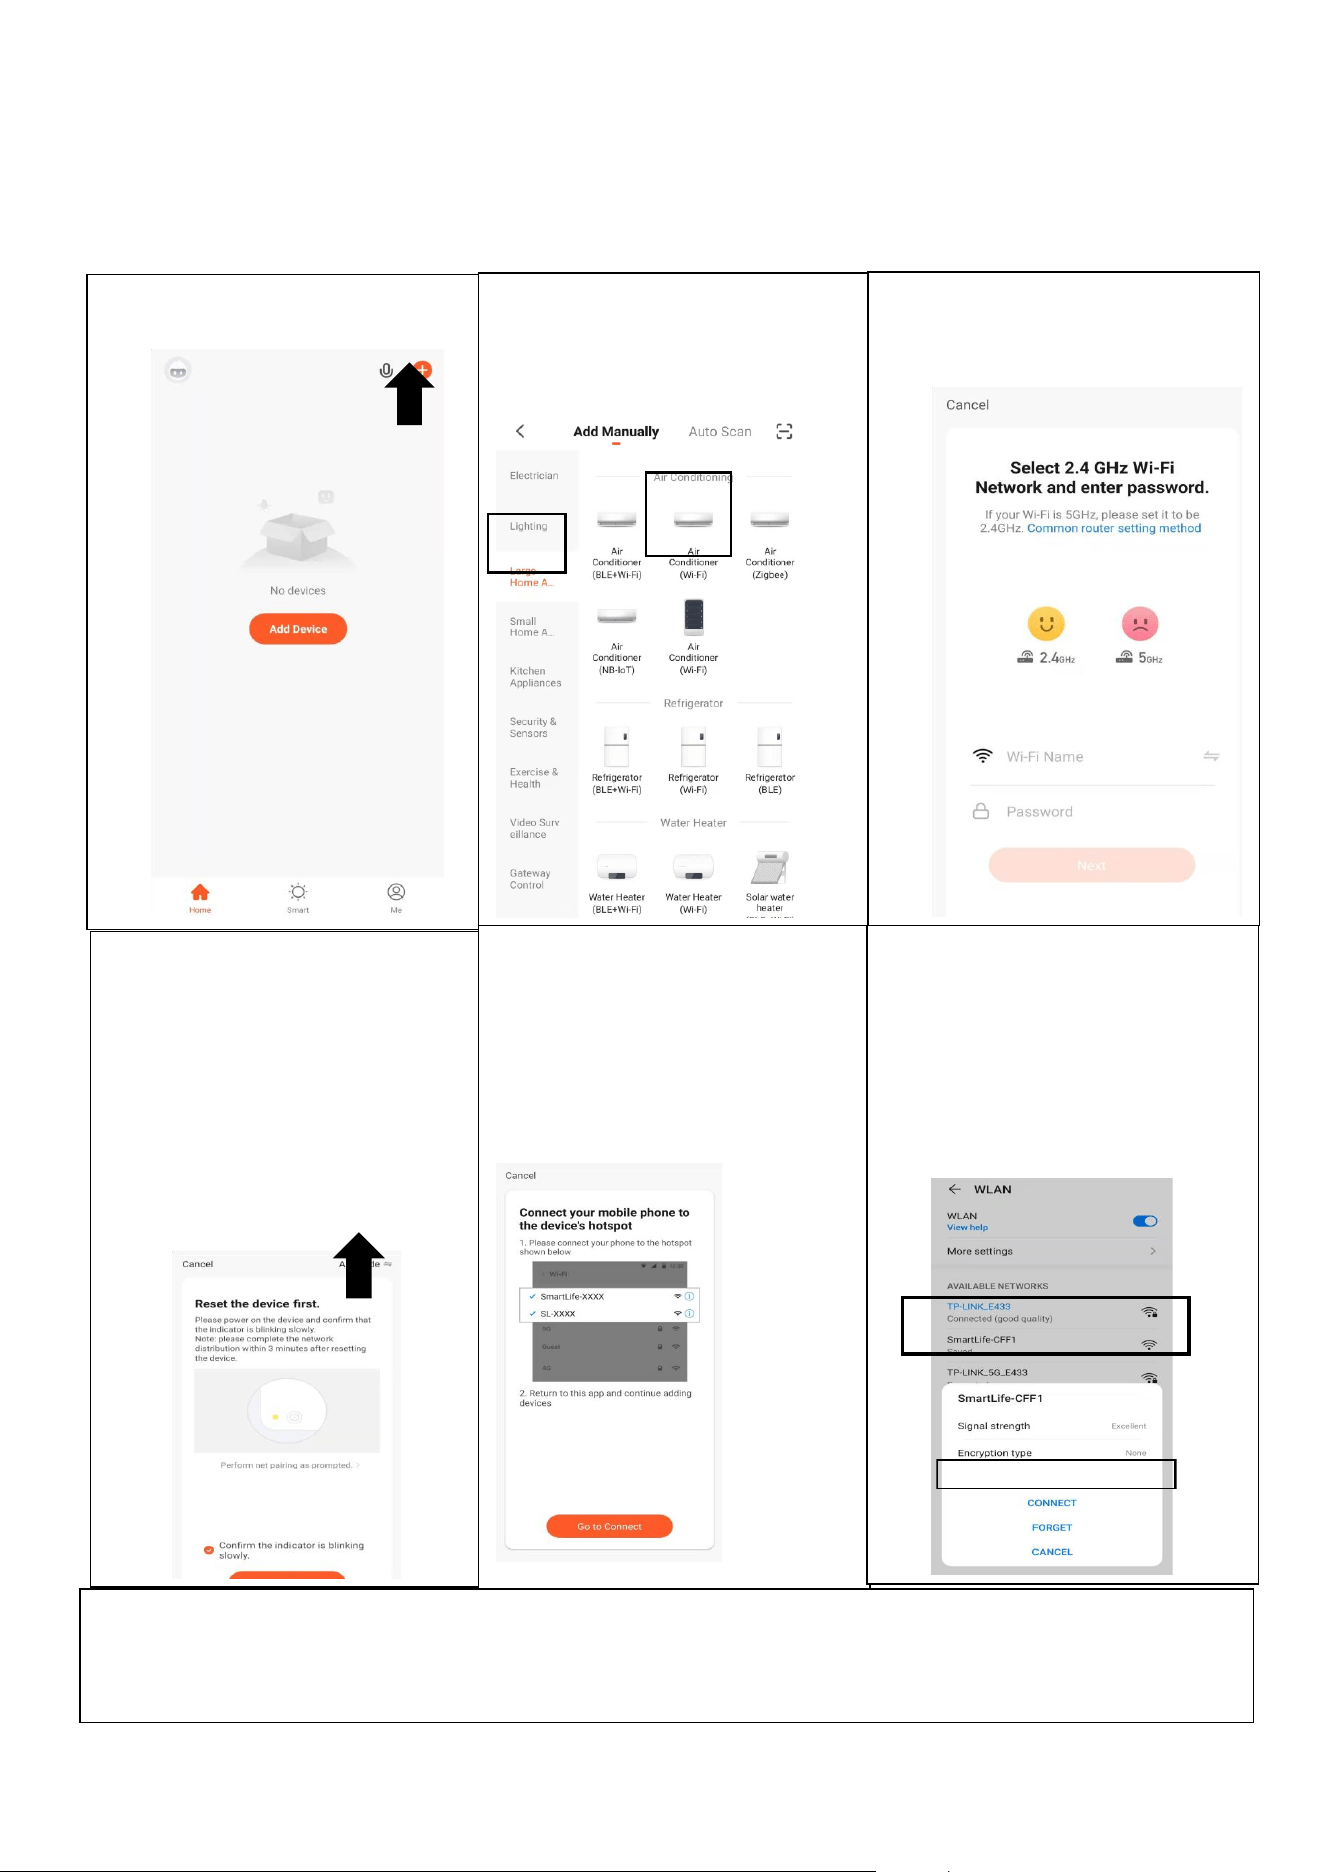
CONNECTING USING AP MODE (ALTERNATIVE METHOD)
Before iniang the connecon, make sure the unit is in standby mode and that the Wi-Fi light is
ashing once per second. If not, follow the instrucons to change the Wi-Fi connecon mode. Ensure
your phone is connected to the Wi-Fi network. (We advise turning mobile data o during
setup)
1. Open the app and press “+”
to add device
2. Select the type of device
as “Air Condioner (Wi-Fi)”
within the Large Home
Appliance tab.
3. Select your network, enter
your Wi-Fi password and
press Next.
4. Ensure the Wi-Fi light on the
air condioner is slowly
ashing (once per three
seconds), then select AP
Mode in the top right corner
before pressing on the orange
buon at the boom of the
screen to conrm
5. Go to network sengs in your
phone and connect to the
“SmartLife xxx” connecon.
then press on the orange
buon at the boom of the
screen to conrm
6. Go to network sengs in your
phone and connect to the
“SmartLife xxx” connecon.
There is no password to enter.
Then return back to the app
to complete setup.
This will then transfer the sengs to the air condioner.
Once the connecon process has completed, go back to the network sengs on your phone to ensure
your phone has reconnected to your Wi-Fi router.
19
CONTROLLING YOUR DEVICE THROUGH THE APP
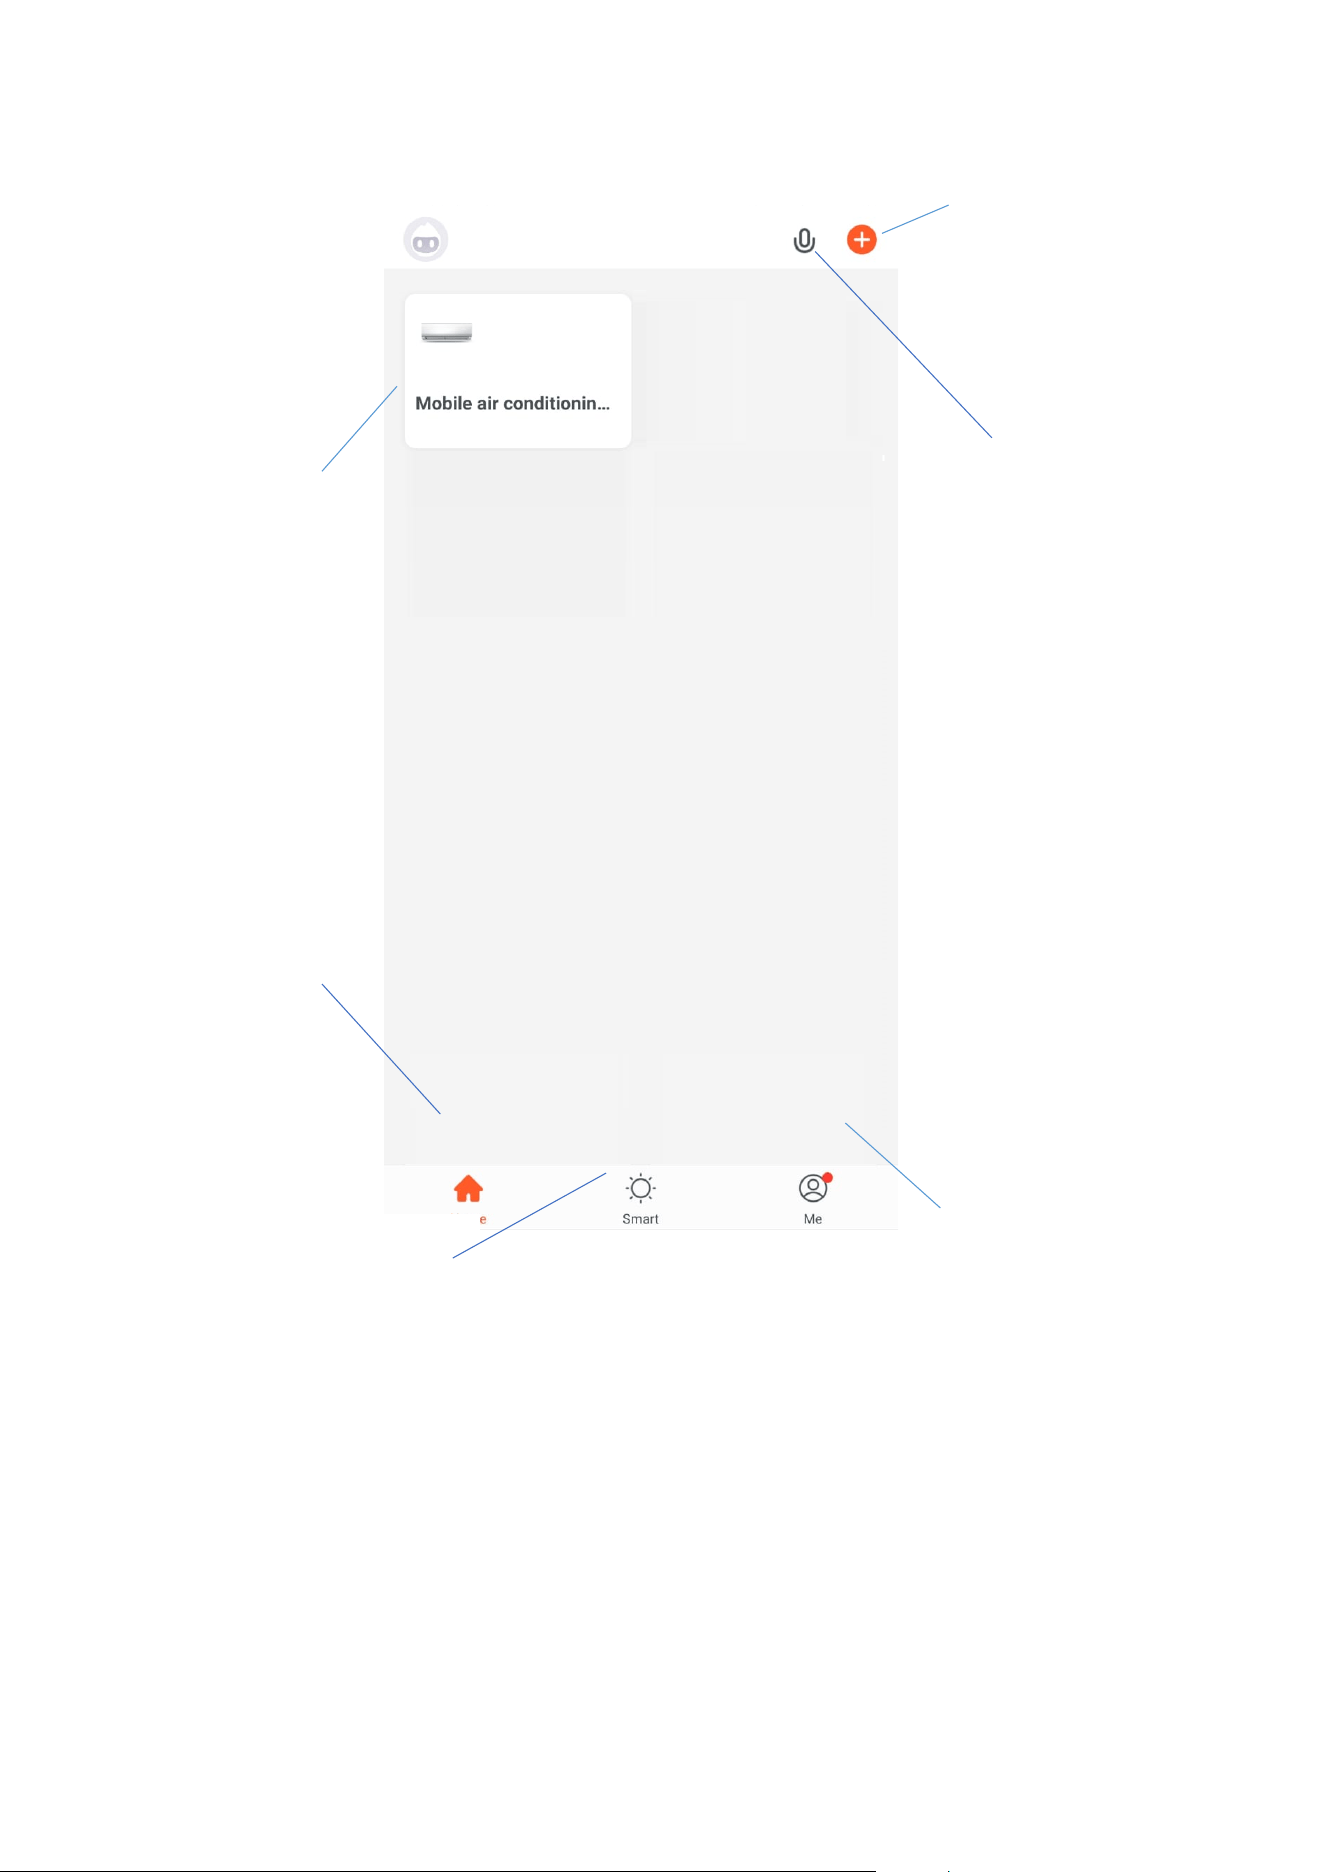
THE HOME SCREEN
Each device has its own entry on the home screen, allowing the user to quickly turn the unit on or o or
enter the device screen to make other changes.
Your Device: Press
to enter the device
screen.
Smart Scene: Allows you to
program intelligent behaviour
based on the internal and
external environment
Add Device: Add a device
to the app, and go through
the setup process.
Prole: Provides the
opon for changing
sengs, and adding
devices using a QR code
provided by a friend.
Voice Control: Use to give
verbal instrucons to the
app.
Home: Return to this
screen when within
the Smart or prole
tabs.
20
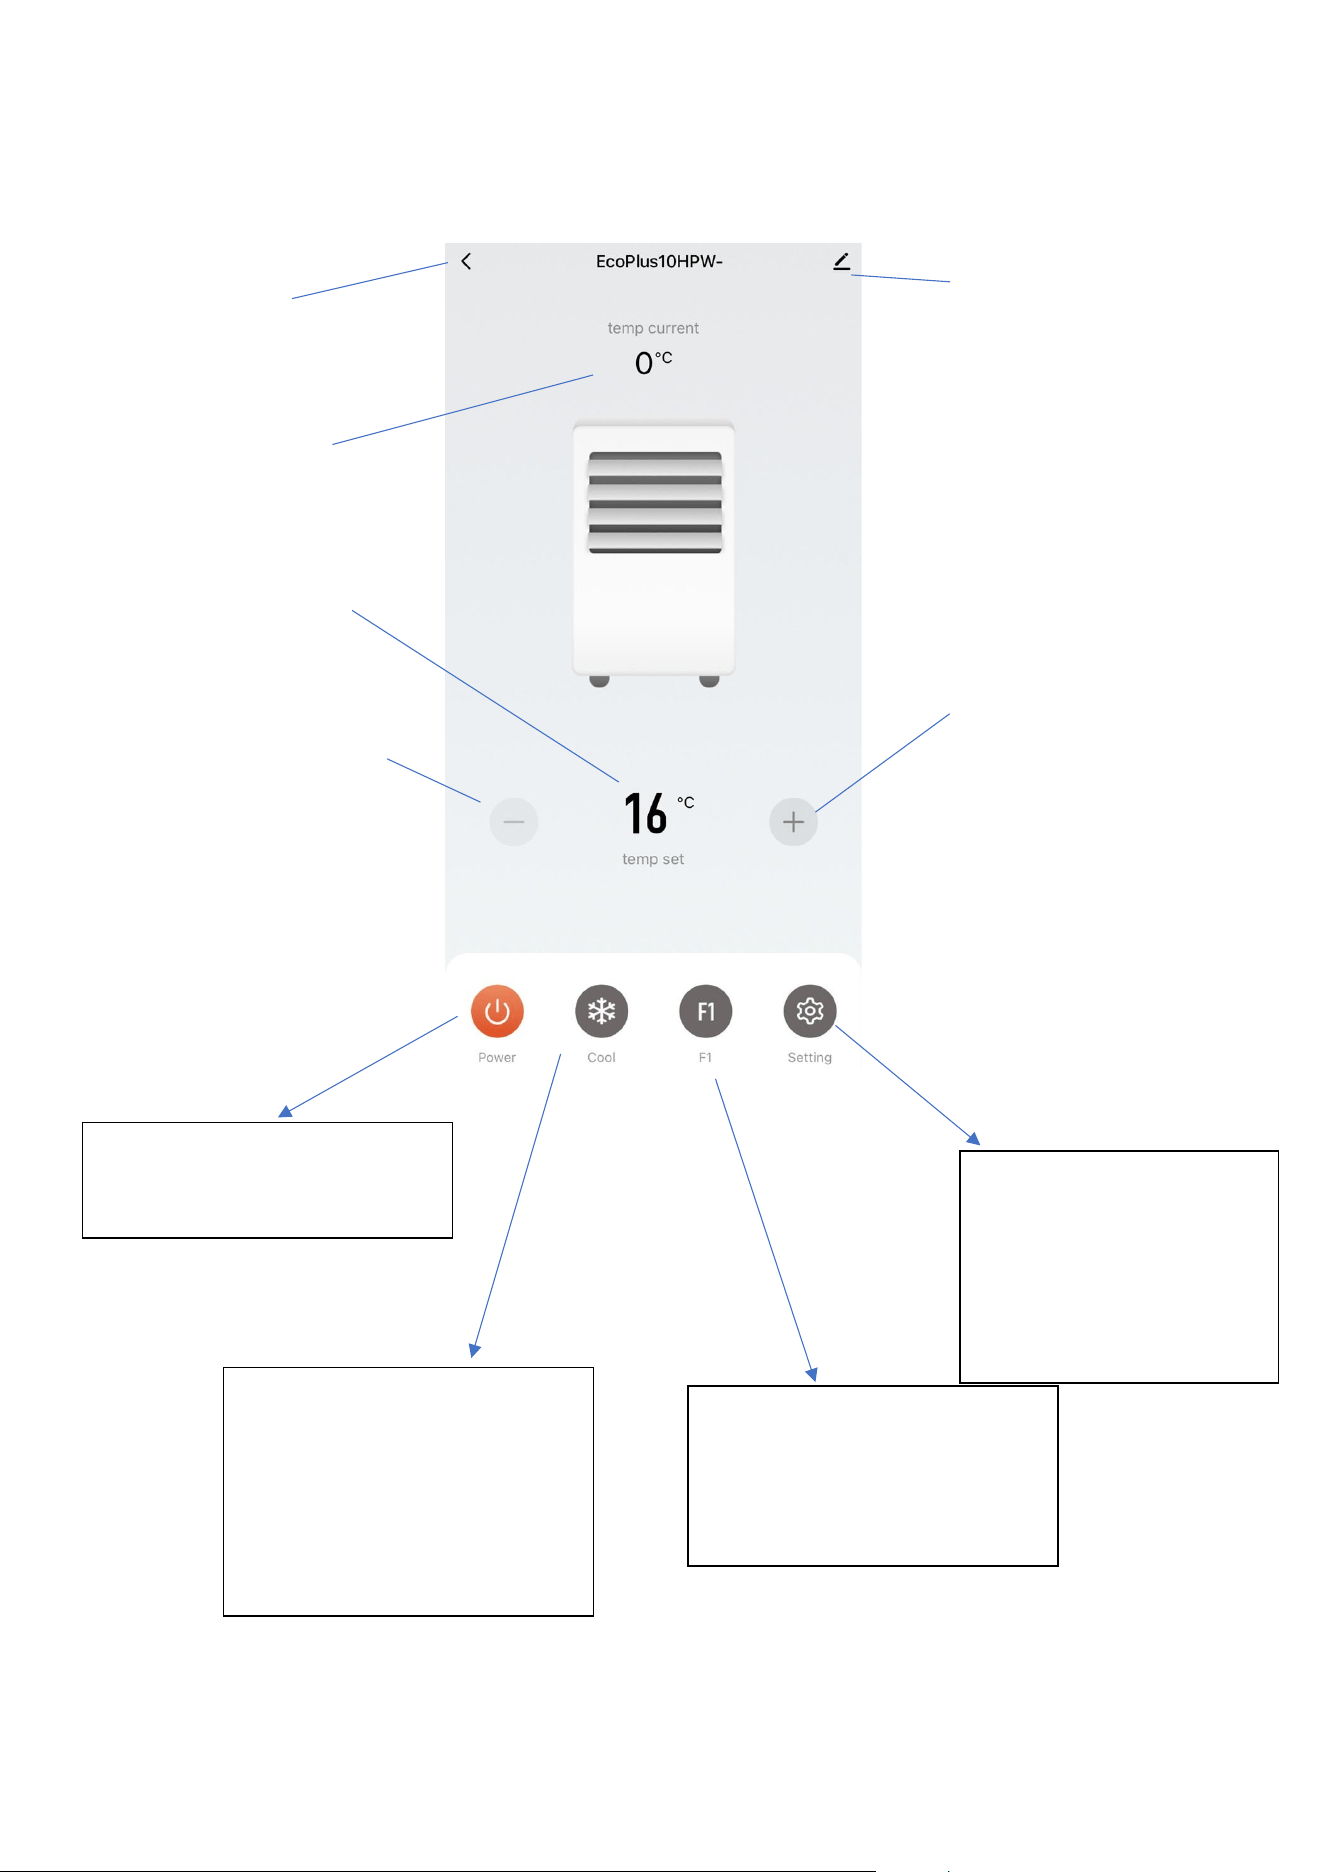
DEVICE SCREEN
The device screen is the main control screen for the air condioner, providing access to the controls for
adjusng funcons and sengs.
Due to ongoing app development, the layout and available features may change.
Edit Name: Use to
change the name of
the air condioner.
Desired Temperature UP
Buon: Use to increase the
desired temperature.
Current Room
Temperature: Displays the
current room temperature
Back: Returns to the
Home Screen
Desired Temperature:
Shows what temperature
the unit is currently set
to
MODE: (Will show as current
mode)
Change the operang mode of
the air condioner between
Cool, Smart Cool, Dry, Heat,
and Fan
SPEED: (Will show as
current speed)
Use to change the Fan
speed between F1(Low)
and F5 (High)
POWER:
Use to turn the air
condioner on and o.
SETTINGS:
Use to add an o mer
while the unit is running,
or an on mer while the
unit is turned o
Desired Temperature
DOWN Buon: Use to
increase the desired
temperature.
21
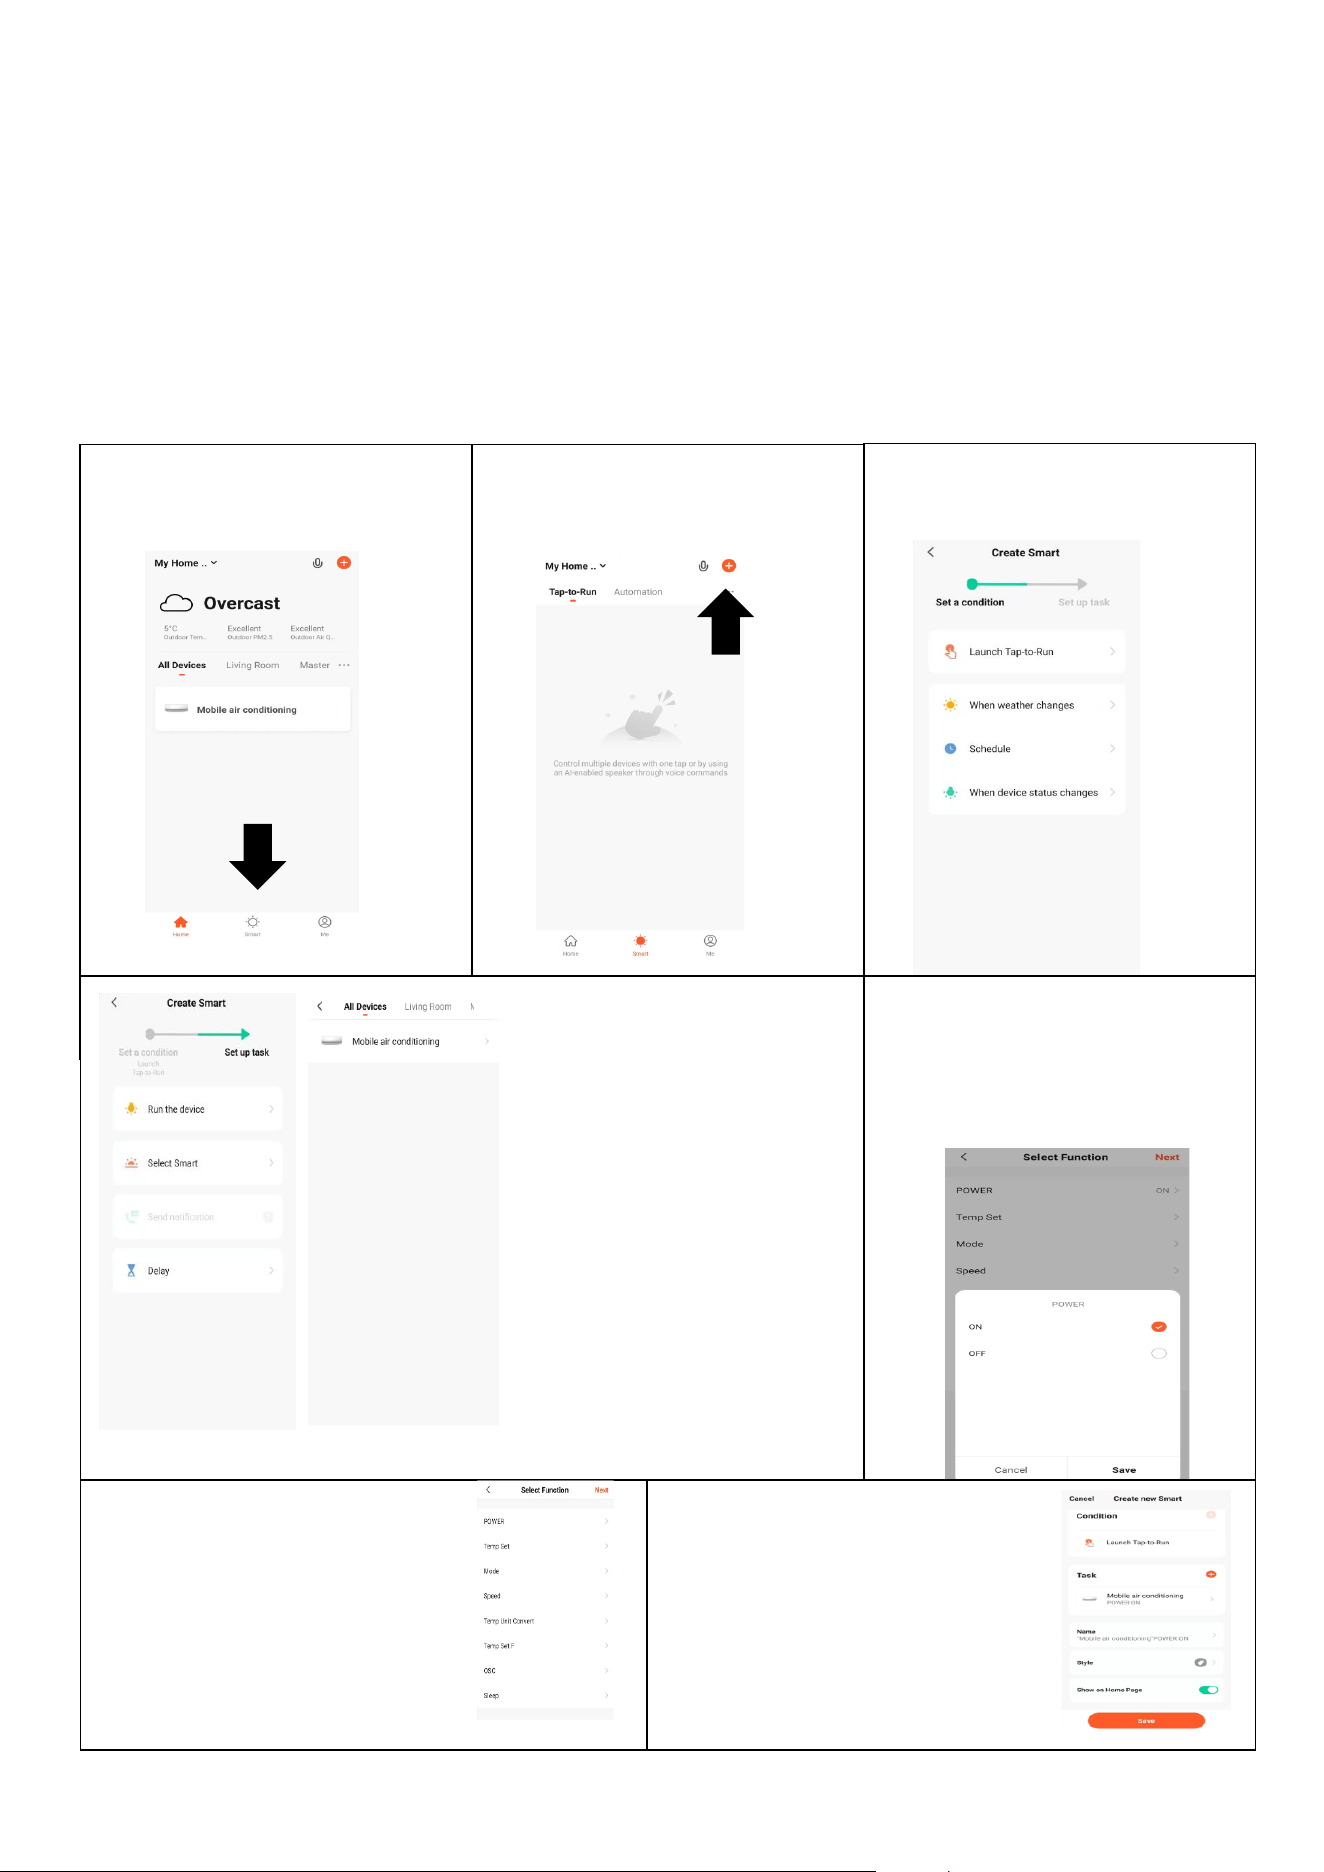
SMART SCENES
Smart Scenes is a powerful tool that lets you customise the air condioner's operaon based on both
room condions and external factors. This gives the user the opon of specifying much more intelligent
acons. These are split into two categories: Scene and Automaon.
SCENE
Scene allows for a one-touch buon to be added to the Home screen. The buon can be used to
change mulple sengs at once and adjust all sengs within the unit. A number of scenes can be set
up, allowing the user to switch between preset conguraons.
Below is an example of how to set up a scene:
1. Press on the Smart Scene
tab at the boom of the
Home screen
3. Select the type of Scene to
create.
2. Press on the Plus in the top
right corner to add a smart
scene.
4. Select Tap To Run,
followed by the device
you want to control.
5. Choose the funcon, set the
value for the funcon, and
then press the back buon in
the top right corner, to return
to the previous screen.
6. Once all the funcons
required have been added,
press the Next buon in the
top right corner to nalise and
save your new Scene
7. Once you have named your
scene, save it, and the buon will
be available to acvate the scene
with one touch within the app.
22
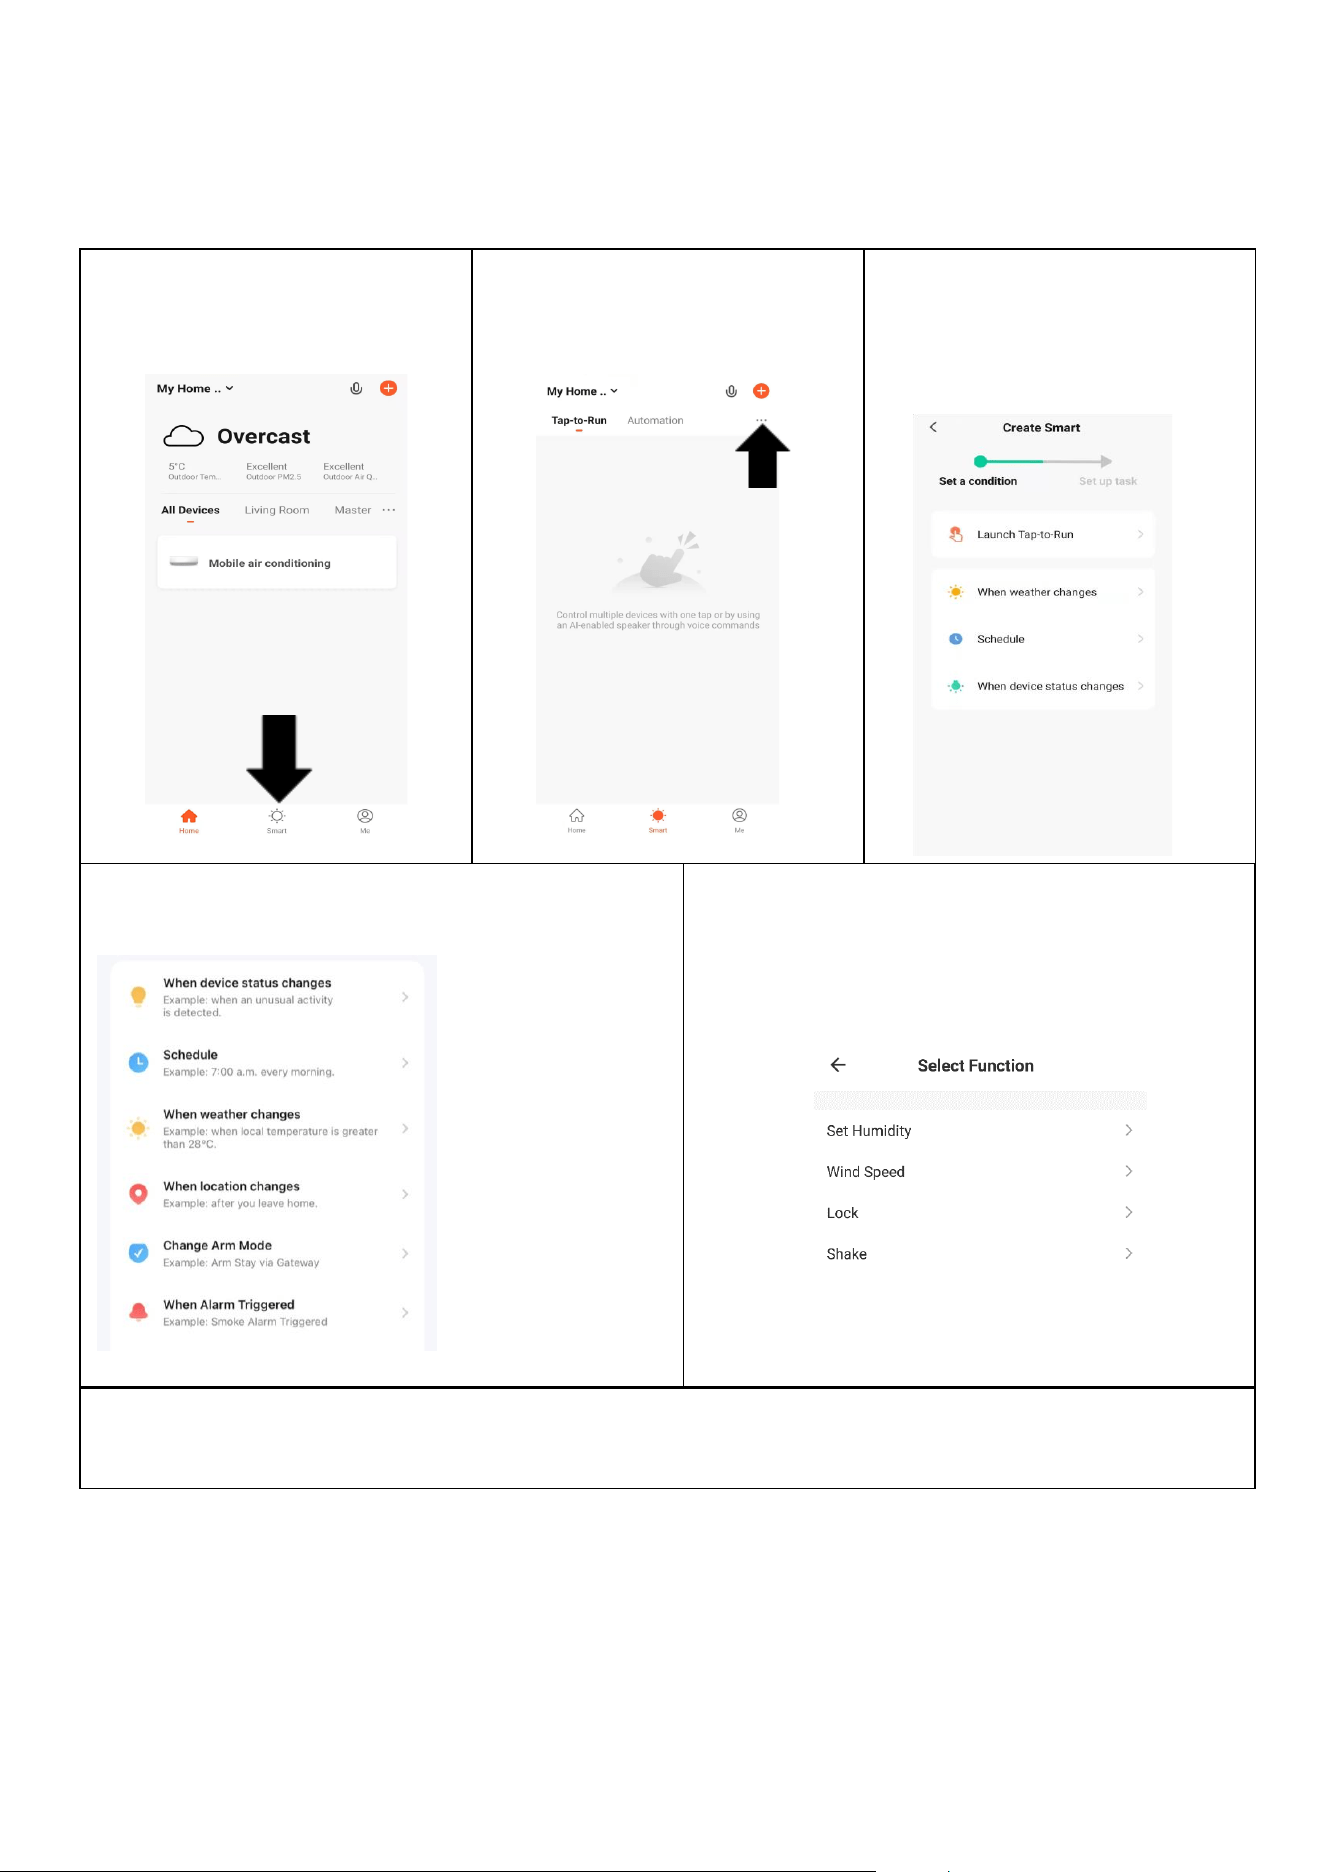
AUTOMATION
Automaon allows an automac acon to be set up for the device. Time, indoor temperature and
humidity, weather condions, and other factors can trigger this.
1. Press on the Smart Scene
tab at the boom of the
Home screen
2. Press on the Plus in the top
right corner to add a smart
scene.
3. Select the type of automaon
required, such as on schedule
for seng up a med
operaon.
5. Chose the funcon, set the value for the
funcon, and then press the back buon in the
top right corner, to return to the previous screen.
4. Select the condion when the automaon should
start. A number of triggers can be combined.
6. Once all the funcons required have been added, press the Save buon to nalise and save your
automated acon. The automaon can be turned on and o as required.
23
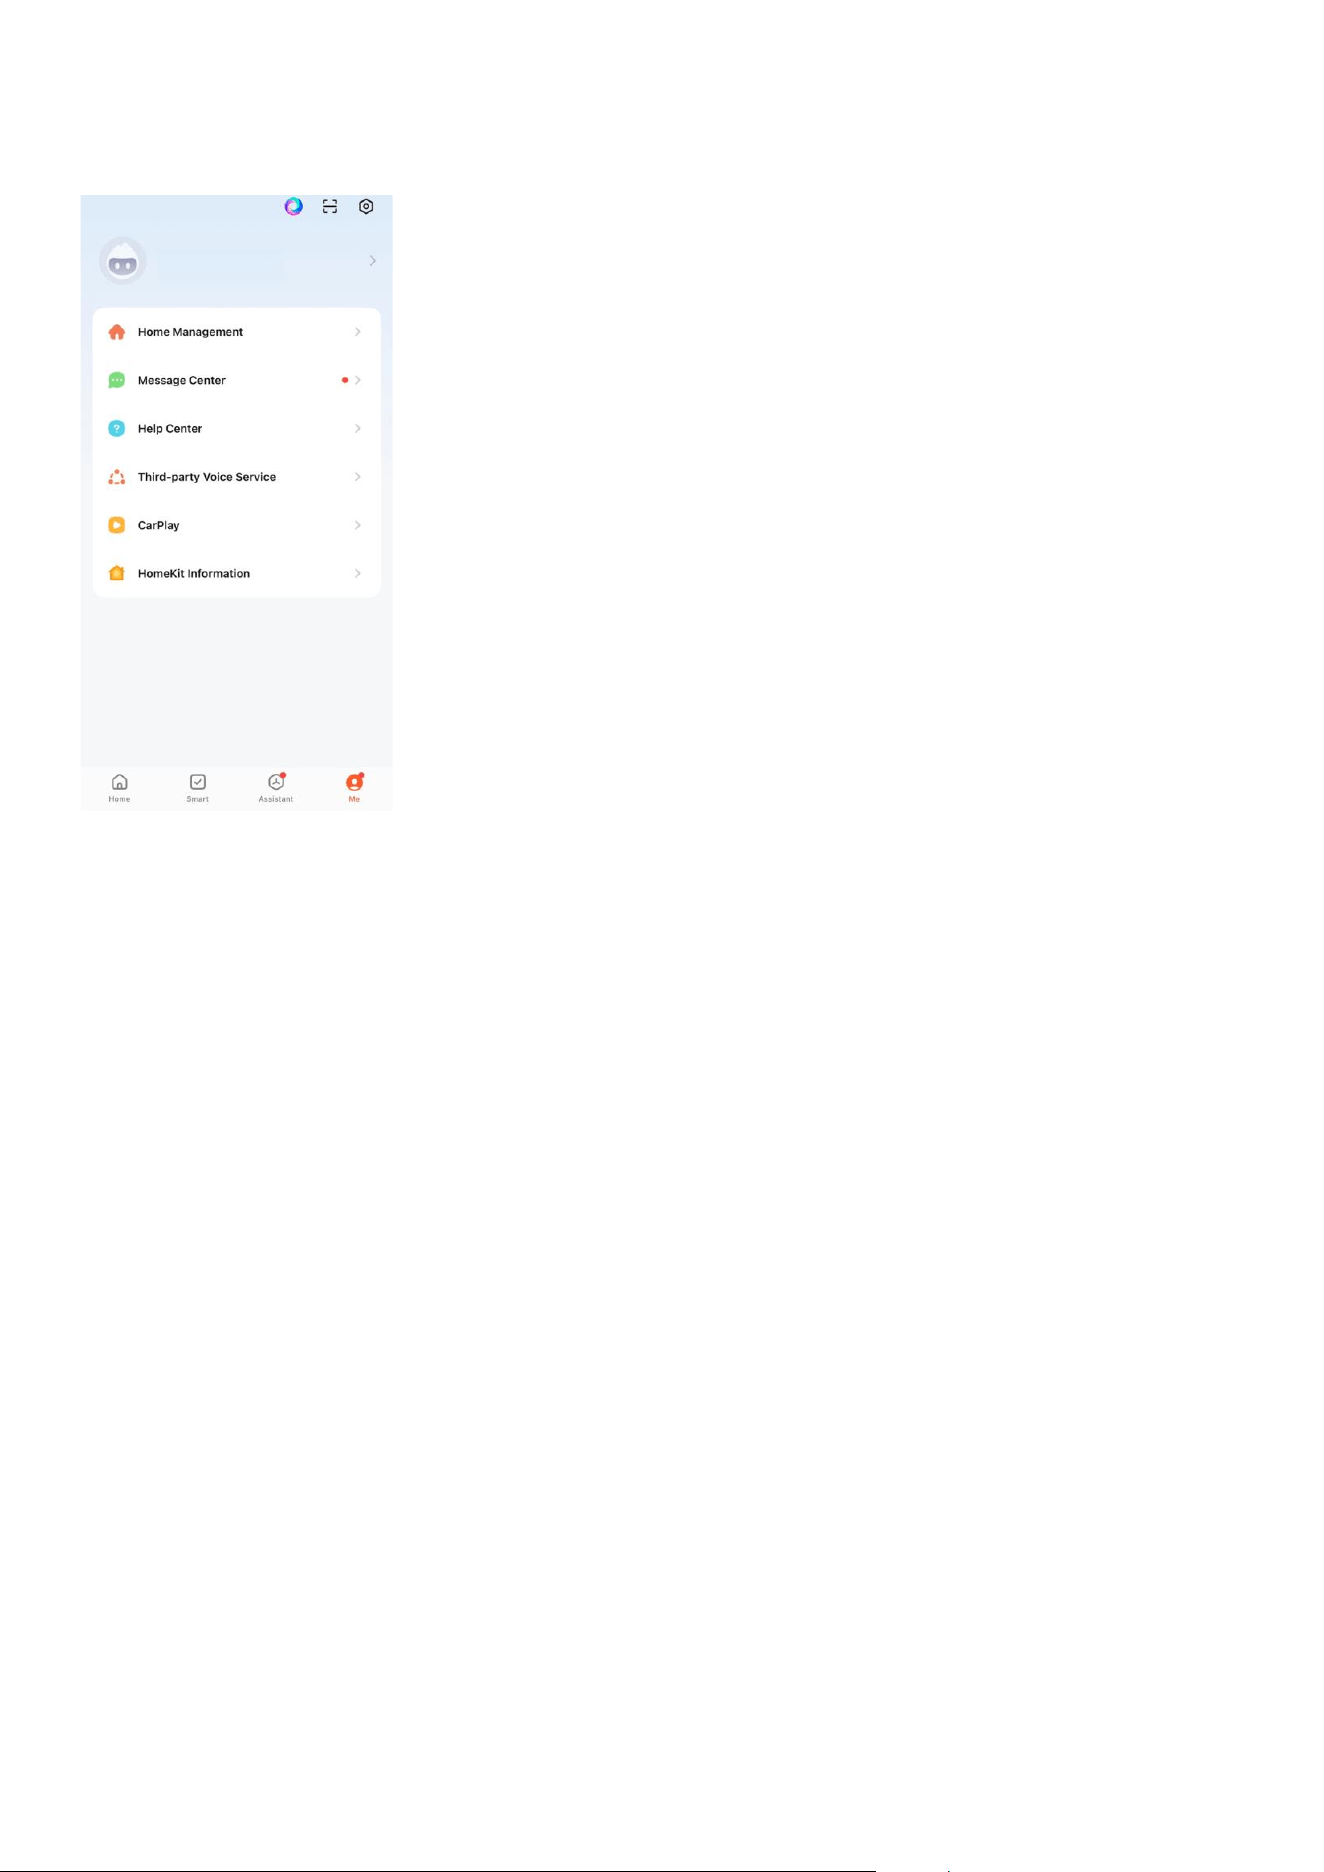
PROFILE TAB
The prole tab gives you the opon to edit your details and use the unit's
added features.
CHANGING THE NAME OF YOUR DEVICE
On any device screen, further device sengs can be accessed by pressing
the three dots in the top right-hand corner. The top opon in this allows
you to change the device name to something relevant to the product's use,
such as “Living Room Air Condioner”. In the menu, you can also set up a
paern lock or change your password.
MESSAGE CENTRE
Shows alerts generated by the App.
THIRD PARTY VOICE SERVICE
This allows the unit to be integrated with your favourite home automaon
hardware, such as Google Home and the Amazon Echo.
CONNECTION TROUBLESHOOTING
1. Check whether the device is powered on and is in the correct Wi-Fi connecon mode
2. Ensure the Wi-Fi password has been entered into the app correctly (Case sensive)
3. Check that the phone is connected to the Wi-Fi you are connecng the device to.
4. Ensure the network you are connecng to is 2.4Ghz (5Ghz Wi-Fi networks are not supported), and that
there is a strong Wi-Fi signal to the item.
5. If your router is dual-band, ensure that the 2.4Ghz network has a dierent network name (SSID).
Further advice on changing router sengs will be available from your Internet service provider /
Router manufacturer.
6. Check the sengs on the router. Encrypon should be WPA2-PSK, and the authorisaon type should
be set to AES
24
CLEANING AND MAINTENANCE
PLEASE SHUT OFF THE UNIT AND UNPLUG FROM THE MAINS BEFORE CLEANING OR PERFORMING
ANY MAINTENANCE
CLEAN THE SURFACE
Clean the machine's surface with a wet, soft cloth. Do not use chemicals such as benzene, alcohol, or
gasoline, as acidic, corrosive, or alkaline substances may cause damage to the surface and/or the
internal workings of the machine.
AIR FILTER CLEANING
If the filter screen is clogged with dust, the air conditioner's effectiveness is reduced. The filter screen
should be cleaned every 2 weeks or as often as needed in your environment.
CLEAN THE UPPER FILTER SCREEN FRAME
Remove the top of the evaporator lter screen from the appliance.
The evaporator lter screen can be cleaned in warm water with neutral detergent (around 40°C or
104°F). The lter screen must be rinsed clean and thoroughly dried before reinstallaon.
CLEAN THE LOWER FILTER SCREEN FRAME
Hold the handle of the lower lter screen and gently pull to unclip the clips and remove the screen.
Clean this lter screen in the same way as the upper lter screen.
Clip
Clip
25
EMPTYING THE INTERNAL WATER TANK
When the internal water tank is full, the unit will stop working and display FL. There are 2 options for
draining the internal water tank:
1) MANUAL DRAINAGE:
The unit should be manually drained after END-OF-SEASON
maintenance before any prolonged storage.
Turn off the unit and unplug. Avoid abrupt movements of the
model, as this may cause water in the internal tank to spill out.
Place a tray in a drainage area under the lower drain port. Remove
the rubber stopper from the drain port - water will drain from the
internal tank. Once the tank is empty, place the rubber stopper back
in position.
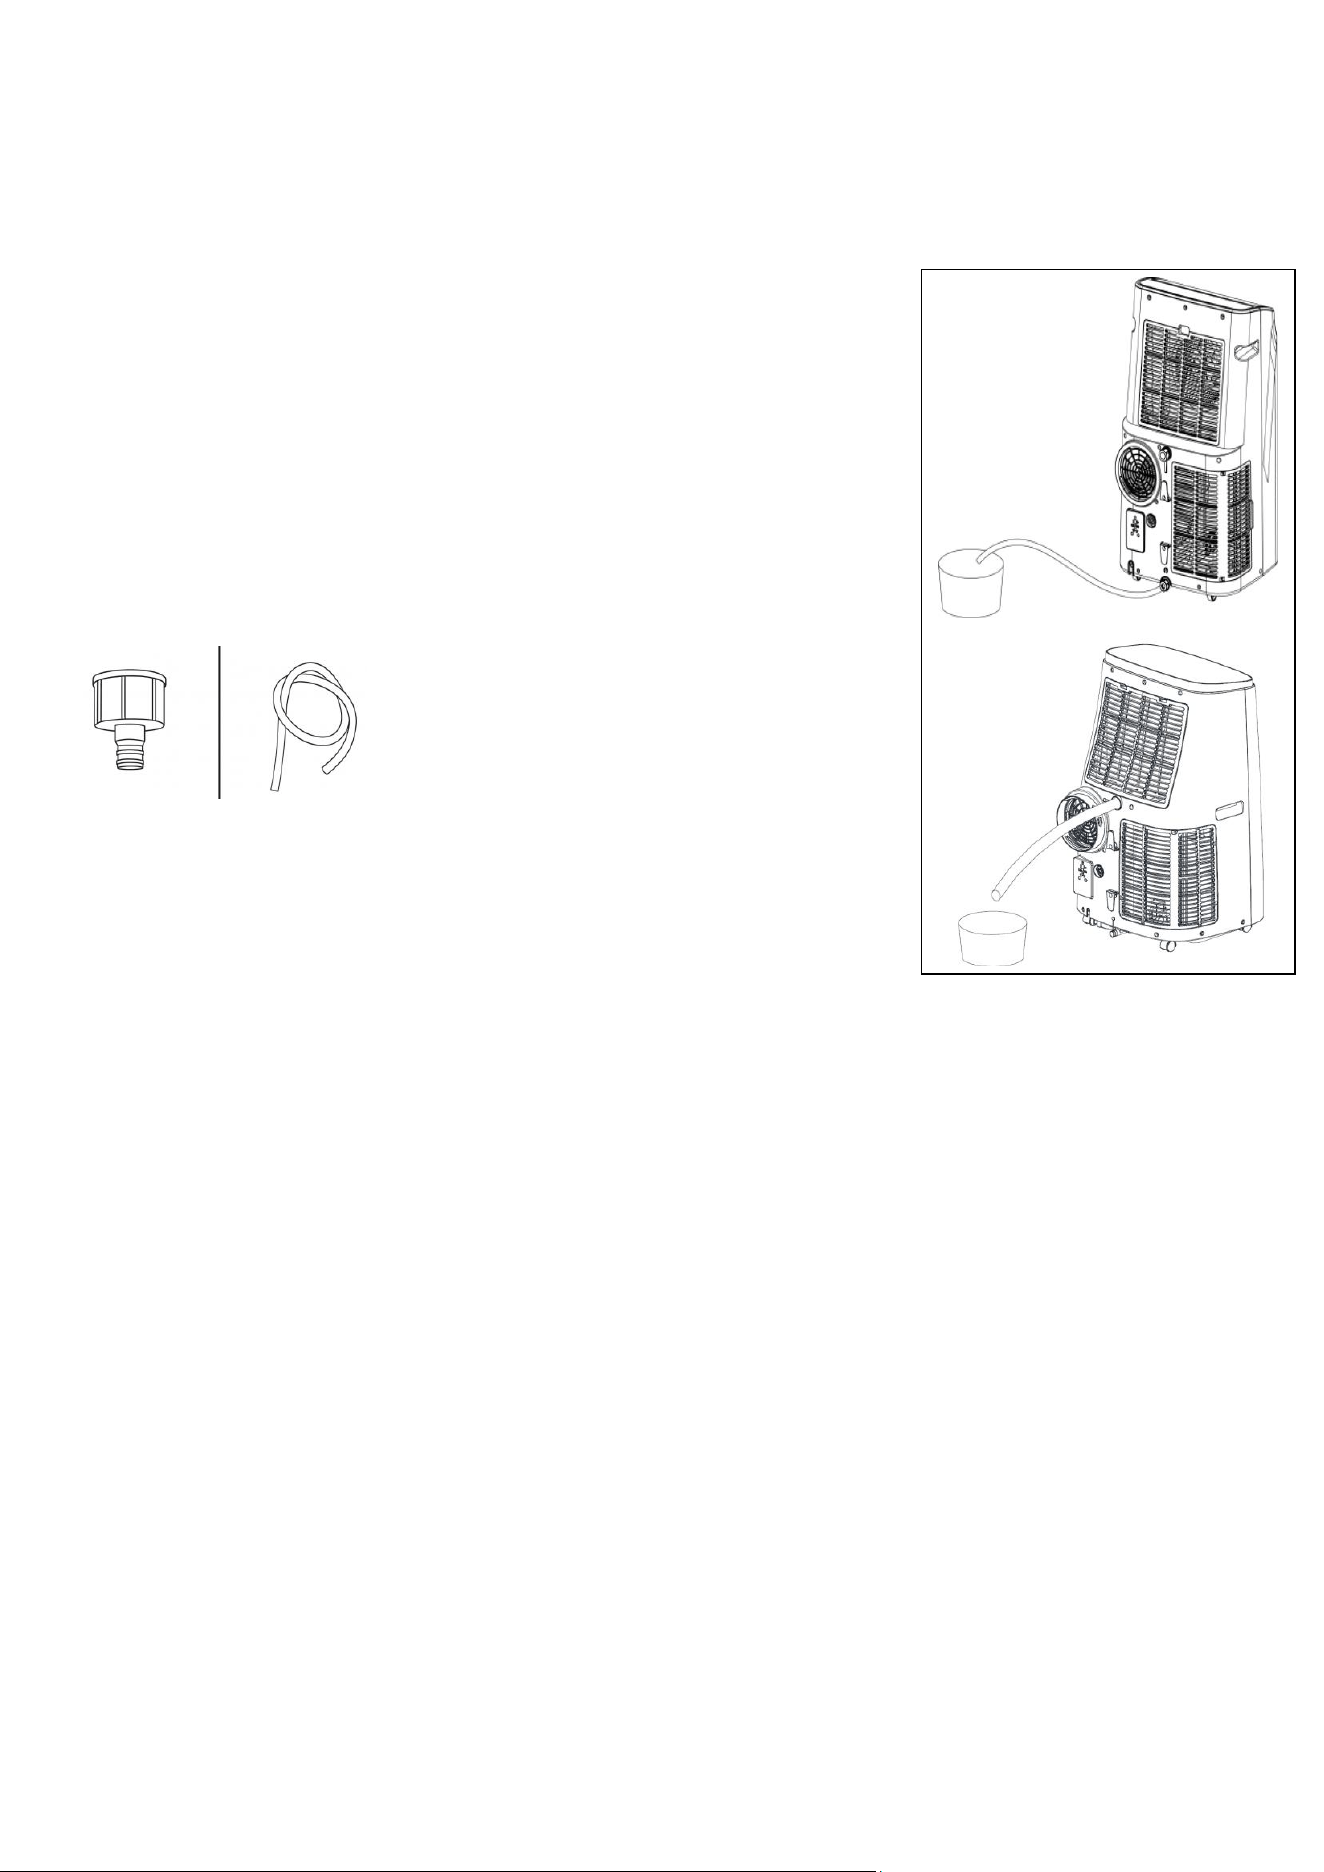
2) CONTINUOUS DRAINAGE:
Remove the rubber stopper from the upper
drain port. Connect a drainage hose (10 mm
internal diameter) to the drain port using the
provided adapter. You can plumb this hose into
your current plumbing system, lead it outside,
use gravity fall, or use an external water pump.
NOTE: This model features self-evaporation, reducing the need to empty
the water tank in cooling mode. If the unit is vented correctly, most of the
water is reused to cool the condenser coils, and any excess is evaporated.
Please do not use continuous drainage if you intend to use the self-
evaporating facility.
END-OF-SEASON MAINTENANCE
1. Remove the rubber stoppers from the drainage holes and empty the internal tank. You
can also drain the water by leaning the unit backwards.
2. Run the unit in fan mode, with a low fan speed, with the rubber stopper sll removed and
a container under the lower drain port.
3. Keep the unit in this mode for half a day - unl the conduit is dry. Doing this helps to keep
the inside of the unit dry and prevents mould from developing.
4. Turn o the unit and disconnect the plug.
5. Replace the rubber stopper.
6. Coil the cable, bind it together, and put it into the cable storage compartment.
7. Separate the vent hose and store it safely.
8. Cover the unit and keep it in a dry place.
9. Take the baeries out of the remote control and store or dispose of them safely.
10. Keep all accessories with the unit ready for next season.
26
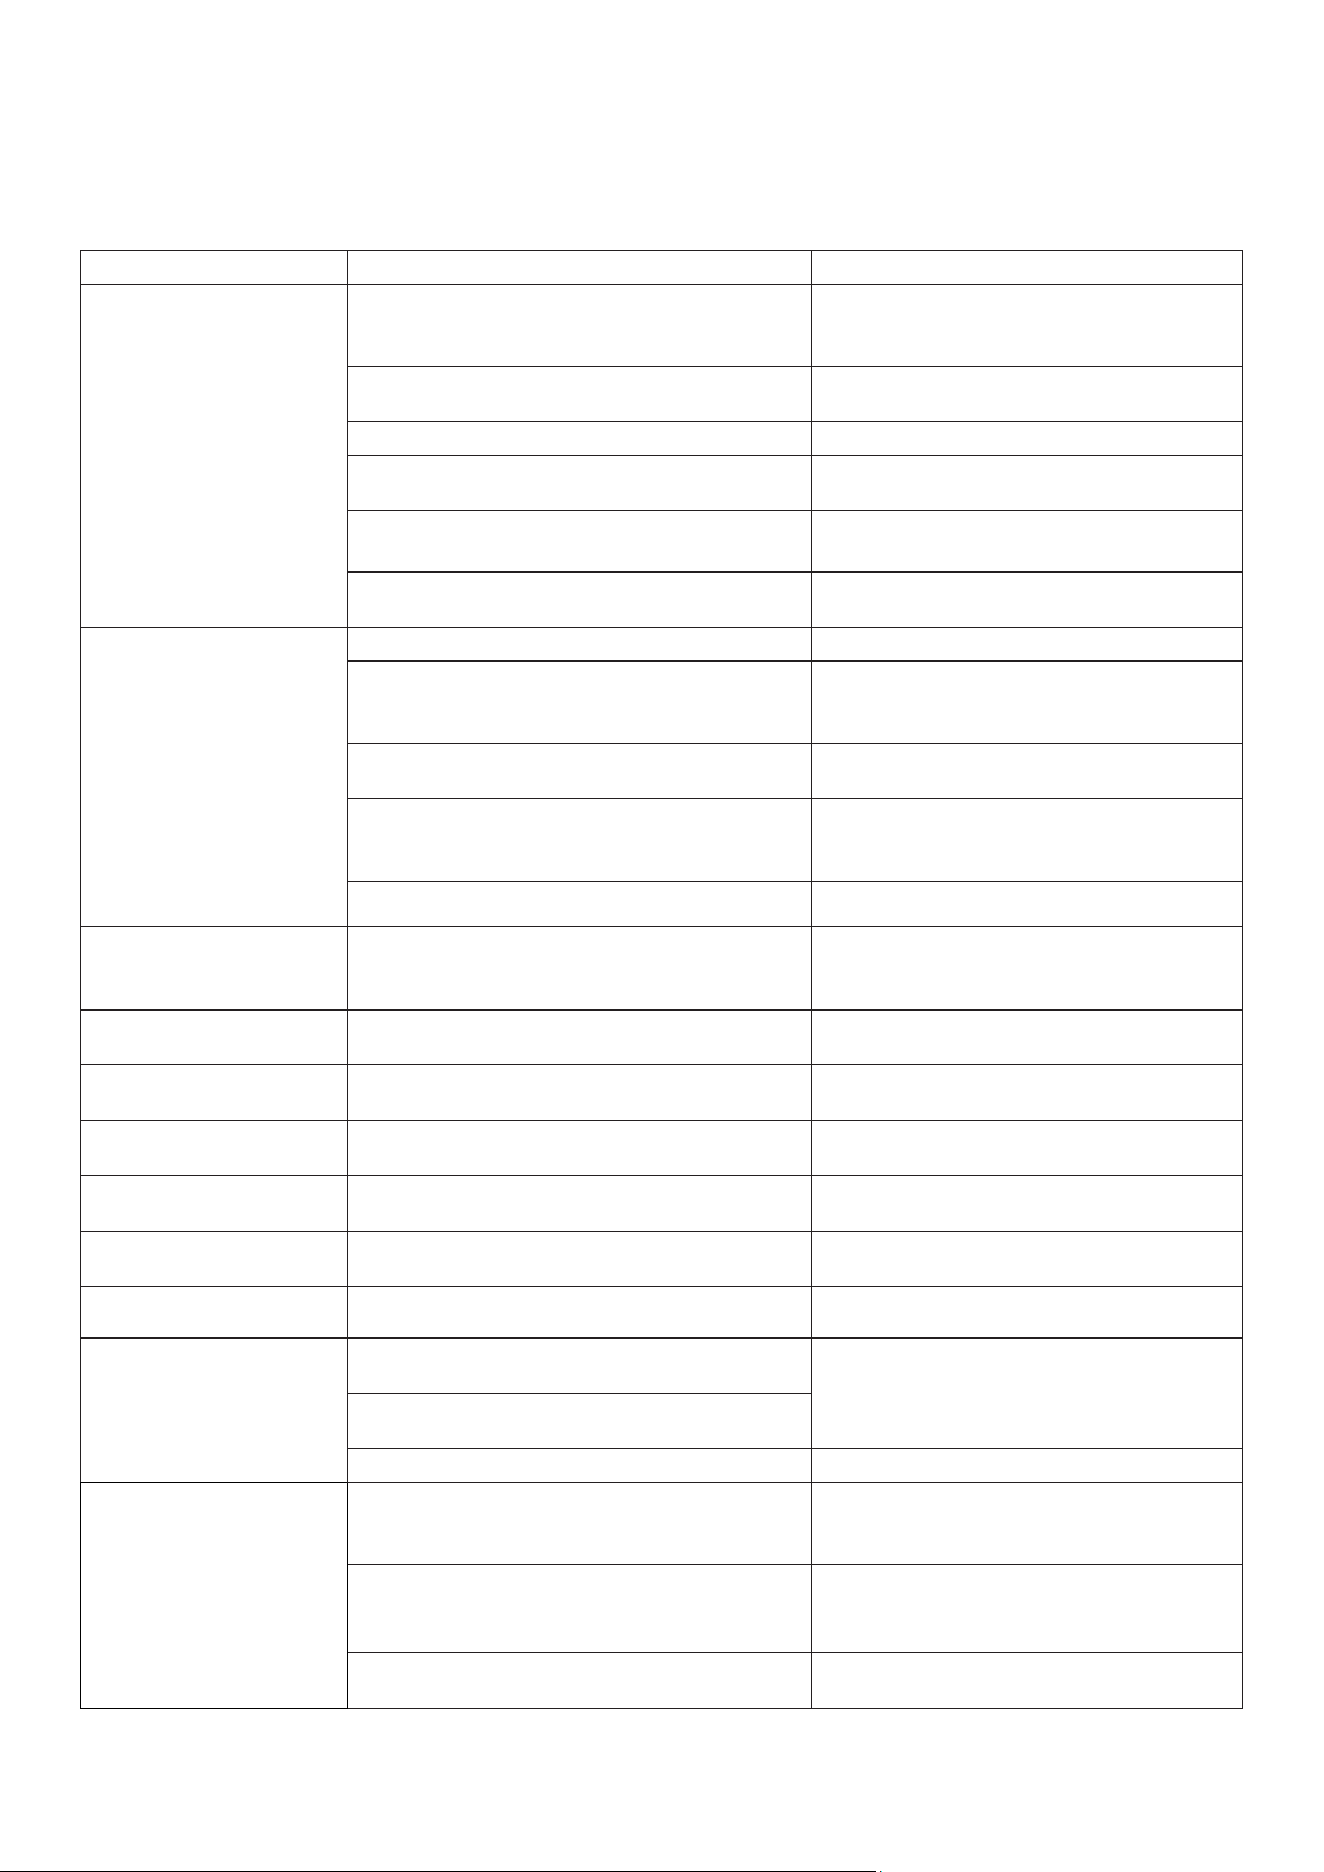
TROUBLESHOOTING
Do not repair or disassemble the air condioning. Unqualied repair will invalidate the warranty
and may lead to failure, causing injuries and property damage. Only use it as directed in this user
manual and only perform operaons advised here.
Problems
Reasons
Solutions
The air conditioner does
not work or unit turns
on but stops quickly
Power not connected; loose plug; socket
switched off
Please turn it on after connecting it to a
power outlet. Check mains outlet, ensure
plug is fully inserted and outlet has power
Overheat protection triggered; airflow blocked
Ensure 50 cm clearance around unit; clean
both filters; check exhaust hose
The display shows "FULL".
Discharge the water inside internal tank.
The ambient temperature is too low or too
high.
Only use the machine within a temperature
range of 7-35 °C
In cooling mode, the room temperature is
lower than the desired temperature.
Change the target temperature.
In dry mode, the ambient temperature is
low.
The ambient temperature must be above
17 °C
The cooling effect is not
good.
There is direct sunlight.
Use curtains to reduce direct sunlight.
Doors or windows are open; there are a lot of
people; or in cooling mode, there are other
sources of heat (e.g. fridges)
Close doors and windows; increase air
conditioning power
The filter screen is dirty.
Remove both mesh filters, rinse with
lukewarm water, dry fully, reinstall
The air inlet or outlet is blocked.
Clear obstructions: make sure venting is
correct as described in this user manual, and
the hose is not bent
Exhaust hose kinked or blocked
Straighten hose, remove obstructions
Blowing Warm Air.
Exhaust hose not fitted correctly; hose not
inserted correctly into fishtail, windows
slider or window seal.
Refit hose, ensure flat end snaps into
window sealing adapters.
Loud Noise.
The air conditioning is not placed on a flat
surface.
Put the air conditioner on a flat, hard surface
(to reduce noise).
The compressor does not
work.
Overheat protection starts.
Wait 3 minutes for the temperature to drop,
then restart the machine.
Water leaking.
Drain plugs may not be inserted properly;
container overflow during drainage
Reinsert plugs securely; use larger container;
avoid tilting unit excessively
Bad smell from air outlet.
Dirty filters; moisture inside unit
Clean filters; run unit in fan mode to dry
internal components
Exhaust hose gets very hot
Hose too long or coiled; poor ventilation
Keep hose between 280–1500 mm; avoid
bends
Wi-Fi indicator not lighng
WI-FI not activated
Hold TIMER for 3 seconds to enable Wi-Fi
The remote control does
not work.
The distance between the machine and the
remote control is too far.
Bring the remote control closer to the air
conditioner and ensure it faces the receiver
directly.
The remote control is not aligned with or too
far from receiver.
Batteries are low or discharged.
Replace batteries.
Others
No refrigerant or there is minimal refrigerant.
Refer to the Service Centre (check leakage,
welding, vacuum pump, charge refrigerant
according to nameplate)
Anti-freezing protection
Waiting for defrosting.
The function will recover automatically. No
user input is needed.
High-pressure protection.
Once the internal gas pressure drops, it will
function normally. No user input is needed.
27
If problems not listed in the table occur or recommended soluons do not work, please get in touch
with the service centre.
1. Has the unit been standing upright for at least 2 hours?
2. Is the unit plugged into the mains?
3. Is the fuse OK?
4. Switch the unit o and wait three minutes to see if the issue is resolved.
Restart the unit.
5. Check if the water tank is full.
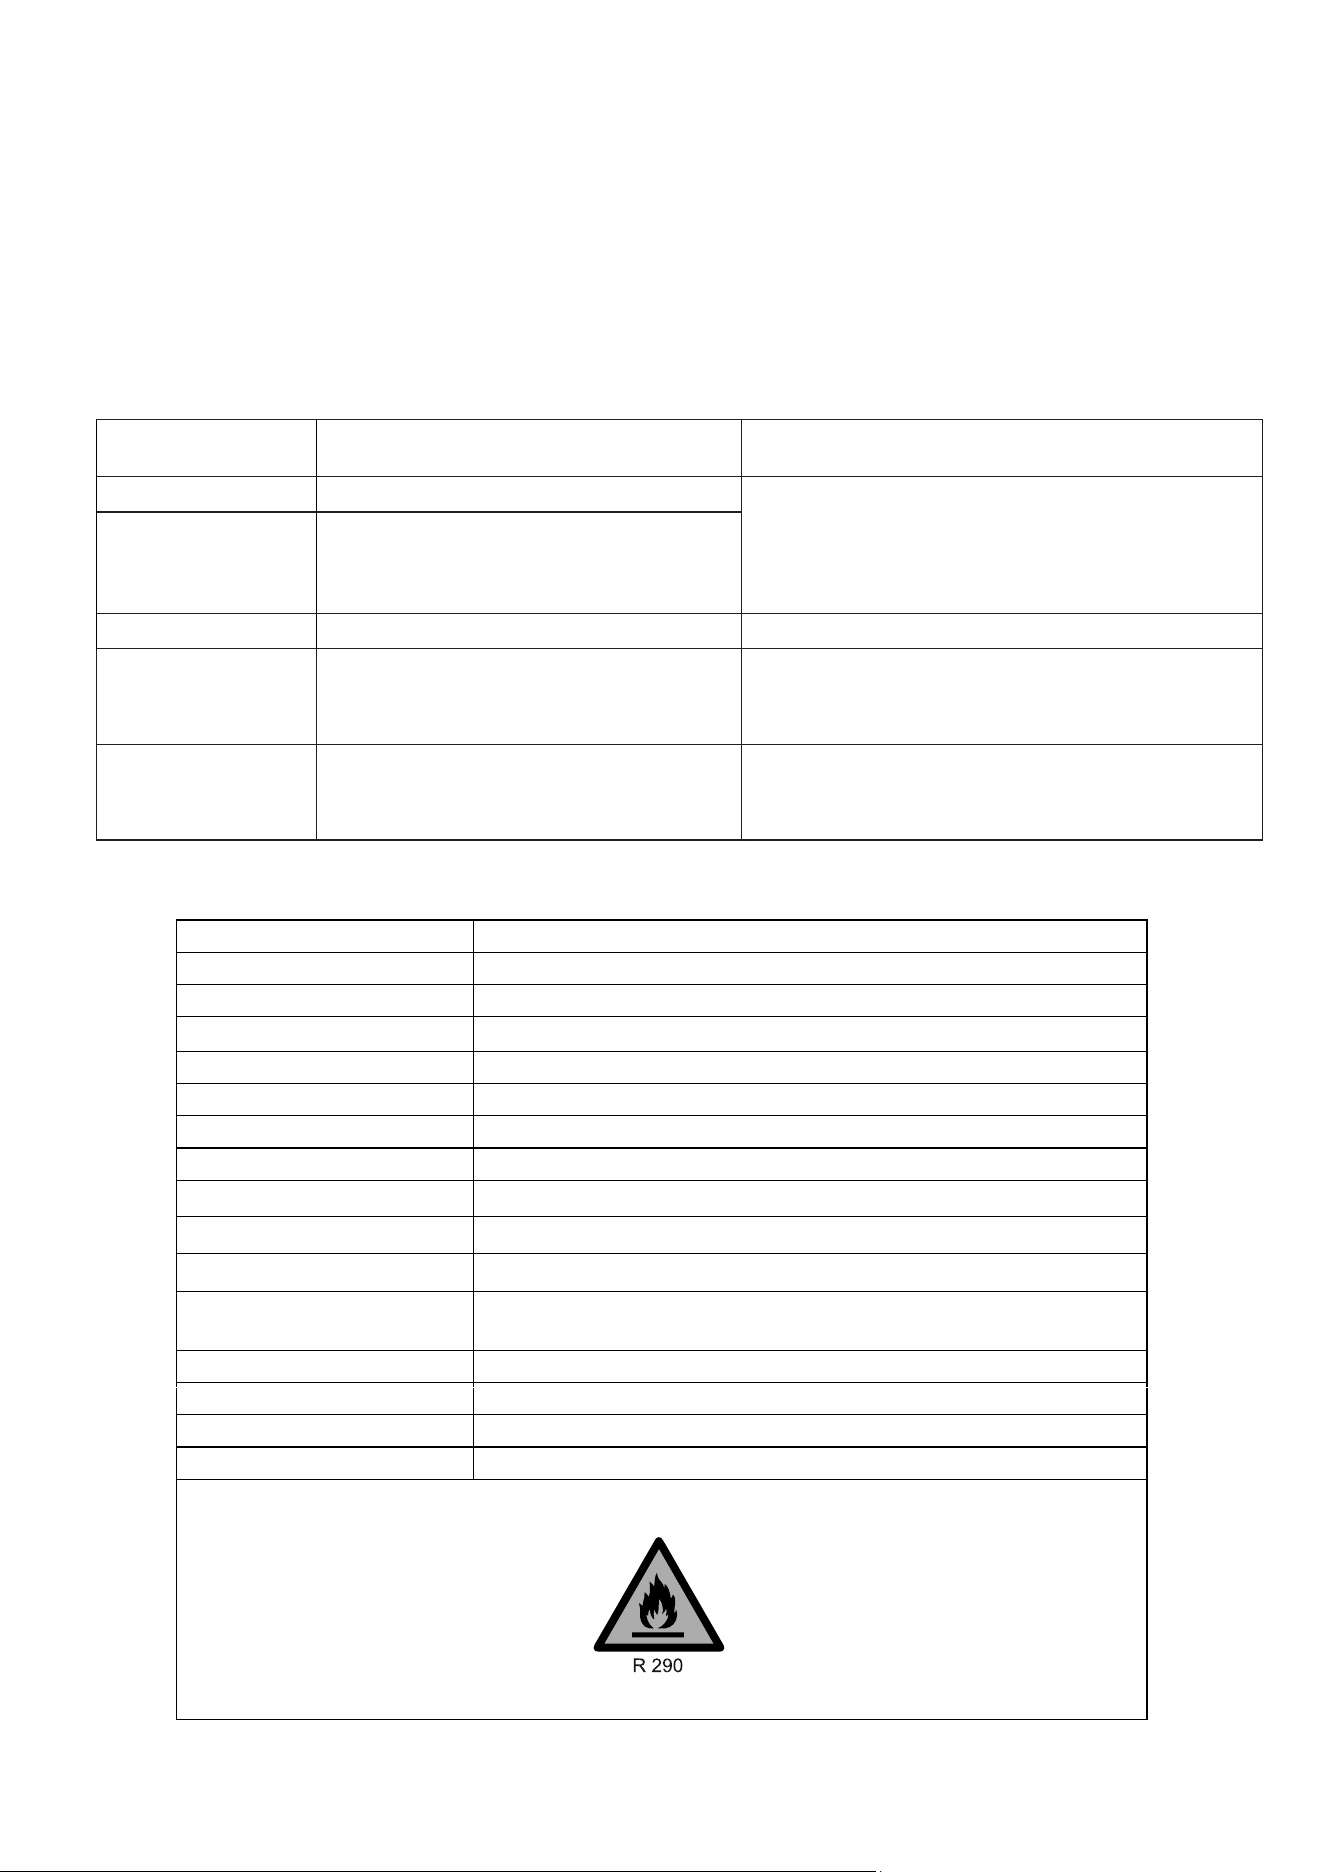
ERROR CODES
CODE /
DISPLAY STATUS
CAUSE
SOLUTION
E1
Room temperature sensor error
Check to ensure filters are clean, the vent hose is not
restricted, and the room temperature is within the
operational range. Failing this contact a qualified
service technician to check the room temperature
sensor/ evaporator sensor and wiring.
E2
Evaporator pipe coil temperature sensor
error
FL
Water Tank Full
Empty the water tank.
DH
Unit is in dry mode.
No fault, this is the indication of the mode.
MODE LIGHT FLASHING
This is normal – it shows which mode is
operating, but the compressor is not running.
The unit will start operation when the protection
period has finished (approx. 3 minutes)
TECHNICAL
DATA
Model
P18CW
Cooling capacity:
5270w
Rated Input:
2026w
Input Current:
8.9A
Fan:
3-speed motor
Airflow:
550m
3
/h
EER Rate:
2.6 / A
Refrigerant:
R290/300g
Sound Power Level:
65dB(A)
Sound Pressure Level
55-59dB(A)
Thermostat:
16-31˚C
Maximum Allowable Pressure of
suction/ exhaust side:
0.8/3.5Mpa
Maximum Allowable Pressure
3.5MPa
Power Supply:
AC 220-240V/50 Hz
Net Weight:
35Kg
Dimension(L*D*H):
394*470*770 mm
The unit must be vented outside when in air-cooling mode. For the purposes of EU regulation EN12102,
this is a local air conditioner that produces less than 65dB(A) sound energy.
28
PRODUCT FICHE
Descripon
Symbol
Value
Unit
P18CW
Rated capacity for cooling
P
rated
for cooling
5.27
kW
Rated power input for cooling
P
EER
2.026
kW
Rated Energy eciency rao
EER
d
2.6
-
Power consumpon in
thermostat-o mode
P
TO
NA
W
Power consumpon in standby
mode
P
SB
1
W
Power consumpon in standby
mode with Wi-Fi on
P
SB
2
W
Electricity consumpon of
single/double duct appliances
SD: Q
SD
2.026
SD:
kWh/h
Sound power level
L
WA
65
dB(A)
Global Warming Potenal
GWP
3
kgCO
2
eq.
PSTI STATEMENT OF COMPLIANCE
Descripon: Air Condioner
Model Number: P18CW
Manufacturer: electriQ, 2A Trident Business Park, Leeds Road, Hudderseld, HD2 1UA
PSTI Contact: TiSecurity@buyitdirect.co.uk
We have prepared this statement of compliance and can conrm that this product is compliant with the deemed
compliance condions in Schedule 2 of The Product Security and Telecommunicaons Infrastructure (Security
Requirements for Relevant Connectable Products) Regulaons 2023.
Duraon of security updates: 31/01/2031. This date is correct at the me of prinng, but we may be extended. Please
visit www.electriQ.co.uk for the latest informaon and details of our PSTI compliance.
Richard Leach
Compliance and Quality Manager, Buy It Direct, Hudderseld
19
th
December 2025
EU DECLARATION OF CONFORMITY
Hereby, electriQ declares that these air condioners are in compliance with Direcve 2014/53/EU. The full
text of the EU declaraon of conformity is available at the following internet addresses:
hps://www.electriq.co.uk/les/DOC/EU/P18CW.pdf
29
UK DECLARATION OF CONFORMITY
Hereby, electriQ declares that these air condioners are in compliance with Radio Equipment Regulaons
2017. The full text of the UK declaraon of conformity is available at the following internet addresses:
https://www.electriq.co.uk/files/DOC/UK/P18CW.pdf
electriQ UK SUPPORT
www.electriQ.co.uk/support
Please review the troubleshooting section for your convenience before calling the service line.
Call the number below if the unit fails to operate or complete the online form.
0330 390 3061
Office hours: 9 AM - 5 PM, Monday to Friday
www.electriQ.co.uk
Unit 2A, Trident Business Park,
Neptune Way, Leeds Road, Hudderseld, HD2 1UA.
Disposal: Do not dispose this product as unsorted municipal waste. Collection of such
waste must be handled separately, as it requires special treatment. Recycling facilities
are now available to all customers, where you can deposit your old electrical products.
Customers will be able to take any old electrical equipment to participating civic
amenity sites run by their local councils. Please remember that this equipment will be
further handled during the recycling process, so please be considerate when
depositing your equipment. Please get in touch with the local council for details of
your local household waste recycling centres.
V20260112VS-2