UMATOLL
Read this manual carefully before use and keep it for future reference.
ASTM F963,CPSIA
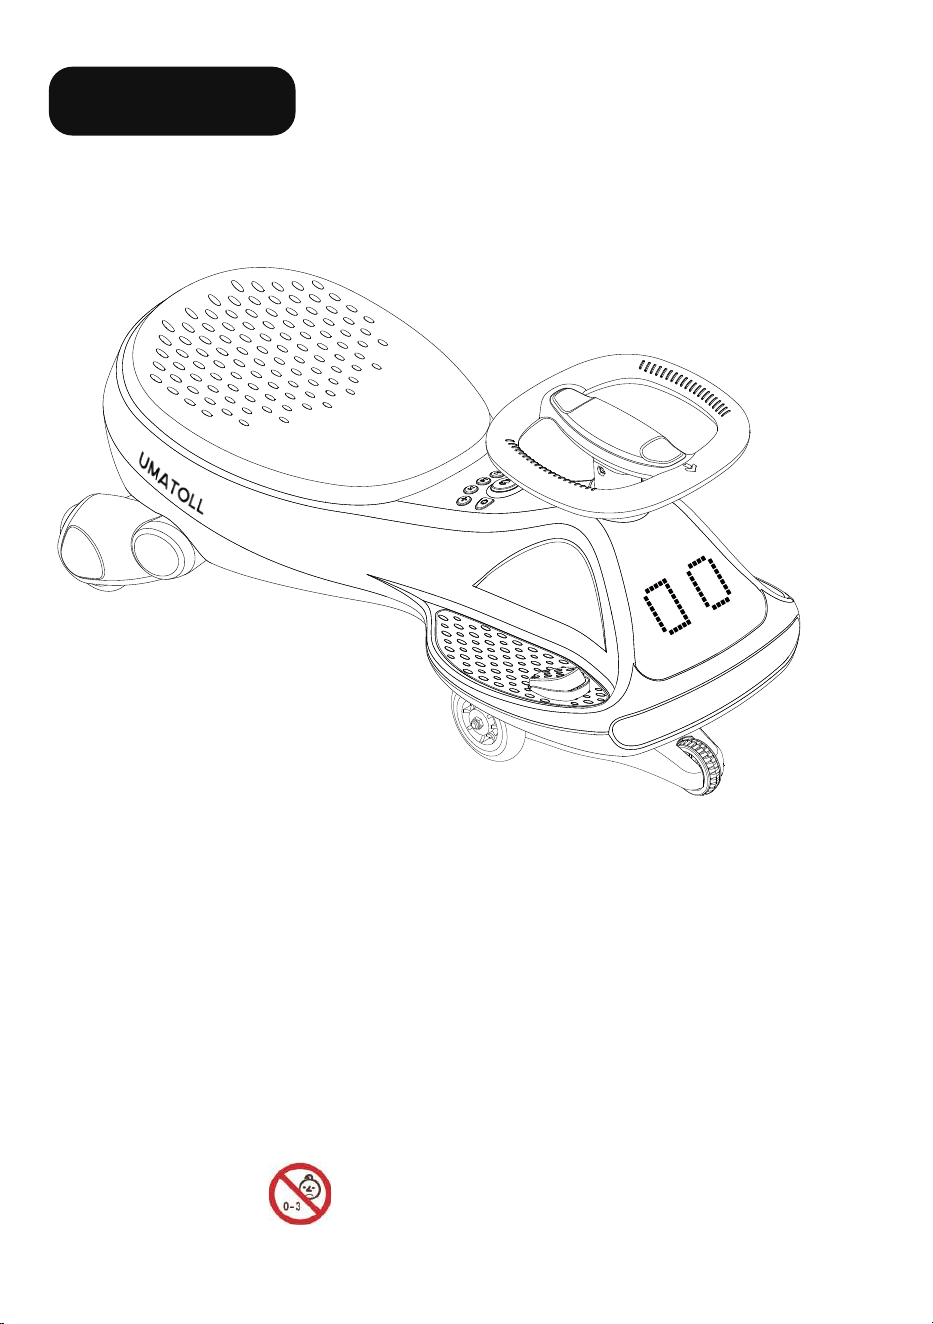
Electric Wiggle Car
Model No: UT501
Trademark: UMATOLL
Manufacturer Name: CHIZHOU FANGXI TOY
TECHNOLOGY CO., LTD.
Manufacturer Address: No. 01, Jianshe Road, Matang
Industrial Zone, Dingqiao Town, Qingyang County, Chizhou
City, Anhui Province, 242807, China
Email: UMA[email protected]
Telephone: +86 173 7674 7653
1
About Your New Vehicle
WARNING!
Battery:
Material:
Suitable age:
Load Capacity:
Size of car:
Speed:
Charging time:
Charger:
Fuse:
12V 4.5Ah
PP, PU
3+ years
Max 150lbs
73.5×33.8×38.2cm
1.9-4mph
4-6 hours
INPUT: 100-240V OUTPUT: 12V DC 500mA
Auto-reset fuse
1. It should be used under adult guidance.
2. Parents should ensure that children have taken the safety measures before
use.
3. The toy should be used with caution since skill is required to avoid falls or
collisions causing injury to the user or third party.
4. Products should be assembled by an adult. Protective equipment should be
worn. Not to be used in traffic. Not suitable for children under 3 years. Choking
hazard-small parts. In unassembled state, contains potentially
hazardous small parts. Please keep out of the reach of small children. Pay
attention to the potential hazards of using the toy in areas other than private
grounds.
5. When the vehicle's driving load exceeds 150 lbs, PU wheels may cause
scratches and damage to hardwood floors.
2
Safety Information
WARNING!
General Safety:
Positioning:
Before Use:
1. Where products need assembly they must always be assembled by an adult.
As a parent/carer, it is also your responsibility to check the tightness of screws,
nuts and bolts before each use and if necessary, adjust and re-tighten.
2. This product may contain small parts and it is your responsibility as a
parent/carer to exclude children from the area during assembly due to small
parts.
3. Remove protective material and poly bags and dispose of them responsibly
before giving the assembled product to your child.
4. Remember to retain these instructions for future reference.
1. Do not allow your child to ride at night or in poor light conditions.
2. Do not let your child play near steps, swimming pools / spas or other sources of
water, on slopes, on streets or around cars, even if parked on your own property.
3. It is prohibited to drive/use this product on the public roads.
4. This product is designed to be used on smooth surfaces and should not be
used on soft ground or in the rain or snow. May not be suitable for carpet driving.
1. Very Important! You Must Charge The Battery Fully Before The First
Use.
2. Dispose of all packaging material responsibly before giving this product to
your child.
3. Check tightness of all components before giving this product to your child.
3
During Use:
1. This product is only suitable for children 3+ years old.
2. The toy should be used with caution since skill is required to avoid falls or
collisions causing injury to the user or third parties.
3. The maximum rider weight capacity for this product is 150lbs. Overload may
damage this product.
4. Adult supervision is highly recommended when children play with wheeled
toys. Please take care of your child.
5. Do not allow the child to ride with bare feet or without suitable footwear.
6. Ensure the child keeps clothing, hands, hair, fingers and feet away from
moving parts.
7. The use of protective gear including approved helmets, gloves and pad is
recommended.
8. Store this product at room temperature; do not leave it outside or uncared
for.
9. Never let any child play with the battery or charger at any time, or let them
charge the product.
10. Do not use if product is faulty or damaged.
11. Do not tamper with the battery or electrical parts inside the product.
Safety Information
WARNING!
4
Charging the Battery:
Safety Information
WARNING!
1. All charging and re-charging must be carried out by an adult.
2. Do not attempt to use the product while it is being charged. When charging,
all the functions will be cut off.
3. Charging should be carried out under cover and in a well-ventilated area.
4. Make sure the vehicle is powered off while charging.
5. Always ensure the charger is plugged into a wall outlet. Do not use an
extension.
6. Do not charge near sources of potential sparks, fires or flames or where
flammable gases, liquids and materials are stored.
7. During charging the battery and the charger may get hot.
8. Only charge the battery for a maximum time of 20 hours.
9. Always ensure that once the battery becomes discharged/flat that you
re-charge for the recommended time. Failing to do so will significantly shorten
battery life.
10. Charging the product below 4°C (40°F) or above 40°C (104°F) will decrease
the battery life significantly.
11. V.R.L.A. batteries are heavy and contain lead & acid. They are dangerous if
improperly handled.
12. Only use the charger supplied with the product. The use of other chargers
may cause damage to the battery and/or cause explosion.
13. Battery chargers used with the toy are to be regularly examined for
damage to the cord, plug, enclosure and other parts, and in the event of such
damage, they must not be used until the damage has been repaired.
14. Only use the battery supplied with this product. The use of other batteries
may cause damage to the motor, charger and subsequent wiring, which could
lead to fire and/or explosion.
15. Never short-circuit the terminals of the battery, or any subsequent wiring.
16. Never bypass or bridge a broken/blown fuse or circuit breaker and always
replace with the same type/value and model.
5
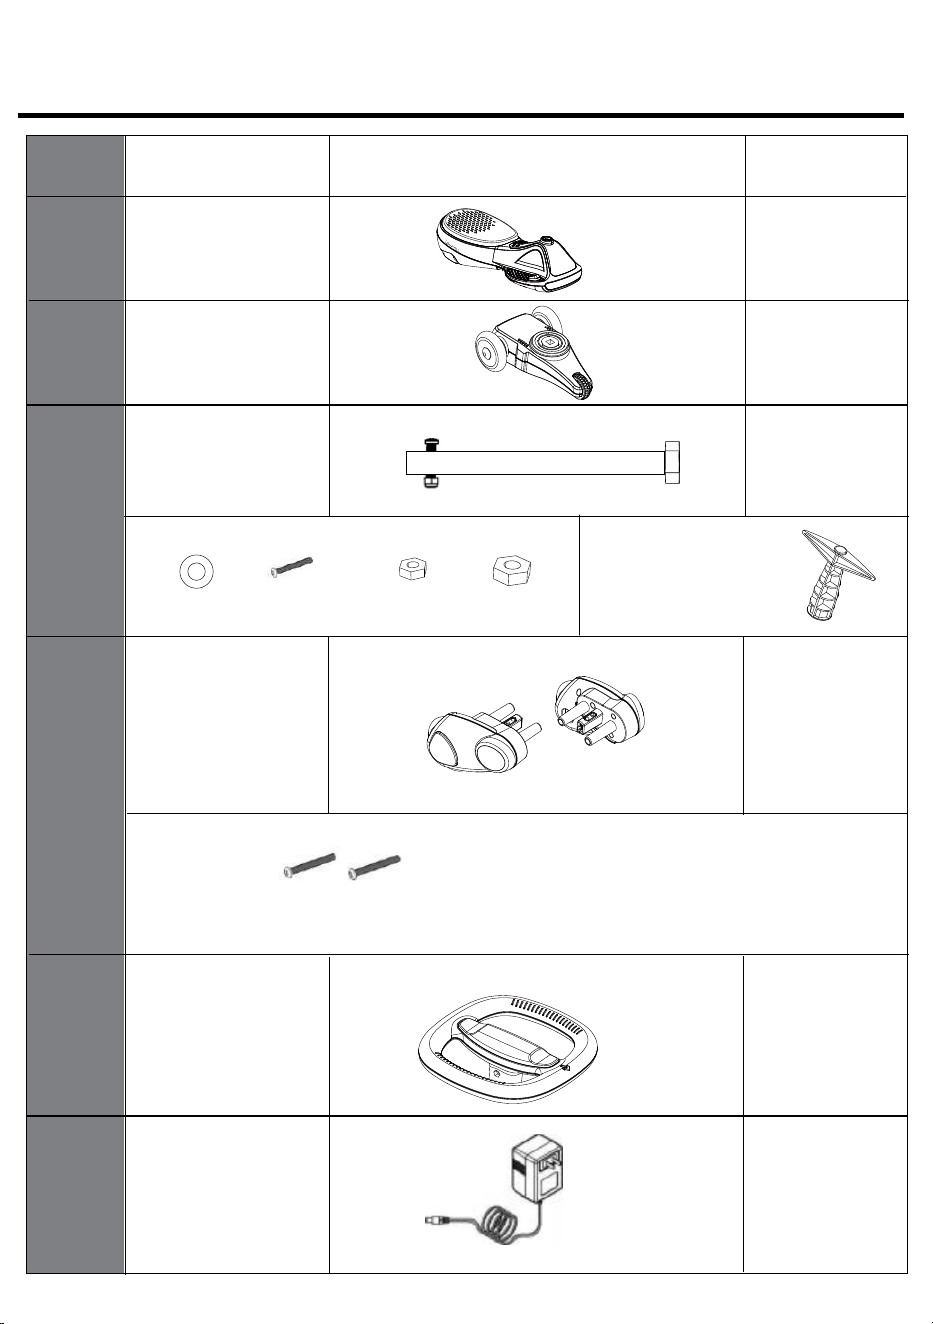
Square tube
Socket Wrench:
For tightening M8 nuts.
Connect the rear wheels
to the vehicle body.
M5×38 Bolt
M5×38 Bolt M5 Nut M8 Nut
Rear wheel
Charger
Parts List
No.
1
2
3
4
5
6
Image
Description
Vehicle
body
Bogie
Steering
wheel
1
1
1
2
1
1
Qty
Placed on the Square tube.
Washer
6
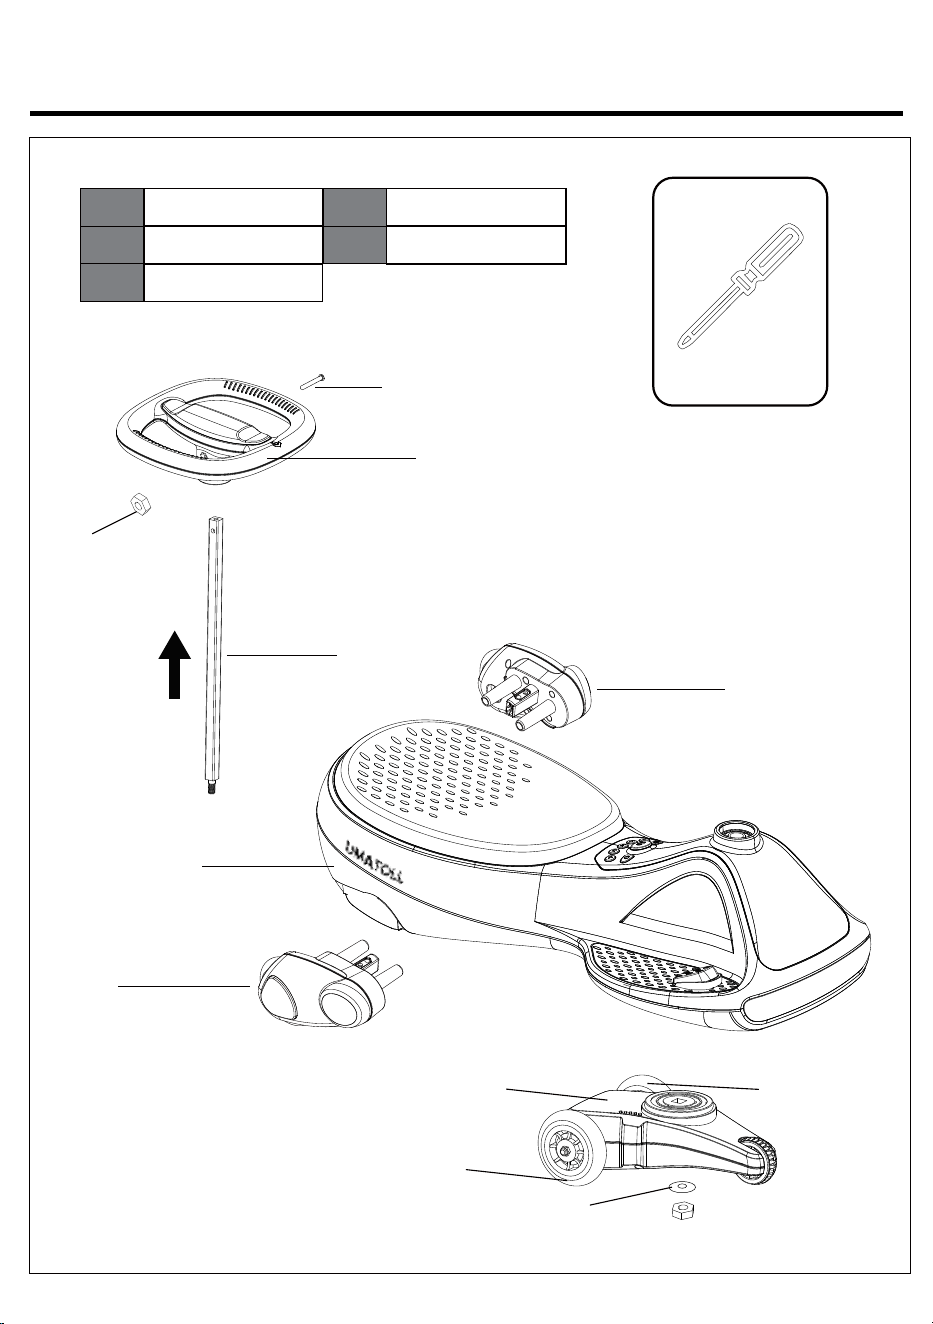
Parts Diagram
Tools Required
Screwdriver(not incIuded)
1 2
3
Vehicle body*1
Square tube*1
Bogie*1
Steering wheel*1
Driving wheel
4
5
Non-powered wheel
Rear wheel*2
4 Left rear wheel
1
2
3
3
3
5
4 Right rear wheel
M8 Nut
Washer
7
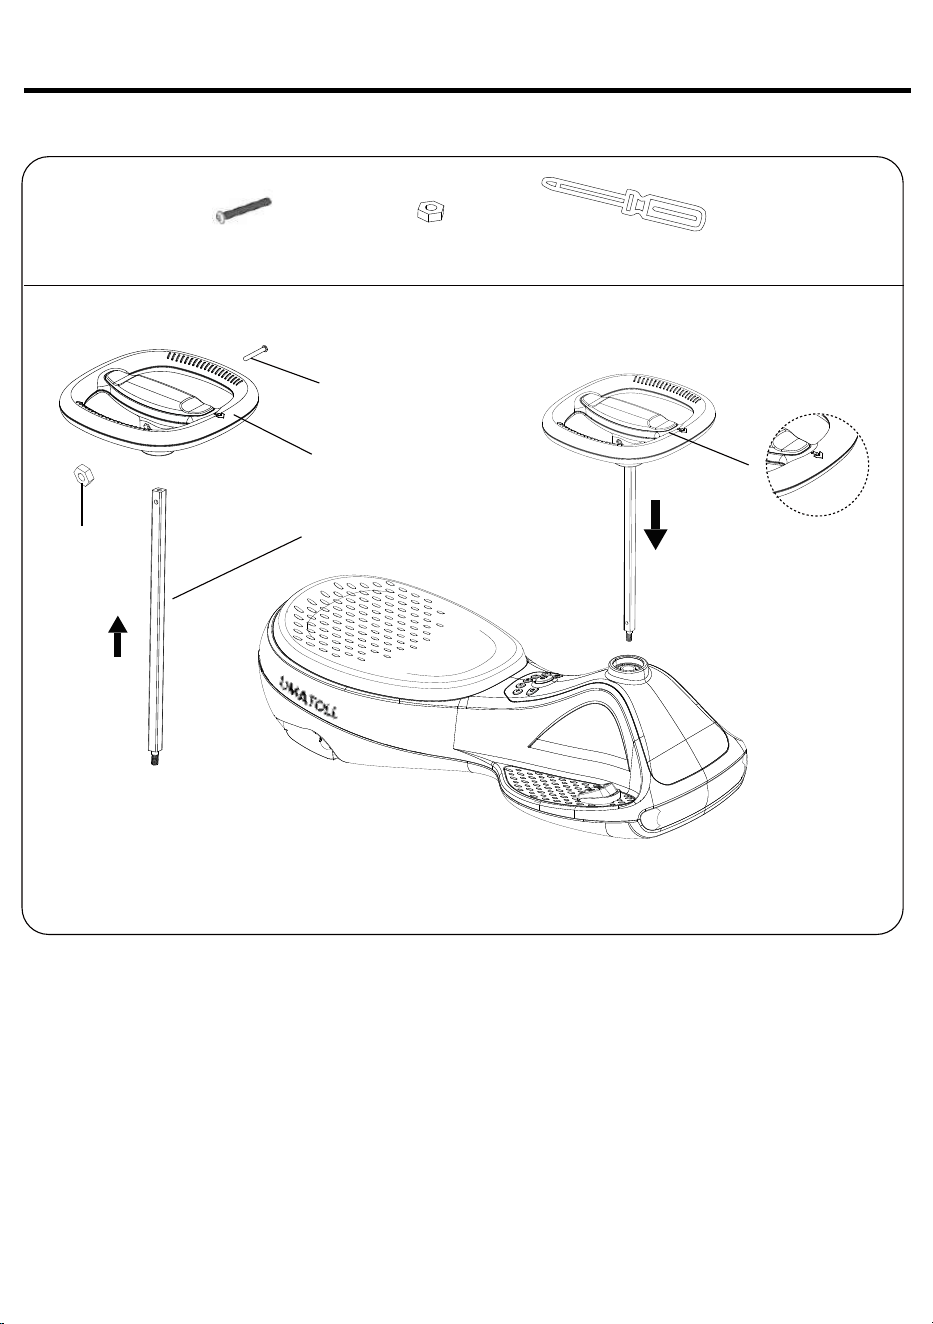
1.Install the square tube and steering wheel.
Screwdriver
1. Remove the bolt and nut from the square tube.
2. Insert the square tube into the steering wheel and align it with the holes.
3. Insert the bolt through the holes and fasten the nut.
4. Insert the fully assembled steering wheel and square tube into the vehicle
body.
Note: The side of the steering wheel with the arrow should face forward.
Assembly Steps
Steering wheel
Forward
M5 Nut
M5 Nut
square tube
M5×38 Bolt
M5×38 Bolt
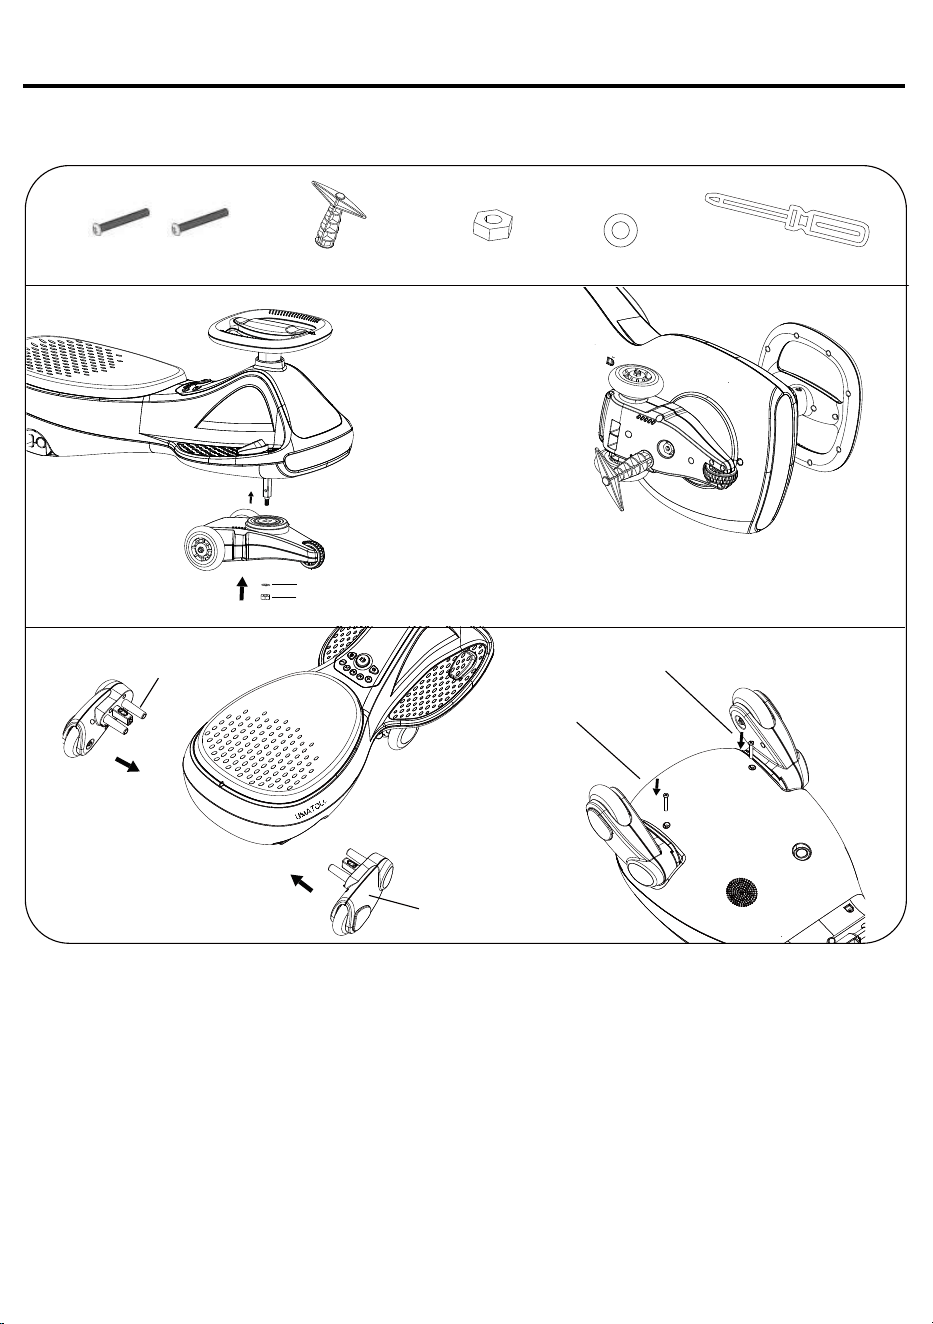
2. Install the bogie and rear wheels.
1. Remove the washer and M8 nut from the end of the square tube.
2. Insert the end of the square tube into the bogie.
3. Install the washer and M8 nut to the bottom of the bogie in sequence.
4. Use the included socket wrench to tighten the nut until the bogie is securely fixed.
1. Align the right rear wheel with the right rear wheel hole of the vehicle body, insert it,
then insert the bolt into the corresponding hole on the vehicle body and tighten it.
2. Align the left rear wheel with the left rear wheel hole of the vehicle body, insert it,
then insert the bolt into the corresponding hole on the vehicle body and tighten it.
Assembly Steps
M5X38 Bolt X2
M5X38 Bolt
M5X38 Bolt
Forward
Screwdriver
M8 Nut
M8 Nut
Socket Wrench
Socket Wrench
Right rear wheel
Left rear wheel
8
Washer
Washer
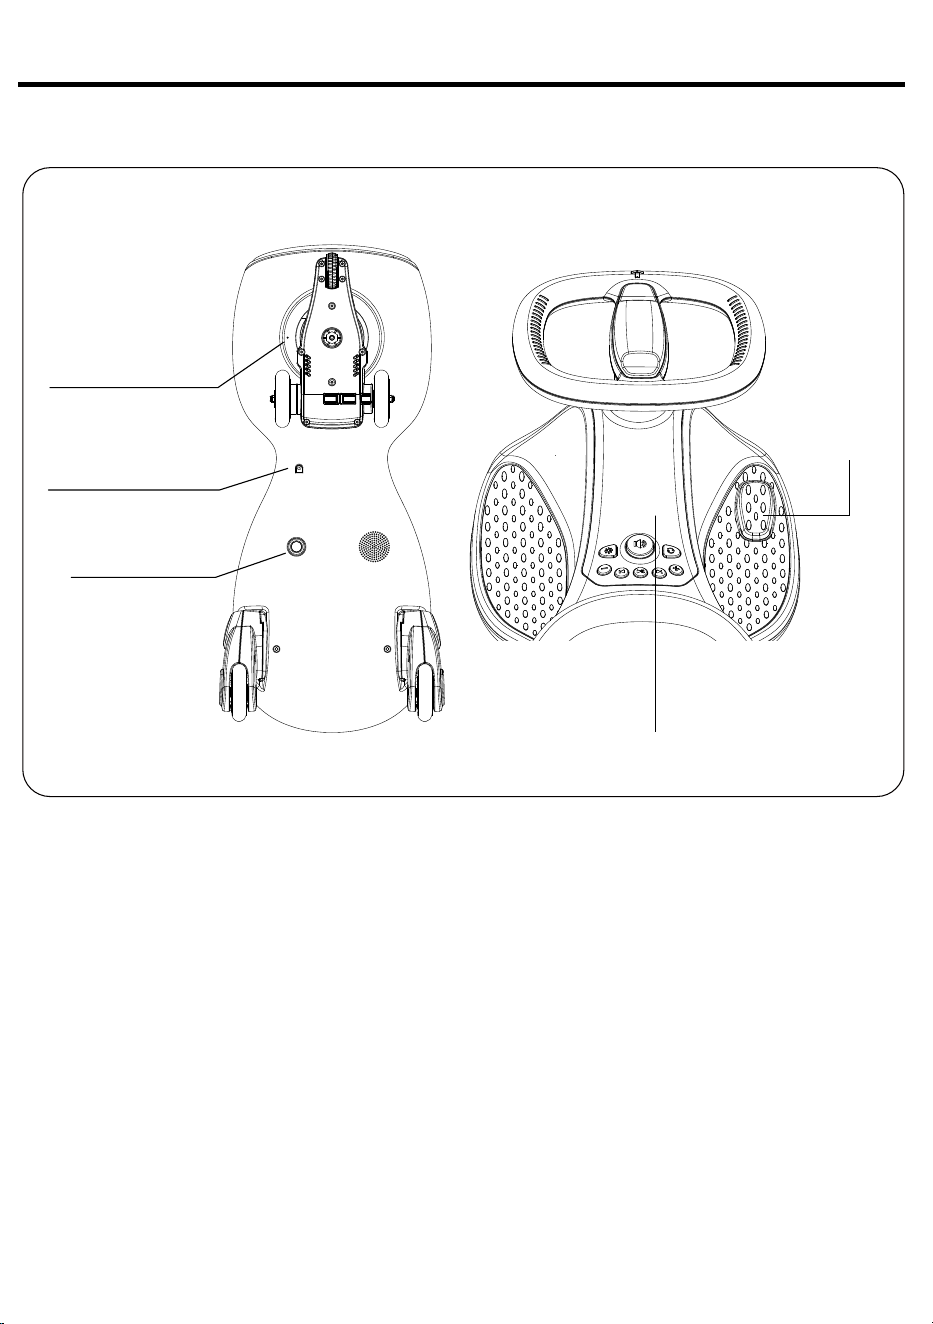
How To Operate Your Vehicle
Pedal Switch
Control Panel
Power Switch
Charging Input Socket
Parent Control Butlon
Use Manual(Ensure the power switch has been turned on)
1. Turn on the power switch.
2. Forward
Hold the steering wheel in the forward direction. Press the pedal switch. The
vehicle will drive forward.
3. Stop
Release the pedal, then the motor will stop engaging. The vehicle will stop
gradually.
4. Reverse
Turn the steering wheel 180° to make it face backward. Then press the pedal
switch to make the vehicle go reverse.
9
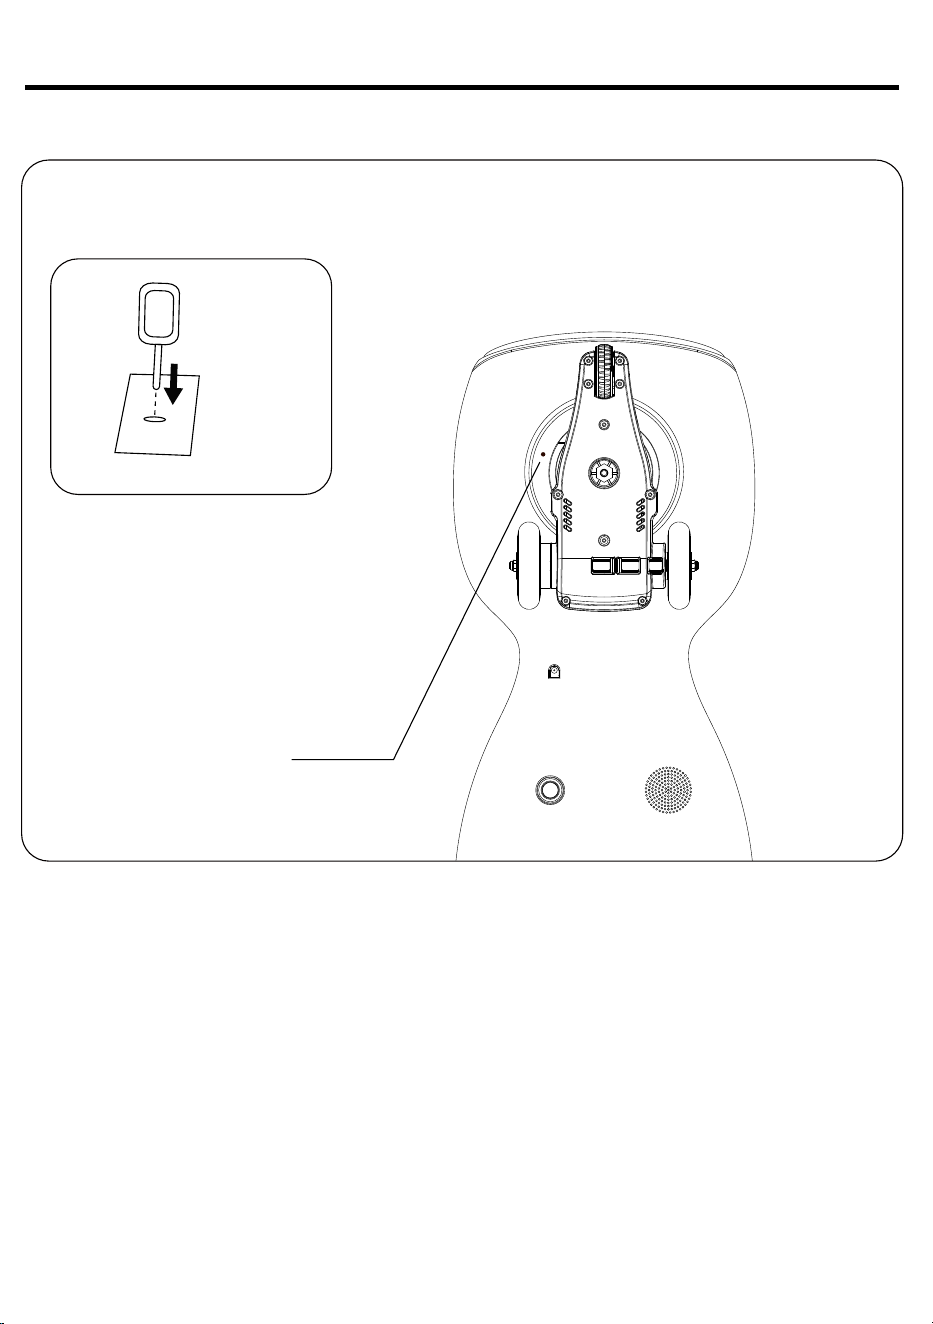
Parent Control Button
Ejection Pin
(Not Included)
Hole
IMPORTANT!
Always stop the vehicle first before changing the direction to avoid rollover
and damage to the gear box and motor.
Not recommended to ride on carpet, grass, gravel and other ‘rough’
surfaces, which will diminish the toy's ability to propel forward.
5. Parent Control
Pin the button inside pinhole to shift gearing between Low/Fast.
How To Operate Your Vehicle
10
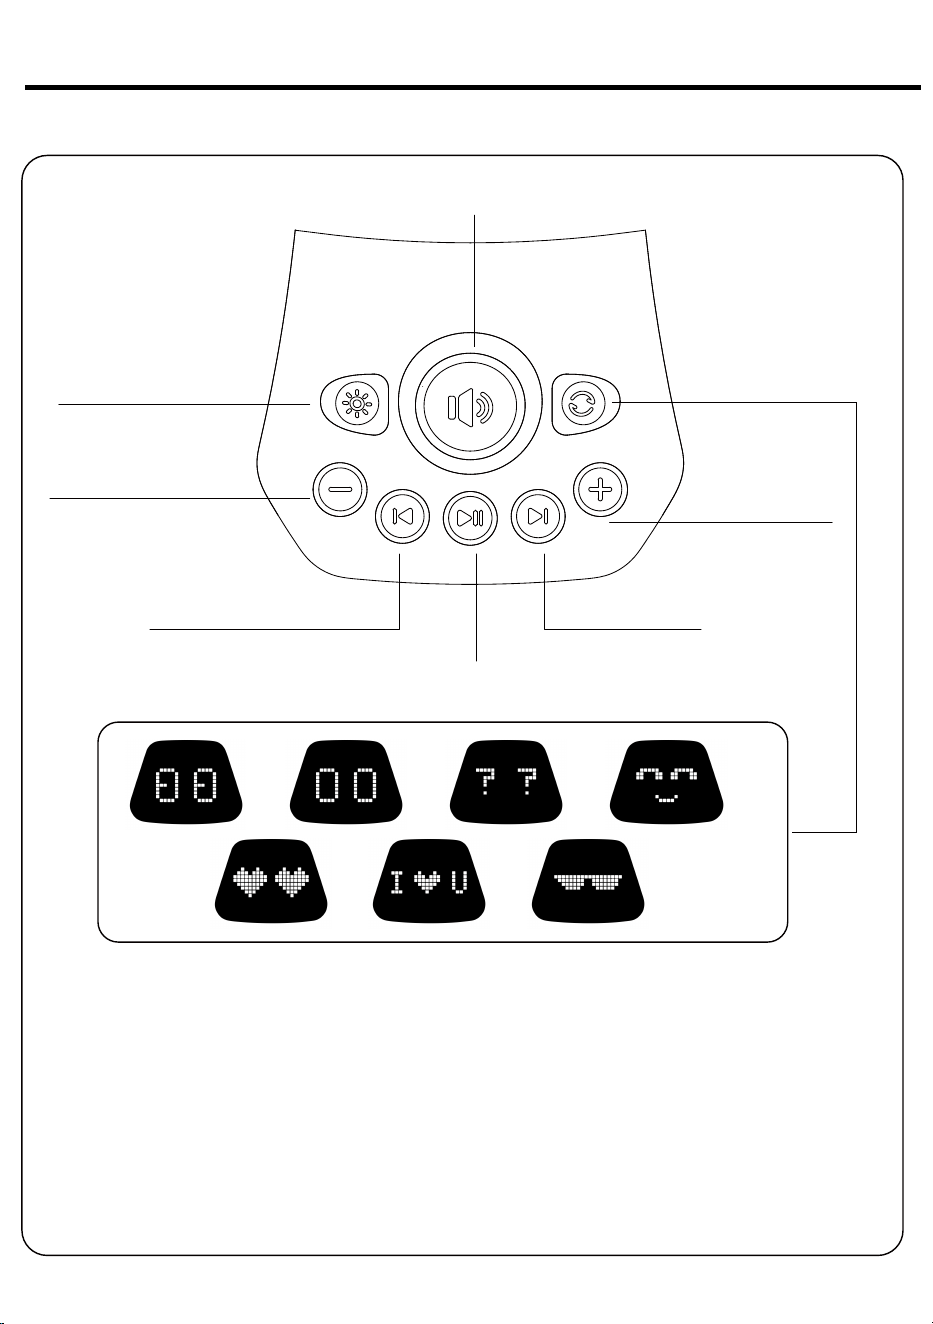
Instruction of Control Panel
How To Operate Your VehicIe
Light Control
(Press the button to change the color
of the LED light strip.)
Horn Control
Expression Switch
Press this button to switch between different expressions on
the display screen.
Note:
1. Press and hold the Light Control button for 3 seconds to turn off the lights
automatically.
2. Press and hold the Expression Switch button for 3 seconds to turn off the display
automatically.
3. Press and hold the Music Play/Pause button for 3 seconds to disconnect the
Bluetooth automatically.
Volume Down
Volume Up
Music Play/Pause
Previous Track
Next Track
11
How To Operate Your Vehicle
Bluetooth Function Operation
Turn on the power switch located at the bottom of the wiggle car, then enable
Bluetooth on your mobile phone. Search for the ‘UT501’ device and connect to it.
Once successfully connected, you can play music through your mobile phone.
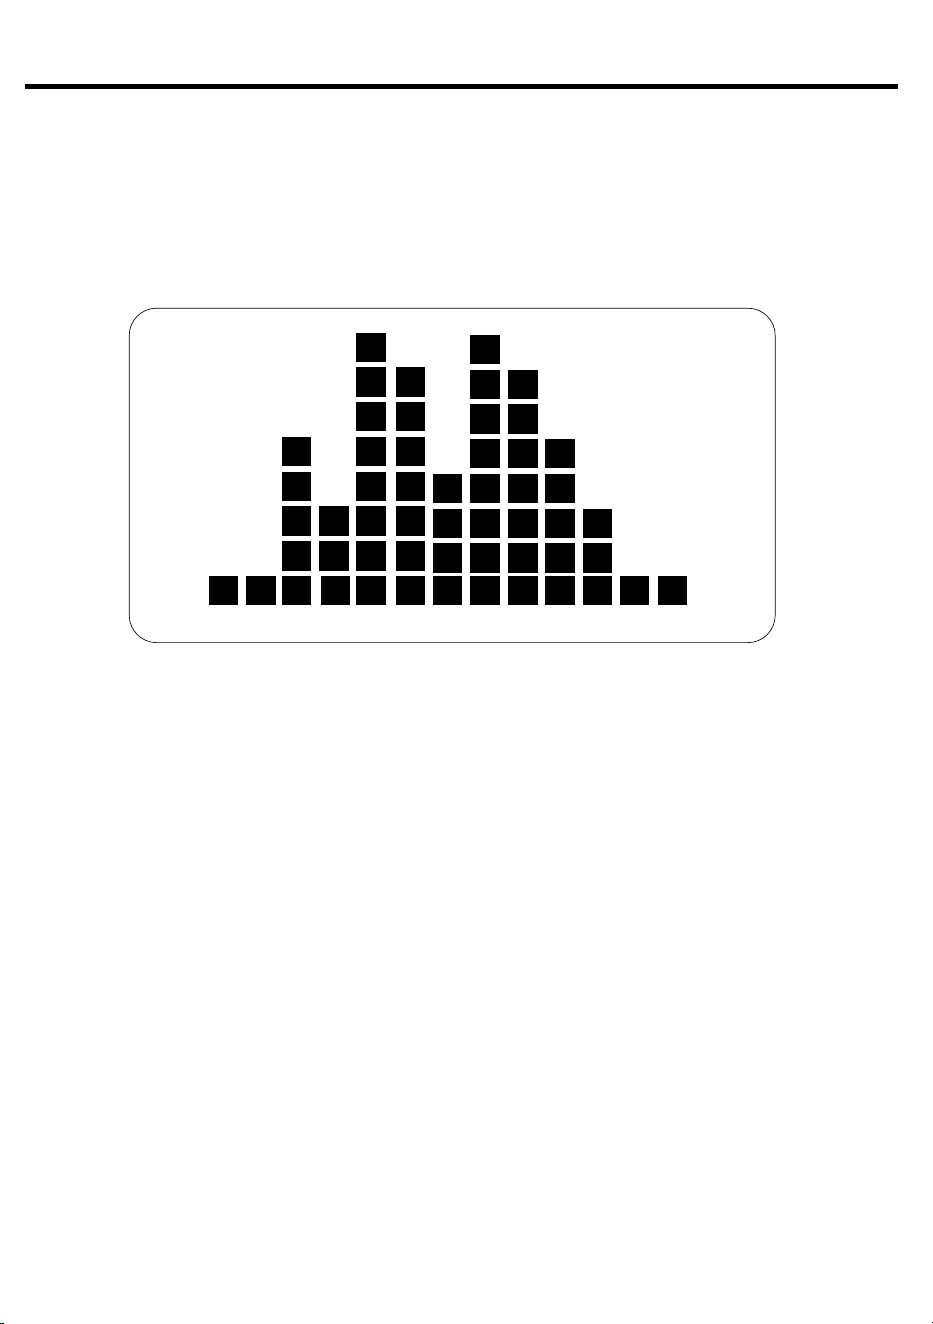
When Bluetooth is connected and music is playing, the display will
automatically switch to the Music Rhythm Mode, where the screen
presents dynamic visual effects synchronized with the beat of the music.
The rhythm display will automatically turn off and revert to the Expression
Mode if music playback stops for more than 10 seconds.
12
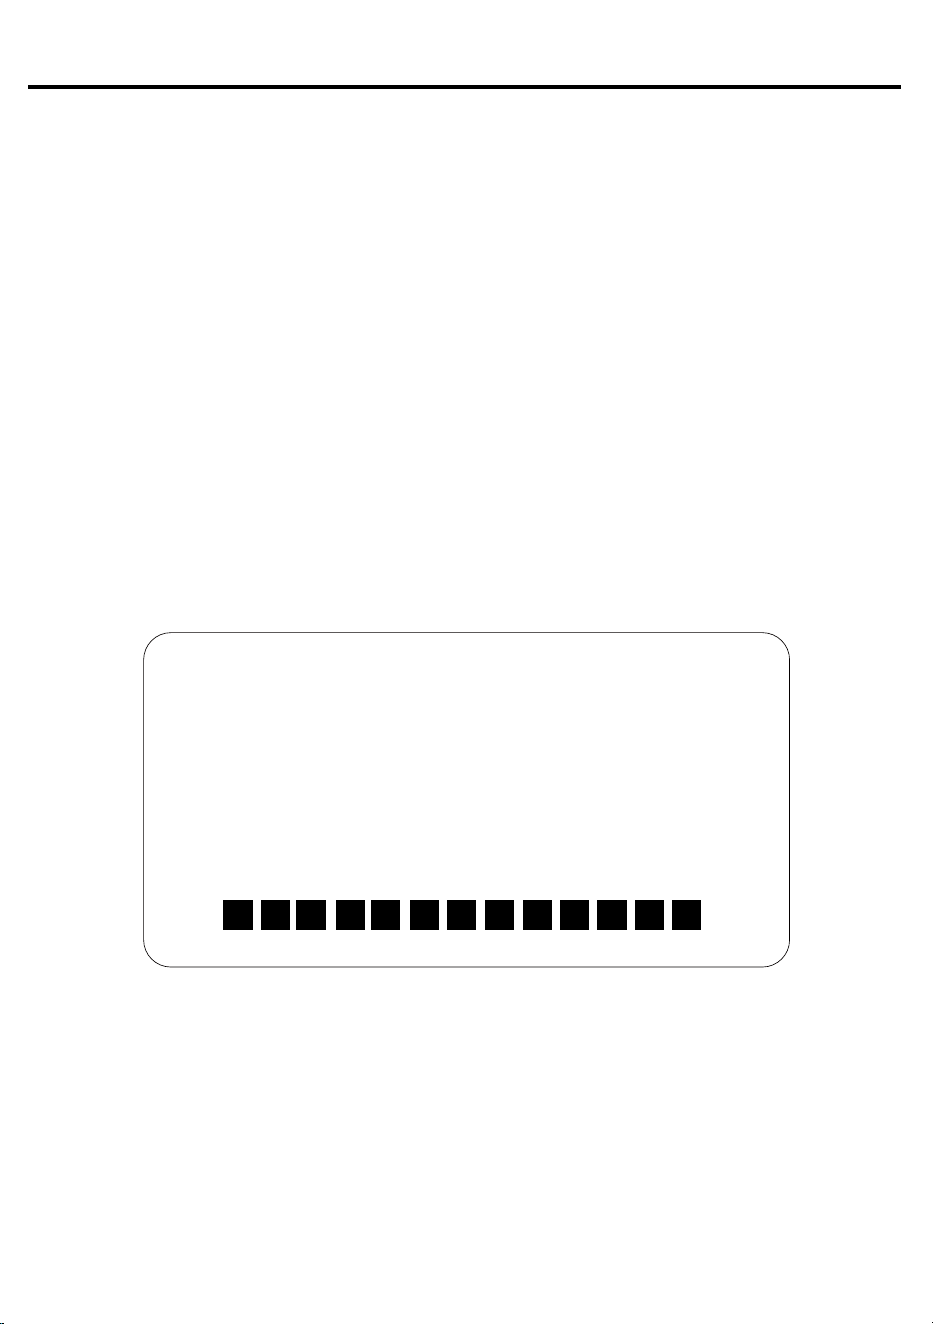
3. If you continue to step on the pedal but the vehicle is unable to move forward due
to obstruction, the system will automatically cut off the power. After about 10 seconds,
the power will automatically recover, and the device can be used normally.
Additional Operating Instructions
1. If the device has no operation for 20 minutes, it will automatically enter sleep
mode. At this time, press the light control button to turn on the light again; press the
expression switch button to reactivate the display screen; press the music play/pause
button to restart the Bluetooth connection function.
2. After the Bluetooth connection is successful and music playback starts, the display
screen will automatically switch to the rhythm mode. If you need to switch the display
content, you can press the expression switch button, and the display screen will
switch to the expression mode. If you need to return to the Rhythm Mode, continue
pressing the Expression Switch button to cycle through the display screen
expressions until the screen switches to the following pattern, then you will enter the
Rhythm Mode.
Note: The rhythm mode only takes effect when music is playing. If the music is
paused, the rhythm mode will not be displayed on the display screen.
How To Operate Your Vehicle
13
Charging Your Vehicle
1. Voice Broadcast: When the battery is low, the device will automatically trigger a voice broadcast:
Low battery. Please charge now.
2. LED Light Strip: When the battery is low, the LED light strip will automatically turn into a red
breathing light.
Note: After charging the device, the low battery reminder will be automatically canceled, the
voice prompt will stop, and the red breathing light will go out.
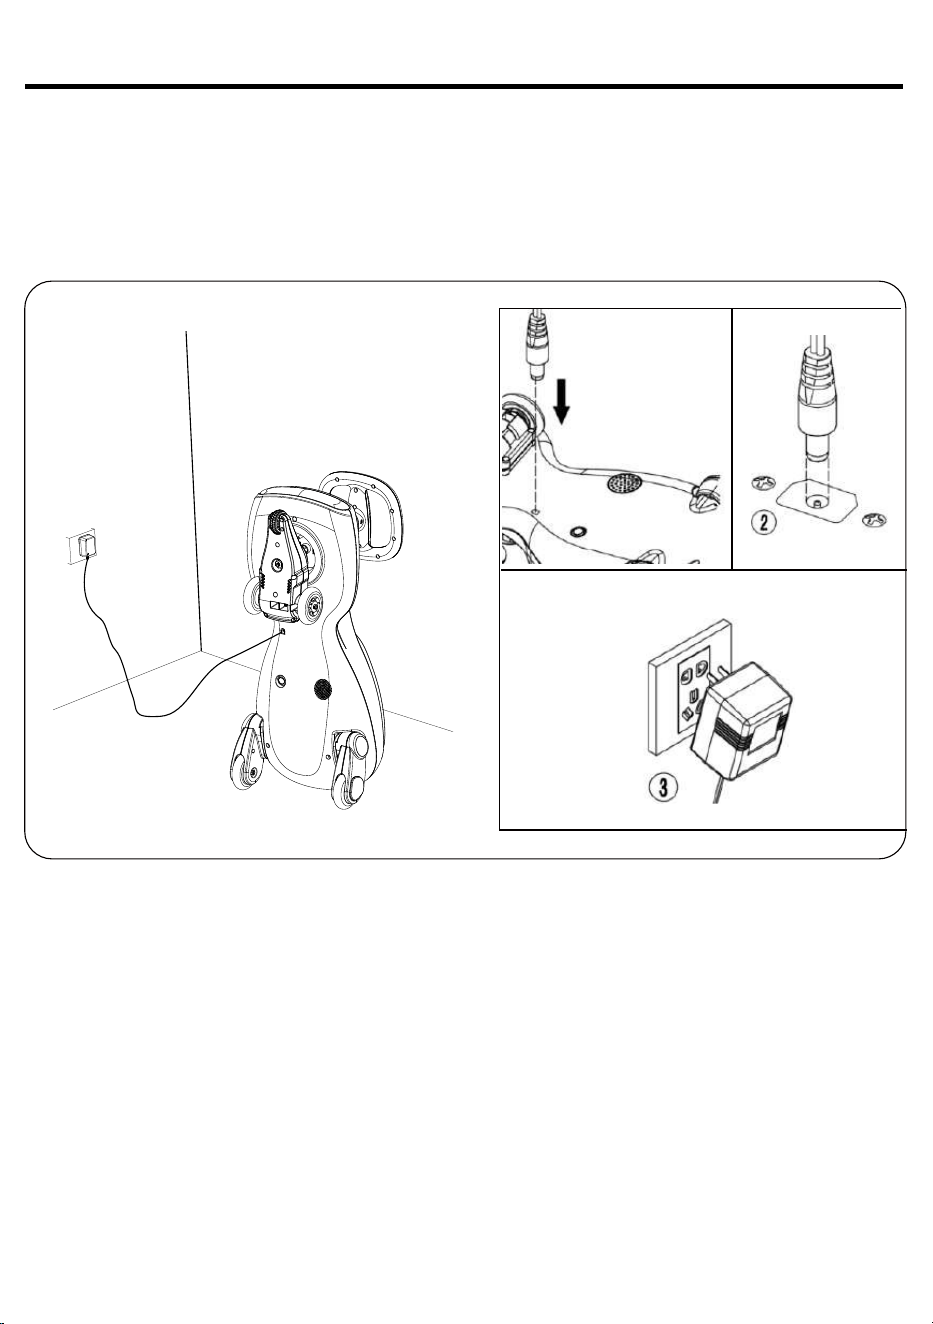
1. The charging input socket is at the bottom of the car.
2. The POWER SWITCH must be turned in OFF position when charging.
3. Before the first use, first use, please fully charged. Do not recharge the battery for more
than 20 hours to avoid overheating the charger.
4. After each use or at least once a month when not in use, recharge the battery one time.
1. Find the charging input socket at the bottom of the car.
2. Turn off the power switch, then plug the charger port into the input socket.
3. Plug the charger plug into the wall outlet. The indicator light on the charger will turn red and the
battery will begin to recharge. When fully charged, the indicator will turn green.
Note: When only the charger is plugged into the wall outlet without being connected to the
wiggle car, the indicator will show green.
Low Battery Reminder
①
14

WARNING!
PREVENT FIRE AND ELECTRIC SHOCK:
1. Use the only rechargeable battery and charger supplied with your vehicle. NEVER substitute the
battery or the charger with another brand. Using another battery or charger may cause a fire or
explosion.
2. Do not use the battery or charger for any other product. Overheating, fire or explosion could
occur.
3. NEVER modify the electric circuit system. Tampering with the electric system may cause a shock,
fire or explosion or may permanently damage the system.
4. Do not allow direct contact between battery terminals. Fire or explosion can occur.
5. Do not allow any type of liquid on the battery or its components.
6. Do not charge near heat or flammable materials. Charge the battery in a well-ventilated area
ONLY.
7. Charge the battery in a dry area ONLY.
8. Do not open the battery. Battery contains lead acid and other materials that are toxic and
corrosive.
9. Do not open the charger. Exposed wiring and circuitry inside case may cause electric shock.
10. Only adults may handle or charge the battery. NEVER allow child to handle or charge the battery.
Battery is heavy and contains lead acid (electrolyte).
11. Do not drop the battery. Permanent damage to the battery could occur or cause serious injury.
12. Before charging the battery, check for wear or damage to the battery, charger, its supply cord
and the connectors. DO NOT charge the battery if any damage to parts has occurred.
13. Do not allow the battery to drain completely. Recharge the battery after each use or once a
month if not used regularly.
14. Do not charge battery upside down.
15. Always secure the battery with the bracket. Battery can fall out and injure a child if vehicle tips
over.
16. A recommendation for adult supervision of young children.
17. The toy should be used with caution since skill is required to avoid falls or collisions causing
injury to the user or third parties.
15
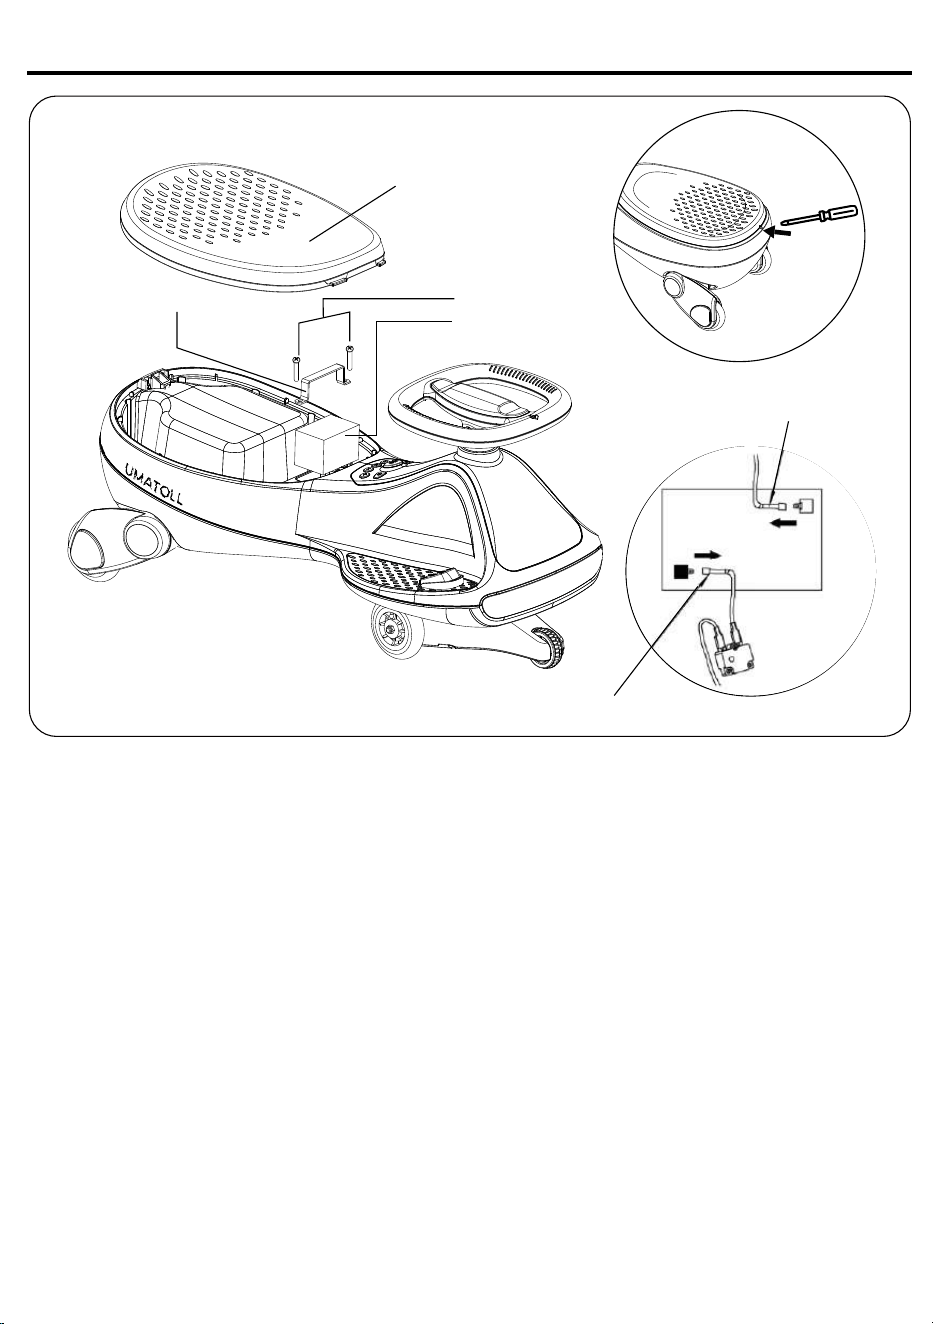
1. As shown in the picture, insert a screwdriver into the corresponding hole to
open the seat.
2. Remove Battery hold-down bracket and screws.
3. Un-plug RED power connector.
4. Carefully unplug BLACK connector.
CAREFULLY LIFT OUT THE BATTERY:
1. Depending on the condition of the battery (i.e.: leakage) you may want to wear
protective rubber gloves before removal.
2. Do not lift the battery by its connectors or cables.
3. Place the dead battery in a plastic bag and dispose of according to local
regulations.
4. Install replacement battery in same position as original.
INSTALL NEW BATTERY:
1. Reconnect the BLACK Connector.
2. Reconnect RED Power Connector.
3. Install Battery hold-down bracket and screws.
WARNING: Ensure no wires are pinched or bound up.
4. Place the seat in the corresponding position and press firmly to secure it.
Drive Battery Replacement
Seat
Screws
Battery hold-down bracket
Battery
BLACK connector
RED power connector
16
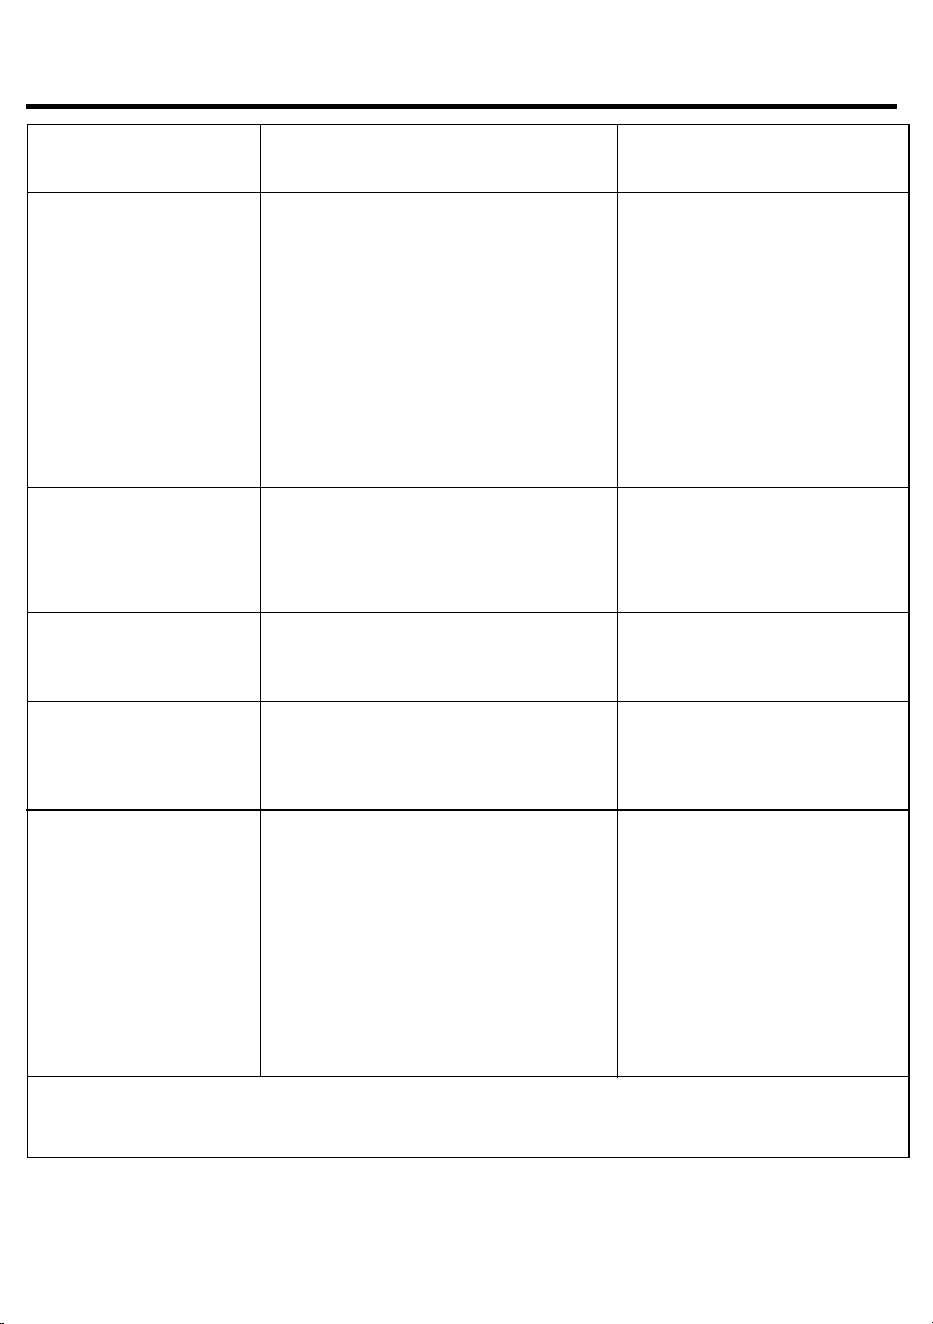
Troubleshooting Guide
Type of fault
The car can't move.
The battery can't
be charged.
Running distance per
charge is short.
There is noise and
heat when charging
the battery.
The speed is low.
NOTE: If you can't solve the problem, please feel free to contact us.
-The battery is below normal level
-Safety protection of line
-The screw on the wheels has fallen off
-The battery connector has fallen off
-The battery is damaged
-The electrical equipments damaged
-The motor is damaged
-Battery connector has fallen off
-Battery charger is powered off
-Battery charger is damaged
-Driving on uneven road
-Change the battery
-Charge the battery again
-Lighten the weight to less than
150 lbs. Step on the pedal for
6-8 seconds to reach the
maximum speed
-Drive on flat road
-Battery is not full
-Battery is old
Chemical reaction It is normal.
-Charge the battery again
-Change the battery
-Plug into again
-Plug into again
-Change the battery charger
-Charge the battery
-Wait for a moment
-Tight the screw again
-Come on again
-Change the battery
-Bring it to repair
-Contact the seller
Type of Analysis of causes
Solutions
17
-Battery is old
-Battery is out of power
-Overweight

1. It is parents’responsibility to check main parts of the
toy before using. Must regularly examine for potential
hazard, such as the battery, charger, cable or cord, plug,
screws are fastening enclosure of other parts and that in
the event of such damage, the toy must not be used until
that damage had been properly removed.
2. Make sure the plastic parts of the vehicle are not cracked
or broken.
3. Occasionally use a lightweight oil to lubricate moving
parts such as wheels.
4. Park the vehicle indoors or cover it with a tarp to protect
it from wet weather.
5. Keep the vehicle away from sources of heat, such as
stoves and heaters. Plastic parts may melt.
6. Recharge the battery after each use. Only an adult can
handle the battery. Recharge the battery at least once a
month when the vehicle is not being used.
7. Do not wash the vehicle with a hose. Do not wash the
vehicle with soap and water. Do not drive the vehicle in
rainy or snowy weather. Water will damage the motor,
electric system and battery.
8. Clean the vehicle with a soft, dry cloth. To restore shine
to plastic parts, use a non-wax furniture polish. Do not use
car wax. Do not use abrasive cleaners.
9. Do not drive the vehicle in loose dirt, sand or fine gravel
which could damage moving parts, motors or the electric
system.
10. When not in use, all the electrical source should be
turned off. Turn off the power switch and disconnect the
battery connection.
Maintaining Your Vehicle
18
Disposal of Battery
1. Your sealed lead-acid battery must be recycled or
disposed of in an environmentally sound manner.
2. Do not dispose of your lead-acid battery in a fire.
The battery may explode or leak.
3. Do not dispose of a lead-acid battery in your regular,
household trash. The incineration, land filling or mixing
of sealed lead-acid batteries with household trash is
prohibited by law.
4. Return an exhausted battery to your local approved
lead-acid battery recycle, such as a local seller of
automotive batteries.
5. Contact your local waste management officials for
other information regarding the environmentally sound
recycling and disposal of lead-acid batteries.
Disposal Of Battery
Made in China
CHOKING HAZARD-Small parts.
Not for children under 3 years.
WARNING
19

1. Warning: Changes or modifications to this unit not expressly
approved by the party responsible for compliance could void the
user’s authority to operate the equipment.
2. NOTE: This equipment has been tested and found to comply with
the limits for a Class B digital device, pursuant to Part 15 of the FCC
Rules. These limits are designed to provide reasonable protection
against harmful interference in a residential installation. This equip-
ment generates, uses and can radiate radio frequency energy and, if
not installed and used in accordance with the instructions, may cause
harmful interference to radio communications.
However, there is no guarantee that interference will not occur in a
particular installation. If this equipment does cause harmful interfer-
ence to radio or television reception, which can be determined by
turning the equipment off and on, the user is encouraged to try to
correct the interference by one or more of the following measures:
-Reorient or relocate the receiving antenna.
-Increase the separation between the equipment and receiver.
-Connect the equipment into an outlet on a circuit different from that
to which the receiver is connected.
-Consult the dealer or an experienced radio/TV technician for help.
3. This device complies with Part 15 of the FCC Rules. Operation is
subject to the following two conditions: (1) this device may not cause
harmful interference, and
(2) this device must accept any interference received, including inter-
ference that may cause undesired operation.
20