
1.Automatic Stop During Recording or No Loop Recording:Due to the large size of high-definition video data, the read/write
overwrite whenfull.
3.Blurry Photos:Please check if the lens has dit or fingerprints.Clean the lens surface before shooting to ensurethe lens i
speed of the memory card may not be fast enough.Please use a high-speed TF card,such as a C10 card.
2.Loop Recording Settings:If set to off,video will be recordedin 5-minute segments,and the card will not automatically
s
clean and clear.
4.Inconsistent Video Quality:The video quality is greatly affected by the lighting conditions,such as backlighting. front
l
environments,and do not disassemble the camera.
saunas or hot springs.Do not store the camera in high-temperature or high-humidity
ighting,and the strength of the light,all of which can cause variations in the video recording quality.
5.Freeze: Press and hold the power button for 10s to reset.
6.To Maintain Optimal Camera Performance:Do notoperate the camera for extended periods(>1 hour)in
environments outside the recommended temperature rangeor in extremely humid environments.Avoid using the camera in
setoNtnatropmI
Video Recording Mode Menu
Video Resolution 2.7K/108OP/720P
Photo Resolution 1.3M/2M/3M/5M/8M/10M/12M/VGA
Time-Lapse Recording Off / 1 sec / 2 sec / 5 sec
Loop Recording Off / 1 min / 2 min / 5 min
Date/Time
Set year, month, day, hour, minute, and second. Use the WIFI button to adjust
the current selection upwards, or the M button to adjust downwards. Press
the Power button to confirm and proceed to the next item. Press and hold
the WIFI button to save settings and exit.
Auto Power off Off/1 minutes/3 minutes
Auto Screensaver Off/1 minutes/2 minutes/5 minutes
Language English,Chinese (Traditional).Chinese(Simplifed).French
Light Frequency 50HZ/60HZ
Format CanceVConfirm
Restore Factory Settings CanceVConfirm
WIFI Button
A. Press and hold the WIFI button to enter or exit the camera's WIFI mode.
B. During recording, a short press locks the current file, preventing it from being overwritten during loop
recording.
C. Within the menu system, press and hold the WIFI button to exit.
D. In standby mode, a short press of the WIFI button toggles between Recording, Photo, and Playback modes; a
short press of the power button takes a photo; press and hold the WIFI button to exit.
3. 4.Insert Card:Open the TF card silicone cover and insert the TF card in the correct direction as indicated.
4. 5.Adjustable Lens Angle:The built-in camera can be flipped upward by 180 degrees to meet various shooting
needs.
5. 6.Freeze: If the unit freezes, press and hold the power button for 10 seconds to reset.
Connect the camera's Wi-Fi to the mobile app
1.Scan the QR code to download the "Viidure" APP,then press and hold the WIFI button to turn on WIFl.2. Find the
WIFI name: D1******in the phone's WIFI list and enter the password: 12345678 to connect.3.Open
the'Roadcam'app,tap the camera icon on the homepage,and follow the on-screen instructionsto connect.
Scan the QR code to download the "Viidure" APP
1、Power Button:
A. When powered off, press and hold the power button to turn the device on or off.
B. During recording mode, a short press starts or pauses recording. During photo mode, a short press takes a photo.
C. Within the menu system, it functions as the confirmation key.
2
、
M (Menu) Button:
When in standby mode, a short press of the M button enters the settings menu. Within the menu, press the WIFI
button to move the selection up, press the M button to move the selection down, and press the power button to
confirm your selection. Press and hold the WIFI button to exit the menu
C
Charge the camera using the Type-C charging cable included in the package.During charging,the camera's status indicator will
show a red light,and once fully charged,the statuslight will turn off.
Betriebsanzeige:
Teobdunightis th indicatorfor video recording and photography.It binks once per second during video
Charging time: 90 minutesBattery life: 100 minutes
Button Operation
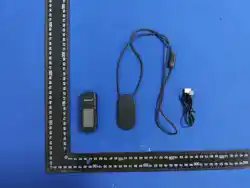
Accessories
Description
Ilustration
Momoic bock
Please place the magnetic neck mount inside the clothingwith the
magnetic back clip attaching tothe silicone side,and place the eamera on
the magnetie
Back clip.
Charging afie anarm er stheid aet useThis
Type-C
Charging Cablo
Charge the camera
Lanyard Secure the camera to preventit from taling of
Standard Accessories
.draynalaesuotdednemmocersitItcudorp
:nOrewoP/gnigrahCarema
Camera Exterior Structure
USER MANUAL
2.7K HD Thumb Camera
-Reorient or relocate the receiving antenna.
-Increase the separation between the equipment and receiver.
-Connect the equipment into an outlet on a circuit different from that to which the
receiver is connected.
-Consult the dealer or an experienced radio/TV technician for help.
The device has been evaluated to meet general RF exposure requirement. The device
can be used in portable exposure condition without restriction.
and on, the user is encouraged to try to correct the interference by one or more of the
following measures:
radio or television reception, which can be determined by turning the equipment off
occur in a particular installation. If this equipment does cause harmful interference to
communications. However, there is no guarantee that interference will not
installed and used in accordance with the instructions, may cause harmful interference to radio
This equipment generates uses and can radiate radio frequency energy and, if not
FCC Caution:
This device complies with part 15 of the FCC Rules. Operation is subject to the
following two conditions: (1) This device may not cause harmful interference, and (2)
this device must accept any interference received, including interference that may
cause undesired operation.
Any Changes or modifications not expressly approved by the party responsible for
compliance could void the user's authority to operate the equipment.
Note: This equipment has been tested and found to comply with the limits for a Class
B digital device, pursuant to part 15 of the FCC Rules. These limits are designed to
provide reasonable protection against harmful interference in a residential installation.

使用说明书
2.7K 高清拇指相机
相机外观结构
标配配件
相机充电/开机:
使用包装内的 Type-C 充电线给相机进行充电。充电过程中相机的状态指示灯红灯,充满电之后状态灯熄灭 。
工作指示灯:
相机充电时间:90 分钟 续航:100 分钟
按键操作
1.电源键:
A. 关机状态下,长按电源键开机和关机。
B. 开机录像模式下,短按为开启或暂停录像,拍照模式下,短按拍照。
C. 菜单模式下是确认键
2.M 菜单键
待机状态下,短按 M 键进入设置,按 WIFI 键为向上选择键,按 M 键为向下选择键, 电源键为确认键 。长按 WIFI
键取消菜单
配件
描述
示意图
磁吸挂脖支架
请将磁吸挂脖支架放入衣服内侧,磁吸背夹
与硅胶一面相吸,相机放置于磁吸背夹上。
注:佩戴心脏起博器的患者请勿使用,建议使用
挂绳。
Type-C 充电线
给相机充电
挂绳
固定相机以免脱落。
3.WIFI 键
A.长 按 WIFI 键进入或者退出相机 WIFI。
B.录 像 状 态 下 短 按 WIFI 键 为 文 件 加 锁 , 加 锁文件,不会被循环抹掉。
C.进 入菜单 后长按 WIFI 键为退 出键,
D.待 机 状 态 下 短 按 WIFI 键 为 录 像 /拍 照 /回 放 切 换 , 短 按电源 键为拍 照键, 长按 WIFI 键 退出。
4.插卡
打开 TF 卡硅胶塞,请按照正确提示方向插入 TF 卡。
5.镜头视角可调
本机摄像 头 可 以向上翻转 180 度 满 足多种拍摄需 求
6.当机:当机后请长按 10S 电源键复位。
扫码下载"录风者"APP
手机 APP 连接相机 WIFI
1.下载安装“录风者”APP,长按 WIFI 键,打开 WIFI。
2.在手机 WIFI 列表中找到 WIFI 名称:D1-******,需要输入密码:12345678,进行连接。
3 .打开“录风者”App,点击首页相机图标,连接 WIFI,根据界面提示操作。
录像模式菜单
录像分辨率
2.7K/1080P/720P
拍照分辨率
1.3M/2M/3M/5M/8M/10M/12M/VGA
缩时录像
关/1 秒/2 秒/5 秒
循环录影
关/1 分钟/2 分钟/5 分钟
日期/时间
可设置年月日时分秒,显示顺序上(WIF 键)/下(M 键)键调节当前选项时
间,电源键 确认并进入下一项,长按 WIFI 键保存并退出。
自动关机
关/1 分钟/3 分钟
自动屏保
关/1 分钟/2 分钟/5 分钟
语 言
英、中文(繁)、中文(简)、法
光源频率
50HZ、60HZ
格式化
取消/确认
恢复出厂设置
取消/确认
注意事项
1. 录像时自动停止录或不循环录像由于高清视频数据巨大,有可能因为内存卡的读写速度跟不上。请
使用高速 TF 卡如 C10 的高速卡。
2. 循环录像的设置:如果选择关闭,5 分钟一段,卡满将不能自动循环覆盖。
3. 拍出的照片不清晰:请检查镜头是否有脏物、手指印。进行拍摄前请清洁镜头表面,保持 镜头的干
净整洁。
4. 拍出的影片有时效果时好事坏:录像效果与拍摄的光线环境有很大关系,如逆光、顺光、光线的强
弱等都会造成拍摄出来的视频效果不同。
5.当机:当机后请长按 10S 电源键复位。
6. 为了保持相机最佳性能,请勿在温度范围外或极端潮湿的环境下长时间(>1 小时)操作本拇指相机,如
桑拿房或温泉中使用,请勿在温度过高或湿度过高的环境存放,请勿拆卸相机。