1
INSTALLATION MANUAL
FOR 24inch Dual Zone Wine Cooler
MODEL NO.
EWD24BES
Thanks for buying our beverage center, Hope our advanced product will give your
wine a different joyful taste. Before use, please read and follow all safety rules and
operating instructions

2
WARNING
•
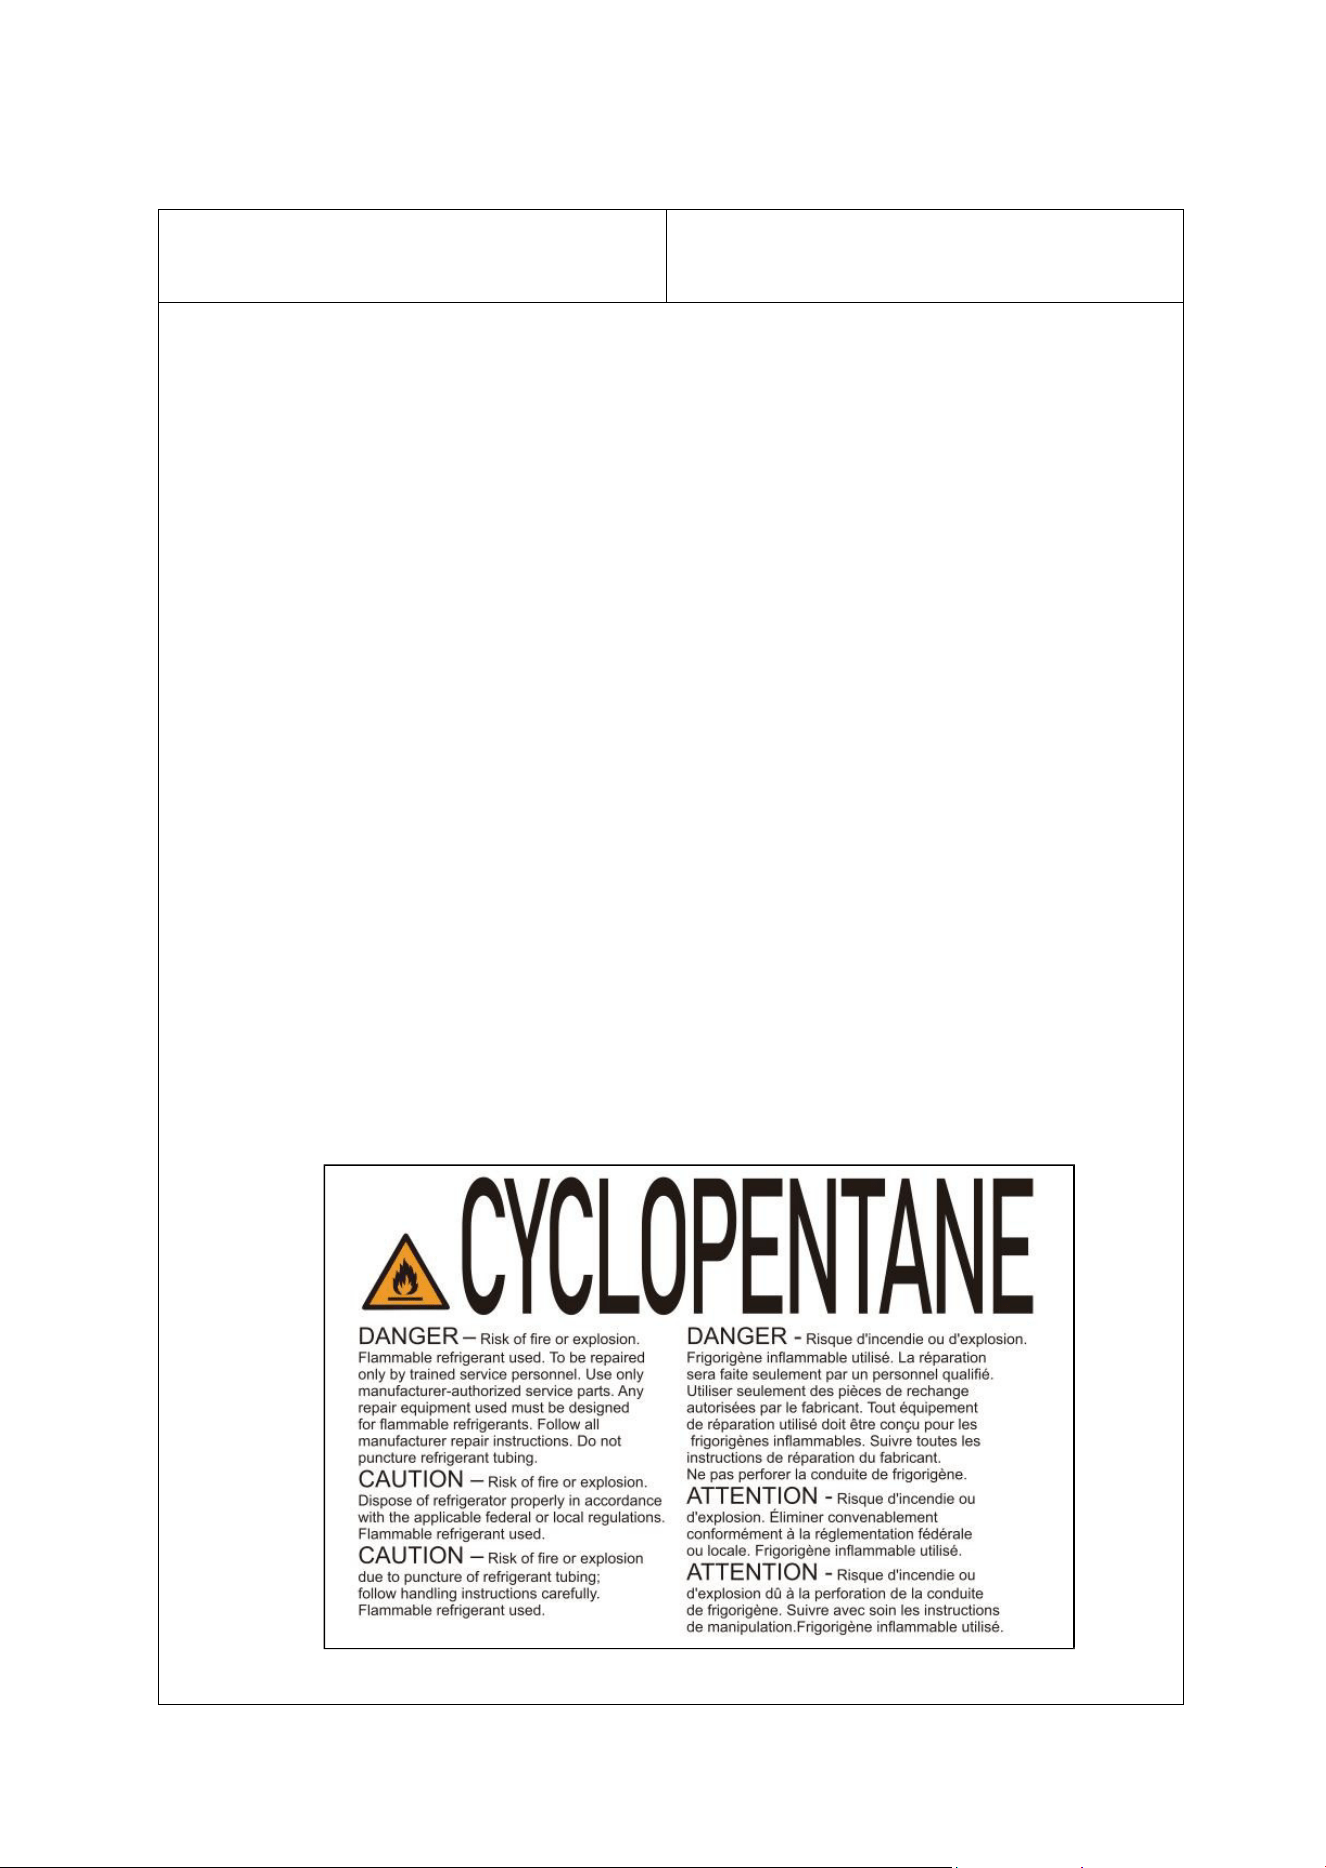
This wine cooler contains a flammable refrigerant (R600a). Keep away from
open flames, sparks, cigarettes, or other ignition sources. Do not damage the
refrigerant tubing.
•
Do not store or use gasoline or other flammable vapors and liquids near this
or any other appliance.
•
Do not use electrical devices inside the wine cooler unless they are
recommended by the manufacturer.
•
Do not use an extension cord, adapter, or power strip. Connect the wine
cooler to a properly grounded outlet.
•
Children should not play with or inside the wine cooler. Keep packaging
materials out of reach of children.
•
If the supply cord is damaged, it must be replaced by the manufacturer, its
service agent, or qualified personnel.
•
Do not touch the compressor or rear metal components; some surfaces may
be hot.
•
Ensure that the power plug remains accessible after installation.
To avoid contamination of wine, please respect the following instructions:
– Opening the door for long periods can cause a significant increase of the
temperature in the compartments of the appliance.
– Regularly clean surfaces that can come in contact with bottles and accessible
drainage systems.
– Clean water tanks if they have not been used for 48 h; flush the water system
connected to a water supply if water has not been drawn for 5 days.
– If the refrigerating appliance is left empty for long periods, switch off, defrost, clean,
dry, and leave the door open to prevent mold developing within the appliance.
– WARNING: Keep ventilation openings, in the appliance enclosure or in the built-in
structure, clear of obstruction.
– WARNING: Do not use mechanical devices or other means to accelerate the
defrosting process, other than those recommended by the manufacturer.
– WARNING: Do not damage the refrigerant circuit.
– WARNING: Do not use electrical appliances inside the food storage compartments
of the appliance, unless they are of the type recommended by the manufacturer.
Do not store explosive substances such as aerosol cans with a flammable propellant
in this appliance.
– WARNING: This refrigerating appliance is not suitable for freezing food.
This appliance is intended to be used in household and similar applications such as
– staff kitchen areas in shops, offices and other working environments;
– farm houses and by clients in hotels, motels and other residential type
environments;
– bed and breakfast type environments;
– catering and similar non-retail applications.
–WARNING: To avoid a hazard due to instability of the appliance, it must be fixed in
accordance with the instructions.
PLEASE DON’T TRY TO PLUG INTO OR EXTENSION THE CABLE IN ANY
CASE.
3
IMPORTANT SAFETY INSTRUCTIONS
WARNING
To reduce the risk of fire, electrical shock,
or injury when using your appliance,
follow these basic precautions:
• Read all instructions before using the beverage center.
IMPORTANT SAFETY INSTRUCTIONS
DANGER — ELECTRICAL SHOCK HAZARD
•
Disconnect the wine cooler from the power supply before servicing, cleaning,
or replacing any components.
•
Never remove the grounding prong from the plug.
WARNING — RISK OF FIRE / FLAMMABLE REFRIGERANT (R600a)
•
This appliance uses a flammable refrigerant. Avoid ignition sources. If a leak
is suspected, disconnect power, ventilate the room, and contact qualified
service personnel.
•
Do not damage the sealed system.
WARNING — INSTALLATION AND USE
•
This appliance must be properly installed and grounded.
•
Do not use an extension cord or multi-plug adapter.
•
Do not store explosive materials (such as aerosol cans) inside or near the
wine cooler.
•
This appliance is intended for indoor household use only.
CAUTION — HANDLING AND OPERATION
•
Do not overload shelves and do not block internal air vents.
•
Open the door slowly to prevent tipping or shelf movement.
NOTICE — CLEANING AND MAINTENANCE
•
Disconnect power before cleaning. Do not use steam cleaners or flammable
cleaning fluids.
4
INSTALLATION INSTRUCTIONS
Before Using Your beverage center
• Remove the exterior and interior packing.
• Before connecting the beverage center to the power source, let it stand upright for
approximately 2 hours. This will reduce the possibility of a malfunction in the cooling
system from handling during transportation.
• Clean the interior surface with lukewarm water using a soft cloth.
• This appliance is intended to be used in household and similar applications such as
– staff kitchen areas in shops, offices and other working environments;
– farm houses and by clients in hotels, motels and other residential type
environments;
– bed and breakfast type environments;
– catering and similar non-retail applications.
• When disposing your appliance, please choose an authorized disposal site.
Installation of Your beverage center
• This appliance is designed to be for freestanding installation or built-in (fully recessed)
(Refer to sticker location the back of this appliance).
• This appliance is intended to be used exclusively for the storage of wine and
beverages .
• Place your beverage center on a floor that is strong enough to support it when it is fully
loaded. To level your beverage center, adjust the front leveling leg at the bottom of the
beverage center.
• This wine cooler uses a flammable refrigerant (R600a). Do not damage refrigerant
tubing during transportation or installation. Keep the area free of ignition sources.
• Avoid locating the unit in moist areas.
• Connect the appliance to a properly grounded 120V~, 60Hz outlet. Do not use an
extension cord, adapter, or power strip. Do not remove or bypass the grounding prong.
Attention
• Store wine in sealed bottles;
• Do not overload the cabinet;
• Do not open the door unless necessary;
• Do not cover shelves with aluminum foil or any other shelf material which may prevent
air
circulation
• Should the beverage center be stored without use for long periods it is suggested, after
a careful cleaning, to leave the door ajar to allow air to circulate inside the cabinet in
order to avoid possible formations of condensation, mold or odors.
Ambient Room Temperature Limits
This appliance is designed to operate in ambient temperatures specified by its temperature
class marked on the rating plate.
Class
Symbol
Ambient Temperatures range (
℉
)
Extended Temperate
SN
﹢50 to﹢99
Temperate
N
﹢61 to﹢99
Subtropical
ST
﹢61 to﹢100
Tropical
T
﹢61 to﹢109
5
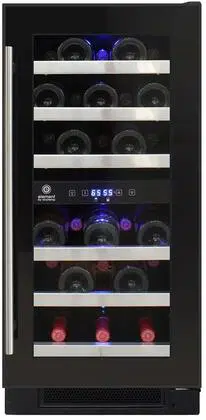
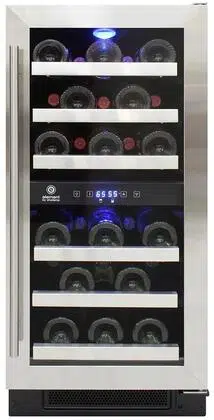
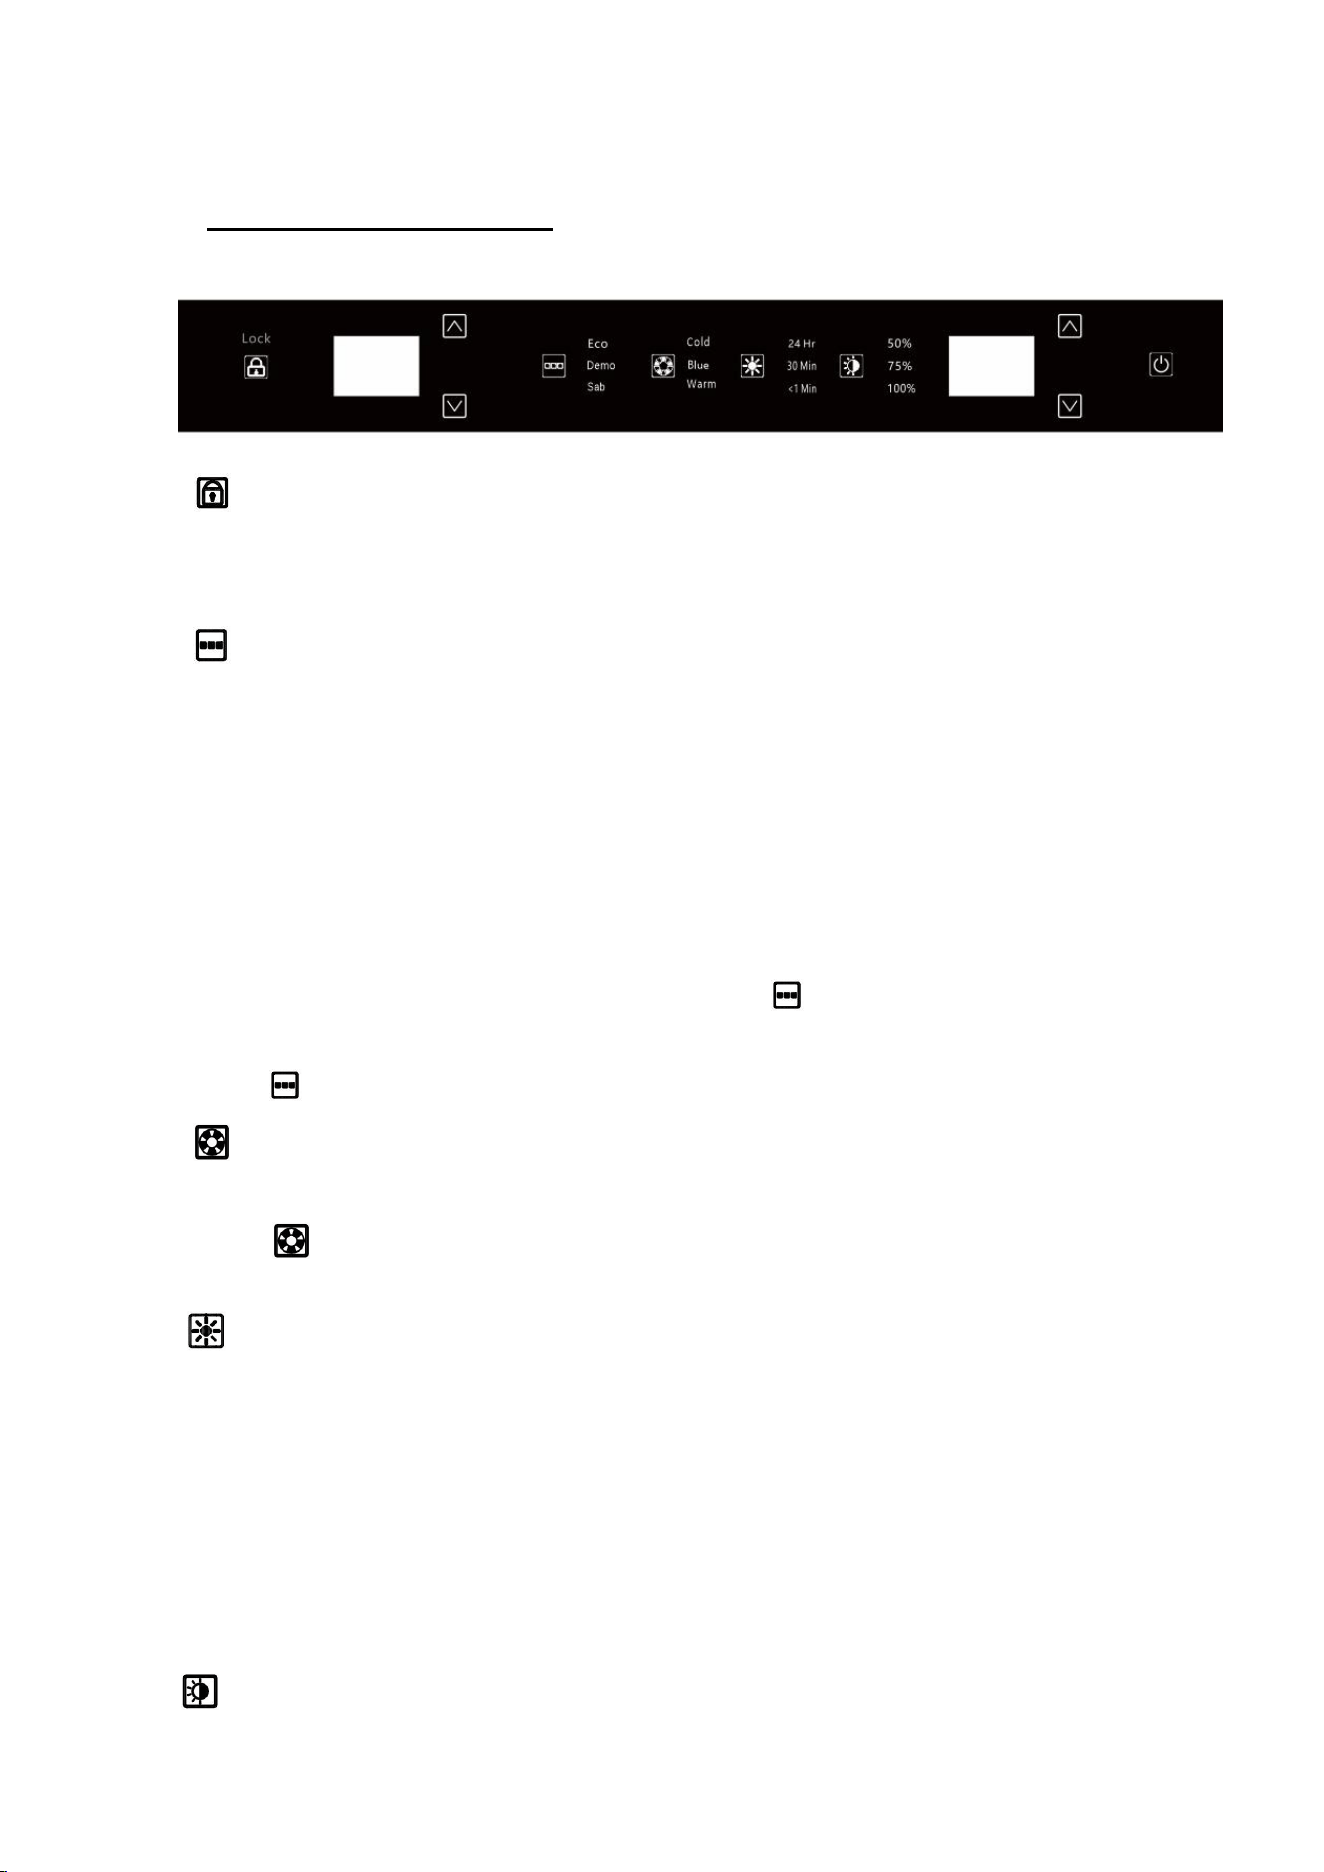
OPERATING YOUR BEVERAGE CENTER
AND SETTING THE TEMPERATURE CONTROL
OPERATING THE APPLIANCE
EWD24BES
1.
Child Lock
When connected to the power, the default setting is unlocked. Press and hold the
button for 3 seconds to lock it. Press again and hold this button for 3 seconds to
unlock.
2.
Changing the Running Modes
Press to cycle through and select the desired operating mode (STD, ECO or DEMO).
When the appliance is switched on, the default mode is STD (Standard mode, no
indicator light). The selected mode is shown on the display.
ECO Mode: This is an energy-saving mode where the interior light does not illuminate,
and the display shows "Eco." After closing the door, the display and buttons will remain
active for 5 seconds before turning off.
Demo Mode: This mode is for showroom display only and not for normal operation. The
LED lighting works, but the appliance does not cool. The alarm symbol activates when
the temperature has varied too high or low (HI or LO will also show in display to confirm
this).
Sab Mode: To enter Sabbath mode, press and hold for 3 seconds. The internal light
will be turned off and opening the door will not cause the alarm to sound. ‘Sb’ is
displayed and the control panel is locked except for the mode and power button. Press
and hold for 3 seconds to exit Sabbath and return to the standard mode.
3.
Changing the LED light color
The LED light and button backlight default setting is Cold color when the appliance
connects to power.
Press the button. The LED light and button backlight alternate three colors: Cold.
blue and warm.
4.
Changing the LED light mode
Touch this key to cycle through and select the desired light mode. The default mode is
activated on power-on. The modes available are listed below. When selected, the
relevant symbol will illuminate:
Default — Door opening and closing controls the internal lights.
24Hr — After closing the door, the light will remain on for 24 hours.
30Min — After closing the door, the light will remain on for 30 minutes.
1Min — After closing the door, the light will remain on for 1 minute
5.
Adjusting the LED light brightness.
In 24hr/30min/1min light mode, the brightness of the opening the door is 100%, and the
6
default brightness after closing the door is 50%.
Each time the button is pressed, the brightness will alternate between 50%. 75%
and 100%.
6.
Power button
Press and hold this button for 3 seconds to turn off the appliance. With a slight press
again, to turn it on.
7.
Upper zone temperature setting (up button).
Press this button to increase the temperature by one degree increments. When the
setting reaches the temperature upper limit value 64℉. The set temperature will not
change again.
8.
Upper zone temperature setting (down button).
Press this button to lower the temperature by one degree increments. When the setting
reaches the temperature lower limit value 41℉. The set temperature will no change
again.
9.
Lower zone temperature setting (up button)
Press this button to increase the temperature by one degree increments. When the
setting reaches the temperature upper limit value 64℉. The set temperature will no
change again.
10.
Lower zone temperature setting (down button)
Press this button to lower the temperature by one degree increments. When the setting
reaches the temperature lower limit value 41℉. The set temperature will no change
again.
11.
To switch between Celsius or Fahrenheit.
Press and hold and (or and ) for 3 seconds to switch between ℃ and ℉.
The indicator light will illuminate on the desired temperature setting.
Temperature control range: upper zone:41℉-64℉, lower zone:41℉-64℉
. The upper/lower compartment temperature preset at the factory is 54℉.
The product has power off memory function.
Temperature Alarm
If inner temperature is higher than 73℉, The “HI” is shown in display panel, and the
buzzer alarm after one hour continuously. It informs that the inner temperature is
too high, please check the reason.
If inner temperature is too low, the “LO” is shown in display panel, and the alarm
sounded at the same time.
When the set temperature is ≥39℉, the low-temperature alarm triggers at 32℉.
When the set temperature is between 36℉ and 39℉ (36℉ ≤ T <39℉), the low-
temperature alarm triggers at -36℉.
No low-temperature alarm is activated when the set temperature is below 36℉.
7
Temperature Recollection Function
In the event of a power interruption, beverage center can remember the previous
temperature settings, and when the power is recovery, the cooler temperature will go
back the same setting temperature as power off.
Door Ajar Alarm Function
If the door is not closed completely the alarm will sound after 1 minutes. Please
close the door completely to avoid the loss of cold energy.
NOTE
If the unit is unplugged, power lost, or turned off, you must wait 3 to 5 minutes
before restarting the unit. If you attempt to restart before this time delay, the beverage
center will not start.
When you use the beverage center for the first time or restart the beverage center after
having been shut off for a long time, there could be a few degrees variance between the
temperature you select, and the one indicated on the LED readout. This is normal and it is due
to the length of the activation time. Once the beverage center is running for a few hours
everything will be back to normal.
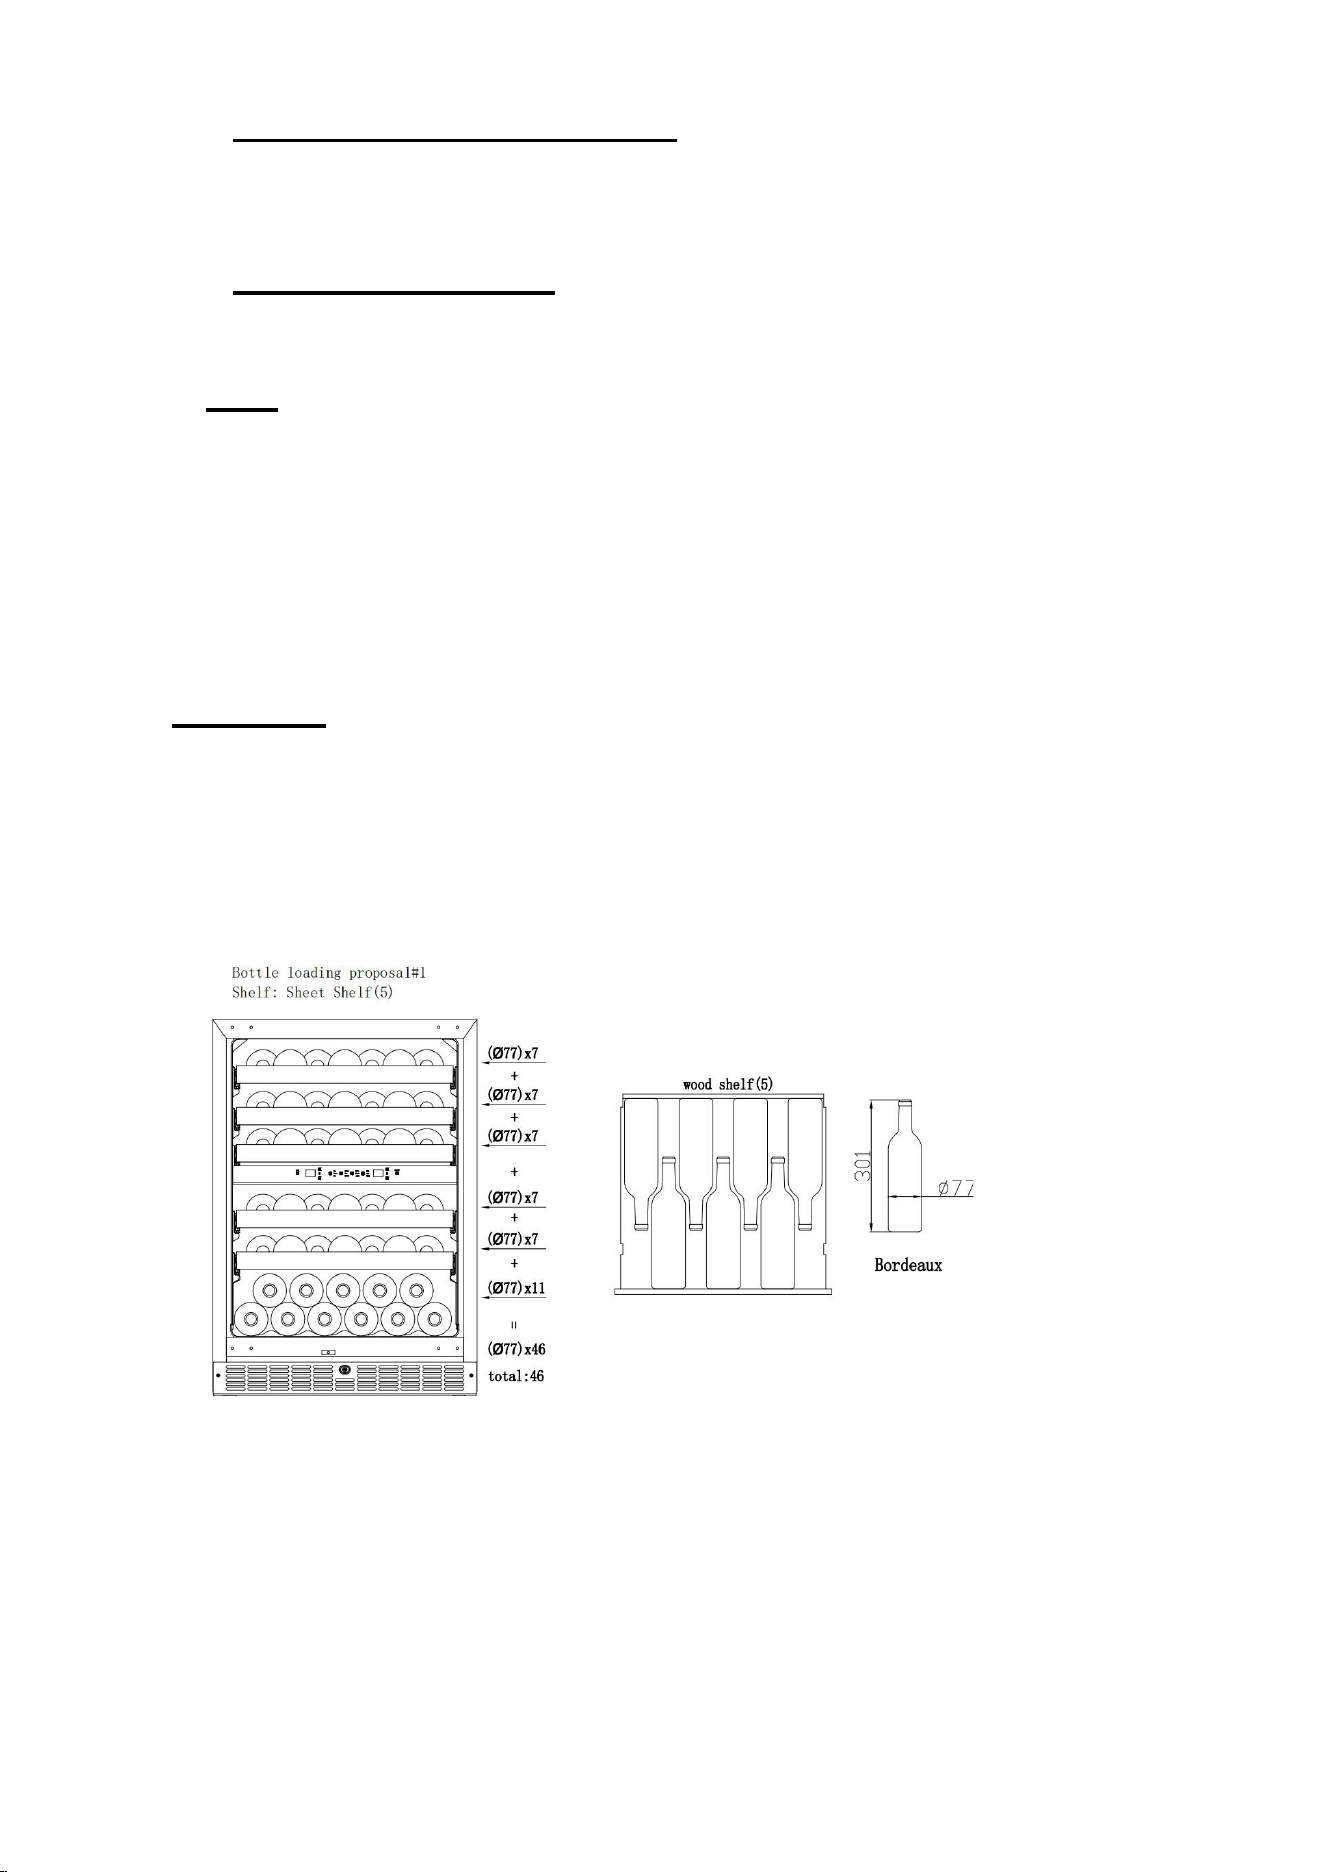
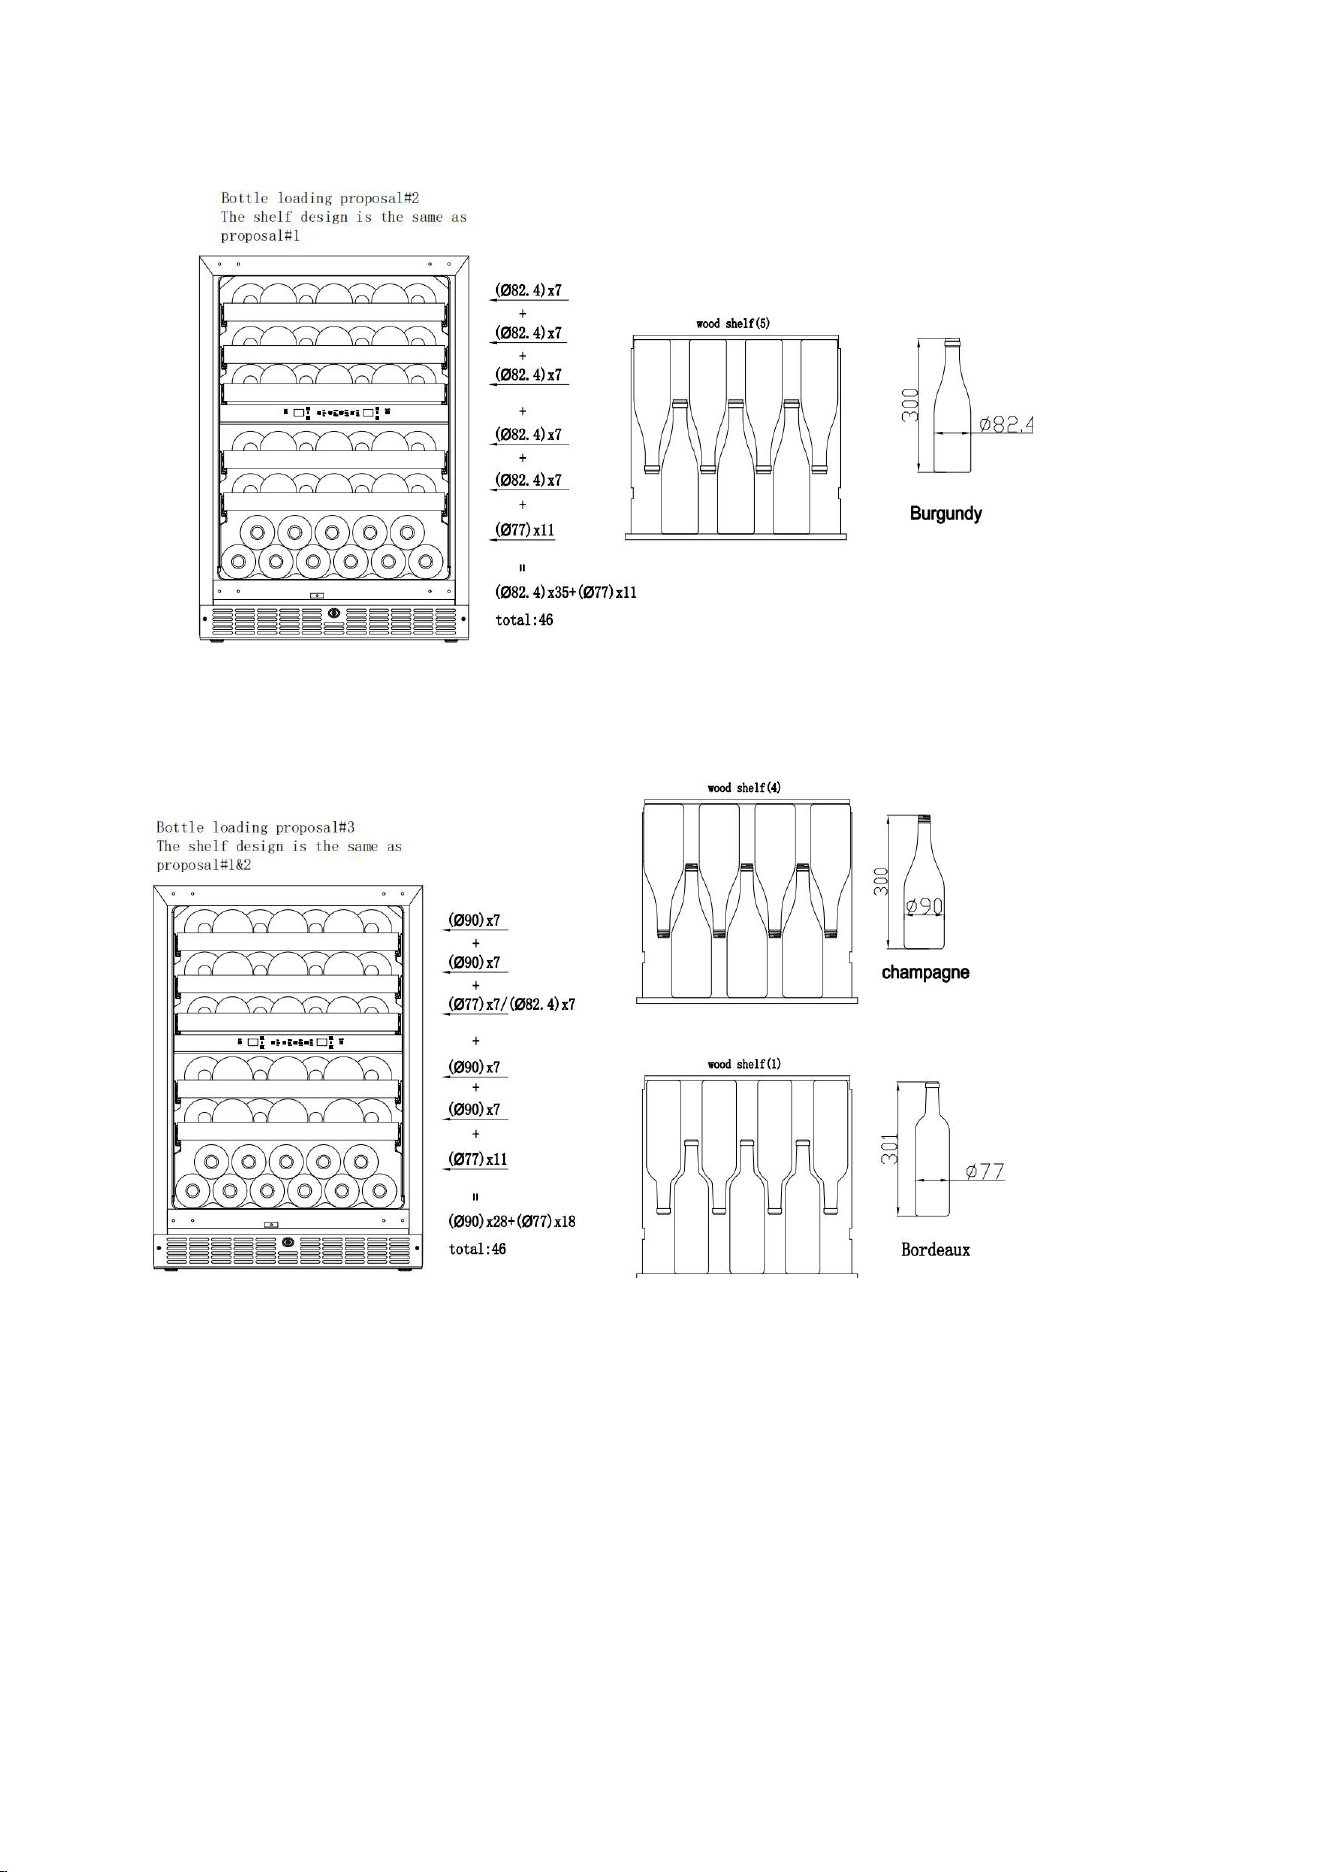
WINE CHART
The maximum number of bottles that can be loaded into the cabinet are for information only.
This information is not contractual as it provides a means for rapidly estimating the size of the
device.
Loading proposal#1
Total:Bordeaux 46 bottles
8
Loading proposal#2
Total:46 bottles(Burgundy 35 bottles +Bordeaux 11 bottles)
Loading proposal#3
Total:46 bottles(Champagne 28 bottles +Bordeaux18 bottles/Burgundy7 bottles+Bordeaux11 bottles )

9
ADJUSTABLE SHELVES
• To prevent damaging the door gasket, make sure to have the door fully opened when pulling
shelves out of the rail compartment.
• For easy access to the storage content, you can pull the shelves approximately 1/3 out of
the rail compartment.
• Do not cover the gaps on the racks with aluminum foil or any other material that will prevent
adequate air circulation within the cabinet.
According to the actual configuration of your product, please check the relative Remove or
Replace Racks.
1. Fully extend the shelf you wish to remove.
2. Lift the front of the shelf up.
3. Holding the shelf track, pushing the shelf in, then up to release from the rear dampers.
10
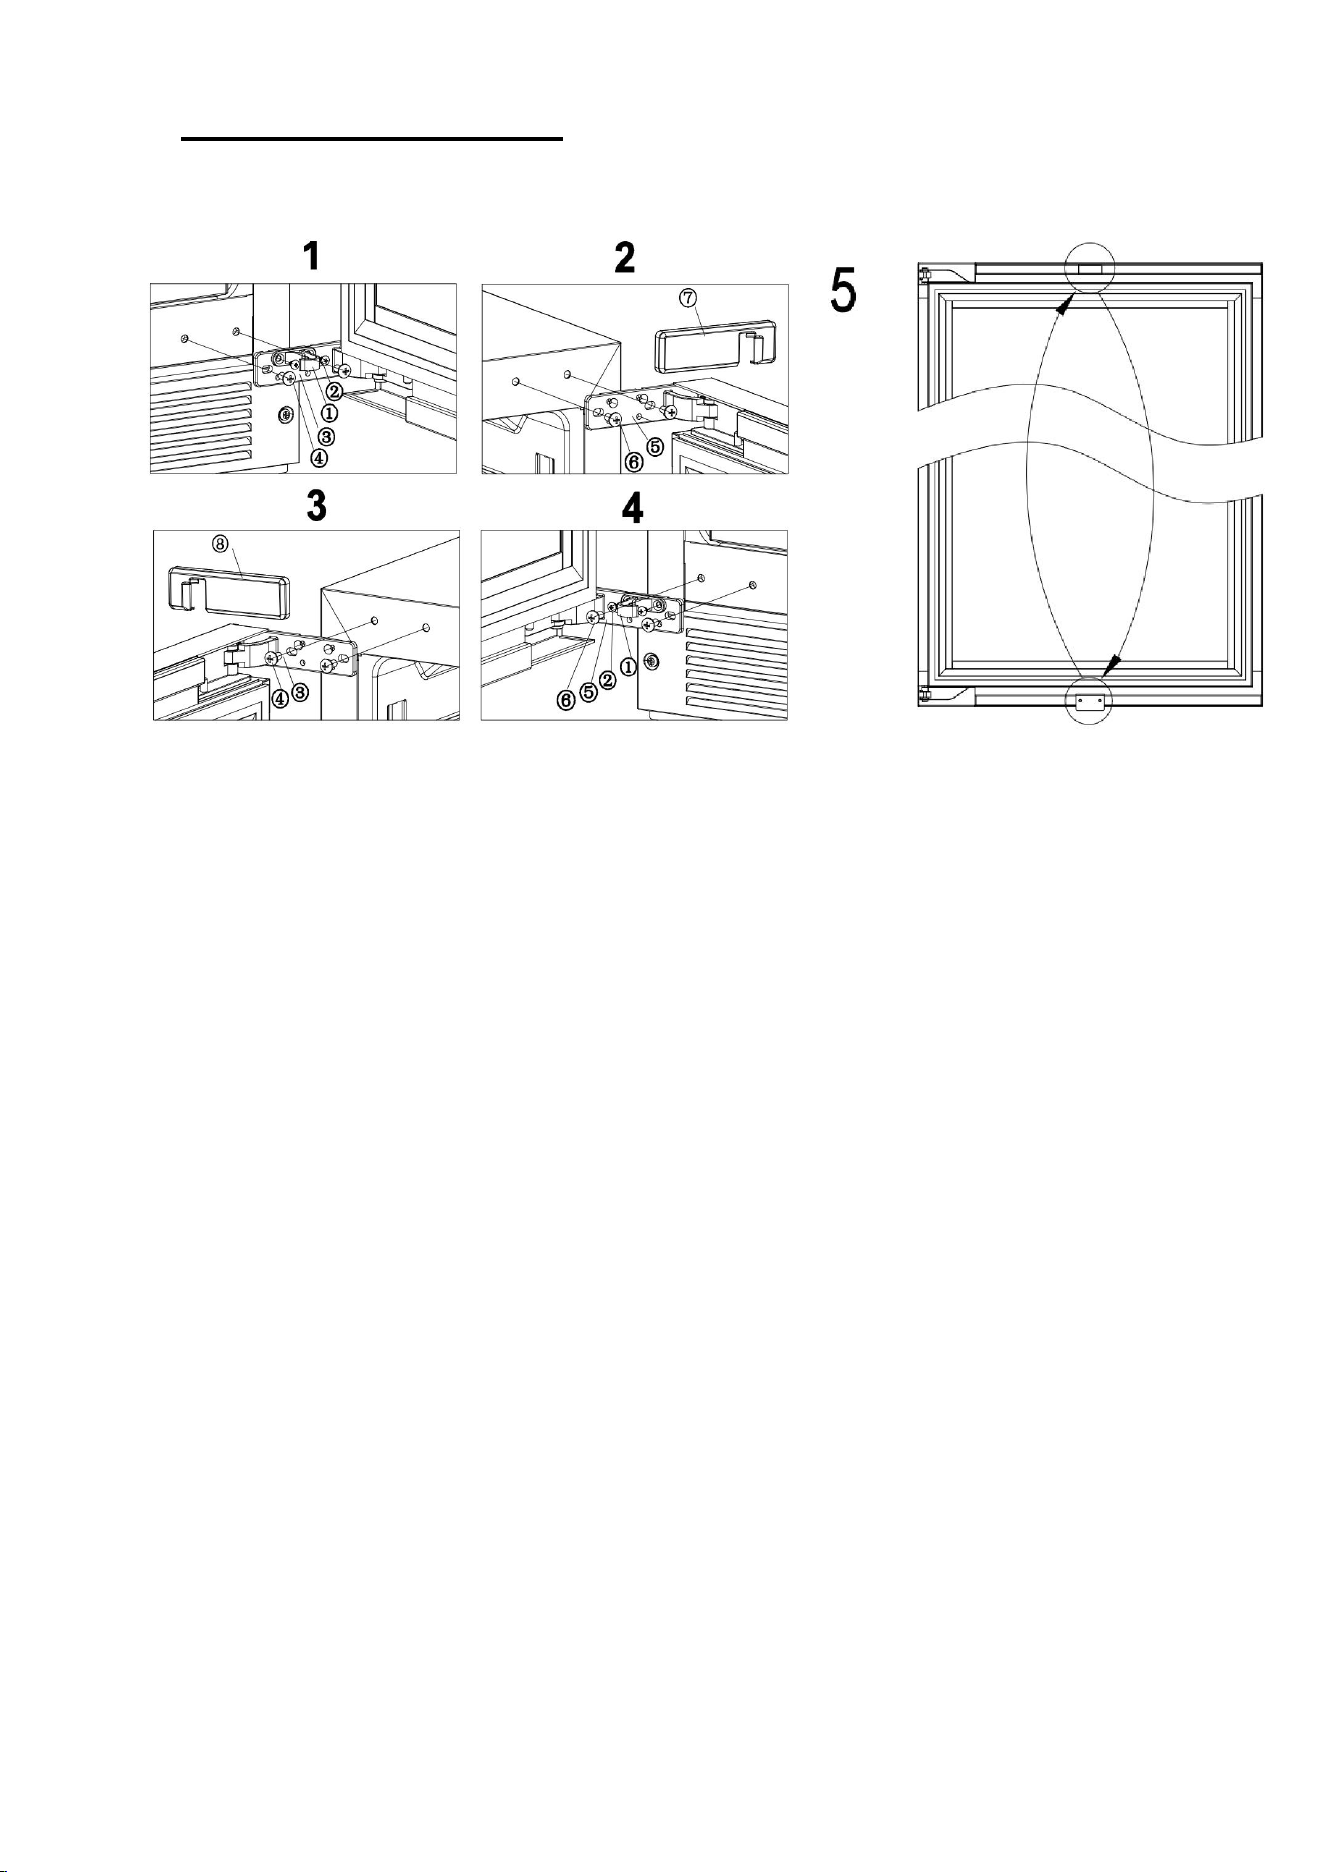
REVERSIBILITY OF THE DOOR
Warning: To avoid accidents during the process of changing the door, we recommend that you
get assistance.
The glass door is heavy and may cause injury if dropped.
1. DOOR HINGER BUFFER 2. DOOR HINGE BUFFER SCREW
3. HINGE 4. HINGE SCREW
5. HINGE 6. HINGE SCREW
7. HINGE COVER 8. HINGE COVER
1. Remove the door hinge buffer screw first, and then remove the door hinge buffer
(Standby)(Fig 1)
2. Then remove the door hinge cover and right upper and lower hinge (Fig 1.2)
3. Rotate the door 180 degrees, install the hinge screw, take the lower hinge cover from the
kit and install it (Fig 3)
4. The install the door hinge buffer (Fig 4)
5. Remove the door light switch spacer from the lower door frame and the decorative cover
from the upper door frame, then swap the positions of these two components 180° for
reinstallation (Fig 5)
11
Standard-Depth Beverage Center
Standard-depth beverage center typically measure 25 to 29 inches in depth,
as opposed to counter-depth beverage center that sit flush with cabinetry.
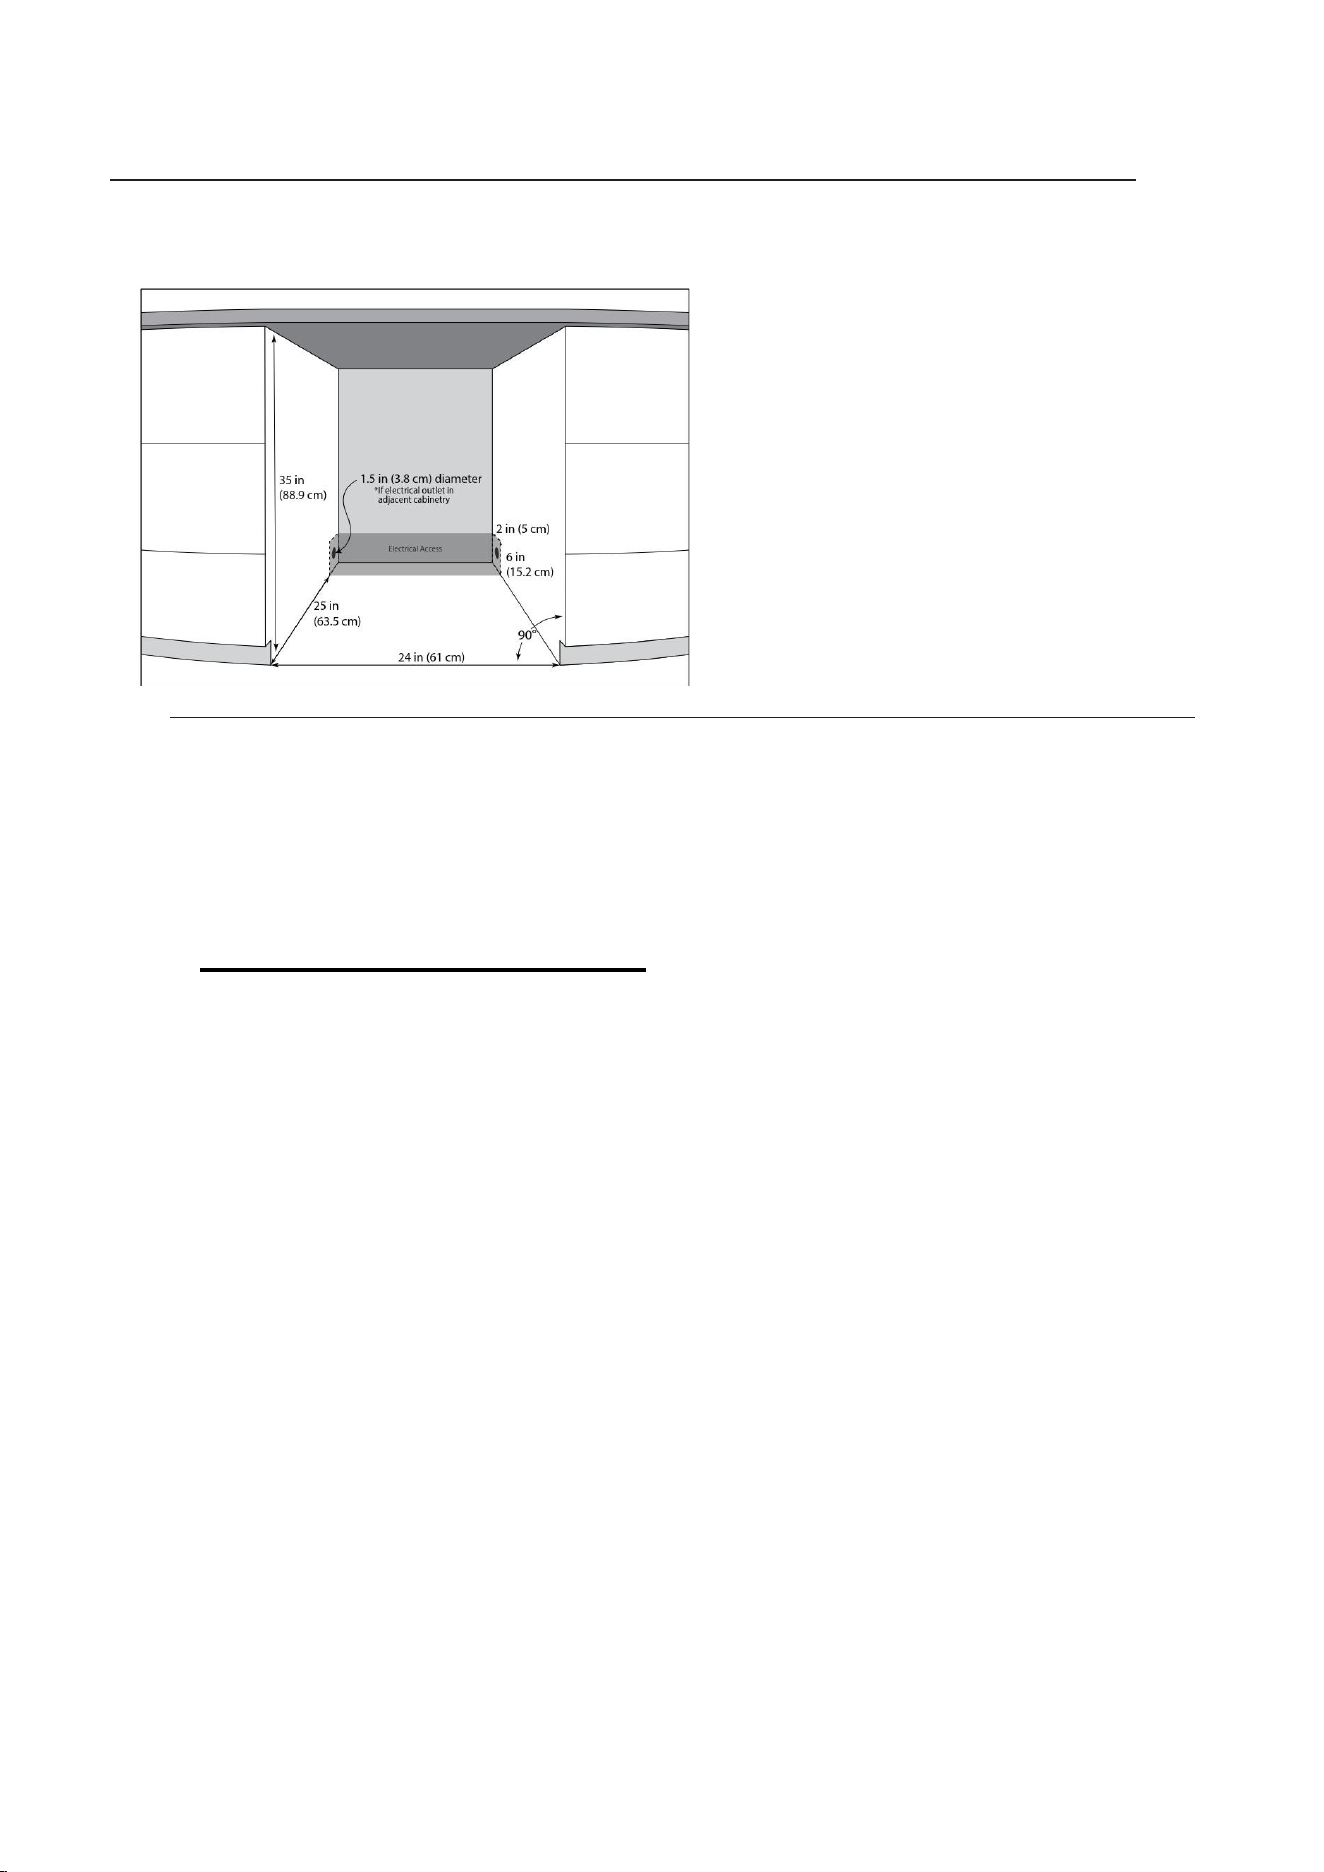
Installation Clearances
√ Ensure adequate ventilation around the wine cooler. Do
not block ventilation openings. Install in a well-ventilated area
away from ignition sources. Proper airflow is required to
prevent overheating and to reduce the risk of fire in
appliances using flammable refrigerant (R600a).
√ The cabinet opening must be at least 24 inches (61 cm)
wide by 35 inches (88.9 cm) high by 25 inches (63.5 cm)
deep.
√ If the electrical outlet is located inside adjacent cabinetry,
cut a 1.5 inch (3.8 cm) diameter hole to admit the power
cord. If the cabinet wall is metal, the hole edge must be
covered with a bushing or grommet.
For optimal usage and ability to open refrigerator doors
completely, do not install next to a wall.
Please note: The above dimensions and cut out information is
for planning purposes only.
Walk the delivery route
√Identify the narrowest opening that the appliance will travel through, from outside the home to the location
where it will be installed.
√Appliance depth or width must be smaller than the width of the narrowest opening.
Recommended DRINKING temperature
The following (approximate) temperatures are recommended for wine drinking:
o For storing ALL TYPES OF WINES
54 – 57
℉
o Champagne NV, Sparkling
43
℉
o Champagne Vintage
50
℉
o Dry White Semillon, Sauvignon Blanc
46
℉
o Dry White Gewürztraminer, Riesling
50
℉
o Dry White Chardonnay
50
℉
o Vintage Chardonnay
57
℉
o Sweet White Sauternes Monbazillac, Late Harvest ice wine
50
℉
o Sweet whites vintage Sauternes
57
℉
o Beaujolais
55
℉
o Red Pinot Noir
61
℉
o Vintage Pinot Noir red
64
℉
o Red Grenache, Syrah
o
Red Cabernet, Merlot, French, Australian, New Zealand,
61℉
Chilean, Argentinean, Italian, Spanish, Californian
64℉
12
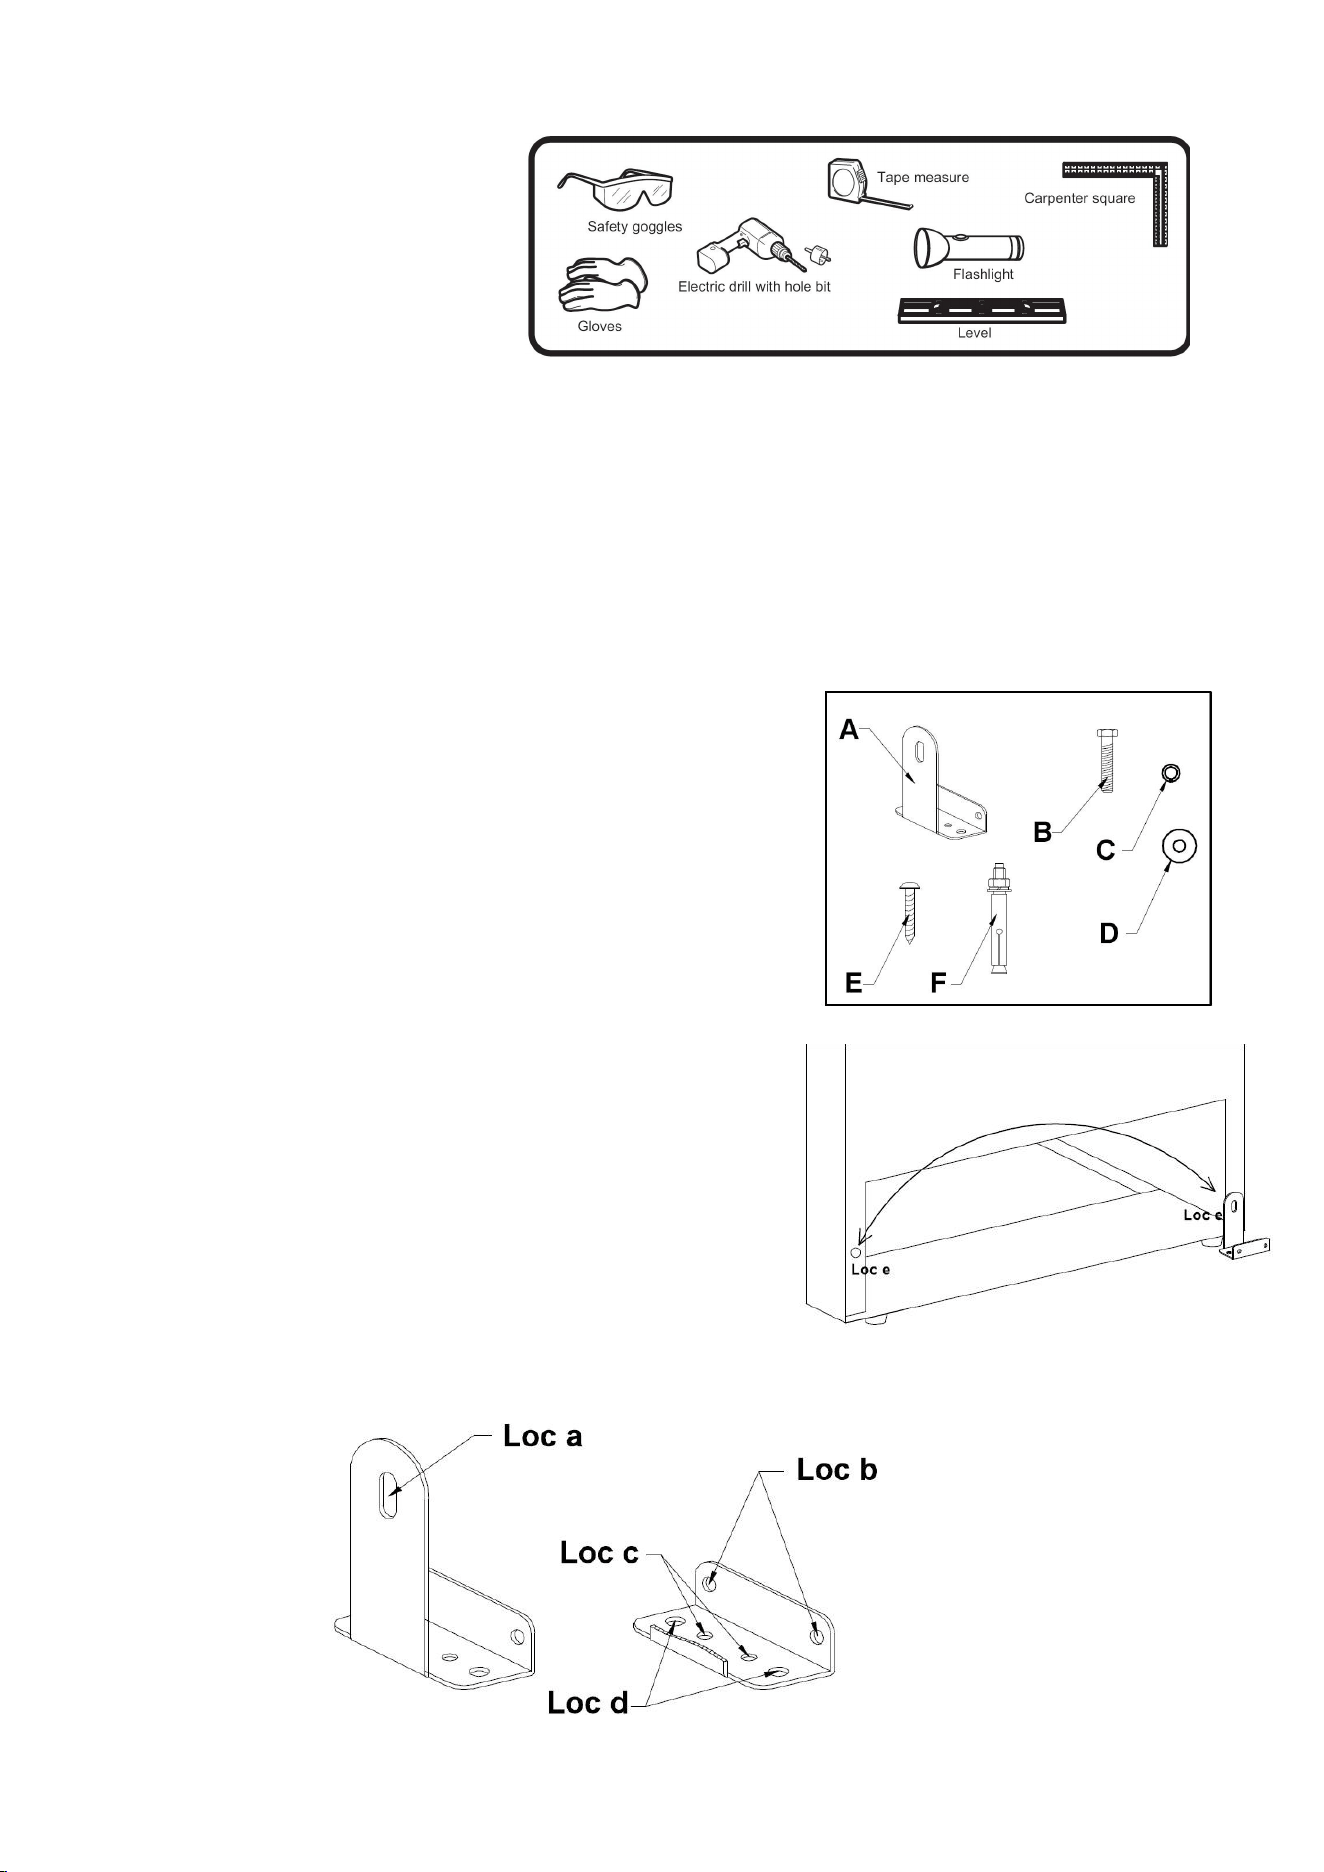
REQUIRED TOOLS
•
Safety goggles
•
Gloves
•
Tape measure
•
Carpenter square
•
Level
•
Flashlight
•
Electric drill with hole bit
INSTALLING THE ANTI-TIP BRACKET FOR FREE STANDING
WARNING:
This appliance may tip when shelves are extended, causing damage or injury. If this
appliance is used in a free standing application, the anti- tip bracket must be installed
following these instructions!
Anti-tip bracket parts list:
A: Anti-tip bracket (1pc)
B: Hexagon bolt (1pc) size (6mm x 20mm) (1/4"x4/5")
C: Lock washer (1pc) size (6)
D: Flat washer (1pc) size (6)
E: Screw (2pcs) size (ST4x35)
F: Expansion screw (1 pc) size (6mmX60mm) (1/4"x2.4" )
Secure the bracket with the screws provided.
Anti-tip bracket installation
The bracket can be installed at the
left bottom OR right bottom of the back
of the unit. You can choose which side is
convenient for you.
Anti-tip bracket mounting hole instruction:
Location a: Fixed mounting hole for unit
Location b: Fixed mounting holes for Drywall
Location c: Fixed mounting holes for Wood floor
Location d: Fixed mounting holes for Concrete floor
Location e: Mounting hole on the back unit

13
IMPORTANT:
Determine the final location of the appliance before attempting to install the bracket.
You will need to choose one of the three installation methods below.
DRYWALL installation:
1. After you have chosen the installation
location, place the bracket on the floor
with Loc b against the wall, use Screw (E)
(2pcs) to secure the bracket to the wall.
Ensure at least one screw is secured into
a stud.
2. Move the unit to align Loc e to bracket Loc a,
secure with the bolt (B),lock washer (C)
and flat washer (D).
NOTE: The screws MUST enter into a wood stud. If the wall contains metal studs or
similar materials, then the floor installation must be used
WOOD FLOOR installation:
1. After you have chosen the installation
location, place the bracket on the wood
floor, use: Screw (E) (2pcs) align Loc C
and secure the bracket into wood floor.
2. Move the unit to align Loc e to bracket
Loc a, secure with the bolt(B),lock washer
(C) and flat washer (D).
CONCRETE FLOOR installation:
1. After you have chosen the installation
location, choose any hole of Loc d to
secure the bracket into the concrete floor.
2. Using a concrete bit, drill 8mm (3/8")
pilot hole 45~55mm (1.7"~2") deep3.
Remove the nut, spring washer and
washer of the expansion screw.
4. Carefully tap the expansion screw into
the concrete, using a hammer or mallet.
5. Align Loc d and secure the nut, spring
washer, washer tightly back on the
expansion screw and fix on the concrete floor.
6. Move the unit to align Loc e to bracket Loc a,
secure with the bolt(B),lock washer (C)
and flat washer (D).
ATTENTI ON:
Check the bracket: After installing the bracket, try using light force to tip the unit. If the
unit does not tip then the bracket mounted securely. If the unit does tip, the bracket
MUST be reinstalled following these instructions.
14
CARE AND MAINTENANCE
Cleaning Your Beverage Center
•
Turn off the power, unplug the appliance, and remove all items including shelves and
rack.
•
Wash the inside surfaces with warm water and baking soda solution. The solution should
be about 2 tablespoons of baking soda to a quart of water.
•
Wash the shelves with a mild detergent solution.
•
Wring excess water out of the sponge or cloth when cleaning area of the controls, or any
electrical parts.
•
Wash the outside cooler with warm water and mild liquid detergent. Rinse well and
wipe dry with a clean, soft cloth.
Power Failure
•
Most power failures are corrected within a few hours and should not affect the
temperature of your appliance if you minimize the number of times the door is opened. If
the power is going to be off for a longer period of time, you need to take the proper steps
to protect your contents.
Vacation Time
•
Short vacations: Leave the beverage center operating during vacations of less than
three weeks.
•
Long vacations: If the appliance will not be used for several months, remove all items
and turn off the appliance. Clean and dry the interior thoroughly. To prevent odor and
mold growth, leave the door open slightly, blocking it open if necessary.
Moving Your Beverage Center
•
Remove all items.
•
Securely tape down all loose items (shelves) inside your appliance.
•
Turn the adjustable leg up to the base to avoid damage.
•
Tape the door shut.
•
Be sure the appliance stays secure in the upright position during transportation. Also
protect outside of appliance with a blanket, or similar item.
Energy Saving Tips
•
The beverage center should be located in the coolest area of the room, away from heat
producing appliances, and out of the direct sunlight.
15
PROBLEMS WITH YOUR BEVERAGE CENTER?
You can solve many common beverage center problems easily, saving you the cost of a
possible service call. Try the suggestions below to see if you can solve the problem before
calling the service.
TROUBLESHOOTING GUIDE
PROBLEM
POSSIBLE CAUSE
Beverage center does not operate.
Not plugged in.
The appliance is turned off.
The circuit breaker tripped or a blown fuse.
Beverage center is not cold enough.
Check the temperature control setting.
External environment may require a higher
setting.
The door is opened too often.
The door is not closed completely.
The door gasket does not seal properly.
Turns on and off frequently.
The room temperature is hotter than normal.
A large amount of contents has been added
to the beverage center.
The door is opened too often.
The door is not closed completely.
The temperature control is not set correctly.
The door gasket does not seal properly.
The light does not work.
Not plugged in.
The circuit breaker tripped or a blown fuse.
The bulb has burned out.
The light button is “OFF”.
Vibrations.
Check to assure that the beverage center is
level.
The beverage center seems to make too
much noise.
The rattling noise may come from the flow of
the refrigerant, which is normal.
As each cycle ends, you may hear gurgling
sounds caused by the flow of refrigerant in
your beverage center.
Contraction and expansion of the inside
walls may cause popping and crackling
noises.
The beverage center is not level.
The door will not close properly.
The beverage center is not level.
The door was reversed and not properly
installed.
The gasket is dirty.
The shelves are out of position.

16
Before disposal of the appliance.
Before disposal, disconnect the wine cooler from the power supply. This appliance contains a
flammable refrigerant (R600a). The refrigerant must be recovered by authorized personnel in
accordance with local regulations. Remove the door to prevent child entrapment.

17
Element Appliance Limited Warranty
(the “Products” or “Product” when referencing a singular product herein)
This Product (including any accessories included in the original packaging) as supplied
and distributed in new condition, is warranted by Element Appliance Company, LLC
("Element") to the original customer who purchases the Product from an authorized
Element retailer (the “Original Customer” or “you”) against defects in material and
workmanship under proper use, maintenance, and care according to the owner’s
manual, warnings, and instructions accompanying the Product (“Warranty”) as follows:
* PLEASE NOTE – Proof of purchase evidencing the date of purchase by the Original
Purchaser from an authorized Element retailer (“Valid Proof of Purchase”) is required for all
Warranty service.
The express Warranty set forth herein is subject to all terms and conditions
set forth below.
1.
WARRANTY SERVICE:
A.ONE-YEAR WARRANTY: Except as provided in subpart 1.B below, for a
period of one (1) year from the date of purchase by the Original Customer (the
“Warranty Period”), if
the parts or components covered by this Warranty are
determined by Element or Element’s authorized service provider to be defective in
material or workmanship, Element will, at its sole and absolute discretion and option: (i)
repair the defective part or component at no charge to the Original Customer, (ii)
replace the defective Product with a new Product of similar or better quality, at no
charge to the Original Customer, or (iii) refund the documented purchase price paid by
the Original Customer (excluding tax) to the Original Customer upon return of the
defective Product as directed by Element. After the Warranty Period expires, the
Original Customer must pay for all parts, components, shipping and handling, labor, and
replacement costs associated with the Product or any part or component thereof,
regardless of any defects in the Product or any part or component thereof.
B.LIMITED EXTENDED WARRANTY THROUGH PRODUCT REGISTRATION: If and
only if the Original Customer registers the Product at www.elementelectronics.com within ninety
(90) days of the date of purchase by the Original Customer, then the Warranty Period discussed
in subpart 1.A. above shall be extended an additional one (1) year to a new Warranty Period
equaling two (2) years from the date of purchase by the Original Customer. If the Product is
not registered as provided for in this subpart 1.B, then the standard one-year Warranty Period
set forth in subpart 1.A shall apply.
C.TIMING AND PROCEDURE: Before Warranty service can commence, the
Original Customer must contact either (i) the retailer from whom the Original Customer
purchased the Product, or (ii) Element directly, in either case for problem determination
and service procedures. Valid Proof of Purchase evidencing that the Product is within
the Warranty Period MUST be presented by Original Customer in order to obtain the
requested Warranty service.
Please have your model and serial number available,
along with your date of purchase of the Product. To remain eligible for Warranty service,
Original Customer may not return the Product or any part or component thereof to the
retailer or Element without Element’s prior written consent.
2.
EXCLUSIONS AND LIMITATIONS TO WARRANTY SERVICE
The Warranty covers manufacturing defects in materials and workmanship of the
Product encountered in the normal, non-commercial use of the Product, and does not
cover (a) damages or malfunctions resulting from improper or unreasonable use or
maintenance, abuse, negligence, failure to follow instructions contained in any written
materials that accompany the Product, deterioration by reason of excess moisture,
corrosive atmosphere, lightning, power surges, connections to improper voltage supply,

18
unauthorized alteration, or other external causes such as extremes in temperature or
humidity, modifications, scratches or discoloration; (b) any damage caused by using
non-authorized parts or service facilities for repair of Products (however, for avoidance
of doubt, using non-authorized parts or service facilities will not, in and of itself, void the
Warranty); (c) transportation, shipping, delivery, pickup, insurance, installation, or set-up
costs; (d) ordinary wear and tear, cosmetic damage, or damage due to acts of nature,
including but not limited to, water, floods, wind, storm, tornado, earthquake, or fire, or due to
damage caused by extraordinary impact events, such as dropping, crushing, demolition or other
extraordinary damage
; (e) commercial use of the Product, or use of the Product for
anything other than single-family household or residential use; or (f) modification of the
Product or any part of the Product.
This Warranty is made to the Original Customer only and does not cover Products sold
AS IS or WITH ALL FAULTS.
The Warranty is invalid if the factory-applied serial
number has been altered or removed from the Product. This Warranty is valid only in
the United States, and only applies to Product if it was purchased and serviced in the
United States.
The addition of equipment or features to the Product that are not
manufactured or recommended by Element could affect the intended function of the Product,
and therefore may void the Warranty. Furthermore, the exposure of the Product to chemicals,
heat, cold, humidity, or other elements can affect the Product components, and therefore, the
Warranty does not cover discoloration, fading, cosmetic changes, rust, or any damages or
failure related to any such items.
The Warranty is contingent upon the proper use,
maintenance, and care of the Product. The Warranty may be void if the Product has been used
in a manner contradictory to, or in violation of, the terms of the user’s manual, warnings, or
instructions accompanying the Product.
THIS WARRANTY IS MADE IN LIEU OF AND SUPERSEDES ALL OTHER WARRANTIES
OR CONDITIONS OF MERCHANTABILITY OR FITNESS FOR A PARTICULAR PURPOSE
OR GENERAL USE, WHETHER EXPRESS, IMPLIED, COLLATERAL, STATUTORY, OR
PROVIDED BY COMMON LAW, THE UNIFORM COMMERCIAL CODE, OR OTHERWISE.
ELEMENT FURTHER DISCLAIMS ALL WARRANTIES AFTER THE END OF THE
WARRANTY TERM DEFINED ABOVE.
NO OTHER EXPRESS WARRANTY OR
GUARANTY GIVEN BY ANY OTHER PERSON, FIRM, OR ENTITY WITH RESPECT TO THE
PRODUCT SHALL BE BINDING ON ELEMENT.
REPAIR, REPLACEMENT, OR REFUND
OF THE ORIGINAL PURCHASE PRICE, AT ELEMENT’S SOLE DISCRETION, ARE THE
EXCLUSIVE REMEDIES OF THE CUSTOMER.
ELEMENT SHALL NOT BE LIABLE FOR ANY INCIDENTAL OR CONSEQUENTIAL
DAMAGES CAUSED BY THE USE, MISUSE, OR INABILITY TO USE THE PRODUCT.
THESE INCLUDE, BUT ARE NOT LIMITED TO, ANY DAMAGES IN THE FORM OF LOST
PROFITS, LOSS OF USE, LEGAL FEES, ECONOMIC LOSS, PERSONAL INJURIES, OR
ANY OTHER DAMAGES CAUSED BY CIRCUMSTANCES BEYOND THE CONTROL OF
ELEMENT.
NOTWITHSTANDING THE FOREGOING, ELEMENT’S AGGREGATE
LIABILITY TO ANY CUSTOMER SHALL NOT EXCEED THE ORIGINAL PURCHASE PRICE
OF THE PRODUCT. THIS WARRANTY SHALL NOT EXTEND TO ANYONE OTHER THAN
THE ORIGINAL CUSTOMER WHO PURCHASED THE PRODUCT, AND IS NOT
TRANSFERRABLE. NO PERSON IS AUTHORIZED TO ALTER, EXTEND, OR WAIVE THIS
WARRANTY OR ANY OF ITS TERMS OR CONDITIONS.
Some states do not allow the exclusion or limitation of incidental or consequential
damages, or allow limitations on warranties, so the above limitations or exclusions may
not apply to you. This Warranty gives you specific rights, and you may have other rights,
which vary from state to state. The exclusions and limitations to the Warranty apply to the
maximum extent permitted by law and unless restricted or prohibited by law. Where any term of
this Warranty is prohibited by applicable law, it shall be null and void, but the remainder of this
Warranty shall remain in effect.
PLEASE DIRECT ALL CORRESPONDENCE TO:

19
Element Appliance Company, LLC
customerservice@elementelectronics.com
(888) 842-3577
https://elementelectronics.com
Element, the Element Logo, and Bring it home are trademarks of Element Brand
Holding, LLC. All other trademarks are the property of their respective owner, who has
not sponsored, endorsed, or approved this product. ©2025 Element Appliance
Company, LLC. All rights reserved.
Distributed by Element Appliance Company, LLC
Augusta, GA 30909
For service, support and warranty information:
Call 888.842.3577, email us at [email protected] or visit
www.elementelectronics.com