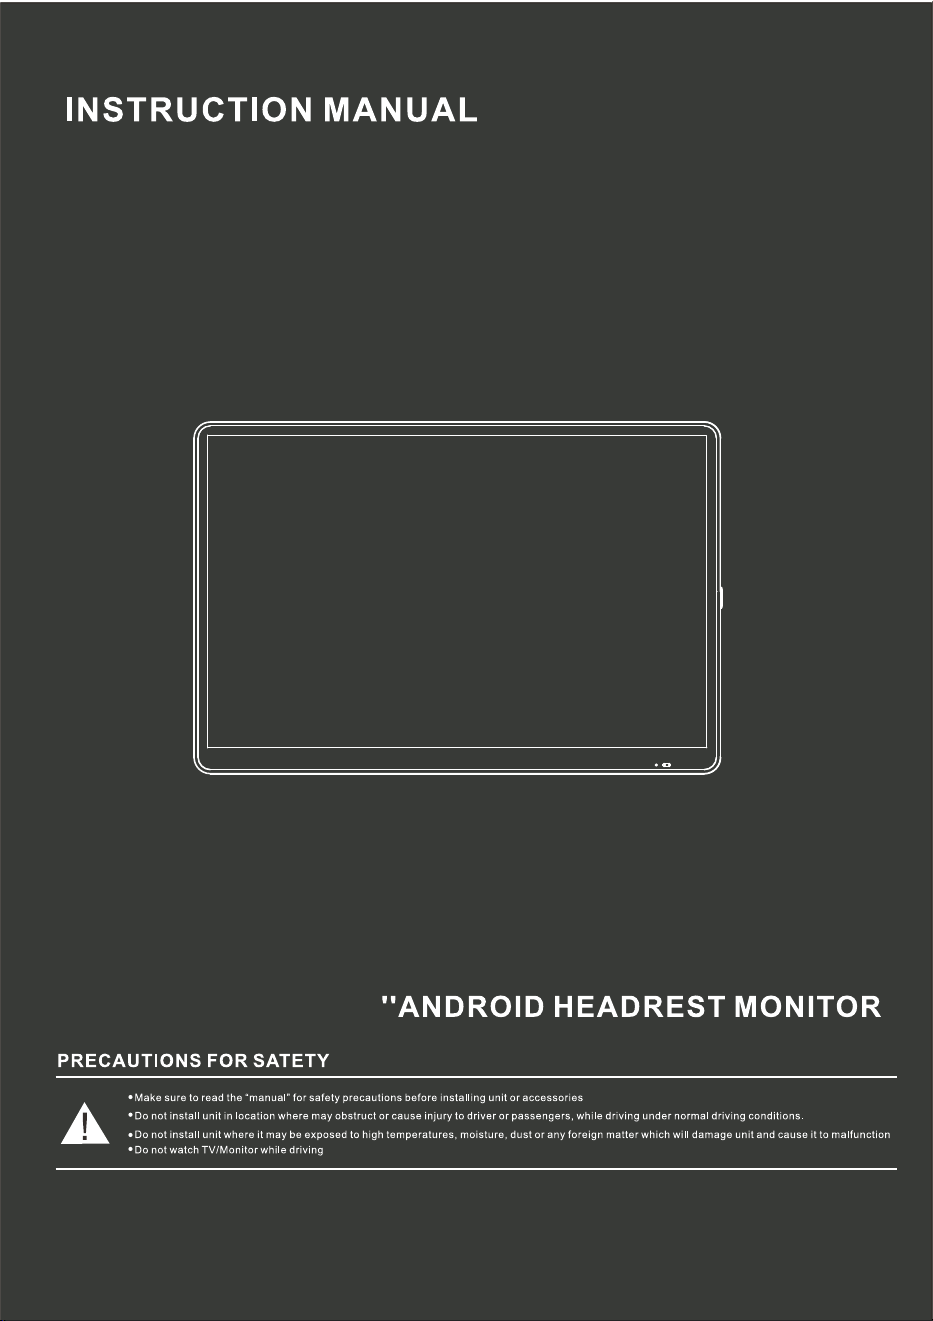
13.3
Profile drawing 1
The Main Interface 1
Functional parameters
2
System Parameters
2
Function Setup 3
Insert USB/Micro SD
3
Insert USB/Micro SD into the Movie interface
4
Input source 5
FM Transmitter
5
Application 6
Ambient light
6
7
7-11
12
13
Remote Desktop function
Screen Mirroring
Product Display
Attention
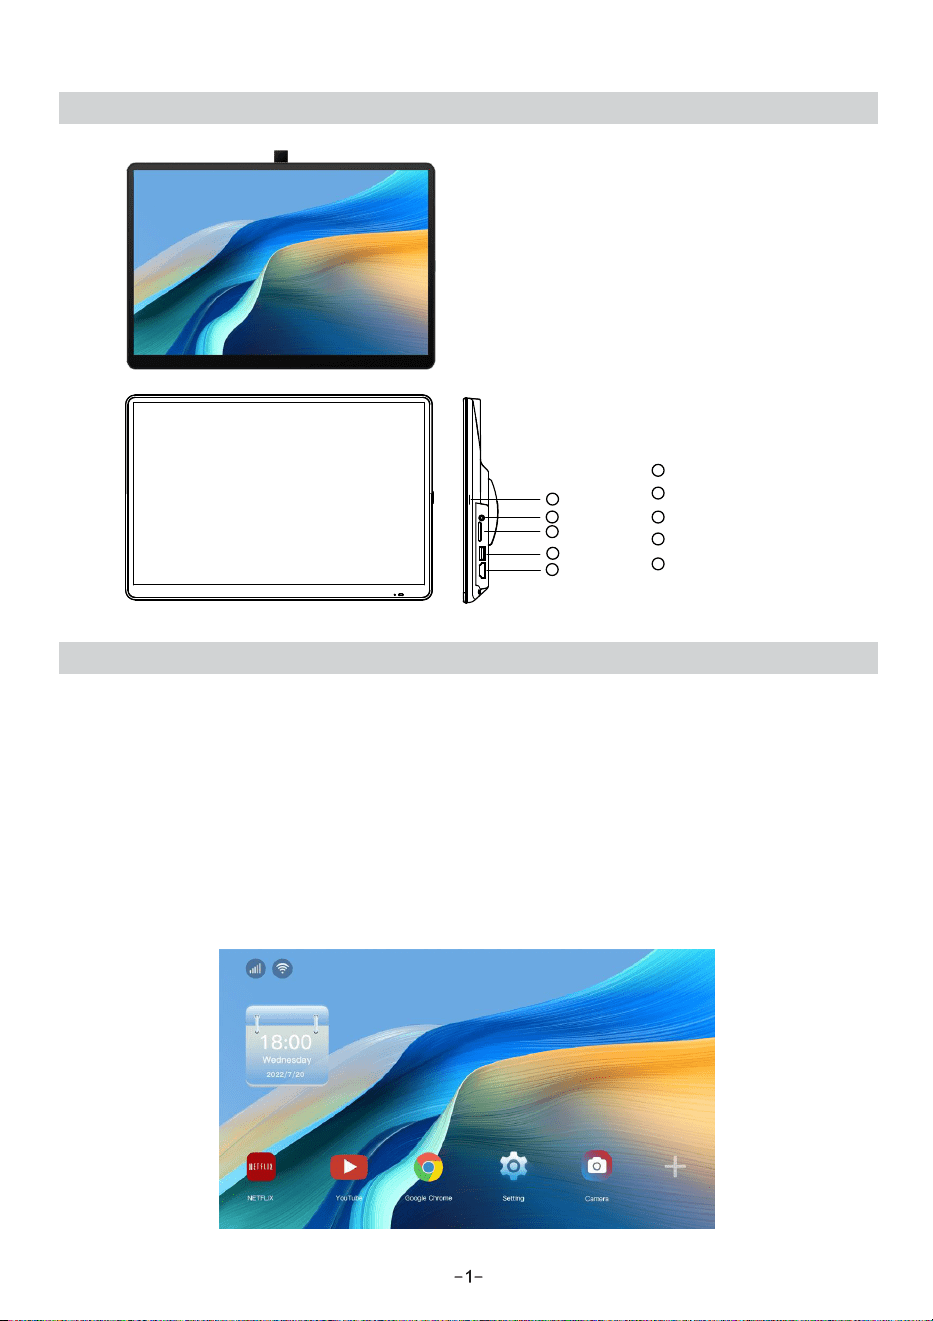
Profile drawing
The Main Interface
The main interface application functions are multi-style. Connect the power, press the power
button to enter the main interface as shown in the figure below; there are
multimedia (movies, music, pictures), APPS, signal input on the main interface; when
insert USB/ TF card , click on the main interface Enter the corresponding sub-interface, and
then select USB or Micro SD to enter the selection item and playback stat
us; when the
external interface is connected to the input source AV/HDMI, it will enter the
corresponding input source video interface; when performing system settings, you need to
enter the setting module.The interface is shown in the figure below:
1
2
3
4
5
1
2
3
4
5
Power on/off(shut off screen)
Earphone jack
TF/SIM
USB port
HDMI
2
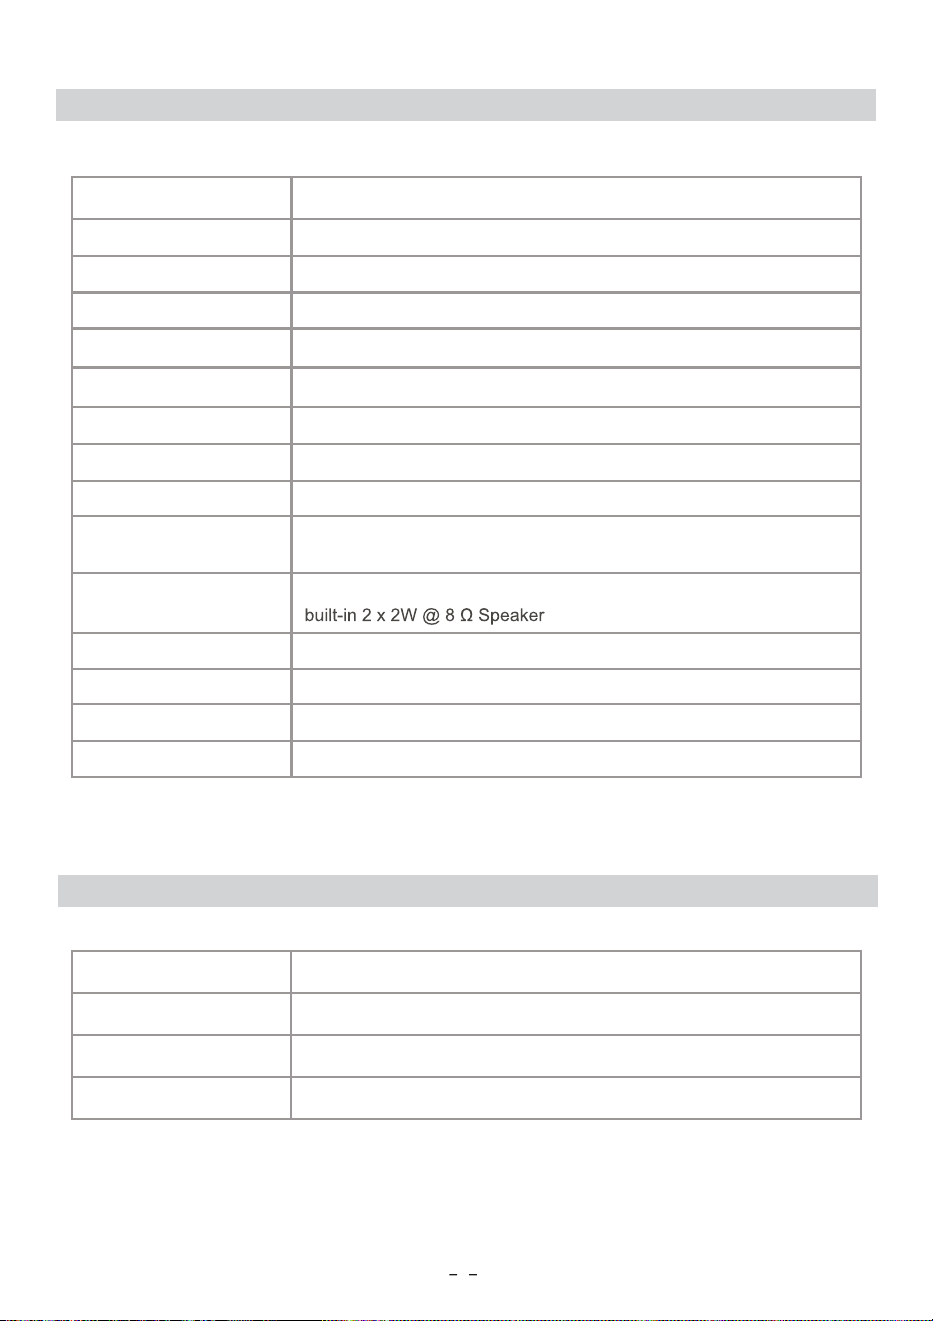
Domain Frequency Octa core 64 bit processor
4GB
64GB
Android 13.0
Ram
Rom
Operating System
System Parameters
High definition panel 13.3":1920(W)*(RGB)*1200(H)
802.11 b/g/n/a/ac
Connect to mobile phone via wifi
Support Bluetooth version 5.0
MPEG/Windows Media/AAC/WAV/OGG/AMR/MIDI etc.
MPEG-1/2/MPEG-4/MP4/H.265/RMVB/WMV/VOB/VC-1 etc.
JPEG/BMP/PNG/GIF/WEBP
Support high-speed USB 2.0 Host
Support high-speed SDI0 3.0 and the maximum capacity of 128GB
Supports stereo audio emission of FM and optional frequency
points:88MHz – 108MHz
Supports earphone output
12 V
Max. 800MA
-10℃~55℃
-20℃~65℃
WIFI Data Rate
Miracast
Bluetooth transmitter
Audio Formats Supported
Video Formats Supported
Image Formats Supported
USB
TF Card
FM Transmitter
Audio
Supply Voltage
Supply current
Operating temperature
Storage temperature
Functional parameters
Function Setup
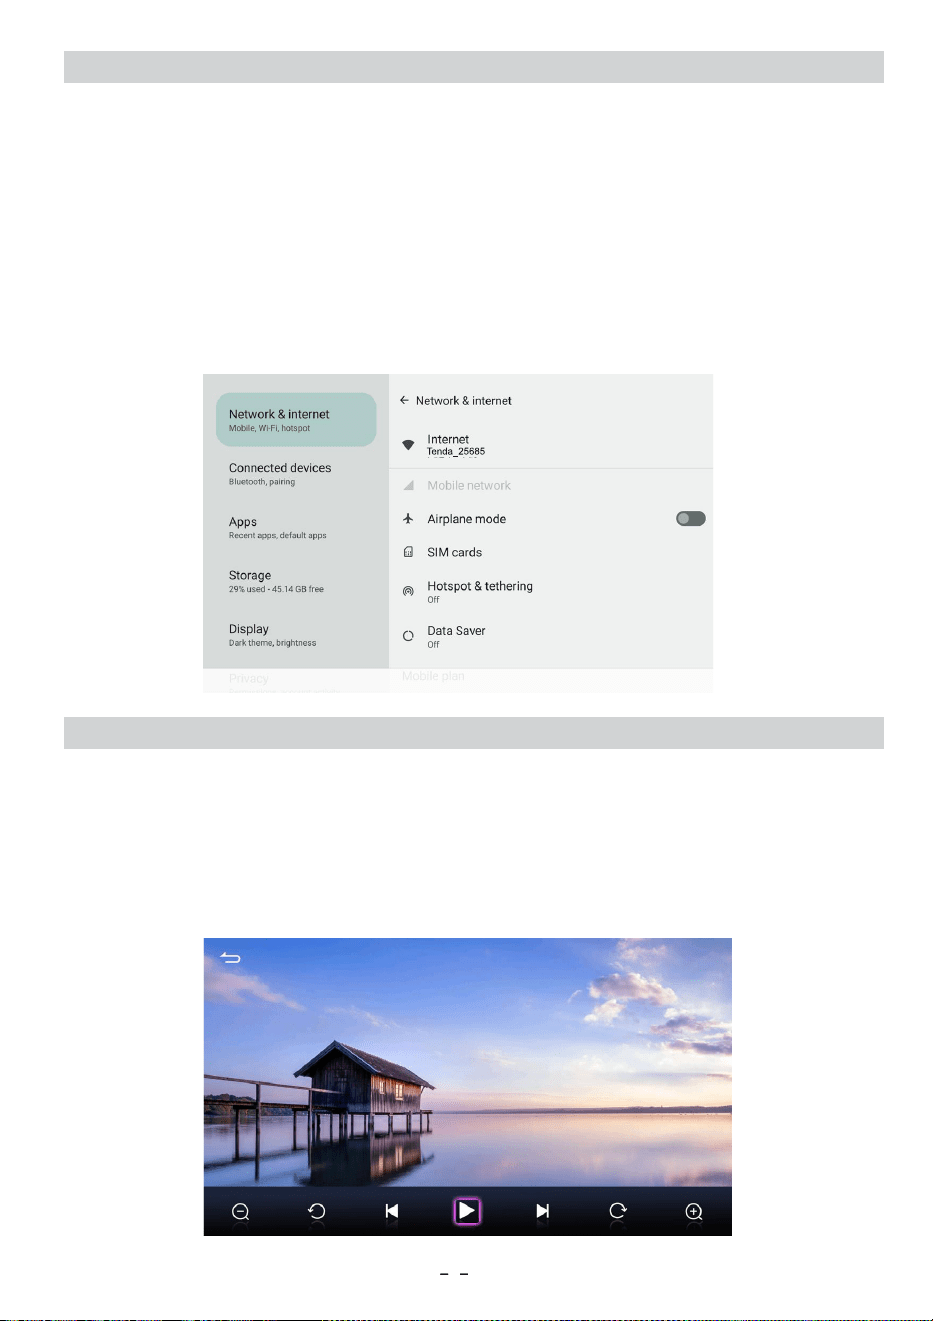
1. Network and Internet
Network and Internet are only for WLAN, network sharing and portable hotspots. When you
need to select and set a certain item, click directly to enter.
WIFI setting: Turn on WIFI, the system will automatically search for wireless networks, select
the desired wireless network name, enter the correct password in the password interface, and
click connect.
2.Bluetooth
After turning on the Blue
tooth of the external device, click on the Bluetooth on the
interface to pair. After the pairing is successful, you can connect and use the external
device function.
Insert USB/Micro SD
1.1 Insert into the picture interface When inserting the USB/ into the external
interface of the unit, enter the corresponding sub-interface (as shown in above), there
are return, USB, on the sub-interface, and then click to enter the USB/
that is, enter Picture playback interface, the specific operation interface is shown
in the figure below:
3
Function Setup
1. Network and Internet
Network and Internet are only for WLAN, network sharing and portable hotspots. When you
need to select and set a certain item, click directly to enter.
WIFI setting: Turn on WIFI, the system will automatically search for wireless networks, select
the desired wireless network name, enter the correct password in the password interface, and
click connect.
2.Bluetooth
After turning on the Blue
tooth of the external device, click on the Bluetooth on the
interface to pair. After the pairing is successful, you can connect and use the external
device function.
Insert USB/TF card
1.1 Insert into the picture interface When inserting the USB/TF card into the external
interface of the unit, enter the corresponding sub-interface (as shown in above), there
are return, USB, TF card on the sub-interface, and then click to enter the USB/TF card
in the figure below:
3
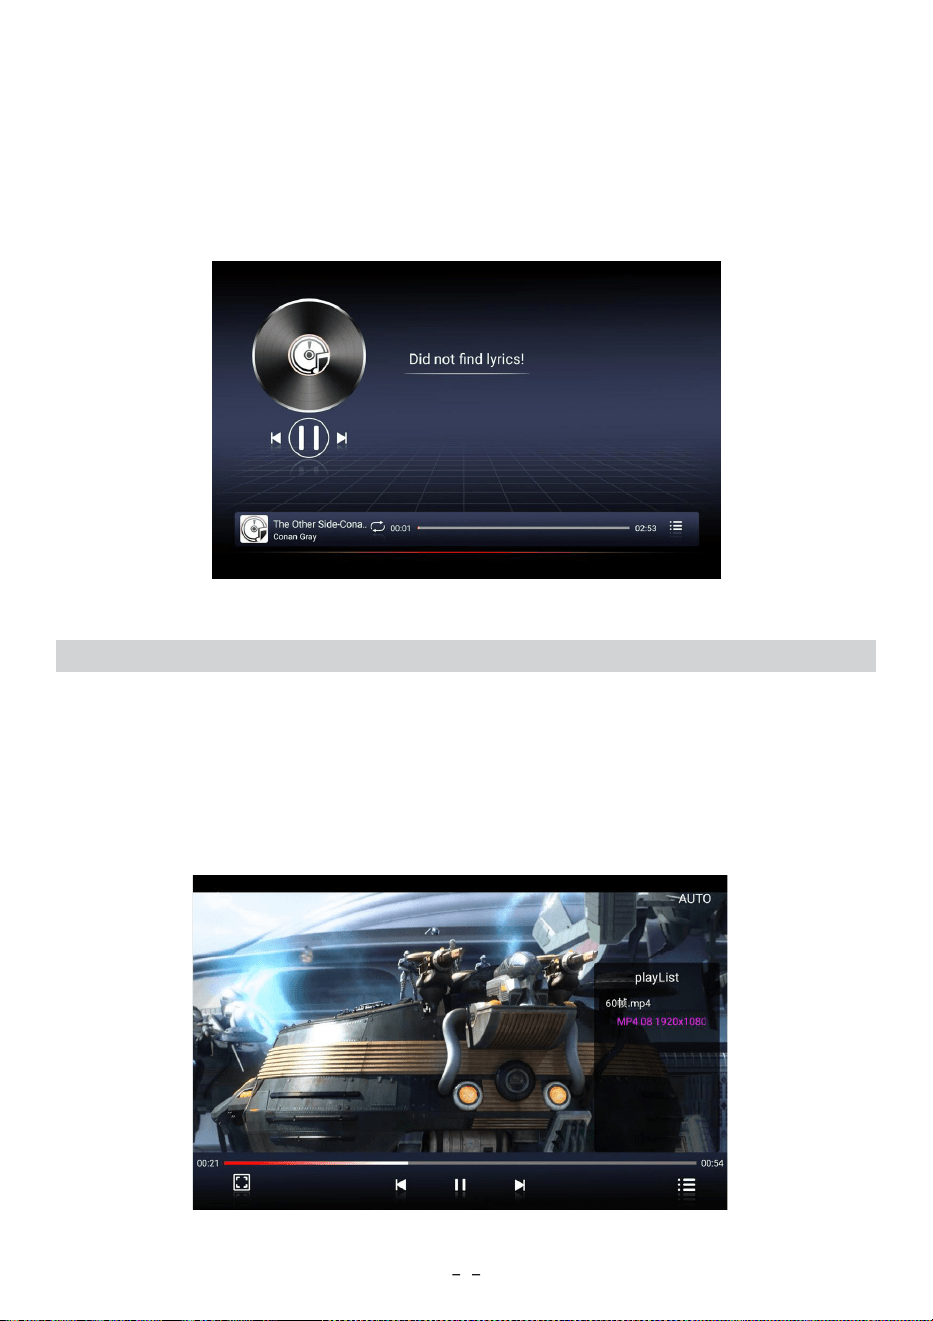
1.2 Insert into the picture interface When inserting the USB / TF card into the external interface
of the unit, enter the corresponding sub-interface (as shown in above), there are return,
USB, TF card on the sub-interface, and then click to enter the USB/TF card to enter
Music playback interface, the specific operation interface is shown in the
figure below:
Insert USB/TF card into the Movie interface
1.3 Insert into the movie interface When inserting the USB / TF card into the external
of the unit, enter the corresponding sub-interface (as shown in above), there
are return
USB, TF card on the sub-interface, and then click to enter the USB/TF card
to enter
Movie playback interface, the specific operation interface is shown in the
figure below:
interface
4
Input source
1.
FM Transmitter
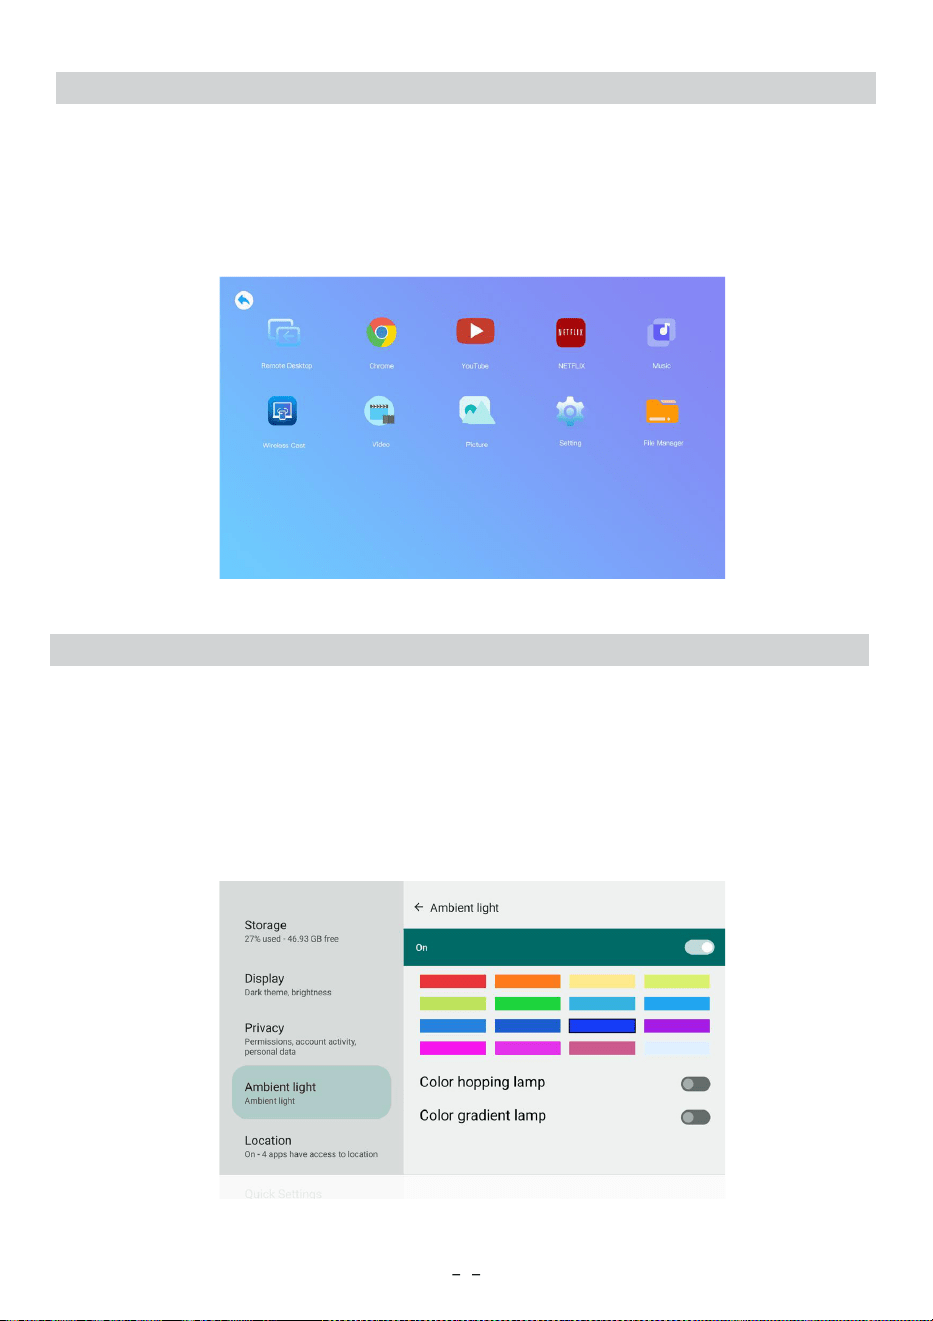
Click the application icon on the lower right corner of the main interface, and after
clicking it, a sub-interface will pop up on the main interface; there are speakers, FM,
Infrared headphones. Select the speaker on the sub-interface, you can adjust the sound
level; if you select FM, you can use the FM value on the interface
Select FM; turn on the FM frequency on the interface, such as 102.5MHz, and t
urn on
the radio at the same time.
Also adjust to 102.5MHZ, play music on the monitor, and then play music on the radio at
the same time.
5
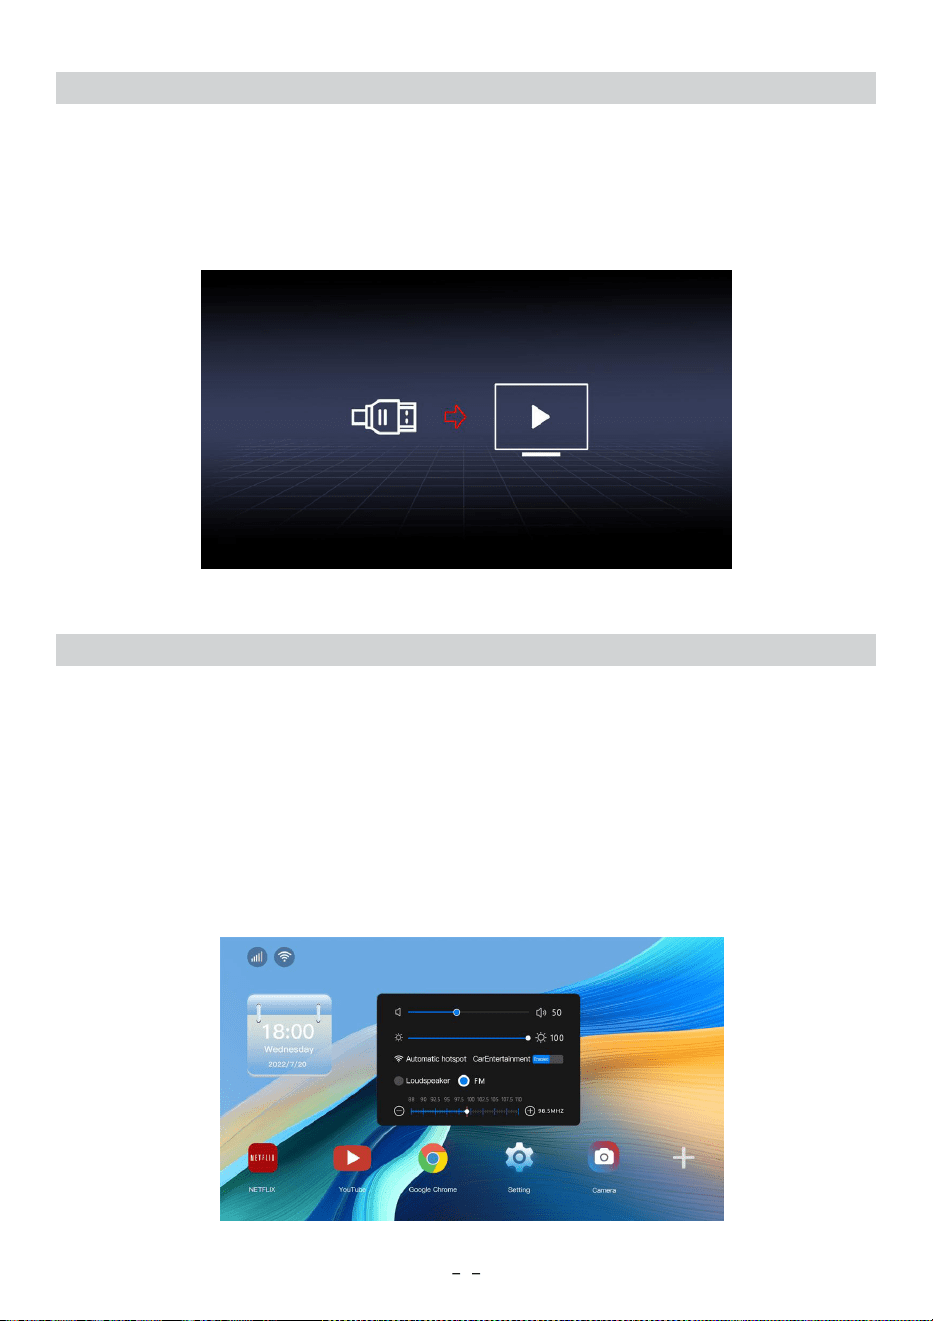
Select the HDMl input icon on the main interface of remote control touch workspace.
Double-click the remote controller to enter the HDMl input interface. HDMl input sources can
be connected from HDMl. lt will display no signal if without input source. HDMl input Source
interface shown as below.
Application
Slide the main interface up to the APP interface
. If users need to add other applications, they can
enter the Android market to download them if there is a network. Its interface is as shown in
the figure below: Enter the application interface, as shown in the figure
below, there are various applications that come with this unit;
6
Ambient light
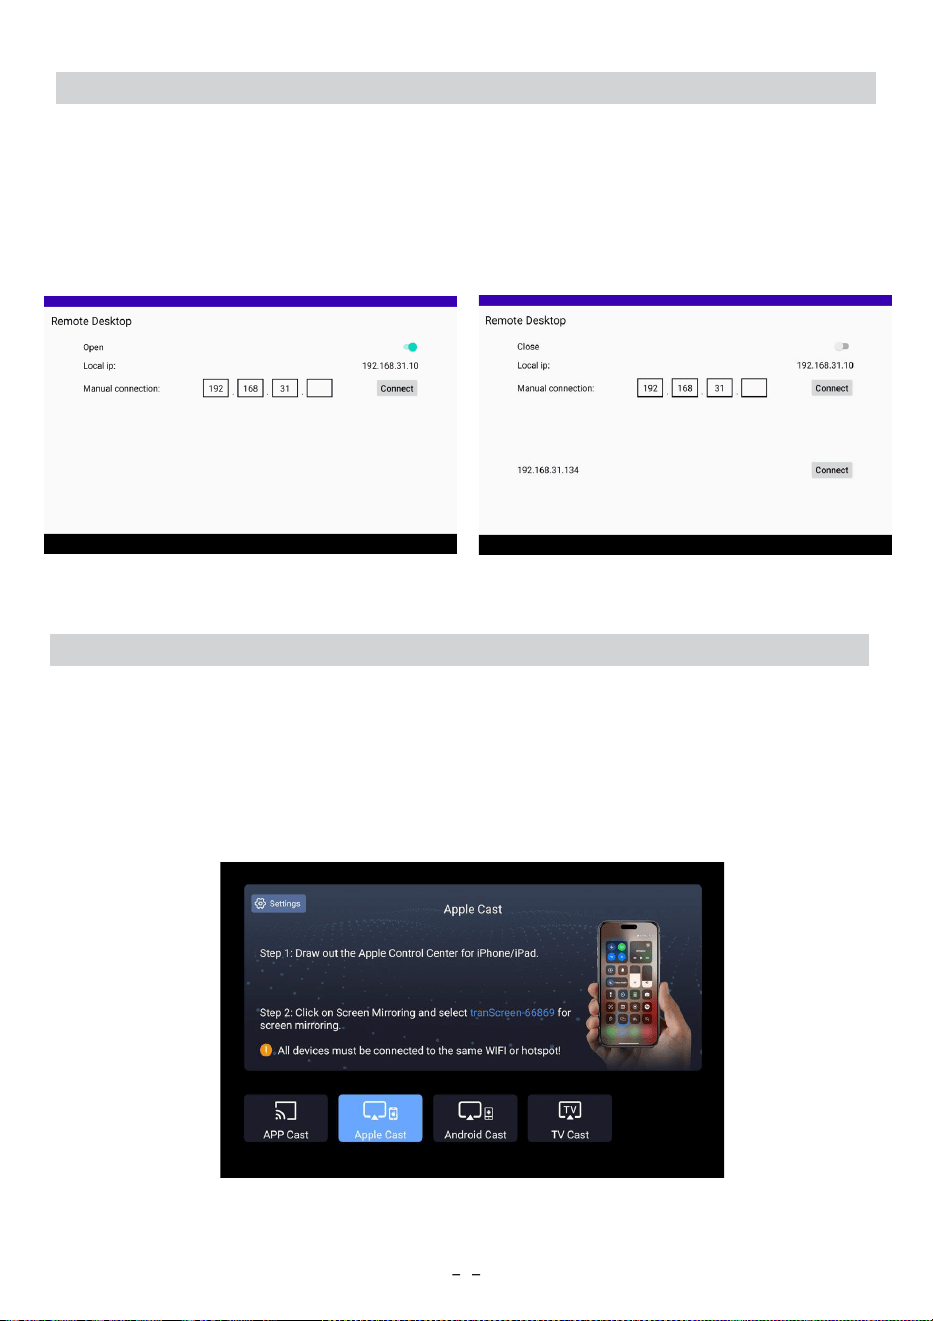
Click the setting icon to enter the interface, and click the sub-interface and shows ambient light. There
are 16 colors atmosphere light for different choices. If you choose one color, the atmosphere light shows
the same color. Once open color hopping lamp, the ambient light will change in different color fast. Open
color gradient lamp, the ambient light will change in different color smoothly.
Remote Desktop function
7
Screen mirroring
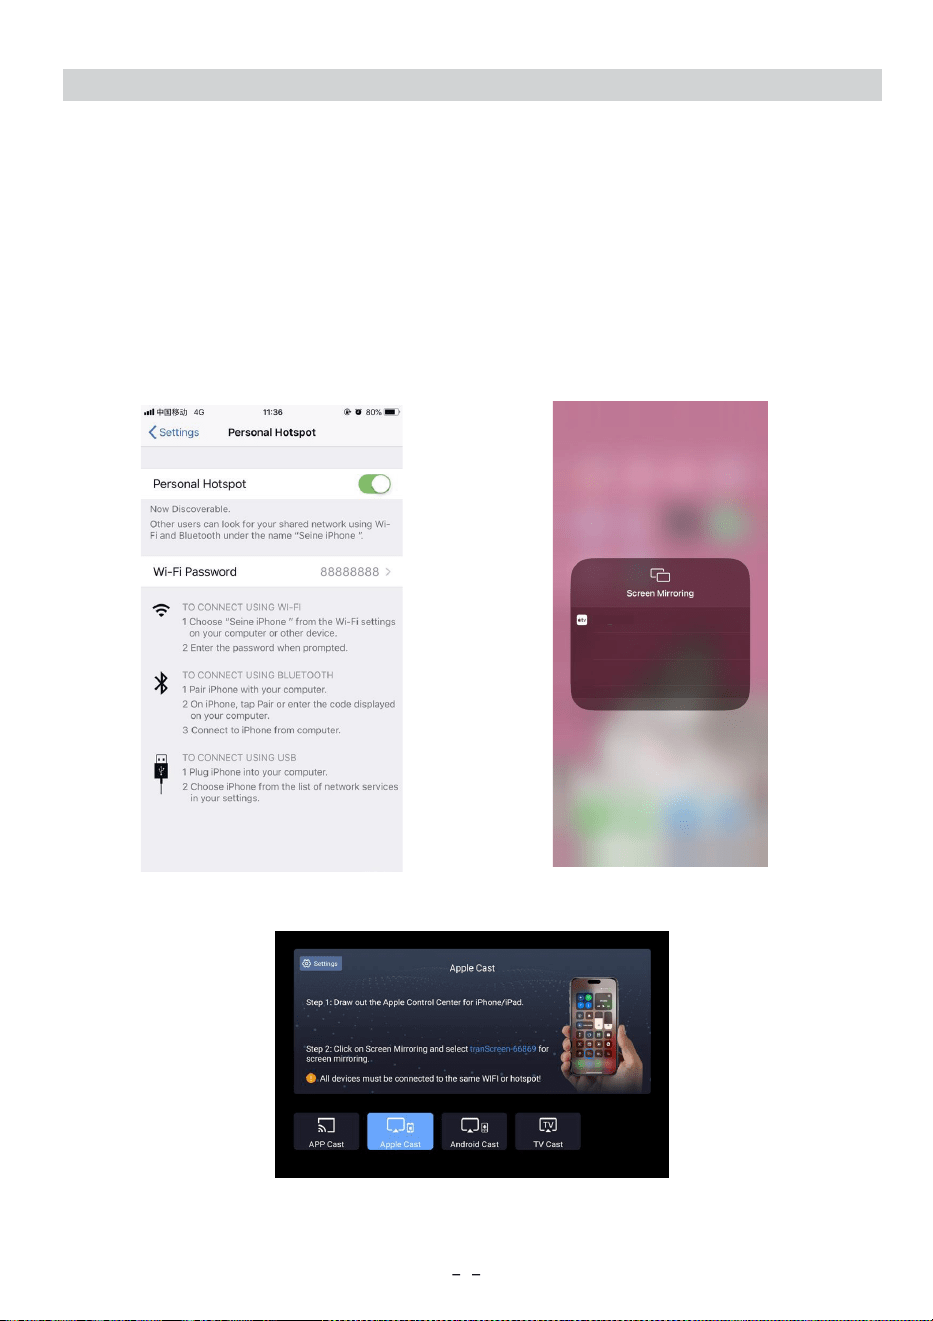
Click on the wireless screen mirroring APP on the application interface to enter the wireless screen
mirroring interface. It includes app cast, iPhone Airplay, Android phone mirror cast, and TV projection.
Detailed methods for screen mirroring on different devices are provided. Users can choose according
to the model of their own mobile phone.
This function support two screen shows the same interface. Achieve this dual screen function, two
screens use the same wifi signal, both click the remote desktop app icon and enter the application,
just open monitor A, monitor B will show Local ip of monitor A, click”Connect” in monitor B, then cast
monitor A to monitor B successfully.
8
Wireless Miracast Usage
3.Operation on lphone
Once WIFIconnected,open Airplay, and search device:tranScreen-XX until connected, then the
mobile phone image can cast to unit,as picture below.
1.Carbit Cast Carbit Cast forlphone Airplay
For lphone, enter into Setting, set the Hotspot ON, and find the Password, as picture below.
2.Connectunit to Mobile phone Hotspot
Use remote Control to choose Settings on unit, Set WIFI ON, and search the WIFI ID of
Mobile Phone Hotspot. (Please make sure same WIFl source for Mobile phone and unit.)
tranScreen-66869
(1)
(2)
(3)
9
Wireless Miracast Usage
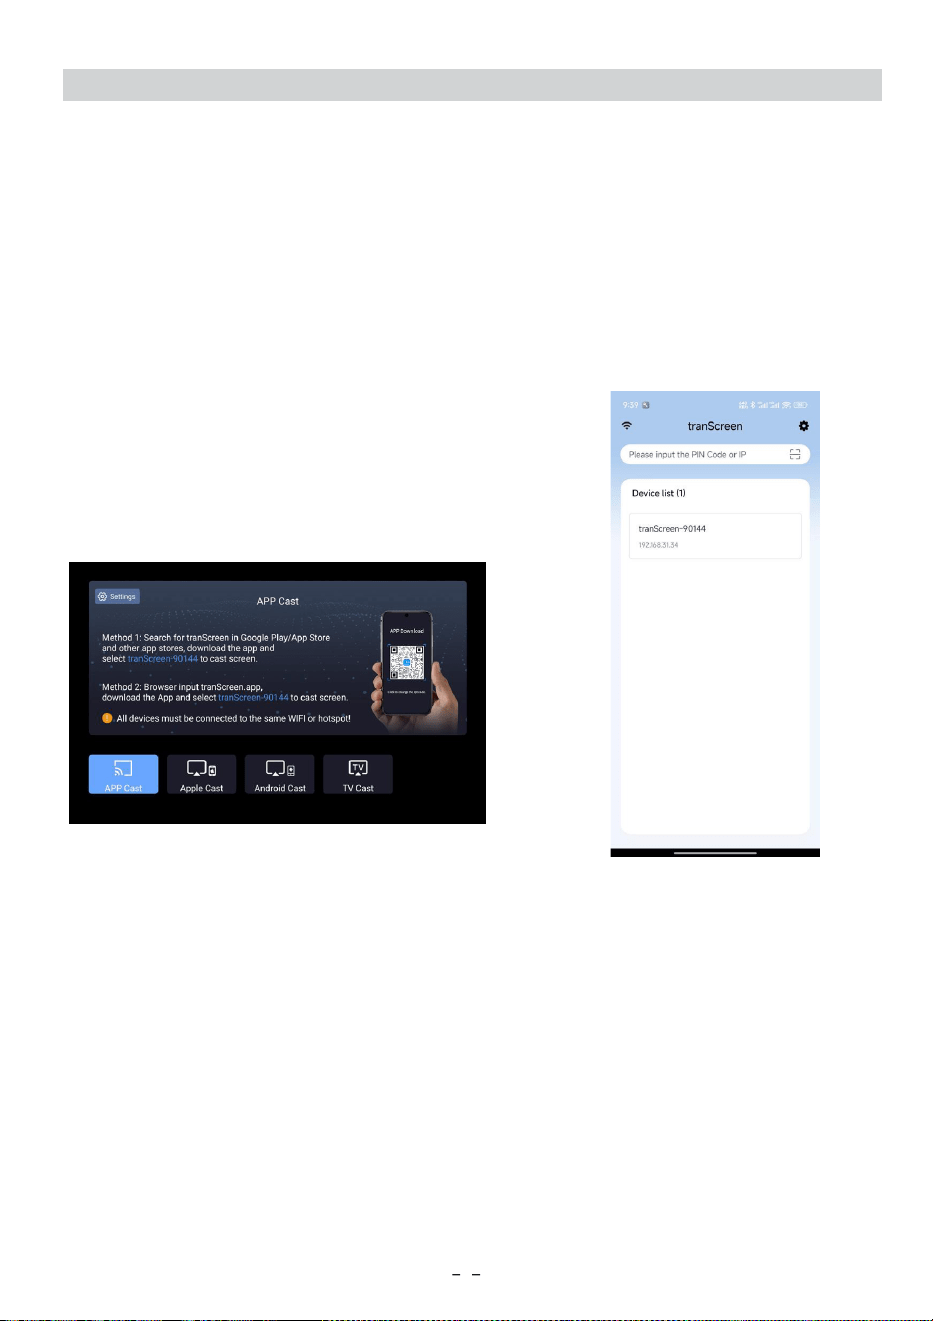
3.Click tranScreen-xxx to cast your device.
1.Open Wireless cast, choose APP Cast, scan the QR code on the right side photo shows, choose
the corresponding App to your own device system.
2. After installing tranScreen APP, connect your device and monitor to the same WIFI signal.
(1) (2)
10
Wireless Miracast Usage
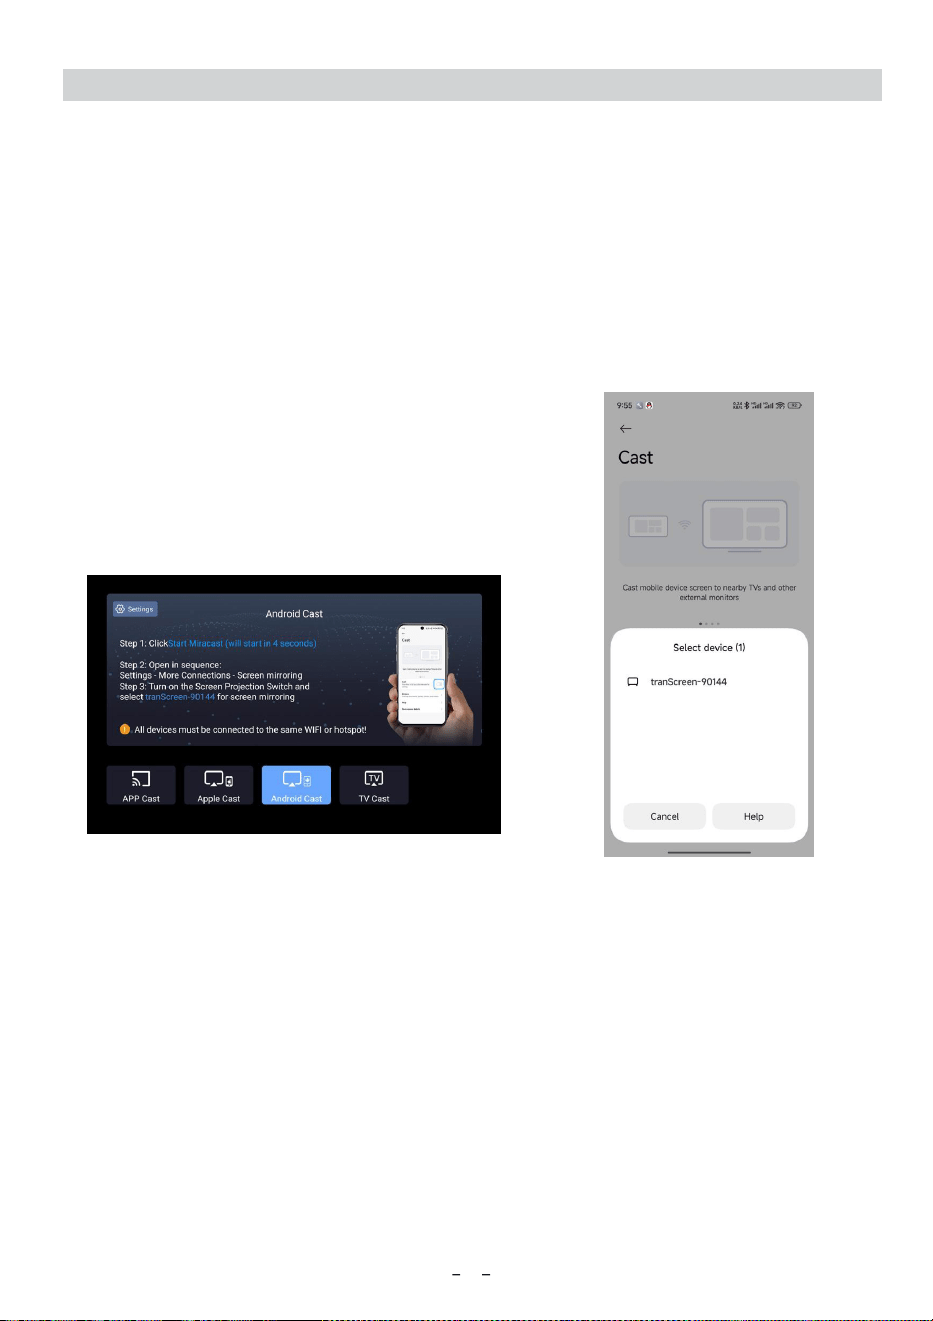
3. In Android phone to enter Setting-More connecting-Cast, open Cast function and
choose tranScreen-xxx to start.
1.Open Wireless Cast, choose Android Cast, wait for casting screen automatically.
2. Connect Android phone and monitor to the same WIFI.
(1) (2)
11
Wireless Miracast Usage
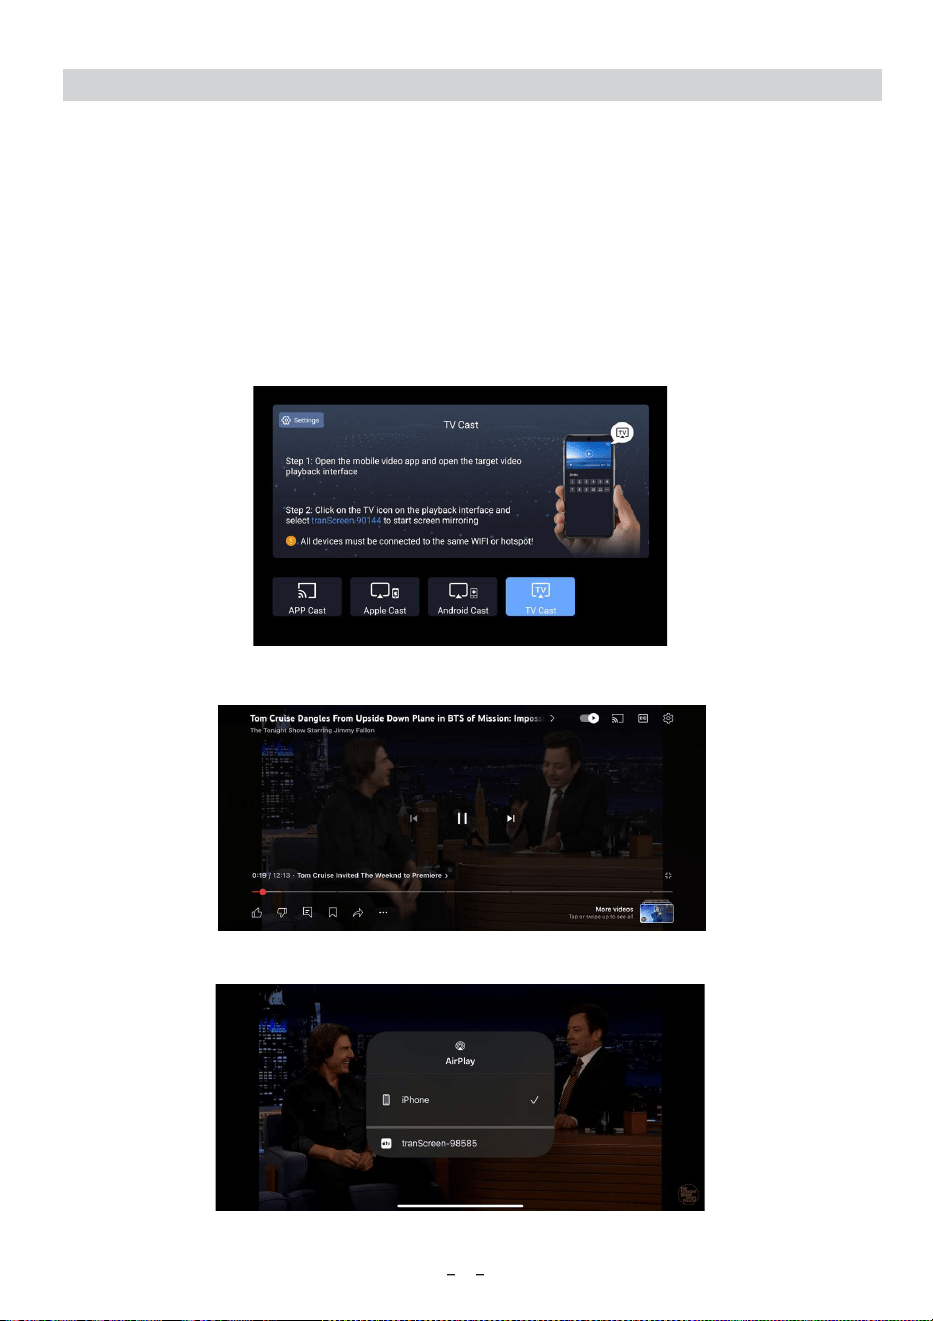
3. Choose App support TV cast, in video choose cast icon on the right top corner,
in the pop-up window, choose tranScreen-xxx to cast.
1. Open Wireless Cast, choose TV Cast function.
2. Connect the device and monitor to the same WIFI signal.
(1)
(2)
(3)
headset
headset
headset
65
55
humid
For safety reasons,
13

Warning:
Changes or modifications to this unit not expressly approved by the party responsible for compliance could
void the user
s authority to operate the equipment.
NOTE:
This device complies with part 15 of the FCC Rules. Operation is subject to the following two conditions: (1
) This device may not cause harmful interference, and (2) this device must accept any interference
received, including interference that may cause undesired operation.
FCC Statement:
This equipment has been tested and found to comply with the limits for a Class B digital device, pursuant
to part 15 of the FCC Rules. These limits are designed to provide reasonable protection against harmful
interference in a residential installation. This equipment generates, uses and can radiate radio frequency
energy and, if not installed and used in accordance with the instructions, may cause harmful interference
to radio communications. However, there is no guarantee that interference will not occur in a particular
installation. If this equipment does cause harmful interference to radio or television reception, which can
be determined by turning the equipment off and on, the user is encouraged to try to correct the
interference by one or more of the following measures:
Reorient or relocate the receiving antenna.
Increase the separation between the equipment and receiver.
Connect the equipment into an outlet on a circuit different from that to which the receiver is connected.
Consult the dealer or an experienced radio/TV technician for help.
The equipment complies with FCC Radiation exposure limit set forth for uncontrolled environment. This
equipment should be installed and operated with minimum distance 20cm between the radiator and your
body.