User Manual
1
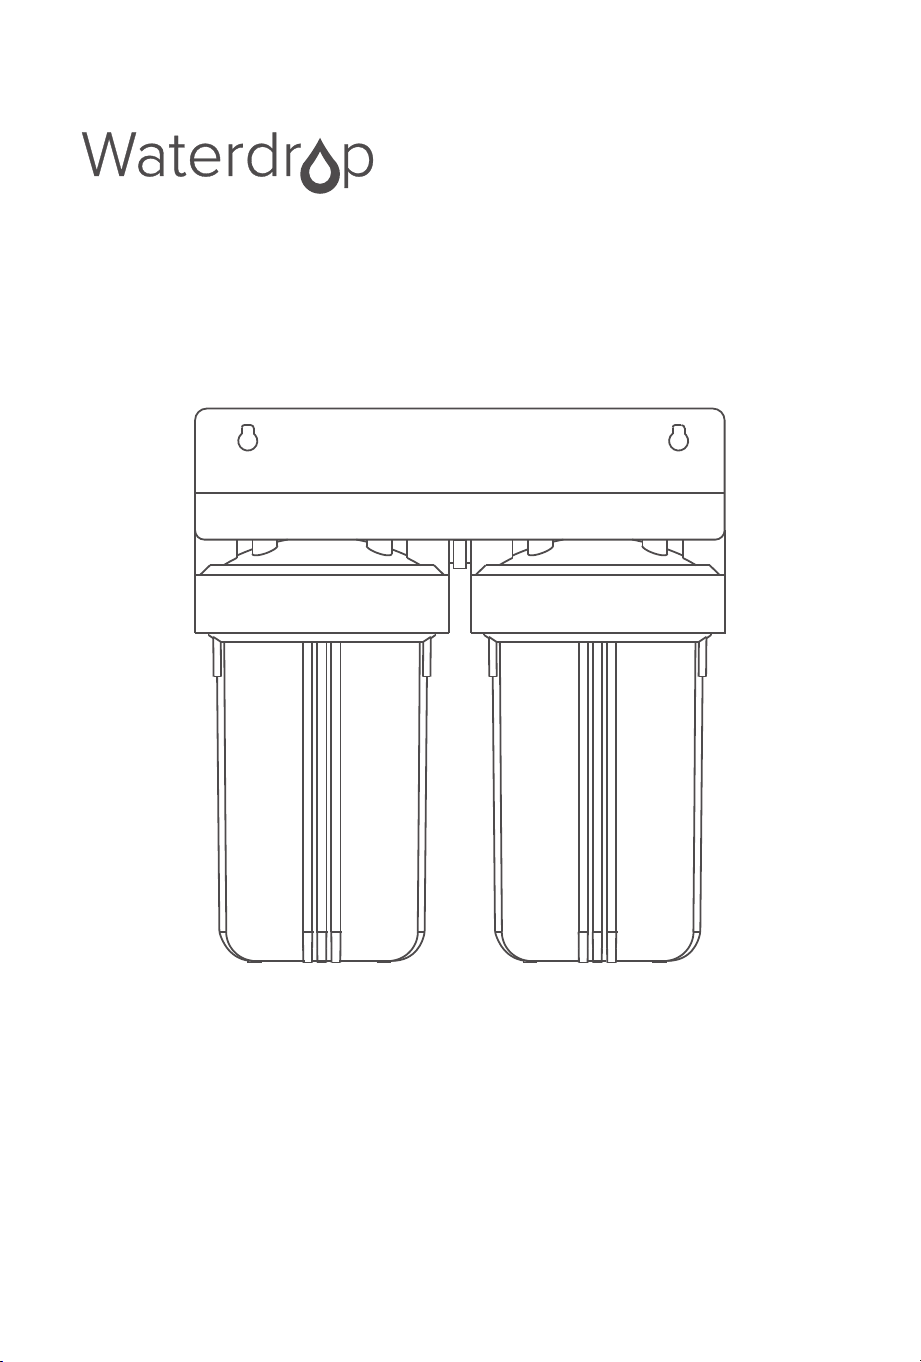
2-Stage Whole House
Water Filtration System
Read this manual before using and keep it for future reference.
3
1 2
4 5 6
7 8

3
1 2
4 5 6
7 8

Table of Contents
Product Operation and Specifications.....................................................................2
Components List................................................................................................................2
Tools Required ....................................................................................................................2
Pre-installation ...................................................................................................................3
Installation............................................................................................................................3
Maintenance Instructions..............................................................................................6
Filter Change Instructions .............................................................................................7
Frequently Asked Questions ........................................................................................8
Warranty ................................................................................................................................9
3
1 2
4 5 6
7 8
Model
Flow Rate
Working Pressure
Operating Temperature
Feed Water Requirement
Grooved Fit PP Cotton Filter
Sediment and Activated Carbon Filter
Iron and Manganese Reducing Filter
WD-WHF21-PG/WD-WHF21-FG
Up to 12 GPM
25~90 psi
40-100 ˚F (4 - 38 ˚C)
Municipal tap water
Lifetime: 3-6 months
Lifetime: up to 6 months
Lifetime: up to 6 months
Safety glasses
Towels
Flat head screwdriver
Medium crescent wrench
Hacksaw
Soldering iron or torch
Adjustable wrench
Teon tape
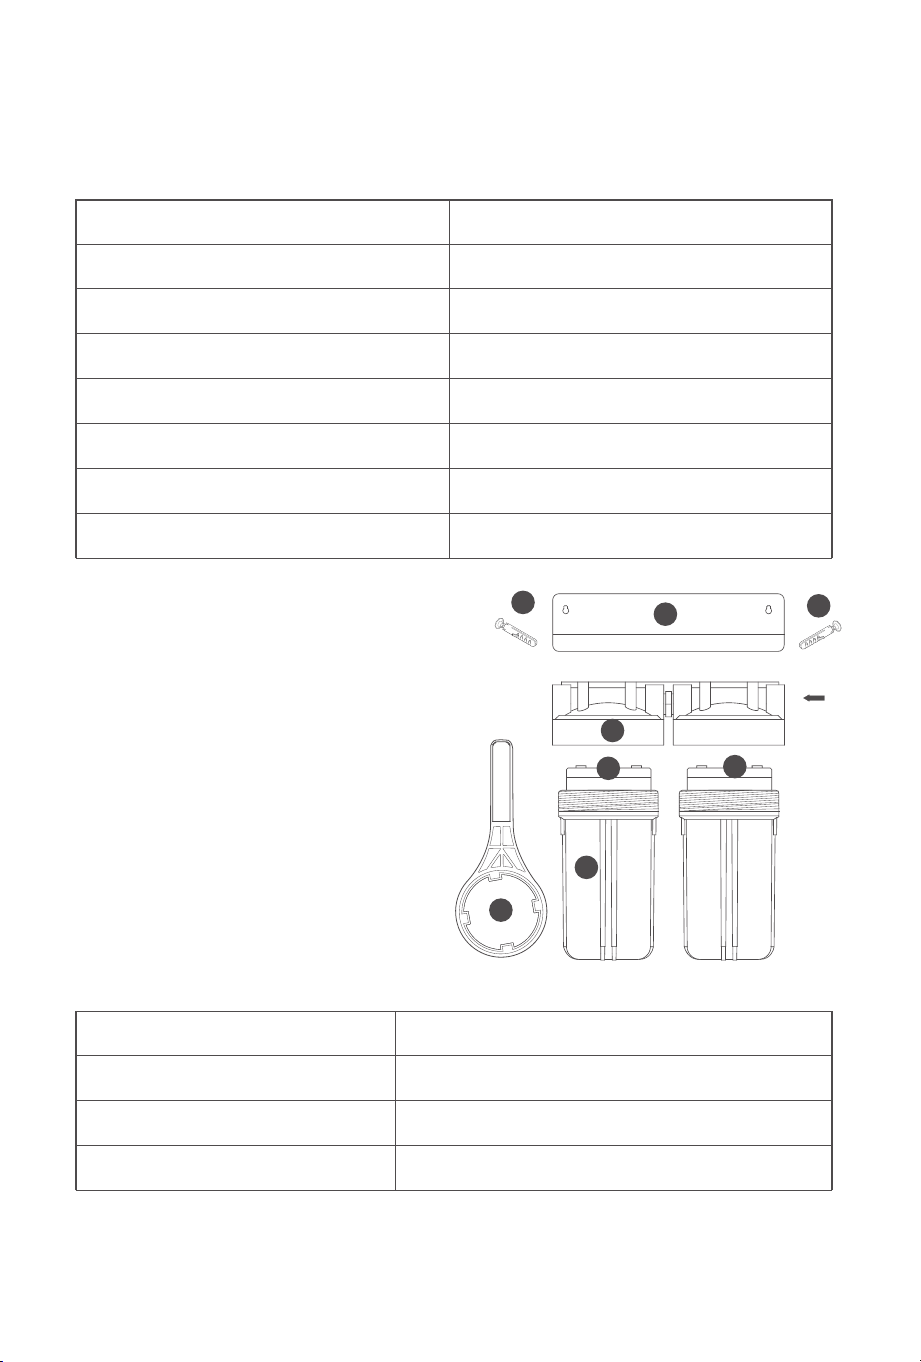
1.Metal filter housing scraper
2.10”*4.5” 2-stage blue filter with 1”NPT inlet
and outlet port
3. Grooved fit PP cotton filter or
Iron and Manganese Reducing Filter
4. Sediment and activated carbon filter
5. Wrench
6. Expansion screw*2
Product Operation and Specications
Components List
Tools Required
(Not Included)
3
1
2
4 5 6
7 8
IN
1
2
2
4
3
5
6
6

Parts required (Not Included)
(2x) Hex nipples or pipe nipples (2x) Shuto valves (as needed)
(2x) Pipe union pressure regulators (as needed)
Pre-installation
• Turn o the water to your house before beginning the installation. Turn o power
to your water heater before installation. Open all plumbing xtures in the house to
drain the lines of water and pressure.
• Lay out all the ttings and tools you will need to install the system depending on
your conguration. Be sure to use Teon tape on threaded ttings.
• Measure, cut, and remove the section of water line where the system is to be
installed. When determining the length of pipe to cut, account for lter width, shuto
valves, union ttings, nipple ttings, pressure gauges (if used) and bypass valve (if used).
• Allow the cut line to drain. Smooth the newly cut ends down to avoid jagged
points or edges.
• A three-valve bypass valve and loop may be installed to loop the entire system to
make servicing easier.
• The lter should be placed on the main water supply line near where it enters the
house at any point past the main shuto valve for the whole house, but before pipes
branch o into multiple directions. However, you may choose to locate the lter after
the line branches to the inside and outside plumbing depending on your ltration
intent. Your lter should be located in a dry, level area and protected from freezing
temperatures and direct sunlight.
Installation
Step 1: Select connection method according to pipe’s size
Please select the appropriate connection method according to the size of the pipe in
your home. Please pay attention to the direction of water ow when installing. Take
the 1” MNPT thread specication and 1” PEX pipe as an example:
3
1 2
4 5 6
7 8
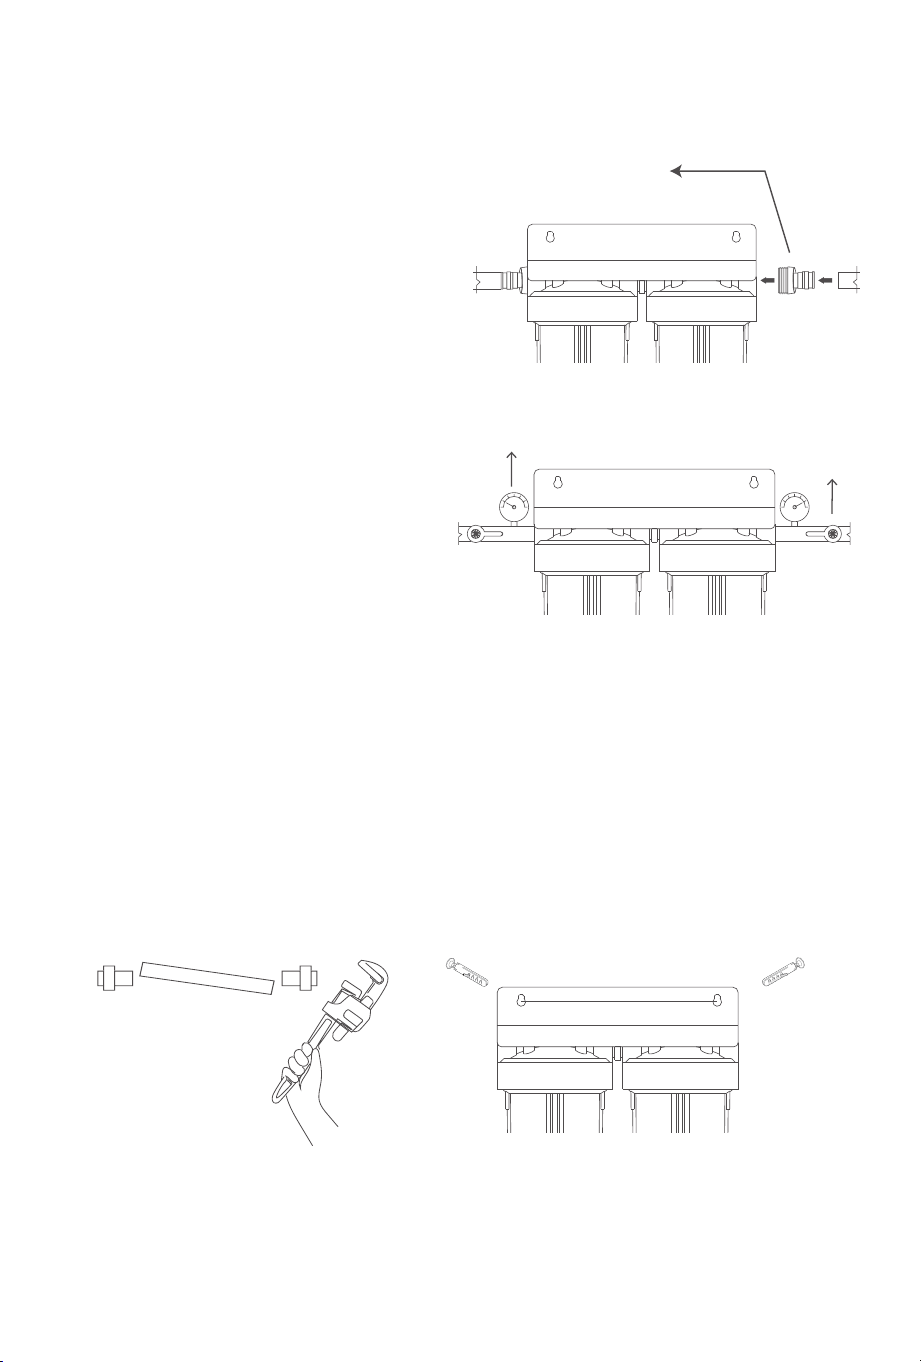
Figure 1
Figure 2
1. Close the main intake valve. Turn on
the tap to release the pressure in the
pipe.
2. Remark two 1‘’. Brass PEX-A Expansion
Barb x 1‘’ MNPT Male Adapter(not
included in the box). Wrap more than 10
turns of Teon tape on the external
thread of the Adapter. Screw one end of
the external thread into the thread of the
1” FNPT lter bottle and tighten it with a
wrench. (Figure 1)
Notice: If necessary, you can also
congure two additional Shuto Valve
and Pressure Gauge to connect, the
eect is shown in the gure: (Figure 2)
1’’. Brass PEX-A Expansion Barb x 1‘’
MNPT Male Adapter
Step 2: Measure the system and cut the pipe (Figure 3)
Determine location and water ow direction for the system. Cut o the appropriate
length of PEX pipe. Fix the pipe on the system with two 1’’. Stainless Steel PEX Barb
Pinch Clamps. Pay attention to the water inlet direction, and do not install it in the
opposite direction. You can also use an expansion ring to x the pipe.
Step 3: Fix the whole house lter (Figure 4)
Securely mount the whole house lter bracket and ensure the system is level.
Notice: Fit pipe hanger (not included) on water INLET and OUTLET side for addition-
al support.
X
Figure 3
Figure 4
3
1 2
4 5 6
7 8
Press Gauge
Shuto Valve
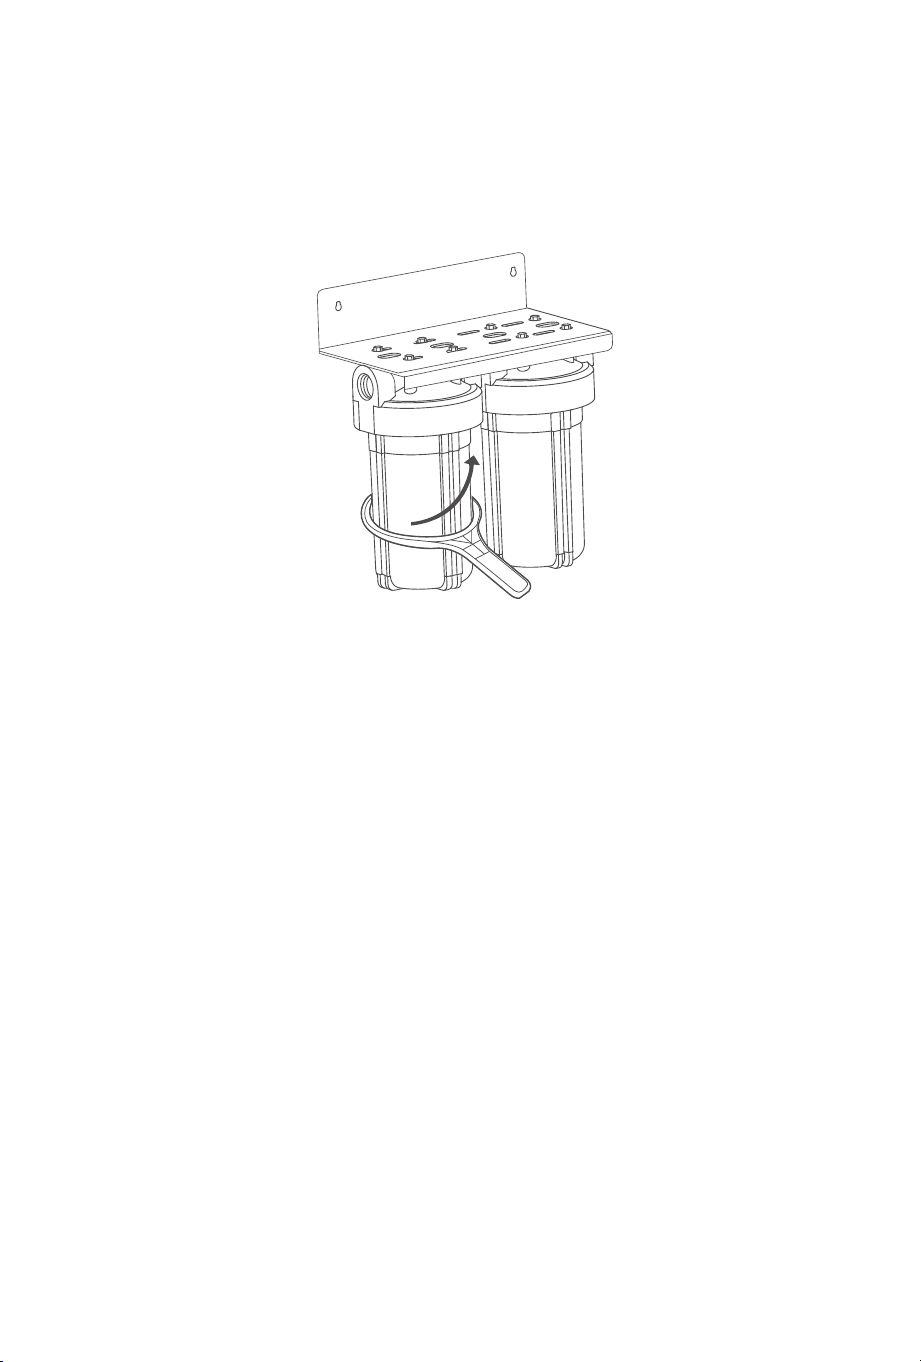
Step 4: Screw the lter housing tightly
Tighten the blue lter housing by hand. Then, use supply lter wrench to tighten the
blue lter housing.
Step 5: Slowly turn on the main inlet valve. Turn o the water outlet after the
domestic water equipment is able to dispense water. Be sure to check whether there
is water leakage or slow water seepage at the joints.
Caution: Do not use a hot water faucet to perform the initial system ush.
Notice: The water will be blackish in color for the initial ush. This is residual carbon
dust and is to be expected. Continue to run water until it runs clear and all air has
been purged. Shut the water o and let the unit sit for a while, and then ush again. It is
not unusual for the water to appear "cloudy" for a day or so following installation. This
cloudiness is actually tiny air bubbles being purged from the lters. This is normal and
will clear up in a day or two.
After prolonged periods of nonuse (such as a vacation), it is recommended that the
system be ushed thoroughly for at least 10 minutes before using the water.
Other Options
1. 1’’ MNPT thread specication and ¾’’ PEX pipe
Take out two ¾‘’. Brass PEX-A Expansion Barb x 1‘’ MNPT male Adapter (not included
in the box), Wrap more than 10 turns of Teon tape on the external thread of the
connector.
Close
3
1 2
4 5 6
7 8
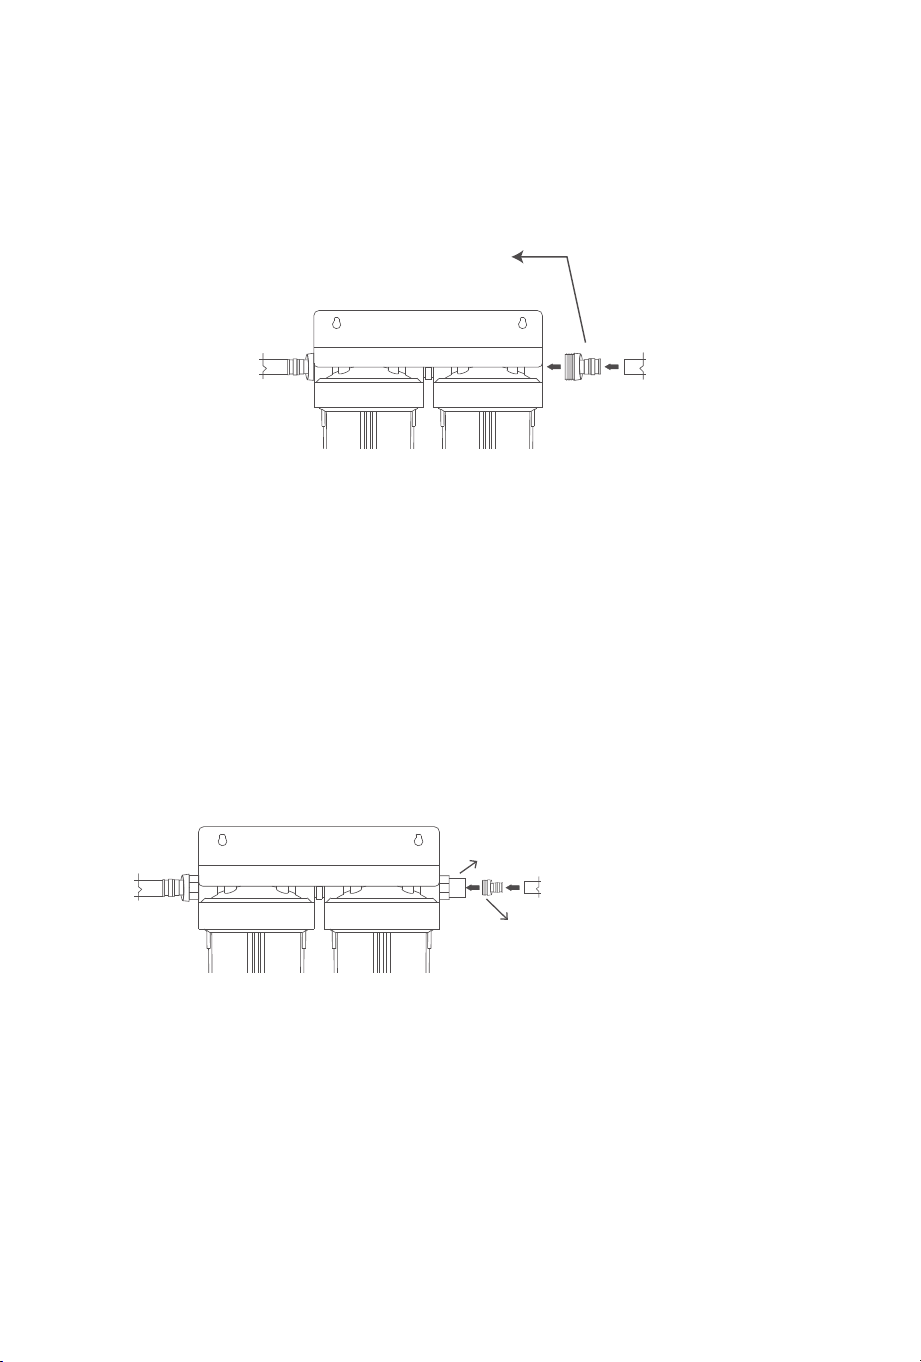
Screw one end of the external thread into the thread of the 1” MNPT lter bottle and
tighten it with a wrench. Refer to the installation steps above for further steps.
2. ¾’’ MNPT thread specication and ¾’’ PEX pipe
Take out two ¾" FNPT / 1" MNPT adapter (not included in the box), wrap more than
10 turns of Tefon tape on the 1" MNPT external thread of the adapter, then screw the
adapter into the thread of the 1" FNPT ter bottle and tighten it with a wrench.
Remark two ¾" brass PEX-A barb x ¾" MNPT external thread adapter (not included in
the box). Wrap more than 10 turns of Tefon tape on the ¾" Brass PEX-A barb x ¾"
MNPT male adapter external thread of the adapter. Screw one end of the male thread
into the ¾" FNPT / 1" MNPT adapter and tighten it with a wrench. Refer to the
installation steps above for further steps.
Notice: If the direction of the water flow of the bipolar system is
opposite to the direction of the water pipe, please unscrew the screw
connecting the filter bottle and the hanging plate, rotate the filter
bottle 180 degrees and connect it to the hanging plate, and then
install the water purification system normally according to the instal-
lation steps.
3/4‘’. Brass PEX-A Barb x 3/4‘’
MNPT Male Adapter
1” MNPT/ ¾” FNPT adapter
¾‘’. Brass PEX-A Expansion Barb x 1‘’
MNPT male Adapter
3
1 2
4 5 6
7 8

Maintenance Instructions
Your Whole House Water System requires care and cleaning after a period of time. It is
recommended that the cartridges be replaced every 6 months depending on the
amount of contaminants present in the water supply. If the system has been working
properly and the pressure is slowing, it may be time to change the lter cartridge.
Filter Change Instructions
Step 1: Remove the old cartridge
1. Turn o the water supply to the system. Open a nearby faucet to release the
pressure and drain the water.
2. Depress the pressure release button on the top of the lter housing to relieve
system pressure. This will make removing the lter housing easier.
3. Unscrew the housing using the lter wrench included with your system.
4. Remove and discard the old lter cartridge.
Step 2: Clean the housings
1. Scrub the housing and cap with warm water mixed with about 2 tablespoons of
household bleach using a sponge or soft rag. Wear rubber gloves. Rinse all parts very
thoroughly!
2. Lubricate the O-ring with clean silicone grease if needed. DO NOT USE PETROLEUM
JELLY. Insert the O-ring in lter groove and press into place. Make sure the O-ring is
seated correctly.
Caution:
This step is important to ensure the proper lter seal. Make sure the
O-rings are seated level in the groove. If the O-ring appears damaged, stretched, or
crimped, it should be replaced.
Step 3: Install the new cartridge
1.Remove the new lter packaging and insert the lter cartridges into the housings,
making sure they slip over the standpipe in the bottom of the housing.
2.Align the bottom of the housing into the cap and hand tighten, then use the lter
wrench to t it snugly. Do not over-tighten.
3.Close any open valves. Turn on the water supply slowly to allow the system to ll
with water. Inspect carefully for leaks. If a leak is found, remove the housing and
inspect the O-ring to ensure that it is seated properly, and then retighten
.
3
1 2
4 5 6
7 8

Note:
If there is a sealing ring left by the old lter element in the lter bottle, please
take out the sealing ring and put it in the lter element.
Step 4: Flush the system
Flush the system by turning on a few cold-water faucets. Allow the water to run until
the air and carbon has been purged. Water may be cloudy initially as the lters and
system clear of trapped air. New activated carbon lter cartridges may contain loose
carbon and air bubbles after installation.
Frequently Asked Questions
Q: Why does water leak from the housing connection?
A:
The O-ring may not be in place or not enough teon tape on the threads. Reapply
teon tape and tighten. If it still leaks after adjusting the O-ring or threads, please
contact us.
Q: Why does water leak from the pressure release button?
A:
The pressure release button has a screw under the bracket. Simply tighten that
screw and the leaking should stop.
Q: Why does water appear cloudy and gray?
A:
Water may appear cloudy or gray for the rst 1-2 days after installation due to the
tiny air bubbles being purged from the ters and extra carbon dust in the water.
Q: Why does water pressure slow after a period of time?
A:
It is recommended that the cartridges be replaced every 3-6 months depending
on the amount of contaminants present in the water supply. If the system has been
working properly and the pressure is slowing, it may be time to change the lter
cartridge.
Q: Why does water pressure slow immediately after installation?
A:
The cartridges may be installed incorrectly. Check to see if a piece of the plastic
wrapping is still protecting the lter cartridges. Bathtubs, utility sinks, hose bibs,
multi-headed showers,body sprayers, or anything that is considered high-fow should
be avoided for the rst 72 hours. Any high-fow situation within the rst 72 hours may
cause a temporary carbon blockage. To clear the blockage, turn of any running water
for at least 10 minutes and resume using water at low or normal fow rates.
Step 2: Measure the system and cut the pipe (Figure 3)
Determine location and water ow direction for the system. Cut o the appropriate
length of PEX pipe. Fix the pipe on the system with two 1’’. Stainless Steel PEX Barb
Pinch Clamps. Pay attention to the water inlet direction, and do not install it in the
opposite direction. You can also use an expansion ring to x the pipe.
Step 3: Fix the whole house lter (Figure 4)
Securely mount the whole house lter bracket and ensure the system is level.
Notice: Fit pipe hanger (not included) on water INLET and OUTLET side for addition-
al support.
3
1 2
4 5 6
7
8

Warranty
The Waterdrop 2- Stage Whole House Water Filtration System oers a 1-year warranty
covering defects in materials and workmanship from the original date of purchase.
During the warranty period, we will replace or repair any part deemed defective, If
the product proves to be defective within 1 year from the date of purchase, and if the
product has not been subjected to tampering, alteration, or improper use after
delivery and has not been repaired by the manufacturer. The product is not warrant-
ed against misuse, use in abnormal operation temperature conditions, conditions
outside listed operating parameters, use in commercial operations, or any other
manner outside the product specications set forth in the owner’s manual. Our
obligation does not include the cost of transportation. We are
not responsible for
damage in transit, and claims for such damage should be presented
to the carrier
by the customer. Should service be required or if you have any questions regarding
how to use your product, please call us
. We have a professional
team and will take
care of your problem on time.
NOTE: This does NOT apply to any lter cartridge, as the life expectancy varies based
on incoming water quality.
Manufacturer Technical Support
Tel: 1-888-352-3558 (U.S.)
E-mail: service@waterdroplter.com
Made in China V001
Qingdao Ecopure Filter Co., Ltd.
3
1 2
4 5 6
7 8
9

3
1 2
4 5 6
7 8