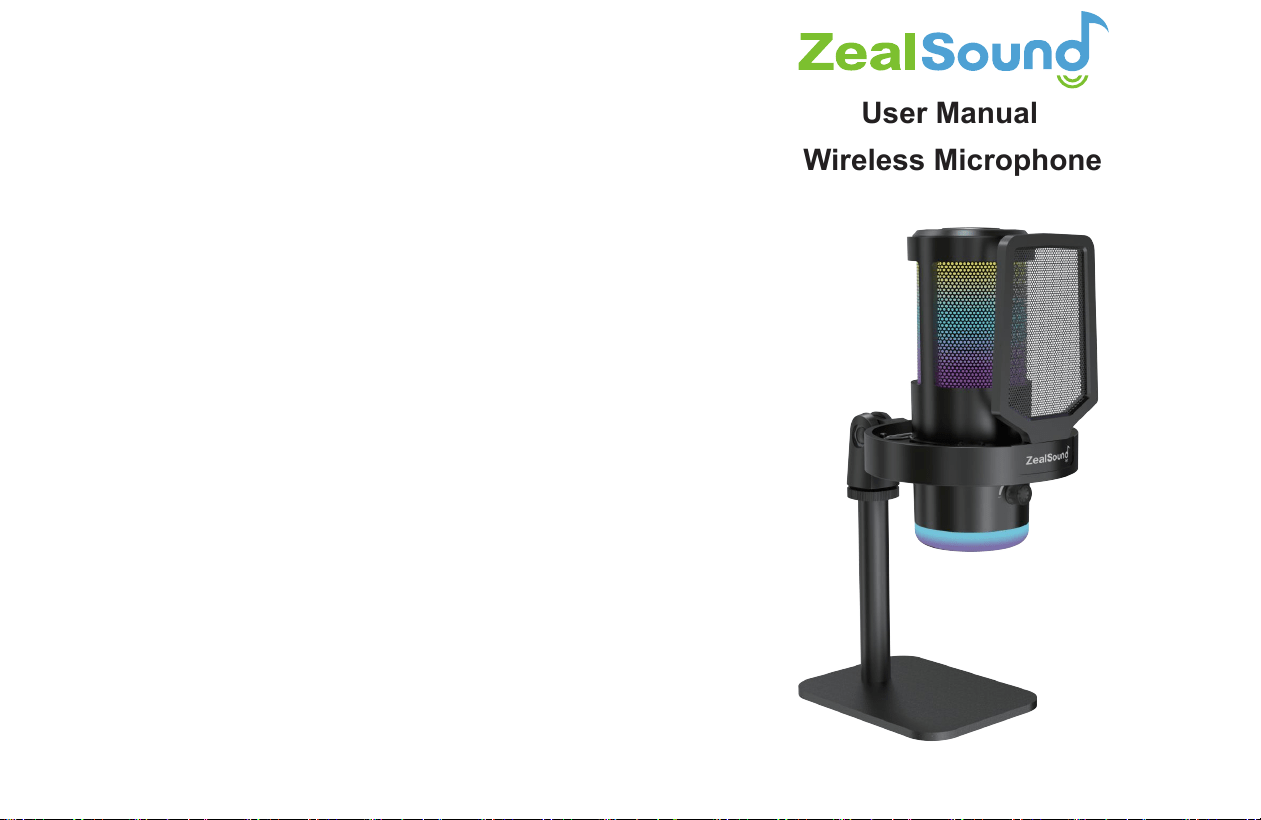
User Manual
Wireless Microphone
English/Deutsch/日本語
KX6 V1.0
CONTENTS
English
Deutsch
日本語
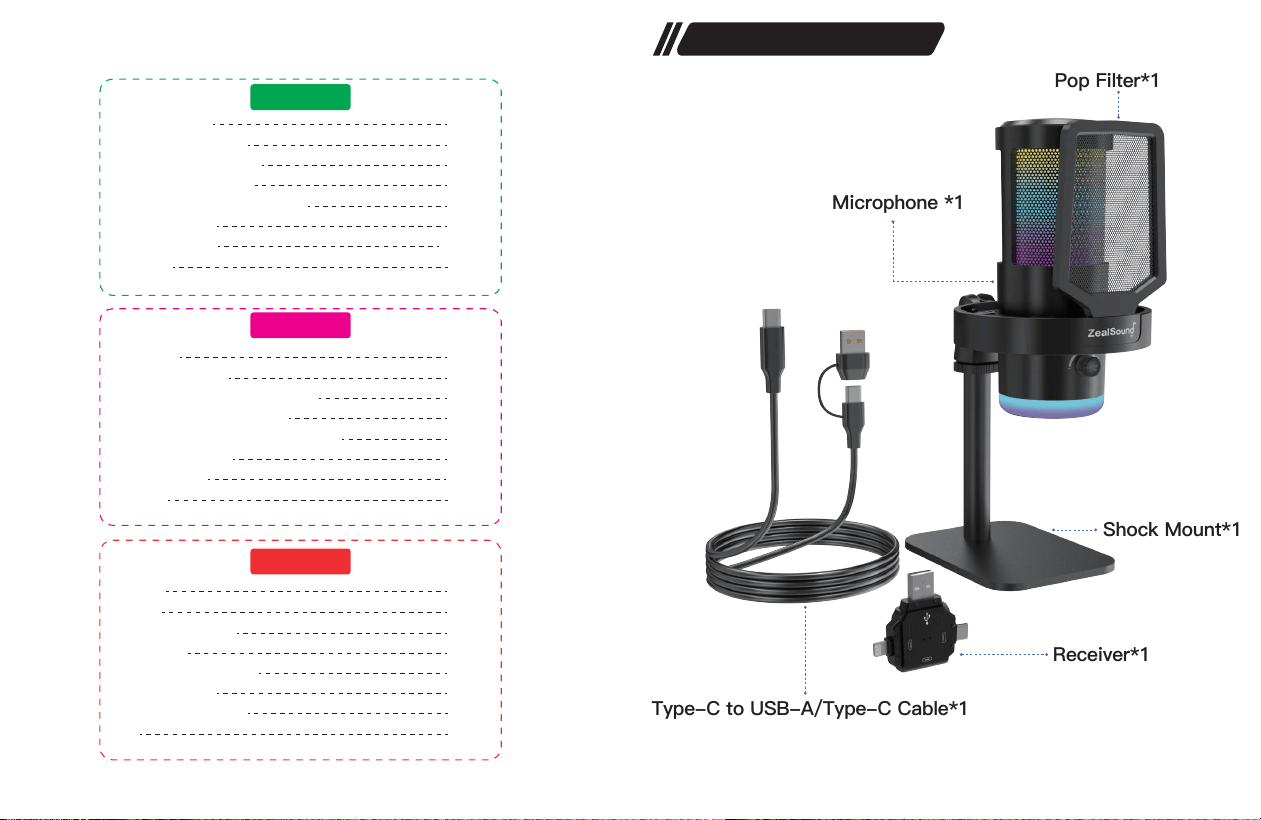
Box Contents
Shock Mount*1
Receiver*1
Microphone *1
Pop Filter*1
Type-C to USB-A/Type-C Cable*1
1
BOX Contents
Function Introduction
How to connect Receiver
How to connect via wire
If you wish to charge your phone
Computer Set up
Troubleshooting
Warranty
1
5
2-4
6-7
10-12
13
9
8
BOX Inhalt
Funktionsübersicht
So schließen Sie den Empfänger an
Wie man über Kabel verbindet
Wenn Sie Ihr Telefon aufladen möchten
Computer einrichten
Fehlerbehebung
Garantie
14-15
19
16-18
20-21
24-26
27
23
22
箱の中身
機能紹介
レシーバーの接続方法
有線接続方法
携帯電話を充電したい場合
コンピュータ設定
トラブルシューティング
保証
28-29
33
30-32
34-35
38-40
41
37
36
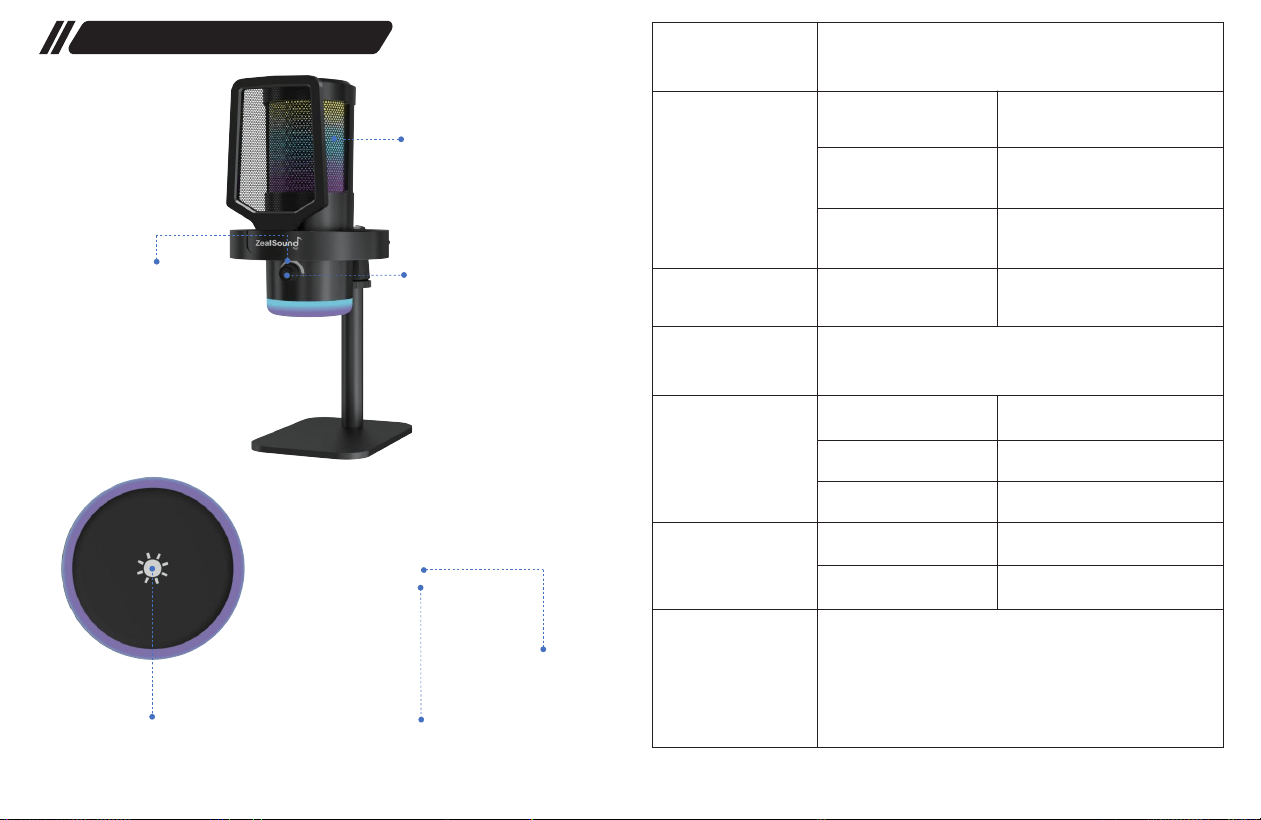
④ Status Indicator
③ Volume Knob
⑥ RGB Lighting Effect
⑤ RGB Lighting Effect Key
① Function Button
② Function
Indicator
① Function Button
Long press
② Function Indicator
③ Volume Knob
④ Status Indicator
Function Description
Power On/Off
Indicator light is red
Adjusts the microphone volume and headphone monitoring
volume simultaneously
Mute/Unmute
Mute mode: All indicator lights
remain solid red.
Original Sound/Noise Reduction
(Original Sound enabled by
default at startup)
Short press
Double click
Charging
Original Sound
Short Press
Long Press
Indicator light is green
Indicator light is blue
Indicator light flashes
Status Switching (4 Fixed
Colors + 3 Dynamic Effects)
On/Off RGB lighting effects
Noise Reduction
Receiver Not Connected
1. Low battery alert: RGB indicator flashes red for 1
minute before shutting down. Please recharge promptly.
2. When microphone is activated, it will automatically
deactivate after 5 minutes of inactivity.
⑤ RGB Lighting Effect
Key
Friendly Remind
Function Introduction
32
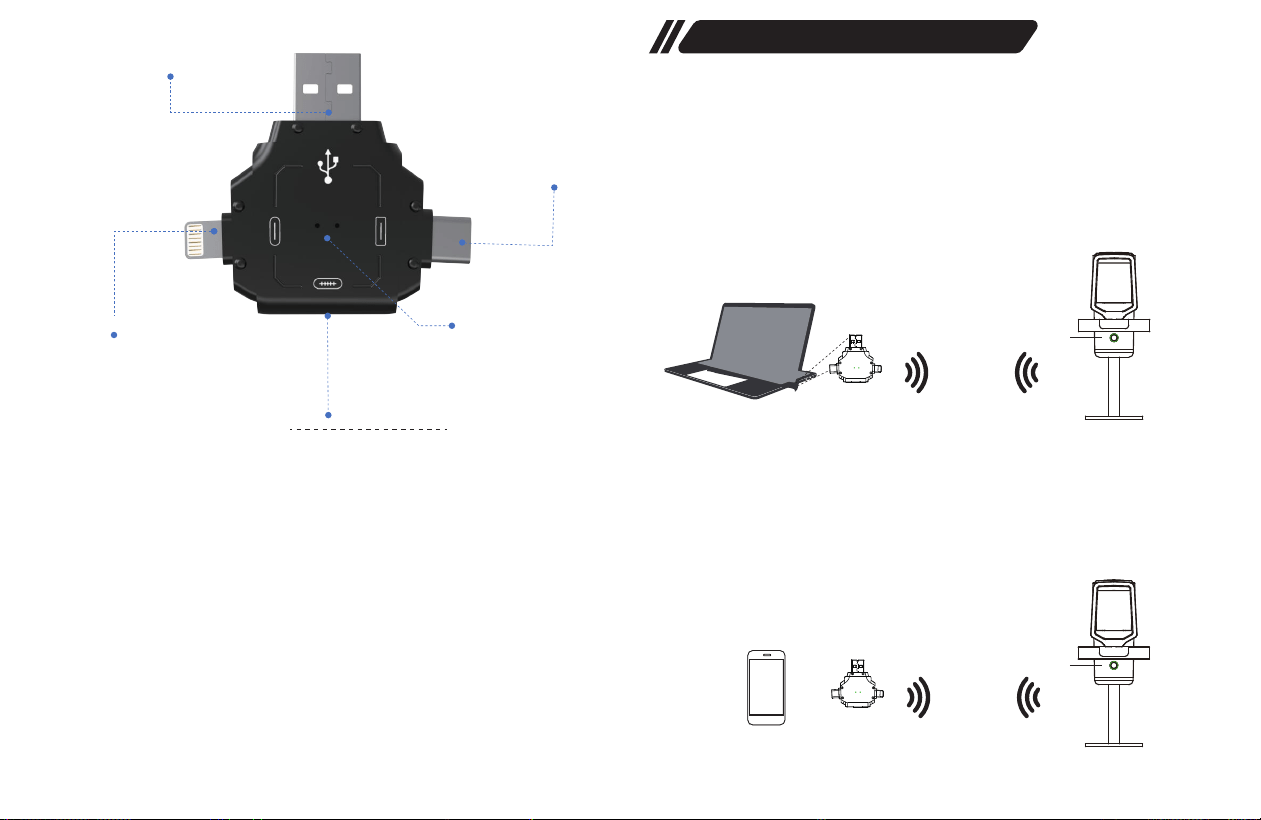
① USB-A Connector:For connecting to standard USB-A ports on devices
like laptops and desktops.
Long press the function button to turn on the microphone, the status
indicatorwill flash.
Long press the function button to turn on the microphone, the status indicator
will flash.
Plug the receiver into your device (computer), the receiver's status indicator
stays solid green and the microphone's status indicator solid.
Plug the receiver into your device (phone), the receiver's status indicator stays
solid green and the microphone's status indicator solid.
Then you can start it.
Then you can start it.
⑤Type-C Input Interface: If your device (phone) runs out of power during use,
you can plug in a data cable via the Type-C port to charge the device.
② For iPhone connectors: Compatible with Apple phones featuring a
Lightning port.
③ Type-C Input Interface:For Type-C smartphones.
④ Status Indicator: A solid green light indicates a successful microphone
connection.
A flashing green light indicates it is attempting to connect.
Function Introduction
⑤Type-C Input Interface
④ Status
Indicator
① USB-A Connector
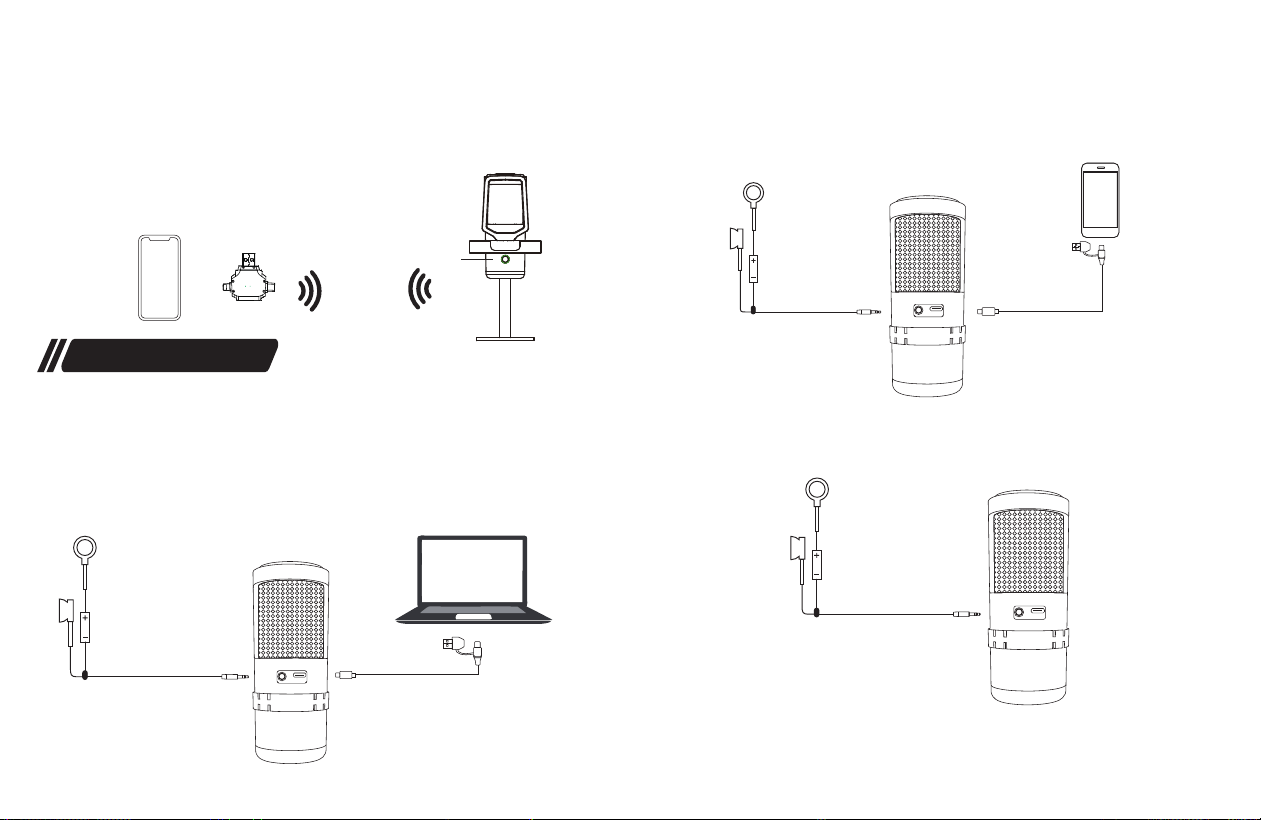
1. Connect to PC with Receiver
Tips: Device name RC01
2. Connect to Type-C devic with Receiver
②For iPhone connectors
③ Type-C
connector
How to connect Receiver
Constantly lit
Receiver
Receiver
Receiver
Constantly lit
5
4
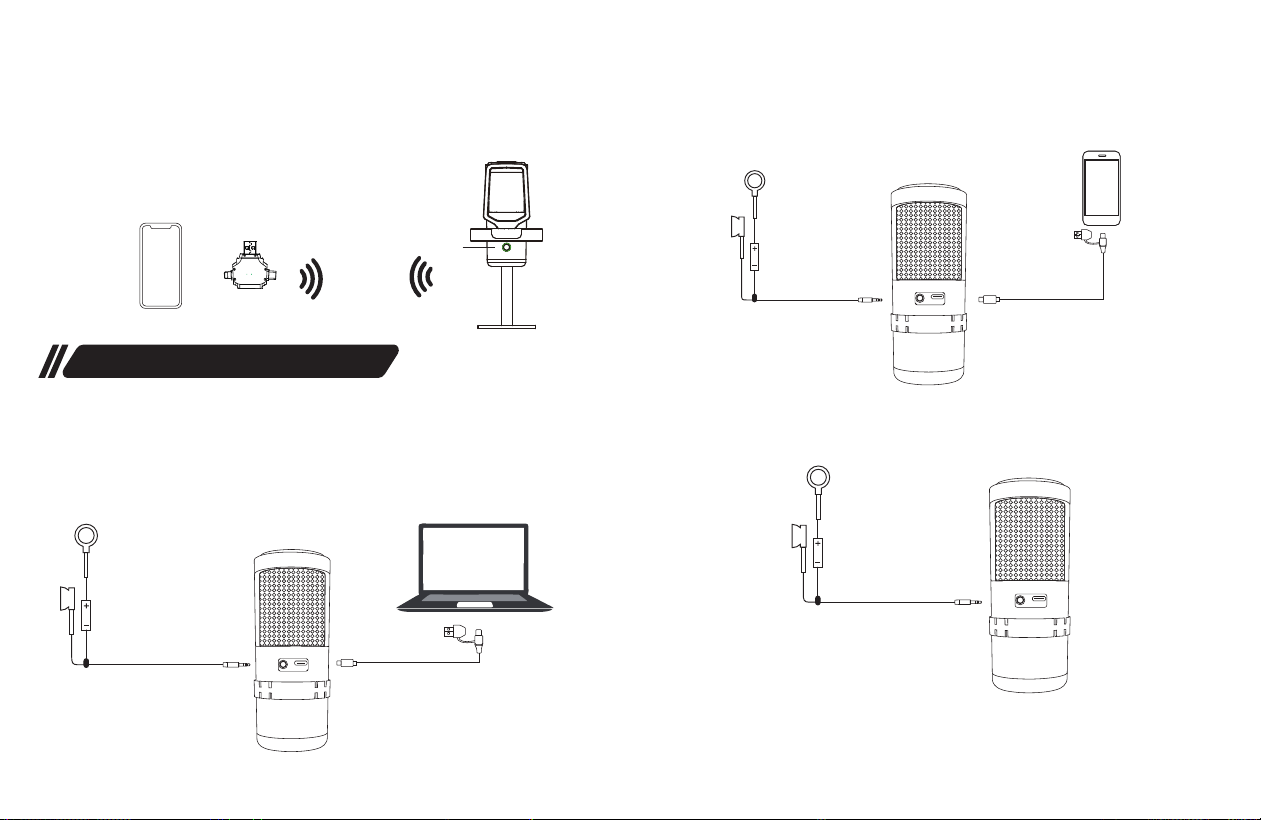
Long press the function button to turn on the microphone, the status
indicator will flash.
Plug the receiver into your device (iPhone), the receiver's status indicator
stays solid green and the microphone's status indicator solid.
Then you can start it.
Plug the USB / Type-C end of cable into your computer, and the Type-C end
into the Microphone. Then the indicator light on the knob solid green.
Then you can start it.
Plug the Type-C end of the cable into your Type-C device (phone), and
connect the other Type-C end to the microphone. The indicator light on the
knob solid green.
Then you can start it.
Note:Adjust the volume of the microphone, earphone, and echo to achieve the
desired effect before using the KX6 microphone.
3. Connect to iPhone with Receiver
Tips:Device name KX6DG
1. Connect to PC with USB Interface
2. Connect to a device with a Type-C port
3. Plug the earphone into the the headphone jack of Mic if you
need to monitor while recording.
How to connect via wire
Receiver
USB-A / Type-C
Connector
Constantly lit
Type-C
Connector
Headphone
Headphone
Headphone
76
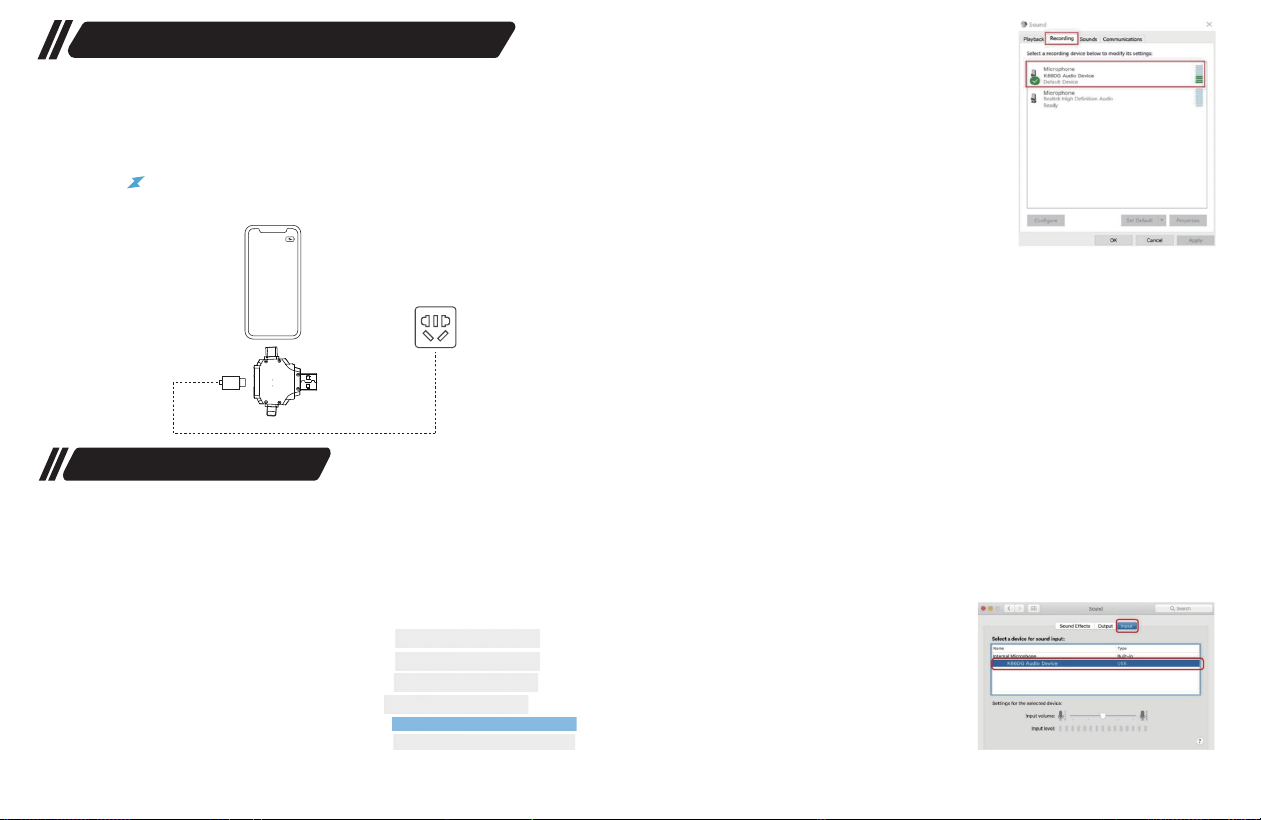
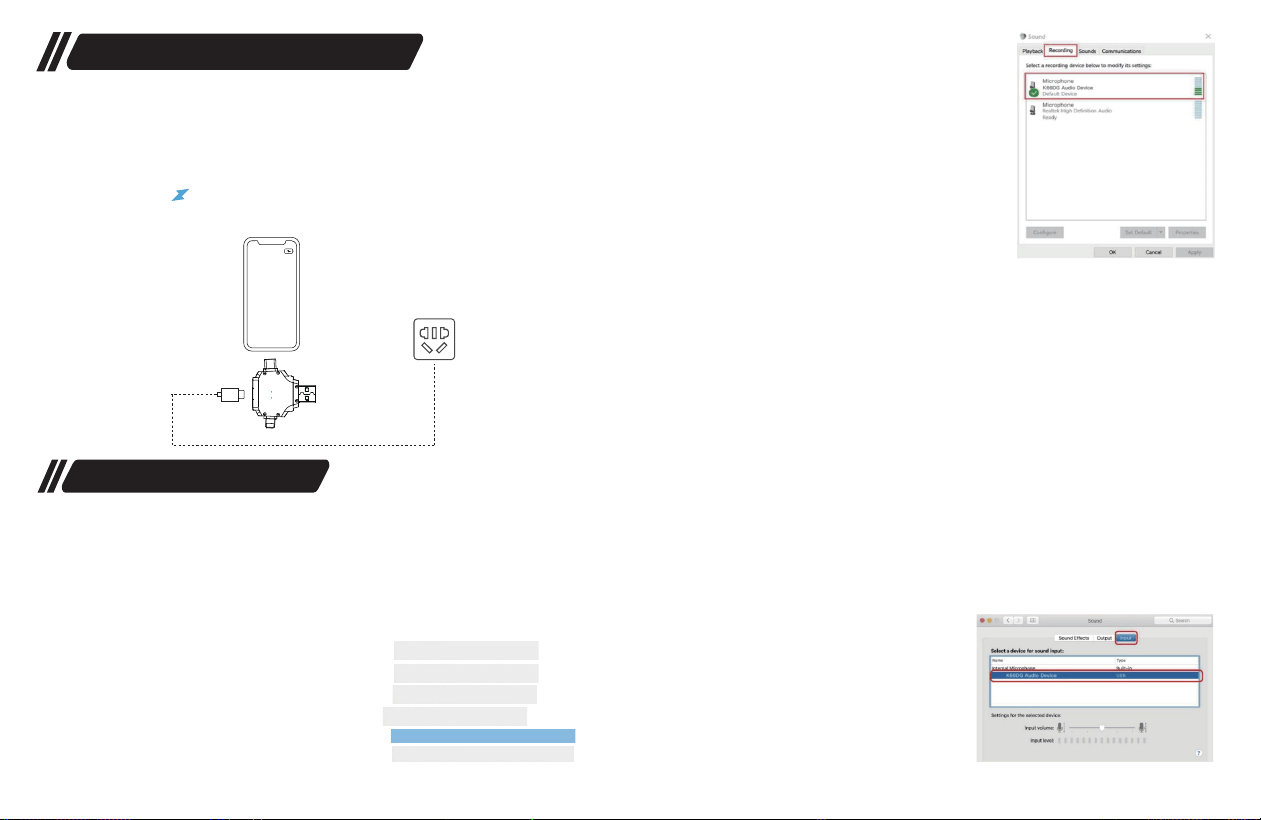
When using the receiver to connect the microphone and phone, you can
charge your phone using the included data cable.
Insert the included data cable's Type-C end into the receiver's Type-C port,
then plug the other end into a power strip or power supply interface to charge
your phone.
Note: You will need to provide your own power adapter.
Tips:
① Connect the device to the computer using the receiver. The
device will be recognized as (RC01).
② Connect the device to the computer using a USB cable. The
device will be recognized as (KX6DG).�
If you wish to charge your phone
Computer Set up�
8 9
Socket
Windows
Step 1:Plug the KX6DG microphone
into your computer. The computer
will automatically recognize the
USB device and install a driver.
Recording devices
Open Volume Mixer
Spatial sound (Off)
Playback devices
Troubleshoot sound problems
Sounds
macOS
Step 1:Plug the KX6DG microphone into your
computer space. The computer will automati-
cally recognize the USB
device and install a driver.
Step 2:Open your “ System
Preferences ”.
Step 3:Click “ sound ” to
display the Sound preference
pane.
Step 4:Click the Input tab and
select the “ KX6DG/RC01 Audio
Device ” as the device for sound input.
Step 2:Right-click on the
sound icon on the system tray and
select “ Sounds ”.
Step 3:Click the Recording tab
and select The “ KX6DG/RC01 Audio
Device ” and click on the Set
Default button.

① Check if the status indicator light on the KX6 microphone
is flashing. If it is flashing, this indicates the device is not
connected and needs to be paired again.�
② Ensure you have connected a 3.5mm headphone to the
KX6 for audio monitoring.
③ Verify if the microphone volume is set to the minimum or
if the mute button is activated.
④ Try using the microphone on a different device to see if
you can hear the sound from the headphones, then deter-
mine if the issue lies with the receiver or cable.
⑤ Check whether the RGB lighting effects are turned off.
⑥ Some mobile phone brands, such as VIVO, OPPO,Realme,
OnePlus, iQOO, etc., require you to enable the”OTG”
function and tum on the external recording device.Go to
Settings > Other settings > OTG >Turn on (or search for
"OTG” in the settings search box and enable it).
⑦ For Android smartphones with a 3.5mm headphone jack,
you will need to acquire a USB to 3.5mm audio cable
separately.
This microphone is quite sensitive because of its cardioid
polar pattern and 16mm Capsule. However, you can try some
methods below to reduce background noise:
Please try unplugging and replugging the receiver/data
cable, then attempt to record the audio again.
It is generally recommended to maintain a distance of
approximately 6 to 12 inches when using this microphone.
Please note that this is a single pointing microphone, so
when using it, position it so that the position of the micro-
phone's side spray screen is facing the sound source. For the
best sound quality, speak directly into the spray screen on
the side of the microphone.
① Place the microphone closer to your mouth and away from
noise sources like electrical appliances.
② Check if the noise reduction function is enabled. You can
try double-clicking the microphone Function Button to
activate noise reduction.
③ Record in a quiet environment and use noise reduction
software to remove background noise.
If the troubleshooting steps mentioned below haven't
solved your issue, please email us at info @zealsound.
com for further assistance.
2. When I tried to record videos on my Android or iPhone,
it showed that my phone does not support this KX6
microphone, and the microphone sound was not recorded.
5. It doesn't work properly during calls, and there is no
sound coming from the headphones.
3. ls it possible to use this microphone from a distance
without being too close to it?
4.This microphone picks up a lot of background noise.
1. My microphone can’t work.
Troubleshooting
1110

The KX6 microphone is not compatible with call and chat
applications on iPhone, and there will be no sound output
from the headphones during calls. However, it fully supports
call and chat applications on Android devices.
Regrettably, this microphone is not compatible with podcast
equipment bundles as it is a USB microphone and not an
XLR microphone.
Try holding down the function button to power it off, then
restart it.
① Connect the device to the computer using the receiver.
The device will be recognized as (RC01).
② Connect the device to the computer using a USB cable.
The device will be recognized as (KX6DG).
This indicates a low battery and means that the microphone
requires prompt charging (it will automatically shut down
after one minute).
Please note this microphone is powered on. If unused for
over 5 minutes, it will automatically shut down and enter
power-saving mode.
Use the included data cable to connect the receiver's
Type-C port to a charging dock to charge your phone (plug
adapter not included).
6. Is this microphone compatible with a podcast equip-
ment bundle?
7.What is the reason for the microphone displaying a
different device name when it is connected to the com-
puter?�
8. Why does my microphone flash a red light and then
turn off after a while?
9. Why does my microphone turn off shortly after turning
it on?
10. What should I do if my microphone stops responding?
11. What if my phone runs out of battery while connected
to the receiver?
This device complies with Part 15 of the FCC Rules.
Operation is subject to the following two conditions:
(1) this device may not cause harmful interference, and
(2) this device must accept any interference received,
including interference that may cause undesired opera-
tion.
NOTE: This equipment has been tested and found to
comply with the limits for a Class B digital device,
pursuant to Part 15 of the FCC Rules. These limits are
designed to provide reasonable protection against
harmful interference in a residential installation. This
equipment generates, uses and can radiate radio
frequency energy and, if not installed and used in
accordance with the instructions, may cause harmful
1312
FCC Declaration of Conformity

Warranty
The product comes with 12-month warranty. It will
become void if the equipment is altered, misused,
mishandled, maladjusted or suffers excessive wear. If you
have more questions, please feel free to contact our
after-sale service via email [email protected]. We
are dedicated to actively seeking a suitable solution
toaddress any issues you may have.
Warning: changes or modifications not expressly
approved by the party responsible for compliance could
void the user's authority to operate the equipment.
The device has been evaluated to meet general RF
exposure requirement, the device can be used in porta-
ble exposure condition without restriction.
NOTE: This equipment has been tested and found to
comply with the limits for a Class B digital device,
pursuant to Part 15 of the FCC Rules. These limits are
designed to provide reasonable protection against
harmful interference in a residential installation. This
equipment generates, uses and can radiate radio
frequency energy and, if not installed and used in
accordance with the instructions, may cause harmful
interference to radio communications. However, there is
no guarantee that interference will not occur in a partic-
ular installation. If this equipment does cause harmful
interference to radio or television reception, which can
be determined by turning the equipment off and on, the
user is encouraged to try to correct the interference by
one or more of the following measures:
Reorient or relocate the receiving antenna.
Increase the separation between the equipment and
receiver.Connect the equipment into an outlet on a
circuit different from that to which the receiver is con-
nected.
Consult the dealer or an experienced radio/TV technician
for help.
Made in China
1514
16
Bedienungsanleitung
Drahtloses Mikrofon
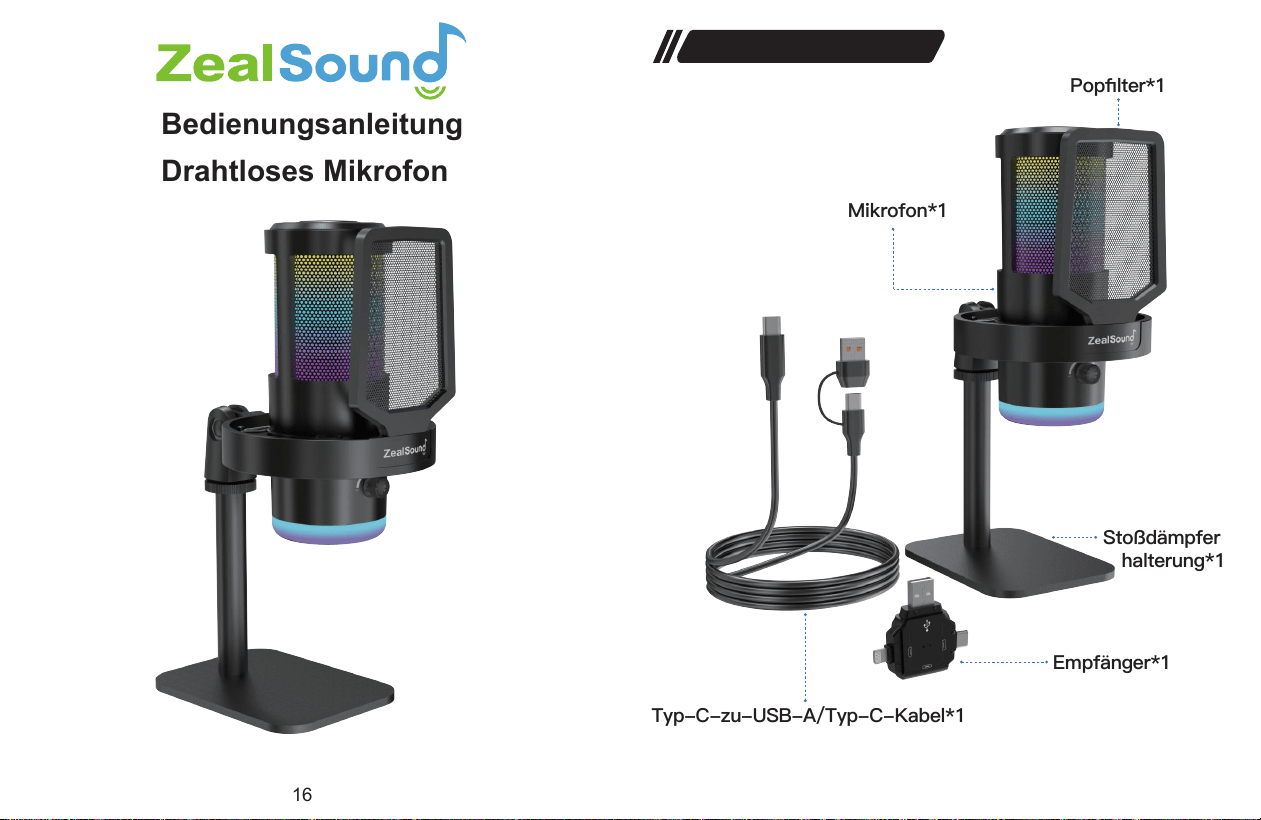
Lieferumfang
Stoßdämpfer
halterung*1
Empfänger*1
Mikrofon*1
Popfilter*1
Typ-C-zu-USB-A/Typ-C-Kabel*1
17
English/Deutsch/日本語
KX6 V1.0
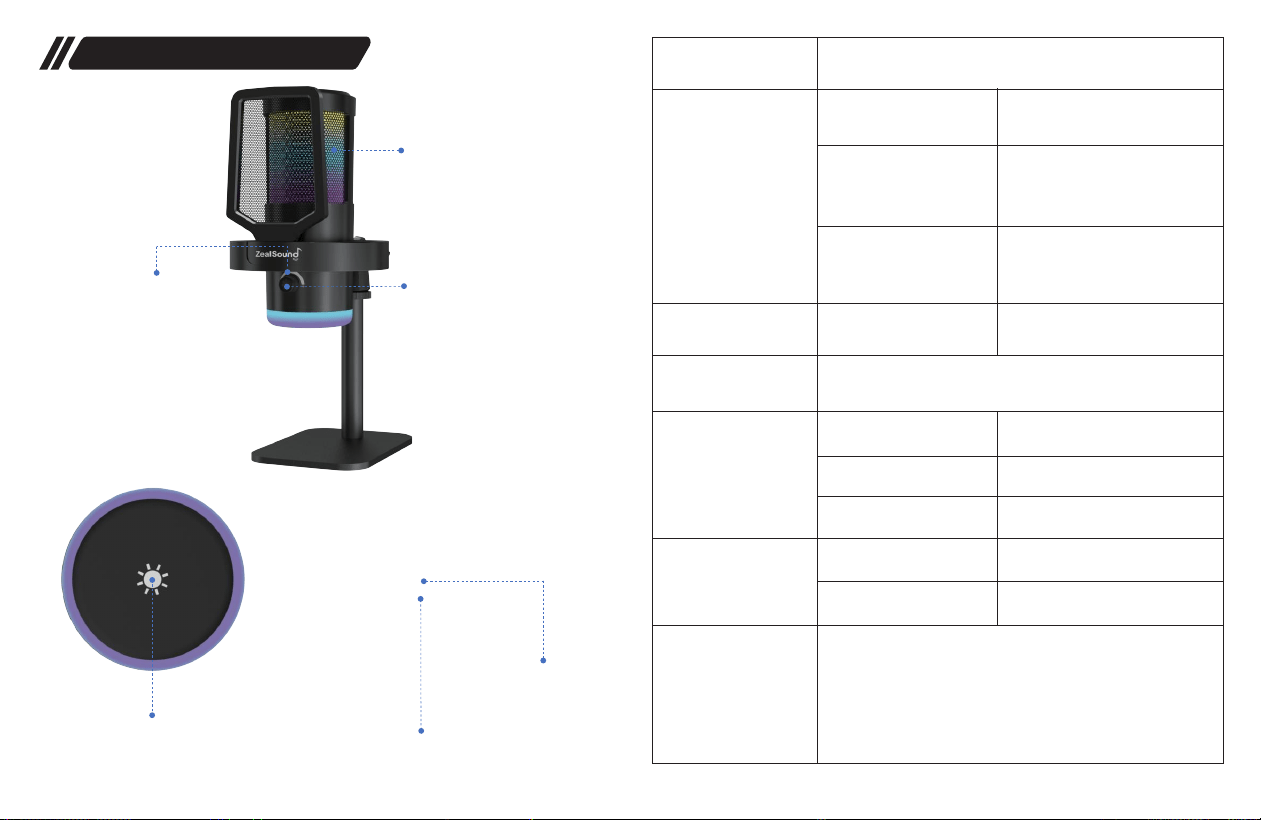
④ Statusanzeige
③ Lautstärkeregler
⑥ RGB-Beleuchtung
seffekt
⑤ Taste für
RGB-Beleuchtungseffekt
① Funktionstaste
② Funktionsan
zeige
① Funktionstaste
Langes Drücken
② Funktionsanzeige
③ Lautstärkeregler
④ Statusanzeige
Funktion Beschreibung
Ein-/Ausschalten
IAnzeige leuchtet rot
Stellt gleichzeitig die Mikrofonlautstärke und die Lautstärke
der Kopfhörerüberwachung ein
Stummschalten/Stummschal-
tung aufheben
Stummschaltungsmodus: Alle
Anzeigeleuchten leuchten
dauerhaft rot.
Original-Ton/Rauschunter-
drückung (Original-Ton ist
beim Start standardmäßig
aktiviert)
Kurzes Drücken
Double click
Laden
Original-Ton
Kurz drücken
Lang drücken
IAnzeigeleuchte leuchtet grün
Anzeigeleuchte leuchtet blau
Anzeigeleuchte blinkt
Statusumschaltung (4 feste
Farben + 3 dynamische Effekte)
Ein-/Ausschalten der
RGB-Beleuchtungseffekte
Rauschunterdrückung
Empfänger nicht
angeschlossen
1. Warnung bei niedrigem Batteriestand: Die RGB-An-
zeige blinkt 1 Minute lang rot, bevor sich das Gerät
ausschaltet. Bitte laden Sie es umgehend auf.
2. Wenn das Mikrofon aktiviert ist, wird es nach 5
Minuten Inaktivität automatisch deaktiviert.
⑤ RGB-Beleuch-
tungseffekt-Taste
Freundliche Erinnerung
Funktionsübersicht
1918
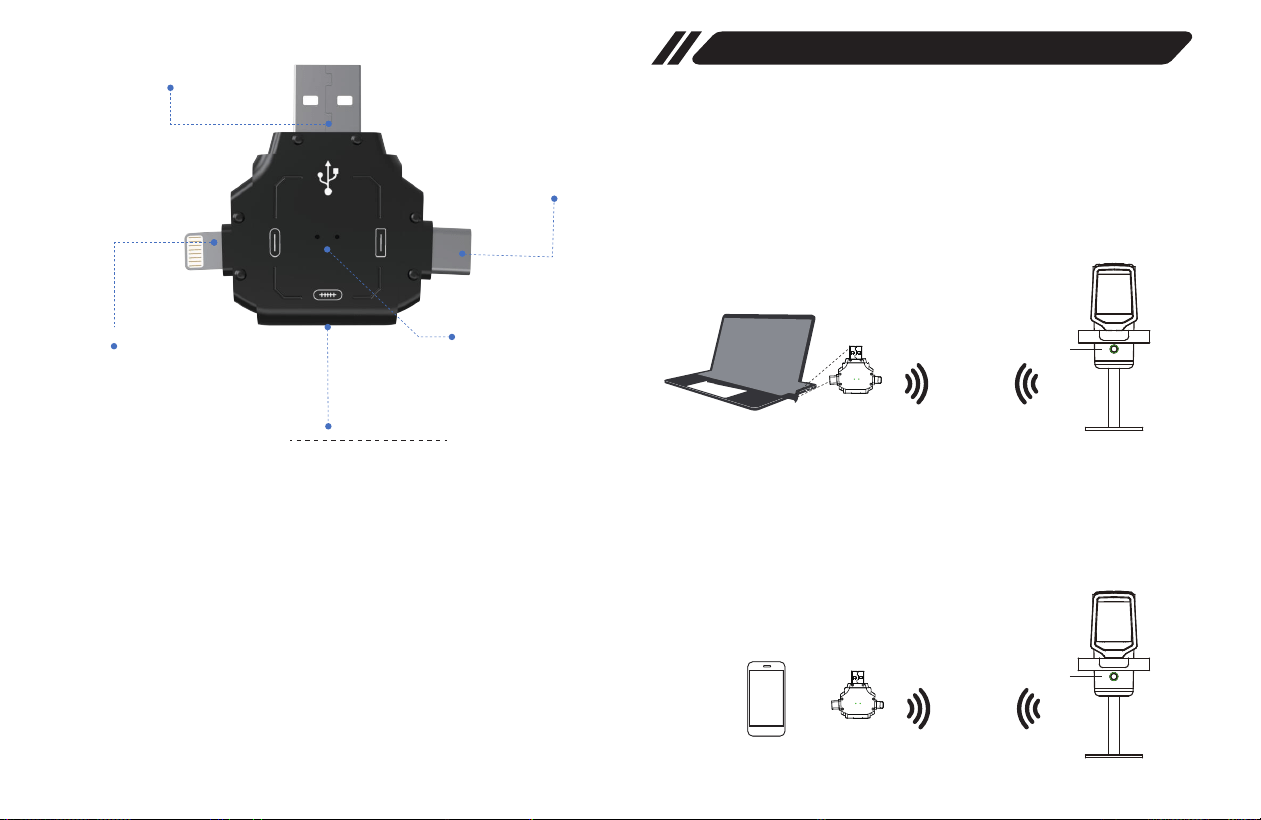
① USB-A-Anschluss: Zum Anschluss an Standard-USB-A-Anschlüsse von
Geräten wie Laptops und Desktops.
Drücken Sie lange auf die Funktionstaste, um das Mikrofon einzuschalten. Die
Statusanzeige blinkt.
Drücken Sie lange auf die Funktionstaste, um das Mikrofon einzuschalten. Die
Statusanzeige blinkt.
Schließen Sie den Empfänger an Ihr Gerät (Computer) an. Die Statusanzeige
des Empfängers leuchtet grün und die Statusanzeige des Mikrofons leuchtet
dauerhaft.
Schließen Sie den Empfänger an Ihr Gerät (Telefon) an. Die Statusanzeige des
Empfängers leuchtet grün und die Statusanzeige des Mikrofons leuchtet
ebenfalls.
Dann können Sie es starten.
Dann können Sie es starten.
⑤Typ-C-Eingangsanschluss: Wenn Ihr Gerät (Telefon) während der
Verwendung keinen Strom mehr hat, können Sie ein Datenkabel über den
Typ-C-Anschluss anschließen, um das Gerät aufzuladen.
② Für iPhone-Anschlüsse: Kompatibel mit Apple-Telefonen mit
Lightning-Anschluss.
③ Typ-C-Eingangsinterface: Für Typ-C-Smartphones.
④ Statusanzeige: Ein dauerhaft grünes Licht zeigt an, dass die Mikrofon-
verbindung erfolgreich hergestellt wurde.
Ein blinkendes grünes Licht zeigt an, dass eine Verbindung hergestellt wird.
Function Introduction
⑤Typ-C-Eingangsinterface
④ Statusanzeige
① USB-A-Anschluss
1. Mit dem Empfänger an den PC anschließen
Tipps: Gerätename RC01
2. Mit Typ-C-Gerät und Empfänger verbinden
②Für iPhone-Anschlüsse
③ Typ-C-
Anschluss
So schließen Sie den Empfänger an
Leuchtet
ständig
Leuchtet
ständig
Empfänger
Empfänger
Empfänger
21
20
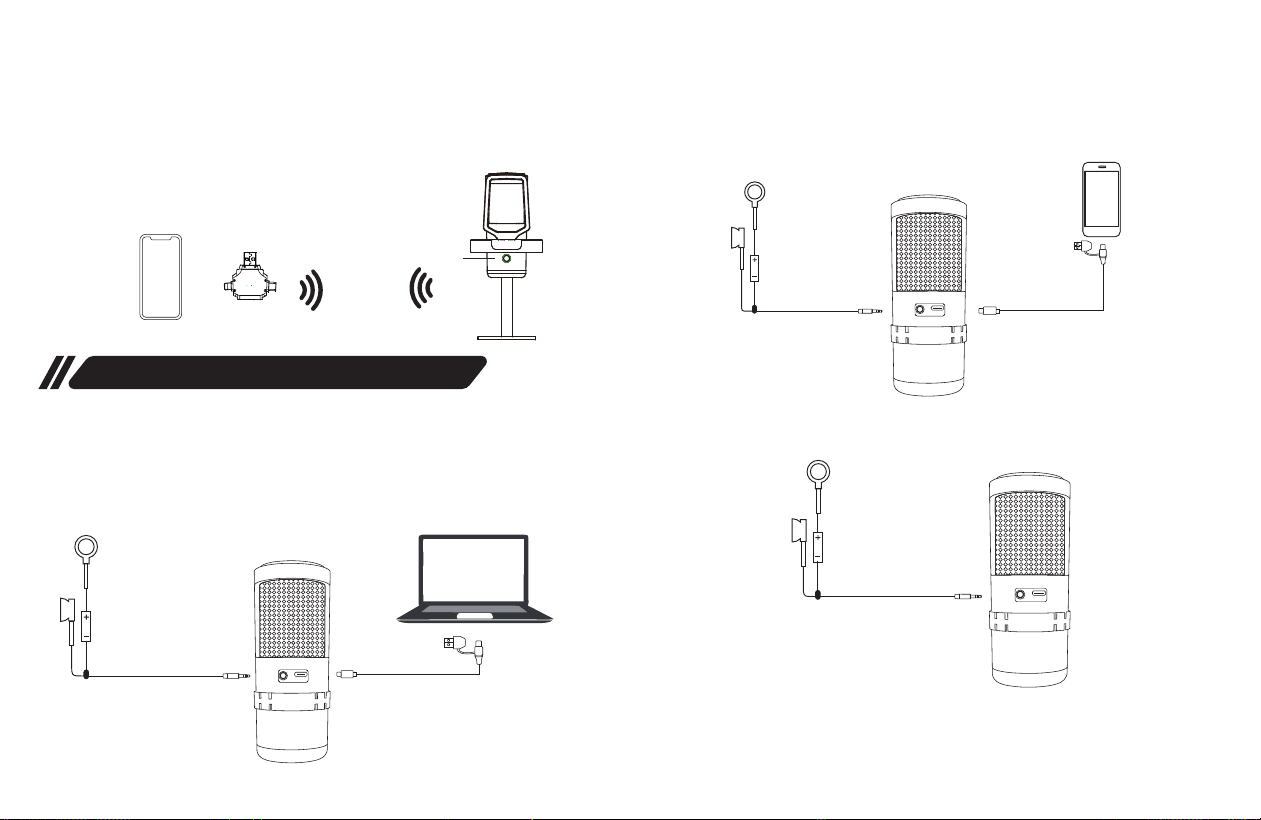
Drücken Sie lange auf die Funktionstaste, um das Mikrofon einzuschalten. Die
Statusanzeige blinkt.
Schließen Sie den Empfänger an Ihr Gerät (iPhone) an. Die Statusanzeige des
Empfängers leuchtet grün und die Statusanzeige des Mikrofons leuchtet
dauerhaft.
Dann können Sie es starten.
Stecken Sie das USB-/Typ-C-Ende des Kabels in Ihren Computer und das
Typ-C-Ende in das Mikrofon. Die Anzeigeleuchte am Knopf leuchtet dann
grün.
Dann können Sie es starten.
Stecken Sie das Typ-C-Ende des Kabels in Ihr Typ-C-Gerät (Telefon) und
verbinden Sie das andere Typ-C-Ende mit dem Mikrofon. Die Anzeigeleuchte
am Knopf leuchtet grün.
Dann können Sie es starten.
Hinweis: Stellen Sie die Lautstärke des Mikrofons, des Kopfhörers und des
Echos ein, um den gewünschten Effekt zu erzielen, bevor Sie das kX6-Mikro-
fon verwenden.
3. Mit dem iPhone über den Empfänger verbinden
Tipps: Gerätename KX6DG
1. Mit USB-Schnittstelle an PC anschließen
2. Verbinden Sie das Gerät mit einem Typ-C-Anschluss.
3. Stecken Sie den Kopfhörer in die Kopfhörerbuchse des
Mikrofons, wenn Sie während der Aufnahme abhören möchten.
Wie man über Kabel verbindet
Leuchtet
ständig
Empfänger
USB-A/Typ-C-
Anschluss
Typ-C-
Anschluss
Kopfhörer
Kopfhörer
Kopfhörer
23
22
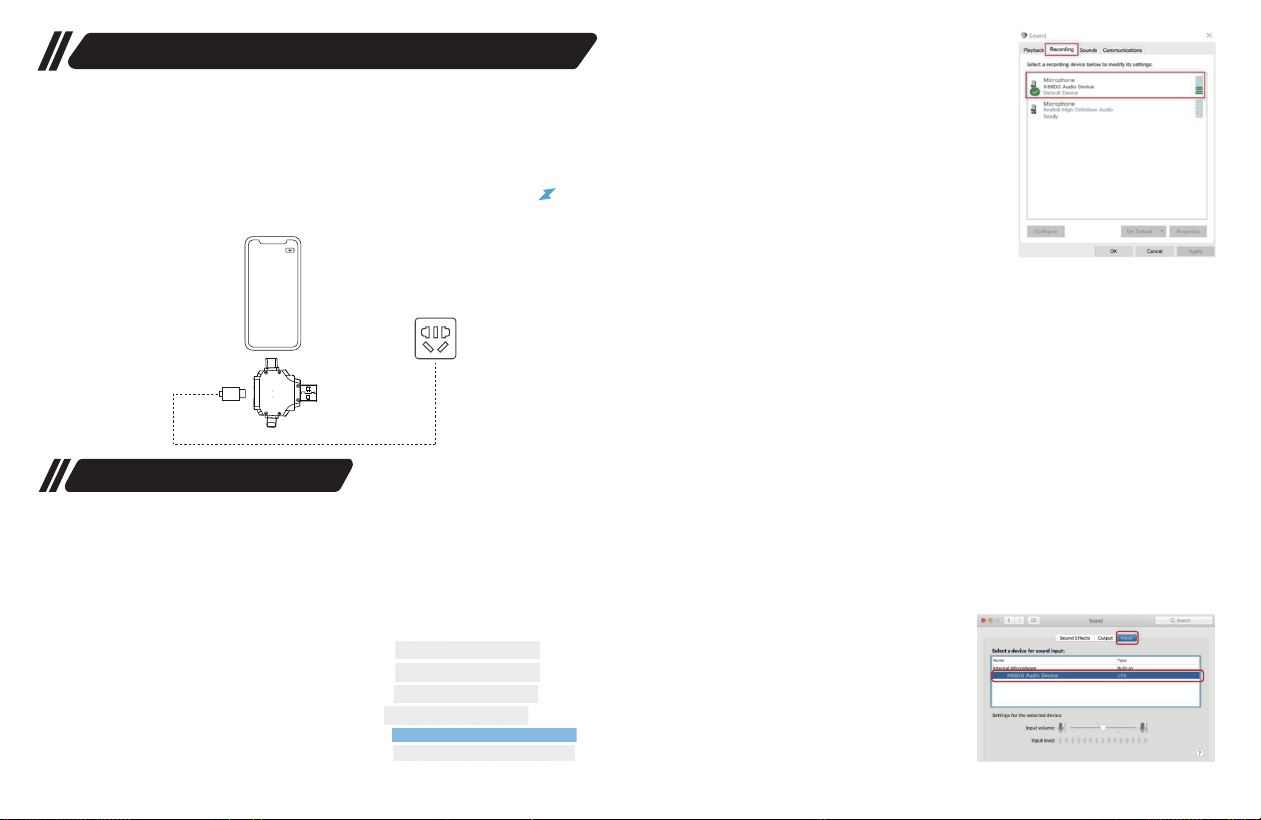
Wenn Sie das Mikrofon und das Telefon über den Empfänger anschließen,
können Sie Ihr Telefon mit dem mitgelieferten Datenkabel aufladen.
Stecken Sie das Typ-C-Ende des mitgelieferten Datenkabels in den
Typ-C-Anschluss des Empfängers und schließen Sie das andere Ende an
eine Steckdosenleiste oder ein Netzteil an, um Ihr Telefon aufzuladen.
Hinweis: Sie müssen Ihr eigenes Netzteil bereitstellen.
Tipps:
① Verbinden Sie das Gerät über den Empfänger mit dem
Computer. Das Gerät wird als (RC01) erkannt.
② Verbinden Sie das Gerät über ein USB-Kabel mit dem
Computer. Das Gerät wird als (KX6DG) erkannt.
Wenn Sie Ihr Telefon aufladen möchten
Computer einrichten
�
24 25
Steckdose
Windows
Schritt 1:Schließen Sie das
KX6DG-Mikrofon an Ihren Computer an.
Der Computer erkennt das USB-Gerät
automatisch und installiert einen Treiber.
Recording devices
Open Volume Mixer
Spatial sound (Off)
Playback devices
Troubleshoot sound problems
Sounds
macOS
Schritt 1: Schließen Sie das KX6DG-Mikrofon
an Ihren Computer an. Der Computer erkennt
das USB-Gerät automatisch und installiert
einen Treiber.
Schritt 2:Öffnen Sie die “Systemeinstel-
lungen”.
Schritt 3:Klicken Sie auf “Ton”, um
den Einstellungsbereich“Ton”
anzuzeigen.
Schritt 4:Klicken Sie auf die Registerk-
arte“ Eingabe” und wählen Sie
“KX6DG/RC01 Audio Device” als Gerät
für die Toneingabe aus.
Schritt 2:Klicken Sie mit der
rechten Maustaste auf das
Sound-Symbol in der Taskleiste
und wählen Sie“ Sounds”.
Schritt 3:Klicken Sie auf die Registerk-
arte “Aufnahme” und wählen Sie
“KX6DG/RC01 Audio Device” aus.
Klicken Sie anschließend auf die
Schaltfläche “Als Standard festlegen”.

① Überprüfen Sie, ob die Status-Anzeige am KX6-Mikrofon
blinkt. Wenn sie blinkt, bedeutet dies, dass das Gerät nicht
verbunden ist und erneut gekoppelt werden muss.
② Stellen Sie sicher, dass Sie einen 3,5-mm-Kopfhörer an
das KX6 angeschlossen haben, um den Ton zu überwachen.
③ Überprüfen Sie, ob die Mikrofonlautstärke auf Minimum
eingestellt ist oder ob die Stummschalttaste aktiviert ist.
④ Versuchen Sie, das Mikrofon an einem anderen Gerät zu
verwenden, um zu sehen, ob Sie den Ton über den Kopfhörer
hören können, und stellen Sie dann fest, ob das Problem
beim Empfänger oder beim Kabel liegt.
⑤Überprüfen Sie, ob die RGB-Beleuchtungseffekte ausges-
chaltet sind.
⑥ Bei einigen Mobiltelefonmarken, wie z. B. VIVO, OPPO,
Realme, OnePlus, iQOO usw., müssen Sie die „OTG”-Funk-
tion aktivieren und das externe Aufnahmegerät einschalten.
Gehen Sie zu Einstellungen > Weitere Einstellungen > OTG >
Einschalten (oder suchen Sie in dem Suchfeld der Einstellun-
gen nach „OTG” und aktivieren Sie es).
⑦ Für Android-Smartphones mit einer 3,5-mm-Kopf-
hörerbuchse müssen Sie separat ein USB-zu-3,5-mm-Au-
diokabel erwerben.
Dieses Mikrofon ist aufgrund seiner Nierencharakteristik und
der 16-mm-Kapsel sehr empfindlich. Sie können jedoch
einige der folgenden Methoden ausprobieren, um Hinter-
grundgeräusche zu reduzieren:
Bitte ziehen Sie das Empfänger-/Datenkabel ab und stecken
Sie es erneut ein. Versuchen Sie dann erneut, den Ton
aufzunehmen.
Es wird allgemein empfohlen, bei der Verwendung dieses
Mikrofons einen Abstand von etwa 15 bis 30 cm einzuhalten.
Bitte beachten Sie, dass es sich um ein unidirektionales
Mikrofon handelt. Positionieren Sie es daher so, dass die
seitliche Sprühblende des Mikrofons zur Schallquelle zeigt.
Um die beste Klangqualität zu erzielen, sprechen Sie direkt in
die Sprühblende an der Seite des Mikrofons.
① Halten Sie das Mikrofon näher an Ihren Mund und
entfernen Sie es von Geräuschquellen wie Elektrogeräten.
② Überprüfen Sie, ob die Rauschunterdrückungsfunktion
aktiviert ist. Sie können versuchen, die Rauschunterdrückung
durch Doppelklicken auf die Mikrofon-Funktionstaste zu
aktivieren.
Wenn die unten aufgeführten Schritte zur Fehlerbehebung
Ihr Problem nicht gelöst haben, senden Sie uns bitte eine
E-Mail an info @zealsound.com, um weitere Unterstützu-
ng zu erhalten.
2. Als ich versuchte, Videos auf meinem Android- oder
iPhone aufzunehmen, wurde angezeigt, dass mein Telefon
dieses KX6-Mikrofon nicht unterstützt, und der Mikro-
fon-Ton wurde nicht aufgenommen.
3. Ist es möglich, dieses Mikrofon aus der Entfernung zu
verwenden, ohne zu nah daran zu sein?
4.Dieses Mikrofon nimmt viele Hintergrundgeräusche auf.
1. Mein Mikrofon funktioniert nicht.
Fehlerbehebung
2726

Das KX6-Mikrofon ist nicht mit Anruf- und Chat-Anwend-
ungen auf dem iPhone kompatibel, und während Anrufen
wird kein Ton über die Kopfhörer ausgegeben. Es unter-
stützt jedoch vollständig Anruf- und Chat-Anwendungen auf
Android-Geräten.
③Nehmen Sie in einer ruhigen Umgebung auf und verwen-
den Sie eine Rauschunterdrückungssoftware, um Hinter-
grundgeräusche zu entfernen.
Leider ist dieses Mikrofon nicht mit Podcast-Ausrüstung-
spaketen kompatibel, da es sich um ein USB-Mikrofon und
nicht um ein XLR-Mikrofon handelt.
Halten Sie die Funktionstaste gedrückt, um es auszus-
chalten, und starten Sie es dann neu.
Wenn es länger als 5 Minuten nicht benutzt wird, schaltet es
sich automatisch aus und wechselt in den Energiesparmo-
dus.
① Schließen Sie das Gerät über den Empfänger an den
Computer an. Das Gerät wird als (RC01) erkannt.
② Schließen Sie das Gerät mit einem USB-Kabel an den
Computer an. Das Gerät wird als (KX6DG) erkannt.
Dies weist auf einen niedrigen Batteriestand hin und bedeu-
tet, dass das Mikrofon umgehend aufgeladen werden muss
(es schaltet sich nach einer Minute automatisch aus).
Bitte beachten Sie, dass dieses Mikrofon eingeschaltet ist.
Verwenden Sie das mitgelieferte Datenkabel, um den
Typ-C-Anschluss des Empfängers mit einer Ladestation zu
verbinden und Ihr Telefon aufzuladen (Steckeradapter nicht
im Lieferumfang enthalten).
5.Es funktioniert während Anrufen nicht richtig und es
kommt kein Ton aus den Kopfhörern.
6. Ist dieses Mikrofon mit einem Podcast-Gerätepaket
kompatibel?
7. Was ist der Grund dafür, dass das Mikrofon einen
anderen Gerätenamen anzeigt, wenn es mit dem Comput-
er verbunden ist?
8. Warum blinkt mein Mikrofon rot und schaltet sich nach
einer Weile aus?
9. Warum schaltet sich mein Mikrofon kurz nach dem
Einschalten wieder aus?
10. Was soll ich tun, wenn mein Mikrofon nicht mehr
reagiert?
11. Was passiert, wenn mein Telefon keinen Akku mehr
hat, während es mit dem Empfänger verbunden ist?
Garantie
Das Produkt wird mit einer 12-monatigen Garantie
geliefert. Diese erlischt, wenn das Gerät verändert,
missbräuchlich verwendet, unsachgemäß behandelt,
falsch eingestellt oder übermäßig abgenutzt wird. Wenn
Sie weitere Fragen haben, wenden Sie sich bitte per
E-Mail an unseren Kundendienst unter info@zeal-
sound.com. Wir sind bestrebt, aktiv nach einer gee-
igneten Lösung für Ihre Probleme zu suchen.
Hergestellt in China
2928
ユーザーマニュアル
ワイヤレスマイク
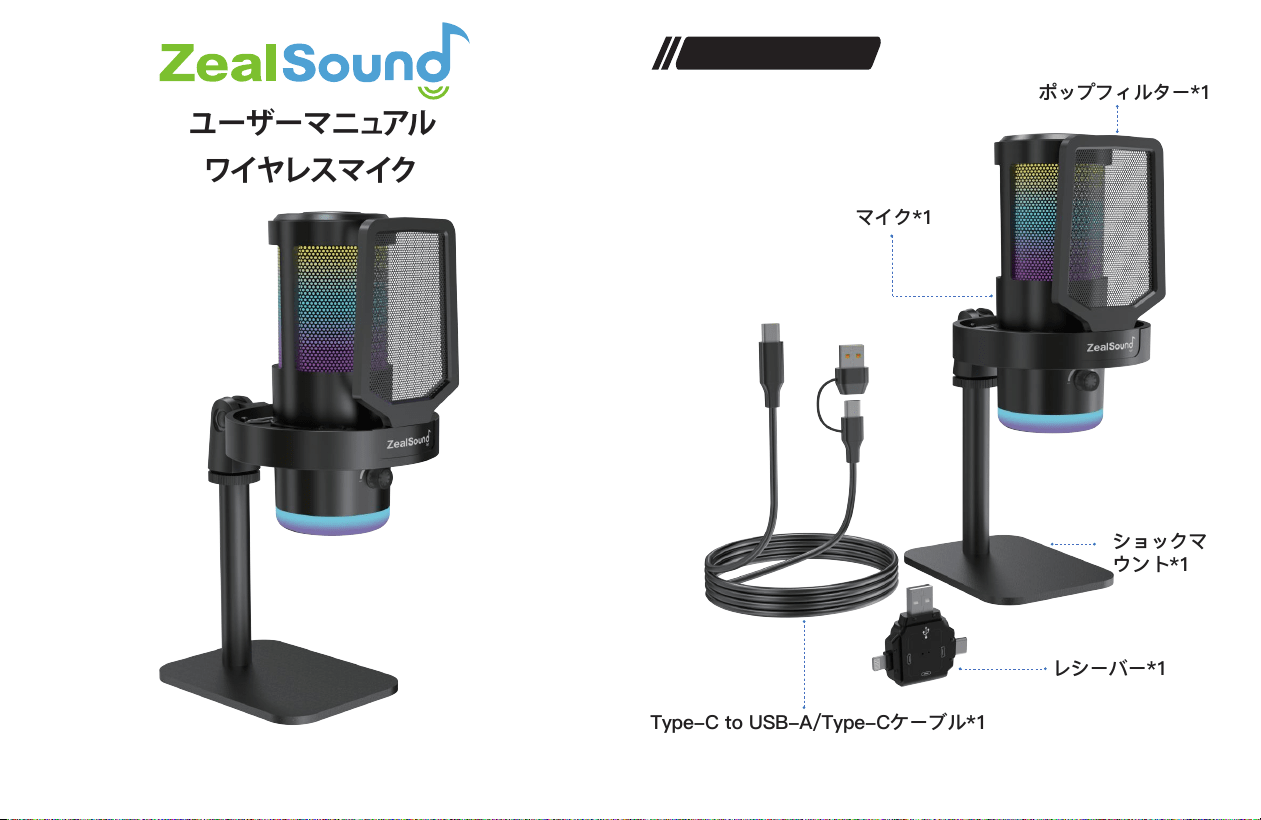
箱の中身
ショックマ
ウント*1
レシーバー*1
マイク*1
ポップフィルター*1
Type-C to USB-A/Type-Cケーブル*1
31
English/Deutsch/日本語
KX6 V1.0
30
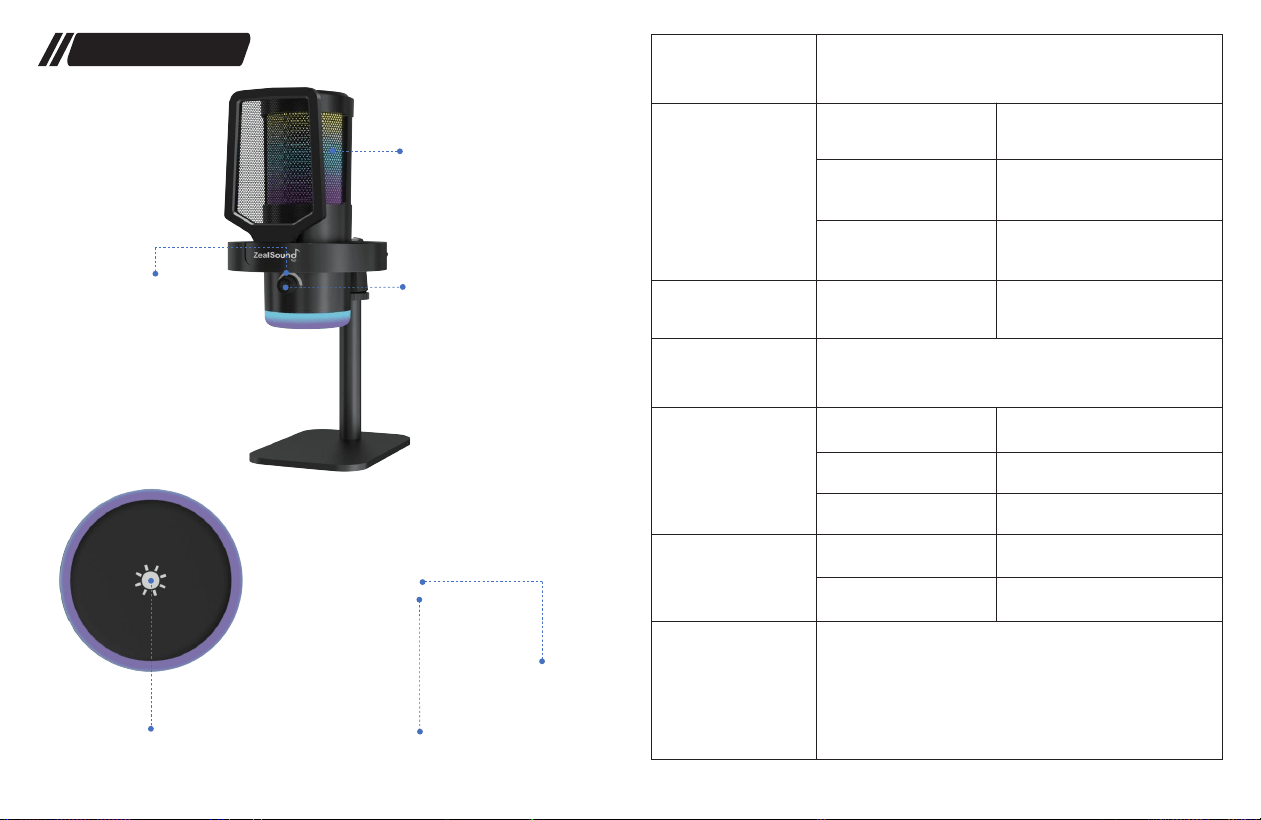
④ ステータス指標
③ ボリュームノブ
⑥ RGB照明効果
⑤ RGB照明効果キー
① 機能ボタン
② 機能インジ
ケーター
① 機能ボタン
長押し
② 機能インジケーター
③ ボリュームノブ
④ ステータスイン
ジケーター
機能 説明
電源オン/オフ
Iインジケーターが赤色点灯
マイク音量とヘッドホンモニタリング音量を同時に調整
ミュート/ミュート解除
ミュートモード時:全インジケ
ーターが赤点灯のまま。
オリジナルサウンド/ノイズリダ
クション(起動時はデフォルト
でオリジナルサウンド有効)
短押し
ダブルクリック
充電中
オリジナルサウンド
短押し
長押し
Iインジケーターランプが緑色
インジケーターランプが青色
インジケーターランプが点滅
状態切り替え(4固定色+3ダイ
ナミック効果)
RGB照明効果のオン/オフ
ノイズリダクション
レシーバー未接続
1. バッテリー残量低下時:RGBインジケーターが赤色で1
分間点滅後、電源が切れます。速やかに充電してください
2. マイク作動時:5分間操作がない場合、自動的に無効化
されます
⑤ RGB Lighting Effect
Key
ご注意事項
機能紹介
3332
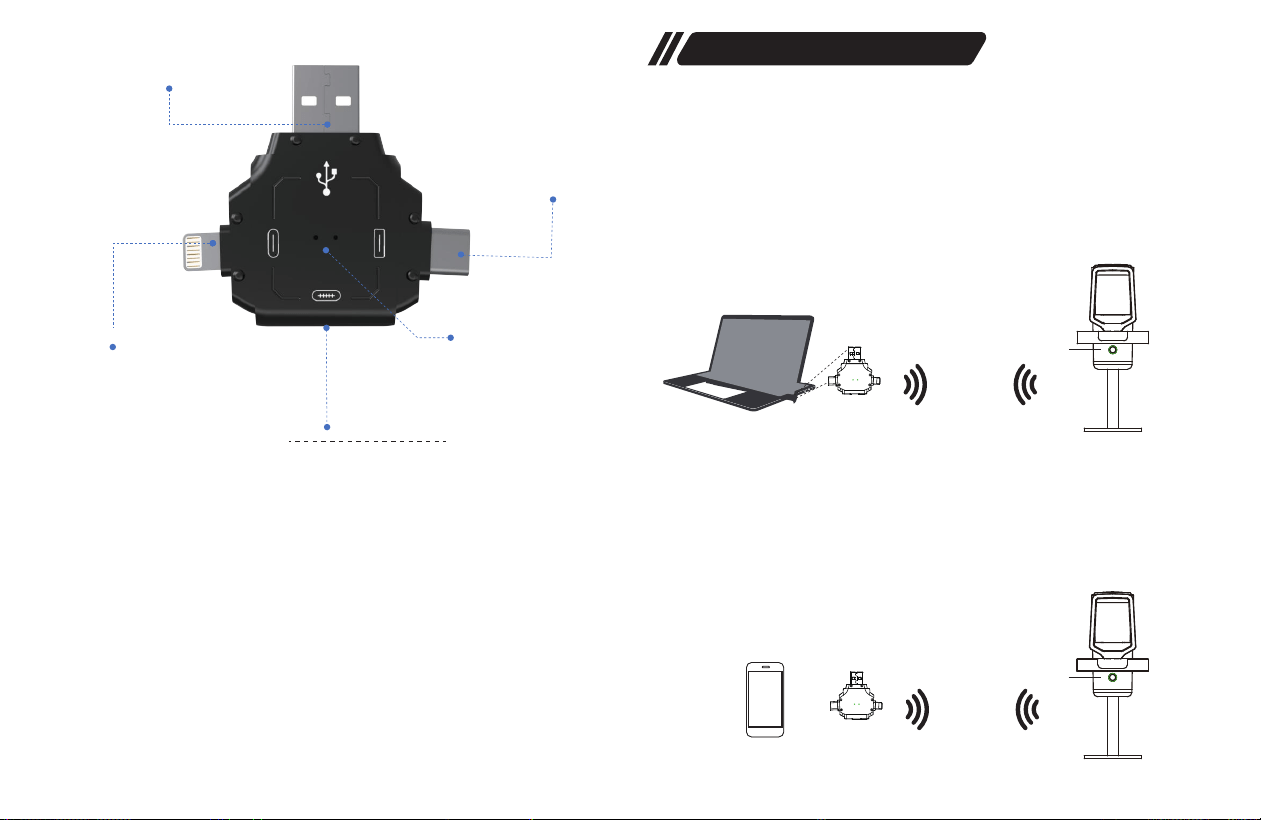
① USB-Aコネクタ:ノートパソコンやデスクトップなどの標準USB-Aポートに
接続します。
機能ボタンを長押ししてマイクをオンにします。ステータスインジケーターが点
滅します。
機能ボタンを長押ししてマイクをオンにすると、ステータスインジケーターが点
滅します。
レシーバーをデバイス(コンピューター)に接続します。レシーバーのステータ
スインジケーターが緑色に点灯し、マイクのステータスインジケーターが点灯し
ます。
レシーバーをデバイス(スマートフォン)に接続すると、レシーバーのステータ
スインジケーターが緑色に点灯し、マイクのステータスインジケーターも点灯し
ます。
これで使用を開始できます。
これで使用を開始できます。
⑤Type-C入力インターフェース:使用中にデバイス(スマートフォン)の電源
が切れた場合、Type-Cポート経由でデータケーブルを接続し、デバイスを充電
できます。
② iPhone用コネクタ:Lightningポート搭載のApple製スマートフォンに対応し
ます。
③ Type-C入力インターフェース:Type-Cスマートフォン用です。
④ ステータスインジケーター:緑色の点灯はマイク接続成功を示します。
緑色の点滅は接続を試行中であることを示します。
Function Introduction
⑤Type-C入力インターフェース
④ ステータスイ
ンジケーター
① USB-Aコネクタ
1. レシーバーをPCに接続
ヒント:デバイス名 RC01
2. レシーバーをType-Cデバイスに接続
② iPhone用コネクタ
③ Type-C
コネクタ
レシーバーの接続方法
点灯状態
レシーバー
レシーバー
レシーバー
点灯状態
35
34
機能ボタンを長押ししてマイクをオンにします。ステータスインジケーターが
点滅します。
レシーバーをデバイス(iPhone)に接続します。レシーバーのステータスイン
ジケーターが緑色に点灯し、マイクのステータスインジケーターも点灯しま
す。
これで使用開始できます。
USBインターフェースでPCに接続
ケーブルのUSB/Type-C端子をコンピュータに、Type-C端子をマイクに接続し
ます。するとノブ上のインジケーターライトが緑色に点灯します。
これで使用開始できます。
ケーブルのType-C端子をType-Cデバイス(スマートフォン)に接続し、もう一
方のType-C端子をマイク本体に接続します。ノブ上のインジケーターライトが
緑色に点灯します。
これで起動準備完了です。
注:kX6マイク使用前に、マイク・イヤホン・エコーの音量を調整し、希望の効果
を得てください。
3. レシーバーでiPhoneに接続
ヒント:デバイス名 KX6DG
1. Connect to PC with USB Interface
2. Type-Cポート搭載デバイスへの接続
3. 録音中にモニタリングが必要な場合は、イヤホンをマイク本体のヘ
ッドホンジャックに接続してください。
有線接続方法
レシーバー
USB-A/Type-C
コネクタ
点灯状態
Type-C
コネクタ
ヘッドホン
ヘッドホン
ヘッドホン
3736
レシーバーを使用してマイクと携帯電話を接続する際、付属のデータケーブル
で携帯電話を充電できます。
I付属データケーブルのType-C端子をレシーバーのType-Cポートに挿入し、も
う一方の端子を電源タップまたは電源インターフェースに接続して携帯電話を
充電してください。
注:電源アダプターは別途ご用意ください。
ヒント:
① レシーバー経由でデバイスをコンピューターに接続。デバイス
は「(RC01)」として認識されます。
② USBケーブルでデバイスをコンピューターに接続。デバイス
は「(KX6DG)」として認識されます。
携帯電話を充電したい場合
コンピューター設定
�
38 39
ソケット
Windows
手順1:KX6DGマイクをコンピューター
に接続します。コンピューターが自動
的にUSBデバイスを認識し、ドライバ
ーをインストールします。
Recording devices
Open Volume Mixer
Spatial sound (Off)
Playback devices
Troubleshoot sound problems
Sounds
macOS
ステップ1: KX6DGマイクをコンピュータの
USBポートに接続します。コンピュータが自動
的にUSBデバイスを認識し、ドライバーをイン
ストールします。
ステップ2: 「システム環境設定」を開きま
す。
ステップ3:「サウンド」をクリックして
サウンド設定パネルを表示します。
ステップ4:入力タブをクリックし、音
声入力デバイスとして「KX6DG/RC01
オーディオデバイス」を選択します。
ステップ2:システムトレイのサウンド
アイコンを右クリックし、「サウン
ド」を選択します。
ステップ3:「録音」タブをクリックし、「
KX6DG/RC01 Audio Device」を選択し、
「既定値に設定」ボタンをクリックします。

① KX6マイクの状態インジケーターランプが点滅していない
か確認してください。点滅している場合、デバイスが接続され
ておらず、再度ペアリングが必要です。
② 音声モニタリング用に3.5mmヘッドホンをKX6に接続して
いることを確認してください。
③ マイク音量が最小に設定されていないか、ミュートボタン
が押されていないかを確認してください。
④ 別のデバイスでマイクを使用し、ヘッドホンから音が出力
されるか試してください。これにより、受信機かケーブルのど
ちらに問題があるかを判断できます。
⑤ RGB照明効果がオフになっていないか確認してください。
⑥ VIVO、OPPO、Realme、OnePlus、iQOOなどの一部スマー
トフォンブランドでは、「OTG」機能を有効にし、外部録音デ
バイスをオンにする必要があります。設定>その他の設定>
OTG>オン(または設定検索ボックスで「OTG」を検索し有
効化)に進んでください。
⑦ 3.5mmヘッドホンジャック搭載のAndroidスマートフォンで
は、別途USB-3.5mmオーディオ変換ケーブルが必要です。
このマイクはカーディオイド指向特性と16mmカプセルにより
非常に感度が高いです。ただし、以下の方法で背景ノイズを低
減できます:
受信機/データケーブルを一度抜いてから再度差し込み、音声
の録音を再試行してください。
このマイクを使用する際は、一般的に約6~12インチ(約15~
30cm)の距離を保つことをお勧めします。なお、これは単指
向性マイクですので、使用時にはマイクの側面にある防風スク
リーンが音源に向くように配置してください。最高の音質を得
るには、マイク側面の防風スクリーンに向かって直接話しかけ
てください。
① マイクを口元に近づけ、家電製品などの騒音源から離す。
② ノイズリダクション機能が有効になっているか確認してくだ
さい。マイクの機能ボタンをダブルクリックしてノイズリダク
ションを有効にしてみてください。
③静かな環境で録音し、ノイズリダクションソフトウェアを使
用して背景ノイズを除去してください。
KX6マイクはiPhoneの通話・チャットアプリに対応しておらず
、通話中にヘッドホンから音声が出力されません。ただし、
Android端末の通話・チャットアプリには完全に対応していま
す。
以下のトラブルシューティング手順で問題が解決しない場合は
、[email protected] までメールにてお問い合わせくだ
さい。
2. AndroidまたはiPhoneで動画録画を試みた際、「このKX6マ
イクは端末に対応していません」と表示され、マイク音声が録
音されませんでした。
5. 通話中に正常に動作せず、ヘッドホンから音が出ない。
3. このマイクは、あまり近づかずに離れた位置から使用するこ
とは可能ですか?
4.このマイクは背景ノイズを多く拾います。
1. マイクが動作しない場合
トラブ ル シュー ティング
4140
残念ながら、本マイクはUSBマイクでありXLRマイクではない
ため、ポッドキャスト機器バンドルには対応しておりません。
機能ボタンを長押しして電源をオフにし、再起動してくださ
い。
① レシーバーを使用してデバイスをコンピューターに接続し
ます。デバイスは「(RC01)」として認識されます。
② USBケーブルでコンピュータに接続した場合、デバイスは
(KX6DG)として認識されます。
これはバッテリー残量が少ないことを示しており、マイクは早
急な充電が必要です(1分後に自動的に電源が切れます)。
本マイクは電源オン状態です。5分以上使用しない場合、自動
的に電源がオフになり省電力モードに移行します。
付属のデータケーブルを使用して、受信機のType-Cポートを
充電ドックに接続し、スマートフォンを充電してください(プ
ラグアダプターは付属していません)。
6. このマイクはポッドキャスト機器セットに対応しています
か?
7.マイクがコンピュータに接続されたときに別のデバイス名を
表示する理由は何ですか?
8. マイクの赤いランプが点滅し、しばらくすると電源が切れ
るのはなぜですか?
9. マイクをオンにしてもすぐに電源が切れるのはなぜです
か?
10.マイクが反応しなくなった場合はどうすればよいですか?
11. 受信機に接続中にスマートフォンのバッテリーが切れた場
合はどうすればよいですか?
保証
中国製
本製品には12ヶ月間の保証が付帯します。機器の改造、
誤用、誤操作、不適切な調整、または過度な摩耗が生じた
場合、保証は無効となります。ご質問がございましたら、
メール [email protected] にて弊社アフターサービス
までお気軽にお問い合わせください。お客様が抱えるあら
ゆる問題に対し、適切な解決策を積極的に模索してまいり
ます。
4342