www.klarstein.com
MEAT MACHINE
Holzkohlegrill
Charcoal Grill
Parrilla de carbón
Gril au charbon de bois
Griglia a carbone di legna
10034819


3
DE
HERSTELLER & IMPORTEUR (UK)
Hersteller:
Chal-Tec GmbH, Wallstraße 16, 10179 Berlin, Deutschland.
Importeur für Großbritannien:
Berlin Brands Group UK Limited
PO Box 42
272 Kensington High Street
London, W8 6ND
United Kingdom
Sicherheitshinweise4
Einzelteile6
Zusammenbau9
Sehr geehrter Kunde,
wir gratulieren Ihnen zum Erwerb Ihres Gerätes. Lesen Sie
die folgenden Hinweise sorgfältig durch und befolgen Sie
diese, um möglichen Schäden vorzubeugen. Für Schäden,
die durch Missachtung der Hinweise und unsachgemäßen
Gebrauch entstehen, übernehmen wir keine Haftung. Scannen
Sie den folgenden QR-Code, um Zugriff auf die aktuellste
Bedienungsanleitung und weitere Informationen rund um das
Produkt zu erhalten.
INHALTSVERZEICHNIS
English 17
Français 31
Español 45
Italiano 59

4
DE
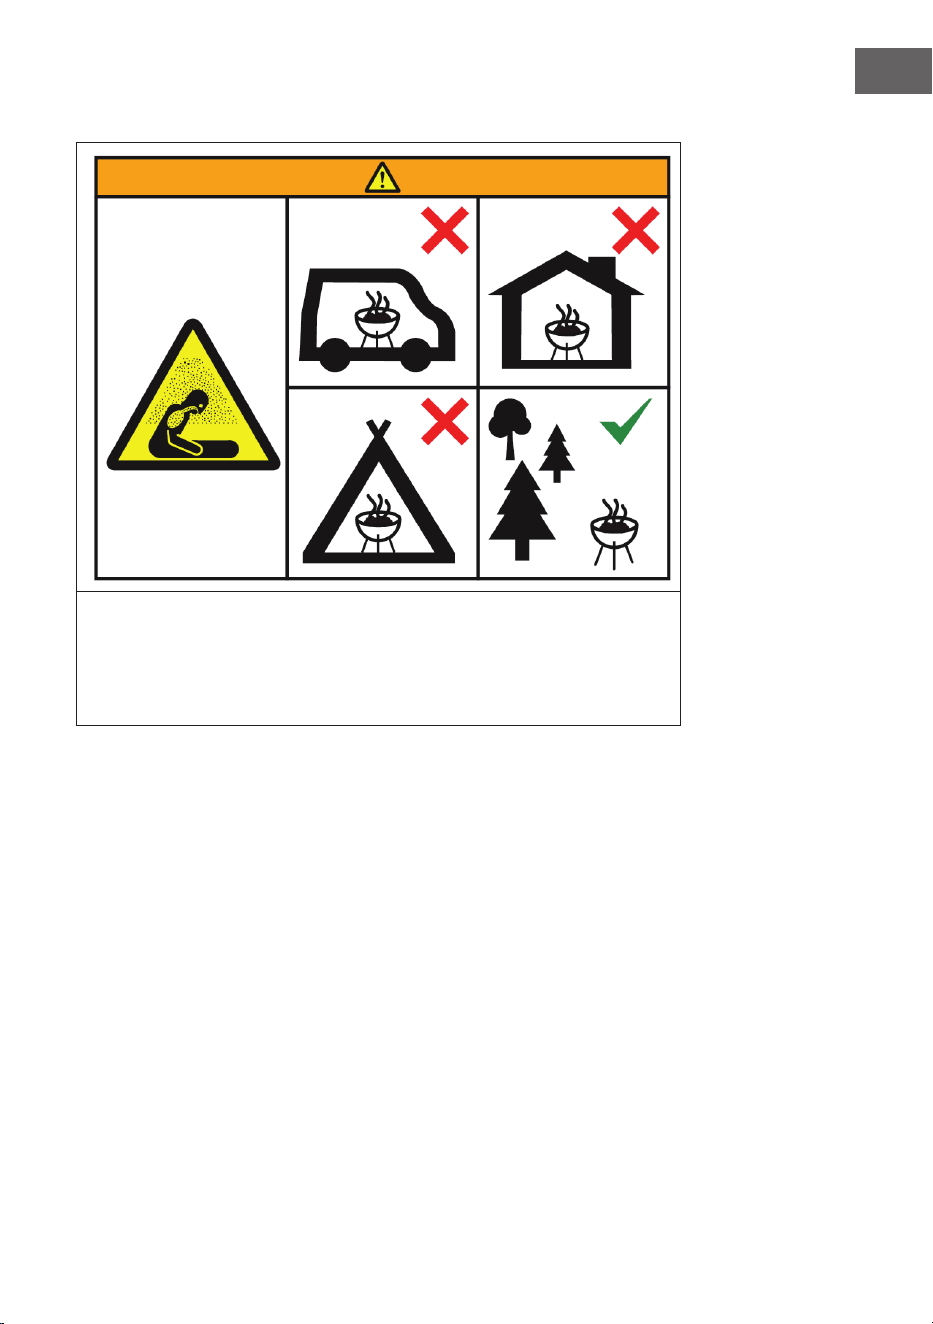
SICHERHEITSHINWEISE
WARNUNG
Erstickungsgefahr! Betreiben Sie den Grill nicht in geschlossenen und/
oder bewohnbaren Räumen, z. B. Gebäuden, Zelten, Wohnwagen,
Wohnmobilen, Booten. Es besteht Lebensgefahr durch Kohlenmonoxid-
Vergiftung.
• Stellen Sie den Grill immer auf eine feste, ebene und hitzebeständige Oberfl äche,
in ausreichender Entfernung von Zäunen, überhängenden Ästen und anderen
brennbaren Stoffen.
• Der Grill muss stets von einer sachkundigen erwachsenen Person überwacht
werden.
• Der Holzkohlegrill ist nur zur Nutzung im Freien bestimmt. Nicht in geschlossenen
Räumen benutzen!
• Zum Anzünden oder Wiederanzünden keinen Spiritus oder Benzin verwenden!
Nur Anzündhilfen entsprechend EN 1860-3 verwenden!. Verwenden Sie
zum Anzünden des Grills nie Brennspiritus, Paraf nöl, Methylalkohol, Benzin
oder ähnliche Lösungsmittel. Verwenden Sie zum Anzünden einen geeigneten
Flüssiganzünder und befolgen Sie dabei die Herstellerhinweise. Fügen Sie keinen
Flüssiganzünder mehr hinzu, wenn die Kohle brennt.
• Die meisten Teile aus Metall werden heiß. Tragen Sie Schutzhandschuhe, wenn Sie
den Grill berühren oder das Grillgut wenden. Der Grill darf während des Betriebes
nicht bewegt werden.
• Wenn Fett auf die Kohle tropft, kommt es zum Auffl ammen. Halten Sie einen
fein eingestellten Wassersprüher bereit, um solche Flammen zu löschen und das
Verbrennen des Grillguts zu verhindern.
• Wenn das Grillen beendet ist, löschen Sie die Kohle mit einem feinen Sprühnebel
ab oder bedecken Sie die Kohle mit Sand.
• Dieser Grill wird sehr heiß und darf während des Betriebes nicht bewegt werden.
• Stellen Sie sicher, dass der Grill vollständig abgekühlt ist, bevor Sie ihn bewegen
und die Asche entleeren.
• Verlängern Sie die Lebenszeit der Metallteile, indem Sie den Grill nicht ungeschützt
im Freien stehen lassen. Idealerweise sollte der Grill in einer Garage oder einem
Gartenschuppen aufbewahrt werden, wenn er nicht gebraucht wird.
• Legen Sie das Grillgut erst auf, wenn der Brennstoff mit einer Ascheschicht bedeckt
ist!
• Halten Sie Kinder und Tiere vom Gerät fern.

5
DE
VORSICHT!
VERWENDEN SIE KEINEN ALKOHOL ODER BENZIN
ZUM ANZÜNDEN ODER WIEDERANZÜNDEN!

6
DE
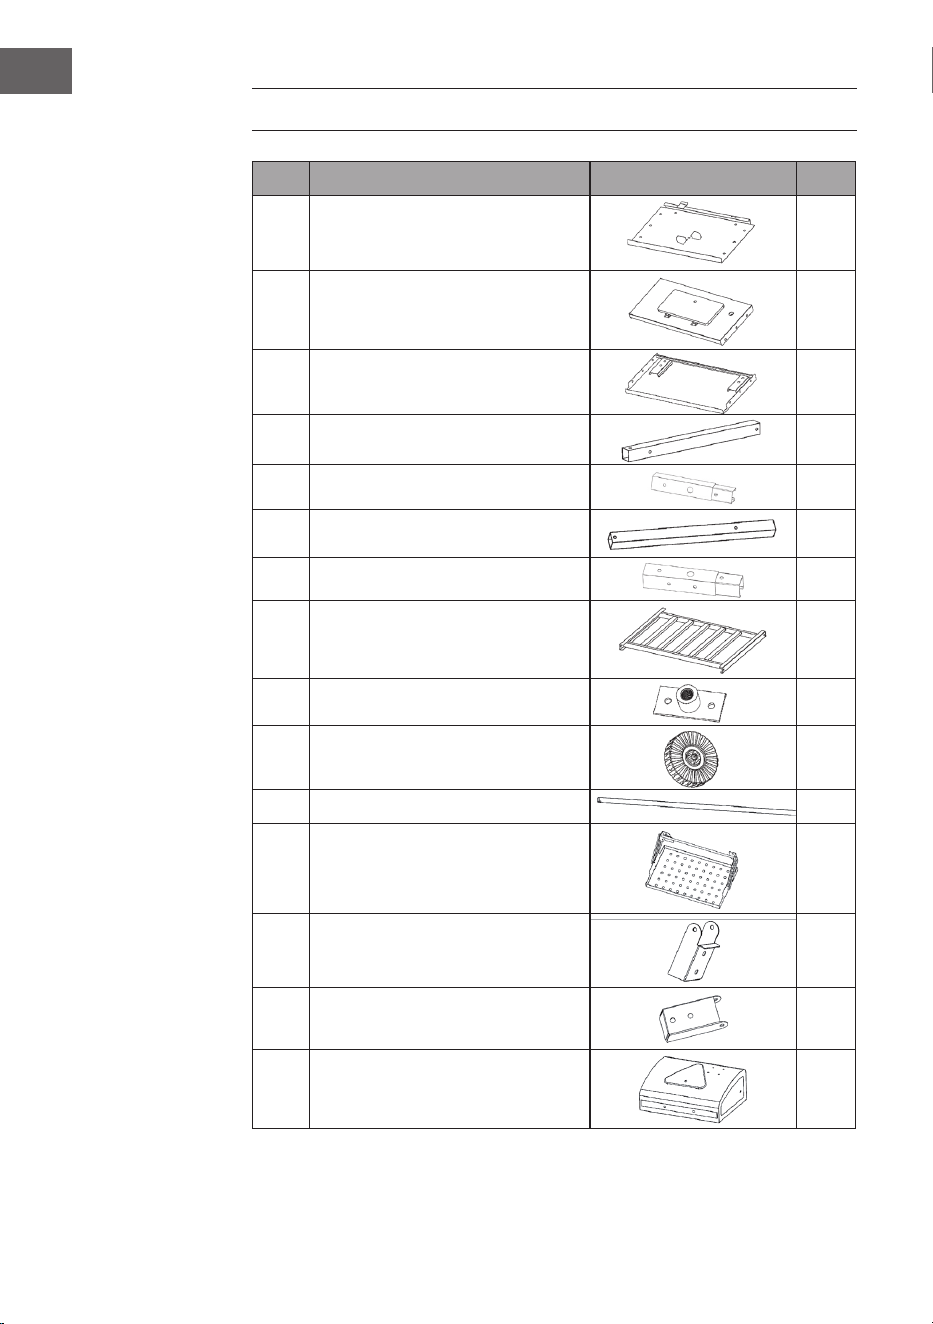
EINZELTEILE
Nr. Bezeichnung Bild Stk.
1 Seitenwand
2
2 Vorderwand
1
3 Rückwand
1
4 Bein-A
2
4.1 Bein-A1
3
5 Bein-B
2
5.1 Bein-B1
1
6 Unterer Rahmen
1
7 Rahmen-A
1
8 Räder
2
9 Achse
1
10 Holzkohlenplatte
1
11 Scharnier-A
2
12 Scharnier-B
2
13 Deckel
1

7
DE
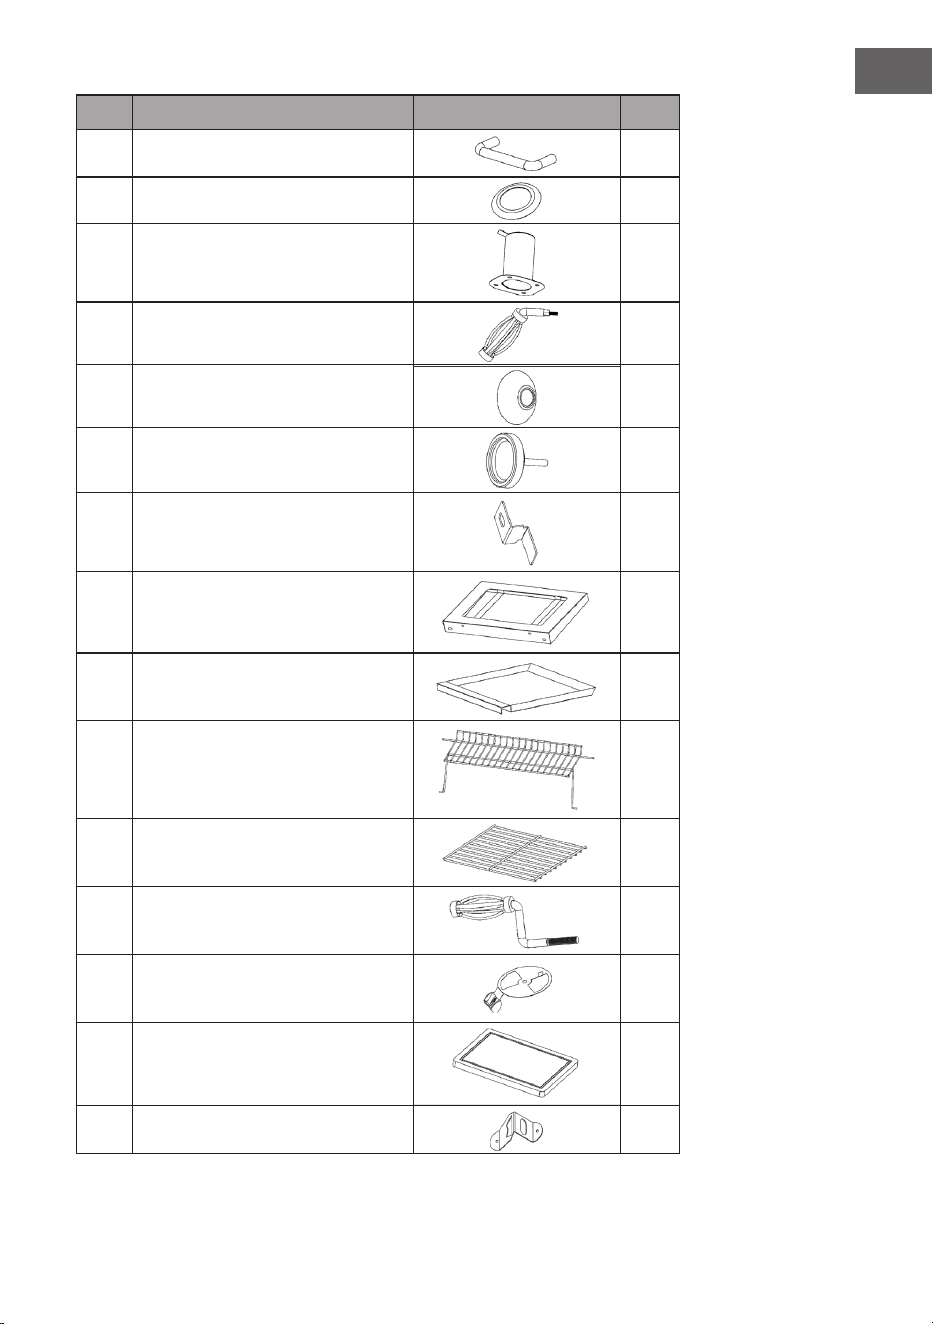
Nr. Bezeichnung Bild Stk.
14 Deckelgriff
1
15 Unterlegscheibe-A
2
16 Schornstein
1
17 Feuerschalen-Griff
1
18 Unterlegscheibe-B
1
19 Thermometer
1
20 Rahmen-B
1
21 Seitentische 2
22 Aschenschublade
1
23 Warmhalte-Grill
1
24 Grillrost
2
25 Höhenverstellbarer Griff
1
26 Entlüftung
2
27 Bambus-Tisch
2
28 Öffner
1

8
DE
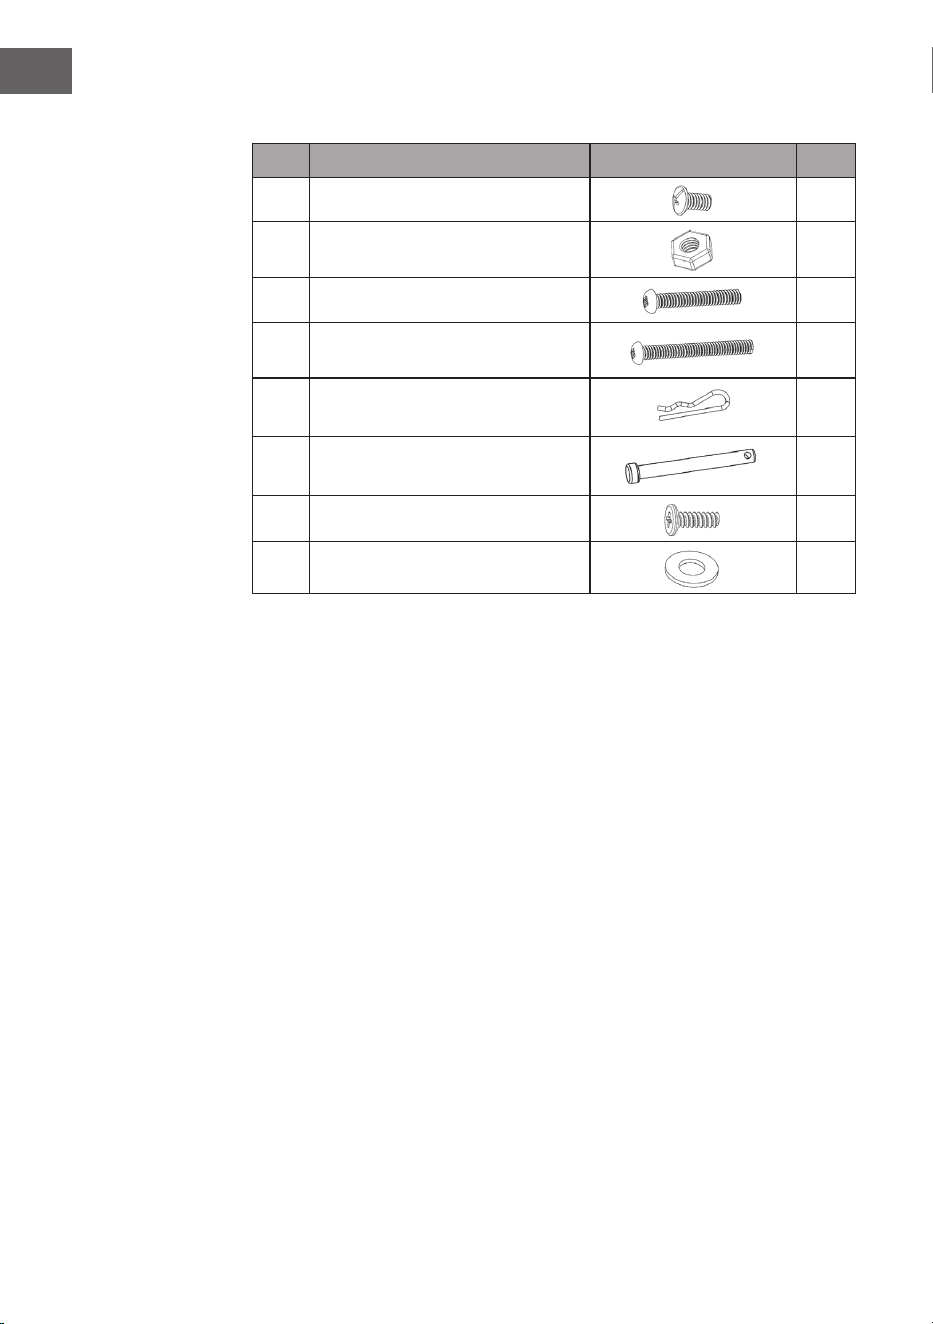
Kleinteile
Nr. Bezeichnung Bild Stk.
A Schraube M6-12
26
B Mutter M6
19
C Schraube M6-35
8
D Schraube M6-55
4
E Sicherungsklammern
4
F Sicherungsstifte
2
G Schraube M5-16
4
H Unterlegscheibe-H
2
9
DE
ZUSAMMENBAU
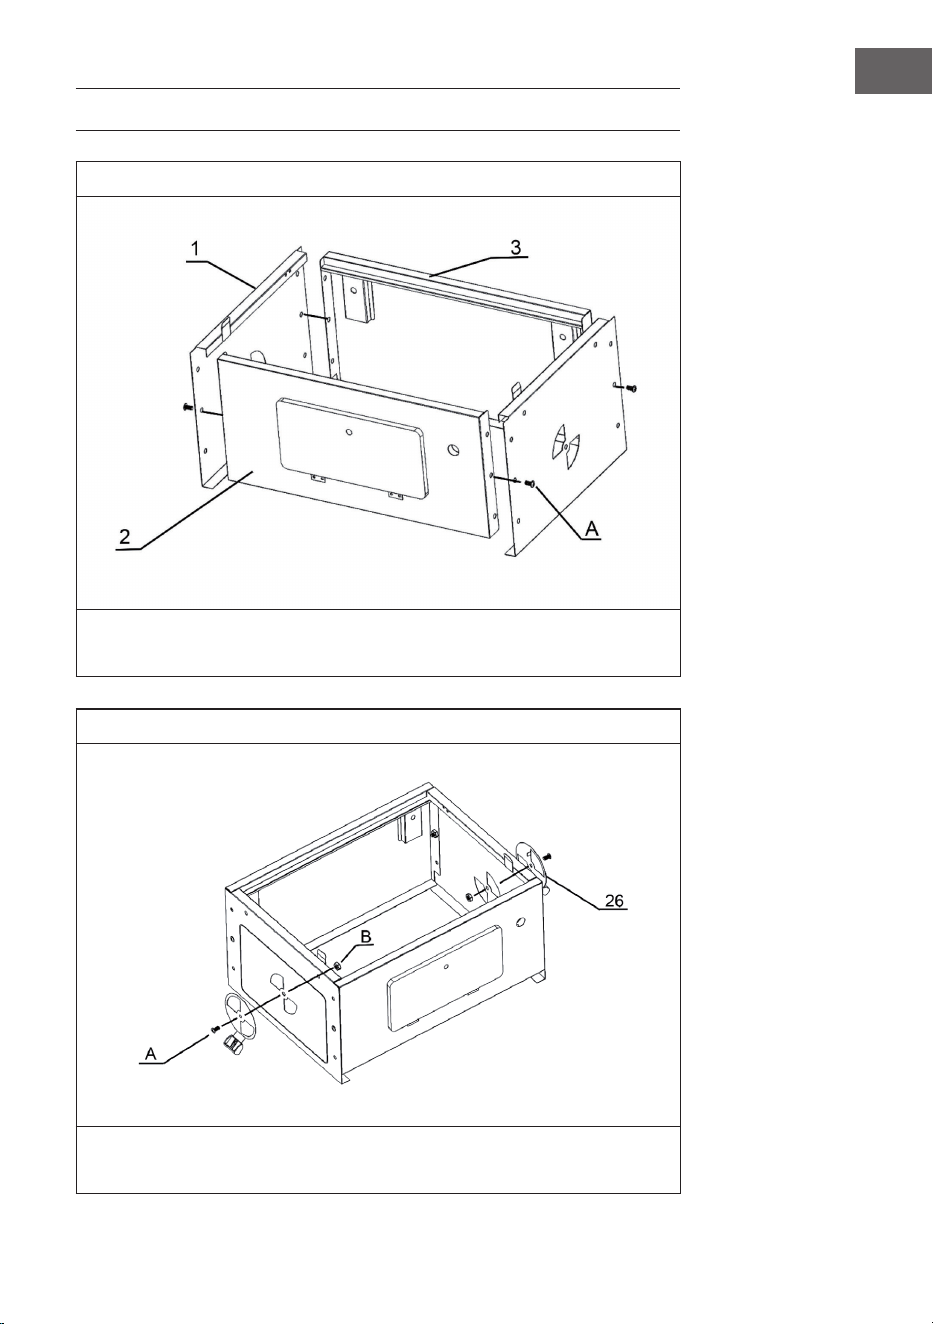
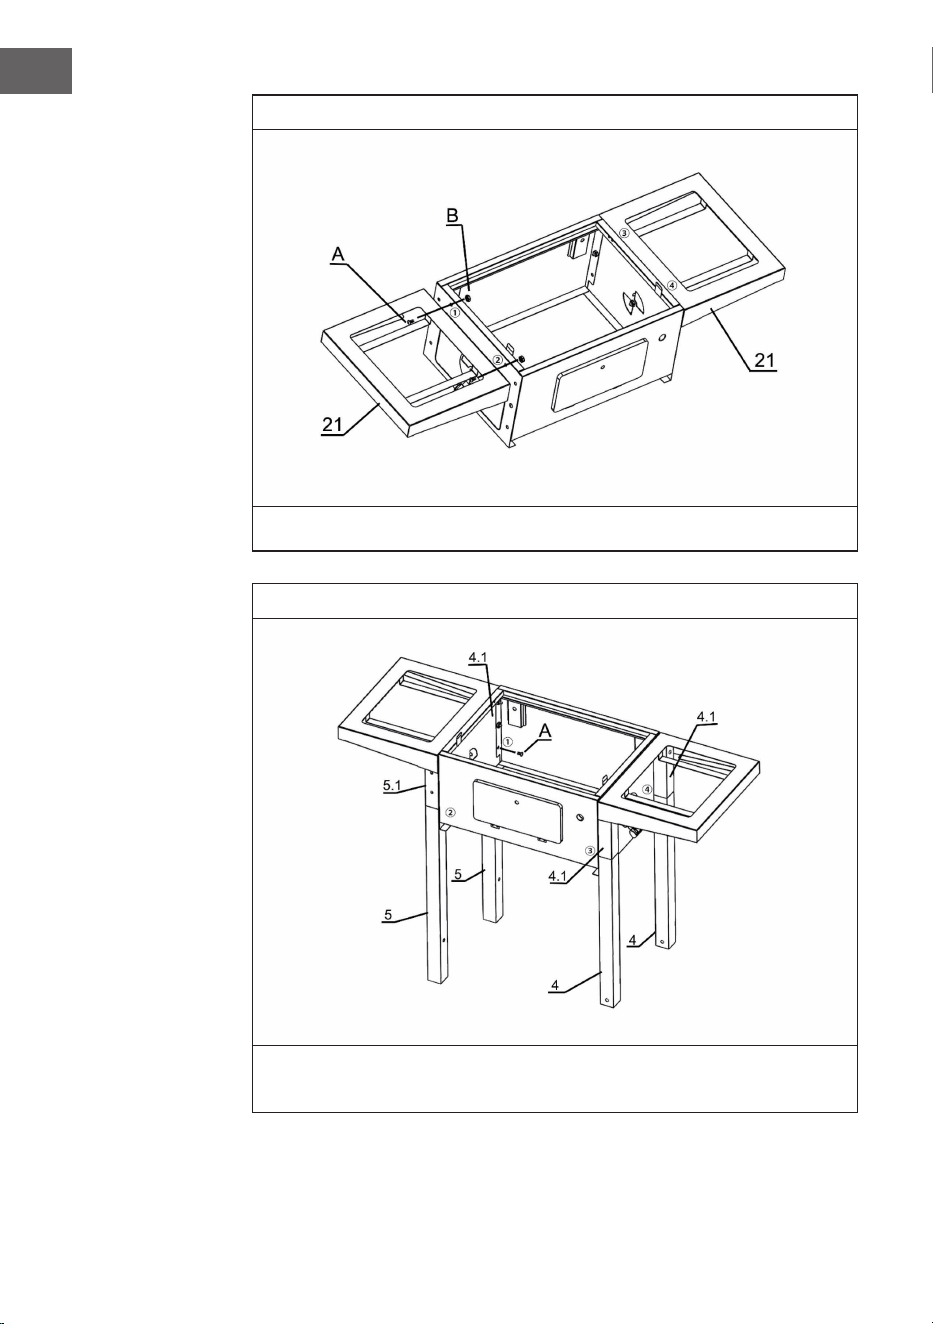
1
Verbinden Sie Seitenwand (1), Vorderwand (2) und Rückwand (3) mit Schrauben
M6-12 (A).
2
Montieren Sie die Entlüftung (26) mit Schraube M6-12 (A) und Mutter M6 (B) an
der Seitenwand (1).

10
DE
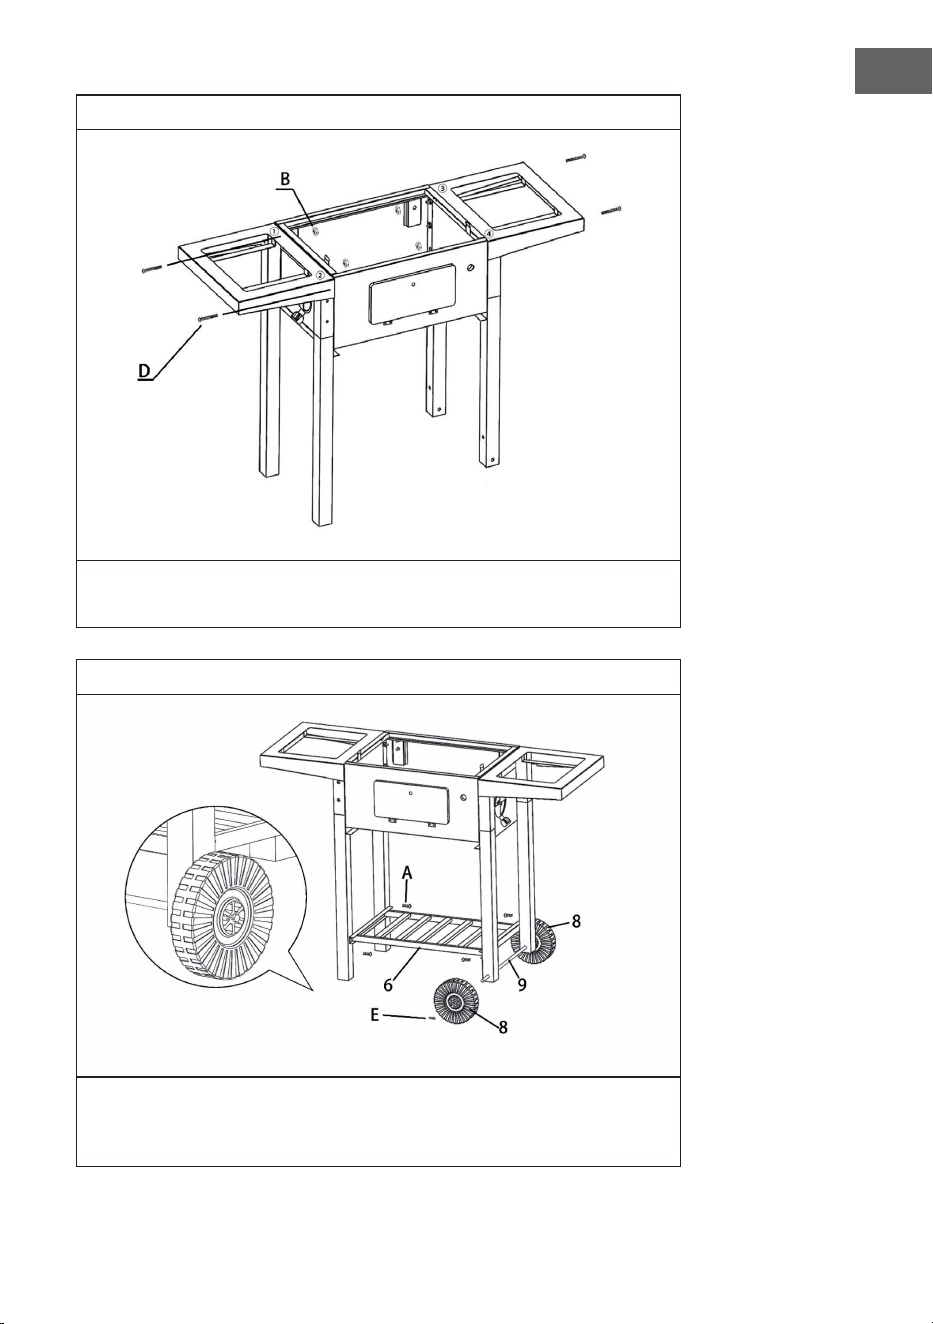
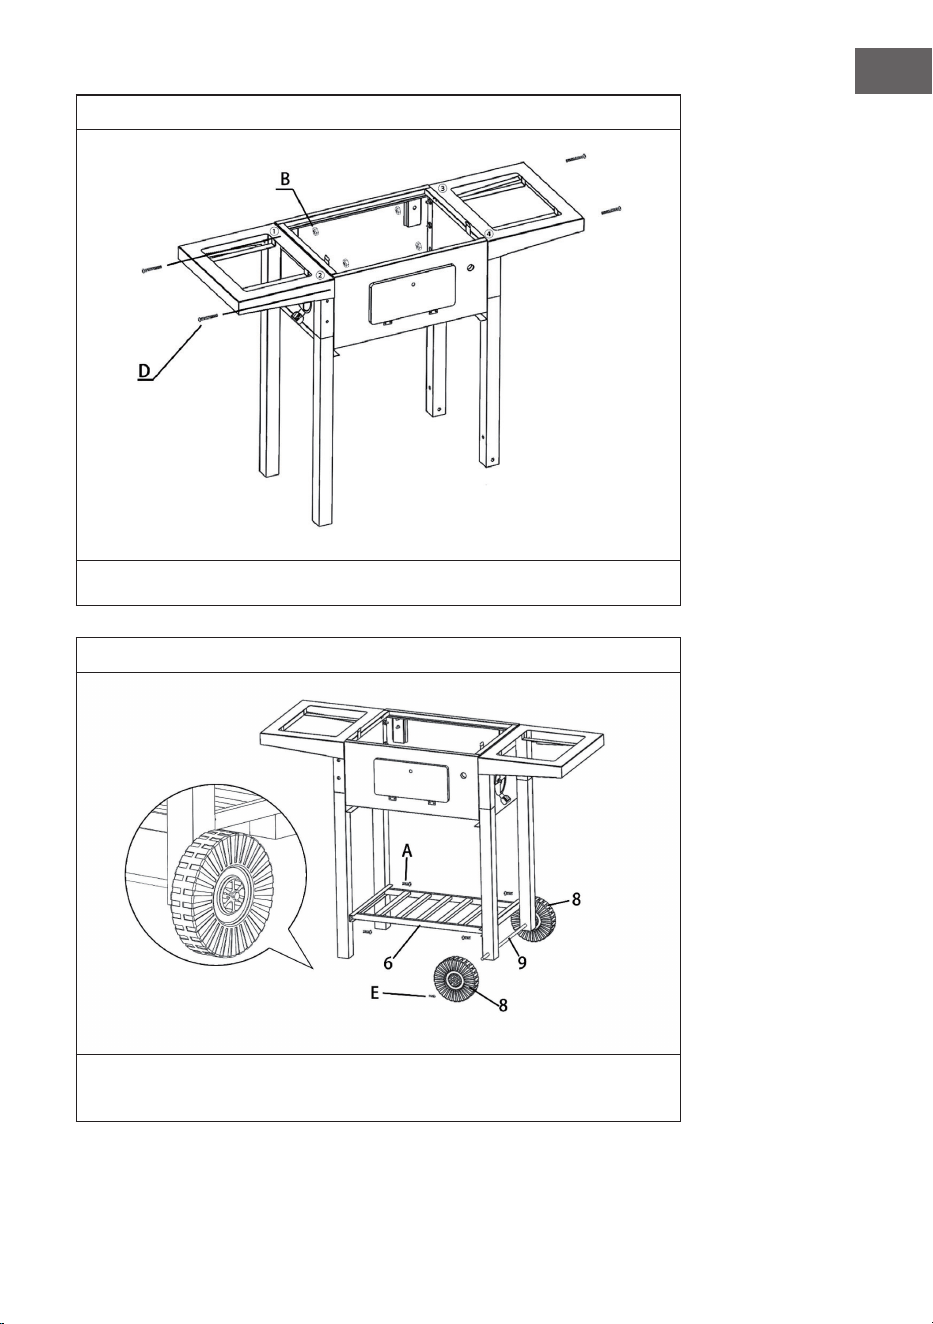
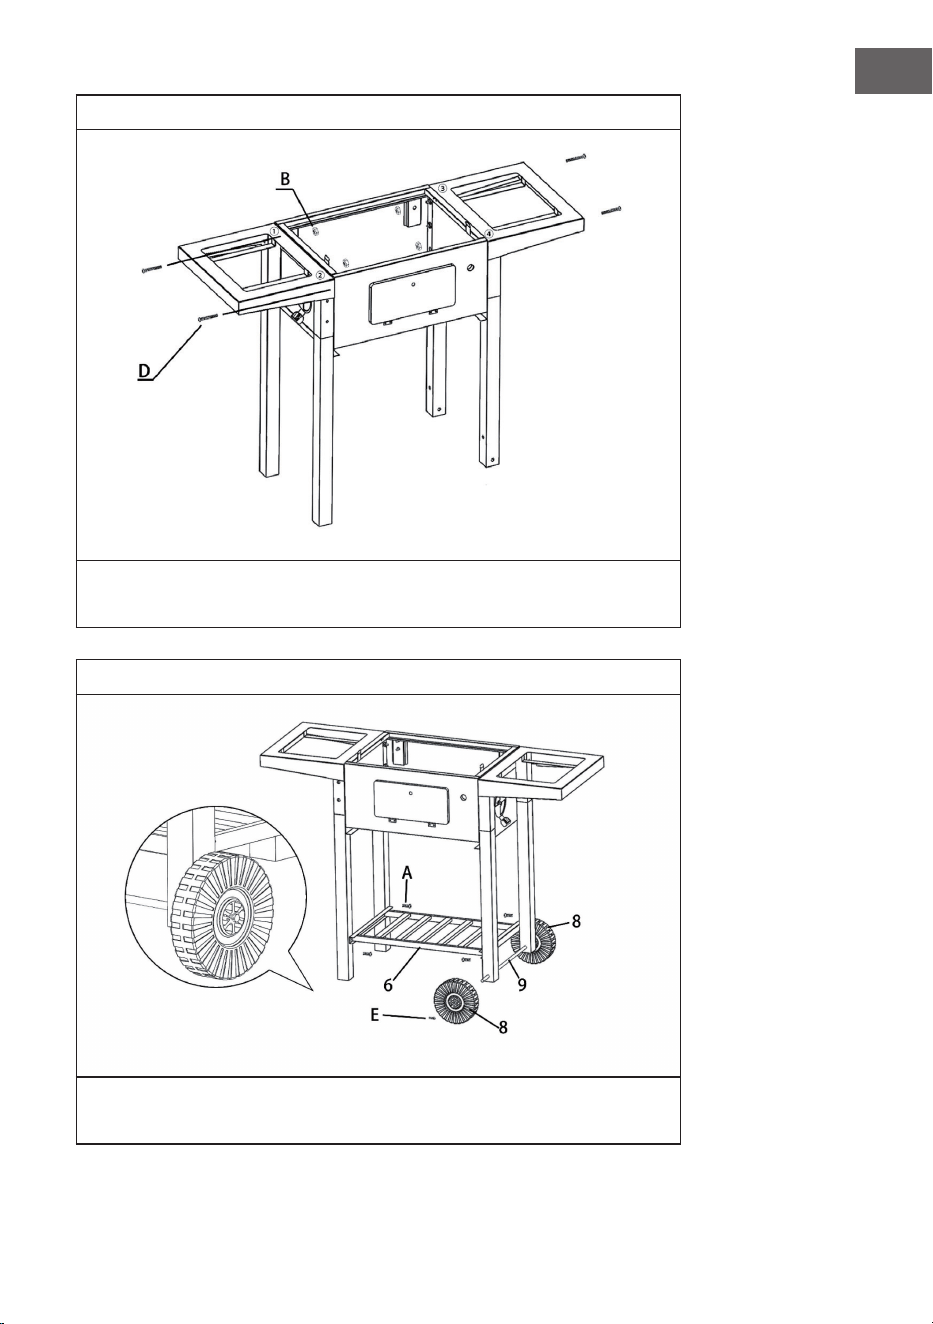
3
Befestigen Sie die 2 Seitentische (21) mit Schraube M6-12(A) und Mutter M6 an der
Seitenwand (1).
4
Verbinden Sie zuerst das Bein-A1 (4.1) und das Bein-B1 (5.1) mit dem Bein-B (5).
Verbinden Sie dann das Bein-A1 (4.1) mit dem Bein-A (4) und befestigen Sie die
4Beine mit Schraube M6-12 (A) an der Feuerschale.
11
DE
5
Befestigen Sie den Seitentische, die Beine und die Feuerschale mit
Schraube M6-55 (D) und Mutter M6 (B).
6
Montieren Sie den unteren Rahmen (6) mit Schraube M6-12(A) an den Beinen.
Setzen Sie die Achse (9) in das Bein-A (4) ein und befestigen Sie denn die Räder (8)
mit den Sicherungsklammern (E) an der Achse.
12
DE
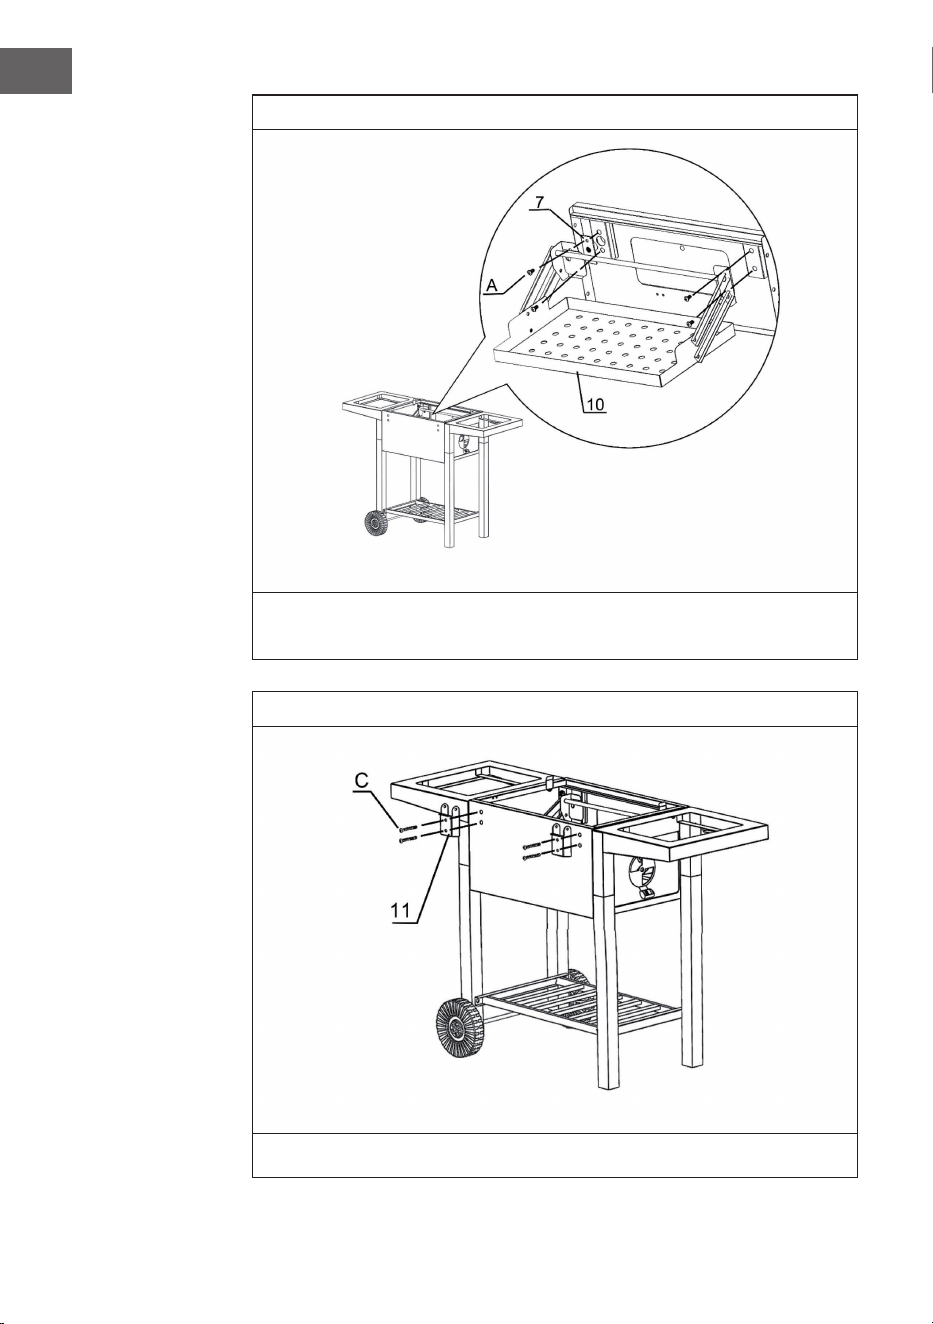
7
Befestigen Sie Sie die Holzkohlenplatte (10) und befestigen Sie Rahmen-A (7) mit
Schraube M6-12 (A) an der Vorderwand.
8
Montieren Sie das Scharnier-A (11) mit Schraube M6-35 (C) an der Rückwand.

13
DE
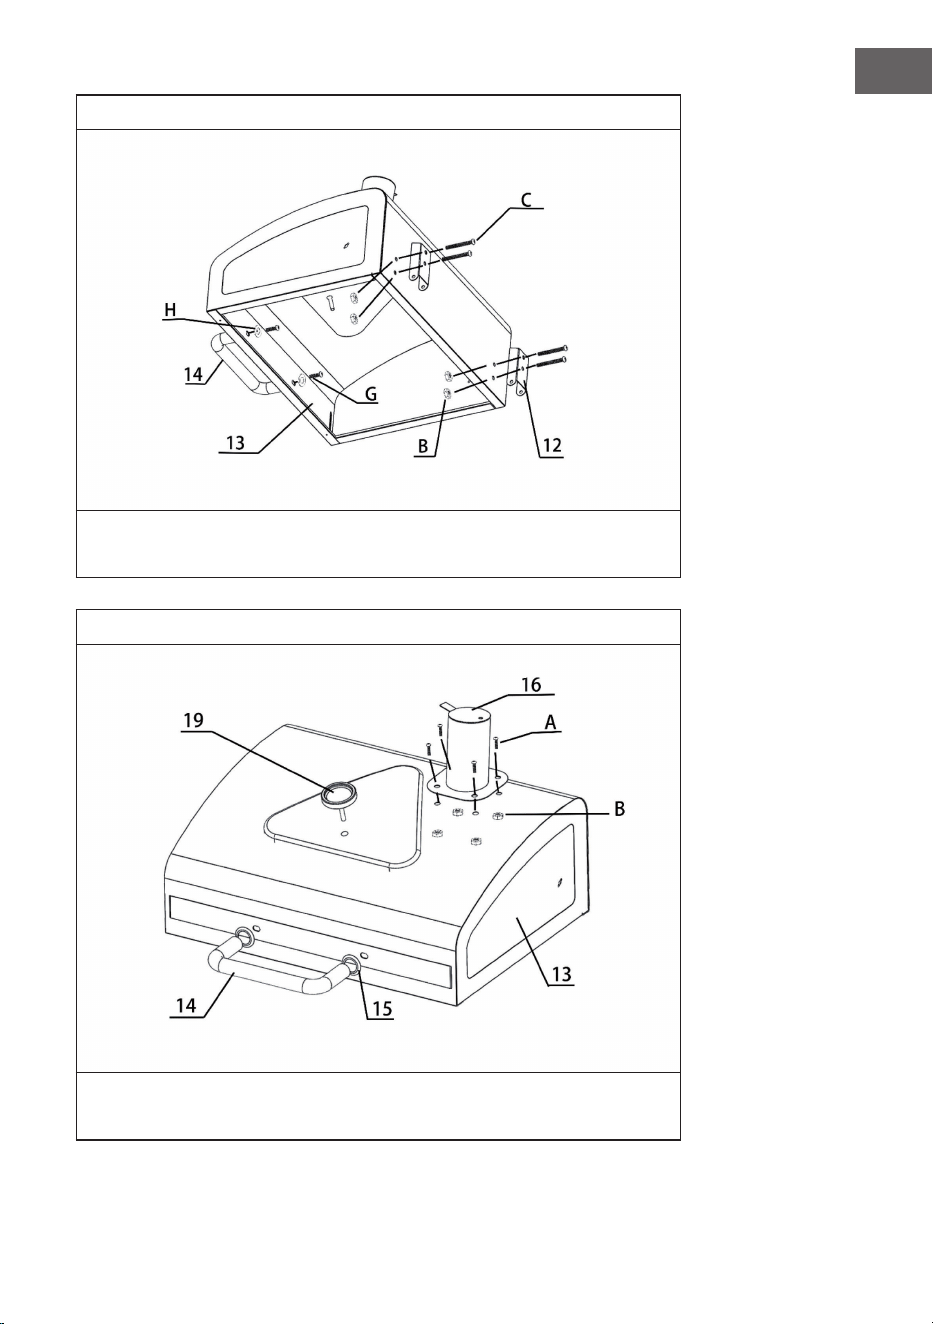
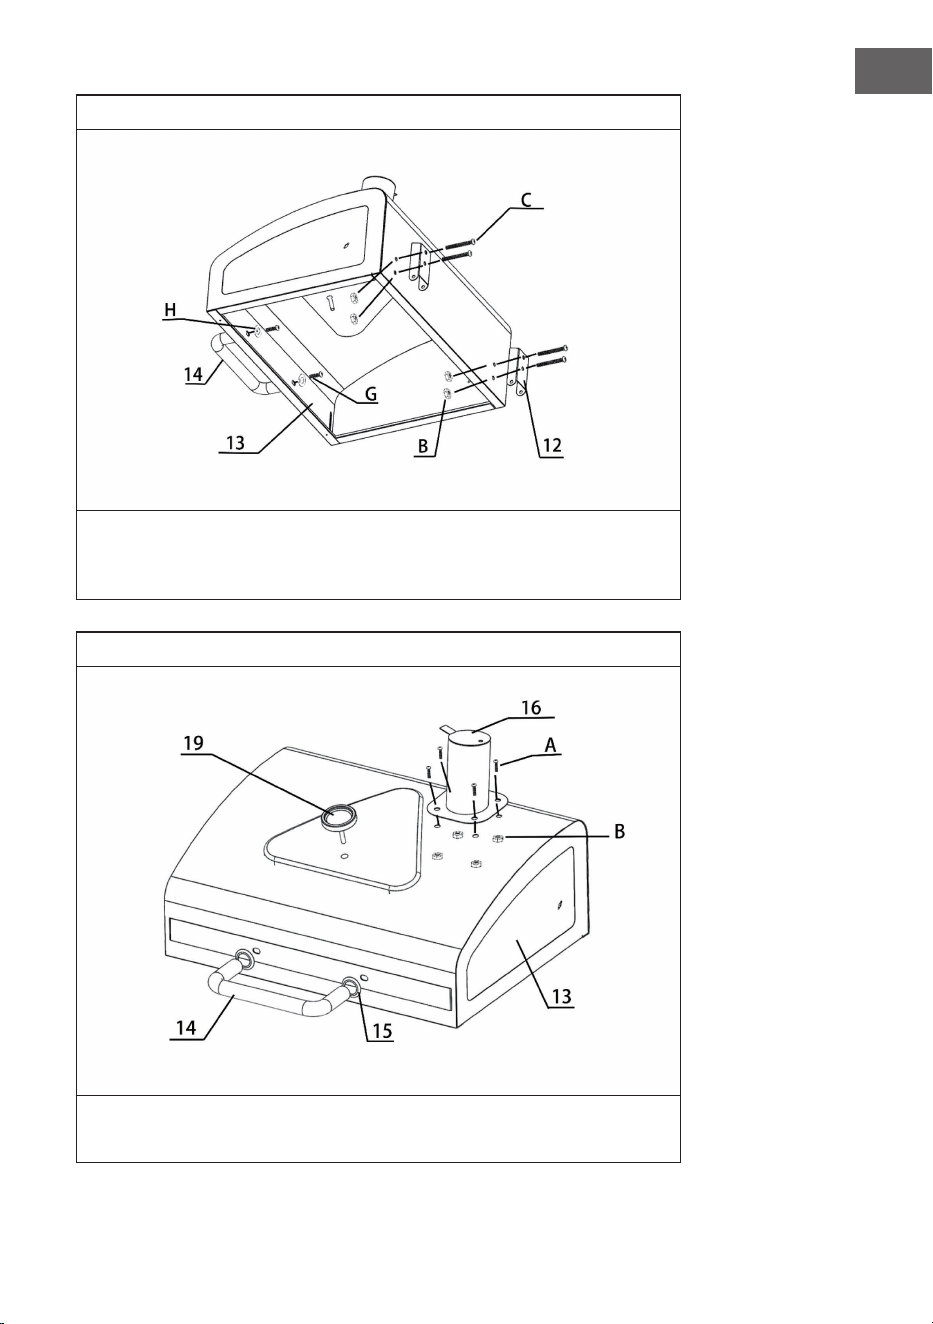
9
Montieren Sie das Scharnier-B (12) mit Schraube M6-35 (C) und Mutter M6 (B)
am Deckel (13). Befestigen Sie den Deckelgriff (14) mit Unterlegscheibe-A (15),
Schraube M6-35 (C) und Mutter M6 (B) am Deckel(13).
10
Befestigen Sie den Schornstein (16) mit Schraube M6-12 (A) und Mutter M6 (B) am
Deckel (13). Befestigen Sie dann das Thermometer (19) am Deckel (13).

14
DE
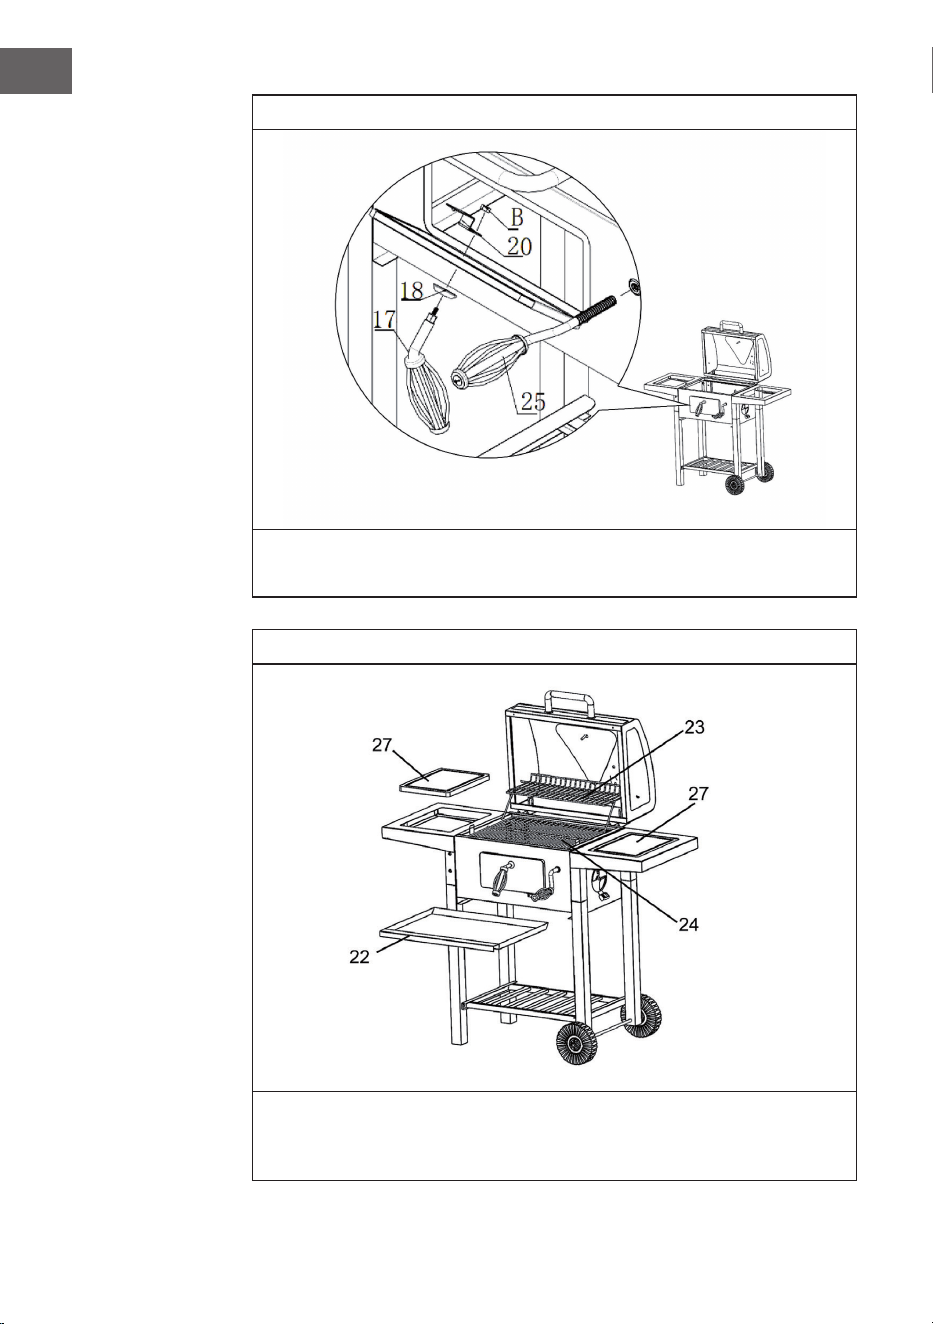
11
Schieben Sie den Griff der Feuerschale (17) durch die Unterlegscheibe-B (18) und
den Rahmen (20) und befestigen Sie ihn mit einer Mutter M6 (B). Befestigen Sie
dann den Einstellgriff (25) an der Feuerschale.
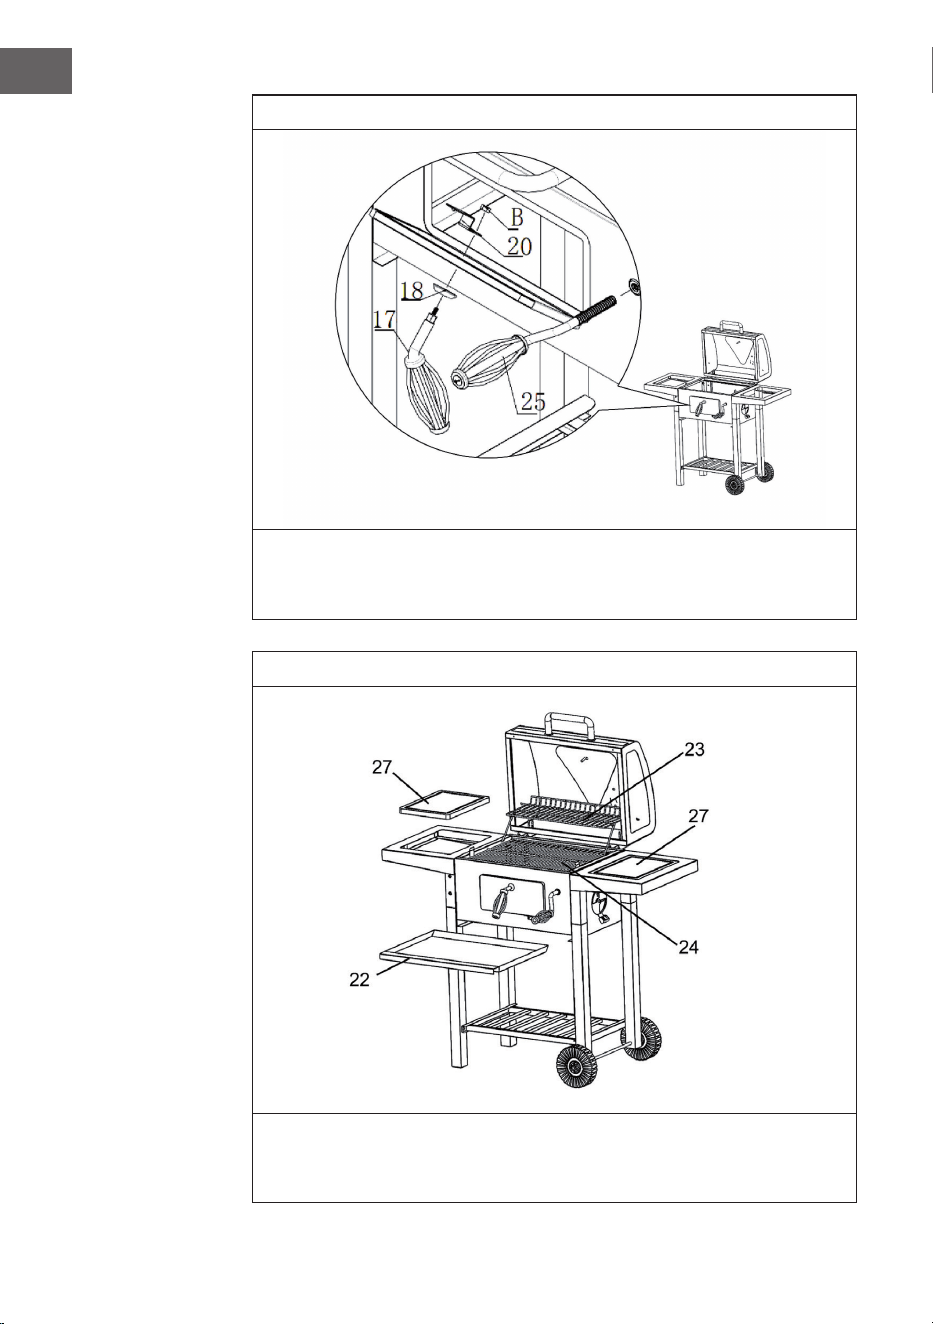
12
Platzieren Sie 2 Bambustische (27) auf den Seitentischen. Setzen Sie die
Ascheschublade (22) in die Feuerschale ein. Öffnen Sie dann den Deckel und legen
Sie die 2 Grillroste (23) und den Warmhaltegrill (24) in die Feuerschale.

15
DE
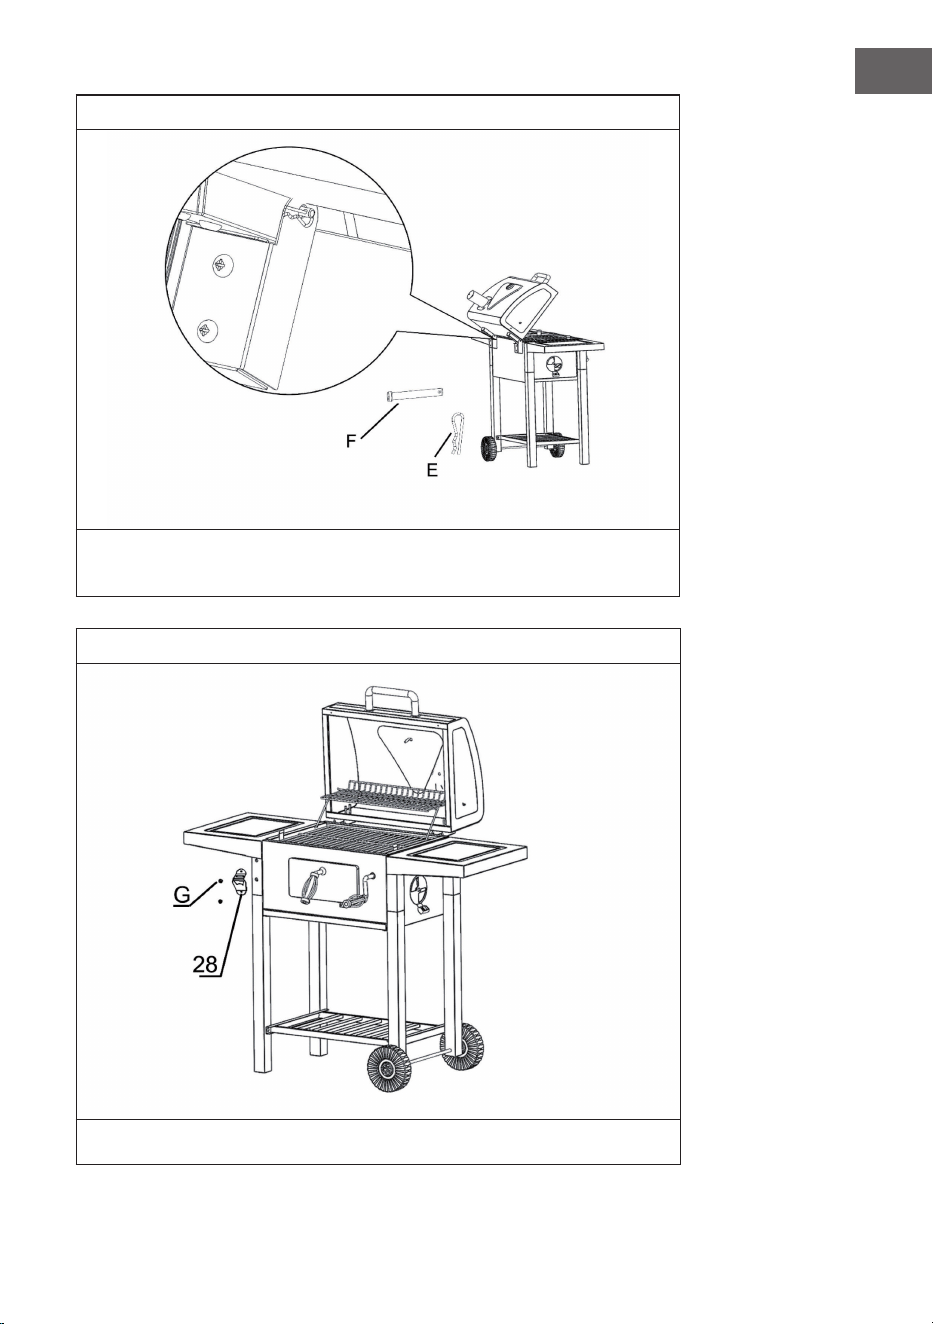
13
Befestigen Sie die Feuerschale und den Deckel mit Sicherungsstiften (F) und
Sicherungsklammern (E), wie in den Zeichnungen dargestellt.
14
Befestigen Sie den Flaschenöffner (28) und die Beine mit Schraube M5-16 (G).


17
EN
Dear Customer,
Congratulations on purchasing this device. Please read the
following instructions carefully and follow them to prevent
possible damages. We assume no liability for damage caused
by disregard of the instructions and improper use. Scan the QR
code to get access to the latest user manual and more product
information.
CONTENTS
MANUFACTURER & IMPORTER (UK)
Manufacturer:
Chal-Tec GmbH, Wallstrasse 16, 10179 Berlin, Germany.
Importer for Great Britain:
Berlin Brands Group UK Limited
PO Box 42
272 Kensington High Street
London, W8 6ND
United Kingdom
Safety Instructions18
Parts20
Assembly23

18
EN
SAFETY INSTRUCTIONS
WARNING
Risk of suffocation! Do not use the barbecue in a con ned and/ or
habitable space e.g. houses, tents, caravans, motor homes, boats.
Danger of carbon monoxide poisoning fatality.
• Always place the grill on a rm, level and heat-resistant surface, away from fences,
overhanging branches and other fl ammable materials.
• The grill must always be supervised by a knowledgeable adult.
• The charcoal grill is only intended for outdoor use. Do not use indoors!
• Do not use spirit or petrol for lighting or relighting! Use only relighters complying to
EN 1860-3! Never use denatured alcohol, paraf n oil, methyl alcohol, gasoline or
similar solvents to light the grill. Use a suitable liquid lighter for lighting and follow
the manufacturer's instructions. Stop adding a liquid lighter when the charcoal is
burning.
• Most metal parts get hot. Wear protective gloves when touching the grill or turning
the food. The grill must not be moved during operation.
• If fat drips on the charcoal, it will fl are up. Have a nely adjusted water sprayer
ready to put out such fl ames and prevent the food from burning.
• When the grilling is nished, extinguish the charcoal with a ne spray or cover the
charcoal with sand.
• This grill will become very hot do not move it during operation.
• Make sure the grill is completely cool before moving it or emptying the ashes.
• Extend the life of the metal parts by not leaving the grill unprotected outdoors.
Ideally, the grill should be stored in a garage or garden shed when not in use.
• Do not place the food on the grill until the fuel is covered with a coating of ash!
• Keep children and animals away from the device.

19
EN
CAUTION!
DO NOT USE ALCOHOL OR GASOLINE TO LIGHT
OR RE-LIGHT!

20
EN
PARTS
No. Description Picture Pc.
1 Side wall
2
2 Front wall
1
3 Back wall
1
4 Leg-A
2
4.1 Leg A1
3
5 Leg-B
2
5.1 Leg-B1
1
6 Lower frame
1
7 Frame-A
1
8 Wheels
2
9 Axis
1
10 Charcoal board
1
11 Hinge-A
2
12 Hinge-B
2
13 Cover
1

21
EN
No. Description Picture Pc.
14 Lid handle
1
15 Washer-A
2
16 Chimney
1
17 Fire bowl handle
1
18 Washer-B
1
19 Thermometer
1
20 Frame-B
1
21 Side tables 2
22 Ash drawer
1
23 Heat-retaining grill
1
24 Barbecue grill
2
25 Height-adjustable handle
1
26 Ventilation
2
27 Bamboo table
2
28 Opener
1
22
EN
Hardware
No. Description Picture Pc.
A Screw M6-12
26
B Nut M6
19
C Screw M6-35
8
D screw M6-55
4
E Safety clamps
4
F Locking pins
2
G Screw M5-16
4
H Washer-H
2

23
EN
ASSEMBLY
1
Connect the side panel (1), front panel (2) and rear panel (3) with screws
M6-12 (A).
2
Mount the air vent (26) to the side wall (1) using screw M6-12 (A) and nut M6 (B).
24
EN
3
Fix the 2 side tables (21) to the side wall (1) with M6-12 (A) screw and M6 nut.
4
First connect leg A1 (4.1) and leg B1 (5.1) with leg B (5). Then connect the leg A1
(4.1) to the leg A (4) and x the 4 legs to the re bowl with screw M6-12 (A).
25
EN
5
Fix the side tables, legs and re bowl with screw M6-55 (D) and nut M6 (B).
6
Mount the lower frame (6) to the legs with screw M6-12(A). Insert the axle (9) into
the leg A (4) and x the wheels (8) to the axle with the safety clips (E).

26
EN
7
Attach the charcoal plate (10) and x frame A (7) to the front wall with screw
M6-12 (A).
8
Mount the hinge-A (11) to the rear wall with screw M6-35 (C).
27
EN
9
Fit the hinge-B (12) to the cover (13) with the M6-35 bolt (C) and M6 nut (B). Fix the
lid handle (14) to the lid (13) with washer-A (15), screw M6-35 (C) and nut M6 (B).
10
Fasten the chimney (16) to the cover (13) with screw M6-12 (A) and nut M6 (B).
Then x the thermometer (19) to the cover (13).

28
EN
11
Push the handle of the re bowl (17) through the washer-B (18) and the frame (20)
and secure it with an M6 nut (B). Then attach the adjustment handle (25) to the re
bowl.
12
Place 2 bamboo tables (27) on the side tables. Place the ash drawer (22) in the re
bowl. Then open the lid and place the 2 grills (23) and the warming grill (24) in the
re bowl.
29
EN
13
Secure the re bowl and lid with safety pins (F) and safety clips (E) as shown in the
drawings.
14
Fix the bottle opener (28) and the legs with screw M5-16 (G).


31
ES
Estimado cliente:
Le felicitamos por la adquisición de este producto. Lea
atentamente las siguientes instrucciones y sígalas para evitar
posibles daños. No asumimos ninguna responsabilidad por los
daños causados por el incumplimiento de las instrucciones y el
uso inadecuado. Escanee el siguiente código QR para obtener
acceso a la última guía del usuario y más información sobre el
producto.
ÍNDICE
Indicaciones de seguridad32
Piezas34
Montaje37
FABRICANTE E IMPORTADOR (REINO UNIDO)
Fabricante:
Chal-Tec GmbH, Wallstraße 16, 10179 Berlín, Alemania.
Importador para Gran Bretaña:
Berlin Brands Group UK Limited
PO Box 42
272 Kensington High Street
London, W8 6ND
United Kingdom

32
ES
INDICACIONES DE SEGURIDAD
ADVERTENCIA
¡Peligro de as xia! No use la barbacoa en un espacio cerrado y/o
habitable. p.e. vivienda, tienda de campaña, caravana, autocaravana,
embarcación. Peligro de envenenamiento mortal por monóxido de
carbono.
• Coloque siempre la barbacoa sobre una super cie resistente al calor, sólida
y plana, a su ciente distancia de vallas, ramas suspendidas y otro material
infl amable.
• La barbacoa siempre debe estar controlada por una persona adulta y capacitada.
• La barbacoa de carbón está pensada únicamente para su uso en el exterior. ¡No
utilizar en locales cerrados!
• ¡No use alcohol o gasolina para encender o avivar el fuego! Utilice únicamente los
combustibles de encendido conformes a la Norma EN 1860-3. Para encender la
barbacoa, nunca utilice bebidas alcohólicas, aceite de para na, alcohol etílico,
gasolina ni solventes similares. Para encender la barbacoa, utilice un encendedor
líquido adecuado y siga las indicaciones del fabricante. No añada ningún otro
encendedor líquido cuando el carbón esté ardiendo.
• La mayoría de las partes metálicas se calentarán mucho. Utilice guantes
protectores para tocar la barbacoa o voltear los alimentos. La barbacoa no debe
moverse durante su funcionamiento.
• Si se cae grasa al carbón, pueden producirse llamas. Tenga a mano un
pulverizador de agua para sofocar esas llamas y evitar que se quemen los
alimentos.
• Cuando nalice la cocción, apague el carbón con una pulverización de niebla
na o cúbralo con arena.
• ¡Esta barbacoa se calentará mucho. no la mueva durante su utilización!
• Asegúrese de que la barbacoa se haya enfriado por completo antes de moverla o
de vaciar las cenizas.
• Prolongue la vida útil de las piezas metálicas no dejando la barbacoa sin proteger
al aire libre. En el caso ideal, la barbacoa debería guardarse en un garaje o
cobertizo de jardín cuando no se utilice.
• Coloque los alimentos solo cuando el carbón esté cubierto con una capa de
cenizas.
• Mantenga a los niños y mascotas alejados del aparato.
33
ES
¡ATENCIÓN!
¡NO UTILICE ALCOHOL O GASOLINA PARA
ENCENDER O REENCENDER!

34
ES
PIEZAS
Núm. Descripción Imagen Pz.
1 Pared lateral
2
2 Pared delantera
1
3 Pared trasera
1
4 Pata A
2
4.1 Pata A 1
3
5 Pata B
2
5.1 Pata B 1
1
6 Marco inferior
1
7 Marco A
1
8 Ruedas
2
9 Eje
1
10 Tablero para carbón
1
11 Bisagra A
2
12 Bisagra B
2
13 Tapa
1

35
ES
Núm. Descripción Imagen Pz.
14 Asa de la tapa
1
15 Arandela A
2
16 Chimenea
1
17 Mango del recipiente de asado
1
18 Arandela B
1
19 Termómetro
1
20 Marco B
1
21 Mesa lateral 2
22 Cajón de ceniza
1
23 Parrilla de calor
1
24 Parrilla de calor
2
25 Mango para regular la altura
1
26 Respiradero
2
27 Masa de bambú
2
28 Abridor
1

36
ES
Piezas pequeñas
Núm. Descripción Imagen Pz.
A Tornillo M6-12
26
B Tuerca M6
19
C Tornillo M6-35
8
D Tornillo M6-55
4
E Pasador
4
F Bulón de enganche
2
G Tornillo M5-16
4
H Arandela H
2

37
ES
MONTAJE
1
Conecta el panel lateral (1), el panel frontal (2) y el panel trasero (3) con los
tornillos M6-12 (A).
2
Montar el respiradero de aire (26) en la pared lateral (1) con el tornillo M6-12 (A)
y la tuerca M6 (B).

38
ES
3
Fije las 2 mesas laterales (21) a la pared lateral (1) con el tornillo M6-12(A) y la
tuerca M6.
4
Primero una la pata A1 (4.1) y la pata B1 (5.1) con la pata B (5). A continuación,
una la pata A1 (4.1) a la pata A (4) y je las 4 patas al recipiente de asado con el
tornillo M6-12 (A).
39
ES
5
Fije las mesas laterales, las patas y el recipiente de asado con un tornillo M6-55 (D)
y una tuerca M6 (B).
6
Monte el marco inferior (6) a las patas con el tornillo M6-12(A). Inserte el eje (9) en
la pata A (4) y asegure las ruedas (8) al eje con los pasadores de sujeción (E).

40
ES
7
Fije la placa de carbón (10) y je el marco A (7) a la pared frontal con el tornillo
M6-12 (A).
8
Monte la bisagra-A (11) en la pared trasera con el tornillo M6-35 (C).
41
ES
9
Monte la bisagra-B (12) en la cubierta (13) con un tornillo M6-35 (C) y una tuerca
M6 (B). Fije el mango de la tapa (14) a la tapa (13) con la arandela-A (15), el
tornillo M6-35 (C) y la tuerca M6 (B).
10
Fije la chimenea (16) a la tapa (13) con el tornillo M6-12 (A) y la tuerca M6 (B).
Luego, coloque el termómetro (19) en la cubierta (13).

42
ES
11
Empuje el asa del recipiente de asado (17) a través de la arandela-B (18) y el
marco (20) y asegúrelo con una tuerca M6 (B). Luego, coloque la manija de ajuste
(25) en el recipiente de asado.
12
Coloque las 2 mesas de bambú (27) en las mesas laterales. Ponga el cajón de
las cenizas (22) en el recipiente de asado. Entonces abre la tapa y coloque las 2
rejillas de la parrilla (23) y la parrilla para calentar (24) en el recipiente de asado.

43
ES
13
Asegure el recipiente de asado y la tapa con pasadores de seguridad (F) y clips de
seguridad (E) como se muestra en los dibujos.
14
Fije el abrebotellas (28) y las patas con el tornillo M5-16 (G).


45
FR
Chère cliente, cher client,
Toutes nos félicitations pour l’acquisition de ce nouvel appareil.
Veuillez lire attentivement et respecter les instructions de ce mode
d’emploi an d’éviter d’éventuels dommages. Nous ne saurions
être tenus pour responsables des dommages dus au non-respect
des consignes et à la mauvaise utilisation de l’appareil. Scannez
le QR-Code pour obtenir la dernière version du mode d‘emploi
et des informations supplémentaires concernant le produit.
SOMMAIRE
Consignes de sécurité46
Pièces détachées48
Assemblage51
FABRICANT ET IMPORTATEUR (UK)
Fabricant :
Chal-Tec GmbH, Wallstraße 16, 10179 Berlin, Allemagne.
Importateur pour la Grande Bretagne :
Berlin Brands Group UK Limited
PO Box 42
272 Kensington High Street
London, W8 6ND
United Kingdom

46
FR
CONSIGNES DE SÉCURITÉ
MISE EN GARDE
Risque d'étouffement ! Ne pas utiliser le barbecue dans un espace
con né et/ou habitable par exemple des maisons, tentes, caravanes,
camping-cars, bateaux. Risque de décès par empoisonnement au
monoxyde de carbone.
• Placez toujours le barbecue sur une surface ferme, plane et résistante à la chaleur,
loin des clôtures, des branches en surplomb et d'autres matériaux infl ammables.
• Le barbecue doit toujours être surveillé par un adulte compétent.
• Le barbecue au charbon est uniquement destiné à une utilisation en extérieur. Ne
pas utiliser dans des locaux fermés !
• Ne pas utiliser d‘alcool ou d‘essence pour allumer ou réactiver le feu ! Utiliser
uniquement des allume-feu conformes à l‘EN 1860-3. N'utilisez jamais d'alcool
dénaturé, d'huile de paraf ne, d'alcool méthylique, d'essence ou de solvants
similaires pour allumer le barbecue. Utilisez un allume feu liquide approprié et
suivez les instructions du fabricant. Arrêtez d'ajouter de l'allume-feu liquide lorsque
le charbon de bois brûle.
• La plupart des pièces métalliques deviennent chaudes. Portez des gants de
protection lorsque vous touchez le barbecue ou retournez les aliments. Le barbecue
ne doit pas être déplacé pendant le fonctionnement.
• Si de la graisse coule sur le charbon de bois, il s'enfl ammera. Préparez un
pulvérisateur d'eau nement réglé pour éteindre de telles fl ammes et empêcher les
aliments de brûler.
• Lorsque la cuisson est terminée, éteignez le charbon avec un jet n ou recouvrez le
charbon de sable.
• Ce barbecue va devenir très chaud. Ne pas le déplacer pendant son utilisation.
• Assurez-vous que le barbecue est complètement froid avant de le déplacer et de
vider les cendres.
• Prolongez la durée de vie des pièces métalliques en ne laissant pas le barbecue
sans protection à l'extérieur. Idéalement, le barbecue doit être rangé dans un
garage ou un abri de jardin lorsqu'il n'est pas utilisé.
• Ne placez pas les grillades tant que le combustible n'est pas recouvert d'une
couche de cendres !
• Tenez les enfants et les animaux domestiques à distance de l'appareil.

47
FR
ATTENTION !
N'UTILISEZ PAS D'ALCOOL OU D'ESSENCE POUR
ALLUMER OU RALLUMER LE FEU !
48
FR
PIÈCES DÉTACHÉES
N° Description Illustration Qté
1 Paroi latérale
2
2 Panneau avant
1
3 Fond
1
4 Pied-A
2
4.1 Be Pied in-A1
3
5 Pied -B
2
5.1 Pied -B1
1
6 Cadre inférieur
1
7 Cadre -A
1
8 Roues
2
9 Axe
1
10 Plaque à charbons de bois
1
11 Charnière A
2
12 Charnière B
2
13 Couvercle
1
49
FR
N° Description Illustration Qté
14 Poignée du couvercle
1
15 Rondelle A
2
16 Conduit de cheminée
1
17 Poignée de brasero
1
18 Rondelle B
1
19 Thermomètre
1
20 Cadre B
1
21 Tablettes latérales 2
22 Tiroir à cendres
1
23 Grille de réchauffage
1
24 Grille de cuisson
2
25 Poignée réglable en hauteur
1
26 Ventilation
2
27 Table en bambou
2
28 Décapsuleur
1

50
FR
Petits éléments
N° Description Illustration Qté
A Vis M6-12
26
B Écrou M6
19
C Vis M6-35
8
D Vis M6-55
4
E Clips de xation
4
F Goupille de sécurité
2
G Vis M5-16
4
H Rondelle H
2

51
FR
ASSEMBLAGE
1
Connectez la paroi latérale (1), la paroi avant (2) et la paroi arrière (3) avec les vis
M6-12 (A).
2
Montez l‘évent (26) avec la vis M6-12 (A) et l‘écrou M6 (B) sur la paroi latérale (1).

52
FR
3
Fixez les 2 tablettes latérales (21) à la paroi latérale (1) avec la vis M6-12 (A) et
l‘écrou M6.
4
Connectez d‘abord le pied A1 (4.1) et le pied B1 (5.1) avec le pied B (5). Ensuite,
connectez le pied A1 (4.1) au pied A (4) et xez les 4 pieds au braséro avec la vis
M6-12 (A).

53
FR
5
Fixez les tables d‘appoint latérales, les pieds et le braséro avec les vis M6-55 (D) et
les écrous M6 (B).
6
Montez le cadre inférieur (6) sur les pieds avec la vis M6-12 (A). Insérez l‘axe (9)
dans la jambe-A (4) puis xez les roues (8) à l‘axe avec les clips de verrouillage (E).

54
FR
7
Fixez la plaque à charbon (10) et xez le cadre-A (7) à la paroi avant avec la vis
M6-12 (A).
8
Montez la charnière-A (11) avec la vis M6-35 (C) sur le fond (paroi arrière).

55
FR
9
Montez la charnière B (12) avec la vis M6-35 (C) et l‘écrou M6 (B) sur le couvercle
(13). Fixez la poignée du couvercle (14) avec la rondelle A (15), la vis M6-35 (C) et
l‘écrou M6 (B) sur le couvercle (13).
10
Fixez la cheminée (16) au couvercle (13) avec la vis M6-12 (A) et l‘écrou M6 (B).
Fixez ensuite le thermomètre (19) au couvercle (13).
56
FR
11
Faites glisser la poignée du foyer (17) à travers la rondelle B (18) et le cadre (20) et
xez-la avec un écrou M6 (B). Ensuite, xez la poignée de réglage (25) au braséro.
12
Placez 2 tablettes en Bambou (27) sur les tables d‘appoint. Placez le tiroir à cendres
(22) dans le braséro. Ensuite, ouvrez le couvercle et placez les 2 grilles de cuisson
(23) et la grille chauffante (24) dans le braséro.

57
FR
13
Fixez le braséro et le couvercle avec des goupilles de verrouillage (F) et des clips (E)
comme indiqué sur les dessins.
14
Fixez le décapsuleur (28) et les pieds avec la vis M5-16 (G).


59
IT
Gentile cliente,
La ringraziamo per aver acquistato il dispositivo. La preghiamo
di leggere attentamente le seguenti istruzioni per l’uso e di
seguirle per evitare possibili danni. Non ci assumiamo alcuna
responsabilità per danni scaturiti da una mancata osservazione
delle avvertenze di sicurezza e da un uso improprio del
dispositivo. Scansionare il codice QR seguente, per accedere
al manuale d’uso più attuale e per ricevere informazioni sul
prodotto.
INDICE
Avvertenze di sicurezza60
Singoli componenti62
Assemblaggio65
PRODUTTORE E IMPORTATORE (UK)
Produttore:
Chal-Tec GmbH, Wallstraße 16, 10179 Berlino, Germania.
Importatore per la Gran Bretagna:
Berlin Brands Group UK Limited
PO Box 42
272 Kensington High Street
London, W8 6ND
United Kingdom

60
IT
AVVERTENZE DI SICUREZZA
AVVERTIMENTO
Pericolo di soffocamento! Non utilizzare il barbecue in uno spazio
con nato e/o abitabile, per esempio in case, tende, caravan, case
mobili, barche. Pericolo di morte per avvelenamento da monossido di
carbonio.
• Posizionare sempre la griglia su una super cie stabile, piana e resistente al calore,
a distanza suf ciente da recinti, rami e altri materiali in ammabili.
• La griglia deve essere sempre tenuta sotto controllo da una persona adulta e in
grado di utilizzarla in sicurezza.
• La griglia a carbonella può essere utilizzata solo all'aperto. Non utilizzarlo in
ambienti chiusi!
• Non usare alcol o benzina per accendere o ravvivare la amma! Utilizzare solo
gli accenditori conformi alla norma EN 1860-3! Non utilizzare assolutamente
spirito, olio di paraf na, metanolo, benzina o solventi simili per accendere la
griglia. Utilizzare un liquido accendifuoco adatto e rispettare le indicazioni
d'uso del produttore. Quando la carbonella arde, non aggiungere altro liquido
accendifuoco.
• La maggior parte dei componenti metallici diventa bollente. Indossare guanti
protettivi quando si tocca la griglia o si girano le pietanze. La griglia non può
essere spostata durante l'uso.
• Quando il grasso gocciola sulle braci possono formarsi amme. Tenere un
nebulizzatore con dell'acqua a portata di mano per estinguere tali amme ed
evitare di bruciare gli alimenti.
• Al termine della cottura, spegnere le braci con il nebulizzatore o coprirle con della
sabbia.
• Questo barbecue diventerà molto caldo, non movimentarlo durante il
funzionamento.
• Assicurarsi che la griglia si sia completamente raffreddata prima di spostarla o
rimuovere la cenere.
• Per permettere ai componenti metallici di durare a lungo, non lasciare la griglia
all'aperto senza protezione. Si consiglia di conservare la griglia in garage o
capanni quando non viene utilizzata.
• Poggiare gli alimenti da grigliare solo quando la carbonella è coperta da uno
strato di cenere!
• Tenere bambini e animali domestici lontano dal dispositivo.

61
IT
ATTENZIONE!
NON UTILIZZARE ALCOOL O BENZINA PER
ACCENDERE O RAVVIVARE IL FUOCO!

62
IT
SINGOLI COMPONENTI
N° Nome Immagine Qtà.
1 Parete laterale
2
2 Parete anteriore
1
3 Parete posteriore
1
4 Gamba A
2
4.1 Gamba A1
3
5 Gamba B
2
5.1 Gamba B1
1
6 Telaio inferiore
1
7 Telaio A
1
8 Ruote
2
9 Asse
1
10 Pannello per carbonella
1
11 Cerniera A
2
12 Cerniera B
2
13 Deckel
1

63
IT
N° Nome Immagine Qtà.
14 Impugnatura coperchio
1
15 Rondella A
2
16 Canna fumaria
1
17 Impugnatura braciere
1
18 Rondella B
1
19 Termometro
1
20 Telaio B
1
21 Tavolini laterali 2
22 Cassetto per la cenere
1
23 Grill per mantenimento calore
1
24 Griglia di cottura
2
25 Impugnatura regolabile in altezza
1
26 Sportello di ventilazione
2
27 Tavolo di bambù
2
28 Apribottiglie
1

64
IT
Piccoli componenti
N° Nome Immagine Qtà.
A Vite M6-12
26
B Dado M6
19
C Vite M6-35
8
D Vite M6-55
4
E Clip di ssaggio
4
F Perni di ssaggio
2
G Vite M5-16
4
H Rondella H
2

65
IT
ASSEMBLAGGIO
1
Collegare le pareti laterale (1), anteriore (2) e posteriore (3) con le viti M6-12 (A).
2
Montare lo sportello di ventilazione (26) con le viti M6-12 (A) e i dadi M6 (B) alla
parete laterale (1).

66
IT
3
Fissare i 2 tavolini laterali (21) con le viti M6-12 (A) e dadi M6 alla parete laterale
(1).
4
Collegare prima la gamba A1 (4.1) e poi la gamba B1 (5.1) con la gamba B (5).
Collegare poi la gamba A1 (4.1) con la gamba A (4) e ssare le 4 gambe con le
viti M6-12 (A) al braciere.

67
IT
5
Fissare i 2 tavolini laterali, le gambe e il braciere con le viti M6-55 (D) e dadi M6
(B).
6
Montare il telaio inferiore (6) con le viti M6-12 (A) alle gambe. Inserire l’asse (9)
nella gamba A (4) e ssare le ruote (8) all’asse con le clip (E).

68
IT
7
Fissare il pannello per la carbonella (10) e ssare il telaio A (7) alla parete anteriore
con le viti M6-12.
8
Montare la cerniera A (11) alla parete posteriore con le viti M6-35 (C).

69
IT
9
Montare la cerniera B (12) al coperchio (13) con le viti M6-35 (C) e dadi M6 (B).
Fissare l’impugnatura del coperchio (14) al coperchio (13) con le rondelle A (15),
viti M6-35 (C) e dadi M6 (B).
10
Fissare la canna fumaria (16) al coperchio (13) con viti M6-12 (A) e dadi M6 (B).
Fissare poi il termometro (19) al coperchio (13).
70
IT
11
Inserire l’impugnatura del braciere (17) attraverso la rondella B (18) e il telaio (20)
e ssarla con un dado M6 (B). Fissare poi l’impugnatura di regolazione (25) al
braciere.
12
Posizionare i 2 tavolini di bambù (27) sopra ai tavolini laterali. Inserire il cassetto
della cenere (22) nel braciere. Aprire il coperchio e inserire le 2 griglia di cottura
(23) e il grill di mantenimento calore (24) nel braciere.

71
IT
13
Fissare il braciere e il coperchio con i perni di ssaggio (F) e le clip (E), come
mostrato in immagine.
14
Fissare l’apribottiglie (28) e le gambe con le viti M5-16 (G).