© 2014 ZOOM CORPORATION
Reproduction or reprinting of this manual in whole or in part
by any means without permission is prohibited.
Operation Manual
Safety and usage precautions
02
Safety and usage precautions
SAFETY PRECAUTIONS
In this operation manual, symbols are used
to highlight warnings and cautions that you
must read to prevent accidents. The mean-
ings of these symbols are as follows.
Warning
Something that could cause serious
injury or death
Caution
Something that could cause injury
or damage to the equipment
Other symbols used
An action that is mandatory
An action that is prohibited
Warnings
Operation using an AC adapter
Use only a ZOOM AD-17 AC adapter
with this unit.
Do not do anything that could exceed
the ratings of outlets and other electrical
wiring equipment. Do not use with pow-
er other than AC 100V.
Before using the equipment in a foreign
country or other region with a power
voltage other than AC100V, always con-
sult with a shop that carries ZOOM prod-
ucts and use the appropriate AC adapter.
Operation using batteries
Use 2 ordinary 1.5-volt AA batteries (alka-
line or nickel-metal hydride).
Read battery warning labels carefully.
Always close the battery compartment
cover when using the unit.
Alterations
Do not open the case or modify the
product.
Precautions
Product handling
Do not drop, bump or apply excessive
force to the unit.
Be careful not to allow foreign objects or
liquids to enter the unit.
Operating environment
Do not use in extremely high or low
temperatures.
Do not use near heaters, stoves and oth-
er heat sources.
Do not use in ver y high humidity or
where it could be splashed by water.
Do not use in places with frequent
vibrations.
Do not use in places with much dust or
sand.
AC adapter handling
When disconnecting the power plug
from an outlet, always hold the plug
when pulling.
Disconnect the power plug from the out-
let during lightning storms and when not
using the unit for a long time.
Battery handling
Install the batteries with the correct
+/− orientation.
Use a specified battery type. Do not mix
new and old batteries or different brands
or types at the same time.
When not using the unit for an extended
period of time, remove the batteries.
If a battery leak should occur, wipe the
battery compartment and the battery
terminals carefully to remove all residue.
Mics
Before connecting a mic, always turn the
power off. Do not use excessive force
when connecting it.
Connection cables and input/output jacks
Always turn the power OFF for all equip-
ment before connecting any cables.
Always disconnect all connection cables
and the AC adapter before moving the
unit.
Volume
Do not use at a loud volume for a long
time.
Usage Precautions
Interference with other electrical equipment
In consideration of safety, the has
been designed to minimize its emission of
electromagnetic waves and to suppress
interference from external electromagnetic
waves. However, equipment that is very
susceptible to interference or that emits
powerful electromagnetic waves could result
in interference if placed nearby. If this occurs,
place the
and the other device farther
apart.
With any type of electronic device that uses
digital control, including the
, electro-
magnetic interference could cause malfunc-
tion, corrupt or destroy data and result in oth-
er unexpected trouble. Always use caution.
Cleaning
Use a soft cloth to clean the exterior of the
unit if it becomes dirty. If necessary, use a
damp cloth that has been wrung out well.
Never use abrasive cleansers, wax or sol-
vents such as alcohol, benzene or paint
thinner.
Breakdown and malfunction
If the unit becomes broken or malfunctions,
immediately disconnect the AC adapter,
turn the power OFF and disconnect other
cables. Contact the store where you bought
the unit or ZOOM service with the following
information: product model, serial number
and the specific breakdown or malfunction
symptoms, along with your name, address
and telephone number.
Copyrights
Windows®, Windows® 8, Windows® 7
and Windows Vista® are trademarks or regis-
tered trademarks of Microsoft Corporation.
Macintosh, Mac OS and iPad are trade-
marks or registered trademarks of Apple Inc.
The SD and SDHC logos are trademarks.
The use of MPEG Layer-3 audio compres-
sion technology is licensed from Fraunhofer
IIS and Sisvel SpA.
All other product names, trademarks and
company names in this document are the
property of their respective owners.
Note: All trademarks and registered trade-
marks in this document are for identification
purposes only and are not intended to in-
fringe on the copyrights of their respective
owners.
Recording for any purpose other than person-
al use from copyrighted sources, including
CDs, records, tapes, live performances, video
works and broadcasts, without permission of
the copyright holder is prohibited by law.
Zoom Corporation will not assume any
responsibility related to infringements of
copyrights.
Introduction
03
H5 Handy Recorder
Introduction
Thank you very much for purchasing a ZOOM Handy
Recorder. The has the following features.
Stereo mics can be changed according to use
An XY mic that can record sound images with depth is
included. You can switch mics according to the situation as
you would switch lenses on an SLR camera.
Record up to 4 tracks at once
In addition to the swappable stereo mic (L/R inputs), the
main unit has 2 XLR/TRS inputs (Inputs 1/2).
Use these to simultaneously record a maximum of 4 tracks,
including ambiance, narration, an overall sound image and
the voices of multiple performers, for example.
Advanced recording features
•
The XY mic uses a shock mount structure to minimize
external vibration noise. In addition, it can handle sound
pressure input of up to 140 dBSPL, allowing it to capture
sounds that previous recorders could not handle. With
this capability, it can make stereo recordings with excel-
lent separation.
•
Using the L/R inputs, you can simultaneously record a
backup file with a recording level that is 12 dB less than
the regular recording. You can use this backup recording
if an unexpected loud noise should cause the regular
recording to distort, for example.
•
All input volume (gain) levels can be adjusted quickly by
hand using dedicated knobs.
Useful operation features
•
SDHC cards (up to 32GB) can be used as recording
media.
•
In addition to the standard headphones output, a line
output jack is built-in. This allows you to send the audio
signal to a video camera or other device while monitor-
ing with headphones.
•
When connected by USB, in addition to use as a card
reader or conventional 2 IN/2 OUT audio interface, it can
also be used as a 4 IN/2 OUT interface (driver required
for Windows).
•
Of course, a tuner, a metronome and playback speed
and pitch adjustment functions are included among the
useful features shared with other H series recorders. A
remote control (wired) is also available.
Please read this manual carefully to fully understand the
functions of the
so that you can make the most of it
for many years.
After reading this manual, please keep it with the warranty
in a safe place.
04
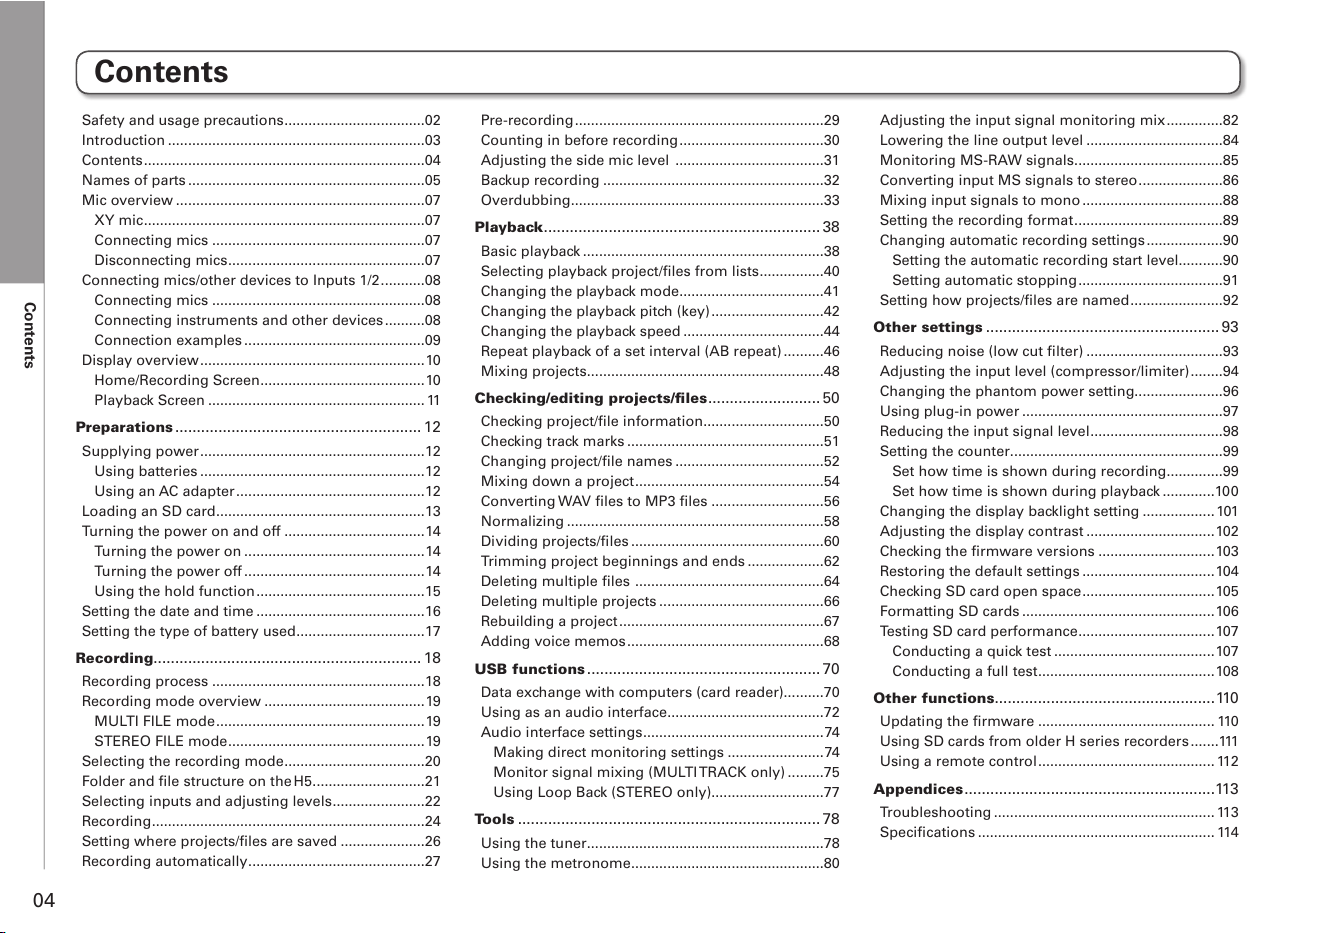
Contents
Contents
Safety and usage precautions ...................................02
Introduction
................................................................03
Contents
......................................................................04
Names of parts
...........................................................05
Mic overview
..............................................................07
XY mic
......................................................................07
Connecting mics
.....................................................07
Disconnecting mics
.................................................07
Connecting mics/other devices to Inputs 1/2
...........08
Connecting mics
.....................................................08
Connecting instruments and other devices
..........08
Connection examples
.............................................09
Display overview
........................................................10
Home/Recording Screen
.........................................10
Playback Screen
...................................................... 11
Preparations
......................................................... 12
Supplying power ........................................................12
Using batteries
........................................................12
Using an AC adapter
...............................................12
Loading an SD card
....................................................13
Turning the power on and off
...................................14
Turning the power on
.............................................14
Turning the power off
.............................................14
Using the hold function
..........................................15
Setting the date and time
..........................................16
Setting the type of battery used
................................17
Recording
..............................................................18
Recording process .....................................................18
Recording mode overview
........................................19
MULTI FILE mode
....................................................19
STEREO FILE mode
.................................................19
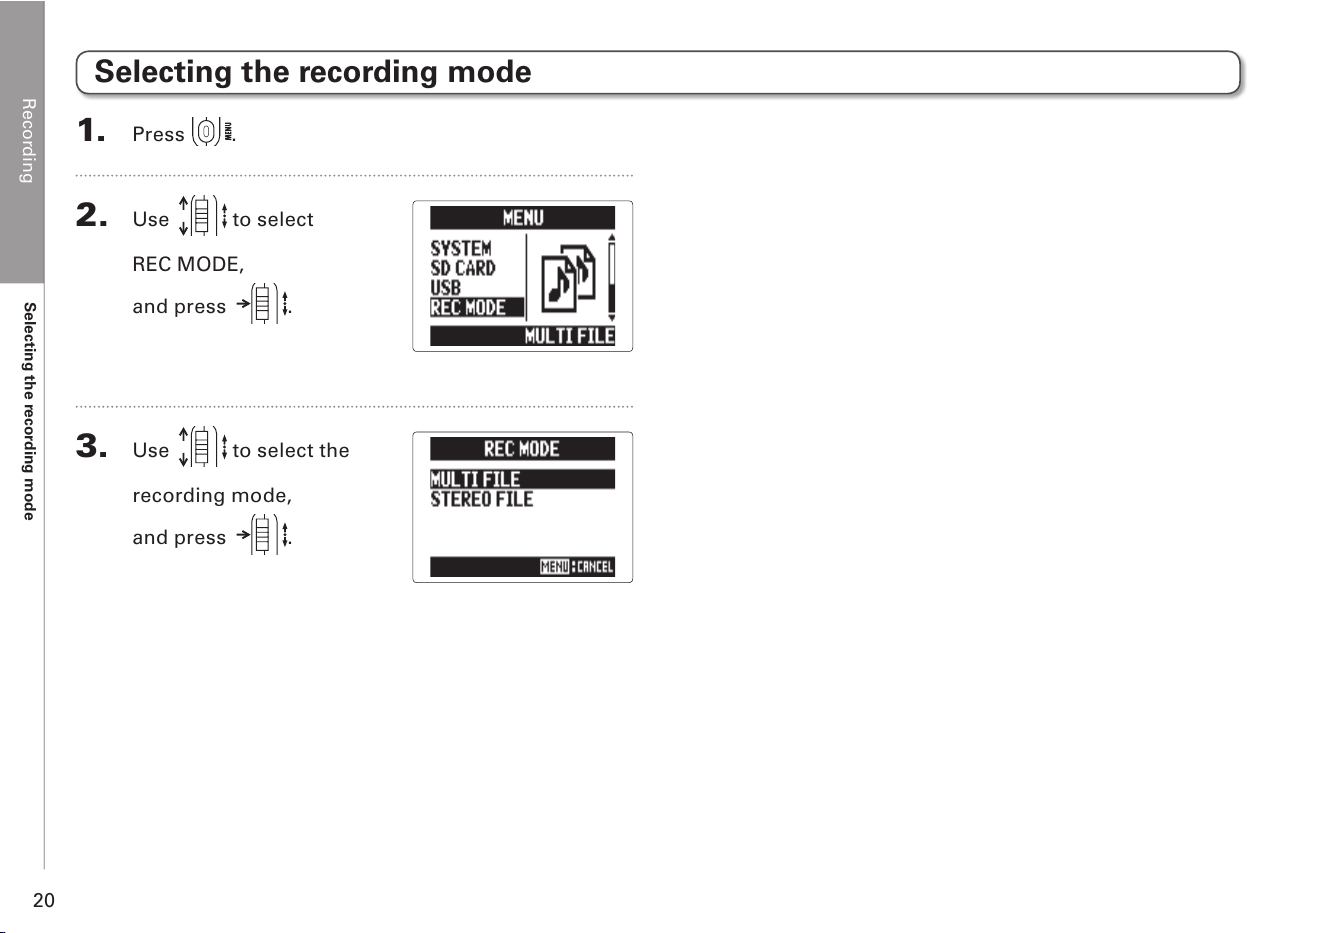
Selecting the recording mode
...................................20
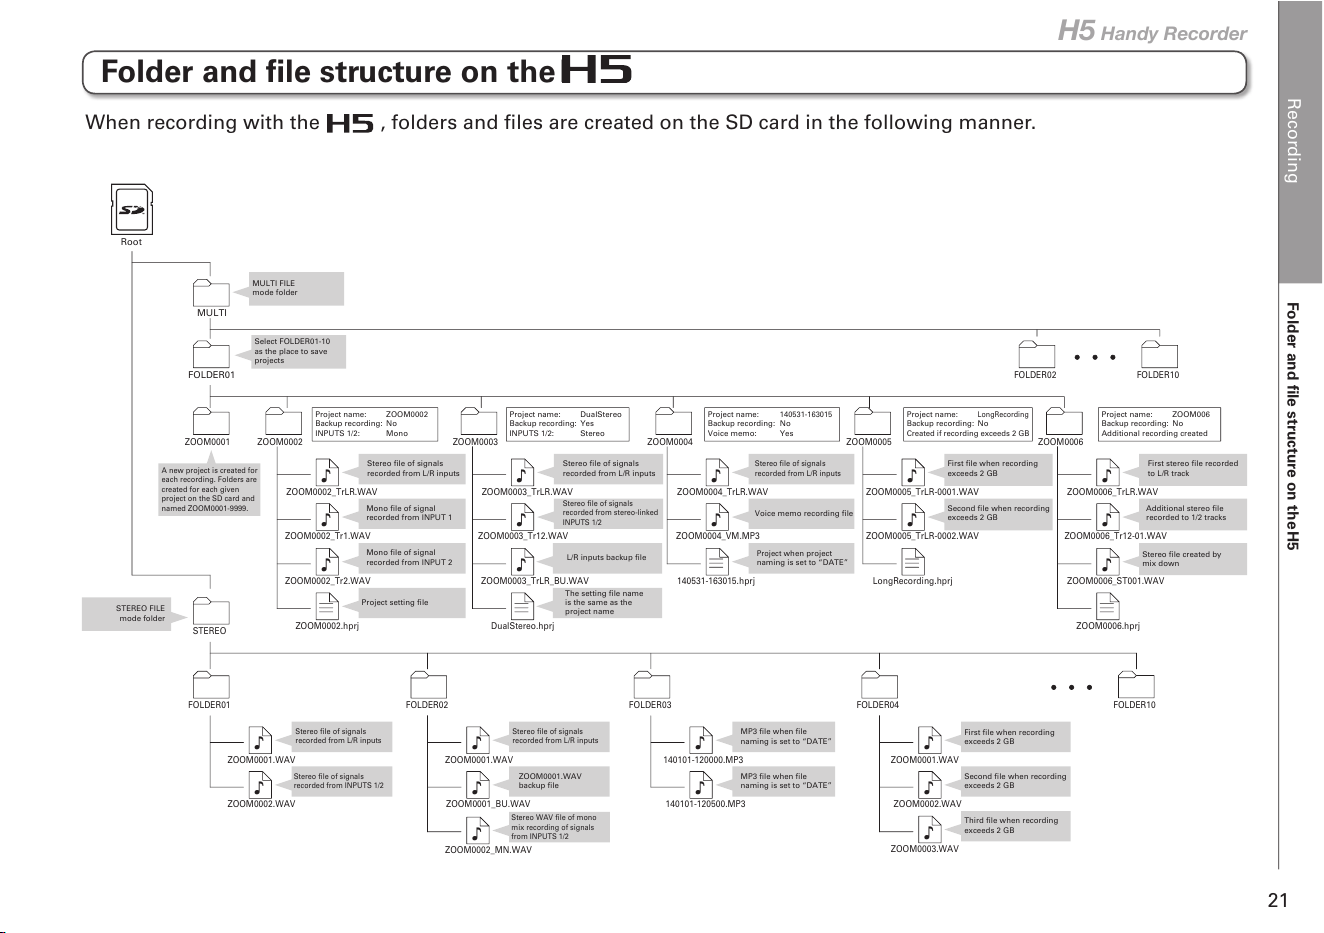
Folder and file structure on the H5 ............................21
Selecting inputs and adjusting levels
.......................22
Recording
....................................................................24
Setting where projects/files are saved
.....................26
Recording automatically
............................................27
Pre-recording
..............................................................29
Counting in before recording
....................................30
Adjusting the side mic level
.....................................31
Backup recording
.......................................................32
Overdubbing
...............................................................33
Playback
................................................................ 38
Basic playback ............................................................38
Selecting playback project/files from lists
................40
Changing the playback mode
....................................41
Changing the playback pitch (key)
............................42
Changing the playback speed
...................................44
Repeat playback of a set interval (AB repeat)
..........46
Mixing projects
...........................................................48
Checking/editing projects/files
.......................... 50
Checking project/file information ..............................50
Checking track marks
.................................................51
Changing project/file names
.....................................52
Mixing down a project
...............................................54
Converting WAV files to MP3 files
............................56
Normalizing
................................................................58
Dividing projects/files
................................................60
Trimming project beginnings and ends
...................62
Deleting multiple files
...............................................64
Deleting multiple projects
.........................................66
Rebuilding a project
...................................................67
Adding voice memos
.................................................68
USB functions
...................................................... 70
Data exchange with computers (card reader)..........70
Using as an audio interface
.......................................72
Audio interface settings
.............................................74
Making direct monitoring settings
........................74
Monitor signal mixing (MULTI TRACK only)
.........75
Using Loop Back (STEREO only)
............................77
Tools
...................................................................... 78
Using the tuner ...........................................................78
Using the metronome
................................................80
Adjusting the input signal monitoring mix
..............82
Lowering the line output level
..................................84
Monitoring MS-RAW signals
.....................................85
Converting input MS signals to stereo
.....................86
Mixing input signals to mono
...................................88
Setting the recording format
.....................................89
Changing automatic recording settings
...................90
Setting the automatic recording start level...........90
Setting automatic stopping
....................................91
Setting how projects/files are named
.......................92
Other settings
...................................................... 93
Reducing noise (low cut filter) ..................................93
Adjusting the input level (compressor/limiter)
........94
Changing the phantom power setting......................96
Using plug-in power
..................................................97
Reducing the input signal level
.................................98
Setting the counter
.....................................................99
Set how time is shown during recording
..............99
Set how time is shown during playback
.............10 0
Changing the display backlight setting
.................. 101
Adjusting the display contrast
................................102
Checking the firmware versions
.............................103
Restoring the default settings
.................................104
Checking SD card open space
.................................105
Formatting SD cards
................................................106
Testing SD card performance
..................................107
Conducting a quick test
........................................107
Conducting a full test
............................................108
Other functions
...................................................110
Updating the firmware ............................................ 110
Using SD cards from older H series recorders
.......111
Using a remote control
............................................ 11 2
Appendices
..........................................................11 3
Troubleshooting ....................................................... 113
Specifications
........................................................... 11 4
Names of parts
05
H5 Handy Recorder
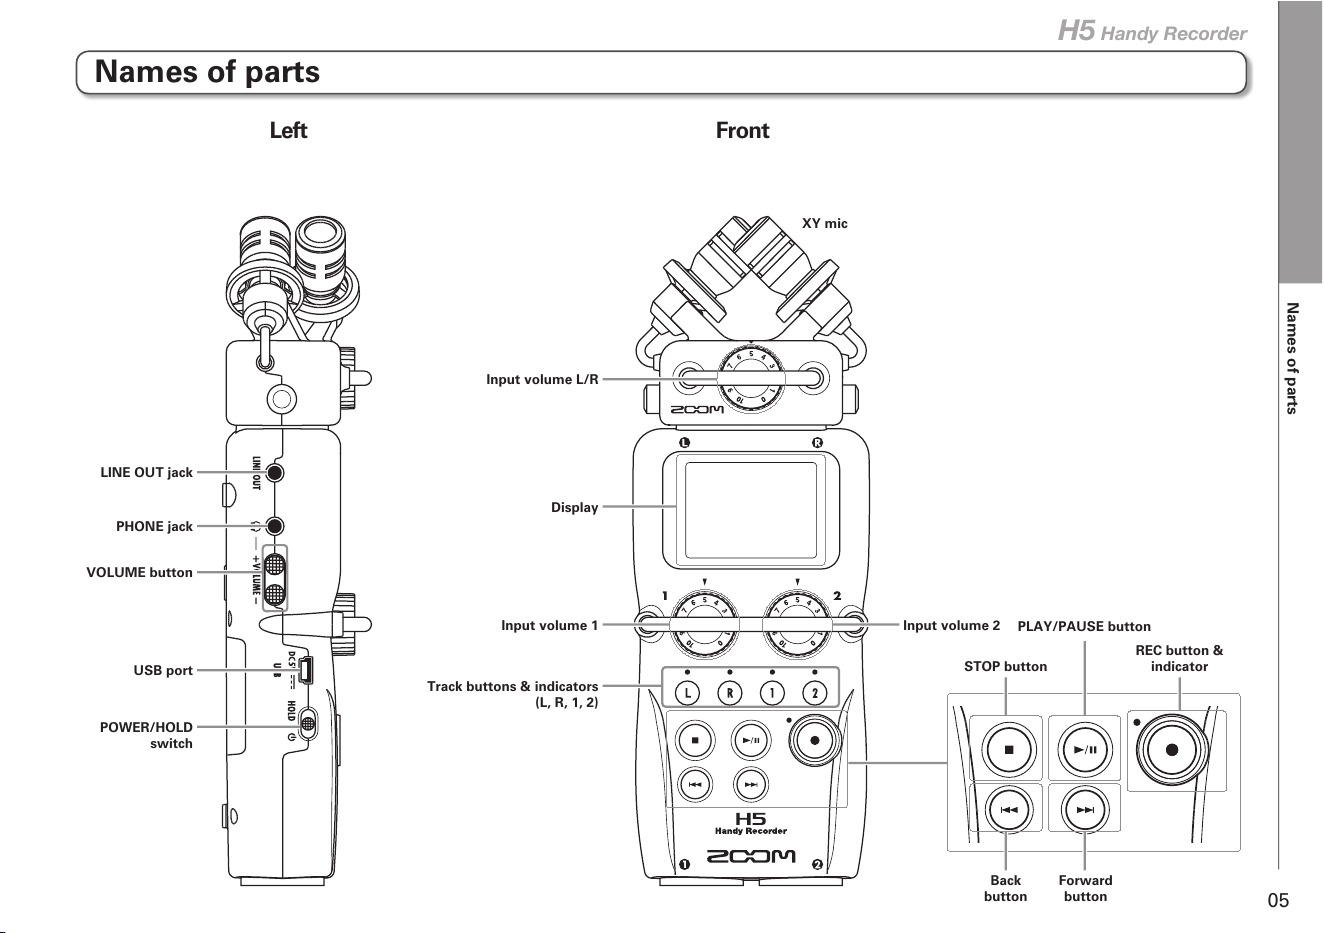
Names of parts
Left Front
Input volume L/R
Input volume 1
VOLUME button
PHONE jack
LINE OUT jack
POWER/HOLD
switch
USB port
Track buttons & indicators
(L, R, 1, 2)
Input volume 2
XY mic
STOP button
Display
PLAY/PAUSE button
Back
button
Forward
button
REC button &
indicator
Names of parts
06
12
3
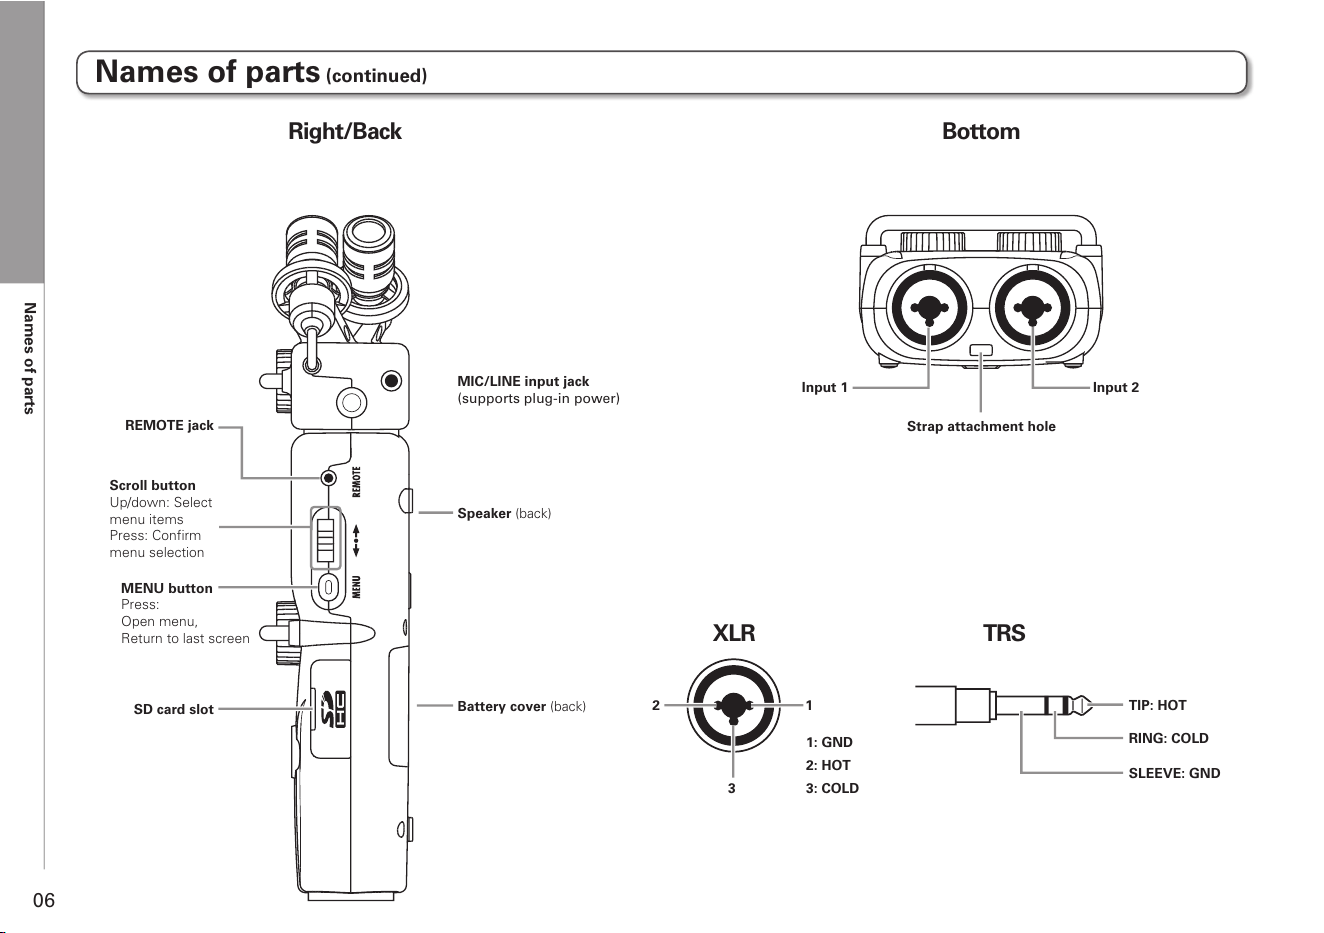
Right/Back Bottom
XLR TRS
MIC/LINE input jack
(supports plug-in power)
Battery cover (back)
Speaker (back)
Scroll button
Up/down: Select
menu items
Press: Confirm
menu selection
MENU button
Press:
Open menu,
Return to last screen
SD card slot
REMOTE jack
1: GND
2: HOT
3: COLD
TIP: HOT
RING: COLD
SLEEVE: GND
Input 1
Strap attachment hole
Input 2
Names of parts (continued)
Mic overview
07
H5 Handy Recorder
Mic overview
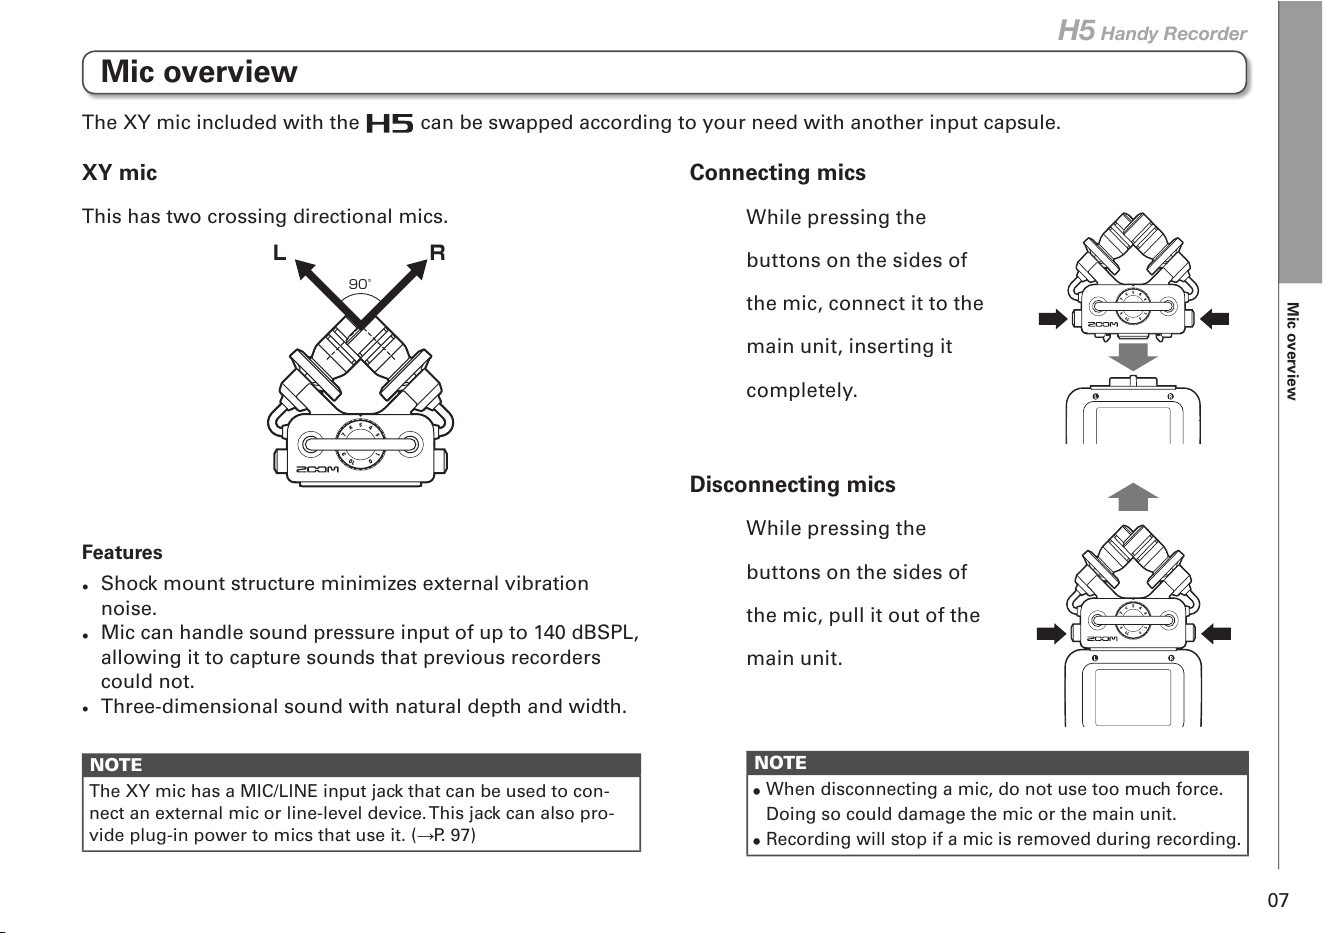
This has two crossing directional mics.
L R
90°
Features
•
Shock mount structure minimizes external vibration
noise.
•
Mic can handle sound pressure input of up to 140 dBSPL,
allowing it to capture sounds that previous recorders
could not.
•
Three-dimensional sound with natural depth and width.
NOTE
The XY mic has a MIC/LINE input jack that can be used to con-
nect an external mic or line-level device. This jack can also pro-
vide plug-in power to mics that use it. (P. 97)
Connecting mics
While pressing the
buttons on the sides of
the mic, connect it to the
main unit, inserting it
completely.
Disconnecting mics
While pressing the
buttons on the sides of
the mic, pull it out of the
main unit.
NOTE
•
When disconnecting a mic, do not use too much force.
Doing so could damage the mic or the main unit.
•
Recording will stop if a mic is removed during recording.
The XY mic included with the can be swapped according to your need with another input capsule.
XY mic
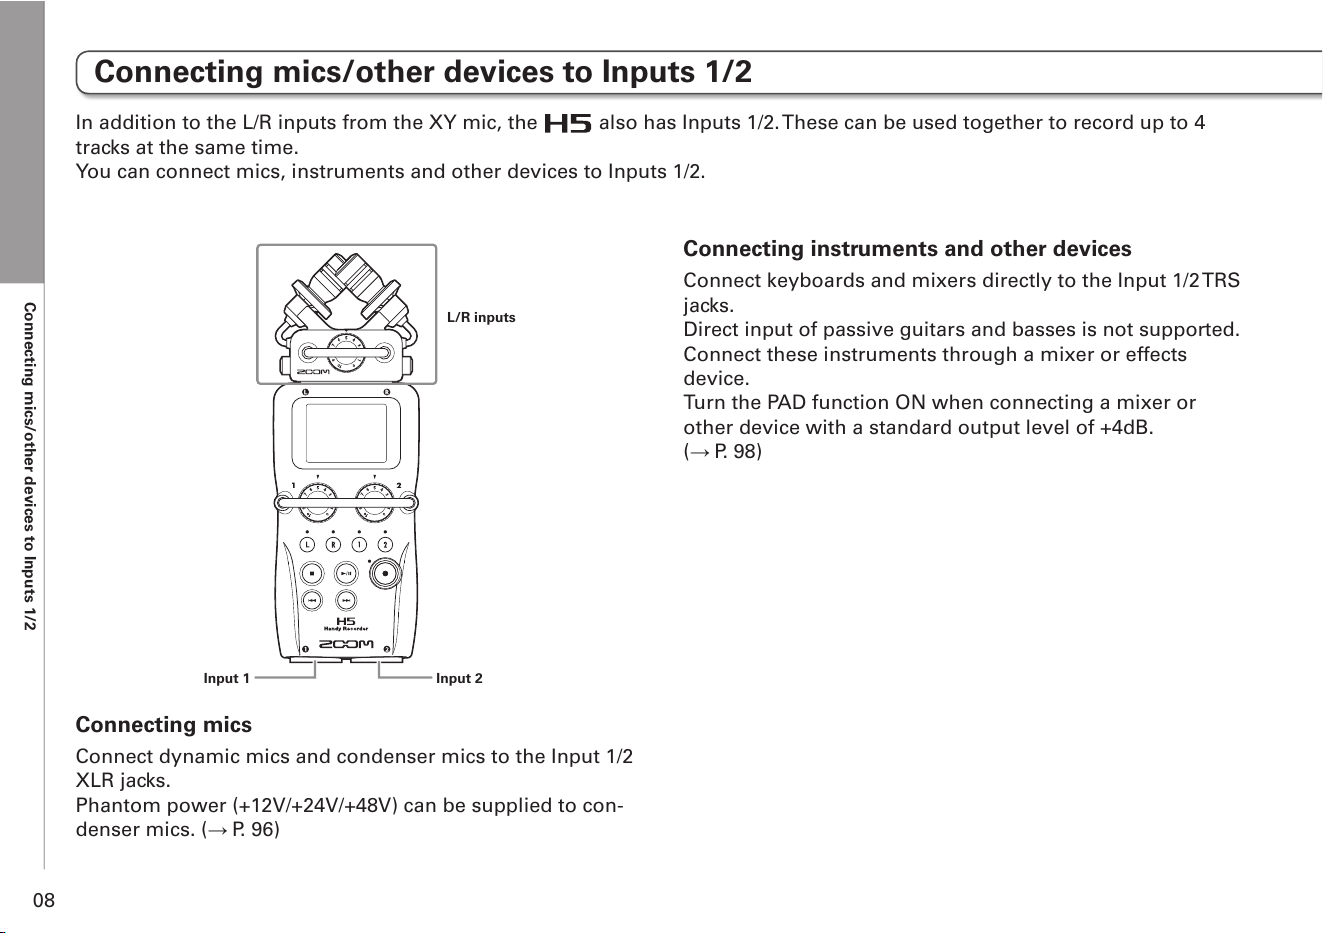
Connecting mics/other devices to Inputs 1/2
08
Connecting mics/other devices to Inputs 1/2
Connecting mics
Connect dynamic mics and condenser mics to the Input 1/2
XLR jacks.
Phantom power (+12V/+24V/+48V) can be supplied to con-
denser mics. ( P. 96)
Connecting instruments and other devices
Connect keyboards and mixers directly to the Input 1/2 TRS
jacks.
Direct input of passive guitars and basses is not supported.
Connect these instruments through a mixer or effects
device.
Turn the PAD function ON when connecting a mixer or
other device with a standard output level of +4dB.
( P. 98)
Input 1 Input 2
L/R inputs
In addition to the L/R inputs from the XY mic, the also has Inputs 1/2. These can be used together to record up to 4
tracks at the same time.
You can connect mics, instruments and other devices to Inputs 1/2.
Connecting mics/other devices to Inputs 1/2
09
H5 Handy Recorder
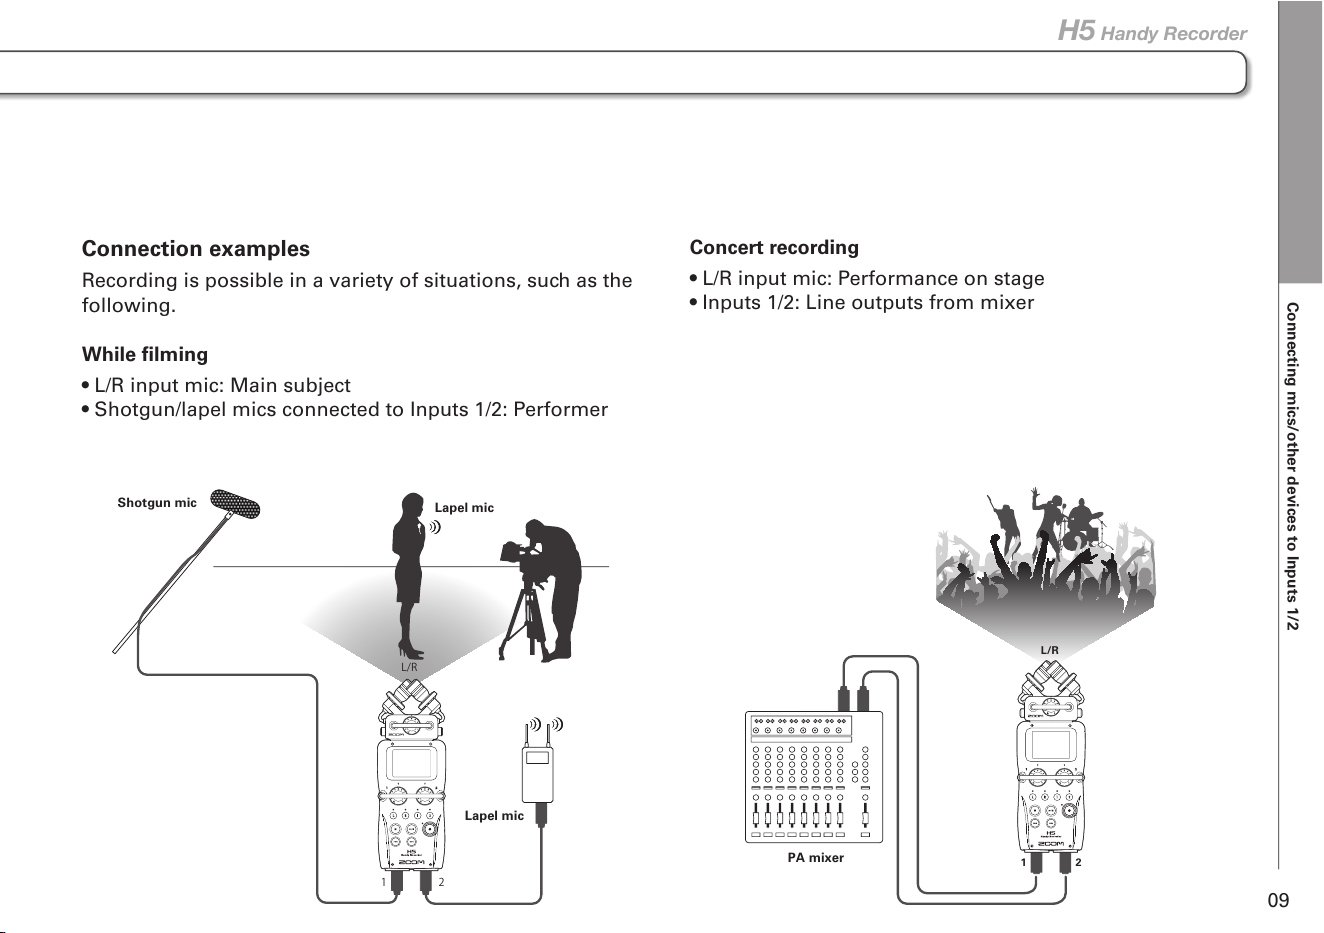
Connection examples
Recording is possible in a variety of situations, such as the
following.
While filming
• L/R input mic: Main subject
• Shotgun/lapel mics connected to Inputs 1/2: Performer
Lapel mic
Shotgun mic
Lapel mic
L/R
12
Concert recording
• L/R input mic: Performance on stage
• Inputs 1/2: Line outputs from mixer
PA mixer
L/R
12
Display overview
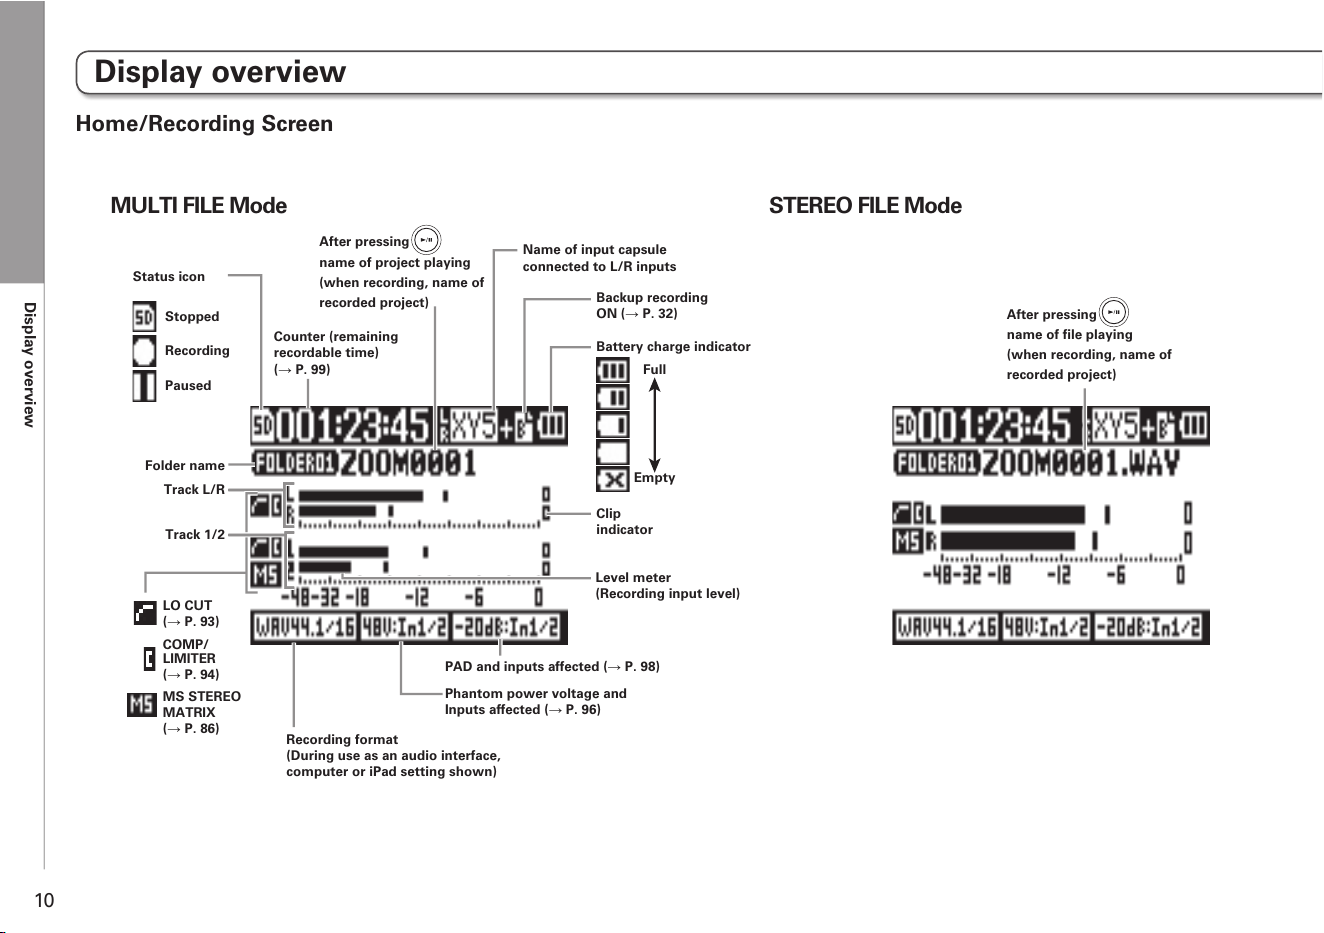
10
Display overview
Home/Recording Screen
MULTI FILE Mode STEREO FILE Mode
PAD and inputs affected ( P. 98)
Phantom power voltage and
Inputs affected ( P. 96)
Folder name
Track L/R
Recording format
(During use as an audio interface,
computer or iPad setting shown)
Stopped
Status icon
Recording
LO CUT
( P. 93)
MS STEREO
MATRIX
( P. 86)
COMP/
LIMITER
( P. 94)
Counter (remaining
recordable time)
( P. 99)
Battery charge indicator
Clip
indicator
Name of input capsule
connected to L/R inputs
Paused
Level meter
(Recording input level)
Backup recording
ON ( P. 32)
Track 1/2
After pressing
name of project playing
(when recording, name of
recorded project)
Full
Empty
After pressing
name of file playing
(when recording, name of
recorded project)
Display overview
11
H5 Handy Recorder
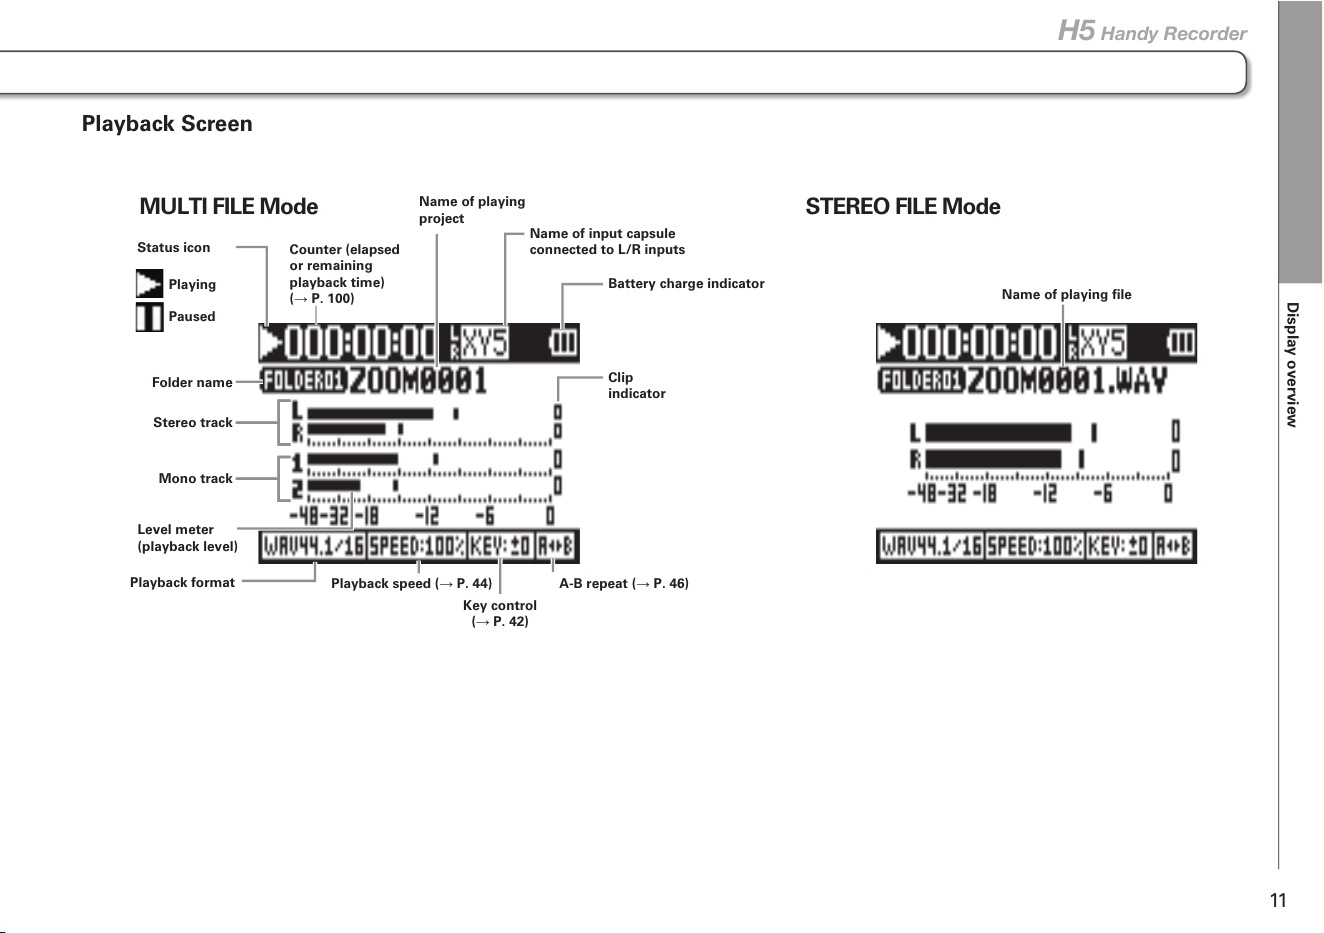
Playback Screen
MULTI FILE Mode STEREO FILE Mode
Key control
(
P. 42)
A-B repeat ( P. 46)Playback speed ( P. 44)
Folder name
Stereo track
Playback format
Level meter
(playback level)
Status icon
Counter (elapsed
or remaining
playback time)
( P. 100)
Name of playing
project
Name of playing file
Mono track
Playing
Paused
Clip
indicator
Battery charge indicator
Name of input capsule
connected to L/R inputs
Preparations
Supplying power
12
Supplying power
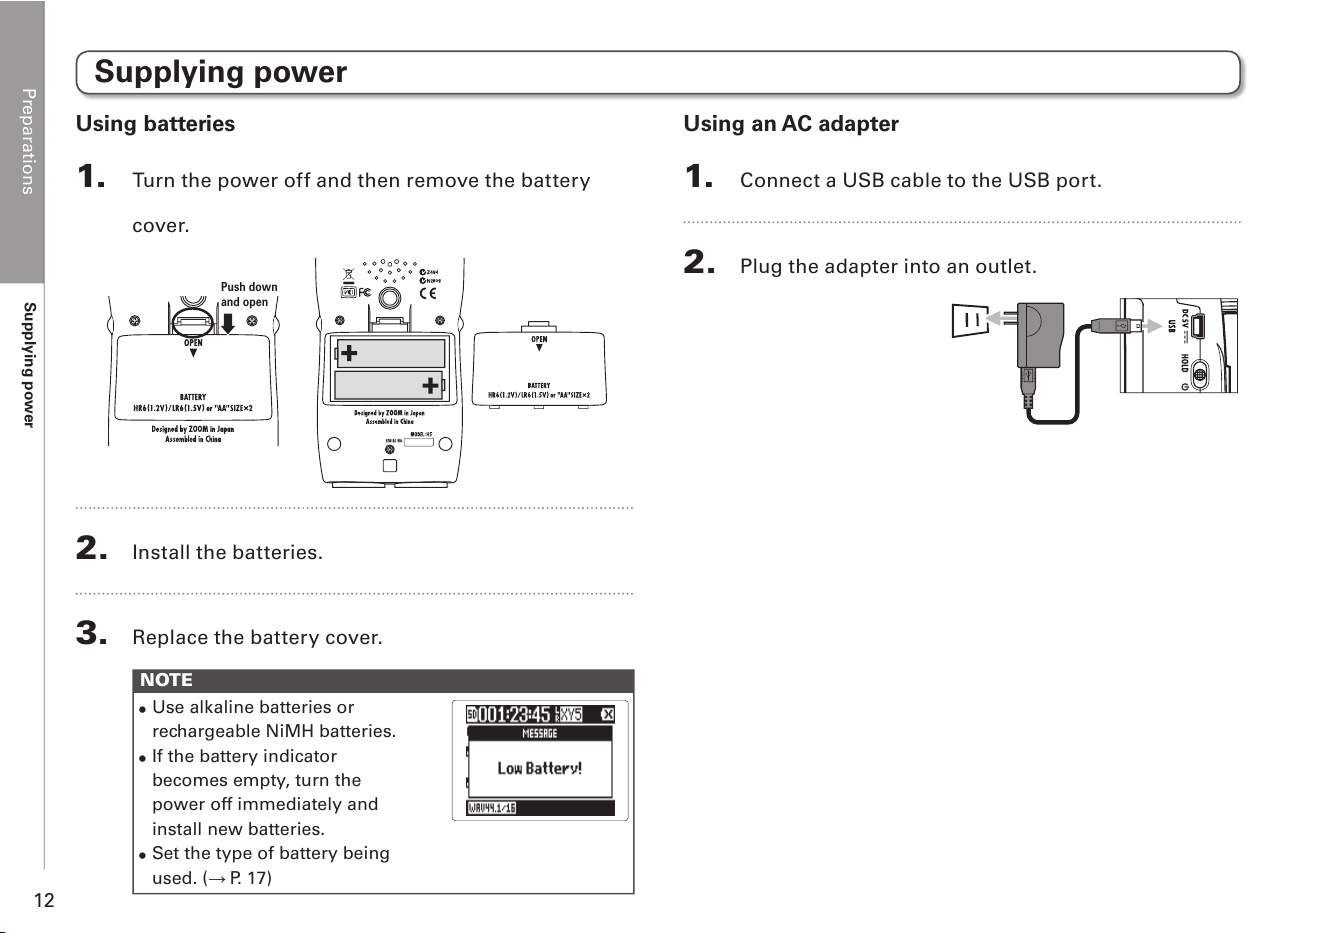
Using batteries
1. Turn the power off and then remove the battery
cover.
Push down
and open
2. Install the batteries.
3. Replace the battery cover.
NOTE
•
Use alkaline batteries or
rechargeable NiMH batteries.
•
If the battery indicator
becomes empty, turn the
power off immediately and
install new batteries.
•
Set the type of battery being
used. ( P. 17)
Using an AC adapter
1. Connect a USB cable to the USB port.
2. Plug the adapter into an outlet.
Preparations
Loading an SD card
13
H5 Handy Recorder
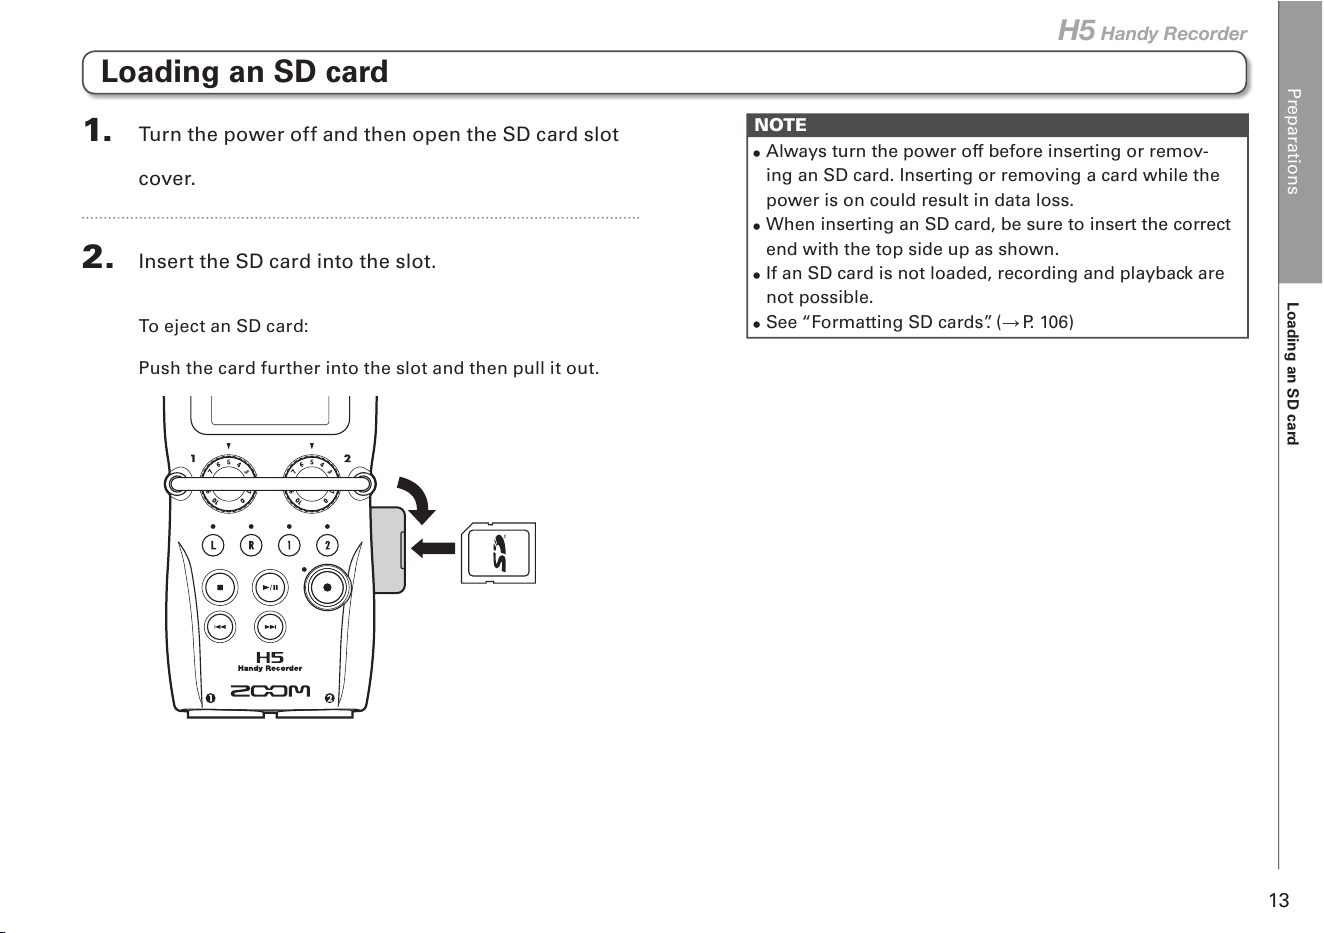
1. Turn the power off and then open the SD card slot
cover.
2. Insert the SD card into the slot.
To eject an SD card:
Push the card further into the slot and then pull it out.
Loading an SD card
NOTE
•
Always turn the power off before inserting or remov-
ing an SD card. Inserting or removing a card while the
power is on could result in data loss.
•
When inserting an SD card, be sure to insert the correct
end with the top side up as shown.
•
If an SD card is not loaded, recording and playback are
not possible.
•
See “Formatting SD cards”. (P. 106)
Preparations
Turning the power on and off
14
Turning the power on and off
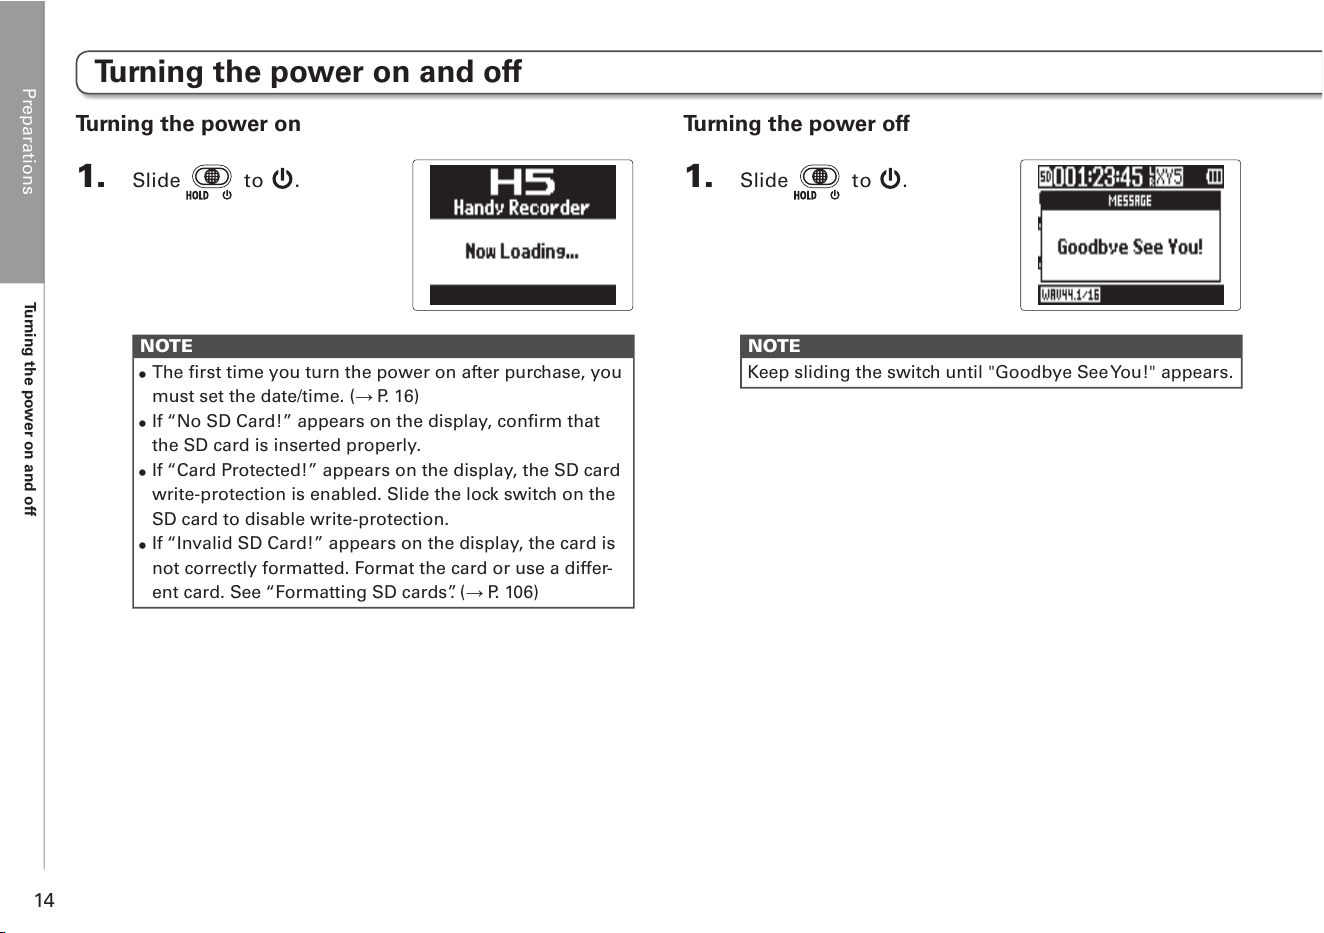
Turning the power on
1. Slide to .
NOTE
•
The first time you turn the power on after purchase, you
must set the date/time. ( P. 16)
•
If “No SD Card!” appears on the display, confirm that
the SD card is inserted properly.
•
If “Card Protected!” appears on the display, the SD card
write-protection is enabled. Slide the lock switch on the
SD card to disable write-protection.
•
If “Invalid SD Card!” appears on the display, the card is
not correctly formatted. Format the card or use a differ-
ent card. See “Formatting SD cards”. ( P. 106)
Turning the power off
1. Slide to .
NOTE
Keep sliding the switch until "Goodbye See You!" appears.
Preparations
Turning the power on and off
15
H5 Handy Recorder
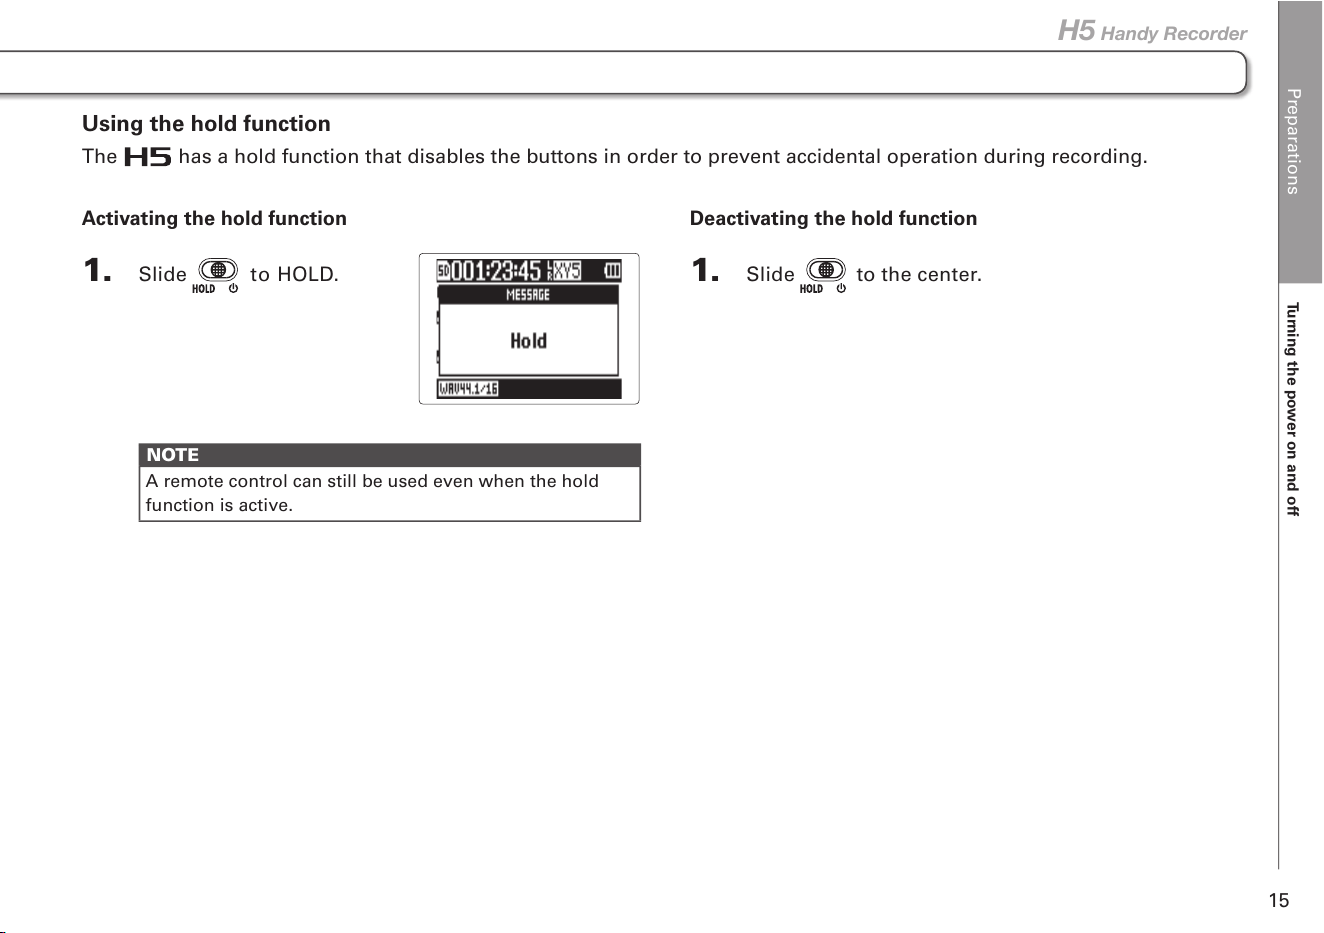
Activating the hold function
1. Slide to HOLD.
NOTE
A remote control can still be used even when the hold
function is active.
Deactivating the hold function
1. Slide to the center.
Using the hold function
The has a hold function that disables the buttons in order to prevent accidental operation during recording.
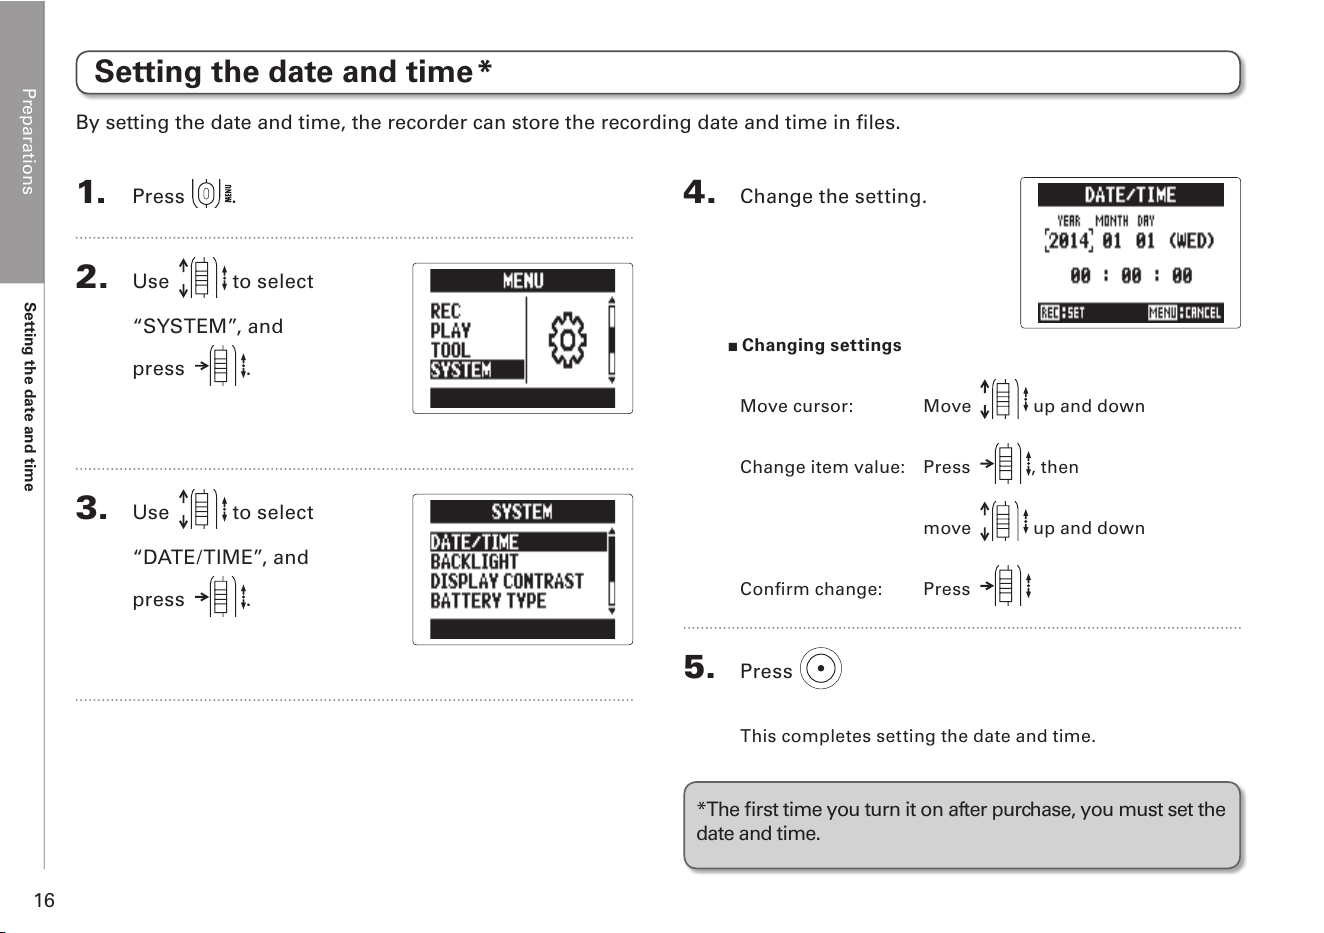
Preparations
Setting the date and time
16
1. Press .
2. Use to select
“SYSTEM”, and
press
.
3. Use to select
“DATE/TIME”, and
press
.
Setting the date and time
4. Change the setting.
Changing settings
Move cursor: Move up and down
Change item value: Press , then
move up and down
Confirm change: Press
5. Press
This completes setting the date and time.
By setting the date and time, the recorder can store the recording date and time in files.
*The first time you turn it on after purchase, you must set the
date and time.
*
Preparations
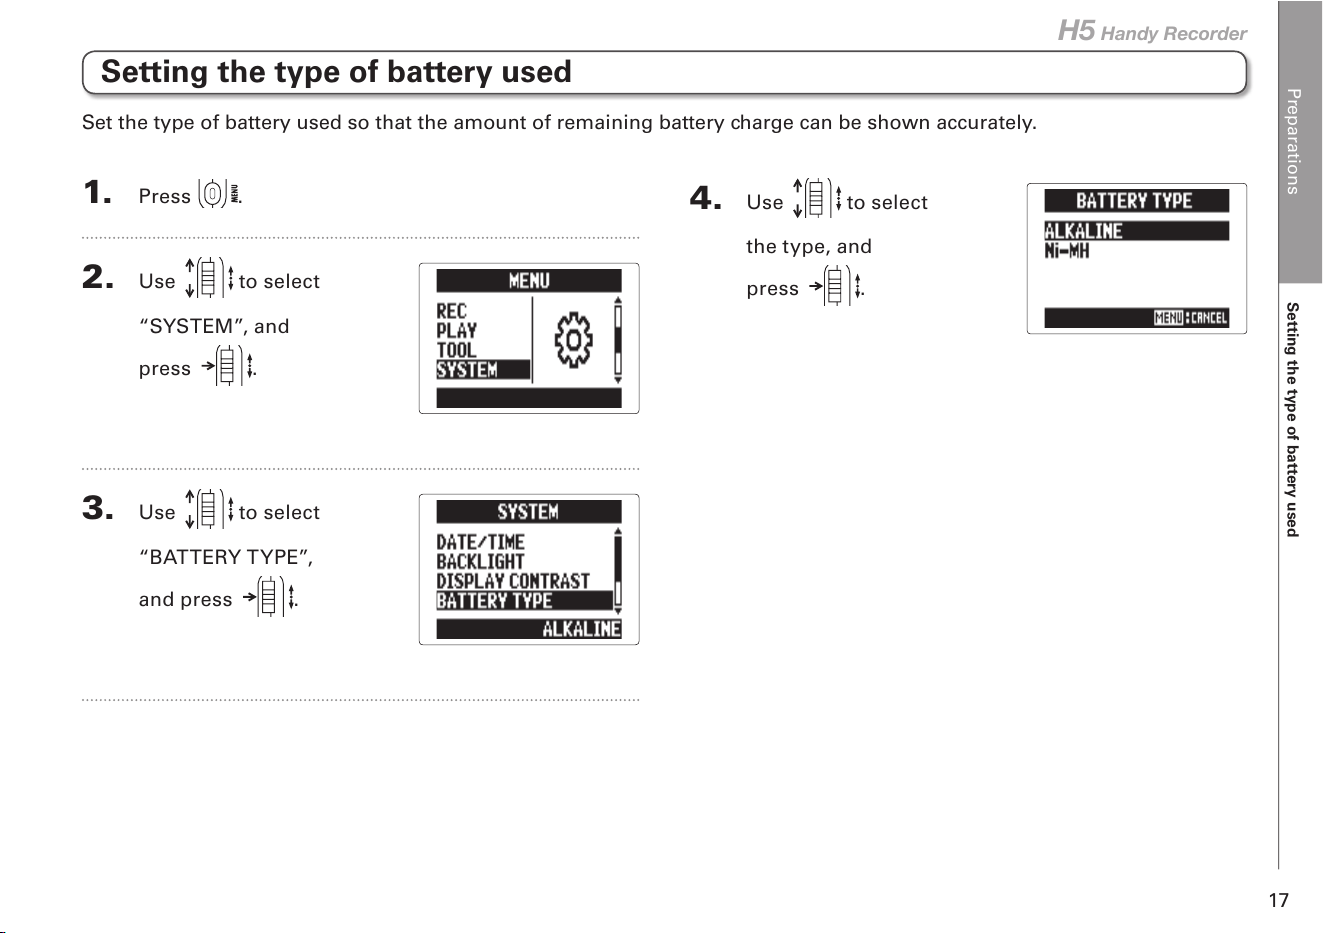
Setting the type of battery used
17
H5 Handy Recorder
4. Use to select
the type, and
press
.
Setting the type of battery used
1. Press .
2. Use to select
“SYSTEM”, and
press
.
3. Use to select
“BATTERY TYPE”,
and press
.
Set the type of battery used so that the amount of remaining battery charge can be shown accurately.
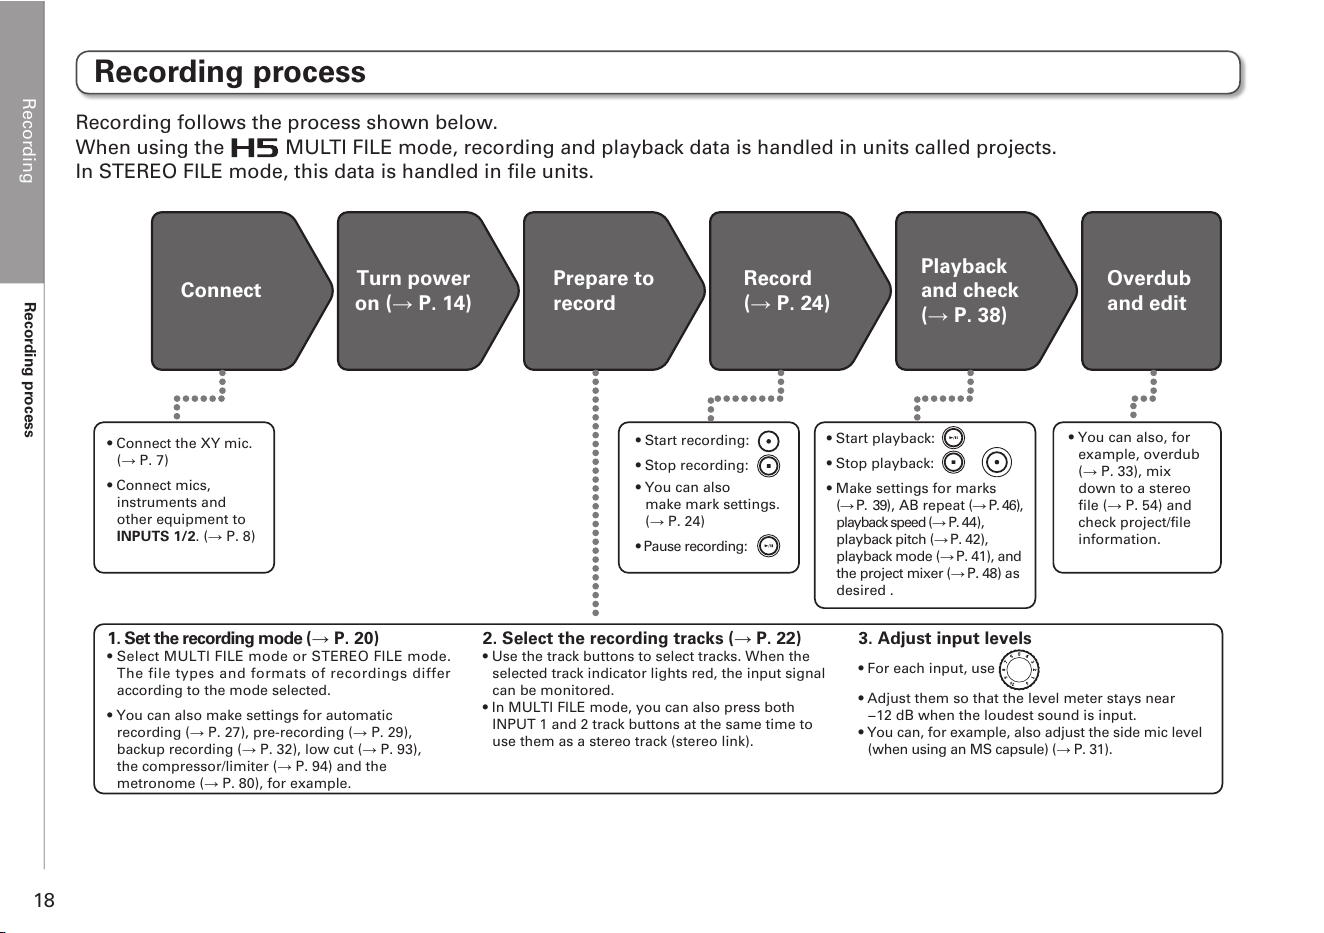
Recording
Recording process
18
Recording process
Connect
Turn power
on ( P. 14)
Prepare to
record
Record
( P. 24)
Playback
and check
( P. 38)
Overdub
and edit
• Connect the XY mic.
( P. 7)
• Connect mics,
instruments and
other equipment to
INPUTS 1/2. ( P. 8)
1. Set the recording mode ( P. 20)
• Select MULTI FILE mode or STEREO FILE mode.
The file types and formats of recordings differ
according to the mode selected.
• You can also make settings for automatic
recording ( P. 27), pre-recording ( P. 29),
backup recording ( P. 32), low cut ( P. 93),
the compressor/limiter ( P. 94) and the
metronome ( P. 80), for example.
2. Select the recording tracks ( P. 22)
• Use the track buttons to select tracks. When the
selected track indicator lights red, the input signal
can be monitored.
• In MULTI FILE mode, you can also press both
INPUT 1 and 2 track buttons at the same time to
use them as a stereo track (stereo link).
3. Adjust input levels
• For each input, use
• Adjust them so that the level meter stays near
−12 dB when the loudest sound is input.
• You can, for example, also adjust the side mic level
(when using an MS capsule) ( P. 31).
• Start recording:
• Stop recording:
• You can also
make mark settings.
( P. 24)
• Pause recording:
• Start playback:
• Stop playback:
• Make settings for marks
( P. 39), AB repeat ( P. 46),
playback speed (P. 44),
playback pitch (P. 42),
playback mode (P. 41), and
the project mixer (P. 48) as
desired .
• You can also, for
example, overdub
( P. 33), mix
down to a stereo
file ( P. 54) and
check project/file
information.
Recording follows the process shown below.
When using the
MULTI FILE mode, recording and playback data is handled in units called projects.
In STEREO FILE mode, this data is handled in file units.
Recording
Recording mode overview
19
H5 Handy Recorder
Recording mode overview
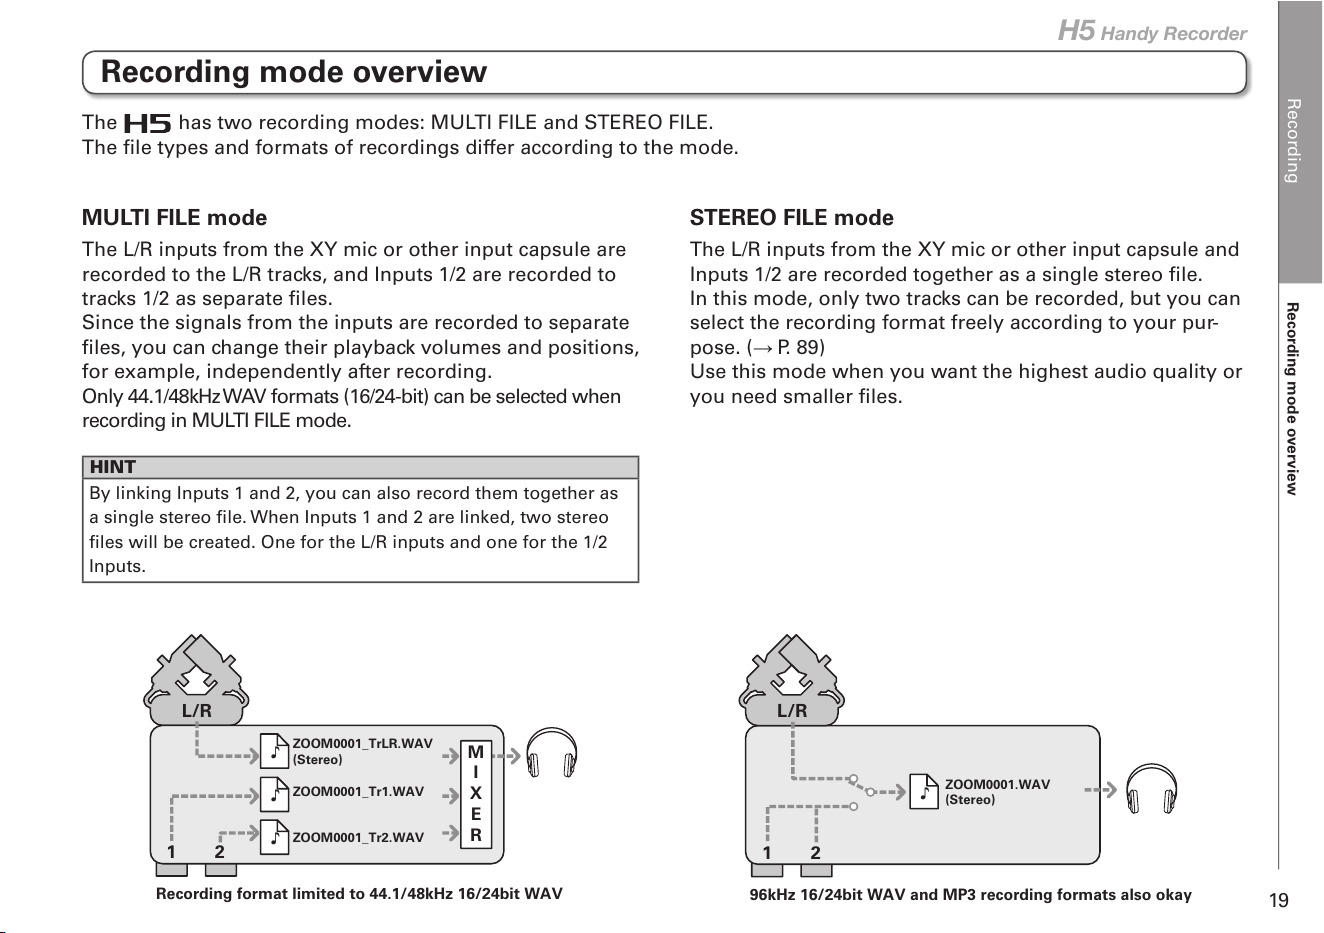
The has two recording modes: MULTI FILE and STEREO FILE.
The file types and formats of recordings differ according to the mode.
MULTI FILE mode
The L/R inputs from the XY mic or other input capsule are
recorded to the L/R tracks, and Inputs 1/2 are recorded to
tracks 1/2 as separate files.
Since the signals from the inputs are recorded to separate
files, you can change their playback volumes and positions,
for example, independently after recording.
Only 44.1/48kHz WAV formats (16/24-bit) can be selected when
recording in MULTI FILE mode.
HINT
By linking Inputs 1 and 2, you can also record them together as
a single stereo file. When Inputs 1 and 2 are linked, two stereo
files will be created. One for the L/R inputs and one for the 1/2
Inputs.
STEREO FILE mode
The L/R inputs from the XY mic or other input capsule and
Inputs 1/2 are recorded together as a single stereo file.
In this mode, only two tracks can be recorded, but you can
select the recording format freely according to your pur-
pose. ( P. 89)
Use this mode when you want the highest audio quality or
you need smaller files.
ZOOM0001_TrLR.WAV
(Stereo)
ZOOM0001_Tr1.WAV
ZOOM0001_Tr2.WAV
Recording format limited to 44.1/48kHz 16/24bit WAV
M
I
X
E
R
21
L/R
ZOOM0001.WAV
(Stereo)
96kHz 16/24bit WAV and MP3 recording formats also okay
21
L/R
Recording
Selecting the recording mode
20
Selecting the recording mode
1. Press .
2. Use to select
REC MODE,
and press
.
3. Use to select the
recording mode,
and press
.
Recording
Folder and file structure on the H5
21
H5 Handy Recorder
FOLDER01
FOLDER02 FOLDER10
ZOOM0001 ZOOM0002
ZOOM0002_TrLR.WAV
Stereo file of signals
recorded from L/R inputs
ZOOM0002_Tr1.WAV
Mono file of signal
recorded from INPUT 1
ZOOM0002_Tr2.WAV
Mono file of signal
recorded from INPUT 2
ZOOM0002.hprj
ZOOM0003
ZOOM0003_TrLR.WAV
Stereo file of signals
recorded from L/R inputs
ZOOM0003_Tr12.WAV
Stereo file of signals
recorded from stereo-linked
INPUTS 1/2
ZOOM0003_TrLR_BU.WAV
L/R inputs backup file
DualStereo.hprj ZOOM0006.hprj
Project name: ZOOM0002
Backup recording: No
INPUTS 1/2: Mono
Project name: DualStereo
Backup recording: Yes
INPUTS 1/2: Stereo
ZOOM0004
ZOOM0004_TrLR.WAV
Stereo file of signals
recorded from L/R inputs
ZOOM0004_VM.MP3
Voice memo recording file
140531-163015.hprj LongRecording.hprj
Project name:
140531-163015
Backup recording: No
Voice memo: Yes
ZOOM0005
ZOOM0005_TrLR-0001.WAV
First file when recording
exceeds 2 GB
ZOOM0005_TrLR-0002.WAV
Second file when recording
exceeds 2 GB
Project name:
LongRecording
Backup recording: No
Created if recording exceeds 2 GB
ZOOM0006
ZOOM0006_TrLR.WAV
First stereo file recorded
to L/R track
ZOOM0006_Tr12-01.WAV
Additional stereo file
recorded to 1/2 tracks
ZOOM0006_ST001.WAV
Stereo file created by
mix down
Project name: ZOOM006
Backup recording: No
Additional recording created
Root
Select FOLDER01-10
as the place to save
projects
A new project is created for
each recording. Folders are
created for each given
project on the SD card and
named ZOOM0001-9999.
MULTI
STEREO
FOLDER01
STEREO FILE
mode folder
ZOOM0001.WAV
Stereo file of signals
recorded from L/R inputs
ZOOM0002.WAV
Stereo file of signals
recorded from INPUTS 1/2
ZOOM0002_MN.WAV
Stereo WAV file of mono
mix recording of signals
from INPUTS 1/2
FOLDER02
ZOOM0001.WAV
Stereo file of signals
recorded from L/R inputs
ZOOM0001_BU.WAV
ZOOM0001.WAV
backup file
FOLDER03
140101-120000.MP3
MP3 file when file
naming is set to “DATE”
140101-120500.MP3
FOLDER04
ZOOM0001.WAV
First file when recording
exceeds 2 GB
ZOOM0002.WAV
Second file when recording
exceeds 2 GB
ZOOM0003.WAV
Third file when recording
exceeds 2 GB
FOLDER10
The setting file name
is the same as the
project name
Project
when project
naming is set to “DATE”
Project setting file
MULTI FILE
mode folder
MP3 file when file
naming is set to “DATE”
When recording with the , folders and files are created on the SD card in the following manner.
Folder and file structure on the H5
Recording
Selecting inputs and adjusting levels
22
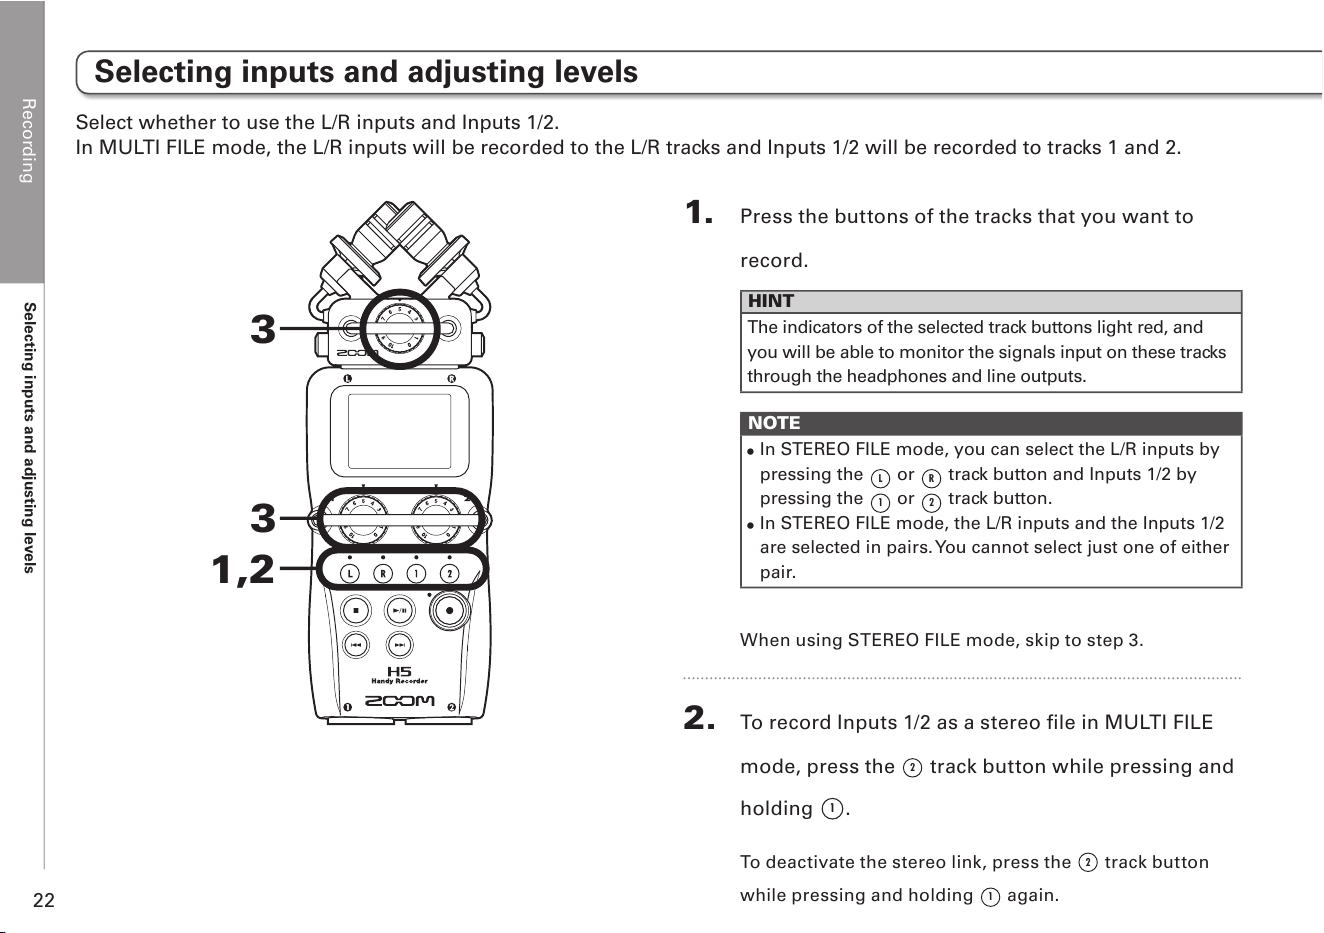
Selecting inputs and adjusting levels
Select whether to use the L/R inputs and Inputs 1/2.
In MULTI FILE mode, the L/R inputs will be recorded to the L/R tracks and Inputs 1/2 will be recorded to tracks 1 and 2.
1. Press the buttons of the tracks that you want to
record.
HINT
The indicators of the selected track buttons light red, and
you will be able to monitor the signals input on these tracks
through the headphones and line outputs.
NOTE
•
In STEREO FILE mode, you can select the L/R inputs by
pressing the
L
or
R
track button and Inputs 1/2 by
pressing the
1
or
2
track button.
•
In STEREO FILE mode, the L/R inputs and the Inputs 1/2
are selected in pairs. You cannot select just one of either
pair.
When using STEREO FILE mode, skip to step 3.
2. To record Inputs 1/2 as a stereo file in MULTI FILE
mode, press the
2
track button while pressing and
holding
1
.
To deactivate the stereo link, press the
2
track button
while pressing and holding
1
again.
1,2
3
3
Recording
Selecting inputs and adjusting levels
23
H5 Handy Recorder
HINT
If a combo type input capsule is connected to the L/R
inputs, you can enable and disable the stereo link with
these tracks in the same manner by pressing the
R
track
button while pressing and holding
L
.
NOTE
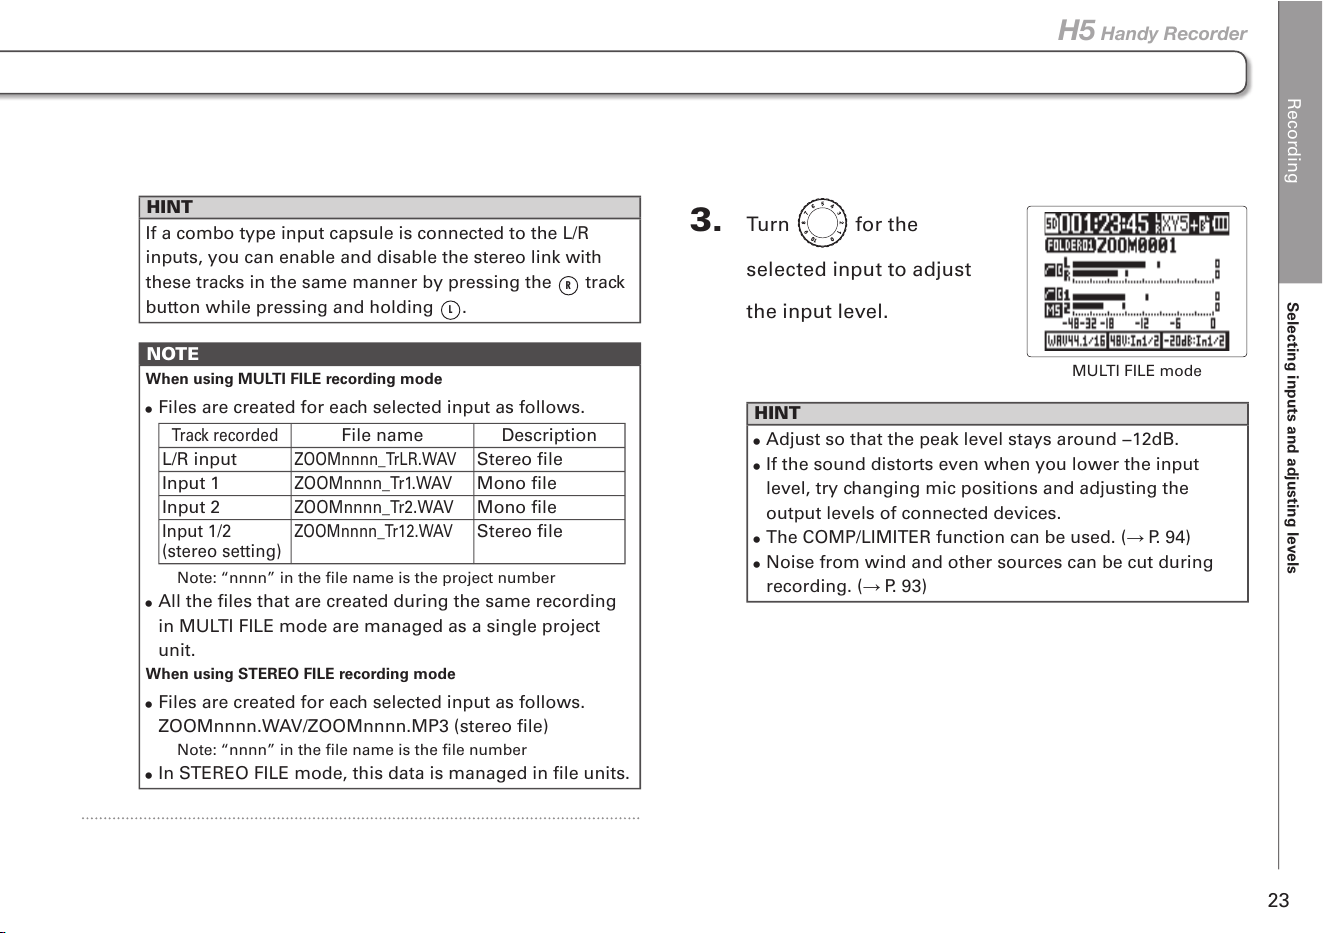
When using MULTI FILE recording mode
•
Files are created for each selected input as follows.
Track recorded
File name Description
L/R input
ZOOMnnnn_TrLR.WAV
Stereo file
Input 1
ZOOMnnnn_Tr1.WAV
Mono file
Input 2
ZOOMnnnn_Tr2.WAV
Mono file
Input 1/2
(stereo setting)
ZOOMnnnn_Tr12.WAV
Stereo file
Note: “nnnn” in the file name is the project number
•
All the files that are created during the same recording
in MULTI FILE mode are managed as a single project
unit.
When using STEREO FILE recording mode
•
Files are created for each selected input as follows.
ZOOMnnnn.WAV/ZOOMnnnn.MP3 (stereo file)
Note: “nnnn” in the file name is the file number
•
In STEREO FILE mode, this data is managed in file units.
3. Turn for the
selected input to adjust
the input level.
HINT
•
Adjust so that the peak level stays around −12dB.
•
If the sound distorts even when you lower the input
level, try changing mic positions and adjusting the
output levels of connected devices.
•
The COMP/LIMITER function can be used. ( P. 94)
•
Noise from wind and other sources can be cut during
recording. ( P. 93)
MULTI FILE mode
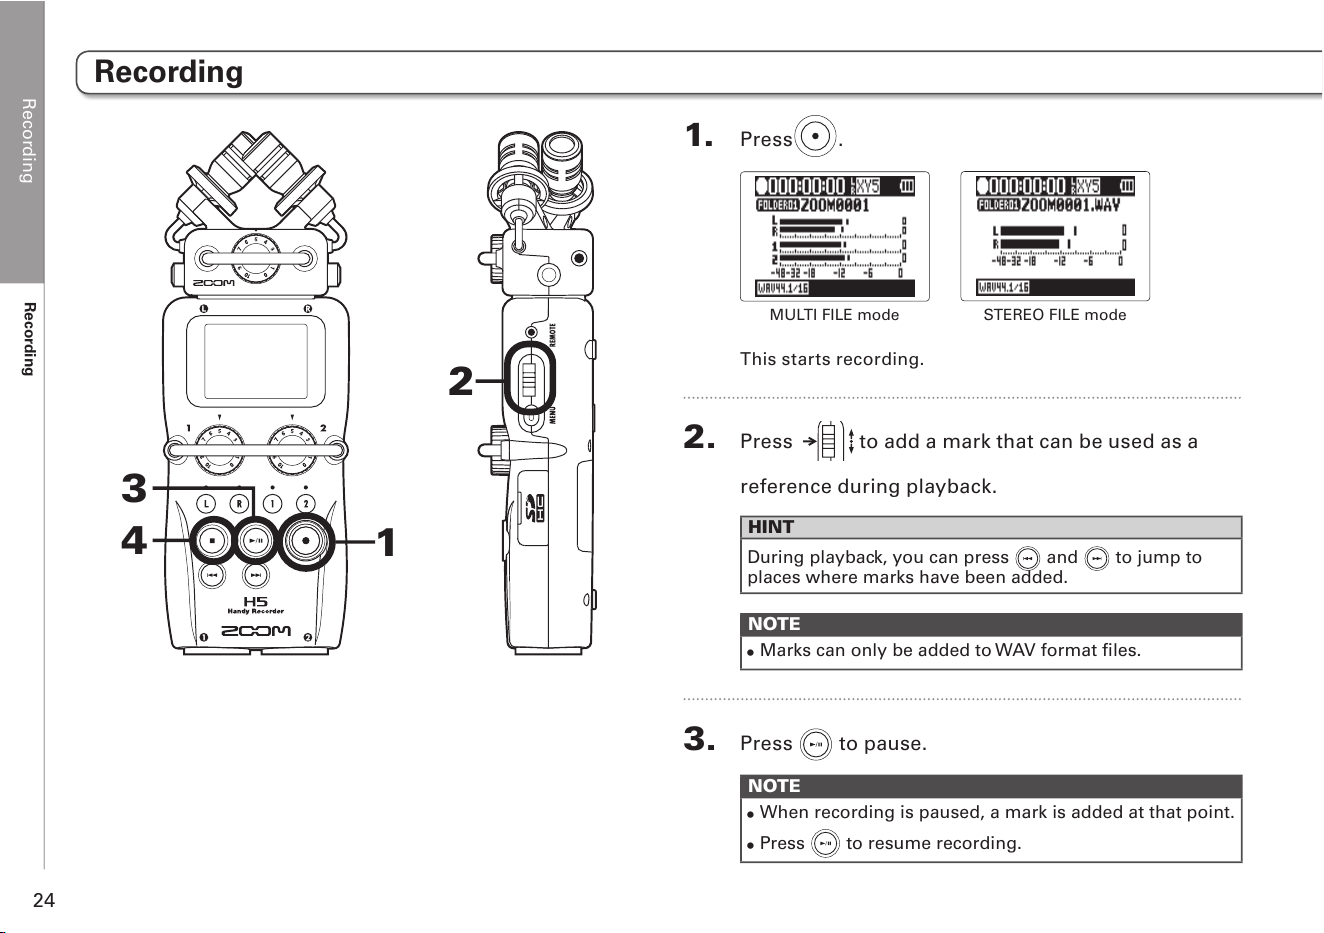
Recording
Recording
24
1. Press .
MULTI FILE mode
STEREO FILE mode
This starts recording.
2. Press to add a mark that can be used as a
reference during playback.
HINT
During playback, you can press
and to jump to
places where marks have been added.
NOTE
•
Marks can only be added to WAV format files.
3. Press to pause.
NOTE
•
When recording is paused, a mark is added at that point.
•
Press to resume recording.
Recording
1
3
4
2
Recording
Recording
25
H5 Handy Recorder
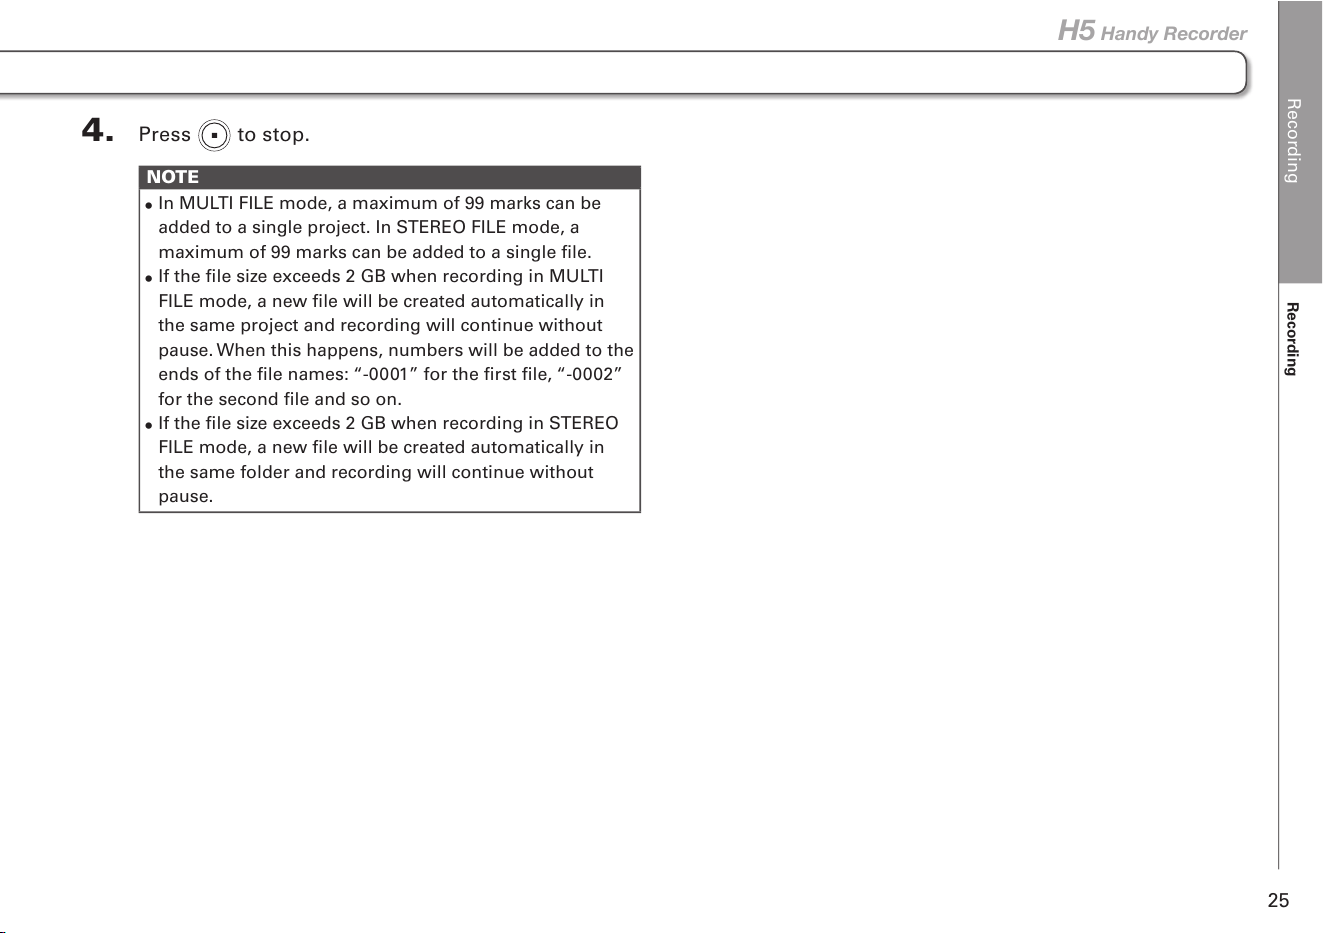
4. Press to stop.
NOTE
•
In MULTI FILE mode, a maximum of 99 marks can be
added to a single project. In STEREO FILE mode, a
maximum of 99 marks can be added to a single file.
•
If the file size exceeds 2 GB when recording in MULTI
FILE mode, a new file will be created automatically in
the same project and recording will continue without
pause. When this happens, numbers will be added to the
ends of the file names: “-0001” for the first file, “-0002”
for the second file and so on.
•
If the file size exceeds 2 GB when recording in STEREO
FILE mode, a new file will be created automatically in
the same folder and recording will continue without
pause.
Recording
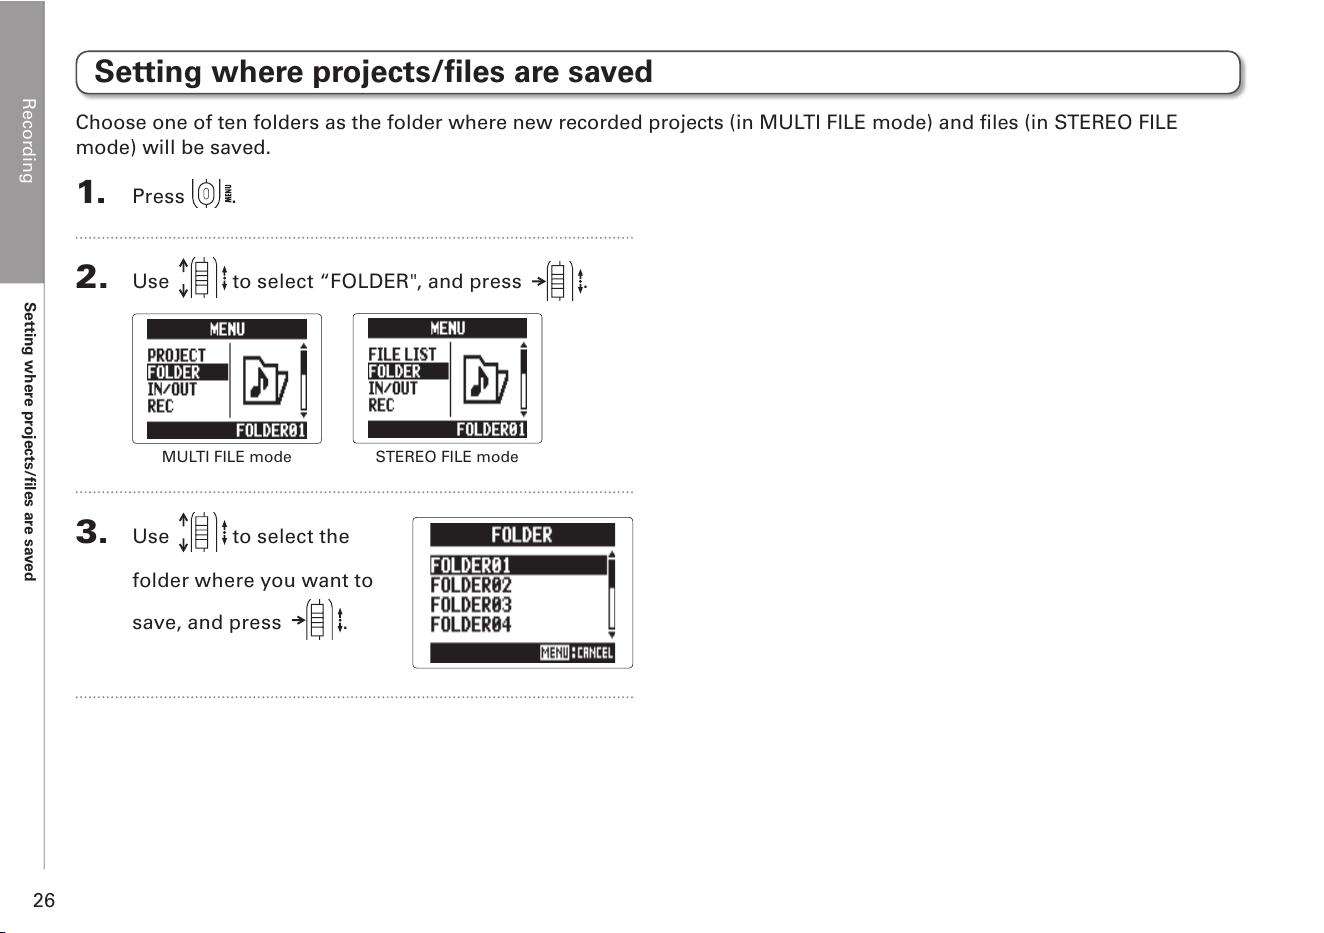
Setting where projects/files are saved
26
1. Press .
2. Use to select “FOLDER", and press .
MULTI FILE mode
STEREO FILE mode
3. Use to select the
folder where you want to
save, and press
.
Setting where projects/files are saved
Choose one of ten folders as the folder where new recorded projects (in MULTI FILE mode) and files (in STEREO FILE
mode) will be saved.
Recording
Recording automatically
27
H5 Handy Recorder
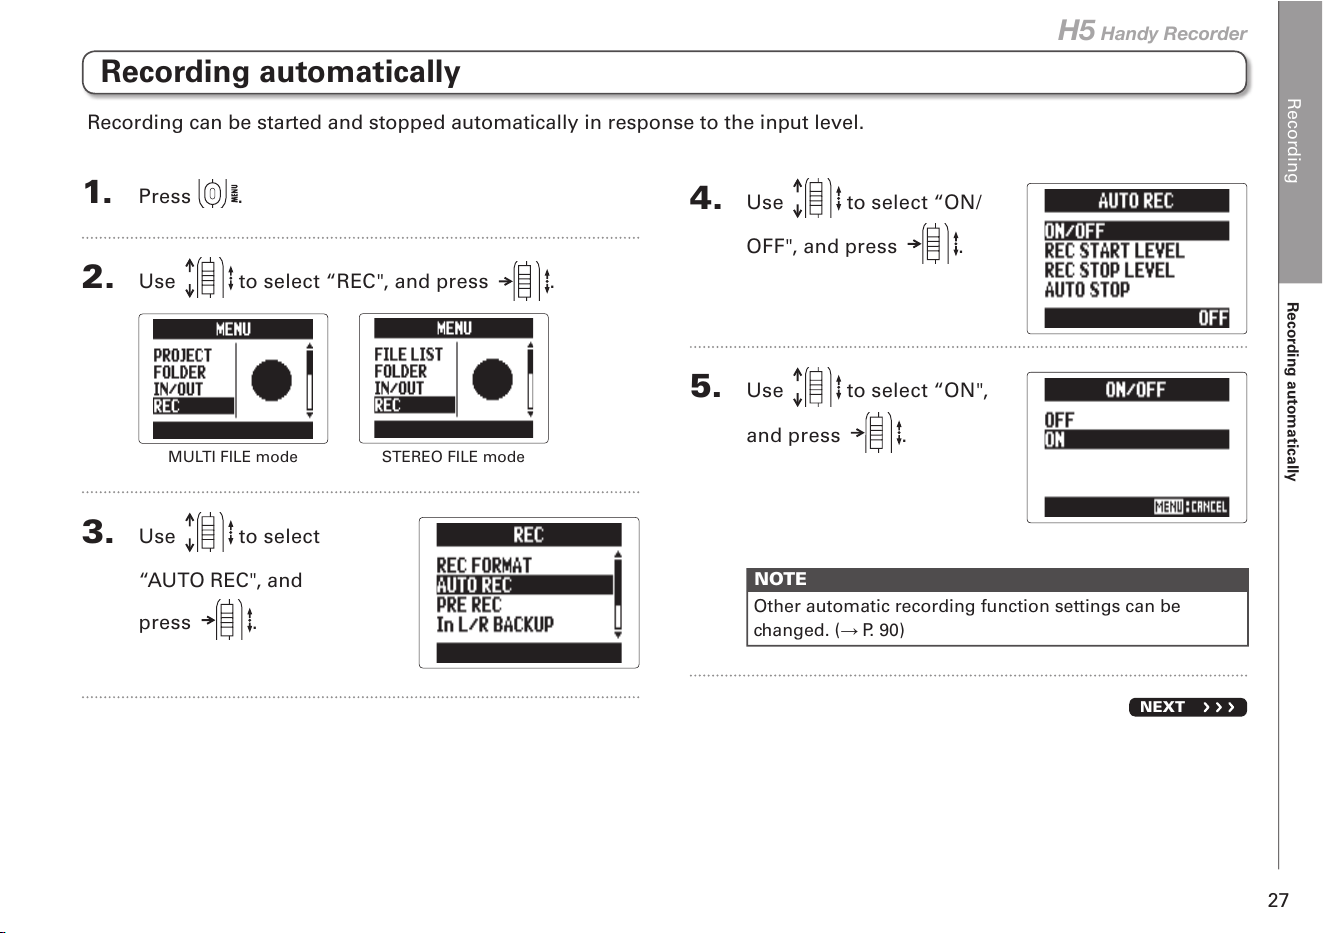
Recording automatically
1. Press .
2. Use to select “REC", and press .
MULTI FILE mode
STEREO FILE mode
3. Use to select
“AUTO REC", and
press
.
4. Use to select “ON/
OFF", and press .
5. Use to select “ON",
and press .
NOTE
Other automatic recording function settings can be
changed. ( P. 90)
NEXT
Recording can be started and stopped automatically in response to the input level.
Recording
Recording automatically
28
6. Return to the Home Screen.
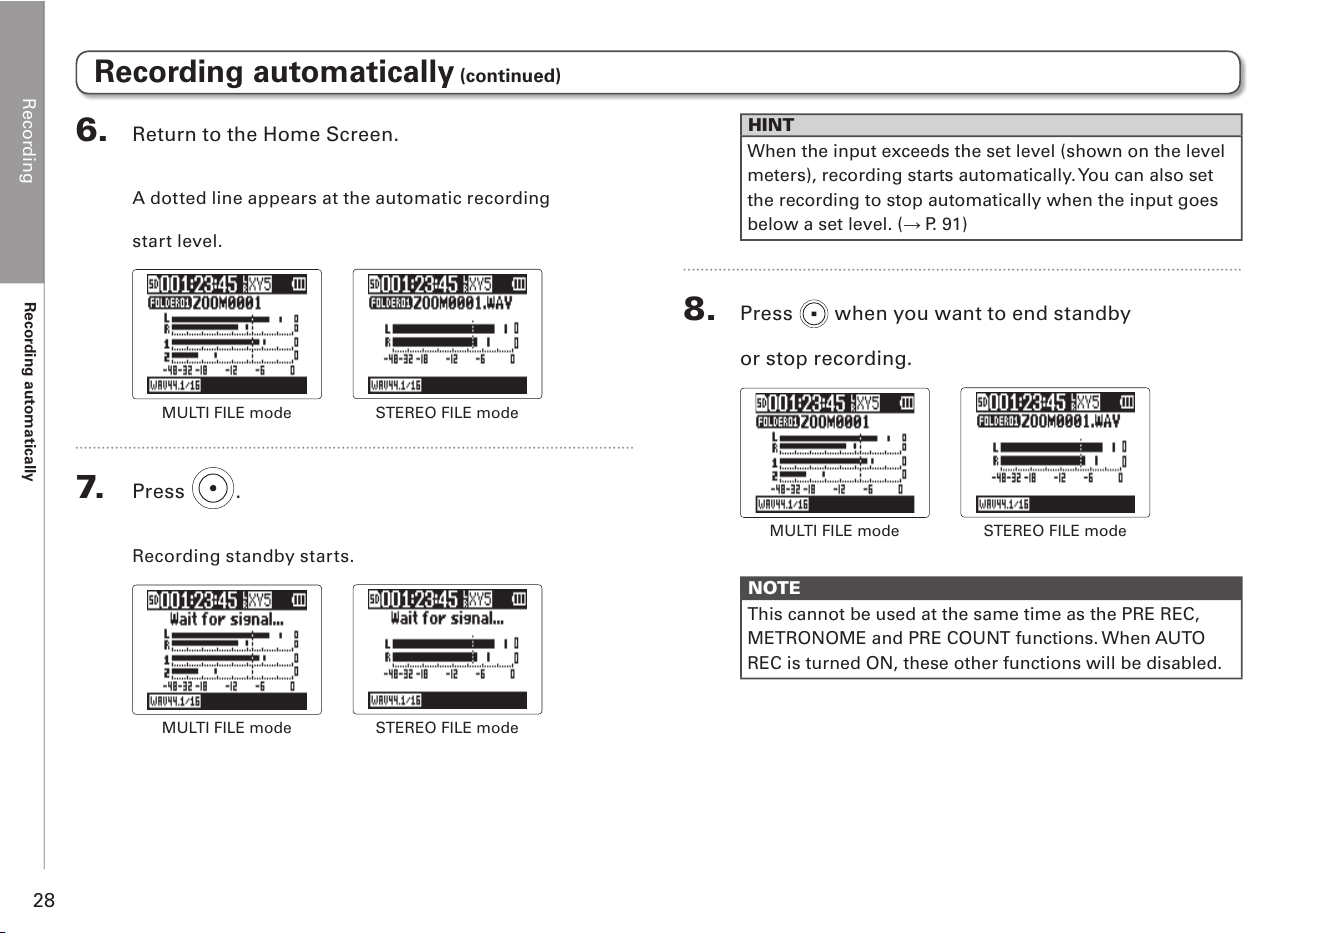
A dotted line appears at the automatic recording
start level.
MULTI FILE mode
STEREO FILE mode
7. Press .
Recording standby starts.
MULTI FILE mode
STEREO FILE mode
HINT
When the input exceeds the set level (shown on the level
meters), recording starts automatically. You can also set
the recording to stop automatically when the input goes
below a set level. ( P. 91)
8. Press when you want to end standby
or stop recording.
MULTI FILE mode
STEREO FILE mode
NOTE
This cannot be used at the same time as the PRE REC,
METRONOME and PRE COUNT functions. When AUTO
REC is turned ON, these other functions will be disabled.
Recording automatically (continued)
Recording
Pre-recording
29
H5 Handy Recorder
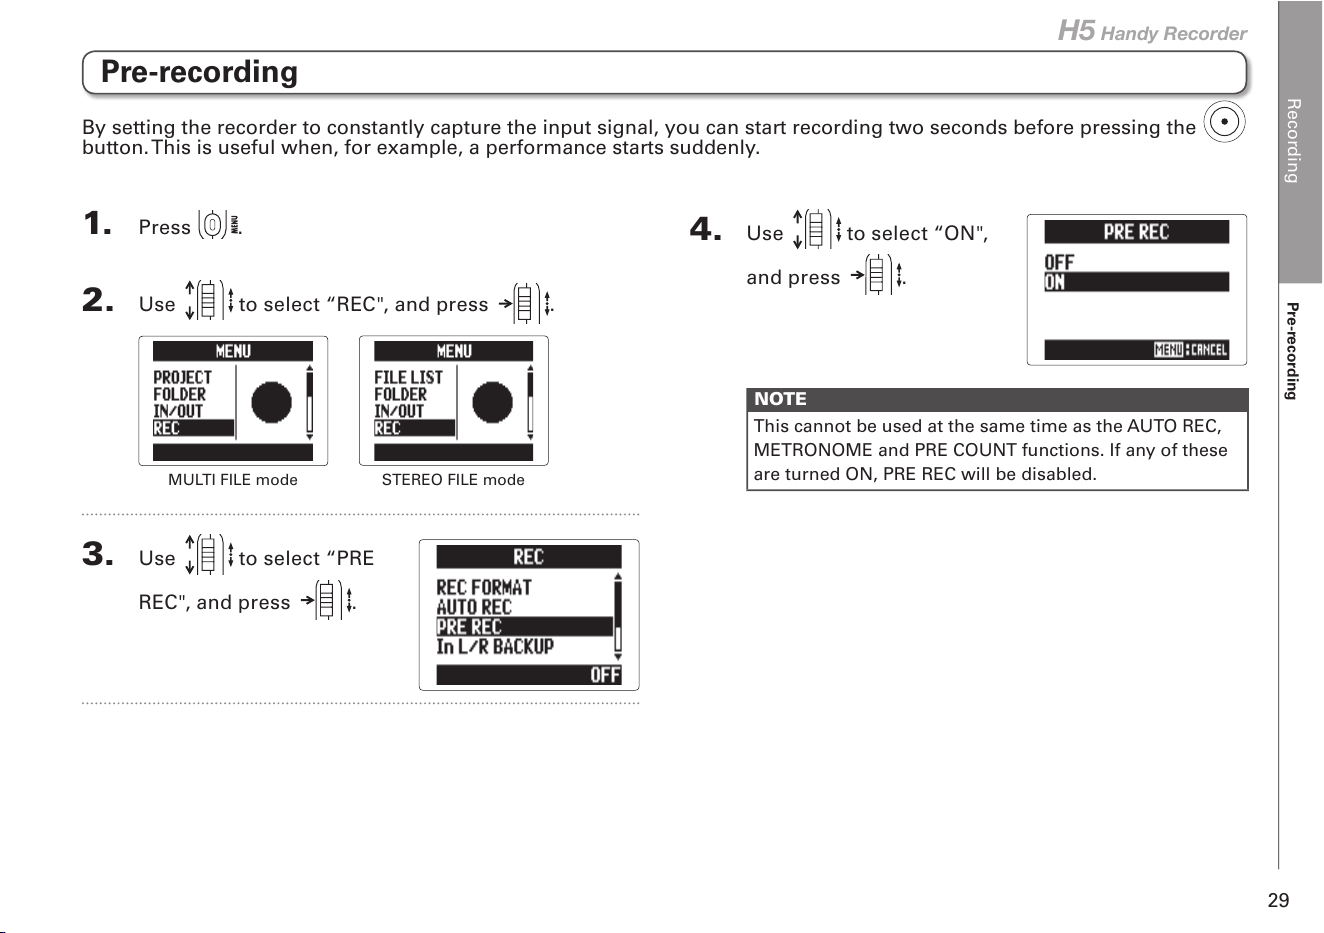
4. Use to select “ON",
and press .
NOTE
This cannot be used at the same time as the AUTO REC,
METRONOME and PRE COUNT functions. If any of these
are turned ON, PRE REC will be disabled.
Pre-recording
1. Press .
2. Use to select “REC", and press .
MULTI FILE mode
STEREO FILE mode
3. Use to select “PRE
REC", and press .
By setting the recorder to constantly capture the input signal, you can start recording two seconds before pressing the
button. This is useful when, for example, a performance starts suddenly.
Recording
Counting in before recording
30
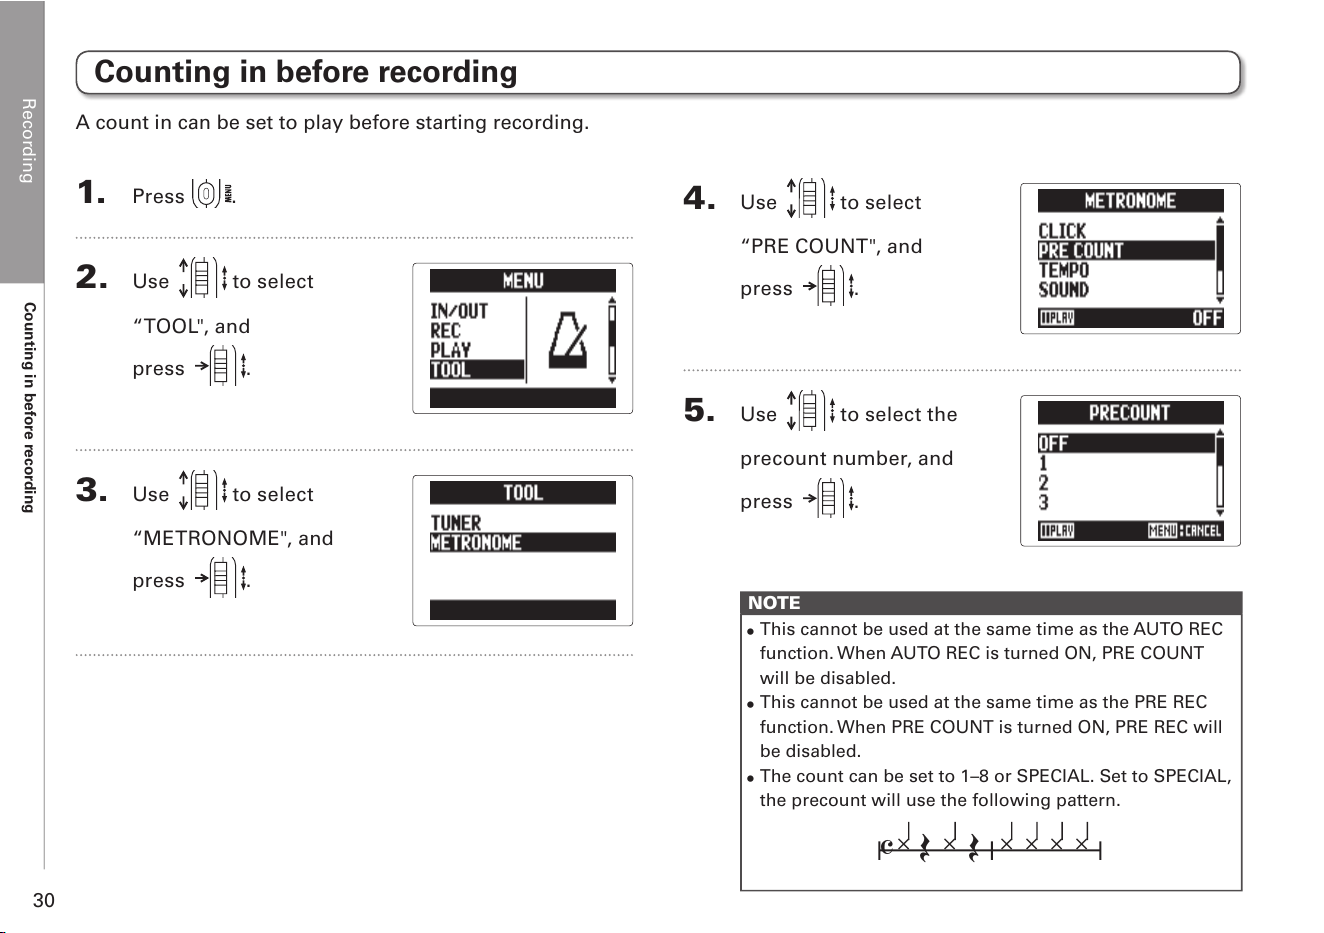
4. Use to select
“PRE COUNT", and
press
.
5. Use to select the
precount number, and
press
.
NOTE
•
This cannot be used at the same time as the AUTO REC
function. When AUTO REC is turned ON, PRE COUNT
will be disabled.
•
This cannot be used at the same time as the PRE REC
function. When PRE COUNT is turned ON, PRE REC will
be disabled.
•
The count can be set to 1–8 or SPECIAL. Set to SPECIAL,
the precount will use the following pattern.
A
Counting in before recording
1. Press .
2. Use to select
“TOOL", and
press
.
3. Use to select
“METRONOME", and
press
.
A count in can be set to play before starting recording.
Recording
Adjusting the side mic level
31
H5 Handy Recorder
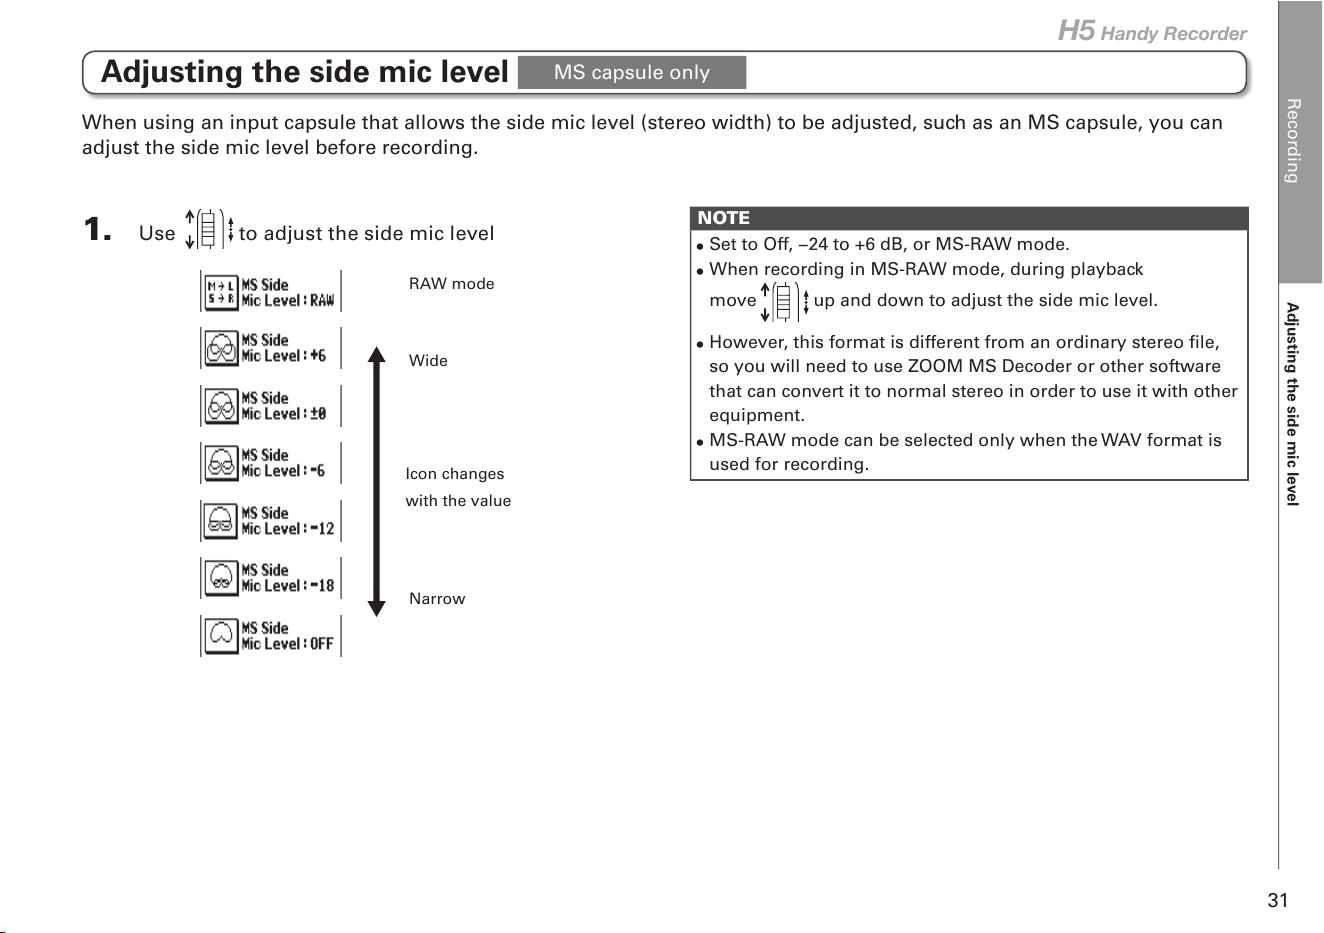
1. Use to adjust the side mic level
Adjusting the side mic level
Wide
RAW mode
Icon changes
with the value
Narrow
When using an input capsule that allows the side mic level (stereo width) to be adjusted, such as an MS capsule, you can
adjust the side mic level before recording.
NOTE
•
Set to Off, −24 to +6 dB, or MS-RAW mode.
•
When recording in MS-RAW mode, during playback
move up and down to adjust the side mic level.
•
However, this format is different from an ordinary stereo file,
so you will need to use ZOOM MS Decoder or other software
that can convert it to normal stereo in order to use it with other
equipment.
•
MS-RAW mode can be selected only when the WAV format is
used for recording.
MS capsule only
Recording
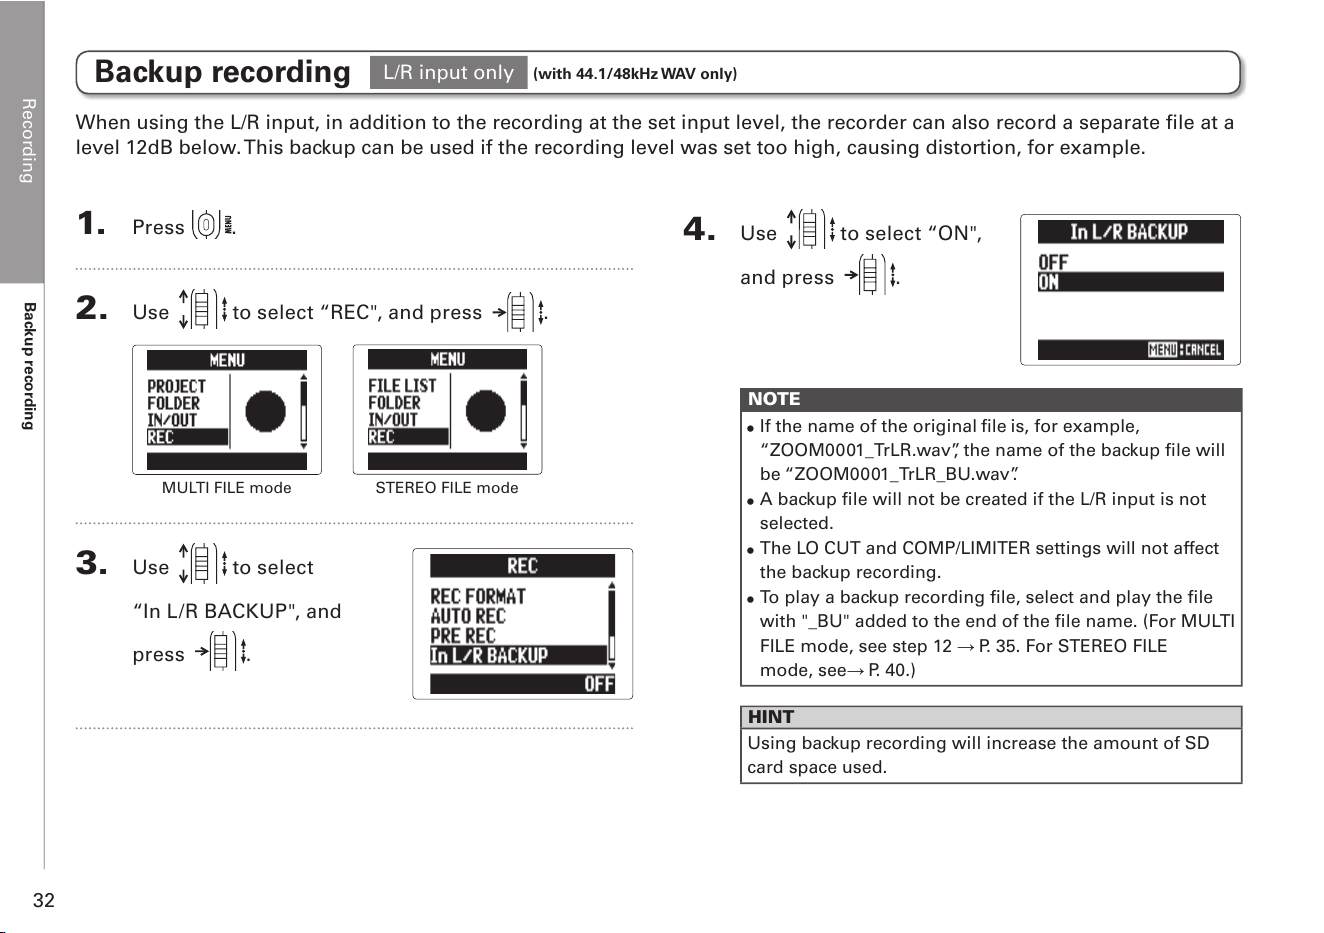
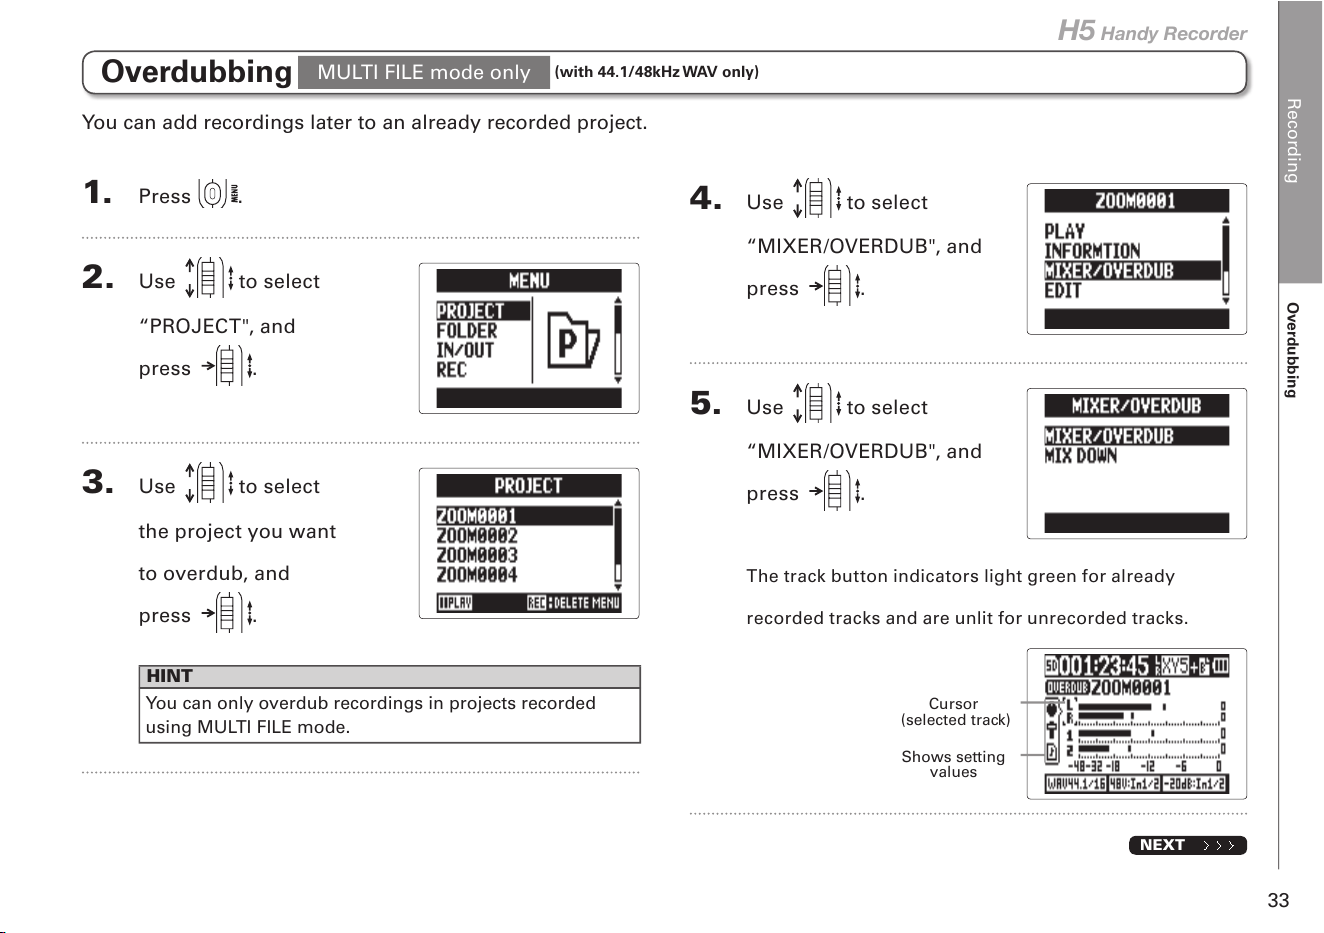
Backup recording
32
4. Use to select “ON",
and press .
NOTE
•
If the name of the original file is, for example,
“ZOOM0001_TrLR.wav”, the name of the backup file will
be “ZOOM0001_TrLR_BU.wav”.
•
A backup file will not be created if the L/R input is not
selected.
•
The LO CUT and COMP/LIMITER settings will not affect
the backup recording.
•
To play a backup recording file, select and play the file
with "_BU" added to the end of the file name. (For MULTI
FILE mode, see step 12 P. 35. For STEREO FILE
mode, see P. 40.)
HINT
Using backup recording will increase the amount of SD
card space used.
Backup recording
1. Press .
2. Use to select “REC", and press .
MULTI FILE mode
STEREO FILE mode
3. Use to select
“In L/R BACKUP", and
press
.
When using the L/R input, in addition to the recording at the set input level, the recorder can also record a separate file at a
level 12dB below. This backup can be used if the recording level was set too high, causing distortion, for example.
L/R input only
(with 44.1/48kHz WAV only)
Recording
Overdubbing
33
H5 Handy Recorder
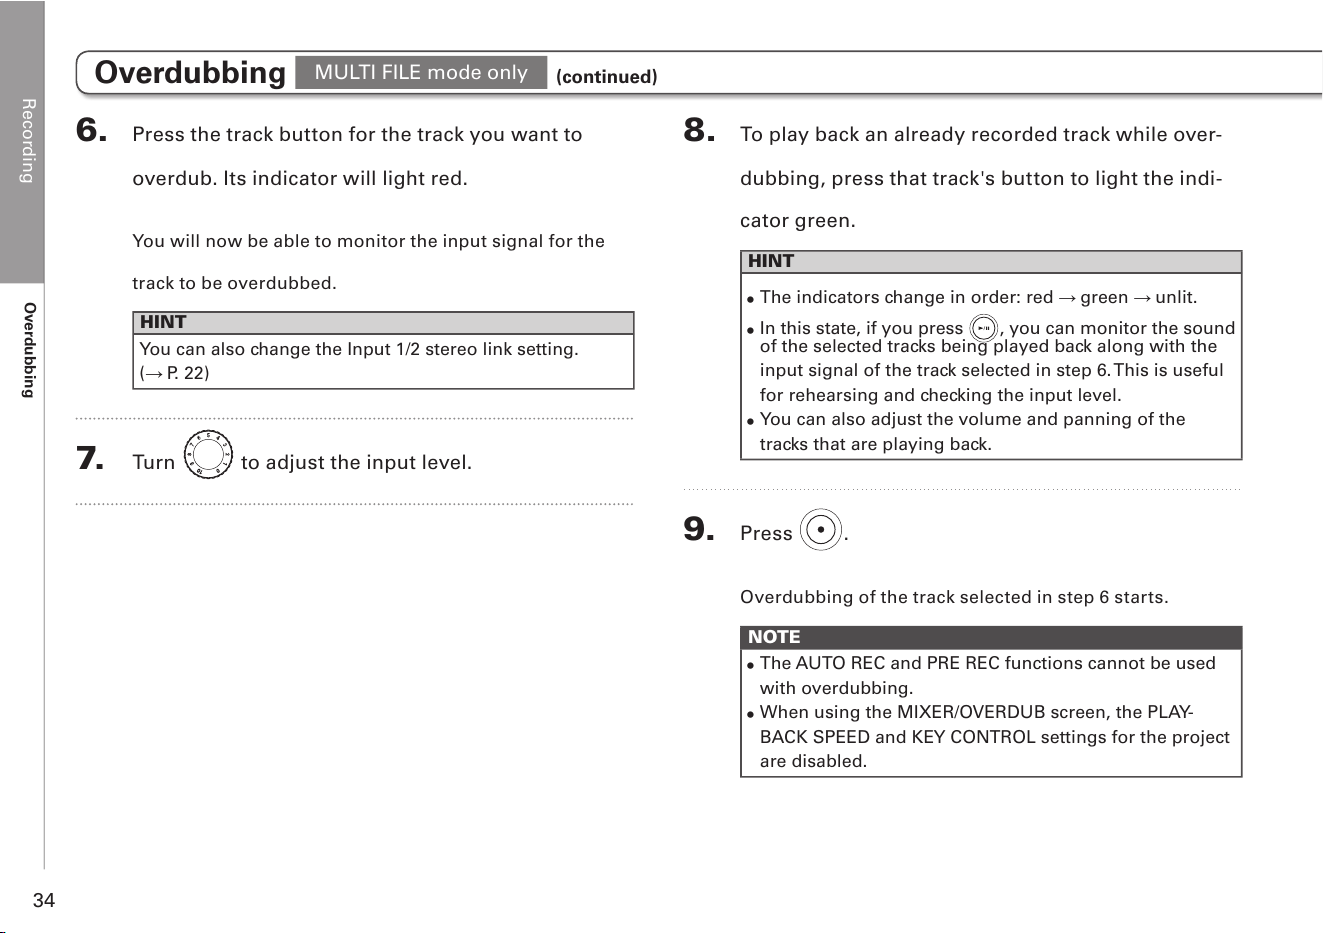
1. Press .
2. Use to select
“PROJECT", and
press
.
3. Use to select
the project you want
to overdub, and
press
.
HINT
You can only overdub recordings in projects recorded
using MULTI FILE mode.
4. Use to select
“MIXER/OVERDUB", and
press
.
5. Use to select
“MIXER/OVERDUB", and
press
.
The track button indicators light green for already
recorded tracks and are unlit for unrecorded tracks.
NEXT
Cursor
(selected track)
Shows setting
values
You can add recordings later to an already recorded project.
Overdubbing
(with 44.1/48kHz WAV only)
MULTI FILE mode only
Recording
Overdubbing
34
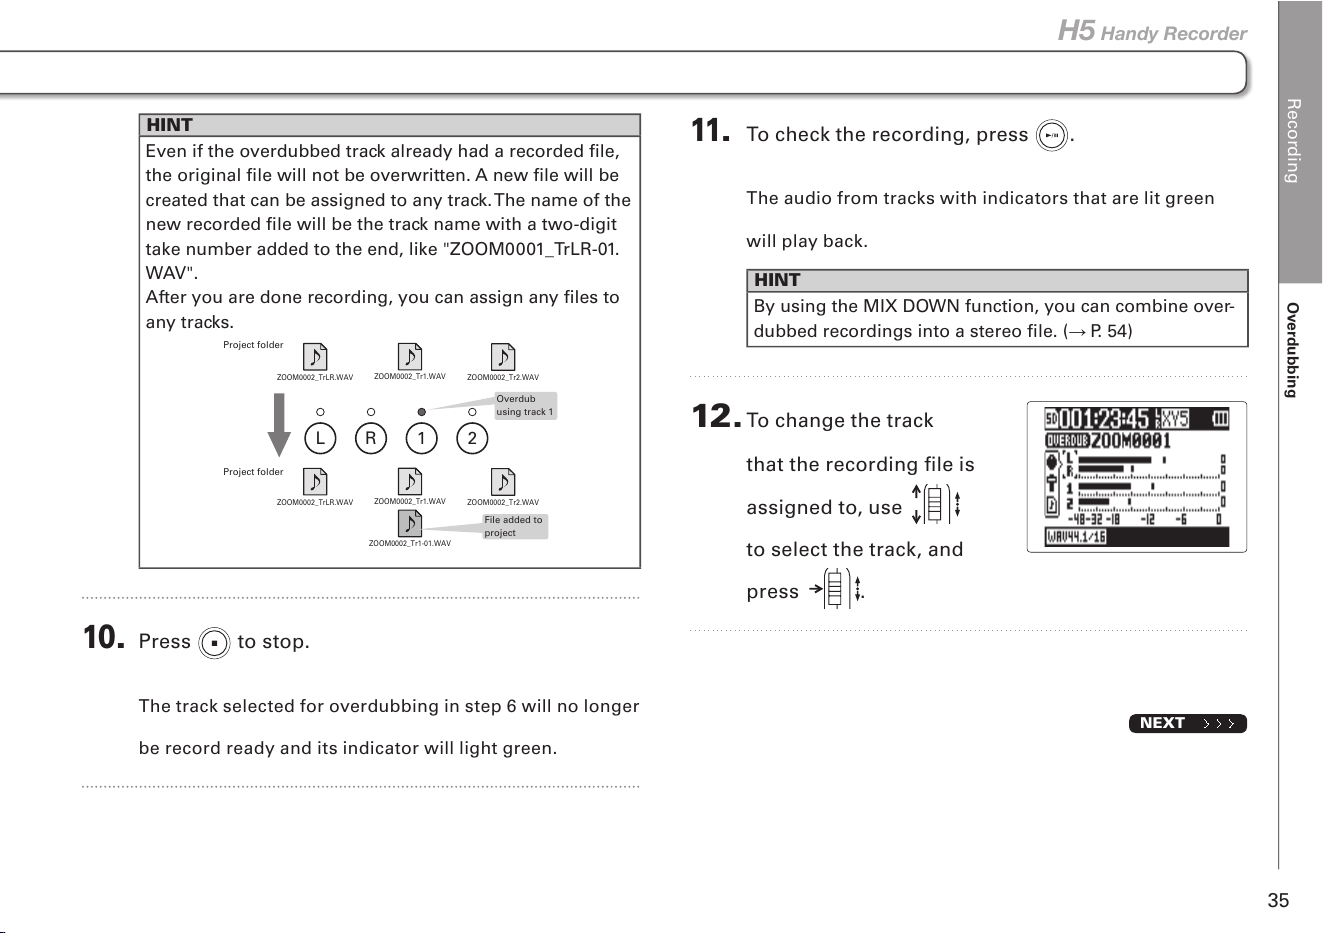
6. Press the track button for the track you want to
overdub. Its indicator will light red.
You will now be able to monitor the input signal for the
track to be overdubbed.
HINT
You can also change the Input 1/2 stereo link setting.
( P. 22)
7. Turn to adjust the input level.
8. To play back an already recorded track while over-
dubbing, press that track's button to light the indi-
cator green.
HINT
•
The indicators change in order: red green unlit.
•
In this state, if you press , you can monitor the sound
of the selected tracks being played back along with the
input signal of the track selected in step 6. This is useful
for rehearsing and checking the input level.
•
You can also adjust the volume and panning of the
tracks that are playing back.
9. Press .
Overdubbing of the track selected in step 6 starts.
NOTE
•
The AUTO REC and PRE REC functions cannot be used
with overdubbing.
•
When using the MIXER/OVERDUB screen, the PLAY-
BACK SPEED and KEY CONTROL settings for the project
are disabled.
Overdubbing
MULTI FILE mode only
(continued)
Recording
Overdubbing
35
H5 Handy Recorder
HINT
Even if the overdubbed track already had a recorded file,
the original file will not be overwritten. A new file will be
created that can be assigned to any track. The name of the
new recorded file will be the track name with a two-digit
take number added to the end, like "ZOOM0001_TrLR-01.
WAV".
After you are done recording, you can assign any files to
any tracks.
Overdub
using track 1
Project folder
Project folder
ZOOM0002_TrLR.WAV
ZOOM0002_Tr1.WAV
ZOOM0002_Tr2.WAV
ZOOM0002_TrLR.WAV
ZOOM0002_Tr1.WAV
ZOOM0002_Tr1-01.WAV
ZOOM0002_Tr2.WAV
21RL
File added to
project
10
. Press to stop.
The track selected for overdubbing in step 6 will no longer
be record ready and its indicator will light green.
11
. To check the recording, press .
The audio from tracks with indicators that are lit green
will play back.
HINT
By using the MIX DOWN function, you can combine over-
dubbed recordings into a stereo file. ( P. 54)
12. To change the track
that the recording file is
assigned to, use
to select the track, and
press
.
NEXT
Recording
Overdubbing
36
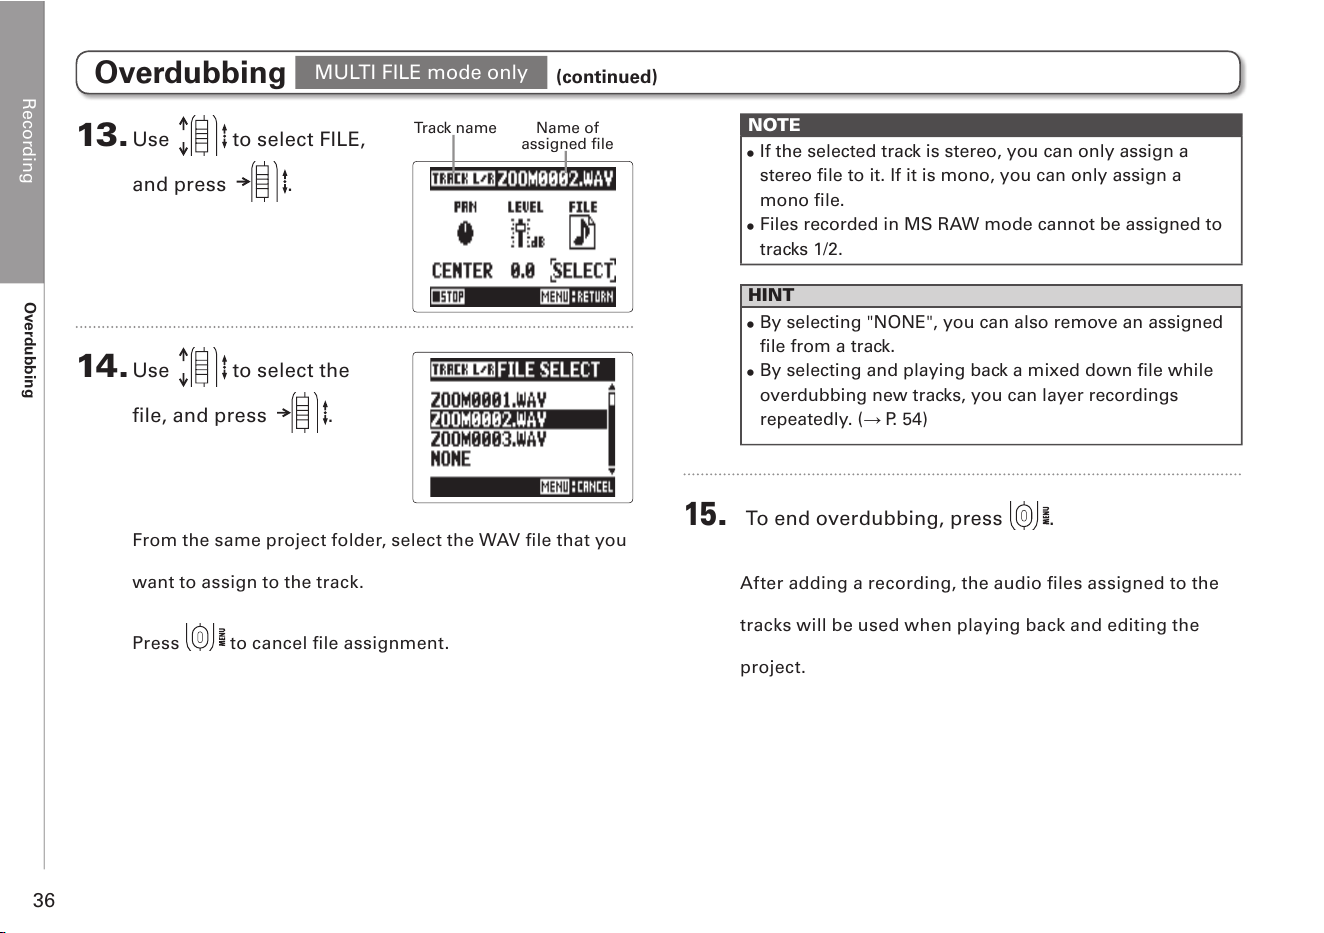
13. Use to select FILE,
and press .
14. Use to select the
file, and press .
From the same project folder, select the WAV file that you
want to assign to the track.
Press
to cancel file assignment.
Track name
Name of
assigned file
NOTE
•
If the selected track is stereo, you can only assign a
stereo file to it. If it is mono, you can only assign a
mono file.
•
Files recorded in MS RAW mode cannot be assigned to
tracks 1/2.
HINT
•
By selecting "NONE", you can also remove an assigned
file from a track.
•
By selecting and playing back a mixed down file while
overdubbing new tracks, you can layer recordings
repeatedly. ( P. 54)
15
. To end overdubbing, press .
After adding a recording, the audio files assigned to the
tracks will be used when playing back and editing the
project.
Overdubbing
MULTI FILE mode only
(continued)

Recording
Overdubbing
37
H5 Handy Recorder
Playback
Basic playback
38
Basic playback
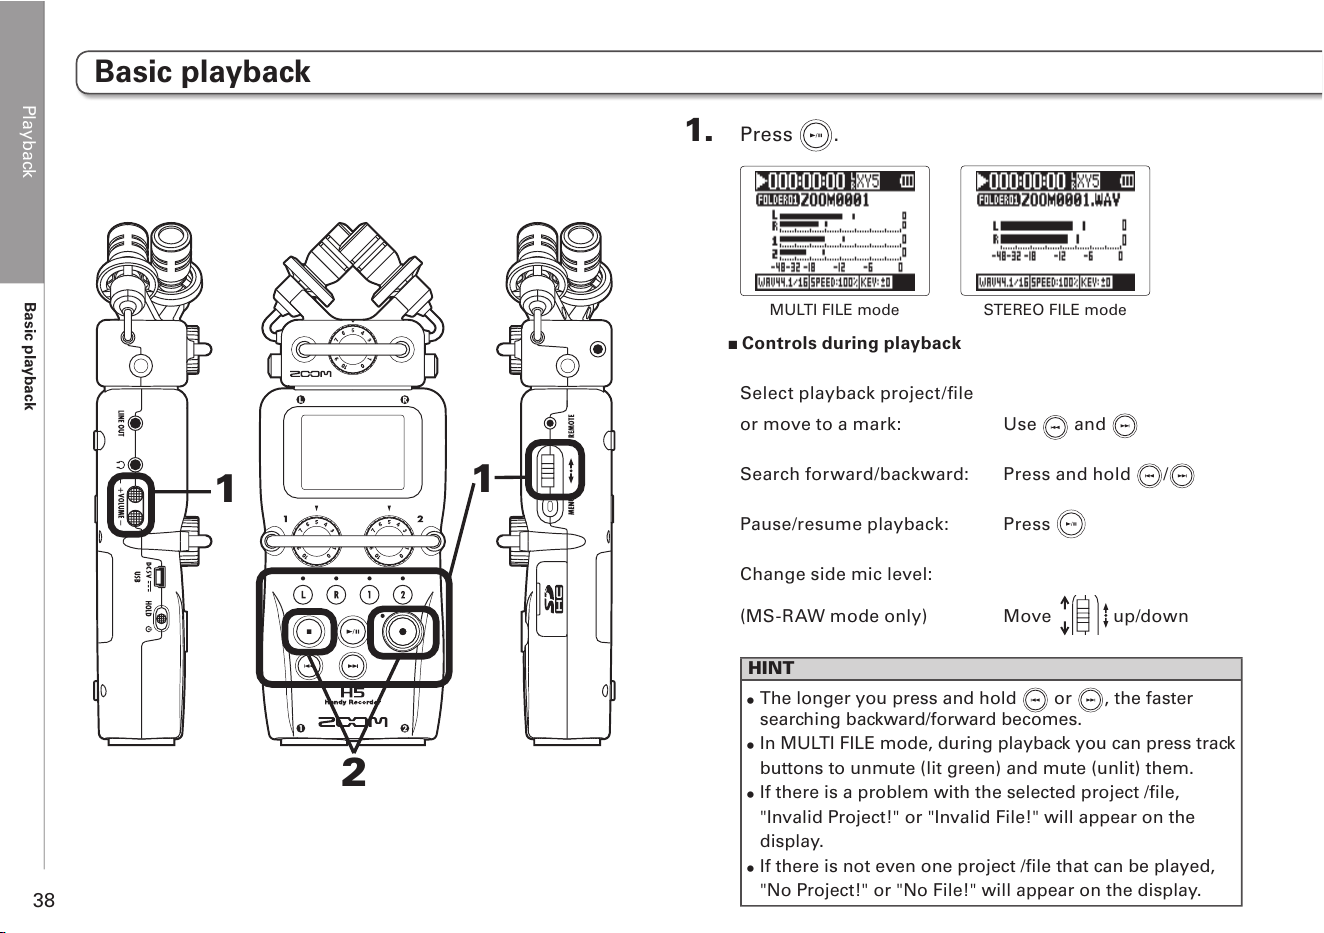
1
2
1
1. Press .
MULTI FILE mode
STEREO FILE mode
Controls during playback
Select playback project/file
or move to a mark: Use and
Search forward/backward: Press and hold /
Pause/resume playback: Press
Change side mic level:
(MS-RAW mode only) Move up/down
HINT
•
The longer you press and hold or , the faster
searching backward/forward becomes.
•
In MULTI FILE mode, during playback you can press track
buttons to unmute (lit green) and mute (unlit) them.
•
If there is a problem with the selected project /file,
"Invalid Project!" or "Invalid File!" will appear on the
display.
•
If there is not even one project /file that can be played,
"No Project!" or "No File!" will appear on the display.
Playback
Basic playback
39
H5 Handy Recorder
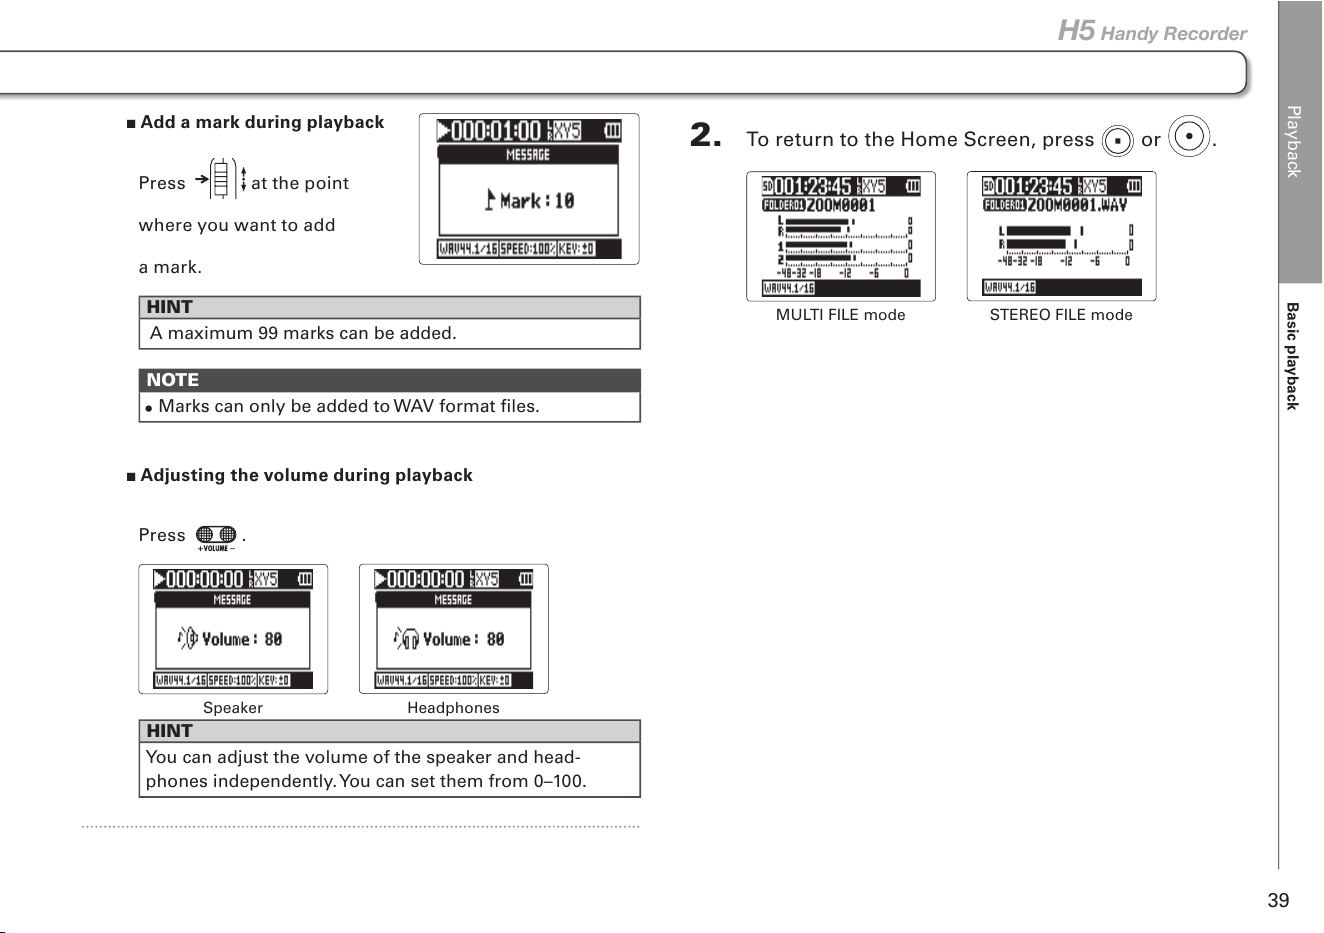
Add a mark during playback
Press
at the point
where you want to add
a mark.
HINT
A maximum 99 marks can be added.
NOTE
•
Marks can only be added to WAV format files.
Adjusting the volume during playback
Press
.
Speaker
Headphones
HINT
You can adjust the volume of the speaker and head-
phones independently. You can set them from 0–100.
2. To return to the Home Screen, press or .
MULTI FILE mode
STEREO FILE mode
Playback
Selecting playback project/files from lists
40
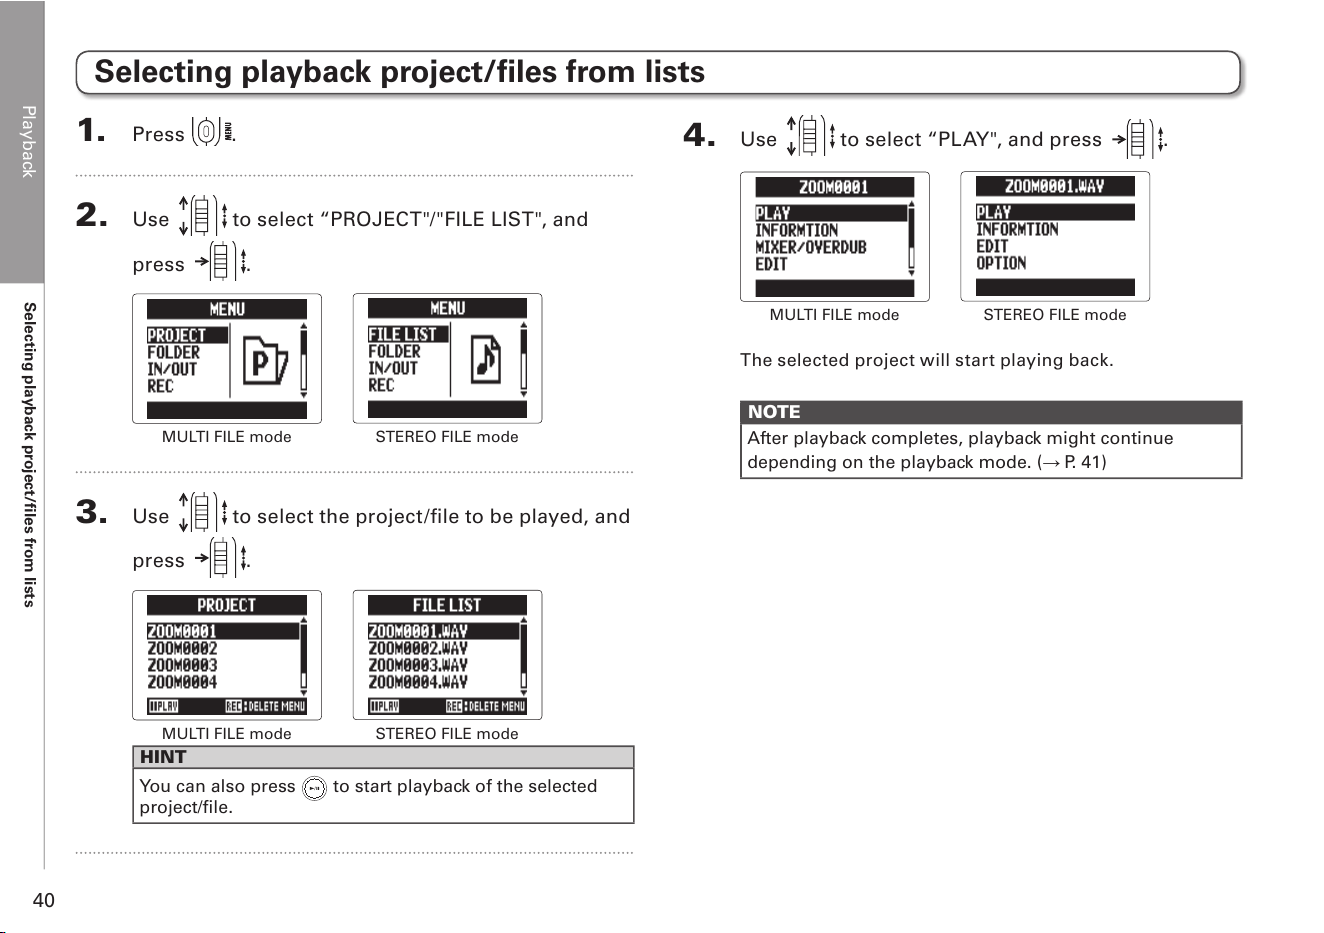
Selecting playback project/files from lists
1. Press .
2. Use to select “PROJECT"/"FILE LIST", and
press .
MULTI FILE mode
STEREO FILE mode
3. Use to select the project/file to be played, and
press .
MULTI FILE mode
STEREO FILE mode
HINT
You can also press
to start playback of the selected
project/file.
4. Use to select “PLAY", and press .
MULTI FILE mode
STEREO FILE mode
The selected project will start playing back.
NOTE
After playback completes, playback might continue
depending on the playback mode. ( P. 41)
Playback
Changing the playback mode
41
H5 Handy Recorder
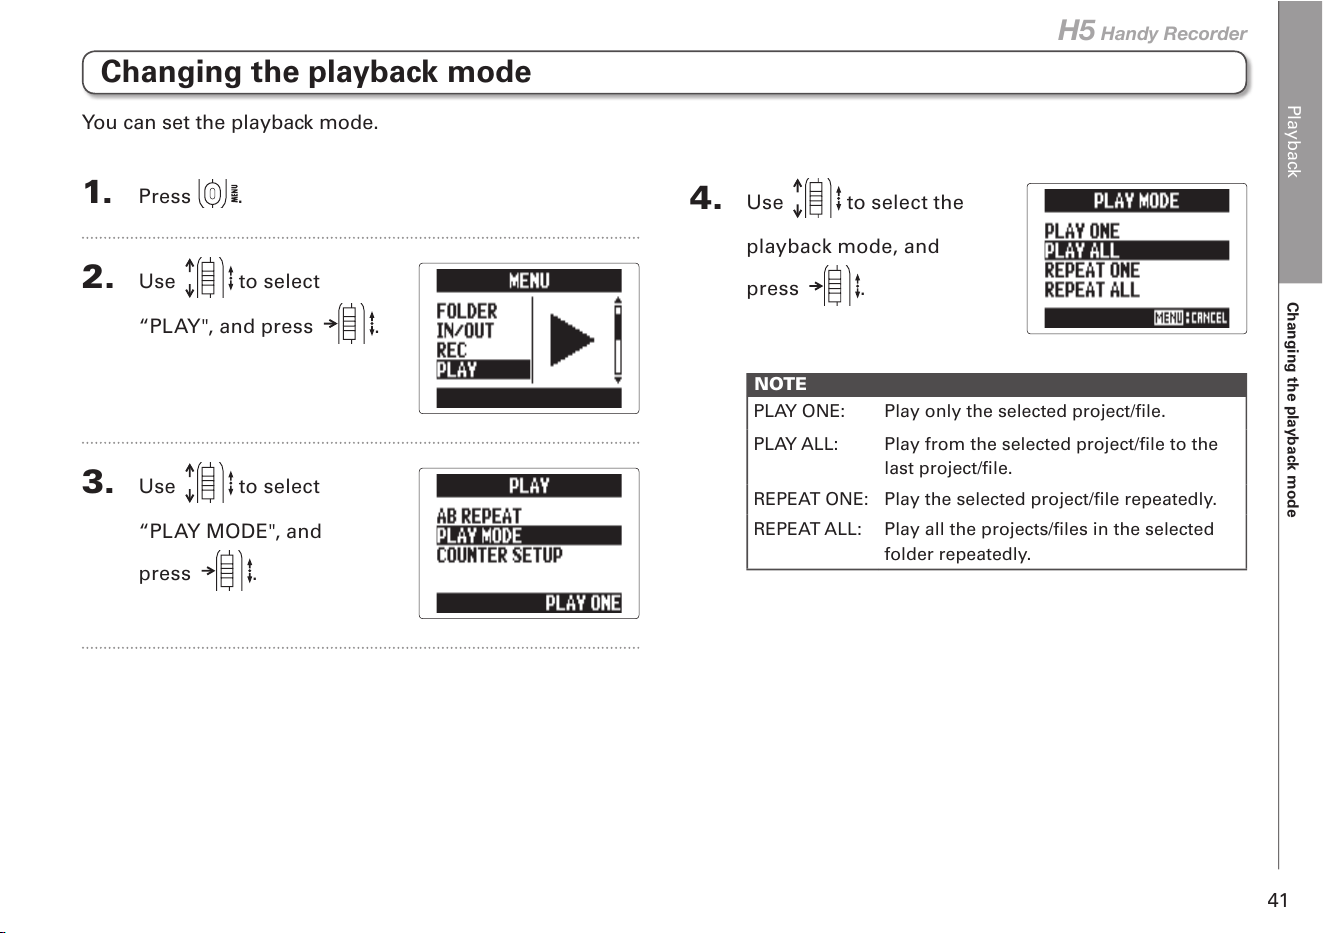
Changing the playback mode
1. Press .
2. Use to select
“PLAY", and press .
3. Use to select
“PLAY MODE", and
press
.
4. Use to select the
playback mode, and
press
.
NOTE
PLAY ONE: Play only the selected project/file.
PLAY ALL: Play from the selected project/file to the
last project/file.
REPEAT ONE: Play the selected project/file repeatedly.
REPEAT ALL: Play all the projects/files in the selected
folder repeatedly.
You can set the playback mode.
Playback
Changing the playback pitch (key)
42
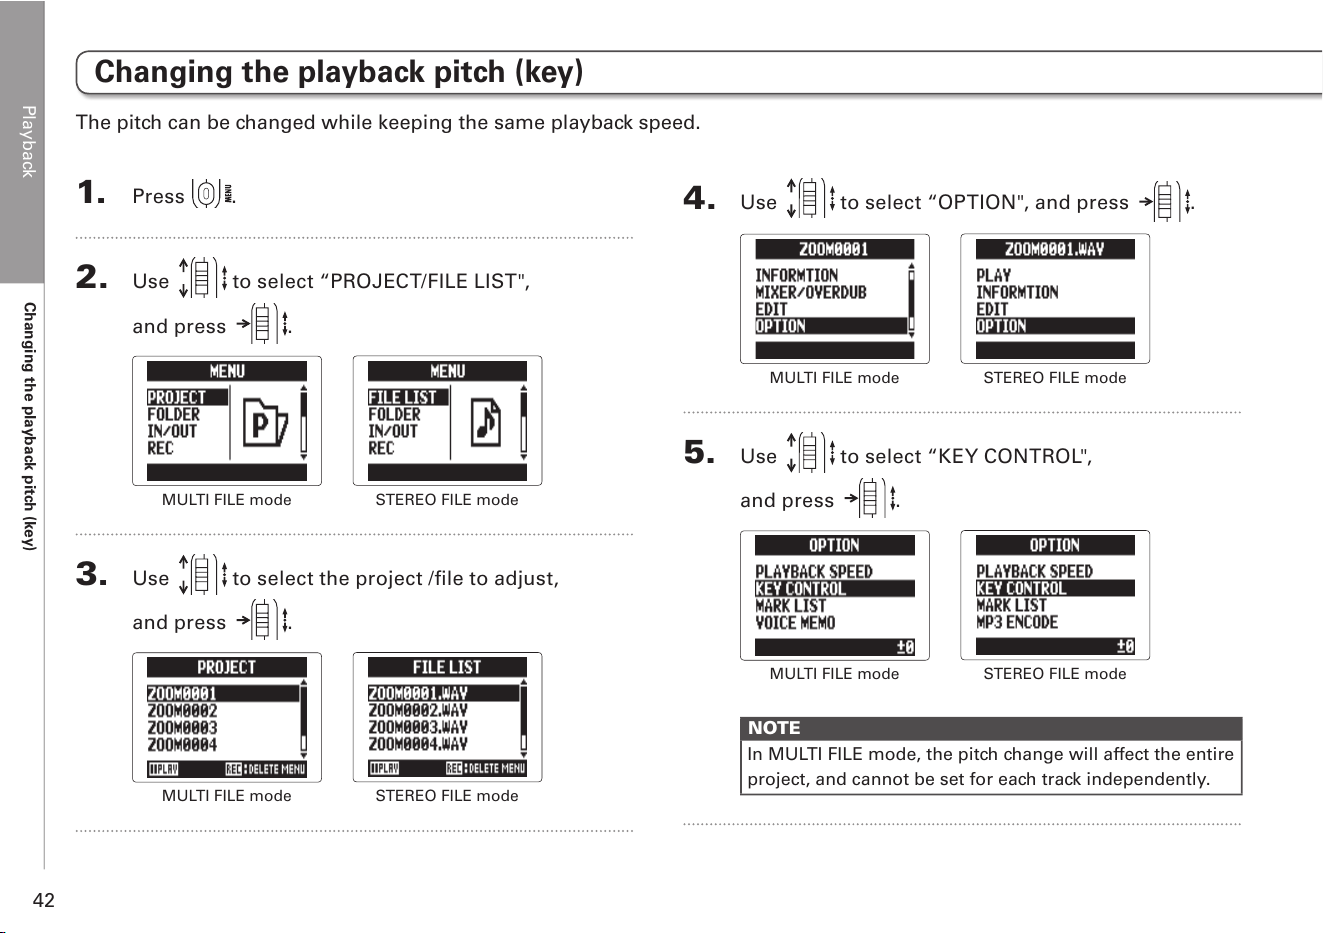
Changing the playback pitch (key)
1. Press .
2. Use to select “PROJECT/FILE LIST",
and press
.
MULTI FILE mode
STEREO FILE mode
3. Use to select the project /file to adjust,
and press
.
MULTI FILE mode
STEREO FILE mode
4. Use to select “OPTION", and press .
MULTI FILE mode
STEREO FILE mode
5. Use to select “KEY CONTROL",
and press
.
MULTI FILE mode
STEREO FILE mode
NOTE
In MULTI FILE mode, the pitch change will affect the entire
project, and cannot be set for each track independently.
The pitch can be changed while keeping the same playback speed.
Playback
Changing the playback pitch (key)
43
H5 Handy Recorder
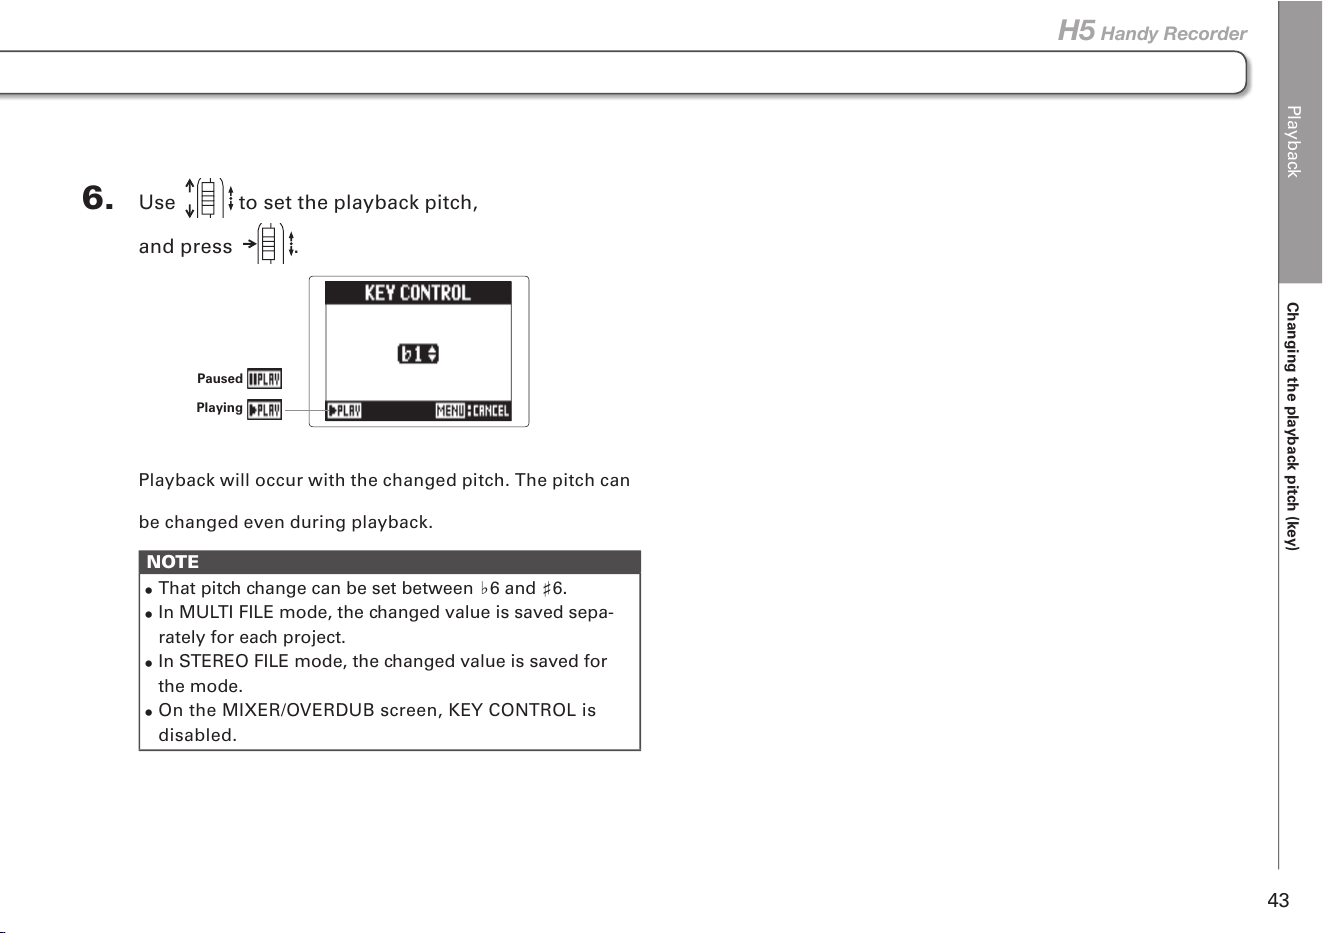
6. Use to set the playback pitch,
and press
.
Playing
Paused
Playback will occur with the changed pitch. The pitch can
be changed even during playback.
NOTE
•
That pitch change can be set between 6 and 6.
•
In MULTI FILE mode, the changed value is saved sepa-
rately for each project.
•
In STEREO FILE mode, the changed value is saved for
the mode.
•
On the MIXER/OVERDUB screen, KEY CONTROL is
disabled.
Playback
Changing the playback speed
44
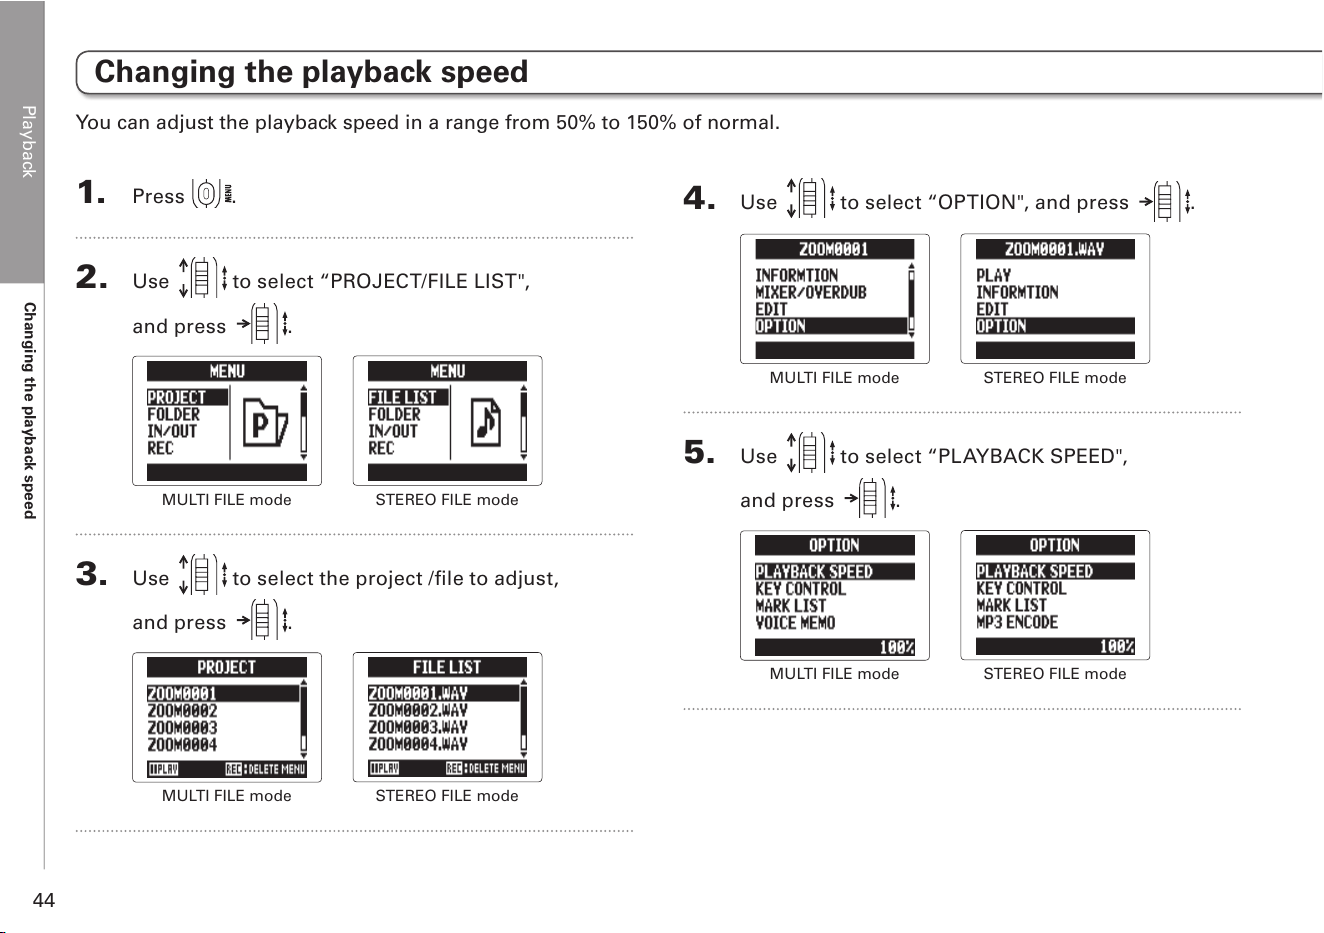
Changing the playback speed
1. Press .
2. Use to select “PROJECT/FILE LIST",
and press
.
MULTI FILE mode
STEREO FILE mode
3. Use to select the project /file to adjust,
and press
.
MULTI FILE mode
STEREO FILE mode
4. Use to select “OPTION", and press .
MULTI FILE mode
STEREO FILE mode
5. Use to select “PLAYBACK SPEED",
and press
.
MULTI FILE mode
STEREO FILE mode
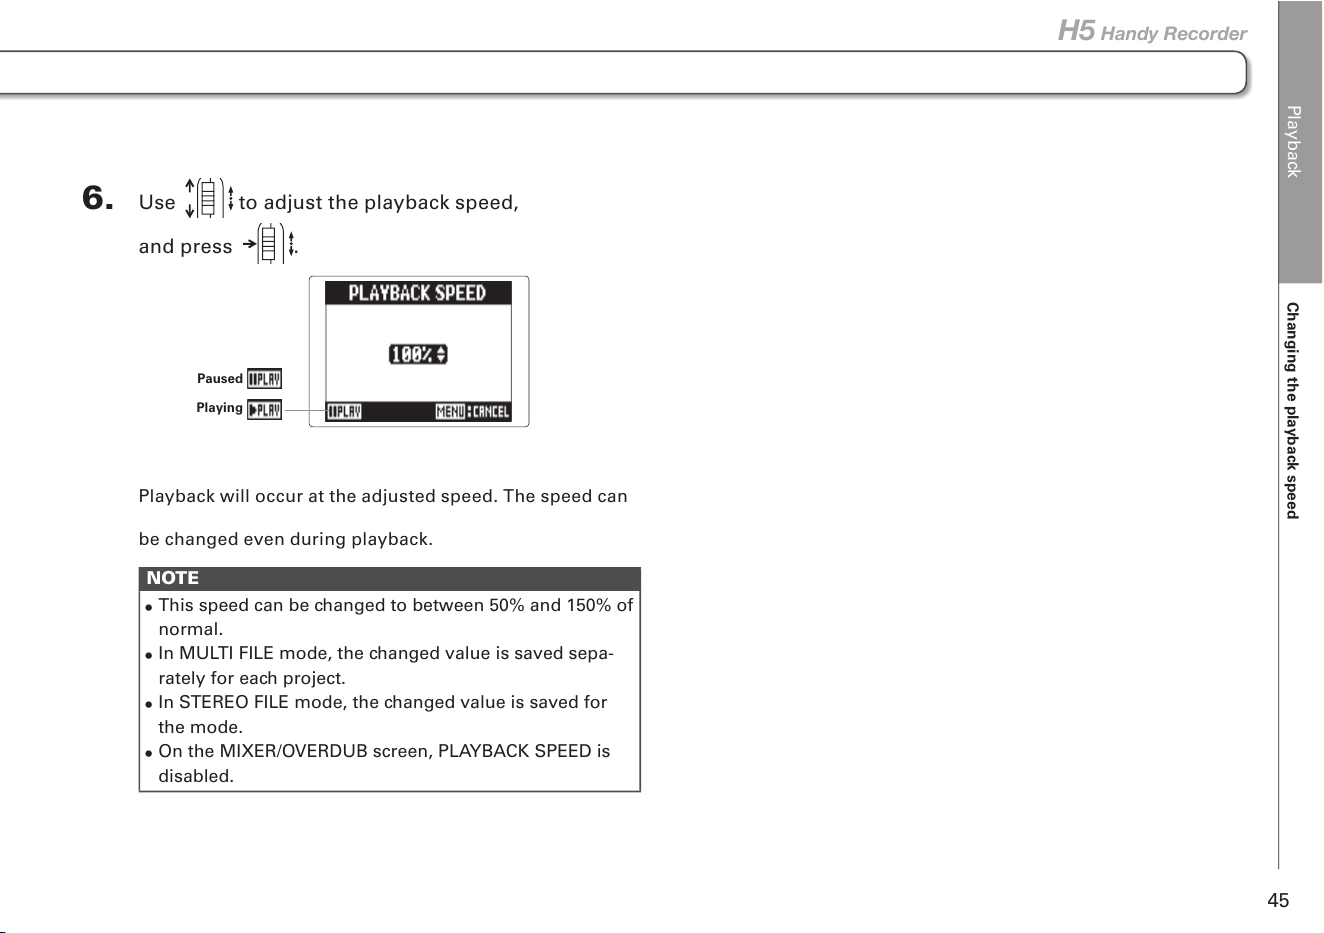
You can adjust the playback speed in a range from 50% to 150% of normal.
Playback
Changing the playback speed
45
H5 Handy Recorder
6. Use to adjust the playback speed,
and press
.
Playing
Paused
Playback will occur at the adjusted speed. The speed can
be changed even during playback.
NOTE
•
This speed can be changed to between 50% and 150% of
normal.
•
In MULTI FILE mode, the changed value is saved sepa-
rately for each project.
•
In STEREO FILE mode, the changed value is saved for
the mode.
•
On the MIXER/OVERDUB screen, PLAYBACK SPEED is
disabled.
Playback
Repeat playback of a set interval (AB repeat)
46
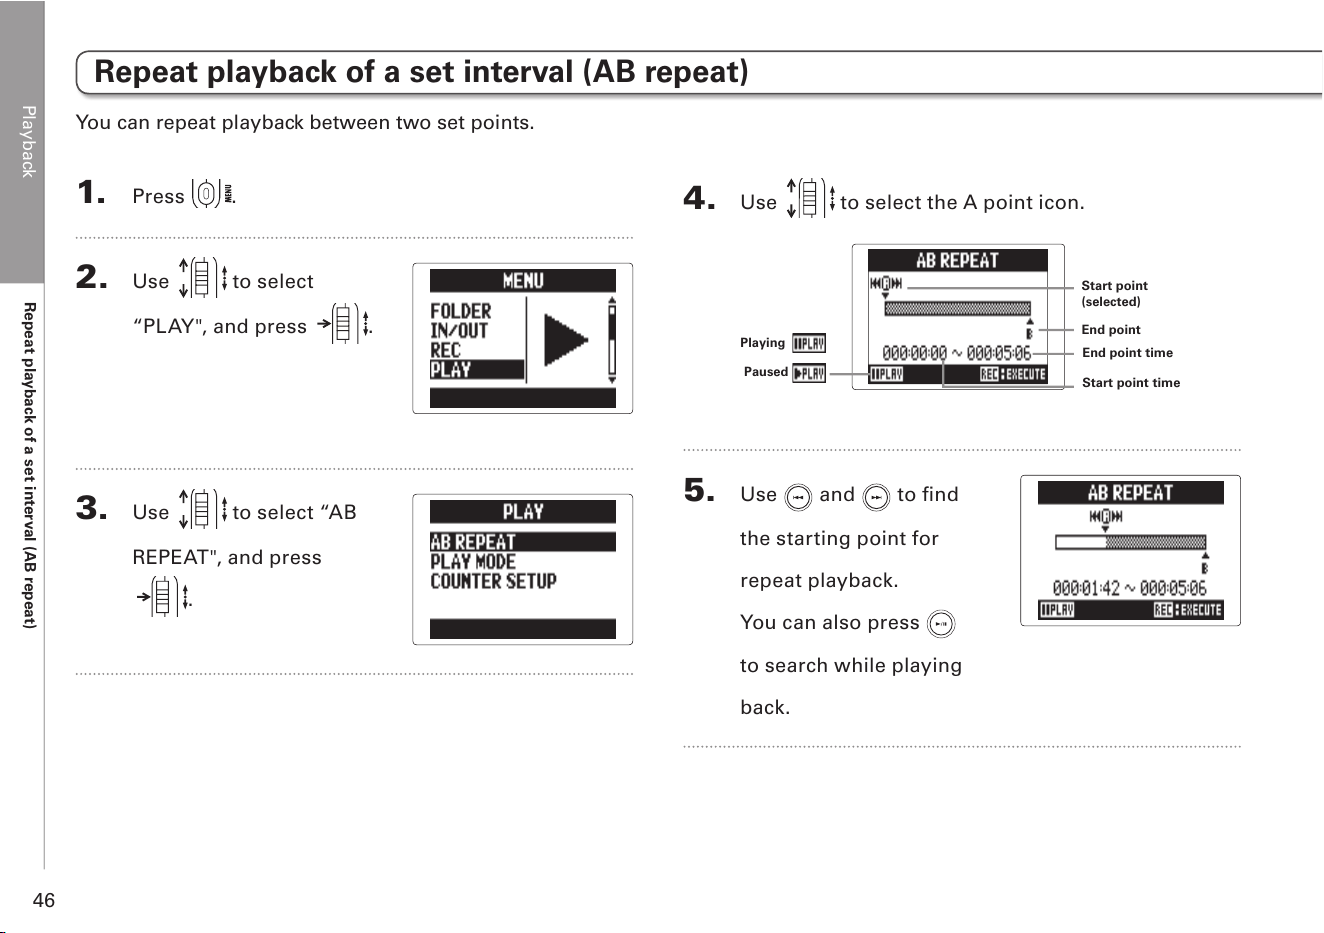
4. Use to select the A point icon.
End point time
Start point time
Paused
Playing
Start point
(selected)
End point
5. Use and to find
the starting point for
repeat playback.
You can also press
to search while playing
back.
Repeat playback of a set interval (AB repeat)
1. Press .
2. Use to select
“PLAY", and press .
3. Use to select “AB
REPEAT", and press
.
You can repeat playback between two set points.
Playback
Repeat playback of a set interval (AB repeat)
47
H5 Handy Recorder
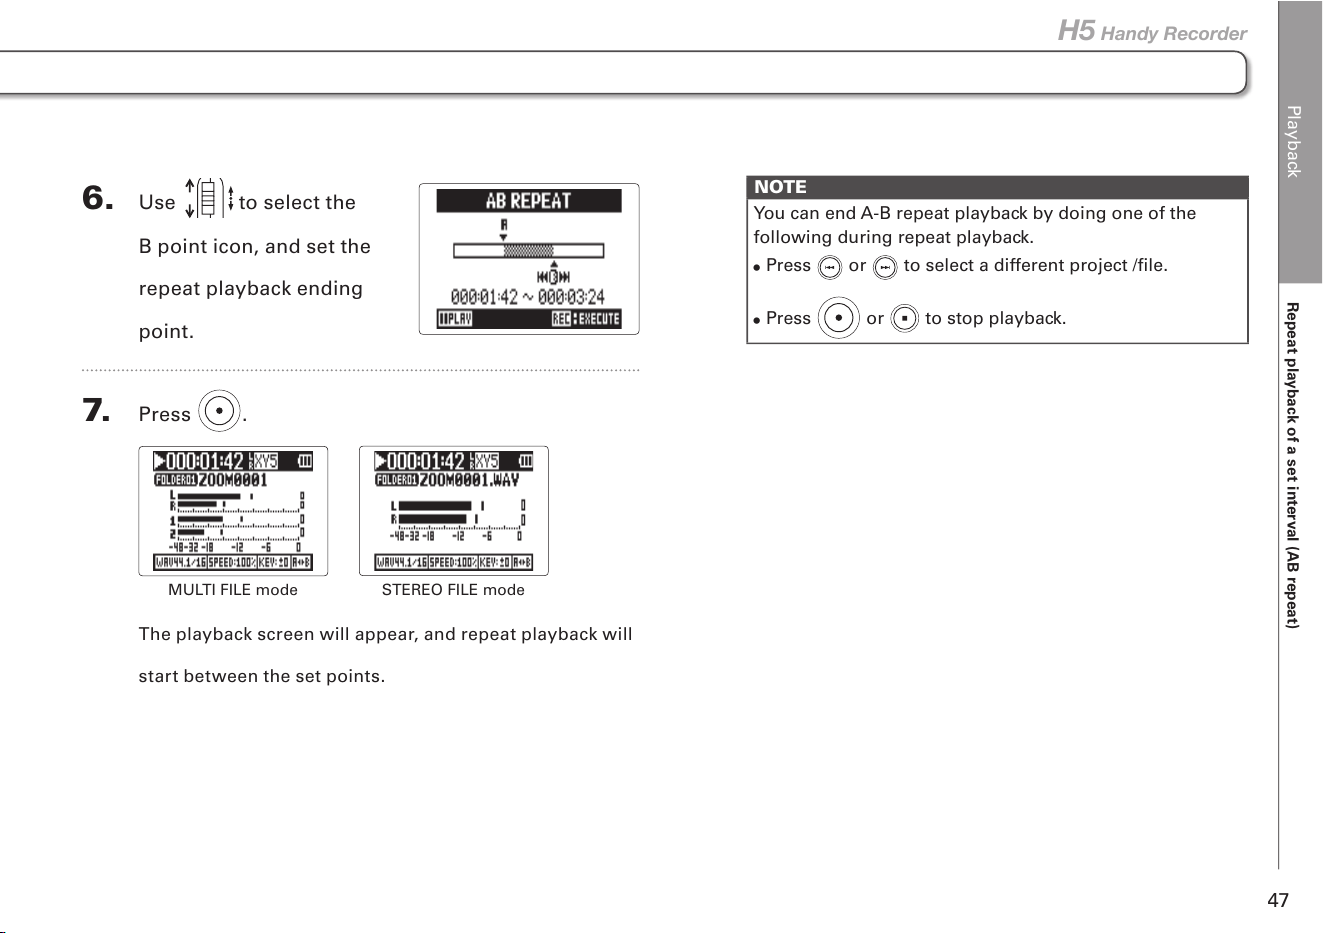
6. Use to select the
B point icon, and set the
repeat playback ending
point.
7. Press .
MULTI FILE mode
STEREO FILE mode
The playback screen will appear, and repeat playback will
start between the set points.
NOTE
You can end A-B repeat playback by doing one of the
following during repeat playback.
•
Press or to select a different project /file.
•
Press or to stop playback.
Playback
Mixing projects
48
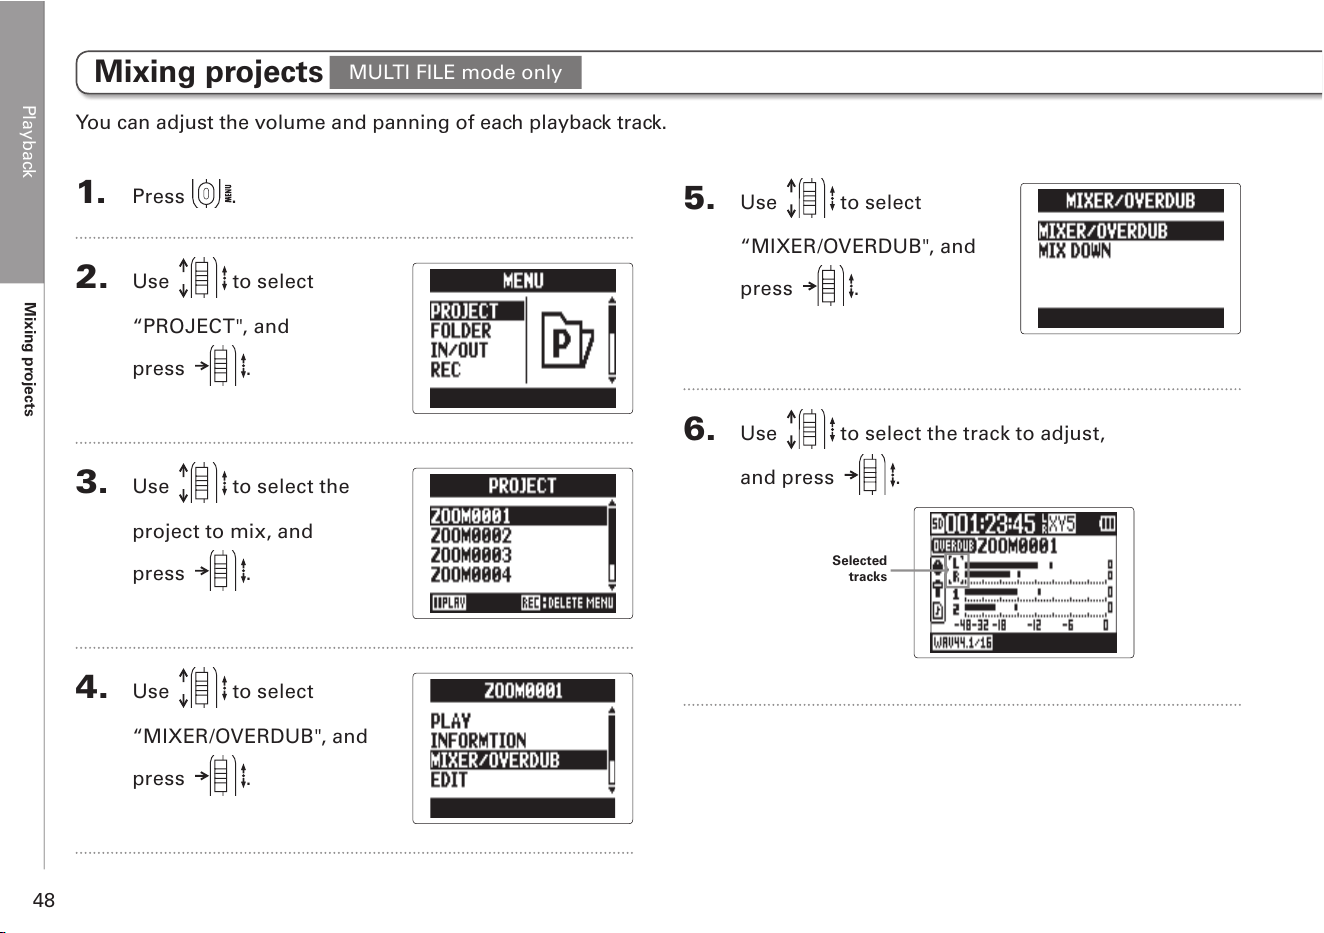
1. Press .
2. Use to select
“PROJECT", and
press
.
3. Use to select the
project to mix, and
press
.
4. Use to select
“MIXER/OVERDUB", and
press
.
5. Use to select
“MIXER/OVERDUB", and
press
.
6. Use to select the track to adjust,
and press
.
Selected
tracks
Mixing projects
You can adjust the volume and panning of each playback track.
MULTI FILE mode only
Playback
Mixing projects
49
H5 Handy Recorder
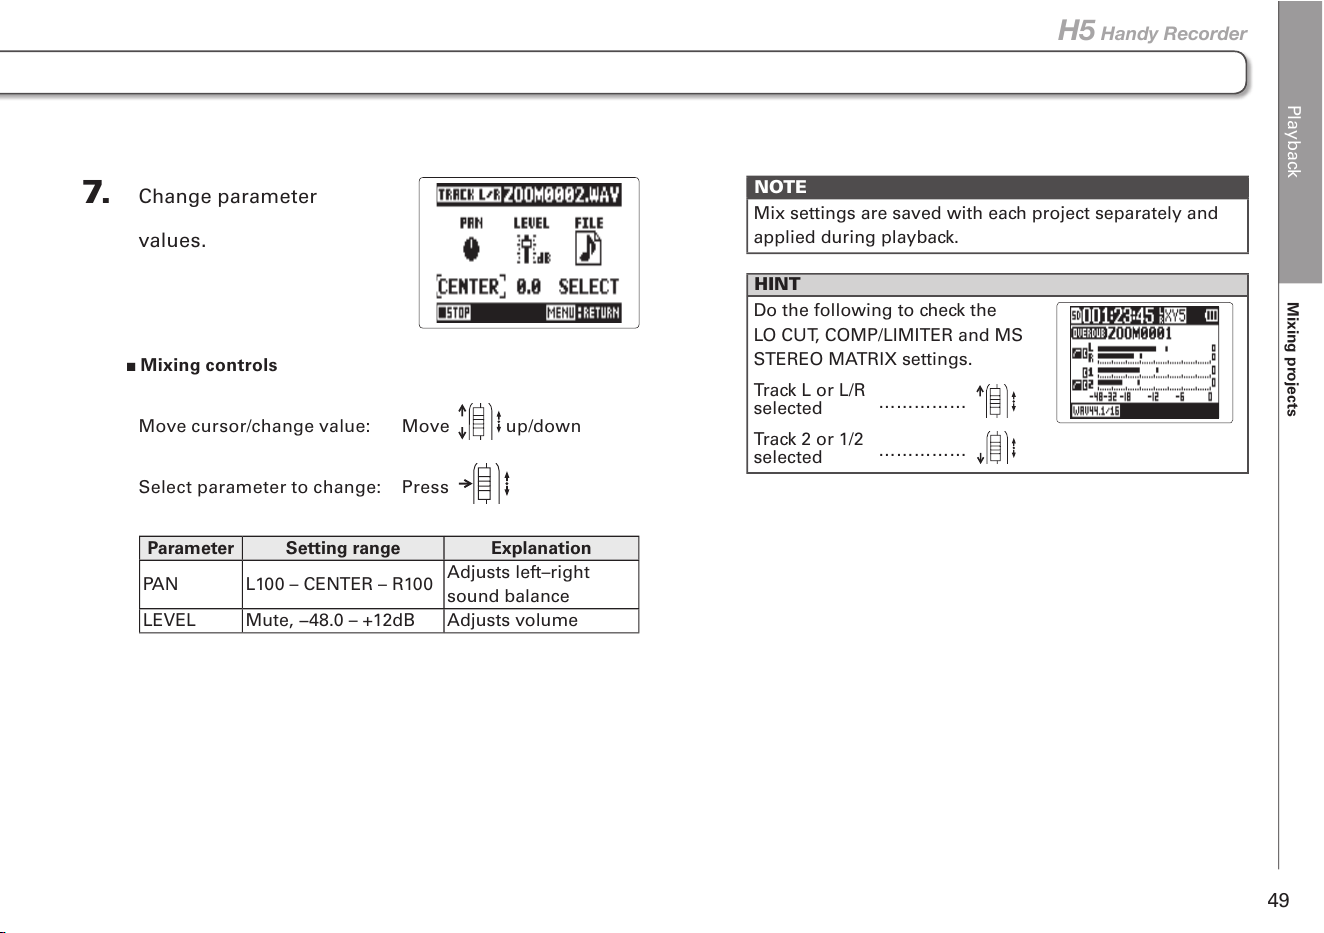
7. Change parameter
values.
Mixing controls
Move cursor/change value: Move up/down
Select parameter to change: Press
Parameter Setting range Explanation
PAN L100 – CENTER – R100
Adjusts left–right
sound balance
LEVEL Mute, −48.0 – +12dB Adjusts volume
NOTE
Mix settings are saved with each project separately and
applied during playback.
HINT
Do the following to check the
LO CUT, COMP/LIMITER and MS
STEREO MATRIX settings.
Track L or L/R
……………
selected
Track 2 or 1/2
……………
selected
Checking/editing projects/files
Checking project/file information
50
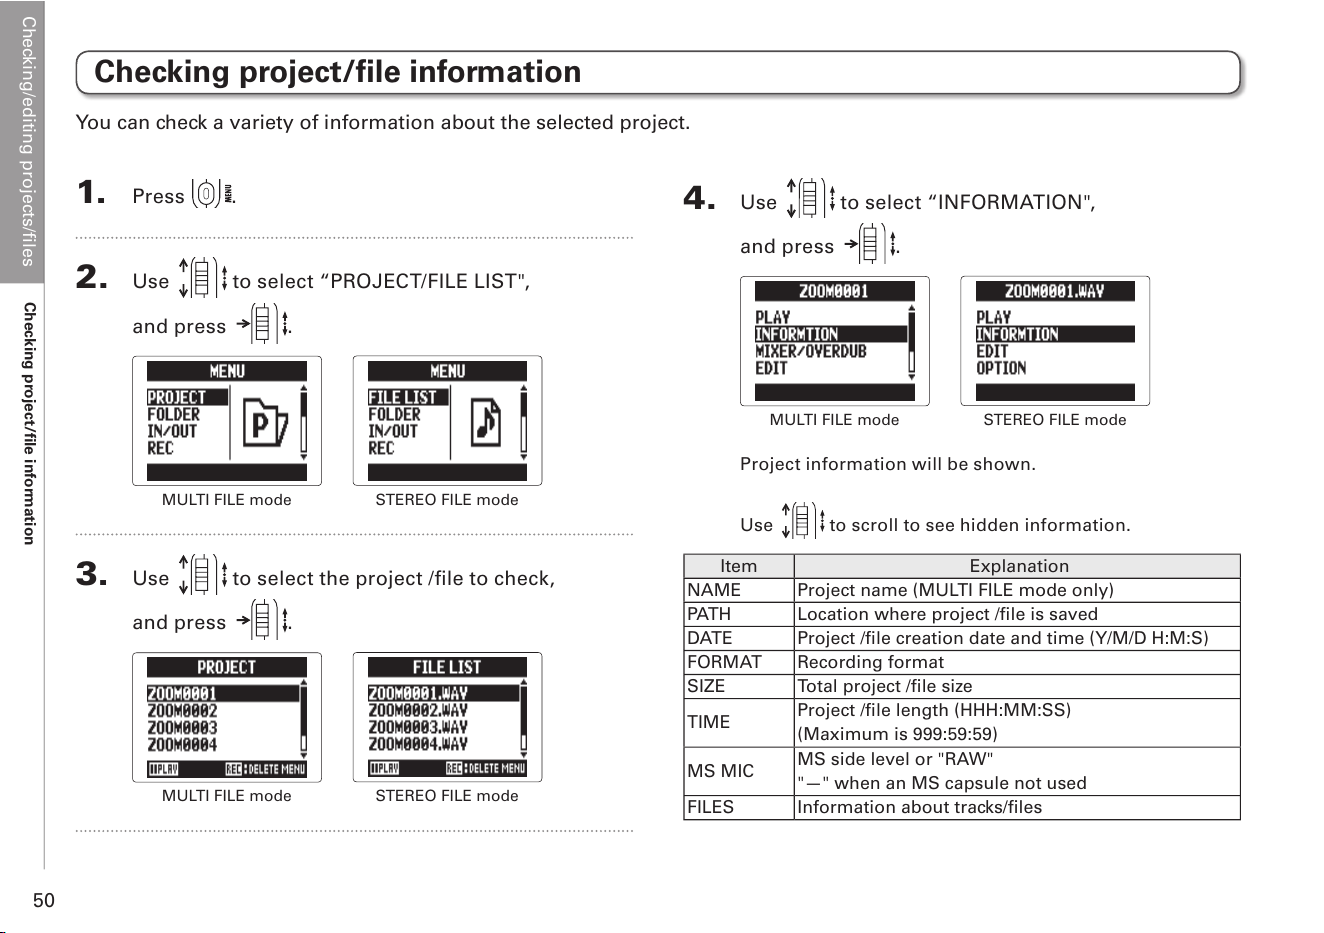
Checking project/file information
1. Press .
2. Use to select “PROJECT/FILE LIST",
and press
.
MULTI FILE mode
STEREO FILE mode
3. Use to select the project /file to check,
and press
.
MULTI FILE mode
STEREO FILE mode
4. Use to select “INFORMATION",
and press
.
MULTI FILE mode
STEREO FILE mode
Project information will be shown.
Use to scroll to see hidden information.
Item Explanation
NAME Project name (MULTI FILE mode only)
PATH Location where project /file is saved
DATE Project /file creation date and time (Y/M/D H:M:S)
FORMAT Recording format
SIZE Total project /file size
TIME
Project /file length (HHH:MM:SS)
(Maximum is 999:59:59)
MS MIC
MS side level or "RAW"
"—" when an MS capsule not used
FILES Information about tracks/files
You can check a variety of information about the selected project.
Checking/editing projects/files
Checking track marks
51
H5 Handy Recorder
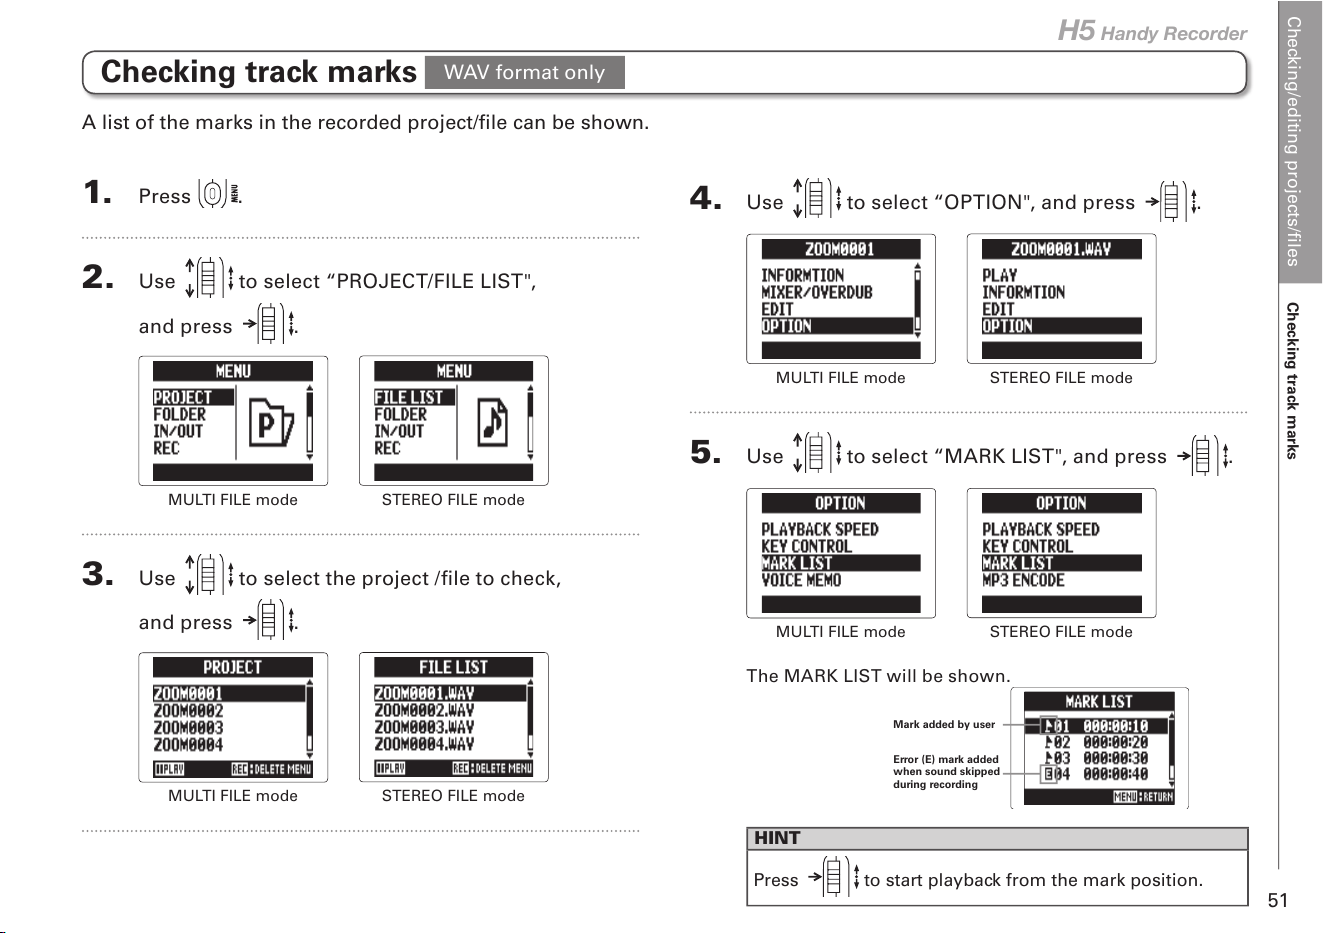
1. Press .
2. Use to select “PROJECT/FILE LIST",
and press
.
MULTI FILE mode
STEREO FILE mode
3. Use to select the project /file to check,
and press
.
MULTI FILE mode
STEREO FILE mode
4. Use to select “OPTION", and press .
MULTI FILE mode
STEREO FILE mode
5. Use to select “MARK LIST", and press .
MULTI FILE mode
STEREO FILE mode
The MARK LIST will be shown.
HINT
Press
to start playback from the mark position.
Mark added by user
Error (E) mark added
when sound skipped
during recording
Checking track marks
A list of the marks in the recorded project/file can be shown.
WAV format only
Checking/editing projects/files
Changing project/file names
52
Changing project/file names
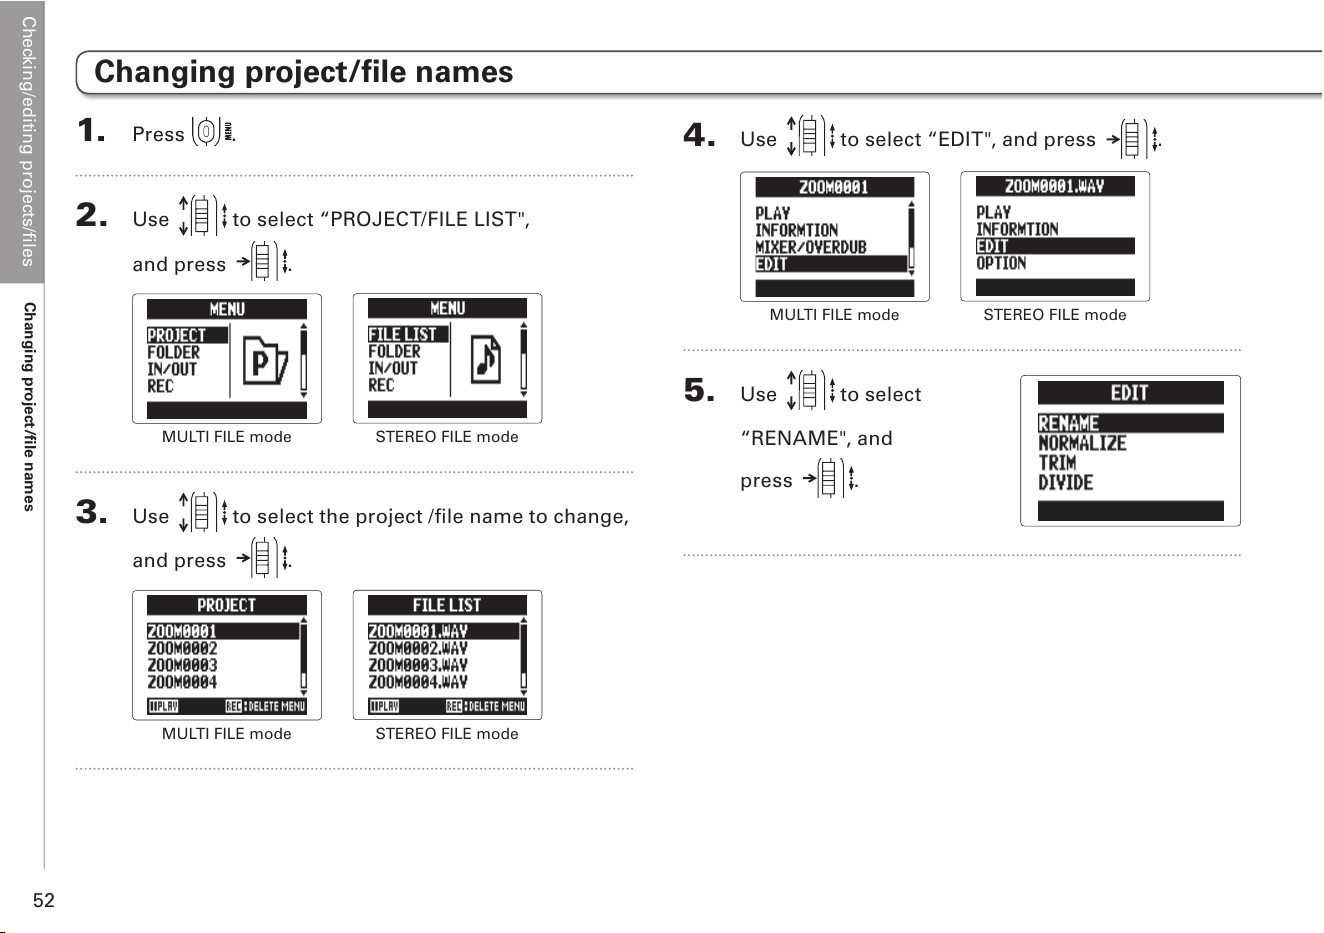
1. Press .
2. Use to select “PROJECT/FILE LIST",
and press
.
MULTI FILE mode
STEREO FILE mode
3. Use to select the project /file name to change,
and press .
MULTI FILE mode
STEREO FILE mode
4. Use to select “EDIT", and press .
MULTI FILE mode
STEREO FILE mode
5. Use to select
“RENAME", and
press
.
Checking/editing projects/files
Changing project/file names
53
H5 Handy Recorder
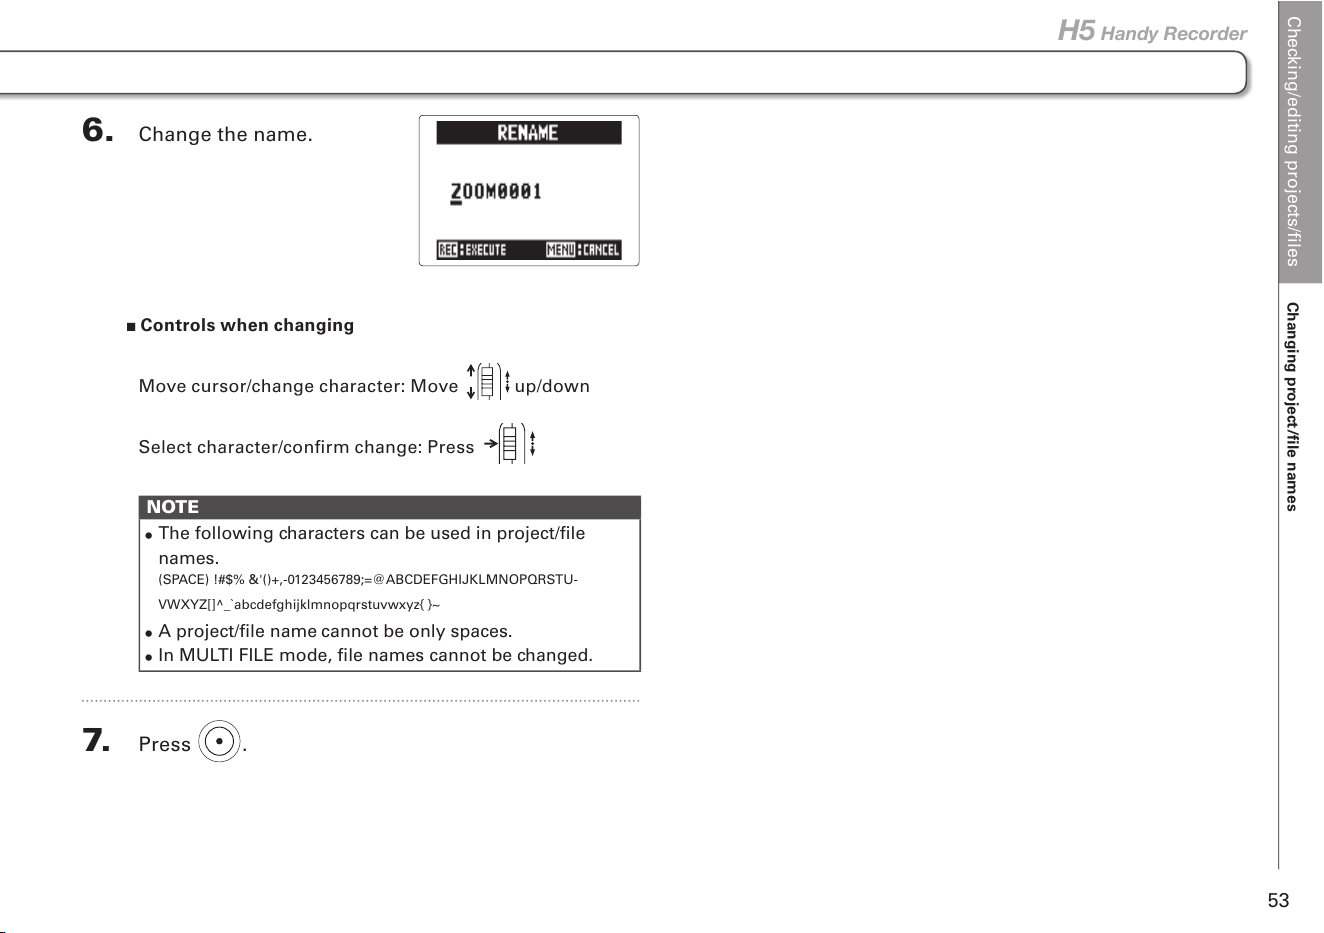
6. Change the name.
Controls when changing
Move cursor/change character: Move
up/down
Select character/confirm change: Press
NOTE
•
The following characters can be used in project/file
names.
(SPACE) !#$% &'()+,-0123456789;=@ABCDEFGHIJKLMNOPQRSTU-
VWXYZ[]^_`abcdefghijklmnopqrstuvwxyz{ }~
•
A project/file name cannot be only spaces.
•
In MULTI FILE mode, file names cannot be changed.
7. Press .
Checking/editing projects/files
Mixing down a project
54
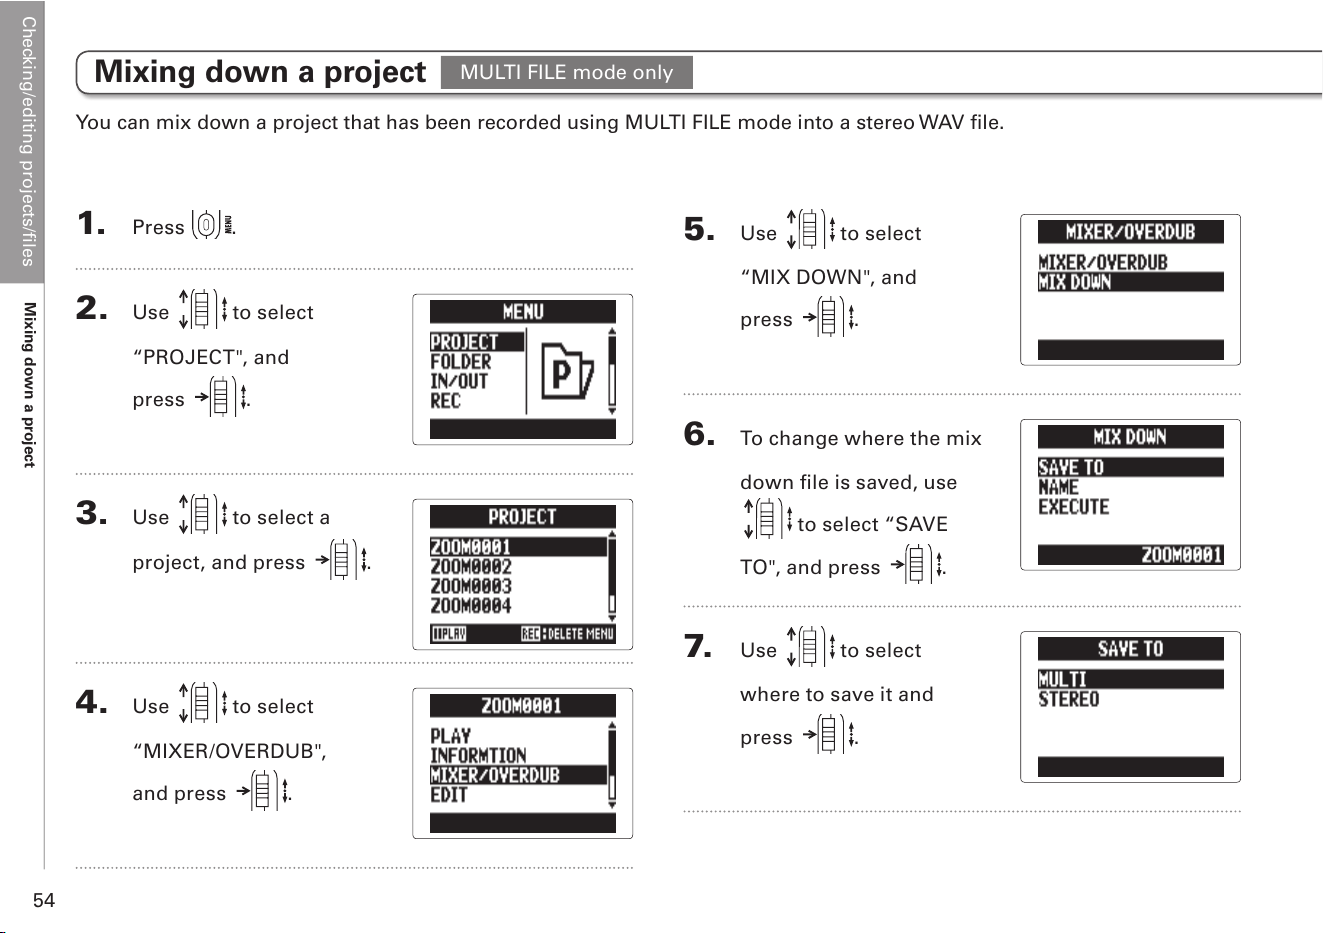
5. Use to select
“MIX DOWN", and
press
.
6. To change where the mix
down file is saved, use
to select “SAVE
TO", and press .
7. Use to select
where to save it and
press
.
1. Press .
2. Use to select
“PROJECT", and
press
.
3. Use to select a
project, and press .
4. Use to select
“MIXER/OVERDUB",
and press
.
Mixing down a project
You can mix down a project that has been recorded using MULTI FILE mode into a stereo WAV file.
MULTI FILE mode only
Checking/editing projects/files
Mixing down a project
55
H5 Handy Recorder
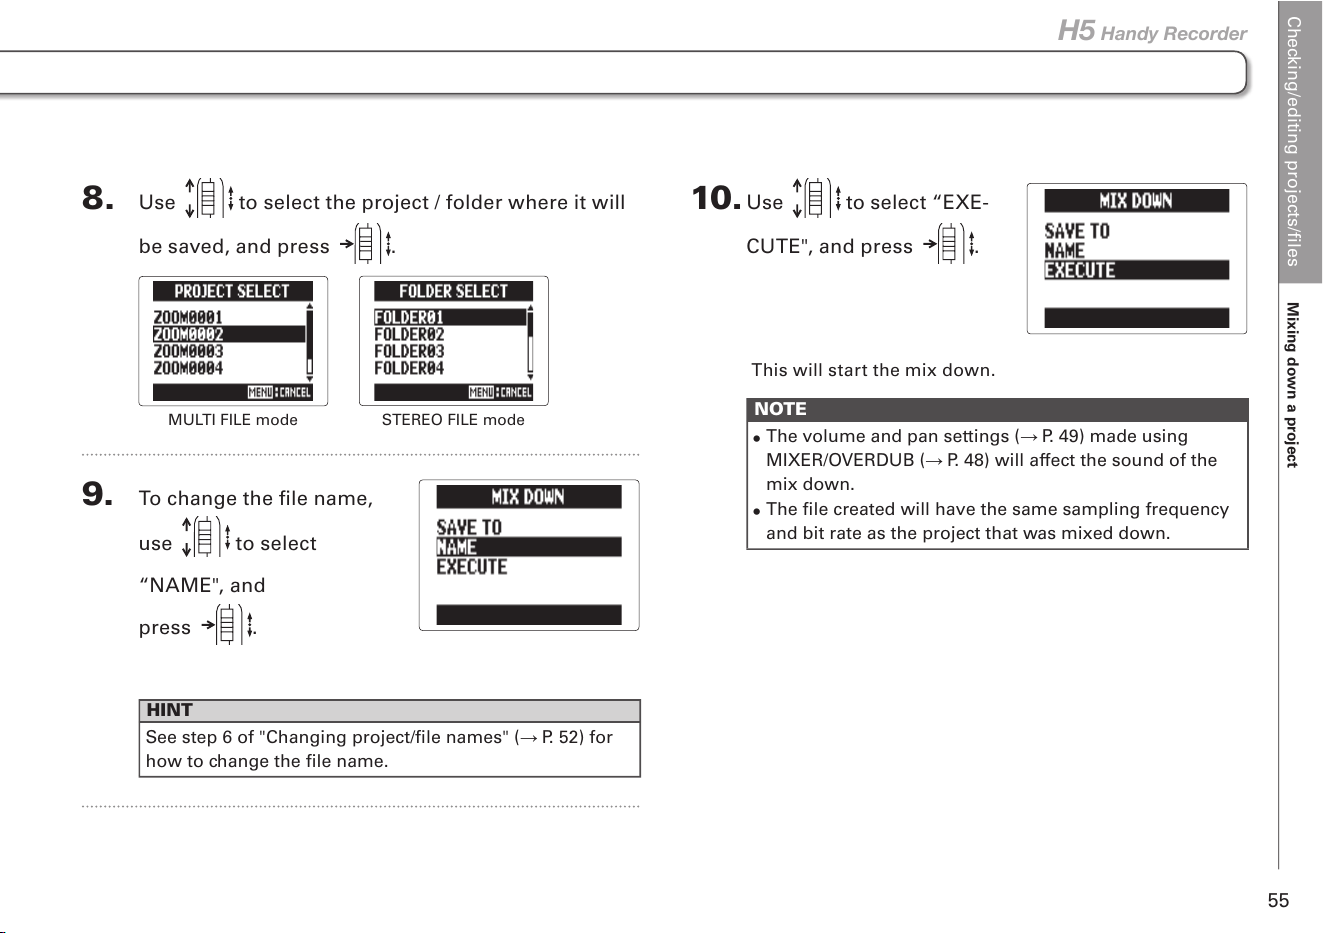
8. Use to select the project / folder where it will
be saved, and press .
MULTI FILE mode
STEREO FILE mode
9. To change the file name,
use to select
“NAME", and
press
.
HINT
See step 6 of "Changing project/file names" ( P. 52) for
how to change the file name.
10. Use to select “EXE-
CUTE", and press
.
This will start the mix down.
NOTE
•
The volume and pan settings ( P. 49) made using
MIXER/OVERDUB ( P. 48) will affect the sound of the
mix down.
•
The file created will have the same sampling frequency
and bit rate as the project that was mixed down.
Checking/editing projects/files
Converting WAV files to MP3 files
56
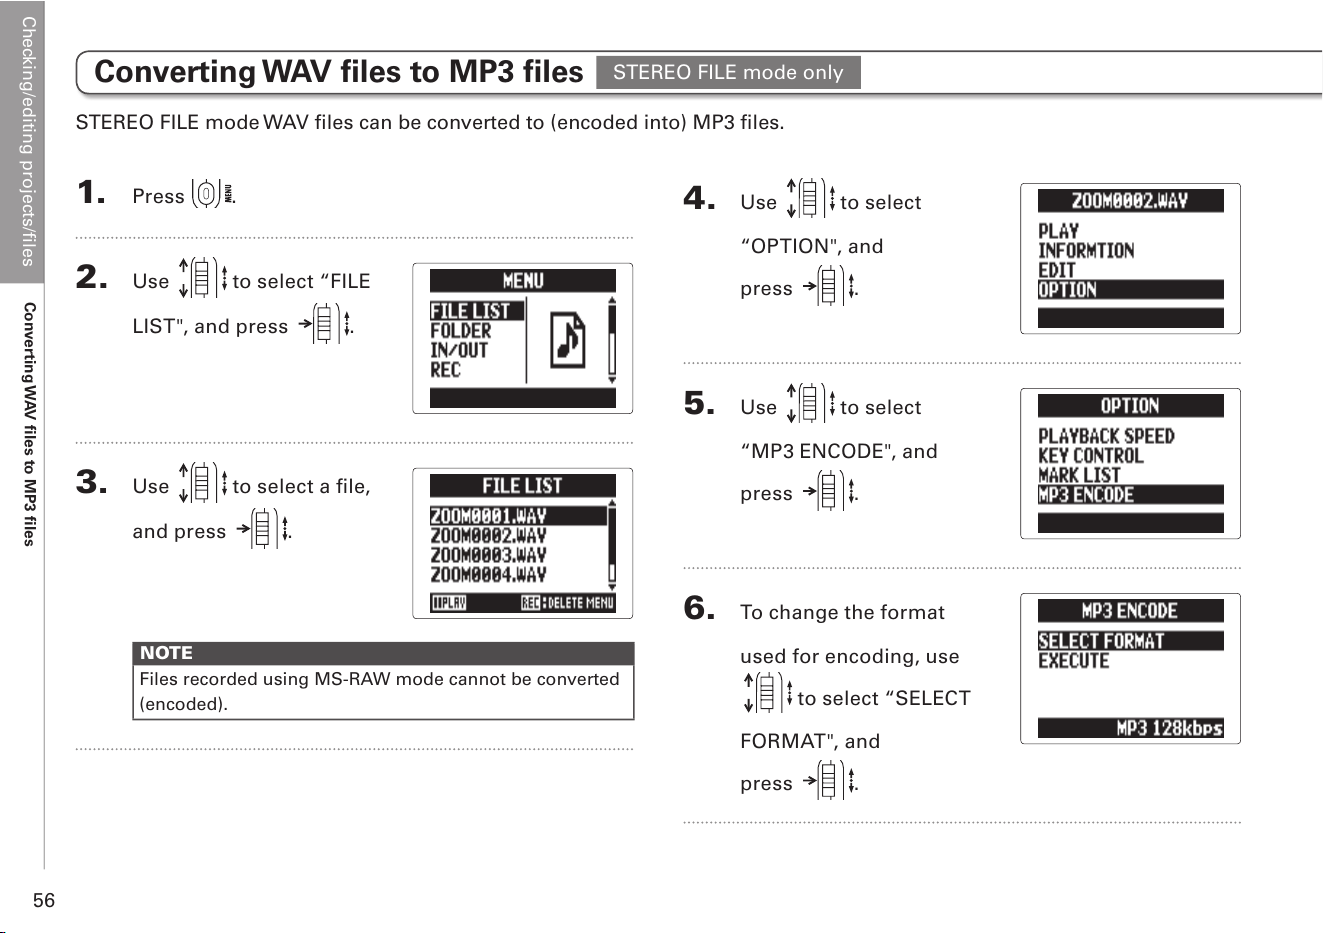
Converting WAV files to MP3 files
STEREO FILE mode WAV files can be converted to (encoded into) MP3 files.
1. Press .
2. Use to select “FILE
LIST", and press .
3. Use to select a file,
and press .
NOTE
Files recorded using MS-RAW mode cannot be converted
(encoded).
4. Use to select
“OPTION", and
press
.
5. Use to select
“MP3 ENCODE", and
press
.
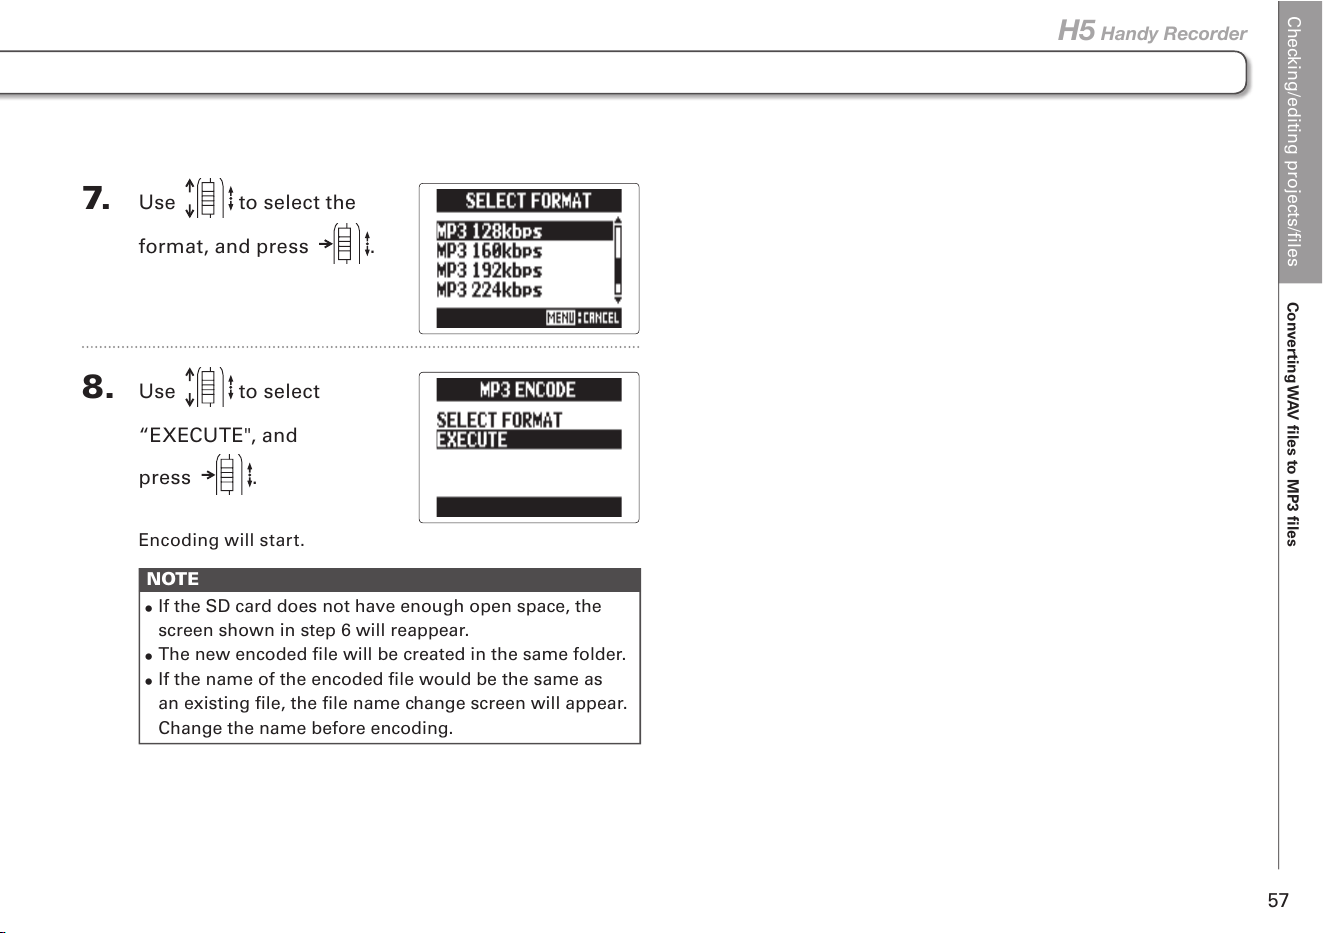
6. To change the format
used for encoding, use
to select “SELECT
FORMAT", and
press
.
STEREO FILE mode only
Checking/editing projects/files
Converting WAV files to MP3 files
57
H5 Handy Recorder
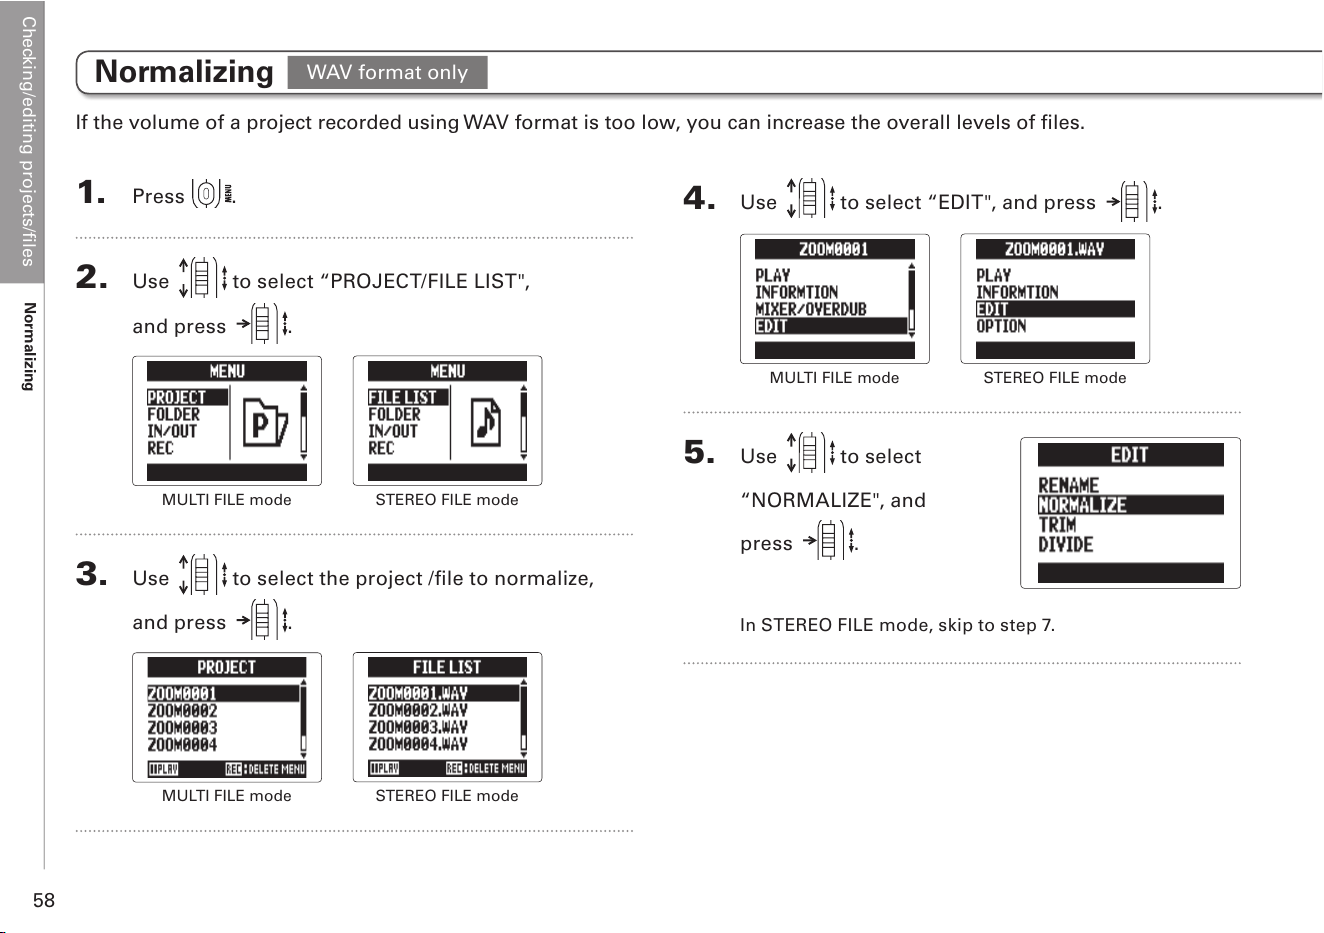
7. Use to select the
format, and press .
8. Use to select
“EXECUTE", and
press
.
Encoding will start.
NOTE
•
If the SD card does not have enough open space, the
screen shown in step 6 will reappear.
•
The new encoded file will be created in the same folder.
•
If the name of the encoded file would be the same as
an existing file, the file name change screen will appear.
Change the name before encoding.
Checking/editing projects/files
Normalizing
58
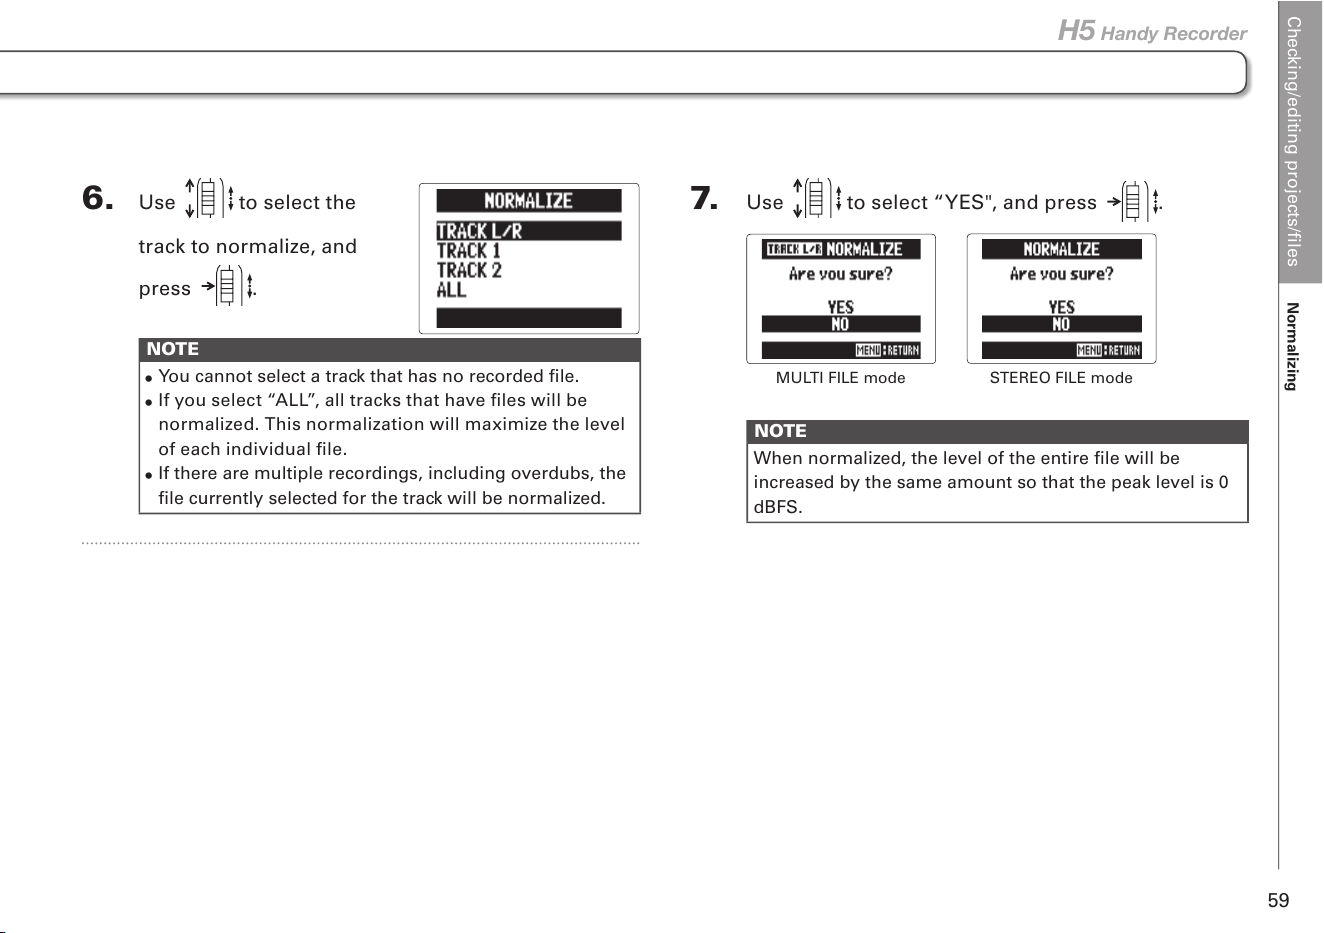
Normalizing
1. Press .
2. Use to select “PROJECT/FILE LIST",
and press
.
MULTI FILE mode
STEREO FILE mode
3. Use to select the project /file to normalize,
and press .
MULTI FILE mode
STEREO FILE mode
4. Use to select “EDIT", and press .
MULTI FILE mode
STEREO FILE mode
5. Use to select
“NORMALIZE", and
press
.
In STEREO FILE mode, skip to step 7.
If the volume of a project recorded using WAV format is too low, you can increase the overall levels of files.
WAV format only
Checking/editing projects/files
Normalizing
59
H5 Handy Recorder
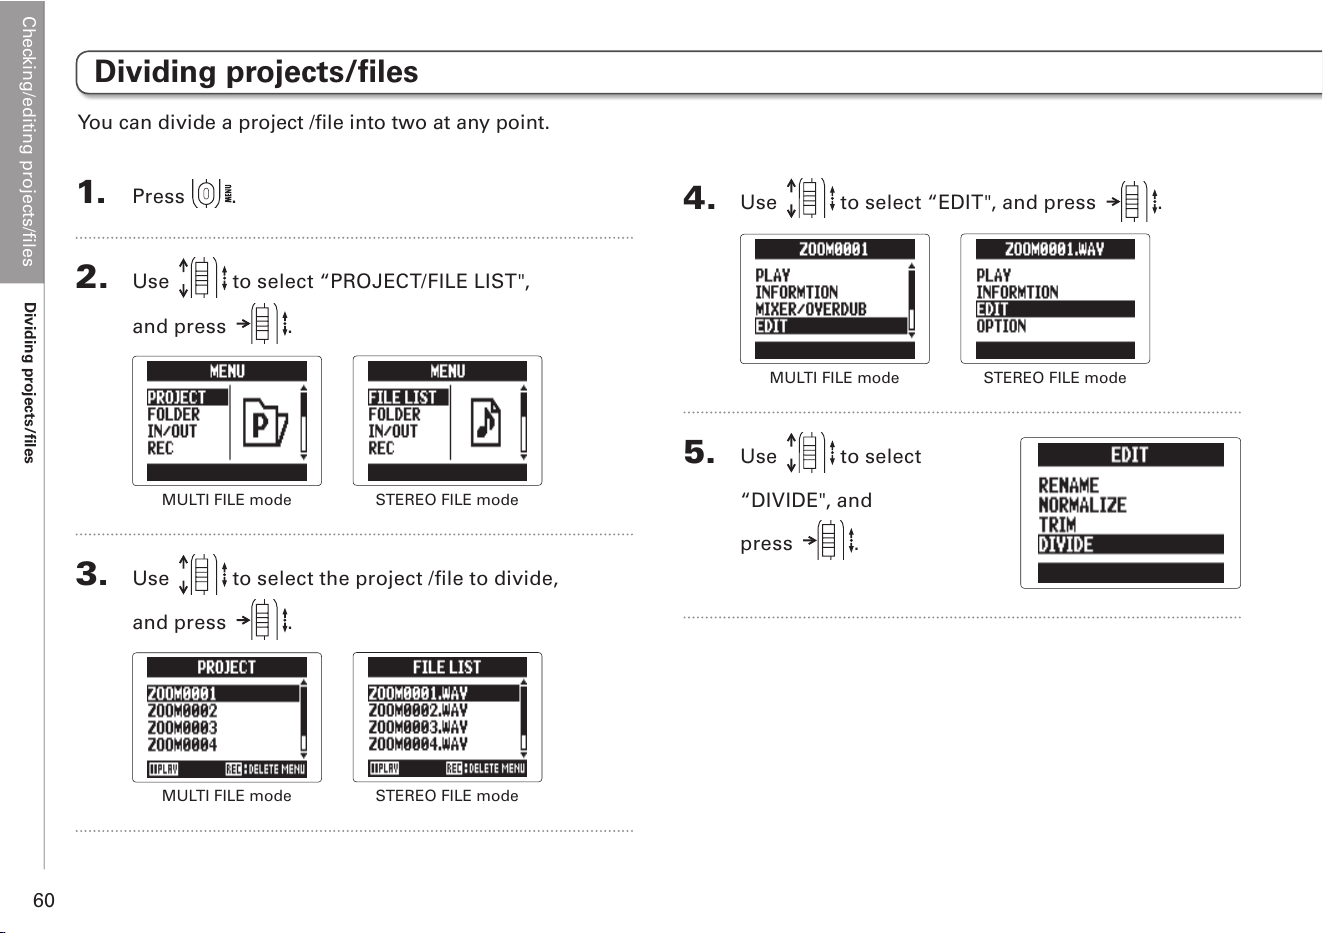
6. Use to select the
track to normalize, and
press
.
NOTE
•
You cannot select a track that has no recorded file.
•
If you select “ALL”, all tracks that have files will be
normalized. This normalization will maximize the level
of each individual file.
•
If there are multiple recordings, including overdubs, the
file currently selected for the track will be normalized.
7. Use to select “YES", and press .
MULTI FILE mode
STEREO FILE mode
NOTE
When normalized, the level of the entire file will be
increased by the same amount so that the peak level is 0
dBFS.
Checking/editing projects/files
Dividing projects/files
60
4. Use to select “EDIT", and press .
MULTI FILE mode
STEREO FILE mode
5. Use to select
“DIVIDE", and
press
.
1. Press .
2. Use to select “PROJECT/FILE LIST",
and press
.
MULTI FILE mode
STEREO FILE mode
3. Use to select the project /file to divide,
and press
.
MULTI FILE mode
STEREO FILE mode
Dividing projects/files
You can divide a project /file into two at any point.
Checking/editing projects/files
Dividing projects/files
61
H5 Handy Recorder
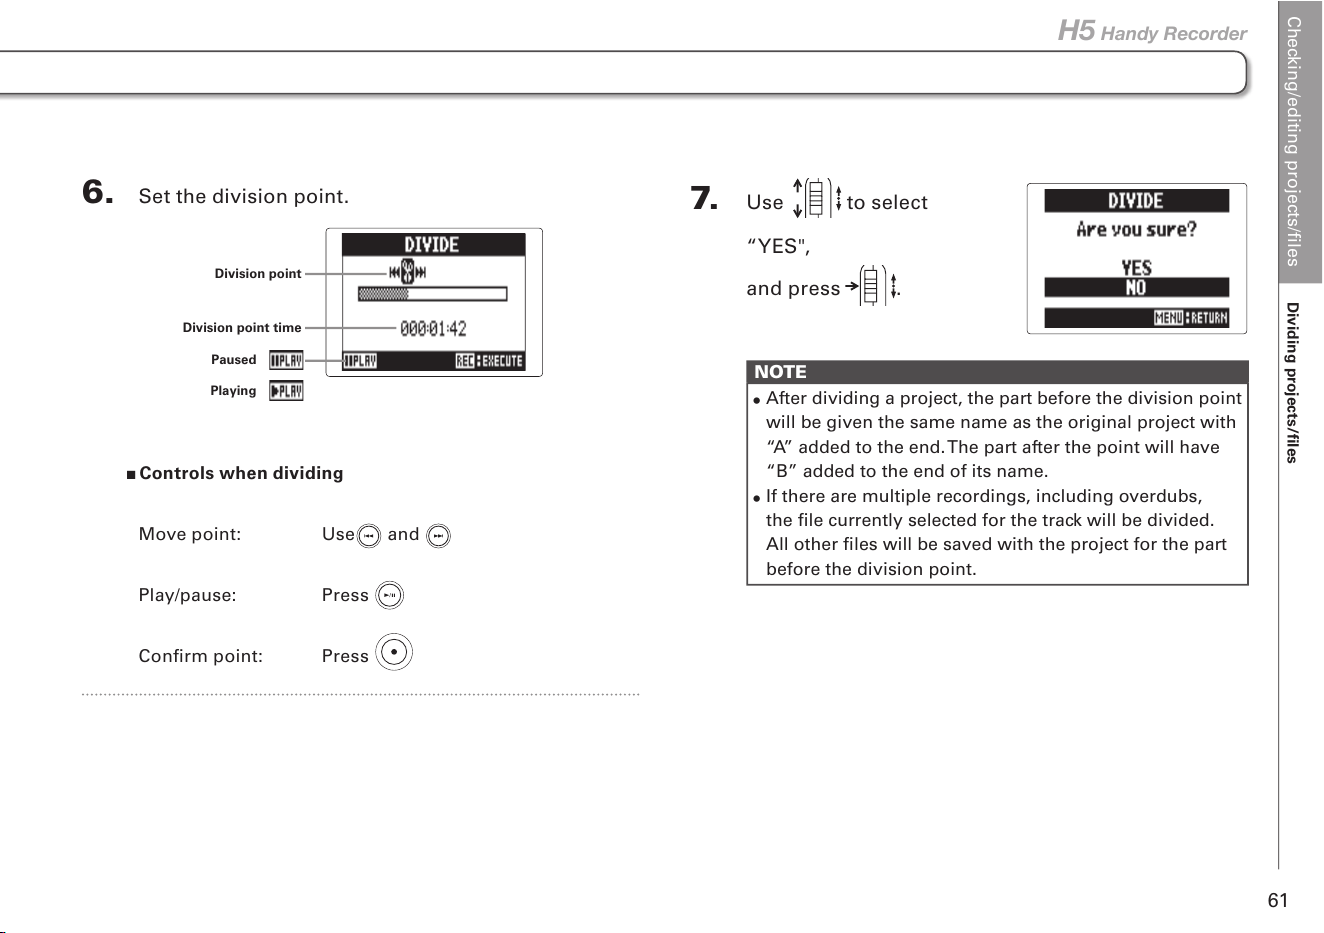
6. Set the division point.
Division point
Division point time
Paused
Playing
Controls when dividing
Move point: Use and
Play/pause: Press
Confirm point: Press
7. Use to select
“YES",
and press
.
NOTE
•
After dividing a project, the part before the division point
will be given the same name as the original project with
“A” added to the end. The part after the point will have
“B” added to the end of its name.
•
If there are multiple recordings, including overdubs,
the file currently selected for the track will be divided.
All other files will be saved with the project for the part
before the division point.
Checking/editing projects/files
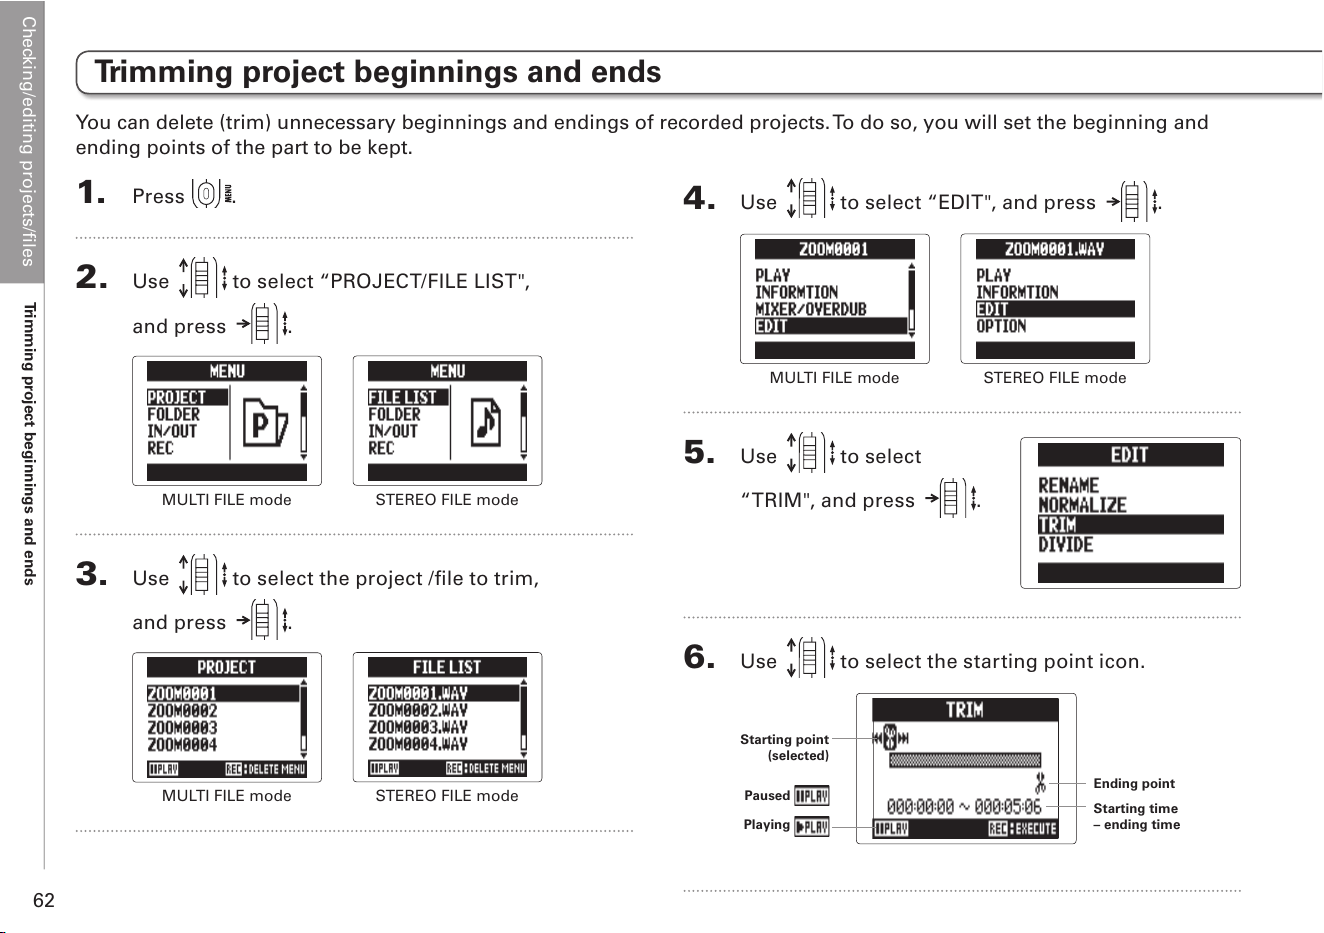
Trimming project beginnings and ends
62
1. Press .
2. Use to select “PROJECT/FILE LIST",
and press
.
MULTI FILE mode
STEREO FILE mode
3. Use to select the project /file to trim,
and press
.
MULTI FILE mode
STEREO FILE mode
4. Use to select “EDIT", and press .
MULTI FILE mode
STEREO FILE mode
5. Use to select
“TRIM", and press .
6. Use to select the starting point icon.
Playing
Paused
Starting point
(selected)
Starting time
– ending time
Ending point
Trimming project beginnings and ends
You can delete (trim) unnecessary beginnings and endings of recorded projects. To do so, you will set the beginning and
ending points of the part to be kept.
Checking/editing projects/files
Trimming project beginnings and ends
63
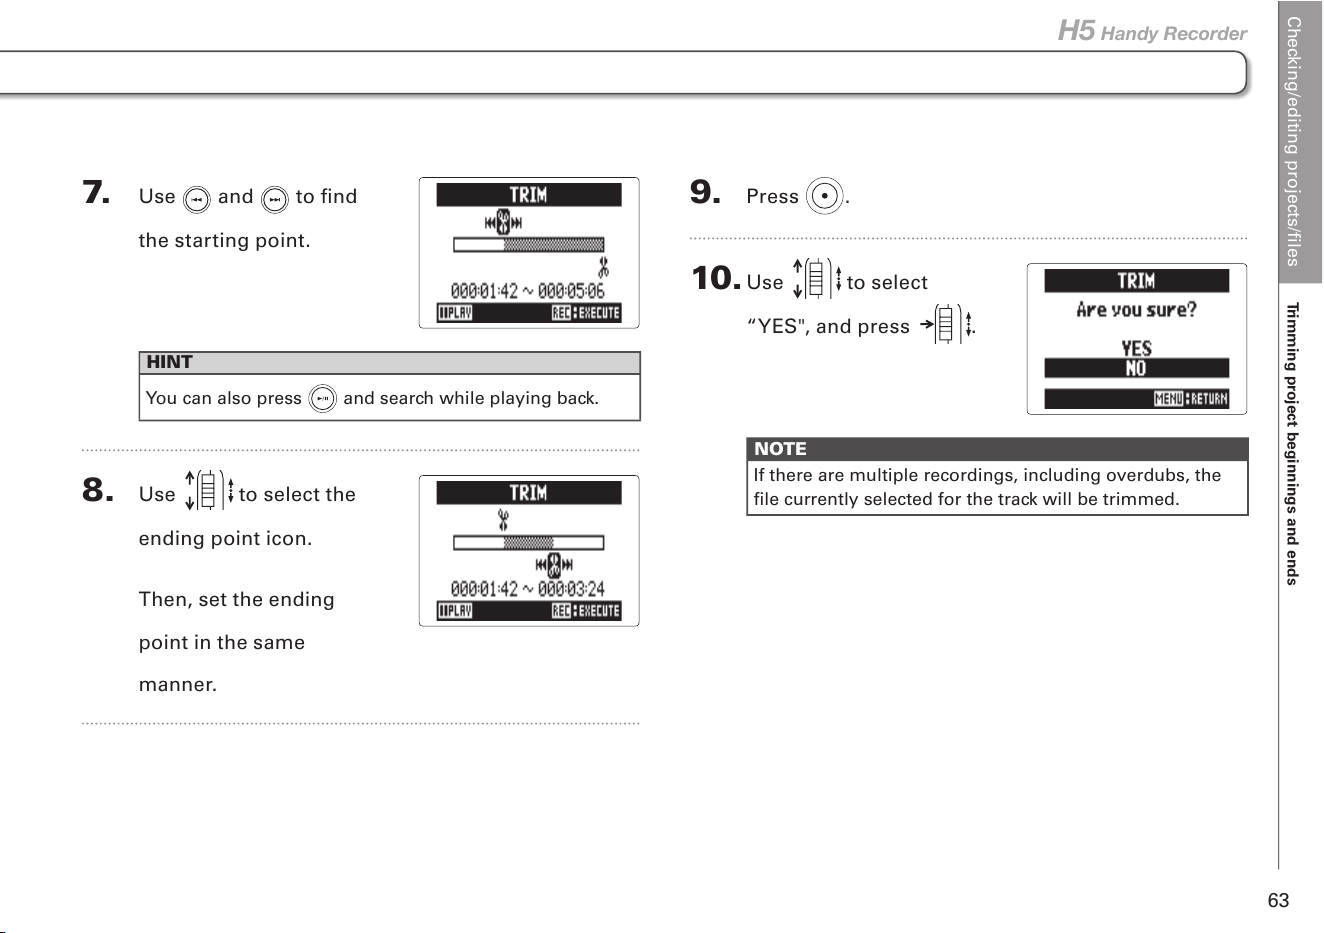
H5 Handy Recorder
7. Use and to find
the starting point.
HINT
You can also press
and search while playing back.
8. Use to select the
ending point icon.
Then, set the ending
point in the same
manner.
9. Press .
10. Use to select
“YES", and press .
NOTE
If there are multiple recordings, including overdubs, the
file currently selected for the track will be trimmed.
Checking/editing projects/files
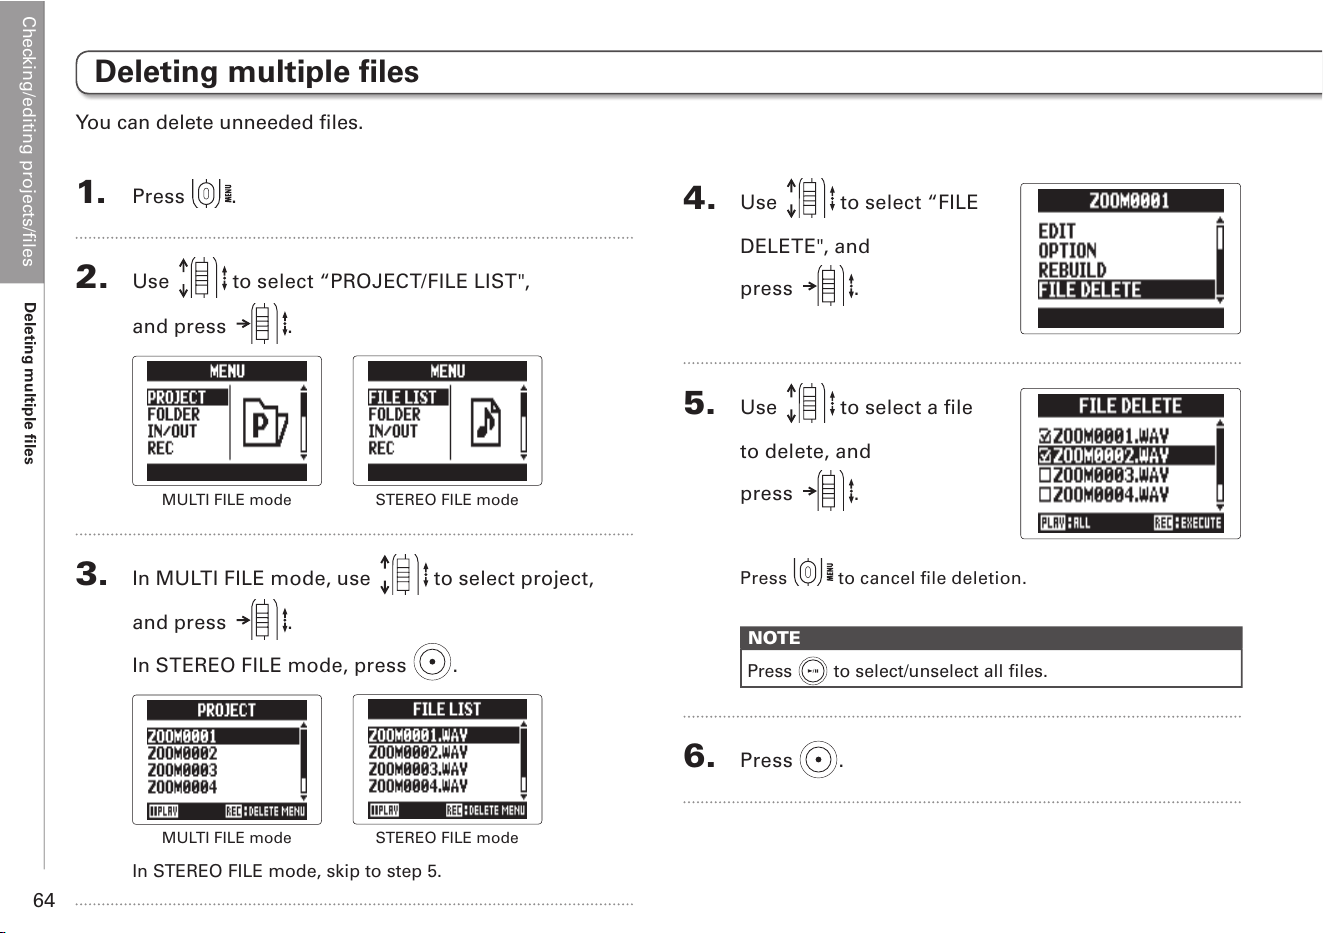
Deleting multiple files
64
Deleting multiple files
1. Press .
2. Use to select “PROJECT/FILE LIST",
and press
.
MULTI FILE mode
STEREO FILE mode
3. In MULTI FILE mode, use to select project,
and press .
In STEREO FILE mode, press
.
MULTI FILE mode
STEREO FILE mode
In STEREO FILE mode, skip to step 5.
4. Use to select “FILE
DELETE", and
press
.
5. Use to select a file
to delete, and
press
.
Press to cancel file deletion.
NOTE
Press
to select/unselect all files.
6. Press .
You can delete unneeded files.
Checking/editing projects/files
Deleting multiple files
65
H5 Handy Recorder
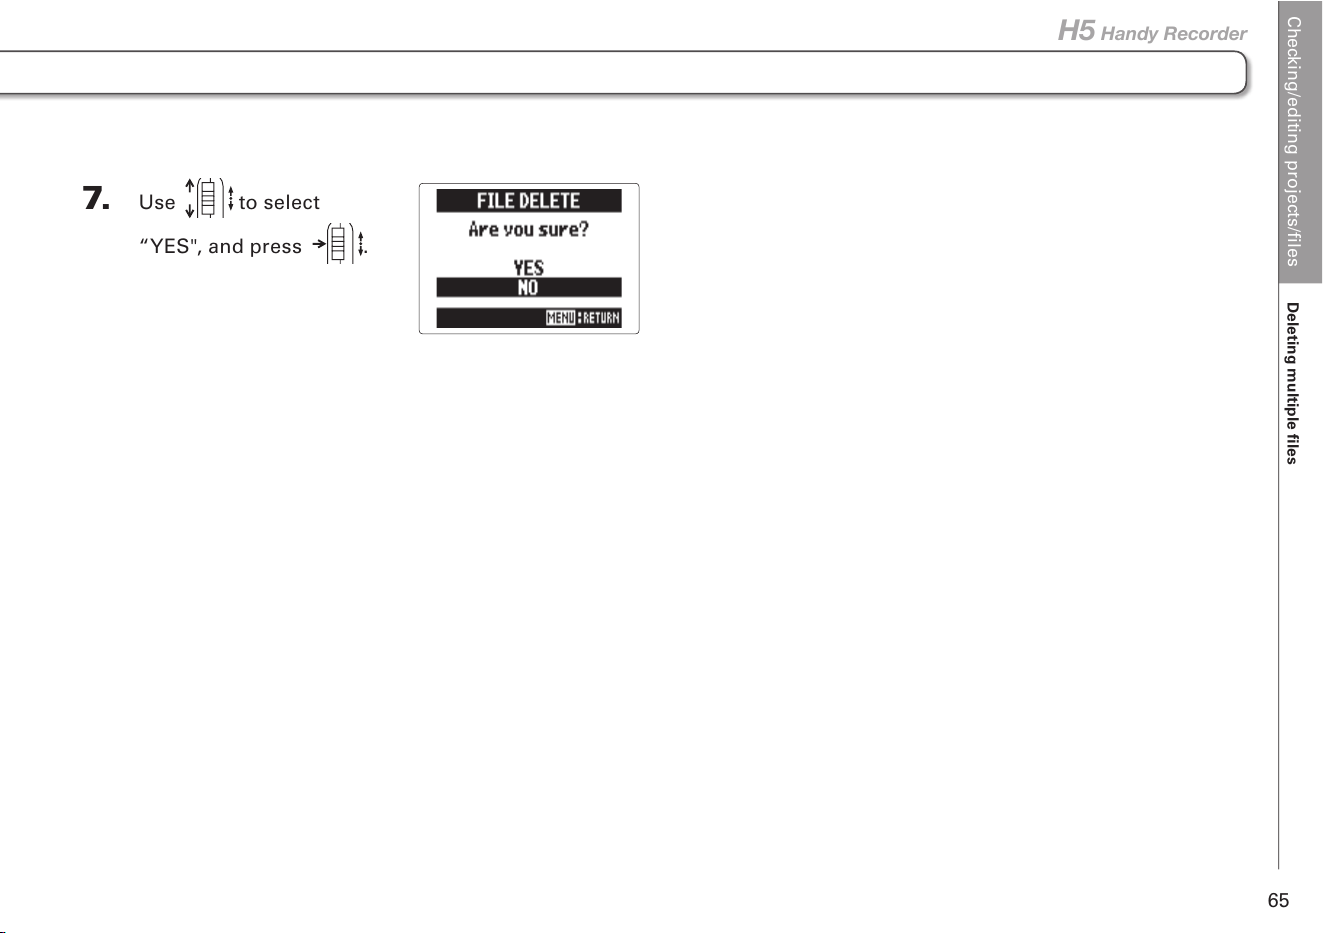
7. Use to select
“YES", and press .
Checking/editing projects/files
Deleting multiple projects
66
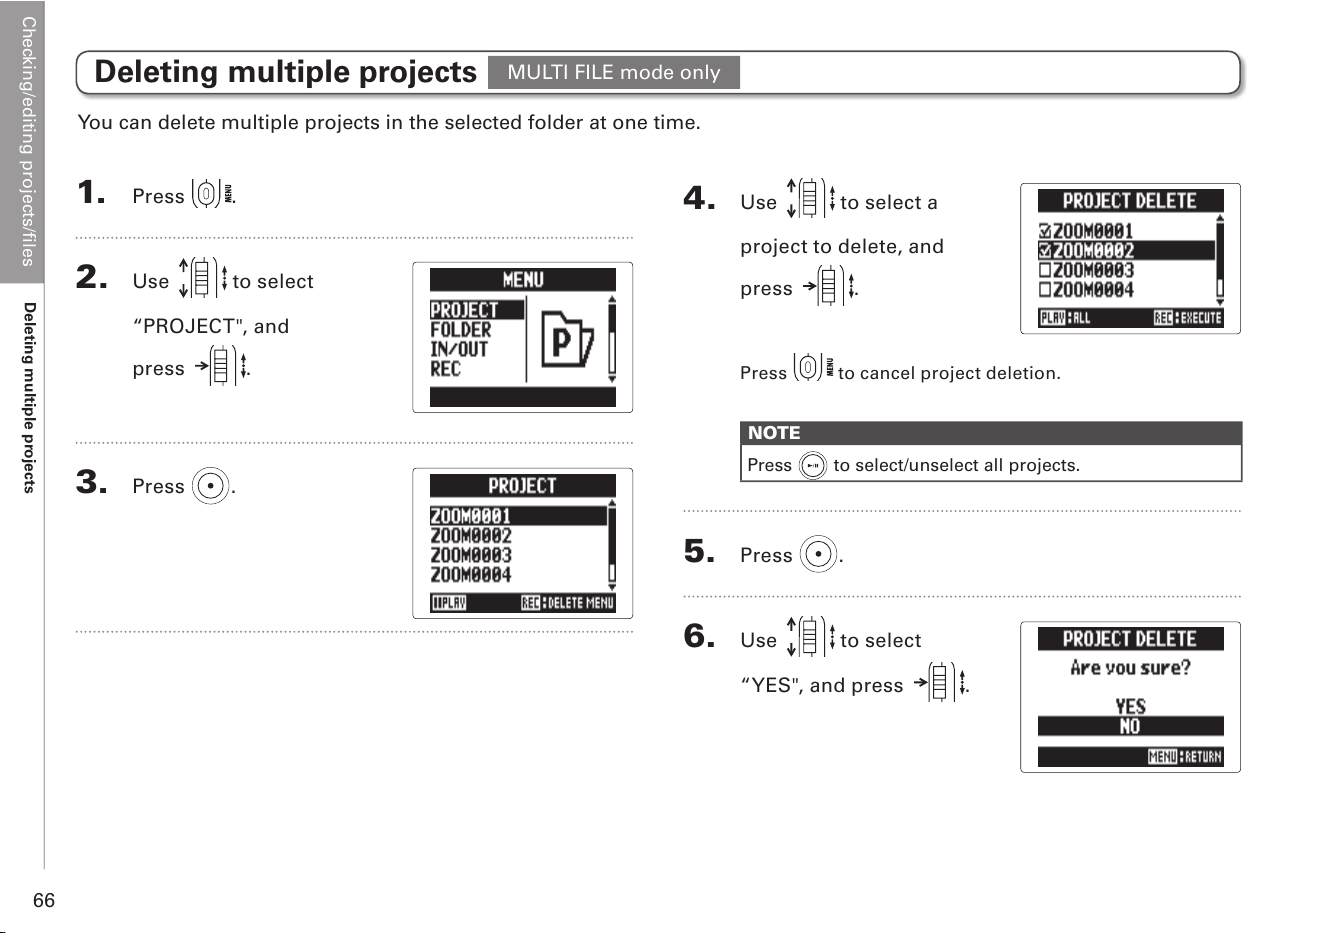
Deleting multiple projects
1. Press .
2. Use to select
“PROJECT", and
press
.
3. Press .
4. Use to select a
project to delete, and
press
.
Press to cancel project deletion.
NOTE
Press
to select/unselect all projects.
5. Press .
6. Use to select
“YES", and press .
You can delete multiple projects in the selected folder at one time.
MULTI FILE mode only
Checking/editing projects/files
Rebuilding a project
67
H5 Handy Recorder
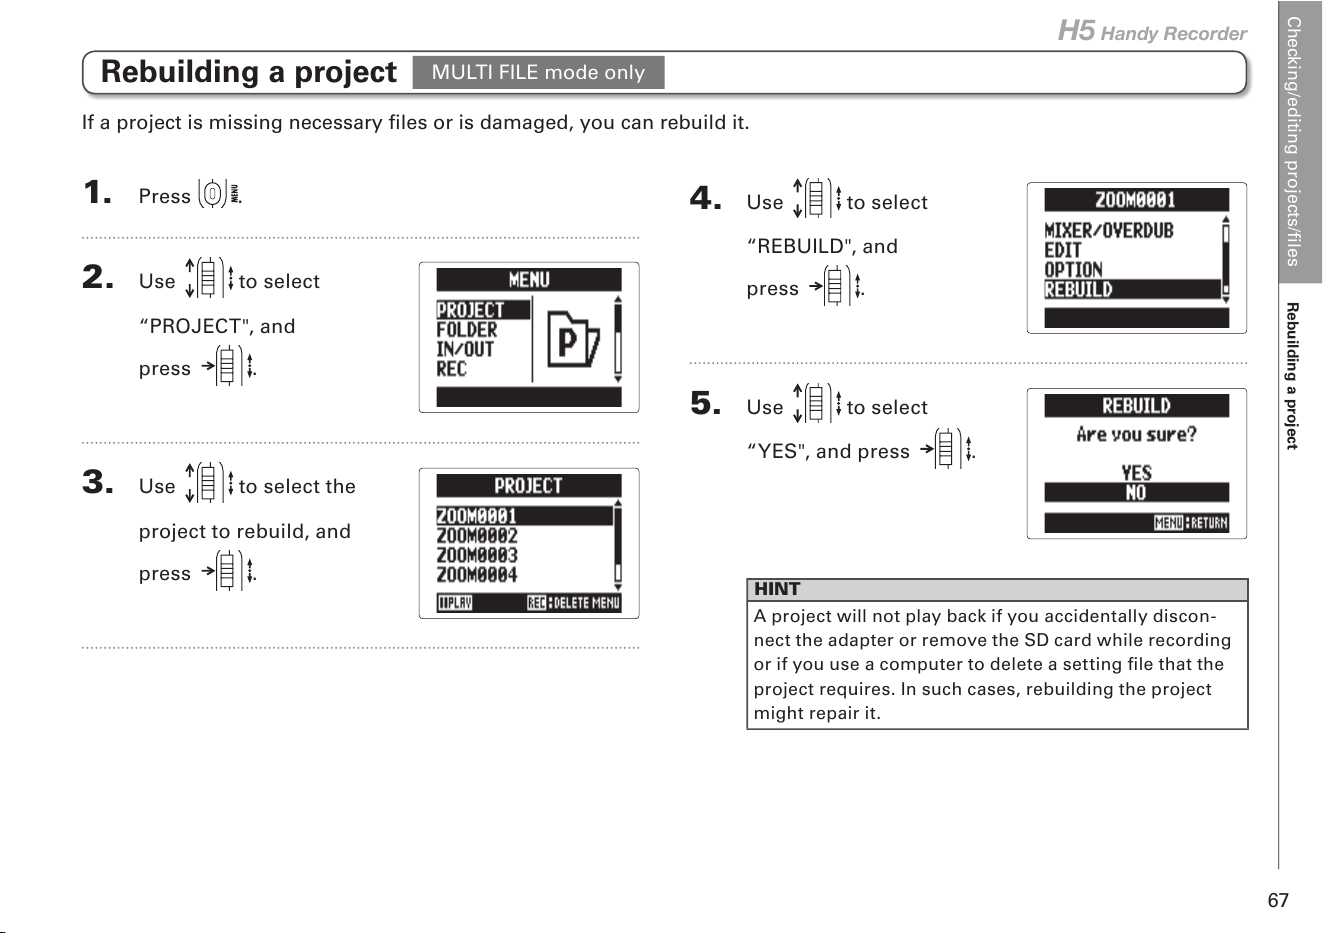
4. Use to select
“REBUILD", and
press
.
5. Use to select
“YES", and press .
HINT
A project will not play back if you accidentally discon-
nect the adapter or remove the SD card while recording
or if you use a computer to delete a setting file that the
project requires. In such cases, rebuilding the project
might repair it.
1. Press .
2. Use to select
“PROJECT", and
press
.
3. Use to select the
project to rebuild, and
press
.
If a project is missing necessary files or is damaged, you can rebuild it.
Rebuilding a project
MULTI FILE mode only
Checking/editing projects/files
Adding voice memos
68
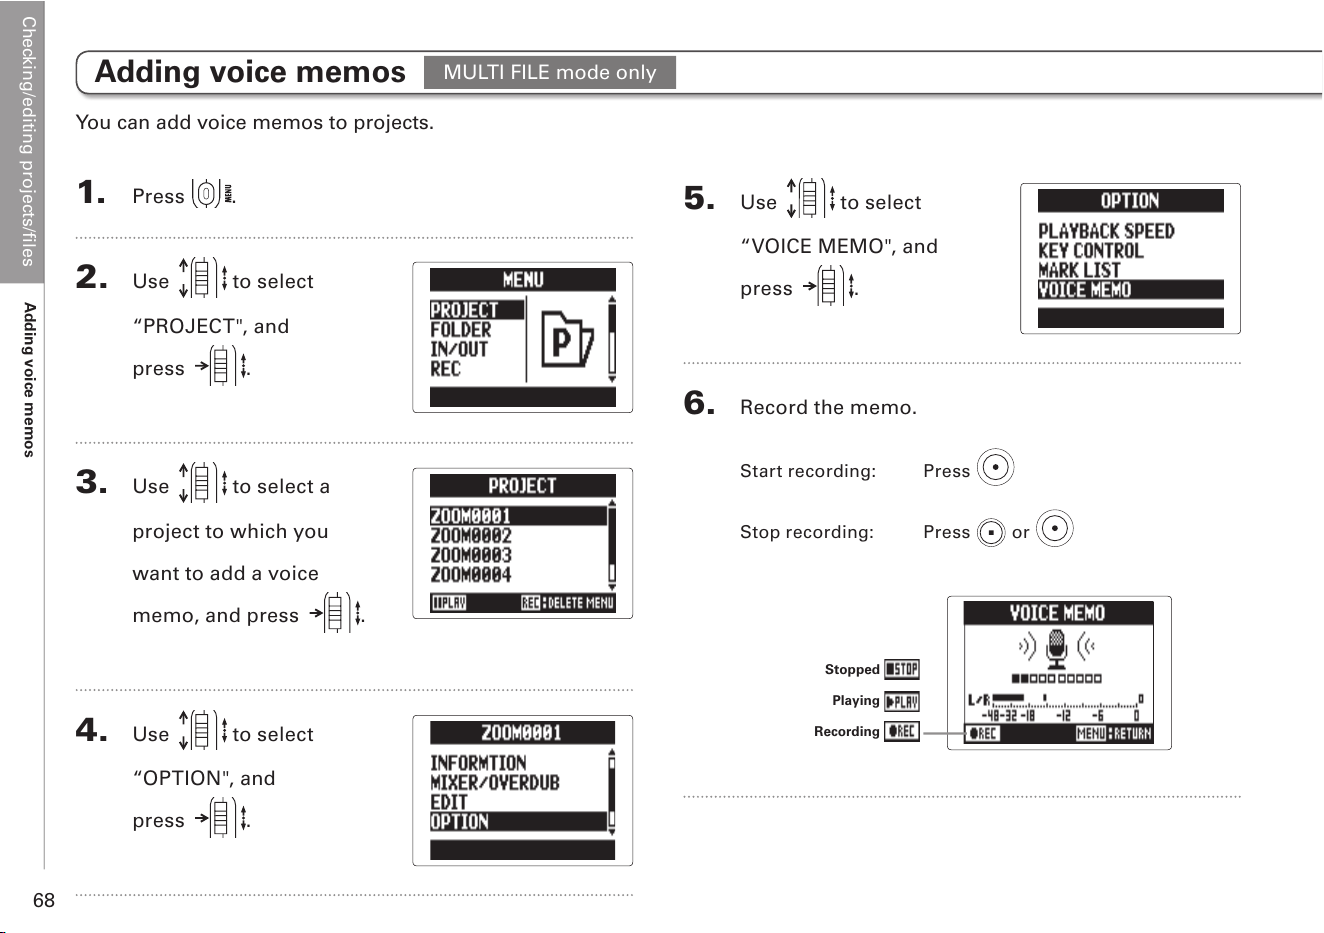
Adding voice memos
1. Press .
2. Use to select
“PROJECT", and
press
.
3. Use to select a
project to which you
want to add a voice
memo, and press
.
4. Use to select
“OPTION", and
press
.
5. Use to select
“VOICE MEMO", and
press
.
6. Record the memo.
Start recording: Press
Stop recording: Press or
Playing
Recording
Stopped
You can add voice memos to projects.
MULTI FILE mode only
Checking/editing projects/files
Adding voice memos
69
H5 Handy Recorder
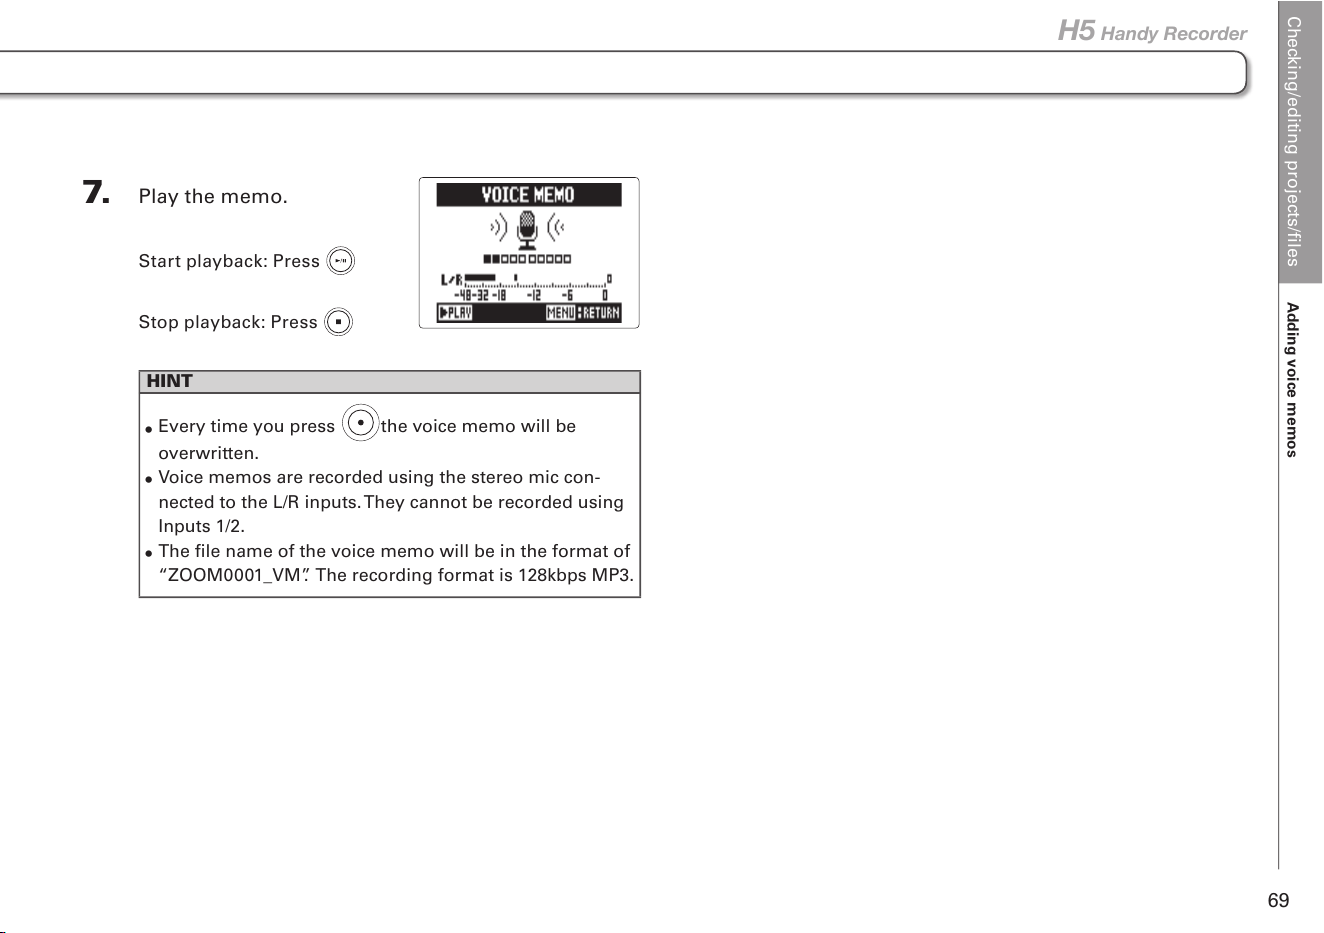
7. Play the memo.
Start playback: Press
Stop playback: Press
HINT
•
Every time you press the voice memo will be
overwritten.
•
Voice memos are recorded using the stereo mic con-
nected to the L/R inputs. They cannot be recorded using
Inputs 1/2.
•
The file name of the voice memo will be in the format of
“ZOOM0001_VM”. The recording format is 128kbps MP3.
USB functions
Data exchange with computers (card reader)
70
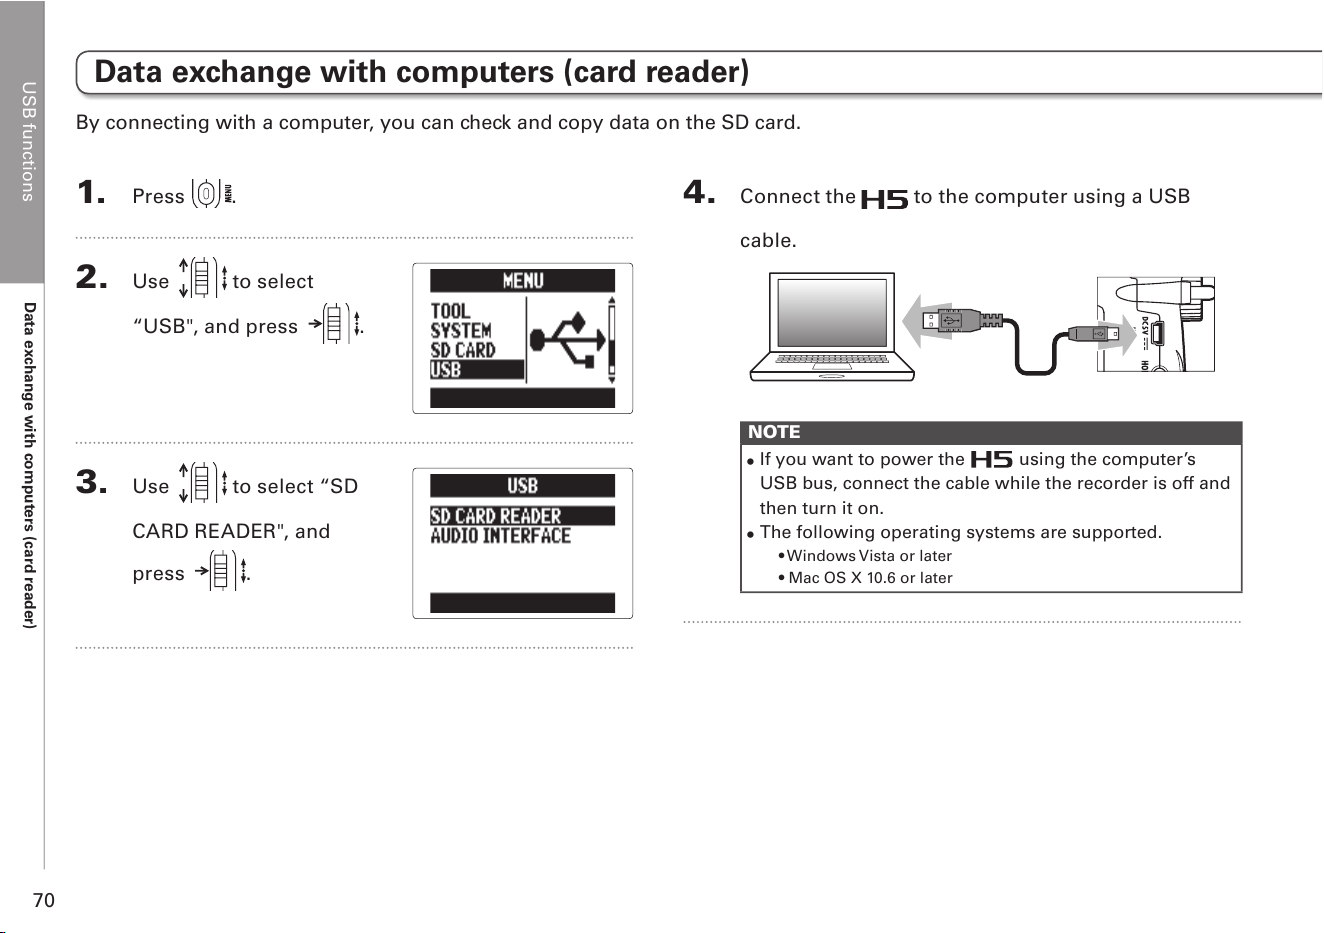
1. Press .
2. Use to select
“USB", and press .
3. Use to select “SD
CARD READER", and
press
.
4. Connect the to the computer using a USB
cable.
NOTE
•
If you want to power the using the computer’s
USB bus, connect the cable while the recorder is off and
then turn it on.
•
The following operating systems are supported.
• Windows Vista or later
• Mac OS X 10.6 or later
Data exchange with computers (card reader)
By connecting with a computer, you can check and copy data on the SD card.
USB functions
Data exchange with computers (card reader)
71
H5 Handy Recorder
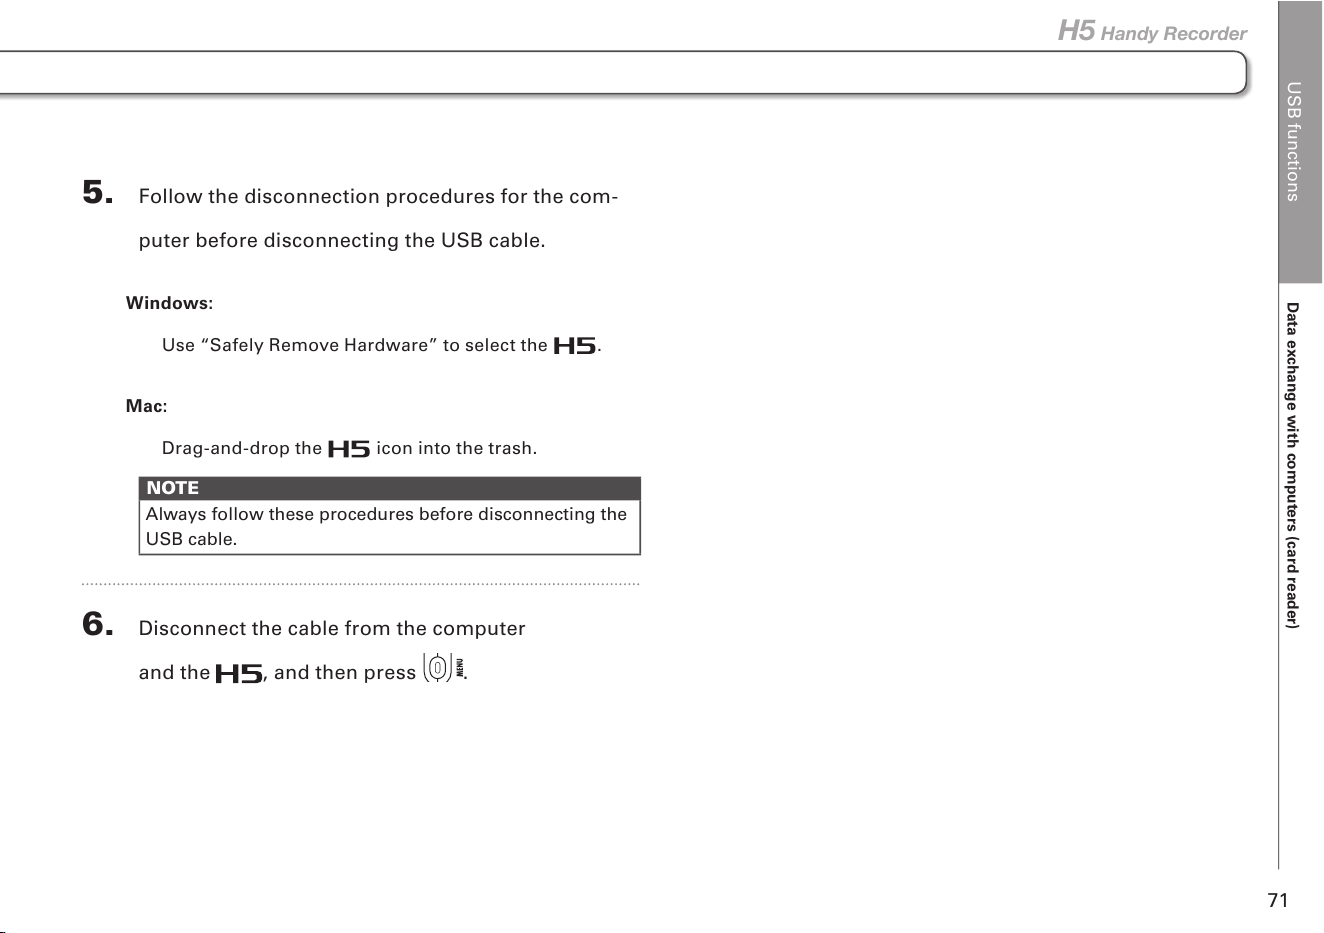
5. Follow the disconnection procedures for the com-
puter before disconnecting the USB cable.
Windows:
Use “Safely Remove Hardware” to select the .
Mac:
Drag-and-drop the icon into the trash.
NOTE
Always follow these procedures before disconnecting the
USB cable.
6. Disconnect the cable from the computer
and the
, and then press .
USB functions
Using as an audio interface
72
Using as an audio interface
You can send signals input through the directly to a computer or iPad as well as output signals from that device
through the .
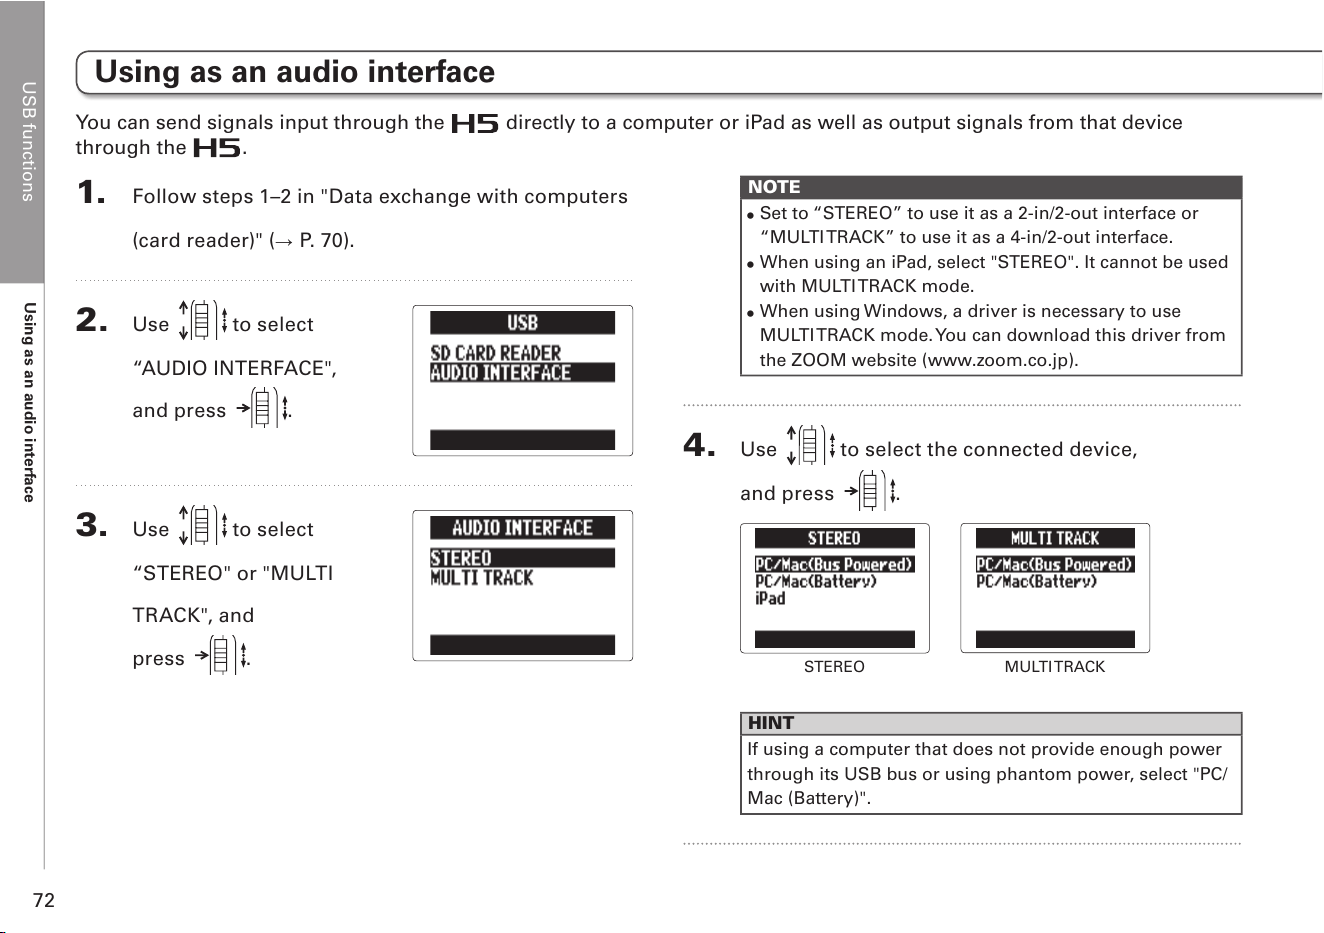
1. Follow steps 1–2 in "Data exchange with computers
(card reader)" (P. 70).
2. Use to select
“AUDIO INTERFACE",
and press
.
3. Use to select
“STEREO" or "MULTI
TRACK", and
press
.
NOTE
•
Set to “STEREO” to use it as a 2-in/2-out interface or
“MULTI TRACK” to use it as a 4-in/2-out interface.
•
When using an iPad, select "STEREO". It cannot be used
with MULTI TRACK mode.
•
When using Windows, a driver is necessary to use
MULTI TRACK mode. You can download this driver from
the ZOOM website (www.zoom.co.jp).
4. Use to select the connected device,
and press
.
STEREO
MULTI TRACK
HINT
If using a computer that does not provide enough power
through its USB bus or using phantom power, select "PC/
Mac (Battery)".
USB functions
Using as an audio interface
73
H5 Handy Recorder
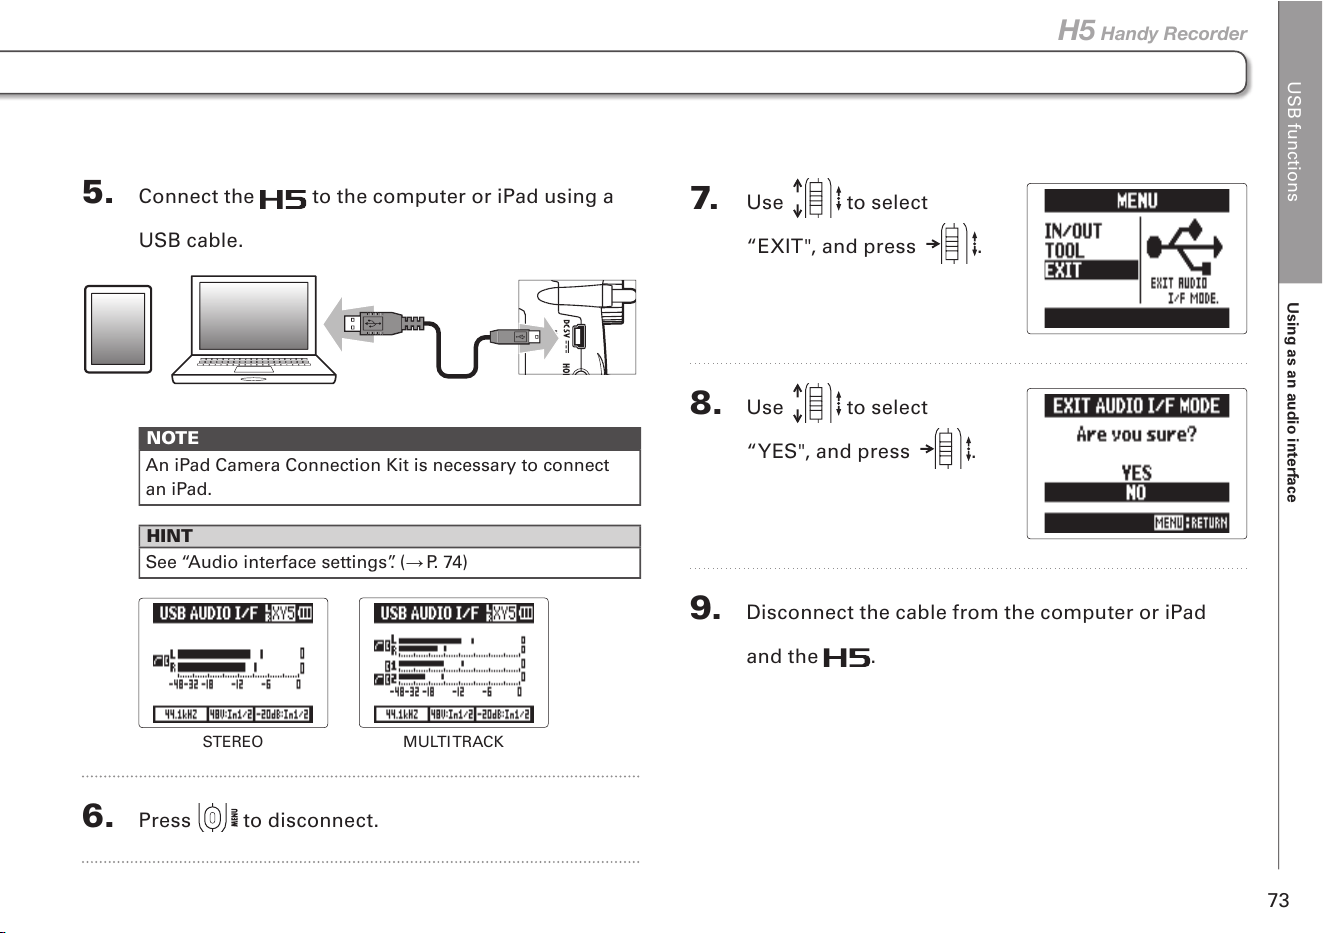
5. Connect the to the computer or iPad using a
USB cable.
NOTE
An iPad Camera Connection Kit is necessary to connect
an iPad.
HINT
See “Audio interface settings”. (P. 74)
STEREO
MULTI TRACK
6. Press to disconnect.
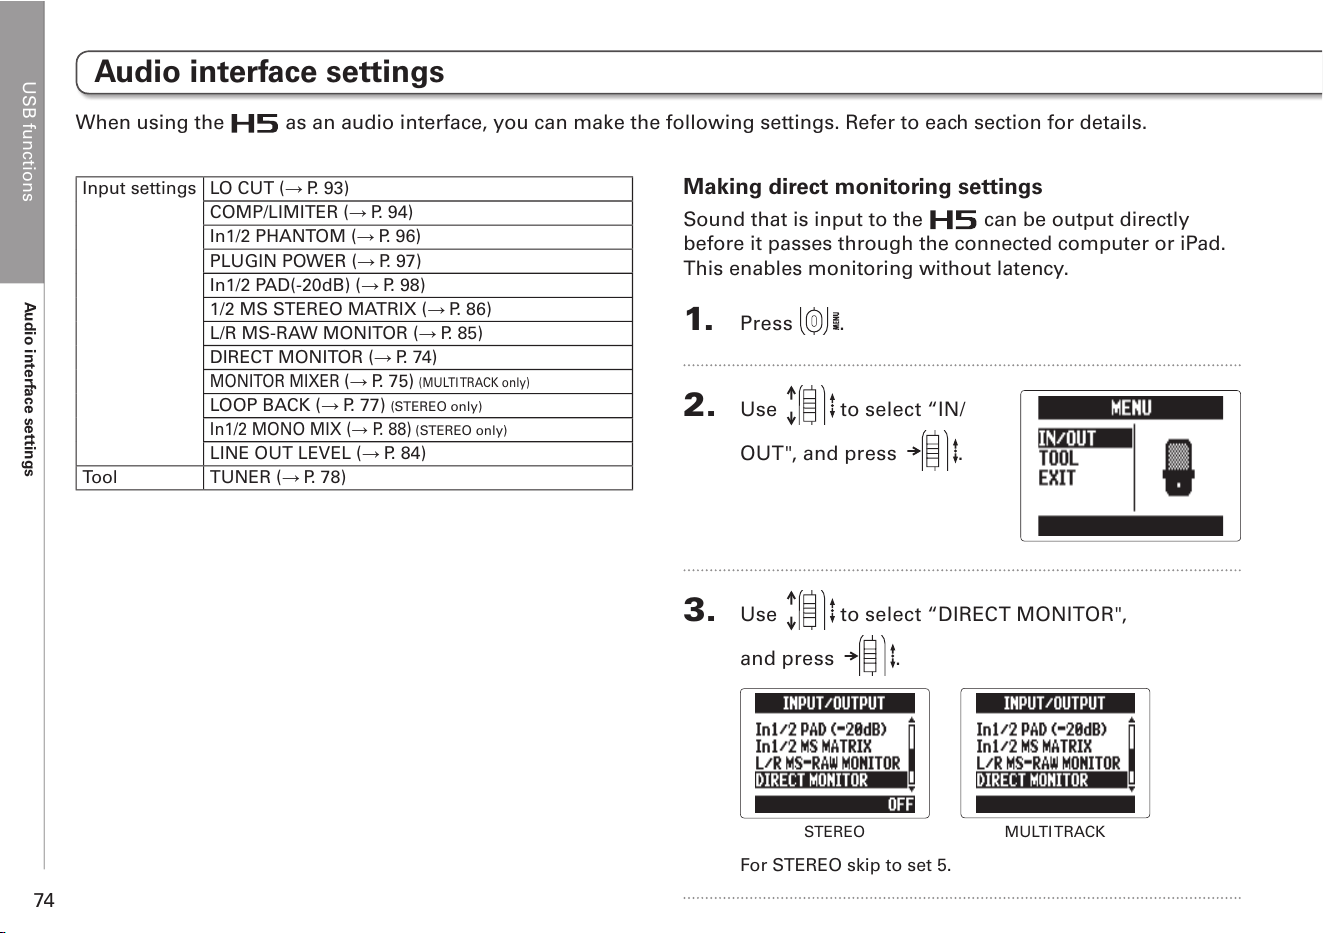
7. Use to select
“EXIT", and press .
8. Use to select
“YES", and press .
9. Disconnect the cable from the computer or iPad
and the
.
USB functions
Audio interface settings
74
Audio interface settings
When using the as an audio interface, you can make the following settings. Refer to each section for details.
Input settings LO CUT ( P. 93)
COMP/LIMITER ( P. 94)
In1/2 PHANTOM ( P. 96)
PLUGIN POWER ( P. 97)
In1/2 PAD(-20dB) ( P. 98)
1/2 MS STEREO MATRIX ( P. 86)
L/R MS-RAW MONITOR ( P. 85)
DIRECT MONITOR ( P. 74)
MONITOR MIXER
( P. 75)
(MULTI TRACK only)
LOOP BACK ( P. 77) (STEREO only)
In1/2 MONO MIX ( P. 88)
(STEREO only)
LINE OUT LEVEL ( P. 84)
Tool TUNER ( P. 78)
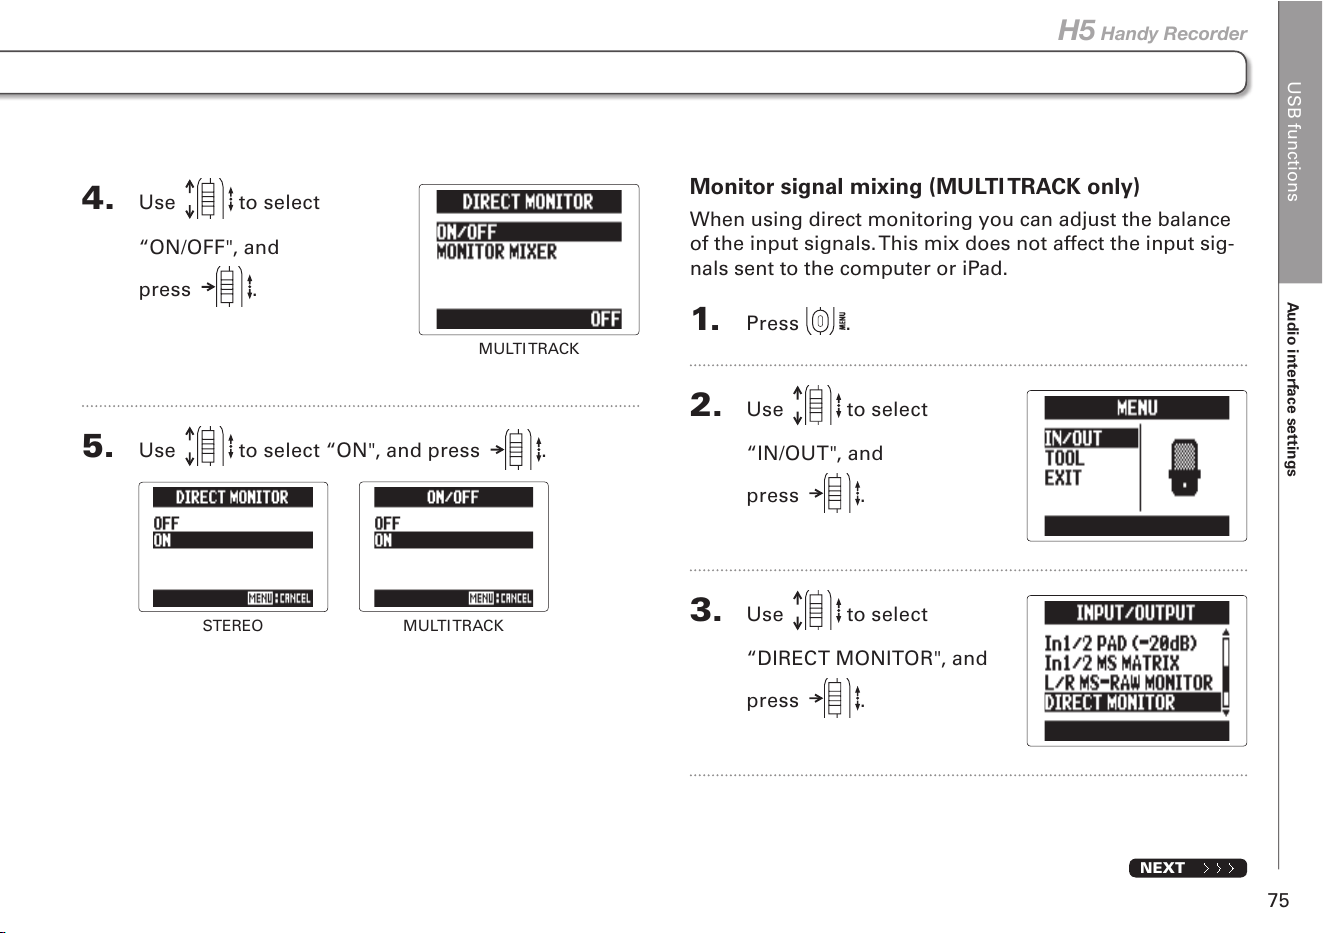
Making direct monitoring settings
Sound that is input to the can be output directly
before it passes through the connected computer or iPad.
This enables monitoring without latency.
1. Press .
2. Use to select “IN/
OUT", and press .
3. Use to select “DIRECT MONITOR",
and press
.
STEREO
MULTI TRACK
For STEREO skip to set 5.
USB functions
Audio interface settings
75
H5 Handy Recorder
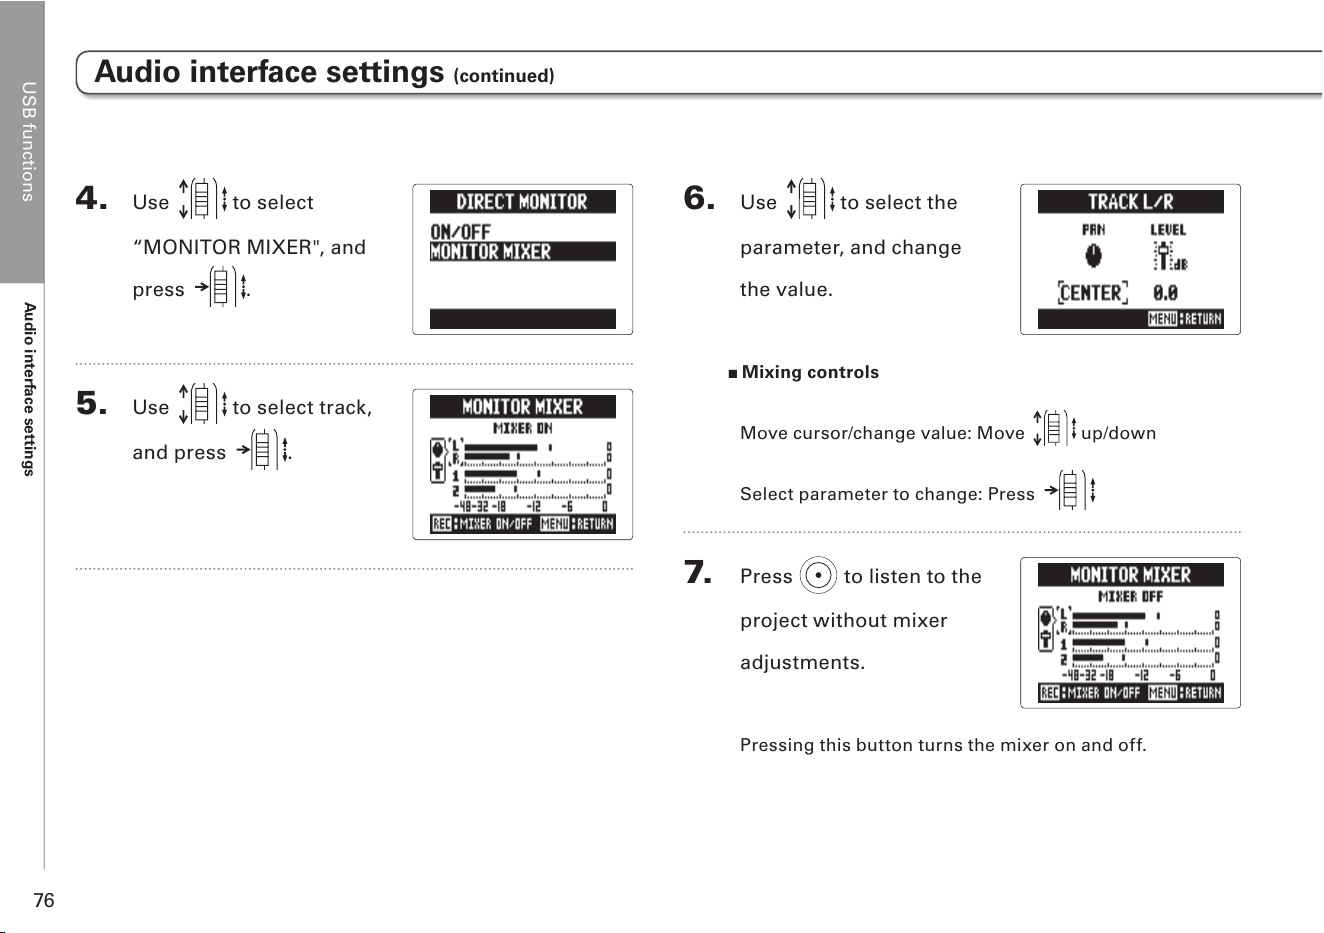
4. Use to select
“ON/OFF", and
press
.
5. Use to select “ON", and press .
STEREO
MULTI TRACK
MULTI TRACK
Monitor signal mixing (MULTI TRACK only)
When using direct monitoring you can adjust the balance
of the input signals. This mix does not affect the input sig-
nals sent to the computer or iPad.
1. Press .
2. Use to select
“IN/OUT", and
press
.
3. Use to select
“DIRECT MONITOR", and
press
.
NEXT
USB functions
Audio interface settings
76
Audio interface settings (continued)
4. Use to select
“MONITOR MIXER", and
press
.
5. Use to select track,
and press .
6. Use to select the
parameter, and change
the value.
Mixing controls
Move cursor/change value: Move
up/down
Select parameter to change: Press
7. Press to listen to the
project without mixer
adjustments.
Pressing this button turns the mixer on and off.
USB functions
Audio interface settings
77
H5 Handy Recorder
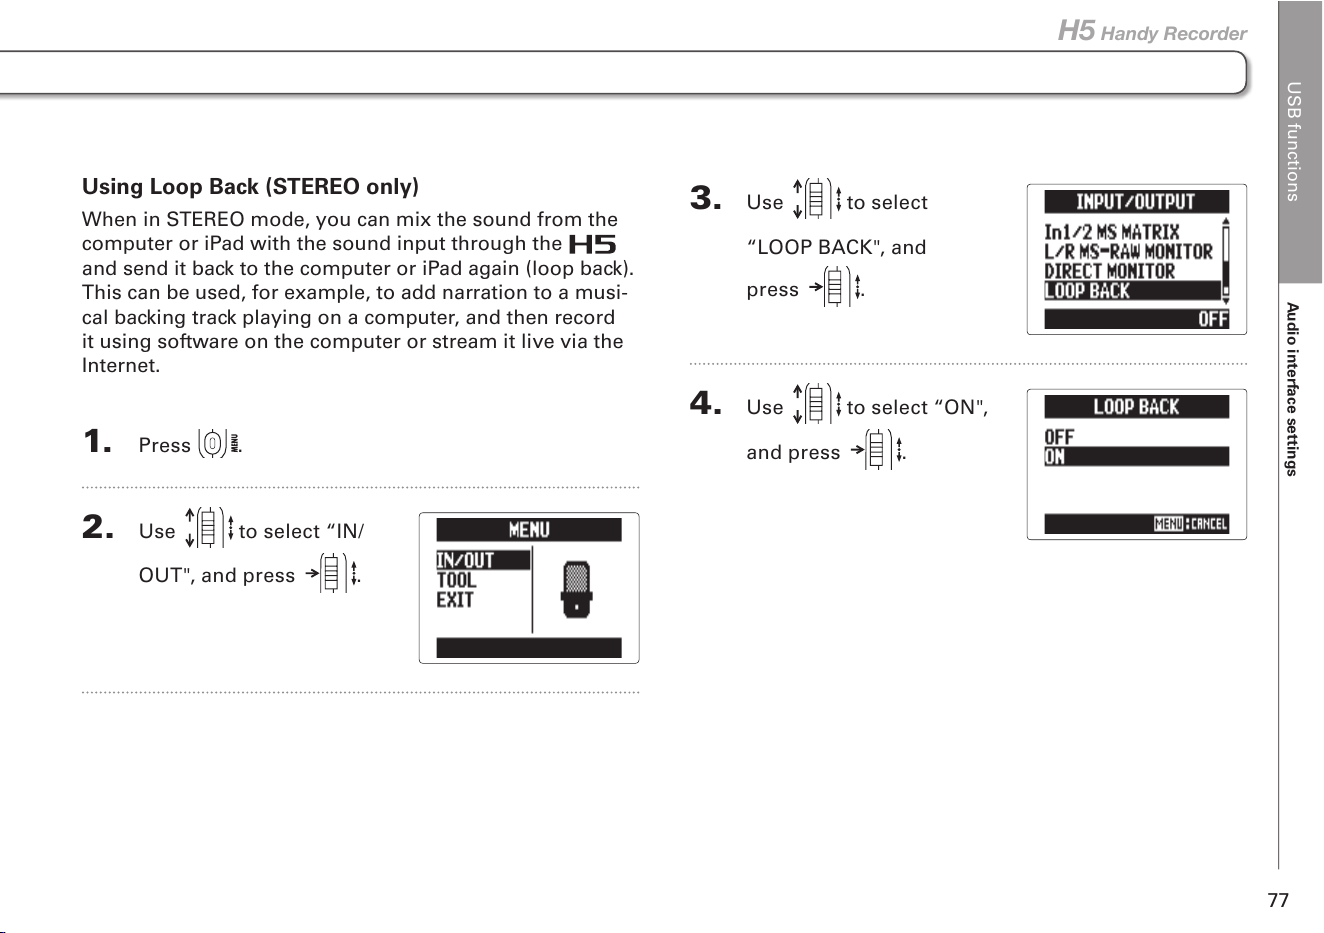
Using Loop Back (STEREO only)
When in STEREO mode, you can mix the sound from the
computer or iPad with the sound input through the
and send it back to the computer or iPad again (loop back).
This can be used, for example, to add narration to a musi-
cal backing track playing on a computer, and then record
it using software on the computer or stream it live via the
Internet.
1. Press .
2. Use to select “IN/
OUT", and press .
3. Use to select
“LOOP BACK", and
press
.
4. Use to select “ON",
and press .
Tools
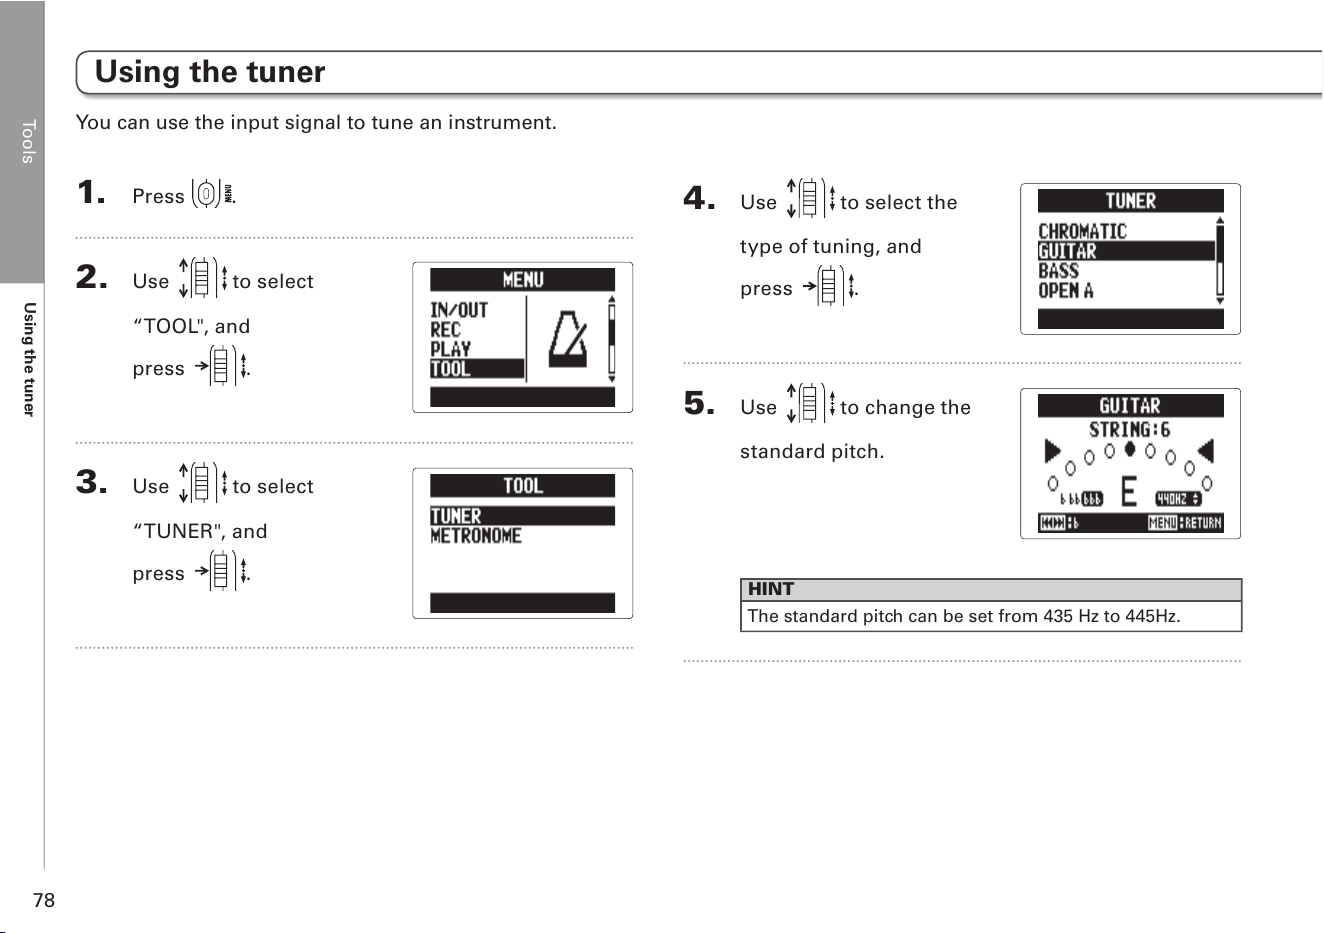
Using the tuner
78
1. Press .
2. Use to select
“TOOL", and
press
.
3. Use to select
“TUNER", and
press
.
Using the tuner
You can use the input signal to tune an instrument.
4. Use to select the
type of tuning, and
press
.
5. Use to change the
standard pitch.
HINT
The standard pitch can be set from 435 Hz to 445Hz.
Tools
Using the tuner
79
H5 Handy Recorder
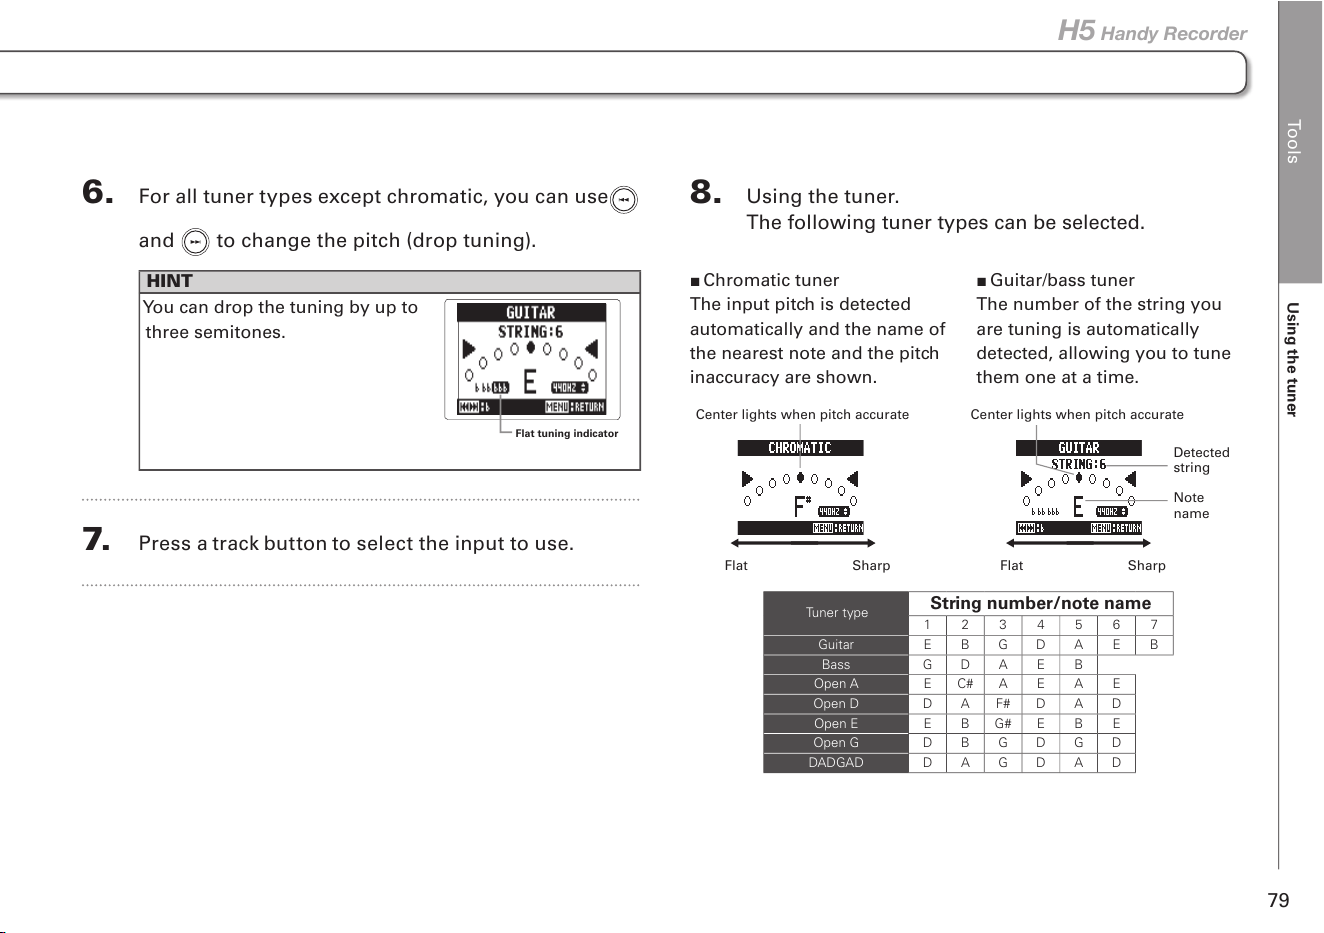
6. For all tuner types except chromatic, you can use
and
to change the pitch (drop tuning).
HINT
You can drop the tuning by up to
three semitones.
7. Press a track button to select the input to use.
Flat tuning indicator
8. Using the tuner.
The following tuner types can be selected.
Chromatic tuner
The input pitch is detected
automatically and the name of
the nearest note and the pitch
inaccuracy are shown.
Guitar/bass tuner
The number of the string you
are tuning is automatically
detected, allowing you to tune
them one at a time.
Tuner type
String number/note name
1 2 3 4 5 6 7
Guitar E B G D A E B
Bass G D A E B
Open A E C# A E A E
Open D D A F# D A D
Open E E B G# E B E
Open G D B G D G D
DADGAD D A G D A D
Flat Sharp Flat Sharp
Center lights when pitch accurate
Center lights when pitch accurate
Detected
string
Note
name
Tools
Using the metronome
80
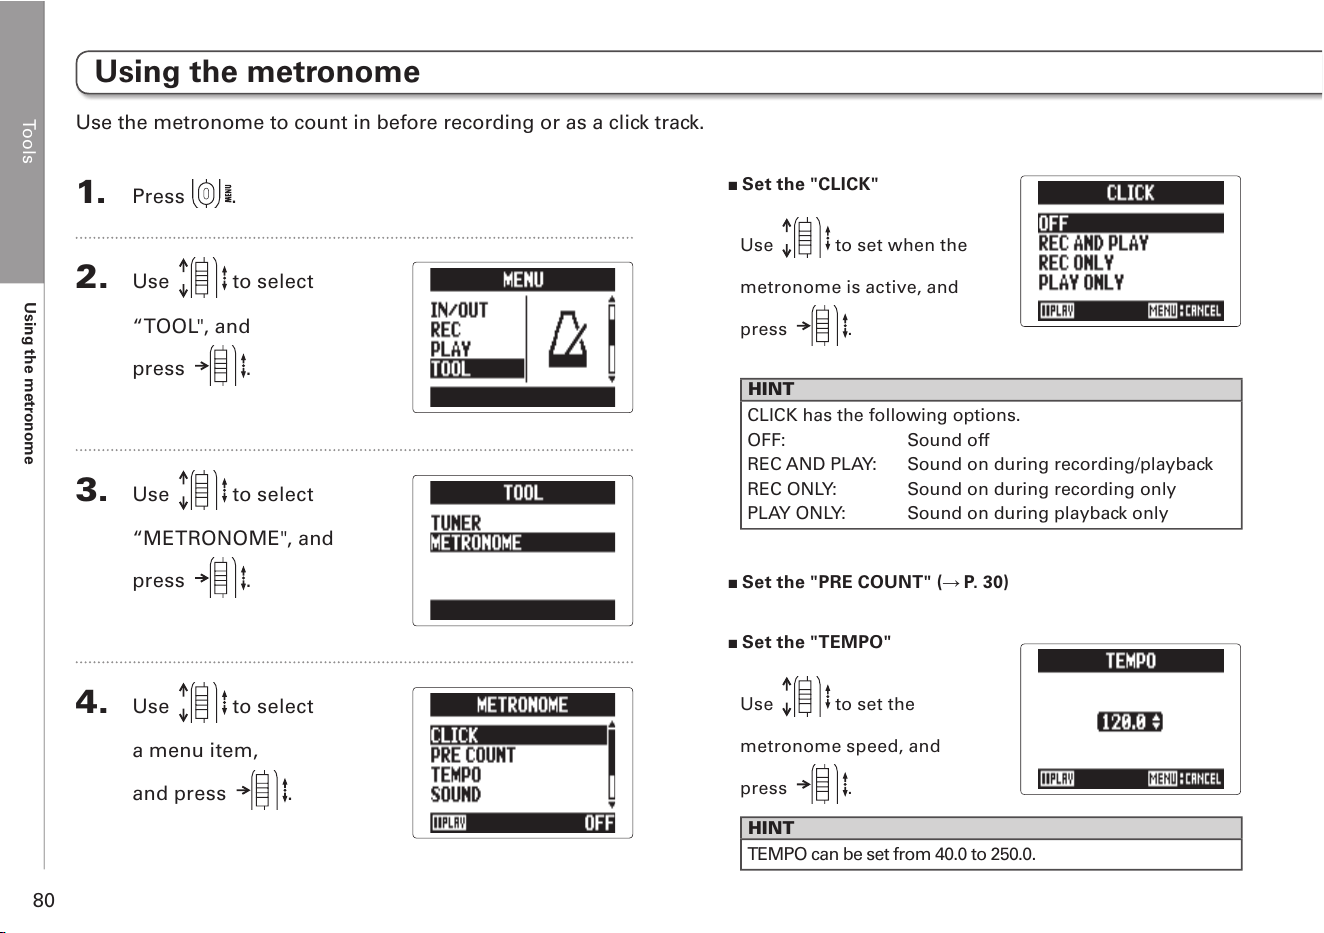
Set the "CLICK"
Use to set when the
metronome is active, and
press .
HINT
CLICK has the following options.
OFF: Sound off
REC AND PLAY: Sound on during recording/playback
REC ONLY: Sound on during recording only
PLAY ONLY: Sound on during playback only
Set the "PRE COUNT" ( P. 30)
Set the "TEMPO"
Use
to set the
metronome speed, and
press .
HINT
TEMPO can be set from 40.0 to 250.0.
Using the metronome
1. Press .
2. Use to select
“TOOL", and
press
.
3. Use to select
“METRONOME", and
press
.
4. Use to select
a menu item,
and press
.
Use the metronome to count in before recording or as a click track.
Tools
Using the metronome
81
H5 Handy Recorder
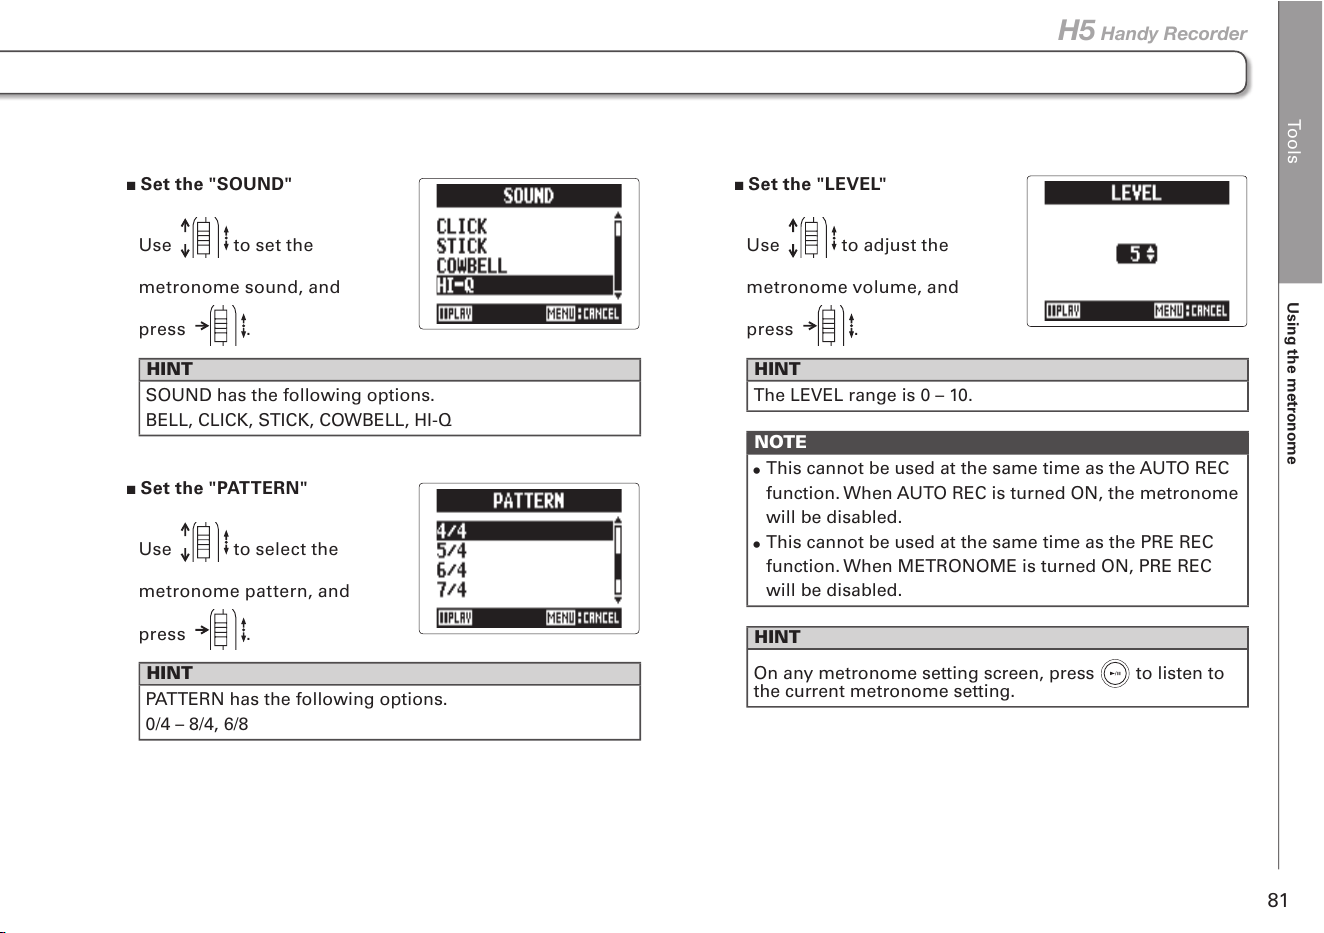
Set the "SOUND"
Use to set the
metronome sound, and
press .
HINT
SOUND has the following options.
BELL, CLICK, STICK, COWBELL, HI-Q
Set the "PATTERN"
Use
to select the
metronome pattern, and
press .
HINT
PATTERN has the following options.
0/4 – 8/4, 6/8
Set the "LEVEL"
Use to adjust the
metronome volume, and
press .
HINT
The LEVEL range is 0 – 10.
NOTE
•
This cannot be used at the same time as the AUTO REC
function. When AUTO REC is turned ON, the metronome
will be disabled.
•
This cannot be used at the same time as the PRE REC
function. When METRONOME is turned ON, PRE REC
will be disabled.
HINT
On any metronome setting screen, press
to listen to
the current metronome setting.
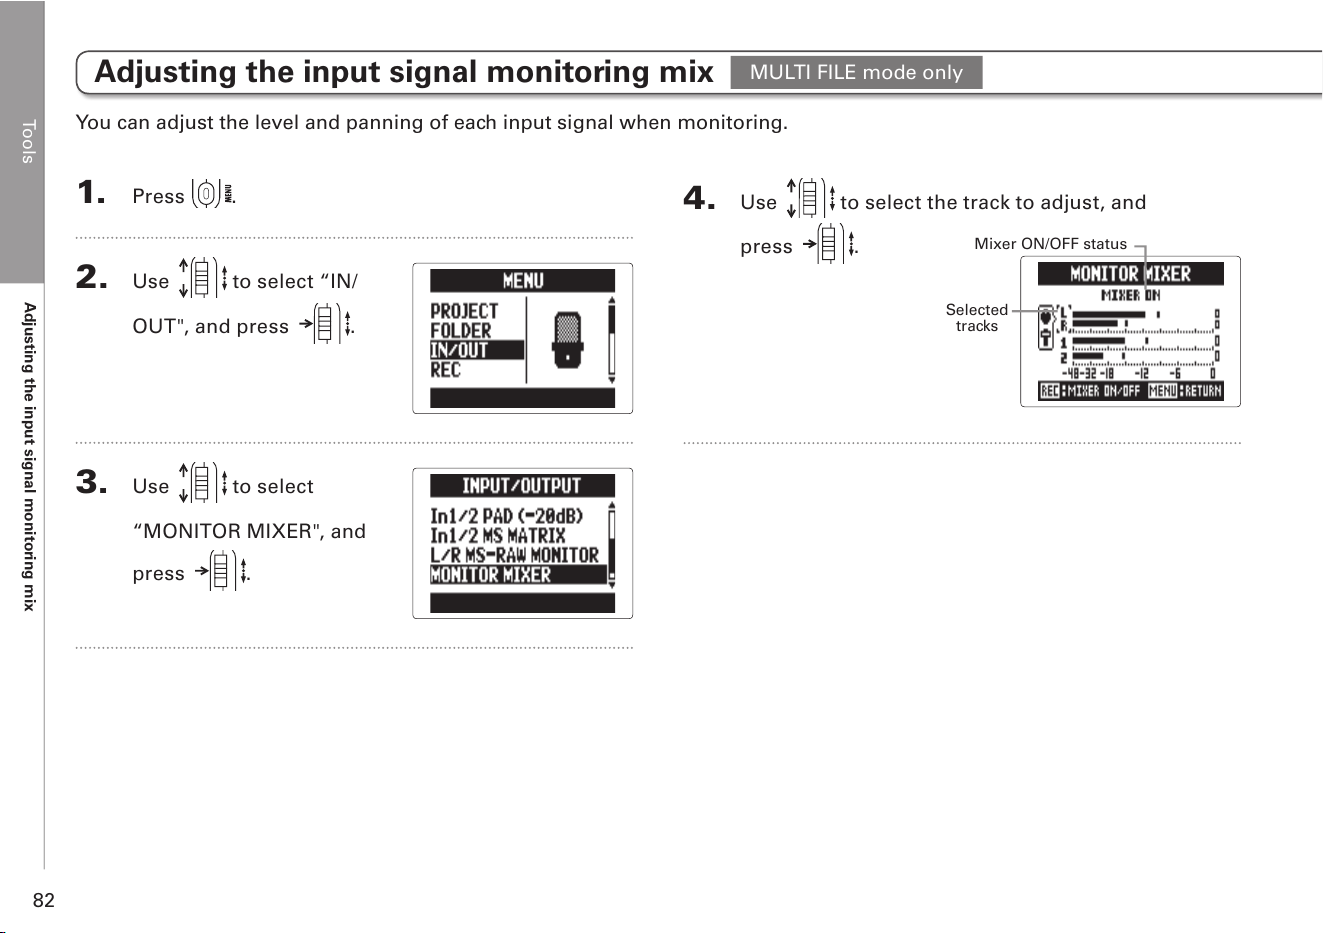
Tools
Adjusting the input signal monitoring mix
82
1. Press .
2. Use to select “IN/
OUT", and press .
3. Use to select
“MONITOR MIXER", and
press
.
You can adjust the level and panning of each input signal when monitoring.
4. Use to select the track to adjust, and
press
.
Mixer ON/OFF status
Selected
tracks
Adjusting the input signal monitoring mix
MULTI FILE mode only
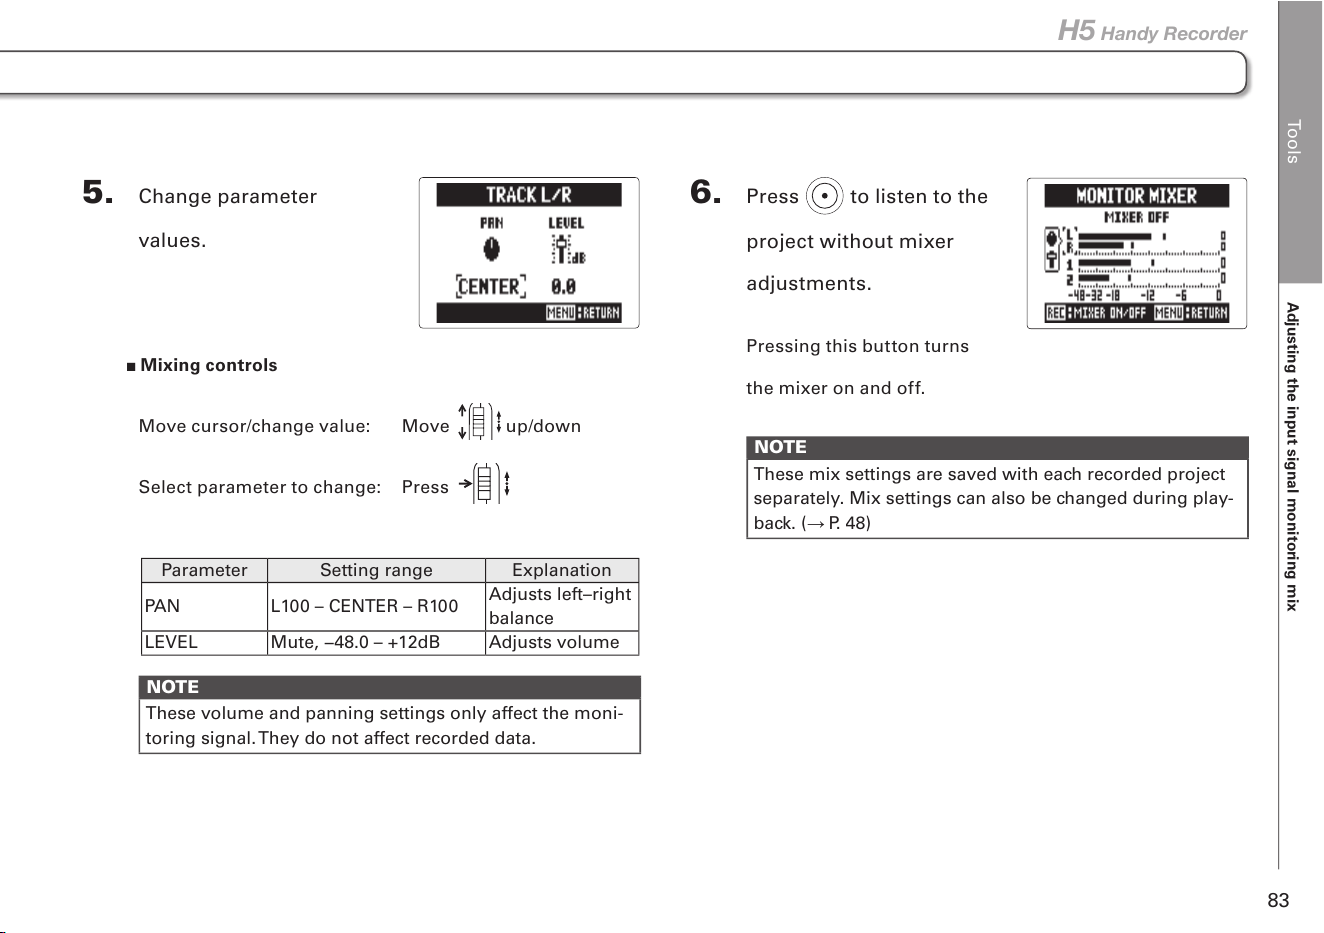
Tools
Adjusting the input signal monitoring mix
83
H5 Handy Recorder
5. Change parameter
values.
Mixing controls
Move cursor/change value: Move up/down
Select parameter to change: Press
Parameter Setting range Explanation
PAN L100 – CENTER – R100
Adjusts left–right
balance
LEVEL Mute, −48.0 – +12dB Adjusts volume
NOTE
These volume and panning settings only affect the moni-
toring signal. They do not affect recorded data.
6. Press to listen to the
project without mixer
adjustments.
Pressing this button turns
the mixer on and off.
NOTE
These mix settings are saved with each recorded project
separately. Mix settings can also be changed during play-
back. ( P. 48)
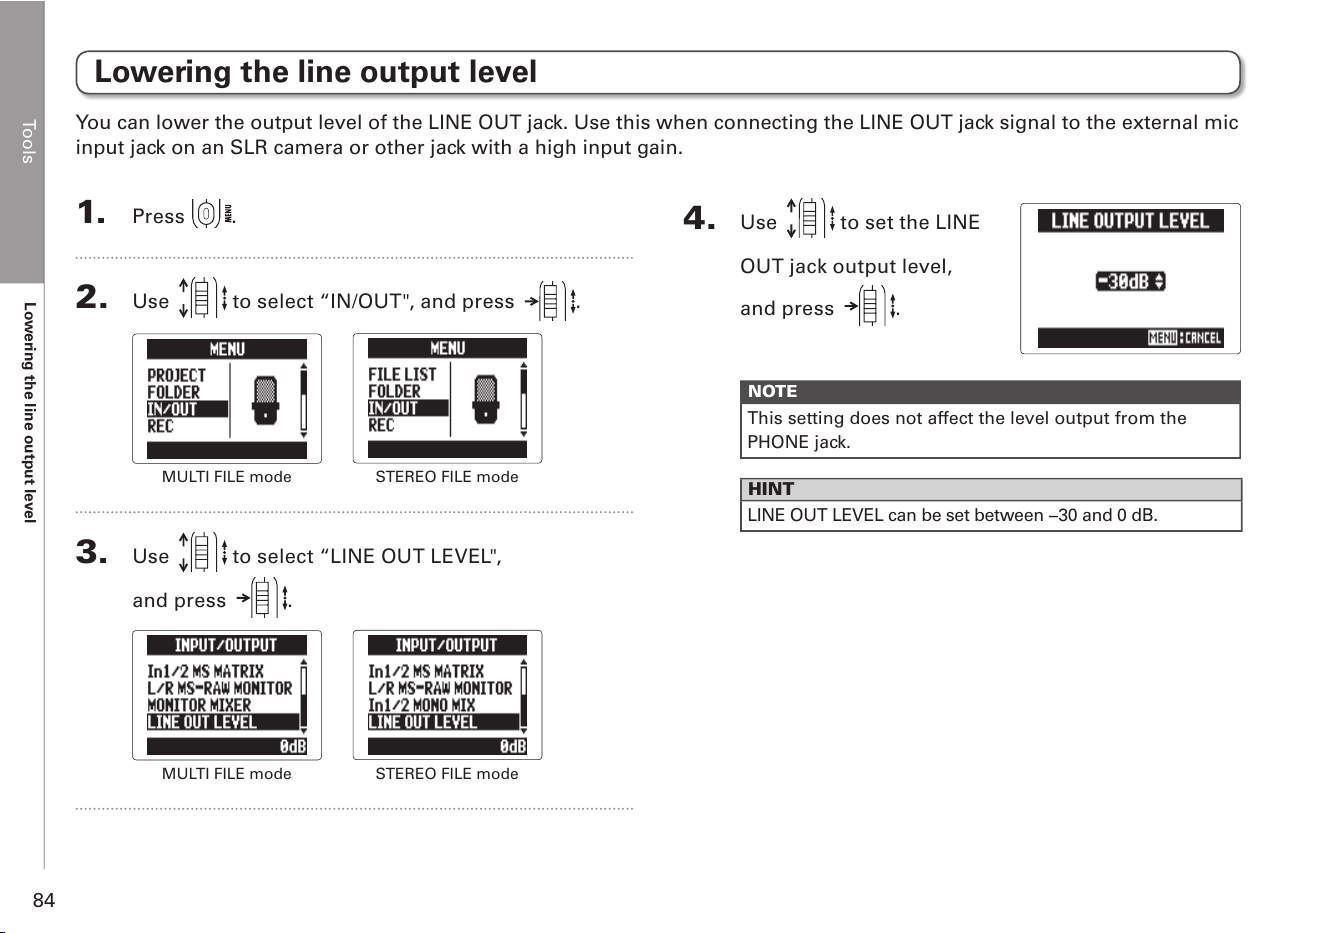
Tools
Lowering the line output level
84
Lowering the line output level
1. Press .
2. Use to select “IN/OUT", and press .
MULTI FILE mode
STEREO FILE mode
3. Use to select “LINE OUT LEVEL",
and press
.
MULTI FILE mode
STEREO FILE mode
You can lower the output level of the LINE OUT jack. Use this when connecting the LINE OUT jack signal to the external mic
input jack on an SLR camera or other jack with a high input gain.
4. Use to set the LINE
OUT jack output level,
and press
.
NOTE
This setting does not affect the level output from the
PHONE jack.
HINT
LINE OUT LEVEL can be set between −30 and 0 dB.
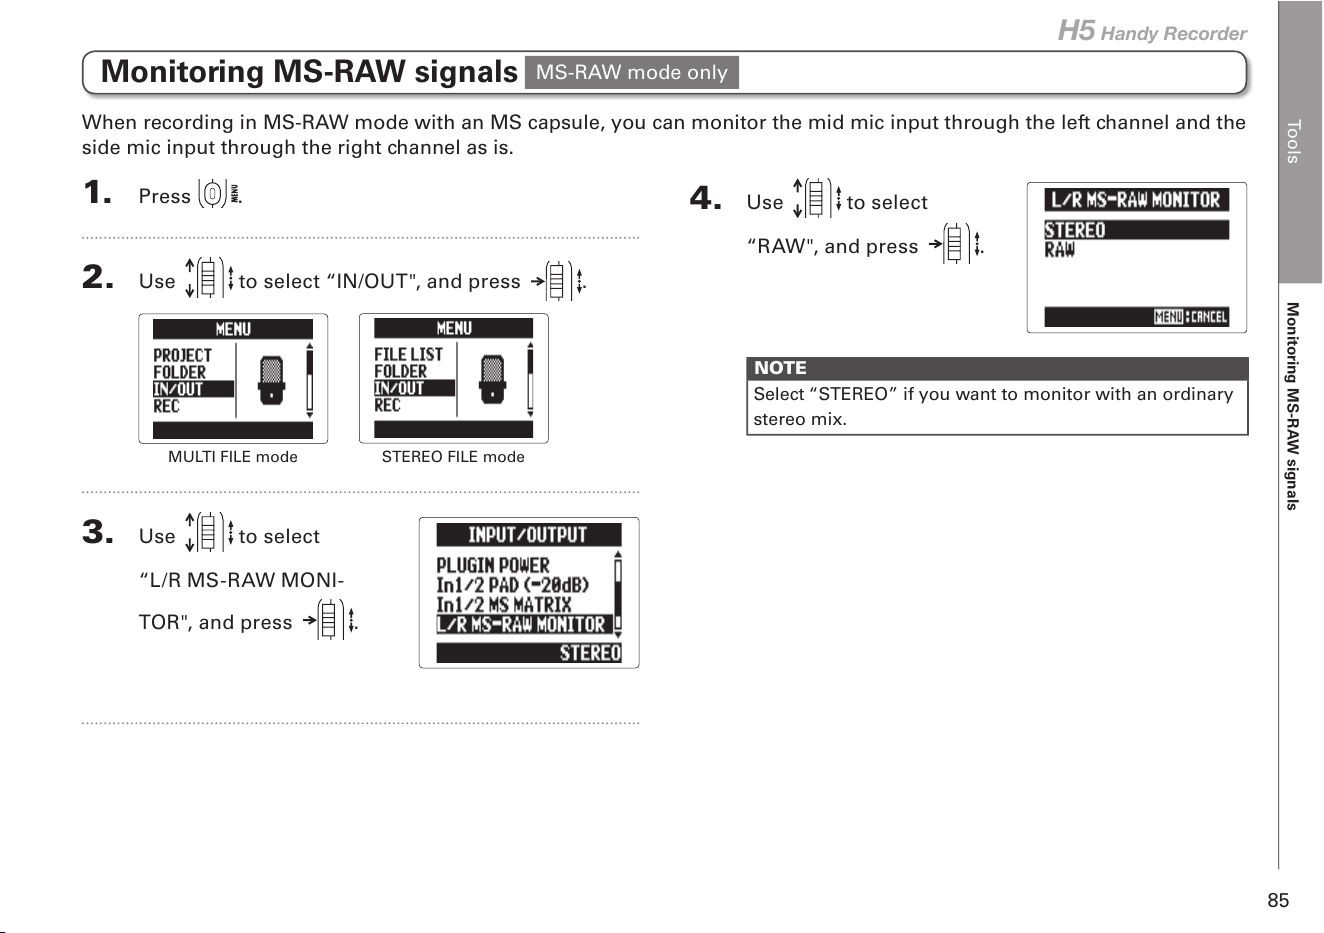
Tools
Monitoring MS-RAW signals
85
H5 Handy Recorder
Monitoring MS-RAW signals
1. Press .
2. Use to select “IN/OUT", and press .
MULTI FILE mode
STEREO FILE mode
3. Use to select
“L/R MS-RAW MONI-
TOR", and press
.
When recording in MS-RAW mode with an MS capsule, you can monitor the mid mic input through the left channel and the
side mic input through the right channel as is.
4. Use to select
“RAW", and press .
NOTE
Select “STEREO” if you want to monitor with an ordinary
stereo mix.
MS-RAW mode only
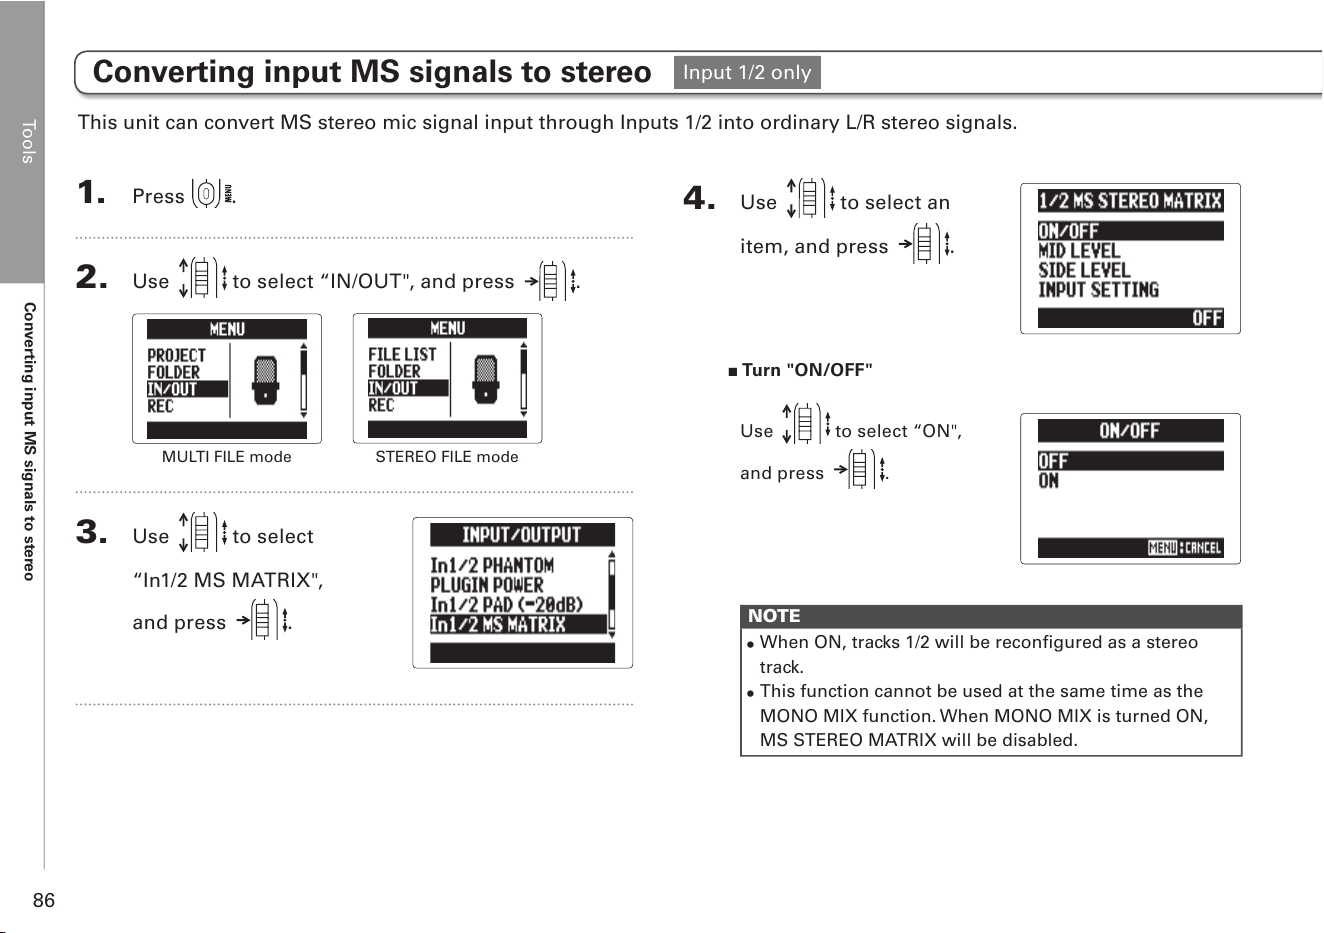
Tools
Converting input MS signals to stereo
86
This unit can convert MS stereo mic signal input through Inputs 1/2 into ordinary L/R stereo signals.
1. Press .
2. Use to select “IN/OUT", and press .
MULTI FILE mode
STEREO FILE mode
3. Use to select
“In1/2 MS MATRIX",
and press
.
4. Use to select an
item, and press .
Turn "ON/OFF"
Use
to select “ON",
and press .
NOTE
•
When ON, tracks 1/2 will be reconfigured as a stereo
track.
•
This function cannot be used at the same time as the
MONO MIX function. When MONO MIX is turned ON,
MS STEREO MATRIX will be disabled.
Converting input MS signals to stereo
Input 1/2 only
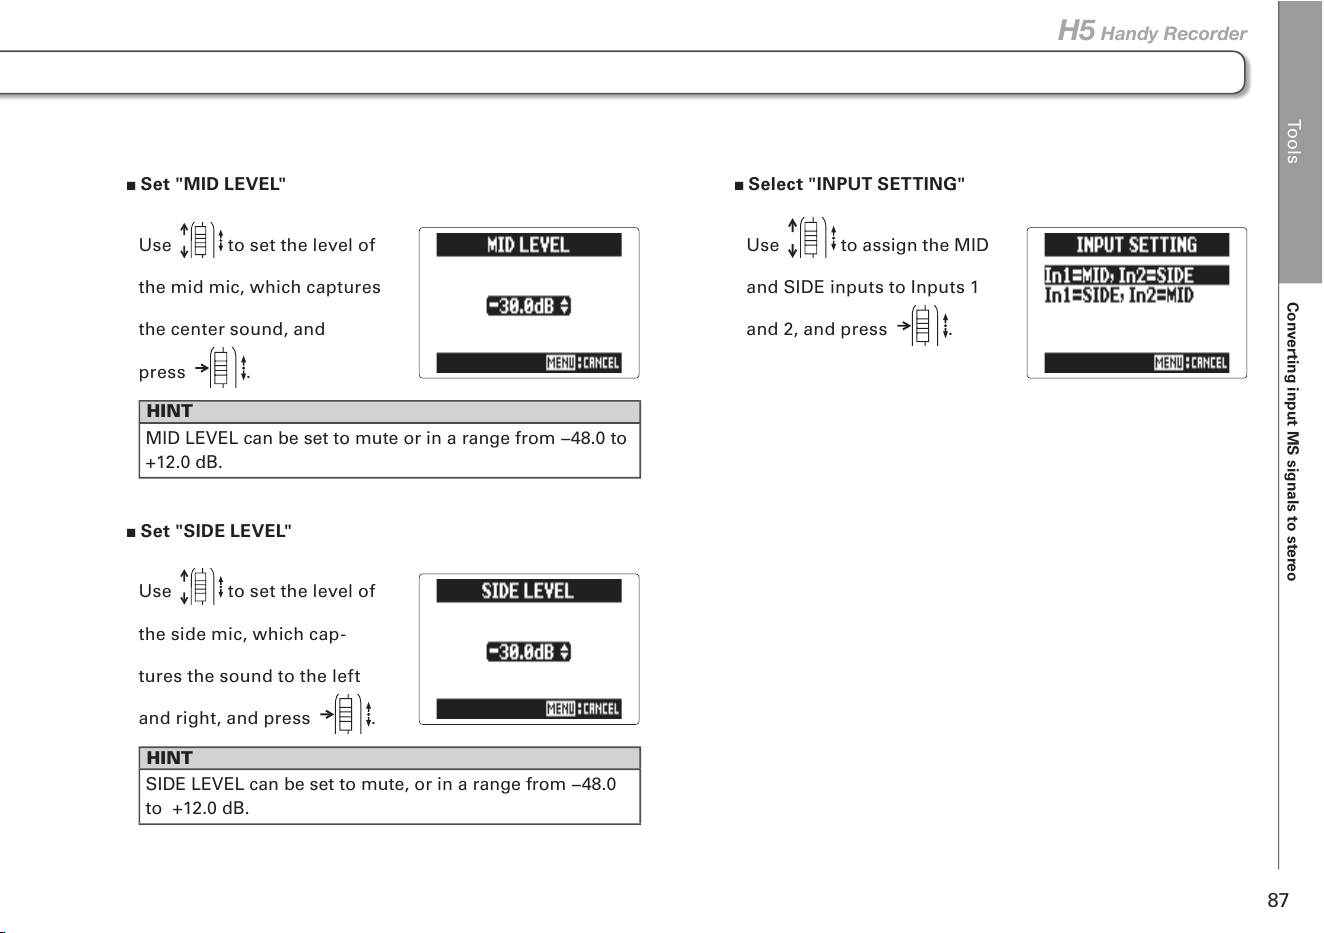
Tools
Converting input MS signals to stereo
87
H5 Handy Recorder
Set "MID LEVEL"
Use
to set the level of
the mid mic, which captures
the center sound, and
press .
HINT
MID LEVEL can be set to mute or in a range from −48.0 to
+12.0 dB.
Set "SIDE LEVEL"
Use
to set the level of
the side mic, which cap-
tures the sound to the left
and right, and press .
HINT
SIDE LEVEL can be set to mute, or in a range from −48.0
to +12.0 dB.
Select "INPUT SETTING"
Use
to assign the MID
and SIDE inputs to Inputs 1
and 2, and press .
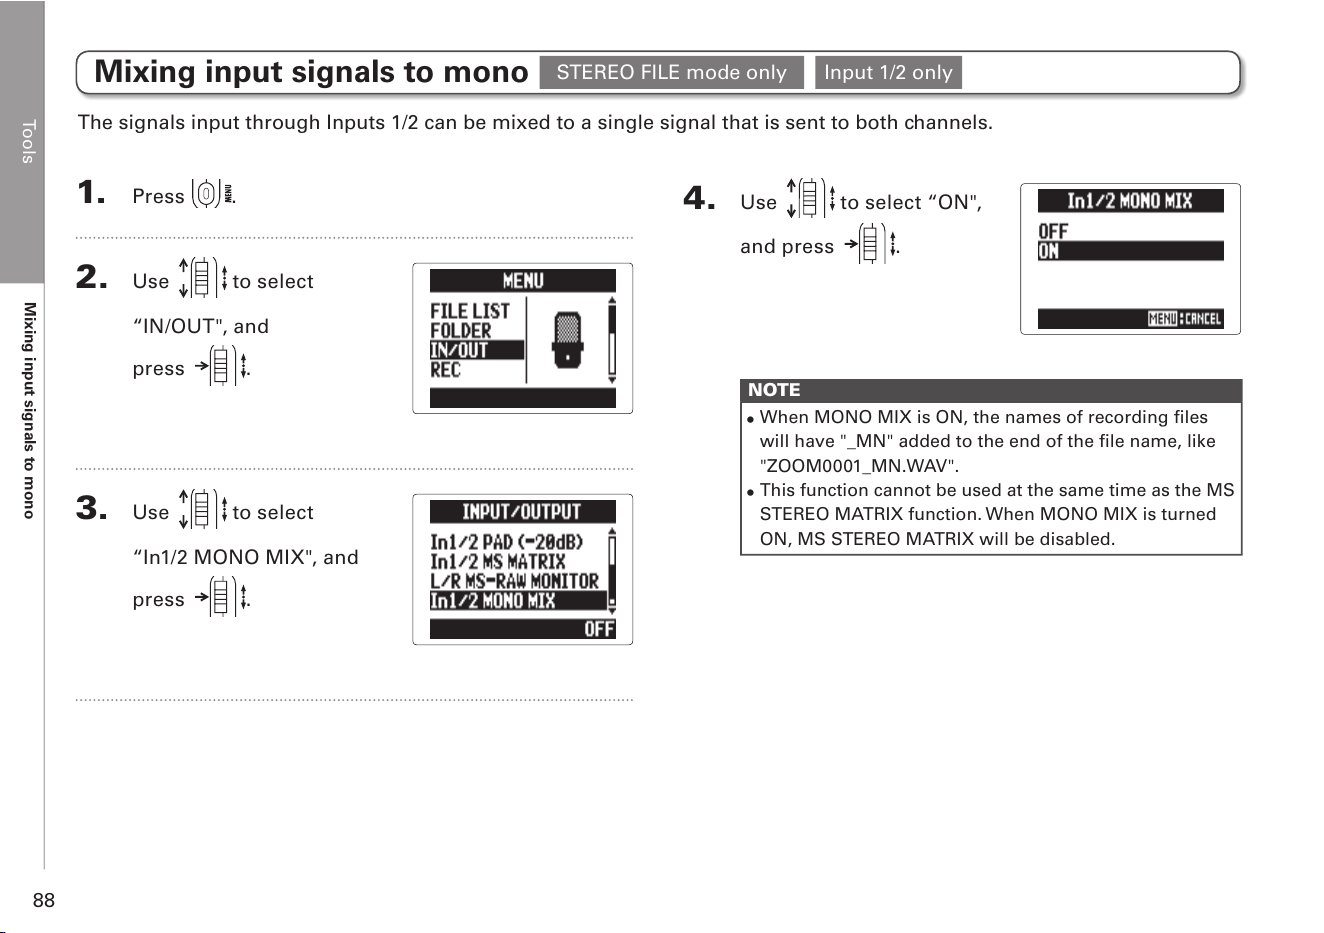
Tools
Mixing input signals to mono
88
4. Use to select “ON",
and press .
NOTE
•
When MONO MIX is ON, the names of recording files
will have "_MN" added to the end of the file name, like
"ZOOM0001_MN.WAV".
•
This function cannot be used at the same time as the MS
STEREO MATRIX function. When MONO MIX is turned
ON, MS STEREO MATRIX will be disabled.
1. Press .
2. Use to select
“IN/OUT", and
press
.
3. Use to select
“In1/2 MONO MIX", and
press
.
The signals input through Inputs 1/2 can be mixed to a single signal that is sent to both channels.
Mixing input signals to mono
STEREO FILE mode only Input 1/2 only
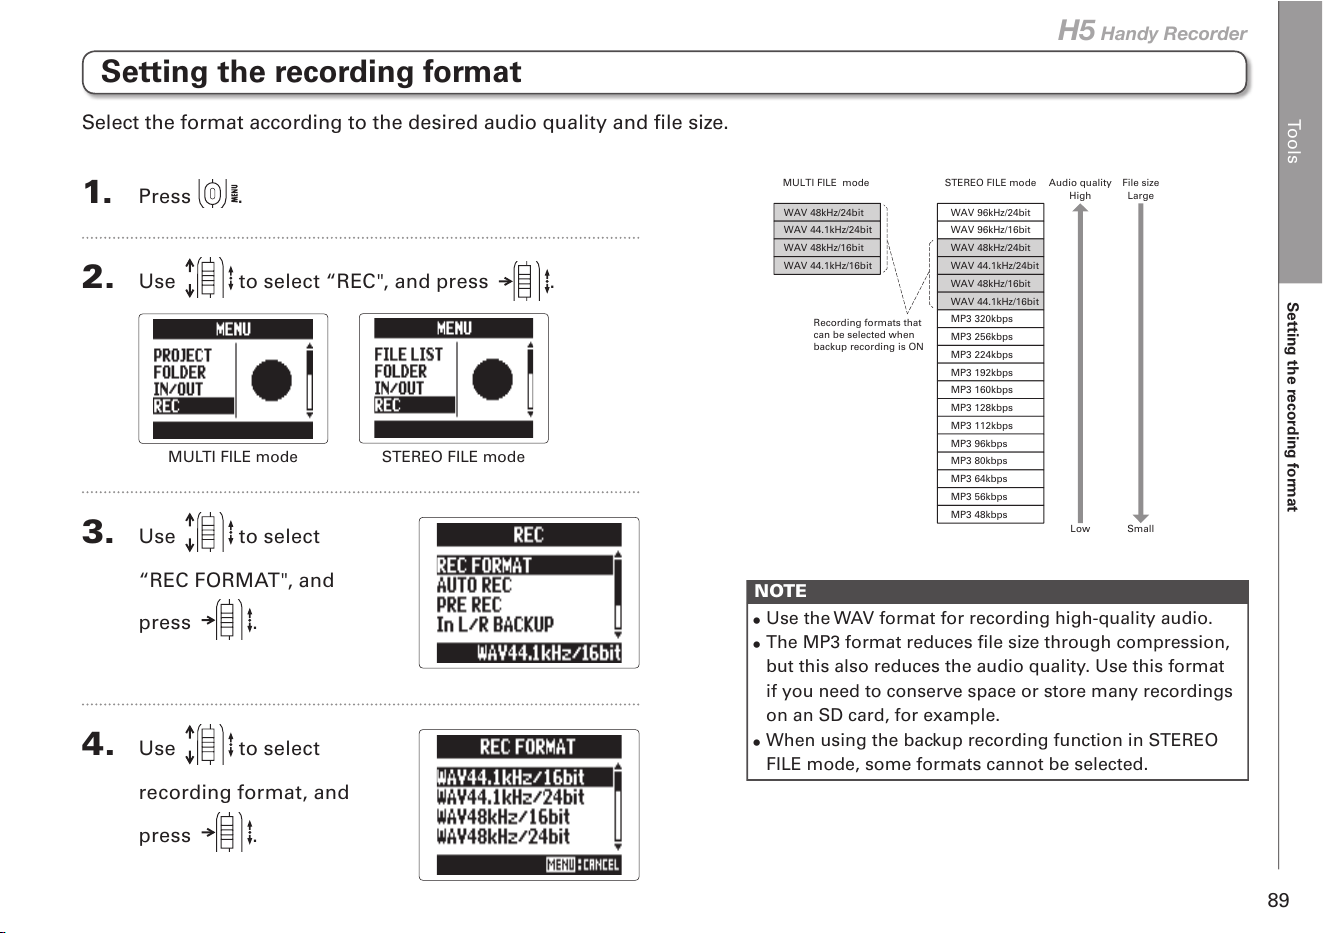
Tools
Setting the recording format
89
H5 Handy Recorder
Setting the recording format
1. Press .
2. Use to select “REC", and press .
MULTI FILE mode
STEREO FILE mode
3. Use to select
“REC FORMAT", and
press
.
4. Use to select
recording format, and
press
.
Select the format according to the desired audio quality and file size.
WAV 96kHz/24bit
WAV 96kHz/16bit
WAV 48kHz/24bit
WAV 44.1kHz/24bit
WAV 48kHz/16bit
WAV 44.1kHz/16bit
MP3 320kbps
MP3 256kbps
MP3 224kbps
MP3 192kbps
MP3 160kbps
MP3 128kbps
MP3 112kbps
MP3 96kbps
MP3 80kbps
MP3 64kbps
MP3 56kbps
MP3 48kbps
WAV 48kHz/24bit
WAV 44.1kHz/24bit
WAV 48kHz/16bit
WAV 44.1kHz/16bit
Audio quality File sizeSTEREO FILE modeMULTI FILE mode
High
Low
Large
Small
Recording formats that
can be selected when
backup recording is ON
NOTE
•
Use the WAV format for recording high-quality audio.
•
The MP3 format reduces file size through compression,
but this also reduces the audio quality. Use this format
if you need to conserve space or store many recordings
on an SD card, for example.
•
When using the backup recording function in STEREO
FILE mode, some formats cannot be selected.
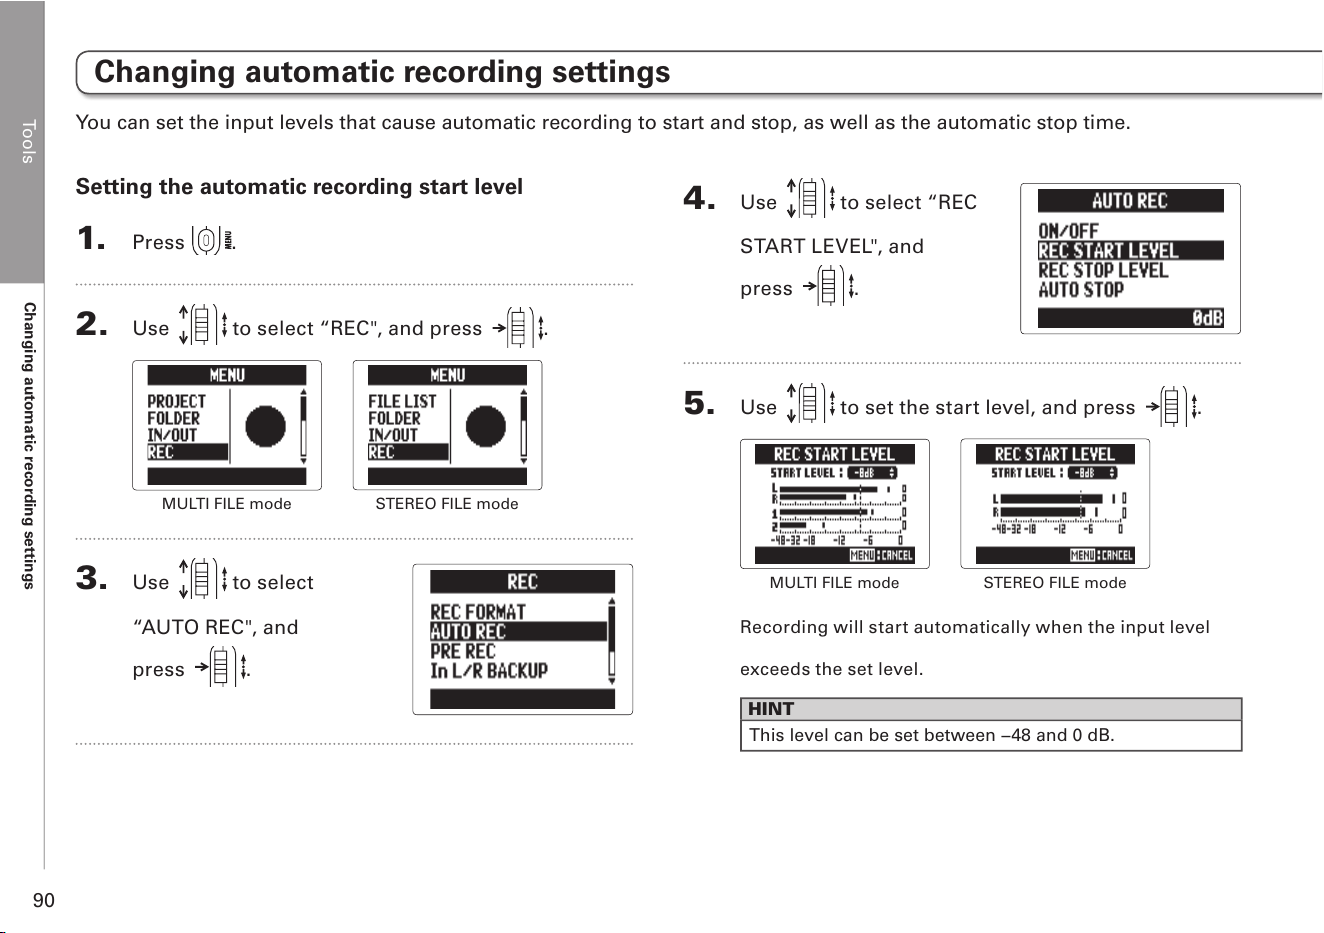
Tools
Changing automatic recording settings
90
Changing automatic recording settings
Setting the automatic recording start level
1. Press .
2. Use to select “REC", and press .
MULTI FILE mode
STEREO FILE mode
3. Use to select
“AUTO REC", and
press
.
You can set the input levels that cause automatic recording to start and stop, as well as the automatic stop time.
4. Use to select “REC
START LEVEL", and
press
.
5. Use to set the start level, and press .
MULTI FILE mode
STEREO FILE mode
Recording will start automatically when the input level
exceeds the set level.
HINT
This level can be set between −48 and 0 dB.
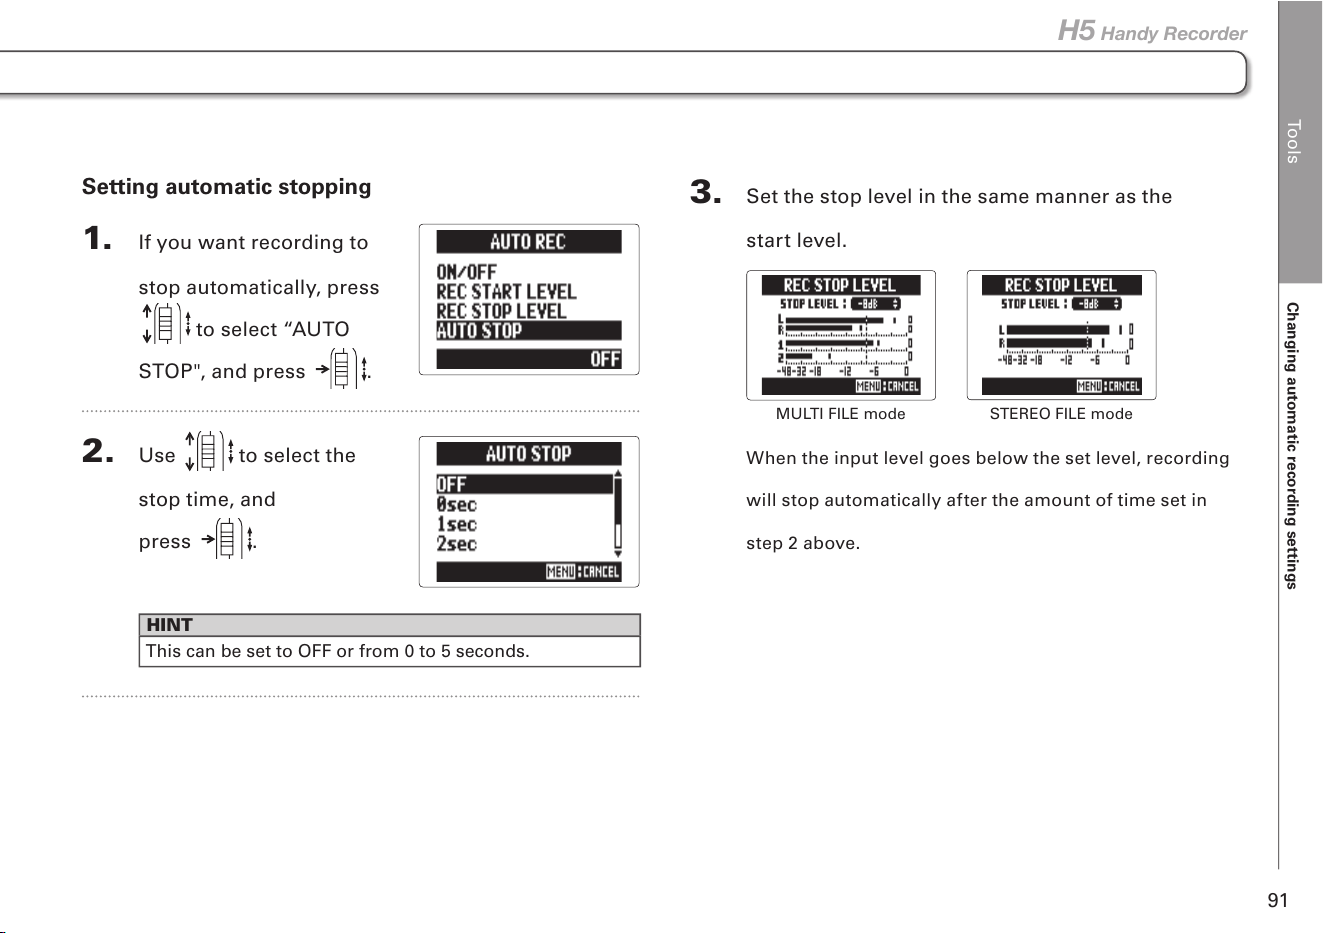
Tools
Changing automatic recording settings
91
H5 Handy Recorder
Setting automatic stopping
1. If you want recording to
stop automatically, press
to select “AUTO
STOP", and press .
2. Use to select the
stop time, and
press
.
HINT
This can be set to OFF or from 0 to 5 seconds.
3. Set the stop level in the same manner as the
start level.
MULTI FILE mode
STEREO FILE mode
When the input level goes below the set level, recording
will stop automatically after the amount of time set in
step 2 above.
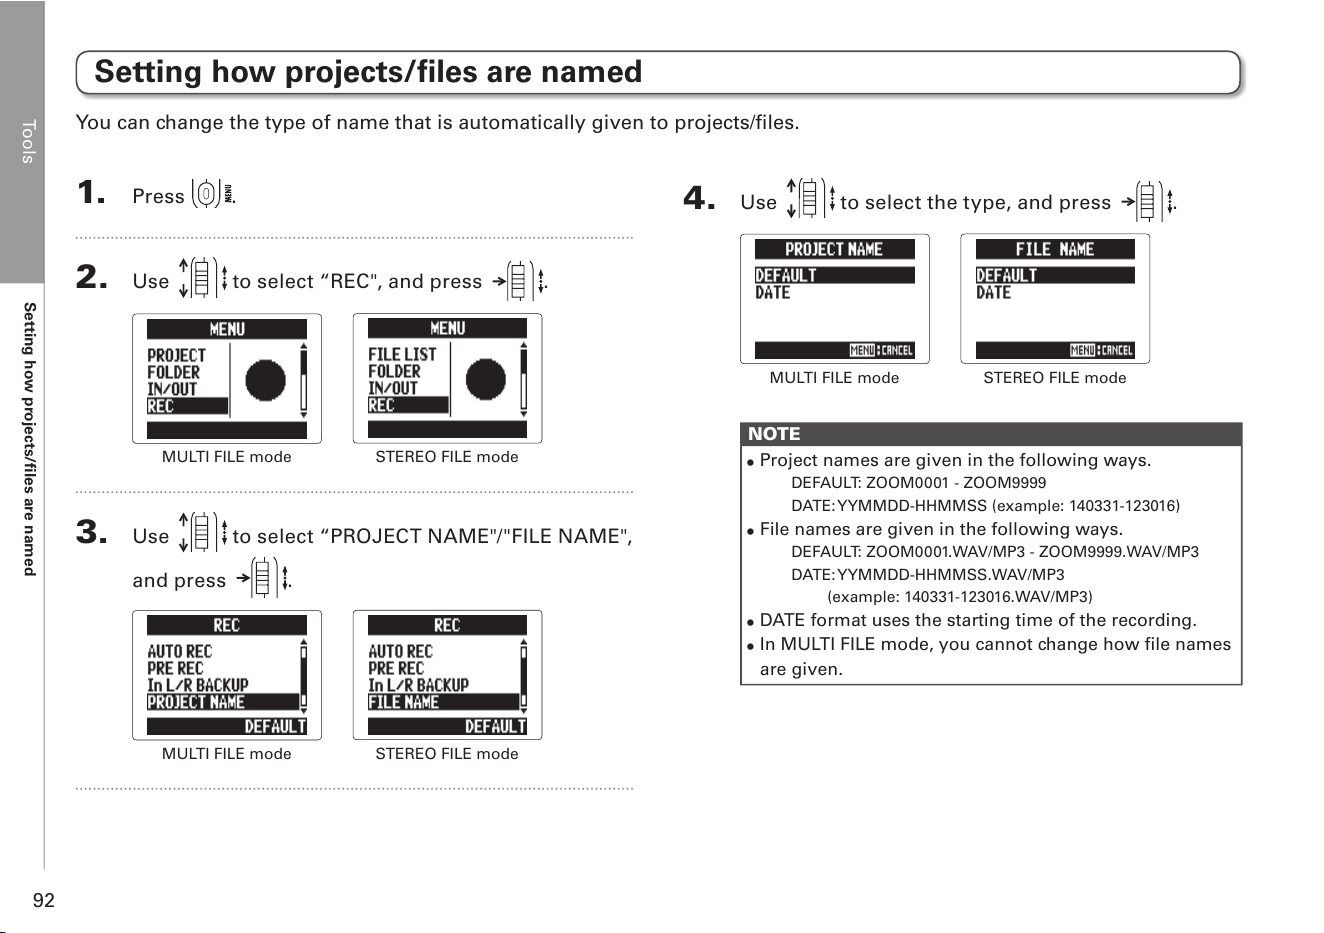
Tools
Setting how projects/files are named
92
Setting how projects/files are named
1. Press .
2. Use to select “REC", and press .
MULTI FILE mode
STEREO FILE mode
3. Use to select “PROJECT NAME"/"FILE NAME",
and press .
MULTI FILE mode
STEREO FILE mode
You can change the type of name that is automatically given to projects/files.
4. Use to select the type, and press .
MULTI FILE mode
STEREO FILE mode
NOTE
•
Project names are given in the following ways.
DEFAULT: ZOOM0001 - ZOOM9999
DATE: YYMMDD-HHMMSS (example: 140331-123016)
•
File names are given in the following ways.
DEFAULT: ZOOM0001.WAV/MP3 - ZOOM9999.WAV/MP3
DATE: YYMMDD-HHMMSS.WAV/MP3
(example: 140331-123016.WAV/MP3)
•
DATE format uses the starting time of the recording.
•
In MULTI FILE mode, you cannot change how file names
are given.
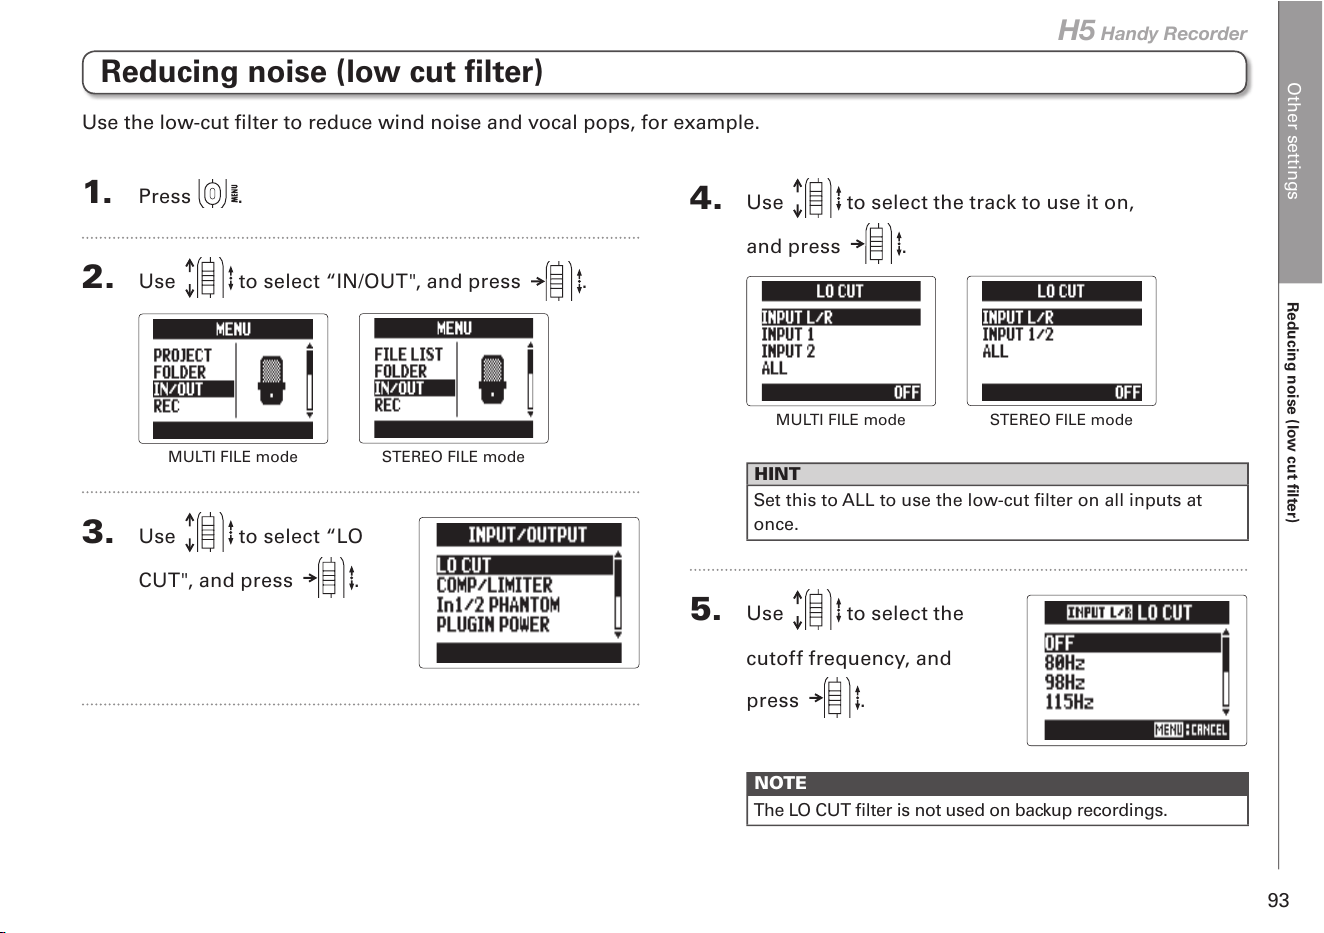
Other settings
Reducing noise (low cut filter)
93
H5 Handy Recorder
4. Use to select the track to use it on,
and press
.
MULTI FILE mode
STEREO FILE mode
HINT
Set this to ALL to use the low-cut filter on all inputs at
once.
5. Use to select the
cutoff frequency, and
press
.
NOTE
The LO CUT filter is not used on backup recordings.
Reducing noise (low cut filter)
1. Press .
2. Use to select “IN/OUT", and press .
MULTI FILE mode
STEREO FILE mode
3. Use to select “LO
CUT", and press .
Use the low-cut filter to reduce wind noise and vocal pops, for example.
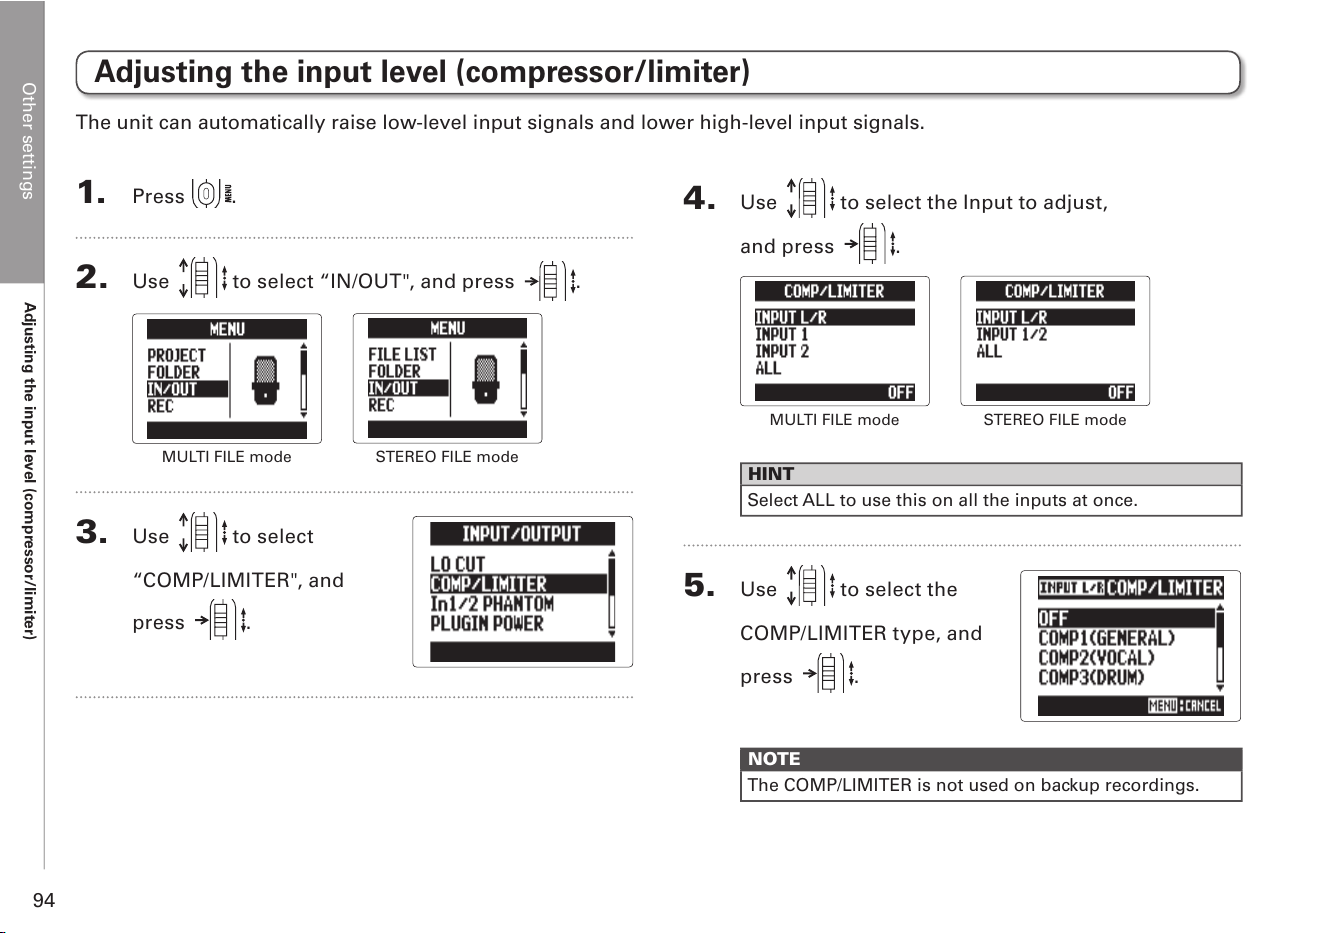
Other settings
Adjusting the input level (compressor/limiter)
94
Adjusting the input level (compressor/limiter)
1. Press .
2. Use to select “IN/OUT", and press .
MULTI FILE mode
STEREO FILE mode
3. Use to select
“COMP/LIMITER", and
press
.
The unit can automatically raise low-level input signals and lower high-level input signals.
4. Use to select the Input to adjust,
and press
.
MULTI FILE mode
STEREO FILE mode
HINT
Select ALL to use this on all the inputs at once.
5. Use to select the
COMP/LIMITER type, and
press
.
NOTE
The COMP/LIMITER is not used on backup recordings.
Other settings
Adjusting the input level (compressor/limiter)
95
H5 Handy Recorder
Setting Explanation
Threshold
(dB)
Ratio Output
level
(dB)
Attack time
(ms)
Release
time (ms)
OFF
Compressor/limiter OFF
- - - - -
COMP
(GENERAL)
Standard compressor Compressors reduce
high levels and raise
low levels.
-48.7 9:1 +6.0 7.2 968
COMP
(VOCAL)
Compressor for vocals
-8.4 16:1 0 1.8 8.7
COMP
(DRUM)
Compressor for drums
and percussion
-48.2 7:1 +3.6 12.3 947
LIMITER
(GENERAL)
Standard limiter Limiters reduce the
level when input
signals exceed a set
level.
-14.4 60:1 0 6.4 528
LIMITER
(CONCERT)
Limiter for live
performances
-13.8 32:1 +1.2 1.9 8.5
LIMITER
(STUDIO)
Limiter for studio
recording
-12.0 8:1 +1.2 6.5 423
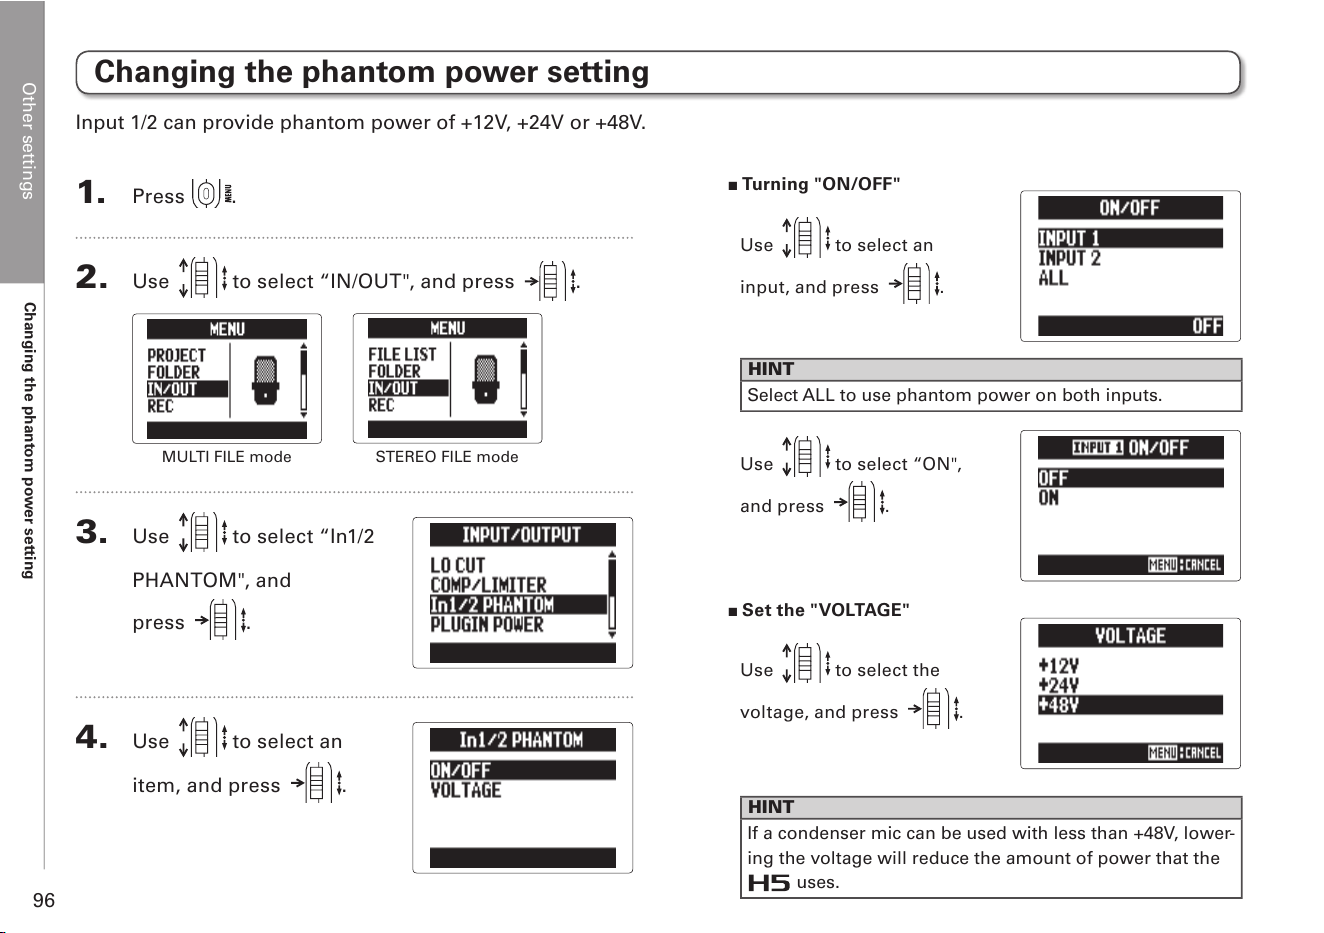
Other settings
Changing the phantom power setting
96
Changing the phantom power setting
1. Press .
2. Use to select “IN/OUT", and press .
MULTI FILE mode
STEREO FILE mode
3. Use to select “In1/2
PHANTOM", and
press
.
4. Use to select an
item, and press .
Turning "ON/OFF"
Use
to select an
input, and press .
HINT
Select ALL to use phantom power on both inputs.
Use
to select “ON",
and press .
Set the "VOLTAGE"
Use
to select the
voltage, and press .
HINT
If a condenser mic can be used with less than +48V, lower-
ing the voltage will reduce the amount of power that the
uses.
Input 1/2 can provide phantom power of +12V, +24V or +48V.
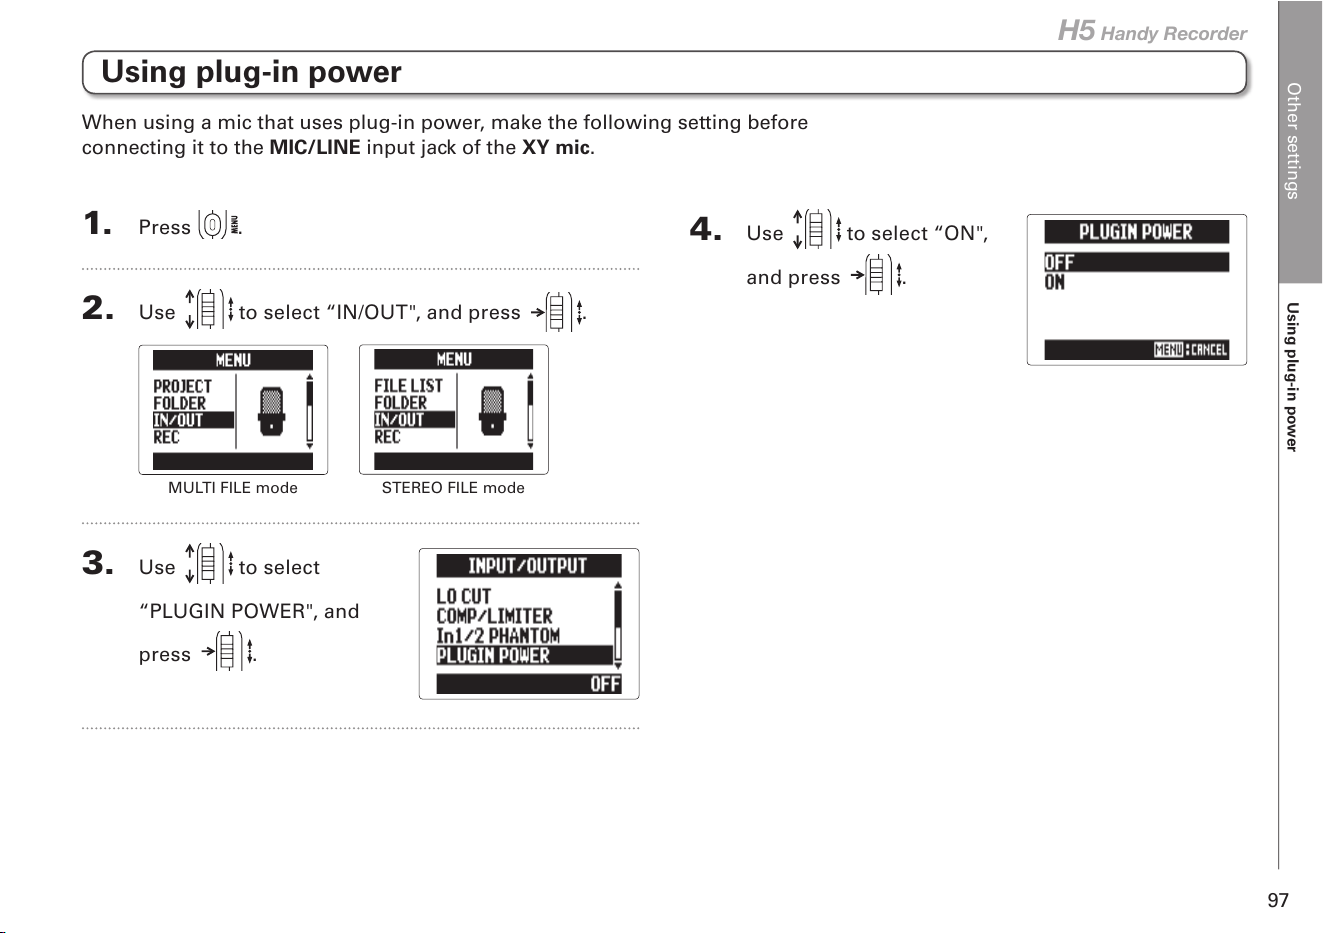
Other settings
Using plug-in power
97
H5 Handy Recorder
Using plug-in power
1. Press .
2. Use to select “IN/OUT", and press .
MULTI FILE mode
STEREO FILE mode
3. Use to select
“PLUGIN POWER", and
press
.
4. Use to select “ON",
and press .
When using a mic that uses plug-in power, make the following setting before
connecting it to the MIC/LINE input jack of the XY mic.
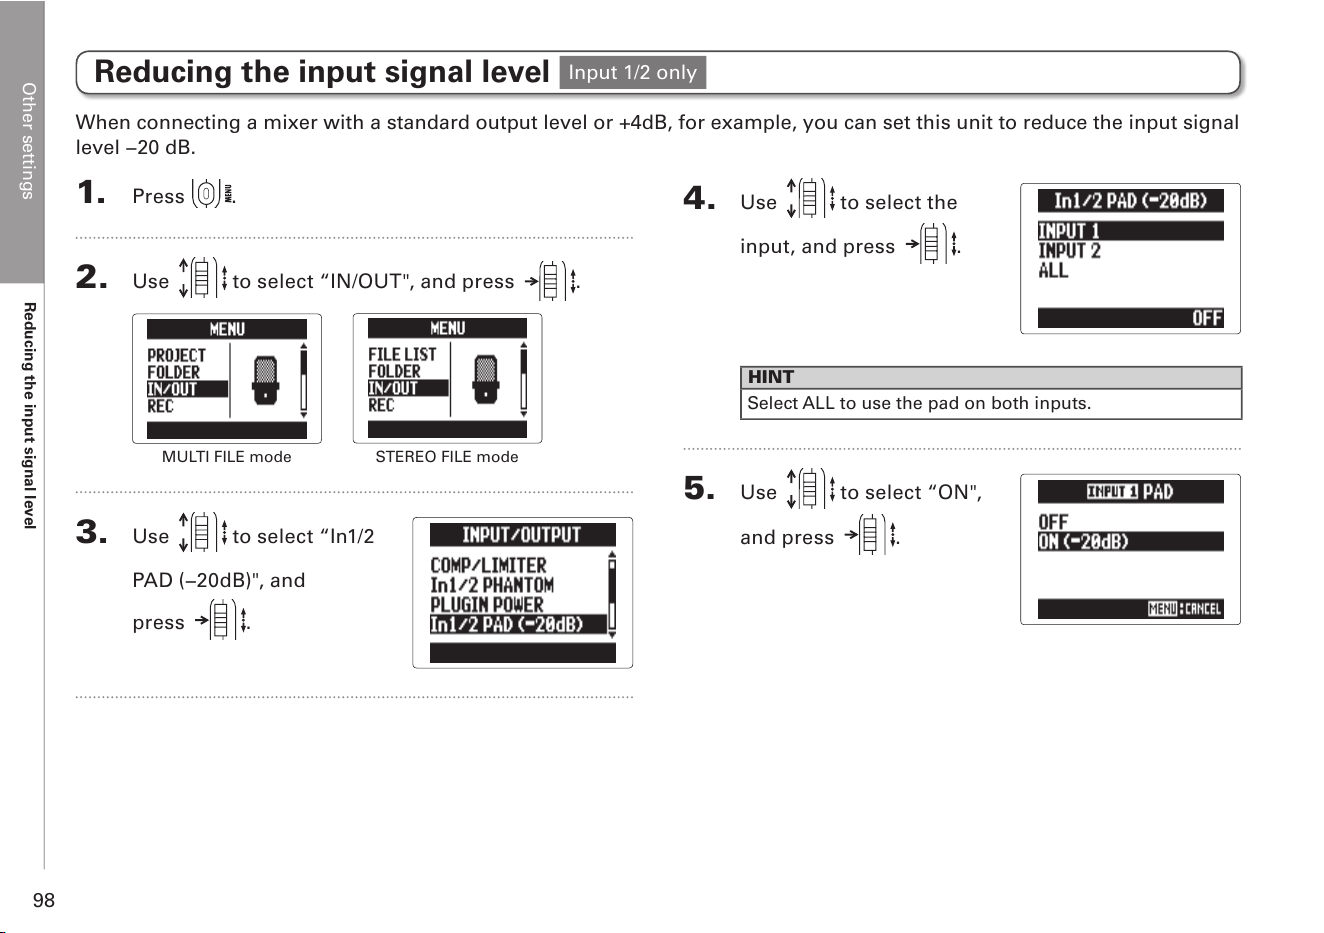
Other settings
Reducing the input signal level
98
Reducing the input signal level
When connecting a mixer with a standard output level or +4dB, for example, you can set this unit to reduce the input signal
level −20 dB.
1. Press .
2. Use to select “IN/OUT", and press .
MULTI FILE mode
STEREO FILE mode
3. Use to select “In1/2
PAD (−20dB)", and
press
.
4. Use to select the
input, and press .
HINT
Select ALL to use the pad on both inputs.
5. Use to select “ON",
and press .
Input 1/2 only
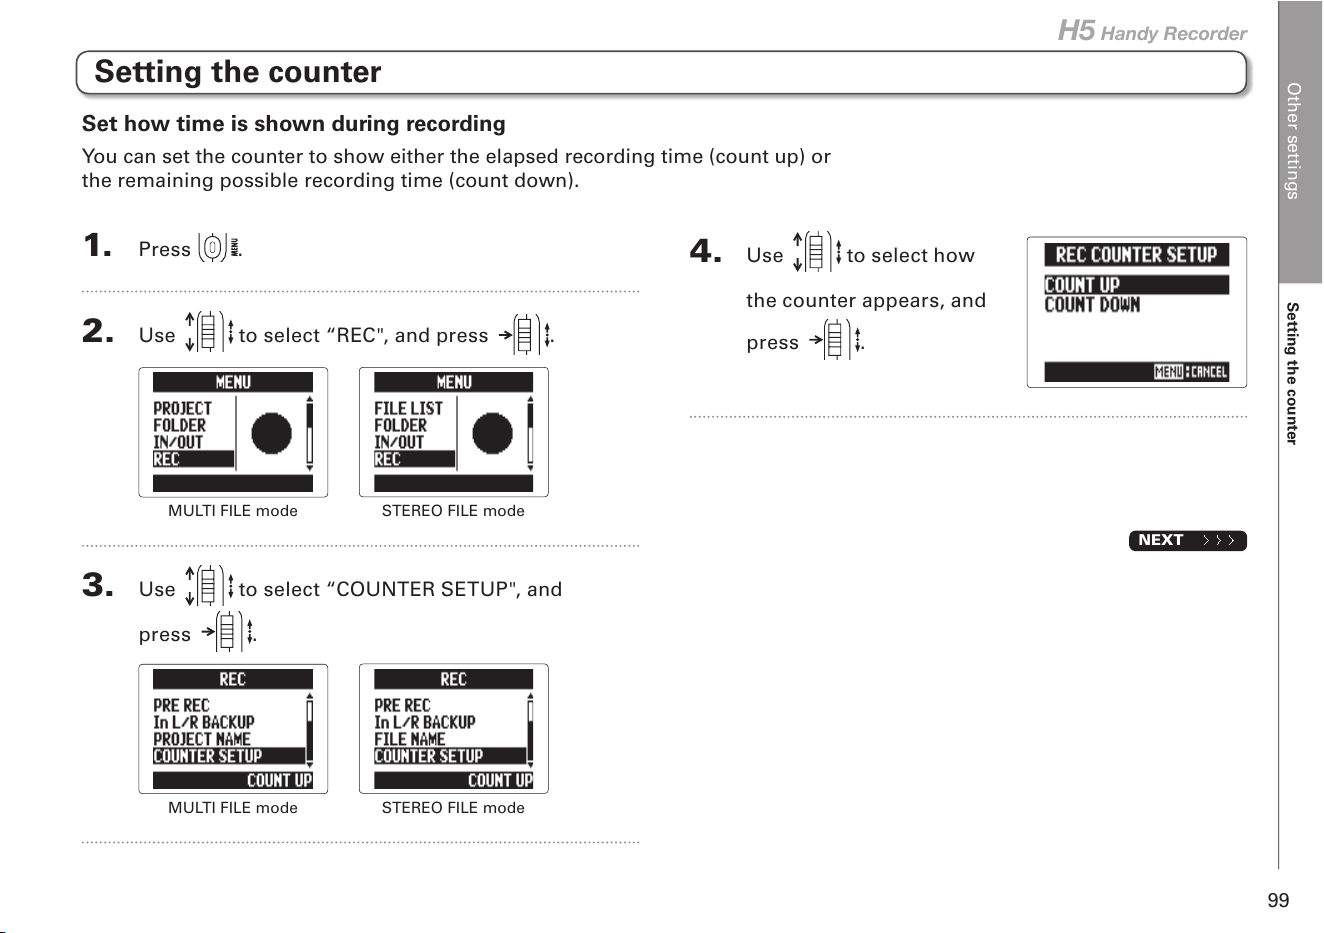
Other settings
Setting the counter
99
H5 Handy Recorder
Setting the counter
Set how time is shown during recording
You can set the counter to show either the elapsed recording time (count up) or
the remaining possible recording time (count down).
1. Press .
2. Use to select “REC", and press .
MULTI FILE mode
STEREO FILE mode
3. Use to select “COUNTER SETUP", and
press
.
MULTI FILE mode
STEREO FILE mode
4. Use to select how
the counter appears, and
press
.
NEXT
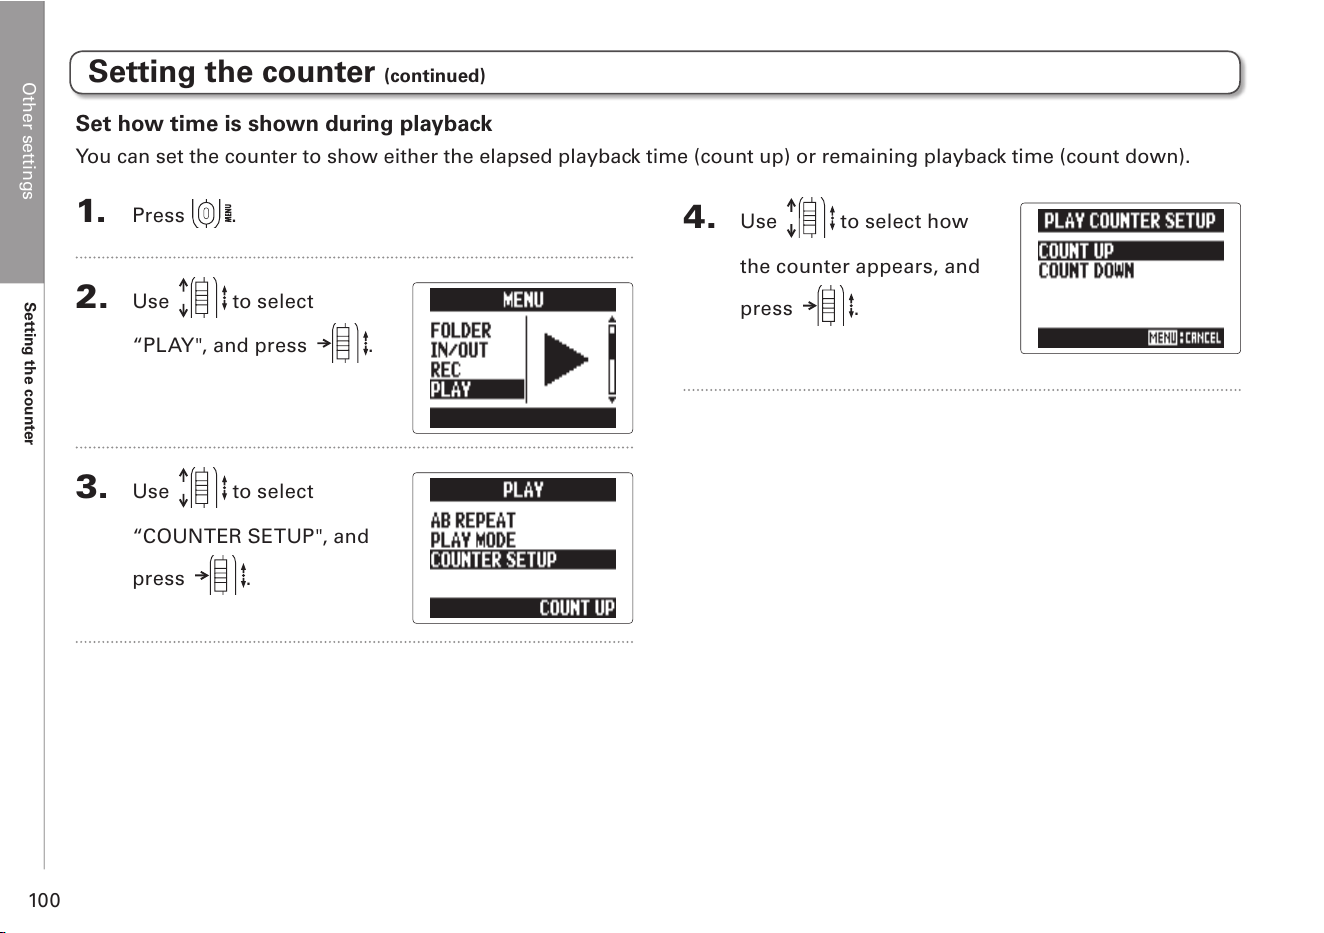
Other settings
Setting the counter
100
Set how time is shown during playback
You can set the counter to show either the elapsed playback time (count up) or remaining playback time (count down).
1. Press .
2. Use to select
“PLAY", and press .
3. Use to select
“COUNTER SETUP", and
press
.
4. Use to select how
the counter appears, and
press
.
Setting the counter (continued)
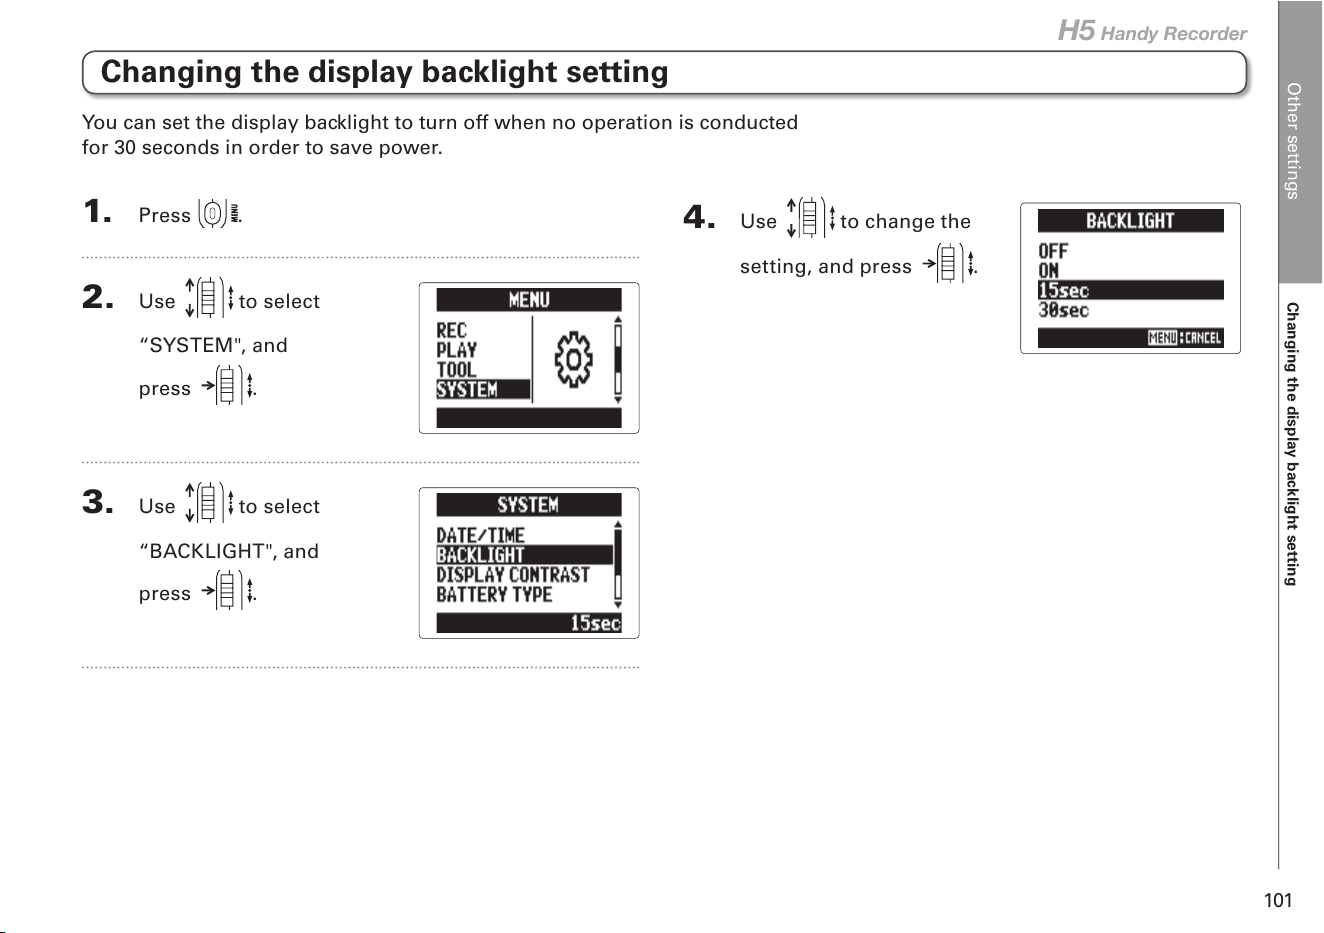
Other settings
Changing the display backlight setting
101
H5 Handy Recorder
Changing the display backlight setting
1. Press .
2. Use to select
“SYSTEM", and
press
.
3. Use to select
“BACKLIGHT", and
press
.
You can set the display backlight to turn off when no operation is conducted
for 30 seconds in order to save power.
4. Use to change the
setting, and press .
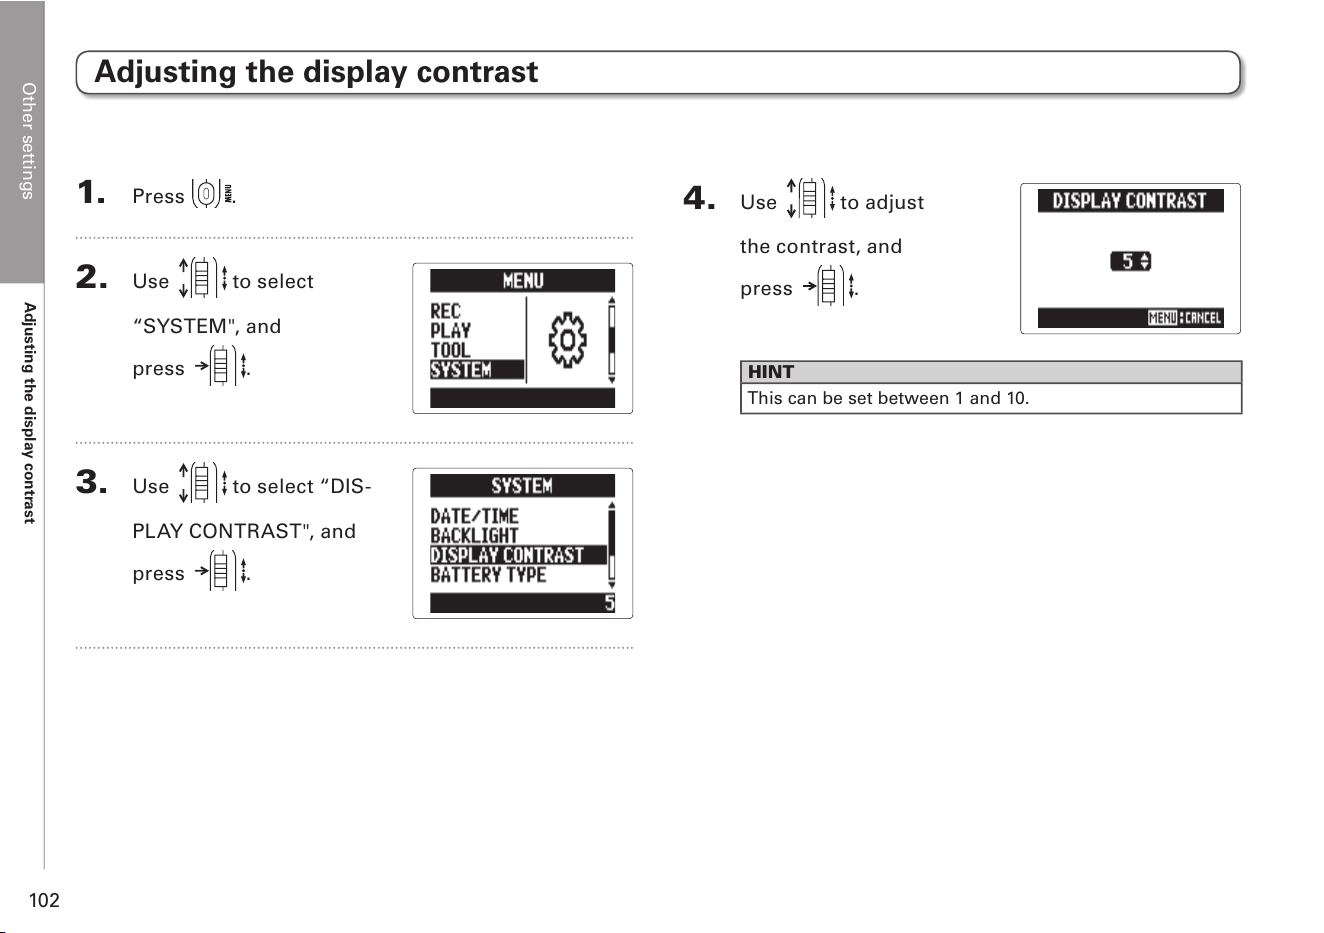
Other settings
Adjusting the display contrast
102
Adjusting the display contrast
1. Press .
2. Use to select
“SYSTEM", and
press
.
3. Use to select “DIS-
PLAY CONTRAST", and
press
.
4. Use to adjust
the contrast, and
press
.
HINT
This can be set between 1 and 10.
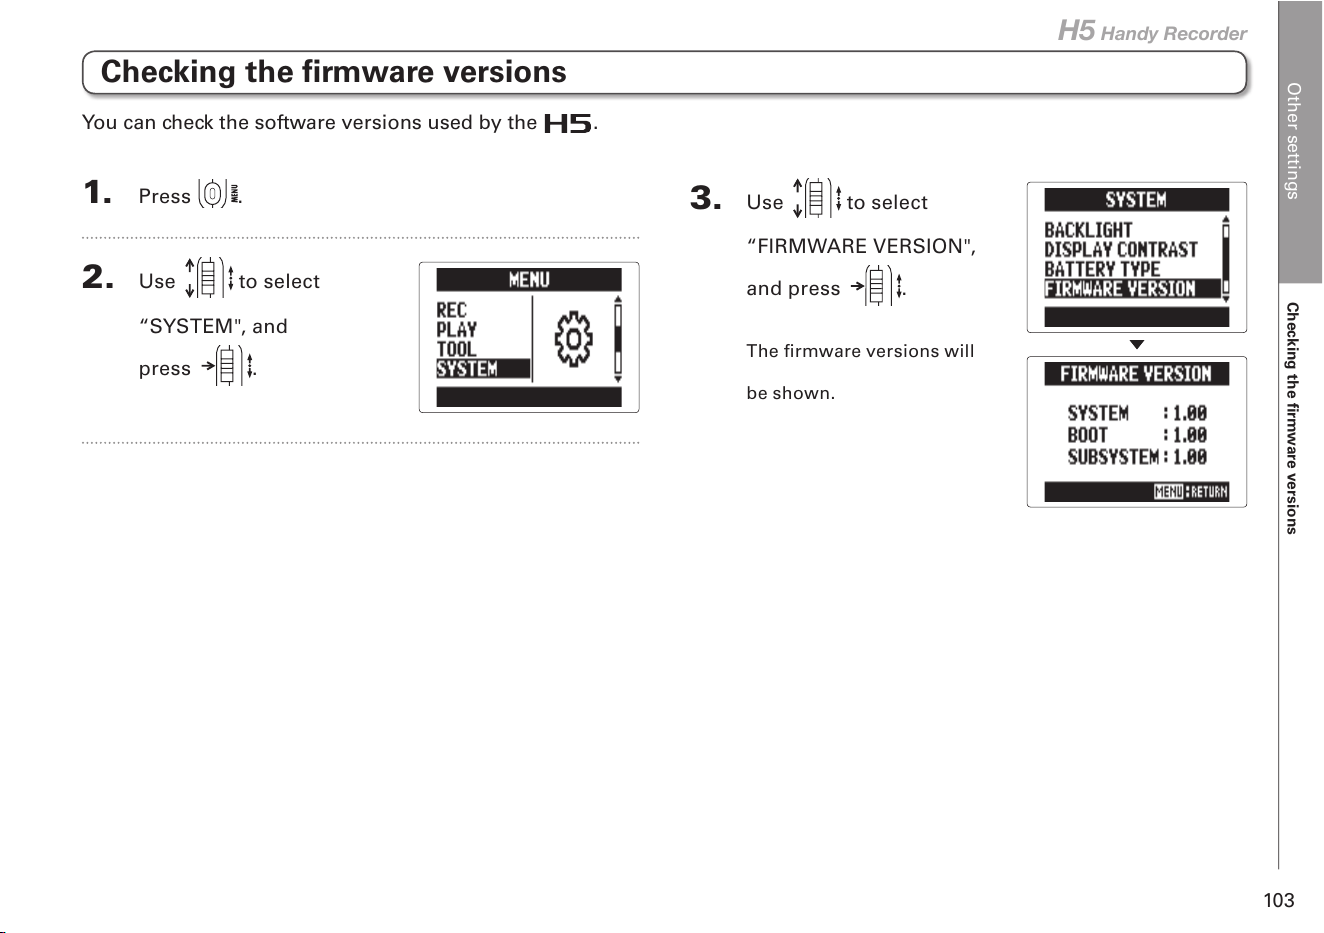
Other settings
Checking the firmware versions
103
H5 Handy Recorder
Checking the firmware versions
1. Press .
2. Use to select
“SYSTEM", and
press
.
You can check the software versions used by the .
3. Use to select
“FIRMWARE VERSION",
and press
.
The firmware versions will
be shown.
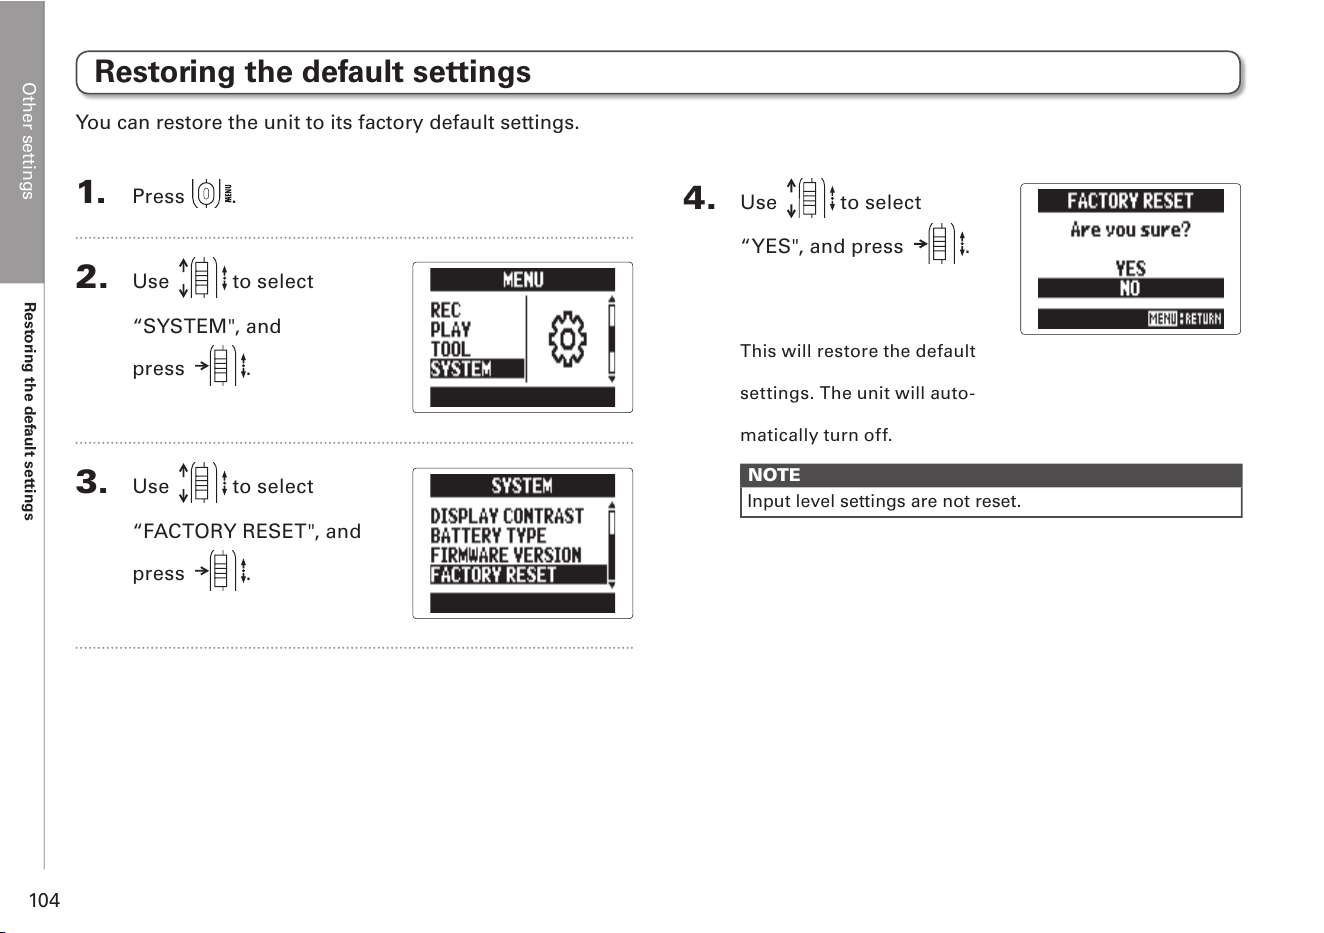
Other settings
Restoring the default settings
104
Restoring the default settings
1. Press .
2. Use to select
“SYSTEM", and
press
.
3. Use to select
“FACTORY RESET", and
press
.
You can restore the unit to its factory default settings.
4. Use to select
“YES", and press .
This will restore the default
settings. The unit will auto-
matically turn off.
NOTE
Input level settings are not reset.
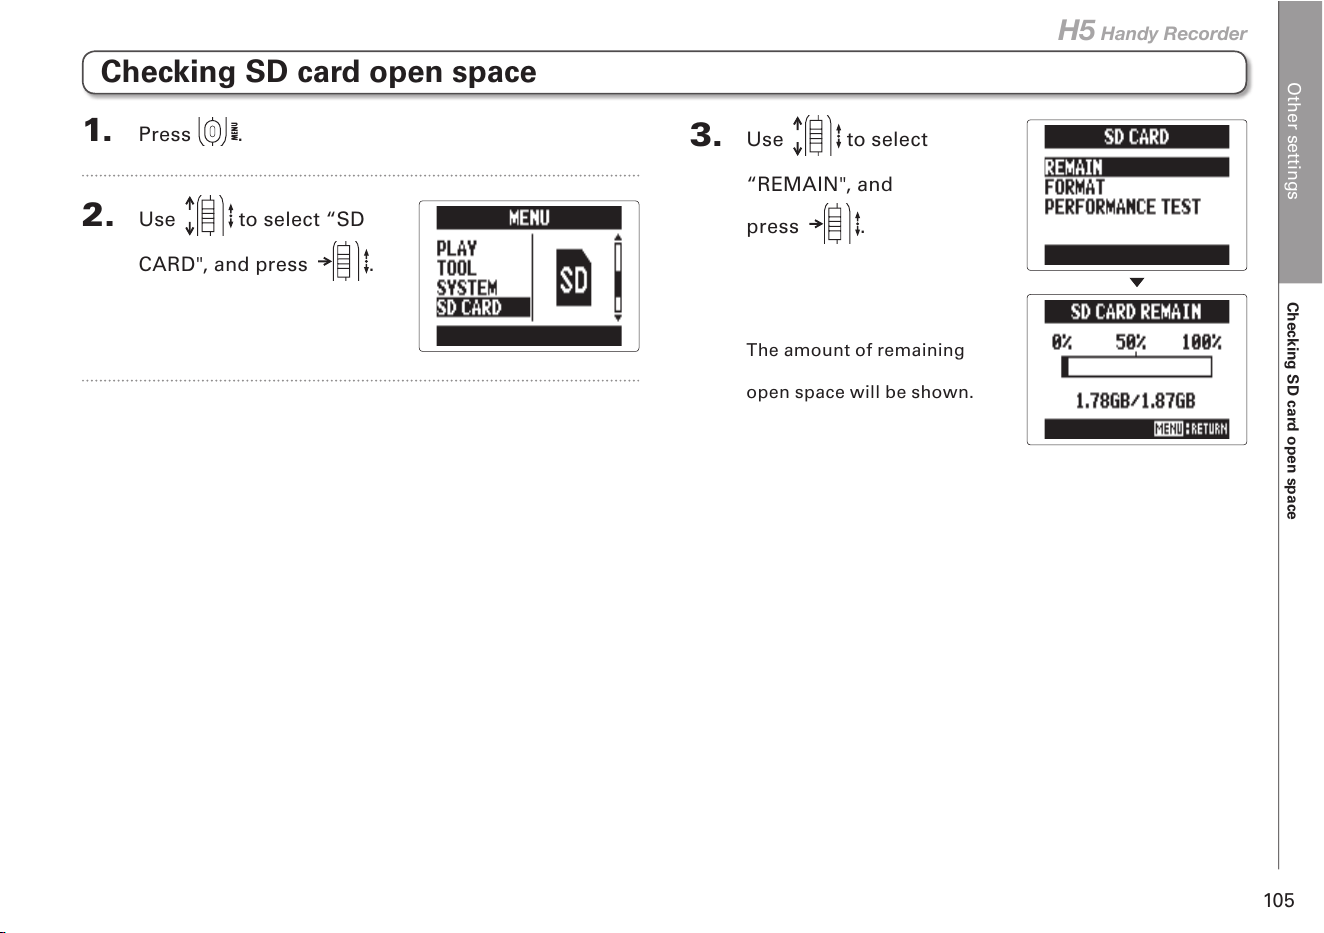
Other settings
Checking SD card open space
105
H5 Handy Recorder
Checking SD card open space
1. Press .
2. Use to select “SD
CARD", and press .
3. Use to select
“REMAIN", and
press
.
The amount of remaining
open space will be shown.
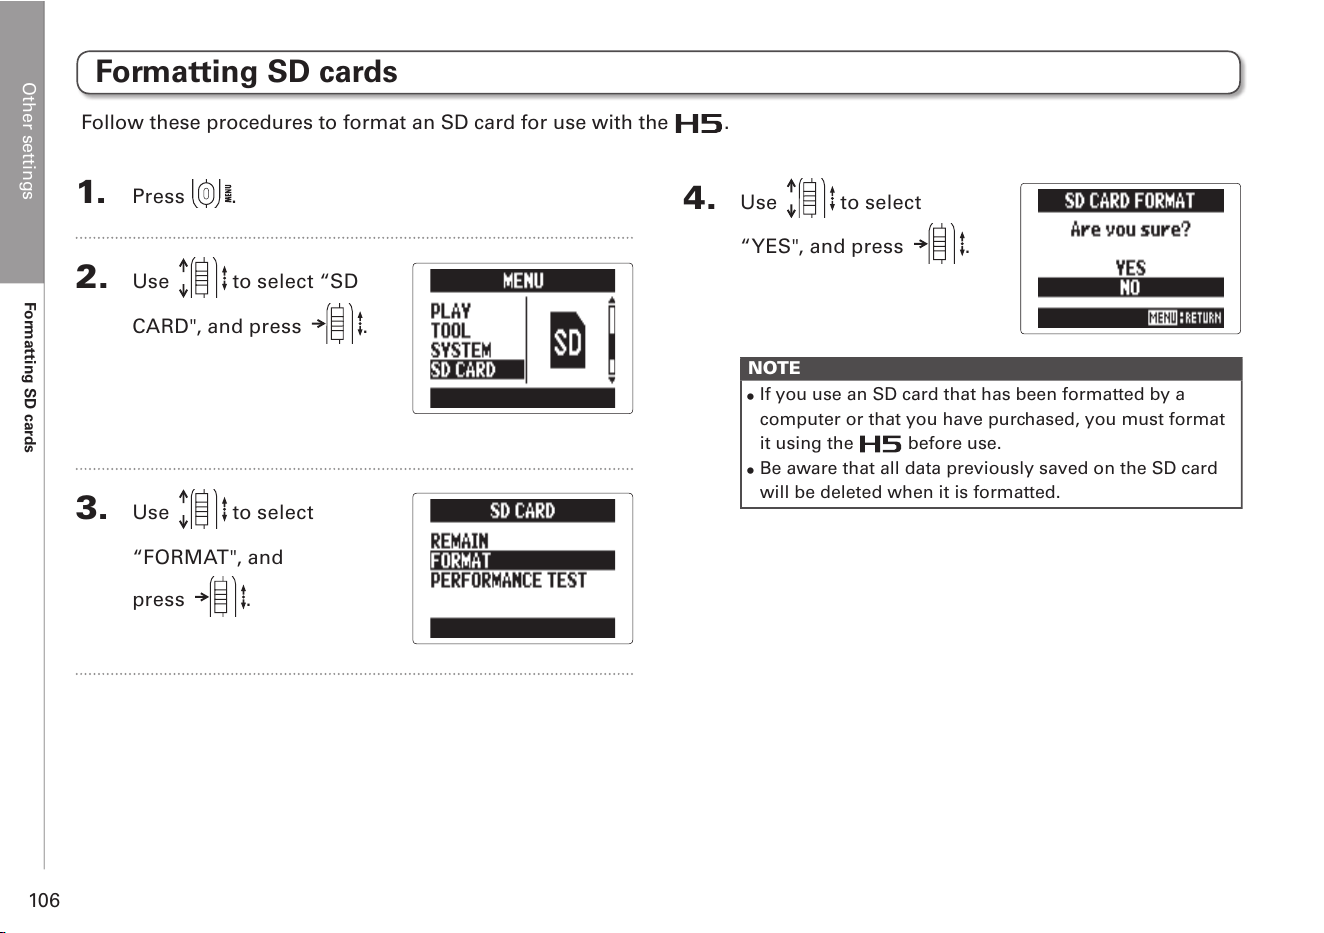
Other settings
Formatting SD cards
106
Formatting SD cards
1. Press .
2. Use to select “SD
CARD", and press .
3. Use to select
“FORMAT", and
press
.
Follow these procedures to format an SD card for use with the .
4. Use to select
“YES", and press .
NOTE
•
If you use an SD card that has been formatted by a
computer or that you have purchased, you must format
it using the before use.
•
Be aware that all data previously saved on the SD card
will be deleted when it is formatted.
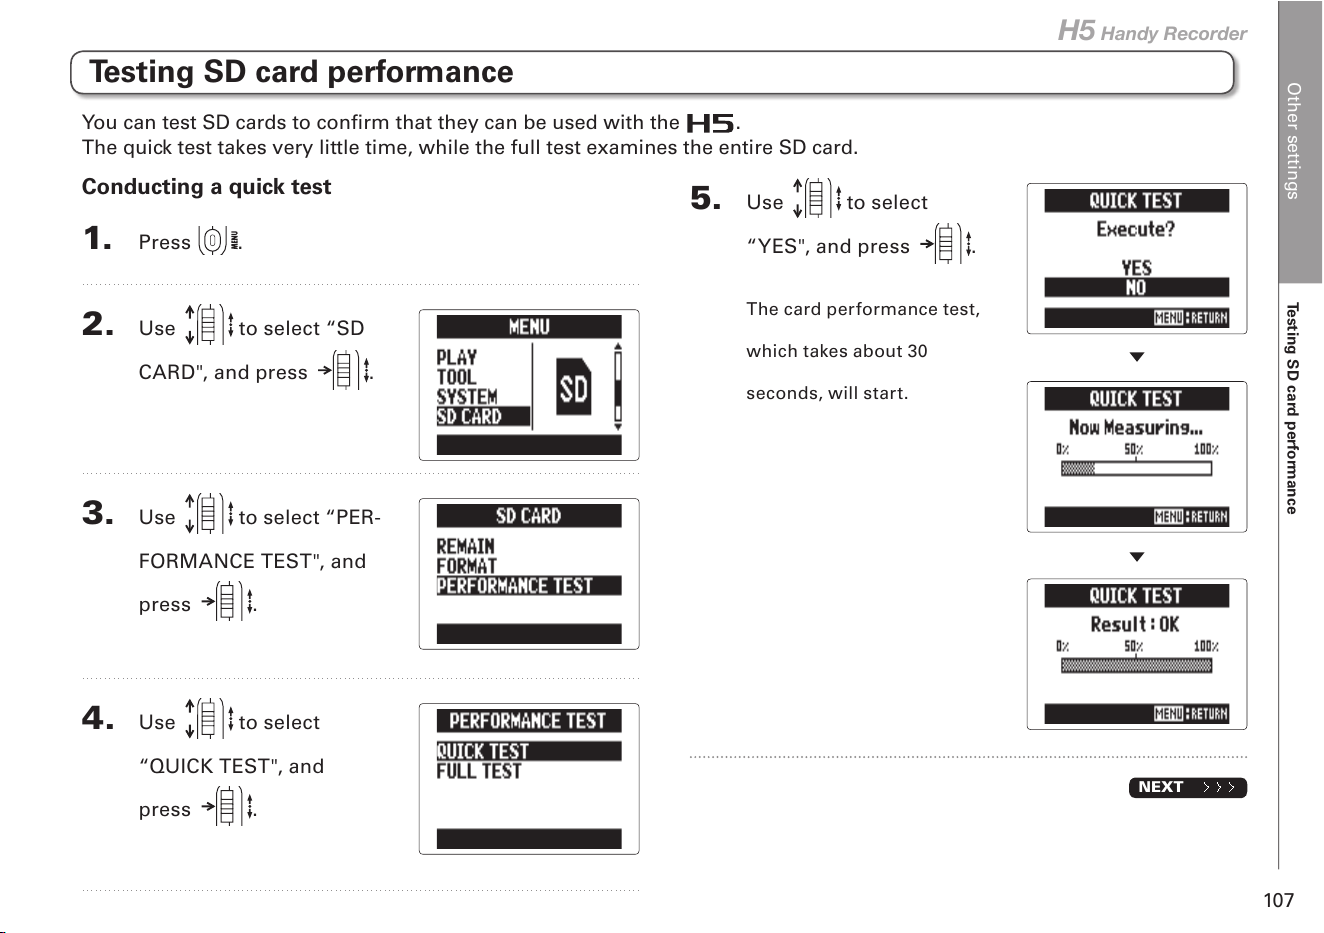
Other settings
Testing SD card performance
107
H5 Handy Recorder
Testing SD card performance
You can test SD cards to confirm that they can be used with the .
The quick test takes very little time, while the full test examines the entire SD card.
Conducting a quick test
1. Press .
2. Use to select “SD
CARD", and press .
3. Use to select “PER-
FORMANCE TEST", and
press
.
4. Use to select
“QUICK TEST", and
press
.
5. Use to select
“YES", and press .
The card performance test,
which takes about 30
seconds, will start.
NEXT
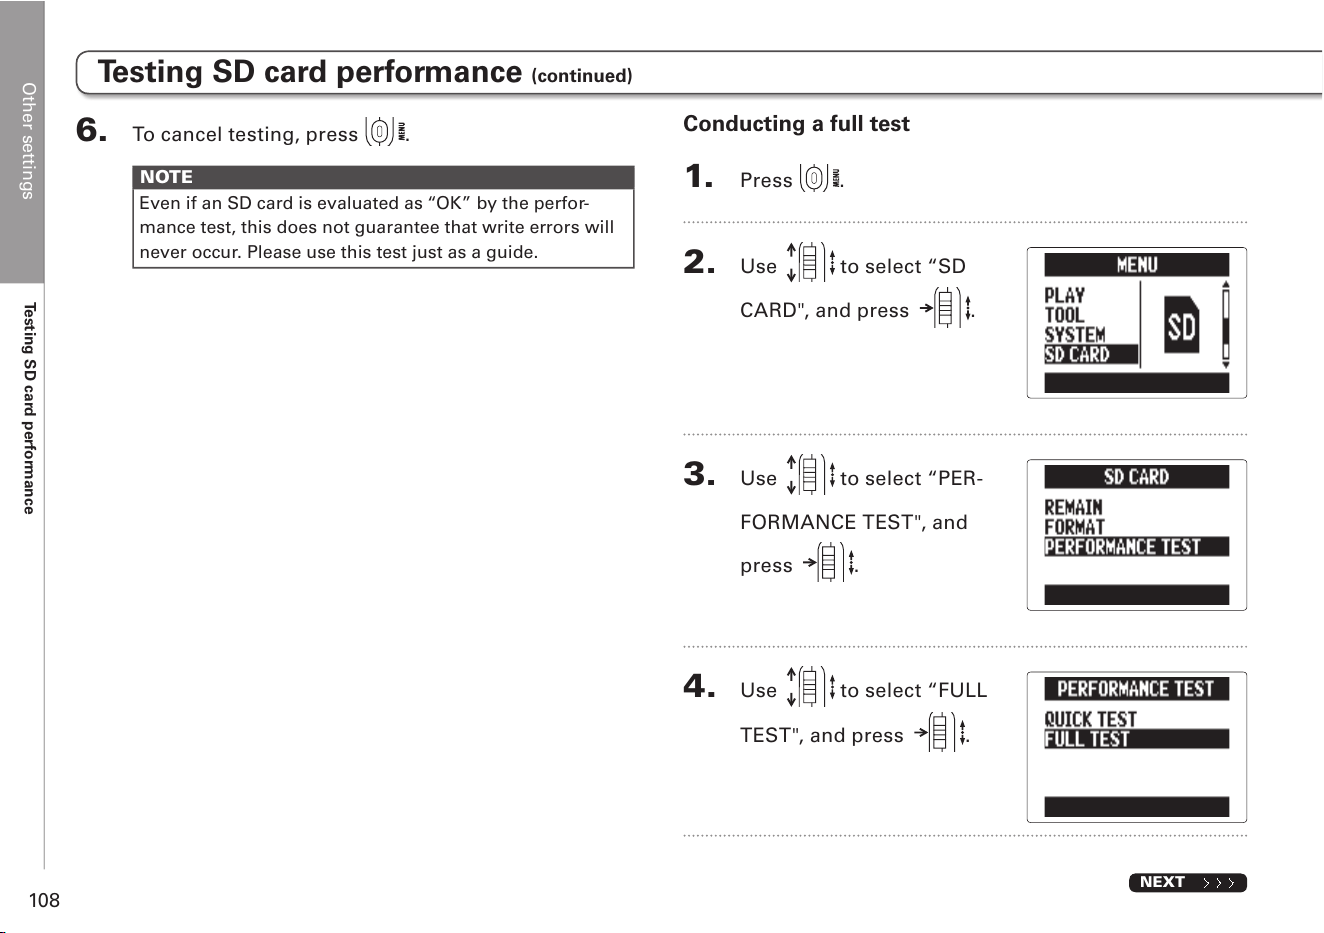
Other settings
Testing SD card performance
108
Testing SD card performance (continued)
6. To cancel testing, press .
NOTE
Even if an SD card is evaluated as “OK” by the perfor-
mance test, this does not guarantee that write errors will
never occur. Please use this test just as a guide.
Conducting a full test
1. Press .
2. Use to select “SD
CARD", and press .
3. Use to select “PER-
FORMANCE TEST", and
press
.
4. Use to select “FULL
TEST", and press .
NEXT
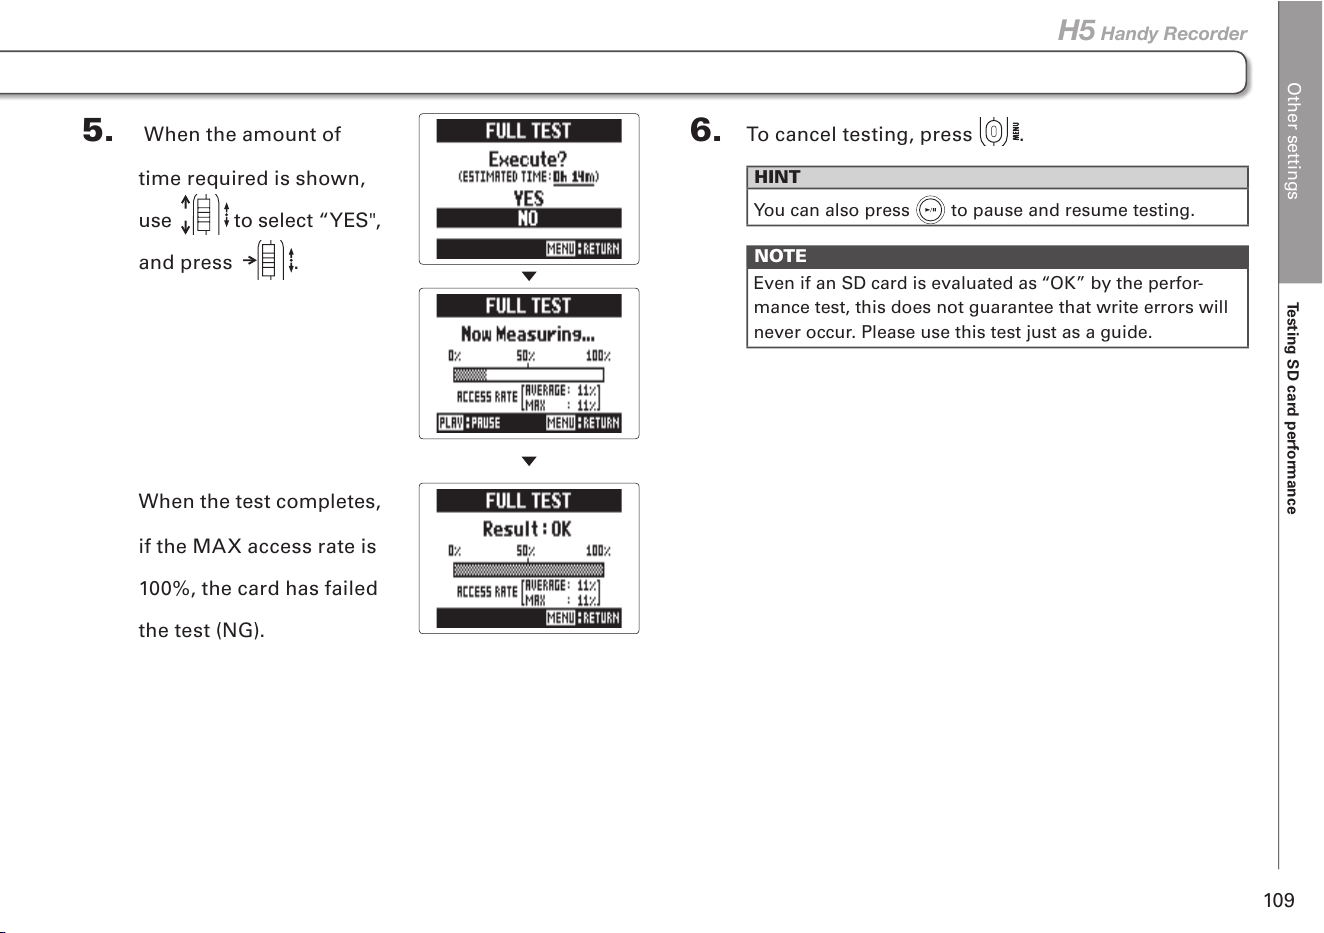
Other settings
Testing SD card performance
109
H5 Handy Recorder
5. When the amount of
time required is shown,
use
to select “YES",
and press .
When the test completes,
if the MAX access rate is
100%, the card has failed
the test (NG).
6. To cancel testing, press .
HINT
You can also press
to pause and resume testing.
NOTE
Even if an SD card is evaluated as “OK” by the perfor-
mance test, this does not guarantee that write errors will
never occur. Please use this test just as a guide.
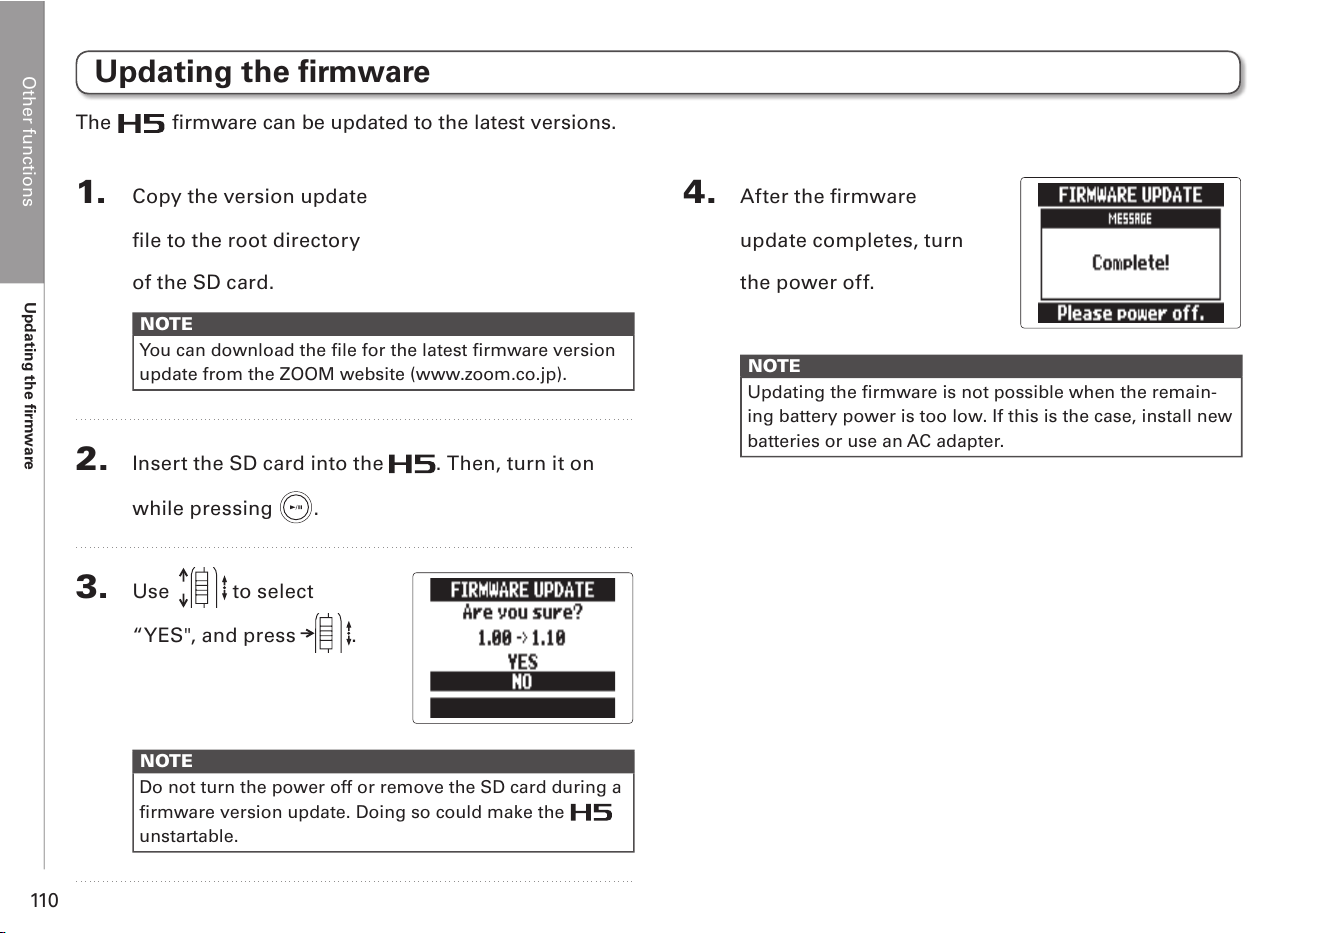
Other functions
Updating the firmware
110
Updating the firmware
The firmware can be updated to the latest versions.
1. Copy the version update
file to the root directory
of the SD card.
NOTE
You can download the file for the latest firmware version
update from the ZOOM website (www.zoom.co.jp).
2. Insert the SD card into the . Then, turn it on
while pressing .
3. Use to select
“YES", and press .
NOTE
Do not turn the power off or remove the SD card during a
firmware version update. Doing so could make the
unstartable.
4. After the firmware
update completes, turn
the power off.
NOTE
Updating the firmware is not possible when the remain-
ing battery power is too low. If this is the case, install new
batteries or use an AC adapter.
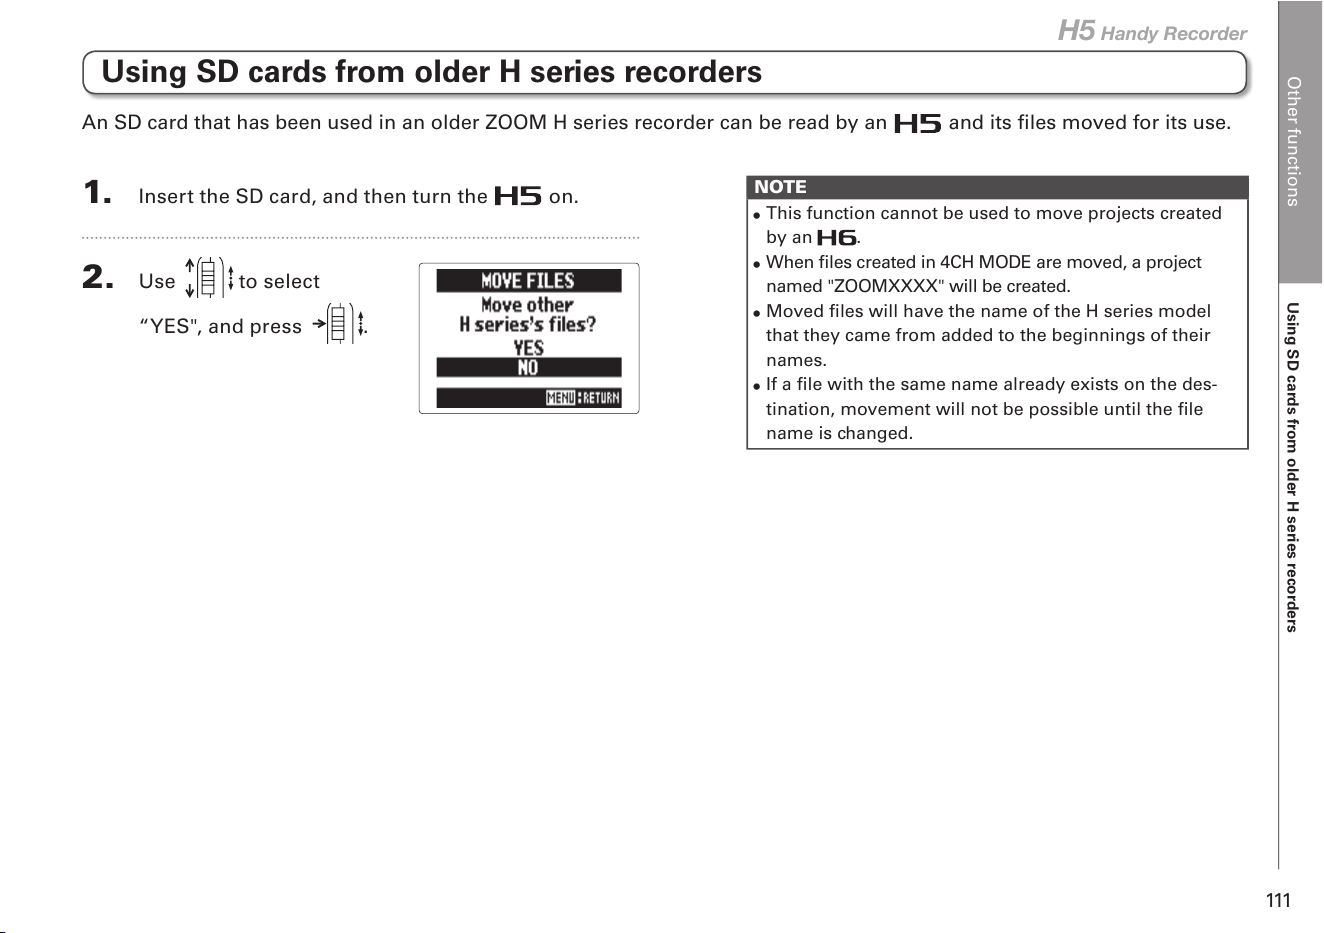
Other functions
Using SD cards from older H series recorders
111
H5 Handy Recorder
Using SD cards from older H series recorders
1. Insert the SD card, and then turn the on.
2. Use to select
“YES", and press .
An SD card that has been used in an older ZOOM H series recorder can be read by an and its files moved for its use.
NOTE
•
This function cannot be used to move projects created
by an .
•
When files created in 4CH MODE are moved, a project
named "ZOOMXXXX" will be created.
•
Moved files will have the name of the H series model
that they came from added to the beginnings of their
names.
•
If a file with the same name already exists on the des-
tination, movement will not be possible until the file
name is changed.
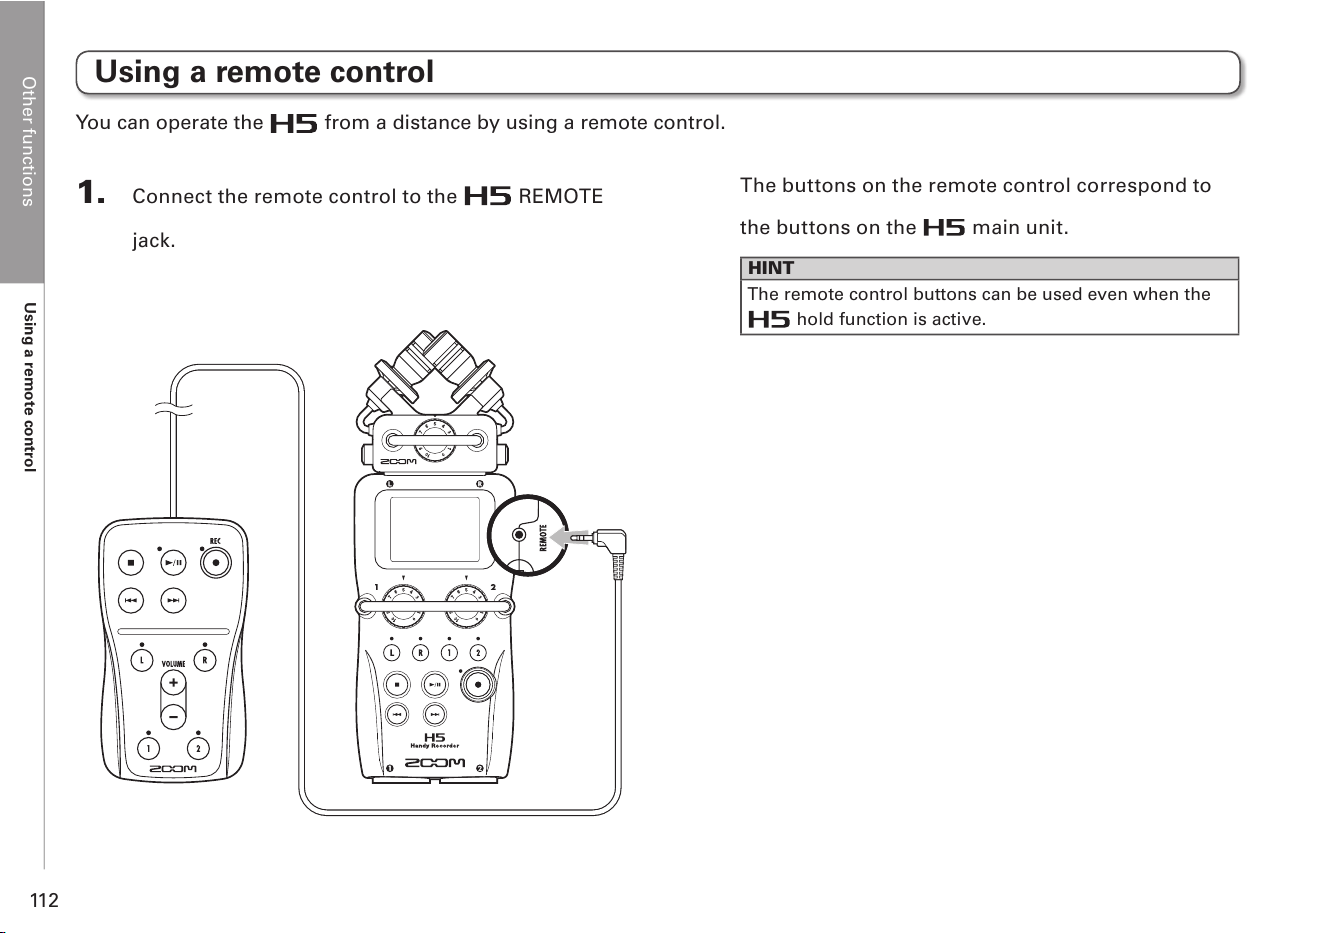
Other functions
Using a remote control
11 2
Using a remote control
You can operate the from a distance by using a remote control.
1. Connect the remote control to the REMOTE
jack.
The buttons on the remote control correspond to
the buttons on the main unit.
HINT
The remote control buttons can be used even when the
hold function is active.
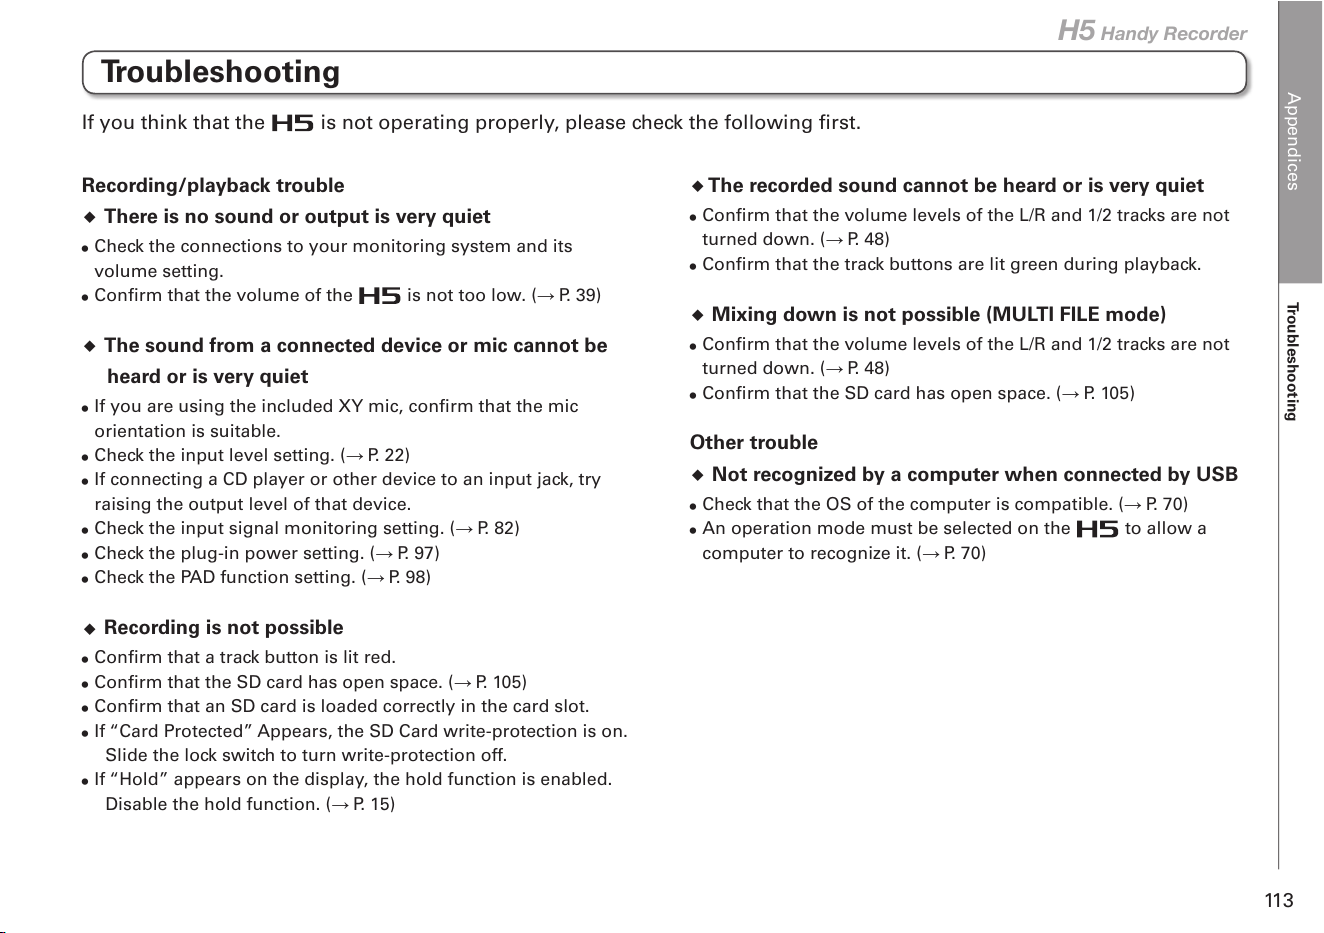
Appendices
Troubleshooting
11 3
H5 Handy Recorder
Troubleshooting
Recording/playback trouble
There is no sound or output is very quiet
•
Check the connections to your monitoring system and its
volume setting.
•
Confirm that the volume of the is not too low. ( P. 39)
The sound from a connected device or mic cannot be
heard or is very quiet
•
If you are using the included XY mic, confirm that the mic
orientation is suitable.
•
Check the input level setting. ( P. 22)
•
If connecting a CD player or other device to an input jack, try
raising the output level of that device.
•
Check the input signal monitoring setting. ( P. 82)
•
Check the plug-in power setting. ( P. 97)
•
Check the PAD function setting. ( P. 98)
Recording is not possible
•
Confirm that a track button is lit red.
•
Confirm that the SD card has open space. ( P. 105)
•
Confirm that an SD card is loaded correctly in the card slot.
•
If “Card Protected” Appears, the SD Card write-protection is on.
Slide the lock switch to turn write-protection off.
•
If “Hold” appears on the display, the hold function is enabled.
Disable the hold function. ( P. 15)
If you think that the is not operating properly, please check the following first.
The recorded sound cannot be heard or is very quiet
•
Confirm that the volume levels of the L/R and 1/2 tracks are not
turned down. ( P. 48)
•
Confirm that the track buttons are lit green during playback.
Mixing down is not possible (MULTI FILE mode)
•
Confirm that the volume levels of the L/R and 1/2 tracks are not
turned down. ( P. 48)
•
Confirm that the SD card has open space. ( P. 105)
Other trouble
Not recognized by a computer when connected by USB
•
Check that the OS of the computer is compatible. ( P. 70)
•
An operation mode must be selected on the to allow a
computer to recognize it. ( P. 70)
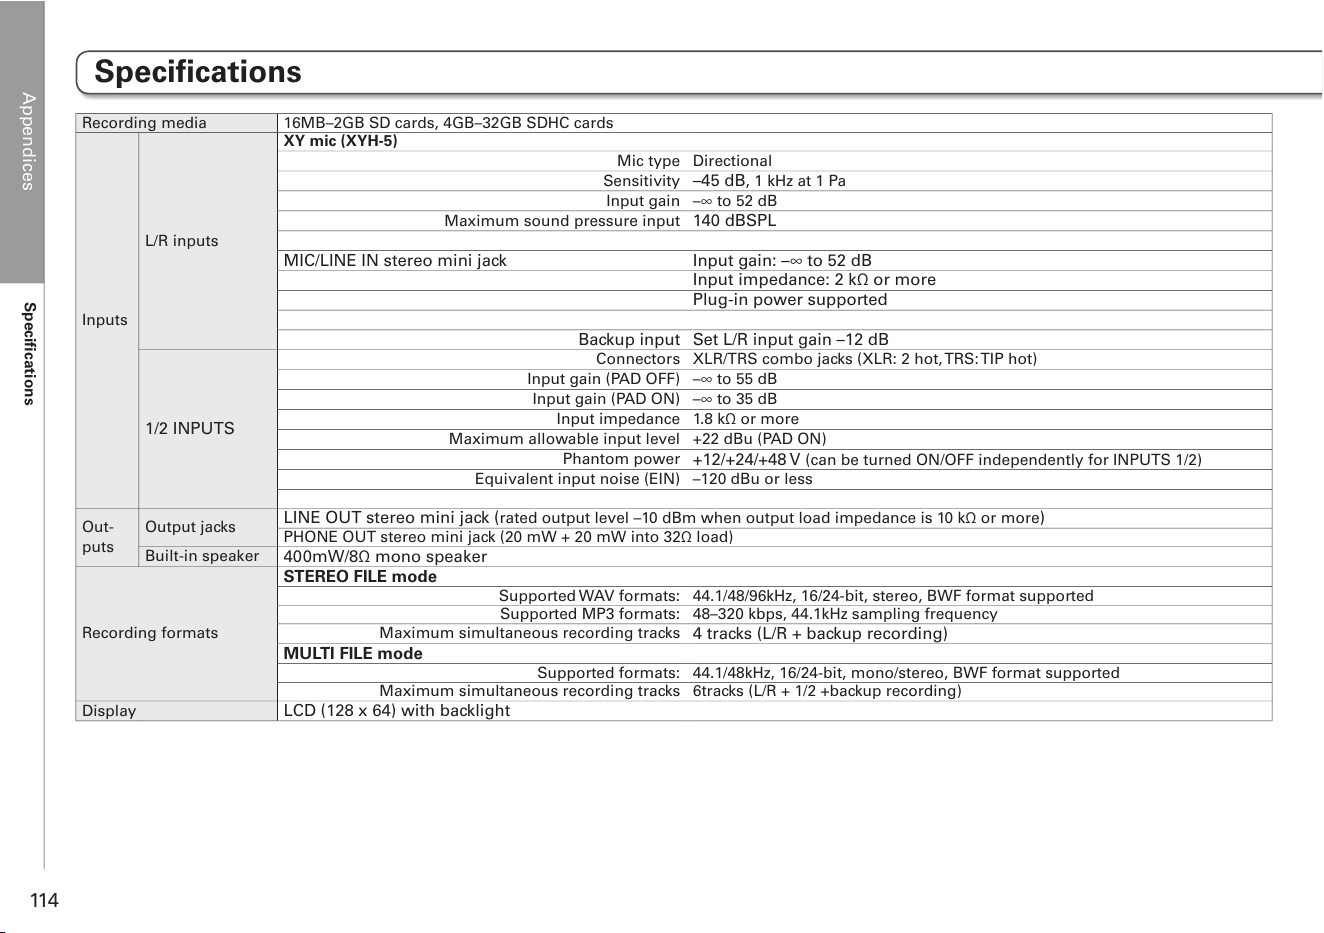
Appendices
Specifications
114
Recording media 16MB–2GB SD cards, 4GB–32GB SDHC cards
Inputs
L/R inputs
XY mic (XYH-5)
Mic type
Directional
Sensitivity
–45 dB, 1 kHz at 1 Pa
Input gain –∞ to 52 dB
Maximum sound pressure input
140 dBSPL
MIC/LINE IN stereo mini jack Input gain: –∞ to 52 dB
Input impedance: 2 kΩ or more
Plug-in power supported
Backup input Set L/R input gain –12 dB
1/2 INPUTS
Connectors XLR/TRS combo jacks (XLR: 2 hot, TRS: TIP hot)
Input gain (PAD OFF) –∞ to 55 dB
Input gain (PAD ON) –∞ to 35 dB
Input impedance 1.8 kΩ or more
Maximum allowable input level +22 dBu (PAD ON)
Phantom power
+12/+24/+48 V (can be turned ON/OFF independently for INPUTS 1/2)
Equivalent input noise (EIN) –120 dBu or less
Out-
puts
Output jacks
LINE OUT stereo mini jack (rated output level –10 dBm when output load impedance is 10 kΩ or more)
PHONE OUT stereo mini jack (20 mW + 20 mW into 32Ω load)
Built-in speaker
400mW/8Ω mono speaker
Recording formats
STEREO FILE mode
Supported WAV formats: 44.1/48/96kHz, 16/24-bit, stereo, BWF format supported
Supported MP3 formats: 48–320 kbps, 44.1kHz sampling frequency
Maximum simultaneous recording tracks
4 tracks (L/R + backup recording)
MULTI FILE mode
Supported formats: 44.1/48kHz, 16/24-bit, mono/stereo, BWF format supported
Maximum simultaneous recording tracks 6tracks (L/R + 1/2 +backup recording)
Display
LCD (128 x 64) with backlight
Specifications
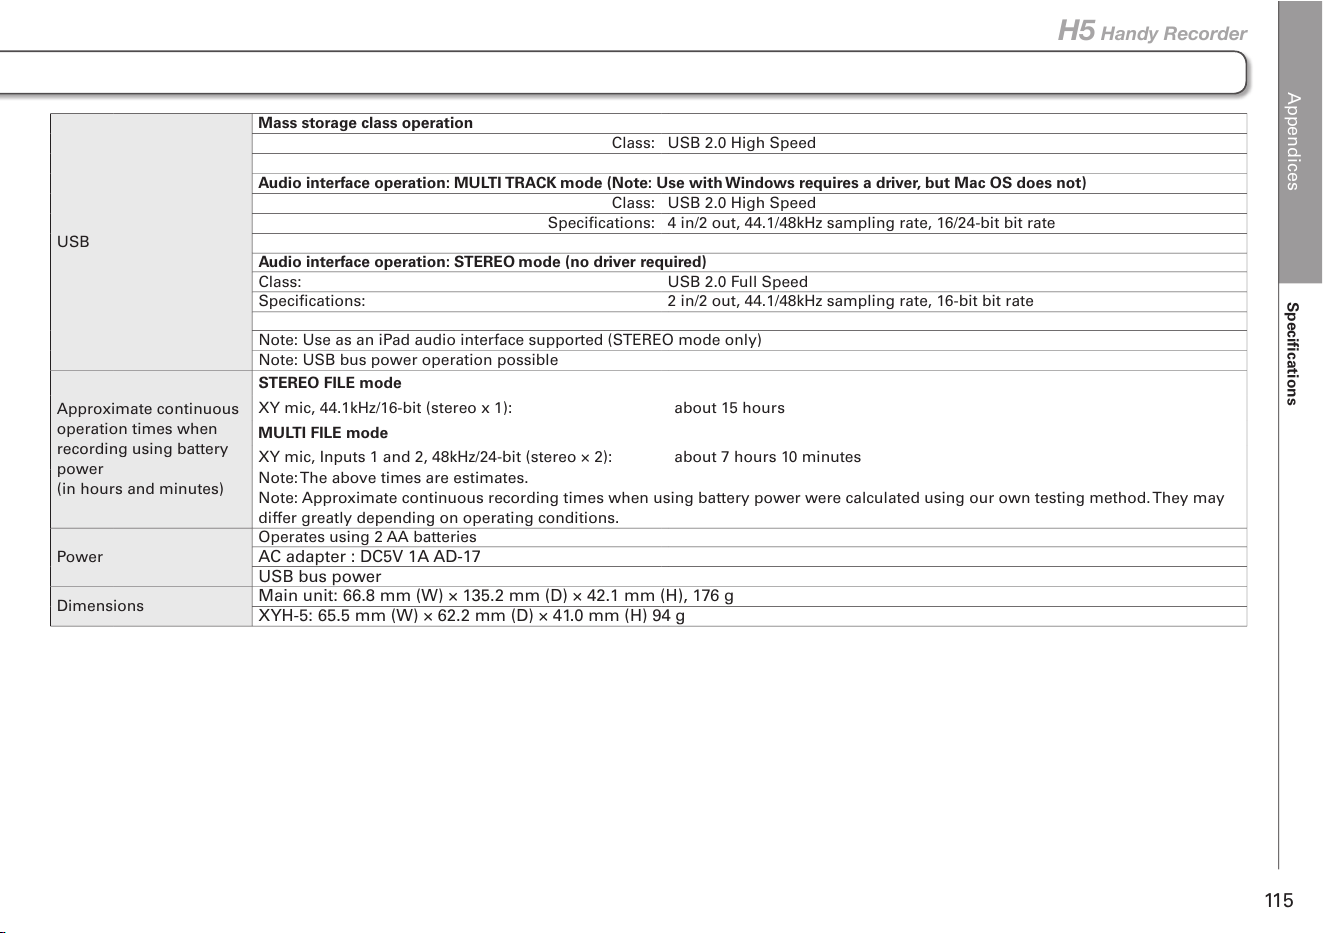
Appendices
Specifications
11 5
H5 Handy Recorder
USB
Mass storage class operation
Class: USB 2.0 High Speed
Audio interface operation: MULTI TRACK mode (Note: Use with Windows requires a driver, but Mac OS does not)
Class: USB 2.0 High Speed
Specifications: 4 in/2 out, 44.1/48kHz sampling rate, 16/24-bit bit rate
Audio interface operation: STEREO mode (no driver required)
Class: USB 2.0 Full Speed
Specifications: 2 in/2 out, 44.1/48kHz sampling rate, 16-bit bit rate
Note: Use as an iPad audio interface supported (STEREO mode only)
Note: USB bus power operation possible
Approximate continuous
operation times when
recording using battery
power
(in hours and minutes)
STEREO FILE mode
XY mic, 44.1kHz/16-bit (stereo x 1): about 15 hours
MULTI FILE mode
XY mic, Inputs 1 and 2, 48kHz/24-bit (stereo × 2): about 7 hours 10 minutes
Note: The above times are estimates.
Note: Approximate continuous recording times when using battery power were calculated using our own testing method. They may
differ greatly depending on operating conditions.
Power
Operates using 2 AA batteries
AC adapter : DC5V 1A AD-17
USB bus power
Dimensions
Main unit: 66.8 mm (W) × 135.2 mm (D) × 42.1 mm (H), 176 g
XYH-5: 65.5 mm (W) × 62.2 mm (D) × 41.0 mm (H) 94 g
Z2I-2111-01
ZOOM CORPORATION
4-4-3 Surugadai, Kanda, Chiyoda-ku, Tokyo
101-0062 Japan
http://www.zoom.co.jp
• Reorient or relocate the receiving antenna.
• Increase the separation between the equipment and receiver.
• Connect the equipment to an outlet on a circuit different from that to
which the receiver is connected.
• Consult the dealer or an experienced radio/TV technician for help.
FCC regulation warning (for U.S.A.)
This equipment has been tested and found to comply with the limits
for a Class B digital device, pursuant to Part 15 of the FCC Rules. These
limits are designed to provide reasonable protection against harmful
interference in a residential installation. This equipment generates, uses,
and can radiate radio frequency energy and, if not installed and used in
accordance with the instructions, may cause harmful interference to radio
communications. However, there is no guarantee that interference will
not occur in a particular installation. If this equipment does cause harmful
interference to radio or television reception, which can be determined by
turning the equipment off and on, the user is encouraged to try to correct
the interference by one or more of the following measures:
Declaration of Conformity:
This product complies with the requirements of
EMC Directive 2004/108/EC and
Low Voltage Directive 2006/95/EC and
ErP Directive 2009/125/EC and
RoHS Directive 2011/65/EU
For EU Countries