- 1 -
Low power monitoring camera
Please read this manual thoroughly before operating the device, and
keep it for future reference.
Product User Manual & Installation Instructions
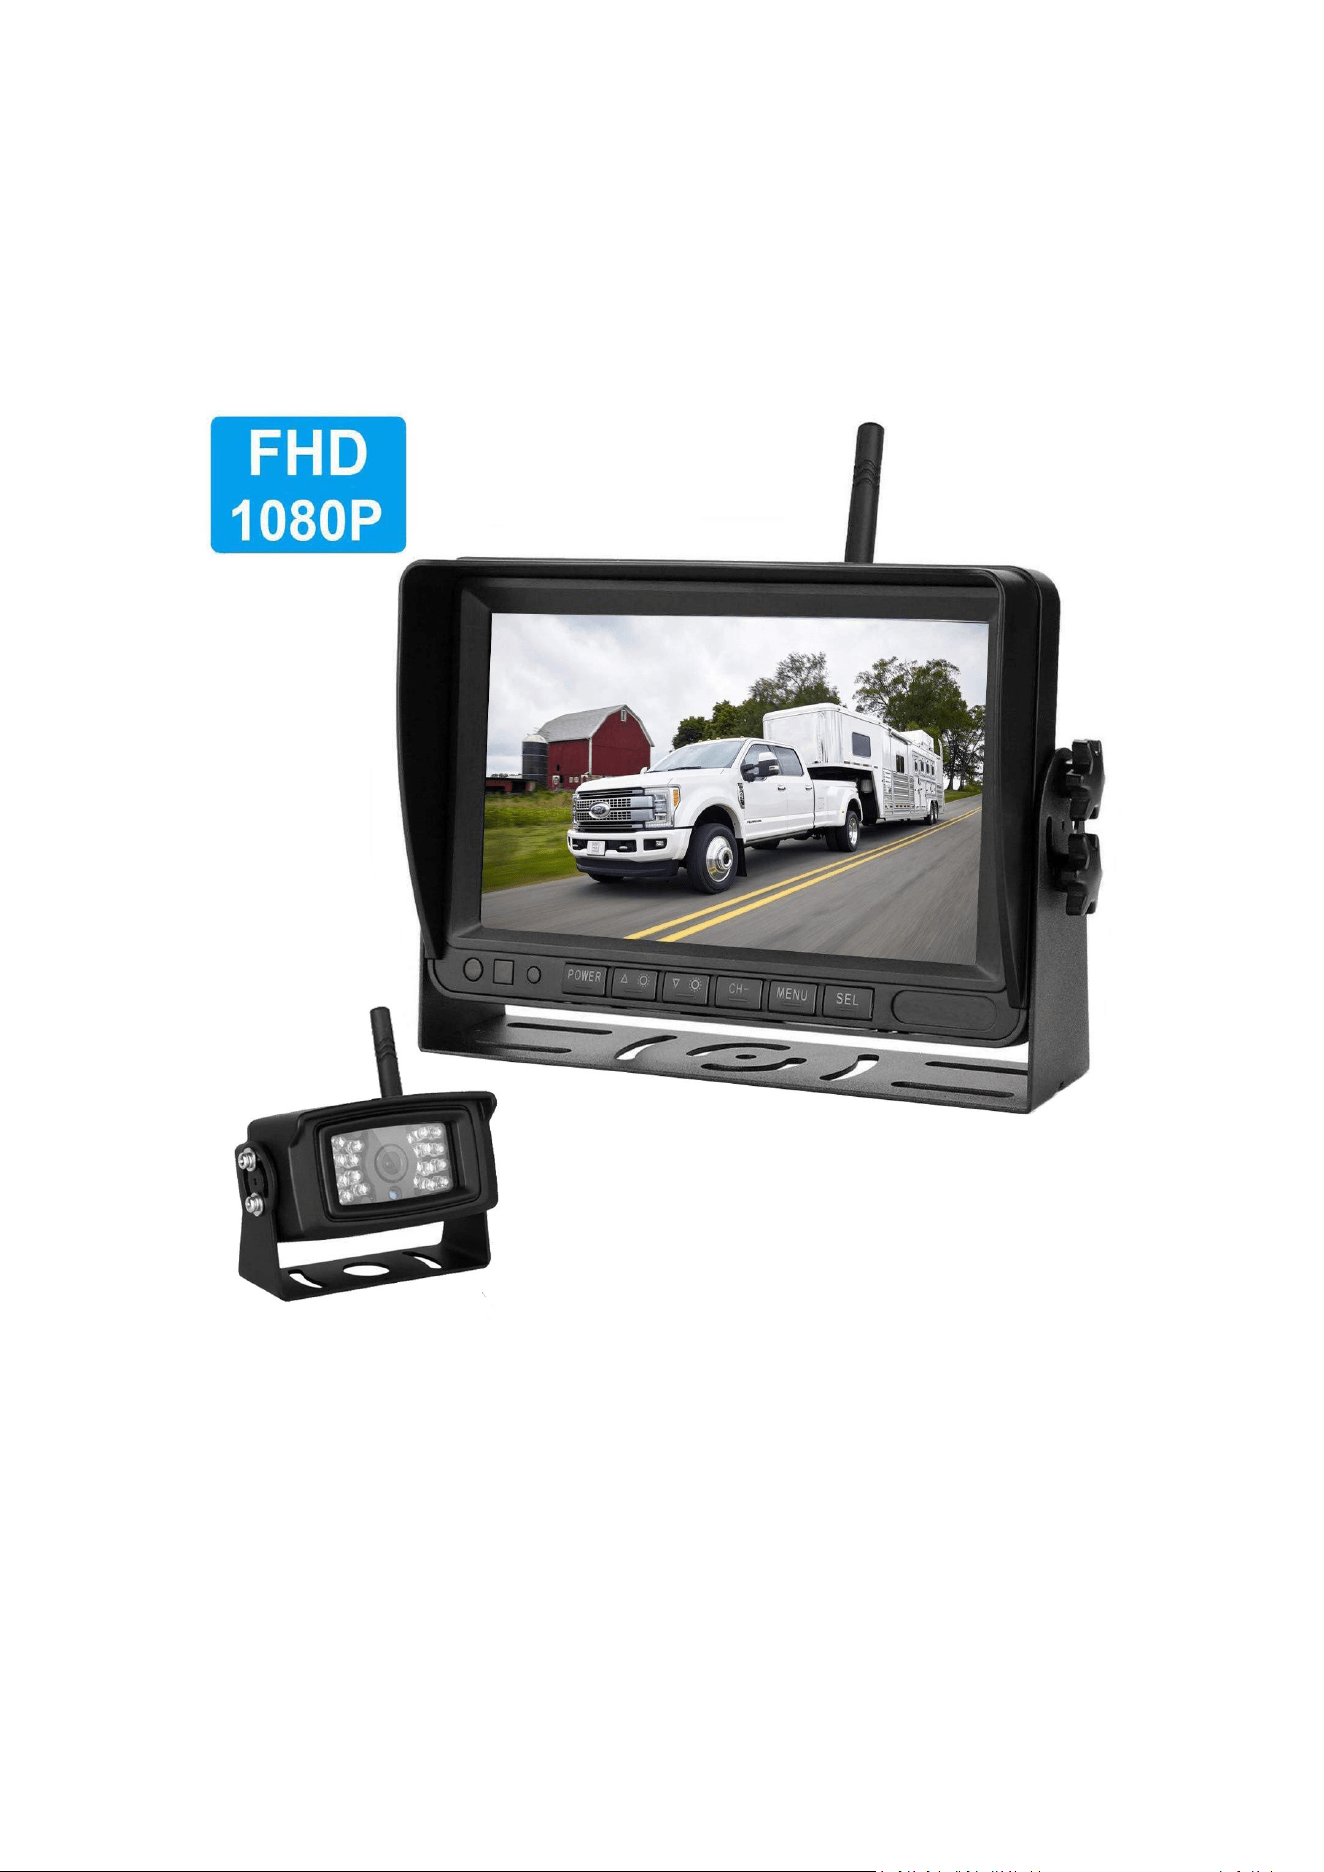
HD-M729W -CAMERA
- 2 -
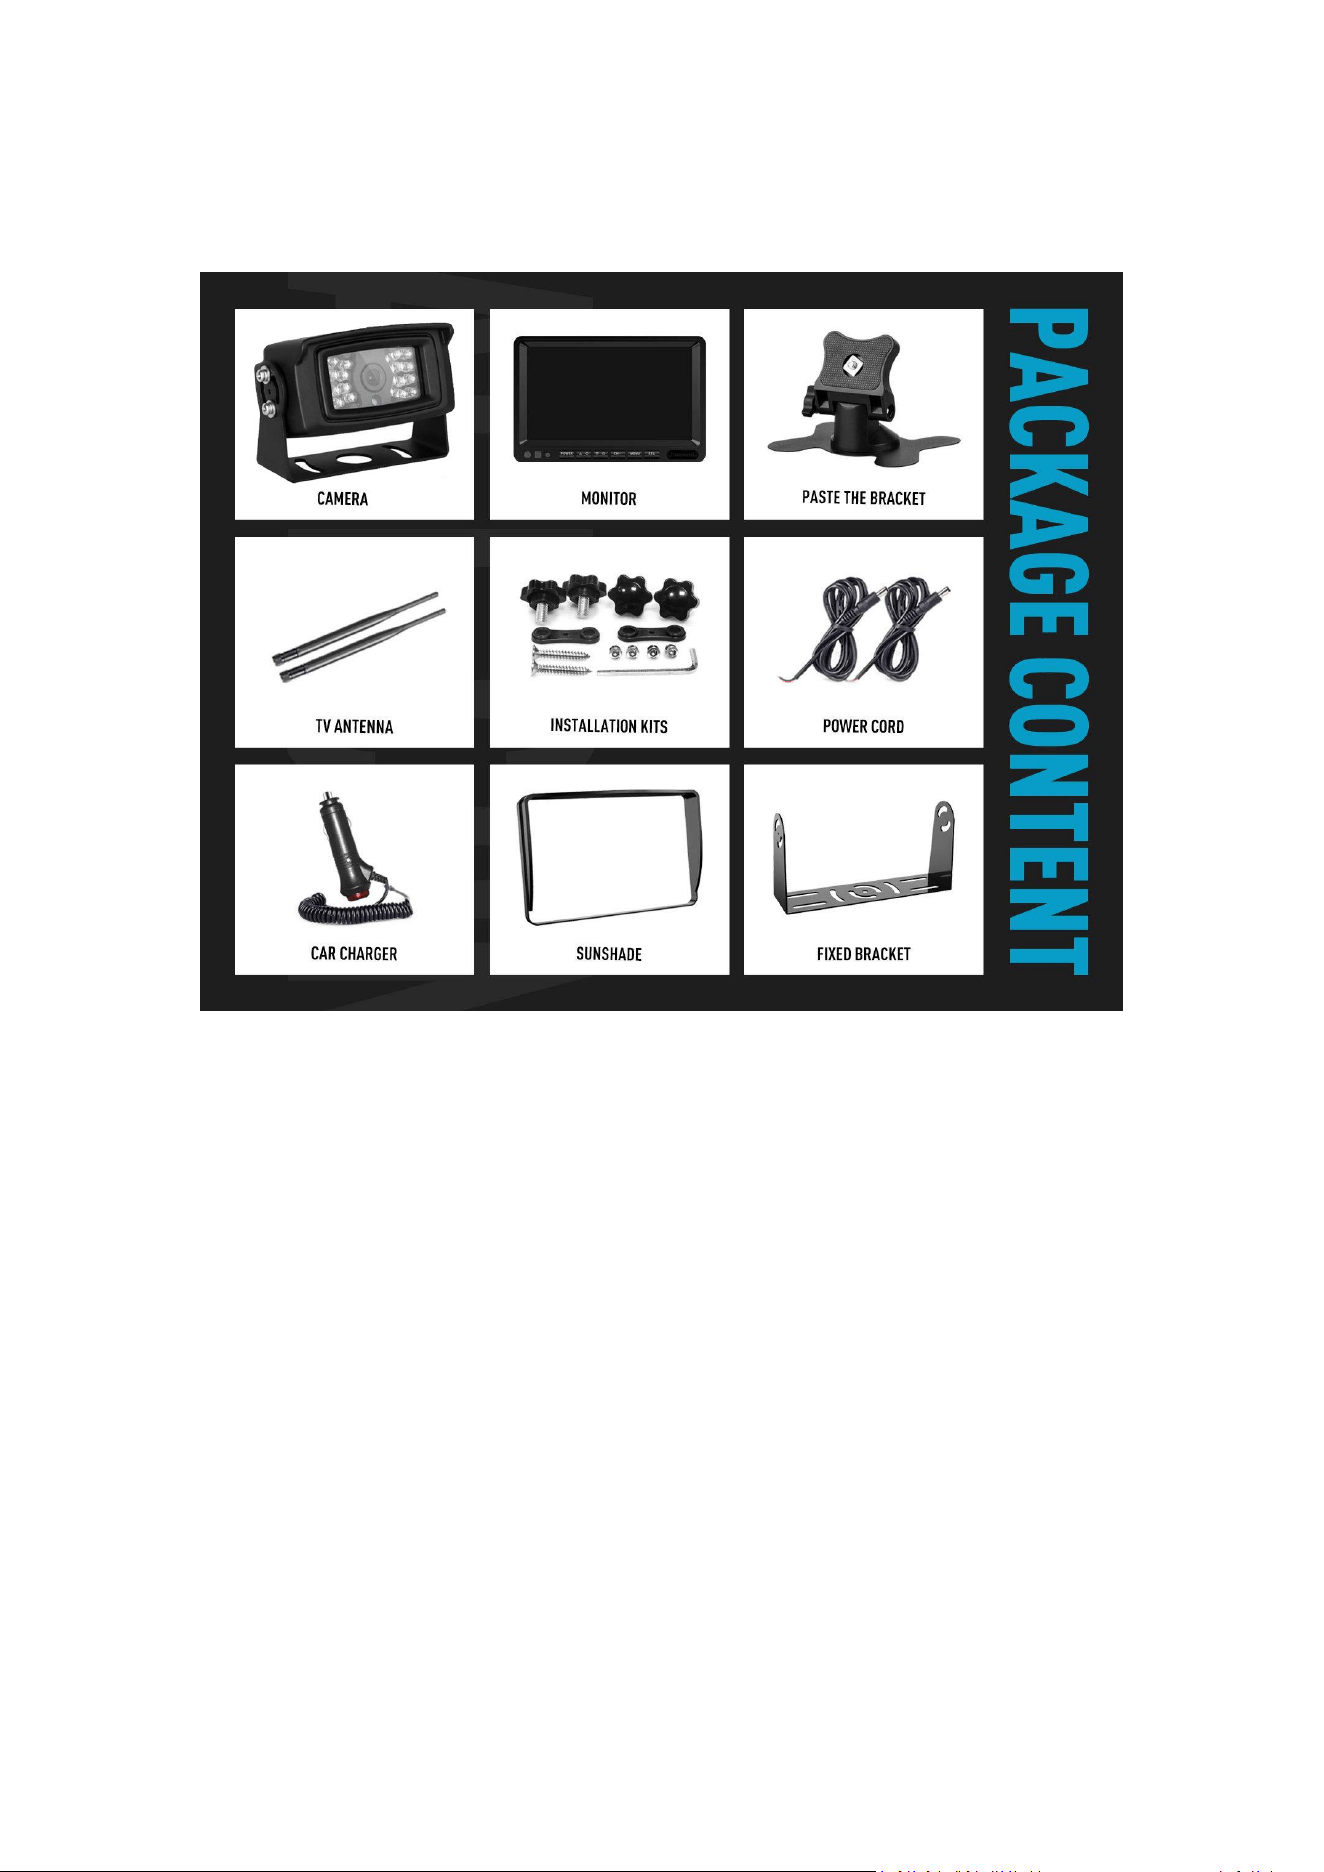
PACKAGE CONTENTS
What You Get
Color CCD Weatherproof Wireless Backup Camera
Wireless Antennas
7" Wireless Color LCD Monitor
Car cigarette lighter
Sunshade
Universal Mount With Adhesive Pad
Butterfly Bracket
Camera Power Cable
Screw Kit for Camera Installation
NOTE: The quantity and appearance of the cameras will vary depending on the
product model.

- 3 -
TABLE OF CONTENTS
INTRODUCTION............................................................................................4
INSTALLATION:.............................................................................................5
Camera Connection:.................................................................................... 6
Monitor Connection:................................................................................... 6
OPERATION GUIDE.......................................................................................7
System Operations................................................................................. 7-13
Monitor Specification................................................................................ 14
Camera Specification................................................................................. 14
Troubleshooting.........................................................................................15
ONE YEAR WARRANTY............................................................................... 16
WARRANTY PERFORMANCE...................................................................... 16

- 4 -
INTRODUCTION
NOTE!
Please read all of the installation instructions carefully before installing the product.
Improper installation will void manufacture warranty.
Thanks on purchasing ours Digital Wireless Backup Camera DVR System! With this manual, you
will be able to properly install and operate the unit.
The Backup Camera System is intended to be installed as a supplement aid to your standard
rear view mirror & driving recorder that already exists in your vehicle. The Backup Camera
System should not be used as a substitute for the standard rear view mirror or for any other
mirror that exists in your vehicle.
In some jurisdictions, it is unlawful for a person to drive a motor vehicle equipped with a TV
viewer or screen located forward of the back of the driver’s seat or in any location that is
visible, directly or indirectly, to the driver while operating the vehicle.
Please read the entire manual and follow the instructions and warnings carefully. Failure to do
so can cause serious damage and/or injury, including loss of life. Be sure to obey all applicable
local traffic and motor vehicle regulations as it pertains to this product.
Improper installation will void manufacture warranty.
Usage:
The Rear View Camera DVR System is designed to help the driver safety detect people
and/or objects helping to avoid damage or injury. However, you the driver, must use it
properly. Use of this system is not a substitute for safe, people or legal driving.
Never back up while looking at the monitor alone. You should always check behind
and around the vehicle when backing up, in the same way as you would if the vehicle
did not have the Rear View Camera System. If you back up while looking only at the
monitor, you may cause damage or injury. Always back up slowly.
The Rear View Camera System is not intended for use during extensive back-up
maneuvers or backing into cross traffic or pedestrian walkways.
Please, always remember, the area displayed by the Rear View Camera System is
limited. It does not display the entire panorama that is behind you.

- 5 -
INSTALLATION
Electric shock or product malfunction may occur if this product is installed incorrectly.
Use this product within the voltage range specified. Failure to do so can cause
electronic shock or product malfunction.
Take special care when cleaning the monitor.
Make sure to firmly affix the product before use.
If smoke or burning smell is detected, disconnect the system immediately.
Where the power cable may touch a metal case, cover the cable with friction tape. A
short circuit or disconnected wire may cause a fire.
While installing the Rear View System be careful with the wire positioning in order to
avoid wire damage.
Do not watch movies or operate the monitor while driving; as it may cause an
accident.
Do not install the monitor where it may obstruct drivers view or obstruct an air bag
device.
Dropping the unit may cause possible mechanical failure.
Before drilling please check that no cable or wiring is on the other side of the wall. Please
clamp all wires securely to recycle the possibility of them being damaged while vehicle is in use.
Keep all cables away from hot/moving parts and electrical noisy components.
We recommend doing a benchmark test before installation to insure that all components are
working properly.
Step 1: Choose the monitor and camera locations.
Step 2: Install all cables in vehicle, when necessary a 0.8(20mm) hole should be drilled for
passing camera cable through vehicles walls. Install split grommets where applicable.
Step 3: Once all cables and wiring have been properly routed, perform a system function test
by temporarily connecting the system.
Operating Precautions
1. The device may be powered by a 12-36volt battery or the vehicle's electrical system.
2.Make sure all cables are connected properly. Improper cable connections may damage the
monitor. Remove the power cable connections when not using the device.

- 6 -
Warning!
1.This monitor is high voltage. Only professionals should open the monitor's case.
2.Do not watch the video while driving unless you are monitoring the rear view
camera display.
Special Note
Occasionally, a few highlights or dark spots may appear on the LCD screen. This
does not necessarily indicate any monitor defects. Never try to repair this device
yourself. If any problems occur, immediately turn the display off and notify our
company or an authorized dealer. Any disassembly or modification may lead to
damage and will also void the warranty.
Camera Connection:
Locate the clearance lights wiring on your vehicle. You may need to remove the interior panel
in order to locate. Connect the power cables for camera: Red wire to light's positive; Black wire
to chassis ground.
Monitor Connection:
Cigarette lighter adapter: firmly insert the lighter plug to the cigarette lighter socket.
Loose lead wire: To power the system connect the power (RED) 12V + wire to ignition power
and the ground (BLACK) wire to the chassis ground. These are the only wires needed to power
the system. Press "left" or "right" keys to toggle between different views.
DO NOT INSTALL monitor where it may obstruct driver view or obstruct air bag
devices.
- 7 -
OPERATION GUIDE
1. The monitor will automatically turn on when connected to a power source.
2. Image will automatically appear on the screen when a trigger is activated.
3. Grid lines can be turned ON/OFF.
4. Support recycle driving record function. Support 8GB to 128GB SD card.
SAFETY NOTICE
This system is designed as a driver's aid.
Just using a backup camera will not completely erase a vehicle's blind spots.
System Operations
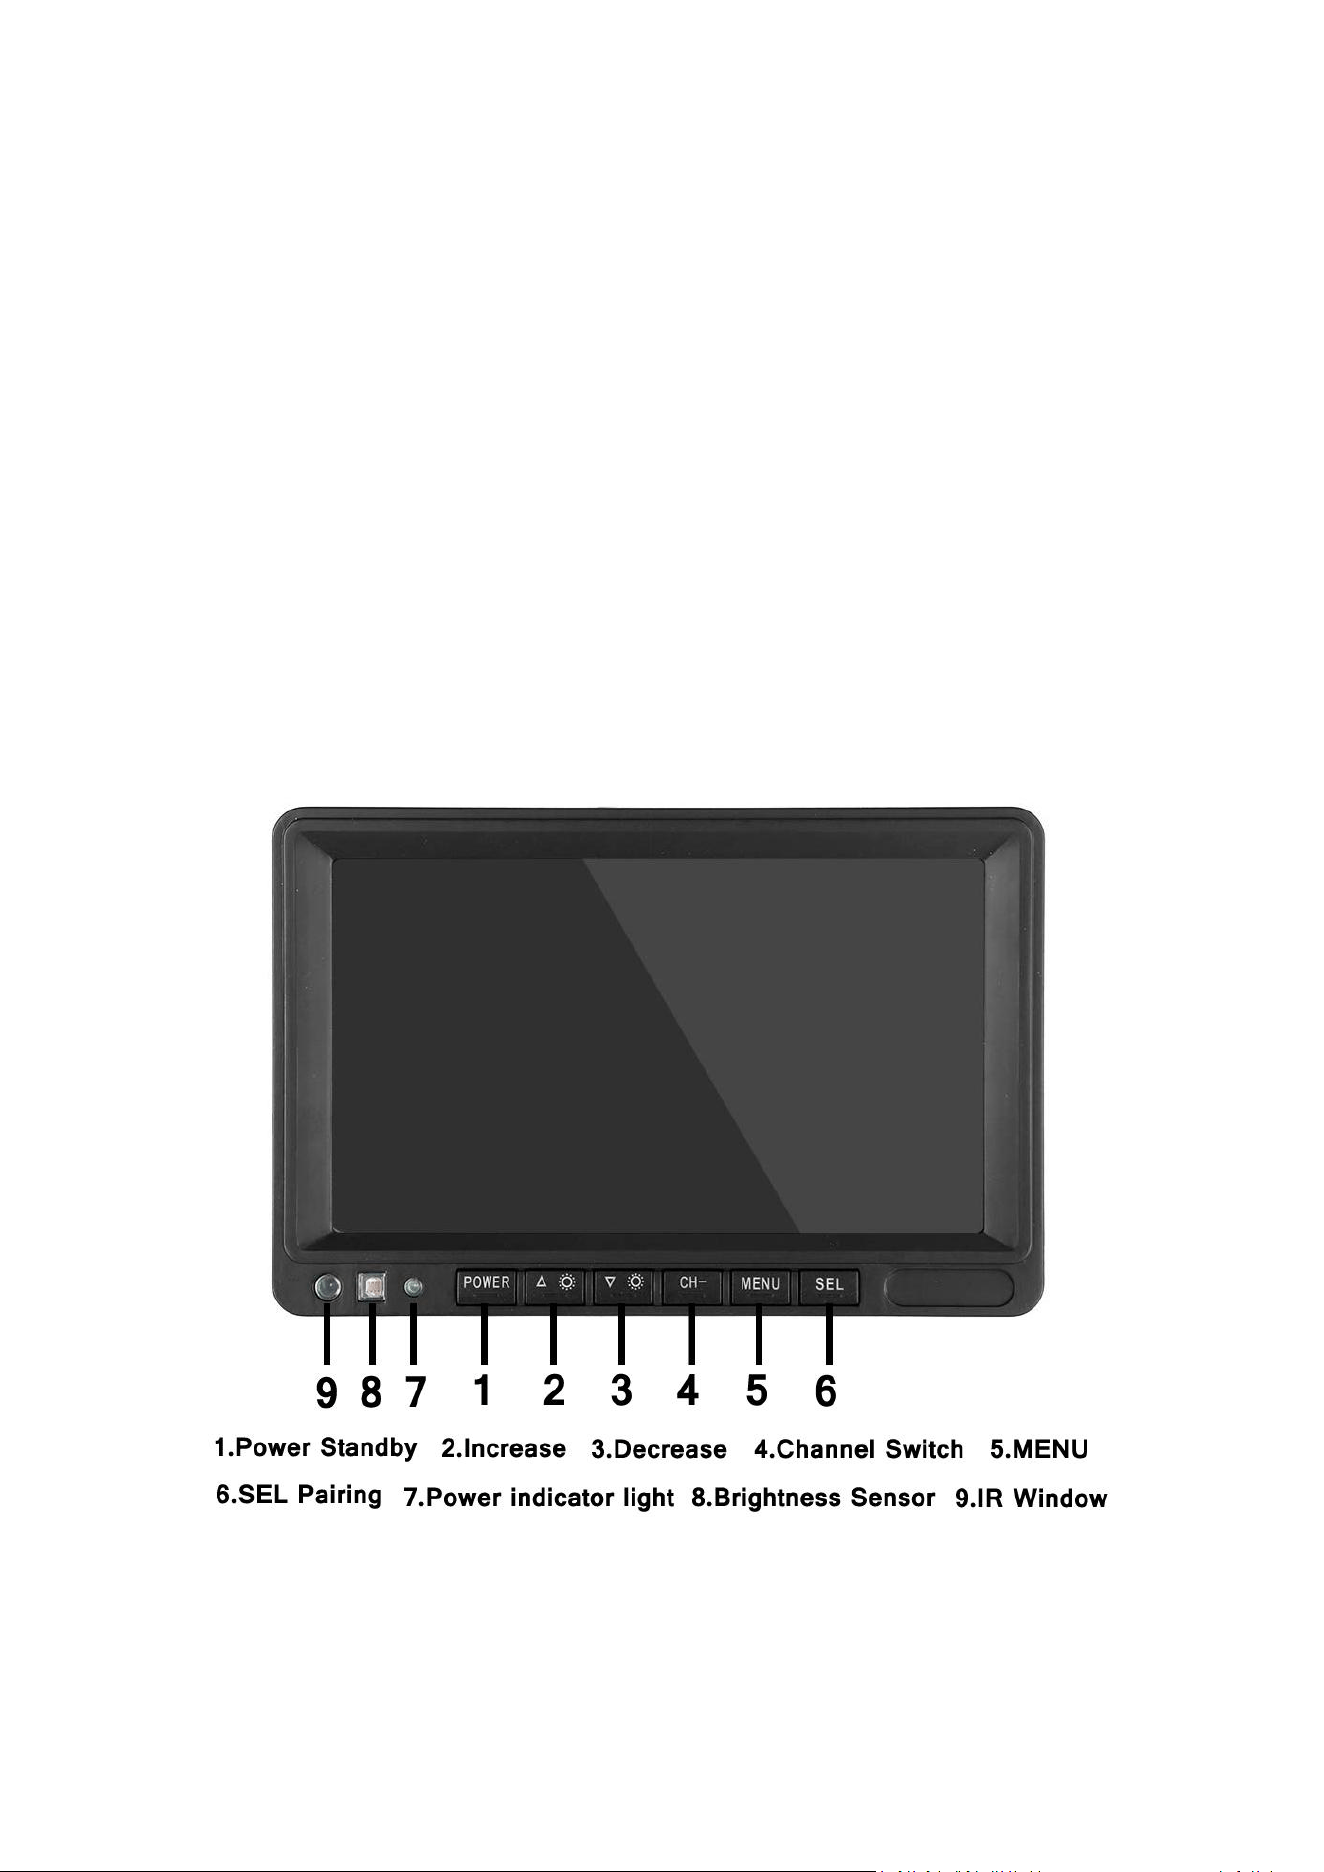
Button introduction
- 8 -
System Setting
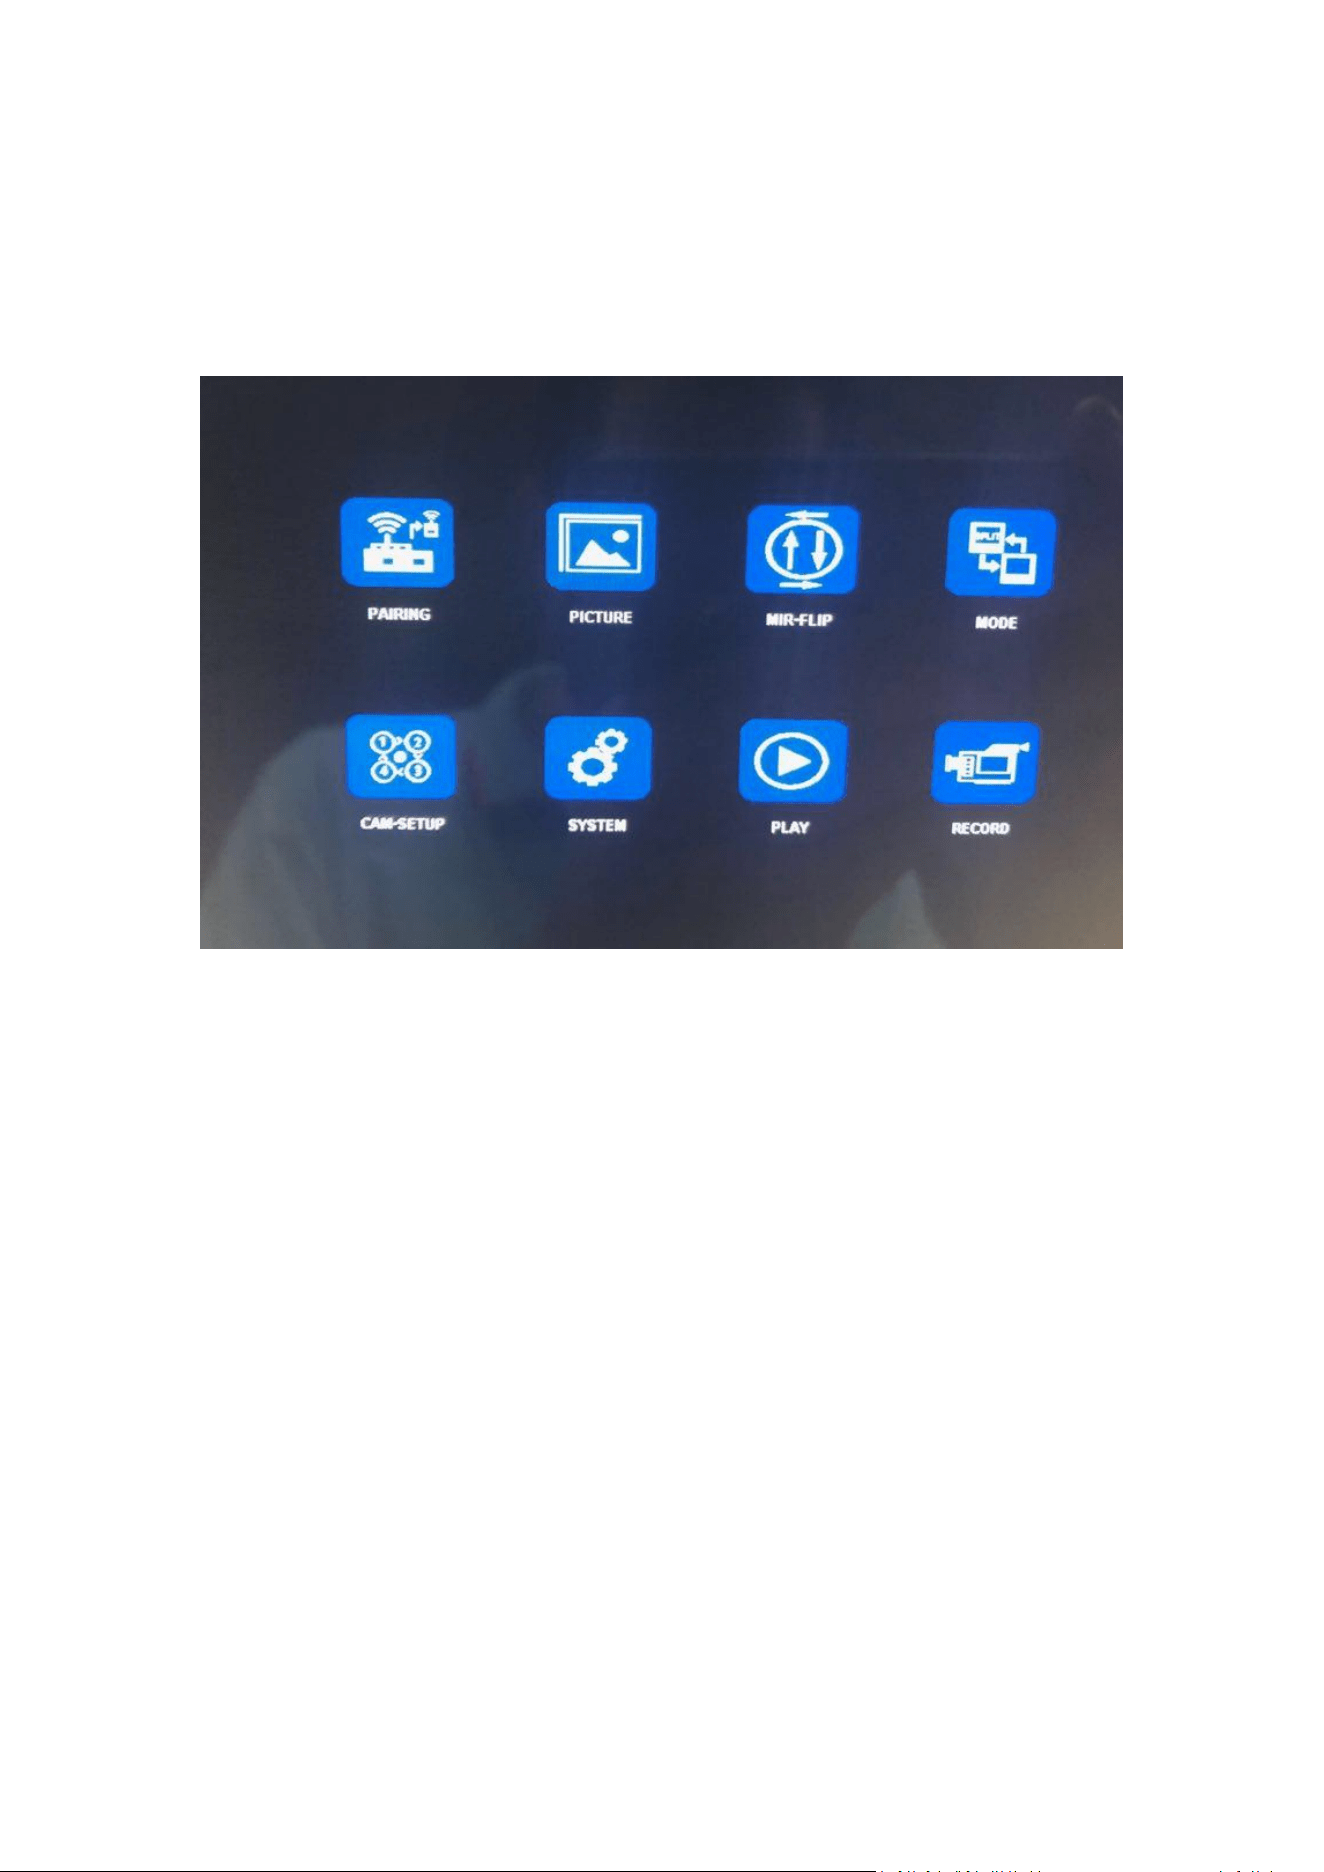
To get to Main MENU, Press the MENU button to enter the setting, press the
Increase or Decrease button to switch between different setting options, use the
SEL buttons to select the setting.
PAIRING
Please plug in the camera and monitor, then press the monitor MENU key and
select the“Match” icon, then press SEL key to enter the camera match countdown
interface. The user only needs to wait for the match to succeed. If the match is
unsuccessful, repeat the previous steps to match again.
Remind:
1. please switch to the desired channel before pairing the camera with the
monitor.
2. Press CH- button to choice which Channel (CAM1 CAM2 CAM3 CAM4) you want
to pairing with the camera.
3. Keep the monitor as close to the camera as possible when doing the pairing
operation.
- 9 -
(2)PICTURE
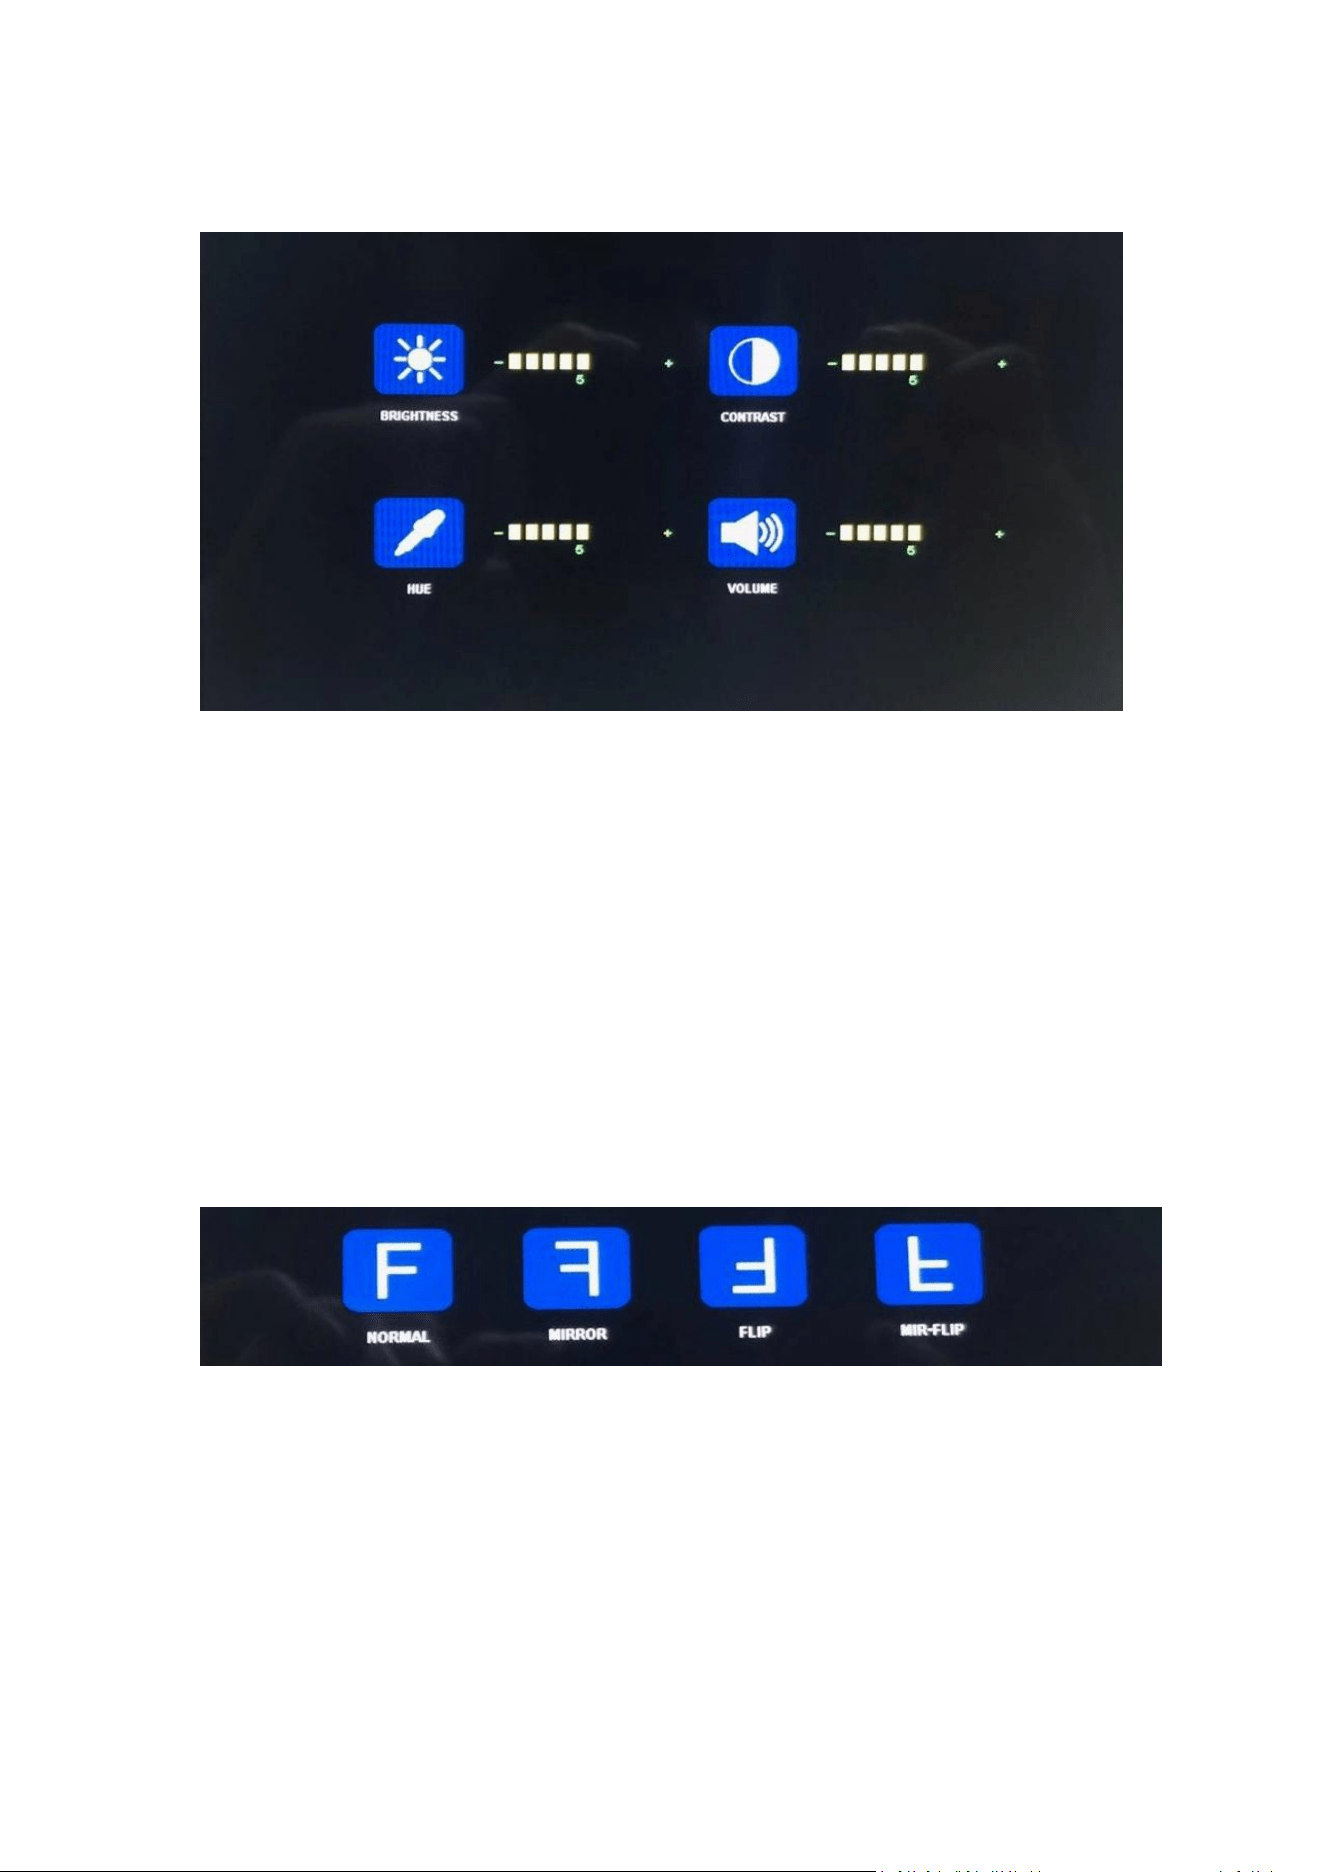
Press MENU and Choice the “PICTURE” icon and then press SEL to get in to the
screen setting. User can use the Increase or Decrease and SEL button to set the
screen BRIGHTNESS, CONTRAST, HUE. Press MENU button return to main menu.
NOTE: The system have no volume function.
(3)MIR-FLIP
Press MENU and Choice the “MIR-FLIP” icon and then press SEL to get in to the
image setting. User can use the Increase or Decrease button to set the image
NORMOL, MIRROR, FLIP, MIR-FLIP. Press MENU button return to main menu.
- 10 -
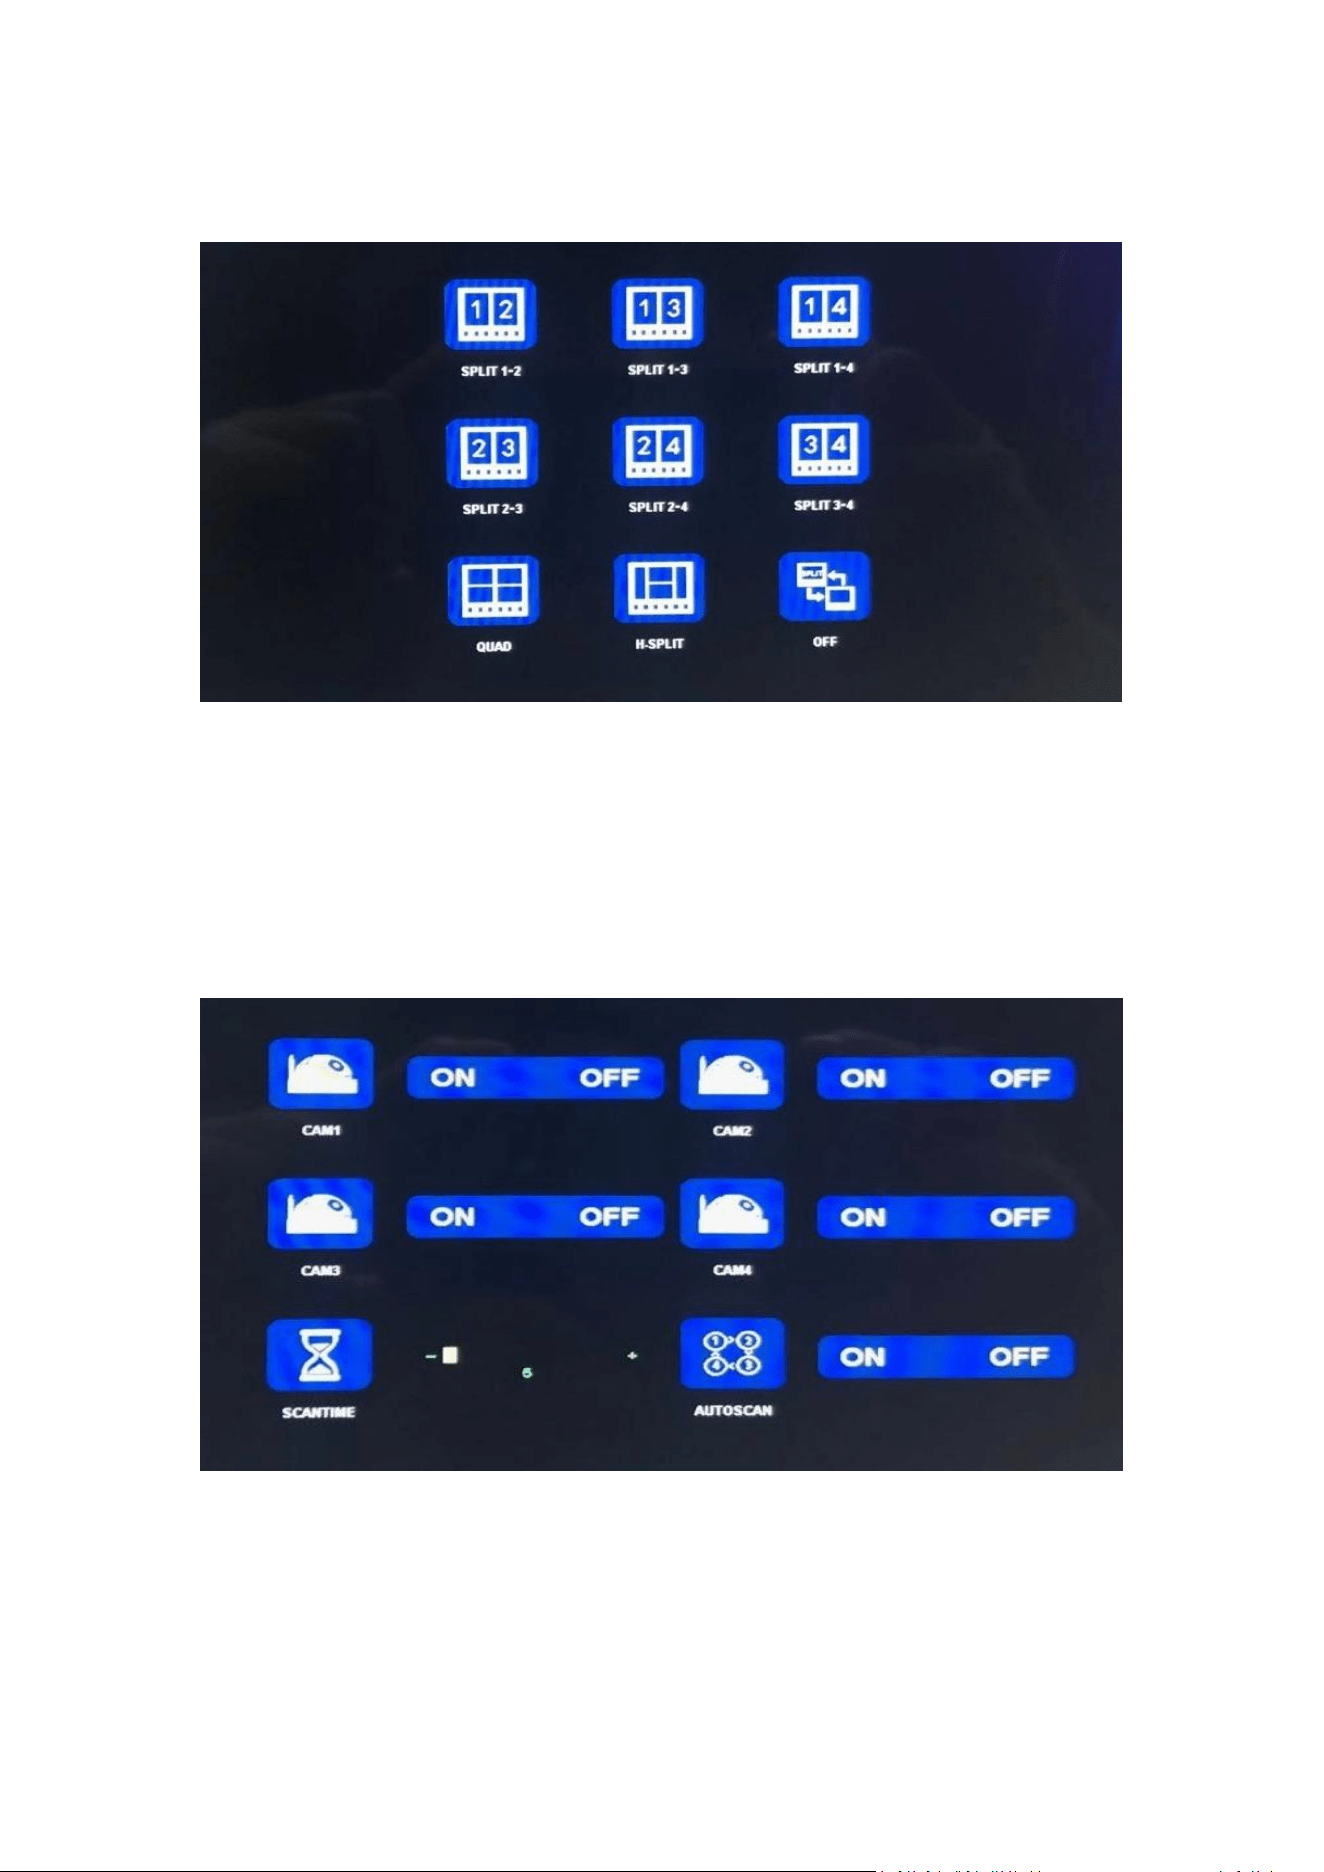
(4)MODE
Press MENU and Choice the “MODE” icon and then press SEL to get in to the
display format setting. This monitor has 9 different display modes. You can use the
Increase or Decrease and SEL button to choice the display that you need. Press
MENU button return to main menu.
(5) CAM-SETUP
Press MENU and Choice the “CAM-SETUP” icon and then press SEL to get in to the
camera signal channel settings. You can turn on or turn off the camera signal
channel as you need. Press MENU button return to main menu.
- 11 -
(6) SYSTEM
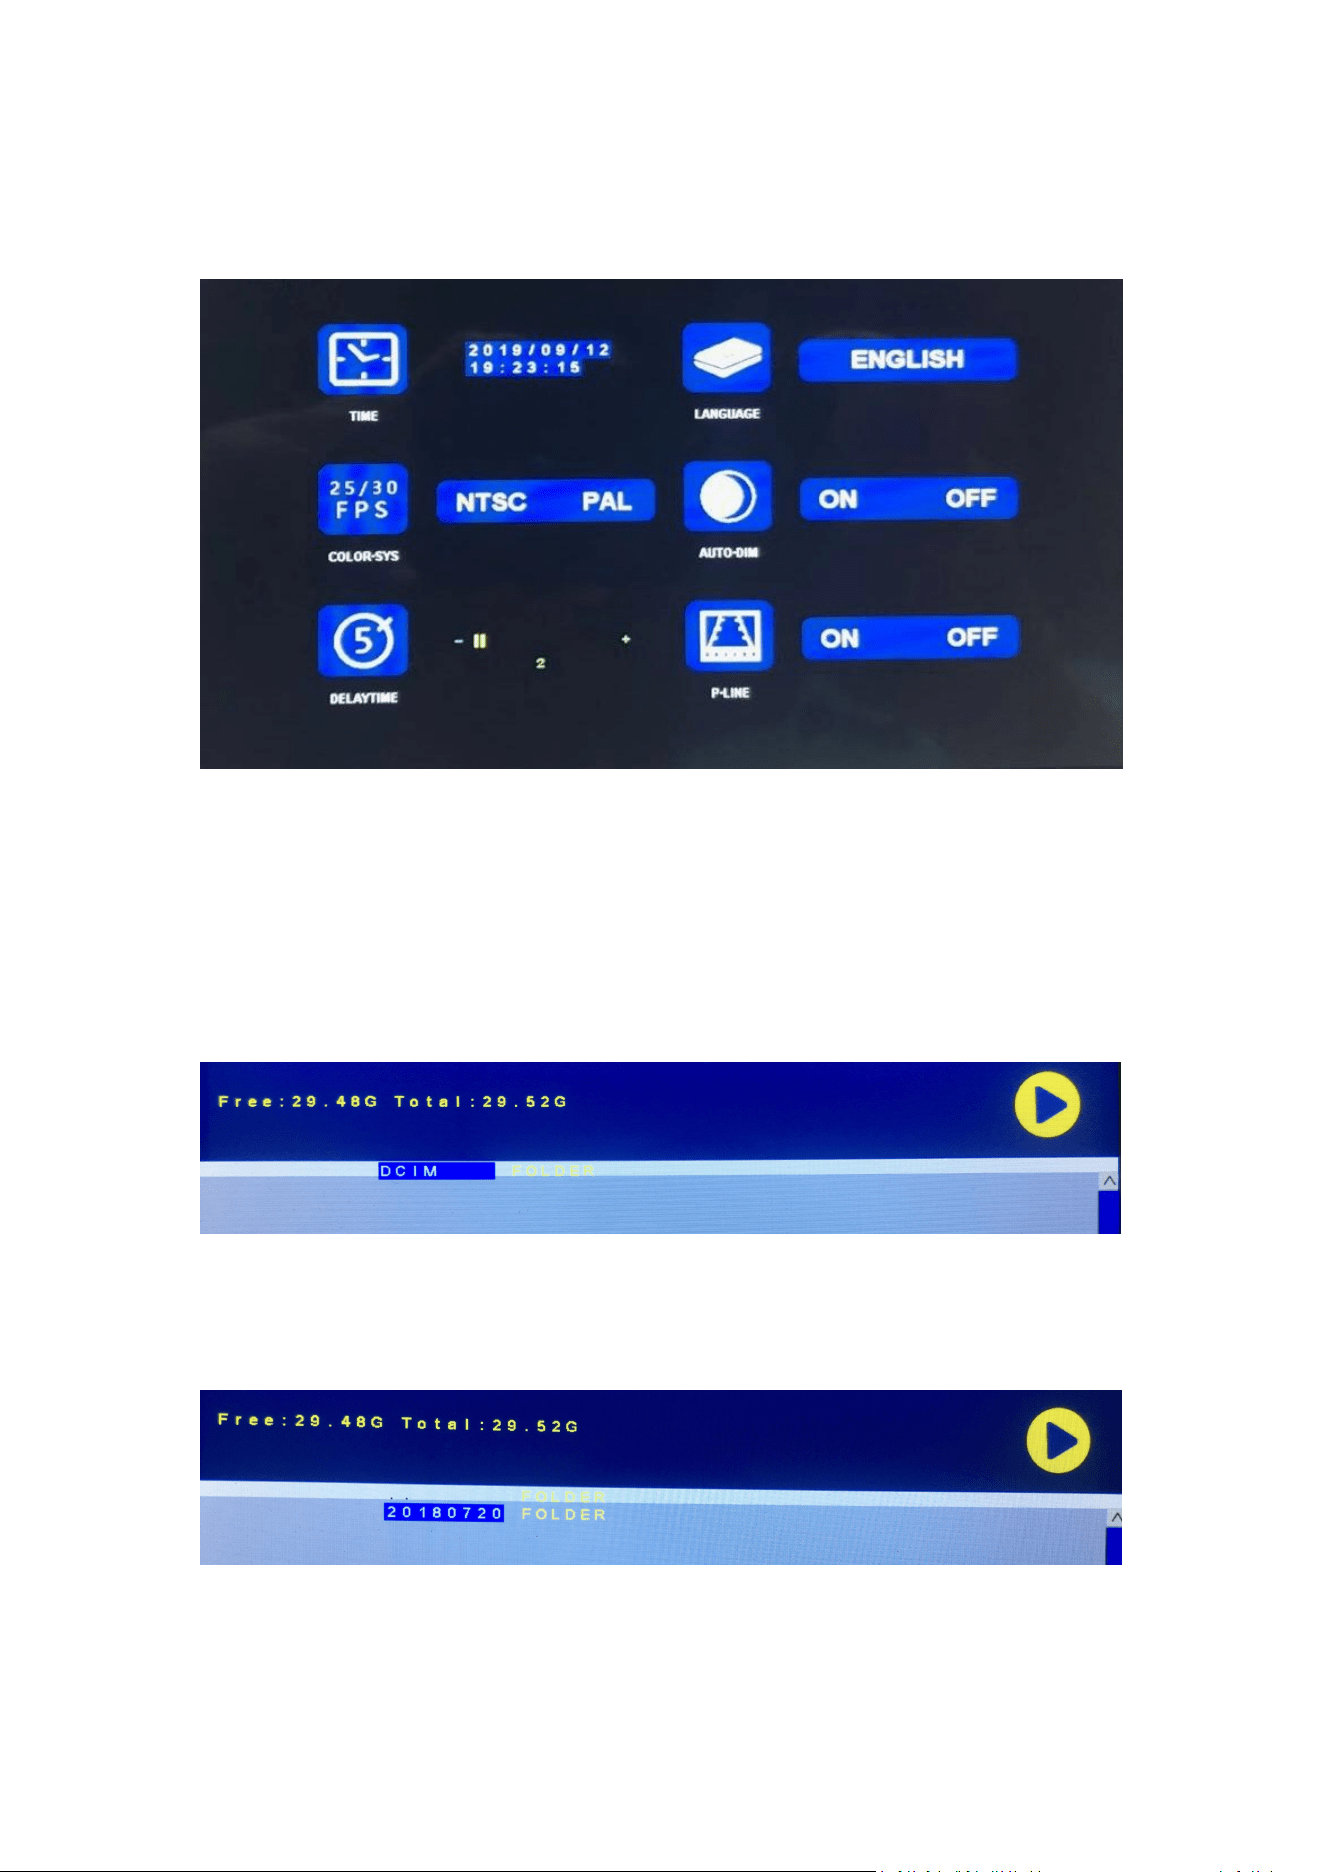
Press MENU and Choice the “SYSTEM” icon and then press SEL to get in to the
system settings. System settings included: TIME, LANGUAGE, COLOR-SYS,
AUTO-DIM, DELAYTIME (Trigger delay), P-LINE(Parking guide line). Use the Increase
or Decrease and SEL button to do the setting. Press MENU button return to main
menu.
(7)PLAY
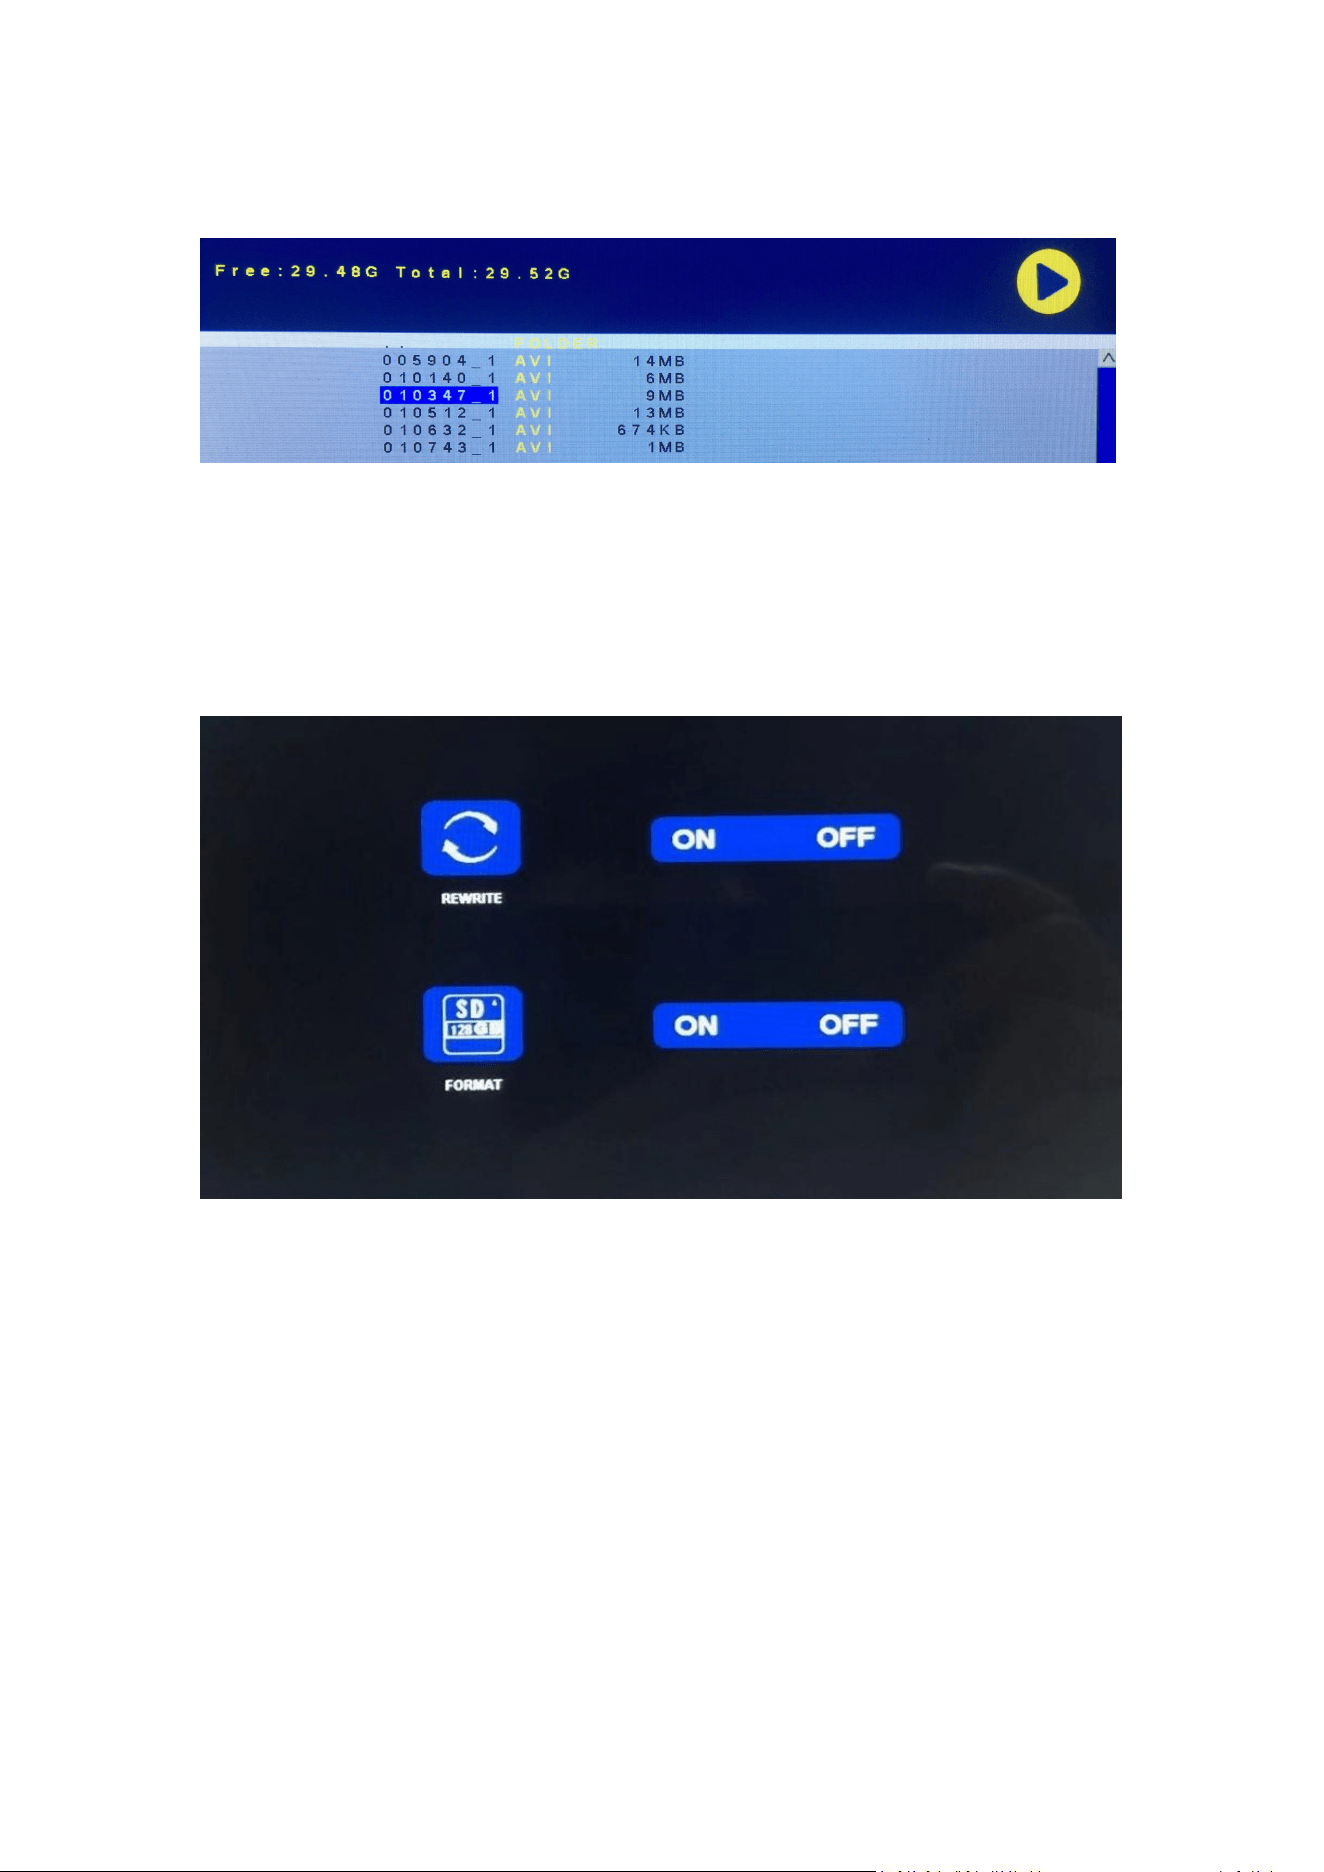
Press MENU and Choice the “PLAY” icon and then press SEL to enter the record
video library.
Press SEL button to enter record day director and then press Decrease button to
choice which day video you want to watch.
- 12 -
After choice the day, then press the SEL button to enter choice the record video.
Press Decrease button to choice video and then press SEL to Play. Press MENU to
exit.
(7) RECORD
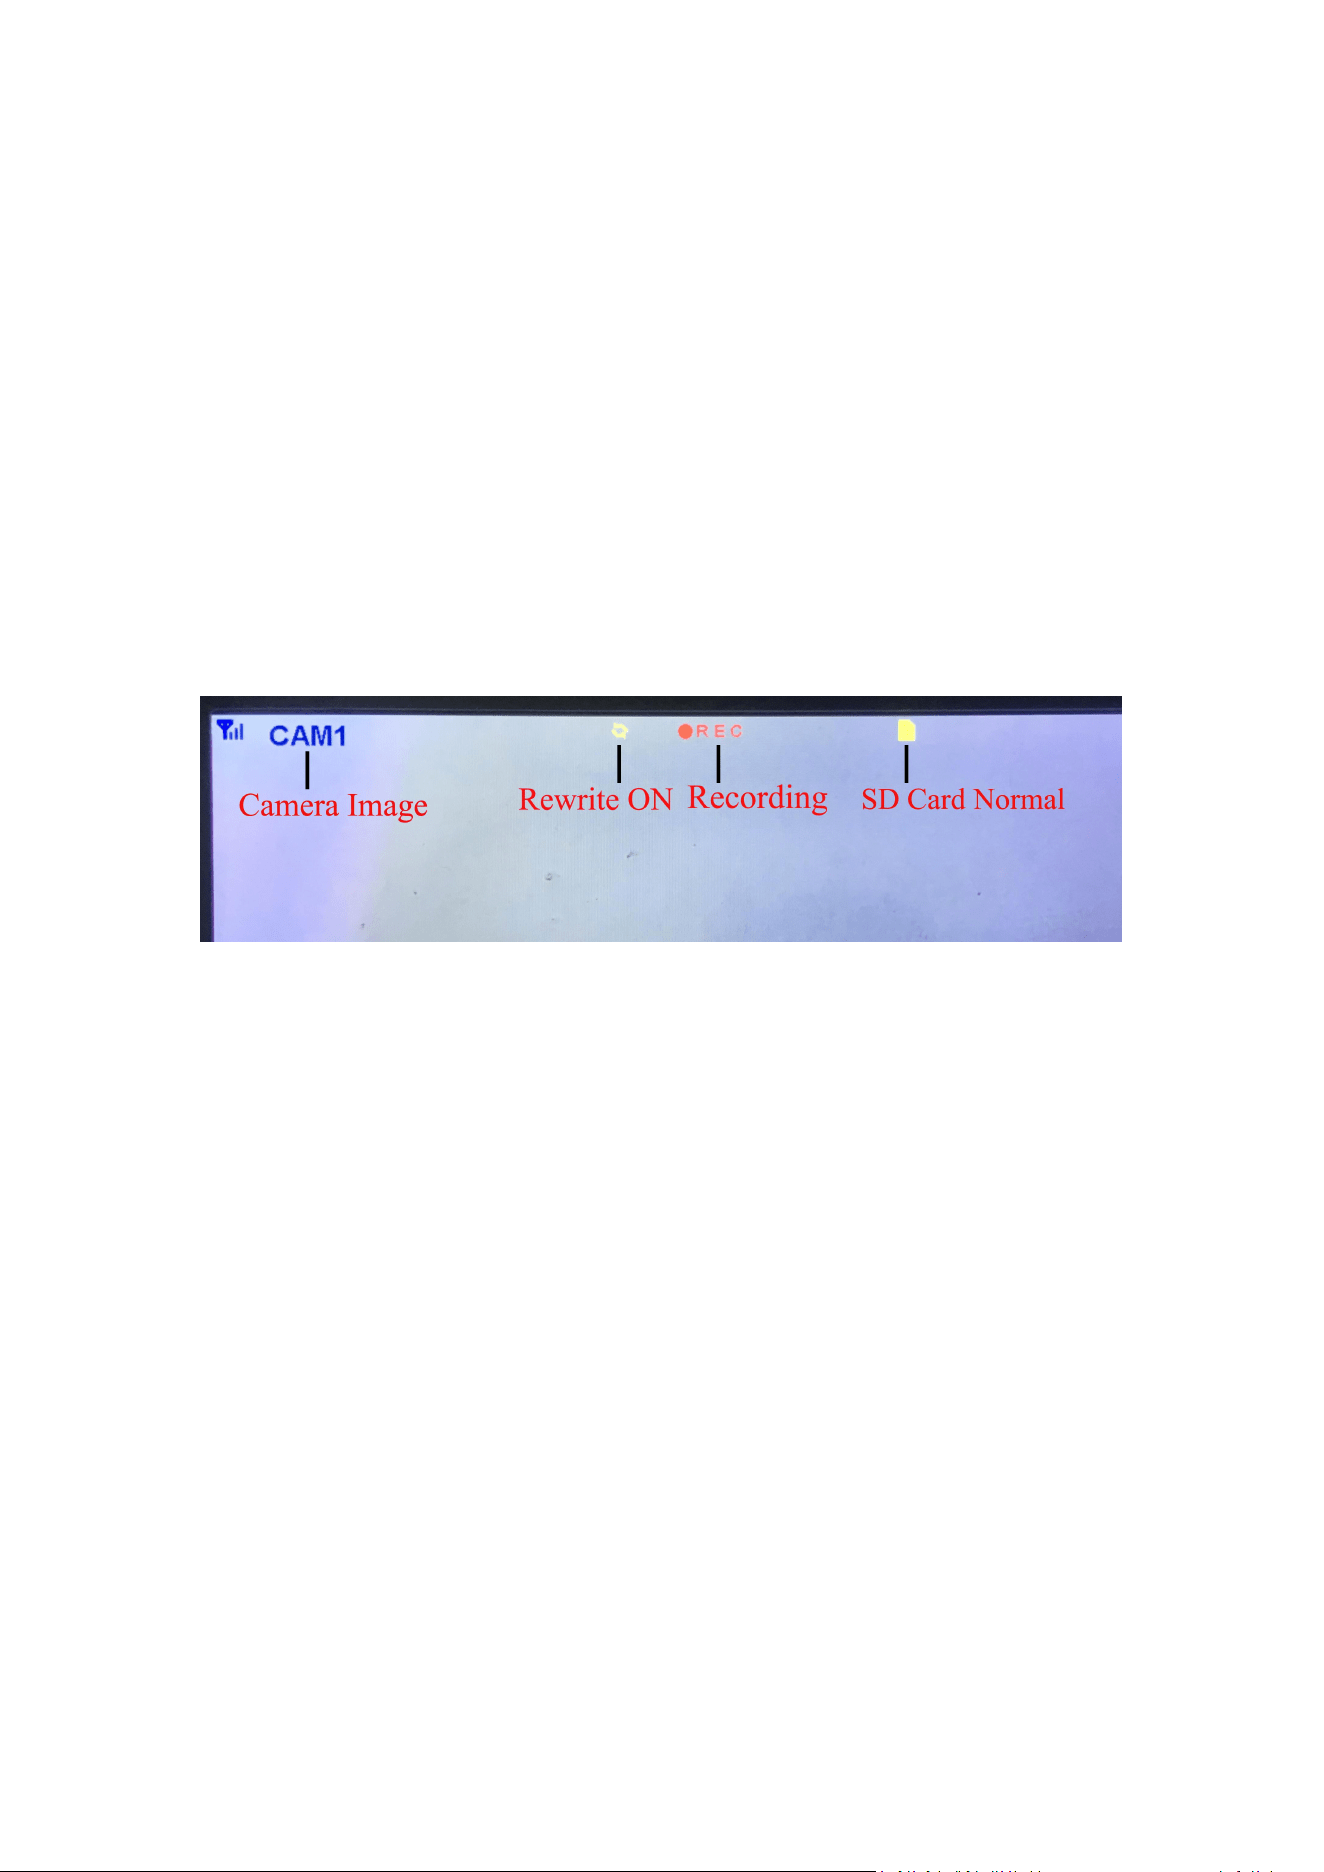
Press MENU and Choice the “RECORD” icon and then press SEL to enter record
setting. Press Increase or Decrease button to choice the setting. Press MENU
button return to main menu.
REWRITE ON: When the SD card is full, the monitor will delete the earliest
manual/timing record file one by one and keep recording.
REWRITE OFF: When the SD card is full, the recorder will stop working.
FORMAT: SD card must be formatted before being used. All documents in SD card
will be lost once user format the card.
- 13 -
Recorder Function Remind:
1. The recorder can work well with Class 8 and Class 10 SD Card. It can not work
well with Class 4 SD Card.
2. After user plug the SD card in the monitor, please format the SD card.
3. The recorder can record 1 camera channel, 2 camera channels or 4 camera
channels at the same time. But need all the cameras image be display on the
screen. If 2 cameras or 4 cameras system just 1 camera image be display on the
screen, it just can record the image that be display on the screen. If the screen
show dual split or quad split display, all the cameras images be display on screen
can be record.
4. After user format SD card and exit to the camera image, Please press the SEL
button to start recording(The screen will display the word ●REC). If the recorder
on recording, press SEL button, the recorder will stop recording.
CH- Button
1. User can press the CH- button to choice the which camera channel can be show
on the monitor(CAM1, CAM2, CAM3, CAM4 Dual Split, Quad Split).
2. When the monitor enters the automatic scan mode, you only need to press the
CH button again to exit.
3. Before pairing the camera to the monitor, user also need to use CH- to choice the
camera to be paired with which channel (CAM1, CAM2, CAM3, CAM4).
Recorder Function
1. The recorder can work well with Class 8 and Class 10 SD Card. It can not work
well with Class 4 SD Card.
2. After user plug the SD card in the monitor, please format the SD card.
3. The recorder just recorder the image display on the monitor.
4. The recorder can support 8GB-128GB SD card.
5. Support Loop recording, press SEL button to start or stop recording.

- 14 -
Monitor Specification
•Supports both NTSC and PAL video systems
•Support up for 4 cameras
•Display effect can be changed for each individual camera
•Multiple Viewing Options - Single/Split Screen/Quad
•Grid lines (can be switched on/off)
•Operating frequency:2400-2483.5MHZ
•Transmitted Power:18db
•Resolution: 1280(H)×1024(V)
•Contrast: 500:1
•Brightness: 500cd/m2
•Response Time(ms): 25
•Power Supply: DC12-36V
•Power consumption: <500mA
•Operating temperature: -20°C ~ 70°C
•Storage temperature: -30°C ~ 80°C
Camera Specification
•Image Sensor:1/2.7 inch Starlight HD
•Picture Elements:250,000 pixels
•View Angle: 127°[H] 170°[D]
•Resolution: 1000TV lines
•TV System: PAL/NTSC
•Waterproof Rating:IP69
•Minimum illumination: 0.5lux
•Power Supply: DC12V-36V
•Operating frequency:2400-2483.5MHZ
•Operating Temperature -20°C ~ +70°C / RH 95% Max
•Storage Temperature -30°C ~ +80°C / RH 95% Max

- 15 -
Troubleshooting
Monitor No Power
-Car engine has not been started,start the car engine
-Incorrect wiring connection.Check the wiring
-Monitor power off in default,press power button to turn on
Camera No Power
-Car engine has not been started,start the car engine
-Incorrect wiring connection.Check the wiring
No signal
-Check whether the camera has power supply (Make sure the power supply
stability voltage enough ). Pair the monitor and the camera again.
Dark picture
-Check whether brightness and contrast are adjusted correctly
No Color
-Adjust the HUE settings.
Weak signal
-Check whether there is any interference and ensure that the camera's bracket is
connected to the metal
SD card can not be write
-Use Class 10 SD card. Make sure SD card is 8GB-128GB. Do the format operation
and press SEL button begin to recording.

- 16 -
ONE YEAR WARRANTY
OUR COMPANY WARRANTS THIS PRODUCT AGAINST MATERIAL DEFECTS FOR A PERIOD OF
ONE YEAR FROM DATE OF PURCHASE. WE RESERVE THE RIGHT TO REPAIR OR REPLACE ANY
SUCH DEFECTIVE UNIT AT OUR SOLE DISCRETION. OUR COMPANY IS NOT RESPONSIBLE FOR A
DEFECT IN THE SYSTEM AS A RESULT OF MISUSE, IMPROPER INSTALLATION, DAMAGE OR
MISHANDLING OF THE ELECTRONIC COMPONENTS.OUR COMPANY IS NOT RESPONSIBLE FOR
CONSEQUENTIAL DAMAGES OF ANY KIND. THIS WARRANTY IS VOID IF: DEFECTS IN MATERIALS
OR WORKMANSHIP OR DAMAGES RESULT FROM REPAIRS OR ALTERATIONS WHICH HAVE BEEN
MADE OR ATTEMPTED BY OTHERS OR THE UNAUTHORIZED USE OF NONCONFORMING PARTS;
THE DAMAGE IS DUE TO NORMAL WEAR AND TEAR, THIS DAMAGE IS DUE TO ABUSE,
IMPROPER MAINTENANCE, NEGLECT OR ACCIDENT; OR THE DAMAGE IS DUE TO USE OF THE
SYSTEM AFTER PARTIAL FAILURE OR USE WITH IMPROPER ACCESSORIES.
WARRANTY PERFORMANCE
DURING THE ABOVE WARRANTY PERIOD, SHOULD YOUR REAR VIEW SAFETY PRODUCT EXHIBIT
A DEFECT IN MATERIAL OR WORKMANSHIP, SUCH DEFECT WILL BE REPAIRED WHEN THE
COMPLETE PRODUCT IS RETURNED, POSTAGE PREPAID AND INSURED.
Remind:
1.please switch to the desired channel before pairing the camera with
the monitor.
2.Please plug in the camera and monitor, then press the monitor MENU
key and select the “ Match ” icon, then press SEL key to enter the
camera match countdown interface. The user only needs to wait for the
match to succeed. If the match is unsuccessful, repeat the previous
steps to match again.

This device complies with Part 15 of the FCC Rules. Operation
is subject to the following two conditions: (1) this device may not
cause harmful interference, and (2) this device must accept any
interference received, including interference that may cause
undesired operation.
Changes or modifications to this unit not expressly approved by
the party responsible for compliance could void the user’s
authority to operate the equipment.
NOTE: This equipment has been tested and found to comply
with the limits for a Class B digital device, pursuant to Part 15 of
the FCC Rules. These limits are designed to provide reasonable
protection against harmful interference in a residential
installation. This equipment generates, uses and can radiate
radio frequency energy and, if not installed and used in
accordance with the instructions, may cause harmful
interference to radio communications. However, there is no
guarantee that interference will not occur in a particular
installation. If this equipment does cause harmful interference to
radio or television reception, which can be determined by turning
the equipment off and on, the user is encouraged to try to
correct the interference by one or more of the following
measures:
-- Reorient or relocate the receiving antenna.
-- Increase the separation between the equipment and receiver.
-- Connect the equipment into an outlet on a circuit different from
that to which the receiver is connected.
-- Consult the dealer or an experienced radio/TV technician for
help.
This device and its antenna(s) must not be co-located or
operation in conjunction with any other antenna or transmitter.
Radiation Exposure Statement
To maintain compliance with FCC’s RF Exposure guidelines,
This equipment should be installed and operated with minimum
distance of 20cm from your body.