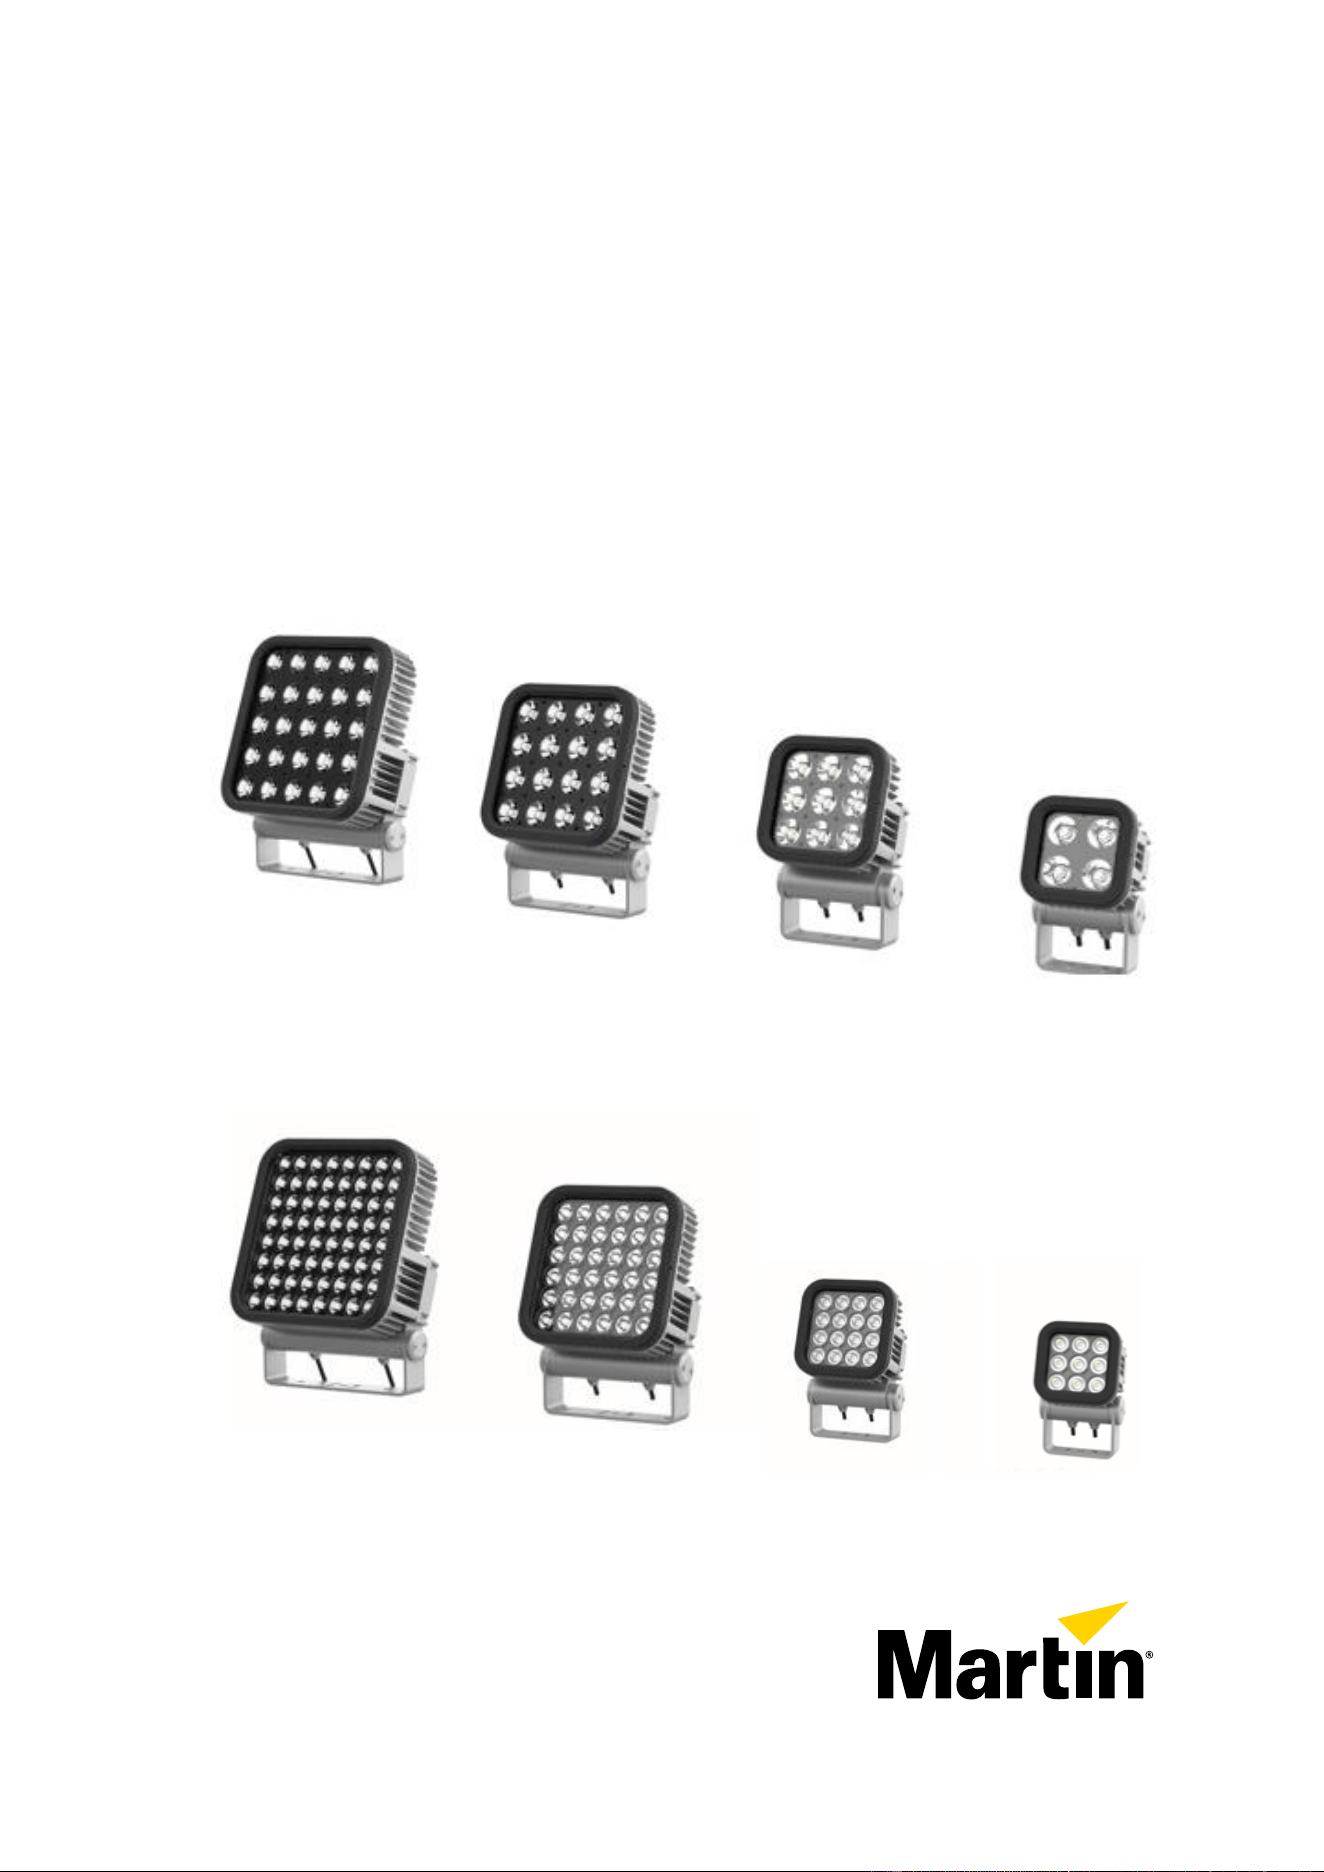
Exterior Wash Pro
S, M, L, XL – QUAD and CTC
User manual
with Safety and installation manual
Exterior Wash
Pro XL CTC
Exterior Wash
Pro L CTC
Exterior Wash
Pro M CTC
Exterior Wash
Pro S CTC
Exterior Wash
Pro XL QUAD
Exterior Wash
Pro L QUAD
Exterior Wash
Pro M QUAD
Exterior Wash
Pro S QUAD

©2023-2025 HARMAN PROFESSIONAL DENMARK ApS. All rights reserved. Features, specifications and appearance are
subject to change without notice. HARMAN PROFESSIONAL DENMARK ApS and all affiliated companies disclaim liability for
any injury, damage, direct or indirect loss, consequential or economic loss or any other loss occasioned by the use of, inability to
use or reliance on the information contained in this document. Martin is a registered trademark of HARMAN PROFESSIONAL
DENMARK ApS registered in the United States and/or other countries.
HARMAN PROFESSIONAL DENMARK ApS, Olof Palmes Allé 44, 8200 Aarhus N, Denmark
HARMAN PROFESSIONAL, INC., 8500 Balboa Blvd., Northridge CA 91325, USA
www.martin.com
Exterior Wash Pro family User Manual English, Revision F
Notes
User documentation Revision F
- Corrected Harman Pro USA contact details.
- Fixed incorrect fixture names in Safety and Installation Manual page 12 under 'Mounting on
a Surface'.

Table of contents
Introduction .................................................................................................. 4
Exterior Wash Pro Series ....................................................................... 4
Fixture overview ........................................................................................... 5
Before using the product for the first time ............................................... 5
Setting up fixtures ........................................................................................ 6
Martin Companion
®
and RDM ................................................................ 6
Fixture discovery ..................................................................................... 6
Supported parameters ............................................................................ 6
Setting up DMX operation ....................................................................... 7
Setting DMX addresses .......................................................................... 8
Dimming curves ...................................................................................... 8
QUAD fixture color temperature ............................................................. 9
Full and reduced power modes .............................................................. 9
Fixture information .................................................................................. 9
Status messages .................................................................................... 9
Utilities .................................................................................................... 9
Behavior when no DMX signal is present ............................................. 10
Standalone operation ................................................................................. 11
Synchronized standalone operation ..................................................... 11
Programming standalone operation ...................................................... 12
Running a standalone show ................................................................. 13
RDM parameter IDs ................................................................................... 15
Operating the fixture .................................................................................. 17
Test sequences and fixture status ........................................................ 17
Controlling via DMX .............................................................................. 17
Identifying fixtures in the installation ..................................................... 17
DMX protocols............................................................................................ 18
QUAD fixtures ....................................................................................... 18
CTC fixtures .......................................................................................... 19
Troubleshooting ......................................................................................... 20

4 Martin
®
Exterior Wash Pro family
User Manual Rev. F
Introduction
Warning! Before installing, operating or servicing the Exterior Wash Pro
lighting fixture, read the latest version of the fixture’s Safety and Installation
Manual, paying particular attention to the Safety Precautions section.
Important! Full specifications for Exterior Wash Pro fixtures and accessories
are available in the Exterior Wash Pro area of the Martin® website at
www.martin.com.
Thank you for selecting the Exterior Wash Pro lighting fixture from Martin.
We recommend that you check the Martin website regularly for updated documentation.
Bear in mind that the output of LEDs, like all light sources, changes gradually over many thousands of
hours of use. If you require products to perform to very precise color specifications, you may
eventually need to make small readjustments at the lighting controller.
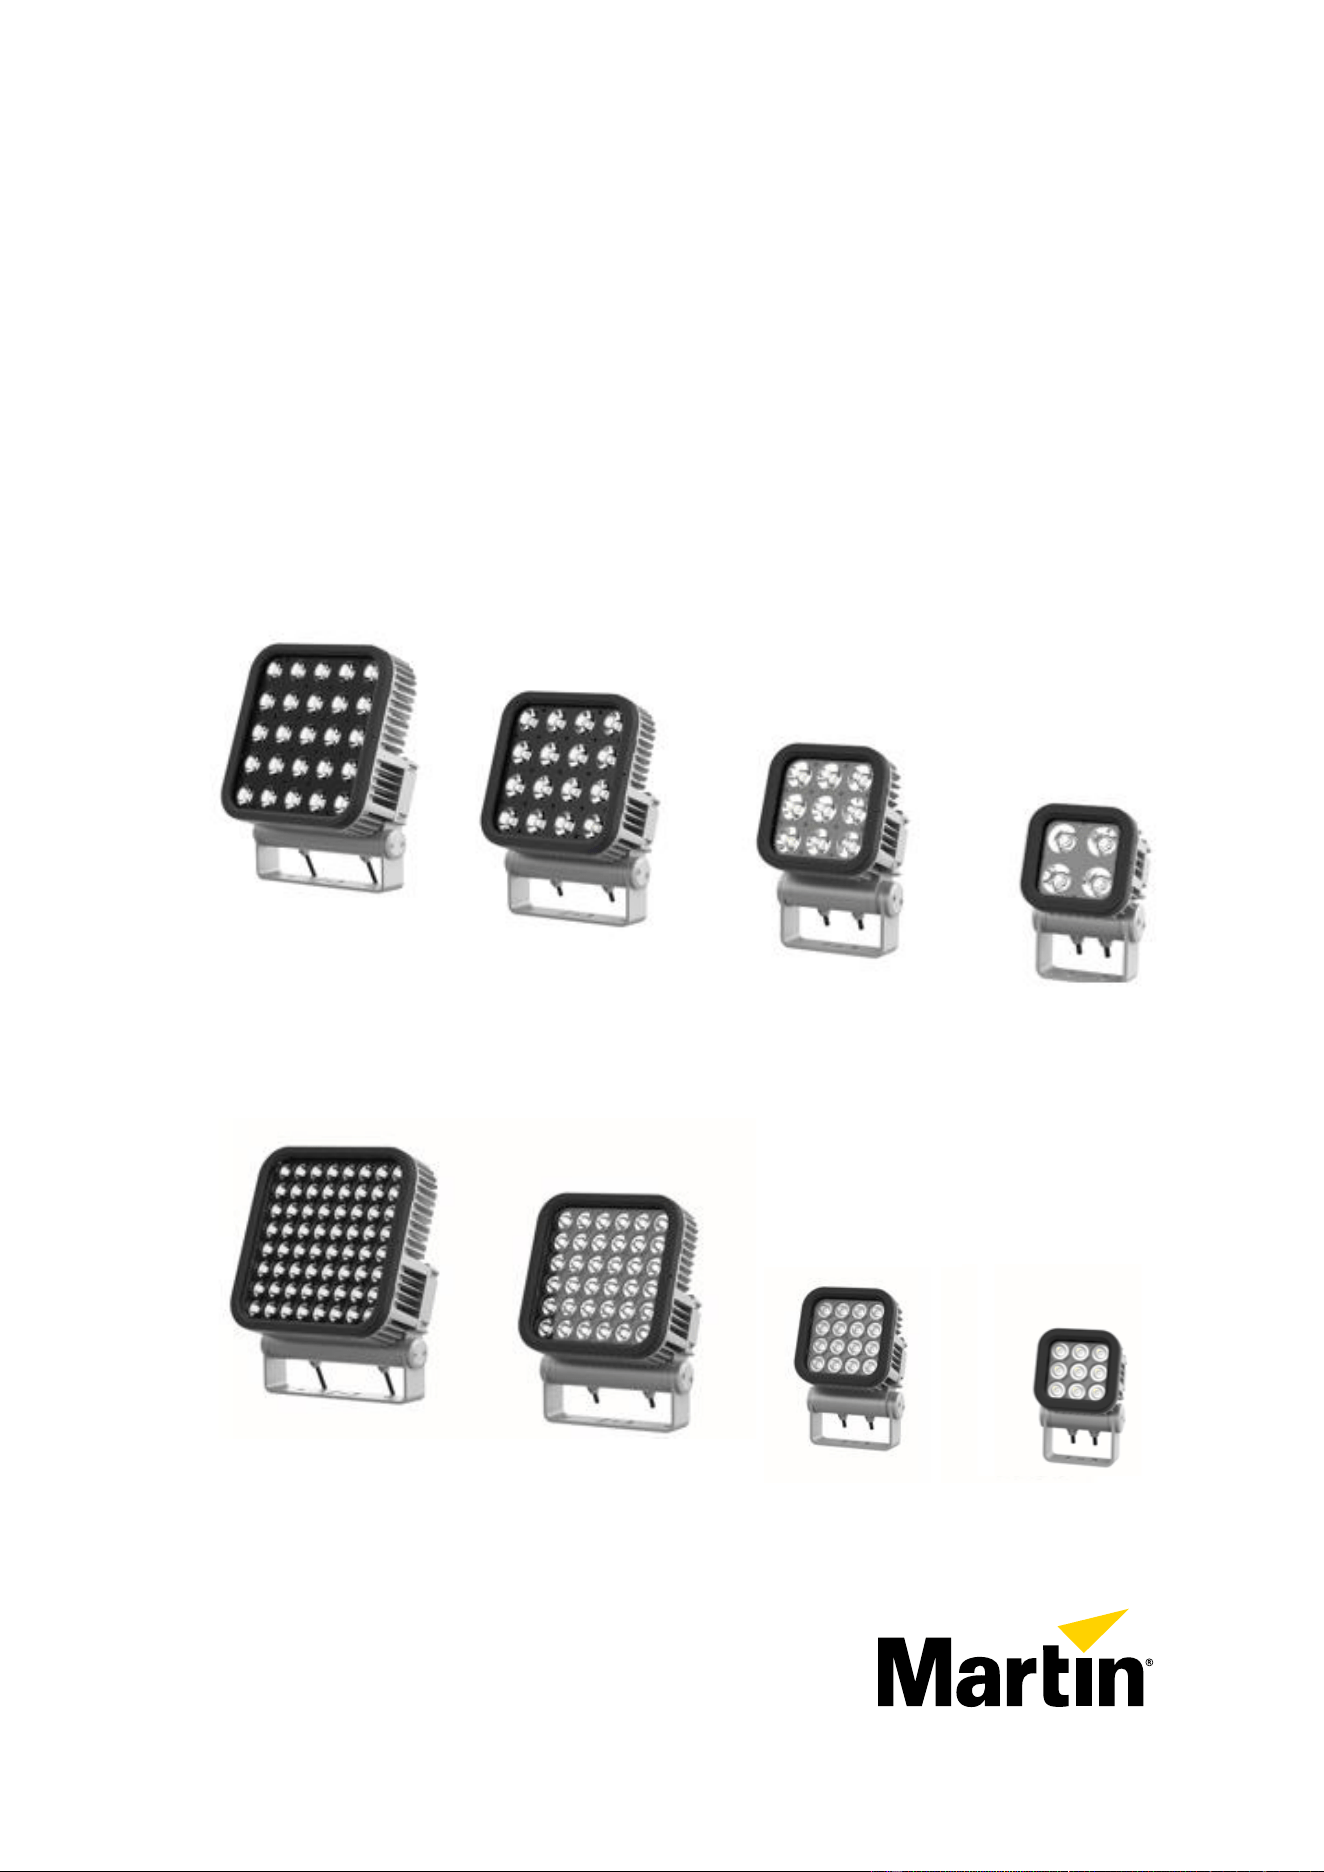
Exterior Wash Pro Series
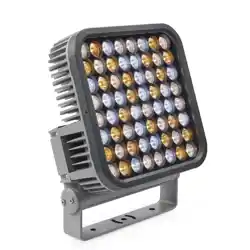
The Exterior Wash Pro Series from Martin is a powerful, compact and energy-efficient line of LED
lighting fixtures designed to illuminate structures and building facades. All models offer a wide
selection of beam angles, and sealed construction suited to permanent outdoor use. A discreet baffle
snoot that integrates seamlessly with the fixtures’ sleek design is available as an optional accessory.
The baffle snoot lets you limit light spill and aim the beam more directly at the target.
QUAD color mixing fixtures
Exterior Wash Pro QUAD variants feature four-color RGBW LEDs and offer RGB control with
automatic addition of White. QUAD fixtures have a dedicated color temperature control channel which
accurately follows the black body curve from 1000 K to 12 850 K.
Exterior Wash Pro QUAD fixtures are available in the following variants:
• Pro S QUAD – 4 x RGBW LEDs
• Pro M QUAD – 9 x RGBW LEDs
• Pro L QUAD – 16 x RGBW LEDs
• Pro XL QUAD – 25 x RGBW LEDs
CTC fixtures
Exterior Wash Pro Controllable Color Temperature (CTC) variants feature even higher white light
quality and efficacy than QUAD variants. They offer White CT mixing from 2400 to 6500 K with 3 x
discrete white color temperature LEDs for high efficacy.
Exterior Wash Pro CTC fixtures are available in the following variants:
• Pro S CTC – 3 x 2400 K, 3 x 4000 K, 3 x 6500 K white LEDs
• Pro M CTC – 5 x 2400 K, 5 x 4000 K, 6 x 6500 K white LEDs
• Pro L CTC – 12 x 2400 K, 12 x 4000 K, 12 x 6500 K white LEDs
• Pro XL CTC – 21 x 2400 K, 21 x 4000 K, 21 x 6500 K white LEDs
Martin
®
Exterior Wash Pro family
User Manual Rev. F 5
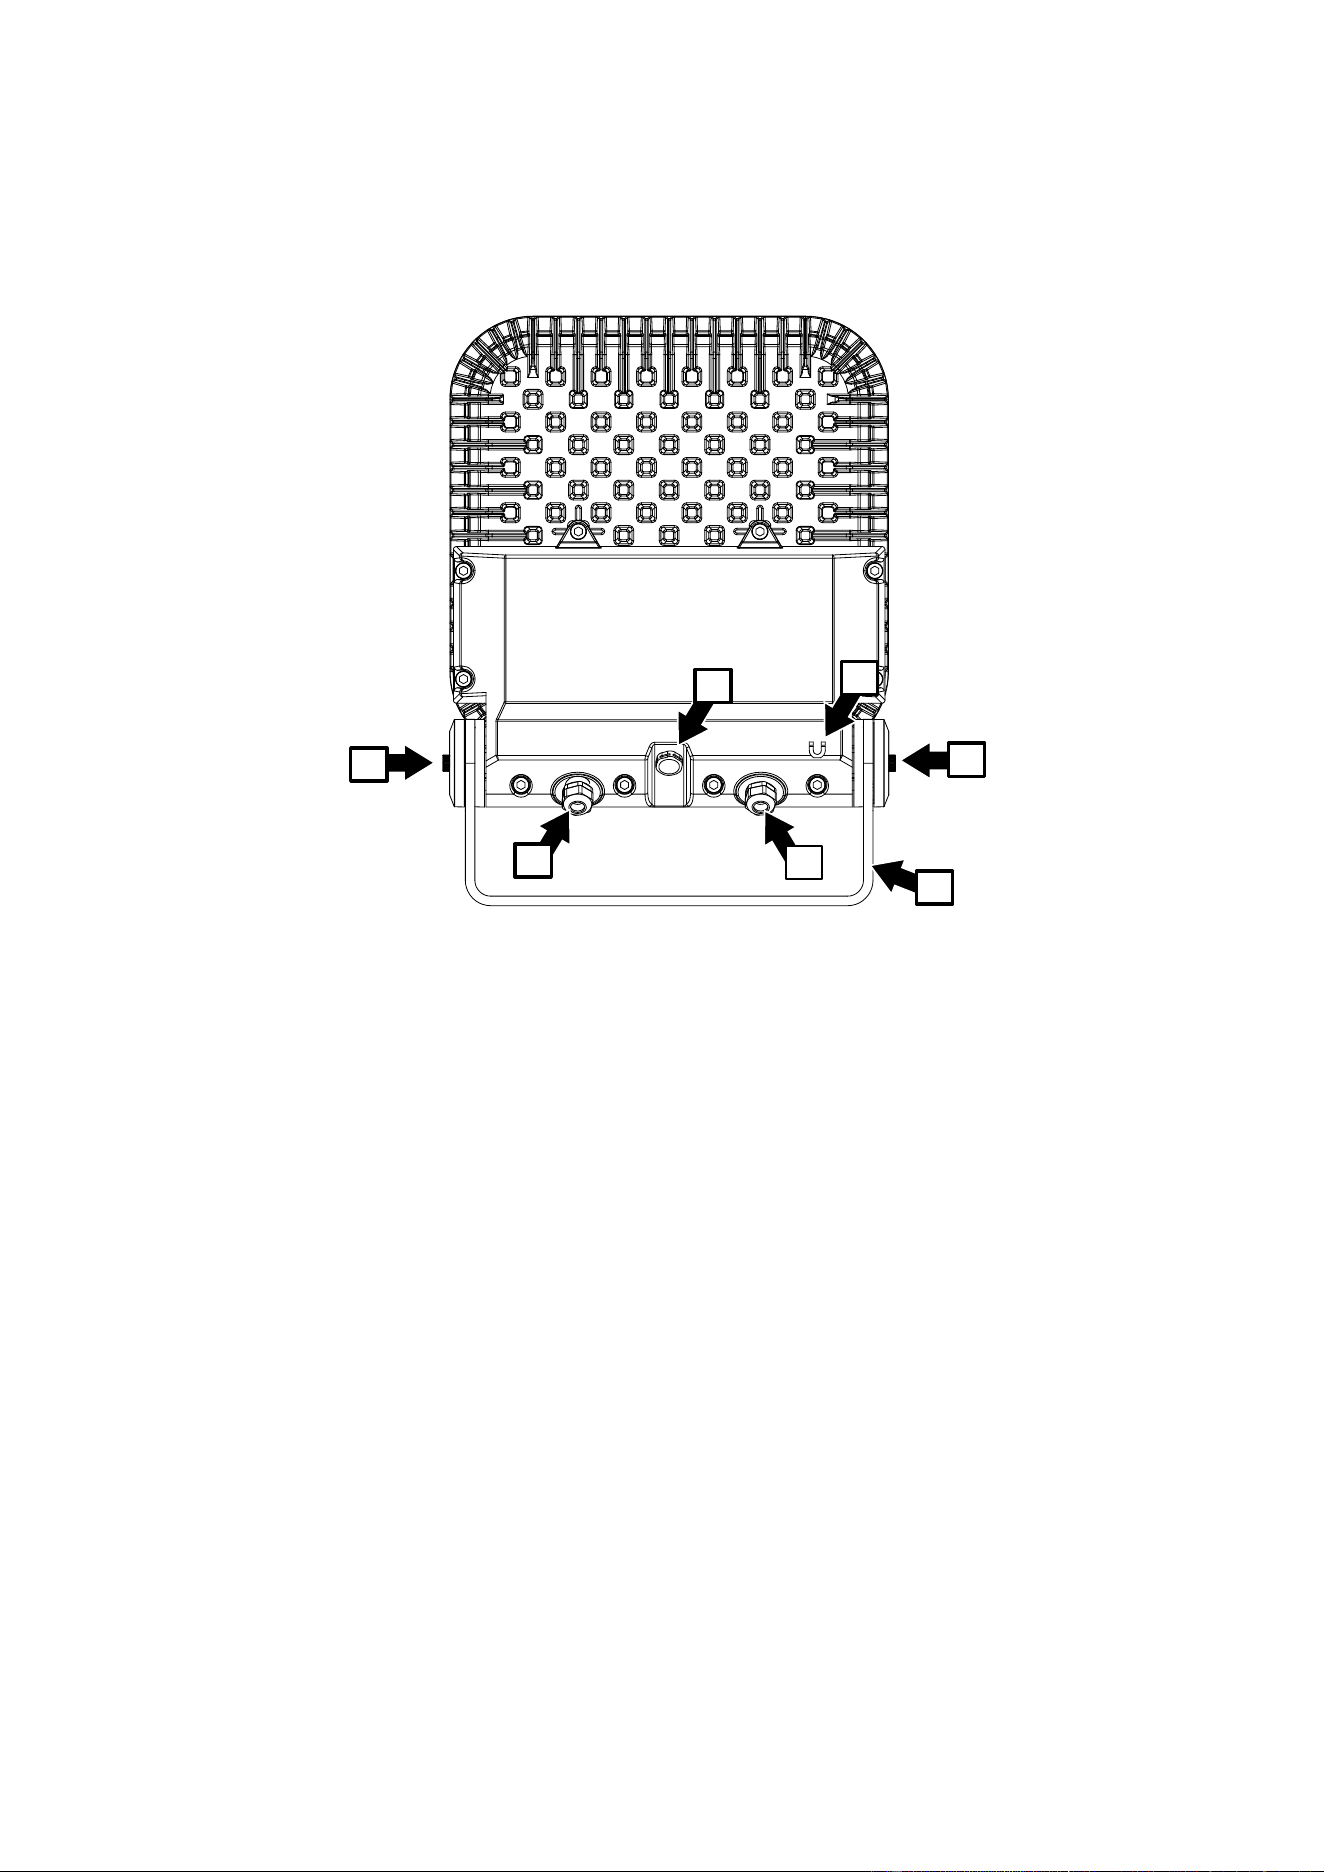
Fixture overview
A
Tilt adjustment/locking plates
B
Data In/Out (fixture supplied with cable tail installed)
C
Pressure relief valve
D
AC mains power In (fixture supplied with cable tail installed)
E
Magnetic ‘swipe’ switch
F
Adjustable mounting yoke
Before using the product for the first time
1. Unpack and ensure that there is no transportation damage before using the fixture. Do not attempt
to operate a damaged fixture.
2. Ensure that the voltage and frequency of the power supply match the power requirements of the
fixture.
3. If testing and/or setting up the fixture before it is hard-wired to a mains supply, install a local power
plug (not supplied) to the end of the supplied power cable.
4. If fixtures are exposed to a sudden temperature change, give them time to warm or cool to the
ambient temperature before applying power. This will help avoid damage due to condensation.
E
C
D
B
A
A
F

6 Martin
®
Exterior Wash Pro family
User Manual Rev. F
Setting up fixtures
This chapter covers the use of Martin Companion to set up and manage the Exterior Wash Pro via
RDM. While we recommend the use of Martin Companion, most of the commonly available RDM
controllers also support the Exterior Wash Pro. Check with the controller manufacturer if you cannot
find the Martin Exterior Wash Pro in the list of supported fixtures. The exact procedures and command
names used by different RDM controllers vary.
Setting up single or multiple fixtures
You can set behavior in one fixture by sending a unicast RDM command to that one fixture only, or
you can set behavior in all the fixtures on the data link by sending a broadcast RDM command to all
the fixtures.
Martin Companion
®
and RDM
To set up Exterior Wash Pro fixtures via RDM, we invite you to use the Martin Companion Cable PC-
to-DMX interface that is available as an accessory from Martin suppliers. This tool plugs into the USB
port of a Windows PC and connects to Martin fixtures over the DMX data link.
The Martin Companion Cable is designed to work together with the Martin Companion software
suite for Windows PCs that can be downloaded free of charge from the Martin website at. The Martin
Companion software suite will always offer the latest Exterior Wash Pro features and firmware when
your PC is connected to the Internet.
Instructions for connecting the Martin Companion Cable are supplied with the tool and can also be
downloaded from the Martin website.
Martin Companion offers the following features:
• Simple PC-based user interface
• Update of fixture firmware
• RDM configuration and addressing
• Standalone show programming with automatic start when fixtures are powered on.
RDM functions
A full list of the RDM functions that Exterior Wash Pro fixtures support is given at the end of this
chapter. These functions are generally referred to using the more specific term ‘PIDs’ or ‘Parameter
IDs’.
Fixture discovery
Before you can communicate with fixtures using RDM, you must send a scan command (fixture
discovery command) to all the devices on the data link so that the RDM controller can identify them. It
does this by retrieving each device’s factory-set unique identifier (UID). This process can take some
time, depending on the number of devices on the link.
To identify the fixtures on the link:
1. Check that the fixtures are correctly connected to the RDM controller on the data link and that
power is applied to all fixtures.
2. Send a discovery command via RDM (Martin Companion does this automatically as soon as the
cable is connected).
3. Give the controller time to identify the devices on the link and prepare for communication with the
devices.
Supported parameters
Exterior Wash Pro fixtures can communicate the PIDs that they support to the RDM controller and give
brief information on each PID.

Martin
®
Exterior Wash Pro family
User Manual Rev. F 7
Setting up DMX operation
Setting DMX mode
The DMX_PERSONALITY PID lets you set the DMX mode of fixtures on the data link. The different
DMX modes available give you a range of options for color or color temperature control as well as
dimming and strobe effects.
Because DMX mode affects the number of DMX channels a fixture uses, it will affect the assignment
of DMX addresses to fixtures. You should therefore set the DMX mode of all the fixtures in the
installation before you set their DMX addresses.
You can set the DMX mode of one fixture by sending a unicast RDM command to that one fixture only,
or you can set the DMX mode of all the fixtures on the data link by sending a broadcast RDM
command to all the devices on the link.
QUAD fixture DMX modes
Exterior Wash Pro QUAD fixtures can be set to one of four DMX control modes:
DMX control
mode
Control options
Color
calibration
DMX
footprint
Color mode
Basic
RGB with White added
automatically
Calibrated
3 x channels
Fixtures can be set
to Calibrated or
Calibrated Extended
(default) via RDM
RGBW raw
RGBW
Uncalibrated
4 x channels
Fixtures are always
in RAW mode
Standard
(default
mode)
Intensity (16-bit), RGB with
White added automatically,
CTC with color temperature
variable from 1000 K to
12 850 K in 50 K steps
Calibrated
6 x channels
Fixtures can be set
to Calibrated or
Calibrated Extended
(default) via RDM
Extended
Shutter/strobe effect,
intensity (16-bit), RGB with
White added automatically,
CTC with color temperature
variable from 1000 K to
12 850 K in 50 K steps
Calibrated
7 x channels
Fixtures can be set
to Calibrated or
Calibrated Extended
(default) via RDM
The default color temperature of QUAD fixtures in Basic mode is 4000 K. This can be adjusted via
RDM.
Since color in RGBW raw mode is not calibrated, slight differences in color and/or intensity between
different fixtures may be visible in the light output from multiple fixtures, but you can obtain slightly
higher light intensity levels.
QUAD fixture Color modes
Exterior Wash Pro QUAD fixtures have three color modes (also shown in table above).
In RGBW Raw DMX control mode, the color mode is always raw – you cannot select a calibrated color
mode.
In Basic, Standard and Extended DMX control modes, you can select from two color modes via RDM:
• Calibrated – All colors stay consistent at all times.
• Calibrated Extended (default setting) – The White point is calibrated, but you can saturate colors to the
maximum level available.
8 Martin
®
Exterior Wash Pro family
User Manual Rev. F
CTC fixture DMX modes
Exterior Wash Pro CTC fixtures can be set to one of two DMX control modes:
DMX mode
Control options
DMX footprint
Notes
Basic
Manual color temperature mixing
(individual control of 2400 K, 4000 K and
6500 K LEDs)
3 x channels
Fixtures are
always in RAW
mode
Standard
(default
mode)
Intensity (16-bit), color temperature
control from 2400 K to 6500 K by
automatically mixing the three different
LED types
3 x channels
Fixtures are
always in RAW
mode
Setting DMX addresses
This RDM command lets you set the DMX addresses of fixtures on the data link.
A fixture’s DMX address is the first DMX channel it uses to receive data communication. It uses this
channel and the channels immediately above it. If a fixture has DMX address 001 and the fixture uses
four DMX channels, it will use channels 001, 002, 003 and 004. DMX address 005 will be available as
a DMX address for the next fixture on the data link. If this fixture also uses four DMX channels, the
next available DMX address will be 009, and so on.
You can set the DMX address of one fixture by sending a unicast RDM command to that one fixture
only, or you can set all the fixtures on the data link to the same DMX address by sending a broadcast
RDM command to all the devices on the link. If all the fixtures have the same DMX address, they will
behave identically and you will not be able to control any single fixture independently.
An example procedure might look like this, depending on which RDM controller you use:
1. Go to Scan → Properties → Advanced → Choose PID → SET DMX START ADDRESS.
2. Enter the DMX address that you want to give to the fixture (or give to all the fixtures if you are
sending a broadcast command).
3. Confirm your selection.
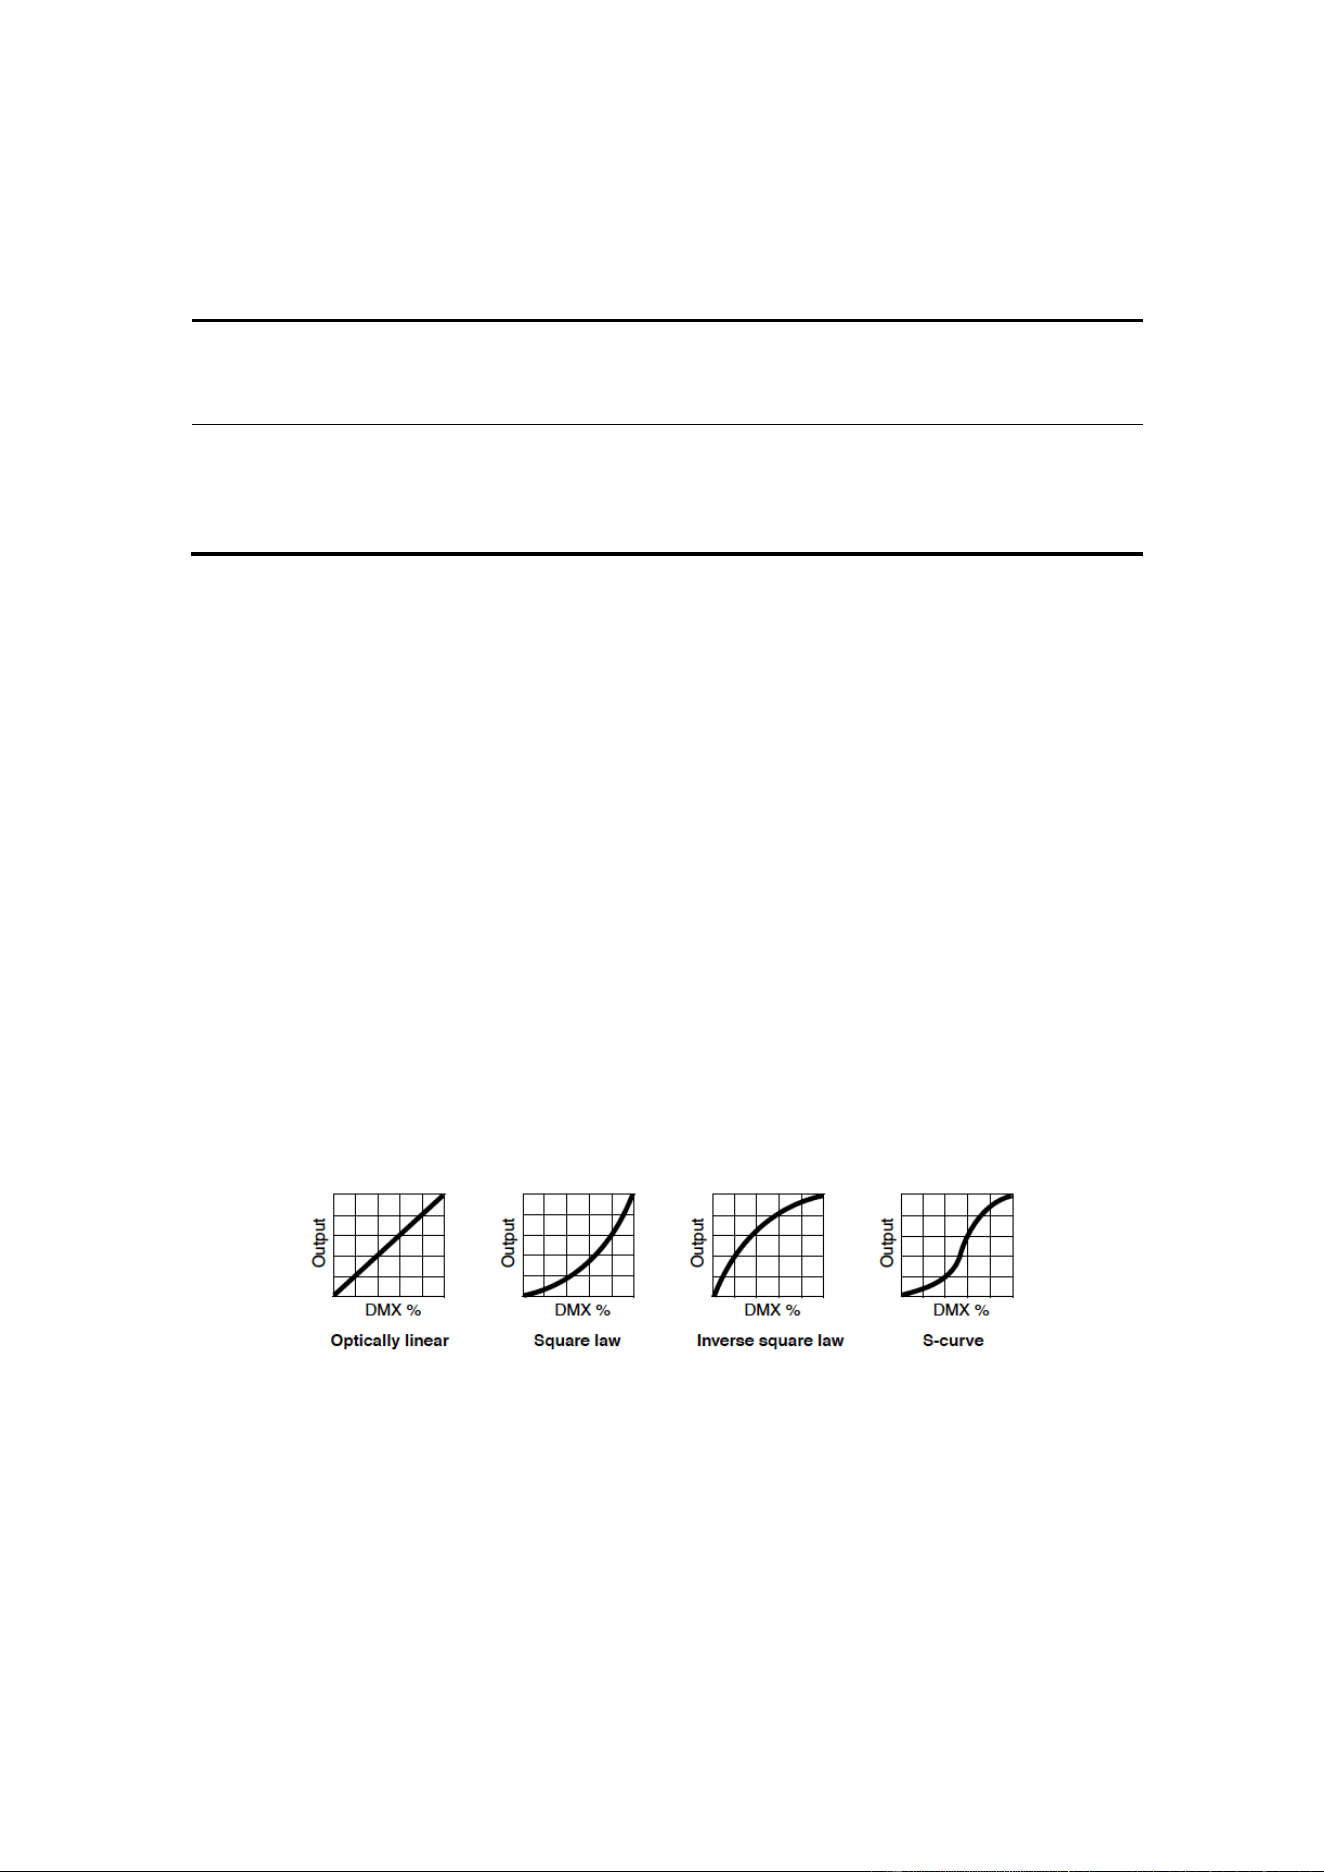
Dimming curves
Four dimming curves are available via RDM:
• Optically linear – The increase in light intensity appears to be linear as DMX value is increased.
• Square law (default setting) – light intensity control is finer at low levels and coarser at high levels.
• Inverse square law – Light intensity control is coarser at low levels and finer at high levels.
• S-Curve – light intensity control is finer at low levels and high levels and coarser at medium levels.

Martin
®
Exterior Wash Pro family
User Manual Rev. F 9
QUAD fixture color temperature
The default color temperature of QUAD fixtures in Basic DMX mode is 4000 K. This can be adjusted
using the MANUAL_CTC_VALUE PID.
Full and reduced power modes
You can set the maximum power consumption of Exterior Wash Pro fixtures via RDM. The power limit
mode settings let you reduce electrical power consumption, which of course reduces maximum light
intensity. The power settings are as follows:
Exterior
Wash Pro S
Exterior
Wash Pro M
Exterior
Wash Pro L
Exterior
Wash Pro XL
Full mode
35W
75W
150W
250W
Reduced mode
28W
60W
120W
200W
Fixture information
Exterior Wash Pro fixtures can communicate the following information to the RDM controller:
• Basic fixture information – type of fixture.
• Name of product and manufacturer.
• Device label – This information can be edited by the user, providing a means of giving an individual
fixture its own ID number, for example.
• Currently installed firmware version.
• LED PCB temperature.
• Number of hours fixture has had power applied since manufacture (non-resettable).
• Number of hours LEDs have been active since manufacture (non-resettable).
• Number of on/off power cycles since manufacture (non-resettable).
• Serial number – This is a factory-set serial number that cannot be changed.
Status messages
The Exterior Wash Pro features a self-diagnostic system that detects any issues concerning correct
operation or safety (temperature that exceeds safe level, for example) and communicates the issues
as status messages or warnings. These messages can be useful in connection with service and
maintenance.
It is possible to do the following from within the RDM controller:
• Call up a list of any status messages that the fixture has stored in memory.
• View information on the messages.
• Clear the stored list of status messages.
Utilities
The Exterior Wash Pro offers various commands for managing the fixture:
• Reset device – Carries out a full reset of all the fixture’s electronics.
• Perform self-test – The fixture carries out a sequence of functions designed to test the fixture.
• Self-test description – Lets you select from various sequences that test the fixture’s functionality, the
fixture’s LEDs or every aspect of the fixture.
• Factory defaults – Deletes any custom settings that have been configured via RDM and returns the
fixture to its factory default settings.

10 Martin
®
Exterior Wash Pro family
User Manual Rev. F
Behavior when no DMX signal is present
Using the RDM OFFLINE_MODE PID, you can define how fixtures behave if power is applied but
fixtures are not receiving a DMX signal (or if fixtures are powered on and being controlled by DMX,
and then the DMX signal stops).
Four options are available:
• Blackout (default setting) – Fixture intensity set to zero light output when no DMX signal is present.
• Standalone – Fixture goes to standalone operation when no DMX signal is present. If you have
programmed a scene or scenes via RDM and DMX, the fixtures will display that scene when no DMX
signal is present.
• Hold Last State – Fixture follows the last DMX values it received.
• Full Output – All LEDs go to 100% intensity when no DMX signal is present.

Martin
®
Exterior Wash Pro family
User Manual Rev. F 11
Standalone operation
Setting up standalone operation in the Exterior Wash Pro requires the use of Martin Companion. This
hardware cable accessory and free software offers the following features:
• Simple PC-based user interface
• Programming from a remote location over the DMX link.
• Easy programming of multiple fixtures simultaneously
• Combining different types of Martin fixture in one standalone show
• Standalone show programming with possibility of automatic start when fixtures are powered on
• Programming of up to twenty scenes with global or individual fade and hold times.
In standalone mode, fixtures display a ‘scene’ (a ‘look’ in which its controllable effects can be deployed
to varying degrees) or a sequence of up to twenty scenes if you use Martin Companion. Once scenes
have been programmed, fixtures can display them without needing a DMX signal.
Synchronized standalone operation
In synchronized standalone operation, one fixture on the data link – the ’host’ fixture –sends ‘fade’ and
’wait’ signals to the other fixtures on the data link – the ’client’ fixtures – so that scene change times in
client fixtures are synchronized with the scene change times in the host. Every time the host changes
to its next pre-programmed scene, the client fixtures change to their next pre-programmed scene at
the same time.
Important! Martin Companion sets up host and client fixtures automatically. When you set up
standalone operation in multiple fixtures, all the fixtures must be connected on the DMX/RDM link and
powered on, and you must program all the fixtures at the same time. This will ensure that host and
client roles are allocated correctly. If you try to set up fixtures individually using Martin Companion and
then connect them to the DMX/RDM link afterwards, more than one fixture will try to be the host and
fixtures will behave unpredictably.
Setting up synchronized standalone operation
Note the following:
• Although scene changes in host and client fixtures all happen at the same time, scenes do not have to
be identical. The host fixture only tells the client fixtures to “go to scene X with fade time Y”. The effects
(intensity, color etc.) that each fixture uses in a specific scene are stored inside each fixture individually.
• Each fixture displays its own pre-programmed standalone show until it reaches its last scene, then it
starts the show sequence again and continues in a loop. All fixtures will have the same number of
scenes in their shows and they will all start and run their shows in synch (but as mentioned above, you
can program different content for a scene in different fixtures).
• For best data signal quality, you should always terminate a DMX data link by connecting a 120 Ohm
resistor across data hot and data cold at the end of the link. When you disconnect Martin Companion
from the data link in order to begin standalone operation, we recommend that you also terminate the
beginning of the link with a 120 Ohm resistor across data hot and data cold.
• Standalone operation is only possible if no DMX/RDM signal is present. If you connect a DMX signal to
fixtures that are running a standalone show, they will stop standalone operation and respond to DMX
control.
12 Martin
®
Exterior Wash Pro family
User Manual Rev. F
Programming standalone operation
To program standalone operation using Martin Companion:
1. Connect the fixtures to a DMX/RDM data link and apply power to the fixtures that you want to
program. Important! When using Martin Companion, all fixtures must be connected via a data link
and powered on – you cannot program fixtures individually and connect them together to the link
later!
2. Connect the Martin Companion Cable and a PC running the Martin Companion application to the
data link. If the fixtures have not already been discovered by Martin Companion, wait until the
Discovery counter stops. This will indicate that all fixtures have been discovered.
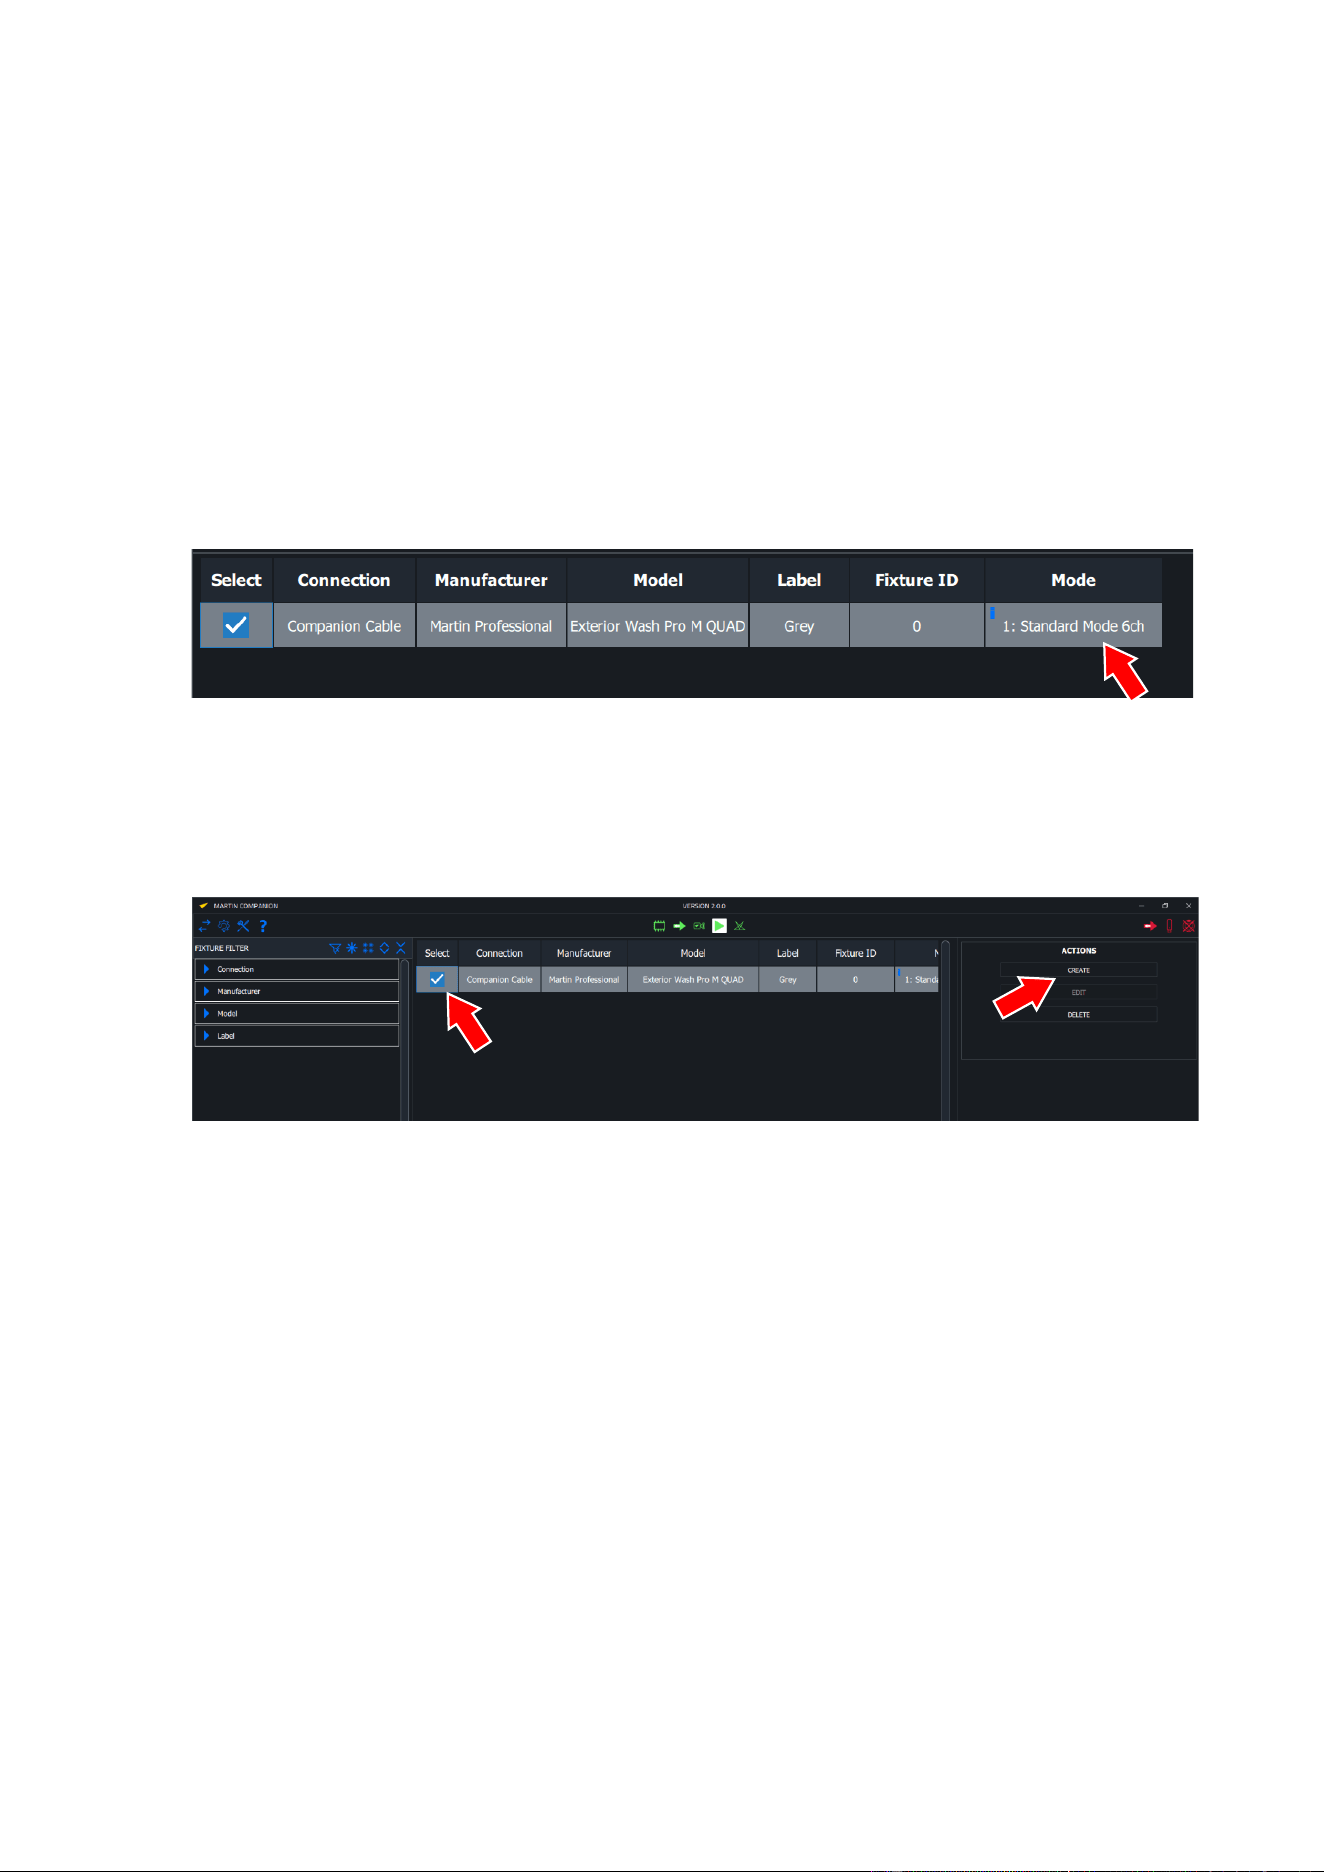
3. Once all fixtures have been discovered and are shown in the list of connected fixtures in the main
Martin Companion window, set each fixture to its desired DMX Mode in its Mode box (arrowed in
screenshot below). The DMX mode that you set for a fixture determines what controls are
available when you create scenes in the next steps.
4. See screenshot below. Select the fixture or fixtures that you want to set up for stand-alone
operation by checking each fixture’s box under Select in the grey bar at the top of the window.
Then click on CREATE under ACTIONS on the right of the window to continue to the next step (it
is also possible to edit an existing show that has already been programmed into the fixtures).
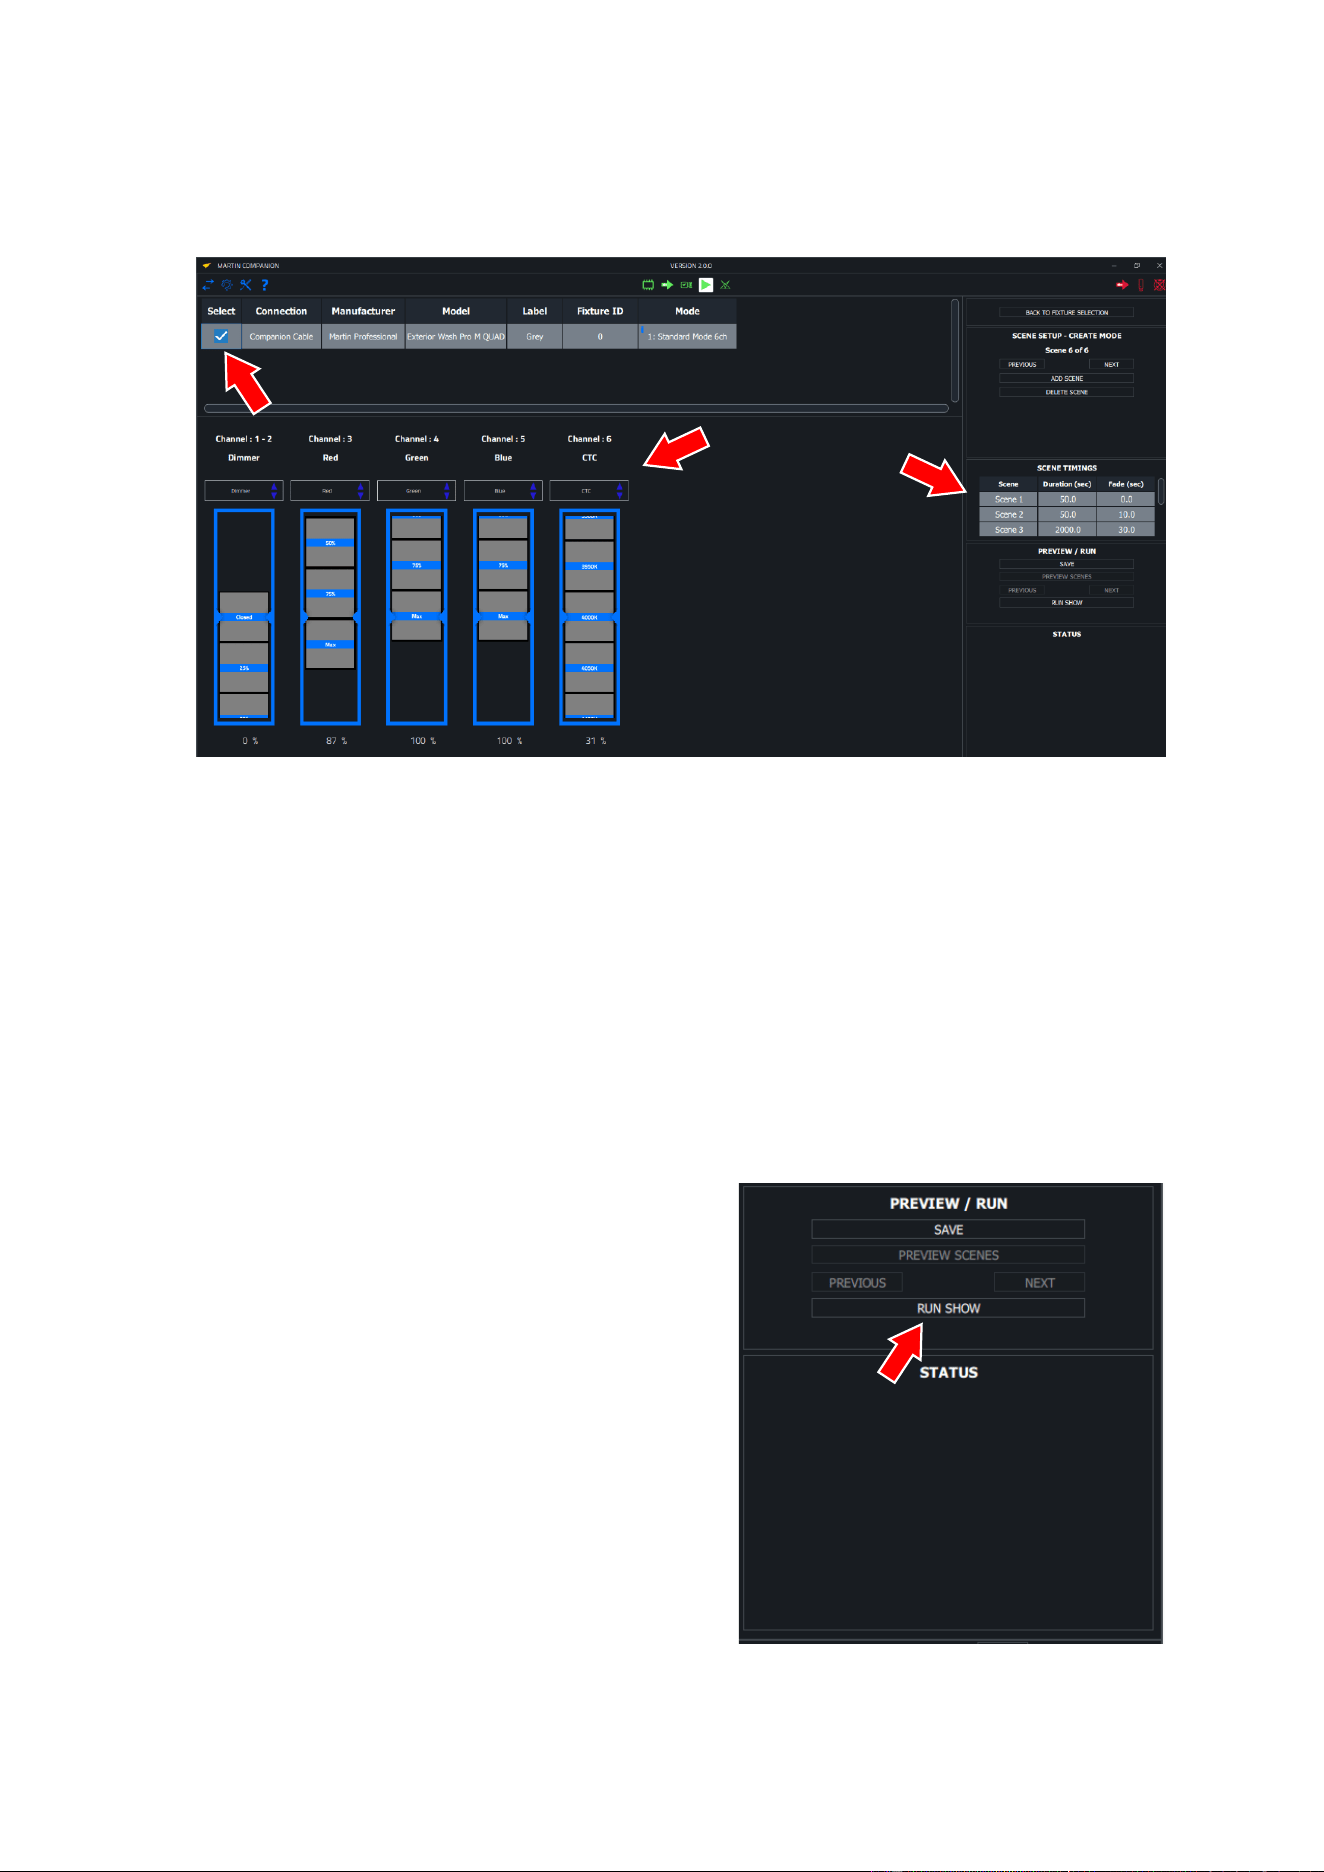
5. See screenshot on next page. To create the first scene:
(a) Select the fixture (or fixtures that you want to control with identical behavior) in Scene 1 by
checking each fixture’s box under Select in the grey bar at the top of the screen.
(b) Create the desired look for the selected fixture(s) in Scene 1 using the sliders on the left (the
sliders shown depend on which DMX Mode you set for the fixtures in the previous step).
(c) Select any other fixtures that you want to control with different behavior in Scene 1 by
checking each fixture’s box under Select in the grey bar at the top of the screen.
(d) Create the desired look for these fixture(s) in Scene 1 using the sliders on the left.
(e) Repeat the steps above until you are happy with the way all the fixtures in Scene 1 are set up.
Martin
®
Exterior Wash Pro family
User Manual Rev. F 13
(f) In the SCENE TIMINGS pane on the right, set FADE and WAIT times for Scene 1. The FADE
time is the time it takes for one scene to fade to the next, and the WAIT time is the time that a
scene will be displayed before it begins to fade to the next scene.
6. To create the next scene:
(a) Click on ADD SCENE.
(b) Repeat steps (a) to (d) under point 5. above to create the desired look for all the fixtures in
scene 2.
(c) Continue repeating steps (a) to (d) under point 5. to add more scenes.
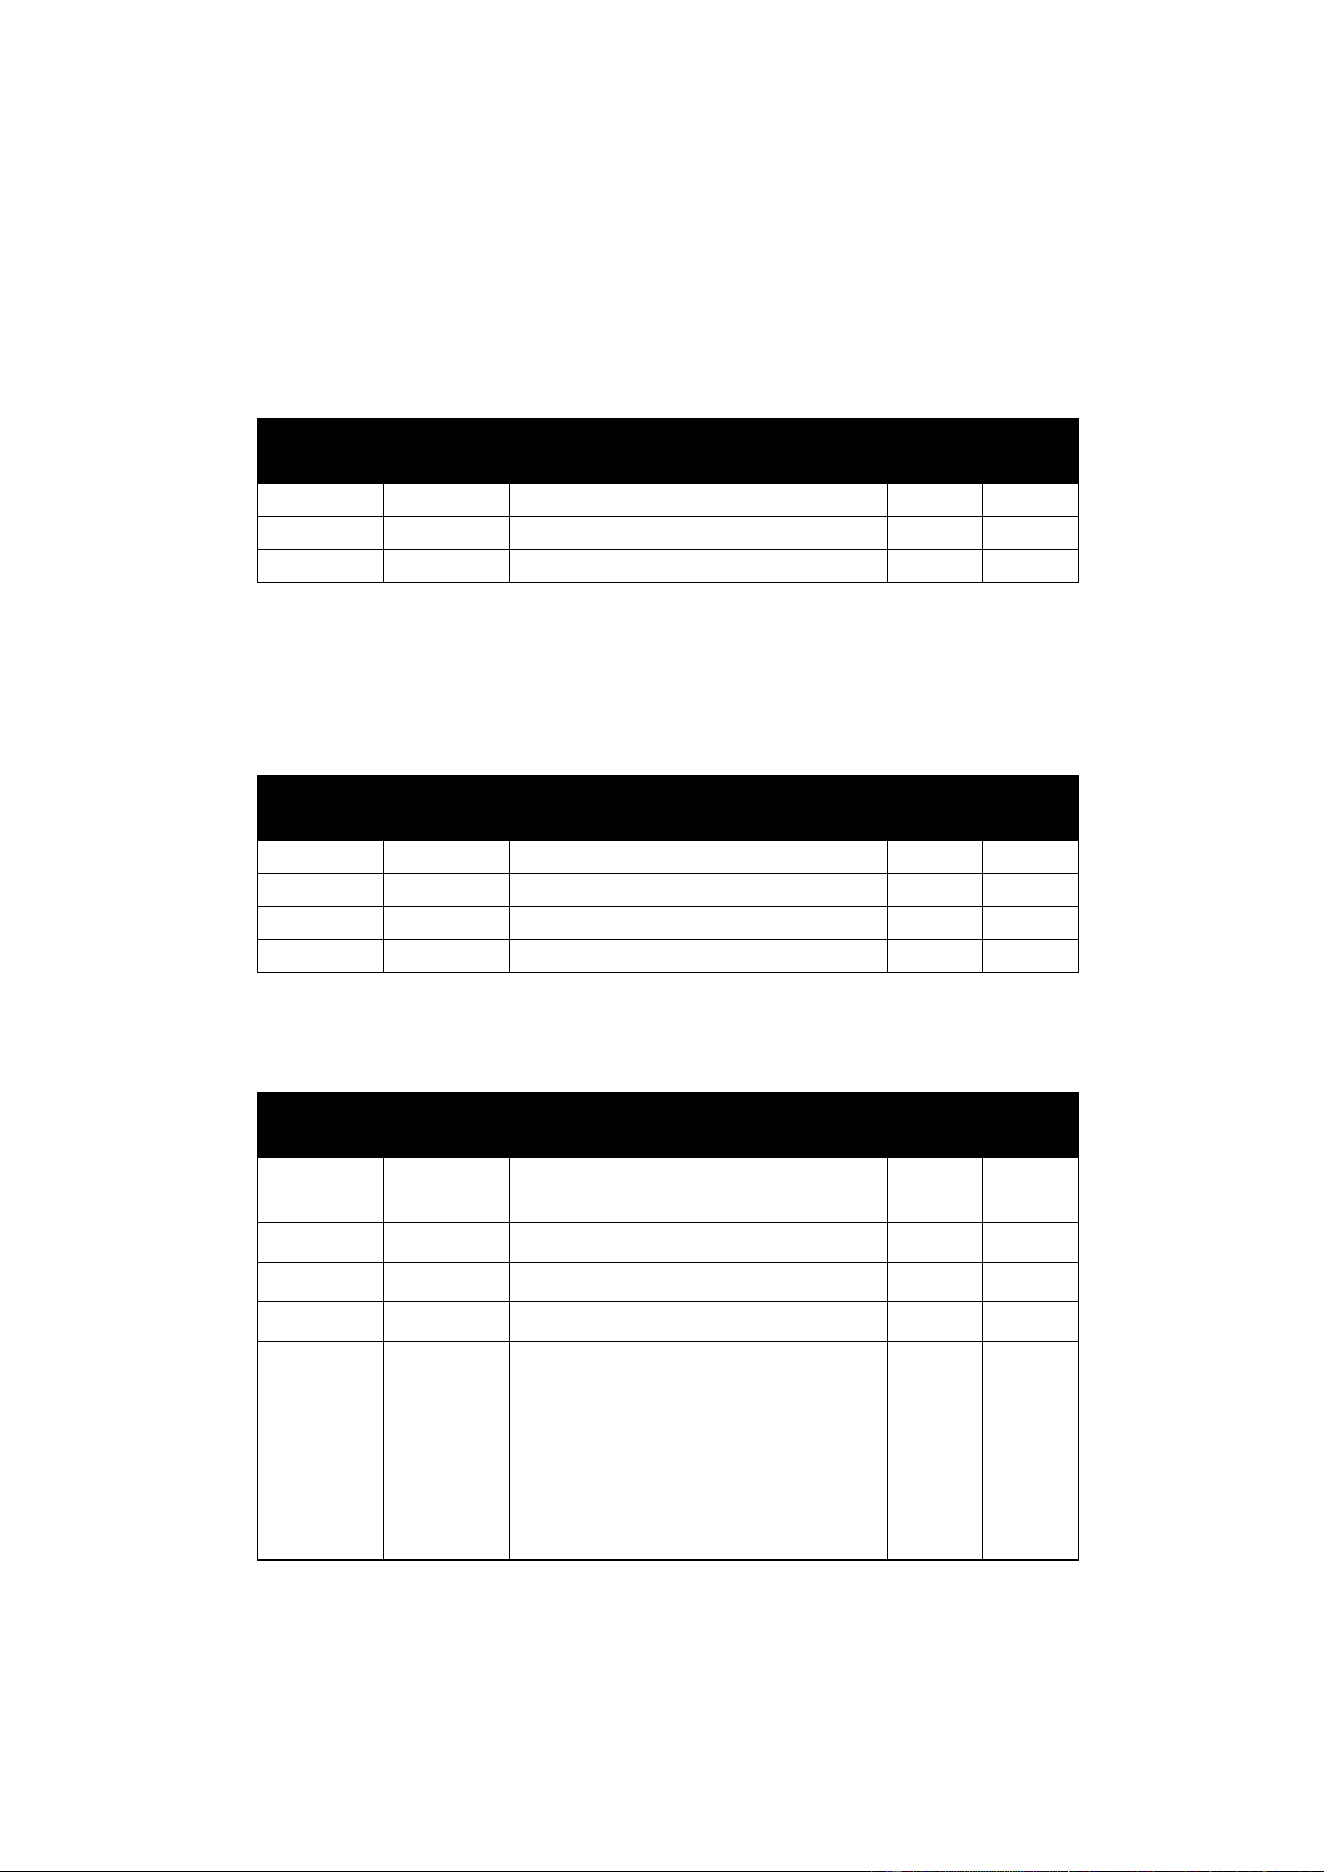
7. If you want to preview scenes one by one, click on PREVIEW SCENES in the PREVIEW/RUN
pane, then click on PREVIOUS and NEXT to scroll through the scenes.
8. When you have finished programming the standalone show, click on SAVE in the PREVIEW/RUN
pane.
Running a standalone show
To run the standalone show that you have programmed:
1. See screenshot on right. Click on RUN SHOW in
the PREVIEW/RUN pane.

14 Martin
®
Exterior Wash Pro family
User Manual Rev. F
2. See screenshot on right. In the STATUS box, Martin
Companion will now tell you to disconnect the
Martin Companion Cable that is running from the
PC to the fixtures. Once this cable is disconnected,
the fixtures will start to run their standalone show.
Fixtures will play the standalone show that has been
programmed each time they are powered off and then
powered on again, provided that they are not receiving a
DMX signal. DMX control will override the standalone
show for as long as the DMX signal is being received.
To stop fixtures from running their standalone show
when they are powered on and not receiving a DMX
signal, reconnect Martin Companion to the fixtures and
click on STOP SHOW in the PREVIEW/RUN pane.

Martin
®
Exterior Wash Pro family
User Manual Rev. F 15
RDM parameter IDs
Exterior Wash Pro fixtures support the following RDM PIDs:
PID
Name
Description
GET
SET
Device discovery
0x0001
DISC_UNIQUE_BRANCH
Fixture discovery
N/A
N/A
0x0002
DISC_MUTE
Fixture discovery
N/A
N/A
0x0003
DISC_UN_MUTE
Fixture discovery
N/A
N/A
Device information
0x0060
DEVICE_INFO
Get basic fixture info
✓
0x0080
DEVICE_MODEL_DESCRIPTION
Product Name
✓
0x0081
MANUFACTURER_LABEL
Manufacturer Name
✓
0x0082
DEVICE_LABEL
Info label (user-settable)
✓
✓
0x8003
FIXTURE_ID
Fixture number (user- settable)
✓
✓
0x8700
SERIAL_NUMBER
Fixture serial number
✓
0x00C0
SOFTWARE_VERSION_LABEL
Firmware version
✓
0x0200
SENSOR_DEFINITION
Sensor description
✓
0x0201
SENSOR_VALUE
Sensor value
✓
✓
0x0400
DEVICE_HOURS
Fixture hours (non-resettable)
✓
✓
0x0405
DEVICE_POWER_CYCLES
Fixture power cycles (non-
resettable)
✓
✓
DMX setup
0x00E0
DMX_PERSONALITY
DMX mode
✓
✓
0x00E1
DMX_PERSONALITY_DESCRIPTION
DMX mode details
✓
0x00F0
DMX_START_ADDRESS
DMX start address
✓
✓
0x0121
SLOT_DESCRIPTION
DMX channel details
✓
Device management
0x0050
SUPPORTED_PARAMETERS
Parameter discovery
✓
0x0051
PARAMETER_DESCRIPTION
Parameter discovery
✓
0x0090
FACTORY_DEFAULTS
Reset to factory defaults
✓
✓
0x1000
IDENTIFY_DEVICE
Identify fixture in rig
✓
✓
0x1001
RESET_DEVICE
Reset fixture
✓
0x1020
PERFORM_SELFTEST
Run self-test
✓
✓
0x1021
SELF_TEST_DESCRIPTION
Self-test description
✓
0x8004
COLOR_MODE
Set color mode
✓
✓
0x8310
DIMMER_CURVE
Set dimmer curve
✓
✓
0x8335
POWER_LIMIT_MODE
Full or reduced power mode
✓
✓
0x8339
MANUAL_CTC_VALUE
Set default color temperature
(QUAD fixtures in Basic DMX
mode only)
✓
✓

16 Martin
®
Exterior Wash Pro family
User Manual Rev. F
PID
Name
Description
GET
SET
Status messages
0x0020
QUEUED_MESSAGE
Get Queued Messages
✓
0x0030
STATUS_MESSAGES
Get Status/Error Information
✓
0x0031
STATUS_ID_DESCRIPTION
Status/Error Description
✓
0x0032
CLEAR_STATUS_ID
Clear Status/Error Queue
✓
✓
Standalone operation
0x1030
CAPTURE_PRESET
Capture current DMX values for use
as standalone preset
✓
0x1031
PRESET_PLAYBACK
Play back standalone preset
✓
✓
0x8220
MANUAL_MODE_OVERRIDE
Remote manual control
✓
✓
0x810B
PRESET_PLAYBACK_LIMIT
Standalone cue counter
✓
✓
0x8101
SYNCHRONIZED
Sync mode in standalone
✓
✓
0x810C
OFFLINE_MODE
Set behavior when DMX stops
✓
✓
The text displayed and the options available in different RDM interfaces vary depending on the
controller/software producer. The above table includes the custom PIDs used for standalone operation
in the Martin Companion application.

Martin
®
Exterior Wash Pro family
User Manual Rev. F 17
Operating the fixture
Controlling via DMX
Once you have set up fixtures’ DMX modes and DMX addresses via RDM, you can control fixtures
using a DMX controller that is connected to the installation.
See the ‘DMX protocols’ section at the end of this manual for details of the control options available.
Identifying fixtures in the installation
To help with programming scenes and controlling the installation, it is possible to send an RDM
command that causes a fixture to flash a signal so that you can identify it. To identify a fixture:
1. Black out all fixtures if you have been using them.
2. Send an IDENTIFY DEVICE unicast command to an individual fixture in the installation via RDM.
The fixture will respond by flashing white, letting you identify it. In Martin Companion you can
simply enable the “Identify” button in the toolbar, and then any fixture(s) you select will
immediately identify itself. You can even use arrow keys to navigate through the list of fixtures,
with the corresponding fixture flashing as soon as you get to it.
3. If your RDM-compatible DMX controller allows it, you can now identify the fixture at the controller.
Test sequences and fixture status
The Exterior Wash Pro Series Safety and Installation Manual that is included at the end of this User
Manual contains information on displaying fixture status codes and running test sequences that you
may find useful before starting fixture operation.
18 Martin
®
Exterior Wash Pro family
User Manual Rev. F
DMX protocols
QUAD fixtures
Exterior Wash Pro QUAD fixtures have four DMX control modes. See ‘QUAD fixture DMX modes’
on page 7 for full details.
Basic mode
Channel
DMX
value
Function
Fade
type
Default
value
1
0-255
Red: 0-100%
Fade
0
2
0-255
Green: 0-100%
Fade
0
3
0-255
Blue: 0-100%
Fade
0
The default color temperature in Basic mode is 4000 K. This can be adjusted via RDM.
RGBW raw mode
Channel
DMX
value
Function
Fade
type
Default
value
1
0-255
Red: 0-100%
Fade
0
2
0-255
Green: 0-100%
Fade
0
3
0-255
Blue: 0-100%
Fade
0
4
0-255
White: 0-100%
Fade
0
Standard mode
Channel
DMX
value
Function
Fade
type
Default
value
1
2
0-65535
Dimmer Overall intensity 0 – 100%
Fade
0
3
0-255
Red Intensity 0-100%
Fade
255
4
0-255
Green Intensity 0-100%
Fade
255
5
0-255
Blue Intensity 0-100%
Fade
255
6
0-18
19-77
78
79-127
128
129-254
255
Color Temperature Control
1000 K
1050 K to 3950 K in 50 K steps
4000 K
4050 K to 6450 K in 50 K steps
6500 K
6550 K to 12 800 K in 50 K steps
12 850 K
Fade
78
Martin
®
Exterior Wash Pro family
User Manual Rev. F
19
Extended mode
Channel
DMX
value
Function
Fade
type
Default
value
1
0-19
20-49
50-200
201-210
211-255
Strobe/shutter effect
Shutter closed: blackout
Shutter open: full intensity
Strobe slow → fast
Shutter open: full intensity
Random strobe slow → fast
Snap
30
2
3
0-65535
Dimmer Overall intensity 0 – 100%
Fade
0
4
0-255
Red Intensity 0-100%
Fade
255
5
0-255
Green Intensity 0-100%
Fade
255
6
0-255
Blue Intensity 0-100%
Fade
255
7
0-18
19-77
78
79-127
128
129-254
255
Color Temperature Control
1000 K
1050 K to 3950 K in 50 K steps
4000 K
4050 K to 6450 K in 50 K steps
6500 K
6550 K to 12 800 K in 50 K steps
12 850 K
Fade
78
CTC fixtures
Exterior Wash Pro CTC fixtures have two DMX modes. See ‘CTC fixture DMX modes’ on page 8 for
full details.
Basic mode
Channel
DMX
value
Function
Fade
type
Default
value
1
0-255
2400 K Warm White 0-100%
Fade
0
2
0-255
4000 K Medium White 0-100%
Fade
0
3
0-255
6500 K Cool White 0-100%
Fade
0
Standard mode
Channel
DMX
value
Function
Fade
type
Default
value
1
2
0-65535
Dimmer Overall intensity 0 – 100%
Fade
0
3
0-46
47-77
78
79-127
128-255
Color Temperature Control
2400 K
2450 K to 3950 K in 50 K steps
4000 K
4050 K to 6450 K in 50 K steps
6500 K
Fade
78

20 Martin
®
Exterior Wash Pro family
User Manual Rev. F
Troubleshooting
Problem
Probable cause(s)
Remedy
Fixture is completely dead.
No power to fixture.
Primary fuse blown.
Check power source and
connections. Use magnetic ‘swipe’
tool to check that power is applied.
Isolate fixture from power. Contact
Martin Service for assistance.
One or more fixtures
responds incorrectly to
control or does not respond
at all.
Incorrect DMX addressing.
Incorrect DMX mode.
Fault on DMX link.
Electromagnetic
interference on DMX link
Fixture defective.
Other device on DMX link
defective.
Check number of DMX channels
required by each fixture and check
fixtures’ DMX addresses and
addresses set on DMX controller.
Check DMX mode setting.
Inspect connections and cables.
Correct poor connections. Check
that data + and data - have not
been swapped somewhere on the
data link. Repair or replace faulty
or damaged cables.
Move cables away from any strong
electromagnetic fields.
Have faulty fixture serviced by
Martin Service.
Bypass devices on DMX link until
the faulty device has been
identified. Have faulty device
serviced by Martin Service or
device supplier.
Light output intensity falls.
The fixture eventually
blacks out.
Fixture is too hot.
Ensure free airflow around fixture.
Clean fixture.
Check that ambient temperature
does not exceed maximum
permitted level.
Contact Martin Service for
assistance.

www.martin.com
Exterior Wash Pro
S, M, L, XL – QUAD and CTC
Safety and Installation manual
Exterior Wash
Pro XL CTC
Exterior Wash
Pro L CTC
Exterior Wash
Pro M CTC
Exterior Wash
Pro S CTC
Exterior Wash
Pro XL QUAD
Exterior Wash
Pro L QUAD
Exterior Wash
Pro M QUAD
Exterior Wash
Pro S QUAD
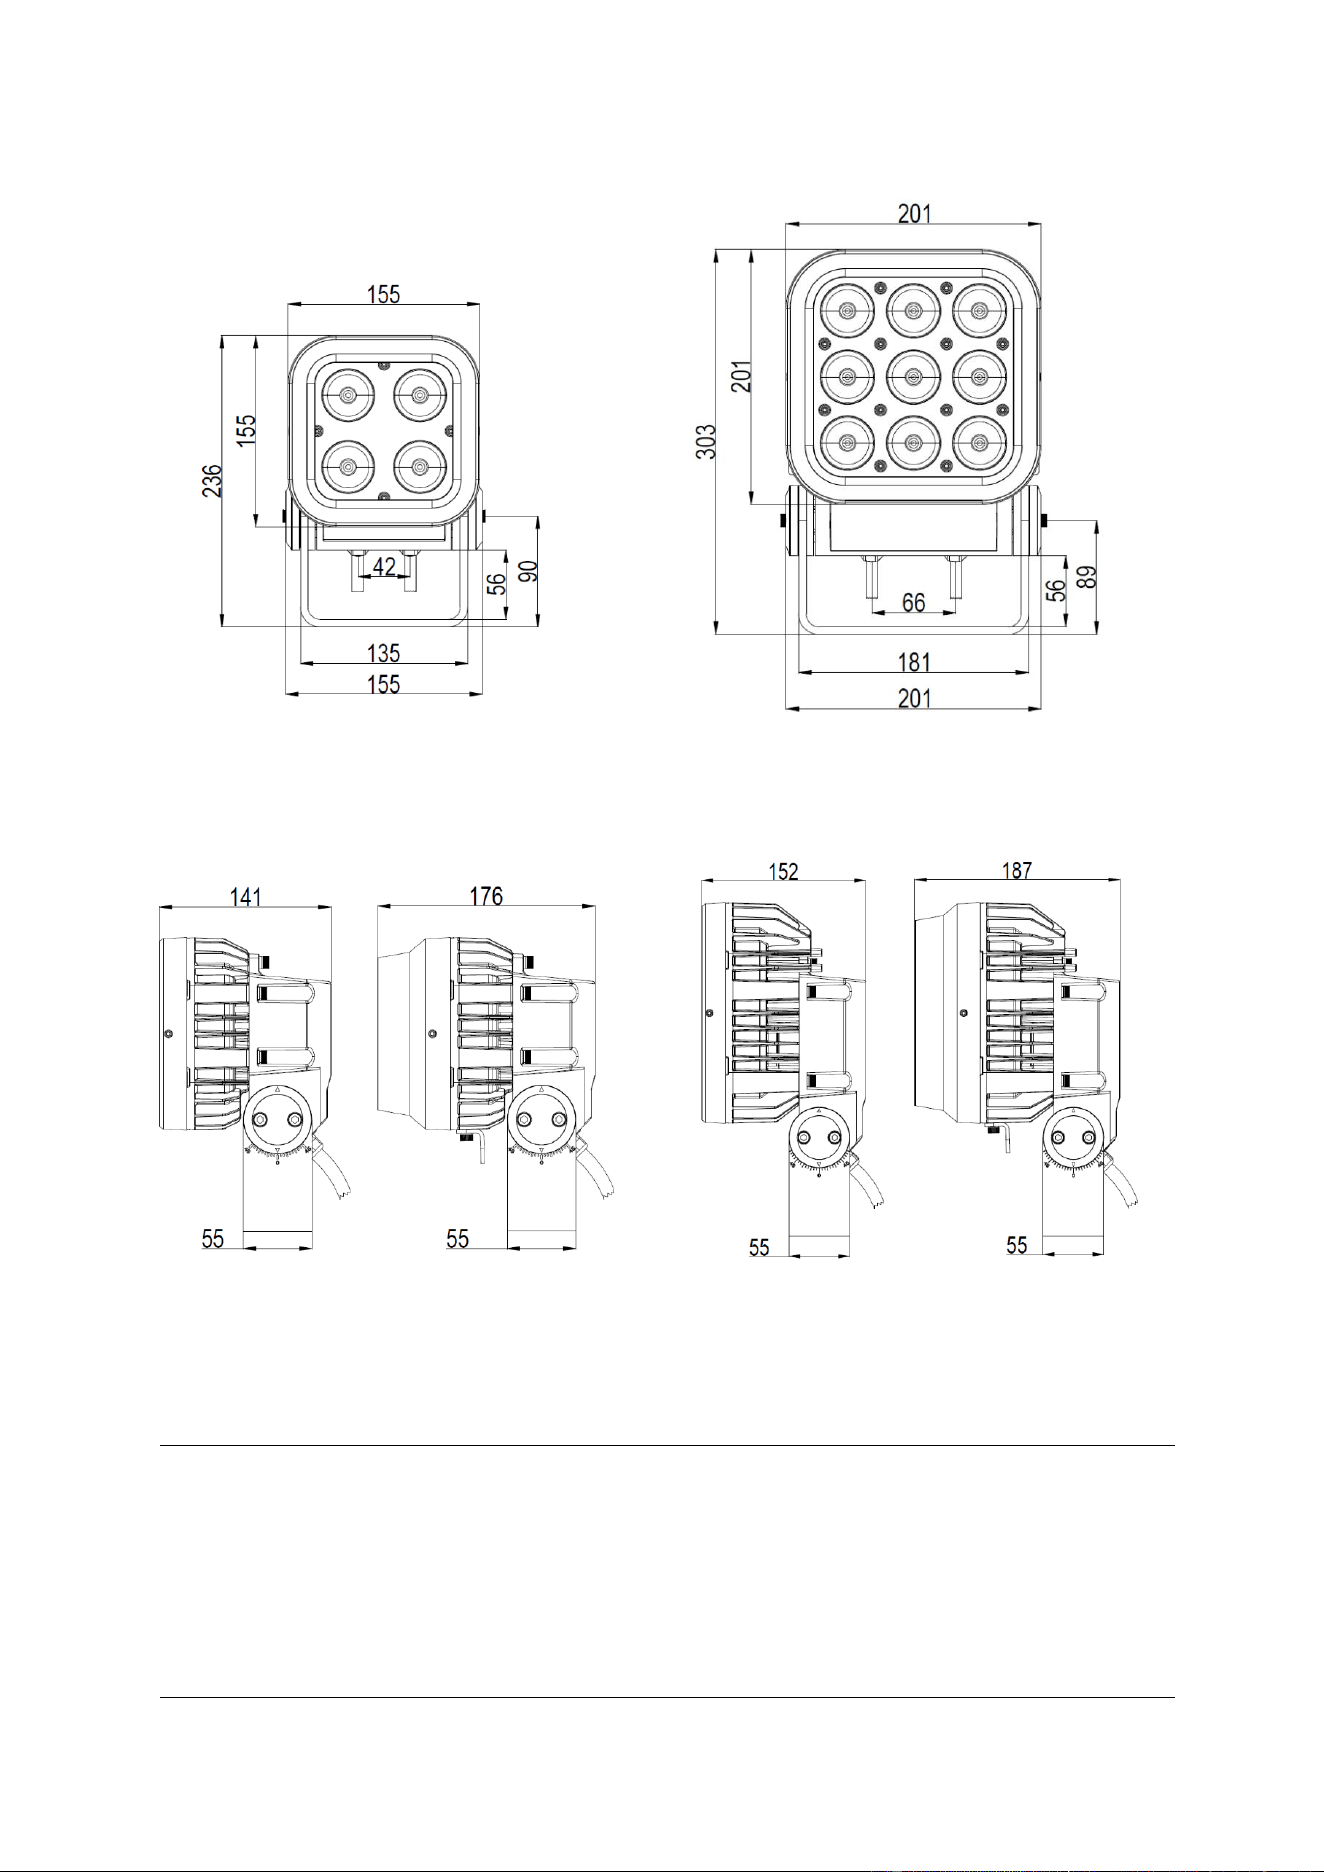
Dimensions
©2023-2025 HARMAN PROFESSIONAL DENMARK ApS. All rights reserved. Features, specifications and appearance are
subject to change without notice. HARMAN PROFESSIONAL DENMARK ApS and all affiliated companies disclaim liability for
any injury, damage, direct or indirect loss, consequential or economic loss or any other loss occasioned by the use of, inability to
use or reliance on the information contained in this document. Martin is a registered trademark of HARMAN PROFESSIONAL
DENMARK ApS registered in the United States and/or other countries.
HARMAN PROFESSIONAL DENMARK ApS, Olof Palmes Allé 44, 8200 Aarhus N, Denmark
HARMAN PROFESSIONAL, INC., 8500 Balboa Blvd., Northridge CA 91325, USA
www.martin.com
Exterior Wash Pro family Safety and Installation Manual, English, Revision F
Exterior Wash Pro S
Exterior Wash Pro M
Exterior Wash Pro S with
and without Baffle Snoot
Exterior Wash Pro M with
and without Baffle Snoot
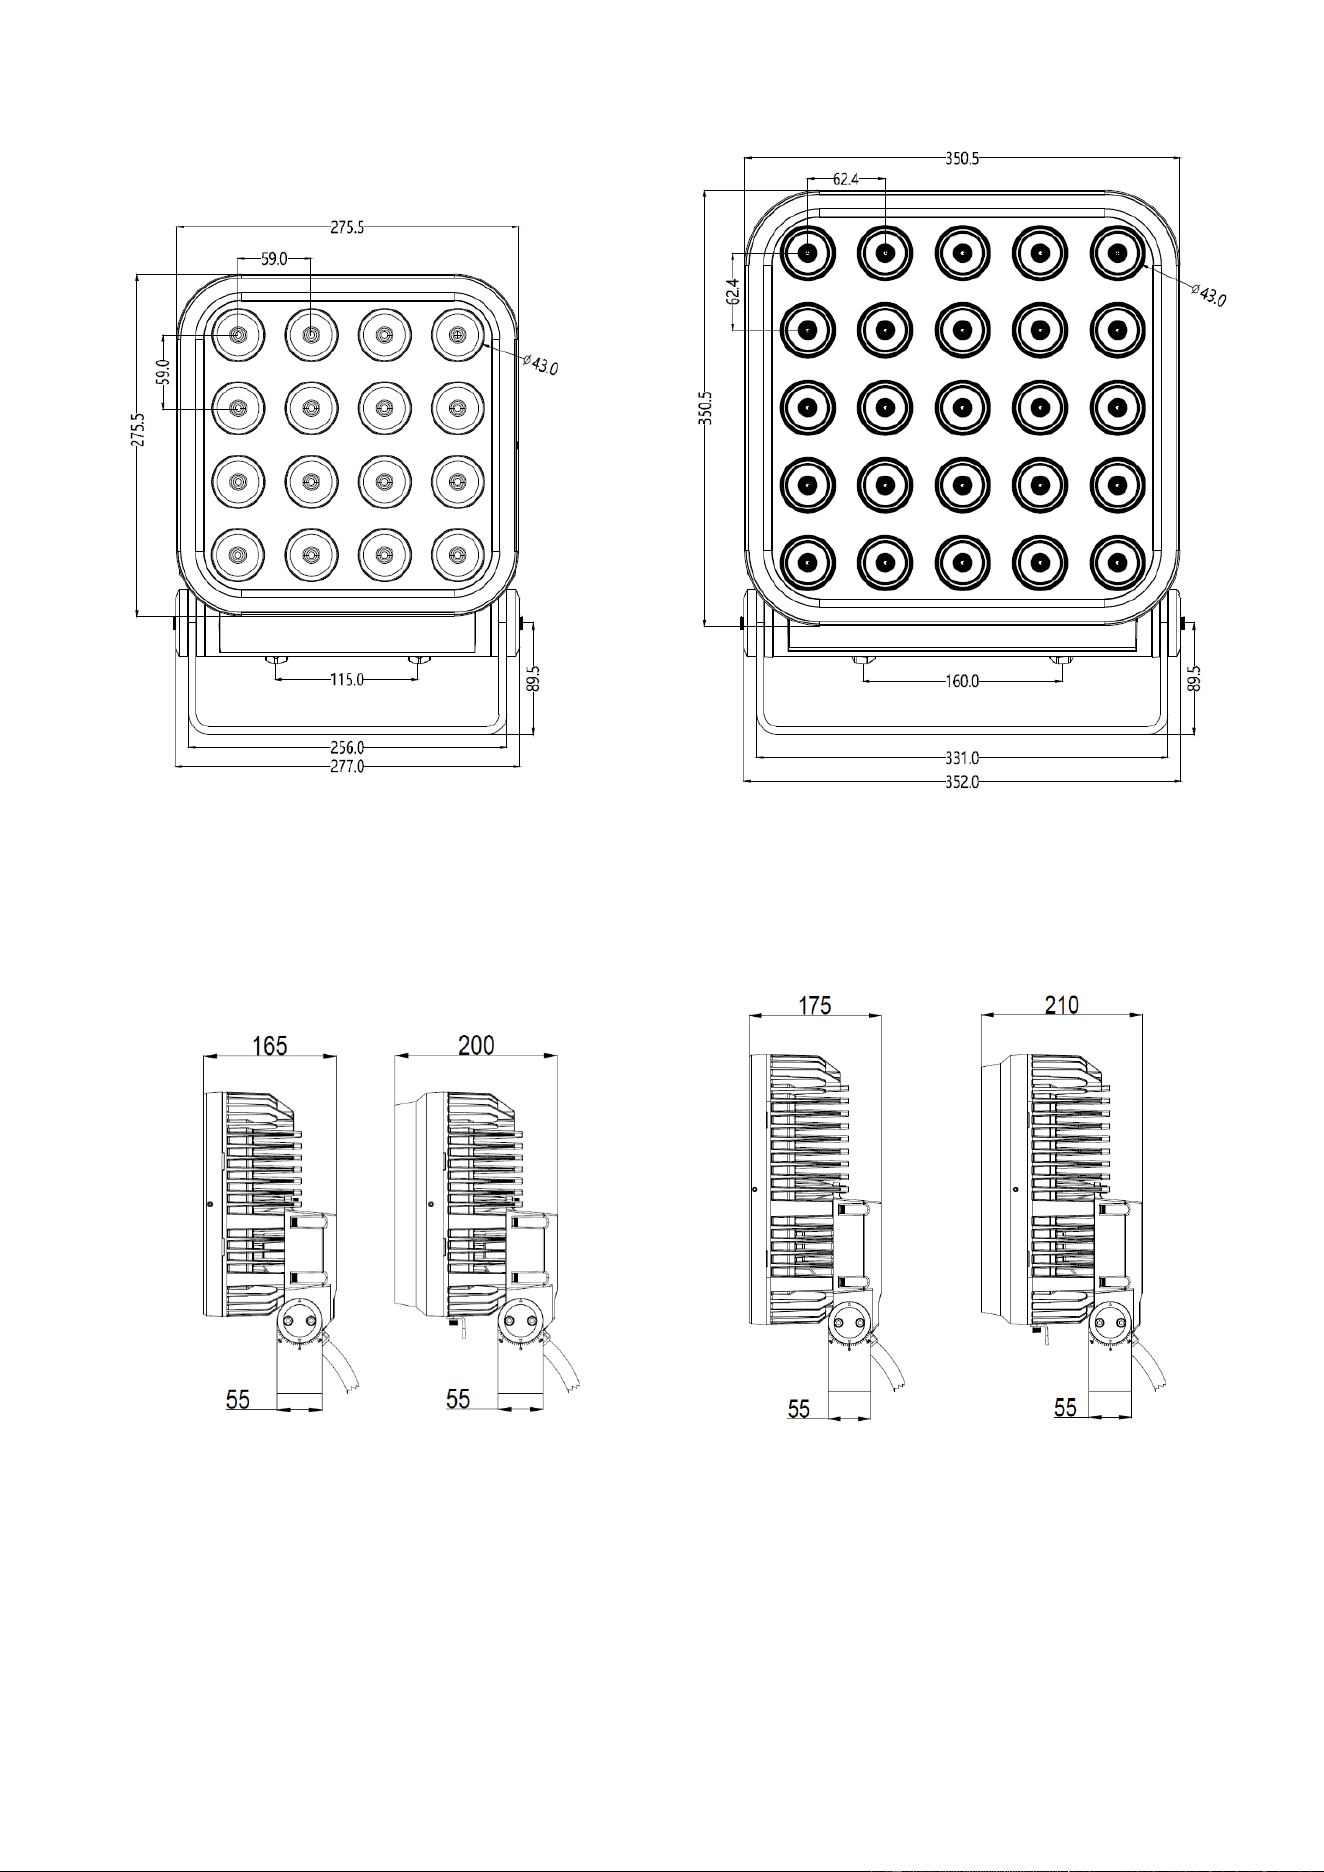
Exterior Wash Pro L
Exterior Wash Pro XL
All dimensions are in millimeters.
Exterior Wash Pro L with
and without Baffle Snoot
Exterior Wash Pro XL with
and without Baffle Snoot

Table of contents
Dimensions .......................................................................................................... 2
Safety information ................................................................................................ 5
Introduction ........................................................................................................ 10
Accessories ........................................................................................... 10
Precautions to avoid damage ............................................................... 10
Before using the product for the first time ............................................. 11
Physical installation ............................................................................................ 12
Fixture location ...................................................................................... 12
Mounting the fixture ............................................................................... 12
Securing with a safety cable ................................................................. 13
Adjusting tilt ........................................................................................... 14
Installing a microlens beam angle accessory ....................................... 14
Installing a Baffle Snoot ........................................................................ 15
AC power ........................................................................................................... 17
Power characteristics ............................................................................ 17
Protecting connections from moisture ................................................... 17
Connecting to power ............................................................................. 18
Installing a temporary power plug ......................................................... 18
Connecting to control data ................................................................................. 19
Testing ............................................................................................................... 20
Maintenance ....................................................................................................... 21
Cleaning ................................................................................................ 21
Installation safety .................................................................................. 21
Pressure relief valve .............................................................................. 21
Firmware maintenance .......................................................................... 22
Martin
®
Exterior Wash Pro family Safety and Installation Manual Rev. F 5
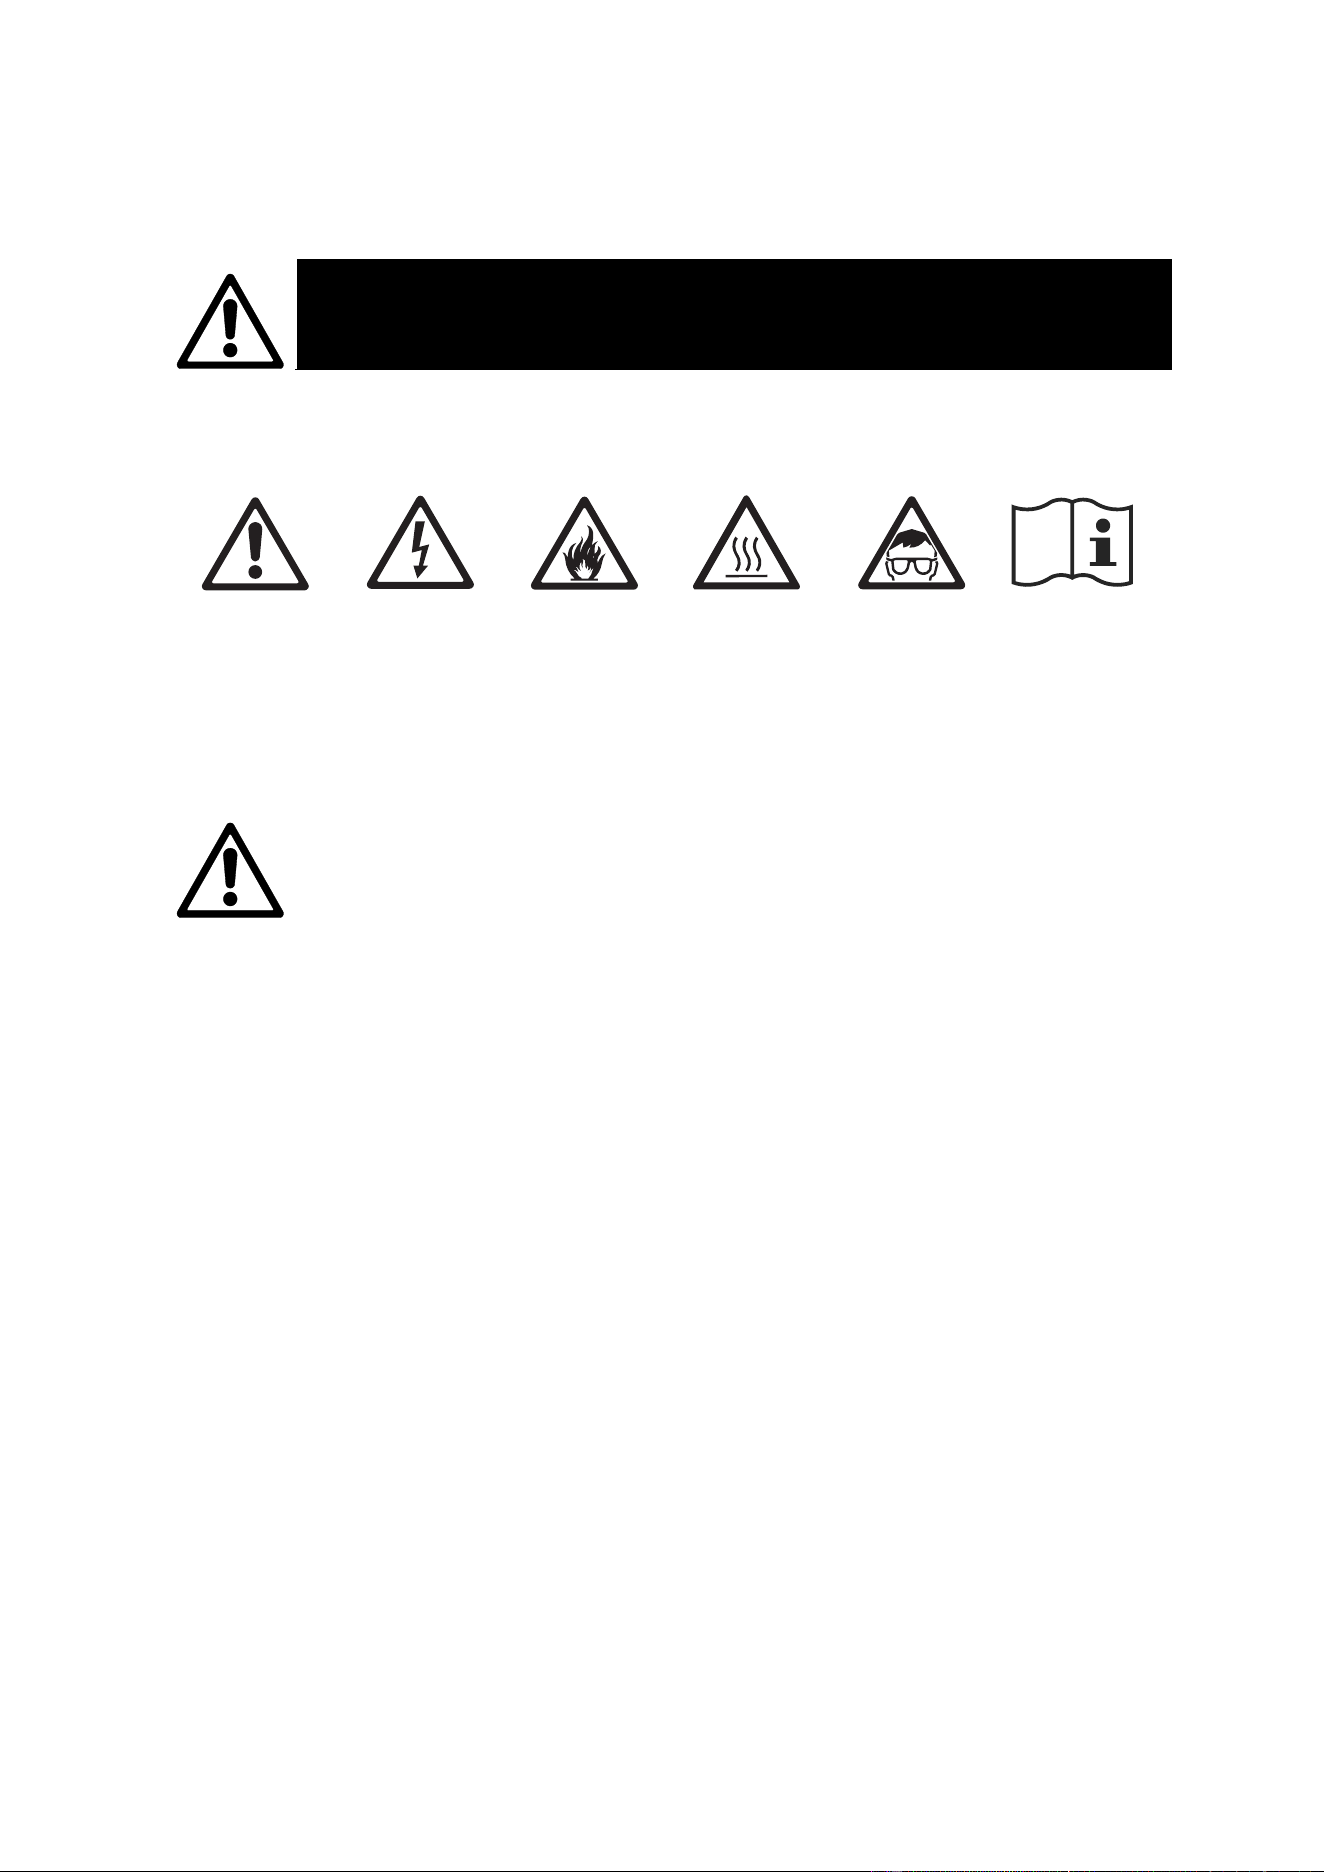
Safety information
WARNING!
Read the safety precautions in this manual before installing, operating or
servicing this product.
The following symbols are used to identify important safety information on the product and in this
manual:
Warning!
Safety hazard.
Risk of severe
injury or death.
Warning!
Hazardous
voltage. Risk of
lethal or severe
electric shock.
Warning!
Fire hazard.
Warning!
Burn hazard.
Hot surface. Do
not touch.
Warning!
Intense light
emission.
Warning!
See user
documentation.
Warning! Exterior Wash Pro QUAD and Exterior Wash Pro CTC lighting fixtures are
Risk Group 2 products according to IEC/TR 62778 for blue light only (see full details
later in this chapter). These fixtures produce intense light output that may be
hazardous if suitable precautions are not taken. Do not view the light output with
optical instruments or any device that may concentrate the beam. Do not stare into
the light output. Eye injury may result.
This fixture presents risks of severe injury or death due to burn and fire hazards,
electric shock and falls if the safety precautions in this manual are not followed.
Read this Safety and Installation Manual before installing, powering. operating or
servicing the fixture. Follow the safety precautions and observe all warnings in this
manual, in the fixture’s User Manual, and printed on the fixture. Respect all locally
applicable laws, codes and regulations.
The fixture is for professional use and must be installed by a qualified technician. It
is not for household use.
The safety and suitability of lifting equipment, installation location, anchoring
method, mounting hardware and electrical installation are the responsibility of the
installer.
Users may carry out external cleaning and install microlens accessories and the
Baffle Snoot available from Martin following the instructions and warnings given in
this manual, but any service operation not described in this manual or in the fixture’s
User Manual must be referred to an authorized Martin service agent. The light
source contained in the fixture may be replaced by Martin or an authorized Martin
service agent only.
The fixture is suitable for mounting at any height, including less than 1.2 m (3.9 ft.)
and more than 5 m (16.4 ft.) above ground or floor level.
Do not operate the fixture at an altitude of more than 2000 m (6570 ft.) above sea
level.
6 Martin
®
Exterior Wash Pro family
Safety and Installation Manual Rev. F
Technical Support
If you have any questions about how to install or operate the fixture safely, please
contact Harman Professional Technical support.
For technical support in N. America, please contact
HProTechSupportUSA@harman.com
Phone: (844) 776-4899
For technical support outside North America, please contact your national
distributor.
Read this manual before installing, powering or servicing the fixture. Follow the
safety precautions and observe all warnings in this manual and printed on the
fixture.
The latest version of this manual is available for download from the Exterior Wash
Pro pages of the Martin® website at www.martin.com. Before you install, operate or
service an Exterior Wash Pro family fixture, check the Martin website and make sure
that you have the latest user documentation for the fixture. Document revisions are
indicated at the bottom of page 2.
Install, operate and service Martin products only as directed in their manuals, or you
may create a safety hazard or cause damage that is not covered by product
warranties. Keep this manual for future use.
Protection from electric shock
This fixture is IP66 rated. It is suitable for use in wet locations, but do not immerse it
in water or install it in a location where it may become submerged. Ensure sufficient
drainage to cope with the heaviest rainfall. Make sure that water can drain away
from the installation area at least as fast as it can enter it.
Do not allow water to collect on or near the pressure equalization valve located on
the rear of the fixture between the cable entries. Do not install a fixture with the
valve membrane horizontal so that water can pool on it. Do not cover, immerse or
block the valve. Check the valve periodically. If it appears dirty, it may be becoming
blocked. Contact an authorized Martin service agent for possible replacement.
Arrange cables so that they arrive at connectors from below. Create a ‘drip loop’ if
necessary. With this arrangement, gravity will cause any condensation or water
droplets to run away from connectors.
Support the weight of cable runs. Do not allow a length of cable to hang from a
cable gland or connector.
This fixture is a Class I product according to IEC 61140. Ensure that the fixture is
electrically connected to ground (earth) via the fixture’s mains power cable.
The DMX and Ethernet transceivers of the fixture are isolated/SELV to prevent
ground loops and for safety reasons.
This fixture accepts AC mains power within the ranges 100-120 V~ and 200-277 V~
nominal at 50 or 60 Hz only. Do not connect it to power at any other voltage or
frequency.
Exterior Wash Pro QUAD and CTC fixtures have the following AC mains power
characteristics:
• Exterior Wash Pro S
- Maximum power consumption: 35 W
- Maximum current draw: 0.35 A at 100-120 V~, 0.16 A at 200-240 V~
• Exterior Wash Pro M
- Maximum power consumption: 75 W
- Maximum current draw: 0.75 A at 100-120 V~, 0.35 A at 200-240 V~
Martin
®
Exterior Wash Pro family Safety and Installation Manual Rev. F 7
• Exterior Wash Pro L
- Maximum power consumption: 150 W
- Maximum current draw: 1.5 A at 100-120 V~, 0.69 A at 200-240 V~
• Exterior Wash Pro XL
- Maximum power consumption: 250 W
- Maximum current draw: 2.5 A at 100-120 V~, 1.13 A at 200-240 V~
Use only a source of AC power that complies with local building and electrical codes
and has both overload and ground-fault (earth-fault) protection.
Before using the fixture, check that all power distribution equipment and cables are
in perfect condition, are rated for the current requirements of all connected devices,
are protected to IP66 or higher and are of suitable type for the location (including
water, pollution, temperature and UV resistance).Disconnect the fixture from AC
power when not in use.
You may install micro lens accessories and install a Baffle Snoot as described in this
manual, but do not open the fixture or remove any cover. Refer any service
operation not described in this manual to an authorized Martin Service agent.
Shut down power to the entire installation at the main power distribution board and
lock out power before carrying out any installation or maintenance work.
Isolate the fixture from power immediately if any seal, cover, cable, or other
component is damaged, defective, deformed or showing signs of overheating. Do
not reapply power until repairs have been completed.
Protection from burns and fire
Do not operate the fixture if the ambient temperature (Ta) exceeds 45° C (113° F).
Above this temperature, the fixture regulates output to protect from overheating.
The surface of the product can become hot during operation. Avoid contact by
persons and materials. Allow the fixture to cool for at least 10 minutes before
handling.
Keep flammable materials well away from the fixture. Keep all combustible materials
(e.g. fabric, wood, paper) at least 10 cm (4 in.) away from the front of the fixture.
Ensure that there is free and unobstructed airflow around the fixture.
Do not illuminate surfaces that are closer than the following minimum distances from
the fixture:
• Exterior Wash Pro QUAD and CTC S, M and L: 10 cm (4 in.)
• Exterior Wash Pro QUAD and CTC XL: 40 cm (15.8 in.).
Do not attempt to bypass thermostatic switches or fuses.
Do not modify the fixture in any way not described in this manual or install other than
genuine Martin® parts. Do not stick filters, masks or other materials onto any lens or
other optical component. Use only accessories approved by Martin® to modify the
light beam.
The fixture’s optical components can focus the sun’s rays, creating a risk of fire and
damage. Do not expose the front of the fixture to sunlight or any other intense light
source.
Protection from eye injury
Do not look directly into the product’s light output.
Do not look at the light output with magnifiers, telescopes, binoculars or similar
optical instruments that may concentrate the light output.
Ensure that persons are not looking directly into the front of the fixture when the
product lights up suddenly. This can happen when power is applied, when the
product receives a DMX signal, or when certain control menu items are selected.
8 Martin
®
Exterior Wash Pro family
Safety and Installation Manual Rev. F
Do not stare into the light output. Eye injury may result.
Disconnect the fixture from power at all times when the fixture is not in use.
Provide well-lit conditions to reduce the pupil diameter of anyone working on or near
the fixture.
Wear protective glasses and other PPE (personal protective equipment) when
working on or near the fixture.
Exterior Wash Pro fixtures emit possibly hazardous optical radiation. Exterior Wash
Pro QUAD and CTC fixtures are Risk Group 2 products. See the diagrams and
safety instructions given below for these fixtures. The Risk Group distances
indicated apply to the light output from one fixture only. If fixtures can be operated in
combination, light intensity can increase and you should consult a lighting
professional for more appropriate safety recommendations.
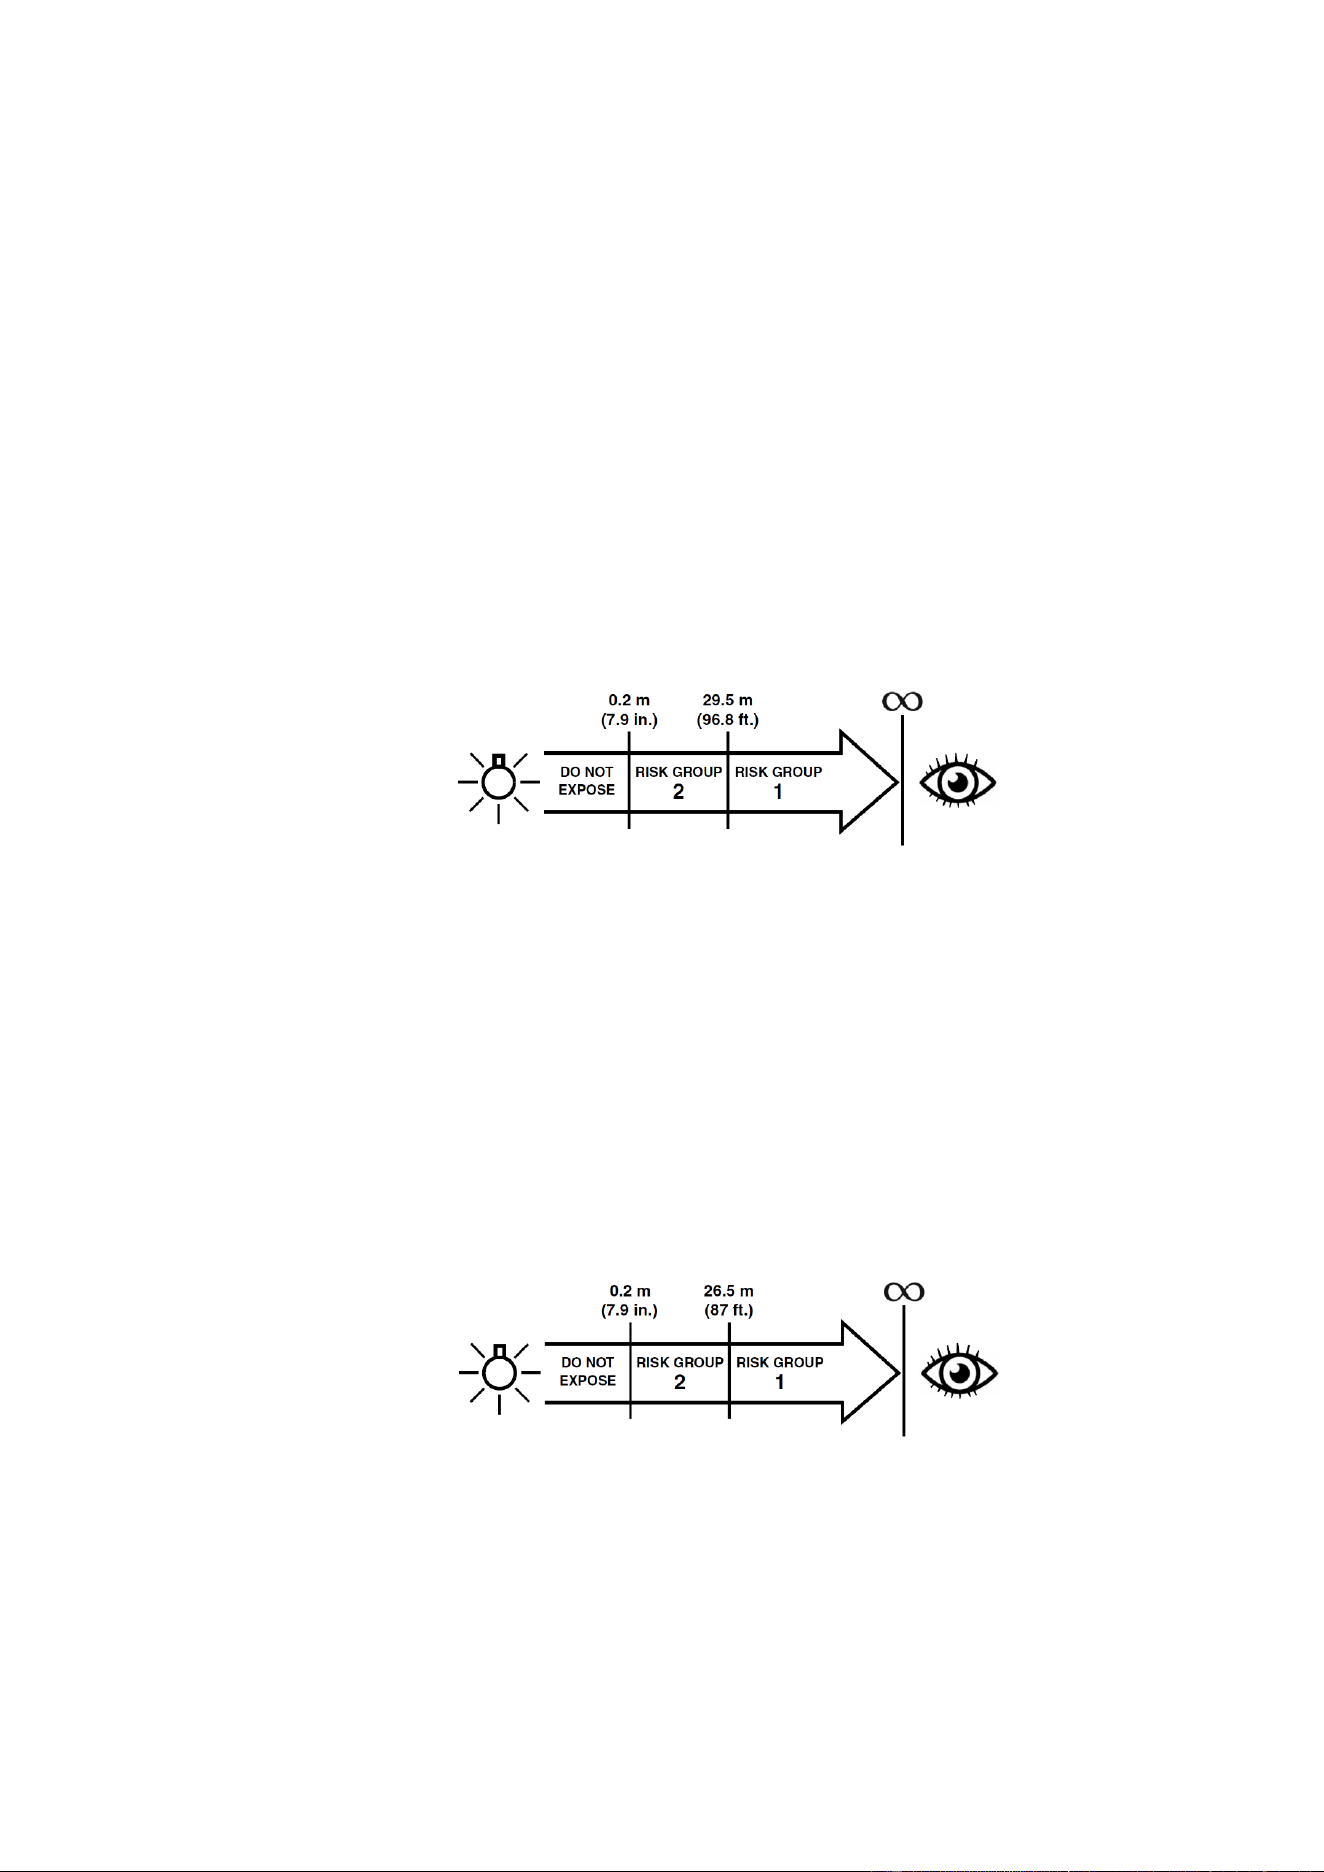
Exterior Wash Pro QUAD
Exterior Wash Pro S, M, L and XL QUAD fixtures are classified Photobiological Risk
Group 2 according to IEC/TR 62778 for blue light only. They fall into the Risk Group
categories shown below according to IEC/TR 62778 under worst-case conditions:
At a distance of less than 0.2 m (7.9 in.) from the fixture, the light output can
potentially cause eye or skin injury before an exposed person’s natural aversion
responses (blink reflex and reaction to skin discomfort) can protect them. At
distances greater than 0.2 m (7.9 in.), potential eye and skin injury hazards from the
light output are normally prevented by natural aversion reflexes.
Position the Exterior Wash Pro QUAD so that persons cannot be exposed to the
fixture’s light output at less than 0.2 m (7.9 in.) from the fixture and so that prolonged
staring into the light output at less than 29.5 m (96.8 ft.) from the fixture is not
expected.
Exterior Wash Pro CTC
Exterior Wash Pro S, M, L and XL CTC fixtures are classified Photobiological Risk
Group 2 according to IEC/TR 62778 for blue light only. They fall into the Risk Group
categories shown below according to IEC/TR 62778 under worst-case conditions:
At a distance of less than 0.2 m (7.9 in.) from the fixture, the light output can
potentially cause eye or skin injury before an exposed person’s natural aversion
responses (blink reflex and reaction to skin discomfort) can protect them. At
distances greater than 0.2 m (7.9 in.), potential eye and skin injury hazards from the
light output are normally prevented by natural aversion reflexes.
Position the Exterior Wash Pro CTC so that persons cannot be exposed to the
fixture’s light output at less than 0.2 m (7.9 in.) from the fixture and so that prolonged
staring into the light output at less than 26.5 m (87 ft.) from the fixture is not
expected.

Martin
®
Exterior Wash Pro family Safety and Installation Manual Rev. F 9
Protection from injury
Fasten the fixture securely to a fixed surface or structure when in use. The fixture is
not portable when installed.
To reduce the risk of strangulation, the flexible wiring connected to this fixture shall
be effectively fixed to the wall if the wiring is within arm's reach.
Exterior Wash Pro QUAD and CTC fixtures have the following weights (mounting
yoke included):
• Exterior Wash Pro S: 4.8 kg (10.6 lbs.)
• Exterior Wash Pro M: 7.4 kg (16.3 lbs.)
• Exterior Wash Pro L: 12.1 kg (26.7 lbs.)
• Exterior Wash Pro XL: 18.1 kg (39.9 lbs.)
Ensure that any supporting structure and/or hardware used can hold at least six (6)
times (or more if required by local regulations) the weight of all the devices they
support.
If suspending from a rigging structure, fasten the fixture to a rigging clamp. Do not
use safety cables as the primary means of support. If the fixture is installed in a
location where it may cause injury or damage if it falls, provide a secondary
attachment such as a safety cable inserted through the secondary attachment point
that will hold the fixture if a primary attachment fails. The secondary attachment
must be approved by an official body such as TÜV as a safety attachment for the
weight that it secures, must comply with DGUV 17 (BGV C1) or EN 60598-2-17
Section 17.6.6 and must be capable of bearing a static suspended load that is six
(6) times (or more if required by local regulations) the weight of the fixture and all
installed accessories.
The safety and suitability of lifting equipment, installation location, anchoring
method, mounting hardware and electrical installation are the responsibility of the
installer.
All fasteners used to mount fixtures must be suitable for the application, corrosion
resistant and strong enough to mount the fixture safely.
Block access below the work area and work from a stable platform whenever
installing, setting, adjusting, or cleaning the fixture.
After installation or service, check that the fixture and the trim frame or Baffle Snoot
are securely fastened.
Do not operate the fixture with missing or damaged covers, shields or any optical
component.
In the event of an operating problem, stop using the fixture immediately and
disconnect it from power. Do not attempt to use a fixture that is obviously damaged.
The fixture’s Effective Projected Area (EPA) is as follows:
Fixture
only
Fixture with
Baffle Snoot
Exterior Wash Pro S
0.024 m²
0.038 m²
Exterior Wash Pro M
0.048 m²
0.072 m²
Exterior Wash Pro L
0.084 m²
0.120 m²
Exterior Wash Pro XL
0.144 m²
0.180 m²
10 Martin
®
Exterior Wash Pro family
Safety and Installation Manual Rev. F
Introduction
Thank you for selecting an Exterior Wash Pro lighting fixture from Martin®. This Safety and Installation
Manual covers the following Exterior Wash Pro family lighting fixtures from Martin®:
• Exterior Wash Pro QUAD S, M, L and XL fixtures with premixed quad-color LEDs optimized for
superior color mixing.
• Exterior Wash Pro CTC S, M, L and XL fixtures with mixable warm-white, medium white and
cold-white LEDs that give white tones ranging in color temperature from 2400 K to 6500 K.
This Safety and Installation Manual is supplied with the fixture. It gives details of installing and
servicing the fixture as well as connecting to mains power. The Exterior Wash Pro User Manual,
containing full instructions for connecting to control data, setting up, controlling and monitoring the
fixture, is available for download from the Exterior Wash Pro area of the Martin website at
www.martin.com. If you have any difficulty locating this document, please contact your Martin supplier
for assistance.
Before installing, operating or servicing an Exterior Wash Pro fixture, please check the fixture’s area of
the Martin website at www.martin.com and make sure that you have the latest user documentation for
the product.
Not all product specifications are included in the fixture’s user documentation. You can find full
specifications for the fixture in the Exterior Wash Pro area of the Martin website. The online
specifications include information to help you order accessories such as cables, flightcases etc.
Each fixture is supplied with this safety and installation manual. The fixture is prepared for hard wiring
with 2 m (6.5 ft.) cable tails for power and data connection inside sealed junction boxes, preferably
filled with potting compound.
Accessories
Narrow, Medium, Wide, Very Wide and Asymmetric beam angle micro lens accessories are available
from Martin. A Baffle Snoot accessory that limits light spill and integrates with the fixture’s design is
also available. These accessories are designed to mount quickly on the front of the fixture. See the
Exterior Wash Pro pages on the Martin website at www.martin.com for details and ordering
information.
A safety cable attachment bracket is also available as an accessory.
Cable tail accessories
The fixture is supplied with two 2 m (6.6 ft.) cable tails with bare ends installed, one for connection to
power and one for connection to data. These cables are suitable for connection to power and data
links inside a junction box.
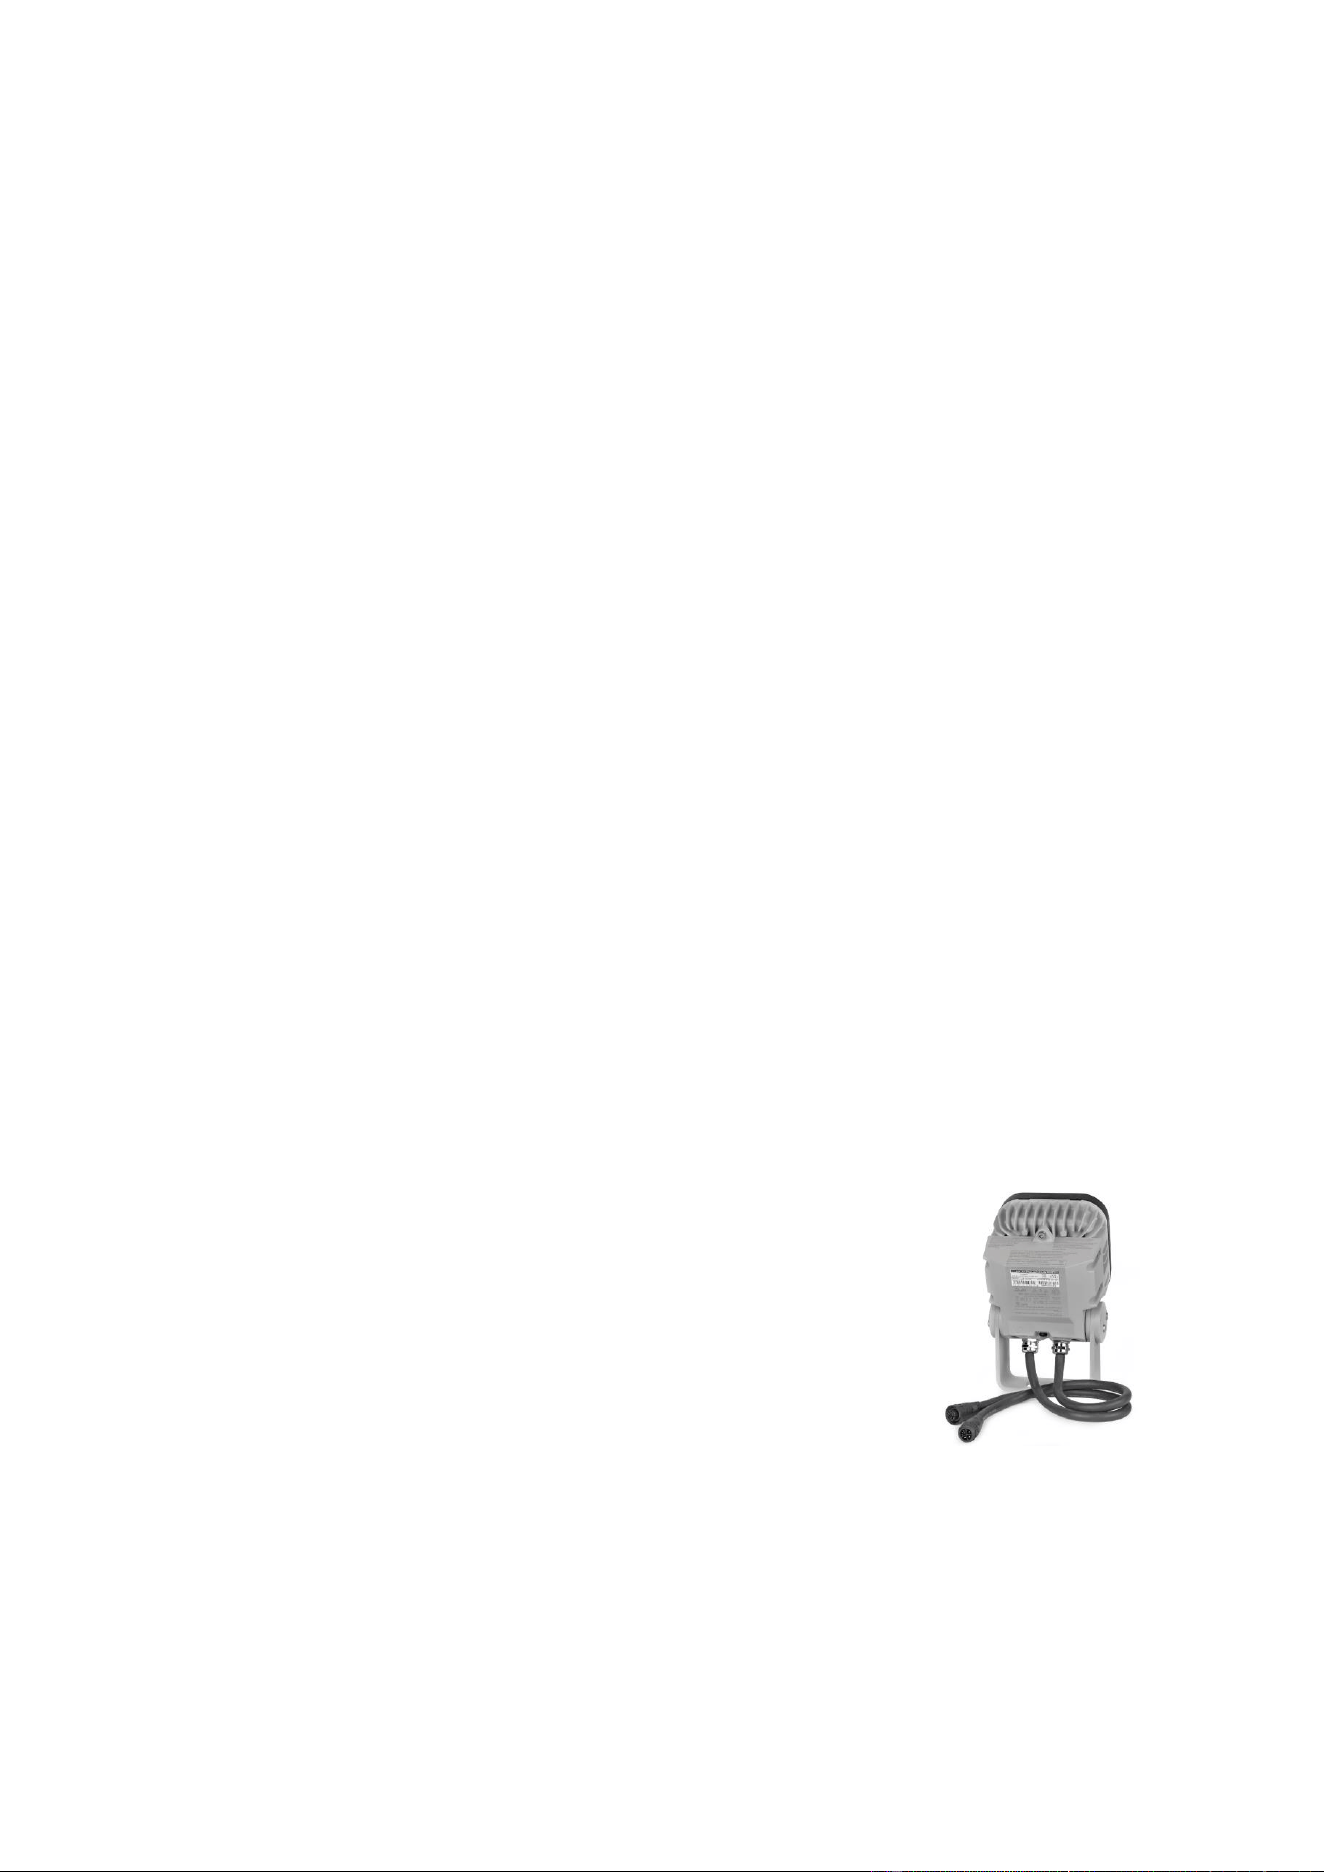
As an alternative, 0.5 m (1.6 ft.) hybrid (combined power and data) cable
tails with the same IP67-rated PD connectors as used on Martin Exterior
Linear Pro fixtures are available as accessories from Martin suppliers (see
illustration on right). Cable tails with PD connectors allow quick and easy
connection to other fixtures and to power and data links using the PD
extension cables that are available from Martin suppliers. The cable tails can
be ordered using the following part numbers:
• PD Cable Tail, 0.5 m black, EU, P/N MAR-91700020
• PD Cable Tail, 0.5 m white, EU, P/N MAR-91700022
The PD cable tails fit all sizes of Exterior Wash Pro fixtures and are supplied
with installation instructions. The system diagrams available in the DOWNLOADS section of the
Exterior Wash Pro pages on the Martin website at www.martin.com will help with planning the
installation layout.

Martin
®
Exterior Wash Pro family Safety and Installation Manual Rev. F 11
Precautions to avoid damage
Important! To get the best out of the Exterior Wash Pro and avoid causing damage that is not
covered by the product warranty, make sure that everyone who is involved in installing, working on or
using the fixture has read and understood the following information.
Cleaning
Excessive dirt buildup causes overheating and may lead to damage that is not covered by the product
warranty. Clean the product at regular intervals (see “Cleaning” on page 21)
Operating temperature precautions
Do not operate the fixture in an ambient temperature that exceeds the specified maximum of 45° C
(113° F). Fixtures have an internal thermal sensor. If the sensor measures excessive temperature, a
thermal protection system reduces output. If the temperature is dangerously high, a thermal cutout
shuts down the fixture. The fixture will not function normally again until the temperature has fallen to a
safe level.
Maintaining IP66 protection
The fixture is supplied as a sealed unit. It may be opened for the purposes of changing power and/or
data cables by a qualified technician in a controlled environment with service documentation or
guidance from Martin Service only.
Condensation and pressure relief valve
A valve with a gas-permeable membrane in the base of the product equalizes pressure by allowing air
to pass through it when the product heats up and cools down, but at the same time it acts as a barrier
to water in liquid form. This valve requires maintenance – see ‘Pressure relief valve’ on page 21 for
details.
Under certain conditions, condensation may become visible under optical components. This is normal
and harmless. The fixture gradually expels condensation via its pressure relief valve.
Before using the product for the first time
1. Read ‘Safety information’ on page 5 before installing, operating or servicing the fixture.
2. Unpack the fixture. Please make sure to recycle cardboard packaging material. Both the inner
layer (buffer) and the outer box are 100% cardboard.
3. Ensure that there is no transportation damage before using the fixture. Do not attempt to operate a
damaged fixture.
4. If testing and/or setting up the fixture before it is hard-wired to a mains supply, install a local power
plug (not supplied) to the end of the supplied power cable.
5. Before operating, ensure that the voltage and frequency of the power supply match the power
requirements of the fixture.
6. Check the support pages on the Martin Professional website at www.martin.com for the most
recent user documentation and technical information about the fixture. Martin® manual revisions
are identified by the revision letter at the bottom of the inside cover.

12 Martin
®
Exterior Wash Pro family
Safety and Installation Manual Rev. F
Physical installation
Warning! Read ‘Safety information’ on page 5 before installing the fixture.
Contact your Martin® supplier for assistance if you have any questions about how to
install this product safely.
Fixture location
Exterior Wash Pro family fixtures are intended for outdoor use. With an IP66 rating, they are protected
against dust, humidity and water and are able to withstand powerful water jets, but they are not
submersible.
Mounting the fixture
The fixture and yoke can be mounted at any angle. The yoke allows the fixture to be manually panned
and tilted for beam aiming adjustment.
The fixture and mounting bracket are manufactured in corrosion-resistant anodized aluminum. Avoid
mounting the fixture in direct contact with other types of metal, as this can cause galvanic corrosion.
When fastening to a dissimilar metal surface:
• Use an electrically insulating material (such as rubber or plastic) or coating between the mounting
bracket and the other metal.
• Use a non-conductive coating such as Delta Seal on fasteners (screws, bolts, washers, etc.)
where they come into contact with the mounting bracket.
The fixture’s mounting yoke base must be securely and safely anchored to a stable, static surface,
pedestal, structural beam, rigging truss or other suitable support. Do not stand the fixture unanchored
on a surface or leave it where it can be moved or fall over.
Mounting on a surface
To anchor the mounting yoke to a wall or other flat surface, use at least three high-strength corrosion-
resistant fasteners that are safe for the application and the environment (recommended minimum
properties: stainless steel A4-70 grade according to ISO 3506 or steel grade 8.8 according to
ISO 898-1). Any nuts used must be self-locking. Install washers under all nuts and bolt heads. Make
sure that there is a washer between each fastener and the yoke base.
To mount S and M fixtures on a suitable surface:
1. See Figure 1. Pass a 12 mm (1/2 inch) shaft diameter bolt through the 13.5 mm hole in the center
of the yoke base and fasten it finger-tight into the surface.
Figure 1. Mounting yoke base, S and M fixtures

Martin
®
Exterior Wash Pro family Safety and Installation Manual Rev. F 13
2. Pass two bolts with 8 mm (5/16 inch) shaft diameter through the 9 mm curved slots and fasten
them finger-tight into the mounting surface.
3. Adjust the aim of the fixture by turning it within the 60° of pan adjustment available, then fully
tighten all three bolts. If additional fasteners are required to mount the fixture safely, pass two
8 mm (5/16 inch) shaft diameter bolts through the 9 mm curved slots in the yoke base and fasten
them into the mounting surface.
To mount L and XL fixtures on a suitable surface:
1. See illustration below. Pass a 12 mm (1/2 inch) shaft diameter bolt through the 13.5 mm hole in
the center of the yoke base and fasten it finger-tight into the surface.
2. Pass two bolts with 8 mm (5/16 inch) shaft diameter through the 9 mm curved slots and fasten
them finger-tight into the mounting surface.
3. Adjust the aim of the fixture by turning it within the 60° of pan adjustment available, then fully
tighten all three bolts.
4. If additional fasteners are required to mount the fixture safely, pass two 12 mm (1/2 inch) shaft
diameter bolts through the 13.5 mm holes at the edges of the yoke base and tighten them into the
mounting surface.
Securing with a safety cable
If regulations require it, the fixture can be secured with a safety cable that is approved for the weight of
the fixture and mounting hardware.
To secure the fixture with a safety cable:
1. Obtain an Exterior Wash Pro Safety Cable Attachment Bracket from your Martin supplier. Fasten
this bracket (arrowed) securely to the bottom of the fixture as shown in the illustration below using
the screws supplied with the bracket.
Figure 2. Mounting yoke base, L and XL fixtures
14 Martin
®
Exterior Wash Pro family
Safety and Installation Manual Rev. F
2. Fasten the safety cable to a secure anchoring point, by looping it around the truss chord, for
example. Remove as much slack as possible from the safety cable by looping it more than once
around the truss chord, for example. Then fasten the safety cable to the attachment bracket on the
fixture with the cable’s carabiner clip. Make sure that the cable will catch the fixture if a primary
means of suspension fails.
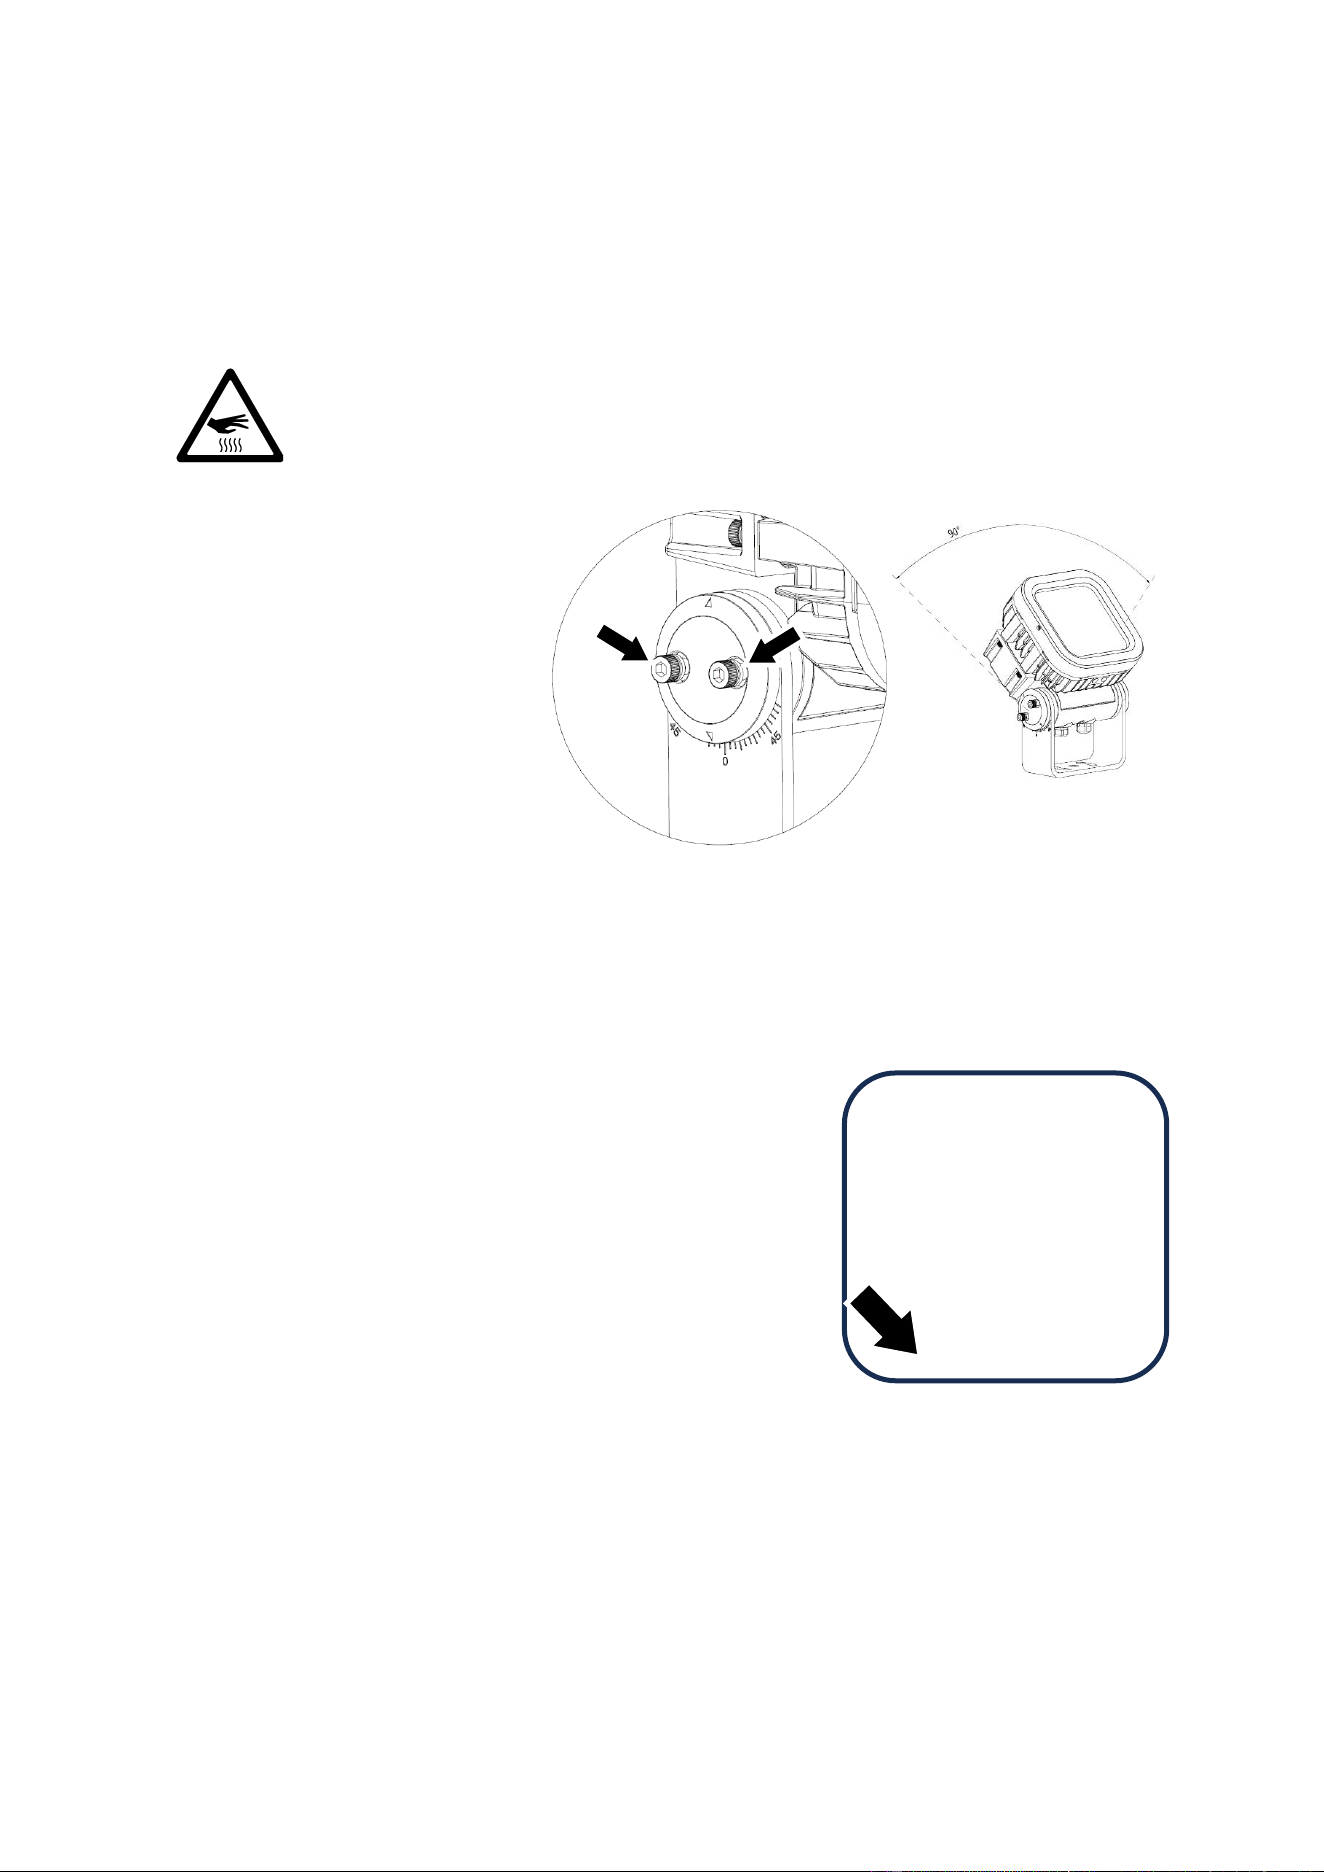
Adjusting tilt
Warning! The fixture can become hot. Wear heat-resistant gloves if you adjust
the aim of the fixture when it is (or has recently been) powered on.
Tilt adjustment can be carried out
with the fixture powered on as
follows:
1. Put on heat-resistant gloves.
2. See illustration on right. Loosen,
but do not remove, the tilt lock
screws (arrowed) on both sides
of the yoke.
3. Tilt the fixture to the desired
angle and retighten the screws.
You can tilt the fixture up to 45°
forward or 45° backward. A scale
is printed on the yoke to ensure
accurate adjustment.
Installing a microlens beam angle accessory
Optional microlenses that modify the beam angle are available from Martin (see the Exterior Wash Pro
pages on the Martin website at www.martin.com for details and
ordering information). The following options are available:
• Narrow (8°)
• Medium (15°)
• Wide (25°)
• Very Wide (50°)’
• Asymmetric (5 x 60°)
Note that the nominal beam angles given above are for reference
only. The effective beam angle is a combination of the nominal
microlens angle and the fixture beam angle defined by the lens.
Located close to the edge of the microlens is a marking that gives
the microlens’s nominal beam angle and indicates which side of
the microlens must face outwards (see illustration on rightFigure
4). Note that the marking can be partially hidden under the
microlens’s silicone gasket.
The asymmetric microlens also includes markings with arrows and beam angles indicating the
orientation of the microlens.
The microlens is held in place on the front of the fixture by the fixture’s trim frame or, if installed, by a
Baffle Snoot accessory.
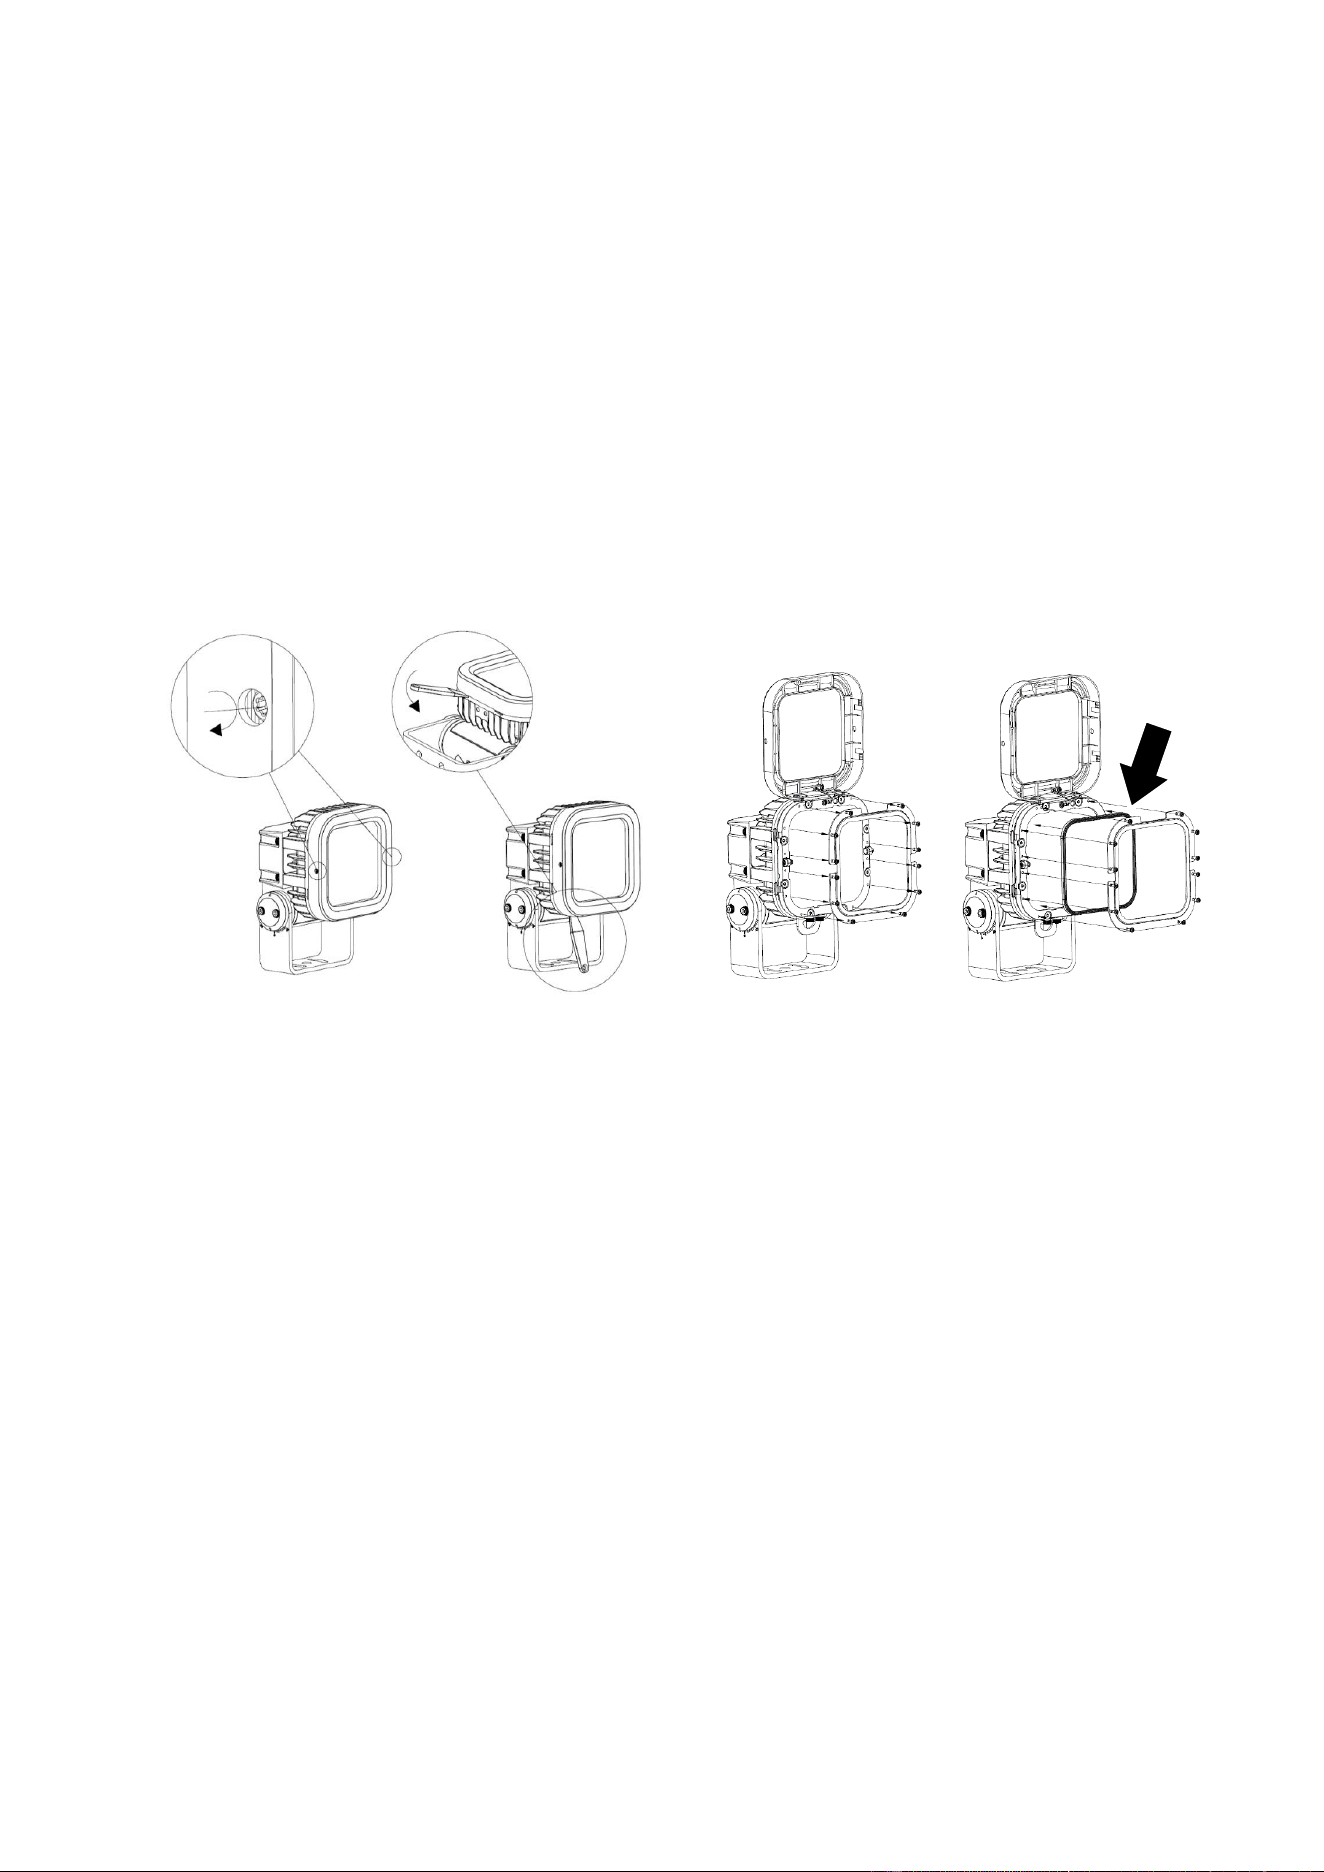
To install an optional microlens:
1. Shut down power to the fixture and allow it to cool.
Figure 3. Tilt adjustment
Figure 4. Microlens marking
Medum 15° this side out
Martin
®
Exterior Wash Pro family Safety and Installation Manual Rev. F 15
2. See A in Figure 5. Loosen the captive screws from both sides of the trim frame (or Baffle Snoot, if
used) on the front of the fixture by pressing them in and turning them clockwise until they reach a
stop.
3. See B. Using the Exterior Multitool available from Martin or a similar tool with no sharp edges,
lever the trim frame carefully away from the fixture. Avoid damaging the fixture housing, seal or
trim frame.
4. See C. Remove the screws from the filter holder on the front of the fixture and remove the filter
holder (the number and positions of the screws varies depending on fixture).
5. See D. Position the microlens (arrowed) in the recess provided for it in the front of the fixture,
making sure that the marking ‘This side out’ close to the edge of the microlens faces outwards,
towards the front of the fixture. Re-install the filter holder, tightening the screws evenly. Make sure
that the microlens remains in position while installing the filter holder.
6. Re-install the trim frame (or Baffle Snoot, if used) and fasten it in place with its two captive screws.
Press each screw in and turn it counter-clockwise until it reaches a stop. Check that the trim frame
is held securely.
In S, M and L fixtures, it is possible to use an asymmetric microlens to modify the orientation of the
beam’s wide/narrow configuration to angles other than 90° by ordering a microlens for the next size
fixture up and cutting it to shape with the microlens at an angle.
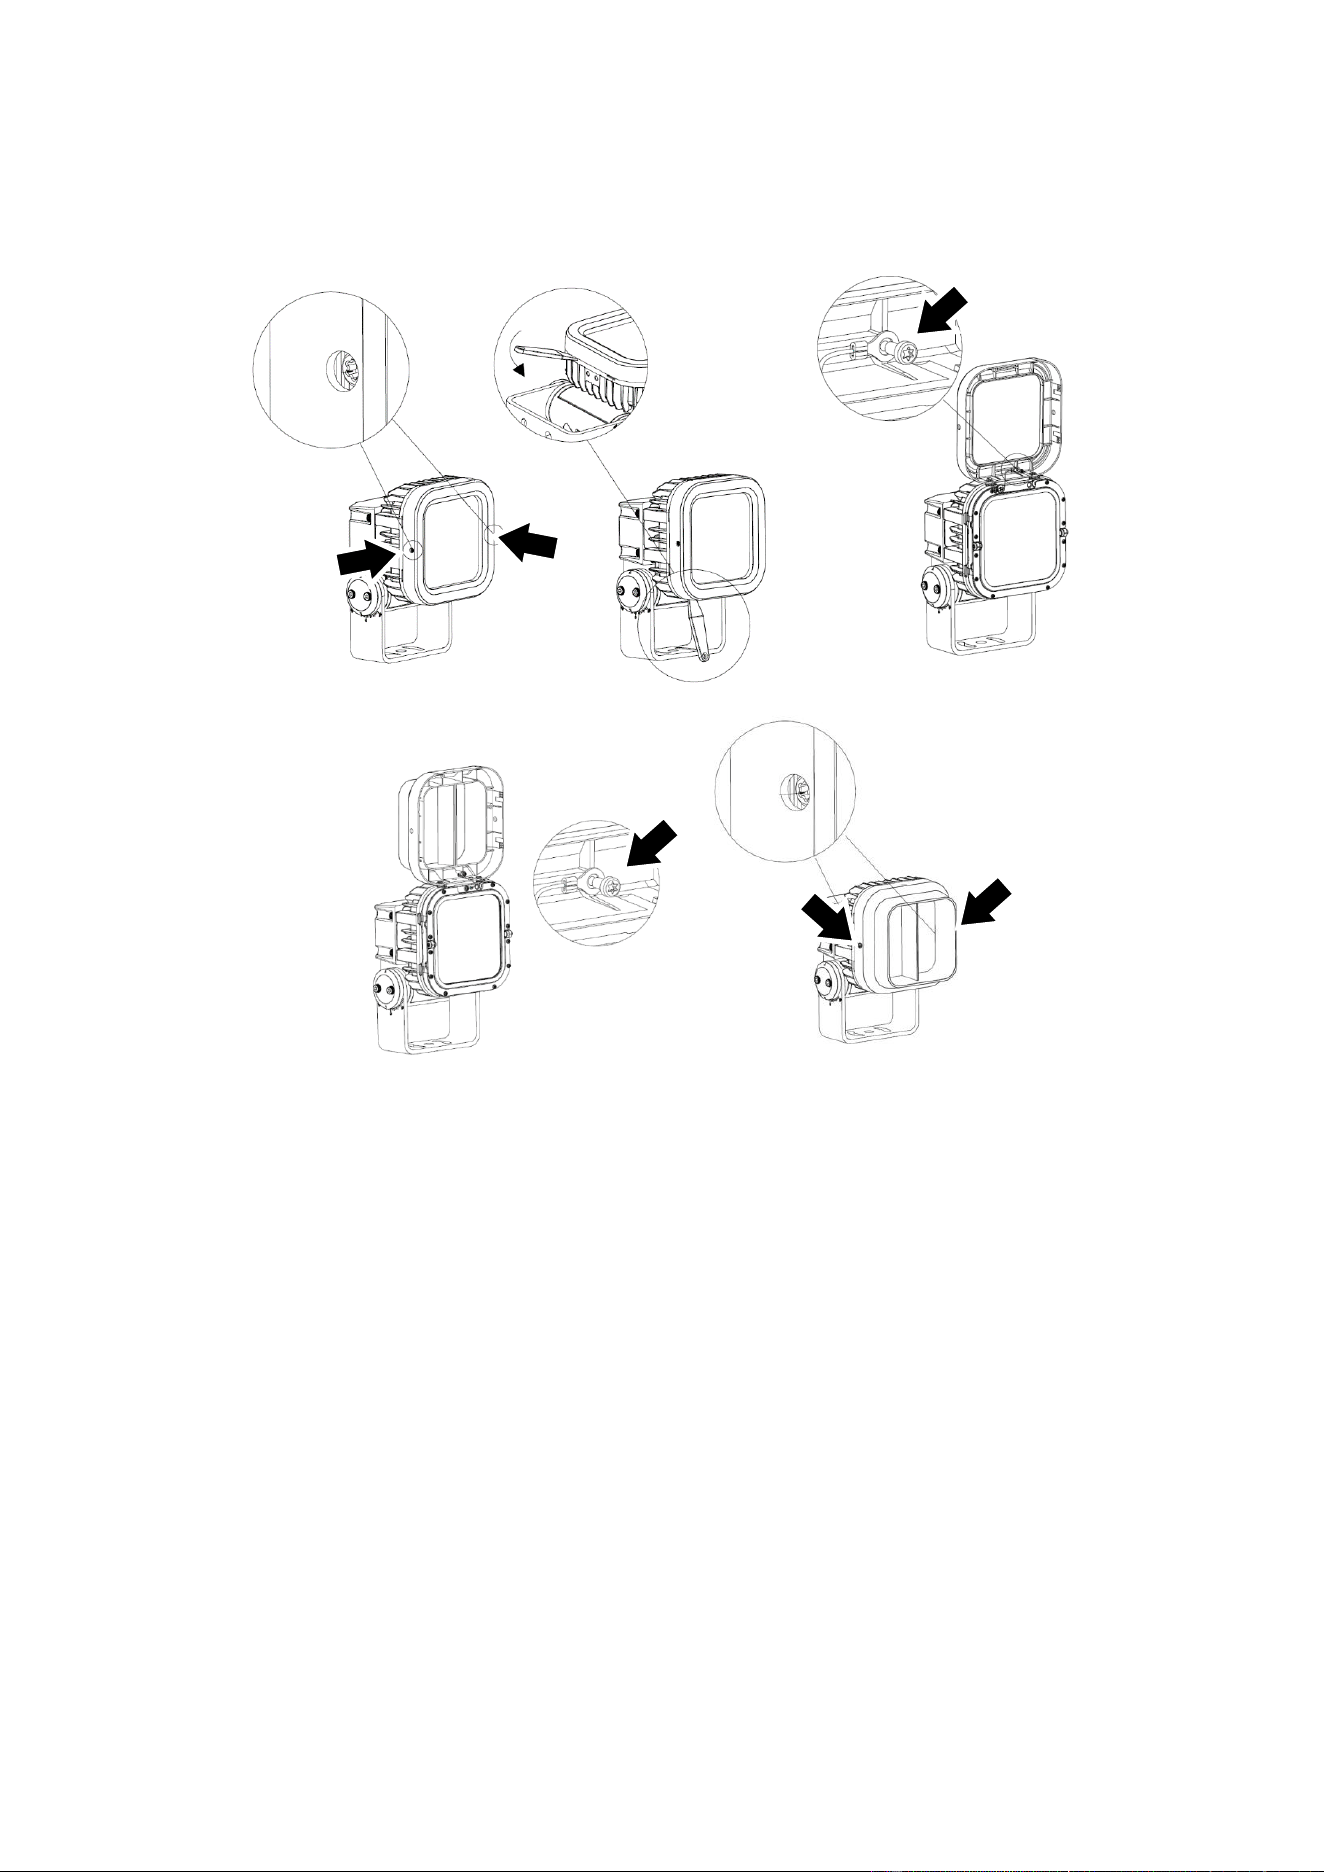
Installing a Baffle Snoot
The optional Baffle Snoot accessory for Exterior Wash Pro fixtures may be installed with or without a
microlens (see previous page).
1. To install a Baffle Snoot accessory:
2. Shut down power to the fixture and allow it to cool.
3. Refer to the illustration on the next page. See A. Loosen the two captive screws (arrowed) in the
sides of the trim frame on the front of the fixture by pressing them n and turning them clockwise
until they reach a stop.
4. See B. Using the Exterior Multitool available from Martin or a similar plastic tool with no sharp
edges, lever the trim frame carefully away from the fixture. Avoid damaging the fixture housing,
seal or trim frame.
5. See C. Lift the trim frame up as shown, remove the screw (arrowed) from the safety wire and
release the wire from the trim frame. Set the trim frame aside for storage and possible future re-
use.
6. See D. Hold the snoot up to the front of the fixture. Fasten the safety wire to the snoot re-using the
safety wire’s screw (arrowed).
Figure 5. Microlens installation
A
B
C
D
16 Martin
®
Exterior Wash Pro family
Safety and Installation Manual Rev. F
7. See E. Place the snoot into position on the front of the fixture, lining it up carefully, and fasten it to
the fixture with the two captive screws in the snoot. Press each screw in and turn it counter-
clockwise until it reaches a stop. Check that the snoot is held securely.
A
B
C
D
E
Figure 6. Installing a Baffle Snoot
Martin
®
Exterior Wash Pro family Safety and Installation Manual Rev. F 17
AC power
Warning! Read “Safety Information” on page 5 before attempting
to connect an Exterior Wash Pro fixture to power.
The system diagrams available in the DOWNLOADS section of the Exterior Wash Pro pages on the
Martin website at www.martin.com will also help with planning the installation layout.
Exterior Wash Pro fixtures are supplied in EU and US models. Both models accept AC power at
100-240 V nominal or 277 V nominal at 50 or 60 Hz. Do not connect to power at any other voltage or
frequency.
You can connect Exterior Wash Pro fixtures to either of the following mains power distribution
systems:
● Single-phase (live, neutral, ground/earth) system.
● Grounded/earthed three-phase four-wire (three phases, neutral, ground/earth) system.
Do not try to connect a fixture to a three-phase three-wire (three phases, ground/earth) system.
There is no power on/off switch. Power is applied to an Exterior Wash Pro fixture as soon as it is
connected to power. Provide a means to disconnect or shut down power to fixtures that is easily
accessible and is located close to the fixtures.
Do not use an external dimming system to supply power to the fixture, as this may cause damage to
the fixture that is not covered by the product warranty.
Power characteristics
The current draw, power consumption and power factor figures for Exterior Wash Pro fixtures are as
follows:
Mains
power
Exterior Wash Pro S
Exterior Wash Pro M
Exterior Wash Pro L
Exterior Wash Pro XL
100 V,60 Hz
0.35 A, 35 W, PF 0.99
0.75 A, 75 W, PF 0.99
1.5 A, 150 W, PF 0.99
2.5 A, 250 W, PF 0.99
120 V,60 Hz
0.29 A, 35 W, PF 0.99
0.63 A, 75 W, PF 0.99
1.26 A, 150 W, PF 0.99
2.1 A, 250 W, PF 0.99
230 V,50 Hz
0.16 A, 35 W, PF 0.94
0.35 A, 75 W, PF 0.94
0.69 A, 150 W, PF 0.95
1.13 A, 250 W, PF 0.96
277 V,50 Hz
0.14 A, 35 W, PF 0.90
0.30 A, 75 W, PF 0.90
0.60 A, 150 W, PF 0.91
0.98 A, 250 W, PF 0.92
*Power figures are typical, not maximum. Measurements made at nominal voltage. Allow for +/- 10% deviation.
PF = Power factor. Allow for +/- 0.05 deviation.
Typical half-cycle RMS inrush current: 16.0 A at 230 V, 50 Hz.
Typical earth-leakage current: 0.5 mA.
Surge protection: 4 kV
Protecting connections from moisture
Moisture can cause corrosion in unprotected cable connections. Moisture can also be sucked along
the inside of cables at breaks or cuts in the cable jacket (for example at connection points) and into
fixtures because of the vacuum effect of temperature fluctuations inside fixtures. To protect
connections and fixtures from moisture, take at least one of the following precautions:
● Locate cable junctions in dry areas (e.g. junction boxes in dry locations).
● Use connectors or junction boxes that are protected to IP67 or higher.
● Fill junction boxes with potting compound to seal the ends of cables and to protect connections
from corrosion.
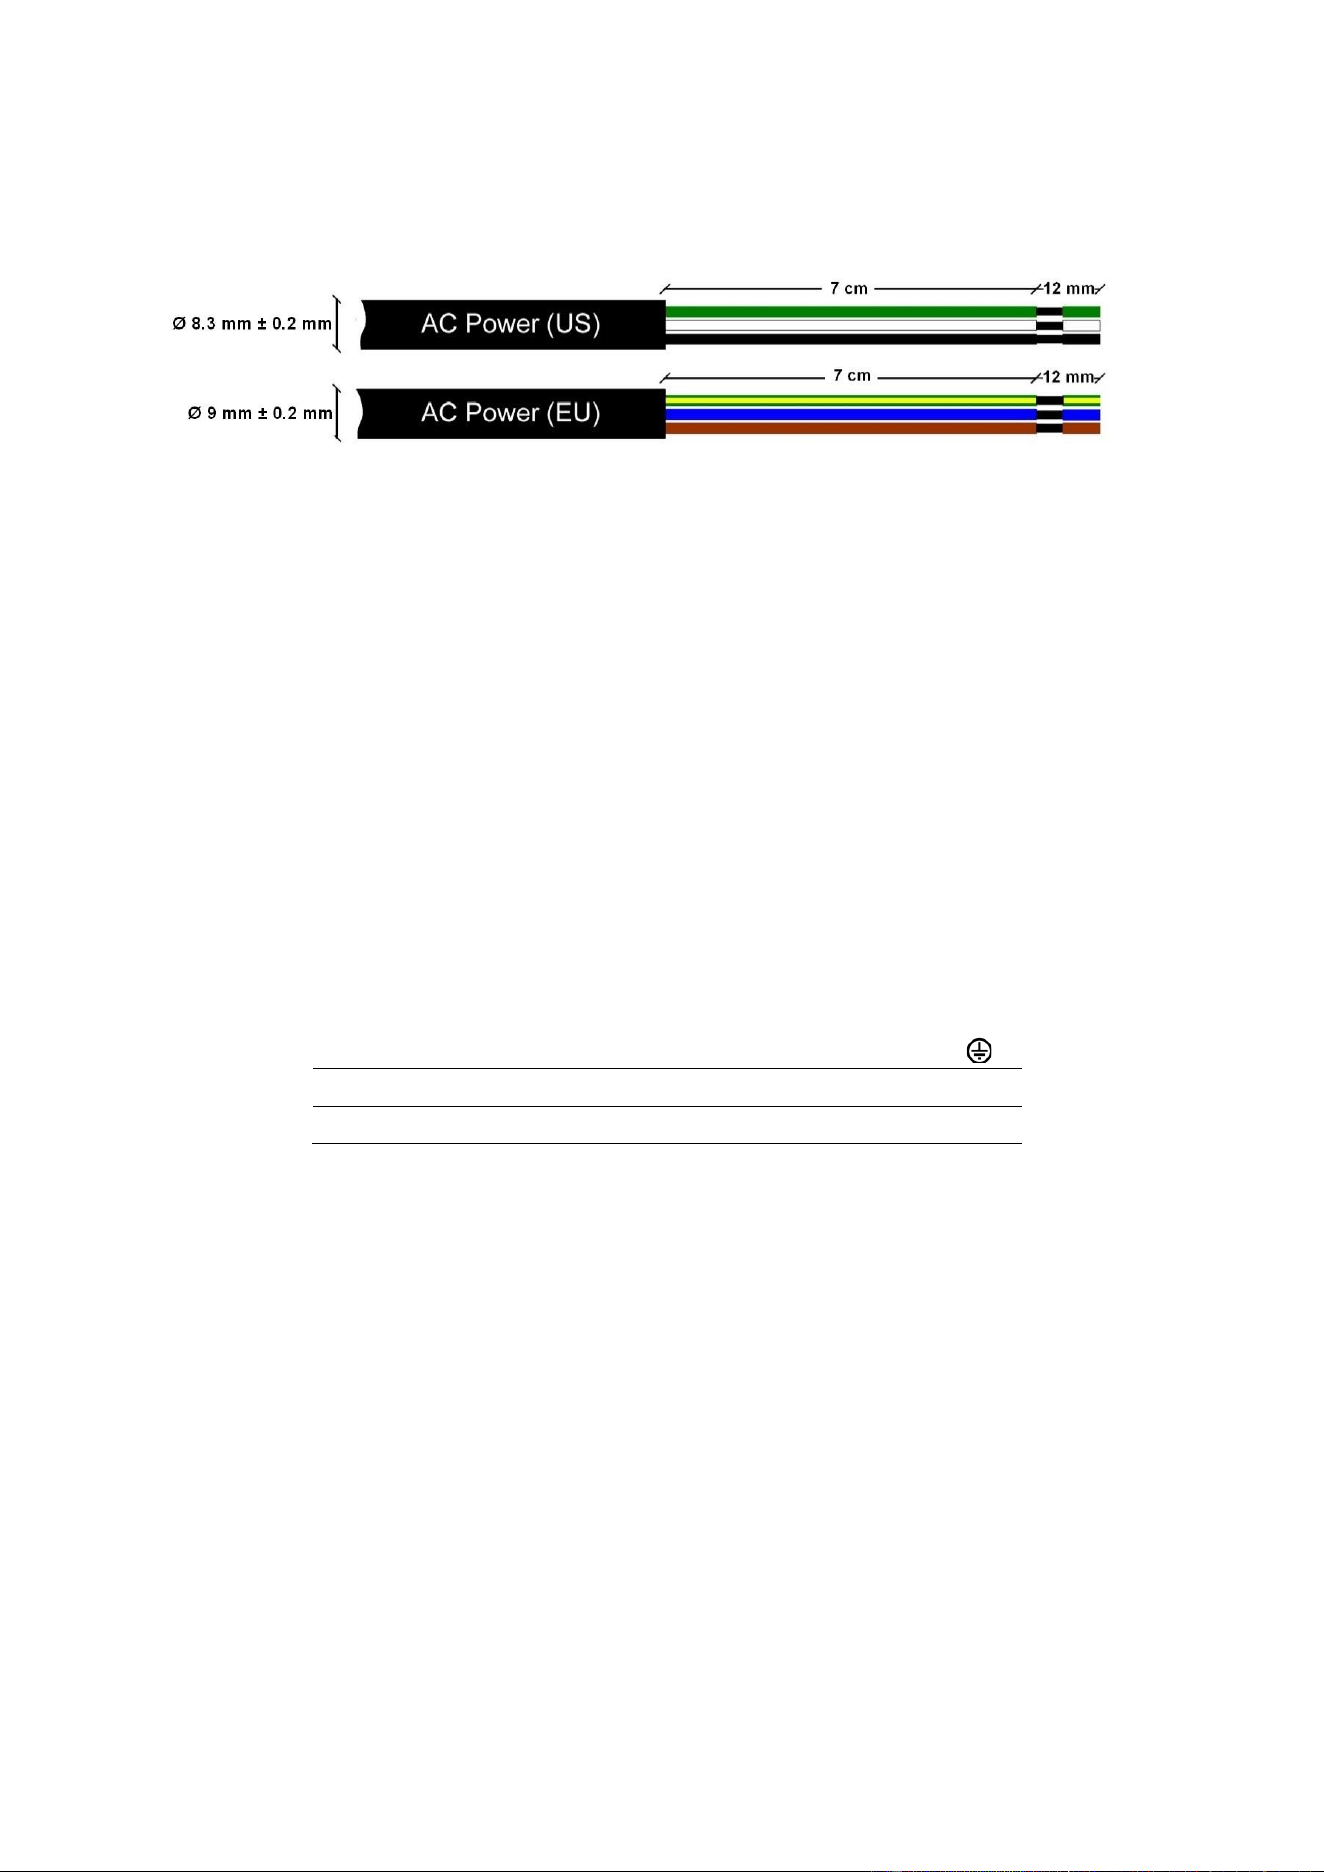
18 Martin
®
Exterior Wash Pro family
Safety and Installation Manual Rev. F
Connecting to power
The fixture is supplied with a 2 m (6.5 ft.) power cable tail installed ready for connection. See
illustration below:
AC power cable details
To connect to a single-phase system or to one phase of a three-phase, four-wire system:
1. Lock out power to the installation.
2. Connect the conductors in the power cable to the distribution circuit inside a sealed junction box
as follows:
• Connect the green wire (US models) or yellow/green wire (EU models) to ground (earth).
• Connect the white wire (US models) or blue wire (EU models) to neutral.
• Connect the black wire (US models) or brown wire (EU models) to live (one phase).
3. Check that all installation work is completed and carry out appropriate tests and safety checks
before applying power.
Installing a temporary power plug
If you install a power plug on the power cable for temporary use, install a grounding type (earthed)
plug with integral cable grip that is rated minimum 277 V, 6 A. Follow the plug manufacturer’s
instructions and connect the wires in the power cable as shown in the following table:
Live or L
Neutral or N
Earth, Ground or
US system
Black
White
Green
EU system
Brown
Blue
Yellow/green
Power plug connections
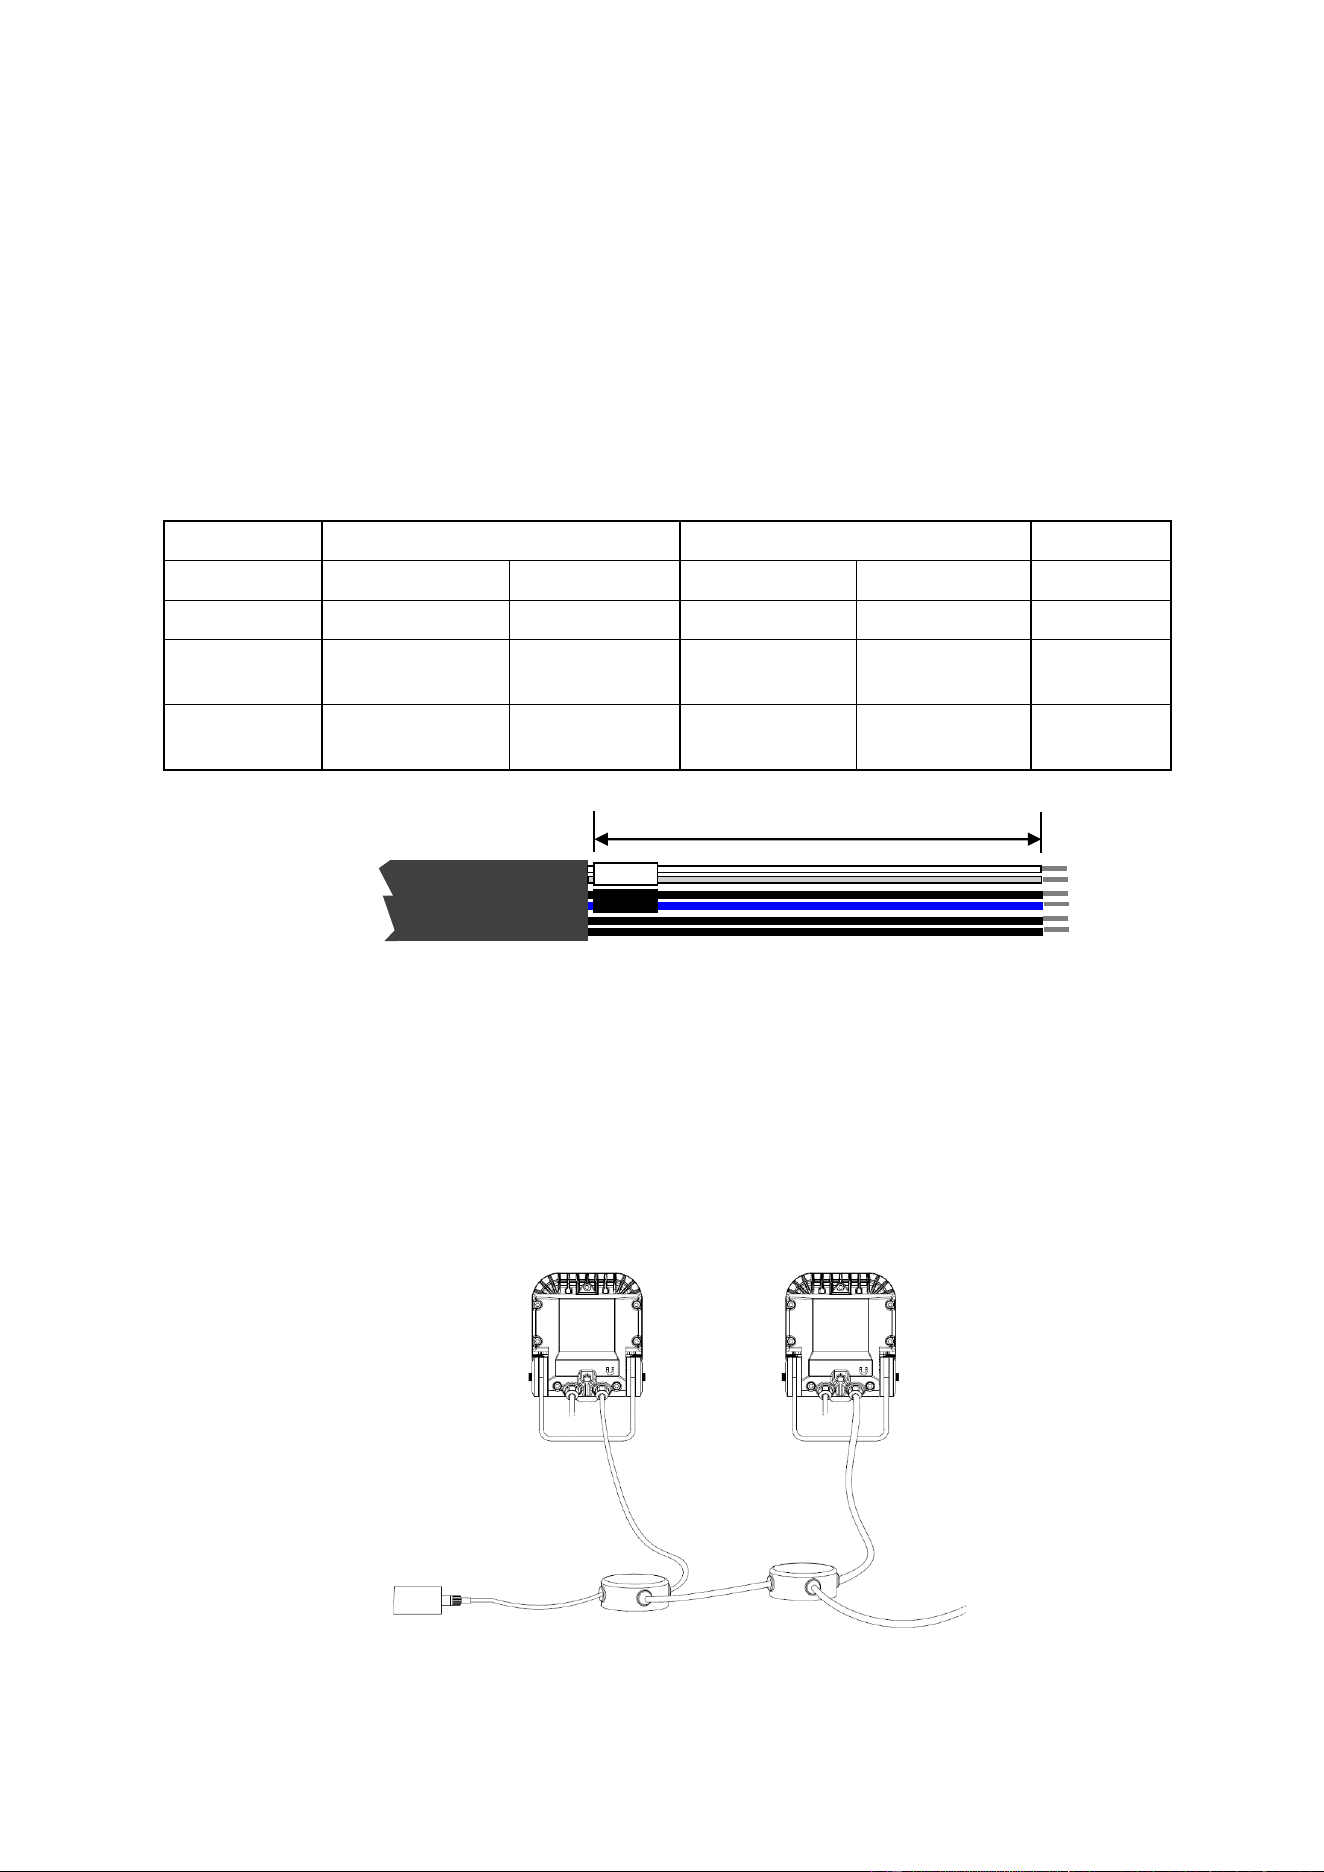
Martin
®
Exterior Wash Pro family Safety and Installation Manual Rev. F 19
Connecting to control data
The system diagrams available in the DOWNLOADS section of the Exterior Wash Pro pages on the
Martin website at www.martin.com will also help with planning the installation layout.
A DMX512 data link is required in order to control the fixture via DMX (and manage fixtures via RDM,
if used). Your Martin® supplier will be happy to help if you need advice or assistance in planning the
link.
Important! Protect all connections and all breaks in cable jackets from moisture (see ‘Protecting
connections from moisture’ on page 17).
The fixture has a 2 m (6.5 ft.) cable tail with two pairs of data conductors and two shield wires for data
connection. See below.
Data Input pair (white sleeve)
Data output pair (black sleeve)
Shield (x 2)
Wire color
Grey
White
Blue
Black
Black
Signal
DMX IN -
DMX IN +
DMX OUT -
DMX OUT +
Common
Male XLR
(if used)
Pin 2
Pin 3
-
-
Pin 1
Female XLR
(if used)
-
-
Pin 2
Pin 3
Pin 1
Do not connect either of the shield conductors to ground (earth) or allow a shield conductor to come
into contact with a connector shell, as this may cause interference.
You can connect the fixture’s data cable tails to a DMX/RDM data link using screw terminals, quick
connectors or soldered joints in junction boxes or using XLR connectors that are suitable for the
environment. Ensure that the fixture is protected from the entry of water via the data cable by using
junction boxes or connectors that are protected to IP67 or higher. Fill junction boxes with potting
compound.
DMX data link layout
Ø8.5 mm
±0.2 mm
9 cm
DATA I/O
Data connections
DMX / RDM
controller
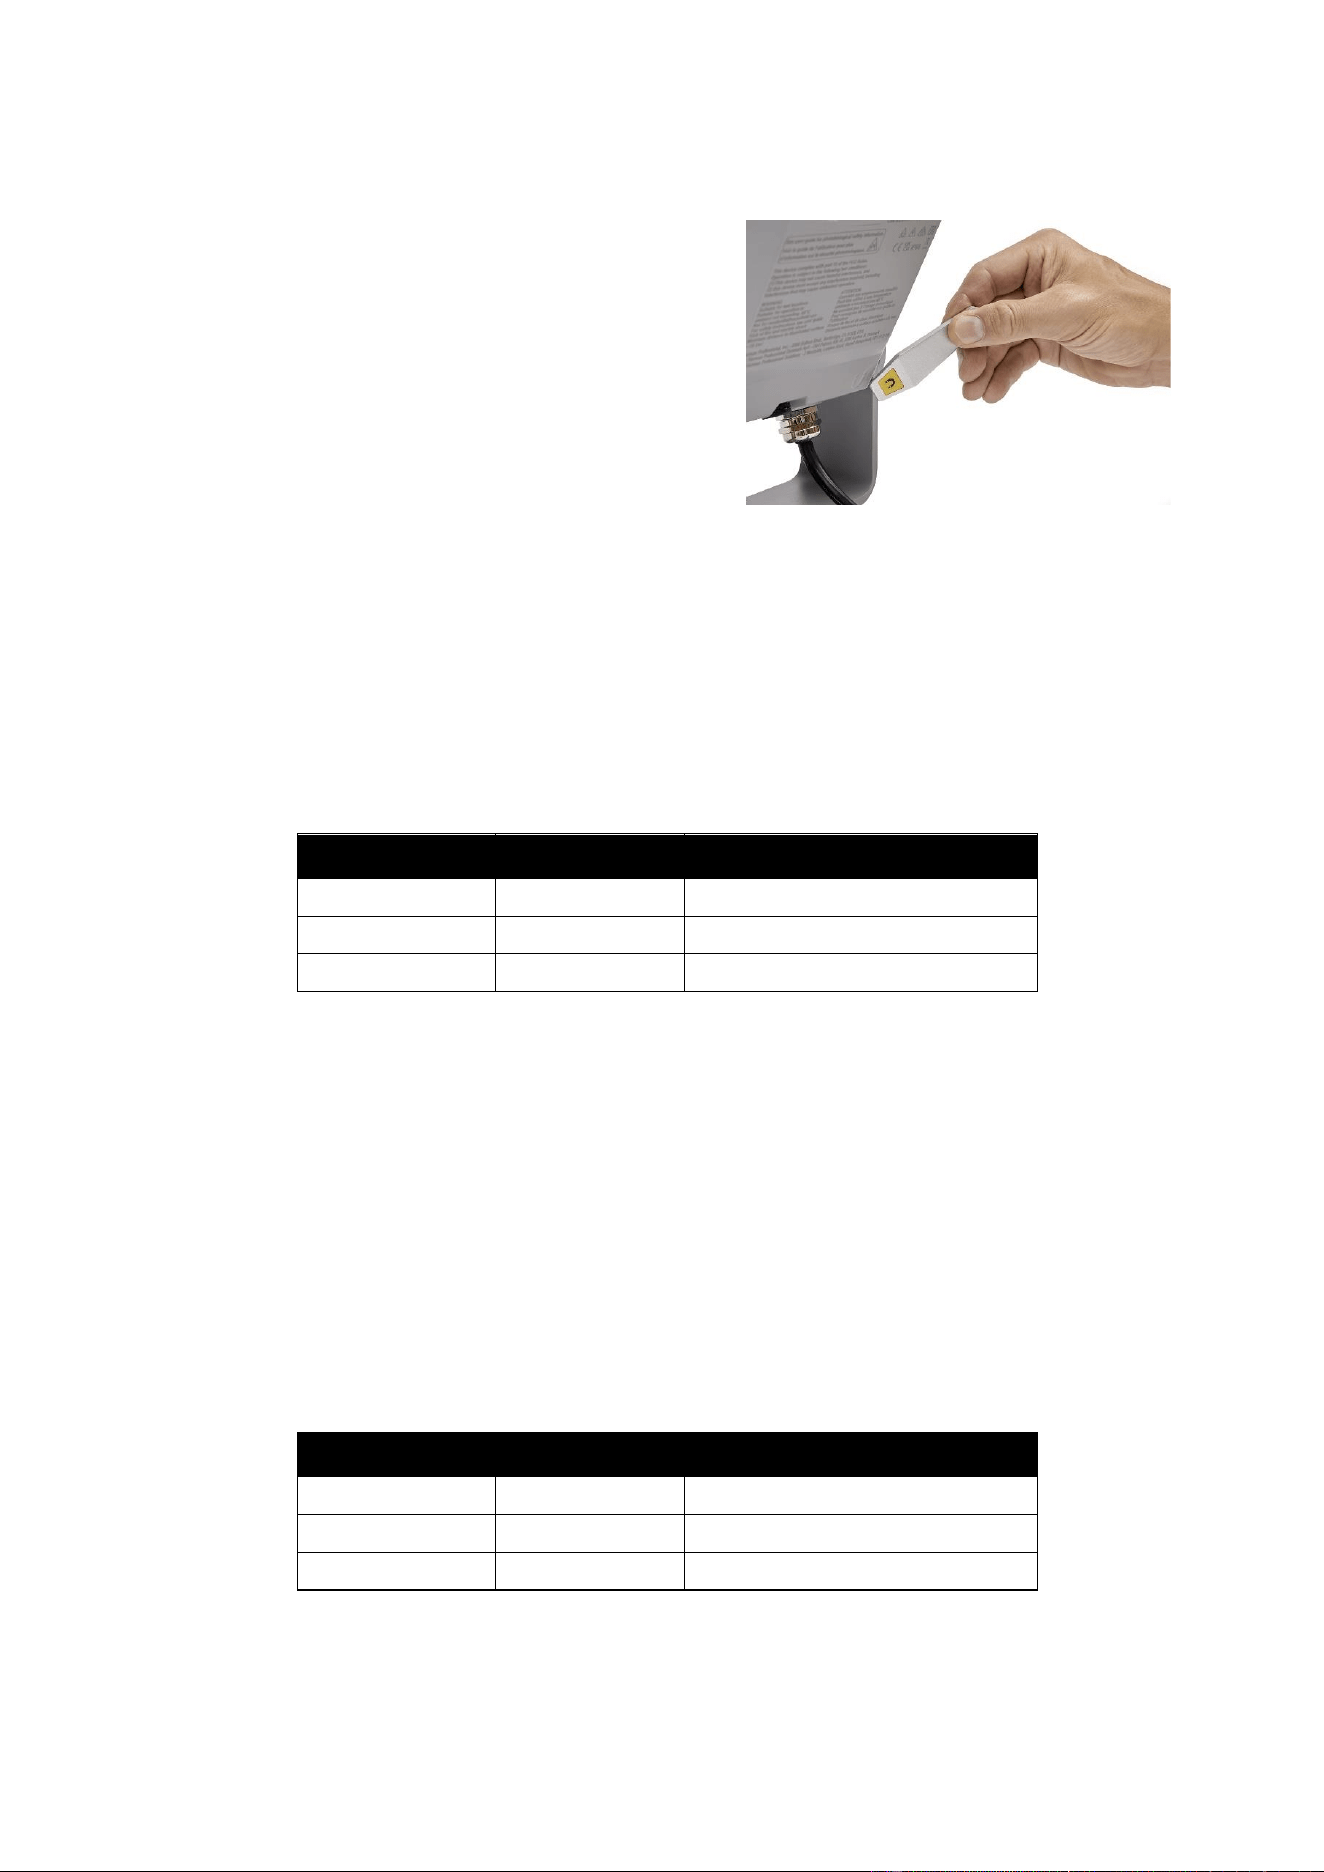
20 Martin
®
Exterior Wash Pro family
Safety and Installation Manual Rev. F
Testing
Exterior Wash Pro fixtures are programmed with a test
sequence that is activated by ‘swiping’ (moving) a
magnet past a magnetic switch inside the fixture. The
magnetic switch is located on the rear of the fixture. A
magnet icon is provided on the housing to show the
switch location.
Exterior Wash Pro QUAD models
Swiping a magnet past the magnetic switch causes the
fixture to step through the following sequence:
1. Display status code (see table below for meaning).
2. All LEDs at full intensity.
3. All red LEDs at full intensity.
4. All green LEDs at full intensity.
5. All blue LEDs at full intensity.
6. All white LEDs at full intensity.
7. Exit sequence and resume normal operation.
You can also resume normal operation by cycling power off and on. If you are sending a DMX signal
to the fixture, it will exit the sequence and enter normal DMX operation again after a short period.
Fixture status is indicated as follows:
LED color
Signal
Status
Blue
Fast flash
Busy (booting or uploading SW)
Blue
Slow flash
No DMX detected
Green/blue
Alternating
Running normally in DMX mode
Exterior Wash Pro CTC models
Swiping a magnet past the magnetic switch causes the fixture to step through the following sequence:
1. Display status code (see table below for meaning).
2. All LEDs at full intensity.
3. All cold white LEDs at full intensity.
4. All medium white LEDs at full intensity.
5. All warm white LEDs at full intensity.
6. Exit sequence and resume normal operation.
You can also resume normal operation by cycling power off and on. If you are sending a DMX signal
to the fixture, it will exit the sequence and enter normal DMX operation again after a short period.
Fixture status is indicated as follows.
LED color
Signal
Status
Cold
Fast flash
Busy (booting or uploading SW)
Cold
Slow flash
No DMX detected
Cold/warm
Alternating
Running normally in DMX mode
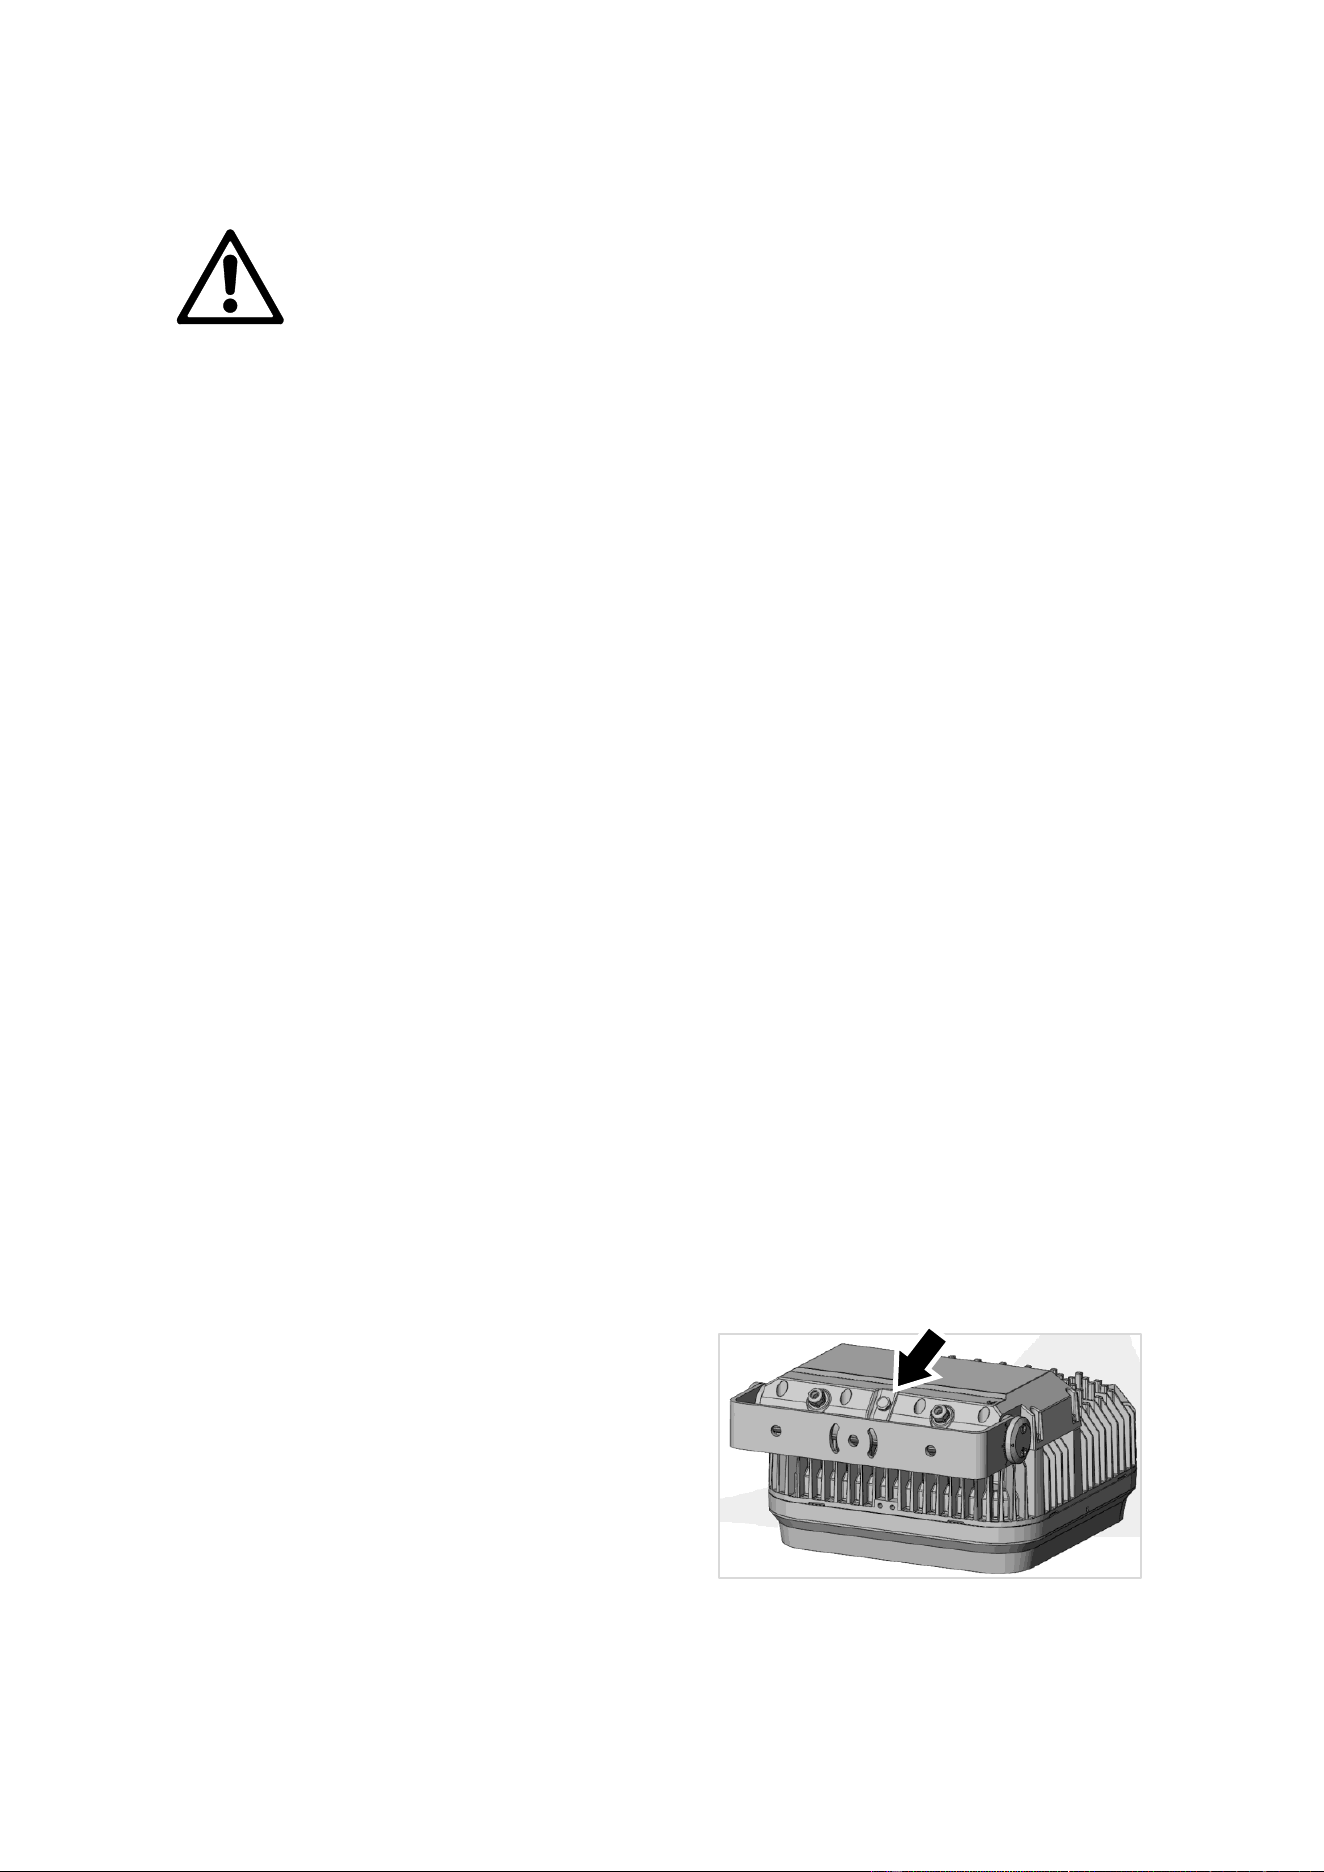
Martin
®
Exterior Wash Pro family Safety and Installation Manual Rev. F 21
Maintenance
Warning! Read ‘Safety information’ on page 5 before carrying out service or
maintenance. There are no user-serviceable parts inside. Do not open the
housing. Refer any service operation not described in this manual to Martin
Professional or its authorized service agents.
Installation, on-site service and maintenance can be provided worldwide by the Martin
Professional Global Service organization and its approved agents, giving owners
access to Martin’s expertise and product knowledge in a partnership that will ensure
the highest level of performance throughout the product’s lifetime. Please contact your
Martin® supplier for details.
Be aware that the output of LEDs, like all light sources, changes gradually over many thousands of
hours of use. If you require products to perform to very precise color specifications, you may
eventually need to make small readjustments at the lighting controller.
Cleaning
Regular cleaning is essential for fixture life and performance. Buildup of dust and dirt degrades the
fixture’s light output and cooling ability.
Cleaning schedules will vary greatly depending on the operating environment. Inspect fixtures within
their first few months of operation to see whether cleaning is necessary. Check again at regular
intervals. This procedure will allow you to assess cleaning requirements in your particular situation.
Do not use products that contain solvents, abrasives or caustic agents for cleaning, as they can cause
surface damage to the fixture. The aluminum housing and front glass can be cleaned with mild
detergents such as those for washing cars.
To clean the housing and front glass:
1. Isolate the fixture from AC power and allow the fixture to cool for 20 minutes.
2. Visually check that the silicone seals and the power and data cables are in good condition. If any
seal or cable shows signs of damage, cracking or loss of water resistance, stop cleaning the
fixture and contact a Martin authorized service technician for replacement.
3. If seals are in good condition, rinse off loose dirt with a hose or low-pressure water spray.
4. Wash the aluminum housing and front glass using warm water with a little mild detergent and a
soft brush or sponge. Do not use abrasive cleaners.
5. Rinse with clean water and wipe dry.
Installation safety
Each time the fixture is cleaned, check that the fixture and any accessories mounted on it are held
securely and cannot fall. Check mounting fasteners and re-tighten if necessary.
Pressure relief valve
A valve with a permeable membrane between the
cable entries on the back of the fixture (see illustration
on right) equalizes pressure by allowing air to pass
through it when the fixture heats up and cools down.
At the same time, the valve acts as a barrier to water
in liquid form. The expulsion of warm air (with a
slightly higher water vapor content) and intake of cool
air (with a slightly lower water vapor content) prevents
humidity buildup over time, provided that the valve
works correctly and that the fixture is correctly sealed.
Pressure relief valves have a limited service life. They become blocked over time as the micropores in
the membrane fill with particles. When a valve becomes blocked, excess pressure can damage seals
or cause air and even water to be sucked into the fixture along cables. A blocked valve cannot be
cleaned and must be replaced if it shows signs of contamination or is not in perfect condition. Valve

22 Martin
®
Exterior Wash Pro family
Safety and Installation Manual Rev. F
replacement involves pressure-testing the fixture and must be carried out by an authorized Martin
service agent.
Firmware maintenance
Important! Do not switch the fixture off or disconnect the source of the firmware during an update, or
the firmware will be corrupted.
You may need to install new fixture firmware if a new firmware version with new features is released,
or in the unlikely event that firmware has become corrupted. Firmware updates can be downloaded
automatically from the Martin cloud using the Martin Companion software suite on a PC connected to
the Internet.
All fixtures that are powered on and connected via a DMX link to the fixture that you update will also
have their firmware updated.
If you update firmware to a newer version, check the Exterior Wash Pro area of www.martin.com to
see whether an updated version of the User Manual is available for the new firmware.
You need the following in order to install firmware:
• A Windows PC running the latest version of the Martin Companion software suite that is available
for download from the Martin website at www.martin.com.
• The latest Exterior Wash Pro firmware files (Martin Companion automatically downloads these
from the Martin fixture firmware cloud when you run it on a PC that is connected to the Internet).
• A Martin Companion Cable USB-DMX hardware interface (available from your Martin supplier).
To install the firmware in a fixture (or in multiple fixtures on the DMX link) using a Martin Companion
Cable:
1. Apply power to the fixture(s) and wait until they have finished their startup procedure.
2. Connect the Martin Companion Cable’s USB connector to a USB port on your PC. Connect the
Martin Companion Cable’s XLR connector to either the fixture’s DMX IN connector or the DMX
link.
3. Start the PC and launch Martin Companion. Check that the Martin Companion application
correctly detects the Martin Companion Cable (a green dot should appear next to USB
Connected in the top right-hand corner of the window).
4. Locate the latest Exterior Wash Pro firmware in Martin Companion’s Firmware window.
5. Start the firmware update by clicking Update Firmware in Martin Companion. Do not disconnect
the Martin Companion Cable or power off the fixture(s) until the upload is complete and the
fixture(s) has successfully rebooted.
6. If you are updating multiple fixtures over a DMX link, check that they have all rebooted correctly.
Martin
®
Exterior Wash Pro family Safety and Installation Manual Rev. F 23
Specifications
For full product specifications, see the Exterior Wash Pro area of the Martin website at
www.martin.com.
FCC compliance
This equipment has been tested and found to comply with the limits for a Class B digital device,
pursuant to part 15 of the FCC Rules. These limits are designed to provide reasonable protection
against harmful interference in a residential installation. This equipment generates, uses and can
radiate radio frequency energy and, if not installed and used in accordance with the instructions, may
cause harmful interference to radio communications. However, there is no guarantee that interference
will not occur in a particular installation. If this equipment does cause harmful interference to radio or
television reception, which can be determined by turning the equipment off and on, the user is
encouraged to try to correct the interference by one or more of the following measures:
• Reorient or relocate the receiving antenna.
• Increase the separation between the equipment and receiver.
• Connect the equipment into an outlet on a circuit different from that to which the receiver is
connected.
• Consult the dealer or an experienced radio/TV technician for help.
FCC supplier’s declaration of conformity declaration
This device complies with part 15 of the FCC Rules. Operation is subject to the following two
conditions:
1. This device may not cause harmful interference, and
2. this device must accept any interference received, including interference that may cause
undesired operation.
Canadian Interference-Causing Equipment Regulations – Règlement sur le Matériel
Brouilleur du Canada
This Class B digital apparatus meets all requirements of the Canadian Interference-Causing
Equipment Regulations.Cet appareil numérique de la classe B respecte toutes les exigences du
Règlement sur le Matériel Brouilleur du Canada.
CAN ICES-003 (B) / NMB-003 (B); CAN ICES-005 (B) / NMB-005 (B)
EU Declaration of Conformity
An EU Declaration of Conformity covering this product is available for download from the Exterior
Wash Pro area of the Martin website at www.martin.com.
Disposing of the product
Martin products are supplied in compliance with Directive 2012/19/EC of the European
Parliament and of the Council of the European Union on WEEE (Waste Electrical and
Electronic Equipment), where applicable.
Help preserve the environment! Ensure that this product is recycled at the end of its life.
Your supplier can give details of local arrangements for the disposal of Martin products

www.martin.com