www.greenworkstools.com
GBB100
EN OPERATOR MANUAL
ES MANUAL DEL OPERADOR
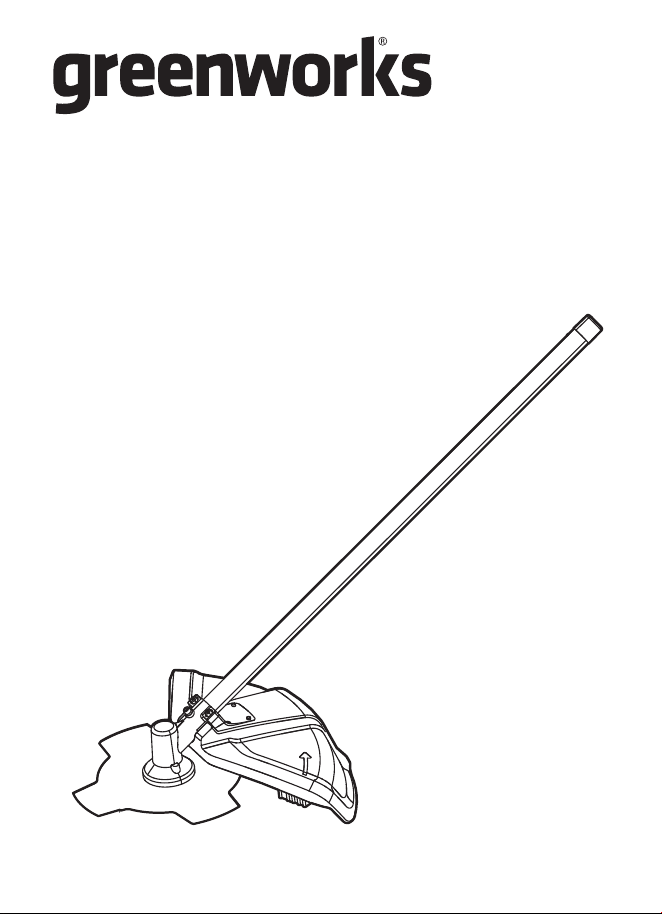
BRUSHCUTTER ATTACHMENT
ACCESORIO DE DESBROZADORA
FR
MANUEL D’OPÉRATEUR
ACCESSOIRE DE DÉBROUSSAILLEUSE

FOR QUEBEC RESIDENTS: The availability of replacement parts, repair services,
and maintenance or repair information is not guaranteed.
À L’ATTENTION DES RÉSIDENTS DU QUÉBEC : La disponibilité des pièces de
remplacement, des services de réparation et des renseignements sur l’entretien ou
la réparation n’est pas garantie.
PARA LOS RESIDENTES DE QUEBEC: La disponibilidad de piezas de repuesto,
servicios de reparación y la información de mantenimiento o reparación no está
garantizada.

1 Description............................. 4
1.1 Product description......................... 4
1.2 Intended use................................... 4
1.3 Product overview............................ 4
1.4 California Proposition 65.................4
2 Safety...................................... 4
2.1 Safety definitions............................ 4
3 Installation.............................. 4
3.1 Install the brush cutter guard.......... 4
3.2 Remove the brush cutter guard...... 4
3.3 Install the brush cutter blade...........5
3.4 Remove the brush cutter blade.......5
3.5 Install the auxiliary handle.............. 6
4 Transportation and
storage....................................6
4.1 Store the product............................ 6
5 Technical data........................ 6
6 Limited warranty.................... 6
6.1 Items not covered by warranty........7
6.2 Helpline...........................................7
6.3 Shipping..........................................7
3
English
EN
1 DESCRIPTION
1.1 PRODUCT DESCRIPTION
This product is a brushcutter attachment designed to
be used with a compatible powerhead.
We are committed to continuously improving our
products, and reserve the right to modify the design
and appearance without prior notice.
1.2 INTENDED USE
This product is designed to cut, trim, and clear different
types of vegetation using the brush cutter blade. It
should not be used for any other tasks.
Please note that national or local regulations may
regulate the use of the product. It is important to
comply with any regulations given.
Always use accessories that are approved by the
manufacturer with this product.
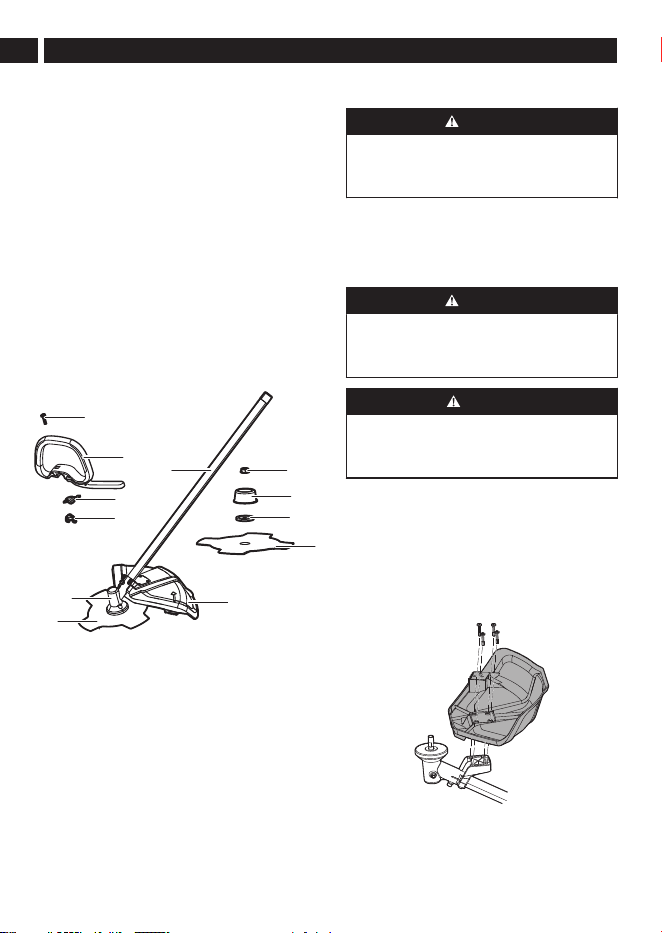
1.3 PRODUCT OVERVIEW
8
9
10
11
7
6
5
4
1
2
3
3
1
Brush cutter shaft
2
Gear box
3
Brush cutter blade
4
Guard
5
Support flange
6
Outer cap
7
Locknut
8
Bolt
9
Auxiliary handle
10
Lower bracket
11
Knob
1.4 CALIFORNIA PROPOSITION 65
WARNING
THIS PRODUCT CONTAINS OR EMITS A
CHEMICAL KNOWN TO THE STATE OF
CALIFORNIA TO CAUSE CANCER OR BIRTH
DEFECTS OR OTHER REPRODUCTIVE HARM.
2 SAFETY
2.1 SAFETY DEFINITIONS
Warnings, cautions, and notes are used to point out
especially important parts of the manual.
WARNING
THERE IS A RISK OF INJURY OR DEATH
FOR THE OPERATOR OR BYSTANDERS IF THE
INSTRUCTIONS IN THE MANUAL ARE NOT
OBEYED.
CAUTION
THERE IS A RISK OF DAMAGE TO THE
PRODUCT, OTHER MATERIALS, OR THE
ADJACENT AREA, IF THE INSTRUCTIONS IN
THE MANUAL ARE NOT OBEYED.
Note: Used to give more information that is necessary
in a given situation.
3 INSTALLATION
3.1 INSTALL THE BRUSH CUTTER GUARD
1. Place the brush cutter guard onto the shaft.
2. Securely tighten the screws with a Phillips head
screwdriver.
3.2 REMOVE THE BRUSH CUTTER GUARD
1. Remove the screws from the brush cutter guard
with the hex wrench.
2. Remove the brush cutter guard.
4
English
EN
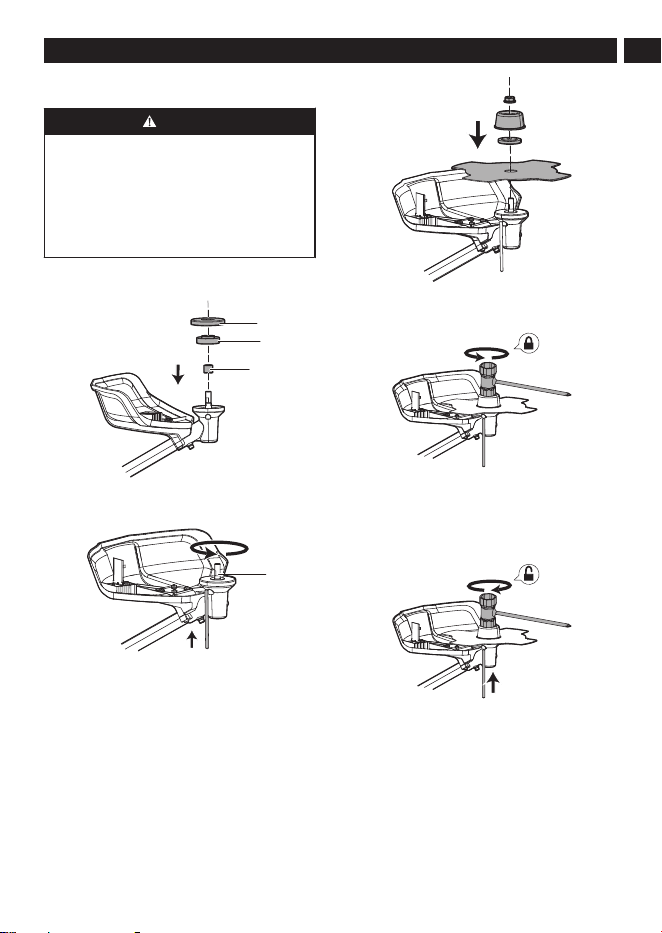
3.3 INSTALL THE BRUSH CUTTER BLADE
WARNING
• THE BRUSH CUTTER GUARD MUST BE
INSTALLED BEFORE INSTALLING THE BRUSH
CUTTER BLADE.
• WEAR PROTECTIVE GLOVES AND BE
CAREFUL WITH SHARP EDGES.
• USE THE SPECIFIED LOCKNUT INCLUDED
WITH THE BLADE, TO ASSEMBLE THE
BLADE.
1. Arrange the shaft sleeve (c), blade seat (b), anti-
winding plate (a) in the specified order.
a
b
c
2. Insert the metal rod into the specified gearbox
hole, and hold in place. Turn the center shaft (d)
until the metal rod blocks rotation of the shaft.
d
3. Arrange the brush cutter blade, support flange,
outer cap, and locknut on the center shaft in the
specified order.
4. Tighten the locknut counterclockwise with the
socket wrench, while firmly holding the metal rod
in place.
5. Remove the metal rod.
3.4 REMOVE THE BRUSH CUTTER BLADE
1. Insert the metal rod into the specified gearbox
hole, and hold in place. Turn the blade until the
metal rod blocks rotation of the blade.
2. Loosen the locknut clockwise and remove the
outer cap.
3. Remove the support flange and brush cutter
blade.
5
English
EN
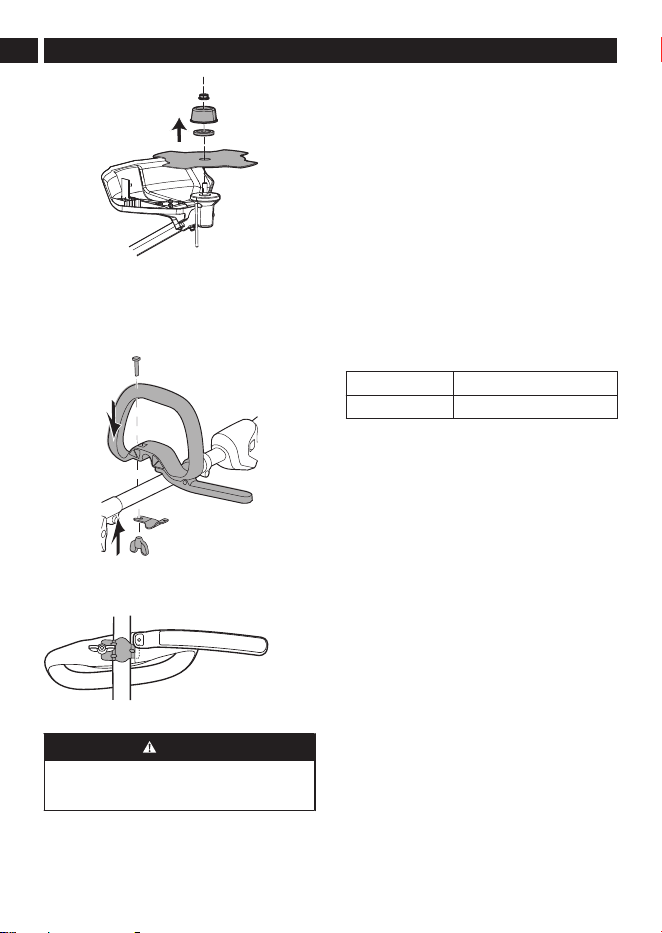
3.5 INSTALL THE AUXILIARY HANDLE
1. Remove the knob from the handle.
2. Attach the auxiliary handle on the shaft and set
the auxiliary handle in the comfortable position.
3. Put the bolt through the holes.
4. Insert the lower bracket into the slot on the
auxiliary handle.
5. Tighten the auxiliary handle with the knob.
4 TRANSPORTATION AND STORAGE
WARNING
REMOVE THE BATTERY PACK FROM THE
PRODUCT BEFORE TRANSPORTATION AND
STORAGE.
• Clean the product before storage.
• Make sure that the motor is not hot when you store
the product.
• Make sure that the product does not have loose
or damaged parts. If it is necessary, do these steps/
instructions:
• Replace the damaged parts.
• Tighten the bolts.
• Speak to a person of an approved service center.
• Store the product in a dry area.
• Make sure that children can't reach the product.
4.1 STORE THE PRODUCT
• Remove the battery from the product and charge it.
• Make sure that children cannot access the product.
• Keep the product away from corrosive agents such
as garden chemicals and de-icing salts.
• Secure the product during transportation to prevent
damage or injury. Clean and examine the product
for any damage.
5 TECHNICAL DATA
Cutting head Blade
Cutting width 10" (254mm)
Note: Fits all Greenworks attachment-capable string
trimmers with standard 1" (25.4mm) shaft diameter.
Compatible with Greenworks 24V×2, 40V, 60V and
80V original voltage platforms. Not for modified, third-
party or non-standard aftermarket machines.
6 LIMITED WARRANTY
Greenworks products and batteries are protected
against all defects in materials, parts, or workmanship
under normal use for a period of 3 years from the
shipping date or in-store purchase date.
At its own discretion, Greenworks can opt to repair,
replace, substitute with a comparable item, or issue a
refund for products that are determined to be defective
through normal use or that have been damaged during
shipment. Proof of purchase and product registration
is required. Replacement of products or parts subject
to normal wear and tear is the responsibility of the
customer.
This warranty is valid only for units which have been
maintained in accordance with the instructions found
in the operator manual supplied with the product; and
for units which have been registered in one of the
following ways:
Online: www.greenworkstools.com
Phone – 1-888-909-6757
If Greenworks accepts a return under warranty, you
can return the defective or damaged product only
after you call our Customer Care team and receive a
Return Authorization from Greenworks. You will also
6
English
EN

receive a refund for your original shipping charges,
and Greenworks will arrange and pay for your return
shipping charges. To request a Return Authorization,
please contact us at 1-888-909-6757.
6.1 ITEMS NOT COVERED BY WARRANTY
• Any part that has become inoperative due to
misuse, commercial use, abuse, neglect, accident,
improper maintenance, or alteration.
• The unit, if it has not been operated and/or
maintained in accordance with the operator manual.
• Normal wear, except as noted below:
• Routine maintenance items such as lubricants.
• Normal deterioration of the exterior finish due to
use or exposure.
• Any part/product, that has become inoperable
due to use with any non-Greenworks-branded
parts or batteries/chargers.
6.2 HELPLINE
Warranty service is available by calling our toll-free
helpline at: 1-888-909-6757.
6.3 SHIPPING
Transportation charges for the movement of any power
equipment unit or attachment are the responsibility of
the purchaser. It is the purchaser’s responsibility to
pay transportation charges for any part submitted for
replacement under this warranty unless such return is
requested in writing by Greenworks.
6.3.1 ADDRESS
USA address:
Greenworks North America, LLC
P.O. Box 1238, Mooresville, NC 28115, USA
Canada address:
Greenworks Tools Canada, Inc.
67 Toll Rd., Holland Landing, ON L9N 1H2
Mexico address:
TECNOLOGIA CAMPO Y JARDIN S.A. DE C.V.
ADMINISTRADORES No. 5336 A, COL. ARCOS DE
GUADALUPE, ZAPOPAN, JALISCO, C.P. 45037
7
English
EN

1 Description............................. 9
1.1 Description du produit.....................9
1.2 Utilisation prévue............................ 9
1.3 Description du produit.....................9
1.4 California Proposition 65.................9
2 Sécurité...................................9
2.1 Définitions de sécurité.................... 9
3 Installation.............................. 9
3.1 Installation du carter de la
débroussailleuse.............................9
3.2 Démontage de la protection
de la débroussailleuse.................. 10
3.3 Installation de la lame de la
débroussailleuse...........................10
3.4 Retirez la lame de la
débroussailleuse...........................10
3.5 Installation de la poignée
auxiliaire........................................11
4 Transport et stockage..........11
4.1 Rangement du produit...................11
5 Données techniques ........... 11
6 Garantie limitée.................... 11
6.1 Articles non couverts par la
garantie.........................................12
6.2 Ligne d’assistance téléphonique...12
6.3 Expédition..................................... 12
8
Français
FR
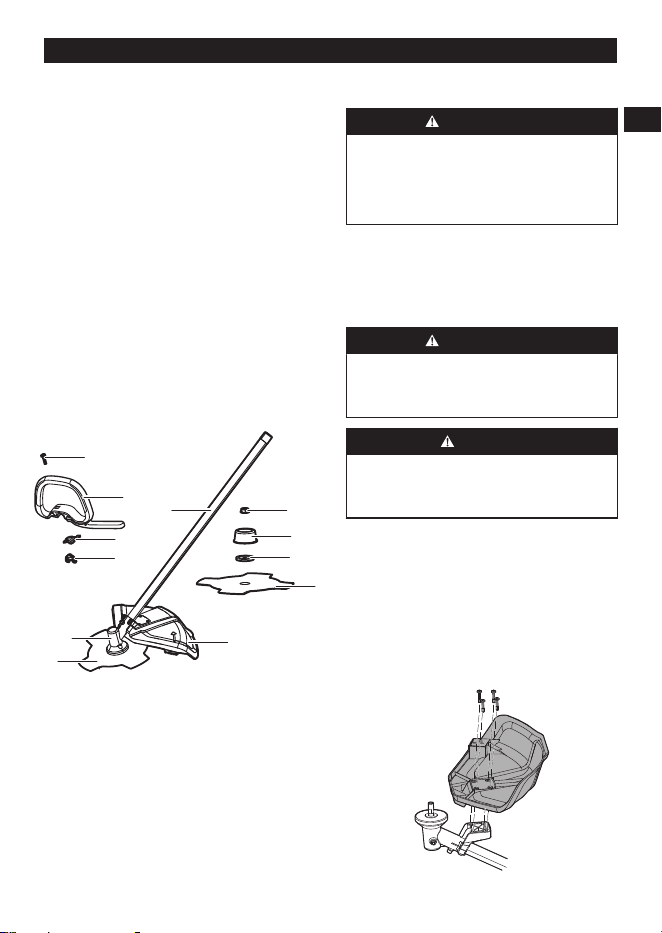
1 DESCRIPTION
1.1 DESCRIPTION DU PRODUIT
Ce produit est un accessoire débroussailleuse conçu
pour être utilisé avec une tête motrice compatible.
Nous nous engageons à améliorer continuellement
nos produits et nous nous réservons le droit d’en
modifier leur conception et leur apparence sans
préavis.
1.2 UTILISATION PRÉVUE
Ce produit est conçu pour couper, tailler et nettoyer
différents types de végétation à l'aide de la lame de
débroussailleuse. Ce produit ne doit pas être utilisé
pour d'autres tâches.
Veuillez noter que les réglementations nationales ou
locales peuvent régir l'utilisation de ce produit. Il est
important de se conformer à toute réglementation
applicable.
Utilisez toujours avec ce produit des accessoires
approuvés par le fabricant.
1.3 DESCRIPTION DU PRODUIT
8
9
10
11
7
6
5
4
1
2
3
3
1
Arbre de débroussailleuse
2
Boîte de vitesses
3
Lame de la débroussailleuse
4
Protection
5
Bride de support
6
Capuchon extérieur
7
Contre-écrou
8
Boulon
9
Poignée auxiliaire
10
Support inférieur
11
Molette
1.4 CALIFORNIA PROPOSITION 65
AVERTISSEMENT
CE PRODUIT CONTIENT OU ÉMET UN
PRODUIT CHIMIQUE CONNU DANS L'ÉTAT
DE CALIFORNIE COMME ÉTANT UNE
CAUSE DE CANCER, DE MALFORMATIONS
CONGÉNITALES OU D'AUTRES PROBLÈMES DE
REPRODUCTION.
2 SÉCURITÉ
2.1 DÉFINITIONS DE SÉCURITÉ
Les avertissements, précautions et notes mettent
l'accent sur des parties spécialement importantes du
manuel.
AVERTISSEMENT
L’OPÉRATEUR OU LES BADAUDS SONT
EXPOSÉS À UN RISQUE DE BLESSURES,
PARFOIS MORTELLES, SI LES INSTRUCTIONS
DU MANUEL NE SONT PAS RESPECTÉES.
ATTENTION
LE PRODUIT, LE RESTE DU MATÉRIEL OU LA
ZONE ADJACENTE EST EXPOSÉ À UN RISQUE
DE DOMMAGES SI LES INSTRUCTIONS DU
MANUEL NE SONT PAS RESPECTÉES.
Note : Pour un complément d’information nécessaire
dans une situation donnée.
3 INSTALLATION
3.1 INSTALLATION DU CARTER DE LA
DÉBROUSSAILLEUSE
1. Placez le protège-débris de la débroussailleuse
sur l'arbre.
2. Serrez solidement les vis avec un tournevis à tête
Phillips.
9
Français
FR
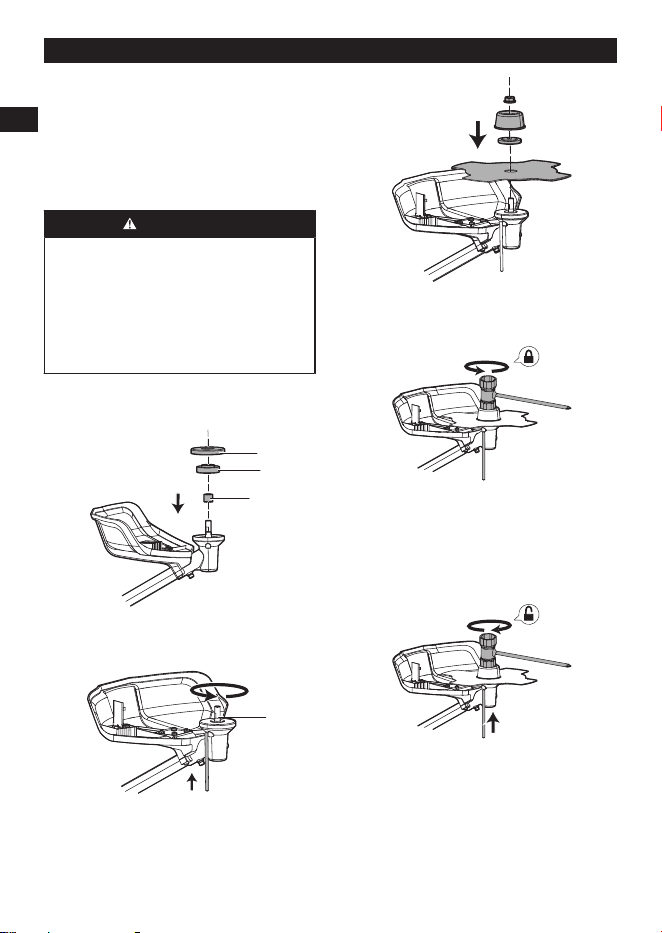
3.2 DÉMONTAGE DE LA PROTECTION DE LA
DÉBROUSSAILLEUSE.
1. Retirez les vis du protège-débris de la
débroussailleuse avec la clé hexagonale.
2. Retirez la protection de la débroussailleuse.
3.3 INSTALLATION DE LA LAME DE LA
DÉBROUSSAILLEUSE
AVERTISSEMENT
• LA PROTECTION DE LA DÉBROUSSAILLEUSE
DOIT ÊTRE INSTALLÉE AVANT D’INSTALLER
LA LAME DE LA DÉBROUSSAILLEUSE.
• PORTEZ DES GANTS DE PROTECTION
ET FAITES ATTENTION AUX ARÊTES
TRANCHANTES.
• UTILISEZ LE CONTRE-ÉCROU SPÉCIFIÉ,
FOURNI AVEC LA LAME, POUR ASSEMBLER
LA LAME.
1. Disposez le manchon de l'arbre (c), le siège de
la lame (b), la plaque anti-enroulement (a) dans
l'ordre spécifié.
a
b
c
2. Insérez la tige métallique dans le trou spécifique
du boîtier d'engrenage et maintenez-la en place.
Tournez l'arbre central (d) jusqu'à ce que la tige
métallique bloque la rotation de l'arbre.
d
3. Placez la lame de la débroussailleuse, la bride de
support, le capuchon extérieur et le contre-écrou
sur l'arbre central dans l'ordre spécifié.
4. Serrez le contre-écrou dans le sens inverse des
aiguilles d’une montre avec la clé à douille, tout
en maintenant fermement la tige métallique en
place.
5. Retirez la tige métallique.
3.4 RETIREZ LA LAME DE LA
DÉBROUSSAILLEUSE
1. Insérez la tige métallique dans le trou spécifié
du boîtier d'engrenage et maintenez-la en place.
Tournez la lame jusqu’à ce que la tige métallique
bloque la rotation de la lame.
2. Desserrez l'écrou dans le sens horaire et retirez
la ventouse extérieure.
3. Retirez la bride de support et la lame de la
débroussailleuse.
10
Français
FR
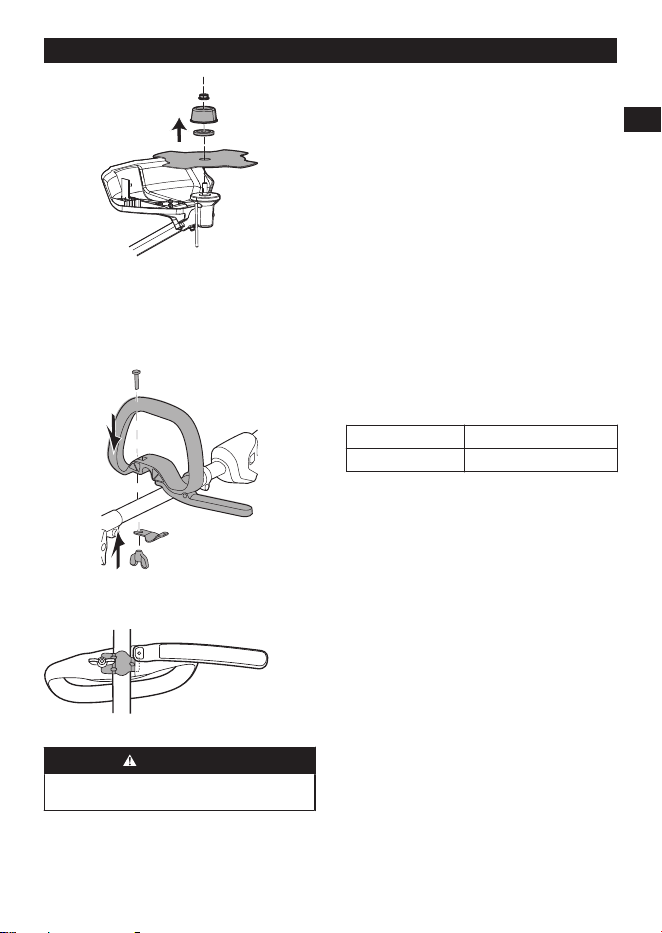
3.5 INSTALLATION DE LA POIGNÉE
AUXILIAIRE
1. Retirez le bouton de la poignée.
2. Fixez la poignée auxiliaire sur l'arbre et placez la
poignée auxiliaire dans une position confortable.
3. Introduisez le boulon dans les trous.
4. Insérez le support inférieur dans la fente de la
poignée auxiliaire.
5. Serrez la poignée auxiliaire à l’aide du bouton.
4 TRANSPORT ET STOCKAGE
AVERTISSEMENT
RETIREZ LA BATTERIE DU PRODUIT AVANT LE
TRANSPORT ET LE STOCKAGE.
• Nettoyez le produit avant de le ranger.
• Assurez-vous que le moteur n'est pas chaud
lorsque vous entreposez le produit.
• Assurez-vous que le produit ne comporte pas de
pièces détachées ou endommagées. Si nécessaire,
suivez les étapes / instructions suivantes :
• Remplacez les pièces endommagées.
• Serrez les boulons.
• Consultez un centre d’entretien agréé.
• Rangez la machine dans un endroit sec.
• Assurez-vous que les enfants ne peuvent pas
accéder au produit.
4.1 RANGEMENT DU PRODUIT
• Retirez la batterie du produit et chargez-la.
• Veillez à ce que les enfants ne puissent pas accéder
au produit.
• Conservez le produit à l'écart des agents corrosifs
tels que les produits chimiques de jardinage et les
sels de déglaçage.
• Sécurisez le produit pendant le transport afin
d'éviter tout dommage ou blessure. Nettoyez et
examinez le produit pour vérifier qu'il n'est pas
endommagé.
5 DONNÉES TECHNIQUES
Tête de coupe Lame
Largeur de coupe 10po (254mm)
Remarque : Compatible avec tous les coupe-bordures
à fil de Greenworks dotés d'un arbre standard de 1"
(25,4 mm). Compatible avec les plateformes d'origine
Greenworks 24V×2, 40V, 60V et 80V. Non compatible
avec des machines modifiées, tierces ou non standard
du marché secondaire.
6 GARANTIE LIMITÉE
Greenworks Les produits et batteries sont couverts
contre les défauts de matériaux, de pièces et de main-
d’œuvre pour un usage normal sur une période de 3
ans à compter de la date d'expédition ou de la date
d'achat en magasin.
À son entière discrétion, Greenworks peut choisir
de réparer, de remplacer, de substituer par un article
comparable ou d’émettre un remboursement pour
les produits déterminés comme défectueux dans le
cadre d’un usage normal ou endommagés durant
l’expédition. Une preuve d’achat et d’enregistrement
du produit est nécessaire. Le remplacement des
produits ou pièces soumis à une usure et un
vieillissement normaux incombe au client.
Cette garantie est valide uniquement pour les
unités ayant bénéficié d’un entretien conforme aux
instructions du manuel opérateur accompagnant le
produit et pour les unités dûment enregistrées selon
l’une des méthodes suivantes :
11
Français
FR

En ligne : www.greenworkstools.com
Téléphone - 1-888-909-6757
Si Greenworks accepte un retour sous garantie,
vous ne pouvez renvoyer le produit défectueux ou
endommagé qu'après avoir appelé notre service
clientèle et reçu une autorisation de retour de la
part de Greenworks. Vous recevrez également un
remboursement de vos frais d'expédition initiaux, et
Greenworks organisera et paiera les frais de retour.
Pour demander une autorisation de retour, veuillez
nous contacter à l'adresse suivante 1-888-909-6757.
6.1 ARTICLES NON COUVERTS PAR LA
GARANTIE
• Toute pièce devenue inopérante en raison d'une
mauvaise utilisation, d'une utilisation commerciale,
d'un abus, d'une négligence, d'un accident, d'un
entretien inapproprié ou d'une altération.
• L'unité si elle n'a pas été utilisée ou entretenue
conformément au manuel de l’opérateur.
• Usure normale, sauf comme indiqué ci-dessous :
• Articles d'entretien de routine comme les
lubrifiants.
• Détérioration normale du fini extérieur due à
l'utilisation ou à l'exposition.
• Tout produit/pièce devenu inopérant du fait de
l’usage de pièces ou batteries/chargeurs qui ne
seraient pas de marque Greenworks.
6.2 LIGNE D’ASSISTANCE TÉLÉPHONIQUE
Le service de garantie est accessible en appelant
notre ligne d'assistance téléphonique sans frais, au :
1-888-909-6757.
6.3 EXPÉDITION
Les frais de transport pour le déplacement de tout
équipement motorisé ou accessoire sont à la charge
de l'acheteur. Il incombe à l'acheteur de payer les
frais de transport pour toute pièce retournée pour
remplacement en vertu de la présente garantie, à
moins qu'un tel retour ne soit demandé par écrit par
Greenworks.
6.3.1 ADRESSE
Adresse aux États-Unis :
Greenworks North America, LLC
P.O. Box 1238, Mooresville, NC 28115, USA
Adresse au Canada :
Greenworks Tools Canada, Inc.
67 Toll Rd., Holland Landing, ON L9N 1H2
Adresse au Mexique :
TECNOLOGIA CAMPO Y JARDIN S.A. DE C.V.
ADMINISTRADORES No. 5336 A, COL. ARCOS DE
GUADALUPE, ZAPOPAN, JALISCO, C.P. 45037
12
Français
FR

1 Descripción.......................... 14
1.1 Descripción del producto.............. 14
1.2 Uso previsto..................................14
1.3 Descripción del producto.............. 14
1.4 Propuesta 65 de California........... 14
2 Seguridad............................. 14
2.1 Definiciones de seguridad............ 14
3 Instalación............................ 14
3.1 Instalación de la protección
de la guadaña............................... 14
3.2 Retirada de la protección de
la guadaña.................................... 15
3.3 Instalación de la cuchilla de
la guadaña.................................... 15
3.4 Retire la cuchilla del
cortacésped.................................. 15
3.5 Instale el mango auxiliar............... 16
4 Transporte y
almacenamiento...................16
4.1 Almacenamiento del producto...... 16
5 Datos técnicos..................... 16
6 Garantía limitada..................16
6.1 Artículos no cubiertos por la
garantía.........................................17
6.2 Línea de asistencia telefónica...... 17
6.3 Envío.............................................17
13
Español
ES
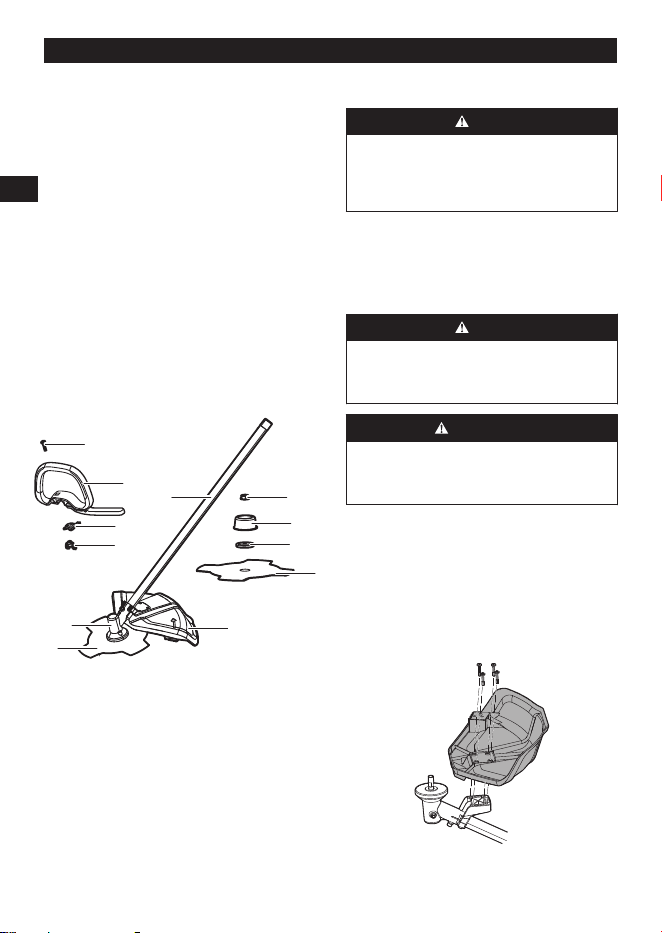
1 DESCRIPCIÓN
1.1 DESCRIPCIÓN DEL PRODUCTO
Este producto es un accesorio de desbrozadora
diseñado para ser utilizado con un cabezal motorizado
compatible.
Nos comprometemos a mejorar continuamente
nuestros productos, y nos reservamos el derecho de
modificar el diseño y la apariencia sin previo aviso.
1.2 USO PREVISTO
Este producto está diseñado para cortar, recortar y
despejar diferentes tipos de vegetación utilizando la
cuchilla de la desbrozadora. No debe utilizarse para
ninguna otra tarea.
Tenga en cuenta que los reglamentos nacionales o
locales pueden regular la utilización del producto. Es
importante cumplir todos los reglamentos indicados.
Utilice siempre accesorios que hayan sido aprobados
por el fabricante con este producto.
1.3 DESCRIPCIÓN DEL PRODUCTO
8
9
10
11
7
6
5
4
1
2
3
3
1
Eje de la desbrozadora
2
Caja de engranajes
3
Cuchilla de la desbrozadora
4
Protector
5
Brida de soporte
6
Tapa exterior
7
Contratuerca
8
Perno
9
Mango auxiliar
10
Soporte inferior
11
Pomo
1.4 PROPUESTA 65 DE CALIFORNIA
AVISO
ESTE PRODUCTO CONTIENE O EMITE UNA
SUSTANCIA QUÍMICA CONOCIDA EN EL
ESTADO DE CALIFORNIA COMO CAUSANTE
DE CÁNCER O DEFECTOS DE NACIMIENTO U
OTROS DAÑOS REPRODUCTIVOS.
2 SEGURIDAD
2.1 DEFINICIONES DE SEGURIDAD
Las advertencias, precauciones y notas se utilizan
para señalar partes especialmente importantes del
manual.
AVISO
EXISTE UN RIESGO DE LESIONES O MUERTE
PARA EL OPERARIO O PARA OTRAS
PERSONAS SI NO SE RESPETAN LAS
INSTRUCCIONES DEL MANUAL.
PRECAUCIÓN
EXISTE UN RIESGO DE DAÑOS AL PRODUCTO,
OTROS DAÑOS MATERIALES O EN LA ZONA
ADYACENTE SI NO SE RESPETAN LAS
INSTRUCCIONES DEL MANUAL.
Nota: Se utiliza para ofrecer más información de la
necesaria en una situación determinada.
3 INSTALACIÓN
3.1 INSTALACIÓN DE LA PROTECCIÓN DE LA
GUADAÑA
1. Coloque el protector del cortacésped en el eje.
2. Apriete firmemente los tornillos con un
destornillador Phillips.
14
Español
ES
3.2 RETIRADA DE LA PROTECCIÓN DE LA
GUADAÑA
1. Retire los tornillos del protector del cortacésped
con la llave hexagonal.
2. Retire el protector del cortacésped.
3.3 INSTALACIÓN DE LA CUCHILLA DE LA
GUADAÑA
AVISO
• LA PROTECCIÓN DE LA GUADAÑA DEBE
INSTALARSE ANTES DE INSTALAR LA
CUCHILLA DE LA GUADAÑA.
• LLEVE GUANTES DE PROTECCIÓN Y TENGA
CUIDADO CON LOS BORDES AFILADOS.
• UTILICE LA CONTRATUERCA ESPECIFICADA
INCLUIDA CON LA CUCHILLA, PARA
ENSAMBLAR LA CUCHILLA.
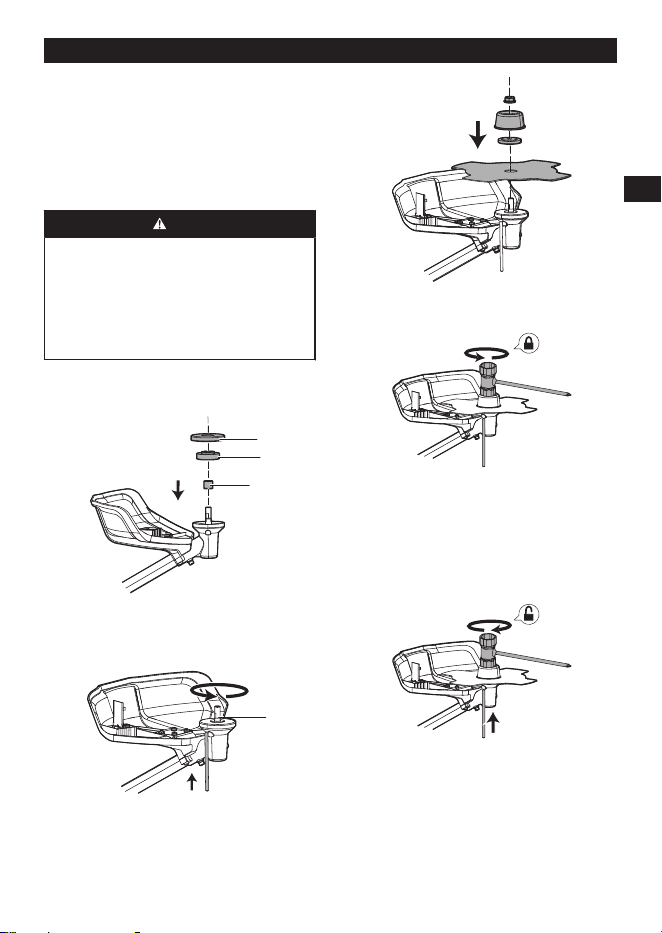
1. Coloque la manga del eje (c), el asiento de la
cuchilla (b) y la placa anti-enredo (a) en el orden
especificado.
a
b
c
2. Inserte la varilla de metal en el orificio
especificado de la caja de engranajes y
manténgala en su lugar. Gire el eje central (d)
hasta que la varilla de metal bloquee la rotación
del eje.
d
3. Coloque la cuchilla de la guadaña, la brida de
soporte, la tapa exterior y la contratuerca en el
eje central en el orden especificado.
4. Apriete la contratuerca en sentido antihorario con
la llave de tubo, mientras sujeta firmemente la
varilla metálica.
5. Retire la varilla metálica.
3.4 RETIRE LA CUCHILLA DEL
CORTACÉSPED.
1. Inserte la varilla de metal en el orificio
especificado de la caja de engranajes y
manténgala en su lugar. Gire la cuchilla hasta
que la varilla metálica bloquee la rotación de la
cuchilla.
2. Afloje la contratuerca en el sentido de las agujas
del reloj y retire el tapón exterior.
3. Retire la brida de soporte y la cuchilla del
cortacésped.
15
Español
ES
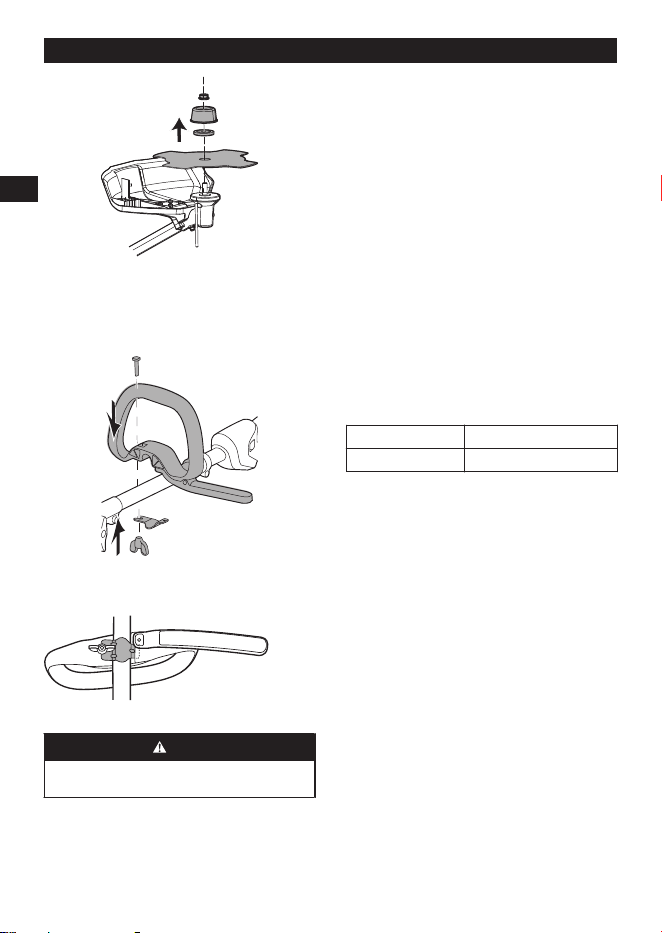
3.5 INSTALE EL MANGO AUXILIAR.
1. Retire la perilla del mango.
2. Coloque el mango auxiliar en el eje y ajuste el
mango auxiliar en una posición cómoda.
3. Introduzca el perno por los orificios.
4. Inserte el soporte inferior en la ranura del mango
auxiliar.
5. Apriete el asa auxiliar con el mando.
4 TRANSPORTE Y ALMACENAMIENTO
AVISO
RETIRE LA BATERÍA DEL PRODUCTO ANTES
DE TRANSPORTARLO Y ALMACENARLO.
• Limpie el producto antes de guardarlo.
• Asegúrese de que el motor no esté caliente cuando
guarde el producto.
• Asegúrese de que el producto no tenga piezas
sueltas o dañadas. Si es necesario, siga estos
pasos o instrucciones:
• Sustituya las piezas dañadas.
• Ajuste los pernos.
• Hable con el personal de un servicio técnico
autorizado.
• Guarde el producto en un lugar seco.
• Asegúrese de que los niños no puedan alcanzar el
producto.
4.1 ALMACENAMIENTO DEL PRODUCTO
• Retire la batería del producto y cárguela.
• Asegúrese de que los niños no puedan acceder al
producto.
• Mantenga el producto alejado de agentes corrosivos
como productos químicos de jardinería y sales
antihielo.
• Asegure el producto durante el transporte para
evitar daños o lesiones. Limpie y examine el
producto para detectar posibles daños.
5 DATOS TÉCNICOS
Cabezal de corte Cuchilla
Ancho de corte 10" (254mm)
Nota: Compatible con todos los desbrozadores de hilo
de Greenworks con eje estándar de 1" (25.4 mm) de
diámetro. Compatible con las plataformas de voltaje
originales de Greenworks 24V×2, 40V, 60V y 80V.
No apto para máquinas modificadas, de terceros o no
estándar del mercado de accesorios.
6 GARANTÍA LIMITADA
Greenworks los productos y las baterías están
protegidos contra cualquier defecto de materiales,
piezas o mano de obra en condiciones normales de
uso durante un periodo de 3 años a partir de la fecha
de envío o de compra en la tienda.
A su entera discreción Greenworks puede optar
por reparar, reemplazar, sustituir por un artículo
comparable o reembolsar los productos que se
consideren defectuosos por su uso normal o que
hayan sufrido daños durante el envío. Se requiere
prueba de compra y registro del producto. La
sustitución de productos o piezas sujetas a desgaste
normal es responsabilidad del cliente.
Esta garantía solo es válida para las unidades
que hayan sido mantenidas de acuerdo con las
instrucciones que se encuentran en el manual del
operario suministrado con el producto; y para las
unidades que hayan sido registradas mediante una de
las siguientes maneras:
16
Español
ES

En línea: www.greenworkstools.com
Teléfono – 1-888-909-6757
Si Greenworks acepta una devolución en garantía,
puede devolver el producto defectuoso o dañado solo
después de llamar a nuestro equipo de Atención al
Cliente y recibir una Autorización de Devolución de
Greenworks. También recibirá un reembolso por sus
gastos de envío originales, y Greenworks organizará
y pagará los gastos de envío de su devolución. Para
solicitar una Autorización de Devolución, póngase en
contacto con nosotros en 1-888-909-6757.
6.1 ARTÍCULOS NO CUBIERTOS POR LA
GARANTÍA
• Cualquier pieza que no funcione debido a mal
uso, uso comercial, abuso, negligencia, accidente,
mantenimiento inadecuado o alteración.
• La unidad, si no ha sido utilizada o mantenida de
acuerdo con el manual del operario.
• Desgaste normal, excepto en lo indicado a
continuación:
• Artículos de mantenimiento de rutina tales como
lubricantes.
• Deterioro normal del acabado exterior debido al
uso o la exposición.
• Cualquier pieza/producto que no funcione debido
a su uso con piezas o baterías/cargadores que
no sean de la marca Greenworks.
6.2 LÍNEA DE ASISTENCIA TELEFÓNICA
Puede contactar con el servicio de garantía llamando
a nuestra línea de asistencia telefónica gratuita a:
1-888-909-6757.
6.3 ENVÍO
Los costes de transporte por el desplazamiento de
cualquier unidad o accesorio de equipos eléctricos son
responsabilidad del comprador. Es responsabilidad del
comprador pagar los costes de transporte de cualquier
pieza enviada para su sustitución bajo esta garantía, a
menos que dicha devolución sea solicitada por escrito
por Greenworks.
6.3.1 DIRECCIÓN
Dirección de EE. UU.:
Greenworks North America, LLC
P.O. Box 1238 , Mooresville, NC 28115, EE. UU.
Dirección de Canadá:
Greenworks Tools Canada, Inc.
67 Toll Rd., Holland Landing, ON L9N 1H2
Dirección en México:
TECNOLOGIA CAMPO Y JARDIN S.A. DE C.V.
ADMINISTRADORES No. 5336 A, COL. ARCOS DE
GUADALUPE, ZAPOPAN, JALISCO, C.P. 45037
17
Español
ES



www.greenworkstools.com
Rev B
P0807736-00