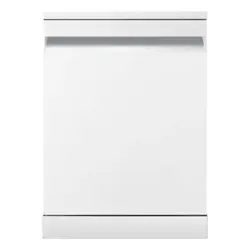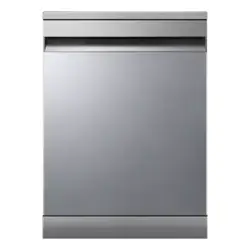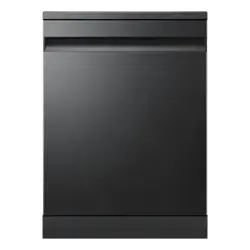
Dishwasher
User manual
DW70H75****
Untitled-3 1Untitled-3 1 2026-04-23 4:34:352026-04-23 4:34:35
English2
Contents
Safety information 4
What you need to know about safety instructions 4
Important safety symbols 4
Important safety precautions 5
Instructions when using your dishwasher 7
Instructions for protecting your children 8
Instructions for installing your dishwasher 8
Product overview 11
Dishwasher at a glance 11
Preparing the installation 12
Installation requirements 12
SmartThings 14
Wi-Fi connection 14
Download 14
Log in 14
Wi-Fi Off 14
To register your device to SmartThings 14
Dishwasher app 15
SmartThings functions 16
Before you start 18
Unsuitable items for the dishwasher 18
Basic use of racks 19
Detergent compartment 24
Rinse aid compartment 26
Touchpad responsiveness 27
Operation status indicators 27
Untitled-3 2Untitled-3 2 2026-04-23 4:34:352026-04-23 4:34:35
English 3
Operations 28
Control panel 28
Icon descriptions 29
Cycle overview 30
Operating a cycle 32
Settings 33
Special features 34
Open Source Announcement 35
Maintenance 36
Cleaning 36
Long-term care 40
Troubleshooting 41
Checkpoints 41
Information codes 44
Appendix 45
Cycle chart 45
Transportation/relocation 46
Protection against frost 46
Disposing the dishwasher and helping the environment 46
Specifications 47
For standard test 48
DW70H75**** models 48
Untitled-3 3Untitled-3 3 2026-04-23 4:34:352026-04-23 4:34:35
English4
Safety information
Congratulations on your new Samsung dishwasher. This manual contains important information on the
installation, use, and care of your appliance. Please take time to read this manual to take full advantage of
your dishwasher’s many benefits and features.
What you need to know about safety instructions
Please read this manual thoroughly to ensure that you know how to safely and efficiently operate the
extensive features and functions of your new appliance and retain it at a safe place near the appliance for
your future reference. Use this appliance only for its intended purpose as described in this user manual.
Warning and important safety instructions in this manual do not cover all possible conditions and
situations that may occur. It is your responsibility to use common sense, caution, and care when installing,
maintaining, and operating your dishwasher.
Because the following operating instructions cover various models, the characteristics of your dishwasher
may differ slightly from those described in this manual and not all warning signs may be applicable. If you
have any questions or concerns, contact your nearest service centre or find help and information online at
www.samsung.com.
Important safety symbols
What the icons and signs in this user manual mean:
WARNING
Hazards or unsafe practices that may result in severe personal injury, death, or property damage.
CAUTION
Hazards or unsafe practices that may result in personal injury or property damage.
NOTE
Indicates that a risk of personal injury or material damage exists.
These warning symbols are here to prevent injury to you and others. Please follow them explicitly.
Keep these instructions in a safe place and ensure that new users are familiar with the content. Pass them
on to any future owner.
Untitled-3 4Untitled-3 4 2026-04-23 4:34:362026-04-23 4:34:36
English 5
Important safety precautions
To reduce the risk of fire, electric shock, or injury to persons when using
your appliance, follow basic precautions, including the following:
1. This appliance is not intended for use by persons (including children)
with reduced physical, sensory or mental capabilities, or lack of
experience and knowledge, unless they have been given supervision
or instruction concerning use of the appliance by a person
responsible for their safety.
2. For use in Europe: This appliance can be used by children aged from
8 years and above and persons with reduced physical, sensory or
mental capabilities or lack of experience and knowledge if they have
been given supervision or instruction concerning use of the appliance
in a safe way and understand the hazards involved. Children shall not
play with the appliance. Cleaning and user maintenance shall not be
made by children without supervision.
3. Children should be supervised to ensure that they do not play with
the appliance.
4. If the supply cord is damaged, it must be replaced by the
manufacturer, its service agent or similarly qualified persons in order
to avoid a hazard.
5. The new hose-sets supplied with the appliance are to be used and
that old hose-sets should not be reused.
6. For appliances with ventilation openings in the base, a carpet must
not obstruct the openings.
Untitled-3 5Untitled-3 5 2026-04-23 4:34:362026-04-23 4:34:36
Safety information
English6
7. Children of less than 3 years should be kept away from the appliance
unless continuously supervised.
8. CAUTION: In order to avoid a hazard caused by inadvertent resetting
of the thermal cut-out, this appliance must not be supplied through
an external switching device, such as a timer, or connected to a circuit
that is regularly switched on and off by the utility.
9. WARNING: Knives and other utensils with sharp points must be
loaded in the basket with their points down or placed in a horizontal
position.
10. The door should not be left in the open position since this could
present a tripping hazard.
This appliance is solely intended to be used in household and similar
applications such as:
• Staff kitchen areas in shops, offices, and other working environments;
• Farm houses;
• Clients in hotels, motels, and other residential type environments;
• Bed and breakfast type environments.
Untitled-3 6Untitled-3 6 2026-04-23 4:34:362026-04-23 4:34:36
English 7
Instructions when using your dishwasher
It must only be used as an appliance as specified in this user manual, for cleaning domestic crockery and
cutlery. Any other usage is not supported by the manufacturer and could be dangerous.
The manufacturer cannot be held liable for damage resulting from incorrect use, operation, and
installation.
Do not use solvents in the dishwasher. Danger of explosion.
Do not inhale or ingest dishwasher detergent. Dishwasher detergents contain irritant or corrosive
ingredients which can cause burning in the nose, mouth and throat if swallowed, or inhibit breathing.
Consult a doctor immediately if detergent has been swallowed or inhaled.
Avoid leaving the door open unnecessarily, as you could trip over it.
Do not sit or lean on the opened door. This could cause the dishwasher to tip and get damaged, and you
could get injured.
Only use detergent and rinse aid formulated for domestic dishwashers. Do not use washing-up liquid.
Do not use any strong acid cleaning agent.
Do not fill the rinse aid compartment with powder or liquid detergent. This will cause serious damage to
the compartment.
In an appliance with a cutlery basket (depending on the model), cutlery is cleaned and dried better if placed
efficiently in the basket with the handles downwards. However, to avoid the risk of injury, place knives and
forks etc. with the handles upwards.
Plastic items which cannot withstand being washed in hot water, such as disposable plastic containers,
or plastic cutlery and crockery should not be cleaned in the dishwasher. The high temperatures in the
dishwasher may cause them to melt or lose shape.
On models with the Delay Start function, make sure that the detergent compartment is dry before
adding detergent. Wipe dry if necessary. The detergent will clog if poured into a damp detergent
compartment and may not be thoroughly dispersed.
Always be caution when using remote control. You may be exposed to security risks during use, and usage-
related problems may also arise because of Internet connectivity issues or incorrect settings.
Please do not operate the product with living beings (such as a person or an animal) or items that may
cause water leakage or explosion.
Untitled-3 7Untitled-3 7 2026-04-23 4:34:362026-04-23 4:34:36
Safety information
English8
Instructions for protecting your children
This appliance is not a toy! To avoid the risk of injury, keep children well away and do not allow them to play
in or around the dishwasher or to use the controls. They will not understand the potential dangers posed by
it. They should be supervised whenever you are working in the kitchen. There is also a danger that children
playing might shut themselves in the dishwasher.
Cleaning and user maintenance shall not be made by children without supervision.
Older children may only use the dishwasher when its operation has been clearly explained to them and they
are able to use it safely, recognising the dangers of misuse.
KEEP CHILDREN AWAY FROM DETERGENTS!
Dishwasher detergents contain irritant and corrosive ingredients which can cause burning in the mouth,
nose and throat if swallowed, or inhibit breathing.
Keep children away from the dishwasher when the door is open. There could still be detergent residues in
the cabinet.
Consult a doctor immediately if your child has swallowed or inhaled detergent.
Instructions for installing your dishwasher
Before setting up the appliance, check it for any externally visible damage. Under no circumstances should
you use a damaged appliance. A damaged appliance can be dangerous.
The dishwasher must only be plugged into the electricity supply through a suitable switched socket. The
electrical socket must be easily accessible after the dishwasher is installed so that it can be disconnected
from the electricity supply at any time. (Refer to the “Dishwasher at a glance” section on page 11.)
There must be no electrical sockets behind the dishwasher. The Danger of overheating and fire risk if the
dishwasher were to be pushed up against a plug. After the installation is complete, make sure the power
plug is not bent or damaged.
The dishwasher must not be installed under a hob. The high radiant temperatures which are sometimes
generated by a hob could damage the dishwasher. For the same reason, it should not be installed next to
open fires or other appliances which give off heat, such as heaters etc.
Do not connect the dishwasher to the mains supply until it has been fully installed and any adjustment has
been made to the door springs.
Before connecting the appliance, check that the connection data on the data plate (voltage and connected
load) match the mains electricity supply. If in any doubt, consult a qualified electrician.
The electrical safety of this appliance can only be guaranteed when continuity is complete between it
and an effective grounding system. It is most important that this basic safety requirement is present and
regularly tested and where there is any doubt the electrical system in the house should be checked by a
qualified electrician.
Untitled-3 8Untitled-3 8 2026-04-23 4:34:362026-04-23 4:34:36
English 9
The manufacturer cannot be held liable for the consequences of an inadequate grounding system (for
example electric shock). Do not connect the ground wire to plastic plumbing, gas lines, or hot water pipes.
Improperly connected grounding conductors may cause electric shock.
Do not connect the appliance to the mains electricity supply by a multi-socket unit or an extension lead.
These do not guarantee the required safety of the appliance (for example danger of overheating).
This appliance may only be installed in mobile installations such as ships if a risk assessment of the
installation has been carried out by a suitably qualified engineer.
The plastic housing of the water connection contains an electrical component. The housing must not be
submerged in water.
There are electrical wires in the hose of Aqua-Stop. Never cut the water inlet hose, even if it is too long.
Installation, maintenance and repairs may only be carried out by a suitably qualified and competent
person in strict accordance with current national and local safety regulations. Repairs and other work by
unqualified persons can be dangerous. The manufacturer cannot be held liable for unauthorised work.
The integrated waterproof system offers protection from water damage, provided the following conditions
are met:
• The dishwasher is correctly installed and plumbed in.
• The dishwasher is properly maintained and parts are replaced where it can be seen that this is
necessary.
• The stopcock/supply valve has been turned off when the appliance is not used for a longer period of
time (for example during holidays).
• The waterproof system will work even if the appliance is switched off. However, the appliance must
remain connected to the electricity supply.
A damaged appliance can be dangerous. If the dishwasher gets damaged, switch it off at the mains and call
your dealer or the service department.
Unauthorised repairs could result in unforeseen dangers for the user, for which the manufacturer cannot
accept liability. Repairs should only be undertaken by an approved service technician.
Faulty components must only be replaced by original spare parts. Only when these parts are fitted can the
safety of the appliance can be guaranteed.
Always disconnect the dishwasher from the electrical supply for maintenance work (Power off the wall
socket and remove the plug).
If the connection cable is damaged, it must be replaced with a special cable available from the
manufacturer. For safety reasons, this must only be fitted by the service department or an authorised
service technician.
In countries where there are areas which may be subject to infestation by cockroaches or other vermin, pay
particular attention to keeping the appliance and its surroundings in a clean condition at all times. Any
damage which may be caused by cockroaches or other vermin will not be covered by the guarantee.
Untitled-3 9Untitled-3 9 2026-04-23 4:34:362026-04-23 4:34:36
Safety information
English10
In the event of a fault or for cleaning purposes, the appliance is only completely isolated from the electricity
supply when:
• it is switched off at the wall socket and the plug is withdrawn, or
• it is switched off at the mains, or
• the mains fuse is disconnected, or
• the screw-out fuse is removed (in countries where this is applicable).
Do not make any alterations to the appliance, unless authorised to do so by the manufacturer.
Never open the casing/housing of the appliance. Tempering with electrical connections or components and
mechanical parts is highly dangerous and can cause operational faults or electric shock.
While the appliance is under guarantee, repairs should only be undertaken by a service technician
authorised by the manufacturer. Otherwise, the guarantee will be invalidated.
When installing the product, make sure there is space at the top, left, right and back of the product to
ensure proper ventilation. If there is insufficient space between the product and the sink, it may damage
the sink or allow mould to grow.
Make sure that your dishwasher’s hardness level setting is correct as your area.
Please consult www.samsung.com/support for more information about materials and repairs.
Untitled-3 10Untitled-3 10 2026-04-23 4:34:362026-04-23 4:34:36
English 11
Product overview
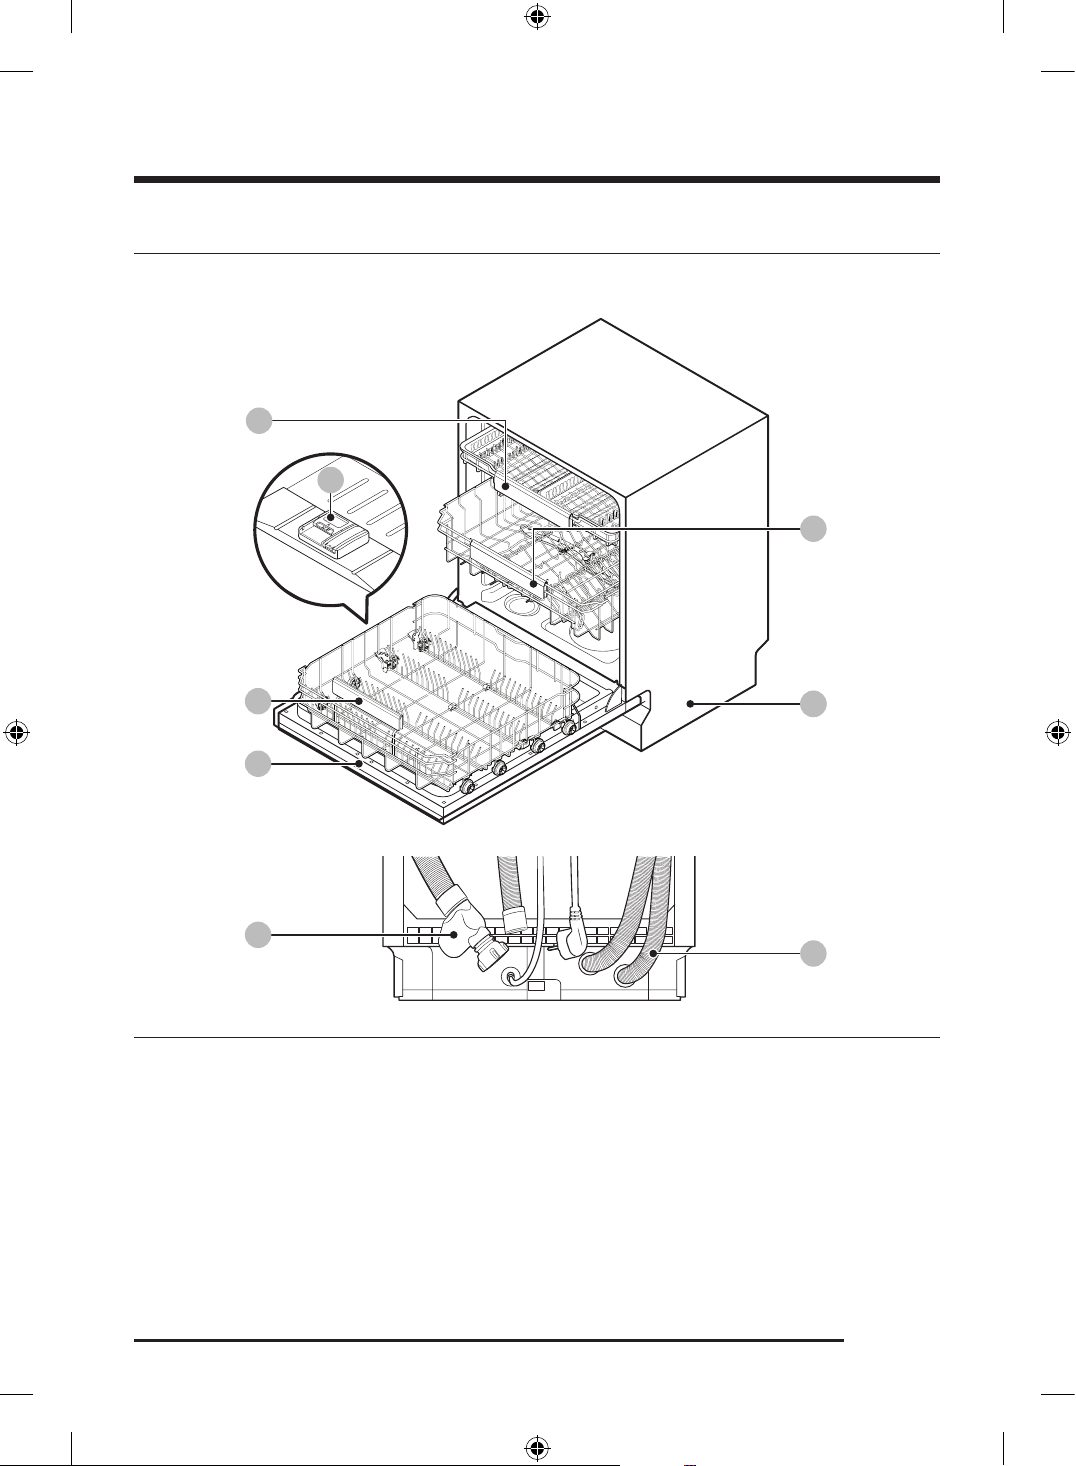
Dishwasher at a glance
DW70H75**** models
06
03
05
04
01
02
08
07
01 Cutlery rack 02 Upper rack 03 Lower rack
04 Dispenser 05 Door 06 Base
07 Water hose 08 Drain hose
Untitled-3 11Untitled-3 11 2026-04-23 4:34:372026-04-23 4:34:37
English12
Preparing the installation
Installation requirements
To prevent a risk of fire, electric shock, or personal
injury, all wiring and grounding must be done by a
qualified technician.
Power supply
An individual 220-240 V~, 50 Hz branch circuit
that is dedicated to the dishwasher.
WARNING
• Do not use an extension cord.
• You must only use the power plug that comes
with the dishwasher.
• After the installation is complete, make sure
the power plug is not bent or damaged.
Grounding
For permanent grounding, the dishwasher must
be properly grounded to a grounded metal
or permanent wiring system. The grounding
conductor must be run with the circuit conductors
and then connected to the grounding terminal or
lead on the dishwasher.
WARNING
• Do not connect the ground wire to plastic
plumbing, gas lines, or hot water pipes.
Improperly connected grounding conductors
may cause electric shock.
• Do not modify the power plug of the
dishwasher. If the power plug does not fit
the outlet, have a proper outlet installed by a
qualified electrician.
Water supply
• The water supply line must support water
pressures between 0.04 and 1.0 MPa.
• Water temperatures must be lower than 60 °C.
• The stopcock / supply valve with a 3/4” male
thread must be installed for the water supply
connection.
To reduce the risk of leaks:
• Make sure water taps are easily accessible.
• Turn the water supply valve off when the
dishwasher is not in use.
• Check for any leaks at the water hose fittings
on a regular basis.
• To stop any leak, seal the water line
connections and joints using Teflon tape or a
sealing compound.
Aqua Stop
The Aqua Stop is an electrical component that is
designed to prevent water leaks. The Aqua Stop
is attached to the water hose and automatically
cuts off the water flow in the event of damage to
the hose.
CAUTION
• Handle the Aqua Stop with care.
• Do not kink or twist the water hose connected
to the Aqua Stop. If the Aqua Stop is damaged,
shut off the water taps and unplug the power
plug immediately. Then, contact a local
Samsung customer centre or a qualified
technician.
Untitled-3 12Untitled-3 12 2026-04-23 4:34:372026-04-23 4:34:37
English 13
Drain
If you are using a drain system dedicated to the
dishwasher, connect the drain hose to a drain
system that is between 300 mm and 700 mm off
the ground. Connecting the drain hose to a drain
system more than 700 mm off the ground can
cause the drained water to flow backward.
Flooring
For safety, install the dishwasher on a solidly
constructed floor. Wooden floors may need to be
reinforced to minimise vibrations. Avoid installing
on carpet or soft tiles. Carpeting and soft tile may
cause vibrations and may cause your dishwasher
to move slightly while operating.
WARNING
Do not install the dishwasher on a poorly
supported structure.
• Make sure the dishwasher is level using the
height-adjustable feet.
• When levelling is complete, check if the door
opens and closes properly.
Ambient temperature
Do not install the dishwasher in an area exposed
to freezing temperatures. The dishwasher always
retains some water in the water valve, pump,
and hose. If the water freezes in the dishwasher
or hoses, it may damage the dishwasher and its
components.
Untitled-3 13Untitled-3 13 2026-04-23 4:34:372026-04-23 4:34:37
English14
SmartThings
Wi-Fi connection
On your phone, go to Settings and connect to your home Wi-Fi network.
Download
On an app market (Google Play Store, Apple App Store, Samsung Galaxy Apps), find the SmartThings app
with a search term of “ SmartThings ”. Download and install the app on your device.
Log in
You must first log into SmartThings with your Samsung account. To create a new Samsung account, follow
the instructions on the app. You don’t need a separate app to create your account.
NOTE
If you have a Samsung account, use the account to log in. A registered Samsung phone user automatically
logs in.
Wi-Fi Off
To manually turn the Wi-Fi off, tap and hold Sanitize and Smart Control for 3 seconds at the same time.
To register your device to SmartThings
1. Make sure your phone is connected to a wireless network.
2. Select to run SmartThings on your phone.
3. When a message of “ A new device is found. ”, select Add .
4. If no message appears, select + and select your dishwasher in a list of devices available. If your
dishwasher is not listed, select Device Type > Specific Device Model, and then add your dishwasher
manually.
5. Follow the onscreen instructions to complete the connection process for your dishwasher.
6. When the process is complete, your dishwasher will appear in the list of devices on your SmartThings
App.
7. For iPhone users to access the SmartThings app, they need to scan the QR code or enter the serial
number provided below the QR code.
Untitled-3 14Untitled-3 14 2026-04-23 4:34:372026-04-23 4:34:37
English 15
Dishwasher app
Integrated control: You can monitor and control your dishwasher both at home and on the go.
• Select the dishwasher icon on SmartThings . The dishwasher page appears.
• Check the operation status or notifications related to your dishwasher, and change options or settings if
necessary.
NOTE
• This device is designed for household use only (Class B), and can be used in all residential areas.
• This device may cause wireless interference, and neither the manufacturer nor the installer of this
device can provide a safety measure of any kind.
• Recommended encryption methods are WPA/TKIP and WPA2/AES . Newly developed Wi-Fi protocols or
unapproved Wi-Fi protocols are not supported.
• The reception sensitivity of a wireless network may be affected by surrounding wireless environments.
• If your Internet provider has registered the MAC address of your PC or the modem module for
permanent use, your Samsung dishwasher fails to connect to the Internet. If this happens, contact your
Internet provider.
• The Internet firewall may interrupt your Internet connection. If this happens, contact your Internet
provider.
• If Internet failure continues after following the measurement of your Internet provider, contact a local
Samsung retailer or service centre.
• For installing wired and wireless routers, refer to the user manual of the router you use.
• Samsung dishwasher supports the Wi-Fi 2.4 GHz protocols.
• Samsung dishwasher supports the IEEE802.11 b/g/n (2.4 GHz), Soft-AP protocols. ( IEEE802.11n is
recommended)
• An unapproved wired/wireless router may fail to connect to Samsung dishwasher.
• The SmartThings app is available on Android and iOS devices. The app is optimised for Samsung phones.
• Some functions of the app may operate differently on third-party devices.
• The app is subject to change without notice for improved performance.
• In addition, further updates on the app or the function in the app may stop caused by usability and
security reasons, even if updates are currently supported on your OS.
• Your device uses non-harmonised frequency and is intended for use in all European countries. The
WLAN can be operated in the EU without restriction indoors, but cannot be operated outdoors in France.
• You can easily install the SmartThings app or use the product with your phone by scanning the QR code
on the attached label.
• Hereby, Samsung Electronics, declares that the radio equipment type appliance is in compliance with
Directive 2014/53/EU. The full text of the EU declaration of conformity is available at the following
internet address: The official Declaration of conformity may be found at http://www.samsung.com, go
to Support > Search Product Support and enter the model name.
• The overall standby power consumption is 2.0 W in which all network ports stay in “on” condition.
- Data determined according to standard EN 50564 and Regulation (EC) No 1275/2008
Untitled-3 15Untitled-3 15 2026-04-23 4:34:372026-04-23 4:34:37
English16
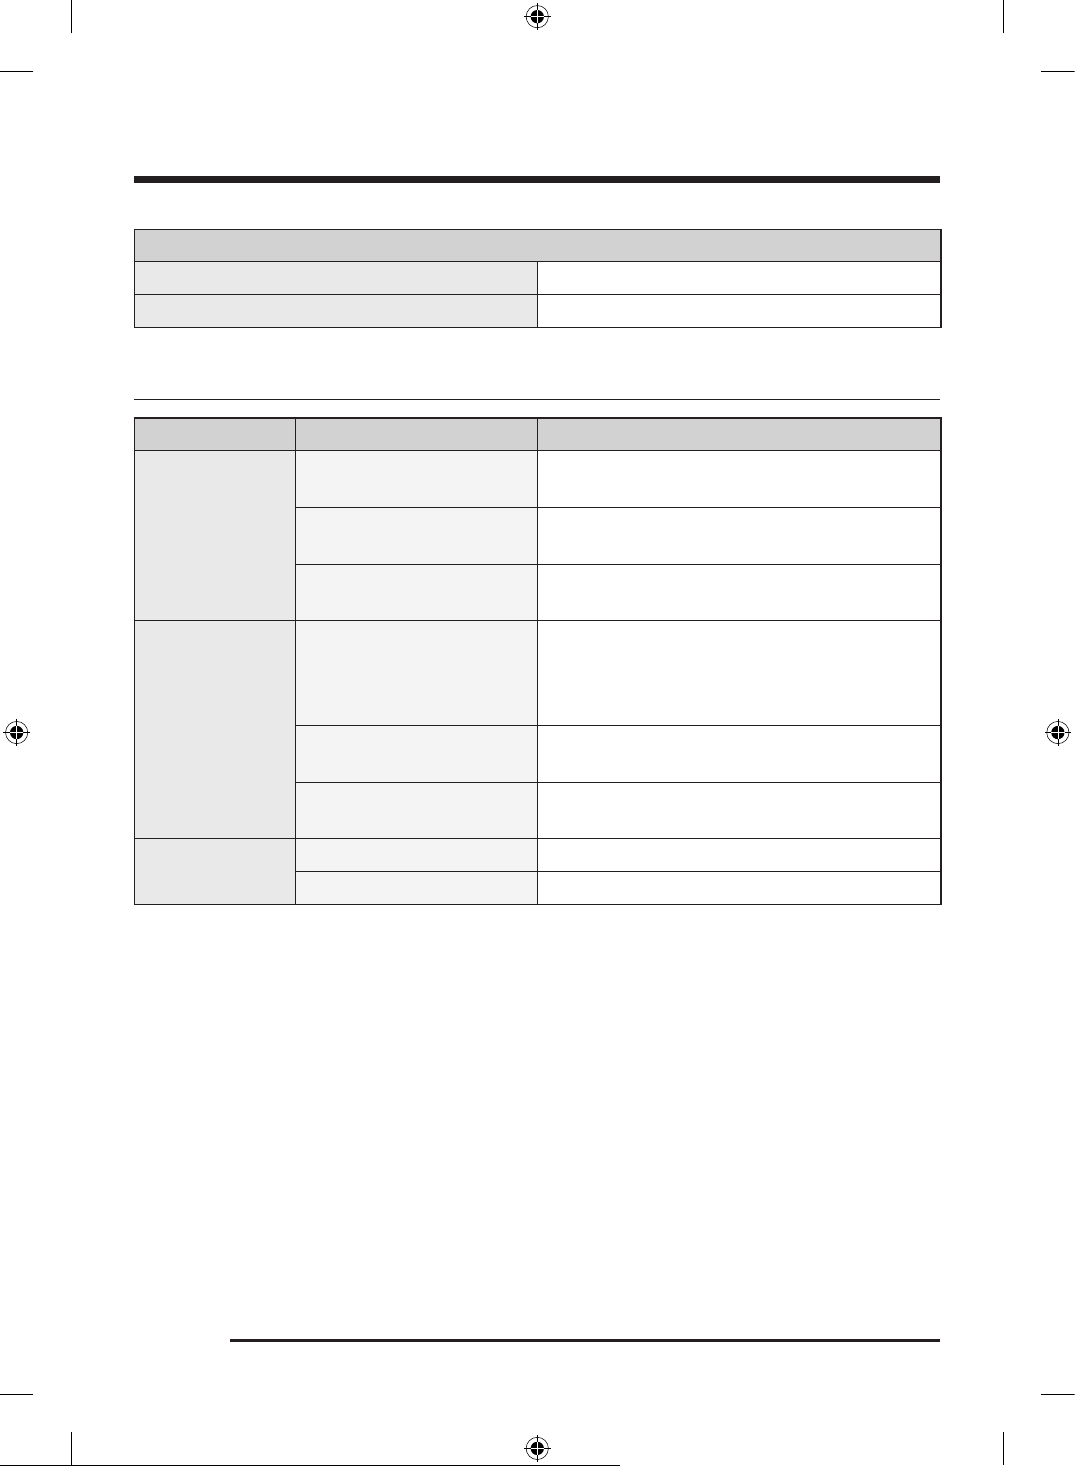
Wi-Fi
Frequency range Transmitter power (Max)
2412 MHz - 2472 MHz 20 dBm
SmartThings functions
Category Function Description
Monitoring
Washing status
You can check the current cycle and its options,
and the remaining cycle time.
Smart Control
The Smart Control status is shown for the
dishwasher.
Energy monitoring
Use this to monitor the energy consumption
status.
Control
Start / Pause / Cancel
Select a cycle and necessary options, and then
select Start / Pause / Cancel to start an operation,
to stop temporarily, or to cancel the current
operation.
My Favorite
Add frequently used cycles and options to My
Favorite for later use.
Delay Start
Set Delay Start to start the cycle at a scheduled
time (up to 24 hours).
Notification
Cycle completed Notifies you when the current cycle is complete.
Detergent Notifies you if the dishwasher is out of rinse aid.
Untitled-3 16Untitled-3 16 2026-04-23 4:34:372026-04-23 4:34:37
English 17
WSN
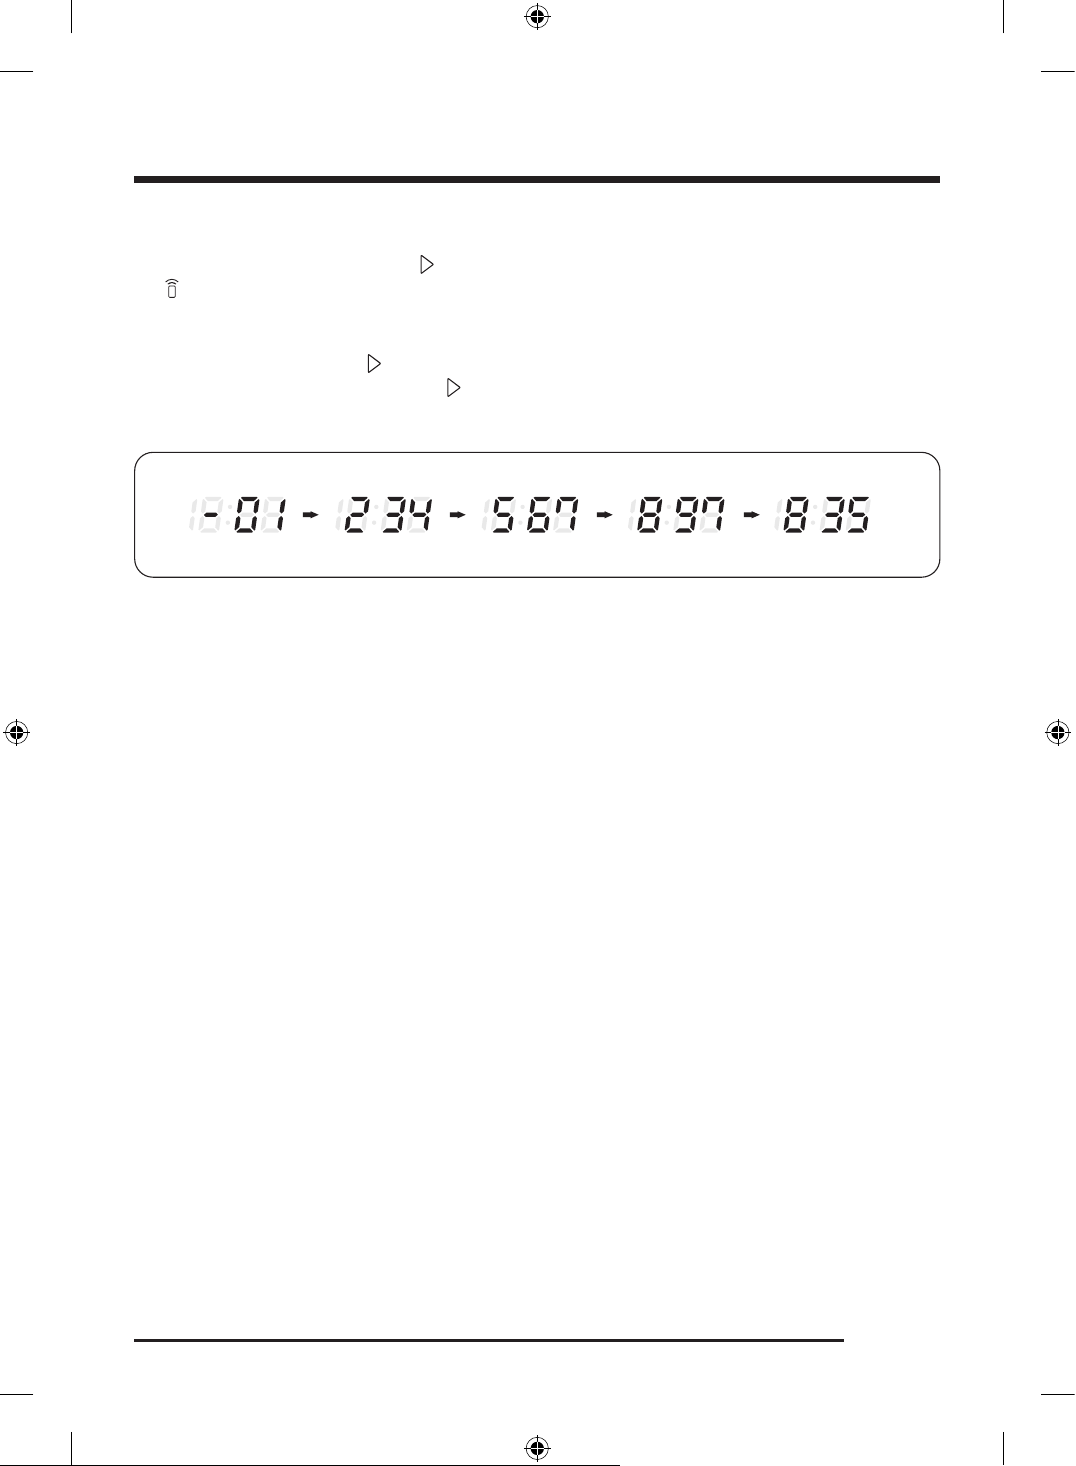
1. How to access: tap and hold Start in AP mode. (To enter the AP mode, tap and hold Smart Control
for 3 seconds.)
2. Display format
- After receiving WSN data from WiFi module, “-” + first 2 digits are diplayed and next 3 digits are
diplayed by every Start button tapping.
- Beep is generated when the Start button is tapped for displaying digits.
- Display example : “-” for the starting display
ex) WSN : “ 01234567897835 ”
Untitled-3 17Untitled-3 17 2026-04-23 4:34:382026-04-23 4:34:38
English18
Before you start
Unsuitable items for the dishwasher
WARNING
Only wash items such as glass, porcelain, and cutlery which the manufacturer declares as dishwasher safe.
Do not wash aluminium (for example grease filters). The dishwasher may damage aluminium, or in extreme
cases, cause a severe chemical reaction.
Do not wash the following items in the dishwasher.
• Copper, brass, tin, ivory, and aluminium items or items with adhesive
• Non-heat resistant plastics
• Craft items, antiques, valuable vases, and decorative glassware
• Pottery or glazed-ceramic items
• Wooden or silver tableware or items that includes wooden or silver parts
• Delicate glassware or glassware containing the lead crystal. Clouding may occur on the glassware after
frequent washing.
CAUTION
• Do not wash items that are covered with ash, sand, wax, lubricating grease, or paint. These materials
will damage the dishwasher. Ash does not dissolve and will spread inside the dishwasher.
• Remove food remains such as bones, fruit seeds, etc. and waste such as toothpicks, paper napkins, etc.
from your dishes. Food remains and waste can make noise, cause the dishwasher to malfunction, and
damage your dishes and dishwasher.
NOTE
Silverware that has contacted foods containing sulphur may become discoloured. Food with sulphuric
content include egg yolks, onions, mayonnaise, mustard, fish, fish brine, and marinades.
Untitled-3 18Untitled-3 18 2026-04-23 4:34:382026-04-23 4:34:38
English 19
Basic use of racks
NOTE
Depending on the models, the actual appearance of the racks and the loading method may differ from the
figures.
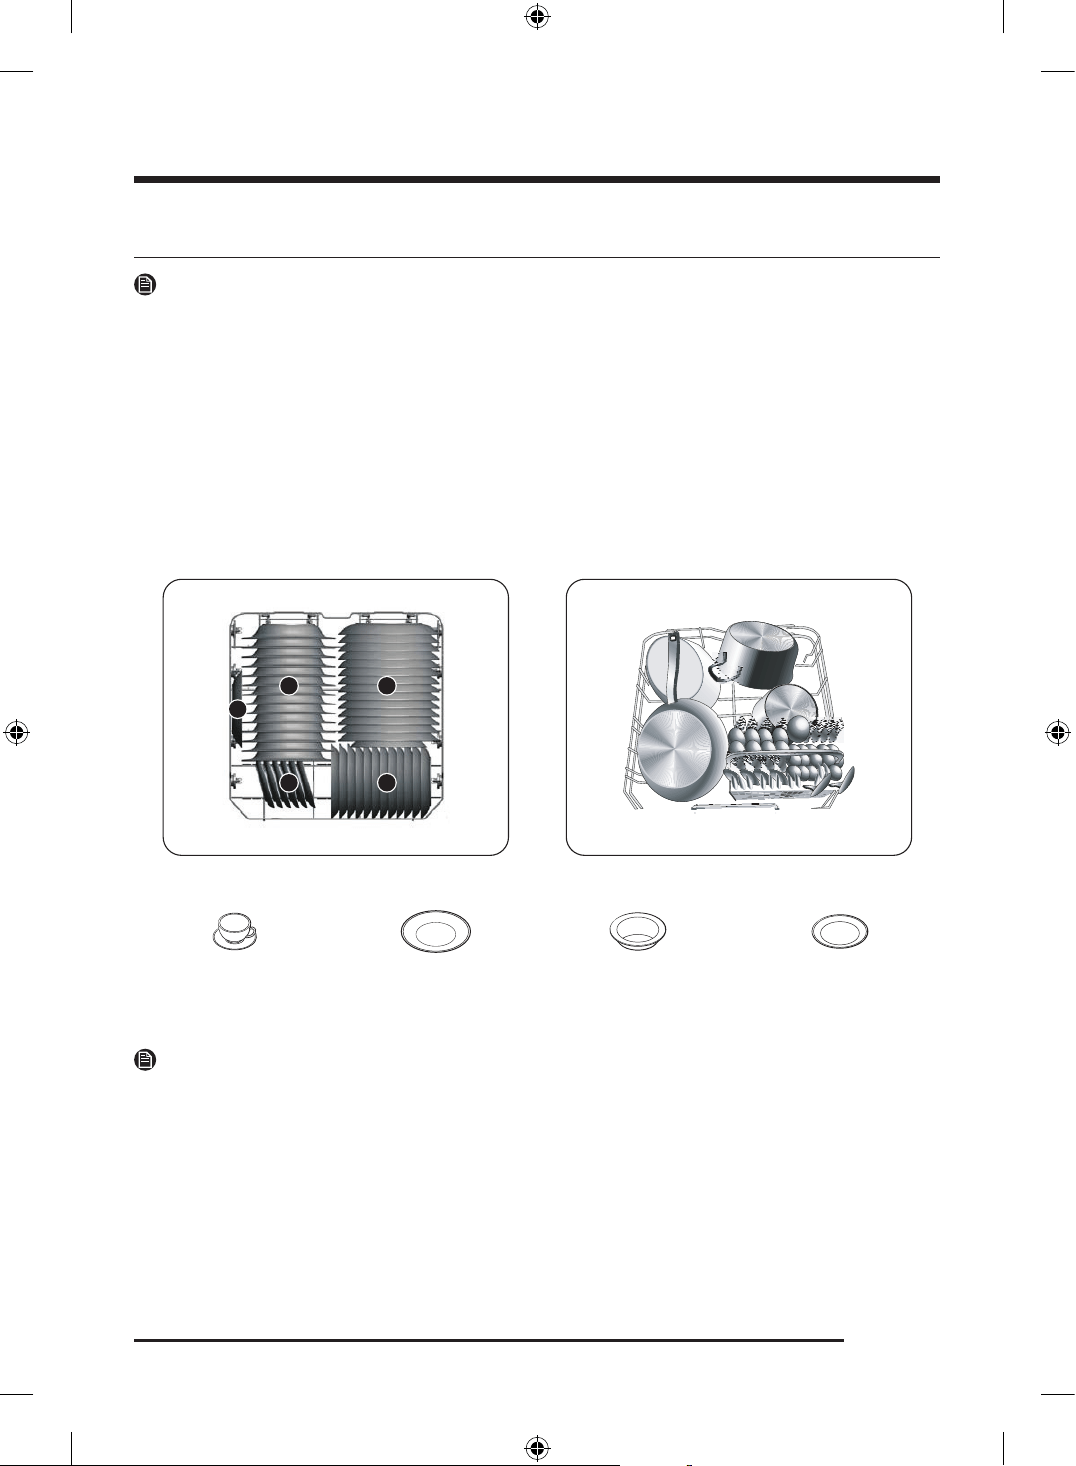
Loading the lower rack
We recommend that you place large items, that are difficult to clean (such as pots, pans, lids, serving
dishes and bowls), in to the lower rack.
It is preferable to place serving dishes and lids on the side of the racks in order to avoid blocking the
rotation of the upper nozzle. Pots, serving bowls, etc. must always be placed top down.
Deep pots should be slanted to allow water to flow out.
The lower rack features folding tines to easily load larger pots and pans.
2
34
5
5
1. Cups
2. Saucers
3. Dinner plates 4. Soup plates 5. Dessert dishes
NOTE
Long items, serving cutlery, salad servers and big knives should be placed on the shelf so that they do not
obstruct the rotation of the spray arms.
Untitled-3 19Untitled-3 19 2026-04-23 4:34:422026-04-23 4:34:42
Before you start
English20
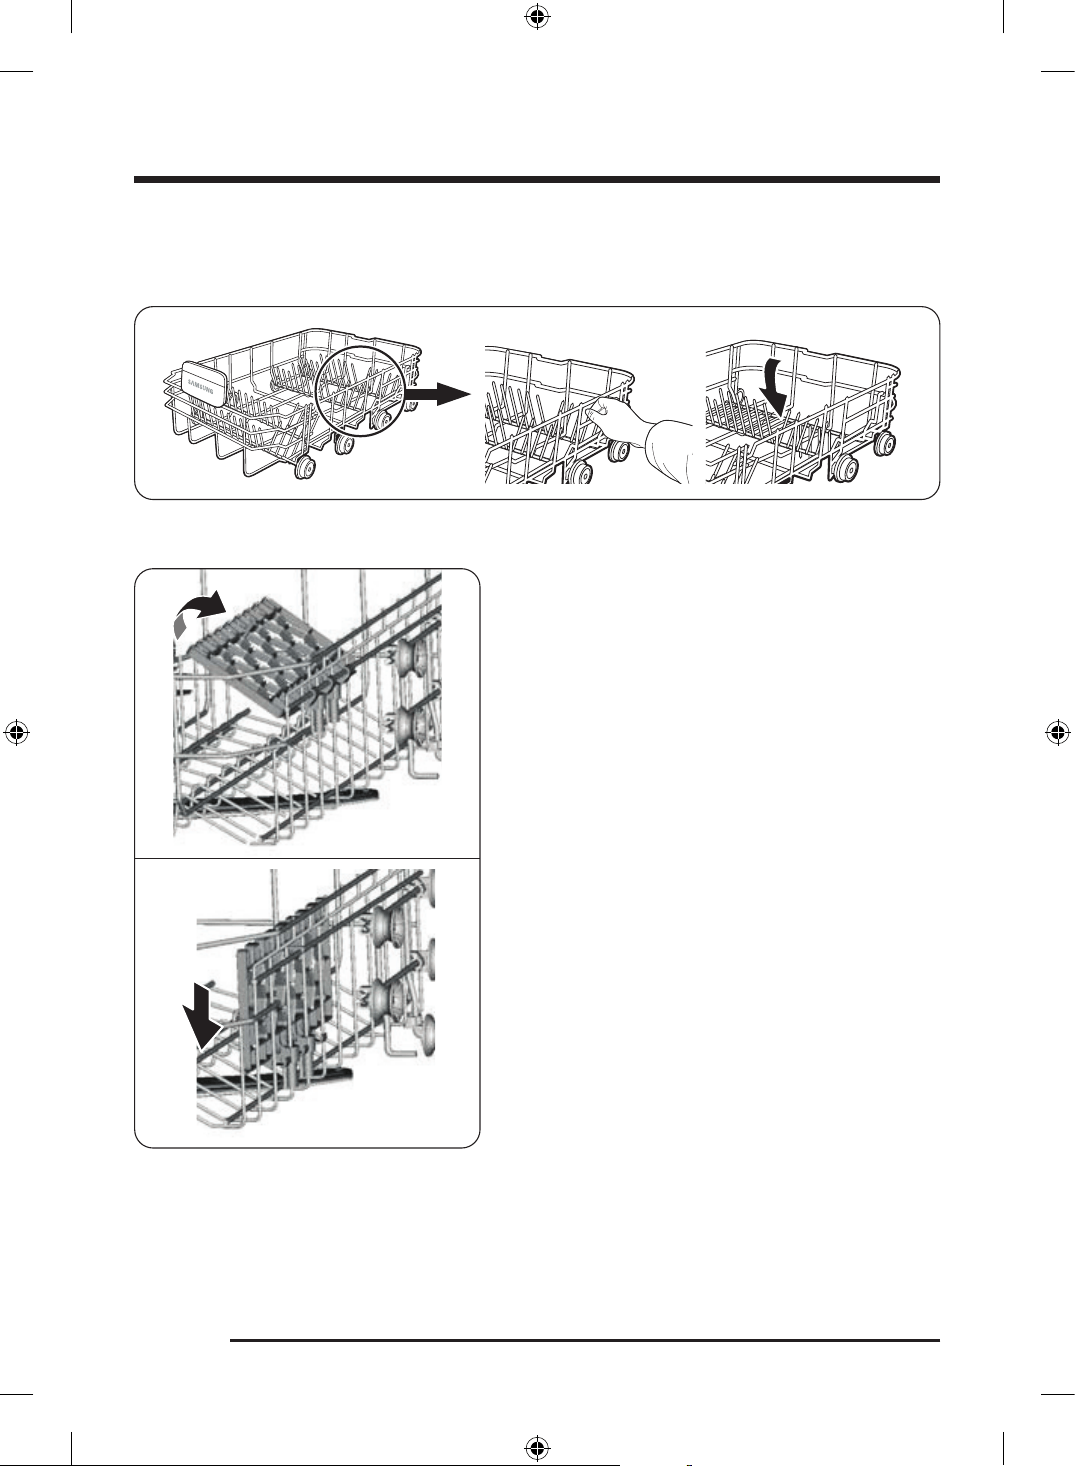
Using the tines
Fold or unfold the tines depending on the items you load.
Fold them for better stacking of pots and pans and unfold them to load items such as dishes.
Folding back the cup shelves
For better stacking of pots and pans, the shelves can be
folded down as shown in the picture below.
Untitled-3 20Untitled-3 20 2026-04-23 4:34:422026-04-23 4:34:42
English 21
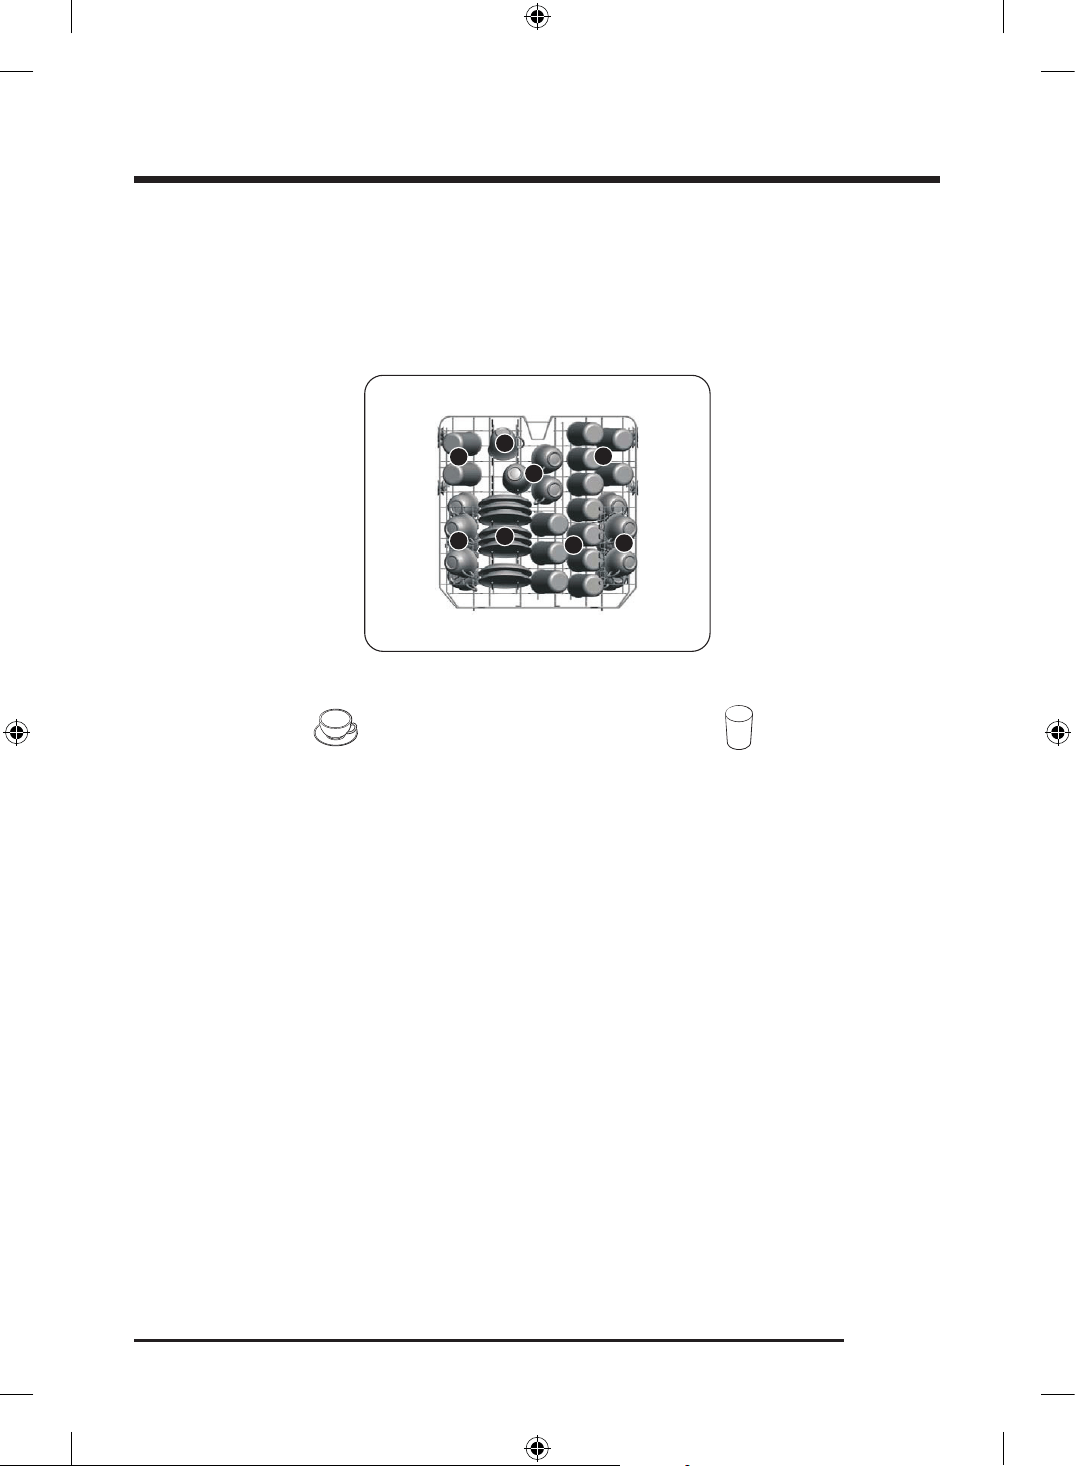
Loading the upper rack
The upper rack is designed to hold more delicate and lighter dishware such as glasses, coffee and tea cups
and saucers, as well as plates, small bowls and shallow pans (as long as they are not too dirty). Position the
dishes and cookware so that they will not get moved by the spray of water. Always place glasses, cups &
bowls upside down.
1
1
1
1
2
3
3
3
1. Cups
2. Saucers
3. Glasses
Untitled-3 21Untitled-3 21 2026-04-23 4:34:432026-04-23 4:34:43
Before you start
English22
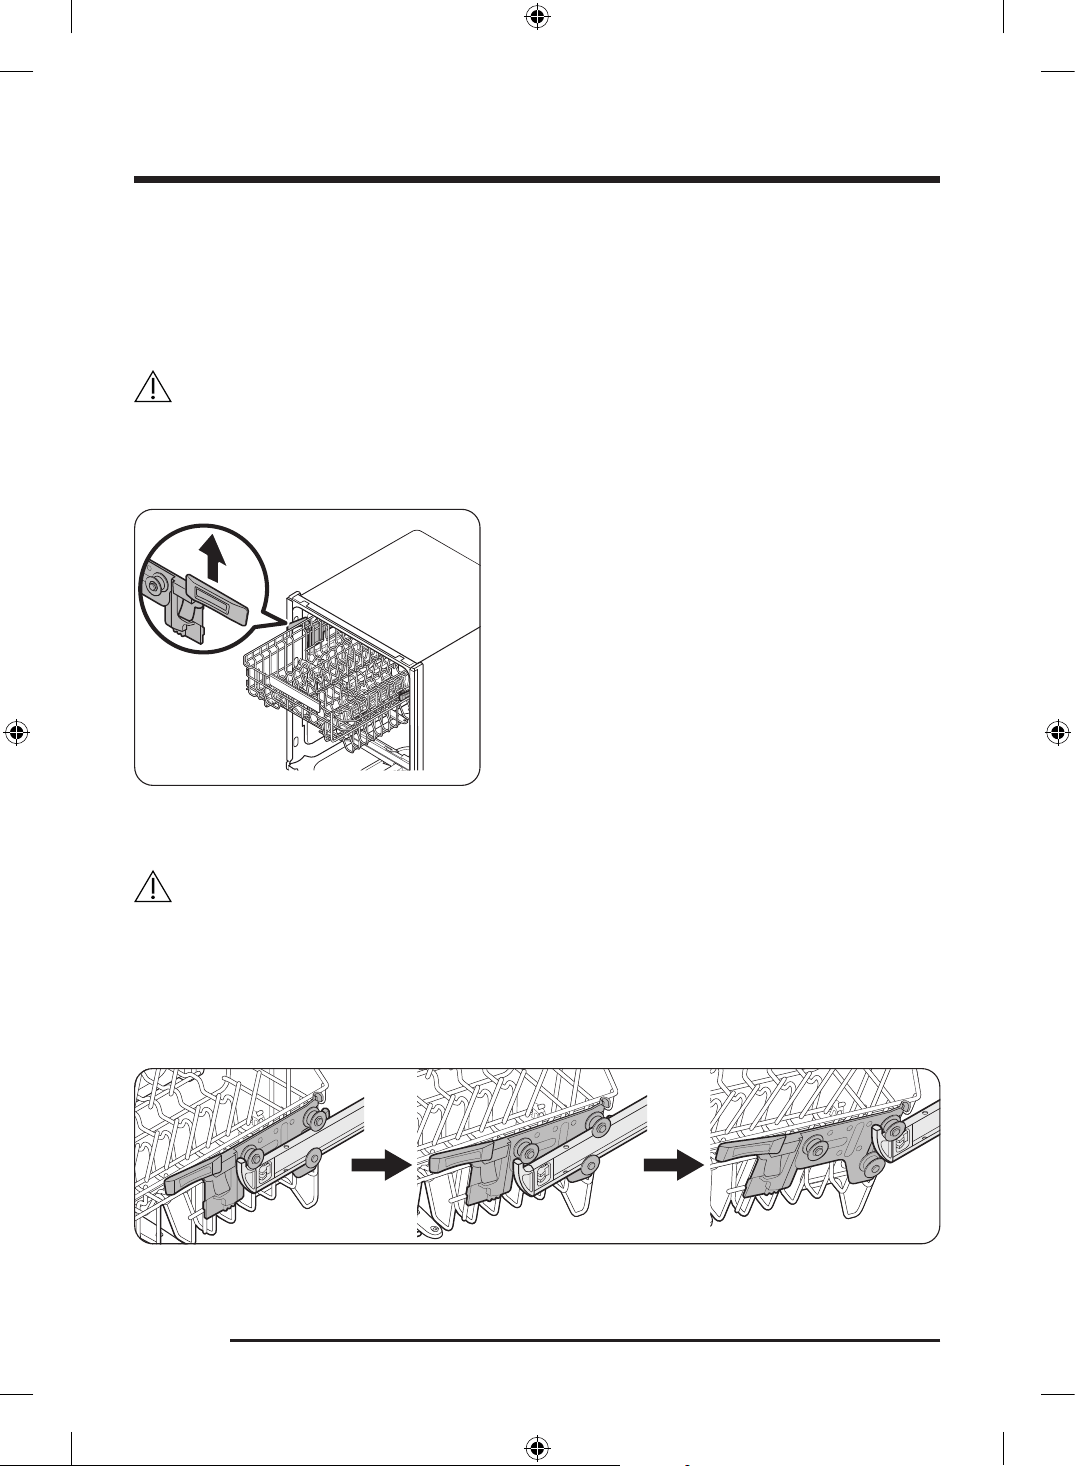
Adjusting the position of the upper rack
You can adjust the height of the upper rack so that the lower rack can accommodate larger sized dishes.
Depending on the height of the upper rack, the lower rack can accommodate plates up to 30 cm in
diameter, and the upper rack can accommodate plates up to 18 cm (with Cutlery rack) or 25 cm (without
Cutlery rack) in diameter.
CAUTION
• Pull out the upper rack completely and adjust its height before loading dishes. Adjusting the rack after
loading the dishes may damage the dishes.
• Make sure to hold both handles when adjusting, or the dishwasher door may not close properly.
• To raise the upper rack, pull the upper rack upwards.
The adjustable handle will latch, and the upper rack
will raise.
• To lower the upper rack, hold both the adjustable
handles located at the left and right sides of the
upper rack, and then evenly press down.
Removing the upper rack
CAUTION
• Do not operate the dishwasher without the upper rack. Otherwise, noises occur and the dishwasher
does not operate properly.
• Because the upper rack is removable, insert the upper rack properly to ensure the dishwasher operates
normally.
Pull the upper rack to the front until it is fully extended, and then lift it slightly to remove. See the following
figures.
Untitled-3 22Untitled-3 22 2026-04-23 4:34:432026-04-23 4:34:43
English 23
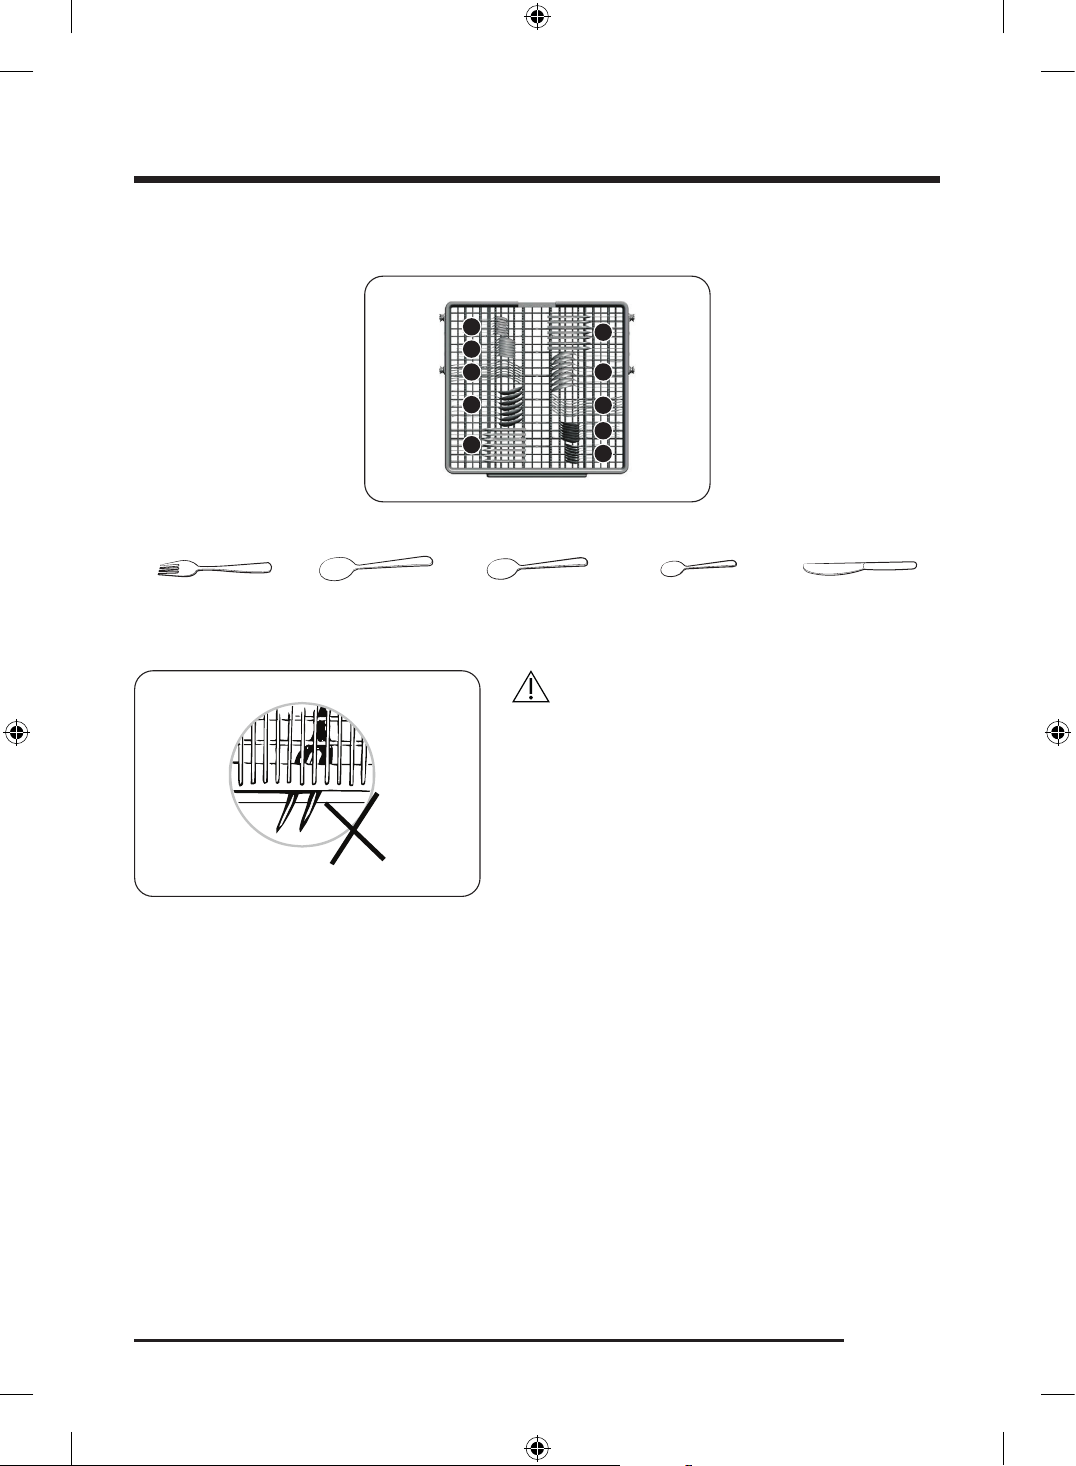
Loading the cutlery rack
1
1
2
2
3
3
4
4
5
5
1. Forks 2. Soup spoons 3. Dessert spoons 4. Tea spoons 5. Knives
WARNING
• Do not let any item extend through the bottom.
• Always load sharp utensils with the sharp point
down!
Untitled-3 23Untitled-3 23 2026-04-23 4:34:452026-04-23 4:34:45
Before you start
English24
Detergent compartment
All dishwasher cycles require detergent in the detergent compartment. Apply detergent as recommended
for the selected cycle to ensure best performance.
WARNING
• Do not place dishwasher detergent in your mouth. Avoid breathing in detergent fumes. Dishwasher
detergent contains irritants and caustic chemicals that can induce respiratory conditions. If you have
consumed dishwasher detergent or inhaled detergent fumes, seek medical attention immediately.
• Keep dishwasher detergent out of children’s reach.
CAUTION
• Use dishwasher detergent only. Other types of detergent produce excessive foam, which may decrease
the dishwasher’s performance or cause it to malfunction.
• The dishwasher may not wash well if there is not much detergent. For normally soiled items, we
recommend 20-25 grams; however, this may differ depending on the detergent manufacturer, so please
follow that manufacturer’s recommendations.
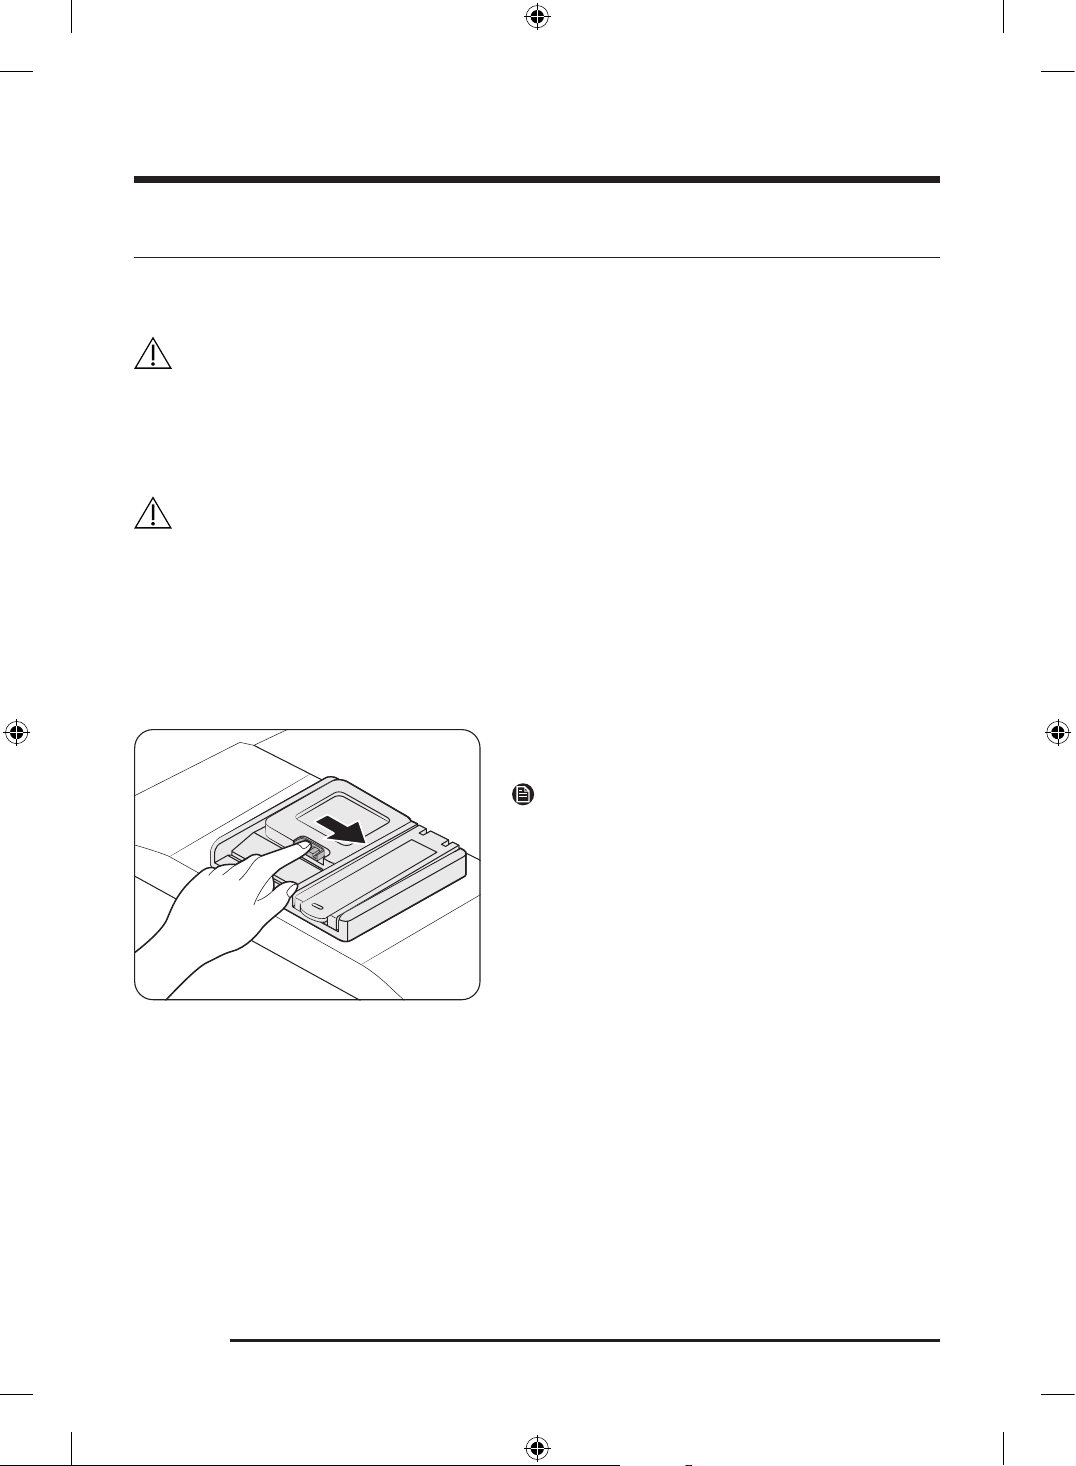
Filling the detergent
1. Open the detergent dispenser cap by pushing the
detergent dispenser catch to the right.
NOTE
The cap remains open at the end of a cycle.
Untitled-3 24Untitled-3 24 2026-04-23 4:34:452026-04-23 4:34:45
English 25
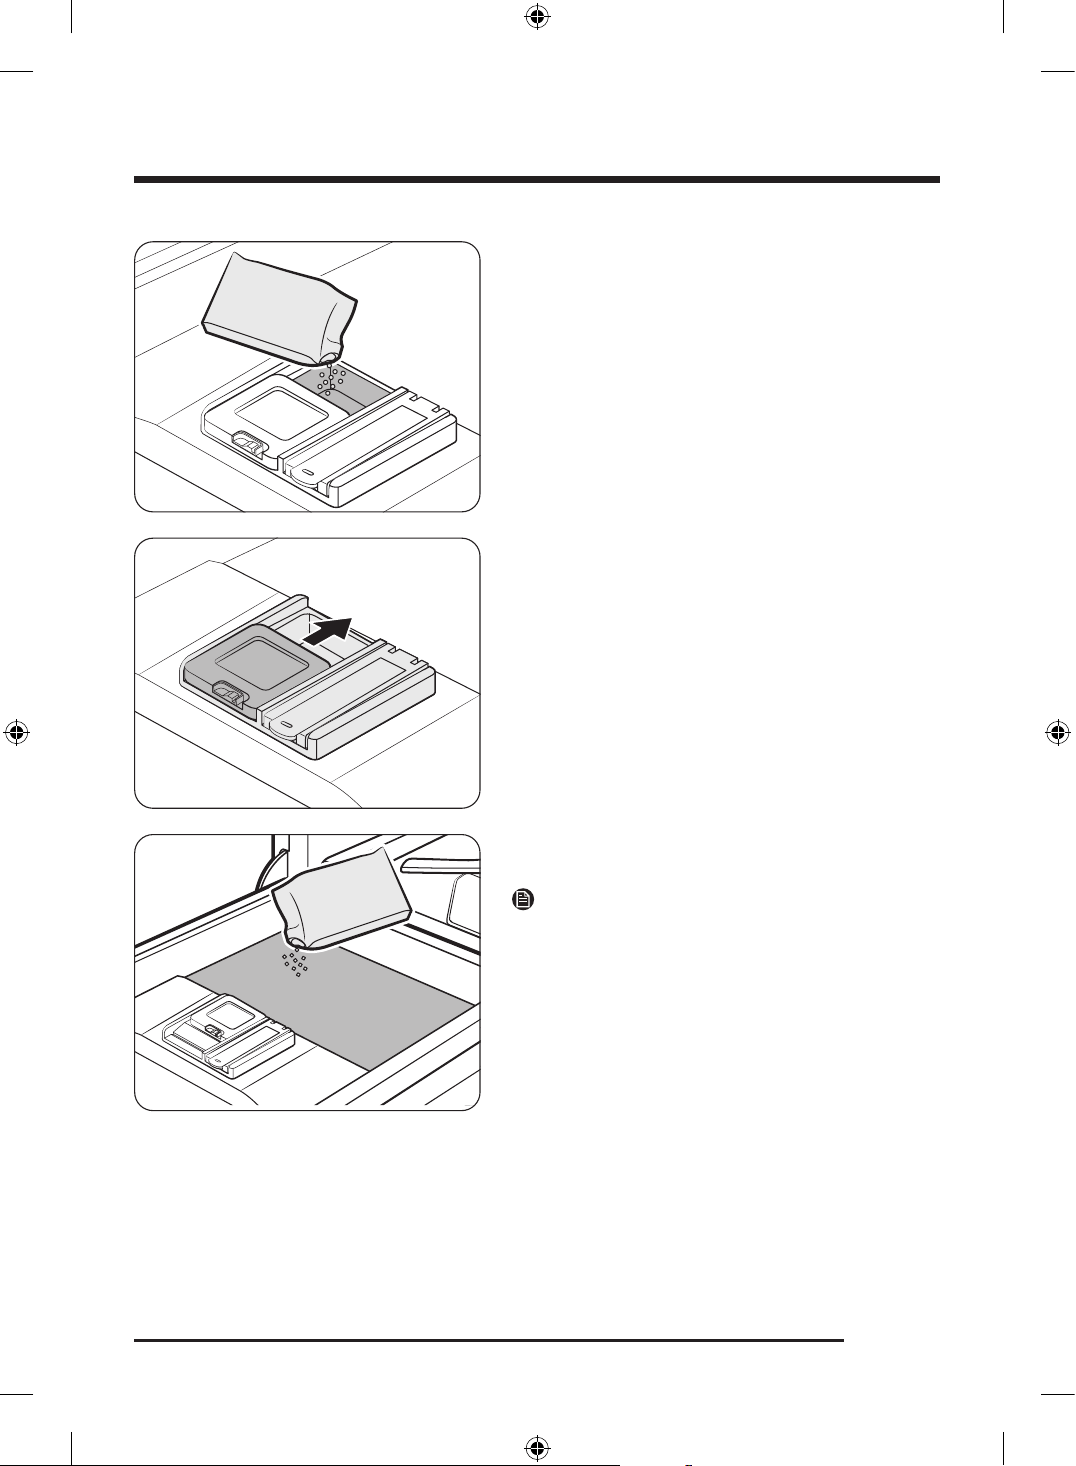
2. Add the recommended amount of detergent to the
main wash detergent compartment.
3. Close the lid by sliding it up.
4. If the items are heavily soiled, pour a small amount of
detergent onto the door for better cleaning results.
NOTE
The additional detergent will activate during the pre-
wash process.
The cover opens automatically to dispense the detergent during the wash.
Untitled-3 25Untitled-3 25 2026-04-23 4:34:462026-04-23 4:34:46
Before you start
English26
Rinse aid compartment
• Rinse aid improves the drying performance of the dishwasher.
• Refill the rinse aid compartment when you get a rinse refill alert message on the control panel.
• Only use a liquid rinse aid. A Powdered rinse aid will clog the opening of the compartment causing the
dishwasher to malfunction.
CAUTION
• Do not apply any type of detergent to the rinse aid compartment.
• Do not excessively fill the rinse aid compartment as it may overflow during a cycle.
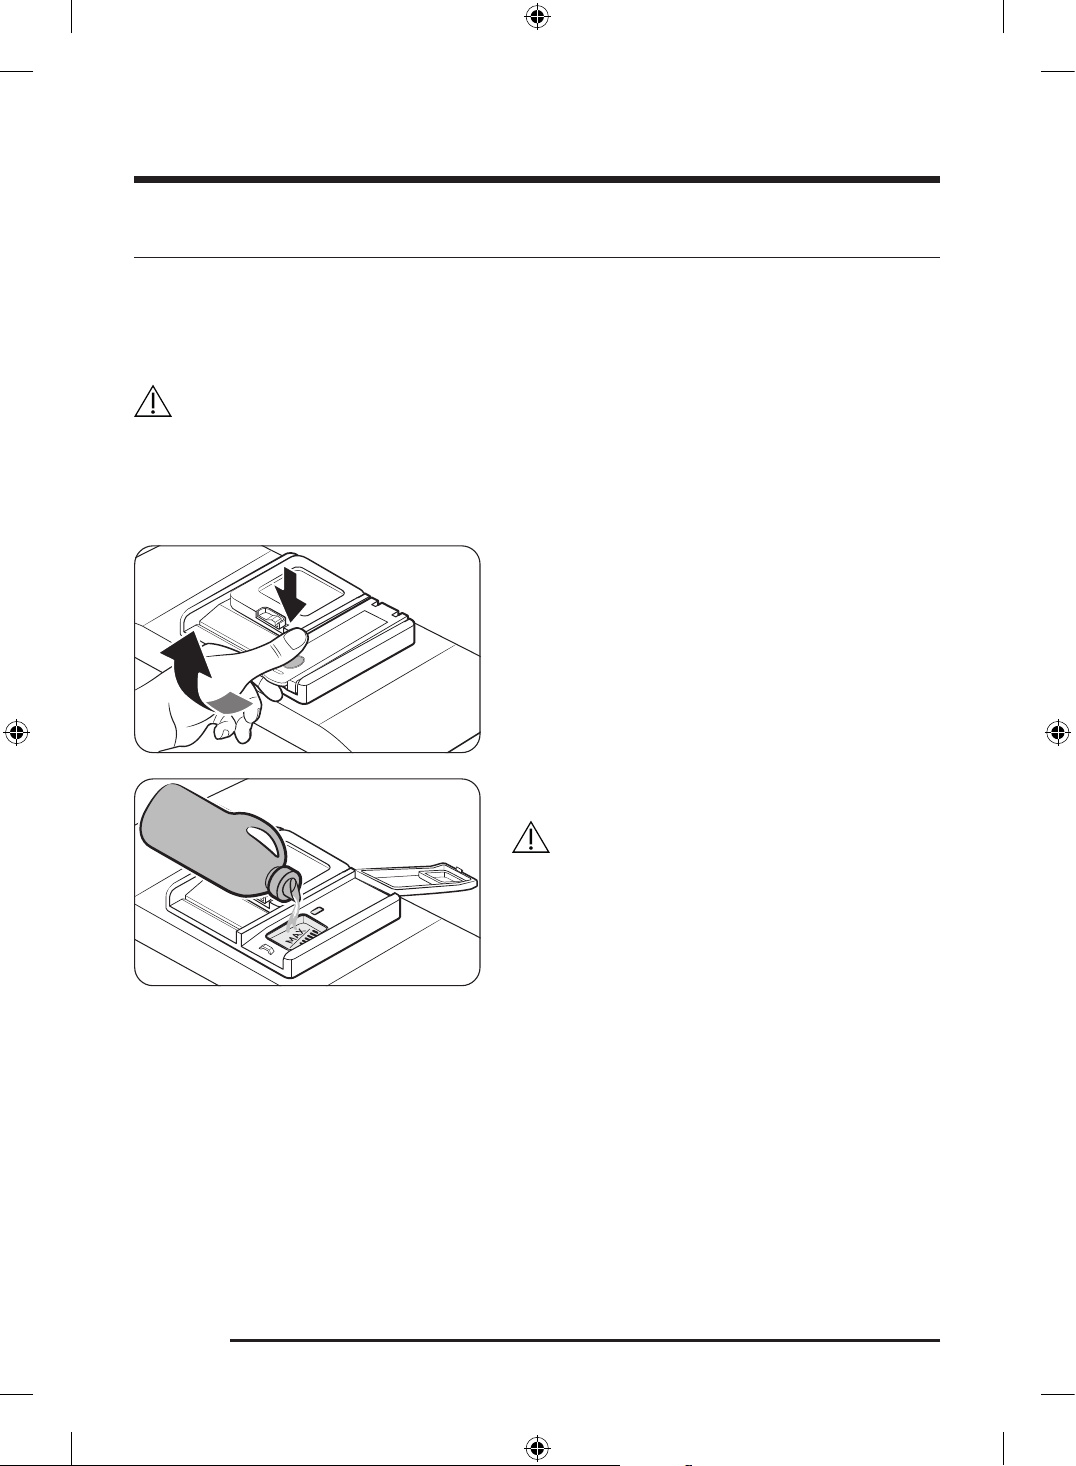
Filling the rinse aid
1. Open the rinse aid compartment cover.
- While pressing the circular section on the cover,
lift the cover to open it.
2. Fill the rinse aid compartment with the rinse aid.
CAUTION
Do not fill the rinse aid over the max line in the
compartment. Excess rinse aid can overflow during the
wash cycle.
3. Close the rinse aid compartment cover.
Untitled-3 26Untitled-3 26 2026-04-23 4:34:462026-04-23 4:34:46
English 27
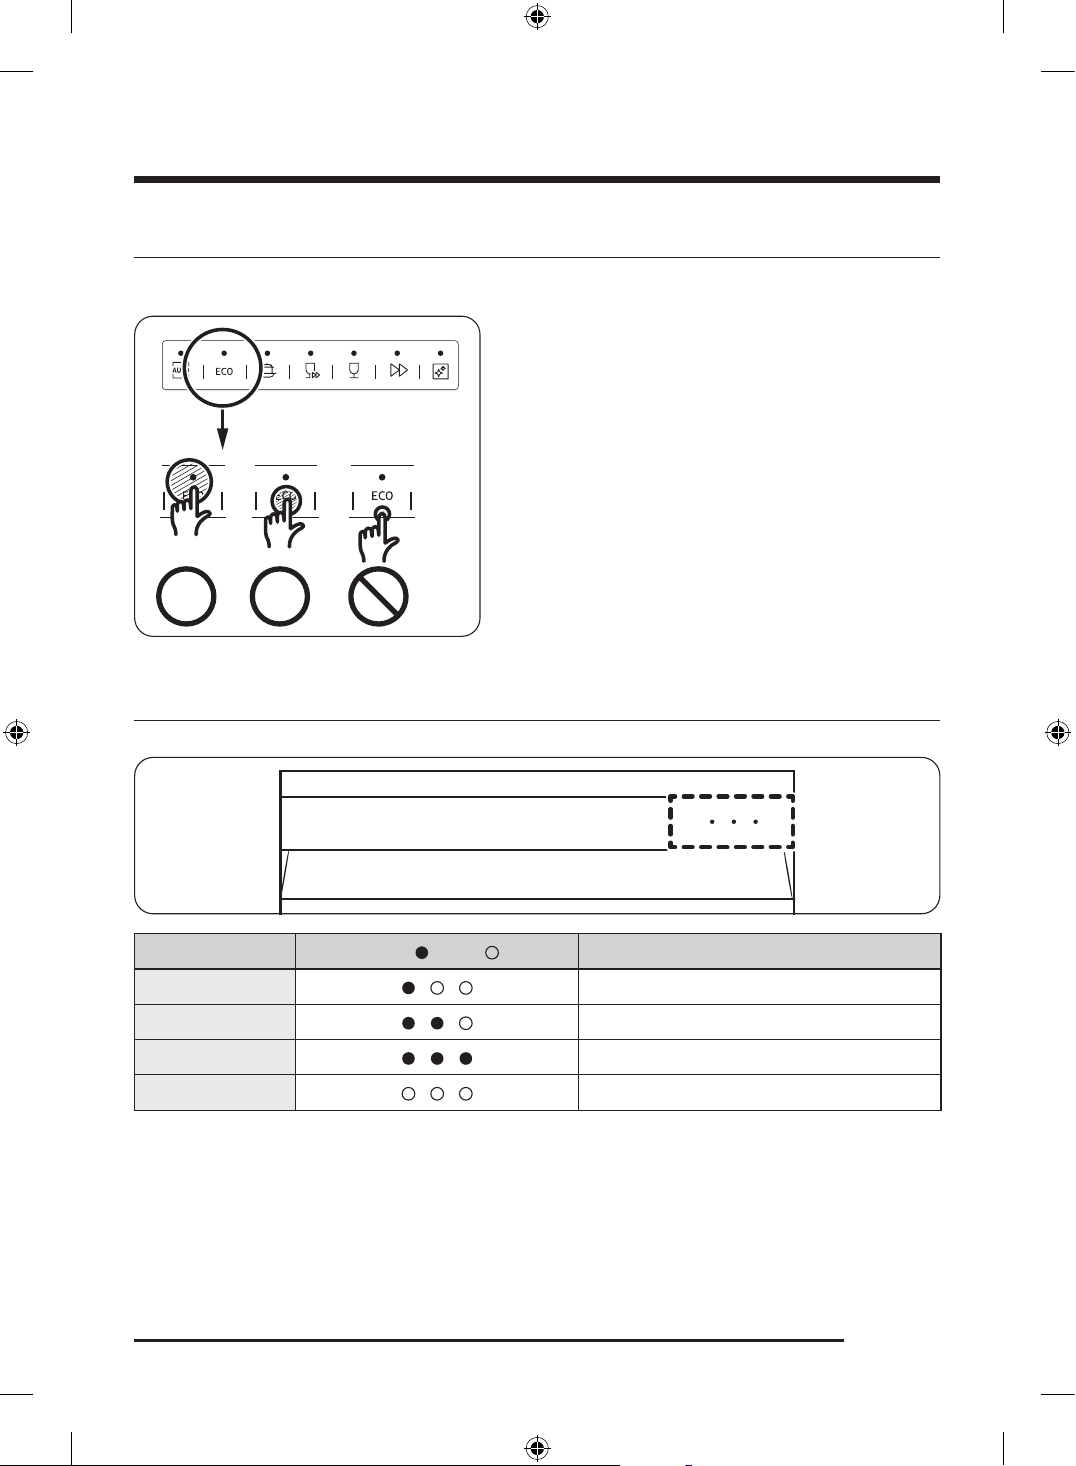
Touchpad responsiveness
To prevent the touch-enabled controls from losing responsiveness, follow these instructions.
• Touch the centre of each button with one finger.
• Do not touch more than one button at a time, except
as directed.
• Clean the surface of the control panel regularly with
a soft, damp cloth.
Operation status indicators
Three indicators at the front top right corner indicate the current operation status of the dishwasher.
Status
Indicator ( : On / : Off)
Description
Washing
The washing process is in progress.
Rinsing
The rinsing process is in progress.
Drying
The drying process is in progress.
Complete
The operation is complete.
Untitled-3 27Untitled-3 27 2026-04-23 4:34:472026-04-23 4:34:47
English28
Operations
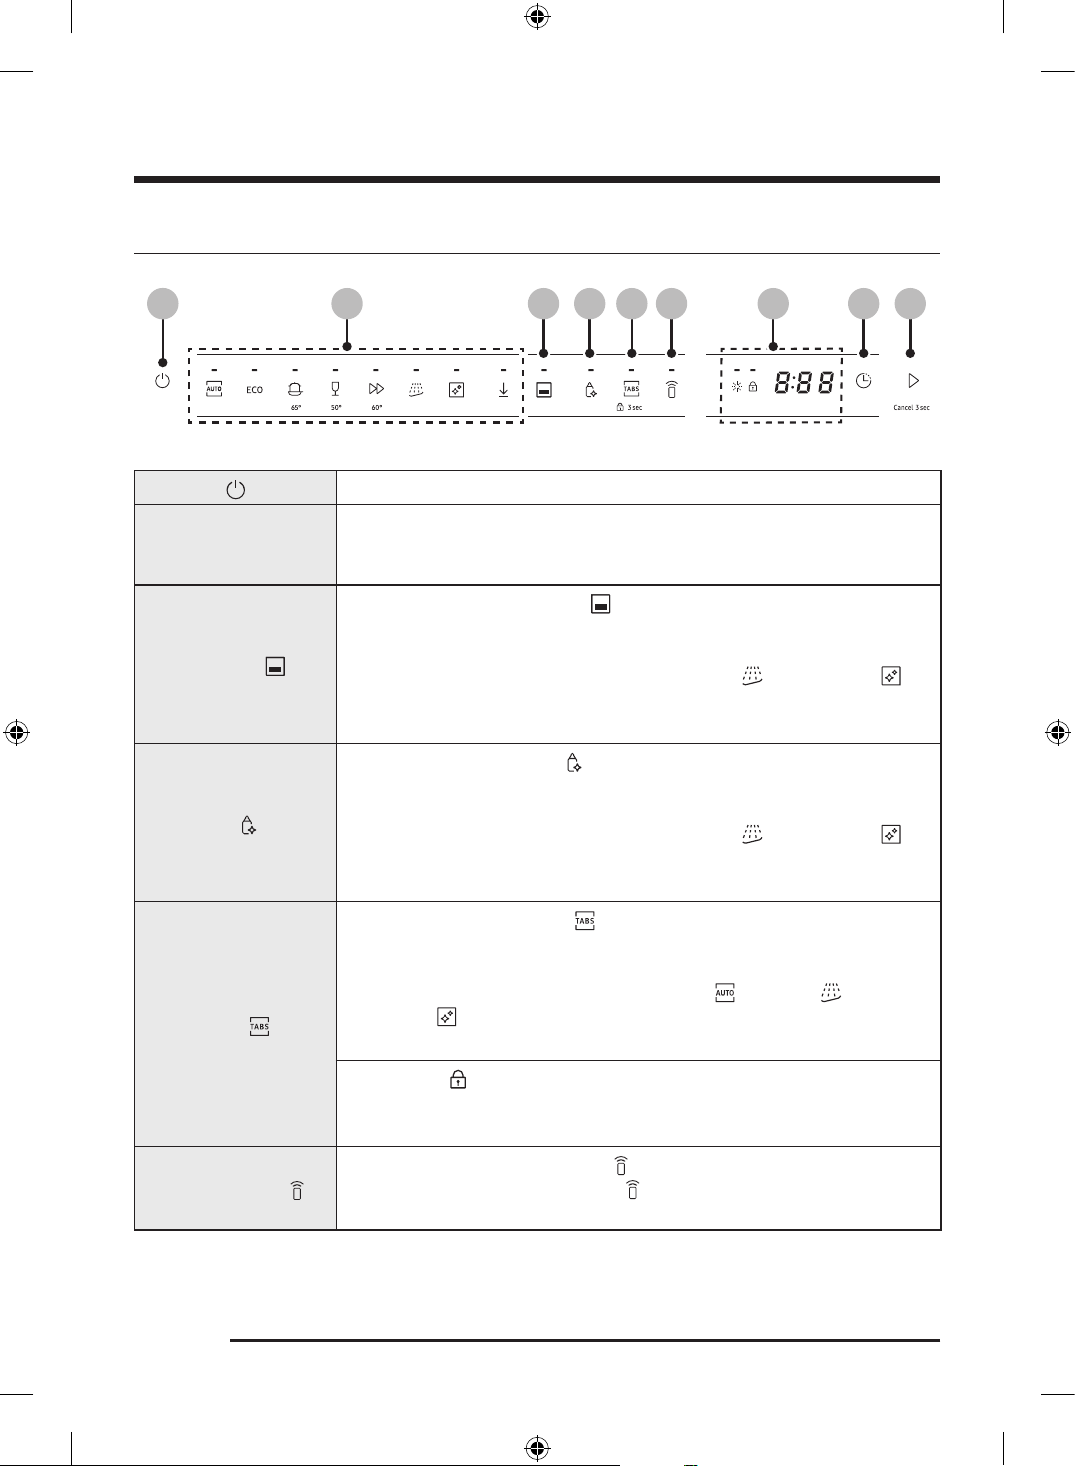
Control panel
01
02 0703 04 05 06 08 09
01 Power
• Tap this button to turn the dishwasher on or off.
02 Cycles
• You can select the desired wash cycle.
- For more information on the wash cycles, see the “Cycle overview ”
section on page 30.
03 Lower Rack
• You can turn the Lower Rack option on or off.
- Use this option to run a wash cycle with fewer items, using only the
lower rack.
- This option is not available with the Pre Wash , Machine Care ,
Plastic*, Pots & Pans* and Baby Care* cycles.
*: Downloaded cycle
04 Sanitize
• You can turn the Sanitize option on or off.
- Use this option to increase the water temperature up to 70 °C in the
final rinse process for high-temperature sanitization.
- This option is not available with the Pre Wash , Machine Care ,
Plastic* , Pots & Pans* and Baby Care* cycles.
*: Downloaded cycle
05 Multi Tab
• You can turn the Multi Tab option on or off.
- Use this option to use the 3 in 1 tablet which does not need salt and
rinse aid.
- This option is not available with the AUTO , Pre Wash , Machine
Care , Plastic* , Pots & Pans* and Baby Care* cycles.
*: Downloaded cycle
Control Lock
Tap and hold this button for 3 seconds to activate the Control Lock function.
For more information, see the "Control Lock” section on page 34.
06 Smart Control
• You can turn the Smart Control option on or off.
- Turning on the Smart Control option allows remote access to the
dishwasher.
Untitled-3 28Untitled-3 28 2026-04-23 4:34:492026-04-23 4:34:49
English 29
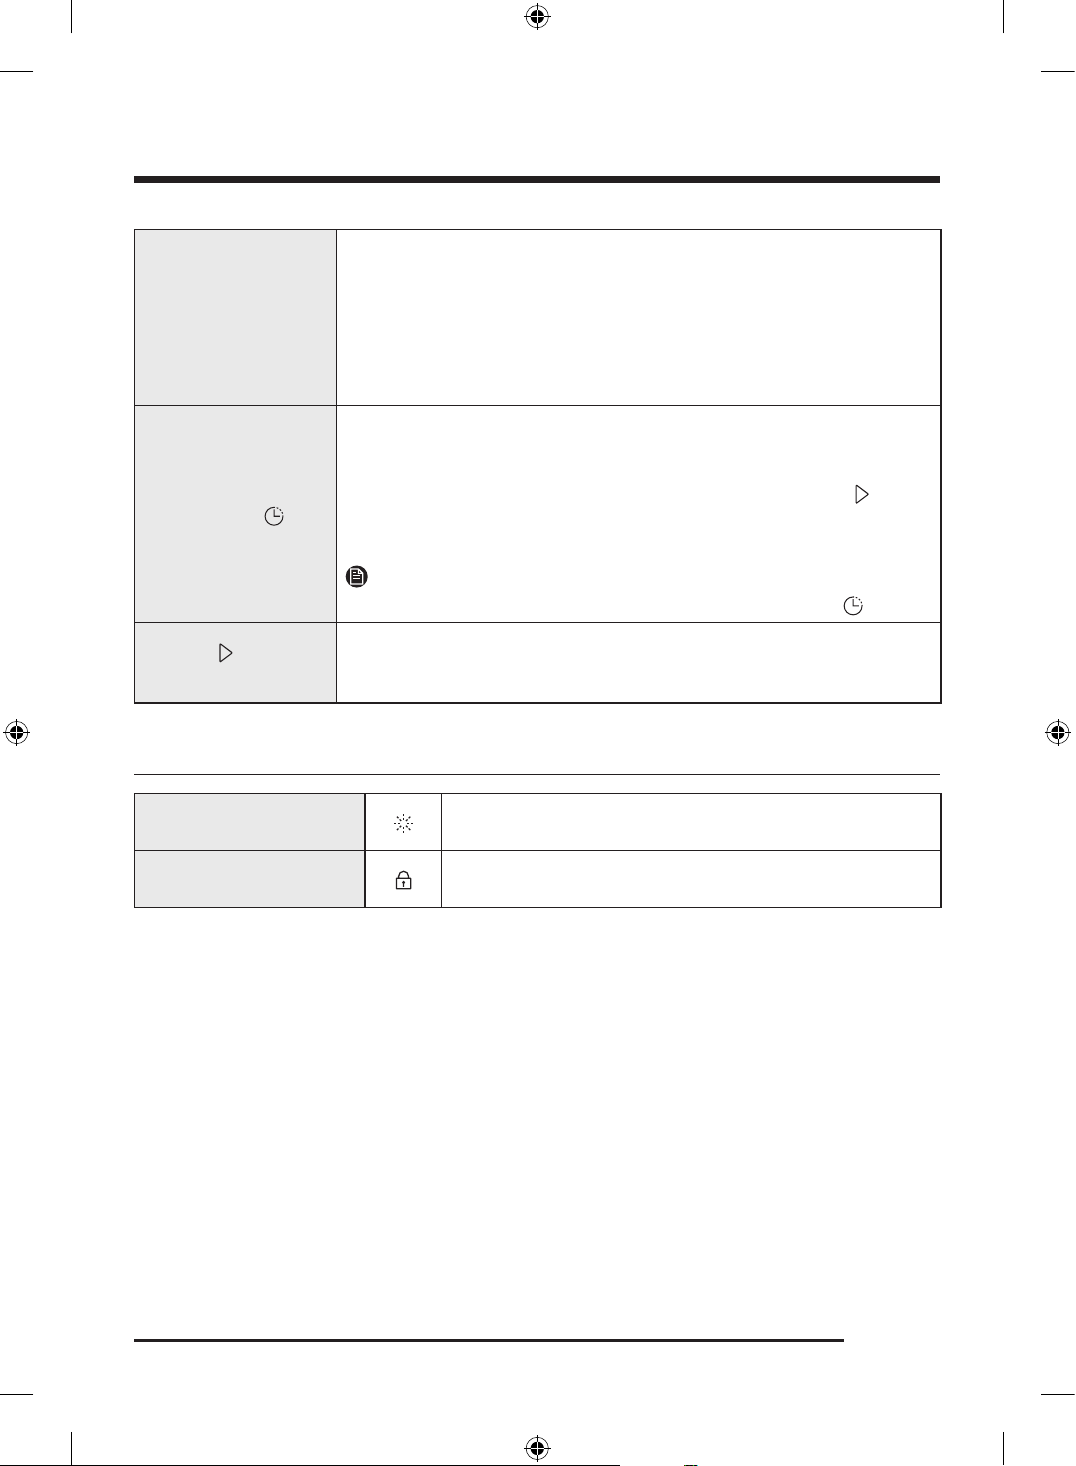
07 Display
• You can check various information on the display.
- You can check the operation time of each cycle, remaining operation
time, alert icons, information codes, etc.
- For more information on the icons, see the “Icon descriptions ” section
on page 29.
- For more information on the information codes, see the “Information
codes” section on page 44.
08 Delay Start
• You can start the dishwasher operation at a desired time.
- Tap this button to select from 1 to 24 hours to delay the start of the
dishwasher.
- After selecting the desired starting time, you must tap Start and
close the door.
- To change the delay start setting, you must restart the dishwasher.
NOTE
You must select the desired wash cycle before setting Delay Start .
09 Start
( Cancel 3 sec )
• Tap this button, and then close the door to start the operation.
- Cancel 3 sec : Tap and hold this button for 3 seconds to cancel the
current cycle and drain the dishwasher.
Icon descriptions
Rinse Refill
• This icon turns on to alert you to refill the rinse aid
compartment.
Control Lock
• This icon turns on when the Control Lock function is
activated.
Untitled-3 29Untitled-3 29 2026-04-23 4:34:492026-04-23 4:34:49
Operations
English30
Cycle overview
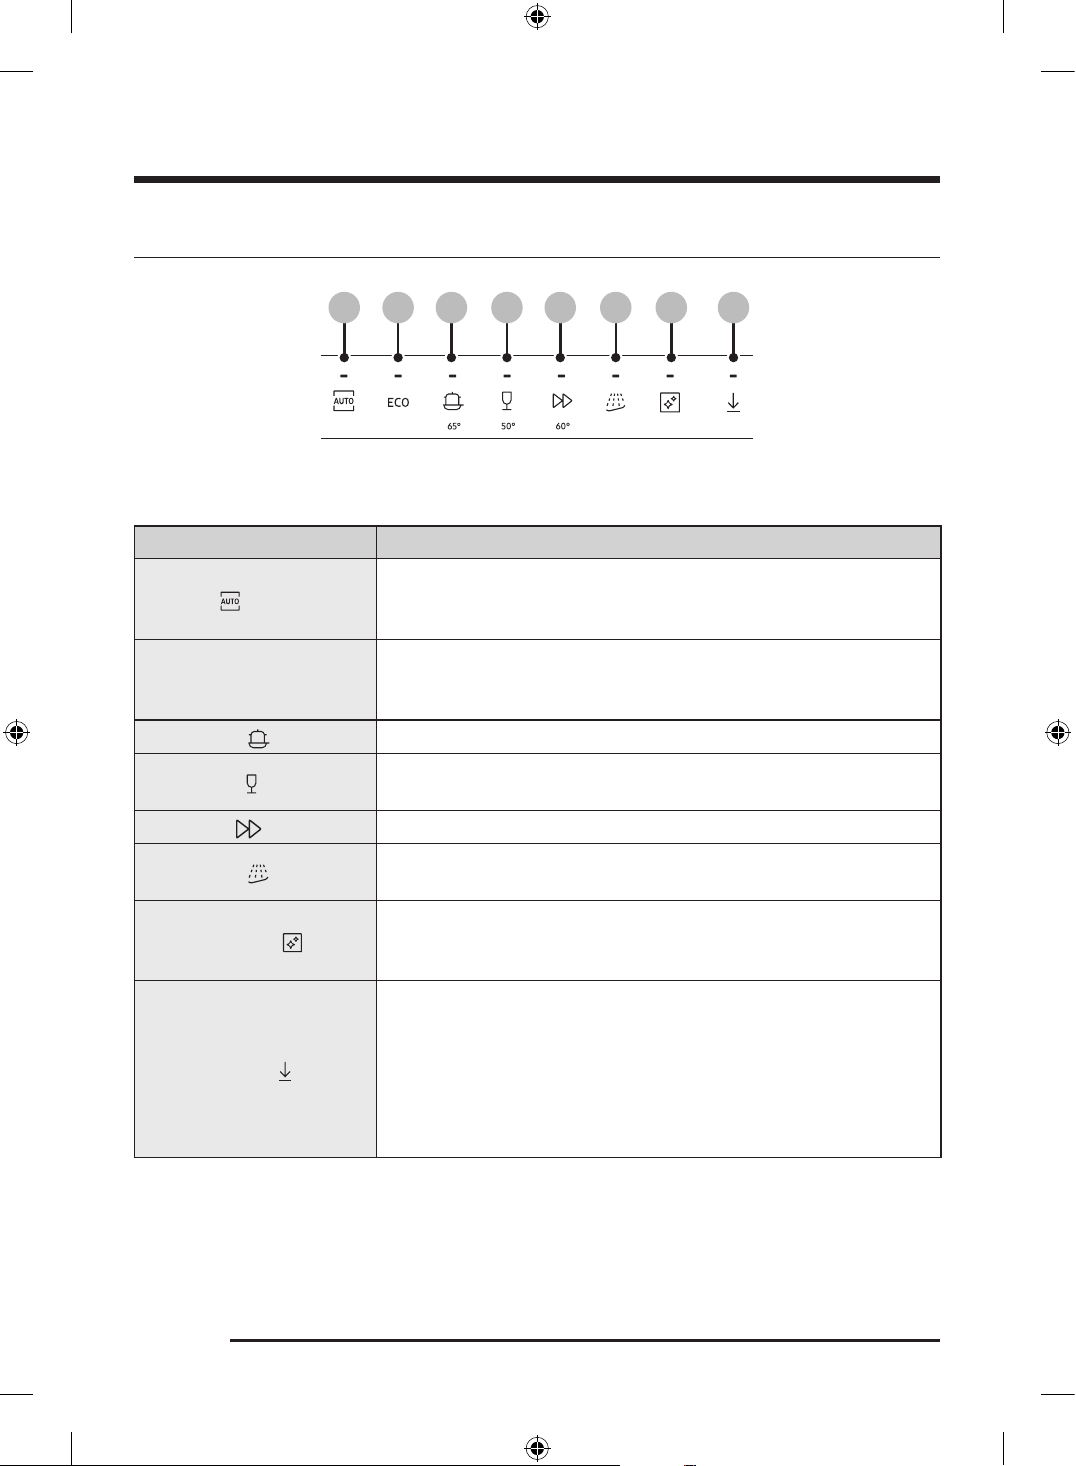
01 02 03 04 05 06 07 08
The temperature under the buttons indicates the washing temperature during the cycle, and the washing
temperature may differ depending on the selected options.
Cycle Description
01 AUTO
• The dishwasher sets the appropriate wash time and water
temperature according to the detected soil level for effective
washing.
02 ECO *
• This cycle is for washing normally soiled dishes with less energy use.
- This cycle takes a longer time to complete for less energy
consumption.
03 Intensive
• This cycle is for washing heavily soiled items.
04 Delicate
• This cycle is for lightly soiled, fragile items such as glasses.
- The items must be dishwasher-safe.
05 Express
• This cycle is best for quickly washing daily-using items.
06 Pre Wash
• This cycle is for pre-washing the items with cold water to remove dirt
before running another wash cycle.
07 Machine Care
• This cycle is for cleaning the inside of the dishwasher.
• Do not operate this cycle with the racks loaded with any items.
Empty the dishwasher before running this cycle.
08 Downloaded
• You can download a cycle from the SmartThings app and use this
button to select the downloaded cycle.
- Plastic is the default download cycle and you can download the
following additional cycles: Plastic, Pots & Pans and Baby Care.
- For more information on downloading the cycle, see the
“Downloading a cycle from the SmartThings app” section on page
31.
* The values for the ECO program have been obtained following the test standard AS/NZS2007.1-2021 . The
values given for the other programs are indicative only.
Untitled-3 30Untitled-3 30 2026-04-23 4:34:502026-04-23 4:34:50
English 31
Downloading a cycle from the SmartThings app
You can download and use the cycles available from the SmartThings app.
NOTE
Some models may have applied one of the available cycles as a default and may not need to download a
cycle.
1. Turn on the dishwasher and make sure it is connected to a Wi-Fi.
2. Turn on the SmartThings app on your mobile device and select the dishwasher.
3. Tap Downloaded cycle .
4. Select the cycle you want to download to the dishwasher. Plastic , Pots & Pans and Baby Care cycles are
available.
5. Tap Apply .
NOTE
You can check the descriptions of the each cycle on the SmartThings app.
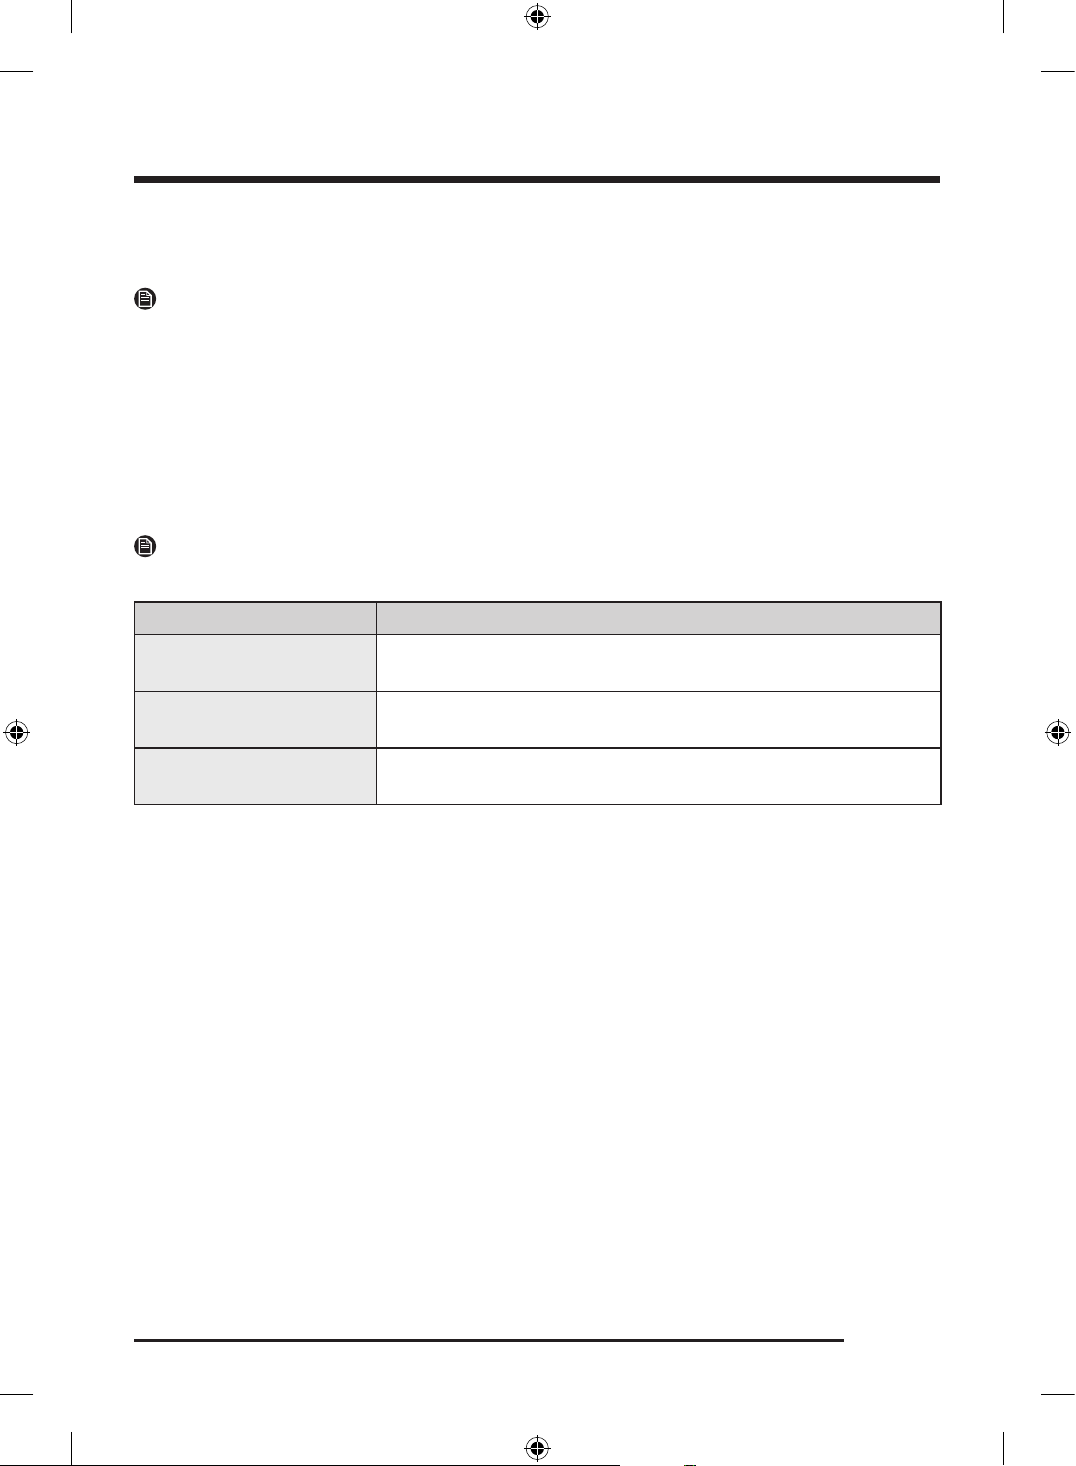
Cycle Description
Plastic
This cycle is used when washing plastic dishes. It washes plastic at a
safer temperature (60 °C) and dries them better.
Pots & Pans
Choose to wash pots and pans. This cycle uses hotter water and higher
pressure than a standard cycle for focused cleaning of pot and pans.
Baby Care
Suitable for rinsing/drying dishes at a high temperature of 70 °C. Do not
add detergent or rinse.
Untitled-3 31Untitled-3 31 2026-04-23 4:34:502026-04-23 4:34:50
Operations
English32
Operating a cycle
1. Open the door and then load the dishwasher. Make sure to remove food remains and waste on the
dishes.
- Do not load the dishwasher if you are going to use the Machine Care cycle.
2. Apply detergent to the detergent dispenser. For better results, add rinse aids.
3. Tap Power to turn on the dishwasher.
4. Tap the desired cycle button.
5. Select the desired options.
- Tap Lower Rack , Sanitize , Multi Tab , or Delay Start to enable or disable each option.
- Some options may be unavailable depending on the cycle.
- Make sure you have loaded only the lower basket to use the Lower Rack option.
6. Tap Start , and then close the door.
- The dishwasher starts the cycle after draining for a few seconds.
NOTE
• To change the cycle after it has started, touch and hold Start for 3 seconds to cancel the cycle. Then,
select a new cycle.
• The default cycle is ECO .
• To resume after you have opened the door to stop the dishwasher while operating, simply close the door.
Untitled-3 32Untitled-3 32 2026-04-23 4:34:512026-04-23 4:34:51
English 33
Settings
You can customize your dishwasher settings easily by following the steps below.
Entering the setting menu
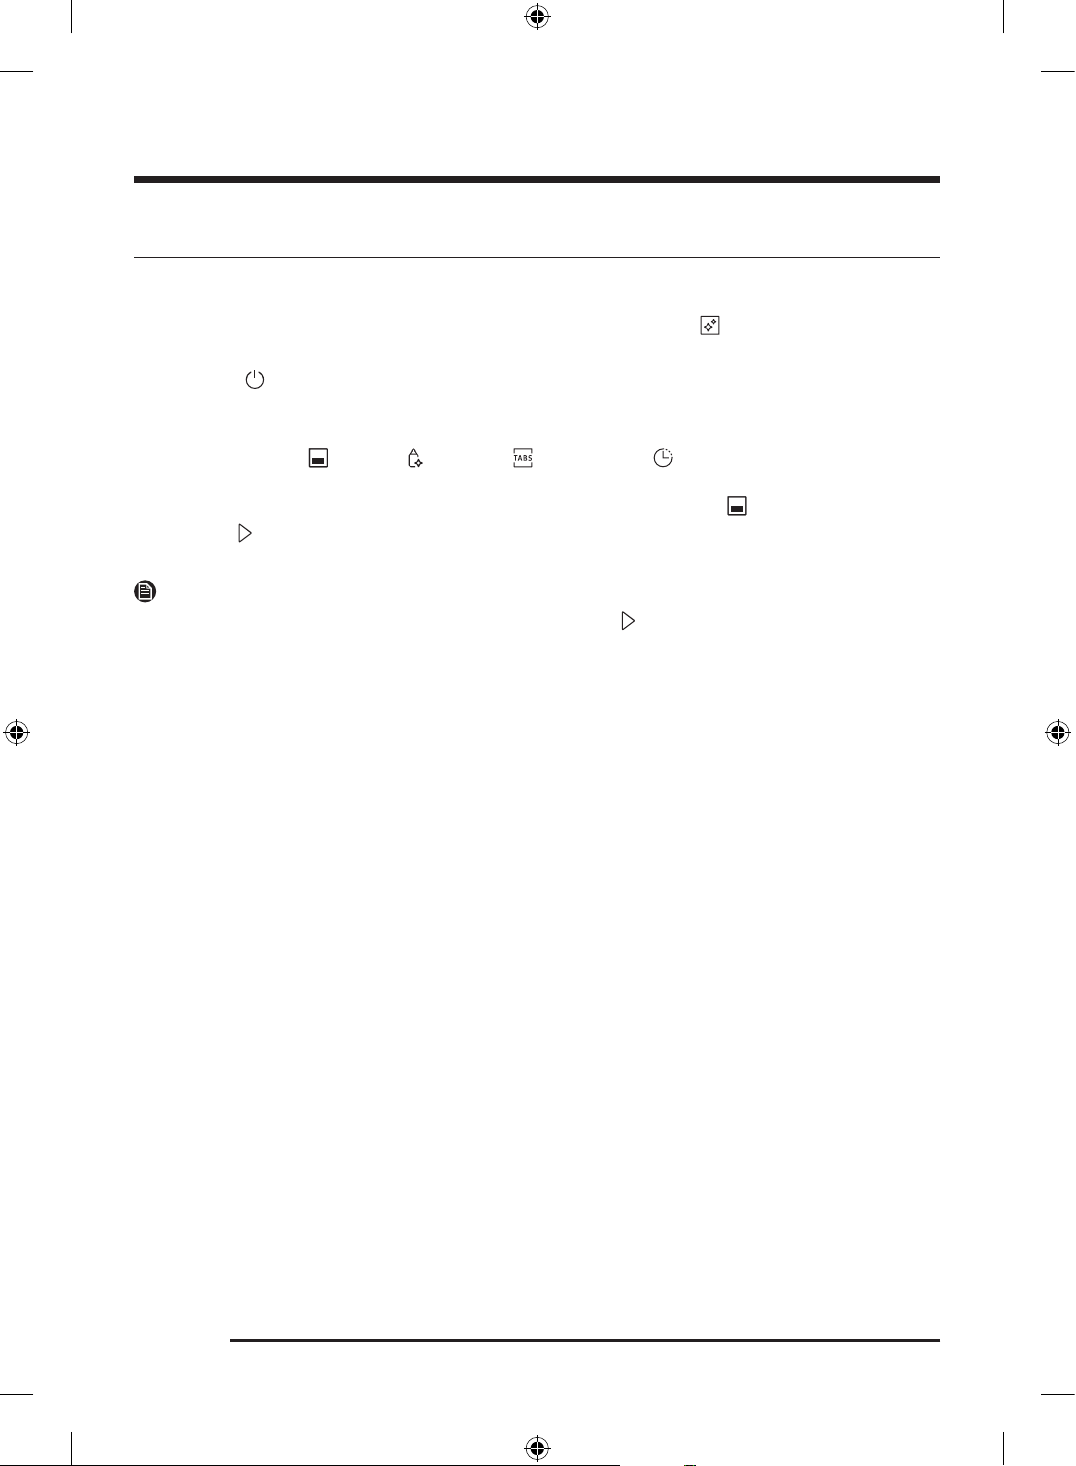
1. Tap Power to turn on the dishwasher.
2. Within 60 seconds of powering on, tap and hold ECO for 5 seconds to enter the setting menu.
- "0:00" appears on the display, when you enter the setting menu.
3. Use the corresponding buttons to select and adjust each setting as described below.
Sound
You can turn the sound on or off.
1. Tap Lower Rack to select the Sound setting.
- The current setting appears on the display. (The factory default setting is " U1 ".)
2. Tap AUTO to change the setting.
- U0 : Off
- U1 : On
3. The setting will be saved automatically after 5 seconds.
AutoRelease™
Enable automatic door opening after each cycle to improve drying performance.
1. Tap Multi Tab to select the AutoRelease™ setting.
- The current setting appears on the display. (The factory default setting is " A1 ".)
2. Tap AUTO to change the setting.
- A0 : Off
- A1 : On
3. The setting will be saved automatically after 5 seconds.
Rinse aid level
1. Tap Sanitize to select the Rinse aid level setting.
- The current setting appears on the display. (The factory default setting is " F4 ".)
2. Tap AUTO to change the setting.
- You can select from F1 (minimum) to F5 (maximum).
3. The setting will be saved automatically after 5 seconds.
Untitled-3 33Untitled-3 33 2026-04-23 4:34:512026-04-23 4:34:51
Operations
English34
Special features
Delay Start
You can delay the cycle starting time up to 24 hours in 1-hour increments. The hour displayed indicates the
time at which the cycle will start.
1. Open the door and then load the dishwasher.
2. Tap Delay Start to change the time in 1-hour increments.
- If you tap and hold Delay Start , the time will increase continuously until you release it.
3. Tap Start and close the door.
NOTE
If you need to adjust the delay time after the cycle has started, tap Power to turn off the dishwasher,
then restart and set the new delay time.
Control Lock
To prevent children from playing with the dishwasher, Control Lock locks all button controls except for
Power.
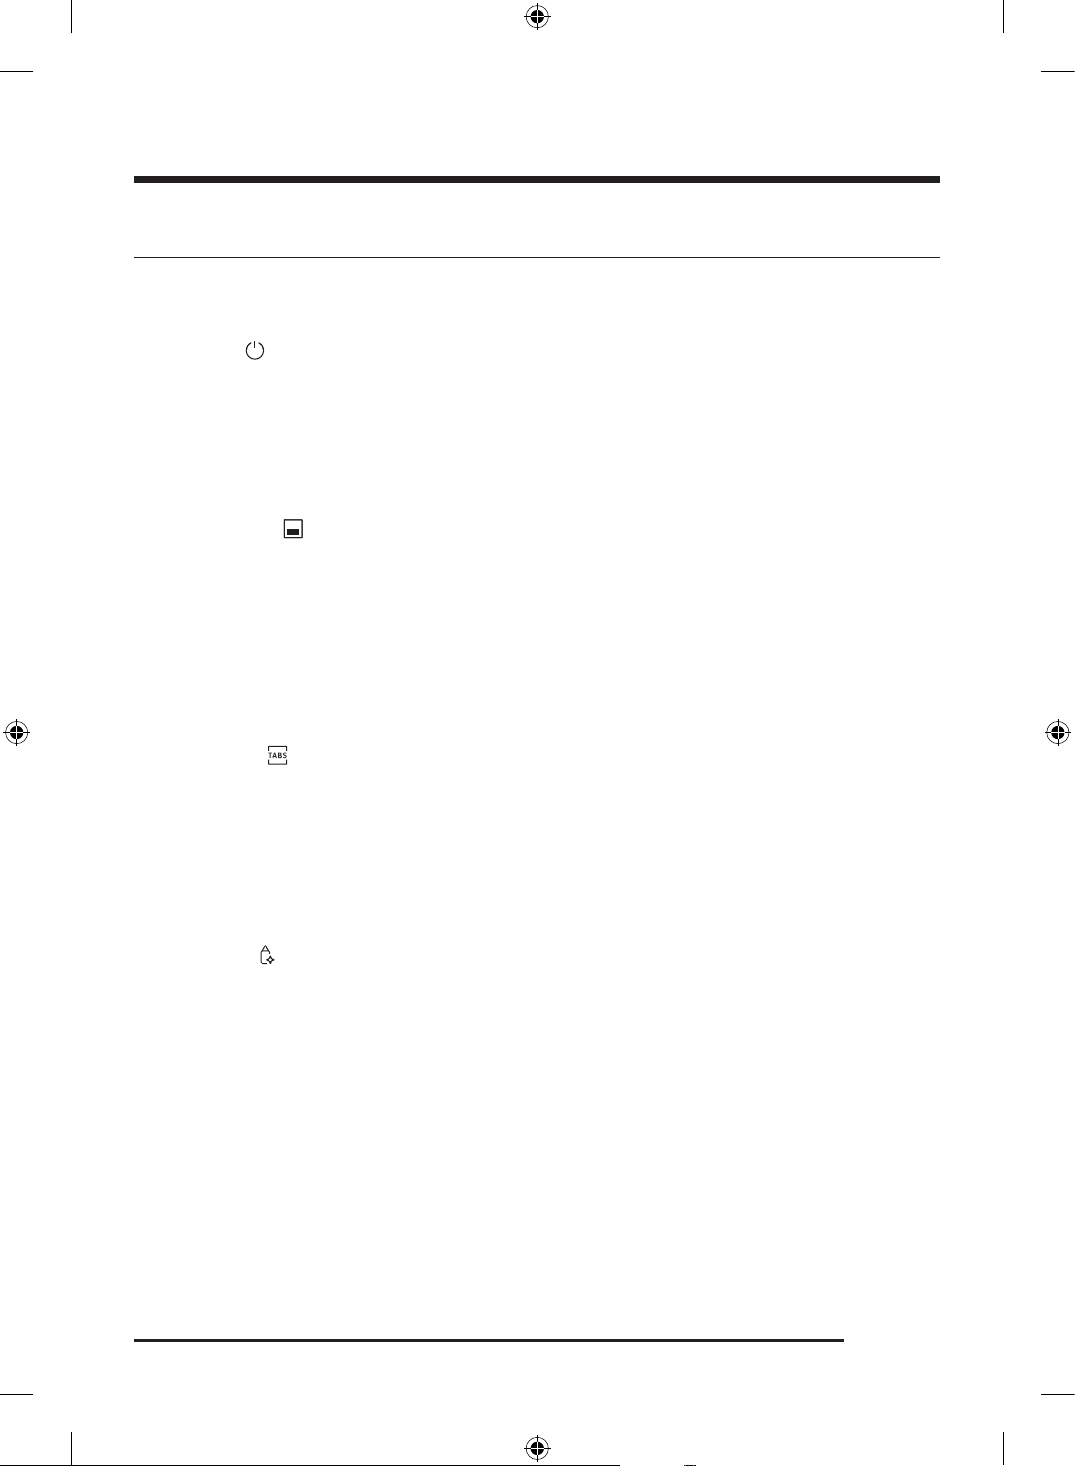
• To activate Control Lock , tap and hold Multi Tab for 3 seconds. With Control Lock activated, you
cannot select a cycle or option or start an operation.
• To deactivate Control Lock , tap and hold Multi Tab again for 3 seconds.
• The Control Lock remains enabled even after restarting the dishwasher. To cancel Control Lock , you
must deactivate it first.
Untitled-3 34Untitled-3 34 2026-04-23 4:34:512026-04-23 4:34:51
English 35
Open Source Announcement
The software included in this product contains open source software.
The following URL http://opensource.samsung.com/opensource/SMART_TP2_0/seq/0 leads to open
source license information as related to this product.
Untitled-3 35Untitled-3 35 2026-04-23 4:34:512026-04-23 4:34:51
English36
Maintenance
Cleaning
Keep the dishwasher clean to improve performance, reduce unnecessary repairs, and lengthen its lifecycle.
Exterior
Clean spills on the surface of the dishwasher immediately. Use a soft, damp cloth on the control panel to
gently wipe away spills and dust.
CAUTION
• Do not use benzene, wax, thinner, chlorine bleach, alcohol, or other chemical substances. These
materials may discolour the surface of the dishwasher and cause stains.
• The dishwasher has electric parts inside. Do not spray water directly onto the dishwasher. Protect
electrical components from water.
• For a stainless-steel door panel, use a stainless-steel cleaner for home appliances and a clean, soft
cloth.
Interior
• Clean the interior of the dishwasher on a regular basis to remove any dirt or food particles. Wipe inside
the dishwasher and inside the door with a wet dishcloth.
• Use the Machine Care cycle every month to keep the interior clean and prevent bad odours.
• If your tap water is hard, you can prevent limescale inside the dishwasher by adding citric acid to the
detergent when operating the dishwasher.
CAUTION
• Do not remove the front seal (the long rubber seal enclosing the opening of the dishwasher). The seal
keeps the inner side of the dishwasher sealed.
• Use a damp cloth to remove the lime scale or grease deposits inside the dishwasher. Alternatively,
apply some detergent, and then run an empty cycle using the highest rinse temperature.
Untitled-3 36Untitled-3 36 2026-04-23 4:34:512026-04-23 4:34:51
English 37
Spray arms
To prevent the spray arms from being clogged or if the spray arms are clogged, remove and clean each
spray arm. Use caution when removing the spray arms as they may break.
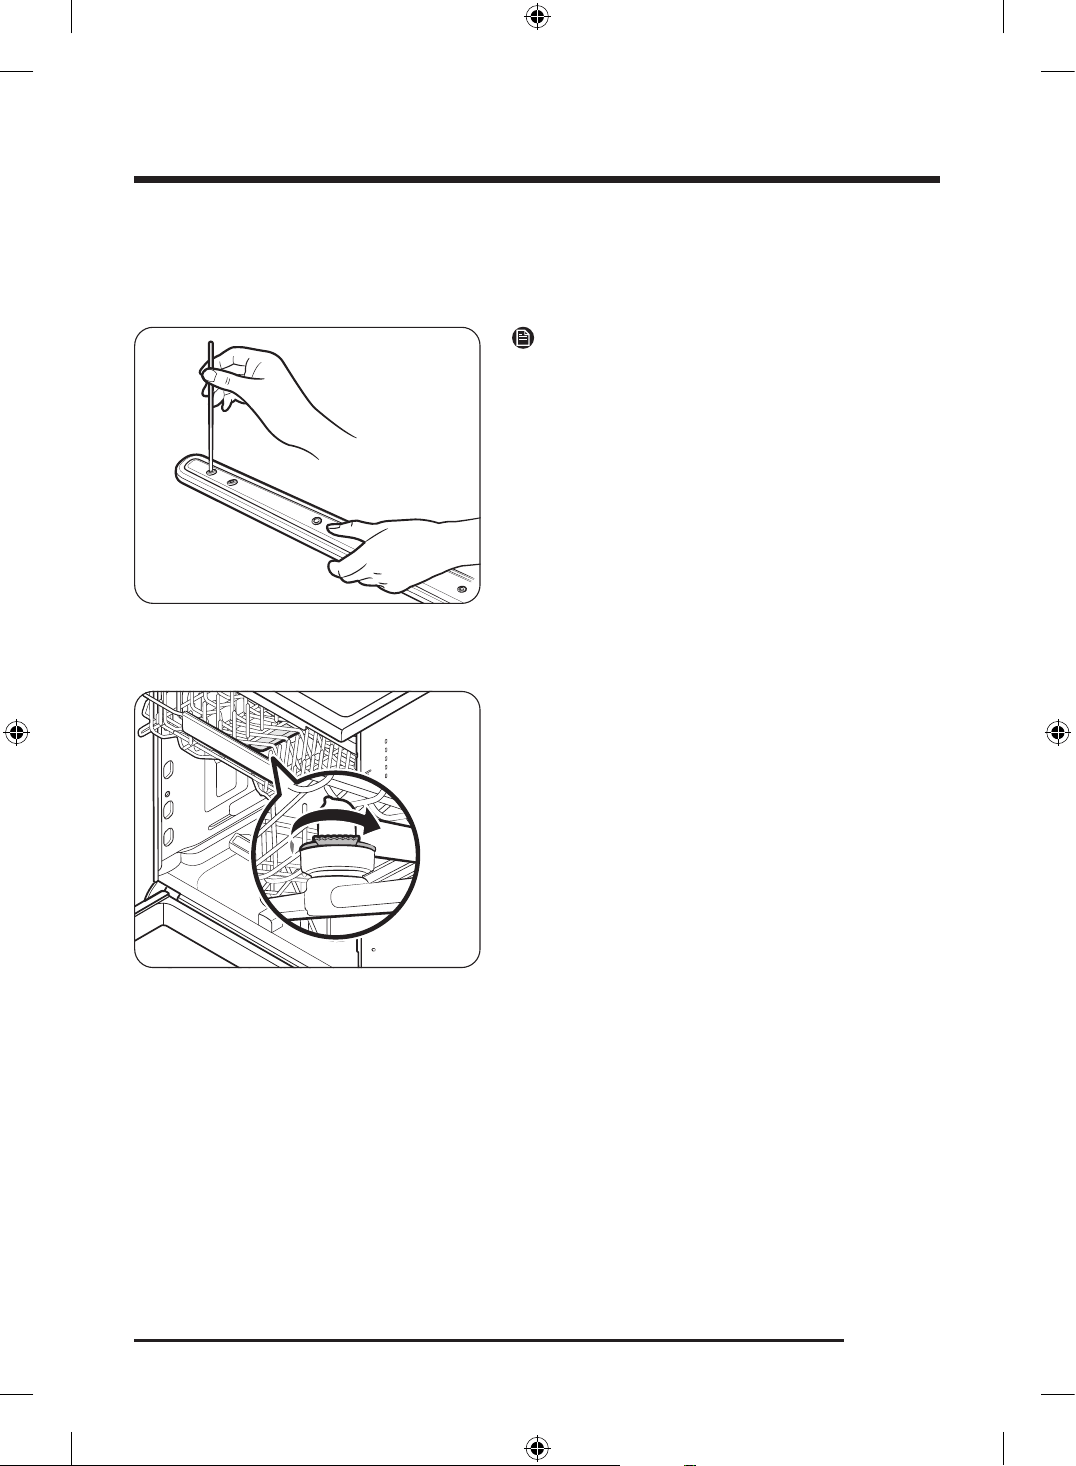
NOTE
If the water holes on the spray arms are clogged, use a
thin pointed tool to unclog the holes.
Middle spray arm
1. Open the door, and then pull out the upper rack.
- The middle spray arm is attached underneath the
upper rack.
2. Loosen and remove the nut, and then remove the
spray arm.
3. Unclog and clean the spray arm.
4. Reinsert the spray arm, and then tighten the nut by
hand.
5. Rotate the spray arm to make sure it is correctly
assembled.
Untitled-3 37Untitled-3 37 2026-04-23 4:34:522026-04-23 4:34:52
Maintenance
English38
Bottom spray arm
1. Open the door.
2. Remove the lower rack.
- The bottom spray arm is attached on the bottom
interior wall.
3. Pull the bottom spray arm to remove it.
4. Unclog and clean the spray arm.
5. Reinsert the spray arm.
6. Rotate the spray arm to make sure it is correctly
assembled.
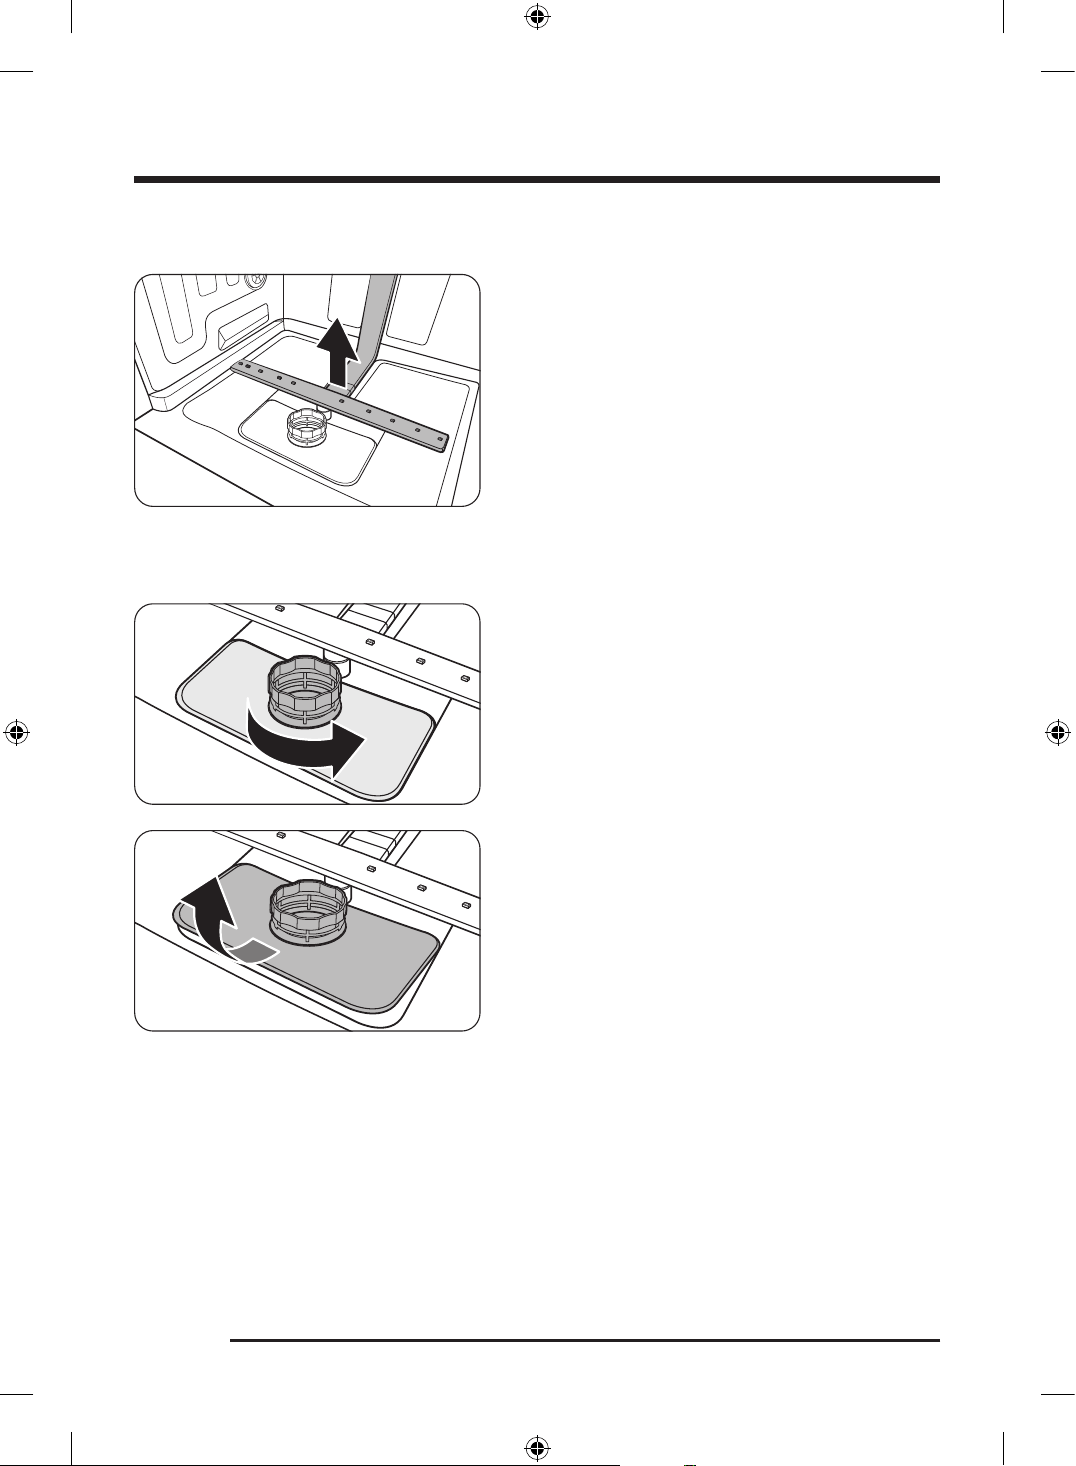
Filters
1. Open the door, and then remove the lower rack.
2. Turn the filter handle anticlockwise to unlock the
coarse filter.
3. Lift the coarse filter and remove them from the
bottom of the dishwasher.
Untitled-3 38Untitled-3 38 2026-04-23 4:34:522026-04-23 4:34:52
English 39
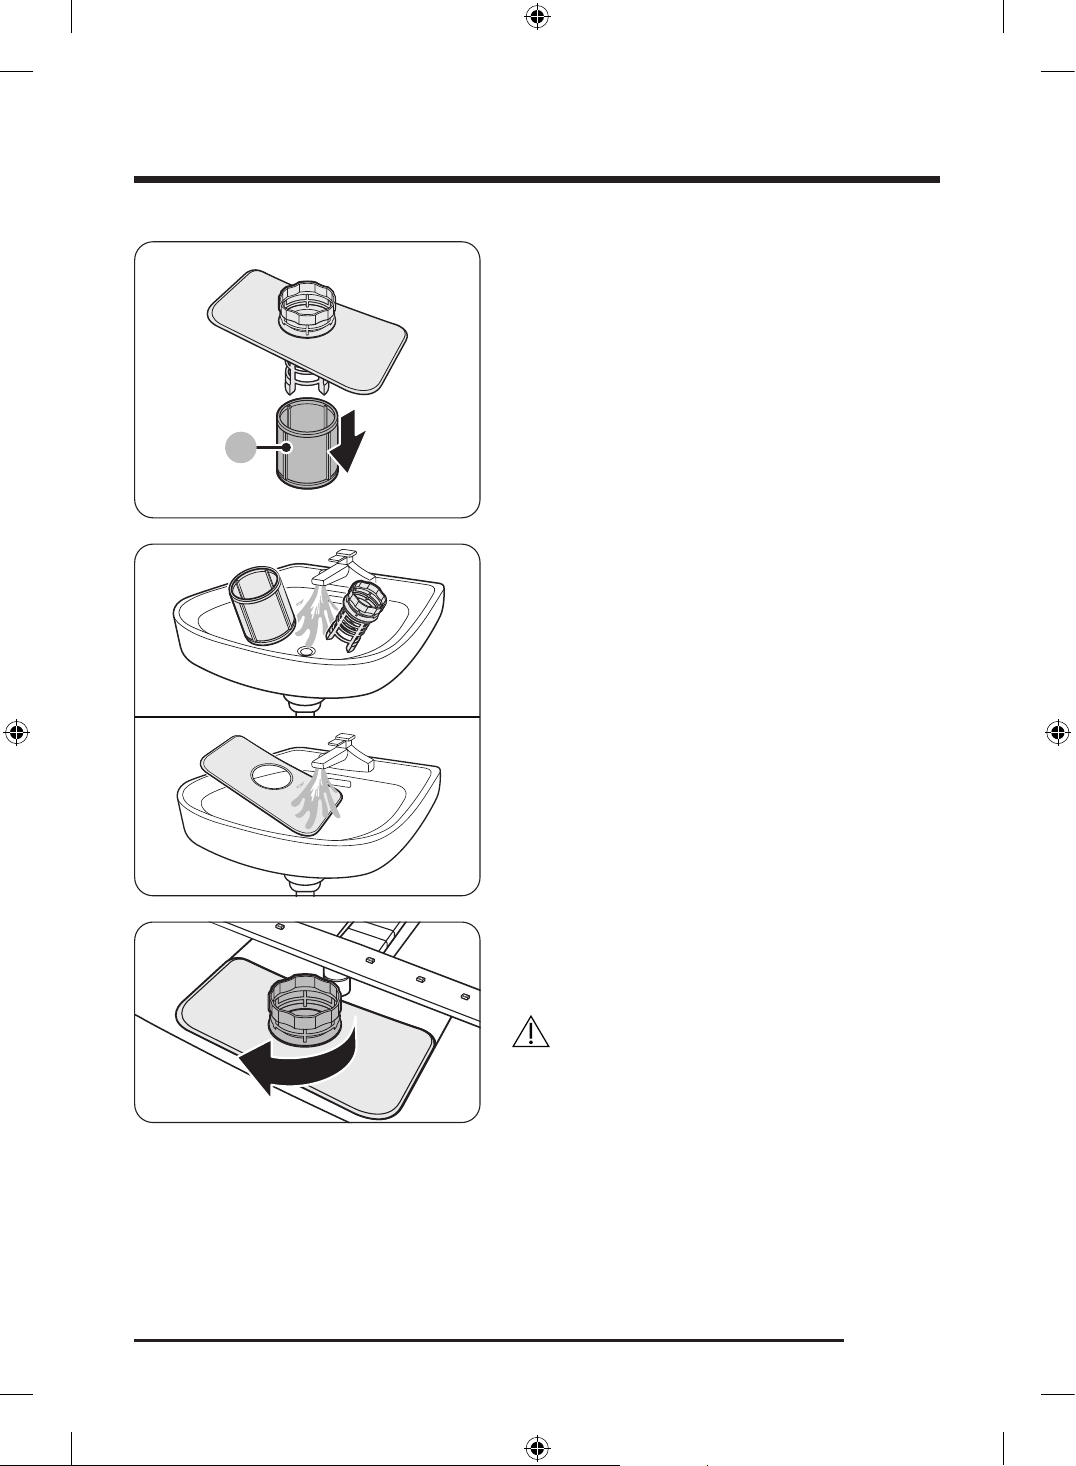
A
4. Disassemble the micro filter (A).
5. Remove any dirt and impurities from all the
disassembled filters and rinse them in running water.
6. Dry the filters before putting them back into the
dishwasher.
7. Assemble all the filters and put them back into the
dishwasher.
8. Turn the filter handle clockwise to lock the filters.
CAUTION
Make sure the coarse filter is securely and completely
closed. Improper closure may reduce filtration
performance and affect the proper operation of the
product.
Untitled-3 39Untitled-3 39 2026-04-23 4:34:532026-04-23 4:34:53
Maintenance
English40
Long-term care
If you will not use the dishwasher for an extended period of time, first drain the unit completely, and then
disconnect the water hose. Shut off the water supply valve and the circuit breaker. Water remaining in the
hoses or the internal components can damage the dishwasher.
Untitled-3 40Untitled-3 40 2026-04-23 4:34:532026-04-23 4:34:53
English 41
Troubleshooting
Checkpoints
If you encounter an issue with the dishwasher, first check the table below and try the suggestions.
Following the repair by a non-authorised service provider, self-repair or non-professional repair of the
product, Samsung is not liable for any damage to the product, any injury or any other product safety issue
caused by any attempt to repair the product which does not carefully follow these repair and maintenance
instructions. Any damage to the product caused by an attempt to repair the product by any person other
than a Samsung certified service provider will not be covered by the warranty
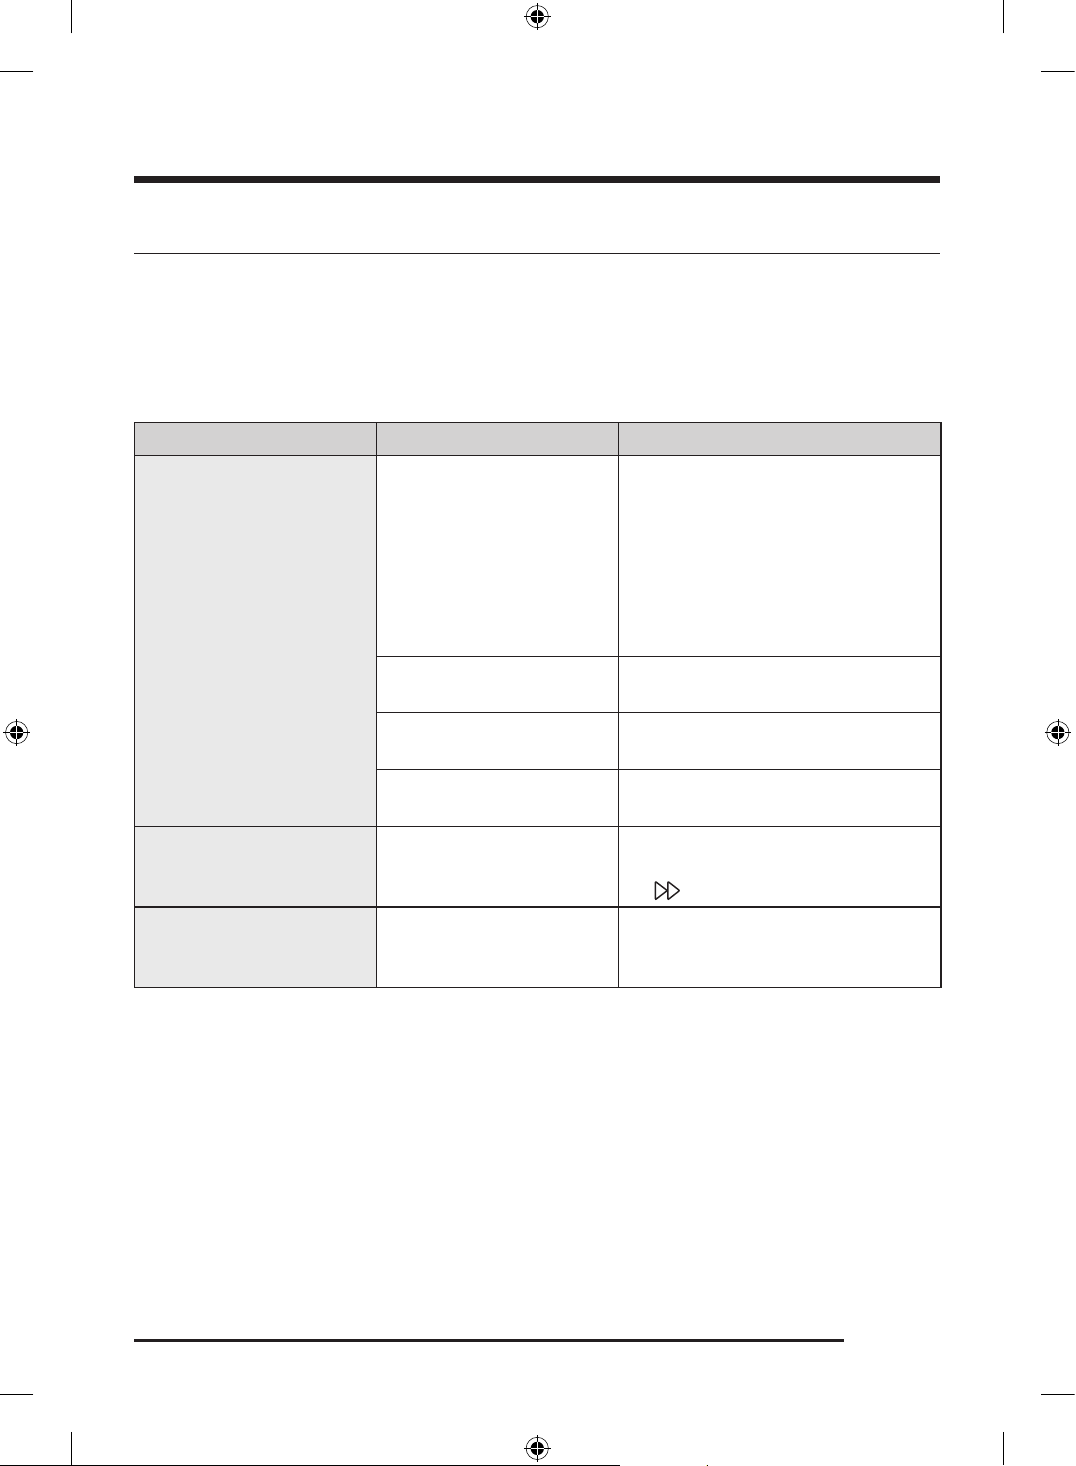
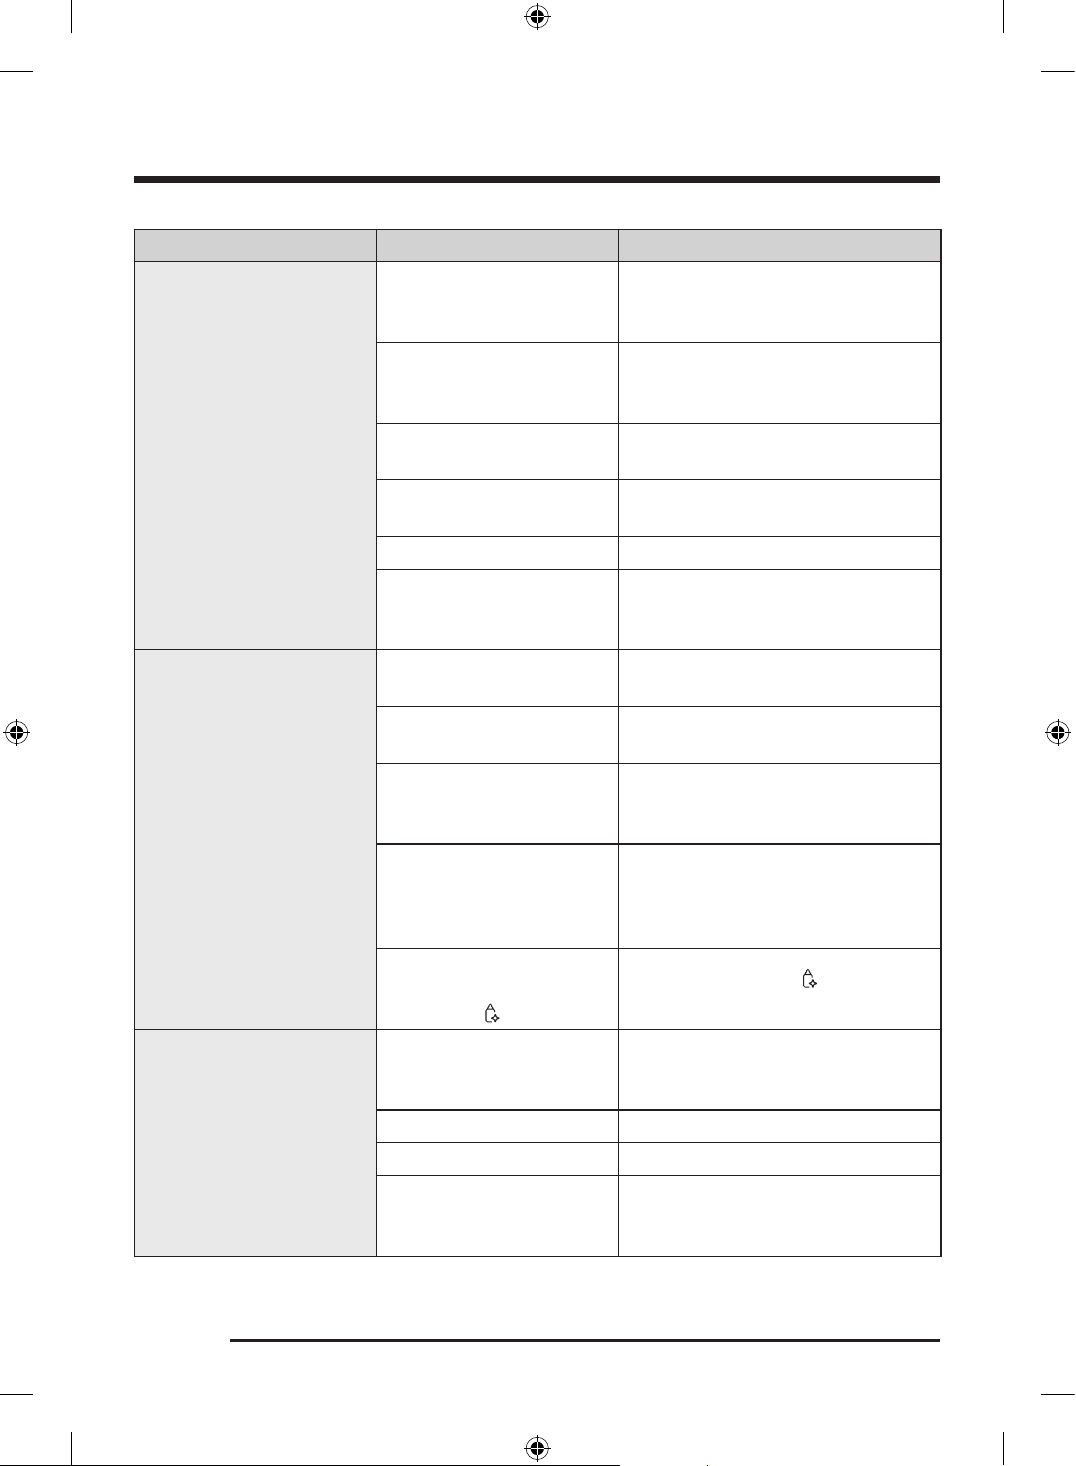
Symptom Possible cause Action
The dishwasher does not
start.
The door is not completely
closed.
• Make sure the door is latched and
completely closed.
• Make sure the middle spray arm
water supply tube is properly
connecting to the water outlet at the
rear interior wall.
• Make sure the upper rack is properly
inserted.
The power cord is not
connected.
• Connect the power cord.
Water is not being supplied.
• Make sure the water supply valve is
open.
The control panel is locked.
• Deactivate the Control Lock
function.
The dishwasher has bad
odours.
Water remains from the
previous cycle.
• With the dishwasher empty, add
detergent, and then run the Express
cycle.
Water remains in the
dishwasher after a cycle has
finished.
The drain hose is kinked or
clogged
• Straighten and unclog the drain
hose.
Untitled-3 41Untitled-3 41 2026-04-23 4:34:532026-04-23 4:34:53
Troubleshooting
English42
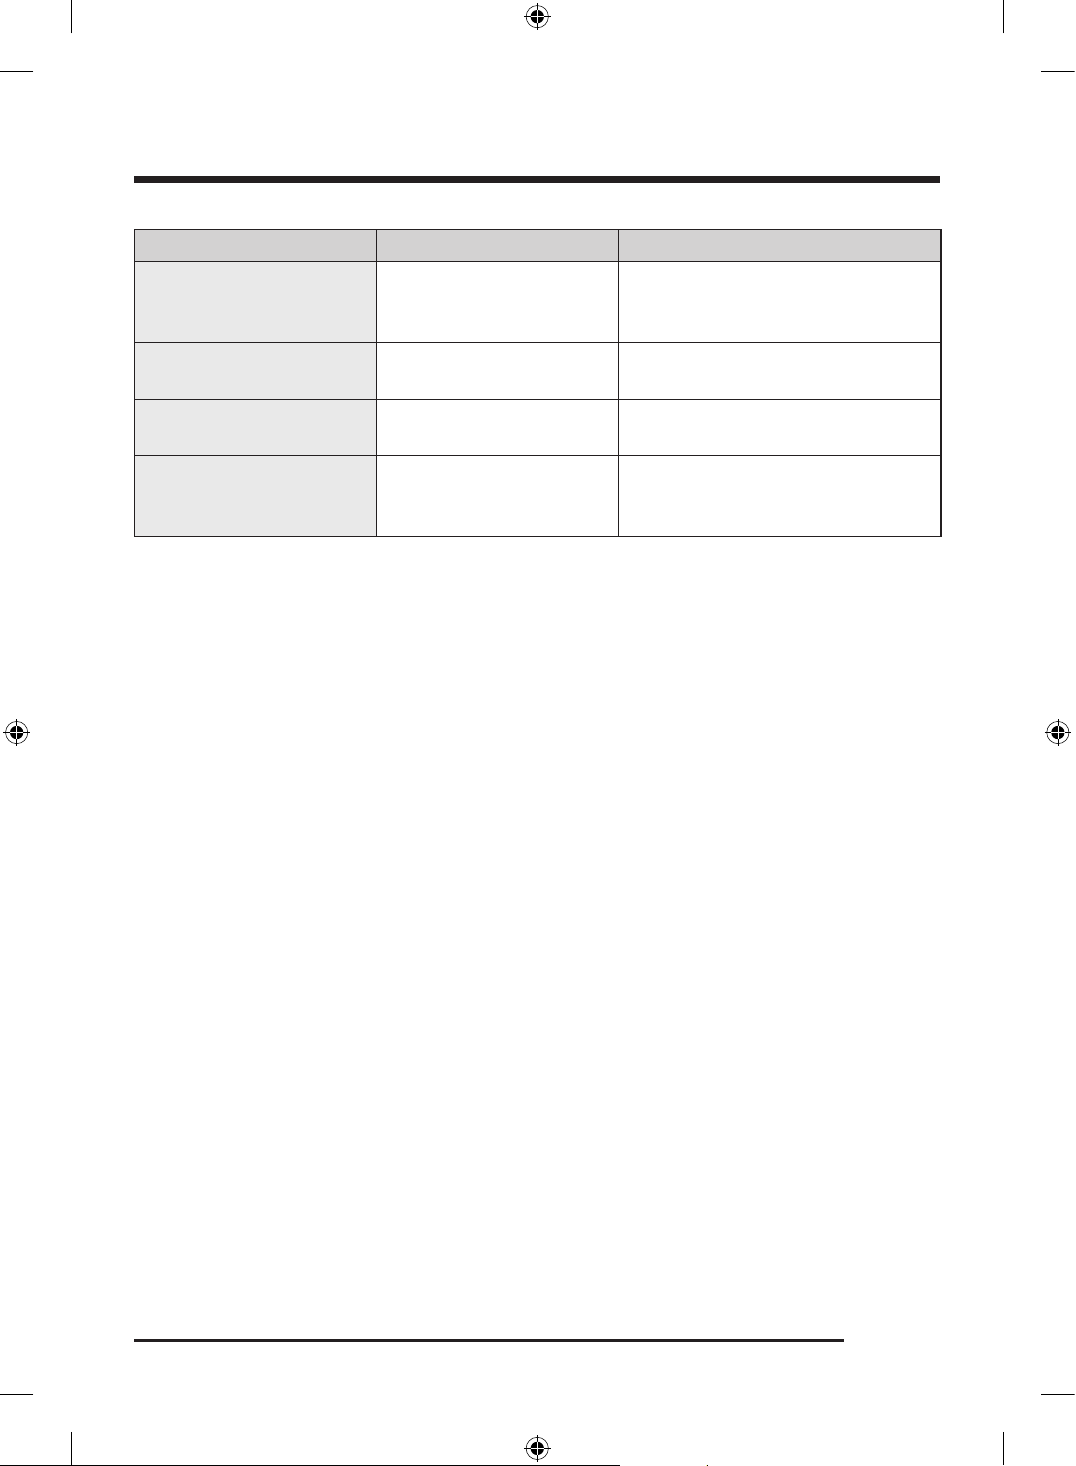
Symptom Possible cause Action
Food remains on dishes.
An incorrect cycle was
selected.
• Select a cycle according to the soil
level of the dishes as instructed in
this manual.
The filters are clogged or not
correctly fastened.
• Clean the filters.
• Make sure the filters are correctly
fastened.
An insufficient amount of
detergent was used.
• Use the correct amount of detergent
for each load.
The water pressure is low.
• Make sure the pressure is between
40-1000 kPa.
The spray arms are clogged. • Clean and unclog the spray arms.
Dishes are improperly loaded
or overloaded.
• Arrange the dishes so they do not
interfere with the spray arms or the
detergent dispenser.
Dishes are not dried well
enough
The rinse aid compartment
is empty.
• Fill the rinse aid compartment with
the rinse aid.
Not enough rinse aid was
used.
• Change the Dose per Rinse setting.
Too many dishes were
loaded.
• Overloading may reduce the drying
performance. Load your dishes as
recommended.
Glasses and cups spilled
water onto other dishes while
being unloaded.
• Empty the lower rack first, and then
the upper rack. This will avoid water
dripping from the upper rack onto
the dishes in the lower rack.
Multiple detergent tablets
were used without selecting
the Sanitize option.
• Select the Sanitize option or use
a rinse aid.
The dishwasher is too noisy.
The detergent compartment
is opened to dispense the
detergent.
• This is normal.
The drain pump is operating. • This is normal.
The dishwasher is not level. • Make sure the dishwasher is level.
The spray arm bumps
against the dishes, creating a
chopping sound.
• Rearrange the dishes.
Untitled-3 42Untitled-3 42 2026-04-23 4:34:532026-04-23 4:34:53
English 43
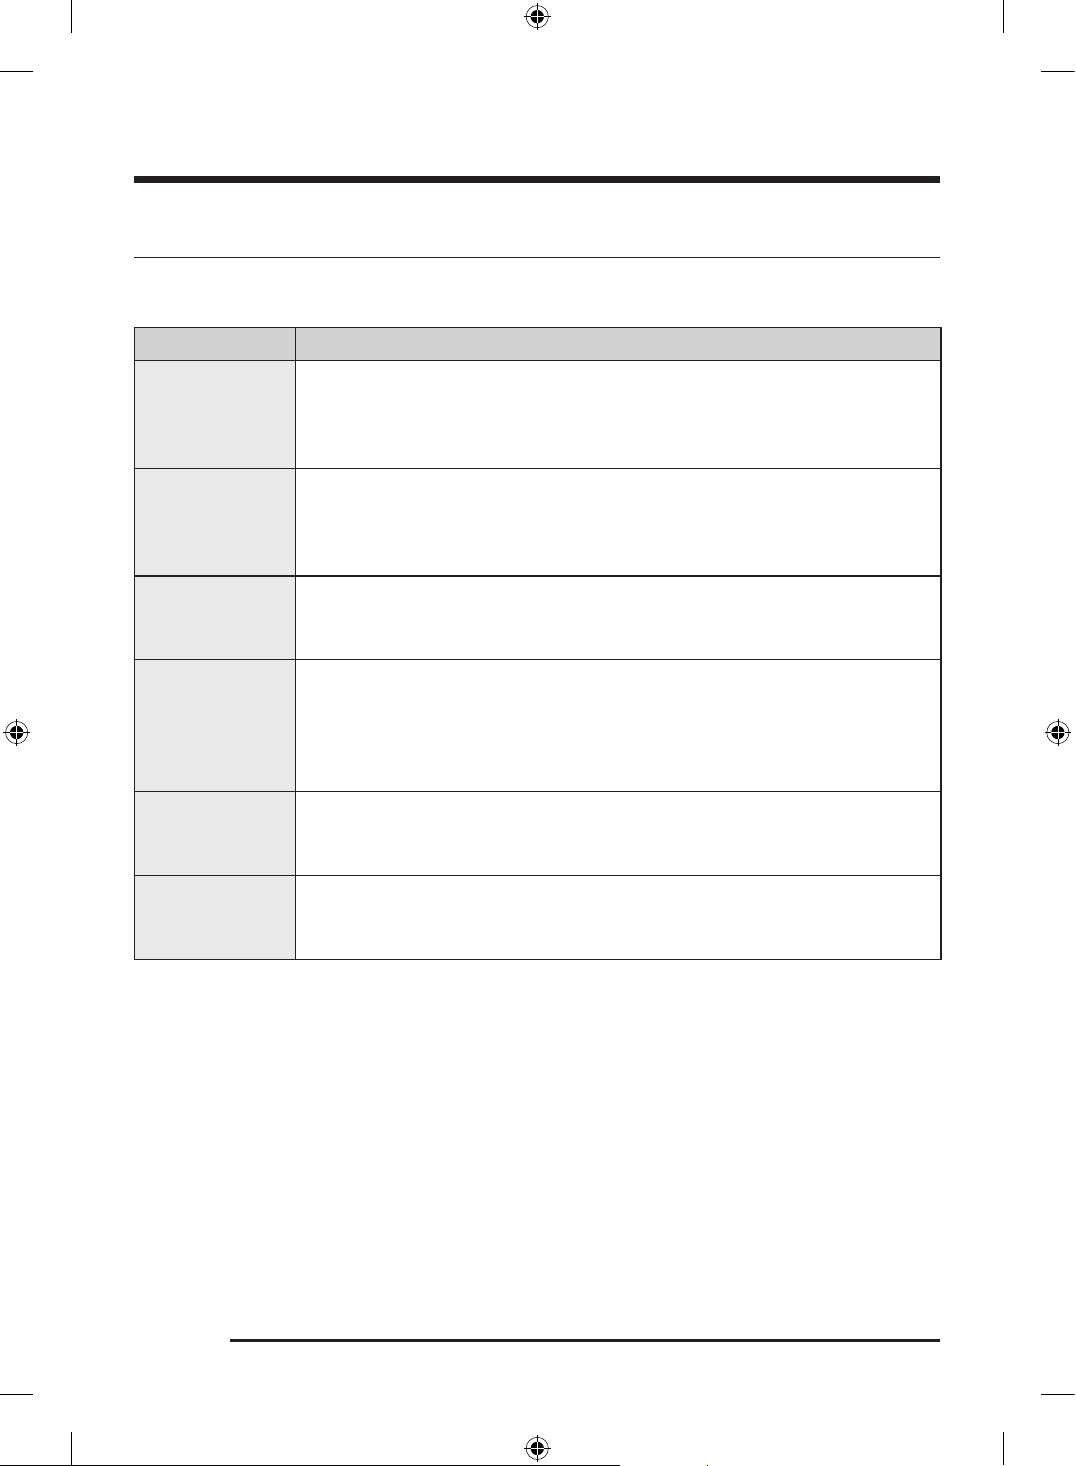
Symptom Possible cause Action
A layer of the yellow or
brown stain remains on
dishes.
Coffee and tea soils.
• Use a cycle with a higher
temperature water.
The display is not turning on.
The power cord is not
connected.
• Check power supply is present.
The spray arms do not rotate
smoothly.
The spray arms are clogged
with food particles.
• Clean the spray arms.
The dishwasher bubbles up
and the foam remains too
much on the front.
Regular detergent was
used instead of dishwasher
detergent.
• Always use dishwasher detergent.
• Turn the dishwasher off and remove
the bubbles.
Untitled-3 43Untitled-3 43 2026-04-23 4:34:532026-04-23 4:34:53
Troubleshooting
English44
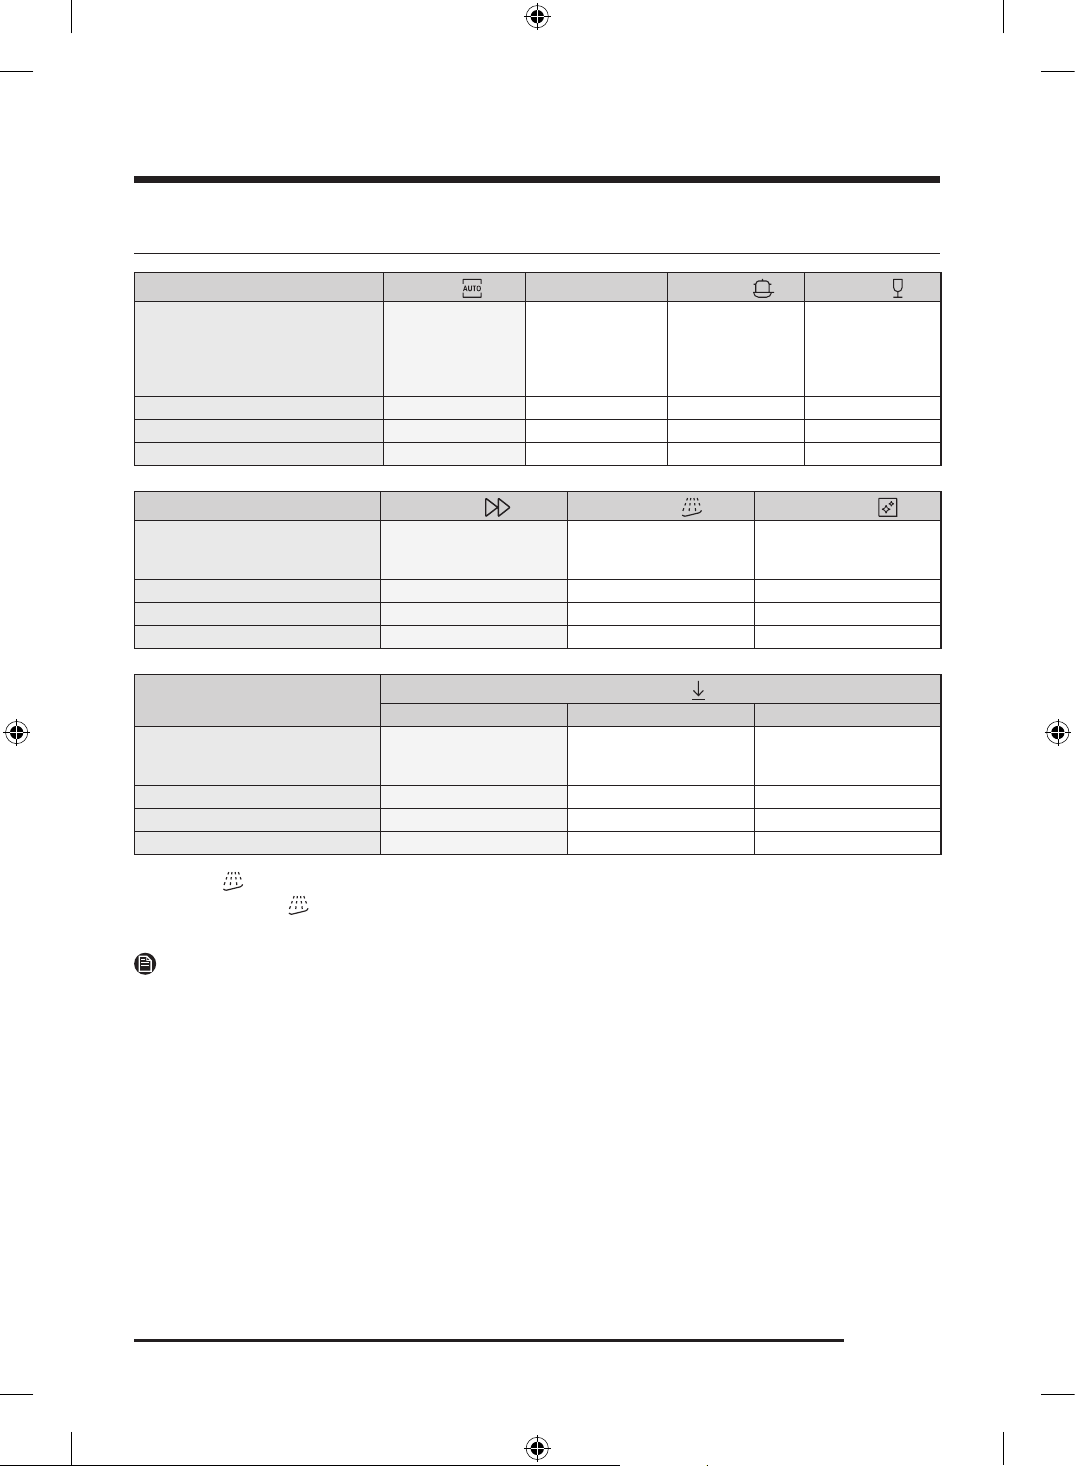
Information codes
If the dishwasher fails to operate, you may see an information code on the display. Check the table below
and try the suggestions.
Code Action
LC
Leakage check
• Close the water supply valve. Go to your home’s circuit breaker panel, and set
the dishwasher’s circuit breaker switch to off. Contact the installer to repair. If
the issue continues, contact a local Samsung service centre.
4C
Water supply check
• Check if the water supply valve is closed, if the water supply is suspended, or if
the water inlet valve or line is frozen or clogged by foreign particles. If the issue
continues, contact a local Samsung service centre.
AC
PCB communication check
• Abnormal communication between the main PCB and the sub PCB. If the issue
continues, contact a local Samsung service centre.
HC
High temperature heating check
• Functional check. With the dishwasher empty, add detergent, and then run a
cycle. If the issue continues, go to your home’s circuit breaker panel, and set
the dishwasher’s circuit breaker switch to off. Contact a local Samsung service
centre.
tC
Thermistor check
• Temperature sensor is deformed or broken (short or open circuit). If the problem
continues, contact an authorised Samsung service centre.
PC
Distribution motor check
• Abnormal working with distribution motor assembly, or main PCB. If the issue
continues, contact a local Samsung service centre.
If any information code keeps appearing on the screen, contact a local Samsung service centre.
Spare parts* for end-users are available for a minimum of 10 years**.
* Applicable parts : door hinge and seals, other seals, spray arms, drain filters, interior racks and plastic
peripherals such as baskets and lids.
** This means a minimum of 10 years after Samsung places the last unit of the model on the market.
Untitled-3 44Untitled-3 44 2026-04-23 4:34:532026-04-23 4:34:53
English 45
Appendix
Cycle chart
Cycle
AUTO
ECO
Intensive Delicate
Cycle sequence
Pre wash (45 °C) >
Main wash (55-65 °C) >
Rinse > Hot Rinse (50-
70 °C) > Dry > End
Main wash (46 °C)
> Rinse > Hot Rinse
(35 °C) > Dry > End
Pre wash (50 °C) >
Main wash (65 °C)
> Rinse > Hot Rinse
(65 °C) > Dry > End
Pre wash (40 °C) >
Main wash (50 °C) >
Rinse (50 °C) > Hot
Rinse (50 °C) > Dry
> End
Water consumption (L) 7.8-17.3 11.53 17.3 13.9
Energy consumption (kWh) 0.810-1.500 0.619 1.535 0.950
Cycle time (min.) 129-150 225 205 120
Cycle
Express Pre Wash * Machine Care
Cycle sequence
Main wash (60 °C) > Rinse
(50 °C) > Hot Rinse (65 °C) >
Dry > End
Pre wash > End
Pre wash > Main wash (70 °C)
> Rinse > Hot Rinse (70 °C) >
Dry > End
Water consumption (L) 12.1 4.1 14.9
Energy consumption (kWh) 1.050 0.02 1.510
Cycle time (min.) 60 15 145
Cycle
Downloaded
Plastic Pots & Pans Baby Care
Cycle sequence
Pre wash > Main wash (60 °C)
> Rinse > Hot Rinse (60 °C) >
Dry > End
Pre wash (50 °C) > Main wash
(70 °C) > Rinse > Hot Rinse
(70 °C) > Dry > End
Pre wash > Rinse > Hot Rinse
(70 °C) > Dry > End
Water consumption (L) 14.1 21.5 10.6
Energy consumption (kWh) 1.080 1.610 0.755
Cycle time (min.) 129 172 79
* Pre Wash : This cycle does not activate the AutoRelease™ function nor the drying process. Continuous
use of the Pre Wash cycle for an extended time is not recommended. This may reduce the performance
of the water softener.
NOTE
• The cycle time depends on the options you have added, and the pressure and temperature of the
supplied water.
• The power consumption depends on the water temperature and/or load.
• Energy values for courses were calculated under standardized testing conditions.
Untitled-3 45Untitled-3 45 2026-04-23 4:34:542026-04-23 4:34:54
Appendix
English46
Transportation/relocation
Make sure the dishwasher is empty with no loose parts. First, drain the dishwasher as follows.
1. When the draining process is complete, open the door.
2. Turn the dishwasher off, and then shut the water valve off.
3. Disconnect the both the water hose and the drain hose.
CAUTION
Do not shake or sway the dishwasher while moving it. Residual water may drip from the dishwasher.
Protection against frost
If you leave the dishwasher in a place with a risk of frost for an extended time, make sure to empty the
dishwasher. For details, see the “Transportation/relocation ” section.
Disposing the dishwasher and helping the environment
Your dishwasher is manufactured from recyclable materials. If you decide to dispose of it, please observe
your local waste disposal regulations. Cut off the power cord so that the appliance cannot be connected to
a power source.
Remove the door so that animals and children cannot get trapped inside the appliance.
Untitled-3 46Untitled-3 46 2026-04-23 4:34:542026-04-23 4:34:54
English 47
Specifications
Model DW70H7***F*
Type Free Standing
Power supply 220-240 V~, 50 Hz
Water pressure 40–1000 kPa
Wash capacity 14 place settings
Rated power 1760-2100 W
Dimension
(Width x Depth x Height)
598x600x845 mm
Weight (Unpacked) 45.0 kg
Untitled-3 47Untitled-3 47 2026-04-23 4:34:542026-04-23 4:34:54
English48
For standard test
NOTE
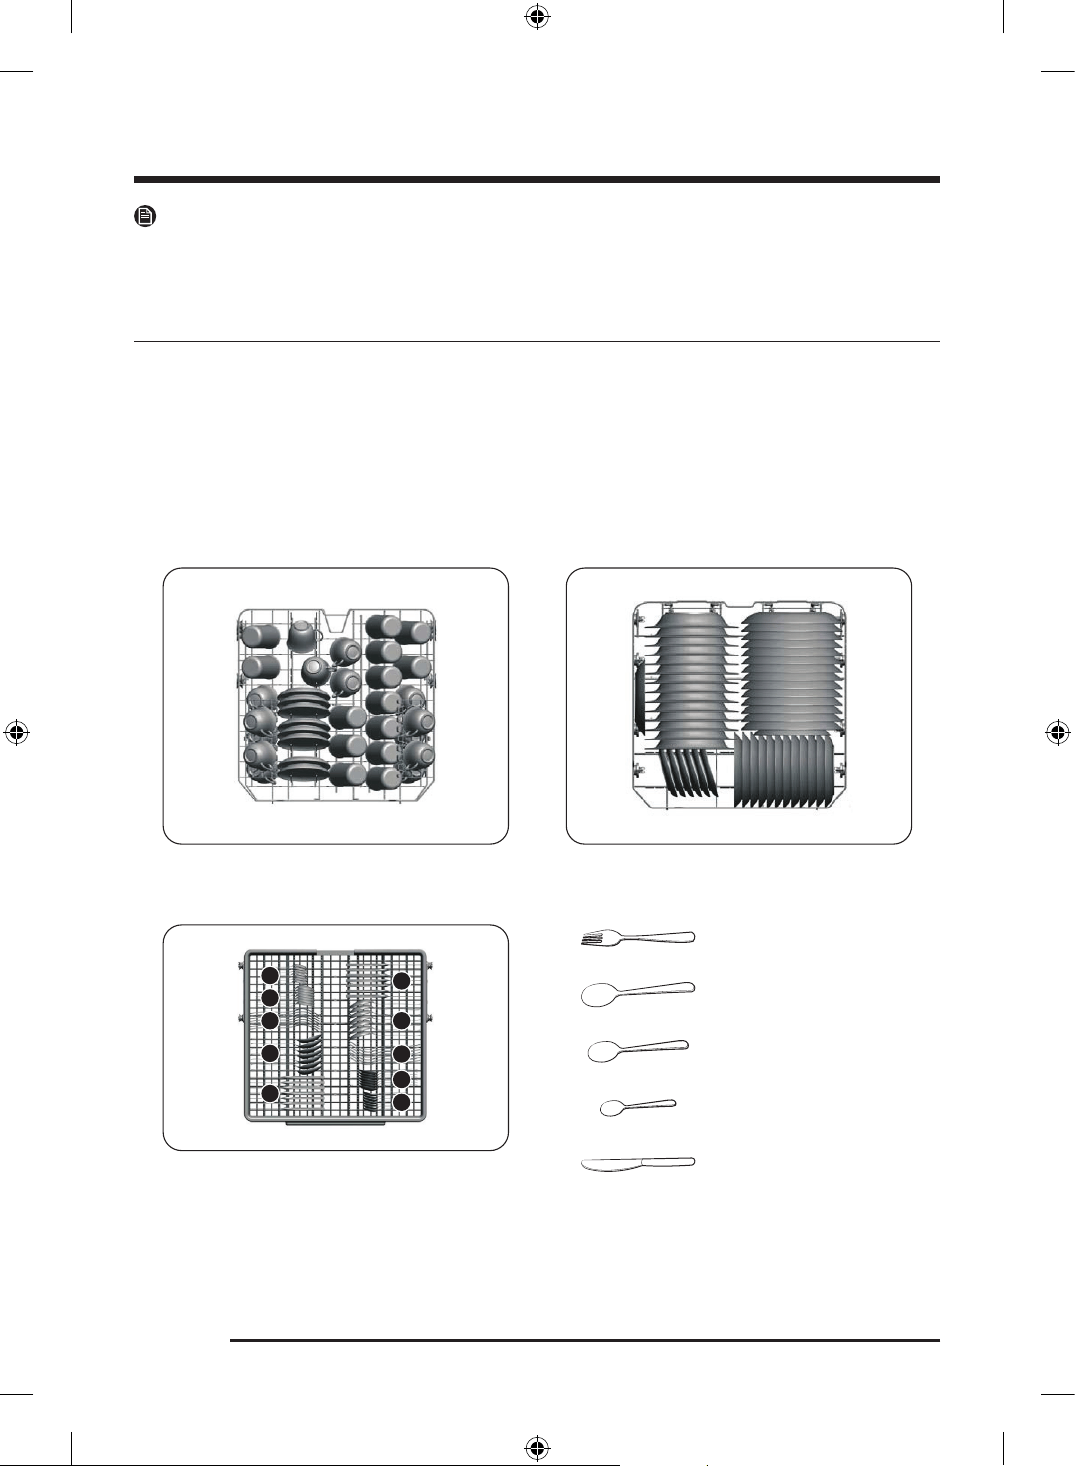
The information for comparability test in accordance with AS/NZS:2007 , as follows: The diagrams below
show the proper way to load the baskets based on the Australian/ New Zealand Standards ( AS/NZS:2007 ).
DW70H75**** models
• Washing capacity: 14 place settings
• Test standard: AS/NZS:2007
• Position of upper rack: lower position
• Wash cycle: ECO
• Additional options: None
• Rinse aid level setting: F5
• Dosage of the standard detergent: Main-wash 32.5 g
• For the arrangement of the items, refer to the below figures
Upper rack
Lower rack
1
1
2
2
3
3
4
4
5
5
Cutlery rack
1. Forks
2. Soup spoons
3. Dessert spoons
4. Tea spoons
5. Knives
Untitled-3 48Untitled-3 48 2026-04-23 4:34:542026-04-23 4:34:54
Memo
Untitled-3 49Untitled-3 49 2026-04-23 4:34:542026-04-23 4:34:54
Memo
Untitled-3 50Untitled-3 50 2026-04-23 4:34:542026-04-23 4:34:54
Memo
Untitled-3 51Untitled-3 51 2026-04-23 4:34:542026-04-23 4:34:54
QUESTIONS OR COMMENTS?
COUNTRY CALL OR VISIT US ONLINE AT
AUSTRALIA
1300 362 603 (Other)
1300 425 299 (HHP)
www.samsung.com/support
NEW ZEALAND
0800 726 7864 (All Products)
0800 726 786 (All Products)
both numbers are linked with same line
Untitled-3 52Untitled-3 52 2026-04-23 4:34:552026-04-23 4:34:55