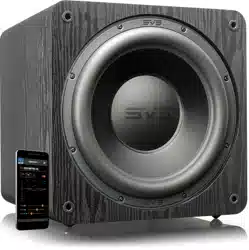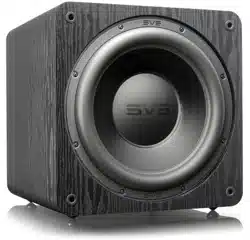
SB-3000
R|Evolution
OWNER’S MANUAL

Congratulations on bringing home the ultimate
subwoofer experience!
The SB-3000 R|Evolution Subwoofer embodies all the technology and engineering advance-
ments made by SVS since we developed our first subwoofer nearly three decades ago. You can
feel proud knowing your subwoofer was masterfully engineered to deliver the deepest, most
powerful, most accurate, and most detailed low frequencies. Between the new 13-inch driver,
stunningly powerful STA-1200D2 amplifier, industry-leading subwoofer control smartphone
app, and other breakthroughs, the SB-3000 R|Evolution represents a quantum leap forward in
subwoofer design and will provide many years of listening pleasure.
We know you are eager to get your new subwoofer set up, so in this owner’s manual, you will
find instructions on placement, connecting, tuning, and more. Our expert SVS support team is
standing by seven days a week to take the guesswork out of setting up your new subwoofer.
They are equipped to handle even the most complicated questions about placement, tuning, AV
receiver settings, and more.
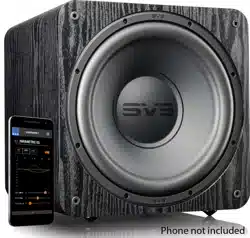
One of the most useful features of your SB-3000 R|Evolution is the free SVS Subwoofer Control
App, which can be used to fine-tune performance and create custom presets from the comfort
of your seat and the convenience of your mobile device. Just visit the Apple® App® Store or
Google Play™ Store and search “SVS App” to get started.
If you have any questions about your SVS SB-3000 R|Evolution Subwoofer, please contact us
directly.
www.svsound.com • [email protected] • (877) 626-5623
Happy Listening!
version 1.1.01142026
The SVS SB-3000 R|Evolution is designed for easy set-up and integration in both multi-channel
home theater and two-channel (stereo) systems. It is best to familiarize yourself with the
subwoofer connections and the rear panel of your AV receiver or preamplifier before setting your
subwoofer up. Be sure your SB-3000 R|Evolution is switched to Off before plugging it in or
connecting to your AV receiver. It’s also best to use cables with secure connections for optimal
bass performance.
The convenient SVS mobile app for both Apple® iOS® and Google Android™ allows you to make
adjustments for room layout, personal preferences, movies vs. music, and more. It’s the best way
to fine tune your subwoofer for perfect performance from the comfort of your favorite seat.
In addition to the SVS mobile app you can control the primary features of the amp using the
back-lit user interface on the rear amplifier plate.
A full explanation of all the advanced subwoofer DSP controls is available in this manual, as well
as in the SVS subwoofer app tutorial. The following sections cover basic connections and control
settings when integrating the SB-3000 R|Evolution into a surround sound or two channel system.
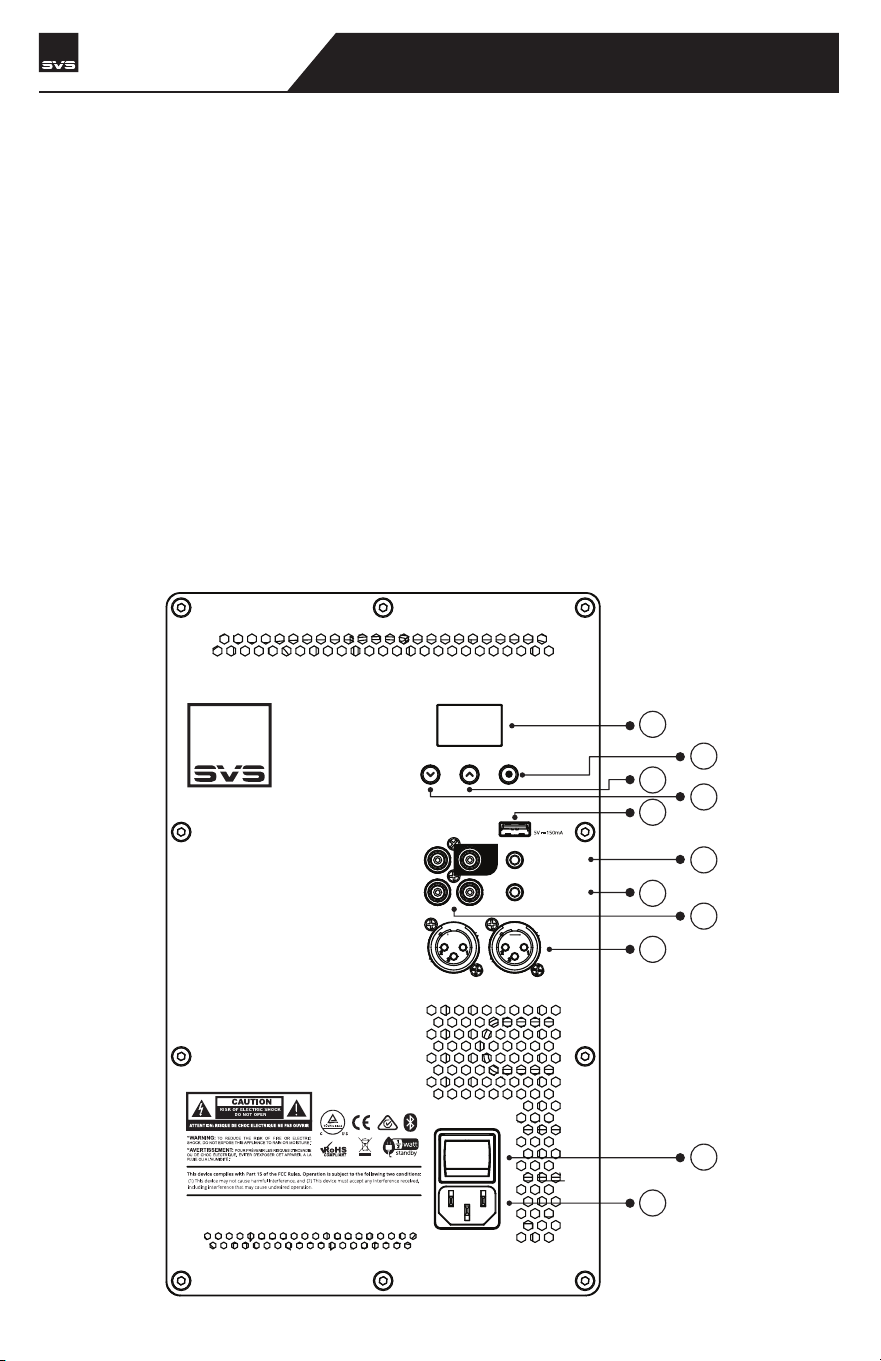
BACK PANEL FEATURES
CONNECTING & CONTROLLING YOUR SUBWOOFER
6
7
8
9
10
11
1
5
4
3
2
SB-3000 R|Evolution
SUBWOOFER
SVS | 340 Victoria Rd. Youngstown, OH 44515, USA | svsound.com
USB Output:
ONOFF
100V-240V ~ 50- 60Hz 100 0W
LINE LEVEL
BALANCED
INPUT
OUTPUT
INPUT
3V-12V
| AC/DC
TRIGGER INPUT
IR INPUT
SVS SOUNDPATH
WIRELESS AUDIO ADAPTER
LFE
RL
RL
CONNECTING & CONTROLLING YOUR SUBWOOFER
OLED Display - Displays the level for Volume, Low Pass Filter Frequency, Phase, and other
settings
[ ] - Press this navigation button to cycle through the main features. The list of features are
in the following order: Volume > Low Pass Filter Frequency > Phase > Power Mode > Flip
Display > BT Lock (if enabled) > Firmware Version > Factory Reset
[ ] - Push repeatedly or long press to increase volume, raise the low pass frequency cut-off,
set to LFE, increase phase degree, or adjust other settings
[
] - Push repeatedly or long press to decrease volume, lower the low pass frequency
cut-off, reduce phase degree, or adjust other settings.
USB Type A Port - Used for Firmware updates and powering a USB device like the SVS Sound-
Path Wireless Audio Adapter.
3.5mm IR Input - This feature allows IR based control
systems to send specific commands to the subwoofer
amplifier. A powered IR repeater must be used, passive IR
sensors will not work. The IR control system must be able
to send NEC format commands. For more information
please consult your IR control system for more details
about the IR pin layout and IR codes that can be used for
programming with IR based control systems.
3V-12V Trigger Input - This feature will automatically turn
the subwoofer on/off when a signal is sent to the trigger
input from another component in the system (typically the
pre/pro or AV receiver). The other component in the
system must be equipped with a trigger output feature and
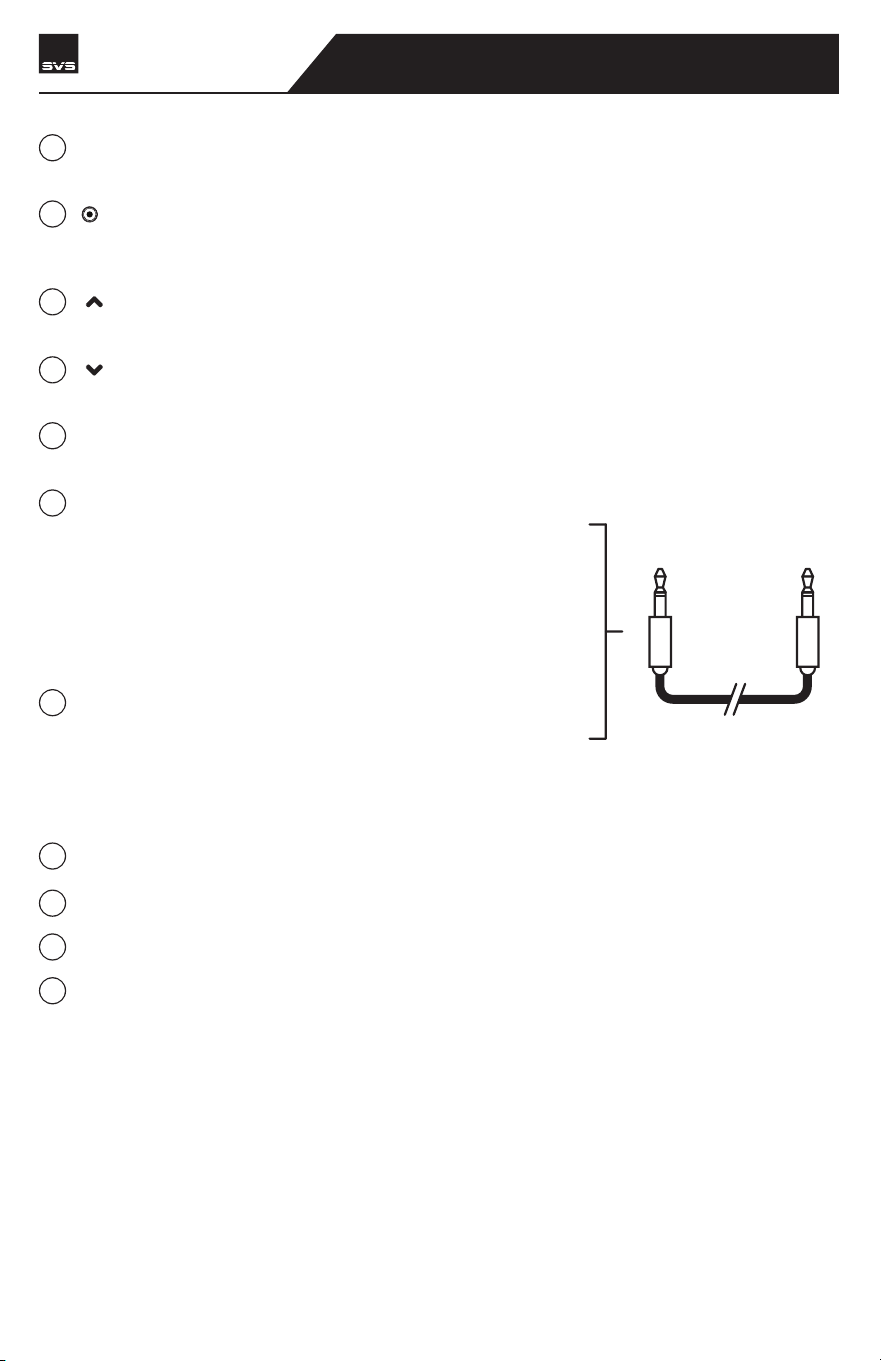
requires a TS 1/8” mono cable (pictured below).
Unbalanced (RCA) Line Level Inputs and Outputs
Balanced (XLR) Line Level Input and Outputs
On/Off Switch - Turns Subwoofer On/Off
AC Power Cord Receptacle
1/8” TS
MONO CABLE
1
2
3
4
5
6
7
8
9
10
11
SB-3000 R|Evolution
SUBWOOFER
AC Power Connection
Connect the subwoofer power cord to the subwoofer amplifier and directly into an AC outlet.
Convenience outlets located on the rear panel of some AV receivers or pre/pros are NOT recom-
mended for your SB-3000 R|Evolution as these outlets are not meant for high power devices.
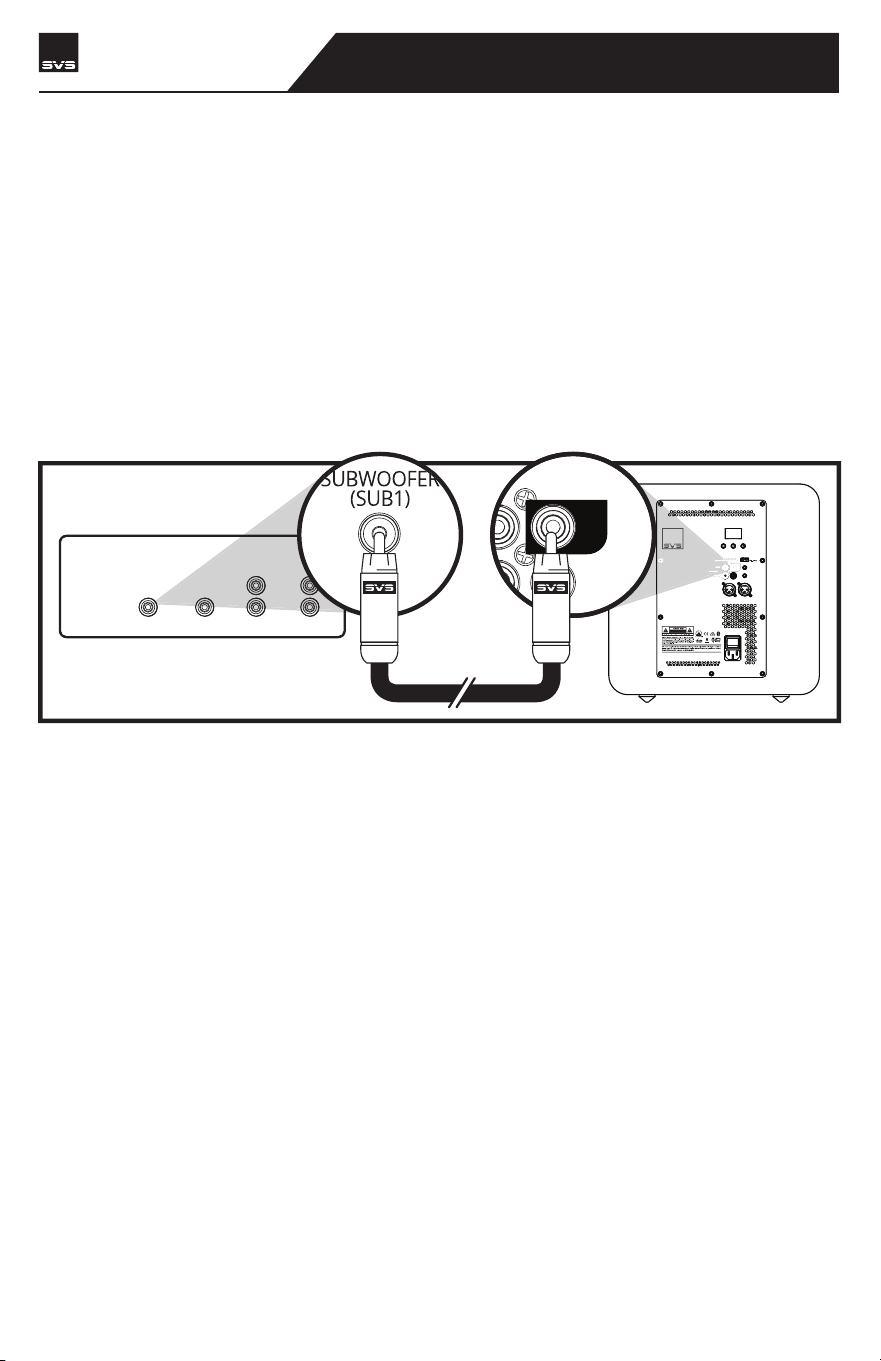
Line Level Connection – Single LFE Channel
The most common way to connect your SB-3000 R|Evolution is with a single RCA or XLR intercon-
nect cable going from the LFE or SUB1 Output on your AV receiver or preamplifier to the LFE
Input on your SB-3000 R|Evolution. This allows your processor to perform the upstream bass
management and send the subwoofer a pre-filtered mono signal.
CONNECTING & CONTROLLING YOUR SUBWOOFER
SB-3000 R|Evolution
SUBWOOFER
CENTER
REAR FRONT
SUBWOOFER
(SUB1)
LINE LEVEL OUTPUTS
SVS | 340 Victoria Rd. Youngstown, OH 44515, USA | svsound.com
USB Output:
ONOFF
100V-240V ~ 50- 60Hz 1000W
BALANCED
INPUT
3V-12V
| AC/DC
TRIGGER INPUT
IR INPUT
LFE
RL
RL
RL
LFE
RECEIVER/PREAMP
CONNECTING & CONTROLLING YOUR SUBWOOFER
SB-3000 R|Evolution
SUBWOOFER
Enable and adjust the on-board low pass filter of the SB-3000 R|Evolution for a smooth blend
with the main speakers.
NOTE: For additional guidance on speaker/subwoofer crossover settings, visit our Subwoofer Matching
Tool at www.svsound.com/merlin, or contact our support team.
www.svsound.com • [email protected] • (877) 626-5623
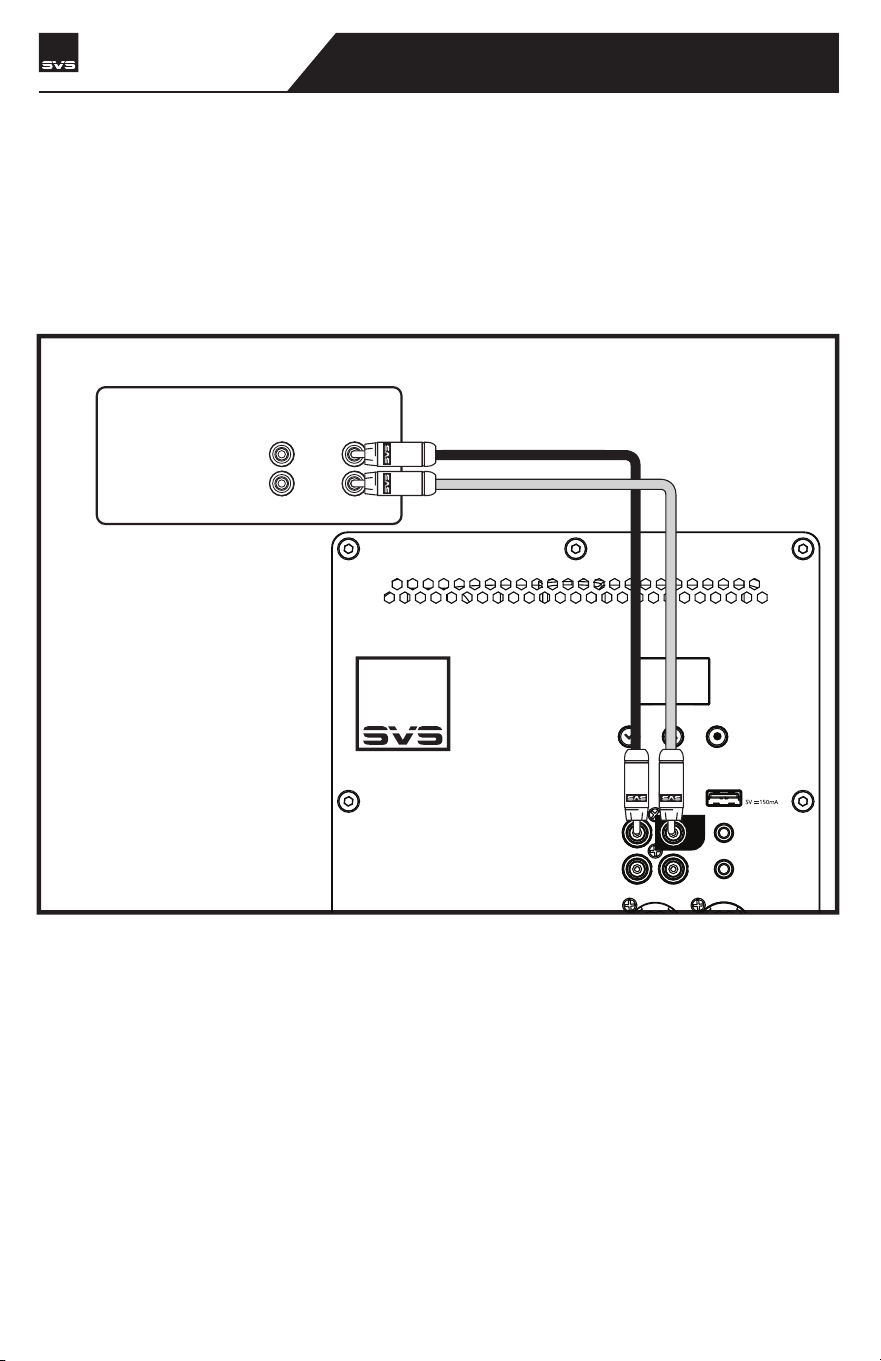
Line Level Connection – Stereo Receiver or Preamplifier Left/Right Channels
Both Left and Right inputs on your SB-3000 R|Evolution can be used in a two-channel stereo
application with a stereo preamplifier that has Left and Right line level or Balanced (XLR) outputs.
Connect the left and right outputs of your preamplifier to the left and right line level inputs of the
SB-3000 R|Evolution using RCA or XLR interconnects.
USB Output:
LINE LEVEL
BALANCED
INPUT
OUTPUT
3V-12V
| AC/DC
TRIGGER INPUT
IR INPUT
SVS SOUNDPATH
WIRELESS AUDIO ADAPTER
LFE
RL
LINE LEVEL OUTPUTS
REAR FRONT
R
L
RECEIVER/PREAMP
CONNECTING & CONTROLLING YOUR SUBWOOFER
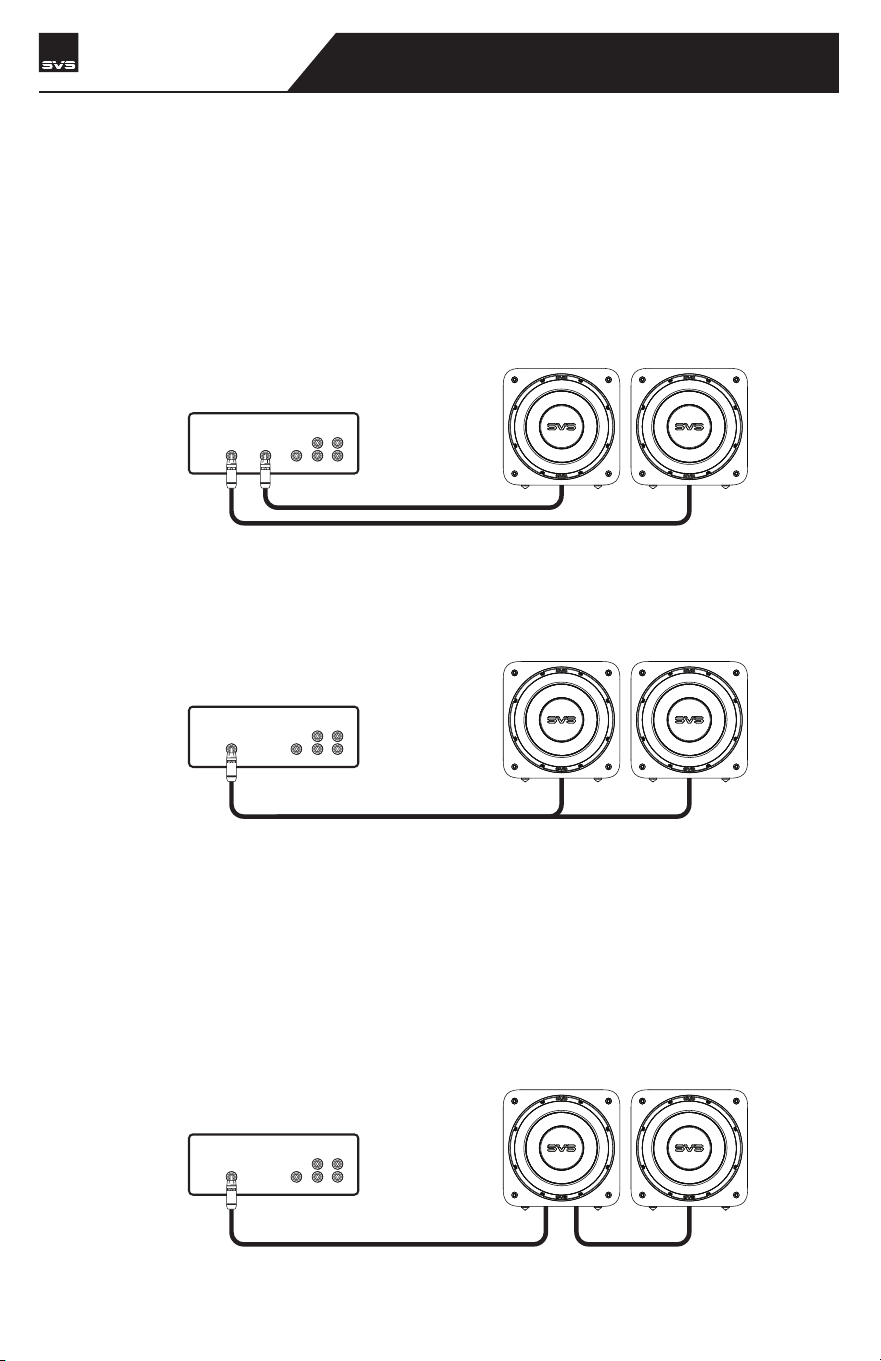
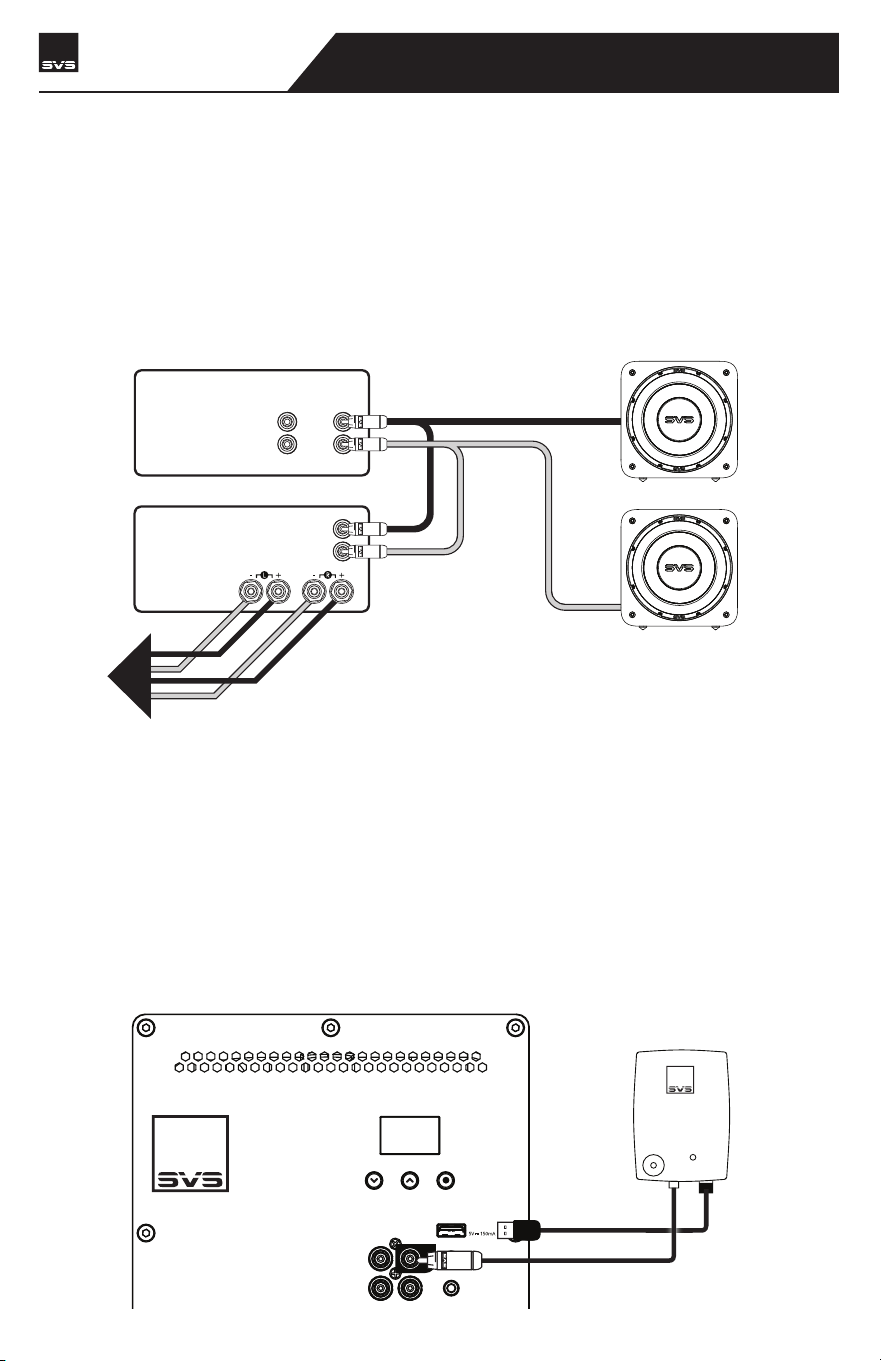
Connecting Multiple Subwoofers or “Going Dual”
Running two or more subwoofers has many acoustic benefits such as: improved frequency
response throughout the listening area, fewer peaks and nulls, increased output and decreased
bass localization. The RCA and XLR Outputs provide an easy way to integrate multiple SB-3000
R|Evolution or other subwoofers into your audio system.
Many AV Receivers and Surround Processors have more than one subwoofer output.
As described previously, you can run a single connection from each subwoofer output
to each of your subwoofers.
If you have more subwoofers than Sub Outputs from your AV Receiver, an easy
solution is to use an RCA splitter or RCA Y-adapter to divide the subwoofer output. This
is the most commonly recommended way to connect multiple subwoofers when there
is only one Sub Out.
Another option is to use the Left and Right RCA or XLR outputs on the SB-3000 R|Evolu-
tion to Daisy Chain additional subwoofers. It’s important to use the matching output
and input terminals. For example, if you are using the RCA inputs, be sure to use the
RCA outputs to daisy chain to the next subwoofer.
NOTE: While the settings of each subwoofer should be similar, you will probably find that
each sub will need to be calibrated for optimal performance because of its unique room
placement. Regardless of how you use your subwoofer, experimentation can often result in
better sound. Don't be afraid to try different settings, you can always return the controls to
their defaults.
CENTER
REAR FRONT
SUBWOOFER
(SUB1)
SUBWOOFER
(SUB2)
LINE LEVEL OUTPUTS
RECEIVER/PREAMP
CENTER
REAR FRONT
SUBWOOFER
(SUB1)
LINE LEVEL OUTPUTS
RECEIVER/PREAMP
CENTER
REAR FRONT
SUBWOOFER
(SUB1)
LINE LEVEL OUTPUTS
RECEIVER/PREAMP
SB-3000 R|Evolution
SUBWOOFER
CONNECTING & CONTROLLING YOUR SUBWOOFER
Connecting Multiple Subwoofers or “Going Dual”
In a 2-channel system you can set up Stereo Subwoofers, where one is used for the Left Channel
and one for the Right Channel. Typically, the subwoofers will be symmetrically placed according
to your speakers. And be sure to maintain all the correct Left and Right output and input connec-
tions to ensure optimum performance.
LINE LEVEL OUTPUTS
REAR FRONT
R
L
RECEIVER/PREAMP
LINE LEVEL INPUTS
SPEAKER LEVEL
OUTPUTS
R
L
TO
SPEAKERS
POWER AMPLIFIER
Going Wireless
If you want to add wireless connectivity via the SVS SoundPath Wireless Adapter (sold separately),
your SB-3000 R|Evolution conveniently includes a USB input on the amplifier plate to easily
power the Receiver. Set-up is simple and quick and separate instructions are included with the
adapter.
NOTE: The SB-3000 R|Evolution amplifier should be turned off when making all connections.
USB Output:
LINE LEVEL
INPUT
OUTPUT
IR INPUT
SVS SOUNDPATH
WIRELESS AUDIO ADAPTER
LFE
RL
SB-3000 R|Evolution
SUBWOOFER

CONNECTING & CONTROLLING YOUR SUBWOOFER
Control Settings for AV Receiver & Processor
If using your SB-3000 R|Evolution subwoofer with an AV Receiver or preamp with bass manage-
ment, it is recommended to leave all control settings in the default position, aside from the
volume, which allows you to adjust the level of output based on your personal preferences.
NOTE: Always re-run AV Receiver auto-set-up after moving the subwoofer to a different location to
ensure the acoustic distance and calibration levels are set correctly.
NOTE: If you want to run the subwoofer louder than the initial auto-set-up level, adjust the subwoofer
channel level upward in the AV receiver menu until you get the experience and performance you want.
An increase of 2-4 dB louder than initial set-up level is common for many customers. Volume can be
controlled from your mobile device via the SVS Subwoofer Control App or using the controls on the rear
panel interface.
Please consult the Advanced Subwoofer Controls section of this owner’s manual or contact our
SVS Sound Experts if you have questions about any of the control settings.
www.svsound.com • [email protected] • (877) 626-5623
Control Settings for Stereo Receiver or Pre-Amplifier
Most Stereo Receivers and Pre-Amplifiers do not have bass management. Instead, you will use
the Left and Right full-range outputs and adjust through the DSP amplifier on the subwoofer.
Be sure to connect both Left and Right outputs to the Left and Right inputs on the subwoofer.
Set the Low Pass Filter to “On” and adjust the Crossover Frequency and Slope to achieve a
smooth blend and transition with the main speakers.
Once blended, adjust the Subwoofer volume to match the volume level of your main speakers.
For finer tuning, our Subwoofer Matching Tool provides the recommended low pass filter
frequency and slope setting for most loudspeakers on the market. Just choose your brand and
model of speakers from the menus and the tool does the rest. It’s available 24/7, 365 at
www.svsound.com/merlin. Our SVS Sound Experts are also standing by to help with any connec-
tion or control questions you have about any of the controls or settings.
NOTE: Volume and low pass filter can be controlled from your mobile device via the SVS Subwoofer
Control App or using the buttons on the rear panel interface.
SB-3000 R|Evolution
SUBWOOFER
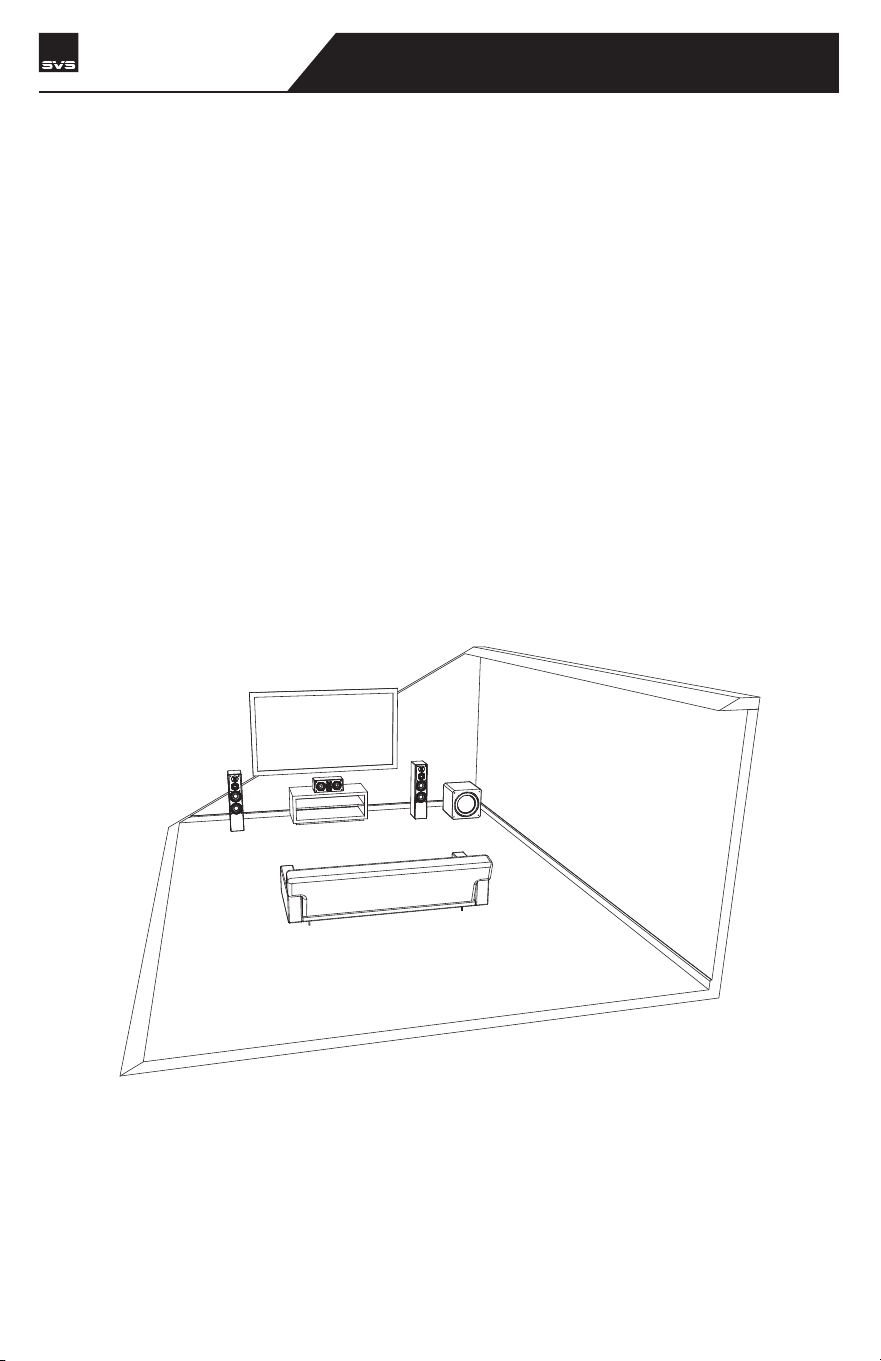
SUBWOOFER ROOM PLACEMENT
Placement of subwoofers is a process driven by competing variables that differ in every home.
Décor, floor space, furniture, speaker placement, seating location, and of course, sound quality
all factor into the decision of where a subwoofer should be placed. If you have flexibility, there’s
an artistry to subwoofer placement that can be aided by understanding some basic acoustic
principles and set-up techniques.
If you are limited to a single subwoofer location, it’s best to find the ideal listening location in the
room. You’ll notice as you move through the room, bass response will vary significantly. This is
due to the complex pattern of standing sound waves in the room. Sometimes simply moving a
few feet in any given direction can improve the balance and accuracy dramatically. Once you find
the ‘subwoofer sweet spot’ in the room – reserve that seat for yourself!
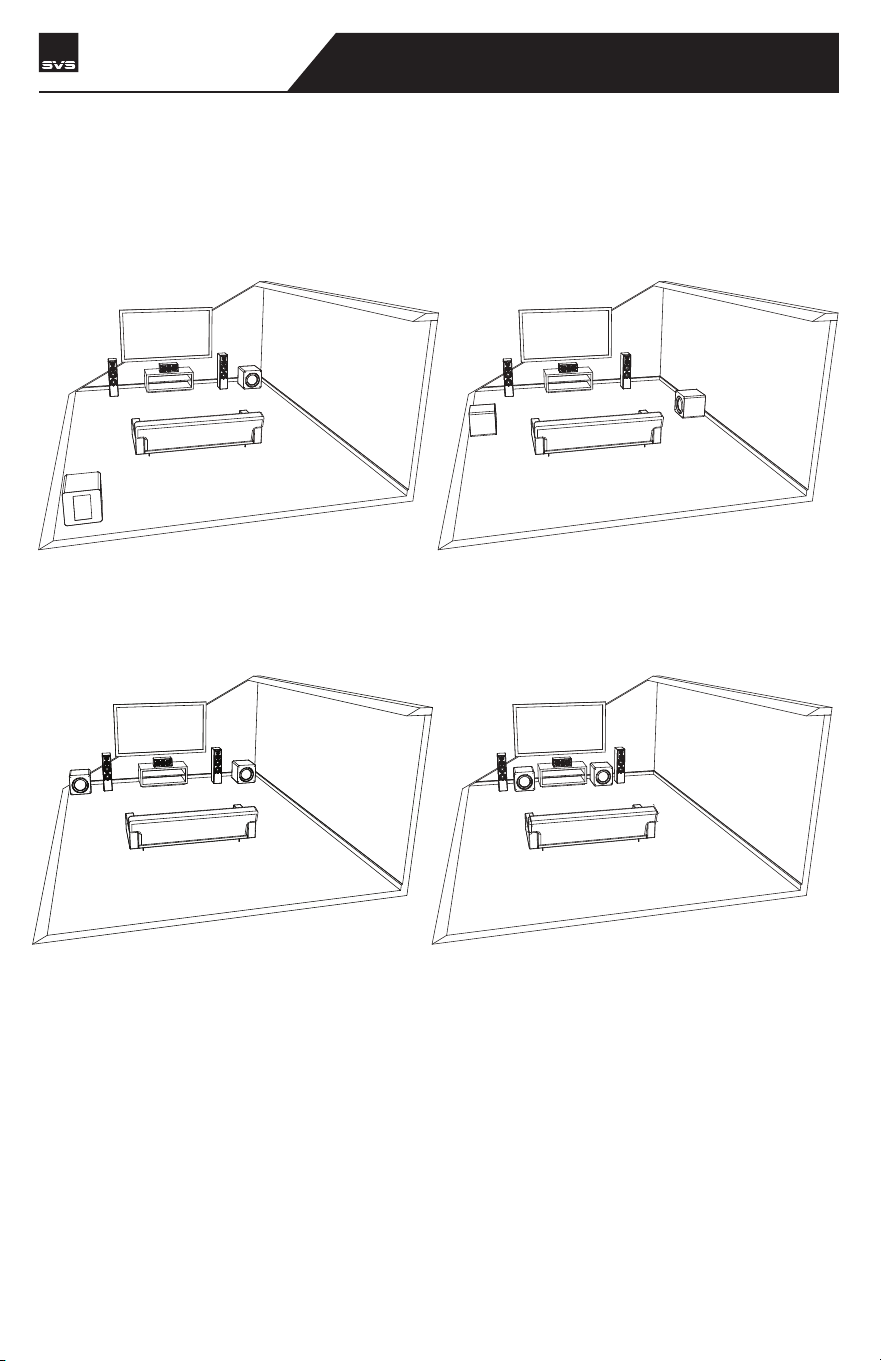
Corner Placement
Corner placement of a subwoofer reduces the potential to encounter nulls, which are acoustic
cancellation points or ‘dead spots’ in the room. While this can often make for hugely impactful
bass, it can sometimes result in a “boomy” sound depending on your listening position. If you
experience this, you can use the tuning controls to blend your SB-3000 R|Evolution more
smoothly with your speakers or try pulling it further away from the walls to smooth out the bass
response.
SB-3000 R|Evolution
SUBWOOFER

SUBWOOFER ROOM PLACEMENT
Front Placement
Front of the room placement in between or just to the side of the front channel speakers is
another common choice. Front of the room placement usually results in the best blending with
the main speakers and center channel and minimizes localization effects.
Side Wall Placement
Side wall placement is less frequently used but can be an effective subwoofer location for
excellent accuracy and output.
SB-3000 R|Evolution
SUBWOOFER
SUBWOOFER ROOM PLACEMENT
Dual Subwoofer Placement
Based on our own extensive testing, and research done by the professional audio community, we
recommend the following placement options for dual subwoofers:
While the first two options are proven performers with typically excellent results, they are often
difficult to implement in a living/family room environment. All rooms are different, so we recom-
mend staying flexible and trying all possible placement options for the best results.
• Opposite diagonal front/rear corners.
• Front stage in the corners.
• At the mid-points of the side walls.
• Front stage flanking the center channel
to the inside of the main speakers.
SB-3000 R|Evolution
SUBWOOFER
SUBWOOFER CONTROL OPTIONS
Your SVS SB-3000 R|Evolution can be controlled from the SVS Subwoofer Control App or via the
rear panel for unprecedented flexibility when optimizing performance for room layout, speakers,
system set-up and more.
SVS Subwoofer App
Our groundbreaking SVS Subwoofer Control
app is available for free via the Apple® App®
Store and Google Play™ Store. Just search “SVS
App” and follow the prompts to download to
your mobile device. Once installed, there’s a
helpful tutorial that will guide you through each
option and provide common settings to simplify
the process. The SVS App is the only way to
access all of the advanced control features
available on your SB-3000 R|Evolution and it is
the most convenient option for controlling every
feature.
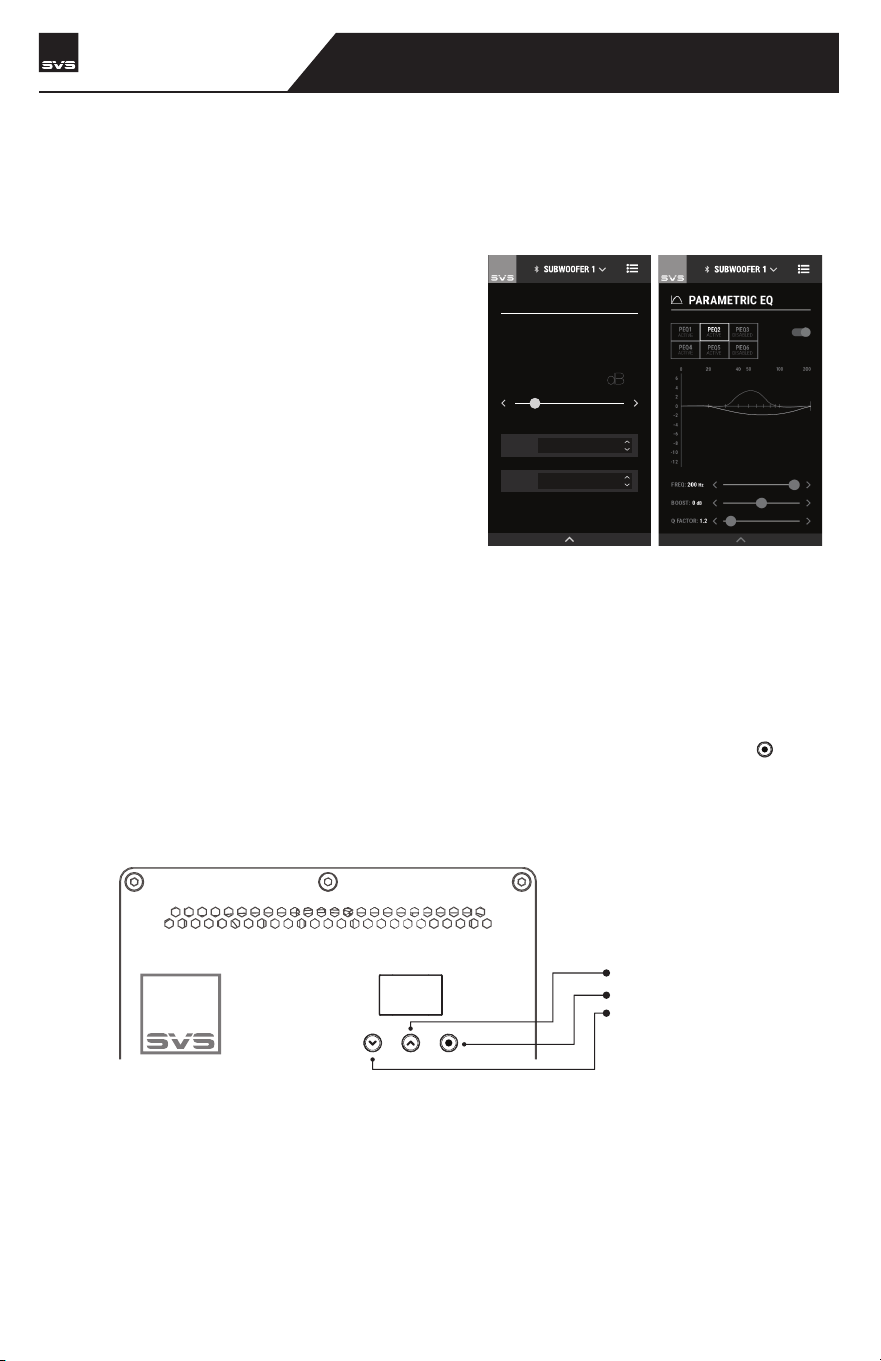
Rear Subwoofer Panel
The amplifier rear panel has an all-new OLED and push button interface which provides clear and
exact control over the most important features. This simplified interface allows direct and easy
access to Volume, Low Pass Filter Frequency, Phase and important system settings like Power
Mode, Display Orientation, Bluetooth Lock, and performing a Factory Reset. Use the [ ] select
button to cycle through all the main features. Once at the selected feature use the UP and Down
arrows to adjust the setting in real time.
HOME / VOLUME
MOVIE
PRESET
LOW PASS FILTER
OPTIONS
-22
10 050
20 40
200
0
6
4
2
0
-2
-4
-6
-8
-10
-12
PEQ1
ACTIVE
PEQ2
ACTIVE
PEQ3
DISABLED
BOOST: 0 dB
Q FACTOR: 1.2
FREQ: 200
Hz
PARAMETRIC EQ
SB-3000 R|Evolution
SUBWOOFER
UP (Adjust setting)
NAVIGATE (Cycle through settings)
DOWN (Adjust setting)

ADVANCED SUBWOOFER CONTROLS
Volume
Adjust to make your system’s low end more powerful and extended while remaining accurate.
The subwoofer should sound like it’s naturally adding bass for all the speakers without overly
drawing attention to itself. Different content has different levels of output so it’s normal to adjust
volume based on source material and your personal listening preferences.
Low Pass Filter
Enables smooth sonic transition and flat frequency response between speakers and the
subwoofer. This allows you to control the upper frequency cut-off to blend with main speakers.
It also allows you to adjust slope, or the rate at which the low pass filter rolls off. If using an AV
Receiver with a Subwoofer Output, leave in the OFF position.
Phase Adjustment
Solves sound wave cancellation issues at specific frequencies and perfectly aligns the arrival of
output from speakers and subwoofers to your listening position. Normally set to 0° if the
subwoofer is near the main speakers. Adjusting Phase shifts timing of the subwoofer output to
align with the main speakers or additional subwoofers.
Polarity (SVS App Only)
In some cases, reversing polarity solves dips or humps at the crossover frequency between a
subwoofer and speaker and can be used to fix bass nulls or overly boomy spots in the listening
area. Reversing the electrical polarity of the subwoofer amplifier makes it so the woofer moves
in when speaker drivers move out and is normally set to positive.
SVS Auto EQ Room Correction (Coming Soon - SVS App Only)
Using the SVS app and the built-in microphone on your smartphone or an external mic, the
feature applies equalization filters, capitalizes on available room gain, and optimizes in-room
frequency response at main listening positions for optimal in-room performance.
The simple process requires just a few steps and can have a profound effect on performance. SVS
Auto EQ room correction will be available via an over-the-air app and firmware update coming
soon.
Parametric EQ (SVS App Only)
Powerful tool for removing peaks and dips in your listening area, and for creating custom
subwoofer output based on personal listening preferences. Works best when used with acoustic
measurements.
Allows you to set the desired center frequency of the filter, increase or decrease the SPL dB of the
filter, or adjust the bandwidth of the filter.
Room Gain Compensation (SVS App Only)
Fixes bloated sounding bass by optimizing low frequency output and extension when too much
sound wave density is being created by a small room.
SB-3000 R|Evolution
SUBWOOFER

Presets (SVS App Only)
Allows up to three pre-saved settings for movie, music and custom. This enables easy switching
to optimize subwoofer output and settings based on your specific listening preferences with
different kinds of content. If using the SVS App, these presets can be renamed as desired. System
Settings
System Settings
Allows you to make further customizations and reset your subwoofer to factory settings.
Subwoofer Name (SVS App Only)
Customize the name of your subwoofer for easy preset switching.
Subwoofer Power Mode
Choose whether to have your subwoofer in Auto Standby (Default), or Always On
modes. When Auto Standby mode is selected the subwoofer will enter a low power
standby mode within 20 minutes of inactivity and no audio signal. Standby mode is
less than 0.5watts. Trigger mode is automatically entered when a 3.5mm trigger cable
is inserted.
Subwoofer Display (Rear Panel Only)
Display Flip will flip the rear panel OLED display making it easier to read when viewing
upside down.
Bluetooth Lock
Locks the subwoofer Bluetooth connection to a single mobile device so no other
mobile devices can connect to and control the subwoofer. This feature can be disabled
from the amplifier rear panel interface or by performing a factory reset.
Reset
Resets SB-3000 R|EVOLUTION Subwoofer back to original Factory Settings.
About this App
Provides version number and other information about the SVS App and also allows you
to turn performance monitoring on/off.
ADVANCED SUBWOOFER CONTROLS
SB-3000 R|Evolution
SUBWOOFER

ADVANCED CONTROLS FEATURE TABLE
FEATURE OPTIONS & RANGES
FEATURE RANGE / OPTION
Volume
Low Pass Filter
Phase
Polarity
Parametric EQ
Room Gain Comp
-60dB – 0dB (1dB/step)
LP Frequency: 30Hz – 200Hz (1Hz/step)
LP Slope: 6dB, 12dB, 18dB, 24dB
0° – 180° (1degree/step)
Positive (+) / Negative (-)
PEQ Frequency: 20 – 200Hz (1Hz/step)
PEQ Boost: -12.0 – 6.0dB (0.1dB/step)
PEQ Q Factor: 0.2 – 10.0 (0.1/step)
RGC Frequency: 25Hz, 31Hz, 40Hz
RGC Slope: 6dB, 12dB
SB-3000 R|Evolution
SUBWOOFER
Total Harmonic Distortion (THD) ≤ 1.00%
Power Off Mode < 0.3 W
Auto Standby Power Mode < 0.5 W
Network (BT Connected) Standby Mode < 2.0 W
Note: When the Subwoofer is set to Auto Standby Power Mode, and there is no audio
signal, the subwoofer will enter Auto Standby Mode within 20 minutes.
When the Subwoofer is set to Auto Standby Power Mode, and is connected to a mobile
device APP via Bluetooth, and there is no audio signal, the subwoofer will enter Network
(BT Connected) Standby Mode within 20 minutes.

IR INPUT CODES
The Rear IR input will allow IR based control systems to send specific commands to the subwoof-
er amplifier. A powered IR repeater must be used, passive IR sensors will not work. The IR
control system must be able to send NEC format commands. For more information please
consult your IR control system for more details. The IR pin layout is as shown below where the
“tip” is signal, and the “sleeve” is ground. For NEC programming, the below table show the
available IR commands and their codes.
Volume Up #define VOL_DOWN_IR_CODE 0x020220DF
Volume Down #define VOL_UP_IR_CODE 0x0202609F
Load Preset 1 #define PRESET1_IR_CODE 0x020228D7
Load Preset 2 #define PRESET2_IR_CODE 0x0202A857
Load Preset 3 #define PRESET3_IR_CODE 0x02026897
IR OUTPUTS
3V-12V | AC
TRIGGER IN
IR INPUT
LFE
R
IR REPEATER
123
SVS | 340 Victoria Rd. Youngstown, OH 44515, USA | svsound.com
USB Output:
ONOFF
100V-240V ~ 50- 60Hz 1000W
LINE LEVEL
BALANCED
INPUT
OUTPUT
INPUT
3V-12V
| AC/DC
TRIGGER INPUT
IR INPUT
SVS SOUNDPATH
WIRELESS AUDIO ADAPTER
LFE
RL
RL
SB-3000 R|Evolution
SUBWOOFER
SAFETY INSTRUCTIONS
Read these instructions.
Keep these instructions.
Heed all warnings.
Follow all instructions.
Do not use this apparatus near water.
Clean only with dry cloth.
Do not block any ventilation openings. Install in accordance with the manufacturer’s instruc-
tions.
Do not install near any heat sources such as radiators, heat registers, stoves, or other appara-
tus (including amplifiers) that produce heat.
Do not defeat the safety purpose of any polarized or grounding-type plug. A polarized plug has
two blades with one wider than the other. A grounding type plug has two prongs and a third
grounding point. The wide blade or the third prong are provided for your safety. If the provided
plug does not fit into your outlet, consult an electrician for replacement of the obsolete outlet.
Protect the power cord from being walked on or pinched particularly at plugs, convenience
receptacles, and the point where they exit from the apparatus.
Only use attachments/accessories specified by the manufacturer.
Use only with the cart, stand, tripod, bracket, or table specified by the manufacturer, or sold
with the apparatus. When a cart is used, use caution when moving the cart/apparatus combina-
tion to avoid injury from tip-over.
Unplug this apparatus during lightning storms or when unused for long periods of time.
Refer all servicing to qualified service personnel. Servicing is required when the apparatus has
been damaged in any way, such as power-supply cord or plug is damaged, liquid has been
spilled or objects have fallen into the apparatus, the apparatus has been exposed to rain or
moisture, does not operate normally, or has been dropped.
WARNING: To reduce the risk of fire or electric shock, this apparatus should not be exposed to
rain or moisture and objects filled with liquids, such as vases, should not be placed on this
apparatus.
This apparatus conforms to the use requirement in tropical and moderate climates, with a
maximum temperature of the environment not exeeding 45°C (113°F).
If the subwoofer is to be used in a confined space (e.g. built into furniture), the space must be
ventilated to allow sufficient air to circulate and cool the unit.
The mains inlet receptacle on the equipment is for connecting to the mains outlet. The mains
outlet should be near the equipment for easy access.
To completely disconnect this equipment from the mains, disconnect the power supply cord
plug from the receptacle.
The mains plug of the power supply cord shall remain readily operable.
ERP Information:
• If the APP is not connected and there is no audio playback on RCA or XLR inputs, the
device will enter standby mode within 20 minutes.
• If the APP is connected, but the APP is not actively controlling the device, and there
is no audio playback on RCA or XLR inputs, the device will enter network standby
mode within 20 minutes.
• Off mode < 0.5 W
• Standard standby mode < 0.5 W
• Networked standby mode < 2.0 W
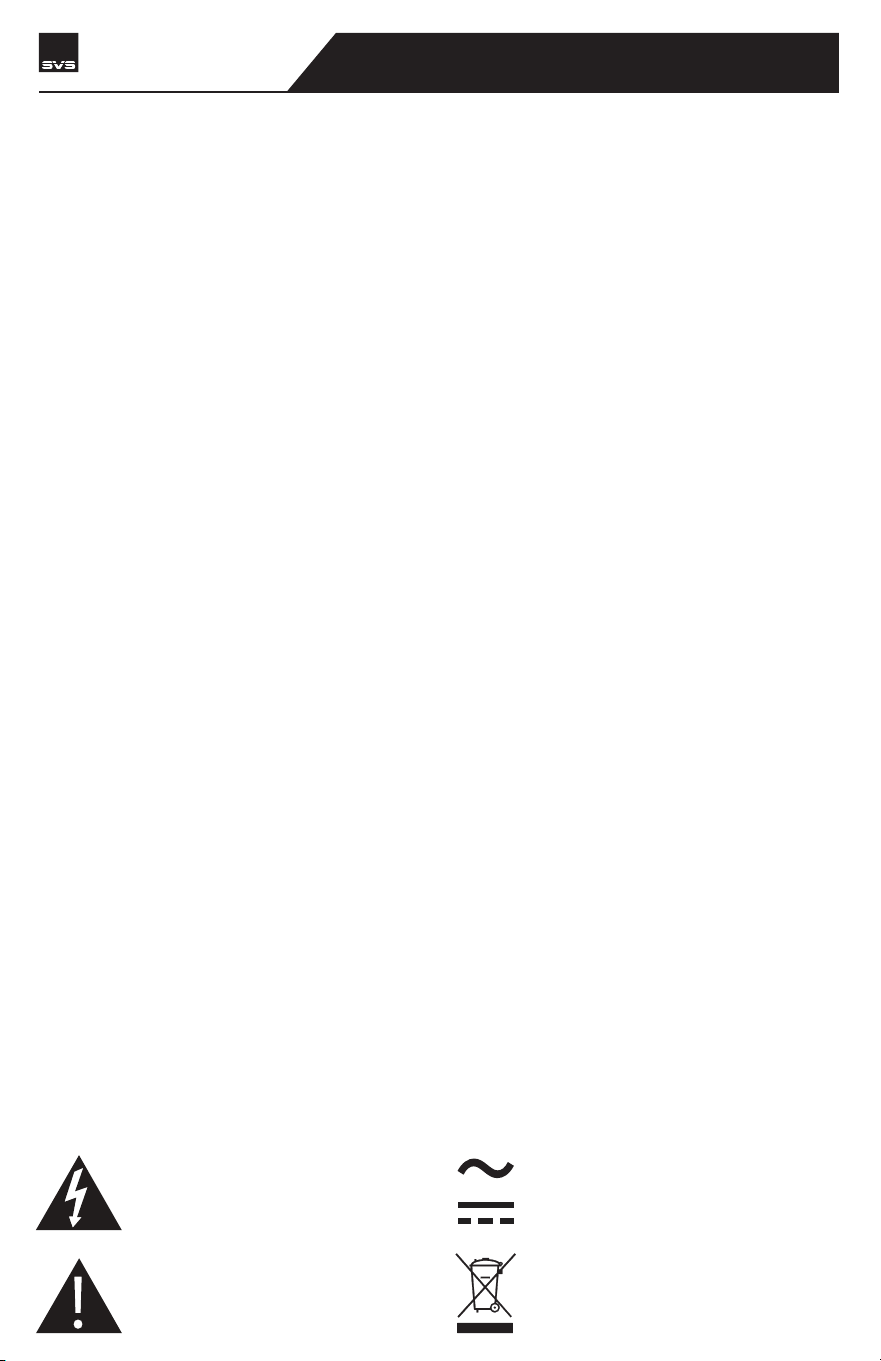
The lightning flash with arrowhead symbol within an
equilateral triangle is intended to alert the user to the
presence of uninsulated “dangerous voltage” within the
products enclosure that may be of sufficient magnitude
to constitute risk of electric shock to persons.
The symbol indicates AC voltage.
The symbol indicates DC voltage.
RECYCLING: This product bears the selective sorting symbol
for Waste electrical and electronic equipment (WEEE). This
means that this product must be handled pursuant to
European directive 2012/19/EU in order to be recycled or
dismantled to minimize its impact on the environment.
The exclamation point within a triangle is intended to
alert the user to the presence of importance operating
and maintenance {servicing) instructions in the literature
companying the product.
•
•
•
•
•
•
•
•
•
•
•
•
•
•
•
•
•
•
•
•
•
SB-3000 R|Evolution
SUBWOOFER

SB-3000 R|Evolution
SUBWOOFER
FCC & IC COMPLIANCE
FCC Statement
This device complies with part 15 of the FCC Rules. Operation is subject to the following two condi-
tions: (1) This device may not cause harmful interference, and (2) this device must accept any
interference received, including interference that may cause undesired operation.
This device must not be co-located or operating in conjunction with any other antenna or
transmitter.
This equipment has been tested and found to comply with the limits for a Class B digital device,
pursuant to part 15 of the FCC Rules. These limits are designed to provide reasonable protection
against harmful interference in a residential installation. This equipment generates, uses and can
radiate radio frequency energy and, if not installed and used in accordance with the instructions,
may cause harmful interference to radio communications. However, there is no guarantee that
interference will not occur in a particular installation. If this equipment does cause harmful
interference to radio or television reception, which can be determined by turning the equipment
off and on, the user is encouraged to try to correct the interference by one or more of the follow-
ing measures:
• Reorient or relocate the receiving antenna.
• Increase the separation between the equipment and receiver.
• Connect the equipment into an outlet on a circuit different from that to which the receiver is
connected.
• Consult the dealer or an experienced radio/TV technician for help.
To comply with FCC’s and Industry Canada’s RF radiation exposure limits for general popula-
tion/uncontrolled exposure, this device must be installed to provide a separation distance of at
least 20cm from all persons.
WARNING: Any changes or modifications to this unit not expressly approved by the party responsible for
compliance could void the user’s authority to operate the equipment.
FCC ID: 2AGJ43KRE
IC Statement
This device complies with Industry Canada licence-exempt RSS standard(s). Operation is subject to
the following two conditions: (1) this device may not cause interference, and (2) this device must
accept any interference, including interference that may cause undesired operation of the device.
Le présent appareil est conforme aux CNR d'Industrie Canada applicables aux appareils radio
exempts de licence. L'exploitation est autorisée aux deux conditions suivantes: (1) l'appareil
nedoit pas produire de brouillage, et (2) l'utilisateur de l'appareil doit accepter tout brouillage
radioélectrique subi, même si le brouillage est susceptible d'en compromettre le fonctionnement.
The device is compliance with RF field strength limits, users can obtain Canadian information on
RF exposure and compliance.
Le présent appareil est conforme de ce matériel aux conformités ou aux limites d’intensité de
champ RF, les utilisateurs peuvent sur l’exposition aux radiofréquences et la conformité
d’acquérir les informations correspondante.
This Class B digital apparatus complies with Canadian ICES-003.
Cet appareil numérique de la classe B est conforme à la norme NMB-003 du Canada.
CAN ICES (B)/NMB (B)
IC: 20885-3KRE

CLEANING & CABINET CARE INTRUCTIONS
WARRANTY & SUPPORT
Your SVS Subwoofer may be gently cleaned as follows:
5-YEAR UNCONDITIONAL WARRANTY
SVS offers the industry's most comprehensive warranty on all our products. SVS warrants this
subwoofer and all of its products to be free from defects in the workmanship for 5 years from
date of purchase.
This, and all of the SVS customer Bill of Rights can be viewed online at:
www.svsound.com/bill-of-rights.
SHARE YOUR THOUGHTS
Our SVS Sound Experts are standing by from Monday to Friday form 9AM-9PM ET, Saturday from
12PM-6PM, and Sunday from 12PM-4PM to assist you with subwoofer set-up and optimization,
AV Receiver settings and more. They can be reached by phone, email or chat via the options
below.
www.svsound.com • [email protected] • (877) 626-5623
We also invite you to share a review on our website and to join our fun and active social media
community where we share reviews, featured systems, interesting audio articles and more.
• Use a dry microfiber duster to remove any loose surface dust.
• Use a water-damp microfiber cloth to remove fingerprints, smudges and other
contaminants. Wipe in one direction only, with the grain if applicable.
• Follow any damp cleaning immediately with a dry microfiber cloth. Again dry wipe in
one direction only, with the grain if applicable.
SB-3000 R|Evolution
SUBWOOFER
Write a review at svsound.com
Post at facebook.com/SVSound
Post (formerly tweet) @SVS_Sound
Follow at instagram.com/SVS_Sound
Subscribe at youtube.com/SVS_Sound