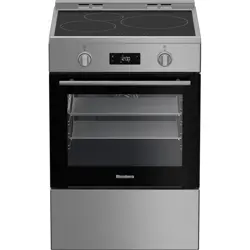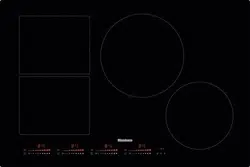
24" Induction Cooktop
Owner’s Manual
185.9299.69/ R.AA/ 10.08.2023
CTI24310

CONGRATULATIONS ON THE PURCHASE OF YOUR
NEW BLOMBERG INDUCTION COOKTOP
This stainless steel slide-in range has been manufactured in modern facilities with the
utmost care and meticulous quality controls. We are so confident in the quality of this
product that we back it with a two year parts and labor warranty. Please read this entire
owners manual before using your product to ensure you understand all of its features
and benefits and know how to operate it properly. This manual should be kept in an
easily accessible location and passed on to any future owners.
• Always observe the applicable safety instructions.
• Please read any other documents provided with the product.
Take a moment to complete the following information so it can be easily referenced
when contacting Customer Service:
Model
Serial No
Date of Purchase
Store / Dealer
City
State
Zip Code
If you have questions or comments, please contact your local authorized Blomberg
dealer, or call our Toll Free Customer Hotline number.
SERVICE SUPPORT (800) 459-9848
PRODUCT INQUIRIES (888) 352-2356
BLOMBERGAPPLIANCES.COM
To register your product with Blomberg, please go to
BLOMBERGAPPLIANCES.COM/PRODUCT-
REGISTRATION
(Located on bottom of control panel)

3
Premium Technology ..................................................................................................................... 4
Technical Information .................................................................................................................... 5
24" Induction Cooktop Overview ................................................................................................. 6
Control Panel Overview ................................................................................................................. 7
Preparation ...................................................................................................................................... 9
General Information Of Cooktop Usage ................................................................................... 10
Operation ........................................................................................................................................ 14
General Information About Cooking .........................................................................................19
Care and Maintenance ................................................................................................................20
Troubleshooting ............................................................................................................................22
Warranty and Service ...................................................................................................................26
CONTENTS
FURTHER INFORMATION
Browse the Blomberg website for helpful information on using your slide-in
range, care and maintenance, troubleshooting and more just visit
https://www.blombergappliances.com
4
At Blomberg, we believe a truly revolutionary product is one that redefines what is
possible in terms of performance. Secondly, it must achieve that performance while
using the least amount of natural resources possible. And finally, it needs to be priced
within reach of everyone who wants to lead a healthy and sustainable life.
You don’t have to be a pro to cook like one.To make sure every healthy recipe meets
your standards of tasty perfection, Blomberg’s advanced features let you cook with
confidence.
PREMIUM TECHNOLOGY
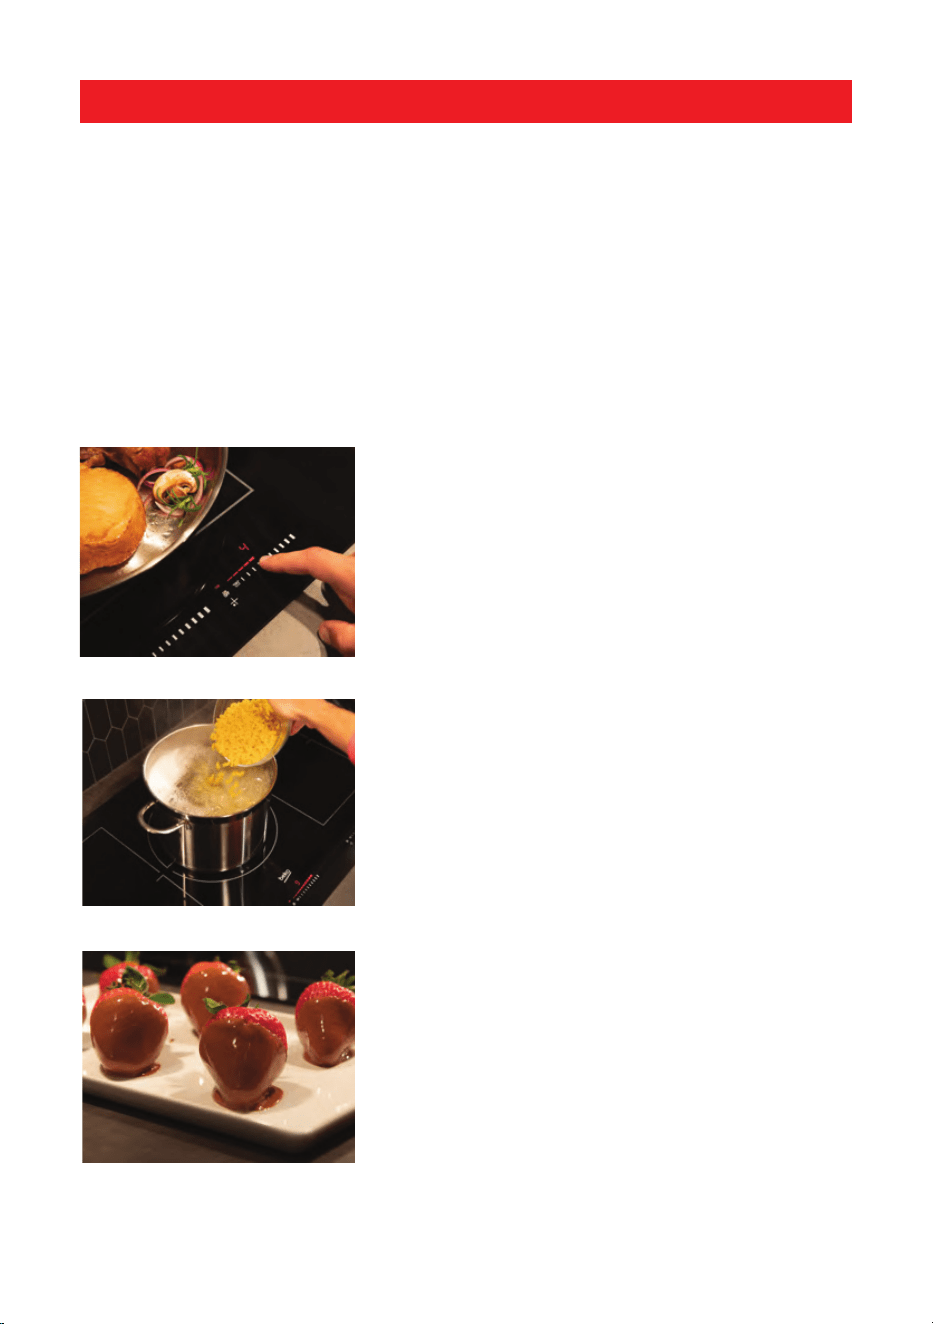
Induction Cooking
Induction technology provides fast and precise results
by directly heating pots and pans instead of the
cooktop surface
Power Boost
Add a boost or double boost of power so you can
quickly heat a pan for searing or stir-frying, or boil water
fast.
Precise Temperature Control
9 cooking levels put you in control to boil water
rapidly or delicately melt chocolate—plus everything in
between.
5
TECHNICAL INFORMATION
This device corresponds to the following standarts: UL 858 Household Electric Ranges
directive.
General
Overall Height 2 - 11/32" (59.5 mm without seperator)
3 - 23/32" (94.5 mm with seperator)
Overall Width 23 - 37/64" (599 mm)
Overall Depth 20 - 53/64" (529 mm)
Installation dimensions
(width / depth)
22 - 1/6" (560 mm) / 19 - 5/16" (490 mm)
Total electric power 7,4 kW
Electrical connection 120/240 V~;60 Hz
Cable type / Cross section / Fuse 3 x 10 AWG / min. 40 A
Cable length max. 6ft
Burners
Front left Induction cooking burner
Size 8,3 " (210 mm)
Power max: 2300/ booster: 3700 W
Right Induction cooking burner
Size 10,3 " (260 mm)
Power max: 2600/ booster: 3700 W
Rear left Induction cooking burner
Size 5,7 " (145 mm)
Power max: 1400/ booster: 2200 W
6
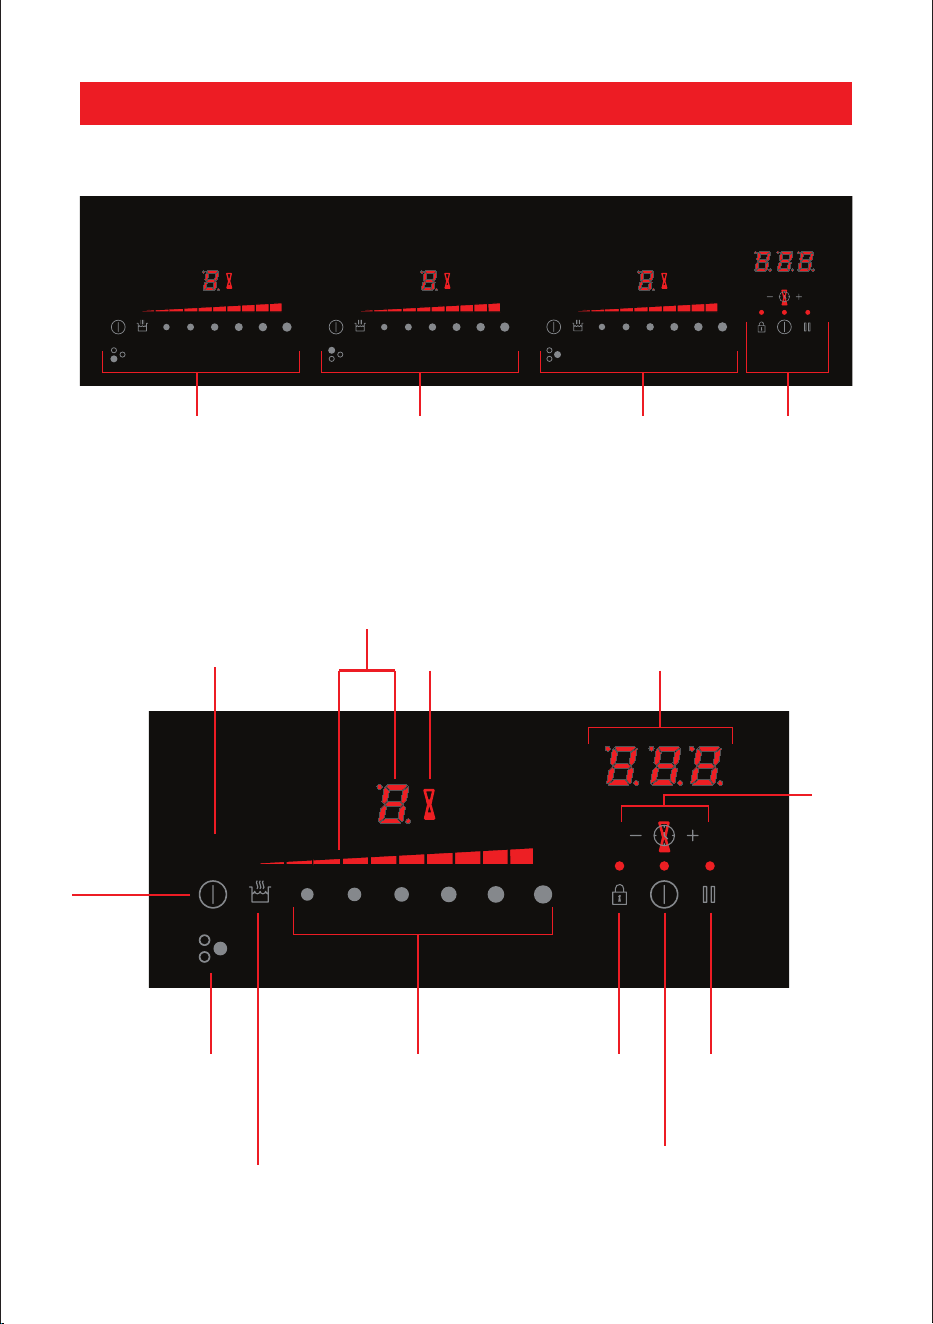
Control panel
Rear left
Induction cooking zone
Front left
Induction cooking zone
Right
Induction cooking zone
24" INDUCTION COOKTOP OVERVIEW
(Located on bottom of countertop)
Cooking zone
“On/Off” key
7
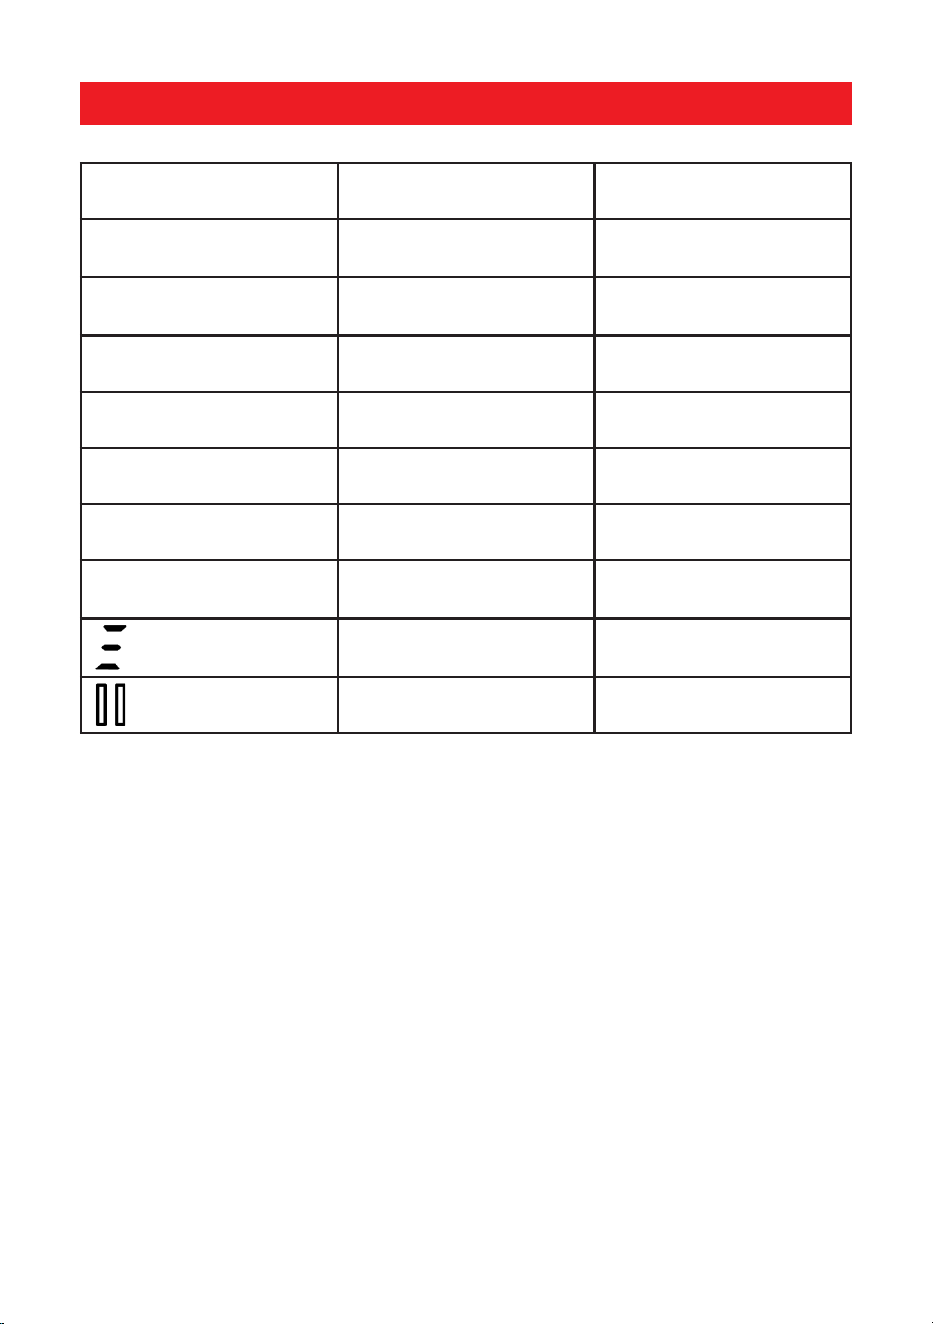
ON ON ON
CONTROL PANEL OVERVIEW
Central induction
cooking zone
control display
Rear left induction
cooking zone
control display
Front left induction
cooking zone
control display
General function
control display
ON
Location
information from
cookin zone
Keep warm key
Power selection
zone “Slider”
Locking
key
Main On/Off key
Pause/Recall
key
Timer
keys
Timer
display
Timer
symbol
Cooking
zone ON
display
Cooking zone
“On/Off” key
Power
display
8
CONTROL PANEL OVERVIEW
Display Designation Description
0 Zero
The heating zone is
activated.
1 ... 9 Power level
Selection of the cooking
level.
U No pan detection No pan or inadequate pan.
A Heat accelerator Automatic cooking.
E Error message Electronic failure.
H Residual heat The heating zone is hot.
P Booster level
The booster level is
activated.
Keep warm
Maintain automatically of
107.6, 158 or 201.2°F
Pause&Play The hob is in pause.

9
PREPARATION
FIRST CLEANING OF THE
APPLIANCE
• Remove all packaging materials.
• Wipe the surfaces of the appliance with
a damp cloth or sponge and dry with a
cloth.
i
The surface might get damaged by
some detergents or cleaning materials.
i
Do not use aggressive detergents,
cleaning powders/creams or any sharp
objects during cleaning.

10
VENTILATION
The cooling system is fully automatic.
The cooling fan starts with a low speed
when the calories brought out by the
electronic system reach a certain level.
The ventilation starts his high speed
when the hob is intensively used. The
cooling fan reduces his speed and stops
automatically when the electronic circuit
is cooled enough.
GENERAL WARNINGS
• Do not let any objects to fall on the hob.
Even small objects such as saltshakers
may damage the hob. Do not use
cracked hobs. Water may seep through
these cracks and cause a short circuit. If
the surface is damaged in any way (e.g.
visible cracks), turn off the fuse first,
then call the authorized service to unplug
the product to reduce the risk of electric
shock.
• Do not use unbalanced and easily tilting
pots/pans on the hob.
• Do not heat the pots/pans and pots
empty. The pots and the appliance may
be damaged.
• Always turn off the hob's burners after
each use.
• You shall damage the appliance if you
operate the hobs without any pot or
pots/pans. Always turn off the hobs after
each operation.
• After each use the cooking surface will
be hot, so do not put the plastic pots/
pans on the cooking surface. Clean such
material on the surface immediately.
• Sudden temperature changes on the
glass cooking surface may cause
damage, be careful not to spill cold
liquids during cooking.
• Put a sufficient amount of food in pots
and pans. Thus, you can prevent food
from pouring forth out of the pots/pans
and will not need to clean unnecessarily.
• Do not place the covers of pots and pans
on burners/zones.
• Place the pots by centering them on the
burners/zones. If you wish to place a pot
on a different burner/zone, do not slide it
towards the desired burner; rather, lift it
first and then put it on the other burner.
OPERATING PRINCIPLE OF THE
INDUCTION HOB
Induction hob is like an open circuit. The
circuit completes when a cooking pots/
pans suitable for induction cooking is
placed on it and an electronic system
below the glass surface generates a
magnetic field. The metal base of the
pots/pans is heated by taking energy from
this magnetic field. Thus, the heat is not
generated on the surface of the hob, but
directly on the pots/pans above it. Glass
surface is heated with the heat of the
cooking pots/pans.
GENERAL INFORMATION OF COOKTOP USAGE

11
ADVANTAGES OF COOKING
WITH INDUCTION
Induction hobs offer some advantages
as the heat is transferred directly to the
cooking pots/pans.
•
Foods that overflow during cooking do
not burn rapidly as the glass cooking
surface is not heated directly. It is
cleaned more easily.
•
Cooking shall be faster as the heat is
generated directly on the cooking pots/
pans. Thus, it saves time and energy with
respect to other hob types.
•
As the heat is given directly to the
cooking pots/pans, there is no heat loss,
and it provides a more efficient cooking.
•
The fact that the heat transfer stops and
the cooking surface is not heated directly
when the cooking pots/pans is removed
from the cooking surface provides a
safer use against possible accidents
while cooking.
FOR A SAFE OPERATION:
•
Do not select high heating levels when
using non-sticking cooking pots/pans
coated with little amount of oil or used
without oil (teflon type).
•
Do not use glass cooking surface as a
surface where you can place something
on it or as a cutting surface.
•
Do not place metal objects such as
cutlery or pot lids on your hob as they
may get hot.
•
Never use aluminium foil for cooking.
Never place food wrapped in aluminium
foil on the induction zone.
•
Keep magnetic objects such as credit
cards or tapes away from the hob while
it is operating.
•
If there is an oven under your hob and it
is being operated, the sensors on the hob
may reduce the cooking level or turn off
the hob.
•
Your hob has an automatic shut-off
system. Detailed information about
this system is provided in the following
sections. However, if you use thin based
pots for your cooking, these pots shall
heat up very quickly and the bottom
of the pan may melt and damage the
cooking surface and the appliance
before the automatic shut-off system is
activated.
COOKING POTS/PANS
You shall use ferromagnetic, quality
cooking pots/pans which bear a label or
warning that it is compatible for induction
cooking only with your induction hob.
Generally, the higher the iron content,
the better the cooking pots/pans shall
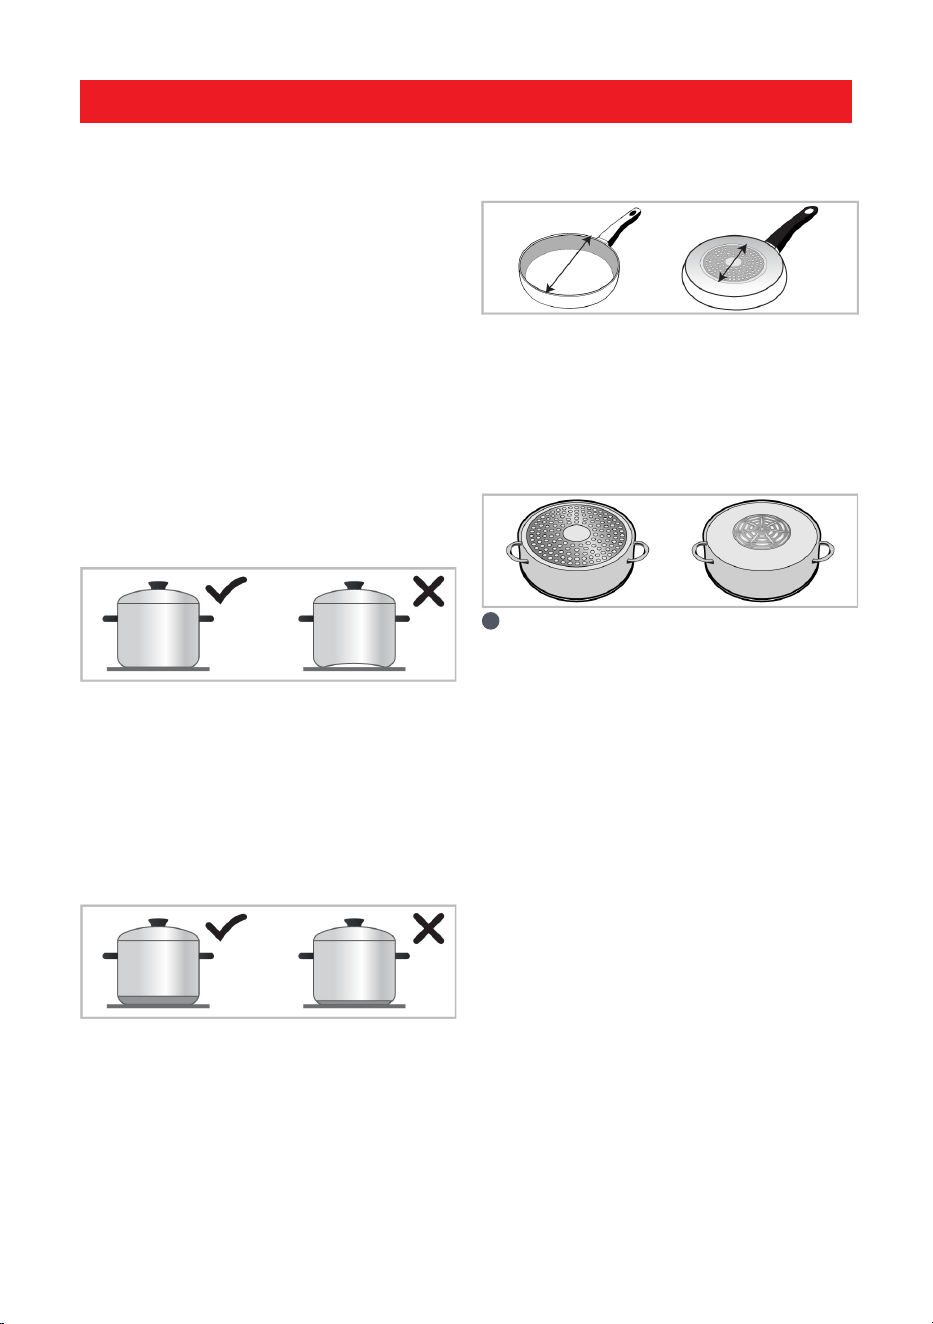
perform. The base diameter of the
cooking pots/pans shall match the
induction zone. Suggested dimensions are
listed below.
Suitable pots/pans:
•
Cast iron pots/pans
•
Enamelled steel pots/pans
•
Steel and stainless steel pots/pans
(with label or warning indicating that it is
induction compatible)
GENERAL INFORMATION OF COOKTOP USAGE
12
Unsuitable pots/pans:
•
Aluminium pots/pans
•
Copper pots/pans
•
Glass pots/pans
•
Pottery
•
Ceramic and porcelain
Recommendations:
•
Use flat bottomed cooking pots/pans
only. Do not use pots/pans with convex
or concave bases.
•
Use cooking pots/pans with thick,
processed bases only. If you use thin
based pots, these pots shall heat up very
quickly and the bottom of the pan may
melt and damage the cooking surface
and the appliance before the automatic
shut-off system is activated. Sharp
edges may cause scratches on the
surface.
•
The bases of some cooking pots/
pans have a smaller ferromagnetic
field than its true diameter. Only this
area is heated by the hob. Therefore,
the heat is not evenly distributed and
the cooking performance is decreased.
Moreover, such cooking pots/pans
may not be detected by large induction
hobs. Thus, the cooking hob shall be
selected according to the size of the
ferromagnetic field.
•
Some cooking pots/pans have a base
that contains non-ferromagnetic
materials such as aluminium. These
types of cooking pots/pans may not heat
adequately or may not be detected by
the induction hob at all. In some cases, a
bad pots/pans warning may appear.
i
Equal distribution of the cookware
on the right and left and center hobs
for the selection of hobs affects the
cooking performance positively while
cooking multiple meals on the induction
hobs.
Pan detection
The pan detection ensures a perfect
safety. The induction doesn’t work:
•
If there is no pan on the heating zone
or if this pan is not adapted to the
induction. In this case it is impossible
to increase the power and the display
shows [ U ]. This symbol disappears
when a pan is put on the heating zone.
•
If the pan is removed from the heating
zone the operation is stopped. The
display shows [ U ]. The symbol [ U ]
disappears when the pan is put back to
the heating zone. The cooking continues
with the power level set before.
After use, switch the heat element off:
don’t let the pan detection [ U ] active.
GENERAL INFORMATION OF COOKTOP USAGE
13
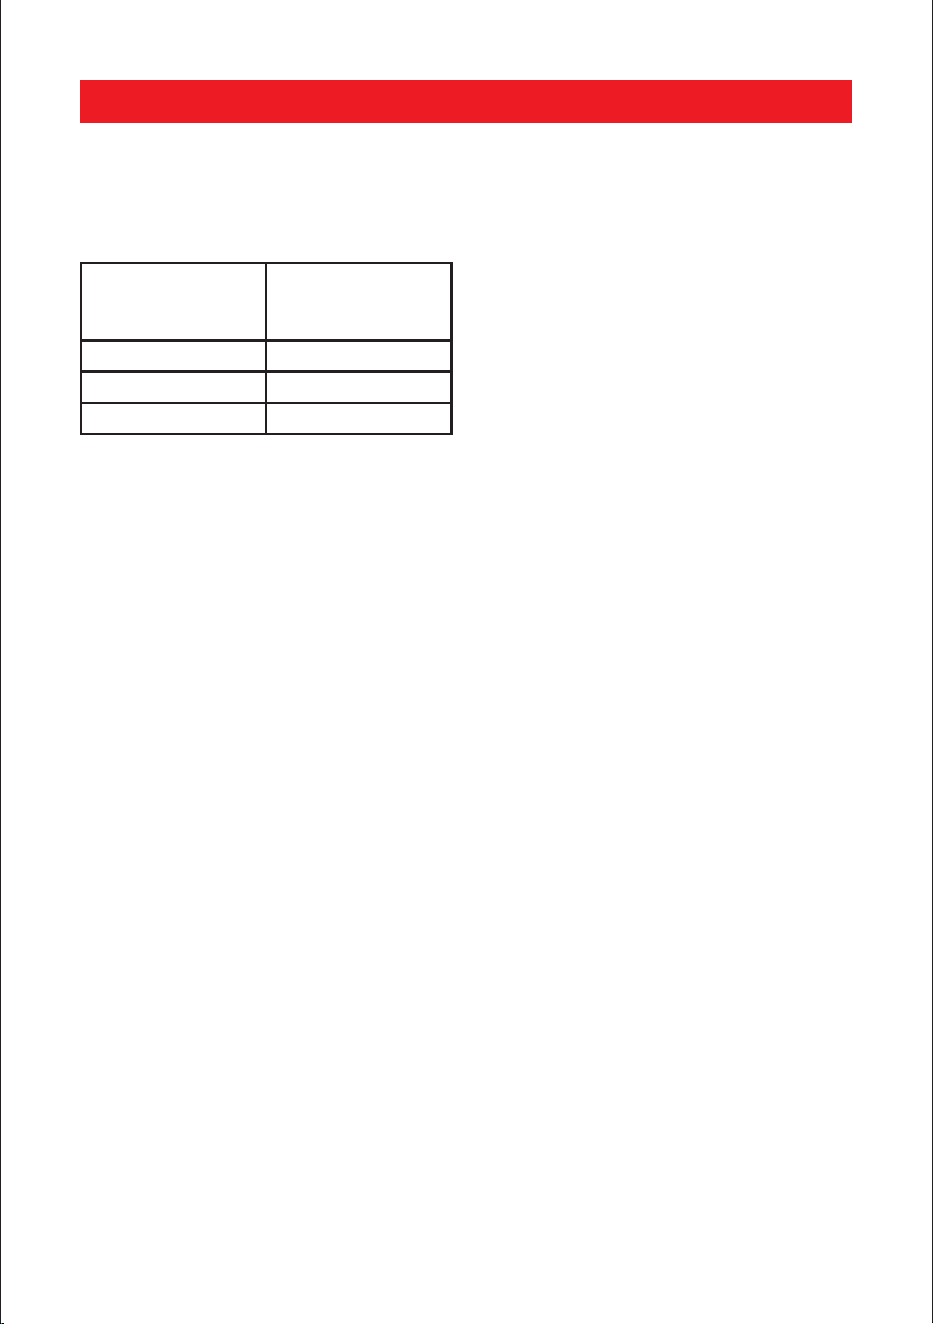
Recommended cooking pots/pans
sizes
Diameter of
cooking zone -
mm
Pot diameter -
mm
145 min. 100 - max 145
180 min. 100 - max 180
210 min. 140 - max 210
The detection of cooking pots/pans by the
induction hobs depend on the diameter
and material of the ferromagnetic in
the base of the pots/pans. To ensure
detection of the cooking pots/pans and
achieve an efficient cooking, the cooking
pots/pans shall be selected as per the size
of your hob. The cooking pots/pans sizes
recommended for hob sizes are given
above.
Boiling behavior may vary depending
on the pot types, size of the pot and
size of the cooking zone. For a more
homogenous boiling behavior, a one step
larger cooking zone might be used. To
use a larger cooking zone does not cause
wasting of energy at induction hobs,
because the heat is only created in the
relevant pot area.
GENERAL INFORMATION OF COOKTOP USAGE
14
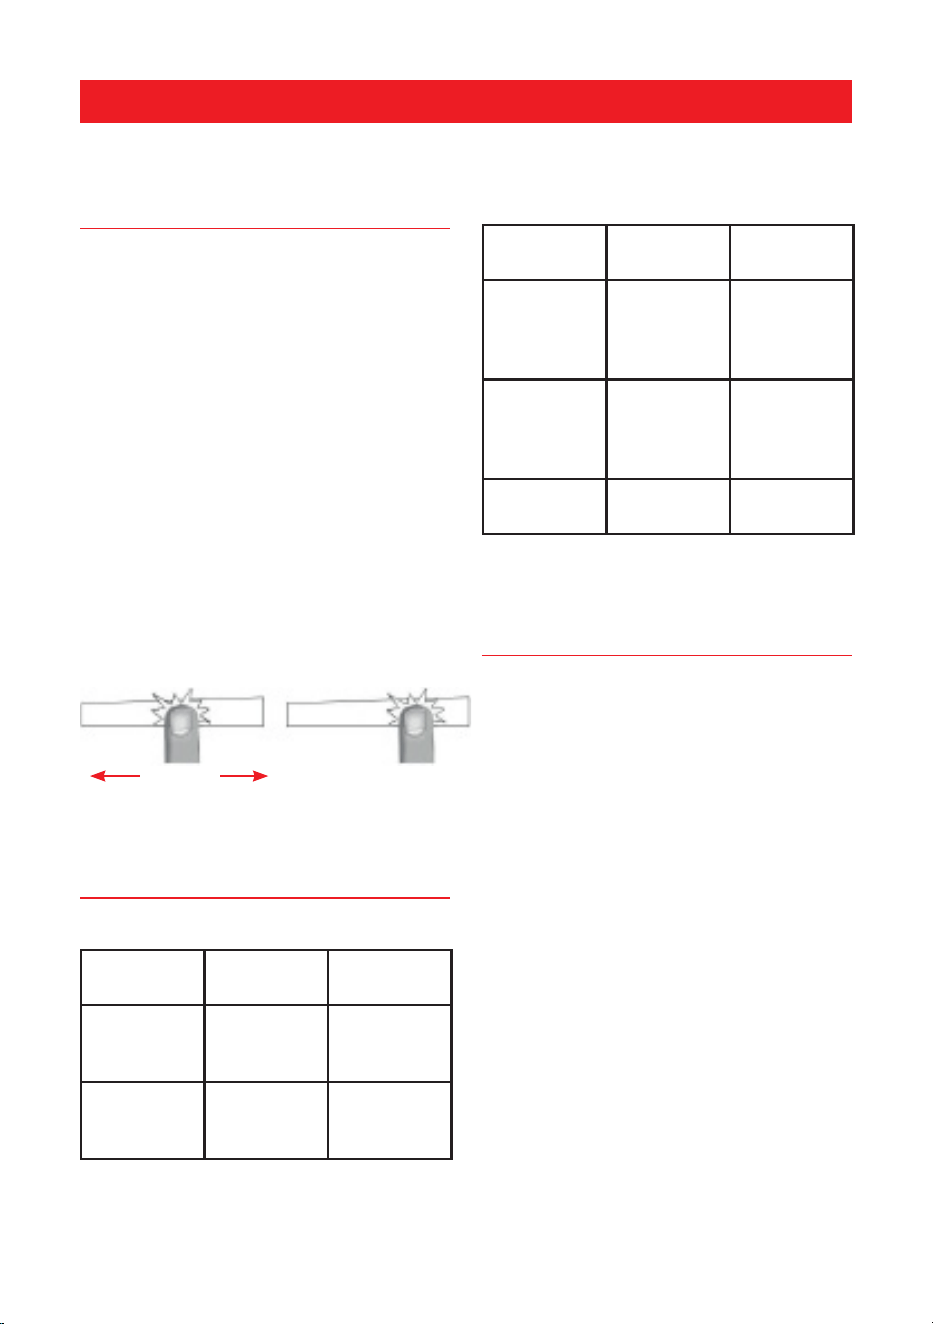
SENSITIVE TOUCH
Your ceramic hob is equipped with
electronic con-trols with sensitive touch
keys. When your finger presses the key,
the corresponding command is activated.
This activation is validated by a control
light, a letter or a number in the display
and/or a “beep” sound.
In the case of a general use press only one
key at the same time.
Power selection zone “SLIDER” and timer
setting zone
To select the power with the slider, slide
your fin-ger on the “SLIDER” zone. You can
already have a direct access if you put
your finger directly on the chosen level.
Power selection zone “SLIDER” and timer
setting zone
STARTING-UP
Start up / switch off the hob:
Action Control
panel
Display
To start press
[ main On/
Off ] key
[ ON ]
To stop press
[ main On/
Off ] key
nothing or
[ H ]
Start up / switch off a heating zone:
Action Control
panel
Display
Switch on
cooking
zone
Press
cooking
zone “On/
Off” key
[ ON ]
To set
(adjust the
power)
slide on the
“SLIDER“ to
the right or
to the left
[ 1 ] to [ P ]
To stop slide to [ 0 ]
on “SLIDER“
[ 0 ] or [ H ]
If no action is made within 20 second the
electronics returns in waiting position.
RESIDUAL HEAT INDICATION
After the switch off of a heating zone or
the complete stop of the hob, the heating
zones are still hot and indicates [ H ] on
the display.
The symbol [ H ] disappears when the
heating zones may be touched without
danger.
As far as the residual heat indicators are
on light, don’t touch the heating zones
and don’t put any heat sensitive object on
them. There are risks of burn and fire.
OPERATION
SLIDER
DIRECT
ACCESS
15
OPERATION
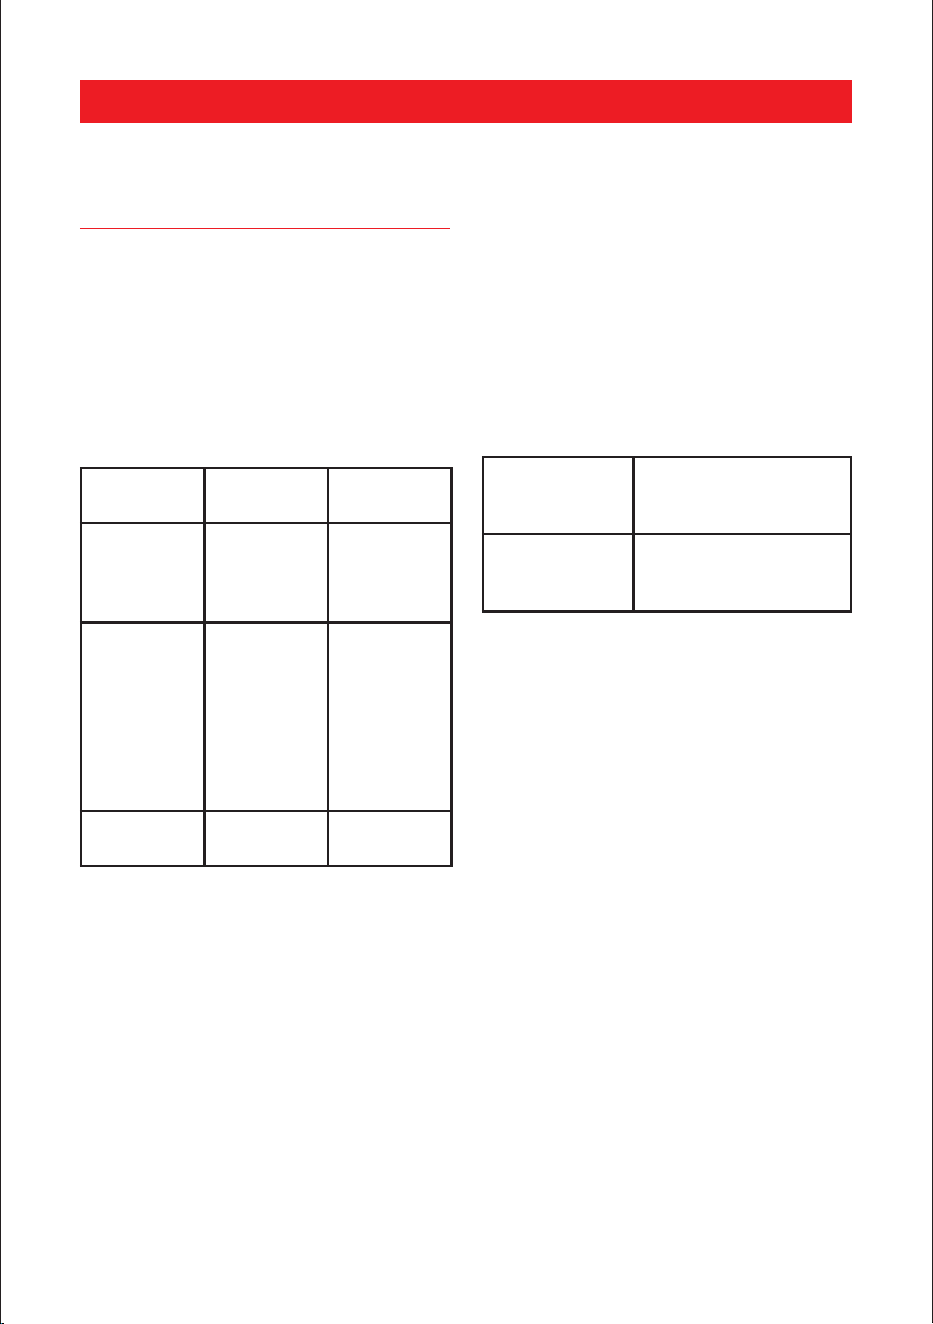
BOOSTER FUNCTION
Booster [ P ] grant a boost of Power to the
selected heating zone.
If this function is activated the heating
zones work during 10 minutes with an
ultra high Power. This is foreseen for
example to heat up rapidly big quantities
of water, like nuddles
Start up / Stop the Booster:
Action Control
panel
Display
Switch on
cooking
zone
Press
cooking
zone “On/
Off” key
[ ON ]
Start up the
Booster
Slide to the
end of the
“SLIDER”
or press
directly
on the
end of the
“SLIDER”
[ P ]
Stop the
Booster
Slide on the
“SLIDER“
[ 9 ] to [ 0 ]
Power management:
The hole cooking hob is equipped with
a maximum of Power. When the Power
function is activated, and in order to
exceed the maximum Booster, the
electronic system orders to reduce
automatically the power level of an other
heating zone. The display is blinking on [9]
during a few seconds and then shows the
maximum of power allowed:
Heating zone
selected
The other heating
zone: (example:
Booster level 9)
[ P ] is
displayed
[ 9 ] goes to [ 6 ] or
[ 8 ] depend-ing the
type of zone
16
TIMER
The timer is able to be used simultaneous
with all heating zones and this with
different time settings (from 0 to 159
minutes) for each heating zone.
Setting and modification of the cooking
time:
Action Control panel Display
Switch
on
cooking
zone
Press cooking
zone “On/Off”
key
[ ON ]
Select
the
power
level
Slide on the
“SLIDER“
[ 1 ] to [ P ]
Select
the Timer
Press
simultaneously
key [ - ] and
[ + ] from the
timer until the
desired display
is on
Timer
display on
Decrease
the time
Press key [ - ]
from the timer
[ 60 ] to 59,
58...
Increase
the time
Press key [ + ]
from the timer
Time
increase
After a few seconds, the [ . ] display starts
blinking
The time is confirmed and the timer
starts.
To stop the cooking time:
Action Control panel Display
Select
the
Timer
Press
simultaneously
key [ - ] and
[ + ] from the
timer until the
desired display
is on
Timer
display on
Stop the
time
Press key [ - ]
from the timer
[ 000 ]
If several timers are activated, repeat the
process.
Egg timer function:
Egg timer is an independent function. It
stops as soon as a heating zone starts up.
If the egg timer is on and the hob is
switched off, the timer continues until
time runs out.
Action Control panel Display
Activate
the hob
Press
[ main On/Off]
key
[ 0 ]
Select
the
Timer
Press
simultaneously
key [ - ] and [ + ]
from the timer
[ 000 ]
Decrease
the time
Press key [ - ]
from the timer
[ 60 ] to 59,
58...
Increase
the time
Press key [ + ]
from the timer
Time
increase
After a few seconds, the [ . ] display starts
blinking.
The time is confirmed and the timer
starts.
OPERATION
17
STOP&GO FUNCTION
This function brakes all the hob’s
cooking activity temporarily and allows
restarting with the same settings.
Start up/stop the pause function:
Action Control panel Display
Engage
pause
Press [ II ] [ II ] and
control light
on
Stop the
pause
Press [ II ]
Press on the
animated
“slider”
“Slider”
animated
previous
settings
RECALL FUNCTION
After switching off the hob (press main
On/Off key), it is possible to recall the
last settings.
•
cooking stages of all cooking zones
(Booster)
•
minutes and seconds of programmed
cooking zone-related timers
•
Keep warm function
The recall procedure is following:
•
Press [ main On/Off ] key
•
Then press [ II ] before the light stops
blinking. The previous settings are
again active.
OPERATION
Automatic stop at the end of the cooking
time:
As soon as the selected cooking time is
finished the timer displays blinking [ 000 ]
and a sound rings.
To stop the sound and the blinking, press
the key [ - ] and [ + ].
AUTOMATIC COOKING
All the cooking zones are equipped with
an automatic cooking device. The cooking
zone starts at full power during a certain
time, and then reduces automatically its
power on the pre-selected level.
Start-up:
Action Control panel Display
Switch on
cooking
zone
Press cooking
zone “On/Off”
key
[ ON ]
Power
level
selection
(for
example
«7 »)
Slide on the
“SLIDER“ to
[ 7 ] and stay
3s
[ 7 ] is
blinking
with [ A ]
Switching off the automatic cooking:
Action Control panel Display
Power
level
selection
Slide on the
“SLIDER“
[ 9 ] to [ 0 ]
18
OPERATION
“KEEP WARM” FUNCTION
This function allows the reach and
automatical-ly maintains at the
temperature of 107.6, 158 or 201.2°F.
This will avoid liquids overflowing and fast
burning at the bottom of the pan.
To engage, to start the function « Keep
warm »:
Action Control panel Display
Switch
on
cooking
zone
Press cooking
zone “On/Off”
key
[ ON ]
107.6°F
to
engage
Press on key
[Keep warm ]
158°F to
engage
Press and hold
key [Keep
warm ] 2s
201.2°F
to
engage
Press and hold
key [Keep
warm ] 4s
To stop Slide on the
“SLIDER“
[ 0 ] to [ 9 ]
or press key
[Keep warm ]
until [ 0 ]
[ 0 ]
The maximum duration of keeping warm
is 2 hours.
CONTROL PANEL LOCKING
To avoid modification of the setting of
the cooking zones , in particular during
cleaning, the control panel can be locked
(with exception to the main On/Off key).
Action Control panel Display
Locking
the hob
Press [ ]
during 6s
locking light
on
Action Control panel Display
Unlock
the hob
Press [ ]
during 6s
locking light
off
AUTOMATIC TURNING OFF
SYSTEM
The hob control has an automatic turn
off system. If one or more hob zone(s)
are left on, the hob zone turns off
automatically after a while (See Table-1).
In case of a timer assigned to the hob,
the timer screen is turned off then, too.
The time limit for automatic turn off de-
pends on the selected temperature level.
Maximum operating period is applied for
this temperature level.
The hob zone may be operated by
the user again after it is turned off
automatically as described above.
Temperature level Operating time
limit - hours
0 --
low 2.0
1 8.7
2 6.7
3 5.3
4 4.3
5 3.5
6 2.8
7 2.3
8 1.9
9 1.5
P 10 minutes
19
GENERAL INFORMATION ABOUT COOKING
This section describes tips on preparing
and cooking your food.
• Never fill the pan with oil more than
one third of it. Do not leave the hob
unattended when heating oil. Overheated
oils bring risk of fire. Never attempt to
extinguish a possible fire with water!
When oil catches fire, cover it with a
fire blanket or damp cloth. Turn off the
hob if it is safe to do so and call the fire
department.
• Before frying foods, always remove their
excess water and put them inside the
heated oil slowly. Make sure that frozen
foods are defrosted before frying.
• When heating oil, make sure that the pot
you use is dry and keep its lid open.
• The cooking temperature and time values
given for foods may vary depending on the
recipe and amount.
EXAMPLES OF COOKING POWER SETTING
The values below are indicative
Keep warm to 2 Melting, Reheating
Sauces, butter, chocolate, gelatine Dishes pre-
pared beforehand
2 to 3 Simmering, Defrosting
Rice, pudding, sugar syrup
Dried vegetables, sh, frozen products
3 to 4 Steam Vegetables, sh, meat
4 to 5 Water
Steamed potatoes, soups, pasta, fresh vegeta-
bles
6 to 7
Medium cooking,
Simmering
Meat, lever, eggs, sausages Goulash, roulade,
tripe
7 to 8 Cooking Potatoes, fritters, wafers
9
Frying, roosting,
Boiling water
Steaks, omelettes, fried dishes Water
P
Frying, roosting,
Boiling water
scallops, steaks
Boiling signicant quantities of water

20
CARE AND MAINTENANCE
GENERAL CLEANING
INFORMATION
!
General warnings
•
Wait for the product to cool before
cleaning the product. Hot surfaces may
cause burns!
•
Do not apply the detergents directly
on the hot surfaces. This may cause a
permanent stains.
•
The appliance shall be thoroughly
cleaned and dried after each operation.
Thus, food residues shall be easily
cleaned and these residues shall be
prevented from burning when the
appliance is used again later. Thus, the
service life of the appliance extends
and frequently faced problems are
decreased.
•
Do not use steam cleaning products for
cleaning.
•
Some detergents or cleaning agents may
damage the surface. Do not use abrasive
detergents, cleaning powders, cleaning
creams, descalers or sharp objects
during cleaning.
•
There is no need for a special cleaning
agent for cleaning after each use. Clean
the appliance using dish soap, warm
water and a soft cloth or sponge and dry
with a dry microfiber cloth.
•
Be sure to completely wipe off any
remaining liquid after cleaning and
immediately clean any food splashing
around during cooking.
•
Do not wash any component of your
appliance in a dishwasher.
For the hob:
• Acidic dirt such as milk, tomato paste
and oil may cause permanent stains
on the hobs and components of the
burners/hotplates, clean any overflown
fluids immediately after
Inox and stainless surfaces
• Do not use acid or chlorine-containing
cleaning agents to clean stainless or inox
surfaces and handles.
• Stainless or inox surface may change
colour in time. This is normal. After each
operation, clean with a detergent suitable
for the stainless or inox surface.
• Clean with a soft soapy cloth and liquid
(non-scratching) detergent suitable for
inox surfaces, taking care to wipe in one
direction.
• Remove lime, oil, starch, milk and protein
stains on the inox-stainless and glass
surfaces immediately without waiting.
Stains may rust under long periods of
time.
Glass surfaces
•
When cleaning glass surfaces, do not
use hard metal scrapers and abrasive
cleaning materials. They can damage the
glass surface.
•
Clean the appliance using dishwashing
detergent, warm water and a microfiber
cloth specific for glass surfaces and dry
it with a dry microfiber cloth.
•
If there is residual detergent after
cleaning, wipe it with cold water and dry
with a clean and dry microfiber cloth.
Residual detergent residue may damage
the glass surface next time.
•
Under no circumstances should the
dried-up residue on the glass surface
be cleaned off with serrated knives, wire
wool or similar scratching tools.
•
You can remove the calcium stains
(yellow stains) on the glass surface with
the commercially available descaling
agent, with a descaling agent such as
vinegar or lemon juice.
•
If the surface is heavily soiled, apply
the cleaning agent on the stain with a
sponge and wait a long time for it to
work properly. Then clean the glass
surface with a wet cloth.

21
•
Discolorations and stains on the glass
surface are normal and not defects.
Plastic parts and painted surfaces
• Clean plastic parts and painted surfaces
using dishwashing detergent, warm
water and a soft cloth or sponge and dry
them with a dry cloth.
• Do not use hard metal scrapers and
abrasive cleaners. It may damage the
surfaces.
• Ensure that the joints of the components
of the appliance are not left as damp and
with detergent. Otherwise, corrosion may
occur on these joints.
CLEANING OVEN DOOR
Glass cooking surface
Follow the cleaning steps described for
the glass surfaces in the "General cleaning
information" section for the cleaning of
glass cooking surface. You may complete
your cleaning as per the information
below for special cases.
• Sugar-based foods such as dark cream,
starch and syrup should be cleaned
immediately, without waiting for the
surface to cool. Otherwise, the glass
cooking surface may be permanently
damaged.
• Do not use cleaning agents for cleaning
operations you perform while the hob
is hot, otherwise permanent stains may
occur.
CLEANING THE CONTROL
PANEL
• When cleaning the panels with knob
control, wipe the panel and knobss with a
damp soft cloth and dry with a dry cloth.
Do not remove the knobs and gaskets
underneath to clean the control panel.
The control panel and knobs may be
damaged.
• While cleaning the inox panels with knob
control, do not use inox cleaning agents
around the knobs. The indicators around
the knobs may be deleted.
• Clean the touch control panels with a
damp soft cloth and dry with a dry cloth.
If your product has a key lock feature, set
the key lock before performing control
panel cleaning. Otherwise, incorrect
detection may occur on the keys.
CARE AND MAINTENANCE

22
TROUBLESHOOTING
!
Warning: Consult your Authorized
Service Agent or the dealer where
you purchased the product if the
instruction above do not remedy
your issue. Never attempt to repair a
defective product yourself.
THE HOB OR THE COOKING
ZONE DOESN’T START-UP:
• The hob is badly connected on the
electrical network.
• The protection fuse cut-off.
• The looking function is activated.
• The sensitive keys are covered of grease
or water.
• An object is put on a key.
THE CONTROL PANEL
DISPLAYS [ U ]:
• There is no pan on the cooking zone.
• The pan is not compatible with induction.
• The bottom diameter of the pan is too
small.
THE CONTROL PANEL
DISPLAYS [ E ]:
• The electronic system is defective.
• Disconnect and replug the hob.
• Call after sales
ONE OR ALL COOKING ZONE
CUT-OFF:
• The safety system functioned.
• You forgot to cut-off the cooking zone
for a long time.
• One or more sensitive keys are covered.
• The pan is empty and its bottom
overheated.
• The hob also has an automatic reduction
of Booster level and breaking Automatic
overheating
CONTINUOUS VENTILATION
AFTER CUTTING OFF THE HOB:
• This is not a failure, the fan continuous to
protect the electronic device.
• The fan cooling stops automatically.
THE AUTOMATIC COOKING
SYSTEM DOESN’T START-UP:
• The cooking zone is still hot [ H ].
• The highest Booster level is set [ 9 ].
OVEN EMITS STEAM WHEN IN
USE
• Steam escaping during operation is
normal. >>>No corrective action needed.
THE CONTROL PANEL
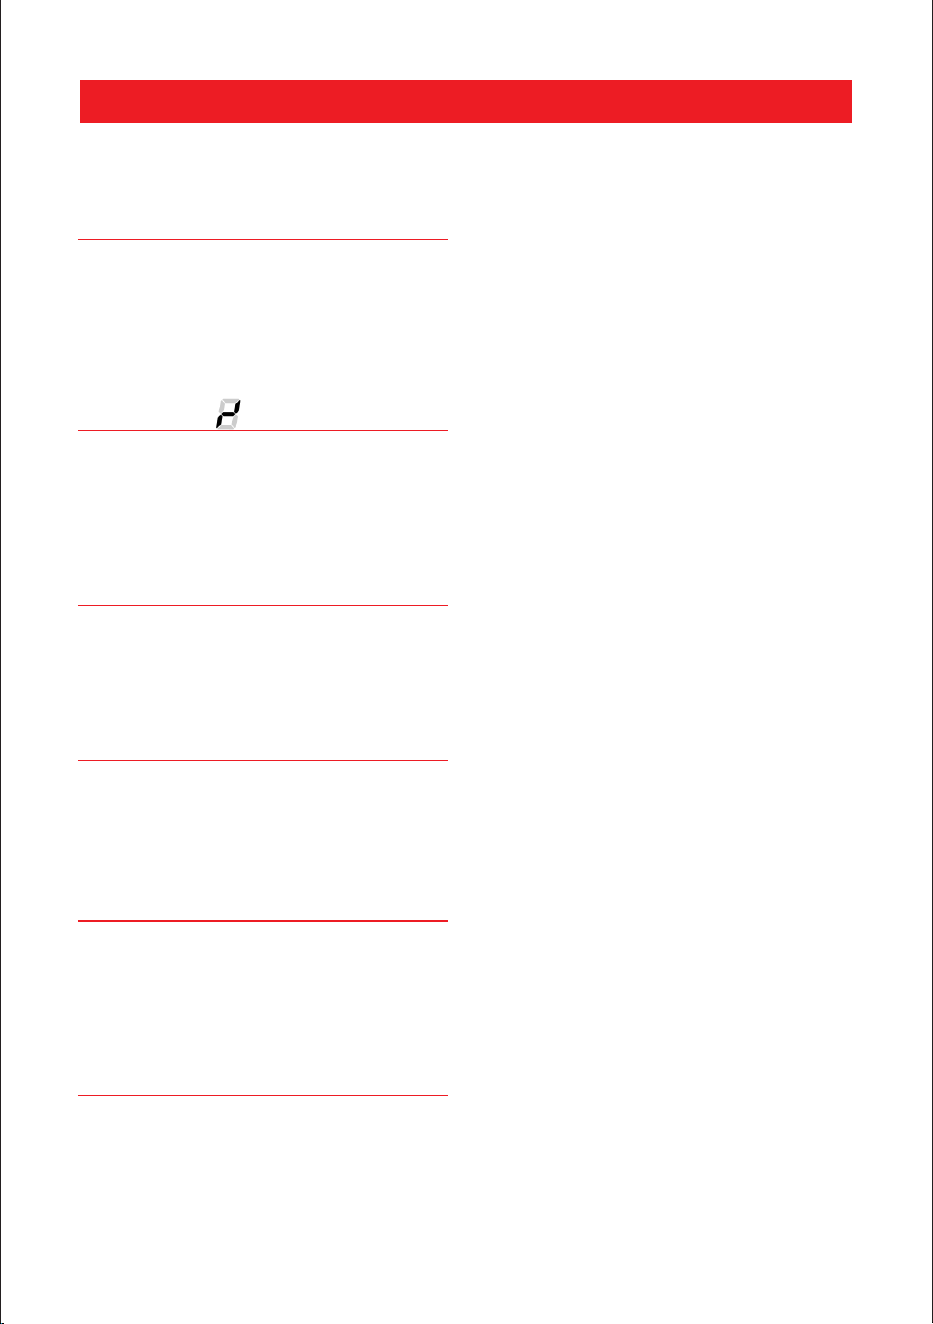
DISPLAYS [ ]:
• Refer to the chapter “Keep warm“.
23
TROUBLESHOOTING
THE CONTROL PANEL
DISPLAYS [ II ]:
• Refer to the chapter “Stop&Go“
• Key lock enabled. >>>Disable key lock,
see Operation.
THE CONTROL PANEL
DISPLAYS [ ] OR [ ER03 ] :
• An object or liquid covers the control
keys. The symbol disappear as soon as
the key is released or cleaned.
THE CONTROL PANEL
DISPLAYS [ E2 ] :
• The hob is overheated, let it cool and
then turn it on again.
THE CONTROL PANEL
DISPLAYS [ E8 ] :
• The air inlet of the ventilator is
obstructed, re-lease it.
USE THE CONTROL PANEL
DISPLAYS [ U400 ] :
• The hob is not connected to the network.
Check the connection and reconnect the
hob.
THE CONTROL PANEL
DISPLAYS [ ER47 ] :
• The hob is not connected to the network.
Check the connection and reconnect the
hob.
If one of the symbols above persists, call
the after sales service.

24
NOTES

25
NOTES

26
1 year * limited warranty from date
of first installation
Blomberg will repair or replace at no cost to the
consumer any defective parts of the electric and
gas cooktop
2 year * ++ limited warranty from
date of first installation (Parts only
Blomberg will repair or replace any parts at
no cost to the consumer if material defects or
workmanship have caused the damage or failure
of these components. Labor charges are the
responsibility of the consumer
2-5 year * ++ limited warranty
from date of first installation
(Parts only)
Blomberg will repair or replace oven cavitiy at
no cost to the consumer if material defects or
workmanship have caused the damage or failure
of these components. Labor charges are the
responsibility of the consumer
DISCLAIMERS OF WARRANTIES AND EXCLUSIONS
Warranty does not cover service costs by an authorized service agent to correct
installation, electrical problems or educational instruction on the use of the electric and
gas cooktop. The warranty also does not cover defects or damage caused by an act of
god (such as storms, floods, fires, mudslides, etc.), damage cause by use of the electric
and gas cooktop for pur-poses other than those for which it was designed, misuse,
abuse, accident, alteration, improper
The warranties provided by Blomberg in these statements only apply to Blomberg electric
and gas cooktop sold to the original purchaser or homeowner in the US and Canada.
This warranty is not transferable.
To obtain warranty service, please contact our nearest distributor as listed by state or call
1800-459-9848. You will need your electric and gas range model number,serial number,
retailer name and address, where pur-chased and purchase date / installation date.
This warranty gives you specific legal rights, and you may also have other rights which
vary from state to state.
All warranties stated below are based upon normal houshold use. The use of the product
in a commercial setting will void all warranties.
Service must also be performed by an authorized Blomberg Service Agency.
Cosmetic defects must be reported within 10 business days from installation
WARRANTY AND SERVICE

27
installation, maintenance, travel fees, service calls outside normal service hours,
unauthorized service work or work.
This product is fully tested and went through official quality assurance inspections
before leaving the original manufacturing site. Warranty
terms for this Blomberg household appliance is not valid if the product is altered,
tampered, modifed, additional parts assembled, fixed and re-packed by an authorized
distributor, servicer, a third party retailer, reseller or by any other unauthorized person(s).
TO THE EXTENT PERMITTED BY LAW, THIS WARRANTY IS IN LIEU OF ALL OTHER
EXPRESSED AND IMPLIED WARRANTIES, INCLUDING THE IMPLIED WARRANTIES
OF MERCHANTABILITY AND FITNESS FOR A PARTICULAR PURPOSE. BLOMBERG
UNDERTAKES NO RESPONSIBILITY FOR THE QUALITY OF THIS PRODUCT EXCEPT AS
OTHERWISE PROVIDED IN THIS WARRANTY STATEMENT. BLOMBERG ASSUMES NO
RESPONSIBILITY THAT THE PRODUCT WILL BE FIT FOR ANY PARTICULAR PURPOSE
FOR WHICH YOU MAY BE BUYING THIS PRODUCT, EXCEPT AS OTHERWISE PROVIDED
IN THIS WARRANTY STATEMENT.
Blomberg does not assume any responsibility for incidental or consequential damages.
Such damages include, but are not limited to, loss of profits, loss of savings or revenue,
loss of use of the cooker or any associated equipment, cost of capital, cost of any
substitute equipment, facilities or services, downtime, the claims of third parties, and
injury to property. Some states do not allow the exclusion or limitation of incidental or
consequential damages, so the above limitations or exclusion may not apply to you.
* installation date shall refer to either purchase date or 5 business days after delivery of
the product to the home, whichever is later.
++ Parts replaced will assume the identity of the original parts + their original warranty.
No Other Warranties. This Warranty Statement is the complete and exclusive warranty
from the manufacturer. No employee of Blomberg or any other party is authorized to
make any warranty statements in addition to those made in this Warranty Statement.
Please keep this warranty card, user manual and your sales slip for future reference.
SERVICE
Please contact the Distributor for your State or Province as listed on the Distributor
Contact List, or call our Toll Free Number at 1 800 459 9848 for direction to an
Authorized Blomberg Service Agent. 02 01
WARRANTY AND SERVICE

1 800 459 9848 Blomberg (02 01)
blombergappliance.com
©2022 Beko U.S., Inc. All rights reserved.
185.9303.36 / R.AA / 10.08.2023
CTI24310
WARNING: Read all safety
instructions before using the
product. If the information in
this manual is not followed
exactly, a fire or explosion
may result causing property
damage, personal injury or
death.
24" Induction Cooktop
Safety & Installation Instructions
Read all safety instructions before using the product.
If the information in this manual is not followed
exactly, a fire or explosion may result causing
property damage, personal injury or death.
This appliance is intended for normal household use only. It is not approved for outdoor
or other non-household uses (including sea or air-going vessels). See the Statement of
Limited Warranty. If you have any questions, contact the manufacturer.
Do not repair or replace any part of the appliance unless specifically recommended in
this manual. Refer all servicing to a factory authorized service center
3
PLEASE READ THESE INSTRUCTIONS CAREFULLY
BEFORE INSTALLATION OR USING YOUR APPLIANCE !
SAVE THESE INSTRUCTIONS
Save these instructions for the local electrical inspectors use.
This product can only be used in the rooms which incorporates a properly adjusted and
functioning Carbon Monoxide sensor. Make sure the Carbon Monoxide sensor works
properly and its maintenance done frequently. Carbon Monoxide sensor should be
installed maximum 6.5 feet away from the product.
THE INSTRUCTIONS WILL HELP YOU TO OPERATE THE
APPLIANCE SAFELY !
•Upon delivery, please check that the appliance is not damaged. If you note any transport
damage, please contact your point of sale immediately and do not connect and operate
the appliance!
•Before you connect and start using the appliance, please read this manual and all
enclosed documents. Please note in particular the safety instructions.
•Keep all documents so that you can refer to the information again later on.
Please keep your receipt for any repairs which may be required under warranty.
•When you pass on the appliance to another person, please provide all documents
including original date of purchasing. Warranty is not valid if the product is sold second
hand.
•If you should decide not to use this appliance any longer (or decide to substitute an
older model), before disposing of it, it is recommended that it be made inoperative in an
appropriate manner in accordance to health and environmental protection regulations,
ensuring in particular that all potentially hazardous parts be made harmless, especially
in relation to children who could play with old appliances. Remove the door and the
warming drawer before disposal to prevent entrapment.
Technical Information .................................................................................................................... 4
Important Safety Information ...................................................................................................... 5
Installation .....................................................................................................................................10
CONTENTS

4
TECHNICAL INFORMATION
This device corresponds to the following standarts: UL 858 Household Electric Ranges
directive.
General
Overall Height 2 - 11/32" (59.5 mm without seperator)
3 - 23/32" (94.5 mm with seperator)
Overall Width 23 - 37/64" (599 mm)
Overall Depth 20 - 53/64" (529 mm)
Installation dimensions
(width / depth)
22 - 1/6" (560 mm) / 19 - 5/16" (490 mm)
Total electric power 7,4 kW
Electrical connection 120/240 V~;60 Hz
Cable type / Cross section / Fuse 3 x 10 AWG / min. 40 A
Cable length max. 6ft
Burners
Front left Induction cooking burner
Size 8,3 " (210 mm)
Power max: 2300/ booster: 3700 W
Right Induction cooking burner
Size 10,3 " (260 mm)
Power max: 2600/ booster: 3700 W
Rear left Induction cooking burner
Size 5,7 " (145 mm)
Power max: 1400/ booster: 2200 W

5
IMPORTANT SAFETY INFORMATION
Tis section contains safety instructions
that will help protect from risk of personal
injury or property damage. Failure to
follow these instructions shall void any
warranty.
Be sure to observe all listed warnings
and cautions. Look particularly for the
icons with exclamation marks inside.
The information icon will also provide
important references.
!
Warning: Indicates a potentially
hazardous situation which, if not
avoided, could result in death or
serious injury.
!
Caution: Indicates a potentially
hazardous situation which, if not
avoided, may result in injury. It may
also be used to alert against unsafe
practices.
i
Indicates a potentially hazardous
situation which, if not avoided, may
result in damage to the dishwasher, the
table-ware, the equipment or
the environment.
IMPORTANT SAFETY
INSTRUCTIONS
• The manufacturer reserves its right
to make changes in the technical
specifications in order to improve the
appliance quality without any prior
notice. Figures included in this manual
are for schematic purpose only and may
not match exactly with your appliance.
Values stated on the markings of the
appliance or in other printed documents
supplied with the appliance are obtained
under laboratory conditions as per
relevant standards. These values may
vary according to the usage of the
appliance and ambient conditions.
• This appliance is not intended for use
by persons (including children) with
reduced physical, sensory or mental
capabilities, or lack of experience and
knowledge, unless they have been given
supervision or instruction concerning
use of appliance by a person responsible
for their safety.
• Children should be supervised to ensure
that they do not play with the appliance.
• The manufacturer shall not be held
responsible for damages aris-ing from
procedures carried out by unauthorized
persons which may also void the
warranty. Before inallation, read the
instructions carefully.
!
Warning: This appliance can be used by
children aged from 8 years and above
and persons with reduced physical,
sensory or mental capabilities or lack of
experience and knowledge if they have
been given supervision or instruction
concerning use of the appliance in a
safe way and understand the hazards
involved.
• Children shall not play with the appliance.
Cleaning and user maintenance shall not
be made by children without supervision.
!
Warning: The appliance and its
accessible parts become hot during
use. Care should be taken to avoid
touching heating elements. Children
less than 8 years of age shall be kept
away unless continuously supervised.
• Installation and repair procedures must
always be performed by Auhorized
Service Agents.
• Proper Installation – Be sure your
appliance is properly installed and
grounded by a qualified technician.
• Wear Proper Apparel – Loose-fitting or
hanging garments should never be worn
while using the appliance.
• Do not operate the product if it is
defective or has any visible damage.
• Ensure that the product function knobs
are switched off after every use.

6
IMPORTANT SAFETY INFORMATION
• User Servicing - DO NOT repair or
replace any part of the appliance unless
specifically recommended in the manual.
All other servicing should be referred to a
qualified technician.
!
Caution: Clean only parts listed in this
manual.
!
Caution: Use proper pan size - this
appliance is equipped with one or
more surface units of different size.
Select utensils having flat bottoms
large enough to cover the surface unit
heating element. The use of undersized
utensils will expose a portion of the
heating element to direct contact
and may result in ignition of clothing.
Proper relationship of utensil to heating
element will also improve efficiency.
PRODUCT SAFETY
• Never use when judgment or
coordination is impaired by the use of
alcohol and/or drugs.
• Be careful when using alcoholic drinks in
your dishes. Alcohol evaporates in high
temperatures and may cause fire since it
will catch fire when it gets in contact with
hot surfaces.
!
Warning: Do not place any flammable
maerials close to the product as the
sides may become hot during use.
!
Warning: Keep Oven Vent Ducts
unobstructed.
• Do not use steam cleaners to clean the
appliance as this may cause an electric
shock.
!
Warning: Unattended cooking on a
hob with fat or oil can be dangerous
and may result in fire. NEVER try to
extinguish a fire with water, but switch
off the appliance and then cover flame
e.g. with a lid or a fire blanket.
• Danger of fire: Do not store items on the
cooking surfaces.
• If the surface is cracked, switch off the
appliance to avoid the possibility of
electric shock.
!
Warning: Do not cook on broken
cooktop. If cooktop should break,
cleaning solutions and spillovers may
penetrate the broken cook-top and
create a risk of electric shock. Contact
a qualified technician immediately.
• After use, switch off the hob element
by its control and do not rely on the pan
detector.
!
Warning: Do not place metallic objects
such as knives, forks, spoons and lids
on the cooktop surface since they can
get hot.
• The appliance is not intended to be
operated by means of an external timer
or separate remote-control system.
• Vapour pressure that build up due to
the moisture on the hob surface or at
the bottom of the pot can cause the pot
to move. Therefore, make sure that the
oven surface and bottom of the pots are
always dry.
• Hotplates are equipped with “Induction”
technology. Your induc-tion hob that
provides both time and money savings
must be used with pots suitable for
induction cooking; otherwise hotplates
will not operate.
• As induction hobs create a magnetic
field, they may cause harmful impacts
for people who use devices such as
insulin pump or pacemaker.
• Use only hob guards designed by the
manufacturer of the cooking appliance
or indicated by the manufacturer of the
appliance in the instructions for use as
suitable or hob guards incorporated in
the appliance. The use of inappropriate
guards can cause accidents.
!
Warning: Food Poisoning Hazard: Do
not let food sit in oven for more than
1 hour before or after cooking. Doing
so can result in food poisoning or
sickness.
7
IMPORTANT SAFETY INFORMATION
!
Warning: Never leave surface units
unattended at high heat settings. Boil
over causes smoking and greasy spill
overs that may ignite.
!
Warning: Do not use aluminum foil
to line drip pans or anywhere in the
appliance, except as described in this
manual. Foil can trap heat or melt,
resulting in damage to the product and
a shock or fire hazard.
!
Warning: Utensil handles should be
turned inward and not extend over
adjacent surface units - to reduce the
risk of burns, ignition of flammable
materials, and spillage due to
unintentional contact with the utensil,
the handle of a utensil should be
positioned so that it is turned inward,
and does not extend over adjacent
surface units.
i
Nickel is a component in all stainless
steel and some other metal
components.
!
Caution: Use only dry potholders.
Moist or damp potholders on hot
surfaces may result in burns from
steam. Do not let potholder touch hot
heating elements. Do not use a towel or
other bulky clothes.
!
Warning: Clean cooktop with caution.
If a wet sponge or cloth is used to
wipe spills on a hot cooking area, be
careful to avoid steam burn. Some
cleaners can produce noxious fumes
if applied to a hot surface. Utensil
handles should be turned inward and
not extend over adjacent surface units.
To reduce the risk of burns, ignition
of flammable materials, and spillage
due to unintentional contact with the
utensil, the handle of a utensil should
be positioned so that it is turned inward,
and does not extend over adjacent
surface units.
!
Storage in or on Appliance - Flammable
materials should not be stored in an
oven or near surface units.
!
Caution: Do not store or use flammable
materials in an oven or near the cook
top, including paper, plastic, pot holders,
linens, wall coverings, curtains, drapes
and gasoline or other flammable vapors
and liquids.
• Do not carry out any repairs or
modifications on the appliance. However,
you may remedy some malfunctions; see
Troubleshooting.
.
!
Warning: Keep appliance area clear
and free from combustible materials,
gasoline, and other flammable vapors.
!
Warning: Do Not Use Water on Grease
Fires Smother fire or flame or use dry
chemical or foam type extinguisher.
!
Warning: Do not use water on grease
fires. Never pick up a flaming pan. Turn
the controls off. Smother a flaming
pan on a surface unit by covering the
pan completely with a well-fitting lid or
a fire blanket, cookie sheet or flat tray.
Use a multi-purpose dry chemical or
foam-type fire extinguisher. If there is a
fire in the oven during baking, smother
the fire by closing the oven door and
turning the oven off or by using a multi-
purpose dry chemical or foam-type fire
extinguisher.
• Do not leave empty pots or pans on
burners that are switched on. They might
get damaged.
• Since it may be hot, do not leave plastic
or aluminum dishes on the surface of
appliance. These kind of dishes should
not be used to keep food either.
• Only authorized replacement parts
may be used in performing service on
the cooktop. Replacement parts are
available from factory authorized parts
distributors. Contact the nearest parts
distributor in your area.
!
Warning: The manufacturer declines all
liability for injury to persons or damage
to property caused by incorrect or
improper use of the appliance.

8
IMPORTANT SAFETY INFORMATION
SAFETY FOR CHILDREN
!
Warning: Do Not leave children alone
Children should not be left alone or
unattended in area where appliance is
in use. They should never be allowed
to sit or stand on any part of the
appliance.
• Electrical products are dangerous to
children. Keep children away from the
product when it is op-erating and do not
allow them to play with the product.
!
Warning: Accessible parts may become
hot during use. Young children should
be kept away.
• Surface units may be hot even though
they are dark in color. Areas near surface
units may become hot enough to cause
burns. During and after use, do not
touch or let clothing or other flammable
materials contact surface units until they
have had sufficient time to cool. Among
these areas are for example, the cooktop
and surfaces facing the cooktop.
!
Caution: Do not place any items above
the appliance that children may reach
for.
• The packaging materials will be
dangerous for children. Keep the
packaging materials away from children.
Please dispose of all parts of the
packaging according to environmental
standards.
SAFETY FOR ELECTRICITY
!
Warning: Before installing, turn power
OFF at the service panel. Lock service
panel to prevent power from being
turned ON accidentally.
!
Warning: Personal injury or death
from electrical shock may occur if the
cooktop is not installed by a qualified
installer or electrician.
• Any additions, changes or conversions
required in order for this appliance to
satisfactorily meet the application needs
must be made by a qualified technician.
• Before performing any service, unplug
the range or disconnect the power
supply at the household distribution
panel by removing the fuse or switching
off the circuit breaker.
• The appliance must be installed so that
it can be completely dis-connected from
the mains supply. The separation must
be provided by a switch built into the
fixed electrical installation, according to
construction regulations.
• Any work on electrical equipment and
systems should only be car-ried out by
authorized and quali-fied persons.
• If the product has a failure, it should not
be operated unless it is repaired by an
Authorized Service Agent. There is the
risk of electric shock!
• Never wash the product by spreading or
pouring water onto it! There is the risk of
electric shock!
• The product must be disconnected
during installation, maintenance,
cleaning and repairing procedures.
• If the power connection cable for the
product is damaged, it must be replaced
by the manufacturer, its service agent
or similarly qualified persons in order to
avoid a hazard.
!
Warning: Only connect the product
to a grounded outlet/line with the
voltage and protection as specified in
the “Technical specifications”. Have
the grounding installation made by a
qualified electrician while using the
product with or without a transformer.
Our company shall not be liable for any
problems arising due to the product not
being earthed in accordance with the
local regulations.
• Ensure that the fuse rating is correct.
9
• Do not operate the appliance barefooted.
• Never touch the appliance with wet
hands or feet.
Prevention against possible fire risk!
• Ensure all electrical connections are
secure and tight to prevent risk of arcing.
• Do not use damaged cables or extension
cables.
• Ensure liquid or moisture is not
accessible to the electrical con-nection
point.
INTENDED USE
!
Warning: Use this appliance only for
its intended use as described in this
manual. NEVER Use Your Appliance for
Warming or Heating the Room.
• This product is designed for do-mestic
use. Commercial use will void the
guarantee.
• This appliance is for cooking pur-poses
only. It must not be used for other
purposes, for example room heating.
• This appliance is not intended to use at
mobile homes, recreational vehicles.
• The manufacturer shall not be held liable
for any damage caused by improper use
or handling errors.
DISPOSAL
!
Warning: Risk of suffocation
by the packaging materials!
Packing elements (i.e. plastic bags,
polystyrene foam, nails, packing straps,
etc.) should not be left around within
easy reach of children, as these may
cause serious injuries.
• The packaging material and transport
locks are made from materials that are
not harmful to the environment. Please
dispose of all parts of the packaging
according to environmental standards.
• This is beneficial to the environment.
!
Caution: If product will be given to
someone for personal use or given to
someone for second hand use, User
manual, product labels, other related
documents, mounting parts etc. should
be given with product.
FUTURE TRANSPORTATION
• Do not carry out cleaning or maintenance
operations on the appliance without
having previously disconnected it from
the electric power supply.
i
Do not place other items on the top of
the appliance. The appliance must be
transported upright.
• Store the appliance's original box and
transport the appliance in its original
carton. Follow the guidance marks that
are printed on the carton.
i
Verify the general appearance of your
equipment by identifying possible
damage during the transportation.
• To prevent the wire shelf and tray inside
the oven from damaging the oven door,
place a strip of cardboard onto the inside
of the oven door that lines up with the
position of the trays. Tape the oven door
to the side walls.
• If you do not have the original carton,
pack the appliance in bubble wrap or
thick cardboard and tape it securely
in order to prevent damage during
transportation.
IMPORTANT SAFETY INFORMATION

10
INSTALLATION
SAFETY FOR INSTALLATION
!
Warning: Save for the local electrical
inspector’s use.
!
Caution: The product should only
be installed by suitably qualified
electricians.
• Preparation of location and electrical
installation for the product is under
customer’s responsibility.
• The product must be installed in
accordance with all local electrical
regulations.
• Prior to installation, visually check if the
product has any defects on it. If so, do
not have it installed.
• Damaged products cause risks for your
safety.
• Product guarantee will be valid after
proper installation. Manufacturer will not
be responsible any hazard or damage of
improper installation or usage.
BEFORE INSTALLATION
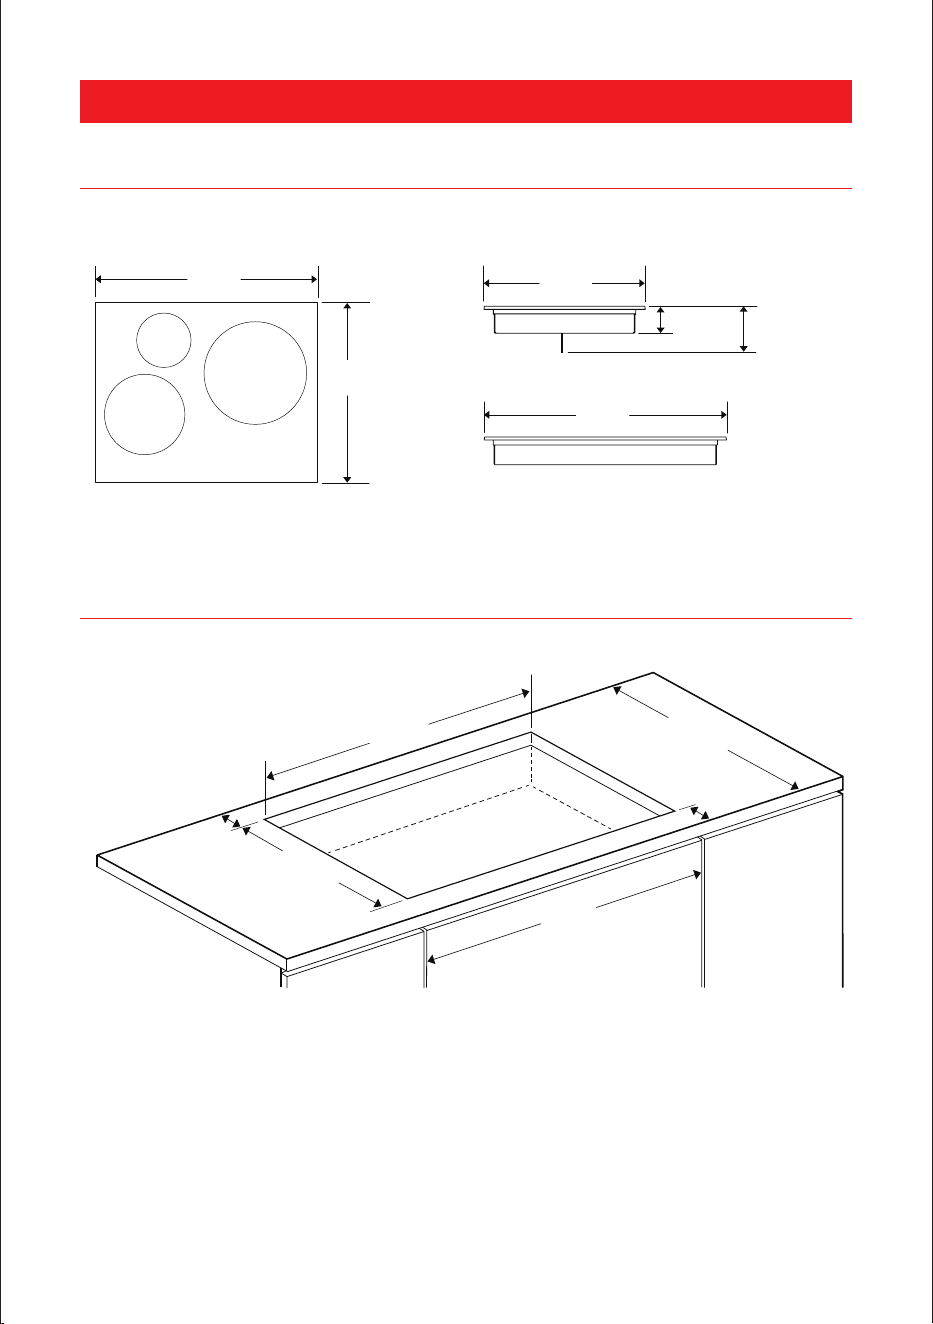
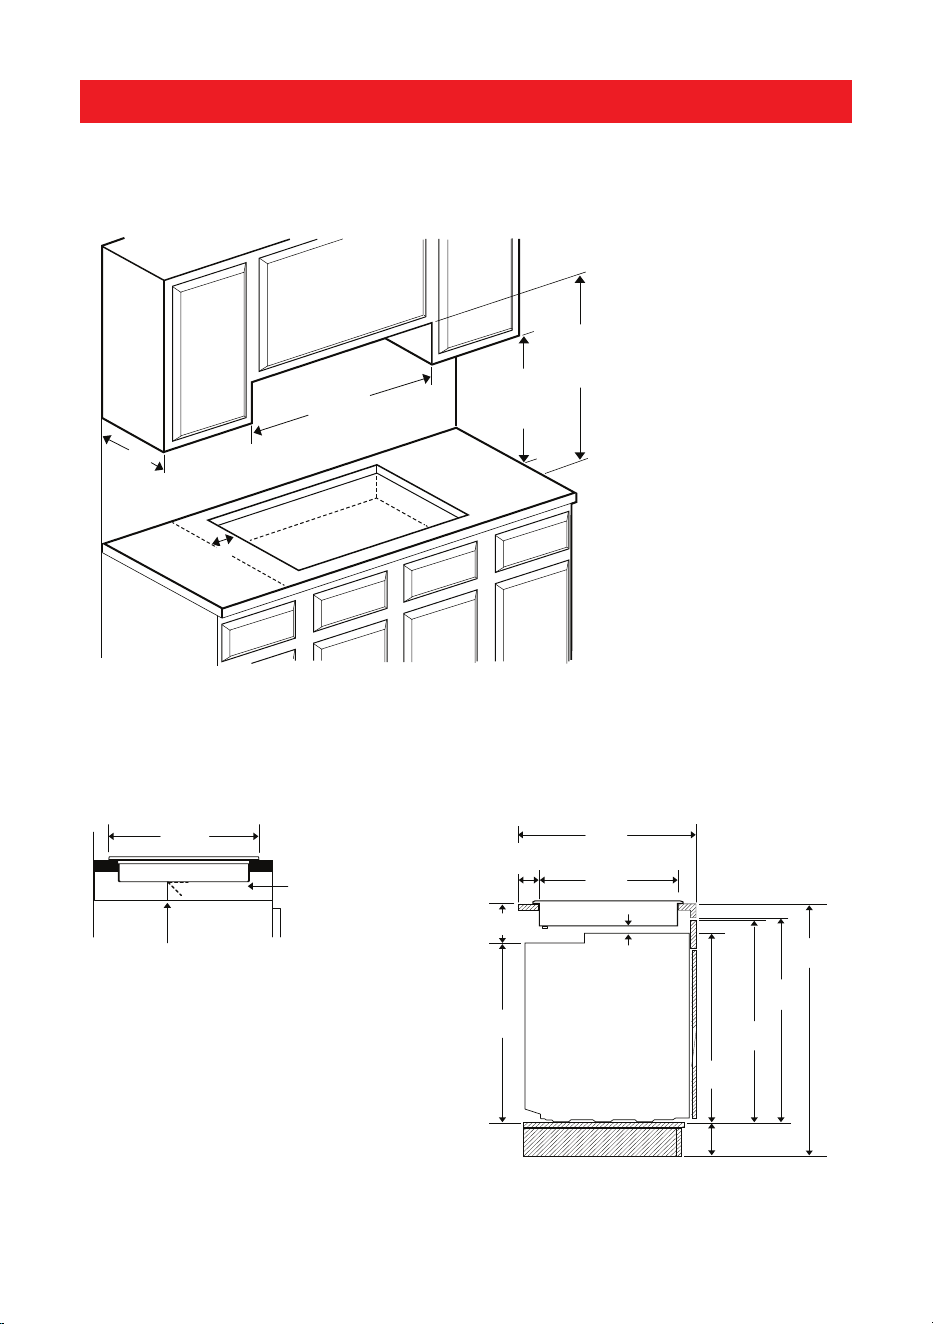
• The cooktop is designed for installation
in a commercial worktop. A safety
distance must be left between the
appliance and the kitchen walls and
furniture. See figure (values in mm).
• The following installation drawings are
representational and may not match
exactly with your appliance
• Allow a minimum distance of 750 mm
above the hob surface.
• (*) If a cooker hood is to be installed
above the cooker, refer to cooker hood
manufacturer' instructions regarding
installation height (min 650 mm)
• Remove packaging materials and
transport locks.
• Surfaces, synthetic laminates and
adhesives used must be heat resistant
(100 °C minimum).
• The worktop must be aligned and fixed
horizontally.
• Cut aperture for the cooktop in worktop
as per installation dimensions.
• Write down the model and serial
numbers before installing the cooktop.
Both numbers are on the box. Serial
rating plate located on bottom of
cooktop box.
• To eliminate the risk of burns by reaching
over heated surface units,cabinet
storage space located above the surface
units should be avoided. If the cabinet
storage is to be provided, the risk can be
reduced by installing a range hood that
projects horizontally a minimum of 5"
(12,7 cm) beyond the bottom of cabinet.
• Do not install the appliance next to
refrigerators or freezers. The heat
emitted by the appliance will lead to
an increased energy consumption of
cooling appliances.
!
Important notes to the consumer
Keep this manual for future reference.
• If the information in this manual is not
followed exactly, a fire or explosion may
result in personal injury or death.
• Do not store or use gasoline or
other flammable vapors and liquids
in the vicinity of this or any other
appliance.
You can be killed or seriously injured
if you don't IMMEDIATELY follow
instructions.
!
Important notes to the installer
Read manual before installing the cook
top. Observe all governing codes and
ordinances. Be sure to leave these
instructions with the consumer.
Be sure your cook top is installed and
grounded properly by a qualified installer
or service technician.
11
INSTALLATION
PRODUCT DIMENSIONS
CUTOUT - CLEARENCE DIMENSIONS
Figure 2
Top View Side View
Front View
(529 mm)
23
37/64
20
53/64
"
23
37/64
"
"
(529 mm)
20
53/64
"
2
11/32
"
(599 mm)
(59.5 mm)
3
23/32
"
(94.5 mm)
with seperator
(599 mm)
24"
(609.6 mm)
Base Cabinet
or Wider
22
1
/6"
(560 mm)
19
5
/16"
(490 mm)
3"
(76 mm)
3 "
(81.7 mm)
25
1
/2
3
/16
"
(647.7 mm)
Countertop Cutout
Figure 1
12
INSTALLATION
24"
(609.6 mm)
Clearances
18"
(457 mm)
min.
24"**
(609.6 mm)
min.
13"
(330 mm)
Right and left sides
Min. clearance between
cooktop surface and lower
edge of ventilation unit
*
**
2""*
(50 mm)
min.
25
1
/2"
(647.7 mm)
24
5
/8"
(625 mm)
26
3
/8"
(669.4 mm)
28
7
/8"
(733 mm)
29
3
/16"
(742 mm)
36"
(915 mm)
3"
(76 mm)
6
5
/8"
(169 mm)
BUILT-IN OVEN
COOKTOP
2
49
/64"
(70.1 mm)
4
3
/4"
(121 mm)
19
5
/16"
(490 mm)
Installation Above a Built-in Oven
Installation Above a Drawer or Cabinet – Side View
(51 mm)
min. clearance
with seperator installation
(529 mm)
20
53/64
"
seperator
2
1/64
"
Figure 3
Figure 4
Figure 5
13
INSTALLATION
IMPORTANT PREPARATION
SUGGESTIONS
1.
Chamfer all exposed edges of
decorative laminate to prevent damage
from chipping.
2.
Radius corners of cutout and file to
Insure smooth edges and prevent
corner cracking. Recommend 1/4"or
3/8"diameter drill in each corner.
3.
Rough edges, inside corners which have
not been rounded and forced fits can
contribute to cracking of the countertop
laminate.
This cooktop has been designed with
wide tolerances of cut-out to cover
possible replacement with other brands.
We recommend to that you consider the
minimum dimension of cutout size In the
case of new Installation. Some cut out
sizes for possible replacements.
COOKTOP INSTALLATION
!
Warning: Excessive Weight Hazard -
Use two or more people to move and
install cooktop. Failure to do so can
result in back or other injury.
!
Warning: Cut Hazard - Beware of sharp
edges. Use the polystyrene ends when
carrying the product. Failure to use
caution could result in minör injury or
cuts.
• Always consult the countertop
manufacturerfor specific instructions.
• Ensure the countertop is square and
level and ensure no structural members
interfere with space requirements.
• Prepare the cut-out according to the
instructions (see cut-out dimensions).
• Make sure the wall coverings, countertop
and cabinets around the cooktop can
withstand heat (up to 212 °F / 100 °C).
• During installation of your hob, place
the product parallel to the installation
surface. Also, apply sealing gasket to the
parts of the hob contacting the counter
as described below in order to prevent
any liquid from penetrating between the
product and the counter.
For Installation :
1. Prepare the surface of the counter as
shown in the figure.
2. Turning the cooktop upside down, place
it on a flat surface.
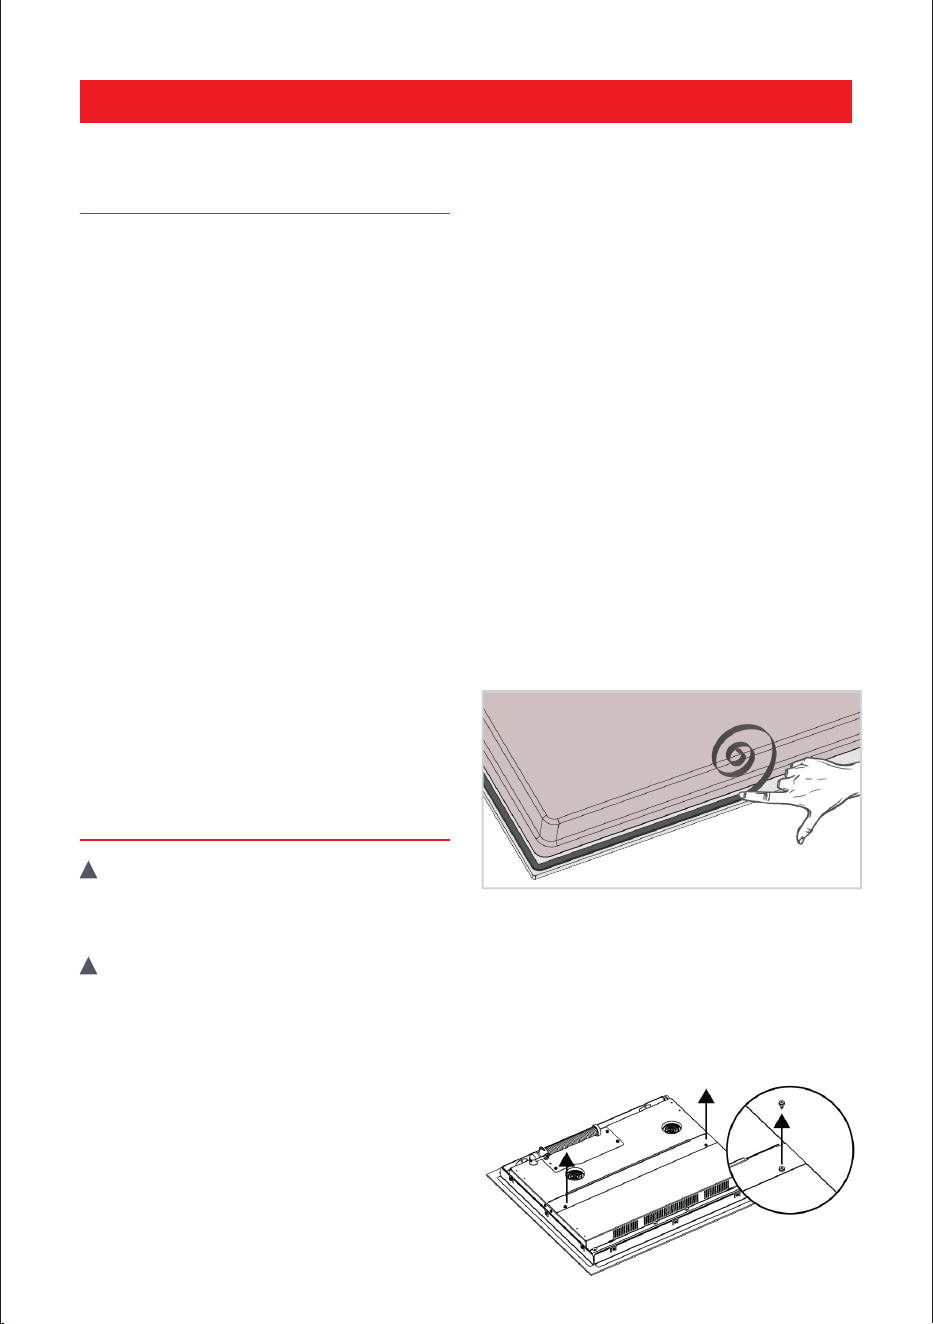
3. The sealing gasket provided in the
package must be applied on the lower
casing bend around the hob as shown
in the figure, during installation of the
hob.
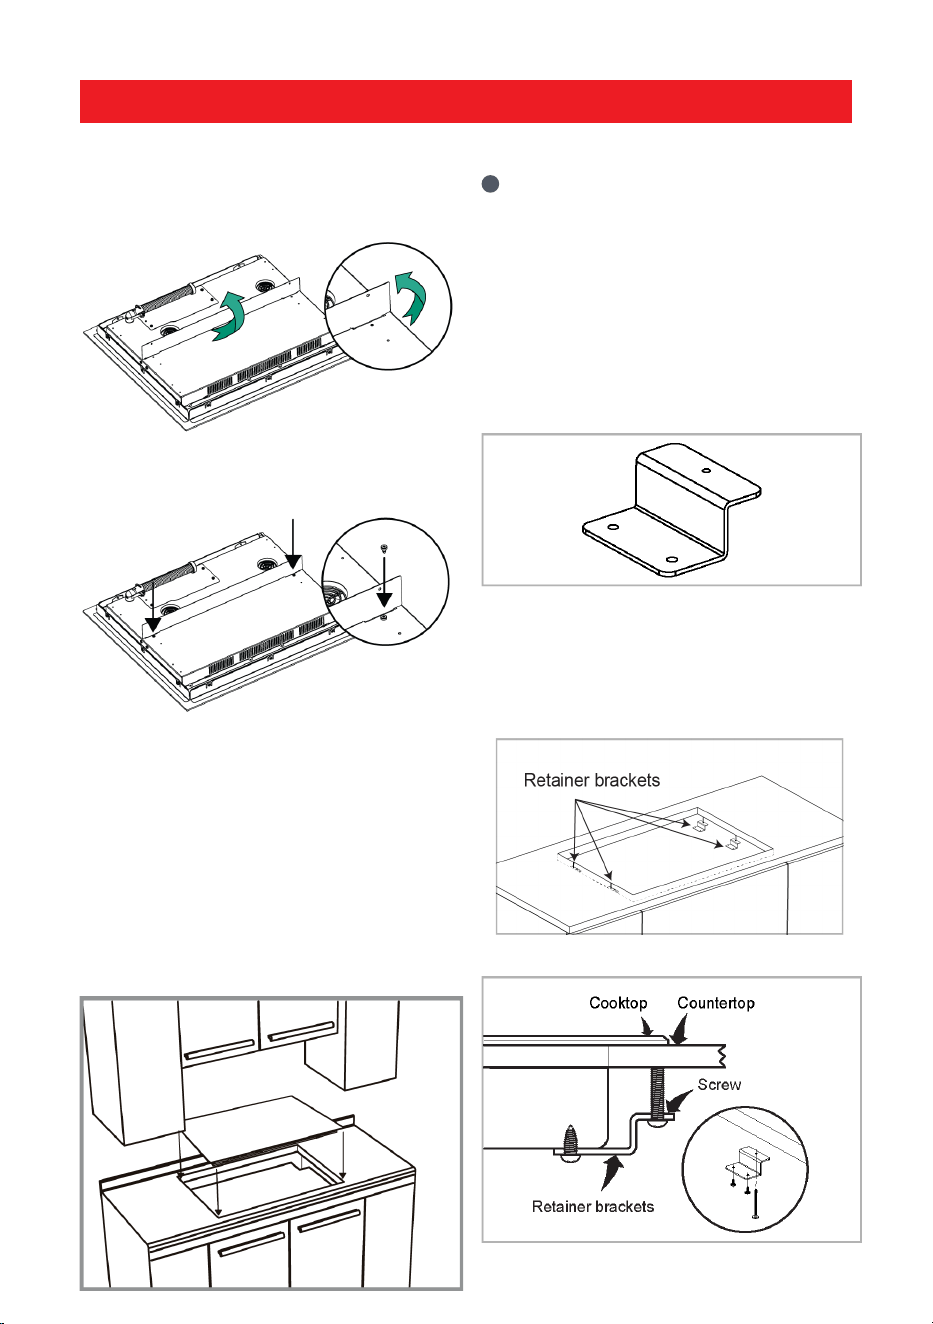
4. If the cooktop installed above a drawer
or cabinet; it must be installed the
separator. (figure 4) For the seperator
installtion:
- Remove the two screws as shown below
14
INSTALLATION
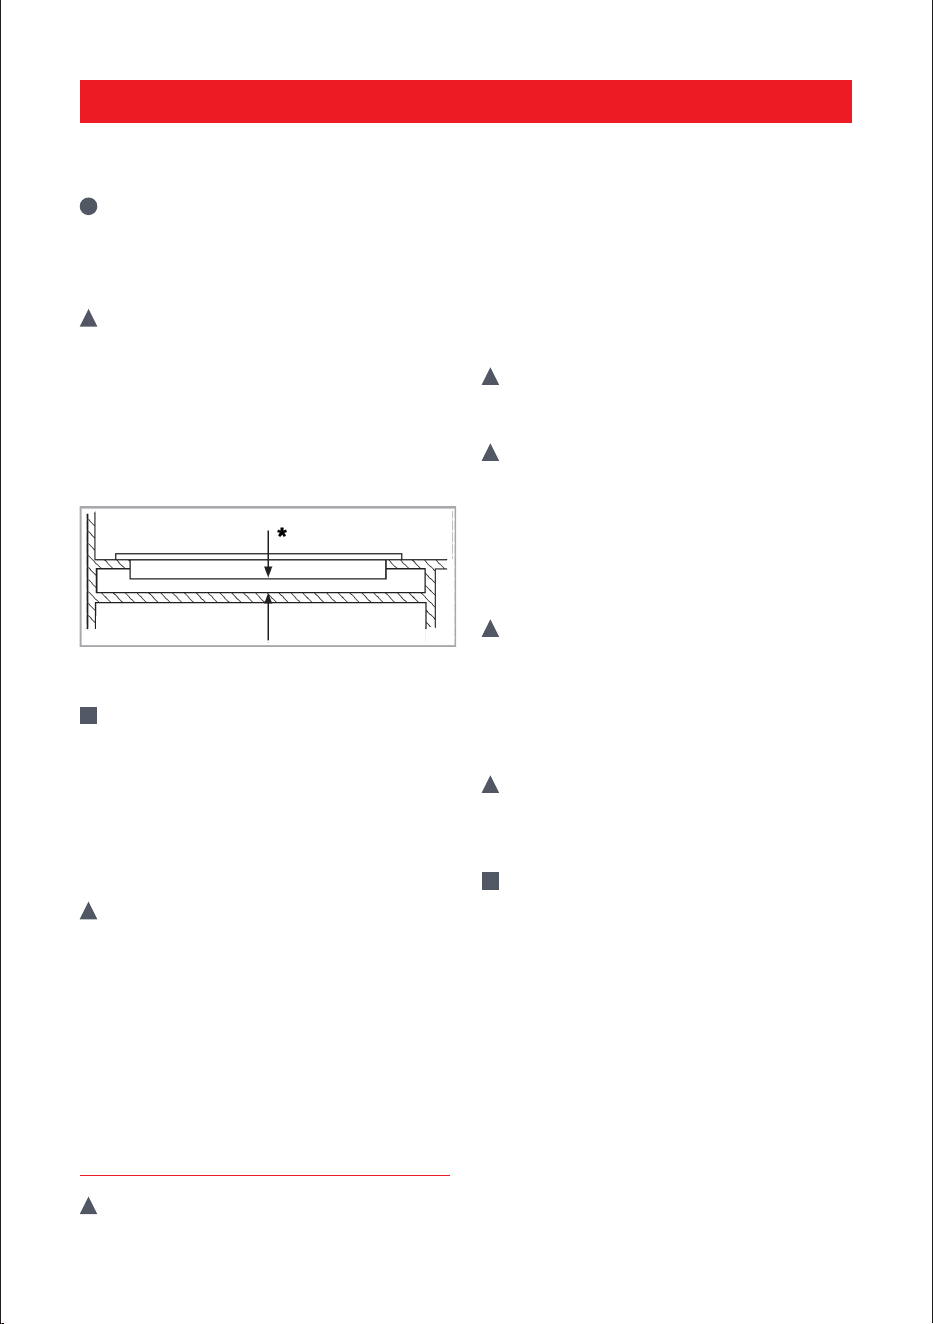
- Lift the seperator 90 degrees as shown
below
- Fix the two screw again to the bottom of
cooktop as shown below.
5. If the cooktop installed above a oven;
there is no need to be installed the
separator. Install according to the
dimensions shown in Figure 5
6. Insert the cooktop centered into the
cutout opening. Make sure the front
edge of the counter top is parallel
to cooktop. Make final check that all
required clearances are met.
i
When installing the hob onto a cabinet,
a shelf must be installed in order to
separate the cabinet from the hob as
illustrated in the above figure. This is
not required when installing onto a
built-under oven.
7. LOCATE RETAINER BRACKETS
Remove the retainer brackets from the
literature package.
8. INSTALL THE RETAINER BRACKETS
Install the retainer brackets to the
bottom of the hob. Then snug the bolts
against the bottom of the countertop as
shown.
15
INSTALLATION
i
The retainer brackets MUST be installed
to meet local codes or, in their absence,
with the National Electrical Code ANSI/
NFPA No. 70, latest edition.
!
Warning: Installing retainer brackets to
different holes is not a good practice in
terms of safety since it can damage the
electrical system.
For exmaple, if it is possible to touch the
bottom of the product since it is installed
onto a drawer, this section must be
covered with a seperator.
* 52 mm
!
Caution: The California Safe Drinking
Water and Toxic Enforcement Act
requires the Governor of California to
publish a list of substances known to
the State of California to cause cancer,
birthdefects, or other reproductive
harm, and requires businesses to
warn of potential exposure to such
substances.
!
Warning: This product can expose
you to chemicals including Nickel
(Metallic) which is known to
the State of California to cause
cancer. For more information go to
www.P65Warnings.ca.gov
Note: Nickel is a component in all
stainless steel and some other metal
components.
CONNECTION TO THE MAIN
SUPPLY
!
Warning: This appliance must be
earthed! Our company shall not be held
responsible for any damage caused
by using the appliance without an
earthed socket. This appliance must
be electrically grounded in accordance
with local codes, or in their absence,
with the National Electrical Code ANSI/
NFPA No. 70-latest edition in United
States.
!
Warning: Disconnect power before
servicing the product. Failure to do so
could result in death or electrical shock.
!
Warning: The product must be
connected to the mains supply only by
an authorised and qualified person. The
product's warranty period starts only
after correct installation. Manufacturer
shall not be held responsible for
damages arising from procedures
carried out by unauthorised persons.
!
Warning: The power cable must not
be clamped, bent or trapped or come
into contact with hot parts of the
product. A damaged power cable must
be replaced by a qualified electrician.
Otherwise, there is risk of electric
shock, short circuit or fire!
!
Warning: Before starting any work on
the electrical installation, disconnect
the product from the mains supply.
There is the risk of electric shock!
!
Caution: This appliance must only be
connected to a network 208-240 V ~ 60
Hz. Always connect the ground wire
• The mains supply data must correspond
to the data specified on the rating
plate of the appliance. The rating plate
is located at the rear housing of the
appliance.
• The appliance mains cable must
correspond to the specifications and the
power consumption.
• The installation of this appliance and
the connection to the electrical network

16
INSTALLATION
should be entrusted only to an electrician
perfectly to the fact of the normative
regulations and which respects them
scrupulously.
• The electrical parts should always be
protected after the installation.
• The appliance should be connected
using a multipolar circuit breaker.
• If the appliance is not fitted with an
accessible plug, disconnecting means
must be incorporated in the fixed
installation, in accordance with the
installation regulations.
• The inlet hose must be positioned so
that it does not touch any of the hot
parts of the cooktop or oven.
This cooktop does not require a neutral
connection. If the cooktop is to be
completely enclosed in a cabinet, feed the
cooktop cable through the opening in the
cabinet. Make the electrical connection
following the appropriate steps for
your installation. Your cooktop must be
connected to the proper electrical voltage
and frequency as specified in the table on
the right.
Connect with copper wire only
If house has aluminum wiring, follow the
procedure below:
1.
Connect the aluminum wiring to
the copper wire by using special
connectors designed and Underwriters
Laboratories-listed for joining
copper to aluminum. Follow the
electrical connector manufacturer's
recommended procedure.
2.
Aluminum/copper connection must
conform with local codes and industry-
accepted wiring practices.
The flexible conduit (supplied) min. 4
feet long (120 cm) located at the right
rear of the cooktop bottom box should
be connected directly to junction box. Do
not cut the conduit. A U.L - or CSA - listed
conduit connector must be provided at
each end of the power supply cable (at
the cooktop and at the junction box.)
A time delay fuse or circuit breaker is
recommended. Do not ground to a gas
pipe. Do not have a fuse in the grounding
or neutral circuit. Fuse both supply
(phase) lines.
i
Improper connection of aluminum
house wiring to the copper leads can
result in a serious problem.
National Fire Protection Association
Batter/march Park Quincy,
Massachusetts 02269
A three-wire, single phase, 240 Volt 60
cycle electrical system (properly circuit
protected to meet Local Codes of NFPA
No.70) must be provided. Unit must
be properly grounded in accordance
with local wiring code. The chart below
recommends the minimum circuit
protector and wire size if the appliance is
the only unit on the circuit. If smaller sizes
of wire are used, the unit efficiency will be
reduced and a fire hazard may be created.
It is advisable that the electrical wiring and
hookup be accomplished by a competent
electrician.
Be sure your appliance is properly installed
and grounded by a qualified technician.
Ask your dealer to recommend a qualified
technician or an authorized repair service.
This cooktop does not require a neutral
connection. If the cooktop Is to be
completely enclosed In a cabinet, feed the
cooktop cable through the opening in the
cabinet. Make the electrical connection
following the appropriate steps for your
installation.
!
Warning: Risk of Electric Shock, frame
grounded to neutral of appliance
through a link.
Grounding through the neutral conductor
is prohibited for new branch-circuit
installations (1996 NEC)# mobile
homes#and recreational vehicles, or in an
area where local codes prohibit grounding
through the neutral conductor.
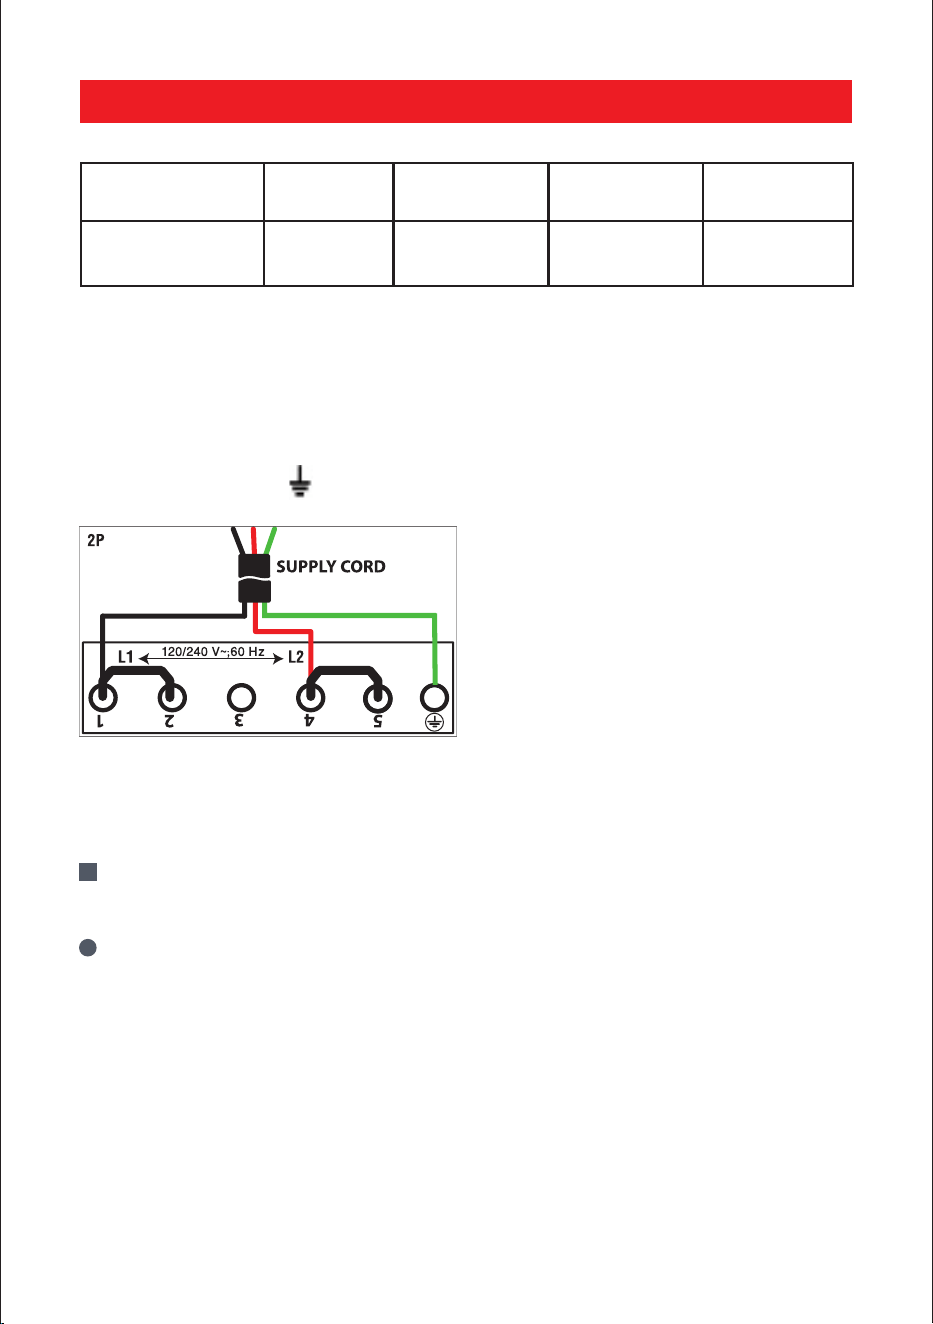
17
Connection of the cooktop
• Use the brass bridges which are in the
connection box to bridge terminals 1-2
and terminals 4-5. Connect line 1 to the
terminal 1, line 2 to the terminal 4 and
the ground to terminal
L1 : Black
L2: Red
Ground : Green
!
Caution: Ensure that the cables are
correctly inserted and tightly screwed
down.
i
We cannot be held responsible for
any incident resulting from incor-rect
connection or which could arise from
the use of an appliance which has not
been earthed or has been equipped
with a faulty earth connection.
INSTALLATION
Mains Connection Cable diameter Protection
calibre
Flexible
conduit
120/240 V~;60 Hz 2 Phases 3 x 10 AWG 40 A
¾”
Use only ul listed or csa approved components

18
NOTES

19
NOTES

1 800 459 9848 Blomberg (02 01)
blombergappliance.com
©2022 Beko U.S., Inc. All rights reserved.