1
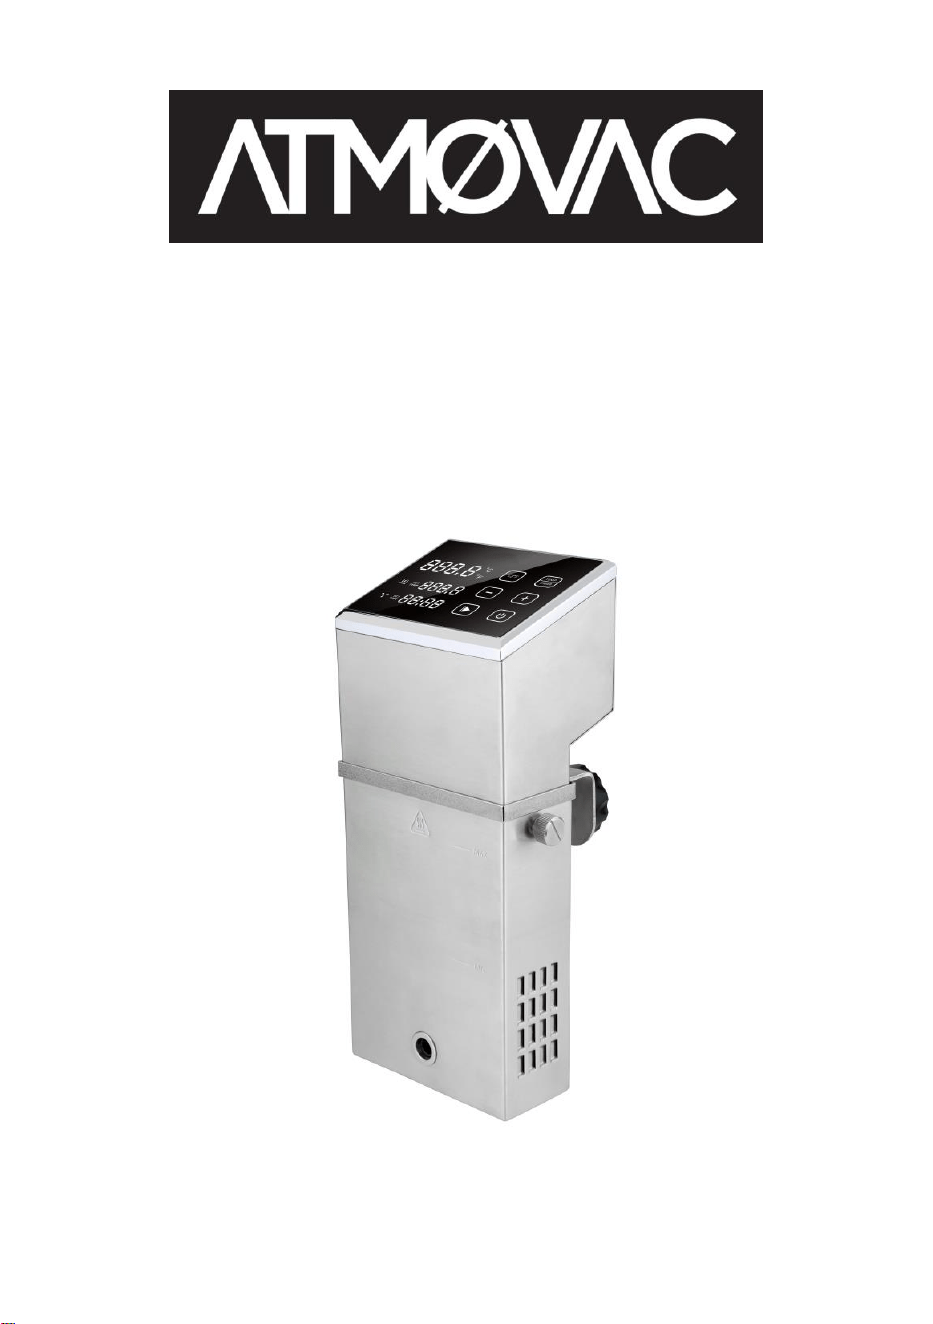
Thermal immersion circulator
Model: SV310
User Manual

2
Table of Contents
Benefits of Low-Temperature Cooking and Sous Vide ............................................ 3
Preparation for Low-Temperature Cooking ................................................................ 5
Safety ......................................................................................................................................... 7
Technical Specifications ...................................................................................................... 9
Product Functionality ......................................................................................................... 10
Components ......................................................................................................................... 14
Operating Instructions ....................................................................................................... 15
Maintenance ......................................................................................................................... 17
Care and Cleaning .............................................................................................................. 19
Error Codes and Troubleshooting ................................................................................. 21
Warranty and After-Sales Service ................................................................................. 23

3
Benefits of Low-Temperature Cooking and Sous Vide
Vacuum low-temperature cooking maximizes the preservation of
nutrients in food since the food does not come into direct contact
with air or water; very little or no oil needs to be used and only a
very little amount of salt is needed to preserve taste. This cooking
method maintains and even enhances the taste of everyday
foods.
Vacuum low-temperature cooking ensures that heat is evenly
distributed throughout the food; not only making it taste great, but
also preserving the color of the ingredients. Furthermore, the
thermal immersion circulator will save lots of energy in
comparison to an oven or gas stove, as well as reduce smoke
pollution in the kitchen.
You don’t need to be a trained chef! Even if you don’t have any
cooking experience, you can prepare healthy and delicious meals
using the thermal immersion circulator which will help you achieve
perfectly cooked foods.

4
Thanks to precise temperature and time control, it is possible to
ensure that food is not scorched or dried out due to overcooking,
in particular for food cooked at medium and low temperatures.

5
Preparation for Low-Temperature Cooking
• Vacuum sealing machine
A vacuum sealing unit will remove most of the air from bags,
providing an airtight seal that will prevent air or liquid from
going in. You can use a chamber vacuum sealer or a suction
vacuum sealer depending on your needs. We supply both
kinds of vacuum sealers.
• Vacuum seal bags
Vacuum seal bags will allow you to thoroughly pack foods,
ensuring that no air or liquid gets inside. Please ensure that
the vacuum seal bags you use can withstand temperatures up
to 100 °C or 212 °F.
• Thermal circulator with cooking water tank or sous vide
water bath
Start by placing the cooking rack into the water tank (failure to
use the cooking rack may result in a unit breakdown); next, fill
the tank or water bath with enough water to cover the food,
and set the cooking temperature. For the immersion thermal
circulator, you must also ensure that the water tank can
withstand temperatures up to 100 °C or 212 °F. For sous vide

6
water baths, fill the bath with water and then set the
temperature and time (the unit is equipped with a thermostat
controller).

7
Safety
Please follow all safety precautions:
• Only operate the unit according to the specific instructions
contained in this manual to avoid damaging the unit.
• Ensure that the power supply conforms to the standard.
• The unit must be connected to a grounded electrical socket.
• Always turn off the power supply before moving the machine.
• Do not touch the liquid with your bare hand to check the
temperature; use the temperature display or a thermometer.
• When putting food into the water bath, always ensure that the
water level is between the minimum (MIN) and the maximum
(MAX) levels to avoid damaging the unit.
• Do not touch hot surfaces while the unit is running or right after
it has been used in order to avoid injury.
• Should there be water on the top part of the unit (above the
MAX water level), please turn off the power and dry it before
continuing.
• Always keep the unit and its power cord out of the reach of
children to avoid danger.
• Do not let children play with the unit.

8
• This appliance is not intended for use by persons with reduced
physical, sensory or mental capabilities, or lack of experience
and knowledge, unless they are supervised, or given
instructions by a person responsible for their safety
concerning safe use of the appliance, and understand the
hazards involved.
• Please ensure that the power receptacle and fan outlet at the
back of the unit do not come in contact with liquid.

9
Technical Specifications
Rated voltage: 110–120V~
Rated frequency: 60 HZ
Rated power: 1800 W
Temperature setting range: 5-95 °C/41-203 °F
Time setting range: 5 minutes to 99 hours 59 minutes
Display accuracy: 0.1
Size: 5.6 ″ × 6.3 ″ × 12.8 ″ (142 mm × 160 mm
× 326 mm)
10
Product Functionality
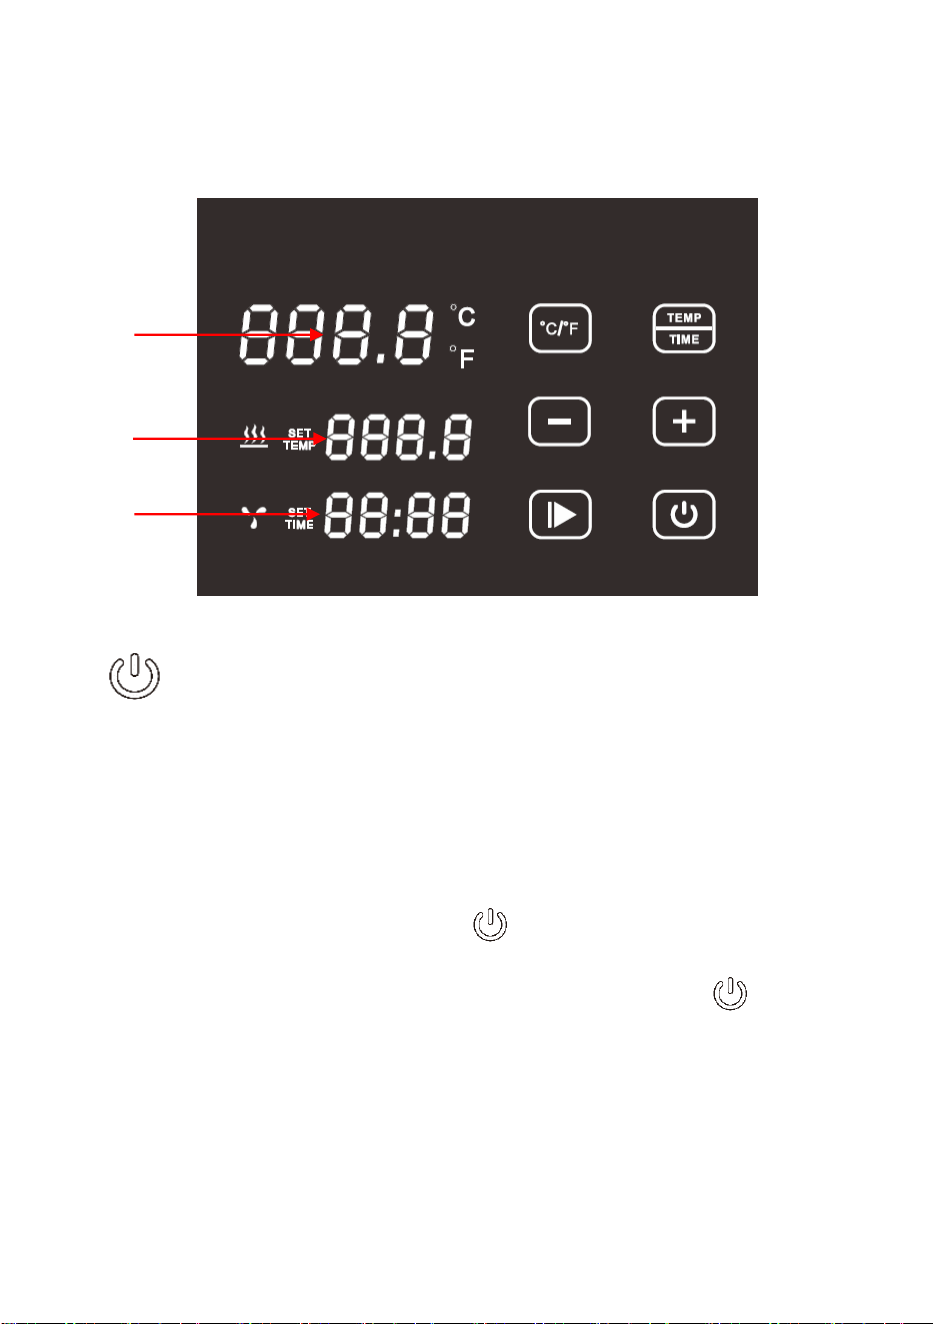
1. Power
• When the power is turned on, the button and indicator light
are on. After two seconds, the machine goes into
power-saving mode (only is on).
• When the unit is in power-saving mode, press to wake
up the unit; it will enter standby mode and is then ready to
be used. At this point, the temperature display (A) indicates
current water temperature, the SET TEMP display (B)
B
A
C

11
shows the previous water temperature setting, and the
SET TIME display (C) indicates the time setting for the
previous operation.
• In standby mode (the indicator is fully illuminated), press
to enter power-saving mode (only is on).
• When the unit is on, press to enter power-saving
mode directly.
°C/°F
2. Temperature button
Press on “°C/°F” to select the temperature display unit of your
choice – Celsius or Fahrenheit.
TEMP/TIME
3. Temperature/time setting button
Press on “TEMP/TIME” to switch between the temperature
and time setting. When the SET TEMP display is flashing, use
the “+” and “-” buttons to set the desired target temperature;
when the SET TIME display is flashing, use the “+” and “-”

12
buttons to set the desired target duration.
*After the display flashes 10 times, if no temperature or time
has been set, the unit will exit the setting mode. To reset it,
press “TEMP/TIME”.
*Press and hold the “TEMP/TIME” button for 3 seconds; the
display indicates the temperature and time that have been set.
4. Start/stop button
• In standby mode, press to start the unit.
• In work mode, press to stop the unit.
+ -
5. Setting buttons
Press on the “TEMP/TIME” button to select the setting you
want to adjust (temperature or time), then use the “+” and “-”
buttons to set it to the desired temperature or time.

13
6. Digital display (A) – Temperature
Displays actual temperature.
7. Digital display (B) – Temperature (SET TEMP)
Displays the set temperature.
8. Digital display (C) – Time (SET TIME)
• In standby mode, the set target time is displayed.
• In working mode, the remaining duration is displayed.
14
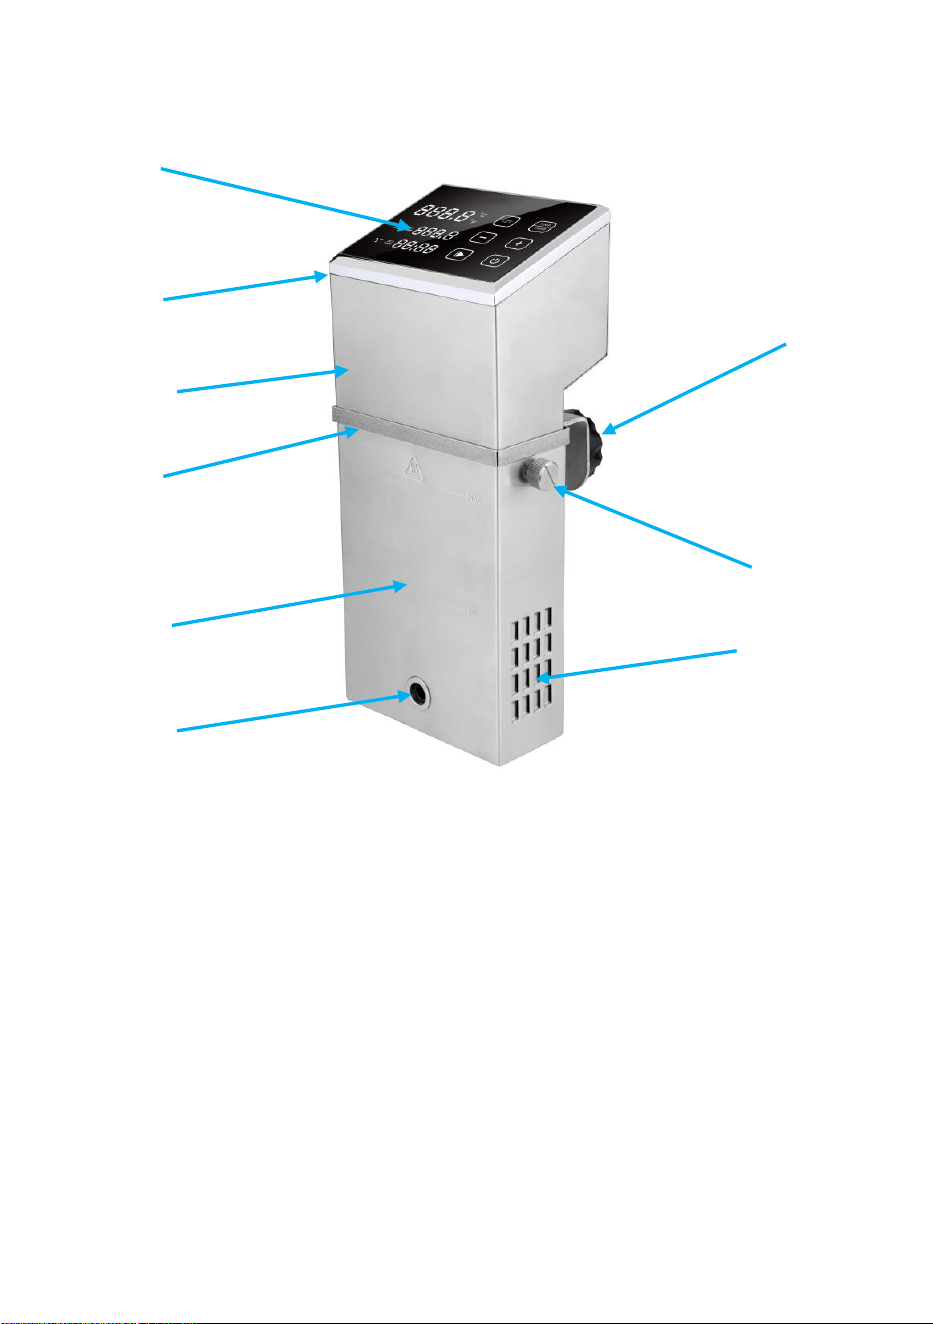
Components
1. Control panel
6. Water outlet
2. Upper cover
7. Handle
3. Upper body
8. Quick release screw
4. Connecting ring
9. Water inlet
5. Lower body
1
9
7
2
4
6
5
3
8

15
Operating Instructions
1. Select the appropriate cooking container. To fix the unit to the
container, turn the knob counterclockwise to create a gap
between the main body of the unit and the knob; insert the unit
into the container; tighten the knob clockwise to secure the
unit onto the container.
2. Add water to the container making sure that the water level is
between the minimum and maximum allowed water levels.
3. Connect the power cord; the digital display and buttons will
light up. The unit will enter power-saving mode after two
seconds, only will be illuminated; press to put the
unit into standby mode.
4. Press “°C/°F” to select the temperature unit. The default
setting is °C. Your choice will be stored in the unit’s memory
and the next time the unit is turned on, it will default to this unit.
5. Press “TEMP/TIME”; using the “+” and “-” buttons, adjust the
temperature and time to the desired values.
6. Once set, press to start the unit. After the temperature in
the container reaches the programmed temperature, the time

16
display starts counting down, and the vacuum-packed food
can be placed into the container cooking.
7. Once cooking is done, the unit will beep. Press to
complete the process.
Note: if no action is taken after 20 seconds, the unit will emit a
continuous beep; the water temperature will remain at the
preset temperature.
8. Remove food from the container; it is ready for the next step.
9. After using the unit, unplug it and store out of reach of
children.
Notes:
1. Food must be vacuum packed before sous vide cooking.
2. The water level (after the food is put in) should be higher than
“MIN”, but lower than “MAX” marked on the unit.
3. In order to prolong the service life of the unit, drain the water
after each use and clean the container.

17
Maintenance
To prevent burns, please ensure that the machine is off and at
room temperature before cleaning.
1. After cleaning, position the unit vertically; do not position it
horizontally or upside down.
2. Be careful not to damage the components inside the unit
during cleaning. If components are damaged, ask a specialist
to check and repair the unit. To avoid the risk of damage or
injury, only use the services of an authorized repair specialist.
3. Discard water after each use. Always fill with fresh water. If
the water is reused many times, mineral substances may
adhere to the surface of the unit and negatively impact its
performance.
4. If there is a noticeable decrease in the performance of the unit,
or if you notice that there is a buildup of residue or dirt, please
disassemble the back cover of the unit to clean the
components. Ideally, clean the unit after 20 uses or after 100
working hours.

18
5. If the unit is hot, do not use it in cool water; the unit should be
at room temperature and used in cool water. Likewise, do not
use a room temperature unit in hot water. Disregarding these
instructions will adversely affect the performance and service
life of the unit.

19
Care and Cleaning
Preparing to Clean the Unit
In preparation to clean the unit, please ensure you have
food-grade vinegar (white vinegar, apple vinegar, etc.) on hand.
Importance of Regular Cleaning
Standard tap water contains minerals. When water is heated to a
certain temperature, it may cause scale deposits on the unit.
Water scale can affect the performance of the unit. We suggest
cleaning the unit after every 20 uses if the accumulated usage
time is less than 200 hours. Water hardness varies depending on
your location; because of this, you may need to clean the unit
more often.
Cleaning Instructions
1. Pour water into the container until the “MAX” line of the unit.
Add 5g vinegar into the water. (CAUTION! If the vinegar
accidentally comes into contact with your eyes, rinse your
eyes immediately with lots of water. See a doctor if needed.)
2. Turn on the machine; set the temperature to 80 °C (176 °F);

20
set the time to three hours (03:00), press . After three
hours, the machine will beep. Once it beeps, turn it off.
Quick cleaning procedure: simultaneously press and
“-”; the temperature display (B) will indicate 80 °C, the time
display (C) will indicate 03:00; release the buttons. The
temperature and time displays, (B) and (C), will blink 10 times.
If you need to switch temperature unit, press “°C/°F”,
otherwise, press to start the cleaning process. During the
process, the display indicates the remaining time.
3. Check the unit to ensure it is thoroughly clean. If it is not, you
can add vinegar and repeat step two above. If it is clean, drain
the vinegar and wash the unit with fresh water before drying
and storing it.

21
Error Codes and Troubleshooting
Error
code
Cause
Troubleshooting
E01
The water level is lower
than the minimum
required water level, or
higher than the
maximum allowed
water level.
Turn off the unit. If
water level is too low,
add water until level
reaches a minimum
requirement. If water
level is too high,
remove water until it is
no higher than the
maximum allowed
water level.
E02
Indicates a possible
problem with:
1. heating pipe;
2. internal wiring of the
unit;
3. temperature sensor.
Contact an authorized
repair specialist to fix
the unit.
CLEAN
The unit has been
Unit must be cleaned.

22
running continuously for
more than 100 hours.
Refer to the Care and
Cleaning section.
LP
The unit suddenly loses
power during normal
use.
*If any other issues arise, please get the unit checked by an
authorized specialist. DANGER! Do not attempt to fix the unit
yourself.

23
Warranty and After-Sales Service
1. When using the unit, please ensure to do so on a clean and
level surface.
2. Warranty is limited to damage caused by production defects
and normal household use.
3. In the case of improper use or other non-product quality
problems, there will be a charge for parts and maintenance.
4. Please keep your receipt.
Maintenance Card
Customer Name:
Tel.:
Email:
Address:
Machine Model:
Purchase Date:
Supplier:
Repair
record
Date
Cause
Repaired by

24
Thank you
Thank you for choosing the SV310 thermal immersion circulator.
We are confident that you will enjoy your cooking experience with
this appliance. Please do not hesitate to contact us if you have
any questions about the unit.
Toll-free: +1 (888) 956-6866
www.eurodib.com